/


Similar


Text
Harley-Prescott: Front Matter Preface
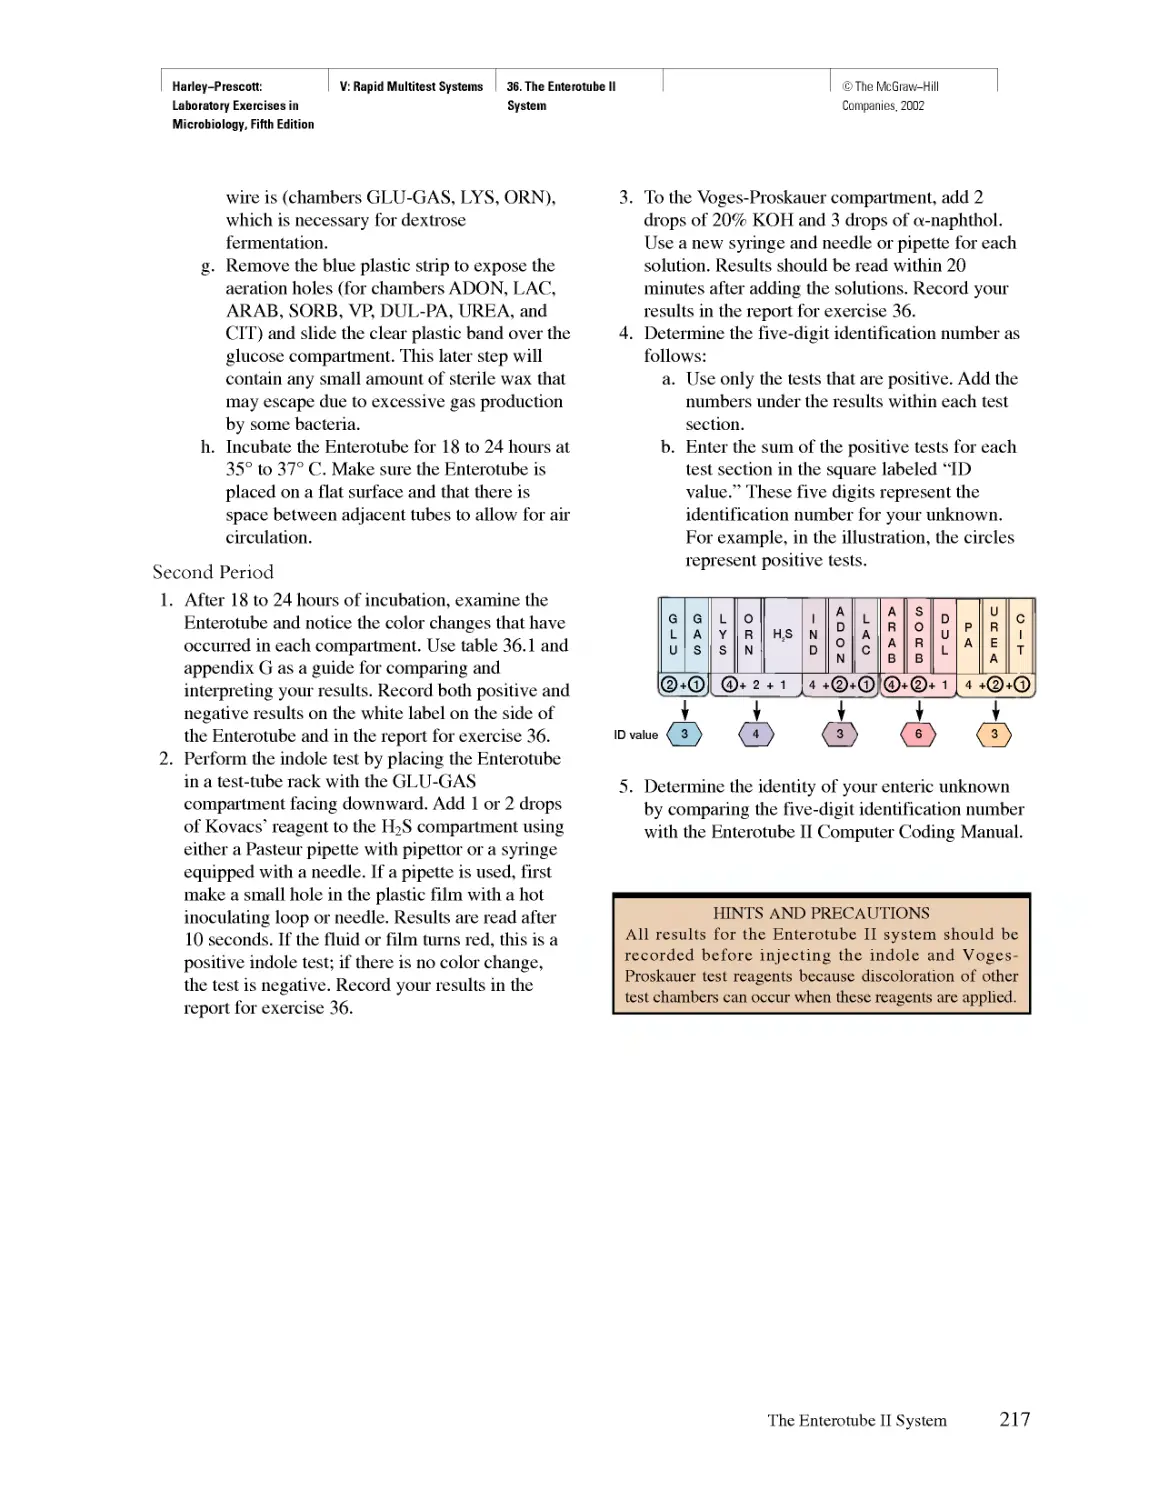
Laboratory Exercises in
Microbiology, Fifth Edition
©The McGraw-Hill
Companies, 2002
PRE FACE
Take interest, I implore you, in those sacred dwellings which one designates
by the expressive term; laboratories, Demand that they be multiplied, that
they be adorned, Tliese are the temples of the future—temples of well-being
and of happiness, There it is that humanity grows greater, stronger, better,
Louis Pasteur
(French chemist, founder of microbiology, 1822—1895)
There are many excellent microbiology laboratory
manuals on the market and many others that are
called "in-house" productions because they are
written for a microbiology course at a particular school.
Why another microbiology manual? The answer is
straightforward. Many instructors want a manual
that is directly correlated with a specific textbook.
As a result, this laboratory manual was designed
and written to be used in conjunction with the
textbook Microbiology, fifth edition, by Lansing M.
Prescott, John P. Harley, and Donald A. Klein;
however, it can be used with other textbooks with slight
adaptation.
Since this manual correlates many of the
microbiological concepts in the textbook with the various
exercises, comprehensive introductory material is
not given at the beginning of each exercise. Instead,
just enough specific explanation is given to
complement, augment, reinforce, and enhance what is
in the textbook. We feel that time allocation is an
important aspect of any microbiology course.
Students should not be required to reread in the
laboratory manual an in-depth presentation of material
that has already been covered satisfactorily in
the textbook.
Each exercise has been designed to be modular
and short. This will allow the instructor to pick and
choose only those exercises or parts of exercises
that are applicable to a specific course. Several
exercises usually can be completed in a two- or three-
hour laboratory period. The exercises have also
been designed to use commonly available
equipment, with the least expense involved, and to be
completed in the shortest possible time period.
Considering the above parameters, the purpose of
this laboratory manual is to guide students through a
process of development of microbiological technique,
experimentation, interpretation of data, and discovery
in a manner that will complement the textbook and
make the study of microbiology both exciting and
challenging. According to an old Chinese proverb:
Tell me and I will forget.
Show me and I might remember.
Involve me and I will understand.
These words convey our basic philosophy that it is
experiences in the microbiology laboratory and the
scientific method that help develop students' critical
thinking and creativity and that increase their
appreciation of the mechanisms by which microbiologists
analyze information. The laboratory accomplishes this
by having students become intensely and personally
involved in the knowledge they acquire.
The array of exercises was chosen to illustrate the
basic concepts of general microbiology as a whole
and of the individual applied fields. The protocols
vary in content and complexity, providing the
instructor with flexibility to mold the laboratory syllabus to
the particular needs of the students, available time and
equipment, and confines and scope of the course.
Furthermore, it provides a wide spectrum of individual
exercises suitable for students in elementary and
advanced general microbiology as well as those in
various allied health programs.
In 1997, the American Society for Microbiology,
through its Office of Education and Training, adopted
a Laboratory Core Curriculum representing themes
and topics considered essential to teach in every
introductory microbiology laboratory, regardless of its
emphasis. An instructor might add items appropriate to
allied health, applied, environmental, or majors
microbiology courses.
The Laboratory Core is not meant to be a syllabus
or outline. The core themes and topics are meant to
frame objectives to be met somewhere within the
introductory microbiology laboratory. Depending on the
v
Harley-Prescott:
Laboratory Exercises in
Microbiology, Fifth Edition
Front Matter
Preface
©The McGraw-Hill
Companies, 2002
specific emphasis of the course, a single lab session
could meet multiple core objectives, focus on one
objective, or emphasize a topic that is not in the lab core
but is important to that particular course.
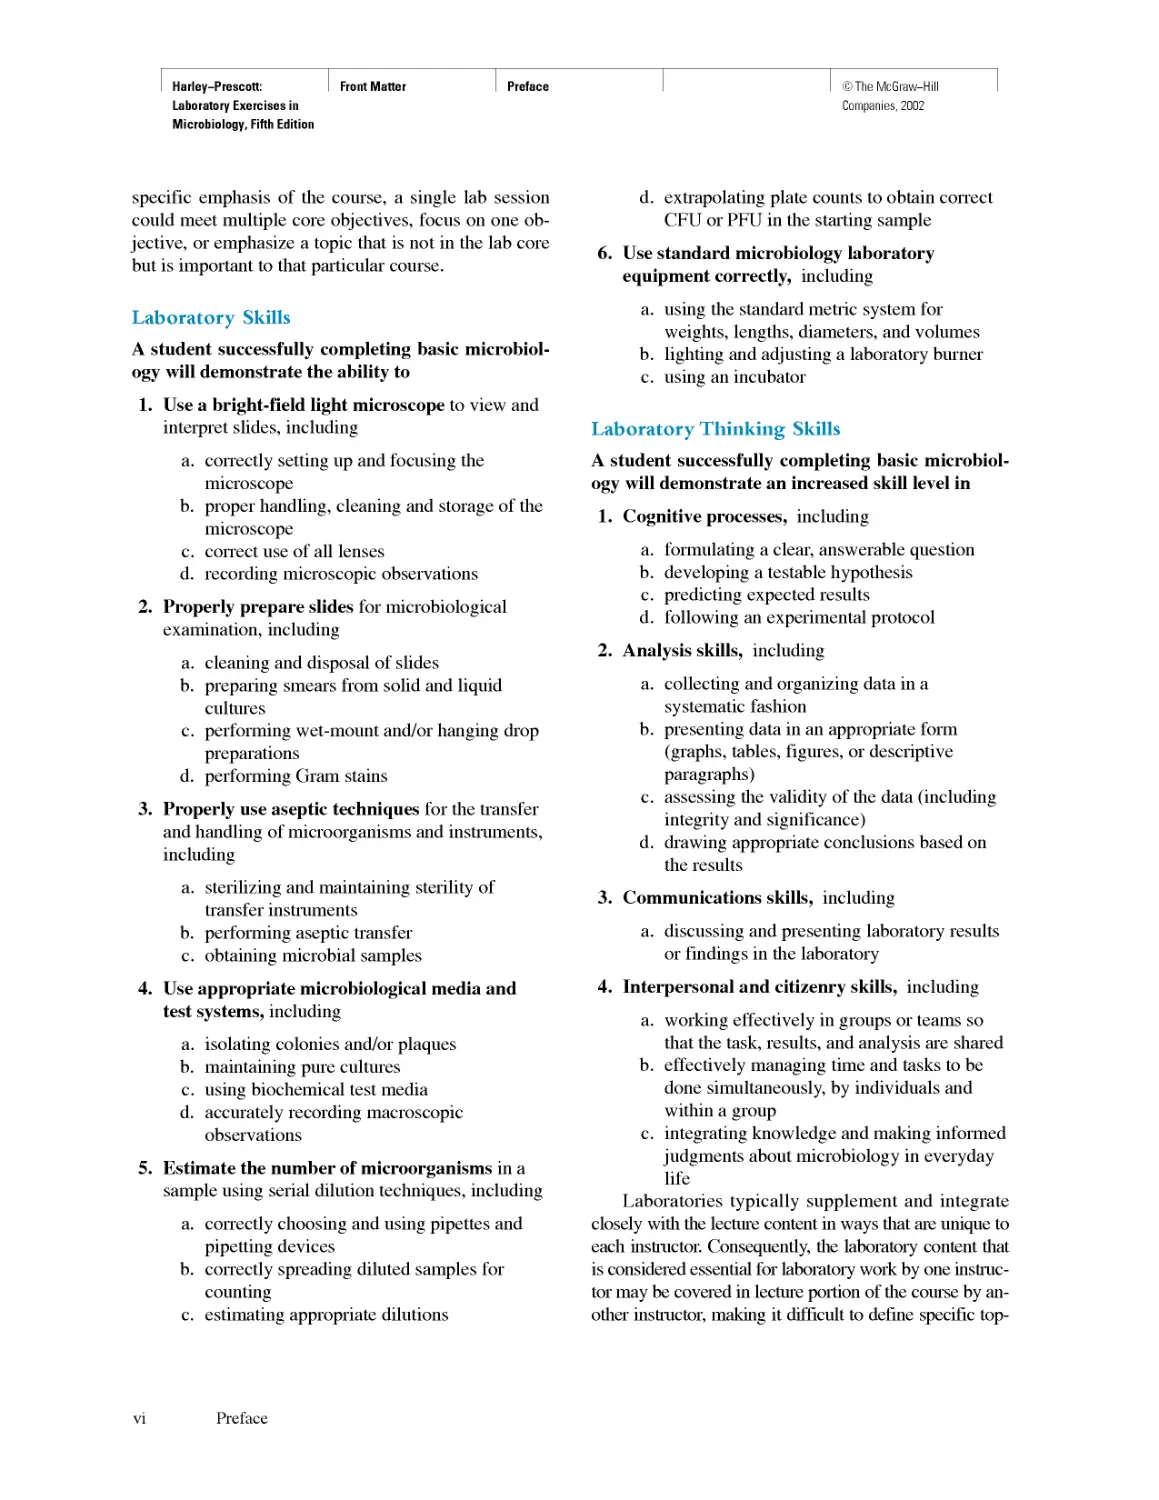
Laboratory Skills
A student successfully completing basic
microbiology will demonstrate the ability to
1. Use a bright-field light microscope to view and
interpret slides, including
a. correctly setting up and focusing the
microscope
b. proper handling, cleaning and storage of the
microscope
c. correct use of all lenses
d. recording microscopic observations
2. Properly prepare slides for microbiological
examination, including
a. cleaning and disposal of slides
b. preparing smears from solid and liquid
cultures
c. performing wet-mount and/or hanging drop
preparations
d. performing Gram stains
3. Properly use aseptic techniques for the transfer
and handling of microorganisms and instruments,
including
a. sterilizing and maintaining sterility of
transfer instruments
b. performing aseptic transfer
c. obtaining microbial samples
4. Use appropriate microbiological media and
test systems, including
a. isolating colonies and/or plaques
b. maintaining pure cultures
c. using biochemical test media
d. accurately recording macroscopic
observations
5. Estimate the number of microorganisms in a
sample using serial dilution techniques, including
a. correctly choosing and using pipettes and
pipetting devices
b. correctly spreading diluted samples for
counting
c. estimating appropriate dilutions
d. extrapolating plate counts to obtain correct
CFU or PFU in the starting sample
6. Use standard microbiology laboratory
equipment correctly, including
a. using the standard metric system for
weights, lengths, diameters, and volumes
b. lighting and adjusting a laboratory burner
c. using an incubator
Laboratory Thinking Skills
A student successfully completing basic
microbiology will demonstrate an increased skill level in
1. Cognitive processes, including
a. formulating a clear, answerable question
b. developing a testable hypothesis
c. predicting expected results
d. following an experimental protocol
2. Analysis skills, including
a. collecting and organizing data in a
systematic fashion
b. presenting data in an appropriate form
(graphs, tables, figures, or descriptive
paragraphs)
c. assessing the validity of the data (including
integrity and significance)
d. drawing appropriate conclusions based on
the results
3. Communications skills, including
a. discussing and presenting laboratory results
or findings in the laboratory
4. Interpersonal and citizenry skills, including
a. working effectively in groups or teams so
that the task, results, and analysis are shared
b. effectively managing time and tasks to be
done simultaneously, by individuals and
within a group
c. integrating knowledge and making informed
judgments about microbiology in everyday
life
Laboratories typically supplement and integrate
closely with the lecture content in ways that are unique to
each instructor. Consequently, the laboratory content that
is considered essential for laboratory work by one
instructor may be covered in lecture portion of the course by
another instructor, making it difficult to define specific top-
VI
Preface
Harley-Prescott: Front Matter Preface
Laboratory Exercises in
Microbiology, Fifth Edition
ics that should be integral in all microbiology
laboratories. As a result, the ASM Laboratory Core Curriculum
Committee developed themes, which are broadly based
and will enable instructors to have the flexibility to use a
wide variety of laboratories to meet the suggested core.
A student successfully completing basic
microbiology will demonstrate mastery of the basic principles
of the following themes and complete laboratory
activities that focus on one or more of the topics under each
theme.
Theme 1. Integrating themes—impact of
microorganisms on the biosphere and humans;
microbial diversity
Theme 2. Microbial cell biology, including cell
structure and function, growth and division, and
metabolism
Theme 3. Microbial genetics, including mutations
Theme 4. Interactions of microorganisms with
hosts (humans, other animals, plants), including
pathogenicity mechanisms and antimicrobial
agents
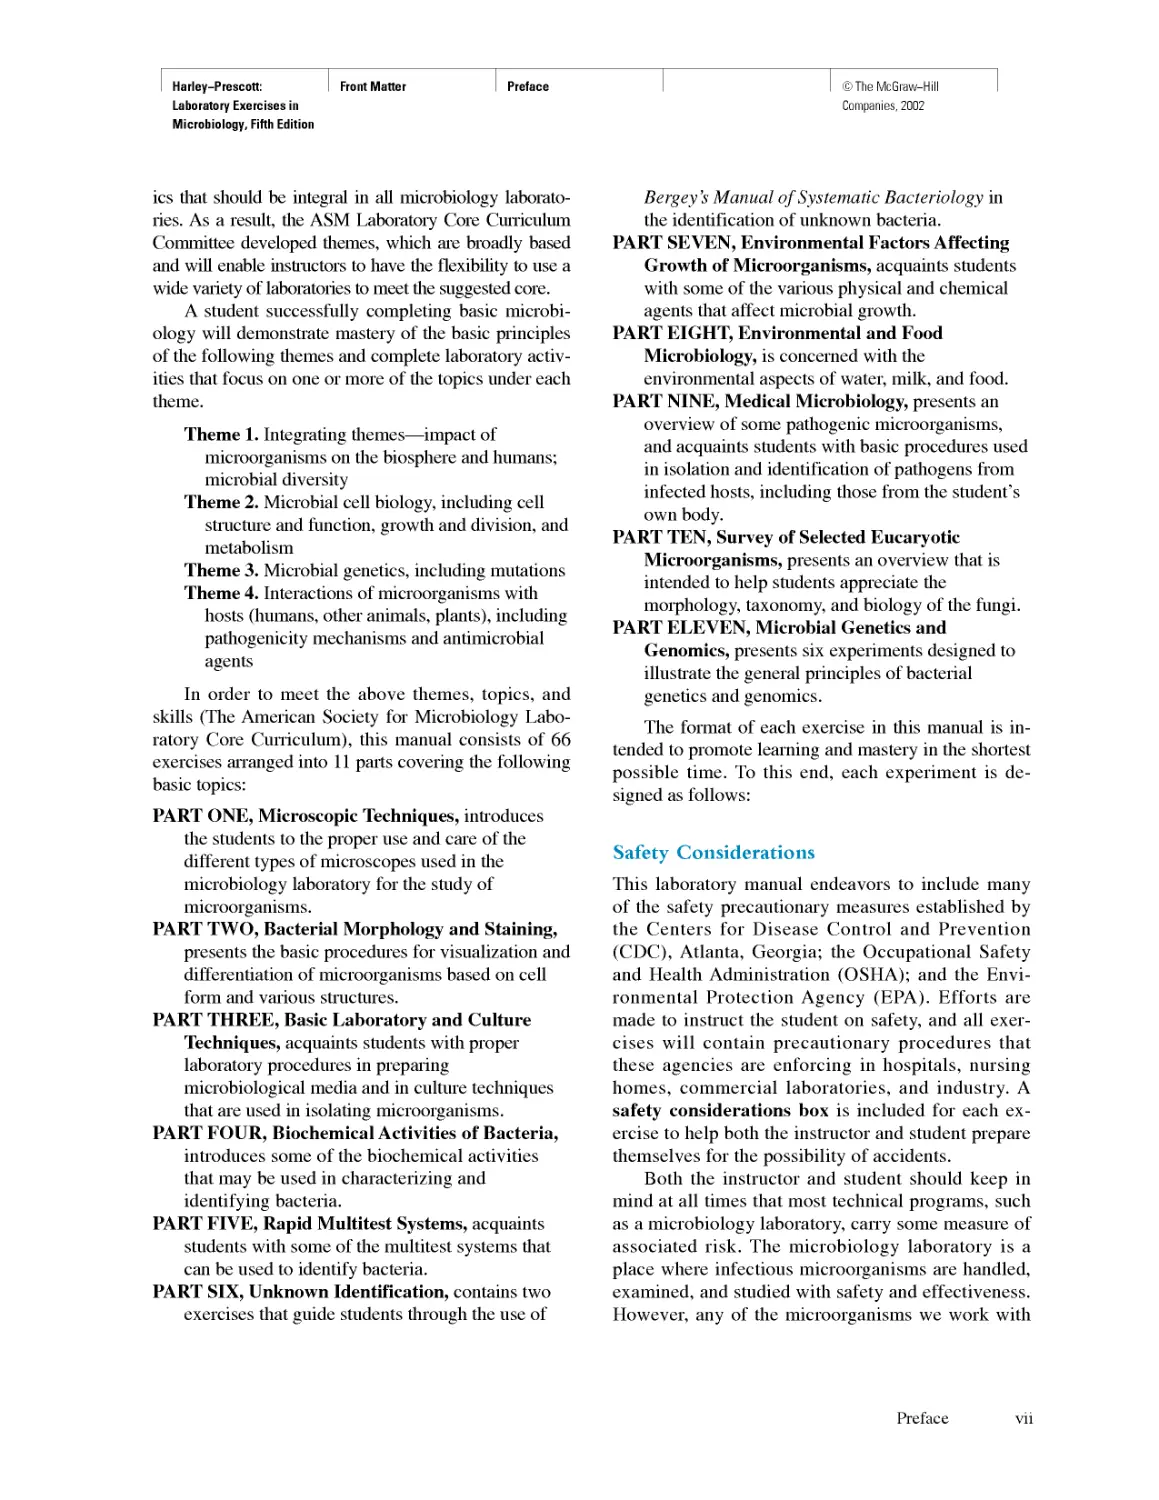
In order to meet the above themes, topics, and
skills (The American Society for Microbiology
Laboratory Core Curriculum), this manual consists of 66
exercises arranged into 11 parts covering the following
basic topics:
PART ONE, Microscopic Techniques, introduces
the students to the proper use and care of the
different types of microscopes used in the
microbiology laboratory for the study of
microorganisms.
PART TWO, Bacterial Morphology and Staining,
presents the basic procedures for visualization and
differentiation of microorganisms based on cell
form and various structures.
PART THREE, Basic Laboratory and Culture
Techniques, acquaints students with proper
laboratory procedures in preparing
microbiological media and in culture techniques
that are used in isolating microorganisms.
PART FOUR, Biochemical Activities of Bacteria,
introduces some of the biochemical activities
that may be used in characterizing and
identifying bacteria.
PART FIVE, Rapid Multitest Systems, acquaints
students with some of the multitest systems that
can be used to identify bacteria.
PART SIX, Unknown Identification, contains two
exercises that guide students through the use of
©The McGraw-Hill
Companies, 2002
Bergey's Manual of Systematic Bacteriology in
the identification of unknown bacteria.
PART SEVEN, Environmental Factors Affecting
Growth of Microorganisms, acquaints students
with some of the various physical and chemical
agents that affect microbial growth.
PART EIGHT, Environmental and Food
Microbiology, is concerned with the
environmental aspects of water, milk, and food.
PART NINE, Medical Microbiology, presents an
overview of some pathogenic microorganisms,
and acquaints students with basic procedures used
in isolation and identification of pathogens from
infected hosts, including those from the student's
own body.
PART TEN, Survey of Selected Eucaryotic
Microorganisms, presents an overview that is
intended to help students appreciate the
morphology, taxonomy, and biology of the fungi.
PART ELEVEN, Microbial Genetics and
Genomics, presents six experiments designed to
illustrate the general principles of bacterial
genetics and genomics.
The format of each exercise in this manual is
intended to promote learning and mastery in the shortest
possible time. To this end, each experiment is
designed as follows:
Safety Considerations
This laboratory manual endeavors to include many
of the safety precautionary measures established by
the Centers for Disease Control and Prevention
(CDC), Atlanta, Georgia; the Occupational Safety
and Health Administration (OSHA); and the
Environmental Protection Agency (EPA). Efforts are
made to instruct the student on safety, and all
exercises will contain precautionary procedures that
these agencies are enforcing in hospitals, nursing
homes, commercial laboratories, and industry. A
safety considerations box is included for each
exercise to help both the instructor and student prepare
themselves for the possibility of accidents.
Both the instructor and student should keep in
mind at all times that most technical programs, such
as a microbiology laboratory, carry some measure of
associated risk. The microbiology laboratory is a
place where infectious microorganisms are handled,
examined, and studied with safety and effectiveness.
However, any of the microorganisms we work with
Preface vii
Harley-Prescott: Front Matter Preface
Laboratory Exercises in
Microbiology, Fifth Edition
may be pathogenic in an immunocompromised
person. Therefore, rather than modifying the objectives
in this laboratory manual to avoid any risk, the
authors propose that instructors and students
implement the Centers for Disease Control and
Prevention (CDC) principles of biosafety throughout. One
way we propose is to simply modify the "Universal
Precautions" (see pp. xiii-xiv) so the wording is
appropriate for the classroom by simply changing
"laboratory worker" to "student." In addition, a
written safety policy consistent with CDC
guidelines and adopted by your institution's governing
body will protect you, your institution, and the
students. As in any laboratory, safety should be a major
part of the curriculum. Students should be required
to demonstrate their knowledge of safety before
they begin each laboratory exercise.
Materials per Student or Group of Students
To aid in the preparation of all exercises, each
procedure contains a list of the required cultures with
American Type Culture Collection catalog numbers
(American Type Culture Collection, 12301 Parklawn Drive,
Rockville, Maryland 29852-1776; www.ATCC.org;
703-365-2700), media, reagents, and other equipment
necessary to complete the exercise in the allocated lab
time either per student or group of students.
Appendixes H and I provide recipes for reagents, stains, and
culture media. Appendix J describes the maintenance
of microorganisms and supply sources.
Learning Objectives
Each exercise has a set of learning objectives that
define the specific goals of the laboratory session. It
is to the student's advantage to read through this list
before coming to class. In like manner, these
objectives should be given special attention during the
laboratory exercise. Upon conscientious completion
of the exercise, the student should be able to meet all
of the objectives for that exercise. Before leaving the
class, students should check the objectives once
again to see that they can master them. If problems
arise, consult the instructor.
Suggested Reading in Textbook
These cross-references have been designed to save the
student's time. By referring the student to sections,
paragraphs, tables, charts, figures, and boxes within
the textbook, unnecessary duplication is avoided.
viii Preface
©The McGraw-Hill
Companies, 2002
Pronunciation Guide
This section contains the phonetic pronunciations for
all organisms used in the exercise. If students take the
time to sound out new and unfamiliar terms and say
them aloud several times, they will learn to use the
vocabulary of microbiologists.
Why Are the Above Bacteria, Slides, or Other
Microorganisms Used in This Experiment?
The authors have chosen specific viruses, bacteria,
fungi, protozoa, algae, and various prepared slides for
each exercise. This microbial material has been
selected based on cost, ease of growth, availability,
reliability, and most importantly, the ability to produce
the desired experimental results. In order to
communicate these guidelines to the student, this section
explains why the authors have chosen the microbial
material being used and also gives additional
biochemical, morphological, and taxonomic
information about the microorganism(s) that the student
should find helpful when performing the experiment.
Medical Application
Many students using this laboratory manual are either
in one of the allied health disciplines, such as nursing,
or in a preprofessional program such as premed, pre-
dent, or prevet and need to know the clinical relevance
of each exercise performed. To satisfy mis need, a
Medical Application section is included for some of the
medically oriented exercises. Medical applications are
described for most clinical procedures as a specific
application of the purpose of the exercise. For example, a
procedure can be used for the identification of a
particular microorganism or used in combination with other
exercises in a diagnosis. For these exercises, some
important pathogens with their diseases and their need for
the test being performed in the exercise are listed.
Principles
This section contains a brief discussion of the
microbiological principles, concepts, and techniques that
underlie the experimental procedures being performed
in the exercise.
Procedure
Explicit instructions are augmented by diagrams to aid
students in executing the experiment as well as
interpreting the results. Where applicable, actual results are shown
so mat the student can see what should be obtained.
Harley-Prescott: Front Matter Preface
Laboratory Exercises in
Microbiology, Fifth Edition
©The McGraw-Hill
Companies, 2002
Hints and Precautions
Additional information on what to watch out for, what
can go wrong, and helpful tidbits to make the experiment
work properly are presented in accompanying boxes.
Laboratory Report
Various pedagogical techniques are used for recording
the obtained results. This part of the exercise can be
turned in to the instructor for checking or grading.
Review Questions
Review questions are located at the end of each
laboratory report. These were written so that students can
test their understanding of the concepts and
techniques presented in each exercise.
Dilution Ratios Used in This Manual
According to the American Society for Microbiology
Style Manual, dilution ratios may be reported with
either colons (:) or shills (/), but note mere is a difference
between mem. A shill indicates the ratio of a part to a
whole; e.g., Vi means 1 of 2 parts, with a total of 2 parts.
A colon indicates the ratio of 1 part to 2 parts, with a
total of 3 parts. Tims, Vi equals 1:1, but 1:2 equals Vs.
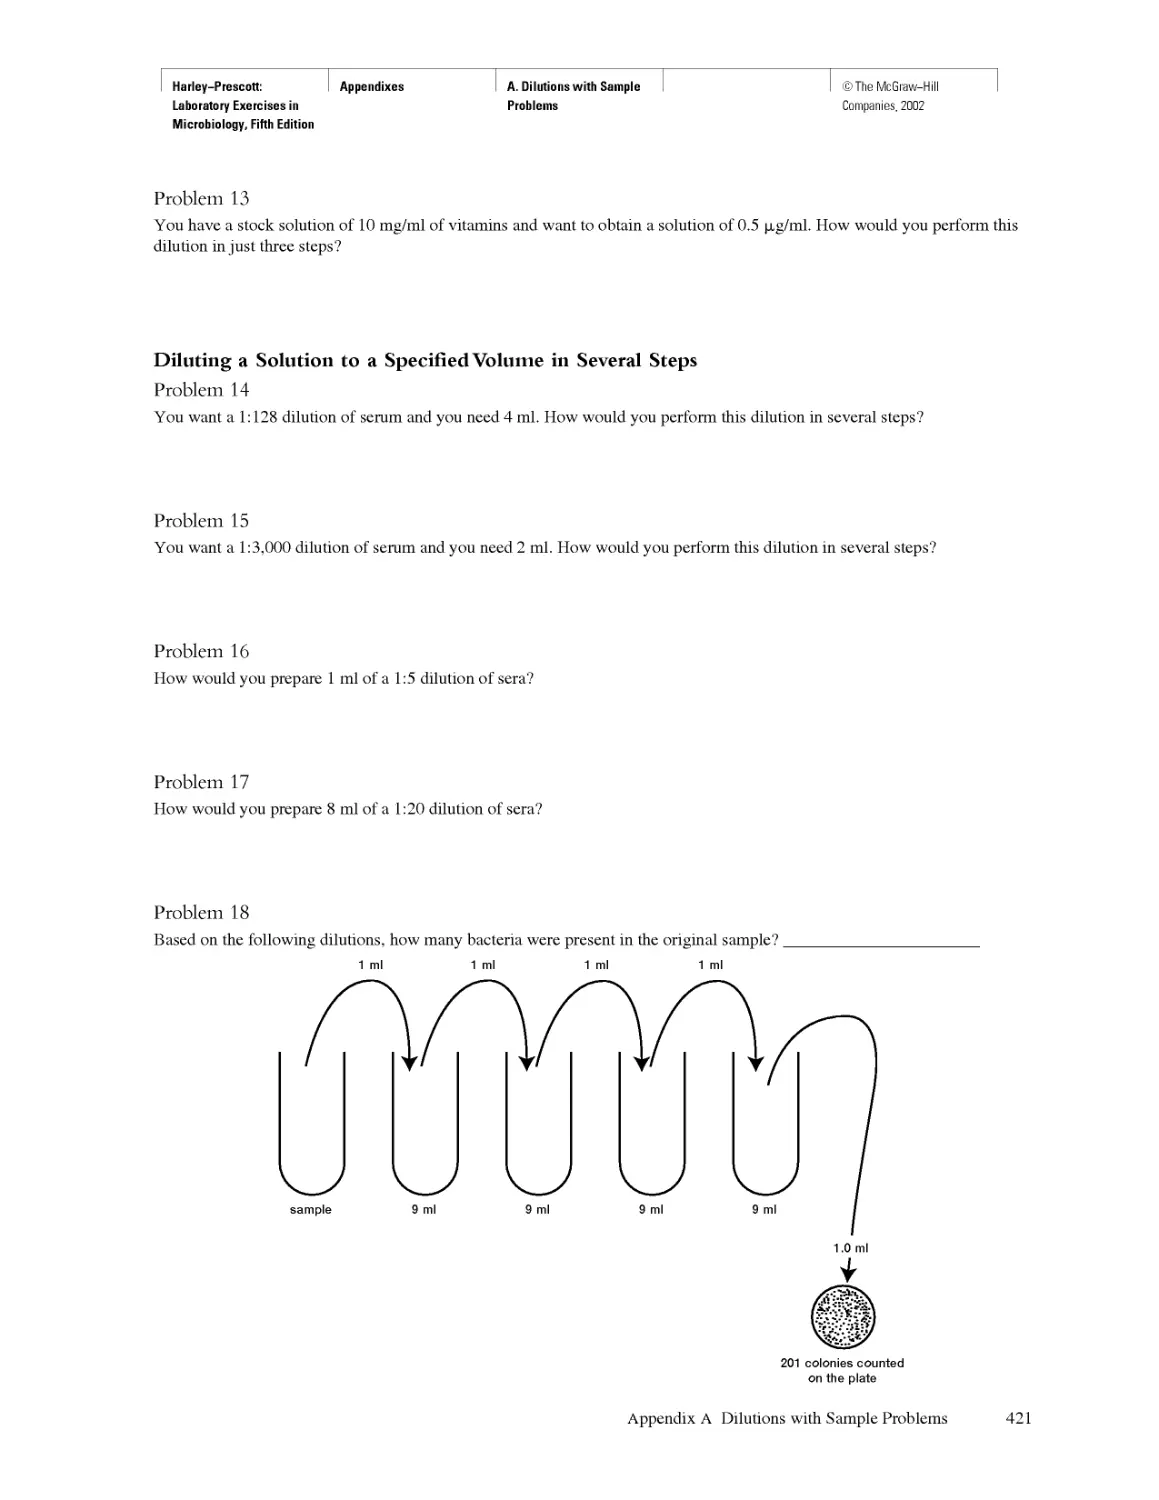
Dilution Problems
Since dilution problems are such an integral part of any
microbiology course, Appendix A gives an overview of
the different types of dilution. This includes a variety of
practice problems. Answers are provided.
Instructor's Guide
An instructor's guide has been prepared for the
laboratory manual and is available on our web site at
www.mhhe.com/prescott5. This guide provides answers
to the questions in this manual.
Finally, it is our hope that this manual will serve
as a vehicle to (1) introduce the complexity and
diversity of microorganisms and their relationships to one
another; (2) provide a solid foundation for further
study for those electing a career in science; and
(3) convey something of the meaning, scope, and
excitement of microbiology as a significant perspective
from which to view the world.
We appreciate the many comments offered to us
over the years by both faculty and students. In our desire
to continue to improve mis laboratory manual, we invite
constructive comments from those using it. Please
contact us through the Cell and Molecular Biology Editor,
McGraw-Hill Publishers (www.mhhe.com/prescott5).
John P. Harley
Lansing M. Prescott
Preface
IX
Harley-Prescott: I Front Matter I Acknowledgments I I ©The McGraw-Hill
Laboratory Exercises in Companies, 2002
Microbiology, Fifth Edition
ACKNOWLEDGMENTS
Our special thanks go to the following reviewers,
whose comments proved very helpful to us:
Ghayasuddin Ahmad
Seton Hall University
Alberta M. Albrecht
Manhattanville College
Mary A. Anderson
Gustavus Adolphus College
Susan T. Bagley
Michigan Tech University
Paul Blum
University of Nebraska-Lincoln
Geoffrey W. Gearner
Morehead State University
Robert J. Kearns
University of Dayton
Dana Kolibachuk
Rhode Island College
David Mardon
Eastern Kentucky University
Glendon Miller
Wichita State University
Rita Moyes
Texas A&M University
Raymond B. Otero
Eastern Kentucky University
Norbert A. Pilewski
Duquesne University School of Pharmacy
Marcia Pierce
Eastern Kentucky University
Ralph J. Rascati
Kennesaw State College
Jackie Reynolds
Richland College
Nancy Ricker
Capilano College
Ivan Roth
University of Georgia
Julie J. Shaffer
University of Nebraska at Kearney
Thomas Terry
University of Connecticut
Robert Twarog
University of North Carolina
A special thanks also goes to Kay Baitz, KEY
Scientific Products, 1402 Chisholm Trail, Suite D, Round
Rock, Texas 78681, for all of her help with the KEY
products.
x
Harley-Prescott:
Laboratory Exercises in
Microbiology, Fifth Edition
Front Matter
Orientation to the
Laboratory: Rules of
Conduct and General
Safety
©The McGraw-Hill
Companies, 2002
ORIENTATION TO THE
LAB ORATORY:
RULES OF CONDUCT
AND GENERAL SAFETY
Many of the microorganisms used in this course may
be pathogenic for humans and animals. As a result,
certain rules are necessary to avoid the possibility of
infecting yourself or other people. Anyone who
chooses to disregard these rules or exhibits
carelessness that endangers others may be subject to
immediate dismissal from the laboratory. If doubt arises as to
the procedure involved in handling infectious
material, consult your instructor.
In 1997, the American Society for Microbiology,
through its Office of Education and Training, adopted
the following on laboratory safety. Each point is
considered essential for every introductory microbiology
laboratory, regardless of its emphasis.
A student successfully completing basic
microbiology will demonstrate the ability to explain and
practice safe
1. Microbiological procedures, including
a. reporting all spills and broken glassware to
the instructor and receiving instructions for
cleanup
b. methods for aseptic transfer
c. minimizing or containing the production of
aerosols and describing the hazards
associated with aerosols
d. washing hands prior to and following
laboratories and at any time contamination is
suspected
e. never eating or drinking in the laboratory
f. using universal precautions (see inside front
and end covers of this laboratory manual)
g. disinfecting lab benches prior to and at the
conclusion of each lab session
h. identification and proper disposal of
different types of waste
i. never applying cosmetics, including contact
lenses, or placing objects (fingers, pencils)
in the mouth or touching the face
j. reading and signing a laboratory safety
agreement indicating that the student has
read and understands the safety rules of the
laboratory
k. good lab practice, including returning
materials to proper locations, proper care
and handling of equipment, and keeping the
bench top clear of extraneous materials
2. Protective procedures, including
a. tying long hair back, wearing personal
protective equipment (eye protection, coats,
closed shoes; glasses may be preferred to
contact lenses), and using such equipment in
appropriate situations
b. always using appropriate pipetting devices
and understanding that mouth pipetting is
forbidden
3. Emergency procedures, including
a. locating and properly using emergency
equipment (eye-wash stations, first-aid kits,
fire extinguishers, chemical safety showers,
telephones, and emergency numbers)
b. reporting all injuries immediately to the
instructor
c. following proper steps in the event of an
emergency
XI
Harley-Prescott:
Laboratory Exercises in
Microbiology, Fifth Edition
Front Matter
Orientation to the
Laboratory: Rules of
Conduct and General
Safety
©The McGraw-Hill
Companies, 2002
In addition, institutions where microbiology
laboratories are taught will
1. train faculty and staff in proper waste stream
management
2. provide and maintain necessary safety equipment
and information resources
3. train faculty, staff, and students in the use of
safety equipment and procedures
4. train faculty and staff in the use of MSDS. The
Workplace Hazardous Materials Information
System (WHMIS) requires that all hazardous
substances, including microorganisms, be labeled
in a specific manner. In addition, there must be a
Material Safety Data Sheet (MSDS) available to
accompany each hazardous substance. MSDS
sheets are now supplied with every chemical sold
by supply houses. The person in charge of the
microbiology laboratory should ensure that
adherence to this law is enforced.
All laboratory work can be done more effectively
and efficiently if the subject matter is understood
before coming to the laboratory. To accomplish this, read
the experiment several times before the laboratory
begins. Know how each exercise is to be done and what
principle it is intended to convey. Also, read the
appropriate sections in your textbook that pertain to the
experiment being performed, this will save you much
time and effort during the actual laboratory period.
All laboratory experiments will begin with a brief
discussion by your instructor of what is to be done,
the location of the materials, and other important
information. Feel free to ask questions if you do not
understand the instructor or the principle involved.
Much of the work in the laboratory is designed to
be carried out in groups or with a partner. This is to aid
in coverage of subject matter, to save time and
expense, and to encourage discussion of data and results.
Many of the ASM's recommended precautions are
represented by the specific safety guidelines given
inside the cover of this laboratory manual.
I have read the above rules and understand
their meaning
Signature
Date
xii Orientation to the Laboratory: Rules of Conduct and General Safety
Harley-Prescott:
Laboratory Exercises in
Microbiology, Fifth Edition
Front Matter
Summary of Universal
Precautions and
Laboratory Safety
Procedures
©The McGraw-Hill
Companies, 2002
SUMMARY OF UNIVERSAL
PRECAUTIONS AND
LABORATORY SAFETY
PRO CEDURE S
Universal Precautions
Since medical history and examination cannot reliably
identify all patients infected with HIV or other blood-
borne pathogens, blood and body-fluid precautions
should be consistently used for all patients.
1. All health-care workers should routinely use
appropriate barrier precautions to prevent skin
and mucous-membrane exposure when contact
with blood or other body fluids of any patient is
anticipated. Gloves should be worn for touching
blood and body fluids, mucous membranes, or
non-intact skin of all patients, for handling items
or surfaces soiled with blood or body fluids, and
for performing venipuncture and other vascular
access procedures. Gloves should be changed
after contact with each patient. Masks and
protective eyewear or face shields should be worn
during procedures that are likely to generate
droplets of blood or other body fluids to prevent
exposure of mucous membranes of the mouth,
nose, and eyes. Gowns or aprons should be worn
during procedures that are likely to generate
splashes of blood or other body fluids.
2. Hands and other skin surfaces should be washed
immediately and thoroughly if contaminated with
blood or other body fluids. Hands should be
washed immediately after gloves are removed.
3. All health-care workers should take precautions to
prevent injuries caused by needles, scalpels, and
other sharp instruments or devices during
procedures; when cleaning used instruments; during
disposal of used needles; and when handling sharp
instruments after procedures. To prevent needlestick
injuries, needles should not be recapped, purposely
bent or broken by hand, removed from disposable
syringes, or otherwise manipulated by hand. After
they are used, disposable syringes and needles,
scalpel blades, and other sharp items should be
placed in puncture-resistant containers for disposal.
4. Although saliva has not been implicated in HIV
transmission, to minimize the need for emergency
mouth-to-mouth resuscitation, mouthpieces,
resuscitation bags, or other ventilation devices
should be available for use in areas in which the
need for resuscitation is predictable.
5. Health-care workers who have exudative lesions
or weeping dermatitis should refrain from all
direct patient care and from handling patient-care
equipment.
6. The following procedure should be used to clean up
spills of blood or blood-containing fluids: (1) Put on
gloves and any other necessary barriers. (2) Wipe
up excess material with disposable towels and
place the towels in a container for sterilization.
(3) Disinfect the area with either a commercial
EPA-approved germicide or household bleach
(sodium hypochlorite). The latter should be diluted
from 1:100 (smooth surfaces) to 1:10 (porous or
dirty surfaces); the dilution should be no more man
24 hours old. When dealing with large spills or
those containing sharp objects such as broken glass,
first cover the spill with disposable toweling. Then
saturate the toweling with commercial germicide or
a 1:10 bleach solution and allow it to stand for at
least 10 minutes. Finally clean as described above.
xm
Harley-Prescott:
Laboratory Exercises in
Microbiology, Fifth Edition
Front Matter
Summary of Universal
Precautions and
Laboratory Safety
Procedures
©The McGraw-Hill
Companies, 2002
Precautions for Laboratories
Blood and other body fluids from all patients should be
considered infective.
1. All specimens of blood and body fluids should be
put in a well-constructed container with a secure
lid to prevent leaking during transport. Care
should be taken when collecting each specimen to
avoid contaminating the outside of the container
and of the laboratory form accompanying the
specimen.
2. All persons processing blood and body-fluid
specimens should wear gloves. Masks and
protective eyewear should be worn if mucous-
membrane contact with blood or body fluids is
anticipated. Gloves should be changed and hands
washed after completion of specimen processing.
3. For routine procedures, such as histologic and
pathologic studies or microbiologic culturing, a
biological safety cabinet is not necessary.
However, biological safety cabinets should be
used whenever procedures are conducted that
have a high potential for generating droplets.
These include activities such as blending,
sonicating, and vigorous mixing.
4. Mechanical pipetting devices should be used for
manipulating all liquids in the laboratory. Mouth
pipetting must not be done,
5. Use of needles and syringes should be limited to
situations in which there is no alternative, and the
recommendations for preventing injuries with
needles outlined under universal precautions should
be followed.
6. Laboratory work surfaces should be
decontaminated with an appropriate chemical
germicide after a spill of blood or other body fluids
and when work activities are completed.
7. Contaminated materials used in laboratory tests
should be decontaminated before reprocessing or be
placed in bags and disposed of in accordance with
institutional policies for disposal of infective waste.
8. Scientific equipment that has been contaminated
with blood or other body fluids should be
decontaminated and cleaned before being repaired
in the laboratory or transported to the manufacturer.
9. All persons should wash their hands after
completing laboratory activities and should remove
protective clothing before leaving the laboratory.
10. Tliere should be no eating, drinking, or smoking in
the work area.
xiv Summary of Universal Precautions and Laboratory Safety Procedures
Harley-Prescott:
Laboratory Exercises in
Microbiology, Fifth Edition
I. Microscopic Techniques Introduction
©The McGraw-Hill
Companies, 2002
PART ONE
Microscopic Techniques
The most important discoveries of the laws,
methods and progress of nature have nearly
always sprung from the examination ofthe
smallest objects which she contains.
Jean Baptiste Pierre Antoine Monet de Lamarck
(French naturalist, 1744-1829)
Microbiologists employ a variety of light microscopes
in their work: bright-field, dark-field, phase-contrast,
and fluorescence are most commonly used. In fact, the same
microscope may be a combination of types: bright-field and
phase-contrast, or phase-contrast and fluorescence. You will
use these microscopes and the principles of microscopy
extensively in this course as you study the form, structure,
staining characteristics, and motility of different
microorganisms. Therefore, proficiency in using the different
microscopes is essential to all aspects of microbiology and must be
mastered at the very beginning of a microbiology course.
The next five exercises have been designed to accomplish
this major objective.
After completing at least exercise 1, you will, at
the minimum, be able to demonstrate the ability to
use a bright-field light microscope. This will meet
the American Society for Microbiology Core
Curriculum skill number 1 (see pp. vi—xnii): (a) correctly
setting up and focusing the microscope; (b) proper
handling, cleaning, and storage of the microscope;
(c) correct use of all lenses; and (d) recording
microscopic observations.
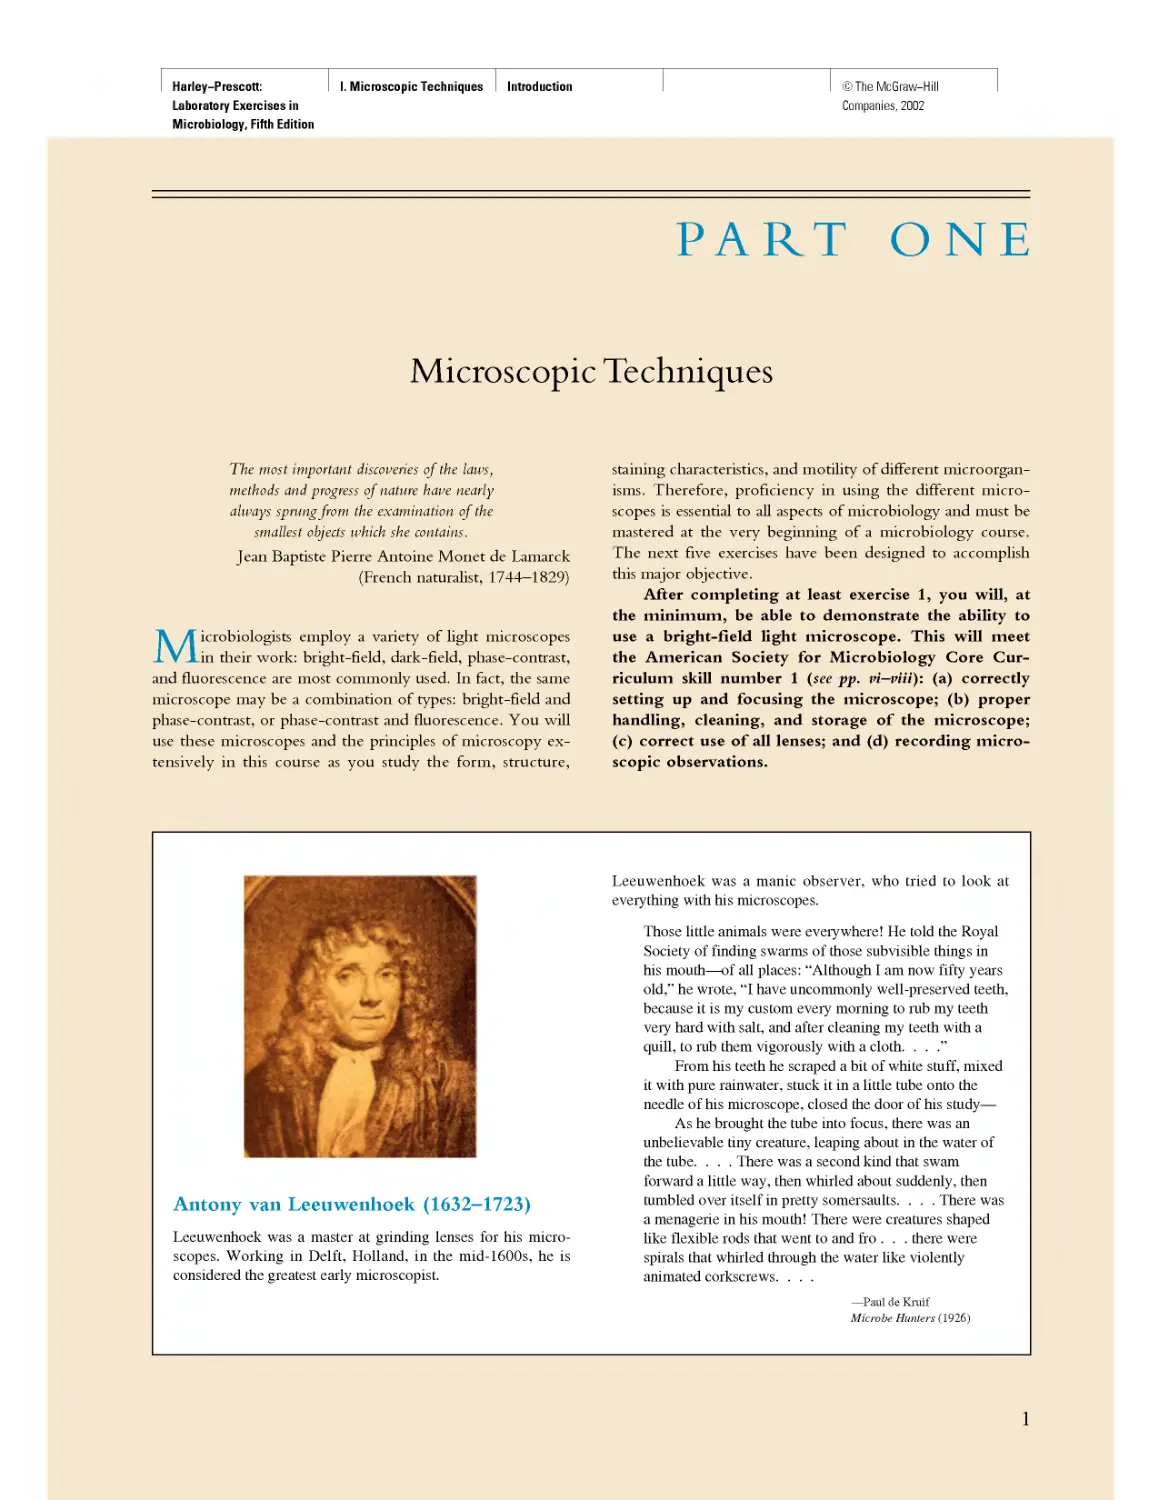
Antony van Leeuwenhoek (1632—1723)
Leeuwenhoek was a master at grinding lenses for his
microscopes. Working in Delft, Holland, in the mid-1600s, he is
considered the greatest early microscopist.
Leeuwenhoek was a manic observer, who tried to look at
everything with his microscopes.
Those little animals were eveiywhere! He told the Royal
Society of finding swarms of those subvisible things in
his mouth—of all places: "Although I am now fifty years
old," he wrote, "I have uncommonly well-preserved teeth,
because it is my custom eveiy morning to rub my teeth
veiy hard with salt, and after cleaning my teeth with a
quill, to rub them vigorously with a cloth. . . ."
From his teeth he scraped a bit of white stuff, mixed
it with pure rainwater, stuck it in a little tube onto the
needle of his microscope, closed the door of his study—
As he brought the tube into focus, there was an
unbelievable tiny creature, leaping about in the water of
the tube. . . . There was a second kind that swam
forward a little way, then whirled about suddenly, then
tumbled over itself in pretty somersaults. . . . There was
a menagerie in his mouth! There were creatures shaped
like flexible rods that went to and fro . . . there were
spirals that whirled through the water like violently
animated corkscrews. . . .
—Paul de Kmif
Microbe Hunters (1926)
1
Harley-Prescott:
Laboratory Exercises in
Microbiology, Fifth Edition
I. Microscopic Techniques
1. Bright-Field Light
Microscope and
Microscopic Measurement
of Organisms
©The McGraw-Hill
Companies. 2002
EXERCISE
1
Bright-Field Light Microscope
and Microscopic Measurement of Organisms
SAFETY CONSIDERATIONS
Slides and coverslips are glass. Be careful with them. Do
not cut yourself when using them. The coverslips are
very thin and easily broken. Dispose of any broken glass
in the appropriately labeled container. If your
microscope has an automatic stop, do not use it as the stage
micrometer is too thick to allow it to function properly.
It may result in a shattered or broken slide or lens.
Materials per Student
compound microscope
lens paper and lens cleaner
immersion oil
prepared stained slides of several types of bacteria
(rods, cocci, spirilla), fungi, algae, and protozoa
glass slides
coverslips
dropper with bulb
newspaper or cut-out letter e's
tweezers
ocular micrometer
stage micrometer
Learning Objectives
Each student should be able to
1. Identify all the parts of a compound microscope
2. Know how to correctly use the microscope—
especially the oil immersion lens
3. Learn how to make and examine a wet-mount
preparation
4. Understand how microorganisms can be measured
under the light microscope
5. Calibrate an ocular micrometer
6. Perform some measurements on different
microorganisms
Suggested Reading in Textbook
1. The Bright-Field Microscope, section 2.2; see
also figures 2.3-2.6.
2. See tables 2.1 and 34.1
Medical Application
In the clinical laboratory, natural cell size, arrangement and
motility are important characteristics in the identification of
a bacterial pathogen.
Why Are Prepared Slides
Used in This Exercise?
Because this is a microbiology course and most of the
microorganisms studied are bacteria, this is an excellent place
to introduce the student to the three basic bacterial shapes:
cocci, rods, and spirilla. By gaining expertise in using the
bright-field light microscope, the student should be able to
observe these three bacterial shapes by the end of the lab
period. In addition, the student will gain an appreciation for
the small size and arrangement of procaryotic cell structure.
One major objective of this exercise is for the student
to understand how microorganisms can be measured under
the light microscope and to actually perform some
measurements on different microorganisms. By making
measurements on prepared slides of various bacteria, fungi,
algae, and protozoa, the student will gain an appreciation
for the size of different microorganisms discussed
throughout both the lecture and laboratory portions of this course.
Principles
The bright-field light microscope is an instrument
that magnifies images using two lens systems. Initial
magnification occurs in the objective lens. Most
microscopes have at least three objective lenses on a
rotating base, and each lens may be rotated into
alignment with the eyepiece or ocular lens in which the
final magnification occurs. The objective lenses are
identified as the low-power, high-dry, and oil
immersion objectives. Each objective is also designated by
other terms. These terms give either the linear magni-
Harley-Prescott:
Laboratory Exercises in
Microbiology, Fifth Edition
I. Microscopic Techniques
1. Bright-Field Light
Microscope and
Microscopic Measurement
of Organisms
©The McGraw-Hill
Companies. 2002
Figure 1.1 The Oil Immersion Objective. An oil immersion
objective lens operating in air and with immersion oil. Light rays
that must pass through air are bent (refracted), and many do not
enter the objective lens. The immersion oil prevents the loss of
light rays.
fication or the focal length. The latter is about equal
to or greater than the working distance between the
specimen when in focus and the tip of the objective
lens. For example, the low-power objective is also
called the lOx, or 16 millimeter (mm), objective; the
high-dry is called the 40x, or 4 mm, objective; and
the oil immersion is called the 90x, lOOx, or 1.8 mm
objective. As the magnification increases, the size of
the lens at the tip of the objective becomes
progressively smaller and admits less light. This is one of the
reasons mat changes in position of the substage
condenser and iris diaphragm are required when using
different objectives if the specimens viewed are to be
seen distinctly. The condenser focuses the light on a
small area above the stage, and the iris diaphragm
controls the amount of light that enters the condenser.
When the oil immersion lens is used, immersion oil
fills the space between the objective and the specimen.
Because immersion oil has the same refractive index
as glass, the loss of light is minimized (figure 1.1). The
eyepiece, or ocular, at the top of the tube magnifies
the image formed by the objective lens. As a result, the
total magnification seen by the observer is obtained by
multiplying the magnification of the objective lens by
the magnification of the ocular, or eyepiece. For
example, when using the lOx ocular and the 43x objective,
total magnification is 10 x 43 = 430 times.
Procedure for Basic Microscopy: Proper Use
of the Microscope
1. Always carry the microscope with two hands. Place
it on the desk with the open part away from you.
2. Clean all of the microscope's lenses only with
lens paper and lens cleaner if necessary. Do not
use paper towels or Kimwipes; they can scratch
the lenses. Do not remove the oculars or any other
parts from the body of the microscope.
Figure 1.2 Preparation of a Wet-mount Slide, (a) Add a
drop of water to a slide, (b) Place the specimen (letter e) in the
water, (c) Place the edge of a coverslip on the slide so that it
touches the edge of the water, (d) Slowly lower the coverslip to
prevent forming and trapping air bubbles.
(c)
(d)
3. Cut a lowercase e from a newspaper or other
printed page. Prepare a wet-mount as illustrated in
figure 1.2. Place the glass slide on the stage of the
microscope and secure it firmly using stage clips.
If your microscope has a mechanical stage device,
place the slide securely in it. Move the slide until
the letter e is over the opening in the stage.
4. With the low-power objective in position, lower
the tube until the tip of the objective is within
5 mm of the slide. Be sure that you lower the tube
while looking at the microscope from the side.
5. Look into the microscope and slowly raise the
tube by turning the coarse adjustment knob
counterclockwise until the object comes into
view. Once the object is in view, use the fine
adjustment knob to focus the desired image.
6. Open and close the diaphragm, and lower and raise
the condenser, noting what effect these actions
have on the appearance of the object being viewed.
Usually the microscope is used with the substage
condenser in its topmost position. The diaphragm
should be open and then closed down until just a
slight increase in contrast is observed (table 1.1).
Use the oil immersion lens to examine the stained
bacteria that are provided (figure 1.3a-<i). The
directions for using this lens are as follows: First locate
7.
Bright-Field Light Microscope and Microscopic Measurement of Organisms 3
Harley-Prescott: I I. Microscopic Techniques I 1. Bright-Field Light I I ©The McGraw-Hill
Laboratory Exercises in Microscope and Companies. 2002
Microbiology, Fifth Edition Microscopic Measurement
of Organisms
Figure 1.3 Examples of Bacterial Shapes as Seen with the Bright-field Light Microscope, (a) Staphylococcus aureus cocci; singular,
coccus (xl,000). (b) Bacillus subtilis rods or bacilli; singular, bacillus (xl,000). (c) A single, large spirillum; plural, spiralla {Spirillum volutans;
Xl,000). (d) Numerous, small spirilla {Rhodospirillum rubruin; Xl,000).
(a) (b)
(c) (d)
the stained area with the low-power objective and then
turn the oil immersion lens into the oil and focus with
the fine adjustment. An alternate procedure is to get
the focus very sharp under high power, then move the
revolving nosepiece until you are halfway between the
high-power and oil immersion objectives. Place a
small drop of immersion oil in the center of the
illuminated area on the slide. Continue revolving the
nosepiece until the oil immersion objective clicks into
place. The lens will now be immersed in oil. Sharpen
the focus with the fine adjustment knob. Draw a few
of the bacteria in the spaces provided.
4 Microscopic Techniques
Harley-Prescott:
Laboratory Exercises in
Microbiology, Fifth Edition
I. Microscopic Techniques
1. Bright-Field Light
Microscope and
Microscopic Measurement
of Organisms
©The McGraw-Hill
Companies. 2002
Table 1.1
Troubleshooting the Bright-Field Light Microscope
Common Problem
Possible Correction
No light passing through the ocular
Insufficient light passing through the ocular
Lint, dust, eyelashes interferring with view
Particles seem to move in hazy visual field
Check to ensure that the microscope is completely plugged into a good receptacle
Check to ensure that the power switch to die microscope is turned on
Make sure die objective is locked or clicked in place
Make sure die iris diaphragm is open
Raise the condenser as high as possible
Open die iris diaphragm completely
Make sure die objective is locked or clicked in place
Clean ocular widi lens paper and cleaner
Air bubbles in immersion oil; add more oil or make certain diat oil immersion objective is in die oil
Make sure diat die high-dry objective is not being used with oil
Make sure a temporary covershp is not being used with oil. Oil causes the covershp to float since the covershp
sticks to die oil and not die slide, making viewing very hazy or impossible
8. After you are finished with the microscope, place
the low-power objective in line with the ocular,
lower the tube to its lowest position, clean the oil
from the oil immersion lens with lens paper and
lens cleaner, cover, and return the microscope to
its proper storage place.
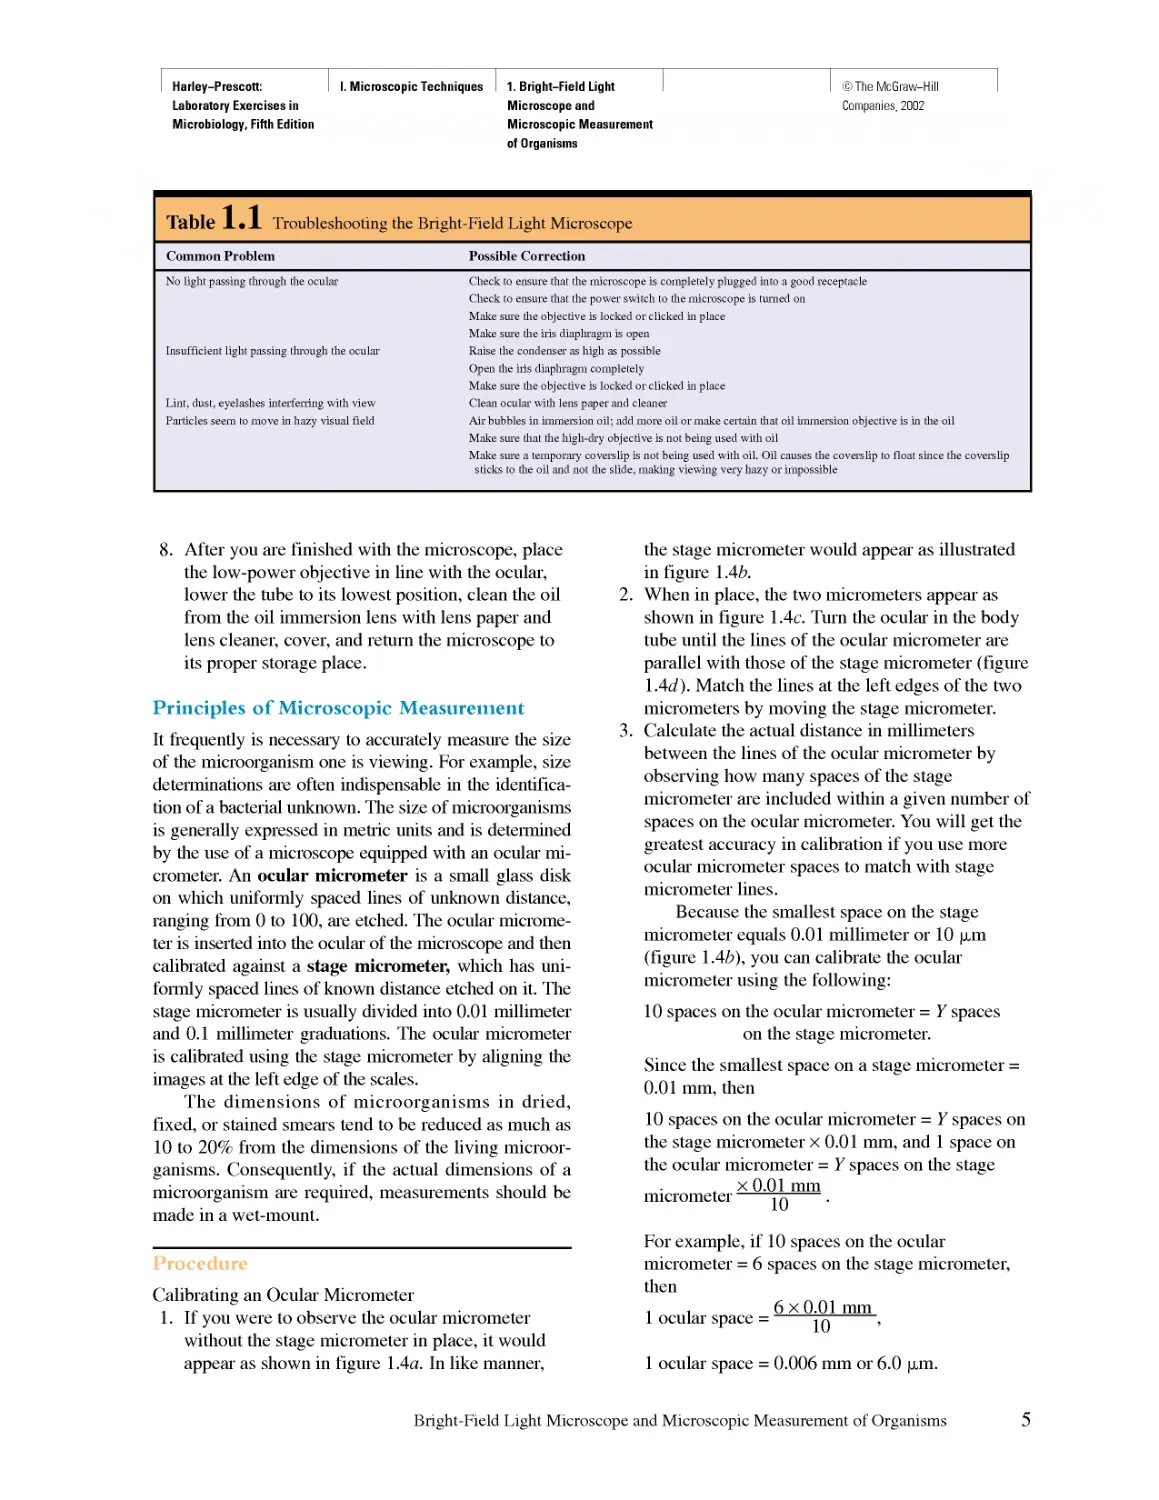
Principles of Microscopic Measurement
It frequently is necessary to accurately measure the size
of the microorganism one is viewing. For example, size
determinations are often indispensable in the
identification of a bacterial unknown. The size of microorganisms
is generally expressed in metric units and is determined
by the use of a microscope equipped with an ocular
micrometer. An ocular micrometer is a small glass disk
on which uniformly spaced lines of unknown distance,
ranging from 0 to 100, are etched. The ocular
micrometer is inserted into the ocular of the microscope and then
calibrated against a stage micrometer, which has
uniformly spaced lines of known distance etched on it. The
stage micrometer is usually divided into 0.01 millimeter
and 0.1 millimeter graduations. The ocular micrometer
is calibrated using the stage micrometer by aligning the
images at the left edge of the scales.
The dimensions of microorganisms in dried,
fixed, or stained smears tend to be reduced as much as
10 to 20% from the dimensions of the living
microorganisms. Consequently, if the actual dimensions of a
microorganism are required, measurements should be
made in a wet-mount.
Procedure
Calibrating an Ocular Micrometer
1. If you were to observe the ocular micrometer
without the stage micrometer in place, it would
appear as shown in figure 1 Aa. In like manner,
the stage micrometer would appear as illustrated
in figure 1 Ab.
2. When in place, the two micrometers appear as
shown in figure 1.4c. Turn the ocular in the body
tube until the lines of the ocular micrometer are
parallel with those of the stage micrometer (figure
I Ad). Match the lines at the left edges of the two
micrometers by moving the stage micrometer.
3. Calculate the actual distance in millimeters
between the lines of the ocular micrometer by
observing how many spaces of the stage
micrometer are included within a given number of
spaces on the ocular micrometer. You will get the
greatest accuracy in calibration if you use more
ocular micrometer spaces to match with stage
micrometer lines.
Because the smallest space on the stage
micrometer equals 0.01 millimeter or 10 |xm
(figure lAb), you can calibrate the ocular
micrometer using the following:
10 spaces on the ocular micrometer = Y spaces
on the stage micrometer.
Since the smallest space on a stage micrometer =
0.01 mm, then
10 spaces on the ocular micrometer = Y spaces on
the stage micrometer x 0.01 mm, and 1 space on
the ocular micrometer = Y spaces on the stage
x 0.01 mm
10
micrometer"
For example, if 10 spaces on the ocular
micrometer = 6 spaces on the stage micrometer,
then
, , 6 x 0.01 mm
1 ocular space = ttj ,
1 ocular space = 0.006 mm or 6.0 urn.
Bright-Field Light Microscope and Microscopic Measurement of Organisms 5
Harley-Prescott:
Laboratory Exercises in
Microbiology, Fifth Edition
I. Microscopic Techniques
1. Bright-Field Light
Microscope and
Microscopic Measurement
of Organisms
©The McGraw-Hill
Companies. 2002
This numerical value holds only for the
specific objective-ocular lens combination used
and may vary with different microscopes.
Calibrate for each of the objectives on your
microscope and record below. Show all
calculations in the space following the table; also
show your calculations to your instructor.
Figure 1.4 Calibrating an Ocular Micrometer.
Image of ocular micrometer
with uniformly spaced lines
Image of stage micrometer
with uniform lines at standard
known intervals
micrometer
I
0 20 40 60 80 100
■liliiii iliiiiliiiiliiinii
(d)
Superposition of scales allows
calibration of ocular scales
(10 ocular units = 0,07 mm)
Low power (lOx objective) 1 ocular space =
High-dry power (40x objective) 1 ocular space =
Oil immersion (90x objective) 1 ocular space =
HINTS AND PRECAUTIONS
(1) Forcing the fine or coarse adjustment knobs on the
microscope beyond their gentle stopping points can render
the microscope useless. (2) A general rule for you to note
is that the lower the magnification, the less light should be
directed upon the object. (3) The fine adjustment knob on
the microscope should be centered prior to use to allow
for maximum adjustment in either direction. (4) If a slide
is inadvertently placed upside down on the microscope
stage, you will have no difficulty focusing the object
under low and high power. However, when progressing to
oil immersion, you will find it impossible to bring the
object into focus. (5) Slides should always be placed on and
removed from the stage when the low-power (4x or lOx)
objective is in place. Removing a slide when the higher
objectives are in position may scratch the lenses. (6) A
note about wearing eyeglasses. A microscope can be
focused; therefore, it is capable of correcting for near- or
farsightedness. Individuals who wear eyeglasses that
correct for near- or farsightedness do not have to wear their
glasses. The microscope cannot correct for astigmatism;
thus, these individuals must wear their glasses. If
eyeglasses are worn, they should not touch the oculars for
proper viewing. If you touch the oculars with your
glasses, they may scratch either the glasses or the oculars.
(7) Because lens cleaner can be harmful to objectives, be
sure not to use too much cleaner or leave it on too long.
The distance between the lines of an ocular
micrometer is an arbitrary measurement that has meaning only if
the ocular micrometer is calibrated for the specific
objective being used. If it is necessary to insert an ocular
micrometer in your eyepiece (ocular), ask your instructor
whether it is to be inserted below the bottom lens or
placed between the two lenses. Make sure that the etched
graduations are on the upper surface of the glass disk that
you are inserting. With stained preparations such as
Gram-stained bacteria, the bacteria may measure smaller
than they normally are if only the stained portion of the
cell is the cytoplasm (gram-negative bacteria), whereas
those whose walls are stained (gram-positive bacteria)
will measure closer to their actual size.
Microscopic Techniques
Harley-Prescott: I I. Microscopic Techniques I 1. Bright-Field Light I I ©The McGraw-Hill
Laboratory Exercises in Microscope and Companies. 2002
Microbiology, Fifth Edition Microscopic Measurement
of Organisms
Laboratory Report j
Name:
Date: .
Lab Section:
Bright-Field Light Microscope
(Basic Microscopy)
Parts of a Compound Microscope
1. Your microscope may have all or most of the features described below and illustrated in figure 2.3 in your
textbook. By studying this figure and reading your textbook, label the compound microscope in figure LRl.l
on the next page. Locate the indicated parts of your microscope and answer the following questions.
a. What is the magnification stamped on the housing of the oculars on your microscope?
b. What are the magnifications of each of the objectives on your microscope?
c. Calculate the total magnification for each ocular/objective combination on your microscope.
Ocular X Objective = Total Magnification
d. List the magnification and numerical aperture for each objective on your microscope.
Magnification of Objective Numerical Aperture (NA)
e. With some compound microscopes, loosening a lock screw allows you to rotate the body tube 180°.
What is the advantage of being able to rotate the body tube?
f. Note the horizontal and vertical scales on the mechanical stage. What is the function of these scales?
g. Where is the diaphragm on your microscope located?
©The McGraw-Hill
Companies. 2002
Figure LRl.l Modern Bright-Field Compound Microscope.
8 Microscopic Techniques
Harley-Prescott:
Laboratory Exercises in
Microbiology, Fifth Edition
I. Microscopic Techniques
1. Bright-Field Light
Microscope and
Microscopic Measurement
of Organisms
Harley-Prescott: I. Microscopic Techniques 1. Bright-Field Light
Laboratory Exercises in Microscope and
Microbiology, Fifth Edition Microscopic Measurement
of Organisms
©The McGraw-Hill
Companies. 2002
How can you regulate the diaphragm?
h. Locate the substage condenser on your microscope. What is its function, and how can it be regulated?
i. Can the light intensity of your microscope be regulated? Explain.
Microscopic Measurement of Microorganisms
2. After your ocular micrometer has been calibrated, determine the dimensions of the prepared slides of the
following microorganisms.
Microorganism
Length
Width
Magnification
Bacterium
name
Fungus name
Alga name
Protozoan name
3. Draw and label, as completely as possible, the microorganisms that you measured.
Genus and species:
Magnification: x_
Genus and species:
Magnification: x
Genus and species:
Magnification: x_
Genus and species:
Magnification: x
Bright-Field Light Microscope (Basic Microscopy) 9
Harley-Prescott: I I. Microscopic Techniques I 1. Bright-Field Light I I ©The McGraw-Hill
Laboratory Exercises in Microscope and Companies. 2002
Microbiology, Fifth Edition Microscopic Measurement
of Organisms
Review Questions
1. Differentiate between the resolving power and magnifying power of a lens. What is meant by the term
"parfocal"?
2. Why is the low-power objective placed in position when the microscope is stored or carried?
3. Why is oil necessary when using the 90x to lOOx objective?
4. What is the function of the iris diapliragm? The substage condenser?
5. What is meant by the limit of resolution?
10 Microscopic Techniques
Harley-Prescott: I I. Microscopic Techniques I 1. Bright-Field Light I I ©The McGraw-Hill
Laboratory Exercises in Microscope and Companies. 2002
Microbiology, Fifth Edition Microscopic Measurement
of Organisms
6. How can you increase the bulb life of your microscope if its voltage is regulated by a rheostat?
7. In general, at what position should you keep your microscope's substage condenser lens?
8. What are three bacterial shapes you observed?
9. How can you increase the resolution on your microscope?
10. In microbiology, what is the most commonly used objective? Explain your answer.
11. In microbiology, what is the most commonly used ocular? Explain your answer.
12. If 5x instead of lOx oculars were used in your microscope with the same objectives, what magnifications
would be achieved?
Bright-Field Light Microscope (Basic Microscopy) 11
Harley-Prescott: I I. Microscopic Techniques I 1. Bright-Field Light I I ©The McGraw-Hill
Laboratory Exercises in Microscope and Companies. 2002
Microbiology, Fifth Edition Microscopic Measurement
of Organisms
13. Why is it necessary to calibrate the ocular micrometer with each objective?
14. In the prepared slides, which organism was the largest?
15. When identifying microorganisms, why should a wet-mount be used when making measurements?
16. What is a stage micrometer?
17. Complete the following for the 10 x objective:
a. ocular micrometer divisions = stage micrometer divisions
b. ocular micrometer divisions = 1 stage micrometer division = mm
c. One ocular micrometer division = stage micrometer divisions = mm
18. Complete the following on units of measurement:
a.
b.
c.
d.
e.
Unit
1 centimeter
1 millimeter
1 nanometer
1 angstrom
Abbreviation
mm
|xm
Value
102 meter
10"6 meter
10"9 meter
1CH° meter
12
Microscopic Techniques
Harley-Prescott:
Laboratory Exercises in
Microbiology, Fifth Edition
I. Microscopic Techniques
2. The Hanging Drop Slide
and Bacterial Motility
©The McGraw-Hill
Companies. 2002
EXERCISE
2
The Hanging Drop Slide and Bacterial Motility
SAFETY PRECAUTIONS
Be careful with the Bunsen burner flame. Slides and
coverslips are glass. Do not cut yourself when using
them. Dispose of any broken glass in the appropriately
labeled container. Discard contaminated depression
slides in a container with disinfectant.
Pronunciation Guide
Bacillus cereus (bah-SIL-lus SEE-ree-us)
Pseudomonas aeruginosa (soo-do-MO-nas a-ruh-jin-
OH-sah)
Spirillum volutans (spy-RIL-lum VOL-u-tans)
Materials per Student
24- to 48-hour tryptic soy broth cultures of
Pseudomonas aeruginosa (ATCC 10145,
small, motile bacillus), Bacillus cereus (ATCC
21768, large, motile bacillus), and Spirillum
volutans (ATCC 19554, spiral, motile
bacterium)
microscope or phase-contrast microscope
lens paper and lens cleaner
immersion oil
clean depression slides and coverslips
petroleum jelly (Vaseline)
inoculating loop
toothpicks
Bunsen burner
Learning Objectives
Each student should be able to
1. Make a hanging drop slide in order to observe
living bacteria
2. Differentiate between the three bacterial species
used in this exercise on the basis of size, shape,
arrangement, and motility
Suggested Reading in Textbook
1. Flagella and Motility, section 3.6; see also
figures 3.31-3.36.
Why Are the Above Bacteria Used
in This Exercise?
The major objectives of this exercise are to allow students
to gain expertise in making hanging drop slides and
observing the motility of living bacteria. To accomplish these
objectives, the authors have chosen three bacteria that are
easy to culture and vary in size, shape, arrangement of
flagella, and types of motion. Specifically, Pseudomonas
aeruginosa (L. aeruginosa, full of copper rust, hence
green) is a straight or slightly curved rod (1.5 to 3.0 |xm in
length) that exhibits high motility by way of a polar flagel-
lum; Bacillus cereus (L. cereus, waxen, wax colored) is a
large (3.0 to 5.0 |xm in length) rod-shaped and straight
bacillus that moves by peritrichous flagella; and Spirillum
volutans (L. voluto, tumble about) is a rigid helical cell (14
to 60 |xm in length) that is highly motile since it contains
large bipolar tufts of flagella having a long wavelength and
about one helical turn. P. aeruginosa is widely distributed
in nature and may be a saprophytic or opportunistic animal
pathogen. B. cereus is found in a wide range of habitats and
is a significant cause of food poisoning. S. volutans occurs
in stagnant freshwater environments.
Principles
Many bacteria show no motion and are termed non-
motile. However, in an aqueous environment, these
same bacteria appear to be moving erratically. This
erratic movement is due to Brownian movement.
13
Harley-Prescott:
Laboratory Exercises in
Microbiology, Fifth Edition
I. Microscopic Techniques
2. The Hanging Drop Slide
and Bacterial Motility
©The McGraw-Hill
Companies. 2002
Brownian movement results from the random motion
of the water molecules bombarding the bacteria and
causing them to move.
True motility (self-propulsion) has been
recognized in other bacteria and involves several different
mechanisms. Bacteria that possess flagella exhibit
flagellar motion. Helical-shaped spirochetes have axial
fibrils (modified flagella that wrap around the
bacterium) that form axial filaments. These spirochetes
move in a corkscrew- and bending-type motion.
Other bacteria simply slide over moist surfaces in a
form of gliding motion.
The above types of motility or nonmotility can be
observed over a long period in a hanging drop slide.
Hanging drop slides are also useful in observing the
general shape of living bacteria and the anangement
of bacterial cells when they associate together (see
figure 1.3). A ring of Vaseline around the edge of the
coverslip keeps the slide from drying out.
Procedure
1. With a toothpick, spread a small ring of Vaseline
around the concavity of a depression slide (figure
2.1a). Do not use too much Vaseline.
2. After thoroughly mixing one of the cultures, use
the inoculating loop to aseptically place a small
drop of one of the bacterial suspensions in the
center of a coverslip (figure 2.1b).
3. Lower the depression slide, with the concavity
facing down, onto the coverslip so that the drop
protrudes into the center of the concavity of the
slide (figure 2.1c). Press gently to form a seal.
4. Turn the hanging drop slide over (figure 2.ld) and
place on the stage of the microscope so that the
drop is over the light hole.
5. Examine the drop by first locating its edge under
low power and focusing on the drop. Switch to
the high-dry objective and then, using immersion
oil, to the 90 to lOOx objective. In order to see the
bacteria clearly, close the diaphragm as much as
possible for increased contrast. Note bacterial
shape, size, arrangement, and motility. Be careful
to distinguish between motility and Brownian
movement.
6. Discard your coverslips and any contaminated
slides in a container with disinfectant solution.
7. Complete the report for exercise 2.
Figure 2.1 Preparation of a Hanging Drop Slide.
(b)
(c)
Toothpick
Vaseline ring
Slide concavity
Inoculating loop
Drop of bacterial culture
Coverslip
Vaseline
m 1 Move slide to coverslip
Drop of bacterial culture
(d) T 1=
J Turn slide over
HINTS AND PRECAUTIONS
(1) Always make sure the specimen is on the top side of
the slide. (2) Particular care must be taken to avoid
breaking the coverslip since it is more vulnerable when
supported only around its edges. (3) With depression
slides, the added thickness of the slide and coverslip may
preclude the use of the oil immersion objective with
some microscopes. (4) If your microscope is equipped
with an automatic stop, it may be necessary to bring the
image into focus by using the coarse adjustment knob.
14 Microscopic Techniques
Harley-Prescott: I. Microscopic Techniques 2. The Hanging Drop Slide
Laboratory Exercises in and Bacterial Motility
Microbiology, Fifth Edition
©The McGraw-Hill
Companies. 2002
Laboratory Report Z
Name:
Date: _
Lab Section:
The Hanging Drop Slide and Bacterial Motility
1. Examine the hanging drop slide and complete the following table with respect to the size, shape, and motility
of the different bacteria.
Bacterium Size
Shape
Type of Motility
Cell Arrangement
B. cereus
P. aeruginosa
S. volutans
2. Draw a representative field for each bacterium.
B. cereus
Magnification: x_
P. aeruginosa S. volutans
Magnification: x Magnification: x
15
Harley-Prescott: I. Microscopic Techniques 2. The Hanging Drop Slide
Laboratory Exercises in and Bacterial Motility
Microbiology, Fifth Edition
Review Questions
1. Why are unstained bacteria more difficult to observe than stained bacteria?
2. What are some reasons for making a hanging drop slide?
3. Describe the following types of bacterial movement:
a. Brownian movement
b. flagellar motion
c. gliding motion
4. Why do you have to reduce the amount of light with the diapliragm in order to see bacteria in a hanging drop
slide?
5. Can the hanging drop slide be used to examine otlier microorganisms? Explain which ones.
6. Which of the bacteria exhibited true motility on the slides?
7. How does true motility differ from Brownian movement?
©The McGraw-Hill
Companies. 2002
16 Microscopic Techniques
Harley-Prescott:
Laboratory Exercises in
Microbiology, Fifth Edition
I. Microscopic Techniques
3. Dark-Field Light
Microscope
©The McGraw-Hill
Companies. 2002
EXERCISE
3
Dark-Field Light Microscope
SAFETY CONSIDERATIONS
Gently scrape the gum line or gingival sulcus with a flat
toothpick so that you obtain a small amount of surface
scrapings and not lacerated gum tissue or impacted
food. Slides and coverslips are glass. Do not cut
yourself when using them. Dispose of any broken glass in
the appropriately labeled container. Do not throw used
toothpicks in the wastebasket. Place them in the
appropriate container for disposal.
Materials per Group of Students
dark-field light microscope
flat toothpicks
lens paper and lens cleaner
immersion oil
slides and coverslips
prepared slides of spirochetes (e.g., Treponema
denticola), radiolarians, protozoa
tweezers
Learning Objectives
Each student should be able to
1. Understand the principles behind dark-field
microscopy
2. Correctly use the dark-field microscope
3. Make a wet-mount and examine it for spirochetes
with the dark-field microscope
Suggested Reading in Textbook
1. The Dark-Field Microscope, section 2.2; see also
figures 2.7 and 2.8.
Pronunciation Guide
Treponema denticola (trep-o-NE-mah dent-A-cola)
Why Is the Following Bacterium
Used in This Exercise?
Treponema denticola (M.L. n, denticola, tooth dweller)
often is a part of the normal microbiota of the oral mucosa;
thus, this spirochete is readily available and does not have
to be cultured. Most species stain poorly if at all with
Gram's or Giemsa's methods and are best observed with
dark-field or phase-contrast microscopy. Thus, T. denticola
is an excellent specimen to observe when practicing the use
of a dark-field microscope, and also allows the student to
continue practicing the wet-mount preparation. T. denticola
is a slender, helical cell, 6 to 16 |xm in length. In a wet-
mount, the bacteria show both rotational and translational
movements due to two or three periplasmic flagella inserted
at each end of the protoplasmic cylinder. Young cells rotate
rapidly on their axis. Thus, by using T. denticola, the
student is also able to observe bacterial motility.
Principles
The compound microscope may be fitted with a dark-
field condenser that has a numerical aperture
(resolving power) greater than the objective. The condenser
also contains a dark-field stop. The compound
microscope now becomes a dark-field microscope. Light
passing through the specimen is diffracted and enters
the objective lens, whereas undiffracted light does
not, resulting in a bright image against a dark
background (figures 3.1-3.2). Since light objects against a
dark background are seen more clearly by the eye
than the reverse, dark-field microscopy is useful in
observing unstained living microorganisms,
microorganisms that are difficult to stain, and spirochetes
(figure 3.2), which are poorly defined by bright-field
microscopy.
17
Harley-Prescott:
Laboratory Exercises in
Microbiology, Fifth Edition
I. Microscopic Techniques
3. Dark-Field Light
Microscope
©The McGraw-Hill
Companies. 2002
Figure 3.1 Dark-field Microscopy. Dark-field microscopy
can best visualize transparent, unstained specimens, which display
only low contrast in bright-field. In this dark-field
photomicrograph (XlOO), a mixture of radiolarian shells is shown.
Notice their many unique and beautiful shapes.
Figure 3.2 Photomicrograph of Treponema pallidum, as
Seen with Dark-field Microscopy (X500).
Procedure
1. Place a drop of immersion oil directly on the
dark-field condenser lens.
2. Position one of the prepared slides so that the
specimen is directly over the light opening.
3. Raise the dark-field condenser with the height
control until the oil on the condenser lens just
touches the slide.
4. Lock the lOx objective into position. Focus with
the coarse and fine adjustment knobs until the
spirochetes come into sharp focus. Do the same
with the 40x objective.
5. Use the oil immersion objective lens to observe
the spirochetes. Draw several in the space
provided in the report for exercise 3.
6. Nonpathogenic spirochetes (T. denticola) may be
part of the normal microbiota of the oral mucosa.
To make a wet-mount of these, gently scrape your
gum line with a flat toothpick. Stir the scrapings
into a drop of water on a slide. Gently lower a
coverslip (see figure 1.2) to prevent trapping air
bubbles. Examine with the dark-field microscope
and draw several spirochetes in the space
provided in the report for exercise 3.
HINTS AND PRECAUTIONS
(1) It is good practice to always clean the condenser
lens before placing a drop of oil on it. (2) Make sure the
prepared slide is placed right side up (coverslip up) on
the stage. (3) If you have trouble focusing with the oil
immersion lens, don't flounder—ask for help from your
instructor. (4) Always make sure that the substage
condenser diaphragm is wide open for adequate
illumination of the specimen.
18 Microscopic Techniques
Harley-Prescott: I. Microscopic Techniques 3. Dark-Field Light
Laboratory Exercises in Microscope
Microbiology, Fifth Edition
©The McGraw-Hill
Companies. 2002
Laboratory Report j
Name:
Date: .
Lab Section:
Dark-Field Light Microscope
1. Drawing of spirochetes from a prepared slide.
Drawing of spirochetes from a wet-mount.
Magnification: x
Magnification: x
Genus and species:
Shape:
Genus and species: _
Shape:
2. Label the following parts of a dark-field microscope. Use the following terms: dark-field stop, specimen,
Abbe condenser, and objective.
JJ
\ I
Harley-Prescott: I. Microscopic Techniques 3. Dark-Field Light
Laboratory Exercises in Microscope
Microbiology, Fifth Edition
Review Questions
1. What is the principle behind dark-field microscopy?
2. When would you use the dark-field microscope?
3. Why is the field dark and the specimen bright when a dark-field microscope is used to examine a specimen?
4. Differentiate between bright-field and dark-field microscopy.
5. What is the function of the Abbe condenser in dark-field microscopy?
6. What is the function of the dark-field stop?
7. In dark-field microscopy, why is a drop of oil placed directly on the condenser lens?
©The McGraw-Hill
Companies. 2002
20 Microscopic Techniques
Harley-Prescott:
Laboratory Exercises in
Microbiology, Fifth Edition
I. Microscopic Techniques
4. Phase-Contrast Light
Microscope
©The McGraw-Hill
Companies. 2002
EXERCISE
4
Phase-Contrast Light Microscope
SAFETY CONSIDERATIONS
Be careful with the glass slides and coverslips. Dispose
of the slides and coverslips, the used Pasteur pipettes,
and pond water properly when finished. Do not pipette
pond water with your mouth—use the pipettor provided.
Materials per Group of Students
pond water
phase-contrast light microscope
new microscope slides and coverslips
Pasteur pipette with pipettor
pictorial guides of common pond water
microorganisms
methyl cellulose (Protoslo, Carolina Biological
Supply)
tweezers
lens paper and lens cleaner
prepared slides of Bacillus or Clostridium
showing endospores
Learning Objectives
Each student should be able to
1. Understand the basic principles behind phase-
contrast microscopy
2. Correctly use the phase-contrast microscope
3. Make a wet-mount of pond water and observe
some of the transparent, colorless microorganisms
that are present
Suggested Reading in Textbook
1. The Phase-Contrast Microscope, section 2.2; see
also figures 2.8 and 2.9.
Pronunciation Guide
Bacillus (bah-SIL-lus)
Clostridium (klos-STRID-ee-um)
Why Are the Following Bacteria and
Pond Water Used in This Exercise?
Most microorganisms and their organelles are colorless and
often difficult to see by ordinary bright-field or dark-field
microscopy. Phase-contrast microscopy permits the
observation of otherwise indistinct, living, unstained bacteria and
their associated structures (such as endospores). Bacillus
species are rod shaped, often arranged in pairs or chains,
with rounded or square ends. Endospores are oval or
sometimes cylindrical. Clostridium species are often arranged in
pairs or short chains, with rounded or sometimes pointed
ends. The endospores often distend the cell. Thus, by using
prepared slides of Bacillus and Clostridium, the student
gains expertise in using the phase-contrast microscope and
in observing specific bacterial structures, such as different
endospores.
Pond water is usually teeming with bacteria and pro-
tists. By using the phase-contrast microscope and slowing
down the many microorganisms with Protoslo, the student
is able to observe the internal structure of protists such as
Paramecium.
Principles
Certain transparent, colorless living microorganisms
and their internal organelles are often impossible to
see by ordinary bright-field or dark-field microscopy
because they do not absorb, reflect, refract, or diffract
sufficient light to contrast with the surrounding
environment or the rest of the microorganism.
Microorganisms and their organelles are only visible when
they absorb, reflect, refract, or diffract more light than
their environment. The phase-contrast microscope
permits the observation of otherwise invisible living,
unstained microorganisms (figure A.\a-d).
In the phase-contrast microscope, the condenser
has an annular diaphragm, which produces a hollow
cone of light; the objective has a glass disk (the phase
21
Harley-Prescott:
Laboratory Exercises in
Microbiology, Fifth Edition
I. Microscopic Techniques
4. Phase-Contrast Light
Microscope
©The McGraw-Hill
Companies. 2002
Figure 4.1 Some Examples of Microorganisms Seen with Phase-contrast Microscopy, (a) A protozoan, Paramecium caudatum,
from pond water stained to show internal structures (X200). (b) A bacterium, Bacillus cereus, stained to show spores (xl,000). (c) A yeast,
Saccharomyces cerevlslae, stained to show budding (xl,000). (d) A filamentous green alga, Spirogyra, showing its helical chloroplasts (X200).
(a)
(b)
(c)
(d)
plate) with a thin film of transparent material
deposited on it, which accentuates phase changes
produced in the specimen. This phase change is observed
in the specimen as a difference in light intensity.
Phase plates may either retard (positive phase plate)
the diffracted light relative to the undiffracted light,
producing dark-phase-contrast microscopy, or
advance (negative phase plate) the undiffracted light
relative to the directed light, producing bright-phase-
contrast microscopy.
Procedure
1. Make a wet-mount of pond water. Add a drop of
methyl cellulose (Protoslo) to slow the swimming
of the microorganisms. Prepared slides of Bacillus
or Clostridium may also be used.
2. Place the slide on the stage of the phase-contrast
microscope so that the specimen is over the light
hole.
3. Rotate the lOx objective into place.
4. Rotate into position the annular diaphragm that
corresponds to the lOx objective. It is absolutely
necessary that the cone of light produced by the
annular diaphragm below the condenser be
centered exactly with the phase plate of the
objective (see figure 2.9 in textbook if you do not
understand this procedure). Consequently, there
are three different annular diaphragms that match
the phase plates of the three different phase
objectives (lOx, 40x, and 90x or lOOx). The
substage unit beneath the condenser contains a
disk that can be rotated in order to position the
correct annular diaphragm.
22 Microscopic Techniques
Harley-Prescott:
Laboratory Exercises in
Microbiology, Fifth Edition
I. Microscopic Techniques
4. Phase-Contrast Light
Microscope
©The McGraw-Hill
Companies. 2002
5. Focus with tlie lOx objective and observe the
microorganisms.
6. Rotate tlie nosepiece and annular diapliragm into
the proper position for observation with the 40x
objective.
7. Do the same with tlie oil immersion lens.
8. In tlie report for exercise 4, sketch several of the
microorganisms that you have observed.
9. If you examined pond water, use the pictorial
guides provided by your instructor to assist you in
identifying some of tlie microorganisms present.
HINTS AND PRECAUTIONS
(1) Make sure the specimen is directly over the light
hole in the stage of the microscope. (2) The phase
elements must be properly aligned. Misalignment is the
major pitfall that beginning students encounter in phase-
contrast microscopy. (3) If your microscope is not
properly aligned, ask your instructor for help.
Phase-Contrast Light Microscope 23
Harley-Prescott: I. Microscopic Techniques 4. Phase-Contrast Light
Laboratory Exercises in Microscope
Microbiology, Fifth Edition
©The McGraw-Hill
Companies. 2002
Laboratory Report 4
Name:
Date: _
Lab Section:
Phase-Contrast Light Microscope
1. Some typical microorganisms in pond water as seen with the phase-contrast light microscope.
Low power
High-dry power
Oil immersion
2. Drawings of Bacillus, Clostridium, or another bacterium showing endospores as seen with the phase-contrast
microscope.
Bacillus
Clostridium
Third specimen
25
Harley-Prescott: I. Microscopic Techniques 4. Phase-Contrast Light
Laboratory Exercises in Microscope
Microbiology, Fifth Edition
Review Questions
1. In the phase-contrast microscope, what does the annular diaphragm do?
2. When would you use the phase-contrast microscope?
3. Explain how the phase plate works in a phase-contrast microscope that produces bright objects with respect to
the background.
4. What happens to the phase of diffracted light in comparison to undiffracted light in a phase-contrast
microscope?
5. What advantage does the phase-contrast microscope have over the ordinary bright-field microscope?
6. What is the difference between a bright-phase-contrast and a dark-phase-contrast microscope?
7. In microscopy, what does the term "phase" mean?
©The McGraw-Hill
Companies. 2002
26 Microscopic Techniques
Harley-Prescott:
Laboratory Exercises in
Microbiology, Fifth Edition
I. Microscopic Techniques
5. Fluorescence
Microscope
©The McGraw-Hill
Companies. 2002
EXERCISE
5
Fluorescence Microscope
SAFETY CONSIDERATIONS
Remember that the pressurized mercury vapor arc lamp
is potentially explosive. Never attempt to touch the
lamp while it is hot. Never expose your eyes to the
direct rays of the mercury vapor arc lamp. Severe burns of
the retina can result from exposure to the rays. In like
manner, removal of either the barrier or exciter filter
can cause retinal injury while looking through the
microscope.
Materials per Group of Students
fluorescence microscope
lens paper and lens cleaner
low-fluorescing immersion oil
protective glasses that filter UV light
prepared slides of known bacteria (M.
tuberculosis) stained with fluorescent dye
Learning Objectives
Each student should be able to
1. Understand the principles behind the fluorescence
microscope
2. Correctly use the fluorescence microscope by
observing prepared slides of known bacteria
stained with a fluorescent dye
Suggested Reading in Textbook
1. The Fluorescence Microscope, section 2.2; see
also figures 2.12, 2.13.
Pronunciation Guide
Mycobacterium tuberculosis (mi-ko-bak-TE-re-um
too-ber-ku-LO-sis)
Why Is the Following Bacterium
Used in This Exercise?
Mycobacterium tuberculosis (L. tuberculum, a small swelling
+ Gr. -osis, characterized by) is a human pathogen that causes
tuberculosis. It is very slow growing and not readily stained
by Gram's method. The cell is 1 to 4 |xm in length, straight or
slightly curved, occurring singly and in occasional threads.
This bacterium can most readily be identified after staining
with fluorochromes or specifically labelling it with
fluorescent antibodies using complicated immunofluorescence
procedures, which are both time consuming and expensive. By
using commercially prepared slides, the student is able to
immediately examine a pathogenic bacterium, such as M.
tuberculosis, and gain expertise in using the fluorescence
microscope. In this exercise, microscopic technique is more
important than what is being observed.
Medical Applications
Fluorescence microscopy is commonly used in the clinical
laboratory for the rapid detection and identification of
bacterial antigens in tissue smears, sections, and fluids, as well as
the rapid identification of many disease-causing
microorganisms. For example, a sputum specimen can be quickly
screened for M. tuberculosis by staining it with a fluorescent
dye that binds specifically to M. tuberculosis. Only the
stained bacterium of interest will be visible when the
specimen is viewed under the fluorescence microscope.
Principles
Fluorescence microscopy is based on the principle of
removal of incident illumination by selective
absorption, whereas light that has been absorbed by the
27
Harley-Prescott:
Laboratory Exercises in
Microbiology, Fifth Edition
I. Microscopic Techniques
5. Fluorescence
Microscope
©The McGraw-Hill
Companies. 2002
Figure 5.1 Fluorescence Microscopy, (a) Escherichia coli stained with DAPI and propidium iodine. These fluorochromes bind DNA
(xl,000). The blue cells are viable and the red cells are dead, (b) Giardia lamhlia stained with IFA (xl,000).
(a)
(b)
specimen and re-emitted at an altered wavelength is
transmitted. The light source must produce a light
beam of appropriate wavelength. An excitation filter
removes wavelengths that are not effective in exciting
the fluorochrome used. The light fluoresced by the
specimen is transmitted through a filter that removes
the incident wavelength from the beam of light. As a
result, only light that has been produced by specimen
fluorescence contributes to the intensity of the image
being viewed (figure 5.\a,b).
Procedure
1. Turn on the UV light source at least 30 minutes
before using the fluorescence microscope.
NEVER LOOK AT THE UV LIGHT SOURCE
WITHOUT PROTECTIVE GLASSES THAT
FILTER UV LIGHT BECAUSE RETINAL
BURNS AND BLINDNESS MIGHT RESULT.
2. Make sure that the proper excitation filter and
barrier filter are matched for the type of
fluorescence expected and are in place.
3. Place a drop of the low-fluorescing immersion oil
on the condenser.
4. Place the prepared slide on the stage and position
it so that the specimen is over the light opening.
Raise the condenser so that the oil just touches the
bottom of the slide.
5. After the mercury vapor arc lamp has been
warmed up, turn on the regular tungsten filament
light source and focus on the specimen.
6. Starting with the lOx objective, find and focus the
specimen.
7. After finding the specimen, move to the 90x to
lOOx objective, switch to the mercury vapor arc
and view the specimen.
8. Compare what you see in the bright-field
microscope with what you see in the fluorescence
microscope by sketching the organisms in the
report for exercise 5.
HINTS AND PRECAUTIONS
(1) The mercury vapor arc lamp requires about a 30-
minute warm-up period. During a normal laboratory
period, do not turn the microscope on and off. (2) Make
sure the proper filters are in place. If you are in doubt,
ask your instructor. (3) Note that there is no diaphragm
control on the dark-field condenser. (4) Never use
ordinary immersion oil with a fluorescence microscope.
28 Microscopic Techniques
Harley-Prescott: I. Microscopic Techniques 5. Fluorescence
Laboratory Exercises in Microscope
Microbiology, Fifth Edition
©The McGraw-Hill
Companies. 2002
Laboratory Report j
Name:
Date: _
Lab Section:
Fluorescence Microscope
1. Bacterium as seen with the bright-field microscope. Bacterium as seen with the fluorescence microscope.
Genus and species:
Magnification: x _
Shape:
Genus and species:
Magnification: x _
Shape:
2. Label the following parts of a fluorescence microscope. Use the following terms: specimen and fluoroclirome,
heat filter, mercury vapor arc lamp, exciter filter, barrier filter, dark-field condenser.
Eyepiece
[Objective
lens
Mirror
29
Harley-Prescott: I. Microscopic Techniques 5. Fluorescence
Laboratory Exercises in Microscope
Microbiology, Fifth Edition
Review Questions
1. What kind of light is used to excite dyes and make microorganisms fluoresce?
2. List two fluorochromes that are used in staining bacteria.
3. What is a serious hazard one must guard against when working with mercury vapor arc lamps?
4. What is the function of each of the following?
a. exciter filter
b. barrier filter
c. heat filter
d. mercury vapor arc lamp
5. When is fluorescence microscopy used in a clinical laboratory?
6. Differentiate between phosphorescence and fluorescence.
7. What advantage is there to using fluorescence procedures in ecological studies? Give several examples.
©The McGraw-Hill
Companies. 2002
30 Microscopic Techniques
Harley-Prescott:
Laboratory Exercises in
Microbiology, Fifth Edition
II. Bacterial Morphology
and Staining
Introduction
©The McGraw-Hill
Companies. 2002
PART TWO
Bacterial Morphology and Staining
Hie more I practice, the luckier I get.
Lee Trevino (Professional golfer, 1939— )
Living bacteria sometimes may be studied directly by
bright-field or phase-contrast microscopy. This is useful
when one needs to demonstrate, for example, bacterial
motility. The first exercise in this part of the manual provides
an opportunity for observing bacteria alive and unstained.
Since living bacteria are generally colorless and almost
invisible because of their lack of contrast with the water in
which they may reside, staining is necessary in order to
make them readily visible for observation of intracellular
structures as well as overall morphology. The exercises in
this part of the manual have been designed to give the
student expertise in staining and slide preparation, an
appreciation for bacterial morphology, and experience in how to
specifically stain some specialized bacterial features such as
endospores, capsules, and flagella.
After completing the exercises in Part Two, you
will be able to demonstrate how to properly prepare
slides for microbiological examination. This will
meet the American Society for Microbiology Core
Curriculum skill number 1 (see pp. vi—viii): (a)
cleaning and disposal of slides; (b) preparing smears from
solid and liquid cultures; (c) performing wet-mounts
and/or hanging drop preparations; and (d)
performing Gram stains.
Hans Christian Joachim Gram
(1853-1938)
The most widely used staining procedure in microbiology is
the Gram stain, discovered by the Danish scientist and
physician Christian Gram.
In 1884, Gram entitled his procedure "The Differential
Staining of Schizomycetes in Sections and in Smear Preparations"
(Fortschr. Med. 2:185-89, 1884), and described it as follows:
After having been dehydrated in alcohol, the preparations
are immersed in the aniline-gentian violet solution of
Ehrlich for 1 to 3 minutes. . . . The preparations are then
placed in an aqueous solution of iodine-potassium iodide
directly or after a rapid rinsing in alcohol. They are
allowed to remain there for 1 to 3 minutes, during which
time the color of the preparations changes from dark blue-
violet to deep purple-red. The preparations are then
completely decolorized with absolute alcohol. Further
dealing is achieved with clove oil. . . . Bacteria are
stained intense blue while the background tissues are light
yellow. . . .
The Gram stain, as devised by Gram in 1884, was his attempt
to differentiate bacterial cells from infected tissue. Although
Gram observed what is now called the "Gram reaction," he did
not recognize the taxonomic value of his technique.
31
Harley-Prescott:
Laboratory Exercises in
Microbiology, Fifth Edition
II. Bacterial Morphology
and Staining
6. Negative Staining
©The McGraw-Hill
Companies. 2002
EXERCISE
6
Negative Staining
SAFETY PRECAUTIONS
Be careful with the Bunsen burner flame. If the stains
used in this experiment get on your clothing, they will
not wash out. When preparing a negative stain smear,
push the top slide away from the end of the slide you
are holding (figure 6.2). Slides should always be
discarded in a container with disinfectant.
Materials per Student
24- to 48-hour tryptic soy broth cultures of
Bacillus subtilis (ATCC 6051), Micrococcus
luteus (ATCC 9341), and Spirillum volutans
(ATCC 19554)
Dorner's nigrosin solution, India ink, or eosin blue
clean microscope slides
inoculating loop
immersion oil
microscope
lens paper and lens cleaner
wax pencil
Bunsen burner
Learning Objectives
Each student should be able to
1. Understand the reason for the negative staining
procedure
2. Stain three different bacteria using the negative
staining procedure
Why Are the Following Bacteria
Used in This Exercise?
Because cultures of Bacillus subtilis (L. subtilis, slender)
and Spirillum volutans were used in exercise 6, students are
now familiar with the rod-shaped morphology of these
bacteria. Thus, these same bacteria can be used to illustrate the
negative staining technique. One new bacterium has been
added to broaden the student's awareness of bacterial
morphology by way of negative staining. Micrococcus luteus
(L. luteus, golden yellow) is a spherical cell, 0.9 to 1.8 |xm
in diameter, occurring in pairs, tetrads, or irregular clusters
but not chains. It is nonsporing and seldom motile. The
bacterium is easy to culture since it grows on simple
medium and forms yellow, yellowish green, or orange
colonies. M. luteus occurs primarily on mammalian skin
and in soil but can be easily isolated from food products
and the air.
Medical Application
Treponema pallidum is the spirochete that causes the sexually
transmitted disease syphilis. This bacterium is a very delicate
cell that is easily distorted by heat-fixing; thus, negative
staining is the procedure of choice in the clinical laboratory.
Suggested Reading in Textbook
1. Dyes and Simple Staining, section 2.2.
Pronunciation Guide
Bacillus subtilis (bah-SIL-lus sub-til-us)
Micrococcus luteus (my-kro-KOK-us LOO-tee-us)
Spirillum volutans (spy-RIL-lum VOL-u-tans)
Principles
Sometimes it is convenient to determine overall
bacterial morphology without the use of harsh staining or
heat-fixing techniques that change the shape of cells.
This might be the case when the bacterium does not
stain well (e.g., some of the spirochetes) or when it is
desirable to confirm observations made on the shape
32
Harley-Prescott:
Laboratory Exercises in
Microbiology, Fifth Edition
II. Bacterial Morphology
and Staining
6. Negative Staining
©The McGraw-Hill
Companies. 2002
Figure 6.1 India Ink Stain of Bacillus megaterium (Xl,000).
Notice the dark background around the clear bacterial cells.
Figure 6.2 Negative Staining Procedure and Thin Smear
Preparation.
and size of bacteria observed in either a wet-mount or
hanging drop slide. Negative staining is also good for
viewing capsules (see exercise 11).
Negative, indirect, or background staining is
achieved by mixing bacteria with an acidic stain such
as nigrosin, India ink, or eosin, and then spreading out
the mixture on a slide to form a film. The above stains
will not penetrate and stain the bacterial cells due to
repulsion between the negative charge of the stains
and the negatively charged bacterial wall. Instead,
these stains either produce a deposit around the
bacteria or produce a dark background so that the bacteria
appear as unstained cells with a clear area around
them (figure 6.1).
Procedure
1. With a wax pencil, label the left-hand corner of
three glass slides with the names of the respective
bacteria.
2. Use an inoculating loop to apply a small amount
of bacteria to one end of a clean microscope slide
(figure 6.2a).
3. Add 1 to 2 loops of nigrosin, India ink, or eosin
solution to tire bacteria (figure 6.2b) and mix
thoroughly.
4. Spread the mixture over the slide using a second
slide. The second slide should be held at a 45°
angle so that the bacteria-nigrosin solution
~ Inoculating loop
" 1-2 drops of bacterial culture
Clean glass slide
1-2 drops of nigrosin
(or other stain) and mix
Bacteria-nigrosin
suspension spreads
along edge of slide
Direction of
movement
l|l|i
(e)
Air dry
Stained material forms a
thin feathered film
spreads across its edge (figure 6.2c). The slide is
then pushed across the surface of the first slide in
order to form a smear that is thick at one end and
thin at the other (figure 6.2<i). This is known as a
thin smear.
Negative Staining 33
Harley-Prescott: II. Bacterial Morphology 6. Negative
Laboratory Exercises In and Staining
Microbiology, Fifth Edition
5. Allow the smear to air dry (figure 6.2e). Do not
heat-fix!
6. With the low-power objective, find an area of the
smear that is of the optimal thickness for
observation.
7. Use the oil immersion lens to observe and draw
the three bacterial species in the report for
exercise 6.
Staining I I ©The McGraw-Hill
Companies. 2002
HINTS AND PRECAUTIONS
(1) For a successful thin smear, the slides must be
absolutely clean and free from oil and grease—including
fingerprints. (2) If an inconsistent smear is obtained, it
is better to prepare a new slide than to search
unsuccessfully for an appropriate area on a poorly stained slide.
(3) Do not use too much stain; use only a small drop of
nigrosin. (4) The mixture must be drawn over the slide,
not pushed. Drawing the mixture over the slide will
produce a more uniform film. (5) Prepare a smear that
consists of a thin layer of cells without clumps. (6) View
the thinner or clearer portions of the film.
34 Bacterial Morphology and Staining
Harley-Prescott: II. Bacterial Morphology 6. Negative Staining
Laboratory Exercises In and Staining
Microbiology, Fifth Edition
©The McGraw-Hill
Companies. 2002
Laboratory Report Q
Name:
Date: _
Lab Section:
Negative Staining
1. Draw a representative field of your microscopic observation as seen with the oil immersion lens.
B. subtilis
M. luteus
S. volutans
Magnification: x_
Magnification: x_
Magnification: x_
2. Describe the microscopic appearance of the tliree bacteria,
a. B. subtilis
b. M. luteus
c. S. volutans
©The McGraw-Hill
Companies. 2002
Review Questions
1. When is negative staining used?
2. Name three stains that can be used for negative staining.
a.
b.
c.
3. Why do the bacteria remain unstained in the negative staining procedure?
4. What is an advantage of negative staining?
5. Why didn't you heat-fix the bacterial suspension before staining?
6. Why is negative staining also called either indirect or background staining?
7. When streaking with the second slide, why must it be held at a 45° angle?
36 Bacterial Morphology and Staining
Harley-Prescott: II. Bacterial Morphology 6. Negative Staining
Laboratory Exercises In and Staining
Microbiology, Fifth Edition
Harley-Prescott:
Laboratory Exercises in
Microbiology, Fifth Edition
II. Bacterial Morphology
and Staining
7. Smear Preparation and
Simple Staining
©The McGraw-Hill
Companies. 2002
EXERCISE
7
Smear Preparation and Simple Staining
SAFETY CONSIDERATIONS
Always use a slide holder or clothespin to hold glass
slides when heat-fixing them. Never touch a hot slide
until it cools. If a glass slide is held in the flame too
long, it can shatter. Be careful with the Bunsen burner
flame. If the stains used in this experiment get on your
clothing, they will not wash out. Always discard slides
in a container with disinfectant.
Materials per Student
24- to 48-hour tryptic soy broth or agar slants of
Bacillus subtilis (ATCC 6051),
Corynebacterium pseudodiphtheriticum
(ATCC 7091), Micrococcus luteus (ATCC
9341), and Spirillum volutans (ATCC 19554)
microscope
clean microscope slides
bibulous paper
inoculating loop and needle
sterile distilled water
Bunsen burner
Loeffler's alkaline methylene blue
crystal violet (1% aqueous solution)
Ziehl's carbolfuchsin
wax pencil
immersion oil
lens paper and lens cleaner
slide holder or clothespin
slide warmer
Learning Objectives
Each student should be able to
1. Learn the proper procedure for preparing a
bacterial smear
2. Do several simple staining procedures
Suggested Reading in Textbook
1. Fixation, section 2.3.
2. Dyes and Simple Staining, section 2.3.
3. Size, Shape, and Arrangement, section 3.1; see
also figures 3.1 and 3.2.
Pronunciation Guide
Bacillus subtilis (bah-SIL-lus sub-til-us)
Corynebacterium pseudodiphtheriticum (koh-rye-nee-
back-TIR-ee-um soo-doh-dif-theh-RIT-ee-cum)
Micrococcus luteus (my-kro-KOK-us LOO-tee-us)
Spirillum volutans (spy-RIL-lum VOL-u-tans)
Why Are the Above Bacteria Used
in This Exercise?
The same three cultures (73. subtilis, M. luteus, and S
volutans) that were used for the negative staining exercise will
continue to be used in this exercise. The new bacterium is
Corynebacterium pseudodiphtheriticum. C.
pseudodiphtheriticum (M.L. n, pseudodiphtheriticum, relating to false
diphtheria) is a straight or slightly curved slender rod 0.5 to
2.0 |xm in length that has tapered or sometimes clubbed
ends. Cells are arranged singly or in pairs, often in a "V"
formation or in palisades of several parallel cells. C.
pseudodiphtheriticum is primarily an obligate parasite of
mucous membranes or the skin of mammals. By using
Loeffler's alkaline methylene blue, crystal violet, and Ziehl's
carbolfuchsin, the student gains expertise in using some
simple stains to observe the morphology and characteristics
of four different bacteria.
Principles
While negative staining is satisfactory when making
simple observations on bacterial morphology and size,
more specific stains are necessary if bacterial detail is
37
Harley-Prescott:
Laboratory Exercises in
Microbiology, Fifth Edition
II. Bacterial Morphology
and Staining
7. Smear Preparation and
Simple Staining
©The McGraw-Hill
Companies. 2002
Figure 7.1 Bacterial Smear Preparation.
From solid medium From liquid medium
Inoculating
1 needle needle
of bacterial
growth
Spread out
water-bacteria
mixture
Air dry
Mf
(e)
to be observed. One way of achieving this detail
involves smear preparation and simple staining. A
bacterial smear is a dried preparation of bacterial cells
on a glass slide. In a bacterial smear that has been
properly processed, (1) the bacteria are evenly spread
out on the slide in such a concentration that they are
adequately separated from one another, (2) the
bacteria are not washed off the slide during staining, and
(3) bacterial form is not distorted.
In making a smear, bacteria from either a broth
culture or an agar slant or plate may be used. If a slant
or plate is used, a small amount of bacterial growth is
transferred to a drop of water on a glass slide (figure
7.1a) and mixed. The mixture is then spread out
evenly over a large area on the slide (figure 7.1b).
One of the most common errors in smear
preparation from agar cultures is the use of too large an
inoculum. This invariably results in the occurrence of
large aggregates of bacteria piled on top of one
another. If the medium is liquid, place one or two loops
of the medium directly on the slide (figure 7.1c) and
spread the bacteria over a large area (figure 7.Id).
Allow the slide to air dry at room temperature (figure
l.le). After the smear is dry, the next step is to attach
the bacteria to the slide by heat-fixing. This is
accomplished by gentle heating (figure 7.1/), passing the
slide several times through the hot portion of the
flame of a Bunsen burner. Most bacteria can be fixed
to the slide and killed in this way without serious
distortion of cell structure.
The use of a single stain or dye to create contrast
between the bacteria and the background is referred to
as simple staining. Its chief value lies in its simplicity
and ease of use. Simple staining is often employed
when information about cell shape, size, and
arrangement is desired. In this procedure, one places the heat-
fixed slide on a staining rack, covers the smear with a
small amount of the desired stain for the proper
amount of time, washes the stain off with water for a
few seconds, and, finally, blots it dry. Basic dyes such
as crystal violet (20 to 30 seconds staining time),
carbolfuchsin (5 to 10 seconds staining time), or
methylene blue (1 minute staining time) are often
used. Once bacteria have been properly stained, it is
usually an easy matter to discern their overall shape.
Bacterial morphology is usually uncomplicated and
limited to one of a few variations. For future reference,
the most common shapes are presented in figure 7.2.
Procedure
Smear Preparation
1. With the wax pencil, mark the name of the
bacterial culture in the far left corner on each of
three slides.
2. For the broth culture, shake the culture tube and,
with an inoculating loop, aseptically (see figure
14.3) transfer 1 to 2 loopfuls of bacteria to the
center of the slide. Spread this out to about a 'A-inch
area. When preparing a smear from a slant or plate,
place a loopful of water in the center of the slide.
With the inoculating needle, aseptically pick up a
very small amount of culture and mix into the drop
of water. Spread this out as above. (Three slides
should be prepared; one each of B. subtilis or C.
pseudodiphtheriticum, M. luteus, and& volutans.)
38 Bacterial Morphology and Staining
Harley-Prescott:
Laboratory Exercises in
Microbiology, Fifth Edition
II. Bacterial Morphology
and Staining
7. Smear Preparation and
Simple Staining
©The McGraw-Hill
Companies. 2002
Figure 7.2 Common Bacterial Shapes.
Shape Arrangement
Spherical
Rod-shaped
Spiral
Incomplete
spiral
Irregular or
shape
coccus
(pi., cocci)
bacillus
(pi., bacilli)
spirillum
(pi., spirilla)
vibrio
(pi., vibrios)
4^*
pleomorphic
diplococcus
(pairs)
streptococcus
(chains)
staphylococcus
(random or
grapelike clusters)
micrococcus
(square groups
of four cells)
strepto bacillus
(chains)
sarcina
(cubical packets
of eight cells)
«fc
Figure 7.3 A Typical Slide Warmer Used to Speed Up the
Drying of Slides.
Figure 7.4 Simple Staining Procedure.
j^^^^^Sk Staining loop
■■B^B^^^^^^B Sink or suitable receptacle
I
Staining bottle
(c)
Wash bottle
Gentle blotting
3. Allow the slide to air dry, or place it on a slide
warmer (figure 7.3).
4. Pass the slide through a Bunsen burner flame
tliree times to heat-fix and kill the bacteria.
Simple Stammg
1. Place the tliree fixed smears on a staining loop or
rack over a sink or other suitable receptacle
(figure 7.4a).
2. Stain one slide with alkaline methylene blue for
1 to Vh minutes; one slide with carbolfuchsin for
5 to 10 seconds; and one slide with crystal violet
for 20 to 30 seconds.
3. Wash stain off slide with water for a few seconds
(figure lAb).
4. Blot slide dry with bibulous paper (figure 7.4c).
Be careful not to rub the smear when drying the
slide because this will remove the stained
bacteria.
5. Examine under the oil immersion lens and
complete the report for exercise 7.
6. You may want to treat smears of the same
bacterium with all tliree stains in order to compare
them more directly. It is also instructive to cover
bacterial smears for varying lengths of time with a
given stain in order to get a feel for how reactive
they are and the results of overstaining or
understating a slide preparation. See figure
7'.5a—c for examples of bacteria stained with
crystal violet.
Smear Preparation and Simple Staining 39
Harley-Prescott:
Laboratory Exercises in
Microbiology, Fifth Edition
II. Bacterial Morphology
and Staining
7. Smear Preparation and
Simple Staining
©The McGraw-Hill
Companies. 2002
Figure 7.5 Bacteria Stained with Crystal Violet, (a) Bacillus subtllls (xl,000). (b) Spirillus volutans (xl,000). (c) Micrococcus luteus
(XI,000).
(a)
(c)
(b)
HINTS AND PRECAUTIONS
(1) When heat-fixing a smear, always make sure that the
smear is on the top of the slide as you pass it through
the flame. (2) Bacteria growing on solid media tend to
cling to each other and must be dispersed sufficiently by
diluting with water. If this is not done, the smear will be
too thick and uneven. Be careful not to use too much
paste in making the smear. It is easy to ruin your results
by using too many bacteria. (3) Always wait until the
slide is dry before heat-fixing. (4) Fixing smears with
an open flame may create artifacts. (5) The inoculating
loop must be relatively cool before inserting it into any
broth. If the loop is too hot, it will spatter the broth and
suspend bacteria into the air. Always flame the
inoculating loop after using it and before setting it down. (6)
When rinsing with water, direct the stream of water so
that it runs gently over the smear.
40 Bacterial Morphology and Staining
Harley-Prescott: II. Bacterial Morphology 7. Smear Preparation and
Laboratory Exercises In and Staining Simple Staining
Microbiology, Fifth Edition
©The McGraw-Hill
Companies. 2002
Laboratory Report /
Name:
Date: _
Lab Section:
Smear Preparation and Simple Staining
1. Complete the following drawings and table for the simple staining procedure.
Drawing of
representative
field
C. pseudodiphtheriticum
B. subtilis
M. luteus
S. volutans
Bacterium
Magnification
Stain
Cell form (shape)
Cell color
Background color
Cell grouping
41
Harley-Prescott: II. Bacterial Morphology 7. Smear Preparation and
Laboratory Exercises In and Staining Simple Staining
Microbiology, Fifth Edition
Review Questions
1. What are the two purposes of heat fixation?
a.
b.
2. What is the purpose of simple staining?
3. Why are basic dyes more successful in staining bacteria than acidic dyes?
4. Name three basic stains.
a.
b.
c.
5. Why is time an important factor in simple staining?
6. How would you define a properly prepared bacterial smear?
7. Why should you use an inoculating needle when making smears from solid media? An inoculating loop from
liquid media?
©The McGraw-Hill
Companies. 2002
42 Bacterial Morphology and Staining
Harley-Prescott:
Laboratory Exercises in
Microbiology, Fifth Edition
II. Bacterial Morphology
and Staining
8. Gram Stain
©The McGraw-Hill
Companies. 2002
EXERCISE
8
Gram Stain
SAFETY CONSIDERATIONS
Be careful with the Bunsen burner flame. Volatile and
flammable liquids (ethanol, isopropanol-acetone) are
used in this experiment. Do not use them near an open
flame. If the stains used in this experiment get on your
clothing, they will not wash out. Discard slides in a
container with disinfectant. Hold all slides with forceps or a
clothespin when heat-fixing. Gram crystal violet,
safranin, and iodine can cause irritation to the eyes,
respiratory system and skin. Avoid contact with skin and
eyes. Do not breathe spray. Wear suitable protective
gloves. Always keep the containers tightly closed.
Materials per Student
18- to 24-hour tryptic soy broth cultures of
formalinized (1 ml of concentrated formalin
per 10 ml of culture) Staphyloccus aureus
(ATCC 25923), Escherichia coli (ATCC
25922), and a mixture of S. aureus and E. coli
solutions of crystal violet, Gram's iodine (2 g
potassium iodide in 300 ml distilled water plus
1 g iodine crystals), 95% ethanol and/or
isopropanol-acetone mixture (3:1 v/v), and
safranin
Bismark brown stain (for color-blind students)
clean glass slides
inoculating loop
Bunsen burner
bibulous paper
microscope
lens paper and lens cleaner
immersion oil
Hyphomonas (Hyphomicrobium) neptunium
(ATCC 15444) grown in marine broth (Difco)
slide warmer
staining rack
Bacto Gram Stain Reagents from Difco for the
three-step Gram stain
Learning Objectives
Each student should be able to
1. Understand the biochemistry underlying the Gram
stain
2. Understand the theoretical basis for differential
staining procedures
3. Perform a satisfactory Gram stain
4. Differentiate a mixture of bacteria into gram-
positive and gram-negative cells
Suggested Reading in Textbook
1. Differential Staining, section 2.3; see also figures
2.14 and 2.15.
2. Gram-Positive Cell Walls, section 3.5.
3. Gram-Negative Cell Walls, section 3.5.
4. The Mechanism of Gram Staining, section 3.5.
5. Budding and/or Appendaged Bacteria, section 22.1;
see also figures 22.4 and 22.5.
Pronunciation Guide
Escherichia coli (esh-er-I-ke-a KOH-lee)
Hyphomonas (Hyphomicrobium) neptunium (hi-fo-
MO-nas nep-TU-ne-um)
Staphylococcus aureus (staf-il-oh-KOK-us ORE-ee-us)
43
Harley-Prescott:
Laboratory Exercises in
Microbiology, Fifth Edition
II. Bacterial Morphology
and Staining
8. Gram Stain
©The McGraw-Hill
Companies. 2002
Why Are the Following Bacteria
Used in This Exercise?
The major objective of this exercise is to enable the student
to correctly use the Gram stain to differentiate a mixture of
bacteria into gram-positive and gram-negative cells. The
classical standards for this differentiation are
Staphylococcus aureus and Escherichia coll. S. aureus (L. aureus,
golden) cells are spherical, 0.5 to 1.0 |xm in diameter,
occurring singly, in pairs, and in irregular clusters. This
bacterium is gram-positive, nonmotile, and nonsporing. S.
aureus is mainly associated with the skin and mucous
membranes of warm-blooded vertebrates but is often
isolated from food products, dust, and water. E. coli (Gr.
colon, large intestine) cells are straight rods, 2.0 to 6.0 |xm
in length, occurring singly or in pairs. This bacterium is
gram-negative. E. coli occurs as part of the normal flora in
the lower part of the intestine of warm-blooded animals.
Hyphomonas (Hyphomicrobium) neptunium is a rod-
shaped, oval, or bean-shaped cell (1 to 3 |xm in length) with
a polar prostheca of varying length. This bacterium is
gram-negative and provides the student the opportunity to
Gram stain a large bacterium that differs in its morphology
and reproduction. H. neptunium is widely distributed in
freshwater, marine, and soil habitats.
Medical Application
Gram staining is the single most useful test in the clinical
microbiology laboratory. It is the differential staining
procedure most commonly used for the direct examination of
specimens and bacterial colonies because it has a broad
staining spectrum. The Gram stain is the first differential
test run on a bacterial specimen brought into the laboratory
for specific identification. The staining spectrum includes
almost all bacteria, many fungi, and parasites such as
Trichomonas, Strongyloides, and miscellaneous protozoan
cysts. The significant exceptions include Treponema,
Mycoplasma, Chlamydia, and Rickettsia, which are too small
to visualize by light microscopy or lack a cell wall.
Principles
Simple staining depends on the fact that bacteria differ
chemically from their surroundings and thus can be
stained to contrast with their environment. Bacteria
also differ from one another chemically and physically
and may react differently to a given staining procedure.
This is the principle of differential staining.
Differential staining can distinguish between types of bacteria.
Figure 8.1 Gram Stain. Light micrograph (X900) of a Gram-
stained mixture of gram-positive Staphylococcus aureus (purple cocci)
and gram-negative Escherichia coli (pink rods).
The Gram stain (named after Christian Gram,
Danish scientist and physician, 1853-1938) is the
most useful and widely employed differential stain in
bacteriology. It divides bacteria into two groups—
gram negative and gram positive.
The first step in the procedure involves staining
with the basic dye crystal violet. This is the primary
stain. It is followed by treatment with an iodine
solution, which functions as a mordant; that is, it
increases the interaction between the bacterial cell and
the dye so that the dye is more tightly bound or the
cell is more strongly stained. The smear is then
decolorized by washing with an agent such as 95% ethanol
or isopropanol-acetone. Gram-positive bacteria retain
the crystal violet-iodine complex when washed with
the decolorizer, whereas gram-negative bacteria lose
their crystal violet-iodine complex and become
colorless. Finally, the smear is counterstained with a basic
dye, different in color than crystal violet. This coun-
terstain is usually safranin. The safranin will stain the
colorless, gram-negative bacteria pink but does not
alter the dark purple color of the gram-positive
bacteria. The end result is that gram-positive bacteria are
deep purple in color and gram-negative bacteria are
pinkish to red in color (figure 8.1).
The Gram stain does not always yield clear results.
Species will differ from one another in regard to the
ease with which the crystal violet-iodine complex is
removed by ethanol. Gram-positive cultures may often
turn gram negative if they get too old. Thus, it is
always best to Gram stain young, vigorous cultures rather
than older ones. Furthermore, some bacterial species
are gram variable. That is, some cells in the same cul-
44 Bacterial Morphology and Staining
Harley-Prescott: II. Bacterial Morphology 8. Gram Stain
Laboratory Exercises In and Staining
Microbiology, Fifth Edition
ture will be gram positive and some, gram negative.
Therefore, one should always be certain to run Gram
stains on several cultures under carefully controlled
conditions in order to make certain that a given
bacterial "strain" is truly gram positive or gram negative.
Indistinct Gram-stain results can be confirmed by
a simple test using KOH. Place a drop of 10% KOH
on a clean glass slide and mix with a loopful of
bacterial paste. Wait 30 seconds, then pull the loop slowly
through the suspension and up and away from the
slide. A gram-negative organism will produce a
mucoid string; a gram-positive organism remains fluid.
In most introductory microbiology laboratories,
the bacteria that are used in staining exercises are
normally relatively small gram-negative or gram-
positive cocci and rods. One usually does not have
the opportunity to observe larger bacteria or those
with differences in morphology and reproduction.
Part of the Gram-staining exercise has been designed
to help alleviate this deficiency by introducing you to
a less typical bacterium, Hyphomonas (Hyphomicro-
bium) neptunium.
Hyphomicrobia are widely distributed in
freshwater, marine, and soil habitats. Of particular concern in
this Gram-stain exercise is the unique morphology and
morphogenic cycle (figure 8.2) of these procaryotes.
A small, nonmotile swarmer cell about 0.5 |xm in
diameter matures into an ovoid cell, measuring 0.5 by
1.0 |xm. This cell grows a stalk (hypha) about 0.3 |xm
wide and about 3.0 |xm long. The stalk is just thick
enough to be seen under the oil immersion lens, and
success in viewing it provides a good test of one's
ability to Gram stain correctly and focus the
microscope. Through the tip of a growing hypha, a bud is
formed, which grows a single flagellum. Completing
the cycle, the bud separates from the parent and swims
away (to later differentiate into a stalked cell itself),
while the mother cell continues to generate more buds.
All morphological forms are gram negative.
Procedure for Traditional Gram-Stain
Technique
1. Prepare heat-fixed smears of E. coli, S. aureus, and
the mixture of E. coli and S. aureus (see figure 7.1).
2. Place the slides on the staining rack.
3. Flood the smears with crystal violet and let stand
for 30 seconds (figure 8.3a).
4. Rinse with water for 5 seconds (figure 8.3£>).
5. Cover with Gram's iodine mordant and let stand
for 1 minute (figure 8.3c).
©The McGraw-Hill
Companies. 2002
Figure 8.2 Hyphomonas (Hyphomicrobium) neptunium.
Morphological forms of the life cycle: (1) nonmotile swarmer;
(2) mature cell; (3) stalked cell with bud; (4) stalked cell with
flagellated bud; (5) stalked cell; (6) motile swarmer.
6. Rinse with water for 5 seconds (figure 8.3<i).
7. Decolorize with 95% ethanol for 15 to 30 seconds.
Do not decolorize too long. Add the decolorizer
drop by drop until the crystal violet fails to wash
from the slide (figure 8.3e). Alternatively, the
smears may be decolorized for 30 to 60 seconds
with a mixture of isopropanol-acetone (3:1 v/v).
8. Rinse with water for 5 seconds (figure 8.3/).
9. Counterstain with safranin for about 60 to 80
seconds (figure 8.3g). Safranin preparations vary
considerably in strength, and different staining
times may be required for each batch of stain. (If
you are color-blind, use Bismark brown stain
rather than safranin.)
10. Rinse with water for 5 seconds (figure 8.3/z).
11. Blot dry with bibulous paper (figure 8.3/) and
examine under oil immersion. Gram-positive
organisms stain blue to purple; gram-negative
organisms stain pink to red. There is no need to
place a coverslip on the stained smear. See figure
8.1 for an example of gram-positive and gram-
negative bacteria.
Control Procedure
1. Prepare two heat-fixed slides of the mixed culture
of E. coli and S. aureus.
2. Stain one with crystal violet only (steps 3 to 6).
Gram Stain 45
Harley-Prescott:
Laboratory Exercises in
Microbiology, Fifth Edition
II. Bacterial Morphology
and Staining
8. Gram Stain
©The McGraw-Hill
Companies. 2002
3. Carry the second slide through the decolorizing
process (steps 3 to 8).
4. Examine these two slides and compare with the
mixed culture slide that was carried all the way
through the staining procedure (steps 1 to 10).
Your observations should help you understand
how the Gram stain works.
Hyphomonas (Hyphomicrobium) neptunium
1. Gram stain this bacterium according to standard
procedures (figure 8.3a—0-
Procedure for Three-Step Gram Stain
Difco Laboratories has introduced reagents for a three-
step Gram stain. The advantages include less reagent
usage versus conventional stains, reduced chance of
overdecolorization, and saved time. The procedure
recommended by the company is as follows:
1. Flood smear with gram crystal violet primary
stain and stain for 1 minute.
2. Wash off the crystal violet with cold water.
3. Flood the slide with Gram's iodine mordant and
let sit for 1 minute.
4. Wash off the mordant with safranin
decolorizer/counterstain solution. Then add more
decolorizer/counterstain solution to the slide and
stain for 20 to 50 seconds.
5. Wash off the decolorizer/counterstain with cold
water.
6. Either blot or air dry.
If the three-step Gram-stain reagents are
available, this new procedure may be used in place of the
traditional approach.
Regardless of which procedure is used, run
known cultures or controls. Smears of known
cultures are available commercially (figure 8.4) or can
be prepared in the laboratory. It is very important
that controls be included in each staining run,
preferably on the same slide using Staphylococcus
aureus (ATTC 25923) and Escherichia coli (ATCC
25922). Both of these are also available from Difco
as Bactrol™ Disks. When performing the Gram
Figure 8.3 Gram-stain Procedure.
mgg^m
(a) Crystal violet; 30 seconds (b) Rinse for 5 seconds
(c) Cover with Gram's iodine
for 1 minute
(d) Rinse with water for
5 seconds
(e) Deco lo rize fo r 15-30
seconds
(f) Rinse with water for
5 seconds
(g) Counterstain with safranin
for about 60-80 seconds
(h) Rinse for 5 seconds
(i) Blot dry with bibulous paper
stain on a clinical specimen, particularly when the
results will be used as a guide to the selection of a
therapeutic agent, such a control system furnishes
assurance that the iodine solution is providing
proper mordant activity and that decolorization was
performed properly.
46 Bacterial Morphology and Staining
Harley-Prescott: I II. Bacterial Morphology I 8. Gram Stain I I ©The McGraw-Hill
Laboratory Exercises In and Staining Companies. 2002
Microbiology, Fifth Edition
Figure 8.4 Gram Stain Control Slide. Notice the positive
control at the top and negative control at the bottom. Each area
contains a known Gram-positive and Gram-negative bacterium.
HINTS AND PRECAUTIONS
(1) Don't make your smears too thick. (2) Thick
smears will require more time to decolorize than thin
ones. (3) Decolorization has occurred when the
solution flows colorlessly from the slide. If you cannot tell
accurately when the solution becomes colorless, try
decolorizing with isopropanol-acetone mixture for
about 30 to 40 seconds. (4) Some common sources of
Gram-staining errors are (a) the inoculating loop was
too hot, (b) excessive heat was used during the heat-
fixing procedure, and (c) the decolorizing alcohol was
left on the slide too long.
Gram Stain 47
Harley-Prescott: I II. Bacterial Morphology I 8. Gram Stain I I ©The McGraw-Hill
Laboratory Exercises In and Staining Companies. 2002
Microbiology, Fifth Edition
Laboratory Report
Lab Section:
1. Draw the Gram-stained bacteria in the following circles.
S. aureus E. coli Mixed culture
(E. coli + S. aureus)
2. Control Gram-stain results.
Steps 3-6
Bacterial
color
3. Gram stain of H. neptunium illustrating the different stages in its life cycle.
Stage
8
Name:
Steps 3-8
49
Harley-Prescott: II. Bacterial Morphology 8. Gram Stain
Laboratory Exercises In and Staining
Microbiology, Fifth Edition
Review Questions
1. What is the difference between a simple and differential stain?
2. Name the reagent used and state the purpose of each of the following in the Gram stain:
a. mordant
b. primary stain
c. decolorizer
d. counterstain
3. Which step is the most crucial or most likely to cause poor results in the Gram stain? Why?
4. Why must young cultures be used when doing a Gram stain?
5. Why was H. neptunium Gram stained?
6. What is meant by gram variable?
7. What part of the bacterial cell is most involved with Gram staining, and why?
©The McGraw-Hill
Companies. 2002
50 Bacterial Morphology and Staining
Harley-Prescott:
Laboratory Exercises in
Microbiology, Fifth Edition
II. Bacterial Morphology
and Staining
9. Acid-Fast Staining
(Ziehl-Neelsen and
Kinyoun) Procedures
©The McGraw-Hill
Companies. 2002
EXERCISE
9
Acid-Fast Staining
(Ziehl-Neelsen and Kinyoun) Procedures
SAFETY CONSIDERATIONS
A volatile and flammable liquid (acid-alcohol) is used
in this experiment. Do not use near an open flame. If the
carbolfuchsin or methylene blue get on your clothing,
they will not wash out. Note: when carbolfuchsin is
heated, phenol is driven off. Phenol is poisonous and
caustic. Thus, always use a chemical hood with the
exhaust fan on for the hot plate or boiling water bath
setup. Discard slides in a container with disinfectant. No
mouth pipetting. Mycobacteria should be handled in a
safety cabinet to prevent dissemination in case the
human pathogen Mycobacterium tuberculosis should
occur among the cultures. Infected material should be
disinfected by heat because mycobacteria are relatively
resistant to chemical disinfectants.
Materials per Student
tryptic soy broth culture of Escherichia coli
(ATCC 11229) and nutrient agar slant culture
of Mycobacterium smegmatis (ATCC 19420)
or Mycobacterium phlei (ATCC 354)—5-day-
old cultures
Ziehl's carbolfuchsin
carbolfuchsin prepared with either Tergitol No. 4
(a drop per 30 ml of carbolfuchsin) or Triton-X
(2 drops per 100 ml of carbolfuchsin). Tergitol
No. 4 and Triton-X act as detergents,
emulsifiers, and wetting agents.
alkaline methylene blue
acid-alcohol
clean glass slides
commercial slides showing acid-fast
Mycobacterium tuberculosis (Carolina
Biological Supply, Wards)
inoculating loop
hot plate
microscope
bibulous paper
paper toweling
lens paper and lens cleaner
immersion oil
staining racks
1-ml pipettes with pipettor
Learning Objectives
Each student should be able to
1. Understand the biochemical basis of the acid-fast
stain
2. Perform an acid-fast stain
3. Differentiate bacteria into acid-fast and non-acid-
fast groups
Suggested Reading in Textbook
1. Differential Staining, section 2.3.
2. The Mycobacteria, section 24.5; see also figure 24.9.
3. Tuberculosis, section 39.1.
4. Leprosy, section 39.3.
Pronunciation Guide
Cryptosporidium (krip-toe-spoh-RED-jee-um)
Escherichia coli (esh-er-I-ke-a KOH-lee)
Mycobacterium phlei (mi-ko-bak-TE-re-um fee-ii)
M. smegmatis (M. smeg-MEH-tis)
M. tuberculosis (M. too-ber-ku-LO-sis)
Nocardia (no-KAR-dee-ah)
51
Harley-Prescott:
Laboratory Exercises in
Microbiology, Fifth Edition
II. Bacterial Morphology
and Staining
9. Acid-Fast Staining
(Ziehl-Neelsen and
Kinyoun) Procedures
©The McGraw-Hill
Companies. 2002
Figure 9.1 Ziehl-Neelsen Stain of Mycobacterium Acid-fast Rods, (a) Mycobacterium smegmatis stained red (xl,000). (b) In this
photomicrograph, Mycobacterium smegmatis stains red and the background cells blue-brown.
(a)
(b)
Why Are the Above Bacteria Used
in This Exercise?
One of the major objectives of this exercise is to give the
student expertise in acid-fast staining. To allow the student
to differentiate between acid-fast and non-acid-fast
bacteria, the authors have chosen one of the cultures from the
last exercise, Escherichia coli. E. coli is a good example of
a non-acid-fast bacterium. Mycobacterium smegmatis and
M. phlei are nonpathogenic members of the genus
Mycobacterium. These bacteria are straight or slightly curved
rods, 1 to 10 |xm in length, acid-fast at some stage of
growth, and not readily stained by Gram's method. They
are also nonmotile, nonsporing, without capsules, and slow
or very slow growers. The mycobacteria are widely
distributed in soil and water; some species are obligate parasites
and pathogens of vertebrates.
Medical Application
In the clinical laboratory, the acid-fast stain is important in
identifying bacteria in the genus Mycobacterium;
specifically, M. leprae (leprosy) and M. tuberculosis
(tuberculosis). This differential stain is also used to identify members
of the aerobic actinomycete genus Nocardia; specifically,
the opportunistic pathogens N. brasiliensis and N. aster-
oides that cause the lung disease nocardiosis. The water-
borne protozoan parasite Cryptosporidium that causes
diarrhea in humans (cryptosporidiosis) can also be identified by
the acid-fast stain.
Principles
A few species of bacteria in the genera Mycobacterium
and Nocardia, and the parasite Cryptosporidium do not
readily stain with simple stains. However, these
microorganisms can be stained by heating them with
carbolfuchsin. The heat drives the stain into the cells. Once the
microorganisms have taken up the carbolfuchsin, they
are not easily decolorized by acid-alcohol, and hence are
termed acid-fast. This acid-fastness is due to the high
lipid content (mycolic acid) in the cell wall of these
microorganisms. The Ziehl-Neelsen acid-fast staining
procedure (developed by Franz Ziehl, a German
bacteriologist, and Friedrich Neelsen, a German pathologist,
in the late 1800s) is a very useful differential staining
technique that makes use of this difference in retention
of carbolfuchsin. Acid-fast microorganisms will retain
this dye and appear red (figure 9.1a, b). Microorganisms
that are not acid-fast, termed non-acid-fast, will appear
blue or brown due to the counterstaining with methylene
blue after they have been decolorized by the
acid-alcohol. A modification of this procedure that employs a
wetting agent (Tergitol No. 7) rather than heat to ensure stain
penetration is known as the Kinyoun staining
procedure (developed by Joseph Kinyoun, German
bacteriologist, in the early 1900s).
Procedure
Ziehl-Neelsen (Hot Stain) Procedure
1. Prepare a smear consisting of a mixture of E. coli
andAf. smegmatis.
52
Bacterial Morphology and Staining
Harley-Prescott:
Laboratory Exercises in
Microbiology, Fifth Edition
II. Bacterial Morphology
and Staining
9. Acid-Fast Staining
(Ziehl-Neelsen and
Kinyoun) Procedures
©The McGraw-Hill
Companies. 2002
Figure 9.2 Acid-fast Staining Procedure.
(a) Apply carbolfuchsin to
saturate paper and heat
for 5 minutes in an
exhaust hood
(b) Cool and rinse with water
for 30 seconds
(c) Decolorize with acid-
alcohol until pink
(10-30 seconds)
(d) Rinse with water for
5 seconds
(e) Counterstain with
methylene blue for
about 2 minutes
(f) Rinse with water for
30 seconds
(g) Blot dry with
bibulous paper
2. Allow the smear to air dry and then heat-fix (see
figure 7.1).
3. Place the slide on a hot plate that is within a
chemical hood (with the exhaust fan on), and
cover the smear with a piece of paper toweling
that has been cut to the same size as the
microscope slide. Saturate the paper with Ziehl's
carbolfuchsin (figure 9.2a). Heat for 3 to 5
minutes. Do not allow the slide to dry out, and
avoid excess flooding! Also, prevent boiling by
adjusting the hot plate to a proper temperature. A
boiling water bath with a staining rack or loop
held 1 to 2 inches above the water surface also
works well. (Instead of using a hot plate to heat-
drive the carbolfuchsin into the bacteria, an
alternate procedure is to cover the heat-fixed slide
with a piece of paper towel. Soak the towel with
the carbolfuchsin and heat, well above a Bunsen
burner flame.)
4. Remove the slide, let it cool, and rinse with water
for 30 seconds (figure 9.2b).
5. Decolorize by adding acid-alcohol drop by drop
until the slide remains only slightly pink. This
requires 10 to 30 seconds and must be done
carefully (figure 9.2c).
6. Rinse with water for 5 seconds (figure 9.2d).
7. Counterstain with alkaline methylene blue for
about 2 minutes (figure 9.2e).
8. Rinse with water for 30 seconds (figure 9.2/).
9. Blot dry with bibulous paper (figure 9.2g).
10. There is no need to place a coverslip on the
stained smear. Examine the slide under oil
immersion and record your results in the report
for exercise 9. Acid-fast organisms stain red; the
background and other organisms stain blue or
brown. See figure 9.1 for an example of the
Ziehl-Neelsen stain.
11. Examine the prepared slide of Mycobacterium
tuberculosis.
Kinyoun (Cold Stain) Procedure
(This may be used instead of or in addition to the
Ziehl-Neelsen procedure.)
1. Heat-fix the slide as previously directed.
2. Flood the slide for 5 minutes with carbolfuchsin
prepared with Tergitol No. 7 (heat is not
necessary).
3. Decolorize with acid-alcohol and wash with tap
water. Repeat this step until no more color runs
off the slide.
4. Counterstain with alkaline methylene blue for 2
minutes. Wash and blot dry.
5. Examine under oil. Acid-fast organisms stain red;
the background and other organisms stain blue.
HINTS AND PRECAUTIONS
(1) Light (diaphragm and condenser adjustments) is
critical in the ability to distinguish acid-fast-stained
microorganisms in sputum or other viscous background
materials. (2) If the bacteria are not adhering to the slide, mix
the bacteria with sheep serum or egg albumin during
smear preparation. This will help the bacteria adhere to
the slide.
Acid-Fast Staining (Ziehl-Neelsen and Kinyoun) Procedures 53
Harley-Prescott: I II. Bacterial Morphology I 9. Acid-Fast Staining I I ©The McGraw-Hill
Laboratory Exercises In and Staining (Ziehl-Neelsen and Companies. 2002
Microbiology, Fifth Edition Kinyoun) Procedures
Laboratory Report
Lab Section:
Acid-Fast Staining (Ziehl-Neelsen and Kinyoun) Procedures
1. Complete the following table with respect to the acid-fast stain and draw representative specimens.
£ coli M. smegmatis M. phlei
Magnification X X X^
Bacterium other
than above
Bacterial shape
Cell color
Acid-fast
2. Are you satisfied with your results? If not, what can you do to improve your technique the next
time you prepare an acid-fast stain from a broth culture?
9
Name:
55
©The McGraw-Hill
Companies. 2002
Review Questions
1. What is the purpose of the heat during the acid-fast staining procedure?
2. What is the function of the counterstain in the acid-fast staining procedure?
3. Are acid-fast bacteria gram positive or gram negative? Explain your answer.
4. For what diseases would you use an acid-fast stain?
5. What makes a microorganism non-acid-fast?
6. What chemical is responsible for the acid-fast property of mycobacteria?
7. Is a Gram stain an adequate substitute for an acid-fast stain? Why or why not?
56 Bacterial Morphology and Staining
Harley-Prescott:
Laboratory Exercises in
Microbiology, Fifth Edition
II. Bacterial Morphology
and Staining
9. Acid-Fast Staining
(Ziehl-Neelsen and
Kinyoun) Procedures
Harley-Prescott:
Laboratory Exercises in
Microbiology, Fifth Edition
II. Bacterial Morphology
and Staining
10. Endospore Staining
(Schaeffer-Fulton or
Wirtz-Conklin)
©The McGraw-Hill
Companies. 2002
EXERCISE
10
Endospore Staining
(Schaeffer-Fulton or Wirtz-Conklin)
SAFETY CONSIDERATIONS
Be careful with the Bunsen burner flame and boiling
water bath. If either malachite green or safranin get on
your clothes, they will not wash out. Discard slides in a
container with disinfectant.
Materials per Student
24- to 48-hour nutrient agar slant cultures of
Bacillus megaterium (ATCC 12872) and
Bacillus macerans (ATCC 8244), and old
(more than 48 hours) thioglycollate cultures of
Clostridium butyricum (ATCC 19398) and
Bacillus circulans (ATCC 4513)
clean glass slides
microscope
immersion oil
wax pencil
inoculating loop
hot plate or boiling water bath with staining rack
or loop
5% malachite green solution
safranin
bibulous paper
paper toweling
lens paper and lens cleaner
slide warmer
forceps
Learning Objectives
Each student should be able to
1. Understand the biochemistry underlying
endospore staining
2. Perform an endospore stain
3. Differentiate between bacterial endospore and
vegetative cell forms
Suggested Reading in Textbook
1. Staining Specific Structures, section 2.3.
2. The Bacterial Endospore, section 3.8; see also
figures 3.40-3.44, 23.5, 23.6, 23.8.
3. Anthrax, section 39.3.
4. Tetanus, section 39.3.
Pronunciation Guide
Bacillus megaterium (bah-SIL-us meg-AH-ter-ee-um)
B. macerans (ma-ser-ANS)
B. circulans (sir-KOO-lanz)
Clostridium butyricum (klos-STRID-ee-um bu-TER-
a-cum)
Why Are the Above Bacteria Used
in This Exercise?
Because the major objective of this exercise is to provide
experience in endospore staining, the authors have chosen
several bacteria that vary in the size and shape of their en-
dospores. Bacillus megaterium (M. L. n. megaterium, big
beast) is a cylindrical to oval or pear-shaped cell about 1.2 to
1.5 |xm in diameter and 2 to 5 |xm long; it tends to occur in
short, twisted chains. The spores are central and vary from
short oval to elongate. Spores occur in the soil. Bacillus
macerans (L. macerans, softening by steeping, rotting) is an
elongated cell 0.5 to 0.7 |xm wide and 2.5 to 5 |xm in length
with terminal spores. Spores are relatively scarce in the soil.
Bacillus circulans (L. circulans, circling) is an elongate cell
2 to 5 |xm in length and 0.5 to 0.7 |xm wide. In most strains,
the spore is terminal to subterminal; it is central in a spindle-
shaped sporangium if the bacillus is short. In many strains,
deeply stainable material persists on the surface of the free
spores. The spores are found in the soil. Clostridium
butyricum (Gr. butyrum, butter) is a straight or slightly curved
rod, 2.4 to 7.6 |xm in length and 0.5 to 1.7 |xm wide, with
rounded ends. The cells occur singly, in pairs, in short
chains, and occasionally as long filaments. They are motile
with peritrichous flagella. Spores are oval and eccentric to
subterminal and are found in the soil and animal feces.
57
Harley-Prescott:
Laboratory Exercises in
Microbiology, Fifth Edition
II. Bacterial Morphology
and Staining
10. Endospore Staining
(Schaeffer-Fulton or
Wirtz-Conklin)
©The McGraw-Hill
Companies. 2002
Medical Application
Only a few bacteria produce endospores. Those of medical
importance include Bacillus anthracis (anthrax),
Clostridium tetani (tetanus), C botulinium (botulism), and C. per-
fringens (gas gangrene). In the clinical laboratory, the
location and size of endospores vary with the species; thus, they
are often of value in identifying bacteria.
Principles
Bacteria in genera such as Bacillus and Clostridium
produce quite a resistant structure capable of
surviving for long periods in an unfavorable environment
and then giving rise to a new bacterial cell (figure
10.1). This structure is called an endospore since it
develops within the bacterial cell. Endospores are
spherical to elliptical in shape and may be either
smaller or larger than the parent bacterial cell.
Endospore position within the cell is characteristic and
may be central, subterminal, or terminal.
Endospores do not stain easily, but, once stained,
they strongly resist decolorization. This property is the
basis of the Schaeffer-Fulton (Alice B. Schaeffer and
MacDonald Fulton were microbiologists at Middlebury
College, Vermont, in the 1930s) or Wirtz-Conklin
method (Robert Wirtz and Marie E. Conklin were
bacteriologists in the early 1900s) of staining endospores. The
endospores are stained with malachite green. Heat is used
to provide stain penetration. The rest of the cell is then
decolorized and counterstained a light red with safranin.
Figure 10.1 The Life Cycle of Endospore-forming Bacteria.
Endospore
Vegetative
cell
Sporogenesis
Vegetative
cell
Germination
Procedure
1. With a wax pencil, place the names of the respective
bacteria on the edge of four clean glass slides.
2. As shown in figure 14.3, aseptically transfer one
species of bacterium with an inoculating loop to
each of the respective slides, air dry (or use a
slide warmer), and heat-fix.
3. Place the slide to be stained on a hot plate or
boiling water bath equipped with a staining loop
or rack. Cover the smear with paper toweling that
has been cut the same size as the microscope slide.
4. Soak the paper with the malachite green staining
solution. Gently heat on the hot plate (just until
the stain steams) for 5 to 6 minutes after the
malachite green solution begins to steam. Replace
the malachite green solution as it evaporates so that
the paper remains saturated during heating (figure
10.2a). Do not allow the slide to become dry.
5. Remove the paper using forceps, allow the slide
to cool, and rinse the slide with water for 30
seconds (figure \Q.2b).
6. Counterstain with safranin for 60 to 90 seconds
(figure 10.2c).
7. Rinse the slide with water for 30 seconds (figure
10.2a1).
Figure 10.2 Endospore Staining Procedure.
(a) Apply malachite green to
saturate paper and steam
for 5 minutes
(b) Remove paper, cool, and
rinse with water for
30 seconds
(c) Counterstain with safranin (d) Rinse with water for
for 60-90 seconds 30 seconds
(e) Blot dry with
bibulous paper
58 Bacterial Morphology and Staining
Harley-Prescott:
Laboratory Exercises in
Microbiology, Fifth Edition
II. Bacterial Morphology
and Staining
10. Endospore Staining
(Schaeffer-Fulton or
Wirtz-Conklin)
©The McGraw-Hill
Companies. 2002
8. Blot dry with bibulous paper (figure 10.2e) and
examine under oil immersion. A coverslip is not
necessary. The spores, both endospores and free
spores, stain green; vegetative cells stain red.
Draw the bacteria in the space provided in the
report for exercise 10. See figure 10.3a-c for an
example of endospore staining.
HINTS AND PRECAUTIONS
(1) Do not boil the stain—always steam gently.
(2) After steaming the slide, cool it before flooding it
with cold water. If the slide is not cooled, it may shatter
or crack when rinsed with cold water.
Figure 10.3 Examples of Endospores. (a) Central spores of Bacillus stained with malachite green and counterstained with safranin
(xl,000). Notice that the cells are rod-shaped and straight, often arranged in pairs or chains, with rounded squared ends. The endospores are
oval and not more than one spore per cell, (b) Clostridium tetani showing round, temiinal spores that usually distend the cell (xl,000). Notice
that the cells are rod-shaped and are often arranged in pairs or short chains with rounded or sometimes pointed ends, (c) Bacillus megaterium
showing short oval to elongate spores.
(a)
(b)
(c)
Endospore Staining (Schaeffer-Fulton or Wirtz-Conklin) 59
Harley-Prescott: I II. Bacterial Morphology I 10. Endospore Staining I I ©The McGraw-Hill
Laboratory Exercises In and Staining (Schaeffer-Fulton or Companies. 2002
Microbiology, Fifth Edition Wirtz-Conklin)
Laboratory Report
Lab Section:
Endospore Staining (Schaeffer-Fulton or Wirtz-Conklin)
1. Make drawings and answer die questions for each of die bacterial endospore slides.
B. megaterium B. macerans B. circulans C. butyricum
Bacterium
Magnification X X^ X X^
Bacterium other than above
Spore color
Color of vegetative cell
Location of endospore (central,
terminal, sub terminal)
2. Are you satisfied widi the results of your endospore stain? If not, how can you improve your results
the next time you prepare an endospore stain?
10
Name:
61
©The McGraw-Hill
Companies. 2002
Review Questions
1. Why is heat necessary in order to stain endospores?
2. Where are endospores located within vegetative cells?
3. In the Schaeffer-Fulton endospore stain, what is the primary stain? The counterstain?
4. Name two disease-causing bacteria that produce endospores.
a.
b.
5. What is the function of an endospore?
6. Why are endospores so difficult to stain?
7. What do endospore stains have in common with the acid-fast (Ziehl-Neelsen) stain?
62 Bacterial Morphology and Staining
Harley-Prescott:
Laboratory Exercises in
Microbiology, Fifth Edition
II. Bacterial Morphology
and Staining
10. Endospore Staining
(Schaeffer-Fulton or
Wirtz-Conklin)
Harley-Prescott: I II. Bacterial Morphology I 11. Capsule Staining I I ©The McGraw-Hill
Laboratory Exercises In and Staining Companies. 2002
Microbiology, Fifth Edition
EXERCISE 1 1
Capsule Staining
SAFETY CONSIDERATIONS
Be careful with the Bunsen burner flame. If India ink,
crystal violet, or safranin get on your clothes, they will
not wash out. Seventy percent ethyl alcohol is
flammable—keep away from open flames. Discard slides in a
container with disinfectant.
Suggested Reading in Textbook
1. Capsules, Slime Layers, and S Layers, section
3.6; see also figure 3.27.
Pronunciation Guide
Alcaligenes denitrificans (al-kah-LIJ-e-neez de-ni-tri-
fi-KANS)
Klebsiella pneumoniae (kleb-se-EL-lah nu-MO-ne-EYE)
^-3^^^ >. Why Are the Above Bacteria Used
'^Z^^^-^ in This Exercise?
One of the major objectives of this exercise is to give the
student experience in capsule staining. To help accomplish
this objective, the authors have chosen one capsulated and
one noncapsulated bacterium. Klebsiella pneumoniae (Gr.
pneumonia, pneumonia) is a nonmotile, capsulated rod, 0.6
to 6 |xm in length, and is arranged singly, in pairs, or short
chains. Cells contain a large polysaccharide capsule and
give rise to large mucoid colonies. There are more than 80
capsular (K) antigens that can be used to serotype klebsiel-
lae. K. pneumoniae occurs in human feces and clinical
specimens, water, grain, fruits, and vegetables. Alcaligenes
denitrificans (are able to reduce N03~ to N02~ and N2) occurs as
a rod, a coccal rod, or a coccus; is 0.5 to 2.6 |xm in length;
and usually occurs singly in water and soil. It is motile with
1 to 4 peritrichous flagella. No capsule is present.
Medical Application
Many bacteria (e.g., Bacillus anthracis [anthrax],
Streptococcus mutans [tooth decay], Streptococcus pneumoniae
[pneumonia]) and the fungus Cryptococcus neoformans
[cryptococcosis] contain a gelatinous covering called a capsule. In
the clinical laboratory, demonstrating the presence of a
capsule is a means of diagnosis and determining the organism's
virulence, the degree to which a pathogen can cause disease.
Materials per Student
18-hour skim milk cultures of Klebsiella
pneumoniae (ATCC el3883) and Alcaligenes
denitrificans (ATCC 15173)
Tyler's crystal violet (1% aqueous solution) or
Gram's crystal violet (1% aqueous solution)
20% (w/v) solution of copper sulfate
(C11SO4 • 5H20)
microscope
immersion oil
lens paper and lens cleaner
clean glass slides
wax pencil
bibulous paper
inoculating loop
Bon Ami
70% ethyl alcohol
India ink (Higgins no. 4465 black or Pelikan
Drawing ink No. 17 black for technical pens)
or SpotTest India ink ampules from Difco
safranin stain
Learning Objectives
Each student should be able to
1. Understand the biochemistry of the capsule stain
2. Perform a capsule stain
3. Distinguish capsular material from the bacterial
cell
63
Harley-Prescott:
Laboratory Exercises in
Microbiology, Fifth Edition
II. Bacterial Morphology
and Staining
11. Capsule Staining
©The McGraw-Hill
Companies. 2002
Figure 11.1 Anthony's Capsule Staining Method.
(a) Drawing of a single bacterium, capsule, and background
material, (b) Klebsiella pneumoniae capsules; light micrograph
(xl,000). Capsules appear as white halos around red backgrounds.
Bacterium
Capsule
(b)
Principles
Many bacteria have a slimy layer surrounding them,
which is usually referred to as a capsule (figure
11.1a). The capsule's composition, as well as its
thickness, varies with individual bacterial species.
Polysaccharides, polypeptides, and glycoproteins
have all been found in capsules. Often, a pathogenic
bacterium with a tliick capsule will be more virulent
than a strain with little or no capsule since the capsule
protects the bacterium against the phagocytic activity
of the host's phagocytic cells. However, one cannot
always determine if a capsule is present by simple
staining procedures, such as using negative staining
and India ink. An unstained area around a bacterial
cell may be due to the separation of the cell from the
surrounding stain upon drying. Two convenient
procedures for determining the presence of a capsule are
Anthony's (E. E. Anthony, Jr., a bacteriologist at the
University of Texas, Austin, in the 1930s) capsule
staining method (figure 11.lb) and the Graham and
Evans (Florence L. Evans, a bacteriologist at the
University of Illinois in the 1930s) procedure.
Anthony's procedure employs two reagents. The
primary stain is crystal violet, which gives the bacterial
cell and its capsular material a dark purple color.
Unlike the cell, the capsule is nonionic and the primary
stain cannot adhere. Copper sulfate is the decolorizing
agent. It removes excess primary stain as well as color
from the capsule. At the same time, the copper sulfate
acts as a counterstain by being absorbed into the
capsule and turning it a light blue or pink. In this
procedure, smears should not be heat-fixed since shrinkage is
likely to occur and create a clear zone around the
bacterium, which can be mistaken for a capsule.
Procedure: Capsule Staining (Anthony's)
1. With a wax pencil, label the left-hand corner of a
clean glass slide with the name of the bacterium
that will be stained.
2. As shown in figure 14.3, aseptically transfer a
loopful of culture with an inoculating loop to the
slide. Allow the slide to air dry. Do not heat-fix!
Heat-fixing can cause the bacterial cells to shrink
and give a false appearance to the capsule.
3. Place the slide on a staining rack. Flood the slide
with crystal violet and let stand for 4 to 7 minutes
(figure 11.2a).
4. Rinse the slide thoroughly with 20% copper
sulfate (figure 11.2b).
5. Blot dry with bibulous paper (figure 11.2c).
6. Examine under oil immersion (a coverslip is not
necessary) and draw the respective bacteria in the
report for exercise 11. Capsules appear as faint
halos around dark cells.
Figure 11.2 Capsule Staining Procedure.
(a) Flood the slide with
crystal violet; let stand
4-7 minutes
(b) Rinse thoroughly with
copper sulfate
(c) Blot dry with bibulous paper
64 Bacterial Morphology and Staining
Harley-Prescott: I II. Bacterial Morphology I 11. Capsule Staining I I ©The McGraw-Hill
Laboratory Exercises In and Staining Companies. 2002
Microbiology, Fifth Edition
Modified Capsule Stain (Graham and Evans)
1. Tlioroughly clean the slide to be used with a
household cleanser (such as Bon Ami) and alcohol.
2. Mix two loopfuls of culture with a small amount
(1 to 2 drops) of India ink at one end of the slide.
3. Spread out the drop using a second slide in the same
way one prepares a thin smear (see figure 6.2).
4. Dry the smear.
5. GENTLY rinse with distilled water so that the
bacteria do not wash off the slide.
6. Stain for 1 minute with Gram's crystal violet.
7. Rinse again with water.
Capsule Staining 65
8. Stain for Vh minutes with safranin stain.
9. Rinse with water and blot dry.
10. If a capsule is present, the pink to red bacteria are
surrounded by a clear zone. The background is dark.
HINTS AND PRECAUTIONS
(1) As with any materials stained with similar or
identical colors, light adjustments under the microscope will
be critical for optimal visualization of capsules. (2) Be
sure to use a very small amount of India ink or the
capsules will not be clearly visible.
Harley-Prescott: II. Bacterial Morphology 11. Capsule Staining
Laboratory Exercises In and Staining
Microbiology, Fifth Edition
Laboratory Report
Lab Section:
Capsule Staining
1. Fill in the table and make drawings of a representative field of each preparation as seen with the oil
immersion lens.
K. pneumoniae A. denitrificans
Magnification X *
Bacterium other than above
Capsule size (in ^jim)
Capsule color
Vegetative cell color
2. Are you satisfied with the results of your capsule stain? If not, how can you improve your results
the next time you do a capsule stain?
©The McGraw-Hill
Companies. 2002
11
Name:
67
©The McGraw-Hill
Companies. 2002
Review Questions
1. What tliree chemical substances have been identified in bacterial capsules?
a.
b.
c.
2. What is the relationship between the presence of capsules and bacterial pathogenicity?
3. What is the dual function of copper sulfate in capsule staining?
4. In staining bacterial capsules, why is heat-fixing omitted?
5. How is the capsule stain used in clinical microbiology?
6. Name several bacteria that have capsules.
7. Of what value is a capsule to a bacterium?
68 Bacterial Morphology and Staining
Harley-Prescott: II. Bacterial Morphology 11. Capsule Staining
Laboratory Exercises In and Staining
Microbiology, Fifth Edition
Harley-Prescott:
Laboratory Exercises in
Microbiology, Fifth Edition
II. Bacterial Morphology
and Staining
12. Flagella Staining:West
and Difco's SpotTest
Methods
©The McGraw-Hill
Companies. 2002
EXERCISE
12
Flagella Staining: West and Difco's SpotTest Methods
SAFETY CONSIDERATIONS
Be careful with the boiling water bath and Bunsen
burner flame. No mouth pipetting. West stain solutions
A and B and Difco's SpotTest Flagella stain are
irritants. Do not breathe vapors or get solutions on your
skin. Always prepare solutions A and B while using an
exhaust hood with the fan on. Also, always use the
hoods when applying heat to the staining solutions.
Discard slides in a container with disinfectant.
Materials per Student
young, 18-hour tryptic soy agar slants of
Alcaligenes faecalis (ATCC 8750,
peritrichously flagellated) and Pseudomonas
fluorescens (ATCC 13525, polarly flagellated)
wax pencil
inoculating loop
acid-cleaned glass slides with frosted ends
clean distilled water
microscope
immersion oil
lens paper and lens cleaner
boiling water bath (250-ml beaker with distilled
water, ring stand, wire gauze pad, and Bunsen
burner or hot plate)
Pasteur pipettes with pipettor
West stain
solution A
solution B
Difco's SpotTest Flagella stain
Learning Objectives
Each student should be able to
1. Understand the biochemical basis of flagella staining
2. Perform a flagella stain
3. Differentiate between two types of flagellar
arrangement
Suggested Reading in Textbook
1. Staining Specific Structures, section 2.3.
2. Flagella and Motility, section 3.6.
3. Flagella Ultrastructure, section 3.6.
4. Flagellar Synthesis, section 3.6.
5. The Mechanism of Flagellar Movement, section
3.6; see also figures 3.30-3.36.
Pronunciation Guide
Alcaligenes faecalis (al-kah-LIJ-en-eez fee-KAL-iss)
Pseudomonas fluorescens (soo-do-MO-nas floor-ES-
sens)
Why Are the Above Bacteria Used
in This Exercise?
After this exercise the student should be able to correctly
stain bacteria to determine the presence of flagella and their
arrangement. The authors have chosen two easily
maintained bacteria that have different flagellar arrangements.
Alcaligenes faecalis (M. L. adj. faecalis, fecal) cells exist
as cocci or coccal rods 0.5 to 2.6 |xm in length, usually
occurring singly. Motility is with 1 to 8 (occasionally up to
12) peritrichous flagella. A. faecalis normally occurs in
water and soil. Pseudomonas fluorescens (M. L. v.,fluo-
resco, fluoresce) cells are rods 2.0 to 2.8 |xm in length and
0.7 to 0.8 |xm in width. They occur singly and in pairs.
Motility is with one to several polar flagella. P. fluorescens
is widely distributed in nature.
69
Harley-Prescott:
Laboratory Exercises in
Microbiology, Fifth Edition
II. Bacterial Morphology
and Staining
12. Flagella Staining:West
and Difco's SpotTest
Methods
©The McGraw-Hill
Companies. 2002
Medical Application
In the clinical laboratory, the presence, number and
arrangement of flagella are useful in identifying bacterial species.
Important pathogens that are motile due to the presence of
flagella include Bordetella pertussis (whooping cough), Listeria
monocytogenes (meningoencephalitis), Proteus vulgaris
(urinary tract infections, bacteremia, pneumonia), Pseudomonas
aeruginosa (skin and wound infections), Salmonella typhi
(typhus or typhoid fever), and Vibrio cholerae (cholera).
Figure 12.1 Arrangement of Flagella on Bacterial Cells.
(a) In monotrichous, polar, a single flagellum is located at one end
of the cell; (b) in lophotrichous, polar, many flagella are grouped at
one end of the cell; (c) in amphitrichous, polar, a single flagellum
is located at both ends of the cell; and (d) in peritrichous, flagella
are located all around the cell.
(a)
(b)
Principles
Bacterial flagella are fine, threadlike organelles of
locomotion. They are slender (about 10 to 30 nm in
diameter) and can be seen directly using only the electron
microscope. In order to observe them with the light
microscope, the thickness of the flagella are increased by
coating them with mordants such as tannic acid and
potassium alum, and staining them with basic fuchsin
(Gray method), pararosaniline (Leifson method), silver
nitrate (West method; named after Marcia West, a
clinical microbiologist), or crystal violet (Difco's method).
Although flagella staining procedures are difficult to
carry out, they often provide information about the
presence and location of flagella, which is of great
value in bacterial identification (figure 12.1).
Difco's SpotTest Flagella stain employs an
alcoholic solution of crystal violet as the primary stain, and
tannic acid and aluminum potassium sulfate as
mordants. As the alcohol evaporates during the staining
procedure, the crystal violet forms a precipitate around
the flagella, thereby increasing their apparent size.
Procedure (West)
1. With a wax pencil, mark the left-hand corner of a
clean glass slide with the name of the bacterium.
2. As shown in figure 14.3, aseptically transfer the
bacterium with an inoculating loop from the
turbid liquid at the bottom of the slant to 3 small
drops of distilled water in the center of a clean
slide that has been carefully wiped off with clean
lens paper. Gently spread the diluted bacterial
suspension over a 3-cm area, using the
inoculating needle (figure 12.2a).
3. Let the slide air dry for 15 minutes (figure 12.2b).
4. Cover the dry smear with solution A (the
mordant) for 4 minutes (figure 12.2c).
5. Rinse thoroughly with distilled water (figure
12.2a1).
6. Place a piece of paper toweling on the smear and
soak it with solution B (the stain). Heat the slide
in a boiling water bath for 5 minutes in an exhaust
hood with the fan on. Add more stain to keep the
slide from drying out (figure 12.2e).
7. Remove the toweling and rinse off excess solution
B with distilled water. Flood the slide with
distilled water and allow it to sit for 1 minute
while more silver nitrate residue floats to the
surface (figure 12.2/).
8. Then, rinse gently with water once more and
carefully shake excess water off the slide (figure
12.2s).
9. Allow the slide to air dry at room temperature
(figure I2.2h).
10. Examine the slide with the oil immersion
objective. The best specimens will probably be
seen at the edge of the smear where bacteria are
less dense (figure 12.3a and b). Record your
results in the report for exercise 12.
70 Bacterial Morphology and Staining
Harley-Prescott:
Laboratory Exercises in
Microbiology, Fifth Edition
II. Bacterial Morphology
and Staining
12. Flagella Staining:West
and Difco's SpotTest
Methods
©The McGraw-Hill
Companies. 2002
Figure 12.2 Flagella Staining Procedure (West).
(a) Place bacteria in
3 drops distilled water
and spread out
(b) Air dry for 15 minutes
Figure 12.3 West Silver-plating Staining. Examples of
several patterns of flagellation as seen with the light microscope,
(a) AlcaUgenes faecalis with peritrichous flagella, West silver-plating
staining, (b) Pseudomonas fluorescens with polar monotrichous
flagella, West silver-plating staining (xl,000).
(c) Cover smear with
mordant for 4 minutes
(d) Rinse thoroughly with
distilled water
Boiling water
bath
(e) Place paper towel over
smear and soak with
stain; heat for 5 minutes
(f) Flood slide with distilled
water and allow to sit
for 1 minute
(a)
(b)
(g) Shake excess water
from slide
(h) Air dry at room temperature
Procedure (Difco)
1. Draw a border around the clear portion of a
frosted microscope slide with a wax pencil.
2. Place a drop of distilled water on the slide,
approximately 1 cm from the frosted edge.
3. Gently touch a colony of the culture being tested
with an inoculating loop and then lightly touch
the drop of water without touching the slide. Do
not mix.
4. Tilt the slide at a slight angle to allow the drop
preparation to flow to the opposite end of the
slide.
5. Let the slide air dry at room temperature. Do not
heat-fix.
6. Flood the slide with the contents of the Difco
SpotTest Flagella stain ampule.
7. Allow the stain to remain on the slide for
approximately 4 minutes. (Note: The staining
time may need to be adjusted from 2 to 8 minutes
depending on the age of the culture, the age of the
stain, the temperature, and the depth of staining
solution over the culture.)
8. Carefully rinse the stain by adding water from a
faucet or wash bottle to the slide while it remains
on the staining rack. Do not tip the slide before
this is done.
Flagella Staining: West and Difco's SpotTest Methods 71
Harley-Prescott: I II. Bacterial Morphology I 12. Flagella Stalnlng:West I I ©The McGraw-Hill
Laboratory Exercises In and Staining and Dlfco's SpotTest Companies. 2002
Microbiology, Fifth Edition Methods
9. After rinsing, gently tilt the slide to allow excess
water to run off and let the slide air dry at room
temperature or place on a slide warmer.
10. Examine the slide microscopically with the oil
immersion objective. Begin examination at
thinner areas of the preparation and move toward
the center. Look for fields that contain several
isolated bacteria, rather than fields that contain
clumps of many bacteria. Bacteria and their
flagella should stain purple.
HINTS AND PRECAUTIONS
(1) Do not vortex the cultures, and be gentle when
making smears to avoid detaching the flagella. (2) New tryp-
tic soy agar slants must be used to prepare cultures so
that there is still liquid at the bottom of the slant. (3)
Perform all steps as gently as possible, rough handling of
bacteria could cause flagella to be broken off and lost.
72 Bacterial Morphology and Staining
Harley-Prescott: II. Bacterial Morphology 12. Flagella Staining:West
Laboratory Exercises in and Staining and Difco's SpotTest
Microbiology, Fifth Edition Methods
©The McGraw-Hill
Companies. 2002
Laboratory Report j Z
Name:
Date: _
Lab Section:
Flagella Staining: West and Difco's SpotTest Methods
1. Make a drawing of a representative microscope field of each preparation and fill in the table.
A. faecalis
P. fluorescens
Magnification
Bacterium other than above
Color of flagella
Color of vegetative cell
Arrangement of flagella (be specific)
Number of flagella
2. Are you satisfied with the results of your flagella stain?.
the next time you do a flagella stain?
If not, how can you improve your results
3. Make sketches that illustrate each of the following flagellar arrangements:
Monotrichous Lophotrichous
Amphitrichous
Peritrichous
73
©The McGraw-Hill
Companies. 2002
Review Questions
1. Why are flagella so difficult to stain?
2. Why did you use a young culture for the flagella stain?
3. Why must the glass slide be free of grease and oil before staining for flagella?
4. Name four types of flagella arrangements.
a.
b.
c.
d.
5. What is a mordant?
6. Compare the usefulness of a flagella stain with that of the hanging drop preparation.
7. What happens to the size of flagella when they are stained?
74 Bacterial Morphology and Staining
Harley-Prescott:
Laboratory Exercises in
Microbiology, Fifth Edition
II. Bacterial Morphology
and Staining
12. Flagella Staining:West
and Difco's SpotTest
Methods
Harley-Prescott:
Laboratory Exercises in
Microbiology, Fifth Edition
III. Basic Laboratory and
Culture Techniques
Introduction
©The McGraw-Hill
Companies. 2002
PART THREE
Basic Laboratory and Culture Techniques
What is education but a process by which a person begins to learn
how to learn?
Peter Alexander Ustinov
(English actor and entertainer, 1921— )
In this part of the manual you will be introduced to the
basic techniques employed in microbiology laboratories
to prepare and sterilize culture media, to isolate bacteria in
pure culture from various types of specimens, and to
subculture bacteria and fungi in the laboratory. You will also learn
how to determine the number of bacteria in a given culture.
Along with Parts One and Two of this manual, Part
Three continues your acquisition of basic microbiological
techniques. A thorough understanding and applicability of
microscopic, slide, and culture techniques are an important
foundation on which the rest of this manual is built.
After completing the exercises in Part Three,
you will be able to (1) demonstrate the proper use
of aseptic techniques. This will meet the American
Society for Microbiology Core Curriculum skill
number 3 (see pp. vi-viii): (a) sterilizing and
maintaining sterility of transfer instruments; (b)
performing aseptic transfers; and (c) obtaining
microbial samples. (2) You will also be able to estimate
the number of microorganisms in a sample using
serial dilution techniques. This will meet the
American Society for Microbiology Core Curriculum
skill number 5 (see pp. vi-viii): (a) correctly choosing
and using pipettes and pipetting devices; (b)
correctly spreading diluted samples for counting; (c)
estimating appropriate dilutions; and (d)
extrapolating plate counts to obtain correct CFU or PFU in
the starting sample.
Alfred Theodore MacConkey (1861-1931).
Alfred MacConkey was an English bacteriologist who
described the first and most famous solid differential medium—
MacConkey's agar.
The first and most famous solid differential medium was
described by MacConkey in 1900 in The Lancet. The medium is
used for the detection of conforms and enteric pathogens based
on their ability to ferment lactose. Tactose-fermenting bacteria
appeal' as red to pink colonies. Tactose nonfermenting bacteria
appeal' as colorless or transparent colonies.
The story of the development of this medium is of
interest. The first formula was for a bile salt litmus medium that
contained glycocholate, lactose, and litmus, and that was to be
incubated at 22°C. A year later MacConkey published a new
formulation of the medium in the Zentralblatt fiir Bakteriolo-
gie. The modified medium contained tauiocholate in place of
glycocholate and was to be incubated at 42°C. Finally, in
1905, MacConkey published a third formula for his medium in
which neutral red was substituted for litmus as an indicator. It
is this last formula that we use today for making MacConkey's
medium, which is as follows:
MacConkey's Agar (pH 7.1)
Bacto peptone
Proteose peptone
Lactose
Bile salts mixture
Sodium Chloride
Agar
Neutral red
Crystal violet
Distilled water
17.0 g
3.0 g
10.0 g
1-5 g
5.0 g
13.5 g
0.03 g
0.001 g
1,000.0 ml
75
Harley-Prescott:
Laboratory Exercises in
Microbiology, Fifth Edition
III. Basic Laboratory and
Culture Techniques
13. Microbiological Culture
Media Preparation and
Sterilization
©The McGraw-Hill
Companies. 2002
EXERCISE
13
Microbiological Culture Media
Preparation and Sterilization
SAFETY CONSIDERATIONS
Several types of heat that can cause severe burns are
used in this experiment. Do not operate the autoclave
without approval from your instructor. Always wear
heat-proof (Zetex) gloves when unloading the
autoclave. Zetex fabric gives all of the protection of
asbestos with none of the health hazards. In like manner,
boiling agar can cause severe burns if spilled on your
hands. Be especially careful with Bunsen burners, hot
plates, and boiling water baths. All are potentially
hazardous and can cause burns. If you are burned, seek
immediate treatment. Do not pipette by mouth.
Materials per Group of Students
24- to 48-hour tryptic soy broth culture of
Escherichia coli (ATCC 11229)
autoclave for the entire class
petri plates
culture tubes
test-tube rack or wire basket
test-tube caps
defined culture medium as in table 13.1
complex culture medium as in table 13.2
2-liter Erlenmeyer flask
10-ml pipettes with pipettor
weighing paper or boats
balance
agar
heat-proof Zetex fabric gloves
water bath set at 48° to 50°C
boiling water bath
aluminum foil
stirring rod or plate with stirring bar
Bunsen burner or hot plate
Difco Manual or BBL Manual
Learning Objectives
Each student should be able to
1. Describe the different types of culture media and
their composition, and give several examples of
what each is used for
2. Describe the various ways culture tubes are capped
3. Describe how to prepare and transfer culture media
4. Prepare defined and undefined media, and prepare
agar plates
5. Describe the concept of sterility
6. Describe how various media, supplies, and
equipment can be sterilized
7. Correctly and safely use the autoclave
Suggested Reading in Textbook
1. Definition of Frequently Used Terms, section 7.1.
2. The Use of Physical Methods in Control, section
7.4; see also figures 7.3-7.5.
3. Filtration, section 7.4.
4. Sterilizing Gases, section 7.5.
5. Culture Media, section 5.7.
6. Synthetic or Defined Media, section 5.7 and table
5.4.
7. Complex Media, section 5.7 and table 5.5.
8. Types of Media, section 5.7; see also table 36.1.
Pronunciation Guide
Escherichia coli (esh-er-I-ke-a KOH-lee)
Why Is the Above Bacterium Used
in This Exercise?
One of the major objectives of this exercise is to prepare
defined and complex media. After the media have been
prepared, they can be inoculated with Escherichia coli. E. coli
is facultatively anaerobic and chemoorganoheterotrophic,
having both a respiratory and a fermentative type of
metabolism. Glucose and other carbohydrates are catabolized
with the formation of acid and gas.
76
Harley-Prescott:
Laboratory Exercises in
Microbiology, Fifth Edition
III. Basic Laboratory and
Culture Techniques
13. Microbiological Culture
Media Preparation and
Sterilization
©The McGraw-Hill
Companies. 2002
Figure 13.1 Culture Media. Different forms of culture media with the proper volume in each.
(a) Broth (b) Agar slant (c) Agar slant (d) Agar
tube (front view) (side view) deep
tube
(e) Agar plate
(petri plate, 15-20 ml)
Principles
Microbiological Culture Media
The survival and growth of microorganisms depend
on available nutrients and a favorable growth
environment. In the laboratory, the nutrient preparations that
are used for culturing microorganisms are called
media (singular, medium). Three physical forms are
used: liquid, or broth, media; semisolid media; and
solid media. The major difference among these media
is that solid and semisolid media contain a solidifying
agent (usually agar), whereas a liquid medium does
not. Liquid media, such as nutrient broth, tryptic soy
broth, or brain-heart infusion broth (figure 13.1a), can
be used to propagate large numbers of
microorganisms in fermentation studies and for various
biochemical tests. Semisolid media can also be used in
fermentation studies, in determining bacterial motility,
and in promoting anaerobic growth. Solid media, such
as nutrient agar or blood agar, are used (1) for the
surface growth of microorganisms in order to observe
colony appearance, (2) for pure culture isolations,
(3) for storage of cultures, and (4) to observe specific
biochemical reactions.
While in the liquefied state, solid media can be
poured into either a test tube or petri plate (dish). If the
medium in the test tube is allowed to harden in a slanted
position, the tube is designated an agar slant (figure
13.lb, c); if the tube is allowed to harden in an upright
position, the tube is designated an agar deep tube
(figure 13. Id); and if the agar is poured into a petri plate, the
plate is designated an agar plate (figure 13.\e). Agar
pours (the same as Agar deeps) containing about 15 to
16 ml of media are often used to prepare agar plates.
Microorganisms may be cultured using two
different types of media. Chemically defined, or synthetic,
media are composed of known amounts of pure
Table 13.1
Ingredient
A Chemically Defined Medium
Dipotassium phosphate, K2HP04
Potassium phosphate, monobasic, KH2P04
Hydrated magnesium sulfate, MgS04.7H20
Ammonium sulfate, (NH4)2S04
Glucose
Distilled water
Quantity
Vg
2g
0.2 g
lg
5g
1 liter
Table 13.2
Ingredient
Casein peptone
Soybean peptone
NaCl
Dipotassium phosphate,
Glucose
Distilled water
A Complex (Undefined) Medium—
Tryptic Soy Broth
K2HP04
Quantity
IV g
3g
5g
2.5 g
2.5 g
1 liter
chemicals (table 13.1). Such media are often used in
culturing autotrophic microorganisms such as algae or
nonfastidious heterotrophs. In routine bacteriology
laboratory exercises, complex, or nonsynthetic,
media are employed (table 13.2). These are composed
of complex materials that are rich in vitamins and
nutrients. Three of the most commonly used components
are beef extract, yeast extract, and peptones.
Commercial sources of media and the composition of culture
media used in this manual are given in appendix J.
The preparation of media from commercial
dehydrated products is simple and straightforward. Each
bottle of dehydrated medium has instructions for
preparation on its label. For example, to prepare a liter
of tryptic soy broth, suspend 30 g of the dehydrated
Microbiological Culture Media Preparation and Sterilization 77
Harley-Prescott: I III. Basic Laboratory and I 13. Microbiological Culture I I ©The McGraw-Hill
Laboratory Exercises In Culture Techniques Media Preparation and Companies. 2002
Microbiology, Fifth Edition Sterilization
medium in 1,000 ml of distilled water. Mix
thoroughly in a 2-liter Erlenmeyer flask (always use a
flask that holds twice the volume of media you are
preparing). Dispense and sterilize for 15 to 20 minutes
at 121°C (15 lbs pressure). As noted, the amount of
powder for 1,000 ml of water will be indicated.
If the medium lacks agar, the powder will usually
dissolve without heating. If it contains agar, you must
heat the medium until it starts to simmer or boil in order
to completely dissolve the agar. Specific heating
instructions are given for each type of medium. For example,
to prepare a liter of Vogel-Johnson agar, suspend 61 g of
the dehydrated medium in a liter of distilled water. Mix
until a uniform suspension is obtained. Heat with
constant agitation and simmer for 1 minute. Dispense in
100-ml amounts into 250-ml flasks and sterilize by au-
toclaving at 121 °C for 20 minutes.
Most of the exercises you will be doing in this
manual will involve the use of sterile media in culture
tubes. Normally, 18 x 150 mm, 16 x 125 mm, or 13 x
100 mm bacteriologic culture tubes will be used.
These tubes must be capped in order to maintain
media sterility. This can be accomplished by using
cotton plugs, plastic foam plugs, or plastic or metal
caps (e.g., Morton closures or Bacti Capalls). All of
these caps keep cultures free from contamination
while allowing air into the culture tube, and at the
same time, minimize evaporation. It is sometimes
desirable to use screw-cap culture tubes. This is
especially true when the culture, such as in the case of
slants, may be sealed and stored for long periods.
Culture broth can be dispensed with a pipetting
machine, an automatic syringe, or a regular pipette.
One can also pipette the proper volume (figure 13.1)
of broth or agar into one culture tube and then pour
approximately the same volume of media (using the
initial tube as a guide) into a number of other tubes
lined up in the same test-tube rack. This approach is
fast, convenient, and relatively accurate.
After sterilization of slant tubes, the tubes are
removed from the autoclave while the agar is still
melted and carefully laid on a table with a piece of
wood, vacuum tubing, or metal elevating the capped
ends. Some test-tube racks are also specifically set up
for this. The tubes are then allowed to remain
undisturbed until the agar has cooled and hardened. Slants
should be stored in a vertical position.
Agar deep tubes can be stored after sterilization
for use in preparing petri plates when needed. Some
agar deeps may be stored at room temperature for
several days before use. If longer periods of storage are
required, they should be placed in the refrigerator in
Figure 13.2 Pouring Agar Plates.
(a) Boiling water bath (b) 48° to 50° C water bath
(c) Wipe tube with paper towel (d) Flame the top of the tube
after removing cap
(e) Pour the agar into the petri (f) After cooling, store in an
dish bottom inverted position
order to prevent drying of the agar. When petri plates
are needed, the agar deeps are melted either in a
boiling water bath (figure 13.2a) or by bringing them to
121°C in an autoclave for 30 to 60 seconds and then
releasing the steam under slow exhaust. After the agar
has melted, the pours are transferred to a 48° to 50°C
water bath and kept there for at least 5 to 10 minutes
before use (figure 13.2b). The agar deeps should be
cooled to about 50°C before they are used to
minimize the amount of steam condensation on the petri
plate lids after the agar has been poured. Agar does
not solidify until its temperature drops to about 42°C.
When the deeps have reached 50°C, one is taken from
the bath and the outside is dried with a paper towel
(figure 13.2c). Its cap is removed and the top is
briefly flamed using a Bunsen burner (figure 13.2d).
The agar is immediately poured into a sterile, dry
78 Basic Laboratory and Culture Techniques
Harley-Prescott:
Laboratory Exercises in
Microbiology, Fifth Edition
III. Basic Laboratory and
Culture Techniques
13. Microbiological Culture
Media Preparation and
Sterilization
©The McGraw-Hill
Companies. 2002
Figure 13.3 Filter Apparatuses Used in Sterilizing Small Volumes of Media.
Needle
<Di
OitOO
Fluid travel ■
Syringe
Funnel
Filter
Filter holder
base and
support
Receiver
flask
petri plate while holding the top carefully above the
petri plate bottom in order to avoid contamination
(figure 13.2e). Replace the top, allow the agar to cool
and harden, and store the petri plates in an inverted
position (figure 13.2/). When storing petri plates, do
not stack them more than three high, or use a special
petri plate storage holder.
Sterilization of Media and Equipment
Sterilization is the process of rendering a medium or
material free of all forms of life. There are three basic
ways in which sterilization of media and supplies can
be achieved. The most useful approach is autoclav-
ing, in which items are sterilized by exposure to
steam at 121°C and 15 lbs of pressure for 15 minutes
or longer, depending on the nature of the item. Under
these conditions, microorganisms, even endospores,
will not survive longer than about 12 to 13 minutes.
This method is rapid and dependable. Modern
autoclaves are designed to ensure that all of the air has
been expelled and only steam is present in the
autoclave chamber. They are carefully temperature
controlled as well. Almost all media and anything else
that will resist 121°C temperatures and steam can be
sterilized in this way.
Often, dry glassware such as pipettes and petri
plates must be sterilized. Steam tends to etch
glassware and also leaves it damp. Therefore, such items
are generally dry-heat sterilized. The glassware is
placed in an electric oven set to operate between 160°
and 170°C. Since dry heat is not as effective as wet
heat, the glassware must be kept at this temperature
for about 2 hours or longer. The oven temperature
must not rise above 180°C or any cotton or paper
present will char.
Sometimes media must be made from
components that will not withstand heating at 121°C. Such a
medium can be sterilized by passing it through a
bacteriological filter, which physically removes bacteria
and larger microorganisms from the solution and
thereby sterilizes them without heat. Scintered glass
filters with ultrafine, fritted disks (0.9 to 1.4 |xm pore
size) and Seitz asbestos-pad filter funnels (3 mm thick
with 0.1 |xm pores) are both quite effective in
sterilizing solutions. However, if pore sizes greater than 0.22
|xm are used, there is an exceedingly high chance that
the filtrate will not be sterile. By far, the most useful
and popular approach is the use of specially prepared
sterile, cellulose- or polycarbonate-based membranes
of the appropriate pore size. Generally, membranes
with 0.22 |xm pores are employed in sterilization. A
large number of different devices are commercially
available for membrane sterilization of both large and
small volumes. For example, one can use a filter flask
with a vacuum or syringe with positive pressure to
force liquid through a special membrane filter holder
(figure 13.3).
Two other sterilization techniques use ultraviolet
radiation and ethylene oxide. Ultraviolet (UV)
radiation around 260 nm is quite lethal to many
microorganisms but does not penetrate glass, dirt films, water,
and other substances very effectively. Because of this
disadvantage, UV is used as a sterilizing agent only in
a few particular situations. For example, UV lamps
are sometimes placed on the ceilings of rooms or in
biological safety cabinets to sterilize the air and any
exposed surfaces.
Many heat-sensitive items such as disposable
plastic petri dishes and syringes, sutures, and catlieters
are now sterilized with ethylene oxide gas. Ethylene
oxide is both microbicidal and sporicidal and kills by
covalently attaching to cell proteins. It is a
particularly effective sterilizing agent because it rapidly
penetrates packing materials, even plastic wraps.
Microbiological Culture Media Preparation and Sterilization 79
Harley-Prescott: I III. Basic Laboratory and I 13. Microbiological Culture I I ©The McGraw-Hill
Laboratory Exercises In Culture Techniques Media Preparation and Companies. 2002
Microbiology, Fifth Edition Sterilization
Procedure
Preparing a Chemically Defined Medium
1. Prepare 500 ml of glucose-mineral salts broth for
the culture of E. coli using the recipe outlined in
table 13.1. To a 1-liter Erlenmeyer flask add 375
ml of distilled water. Weigh out and add each
ingredient to the water in the order listed and stir
after each addition until the ingredient is
completely dissolved. Remember to halve the
quantity of each ingredient. Add the remaining
125 ml of water to wash the inside of the flask.
2. Adjust the pH to 7.2 to 7.4 by adding just enough
HC1 or NaOH dropwise (see appendix E).
3. Dispense 3 to 5 ml of the glucose-mineral salts
broth into each of 10 test tubes using a 10-ml
pipette and then loosely cap the tubes. Other
students can use the remaining 450 ml of broth
for their tubes. Place your tubes in a test-tube rack
or basket. Place the basket or rack in the
autoclave.
Preparing a Complex Medium
1. Prepare 500 ml of tryptic soy broth according to
the recipe outlined in table 13.2.
2. Add 375 ml of distilled water to a 1-liter
Erlenmeyer flask and add the ingredients
individually (use half the amounts given); mix
after each addition.
3. Add the remaining 125 ml of water to rinse the
sides of the flask.
4. Adjust the pH to 7.3 by adding just enough HC1
or NaOH dropwise (see appendix E).
5. Dispense 3 to 5 ml of the broth into each of 10
tubes and loosely cap them. Place the tubes in a
test-tube rack or basket, and place in the
autoclave.
6. To the remaining broth (450 ml), add 7.2 g of agar
to give an agar concentration of approximately
1.6%. Heat the contents of the flask and gradually
bring to a boil. Heat the agar until it is completely
melted. Cover with aluminum foil and place in
the autoclave. After autoclaving, cool the flask of
sterile agar in a 48° to 50°C water bath. Line up
the desired number of sterile petri plates on the
bench top. Remove the aluminum foil cap from
the flask and briefly flame the flask's neck. Lift
the top of each plate, pour about 15 ml of agar,
and quickly replace the top (the agar should be
approximately 3 to 5 mm deep in the plate). Pour
all plates without stopping.
Alternatively, after dissolving the agar medium,
dispense 15-ml portions into 18 x 150 mm tubes; cap
and autoclave the tubes. Cool them in a 48° to 50°C
water bath and pour the agar as shown in figure 13.2.
Procedure for Autoclaving
1. Your instructor will demonstrate the use of the
autoclave.
2. Load the autoclave with the freshly prepared
culture media.
3. Close and lock the autoclave door.
4. Set the autoclave time for 15 minutes or longer
and select a slow rate of exhaust.
5. Make certain that the autoclave temperature is set
to 121°C.
6. Start the autoclave by pushing the start button or
twisting the knob to the start position.
7. When the period of sterilization is completed and
the pressure in the chamber reads 0, carefully
open the door and remove the containers, using
heat-proof gloves.
Preparing Agar Plates
1. As outlined previously and in figure \3.2a-f, use
some of the sterilized tryptic soy agar to prepare
agar plates.
2. When the plates are cool (agar solidified), invert
them to prevent condensing moisture from
accumulating on the agar surfaces.
3. All plates and tubes should be incubated for at
least 24 hours to ensure sterility before you use
them.
HINTS AND PRECAUTIONS
(1) Don't overload the autoclave chamber. Provide
ample space between baskets of media to allow
circulation of steam. (2) You should bring media to a boil and
then, using heat-proof gloves, quickly remove the media
from the Bunsen burner or hot plate to prevent boiling
over. Do not shake or swirl the flask as you remove it
from the heat because such shaking may cause the media
to boil over. (3) Before opening the door to the
autoclave, you should always wear heat-proof gloves, stand
at arm's length, and slowly open the door. This will
prevent two problems from occurring: (a) the trapped steam
will dissipate toward the ceiling in a controlled fashion
without burning the skin, and (b) the media will not boil
out of the stoppered containers because of a too rapid
change in internal pressure in the flask.
80 Basic Laboratory and Culture Techniques
Harley-Prescott: I III. Basic Laboratory and I 13. Microbiological Culture I I ©The McGraw-Hill
Laboratory Exercises In Culture Techniques Media Preparation and Companies. 2002
Microbiology, Fifth Edition Sterilization
Laboratory Report
Lab Section:
Microbiological Culture Media Preparation and Sterilization
1. After at least 24 hours of incubation, do your prepared plates and broths appear to be sterile? Explain your
answer.
2. List the steps you would go tlirough to make tryptic soy agar slants.
a.
b.
c.
d.
e.
f.
3. List the steps you would go tlirough to make Vogel-Johnson agar plates (refer to the Difco Manual or the BBL
Manual).
a.
b.
c.
d.
e.
f.
4. Provide the requested information using a Difco Manual or BBL Manual.
a. Quantity of starch in Mueller-Hinton agar
b. Quantity of lactose in Levine eosin methylene blue agar
c. Percent of sodium chloride in mannitol salt agar
d. Percent of agar in MacConkey agar
e. Quantity of beef extract in nutrient broth
13
Name:
81
Harley-Prescott: III. Basic Laboratory and 13. Microbiological Culture
Laboratory Exercises In Culture Techniques Media Preparation and
Microbiology, Fifth Edition Sterilization
5. Using a Difco Manual or BBL Manual, find the following:
a. The purpose of Endo agar
b. The way in which bismuth sulfite agar selects for Salmonella and Shigella species
c. The use of Sabouraud dextrose agar and the role of pH in this selectivity
d. The roles of thioglycollate and methylene blue in thioglycollate medium
e. The function of autoclaving in the preparation of Salmonella-Shigella agar
Review Questions
1. What are the tliree main types (in terms of their physical forms) of microbiological culture media?
2. Define culture medium, defined or synthetic medium, and complex or nonsynthetic medium.
3. Why are culture media sterilized before use?
4. Describe tliree ways for sterilizing culture media and supplies.
a.
b.
c.
5. Why are petri plates inverted after they cool?
6. Why is culture medium cooled to about 48° to 50°C before it is poured into petri plates?
7. What is a buffer? What is the buffer system used in this exercise?
8. What is the source of carbon in the chemically defined medium in table 13.1? The source of nitrogen?
©The McGraw-Hill
Companies. 2002
82 Basic Laboratory and Culture Techniques
Harley-Prescott:
Laboratory Exercises in
Microbiology, Fifth Edition
III. Basic Laboratory and
Culture Techniques
14. Culture Transfer Instru.,
Techniques, & Isolat. &
Maint. of Pure Cultures
©The McGraw-Hill
Companies. 2002
EXERCISE
14
Culture Transfer Instruments, Techniques, and Isolation
and Maintenance of Pure Cultures
SAFETY CONSIDERATIONS
To fill a pipette, always use a bulb or other mechanical
device. Never use your mouth to pipette. Never lay a
pipette on the bench top; use a pipette rack. If the pipette
is contaminated, immediately place it in the proper
container. Always carry the pipette can (or bag) to your
work area before removing a pipette. Do not carry sterile
pipettes through the lab. Be careful of the Bunsen burner
flames and red-hot inoculating loops and needles.
Materials per Student
vortex mixer (if available)
inoculating loop
inoculating needle
Bunsen burner
blow-out pipette with pipettor
to-deliver pipette
24-hour tryptic soy broth and tryptic soy agar
slant cultures of either Serratia marcescens,
pigmented (ATCC el3880) or Micrococcus
roseus (ATCC 186) or streak-plate cultures
from exercise 16
tryptic soy broth tubes
tryptic soy agar slants
tryptic soy agar deeps
wax pencil
Learning Objectives
Each student should be able to
1. Correctly use a blow-out pipette
2. Correctly use a to-deliver pipette
3. Correctly use an inoculating loop and needle
4. Use aseptic technique to remove and transfer
bacteria for subculturing
5. Understand the reasoning behind pure culture
preparations
6. Prepare a stock culture using the isolates from
exercise 16
7. Describe how bacterial cultures can be maintained
Suggested Reading in Textbook
1. Box 5.1.
Pronunciation Guide
Azotobacter (ah-ZO-to-bak-ter)
Bacillus (bah-SIL-lus)
Leuconostoc (loo-ko-NOS-tok)
Micrococcus (mi-kro-KOK-us)
Proteus (PRO-tee-us)
Pseudomonas aeruginosa (soo-do-MO-nas a-ruh-jin-
OH-sah)
Serratia marcescens (se-RA-she-ah mar-SES-sens)
Streptococcus (strep-to-KOK-us)
Why Is the Above Bacterium Used
in This Exercise?
Serratia marcescens (L. marcescens, fading away) is found
in water, soil, food, and is widely distributed in nature. It is
easy to maintain in the laboratory, facultatively anaerobic,
chemoorganotrophic, and has both a respiratory and a
fermentative type of metabolism. It grows very quickly in
tryptic soy broth or agar and often produces the red pigment
prodigiosin when grown between 20° and 35°C.
Principles for Culture Transfer
Instruments and Techniques
A pipette is an instrument often used to transfer
aliquots of culture, to prepare serial dilutions of
microorganisms, and to dispense chemical reagents. Two
types of measuring pipettes are frequently used: the
blow-out pipette (also called a serological pipette)
and the to-deliver pipette (Mohr measuring pipette,
named after Francis Mohr, American pharmaceutical
chemist, nineteenth century) (figure \A.\a,b). With the
blow-out pipette, the final few drops of liquid must be
emptied in order to deliver the correct volume. With
the to-deliver pipette, after the proper amount of liquid
83
Harley-Prescott:
Laboratory Exercises in
Microbiology, Fifth Edition
III. Basic Laboratory and
Culture Techniques
14. Culture Transfer Instru.,
Techniques, & Isolat. &
Maint. of Pure Cultures
©The McGraw-Hill
Companies. 2002
Figure 14.1 Pipetting, (a) A blow-out (serological) pipette, (b) A to-deliver or Mohr pipette, (c) A plastic pump. The pump is attached to the
pipette and the wheel turned to move fluid either into or out of the pipette, (d) A pipette bulb. While pressing the A valve, squeeze the bulb, B,
and it will collapse. To draw fluid into the pipette, press the S valve; to release fluid, press the E valve, (e) Electronically powered pipetting devise
for dispensing 1 to 150 ml volumes. Just push buttons to fill and empty pipettes, (f) A safety bulb pipette filler. This rubber bulb with conical
silicone attachment fits small pipettes through the largest volumetrics. Just squeeze the bulb and touch to pipette to form a seal Let suction draw
fluid, then lift bulb away and control the fluid level with index finger, (g) The volume in a pipette is read at the lowest level of the meniscus.
E. from Kleyn, Bickwell, Gilstrap Microbiology Experiments, 2nd ed. WCB McGraw-Hill. 1999. Fig. 6.2, page 54.
- Cotton-
Double-etched ring on
mouthpiece (blow out)
Identification
and graduations
1-0.1 ml major divisions
1-0.01 ml each minor division
— Final few drops
must be blown out
to deliver indicated
volume
(b)
No double-
etched ring
Knurled
wheel
Final few
drops remain
(g)
has been delivered, liquid will remain in the tip of the
pipette and should not be eliminated.
To fill a pipette, use a bulb or other mechanical
device (figure I4.lc,d,e,f). DO NOT USE YOUR
MOUTH. Draw the desired amount of fluid into the
pipette. The volume is read at the bottom of the
meniscus (figure 14.Ig).
Often the mouth end of a pipette is carefully
plugged with a small piece of cotton before
sterilization. This prevents cross-contamination of the bulb or
mechanical device of the pipette.
Contamination problems are avoided by storing
sterile pipettes in a pipette can. Clean, sterile pipettes
are placed tip first in the pipette can. The bottom of
the can should contain a wad of paper or cotton to
protect the pipette tips from breakage. The top of the
can is then put on. If the top of the can sticks while it
is being put on or taken off, a twisting motion will
often unstick or free it. After the pipettes have been
loaded into the cans, they can be autoclaved and
dried by setting the autoclave on the "fast exhaust
and dry" cycle. Pipettes can also be sterilized in a
dry-heat oven.
To correctly use the pipette, hold the pipette can
in a horizontal position and carefully remove the top
with a twisting motion. The top should always be
handled in such a way that its open end is pointing down.
Remove the pipette. After removal, replace the top of
the can while keeping the can horizontal at all times.
Do not put the pipette down before it is used or it can
no longer be considered sterile. After a pipette has
been used, it should immediately be placed tip down
in a container of a disinfectant such as 3 to 5% Lysol
and completely immersed.
Inoculating needles and loops (figure I4.2a,b) are
used to aseptically transfer microorganisms from broth,
slant, or agar cultures to other media. Both may consist
of handles, a shaft, and a turret, which holds a nickel-
chromium or platinum wire. If the wire is straight, it is
an inoculating needle; if a loop is present, it is an
inoculating loop. Before using either, the end of the wire must
be sterilized by passing it slowly through the tip of the
84 Basic Laboratory and Culture Techniques
Harley-Prescott: I III. Basic Laboratory and I 14. Culture Transfer Instru., I I ©The McGraw-Hill
Laboratory Exercises In Culture Techniques Techniques, & Isolat. & Companies. 2002
Microbiology, Fifth Edition Malnt. of Pure Cultures
Figure 14.2 Microbiological Transfer Instruments.
(a) Inoculating needle, and (b) inoculating loop.
Handle
Shaft.
Needle
Loop O
(a) (b)
flame from a Bunsen burner or into a Bacti-Cinerator
(see figure 14.4). When done correctly, all parts of the
wire will turn red with heat. The needle or loop should
then be used before it becomes contaminated. After you
have finished using an inoculating loop or needle, it
should be thoroughly flame-sterilized.
Microorganisms are transferred from one culture
medium to another by subculturing, using specific
procedures and aseptic technique. (Asepsis means
free from sepsis [a toxic condition resulting from the
presence of microorganisms.] This aseptic technique is
of such importance that it will be used in most of the
exercises in this manual. Since microorganisms are
always present in the laboratory, if aseptic technique is
not followed, there is a good possibility that external
contamination will result and will interfere with the
results. Proper aseptic technique also protects the
laboratory worker from contamination with the culture.
Principles for Isolation of Pure
Cultures and Their Maintenance
Once discrete, well-separated colonies develop on the
surface of the streak plate, selected ones may be
picked up with an inoculating needle and transferred
to separate culture tubes, such as tryptic soy agar
slants (the type of agar will depend on the
microorganism). Where possible, bacteria from the center of a
colony are transferred, because the center is less likely
to be contaminated than the edges. Each slant now
represents the growth of a single species of
microorganism and is called a pure or stock culture.
One of the more important problems in a
microbiology laboratory is the maintenance of pure stock
cultures over a long period. Ideally, one should employ a
technique that minimizes the need for subculturing
the microorganism. This is achieved by storing the
microorganism in a state of dormancy either by
refrigeration or desiccation.
Short-term maintenance (generally between one
to three months) of aerobic bacteria can often be
achieved by storing slant cultures in the refrigerator at
4° to 10°C. The use of screw-cap tubes for these
slants will minimize desiccation during storage.
One way in which many cultures may be
maintained for relatively long periods is by sealing them
with sterile mineral oil in order to prevent moisture
loss. The white mineral oil used can be sterilized by
heating at 110°C for 1 hour in a drying oven. After an
agar slant culture has grown, the slant surface is asepti-
cally covered with the sterile oil. The mineral oil
surface should be about % inch above the top of the slant.
The oil-covered slant is then stored at the normal
storage temperature. A number of genera may be stored
under oil (e.g., Bacillus, most Enterobacteriaceae,
some species of Micrococcus, Proteus, Pseudomonas,
and Streptococcus). There are genera that may not be
stored successfully under oil (e.g., Azotobacter and
Leuconostoc). Table 14.1 summarizes maintenance
conditions for a few representative bacteria.
In many cases, long-term maintenance of cultures
does not even require mineral oil. E. coli and many
other members of the family Enterobacteriaceae,
Pseudomonas aeruginosa, staphylococci, and entero-
cocci can often be successfully stored for years at room
temperature with the following procedure. Stab
inoculate screw-cap deeps containing either half-strength
nutrient agar or 0.7% agar in distilled water. Incubate
overnight at optimal temperature. Finally, screw down
the caps tightly and seal the tubes with tape or paraffin.
Store the cultures in a safe place at room temperature.
The best way to preserve many stock cultures for
long periods is through lyophilization (freeze-drying).
This eliminates the need for periodic transfers and
reduces the chance of mutations occurring in the stock
culture. In lyophilization, the bacterial culture is
suspended in a sterile solution of some protective medium
such as milk, serum, or 3% lactose. Small amounts of
the thick suspension are transferred to vials and then
quickly frozen in a dry-ice/alcohol mixture. The frozen
suspension is finally dried under vacuum while still
frozen, and the vial sealed. These sealed, desiccated
cultures may often be stored for years. Strict anaerobes and
Culture Transfer Instruments, Techniques, and Isolation of Pure Cultures and Their Maintenance 85
Harley-Prescott:
Laboratory Exercises in
Microbiology, Fifth Edition
III. Basic Laboratory and
Culture Techniques
14. Culture Transfer Instru.,
Techniques, & Isolat. &
Maint. of Pure Cultures
©The McGraw-Hill
Companies. 2002
Table 14.1
Bacterium
Aerobacter
Alcaligenes
Bacillus
Clostridium
Escherichia
Lactobacillus
Leuconostoc
Neisseria (saprophytic)
Proteus
Pseudomonas
Salmonella
Serratia
Staphylococcus
Streptococcus
Maintenance of Bacteria
Maintenance Media*
1,2
1,2
1,2
3,4
1,2
4
4
2,5
1,2
1,2
1,2
1,2
1,2,4,5
3,4,5
Storage Temperature (°C)
4-10
4-10
4-10
25
4-10
25
25
25
4-10
4-10
4-10
4-10
4-10
25
Storage Time (Months)
2
3
12
12
3
1
1
1
3
3
3
3
3
1-3
*Maintenance media employed: (1) nutrient agar, (2) tryptic soy agar, (3) cooked meat medium, (4) tliioglycollate medium with CaCC>3, and (5) CTA medium (BBL)
some facultative anaerobes will be injured by exposure
to O2. They can often be maintained as agar stab
cultures. In this procedure, one allows a tube of the desired
agar to solidify in an upright position and then inoculates
it by thrusting an inoculation needle coated with bacteria
into the center of the agar. The anaerobes will grow deep
within the agar in the anaerobic environment it provides.
After suitable growth, the stab may be refrigerated.
Anaerobes can also be maintained in tliioglycollate broth
or cooked meat medium as described in exercise 20.
Commercial sources of cultures and more
information on stock culture maintenance are given in
appendix J.
Procedure for Culture Transfer
Instruments and Techniques
Pipetting
1. Proper pipetting using both to-deliver and
blowout pipettes will be demonstrated in the laboratory
by the instructor. After the demonstration, practice
using both pipettes with some distilled water and
the bulbs or mechanical devices provided.
Aseptic Technique
1. Using a wax pencil, label the tube or plate to be
inoculated with the date, your name, and the name
of the test microorganism (figure 14.3a).
2. Gently mix the primary culture tube in order to
put the bacteria into a uniform suspension (figure
14.3b). The tube can be tapped to create a vortex
that will suspend the microorganisms, or if a
vortex mixer is available, it can be used.
3. Place the stock culture tube and the tube to be
inoculated in the palm of one hand and secure with
the thumb. The tubes are then separated to form a V
in the hand (figure 14.3c). They should be held at an
angle so that the open ends are not vertical and
directly exposed to airborne laboratory contaminants.
4. Using the other hand, flame the inoculating loop
or needle over a Bunsen burner until the wire
becomes red-hot (figure 14.3d) or in a
Bacti-Cinerator (see figure 14.4).
5. Using the same hand that is holding the inoculating
loop, remove the caps from the two tubes, hold
them between your fingers, and briefly flame the
necks of the tubes over a Bunsen burner (figure
14.3e) by passing them through the flame.
However, DO NOT ALLOW THE TUBES TO
BECOME RED-HOT.
6. Cool the hot loop in the broth culture until it stops
"hissing." With the sterile inoculating loop, transfer
1 drop of culture from the stock culture tube into
the new broth tube. At this point, one could also
transfer to a glass slide, streak the surface of a slant,
or streak the bacteria onto the surface of a petri
plate (figure 14.3/). When picking up bacteria from
a slant, cool the hot loop or needle by holding it
against the top of the slant until it stops "hissing."
7. Reflame the neck of the tubes (figure 14.3g).
8. Recap the tubes (figure 14.3/z).
9. Reflame or sterilize the loop or needle
(figure 14.3/).
Using aseptic technique, perform the following
transfers:
a. With the inoculating loop, transfer the S.
marcescens tryptic soy broth culture to a
tryptic soy agar slant. Also, inoculate a
tryptic soy broth tube with S. marcescens,
using the inoculating loop.
86 Basic Laboratory and Culture Techniques
Harley-Prescott:
Laboratory Exercises in
Microbiology, Fifth Edition
III. Basic Laboratory and
Culture Techniques
14. Culture Transfer Instru.,
Techniques, & Isolat. &
Maint. of Pure Cultures
©The McGraw-Hill
Companies. 2002
Figure 14.3 Aseptic Technique for Bacterial Removal and Subculturing.
e
*•
(a) With a wax
pencil, label
the medium
to be inoculated
m
(b) Shake the
primary culture
tube to suspend
the bacteria
y
r^ri
(c) Place both
tubes in the
palm of one
hand to form a V
(d) Flame the inoculating
loop or needle along
full length
(f) Cool the loop
or needle
and pick up
bacteria
Streak the
surface of
a slant
Place the
bacteria
on slide
Streak the
bacteria
on petri plate
(g) Reflamethe
neck of the
tubes
tubes
(e) Remove the caps
from the tubes
and flame the
necks of the tubes.
Do not place the
caps on the lab
bench
(i) Reflame the
loop or needle
b. With the inoculating needle, transfer the S.
marcescens to a tryptic soy agar deep tube.
This is done by plunging the inoculating
needle of S. marcescens into the tube
without touching the walls of the tube.
Penetrate the medium to % of its depth. The
inoculating needle is then withdrawn from
the tube (figure 14.5a-c).
c. Using the inoculating loop, make a slant-to-
slant transfer. This is done by gently streaking
the surface of the slant in the form of a
serpentine (wiggly or S-shaped) line (figure
\A.5d). If there is liquid at the base of the
slant, the tube may be tilted after inoculation
so that the liquid runs over the slant surface.
This will moisten the surface and spread out
the bacteria.
d. Place the tubes in a test-tube rack or a clean
vegetable can and incubate at 35°C for 24 to
Figure 14.4 A Bacti-Cinerator Sterilizer. This oven sterilizes
needles, loops, and culture tube mouths in 5 to 7 seconds at
optimum sterilizing temperature of 871°C (1600°F). This oven
also eliminates microorganism spattering associated with flame
sterilization. It consists of a ceramic funnel tube enclosed in a
stainless-steel perforated guard and casting support stand.
Culture Transfer Instruments, Techniques, and Isolation of Pure Cultures and Their Maintenance 87
Harley-Prescott:
Laboratory Exercises in
Microbiology, Fifth Edition
III. Basic Laboratory and
Culture Techniques
14. Culture Transfer Instru.,
Techniques, & Isolat. &
Maint. of Pure Cultures
©The McGraw-Hill
Companies. 2002
48 hours. Afterwards, examine all of the
tubes for the presence of bacterial growth.
Growth is indicated by turbidity (cloudiness)
in the broth culture, and the appearance of
an orange-to-red growth on the slant culture
and along the line of inoculation in the agar
deep tube. Also note if any contamination is
present. This is indicated by growth that is
not red to orange in color. Record your
results in the report for exercise 14.
Procedure for Isolation of Pure
Cultures and Their Maintenance
1. With a wax pencil, label the tryptic soy agar slants
with the names of the respective bacteria. Do the
same for the broth tubes. Add your name and date.
2. Using aseptic technique, select a well-isolated
colony for each of the three bacteria and pick
off as much of the center of the colony as
possible with an inoculating loop. It may be
necessary to obtain material from more than
one colony. Prepare a slant culture and a tryptic
soy broth tube for each of the bacteria. If
screw-cap tubes are used, they must be
loosened slightly before incubation to keep the
slant aerobic.
3. After incubating 24 to 48 hours, you should have
three pure slant and three pure broth stock cultures.
4. Observe the broth cultures (figure 14.6) while
taking care not to agitate them. Record your
observations in the report for exercise 14.
5. Place the pure cultures in the refrigerator for later
use.
Figure 14.5 Transferring Techniques, {a)—(c) Stab technique
for transferring bacteria. Notice that the inoculating needle is
moved into the tube without touching the walls of the tube, and
the needle penetrates medium to % its depth, (d) Technique for
streaking the surface of a slant with a loop.
Inoculating
needle
Inoculating
loop
HINTS AND PRECAUTIONS
(1) Consider the material contained within the pipette
contaminated if it is drawn up in the pipette until the liquid
touches the cotton. (2) Always check the loop size to see
that it is approximately 3 mm in diameter, because a
significantly larger or smaller loop often fails to hold liquids
properly during transfer. (3) When pipetting, always
position your eyes so that they are horizontal with the top of
the fluid column in the pipette. This avoids parallax (an
apparent displacement of position of an object due to change
in the observer's position) errors that can occur from
misalignment of the meniscus with the graduated line on the
pipette. Hold the pipette vertical and use your forefinger to
control the flow. Remember to always use a pipetting aid
to fill the pipette and do not pipette by mouth.
(4) Media containing fermentable carbohydrates
should be avoided for the maintenance of cultures. (5)
Selective media should never be used. (6) Cultures
should not be allowed to dry out; tightly closed screw-
cap tubes should be used for storage. (7) Be sure to
flame and cool needles between all inoculations to avoid
incidental cross-contamination of cultures.
Figure 14.6 Some Typical Growth Patterns in Broth Media.
.v ':-k
\y
tvO?^
w
:■■*>.:
w
Growth
turbid
and
diffuse
roughout
Growth
layered
at surface
only
Growth
sedimented
at bottom
only
Growth
layered
below
surface;
none beneath
center
Growth
forms
puff balls,
layered
below
surface
Harley-Prescott: III. Basic Laboratory and 14. Culture Transfer Instru.,
Laboratory Exercises In Culture Techniques Techniques, & Isolat. &
Microbiology, Fifth Edition Maint. of Pure Cultures
©The McGraw-Hill
Companies. 2002
Laboratory Report j 4
Name:
Date: _
Lab Section:
Culture Transfer Instruments, Techniques, and Isolation and Maintenance
of Pure Cultures
Type of Culture
Growth (+ or -)
Contamination (+ or -)
Tryptic soy agar deep
Tryptic soy agar slant
Tryptic soy broth
1. Examine the pure stock cultures for bacterial distribution and color of growth. Record your results by drawing
exactly what you observed and completing the table.
B. subtilis
S. marcescens
E. co//'
Unique features
89
Harley-Prescott: III. Basic Laboratory and 14. Culture Transfer Instru.,
Laboratory Exercises In Culture Techniques Techniques, & Isolat. &
Microbiology, Fifth Edition Maint. of Pure Cultures
Review Questions
1. Describe how to use the two most common types of pipettes.
2. What is the purpose of flaming in the aseptic technique?
3. What is the purpose of subculturing?
4. In subculturing, when do you use the inoculating loop?
5. How is it possible to contaminate a subculture?
6. How would you determine whether culture media given to you by the laboratory instructor are sterile before
you use them?
7. What are some signs of growth in a liquid medium?
©The McGraw-Hill
Companies. 2002
90 Basic Laboratory and Culture Techniques
Harley-Prescott: I III. Basic Laboratory and I 14. Culture Transfer Instru., I I ©The McGraw-Hill
Laboratory Exercises In Culture Techniques Techniques, & Isolat. & Companies. 2002
Microbiology, Fifth Edition Malnt. of Pure Cultures
8. Why did you use an inoculating loop instead of a needle to make the transfers from the culture plates to the
culture tubes?
9. How do the pure broth cultures differ? The slant cultures?
10. What is the function of sterile mineral oil in the maintenance of stock cultures?
11. Describe how a culture can be lyophilized.
12. How can some anaerobes be maintained in pure cultures?
13. How could you determine whether the culture media given to you are sterile before you use them?
14. What are some signs of growth in a liquid medium?
Culture Transfer Instruments, Techniques, and Isolation of Pure Cultures and Their Maintenance 91
Harley-Prescott:
Laboratory Exercises in
Microbiology, Fifth Edition
III. Basic Laboratory and
Culture Techniques
15. Spread-Plate
Technique
©The McGraw-Hill
Companies. 2002
EXERCISE
15
Spread-Plate Technique
SAFETY CONSIDERATIONS
Alcohol is extremely flammable. Keep the beaker of
ethyl alcohol away from the Bunsen burner. Do not
pipette with your mouth. Do not put a flaming glass rod
back into the alcohol. Be certain you know the location
of the fire extinguisher.
Materials per Student
24- to 48-hour tryptic soy broth cultures of
Bacillus subtilis (ATCC 6051, white or cream
colonies), Serratia marcescens (ATCC 13880,
red colonies) or Micrococcus roseus (ATCC
186, red colonies), and a mixture of the two
(S. marcescens [or M. roseus] and B. subtilis)
Bunsen burner
inoculating loop
95% ethyl alcohol
L-shaped glass rod
wax pencil
500-ml beaker
pipettes with pipettor
3 tryptic soy agar plates
rulers
Learning Objectives
Each student should be able to
1. Understand the purpose of the spread-plate
technique
2. Perform the spread-plate technique
Suggested Reading in Textbook
1. Isolation of Pure Cultures, section 5.8.
2. The Spread Plate and Streak Plate, section 5.8;
see also figures 5.7-5.9, 5.11.
3. Colony Morphology and Growth, section 5.8.
Pronunciation Guide
Bacillus subtilis (bah-SIL-lus sub-til-lus)
Serratia marcescens (se-RA-she-ah mar-SES-sens)
Why Are the Above Bacteria Used
in This Exercise?
After this exercise, the student should be able to use the
spread-plate technique to separate a mixture of two or
more bacteria into well-isolated colonies. The bacteria to
be used are Bacillus subtilis and Serratia marcescens or
M. roseus. B. subtilis is easy to culture since it grows on
simple medium (e.g., tryptic soy agar) and produces dull
white to cream colonies that are easy to see. S. marcescens
was used in the last experiment and produces large red,
pink, or magenta colonies. By using color and colony
morphology, the student can see what a well-isolated colony of
each of the above bacteria looks like. The isolated bacteria
can then be picked up and streaked onto fresh medium to
obtain a pure culture.
Medical Application
In the clinical laboratory, growth of a pure culture is
absolutely necessary before any biochemical tests can be
performed to identify a suspect microorganism.
Principles
In natural habitats, bacteria usually grow together in
populations containing a number of species. In order to
adequately study and characterize an individual
bacterial species, one needs a pure culture. The spread-
plate technique is an easy, direct way of achieving
this result. In this technique, a small volume of dilute
93
Harley-Prescott: I III. Basic Laboratory and I 15. Spread-Plate
Laboratory Exercises in Culture Techniques Technique
Microbiology, Fifth Edition
©The McGraw-Hill
Companies. 2002
Figure 15.1 Bacterial Colony Characteristics on Agar Media as Seen with the Naked Eye. The characteristics of bacterial
colonies are described using the following terms.
Form
Punctiform Circular Filamentous Irregular Rhizoid Spindle
Elevation
Flat
Raised
Convex
Pulvinate Umbonate
Margin
£^Z2l<5^Q
Entire Undulate
Lobate
Erose Filamentous
Curled
Appearance: Shiny or dull
Optical property: Opaque, translucent, transparent
Pigmentation: Pigmented (purple, red, yellow)
Nonpigmented (cream, tan, white)
Texture: Rough or smooth
bacterial mixture containing 100 to 200 cells or less is
transferred to the center of an agar plate and is spread
evenly over the surface with a sterile, L-shaped glass
rod. The glass rod is normally sterilized by dipping in
alcohol and flamed to burn off the alcohol. After
incubation, some of the dispersed cells develop into
isolated colonies. A colony is a large number of bacterial
cells on solid medium, which is visible to the naked
eye as a discrete entity. In this procedure, one assumes
that a colony is derived from one cell and therefore
represents a clone of a pure culture.
After incubation, the general form of the colony
and the shape of the edge or margin can be
determined by looking down at the top of the colony. The
nature of the colony elevation is apparent when
viewed from the side as the plate is held at eye level.
These variations are illustrated in figure 15.1. After a
well-isolated colony has been identified, it can then be
picked up and streaked onto a fresh medium to obtain
a pure culture.
Procedure
1. With a wax pencil, label the bottom of the agar
medium plates with the name of the bacterium to be
inoculated, your name, and date. Three plates are to
be inoculated: (a) one with B. subtilis, (b) one with
5. marcescens, and (c) one with the mixture.
Pipette 0.1 ml of the respective bacterial culture
onto the center of a tryptic agar plate (figure 15.2a).
Dip the L-shaped glass rod into a beaker of
ethanol (figure \5.2b) and then tap the rod on the
side of the beaker to remove any excess ethanol.
Briefly pass the ethanol-soaked spreader through
the flame to bum off the alcohol (figure 15.2c), and
allow it to cool inside the lid of a sterile petri plate.
Spread the bacterial sample evenly over the agar
surface with the sterilized spreader (figure \5.2d),
making sure the entire surface of the plate has
been covered. Also make sure you do not touch
the edge of the plate.
Immerse the spreader in ethanol, tap on the side
of the beaker to remove any excess ethanol, and
reflame.
Repeat the procedure to inoculate the remaining
two plates.
Invert the plates and incubate for 24 to 48 hours at
room temperature or 30°C.
After incubation, measure some representative
colonies and carefully observe their morphology
(figure 15.3). Record your results in the report for
exercise 15.
94 Basic Laboratory and Culture Techniques
Harley-Prescott:
Laboratory Exercises in
Microbiology, Fifth Edition
III. Basic Laboratory and
Culture Techniques
15. Spread-Plate
Technique
©The McGraw-Hill
Companies. 2002
Figure 15.2 Spread-Plate Technique.
Figure 15.3 Spread Plate. Macroscopic photomicrograph of a
spread plate. Notice the many well-isolated colonies.
HINTS AND PRECAUTIONS
(1) When flaming the alcohol on the glass rod, touch it to
the flame only long enough to ignite the alcohol, then
remove it from the flame while the alcohol burns. (2) Wait
5 to 10 seconds after flaming to allow the alcohol to burn
off and to ensure that the glass is cool enough to spread
the culture without sizzling. Hold the rod briefly on the
surface of the agar to finish cooling. Do not return the
flaming rod to the beaker. If you accidentally do this,
remove the rod from the beaker and smother the flames
with a book by quickly lowering the book on the beaker.
Do not pour flaming alcohol into the sink. Do not pour
water into the flaming alcohol. (3) Avoid contamination
of the petri plate cover and the culture by not placing the
cover upon the table, desk, or other object while
spreading. Hold the cover, bottom side down, above the agar
surface as much as possible. (4) Turning the plate while
carefully spreading the culture (but not hitting the sides
of the plate with the glass rod) will result in a more even
separation of the bacteria. (5) An inoculated plate is
always incubated in an inverted position to prevent
condensation from falling onto the surface of the plate and
interfering with discrete colony formation. (6) To prevent
burns, avoid holding the glass rod so that alcohol runs
onto your fingers. (7) Keep all flammable objects, such
as paper, out of reach of ignited alcohol.
Spread-Plate Technique 95
Harley-Prescott: III. Basic Laboratory and 15. Spread-Plate
Laboratory Exercises In Culture Techniques Technique
Microbiology, Fifth Edition
Laboratory Report
Lab Section:
Spread-Plate Technique
1. Make drawings of several well-isolated colonies from each plate and fill in the table.
B. subtilis S. marcescens Mixture
Form
Elevation
Margin
Color of colony(ies)
2. With your ruler, measure the diameter of the average colony appearing on each plate by placing the ruler on
the bottom of the plate. Hold the plate and ruler against the light to make your readings and be sure to
measure a well-separated colony.
a. Size of B. subtilis colony
b. Size of S. marcescens colony
97
©The McGraw-Hill
Companies. 2002
15
Name:
Harley-Prescott: III. Basic Laboratory and 15. Spread-Plate
Laboratory Exercises In Culture Techniques Technique
Microbiology, Fifth Edition
Review Questions
1. What is a bacterial colony?
2. What is the purpose of the ethanol in the spread-plate technique?
3. Why is it necessary to use only diluted cultures that contain 100 to 200 cells for a successful spread plate?
4. Describe the form of some typical bacterial colonies.
5. What is the purpose of the spread-plate technique?
6. In all routine laboratory work, petri plates are labeled on the bottom. Why?
©The McGraw-Hill
Companies. 2002
98 Basic Laboratory and Culture Techniques
Harley-Prescott:
Laboratory Exercises in
Microbiology, Fifth Edition
III. Basic Laboratory and
Culture Techniques
16. The Streak-Plate
Technique and Differential
Media
©The McGraw-Hill
Companies. 2002
EXERCISE
16
The Streak-Plate Technique and Differential Media
SAFETY CONSIDERATIONS
Be careful with the Bunsen burner flame and the hot
water baths.
Materials per Student
(Streak-Plate Technique)
24- to 48-hour tryptic soy broth cultures of
Escherichia coli (ATCC 11229, white
colonies), Serratia marcescens (ATCC 13880,
red colonies; Micrococcus roseus ATCC 186
can also be used), and Bacillus subtilis (ATCC
6051, white or cream colonies)
3 tryptic soy agar pours
boiling water bath
48° to 50°C water bath
Bunsen burner
petri plates
inoculating loop
wax pencil
(Differential Media)
24- to 48-hour tryptic soy broth culture of a mixture
of Escherichia coli (ATCC 11229), Proteus
vulgaris (ATCC 13315), and Staphylococcus
aureus (ATCC 25903).
mannitol salt agar pour
eosin methylene blue agar pour
Learning Objectives
Each student should be able to
1. Understand the purpose of the streak-plate
technique and differential media
2. Perform a streak-plate technique and isolate
discrete colonies for subculturing
Suggested Reading in Textbook
1. Isolation of Pure Cultures, section 5.8.
2. The Spread Plate and Streak Plate, section 5.8.
3. Colony Morphology and Growth, section 5.8.
4. Differential Media, section 5.7.
Pronunciation Guide
Escherichia coli (esh-er-I-ke-a KOH-lee)
Bacillus subtilis (bah-SIL-lus sub-til-lus)
Serratia marcescens (se-RA-she-ah mar-SES-sens)
Why Are the Following Bacteria
Used in This Exercise?
Another procedure that is used to obtain well-isolated, pure
colonies is the streak-plate technique. Since Serratia
marcescens, Bacillus subtilis, and Escherichia coli were
used in the past few exercises, these same cultures are used
in this exercise. Remember, S. marcescens produces red
colonies; B. subtilis, white to cream colonies; and E. coli,
white colonies. These same cultures will also be used in the
next exercise (number 17).
Medical Application
In the clinical laboratory, growth of a pure culture is
absolutely necessary before any biochemical tests can be
performed to identify a suspect microorganism.
Principles of the Streak-Plate Technique
Isolated, pure colonies can also be obtained by the
streak-plate technique. In this technique, the bacterial
mixture is transferred to the edge of an agar plate with
an inoculating loop and then streaked out over the
surface in one of several patterns. At some point on the
streaks, individual cells will be removed from the loop
as it glides along the agar surface and will give rise to
separate colonies (figure 16.1). Again, one assumes that
one colony comes from one cell. The key principle of
this method is that by streaking, a dilution gradient is
established on the surface of the plate as cells are
deposited on the agar surface. Because of this gradient,
99
Harley-Prescott:
Laboratory Exercises in
Microbiology, Fifth Edition
III. Basic Laboratory and
Culture Techniques
16. The Streak-Plate
Technique and Differential
Media
©The McGraw-Hill
Companies. 2002
Figure 16.1 Streak Plate. Notice the well-isolated colonies of
E. coll (white) and S. marcescens (red).
confluent growth occurs on part of the plate where the
cells are not sufficiently separated, and individual, well-
isolated colonies develop in other regions of the plate
where few enough cells are deposited to form separate
colonies mat can be seen with the naked eye. Cells from
the new colony can men be picked up with an
inoculating needle and transferred to an agar slant or other
suitable medium for maintenance of the pure culture.
Procedure
1. Melt three sterile, capped tubes of tryptic soy agar
by heating them in a boiling water bam until
melted (see figure 13.2&,b).
2. Cool the tubes in a 48° to 50°C water bath for
10-15 minutes.
3. Remove the cap, flame the lip of the tube, and
pour the agar into a petri plate (see figure
13.2c-T). Be careful to keep the lid of the plate
covering the bottom and the mouth of the tube
while pouring the agar. Do the same for the other
two plates.
4. After pouring the plates, allow them to cool for a
few minutes on the bench top. With a wax pencil,
mark on the bottom of the plate the name of the
bacterium to be inoculated, your name, and date.
Also draw four quadrants on the bottom of the
plate, as illustrated in figure 16.2c, to aid you in
keeping track of your streaks.
5. Aseptically remove a loopful of the bacterial
mixture (see figure 14.3).
6. Streak out the loopful of bacteria on the agar plate
that you have prepared as follows:
a. Carefully lift the top of the petri plate just
enough to insert your inoculating loop easily
(figure 16.2a). The top should cover the agar
surface as completely as possible at all times
in order to avoid contamination. Insert the
inoculating loopful of bacteria and spread it
over a small area (area 1) at one edge of the
plate as shown in figure \6.2b in order to
make effective use of the agar surface. This
is accomplished by letting the loop rest
gently on the surface of the agar and then
moving it across the surface each time
without digging into the agar.
b. Remove the inoculating loop and kill any
remaining bacteria by flaming them. Then
insert the loop under the lid and cool it at the
edge of the agar near area 1.
c. Rotate the plate while carefully keeping in
mind where the initial streaks ended (use
the marked quadrants as a guide) and cross
over the streaks in area 1 (figure \6.2b).
Streak out any bacteria picked up as shown
in area 2.
d. Remove the loop, flame it, cool in the agar
as before, and repeat the streaking process
(figure \6.2b, area 3).
e. If necessary, you can repeat this sequence
once more to make a fourth set of streaks
(area 4). Use fewer cross-streaks here than
in the previous quadrant.
f. Repeat the above procedure (a-e) for the
other two bacteria on two new petri plates.
7. Incubate the plates at 30° to 37°C for 24 to 48
hours in an inverted position. Afterwards,
examine each of the agar plates to determine the
distribution and amount of growth in the three or
four streaked areas and record your results in the
report for exercise 16.
Principles for the Use of Differential Media
Many kinds of media can be used with streak plates.
The first part of this exercise employed typtic soy
agar, a general purpose complex medium. Often it is
most advantageous to prepare streak plates with
selective and/or differential media. Selective media favor
the growth of particular microorganisms. For
example, bile salts or dyes like basic fuchsin and crystal
violet favor the growth of gram-negative bacteria by
inhibiting the growth of gram-positive bacteria without
affecting gram-negative organisms. Differential
media are media that distinguish between different
groups of bacteria and even permit tentative
identification of microorganisms based on their biological
100 Basic Laboratory and Culture Techniques
Harley-Prescott:
Laboratory Exercises in
Microbiology, Fifth Edition
III. Basic Laboratory and
Culture Techniques
16. The Streak-Plate
Technique and Differential
Media
©The McGraw-Hill
Companies. 2002
Figure 16.2 Preparation of a Streak Plate. Arrows indicate motion of the loop. In b, flame and cool the loop between 1 and 2, 2 and
3, and 3 and the end of the streak. The goal is to thin the numbers of bacteria growing in each successive area of the plate as it is rotated and
streaked so that well isolated colonies will appear in quadrant 3.
(a)
characteristics. Blood agar is both a differential
medium and an enriched one. It distinguishes between
hemolytic and nonhemolytic bacteria. Hemolytic
bacteria (e.g., many streptococci and staphylococci
isolated from throats) produce clear zones around their
colonies because of red blood cell destruction.
Two very important differential and selective
media that are used to isolate and partially identify
bacteria are mannitol salt agar and eosin methylene
blue agar. Mannitol salt agar is used to isolate
staphylococci from clinical and nonclinical samples. It
contains 7.5% sodium chloride, which inhibits the growth
of most bacteria other than staphylococci.
Staphylococcus aureus will ferment the mannitol and form
yellow zones in the reddish agar because phenol red
becomes yellow in the presence of fermentation acids
(see figure 54.5). This differentiates it from S. epider-
midis, which forms colonies with red zones or both
zones (see figure 54.6). Eosin methylene blue (EMB)
agar is widely used for the detection of E. coli and
related bacteria in water supplies and elsewhere. It
contains the dyes eosin Y and methylene blue that
partially suppress the growth of gram-positive bacteria.
The dyes also help differentiate between
gram-negative bacteria. Lactose fermenters such as Escherichia
coli will take up the dyes and form blue-black
colonies with a metallic sheen. Lactose nonfermenters
such as Salmonella, Proteus, and Pseudomonas form
colorless to amber colonies.
In this exercise, we will combine the streak-plate
technique with differential and selective media to
isolate and partly identify Staphylococcus aureus and
Escherichia coli.
Procedure
1.
2.
Melt a sterile, capped tube of mannitol salt agar
and a tube of EMB agar in a boiling water bath.
Cool the two tubes in a 48° to 50°C water bath for
10-15 minutes.
Remove the cap, flame the lip of the tube, and pour
the agar into a sterile petri plate (see figure 13.2c-i).
Streak-Plate Technique 101
Harley-Prescott: I III. Basic Laboratory and I 16. The Streak-Plate I I ©The McGraw-Hill
Laboratory Exercises In Culture Techniques Technique and Differential Companies. 2002
Microbiology, Fifth Edition Media
Be careful to keep the lid of the plate covering the
bottom and the mouth of the tube while pouring the
agar. Do the same for the second plate.
4. Allow the plates to cool for a few minutes on the
bench top. Mark on the bottom of each plate your
name, the date, and the agar used.
5. Aseptically remove a loopful of the bacterial
mixture containing E. coli, S. aureus, and Proteus
vulgaris. Prepare mannitol salt agar and EMB
agar streak plates following the procedure
described in step 6 on page 100.
6. Incubate the plates at 35-37°C for 24-48 hours in
an inverted position. Examine them and evaluate
the type of colony growth. Compare the colonies
on the two plates and try to determine which
bacteria are growing on each. Record your
observations in the report for Exercise 16.
HINTS AND PRECAUTIONS
(1) Each time the loop is flamed, allow it to cool on the
agar at least 10 to 15 seconds before streaking the
culture. Wait until the loop stops "hissing." (2) Use a
loopful of culture from the source tube only when applying
the first streak in quadrant 1 of the petri plate. Do not
return to the source tube for more culture when
streaking quadrants 2 to 4. (3) An inoculated plate is always
incubated in an inverted position to prevent
condensation from falling onto the surface of the plate and
interfering with discrete colony formation.
Harley-Prescott: I III. Basic Laboratory and I 16. The Streak-Plate I I ©The McGraw-Hill
Laboratory Exercises In Culture Techniques Technique and Differential Companies. 2002
Microbiology, Fifth Edition Media
Laboratory Report
Lab Section:
The Streak-Plate Technique and Differential Media
1. Make a drawing of the distribution of the colonies on each petri plate.
2. Select one discrete colony, describe it (see figure 15.1), and identify the bacterium it contains.
Bacterium
Colony form
Colony elevation
Colony margin
Colony size
Colony color
3. Draw your streaking patterns. Did you obtain isolated colonies? If not, what went wrong? If you carried
out the differential medium experiment, comment on the differences in growth on mannitol salt agar and
EMB agar.
16
Name:
103
Harley-Prescott: I III. Basic Laboratory and I 16. The Streak-Plate I I ©The McGraw-Hill
Laboratory Exercises In Culture Techniques Technique and Differential Companies. 2002
Microbiology, Fifth Edition Media
Review Questions
1. In the streak-plate technique, how are microorganisms diluted and spread out to form individual colonies?
2. Which area of a streak plate will contain the greatest amount of growth? The least amount of growth? Explain
your answers.
3. Does each discrete colony represent the growth of one cell? Explain your answer. Why can a single colony on
a plate be used to start a pure culture?
4. Why can mannitol salt agar and EMB agar be described as both selective and differential media?
5. How can a streak plate become contaminated?
104 Basic Laboratory and Culture Techniques
Harley-Prescott:
Laboratory Exercises in
Microbiology, Fifth Edition
III. Basic Laboratory and
Culture Techniques
17. Pour-Plate Technique
©The McGraw-Hill
Companies. 2002
EXERCISE
17
Pour-Plate Technique
SAFETY CONSIDERATIONS
Be careful with the Bunsen burner flame and the hot
water baths. Do not use your mouth to pipette.
Materials per Student
24- to 48-hour mixed tryptic soy broth culture of
Escherichia coli (ATCC 11229), Serratia
marcescens (ATCC 13880; Micrococcus roseus
ATCC 186 also can be used), and Bacillus
subtilis (ATCC 6051)
3 tryptic soy agar pour tubes
3 9-ml sterile 0.9% NaCl (saline) blanks
48° to 50°C water bath
boiling water bath
wax pencil
3 petri plates
inoculating loop
Bunsen burner
3 sterile 1-ml pipettes with pipettor
Learning Objectives
Each student should be able to
1. Understand the pour-plate technique
2. Perform a pour-plate technique to obtain isolated
colonies
Suggested Reading in Textbook
1. The Pour Plate, section 5.8.
Pronunciation Guide
Escherichia coli (esh-er-I-ke-a KOH-lee)
Bacillus subtilis (bah-SIL-lus sub-til-lus)
Serratia marcescens (se-RA-she-ah mar-SES-sens)
Why Are the Following Bacteria
Used in This Exercise?
Another procedure that is used to obtain well-isolated, pure
colonies is the pour-plate technique. Since Serratia
marcescens, Bacillus subtilis, and Escherichia coli were used
in the past three exercises, and the pure culture plates should
have been saved, these same cultures are used in this
exercise. Remember, S. marcescens produces red colonies; B.
subtilis, white to cream colonies; and E. coli, white colonies.
Principles
The pour-plate technique also will yield isolated
colonies and has been extensively used with bacteria
and fungi. The original sample is diluted several times
to reduce the microbial population sufficiently to
obtain separate colonies upon plating (figure 17.1). The
small volumes of several diluted samples are added to
sterile petri plates and mixed with liquid tryptic soy
agar that has been cooled to about 48° to 50°C. Most
bacteria and fungi will not be killed by the brief
exposure to the warm agar. After the agar has hardened,
each cell is fixed in place and will form an individual
colony if the sample is dilute enough. Assuming no
chaining or cell clusters, the total number of colonies
are equivalent to the number of viable
microorganisms in the diluted sample. To prepare pure cultures,
colonies growing on the surface or subsurface can be
inoculated into fresh medium.
Procedure
1. With a wax pencil, label three sterile saline blanks
lto3.
2. Melt the tryptic soy agar deeps in a boiling water
bath and cool in a 48° to 50°C bath for at least 10
to 15 minutes (see figure 13.2).
105
Harley-Prescott:
Laboratory Exercises in
Microbiology, Fifth Edition
III. Basic Laboratory and
Culture Techniques
17. Pour-Plate Technique
©The McGraw-Hill
Companies. 2002
Figure 17.1 The Pour-Plate Technique. The original sample is diluted several times to decrease or dilute the population sufficiently.
1 ml of each dilution is then dispensed into the bottom of a petri plate. Agar pours are then added to each plate. Isolated cells grow into
colonies and can be used to establish pure cultures. The surface colonies are circular and large, subsurface colonies are lenticular or lens-
shaped and much smaller.
Colony
growth
after
incubation
3. With a wax pencil, label the bottoms of three petri
plates 1 to 3, and add your name and date.
4. Inoculate saline tube 1 with 1 ml of the MIXED
bacterial culture using aseptic technique (see
figure 14.3) and MIX thoroughly. This represents
a 10-1 dilution.
5. Using aseptic technique, immediately inoculate
tube 2 with 1 ml from tube 1; a 10~2 dilution.
6. Using aseptic technique, mix the contents of tube
2 and use it to inoculate tube 3 with 1 ml; a 10~3
dilution.
7. After tube 3 has been inoculated, mix its contents,
remove the cap, flame the top, and aseptically
transfer 1 ml into petri plate 3. Then inoculate
plates 1 and 2 in the same way, using 1 ml from
tubes 1 and 2, respectively.
8. Add the contents of the melted tryptic soy agar
pours to the petri plates. Gently mix each agar
plate with a circular motion while keeping the
plate flat on the bench top. Do not allow any agar
to splash over the side of the plate! Set the plate
aside to cool and harden.
9. Incubate the plates at 30° to 37°C for 24 to 48
hours in an inverted position.
10. Examine the pour plates and record your results in
the report for exercise 17.
HINTS AND PRECAUTIONS
(1) Always allow sufficient time for the agar deeps to
cool in the water bath after they have been boiled prior
to the addition of bacteria. (2) When the poured agar
has solidified in the petri plates, it will become lighter
in color and cloudy (opaque) in appearance. Wait until
this occurs before attempting to move the plates. (3) An
inoculated plate is always incubated in an inverted
position to prevent condensation from falling onto the
surface of the plate and interfering with discrete colony
formation.
106 Basic Laboratory and Culture Techniques
Harley-Prescott: III. Basic Laboratory and 17. Pour-Plate Technique
Laboratory Exercises In Culture Techniques
Microbiology, Fifth Edition
Laboratory Report
Lab Section:
Pour-Plate Technique
1. Examine each of the agar plates for colony distribution and amount of growth. Look for discrete surface
colonies and record your results. Do the same for the subsurface colonies. Color each species of bacterium a
different color or label each. Fill in the table.
Plate 1 Plate 2 Plate 3
Surface Colonies
Form
Elevation
Margin
Number
Subsurface Colonies
Form
Elevation
Margin
Number
©The McGraw-Hill
Companies. 2002
11
Name:
Harley-Prescott: I III. Basic Laboratory and I 17. Pour-Plate Technique I I ©The McGraw-Hill
Laboratory Exercises In Culture Techniques Companies. 2002
Microbiology, Fifth Edition
Review Questions
1. How do the results of the pour-plate method compare with those obtained using the streak-plate and spread-
plate methods?
2. What is the main advantage of the pour-plate method over other metliods of bacterial colony isolation? What
are some problems?
3. Why are the surface colonies on a pour plate larger than those within the medium?
4. Why doesn't the 48° to 50°C temperature of the melted agar kill most of the bacteria?
5. Explain how the pour-plate method can be used to isolate fungi.
6. Why must tryptic soy agar be cooled below 50°C before pouring and inoculating?
7. Why is it important to invert the petri plates during incubation?
108 Basic Laboratory and Culture Techniques
Harley-Prescott:
Laboratory Exercises in
Microbiology, Fifth Edition
III. Basic Laboratory and
Culture Techniques
18. Cultivation of
Anaerobic Bacteria
©The McGraw-Hill
Companies. 2002
EXERCISE
18
Cultivation of Anaerobic Bacteria
SAFETY CONSIDERATIONS
No mouth pipetting. Be careful with the Bunsen burner
flame and water baths. Pyrogallol is poisonous;
percutaneous absorption through the skin is possible—wear
disposable gloves and use the spatula when
transferring the crystals. Ten percent NaOH is caustic to the
skin, and the vapors may cause damage to the
respiratory tract. Use a pipette with pipettor when
transferring this caustic soda. The various gas-generating
envelopes that liberate hydrogen react rapidly with water
to produce flammable gas. Observe appropriate
precautions when handling these products. Further, the
anaerobic jar used must not leak and the lid seal
should be tight. Envelopes that have been activated
with water but not used in anaerobic jars should be
kept in a ventilating hood away from open flames or
sparks for approximately 30 minutes until the reaction
has subsided.
Materials per Group of Students
24- to 48-hour Eugon broth cultures of
Pseudomonas aeruginosa (ATCC el0145), and
Escherichia coli (ATCC 11229); thioglycollate
broth cultures of Clostridium sporogenes
(ATCC 3584)
3 Eugon agar deeps
boiling water bath
48° to 50°C water bath
4 thioglycollate broth tubes
inoculating loop
2 tryptic soy agar plates
4 petri plates containing Brewer's anaerobic agar
sterilized Brewer's anaerobic covers
GasPak Jar, GasPak Disposable Anaerobic
System (BBL Microbiology Systems), GasPak
Pouch (BBL), Difco Gas Generating
envelopes, BioBag (Marion Scientific),
Anaero-Pack System (KEY ScientificProducts)
Oxyrase For Broth, Oxyrase For Agar, OxyDish,
OxyPlates (Oxyrase, Inc., P.O. Box 1345,
Mansfield, OH 44901; 419-589-8800;
www.oxyrase.com)
3 trypticase soy broth tubes containing 0.1-ml
Oxyrase For Broth
3 OxyDishes containing Oxyrase For Agar
4 tryptic soy agar slants
scissors
cotton plugs
pyrogallol crystals (poisonous)
10% NaOH (caustic)
test tubes
rubber stoppers
test-tube rack
wax pencil
disposable gloves
spatula for handling pyrogallol crystals and soil
1-ml pipette with pipettor
garden soil
Learning Objectives
Each student should be able to:
1. Appreciate why some bacteria need an anaerobic
environment to grow
2. Understand some of the different metliods that are
used to cultivate anaerobic bacteria
3. Successfully cultivate several anaerobic bacteria
Suggested Reading in Textbook
1. Oxygen Concentration, section 6.4.
2. Anaerobic Respiration, section 9.6.
3. Fermentations, section 9.3.
Pronunciation Guide
Clostridium sporogenes (klos-STRID-ee-um spo-
ROJ-ah-nees)
Escherichia coli (esh-er-I-ke-a KOH-lee)
Pseudomonas aeruginosa (soo-do-MO-nas a-ruh-jin-
OH-sah)
Harley-Prescott:
Laboratory Exercises in
Microbiology, Fifth Edition
III. Basic Laboratory and
Culture Techniques
18. Cultivation of
Anaerobic Bacteria
©The McGraw-Hill
Companies. 2002
Figure 18.1 The Appearance of Various Agar Deep Cultures. Each dot represents an individual bacterial colony within the agar or
on its surface. The surface, which is directly exposed to atmospheric oxygen, will be aerobic. The oxygen content of the medium decreases
with depth until the medium becomes anaerobic toward the bottom of the tube.
Solidified
agar
Growth
through-
,, out agar <
deep,
but
greatest
at surface
Obligate aerobe
surface
growth
Growth
only at
bottom
of agar
Growth
below
surface
Strict
anaerobe
Microaerophile
Why Are the Following Bacteria
Used in This Exercise?
This exercise is designed to give the student expertise in the
cultivation of anaerobic bacteria. Thus, the authors have
chosen an obligate anaerobe (C. sporogenes), a facultative
anaerobe (E. coli), and for comparison, a strict aerobe (P.
aeruginosa). Pseudomonas aeruginosa (L. aeruginosa, full
of copper rust, hence green) is a straight or slightly curved
motile rod (1.5 to 3.0 |xm in length) that has a polar flagel-
lum. This bacterium is aerobic, having a strictly respiratory
type of metabolism with oxygen as the usual terminal
electron acceptor. It is widely distributed in nature. Clostridium
sporogenes (M.L. n. spora, spore + Gr. v. gennaio, to
produce) is a straight rod 1.3 to 16.0 |xm in length, motile with
peritrichous flagella. Endospores are oval and subterminal
and distend the cell. C. sporogenes is obligatorily anaerobic;
if growth occurs in air, it is scanty and sporulation is
inhibited. It is widespread in the environment. Escherichia coli
grows readily on nutrient agar. The colonies may be smooth,
low convex, and moist. E. coli is facultatively anaerobic
having both a respiratory and a fermentative type of metabolism.
Medical Application
From a clinical laboratory perspective, the most common
pathogenic anaerobic bacteria vary depending on body site.
Examples are as follows. Blood: Bacteroides fragilis;
Intestine: Clostridium, Bacteroides; Genital area: Actino-
mycetes, Bacteroides, Fusobacterium, Clostridium, Mo-
biluncus; and skin and soft tissue: Clostridium perfringens,
Bacteroides fragilis, Peptostreptococcus.
Principles
One of the environmental factors to which bacteria
and other microorganisms are quite sensitive is the
presence of O2. For example, some microorganisms
will grow only in the presence of O2 and are called
obligate aerobes. Facultative anaerobes will grow
either aerobically or in the absence of O2, but better in
its presence. Strict obligate anaerobes will grow only
in the absence of O2 and are actually harmed by its
presence. Aerotolerant anaerobes are
microorganisms that cannot use O2 but are not harmed by it
either. Finally, microorganisms that require a small
amount of O2 for normal growth but are inhibited by
O2 at normal atmospheric tension are called mi-
croaerophiles. These variations in O2 requirements
can be easily seen by inoculating a tube of molten
agar with the bacterium in question, mixing the agar
thoroughly without aerating it, and allowing it to
solidify. The bacteria will grow in the part of the agar
deep culture that contains the proper O2
concentration (figure 18.1).
The damaging effects of O2 on anaerobic bacteria
create difficult culturing problems. Ideally, one should
not only provide an 02-free environment, but one that
has an adequate amount of moisture for bacterial
growth. It is also necessary to have CO2 present for
the growth of many anaerobic bacteria. There are a
number of ways in which anaerobic bacteria may be
cultured. Four of the most useful will be described.
One of the most convenient approaches is to employ
a specially designed commercial anaerobic broth. Two of
the most useful are cooked meat medium and thioglycol-
late broth. Thioglycollate medium can be purchased
110 Basic Laboratory and Culture Techniques
Harley-Prescott:
Laboratory Exercises in
Microbiology, Fifth Edition
III. Basic Laboratory and
Culture Techniques
18. Cultivation of
Anaerobic Bacteria
©The McGraw-Hill
Companies. 2002
Figure 18.2 Preparation of an Anaerobic Wright's Tube. Pyrogallol is a reducing agent that is activated by NaOH to remove
oxygen from the tube and create anaerobic conditions.
Cotton
Inoculate
surface of
slant
Cotton plug
NaOH
Stopper
Trim
cotton
plug
Push
cotton
plug
down
Add pyrogallol
crystals, 1 ml
of 10% NaOH,
and stopper
Invert the
Wright's
tube
with methylene blue or resazurin as an oxidation-
reduction indicator. When this medium begins to turn
bluish or reddish, it is becoming too aerobic for the
culture of anaerobic bacteria.
For those bacteria that are not really fastidious
anaerobes, growth can occur on nutrient agar slants if
anaerobic conditions are created. This setup is called
a Wright's tube (named after James H. Wright,
American physician, 1901-1978) (figure 18.2). The
anaerobic condition is created using pyrogallol and
NaOH. In the presence of NaOH, pyrogallol is
oxidized and removes O2 very effectively in the process.
After the anaerobic bacterium has been streaked out
on the surface of the agar slant, the cotton plug is
trimmed and then pushed into the culture tube until it
rests just above the top of the slant. The space
between the top of the cotton plug and the open end of
the culture tube is then filled with pyrogallol crystals,
and 1 ml of 10% NaOH is added. The tube is closed
with a rubber stopper and is immediately inverted. It
is incubated upside down.
Anaerobic bacteria may also be grown in special
petri plates without the use of complex and expensive
incubators. One of the most convenient plate methods
uses the Brewer's (named after John H. Brewer, an
industrial bacteriologist, in 1942) anaerobic petri plate,
together with special anaerobic agar (figure 18.3).
Brewer's special cover fits on a normal petri plate
bottom in such a way that its circular ridge rests on the
Figure 18.3 Brewer's Petri Plate. An anaerobic space is
created between the Brewer cover and the thioglycollate agar.
Anaerobic space
Culture
ni\
#=
Brewer dish cover
— Anaerobic agar
agar, thereby protecting most of the surface from the
exposure to O2. Brewer's anaerobic agar contains a high
concentration of thioglycollic acid. The free sulfhydryl
groups of thioglycollate reduce any O2 present and
create an anaerobic environment under the Brewer cover.
Another way of culturing bacteria anaerobically
on plates is the GasPak Anaerobic System. In the
GasPak System (figure 18.4), hydrogen and CO2 are
generated by a GasPak envelope after the addition of
water. A palladium catalyst (pellets) in the chamber lid
catalyzes the formation of water from hydrogen and
O2, thereby removing O2 from the sealed chamber.
For greater convenience and visibility, GasPak
pouches (figure 18.5) can be used instead of the
regular GasPak incubation chamber. In this procedure, a
special activating reagent is dispensed into the reagent
channel (figure 18.5a). Inoculated plates are then put
into the pouch (figure 18.5£>). The anaerobic
environment is locked in with a sealing bar (figure 18.5c) and
the pouch incubated. Growth can be observed at one's
convenience.
Cultivation of Anaerobic Bacteria 111
Harley-Prescott:
Laboratory Exercises in
Microbiology, Fifth Edition
III. Basic Laboratory and
Culture Techniques
18. Cultivation of
Anaerobic Bacteria
©The McGraw-Hill
Companies. 2002
Figure 18.4 The GasPak System.
Lockscrew
Catalyst chamber
Contains palladium pellets
Gas generator envelope
Water is added to chemicals
in envelope to generate H2 and CO,
Carbon dioxide promotes more rapid
growth of organisms.
Rubber gasket seal
Oxygen is removed from chamber by
combining with hydrogen to form water.
This reaction is catalyzed by the
palladium pellets.
Anaerobic indicator strip
Methylene blue becomes colorless in
absence of O,.
Figure 18.5 Procedure for GasPak Pouch, (a) Dispense GasPak liquid activating reagent into channel of pouch, (b) Place plates inside
the pouch, (c) Lock in anaerobic environment with sealing bar and incubate.
One of the simplest methods for growing
anaerobes has recently been introduced by Oxyrase, Inc.
One simply adds 0.1 mL of Oxyrase For Broth to 5.0
ml of broth medium (Mueller-Hinton, Eugon, Trypti-
case Soy, Nutrient, Schaedler, Columbia, or Brain
Heart Infusion). Most anaerobes can be inoculated
immediately after this addition. Also from Oxyrase, Inc.
are the OxyDish and Oxyrase For Agar that make
growing and recovering anaerobes on agar plates easy.
Simply mix Oxyrase For Agar with your agar medium
and pour the still liquid agar into an OxyDish. The
OxyDish contains an inner ring that forms a tight seal
with the agar surface, which can be easily broken and
reformed. Within minutes, the enzyme system and
substrates in the Oxyrase For Agar reduce oxygen in
the agar medium and the trapped headspace in the
dish. The dish can be opened and closed several times
while still maintaining an anaerobic environment. This
system eliminates the complications and expense of
bags, jars, anaerobic incubators, and chambers.
A newer methodology for growing anaerobes from
Oxyrase is the OxyPlate. OxyPlates are pre-poured
plates with formulations identical to the traditional
anaerobic media with the addition of Oxyrase enzymatic
preparation. The enzyme continues to reduce the oxygen
within the media and in the space between the agar
surface and the lid. Because the burden of achieving
anaerobic conditions is placed directly into the media, no
barrier apparatuses such as jars, pouches, and chambers is
required. Simply streak the OxyPlate and incubate aero-
bically. The plates can be stacked and stored in an
ambient air incubator along side aerobic plates. Side-by-side
comparison of the aerobic and anaerobic plates allows
for early recognition of anaerobic colonies.
112 Basic Laboratory and Culture Techniques
Harley-Prescott: I III. Basic Laboratory and I 18. Cultivation of I I ©The McGraw-Hill
Laboratory Exercises In Culture Techniques Anaerobic Bacteria Companies. 2002
Microbiology, Fifth Edition
Procedure
The Relationship of O2 to Bacterial Growth
1. Melt three Eugon agar deeps and heat them in a
boiling water bath for a few minutes in order to
drive off any O2.
2. Cool the deeps in a water bath 48° to 50°C.
3. With a wax pencil, label each tube with the name
of the bacterium to be inoculated, your name, and
date.
4. Using aseptic technique (see figure 14.3),
inoculate each cooled deep with 1 or 2 loopsful of
one of each of the three different bacteria
(P. aeruginosa, C. sporogenes, and E. coli).
5. Mix the bacteria throughout the agar without
aerating it by rolling each tube between the palms
of your hands.
6. Allow the agar to harden and incubate the three
tubes for 24 to 48 hours at 35°C.
7. Observe each tube for growth and record your
results in the report for exercise 18.
Broth Culture of Anaerobic Bacteria
1. With a wax pencil, label three freshly steamed
thioglycollate broth tubes with P. aeruginosa, C.
sporogenes, and E. coli, as well as your name and
date.
2. Using aseptic procedures, inoculate the three
broth tubes. Do not shake these tubes to avoid
oxidizing the medium! Methylene blue or
resazurin is present in the medium as an
oxidation-reduction indicator. If more than Vs of
the broth is bluish or reddish in color, the tube
should be reheated in a water bath in order to
drive off the O2 before use.
3. Incubate the tubes at 35°C for 24 to 48 hours.
4. Observe each tube for growth and record your
results in the report for exercise 18.
Plate Culture of Anaerobic Bacteria
1. With a wax pencil, divide the bottom of each of the
culture plates (one regular tryptic soy agar petri
plate, one petri plate containing Brewer's anaerobic
agar, and one Brewer's plate with cover) in half
and label one of the halves P. aeruginosa and the
other half C. sporogenes. Do the same with three
more plates and label P. aeruginosa and E. coli
(these plates will show facultative growth).
2. With an inoculating loop, streak the center of each
half with the proper bacterium.
3. Incubate the tryptic soy agar plate inverted at
35°C in a regular aerobic incubator.
4. Carefully cover the Brewer's plate with a
sterile Brewer anaerobic cover. The circular
rim of the cover should press against the agar
surface, but not sink into it. Incubate inverted
at 35°C.
5. Place the regular anaerobic agar plate in a GasPak
Anaerobic Jar or a GasPak Disposable Anaerobic
Pouch.
6. Follow the instructions supplied with these
products.
7. Incubate at 35°C for 24 to 48 hours.
8. Record your results in the report for exercise 18.
Slant Culture of Anaerobic Bacteria in a Wright's
Tube
1. With a wax pencil, label four tryptic soy agar
slants—two with P. aeruginosa and two with C.
sporogenes, and your name and date.
2. Using aseptic technique, inoculate each slant with
the respective bacterium.
3. Incubate two slants (one of each bacterium)
aerobically at 35°C for 24 to 48 hours.
4. With the other two slants, cut off the cotton plug
with a pair of scissors (figure 18.2), and with the
butt of the inoculating loop, push it into the tube
until it almost touches the top of the slant. While
wearing gloves, fill the space above the cotton
with pyrogallol crystals and add 1 ml of 10%
NaOH. Quickly stopper the tube with a rubber
stopper and invert the tube.
5. Place in a test-tube rack and incubate inverted at
35°C for 24 to 48 hours.
6. Record your growth results in the report for
exercise 18.
Isolation of Anaerobes from the Soil
1. Place a spatula of soil in a thioglycollate broth
tube.
2. Incubate at either 30° or 37°C for one day (teams
can alternate temperatures).
3. Observe culture tubes for growth in the form of
turbidity and the production of fermentation
gases.
4. If time permits, streak the culture on a petri plate
containing Brewer's anaerobic agar and incubate
in a GasPak incubator. Observe colony
morphology.
5. Record your results in the report for exercise 18.
Cultivation of Anaerobic Bacteria 113
Harley-Prescott: I III. Basic Laboratory and I 18. Cultivation of I I ©The McGraw-Hill
Laboratory Exercises In Culture Techniques Anaerobic Bacteria Companies. 2002
Microbiology, Fifth Edition
Simplified Method For Growing Anaerobes
1. Using aseptic technique, inoculate each trypticase
soy broth tube containing Oxyrase For Broth with
P. aeruginosa, C. sporogenes, and E. coli. Repeat
the inoculation on the OxyDish containing tryptic
soy agar and Oxyrase For Agar.
2. Incubate for 24 to 48 hours at 37°C.
3. Record your growth results in the report for
exercise 18.
HINTS AND PRECAUTIONS
(1) If screw-cap tubes are used with any tubed media
(such as thioglycollate broth), the cap should be tightly
closed during incubation outside of an anaerobic
incubator to avoid unnecessary penetration of oxygen from
the atmosphere. (2) In an anaerobic GasPak jar, the caps
should be loosened slightly to allow neutralization of
oxygen within the tubes by the hydrogen gas generated
within the system.
114 Basic Laboratory and Culture Techniques
Harley-Prescott:
Laboratory Exercises in
Microbiology, Fifth Edition
III. Basic Laboratory and
Culture Techniques
18. Cultivation of
Anaerobic Bacteria
©The McGraw-Hill
Companies. 2002
Laboratory Report j q
Name:
Date: _
Lab Section:
Cultivation of Anaerobic Bacteria
1. The relationship of O2 to bacterial growth.
Drawing of
growth in
Eugon culture
tubes
P. aeruginosa
C. sporogenes
E. col:
Growth pattern
Cracking of agar due to gas ( + or —)
Classification according to growth pattern
(figure 12.1)
2. Anaerobic broth cultures of bacteria.
Drawing of
culture in
anaerobic
broth culture
tubes
P. aeruginosa
C. sporogenes
E. coli
Comments
3. Drawings of plate cultures of aerobic and anaerobic bacteria.
Tryptic soy
agar plate
Brewer's plate
GasPak plate
OxyDish
Harley-Prescott:
Laboratory Exercises in
Microbiology, Fifth Edition
III. Basic Laboratory and
Culture Techniques
18. Cultivation of
Anaerobic Bacteria
©The McGraw-Hill
Companies. 2002
4. Slant cultures of anaerobic bacteria.
Drawing of
slant cultures
of bacteria
s\
Aerobic culture
P aeruginosa C. sporogenes
Anaerobic culture
P aeruginosa C sporogenes
Comments
Review Questions
1. Explain how an anaerobic atmosphere can be created in ajar.
2. Explain what happens in a Wright's tube.
3. Differentiate between the following:
a. an obligate anaerobe
b. an obligate aerobe
c. a facultative anaerobe
d. an aerotolerant anaerobe
e. a microaerophile
4. What are the ingredients in Brewer's anaerobic agar that remove O2 from the medium? Briefly explain how
an Oxyrase plate works.
5. Of the metliods used in this exercise to create an anaerobic environment, which works the best, and why?
116 Basic Laboratory and Culture Techniques
Harley-Prescott: III. Basic Laboratory and 19. Determination of
Laboratory Exercises In Culture Techniques Bacterial Numbers
Microbiology, Fifth Edition
©The McGraw-Hill
Companies. 2002
EXERCISE
19
Determination of Bacterial Numbers
SAFETY PRECAUTIONS
No mouth pipetting. Be careful with the Bunsen burner
flame and water baths.
Materials per Student
24-hour tryptic soy broth culture of Escherichia
coli (ATCC 11229)
4 sterile 99-ml saline or phosphate buffer blanks
1-ml or 1.1-ml pipettes with pipettor
6 petri plates
6 agar pour tubes of tryptone glucose yeast agar
(plate count agar)
48° to 50°C water bam
boiling water bath
Bunsen burner
cuvettes
spectrophotometer
4 tubes of tryptic soy broth
Learning Objectives
Each student should be able to
1. Describe several different ways to quantify the
number of bacteria in a given sample
2. Determine quantitatively the number of viable
cells in a bacterial culture by the standard plate
count technique
3. Measure the turbidity of a culture with a
spectrophotometer and relate this to the number
(biomass) of bacteria
Suggested Reading in Textbook
1. Measurement of Microbial Growth, section 6.2.
2. Measurement of Cell Numbers, section 6.2.
3. Measurement of Cell Mass, section 6.2.
Pronunciation Guide
Escherichia coli (esh-er-I-ke-a KOH-lee)
Why Is the Following Bacterium
Used in This Exercise?
All of the learning objectives of this exercise are related to
determining bacterial numbers. When working with large
numbers and a short time frame, one of the most reliable
microorganisms is one that has been used in previous
experiments, namely, Escherichia coli. E. coli has a
generation time at 37°C of 0.35 hours. Thus, it reproduces very
rapidly and is easy to quantify (i.e., the number [biomass]
of viable E. coli cells in a bacterial culture can be easily
determined by spectrophotometry).
Medical Application
In the clinical laboratory and in research laboratories, it is
frequently necessary to have an accurate count of living
(viable) cells in a given culture. If done properly, counting
procedures can produce very accurate results.
Principles
Many studies require the quantitative determination of
bacterial populations. The two most widely used
methods for determining bacterial numbers are the
standard, or viable, plate count method and spec-
trophotometric (turbidimetric) analysis. Although
the two methods are somewhat similar in the results
they yield, there are distinct differences. For example,
the standard plate count method is an indirect
measurement of cell density and reveals information
related only to live bacteria. The spectrophotometric
analysis is based on turbidity and indirectly measures
all bacteria (cell biomass), dead or alive.
The standard plate count method consists of
diluting a sample with sterile saline or phosphate buffer
117
Harley-Prescott: I III. Basic Laboratory and I 19. Determination of I I ©The McGraw-Hill
Laboratory Exercises In Culture Techniques Bacterial Numbers Companies. 2002
Microbiology, Fifth Edition
diluent until the bacteria are dilute enough to count
accurately. That is, the final plates in the series should
have between 25 and 250 colonies. Fewer than 25
colonies are not acceptable for statistical reasons, and
more than 250 colonies on a plate are likely to
produce colonies too close to each other to be
distinguished as distinct colony-forming units (CFUs).
The assumption is that each viable bacterial cell is
separate from all others and will develop into a single
discrete colony (CFU). Thus, the number of colonies
should give the number of live bacteria that can grow
under the incubation conditions employed. A wide
series of dilutions (e.g., 10^* to 10~10) is normally plated
because the exact number of live bacteria in the
sample is usually unknown. Greater precision is achieved
by plating duplicates or triplicates of each dilution.
Increased turbidity in a culture is another index of
bacterial growth and cell numbers (biomass). By
using a spectrophotometer (see Appendix C), the
amount of transmitted light decreases as the cell
population increases. The transmitted light is converted to
electrical energy, and this is indicated on a
galvanometer. The reading indirectly reflects the number
of bacteria. This method is faster than the standard
plate count but is limited because sensitivity is
restricted to bacterial suspensions of 107 cells or greater.
Dilution Ratios
According to the American Society for Microbiology
Style Manual, dilution ratios may be reported with
either colons (:) or shills (/), but note there is a
difference between them. A shill indicates the ratio of a part
to a whole; for example, 1/2 means 1 of 2 parts, with
a total of 2 parts. A colon indicates the ratio of 1 part
to 2 parts, with a total of 3 parts. Thus, 1/2 equals 1:1,
but 1:2 equals 1/3. (See Appendix A for a complete
discussion of dilutions and sample problems.)
Procedure
Standard Plate Count
1. With a wax pencil, label the bottom of six petri
plates with the following dilutions: 10^*, 10~5, 10"6,
1CL7, 10~8, and 10~9. Label four bottles of saline
Diphosphate buffer 10-2, 10"4, 10"6, and 108.
2. Using aseptic technique, the initial dilution is
made by transferring 1.0 ml of liquid sample or
1 g of solid material to a 99-ml sterile saline blank
(figure 19.1). This is a 1/100 or 10~2 dilution (see
appendix A). Cap the bottle.
3. The 10~2 blank is then shaken vigorously 25 times
by placing one's elbow on the bench and moving the
forearm rapidly in an arc from the bench surface and
back. This serves to distribute the bacteria and break
up any clumps of bacteria that may be present.
4. Immediately after the 10~2 blank has been shaken,
uncap it and aseptically transfer 1.0 ml to a
second 99-ml saline blank. Since this is a 10~2
dilution, this second blank represents a 10^*
dilution of the original sample. Cap the bottle.
5. Shake the 10^* blank vigorously 25 times and
transfer 1.0 ml to the third 99-ml blank. This third
blank represents a 10~6 dilution of the original
sample. Cap the bottle. Repeat the process once
more to produce a 10~8 dilution.
6. Shake the 10^* blank again and aseptically
transfer 1.0 ml to one petri plate and 0.1 ml to
another petri plate. Do the same for the 10~6 and
the 10-8 blanks (figure 19.1).
7. Remove one agar pour tube from the 48° to 50°C
water bath. Carefully remove the cover from the
10^* petri plate and aseptically pour the agar into
it. The agar and sample are immediately mixed by
gently moving the plate in a figure-eight motion
while it rests on the tabletop. Repeat this process
for the remaining five plates.
8. After the pour plates have cooled and the agar has
hardened, they are inverted and incubated at 35°C
for 24 hours or 20°C for 48 hours.
9. At the end of the incubation period, select all of
the petri plates containing between 25 and 250
colonies. Plates with more than 250 colonies
cannot be counted and are designated too
numerous to count (TNTC). Plates with fewer
than 25 colonies are designated too few to count
(TFTC). Count the colonies on each plate. If at
all possible, a special counter such as a Quebec
colony counter should be used (figure 19.2a).
Your instructor will demonstrate how to use this
counter or a handheld counter (figure 19.2b).
10. Calculate the number of bacteria (CFU) per
milliliter or gram of sample by dividing the
number of colonies by the dilution factor (see
appendix A). The number of colonies per ml
reported should reflect the precision of the
method and should not include more than two
significant figures. For example, suppose the plate
of the 10~6 dilution yielded a count of 130
colonies. Then, the number of bacteria in 1 ml of
the original sample can be calculated as follows:
Bacteria/ml = (130) 4- (lO"6) = 1.3 x 10⁸
or
130,000,000.
11. Record your results in the report for exercise 19.
118 Basic Laboratory and Culture Techniques
Harley-Prescott: I III. Basic Laboratory and I 19. Determination of
Laboratory Exercises in Culture Techniques Bacterial Numbers
Microbiology, Fifth Edition
©The McGraw-Hill
Companies. 2002
Figure 19.1 Quantitative Plating Procedure.
1.0ml 1.0ml
1.0 ml
1.0ml
0.1 ml
Pour agar
into
each plate
aseptically
Too numerous
to count
(TNTC)
TNTC
0
colonies
*Discard pipette after each transfer.
Figure 19.2 Colony Counters, (a) The Leica Dark-field Quebec Colony Counter. The counter illuminates the petri plate uniformly
from the side, and the plate is magnified for easier counting of small colonies. The exclusive dark-field design provides even, glarefree
illumination. Contrasted against dark-field background, colonies are bright—readily distinguished from other structures in agar. In this
model, an electric probe (not shown) is touched to each colony to record the count automatically, (b) An electronic handheld colony
counter. This model is a combination marker and counter. When the petri plate is touched, it is marked by the pen and counted at the same
time. An electronic beep verifies each entry. A cumulative total appears on an easy-to-read LCD.
(b)
(a)
Determination of Bacterial Numbers 119
Harley-Prescott:
Laboratory Exercises in
Microbiology, Fifth Edition
III. Basic Laboratory and
Culture Techniques
19. Determination of
Bacterial Numbers
©The McGraw-Hill
Companies. 2002
Figure 19.3 Twofold Serial Dilution for Standard Curve.
3 ml
3 ml 3 ml
Discard
No sterile These tubes contain 3 ml of sterile
broth broth plus the diluted sample
1/1 1/2 1/4 1/8 1/16
*Discard pipette after each transfer.
Figure 19.4 Typical Spectrophotometers, (a) The top photo
illustrates an analog model where (A) is the sample holder; (B) the
power switch/zero control knob; (C) the 100% T control knob;
(D) the wavelength control knob, (b) The bottom photo is a
digital model that features direct concentration readout.
(a)
Turbidimetry Determination of Bacterial Numbers
1. Put one empty tube and four tubes of the sterile
tryptic soy broth in a test-tube rack. With the
exception of the empty tube, each tube contains
3 ml of sterile broth. Use four of these tubes
(tubes 2 to 5) of broth to make four serial
dilutions of the culture (figure 19.3).
2. Standardize and use the spectrophotometer (figure
19.4) as follows:
a. Turn on the spectrophotometer by rotating
knob B in figure 19.4 to the right.
b. Set the monochromator dial (D in figure
19.4) so that the correct wavelength in
nanometers (550 to 600 nm) is lined up with
the indicator in the window adjacent to this
dial. (Your instructor will inform you which
wavelength to use.)
c. When there is no cuvette in the cuvette holder
(A in figure 19.4), the light source is blocked.
The pointer should thus read zero
transmittance or infinite absorbance. This is at
the left end of the scale. Turn knob B until the
pointer is aligned with the left end of the scale.
d. Place in the cuvette holder (A in figure 19.4)
the cuvette that contains just sterile broth.
(b)
This tube is called the blank because it has a
sample concentration equal to zero. It should
therefore have an absorbance of zero (or a
transmittance of 100%). This is at the right
end of the scale. Set the pointer to the right
end of the scale using knob C (figure 19.4).
Place the other cuvettes, which contain the
diluted bacterial suspension, in the cuvette
chamber one at a time. Repeat steps c and d
between experimental readings to confirm
settings.
Close the hatch and read the absorbance
values of each bacterial dilution, and record
your values. Remember to mix the bacterial
suspension just before reading its absorbance.
Record your values in the report for exercise 19.
Using the plate count data, calculate the colony-
forming units per milliliter for each dilution.
HINTS AND PRECAUTIONS
When mixing dilution tubes, do not use a vortex mixer.
120
Basic Laboratory and Culture Techniques
Harley-Prescott: III. Basic Laboratory and 19. Determination of
Laboratory Exercises In Culture Techniques Bacterial Numbers
Microbiology, Fifth Edition
Laboratory Report
Lab Section:
Determination of Bacterial Numbers
1. Record your observations and calculated bacterial counts per milliliter in the following table.
Petri Plate Dilution ml of Dilution Plated Number of Colonies Bacterial Count per ml of Sample3
1
2
3
4
aTliis value is also expressed as colony-forming units per milliliter (CFU/ml).
2. Record your data from the turbidimetry experiment in the following table.
Turbidity-Absorbance Standard Curve
Dilution CFU/ml % T Absorbance
Undiluted
1/2 dilution
1/4 dilution
1/8 dilution
1/16 dilution
©The McGraw-Hill
Companies. 2002
19
Name:
121
Harley-Prescott: I III. Basic Laboratory and I 19. Determination of I I ©The McGraw-Hill
Laboratory Exercises In Culture Techniques Bacterial Numbers Companies. 2002
Microbiology, Fifth Edition
3. Construct a cell biomass standard curve by plotting the absorbance on the y-axis and the colony-forming units
per milliliter on the x-axis.
1/24 1/12 1/6 1/3 1/1
Cell biomass per dilution
122 Basic Laboratory and Culture Techniques
Harley-Prescott: I III. Basic Laboratory and I 19. Determination of I I ©The McGraw-Hill
Laboratory Exercises In Culture Techniques Bacterial Numbers Companies. 2002
Microbiology, Fifth Edition
Review Questions
1. What is the difference between % Tand absorbance?
2. Why is the viable plate count technique considered to be an indirect measurement of cell density, whereas the
turbidimetry method is not a "count" at all?
3. Why is absorbance used in constructing a calibration curve instead of percent transmittance?
4. What is the purpose of constructing a calibration curve?
5. Why is it necessary to perform a plate count in conjunction with the turbidimetry procedure?
6. Give several reasons why it is necessary to shake the water blanks 25 times.
7. WhatisaCFU?
Determination of Bacterial Numbers 123
Harley-Prescott: I III. Basic Laboratory and I 19. Determination of I I ©The McGraw-Hill
Laboratory Exercises In Culture Techniques Bacterial Numbers Companies. 2002
Microbiology, Fifth Edition
8. How would you prepare a series of dilutions to get a final dilution of 10~10? Outline each step.
9. Why was 550 to 600 nm used in the spectroscopy portion of this experiment?
10. How would you define biomass?
11. What are several advantages to spectrophotometric determination of bacterial numbers? Several
disadvantages?
124 Basic Laboratory and Culture Techniques
Harley-Prescott:
Laboratory Exercises in
Microbiology, Fifth Edition
IV. Biochemical Activities
of Bacteria
Introduction
©The McGraw-Hill
Companies. 2002
PART FOUR
Biochemical Activities of Bacteria
Life is driven by nothing else but electrons, by the energy given off
by these electrons while cascading down from the high level to which
they have been boosted up by photons. An electron going around
is a little current. What drives life is thus a little current,
kept up by the sunshine. All the complexes of intermediary
metabolism are but lacework around this basic fact.
Albert Azent-Gyorgi (American physician and
biochemist, Nobel recipient, 1893—1986)
Bacteria accomplish their various biochemical activities
(growth and multiplication) using raw materials
(nutrients) obtained from the environment. The biochemical
transformations that occur both inside and outside of
bacteria are governed by biological catalysts called enzymes.
This part of the laboratory manual presents exercises
that have been designed to experimentally demonstrate or
test for some of the biochemical activities of bacteria. This
will be accomplished by observing the ability of bacteria to
use enzymes and degrade carbohydrates, lipids, proteins,
and amino acids. The metabolism, or use, of these organic
molecules often produces by-products that can be used in
the identification and characterization of bacteria.
After completing the exercises in Part Four, you
will be able to demonstrate the ability to use
appropriate microbiological media and test systems. This
will meet the American Society for Microbiology
Core Curriculum skill number 4 (see pp. vi—viii): (a)
using biochemical test media and (b) accurately
recording macroscopic observations.
Sir Alexander Fleming (1881-1955)
Fleming was a co-winner, with Ernst Boris Chain and Sir
Howard Walter Florey, of the Nobel prize for medicine or
physiology in 1945 for the discovery of penicillin.
In 1922, Alexander Fleming, a bacteriologist in London, had a
cold. He allowed a few drops of his nasal mucus to fall on a
culture plate containing bacteria. Some time later, he noticed
that the bacteria near the mucus had been dissolved away, and
he thought that the mucus might contain the "universal
antibiotic" he was seeking. From this observation, Fleming showed
that the antibacterial substance was an enzyme, which he
named lysozyme—lyso- because of its ability to lyse bacteria
and -zyme because it was an enzyme. He discovered a small
coccus that was particularly susceptible to lysozyme and
named it Micrococcus lysodeikticus because it exhibited lysis
(Greek deiktikos, to show). Fleming also found that tears are a
rich source of lysozyme. To continue his research, volunteers
provided tears after they suffered a few squirts of lemon—an
"ordeal by lemon." The St. Mary's Hospital Gazette published
a cartoon showing children coming in to Fleming's laboratory
for a few pennies where an attendant administered the beatings
while another collected their tears. Fleming was disappointed
to learn that lysozyme was not effective against harmful
bacteria. However, seven years later, he discovered a highly
effective antibiotic: penicillin—a striking illustration of Pasteur's
famous comment that "Chance favors the prepared mind."
125
Harley-Prescott:
Laboratory Exercises in
Microbiology, Fifth Edition
IV. Biochemical Activities
of Bacteria
20. Carbohydrates I:
Fermentation
andBGalactosidase
Activity
©The McGraw-Hill
Companies. 2002
EXERCISE
20
Carbohydrates I:
Fermentation and (3-Galactosidase Activity
SAFETY CONSIDERATIONS
Be careful with the Bunsen burner flame. Seventy
percent ethanol is flammable—keep away from open flames.
Keep all culture tubes upright in a test-tube rack or in
empty cans.
Materials per Student
20- to 24-hour tryptic soy broth cultures of
Escherichia coli (ATCC 11229), Alcaligenes
faecalis (ATCC 8750), Salmonella cholerae-
suis (ATCC 29631), and a 7- to 10-day
Sabouraud dextrose plate culture of
Saccharomyces cerevisiae (ATCC 2366)
phenol red (or bromcresol purple) dextrose, lactose,
and sucrose peptone broths with Durham tubes
Bunsen burner
inoculating loop and forceps
test-tube rack
incubator set at 35°C
5 tryptic agar base tubes
differentiation disks for dextrose, lactose, sucrose
(Difco, BBL, or KEY Scientific Products, 1402
Chisholm Trail, Suite D, Round Rock, TX 78681;
800-843-153 9; www. key scientific, com)
ONPG disks (Difco) or ONPG tablets (KEY
Scientific Products) for (3-galactosidase
inoculating needle and forceps
100-ml beakers containing 70% ethanol
1-ml pipette and pipettor
sterile 0.85% NaCl (for (3-galactosidase test)
3 sterile test tubes
Learning Objectives
Each student should be able to
1. Understand the biochemical process of fermentation
2. Describe how the carbohydrate fermentation
patterns of some bacteria result in the production
of an acid, or an acid and a gas
3. Explain how a Durham tube or a tryptic agar base
tube and a differentiation disk can be used to
detect acid and gas production
4. Perform a carbohydrate and a (3-galactosidase
fermentation test
5. Understand the function of (3-galactosidase
Suggested Reading in Textbook
1. Fermentations, section 9.3.
Pronunciation Guide
Alcaligenes faecalis (al-kah-LIJ-e-neez fee-KAL-iss)
Escherichia coli (esh-er-I-ke-a KOH-lee)
Salmonella cholerae-suis (sal-mon-EL-ah col-ER-AE
su-is)
Saccharomyces cerevisiae (sak-a-row-MY-sees seri-
VlSS-ee-eye)
Staphylococcus aureus (staf-il-oh-KOK-kus ORE-ee-us)
Why Are the Above Microorganisms
Used in This Exercise?
In this exercise, students will observe how microbial
fermentation can yield acid, gas, or acid and a gas. Students
also will test microorganisms for the presence of the
enzyme P-galactosidase. To accomplish these objectives, the
authors have chosen three bacteria and one yeast, each with
a different fermentation pattern. Escherichia coli is a
facultatively anaerobic gram-negative rod that produces acid and
gas by catabolizing D-glucose (dextrose) and other
carbohydrates. E. coli is P-galactosidase positive since it can also
use lactose as its sole source of carbon. Alcaligenes faecalis
is an obligately aerobic rod, coccal rod, or coccus that uses
acetate, propionate, butyrate, and some other organic acids
as a sole carbon and energy source; because carbohydrates
are not used, it does not produce acid or gas. A. faecalis also
is P-galactosidase negative. Salmonella cholerae-suis is a
facultatively anaerobic gram-negative rod having both a
respiratory and fermentative type of metabolism; thus,
D-glucose and other types of carbohydrates are metabolized with
126
Harley-Prescott: IV. Biochemical Activities
Laboratory Exercises In of Bacteria
Microbiology, Fifth Edition
CH,OH CH,OH
H^°N
h\°H VI
H OH
/lX^^h
H OH
.actose
R-form)
20. Carbohydrates 1:
Fermentation
andBGalactosldase
Activity
R-galactosidase
r '
H,0
CH,OH
HOk^\OH +
rv oh h y\
H OH
R-galactose
©The McGraw-Hill
Companies. 2002
CH,OH
H^\0H
Fv oh hy\
Hoy—^S h
H OH
R-glucose
the production of acid and sometimes gas. S. cholerae-suis
is P-galactosidase positive. The yeast, Saccharomyces cere-
visiae, will ferment glucose (but not sucrose) to produce
gas, but no acid. S. cerevisiae is P-galactosidase negative.
Principles
Fermentations are energy-producing biochemical
reactions in which organic molecules serve both as electron
acceptors and donors. The ability of microorganisms to
ferment carbohydrates and the types of products formed
are very useful in identification. A given carbohydrate
may be fermented to a number of different end products
depending upon the microorganism involved (figure
20.1). These end products (alcohols, acids, gases, or
other organic molecules) are characteristic of the
particular microorganisms. For example, if fermenting
bacteria are grown in a liquid culture medium containing the
carbohydrate glucose, they may produce organic acids
as by-products of the fermentation. These acids are
released into the medium and lower its pH. If a pH
indicator such as phenol red or bromcresol purple is included
in the medium, the acid production will change the
medium from its original color to yellow (figures 20.2,
20.3; see also appendix E).
Gases produced during the fermentation process
can be detected by using a small, inverted tube, called
a Durham tube (named after Herbert Edward
Durham, English bacteriologist, 1866-1945), within
the liquid culture medium. After adding the proper
amount of broth, Durham tubes are inserted into each
culture tube. During autoclaving, the air is expelled
from the Durham tubes, and they become filled with
the medium. If gas is produced, the liquid medium
inside the Durham tube will be displaced, entrapping
the gas in the form of a bubble (figure 20.2).
Some microorganisms, such as E. coli, can use
lactose as their sole source of carbon. An essential enzyme
in the metabolism of this sugar is (3-galactosidase.
(3-galactosidase hydrolyzes lactose to galactose and
glucose as shown in a previous diagram.
Instead of lactose, the natural substrate of this
enzyme, an artificial substrate, ONPG (o-nitro-phenyl-
(3-D-galactopyranoside), can be used. (3-galactosidase
catalyzes the hydrolysis of ONPG as follows:
ONPG + H2Qp-£alactosidase>
galactose + o-nitrophenol.
ONPG is colorless but upon hydrolysis yields
o-nitrophenol, which is yellow in an alkaline
solution. If an ONPG disk or KEY tablet is incubated
with a bacterial culture and the culture turns yellow,
this is the positive test for (3-galactosidase activity
(figure 20.4).
Each of the above tests is important in the
identification of certain bacteria.
Procedure: Durham Tube
First Period
1. Label five of the specified culture tubes with your
name, date, and type of culture medium.
2. Label the first tube E. coli; the second, S.
typhimurium; the third, A. faecalis; the fourth, S.
cerevisiae; and the fifth, "control."
3. Using aseptic technique (see figure 14.3), inoculate
each tube with the corresponding microbial culture.
Leave the fifth tube uninoculated. Care should be
taken during this step not to tip the fermentation
tube, as this may accidentally force a bubble of air
into the Durham tube and give a false-positive
result. The tubes may be mixed by rolling them
back and forth between the palms of the hands.
4. Place the five tubes in a test-tube rack and
incubate at 35°C for 24 to 48 hours.
Second Period
1. Ideally, the tubes should be examined carefully
between 2 to 4 hours, at 8 hours, and 18 hours in
order to avoid false negatives due to reversal of
the fermentation reactions that may occur with
long incubations.
2. Examine all carbohydrate broth cultures for
evidence of acid (A), or acid and gas (A/G)
production. Use figure 20.2 as a reference. Acid
Carbohydrates I: Fermentation and P-Galactosidase Activity 127
Harley-Prescott:
Laboratory Exercises in
Microbiology, Fifth Edition
IV. Biochemical Activities
of Bacteria
20. Carbohydrates I:
Fermentation
andBGalactosidase
Activity
©The McGraw-Hill
Companies. 2002
Figure 20.1 Outline of Major Fermentation Pathways. Microorganisms produce various waste products when they ferment glucose.
The by-products released (shaded boxes) are often characteristic of the microorganisms and can be used as identification tools.
Oxalo acetate
Sugars
Glycolysis
Pyruvate
NADH
r
©
NADH
Ethanol
+
CO,
CoASH
a-acetolactate
H,0
CO,
Malate
Fumarate
Succinate
A ,
Acetyl-CoA | Formic acid]
V I Ethai
'
CO,
ADP ■
ATP' i. r .
| Ethanol |
w@ I Acetate |
Acetoacetyl-CoA
, X \NADH
| Acetone | Butyryl-CoA
Acetoin
NADH
2,3,-butanediol
NADH
NADH
Propionic
acid
| Isopropanol | | Butanol | | Butyric acid |
1. Lactic acid fermentation. Lactic acid bacteria (Streptococcus, Lactobacillus).
2. Alcoholic fermentation. Zymomonas, Saccharomyces.
3. Propionic acid fermentation. Propionic acid bacteria (Propionibacterium).
4. 2,3,-butanediol fermentation. Enterobacter, Serratia, Bacillus.
5. Mixed acid fermentation. Enteric bacteria (Escherichia, Enterobacter, Salmonella, Proteus).
6. Butyric acid fermentation. Clostridium.
Figure 20.2 Carbohydrate Fermentation, (a) Possible carbohydrate fermentation patterns of microorganisms, with phenol red as the
pH indicator, (b) The tube on the left is the control. The next tube shows alcohol femientation. Notice the gas bubble at the top. The third
tube from the left shows no carbohydrate fermentation (negative). The tube on the right shows acid and gas production.
Durham
tube
^Original
color
(red)
No
fermentation
Acid
production
Acid and
gas production
(b)
Alcohol
fermentation
128 Biochemical Activities of Bacteria
Harley-Prescott:
Laboratory Exercises in
Microbiology, Fifth Edition
IV. Biochemical Activities
of Bacteria
20. Carbohydrates I:
Fermentation
andBGalactosidase
Activity
©The McGraw-Hill
Companies. 2002
Figure 20.3 Carbohydrate Fermentation Using KEY Rapid
Fermentation Tablets. The color change from red (right tube) to
yellow (left tube) indicates acid production. Fermentation may be
apparent within 30 minutes and usually is complete in 6 hours, but
tubes should be held for 48 hours before being discarded. Gas
production is shown by the appearance of bubbles near the bottom
of the tube. Both of these tubes are negative for gas production.
Figure 20.4 ONPG Test Using KEY Tablets. An ONPG
positive reaction can be detected within 30 minutes by the
appearance of a yellow color (tube on the left). A positive ONPG
test shows that the bacteria being tested contain the enzyme beta-
galactosidase, can ferment lactose, and may be properly classed as
lactose fermenters. The tube on the right has not changed color;
thus the bacteria would be ONPG negative.
production is detected by the medium turning
yellow, and gas production by a gas bubble in the
Durham tube.
3. The control tube should be negative for acid and
gas production, and should have no turbidity.
4. Based on your observations, determine and record
in the report for exercise 20 whether or not each
microorganism was capable of fermenting the
carbohydrate substrate with the production of
acid, or acid and gas. Compare your results with
other students who used other sugars.
Procedure: Sugar-Differentiation Disk
First Period
1. Label five tryptic agar base tubes with your name,
date, and the sugar to be studied.
2. Label the first tube E. coli; the second,
S. cholerae-suis; the third, A. faecalis; the fourth,
S. cerevisiae; and the fifth, "control."
3. Using sterile forceps (or forceps that have been
dipped in 70% ethanol and flamed), aseptically
add one of your assigned sugar disks to each tube.
4. Inoculate each tube except the control in the
following way. Heavily load the inoculating
needle with microbial paste, then stab the deep
until the needle reaches about Vi to % of the agar
depth. The inoculating needle should strike the
sugar-differentiation disk off-center and push it
into the soft agar. The control tube should be
stabbed with a sterile inoculating needle.
5. Incubate the tubes at 35°C for 24 hours.
Second Period
1. Examine the tubes after 2 to 4 hours, about 8
hours, and 18 hours.
2. Acid production is shown by yellowing of the
medium around the disk, which often spreads
throughout the agar. Gas production yields
bubbles and splitting of the soft agar. Remember
that positive-acid results can reverse with
further incubation. Therefore, yellowing of the
agar at 2 to 4 hours is a positive result, even if
the tube turns red to violet upon longer
incubation.
3. Compare your results with those of students who
used different sugars.
ONPG Disks or Tablets
1. Dispense 0.2 ml of sterile 0.85% NaCl (Difco
disks) or 1 ml (about 40 drops with a Pasteur
pipette) of distilled water (KEY tablets) into four
sterile test tubes.
2. Label each tube with the microorganism to be
inoculated. Add your name and the date.
3. Suspend a loopful of paste (concentrated
microorganisms) into each tube.
Carbohydrates I: Fermentation and P-Galactosidase Activity 129
Harley-Prescott:
Laboratory Exercises in
Microbiology, Fifth Edition
IV. Biochemical Activities
of Bacteria
20. Carbohydrates I:
Fermentation
andBGalactosidase
Activity
©The McGraw-Hill
Companies. 2002
4. Place an ONPG disk or tablet into each tube and
incubate at 35°C.
5. Check at 20 minutes and 4 hours (the KEY tablet
test can run up to 6 hours).
6. A positive (3-galactosidase test is indicated by a
yellow color; no color change indicates a negative
test.
7. Record your results in the report for exercise 20.
HINTS AND PRECAUTIONS
(1) The amount of inoculum placed in each tube should
be small. Too much inoculum may lead to overgrowth
and neutralization of acidic fermentation products by
the bacteria, thus resulting in false negatives. (2) Do not
vortex the fermentation tubes when inoculating because
this can force air into the Durham tubes and result in
false-positive recordings for gas production.
130 Biochemical Activities of Bacteria
Harley-Prescott:
Laboratory Exercises in
Microbiology, Fifth Edition
IV. Biochemical Activities 20. Carbohydrates I:
of Bacteria Fermentation
andBGalactosidase
Activity
©The McGraw-Hill
Companies. 2002
Laboratory Report 2,0
Name:
Date:
Lab Section:
Carbohydrates I: Fermentation and $-Galactosidase Activity
1. Complete the following table on carbohydrate fermentation.
Biochemical Results
Bacteria
E. coli
S. cholerae-suis
A. faecalis
S. cerevisae
Lactose
(A), (A/G), (-)
Dextrose
(A), (A/G), (-)
Sucrose
(A), (A/G), (-)
A = Acid production.
A/G = Acid and gas production.
G = Gas production.
- = No growth or no change (alkahne).
2. Indicate whetlier the following bacteria have (J-galactosidase activity.
a. A. faecalis
b. E. coli
c. S. cholerae-suis
d. S. cerevisiae
131
Harley-Prescott: I IV. Biochemical Activities I 20. Carbohydrates I: I I ©The McGraw-Hill
Laboratory Exercises in of Bacteria Fermentation Companies. 2002
Microbiology, Fifth Edition andBGalactosidase
Activity
Review Questions
1. Define fermentation.
2. Do all microorganisms produce the same end product from pyruvate? Explain your answer.
3. What is the purpose of the phenol red or bromcresol purple in the fermentation tube?
4. What is the function of the Durham tube in the fermentation tube?
5. What are some of the metabolic end products produced by the different microorganisms used in this
experiment?
6. What is the color of phenol red at an acid pH?
7. What is the function of (J-galactosidase?
132 Biochemical Activities of Bacteria
Harley-Prescott:
Laboratory Exercises in
Microbiology, Fifth Edition
IV. Biochemical Activities
of Bacteria
21. Carbohydrates II: Triple
Sugar Iron Agar Test
©The McGraw-Hill
Companies. 2002
EXERCISE
21
Carbohydrates II: Triple Sugar Iron Agar Test
SAFETY CONSIDERATIONS
Be careful with the Bunsen burner flame. Be careful
when working with these bacteria, especially Shigella
dysenteriae, as they are known pathogens. Keep all
culture tubes upright in a test-tube rack or in empty cans.
Materials per Student
24- to 48-hour tryptic soy broth cultures of
Alcaligenes faecalis (ATCC 8750), Escherichia
coli (ATCC 11229), Proteus vulgaris (ATCC
13315), Pseudomonas aeruginosa (ATCC
10145), and Shigella flexneri (ATCC 12661)
5 triple sugar iron agar slants
Bunsen burner
inoculating needle
incubator set at 35°C
test-tube rack
Learning Objectives
Each student should be able to
1. Understand the biochemical reactions involved in
the triple sugar iron agar test
2. Differentiate among members of the family
Enterobacteriaceae
3. Distinguish between the Enterobacteriaceae and
other intestinal bacteria
4. Perform a TSI test
Suggested Reading in Textbook
1. Carbohydrate catabolism, section 9.7.
2. 'The, Enterobacteriaceae, section 22.3.
Pronunciation Guide
Alcaligenes faecalis (al-kah-LIJ-e-neez fee-KAL-iss)
Escherichia coli (esh-er-I-ke-a KOH-lee)
Proteus vulgaris (PRO-tee-us vul-GA-ris)
Pseudomonas aeruginosa (soo-do-MO-nas a-ruh-jin-
OH-sah)
Shigella flexneri (shi-GEL-la flex-ner-i)
Why Are the Above Bacteria Used
in This Exercise?
This exercise will provide the student experience in using the
triple sugar iron agar test to differentiate among the members
of the family Enterobacteriaceae and between
Enterobacteriaceae and other intestinal bacteria. The authors have
chosen three common bacteria in the family Enterobacteriaceae:
Escherichia coli, Proteus vulgaris, and Shigella flexneri. All
three are facultatively anaerobic gram-negative rods. In a
TSI tube, E. coli produces an acid butt, an acid or alkaline
slant, and no H2S, but does produce gas. P. vulgaris
produces an acid butt, an acid or alkaline slant, H2S, and gas. S.
flexneri produces an acid butt, an alkaline slant, no H2S, and
no gas. For the other intestinal bacteria, the authors have
chosen Alcaligenes faecalis and Pseudomonas aeruginosa.
Both of these intestinal bacteria are gram-negative aerobic
rods. In a TSI tube, A. faecalis produces an alkaline butt,
alkaline slant, H2S, and gas; P. aeruginosa, an acid butt,
alkaline slant, H2S, and gas.
Principles
As originally described in 1911 by F. F. Russell, the
triple sugar iron (TSI) agar test is generally used for
the identification of enteric bacteria
(Enterobacteriaceae). It is also used to distinguish the
Enterobacteriaceae from other gram-negative intestinal bacilli by
their ability to catabolize glucose, lactose, or sucrose,
and to liberate sulfides from ferrous ammonium sulfate
or sodium thiosulfate. (See exercise 24 for the
biochemistry of H2S production.) TSI agar slants contain a 1%
concentration of lactose and sucrose, and a 0.1%
glucose concentration. The pH indicator, phenol red, is also
133
Harley-Prescott:
Laboratory Exercises in
Microbiology, Fifth Edition
IV. Biochemical Activities
of Bacteria
21. Carbohydrates II: Triple
Sugar Iron Agar Test
©The McGraw-Hill
Companies. 2002
Figure 21.1 Triple Sugar Iron Reactions (TSI-1) and Their
Interpretation, (a) The tube on the left has a yellow
butt (acid), red slant (alkaline), H2S production as indicated by
blackening of the agar, and no gas production, (b) The tube on the
right shows no H2S formation, a yellow slant (acid), gas production,
and an acid butt. Note that the gas on the bottom has lifted the agar.
Figure 21.2 Triple Sugar Iron Reactions (TSI-2) and
Their Interpretation, (a) The tube on the left has a red butt
(alkaline), red slant (alkaline), and no acid or H2S production,
(b) The tube on the right has a yellow slant (acid), yellow butt
(acid), and no gas or H2S production.
(a)
(b)
Slant
Butt
Gas
H2S
Tube a
K
A
-
+
Tube b
A
A
+
-
(a)
(b)
Slant
Butt
Gas
H2S
Tube a
K
K
-
-
Tube b
A
A
-
-
incorporated into the medium to detect acid production
from carbohydrate fermentation (see exercise 20).
Often Kligler Iron Agar (named after I. J. Kligler
in 1917), a differential medium similar to TSI, is used
to obtain approximately the same information.
TSI slants are inoculated by streaking the slant
surface using a zig-zag streak pattern and then
stabbing the agar deep with a straight inoculating needle
(see figure 14.5). Incubation is for 18 to 24 hours in
order to detect the presence of sugar fermentation, gas
production, and H2S production. The following
reactions may occur in the TSI tube (figures 21.1-21.3):
1. Yellow butt (A) and red slant (A) due to the
fermentation of glucose (phenol red indicator turns
yellow due to the persisting acid formation in the
butt). The slant remains red (alkaline) (K) because
of the limited glucose in the medium and, therefore,
limited acid formation, which does not persist.
2. A yellow butt (A) and slant (A) due to the
fermentation of lactose and/or sucrose (yellow slant
and butt due to the high concentration of these
sugars) leading to excessive acid formation in the
entire medium.
3. Gas formation noted by splitting of the agar.
4. Gas formation (H2S) seen by blackening of the
agar.
5. Red butt (K) and slant (K) indicates that none of
the sugars were fermented and neither gas nor
H2S were produced.
Table 21.1 gives reactions usually expected from
some of the more frequently encountered genera of
the Enterobacteriaceae. Figure 21.4 summarizes the
Table 21.1
Bacterium
Enterobacter
Escherichia
Klebsiella
Citrobacter
Proteus vulgaris
Edwardsiella
Morganella
Serratia
Shigella
Salmonella typhi
Results of TSI Reaction
Butt
A
A
A
A
A
A
A
A
A
A
TSI Reaction
Slant
A
AorK
A
KorA
AorK
K
K
KorA
K
K
H2S
-
-
-
V
+
V
-
-
-
+
Gas
+
+
+
+
+
+
+
V
-
-
A = acid, K = alkaline, V = varies between species
134
Biochemical Activities of Bacteria
Harley-Prescott:
Laboratory Exercises in
Microbiology, Fifth Edition
IV. Biochemical Activities
of Bacteria
21. Carbohydrates II: Triple
Sugar Iron Agar Test
©The McGraw-Hill
Companies. 2002
Figure 21.3 Triple Sugar Iron Reactions (TSI-3) and
Their Interpretation, (a) The tube on the left is an uninoculated
control. Notice the red color, (b) The second tube from, the left
has a yellow slant (acid), yellow butt (acid), gas production at the
bottom, of the tube, and no H2S production. This would indicate a
weak lactose fermenter. (c) The third tube from the left has a red
slant (alkaline), red butt (alkaline), and the black indicates H2S
production, but no gas. (d) The tube on the right has a red slant
(alkaline), yellow butt (acid), H2S production, but no gas
production. This would indicate a nonlactose fermenter.
(a) (b) (c) (d)
possible reactions and results in TSI for the various
bacteria used in this experiment.
Procedure
First Period
1. Label each of the TSI agar slants with the name of
the bacterium to be inoculated. Use one of the tubes
as a control. Place your name and date on each tube.
2. Using aseptic technique (see figure 14.3), streak
the slant with the appropriate bacterium and then
stab the butt. Screw the caps on the tubes but do
not tighten!
3. Incubate for only 18 to 24 hours at 35°C for
changes in the butt and on the slant. Tubes should
be incubated and checked daily for up to seven
days in order to observe blackening.
Second Period
1. Examine all slant cultures for the color of the
slant and butt, and for the presence or absence of
blackening within the medium.
2. Record your results in the report for exercise 21.
Slant
Butt
Gas
H2S
Tube a
-
-
-
-
Tube b
A
A
+
-
Tube c
K
K
-
+
Tube d
K
A
-
+
HINTS AND PRECAUTIONS
(1) If screw-cap tubes are used, leave the caps loose about
Vt turn after inoculating the tubes to prevent excessive
disruption of the agar should large amounts of gas be
produced during incubation. (2) Record the butt as acid
production if the black color of FeS masks the color in the butt.
Figure 21.4 The Possible Reactions and Results in TSI Agar for the Various Bacteria Used in This Experiment.
No carbohydrate fermentation or hydrogen sulfide production
Example: Alcaligenes faecalis
glucose, lactose, sucrose -> glucose, lactose, sucrose
(red slant/red butt) (K; red slant/red butt)
cysteine -> cysteine
(no black color)
Glucose fermentation only
Example: Shigella flexneri
glucose -> decrease in pH due to acid
(red butt) (A; yellow butt)
(continued)
Carbohydrates II: Triple Sugar Iron Agar Test 135
Harley-Prescott: I IV. Biochemical Activities I 21. Carbohydrates II: Triple I I ©The McGraw-Hill
Laboratory Exercises in of Bacteria Sugar Iron Agar Test Companies. 2002
Microbiology, Fifth Edition
Figure 21.2 (continued)
lactose, sucrose -> lactose, sucrose
(red slant) (K; red slant)
cysteine -> cysteine
(no black color)
Glucose fermentation only with hydrogen sulfide production
Example: Pseudomonas aeruginosa
glucose -> decrease in pH due to acid
(red butt) (A; yellow butt)
lactose, sucrose -> lactose, sucrose
(red slant) (K; red slant)
cysteine -> H2S production
H2S + FeS04 -> FeS
(black color in media)
Lactose and/or sucrose and glucose fermentation
Example: Escherichia coli
glucose -> decrease in pH due to acid
(red butt) (A; yellow butt)
lactose and/or sucrose -> decrease in pH due to acid
(red butt) (A; yellow slant)
cysteine -> cysteine
(no black color in media)
Lactose and/or sucrose and glucose fermentation with hydrogen sulfide (H2S) production
Example: Proteus vulgaris
glucose -> decrease in pH due to acid
(red butt) (A; yellow butt)
lactose and/or sucrose -> decrease in pH due to acid
(red slant) (A; yellow butt)
cysteine -> H2S production
H2S + FeS04 -> FeS production
136 (black color in media)
Harley-Prescott: I IV. Biochemical Activities I 21. Carbohydrates II: Triple I I ©The McGraw-Hill
Laboratory Exercises in of Bacteria Sugar Iron Agar Test Companies. 2002
Microbiology, Fifth Edition
Laboratory Report Z 1
Name:
Date: _
Lab Section:
Carbohydrates II: Triple Sugar Iron Agar Test
1. Complete the following table on the TSI test.
Carbohydrate Fermentation H2S Production
Bacterium Butt Color Slant Color Black H2S
A. faecalis
E. coli
P. vulgaris
P. aeruginosa
S. flexneri
137
©The McGraw-Hill
Companies. 2002
Review Questions
1. For what bacteria would you use the TSI test?
2. Why must TSI test observations be made between 18 to 24 hours after inoculation?
3. Distinguish between an acid and alkaline slant.
4. What is the purpose of thiosulfate in the TSI agar?
5. What is meant by a saccharolytic bacterium? What reaction would it give in a TSI tube?
6. Why is there more lactose and sucrose in TSI agar than glucose?
7. What is the pH indicator in TSI agar?
138 Biochemical Activities of Bacteria
Harley-Prescott: IV. Biochemical Activities 21. Carbohydrates II: Triple
Laboratory Exercises in of Bacteria Sugar Iron Agar Test
Microbiology, Fifth Edition
Harley-Prescott:
Laboratory Exercises in
Microbiology, Fifth Edition
IV. Biochemical Activities
of Bacteria
22. Carbohydrates III:
Starch Hydrolysis
©The McGraw-Hill
Companies. 2002
EXERCISE
22
Carbohydrates III: Starch Hydrolysis
SAFETY CONSIDERATIONS
Be careful with the Bunsen burner flame. No mouth
pipetting. Use caution to avoid dripping bacteria-laden iodine
solution out of the plates while making observations.
Materials per Student
24- to 48-hour tryptic soy agar slant cultures of
Bacillus subtilis (ATCC 6051), Escherichia
coli (ATCC 11229), and Proteus vulgaris
(ATCC 13315)
1 starch agar plate
Gram's iodine (1 g I2, 2 g KI, 300 ml distilled
water)
wax pencil
inoculating loop
Bunsen burner
Pasteur pipette with bulbs
incubator set at 35°C
Learning Objectives
Each student should be able to
1. Understand the biochemistry of starch hydrolysis
2. Perform a starch hydrolysis test
Pronunciation Guide
Bacillus subtilis (bah-SIL-lus SUB-til-is)
Escherichia coli (esh-er-I-ke-a KOH-lee)
Proteus vulgaris (PRO-te-us vul-GA-ris)
Why Are the Following Bacteria
Used in This Exercise?
The major objective of this exercise is for the student to gain
expertise in performing a starch hydrolysis test. If a
bacterium produces a-amylase, it can hydrolyze starch; if a-
amylase is not produced, the bacterium will not hydrolyze
starch. The three bacteria the authors have chosen vary in
their ability to produce a-amylase. Bacillus subtilis is
amylase positive; Escherichia coli is amylase negative; and
Proteus vulgaris is variable; it may be positive or negative.
Principles
Many bacteria produce enzymes called hydrolases.
Hydrolases catalyze the splitting of organic molecules
into smaller molecules in the presence of water. This
exercise will present the hydrolysis of the
carbohydrate starch.
The starch molecule consists of two constituents:
amylose, an unbranched glucose polymer (200 to 300
units) and amylopectin, a large branched polymer.
Both amylopectin and amylose are rapidly hydrolyzed
by certain bacteria, using their a-amylases, to yield
dextrins, maltose, and glucose, as follows:
Starch
[Amylose + Amylopectin]
(Large polysaccharide)
a-amylase
ILO
Dextrins + Maltose + Glucose
(Intermediate (Disaccharide) (Monosaccharide)
polysaccharides)
Gram's iodine can be used to indicate the
presence of starch. When it contacts starch, it forms a blue
to brown complex. Hydrolyzed starch does not
produce a color change. If a clear area appears after
adding Gram's iodine to a medium containing starch
Carbohydrates III: Starch Hydrolysis
139
Harley-Prescott:
Laboratory Exercises in
Microbiology, Fifth Edition
IV. Biochemical Activities
of Bacteria
22. Carbohydrates III:
Starch Hydrolysis
©The McGraw-Hill
Companies. 2002
Figure 22.1 Test for Starch Hydrolysis After Adding Gram's Iodine. (a,c) Positive hydrolysis. The complete breakdown of all
starch is shown by the clear (white) halo, (b) Negative hydrolysis. Starch remains intact—no color change as indicated by the purple to
brown color around the streak.
(a)
(b)
a-amylase-producing
bacteria
Starch
(c)
and bacterial growth, a-amylase has been produced by
the bacteria (figure 22.1). If there is no clearing,
starch has not been hydrolyzed.
Procedure
First Period: Starch Hydrolysis Test
1. With a wax pencil, divide a starch agar plate into
three straight sections as indicated. Label each
with the bacterium to be inoculated. Add your
name and date to the plate.
2. Using aseptic technique (see figure 14.3), streak
the respective bacteria onto the plate in a straight
line within the section.
3. Incubate the plate for 24 to 48 hours at 35°C.
Second Period
1. Place several drops of Gram's iodine on each of
the line streaks on the starch agar plate. If the area
around the line of growth is clear, starch has been
hydrolyzed, and the test is positive; if it is not
clear or the entire medium turns blue, starch has
not been hydrolyzed, and the test is negative.
2. If the results are difficult to read, an alternative
procedure is to invert the plate (after removing the
lid) over a beaker containing iodine crystals. The
rising vapor will react with the starch without the
interference of the red-brown color of the
unreacted iodine.
3. Record your results in the report for exercise 22.
HINTS AND PRECAUTIONS
(1) Carefully adding iodine to only a small part of the
growth at one end of the streak does not contaminate
the plate, and it may be reincubated and subsequently
retested if necessary. (2) Upon addition of iodine,
record the presence or absence of blue color
immediately. (3) Test bacteria giving a red-violet color with
iodine (partial hydrolysis) should be retested after an
additional incubation period (see no. 1 above).
140 Biochemical Activities of Bacteria
Harley-Prescott: IV. Biochemical Activities 22. Carbohydrates III:
Laboratory Exercises In of Bacteria Starch Hydrolysis
Microbiology, Fifth Edition
©The McGraw-Hill
Companies. 2002
Laboratory Report 22
Name:
Date: _
Lab Section:
Carbohydrates III: Starch Hydrolysis
1. In the following plate, sketch the presence or absence of starch hydrolysis.
141
Harley-Prescott: IV. Biochemical Activities 22. Carbohydrates III
Laboratory Exercises in of Bacteria Starch Hydrolysis
Microbiology, Fifth Edition
Review Questions
1. Describe the function of hydrolases.
2. Describe the chemistry of starch hydrolysis.
3. The chemical used to detect microbial starch hydrolysis on starch plates is
4. What does starch hydrolysis by a bacterium indicate?
5. Amylase is an enzyme that attacks starch. The smallest product of this hydrolysis is called
6. How is it possible that bacteria may grow heavily on starch agar but not necessarily produce a-amylase?
7. What are the ingredients of starch agar?
©The McGraw-Hill
Companies. 2002
142 Biochemical Activities of Bacteria
Harley-Prescott:
Laboratory Exercises in
Microbiology, Fifth Edition
IV. Biochemical Activities
of Bacteria
23. Lipids: Lipid Hydrolysis
©The McGraw-Hill
Companies. 2002
EXERCISE
23
Lipids: Lipid Hydrolysis
SAFETY CONSIDERATIONS
Be careful with the Bunsen burner flame.
Materials per Student
tryptic soy broth cultures of Proteus mirabilis
(ATCC 14273) and Staphylococcus
epidermidis (ATCC 14990)
petri plate containing spirit blue agar with 3%
Bacto lipase reagent (Difco)
inoculating loop
incubator set at 35°C
wax pencil
Bunsen burner
Learning Objectives
Each student should be able to
1. Understand the biochemical process of lipid
hydrolysis
2. Determine the ability of bacteria to hydrolyze
lipids by producing specific lipases
3. Explain how it is possible to detect the hydrolysis
of lipids by a color change reaction
4. Perform a lipid hydrolysis test
Suggested Reading in Textbook
1. Lipid Catabolism, section 9.8; see also figures
9.21 and 9.22.
Pronunciation Guide
Proteus mirabilis (PRO-te-us meh-RA-bill-iss)
Staphylococcus epidermidis (staf-il-oh-KOK-kus
e-pee-DER-meh-diss)
Why Are the Following Bacteria
Used in This Exercise?
After this exercise, the student will be able to differentiate
between bacteria that can produce lipases and those that
cannot. The authors have thus chosen a lipase positive and
a lipase negative bacterium to demonstrate this difference.
Proteus mirabilis (L. adj. wonderful, surprising) is a
facultatively anaerobic gram-negative rod that produces lipase.
P. mirabilis occurs in the intestines of humans and a wide
variety of animals; it also occurs in manure, soil, and
polluted waters. Staphylococcus epidermidis (Gr. epidermidis,
outer skin) is a gram-positive coccus that does not produce
lipase. It is mostly associated with the skin and mucous
membranes of warm-blooded vertebrates but is often
isolated from food products, dust, and water.
Principles
Lipids are high molecular weight compounds
possessing large amounts of stored energy. The two
common lipids catabolized by bacteria are the
triglycerides (triacylglycerols) and phospholipids.
Triglycerides are hydrolyzed by the enzymes called
lipases into glycerol and free fatty acid molecules as
indicated in the following diagram. Glycerol and free
fatty acid molecules can then be taken up by the
bacterial cell and further metabolized through reactions
of glycolysis, (3-oxidation pathway, and the citric
acid cycle. These lipids can also enter other
metabolic pathways where they are used for the synthesis
of cell membrane phospholipids. Since phospholipids
are functional components of all cells, the ability of
bacteria to hydrolyze host-cell phospholipids is an
important factor in the spread of pathogenic bacteria.
143
Harley-Prescott:
Laboratory Exercises in
Microbiology, Fifth Edition
IV. Biochemical Activities
of Bacteria
23. Lipids: Lipid Hydrolysis
©The McGraw-Hill
Companies. 2002
In addition, when lipase-producing bacteria
contaminate food products, the lipolytic bacteria hydrolyze
the lipids, causing spoilage termed rancidity.
CH, — O—C—R,
O
II
CH—O — C—R, + 3H,0 ■
O
lipases
CH, — O—C—R3
Triglyceride
Water
CH, — OH + R,COOH
CH —OH + R,COOH
CH, — OH + R3COOH
Glycerol Fatty acids
When these same lipids are added to an agar-
solidified culture medium and are cultured with
lipolytic bacteria, the surrounding medium becomes
acidic due to the release of fatty acids. By adding a
pH indicator to the culture medium, it is possible to
detect the hydrolysis of lipids by a color change. For
example, spirit blue agar with Bacto lipase reagent
has a lavender color. It turns royal blue around
lipolytic bacterial colonies due to the acid pH.
Procedure
First Period
1. With a wax pencil, divide the bottom of a spirit
blue agar plate in half and label half the plate P.
mirabilis and the other half S. epidermidis. Place
your name and date on the plate.
2. Spot-inoculate (figure 23.1a) the spirit blue agar
plates with the respective bacteria.
3. Incubate the plate in an inverted position for 24 to
48 hours at 35°C.
Second Period
1. Examine the plate for evidence of lipid hydrolysis
(figure 23.1b). Hydrolysis is evidenced by a blue
zone around the bacterial growth. If no lipid
hydrolysis has taken place, the zone around the
colony will remain lavender.
2. Measure the zone of hydrolysis and record your
results in the report for exercise 23.
Figure 23.1 Lipid Hydrolysis, (a) Procedure for spot inoculating
a spirit blue agar plate, (b) Positive and negative reactions.
HINTS AND PRECAUTIONS
(1) When one is trying to observe color changes in agar
media, it is often useful to put the plates against different-
colored backgrounds. (2) It is also advantageous to try
different light angles by holding the plates in various
positions with respect to the light source and looking at the
cultures from both above and below.
144 Biochemical Activities of Bacteria
Harley-Prescott: IV. Biochemical Activities 23. Lipids: Lipid Hydrolysis
Laboratory Exercises in of Bacteria
Microbiology, Fifth Edition
©The McGraw-Hill
Companies. 2002
Laboratory Report Zj
Name:
Date: _
Lab Section:
Lipids: Lipid Hydrolysis
1. Based on your observations, complete the following table on lipid hydrolysis.
Bacterium
Lipid Hydrolysis
Zone of Hydrolysis
P. mirabilis
S. epidermidis
2. Sketch and describe what is happening on the petri plate with respect to lipid hydrolysis.
145
©The McGraw-Hill
Companies. 2002
Review Questions
1. What is the function of lipases?
2. How can one determine whether a bacterium is lipolytic?
3. What are two functions of lipids in bacterial cells?
4. Give some examples of foods that might be spoiled by lipolytic bacteria.
5. How is the ability of certain bacteria to attack phospholipids related to pathogenicity?
6. What is the difference between a triglyceride (triacylglycerol) and a phospholipid?
7. What are several pathways that bacteria use to metabolize lipids?
146 Biochemical Activities of Bacteria
Harley-Prescott: IV. Biochemical Activities 23. Lipids: Lipid Hydrolysis
Laboratory Exercises in of Bacteria
Microbiology, Fifth Edition
Harley-Prescott:
Laboratory Exercises in
Microbiology, Fifth Edition
IV. Biochemical Activities
of Bacteria
24. Proteins, Amino Acids,
& Enzymes I: Hydrogen
Sulfide Production &
Motility
©The McGraw-Hill
Companies. 2002
EXERCISE
24
Proteins, Amino Acids, and Enzymes I:
Hydrogen Sulfide Production and Motility
SAFETY CONSIDERATIONS
Be careful with the Bunsen burner flame. Be careful
when handling the Kovacs' reagent. It contains
concentrated hydrochloric acid. Keep all culture tubes upright
in a test-tube rack or in empty cans.
Materials per Student
24- to 48-hour tryptic soy broth cultures of
Klebsiella pneumoniae (ATCC el3883),
Proteus vulgaris (ATCC 13315), and
Salmonella typhimurium (ATCC 29631)
Bunsen burner
inoculating needle
test-tube rack
3 SIM (sulfide-indole-motility) agar deeps
3 motility test medium deeps
Kovacs' reagent
incubator set at 35°C
wax pencil
Learning Objectives
Each student should be able to
1. Understand the biochemical process of hydrogen
sulfide production by bacteria
2. Describe two ways hydrogen sulfide production
can be detected
3. Describe how motility can be detected
4. Perform hydrogen sulfide and motility tests
Suggested Reading in Textbook
1. Requirements for Nitrogen, Phosphorus, and
Sulfur, section 5.4.
2. Oxidation of Inorganic Molecules, section 9.10.
Pronunciation Guide
Klebsiella pneumoniae (kleb-se-EL-lah nu-MO-ne-ah)
Proteus vulgaris (PRO-tee-us vul-GA-ris)
Salmonella typhimurium (sal-mon-EL-ah tie-fee-
MUR-ee-um)
Why Are the Following Bacteria
Used in This Exercise?
In this exercise, the student will gain experience in
differentiating between bacteria based on hydrogen sulfide
production (H2S) and motility. Thus, the authors have chosen
two bacteria that are H2S producers and motile, and one
bacterium that is nonmotile and does not produce H2S.
Salmonella typhimurium (Gr. typhus, a stupor) is a
facultatively anaerobic gram-negative rod that occurs in humans,
warm- and cold-blooded animals, food, and the
environment. It is H2S positive and motile. Proteus vulgaris (L.
vulgaris, common) is a gram-negative facultatively
anaerobic rod that occurs in the intestines of both humans and a
wide variety of animals, manure, and polluted waters. It is
motile and produces H2S. Klebsiella pneumonia (Gr.
pneumonia, pneumonia, inflammation of the lungs) is a
facultatively anaerobic gram-negative rod that occurs in human
feces, clinical specimens, soil, water, grain, fruits, and
vegetables. It is nonmotile and does not produce H2S.
Principles
Many proteins are rich in sulfur-containing amino
acids such as cysteine. When these proteins are hy-
drolyzed by some bacteria, the amino acids are
released and taken up as nutrients. Cysteine, in the
presence of cysteine desulfurase, loses its sulfur atom
tlirough the addition of hydrogen from water to form
hydrogen sulfide gas (figure 24.1a).
Gaseous hydrogen sulfide may also be produced
by the reduction of inorganic sulfur-containing
compounds such as thiosulfate (S2O32), sulfate (SO42),
or sulfite (SO32). For example, when certain bacteria
take up sodium thiosulfate, they can reduce it to
sulfite using the enzyme thiosulfate reductase, with the
release of hydrogen sulfide gas (figure 24.1b).
147
Harley-Prescott: I IV. Biochemical Activities I 24. Proteins, Amino Acids,
Laboratory Exercises in of Bacteria & Enzymes I: Hydrogen
Microbiology, Fifth Edition Sulfide Production &
Motility
©The McGraw-Hill
Companies. 2002
Figure 24.1 Hydrogen Sulfide Production. It should be noted that not all bacteria are either H2S positive with motility or H2S
negative and no motility. Many other possible combinations exist.
Biochemistry within bacteria
CH2 —SH CH3
' cysteine '
H20 + H2N-C-H —J— ► C = 0 + NH3 + H2S
I desulfurase i
COOH COOH
(a)
Cysteine
Pyruvic acid Ammonia Hydrogen
sulfide gas
, , thiosulfate „
2S,0~+ 4H+ — ► 2S02; + 2KS
reductase
(b)
Thiosulfate
Sulfite Hydrogen
sulfide gas
Biochemistry within tubes
Fe (NHJ2S04 + Bacterial acids
SIM
medium
Black
precipitate
Growth not
restricted to stab line
No black
precipitate
Growth restricted
to stab line
H2S (+) plus motility
H2S (-) and no motility
148
Biochemical Activities of Bacteria
Harley-Prescott:
Laboratory Exercises in
Microbiology, Fifth Edition
IV. Biochemical Activities
of Bacteria
24. Proteins, Amino Acids,
& Enzymes I: Hydrogen
Sulfide Production &
Motility
©The McGraw-Hill
Companies. 2002
In this exercise, the SIM medium (named after
J. S. Simmons in 1926) contains peptones and sodium
thiosulfate as substrates, and ferrous ammonium
sulfate, Fe(NH4)S04, as the H2S indicator. Cysteine is a
component of the peptones used in SIM medium.
Sufficient agar is present to make the medium semisolid.
Once H2S is produced, it combines with the ferrous
ammonium sulfate, forming an insoluble, black ferrous
sulfide precipitate that can be seen along the line of the
stab inoculation. If the organism is also motile, the
entire tube may turn black. This black line or tube
indicates a positive H2S reaction; absence of a black
precipitate indicates a negative reaction (figure 24.1c).
SIM agar may also be used to detect the presence
or absence of motility in bacteria as well as indole
production. (See exercise 25 for a discussion of indole
production.) Motility is present when the growth of
the culture is not restricted to the stab line of the
inoculation. Growth of nonmotile bacteria is confined to
the line of inoculation.
One can also use semisolid media (motility test
medium deeps) to determine whether a bacterial strain
is motile. During growth, motile bacteria will migrate
from the line of inoculation to form a dense turbidity
in the surrounding medium; nonmotile bacteria will
grow only along the line of the inoculation.
Procedure
First Period
1. Label each of the SIM agar deep tubes with the
name of the bacterium to be inoculated, your
name, and date.
2. Using aseptic technique (see figure 14.3),
inoculate each tube with the appropriate
bacterium by stabbing the medium % of the way
to the bottom of the tube. Do the same for the
three motility test medium deeps.
3. Incubate the cultures for 24 to 48 hours at 35°C.
Second Period
1. Examine the SIM cultures for the presence or
absence of a black precipitate along the line of the
stab inoculation. A black precipitate of FeS
indicates the presence of H2S.
2. Based on your observations, determine and record
in the report for exercise 27 whether or not each
bacterium was capable of H2S production, and the
presence (+) or absence (-) of motility.
3. If desired, one can also test for indole production
by adding 5 drops of Kovacs' (named after the
German bacteriologist, Nikolaus Kovacs, in the
early 1900s) reagent to the SIM cultures and
looking for the development of a red color at the
top of the deeps (see exercise 25).
HINTS AND PRECAUTIONS
(1) Be careful when inoculating the deeps to withdraw
the needle from the agar in a line as close as possible to
the line used when entering the agar. (2) Another aid in
visualizing motility is to slowly rotate questionable tubes
containing small amounts of growth around the stab line.
When this is done, the growth appears much wider on
the two opposite sides and narrower on the other two
sides on which the bacteria is not motile. (3) To observe
motility, make sure the outside of your tubes are clean
by wiping them with a Kimwipe. (4) Any blackening of
the medium is considered a positive test for H2S.
Proteins, Amino Acids, and Enzymes I: Hydrogen Sulfide Production and Motility 149
Harley-Prescott: IV. Biochemical Activities 24. Proteins, Amino Acids,
Laboratory Exercises in of Bacteria & Enzymes I: Hydrogen
Microbiology, Fifth Edition Sulfide Production &
Motility
©The McGraw-Hill
Companies. 2002
Laboratory Report ZA-
Name:
Date: _
Lab Section:
Proteins, Amino Acids, and Enzymes I:
Hydrogen Sulfide Production and Motility
1. Complete the following table on hydrogen sulfide production and motility.
Motility (+) or (-)
Bacterium
H2S Production (+) or (-)
SIM
Motility Test Medium
K. pneumoniae
S. typhimurium
P. vulgaris
2. Sketch and describe what is happening in each tube with respect to H2S production and motility.
K. pneumoniae
S. typhimurium
P. vulgaris
151
Harley-Prescott: I IV. Biochemical Activities I 24. Proteins, Amino Acids, I I ©The McGraw-Hill
Laboratory Exercises in of Bacteria & Enzymes I: Hydrogen Companies. 2002
Microbiology, Fifth Edition Sulfide Production &
Motility
Review Questions
1. Of what use to bacteria is the ability to produce H2S?
2. How is SIM medium used to detect motility?
3. What substrates are acted on in SIM medium in order for H2S to be produced?
4. In addition to H2S production and motility, for what otlier test can SIM medium be used?
5. How does a black precipitate of FeS indicate the production of H2S?
6. What does cysteine desulfurase catalyze? Show the reaction.
7. What does thiosulfate reductase catalyze? Show the reaction.
152 Biochemical Activities of Bacteria
Harley-Prescott:
Laboratory Exercises in
Microbiology, Fifth Edition
IV. Biochemical Activities
of Bacteria
25. Proteins, Amino Acids,
and Enzymes II: The IMViC
Tests
©The McGraw-Hill
Companies. 2002
EXERCISE
25
Proteins, Amino Acids, and Enzymes II:
The IMViC Tests
SAFETY CONSIDERATIONS
Be careful with the Bunsen burner flame. No mouth
pipetting. Barritt's reagent contains naphthol, which is
toxic and may cause peeling of the skin; thus, wear
gloves when using this reagent. Kovacs' reagent is also
caustic to the skin and mucous membranes due to the
concentrated HC1 and p-dimethylaminobenzaldehyde.
In case of contact with either reagent, immediately flush
eyes or skin with plenty of water for at least 15 minutes.
Keep all culture tubes upright in a test-tube rack or can.
Materials per Student
24- to 48-hour tryptic soy broth cultures of
Enterobacter aerogenes (ATCC 13048),
Escherichia coli (ATCC 11229), Klebsiella
oxytoca (ATCC 13182), and Proteus vulgaris
(ATCC 13315)
4 SIM agar deep tubes
Kovacs' reagent, KEY Indole Test Tablets, or
Difco's SpotTest Indole Reagent Kovacs
Bunsen burner
inoculating loop and needle
4 MR-VP broth tubes each containing 5 ml of
medium
methyl red indicator
Barritt's reagent (solutions A and B) or Difco's
SpotTest Voges-Proskauer reagents A and B
4 Simmons citrate agar slants
4 empty test tubes
4-ml pipettes with pipettor
wax pencil
disposable gloves
Learning Objectives
Each student should be able to
1. Understand how some bacteria degrade the amino
acid tryptophan
2. Determine the ability of some bacteria to oxidize
glucose with the production of acid end products
3. Differentiate between glucose-fermenting enteric
bacteria
4. Explain the purpose of the Voges-Proskauer test
5. Differentiate among enteric bacteria on the basis
of their ability to ferment citrate
6. Perform the IMViC series of tests
Suggested Reading in Textbook
1. Catabolism of Carbohydrates and Intracellular
Reserve Polymers, section 9.7, see figure 9.10.
2. The Enterobacteriaceae, section 22.3, see
table 22.7.
Pronunciation Guide
Enterobacter aerogenes (en-ter-oh-B AK-ter a-RAH-
jen-eez)
Escherichia coli (esh-er-I-ke-a KOH-lee)
Klebsiella oxytoca (kleb-se-EL-lah ok-se-TO-se-ah)
Proteus vulgaris (PRO-te-us vul-GA-ris)
Salmonella (sal-mon-EL-ah)
Shigella (shi-GEL-la)
Enterobacteriaceae
Enterobacter aerogenes
Escherichia coli
Klebsiella oxytoca
Alcaligenes faecalis
Proteus vulgaris
Salmonella typhimurium
Shigella dysentariae
Lactose
fermenters
Lactose
nonfermenter
Some
enteric
(intestinal)
bacteria
153
Harley-Prescott: I IV. Biochemical Activities I 25. Proteins, Amino Acids, I I ©The McGraw-Hill
Laboratory Exercises in of Bacteria and Enzymes II: The IMViC Companies. 2002
Microbiology, Fifth Edition Tests
^-—>\ >, Why Are the Following Bacteria
^^zz:^^-—' Used in This Exercise?
In this exercise the student will learn how to perform the
IMViC series of tests that distinguish between different
enteric (pertaining to the small intestine) bacteria. To illustrate
the various IMViC reactions, the authors have chosen four
enteric bacteria. Enterobacter aerogenes (Gr. aer, air) is a
facultatively anaerobic gram-negative rod that has peritri-
chous flagella. It is a motile lactose fermenter. E. aerogenes
is widely distributed in nature, occurring in fresh water, soil,
sewage, plants, vegetables, and animal and human feces. It is
indole negative, MR negative, VP positive, and Simmons
citrate positive. Escherichia coli (Gr. colon, large intestine) is
a facultatively anaerobic gram-negative rod that is motile
with peritrichous flagella or nonmotile. It is a lactose
fermenter. E. coli occurs as normal flora in the lower part of the
intestine of warm-blooded animals. It is indole positive, MR
positive, VP negative, and Simmons citrate negative.
Klebsiella oxytoca is a facultatively anaerobic gram-negative rod.
It is nonmotile and a lactose fermenter. K. oxytoca occurs in
human feces and clinical specimens, soil, water, grain, fruits,
and vegetables. It is indole positive, often MR negative, VP
positive, and Simmons citrate positive. Proteus vulgaris (L.
vulgaris, common) is a gram-negative facultatively
anaerobic rod that occurs in the intestines of humans and a wide
variety of animals, in manure, and in polluted waters. It has
peritrichous flagella, is motile, and does not ferment lactose.
P. vulgaris is indole positive, MR positive, VP negative, and
sometimes Simmons citrate positive.
Medical Application
The following medically important bacteria are MR +:
Escherichia coli (opportunistic urinary tract infections),
Salmonella typhi (typhoid fever), Shigella dysenteriae
(bacterial dysentery), and Yersinia pestis (plague). The following
is MR — : Enterobacter aerogenes (urinary tract infections).
Bordetella pertussis (whooping cough) is citrate
negative whereas all other Bordetella species are citrate
positive. The enteric bacteria such as Klebsiella pneumoniae
(pneumonia) and Enterobacter are citrate positive and can
be distinguished in the clinical laboratory from the
opportunistic pathogen Escherichia coli (urinary tract infections)
which is citrate negative.
Principles
The identification of enteric (intestinal) bacteria is of
prime importance in determining certain food-borne
and waterborne diseases. Many of the bacteria that are
found in the intestines of humans and other mammals
belong to the family Enterobacteriaceae. These
bacteria are short, gram-negative, nonsporing bacilli. They
can be subdivided into lactose fermenters and nonfer-
menters. Examples include pathogens (Salmonella and
Shigella, lactose nonfermenters), occasional pathogens
(Klebsiella and Escherichia, lactose fermenters; and
Proteus, lactose nonfermenter), and normal intestinal
microbiota (Enterobacter, lactose fermenter).
The differentiation and identification of these
enteric bacteria can be accomplished by using the
IMViC test (indole, methyl red, Voges-Proskauer,
and citrate; the "i" is for ease of pronunciation).
Indole Production
The amino acid tryptophan is found in nearly all
proteins. Bacteria that contain the enzyme tryptophanase
can hydrolyze tryptophan to its metabolic products,
namely, indole, pyruvic acid, and ammonia. The
bacteria use the pyruvic acid and ammonia to satisfy
nutritional needs; indole is not used and accumulates in the
medium. The presence of indole can be detected by the
addition of Kovacs' reagent. Kovacs' reagent reacts
with the indole, producing a bright red compound on
the surface of the medium (figures 25.1, 25.2). Bacteria
producing a red layer following addition of Kovacs'
reagent are indole positive; the absence of a red color
indicates tryptophan was not hydrolyzed, and the
bacteria are indole negative.
Methyl Red Test
All enteric bacteria catabolize glucose for their energy
needs; however, the end products vary depending on
the enzyme pathways present in the bacteria. The pH
indicator methyl red (see appendix E) detects a pH
change to the acid range as a result of acidic end
products such as lactic, acetic, and formic acids. This test is
of value in distinguishing between E. coli (a mixed
acid fermenter) and E. aerogenes (a butanediol
fermenter). Mixed acid fermenters such as E. coli
produce a mixture of fermentation acids and thus acidify
the medium. Butanediol fermenters such as E.
aerogenes form butanediol, acetoin, and fewer organic
acids. The pH of the medium does not fall as low as
during mixed acid fermentation. As illustrated in
figure 25.3, at a pH of 4, the methyl red indicator turns
red—a positive methyl red test. At a pH of 6, the
indicator turns yellow—a negative methyl red test.
Voges-Proskauer Test
The Voges-Proskauer test (named after Daniel Voges,
German physician, and Bernhard Proskauer, German
154 Biochemical Activities of Bacteria
Harley-Prescott:
Laboratory Exercises in
Microbiology, Fifth Edition
IV. Biochemical Activities
of Bacteria
25. Proteins, Amino Acids,
and Enzymes II: The IMViC
Tests
©The McGraw-Hill
Companies. 2002
Figure 25.1 Indole Test. The tube on the left is indole negative and the tube on the right is indole positive.
Biochemistry within bacteria
tryptophanase
Tryptophan ► indole + pyruvic acid + ammonia
Biochemistry within tubes
Indole + p-dimethylamino-
HCI
-► Rosindole dye
benzaldehyde amv' alcohol (cherry red compound)
Kovacs' reagent
Kovacs' reagent
/ \
Indole-
Indole +
Figure 25.2 Indole Test With KEY Tablets. The development
of a red color within a few minutes after adding 10 drops of Kovacs'
reagent—a positive test (tube on the left). Negative reactions are
colorless (tube on the right).
hygienist, in the early twentieth century) identifies
bacteria that ferment glucose, leading to 2,3-butanediol
accumulation in the medium. The addition of 40%
KOH and a 5% solution of alpha-naphthol in absolute
etlianol (Barritt's reagent) will detect the presence of
acetoin—a precursor in the synthesis of 2,3-butanediol.
In the presence of the reagents and acetoin, a cherry-red
color develops. Development of a red color in the
culture medium 15 minutes following the addition of
Barritt's reagent represents a positive VP test; absence of a
red color is a negative VP test (figure 25.4).
Citrate Utilization Test
The citrate utilization test determines the ability of
bacteria to use citrate as a sole carbon source for their
energy needs. This ability depends on the presence of a
citrate permease that facilitates transport of citrate
into the bacterium. Once inside the bacterium, citrate is
converted to pyruvic acid and CO2. Simmons citrate
agar slants contain sodium citrate as the carbon source,
NTTf1" as a nitrogen source, and the pH indicator (see
appendix D) bromothymol blue. This test is done on
slants since O2 is necessary for citrate utilization. When
bacteria oxidize citrate, they remove it from the
medium and liberate CO2. CO2 combines with sodium
(supplied by sodium citrate) and water to form sodium
carbonate—an alkaline product. This raises the pH,
turns the pH indicator to a blue color, and represents a
positive citrate test; absence of a color change is a
negative citrate test (figure 25.5). Citrate-negative
cultures will also show no growth in the medium.
Procedure
Indole Production Test
First Period
1. Label each of the SIM deep tubes with the name of
the bacterium to be inoculated (E. coli, P. vulgaris,
Proteins, Amino Acids, and Enzymes II: The IMViC Tests 155
Harley-Prescott: I IV. Biochemical Activities I 25. Proteins, Amino Acids,
Laboratory Exercises in of Bacteria and Enzymes II: The IMViC
Microbiology, Fifth Edition Tests
©The McGraw-Hill
Companies. 2002
Figure 25.3 Methyl Red Test, (a) Escherichia coli, MR+. (b) Enterobacter aerogenes, MR-
Biochemistry within bacteria
E. aerogenes
Glucose-
■ 2 pyruvate -
E. coli
Biochemistry within tubes
Acetyl-Co A,
2,3-butanediol,
ethanol,
lactic and
formic
acids
Succinic,
lactic,
->~ acetic,
formic
acids
-►CO2 + H2(pH = 6.0)
-►CO2 + H2(pH = 4.0)
Methyl
red
indicator
/ \
(a)
Methyl
red +
(b)
Methyl
red -
Figure 25.4 Voges-Proskauer Test, (a) Enterobacter aerogenes, VP+. (b) Escherichia coli, VP-
Biochemistry within bacteria
co2 co2
Glucose + 1/2 02 —► 2 pyruvate -^t- a-acetolactate -^t- acetoin —>- 2,3-butanediol
Biochemistry within tubes
40% KOH
Acetoin + a-naphthol ► diacetyl + creatine (pink complex)
absolute
alcohol
Barritt's reagent
/ \
(a)
VP+
(b)
VP-
156 Biochemical Activities of Bacteria
Harley-Prescott:
Laboratory Exercises in
Microbiology, Fifth Edition
IV. Biochemical Activities
of Bacteria
25. Proteins, Amino Acids,
and Enzymes II: The IMViC
Tests
©The McGraw-Hill
Companies. 2002
Figure 25.5 Citrate Test, (a) Enterohacter aerogenes; blue color is positive, (b) Escherichia coli; green color is negative.
Biochemistry within bacteria
Sodium Citrate permease Pyruvic , .. . . «^
.. . - to. J . , + oxaloacetic acid + CO,
citrate citrase acld
Biochemistry within tubes
Na,C03 (alkaline) pH
(a)
Citrate +
(b)
Citrate -
and E. aerogenes), your name, and date. (If SIM
medium is unavailable, tryptic soy broth is a good
substitute for testing indole production.)
2. Using aseptic technique (see figure 14.3),
inoculate each tube by a stab inoculation or with a
loopful of culture.
3. Incubate the tubes for about 24 hours at 35°C.
Second Period
1. Remove the tubes from the incubator and while
wearing disposable gloves, add 0.5 ml (about 10
drops) of Kovacs' reagent to each tube, and shake
the tube gently. A deep red develops in the
presence of indole. Negative reactions remain
colorless or light yellow.
2. Based on your observations, determine and record
in the report for exercise 25 whether or not each
bacterium was capable of hydrolyzing the
tryptophan.
Methyl Red Test
First Period
1. Label each of the MR-VP broth media tubes with
the name of the bacterium (E. coli, E. aerogenes,
and K. oxytoca) to be inoculated, your name, and
date.
2. Using aseptic technique, inoculate each tube with
the appropriate bacterium by means of a loop
inoculation.
3. Incubate all tubes at 35°C for 24 to 48 hours. For
slow fermenters, it may take four to five days.
Second Period
1. Transfer Vs of each culture into an empty test tube
and set these aside for the Voges-Proskauer test.
2. To the % of the culture remaining in each tube,
add 0.2 ml (about 4 to 5 drops) of methyl red
indicator. Carefully note any color change (a red
color is positive).
3. Based on your observations, determine and record
in the report for exercise 25 whether or not each
bacterium was capable of fermenting glucose,
lowering the pH of the medium.
Voges-Proskauer Test
Second Period
1. Use the Vs aliquot from the methyl red test. While
wearing disposable gloves, add 0.6 ml of Barritt's
solution A and 0.2 ml of solution B to each
culture, and shake vigorously to aerate.
(Alternatively, about 15 drops of reagent A
followed by 5 drops of reagent B works fairly
Proteins, Amino Acids, and Enzymes II: The IMViC Tests 157
Harley-Prescott:
Laboratory Exercises in
Microbiology, Fifth Edition
IV. Biochemical Activities
of Bacteria
25. Proteins, Amino Acids,
and Enzymes II: The IMViC
Tests
©The McGraw-Hill
Companies. 2002
well and avoids pipetting.) Positive reactions
occur at once or within 20 minutes and are
indicated by the presence of a red color.
2. Based on your observations, determine and record
in the report for exercise 25 whether or not each
bacterium was capable of fermenting glucose,
with the production of acetylmethylcarbinol.
Citrate Utilization Test
First Period
1. Label each of the Simmons citrate agar slants
with the name of the bacterium (E. coli, E.
aerogenes, and K. oxytoca) to be inoculated, your
name, and date.
2. Using aseptic technique, inoculate each bacterium
into its proper tube by means of a stab-and-streak
inoculation.
3. Incubate these cultures for 24 to 48 hours at 35°C.
Second Period
1. Examine the slant cultures for the presence or
absence of growth and for any change in color
from green to blue.
2. Based on your observations, determine and record
in the report for exercise 25 whether or not each
bacterium was capable of using citrate as an
energy source. The development of a deep blue
color is a positive test.
HINTS AND PRECAUTIONS
(1) Incubate the SIM agar deeps for only 24 hours prior
to adding Kovacs' reagent because the indole may be
further metabolized if the incubation time is prolonged.
This could result in false negatives for some bacteria
that produce indole from tryptophan. (2) The indole
production test also can be performed by adding Ko-
vacs' reagent to a tryptic soy broth culture. (3) Use no
more than five drops of methyl red. If more is added,
this may impart a red color to the medium that is
unrelated to specific metabolic end-products.
158 Biochemical Activities of Bacteria
Harley-Prescott: I IV. Biochemical Activities I 25. Proteins, Amino Acids, I I ©The McGraw-Hill
Laboratory Exercises in of Bacteria and Enzymes II: The IMViC Companies. 2002
Microbiology, Fifth Edition Tests
Laboratory Report 25
Name:
Date: _
Lab Section:
Proteins, Amino Acids, and Enzymes II: The IMViC Tests
1. Based on your observations, record whetlier or not each bacterium was capable of hydrolyzing the tryptophan
to produce indole.
Bacterium Color of Reagent Layer Indole + or -
E. coli
E. aerogenes
P. vulgaris
2. Based on your observations, record whemer or not each bacterium was capable of fermenting glucose, with
the production of either acids or acetylmethylcarbinol.
Methyl Red Test Voges-Proskauer Test
Bacterium Medium Color + or - Medium Color + or -
E. coli
E. aerogenes
K. oxytoca
3. Based on your observations, record whemer or not each bacterium was capable of using citrate as an energy
source.
Bacterium Presence or Absence of Growth Color of Medium Citrate Use + or -
E. coli
E. aerogenes
K. oxytoca
159
Harley-Prescott: I IV. Biochemical Activities I 25. Proteins, Amino Acids, I I ©The McGraw-Hill
Laboratory Exercises in of Bacteria and Enzymes II: The IMViC Companies. 2002
Microbiology, Fifth Edition Tests
Review Questions
1. What is the component in the SIM deep tubes that makes this medium suitable to detect the production of
indole by bacteria?
2. What organic molecule is necessary to detect mixed acid fermentation by bacteria?
3. Why did you shake the MR-VP culture?
4. Can a bacterium that ferments using the 2,3-butanediol patliway also use the mixed acid route? Explain your
answer.
5. Why is a chemically defined medium necessary for the detection of citrate utilization by bacteria?
6. Complete the following table.
Test Medium Significant Ingredients
Indole
Methyl red
Voges-Proskauer
Citrate
160 Biochemical Activities of Bacteria
Harley-Prescott:
Laboratory Exercises in
Microbiology, Fifth Edition
IV. Biochemical Activities
of Bacteria
26. Proteins, Amino Acids,
and Enzymes III: Casein
Hydrolysis
©The McGraw-Hill
Companies. 2002
EXERCISE
26
Proteins, Amino Acids, and Enzymes III:
Casein Hydrolysis
SAFETY CONSIDERATIONS
Be careful with the Bunsen burner flame and the water
baths. No mouth pipetting. Keep all culture tubes
upright in a test-tube rack or in a can.
Pronunciation Guide
Bacillus subtilis (bah-SIL-lus SUB-til-us)
Escherichia coli (esh-er-I-ke-a KOH-lee)
Pseudomonas aeruginosa (soo-do-MO-nas a-ruh-jin-
OH-sa)
Materials per Student
24- to 48-hour tryptic soy broth cultures of
Escherichia coli (ATCC 11229), Bacillus
subtilis (ATCC 6051), and Pseudomonas
aeruginosa (ATCC 10145)
tubes of plate count agar (tryptone glucose yeast
agar)
inoculating loop
boiling water bath
sterile petri plates
water bath set at 48° to 50°C
water bath set at 35°C
Bunsen burner
test-tube rack
wax pencil
sterile skim milk
5-ml pipette with pipettor
Learning Objectives
Each student should be able to
1. Understand the biochemical process of
deamination
2. Determine the ability of some bacteria to secrete
proteolytic enzymes capable of hydrolyzing the
protein casein by performing a casein hydrolysis
test
3. Explain what a zone of proteolysis indicates
Suggested Reading in Textbook
1. Protein and Amino Acid Catabolism, section 9.9.
2. Dairy Products, section 41.6.
Why Are the Above Bacteria Used
in This Exercise?
In this exercise, the student will learn how to perform a
casein hydrolysis test to detect the presence of proteolytic
enzymes. Thus, the authors have chosen three bacteria that
have been used in prior exercises. Escherichia coli will
produce a negative reaction; Bacillus subtilis and Pseudomonas
aeruginosa will produce positive reactions.
Principles
Casein is a large milk protein incapable of permeating
the plasma membrane of bacteria. (Its presence is the
reason milk is white.) Therefore, before casein can be
used by some bacteria as their source of carbon and
energy, it must be degraded into amino acids. Bacteria
accomplish this by secreting proteolytic enzymes that
catalyze the hydrolysis of casein to yield amino acids
(figure 26.1), which are then transported into the cell
and catabolized.
When milk is mixed with plate count agar, the
casein in the milk makes the agar cloudy. Following
inoculation of the plate count agar, bacteria that liberate
proteases (e.g., caseinase) will produce a zone of
proteolysis (a clear area surrounding the colony).
Clearing of the cloudy agar (a positive reaction) is the
result of a hydrolytic reaction that yields soluble amino
acids (figure 26.2b). In a negative reaction, there is no
protease activity, and the medium surrounding the
bacterial colony remains opaque (figure 26.2b)
161
Harley-Prescott: IV. Biochemical Activities 26. Proteins, Amino Acids,
Laboratory Exercises in of Bacteria and Enzymes III: Casein
Microbiology, Fifth Edition Hydrolysis
©The McGraw-Hill
Companies. 2002
Figure 26.1 Proteolytic Hydrolysis.
Protease
H
I
-*~ N C
I I
H R,
I
I
H O
C C ~~ + H,0
Peptide
bond
Peptide
^~
|
1
H
~°rm
i, ■
Carboxyl
component
^B C C «
|
1
R,
Amino
component
Procedure
First Period
1. Melt the tubes of plate count agar by placing them
in the boiling water bath. After melting, place the
tubes in the 48° to 50°C water bath for 10
minutes.
2. With a wax pencil, mark the bottom of a petri
plate into three sections: label one E. coli, the
second, B. subtilis, and the third, P. aeruginosa.
Add your name and date to the plate.
3. Pipette 2 ml of warm (48° to 50°C) sterile skim
milk into the petri plate. Add the melted agar and
mix thoroughly by moving the plate in a circular
motion. Allow this medium to gel on a cool, level
surface.
4. As shown in figure 14.3, aseptically spot-
inoculate (figure 26.2a) each third of the petri
plate with the appropriate bacterium as per the
label. Place a loopful of culture on the center of
each section and spread it in a circular fashion to
cover an area about the size of a dime or less (5 to
18 mm in diameter).
5. Incubate the plate in an inverted position at 35°C
for 24 to 48 hours.
Second Period
1. Examine the plate count agar for the presence or
absence of a clear zone (zone of proteolysis)
surrounding the growth of each of the bacterial
test organisms. You can see the clear zones best
against a black background.
2. Based on your observations, determine and record
in the report for exercise 26 which of the bacteria
were capable of hydrolyzing the casein. Also,
measure the zone of hydrolysis for each colony.
Figure 26.2 Procedure for Determining Casein
Hydrolysis, (a) Spot inoculation of a plate count agar with milk
plate, (b) Plate exhibiting two zones of proteolysis.
Plate count agar
(a)
Bacterial growth
(no proteolysis)
(b)
HINTS AND PRECAUTIONS
Aseptic technique must be followed because possible
contaminating microorganisms from the air or body
might be capable of hydrolyzing casein and thus lead to
erroneous results.
162 Biochemical Activities of Bacteria
Harley-Prescott: I IV. Biochemical Activities I 26. Proteins, Amino Acids, I I ©The McGraw-Hill
Laboratory Exercises in of Bacteria and Enzymes III: Casein Companies. 2002
Microbiology, Fifth Edition Hydrolysis
Laboratory Report Z V
Name:
Date: _
Lab Section:
Proteins, Amino Acids, and Enzymes III: Casein Hydrolysis
1. Complete the following table on casein hydrolysis.
Bacterium Casein Hydrolysis (+ or -) Diameter of Hydrolysis Zone
E. coli
. subtilis
P. aeruginosa
2. Draw your skim milk agar plates showing the growth patterns of the above three bacteria. Label accordingly.
163
Harley-Prescott: I IV. Biochemical Activities I 26. Proteins, Amino Acids, I I ©The McGraw-Hill
Laboratory Exercises in of Bacteria and Enzymes III: Casein Companies. 2002
Microbiology, Fifth Edition Hydrolysis
Review Questions
1. Define the following terms:
a. protein
b. hydrolysis
c. casein
d. protease
e. amino acid
f. peptide bond
g. proteolysis
2. How can plate count agar that contains milk be used to demonstrate proteolysis?
3. Why are some bacteria able to grow on plate count agar that contains milk even though they do not produce
any proteases?
4. Draw the chemical reaction for proteolytic hydrolysis.
5. Why was sterile skim milk used in this experiment?
6. Why is milk white?
164 Biochemical Activities of Bacteria
Harley-Prescott:
Laboratory Exercises in
Microbiology, Fifth Edition
IV. Biochemical Activities
of Bacteria
27. Proteins, Amino Acids,
and Enzymes IV: Gelatin
Hydrolysis
©The McGraw-Hill
Companies. 2002
EXERCISE
27
Proteins, Amino Acids, and Enzymes IV:
Gelatin Hydrolysis
SAFETY CONSIDERATIONS
Be careful with the Bunsen burner flame. No mouth
pipetting. Keep all culture tubes upright in a test-tube rack.
Pronunciation Guide
Enterobacter aerogenes (en-ter-oh-B AK-ter a-RAH-
jen-eez)
Escherichia coli (esh-er-I-ke-a KOH-lee)
Proteus vulgaris (PRO-te-us vul-GA-ris)
Materials per Student
24- to 48-hour tryptic soy broth cultures of
Enterobacter aerogenes (ATCC 13048, gel. +),
Escherichia coli (ATCC 11229, gel. - ), and
Proteus vulgaris (ATCC 13315, gel. +)
4 nutrient gelatin deep tubes
Bunsen burner
inoculating loop
1-ml pipettes with pipettor
refrigerator or ice-water bath
test-tube rack
incubator set at 35°C
3 KEY Rapid Gelatin Test Strips (KEY Scientific
Products, 1402 Chisholm Trail, Suite D, Round
Rock, TX 78681; 800-843-1539)
3 sterile test tubes
wax pencil
Learning Objectives
Each student should be able to
1. Understand how the proteolytic enzyme
gelatinase liquefies gelatin
2. Explain why some bacteria hydrolyze gelatin
3. Describe how gelatin liquefaction is tested for in
the laboratory, and perform a gelatin hydrolysis
test
Suggested Reading in Textbook
1. Complex Media, section 5.7; see also box 5.1 and
table 5.5.
Why Are the Above Bacteria Used
in This Exercise?
This exercise shows the student how to differentiate
between bacteria based on their ability to produce the enzyme
gelatinase. The authors have chosen the following three
bacteria to accomplish this objective. Enterobacter
aerogenes is gelatinase positive, but gelatin is very slowly
liquefied by most strains. In contrast, Proteus vulgaris also is
gelatinase positive and liquefies gelatin very rapidly.
Escherichia coli is gelatinase negative.
Medical Application
In the clinical laboratory gelatin hydrolysis is used to
distinguish between the pathogenic Staphylococcus aureus
( + ) and the nonpathogenic S. epidermidis (slow-). It can
also be used to distinguish Listeria monocytogenes (- for
gelatin hydrolysis and one cause of bacterial meningitis)
from some species of Corynebacterium.
Principles
When boiled in water, the connective tissue collagen
(which is stringy, insoluble, and indigestible) changes
into gelatin, a soluble mixture of polypeptides. Certain
bacteria are able to hydrolyze gelatin by secreting a
proteolytic enzyme called gelatinase. The resulting amino
acids can then be used as nutrients by the bacteria. Since
165
Harley-Prescott:
Laboratory Exercises in
Microbiology, Fifth Edition
IV. Biochemical Activities
of Bacteria
27. Proteins, Amino Acids,
and Enzymes IV: Gelatin
Hydrolysis
©The McGraw-Hill
Companies. 2002
hydrolyzed gelatin is no longer able to gel, it is a liquid.
The ability of some bacteria to digest gelatin is an
important characteristic in their differentiation. For
example, when grown on a gelatin medium (Thiogel),
Clostridium perfringens causes liquefaction, whereas
Bacteroides fragilis does not. Gelatin hydrolysis can
also be used to assess the pathogenicity of certain
bacteria. The production of gelatinase can often be correlated
with the ability of a bacterium to break down tissue
collagen and spread throughout the body of a host.
Gelatin liquefaction (the formation of a liquid) can
be tested for by stabbing nutrient gelatin deep tubes.
Following incubation, the cultures are placed in a
refrigerator or ice bath at 4°C until the bottom resolidifies. If
gelatin has been hydrolyzed, the medium will remain
liquid after refrigeration. If gelatin has not been hydrolyzed,
the medium will resolidify during the time it is in the
refrigerator (figure 27.1). Nutrient gelatin may require up
to a 14-day incubation period for positive results.
Another way to test for gelatinase is by the use of
KEY Rapid Test Strips. These strips are used in the
rapid test (within 24 to 48 hours) for gelatin
liquefaction. Liquefaction is demonstrated by the bacterium's
ability to remove, with gelatinase, the outer layer of
the strip when the gelatin test strip is immersed in a
suspension of bacterial cells. If gelatin is removed, the
strip changes to a blue color, and the test is positive; if
there is no color change, the test is negative.
Procedure
First Period
1. Label three nutrient gelatin deeps with your name,
date, and the bacterium to be inoculated. Label
the fourth tube "control."
2. Using aseptic technique (see figure 14.3),
inoculate three of the deeps with the appropriate
bacterium by stabbing the medium % of the way
to the bottom of the tube.
3. Incubate the four tubes for 24 to 48 hours or
longer at 35°C. The incubation time depends on
the species of bacteria; some may require
incubation for up to 2 weeks. If the latter is the
case, observe on days 7 and 14.
KEY Rapid Test
1. Into three small test tubes, pipette Vi ml (or about 20-
25 drops with a Pasteur pipette) of a heavy bacterial
suspension or suspend paste in Vi to 1 ml of water.
With a wax pencil, label each of the tubes with the
appropriate bacterium, your name, and date.
Figure 27.1 Hydrolysis of Gelatin. If gelatin is hydrolyzed by
the enzyme gelatinase, it does not gel when cooled but remains a
liquid. Thus it flows when the culture is tilted backward (right
tube). A negative control tube is on the left. Notice that the solid
gelatin does not flow when the tube is tilted.
2. Drop one gelatin test strip into each tube.
3. Incubate for 24 to 48 hours at 35°C.
Second Period
1. Remove the nutrient gelatin deep tubes from the
incubator and place them in the refrigerator at
4°C for 30 minutes or in an ice bath for 3 to 5
minutes.
2. When the bottom resolidifies, remove the tubes
and gently slant mem. Notice whether or not the
surface of the medium is fluid or liquid. If the
nutrient gelatin is liquid, this indicates that gelatin
has been hydrolyzed by the bacterium. If no
hydrolysis occurred, the medium will remain a
gel. The uninoculated control should also be
negative.
KEY Rapid Test
1. Observe the color of the three gelatin test strips.
Liquefaction will appear first along the surface of
the suspension. A blue color is a positive test; no
color change is a negative test.
2. Based on your observations, determine and record
in the report for exercise 27 which of the three
bacteria were capable of hydrolyzing gelatin.
HINTS AND PRECAUTIONS
Do not shake the tubes when moving them to a
refrigerator; gelatin digestion may have occurred only at the
surface.
166 Biochemical Activities of Bacteria
Harley-Prescott: IV. Biochemical Activities 27. Proteins, Amino Acids,
Laboratory Exercises in of Bacteria and Enzymes IV: Gelatin
Microbiology, Fifth Edition Hydrolysis
©The McGraw-Hill
Companies. 2002
Laboratory Report Z 7
Name:
Date: _
Lab Section:
Proteins, Amino Acids, and Enzymes TV: Gelatin Hydrolysis
1. Complete the following table on gelatin hydrolysis.
Gelatin Hydrolysis (+ or -)
Bacterium
Tube Results
KEY Strips
E. aerogenes
E. coli
P. vulgaris
2. Sketch and describe what is happening in each tube with respect to gelatin hydrolysis.
£ aerogenes
£ coli
P. vulgaris
167
Harley-Prescott: IV. Biochemical Activities 27. Proteins, Amino Acids,
Laboratory Exercises in of Bacteria and Enzymes IV: Gelatin
Microbiology, Fifth Edition Hydrolysis
Review Questions
1. How can gelatin hydrolysis be beneficial to certain bacteria?
2. What is gelatin?
3. What is unique about gelatin at 35°C versus 5°C?
4. Why did you refrigerate the gelatin cultures before observing them for liquefaction?
5. Can gelatin hydrolysis be correlated with the pathogenicity of a bacterium? Explain your answer.
6. Why is gelatin liquefied in the presence of gelatinase?
7. How does a KEY Rapid Gelatin Test Strip work?
©The McGraw-Hill
Companies. 2002
168 Biochemical Activities of Bacteria
Harley-Prescott:
Laboratory Exercises in
Microbiology, Fifth Edition
IV. Biochemical Activities
of Bacteria
28. Proteins, Amino Acids,
and Enzymes V: Catalase
Activity
©The McGraw-Hill
Companies. 2002
EXERCISE
28
Proteins, Amino Acids, and Enzymes V:
Catalase Activity
SAFETY CONSIDERATIONS
Be careful with the Bunsen burner flame. No mouth
pipetting. Three percent hydrogen peroxide is caustic to
the skin and mucous membranes. Keep all culture tubes
upright in a test-tube rack.
Pronunciation Guide
Enterococcus faecalis (en-te-ro-KOK-kus fee-KAL-iss)
Micrococcus luteus (my-kro-KOK-us LOO-tee-us)
Staphylococcus aureus (staf-il-oh-KOK-kus ORE-ee-us)
Materials per Student
18- to 24-hour tryptic soy broth cultures of
Staphylococcus aureus (ATCC 25923),
Enterococcus faecalis (ATCC 19433), and
Micrococcus luteus (ATCC 9341)
tryptic soy agar slants
3% hydrogen peroxide (H^ChXcaustic) or Difco's
SpotTest Catalase Reagent
Bunsen burner
inoculating loop
Pasteur pipette with pipettor
incubator set at 35°C
test-tube rack
wax pencil
clean glass slides
wooden applicator stick (or Nichrome wire loop)
Why Are the Above Bacteria Used
in This Exercise?
In this exercise, the student will learn to perform the catalase
test. The catalase test is very useful in differentiating
between groups of bacteria. The authors have chosen the
following three bacteria to accomplish the above objective.
Staphylococcus aureus (L. aureus, golden) is a gram-
positive coccus that is catalase positive when grown in an
aerobic environment. S. aureus is mainly associated with the
human skin and mucous membranes of warm-blooded
vertebrates, but is often isolated from food products, dust, and
water. Enterococcus faecalis (L. faecium, of the dregs, of
feces) is a catalase negative, gram-positive coccus. E.
faecalis occurs widely in the environment, particularly in feces
of vertebrates. Micrococcus luteus (L. luteus, golden yellow)
is another gram-positive coccus that also is catalase positive.
M. luteus occurs primarily on mammalian skin and in soil,
but commonly can be isolated from food products and air.
Learning Objectives
Each student should be able to
1. Understand the biochemical process of hydrogen
peroxide detoxification by aerobic bacteria
through the production of the enzyme catalase
2. Describe how catalase production can be
determined
3. Perform a catalase test
Suggested Reading in Textbook
1. Oxygen Concentration, section 6.4.
Principles
Some bacteria contain flavoproteins that reduce O2,
resulting in the production of hydrogen peroxide
(H2O2) or superoxide (O2). These are extremely
toxic because they are powerful oxidizing agents and
destroy cellular constituents very rapidly. A bacterium
must be able to protect itself against such O2 products
or it will be killed.
Many bacteria possess enzymes that afford
protection against toxic O2 products. Obligate aerobes and
facultative anaerobes usually contain the enzymes
superoxide dismutase, which catalyzes the destruction
169
Harley-Prescott:
Laboratory Exercises in
Microbiology, Fifth Edition
IV. Biochemical Activities
of Bacteria
28. Proteins, Amino Acids,
and Enzymes V: Catalase
Activity
©The McGraw-Hill
Companies. 2002
of superoxide, and either catalase or peroxidase,
which catalyze the destruction of hydrogen peroxide as
follows:
+ H20
■2^2
2O2 + 2H+ superoxide w O2 +
dismutase „ TT , .,
Oxygen Hydrogen peroxide
2H2O2 catalase or 2H2O +
peroxidase ^^
02
Free oxygen
Most strict anaerobes lack both enzymes and therefore
cannot tolerate O2.
Catalase production and activity can be detected
by adding the substrate H2O2 to an appropriately
incubated (18- to 24-hour) tryptic soy agar slant culture. If
catalase was produced by the bacteria, the above
chemical reaction will liberate free O2 gas. Bubbles of
O2 represent a positive catalase test; the absence of
bubble formation is a negative catalase test.
Catalase activity is very useful in differentiating
between groups of bacteria. For example, the
morphologically similar Enterococcus (catalase negative) and
Staphylococcus (catalase positive) can be
differentiated using the catalase test (figure 28.1).
Figure 28.1 Catalase Test on Slants, (a) Staphylococcus aureus,
catalase positive. Notice the bubbles of oxygen (tube on the left),
(b) Enterococcus faecalls, catalase negative; note the absence of
bubbles (tube on the right).
(a)
(b)
Figure 28.2 Catalase Test on Slides. A positive catalase
reaction (left slide) shows gas bubbles; a negative catalase reaction
reveals an absence of gas bubbles (right slide).
Procedure
First Period
1. Label each of the tryptic soy agar slants with the
name of the bacterium to be inoculated, your
name, and date.
2. Using aseptic technique (figure 14.3), heavily
inoculate each experimental bacterium into its
appropriately labeled tube by means of a streak
inoculation.
3. Incubate the slants at 35°C for 18 to 24 hours.
Second Period
1. To test for catalase, set the slant in an inclined
position and pipette several drops of a 3% solution
of H2O2 over the growth on the slant or use 3 to 5
drops of Difco's SpotTest catalase reagent.
2. The appearance of gas bubbles (figure 28.1a)
indicates a positive test; the absence of gas
bubbles is a negative test (figure 28.1£>).
3. Based on your observations, determine and record
in the report for exercise 28 whether or not each
bacterium was capable of catalase activity.
4. Note: An alternative procedure for doing the
catalase test is to remove growth from a slant
using a wooden applicator stick or Nichrome wire
loop and place the growth on a glass slide. The
cells are then mixed in a drop of 3% H2O2 or a
drop of Difco's SpotTest catalase reagent.
Immediate bubbling indicates a positive catalase
test (figure 28.2).
HINTS AND PRECAUTIONS
(1) Dispose of the hydrogen peroxide slides in the
appropriate container filled with disinfectant. (2) When using
a slant for other purposes in the same laboratory period,
it is possible to save material by adding H2O2 to the slant
after finishing with it. (3) Extreme care must be
exercised if a colony is taken from a blood agar plate.
Erythrocytes contain catalase, and a transfer of only a few
blood cells can give a false-positive reaction. (4) Always
use fresh hydrogen peroxide, since it is unstable.
170 Biochemical Activities of Bacteria
Harley-Prescott: I IV. Biochemical Activities I 28. Proteins, Amino Acids, I I ©The McGraw-Hill
Laboratory Exercises in of Bacteria and Enzymes V: Catalase Companies. 2002
Microbiology, Fifth Edition Activity
Laboratory Report Zo
Name:
Date: _
Lab Section:
Proteins, Amino Acids, and Enzymes V: Catalase Activity
1. Complete the following table on catalase activity.
Bacterium Presence of Bubbling (catalase positive) Absence of Bubbling (catalase negative)
E. faecalis
S. aureus
M. luteus
111
Harley-Prescott: I IV. Biochemical Activities I 28. Proteins, Amino Acids, I I ©The McGraw-Hill
Laboratory Exercises in of Bacteria and Enzymes V: Catalase Companies. 2002
Microbiology, Fifth Edition Activity
Review Questions
1. What is the importance of catalase to certain bacteria?
2. Do anaerobic bacteria require catalase? Explain your answer.
3. Write a balanced equation for the degradation of H2O2 in the presence of catalase.
4. What two groups of bacteria can be differentiated with the catalase test?
5. What are tliree products that result when flavoproteins reduce O2?
a.
b.
c.
6. What are several bacteria that produce catalase?
7. What is the substrate of the catalase reaction?
172 Biochemical Activities of Bacteria
Harley-Prescott:
Laboratory Exercises in
Microbiology, Fifth Edition
IV. Biochemical Activities
of Bacteria
29. Proteins, Amino Acids,
and Enzymes VI: Coagulase
and DNase Activity
©The McGraw-Hill
Companies. 2002
EXERCISE
29
Proteins, Amino Acids, and Enzymes VI:
Coagulase and DNase Activity
SAFETY CONSIDERATIONS
Be careful with the Bunsen burner flame and water
bath. One normal HC1 can cause severe skin burns and
irritate and burn the respiratory and digestive systems.
No mouth pipetting. Keep all culture tubes upright in a
test-tube rack or in a can.
Materials per Student
24- to 48-hour tryptic slant cultures of
Staphylococcus aureus (ATCC 25923) and
Staphylococcus epidermidis (ATCC 14990)
citrated rabbit plasma
DNase test agar plates
water bath at 35°C
inoculating loop
Bunsen burner
1 N hydrochloric acid (caustic)
small test tubes
1-ml Pasteur pipettes with pipettor
wax pencil
incubator set at 35°C
test-tube rack
Learning Objectives
Each student should be able to
1. Understand the biochemistry of the enzymes
coagulase and DNase
2. Explain how coagulase and DNase confer a
survival advantage to bacteria that produce these
enzymes
3. Describe how pathogenic species of staphylococci
can be differentiated from nonpathogenic species
4. Perform coagulase and DNase tests
Suggested Reading in Textbook
1. The S'taphylococcaceae, section 23.4.
Pronunciation Guide
Staphylococcus aureus (staf-il-oh-KOK-kus ORE-ee-us)
S. epidermidis (e-pee-DER-meh-diss)
Why Are the Above Bacteria Used
in This Exercise?
This exercise shows the student how to differentiate
pathogenic species of staphylococci from nonpathogenic species
by performing catalase and DNase tests. The two most
commonly encountered staphylococci will be used:
Staphylococcus aureus and S. epidermidis. S. aureus is coagulase
and DNase positive, whereas S. epidermidis is coagulase
and DNase negative.
Medical Application
In the clinical laboratory, coagulase activity is used to
distinguish between pathogenic (coagulase +) and
nonpathogenic (coagulase —) staphylococci.
Principles
Coagulases are enzymes that clot blood plasma by a
mechanism that is similar to normal clotting. Although
coagulase activity is not required for pathogenicity,
this enzyme is a good indicator of the pathogenic
potential of S. aureus. Coagulase-producing
staphylococci (termed coagulase positive) form a fibrin clot
around themselves and avoid attack by the host's
defenses. In the coagulase test (figure 29.1), coagulase-
positive staphylococci will cause the plasma to clot by
using coagulase to initiate the clotting cascade. Citrate
and EDTA are usually added to act as anticoagulants
173
Harley-Prescott: IV. Biochemical Activities 29. Proteins, Amino Acids,
Laboratory Exercises in of Bacteria and Enzymes VI: Coagulase
Microbiology, Fifth Edition and DNase Activity
©The McGraw-Hill
Companies. 2002
Figure 29.1 Steps in the Coagulase Test, (a) Positive reaction is indicated by clouding and solidification of plasma due to Staphylococcus
aureus, (b) Negative reaction with coagulase-negative Staphylococcus epidermidis.
Pipette 0.5 ml
of citrated
rabbit plasma
into each
tube
Incubate at
37°Cfor1 hour
(a)
(b)
and prevent false-positive results. Cultures should be
considered coagulase negative if they are unclotted
after 4 hours.
In addition to coagulase production, most
pathogenic strains of staphylococci produce a nuclease
enzyme called DNase. DNase degrades host DNA and
increases the pathogenicity of staphylococci that
possess it. To demonstrate the presence of DNase, agar
containing dissolved DNA is spot-inoculated with
staphylococci. A zone of clearing around the colony
indicates a positive DNase test. This clearing occurs
because the large DNA molecule has been degraded by
the enzyme, and the end products dissolve in the added
acid. Intact DNA does not dissolve in weak acid but
rather is precipitated by it; thus, the medium around
colonies that do not produce DNase becomes opaque.
Procedure
First Period
Coai
1.
rulase Test
Add 0.5 ml of citrated rabbit plasma to two
small test tubes. With the wax pencil, label the
tubes with the respective bacteria, your name,
and date.
2. Inoculate one tube with enough S. aureus paste to
make a cloudy suspension. Inoculate the other
tube with S. epidermidis. Alternatively, one can
add about 5 drops of thick 18- to 24-hour broth
culture to each tube.
3. Incubate both tubes at 35°C for 1 to 4 hours in a
water bath. Afterward, examine both tubes for the
presence or absence of clouding and clots.
174 Biochemical Activities of Bacteria
Harley-Prescott:
Laboratory Exercises in
Microbiology, Fifth Edition
IV. Biochemical Activities
of Bacteria
29. Proteins, Amino Acids,
and Enzymes VI: Coagulase
and DNase Activity
©The McGraw-Hill
Companies. 2002
A positive coagulase test is represented by any
degree of clotting, from a loose clot suspended in
plasma to a solid clot (figure 29.1a).
DNase Test
1. Divide a DNase test agar plate in half by marking
the bottom with a wax pencil. Add your name and
date.
2. On Vi of the plate, heavily spot-inoculate S. aureus
over a 0.5-cm area (figure 29.2a). Do the same
with S. epidermidis on the other half of the plate.
3. Incubate for 18 to 24 hours at 35°C.
Second Period
1. Using a Pasteur pipette with bulb, flood the
DNase test agar plate with 1 N HC1. A zone of
clearing around the colony indicates a positive
DNase test (i.e., the DNA in the medium has been
degraded) (figure 29.2b).
2. Based on your observations, determine and record
in the report for exercise 29 whether or not each
bacterium was coagulase and DNase positive or
negative.
Figure 29.2 DNase Test, (a) Spot inoculate half of a DNase
test agar plate with S. aureus and the other half with S. epidermidis.
(b) DNase lysis (S. aureus, right side of plate) and no lysis
(S. epidermidis, left side of plate).
DNase test agar
Staphylococcus
epidermidis
Staphylococcus
aureus
(a)
HINTS AND PRECAUTIONS
(1) Do not shake or vortex the titrated rabbit plasma when
inoculating it with the bacteria. (2) In a positive DNA test,
the zone of clearing should appear immediately.
(b)
Proteins, Amino Acids, and Enzymes VI: Coagulase and DNase Activity 175
Harley-Prescott: I IV. Biochemical Activities I 29. Proteins, Amino Acids, I I ©The McGraw-Hill
Laboratory Exercises in of Bacteria and Enzymes VI: Coagulase Companies. 2002
Microbiology, Fifth Edition and DNase Activity
Laboratory Report
Lab Section:
Proteins, Amino Acids, and Enzymes VI: Coagulase and DNase Activity
1. Complete the following table on coagulase and DNase activity.
Biochemical Results
Coagulase test (+ or -)
DNase test (+ or -)
S. aureus
S. epidermidis
2. Make a drawing of your DNase test agar plate observations.
177
29
Name:
Harley-Prescott: IV. Biochemical Activities 29. Proteins, Amino Acids,
Laboratory Exercises in of Bacteria and Enzymes VI: Coagulase
Microbiology, Fifth Edition and DNase Activity
Review Questions
1. How does the enzyme coagulase function?
2. How does the enzyme DNase function?
3. False-positive coagulase tests have been reported for some bacteria that can metabolize citrate. Explain.
4. Does a coagulase-positive staphylococcus also have to be DNase positive? Explain why or why not.
5. What is the function of the 1 N HCl added to the DNase plates after incubation?
6. Describe a positive DNase test.
7. Describe a negative DNase test.
©The McGraw-Hill
Companies. 2002
178 Biochemical Activities of Bacteria
Harley-Prescott:
Laboratory Exercises in
Microbiology, Fifth Edition
IV. Biochemical Activities
of Bacteria
30. Proteins, Amino Acids,
and Enzymes VII: Oxidase
Test
©The McGraw-Hill
Companies. 2002
EXERCISE
30
Proteins, Amino Acids, and Enzymes VII: Oxidase Test
SAFETY CONSIDERATIONS
Be careful with the Bunsen burner flame. No mouth
pipetting. The oxidase reagent is caustic. Avoid contact
with eyes and skin. In case of contact, immediately flush
eyes or skin with plenty of water for at least 15 minutes.
Suggested Reading in Textbook
1. The Electron Transport Chain, section 9.5; see
also figures 9.13-9.15.
2. Rapid Methods of Identification, section 36.2; see
also table 36.3.
Materials per Student
young 24-hour tryptic soy broth cultures of
Alcaligenes faecalis (ATCC 8750),
Escherichia coli (ATCC 25922), and
Pseudomonas aeruginosa (ATCC 27853)
tryptic soy agar plates
tetramethyl-p-phenylenediamine dihydrochloride
(oxidase reagent)
Bunsen burner
platinum or plastic loops
wax pencil
Pasteur pipette with pipettor
Oxidase Disks or Dry Slides (Difco); Oxidase
Test Strips (KEY Scientific Products); SpotTest
Oxidase Reagent (Difco)
wooden applicator sticks
Whatman No. 2 filter paper
Learning Objectives
Each student should be able to
1. Understand the biochemistry underlying oxidase
enzymes
2. Describe the experimental procedure that enables
one to distinguish between groups of bacteria
based on cytochrome oxidase activity
3. Give examples of oxidase-positive and oxidase-
negative bacteria
4. Perform an oxidase test
Pronunciation Guide
Alcaligenes faecalis (al-kah-LIJ-e-neez fee-KAL-iss)
Escherichia coli (esh-er-I-ke-a KOH-lee)
Pseudomonas aeruginosa (soo-do-MO-nas a-ruh-jin-
OH-sah)
Why Are the Above Bacteria Used
in This Exercise?
This exercise gives the student experience in performing
the oxidase test. The oxidase test distinguishes between
groups of bacteria based on cytochrome oxidase activity.
Three bacteria will be used. Alcaligenes faecalis (L. fae-
cium, of the dregs, of feces) is a gram-negative, aerobic
rod (coccal rod or coccus) that possesses a strictly
respiratory type of metabolism with oxygen as the terminal
electron acceptor. It is thus oxidase positive. Escherichia
coli is a facultatively anaerobic gram-negative rod that
has both respiratory and fermentative types of
metabolism and isoxidase negative. Pseudomonas aeruginosa is
a gram-negative, aerobic rod having a strictly respiratory
type of metabolism with oxygen as the terminal electron
acceptor and thus is oxidase positive.
179
Harley-Prescott: I IV. Biochemical Activities I 30. Proteins, Amino Acids, I I ©The McGraw-Hill
Laboratory Exercises in of Bacteria and Enzymes VII: Oxidase Companies. 2002
Microbiology, Fifth Edition Test
Medical Application
The oxidase test is a useful procedure in the clinical
laboratory because some gram-negative pathogenic species of
bacteria (such as Neisseria gonorrhoeae, P. aeruginosa, and
Vibrio species) are oxidase positive, in contrast to species in
the family Enterobacteriaceae, which are oxidase negative.
Principles
Oxidase enzymes play an important role in the
operation of the electron transport system during aerobic
respiration. Cytochrome oxidase (aa.3 type) uses O2 as an
electron acceptor during the oxidation of reduced
cytochrome c to form water and oxidized cytochrome c.
The ability of bacteria to produce cytochrome
oxidase can be determined by the addition of the oxidase
test reagent or test strip (tetramethyl-p-phenylenedi-
amine dihydrochloride or an Oxidase Disk, p-amino-
dimethylaniline) to colonies that have grown on a
plate medium. Or, using a wooden applicator stick, a
bacterial sample can either be rubbed on a Dry Slide
Oxidase reaction area, on a KEY test strip, or filter
paper moistened with the oxidase reagent. The light
pink oxidase test reagent (Disk, strip, or Slide) serves
as an artificial substrate, donating electrons to
cytochrome oxidase and in the process becoming
oxidized to a purple and then dark purple (figure 30.1)
compound in the presence of free O2 and the oxidase.
The presence of this dark purple coloration represents
a positive test. No color change or a light pink
coloration on the colonies indicates the absence of
oxidase and is a negative test.
Procedure
First Period
1. With a wax pencil, divide the bottom of a tryptic
soy agar plate into three sections and label each
with the name of the bacterium to be inoculated,
your name, and date.
2. Using aseptic technique (see figure 14.3), make a
single streak-line inoculation on the agar surface
with the appropriate bacterium.
3. Incubate the plate in an inverted position for 24 to
47 hours at 35°C.
Second Period
1. Add 2 to 3 drops of the oxidase reagent to the
surface of the growth of several isolated colonies
of each test bacterium or to some paste that has
been transferred to a piece of filter paper. Using
another colony, place an Oxidase Disk on it. Add a
drop of sterile water. If Dry Slides or test strips are
available, use a wooden applicator stick to transfer
a sample to the slide, test strip, or filter paper
moistened with oxidase reagent. Alternatively, drop
a KEY oxidase test strip onto the surface of a slant
culture and moisten it with water if necessary.
2. Observe the colony or sample for the presence or
absence of a color change from pink to purple,
and finally to dark purple. This color change will
occur within 20 to 30 seconds. Color changes
after 20 to 30 seconds are usually disregarded
since the reagent begins to change color with time
due to auto-oxidation. Oxidase-negative bacteria
will not produce a color change or will produce a
light pink color.
3. Based on your observations, determine and record
in the report for exercise 30 whether or not each
bacterium was capable of producing oxidase.
HINTS AND PRECAUTIONS
(1) Students should note the color change immediately
following the addition of oxidase reagent. Color changes
after 20 seconds are not valid. (2) Using Nichrome or
other iron-containing inoculating devices may cause
false-positive reactions. (3) If bacterial paste is
transferred with an applicator stick, put the stick in a jar of
disinfectant or a Biohazard bag immediately after use.
180 Biochemical Activities of Bacteria
Harley-Prescott: I IV. Biochemical Activities I 30. Proteins, Amino Acids,
Laboratory Exercises in of Bacteria and Enzymes VII: Oxidase
Microbiology, Fifth Edition Test
©The McGraw-Hill
Companies. 2002
Figure 30.1 Oxidase Test. Note the purple to dark purple color after the colonies have been added to filter paper moistened with
oxidase reagent.
Biochemistry within bacteria
cytochrome
2 reduced cytochrome c + 2H+ + 1'202 ► 2 oxidized cytochrome c + H20
oxidase
Biochemistry on filter paper (disk/slide)
2 oxidized cytochrome c +
+ 2 reduced cytochrome c
Tetramethyl-p-phenylenediamine Wurster's blue
(reagent) (dark purple)
Proteins, Amino Acids, and Enzymes VII: Oxidase Test 181
Harley-Prescott: IV. Biochemical Activities 30. Proteins, Amino Acids,
Laboratory Exercises in of Bacteria and Enzymes VII: Oxidase
Microbiology, Fifth Edition Test
©The McGraw-Hill
Companies. 2002
Laboratory Report j (J
Name:
Date: _
Lab Section:
Proteins, Amino Acids, and Enzymes VII: Oxidase Test
1. Complete the following table on the oxidase test.
Color of Colonies after Adding
Oxidase Production (+ or -)
Bacterium
Reagent
Disk or Slide
Reagent
Disk or Slide
A. faecalis
E. coli
P. aeruginosa
183
Harley-Prescott: IV. Biochemical Activities 30. Proteins, Amino Acids,
Laboratory Exercises in of Bacteria and Enzymes VII: Oxidase
Microbiology, Fifth Edition Test
Review Questions
1. What metabolic property characterizes bacteria that possess oxidase activity?
2. What is the importance of cytoclirome oxidase to bacteria that possess it?
3. Do anaerobic bacteria require oxidase? Explain your answer.
4. What is the function of the test reagent in the oxidase test?
5. The oxidase test is used to differentiate among which groups of bacteria?
6. Why should niclirome or other iron-containing inoculating devices not be used in the oxidase test?
7. Are there limitations to the oxidase test?
©The McGraw-Hill
Companies. 2002
184 Biochemical Activities of Bacteria
Harley-Prescott:
Laboratory Exercises in
Microbiology, Fifth Edition
IV. Biochemical Activities
of Bacteria
31. Proteins, Amino Acids,
and Enzymes VIM: Urease
Activity
©The McGraw-Hill
Companies. 2002
EXERCISE
31
Proteins, Amino Acids, and Enzymes VIII:
Urease Activity
SAFETY CONSIDERATIONS
Be careful with the Bunsen burner flame. Keep all
culture tubes upright in a test-tube rack or in a can.
Materials per Student
24- to 48-hour tryptic soy agar slants of
Escherichia coli (ATCC 11229), Klebsiella
pneumoniae (ATCC el3883), Proteus vulgaris
(ATCC 13315), and Salmonella cholerae-suis
(ATCC 29631)
5 urea broth tubes
Bunsen burner
test-tube rack
inoculating loop
incubator set at 35°C
urea disks (Difco) or urease test tablets (KEY
Scientific Products)
4 sterile test tubes
wax pencil
sterile forceps
Learning Objectives
Each student should be able to
1. Understand the biochemical process of urea
hydrolysis
2. Determine the ability of bacteria to degrade urea
by means of the enzyme urease
3. Tell when the urease test is used
4. Perform a urease test
Suggested Reading in Textbook
1. Pseudomonas and the Enterobacteriaceae, section
22.3; see also figure 22.8 and tables 22.6, 22.7.
Pronunciation Guide
Escherichia coli (esh-er-I-ke-a KOH-lee)
Klebsiella pneumoniae (kleb-se-EL-lah nu-mo-ne-ah)
Proteus vulgaris (PRO-tee-us vul-GA-ris)
Salmonella cholerae-suis (sal-mon-EL-ah coler-ah
SU-is)
Why Are the Above Bacteria Used
in This Exercise?
In this exercise, the student will perform a urease test to
determine the ability of bacteria to degrade urea by means of
the enzyme urease. The authors have chosen two urease-
positive bacteria {Klebsiella pneumoniae and Proteus
vulgaris) and two urease-negative bacteria {Escherichia coli
and Salmonella cholerae-suis).
Medical Application
In the clinical laboratory, members of the genus Proteus can
be distinguished from other enteric nonlactose-fermenting
bacteria {Salmonella, Shigella) by their fast urease activity. P.
mirabilis is a major cause of human urinary tract infections.
Principles
Some bacteria are able to produce an enzyme called
urease that attacks the nitrogen and carbon bond in
amide compounds such as urea, forming the end
products ammonia, CO2, and water (figure 31.1).
Urease activity (the urease test) is detected by
growing bacteria in a medium containing urea and using
a pH indicator such as phenol red (see appendix E).
When urea is hydrolyzed, ammonia accumulates in the
medium and makes it alkaline. This increase in pH
causes the indicator to change from orange-red to deep
pink or purplish red (cerise) and is a positive test for
urea hydrolysis. Failure of a deep pink color to develop
is a negative test.
Procedure
First Period
1. Label each of the urea broth tubes with the name of
the bacterium to be inoculated, your name, and date.
185
Harley-Prescott:
Laboratory Exercises in
Microbiology, Fifth Edition
IV. Biochemical Activities
of Bacteria
31. Proteins, Amino Acids,
and Enzymes VIM: Urease
Activity
©The McGraw-Hill
Companies. 2002
Figure 31.1 Urea Hydrolysis, (a) Uninoculated control, (b) Weakly positive reaction (delayed positive), (c) Very rapid positive reaction,
(d) Negative reaction.
Biochemistry within bacteria
H,N
H,N
\ urease
C = 0 + 2H,0 »- CO, + H,0 + 2NH3
Urea Water
Carbon Water Ammonia
dioxide
Biochemistry within tubes
Ammonia + phenol red
-► deep pink
(a)
(b)
(c)
(d)
2. Using aseptic technique (see figure 14.3),
inoculate each tube with the appropriate
bacterium by means of a loop inoculation.
3. Incubate the tubes for 24 to 48 hours at 35°C.
Urea Disks or Tablets
1. Add 0.5 ml (about 20 drops) of sterile distilled
water to four sterile test tubes for the Difco disk
or 1 ml distilled water for the KEY tablet.
2. Transfer one or two loopfuls of bacterial paste to
each tube. Label with your name and date.
3. Using sterile forceps, add one urea or urease disk
tablet to each tube.
4. Incubate up to 4 hours at 35°C. Check for a color
change each hour. (The KEY test may be
incubated up to 24 hours if necessary.)
Second Period
1. Examine all of the urea broth cultures and urea
disk or urease tablet tubes to determine their color
(figures 31.1 and 31.2).
Figure 31.2 KEY Test for Urea. After incubation, a pink to red
color constitutes a positive test (tube on the left). If the original straw
color persists, the test is negative (tube on the right).
2. Based on your observations, determine and record
in the report for exercise 31 whether each
bacterium was capable of hydrolyzing urea.
HINTS AND PRECAUTIONS
Some bacteria have a delayed urease reaction that may
require an incubation period longer than 48 hours.
186 Biochemical Activities of Bacteria
Harley-Prescott: I IV. Biochemical Activities I 31. Proteins, Amino Acids, I I ©The McGraw-Hill
Laboratory Exercises in of Bacteria and Enzymes VIM: Urease Companies. 2002
Microbiology, Fifth Edition Activity
Laboratory Report j j
Name:
Date: _
Lab Section:
Proteins, Amino Acids, and Enzymes VIII: Urease Activity
1. Complete the following table on urease activity.
Color of
Bacterium Urea Broth Disks Urea Hydrolysis (+ or -)
E. coli
K. pneumoniae
P. vulgaris
S. cholerae-suis
187
Harley-Prescott: IV. Biochemical Activities 31. Proteins, Amino Acids,
Laboratory Exercises in of Bacteria and Enzymes VIM: Urease
Microbiology, Fifth Edition Activity
Review Questions
1. Explain the biochemistry of the urease reaction.
2. What is the purpose of the phenol red in the urea brotli medium?
3. When would you use the urease test?
4. Why does the urea disk change color?
5. What is the main advantage of the urea disk over the broth tubes with respect to the detection of urease?
6. What is in urea broth?
7. What color is cerise?
©The McGraw-Hill
Companies. 2002
188 Biochemical Activities of Bacteria
Harley-Prescott:
Laboratory Exercises in
Microbiology, Fifth Edition
IV. Biochemical Activities
of Bacteria
32. Proteins, Amino Acids,
& Enzymes IX: Lysine &
Ornithine Decarboxylase
Test
©The McGraw-Hill
Companies. 2002
EXERCISE
32
Proteins, Amino Acids, and Enzymes IX:
Lysine and Ornithine Decarboxylase Test
SAFETY CONSIDERATIONS
Be careful with the Bunsen burner flame. No mouth
pipetting. Keep all culture tubes upright in a test-tube
rack or in a can.
Materials per Student
24- to 48-hour tryptic soy broth cultures of
Enterobacter aerogenes (ATCC 13048),
Citrobacter freundii (ATCC 8090), Klebsiella
pneumoniae (ATCC el3883), and Proteus
vulgaris (ATCC 13315)
4 Moeller's lysine decarboxylase broth with
lysine (LDC)
4 lysine iron agar slants (LIA)
4 Moeller's ornithine decarboxylase broth with
ornithine (ODC)
1 Moeller's lysine decarboxylase broth without
lysine (DC), which will serve as the control
1 Moeller's ornithine decarboxylase broth without
ornithine (OD), which will serve as the control
Pasteur pipettes with pipettor
inoculating loop
test-tube rack
sterile distilled water
sterile mineral oil
incubator set at 35°C
8 sterile test tubes
ornithine, lysine, and decarboxylase KEY Rapid
Substrate Tablets and strips (KEY Scientific
Products, 1402 Chisholm Trail, Suite D, Round
Rock, TX 78681; 800-843-1539;
www. keyscientific. com)
Bunsen burner
ninhydrin in chloroform (Dissolve 50 mg
ninhydrin in 0.4 ml of dimethylsulfoxide
[DMSO], then add 25 ml of chloroform to the
DMSO solution.)
10% KOH
Learning Objectives
Each student should be able to
1. Understand the biochemical process of
decarboxylation
2. Tell why decarboxylases are important to some
bacteria
3. Explain how the decarboxylation of lysine can be
detected in culture
4. Perform lysine and ornithine decarboxylase tests
Suggested Reading in Textbook
1. Protein and Amino Acid Catabolism, section 9.9;
see also figure 9.23.
Pronunciation Guide
Citrobacter freundii (SIT-ro-bac-ter FRUN-dee)
Enterobacter aerogenes (en-ter-oh-B AK-ter a-RAH-
jen-eez)
Klebsiella pneumoniae (kleb-se-EL-lah nu-MO-ne-ah)
Proteus vulgaris (PRO-te-us vul-GA-ris)
Why Are the Above Bacteria Used
in This Exercise?
This exercise gives the student experience using the lysine
and ornithine decarboxylase test to differentiate between
bacteria. Two lysine decarboxylase-positive {Enterobacter
aerogenes and Klebsiella pneumoniae) and two lysine de-
carboxylase-negative {Proteus vulgaris and Citrobacter
freundii) bacteria, and two ornithine decarboxylase-positive
(E. aerogenes and Citrobacter freundii) and two ornithine
decarboxylase-negative {K. pneumoniae and P. vulgaris)
bacteria were chosen to demonstrate the lysine and
ornithine decarboxylase tests.
189
Harley-Prescott:
Laboratory Exercises in
Microbiology, Fifth Edition
IV. Biochemical Activities
of Bacteria
32. Proteins, Amino Acids,
& Enzymes IX: Lysine &
Ornithine Decarboxylase
Test
©The McGraw-Hill
Companies. 2002
Medical Application
In the clinical laboratory, decarboxylase differential tests
are used to differentiate between organisms in the Enter-
obacteriacea E.
Principles
Decarboxylation is the removal of a carboxyl group
from an organic molecule. Bacteria growing in liquid
media decarboxylate amino acids most actively when
conditions are anaerobic and slightly acidic.
Decarboxylation of amino acids, such as lysine and
ornithine, results in the production of an amine and CO2
as illustrated below.
The lysine decarboxylase test is useful in
differentiating Pseudomonas (L.-), Klebsiella (L.+), Enter-
obacter (L.+), and Citrobacter (L.-) species. The
ornithine decarboxylase test is helpful in distinguishing
between Klebsiella (O.-) and Proteus (O.-), and
Enterobacter (O.+) bacteria.
A quick test for ornithine or lysine decarboxylase
is to use the KEY Rapid Substrate Tablets and strips.
These tablets contain the respective amino acids in a
mixture of salts correctly buffered for each test. In
addition, a pH indicator is present in the tablet, which
changes color as the decarboxylation reaction
progresses. In the lysine decarboxylase test tablet, the
indicator is bromcresol purple, which turns purple as the
test becomes positive (figure 32.2). The indicator in
the ornithine decarboxylase test tablet is phenol red,
which turns red in a positive test.
decarboxylase
R — CH — ^^| »- R — CH — NH + ^|
NH! Carbon
An amino acid An amine dioxide gas
Bacteria that are able to produce the enzymes lysine
decarboxylase and ornithine decarboxylase can
decarboxylate lysine and ornithine and use the amines as
precursors for the synthesis of other needed molecules.
In addition, when certain bacteria carry out
fermentation, acidic waste products are produced, making the
medium acidic and inhospitable. Many decarboxylases
are activated by a low pH. They remove the acid groups
from amino acids, producing alkaline amines, which
raise the pH of the medium making it more hospitable.
Decarboxylation of lysine or omitliine can be
detected by culturing bacteria in a medium containing the
desired amino acid, glucose, and a pH indicator
(bromcresol purple, see appendix E). Before incubation, sterile
mineral oil is layered onto the broth to prevent oxygen
from reaching the bacteria and inhibiting the reaction.
The acids produced by the bacteria from the fermentation
of glucose will initially lower the pH of the medium and
cause the pH indicator to change from purple to yellow.
The acid pH activates the enzyme that causes
decarboxylation of lysine or omitliine to amines and the subsequent
neutralization of the medium. This results in another
color change from yellow back to purple (figure 32.1).
Lysine iron agar (LIA) is also used for the
cultivation and differentiation of members of the Enterobac-
teriaceae based on their ability to decarboxylate
lysine and to form H2S. Bacteria that decarboxylate
lysine turn the medium purple. Bacteria that produce
H2S appear as black colonies.
Procedure
First Period (Standard Method)
1. Label four LDC tubes and/or LIA slants with the
names of the respective bacteria (K pneumoniae,
E. aerogenes, P. vulgaris, and C. freundii) to be
inoculated. Do the same for one control DC tube.
Add your name and date to the tubes.
2. Do the same with the four ODC and one OD tubes.
3. As shown in figure 14.3, aseptically inoculate the
tubes with the proper bacteria.
4. With a sterile Pasteur pipette, layer about 1 ml of
sterile mineral oil on top of the inoculated media.
LIA slants do not need mineral oil.
5. Incubate the cultures for 24 to 48 hours at 35°C.
KEY Test Tablet/Strip Method
1. Label eight sterile test tubes with the respective
bacteria, your name, and date.
2. Pipette 1 ml of sterile distilled water in each tube
for regular tablets and 0.5 ml for ODC test strips.
3. Add a loopful of cell paste or 0.1 ml of thick
bacterial culture to each tube.
4. Add four ornithine test strips to the first four tubes
and four lysine tablets to the other four tubes.
5. Incubate the LDC tubes at 35°C for 24 hours and
the ODC test strips for 4 to 6 hours.
6. A color change to purple (LDC) or red (ODC)
constitutes a positive test; no color change is a
negative test.
Second Period
1. Examine the cultures for color changes in the
medium and record your results in the report for
190 Biochemical Activities of Bacteria
Harley-Prescott:
Laboratory Exercises in
Microbiology, Fifth Edition
IV. Biochemical Activities
of Bacteria
32. Proteins, Amino Acids,
& Enzymes IX: Lysine &
Ornithine Decarboxylase
Test
©The McGraw-Hill
Companies. 2002
Figure 32.1 Ornithine Decarboxylase Test, (a) The tube on the left is the uninoculated control. It is purple due to the pH indicator
bromcresol purple, (b) The second tube from the left (yellow) is negative for ornithine decarboxylase; weak acid production (pH less than
5.2) from glucose fermentation has turned it yellow due to the accumulation of acidic end products (e.g., Proteus vulgaris). If the bacterium is
only capable of glucose fermentation, the medium will remain yellow, (c) The third tube from the left (light purple) is slightly positive for
ornithine decarboxylase due to the accumulation of alkaline end products, (d) The fourth tube from the left is more positive for the enzyme
since it is a darker purple, (e) The tube on the right is strongly positive for ornithine decarboxylase (e.g., Klebsiella pneumoniae).
Biochemistry within bacteria
NH,
CH,
(CH,)3
CH —NH,
i
COOH
Lysine
NH,
(CH,)3
CH —NH,
COOH
Ornithine
(a)
lysine
decarboxylase
ornithine
decarboxylase
(b) (c)
NH,
CH,
(CH,)3
CH,
NH2
cadaverine + C02 + pHt
(a diamine)
CH2- NH2
(CH2)2
CH2- NH2
putrescine + C02 + pHt
(a diamine)
(d) (e)
Figure 32.2 Lysine Decarboxylase KEY Test. The purple
color in the tube on the left is a positive reaction to lysine. No
color change (the tube on the right) is a negative reaction.
Proteins, Amino Acids, and Enzymes IX: Lysine and Ornithine Decarboxylase Test 191
Harley-Prescott:
Laboratory Exercises in
Microbiology, Fifth Edition
IV. Biochemical Activities
of Bacteria
32. Proteins, Amino Acids,
& Enzymes IX: Lysine &
Ornithine Decarboxylase
Test
©The McGraw-Hill
Companies. 2002
exercise 32. Enzymatic activity is indicated by an
alkaline (dark purple) reaction when compared
with the inoculated control medium (light slate
color) in the LDC, LIA, and ODC tubes. Positive
KEY tests are purple (LDC) and red (ODC).
2. The KEY ODC and LDC results can be confirmed
by the Ninhydrin procedure.
a. Add 1 drop of 10% KOH to each tube and mix.
b. Add either 1.0 ml (tablet test) or 0.5 ml (strip
test) of Ninhydrin in chloroform. Let stand
for 10 to 15 minutes without shaking.
c. Purple color in the bottom chloroform layer is
positive for decarboxylation.
HINTS AND PRECAUTIONS
(1) In biochemical tests involving visual evaluation of
color changes that are sometimes minimal, it is often
useful to hold the control and experimental tubes next to
each other to discern any color differences. (2) In
decarboxylase tests, any trace of purple, from light to dark
purple, is considered a positive test.
192 Biochemical Activities of Bacteria
Harley-Prescott: I IV. Biochemical Activities I 32. Proteins, Amino Acids, I I ©The McGraw-Hill
Laboratory Exercises in of Bacteria & Enzymes IX: Lysine & Companies. 2002
Microbiology, Fifth Edition Ornithine Decarboxylase
Test
Laboratory Report j 2,
Name:
Date: _
Lab Section:
Proteins, Amino Acids, and Enzymes IX:
Lysine and Ornithine Decarboxylase Test
1. Results from the decarboxylase tests.
Bacterium Color of LIA Color of LDC Color of ODC LD Tablets OD Tablets
C. freundii
E. aerogenes
K. pneumoniae
P. vulgaris
2. Tabulate the significant ingredients of the following broths.
Medium Ingredients
Moeller's lysine decarboxylase broth
Moeller's ornithine decarboxylase broth
Lysine iron agar
193
Harley-Prescott: IV. Biochemical Activities 32. Proteins, Amino Acids,
Laboratory Exercises in of Bacteria & Enzymes IX: Lysine &
Microbiology, Fifth Edition Ornithine Decarboxylase
Test
Review Questions
1. Explain what occurs during decarboxylation.
2. Why does the LDC broth or lysine iron agar turn purple when lysine is decarboxylated?
3. Why does the LDC medium always turn yellow regardless of the ability of the bacteria to produce lysine
decarboxylase?
4. Why is the lysine decarboxylase test negative if both LDC and DC broths turn purple?
5. Why is sterile mineral oil added to LDC test media?
6. What is the basis for the quick KEY test for ornithine or lysine decarboxylase?
7. How does the pH indicator bromcresol purple indicate a change in pH?
©The McGraw-Hill
Companies. 2002
194 Biochemical Activities of Bacteria
Harley-Prescott:
Laboratory Exercises in
Microbiology, Fifth Edition
IV. Biochemical Activities
of Bacteria
33. Proteins, Amino Acids,
and Enzymes X:
Phenylalanine
Deamination
©The McGraw-Hill
Companies. 2002
EXERCISE
33
Proteins, Amino Acids, and Enzymes X:
Phenylalanine Deamination
SAFETY CONSIDERATIONS
Be careful with the Bunsen burner flame. The ferric
chloride solution is an irritant. Do not breathe its vapors
or get it on your skin. No mouth pipetting. Keep all
culture tubes upright in a test-tube rack or in a can.
Materials per Student
24- to 48-hour tryptic soy broth cultures of
Escherichia coli (ATCC 11229) and Proteus
vulgaris (ATCC 13315)
3 phenylalanine deaminase agar slants or
phenylalanine deaminase test tablets (KEY
Scientific Products)
10% aqueous ferric chloride solution (or 10% FeCl3
in 50% HC1)
inoculating loop
Pasteur pipette with pipettor
test-tube rack
incubator set at 35°C
wax pencil
Why Are the Following Bacteria
Used in This Exercise?
In this exercise, the student will learn how to perform the
phenylalanine deaminase test to differentiate between various
enteric bacteria. The ability of certain bacteria to oxidatively
degrade phenylalanine is of taxonomic importance. The two
enteric bacteria chosen to show this differentiation are
Escherichia coli and Proteus vulgaris. P. vulgaris produces the
enzyme phenylalanine deaminase whereas E. coli does not.
Medical Application
In the clinical laboratory, phenylalanine deamination can be
used to differentiate the genera Morganella, Proteus, and
Providencia (+) from the Enterobacteriaceae (-). Bacteria in
these genera can cause urinary tract infections and are capable
of causing opportunistic infections elsewhere in the body.
Learning Objectives
Each student should be able to
1. Understand the biochemical process of
phenylalanine deamination
2. Describe how to perform the phenylalanine
deamination test
3. Perform a phenylalanine test
Suggested Reading in Textbook
1. Protein and Amino Acid Catabolism, section 9.9;
see also figure 9.23.
Pronunciation Guide
Escherichia coli (esh-er-I-ke-a KOH-lee)
Proteus vulgaris (PRO-tee-us vul-GA-ris)
Principles
Phenylalanine deaminase catalyzes the removal of
the amino group (NH3+) from phenylalanine (figure
33.1). The resulting products include organic acids,
water, and ammonia. Certain enteric bacteria (e.g.,
Proteus, Morganella, and Providencia) can use the
organic acids in biosynthesis reactions. In addition, the
deamination detoxifies inhibitory amines.
The phenylalanine deaminase test can be used
to differentiate among enteric bacteria such as E. coli
and P. vulgaris. P. vulgaris produces the enzyme
phenylalanine deaminase, which deaminates
phenylalanine, producing phenylpyruvic acid. When ferric
chloride is added to the medium, it reacts with
phenylpyruvic acid, forming a green compound. Since
195
Harley-Prescott: IV. Biochemical Activities 33. Proteins, Amino Acids,
Laboratory Exercises in of Bacteria and Enzymes X:
Microbiology, Fifth Edition Phenylalanine
Deamination
©The McGraw-Hill
Companies. 2002
Figure 33.1 Phenylalanine Deamination. (a) Uninoculated control, (b) Phenylalanine negative, (c) Phenylalanine positive.
Biochemistry within bacteria
J V H phenylalanine J V o
(/ VCH,-C-[^de™% P VcH,-/ + [NHH + -,H.<
COO"
Phenylalanine
COO"
Phenylpyruvic Ammonium Water
acid ion
Biochemistry within tubes
Phenylpyruvic acid + ferric chloride ■
(FeClj
-♦-green complex
FeCI,
/\\
(a)
(b)
(c)
E. coli does not pioduce the enzyme, it cannot deami-
nate phenylalanine. When ferric chloride is added to
an E. coli culture, there is no color change.
Procedure
First Period
1. Label two slants of phenylalanine deaminase agar
with the name of the bacterium to be tested. Use
another slant as a control. Add your name and
date to each slant.
2. Using aseptic technique (see figure 14.3), inoculate
each of the slants with the respective bacteria.
3. Incubate aerobically at 35°C for 18 to 24 hours.
4. Alternatively, the cultures can be directly tested by
the addition of KEY test tablets. Add a tablet to
1 ml distilled water, inoculate heavily with paste,
and incubate for about 20 to 24 hours at 35°C.
Add 1 or 2 drops of 10% FeCl3 reagent. A
yellowish green color that develops within 1 to 5
minutes is a positive test (figure 33.2).
Second Period
1. With the Pasteur pipette, add a few drops of the
10% FeCl3 to the growth on the slant. Rotate
each tube between your palms to wet and loosen
the bacterial growth. The presence of
phenylpyruvic acid is indicated by the
development of a green color within 5 minutes
and indicates a positive test for phenylalanine
deamination. If there is no color change after
adding the reagent, the test is negative, and no
deamination has occurred.
2. Based on your observations, determine and record
in the report for exercise 33 which of the bacteria
were able to deaminate phenylalanine.
196 Biochemical Activities of Bacteria
Harley-Prescott:
Laboratory Exercises in
Microbiology, Fifth Edition
IV. Biochemical Activities
of Bacteria
33. Proteins, Amino Acids,
and Enzymes X:
Phenylalanine
Deamination
©The McGraw-Hill
Companies. 2002
Figure 33.2 KEY Test for Phenylalanine. A greenish—yellow
color developing in 1 to 5 minutes (tube on the left) is a positive
test for phenylalanine deaminase. No color change (the tube on
the right) is a negative reaction.
HINTS AND PRECAUTIONS
(1) A positive phenylalanine test must be interpreted
immediately after the addition of the FeCi3 reagent
because the green color fades quickly. (2) Rolling the
FeCi3 over the slant aids in obtaining a faster reaction
with a more pronounced color.
All phenylalanine tests should be read within 5
minutes. After 5 minutes, the green color disappears.
Proteins, Amino Acids, and Enzymes X: Phenylalanine Deamination 197
Harley-Prescott: I IV. Biochemical Activities I 33. Proteins, Amino Acids, I I ©The McGraw-Hill
Laboratory Exercises in of Bacteria and Enzymes X: Companies. 2002
Microbiology, Fifth Edition Phenylalanine
Deamination
Laboratory Report j j
Name:
Date: _
Lab Section:
Proteins, Amino Acids, and Enzymes X: Phenylalanine Deamination
1. Complete the following table on phenylalanine deamination.
Bacterium Color of the Slant Deamination (+ or -)
E. coli
P. vulgaris
2. Describe the phenylalanine deamination reaction.
199
©The McGraw-Hill
Companies. 2002
Review Questions
1. What are two ways that phenylalanine can be used by P. vulgaris?
2. What is the purpose of the ferric chloride in the phenylalanine deamination test?
3. When would you use the phenylalanine deamination test?
4. Name some bacteria mat can deaminate phenylalanine.
5. Describe the process of deamination.
6. Why must the phenylalanine test be determined within 5 minutes?
7. Describe the color of an uninoculated tube of phenylalanine agar.
200 Biochemical Activities of Bacteria
Harley-Prescott: IV. Biochemical Activities 33. Proteins, Amino Acids,
Laboratory Exercises in of Bacteria and Enzymes X:
Microbiology, Fifth Edition Phenylalanine
Deamination
Harley-Prescott:
Laboratory Exercises in
Microbiology, Fifth Edition
IV. Biochemical Activities
of Bacteria
34. Proteins, Amino Acids,
and Enzymes XI: Nitrate
Reduction
©The McGraw-Hill
Companies. 2002
EXERCISE
34
Proteins, Amino Acids, and Enzymes XI:
Nitrate Reduction
SAFETY CONSIDERATIONS
Be careful with the Bunsen burner flame. Since N, N-di-
methyl-1-naphthylamine might be carcinogenic (nitrite
test reagent B), wear disposable gloves and avoid skin
contact or aerosols. The acids in nitrite test reagent A are
caustic. Avoid skin contact and do not breathe the
vapors. Be careful when working with zinc. Do not inhale
or allow contact with skin. No mouth pipetting. Keep all
culture tubes upright in a test-tube rack or in a can.
Learning Objectives
Each student should be able to
1. Understand the biochemical process of nitrate
reduction by bacteria
2. Describe how nitrate reduction can be determined
from bacterial cultures
3. Perform a nitrate reduction test
Suggested Reading in Textbook
1. Anaerobic Respiration, section 9.6.
Materials per Student
24- to 48-hour tryptic soy broth cultures of
Escherichia coli (ATCC 11229), Pseudomonas
fluorescens (ATCC 13525), and
Staphylococcus epidermidis (ATCC 14990)
garden soil
Bunsen burner
inoculating loop
1-ml pipette with pipettor
nitrate broth tubes or nitrate agar slants
nitrite test reagent A or Difco's SpotTest Nitrate
Reagent A
nitrite test reagent B or Difco's SpotTest Nitrate
Reagent B
zinc powder or dust or Difco's SpotTest Nitrate
Reagent C
test-tube rack
incubator set at 35°C
5 sterile test tubes
wax pencil
disposable gloves
Pronunciation Guide
Escherichia coli (esh-er-I-ke-a KOH-lee)
Pseudomonas fluorescens (soo-do-MO-nas floor-es-
shens)
Staphylococcus epidermidis (staf-il-oh-KOK-kus e-
pee-DER-meh-diss)
Why Are the Above Bacteria Used
in This Exercise?
In this exercise, the student will learn how to perform the
nitrate reduction test in order to differentiate between bacteria.
Three different bacteria that give three different nitrate
reduction results will be used. Staphylococcus epidermidis is
unable to use nitrate as a terminal electron acceptor;
therefore, it cannot reduce nitrate. Escherichia coli can reduce
nitrate only to nitrite. Pseudomonas fluorescens (M. L. fluo-
resco, fluoresce; the fluorescent Pseudomonas species are
characterized by excretion of diffusible yellow-green
pigments that fluoresce in ultraviolet light) often reduces nitrate
completely to molecular nitrogen.
201
Harley-Prescott: I IV. Biochemical Activities I 34. Proteins, Amino Acids, I I ©The McGraw-Hill
Laboratory Exercises in of Bacteria and Enzymes XI: Nitrate Companies. 2002
Microbiology, Fifth Edition Reduction
Medical Application
Most enteric bacteria are nitrate reducers. Pathogenic
examples include Escherichia coli (opportunistic urinary tract
infections), Klebsiella pneumoniae (bacterial pneumonia),
Morganella morganii and Proteus mirabilis (nosocomial
infections). Nonenteric nitrogen reducing pathogens
include Staphylococcus aureus (staphylococcal food
poisoning, bacteremia, various abscesses) and Bacillus anthracis
(anthrax).
Principles
Chemolithoautotrophic bacteria (bacteria that obtain
energy through chemical oxidation; they use inorganic
compounds as electron donors and CO2 as their primary
source) and many chemoorganoheterotrophs (bacteria
that require organic compounds for growth; the organic
compounds serve as sources of carbon and energy) can
use nitrate (NO3) as a terminal electron acceptor during
anaerobic respiration. In this process, nitrate is reduced
to nitrite (NO2) by nitrate reductase as illustrated in
figure 34.1. Some of these bacteria possess the enzymes to
further reduce the nitrite to either the ammonium ion or
molecular nitrogen as also illustrated in figure 34.1.
The ability of some bacteria to reduce nitrate can
be used in their identification and isolation. For
example, E. coli can reduce nitrate only to nitrite, P. fluo-
rescens reduces it completely to molecular nitrogen,
and S. epidermidis is unable to use nitrate as a
terminal electron acceptor.
The nitrate reduction test is performed by
growing bacteria in a culture tube with a nitrate broth
medium containing 0.5% potassium nitrate (KNO3).
After incubation, the culture is examined for the
presence of gas and nitrite ions in the medium. The gas (a
mixture of CO2 and N2) is released from the reduction
of nitrate (NO3) and from the citric acid cycle (CO2)
(figure 34.1). The nitrite ions are detected by the
addition of sulfanilic acid and N,N-dimethyl-l-naph-
thylamine to the culture. Any nitrite in the medium will
react with these reagents to produce a pink or red color.
If a culture does not produce a color change,
several possibilities exist: (1) the bacteria possess nitrate
reductase and also reduce nitrite further to ammonia
or molecular nitrogen; (2) they possess other enzymes
that reduce nitrite to ammonia; or (3) nitrates were not
reduced by the bacteria. To determine if nitrates were
reduced past nitrite, a small amount of zinc powder or
5 to 10 drops of SpotTest nitrate reagent C is added to
the culture containing the reagents. Since zinc reduces
nitrates to nitrites, a pink or red color will appear and
verifies the fact that nitrates were not reduced to
nitrites by the bacteria. If a red color does not appear,
the nitrates in the medium were reduced past the
nitrite stage to either ammonia or nitrogen gas.
Procedure
First Period
1. Label three tubes of nitrate broth or nitrate agar
slants with the three respective bacteria (E. coli, P.
fluorescens, and S. epidermidis); label the fourth
tube "garden soil" and the fifth tube "control."
Add your name and date to each tube. The control
tube serves two purposes: (1) to determine if the
medium is sterile and (2) to determine if any O2
comes out of the medium instead of out of the gas
produced by the bacteria.
2. Using aseptic technique (see figure 14.3),
inoculate three tubes with the respective bacteria,
and the fourth with about a gram of garden soil.
3. Incubate all five tubes for 24 to 48 hours at 35°C.
Second Period
1. Observe the tubes for the presence of growth, and
the absence of growth in the control tube.
2. With a pipette and pipettor, while wearing
disposable gloves, add 0.5 ml of nitrate test
reagent A and 0.5 ml of test reagent B to each of
the culture tubes and mix. (Alternatively, about 5
to 10 drops of each reagent works well.) A distinct
pink or red color indicates a positive test, provided
the uninoculated control medium is negative.
3. Negative tests should be confirmed by adding
several grains of zinc powder or 5 to 10 drops of
Difco's nitrate reagent C and gently shaking the
tube. If nitrate is present in the medium, it will
turn red within 5 to 10 minutes; if it is absent,
there will be no color change.
4. Record your results in the report for exercise 34.
HINTS AND PRECAUTIONS
(1) Although disposable gloves should be worn when
using nitrite reagents A and B, if these solutions get on
your hands, wash them immediately with soap and
water for at least 15 minutes. (2) Bubbles indicate a
positive test for nonfermenters only; fermenters may also
produce gas from carbohydrates. (3) Even a small
amount of gas or bubble production is a positive test
for nonfermenters.
202 Biochemical Activities of Bacteria
Harley-Prescott:
Laboratory Exercises in
Microbiology, Fifth Edition
IV. Biochemical Activities
of Bacteria
34. Proteins, Amino Acids,
and Enzymes XI: Nitrate
Reduction
©The McGraw-Hill
Companies. 2002
Figure 34.1 Nitrate Reduction. After 24 to 48 hours of incubation, nitrate reagents are added to the culture tubes. The tube on the left
(C) is a negative broth control. The second tube (1+) is weakly positive, the third tube (3+) is more positive, and the tube on the right (5+)
is very positive for nitrate reduction to nitrite as indicated by the deep red color.
Biochemistry within bacteria
no:
2H*
2e
nitrate
no:
reductase
Nitrate Hydrogen Electrons Nitrite
H,0
Water
no:
other
enzymes
Nitrite
-*- nh; *- v2n,
Ammonia Molecular nitrogen
Biochemistry within tubes
Sulfanilic acid + N,N-dimethyl-1-naphthylamine + nitrite ions
(colorless) (colorless)
->* water + sulfobenzene azo-N,N-dimethyl-1 -naphthylamine
(red color)
(C)
(1+)
(3+)
(5+)
Proteins, Amino Acids, and Enzymes XI: Nitrate Reduction
203
Harley-Prescott: IV. Biochemical Activities 34. Proteins, Amino Acids,
Laboratory Exercises in of Bacteria and Enzymes XI: Nitrate
Microbiology, Fifth Edition Reduction
©The McGraw-Hill
Companies. 2002
Laboratory Report j 4
Name:
Date: _
Lab Section:
Proteins, Amino Acids, and Enzymes XI: Nitrate Reduction
1. On the basis of your observations, complete the following table.
Bacterium
or Soil
Color with
Reagents
Nitrate
Reduction
Color with Zinc (+ or -)
End
Products
Gas
E. coli
P. fluorescens
S. epidermidis
Soil
Control tube
2. Illustrate or outline a complete test for the presence of nitrate reductase.
205
Harley-Prescott: I IV. Biochemical Activities I 34. Proteins, Amino Acids, I I ©The McGraw-Hill
Laboratory Exercises in of Bacteria and Enzymes XI: Nitrate Companies. 2002
Microbiology, Fifth Edition Reduction
Review Questions
1. From your results, which bacteria are negative for nitrate reduction? Which are positive?
2. How do you explain the results from the soil sample?
3. Why is the development of a red color a negative test when zinc is added?
4. What are the end products that may result from the action of bacteria with nitrate-reducing enzymes?
5. What is the purpose of a control tube in this exercise?
6. How would you perform a complete test for the presence of nitrate reduction?
206 Biochemical Activities of Bacteria
Harley-Prescott: I V: Rapid Multitest Systems I Introduction I I ©The McGraw-Hill
Laboratory Exercises in Companies. 2002
Microbiology, Fifth Edition
PART FIVE
Rapid Multitest Systems
Man is a tool-using animal . . . without tools
he is nothing, with tools he is all. . . .
Thomas Carlyle (Scottish critic,
historian, 1795-1881)
Staining, morphology, motility, culture data, enzymatic,
and biochemical activities can be used to identify
microorganisms. These characteristics were the basis for Parts
Two through Four of this manual. In determining each of
these characteristics, a large amount of media, test tubes,
culture plates, and time were involved. In order to reduce
these factors, several rapid multitest systems have been
developed for the identification of medically important
microorganisms in a relatively short period. To facilitate
rapid identification, some of these systems use a uniform
coding procedure that can be computerized.
The purpose of Part Five of this manual is to introduce
you to two of these systems: API 20E and Enterotube II.
The API 20E and Enterotube II Systems are used to
identify primarily the gram-negative, oxidase-negative
Entembacteriaceae.
After completing either of these two exercises,
you will, at the minimum, be able to demonstrate the
ability to use appropriate microbiological test systems
and accurately record macroscopic observations. This
will meet the American Society for Microbiology
Core Curriculum skill number 4 (seepp. vi—isiii).
207
Harley-Prescott:
Laboratory Exercises in
Microbiology, Fifth Edition
V: Rapid Multitest Systems 35. The API 20E System
©The McGraw-Hill
Companies. 2002
EXERCISE
35
The API 20E System
SAFETY CONSIDERATIONS
Be careful with the Bunsen burner flame. No mouth
pipetting. Since nitrite test reagent B might be
carcinogenic, wear gloves and avoid skin contact or aerosols.
The acids in the nitrite test reagent A are caustic. The
ferric chloride solution is an irritant. Avoid skin contact and
do not breathe the vapors. Do not breathe the zinc dust.
Materials per Group of Students
API 20E System strip, incubator tray, and cover
(bioMerieux Vitek, PO Box 42016,
Hazelwood, MO 63042-2395. Phone
800-638-4835).
tryptic soy agar slant or plate culture of unknown
member of the Enterobacteriaceae
5 ml of sterile 0.85% saline in test tube with cap
50-ml plastic squeeze bottle containing tap water
5-ml Pasteur pipettes with pipettor
oxidase test reagent or disk/strip
petri plate
TSA plate
Whatman No. 2 filter paper
10% ferric chloride
Barritt's reagents A and B
sterile mineral oil
tube containing McFarland No. 3 (BaSCAt)
reference standard
platinum inoculating loop (Nichrome wire loops
should NOT be used) or a wooden applicator
stick
Bunsen burner
Kovacs' reagent
nitrite test reagents A and B solution
zinc dust or 20-mesh granular zinc
1.5% hydrogen peroxide
incubator set at 35° to 37°C
API 20E Quick Index Booklet
test-tube rack
wax pencil
disposable gloves
Learning Objectives
Each student should be able to
1. Understand why an oxidase test is first performed
in the API 20E System
2. Correctly inoculate the API 20E System
3. Read and record the various biochemical
reactions that occur after 18 to 24 hours of
incubation
4. Determine a seven-digit profile number
5. Look up the unknown bacterium in the API 20E
Quick Index Booklet
Suggested Reading in Textbook
1. 'The, Enterobacteriaceae, section 22.3.
2. Rapid Methods of Identification, section 36.2; see
also figures 36.7 and 36.8.
Medical Application
The API 20E system and Enterotube II system are used in the
clinical laboratory for the identification of enteric bacteria.
Among them are Escherichia coli (opportunistic urinary tract
infections), Proteus mirabilis (opportunistic urinary tract
infections), Shigella dysenteriae (bacillary dysentery),
Salmonella typhi (typhoid fever), and Yersinia pestis (plague).
Principles
The API 20E System is a standardized, miniaturized
version of conventional biochemical procedures used
in the identification of Enterobacteriaceae and other
gram-negative bacteria. A total of 127 taxa can be
208
Harley-Prescott:
Laboratory Exercises in
Microbiology, Fifth Edition
V: Rapid Multitest Systems 35. The API 20E System
©The McGraw-Hill
Companies. 2002
Figure 35.1 The API 20E Manual Biochemical System for
Microbial Identification, (a) Positive results, (b) Negative results.
(a)
All tests: positive
(b)
All tests: negative
identified with this system. It is a ready-to-use, micro-
tube system that performs 22 standard biochemical
tests on pure bacterial cultures from appropriate,
primary isolation media.
This system consists of a strip containing 20
chambers (figure 35.1), each consisting of a micro-
tube and a depression called a cupule. The tubes con-
Cupule
Tube
0
tain dehydrated substrates. The substrates are rehy-
drated by adding a bacterial saline suspension. To
create anaerobic conditions, sterile mineral oil is
added to several of the microtubes. The strip of
microtubes is then incubated for 18 to 24 hours at
35° to 37°C so that the bacterium can act on the
substrates. The strip is read by noting color changes
after the various indicator systems have been
affected by the metabolites or added reagents (table
35.1). The identification of the unknown bacterium is
achieved by determining a seven-digit profile index
number and consulting the API 20E Profile
Recognition System or the API 20E Profile Index
Booklet. Charts can also be used to determine the
unknown bacterium (see appendix G).
Procedure
First Period
1. Using aseptic technique (see figure 14.3) and an
applicator stick or inoculating loop, select a well-
isolated colony from the unknown streak plate or
from the pure culture slant. Smear a small amount
of the colony over a small area of filter paper.
Add several drops of the oxidase reagent. Note
the color change (see exercise 30, figure 30.1).
You may also use oxidase test strips or disks as
described in exercise 30.
2. Transfer another loopful of bacteria to the test tube
containing 5 ml sterile saline. (If an applicator stick
is used, load the tip with bacteria from the colony.)
Recap and shake the tube. The turbidity should
match that of the McFarlandNo. 3 (BaS04)
standard. Add more bacteria if necessary.
3. Label the elongated flap of the incubation tray
with your name and date. From the wash bottle,
add 5 ml of water to the bottom of the tray. This
provides a humid atmosphere during incubation.
4. Remove the plastic API strip from the sealed
pouch and place it in the incubation tray. Reseal
the pouch to protect the remaining strips.
5. Shake the 5 ml of bacterial suspension. Remove
the cap and fill the 5-ml Pasteur pipette with the
bacterial suspension. (Tilt the strip to avoid
forming bubbles.) Inoculate the strip as follows:
a. Tilt the API 20E incubation tray and place
the pipette tip against the side of each
cupule. Fill the tubes of the ONPG, TDA,
IND, GLU, MAN, INO, SOR, RHA, SAC,
MEL, AMY, and ARA microtubes.
b. Slightly underfill the ADH, LDC, ODC,
H2S, and URE microtubes. Note that these
microtubes are underlined on the test strip!
c. Fill both the tube and cupule section of the
I CIT I, I VP I, and I GEL | tubes. Note that
these microtubes have brackets on the test strip!
d. After inoculation, completely fill the cupule
section of the ADH, LDC, ODC, H2S, and
URE tubes with mineral oil. This creates
anaerobic conditions.
6. Place the lid on the incubation tray and incubate
at 35°C for 18 to 24 hours. If the strip cannot be
read after 24 hours, place it in a refrigerator at 2°
to 8°C until the reactions can be read.
7. Make an isolation streak on a TSA plate with a
portion of the bacterial suspension to ascertain the
purity of the suspension.
Second Period
1. After 18 hours and before 24 hours incubation,
record all reactions not requiring the addition of
reagents (do not read TDA, VP, and IND). Table
35.1 summarizes these reactions. Record these
results by placing a + for a positive reaction and a
- for a negative reaction in the 24-hour box for
the report for exercise 35. Also record the colors.
The API 20E System 209
Harley-Prescott: I V: Rapid Multitest Systems I 35. The API 20E System I I ©The McGraw-Hill
Laboratory Exercises in Companies. 2002
Microbiology, Fifth Edition
Table 35.1 Chart I. Summary of Results—18- to 24-Hour Procedure
Tube
ONPG
ADH
LDC
ODC
CIT
H2S
URE
TDA
IND
VP
GEL
GLU
MAN
INO
SOR
RHA
SAC
MEL
AMY
ARA
GLU
Nitrate
reduction
MAN
INO
SOR
Catalase
Interpretation of Reactions
Positive Negative
Yellow Colorless
Incubation
18-24 h Red or orange Yellow
36^18 h Red Yellow or
orange
18-24 h Red or orange Yellow
36^48 h Red Yellow or orange
18-24 h Red or orange Yellow
36^48 h Red Yellow or orange
Turquoise or dark Light green
blue or yellow
Black No black
deposit deposit
18-24 h Red or orange Yellow
36^48 h Red Yellow or orange
Add 1 drop 10% ferric chloride
Brown-red Yellow
Add 1 drop Kovacs' reagent
Red ring Yellow
Add 1 drop of 40% potassium hydroxide, then 1
drop of 6% a-naphthol.
Red Colorless
Diffusion of the No
pigment diffusion
Yellow Blue or
or gray blue-green
Yellow Blue or
blue-green
After reading GLU reaction, add 2 drops 0.8%
sulfanilic acid and 2 drops 0.5% N,N-dimethyl-a-
naphthylamine
N02 Red Yellow
N2 gas Bubbles; Yellow Orange after
after reagents reagents
and zinc and zinc
After reading carbohydrate reaction, add 1 drop
1.5% H202
Bubbles No bubbles
Comments
(1) Any shade of yellow is a positive reaction.
(2) VP tube, before the addition of reagents, can be used as a negative control.
Orange reactions occurring at 36 to 48 hours should be interpreted as negative.
Any shade of orange within 18 to 24 hours is a positive reaction. At 36 to 48 hours, orange
decarboxylase reactions should be interpreted as negative.
Orange reactions occurring at 36 to 48 hours should be interpreted as negative.
(1) Both tlie tube and cupule should be filled. (2) Reaction is read in the aerobic (cupule) area.
(1) H2S production may range from a heavy black deposit to a very thin black line around die
tube bottom. Carefully examine die bottom of the tube before considering die reaction
negative. (2) A "browning" of die medium is a negative reaction unless a black deposit is
present. "Browning" occurs with TDA positive organisms.
A mediod of lower sensitivity has been chosen.
Klebsiella, Proteus, and Yersinia routinely give positive reactions.
(1) Immediate reaction. (2) Indole positive organisms may produce a golden orange color
due to indole production. This is a negative reaction.
(1) Tlie reaction should be read within 2 minutes after the addition of die Kovacs' reagent
and the results recorded. (2) After several minutes, the HCI present in Kovacs' reagent may
react widi the plastic of the cupule resulting in a change from a negative (yellow) color to a
brownish-red. This is a negative reaction.
(1) Wait 10 minutes before considering die reaction negative. (2) A pale pink color (after 10
minutes) should be interpreted as negative. A pale pink color which appears immediately
after die addition of reagents but which turns dark pink or red after 10 minutes should be
interpreted as positive.
Motility may be observed by hanging drop or wet-mount preparation.
(1) Tlie solid gelatin particles may spread throughout die tube after inoculation. Unless
diffusion occurs, die reaction is negative. (2) Any degree of diffusion is a positive reaction.
Comments for all
carbohydrates
Fermentation (Enterobacteriaceae, Aeromonas, Vibrio)
(1) Fermentation of die carbohydrates begins in die most anaerobic portion (bottom)
of die tube. Therefore, these reactions should be read from die bottom of die tube to
die top. (2) A yellow color at die bottom of the tube only indicates a weak or delayed
positive reaction.
Oxidation (Odier gram negatives)
(1) Oxidative utilization of die carbohydrates begins in die most aerobic portion
(top) of die tube. Therefore, these reactions should be read from the top to die
bottom of die tube. (2) A yellow color in die upper portion of die tube and a
blue color in the bottom of the tube indicates oxidative utilization of the sugar.
This reaction should be considered positive only for nonEnterobacteriaceae
gram-negative rods. This is a negative reaction for fermentative organisms such
as Enterobacteriaceae.
(1) Before addition of reagents, observe GLU tube (positive or negative) for bubbles.
Bubbles are indicative of reduction of nitrate to the nitrogenous (N2) state. (2) A
positive reaction may take 2 to 3 minutes for the red color to appear. (3) Confirm a
negative test by adding zinc dust or 20-mesh granular zinc. A pink-orange color after
10 minutes confirms a negative reaction. A yellow color indicates reduction of nitrates to
nitrogenous (N2) state.
(1) Bubbles may take 1 to 2 minutes to appear. (2) Best results will be obtained if die test
is run in tubes diat have no gas from fermentation.
Tlie following abbreviations are used: ONPG ((3-galactosidase), ADH (arginine dihydrolase), LDC (lysine decarboxylase), ODC (ornidiine decarboxylase), CIT (citrate), H2S
(hydrogen sulfide), URE (urease), TDA (tryptophan deaminase), IND (indole), VP (Voges-Proskauer), GEL (gelatin), GLU (glucose), MAN (mannitol), INO (inositol), SOR
(sorbitol), RHA (rhamnose), SAC (sucrose), MEL (mehbiose), AMY (amygdahn), ARA (arabinose).
Copyright BioMerieux Vitek, Inc., Hazelwood, MO. Reprinted by permission.
210 Rapid Multitest Systems
Harley-Prescott: I V: Rapid Multitest Systems I 35. The API 20E System I I ©The McGraw-Hill
Laboratory Exercises in Companies. 2002
Microbiology, Fifth Edition
Tube
ONPG
ADH
LDC
ODC
CIT
H2S
URE
TDA
IND
VP
GEL
GLU
MAN
INO
SOR
RHA
SAC
MEL
AMY
ARA
GLU
Nitrate
Reduction
MAN
INO
SOR
Catalase
Chemical/Physical Principles
Hydrolysis of ONPG by beta-galactosidase releases yellow
orthonitrophenol from the colorless ONPG; ITPG
(isopropylthiogalactopyranoside) is used as inducer.
Arginine dihydrolase transforms arginine into ornithine, ammonia, and
carbon dioxide. This causes a pH rise in the acid-buffered system and a
change in the indicator from yellow to red.
Lysine decarboxylase transforms lysine into a basic primary amine,
cadaverine. This amine causes a pH rise in the acid-buffered system and
a change in the indicator from yellow to red.
Ornithine decarboxylase transforms ornithine into a basic primary amine,
putrescine. This amine causes a pH rise in the acid-buffered system and
a change in the indicator from yellow to red.
Citrate is the sole carbon source. Citrate utilization results in a pH rise
and a change in the indicator from green to blue.
Hydrogen sulfide is produced from thiosulfate. The hydrogen sulfide
reacts with iron salts to produce a black precipitate.
Urease releases ammonia from urea; ammonia causes the pH to rise and
changes the indicator from yellow to red.
Tryptophan deaminase forms indolepyruvic acid from tryptophane.
Indolepyruvic acid produces a brownish-red color in the presence of
ferric chloride.
Metabolism of tryptophane results in the formation of indole. Kovacs'
reagent forms a colored complex (pink to red) with indole.
Acetoin, an intermediary glucose metabolite, is produced from sodium
pyruvate and indicated by the formation of a colored complex.
Conventional VP tests may take up to four days, but by using sodium
pyruvate, API has shortened the required test time. Creatine intensifies
die color when tests are positive.
Liquefaction of gelatin by proteolytic enzymes releases a black pigment
which diffuses diroughout the tube.
Utilization of the carbohydrate results in acid formation and a consequent
pH drop. The indicator changes from blue to yellow.
Nitrites form a red complex with sulfanilic acid and N, N-dimethylalpha-
naphdiylamine. In case of negative reaction, addition of zinc confirms
die presence of unreduced nitrates by reducing them to nitrites (pink-
orange color). If diere is no color change after the addition of zinc, diis
is indicative of die complete reduction of nitrates through nitrites to
nitrogen gas or to an anaerogenic amine.
Catalase releases oxygen gas from hydrogen peroxide.
Components
Reactive Ingredients
ONPG
ITPG
Arginine
Lysine
Ornithine
Sodium Citrate
Sodium Thiosulfate
Urea
Tryptophane
Tryptophane
Sodium Pyruvate
Creatine
Kolin Charcoal Gelatin
Glucose
Mannitol
Inositol
Sorbitol
Rliamnose
Sucrose
Melibiose
Amygdalin
(L +) Arabinose
Potassium Nitrate
Quantity
0.2 mg
8.0 ng
2.0 mg
2.0 mg
2.0 mg
0.8 mg
80.0 LLg
0.8 mg
0.4 mg
0.2 mg
2.0 mg
0.9 mg
0.6 mg
2.0 mg
2.0 mg
2.0 mg
2.0 mg
2.0 mg
2.0 mg
2.0 mg
2.0 mg
2.0 mg
80.0 LLg
Copyright BioMerieux Vitek, Inc., Hazelwood, MO. Reprinted by permission.
The API 20E System 211
Harley-Prescott:
Laboratory Exercises in
Microbiology, Fifth Edition
V: Rapid Multitest Systems 35. The API 20E System
©The McGraw-Hill
Companies. 2002
2. If the GLU microtube is negative (blue or green),
do not add reagents. This negative glucose test
indicates that your unknown is not a member of
the Enterobacteriaceae and the testing cannot
proceed any further as outlined in this exercise.
3. If the GLU tube is positive (yellow with or
without gas bubbles), add the following test
reagents in the order listed. In all cases, read the
results immediately after adding the reagents and
waiting the proper length of time. Do not replace
the lid on the tray until all results have been
collected. Record the results obtained on the
report for exercise 35 as per step 1.
a. Add 1 drop of 10% ferric chloride to the
TDA microtube. A positive reaction is
indicated by a brown-red color. A negative
reaction is yellow.
b. Add 1 drop each of Barritt's A (a-naphthol)
and B (40% KOH) solutions to the VP
(Voges-Proskauer) microtube. The KOH
should be added first. It may take 10
minutes for this reaction to occur. A positive
reaction is pink to red. No color change is a
negative reaction.
c. Add 1 drop of Kovacs' reagent to the IND
(indole) microtube. A positive test is
indicated by a red ring within 2 minutes. A
yellow ring is a negative reaction.
d. Examine the GLU (glucose) tube (positive
or negative) for bubbles. Bubbles indicate
the reduction of nitrate and the production of
nitrogen gas (see exercise 34). Record the
presence or absence of gas in the report for
exercise 35.
e. Add 2 drops of each nitrite test reagent to the
GLU microtube. If nitrates are reduced, a red
color (with or without gas bubbles) occurs
within 2 to 3 minutes. This is a positive test,
while a yellow color is a negative test.
f. If the test is negative, add a speck of zinc
dust. A pink-orange color within 10 minutes
indicates that nitrate reduction did not occur.
A yellow color indicates that nitrogen gas
was produced.
g. Add 1 drop of hydrogen peroxide to the
MAN, INO, and SOR cupules. If catalase is
produced (see exercise 28), gas bubbles
appear within 2 minutes and the test is
positive. No bubbles indicate a negative test.
4. After all reactions have been recorded on the
report sheet, determine the seven-digit profile
number as follows:
a. Within each test section, add the numbers
containing only the tests that are positive.
b. Enter the sum of the positive tests for each
section in the square labeled "profile
number." The seven digits represent the
profile number for your enteric unknown.
See no. 2 in the report for exercise 35.
c. Identify the unknown by looking up the
profile number in the API 20E Quick Index
Booklet (also see appendix G).
5. When you are finished with the API 20E System,
the entire unit must be autoclaved, incinerated, or
immersed in a germicide prior to disposal.
HINTS AND PRECAUTIONS
(1) Make sure that the culture is adequately mixed and
checked against the McFarland standard to ensure an
even inoculation of the system. (2) Be wary of any air
bubbles in the cupules. (3) Do not cover the incubation
tray with its lid after adding reagents until all changes
have been observed.
212 Rapid Multitest Systems
Harley-Prescott: V: Rapid Multitest Systems 35. The API 20E System
Laboratory Exercises in
Microbiology, Fifth Edition
©The McGraw-Hill
Companies. 2002
Laboratory Report jj
Name:
Date: _
Lab Section:
The API 20E System
1. Tabulation of API 20E System results.
Test
Test value
Results 24 hr
Protile number
ONPG
ADH
LDC
1-2+4
ODC
CIT
1 + 2 -
H2S
- 4
URE
TDA
1 4 2
IND
4
VP
GEL
GLU | MAN
1 + 2+4-] 1
t
i
INO
SOR
2+4
RHA
SAC
1 ■+ 2
MEL
4
AMY
ARA
OX
1+2+4
Catalase:
Nitrate reduction:
2. Construction of the seven-digit profile number. For example, E. coli = 5 144 572.
ONPG ADH LDC ODC CIT H2S URE TDA IND VP GEL GLU
10 0 0 0 4 0 0
MAN INO SOR RHA SAC MEL AMY ARA OXI
1 0
3. Number of unknown:
Name of unknown:
_. Look up the unknown in the API 20E Quick Index Booklet.
Harley-Prescott: V: Rapid Multitest Systems 35. The API 20E System
Laboratory Exercises in
Microbiology, Fifth Edition
Review Questions
1. What is the purpose of the sterile mineral oil in the API 20E System?
2. What group of pathogens is the API 20E System used to detect in a clinical laboratory?
3. Why is the recommended incubation procedure for the API 20E System 18 to 24 hours?
4. Can gram-negative, oxidase-positive bacteria be identified with the API 20E System? Explain your answer.
5. What is a cupule?
6. What is a profile index number?
7. What is found in the API 20E Profile Index Booklet?
©The McGraw-Hill
Companies. 2002
214 Rapid Multitest Systems
Harley-Prescott:
Laboratory Exercises in
Microbiology, Fifth Edition
V: Rapid Multitest Systems
36. The Enterotube II
System
©The McGraw-Hill
Companies. 2002
EXERCISE
36
The Enterotube II System
SAFETY CONSIDERATIONS
Be careful with the Bunsen burner flame. No mouth
pipetting. Kovacs' reagent is caustic to the skin and
mucous membranes due to the concentrated HC1 and
p-dimethylaminobenzaldehyde. The 5% oc-naphthol in
absolute ethanol is highly flammable.
3. Determine a five-digit numerical code
4. Identify unknown Enterobacteriaceae using the
Enterotube II System and the Computer Coding
Manual
Suggested Reading in Textbook
1. 'The, Enterobacteriaceae, section 22.3.
2. Rapid Methods of Identification, section 36.2.
Materials per Student
1 Enterotube II System (Beeton Dickinson
Microbiology Systems, Sparks, MD 21152
(1-800-638-8663) also available from Fisher
Scientific)
plate culture(s) of unknown Enterobacteriaceae
from EMB, MacConkey, SS, Hektoen enteric,
or TSA
TSA plate
Kovacs' reagent
10% KOH with 3% creatine solution
5% a-naphthol in absolute ethanol
3 syringes with needles or Pasteur pipettes with
pipettor
test-tube rack
platinum inoculating loop (Nichrome wire should
NOT be used)
wax pencil
Bunsen burner
Roche Enterotube II Computer Coding Manual
Learning Objectives
Each student should be able to
1. Correctly inoculate the Enterotube II System
2. Read and record the various biochemical reactions
that occur after 18 to 24 hours of incubation
Principles
The basic philosophy of the Enterotube II System is
the same as the API 20E System (see exercise 35)—
speed, ease, and low cost in the identification of
gram-negative, glucose-fermenting, oxidase-negative
Enterobacteriaceae. Some microbiologists prefer this
system over the API 20E System. Both systems are
presented in this manual although they accomplish the
same end.
The Enterotube II System consists of a single tube
containing 12 compartments (figure 36.1), each
containing a different agar-solidified culture medium.
Compartments that require aerobic conditions have small
openings that allow air in; those requiring anaerobic
conditions have a layer of paraffin wax on the top of the
media. There is a self-enclosed inoculating needle
(wire). This needle can touch an isolated bacterial
colony and then in one movement can be drawn through
the 12 compartments, inoculating the test media. Fifteen
standard tests are performed. After 18 to 24 hours of
incubation, the color changes that occur in each of the
compartments are recorded and interpreted according to
the manufacturer's instructions. This is done by
determining a five-digit code from the results and consulting
a coding manual, or by comparing the results obtained
with those outlined in a differential chart provided by
the manufacturer (see appendix G). This quick multitest
215
Harley-Prescott:
Laboratory Exercises in
Microbiology, Fifth Edition
V: Rapid Multitest Systems
36. The Enterotube II
System
©The McGraw-Hill
Companies. 2002
Figure 36.1 Enterotube II Multitest system, (a) Uninoculated colors, (b) Inoculated colors.
Gas production
Indole
Voges-Proskauer PA
*Certain microorganisms will not always produce the
ideal "strong" positive A. Reactions similar to B
should also be considered positive.
system also has a computer-assisted program called EN-
CISE (Enterobacteriaceae Numerical Coding and
Identification System for Enterotube).
Procedure
First Period
1. Using aseptic technique (see figure 14.3), select a
well-isolated colony from the unknown plate and
do an isolation streak on a TSA plate. Incubate at
35° C in the inverted position for 24 to 48 hours.
This plate serves as a control to make sure your
unknown is a pure culture. Alternately, it can
serve as the source colony for the Enterotube II
System.
2. Select a well-isolated colony from either the TSA
plate or a plate provided by your instructor.
Perform an oxidase test on the bacteria either by
placing a small amount of the bacteria on the
filter paper and adding several drops of oxidase
reagent or by using a special test disk/strip. Note
the color change (see exercise 30, figure 30.1). If
oxidase is positive, stop. The Enterotube II
System cannot be used with oxidase-positive
bacteria. If oxidase is negative, proceed as follows:
a. Place your name and date on the white paper
label on the side of the Enterotube above the
VP. Remove the caps from both ends of the
Enterotube. The tip of the wire is sterile and
does not need to be flamed.
b. Touch a well-isolated colony with the tip of
the wire.
c. Inoculate the Enterotube with the bacterial
culture by drawing, and at the same time
rotating, the wire through the 12
compartments. Do not pull the wire out of
the Enterotube!
d. Push the wire back through the Enterotube
so that the 12 chambers are reinoculated.
e. Withdraw the wire once again until the tip is
in the H^S/indole compartment and then
break the wire at the notch by bending it
back and forth. Discard the needle remnant.
f. Replace the caps but do not tighten. This
creates an aerobic environment where the
216 Rapid Multitest Systems
Harley-Prescott:
Laboratory Exercises in
Microbiology, Fifth Edition
V: Rapid Multitest Systems
36. The Enterotube II
System
©The McGraw-Hill
Companies. 2002
h.
wire is (chambers GLU-GAS, LYS, ORN),
which is necessary for dextrose
fermentation.
Remove the blue plastic strip to expose the
aeration holes (for chambers ADON, LAC,
ARAB, SORB, VP, DUL-PA, UREA, and
CIT) and slide the clear plastic band over the
glucose compartment. This later step will
contain any small amount of sterile wax that
may escape due to excessive gas production
by some bacteria.
Incubate the Enterotube for 18 to 24 hours at
35° to 37° C. Make sure the Enterotube is
placed on a flat surface and that mere is
space between adjacent tubes to allow for air
circulation.
Second Period
1. After 18 to 24 hours of incubation, examine the
Enterotube and notice the color changes that have
occurred in each compartment. Use table 36.1 and
appendix G as a guide for comparing and
interpreting your results. Record both positive and
negative results on the white label on the side of
the Enterotube and in the report for exercise 36.
2. Perform the indole test by placing the Enterotube
in a test-tube rack with the GLU-GAS
compartment facing downward. Add 1 or 2 drops
of Kovacs' reagent to the H2S compartment using
either a Pasteur pipette with pipettor or a syringe
equipped with a needle. If a pipette is used, first
make a small hole in the plastic film with a hot
inoculating loop or needle. Results are read after
10 seconds. If the fluid or film tarns red, this is a
positive indole test; if there is no color change,
the test is negative. Record your results in the
report for exercise 36.
3. To the Voges-Proskauer compartment, add 2
drops of 20% KOH and 3 drops of a-naphthol.
Use a new syringe and needle or pipette for each
solution. Results should be read within 20
minutes after adding the solutions. Record your
results in the report for exercise 36.
4. Determine the five-digit identification number as
follows:
a. Use only the tests that are positive. Add the
numbers under the results within each test
section.
b. Enter the sum of the positive tests for each
test section in the square labeled "ID
value." These five digits represent the
identification number for your unknown.
For example, in the illustration, the circles
represent positive tests.
OOIO
O OIO O
*
*
*
ID value
5. Determine the identity of your enteric unknown
by comparing the five-digit identification number
with the Enterotube II Computer Coding Manual.
HINTS AND PRECAUTIONS
All results for the Enterotube II system should be
recorded before injecting the indole and Voges-
Proskauer test reagents because discoloration of other
test chambers can occur when these reagents are applied.
The Enterotube II System 217
Harley-Prescott: I V: Rapid Multitest Systems I 36.The Enterotube II I I ©The McGraw-Hill
Laboratory Exercises in System Companies. 2002
Microbiology, Fifth Edition
Table 36.1 Biochemical Reactions of Enterotube II. Sources: Roche Diagnostics, Division of Hoffman-LaRoche,
„ , , Uninoculated Reacted
Symbol
color color
ADON
LAC
ARAB
SORB
V.P.
DUL-PA
A*
B*
UREA
A*
CIT
B*
Type of reaction
Adonitol Bacterial fermentation of adonitol, which results in
the formation of acidic end products, is indicated by a change in
color of the indicator present in the medium from red (alkaline) to
yellow (acidic). Any sign of yellow should be interpreted as a
positive reaction; orange should be considered negative.
Lactose Bacterial fermentation of lactose, which results in the
formation of acidic end products, is indicated by a change in color
of the indicator present in the medium from red (alkaline) to yellow
(acidic). Any sign of yellow should be interpreted as a positive
reaction; orange should be considered negative.
Arabinose Bacterial fermentation of arabinose, which results
in the formation of acidic end products, is indicated by a change
in color from red (alkaline) to yellow (acidic). Any sign of yellow
should be interpreted as a positive reaction; orange should be
considered negative.
Sorbitol Bacterial fermentation of sorbitol, which results in the
formation of acidic end products, is indicated by a change in color
from red (alkaline) to yellow (acidic). Any sign of yellow should be
interpreted as a positive reaction; orange should be considered
negative.
Voges-Proskauer Acetylmethylcarbinol (acetoin) is an
intermediate in the production of butylene glycol from glucose
fermentation. The presence of acetoin is indicated by the
development of a red color within 20 minutes. Most positive
reactions are evident within 10 minutes.
Dulcitol Bacterial fermentation of dulcitol, which results in the
formation of acidic end products, is indicated by a change in color
of the indicator present in the medium from green (alkaline) to
yellow or pale yellow (acidic).
Phenylalanine Deaminase This test detects the formation of
pyruvic acid from the deamination of phenylalanine. The pyruvic
acid formed reacts with a ferric salt in the medium to produce a
characteristic black to smoky gray color.
Urea The production of urease by some bacteria hydrolyzes
urea in this to produce ammonia, which causes a shift in
pH from yellow (acidic) to reddish-purple (alkaline). This test is
strongly positive for Proteus in 6 hours and weakly positive for
Klebsiella and some Enterobacter species in 24 hours.
Citrate Organisms that are able to utilize the citrate in this
medium as their sole source of carbon produce alkaline metabolites
which change the color of the indicator from green (acidic) to deep
blue (alkaline.) Any degree of blue should be considered positive.
218 Rapid Multitest Systems
Harley-Prescott: I V: Rapid Multitest Systems I 36.The Enterotube II I I ©The McGraw-Hill
Laboratory Exercises in System Companies. 2002
Microbiology, Fifth Edition
„ . , Uninoculated Reacted
Symbol
color color
GLU-GAS
LYS
ORN
H2S/IND
Type of reaction
Glucose (GLU) The end products of bacterial fermentation of
glucose are either acid or acid and gas. The shift in pH due to the
production of acid is indicated by a color change from red (alkaline)
to yellow (acidic). Any degree of yellow should be interpreted as
a positive reaction; orange should be considered negative.
Gas Production (GAS) Complete separation of the wax overlay
from the surface of the glucose medium occurs when gas is
produced. The amount of separation between the medium and
overlay will vary with the strain of bacteria.
Lysine Decarboxylase Bacterial decarboxylation of lysine,
which results in the formation of the alkaline end product cadaverine,
is indicated by a change in color of the indicator from pale yellow
(acidic) to purple (alkaline). Any degree of purple should be
interpreted as a positive reaction. The medium remains yellow if
decarboxylation of lysine does not occur.
Ornithine Decarboxylase Bacterial decarboxylation of ornithine
causes the alkaline end product putrescine to be produced. The
acidic (yellow) nature of the medium is converted to purple as
alkalinity occurs. Any degree of purple should be interpreted as
a positive reaction. The medium remains yellow if decarboxylation
of ornithine does not occur.
H2S Production Hydrogen sulfide, liberated by bacteria that
reduce sulfur-containing compounds such as peptones and sodium
thiosulfate, reacts with the iron salts in the medium to form a black
precipitate of ferric sulfide usually along the line of inoculation.
Some Proteus and Providencia strains may produce a diffuse
brown coloration in this medium, which should not be confused
with true H2S production.
Indole Formation The production of indole from the metabolism
of tryptophan by the bacterial enzyme tryptophanase is detected
by the development of a pink to red color after the addition of
Kovac's reagent.
Source: Copyright © Becton Dickinson Microbiological Systems. Reprinted by permission.
The Enterotube II System 219
Harley-Prescott: V: Rapid Multitest Systems 36. The Enterotube II
Laboratory Exercises In System
Microbiology, Fifth Edition
©The McGraw-Hill
Companies. 2002
Laboratory Report j q
Name:
Date: _
Lab Section:
The Enterotube II System
1. Record the results of your unknown in the following chart. Use a + for a positive test and a - for a
negative test.
G
L
U
G
A
s
2 + 1
L
Y
S
O
R
N
H2S
I
N
D
A
D
0
N
4 + 2+1 4 + 2
V A.
L
A
C
+ 1
A
R
A
B
s
0
R
B
D
U
L
P
A
U
R
E
A
C
I
T
4+2+1 4+2+1
^ A >
ID value
o
o
o
o
o
2. Using the Enterotube II Computer Coding Manual, determine the five-digit code number by encircling the
numbers (4, 2, or 1) only under the tests that are positive. Total these numbers within each group to form a
digit for that group.
221
Harley-Prescott: I V: Rapid Multitest Systems I 36.The Enterotube II I I ©The McGraw-Hill
Laboratory Exercises In System Companies. 2002
Microbiology, Fifth Edition
Review Questions
1. What are some advantages of the Enterotube II System over the API 20E System? Some disadvantages?
2. Why can the Enterotube II System be used to identify only gram-negative, oxidase-negative
Enterobacteriaceae ?
3. What is the medical significance of members of the Enterobacteriaceae ?
4. Why is part of the wire left in the Enterotube II? Why is part of the wire broken off?
5. What is a coding manual?
6. What are some biochemical characteristics shared by the family Enterobacteriaceae ?
1. What is the advantage of ENCISE over a coding manual?
222 Rapid Multitest Systems
Harley-Prescott:
Laboratory Exercises in
Microbiology, Fifth Edition
VI. Unknown Identification Introduction
©The McGraw-Hill
Companies. 2002
PART SIX
Unknown Identification
What's in a name? that which we call a rose
By any other name would smell as sweet. . . .
William Shakespeare (English poet
and dramatist, 1564—1616)
Exercises 6—12 and 20—36 are designed to enable
students to gather morphological, staining, cultural, and
biochemical data on the characteristics of different
microorganisms. The tests used are those that are employed in
bacterial identification in all microbiology laboratories. The
approach is to gather as much information about the
microorganism as possible. After this information has been
collected, it can be used to identify a microorganism.
The first edition of Bergey 's Manual of Systematic Bacteriology
consists of four volumes of material that can be used to identify
microorganisms. (The second edition of this manual with a
revised classification system is currently being prepared. Since this
laboratory manual will be published before the second edition
of Bergey's Manual is available to the majority of higher
education institutions, we will continue to use the first edition.) For
example, in Bergey's Manual, bacteria are grouped according to
Gram-stain reaction, cell shape, cell arrangement, oxygen
requirements, motility, and nutritional and metabolic properties.
In 1994, the ninth edition of Bergey's Manual of
Determinative Bacteriology was published. It is a departure from past
editions that attempted, usually inadequately, to combine
systematic and determinative information. Systematic
information continues to be found in Bergey's Manual of Systematic
Bacteriology, with the Determinative manual serving as a
reference aid in the identification of unknown bacteria. This
ninth edition is intended solely for the identification of those
bacteria that have been described and cultured. They are a
small number and represent only a fraction of those existing
in nature. Much work remains to be done, and future
editions of both Bergey's Manuals will only become larger.
The purpose of Part Six of this manual (chapters 37 and
38) is to first introduce the student to the proper use of
Bergey's Manual of Systematic Bacteriology and then to employ
it in the identification of a general unknown mixture of
gram-positive and gram-negative bacteria.
After completing the two exercises in Part Six,
you will, at the minimum, be able to demonstrate an
increased level in cognitive and analysis skills,
including: (a) following an experimental protocol; (b)
collecting and organizing data in a systematic
fashion; (c) assessing the validity of data (including
integrity and significance); and (d) drawing
appropriate conclusions based on the results. This will meet
the American Society for Microbiology Core
Curriculum Laboratory Cognitive Skill number 1 and
Thinking Skill number 2 (see pp. vi—uiii).
David Hendricks Bergey (1860-1937)
Bergey was the American bacteriologist who first proposed the
system of bacterial classification in which bacteria are grouped
according to Gram reaction, metabolism, and morphology,
with each group being further subdivided into orders, families,
genera, and species.
The first edition of Bergey's Manual of Determinative
[Systematic] Bacteriology was published in 1923. Throughout
the years, Bergey's Manual has become a widely used
international reference work for bacterial taxonomy. At first,
Dr. Bergey was the nominal owner of Bergey's Manual. In
1936, he executed a trust indenture whereby any publication
income is used solely for preparing, editing, and publishing
revisions and successive editions of Bergey's Manual, as well as
for any research that may be necessary or desirable in such
activities. Today, Bergey's Manual is a worldwide collaborative
effort. It has an editorial board of thirteen trustees, and over
two hundred specialists from nineteen countries are listed as
contributors to the first two volumes.
223
Harley-Prescott:
Laboratory Exercises in
Microbiology, Fifth Edition
VI. Unknown Identification
37. Using the 1st Ed. of
Bergey's Man. of Syst.
Bacteriology to Ident.
Bacteria
©The McGraw-Hill
Companies. 2002
EXERCISE
37
Using the First Edition of Bergey's Manual of Systematic
Bacteriology to Identify Bacteria
Materials per Group of Students
Krieg, N. R., ed. 1984. Bergey's Manual of
Systematic Bacteriology, editor-in-chief J. G.
Holt, vol. 1. Baltimore, Maryland: Williams &
Wilkins.
Sneath, P. H. A., Mair, N. S., and Sharpe, M. E.
1986. Bergey's Manual of Systematic
Bacteriology, editor-in-chief J. G. Holt, vol. 2.
Baltimore, Maryland: Williams & Wilkins.
Learning Objectives
Each student should be able to
1. Use Bergey's Manual to identify an unknown
bacterial strain
2. Use Bergey's Manual as a source of further
information about a group of bacteria
Suggested Reading in Textbook
1. Microbial Taxonomy, Chapter 19.
2. The bacterial survey chapters, Chapter 20-24.
These should be consulted for specific
information about particular volumes of the
manual and groups of bacteria. Chapters 21 and
22 cover the bacteria in Volume 1 of Bergey's
Manual and chapters 23 and 24 describe the
bacteria in Volume 2.
3. Bacterial Classification according to the first
edition of Bergey's Manual of Systematic
Bacteriology, appendix III.
Pronunciation Guide
Streptococcus (strep-to-KOK-us)
Principles
Bergey's Manual of Systematic Bacteriology is intended
to aid microbiologists in identifying unknown bacteria
and also to provide information about the biology of
each bacterial group. The first edition of the manual is
divided into four volumes and 33 sections. Each section
contains bacteria sharing a few easily determined
characteristics and bears a title that either describes these
properties or provides the vernacular names of the
bacteria included. The characteristics used to define
sections are normally features such as general shape and
morphology, Gram-staining properties, oxygen
dependence, motility, the presence of endospores, and the
mode of energy production. Each volume focuses on a
different collection of bacteria.
Volume 1. The gram-negative bacteria of general,
medical, or industrial importance.
Volume 2. Gram-positive bacteria other than
actinomycetes.
Volume 3. Gram-negative bacteria with distinctive
properties, cyanobacteria, and archaeobacteria.
Volume 4. Actinomycetes (gram-positive filamentous
bacteria).
Several useful introductory articles on various
aspects of bacterial taxonomy are located at the
beginning of each volume. These articles cover such topics
as using the manual, bacterial classification and
nomenclature, the identification of bacteria, reference
collections of bacteria, and higher bacterial taxa. The
volumes are numbered sequentially. For example,
Volume 1 ends on page 964, and the introduction to
bacterial classification in Volume 2 begins on page 965.
The sections in the first edition of Bergey's Manual
vary considerably in content. Some contain only one
major bacterial taxon. For example, Section 1 has only
the order Spirochetales. Other sections contain more
than one family (Section 5, the facultatively anaerobic
gram-negative rods) or more than one order (Section 9,
the Rickettsias and Chlamydiae). Many sections lack
any taxa above the genus level (Section 13, endospore-
forming, gram-positive rods and cocci). Several
sections also have genera grouped under the heading
224
Harley-Prescott:
Laboratory Exercises in
Microbiology, Fifth Edition
VI. Unknown Identification
37. Using the 1st Ed. of
Bergey's Man. of Syst.
Bacteriology to Ident.
Bacteria
©The McGraw-Hill
Companies. 2002
"Other Genera" or "Other Organisms." These groups
belong in the section, but cannot yet be placed in a
recognized family.
Each article on a genus of bacteria is organized in
a specific sequence to provide essential information
about the genus as efficiently as possible. Some of the
more important parts of each article are the following:
1. Name of the Genus. The accepted name is given
in boldface.
2. Capsule Description. A brief summary of the
major characteristics of the genus, with the most
important properties in boldface, is provided for
convenience.
3. Further Descriptive Information. A more
extensive description of the biology of the genus
is then given. Although this description is not
exhaustive, it provides a great deal of useful
information about such items as morphology,
growth conditions and nutrition, physiology and
metabolism, genetics, pathogenicity, and ecology.
4. Enrichment and Isolation. Selected methods for
growth of the bacteria are presented.
5. Differentiation of the Genus from Other
Genera. Characteristics that are particularly
useful in distinguishing related genera are given,
often in the form of a table.
6. Taxonomic Comment. This part summarizes the
reasons for placing the genus in its current
taxonomic position. The placement of species in
the genus is also discussed.
7. Differentiation of the Species of the Genus. The
characteristics most useful for distinguishing
between species are described and usually
summarized in table form.
8. List of the Species of the Genus. Descriptions of
each species in the genus are given. Where
possible, much of the essential information is
summarized in tables.
In articles on the bacterial genera, three types of
tables are used to summarize a great deal of
information: (1) tables that differentiate between related
genera; (2) tables that differentiate between species
within a genus; and (3) tables that provide extra
information about particular species. A variety of symbols
are used in these tables. The most important are
defined as follows:
+ 90% or more strains are positive for the
characteristic
- 90% or more strains are negative
d 11% to 89% of the strains are positive
D
strain instability (this is not equivalent to
"d")
different reactions in different taxa (species
of a genus or genera of a family)
Footnotes to the tables give additional symbols and
exceptions to the above symbols.
One can use the manual for unknown
identification in the following way. First, determine which
volume to employ based on the Gram-staining properties
of the unknown and its general shape. For example,
most ordinary gram-negative bacteria are found in
Volume 1, while ordinary gram-positive bacteria
(excluding the actinomycetes) are found in Volume 2.
Most unknowns provided for student laboratory
exercises will be found in the first two volumes. Next,
proceed to the Table of Contents in the appropriate
volume and carefully study the descriptive title for
each section. The titles should provide sufficient
information to place the unknown within a section.
Determine the genus of the unknown using the keys or
tables that are normally found at the beginning of
each section. Once the proper genus has been
selected, the unknown can be placed in a species using
information contained in the generic and species
descriptions. Tables and written descriptive material
from both generic and species descriptions should be
employed in the final identification because
characteristics discussed in the generic descriptions are not
normally repeated in the species descriptions.
Two examples of unknown identification using
Bergey's Manual may be helpful in understanding this
approach to unknown identification. First, suppose that
you are trying to identify a gram-negative, facultatively
anaerobic straight rod that is oxidase negative and
motile by peritrichous flagella. Since the unknown is a
regular gram-negative bacterium, you would use
Volume 1. Inspection of the Table of Contents will lead to
Section 5 because the unknown is a facultatively
anaerobic, gram-negative rod. Table 5.1 on page 408
differentiates between the three families in Section 5. The
unknown is a straight rod that is oxidase negative and
peritrichous; thus, it is a member of the family Enter-
obacteriaceae. Properties of the family are described
on pages 408^-20. Tentative identification of the genus
can be made using the biochemical characteristics
given in Table 5.3, pages 414-417. Genus identity can
be confirmed from the descriptions beginning on page
420 with particular emphasis on the properties given in
boldface in the Capsule Descriptions of the genera.
Now imagine that the unknown is a
gram-positive, facultatively anaerobic coccus that grows in
Using Bergey's Manual of Systematic Bacteriology to Identify Bacteria 225
Harley-Prescott:
Laboratory Exercises in
Microbiology, Fifth Edition
VI. Unknown Identification
37. Using the 1st Ed. of
Bergey's Man. of Syst.
Bacteriology to Ident.
Bacteria
©The McGraw-Hill
Companies. 2002
chains and pairs, is catalase negative, and ferments
glucose to lactate. Because the bacterium is gram
positive and not an actinomycete, one would use Volume
2. Inspection of the Table of Contents shows that only
Section 12 of the six sections contains gram-positive
cocci. Table 12.1, pages 999-1,001, can be used to
identify the genus. Since the unknown is a facultative
anaerobe, one would turn to the part of the table that
describes facultatively anaerobic genera (page 1,000).
The genus Streptococcus best fits the unknown
because it forms chains and pairs and produces lactate.
This can be confirmed by testing for the
characteristics given in the Capsule Description of the genus on
page 1,043 and the section entitled "Differentiation of
the genus Streptococcus from other taxa" on page
1,046. Identification of the species is made from the
descriptive material in the list of species that begins
on page 1,047. In particular, the summary tables on
page 1,048 and elsewhere are especially useful in
species identification.
One must very carefully use the Table of Contents
as a key to the sections. If there are many
discrepancies between the unknown's properties and the
descriptions of the leading candidates within a section,
an error may have been made in Gram staining or
some other basic laboratory procedure so that the
unknown has been placed in the wrong section. If faced
with this situation, it is best to recheck the results used
to select the volume and the section.
It should also be kept in mind that there is often a
great deal of variation between different strains of a
species. A bacterium might differ from the species
description in one test and match the description in all
others. Sometimes all one can do is select the species
or genus with the best overall match to the data. If
possible, extra tests should be run to eliminate
alternate candidates.
As mentioned earlier, Bergey's Manual of
Systematic Bacteriology also serves as an excellent source of
information about the biology of bacteria. The Table
of Contents of each volume may be used to find the
bacterial group of interest. However, it is usually
easier to simply look for the desired family, genus, or
species in the Index of Scientific Names of Bacteria at
the end of each volume. All references to each
bacterial taxon are noted in the index. The page numbers in
boldface indicate the page on which the actual
description of the taxon begins. Each volume also
contains an extensive bibliography that lists in
alphabetical order all the papers cited in the volume. These
articles may be consulted for more information about
the genus or species of interest.
226 Unknown Identification
Harley-Prescott: VI. Unknown Identification 37. Using the 1st Ed. of
Laboratory Exercises in Bergey's Man. of Syst.
Microbiology, Fifth Edition Bacteriology to Ident.
Bacteria
Laboratory Report
Lab Section:
Using the First Edition of Bergey's Manual
of Systematic Bacteriology to Identify Bacteria
1. Find the pages in Volume 1 or 2 on which the following topics are discussed:
a. How to use the manual.
b. The nature of taxonomic ranks.
c. Major developments in bacterial classification.
d. The use of nucleic acids in bacterial classification.
2. Give the page in Volume 1 or 2 on which R. G. E. Murray proposes a new arrangement of higher bacterial
taxa (divisions and classes).
Where does he describe the kingdom Procaryotae and its four divisions?
3. Using the indexes in Volumes 1 and 2, find the pages on which descriptions of the following taxa begin:
a. Enterobacteriaceae e. Rickettsiales
b. Pseudomonas aeruginosa f. Treponema
c. Salmonella g. Lactobacillus
d. Mycobacterium tuberculosis h. Staphylococcus
4. Use Bergey's Manual to find the genus and species of an unknown with the following characteristics: gram-
negative straight rod, facultatively anaerobic, motile by peritrichous flagella, oxidase negative, hydrolyzes
urea and gelatin, produces hydrogen sulfide, oxidatively deaminates the amino acids phenylalanine and
tryptophan, indole positive, and ornithine-decarboxylase negative.
Genus:
Species:
5. Use Bergey's Manual to find the genus and species of an unknown with the following characteristics: gram-
positive straight rod, cell diameter 1.0 to 1.2 Llm, motile by peritrichous flagella, grows in chains, facultative
and can grow anaerobically, catalase positive, reduces nitrate to nitrite, elliptical endospores formed centrally
in an unswollen cell (sporangium), colonies dull or frosted in appearance with an undulated margin, no
parasporal body, Voges-Proskauer test positive, gelatin and starch hydrolyzed, and citrate catabolized.
Genus:
Species:
©The McGraw-Hill
Companies. 2002
37
Name:
227
Harley-Prescott: I VI. Unknown Identification I 37. Using the 1st Ed. of I I ©The McGraw-Hill
Laboratory Exercises in Bergey's Man. of Syst. Companies. 2002
Microbiology, Fifth Edition Bacteriology to Ident.
Bacteria
Review Questions
1. What is found in each section of the first edition of Bergey's Manual of Systematic Bacteriology?
2. In articles on the bacterial genera, what types of tables are used to summarize data?
3. How would you use Bergey's Manual to identify an unknown?
4. When using the Table of Contents in Bergey's Manual, why must you be very careful?
5. Of what value is the Bibliography in Bergey's Manual?
6. How many current volumes are there of Bergey's Manual?
7. What are the three types of tables found in Bergey's Manual?
228 Unknown Identification
Harley-Prescott:
Laboratory Exercises in
Microbiology, Fifth Edition
VI. Unknown Identification 38. General Unknown
©The McGraw-Hill
Companies. 2002
EXERCISE
38
General Unknown
SAFETY CONSIDERATIONS
Be careful with the Bunsen burner flame. No mouth
pipetting. Barritt's reagent contains naphthol, which is
toxic and may cause peeling of the skin; thus, wear
gloves when using this reagent. Kovacs' reagent is also
caustic to the skin and mucous membranes due to the
concentrated HC1 and p-dimethylaminobenzaldehyde.
Handle all cultures with care. Some may be pathogens
or potential pathogens.
Materials per Student
number-coded, 24-hour tryptic soy broth culture
containing a mixture of any two bacteria (one
gram positive and one gram negative) listed in
the table on the next page
1 mannitol salt agar plate
1 EMB plate
1 blood agar plate
4 TSA slants—2 screw cap and 2 regular
Materials to Be Requested
2 tryptic soy agar plates
2 nutrient gelatin deep tubes or gelatin test strips
2 starch agar plates
2 tributyrin agar plates
2 SIM agar deeps
2 Simmons' citrate slants
2 urea broth tubes or urease test disks/strips
2 phenol red dextrose broth tubes or dextrose
tablets
2 phenol red lactose broth tubes or lactose tablets
2 phenol red sucrose broth tubes or sucrose tablets
2 tryptic nitrate broth tubes
2 litmus milk tubes
2 MR-VP broth tubes
General Laboratory Material
Gram-stain and acid-fast materials
3% hydrogen peroxide
Barritt's reagents
Kovacs' reagent
zinc powder
tetramethyl-p-phenylenediamine dihydrochloride
or oxidase test disk/strip
glass slides
wax pencil
35°C incubator
Bunsen burner
inoculating loop and needle
disposable gloves
Pasteur pipettes with pipettor
Learning Objectives
Each student should be able to
1. Perform an isolation streak to separate two
unknown bacteria
2. Identify unknown gram-positive and gram-
negative bacteria
Principles
The identification of unknown bacteria is one of the
major responsibilities of the microbiologist. At this
point in the course, students should have developed
sufficient knowledge in staining methods, isolation
techniques, microbial nutrition, biochemical activities,
and characteristics of microorganisms to be able to
work independently in identifying unknown bacteria.
This exercise is called a general unknown because
unknown gram-positive and gram-negative bacteria
will be used. Any of the following bacteria may be
present in the unknown.
229
Harley-Prescott:
Laboratory Exercises in
Microbiology, Fifth Edition
VI. Unknown Identification 38. General Unknown
©The McGraw-Hill
Companies. 2002
Grain Positive
Grain Negative
Bacillus cereus
B. megaterium
B. subtilis
Enterococcus faecalis
Listeria monocytogenes
Micrococcus luteus
Staphylococcus aureus
Others that the instructor may wish
to add:
Acinetobacter calcoaceticus
Citrobacter freundii
Enterobacter aerogenes
Escherichia coli
Klebsiella pneumoniae
Proteus vulgaris
Pseudomonas aeruginosa
Salmonella arizonae
Shigella sonnei
Others that the instructor may wish to
add:
From the first edition of Bergey 's Manual of
Systematic Bacteriology, which will be available in the
laboratory, and from material in the textbook, each
student is to work out a separation scheme (dichotomous
key) in outline or flow-sheet form showing the
important tests to use in distinguishing among the various
genera. This should be done before the first period in
order to use time and the necessary media most
expediently. One example of a separation scheme
(dichotomous key) is shown in figure 38.1. From Bergey's
Manual, each student is to list the significant features
of the possible bacteria in the above gram-positive and
gram-negative list. After culturing and Gram staining,
many bacterial groups can be eliminated. General
morphological properties are most often used in placing a
bacterium in the proper order and family. Biochemical
and physiological characteristics are most useful at the
genus and species level.
Success in the unknown identification will depend
on (1) adequate planning of the approach, (2) careful
selection of the biochemical tests, (3) weighing the
value of one test over another, and (4) execution and
interpretation of results.
Procedure
First Period
1
After obtaining the unknown mixture (containing
one gram-positive and one gram-negative
bacterium) from your instructor, immediately record
the code number in the report for exercise 38.
2. Perform an isolation streak (see exercise 16) on
the mannitol salt, EMB, and blood agar plates.
3. Label the plates with your name, date, and
medium.
4. Incubate inverted for 24 to 48 hours at 35°C.
During incubation, note the growth characteristics
and describe in the report for exercise 38. Record
bacterial colony morphology (see exercise 15).
5. Perform a Gram stain on well-isolated colonies.
Make sure to mark the bottom of the plates
indicating which colony is gram positive and
which is gram negative.
Second Period
1. Using aseptic technique, inoculate two TS A slants
with the gram-positive unknown and two TSA
slants with the gram-negative unknown by means
of a streak inoculation. (One of the two TSA
slants for each unknown should be kept in a
screw-cap tube.) Incubate at 35°C for 24 to 48
hours. One slant of the gram-positive and one of
the gram-negative will be used as a stock culture.
The other two slants will be used to determine the
cultural characteristics of the unknowns. After 24
hours, the stock cultures can be kept in a
refrigerator for later use if necessary. When the
working culture is contaminated or not viable,
subculture onto another slant from the screw-cap
stock culture.
2. Perform a Gram stain on well-isolated, young
(18- to 24-hour) colonies and record the reaction,
morphology, and arrangement of the cells in the
report for exercise 38. Mark the location of the
colonies you Gram stained. If the unknown
appears gram negative, stain a younger culture
(about 18 hours old) to be sure that your unknown
is a gram-positive bacterium that has become
gram-negative with age.
Third Period
1. Examine the tryptic soy agar slants for general
culture characteristics. Record your observations
in the report for exercise 38.
2. From your separation scheme, using aseptic
technique, inoculate only the necessary media
with the gram-positive and gram-negative
unknowns.
3. Use a hanging drop slide (see exercise 2) to
confirm motility, shape, and cell arrangement.
Carefully measure your unknowns using a
hanging drop slide or wet-mount (see exercise 1).
230 Unknown Identification
Harley-Prescott:
Laboratory Exercises in
Microbiology, Fifth Edition
VI. Unknown Identification I 38. General Unknown
©The McGraw-Hill
Companies. 2002
Figure 38.1 Separation Scheme for Some Common Bacterial Genera.
Primary
isolation
Staining
reactions I
\
Biochemical
and culture
tests
Spores
present
Bacterial
groups
Unknown from
instructor
Gram positive
Rods
Spores
absent
Acid-fast
Non-acid-fast
Catalase
Streak plates or slants
for isolation
Gram stain
Maintain
stock cultures
1
Gram negativ<
Cocci
Rods
I
Irregular clusters
and tetrads;
catalase
positive
Positive
~~I
Negative
Group I
e.g.,
Bacillus,
Clostridium
Group II
e.g.,
Mycobacterium
Group III Group IV
e.g., e.g.,
Corynebacterium Lactobacillus
Aerobes
(nonfermenters)
—I
Pairs
or chains;
catalase
negative
—i
Facultative
anaerobes
(ferm enters)
I
Lactose
I
Positive
Neg
Group V
e.g.,
Micrococcus,
Staphylococcus
Group VI
e.g.,
Streptococcus
Group VII
e.g.,
Alcaligenes,
Pseudomonas
Group VIM
e.g.,
Enterobacter,
Escherichia,
Klebsiella
Gro
e.g.
Mor
Pro
Pro
Salr
Shic
Harley-Prescott:
Laboratory Exercises in
Microbiology, Fifth Edition
VI. Unknown Identification I 38. General Unknown
©The McGraw-Hill
Companies. 2002
4. If your unknown is a gram-positive rod, stain for
endospores (see exercise 10) after incubating a
nutrient agar slant culture for 2 to 4 days.
Medium
Phenol red broth tubes or tryptic
agar base tubes for dextrose,
lactose, and sucrose
Starch agar plate
Tryptic soy agar plate
Nutrient gelatin deep tube, gelatin test strip
SIM medium
Tributyrin agar plate
Tryptic nitrate broth
MR-VP broth
Tryptic soy agar slant
Simmons' citrate agar slant
Urea broth, urease test disk/strip
Test
Carbohydrate fermentation
Starch hydrolysis
Oxidase test
Gelatin liquefaction
H2S, indole, motility
Lipid hydrolysis
Nitrate reduction
Methyl red test,
Voges-Proskauer test
Catalase activity
Citrate utilization
Urease activity
Fourth Period
1. Based on your results, identify the unknown
bacteria as to their genus and species. Use figure
38.1, your own outline or flow sheet (figure 38.2
is an example), and Bergey's Manual as guides.
HINTS AND PRECAUTIONS
(1) It is advisable to review the Hints and Precautions
previously listed for exercises 17-34 before progressing
with the identification of unknowns. (2) When using
Bergey's Manual, be sure to keep in mind strain
variations and give greatest weight to the most important
descriptive properties. Remember that if you have too
many discrepancies, you may be in the wrong volume
or section.
Figure 38.2 An Example of a Dichotomous Key Leading to the Identification of Escherichia coli.
Gram stain
Positive
Negative
I
Shape
Coccus
Rod
I
Oxidase
test
(+)
(-)
_l_
Lactose
fermentation
(-)
(+)
_1_
Growth on
citrate
(+>
_i_
Indole
production
(-)
232
Unknown Identification
(+)
I
Escherichia coli
is the
unknown bacterium
Harley-Prescott:
Laboratory Exercises in
Microbiology, Fifth Edition
VI. Unknown Identification 38. General Unknown
©The McGraw-Hill
Companies. 2002
Laboratory Report j q
Name:
Date: _
Lab Section:
General Unknown
Characteristic*
Bacterium 1
Bacterium 2
TSA slant characteristics
Amount of growth
Consistency
Form
Pigmentation
Macroscopic appearance
Blood agar
EMB
Mannitol salt agar
Morphology
Cell arrangement
Cell shape
Endospores present position
Flagella present arrangement
Gram reaction
Biochemistry
Gelatin liquefaction
Lipid hydrolysis
Starch hydrolysis
Fermentation
dextrose
lactose
sucrose
Catalase activity
Citrate utilization
H2S production
Indole production
Mediyl red test
Motility
Nitrate reduction
Oxidase activity
Urease activity
*Write "not tested or done" next to the characteristics or tests that were not done.
233
Harley-Prescott: I VI. Unknown Identification I 38. General Unknown I I ©The McGraw-Hill
Laboratory Exercises in Companies. 2002
Microbiology, Fifth Edition
The code number for my unknown is
The genus of my unknown is
The species of my unknown is
Sketch of unknowns—label and give magnification.
Bacterium 1 Bacterium 2 Additional Tests Performed
Characteristic
Test Bacterium 1 Bacterium 2
Be prepared to hand in on time a neat copy of your flowcharts.
234 Unknown Identification
Harley-Prescott: I VI. Unknown Identification I 38. General Unknown I I ©The McGraw-Hill
Laboratory Exercises in Companies. 2002
Microbiology, Fifth Edition
Review Questions
1. Will the length of time each bacterium has remained in stock culture affect the biochemical results? Explain
your answer.
2. Were there any tests that you carried out in this exercise for which you are not absolutely sure of the outcome
for your unknowns? If so, list the tests and explain your reservations.
3. Outline the steps that you used to identify your unknown.
4. Is there another scheme that you might have used to shorten your identification of the unknowns?
5. Why is it necessary to complete the identification of a bacterium based on its physiology rather than just its
morphology?
General Unknown 235
Harley-Prescott:
Laboratory Exercises in
Microbiology, Fifth Edition
VII. Environmental Factors
Affecting Growth of
Microorganisms
Introduction
©The McGraw-Hill
Companies. 2002
PART SEVEN
Environmental Factors Affecting Growth
of Microorganisms
The paramount evolutionary accomplishment oj bacteria as a group
is rapid, efficient cell growth in many environments. Bacteria grow
and divide as rapidly as the environment permits.
John Lyman Ingraham (Professor Emeritus of Bacteriology,
University of California, Davis, 1924— )
The growth of microorganisms is greatly affected by
the chemical and physical nature of their
environment. An understanding of the environmental factors that
promote microbial growth aids in understanding the
ecological distribution of microorganisms. Therefore, the
nature of some of these influences will be surveyed in this part
of the manual. Some of these factors include temperature,
pH, and osmotic pressure.
These same environmental factors that maximize
microbial growth can also be manipulated to inhibit or retard
the growth of unwanted microorganisms. Microbial control
using antibiotics and disinfectants (chemicals) has become an
important aspect of microbiology. Several exercises that
cover control of microbial growth are included in this part
of the manual.
After completing some (choice is up to the
instructor) of the exercises in Part Seven you will, at
the minimum, be able to demonstrate an increased
level in analysis skills, including (a) collecting and
organizing data in a systematic fashion; (b)
presenting data in an appropriate form (graphs, tables,
figures, or descriptive paragraphs); (c) assessing the
validity of data (including integrity and significance);
and (d) drawing appropriate conclusions based on
the results. This will meet the American Society for
Microbiology Core Curriculum Laboratory Thinking
Skill number 2 (see pp. vi—viii).
Barron Joseph Lister (1827-1912)
Dr. Lister was an English surgeon who, following Pasteur's
theory that bacteria cause infection, introduced to surgery the
practice of antisepsis.
In 1865, Dr. Joseph Lister, using carbolic acid as his antiseptic
agent together with heat-sterilized instruments, greatly reduced
postoperative mortality. He wrote the following lines in the
Lancet ("On a New Method of Treating Compound Fractures
. . ." Lancet, pp. 364-73, 1867):
Applying [Pasteur's] principles to the treatment of
compound fracture ... it appears that all that is requisite
is to dress the wound with some material capable of
killing these germs, provided that any substance can be
found reliable for this purpose, yet not too potent as a
caustic.
In the course of the year 1864 I was struck with an
account of the remarkable effects produced by carbolic
acid upon the sewage of the town of Carlisle, the
admixture of a veiy small proportion not only preventing
all odor from the lands irrigated with the refuse material,
but, as it was stated, destroying entozoa which usually
infest cattle fed upon such pastures.
Carbolic acid proved in various ways well adapted to
the purpose of an antiseptic in surgery.
237
Harley-Prescott:
Laboratory Exercises in
Microbiology, Fifth Edition
VII. Environmental Factors
Affecting Growth of
Microorganisms
39. Temperature
©The McGraw-Hill
Companies. 2002
EXERCISE
39
Temperature
SAFETY CONSIDERATIONS
Be careful with the Bunsen burner flame. No mouth
pipetting. Use caution with the hot water baths. Keep all
culture tubes upright in a test-tube rack or in a can.
Materials per Group of Students
24- to 48-hour tryptic soy broth cultures of
Escherichia coli (ATCC 11229), Bacillus
stearothermophilus (ATCC 7953), Bacillus
globisporus (ATCC 23301), Pseudomonas
aeruginosa (ATCC 10145), Staphylococcus
aureus (ATCC 25923), and spore suspension of
Bacillus subtilis (ATCC 6051). (To produce
endospores, grow B. subtilis for 48 hours at
35°C on endospore agar, nutrient agar plus
0.002% MnCl2 • 4H20. Resuspend the paste in
at least 7 ml of sterile diluent.)
12 tryptic soy agar slants
Bunsen burner
inoculating loop
15 tryptic soy broth tubes (9.9 ml per tube)
test-tube rack
18 sterile 1-ml pipettes with pipettor
3 sterile test tubes
refrigerator set at 4°C
incubators or water baths set at 4°, 23° to 25°
(room temperature), 60°, 85°, and 100°C (The
instructor or students are not limited to these
temperatures. Modifications can be instituted
based on incubators or water baths available.)
wax pencil
sterile water
Learning Objectives
Each student should be able to
1. Understand how microorganisms are affected by
the temperature of their environment
2. Carry out an experiment that differentiates between
several bacteria based on temperature sensitivity
3. Classify these same bacteria based on their
temperature preference for growth
4. Determine the effects of heat on bacteria
Suggested Reading in Textbook
1. Temperature, section 6.4; see also figures 6.12
and 6.13, and table 6.5.
2. Heat, section 7.4, see also table 7.2.
Pronunciation Guide
Bacillus globisporus (bah-SIL-lus glob-EE-spor-us)
B. stearothermophilus (ste-row-ther-MAH-fil-us)
B. subtilis (sub-til-us)
Escherichia coli (esh-er-I-ke-a KOH-lee)
Pseudomonas aeruginosa (soo-do-MO-nas a-ruh-jin-
OH-sah)
Staphylococcus aureus (staf-il-oh-KOK-kus ORE-ee-us)
Why Are the Above Bacteria Used
in This Exercise?
In this exercise, the student will gain expertise in
differentiating between bacteria based on temperature sensitivity and
classifying bacteria based on their temperature preference
for growth. The six bacteria the authors have chosen to
accomplish the above are the following. Bacillus globisporus
(L. globus, a sphere) is an endospore-forming rod that has
an optimum growth temperature of 20° to 25°C. Bacillus
stearothermophilus (Gr. thermus, heat + philus, loving) is
an endospore-forming rod that has an optimum growth
temperature of 60° to 65°C. Its spores are more heat resistant
than those of any mesophilic species in the genus. Bacillus
subtilis (L. subtilis, slender) is an endospore-forming rod
that has an optimum growth temperature of about 30° to
40°C. Escherichia coli is a gram-negative, facultatively
anaerobic rod that does not form spores and has an optimum
growth temperature of 37°C. Pseudomonas aeruginosa is a
gram-negative rod with an optimum growth temperature of
37°C. Staphylococcus aureus is a gram-positive coccus with
an optimum growth temperature of 30° to 37°C.
238
Harley-Prescott: VII. Environmental Factors 39. Temperatui
Laboratory Exercises In Affecting Growth of
Microbiology, Fifth Edition Microorganisms
Principles
Each microbial species requires a temperature growth
range that is determined by the heat sensitivity of its
particular enzymes, membranes, ribosomes, and other
components. As a consequence, microbial growth has
a fairly characteristic temperature dependence with
distinct cardinal temperatures—minimum, maximum,
and optimum. Minimum growth temperature is the
lowest temperature at which growth will occur;
maximum growth temperature is the highest temperature
at which growth will occur; and optimum growth
temperature is the temperature at which the rate of cellular
reproduction is most rapid. The optimum temperature
for the growth of a given microorganism is correlated
with the temperature of the normal habitat of the
microorganism. For example, the optimum temperature for
the growth of bacteria pathogenic to humans is near that
of the temperature of human blood (35° to 37°C).
Most bacteria can be classified into one of three
major groups based on their temperature
requirements. Psychrophiles can grow at 0°C and have an
optimum growth temperature of 15°C or lower; the
maximum is around 20°C. Mesophiles have growth
optima between 20° and 45°C. The majority of
bacteria fall into this category. Thermophiles can grow at
temperatures of 55°C or higher.
Boiling is probably one of the easiest methods
of ridding materials of harmful bacteria. However,
not all bacteria are equally sensitive to this high
temperature. Some bacteria may be able to survive
boiling even though they are unable to grow. These
bacteria are termed thermoduric. Many of the
spore formers (such as B. subtilis) can withstand
boiling for 15 minutes because of their resistant en-
dospores. Thus, both temperature and the species of
bacteria will affect the disinfection of certain
specimens. This is important to know when trying to kill
pathogenic bacteria with heat.
Procedure
First Period
1. Work in groups of three to four students. Each
group of students will be assigned one temperature
to study: 4°, 23° to 25°, 60°, 85°, or 100°C.
2. Label each of the tryptic soy agar slants with the
name of the test bacterium to be inoculated
(E. coli, B. stearothermophilus, and B.
globisporus), your name, and date.
©The McGraw-Hill
Companies. 2002
3. Using aseptic technique (see figure 14.3), streak
the surface of each slant with the appropriate
bacterium. Incubate the slants for 24 to 48 hours
at the temperature assigned to your group.
4. Take three sterile test tubes and label one
S. aureus, the second B. subtilis spores, and the
third P. aeruginosa. Add your name and date.
5. With a sterile pipette, aseptically add 1 ml of
bacterial culture or spore suspension to the
respective tubes.
6. Subject your tubes to the temperature you are
studying for 15 minutes (i.e., either place them in
the refrigerator, let them stand at room temperature,
or put them in one of the water baths).
7. After 15 minutes, let the samples cool or warm up
to room temperature. For each bacterial sample,
make a dilution series as follows (see appendix A):
a. Pipette 0.1 ml of the incubated sample into the
9.9 ml tryptic soy broth (lQr2 dilution). Mix
the tube thoroughly. With a fresh pipette,
transfer 0.1 ml of this I0r2 dilution into 9.9 ml
of broth (10-4 dilution) and mix. In the same
way, prepare a 10-6, 10~8, and 10~10 dilution.
8. Incubate all dilutions at 35°C for 24 to 48 hours.
Second Period
1. At the end of incubation, observe the slants for
the presence of growth. Record your observations
and those of your classmates; use a + for the
presence of growth and a - for the absence of
growth in Part 1 of the report for exercise 39.
2. Observe your dilution series to see which tubes
have bacterial growth as indicated by turbidity.
The logic of this procedure is that reproduction
will have occurred in each tube that received at
least one living bacterium. The greater the number
of bacteria present in the particular sample, the
more such a sample can be diluted and still contain
bacteria in the aliquot transferred. Thus, if bacteria
A are less susceptible to heat than bacteria B,
bacteria A will require more dilutions in order to
obtain a sterile sample as indicated by no growth.
3. From your results and those of your classmates,
complete Part 2 of the report for exercise 39 by
indicating the last dilution in which growth occurred.
HINTS AND PRECAUTIONS
Make sure the spore suspension is diluted with sterile
water to ensure that spores will not germinate prematurely.
Temperature 239
Harley-Prescott: VII. Environmental Factors 39. Temperature
Laboratory Exercises In Affecting Growth of
Microbiology, Fifth Edition Microorganisms
Laboratory Report
Lab Section:
Temperature
1. Based on your observations of bacterial growtli and those of your classmates, complete the following table.
Growth (+) or (-)
Bacterium 4°C 23° to 25°C 60°C 85°C 100°C Temperature Classification
E. coli
B. globispoms
B. stearothermophilus
2. Based on your observations and those of your classmates, complete the following table, showing range of
surviving bacteria.
Temperature for 15 Minutes Last Dilution in Which Growth Occurred
S. aureus P. aeruginosa B. subtilis
4°C
Room temperature (23° to 25°C)
60°C
85°C
100°C
©The McGraw-Hill
Companies. 2002
39
241
Harley-Prescott: I VII. Environmental Factors I 39.Temperature I I ©The McGraw-Hill
Laboratory Exercises In Affecting Growth of Companies. 2002
Microbiology, Fifth Edition Microorganisms
Review Questions
1. How can you be sure that the turbidity produced in tlie broth tubes was caused by tlie bacteria used for the
inoculation?
2. How can you determine experimentally whether a bacterium is a psyclirophile or a mesophile?
3. What limitations are there for using boiling water as a means of sterilizing materials?
4. Is S. aureus a mesophile? Explain your answer.
5. Describe the three cardinal temperatures.
6. Which bacterium had the widest range of temperature tolerance? The narrowest range of temperature
tolerance?
7. What are thermoduric bacteria?
242 Environmental Factors Affecting Growth of Microorganisms
Harley-Prescott:
Laboratory Exercises in
Microbiology, Fifth Edition
VII. Environmental Factors
Affecting Growth of
Microorganisms
40. pH
©The McGraw-Hill
Companies. 2002
EXERCISE
40
pH
SAFETY CONSIDERATIONS
Be careful with the Bunsen burner flame. No mouth
pipetting. Hydrochloric acid and sodium hydroxide are
extremely caustic. Do not get these acids and bases on
your skin or breathe the vapors. Keep all culture tubes
upright in a test-tube rack.
Materials per Group of Students
saline suspensions of 24-hour tryptic soy broth
cultures of Alcaligenes faecalis (ATCC 8750),
Escherichia coli (ATCC 11229), and a
Sabouraud dextrose agar slant (48 hours at
30°C) of Saccharomyces cerevisiae (ATCC
2366, a yeast). Add 3 ml of sterile saline to
each S. cerevisiae slant and resuspend the yeast
with a sterile inoculating loop. Transfer the
suspension to a sterile culture tube. Adjust the
suspensions to an absorbance of 0.05 at a
wavelength of 550 to 600 nm by adding either
more saline or culture.
pH meter or pH paper
4 tryptic soy broth tubes, pH 3.0
4 tryptic soy broth tubes, pH 5.0
4 tryptic soy broth tubes, pH 7.0
4 tryptic soy broth tubes, pH 9.0
(the pH of the above tubes is adjusted with either
1 N sodium hydroxide or 1 N hydrochloric acid)
Bunsen burner
sterile 1-ml pipettes with pipettor
spectrophotometer
cuvettes
wax pencil
test-tube rack
Learning Objectives
Each student should be able to
1. Understand how pH affects the growth of bacteria
2. Perform an experiment that relates bacterial
growth to pH
Suggested Reading in Textbook
1. pH, section 6.4; see also figure 6.11.
Pronunciation Guide
Alcaligenes faecalis (al-kah-LIJ-e-neez fee-
KAL-iss)
Escherichia coli (esh-er-I-ke-a KOH-lee)
Saccharomyces cerevisiae (sak-ah-ro-MI-seez ser-
ah-VEES-ee-eye)
Why Are the Above Microorganisms
Used in This Exercise?
This exercise demonstrates the effect of pH on microbial
growth. Students will use two bacteria and one yeast that
have different pH ranges for optimal growth. After
performing an experiment that relates microbial growth to pH,
the student should appreciate the fact that Alcaligenes
faecalis has optimal growth at about pH 7.0 and Escherichia
coli at pH 6.0 to 7.0. The yeast, Saccharomyces cerevisiae
grows best at a pH of 5.6.
Principles
It is not surprising that pH (acidity; log 1/[H+]; see
appendix D) dramatically affects bacterial growth.
The pH affects the activity of enzymes—especially
those that are involved in biosynthesis and growth.
Each microbial species possesses a definite pH
growth range and a distinct pH growth optimum.
Acidophiles have a growth optimum between pH 0.0
and 5.5; neutrophiles between 5.5 and 8.0; and alka-
lophiles 8.5 to 11.5. In general, different microbial
groups have characteristic pH optima. The majority of
bacteria and protozoa are neutrophiles. Most molds
and yeasts occupy slightly acidic environments in the
pH range of 4 to 6; algae also seem to favor acidity.
243
Harley-Prescott:
Laboratory Exercises in
Microbiology, Fifth Edition
VII. Environmental Factors
Affecting Growth of
Microorganisms
40. pH
©The McGraw-Hill
Companies. 2002
Many bacteria produce metabolic acids that may
lower the pH and inhibit their growth (see exercises
20 and 25). To prevent this, buffers that produce a pH
equilibrium are added to culture media to neutralize
these acids. For example, the peptones in complex
media act as buffers. Phosphate salts are often added
as buffers in chemically defined media.
In this exercise, you will work in groups to see how
the pH affects the growth of several microorganisms.
Procedure
First Period
1. Label each of the tryptic soy broth tubes with the
pH of the medium, your name, date, and the
microorganism to be inoculated.
2. Using a sterile pipette, add 0.1 ml of the E. coli
saline culture to the tube that has a pH of 3.0. Do
the same for the tubes mat have pH values of 5.0,
7.0, and 9.0.
3. Repeat the above for A. faecalis and S. cerevisiae.
4. Incubate the E. coli and A. faecalis cultures for 24
to 48 hours at 35°C, and the S. cerevisiae culture
for 48 to 72 hours at room temperature.
Second Period
1. Use the spectrophotometer as described in
exercise 19. Set the wavelength at 550 to 600 nm.
Calibrate the spectrophotometer, using a tryptic
soy broth blank of each pH for each respective set
of cultures.
2. Fill each cuvette 2/3 full of the respective pH
culture and read the absorbance. Blank the
spectrophotometer with tryptic soy broth.
3. If no spectrophotometer is available, record your
visual results as - (no growth), +, ++, +++, and
++++ (for increasing growth, respectively).
4. Record your results and those of your classmates
in the report for exercise 40.
HINTS AND PRECAUTIONS
(1) Be sure to thoroughly mix the microbial suspensions
just before reading the absorbance. (2) Wipe any
fingerprints off the cuvette before making a reading.
244 Environmental Factors Affecting Growth of Microorganisms
Harley-Prescott:
Laboratory Exercises in
Microbiology, Fifth Edition
VII. Environmental Factors
Affecting Growth of
Microorganisms
40. pH
©The McGraw-Hill
Companies. 2002
Laboratory Report 40
Name:
Date: _
Lab Section:
pH
1. Summarize your results with respect to the pH and growth of each microorganism in the following table.
Indicate the optimal pH with an asterisk.
Microorganism
pH
Visual Results
(-, + ->
++++)
Absorbance
Transmission
Optimal pH
A. faecalis
E. coli
S. cerevisiae
2. Which microorganism grew best in the acid pH range?
3. Which microorganism grew best in the neutral pH range?
4. Which microorganism grew best in the alkaline pH range?
5. Which microorganism has the widest pH growth range?
6. Which microorganism has the narrowest pH growth range?
7. Using a different color line for each bacterium, graph the growth responses to pH variations.
+ + + +
+ + +
+ +
Growth
7
pH
245
Harley-Prescott: VII. Environmental Factors 40. pH
Laboratory Exercises In Affecting Growth of
Microbiology, Fifth Edition Microorganisms
Review Questions
1. Why are buffers added to culture media?
2. Why do microorganisms differ in their pH requirements for growth?
3. What inhibits microbial growth at nonoptimal pHs?
4. What is the pH tolerance of bacteria compared to yeasts?
5. List and describe the chemistry of several common buffers used in microbiological media.
6. How would you define a buffer?
7. How do microorganisms change the pH of their own environment?
246 Environmental Factors Affecting Growth of Microorganisms
©The McGraw-Hill
Companies. 2002
Harley-Prescott:
Laboratory Exercises in
Microbiology, Fifth Edition
VII. Environmental Factors
Affecting Growth of
Microorganisms
41. Osmotic Pressure
©The McGraw-Hill
Companies. 2002
EXERCISE
41
Osmotic Pressure
SAFETY CONSIDERATIONS
Be careful with the Bunsen burner flame.
Materials per Student
24- to 48-hour tryptic soy broth cultures of
Escherichia coli (ATCC 11229) and
Staphylococcus aureus (ATCC 25923). A 48-
hour salt broth culture of Halobacterium
salinarium (ATCC 19700)
1 petri plate nutrient agar with 0% NaCl
1 petri plate nutrient agar with 0.5% NaCl
1 petri plate nutrient agar with 5% NaCl
1 petri plate nutrient agar with 10% NaCl
1 petri plate nutrient agar with 20% NaCl
wax pencil
inoculation loop
Bunsen burner
Difco Manual or BBL Manual for the laboratory
report
Learning Objectives
Each student should be able to
1. Define osmotic pressure and explain how it
affects a bacterial cell
2. Explain how bacterial growth is related to
osmotic pressure in the environment
3. Carry out an experiment that differentiates among
three different bacteria based on their tolerance for
different salt concentrations (osmotic pressure)
Suggested Reading in Textbook
1. The Cell Wall and Osmotic Protection, section 3.5.
2. Solutes and Water Activity, section 6.4; see also
table 6.4.
Pronunciation Guide
Escherichia coli (esh-er-I-ke-a KOH-lee)
Halobacterium salinarium (hal-o-bak-TE-re-um sal-i-
nar-e-um)
Staphylococcus aureus (staf-il-oh-KOK-kus ORE-
ee-us)
Why Are the Above Bacteria Used
in This Exercise?
In this exercise, the student will differentiate three different
bacteria based on their tolerance for different salt
concentrations (osmotic pressure). The authors have thus chosen
three bacteria that vary widely in osmotic tolerance.
Halobacterium salinarium (Genus = Gr. hah, the sea +
bacterium, small rod; species = L. salinarium, pertaining to
salt works) is a gram-negative aerobic rod that requires a
high salt concentration for growth. It is normally found in
highly saline environments such as salt lakes and marine
salterns and is associated with the spoilage of salted fish
and hides. Mature cells retain their rod shape in 3.5 to
about 5.2 M NaCl (aw s 0.75); at lower concentrations,
pleomorphic forms appear, and at 1.5 M the cells are
spherical because of loss of the cell wall. Suspensions are
viscous at 1.5 M because of partial cell lysis; at 0.5 M, few, if
any, cells can be detected. Sodium, chloride, and
magnesium are required to maintain cell structure and rigidity. At
low concentrations, the cell wall dissolves, and the cell
membrane breaks up into tiny fragments. Staphylococcus
aureus is a gram-positive coccus. S. aureus can grow in the
presence of 15% (about 2.5 M) sodium chloride, or at an aw
of 0.86. Escherichia coli is a gram-negative rod that occurs
as normal flora in the lower part of the intestine of
warmblooded animals. It is very sensitive to high salt
concentrations—it lacks osmotic tolerance and can't grow below an
aw of 0.95.
247
Harley-Prescott: I VII. Environmental Factors I 41. Osmotic Pressure I I ©The McGraw-Hill
Laboratory Exercises In Affecting Growth of Companies. 2002
Microbiology, Fifth Edition Microorganisms
Principles
Since bacteria are separated from their environment by
a selectively permeable plasma membrane, they can be
affected by changes in the osmotic pressure or water
availability of their surroundings. Osmotic pressure is
the force developed when two solutions of different
solute concentrations are separated by a membrane
that is permeable only to the solvent. The solvent is
the liquid, usually water, that dissolves a substance
(the solute). Water availability is expressed
quantitatively in terms of water activity (aw). Pure water has
an aw of 1.00, whereas cereals and other dried foods
may have aw values of 0.60 or lower. If a bacterium is
placed in a hypotonic solution (low solute, high-water
content), water will enter the cell and cause it to burst
(figure 41.1a) unless something is done to prevent the
influx. Most bacteria have rigid cell walls that
maintain the shape and integrity of the cell; thus, hypotonic
solutions are not harmful to these bacteria. When
bacteria are placed in a hypertonic solution (high solute,
lower water content), water leaves, and the plasma
membrane shrinks away from the wall (figure 4l.lb),
a process known as plasmolysis. This dehydrates the
cell, and it ceases to grow. A few bacteria, called
halophiles, are able to tolerate high (hypertonic) salt
concentrations. Bacteria that can live in very salty
environments are called extreme halophiles to
distinguish them from the moderate halophiles that live in
the sea. In an isotonic solution, the concentration of
solutes is the same (iso means equal) outside and
inside the bacterium. The bacterium is in osmotic
equilibrium with its environment and does not change
volume (figure 41.1c).
In this exercise, you will examine the effect of
various salt concentrations (osmotic pressure or water
activity, aw) on the growth of three species of bacteria.
This tolerance (or lack of it) can be observed by the
amount (or lack) of growth of the three bacterial
species.
Procedure
First Period
1. With a wax pencil, divide the bottom of each of
the five petri plates into thirds as indicated in
figure 41.2. Place the name of the bacterium to be
inoculated in each section. Add your name, salt
concentration, and date.
2. Streak the respective bacteria onto the five
different petri plates.
Figure 41.1 Effect of Osmotic Pressure on a Bacterial
Cell. The dots represent solute (NaCl) molecules. The shaded
area represents water (solvent).
Solution
Hypotonic
Hypertonic
Isotonic
Before
H20 movement
""*•■• *. 'Jf ' * ""•"•" "."■" .•• •■
; H20 movement •"*'.'..•.■*
* * " Cell wall"
• ■ ■ 1- .
Cell membrane
After
Cell wall
• ' 1 •
Cell membrane
'.". '*•" I;". Cell wall •!•'-.
."■Cell membrane ".•."• •„•"
H20 movement *
Figure 41.2 Streak Pattern.
3. Incubate the plates, inverted, for 48 hours at
35°C.
Second Period
1. Observe the relative amount of growth in each
section at each salt concentration. Record this
growth as - (none), +, ++, +++, and ++++ (the
most).
2. Record your results in the report for exercise 41.
248 Environmental Factors Affecting Growth of Microorganisms
Harley-Prescott: VII. Environmental Factors 41. Osmotic Pressure
Laboratory Exercises In Affecting Growth of
Microbiology, Fifth Edition Microorganisms
Laboratory Report
Lab Section:
Osmotic Pressure
1. Record the amount of growtli of the tliree bacteria at the different salt concentrations in the following table.
Use -, +, ++, +++, ++++ to indicate the relative amount of growth.
Medium E. coli H. saUnarium S. aureus
0%NaCl
0.5%NaCl
5.0%NaCl
10%NaCl
20%NaCl
2. Which of these bacteria tolerates the most salt?
3. Which of these bacteria tolerates the least salt?
4. Which of these bacteria tolerates a broad range of salt?
5. How would you classify H. saUnarium as to its salt needs?
6. Using the Difco Manual or BBL Manual, list the ingredients of mannitol salt agar.
Ingredient Amount
©The McGraw-Hill
Companies. 2002
41
Name:
7. Why is mannitol salt agar used to isolate staphylococci?
Harley-Prescott: I VII. Environmental Factors I 41. Osmotic Pressure I I ©The McGraw-Hill
Laboratory Exercises In Affecting Growth of Companies. 2002
Microbiology, Fifth Edition Microorganisms
Review Questions
1. Compare isotonic, hypotonic, and hypertonic solutions and tlieir effects on bacterial cells.
2. Define:
a. osmosis
b. osmotic pressure
c. plasmolysis
d. halophilic
3. How is it possible for a bacterium to grow in a hypertonic environment?
4. What concentrations of NaCl are optimal for most bacteria?
5. What is unique about H. salinarium?
6. What foods can you think of that are protected from microbial destruction by salting?
7. Why don't bacteria lyse when placed in a hypotonic solution?
250 Environmental Factors Affecting Growth of Microorganisms
Harley-Prescott:
Laboratory Exercises in
Microbiology, Fifth Edition
VII. Environmental Factors
Affecting Growth of
Microorganisms
42. The Effects of Chemical
Agents on Bacteria I:
Disinfectants
©The McGraw-Hill
Companies. 2002
EXERCISE
42
The Effects of Chemical Agents
on Bacteria I: Disinfectants
SAFETY CONSIDERATIONS
Be careful with the Bunsen burner flame. No mouth
pipetting. Always handle cultures with care since they
may be potential pathogens. Keep all culture tubes
upright in a test-tube rack or in a can. Phenol is poisonous
and caustic. Do not handle with bare hands.
Learning Objectives
Each student should be able to
1. Determine the effectiveness of some chemical
disinfectants used in hospitals or homes as
antimicrobial agents
2. Calculate a phenol coefficient
Materials per Group of Students
20-hour tryptic soy broth cultures of
Staphylococcus aureus (ATCC 25923) and
Pseudomonas aeruginosa (ATCC 10145)
2 sterile screw-cap test tubes
1 sterile 5-ml pipette with pipettor
12 sterile 1-ml pipettes
48 tryptic soy broth tubes (10 ml per tube)
sterile water in Erlenmeyer flask
12 sterile tubes for making dilutions
Lysol
commercial disinfectants such as 3% hydrogen
peroxide, 70% isopropyl alcohol, bleach, or
Lysol cleaner. Many others may be used (see
table 42.1), or students can bring in their own
to test. If commercial disinfectants are used,
note the use-dilution and active ingredients.
Dilute with normal tap water. The tap water
need not be sterilized for commercial
disinfectants. Note if any of the disinfectants
contain triclosan. Why is this important?
phenol (carbolic acid)
wax pencil
35°C incubator
test-tube rack
Bunsen burner
inoculating loop
Suggested Reading in Textbook
1. The Use of Chemical Agents in Control, section
7.5; see also tables 7.4 and 7.5.
2. Phenolics, section 7.5.
3. Alcohols, section 7.5.
4. Halogens, section 7.5.
5. Quaternary Ammonium Compounds, section 7.5.
6. Aldehydes, section 7.5.
7. Evaluation of Antimicrobial Agent Effectiveness,
section 7.6; see also table 7.6.
Pronunciation Guide
Pseudomonas aeruginosa (soo-do-MO-nas a-ruh-jin-
OH-sah)
Staphylococcus aureus (staf-il-oh-KOK-kus ORE-ee-us)
Why Are the Above Bacteria Used
in This Exercise?
In this exercise, the student will determine the
antimicrobial effectiveness of some common disinfectants and
calculate a phenol coefficient. The authors have chosen two
common bacteria (Staphylococcus aureus and Pseudomonas
aeruginosa) for use. Both of these bacteria give excellent
positive or negative results depending on the disinfectant
used. S. aureus is often used by laboratories as a test
microorganism to determine phenol coefficients.
251
Harley-Prescott:
Laboratory Exercises in
Microbiology, Fifth Edition
VII. Environmental Factors
Affecting Growth of
Microorganisms
42. The Effects of Chemical
Agents on Bacteria I:
Disinfectants
©The McGraw-Hill
Companies. 2002
Principles
Many factors influence the effectiveness of chemical
disinfectants and antiseptics. The microbicidal (to
kill) or microbiostatic (to inhibit) efficiency of a
chemical is often determined with respect to its ability
to deter microbial growth. The first part of this
exercise will examine this effect of several chemicals.
More specifically, the microbicidal efficiency of
a chemical is often determined with respect to
phenol and is known as the phenol coefficient (PC).
The phenol coefficient is calculated by dividing the
highest dilution of the antimicrobial of interest,
which kills all organisms after incubation for 10
minutes but not after 5 minutes, by the highest
dilution of phenol that has the same characteristics.
Chemicals that have a phenol coefficient greater
than 1 are more effective than phenol, and those that
have a phenol coefficient less than 1 are less
effective than phenol. However, this comparison should
only be used for phenol-like compounds that do not
exert bacteriostatic effects and are not neutralized
by the subculture media used. The second part of
this experiment will enable you to calculate a
phenol coefficient for a select chemical. A list of
commonly used antiseptics and disinfectants and their
area of application is shown in table 42.1
Procedure
First Period
Growth Inhibition
1. Each group of students should select one of the
disinfectants and, if necessary, dilute it according
to the specifications on the label (the use-
dilution).
2. Place 5 ml of disinfectant into two sterile tubes.
Add 0.05 ml of P. aeruginosa to one tube and
0.05 ml of S. aureus to the other.
3. Using the wax pencil, label the tubes with your
name and those of the respective bacteria. Mix
each of the tubes in order to obtain a
homogeneous suspension.
4. At intervals of 1, 2, 5, 10, and 15 minutes,
transfer 0.1 ml of the mixture containing the
bacteria and disinfectant to separate tubes of
tryptic soy broth. Do this for both bacteria. Also
inoculate two tubes of broth with 0.1 ml of both
bacteria and mark these "controls."
5. Incubate all tubes for 48 hours at 35°C.
Phenol Coefficient (See Safety Considerations)
1. Dilute phenol in sterile distilled water 1/80, 1/90,
and 1/100; dilute the Lysol 1/400, 1/450, and 1/500
so that the final volume in each tube is 5 ml.
2. Label 18 tryptic soy broth tubes with the name
and dilution of disinfectant, the time interval of
the subculture (e.g., 5 minutes, phenol 1/80), and
your name. Each dilution should be tested after 5,
10, and 15 minute incubations.
3. Place in order in a test-tube rack, one test tube of
each of the different Lysol and phenol dilutions
for each time interval.
4. Add 0.5 ml of S. aureus to each tube of
disinfectant and note the time. Mix each of the
tubes in order to obtain a homogeneous
suspension and allow the disinfectant to come
into contact with the bacteria.
5. Using aseptic technique, at intervals of 5, 10, and
15 minutes, transfer one loopful from each
disinfectant tube into the appropriately labeled
tryptic soy broth tube.
6. Incubate all tubes for 48 hours at 35°C.
7. The experiment can be repeated with P.
aeruginosa.
Second Period
Growth Inhibition
1. Shake and observe each of the tubes for growth.
Record the presence of growth as + and the
absence of growth as -. Tabulate your results as
well as the results of the class in Part 1 of the
report for exercise 42.
Phenol Coefficient
1. Shake and observe all tryptic soy broth cultures
for the presence (+) or absence (-) of growth.
2. Record your observations in Part 2 of the report
for exercise 42.
3. From your data, calculate the phenol coefficient
for Lysol. For example, assume a 1/20 dilution of
phenol (1 part phenol in a total of 20 parts liquid)
kills S. aureus within 10 minutes. A 1/300 (1 to
300) dilution of Lysol also kills S. aureus within
10 minutes.
r _ 300 1/20
20 01 1/300
PC= 15
Thus, Lysol is 15 times more effective than
phenol in killing S. aureus.
252 Environmental Factors Affecting Growth of Microorganisms
Harley-Prescott: I VII. Environmental Factors I 42. The Effects of Chemical I I ©The McGraw-Hill
Laboratory Exercises In Affecting Growth of Agents on Bacteria I: Companies. 2002
Microbiology, Fifth Edition Microorganisms Disinfectants
Table 42.1 Some Chemical
Sodium hypochlorite (5%)
Iodine (1% in 70% alcohol)
Iodophors (70 ppm avail. I2)
Lysol (5%), a solution of phenolics and/or
ammonium compounds with soap
Phenol (5%), carbolic acid, source coal tar
Hexachlorophene (pHisoHex, Dial soap)
Formaldehyde (4%)
Iodophors (70 ppm avail. I2)
Zephrin (0.001%)
Alcohol, edianol (70%)
Iodine (tincture in alcohol widi KI)
Iodophors
Organic mercury compounds (merthiolate,
Hydrogen peroxide (3%)
Potassium permanganate
Silver nitrate (l%)(Argyrol)
Zinc oxide paste
Zinc salts of fatty acids (Desenex)
Glycerol (50%)
Ethylene oxide gas (12%)
Formaldehyde (20% in 70% alcohol)
Glutaraldehyde (pH 7.5 or more)
Compounds
quaterinary
mercurochrome)
Commonly Used for Controlling the Growth of Microorganisms
Disinfectant
Disinfectant
Disinfectant
Disinfectant
Disinfectant
Disinfectant
Disinfectant
Disinfectant
Disinfectant
Antiseptic
Antiseptic
Antiseptic
Antiseptic
Antiseptic
Antiseptic
Antiseptic
Antiseptic
Antiseptic
Antiseptic
Sterilization
Sterilization
Sterilization
External surfaces, such as tables
External surfaces, such as tables
External surfaces, such as tables
External surfaces, such as tables
External surfaces, such as tables
Presurgical hand washing
Oral and rectal thermometers
Oral and rectal thermometers
Oral and rectal thermometers
Skin
Skin
Skin
Skin
Superficial skin infections
Urethral, superficial skin fungus infections
Prevention of eye infections in newborn babies
Diaper rash
Treatment of athlete's foot
Prevent bacterial growth in stool and surgical specimens
Linens, syringes, etc.
Metal instruments
Metal instruments
Adapted from Microbiology Experiments: A Health Science Perspective. Kleyn, Bicknell, Gils trap. 1999. McGraw-Hill. By permission
The Effects of Chemical Agents on Bacteria I: Disinfectants 253
Harley-Prescott: VII. Environmental Factors 42. The Effects of Chemical
Laboratory Exercises In Affecting Growth of Agents on Bacteria I:
Microbiology, Fifth Edition Microorganisms Disinfectants
©The McGraw-Hill
Companies. 2002
Laboratory Report 42
Name:
Date: _
Lab Section:
The Effects of Chemical Agents on Bacteria I: Disinfectants
1. Based on your observations of bacterial growtli and those of your classmates, complete the following table.
Bacterium
Name of
Disinfectant
plus Active Ingredients*
Use Dilution
Control
1
Degree of Growth
Time of Exposure in Minutes
2
5
10
15
Is triclosan present? Why is this important?
2. Based on your observations of bacterial growtli and the observations of your classmates, complete the
following table.
Disinfectant
Phenol
Lysol
Dilution
1/80
1/90
1/100
1/400
1/450
1/500
Growth in Subculture (Minutes)
5 10
15
3. From the above data, calculate the phenol coefficient of Lysol. For example, if the Lysol dilution of 1/450
showed no growtli at 10 minutes but growtli at 5 minutes, and the phenol dilution of 1/90 showed no growth
at 10 minutes but growtli at 5 minutes, then:
Phenol coefficient of Lysol = = 5
255
Harley-Prescott: I VII. Environmental Factors I 42. The Effects of Chemical I I ©The McGraw-Hill
Laboratory Exercises In Affecting Growth of Agents on Bacteria I: Companies. 2002
Microbiology, Fifth Edition Microorganisms Disinfectants
Review Questions
1. What are some limitations of a test such as you performed on the evaluation of a disinfectant?
2. List some criteria of a good disinfectant.
3. What is the phenol coefficient technique?
4. A disinfectant diluted 1/500 with water kills a bacterium after 10 minutes but not after 5 minutes. A 1/100
dilution of phenol kills the same bacterium after 10 minutes but not after 5 minutes. What is the phenol
coefficient of the disinfectant?
5. What is the difference between microbicidal and microbiostatic?
6. What physical factors can influence the activity of a disinfectant?
7. Why do microorganisms differ in their response to disinfectants?
256 Environmental Factors Affecting Growth of Microorganisms
Harley-Prescott:
Laboratory Exercises in
Microbiology, Fifth Edition
VII. Environmental Factors
Affecting Growth of
Microorganisms
43. The Effects of Chemical
Agents on Bacteria II:
Antimicrobial
©The McGraw-Hill
Companies. 2002
EXERCISE
43
The Effects of Chemical Agents on Bacteria II:
Antimicrobial Agents (Kirby-Bauer Method)
SAFETY CONSIDERATIONS
Be careful with the Bunsen burner flame. Always
handle cultures with care since they may be potential
pathogens. The ethyl alcohol that is used to sterilize the
forceps is flammable.
Materials per Group of Students
4 150 x 15 mm Mueller-Hinton agar plates
antibiotic disk dispensers (BBL or Difco) or
assorted individual vials containing antibiotic
disks
4 sterile swabs
4- to 6-hour tryptic soy broth cultures of
Staphylococcus aureus (ATCC 25903),
Escherichia coli (ATCC 11229), Pseudomonas
aeruginosa (ATCC 10145), and Klebsiella
pneumoniae (ATCC el3883)
35°C incubator
forceps
metric rulers
wax pencil
70% ethyl alcohol and beakers
Bunsen burner
Learning Objectives
Each student should be able to
1. Appreciate the scope of antimicrobial activity of
selected antibiotics
2. Perform the Kirby-Bauer method for
determination of antibiotic sensitivity
3. Correctly interpret a Kirby-Bauer plate
Suggested Reading in Textbook
1. Disk Diffusion Tests, section 35.3; also see table
35.3 and figures 35.1 and 35.2.
2. Susceptibility Testing, section 36.3; see also
figure 36.5o.
Pronunciation Guide
Escherichia coli (esh-er-I-ke-a KOH-lee)
Klebsiella pneumoniae (kleb-se-EL-lah nu-MO-ne-ah)
Pseudomonas aeruginosa (soo-do-MO-nas a-ruh-jin-
OH-sah)
Staphylococcus aureus (staf-il-oh-KOK-kus ORE-ee-us)
Why Are the Above Bacteria Used
in This Exercise?
In this exercise, the student will evaluate the antimicrobial
activity of selected antibiotics using the Kirby-Bauer
method. To accomplish this objective, the authors have
chosen four bacteria that the student has worked with in
previous exercises and which often infect humans. The four
bacteria are Staphylococcus aureus, Escherichia coli,
Pseudomonas aeruginosa, and Klebsiella pneumoniae.
Medical Application
The number of antibiotics (and other antimicrobics)
available today is larger than ever before. New antibiotics are
continuously being developed and discovered; thus there is
an increasing demand on the clinical laboratory to
determine the antibiotic susceptibility or resistance of various
pathogenic bacteria. In most clinical laboratories, the an-
tibiogram has been replaced with molecular techniques.
Principles
One method that is used to determine antibiotic
susceptibility is the sensitivity disk method of Kirby-
Bauer (named after W. Kirby and A. W. Bauer in
1966). In this method, antibiotics are impregnated onto
paper disks and then placed on a seeded
Mueller-Hinton agar plate using a mechanical dispenser or sterile
257
Harley-Prescott:
Laboratory Exercises in
Microbiology, Fifth Edition
VII. Environmental Factors
Affecting Growth of
Microorganisms
43. The Effects of Chemical
Agents on Bacteria II:
Antimicrobial
©The McGraw-Hill
Companies. 2002
Figure 43.1 A Kirby-Bauer Plate. A Mueller-Hinton agar
plate inoculated with S. aureus and various antibiotics. Notice the
diameter of the various zones of inhibition.
forceps. The plate is then incubated for 16 to 18 hours,
and the diameter of the zone of inhibition around the
disk is measured to the nearest millimeter. The
inhibition zone diameter that is produced will indicate the
susceptibility or resistance of a bacterium to the
antibiotic (figure 43.1). Antibiotic susceptibility patterns are
called antibiograms. Antibiograms can be determined
by comparing the zone diameter obtained with the
known zone diameter size for susceptibility (table
43.1). For example, a zone of a certain size indicates
susceptibility, zones of a smaller diameter or no zone
at all show that the bacterium is resistant to the
antibiotic. Frequently one will see colonies within the zone
of inhibition when the strain is antibiotic resistant.
Many factors are involved in sensitivity disk
testing and must be carefully controlled. These include
size of the inoculum, distribution of the inoculum,
incubation period, depth of the agar, diffusion rate of
the antibiotic, concentration of antibiotic in the disk,
and growth rate of the bacterium. If all of these
factors are carefully controlled, this type of testing is
highly satisfactory for determining the degree of
susceptibility of a bacterium to a certain antibiotic.
The Kirby-Bauer method is not restricted to
antibiotics. It may also be used to measure the sensitivity of
any microorganism to a variety of antimicrobial agents
such as sulfonamides and synthetic chemotherapeutics.
Figures 43.1 and 43.2 illustrate the Kirby-Bauer method.
Procedure
First Period
1. With a wax pencil, mark the lid of each Mueller-
Hinton agar plate with your name, date, and the
name of the bacterium to be inoculated. Each
group of students will inoculate the surface of
four Mueller-Hinton plates with S. aureus, E. coli,
P. aeruginosa, and K. pneumoniae, respectively.
Use a separate, sterile cotton swab for each
bacterium. The swab is immersed in the culture
tube, and the excess culture is squeezed on the
inner side of the test tube. If there are sufficient
supplies, you may wish to analyze the
antimicrobial sensitivity of microorganisms from
your throat.
2. The swab is then taken and streaked on the
surface of the Mueller-Hinton plate three times,
rotating the plate 60° after each streaking. Finally,
run the swab around the edge of the agar. This
procedure ensures that the whole surface has been
seeded. Allow the culture to dry on the plate for 5
to 10 minutes at room temperature with the top in
place.
3. Dispense the antibiotics onto the plate either with
the multiple dispenser or individually with the
single unit dispenser. Make sure that contact is
made between the antibiotic disk and the culture
by gently pressing the disk with alcohol-flamed
forceps. DO NOT PRESS THE DISK INTO THE
AGAR, AND DO NOT MOVE THE DISK
ONCE IT IS PLACED ON THE AGAR.
4. Incubate the plates for 16 to 18 hours at 35°C. DO
NOT INVERT THE PLATES.
Second Period
1. Measure the zones of inhibition to the nearest mm
for each of the antibiotics tested. Record the
results in the report for exercise 43. Use table
43.1 as an aid. For each antibiotic, determine
whether the bacteria are resistant or susceptible.
HINTS AND PRECAUTIONS
(1) If the plate is satisfactorily inoculated, and the
inoculum is sufficient, the zones of inhibition will be
uniformly circular and confluent growth should be seen
over the entire plate. If you see isolated colonies on
your plate, then the technique performed is less than
adequate, and the procedure should be repeated.
(2) Colonies growing within the zone of inhibition
usually result in considering the bacteria drug resistant.
258 Environmental Factors Affecting Growth of Microorganisms
Harley-Prescott: I VII. Environmental Factors I 43. The Effects of Chemical I I ©The McGraw-Hill
Laboratory Exercises In Affecting Growth of Agents on Bacteria II: Companies. 2002
Microbiology, Fifth Edition Microorganisms Antimicrobial
Table
Disk
Symbol
AM
AM
B
CB
CB
C
CC
CC
CL
E
GM
K
ME
N
NB
OL
P
P
PB
R
S
S
T(TE)
VA
43.1 Interpretation of Inhibition Zones of Test Cultures
Antibiotic
Ampicilhn3 when testing gram-negative microorganisms
and enterococci
Ampicilhn3 when testing staphylococci and penicilhn
G-susceptible microorganisms
Bacitracin
Carbenicillin when testing Proteus species and E. coli
Carbenicillin when testing P. aeruginosa
Chloramphenicol (Chloromycetic®)
Clindamycin0 when reporting susceptibility to clindamycin
Clindamycin0 when reporting susceptibility to hncomycin
Colistind (Coly-mycin®)
Erythromycin
Gentamicin
Kanamycin
Methicilline
Neomycin
Novobiocinf
Oleandomycin^
Penicillin G. when testing staphylococci'1
Penicillin G. when testing other microorganisms'1'1
Polymyxin Bd
Rifampin when testing N. meningitidis susceptibility only
Streptomycin
Sulfonamides
Tetracycline^
Vancomycin
Disk Content
10 Hg
10 Hg
10 units
50 ng
50 ng
30 ng
2^g
2^g
10 ^g
15 ^g
10 Hg
30 ng
5^g
30 ng
30 ng
15 ^g
10 units
10 units
300 units
5^g
10 ^g
300 ng
30 ng
30 ng
Diameter of Zones of Inhibition (mm)
Resistant
16 or less
28 or less
8 or less
19 or less
13 or less
12 or less
14 or less
16 or less
8 or less
13 or less
12 or less
13 or less
9 or less
12 or less
17 or less
11 or less
28 or less
14 or less
8 or less
16 or less
6 or less
12 or less
14 or less
14 or less
Intermediate
9-12
18-22
14-16
13-17
15-20
17-20
9-10
14-22
13-14
14-17
10-13
13-16
18-21
12-16
9-11
17-19
7-9
13-16
15-18
15-16
Susceptible
17 or more
29 or more
13 or more
23 or more
17 or more
18 or more
21 or more
21 or more
11 or more
23 or more
15 or more
18 or more
14 or more
17 or more
22 or more
17 or more
29 or more
22 or more
15 or more
20 or more
10 or more
17 or more
19 or more
17 or more
Source: Based on data from the National Committee for Clinical Laboratory Standards (NCCLS).
aThe ampicillin disk is used for testing susceptibility of both ampicillin and betacillin.
bStaphylococci exhibiting resistance to the penicillinase-resistant penicilhn class disks should be reported as resistant to cephalosporin class antibiotics. The 30 meg
cephalothin disk cannot be relied upon to detect resistance of methicillin-resistant staphylococci to cephalosporin class antibiotics.
cThe clindamycin disk is used for testing susceptibility to both clindamycin and hncomycin.
dCohstin and polymyxin B diffuse poorly in agar, and the accuracy of the diffusion method is thus less than with other antibiotics. Resistance is always significant, but when
treatment of systemic infections due to susceptible strains is considered, it is wise to confirm the results of a diffusion test with a dilution method.
The mediicillin disk is used for testing susceptibility of all penicillinase-resistant penicillins; that is, methicillin, cloxacilhn, dicloxacillin, oxacilhn, and nafcilhn.
fNot apphcable to medium that contains blood.
The oleandomycin disk is used for testing susceptibility to oleandomycin and trioleandomycin.
hThe penicilhn G. disk is used for testing susceptibility to all penicilhnase-susceptible penicillins except ampicilhn and carbenicillin: that is, penicilhn G., phenoxymetliyl
penicillin, and phenetliicillin.
This category includes some organisms such as enterococci and gram-negative bacilh that may cause systemic infections treatable with high doses of penicilhn G. Such
organisms should only be reported susceptible to penicillin G. and not to phenoxymetliyl penicilhn or phenetliicillin.
The tetracycline disk is used for testing susceptibility to all tetracyclines; that is chloro tetracycline, demeclo eye line, doxycychne, methacycline, oxy tetracycline, minocycline,
and tetracycline.
The Effects of Chemical Agents on Bacteria II: Antimicrobial Agents (Kirby-Bauer Method) 259
Harley-Prescott:
Laboratory Exercises in
Microbiology, Fifth Edition
VII. Environmental Factors
Affecting Growth of
Microorganisms
43. The Effects of Chemical
Agents on Bacteria II:
Antimicrobial
©The McGraw-Hill
Companies. 2002
Figure 43.2 Antimicrobic Sensitivity Testing.
Cartridges (Difco)
can be used
to dispense
individual disks.
Push handle of dispenser down
to dispense 12 disks.
Diameter of zone
Incubate
Measure diameter
of zones of inhibition to the nearest mm
after 16-18 hours incubation.
260 Environmental Factors Affecting Growth of Microorganisms
Harley-Prescott: I VII. Environmental Factors I 43. The Effects of Chemical I I ©The McGraw-Hill
Laboratory Exercises In Affecting Growth of Agents on Bacteria II: Companies. 2002
Microbiology, Fifth Edition Microorganisms Antimicrobial
Laboratory Report
Lab Section:
The Effects of Chemical Agents on Bacteria II:
Antimicrobial Agents (Kirby-Bauer Method)
1. Based on your measurements, complete the following table on the susceptibility of each test bacterium to the
antibiotic by using an R (resistant), I (intermediate), or S (sensitive).
Antibiotic or Antimicrobic
1.
2.
3.
4.
5.
6.
7.
8.
9.
10.
11.
12.
Disk
Code
S. aureus
Zone
Size
s,
I,
R
E. coli
Zone
Size
s,
I,
R
P. aeruginosa
Zone
Size
s,
I,
R
K. pneumoniae
Zone
Size
s,
I,
R
2. From the above table, which antibiotic (antimicrobic) would you use against each of the following?
S. aureus
E. coli
P. aeruginosa
K. pneumoniae
261
43
Name:
Harley-Prescott: I VII. Environmental Factors I 43. The Effects of Chemical I I ©The McGraw-Hill
Laboratory Exercises In Affecting Growth of Agents on Bacteria II: Companies. 2002
Microbiology, Fifth Edition Microorganisms Antimicrobial
Review Questions
1. How can you determine whether the zone of inhibition is due to death or to inhibition of a bacterium?
2. What factors must be carefully controlled in the Kirby-Bauer method?
3. In which growth phase is a bacterium most sensitive to an antibiotic?
4. If the clinical laboratory reports bacterial susceptibility to an antibiotic but the patient is not responding to it,
what could have gone wrong?
5. What are the similarities and differences in response to plates with gram-positive and gram-negative bacteria?
Between enterics and nonenterics?
6. What is the difference between an antibiotic and an antimicrobic?
7. What are some reasons bacteria are becoming more resistant to antibiotics?
262 Environmental Factors Affecting Growth of Microorganisms
Harley-Prescott:
Laboratory Exercises in
Microbiology, Fifth Edition
VII. Environmental Factors
Affecting Growth of
Microorganisms
44. Hand Washing,
Environmental Sampling,
and Microbiological
Monitoring
©The McGraw-Hill
Companies. 2002
EXERCISE
44
Handwashing, Environmental Sampling, and
Microbiological Monitoring
ATTENTION
DO NOT WASH YOUR HANDS BEFORE THIS
EXERCISE. Remove jewelry from your hands and store it
in a safe place during the experiment.
Materials per Student
2 petri plates of TSA containing lecithin and
polysorbate 80
2 ROD AC plates containing TSA with lecithin
and polysorbate 80 for environmental sampling
HYcheck System for Disinfection Control (Difco,
9039-36-4)
Millipore Membrane Sampler and Swab Test Kits
(Coli-Count Sampler [MCOO] or Swab
[MCSK], Yeast and Mold Sampler [MYOO] or
Swab [MYSK], Total Count Sampler [MTOO]
or Swab [MTSK])
variety of chemical disinfectants such as Staphene
(Vestal Labs), Lysol, Zephiran (Winthrop
Labs), alcohol (70%), and others
variety of hand soaps such as Ivory, Dial, Dove,
Zest, Palmolive, Lifebuoy, Phisohex (Winthrop
Labs), Betadine (Purdue Federick Co.),
Septisoft (Vestal Labs), and others. Note if any
of these products contain triclosan!
1-ml and 10-ml pipettes with pipettor for
preparing dilutions
paper towels
wax pencil
35°C incubator
sterile single-use surgical scrub brush
receptacle for used brushes
Learning Objectives
Each student should be able to
1. Understand the value of proper hand washing
2. Understand the importance of efficient
decontamination procedures
3. Evaluate the effectiveness of hand washing and
decontamination
4. Perform routine microbiological monitoring
Suggested Reading in Textbook
1. Definition of Frequently Used Terms, section 7.1.
2. The Use of Chemical Agents in Control, section
7.5; see also tables 7.4 and 7.5.
Principles
Most commercial hand washing products contain
antibacterial chemicals. These products are widely used
in the home and workplace. There are two types
available: hand soaps contain the phenolic antiseptic called
triclosan and hand gels contain ethyl alcohol. Hand
gels can be used without water whereas soaps require
the addition of water.
Proper hand-washing technique performed by
clinical personnel is the most effective method of
controlling infections, especially nosocomial (hospital-
acquired) infections. A layer of oil and the structure of
the skin prevent the removal of microorganisms by
simple hand washing. Using a soap or gel will help
remove the oil, and scrubbing with a brush for 7 to 8
minutes will maximize the removal of both transient
(contaminated) and resident microorganisms. In mis
exercise, each student will be given a specific soap or
gel to evaluate. The proper hand-washing technique
will be demonstrated by the instructor. The
effectiveness of the hand-washing technique and the soap or gel
will then be shown by the presence or absence of
growth on a culture plate.
Also in this exercise, various environmental surfaces
will be disinfected with chemicals generally employed
in a clinical setting. Disinfection is the killing of
vegetative forms of pathogenic microorganisms or viruses.
Disinfectants are agents, usually chemicals, used to carry
out disinfection and are normally used only on inanimate
objects. The purpose for this part of the exercise is to
263
Harley-Prescott:
Laboratory Exercises in
Microbiology, Fifth Edition
VII. Environmental Factors
Affecting Growth of
Microorganisms
44. Hand Washing,
Environmental Sampling,
and Microbiological
Monitoring
©The McGraw-Hill
Companies. 2002
show the student the importance of bom chemical and
physical removal of potentially harmful microorganisms
by disinfectants and, at the same time, to provide
experience in routine biological monitoring. RODAC
(replicate organism detection and counting) plates will be
used for this part of the exercise. The design of the plate
permits the pouring of a raised surface of the culture
medium for total surface contact of the area being
sampled. The 10-mm grid on the bottom of the plate
facilitates counting and colony location. Tliese plates are used
for the detection and enumeration of microorganisms
present on surfaces that must be kept sanitary.
Alternatives for environmental sampling are
either Difco's HYcheck System for Disinfection
Control or Millipore's Sampler and Swab Test Kits for
microbiological monitoring.
Procedure
First Period
Hand Washing
1. Before doing any hand washing, using one of
your hands, gently make a five-finger impression
on one of the TSA plates by rolling each finger
and your thumb on the agar. With the wax pencil,
label mis plate with your name, date, and "before"
hand washing.
2. Take one of the soaps supplied and wash your
hands according to the directions of the
manufacturer or your instructor. Wash your hands
for the length of time assigned by the instructor.
Some appropriate intervals are 10 seconds, 30
seconds, and 3 minutes, but other times may be
chosen. In this way, the effect of both the soap
selected and the length of scrubbing can be
studied. The hand-washing technique involves:
a. Using continuously running hot water
b. Using plenty of soap
c. Applying the soap with vigorous contact on
all surfaces of the hands
d. Washing hands with a surgical scrub brush
e. Keeping hands down at all times, so any
runoff will go into the sink and not down the
arms
f. Avoiding splashing; rinsing thoroughly
g. Drying well with paper towels
h. Discarding the towels into a bag provided
for mat purpose
i. Using a paper towel to turn off the faucet
3. After washing, make another five-finger
impression (using the same hand and fingers) on a
different TSA plate. Mark this plate with your
name, date, and the duration of hand washing.
4. Incubate both plates at 35°C for 24 to 48 hours.
First Period
Environmental Sampling
1. Choose any environmental surface such as a floor,
wall, table, or drinking fountain, and place a
RODAC plate on its surface (figure 44.1). Make
sure that a perfect contact has occurred. Mark mis
plate with your name, date, and "before"
disinfection.
2. Take one of the disinfectants supplied and make
the proper use-dilution as suggested by the
manufacturer. Pour some of the chemical (5 to 10
ml) on the area mat was previously sampled with
the RODAC plate. Allow sufficient time for
contact (your instructor will suggest time
intervals). Wipe the area with a paper towel to
absorb the excess fluid. Scrubbing with the towel
can also be done.
3. Make another impression of the area with another
RODAC plate. Mark this plate with your name,
date, and "after" disinfection.
4. Place both RODAC plates in a 35°C incubator for
24 to 48 hours.
5. The HYcheck contact slide for Disinfection Control
(Difco) is a convenient alternative for testing
disinfectant effectiveness. The hinged slide paddle
has tryptic soy agar on one side and D/E
neutralizing agar for disinfectant testing on the
other. The paddle's surface is marked off in one-
square-centimeter units for ease in colony counting.
Surfaces can be quickly tested in the following way
(your instructor will demonstrate the procedure).
a. Press the paddle's terminal spike against the
surface to be tested and bend the paddle
hinge to a convenient angle.
b. Holding the slide by its cap, gently press the
TSA plate firmly against the surface to be
sampled and hold it there for a few seconds.
Then bend the paddle back straight and
return it to its container.
c. Disinfect the surface as described in step 2.
d. Remove the slide and press the purple D/E
neutralizing agar against the disinfected
surface; hold it there for a few seconds.
e. Return the slide to its container, seal it tightly,
and label the container. Incubate at 35° to
37°C and count any colonies on the two sides
after about 24 and 48 hours incubation.
264 Environmental Factors Affecting Growth of Microorganisms
Harley-Prescott:
Laboratory Exercises in
Microbiology, Fifth Edition
VII. Environmental Factors
Affecting Growth of
Microorganisms
44. Hand Washing,
Environmental Sampling,
and Microbiological
Monitoring
©The McGraw-Hill
Companies. 2002
Figure 44.1 RODAC Plates, (a) A RODAC plate, (b) Applying a RODAC plate to an environmental surface.
(a)
(b)
6. Sampler and Swab Test Kits from Millipore can
also be used for routine microbiological sampling
and monitoring of a specific environment.
Advantages of these kits include no media to mix,
no agar plates to prepare, and nothing to sterilize
and clean. Testing is as simple as sample,
incubate, and count (figures 44.2 and 44.3).
Specific temperatures and incubation times are
given in table 44.1.
Second Period
Hand Washing
1. Examine the TSA plates around the area where
the finger impressions were made. Compare the
"before" and "after" plates. Complete the data
asked for in Part 1 of the report for exercise 44.
2. It will be necessary to exchange data with other
students in order to answer some of the review
questions.
Second Period
Environmental Sampling
1. Examine the RODAC plates, HYcheck slide, and/or
Millipore test kit/sampler. Count the number of
colonies on each plate, slide, and /or test
kit/sampler. Record your results and complete the
data asked for in Part 2 of the report for exercise 44.
2. It will be necessary to exchange data with other
students in order to answer some of the review
questions.
HINTS AND PRECAUTIONS
(1) If you have to dilute concentrated disinfectants,
wear gloves and carry out the dilutions in the chemical
(fume) hood. (2) Millipore samplers should be used
only when counts >10 colonies/ml are anticipated.
(3) Samplers are not recommended for testing drinking
water or when a 100-ml sample is required due to a low
number of microorganisms or for marine water where
salt concentrations might alter nutrients. (4) Triclosan is
primarily effective against Gram-positive bacteria.
Hand Washing, Environmental Sampling, and Microbiological Monitoring 265
Harley-Prescott: I VII. Environmental Factors I 44. Handwashing, I I ©The McGraw-Hill
Laboratory Exercises in Affecting Growth of Environmental Sampling, Companies. 2002
Microbiology, Fifth Edition Microorganisms and Microbiological
Monitoring
Figure 44.2 The Self-Contained Membrane Filter Test (Millipore). (a) To sample surfaces, wipe the surface with the swab; return
the swab to the plastic case containing sterile buffer; shake 30 times; discard the swab, (b) To sample liquids, fill the case with the fluid to
be tested; insert the sampler into the case and lay it horizontally with the membrane side down for 30 seconds; pour out the test fluid,
(a) Reinsert the sampler into the case and incubate with the membrane-side down, (d) Count the colonies or make a quick comparison
using the comparison chart provided in the package figure 44.3.
Figure 44.3 Small and Large Colony Counts. Simply align the sampler with photo showing same density of colonies and record
that number.
266 Environmental Factors Affecting Growth of Microorganisms
Harley-Prescott: I VII. Environmental Factors I 44. Hand Washing, I I ©The McGraw-Hill
Laboratory Exercises In Affecting Growth of Environmental Sampling, Companies. 2002
Microbiology, Fifth Edition Microorganisms and Microbiological
Monitoring
Table 44.1 Temperature
SWAB TEST KIT
Food Applications
Raw Materials
Saws
Grinders
Beverage Applications
Equipment Surfaces
Public Health Inspections
SAMPLER
Food Applications
Treated Waters
Raw Materials
Liquid Raw Ingredients widi
fine particulate suspensions
Finished Liquid Product
Beverage Applications
Treated Waters
Finished Syrup
Packaged Product
Electronics High Purity Water
Cooling Tower Waters
Process Water
Dialysis Water
Make-Up Water
Finished Dialysate
Public Health Inspections
Environmental Waters
Laboratory Grade Water
Cosmetic and pharmaceutical
Manufacturing
and Incubation Times for Various Millipore
Incubation
Organism
Coliform
Bacteria
Bacteria
Bacteria
Yeast, Mold
Coliform
Bacteria
Bacteria
Bacteria
Yeast, Mold
Coliform
Bacteria
Bacteria
Coliform
Bacteria
Bacteria
Yeast, Mold
Bacteria
Bacteria
Bacteria
Yeast, Mold
Bacteria
Coliform
Bacteria
Bacteria
Bacteria
Coliform
Bacteria
Coliform
Bacteria
Bacteria
Bacteria
Bacteria
Test Kit
Coli-Count
HPC
HPC
HPC
Yeast & Mold
Coli-Count
HPC
HPC
HPC
Yeast & Mold
Coli-Count
HPC
HPC
Coli-Count
HPC
HPC
Yeast & Mold
HPC
HPC
Total Count
Yeast & Mold
HPC
Coli-Count
Total Count
HPC
Total Count
Coli-Count
HPC
Coli-Count
HPC
Total Count
HPC
HPC
Test Kits
Temperature
35°C±1°C
25°C-35°C
25°C-35°C
25°C-35°C
28° C-32°C
35°C±1°C
25°C-35°C
25°C-35°C
25°C-35°C
28° C-32° C
35°C±1°C
25°C-35°C
25°C-35°C
35°C±1°C
25°C-35°C
25°C-35°C
28° C-32° C
28° C±2° C
28°C-35°C
28°C-35°C
28° C-32° C
25°C-35°C
35°C±1°C
25°C-35°C
35°C±2°C
35°C±2°C
35°C±1°C
25°C-35°C
35°C±1°C
28°C-35°C
25°C-35°C
28°C-35°C
25°C-35°C
Sampler
Time
22-24 hrs
48-72 hrs
48-72 hrs
48-72 hrs
48-72 hrs
22-24 hrs
48-72 hrs
48-72 hrs
48-72 hrs
22-24 hrs
22-24 hrs
48-72 hrs
48-72 hrs
22-24 hrs
48-72 hrs
48-72 hrs
48-72 hrs
48-96 hrs
48-72 hrs
48-72 hrs
48-72 hrs
48-72 hrs
22-24 hrs
48-72 hrs
48-72 hrs
48-72 hrs
22-24 hrs
48-72 hrs
22-24 hrs
48-72 hrs
48-72 hrs
48-72 hrs
48-72 hrs
Color
Blue
Red
Red
Red
Yellow
Blue
Red
Red
Red
Yellow
Blue
Red
Red
Blue
Red
Red
Yellow
Red
Red
White
Yellow
Red
Blue
White
Red
White
Blue
Red
Blue
Red
White
Red
Red
Note: Except for Coh-Count Sampler and Swab Test Kits, the incubation times and temperatures hsted above are accepted ranges and can vary depending on specific
situations. The same incubation time and temperature should be used for routine testing to establish a standard for comparison. Incubation time and temperature for cohform
testing is specific and follows accepted standards.
Source: Copyright © Millipore Corporation, Bedford, MA. Reprinted by permission.
Hand Washing, Environmental Sampling, and Microbiological Monitoring 267
Harley-Prescott: I VII. Environmental Factors I 44. Hand Washing, I I ©The McGraw-Hill
Laboratory Exercises In Affecting Growth of Environmental Sampling, Companies. 2002
Microbiology, Fifth Edition Microorganisms and Microbiological
Monitoring
Laboratory Report 44
Name:
Date: _
Lab Section:
Hand Washing, Environmental Sampling, and Microbiological Monitoring
1. Data from hand-washing experiment.
a. Type of hand-washing material used:
b. Length of time of hand washing:
c. Type of culture medium used:
d. Hours of incubation:
e. Temperature of incubation:
f. Colony count prior to hand washing:
g. Colony count after hand washing:
h. Colony shape (see figure 15.1):
i. Interpretation:
2. Data from environmental sampling,
a. Chemical used:
b. Use-dilution of chemical:
c. Contact time used:
d. Hours of incubation:
e. Temperature of incubation:
f. Colony count prior to disinfection:
g. Colony count after disinfection:
h. Colony shape (see figure 15.1):
i. Interpretation:
3. Additional data from microbiological monitoring.
269
Harley-Prescott: I VII. Environmental Factors I 44. Hand Washing, I I ©The McGraw-Hill
Laboratory Exercises In Affecting Growth of Environmental Sampling, Companies. 2002
Microbiology, Fifth Edition Microorganisms and Microbiological
Monitoring
Review Questions
1. Why is contact so important in the disinfection process?
2. What disinfectant proved to be the most effective? The least effective? Suggest reasons why.
3. What soap proved to be the most effective? The least effective? Did any contain triclosan? Suggest reasons
why and the significance of triclosan.
4. Since most normal flora are not harmful, why must they be removed in a surgical scrub?
5. List some of the reasons why hand washing fails to remove all microorganisms. In your discussion, analyze
the effect of hand scrubbing time (as well as the soap).
6. Why is liquid soap preferred to bar soap during a surgical scrub?
7. What microbial advantage is there to paper towels in a rest room over a continuous-feed cloth towel?
270 Environmental Factors Affecting Growth of Microorganisms
Harley-Prescott:
Laboratory Exercises in
Microbiology, Fifth Edition
VII. Environmental Factors
Affecting Growth of
Microorganisms
45. Determination of a
Bacterial Growth Curve:
Classical and Two-Hour
Methods
©The McGraw-Hill
Companies. 2002
EXERCISE
45
Determination of a Bacterial Growth Curve:
Classical and Two-Hour Methods
SAFETY CONSIDERATIONS
Be careful with the Bunsen burner flame. No mouth
pipetting.
Materials per Group of Students (Classical
Method)
10- to 12-hour (log phase) tryptic soy broth
cultures of Escherichia coli (ATCC 11229).
Cultures can be maintained in log phase by
immersion in an ice-water bath
100 ml of brain-heart infusion in a 250-ml
Erlenmeyer flask
21 99-ml saline saline blanks
3 100-ml bottles of tryptic soy agar
37°C water bath with shaker or temperature
controlled shaker incubator
spectrophotometer
13 x 100 mm cuvettes
Nephelo culture flasks (Bellco Glass Co., 340
Edrudo Rd., Vineland, NJ 08360;
800-257-7043; www.bellcoglass.com)
colony counter
28 petri plates
1-ml and 10-ml sterile pipettes with pipettor
Bunsen burner
wax pencil
1,000-ml beaker
ruler
Materials per Group of Students
(Two-Hour Method)
6-hour starter culture of Vibrio natriegens (ATCC
14048; Preceptrol)
500-ml flask containing approximately 300 ml
of V. natriegens medium (3.7% [37 g/liter]
brain-heart infusion + 2% [20 g/liter] NaCl,
final pH 7.4)
1- and 10-ml pipettes with pipettor
water bath or incubator at 37°C
Learning Objectives
Each student should be able to
1. Understand the growth dynamics of a bacterial
culture
2. Identify the typical phases of a bacterial growth
curve
3. Use a spectrophotometer
4. Measure bacterial growth and turbidity
5. Plot a growth curve and determine the generation
time of a culture of E. coli and/or Vibrio natriegens
Suggested Reading in Textbook
1. The Growth Curve, section 6.1; see also figures
6.1 to 6.3.
2. Measurement of Microbial Growth, section 6.2.
Pronunciation Guide
Escherichia coli (esh-er-I-ke-a KOH-lee)
Vibrio natriegens (VIB-ree-o nat-re-gens)
Why Are the Above Bacteria Used
in This Exercise?
In this experiment, the student will learn how to measure
bacterial growth, plot a bacterial growth curve, and
determine the generation time. To accomplish this, the authors
have chosen the common bacterium Escherichia coli that
has a generation time of approximately 21 minutes at 40°C
and Vibrio natriegens that has a generation time of less
than 10 minutes at 37°C.
Principles
Classical Growth Curve
The four phases (lag, logarithmic, stationary, and
death or decline) of growth of a bacterial population
can be determined by measuring the turbidity of the
271
Harley-Prescott:
Laboratory Exercises in
Microbiology, Fifth Edition
VII. Environmental Factors
Affecting Growth of
Microorganisms
45. Determination of a
Bacterial Growth Curve:
Classical and Two-Hour
Methods
©The McGraw-Hill
Companies. 2002
Figure 45.1 Indirect Method of Determining Generation
Time.
0.6
E
,§0.5
S
o
^0.4
&
Absorbance
P P
ro co
0.1
Cell doubling /
B /
/ I
/ I
-/ Generation
^■^ I I
7b
i
i
i
i
i
i
time
I I
-
-
-
I
30
60 90 120
Time in minutes
150
180
population in a broth culture. Turbidity is not a direct
measure of bacterial numbers but an indirect measure of
biomass, which can be correlated with cell density
during the log growth phase. Since about 107 bacterial cells
per milliliter must be present to detect turbidity with the
unaided eye, a spectrophotometer can be used to achieve
increased sensitivity and obtain quantitative data.
The construction of a complete bacterial growth
curve (increase and decrease in cell numbers versus
time) requires that aliquots of a shake-flask culture be
measured for population size at intervals over an
extended period. Because this may take many hours,
such a procedure does not lend itself to a regular
laboratory session. Therefore, the first part of this exercise
has been designed to demonstrate only the lag and log
phases of a bacterial growth curve. The bacterial
population will be plotted on graph paper by using both
an indirect and direct method for the measurement of
growth. The resulting growth curve can be used to
delineate stages of the growth cycle. It also makes
possible the determination of the growth rate of a particular
bacterium under standardized conditions in terms of
its generation time—the time required for a bacterial
population to double.
The indirect method uses spectrophotometric
measurements of the developing turbidity in a
bacterial culture taken at regular intervals. These samples
serve as an index of increasing cellular mass. The
graphical determination of generation time is made by
extrapolation from the log phase, as illustrated in
figure 45.1. For example, select two points (0.2 and 0.4)
on the absorbance (A) scale that represent a doubling
of turbidity. Using a ruler, extrapolate by drawing a
line between each absorbance on the ordinate, and the
plotted log or exponential phase of the growth curve.
From these two points, draw perpendicular lines to the
time intervals on the abscissa. From these data, the
generation time can be calculated as follows:
Generation time = t (A of 0.4) - t (A of 0.2)
Generation time = 90 minutes - 60 minutes
= 30 minutes.
The same graphical generation time determination can
be done with a plot of population counts.
The growth rate constant can also be determined
from the data. When the logio of the cell numbers or
absorbance is plotted versus time, a straight line is
obtained, the slope of which can be used to determine
the value of g and k. The dimensions of k are
reciprocal hours or per hour. The growth rate constant will be
the same during exponential growth regardless of the
component measured (e.g., cell biomass, numbers).
The growth rate constant provides the microbiologist
with a valuable tool for comparison between different
microbial species when standard growth and
environmental conditions are maintained.
Once the growth rate constant is known, the
mean generation time (doubling time) can be
calculated from the following equation:
1
8 = T
This equation also allows one to calculate the growth
rate constant from the generation time.
As mentioned previously, the generation time can
be read directly from the bacterial growth curve plot,
and the growth rate constant then determined. To
calculate the generation time (g) from these data with an
equation, use the following formula:
n .. .. 0.301?
Generation time = ——: —
logioM-logioNo
where No = bacterial population at point B
or any other point at the
beginning of the log phase
Nt = bacterial population at
point b or any other point
at or near the end of the
log phase
t = time in minutes between
b and B (figure 45.1).
From the previous equation, one can also
determine the specific mean growth rate constant (k) for
any culture during unrestricted growth. During this
time, the rate of increase of cells is proportional to the
272 Environmental Factors Affecting Growth of Microorganisms
Harley-Prescott:
Laboratory Exercises in
Microbiology, Fifth Edition
VII. Environmental Factors
Affecting Growth of
Microorganisms
45. Determination of a
Bacterial Growth Curve:
Classical and Two-Hour
Methods
©The McGraw-Hill
Companies. 2002
Figure 45.2 Dilution Plating and Spectrophotometric Procedure for Constructing Bacterial Growth Curves.
5 ml
*- A @ 550 to 600 nm
in spectrophotometer
at different time
intervals
10 ml
0.1 ml
oooo
10" dilution
10" dilution
10" dilution
10" dilution
number of cells present at any particular time. In
mathematical terms, the growth rate is expressed as
t
where n is the number of generations per unit time.
The symbol k represents the mean growth rate
constant. Converting the equation to logarithms:
, _logM-logJV0
0.301?
Two-Hour Method
Vibrio natriegens is a facultative anaerobic rod with a
single polar flagellum. It was first isolated in 1958
from a salt marsh on Sapelo Island, Georgia. The
rapid growth of V. natriegens (a generation time of
less than 10 minutes) makes this bacterium useful for
determining a complete bacterial growth curve. The
growth cycle, from lag through log and stationary
phases, can be measured in approximately 2 hours.
Procedure (Classical Method)
First Period
1. Separate the 21 sterile saline blanks (99 ml each)
into seven sets of three each. Using the wax
pencil, label each set as to the time of inoculation
(t = 0, t = 30, t = 60, t = 90, t = 120,?= 150, and
? = 180) and the dilution in each blank (102, 10"4
and 10"6) (figure 45.2).
2. Using the wax pencil, label seven petri plates with
your name, the time of inoculation (use the same
times as in step 1), and the dilution (10-4, 10~5,
10-6, 10"7) to be plated.
3. Melt three tubes of tryptic soy agar in a water
bath and cool to 45°C.
4. Using a sterile pipette, transfer 5 ml of the log
phase E. coli culture to the flask containing 100
ml of brain-heart infusion broth. Label with your
name, time, and date. The approximate
absorbance (A) of this broth should be about 0.1
at 550 to 600 nm (see exercise 19 for proper use
of the spectrophotometer).
5. After the initial A has been determined, shake the
culture and aseptically transfer 1 ml to the 99-ml
water blank labeled 10~2 and continue to serially
dilute to 10~6 (see appendix F and figure 45.2).
6. Place the culture flask in the shaker water bath or
incubator, set at 37°C and 120 rpm. If a shaker
bath is not available, the flask should be shaken
periodically.
7. Plate the 0 time dilutions into the appropriately
labeled petri plates, using the amounts indicated
Determination of a Bacterial Growth Curve: Classical and Two-Hour Methods 273
Harley-Prescott:
Laboratory Exercises in
Microbiology, Fifth Edition
VII. Environmental Factors
Affecting Growth of
Microorganisms
45. Determination of a
Bacterial Growth Curve:
Classical and Two-Hour
Methods
©The McGraw-Hill
Companies. 2002
in figure 45.2. Pour 15 ml of the melted agar into
each plate and mix by gentle rotation on a flat
surface.
8. Thereafter, at 30-minute intervals, transfer 5 ml of
the broth culture to a cuvette and determine the A
of the culture at 550 to 600 nm. Be sure to
suspend the bacteria thoroughly each time before
taking a sample.
9. At the same time interval, transfer 1 ml of the
culture into the 10~2 water blank of the set labeled
with the appropriate time (see step 1). Complete
the serial dilution once again as indicated in
figure 45.2 and plate into the labeled (see step 2)
petri plates. Add melted agar as per step 7.
10. When the media in the petri plates hardens,
incubate them in an inverted position for 24 hours
at 35°C.
Second Period
1. Perform colony counts on all plates as described
in exercise 19.
2. Record all measurements and corresponding
bacterial counts in the table in the report for
exercise 45.
3. On the paper provided, plot the following:
a. Log absorbances on the ordinate, and
incubation times on the abscissa. Use figure
45.1 as an example.
b. Logio values of the bacterial counts on the
ordinate, and incubation times on the
abscissa. Connect the points with a ruler.
c. Also construct a graph of the data using
semilog graph paper. Calculate generation
time and mean growth rate constant. Employ
both the graphical method and growth
equations.
Procedure (Two-Hour Method)
1. Zero the spectrophotometer at 550 to 600 nm with
the V. natriegens medium from the flask.
2. Place the flask containing the brain-heart infusion
medium in the 37°C water bath or incubator for
15 minutes.
3. While slowly agitating the flask in the water bath,
inoculate it with 10 ml of 6-hour V. natriegens
culture.
4. Read and record the %T of this initial culture (0
time) and every 10 minutes thereafter for about
2 hours. Be sure to suspend the bacteria
thoroughly each time before taking a sample.
Use appendix B to accurately convert %T
(transmittance) to A (absorbancy). If your
spectrophotometer has a digital readout,
measure the absorbance directly rather than
calculating it from the %T.
5. Construct a growth curve by plotting A against
time on semilog graph paper. Calculate the mean
generation time and growth rate constant using
both equations and the graphical method.
HINTS AND PRECAUTIONS
(1) Be sure to maintain good aseptic technique when
making transfers and report any spills to your instructor.
Carefully clean and decontaminate your work area at
the end of the experiment. (2) The bacterial growth
curve study can be very easily run using Nephlo culture
flasks. These flasks have side arms that fit into the
spectrophotometer's cuvette compartment so that growth
can be followed without removing samples.
274 Environmental Factors Affecting Growth of Microorganisms
Harley-Prescott:
Laboratory Exercises in
Microbiology, Fifth Edition
VII. Environmental Factors
Affecting Growth of
Microorganisms
45. Determination of a
Bacterial Growth Curve:
Classical and Two-Hour
Methods
©The McGraw-Hill
Companies. 2002
Laboratory Report 43
Name:
Date: _
Lab Section:
Determination of a Bacterial Growth Curve:
Classical and Two-Hour Methods
Classical Method
1. Based on your data on absorbance and plate counts (bacterial cells per milliliter), complete the following
table.
Incubation Time
in Minutes
0
30
60
90
120
150
180
Absorbance @ 550 to 600nm
Plate Counts,
Bacteria/ml
Dilution Factor
Log of Bacteria/ml
2. Calculate the generation time for this E. coli culture by the indirect method, using the formula given in the
Principles section and by the indirect method using your growth curve and extrapolations from the absorbances
for doubling. Show all calculations in the space provided.
a. From formula
b. From growth curve
3. What is the k value for your E. coli culture?
275
Harley-Prescott:
taboratory Exercises in
Microbiology, Fifth Edition
VII. Environmental Factors
Affecting Growth of
Microorganisms
45. Determination of a
Bacterial Growth Curve:
Classical and Two-Hour
Methods
©The McGraw-Hill
Companies. 2002
Two-Hour Method
1. Based on your data on absorbance, complete the following table.
Incubation Time
in Minutes
%T
0
20
40
60
80
100
120
276 Environmental Factors Affecting Growth of Microorganisms
Harley-Prescott: VII. Environmental Factors 45. Determination of a
Laboratory Exercises In Affecting Growth of Bacterial Growth Curve:
Microbiology, Fifth Edition Microorganisms Classical and Two-Hour
Methods
Review Questions
1. Define generation time.
2. When following bacterial growth, why is absorbance plotted instead of percent transmission?
3. Can generation time be calculated from any phase of the growth curve? Explain your answer.
4. What is occurring in a bacterial culture during the lag phase? During the growth phase?
5. What is the significance of a k value?
6. What is meant by the turbidity of a culture?
7. How can the mean generation time be determined for a bacterial culture?
Determination of a Bacterial Growth Curve: Classical and Two-Hour Methods 277
©The McGraw-Hill
Companies. 2002
Harley-Prescott: VII. Environmental Factors 45. Determination of a
Laboratory Exercises In Affecting Growth of Bacterial Growth Curve:
Microbiology, Fifth Edition Microorganisms Classical and Two-Hour
Methods
©The McGraw-Hill
Companies. 2002
Graph paper
) i | | ; ,1 | | | 1 1 1 1 | 1 J l|,' I . i ' I : | 1 ",
; j■ | *; ■ [ t f■ [ i | 1 1 :!: : ] { ' \ i . i I ...j : \[i ... i:.
1 II' ' ' I I ''' ; ! ' ' i 1
-■■- | jj - - -~lt --*-- i- ^ + ■ —h x ii" i " ri 1^ ■■■!-■■- - 4- ■4- ■ f ■[■■- ^/■-■^--
_ -1 1" --£■' i_- ■ ^ ■-£ "■;■ ■ [-;■ Tt ■; 7" " "T" Tl"i"" —*■-}-*-■■ ■ ■ ■ V ■ '] ';■'[; '
! ' T !! ''I! ' T ! TT ~1 . J ^"T !! ! 'JJTrJ *~ ,J, T '("" . ■, "; . '"
■ T ■' 1 ^ 1~ ^~ T~J~ 1 ^1 ^ ^ !;, I : j 'M i|!,,'!!
! , ! ' ! ' ! ' ' ' ' ' I !! ! I ' ! ! it'! !
!:f }■ ■■■:■■. :;—.: : -;::4 ::::- ! I :- 1 ■ ■ - :-, ; : f;; ^t| ■ ■ |^: | ■ ■■ ttt|;.Ji.-.rjj±
') + ■+ -* 4 — 1 h~"^T~t ,-,--,-j^-L -*_ , 1_ _|__. j_—l_ _| j-_ '--r-^—-
11 ^_ -t L . i . +. J...... -. ^ -.. ... . i .,,. ,. +--+--]—L__, 1 .,, . —i—.....
1 j !' ! ! ' 1 * !'[[!! 1 ! !
--— ^-i 4- i ~ i— i-1 """ i"f^'" ■ "■ ■ ii"~ i i— "
I. i ii i ^ i . . T , T . ...
; j j !' ' ! ' I ' ! ' \ \ , ! ! ■
.-X- --- H__ --_ -— ..... ."J. + . - X , T\ 4- 1 1—-(--,—>--
i • \ iii i i . i i
4_, 1—, j ]_., j 1 1 1 1 1—_ __
• - ■*■ ■ ■-■ *j ■ ■->■■ - ■ -" *■ ■ -j- ■■ ■ < --»- ■-* - • -U-—L^-
, , 'ii i f
1,1 j ■ ' I.' i j i |j ■ j t j ; ' '
4—-- --k- ._-~-.j~.-_.. L L_ ----- -1 1 j ■ 1 M- '--r-- -4 ■ t- - ■ ■ - t ■ —1-
i i , If ' ' iEi ii -' > ....
i , i , , . , j i i , . , j i . , .i ...... i
* —4 *~~ ~ i—I '— ~ * *i'—"1 —'—^ *" "—'—~~1-
i ' i ^ i i 1111 11 i . i >>.i..
________ ,__ ,_4_ , __ _ ,_ ___ |__ , , , , L ' ' ' —i ■ ' 1-1-^ ■ 1 ' ■— !-■- —
1 i \ . 1 , . . b i 1 , I ' r 1 r 1 I J ■ ■ ' - ■
:*::::::::::::g:::::::::::::::::|:::t::::::::::::::::::ir!::::^:::^::*:::::::::J:":---±!-„--^r
. j.^ t i , ) , , , i.i i i F - ■ ' ■ * i ... T . . - . -^-.. —
I'-l- _i^.'4__,_j i ^ ' ' _!_j_ ' j_' _J_ ' j_ _!_ ' ' _|j_ '
*, 4^^—,___„.„_._ 4— ..*—\ 1 , J U y~ i r..X--"~ ...... \ .__,.., . .,
— 1—i l-i -i . i 1 -, -_..,4J--..-^.4,_ _ .. 4.. ... T . ^.^
■*-* v* -■■■ ■+-;-■■ ■ -\ 1 ' * ■*- * + ■■■.!■ ■ ..... ,_| J^_
i i | 1 i I i . j h - i i
.* kr-r-- ■ ["| .---„------- _j_- _ 4- -- - - -- - --j-- - -J-- -j- .. . h hH- -j- j...
-+*- ^- ^-^—■-^—"-^ ^~i~^—'—i~~^^ ' '— H~ —.-■-.- —--■ *. ■■ — *-.... *. .+- ■■■ ■ .■ i-- j ....
■<•'- *t' * ' ... J.-.* 4>-i- - .. „ , ^^-^ , 1 ,- (-. ; j-- 1 ..I.
.1 1 j ! H ' . 1 ■ 1 ' 1 ■ 1
; j 11'' '; ! ! ' ; ■ ' ' ' ' ' : ! ! ; !: ' ! ' : ' ;;!'
i j. i i .... i . . i. , , , j , , . ., i
ii ! i . . . ... i i 1 j
■. ...... , j , , , , , , ,, , . i ,, , |
*" '■■■ — ^-j— —i 1 1— . —-i--— >- —i---t- --i- ■+- --•—i—.. i -
. , 1 ..I,. 1
__l T\~^' jj *—" ^ '""—' ^" ^ ' ,_^—n n" ,...---.,..,. l4. . . . .. ^ .. .
. .L ,..-| U j _ ,_^ ,_.^_^ , |_J +1 ,. ,,. .J.^..,^ .
■ ■ ' ■ 1 . 1 II i J J 1
h: jij |||mtil || |[| IIHtittiliimllml lllm l II IiIIilI m 1 ' '' '1
...',' .. . . i i i 11 i i
——- + ■+*• .-.-f 4- -t---H —J- ---------- -1- —H
T" ■ j"- - 1 I . T . •■ - j ■ ) ■ ■ 1 ; ■
—-; 1 1-| j f — 1 ! - H— l-U- -—i---
■ ■ i i ] i i . t .i i • • . . i | . . . .
—^ ... -^ !|_ ^—! . , ni 1 .......
■ ■ ■ 1 -1—!~+~ ^+1 1 -L- * ' I ^ 1 *-*■■*•■+ ...... . | .. . i .
■■+■ ,!t!, T i | .......... — . -.L-..r ..r44-...-. ._ j..p..-i-j-
~"V" :■ : | .0:. ...E—-U-—j—[— .J-I—.. '-1^-, : l.-ii.' ■ —<—}____ ■ ■! ■ i:' r
i ' ■; «-l—h-+-> '-I *-- i- ■ ■ ■ ■ ■ ■ ■ ] ■'■■■J ■ - - J-|' - + ■ - ■ • ■ • ■ ■ ■ t
| ' " j"—1— ■ —• [-4-1 ■ 1 1 1 ■■ - 4+ ..... -,.. ^.+ .,..
L.i-J...... -+--f- 4/— - --t-- -f-- - 1 4 I t j -i.-*.. . _^_ - . ., . ...^ ~l-
ii .ill h. '! I I I ^ i ' ' 'I
-■44-- — ■ ■--! ■■!- 4-- ■— i ■ 1 1 1 .--- . 1 ■■- . ■ •■ . i. r ■■ -■- J ■ ■ ■ , - -■■ -^-^-^^ .-!--
r \ ■■■■•■ j J i ■ , - i i . . , i i i i
-rjV . — .,-I--H--1---r1—t T--+ +—i - ---r-^-44 T.--
-■4:--t:::rt:r^::::i:::|::::::*:::*:::::":+:::-:::::::::=::::::::::i:±^:i^:::::::x:::....T74
- -i-|^ - -t- -, >-p -j- --p^ „- r 1 L i j 1 1_ -1-4- 1 L_- k- L_U - -J-i-1 ' ■ ' —
—j- — - _|-| \-~>rf- 1 -f -~t-^ ^^ - "+- "}- -1 "■ — - - _(. .. , - _f_ _j..._|_ ^|-- - ^- , ^
1 , L . -^ | L .4 1-f-^ --f- - 4-- - - .. ^ ... . 1. .. _._ .. ., _.*......] -.4I... . 1 . . 1...
:![[!' T ! ! IF'T '"
t:iiJ:iiiiinii:iiiiiiiMiiiiiiniiitiiii[iiiHiiiiiiiiinNMiiiiiiiiiMiiiiiiiiinniiini 1111 frH-t;. 1
Time
278 Environmental Factors Affecting Growth of Microorganisms
Harley-Prescott: VII. Environmental Factors 45. Determination of a
Laboratory Exercises In Affecting Growth of Bacterial Growth Curve:
Microbiology, Fifth Edition Microorganisms Classical and Two-Hour
Methods
©The McGraw-Hill
Companies. 2002
Graph paper
Mlllllllllii'lllllimjillHHftfMrlttHllll t It t-f|^m|||}||j[yt^:yji|^H i ^
_± ^ xi- i ±. ---_u.--E_.I_j_ ^L.-izjt-i J_L_._j_j_
_i_—--- I......„: ..:;::..|j.i.::::|:::i.::::i:.ii.l4----lij.--|-i-*^::-:: ~.: -
-_t-_-______-_-:_-_::-_-=_:-|:__||E|„|g.__:_i.j_...j...Z-.^ ..T1 | ::::. :J|:
M^i-^^
|::e:::"ee|:eee:;e:eee;e|:ee":~::;e:eee|;ee:eeeeee-;etEeS
E-EEE|EEEEEEE:EEEEEEEEEEEEEEEEEEEEE|E:EEEEEEEEEEEEEEEEEE:EE|E|EE|EEE=Eip^|.:.:E_.3:-_.-i:E
:i=.::;;=:|:;~:::i|;-^:~ ieieee :::~:i=:~|;g~:^::: :.___.
|iW | f|^ |
iIiIn lllllllllllll
_i ;.: _b i -.3 -, -, ,+ "..... [--I - ....XL-—.! '! ' '
Y^j---^^:: :::=-=j :=-:^:=--^-~=:-:^::^:~: e_=e_-eee
HtflffiW
-1"- f+; '-:=;::~;::=' i:~-i-:=:i::±i ■ ■ - E==== ==:
IJI=.|.__Ei^
"^ +-—1 h -~ '4 r- — -j"-j-- ------ ---H-i-^-^^™-)-. 1 . J- — -I --m-—-O.
□liliB
|:~=:=-!==||!!r!~:;;T;;::rf"^ j-"=f:J:J=:=- .^:
!
Time
Determination of a Bacterial Growth Curve: Classical and Two-Hour Methods 279
til
3 Q co
Harley-Prescott: VII. Environmental Factors 45. Determination of a
Laboratory Exercises In Affecting Growth of Bacterial Growth Curve:
Microbiology, Fifth Edition Microorganisms Classical and Two-Hour
Methods
©The McGraw-Hill
Companies. 2002
Illii!!il!illiSI!BlSIIIIlllIIIIIlH!IIBi!lIII
IIIIIIIlIiilllllllslIlllliillilllSlIIIllIIHIIIIIlillllillllHlilillliI!il!IIII!liIIiI!!iI
[ 1 c 111- -)-|1111| 11j|- -|| ■ |[—1-| ..[||| |-j^- | 111-^-j—[—| | 11.111[ i -J
:
'
r
lllllllllllllilillllllliiiliiiiiillilllillllilllliilllillliiiiiillllliiilliiliiillllliiiii
lililiiiiliiiiiiiiiliiiiiiiliiiiiiiiiiliiiiiiiiiiiiiiiiiiiiiiiiiiiiiiiiiiiiiiiiliiiiliiiii
1 .
~
:
=================================================== = =^:== = =fc ============ = = = - = =^= = K==========
==========================================================================================
^^.-------------- = - = ---------------^^---- ------------=-^^^^^----------- -------------------^
llllllllllllllllll|Elllllll|lllllll|Ell|lll|l|lllllil|||||||lJll|||lll||Jlllllllllllllll
~~Z-Z---^-Z---Z--d^----^~Z^Z--~---ZZ---Z~~-ZZZ--Z-Z-Z------Z~~--ZZ----^fZ--Z-~~ZZ-—^Z.Z----Z
lllllllllllllllllllHllllllllllllllllllllllllllllllllllllllllllllllllllllllllllllll^llllli
=====--—^============== ====== = =;="=====-====.=========-===============.== = ========.=.===.====jp==
iillllllllllllllliiilliiiiilllliiiiillliiiilliillliiiiiillliii(liiiiliiiliiillli^iiiilll
eI1ee==e==ee=eeee'eee1e|eee=^
= -= = ==-:===----::.zz = E=EEEE= = ==E:irzE====EEzz==:=EE==^
^ ^ i _. . r^
4 + 1—
i ,
]
J :
f
~- ±: ::""::::: _:: ::: :__ :: : : :: __, ___
i _L __ j— _.j lj—i—,—i_
Harley-Prescott: VIM. Environmental and Introduction
Laboratory Exercises In Food Microbiology
Microbiology, Fifth Edition
Environmental and
Like a bridge over troubled water
I will lay me down.
(Paul Simon, songwriter and singer, 1942— )
This part of the manual contains exercises dealing with
environmental and food microbiology.
The quality of potable (drinking) water available for
public use is of major concern to everyone. Municipal and
rural water supplies can transmit human diseases such as
cholera, typhoid fever, shigellosis, salmonellosis, and
gastroenteritis. It is generally time consuming and difficult to
directly isolate and identify the relevant human pathogens
because of their low numbers. Therefore, the amount of fecal
contamination is monitored by counting the number of
nonpathogenic, or indicator, bacteria, almost completely fecal in
origin, present in human sewage in large numbers, and that
survive in water long enough to be satisfactorily counted. The
bacterium that satisfies these criteria best is Escherichia coli. It is a
member of the coliform group of bacteria. Even though all
coliforms do not come from human feces, the total coliform
count is used as an index of sewage pollution. Coliform
bacteria are counted during water quality monitoring in four-
ways: (1) The most probable number (MPN) of
coliforms is determined by the use of lactose or lauryl tryptose
broth fermentation tubes. (2) The presence-absence test
(P-A) for coliforms and fecal coliforms is a modification of
Louis Pasteur (1822-1895)
Louis Pasteur was the developer of pasteurization.
©The McGraw-Hill
Companies. 2002
PART EIGHT
Food Microbiology
the MPN procedure in which a large water sample (100 ml)
is incubated in a single culture bottle. (3) The membrane
filter technique (MF) employs a membrane filter. Use of
the proper culture medium to grow the bacteria trapped on
the filter allows the rapid detection of total coliforms, fecal
coliforms, or fecal streptococci by the appearance of their
characteristic colonies. (4) To test for both coliforms and E.
coli, the related KONFIRM Test can be used. All four of
these procedures follow the American Public Health
Association's recommendations in its Standard Methods for the
Examination of Water and Wastewater (19th ed) and are the basis for
the first two exercises in this part of the lab manual.
Viruses are extremely small infective agents. A complete
virus particle, or virion, has a much simpler structure than a
cell. It essentially consists of a block of genetic material
(DNA or RNA) surrounded by a proteinaceous coat that
protects it from the environment and aids in its transmission
from host to host. The protein coat of a virus is called the
capsid. Capsids normally have one of three shapes: (1) icosa-
hedral (as in the poliovirus and adenovirus); (2) helical (as in
the tobacco mosaic virus); or (3) complex (as in the vaccinia
virus). An excellent example of a complex virus is the
bacteriophage, or phage, a virus that reproduces within bacterial
cells and destroys them in the process. It is called complex
because additional structures are attached to the portion of
the capsid that surrounds its nucleic acid. In the third exercise
this part of the manual, we will work with bacteriophages
In 1866, the first edition of Studies on Wine was published.
Pasteur showed that sour wines were caused by contamination
of the wine yeast with acid-producing organisms. He also
showed that other contaminating organisms were responsible
for undesirable secondary fermentations, producing tasteless
wines. Having shown that wine was the result of the action of
the right yeast and proper method of maturation, Pasteur
pointed out that the application of heat was a practical method
for killing undesirable ferments. He stated:
One should not confuse ... the slow heating of wine,
which is used only to help oxygen change the color of
wine, with my process of heating which aims essentially
at destroying parasites.
283
Harley-Prescott: VIM. Environmental and Introduction
Laboratory Exercises In Food Microbiology
Microbiology, Fifth Edition
©The McGraw-Hill
Companies. 2002
that reproduce within the common bacterium, Escherichia coli.
One of the most thoroughly studied of these phages is the T4
bacteriophage. Its capsid consists of a head containing the
double-stranded DNA genome and a complex tail. The virus
attaches to its host cell by the base plate on its tail. The sheath
then contracts and injects the viral DNA into the host cell.
Soils are complex environments in which
microorganisms play a major role. For example, the soil microbial
community is a source of nutrients, contributing to nutrient
cycling and decomposition. Complex microbial interactions
with other microorganisms, macroorganisms, and nutrients
influence degradation processes. These organisms interact
with each other and with plants in the formation and
maintenance of soils. Unfortunately, most microorganisms in soils
have not been cultured and studied. Nevertheless, life on
earth could not be sustained in the absence of the soil micro-
biota and their many important interactions. This section of
the manual contains one exercise that is intended to acquaint
students with the characteristics and activities of soil
microorganisms and to familiarize the student with the quantification
of soil microbiota.
Most of the foods we consume contain microorganisms.
In many instances, these microorganisms have been
introduced into the food from the environment or during food
preparation. In some cases, specific microorganisms are
purposely added to a food product as part of the production
process (e.g., cheese, pickles, buttermilk, sauerkraut, yogurt,
and sausage). Once in the food product and when a
suitable temperature exists, the microorganisms will use the
food product as an energy source, metabolizing it, and
excreting waste products. Some of these waste products may
make the food product unpalatable, and, as a result, the
food source is said to be spoiled. At other times, the waste
products from the microorganisms may cause food
poisonings or food intoxications in the consumer. In yet
other instances, the waste products of the microorganisms
may be desirable (this is called "beneficial spoilage") since
their products aid in the production of a specific food or
food product (e.g., cheese, yogurt). Finally, there are
microorganisms whose presence indicates the sanitary quality
of the food product. These indicator microorganisms
are primarily bacteria. The exercise included in this part of
the manual is intended to introduce some of the
microorganisms involved in food spoilage, food poisonings, food
production, and the sanitary analysis of food products. The
methods for the latter can be found in the Compendium of
Methods for the Microbiological Examination of Foods, prepared
by the American Public Health Association, 1015 Fifteenth
St., NW, Washington, DC 20005.
Vv hen suitable temperatures exist, milk provides an
excellent medium for the growth of many bacteria that cause
diseases such as salmonellosis [Salmonella spp.), brucellosis
(Brucella spp.), listeriosis (Listeria spp.), and tuberculosis
(Mycobacterium). Although these diseases are still transmitted by
contaminated milk (and milk products), their incidence has
been greatly reduced since the introduction of
pasteurization. Pasteurization of milk is designed to expose the milk to
a high enough temperature for a long enough period to
destroy all pathogens. In this process, the nutritional quality and
taste of milk is not altered. As a result, most disease outbreaks
today are the result of consuming raw, or unpasteurized,
milk. It is also vital that milk be routinely subjected to
bacterial counts in order to prevent any disease outbreaks. If the
bacterial population of milk is high, this may indicate that the
milk has been improperly collected, handled, or stored or that
the dairy cows from which the milk was obtained were
diseased. The dairy industry (just as is done for water) uses col-
iform and total bacterial counts as indicators of the sanitary
quality of milk. Various methods are used in the analysis of milk and
dairy products. These methods can be found in Standard Methods
for the Examination of Dairy Products, published by the American
Public Health Association, 1015 Fifteenth St., NW,
Washington, DC 20005. The last exercise in this part of the manual
demonstrates several of these methods.
After completing the exercises in Part Eight, you
will, at the minimum, be able to demonstrate an
increased level in analysis skills, including: (a) collecting
and organizing data in a systematic fashion; (b)
presenting data in an appropriate form (graphs, tables,
figures, or descriptive paragraphs); (c) obtaining
microbial samples; (d) assessing the validity of the data
(integrity and significance); and (e) drawing
appropriate conclusions based on the results. This will meet the
American Society for Microbiology Core Curriculum
Laboratory Thinking Skills number 2. Laboratory skills
numbers 3, 4, and 5 will also be improved. These
include: (a) using biochemical test media and accurately
recording macroscopic observations; (b) performing
aseptic transfers; (c) isolating colonies and/or plaques;
(d) correctly spreading appropriate dilutions; (e)
estimating the number of microorganisms in a sample,
using serial dilution techniques; and (f) extrapolating
plate counts to obtain correct CCU or PAU in the
starting sample (see pp. vi—uiii).
284 Environmental and Food Microbiology
Harley-Prescott:
Laboratory Exercises in
Microbiology, Fifth Edition
VIII. Environmental and
Food Microbiology
46. Stand. Coliform Most
Prob. Num. (MPN)Tests
Presence Absence
Coliform Test
©The McGraw-Hill
Companies. 2002
EXERCISE
46
Standard Coliform Most Probable Number (MPN) Test
and Presence-Absence Coliform Test
SAFETY CONSIDERATIONS
In this experiment, students will be taking unknown
samples and growing them to large concentrations. Any
of these samples could contain human pathogens; thus,
extreme caution should be taken when working with
and disposing of the final products. Be careful with the
Bunsen burner flame. Dispose of all water samples
properly. No mouth pipetting. Keep all culture tubes
upright in a test-tube rack or in a can.
Materials per Group of Students
10 10-ml single-strength lactose broth (SSLB) in
Durham fermentation tubes (lauryl tryptose
broth or presence/absence broth can also be
used)
5 10-ml double-strength lactose broth (DSLB) in
Durham fermentation tubes
125-ml water sample (each group of students
should bring in their own from a possible
contaminated water system) at room
temperature. (If the water samples are collected
early, they should be refrigerated until
analyzed.)
Gram-staining reagents
petri plate containing Levine's EMB agar (or LES
Endo agar)
1 tryptic agar slant
3 tubes brilliant green lactose bile broth (Difco's
Bacto brilliant green bile broth 2%) or 2 tubes
lauryl tryptose broth containing Durham tubes
1 sterile 10-ml pipette with pipettor
2 sterile 1-ml pipettes
wax pencil
test-tube rack
35°C incubator
inoculating loop and needle
Bunsen burner
1 P-A culture bottle (250-ml milk dilution bottle)
containing 50 ml of triple-strength Presence-
Absence or P-A broth
Learning Objectives
Each student should be able to
1. Determine the presence of coliform bacteria in a
water sample
2. Obtain some index as to the possible number of
coliform bacteria present in the water sample
being tested
3. List and explain each step (presumptive, confirmed,
completed) in the multiple-tube technique for
determining coliforms in the water sample
4. Perform the presence-absence coliform test
Suggested Reading in Textbook
1. Sanitary Analysis of Waters, section 29.5.
2. Waters and Disease Transmission, section 29.5.
Pronunciation Guide
Citrobacter (SIT-ro-bac-ter)
Escherichia (esh-er-I-ke-a)
Enterobacter (en-ter-oh-BAK-ter)
Klebsiella (kleb-se-EL-lah)
Principles
The number of total coliforms (Enterobacter,
Klebsiella, Citrobacter, Escherichia) in a water sample can
be determined by a statistical estimation called the
most probable number (MPN) test (figure 46.1).
This test involves a multiple series of Durham
fermentation tubes and is divided into three parts: the
presumptive, confirmed, and completed tests.
In the presumptive test, dilutions from the water
sample are added to lactose or lauryl tryptose broth
fermentation tubes. After 24 to 48 hours of incubation at
35°C, one looks for bacteria capable of fermenting
lactose with gas production, presumably coliforms. (The
lauryl tryptose broth is selective for gram-negative
bacteria due to the presence of lauryl sulfate.)
In the confirmed test, one transfers material from
the highest dilution of those lactose broth tubes that
285
Harley-Prescott:
Laboratory Exercises in
Microbiology, Fifth Edition
VIII. Environmental and
Food Microbiology
46. Stand. Coliform Most
Prob. Num. (MPN)Tests
Presence Absence
Coliform Test
©The McGraw-Hill
Companies. 2002
Figure 46.1 The Most Probable Number (MPN) Procedure for Water Examination for the Presence of Coliforms by the
Presumptive, Confirmed, and Completed Tests.
r\
Water
sample
Inoculate 15 tubes: 5 with 10 ml of sample, 5 with 1.0 ml of sample, and 5 with 0.1 ml of sample.
Double-strength broth
T |=—]r——if——if——if——]
10 10
10
(ml)
10
10
Single-strength broth
p=n==i q=pq=pq=p q=pq=pq=pq==pf=P
1.0 1.0 1.0 1.0 1.0
(ml)
0.1 0.1 0.1 0.1 0.1
(ml)
Lactose or lauryl tryptose broth
Negative presumptive.
The absence of gas in
broth tubes indicates
coliforms are absent.
Incubate an additional
24 hours to be sure.
24 ± 2 hours
35°C
Negative
Positive
After 24 hours of
incubation, the tubes of
lactose broth are examined
for gas production.
No gas produced.
Negative test.
Coliform group absent,
I^=?
I^=?
Positive test: gas production-
use positive confirmed
tubes to determine MPN.
Negative
All positive presumptive
cultures used to inoculate
tubes of brilliant green lactose
bile broth. Incubation for 48 ±3
hours at 35°C.
Nutrient
agar slant
Use coliform colonies
to inoculate nutrient
agar slant and a
broth tube.
Plates of Levine's EMB or LES Endo
agar are streaked from positive
tubes and incubated at 35°C
for 18-24 hours.
W
After 24 hours of incubation make a
Gram-stained slide from the slant.
If the bacteria are gram-negative,
nonsporing rods and produce gas from
lactose, the completed test is positive.
286 Environmental and Food Microbiology
Harley-Prescott:
Laboratory Exercises in
Microbiology, Fifth Edition
VIII. Environmental and
Food Microbiology
46. Stand. Coliform Most
Prob. Num. (MPN)Tests
Presence Absence
Coliform Test
©The McGraw-Hill
Companies. 2002
Table 46.1 Most Probable Number (MPN) Index for Various Combinations of Positive and Negative Results When
Five 10-ml Portions, Five 1-ml Portions, and Five 0.1-ml Portions Are Used
No. of Tubes Giving Positive Reactions Out of
5 of 10 ml 5 of 1ml 5 of 0.1 ml MPN Index per
Each Each Each 100 ml
0 0 0 <2
0 0 1 2
0 10 2
0 2 0 4
10 0 2
10 1 4
110 4
111 6
12 0 6
2 0 0 5
2 0 1 7
2 10 7
2 11 9
2 2 0 9
2 3 0 12
3 0 0 8
3 0 1 11
3 10 11
3 11 14
3 2 0 14
3 2 1 17
3 3 0 17
4 0 0 13
4 0 1 17
4 10 17
4 11 21
4 12 26
4 2 0 22
No. of Tubes Giving Positive Reaction Out of
5ofl0ml 5oflml 5of0.1ml
Each Each Each
4 2 1
4 3 0
4 3 1
4 4 0
5 0 0
5 0 1
5 0 2
5 1 0
5 1 1
5 1 2
5 2 0
5 2 1
5 2 2
5 3 0
5 3 1
5 3 2
5 3 3
5 4 0
5 4 1
5 4 2
5 4 3
5 4 4
5 5 0
5 5 1
5 5 2
5 5 3
5 5 4
5 5 5
MPN Index
per 100 ml
26
27
33
34
23
31
43
33
46
63
49
70
94
79
110
140
180
130
170
220
280
350
240
350
540
920
1,600
>2,400
showed growth and gas production into brilliant green
lactose bile broth, which is selective and differential
for coliforms. The tube is incubated for 48 ± 3 hours
at 35°C. Gas formation in the Durham tube is a
confirmed test for total coliforms.
In the completed test, a sample from the positive
green lactose bile broth is streaked onto Levine's
EMB or LES Endo agar and incubated for 18 to 24
hours at 35°C. On EMB agar, coliforms produce small
colonies with dark centers. On LES Endo agar,
coliforms produce reddish colonies. Samples are then
inoculated into brilliant green lactose bile broth and
onto a nutrient agar slant. These tubes are incubated
for 24 hours at 35°C. If gas is produced in the lactose
broth (see figure 20.2), and the isolated bacterium is a
gram-negative (based on a Gram stain) nonsporing
rod, the completed test is positive.
An estimate of the number of coliforms (most
probable number) can also be done in the presumptive
test. In this procedure, 15 lactose broth tubes are
inoculated with the water sample. Five tubes receive 10 ml
of water, 5 tubes receive 1 ml of water, and 5 tubes
receive 0.1 ml of water. A count of the number of tubes
showing gas production is then made, and the figure is
compared to a table (table 46.1) developed by the
American Public Health Association. The number is
the most probable number (MPN) of coliforms per 100
ml of the water sample. (It should be noted that the
MPN index usually comes from the presumptive test if
raw sewage is being tested and comes from confirmed
or completed tests for other types of samples.)
More recently, a simple and very sensitive
alternative to the classical MPN procedure has been
developed: the presence-absence (P-A) coliform test. The
P-A test is a modification of the MPN procedure in
which a large water sample (100 ml) is incubated in a
single culture bottle with triple-strength broth
containing lactose, sodium lauryl sulfate, and bromcresol
purple indicator. The P-A test is based on the
assumption that no coliforms should be present in 100 ml of
drinking water. Sodium lauryl sulfate inhibits many
bacteria, but not coliforms. A positive test results in
the production of acid from lactose fermentation
(bromcresol purple changes from purple to yellow)
and constitutes a positive presumptive test. As with
the MPN test, it requires confirmation. If there is no
color change, the results are negative for coliforms in
the 100-ml water sample.
Standard Coliform Most Probable Number (MPN) Test and Presence-Absence Coliform Test 287
Harley-Prescott:
Laboratory Exercises in
Microbiology, Fifth Edition
VIII. Environmental and
Food Microbiology
46. Stand. Coliform Most
Prob. Num. (MPN)Tests
Presence Absence
Coliform Test
©The McGraw-Hill
Companies. 2002
Procedure for the MPN Test
First Period
Presumptive Test
1. Mix the bottle of water to be tested 25 times.
Inoculate five of the double-strength lactose (or
lauryl tryptose) broth tubes with 10 ml of the
water sample; five single-strength tubes with 1 ml
of the water sample; and five single-strength
tubes with 0.1 ml of the water sample. Carefully
mix the contents of each tube without spilling any
of the broth by rolling the tubes between the
palms of your hands. Using the wax pencil, label
all tubes with your name, date, and the amount of
water added.
2. Incubate the three sets of tubes for 24 to 48 hours
at 35°C.
3. Observe after 24 ±2 and 48 ±3 hours. The
presence of gas in any tube after 24 hours is a
positive presumptive test. The formation of gas
during the next 24 hours is a doubtful test. The
absence of gas after 48 hours is a negative test.
4. Determine the number of coliforms per 100 ml of
water sample (see Principles section and use table
46.1). For example, if gas was present in all five
of the 10-ml tubes, only in one of the 1-ml series,
and none in the 0.1-ml series, your test results
would read 5-1-0. Table 46.1 indicates that the
MPN for this reading would be 33 coliforms per
100 ml of water sample.
Second Period
Confirmed Test
1. Record your results of the presumptive test in the
report for exercise 46.
2. Using an inoculating loop, from the tube that has
the highest dilution of water sample and shows
gas production transfer one loopful of culture to
the brilliant-green lactose bile broth tube.
Incubate for 48 ± 3 hours at 35°C. The formation
of gas at any time within 48 hours constitutes a
positive confirmed test.
Third Period
Completed Test
1. Record your results of the confirmed test in the
report for exercise 46.
2. From the positive brilliant green lactose bile broth
tube, streak a LES Endo or Levine's EMB plate.
3. Incubate the plate inverted for 24 hours at 35°C.
4. If coliforms are present, select a well-isolated
colony and inoculate a single-strength, brilliant
green lactose bile broth tube and streak a nutrient
agar slant.
5. Gram stain any bacteria found on the slant.
6. The formation of gas in the lactose broth and the
demonstration of gram-negative, nonsporing rods
in the agar culture is a satisfactorily completed
test revealing the presence of coliforms and
indicating that the water sample was polluted.
This is a positive completed test.
Procedure for the P-A Coliform Test
First Period
1. Inoculate 100 ml of the water sample into a 250-
ml P-A culture bottle containing 50 ml of triple-
strength P-A broth. Mix thoroughly by inverting
the bottle five times to achieve even distribution of
the triple-strength medium throughout the sample.
2. Incubate at 35°C.
Second Period
1. Inspect the P-A culture bottle after 24 and 48
hours for acid production. A distinct yellow color
forms in the medium when acid conditions exist
following lactose fermentation. If gas also is
being produced, gently shaking the bottle will
result in a foaming reaction.
2. With an inoculating loop, transfer any culture that
shows acid production or acid and gas (a positive
presumptive test) to a tube of brilliant green
lactose bile (BGLB) broth containing a Durham
tube for incubation at 35°C.
Third Period
1. Turbidity in the BGLB broth and gas in the Durham
tube within 48 hours confirm the presence of
coliform bacteria (e.g., Escherichia coli).
2. Record results as presence-absence test positive
or negative for coliforms in 100 ml of water
sample in the report for exercise 46.
HINTS AND PRECAUTIONS
(1) Do not confuse the appearance of an air bubble in a
clear Durham tube with actual gas production. If gas is
formed as a result of fermentation, the broth medium
will become cloudy. Active fermentation may be shown
by the continued appearance of small bubbles of gas
throughout the medium outside the inner vial when the
fermentation tube is gently shaken. (2) When taking
your water sample, the upper 38 cm of most waters
usually contains the greatest numbers of live bacteria.
(3) Use sterile containers to collect water samples.
288 Environmental and Food Microbiology
Harley-Prescott:
Laboratory Exercises in
Microbiology, Fifth Edition
VIII. Environmental and
Food Microbiology
46. Stand. Coliform Most
Prob. Num. (MPN)Tests
Presence Absence
Coliform Test
©The McGraw-Hill
Companies. 2002
Laboratory Report 46
Name:
Date: _
Lab Section:
Standard Coliform Most Probable Number
(MPN) Test and Presence-Absence Coliform Test
1. Results of presumptive test.
Number of Positive Tubes
5 tubes DSLB
10 ml H20 added
5 tubes SSLB
1.0 ml H20 added
5 tubes SSLB MPN
0.1 ml H20 added
24 horns 48 hours
24 horns 48 hours
24 horns 48 horns
2. Results of confirmed test.
Positive
Negative
24 Hours 48 Hours
24 Hours 48 Hours
EMB or LES Endo Agar Results
3. Results of completed test.
Lactose Fermentation Results
Morphology
Presence-Absence (P-A) Coliform Test
1. Results in P-A culture bottle.
2. Results from brilliant green lactose bile (BGLB) broth.
Acid: Gas:
Harley-Prescott: I VIM. Environmental and I 46. Stand. Collform Most I I ©The McGraw-Hill
Laboratory Exercises In Food Microbiology Prob. Num. (MPN) Test & Companies. 2002
Microbiology, Fifth Edition Presence Absence
Collform Test
Review Questions
1. Why are coliforms selected as the indicator of water potability?
2. Does a positive presumptive test indicate that water is potable?
3. Why is the MPN test qualitative rather than quantitative?
4. What is the function of the following in the MPN test?
a. lactose broth
b. Levine's EMB or LES Endo agar
c. nutrient agar slant
d. Gram stain
5. What does a metallic green sheen indicate on an EMB plate? Pink to dark red colonies with a metallic surface
sheen on LES Endo agar?
6. What bacterial diseases can be transmitted by polluted water?
7. What does a positive presence-absence test indicate? A negative presence-absence test?
290 Environmental and Food Microbiology
Harley-Prescott:
Laboratory Exercises in
Microbiology, Fifth Edition
VIII. Environmental and
Food Microbiology
47. Memb. Filter Tech. for
Coliforms & Fecal Strept.;
Test for Fecal Coliforms
©The McGraw-Hill
Companies. 2002
EXERCISE
47
Membrane Filter Technique for Conforms and Fecal
Streptococci; KONFIRM Test for Fecal Coliforms
SAFETY CONSIDERATIONS
In this experiment, students will be taking unknown
samples and growing them to large concentrations. Any
of these samples could contain human pathogens; thus,
extreme caution should be taken when working with and
disposing of the final products. Be careful with the Bun-
sen burner flame. The 95% ethyl alcohol is flammable—
do not use around an open flame. No mouth pipetting.
Dispose of all water samples properly. Do not look
directly at the ultraviolet light.
Materials per Group of Students
vacuum pump or water faucet aspirator
sterile membrane filter apparatus
9 sterile plastic 50-mm diameter petri plates
Millipore (No. PD10 047 00 or Gelman plates)
sterile membrane filter disks, Millipore
(No. HAWG 047 AO) or Gelman
sterile absorbent disk pads (packed with filters)
5-ml pipettes with pipettor
M-Endo Broth MF
M-FC broth
KF streptococcus agar
LES Endo agar
HACH m-ColiBlue 24 broth
waterproof tape
Whirlpak bag
44.5 ±2°C water bath
300-ml water sample that each group of students
brings in from different sources
95% ethyl alcohol for sterilizing forceps
sterile forceps
Bunsen burner
sterile distilled water
35°C incubator
wax pencil
KONFIRM test tablets (for 100-ml samples)
1 comparator, 2 mis of developer (KEY Scientific
Products)
1 sterile cotton swab
1 nonfluorescent container (150 ml)
long wavelength ultraviolet lamp (Wood's lamp),
KS 1699 or equal
Learning Objectives
Each student should be able to
1. Understand the principles of the membrane filter
technique
2. Determine the quality of a water sample using the
membrane filter technique and/or the KONFIRM
test
3. Quantitate the number of coliforms in a water
sample using the membrane filter technique
4. Perform a KONFIRM water test for fecal
coliforms
Suggested Reading in Textbook
1. Microbial growth in natural environments,
section 6.5.
2. Sanitary Analysis of Waters, section 29.5.
Medical Application
Historically, contaminated water has always been a serious
public health concern and remains so today. In the United
States, public drinking water is tested and treated daily to
maintain potability. This assures the safety of the public
water consumers. The membrane filter technique is one test
commonly used in combination with other tests to test for the
presence of fecal coliforms. Fecal contamination of drinking
water can lead to the bacterial transmission of Salmonella
typhi (typhoid fever), S. paratyphi (paratyphoid fever),
Shigella dysenteriae (bacillary dysentery), and Vibrio
cholerae (cholera) as well as viruses (poliomyelitis and
hepatitis A) and parasites {Cryptosporidium).
291
Harley-Prescott:
Laboratory Exercises in
Microbiology, Fifth Edition
VIII. Environmental and
Food Microbiology
47. Memb. Filter Tech. for
Coliforms & Fecal Strept;
Test for Fecal Coliforms
©The McGraw-Hill
Companies. 2002
Figure 47.1 The Membrane Filter Technique for the Direct Recovery of Coliform Bacteria from Water Samples.
Membrane filter
removed and
placed in plate
containing the
appropriate
medium
Principles for Membrane Filter Technique
The second standard test for measuring coliform
numbers (quantity) in water is the membrane filter
technique (figure 47.1).a This technique involves
filtering a known volume (100 ml for drinking water
samples) of water through a special sterile filter.
These filters are made of nitrocellulose acetate or
polycarbonate, are 150 Llm thick, and have 0.45 Llm
diameter pores. A grid pattern is typically printed on
these filter disks in order to facilitate colony
counting. When the water sample is filtered, bacteria
(larger than 0.45 Llm) in the sample are trapped on
the surface of the filter. The filter is then carefully
removed, placed in a sterile petri plate on a pad
saturated with a liquid or agar-based medium, and
incubated for 20 to 22 hours at 35°C. One assumes that
each bacterium trapped on the filter will then grow
into a separate colony. By counting the colonies one
can directly determine the number of bacteria in the
water sample that was filtered.
The broth medium usually employed in detecting
total coliforms is M-Endo broth MF. Other media,
such as M-FC broth and KF streptococcus agar, are
available for the detection of both fecal coliforms and
fecal streptococci, respectively. Fecal streptococci are
the Lancefield Group D streptococci that occur in the
feces of humans and other warm-blooded mammals.
Total coliform colonies will be pink to dark red in
a As applied to the membrane filter technique, the coliform group may
be defined as comprising all facultatively anaerobic, gram-negative,
nonspore-forming, rod-shaped bacteria that produce a red colony with a
metallic sheen within 24 hours at 35°C on an Endo-type medium
containing lactose.
color and will appear to have a golden green metallic
sheen or luster (figure 47.2a, d). Fecal coliform
colonies will appear blue (figure 47.2b), and fecal
streptococci (figure 47.2c) colonies will appear light
pink and flat, or dark red.
In determining total coliforms, the amount of
water filtered should be enough to result in the
growth of about 20 to 80 colonies and no more than
a total of 200 bacterial colonies of all types. About
50 to 200 ml of unpolluted water is often adequate
for such bacterial counts. Polluted water may contain
so many coliforms that it will be necessary to dilute
1 ml or less of sample with about 50 ml of sterile
water. This is done in order to provide enough
volume for uniform bacterial dispersion across the filter
surface, in addition to providing an appropriately
low coliform count.
Coliform density is expressed in terms of the
number of coliforms per 100 ml of water and is
calculated according to the following formula:
Coliform colonies/100 ml =
coliform colonies counted x 100
ml of water sample filtered
The number of coliforms should be given to two
significant figures per 100 ml.
The standard set for potable (drinking) water is a
limit of 1 coliform per 100 ml and an action limit of 4
coliforms per 100 ml. An action limit means that the
water company or other provider must take immediate
action to remedy the problem(s) that is/are responsible
for the presence of coliforms.
From positive fecal coliform and fecal
streptococci test results, one can be fairly certain that the
water pollution is from a fecal source. However, in
292 Environmental and Food Microbiology
Harley-Prescott:
Laboratory Exercises in
Microbiology, Fifth Edition
VIII. Environmental and
Food Microbiology
47. Memb. Filter Tech. for
Coliforms & Fecal Strept;
Test for Fecal Coliforms
©The McGraw-Hill
Companies. 2002
Figure 47.2 Membrane Filter Technique, (a) Total Colifomi test: Total colifomis on a membrane filter (M-Endo MF broth medium).
Notice the dark red to purple colonies with a metallic sheen, (b) Fecal Colifomi Test: Fecal colifomis on a membrane filter (M-FC broth
medium). Notice the blue-colored colonies, (c) Fecal Streptococcus Test: Fecal streptococci on KF streptococcus agar. Notice the light pink
colonies, (d) HACH m-ColiBlue 24 Broth: The sum of red and blue colonies indicates total colifomis, while the blue specifies E. coll.
(a)
(b)
(c)
(d)
order to determine whether the fecal source is from
human or animal feces, Public Health authorities rely
on a ratio expressed as
t^i /to n ^ Number of fecal coliforms
FC/FS Ratio = ——- ——- r
Number of fecal streptococci
Those waters showing a higher fecal coliform
count than fecal strep count are likely to contain
wastes from humans. In most cases, the FC/FS ratio
will be greater than 2. When the ratio is equal to or
greater than 4, one can be assured that the pollution is
from human fecal material.
When water shows a higher fecal strep count than
fecal coliform count, it is most likely that the
pollution is from animal origin. If ratios fall in between
two and four, estimates must be made as to how close
the ratio is to either the human or animal values. The
following table shows some typical FC/FS ratios:
Animal
Human
Cow
Sheep
Pig
Turkey
Fecal
colifonn
(millions)
13.00
0.23
16.00
3.30
0.29
Fecal
streptococci
(millions)
3.00
1.30
38.00
84.00
2.80
Ratio
FC/FS
4.40
0.20
0.40
0.04
0.10
Principles for KONFIRM Test
for Fecal Coliforms
KONFIRM is an ONPG-MUG test that also can be
used to detect and confirm the presence of total
coliforms or E. coli in a 100-ml water sample (figure
47.3). The active ingredients in KONFIRM are
incorporated into a tablet containing growth factors and
indicators that will reveal and confirm the presence of
fecal contamination. Nonconform bacteria are
inhibited and do not interfere with the test.
Figure 47.3 KONFIRM Water Test. (KEY Scientific
Products; 149C Texas Avenue, Round Rock, Texas 78664). This
slide shows all the materials needed to perform the water test, with
the exception of the ultraviolet lamp.
ONPG and MUG are enzyme substrates bound to
specific indicators. When the enzyme galactosidase
hydrolyses the colorless ONPG (0-nitrophenyl-[J-
D-galactopyranoside), it produces galactopyranose and
O-nitrophenyl, which is yellow (figure 47.4a).
Tryptophan is an amino acid that is degraded to
indole by some coliforms. The presence of indole is
demonstrated by the addition of a developer.
Development of a green color is a positive test for indole
(figure 47.4a).
The enzyme glucuronidase cleaves the MUG
compound (4-methylumbelliferyl-(J-D-glucuronide)
into its components; the product 4-methylumbelhfer-
one is fluorescent (figure Al Ab).
Therefore, if coliforms are present in the water
sample, the medium turns yellow within 24 hours at 35°C
due to the cleavage of ONPG. To check for E. coli, the
Membrane Filter Technique for Coliforms and Fecal Streptococci; KONFIRM Test for Fecal Coliforms 293
Harley-Prescott:
Laboratory Exercises in
Microbiology, Fifth Edition
VIII. Environmental and
Food Microbiology
47. Memb. Filter Tech. for
Coliforms & Fecal Strept.;
Test for Fecal Coliforms
©The McGraw-Hill
Companies. 2002
Figure 47.4 Use of the KONFIRM Comparator, (a) The
comparator shows the approximate color of the positive yellow
ONPG, green indole, and white MUG. ONPG and MUG
comparisons are more accurate by holding the comparator behind
the bottle, half above and half below the water line and observing
through the bottle. To observe the desired color of a positive
ONPG test, the YELLOW dot is used. Water that is yellow or
brown at the onset should develop to this compared color or
darker, (b) To observe fluorescence, hold the Wood's lamp over
the WHITE dot. A positive MUG (left) will be only slightly
duller than this color. A positive indole will progress to the color
of the GREEN dot in 1 to 5 minutes.
ONPG
COMPARATOR
MUG
IND
(a)
(b)
medium is observed under long-wavelength UV light
for fluorescence. When E. coli is present, the MUG is
hydrolyzed to yield a fluorescent product. After
developer is added to the water, the development of a green
color is positive for indole. A positive indole along with
a positive ONPG and MUG is confirmatory for E. coli;
only E. coli is positive for all three substrates.
If the above tests are negative for fecal coliforms,
the water is considered acceptable for human
consumption; if it is positive for coliforms or E. coli, it is
not acceptable for human consumption.
Procedure
General Procedure for the Membrane Filter
Apparatus (figure 47.1)
1. Using alcohol-sterilized forceps, place a sterile
absorbent pad in a sterile petri plate.
2. Transfer 2.0 ml of sterile M-Endo broth to the
absorbent pad using a 5-ml pipette. Place the lid
on the dish.
3. Aseptically place a sterile membrane filter holder
on a filter flask.
4. Using sterile forceps, place a sterile membrane
filter on the filter holder with its grid side up.
5. Place a sterile filter funnel on top of the
membrane filter disk and secure it to the holder.
6. Attach the assembled membrane filter outfit to a
vacuum source.
7. Pour the premeasured water sample into the
funnel. If the sample is less than 20 ml, add about
25 to 50 ml of sterile water to the funnel first. Mix
after adding water sample. Apply the vacuum to
filter the sample through the membrane.
8. Rinse the walls of the funnel with 20 ml of sterile
distilled water and pull the rinse water through the
filter.
9. Remove the funnel and use sterile forceps to
carefully transfer the filter to the absorbent pad
soaked with M-Endo media or onto a plate of
LES Endo agar. Make sure that the grid side is up.
The membrane should be rolled onto the agar or
filter pad so that no air pockets form between the
membrane and medium. Incubate the plate at
35°C. Don't invert.
10. After 24 hours, remove the filter from the dish
and dry it on a piece of absorbent paper at room
temperature for Vi to 1 hour.
11. Count the colonies and record your results in the
report for exercise 47.
Total Coliform Test
1. Using the sterile forceps, place a sterile absorbent
pad into each of three petri plates. With the wax
pencil, label these plates with your name, date,
and TCT (total coliform test).
2. Add 2.0 ml of M-Endo broth MF (or m-ColiBlue
24 broth) to the surface of each pad.
3. Filter 1, 5, and 15 ml of the water sample, and add
the membranes respectively to each plate.
4. Incubate the plates at 35°C for 22 to 24 hours.
5. Count only those colonies that are pink to dark
red with a metallic sheen (figure 47.2a). Use a
plate containing 20 to 80 colonies and no more
than 200 of all types of colonies. If the
m-ColiBlue 24 broth is used, blue to purple
colonies indicate E. coli. The total coliform
count is given by the sum of red and blue
colonies (figure 47.2d).
6. Record your results in the report for
exercise 47.
294 Environmental and Food Microbiology
Harley-Prescott: I VIM. Environmental and I 47. Memb. Filter Tech. for I I ©The McGraw-Hill
Laboratory Exercises in Food Microbiology Coliforms & Fecal Strept; Companies. 2002
Microbiology, Fifth Edition Test for Fecal Coliforms
Fecal ColiformTest
1. Using the sterile forceps, aseptically insert sterile
pads into three snap-lid petri plates. Using the
wax pencil, label these plates with your name,
date, and FCT (fecal coliform test).
2. Add 2.0 ml of M-FC broth to the surface of each
pad.
3. Filter 1, 5, and 15 ml of the water sample, and add
the membranes respectively to each plate.
4. Snap the lids of the petri plates, seal them with
waterproof tape, and place them in a Whirlpak bag.
5. Incubate the plates in a 44.5° ±0.2°C water bath
for 22 to 26 hours. Make sure the bags are
beneath the surface.
6. Count only blue-colored colonies on a plate
containing 20 to 60 fecal coliform colonies.
7. Record your results in the report for exercise 47.
Fecal Streptococcus Test
1. Aseptically insert a sterile absorbent pad into each
of three petri plates. Using the wax pencil, label
these plates with your name, date, and FST (fecal
streptococcus test).
2. Add 2 ml of KF streptococcus agar; allow the
agar to cool.
3. Filter water sample volumes of 1, 5, and 15 ml as
per previous test. Place the membranes in the
labeled petri plates.
4. Incubate these plates for 48 hours at 35°C.
5. Count only those colonies that are light pink and
flat, or smooth dark red ones with or without pink
margins (figure 47.2c). Use the plate containing
20 to 100 colonies.
6. Record the number of colonies in the report for
exercise 47.
General Procedure for the KONFIRM Water
Test for Fecal Coliforms
First Period
1. Using sterile forceps, remove one KONFIRM
tablet and place it into a sterile, nonfluorescent
container (2T50 ml).
2. Add 100 ml of water sample.
3. Cap the bottle and shake briefly. Small bubbles
should appear on the surface of the tablet as it is
activated. (Normally, the tablet will not dissolve
completely; residue on the bottom does not affect
the test.) NOTE: The water should be colorless
after the tablet dissolves. The appearance of a
yellow or brown color as the tablet dissolves is an
indication of a high chlorine concentration in the
sample and negates the test. Water samples that are
already brown or yellow will show a deeper color
of brown or yellow if there is too much chlorine.
4. Incubate for 24 hours at 35°C.
Second Period
1. After 24 hours of incubation, look for a yellow
color (figure 47.4). A lack of color with a
dissolved tablet or around the undissolved tablet is
a negative test. Any yellow color development is a
positive test for total coliforms (a positive ONPG).
2. If the water sample is yellow, test for fluorescence
by holding it 2 to 4 inches from a UV lamp in a
darkened room. Look for a bright blue
fluorescence, especially on the surface of the
water. Blue fluorescence along with a yellow
color is presumptive for E. coli.
3. If the ONPG is positive, do the indole test. Dip a
sterile swab into the test container, remove, and
add 1 to 2 drops of developer to the tip of the
swab. (Alternately shake the bottle, remove the
cap, and add the developer reagent to the
substrate that clings to the inside of the lid.)
Development of a green color is positive. A
positive indole along with a positive ONPG and
MUG is confirmatory for E. coli; only E. coli is
positive for all three substrates.
A positive ONPG, negative MUG, and positive
indole should be further evaluated for the possible
presence of E. coli. A sample that is indole negative
and MUG negative is unlikely to contain E. coli.
HINTS AND PRECAUTIONS
(1) The broth media should be freshly prepared on the
day of the exercise. (2) Water should not be used that is
high in turbidity or contains a lot of algae. Coliform
density is always expressed in terms of a 100-ml water
sample. If the water sample is diluted, the number of
colonies must still be calculated for a 100-ml sample.
Similarly, if less than 100 ml of water is filtered, the
coliform density must still be expressed in terms of 100 ml.
(3) If the water sample will not be tested immediately,
store it in the refrigerator to prevent extra microbial
growth. (4) When using the membrane filter technique,
the 19th edition of Standard Methods for the
Examination of Water and Wastewater suggests that the
following sample volumes be used for total coliform tests:
Drinking water 100 ml
Swimming pools 100 ml
Wells 10-100 ml
Lakes 10-100 ml
Bathing beaches 0.1-10 ml
River water 0.001-1.0 ml
Raw sewage 0.0001-0.1 ml
Membrane Filter Technique for Coliforms and Fecal Streptococci; KONFIRM Test for Fecal Coliforms 295
Harley-Prescott:
Laboratory Exercises in
Microbiology, Fifth Edition
VIII. Environmental and
Food Microbiology
47. Memb. Filter Tech. for
Coliforms & Fecal Strept.;
Test for Fecal Coliforms
©The McGraw-Hill
Companies. 2002
Laboratory Report 4 /
Name:
Date: _
Lab Section:
Membrane Filter Technique for Coliforms and Fecal Streptococci;
KONFIRM Test for Fecal Coliforms
1. What was the total coliform count of the water sample? Show your calculations in the space below.
2. What was the fecal coliform count of the water sample? Show your calculations in the space below.
3. What was the fecal streptococci count of the water sample? Show your calculations in the space below.
4. What are some other applications of the membrane filter technique?
5. Results for the KONFIRM water test.
a. ONPG
b. MUG
c. Indole
Harley-Prescott: I VIM. Environmental and I 47. Memb. Filter Tech. for I I ©The McGraw-Hill
Laboratory Exercises in Food Microbiology Coliforms & Fecal Strept; Companies. 2002
Microbiology, Fifth Edition Test for Fecal Coliforms
Review Questions
1. What are some advantages of the membrane filter technique in the analysis of a water sample? Some
disadvantages?
2. What color are coliform colonies?
3. Would you consider your water sample safe to drink? Why or why not?
4. What problems would be encountered if you used the membrane filter technique on a water sample with a lot
of suspended solids in it?
5. What might your results be if a 0.10 |xm filter is used to filter the water sample?
6. Other than for water examination, what are some additional applications of the membrane filter technique in
microbiology?
7. What is the bacteriological standard for potable water?
298 Environmental and Food Microbiology
Harley-Prescott:
Laboratory Exercises in
Microbiology, Fifth Edition
VIII. Environmental and
Food Microbiology
48. Isol. of Escherichia coli
Bact. from Sewage &
Determ. Bacteriophage
Titers
©The McGraw-Hill
Companies. 2002
EXERCISE
48
Isolation of Escherichia coli Bacteriophages from Sewage
and Determining Bacteriophage Titers
SAFETY CONSIDERATIONS
In this experiment, students will be taking unknown
samples and growing them to large concentrations. Any
of these samples could contain human pathogens; thus,
extreme caution should be taken when working with and
disposing of the final product. No mouth pipetting. Be
careful with the Bunsen burner flame. Handle the raw
sewage with caution. Chloroform is flammable—be
careful not to use around open flames. It should be used
in a fume hood. Keep all culture tubes upright in a test-
tube rack or in a can.
Materials per Group of Students
flask of raw sewage
centrifuge
0.22 and 0.45 Llm membrane filters
filter apparatus
aluminum foil
500-ml flask
graduated cylinder
1 tube T-broth
concentrated T-broth (2x)
Escherichia coli strain B (ATCC 11229)
24-hour tryptic soy broth culture
1-ml cotton-plugged serological pipettes with
pipettors
cotton-plugged Pasteur pipettes
35°C incubator
Bunsen burner
1 ml chloroform
5 sterile screw-cap tubes
2 9.9-ml sterile saline (0.85% NaCl) blanks
4 4.5-ml sterile saline (0.85% NaCl) blanks
5 petri plates
5 tubes with 12 ml sterile bottom agar (nutrient
agar pours)
5 tubes containing 4.5 ml top agar (nutrient broth
plus 0.75% agar)
48° to 50°C water bam
thermometer
wax pencil
Learning Objectives
Each student should be able to
1. Describe a bacteriophage
2. Develop techniques for cultivating bacteriophages
3. Determine a bacteriophage titer
Suggested Reading in Textbook
1. Cultivation of Viruses, section 16.3.
2. Reproduction of Double-Stranded DNA Phages:
The Lytic Cycle, section 17.2.
Pronunciation Guide
Escherichia coli (esh-er-I-ke-a KOH-lee)
Why Is the Above Bacterium and
Sewage Used in This Exercise?
The major objectives of this exercise are to have the student
isolate Escherichia coli bacteriophages from sewage and
determine bacteriophage titers. Raw sewage is a good
source for the bacteriophages that prey upon the E. coli.
Principles
Bacteriophages can be isolated from many different
environments. Since they grow and reproduce within
bacteria, one would expect to find them wherever a
large population of bacteria is present. For example,
large numbers of E. coli grow in the intestinal tract of
warm-blooded animals. Therefore, animal manure and
untreated sewage are excellent sources of coliphages.
Because the concentration of bacteriophages specific
for a particular host may be relatively low, the first step
in the isolation procedure is an enrichment step. When
the sample is incubated with a population of the proper
host, phages specific for mat bacterium will greatly
multiply in number. The phages men are much easier to
isolate since they are present in greater numbers.
Membrane filtration serves to remove cell debris and
most bacteria. Any bacteria that may remain in the
299
Harley-Prescott:
Laboratory Exercises in
Microbiology, Fifth Edition
VIII. Environmental and
Food Microbiology
48. Isol. of Escherichia coli
Bact. from Sewage &
Determ. Bacteriophage
Titers
©The McGraw-Hill
Companies. 2002
Figure 48.1 Plaques of Viruses. Plaques of a bacteriophage on
a lawn of Escherichia coli.
enriched culture can be killed and lysed by treatment
with chloroform. The filtrate containing bacterial viruses
may now be stored in the refrigerator for months.
Individual viruses in the filtrate can be isolated by
mixing a small amount of filtrate with a young culture
of the host bacterium and men spreading the mixture out
on the surface of a petri plate containing nutrient agar.
This is called the double-layered culture technique. In
practice, the viruses and bacteria are mixed with a dilute
agar medium (the top agar) and men poured in a thin
layer on the surface of harder bottom, or base, agar.
When the top agar jells, the viruses and bacteria are
immobilized. Whenever a virus particle is present in the
agar, it will infect an adjacent bacterial cell, reproduce,
and lyse its host cell. The virus particle will men give
rise to millions of virions, and a clear area of lysed
bacteria will develop in the bacterial lawn. This clear area is
called a plaque (figure 48.1). Ideally, each virus will
produce one plaque containing enormous numbers of its
progeny. Samples of each plaque can men be removed
and used to culture large quantities of a single type of
virus for further study. Because each plaque arises from
a single virus particle, a count of the number of plaques
will enable one to calculate the concentration of viruses
in the original undiluted sample.
Procedure
First Period
1. Obtain about 25 ml of raw sewage. Centrifuge it
for 10 minutes at just below top speed in a table
model clinical centrifuge (figure 48.2a).
2. Pass the supernatant through a 0.22 Llm
membrane filter to remove bacterial contaminants
(figure 48.26).
3. Add 20 ml of the filtered supernatant to an
aluminum-foil-capped, 500-ml flask containing
20 ml of sterile, twofold concentrated T-broth (the
final broth concentration will be normal).
4. Inoculate the mixture with 1 ml of an overnight
(109 cells per milliliter) E. coli tryptic soy broth
culture (figure 48.2c). Incubate for 24 hours at
35°C (figure 48.2d).
5. Melt five tubes with 12 ml sterile bottom agar,
cool them in a water bath to 48° to 50°C, and
pour into five sterile petri plates. This forms the
base agar (figure 48.2/). After the plates have
hardened, dry them overnight in a 35°C
incubator.
6. Inoculate a T-broth culture tube with 1 ml of
E. coli and incubate it at 35°C overnight or for
24 hours (figure 48.2/). This will serve as a stock
culture.
Second Period
1. Filter the stock culture through another 0.45 Llm
membrane filter (figure 48.2e). Transfer 8.0-ml
portions of the filtrate into sterile, screw-cap tubes
(figure 48.26).
2. Add 0.2 ml of chloroform to each screw-cap tube
with a sterile pipette (figure 48.2g). Mix
thoroughly.
3. The virus stock can be used immediately or kept
in the refrigerator until it can be analyzed.
4. Prepare a serial dilution of the enriched
bacteriophage sample as shown in figure 48.2/.
Withdraw a sample after lowering the pipette tip
into the medium as short a distance as possible so
as not to transfer extra culture. Transfer an aliquot
to the next tube and mix by drawing the culture in
and out of the pipette several times. Discard the
pipette. With a new pipette, transfer an aliquot to
the next tube in the series. Use a new, sterile,
cotton-plugged pipette for each transfer.
5. After all dilutions have been prepared, add 2
drops of the overnight E. coli culture to the
melted, cooled 10^* to 10~8 dilution tubes of top
agar (figure 48.2/). Use a sterile, cotton-plugged
Pasteur pipette for mis. Keep the tubes in the 48°
to 50°C water bath as much of the time as
possible during this process.
6. As soon as possible after the top agar tubes have
been inoculated, each dilution should be plated out
in the following way. Use a new, sterile, 1-ml pipette
and transfer 0.5 ml of lO4 dilution to a 45°C soft
300 Environmental and Food Microbiology
Harley-Prescott: VIM. Environmental and 48. Isol. of Escherichia coll
Laboratory Exercises In Food Microbiology Bact. from Sewage &
Microbiology, Fifth Edition Determ. Bacteriophage
Titers
©The McGraw-Hill
Companies. 2002
Figure 48.2 The Isolation of E. coli Bacteriophages from Sewage.
agar top tube. Mix quickly and thoroughly, and pour
the top agar aseptically into a petri plate containing
sterile bottom agar (first period, step 5). Immediately
spread the top agar over the surface of the base
nutrient agar by tilting the plate. Set the plate aside
to harden. Repeat this procedure with each of the
other four dilutions. Use the wax pencil to label the
plates with your name, date, and the dilution factor.
Incubate the plates in an inverted position at 35°C
for 8 to 24 hours. The plates may be stored in the
refrigerator after incubation and analyzed at a
later time.
Isolation of Escherichia coli Bacteriophages from Sewage and Determining Bacteriophage Titers 301
Harley-Prescott:
Laboratory Exercises in
Microbiology, Fifth Edition
VIII. Environmental and
Food Microbiology
48. Isol. of Escherichia coli
Bact. from Sewage &
Determ. Bacteriophage
Titers
©The McGraw-Hill
Companies. 2002
Third Period
1. Examine the plates carefully and, using a Quebec
colony counter, count the number of plaques on each
plate. Complete Part 1 of the report for exercise 48.
Also, carefully note the plaque morphology.
2. Use the plate(s) with the most favorable number of
plaques (25 to 250) to determine the number of
coliphages in 1 ml of the original enriched sample.
This is done by dividing the plaque number by the
dilution factor as shown by the following example:
nl t 250/ml
Plaque count = rr-z—77-z
H 0.5 x 10~6
= 500 x 106
= 5 x 10⁸.
HINTS AND PRECAUTIONS
(1) Rapid centrifugation is necessary to separate the
phages from the E. coli. If centrifugation is incomplete,
the membrane filter will clog and filtration will
progress slowly. (2) Plaque size should be checked
every 2 hours for changes, beginning within the first 12
hours of incubation, as some coliphages can form large
plaques quickly enough to clear the plate within 24
hours. (3) If necessary, review the material on dilutions
in Appendix G.
3. Complete Part 2 of the report for exercise 48.
302 Environmental and Food Microbiology
Harley-Prescott: I VIM. Environmental and I 48. Isol. of Escherichia coll I I ©The McGraw-Hill
Laboratory Exercises In Food Microbiology Bact. from Sewage & Companies. 2002
Microbiology, Fifth Edition Determ. Bacteriophage
Titers
Laboratory Report 4H
Name:
Date: _
Lab Section:
Isolation of Escherichia coli Bacteriophages from Sewage
and Determining Bacteriophage Titers
1. Data: PFU Dilution
PFU Dilution
2. a. How many cohphages are present in a milliliter of the enriched sewage isolate?
Show your calculations in the space provided.
b. Are there obvious variations in plaque size and morphology? Explain your answer.
c. What does (b) indicate about the nature of the coliphage sample that you have isolated?
Harley-Prescott: I VIM. Environmental and I 48. Isol. of Escherichia coll I I ©The McGraw-Hill
Laboratory Exercises In Food Microbiology Bact. from Sewage & Companies. 2002
Microbiology, Fifth Edition Determ. Bacteriophage
Titers
Review Questions
1. What is meant by a plaque-forming unit?
2. Determine the number of plaque-forming units per ml in a sample that has been diluted 10 8 and has given
200 plaque-forming units when 0.5 ml is plated.
3. What are coliphages?
4. Why is enrichment of the sewage necessary for the isolation of coliphages?
5. Describe the similarities between the plaque technique in this exercise and the standard plate count for
bacteria.
6. What effect does chloroform have on viruses? On bacteria?
7. Why are two different size filters used in this experiment?
304 Environmental and Food Microbiology
Harley-Prescott:
Laboratory Exercises in
Microbiology, Fifth Edition
VIII. Environmental and
Food Microbiology
49. Enumeration of Soil
Microorganisms
©The McGraw-Hill
Companies. 2002
EXERCISE
49
Enumeration of Soil Microorganisms
SAFETY CONSIDERATIONS
Be careful with the Bunsen burner flame. No mouth
pipetting.
Materials per Group of Students
1 g of rich garden soil in 99 ml sterile water
Students may want to bring in their own soil
and weigh out 1 g on a balance
1 50-ml flask of melted (50°C) tryptic soy agar
1 50-ml flask of melted glycerol yeast extract
agar that contains cyclohexamide (actidione
0.05 g/50 ml) to inhibit fungal growth.
Actidione® Agar (Cycloheximide Agar) can be
purchased from Oxoid Unipath, 800 Proctor
Ave., Ogdensburg, NY 13669, or by calling
1-800-567-8378.
1 50-ml flask of melted Sabouraud dextrose agar
2 99-ml bottles of sterile water
48° to 50°C water bath
wax pencil
Bunsen burner
1-ml pipettes with pipettor
12 petri plates
Difco Manual or BBL Manual
Learning Objectives
Each student should be able to
1. Become acquainted with some of the
microorganisms present in garden soil
2. Determine the number of bacteria, actinomycetes,
and fungi in the garden soil using the plate count
method
Suggested Reading in Textbook
1. Microorganisms and the Formation of Different
Soils, section 30.3; see also table 30.2.
Pronunciation Guide
Aspergillus (as-per-JIL-us)
Mucor (MU-kor)
Penicillium (pen-a-SIL-ee-um)
Rhizopus (rye-ZOH-pus)
Principles
Actinomycetes (including actinoplanetes, nocardio-
forms, and streptomycetes), other bacteria, and
filamentous fungi (Rhizopus, Mucor, Penicillium, and
Aspergillus) are all important members of the soil
microbial community. Protozoa, algae, cyanobacte-
ria, nematodes, insects and other invertebrates, and
viruses are also important members but will not be
studied in this exercise. Each gram of rich garden
soil may contain millions of these micro- and
macroorganisms.
Since soils vary greatly with respect to their
physical features (e.g., pH, general type, temperature,
and other related factors), the microorganisms
present will also vary. For example, acid soils will have a
higher number of fungi compared to alkaline soils,
and rich garden soil will contain more actinomycetes
than either the other bacteria or fungi. Not
surprisingly, no single technique is available to count the
microbial diversity found in average garden soil.
Thus, in this exercise, each group of students will try
to determine only the relative number of fungi,
actinomycetes, and other bacteria in a sample of garden
soil using the serial dilution agar plating procedure
covered in exercise 17.
To support the three different groups of
microorganisms, you will use three types of media:
(1) Sabouraud dextrose agar for the isolation of fungi,
(2) glycerol yeast agar for the isolation of
actinomycetes, and (3) tryptic soy agar for the isolation of
other bacteria.
305
Harley-Prescott: I VIM. Environmental and I 49. Enumeration of Soil
Laboratory Exercises in Food Microbiology Microorganisms
Microbiology, Fifth Edition
©The McGraw-Hill
Companies. 2002
Figure 49.1 Plate Count Procedure for Enumerating Soil Microorganisms.
1ml 1 ml
1 ml
Actinomycetes
Fungi
Glycerol
yeast agar
plates
Sabouraud
dextrose
agar plates
1.0 ml
0.1 ml .
Bacteria
o o o o
Tryptic soy
agar plates
Procedure
1. The procedure for enumeration of soil
microorganisms is illustrated in figure 49.1.
2. Place 1 g of garden soil in a 99-ml sterile water
blank. Mix the soil and water thoroughly by
shaking the water-soil mixture vigorously for 3
minutes, keeping your elbow on the lab table.
Transfer 1 ml of this mixture to the second water
blank and mix as above. Transfer 1 ml of this
mixture to the third water blank and mix as
above.
3. Using a wax pencil, label three sets of four petri
plates each as follows: actinomycetes (10~3, 10-4,
10-5, and 10-6), fungi (102, 103, 10"4, and 105),
and other bacteria (10"4 105, 106, and 107). Be
sure to use the correct medium for each type of
microorganism.
4. Using a 1-ml pipette and aseptic technique,
distribute the proper amount of each soil dilution
to the respective petri plates as indicated in
figure 49.1.
5. Remove the melted glycerol yeast agar from the
water bath and pour 15 ml into each of the
actinomycetes petri plates. Mix on a flat surface,
using a circular motion, and allow to harden. Do
the same for the Sabouraud dextrose and tryptic
soy agars.
6. Invert the petri plates and incubate for 3 to 7 days
at room temperature. Observe daily for the
appearance of colonies. Count the plates with
fewer than 250 colonies but more than 25.
Designate plates with over 250 colonies as too
numerous to count (TNTC) and those with less
than 25 colonies as too few to count (TFTC).
Record your data in the report for exercise 49.
306 Environmental and Food Microbiology
Harley-Prescott:
Laboratory Exercises in
Microbiology, Fifth Edition
VIII. Environmental and
Food Microbiology
49. Enumeration of Soil
Microorganisms
©The McGraw-Hill
Companies. 2002
7. Determine the number of respective
microorganisms per milliliter of original culture
(gram of soil) as follows:
, „. . „ ., count/plate
Microorganisms per gram of soil = ——:— 7
dilution used
For example, if 200 colonies were present on the
10~7 plate, the calculation would be
Microorganisms per gram of soil
200
10-7
HINTS AND PRECAUTIONS
Optimal results in this exercise depend on thoroughly
mixed soil samples containing evenly distributed
microorganisms.
2.0 x 10⁹ colonies/gram
Enumeration of Soil Microorganisms 307
Harley-Prescott: I VIM. Environmental and I 49. Enumeration of Soil I I ©The McGraw-Hill
Laboratory Exercises In Food Microbiology Microorganisms Companies. 2002
Microbiology, Fifth Edition
Laboratory Report ^-y
Name:
Date: _
Lab Section:
Enumeration of Soil Microorganisms
1. Number of microorganisms per gram of soil.
Dilution Number of Microorganisms/Gram
Microorganism Factor Colonies of Garden Soil
Actinomycetes 10~3
1(H
10-5
Kh6
Other bacteria 10^
10-5
Kh6
10-7
Fungi 10~2
1CH
1(H
10-5
2. Some normal population sizes for soil microorganisms are as follows:
a. Actinomycetes = 7 x 10⁶ per gram
b. Other bacteria = 53 x 106 per gram
c. Fungi = 1 x 10⁵ per gram
309
Harley-Prescott: VIM. Environmental and 49. Enumeration of Soil
Laboratory Exercises In Food Microbiology Microorganisms
Microbiology, Fifth Edition
Review Questions
1. Why were three different media used in this experiment?
2. Would the same results be obtained in this experiment if the soil sample was collected during a different time
of the year? Explain your answer.
3. What general group of soil bacteria cannot be determined using the media and procedures in this exercise?
4. What generalizations can you make from this exercise with respect to your garden soil?
5. What are some physical features of soil that influence microbial populations?
6. Using a Difco or BBL Manual, what is the composition of glycerol yeast extract agar?
7. Why are different dilutions used for bacteria, fungi, and actinomycetes?
©The McGraw-Hill
Companies. 2002
310 Environmental and Food Microbiology
Harley-Prescott:
Laboratory Exercises in
Microbiology, Fifth Edition
VIII. Environmental and
Food Microbiology
50. Bacterial Count of i
Food Product
©The McGraw-Hill
Companies. 2002
EXERCISE
50
Bacterial Count of a Food Product
SAFETY CONSIDERATIONS
In this experiment, students will be taking unknown
samples and growing them to large concentrations. Any
of these samples could contain human pathogens; thus,
extreme caution should be taken when working with and
disposing of the final product. No mouth pipetting.
Always handle raw meat with caution.
Materials per Group of Students
20 g of hamburger or chicken
180 ml of sterile distilled water
weighing paper
scale or balance
Bunsen burner
colony counter
plate count agar (Standards Methods Agar)
2 99-ml sterile saline dilution blanks
sterile 1-ml pipettes with pipettor
5 sterile petri plates
35°C incubator
wax pencil
boiling water bath
48° to 50°C water bath for cooling tubes
Learning Objectives
Each student should be able to
1. Explain why the standard plate count is used in
food quality control
2. Determine the number of bacteria in a food
sample by performing a standard plate count
Suggested Reading in Textbook
1. Food Spoilage Processes, section 41.2.
Principles
The sanitary control of food quality is primarily
concerned with testing food products for the presence of
specific microorganisms. Food products are the
primary vehicle responsible for the transmission of
microbial diseases of the gastrointestinal system. For
this reason, food products are routinely examined for
the presence of bacteria.
The heterotrophic plate count can be used to
determine the number of viable bacteria in a food
sample. The larger the count, the greater the
likelihood that specific pathogens capable of causing
disease will be present and also that the food will spoil.
Normally, raw hamburger should not contain over
106 bacteria per gram.
One of the limitations of the heterotrophic plate
count is that only bacteria capable of growing in the
culture medium under the environmental conditions
provided will be counted. As a result, a medium that
supports the growth of most heterotrophic (requiring
organic carbon) bacteria is commonly used.
Figure 50.1 illustrates the procedure for
performing a heterotrophic plate count on a food product.
Procedure
First Period
1. Weigh out 20 g of raw hamburger or chicken.
2. Blend the 20 g of the meat in a blender with 180
ml of sterile distilled water for 5 minutes. This
gives a 1/10 dilution.
3. Make dilutions from 10"2 to 10"6 as indicated in
figure 50.1.
4. Using the wax pencil, label the petri plates with
your name, date, and dilution.
5. Using aseptic technique, pipette aliquots from the
dilution blanks to the petri plates.
311
Harley-Prescott:
Laboratory Exercises in
Microbiology, Fifth Edition
VIII. Environmental and
Food Microbiology
50. Bacterial Count of i
Food Product
©The McGraw-Hill
Companies. 2002
Figure 50.1 Preparation of a Food Sample for Analysis by the Standard Plate Count Method.
£
Balance
Weigh out
20gof
meat
0.1 ml
0.1 ml
*Discard pipette
6. Melt the plate count agar (PCA) pours in a
water bath and cool to about 48° to 50°C. Add
the cooled PCA agar to the plates. Gently swirl
on a flat surface in a figure-eight motion and
allow to harden.
7. Incubate the plates in an inverted position for 24
to 48 hours at 35°C.
Second Period
1. Arrange the plates in order of lowest to highest
dilution.
2. Count the number of colonies on the plates that
have between 25 to 250 colonies. Designate plates
with fewer than 25 colonies as too few to count
(TFTC) and plates with more than 250 colonies as
too numerous to count (TNTC).
3. Calculate the average number of bacteria per
gram of hamburger as follows:
Number bacteria/gram
1
= number of colonies x
dilution factor
1
weight of sample
For example, if 200 colonies were counted from a
10"3 dilution of a 20 gram sample:
Number bacteria/gram = 200 x x
10"3 20g
= 10,000 per gram
4. Record your results in the report for exercise 50.
312 Environmental and Food Microbiology
Harley-Prescott: I VIM. Environmental and I 50. Bacterial Count of a I I ©The McGraw-Hill
Laboratory Exercises In Food Microbiology Food Product Companies. 2002
Microbiology, Fifth Edition
Laboratory Report j(j
Name:
Date: _
Lab Section:
Bacterial Count of a Food Product
1. Record in the table the number of colonies per plate.
Dilution Number of Colonies/Plate
1CH
io-5
Kh6
2. Number of bacteria per gram of hamburger
In the space provided, do your calculations from the plate that had between 25 to 250 colonies.
313
Harley-Prescott: VIM. Environmental and 50. Bacterial Count of a
Laboratory Exercises In Food Microbiology Food Product
Microbiology, Fifth Edition
Review Questions
1. Why is a standard plate count performed on food products?
2. Does the number of bacteria recorded by the standard plate count method accurately reflect the total bacterial
count from that sample? Explain.
3. Why are 25 to 250 colonies used for calculations?
4. Why is a 20 g sample of hamburger blended with 180 ml of diluent to yield a 1/10 dilution before making
further dilutions?
5. What is the difference between food poisoning and food intoxication?
6. Why is plate count agar (standard methods agar) used in this experiment?
7. Why should hamburger not be repeatedly frozen and thawed?
©The McGraw-Hill
Companies. 2002
314 Environmental and Food Microbiology
Harley-Prescott:
Laboratory Exercises in
Microbiology, Fifth Edition
VIII. Environmental and
Food Microbiology
51. Examination of Milkfor
Bacteria
©The McGraw-Hill
Companies. 2002
EXERCISE
51
Examination of Milk for Bacteria
SAFETY CONSIDERATIONS
Be careful with the Bunsen burner flame and the boiling
water bath. No mouth pipetting. Keep all culture tubes
upright in a test-tube rack or in a can.
Materials per Group of Students
pasteurized milk sample
unpasteurized milk may be obtained from any
dairy farm. If a sample is not available,
pasteurized milk incubated at 35°C may be
used or the instructor may wish to contaminate
the sample with coliforms such as Escherichia
coli, Klebsiella pneumoniae, or Enterobacter
aerogenes
32°C incubator
6 15-ml and 6 5-ml violet red bile agar tubes
2 9-ml and 2 99-ml saline blanks
6 petri plates
wax pencil
boiling water bath
methylene blue solution (1/25,000)
2 screw-cap test tubes
sterile 10-ml and 1-ml pipettes with pipettor
37°C water bath
Bunsen burner
test-tube rack
colony counter
48° to 50°C water bath for cooling tubes
Learning Objectives
Each student should be able to
1. Explain the purpose of pasteurization
2. Determine the sanitary quality of milk by
performing a coliform analysis and methylene
blue reductase test
Suggested Reading in Textbook
1. The Use of Physical Methods in Control,
section 7.4.
2. Microbiology of Fermented Foods, section 41.6.
3. Diseases Transmitted by Foods, section 41.4.
Pronunciation Guide
Enterobacter aerogenes (en-ter-oh-B AK-ter
a-RAH-jen-eez)
Klebsiella pneumoniae (kleb-se-EL-lah nu-MO-ne-ah)
Principles
Pasteurization is a means of processing raw milk,
before it is distributed, to assure that it is relatively free of
bacteria and safe for human consumption. It is a heat
process gentle enough to preserve the physical and
nutrient properties of milk, but sufficient to destroy
pathogenic microorganisms. The two methods most
commonly used for pasteurization of milk are (1) heating at
62.9°C (145°F) for 30 minutes or (2) heating to 71.6°C
(161°F) for a minimum of 15 seconds.
The presence of coliforms in milk (and milk
products) is a major indicator of the sanitary quality of
milk. Their presence can be determined by a coliform
plate count. A high count means that there is the
possibility of the presence of disease-causing bacteria. A
low count decreases this possibility but does not
completely rule out the absence of disease-causing
bacteria. In the first part of this exercise, each group of
students will do a plate count on a pasteurized and
unpasteurized milk sample.
Milk that contains a large number of growing
bacteria will have a lower concentration of O2 (a lower
oxidation-reduction potential) compared to milk with
few bacteria. This is because growing aerobic and
facultatively anaerobic bacteria (see exercise 18) use
315
Harley-Prescott:
Laboratory Exercises in
Microbiology, Fifth Edition
VIII. Environmental and
Food Microbiology
51. Examination of Milkfor
Bacteria
©The McGraw-Hill
Companies. 2002
Figure 51.1 Methylene Blue Reduction Test for Bacteria, (a) No reduction, (b) Complete reduction.
Biochemistry within bacteria
Substrate »- NAD »- FAD
(in an aerobic environment)
^
Nv
cytochromes
H,0
methylene - -. .2~2
blue
Biochemistry within tubes
Methylene blue,
oxidized state
(blue color)
\
(in an aerobic environment)
2H'
reductase
N(CH3;
(CH3),N
N(CH3]
Leuco-methylene blue,
reduced state
(colorless)
/
(in an anaerobic environment)
(b)
oxygen as a final electron acceptor in cellular
respiration. The dye, methylene blue, is a redox indicator. It
loses its blue color in an anaerobic environment and is
reduced to leuco-methylene blue (figure 51.1). As a
result, the methylene blue reductase test can be used to
rapidly screen the quality of milk for the load of col-
iforms and Lactococcus (Streptococcus) lactis, strong
reducers of methylene blue and indicators of
contamination. The larger the bacterial load, the more quickly
the milk will spoil. The speed at which the reduction
occurs and the blue color disappears indicates the
quality of milk as follows:
a. Reduction within 30 minutes—very poor
milk quality (class 4 milk)
Reduction between 30 minutes and 2
hours—poor milk quality (class 3 milk)
Reduction between 2 to 6 hours—fair
quality (class 2 milk)
b.
c.
d. Reduction between 6 to 8 hours—good
quality (class 1 milk)
In the second part of this exercise, each group of
students will perform a methylene blue reductase test on
a pasteurized and unpasteurized milk sample.
Procedure
Coliform Analysis
1. Shake the milk sample 25 times. Make dilutions
of the pasteurized and unpasteurized milk samples
as indicated in figure 51.2a.
2. Use the wax pencil to label the petri plates with
your name, date, the respective dilution, and
either pasteurized or unpasteurized milk.
3. Pipette 1-ml milk aliquots of each dilution into
the appropriate plates.
316 Environmental and Food Microbiology
Harley-Prescott:
Laboratory Exercises in
Microbiology, Fifth Edition
VIII. Environmental and
Food Microbiology
51. Examination of Milkfor
Bacteria
©The McGraw-Hill
Companies. 2002
Figure 51.2 Examination of Milk for Bacteria, (a) Dilution series for coliform analysis of pasteurized and unpasteurized milk samples,
(b) Methylene blue reductase test.
1 ml
White
(b)
White
Poor quality milk
(after 2 hours)
*Discard pipette.
4. Melt and cool the violet red bile agar (VRBA)
tubes and add 15 ml of it to each of the plates.
Swirl gently on a flat surface and allow the agar
to solidify. Afterward, add 5 ml of VRBA to each
plate, swirl gently, and allow to solidify.
5. Incubate all plates at 32°C for 24 hours.
Second Period
1. For accuracy, select the plate that has between 25
to 250 colonies, which are located below the
surface, are lens shaped, deep red, and surrounded
by a pink halo. Record these as the coliform count
per ml of milk.
Examination of Milk for B acteria 317
Harley-Prescott: I VIM. Environmental and I 51. Examination of Milk for I I ©The McGraw-Hill
Laboratory Exercises in Food Microbiology Bacteria Companies. 2002
Microbiology, Fifth Edition
Methylene Blue Reductase Test
1. Label the two screw-cap tubes with your name
and pasteurized and unpasteurized, respectively.
2. Using the 10-ml pipette, transfer 10 ml of
unpasteurized milk to one screw-cap tube and,
with another pipette, 10 ml of pasteurized milk to
the other tube (figure 5l.2b).
3. Add 1 drop of methylene blue to each tube.
4. Cap tightly and invert the tubes several times.
5. Place the tubes in a test-tube rack and place the
rack in the 37°C water bath. After a 5-minute
incubation, remove the tubes from the water bath
and invert several times to mix again.
6. Observe the tubes at 30-minute intervals for 8
hours. Reduction is demonstrated by a change in
color of the milk sample from blue to white.
When at least 4h of the tube has turned white, the
end point of reduction has been reached, and the
time should be recorded.
7. Record your results and the class of milk in the
report for exercise 51.
318 Environmental and Food Microbiology
Harley-Prescott: I VIM. Environmental and I 51. Examination of Milk for I I ©The McGraw-Hill
Laboratory Exercises in Food Microbiology Bacteria Companies. 2002
Microbiology, Fifth Edition
Laboratory Report
Lab Section:
Examination of Milk for Bacteria
1. Data from coliform analysis.
Milk Sample
Pasteurized
Unpasteurized
10°
Number of Colonies
Dilution
lO"1
lO"2
Number of colonies per milliliter of pasteurized milk
Number of colonies per milliliter of unpasteurized milk
Calculations:
2. Data from methylene blue reductase analysis.
Reduction time
Milk class
Unpasteurized Milk
Pasteurized Milk
51
Name:
319
Harley-Prescott: VIM. Environmental and 51. Examination of Milk for
Laboratory Exercises in Food Microbiology Bacteria
Microbiology, Fifth Edition
Review Questions
1. What is the function of the methylene blue in the reductase test for milk quality?
2. Why does milk sour when it is not refrigerated?
3. How can a milk sample be contaminated by humans?
4. Why is milk pasteurized and not sterilized?
5. What are the differences in methylene blue reduction time between the different classes of milk? What do
these differences signify?
6. As a bacteriological medium, how does milk differ from water?
7. What are some bacteria normally found in milk?
©The McGraw-Hill
Companies. 2002
320 Environmental and Food Microbiology
Harley-Prescott:
Laboratory Exercises in
Microbiology, Fifth Edition
IX. Medical Microbiology Introduction
©The McGraw-Hill
Companies. 2002
PART NINE
Medical Microbiology
Tlie Greeks, whenever doubt arose with regard to any disease, always
thought it best to rely on nature and her doings, which were sure, in
the last resort, to banish the disease. They based their opinion on the
following grounds: Nature being the servant and provider of all living
things in healthy days, helps them also in disease.
Galen [Claudius Galenus]
(Greek physician and teacher, 129—200 A.D.)
Medical, or clinical, microbiology deals with the
diagnosis, treatment, and prevention of infectious
diseases caused by all groups of microorganisms. As such, a
complete coverage of these groups is not feasible in a few exercises.
This part of the manual has, therefore, been constructed to
enable the student to perform some of the routine techniques that
are used in a clinical microbiology laboratory. For
example, students will first do a routine blood-typing exercise. Then
students will isolate some of the microorganisms that are part of
their normal microbiota by using aseptic technique and
selective and differential media. In subsequent exercises, students
will use various techniques to examine, isolate, and identify
some of the more prevalent and potentially pathogenic
microorganisms such as staphylococci, pneumococci, Neisseriae,
and aerobic and anaerobic spore-forming bacteria. As these
exercises are performed, keep in mind that very similar if not
identical procedures are routinely done for the many other
microorganisms that are associated with the human body.
When carrying out the following exercises, view all
microorganisms as potential pathogens. Take all necessary
precautions to prevent infecting yourself or other members
of your group.
After completing either one or more of the
exercises in Part Nine, you will, at the minimum, be
able to demonstrate an increased level in analysis
skills, including (a) collecting and organizing data
in a systematic fashion; (b) presenting data in an
appropriate form (graphs, tables, figures, or
descriptive paragraphs); (c) assessing the validity of
the data (integrity and significance); (d) drawing
appropriate conclusions based on the results; and
(e) integrating knowledge and making informed
judgments about microbiology in everyday life.
This will meet the American Society for
Microbiology Core Curriculum Laboratory Thinking Skills
numbers 2 and 4. Laboratory skills numbers 1—6
will also be improved. These include (a) using a
bright-field microscope to view and interpret slides;
(b) properly preparing slides for microbiological
examination; (c) proper use of aseptic technique for
transferring and handling of microorganisms and
instruments; (d) use of appropriate microbiological
media and test systems; and (e) the correct use of
standard laboratory equipment (seepp. vi—viii).
Paul Ehrlich (1854-1915)
Paul Ehrlich was the co-winner in 1908 with Elie Metch-
nikoff of the Nobel Prize for Physiology or Medicine for
developing the side chain theory.
Paul Ehrlich clearly enjoyed life. He smoked twenty-five
cigars a day; he was fond of drinking a seidel of beer (publicly)
with his old laboratory servant and many seidels of beer with
colleagues. Although a modern man, there was still something
medieval about him when he said: "We must leam to shoot
microbes with magic bullets." Thus, chemotherapy was born.
Paul Ehrlich's concept of a "magic bullet" was a
compound that would wipe out the microorganisms from the host's
body following a single dosa sterilisa magna. Along these
lines, he changed a drug that is the favorite poison of
murderers (arsenic) into a saver of lives with respect to syphilis. With
the cooperation of the Gentian chemical industry, he produced
and marketed the first chemotherapeutic agents. His theories of
specific receptors and differential affinities produced such
agents as mepercrine (the first synthetic malarial prophylactic)
and Prontosil red (the parent compound of the sulphonamides).
In addition to his work in chemotherapy, Ehrlich invented
the differential stain for white blood cells, initiated quantitive
methods in immunology, and produced his famous side chain
theory on the nature and origin of antibodies.
Overall, there have been few microbiologists who have
made major contributions in so many different fields.
321
Harley-Prescott:
Laboratory Exercises in
Microbiology, Fifth Edition
IX. Medical Microbiology
52. Agglutination
Reactions: Blood Groups
©The McGraw-Hill
Companies. 2002
EXERCISE
52
Agglutination Reactions: Blood Groups
SAFETY CONSIDERATIONS
Human blood may be a vehicle for the transmission of
blood-borne diseases such as AIDS and hepatitis.
Therefore, some instructors may wish to use
commercially prepared blood that has been tested and is free of
the microorganisms responsible for these diseases
instead of having students use their own blood. In 1992,
WARD'S started marketing simulated ABO and Rh
blood and antisera for safe smears and analysis. Some
instructors may want to use this artificial blood. Other
instructors may want to do this classical experiment as
it has been done for years. If the latter is followed, it is
at the students' own risk. Each instructor should advise
the students of the safety and precautions necessary to
carry out this experiment. At a minimum, precautions
should include
1. The use of disposable gloves by the students.
2. Procedures for the prevention of accidental needle
or lancet sticks.
3. The use of appropriate containers for the disposal
of lancets, cotton, slides, toothpicks, and gloves.
Immediately report any blood that has been dropped on
the lab table, bench, or floor to your instructor.
Materials per Student
sterile, unused blood lancets or an automatic
lancet device
glass slide
toothpicks
70% ethyl alcohol and iodine
cotton applicators or cotton swabs
anti-A and anti-B sera
wax pencil
grease-cutting detergent (Bon Ami)
commercially prepared and tested blood (A, B,
AB, and O) or WARD's artificial blood
disposable gloves
BIOHAZARD Bags and a SHARPS container for
proper disposal of material
Learning Objectives
Each student should be able to
1. Appreciate and understand the potential hazards
involved with using human blood
2. Understand the meaning of the terms
agglutination and hemagglutination
3. Determine his or her own blood type (or the blood
types of the commercial blood)
Suggested Reading in Textbook
1. Agglutination, section 33.3.
Principles
When agglutination reactions involve the clumping of
red blood cells, they are termed hemagglutinations.
Hemagglutination occurs because of the ability of
antibodies to cross-link red blood cells by binding to
surface antigens. Hemagglutination microscopic-slide
tests are routinely used in blood typing.
The four major human blood types (A, B, AB, and
O) are genetically determined. Individuals with blood
types A, B, or AB have antigens on the surface of
their red blood cells. These antigens, known as
agglutinogens, correspond to the specific group (e.g., type
A has agglutinogen A). An individual having blood
type O lacks these agglutinogens. These surface
antigens are also referred to as isoantigens (antigens that
exist in alternative forms in a species and which are
capable of causing an immune response in genetically
different individuals of the same species, but not in
individuals who carry them). The ABO blood grouping
system is unique because individuals who have
isoantigens on their red blood cells will have the
opposite isoantibodies (agglutinins) in their serum. For
example, persons with type A red blood cells have
anti-B isoantibodies (table 52.1).
322
Harley-Prescott:
Laboratory Exercises in
Microbiology, Fifth Edition
IX. Medical Microbiology
52. Agglutination
Reactions: Blood Groups
©The McGraw-Hill
Companies. 2002
Table 52.1
Blood Type
A
B
AB
0
Antigens and Antibodies in Human ABO Blood Groups
Antigen Present on
Erythrocyte Membranes Antibody in Plasma
A Anti-B
B Anti-A
A and B Neither Anti-A nor Anti-B
Neither Anti-A and Anti-B
Can Receive
Blood from
AandO
BandO
AB; A; B; 0
0
Can Give Blood to
A and AB
BandAB
AB only
0; A; B; AB
Transfusion reactions, or incompatibility
reactions, generally result when blood typing is done
incorrectly. Such a reaction is caused by tlie transfusion
of the wrong ABO group. This is due to tlie fact that
the blood of a person receiving a different blood type
from his/her own will agglutinate these cells. The
ABO antibodies will cause rapid destruction of the
transfused blood, and the clumped erythrocytes may
block blood vessels.
In this exercise, students will use antibodies
against type A and B antigens to determine their own
(or commercially prepared and tested) blood type,
using microscopic-slide agglutination reactions. In
addition, data will be pooled for tlie whole class in order
to determine blood group frequencies. (If a
slide-warming, blood-typing box is available, your instructor may
also want to demonstrate and include Rli typing data.)
Figure 52.1 Procedure for Determining Blood Types.
Anti-B serum
Anti-A serum
(a) Place a drop of each solution on slide as indicated.
(b) Rub alcohol on tip of finger. Allow to dry.
Procedure
1. Obtain a microscope slide and wash it thoroughly
in the grease-cutting detergent (Bon Ami). With
the wax pencil, write the letters A and B on each
side of the slide as illustrated in figure 52.1a.
Draw two separate circles next to tlie letters,
about 1.5 cm in diameter.
2. Obtain dropper bottles containing commercially
prepared antibody solutions and place a drop of
the antibody to a particular blood type within tlie
circle near the corresponding letter.
3. To obtain some of your blood, clean the tip of
your finger by rubbing it with an alcohol-
saturated cotton swab or gauze pad with iodine
and again with alcohol (figure 52.1b).
4. Obtain a new and clean sterile lancet from the
package and jab the point into your finger
(figure 52.1c). If an automatic lancet device is
available, your instructor will demonstrate how
to use it. Never use a lancet that someone else
has used because viral diseases such as AIDS
and hepatitis can be transmitted in this way.
(c) Prick finger with sterile lancet.
Never use a lancet that someone
else has used.
(d) Add a drop of blood to each
circle. Do not touch finger
to antiserum.
(e) Use seperate toothpicks to
stir each drop.
323
Harley-Prescott:
Laboratory Exercises in
Microbiology, Fifth Edition
IX. Medical Microbiology
52. Agglutination
Reactions: Blood Groups
©The McGraw-Hill
Companies. 2002
Figure 52.2 Slides Illustrating Human ABO Blood
Groups After Adding Antisera A to the Blood on the Left
Part of the Slide and Antisera B to the Blood on the Right
Part of the Slide. The top slide shows no clumping; thus, it is
blood group O. The second slide shows clumping on the right but
not on the left; thus it is blood group B. The third slide shows
clumping on the left but not on the right; thus it is blood group A.
The bottom slide shows clumping on both left and right; it is
blood group AB.
6. Stir the antibody and the blood in each circle
immediately with clean toothpicks, using a rotary
motion (figure 52. \e). Dispose of the toothpicks
in the proper receptacle.
7. After donating blood, wipe your finger once more
with an alcohol pad or gauze pad.
8. Observe the two mixtures against a light
background with bright light, watching for the
appearance of red granules, which indicate that the
red blood cells are agglutinating or clumping
(figure 52.2). If you cannot easily see differences
between the two samples, study the slide with your
microscope. Use the low-power objective with the
substage condenser closed to increase contrast.
9. Determine your blood type according to the
following chart and complete the report for
exercise 52.
Antisera
B
Blood Group
No clumping No clumping
Clumping No clumping
No clumping Clumping
Clumping Clumping
Carefully massage your finger, and work out
several drops of blood. Discard the first two drops
since they represent mostly tissue fluid. Let the
third or fourth drop fall (figure 52.1<i) into the
anti-A antibody on the slide and the next two into
the anti-B antibody circle. (Do not touch your
finger to the slide.) Dispose of the lancet in the
proper SHARPS container.
HINTS AND PRECAUTIONS
(1) You should massage your finger after using the lancet
and then release pressure to allow several drops of blood
to flow freely and evenly. Discard the first few drops of
blood as they may contain tissue fluid. (2) If you are
using an Autolet automatic lancet or a similar device to
draw blood, carefully remove and discard both the lancet
and the platform after every use. NEVER reuse the
platform or you may transfer infected blood to another
person. (3) Usually it is less painful if you draw blood from
the side of the fingertip rather than from the tip itself.
324 Medical Microbiology
Harley-Prescott: I IX. Medical Microbiology I 52. Agglutination I I ©The McGraw-Hill
Laboratory Exercises in Reactions: Blood Groups Companies. 2002
Microbiology, Fifth Edition
Laboratory Report j 2
Name:
Date: _
Lab Section:
Agglutination Reactions: Blood Groups
1. Your blood type is
2. Tabulate the class results and determine the distribution of blood types by completing the following table.
Blood Groups Number of Students Tested Number Positive Percent
AB
3. How do the class results compare with table 52.11*
325
Harley-Prescott: I IX. Medical Microbiology I 52. Agglutination I I ©The McGraw-Hill
Laboratory Exercises in Reactions: Blood Groups Companies. 2002
Microbiology, Fifth Edition
Review Questions
1. Could a type AB individual receive blood from a type B individual? Who would receive type O blood?
Explain your answers.
2. Could a person with blood type AB receive blood from a primate with the same blood type? Explain your
answer.
3. What is the blood type of the person to either your left or right? Are your blood types
compatible? Explain why or why not.
4. Why would a person with blood type A exhibit a transfusion reaction if given type B blood?
5. What causes clumping to occur?
6. What is an agglutination reaction?
7. What is serotyping?
326 Medical Microbiology
Harley-Prescott:
Laboratory Exercises in
Microbiology, Fifth Edition
IX. Medical Microbiology
53. Isolation of Normal
Microbiota from the Human
Body
©The McGraw-Hill
Companies. 2002
EXERCISE
53
Isolation of Normal Microbiota from the Human Body
SAFETY CONSIDERATIONS
In this experiment, students will be taking unknown
microbial samples from the human body and growing
them to large concentrations. Any of these samples
could contain human pathogens; thus, extreme caution
should be taken when working with and disposing of
the final product. Kovacs' reagent is caustic to the skin
and mucous membranes due to the concentrated HC1
and p-dimethyl-aminebenzaldehyde. When finished,
place all used swabs and tongue depressors in
disinfectant. Keep all culture tubes upright in a test-tube rack or
in a can.
Materials per Student
1 blood agar plate
1 tryptic soy agar plate (TSA)
1 eosin methylene blue (EMB) plate
2 triple sugar iron (TSI) agar slants
2 Simmons citrate agar slants
2 lysine agar (LIA) slants
2 SIM tube agar deeps
2 methyl red-Voges-Proskauer (MR-VP) broth
3 sterile swabs
tube of 0.85% saline (NaCl)
3% hydrogen peroxide
sterile tongue depressors
Kovacs' solution
methyl red indicator
Voges-Proskauer reagent
wax pencil
Bunsen burner
inoculating loop
inoculating needle
35°C incubator
Gram-stain reagents
disinfectant for swabs and tongue depressors
test-tube rack or can
Learning Objectives
Each student should be able to
1. Isolate pure cultures of bacteria from his or her
throat, skin, and rectal area
2. Become better acquainted with the normal
microbiota of the human body
3. Learn several techniques for culturing microbiota
from the human body
Suggested Reading in Textbook
1. Normal Microbiota of the Human Body,
section 31.2.
2. Skin, section 31.2.
3. Oropharynx, section 31.2.
4. Large Intestine (Colon), section 31.2.
5. Identification of Microorganisms from
Specimens, section 36.2.
Pronunciation Guide
Enterobacter aerogenes (en-ter-oh-B AK-ter a-RAH-
jen-eez)
Escherichia coli (esh-er-I-ke-a KOH-lee)
Medical Application
EMB and MacConkey's agar allows a quick preliminary
indication of whether a clinical specimen contains enteric
bacteria. Enteric bacteria are facultatively anaerobic Gram-
negative rods. They can be divided into those bacteria that
produce acid from lactose fermentation (the coliforms; e.g.,
the nonpathogenic Escherichia coli and Enterobacter
aerogenes) and those that don't (non lactose fermenters; e.g.,
the pathogenic Salmonella typhi [typhoid fever] and
Schigella dysenteriae [bacillary dysentery]).
327
Harley-Prescott: I IX. Medical Microbiology I 53. Isolation of Normal I I ©The McGraw-Hill
Laboratory Exercises in Microbiota from the Human Companies. 2002
Microbiology, Fifth Edition Body
Principles
The microorganisms that constitute the normal
microbiota of the human body are usually harmless,
although some are potential pathogens or opportunists.
These latter microorganisms may cause disease under
certain circumstances.
Four main reasons for learning about the normal
human microbiota are (1) to gain an understanding of the
different microorganisms at specific body locations,
which provides greater insight into the possible
infections that might result from injury to these body sites;
(2) to develop a knowledge of the native microorganisms
in any one part of the body, wliich helps the clinician put
in perspective the possible source and significance of
microorganisms isolated from clinical infections; (3) to
gain a knowledge of indigenous microbiota aids in
understanding the consequences of overgrowth of those
microorganisms normally absent at a specific body site; and
(4) to develop an increasing awareness of the role these
indigenous microbiota play in stimulating the host
immune response, which provides protection against
microorganisms that might otherwise cause disease.
In this exercise, the student will isolate pure
cultures of bacteria from his or her throat, skin, and
rectal area in order to become better acquainted with the
normal microbiota of these areas, and to become
familiar with some of the techniques of culturing
bacteria from the body.
Procedure
First Period
Throat Culture
1. Your instructor will demonstrate the proper
procedure for doing a throat swab. Note the
specific area that is being swabbed (figure 53.1).
2. Each student will then swab his or her partner's
throat around the tonsillar area (not the roof of the
mouth) using a sterile cotton swab. Use a sterile
tongue depressor to keep the tongue from interfering
with the swab. Roll the swab back and forth near
one edge of a blood agar plate, then streak from this
area with a sterile loop (see figure 16.2).
3. Using the wax pencil, label the plate with your
name, body site, date, and type of medium.
4. Incubate the plate, inverted, at 35°C for 24 to
72 hours.
Skin Culture
1. Each student is to take a swab, moisten it in 0.85%
saline (squeeze out the excess fluid by pressing the
Figure 53.1 Taking a Throat Culture.
Note that the swab should touch only the pharyngeal areas around
the tonsils and not the roof of the mouth.
swab against the side of the tube) and roll it over
his or her arms. Streak a TSA plate in the same
manner as you did for the blood agar plate.
2. Label as in number 3 in the throat culture
procedure.
3. Incubate, inverted, at room temperature for 24 to
72 hours.
Rectal Culture
1. Take a sterile swab in either a sealed tube or
packet and an EMB plate to the rest room. Culture
the rectum by inserting a swab 1/4 to 1/2 inch into
the rectum. Streak 1/3 of the plate with the swab
while you are in the rest room. Place the swab in
the proper receptacle—not in the commode or
urinal.
2. When you return to the laboratory, streak for
isolation with a sterile loop. Label as in step 3 in
the throat culture procedure.
3. Incubate, inverted, at 35°C for 24 to 72 hours.
Second Period
Throat Culture
1. Observe the blood agar plate for the various types
of colonies (see exercise 54 for hemolytic
patterns). Characterize the colonies and hemolytic
328 Medical Microbiology
Harley-Prescott: I IX. Medical Microbiology I 53. Isolation of Normal I I ©The McGraw-Hill
Laboratory Exercises in Microbiota from the Human Companies. 2002
Microbiology, Fifth Edition Body
types. Select a number of well-isolated colonies
that fit the descriptions in table 53.1.
2. Stain each colony you select with the Gram stain
(see exercise 8). Perform a catalase test on the
same colonies you Gram stained (see exercise 28
and figure 28.1). Extreme care must be exercised
if a colony is taken from a blood agar plate.
Erythrocytes contain catalase, and a carryover of
only a few blood cells can give a false-positive
reaction.
3. Complete Part 1 of the report for exercise 53.
Skin Culture
1. Observe the TS A plate for microorganisms that
have been isolated from the skin. If no colonies
grew after 24 hours, incubate for an additional 24
to 48 hours.
2. Select isolated colonies, describe their appearance
(table 53.1), and do a Gram stain.
3. Complete Part 2 of the report for exercise 53.
Rectal Culture
1. The most common rectal isolates will be
Escherichia coli and Enterobacter aerogenes.
These can be distinguished by biochemical tests.
Select two different colonies from your EMB
plate (see exercise 16) and inoculate the following
media with each, respectively:
a. TSI slant. With a needle, stab the butt and
streak the surface (see figure 14.3).
b. LIA slant. With a needle, stab the butt and
streak the surface.
c. SIM deep. Do a needle stab only.
d. Simmons citrate slant. With a loop, streak
the slant.
e. MR-VP broth. Inoculate with a loop.
2. Incubate all tubes at 35°C for 18 to 24 hours.
Third Period
TSI
1. Identify your rectal bacteria from the following
biochemical tests in the TSI tube: acid slant and
acid butt with gas (A/Ag); acid slant and acid butt
(A/A); acid slant and acid butt with H2S (A/A
with H2S); alkaline slant and alkaline butt (K/K);
alkaline slant and neutral butt (K/N).
For acid production, the medium will turn
yellow; for gas production, the medium will be
broken up; for an alkaline reaction, the medium
will be pinkish; and for H2S production, the
medium in the butt will turn black. See figures
21.1 and 21.2 for examples of the above
reactions.
2. Table 53.1 gives a list of some of the more
frequently encountered Enterobacteriaceae found
in the rectal area.
LIA
1. Observe the LIA tube for the following reactions:
alkaline slant and alkaline or neutral butt (K/K or
K/N); alkaline slant and acid butt (K/A); and red
slant and acid butt (R/A). See figure 32.1 for an
example of the above reactions.
2. Interpretation:
K/K or K/N lysine-decarboxylase positive
K/A lysine-decarboxylase negative
R/A lysine-deaminase positive
SIM
1. First, observe the SIM tube for motility and H2S
production. Motile cultures will have growth
diffusing from the stab line while nonmotile ones
will not (see figure 24.1c).
2. H2S production is indicated by blackening along
the line of growth (see figure 24.1c).
3. Add 2 to 4 drops of Kovacs' reagent to the
surface, shake gently, and allow to stand for a few
minutes. Indole production is indicated by a red
color (see figure 25.1).
Simmons Citrate
1. If the citrate slant turns blue, this indicates citrate
utilization and is a positive test (see figure 25.4).
MR-VP Broth
1. Transfer half of the MR-VP broth culture to a
clean tube. Add 2 drops of methyl red indicator. A
pink color indicates a positive test. To the other
portion of MR-VP broth add 3 to 4 drops of VP
reagent. Shake gently and allow to stand at room
temperature for 15 minutes (see exercise 25). If
acetoin is produced, a red color will develop, and
the test is positive.
2. Complete Part 3 of the report for exercise 53.
HINTS AND PRECAUTIONS
When taking a throat culture, it helps if the patient is
positioned in good light so that you can see the back of
the throat and the position of the swab as you insert it.
Isolation of Normal Microbiota from the Human Body 329
Harley-Prescott: I IX. Medical Microbiology I 53. Isolation of Normal I I ©The McGraw-Hill
Laboratory Exercises in Microbiota from the Human Companies. 2002
Microbiology, Fifth Edition Body
Table 53.1 Some Common Microorganisms Associated with the Human
Throat Organisms
* Streptococcus viridans
(alpha streptococcus)
Streptococcus pneumoniae (pneumococcus)
fj-hemolytic streptococci, e.g., Streptococcus
pyogenes
Staphylococcus aureus
Staphylococcus epidennidis
Neisseria spp.
Corynebacterium spp. (diphthei
*Most common microorganism
Skin Organisms
*Staphylococcus epidennidis
Staphylococcus aureus
oids)
isolated.
^■Corynebacterium spp. (diphtheroids)
Yeasts
*Bacillus spp.
*Streptococcus viridans
(alpha streptococcus)
Micrococcus luteus
*Streptococcus viridans, Staphylococcus
Rectal Organisms
Escherichia coli
Citro bac ter freundii
Enterobacter aerogenes
Klebsiella pneumoniae
Proteus mirabilis
Proteus vulgaris
Alcaligenes faecalis
Pseudomonas aeruginosa
TSI
K/Aoi
A/Ag
A/Ag
A/Ag
K/A
K/A
K/Koi
K/Koi
epidennidis,
A/Ag
K/N
K/N
Gram's Stain; Morphological
Arrangement
Gram positive
Cocci
Chains
Gram positive
Cocci
Pairs and short chains
Gram positive
Cocci
Chains
Gram positive
Cocci
Clusters
Gram positive
Cocci
Clusters
Gram negative
Cocci
Pairs
Gram positive
Pleomorphic rods
Club shaped, bipolar, or barred
Gram's Stain; Morphological
Arrangement
Gram positive
Coccus
Clusters
Gram positive
Coccus
Clusters
Gram positive
Pleomorphic rods
Club shaped, bipolar, or barred
Gram positive
Large budding cells
Single
Gram positive
Rod
Single and chains
Gram positive
Cocci
Chains
Gram positive
Cocci
Single, tetrads
Features;
Features;
Body and Their Characteristics
Appearance on Blood Agar Plate
Small, dome-shaped colony surrounded by an area of
greenish brown discoloration
Similar to Streptococcus viridans except it has a
depressed center; a-hemolysis
Small, raised colonies surrounded by an area of clear
(3-hemolysis, widi a sharp border
Large, round, tan to yellowish colony surrounded widi a
clear zone of ^-hemolysis
Large, round and white, opaque colonies generally
widi no hemolysis
Varies with species. Generally fairly small, whitish to
yellowish colonies. Some are dry and crumbling.
Varies with species. Some are dry and wrinkled.
Appearance on TSA Plate
Large, round, white, glistening colony
Large, round, glistening, generally yellow colony
Generally very dry and wrinkled
Large, round, moist colony
Round or irregular; surface dull becoming diick and opaque
Small, dome-shaped colony surrounded by an area of
discoloration
Large, round, yellow, glistening colony
Corynebacterium spp., and Bacillus spp. are die most commonly isolated microorganisms from healdiy skin.
H2S LIA
K/K or K/N or K/A
+ K/A
K/K or K/N
K/K or K/N
+ R/A
+ R/A
K/K or K/N
K/K or K/N
SIM
- + ©*
+ - +
-- +
-©-
+ - +
+ + +
-- +
-- +
Reactions
Citrate MR VP Pigmentation
- + -
+ + -
+ - +
+ - +
+ + -
+ + -
+ - -
+ - - +
*- + ± Negative sulfur, positive indole, and variable motility.
330 Medical Microbiology
Harley-Prescott: IX. Medical Microbiology 53. Isolation of Normal
Laboratory Exercises In Microbiota from the Human
Microbiology, Fifth Edition Body
©The McGraw-Hill
Companies. 2002
Laboratory Report j j
Name:
Date: _
Lab Section:
Isolation of Normal Microbiota from the Human Body
1. Bacteria isolated from the tliroat on the blood agar plate.
Colony
Typel
Colony
Type 2
Colony
Type 3
Gram stain
Colony morphology
Catalase test
Hemolysis
2. Bacteria isolated from the skin on the TSA plate.
Colony
Typel
Colony
Type 2
Colony
Type 3
Gram stain
Morphological features
Colony arrangement
3.
Bacteria isolated from the rectal area on the EMB plate and using the various biochemical reactions.
Reactions
Bacteria TSI H2S LIA SIM Citrate MR-VP
Harley-Prescott: IX. Medical Microbiology 53. Isolation of Normal
Laboratory Exercises In Mlcroblota from the Human
Microbiology, Fifth Edition Body
Review Questions
1. When doing a throat culture, what specific area of the throat is swabbed, and why?
2. When doing a skin culture, why is the swab first moistened with saline?
3. What are four reasons for knowing which microorganisms are associated with different parts of the body?
a.
b.
c.
d.
4. Why were the blood agar plates incubated at 35°C, whereas the TSA plates were at room temperature?
5. Why is EMB used for rectal cultures?
6. What are fastidious streptococci?
7. Would you expect to isolate P-hemolytic streptococci from the skin? Explain your answer.
©The McGraw-Hill
Companies. 2002
332 Medical Microbiology
Harley-Prescott:
Laboratory Exercises in
Microbiology, Fifth Edition
IX. Medical Microbiology 54. Staphylococci
©The McGraw-Hill
Companies. 2002
EXERCISE
54
Staphylococci
SAFETY CONSIDERATIONS
Be careful with the 1 N HC1. Since you are working
with staphylococcal cultures (S. aureus is an
opportunistic pathogen), apply your knowledge of aseptic
technique and make certain that you do not carry
staphylococci out of the laboratory as new additions to
the microbiota of your hands. Keep your hands
scrupulously clean. If you have any minor cuts or scratches,
they should be protected with gloves. While in the
laboratory, keep your hands away from your face. Dispose
of all swabs and mixing sticks in the disinfectant. Keep
all culture tubes upright in a test-tube rack or in a can.
Materials per Student
0.85% sterile saline (NaCl)
1 Vogel-Johnson plate (for coagulase positive [+]
colonies)
1 Mueller-Hinton plate
if desired, m-staphylococcus broth tube and/or
mannitol salt agar plate
4 sterile cotton swabs
1 tryptic soy broth tube (2 ml)
1 blood agar plate
1 titrated rabbit plasma tube (0.5 ml)
1 DNase test agar plate
1 nutrient gelatin deep or KEY gelatin test strip
antibiotic disks (including penicillin G,
methicillin, and novobiocin; 5 Llg)
6-lactamase detection disks (Difco or KEY)
forceps and 70% alcohol for disinfecting
1 N hydrochloric acid
37°C water bam
35°C incubator
STAPHAUREX rapid latex test kit (Wellcome
Diagnostics)
disinfectant for swabs and mixing sticks
disposable gloves
Bunsen burner
inoculating loop
Gram-staining material
Learning Objectives
Each student should be able to
1. Recognize the medical significance of the
staphylococci
2. Perform selected clinical procedures to isolate
staphylococci from certain areas of the human body
3. Perform selected clinical procedures that
distinguish the pathogenic species of
staphylococci from the nonpathogenic species
Suggested Reading in Textbook
1. The Staphylococcaceae, section 23.4; see also
table 23.3.
2. Staphylococcal Diseases, section 39.3.
Pronunciation Guide
Micrococcus (my-kro-KOK-us)
Staphylococcus aureus (staf-il-oh-KOK-kus ORE-ee-us)
S. epidermidis (e-pee-DER-meh-diss)
S. saprophyticus (sa-pro-FIT-e-kus)
Streptococcus (strep-to-KOK-us)
S. salvarius (sal-vah-REE-uss)
Medical Application
Mannitol salt and DNase test agars are used in the clinical
laboratory to differentiate the pathogenic Staphylococcus
spp. which ferment mannitol from the nonpathogenic
Micrococcus spp. The pathogen most often encountered is
Staphylococcus aureus that causes common food poisoning,
osteomyelitis, bacterial pneumonia, and other diseases. The
coagulase test is used to distinguish between pathogenic and
nonpathogenic members of the genus Staphylococcus. All
pathogenic strains of S. aureus are coagulase positive
whereas the nonpathogenic species (S. epidermidis) are
coagulase negative. The coagulase increases virulence by
surrounding those bacteria that produce it with a clot that
protects the bacteria from phagocytosis and antibodies.
333
Harley-Prescott:
Laboratory Exercises in
Microbiology, Fifth Edition
IX. Medical Microbiology I 54. Staphylococci
©The McGraw-Hill
Companies. 2002
Figure 54.1 Morphology of Staphylococci. Gram's stain
smear prepared from a staphylococcal culture illustrating the
characteristic grapelike clusters of gram-positive cocci (xl,000).
Figure 54.2 Cultures of Staphylococcus aureus on Vogel-
Johnson Agar. V-J agar is a modified tellurite-glycine agar
containing phenol red indicator and mannitol that is selective for
recovery and identification of coagulase positive S. aureus. S. aureus
grows on this medium and produces gray to black colonies from
the production of free tellurium. A yellow halo is typically seen
around the colonies from the fermentation of mannitol and the
production of an acid pH. Tellurite, lithium chloride, and high
glycine content inhibit the growth of many gram-positive and
gram-negative bacteria.
Table 54.1
Characteristic
Ferments glucose
Mannitol salt agar
Ferments
Growth
Nitrate reduction
Catalase production
Oxidase reaction
Hemolysis
Bile solubility
Some
Characteristics Used to Distinguish Gram-Positive Cocci
S.
aureus
+
+
+
+
+
-
0
~
Micrococcus
-
-
-
Variable
+
+ &-
None
~
spp.
Streptococcus spp.
+
+ &-
+ &-
-
-
-
a, 0 none
-or +
Principles
The genus Staphylococcus (Gr. staphylo, bunch of
grapes) consists of gram-positive cocci, 0.5 to 1.5
|j.m in diameter, usually in irregular clusters, within
which pairs and tetrads are commonly seen (figure
54.1). They are nonmotile and nonsporing. Members
of this genus are facultatively anaerobic. Colonies
are round, convex, mucoid, and adherent to the agar.
They are chemoorganotrophic, requiring
nutritionally rich media. Staphylococci have respiratory and
fermentative metabolism, producing acid but no gas
from carbohydrates (figure 54.2). They are able to
grow on nutrient agar with 5% NaCl and are usually
positive for catalase. Oxidase negative members
contain cytochromes and are Voges-Proskauer
positive. Most species reduce nitrate to nitrite. Optimum
growth is at 37°C. Staphylococci are commensals on
the skin and in the human mouth and upper
respiratory tract. They can be human pathogens.
S. aureus (L. aureus, golden) is the most
important clinical member of this genus. It may be isolated
from the skin or mucous membranes of the body. It
can cause various infections (e.g., carbuncles,
abscesses, pneumonia, endocarditis, food poisoning,
toxic shock syndrome) throughout the body. In
addition, some of these staphylococci are resistant to
penicillin. This resistance comes about when the bacteria
produce penicillinase (6-lactamase), which hydrolyzes
the B-lactam ring of penicillin.
S. epidermidis (Gr. epidermidis, the outer skin) is a
nonpathogenic member of this genus (figure 54.3). It is
part of the normal microbiota of the skin. Additionally,
S. saprophyticus (Gr. sapros, putrid) can be isolated
and may be responsible for urinary tract infections—
especially in females.
Clinical tests for staphylococci are directed
toward (1) separation of the genus Staphylococcus from
other gram-positive cocci (such as Micrococcus or
Streptococcus) and (2) separation of the species
within the genus. Table 54.1 lists some of the
characteristics used to separate members of this genus from
the other genera. Table 54.2 lists characteristics used
334 Medical Microbiology
Harley-Prescott:
Laboratory Exercises in
Microbiology, Fifth Edition
IX. Medical Microbiology 54. Staphylococci
©The McGraw-Hill
Companies. 2002
Table 54.2
:>me
Characteristics of
Staphylococcus Species
Species
Characteristic
Coagulase
Blood agar lysis
Nitrate reduction
Acid produced aerobically
Mannitol
d-trehalose
Sucrose
D-xylose
Novobiocin resistance at an
DNase activity
Gelatinase activity
Pigmentation
MIC
of 5 (ig/ml
S. aureus
+
B
+
+
+
+
-
- (S)
+
+
Yellow
S. epidermidis
-
-/weak
+
-
-
+
-
-(S)
-/weak
-
White
S. saprophyticus
-
-
-
d
+
+
-
+ (R)
-
-
White, yellow
d = 11-89% strains positive
Figure 54.3 Culture of Staphylococcus epidermidis on Blood
Agar. Notice the white, opaque, nonhemolytic, smooth colonies
characteristic of S. epidermidis.
Figure 54.4 Culture of Staphylococci on Blood Agar. Blood
agar plate on which large, smooth, B-hemolytic colonies of S. aureus
are growing. The lysis of the RBCs is due to alpha toxin production.
to differentiate between the three most commonly
isolated Staphylococcus species.
One of the most popular ways to isolate and identify
S. aureus and other gram-positive cocci of medical
importance (exercises 53-56) is tlirough the use of blood
agar plates. Hemolysis patterns are particularly useful in
identification. In a-hemolysis, a zone of greenish
coloration with an indistinct margin forms around colonies
growing on blood agar (see figure 55.2). The color
results from partial decomposition of hemoglobin. B-he-
molysis is a sharply defined zone of clear hemolysis
with no greenish tinge surrounding the colony (figure
54.4). Of course, some gram-positive cocci such as S.
salvarius produce no hemolysis on blood agar.
Mannitol salt agar also can be used for the selective
isolation, cultivation, and enumeration of staphylococci
from chnical and nonclinical specimens (see exercise 16).
Mannitol-using bacteria (e.g., S. aureus) turn the
medium yellow (figure 54.5), whereas those mat do not
use mannitol (e.g., S. epidermidis, S. saprophyticus)
produce no color change (figure 54.6).
This exercise is designed to illustrate (1) methods
of culturing the staphylococci from certain areas of the
human body and (2) the clinical laboratory techniques
Staphylococci 335
Harley-Prescott:
Laboratory Exercises in
Microbiology, Fifth Edition
IX. Medical Microbiology 54. Staphylococci
©The McGraw-Hill
Companies. 2002
Figure 54.5 Culture of Staphylococcus aureus on Mannitol
Salt Agar. Notice that the medium has turned yellow around the
growing bacteria since the bacteria are able to ferment the
mannitol and produce an acid pH.
Figure 54.7 VJ Plate Showing Streak Patterns.
Figure 54.6 Culture of Staphylococcus epidermidis on
Mannitol Salt Agar. Notice the small white colonies that do not
use the mannitol; that is, no color change is observed since no acid
has been produced.
that are used to distinguish pathogenic from
nonpathogenic species.
Procedure
First Period
1. Obtain a nose culture by rotating a moistened
(0.85% saline) swab thoroughly around the
perimeter of both nares (nostrils). Avoid touching
the outside skin area. Seed 1/2 of a Vogel-Johnson
(VJ) plate (figure 54.7).
2. Obtain a skin culture by rolling a moistened swab
up and down the arm. An alternative method is to
swab underneath the fingernails of one hand. Seed
the other half of the VJ plate (figure 54.8).
3. Incubate the plate at 35°C for 24 to 48 hours.
4. Sometimes the isolation of staphylococci is not
always successful; therefore, one can use
enrichment media and selective agars such as
m-staphylococcus broth and mannitol salt agar. In
order to enrich for staphylococci, the swab is
placed in a tube of m-staphylococcus broth and
incubated at 35°C until the medium becomes turbid
(24 to 48 hours). The culture can then be used to
inoculate the VJ plates. Mannitol salt agar can be
used either with, or as a replacement for, VJ agar.
Second Period
1. On the VJ plate, S. aureus will form small, black
colonies surrounded by a yellow zone due to the
fermentation of mannitol (figure 54.2).
S. epidermidis will form smaller black colonies
with no yellow zone due to the inability to
ferment mannitol. These colonies may even be
surrounded by a deep red color. On a mannitol
salt agar plate, S. aureus will form large golden
colonies surrounded by wide yellow zones.
2. Select one presumptive colony of S. aureus and
one presumptive colony of S. epidermidis for
further characterization. If you did not obtain one
of each from your body, use a plate from one of
the other students in the laboratory and inoculate
the following:
a. Blood agar plate. Use a loop and streak for
isolation. Incubate for 24 hours at 35°C.
b. Citrated rabbit plasma. Use a loop for
inoculation of 0.5 ml of the plasma with
suspected S. aureus. Incubate 4 to 6 hours in
a 37°C water bath. A positive test (coagulase
activity) is indicated by the formation of a
clot (figure 54.8).
336 Medical Microbiology
Harley-Prescott:
Laboratory Exercises in
Microbiology, Fifth Edition
IX. Medical Microbiology 54. Staphylococci
©The McGraw-Hill
Companies. 2002
c. DNase test agar. Use a loop for inoculation.
Incubate for 18 to 24 hours at 35°C.
d. Tryptic soy broth. Use a loop for
inoculation. (This broth culture will be used
later to inoculate a Mueller-Hinton plate.)
e. 6-lactamase. To test for 6-lactamase,
aseptically place two 6-lactamase disks into
an empty petri plate and wet each with 2
drops of sterile water. Transfer a large
inoculum of S. aureus and S. epidermidis
from the above cultures to each disk,
Figure 54.8 Coagulase Test. Coagulase producing strains of
S. aureus form a clot (solid fibrin gel) when grown in plasma
(tube on the left), whereas coagulase negative staphylococci
(S. saprophyticus [middle tube] and S. epidermidis [tube on the
right]) do not form a clot.
respectively. Rub onto the surface. The
development of a red color is a positive test
for 6-lactamase.
f. Gelatinase activity. Test for gelatin
hydrolysis as described in exercise 30.
S. aureus is gelatinase positive (+).
3. Use the STAPHAUREX rapid latex test for
detection of S. aureus.
a. Shake the latex reagent bottle to obtain an
even suspension, and dispense a drop into a
circle on the reaction card for each culture to
be tested (figure 54.9a).
b. Take a mixing stick and pick up some of the
culture from the VJ plate by touching it with
the flat end of the stick (figure 54.9b).
c. Emulsify the sample of culture in a drop of
latex by rubbing with the flat end of the stick.
Discard the mixing stick in a proper receptacle.
d. Rotate the card gently (figure 54.9c) and
examine for agglutination for approximately
20 seconds, holding the card at normal
reading distance (25 to 35 cm) from the eyes.
e. A positive result (figure 54.9<i) is indicated
by the development of an agglutination
pattern showing clearly visible clumping of
the latex particles with clearing of the milky
background. Most positive reactions will be
almost instantaneous, indicating the
presence of S. aureus.
Figure 54.9 STAPHAUREX Rapid Latex Test, (a) Add 1 drop of reagent to each circle, (b) Select an isolated colony and pick it up
with a stick, (c) Rotate the card gently after inoculation, (d) Positive and negative results.
Positive
Negative
(d)
Staphylococci 337
Harley-Prescott:
Laboratory Exercises in
Microbiology, Fifth Edition
IX. Medical Microbiology 54. Staphylococci
©The McGraw-Hill
Companies. 2002
Figure 54.10 Novobiocin Susceptibility Test. (Left on plate)
Novobiocin resistance evidenced by lack of zone of inhibition (or a
zone less than 17 mm) surrounding a novobiocin disk. Resistance is
typical of Staphylococcus saprophyticus. (Right on plate) Novobiocin
susceptibility evidenced by a zone of inhibition greater than 16 mm
surrounding the novobiocin disk. Sensitivity is typical of
Staphylococcus epldevinldls and other coagulase-negative staphylococci,
other than S. saphrophyticus.
f. A negative result is indicated when the latex
does not agglutinate and the milky
appearance remains substantially unchanged
throughout the test (figure 54.9d). A negative
test indicates the absence of S. aureus.
Third Period
1. a. Blood agar plate. Observe for pigmentation
and 6-hemolysis (figure 54.4). S. aureus
should form large golden-yellow colonies
surrounded by wide zones of 6-hemolysis.
b. DNase test agar. Flood the plate with 1 N
HC1. A distinct zone around the streak
indicates that the bacterium is DNase
positive (i.e., it breaks down the DNA in the
agar medium) (see figure 29.2).
c. Nutrient gelatin deep. Place in the
refrigerator for 30 minutes. If the gelatin
remains liquid, it has been broken down by
the enzyme gelatinase. If the medium
hardens, gelatinase was not produced by the
bacteria (see figure 27.1).
d. Tryptic soy broth. Inoculate the surface of a
Mueller-Hinton plate with a swab for
susceptibility testing (see exercise 43 and
figure 43.1). Incubate for 16 to 18 hours at
37°C. Three of the antibiotics should be
methicillin, novobiocin (figure 54.10), and
penicillin G. (Test any other antibiotics
assigned by your instructor.) Measure and
record the diameter of the zone of inhibition
(figure 54.10). See table 43.1 to determine
antibiotic sensitivity.
e. Select organisms for Gram staining from the
same colonies that were used for the blood
agar plates.
Fourth Period
1. Observe the susceptibility plate and record in the
report for exercise 54 whether the staphylococci
were susceptible (+) or resistant (-) to the
antibiotics tested.
Penicillin- or Methicillin-Resistant S. aureus
1. If you are successful in isolating S. aureus,
especially if it is penicillin or methicillin resistant,
you may wish to consider the reasons for its
presence. Questions to ask are the following:
a. Sex of individual
b. Age of individual
c. Have you worked in a hospital environment?
For how long?
d. Do you have patient contact?
e. Have you had penicillin or methicillin
within the last 6 months?
f. Have you had any illness caused by S.
aureus? If so, what was it?
g. Has any member of your immediate family
been infected with S. aureus?
2. The instructor may wish to pass out a
questionnaire to the class to determine the
possible reasons for finding S. aureus in the
anterior nares as well as for penicillin or
methicillin resistance.
HINTS AND PRECAUTIONS
(1) When working with the HC1, use the fume hood.
(2) Be sure to carefully measure the diameter of
inhibition zones at the proper time to get accurate results.
338
Medical Microbiology
Harley-Prescott:
Laboratory Exercises in
Microbiology, Fifth Edition
IX. Medical Microbiology 54. Staphylococci
©The McGraw-Hill
Companies. 2002
Laboratory Report j 4
Name:
Date: _
Lab Section:
1. Biochemical Tests
Staphylococci
S. aureus
S. epidermidis
Mannitol fermentation from VJ plate
or mannitol salt plate
Hemolysis (blood agar plate)
Coagulase activity
DNase activity
Gelatinase activity
Pigmentation (blood agar of TSA)
B-lactamase
2. Antibiotic Susceptibility Test
Antibiotics
Novobiocin zone diameter
Penicillin G zone diameter
3. Number of individuals in the class who are "staph" carriers?.
4. Number of individuals who are harboring coagulase-positive staph?_
339
©The McGraw-Hill
Companies. 2002
Review Questions
1. What precautions should be taken by a nurse who is a "staph" carrier?
2. What test can differentiate the tliree major species of Staphylococcus?
3. How would you treat a person who has a carbuncle?
4. Describe the cellular morphology and arrangement of staphylococci?
5. What is the principle behind the rapid STAPHAUREX test?
6. How could you distinguish S. epidermidis from S. saprophytics?
1. Why are staphylococcal infections frequent among hospital patients?
340 Medical Microbiology
Harley-Prescott: IX. Medical Microbiology 54. Staphylococci
Laboratory Exercises In
Microbiology, Fifth Edition
Harley-Prescott:
Laboratory Exercises in
Microbiology, Fifth Edition
IX. Medical Microbiology 55. Pneumococci
©The McGraw-Hill
Companies. 2002
EXERCISE
55
Pneumococci
SAFETY CONSIDERATIONS
Be careful with the Bunsen burner flame. Streptococcus
pneumoniae is a pathogen. Use aseptic technique
throughout this exercise. Use caution when handling the
0.05 N NaOH. No mouth pipetting. Keep all culture
tubes upright in a test-tube rack or in a can.
Materials per Group of Students
1 sample of sputum containing pneumococci, or a
simulated sputum sample can be prepared by
using saliva inoculated with Streptococcus
pneumoniae (ATCC 6303). Tlie specimen may
be placed in sputum cups or petri plates.
3 blood agar plates
1 tuberculin syringe with a 22-gauge, 1/2-inch
needle
culture of viridians streptococci (e.g.,
Streptococcus bovis, ATCC 9809)
1 mouse (optional)
3 clean glass slides
toothpicks
inoculating loops and needles
specific pneumococcus typing sera (types I—III)
for tlie quellung reaction (Difco)
optochin or Taxo P (BBL) disks
Erlenmeyer flask with 1% aqueous methylene blue
wax pencil
2 serological test tubes
phenol red indicator
0.05N NaOH
2% bile (sodium deoxycholate) or 10% sodium
deoxycholate (SpotTest Ampules by Difco)
0.85% saline (NaCl)
serological pipettes with pipettor
37°C water bath
Gram-stain material
Bunsen burner
pH meter or paper
disinfectant for slides
Learning Objectives
Each student should be able to
1. Culture pneumococci from sputum
2. Perform biochemical and serological diagnostic
tests to identify pneumococci and differentiate
them from other a-hemolytic isolates
3. Perform an animal susceptibility test
Suggested Reading in Textbook
1. Streptococcus, section 23.4; see also tables 23.4
and 23.5.
2. Streptococcal Pneumonia, section 39.1.
Pronunciation Guide
Streptococcus bovis (bo-VIS)
S. oralis (OH-ral-is)
S. pneumoniae (new-MOH-nee-eye)
Principles
S. pneumoniae (pneumococci) is tlie causative agent of
many types of diseases (e.g., bacterial lobar pneumonia,
conjunctivitis, otitis media, meningitis, peritonitis).
Thirty to seventy percent of normal individuals harbor
this bacterium in their pharynx. S. pneumoniae is a
gram-positive coccus (tlie distal ends are lancet-shaped),
usually arranged in pairs or short chains (figure 55.1). It
also occurs singly. Tlie pneumococci are somewhat
fastidious in their nutritional needs and do not survive well
in competition with other microbiota. Tlie medium of
choice for culturing pneumococci is blood agar (figure
55.2). Colonies that form on this medium appear small
and shiny with a dense center and a lighter, raised
margin, giving them a dimpled appearance. The hemolytic
pattern observed on blood agar is a-hemolysis (a zone
of greenish coloration occurs around the colonies). In
contrast, S. oralis colonies are smaller, gray to whitish
gray, and opaque with smooth edges.
341
Harley-Prescott:
Laboratory Exercises in
Microbiology, Fifth Edition
IX. Medical Microbiology 55. Pneumococci
©The McGraw-Hill
Companies. 2002
Figure 55.1 Morphology of Pneumococci. Gram stain of a
direct smear illustrating several short chains and many gram-
positive Streptococcus pneumoniae diplococci clumped together
(XI,000).
Figure 55.2 Streptococcus pneumoniae on Blood Agar. Notice
the zone of inhibition around the optochin disk. This indicates
sensitivity, a characteristic useful in distinguishing S. pneumoniae
from other a-hemolytic streptococci.
The Neufeld (named after Fred Neufeld, German
bacteriologist, 1861-1945) or quellung reaction
(German for swelling) is a serological test used to
determine the specific capsular type around the bacteria.
More than 80 types of pneumococci have been
differentiated by the immunologically distinct
polysaccharide structure in their capsules determined by this
reaction. The test consists of combining the
encapsulated bacteria with antibody directed against the
capsular structure. If the mixture is homologous (type I
bacteria + anti-type-I serum), an apparent swelling of
the capsular structure is observed microscopically at
l,000x. If the reaction is nonspecific (type I bacteria +
anti-type-III serum), no appearance of swelling will
be seen. The quellung reaction is now only performed
for research interest or epidemiological surveys. Since
the advent of antibiotics, there is no longer a need to
determine specific capsular type.
More presumptive tests for pneumococci are bile
solubility and optochin tests. In the bile solubility
test, pneumococci will dissolve in bile (2 to 10%
sodium deoxycholate), whereas alpha streptococci will
not. In the optochin test, the pneumococci exhibit
sensitivity to optochin (ethylhydrocupreine) and will lyse,
but alpha streptococci are unaffected (figure 55.2).
This exercise is designed to acquaint the student
with methods of culturing the pneumococci from
sputum, performing biochemical and serological
diagnostic tests, and experimenting with animal susceptibility.
Procedure
First Period
1. Using an inoculating loop, inoculate 1/3 of a
blood agar plate with the sputum sample.
Restreak the plate with a sterile loop to obtain
isolated colonies. Do the same for S. bovis.
2. The following can be done as a demonstration by
the instructor. Inoculate a mouse intraperitoneally
with 0.5 ml of sputum using a sterile tuberculin
syringe. To do this, place the mouse on the top of
a wire basket or cage. Hold the tail firmly with
one hand and grasp the skin over the nape of the
neck with the thumb and forefinger. Place the tail
between the little finger and palm of the same
hand. Pull the tail so that the mouse is held firmly.
Take the syringe and place the needle between the
forefinger and thumb. Gently pass the needle
through the skin into the abdominal cavity, inject
the contents, and then withdraw the syringe.
Observe the animal daily. If it dies before the next
laboratory period, place it in the refrigerator.
3. Using the quellung reaction, type the
pneumococcus from the sputum with the type
I—III antisera provided as follows:
a. Place a loopful of sputum on three clean slides.
b. Transfer 3 small drops of specific antisera to
the slides next to the sputum.
c. Transfer 2 loopfuls of methylene blue to the
slides and then mix the three materials
together in a small area with a toothpick.
Cover with a coverslip and examine, first
under high-dry and men under oil. Compare
one antiserum preparation with the other.
The enlargement of one of the capsular
structures around the diplococci is a positive
test for the specific type.
342 Medical Microbiology
Harley-Prescott:
Laboratory Exercises in
Microbiology, Fifth Edition
IX. Medical Microbiology 55. Pneumococci
©The McGraw-Hill
Companies. 2002
4. The bile solubility test is performed as follows:
a. Using a wax pencil, mark one of the
serological tubes "bile" and the other
"saline." Place your name on the tubes.
Pipette 0.5 ml of bile and saline into the
respective tubes.
b. With the inoculating loop, transfer 2
loopfuls of sputum into each tube.
c. Add 2 drops of phenol red indicator to each
tube. Adjust the pH to 7.0 with the 0.05 N
NaOH.
d. Place both tubes in a 37°C water bath and
examine at 30-minute intervals for 2 hours.
If the turbidity clears in the bile tube, it
indicates that the bacteria have disintegrated
and the test is positive for S. pneumoniae.
e. The bile solubility test can also be carried
out on isolated colonies. Simply place 1 or 2
drops of 10% deoxycholate on the suspected
colony and observe it carefully. If the colony
dissolves or flattens and disappears in about
5 minutes, it is bile soluble.
Second Period
1. Observe for colonies of pneumococci on the blood
agar, if possible, with a dissecting scope. Inoculate
a colony believed to be pneumococci from the
sputum sample over 1/2 of a blood agar plate. Keep
the streaks close together. Streak the other half with
a broth culture of the a-hemolytic streptococcus
provided. Place an optochin-impregnated disk or
Taxo P disk in the center of each streaked area and
incubate at 35°C for 24 hours.
2. If a mouse was infected with S. pneumoniae
during the first period, kill it and make cultures of
blood from the heart and/or peritoneal exudate on
a blood agar plate. Smear and Gram stain the
blood and/or peritoneal exudate, and examine for
white cells and pneumococci. Perform a quellung
reaction on the peritoneal exudate.
Third Period
1. Examine bom the alpha streptococci and
pneumococci for optochin susceptibility. S.
pneumoniae should have a zone of inhibition >14
mm in width when %-inch disks are used. Also
examine the blood and/or peritoneal exudate.
2. Complete the report for exercise 55.
HINTS AND PRECAUTIONS
(1) If the student or instructor does not have experience
working with mice, it is advisable to obtain
commercially available mouse restrainers for inoculation of
mice. (2) A mouse is most rapidly and efficiently killed
using cervical dislocation or with ether in a fume hood.
(3) A candle jar {see figure 57.4) can also be used to
create a microaerophilic environment preferred by many
pneumococci.
Pneumococci 343
Harley-Prescott: I IX. Medical Microbiology I 55. Pneumococci I I ©The McGraw-Hill
Laboratory Exercises in Companies. 2002
Microbiology, Fifth Edition
Laboratory Report j j
Name:
Date: _
Lab Section:
Pneumococci
1. Description of a S. pneumoniae colony.
2. Description of a S. mitis colony.
3. Optochin susceptibility:
a. S. pneumoniae
b. S. bovis
4. Quellung reaction:
a. Type I
b. Type II
c. Type III
5. Clinical observations from the mouse experiment:
6. Pneumococcus suspension with bile
7. Pneumococcus suspension without bile
345
©The McGraw-Hill
Companies. 2002
Review Questions
1. What differentiates sputum from saliva?
2. What does the optochin test illustrate?
3. Describe the quellung reaction.
4. How can you differentiate between S. mitis and S. pneumoniae ?
5. What does the bile solubility test indicate?
6. What type of hemolysis is produced by S. pneumoniae ?
1. What role does a bacterial capsule play in an infection?
346 Medical Microbiology
Harley-Prescott: IX. Medical Microbiology 55. Pneumococcl
Laboratory Exercises In
Microbiology, Fifth Edition
Harley-Prescott:
Laboratory Exercises in
Microbiology, Fifth Edition
IX. Medical Microbiology 56. Streptococci
©The McGraw-Hill
Companies. 2002
EXERCISE
56
Streptococci
SAFETY CONSIDERATIONS
Be careful with the Bunsen burner flame. No mouth
pipetting. Streptococcus spp. are potential pathogens.
Use aseptic technique throughout this exercise. Keep all
culture tubes upright in a test-tube rack or in a can.
Materials per Group of Students
20 ml streptolysin O buffer
6 ml sheep RBCs in 5% buffer
5 ml streptolysin O reagent
0.5 ml test antisera for streptolysin O antibody
9 serological test tubes
5 1-ml pipettes with pipettor
3 5-ml pipettes
1 10-ml pipette
1 tryptic soy broth culture of Streptococcus equi
(Group C (3-hemolytic, ATCC 33398)
1 tryptic soy broth culture of Streptococcus mitis
(Group D, a-hemolytic, ATCC 903)
1 tryptic soy broth culture of Streptococcus
pyogenes (Group A (3-hemolytic streptococci,
ATCC 14299)
1 tryptic soy broth culture of a non-Group A
(3-hemolytic streptococci (e.g., Streptococcus
agalactiae, ATCC 13813). S. agalactiae is a
member of group B.
1 tryptic soy broth culture of Staphylococcus
aureus (ATCC e25923)
sheep blood agar plates
bacitracin disks
SXT disks (Difco)
4 bile esculin agar slants
Gram-stain material
Bunsen burner
inoculating loop
disinfectant for slides
forceps
Learning Objectives
Each student should be able to
1. Become familiar with morphological and colonial
characteristics of the streptococci as well as their
medical significance
2. Perform several biochemical and serological tests
to identify S. pyogenes
3. Compare and contrast the alpha streptococcus
S. mitis with S. pyogenes
4. Show how bacitracin sensitivity, the CAMP
reaction, and SXT sensitivity are used to
differentiate the Lancefield groups of (3-hemolytic
streptococci.
Suggested Reading in Textbook
1. Streptococcus, section 23.4; see also tables 23.4
and 23.5.
2. Streptococcal Diseases, section 39.1.
Pronunciation Guide
Staphylococcus aureus (staf-il-oh-kok-kus ORE-ee-us)
Streptococcus (strep-to-KOK-us)
S. agalactiae (a-gal-ACT-e-a)
S. bovis (bo-VIS)
S. equi (e-qy)
S. mitis (MY-tiss)
S. mutans (MYOO-tans)
S. pyogenes (pi-OJ-e-neez)
S. salvarius (sal-vah-REE-uss)
Principles
The streptococci are gram-positive cocci arranged in
chains (figure 56.1). Streptococci are classified
according to their hemolytic activity, immunologic properties
(the serological classification of Lancefield), and
resistance to chemical and physical factors. The bacterium
you will study in this exercise is S. pyogenes.
347
Harley-Prescott:
Laboratory Exercises in
Microbiology, Fifth Edition
IX. Medical Microbiology 56. Streptococci
©The McGraw-Hill
Companies. 2002
Figure 56.1 Morphology of Streptococci. Gram stain smear
of exudate illustrating a long chain (since cell division occurs in
one plane) of gram-positive cocci characteristic of streptococci.
Figure 56.2 Streak Plate of Streptococci on Blood Agar.
This blood agar plate illustrates the small, semitranslucent gray-
white colonies of streptococci surrounded by zones of B-hemolysis.
Streptolysins produced by S. pyogenes (Gr. pyum,
pus) cause the lysis of red blood cells in vitro,
producing B-hemolysis (a clear zone of hemolysis with no
color change) on blood agar (figure 56.2). Two types
of beta lysins are produced: streptolysin O and
streptolysin S. The former is oxygen-labile, while the latter
is oxygen-stable. Streptolysin O is demonstrated only
in deep colonies on the blood agar medium. Since
most strains of S. pyogenes produce both types of
lysins, surface hemolysis is generally observed.
Streptolysin O is also immunogenic, and
antistreptolysin O can neutralize the effect of this lysin.
The measurement of the serum level of this antibody
is called anti-streptolysin O titration (ASO).
Streptolysin S is nonimmunogenic. The ASO test is
routinely used in the diagnosis of recent streptococcal
infections that may have caused diseases such as
rheumatic fever or glomerulonephritis. Following an
infection due to Group A streptococci, the antibody in
the individual's serum will begin to rise in 2 to 3
weeks and level off in 5 to 6 weeks. The titer of
antibody is measured in Todd units (named after
American bacteriologist E. W. Todd in 1932). A Todd unit is
the reciprocal of the final dilution of serum used in
the test that shows no hemolysis. A titer greater than
125 Todd units suggests a recent (J-hemolytic, Group
A streptococcal infection.
S. pyogenes is classified as Group A, based on a
chemical substance known as C carbohydrate (an
antigenic, group-specific hapten) found in the cell wall.
There are 18 to 20 different immunologic groups of
streptococci (A to O, excluding I and J) based on the
presence of C factor. The specific type is determined
by precipitin analysis. Members of Group A, such as S.
pyogenes, are the streptococci most often responsible
for human infections. Some diseases in humans caused
by Group A streptococci include tonsillitis, septic sore
throat, scarlet fever, otitis media, rheumatic fever,
meningitis, erysipelas, acute endocarditis, and
glomerulonephritis. S. pyogenes produces many
enzymes and toxins such as streptokinase, leukocidins,
streptodornase, hyaluronidase, hemolysins
(streptolysin O and S), nucleases, and erythrogenic toxin.
The medium of choice for S. pyogenes is blood
agar. On blood agar, the colonies are opaque,
domed, about 0.5 mm in diameter, and surrounded
by a zone of (J-hemolysis. The optimal temperature
for growth is 35°C.
S. pyogenes may be found in the throat and
nasopharyngeal areas of humans. Also found in these
areas are the viridans streptococci (e.g., S. salvarius,
S. mutans) that produce either a-hemolysis (as
evidenced by the greenish to gray pigmentation produced
around the colony growth on blood agar or no
hemolysis. The viridans streptococci do not produce C
carbohydrate and are usually nonpathogenic
opportunists. S. bovis (L. bos, cow) is an example of a
member of the viridans streptococci group.
In addition to hemolysis, S. pyogenes can be
distinguished from viridans streptococci by means of the
bacitracin sensitivity test. In this test, a filter paper disk
impregnated with 0.04 units of bacitracin is applied to
the surface of a blood agar plate that has been
previously streaked with the bacteria to be identified. The
appearance of a zone of inhibition surrounding the disk is
a positive test for Group A streptococci (figures 56.3
348 Medical Microbiology
Harley-Prescott:
Laboratory Exercises in
Microbiology, Fifth Edition
IX. Medical Microbiology 56. Streptococci
©The McGraw-Hill
Companies. 2002
Figure 56.3 The Group A and Group C Streptococcal
Responses to Bacitracin and SXT.
Group A, p-hemolytic
S. pyogenes
Group C, p-hemolytic
S. equi
Figure 56.5 The CAMP Test for Distinguishing Group B
Streptococci from Other B-Hemolytic Streptococci.
Group B
streptococci
with arrowhead
zone of increased
hemolysis
(CAMP test +;
S. aureus
Group A
streptococci with
no increased
hemolysis
(CAMP test-)
Figure 56.4 Bacitracin Sensitivity Test. The right half of this
blood agar plate was inoculated with a pure culture of a Group A
B-hemolytic streptococcus. The left half of the plate was
inoculated with Streptococcus inltls. The two disks contain 0.04 fig
bacitracin. After 24 hours of incubation, the inhibition of growth
around the antibiotic (disk on the right) is a positive bacitracin test.
The bacteria on the left are bacitracin resistant.
Group D streptococci (S. mitis; L. mitis, mild)
and enterococci can be differentiated from other
streptococci by using bile esculin agar slants. Group
D streptococci grow readily on the bile esculin agar
and hydrolyze the esculin, imparting a dark brown
color to the medium. This reaction denotes their bile
tolerance, ability to hydrolyze esculin, and
constitutes a positive reaction. Gram-positive bacteria
(other than group D streptococci and enterococci) are
inhibited by the bile salts.
This exercise is designed to familiarize the
student with the morphological and colonial
characteristics, diagnostic tests (table 56.1), and serological
identification of S. pyogenes. Also included is the
comparison of the usually nonpathogenic alpha
streptococci (S. mitis) with the pathogenic S. pyogenes.
Procedure
and 56.4). An absence of a zone of inhibition suggests
non-Group A bacteria (e.g., Group C). S. pyogenes is
also resistant to SXT disks, which contain a mixture of
1.25 Llg trimethoprim and 27.75 Llg of
sulfamethoxazole. Viridans streptococci are inhibited by these
agents.
Group B streptococci can be distinguished from
other P-hemolytic streptococci by their production of
a substance called the CAMP factor. CAMP is an
acronym for the names of the investigators (Christie,
Atkins, and Munch-Petersen) who first described the
factor. This factor is a peptide that acts together with
the P-hemolysin produced by some strains of S.
aureus, enhancing the effect of the latter on a sheep
blood agar plate (figure 56.5).
First Period
Determination of Anti-Streptolysin O Antibody [ASO]:
A Demonstration
1. The following reagents will be used:
a. Streptolysin O buffer
b. Red blood cell suspension (5% sheep red
blood cells in buffer)
c. Streptolysin O reagent (lyophilized enzyme
preparation, which must be reconstituted by
adding distilled water to the ampule in the
amount indicated on the label. It is prepared
only when ready to be added to the diluted
serum).
d. Serum dilution—the following dilutions of
serum, heated at 56°C for 30 minutes, will
be prepared in buffer:
1/10, 0.05 ml serum + 4.5 ml of buffer
1/100, 1.0 ml of the 1/10 dilution + 9 ml of
buffer
Streptococci 349
Harley-Prescott:
Laboratory Exercises in
Microbiology, Fifth Edition
IX. Medical Microbiology 56. Streptococci
©The McGraw-Hill
Companies. 2002
Table 56.1
Group Species
A
S. pyogenes
S. agalactiae
S. equi
E. faecalis
S. bovis
Viridans
S. salvarius
S. mitis
S. inutans
Diagnostic Tests for
Hemolysis
P
P
P
a, |3, or none
a or none
Streptococcal Differentiation
Bacitracin Sensitivity
Sensitive
Resistant
Resistant
Resistant
Resistant
(some sensitive)
CAMP
-
+
-
_
-
Bile Esculin
-
-
-
+
-
SXT Sensitivity
Resistant
Resistant
Sensitive
Resistant
(some sensitive)
Sensitive
Table 56.2 Protocol for the ASO Test
Tube No.
ml serum dilution 1/10
ml serum dilution 1/100
ml of buffer
Shake gently
Rehydrate streptolysin
ml streptolysin O reagent
Shake gently
Incubate at 37°C for 15 minutes
ml 5% RBC
Shake gently
Incubate at 37°C for 45 minutes
Shake once after 15 minutes
Centrifuge tubes for 1 minute at 1,500 rpm
Examine
Degree of hemolysis 0 to 4+ ; 0 = no hemolysis;
4+ = complete hemolysis
Unit value of each tube in Todd units
1
0.8
-
0.2
0.5
0.5
12
2
0.2
-
0.8
0.5
0.5
50
3
-
1.0
0
0.5
0.5
100
4
-
0.8
0.2
0.5
0.5
125
5
-
0.6
0.4
0.5
0.5
166
6
-
0.4
0.6
0.5
0.5
250
7
-
0.3
0.7
0.5
0.5
333
Buffer-Red
Cell Control
8
-
-
1.5
0.5
-
Streptolysin
Control
9
-
-
1.0
0.5
0.5
-
2. Your instructor will demonstrate the ASO test
according to the protocol illustrated in table 56.2.
Study of Streptococci
1. Each group of students is to inoculate one blood
agar plate with Group A, (J-hemolytic S. pyogenes
and another plate with Group C (J-hemolytic S.
equi. Use a loop to inoculate. A viridans
streptococcus such as S. salvarius can be used in
place of S. equi.
2. Place a bacitracin disk and an SXT disk on the
plates. Be sure to place the disks on opposite sides
of the plates, in well-inoculated areas. Incubate
the plate for 24 hours at 35°C. Do not invert.
3. With an inoculating loop, streak a strain of S.
aureus down the center of a blood agar plate. On
one side of the plate, inoculate a strain of Group
B streptococci (S. agalactiae) by making a streak
at a 90° angle, starting 5 mm away from the S.
aureus and extending outward to the edge of the
agar. On the other side of the plate, inoculate the
strain of Group A streptococci (S. pyogenes). This
streak should not be directly opposite the Group B
streak.
4. Incubate the plates at 35°C for 24 hours.
5. Inoculate 1 bile esculin agar slant with S. equi,
1 with S. mitis, 1 with S. agalactiae, and 1 with
S. pyogenes. Incubate the slants at 35°C for 24 hours.
Second Period
1. Examine the plates for bacitracin and SXT
susceptibility. A zone of bacitracin inhibition
350 Medical Microbiology
Harley-Prescott: I IX. Medical Microbiology I 56. Streptococci I I ©The McGraw-Hill
Laboratory Exercises in Companies. 2002
Microbiology, Fifth Edition
greater than or equal to 14 mm in diameter
indicates the presence of Group A streptococci.
There will not be a zone around the non-Group A
streptococci. Positive SXT results for the presence
of Group C streptococci are indicated by a zone
of inhibition greater than or equal to 16 mm in
diameter. There will not be a zone around the
non-Group C.
2. Observe the area of hemolysis around the S.
aureus streak. At the point adjacent to the streak
of Group B streptococci, you should be able to
see an arrowhead-shaped area of increased
hemolysis indicating the production of the CAMP
factor. There should be no change in the
hemolytic zone adjacent to the streak of the
Group A streptococci since most strains do not
produce the CAMP factor.
3. Gram stain each group of streptococci from the
blood agar plates.
4. Examine the bile esculin agar slants for any color
change. A dark brown color change is a positive
reaction for group D streptococci. No color
change is a negative reaction.
5. Complete the report for exercise 56.
HINTS AND PRECAUTIONS
(1) It should be noted that the zone of hemolysis around
the bacitracin disk is so distinct because a pure culture
is being used. If this is not so, then your stock culture
is probably contaminated. (2) Sometimes it is easiest to
observe hemolysis by examining the zone with the
4x objective of a compound microscope. Any intact
erythrocytes are readily seen.
Streptococci 351
Harley-Prescott: IX. Medical Microbiology 56. Streptococci
Laboratory Exercises In
Microbiology, Fifth Edition
©The McGraw-Hill
Companies. 2002
Laboratory Report jq
Name:
Date: _
Lab Section:
Streptococci
1. Serum titer in Todd units:
2. Streptococci.
Bacterium Gram Stain Group
Colony on Bacitracin SXT Bile Esculin
CAMP Factor Blood Agar Hemolysis Sensitivity Sensitivity Hydrolysis
S. mitis
S. pyogenes
S. equi
S. agalactiae
353
Harley-Prescott: I IX. Medical Microbiology I 56. Streptococci I I ©The McGraw-Hill
Laboratory Exercises in Companies. 2002
Microbiology, Fifth Edition
Review Questions
1. How could you determine if a sore tliroat was caused by S. pyogenes (Group A, 8 hemolytic)?
2. What types of diseases are caused by S. pyogenes?
3. What is a Todd unit?
4. Do all Group A streptococci produce erythrogenic toxin? Explain your answer.
5. What is the purpose of the ASO test? When would you use it in a clinical laboratory?
6. What is SXT sensitivity? CAMP factor? What organisms are identified by those tests?
7. How would you differentiate between a- and (J-hemolysis?
354 Medical Microbiology
Harley-Prescott:
Laboratory Exercises in
Microbiology, Fifth Edition
IX. Medical Microbiology 57. Neisseriae
©The McGraw-Hill
Companies. 2002
EXERCISE
57
Neisseriae
SAFETY CONSIDERATIONS
Be careful with the Bunsen burner flame. The catalase
reagent (3% hydrogen peroxide) and 1 N HC1 are
caustic. Work with them in the fume hood. No mouth
pipetting. Neisseria spp. are potential pathogens. Use aseptic
technique throughout this experiment. Keep all culture
tubes upright in a test-tube rack or in a can.
Learning Objectives
Each student should be able to
1. Become familiar with the clinical isolation and
identification of Neisseria species
2. Perform isolation and biochemical tests to
differentiate N. gonorrhoeae, N.flavescens, and
M. nonliquefaciens
Materials per Group of Students
1 tryptic soy agar plate
1 modified Thayer-Martin plate
3 tubes enriched nitrate broth containing
Durham tubes
candle jar
1 stock culture of Neisseria gonorrhoeae (ATCC
9793)
1 stock culture of Neisseria flavescens (ATCC
13120)
1 stock culture of Moraxella nonliquefaciens
(ATCC 19975)
3 CTA (cystine tryptic agar) glucose medium
tubes
3 CTA fructose medium tubes
3 CTA maltose medium tubes
3 CTA sucrose medium tubes
indophenol oxidase reagent or Difco SpotTest
Oxidase reagent
catalase reagent (3% hydrogen peroxide)
nitrate test reagents
DNase test agar plate
1-ml pipettes with pipettor
Gram-stain reagents
glass slides
wax pencil
37°C incubator
prepared slides of Neisseria gonorrhoeae exudate
1NHC1
Bunsen burner
Suggested Reading in Textbook
1. Order Neisseriales, section 22.2.
2. Gonorrhea, section 39.3.
Pronunciation Guide
Moraxella nonliquefaciens (mo-rak-SEL-ah non-li-
kwe-FA-sens)
Neisseria flavescens (nis-SE-re-ah flav-ES-sens)
N. gonorrhoeae (go-nor-REE-ah)
N. lactamica (lak-tam-ica)
N. mucosa (MU-cosa)
N. sicca (sik-ah)
N. subflava (sub-FLA-vah)
Principles
The family Neisseriaceae includes bacteria that are
gram-negative cocci occurring in pairs or groups. The
two species that are pathogenic in humans are N.
gonorrhoeae (Gr. gonorrhoea, gonorrhea), which causes
gonorrhea, and N. meningitidis (Gr. meninx, the
membrane enclosing the brain), which causes cerebrospinal
meningitis. Since these bacteria are very fastidious and
sensitive to changes in the atmosphere, the following
precautions must be taken in isolating and culturing
them: (1) highly enriched media must be used, and
(2) the bacteria must be incubated in an increased CO2
and water atmosphere.
Other nonpathogenic Neisseria may be isolated
from the respiratory tract of humans. These include
355
Harley-Prescott:
Laboratory Exercises in
Microbiology, Fifth Edition
IX. Medical Microbiology 57. Neisseriae
©The McGraw-Hill
Companies. 2002
Table 57.1
Some Distinguishing Characteristics of Neisseria and Moraxella
Bacteria
Characteristic
N. gonorrhoeae
N. flavescens
M. nonUquefaciens
Growth on soy agar at 35 to 37°C
Growth on modified Thayer-Martin agar, Martin-Lewis
agar, or New York City medium at 35-37°C
Acid produced from
Glucose
Fructose
Maltose
Sucrose
Lactose
Reduction of
N03
N02
Colony pigmentation
Colony morphology
DNase
Catalase
Oxidase
None
Gray to white, smooth
Yellow
Opaque, smooth
None
Opaque, smoodi
N. sicca, N. subflava, N. flavescens, N. mucosa, and
N. lactamica. Moraxella nonUquefaciens is also
commonly found in the respiratory tract. However, it
is a gram-negative rod that produces cocci only in a
stationary culture. All of these bacteria can be
distinguished from the pathogenic species by their
fermentation patterns, nitrate and nitrite reduction
characteristics, and growth patterns on enriched and nutrient
agars (table 57.1).
The purpose of this exercise is to acquaint the
student with methods of clinical laboratory identification of
the Neisseria species. M. nonUquefaciens will also be
studied because of its practical laboratory implications—
it is the only species that produces DNase.
Procedure
First Period
1. Gram stain the known stock cultures of N.
gonorrhoeae (figure 57.1), N. flavescens, andM
nonUquefaciens. Note the resistance of M.
nonUquefaciens to decolorization.
2. Carefully examine the prepared slide of a N.
gonorrhoeae exudate. Notice the many white
blood cells that are present (figure 57.2).
3. Warm the media to be used to room temperature.
With a wax pencil, divide the bottom of a tryptic
soy agar plate, modified Thayer-Martin plate, and
DNase plate into three sections. Modified Thayer-
Figure 57.1 Morphology of Neisseria. Gram stain of a culture
of N. gonorrhoeae showing the gram-negative cocci occurring most
in pairs; some have formed clumps during the staining procedure
(XI,000).
Figure 57.2 Gram Stain of a Urethral Discharge Showing
Acute Gonococcal Urethritis. Note the presence of the
intracellular gram-negative diplococci within the pale-staining
segmented neutrophil.
356 Medical Microbiology
Harley-Prescott:
Laboratory Exercises in
Microbiology, Fifth Edition
IX. Medical Microbiology 57. Neisseriae
©The McGraw-Hill
Companies. 2002
Figure 57.3 Typical Colonies of N. gonorrheae on Modified
Thayer-Martin Medium. Notice that the gonococcal colonies are
typically small, raised, glistening, and gray-white as shown here.
Figure 57.4 A Candle Jar,
I
Martin agar is one of the recommended media
when Neisseria spp. are suspected (table 57.1 and
figure 57.3). With the wax pencil, place your
name, date, and the name of the respective
bacteria to be inoculated on the plates. Streak
each section for isolation with the respective
bacteria.
4. Incubate the plates at 37°C in a candle jar that
contains a dampened paper towel for providing a
humid atmosphere (figure 57.4) for 24 to 48
hours. (The candle jar provides an anaerobic
environment as the burning candle uses up the O2
in the sealed jar.)
5. Inoculate the enriched nitrate tubes with the
respective bacteria. Label with your name, date,
and the name of the bacteria. Incubate for 24 to
48 hours at 37°C (see figure 34.1).
6. Heavily inoculate the following CTA carbohydrate-
containing media tubes just below the surface (Do
not go deep into the medium): glucose, maltose,
fructose, and sucrose. Tighten the caps and
incubate at 37°C. Examine daily for 5 days or until
acid production is seen (see figure 20.2).
7. Add 1 to 2 drops of oxidase reagent to each stock
culture. A positive oxidase test is indicated by a
darkening of the color of the colony within 20 to
30 seconds. This color will eventually turn
purple.
8. To test for catalase, pipette several milliliters of
the hydrogen peroxide reagent over select
colonies. The appearance of gas bubbles indicates
a positive test; the absence of gas bubbles is a
negative test (see figure 28.1).
Second Period
1. Note the characteristics of any isolated colonies
of N. gonorrhoeae, N. flavescens, and M.
nonliquefaciens on tryptic soy, modified Thayer-
Martin agar, and DNase plates. Describe these
colonies.
2. Test and observe the nitrate broth cultures for the
reduction of nitrate and/or nitrite (see figure 34.1).
3. Read the results of the carbohydrate degradation
tubes.
4. Complete the report for exercise 57.
Neisseriae 357
Harley-Prescott: I IX. Medical Microbiology I 57. Neisseriae I I ©The McGraw-Hill
Laboratory Exercises in Companies. 2002
Microbiology, Fifth Edition
Laboratory Report j /
Name:
Date: _
Lab Section:
Neisseriae
1. Neisseria and Moraxella culture data (colony size, form, surface, margin, color).
2.
Agar N. gonorrhoeae
Trvptic sov agar
Modified Thaver-Martin medium
Neisseria and Moraxella biochemical data.
Test N. gonorrhoeae
N. fiavescens
N. fiavescens
M. nonliquefaciens
M. nonliquefaciens
Oxidase (+ or -)
Catalase (+ or -)
DNase (+ or -)
Acid production
Glucose
Fructose
Maltose
Sucrose
Nitrate and nitrate reduction
Nitrate
Nitrite
Gram stain
Reaction
Morphology
Arrangement
Harley-Prescott: IX. Medical Microbiology 57. Nelsserlae
Laboratory Exercises In
Microbiology, Fifth Edition
©The McGraw-Hill
Companies. 2002
Review Questions
1. From what type of clinical specimen would one expect to isolate N. gonorrhoeae ? M. nonliquefaciens ?
2. Why is the oxidase test useful in the separation of gram-negative, facultatively anaerobic bacteria?
3. Give one example in which gonococci might give a false negative test in a CTA carbohydrate test.
4. How does a candle jar function?
5. Since the Neisseria are fastidious and sensitive to atmospheric changes, what precautions must be taken in
isolating and culturing them?
6. How are pathogenic Neisseria identified?
7. What are intracellular gram-negative diplococci?
360 Medical Microbiology
Harley-Prescott:
Laboratory Exercises in
Microbiology, Fifth Edition
IX. Medical Microbiology
58. Aerobic and Anaerobic
Endospore-Forming
Bacteria
©The McGraw-Hill
Companies. 2002
EXERCISE
58
Aerobic and Anaerobic Endospore-Forming Bacteria
SAFETY CONSIDERATIONS
Be careful with the Bunsen burner flame. Handle all
bacteria as if they are pathogens. Use aseptic technique
throughout this experiment. Keep all culture tubes
upright in a test-tube rack or in a can.
Materials per Group of Students
1 tryptic soy agar plate
1 24-hour tryptic soy broth culture of Bacillus
subtilis (ATCC 6051)
1 36-hour tryptic soy agar slant of Bacillus
megaterium
1 24-hour sodium thioglycollate broth culture of
Clostridium perfringens (ATCC 3620)
2 blood agar plates
spore-staining material (see exercise 11)
anaerobic jar, GasPak System (BBL), or Oxyrase
plate
wax pencil
inoculating loop
35°C incubator
clean glass slides
Bunsen burner
Gram-stain reagents
test-tube rack or can
Learning Objectives
Each student should be able to
1. Perform aerobic and anaerobic cultures on
endospore-forming bacteria
2. Do an endospore stain
Suggested Reading in Textbook
1. The Bacilli and Lactobacilli, section 23.4; see
also tables 23.2 and 23.3, and figures 23.5, 23.6,
and 23.8.
2. Anthrax, section 39.3.
3. Gas Gangrene, section 39.3.
4. Tetanus, section 39.3.
5. Botulism, section 39.4.
Pronunciation Guide
Bacillus subtilis (bah-SIL-lus sub-til-us)
B. megaterium (meg-AH-ter-ee-um)
Clostridium perfringens (klos-STRID-ee-um per-
FRIN-jens)
Principles
Bergey's Manual lists six gram-positive, endospore-
forming genera. The most thoroughly studied and
most important are Bacillus and Clostridium.
The genus Bacillus (e.g., B. subtilis, B.
megaterium) is aerobic, or sometimes facultatively
anaerobic, and catalase positive. Bacillus species are
ubiquitous in soil and are common laboratory contaminants.
In older cultures, these bacteria will lose their ability
to retain the primary stain (crystal violet) in the Gram
reaction. Under adverse conditions, Bacillus spp. form
endospores (figure 58.1a,£>). Subgroups of the
Bacillus genus have been constructed based on endospore
shape (oval, spherical), position of the spore in the
cell (central, terminal), and the species' ability to
ferment sugars. Most members of this group are motile,
some produce capsules, some are thermophilic (heat-
loving), and with the exceptions of B. anthracis (the
etiologic agent of anthrax) and B. cereus (the etio-
logic agent of gastroenteritis), are nonpathogenic.
Members of the genus Clostridium are obligately
anaerobic and lack both catalase and a complete
electron transport chain. The endospores may be central,
subterminal, or terminal in position, and spherical or
oval in shape. Like Bacillus, bacteria of this genus tend
to give a gram-negative stain in older cultures.
Clostridium bacteria are widely distributed in the soil and in the
intestinal tract of humans and other animals. Three
species are of medical importance: C. tetani, which
causes tetanus (figure 58.1<i); C. botulinum, which
causes botulism; and C perfringens, which causes gas
gangrene and food poisoning (figure 58.1c). Tetanus is
caused by C tetani endospores entering tissue with a
low oxidation-reduction potential. The spores germinate,
361
Harley-Prescott:
Laboratory Exercises in
Microbiology, Fifth Edition
IX. Medical Microbiology
58. Aerobic and Anaerobic
Endospore-Forming
Bacteria
©The McGraw-Hill
Companies. 2002
Figure 58.1 Bacterial Endospores. (a) Bacillus suhtilis. Notice that the spores are elliptical and central (xl,000). (b) Bacillus megaterium.
Notice the large elliptical central spores (xl,000). (c) Clostridium perfringens. Notice that the spores are elliptical, and central or subterminal,
cells slightly swollen (xl,000). (d) Clostridium tetani. Notice that the spores are round and terminal (xl,000). (e) Bacillus suhtilis on blood
sugar. The large, irregular, rough and waxy colonies are surrounded by zones of B-hemolysis.
(a)
(b)
(c)
(d)
(e)
and the bacteria excrete exotoxins. Botulism is the
result of the ingestion of foods containing the botulinum
exotoxin, which is produced by C. botulinum. Gas
gangrene results when C. perfringens (also C. novyi,
C. septicum, or C. histolyticum) is introduced into
tissue that has been injured. When anaerobiosis occurs in
the surrounding area, this bacterium ferments the
carbohydrates present in the tissue, producing gas.
An anaerobic atmosphere can be obtained by
replacing air in a jar with the desired gas. The gases
usually include mixtures of CO2, and/or H2 in N2. The
H2 gas aids in decreasing the oxidation-reduction
potential by combining with O2 to form water (in the
presence of a catalyst). Chemical reactions can also be
used to generate anaerobic environments. The GasPak
System (BBL) provides a simple means for creating
an anaerobic environment (see figures 20.4 and 20.5).
Cultures are placed in a GasPak along with a GasPak
Disposable Hydrogen + Carbon Dioxide Generator
Envelope with a palladium-coated aluminum pellet
catalyst, and an anaerobic indicator. Water is added to
the envelope, and the container is sealed. The
hydrogen gas combines with O2 to form water and provides
the anaerobic conditions.
In this exercise, students will learn the aerobic
procedures for culturing Bacillus (figure 58. le) and
the anaerobic procedures for culturing Clostridium.
Spore and Gram staining will also be done.
Procedure
First Period
Pure Culture Study
1. With the B. subtilis broth culture, perform an
isolation streak on the tryptic soy agar plate.
Label the plate with your name, date, medium,
and bacterium.
2. Incubate the plate inverted for 24 to 48 hours at
35°C.
3. Streak two blood agar plates for isolation with
C. perfringens. Label as in step 1.
4. Place one of the blood agar plates in either the
anaerobic jar supplied or the GasPak.
(Alternatively, an Oxyrase plate may be
inoculated to grow C. perfringens anaerobically.)
Your instructor will demonstrate the use of the jar,
GasPak Systems, or Oxyrase plate.
362 Medical Microbiology
Harley-Prescott: I IX. Medical Microbiology I 58. Aerobic and Anaerobic I I ©The McGraw-Hill
Laboratory Exercises in Endospore-Forming Companies. 2002
Microbiology, Fifth Edition Bacteria
5. Place either the jar or the GasPak and the other
blood agar plate in the 35°C incubator for 48 hours.
6. Save all cultures for the second period, including
the stock cultures.
Endospore Stain
1. Fix a smear from each culture (tryptic soy agar
slant and sodium thioglycollate broth) on a clean
glass slide.
2. Stain for endospores as described in exercise 11.
3. Draw the endospores in Part 1 of the report for
exercise 58 (figure 58.1a,£>).
Second Period
1. Examine the aerobic culture of B. subtilis and
record the colonial morphology in Part 2 of the
report for exercise 58.
2. Do Gram stains on well-isolated bacterial
colonies from the TSA plate and from the tryptic
soy broth tube.
3. Examine the aerobic and anaerobic cultures of C.
perfringens. Notice that no growth was observed
in the aerobic culture due to the fact that this
bacterium is a strict anaerobe.
4. Record the colonial morphology of the blood agar
plate grown under anaerobic conditions in Part 2
of the report for exercise 58. Also notice the
double zone of (J-hemolysis, which is a
characteristic used in the identification of C.
perfringens.
5. Do Gram stains on well-isolated colonies from
the blood agar plate and sodium thioglycollate
broth.
HINTS AND PRECAUTIONS
Use the fume hood when heat-staining spores with
malachite green.
Aerobic and Anaerobic Endospore-Forming Bacteria 363
Harley-Prescott: IX. Medical Microbiology 58. Aerobic and Anaerobic
Laboratory Exercises in Endospore-Forming
Microbiology, Fifth Edition Bacteria
©The McGraw-Hill
Companies. 2002
Laboratory Report j q
Name:
Date: _
Lab Section:
Aerobic and Anaerobic Endospore-Forming Bacteria
1. Drawing of endospores.
a. C. perfringens
b. B. megaterium
2. Pure culture study.
Bacterium
C. perfringens
B. subtilis
Colonial Morphology
Position of the
Spore
Young
Culture
Gram Stain
Old
Culture
365
Harley-Prescott: IX. Medical Microbiology 58. Aerobic and Anaerobic
Laboratory Exercises in Endospore-Forming
Microbiology, Fifth Edition Bacteria
Review Questions
1. What are several functions of bacterial endospores?
2. Can the position of an endospore help in identifying bacteria? Give examples.
3. What is the major source of Clostridium in our environment?
4. Discuss oxidation-reduction potentials in terms of anaerobiosis.
5. How does a GasPak System function?
6. Why is sodium thioglycollate used to culture anaerobic bacteria?
7. Would you expect to find endospores in the blood agar plate culture of Clostridium? Why or why not?
©The McGraw-Hill
Companies. 2002
366 Medical Microbiology
Harley-Prescott: I X. Survey of Selected I Introduction I I ©The McGraw-Hill
Laboratory Exercises In Eucaryotlc Companies. 2002
Microbiology, Fifth Edition Microorganisms
PART TEN
Survey of Selected
Eucaryotic Microorganisms
Fungi
For 300 years after the birth ofChrist rainfall was abnormally
heavy. . . . Hie crops flourished and so did the host of tiny living
organisms—the rusts, rots, mildews, molds, smuts, and blights
that were to ultimately destroy the grain. . . . Field after field was
laid to waste. History is made by a multiplicity of little things,
as well as major revolutions, wars, earthquakes and floods.
And so it was that the fungi, by bringing hunger and unrest,
contributed to the decline of the Great Roman Empire.
Lucy Kavaler (American author
of Mushrooms, Molds, and Miracles, 1938— )
Eucaryotic microorganisms include the algae, fungi
(yeasts and molds), and the protozoa. All of these eucaryotes
consist of single cells (or simple aggregates of cells) that
contain a membrane-bound nucleus and intracellular
membrane-bound organelles. Free-living, eucaryotic
microorganisms are widely distributed in the environment;
eucaryotic microorganisms also participate in various types of
symbiotic relationships. Many cause human diseases and are of
medical importance; others are domestic animal and
agricultural plant pathogens; still others benefit society.
This section of the manual contains two laboratory
exercises that have been designed to better acquaint the
student with the fungi. Students will work with both prepared
specimens and living microorganisms in order to better
understand the life cycles, salient characteristics, and
morphology of selected examples.
After completing one or more of the exercises in
Part Ten, you will, at the minimum, be able to
demonstrate an increased understanding of microbial
diversity. This will meet the American Society for
Microbiology Core Curriculum theme number 1:
impact of microorganisms on the biosphere and
humans; microbial diversity (seepp. vi—viii).
367
Harley-Prescott:
Laboratory Exercises in
Microbiology, Fifth Edition
X. Survey of Selected
Eucaryotic
Microorganisms
59. Fungi tYeasts
©The McGraw-Hill
Companies. 2002
EXERCISE
59
Fungi I: Yeasts
SAFETY CONSIDERATIONS
Be careful with the Bunsen burner flame. Keep all
culture tubes upright in a test-tube rack or can.
2. Division Ascomycota, section 25.6; see also
figures 25.2 and 25.10.
3. Opportunistic Mycoses, section 40.1; see also
figure 40.16.
Materials per Student
7- to 10-day Sabouraud dextrose plate culture of
Saccharomyces cerevisiae (ATCC 2366) and/or
Rhodotorula species (ATCC 22078)
dried commercial baker's yeast
iodine solution (3 ml water to 1 ml Gram's iodine)
methylene blue solution
Bunsen burner
inoculating loop
clean glass slides
coverslips
wax pencil
2 Sabouraud dextrose agar plates
35°C incubator
1 glucose fermentation tube with Durham tube
(Difco: neopeptone +1% yeast extract +1%
glucose)
1 sucrose fermentation tube with Durham tube
(Difco: neopeptone +1% yeast extract +1%
sucrose)
sterile cotton swabs
Learning Objectives
Each student should be able to
1. Understand the morphological characteristics of
yeast cells
2. Culture a typical yeast and study carbohydrate
fermentation
3. Stain a typical yeast cell
Suggested Reading in Textbook
1. Structure (of Yeast), section 25.3; see also
figure 25.3.
Pronunciation Guide
Rhodotorula spp. (ro-do-TOR-u-lah)
Saccharomyces cerevisiae (sak-ah-ro-MI-seez ser-ah-
VEES-ee-eye)
Why Are the Above Fungi Used
in This Exercise?
The major objectives of this exercise are to learn yeast
morphology and culture some typical yeasts. To achieve these
objectives, the authors have chosen the common yeast
Saccharomyces cerevisiae (or Rhodotorula spp.) for this
exercise. Because Candida albicans is a yeast that is commonly
found in the mouth, the student should be able to isolate it.
Principles
Yeasts are unicellular fungi that are spherical,
ellipsoidal, or oval in shape, and usually (with the
exception of the dimorphic yeasts such as Candida) do not
form hyphae (fungal filaments). They are about 5 to
10 times larger than bacteria. Yeasts commonly
reproduce asexually by budding, a process in which a new
cell (called a daughter cell) is formed by the parent
cell from a protuberance called a bud. When yeasts
reproduce sexually, they produce several types of
sexual spores (e.g., ascospores). The type of spore
produced is very useful in classifying yeasts. Metabolic
activities are also used to identify and classify yeasts.
For example, the yeast Saccharomyces cerevisiae will
ferment glucose but not sucrose. In the laboratory,
Sabouraud dextrose agar is commonly used to iso-
368
Harley-Prescott:
Laboratory Exercises in
Microbiology, Fifth Edition
X. Survey of Selected
Eucaryotic
Microorganisms
59. Fungi l:Yeasts
©The McGraw-Hill
Companies. 2002
late yeasts. It is a selective medium containing
glucose and peptone, and has a low pH, which inhibits
the growth of most other microorganisms.
This exercise illustrates the fermentation ability
and colony and cell morphology of the common yeast,
S. cerevisiae. This yeast is used in making bread and
in various alcoholic fermentations. In addition, each
student will attempt to isolate and culture a yeast from
his/her mouth. A yeast that is most commonly found
in the mouth is C. albicans. In healthy individuals, C.
albicans does not produce disease. However, if the
normal microbiota of the mouth (or other areas of the
body) is upset, or the individual is compromised, the
disease candidiasis may result.
Figure 59.1 Yeasts. Oval yeast cells (Sacchavomyces cerevisiae) in a
wet mount (xl,000).
Procedure
First Period
1. With a wax pencil, draw two circles on a clean
glass slide. Place several drops of the water-iodine
solution into one circle and several drops of the
methylene blue solution into the other circle.
2. Suspend a loopful of yeast culture into each
circle. Place a coverslip over each.
3. Examine both yeast cell preparations under low and
high power. Note the shape and relative size and the
presence or absence of budding (figure 59.1). Look
for the small nucleus and larger vacuole.
4. Draw the representative yeast cells in Part 1 of the
report for exercise 59.
5. Suspend a pinch of commercial baker's yeast in 2
to 3 ml of warm water. With the inoculating loop,
streak onto Vi of a Sabouraud dextrose agar plate.
Using the inoculating loop, remove some S.
cerevisiae from the stock plate. Streak the other
half of the plate. Label the plate with your name,
date, and yeast. Incubate the plate at 35°C until
growth is seen.
6. Inoculate about 1 ml of the commercial baker's
yeast suspension into a glucose fermentation tube
and a sucrose fermentation tube. Incubate these
tubes at 35°C and observe daily until growth is
seen. Look for fermentation (gas bubbles in the
Durham tubes) and growth as indicated by turbidity.
7. Try to isolate S. albicans by swabbing the surface
of your tongue. Streak a Sabouraud dextrose agar
plate. Incubate the plate at 35°C until growth has
occurred.
Second Period
1. Smell the Sabouraud dextrose agar plate. Observe
the appearance of the yeast colonies. Record your
results in Part 2 of the report for exercise 59.
2. Examine the glucose and sucrose fermentation
tubes. Record your results in Part 3 of the report
for exercise 59.
3. Examine the Sabouraud dextrose agar plate
prepared by swabbing your tongue. Smell the
plate. Stain several of the colonies with the
methylene blue as in step 1 of the first period
procedure. Record your results in Part 4 of the
report for exercise 59.
HINTS AND PRECAUTIONS
If phase-contrast or ultraviolet microscopes are
available, the observation of cellular organelles and
inclusions can be particularly revealing when students work
with unstained yeast wet mounts.
Fungi I: Yeasts 369
Harley-Prescott:
Laboratory Exercises in
Microbiology, Fifth Edition
X. Survey of Selected
Eucaryotic
Microorganisms
59. Fungi l:Yeasts
©The McGraw-Hill
Companies. 2002
Laboratory Report jy
Name:
Date: _
Lab Section:
Fungi I: Yeasts
1. Draw typical yeast cells in the following space.
a. Water-iodine suspension (Magnification: x ).
b. Methylene blue suspension (Magnification: x_
2. Draw typical yeast colonies in the following space (Magnification: x_
Commercial baker's yeast
a. color
b. smell
3. Fermentation.
a. What is the color of the glucose broth after
Was gas produced? Explain.
b. What is the color of the sucrose broth after
Was gas produced? Explain.
S. cerevisiae
a. color _
b. smell
days incubation?
days incubation?
371
Harley-Prescott: I X. Survey of Selected I 59. Fungi l:Yeasts I I ©The McGraw-Hill
Laboratory Exercises in Eucaryotic Companies. 2002
Microbiology, Fifth Edition Microorganisms
4. Draw the appearance of the yeast colony from your moutli in the following space. Do the same for the cell
morphology.
Magnification x
Review Questions
1. Define:
a. budding
b. hyphae
c. yeast
2. Compare and contrast the characteristics of baker's yeast and Saccharomyces cerevisiae.
3. Why are yeast colonies larger than bacterial colonies?
4. Why do yeasts generally have to be cultured for longer periods than most bacteria?
5. What are some similarities and differences of the yeasts that were cultured from your mouth?
6. Why are stains not required for yeast identification?
7. Why is Sabouraud dextrose agar used to cultivate yeasts?
372 Survey of Selected Eucaryotic Microorganisms
Harley-Prescott:
Laboratory Exercises in
Microbiology, Fifth Edition
X. Survey of Selected
Eucaryotic
Microorganisms
60. Fungi II: Phycomycetes,
Ascomycetes, and
Basidiomycetes
©The McGraw-Hill
Companies. 2002
EXERCISE
60
Fungi II: Phycomycetes, Ascomycetes, and Basidiomycetes
SAFETY CONSIDERATIONS
When working with sporulating fungi, avoid prolonged
exposure to the plates. Some individuals may be allergic to
the fungi, and the laboratory may become excessively
contaminated with spores when the plates are left uncovered.
Although many procedures used in this experiment are
unlike those for bacteria, aseptic technique is still required.
Materials per Group of Students
7- to 10-day Sabouraud dextrose plate cultures of
Penicillium notation (ATCC 9178) and
Aspergillus niger (ATCC 10535)
preserved mushrooms (Agaricus or Coprinus)
plus and minus strains of Rhizopus stolonifer
(ATCC 12938+, 12939")
1 Sabouraud dextrose agar deep
2 potato dextrose agar deeps
48° to 50°C water bam
3 sterile petri plates
methylene blue in 90% methanol
inoculating loop
wax pencil
clean microscope slides
22 x 40-mm coverslips
tweezers
Bunsen burner
syringes containing paraffin and oil, or tubes of
silicone tub caulk
wooden swab sticks (or a syringe)
1-ml pipettes with pipettor
glass or wooden support rods
sterile Pasteur pipettes and bulbs
prepared slides of Phycomycetes (e.g., Rhizopus,
Saprolegnia), Ascomycetes (e.g., Penicillium,
Aspergillus, Morchella), Basidiomycetes (e.g.,
Polyporus, Lycoperdon, Coprinus, Puccinia)
Learning Objectives
Each student should be able to
1. Describe a typical mold
2. Grow colonies of several molds on Sabouraud
agar plates
3. Prepare culture slides of several molds
4. Identify the morphology and reproductive
structures of representative molds
5. Observe a complete mold life cycle
Suggested Reading in Textbook
1. The Fungi, chapter 25. It is suggested that each
student bring his or her textbook to the laboratory
since all of the morphology data, life cycles, and
terminology covered in this exercise can be found
in chapter 25 and will not be repeated here.
Pronunciation Guide
Aspergillus niger (as-per-JIL-us Nl-jer)
Penicillium notation (pen-a-SIL-ee-um no-TAY-tum)
Rhizopus stolonifer (ri-ZO-pus sto-LON-a-fer)
Why Are the Above Molds Used
in This Exercise?
In this exercise, the student will become familiar with
several aspects of fungus biology. The authors have chosen
three of the most common molds {Penicillium notatum,
Rhizopus stolonifer, and Aspergillus niger) for the student
to culture and study. Other fungi are introduced using
prepared slides and preserved materials.
Principles
Molds are multicellular, filamentous fungi. The
techniques of culturing and observing fungi differ from
the methods used to study bacteria. Fungi grow at
373
Harley-Prescott:
Laboratory Exercises in
Microbiology, Fifth Edition
X. Survey of Selected
Eucaryotic
Microorganisms
60. Fungi II: Phycomycetes,
Ascomycetes, and
Basidiomycetes
©The McGraw-Hill
Companies. 2002
comparatively slow rates, often requiring several days
to weeks to form macroscopically visible colonies.
Usually, the growth will spread over the entire culture
plate. Molds produce spores on brightly colored aerial
hyphae. Most molds grow best at room temperature
(25°C) rather than at 35°C.
The basic medium for the culture of many molds is
Sabouraud dextrose agar. The high sugar concentration
and low pH (5.6) of this medium make it unsuitable for
the growth of most bacteria, thus guarding against
contamination. Most fungi grow well at pH 5.6.
Mold colonies may be examined directly in
culture with a dissecting microscope. However, it is
better to tease away a portion of the growth and place it
on a slide with a drop of water or stain (a wet-
mount). An alternative method is a slide culture.
The latter is more advantageous because one is able
to study the growing mold and identify specific
structures without disturbing the culture. In this way,
the reproductive structures can be easily observed.
Fungi are identified primarily by examining their
reproductive structures, morphological characteristics,
and colony growth.
The macroscopic aggregation (colony) of mold
cells is called a thallus. A thallus is composed of a
mass of strands called a mycelium; each strand is a
hypha. Vegetative hyphae grow on the surface of
culture media. They form aerial hyphae, called
reproductive hyphae, that bear asexual reproductive
spores or conidia. The hyphae that grow below the
surface of culture media are called rhizoidal hyphae.
The hyphal strand of some molds may be separated by
a crosswall called a septum. Hyphae that contain
septa are called septate hyphae. Molds with hyphae
that lack septa are called coenocytic hyphae.
Molds are classified primarily by their sexual
stages of reproduction. They are also characterized
and classified according to the appearance of the
colony (e.g., color, size), organization of the hyphae
(e.g., septate or coenocytic), and structure and
organization of the spores (e.g., sporangiospores, conid-
iospores). Molds are important clinically, industrially,
and as decomposers (saprophytes) in the environment.
Mold spores are a very common source of
contamination of laboratory cultures.
In this exercise, the methods used to study
molds will include the preparation of colonies on
petri plates, the preparation of special culture
slides, the study of the life cycle of Rhizopus (the
common bread mold), the dissection of a
mushroom, and the examination of commercially
prepared slides of preserved molds.
Figure 60.1 Molds. Aspergillus showing black conidiospores.
Procedure
Preparation and Observation of Colonies
1. Melt one tube of Sabouraud dextrose agar and one
of potato dextrose agar.
2. Cool to 48° to 50°C in a water bath.
3. Pour into two petri plates respectively and allow
to harden.
4. Using the wax pencil, label the Sabouraud
dextrose agar plate Aspergillus and the potato
dextrose agar plate Penicillium. Add your name
and date to each plate.
5. Using aseptic technique, inoculate the plates as
labeled with a single loopful of the mold
suspension. Place the loopful of mold inoculum in
the center of the plate. Do not spread the
inoculum. Handle plates carefully so that they are
not jostled.
6. Do not invert the petri plates. Incubate them at
room temperature for 2 to 7 days.
7. After the colonies have developed properly
(figure 60.1), sketch and describe the macroscopic
appearance (e.g., color, texture) of each in Part 2
of the report for exercise 60. If dissecting
microscopes are available, examine the hyphae
and conidia under the microscopes and draw the
conidia.
Preparation of Slides for Microscopic Examination
of Molds
1. Obtain two clean glass slides and coverslips.
2. Flame the surface of the slides and coverslips in
order to sterilize them. Use tweezers to hold the
slides and coverslips.
374 Survey of Selected Eucaryotic Microorganisms
Harley-Prescott:
Laboratory Exercises in
Microbiology, Fifth Edition
X. Survey of Selected
Eucaryotic
Microorganisms
60. Fungi II: Phycomycetes,
Ascomycetes, and
Basidiomycetes
©The McGraw-Hill
Companies. 2002
Figure 60.2 Mold Culture Slide.
Paraffin
(b)
(d)
Coverslip
Coverslip Paraffin
_3-1 mm
Agar
Support
Moist paper towel
3. Use the wooden sticks (or a heated syringe) to
transfer sufficient melted paraffin or silicone
caulk to each slide to support the coverslip about
1 mm over the surface of the slide. Let the
paraffin or silicone harden. Each slide should
appear as in figure 60.2a.
4. Heat the coverslips sufficiently so that they will
form a seal when you set them over the hardened
paraffin or silicone. Each slide should look like
figure 60.2b.
5. Melt and cool to 48° to 50°C a tube of Sabouraud
dextrose agar (for Aspergillus) and a tube of
potato dextrose agar (for Penicillium). Label the
tubes accordingly.
6. Using a sterile pipette, transfer and mix 0.5 ml of
the proper mold suspension with the proper agar
tube.
7. For each mold, use a sterile Pasteur pipette and
quickly let sufficient inoculated agar run under
the coverslip of the prepared slide to half fill the
chamber. Each slide should now appear as shown
in figure 60.2c. This procedure must be completed
before the agar hardens.
8. Moisten two circles of paper towel that just fit the
bottom of the petri plates, and place one in each
plate. Each slide should then be placed in its own
petri plate. Label the plates accordingly. The slide
should be supported above the moist paper by two
wooden sticks or a piece of a V-shaped glass rod
(figure 60.2d). Place the lid on the petri plate and
incubate at room temperature for 2 to 4 days.
9. After incubation, observe the slides with a
microscope, using the low-power objective. Add a
few drops of methylene blue in methanol to stain
the various structures. (The alcohol is necessary to
soften the cell wall and allow the stain to enter.)
Commercially Prepared Slides
1. Obtain commercially prepared slides illustrating
the various classes of fungi, their morphology,
and reproduction. Carefully study each of these
slides. Draw and label the indicated structures in
Part 3 of the report for exercise 60. These slides
should supplement your observations of live fungi
and give you a good picture of fungus
morphology and the various forms of fungal
reproduction.
Phycomycetes:
Rhizopus (sporangia and zygotes)
Saprolegnia (fruiting bodies, sex organs,
sporangia)
Ascomycetes:
Penicillium (sections, conidia)
Aspergillus (conidia, cleistothecia)
Morchella (sections with asci)
Basidiomycetes:
Polyporus (sections with basidia)
Lycoperdon (longitudinal section)
Coprinus (pileus, medium longitudinal section,
cross section)
Puccinia (aecia, telia, media)
Dissection of Preserved Mushrooms
1. Examine a specimen of Agaricus or Coprinus.
Note and draw its major anatomical features (cap,
stipe, annulus, and mycelia at the base of the stipe).
2. Carefully dissect out a gill section, mount it in
water, cover it with a coverslip, and gently crush
it. Examine your specimen under the microscope.
At the gill surface, you should be able to see the
basidia, sterigmata, and basidiospores.
3. Make your drawings in Part 4 of the report for
exercise 60.
Rhizopus Morphology and Reproduction
1. The life cycle of Rhizopus stolonifer can be easily
studied.
Fungi II: Phycomycetes, Ascomycetes, and Basidiomycetes 375
Harley-Prescott:
Laboratory Exercises in
Microbiology, Fifth Edition
X. Survey of Selected
Eucaryotic
Microorganisms
60. Fungi II: Phycomycetes,
Ascomycetes, and
Basidiomycetes
©The McGraw-Hill
Companies. 2002
2. Inoculate a potato dextrose agar plate with the
plus and minus culture strains provided.
3. A spot of each spore type should be placed at
opposite sides of the plate, about 4 cm or more
apart.
4. Within 4 to 7 days, the two strains will have
grown together and a line of zygospores will be
formed in the center of the plate. Carefully
remove the cover of the petri plate and observe
the morphology of the zygomycete with a
dissecting scope. You should be able to see the
hyphae and sporangia. Zygospores can be studied
by carefully teasing apart the mycelium in the
center of the plate. Zygospores in various stages
of development will be seen beneath the surface.
You should also be able to observe gametangia as
well. Portions of the thallus may also be removed
and pressed under a coverslip for observation at
higher magnifications.
HINTS AND PRECAUTIONS
(1) When preparing slides for fungal culture and
observation, it is essential to heat the coverslip properly (step
4). If the coverslip is heated too little, it will not stick to
the paraffin. However, be careful not to overheat the
coverslip, or the paraffin will liquify and run over the
slide surface. (2) After the fungi are incubated for
several days, desiccation of the agar and cultures can be
avoided if the petri plates are taped for a tighter seal.
376 Survey of Selected Eucaryotic Microorganisms
Harley-Prescott:
Laboratory Exercises in
Microbiology, Fifth Edition
X. Survey of Selected
Eucaryotic
Microorganisms
60. Fungi II: Phycomycetes,
Ascomycetes, and
Basidiomycetes
©The McGraw-Hill
Companies. 2002
Laboratory Report Q (J
Name:
Date: _
Lab Section:
Fungi II: Phycomycetes, Ascomycetes, and Basidiomycetes
1. Mold plate colonies.
Aspergillus
a. extent of growth
b. pigmentation
c. aerial hyphae present
2. Mold slide cultures.
Penicillium
a. extent of growth
b. pigmentation
c. aerial hyphae present
Aspergillus
Penicillium
3. Commercially prepared slides.
Rhizopus
Saprolegnia
Penicillium
Aspergillus
Morchella
Harley-Prescott: I X. Survey of Selected I 60. Fungi II: Phycomycetes, I I ©The McGraw-Hill
Laboratory Exercises In Eucaryotic Ascomycetes, and Companies. 2002
Microbiology, Fifth Edition Microorganisms Basldlomycetes
Polyporus Lycoperdon Coprinus Puccinia
4. Dissection of preserved mushrooms.
a. Drawing of the major anatomical features of a musliroom.
b. Drawing of a musliroom gill section.
378 Survey of Selected Eucaryotic Microorganisms
Harley-Prescott: I X. Survey of Selected I 60. Fungi II: Phycomycetes, I I ©The McGraw-Hill
Laboratory Exercises In Eucaryotlc Ascomycetes, and Companies. 2002
Microbiology, Fifth Edition Microorganisms Basldlomycetes
Review Questions
1. What is the difference between vegetative and aerial mycelia?
2. Can bacteriological media be used for the cultivation of molds? Explain your answer.
3. In the common bread-mold life cycle, what do the plus and minus signs mean?
4. Why aren't molds streaked for isolation like previous exercises have done for bacteria?
5. What is the difference between reproductive and rhizoidal hyphae?
6. Are Rhizopus hyphae coenocytic or septate?
7. How would you describe the fruiting bodies of Aspergillus? Penicillium?
Fungi II: Phycomycetes, Ascomycetes, and Basidiomycetes 379
Harley-Prescott: XI. Microbial Genetics and Introduction
Laboratory Exercises in Genomics
Microbiology, Fifth Edition
©The McGraw-Hill
Companies. 2002
PART ELEVEN
Microbial Genetics and Genomics
Hie Double Helix is indeed a remarkable molecule. Modern man is
perhaps 50,000 years old, civilization existed for scarcely 10,000
years, and the United States for only just over 200 years; but
DNA and RNA have been around for at least several billion years.
All that time the double helix has been there, and active, and yet we
were the first creatures on earth to become aware of its existence.
Francis Crick (1916—)
What Mad Pursuit
All of the characteristics of microorganisms (e.g., their
chemical composition, growth patterns, metabolic
pathways, and pathogenicity) are inherited. These
characteristics are transmitted from parent cell to daughter cells
through genes. The science of genetics is concerned with
the study of what genes are, how they carry genetic
information, how they replicate, and how their information is
expressed within a microorganism to determine its particular
characteristics.
Bacteria are especially useful in the study of genetics
because large numbers of them can usually be cultured in a short
period, and their relatively simple genetic composition
facilitates studying the structure and function of specific genes.
Genetic engineering involves the joining together of
DNA (genes) from different sources and the introduction of
the joined material into a suitable cell in which it will be
both replicated and expressed. Several steps are usually part
of the process: (1) provision of a suitable carrier such as a
plasmid; (2) the formation of composite DNA molecules,
or chimeras; (3) introduction of the composite DNA into
a functional recipient cell; and (4) an appropriate
selection method to isolate the desired recombinant bacterium.
Joshua Lederberg (1925- )
Joshua Lederberg, an American biochemist, was co-winner
with George Beadle and Edward Tatum of the Nobel Prize for
The first three exercises in this part of the manual use some
of these genetic techniques.
DNA is the genetic material that gives a microorganism
its inherited characteristics. The basic structure of DNA is
identical in every organism. One experiment in this part of
the manual is thus designed to understand the principles and
steps necessary to isolate DNA from yeast.
Genomics is the study of the molecular organization of
genomes, their information content, and the gene products
they encode. It is a broad discipline, which may be divided
into at least three general areas. Structural genomics is the
study of the physical nature of genomes. Its primary goal is to
determine and analyze the DNA sequence of the genome.
Functional genomics is concerned with the way in which
the genome functions. That is, it examines the transcripts
produced by the genome and the array of proteins they encode.
The third area of study is comparative genomics, which
compares genomes from different organisms to look for
significant differences and similarities. This helps identify important,
conserved portions of the genome, and discern patterns in
function and regulation. The data also provide much
information about microbial evolution, particularly with respect to
phenomena such as horizontal gene transfer. The last two
experiments in this lab manual were designed to help illustrate
the usefulness of genomics in the microbial world.
After completing one or more of the exercises in
Part Eleven, you will, at the minimum, be able to
demonstrate an increased understanding of microbial
genetics, including mutation and genomics. This will
meet the American Society for Microbiology Core
Curriculum theme number 3: microbial genetics,
including mutations (see pp. vi—viii).
Physiology or Medicine in 1958 for discoveries concerning
genetic recombination and the organization of genetic material in
bacteria. In 1946, Joshua Lederberg along with E. L. Tatum
published a paper in Nature (158:558) demonstrating the first
sexual process in a bacterium (E. coli).
Analysis of mixed cultures of nutritional mutants has
revealed the presence of new types which strongly
suggests the occurrence of a sexual process in the
bacterium, Escherichia coli. . . . These experiments
imply the occurrence of a sexual process in the
bacterium. . . . As a result, genetic recombination in E.
coli appears to imply a sexual mechanism.
Lederberg went on to show that bacteria are able to
transmit genetic elements in several ways. He also showed his
versatility by not limiting himself to bacterial genetics. Lederberg
contributed to understanding penicillin's mode of action and
extended his activities to space microbiology and the use of
computers in biology.
Harley-Prescott:
Laboratory Exercises in
Microbiology, Fifth Edition
XI. Microbial Genetics and
Genomics
61. Bacterial Mutation
©The McGraw-Hill
Companies. 2002
EXERCISE
61
Bacterial Mutation
SAFETY CONSIDERATIONS
Staphylococcus aureus is a pathogen. Follow aseptic
procedures. Alcohol is extremely flammable. Keep the
beaker of ethyl alcohol away from the Bunsen burner.
Do not put a flaming rod back into the alcohol. No
mouth pipetting. Keep all culture tubes upright in a test-
tube rack or can.
Materials per Group of Students
sterile petri plate
glass rod or wooden dowel stick (1.6 mm in
diameter)
2 tryptic soy agar tubes containing 6 to 7 ml of agar
1 tryptic soy agar tube containing 0.05 mg of
streptomycin in 6 to 7 ml of agar
1-ml pipette with pipettor
24-hour tryptic soy broth culture of
Staphylococcus aureus (ATCC 25903);
Serratia marcescens (ATCC 13880) can also be
used
95% ethyl alcohol
spreading rod
3 tryptic soy broth tubes
2 tryptic soy broth tubes containing 0.01 mg of
streptomycin in 6 to 7 ml of broth
2 tryptic soy broth tubes containing 0.05 mg of
streptomycin in 6 to 7 ml of broth
Learning Objectives
Each student should be able to
1. Define a bacterial mutation
2. Isolate a streptomycin-resistant mutant
Suggested Reading in Textbook
1. Mutations and Their Chemical Basis, section 11.6.
2. Streptomycin, section 35.6.
3. Drug Resistance, section 35.7.
Pronunciation Guide
Staphylococcus aureus (staf-il-oh-KOK-kus ORE-ee-us)
Why Is the Above Bacterium Used
in This Exercise?
The student will isolate a streptomycin-resistant mutant
bacterium in this experiment. For this purpose, the authors
have chosen the common bacterium Staphylococcus
aureus. Some mutant strains of S. aureus are resistant to high
concentrations of streptomycin. These strains are present in
a ratio of only about one streptomycin-resistant cell to
several million sensitive cells. However, these rare S. aureus
mutants can be readily detected by plating a large number
of cells on a medium containing a high concentration of
streptomycin. Because the bacteria have not been exposed
to any mutagenic agent, the isolated mutants are
spontaneous mutants.
Principles
A mutation is the result of a stable, heritable change
in the nucleotide sequence of DNA. By manipulating
the chemical or physical environment of a bacterium,
one can increase the frequency of mutations. If a
mutant bacterium, by virtue of the change that it has
undergone, is suited to the environment in which it is
formed, its growth can be greater than the parent
bacterium. In such a case, the mutant will quickly
become the dominant bacterium in a culture.
Mutations occur in one of two ways. (1)
Spontaneous mutations arise occasionally in all bacteria and
develop in the absence of any added agent. (2) Induced
mutations are the result of the bacterium's exposure to
a mutagen, which is a physical or chemical agent.
Spontaneous mutations resistant to antibiotics such
as streptomycin are easily detected because they grow
in the presence of antibiotic concentrations that inhibit
382
Microbial Genetics and Genomics
Harley-Prescott:
Laboratory Exercises in
Microbiology, Fifth Edition
XI. Microbial Genetics and
Genomics
61. Bacterial Mutation
©The McGraw-Hill
Companies. 2002
Figure 61.1 Preparation of a Gradient-agar Plate, (a) Place
a 1.6—mm glass rod or dowel under a Petri plate. Add tryptic soy
agar and allow to harden, (b) Remove the rod and add
streptomycin agar.
Tryptic soy agar
Table
Tryptic soy agar
Table
the growth of normal bacteria. This introductory
exercise in microbial genetics employs the gradient-agar
plate method to isolate and select
streptomycin-resistant mutant Staphylococcus aureus strains.
Procedure
First Period
1. Prepare a gradient-agar plate as follows:
a. Place a sterile petri plate on an angle by
placing either a glass rod or dowel stick
under one side (figure 61.1a).
b. Aseptically pour a tube of melted tryptic soy
agar into the petri plate, immediately cover
the plate and allow the agar to harden. Label
the plate with your name and date.
c. After the tryptic soy agar has hardened,
remove the glass rod or dowel and place the
plate flat on the table.
d. Aseptically pour a tube of tryptic soy agar
containing 0.05 mg of streptomycin on the
surface of the gradient-agar plate (figure
61.16). Cover the plate and allow the new
agar to harden.
2. Pipette 0.3 ml of the Staphylococcus aureus
culture onto the agar surface. Using the sterile
glass spreader (sterilize by dipping into 95%
alcohol, flaming, and cooling on the sterile
surface of the gradient plate; see figure 15.2),
spread the culture over the surface of the plate.
3. Allow the surface of the agar plate to dry with the
lid on prior to incubating. Incubate inverted at
37°C for 24 to 48 hours.
Second Period
1. Observe the gradient-agar plate for the
development of resistant S. aureus colonies in the
areas of higher streptomycin concentration.
2. Record your results in the report for exercise 61.
3. Using the initial tryptic soy broth culture,
inoculate one control tube of tryptic soy broth,
one tube containing 0.01, and one tube containing
0.05 mg of streptomycin. (These represent the
original S. aureus bacteria.)
4. In like manner, with a sterile inoculating loop, make
a bacterial suspension in tryptic soy broth from
colonies growing in the region of highest antibiotic
concentration on the gradient-agar plate. (These
represent the resistant or mutant S. aureus.)
5. From this broth suspension, inoculate a loopful of
bacteria into a tube of tryptic soy broth containing
0.01 mg of streptomycin and one containing 0.05 mg
of streptomycin. Do the same for a tube of regular
tryptic soy broth (this serves as your control).
6. Incubate all tubes at 37°C for 24 to 48 hours.
Third Period
1. Observe the four streptomycin tubes for growth
and compare them with the two control tubes.
2. Record your results in the report for exercise 61.
HINTS AND PRECAUTIONS
It is extremely important to be certain that the regular
tryptic soy agar is completely cool and hard before
pouring the streptomycin agar over it.
Bacterial Mutation 383
Harley-Prescott: XI. Microbial Genetics and 61. Bacterial Mutation
Laboratory Exercises in Genomics
Microbiology, Fifth Edition
©The McGraw-Hill
Companies. 2002
Laboratory Report Q j
Name:
Date:
Lab Section:
Bacterial Mutation
1. Draw the number of Staphylococcus aureus colonies growing on the different areas of the gradient-agar plate.
2. Record the relative growth of S. aureus in the tliree tryptic soy broth tubes. Use a scale from 0 for no growth
to + + + + for heavy growth.
Inoculum
Streptomycin
Control
0.01 mg
0.05 mg
Original S. aureus
Resistant S. aureus
385
Harley-Prescott: XI. Microbial Genetics and 61. Bacterial Mutation
Laboratory Exercises in Genomics
Microbiology, Fifth Edition
Review Questions
1. How would you define a bacterial mutation?
2. How would you describe a streptomycin-dependent mutant bacterium?
3. How can bacterial mutations occur?
4. What is a mutagen? Give several examples.
5. What methods could be used to increase the frequency of the appearance of mutant Staphylococcus aureus?
6. Could a gradient-agar plate be used for any antibiotic? Explain your answer.
©The McGraw-Hill
Companies. 2002
386 Microbial Genetics and Genomics
Harley-Prescott:
Laboratory Exercises in
Microbiology, Fifth Edition
XI. Microbial Genetics and
Genomics
62. Bacterial
Transformation
©The McGraw-Hill
Companies. 2002
EXERCISE
62
Bacterial Transformation
SAFETY CONSIDERATIONS
Chloroform is very volatile and flammable. Keep away
from fire or flames. Inhalation of large doses of
chloroform may cause hypotension, respiratory and myocardial
depression and death; it is also carcinogenic. No mouth
pipetting. Make sure the centrifuge tubes are balanced.
Keep all culture tubes upright in a test-tube rack or can.
Materials per Group of Students
24-hour nutrient broth culture of Bacillus subtilis
strain SB 100 (ATCC 29056)
24-hour nutrient broth culture of Bacillus subtilis
wild type (ATCC 6051)
lysozyme solution (2 mg/ml)
1 glucose-minimal salts agar plate containing
tyrosine and histidine (see appendix J)
1 glucose-minimal salts agar plate containing
tyrosine and tryptophan
2 glucose-minimal salts agar plates containing
tyrosine, tryptophan, and histidine
1 glucose-minimal salts agar plate containing
histidine
sterile test tubes
sterile phosphate buffer (0.1 M, pH 6.2)
chloroform
sterile centrifuge tubes
sterile toothpicks
centrifuge
ice-water bath
sterile distilled water
2 sterile 250-ml flasks
50-ml Difco Antibiotic Assay Medium 3 in a
250-ml flask
15 ml of MM1 medium (see appendix J)
15 ml of MM2 medium
5-ml pipettes with pipettor
1-ml pipettes with pipettor
thermometer
glass spreader
70% ethanol
Bunsen burner
Learning Objectives
Each student should be able to
1. Describe the process of transformation
2. Perform a DNA extraction procedure
3. Demonstrate the presence of competent bacterial
cells in a bacterial culture
Suggested Reading in Textbook
1. DNA transformation, section 13.5; (see also
figure 13.6).
Pronunciation Guide
Bacillus subtilis (bah-SIL-lus SUB-til-us)
Why Is the Above Bacterium Used
in This Exercise?
In this exercise, the student will learn how to form
recombinant bacterial cells by transformation. To accomplish this
objective, the authors have chosen a wild-type strain of
Bacillus subtilis as the donor strain and the SB 100 B.
subtilis strain as the recipient. As a result of multiple
mutations, SB 100 B. subtilis is an auxotroph that requires the
amino acids tyrosine, tryptophan, and histidine for growth.
It has lost the ability to synthesize these amino acids. The
wild-type strain of B. subtilis can synthesize these amino
acids and grow on a glucose-minimal salts medium lacking
them. By mixing DNA extracted from the wild type with
viable cells of the SB 100 auxotrophic strain, transformants
will be produced that now have the ability to grow in the
absence of tryptophan or tyrosine.
Principles
Transformation is the uptake by a recipient bacterium
of a naked DNA molecule or a fragment from a culture
medium and the incorporation of this molecule (or
fragment) into the recipient chromosome in a heritable
387
Harley-Prescott: XI. Microbial Genetics and 62. Bacterial
Laboratory Exercises in Genomics Transformation
Microbiology, Fifth Edition
©The McGraw-Hill
Companies. 2002
form. In natural transformation, the DNA comes from a
donor bacterium. The process is random, and any
portion of the genome may be transferred between bacteria.
When bacteria lyse, they release considerable
amounts of DNA into the surrounding environment.
These fragments may be relatively large and contain
several genes. If a fragment contacts a competent
bacterium, one able to take up DNA and be
transformed, it can be bound by the cell and taken inside.
Transformation may be an important route of genetic
exchange in nature.
In this introductory transformation exercise, a
wild-type strain of Bacillus subtilis will be used as the
donor strain and B. subtilis strain SB 100 as the
recipient strain. This recipient strain is an auxotroph (a
mutated bacterium that lacks the ability to synthesize
an essential nutrient and must obtain it from its
surroundings) that requires the amino acids tyrosine,
tryptophan, and histidine to grow because it has lost
the ability to synthesize these amino acids. The wild-
type strain, however, can synthesize these amino acids
and grow on a glucose-minimal salts medium lacking
these amino acids. By mixing DNA extracted from the
wild strain with viable bacteria of the auxotrophic
strain, you will (1) look for transformants that have
gained the ability to grow in the absence of
tryptophan, and (2) look for those which have acquired the
ability to synthesize tryptophan and/or histidine and
no longer require that the particular amino acid be
supplied to the medium.
Procedure
First Period
Preparation of Donor DNA
1. Aseptically transfer 5 ml of the wild-type Bacillus
subtilis to a centrifuge tube and centrifuge at
5,000 g for 10 minutes.
2. After centrifugation, using a new pipette, discard
the supernatant and resuspend the bacteria in 5 ml
of sterile phosphate buffer.
3. Add 0.05 ml of the lysozyme solution and
incubate (with gentle agitation) for 30 minutes at
room temperature.
4. Cool the centrifuge tube to 5°C in an ice-water
bath.
5. Add 5 drops of chloroform to lyse the bacteria
whose walls have been weakened by lysozyme
digestion. Agitate the tube to mix the chloroform
and medium. This is the source of transforming
DNA for the second period of this procedure. This
preparation can be stored at 5°C for several days.
Preparation of Competent Bacteria
1. Aseptically inoculate a culture of B. subtilis SB
100 into a 250-ml flask containing 50 ml of Difco
Antibiotic Assay Medium 3.
2. Incubate for 24 hours at 37°C. The culture should
be gently agitated.
Second Period
Preparation of Competent Bacteria (continued)
1. Harvest the bacteria by centrifugation at 5,000 g
for 10 minutes and resuspend them in 15 ml of
MM1 medium.
2. Add 12.5 ml of the resuspended culture to a
sterile 250-ml culture flask and incubate with
shaking for 5 hours.
3. Harvest these bacteria by centrifugation and dilute
them fivefold by resuspending in 15 ml of MM2
(transformation medium). These are the
competent bacteria that will be used in the next
part of this experiment.
Transformation of Competent Bacteria
1. Aseptically transfer 0.9 ml of the competent
bacteria (B. subtilis SB 100) into a sterile test
tube. Carefully, without adding any chloroform,
add 0.1 ml of the DNA solution (the donor DNA)
prepared from the wild-type B. subtilis. The white
DNA layer is at the chloroform-water interface.
2. Incubate the test tube at 37°C for 30 minutes with
gentle shaking.
3. Pipette 0.1 ml of the transformation mixture onto
a glucose-minimal salts agar plate containing
tryptophan, tyrosine, and histidine. Spread the
bacteria with a flame-sterilized glass spreader.
Label the plate with your name, date, and amino
acid mixture.
4. Dilute the transformation mixture 1/10 using
sterile distilled water. Pipette 0.1 ml of this
dilution onto a glucose-minimal salts agar plate
containing a mixture of tryptophan, tyrosine, and
histidine. Spread out the bacteria as before. Label
with your name, date, and amino acid mixture.
5. Incubate the plates at 37°C for 48 to 72 hours.
6. Using sterile toothpicks, transfer 59 well-isolated
colonies from a transforming petri plate to four
glucose-minimal salts plates containing
(1) tyrosine and histidine, (2) tyrosine and
tryptophan, (3) tyrosine, tryptophan, and
388 Microbial Genetics and Genomics
Harley-Prescott: XI. Microbial Genetics and 62. Bacterial
Laboratory Exercises in Genomics Transformation
Microbiology, Fifth Edition
histidine, and (4) histidine alone. Use the grid
pattern given in figure 62.1 for a 90-mm petri
plate as a template for each of the above three
plates. Transfer each well-isolated colony by
stabbing the colony with the toothpick and
inoculating one grid in each of the above three
plates (e.g., colony 1 will be inoculated into grid
area 1 of all three plates, then colony 2 into grid
area 2, and so forth until all 59 grids have been
streaked). Be careful when doing this transfer not
to go into adjacent grids. Keep the plates covered
as much as possible during these transfers.
7. The tyrosine/tryptophan/liistidine plate serves as
the control plate. If growth does not occur on this
plate, data from the other plates should be
discarded.
8. Incubate the four plates for 48 hours at 37°C.
9. Record the grid areas and indicate in the report
for exercise 62 whether a particular bacterial
transformant grows (+) or does not grow (-) on
each kind of medium.
©The McGraw-Hill
Companies. 2002
Figure 62.1 Grid Pattern for a 90—mm Petri Plate.
Bacterial Transformation 389
Harley-Prescott: I XI. Microbial Genetics and I 62. Bacterial I I ©The McGraw-Hill
Laboratory Exercises in Genomics Transformation Companies. 2002
Microbiology, Fifth Edition
Laboratory Report QZ
Name:
Date: .
Lab Section:
Bacterial Transformation
Growth in Minimal Salts-Glucose Agar Plate Containing
Grid Numbtr Tyrosine/Histidine Tyrosine/Tryptophan Tyrosine/Tryptophan/ Histidinc
Histidine
Number of transformants growing on the control plate (tyrosine/tryptophan/liistidine):
Number of transformants growing on the tyrosine/tryptophan plate:
Number of transformants growing on the tyrosine/liistidine plate:
Number of transformants growing on the histidine plate:
The genes transferred by transformation:
391
Harley-Prescott: XI. Microbial Genetics and 62. Bacterial
Laboratory Exercises in Genomics Transformation
Microbiology, Fifth Edition
Review Questions
1. How would you define bacterial transformation?
2. What is a competent bacterium?
3. What is an auxotroph?
4. Could phenylalanine replace the amino acid tyrosine in this experiment? Explain your answer.
5. What are several factors upon which the successful development of a transformation system depends?
6. What are some important uses of transformation?
©The McGraw-Hill
Companies. 2002
392 Microbial Genetics and Genomics
Harley-Prescott:
Laboratory Exercises in
Microbiology, Fifth Edition
XI. Microbial Genetics and
Genomics
63. Bacterial Conjugation:
The Transfer of
Antibiotic-Resistant
Plasmids
©The McGraw-Hill
Companies. 2002
EXERCISE
63
Bacterial Conjugation:
The Transfer of Antibiotic-Resistant Plasniids
SAFETY CONSIDERATIONS
In this experiment, students will be working with
antibiotic-resistant strains of Escherichia coli. It is essential
that the bacterium and its plasmid not be spread around
the laboratory. It is also imperative to ensure that one is
working with a pure culture. All manipulations must,
therefore, be carried out in such a way as to avoid
contamination of the culture. The following standard
aseptic procedures must be followed:
1. Sterilize all loops before use; cool slightly before
inoculum pick-up to avoid killing the bacteria on
contact.
2. Resterilize the loop after use by gradual heating.
This is recommended to minimize spattering and
the formation of aerosols.
3. Flame the mouths of tubes and flasks momentarily
after removing the cap or plug, and again after
inoculation.
4. Never leave the cap or plug on the bench during
inoculation. Hold it in one hand and replace it in
the tube or flask after flaming the mouth when the
inoculum has been transferred.
5. Cotton wool plugs removed from tubes and flasks
should be held by their projection surfaces only.
Handling of the portion of the plug that is inserted
into the flask or tube will result in contamination.
6. Open tubes should be held in an inclined position
to minimize contamination.
7. Lids of petri plates should be held over the plate
while inoculating and should be replaced as soon as
possible. Never place the lids on the bench surface.
8. When finished, all cultures and tubes will be
autoclaved at 121°C for 15 minutes. After
autoclaving, the tube contents will be poured down
the sink. The petri plates are disposable and the plates
plus agar contents will be autoclaved and discarded.
9. In the event that a culture is accidentally spilled
during handling, it is imperative to flood the
immediate area with Lysol solution. Allow 3 hours for
disinfection and then wash thoroughly with tap water.
Materials per Group of Students
overnight tryptic soy broth culture of Escherichia
coli recipient strain J-53R (Wards number
85W1686)
overnight tryptic soy broth culture of Escherichia
coli donor strain HT-99 (Wards number
85W1684). These strains may be obtained from
Wards, Natural Science Establishment,
Rochester, NY by special order or calling
Wards at 1-800-962-2660.
5 ml sterile nutrient broth in a screw-cap tube
glass spreader in 80% ethanol
2 sterile 1-ml pipettes with pipettors
3 sterile Pasteur pipettes with pipetting bulbs
1 tryptic agar plate containing 25 |J.g
chloramphenicol per ml
1 tryptic agar plate containing 100 |J.g rifampin
per ml
1 tryptic agar plate containing chloramphenicol
(25 |J.g/ml) and rifampin (100 |J.g/ml)
Bunsen burner
petri plate cans
37°C incubator
wax pencil
Learning Objectives
Each student should be able to
1. Perform the transfer of a conjugative plasmid
coding for chloramphenicol resistance from a
donor to a suitable E. coli recipient
2. Describe the method in which chimeric plasmids,
formed by in vitro techniques, may be introduced
into a suitable recipient and may be both
replicated and expressed with the recipient
bacterium
393
Harley-Prescott:
Laboratory Exercises in
Microbiology, Fifth Edition
XI. Microbial Genetics and
Genomics
63. Bacterial Conjugation:
The Transfer of
Antibiotic-Resistant
Plasmids
©The McGraw-Hill
Companies. 2002
Suggested Reading in Textbook
1. Chloramphenicol, section 35.6; see also tables
35.1, 35.2, and 35.4.
2. The Origin and Transmission of Drug Resistance,
section 35.7.
3. Bacterial Plasmids, section 13.2.
4. Bacterial Conjugation, section 13.4.
5. Transduction, section 13.6.
6. Cloning Vectors, section 14.5.
7. Expression of Foreign Genes in Bacteria, section 14.7.
Pronunciation Guide
Escherichia coli (esh-er-I-ke-a KOH-lee)
Why Is the Above Bacterium Used
in This Exercise?
The student will perform a bacterial conjugation
experiment in this exercise. The authors have chosen two strains
of Escherichia coli for this purpose. The HT-99 donor
strain of E. coli is resistant to chloramphenicol. The J-53R
recipient strain of E. coli cannot synthesize methionine and
proline and is rifampin resistant. Recombinants of these
two strains will have different combinations of either the
donor or recipient strains' characteristics and can be readily
detected by using selective plating media.
Principles
Plasmids that can affect the conjugation between
individual bacteria are termed conjugative plasmids.
These plasmids carry genes that code for the ability to
transfer themselves from the donor host bacterium to
a suitable recipient bacterium by conjugation.
Conjugation describes the "mating" between two bacteria,
when (part of) the chromosome is transferred from
one to the other. In order for conjugation to occur,
there must be direct physical contact between
bacteria. The actual "mating" between donor and recipient
is dependent on the production of special filaments
called sex pili by the donor bacteria. Since the genes
for sex pili formation are an integral part of the
conjugative plasmid DNA, the plasmids themselves
determine their own transmissibility between bacteria.
Plasmids are small, circular, double-stranded DNA
molecules that can act as extrachromosomal elements
(i.e., they can carry genetic information and exist apart
from the chromosome). These small DNA circles can
reproduce independently of the bacterial genome, and
many can be incorporated into it and reproduce when
the genome does. The plasmid used in this experiment
carries a gene for chloramphenicol resistance and can
be transferred during bacterial conjugation.
This experiment employs a broth procedure for in
vitro mating. Since conjugation requires cell-to-cell
contact, it can be described as a collision-dependent
process. In the experimental procedure, sufficient time
must be provided for the mating cells to make contact.
In this experiment, students will work in groups
using two E. coli strains: E. coli J-53R (recipient) and E.
coli HT-99 (donor). J-53R is an auxotrophic strain (a
mutant that has a growth factor requirement) for the
amino acids methionine and proline. It also carries a
chromosomal gene for rifampin resistance. HT-99 is a
wild-type isolate mat is resistant to chloramphenicol,
and the resistance determinant is located on a
conjugative plasmid. By this simple experiment, the basic goal
of genetic engineering research (i.e., the creation,
replication, and expression of hybrid strains) is illustrated.
Procedure
First Period
1. Prepare the mating mixture by aseptically
transferring 0.1 ml of an overnight tryptic soy
broth culture of E. coli HT-99 (donor) and 0.9 ml
of an overnight tryptic soy broth culture of E. coli
J-53R (recipient) into 5 ml of sterile tryptic soy
broth (figure 63.1).
2. Mix and incubate at 37°C for 3 hours or
overnight.
3. Confirm the resistance status of the donor and
recipient by culturing on antibiotic-containing
petri plates as follows:
a. Using the wax pencil, divide the
chloramphenicol and the rifampin plates in
half by drawing a line on the bottom surface
of the plate.
b. Using the same sterile Pasteur pipette,
transfer a drop of donor culture to 1/2 of the
chloramphenicol plate and one drop to 1/2
of the rifampin plate. Carefully spread over
1/2 of the plate using the glass spreader
sterilized by flaming (see exercise 15 and
figure 15.1). Sterilize the glass spreader
between spreadings. Using another sterile
Pasteur pipette, transfer a drop of recipient
culture to the other half of the
chloramphenicol and rifampin plates. Spread
394 Microbial Genetics and Genomics
Harley-Prescott:
Laboratory Exercises in
Microbiology, Fifth Edition
XI. Microbial Genetics and
Genomics
63. Bacterial Conjugation:
The Transfer of
Antibiotic-Resistant
Plasmids
©The McGraw-Hill
Companies. 2002
Figure 63.1 Plasmid Transfer Procedure.
Spread plate
1 drop
E. colt HT-99
Chloramphenicol resistance
plasmid donor culture
(chloramphenicol + ,
rifampin -)
Incubate mixture
for 3 hours or overnight;
shake intermittently.
E. coli J-53 R rifampin
resistance plasmid
recipient culture
(chloramphenicol - ,
rifampin +)
Spread plate
1 drop
o
Chloramphenicol and
rifampin plate
(chloramphenicol + ,
rifampin +
[plasmid transfer])
as above. Label the plates with your name
and date. Allow them to dry thoroughly and
incubate inverted overnight at 37°C in a
petri plate can.
4. Remove the mating mixture from the incubator
after the desired period of mating and transfer 1
drop to the center of the petri plate containing
both chloramphenicol and rifampin. Spread as
described above. Label the plate with your name
and date. Incubate inverted at 37°C overnight in a
petri plate can.
Second Period
1. Examine all plates for growth after overnight
incubation, and record the results in the report for
exercise 63.
2. Since the donor (E. coli HT-99) is resistant to
chloramphenicol and sensitive to rifampin, it will
be able to grow in the presence of 25 |^g/ml of
chloramphenicol but unable to grow in the
presence of 100 |^g/ml of rifampin. An
examination of the plate from step 3b in the first
period procedure should confirm this result.
Bacterial Conjugation: The Transfer of Antibiotic-Resistant Plasmids 395
Harley-Prescott:
Laboratory Exercises in
Microbiology, Fifth Edition
XI. Microbial Genetics and
Genomics
63. Bacterial Conjugation:
The Transfer of
Antibiotic-Resistant
Plasmids
©The McGraw-Hill
Companies. 2002
3. The recipient (E. coli J-53R) is sensitive to
chloramphenicol and resistant to rifampin; thus, it
will be able to grow on the rifampin plate but
unable to grow on the chloramphenicol plate
(plate from step 3b).
4. Neimer the donor nor the recipient can grow in the
presence of chloramphenicol plus rifampin because
both strains are inhibited by one or the other of the
antibiotics. Colonies appearing on the double
antibiotic plate prepared in step 4 during the first
period must, therefore, result from growth of
exconjugant bacteria arising by conjugal transfer of
the chloramphenicol resistance plasmid from a
donor to a recipient bacterium. Such bacteria are
the result of in vivo natural genetic engineering and
are genetically new bacteria.
Count the number of doubly resistant bacterial
colonies that have been formed. If desired, each
team may use a different time period of mating
(e.g., 1 to 24 hours) and observe the effect of
mating time on the number of exconjugants
appearing on the plates.
396 Microbial Genetics and Genomics
Harley-Prescott: XI. Microbial Genetics and 63. Bacterial Conjugation:
Laboratory Exercises in Genomics The Transfer of
Microbiology, Fifth Edition Antibiotic-Resistant
Plasmids
©The McGraw-Hill
Companies. 2002
Laboratory Report qj
Name:
Date: _
Lab Section:
Bacterial Conjugation: The Transfer of Antibiotic-Resistant Plasmids
1. Sketch the growth on the following plates:
Chloramphenicol
Rifampin
Chloramphenicol + rifampin
2. What does this growth or lack of it indicate on each side of the following plates?
a. chloramphenicol (HT-99)
chloramphenicol (J-53R)
b. rifampin (HT-99)
rifampin (J-53R)
3. How many doubly resistant colonies were formed?
Assuming mat a drop is approximately 0.05 ml, about how many plasmid transfers took place in the broth
culture? Should this number increase with incubation time? Why or why not?
4. Describe how E. coli is able to grow on the plate containing both chloramphenicol and rifampin.
397
Harley-Prescott: I XI. Microbial Genetics and I 63. Bacterial Conjugation: I I ©The McGraw-Hill
Laboratory Exercises in Genomics The Transfer of Companies. 2002
Microbiology, Fifth Edition Antibiotic-Resistant
Plasmids
Review Questions
1. Why is the aseptic technique so important in this experiment?
2. Why is E. coli HT-99 able to grow in the presence of chloramphenicol but not in the presence of rifampin?
Why is E. coli J-53R able to grow on the rifampin plate but unable to grow on the chloramphenicol plate?
3. Would you expect that the new doubly antibiotic-resistant strain could grow well if it was released into the
environment? Explain.
4. Is it likely mat rifampin resistance will be frequently transferred from the J-53R strain to HT-99? Explain your
reasoning.
5. How do plasmids function?
6. Do bacteria reproduce sexually? Explain.
7. How would you define genetic engineering?
398 Microbial Genetics and Genomics
Harley-Prescott: XI. Microbial Genetics and 64. Isolation of Genomic
Laboratory Exercises in Genomics DNA from Saccharomyces
Microbiology, Fifth Edition cerevisiae
©The McGraw-Hill
Companies. 2002
EXERCISE
64
Isolation of Genomic DNA from Saccharomyces cerevisiae
SAFETY CONSIDERATIONS
Be careful with the 95% ethanol and the hot plate.
Ethanol is very flammable.
Materials per Group of Students
glass stirring rods
baker's yeast, dehydrated or Saccharomyces
cerevisiae YPH499 (ATCC #76625)
95% ethanol
plastic 10 ml transfer pipettes
250-ml beaker
50-60° tap water
temperature controlled hot plate
thermometer
liquid kitchen dishwashing detergent
(concentrated)
Adolph's meat tenderizer
microbalance
Learning Objectives
Each student should be able to
1. Understand the basics of DNA structure and
function
2. Understand the principles and steps needed to
isolate genomic DNA from the yeast,
Saccharomyces cerevisiae
Suggested Reading in Textbook
1. All of chapter 15 on Microbial Genomics.
2. DNA as genetic material, section 11.1.
3. The genetic code, section 11.4.
Pronunciation Guide
Saccharomyces cerevisiae (sak-ah-ro-MI-seez SER-
ah-VEES-ee-eye)
Why Is the Above Yeast Used in
This Exercise?
Isolation and purification of DNA are often the first steps in
starting genetic analysis. DNA is basically the same from
yeast to bacteria to humans. However, DNA packaging
varies greatly. The structure of each organism's cells and the
application for which the extracted DNA is required must be
taken into consideration when selecting an extraction
procedure. Do you want plasmid DNA or genomic DNA? Are you
isolating DNA from a bacterium or a multicellular organism?
Do you want to use DNA for Southern blotting, the
polymerase chain reaction, restriction enzyme analysis, cloning,
or other types of analysis? How does this affect isolation and
purification schemes? The simple procedure described in this
experiment uses yeast genomic DNA; it omits purification
steps, is quick, easy, and an inexpensive method that can be
used in any microbiology laboratory with minimum
equipment and time. The resulting DNA is visible and provides a
source of student discussion for the DNA molecule, genetics,
evolution, and biotechnology.
Principles
DNA is the genetic material that gives an organism its
inherited characteristics. The basic structure of DNA
is the same in every organism. DNA is composed of
two strands of nucleotides wound together in a double
helix. Each nucleotide consists of a deoxyribose
sugar, a phosphate group, and one of four possible
nitrogenous bases: adenine pairing with thymine and
cytosine pairing with guanine. The two strands are
attached to each other by complementary base pairing.
This base pairing involves hydrogen bonds between
opposing adenine and thymine residues and opposing
cytosine and guanine residues.
Spooling DNA onto a glass stirring rod (figure
64.1) is a common way to isolate DNA once it has
399
Harley-Prescott:
Laboratory Exercises in
Microbiology, Fifth Edition
XI. Microbial Genetics and
Genomics
64. Isolation of Genomic
DNA from Saccharomyces
cerevisiae
©The McGraw-Hill
Companies. 2002
Figure 64.1 DNA Spooled Onto A Glass Stirring Rod.
Glass stirring rod
been precipitated out of an aqueous solution using
etlianol. One of the reasons the yield of yeast DNA is
so large is that the size of the yeast genome averages
1.3 X 10⁷ base pairs compared to bacteria that
average 4.7 X 10⁶ base pairs.
Procedure
1. Measure 100 ml of 50-60°C tap water into a 250-
ml beaker.
2. Add one-half package of dry yeast to the tap
water and stir until completely suspended.
3. Incubate for 5-15 minutes at 50-60°C. The warm
water activates the yeast.
4. Add 5 ml of concentrated detergent; stir
occasionally for 5 minutes while keeping the
suspension warm. (The detergent lyses the yeast
cell plasma membrane, releasing the contents of
the cell, including the DNA into water solution.)
5. Add 3 grams of meat tenderizer and stir. (The
meat tenderizer contains the proteolytic enzyme
papain that digests the cellular proteins.)
6. Incubate at room temperature for 20 minutes.
7. Using a plastic 10 ml transfer pipette, carefully
layer 10-15 ml of 95% ethanol on top of the
suspension of lysed yeast cells by allowing the
alcohol to run down the side of the 250-ml beaker.
The alcohol should form a distinct layer on the
top of the detergent and cell mixture (The 95%
etlianol dehydrates the DNA so it precipitates out
of solution.)
8. Insert a glass rod through the 95% etlianol into
the cell suspension. Gently stir and roll the rod
between your fingers, in one direction, but do not
mix the two layers.
9. Observe the glass rod. DNA will stick to the glass
rod and appear as slimy white threads (figure 64.1).
Note that in this simple isolation procedure, DNA
will remain associated with some cellular protein.
10. Scrape the DNA off of the glass rod into a plastic
weighing boat and determine its wet weight in |xg.
HINTS AND PRECAUTIONS
Check the expiration date on the package of baker's
yeast to make sure it has not expired.
400 Microbial Genetics and Genomics
Harley-Prescott: I XI. Microbial Genetics and I 64. Isolation of Genomic I I ©The McGraw-Hill
Laboratory Exercises in Genomics DNA from Saccharomyces Companies. 2002
Microbiology, Fifth Edition cerevisiae
Laboratory Report
Lab Section:
Isolation of Genomic DNA from Saccharomyces cerevisiae
1. Sketch the appearance of the DNA on the glass stirring rod.
2. How much DNA, in |xg wet weight, did you isolate from the yeast?
64
Name:
401
©The McGraw-Hill
Companies. 2002
Review Questions
1. Where is DNA located in a yeast cell?
2. What is the purpose of the household detergent in this isolation procedure?
3. What are some factors mat can affect the amount of DNA isolated?
4. How is DNA organized to fit inside the yeast cell?
5. Describe the chemical structure of DNA.
402 Microbial Genetics and Genomics
Harley-Prescott:
Laboratory Exercises in
Microbiology, Fifth Edition
XI. Microbial Genetics and
Genomics
64. Isolation of Genomic
DNA from Saccharomyces
cerevisiae
Harley-Prescott:
Laboratory Exercises in
Microbiology, Fifth Edition
XI. Microbial Genetics and
Genomics
65. Isolation and
Purification of Genomic
DNA from Escherichia coli
©The McGraw-Hill
Companies. 2002
EXERCISE
65
Isolation and Purification of Genomic DNA
from Escherichia coli
SAFETY CONSIDERATIONS
The alcohols used in this experiment are volatile and
flammable liquids. Do not use near an open flame.
Prolonged exposure to ethanol can cause central nervous
system depression. Disposable exam gloves, lab coats,
and chemical splash goggles are required. Discard
cultures and contaminated wastes only in the appropriate
biohazard container indicated by your instructor.
Materials per Group of Students
10-12 hour (log phase) tryptic soy broth culture
of Escherichia coli (ATCC 11229) Cultures can
be maintained in the log phase by immersion in
an ice-water bath
0.5- to 10 |xl micropipettes and sterile tips
10- to 100 |xl micropipettes and sterile tips
100- to 1,000 |xl micropipettes and sterile tips
microcentrifuge tubes
microcentrifuge
1 ml pipettes
Pasteur pipettes
disinfectant (70% ethanol or 3% hydrogen peroxide)
80°C modular dry bath incubator
37°C modular dry bath incubator
heating block modules
65°C water bath
20-mg/ml RNase A solution (DNASE free;
dissolve 1 mg/ml in 1 X TE [10 mM Tris, pH
7.4 + 1 mM EDTA, pH 8.0], boil 10-30 min,
cool to room temperature, store at — 20°C)
cell lysate solution (Tris-EDTA-SDS) from Puregene
(Gentra Systems, PO Box 13159, Research
Triangle Park, NC 27709; 1-800-866-3039)
protein precipitation solution (ammonium acetate)
from Puregene
1.5 ml tubes
100% isopropanol
70% ethanol
100% absolute ethanol
vortex mixer
hydration solution (IX Tris-EDTA hydration
solution from Puregene)
Learning Objectives
Each student should be able to
1. Understand how to isolate genomic DNA from
the bacterium, Escherichia coli
2. Explain why different protocols are needed for
DNA isolation from various taxa
Suggested Reading in Textbook
1. All of chapter 15 on Microbial Genomics.
2. DNA as genetic material, section 11.1.
3. The genetic code, section 11.4.
Pronunciation Guide
Escherichia coli (esh-er-I-ke-a KOH-lee)
Why Is the Above Bacterium Used
in This Exercise?
Chemically, DNA is identical in structure from one organism
to another. It is the sequence of base pairs that distinguishes
DNA from various species. The composition of an organism,
whether it is unicellular or multicellular, the exact makeup of
the individual cells and tissues, and whether or not a cell wall
is present, affects protocols used to isolate DNA. Also, the use
for which DNA is required may dictate the specific method
employed in its isolation. In the previous exercise {exercise
64), a simple procedure was used to quickly isolate and
visualize genomic DNA from yeast. Since Escherichia coli is one of
the most studied procaryotic cells, it will be used in this
exercise as a source of DNA. Once the DNA has been obtained
and purified, it can be saved and used in more complex
exercises such as quantitation by gel electrophoresis, PCR
amplification, digestion with restriction endonucleases, and
membrane hybridizations such as Southern blots. To carry out the
latter requires a lot of time and expensive equipment that most
general microbiology laboratories do not possess. Therefore,
this experiment stops with pure DNA from E. coli and if
instructors wish, depending on time and equipment, they can
supplement it with additional genomic protocols.
403
Harley-Prescott: I XI. Microbial Genetics and I 65. Isolation and I I ©The McGraw-Hill
Laboratory Exercises in Genomics Purification of Genomic Companies. 2002
Microbiology, Fifth Edition DNA from Escherichia coli
Principles
Isolation and purification of DNA are essential
procedures in molecular biology. Extraction and
purification of genomic DNA from procaryotic organisms
such as E. coli have facilitated the study of complex
genomes. This has also led to the construction of
genomic DNA libraries for many species. (Genomic
libraries will be covered in the last exercise [exercise
66] in this manual.)
The genomic DNA isolation and purification
technique mat will be used in this exercise uses a four step
process (figure 65.1).
1. E. coli cells must be lysed to release genome
DNA. The most common solution contains the
detergent sodium dodecyl sulfate and sodium
hydroxide.
2. Ribonuclease is added to the cell bacterial lysate
to remove the RNA.
3. The bacterial proteins are removed next by the
addition of ammonium or potassium acetate. The
acetate precipitates the proteins but leaves the
large genomic DNA in solution.
4. The E. coli genomic DNA is concentrated and
desalted by using isopropanol precipitation
followed by an ethanol wash.
Procedure
1. Obtain a 10- to 12-hour tryptic soy broth culture
of E. coli.
2. Label a microcentrifuge tube. Using a pipette,
transfer 1 ml of the E. coli culture into the
microcentrifuge tube.
3. Pulse the tube at top speed in the microcentrifuge
for 5 to 10 seconds to cause the E. coli bacteria to
form a pellet.
4. Carefully remove most of the supernatant by
pipetting it into a container of disinfectant.
5. Add 600 |xl of cell lysate solution and gently
pipet up and down to resuspend the bacterial
pellet. The SDS in the lysis solution is a detergent
that disrupts the plasma membrane of the E. coli
cells.
6. Incubate at 80°C for 5 minutes.
7. Slowly cool the sample in the microcentrifuge
tube at room temperature. The sample must reach
room temperature before adding RNase since heat
will denature the enzyme. Once the sample is at
room temperature, add 3 |xl of RNase solution to
the bacterial cell lysate.
8. Mix by inverting the microcentrifuge tube 25
times and incubate at 37°C for 30 minutes.
9. Cool the sample to room temperature. Add 200 |xl
of protein precipitation solution and vortex very
gently for 20 seconds. The ammonium acetate in
the solution precipitates the protein leaving the
genomic DNA in solution.
10. Microcentrifuge the sample for 3 minutes at
14,000 rpm to pellet the protein.
11. Pour the supernatant into a clean 1.5 ml tube
leaving the protein pellet behind.
12. Add 600 |xl of 100% isopropanol, cap the tube,
and mix very gently by inverting the tube at least
50 times. Vigorous mixing will break the DNA
into small fragments.
13. Centrifuge in the microcentrifuge at 14,000 rpm
for 1 minute to pellet the DNA.
14. Pour off the supernatant and drain the liquid onto
an absorbent towel. The pellet will appear off-
white to yellow.
15. Add 600 |xl of 70% ethanol and invert the tube
several times to wash the pelleted DNA. Decant
the 70% ethanol and add 600 |xl of absolute
alcohol. Invert the tube several times to wash the
pelleted DNA. The alcohol washes remove any
salts from the DNA.
16. Centrifuge at 14,000 rpm for 1 minute.
17. Pour off the supernatant very slowly and
carefully watching the pellet so that it does not
come out of the microcentrifuge tube.
18. Air dry the DNA pellet for at least 15 minutes. Air
drying removes any residual alcohol, which will
interfere with any subsequent analyses.
19. Add 100 |xl of hydration solution to the pellet
and place the microcentrifuge tube in a water
bath at 65°C for 1 hour or incubate overnight at
room temperature.
20. The DNA from E. coli is now ready to use. At this
point, depending on the available equipment and
time, your instructor may have you perform other
experiments on the E. coli DNA. Examples include:
• Amplification by the polymerase chain
reaction
• Quantitation by spectrophotometry
• Quantitation by gel electrophoresis
• Restriction fragment length polymorphism
analysis
• Southern blotting
404 Microbial Genetics and Genomics
Harley-Prescott: XI. Microbial Genetics and 65. Isolation and
Laboratory Exercises in Genomics Purification of Genomic
Microbiology, Fifth Edition DNA from Escherichia coli
©The McGraw-Hill
Companies. 2002
Figure 65.1 Summary of Genomic DNA Isolation.
Centrifuge to
pellet bacteria
Add cell lysis
solution
Add RNase |noubation at 80°C
for 5 minutes
Mix by inversion
1
Incubate at
37° C for 30
minutes
Add protein
precipitation solution
and vortex
Centrifuge at 1 4,000 rpm
to pellet protein
Protein debris
Mix by inversion 50 times
Centrifuge to
pellet DNA
■ DNA pellet
Wash DNA pellet
once with 70%
ethanol and once
w with absolute alcohol
satr
1 min
y pell
minu
jsper
ion s<
Centrifuge at 14,000 rpm
for 1 minute
Air dry pellet for
15 minutes
Resuspend in
hydration solution
Incubate for 1 hour
at 65°C in a water bath
i
DNA ready for use
Isolation and Purification of Genomic DNA from Escherichia coli 405
©The McGraw-Hill
Companies. 2002
HINTS AND PRECAUTIONS
(1) Remember that heat denatures the RNase enzyme
and vigorous mixing will shear DNA into small
fragments. (2) To locate the tiny DNA pellet, orient the
hinge on the microcentrifuge tube outward in the
microcentrifuge. After centrifugation, the DNA pellet will be
located towards the bottom of the tube on the same side
as the hinge. (3) Any residual alcohol will interfere with
subsequent DNA analysis. (4) Do not pipette the DNA
to mix, as this will cause shearing.
406 Microbial Genetics and Genomics
Harley-Prescott:
Laboratory Exercises in
Microbiology, Fifth Edition
XI. Microbial Genetics and
Genomics
65. Isolation and
Purification of Genomic
DNA from Escherichia coli
Harley-Prescott: I XI. Microbial Genetics and I 65. Isolation and I I ©The McGraw-Hill
Laboratory Exercises in Genomics Purification of Genomic Companies. 2002
Microbiology, Fifth Edition DNA from Escherichia coli
Laboratory Report qj
Name:
Date: _
Lab Section:
Isolation and Purification of Genomic DNA from Escherichia coli
For each of the steps or reagents in the isolation and purification of genomic DNA from Escherichia coli, indicate
what each accomplishes.
Step/Reagent Accomplishes
cell lysis solution
incubation
RNase
protein precipitation solution
centrifugation
isopropanol precipitation
alcohol washes
hydration solution
Harley-Prescott: I XI. Microbial Genetics and I 65. Isolation and I I ©The McGraw-Hill
Laboratory Exercises in Genomics Purification of Genomic Companies. 2002
Microbiology, Fifth Edition DNA from Escherichia coli
Review Questions
1. Using your knowledge of the cell structure of various procaryotic organisms, hypothesize why specific
conditions are used in the cell lysis step.
2. You have just isolated and identified a new bacterium. Design a protocol for isolating its genomic DNA.
Explain your rationale.
3. How might you optimize the purity of DNA you extracted from your new organism?
4. Why must you handle DNA gently in this extraction procedure?
408 Microbial Genetics and Genomics
Harley-Prescott:
Laboratory Exercises in
Microbiology, Fifth Edition
XI. Microbial Genetics and
Genomics
66. Ident. Archaea & Bact.
Using the Internet &
Computer-Assisted Gene
Analysis
©The McGraw-Hill
Companies. 2002
EXERCISE
66
Identifying Archaea and Bacteria Using the Internet
and Computer-Assisted Gene Analysis
SAFETY CONSIDERATIONS
Protect your system from computer viruses. A computer
virus is a potential damaging computer program
designed to infect other software or files by attaching
itself to the software or files with which it comes in
contact. Virus programs are dangerous because they often
destroy or corrupt data stored on the infected computer.
You can protect your computer from viruses by
installing an antivirus program.
Materials per Group of Students
computer with Internet access
Web browser (such as Netscape or Internet
Explorer)
printer
Learning Objectives
Each student should be able to:
1. Understand the importance of bioinformatics in
microbiology
2. Understand the significance of the 16S rRNA
sequence in the identification of archaea and
bacteria
3. Appreciate the importance of identifying archaea
and bacteria using the Ribosomal Database
Project as well as the availability of other gateway
websites containing links to sequence databases
and computational centers for sequence analysis
Suggested Reading in Textbook
1. Chapter 15 on Microbial Genomics.
2. Mapping and Sequencing the Genome, sections
13.7 and 15.3.
3. Bioinformatics, section 15.4.
4. Chapter 19 on Microbial Taxonomy.
5. Chapter 20 on the Archaea.
6. Chapters 21-24 on the Bacteria.
Principles
Bioinformatics is the branch of science devoted to
computational information management systems used
to collect, store, analyze, and disseminate biological
information. It was created with the union of
information technology and gene-sequencing projects.
Databases for nucleic acids and proteins and the analytical
tools needed for management are available to students
and scientists on the World Wide Web at no cost.
The classical way for identifying and classifying
archaea and bacteria involve morphology and
staining, biochemical activities, and rapid multitext
systems as presented in Parts two, four, and five of this
manual. As we move into the new millennium,
bioinformatics and the ability to sequence the DNA of
organisms has offered new ways of identification. The
closer organisms are related to each other, the more
similar their DNA sequences. These sequences
represent the order that nucleotide bases are found in a
piece of DNA. Certain genes common to all
organisms can be sequenced and compared. The most
useful ones involve the DNA coding for the part of the ri-
bosome called 16S ribosome subunit.
Ribosomes are involved in protein synthesis.
Ribosomes are composed of two subunits, each of which
consists of protein and a type of RNA called
ribosomal RNA (rRNA). Procaryotic ribosomes are made up
of a small 30S subunit, consisting of a 16S rRNA
particle and 21 polypeptide chains, and a large 50S sub-
unit which together make up the complete 70S
ribosome. Since the 16S rRNA DNA segment is found in
all organisms with the same function, ribosomal RNA
gene sequences can easily be compared.
Ribosomal RNA gene sequencing is currently
being used to study the diversity of procaryotes, as well
as all other organisms, and the phylogenetic relationships
among them. There are several advantages to using
rRNA. First, all cells contain ribosomes and ribosomal
RNA. Two closely related organisms will have fewer
409
Harley-Prescott:
Laboratory Exercises in
Microbiology, Fifth Edition
XI. Microbial Genetics and
Genomics
66. Ident. Archaea & Bact.
Using the Internet &
Computer-Assisted Gene
Analysis
©The McGraw-Hill
Companies. 2002
different bases in their rRNA than two organisms that
are more distantly related. A second advantage is that
RNA genes have undergone few changes over time
and are highly conserved. If the sequences were too
different, they could not be compared. Third, when
doing rRNA sequencing, cells do not have to be
cultured in the laboratory
This approach to identification of organisms has
yielded exciting results. For example, some specific
base sequences are always found in particular groups
of organisms. These are called signature sequences.
Signature sequences are DNA sequences about 5-10
bases long found at a specific location in the 16S
rRNA that are unique to the Archaea, Bacteria, Eu-
carya, and many major groups within the procary-
otes. New relationships between organisms can be
determined by comparing base sequences by means
of computer programs. The more the sequences
diverge, the more the organisms have evolved from
one another.
In bioinformatics, these gene sequences often can
be used to identify specific organisms. The sequences
of more than 16,000 organisms are in public data
bases. When a new sequence is submitted to a
database management organization, in seconds it will
respond with the most likely identification of the
species containing the sequence.
This exercise is designed to enable you to send
the DNA sequence of the 16S rRNA of several
bacteria and one archaeon to the Ribosomal Database
Project (rdp.cme.msu.edu/html/) at Michigan State
University, the Center of Microbial Ecology, to
determine the identification of these unknown organisms.
This project is sponsored by the National Science
Foundation, The U.S. Department of Energy, and
Michigan State University. It provides ribosome-
related data services to the scientific community,
including online data analysis, rRNA derived phyloge-
netic trees, and aligned and annotated rRNA
sequences. Other important gateway websites,
containing links to sequence databases and computational
centers for sequence analysis include the following:
• The Institute for Genomic Research
(http://www. tigr.org/)
Genomics: A Global Resource
(http.V/genomics.phrma. o rg/)
European Bioinformatics Institute
(www.ebi.ac.uk/)
GeneBank (http://www.ncbi.nlm.nih.gov/) is a
sequence of databases maintained by the National
Center of Biotechnology Information, the
National Library of Medicine, and the National
Institute of Health.
Procedure
1. Open Netscape or Microsoft Explore on your
computer.
2. Type in the URL rpd.cme.msu.edu/html/
3. When the Ribosomal Database Project II comes
up, click on "Online Analysis."
4. Find the "Sequence Match" in the purple column.
Click on the gray arrow in the run column for the
sequence match.
5. In the large clear box that appears at the bottom of
the screen, cut and paste the gene sequences
(using either Microsoft Word or the sequences
found on the McGraw-Hill website,
www. mhhe. com/prescott5/labsequencedata) from
the four unknown bacteria and one archaon
(figures 66.1-66.5) into the box.
6. Click on "Submit Sequence" a few screens down.
Certain parameters will have to be changed in
order to complete a successful search.
7. As soon as the analysis has been complete, the
genus and species which most closely matches the
entered sequence appears. Also appearing is the
percent of the sequences which matched your
entered sample nucleotide sequence. Other species
and their percent of similarity are also presented.
HINTS AND PRECAUTIONS
Typing gene sequences is most easily done by one
person doing the typing on the keyboard and another
reading the letters and spaces. The gene sequences are also
available electronically on the McGraw-Hill website,
www. mhhe. com/prescott5/labsequencedata
410 Microbial Genetics and Genomics
Harley-Prescott:
Laboratory Exercises in
Microbiology, Fifth Edition
XI. Microbial Genetics and
Genomics
66. Ident. Archaea & Bact.
Using the Internet &
Computer-Assisted Gene
Analysis
©The McGraw-Hill
Companies. 2002
Figure 66.1 Base Sequences for Bacterium A.
1 tctctgatgt tagcggcgga cgggtgagta acacgtggat aacctaccta taagactggg 60
61 ataacttcgg gaaaccggag ctaataccgg ataatatttt gaaccgcatg gttcaaaagt 120
121 gaaagacggt cttgctgtca cttatagatg gatccgcgct gcattagcta gttggtaagg 180
181 taacggctta ccaaggcaac gatgcatagc cgacctgaga gggtgatcgg ccacactgga 240
241 actgagacac ggtccagact cctacgggag gcagcagtag ggaatcttcc gcaatgggcg 300
301 aaagcctgac ggagcaacgc cgcgtgagtg atgaaggtct tcggatcgta aaactctgtt 360
361 attagggaag aacatatgtg taagtaactg tgcacatctt gacggtacct aatcagaaag 420
421 ccacggctaa ctacgtgcca gcagccgcgg taatacgtag gtggcaagcg ttatccggaa 480
481 ttattgggcg taaagcgcgc gtaggcggtt ttttaagtct gatgtgaaag cccacggctc 540
541 aaccgtggag ggtcattgga aactggaaaa cttgagtgca gaagaggaaa gtggaattcc 600
601 atgtgtagcg gttaaatgcg cagagatatg gaggaacacc agtggcgaag gcgactttct 660
661 ggtctgtaac tgacgctgat gtgcgaaagc gtgggaatca aacaggatta gataccctgg 720
721 tagtccacgc cgtaaacgat gagtgctaag tgttaggggg tttccgcccc ttagtgctgc 780
781 agctaacgca ttaagcactc cgcctgggga gtacgaccgc aaggttgaaa ctcaaaggaa 840
841 ttgacgggga cccgcacaag cggtggagca tgtggtttaa ttcgaagcaa cgcgaagaac 900
901 cttaccaaat cttgacatcc tttgacaact ctagagatag agccttcccc ttcgggggac 960
961 aaagtgacag gtggtgcatg gttgtcgtca gctcgtgtcg tgagatgttg ggttaagtcc 1020
1021 cgcaacgagc gcaaccctta agcttagttg ccatcattaa gttgggcact ctaagttgac 1080
1081 tgccggtgac aaaccggagg aaggtgggga tgacgtcaaa tcatcatgcc ccttatgatt 1140
1141 tgggctacac acgtgctaca atggacaata caaagggcag cgaaaccgcg aggtcaagca 1200
1201 aatcccataa agttgttctc agttcggatt gtagtctgca actcgactac atgaagctgg 1260
1261 aatcgctagt aatcgtagat cagcatgcta cggtgaatac gttcccgggt cttgtacaca 1320
1321 ccgcccgtca caccacgaga gtttgtaaca 1351
Figure 66.2 Base Sequences for Bacterium B.
1
61
121
181
241
301
361
taacacgtgg ataacctacc tataagactg ggataacttc gggaaaccgg agctaatacc
ggataatata ttgaaccgca tggttcaata gtgaaagacg gttttgctgt cacttataga
tggatccgcg ccgcattagc tagttggtaa ggtaacggct taccaaggca acgatgcgta
gccgacctga gagggtgatc ggccacactg gaactgagac acggtccaga ctcctacggg
aggcagcagt agggaatctt ccgcaatggg cgaaagcctg acggagcaac gccgcgtgag
tgatgaaggt cttcggatcg taaaactctg ttattaggga agaacaaatg tgtaagtaac
tatgcacgtc ttgacggtac ctaatcagaa agccacggct aactacgtgc
60
120
180
240
300
360
411
Identifying Archaea and Bacteria Using the Internet and Computer-Assisted Gene Analysis
411
Harley-Prescott:
Laboratory Exercises in
Microbiology, Fifth Edition
XI. Microbial Genetics and
Genomics
66. Ident. Archaea & Bact.
Using the Internet &
Computer-Assisted Gene
Analysis
©The McGraw-Hill
Companies. 2002
Figure 66.3 Base Sequences for Bacterium C.
1 gcctaataca tgcaagtaga acgctgagaa ctggtgcttg caccggttca aggagttgcg 60
61 aacgggtgag taacgcgtag gtaacctacc tcatagcggg ggataactat tggaaacgat 120
121 agctaatacc gcataagaga gactaacgca tgttagtaat ttaaaagggg caattgctcc 180
181 actatgagat ggacctgcgt tgtattagct agttggtgag gtaaaggctc accaaggcga 240
241 cgatacatag ccgacctgag agggtgatcg gccacactgg gactgagaca cggcccagac 300
301 tcctacggga ggcagcagta gggaatcttc ggcaatgggg gcaaccctga ccgagcaacg 360
361 ccgcgtgagt gaagaaggtt ttcggatcgt aaagctctgt tgttagagaa gaatgatggt 420
421 gggagtggaa aatccaccaa gtgacggtaa ctaaccagaa agggacggct aactacgtgc 480
481 cagcagccgc ggtaatacgt aggtcccgag cgttgtccgg atttattggg cgtaaagcga 540
541 gcgcaggcgg ttttttaagt ctgaagttaa aggcattggc tcaaccaatg tacgctttgg 600
601 aaactggaga acttgagtgc agaaggggag agtggaattc catgtgtagc ggtgaaatgc 660
661 gtagatatat ggaggaacac cggtggcgaa agcggctctc tggtctgtaa ctgacgctga 720
721 ggctcgaaag cgtggggagc aaagaggatt agataccctg gtagtccacg ccgtaaacga 780
781 tgagtgctag gtgttaggcc ctttccgggg cttagtgccg gagctaacgc attaagcact 840
841 ccgcctgggg agtacgaccg caaggttgaa actcaaagga attgacgggg gcccgcacaa 900
901 gcggtggagc atgtggttta attcgaagca acgcgaagaa ccttaccagg tcttgacatc 960
961 ccgatgcccg ctctagagat agagttttac ttcggtacat cggtgacagg tggtgcatgg 1020
1021 ttgtcgtcag ctcgtgtcgt gagatgttgg gttaagtccc gcaacgagcg caacccctat 1800
1081 tgttagttgc catcattaag ttgggcactc tag 1114
Figure 66.4 Base Sequences for Bacterium D.
1 ggtaccactc ggcccgaccg aacgcactcg cgcggatgac cggccgacct ccgcctacgc 60
61 aatacgctgt ggcgtgtgtc cctggtgtgg gccgccatca cgaagcgctg ctggttcgac 120
121 ggtgttttat gtaccccacc actcggatga gatgcgaacg acgtgaggtg gctcggtgca 180
181 cccgacgcca ctgattgacg ccccctcgtc ccgttcggac ggaacccgac tgggttcagt 240
241 ccgatgccct taagtacaac agggtacttc ggtggaatgc gaacgacaat ggggccgccc 300
301 ggttacacgg gtggccgacg catgactccg ctgatcggtt cggcgttcgg ccgaactcga 360
361 ttcgatgccc ttaagtaata acgggtgttc cgatgagatg cgaacgacaa tgaggctatc 420
421 cggcttcgtc cgggtggctg atgcatctct tcgacgctct ccatggtgtc ggtctcactc 480
481 tcagtgagtg tgattcgatg cccttaagta ataacgggcg ttacgaggaa ttgcgaacga 540
541 caatgtggct acctggttct cccaggtggt taacgcgtgt tcctcgccgc cctggtgggc 600
601 aaacgtcacg ctcgattcga gcgtgattcg atgcccttaa gtaataacgg ggcgttcggg 660
661 gaaatgcgaa cgtcgtcttg gactgatcgg agtccgatgg gtttatgacc tgtcgaactc 720
721 tacggtctgg tccgaaggaa tgaggattcc acacctgcgg tccgccgtaa agatggaatc 780
781 tgatgttagc cttgatggtt tggtgacatc caactggcca cgacgatacg tcgtgtgcta 840
841 agggacacat tacgtgtccc cgccaaacca agacttgata gtcttggtcg ctgggaacca 900
901 tcccagcaaa ttccggttga tcctgccgga ggccattgc 939
412 Microbial Genetics and Genomics
Harley-Prescott:
Laboratory Exercises in
Microbiology, Fifth Edition
XI. Microbial Genetics and
Genomics
66. Ident. Archaea & Bact.
Using the Internet &
Computer-Assisted Gene
Analysis
©The McGraw-Hill
Companies. 2002
Figure 66.5 Base Sequences for one Archaeon.
1 agagtttgat cctggctcag agcgaacgct ggcggcaggc ttaacacatg caagtcgaac 60
61 gggcgtagca atacgtcagt ggcagacggg tgagtaacgc gtgggaacgt accttttggt 120
121 tcggaacaac acagggaaac ttgtgctaat accggataag cccttacggg gaaagattta 180
181 tcgccgaaag atcggcccgc gtctgattag ctagttggtg aggtaatggc tcaccaaggc 240
241 gacgatcagt agctggtctg agaggatgat cagccacatt gggactgaga cacggcccaa 300
301 actcctacgg gaggcagcag tggggaatat tggacaatgg gcgaaagcct gatccagcca 360
361 tgccgcgtga gtgatgaagg ccctagggtt gtaaagctct tttgtgcggg aagataatga 420
421 cggtaccgca agaataagcc ccggctaact tcgtgccagc agccgcggta atacgaaggg 480
481 ggctagcgtt gctcggaatc actgggcgta aagggtgcgt aggcgggttt ctaagtcaga 540
541 ggtgaaagcc tggagctcaa ctccagaact gcctttgata ctggaagtct tgagtatggc 600
601 agaggtgagt ggaactgcga gtgtagaggt gaaattcgta gatattcgca agaacaccag 660
661 tggcgaaggc ggctcactgg gccattactg acgctgaggc acgaaagcgt ggggagcaaa 720
721 caggattaga taccctggta gtccacgccg taaacgatga atgccagccg ttagtgggtt 780
781 tactcactag tggcgcagct aacgctttaa gcattccgcc tggggagtac ggtcgcaaga 840
841 ttaaaactca aaggaattga cgggggcccg cacaagcggt ggagcatgtg gtttaattcg 900
901 acgcaacgcg cagaacctta ccagcccttg acatgtccag gaccggtcgc agagacgtga 960
961 ccttctcttc ggagcctgga gcacaggtgc tgcatggctg tcgtcagctc gtgtcgtgag 1020
1021 atgttgggtt aagtcccgca acgagcgcaa cccccgtcct tagttgctac catttagttg 1080
1081 agcactctaa ggagactgcc ggtgataagc cgcgaggaag gtggggatga cgtcaagtcc 1140
1141 tcatggccct tacgggctgg gctacacacg tgctacaatg gcggtgacaa tgggaagcta 1200
1201 aggggtgacc cttcgcaaat ctcaaaaagc cgtctcagtt cggattgggc tctgcaactc 1260
1261 gagcccatga agttggaatc gctagtaatc gtggatcagc atgccacggt gaatacgttc 1320
1321 ccgggccttg tacacaccgc ccgtcacacc atgggagttg gctttacctg aagacggtgc 1380
1381 gctaaccagc aatgggggca gccggccacg gtagggtcag cgactggggt gaagtcgtaa 1440
1441 caaggtagcc gtaggggaac ctgcggctgg atcacctcct t 1481
Identifying Archaea and Bacteria Using the Internet and Computer-Assisted Gene Analysis
413
Harley-Prescott: XI. Microbial Genetics and 66. Ident. Archaea & Bact.
Laboratory Exercises in Genomics Using the Internet &
Microbiology, Fifth Edition Computer-Assisted Gene
Analysis
©The McGraw-Hill
Companies. 2002
Laboratory Report Q Q
Name:
Date: _
Lab Section:
Identifying Archaea and Bacteria Using the Internet
and Computer-Assisted Gene Analysis
1. Results for the four bacteria.
Bacteria A =
Genus
and
species
Bacteria B
Genus
and
species
Bacteria C
Genus
and
species
Bacteria D =
Genus
and
species
2. Results for the archaeon.
Archaeon =
Genus
and
species
415
Harley-Prescott: I XI. Microbial Genetics and I 66. Ident. Archaea & Bact. I I ©The McGraw-Hill
Laboratory Exercises in Genomics Using the Internet & Companies. 2002
Microbiology, Fifth Edition Computer-Assisted Gene
Analysis
Review Questions
1. What are some advantages of identifying an organism by using the Ribosomal Data Project?
2. What are some disadvantages of identifying an organism by using the Ribosomal Data Project?
3. Why might you obtain different search results from one time to another?
4. What essential terms or search parameters did you find most useful in narrowing your search?
5. Was your search successful? Why or why not?
6. How could a search be performed that accesses only the desired sequence?
7. What is the main purpose of the Ribosomal Data Base Project?
8. How would you define bioinformatics? Signature sequences?
416 Microbial Genetics and Genomics
Harley-Prescott:
Laboratory Exercises in
Microbiology, Fifth Edition
Appendixes
A. Dilutions with Sample
Problems
©The McGraw-Hill
Companies. 2002
APPENDIX A
Dilutions with Sample Problems
Dilutions can be divided into five categories:
1. To dilute a solution to an unspecified final volume in
just one step.
2. To dilute a solution to a specified final volume in just
one step.
3. To dilute a solution to an unspecified final volume in
several steps.
4. To dilute a solution to a specified final volume in
several steps.
5. Serial dilutions.
Diluting a Solution to an Unspecified
Volume in Just One Step
One must first calculate how many times to dilute (this is
called the dilution factor) the initial material (stock
solution) to obtain the final concentration. To accomplish
this type of dilution, use the following formula:
Initial Concentration (IC)
Final Concentration (FC)
Dilution Factor (DF)
For example, if you want to dilute a solution with an initial
concentration of solute of 5% down to 1%, using the above
formula gives
FC 1%
Thus, in order to obtain a 1% solution from a 5% solution,
the latter must be diluted 5 times. This can be accomplished
by taking one volume (e.g., cc, ml, liter, gallon) of the initial
concentration (5%) and adding 4 volumes (e.g., cc, ml, liter,
gallon) of solvent for a total of five volumes. Stated another
way, 1 ml of a 5% solution + 4 ml of diluent will give a total
of 5 ml, and each ml contains 1% instead of 5%.
Diluting a Solution to a Specified Volume in
Just One Step
First, calculate the number of times the initial concentration
must be diluted by dividing the final concentration (FC)
into the initial concentration (IC).
Second, divide the number of times the initial
concentration must be diluted (bottom left paragraph) into the final
volume specified to determine the aliquot (or portion) of
the initial concentration to be diluted.
Third, dilute the aliquot of the initial concentration
calculated in step 2 by the volume specified.
For example, you have a 10% solution and want a 2%
solution. However, you need 100 ml of this 2% solution.
J£ = DF=™* = S
FC 2%
Divide the number of times the 10% solution must be
diluted (DF) into the final volume specified:
100 ml
20 ml
Dilute the portion of 10 to the volume specified:
20 ml of a 10% solution + 80 ml of diluent = 100 ml (each
milliliter = 2%)
Another method for performing this type of dilution is
to use the following formula:
C,
V2
-±= -r^orC1V1 = C2V2
C
Vi
Ci = standard concentration available
'l
C2
v2
Vi
standard concentration desired
final volume of new concentration
volume of C\ required to make the new
concentration
For example, if you want to prepare 100 ml of 10% ethyl
alcohol from 95% ethyl alcohol, then
10%,
Ci
v2
Vi
95
10
X
X
=
=
=
=
=
=
95%, C2:
100 ml,
x and
100
X
1,000/95
10.5 ml
Thus, 10.5 ml of 95% ethyl alcohol + 89.5 ml of H20 = 100
ml of a 10% ethyl alcohol solution.
417
Harley-Prescott: I Appendixes I A. Dilutions with Sample I I ©The McGraw-Hill
Laboratory Exercises in Problems Companies. 2002
Microbiology, Fifth Edition
Diluting a Solution to an Unspecified
Volume in Several Steps
Frequently in the microbiology laboratory, large dilutions
must be employed. They cannot be done in one step
because they are too large. As a result, they must be done in
several steps to conserve not only amounts of diluent to be
used but also space. For example, a 0.5 g/ml solution
diluted to 1 Llg/ml is a 500,000-fold dilution.
0.5 g = 0.5 g x 106 Llg/g
= 500,000 Llg
To obtain a solution containing 500,000 |J.g/ml in one step
would require taking 1 ml of 0.5 gm/ml stock solution and
adding 499,999 ml of diluent. As you can see, it would be
almost impossible to work with such a large fluid volume.
A 500,000 times dilution can be easily performed in
two steps by first taking 1 ml of the initial concentration
and diluting it to 500 ml and second, by diluting 1 ml of the
first dilution to 1,000 ml.
1 ml of 500,000 Llg/ml + 499 ml of diluent = 1,000
Llg/ml
1 ml of 1,000 Llg/ml + 999 ml of diluent = 1 Llg/ml
Thus, by this two-step procedure, we have cut down the
volume of diluent used from 499,999 to 1,498 (499 ml
+ 999 ml).
Dilution Ratios Used in This Manual
According to the ASM (American Society for Microbiology)
Style Manual, dilution ratios may be reported with either
colons (:) or shills (/), but note there is a difference between
them. A shill indicates the ratio of a part to a whole: for
example, 1/2 means 1 of 2 parts, with a total of 2 parts. A
colon indicates the ratio of 1 part to 2 parts, with a total of
3 parts. Thus, 1/2 equals 1:1, but 1:2 equals 1/3.
Diluting a Solution to a Specified
Volume in Several Steps
This type of dilution is identical to all previous dilutions
with the exception that the specified final volume must be
one factor of the total dilution ratio.
For example, you want a 1/10,000 dilution of whole
serum (undiluted) and you need 50 ml.
Divide dilution needed by the volume:
1^0 = 200
50
200 (1/200 dilution) = the first step in the dilution factor;
the second is 1/50, obtained as follows:
1 ml of serum + 199 ml of diluent = 1/200 dilution.
1 ml of 1/200 dilution + 49 ml of diluent = 1/50.
To check: 50 x 200 = 10,000.
Serial Dilutions
The usefulness of dilutions becomes most apparent when
small volumes of a material are required in serological
procedures. For example, if 0.01 ml of serum were required in
a certain test, instead of measuring out this small volume
with a consequent sacrifice of accuracy, it would be more
advantageous to dilute the serum 100 times. One ml of this
1/100 dilution would then contain 0.01 ml of the serum.
Each ml of this dilution would be equivalent to the required
0.01 ml of undiluted serum.
Dilutions represent fractional amounts of a material
and are generally expressed as the ratio of one volume of
material to the final volume of the dilution. Thus, a 1/10
dilution of serum represents 1 volume of serum in 10
volumes of dilution (1 volume of serum + 9 volumes of
diluent). Undiluted serum may be expressed as 1/1.
1 ml of serum + 1 ml of saline may be expressed as
1/2. Each milliliter of this dilution is equivalent to 0.5 ml of
undiluted serum.
1 ml of serum + 2 ml of saline may be expressed as
1/3. Each milliliter of this dilution is equivalent to 0.33 ml
of undiluted serum.
1 ml of serum + 99 ml of saline may be expressed as
1/100. Each milliliter of this dilution is equivalent to 0.01
ml of undiluted serum.
From the above, one can see that dilution expressions
are fractions written as ratios where the numerator is unity
and the denominator is the dilution value.
Division of the numerator by the denominator will give
the amount of material per milliliter of the dilution. For
example, in a 1/25 dilution, 1/25 = 0.04. Therefore, each
milliliter of this dilution contains 1/25 or 0.04 ml of the
original material (e.g., serum).
To convert a ratio into a dilution expression, divide
both the numerator and denominator by the value of the
numerator. For example, in a mixture consisting of 4 ml of
serum and 6 ml of saline,
4 ml of serum + 6 ml of saline
= 10 ml of serum dilution
Ratio of serum dilution = 4/10.
418 Appendix A Dilutions with Sample Problems
Harley-Prescott:
Laboratory Exercises in
Microbiology, Fifth Edition
Appendixes
A. Dilutions with Sample
Problems
©The McGraw-Hill
Companies. 2002
Dividing both numerator and denominator by the
numerator value (4),
4-s-4
lO-s-4
1/2.5 = serum dilution.
In the preparation of dilutions, any multiple or submultiple
of the constituent volumes may be used. For example,
1/30 dilution = 1 ml serum + 29 ml saline
= 0.5 ml serum + 14.5 ml saline
= 2 ml serum + 58.0 ml saline
Serial dilutions indicate that an identical volume of material
is being transferred from one vessel to another. The purpose
of this procedure is to increase the dilutions of a substance
by certain increments. For example, in a twofold dilution,
the dilution factor is doubled each time (e.g., 1/2, 1/4, 1/8,
etc.). See table below for further examples.
Tube
Amount of Saline
Added to Each Tube
Serum
Protocol
Final Dilution
of Serum
1
2
3
4
5
6
0
1ml
1ml
1ml
1ml
1ml
2 ml
1 ml of 1/1
1 ml of 1/2
1 ml of 1/4
1 ml of 1/8
1 ml of 1/16
Remove 1 ml to tube 2
Mix, remove 1 ml to tube 3
Mix, remove 1 ml to tube 4
Mix, remove 1 ml to tube 5
Mix, remove 1 ml to tube 6
Mix, discard 1 ml
1/1
1/2
1/4
1/8
1/16
1/32
Sample Problems
Diluting a Solution to an Unspecified Volume in Just One Step
Problem 1
Dilute a solution which has an initial concentration of solute of 10% down to 2%.
Problem 2
Dilute a solution which has an initial concentration of 0.01% to 0.0001%.
Diluting a Solution to a Specified Volume in Just One Step
Problem 3
You have a 0.01% solution. You want a 0.001% solution and you need 25 ml.
Problem 4
Prepare 50 ml of a 3% solution from a 4% solution.
Appendix A Dilutions with Sample Problems 419
Harley-Prescott: Appendixes A. Dilutions with Sample
Laboratory Exercises in Problems
Microbiology, Fifth Edition
Problem 5
Prepare 100 ml of 10% alcohol from 95% alcohol.
Problem 6
You need 45 ml of 50% alcohol. How can you prepare this from 70% alcohol?
Problem 7
What volume of a 20% dextrose broth solution should be used to prepare 250 ml of 1% dextrose broth?
Problem 8
Prepare a 45 ml of a 2% suspension of RBCs from a 5% suspension.
Problem 9
What volume of a 0.02% solution can be prepared from 25 ml of a 0.1% solution?
Problem 10
What percent concentration of alcohol is prepared when 10 ml of 95% alcohol is diluted with H2O to make a final volume of 38 ml?
Problem 11
What percent of dextrose is prepared when 3 ml of a 10% dextrose solution is mixed with 12 ml of broth?
Diluting a Solution to an Unspecified Volume in Several Steps
Problem 12
You have a stock solution of protein containing 10 grams per ml. You want a concentration of 2 mg/ml. How would you
perform this dilution in just three steps?
©The McGraw-Hill
Companies. 2002
420 Appendix A Dilutions with Sample Problems
Harley-Prescott: Appendixes
Laboratory Exercises in
Microbiology, Fifth Edition
A. Dilutions with Sample
Problems
©The McGraw-Hill
Companies. 2002
Problem 13
You have a stock solution of 10 mg/ml of vitamins and want to obtain a solution of 0.5 |xg/ml. How would you perform this
dilution in just three steps?
Diluting a Solution to a Specified Volume in Several Steps
Problem 14
You want a 1:128 dilution of serum and you need 4 ml. How would you perform this dilution in several steps?
Problem 15
You want a 1:3,000 dilution of serum and you need 2 ml. How would you perform this dilution in several steps?
Problem 16
How would you prepare 1 ml of a 1:5 dilution of sera?
Problem 17
How would you prepare 8 ml of a 1:20 dilution of sera?
Problem 18
Based on the following dilutions, how many bacteria were present in the original sample? .
1 ml
1 ml
1 ml
1 ml
1.0 ml
201 colonies counted
on the plate
Appendix A Dilutions with Sample Problems 421
Harley-Prescott:
Laboratory Exercises in
Microbiology, Fifth Edition
Appendixes
A. Dilutions with Sample
Problems
©The McGraw-Hill
Companies. 2002
Problem 19
How many bacteria were present in the following sample?
Dilution
1&4
10-5
10^
Amount Plated
1.0 ml
1.0 ml
1.0 ml
Number of Colonies Counted
256
28
7
Problem 20
If 0.1 ml of a urine culture from a 10~6 dilution yielded 38 colonies, how many bacteria were there per ml in the original
sample?
Problem 21
How many bacteria were present in the following sample?
Dilution Volume Plated Number of Colonies Counted
10-7 0.1 ml 26
Problem 22
How many bacteria were present in the following sample?
0.1 ml
0.1 ml
0.1 ml
w w w w
undiluted
sample
10-2
dilution
10-2
dilution
10-2
dilution
422 Appendix A Dilutions with Sample Problems
Harley-Prescott:
Laboratory Exercises in
Microbiology, Fifth Edition
Appendixes
A. Dilutions with Sample
Problems
©The McGraw-Hill
Companies. 2002
Problem 23
How many bacteria were there in the original sample?
1.0 ml
0.5 ml
3 ml
1 ml
1 ml
2 ml
w w Ky v^ w w w
sample 9.0 ml 4.5 ml 27 ml 99 ml 9 ml 18 ml
84 colonies
counted
0.01 ml
Answers to Sample Problems
Problem 1
Take 1 volume of the initial concentration (10%) and 4 volumes of solvent for a total of 5 volumes: 1 ml of a 10% solution +
4 ml of diluent will give a total of 5 ml and each ml will now contain 2% instead of 10%.
Problem 2
In order to obtain a 0.0001% solution from a 0.01% solution, the latter must be diluted 100 times. Therefore, take 1 volume of
the initial concentration (0.01%) and add 99 volumes of solvent for a total of 100 volumes. 1 ml of 0.01% solution + 99 ml of
diluent will give a total of 100 ml and each ml now contains 0.0001% instead of 0.01%.
Problem 3
A 0.01% solution is 10 times more concentrated than the 0.001% solution. Divide the number of times the 10 must be diluted
into the final volume specified: 25/10 = 2.5. 2.5 ml of a 0.01% solution + 22.5 ml of diluent will give a total of 25 ml and
each ml now contains 0.001%.
Problem 4
Ci = 4%
C2 = 3% 4%=^ 4X = 37.5ml
V2 = 50 ml 3% X
Vi = X
Thus, 37.5 ml of a 4% solution + 12.5 ml of solvent = 50 ml of a 3% solution.
Problem 5
Ci = 95%
C2 = 10% 95% = 100
V2 = 100 ml 10% X
Vi = X
Thus, 10.5 ml of 95% alcohol + 89.5 ml of H20 = 100 ml of a 10% alcohol solution.
X =
1000
95
X = 10.5 ml
Appendix A Dilutions with Sample Problems 423
Harley-Prescott: I Appendixes I A. Dilutions with Sample I I ©The McGraw-Hill
Laboratory Exercises in Problems Companies. 2002
Microbiology, Fifth Edition
Problem 6
Ci = 70%
C2 = 50% 70%_45 _ 50 X 45 _
_„^. — tjt" A — — A — 32.1 ml
V2 = 45ml 50% X 70
Vi = X
Thus, 32.1 ml of 70% alcohol + 12.9 ml of H20 = 45 ml of a 50% alcohol solution.
Problem 7
Ci = 20%
C2=1% 20% = 250 20X = 25Q x=12.5ml
V2 = 150 ml 1% X
Vi = X
Thus, 12.5 ml of a 20% solution + 237.5 ml of broth = 250 ml of a 1% dextrose broth solution.
Problem 8
Ci = 5%
C2 = 2% 5% 45 ml 90
V2 = 45ml 2%-^T X~T~ X-18ml
Vi = X
Thus, 18 ml of 5% + 27 ml of saline = 45 ml of a 2% red blood cell suspension.
Problem 9
Ci = 0.1%
C2 = 0.02% _01^=^_ 002X = 25 x=12W
V2 = X 0.02% 25 ml
Vi = 25 ml
Thus, prepare a total volume of 125 of a 0.02% solution from 25 ml of 0.01% solution by adding 100 ml of diluent to the latter.
Problem 10
Ci = 95%
C2 = X 95% = 38ml 38X = 950 X = 25%
V2 = 38 ml X 10 ml
Vi = 10 ml
Problem 11
Ci = 10%
c2 = x io% = i5mrn 15X = 30 x = 2%
V2 = 15 ml X 3 ml
Vi = 3 ml *3 + 12 = 15 ml (total volume)
Problem 12
In order to make all units equal, you have to convert 10 grams to milligrams,
stock solution = 10,000 mg/ml
final concentration = 2 mg/ml
IC _ 10,000 mg/ml =5000
FC ~~ 2 mg/ml
Thus, the dilution factor is 5,000.
To perform a 1:5000 dilution:
Step #1 1 ml of 10,000 mg/ml stock solution protein + 49 ml of diluent = 1:50 dilution = 200 mg/ml
Step #2 1 ml of 200 mg/ml + 9 ml of diluent =1:10 dilution = 20 mg/ml
Step #3 1 ml of 20 mg/ml + 9 ml of diluent =1:10 dilution = 2 mg/ml
To check to make sure the correct dilution was made:
50 X 10 X 10 = 5,000
424 Appendix A Dilutions with Sample Problems
Harley-Prescott: I Appendixes I A. Dilutions with Sample I I ©The McGraw-Hill
Laboratory Exercises in Problems Companies. 2002
Microbiology, Fifth Edition
Problem 13
Make all units the same.
10 mg X 1,000 |xg/mg = 10,000 |xg
stock solution = 10,000 |xg/ml
final concentration = 0.5 |xg/ml
jC 10,000 H,g/ml =
FC 0.5 |xg/ml
Thus, the dilution factor is 20,000.
Step #1 1 ml of 10,000 |xg/ml + 19 ml of diluent = 1:20 dilution = 500 |xg/ml (10,000/20 = 500)
Step #2 1 ml of 500 |xg/ml + 99 ml of diluent = 1:100 dilution = 5 |xg/ml (500/100 = 5)
Step #3 1 ml of 5 |xg/ml + 9 ml of diluent = 1:10 dilution = 0.5 |xg/ml (5/10 = 0.5)
To check to make sure the correct dilution was made:
20 X 100 X 10 = 20,000
To help you with these types of problems, always remember that volumes may change depending on the protocol, but the
dilution factor will always remain the same. For example:
1 +99
10 + 990 1:100 dilution
0.1 + 9.9
1 +4
10 + 40 1:5 dilution
0.1 + 0.4
1 + 19
10 + 190 1:20 dilution
0.1 + 1.9
1 + 249
10 + 2,490 1:250 dilution
0.1 + 24.9
1 +9
10 + 90 1:10 dilution
0.5 + 4.5
1 +7
5 + 35 1:8 dilution
0.5 + 3.5
1 + 14
5 + 70 1:15 dilution
0.5 + 7.0
Problem 14
The first step is to establish the initial dilution as follows:
i28 = 32
4
1:32 is the first step dilution, the second is 1:4.
1 ml of serum + 31 ml of diluent =1:32 (individual dilution)
1 ml of the 1:32 dilution = 3 ml of diluent =1:4 (individual dilution)
To check to make sure the dilution was correctly made: 32 X 4 = 128
Appendix A Dilutions with Sample Problems 425
Harley-Prescott: I Appendixes I A. Dilutions with Sample I I ©The McGraw-Hill
Laboratory Exercises in Problems Companies. 2002
Microbiology, Fifth Edition
Problem 15
We can obtain a 1:3000 dilution in 3 steps by using 1:30 and 1:10 dilutions.
Moo =
2
1 ml of serum + 29 ml of diluent =1:30 (individual dilution)
1 ml of 1:30 dilution + 9 ml of diluent = 1:10 (individual dilution)
1 ml of 1:10 + 9 ml of diluent =1:10 (individual dilution)
To check to make sure the dilution was correctly made: 30 X 10 X 10 = 3,000
Problem 16
_D}_ = XL
D2 V2
Di = l
D2 = 5 1 x
,/ v — = — 5X=1 X = 0.2ml
Vi = X 5 1
V2 = l
Thus, 0.2 ml (undiluted sera) + 0.08 ml of saline = 1.0.
Problem 17
Di = l
°2=?° -L=X 20X = 8 X = 0.4ml
Vi = X 20 8
V2 = 8
Thus, 0.4 ml of undiluted sera + 7.6 ml of saline = 1:20.
Problem 18
2.01 X 10⁶
Problem 19
2.8 X 10⁶
Problem 20
3.8 X 10⁸
Problem 21
2.6 X 10⁹
Problem 22
4.6 X 10⁸
Problem 23
8.4 X 10¹⁰
426 Appendix A Dilutions with Sample Problems
Harley-Prescott:
Laboratory Exercises in
Microbiology, Fifth Edition
Appendixes
B. Metric and English
Measurement Equivalents
©The McGraw-Hill
Companies. 2002
APPENDIX B
Metric and English Measurement Equivalents
The Metric System
The metric system comprises three basic units of
measurement: distance measured in meters, volume measured in
liters, and mass measured in grams. In order to designate
larger and smaller measures, a system of prefixes based on
multiples of ten is used in conjunction with the basic unit of
English to Metric
1 in = 2.54 cm
1 ft or 12 in = 30.48 cm
1 yd or 3 ft or 36 in = 91.44 cm or 0.9144 m
1 mi or 5,280 ft or 1,760 yd = 1,609 m or 1.609 km
measurement. The most common
kilo = 103 = 1,000
centi =10-2= 0.01
milli = 10-3 =
micro = 10~6 =
nano = lO"9 =
0.001
0.000001
prefixes are
= 1/100
0.000000001
= 1/1,000
= 1/1,000,000
= 1/1,000,000,000
The Number of:
inches
feet
yards
miles
Units of Area
Multiplied by:
2.5
30.5
0.9
1.6
Equals:
centimeters
centimeters
meters
kilometers
The English System
The measurements of the English system used in the United
States unfortunately are not systematically related. For
example, there are 12 inches in a foot and 3 feet in a yard.
Quick conversion tables for the metric and English systems
are listed below.
Units of Length
Metric to English
1 centimeter (cm) or 10 mm = 0.394 in or 0.0328 ft
1 meter (m) = 100 cm or 1,000 mm = 39.4 in or
3.28 ft or 1.09 yd
Metric to English
1 square centimeter (cm2) or 100 mm2 = 0.155 in2
1 square meter (m2) = 1,550 in2 or 1.196 yd2
1 hectare (ha) or 10,000 m2 = 107,600 ft2 or 2.471
acres (A)
1 square kilometer (km2) or 1,000,000 m2 or 100 ha :
247 A or 0.3861 mi2
The Number of:
square centimeters
square meters
square kilometers
Multiplied by:
0.16
1.2
0.4
Equals:
square inches
square yards
square miles
1 kilometer (km) =
0.621 mile (mi)
The Number of:
millimeters
centimeters
meters
meters
kilometers
: 1,000 m =
= 3,281 ft or
Multiplied by:
0.04
0.4
3.3
1.1
0.6
Equals:
inches
inches
feet
yards
miles
English to Metric
1 square foot (ft2) or 144 in2 = 929 cm2
1 square yard (yd2) or 9 ft2 = 8,361 cm2 or 0.836 m2
1 acre or 43,560 ft2 or 4,840 yd2 = 4,047 m2 = 0.405 ha
1 square mile (mi2) or 27,878 ft2 or 640 A = 259 ha or
2.59 km2
The Number of: Multiplied by: Equals:
square inches 6.5 square centimeters
square feet 0.09 square meters
square yards 0.8 square meters
square miles 2.6 square kilometers
acres 0.4 hectares
427
Harley-Prescott:
Laboratory Exercises in
Microbiology, Fifth Edition
Appendixes
B. Metric and English
Measurement Equivalents
©The McGraw-Hill
Companies. 2002
Units of Volume
Metric to English
1 cubic centimeter (cm3 or cc) or 1,000 mm3
= 0.061 in3
1 cubic meter (m3) or 1,000,000 cm3 = 61,024 in3 or
35.31 ft3 or 1.308 yd3
The Number of: Multiplied by: Equals:
cubic meters 35 cubic feet
cubic meters 1.3 cubic yards
English to Metric
1 cubic ft (ft3) or 1,728 in3 = 28,317 cm3
or 0.02832 m3
1 cubic yard (yd3) or 27 ft3 = 0.7646 m3
The Number of: Multiplied by: Equals:
cubic feet 0.03 cubic meters
cubic yards 0.76 cubic meters
Units of Liquid Capacity
Metric to English
1 milliliter (ml) or 1 cm3 = 0.06125 in3 or 0.03 fl oz
1 liter or 1,000 ml = 2.113 pt or 1.06 qt or 0.264 U.S. gal
The Number of: Multiplied by: Equals:
teaspoons
tablespoons
fluid ounces3
cups
pints
quarts
gallons
5
15
30
0.24
0.47
0.95
3.8
milliliters
milliliters
milliliters
liters
liters
liters
liters
Units of Mass
Metric to English
1 gram (g) or 1,000 mg = 0.0353 oz
1 kilogram (kg) or 1,000 g = 35.2802 oz or 2.205 lb
1 metric or long ton or 1,000 kg = 2,205 lb or 1.102
short tons
The Number of:
grams
kilograms
Multiplied by:
0.035
2.2
Equals:
ounces
pounds
English to Metric
1 ounce (oz) or 437.5 grains (gr) = 28.35 g
1 pound (lb) or 16 ounces = 453.6 g or 0.454 kg
1 ton (short ton) or 2,000 lb = 907.2 kg or 0.9072
metric ton
The Number of:
milliliters
liters
liters
Multiplied by:
0.03
2.10
1.06
Equals:
fluid ounces
pints
quarts
The Number of:
ounces
pounds
tons
Multiplied by:
28
0.45
0.9
Equals:
grams
kilograms
metric ton
English to Metric
1 fluid ounce or 1.81 in3 = 29.57 ml
1 pint or 16 fl oz = 473.2 ml
1 qt or 32 fl oz or 2 pt = 946.4 ml
1 gal or 128 fl oz or 4 qt or 8 pt = 3,785 ml
or 3.785 liters
al British fluid ounce = 0.961 U.S. fluid ounces or, conversely, 1 U.S.
fluid ounce = 1.041 British fluid ounces. The British pint, quart, and
gallon = 1.2 U.S. pints, quarts, and gallons, respectively. To convert these
U.S. fluid measures, multiply by 0.8327.
428 Appendix B Metric and English Measurement Equivalents
Harley-Prescott:
Laboratory Exercises in
Microbiology, Fifth Edition
Appendixes
Transmission-Absorbance
Table for
Spectrophotometry
©The McGraw-Hill
Companies. 2002
APPENDIX C
Transmission-Absorbance Table for Spectrophotometry
%T
1.0
1.5
2.0
2.5
3.0
3.5
4.0
4.5
5.0
5.5
6.0
6.5
7.0
7.5
8.0
8.5
9.0
9.5
10.0
10.5
11.0
11.5
12.0
12.5
13.0
13.5
14.0
14.5
15.0
15.5
16.0
16.5
17.0
17.5
18.0
18.5
19.0
19.5
20.0
20.5
21.0
21.5
22.0
22.5
23.0
23.5
24.0
24.5
25.0
25.5
A
2.000
1.824
1.699
1.602
1.523
1.456
1.398
1.347
1.301
1.260
1.222
1.187
1.155
1.126
1.097
1.071
1.046
1.022
1.000
0.979
0.959
0.939
0.921
0.903
0.886
0.870
0.854
0.838
0.824
0.810
0.796
0.782
0.770
0.757
0.745
0.733
0.721
0.710
0.699
0.688
0.678
0.668
0.658
0.648
0.638
0.629
0.620
0.611
0.602
0.594
%T
26.0
26.5
27.0
27.5
28.0
28.5
29.0
29.5
30.0
30.5
31.0
31.5
32.0
32.5
33.0
33.5
34.0
34.5
35.0
35.5
36.0
36.5
37.0
37.5
38.0
38.5
39.0
39.5
40.0
40.5
41.0
41.5
42.0
42.5
43.0
43.5
44.0
44.5
45.0
45.5
46.0
46.5
47.0
47.5
48.0
48.5
49.0
49.5
50.0
50.5
A
0.585
0.577
0.569
0.561
0.553
0.545
0.538
0.530
0.523
0.516
0.509
0.502
0.495
0.488
0.482
0.475
0.469
0.462
0.456
0.450
0.444
0.438
0.432
0.426
0.420
0.414
0.409
0.403
0.398
0.392
0.387
0.382
0.377
0.372
0.367
0.362
0.357
0.352
0.347
0.342
0.337
0.332
0.328
0.323
0.319
0.314
0.310
0.305
0.301
0.297
%T
51.0
51.5
52.0
52.5
53.0
53.5
54.0
54.5
55.0
55.5
56.0
56.5
57.0
57.5
58.0
58.5
59.0
59.5
60.0
60.5
61.0
61.5
62.0
62.5
63.0
63.5
64.0
64.5
65.0
65.5
66.0
66.5
67.0
67.5
68.0
68.5
69.0
69.5
70.0
70.5
71.0
71.5
72.0
72.5
73.0
73.5
74.0
74.5
75.0
75.5
A
0.292
0.288
0.284
0.280
0.276
0.272
0.268
0.264
0.260
0.256
0.252
0.248
0.244
0.240
0.237
0.233
0.229
0.226
0.222
0.218
0.215
0.211
0.208
0.204
0.201
0.197
0.194
0.191
0.187
0.184
0.181
0.177
0.174
0.171
0.168
0.164
0.161
0.158
0.155
0.152
0.149
0.146
0.143
0.140
0.137
0.134
0.131
0.128
0.125
0.122
%T
76.0
76.5
77.0
77.5
78.0
78.5
79.0
79.5
80.0
80.5
81.0
81.5
82.0
82.5
83.0
83.5
84.0
84.5
85.0
85.5
86.0
86.5
87.0
87.5
88.0
88.5
89.0
89.5
90.0
90.5
91.0
91.5
92.0
92.5
93.0
93.5
94.0
94.5
95.0
95.5
96.0
96.5
97.0
97.5
98.0
98.5
99.0
99.5
100.0
A
0.119
0.116
0.114
0.111
0.108
0.105
0.102
0.100
0.097
0.094
0.092
0.089
0.086
0.084
0.081
0.078
0.076
0.073
0.071
0.068
0.066
0.063
0.061
0.058
0.056
0.053
0.051
0.048
0.046
0.043
0.041
0.039
0.036
0.034
0.032
0.029
0.027
0.025
0.022
0.020
0.018
0.016
0.013
0.011
0.009
0.007
0.004
0.002
0.000
429
Harley-Prescott: I Appendixes I D. Logarithms I I ©The McGraw-Hill
Laboratory Exercises in Companies. 2002
Microbiology, Fifth Edition
APPENDIX D
Logarithms
A logarithm is the exponent of 10, indicating the power to
which 10 must be raised to produce a given number. Since
1 is 10° and 10 is 101, it is evident that the numbers
between 1 and 10 must be greater than 10°. Likewise,
numbers between 10 and 100 must be greater than 101 but less
than 102. These numbers will then have fractional
exponents expressed as mixed fractions. If they are in fractional
forms, they present difficulties in addition or subtraction, so
it is best to express them as a decimal; for example,
1Q0.3010
A number written in the form b" is said to be in
exponential form where b is the base and " is a logarithm. For
example, in the following equation,
N=bn
the number N is equal to the base b to the exponent ". Let
us say that b is equal to 2 and " is equal to 4. Written in
exponential form, we would have 24. Two to the fourth power
equals 16.
In logarithmic form, we would write the log of N to the
base b is n (log;, N = n). So if we take 24 = 16 and place it
in logarithmic form, we would have
log216 = 4.
In the following tables, the logarithms are located in the
body of the table, and the numbers from 1.0 to 9.9 are given
in the left-hand column and the top row. For example, to
locate the logarithm of 4.7, read down the left-hand column to
47 and across the column to 0 to find 0.6721 (in the table,
the zero and the decimal point are omitted for convenience).
Finally, the following relationships should be
remembered when working with logarithms:
log 1 = log 10° =
log 10 = log 101 =
log 100 = log 102 =
log 1,000 = log 103 =
log 10,000 = log 104 =
log 0.1 = log 10"1 =
log 0.01 = log 10-2 =
log 0.001 = log 10-3 =
log 0.0001 = log 1(H =
0
1
2
3
4
-1
-2
-3
-4
Logarithms are particularly useful in graphical
relations that extend over a wide range of values since they
have the property of giving equal relative weight to all parts
of the scale. This is valuable in "spreading out" the values
that would otherwise be concentrated at the lower end of
the scale; for example, in graphing the growth of microbial
populations in a culture versus time. Logarithms are also
used in pH calculations.
430
Harley-Prescott:
Laboratory Exercises in
Microbiology, Fifth Edition
Appendixes
E. pH and pH Indicators
©The McGraw-Hill
Companies. 2002
APPENDIX E
pH and pH Indicators
pH is a measure of hydrogen ion (H+) activity. In dilute
solutions, the H+ activity is essentially equal to the
concentration. In such instances, pH = -log [H+]. The pH scale
ranges from 0 ([H+] = 1.0° M) to 14 ([H+] = 10-14M).
A pH meter should be used for accurate pH
determinations, observing the following precautions:
1. Adjust the temperature of the buffer used for pH
meter standardization to the same temperature as the
sample. Buffer pH changes with temperature; for
example, the pH of standard phosphate buffer is 6.98 at
0°C, 6.88 at 20°C, and 6.85 at 37°C.
2. It is important to stir solutions while measuring their
pH. If the sample is to be stirred with a magnetic
mixer, stir the calibrating buffer in the same way.
3. Be sure that the electrodes used with tris buffers are
recommended for such use by the manufacturer. This
is necessary because some pH electrodes do not give
accurate readings with tris (hydroxymethyl)
aminomethane buffers.
In instances where precision is not required, such as
in the preparation of routine media, the pH may be
checked by the use of pH indicator solutions. By the
proper selection, the pH can be estimated within ± 0.2 pH
units. Some common pH indicators and their useful pH
ranges are listed in the following table. All of the below
indicators can be made by (1) dissolving 0.04 g of
indicator in 500 ml of 95% ethanol, (2) adding 500 ml of
distilled water, and (3) filtering through Whatman No. 1
filter paper. Indicators should be stored in a dark, tightly
closed bottle.
pH Indicator
pH Range
Full Acidic Color
Full Basic Color
Brilliant green
Bromcresol green
Bromcresol purple
Bromophenol blue
Bromodiymol blue
Congo red
Cresolred
Cresolphdialein
2,4-dinitrophenol
Ethyl violet
Litmus
Malachite green
Mediyl green
Mediyl red
Neutral red
Phenolphthalein
Phenol red
Resazurin
Thymol blue
0.0-2.6
3.8-5.4
5.2-6.8
3.0^1.6
6.0-7.6
3.0-5.0
2.3-8.8
8.2-9.8
2.8^1.0
0.0-2.4
4.5-8.3
0.2-1.8
0.2-1.8
4.4-6.4
6.8-8.0
8.2-10.0
6.8-8.4
3.8-6.4
8.0-9.6
Yellow
Yellow
Yellow
Yellow
Yellow
Blue-violet
Orange
Colorless
Colorless
Yellow
Red
Yellow
Yellow
Red
Red
Colorless
Yellow
Orange
Yellow
Green
Blue-green
Purple
Blue
Blue
Red
Red
Red
Red
Blue
Blue
Blue-green
Blue
Yellow
Amber
Pink
Red
Violet
Blue
All of the above indicators can be made by (1) dissolving 0.04 g of indicator in 500 ml of 95% edianol, (2) adding 500 ml of distilled water, and (3) filtering dirough Wliatman
No. 1 filter paper. Indicators should be stored in a dark, tightly closed bottle.
431
Harley-Prescott:
Laboratory Exercises in
Microbiology, Fifth Edition
Appendixes
F. Scientific Notation
©The McGraw-Hill
Companies. 2002
APPENDIX F
Scientific Notation
Microbiologists often have to deal with either very large or
very small numbers, such as 5,550,000,000 or 0.00000082.
The mere manipulation of these numbers is cumbersome.
As a result, it is more convenient to express such numbers in
scientific notation (standard exponential notation).
Scientific notation is a set of rules involving a shorthand
method for writing these numbers and performing simple
manipulations with them. Scientific notation uses the fact
that every number can be expressed as the product of two
numbers—one of which is a power of the number of ten.
Numbers greater than one can be expressed as follows:
1
10
100
1,000
0,000
= 10°
= 101
= 102
= 103
= 104
100,000 =
1,000,000 =
10,000,000 =
100,000,000 =
1,000,000,000 =
= 105
= 106
= 107
= 108
= 109
In the above notations, the exponent to which the ten is
raised is equal to the number of zeroes following the one.
Numbers less than one can be expressed as follows:
0.1
0.01
0.001
0.0001
0.00001
=
=
=
=
=
io-i
io-2
io-3
IO-4
10-5
o.oooooi = io-6
0.0000001 = IO-7
0.00000001 = 10-8
0.000000001 = 10-9
In the above notations, the number of the negative exponent
to which ten is raised is equal to the number of digits to the
right of the decimal point.
Numbers that are not an exact power of ten can also be
dealt with in scientific notation. For example, a number
such as 1234, which is greater than one, can be expressed
in the following ways:
123.4 x 10
12.34 x 100
1.234 x 1,000
0.1234 x 10,000
0.01234 x 100,000
The same numbers can be expressed in scientific notation
as follows:
23.4 x 101
2.34 x IO2
.234 x 103
0.1234 x IO4
0.01234 x 10⁵
The same reasoning is followed for numbers less than one.
Consider the number 0.1234; it can be expressed in the
following ways:
1.234 x 0.1
12.34 x 0.01
123.4 x 0.001
1,234 x 0.0001
12,340 x 0.00001
The same numbers can be expressed in scientific notation
as follows:
1.234 x 10⁻¹
12.34 x IO-2
123.4 x 10⁻³
1,234 x 1(H
12,340 x 10-5
Multiplication can also be done in scientific notation.
Consider the following multiplication:
50 x 250
First, rewriting each number in scientific notation:
(5.0 x 101) x (2.5 x IO2)
To multiply, multiply the first two numbers:
5.0x2.5 = 12.5
To multiply the second part, add the exponents:
10i + 102=103
The answer is written as 12.5 x 10³. It can also be written
as 1.25 x IO4. These same two steps are done in every case
of multiplication, even with numbers less than one. For
example, to multiply 0.5 x 0.25:
(5 x 10-1) x (2.5 x 10-1)
= 12.5 x IO-2
= 1.25x10-1 = 0.125
When multiplying numbers greater than one by numbers
less than one, express the numbers in convenient form,
multiply the first part, add the exponents of the second part,
and then express the answer in scientific notation. For
example, multiply 0.125 x 5,000:
(1.25 x 10-i) = (5 x 10³) = 6 25 x IO2
432
Harley-Prescott: I Appendixes I F. Scientific Notation I I ©The McGraw-Hill
Laboratory Exercises in Companies. 2002
Microbiology, Fifth Edition
When adding a negative number to a positive number,
always subtract the negative number from the positive number.
Dividing in scientific notation is similar to multiplying.
Consider dividing 2,500/500.
First, rewriting in scientific notation gives
2.5 x 10³
5xl02
Second, divide the first two numbers as follows:
^ = 0.5
5
Third, subtract the bottom exponent from the top
exponent:
103-lO^lO1
The answer in scientific notation is expressed as 0.5 x 101.
Always remember that when you subtract one negative
number from another negative number, you add the
numbers and express the answer as a negative number. When
subtracting a negative number from a positive number, it is
the same as adding a positive number to a positive number.
To subtract a positive number from a negative number, add
the positive number to the negative number and express the
answer as a negative number.
Microbiologists use scientific notation continuously.
For example, in this laboratory manual, it is used to
describe the number of bacteria in a population and to express
concentrations of chemicals in solution, of disinfectants,
and of antibiotics.
Appendix F Scientific Notation 433
Harley-Prescott: I Appendixes I G. Identification Charts I I ©The McGraw-Hill
Laboratory Exercises in Companies. 2002
Microbiology, Fifth Edition
APPENDIX G
*
Identification Charts
*The identification charts presented in this appendix are based on rapid
test systems. At times these test results may differ from results obtained
with so-called "conventional" tests.
434
Chart I Characterization of Gram-Negative Rods—The API 20E Systema (Figures indicate the percentage of positive reactions
after 18 to 24 hours of incubation at 35° to 37°C)
Eschenchieae
Salmonelleae
Klebsielleae
Organism
E. coli
Shigella dysenteriae
Sh. flexneri
Sh. boydii
Sh. sonnei
Edwardsiella tarda
Salmonella enteritidis
Sal. typhi
Sal. paratyphi A
Arizona-S. arizonae
Citrobacter freundii
C. diversus-Levinea
C. amalonaticus
Klebsiella pneumoniae
K. oxytoca
K. ozaenae
K. rhinoscleromatis
Enterobacter aerogenes
Ent. cloacae
Ent. agglomerans
Ent. gergoviae
Ent. sakazakii
Serratia liquefaciens
Ser. marcescens
ONPG
98.2
27.8
5.3
5.0
96.7
0
1.9
0
0
94.7
97.0
97.0
97.0
99.0
98.0
85.0
0
99.0
97.0
90.0
99.0
97.0
85.0
83.0
ADH
1.0
0
0
0
0
0
1.0
0
0
1.0
10.0
10.0
10.0
0
0
0
0
0
51.9
0
0
51.6
0
0
LDC
90.2
0
0
0
0
99.0
89.2
90.0
0
95.0
0
0
0
80.0
83.0
38.0
0
98.0
0
0
61.0
0
85.0
88.0
ODC
67.3
0
0
0
80.0
99.0
95.4
0
100
98.5
60.0
90.0
95.0
0
0
0
0
98.0
65.0
0
99.0
59.0
95.0
94.0
CIT
0
0
0
0
0
0
15.4
0
0
15.0
10.0
10.0
10.0
13.9
13.0
1.0
0
8.9
9.0
5.4
8.2
8.6
8.9
8.0
H2S
1.0
0
0
0
0
55.0
76.9
0.1
0.2
85.0
81.0
0
0
0
0
0
0
0
0
0
0
0
0
0
URE
0
0
0
0
0
0
0
0
0
0
0
0
0
10.0
10.0
0
0
0
0
0
75.0
0
1.0
1.0
TDA
0
0
0
0
0
0
0
0
0
0
0
0
0
0
0
0
0
0
0
0
0
0
0
0
IND
85.0
33.0
15.0
20.0
0
100
3.1
0
0
0
6.0
91.0
99.0
0
100
0
0
0
0
50.0
0
4.0
0
0
VP
0
0
0
0
0
0
0
0
0
0
0
0
0
72.0
60.0
0
0
56.0
80.0
20.0
75.0
85.0
50.0
58.0
GEL
0
0
0
0
0
0
0
0
0
0
0
0
0
0
1.0
0
0
0
0
0
0
0
60.0
72.0
GLU
100
100
100
100
100
100
100
100
100
100
100
100
100
100
100
100
100
100
100
100
100
100
100
100
MAN
98.4
0.1
94.7
60.0
99.0
0
98.7
99.0
99.0
99.0
98.0
97.0
97.0
98.0
99.0
69.0
99.0
99.0
99.0
99.0
99.0
99.0
99.0
96.0
INO
0.1
0
0
0
0
0
4.6
0
0
0
1.0
14.5
0.1
30.0
29.0
1.0
1.0
28.0
1.0
1.0
1.0
4.0
1.0
1.0
SOR
95.5
0
78.9
53.3
39.9
0
95.2
99.0
99.0
87.0
96.0
88.0
93.0
95.0
92.0
76.0
86.0
90.0
92.0
80.0
8.3
8.5
99.0
97.0
RHA
84.5
22.2
0
1.0
80.0
0
95.4
1.8
99.0
96.1
87.0
99.0
99.0
91.0
98.0
69.0
53.0
90.0
90.0
60.0
99.0
90.0
30.0
2.0
SAC
41.1
0
0
0
0
0
4.6
0
0
0
59.0
51.0
29.4
99.0
99.0
15.0
33.0
85.0
98.0
60.0
99.0
95.0
85.0
98.0
MEL
88.4
61.1
21.1
33.3
50.0
50.0
96.9
100
40.0
89.5
77.0
47.0
53.0
99.0
99.0
92.0
66.0
97.0
92.0
70.0
99.0
90.0
80.7
37.0
AMY
0.1
0
0
0
0
0
0
0
0
0
30.0
34.0
80.0
98.0
98.0
99.0
99.0
96.0
65.0
70.0
99.0
76.0
80.0
72.0
ARA
95.0
16.7
36.8
66.7
96.7
1.1
94.5
27.0
80.0
95.0
98.0
99.0
93.8
99.0
99.0
84.0
95.0
98.0
95.0
95.0
99.0
95.0
92.9
18.0
OXI
0
0
0
0
0
0
0
0
0
0
0
0
0
0
0
0
0
0
0
0
0
0
0
0
Klebsielleae
Proteeae
Yersiniae
Other Gram-negatives
Chart I continued
Organism
Ser. rubidaea
Ser. odorifera 1
Ser. odorifera 2
Hafnia alvei
Proteus vulgaris
Prot. mirabilis
Providencia alcalifaciens
Prov. stuartii
Prov. stuartii URE +
Prov. rettgeri
Morganella morganii
Yersinia enterocolitica
Y. pseudotuberculosis
Y. pestis
API Group 1
API Group 2
Pseudomonas maltophilia
Ps. cepacia
Ps. paucimobilis
A. calco. var. anitratus
A. calco. var. Iwoffii
CDC Group VE-1
CDC Group VE-2
ONPG
96.0
99.0
99.0
60.0
0.5
1.0
0
1.0
1.0
1.0
1.0
81.0
80.0
93.0
99.0
99.0
62.0
61.0
40.0
0
0
90.0
0
ADH
0
0
0
0
0
0
0
0
0
0
0
0
0
0
0
2.0
0
0
0
0
0
1.0
0
LDC
60.5
95.0
92.0
99.0
0
0
0
0
0
0
0
0
0
0
58.8
7.3
5.0
5.0
0
0
0
0
0
ODC
0.1
100
0
99.0
0
90.0
0
0
0
0
87.0
36.0
0
0
99.0
0
0
5.0
0
0
0
0
0
CIT
8.2
9.5
9.1
1.0
4.1
5.8
9.8
8.5
6.9
7.1
0.2
0
0
0
9.2
0
7.6
7.5
1.0
2.8
0
7.7
7.9
H2S
0
0
0
0
75.3
66.0
0
0
0
0
0
0
0
0
0
0
0
0
0
0
0
0
0
URE
0
0
0
0
91.0
97.0
0
0
99.0
80.0
78.0
59.0
88.0
0
0
0
0
0
0
0
0
0
0
TDA
0
0
0
0
95.0
90.0
95.0
95.0
99.0
95.0
92.0
0
0
0
0
0
0
0
0
0
0
0
0
IND
0
90.0
90.0
0
75.3
1.0
94.0
86.0
95.0
90.0
92.0
54.0
0
0
99.0
0
0
0
0
0
0
0
0
VP
70.0
63.0
80.0
25.0
0
0
0
0
0
0
0
0.4
0
1.0
0
0
0
1.0
0
1.0
0.1
1.0
1.0
GEL
75.6
62.0
78.0
0
75.3
93.0
0
0
0
0
0
0
0
0
0
0
50.0
46.0
0
0.1
0
1.3
0.1
GLU
100
100
100
99.0
100
100
100
100
100
100
98.0
100
100
93.0
100
100
0.5
33.0
0.5
85.0
0
33.0
4.5
MAN
99.0
99.0
99.0
99.0
0
0
0
0
15.0
85.0
0
99.0
94.0
87.0
99.0
99.0
0
1.0
0
0
0
0
0
INO
10.0
10.0
10.0
0
0.1
0
0
8.0
5.0
1.0
0
1.0
0
0
0
0
0
0
0
0
0
1.0
1.0
SOR
75.0
99.0
99.0
35.0
0
0
0
0
0
30.0
0
95.0
76.0
56.0
75.4
2.3
0
1.0
0
0
0
0
0
RHA
13.4
85.0
95.0
75.0
0
1.0
0
0.8
0.5
40.0
0
9.0
58.0
0
82.4
30.8
0
0
0
0
0
1.0
0
SAC
99.0
100
0
0
83.0
9.6
0
3.7
65.0
5.0
0
78.0
0
0
82.4
5.6
0
7.0
0.5
0.1
0
0.1
0
MEL
82.6
99.0
99.0
50.0
1.0
10.0
0
34.0
20.0
0
0
40.4
5.0
0.6
94.1
90.0
0
0
0
77.0
0
1.0
1.0
AMY
96.0
90.0
85.4
30.0
20.0
1.0
0
0
0
40.0
0
31.0
0
25.0
97.0
38.5
0
1.0
0
0
0
1.0
0
ARA
85.8
99.0
99.0
95.0
4.0
27.0
25.0
30.0
20.0
10.0
1.0
76.6
52.0
87.0
94.1
92.3
22.0
1.0
0.5
60.0
0
16.0
5.0
OXI
0
0
0
0
0
0
0
0
0
0
0
0
0
0
0
0
4.8
90.7
50.0
0
0
0
0
icrobi
o
o
CQ
■<
Fiftl
i
s
■<
m
X
CD
I
irley-
TJ
CD
CA
O
O
3
Copyright BioMerieux Vitek, Inc., Hazelwood, MO. Reprinted by permission.
Harley-Prescott:
Laboratory Exercises in
Microbiology, Fifth Edition
Appendixes
G. Identification Charts
©The McGraw-Hill
Companies. 2002
Chart II Characterization of Enterobacteriaceae—The Enterotube II System
Groups
Escherichieae
Edwardsielleae
Salmonelleae
1
Klebsielleae
Yersiniae
Citrobacter
Proteus
Morganella
Providencia
Enterobacter
Hafnia
Serratia
Klebsiella
Yersinia
Escherichia
Shigella
Edwardsiella
Salmonella
Arizona
freundii
amalonaticus
diversus
vulgaris
mirabilis
morganii
alcalifaciens
stuartii
rettgeri
cloacae
sakazakii
gergoviae
aerogenes
agglomerans
alvei
marcescens
liquefaciens
rubidaea
pneumoniae
oxytoca
ozaenae
rhinoschieromatis
enterocolitica
pseudotuberculosis
+
100.0
+
100.0
+
100.0
+
100.0
+
100.0
+
100.0
+
100.0
+
100.0
+
100.0
+
100.0
+
100.0
+
100.0
+
100.0
+
100.0
+
100.0
+
100.0
+
100.0
+
100.0
+
100.0
+
100.0
+
100.0
+
100.0
+
100.0
+
100.0
+
100.0
+
100.0
+
100.0
+
100.0
+
100.0
+J
92.0
-A
2.1
+
99.4
+c
91.9
+
99.7
+
91.4
+
97.0
+
97.3
±G
86.0
+G
96.0
±G
86.0
dG
85.2
0.0
+G
12.2
+
99.3
+
97.0
+
93.0
+
95.9
24.1
+
98.9
±G
52.6
d
72.5
dG
35.0
+
96.0
+
96.0
d
55.0
0.0
0.0
0.0
d
80.6
0.0
+
100.0
+H
94.6
+
99.4
0.0
0.0
0.0
0.0
0.0
0.0
0.0
0.0
0.0
0.0
0.0
64.0
+
97.5
0.0
+
99.6
+
99.6
64.2
61.0
+
97.2
+
97.2
35.8
0.0
0.0
0.0
d
57.8
20.0
+
99.0
+1
92.7
+
100.0
d
17.2
+
97.0
+
99.8
0.0
+
99.0
+
97.0
1.2
0.0
0.0
+
93.7
+
97.0
+
100.0
+
95.9
0.0
+
98.6
+
99.6
+
100.0
0.0
0.0
0.0
1.0
0.0
+
90.7
0.0
-K
4.0
0.0
+
99.6
+E
91.6
+
98.7
81.6
0.0
0.0
+
95.0
+
94.5
0.0
0.0
0.0
0.0
0.0
0.0
0.0
0.0
0.0
0.0
0.0
0.0
0.0
0.0
0.0
0.0
0.0
0.0
0.0
+
96.3
37.8
+
99.0
1.1
2.0
6.7
+
99.0
+
100.0
+
91.4
3.2
+
99.5
+
99.4
+
98.6
+
95.9
0.0
16.0
0.0
0.8
19.7
0.0
-w
0.1
-w
1.8
-w
2.0
0.0
+
100.0
0.0
0.0
26.7
0.0
5.2
0.0
0.0
0.0
0.0
0.0
0.0
+
100.0
0.0
0.0
0.0
+
94.3
12.4
+
99.0
28.0
0.0
0.0
+
97.5
7.5
0.0
56.0
8.3
88.0
89.0
89.0
+
91.8
+
98.0
0.0
0.0
+J
91.6
-B
0.3
0.0
0.8
d
69.8
d
39.3
70.0
d
40.3
0.0
2.0
0.0
0.3
3.6
d
10.0
94.0
+
100.0
42.0
+
92.5
d
52.9
d
2.8
1.3
d
15.6
+
100.0
+
98.7
98.7
d
26.2
d
6.0
0.0
0.0
+
91.3
67.8
10.7
89.2
+
99.1
+
100.0
+
99.0
+
98.0
0.0
0.0
0.0
0.7
4.0
0.0
+
99.4
+
100.0
+
100.0
+
100.0
+
97.5
+
99.3
0.0
+
97.3
+
100.0
+
99.9
+
100.0
+
100.0
+
100.0
+
98.7
55.0
80.3
29.1
0.2
+
94.1
+
97.1
+
98.2
+
97.0
+
98.2
0.0
0.0
0.0
0.6
3.4
1.0
+
100.0
0.0
0.0
+
98.3
d
26.3
0.0
+
99.1
+
97.3
8.0
+
99.4
+
98.0
78.0
+
98.0
+
98.7
0.0
0.0
0.0
0.0
0.0
0.0
0.0
0.0
0.0
0.0
16.0
0.0
0.0
0.0
0.0
+
100.0
+
97.0
+
100.0
+
100.0
64.8
65.0
+
98.7
49.5
+
92.0
+
93.7
+
93.7
0.0
0.0
0.1
0.0
d
49.3
d
5.4
0.0
dD
86.5
0.0
d
59.8
11.0
52.2
0.0
0.0
0.0
0.0
0.0
0.0
d
15.2
6.0
0.0
4.1
d
12.9
2.4
0.0
0.0
0.0
33.0
33.0
0.0
0.0
0.0
0.0
0.1
0.0
0.0
0.0
0.0
0.0
0.0
0.0
+
100.0
+
99.6
+
95.0
+
97.4
+
94.5
+
98.0
0.0
0.0
0.0
0.0
27.6
0.0
0.0
0.9
0.0
0.0
0.0
0.0
0.0
0.0
0.0
0.1
0.0
0.0
0.0
0.0
dw
89.4
81.0
dw
85.8
+
95.0
89.3
+
97.1
0.0
20.0
+
100.0
74.6
0.0
+
100.0
0.0
d
34.1
3.0
d w
39.7
d w
3.7
d w
4.0
+
95.4
95.4
d
14.8
0.0
+
90.7
+
100.0
0.2
0.0
0.0
dF
80.1
+
96.8
+
90.4
+
94.0
+
99.7
d
10.5
58.7
-L
0.0
+
97.9
+
93.7
+
96.0
+
98.9
+
94.0
+
96.0
+
92.6
d
84.2
d
5.6
+
97.6
+
93.6
88.0
+
96.8
96.8
d
28.1
0.0
0.0
0.0
E. S. enteritidis bioserotype Paratyphi A and some rare biotypes may be H2S negative.
F. S. typhi, S. enteritidis bioserotype Paratyphi A and some rare biotypes are citrate-negative and S. cholerae-suis is usually delayed positive.
G. Tlie amount of gas produced by Serratia, Proteus, and Providencia alcalifaciens is slight; tlierefore, gas production may not be evident in tlie ENTEROTUBE II.
H. S. enteritidis bioserotype Paratyphi A is negative for lysine decarboxylase.
I. S. typhi and S. gallinarium are ornithine decarboxylase-negative.
J. Tlie Alkalescens-Dispar (A-D) group is included as a biotype of E. coli. Members of the A-D group are generally anaerogenic, non-motile and do not ferment lactose.
K. An occasional strain may produce hydrogen sulfide.
L. An occasional strain may appear to utilize citrate.
Copyright © Becton Dickinson Microbiological Systems. Reprinted by permission.
Appendix G Identification Charts 437
Harley-Prescott:
Laboratory Exercises in
Microbiology, Fifth Edition
Appendixes
G. Identification Charts
©The McGraw-Hill
Companies. 2002
Chart III Characterization of Oxidative-Fermentative Gram-Negative Rods
Legend
+ = Positive
- = Negative
V = Variable (11% to 89% positive)
Data based on literature only
Ac hromobac ter
Acinetobacter
x%.
Species Bio. 1
Bio. 2
Xylosoxidans
Anitratus
Lwoffii
Aeromonas hydrophila
Alcaligenes faecalis
Bordetella bronchiseptica
Flavobacterium species
Group
Moraxella
Pasteurella
2F Flavobacter-
2/IUM-Like
2K-1 Pseudomonas-
2K-2 Like
4E Alcaligenes-Like
5A-1
5A-2 Pseudomonas
5E-1 Like
5E-2
M-4 Moraxella-
M-4/Like
Species
Phenylpyruvica
Haemolytica
Multocida
Ureae
Plesiomonas shigelloides
Pseudomonas
Vibrio
Aeruginosa
Acidovorans
Alcaligenes
Cepacia
Diminuta
Fluorescens
Mallei
Maltophilia
Pseudoalcaligenes
Pseudomallei
Putida
Putrefaciens
Stutzeri
Testosteroni
Vesicularis
Alginolyticus
Cholerae
Parahaemolyticus
Chromobacterium violaceum
VNs
-
-
-
v
+
-
v
-
-
+
-
-
+
v
v
-
v
+
-
v
-
-
-
v
-
-
v
+
+
+
+
JS&N^JN^
-
v
-
-
v
-
-
-
-
-
-
-
+
-
-
+
+
-
v
+
+
+
-
v
-
-
-
-
+
+
v
v
-
-
v
-
-
-
-
+
v
-
-
-
-
v
-
-
-
v
-
-
v
-
-
-
-
-
-
-
-
-
-
-
-
-
-
-
-
-
-
-
-
-
-
-
-
-
-
-
+
-
-
-
-
-
-
eS^PeNJ
-
-
-
-
v
-
v
+
+
-
-
-
-
-
+
+
-
-
-
-
-
-
-
-
-
v
+
+
-
v
v
v
+
-
-
-
-
-
+
+
v
+
+
-
-
v
v
v
-
-
+
-
v
v
-
v
-
-
?x*%\f
-
v
-
+
+
-
v
-
-
v
+
+
+
+
-
+
v
v
v
+
v
+
+
-
v
v
+
+
v
+
v
+
-
v
v
-
v
+
-
-
+
+
v
v
+
v
v
+
+
-
v
-
v
v
v
v
-
v
v
v
v
-
-
-
-
-
-
v
v
+
v
v
v
v
+
-
-
-
+
v
+
v
+
v
+
+
-
-
-
-
v
v
v
+
+
-
-
v
+
+
-
+
v
-
-
v
v
v
+
+
+
-
-
+
+
+
+
+
+
v
+
+
+
+
-
-
+
+
+
+
+
+
+
+
+
+
+
v
+
+
-
v
+
+
+
+
+
+
+
+
+
+
v
Copyright © Becton Dickinson Microbiological Systems. Reprinted by permission.
438 Appendix G Identification Charts
Harley-Prescott:
Laboratory Exercises in
Microbiology, Fifth Edition
Appendixes
H. Reagents, Solutions,
Stains, and Tests
©The McGraw-Hill
Companies. 2002
APPENDIX H
Reagents, Solutions, Stains, and Tests
Reagents and stains appear in this appendix as the authors
have presented the material in the individual laboratory
exercises and are listed in alphabetical order. When
necessary, methodology is given with the reagents, stains, or
tests. The detailed procedures, however, are presented in
the exercise in which their use is discussed.
Acid-Alcohol (for Ziehl-Neelsen stain)
Concentrated hydrochloric acid 3 ml
95% ethyl alcohol 97 ml
Alcohol, 90%, 500 ml (from 95%)
95% alcohol 473 ml
Distilled water 27 ml
Alcohol, 80%, 500 ml (from 95%)
95% alcohol 421 ml
Distilled water 79 ml
Alcohol, 75%, 500 ml (from 95%)
95% alcohol 395 ml
Distilled water 105 ml
Alcohol, 70%, 500 ml (from 95%)
95% alcohol 368 ml
Distilled water 132 ml
Barritt's Reagent (for Voges-Proskauer test)
Solution A: 6 g of a-naphthol in 100 ml of 95%
ethyl alcohol.
Dissolve the a-naphthol in the ethanol with
constant stirring.
Solution B: 40 g of potassium hydroxide in
100 ml of water. Store in the refrigerator.
Bile Solubility Test (10% bile)
Sodium deoxycholate 1 g
Sterile distilled water 9 ml
To test for bile solubility, prepare two tubes, each
containing a sample of fresh culture (a light suspension of
the bacterium in buffered broth, pH 7.4). To one tube
add a few drops of a 10% solution of sodium
deoxycholate. The same volume of sterile physiological
saline is added to the second tube. If the bacterial cells
are bile soluble, the tube containing the bile salt will
lose its turbidity in 5 to 15 minutes and show an
increase in viscosity.
Cleaning Solution for Glassware
Strong:
Potassium dichromate 20 g
Distilled water 200 ml
Dissolve dichromate in water; when
cool, add very slowly:
Concentrated sulfuric acid 9 parts
2% aqueous potassium dichromate.... 1 part
Copper Sulfate Solution (20%)
Copper sulfate (CuS04 • 5H20) 20 g
Distilled water 80 ml
Crystal Violet Capsule Stain (1%)
Crystal violet (85% dye content) 1 g
Distilled water 100 ml
Decolorizers (for Gram stain)
1. Intermediate agent, 95% ethyl alcohol.
2. Fastest agent, acetone.
3. Slowest agent, acetone-isopropyl alcohol
(isopropyl alcohol, 300 ml; acetone, 100 ml).
For the experienced microbiologist, any one
of the three decolorizing agents will yield
good results.
Diphenylamine Reagent (for the nitrate test)
Working in a fume hood, dissolve 0.7 g of
diphenylamine in a mixture of 60 ml of
concentrated sulfuric acid and 28.8 ml of distilled
water. Allow to cool. Slowly add 11.3 ml of
concentrated hydrochloric acid. After the solution
has stood for 12 to 24 hours, some of the base will
separate. This indicates that the reagent is saturated.
Eosin Blue
Eosin blue stain 1 g
Distilled water 99 ml
Ferric Chloride Reagent
FeCl3 • 6H20 12 g
2% aqueous HC1 100 ml
The 2% aqueous HC1 is made by adding
5.4 ml of concentrated HC1 (37%) to
94.6 ml of distilled H20.
439
Harley-Prescott:
Laboratory Exercises in
Microbiology, Fifth Edition
Appendixes
H. Reagents, Solutions,
Stains, and Tests
©The McGraw-Hill
Companies. 2002
Gram's Iodine (Lugol's)
According to the ASM Manual for Clinical
Microbiology, dissolve 2 g of potassium
iodide in 300 ml of distilled water and
then add 1 g of iodine crystals. Rinse the
solution into an amber bottle with the
remainder of the distilled water. Discard
when the color begins to fade.
Gram Stain
(A) Crystal violet
(Hucker modification)
1. Crystal violet 85% dye 2g
95% ethyl alcohol 20 ml
Mix and dissolve.
2. Ammonium oxalate 0.8 g
Distilled water 80.0 ml
Add solution A to solution B. Let stand
for a day, then filter. If the crystal violet
is too concentrated, solution A may be
diluted as much as 10 times.
(B) Gram's Iodine Solution (mordant)
Iodine crystals 1 g
Potassium iodide 2 g
Distilled water 300 ml
Store in an amber bottle; discard when the color
begins to fade.
(C) Safranin (counterstain) Solution
Safranin 2.5 g
95% ethyl alcohol 100.0 ml
For a working solution, dilute stock solution 1/10
(10ml of stock safranin to 90 ml of distilled
water).
India Ink (for capsule stain)
Mix the specimen with a small drop of India ink
on a clean slide. If the India ink is too dark, dilute
it to 50% with distilled water.
Kinyoun Acid-Fast Stain
(A) Kinyoun Carbolfuchsin
Basic fuchsin 4 g
95% alcohol 20 g
Phenol crystals 8 g
Distilled water 100 ml
(B) Acid-alcohol
Concentrated hydrochloric acid 3 ml
95% ethyl alcohol 97 ml
Methylene Blue Counterstain
Methylene blue 0.3 g
Distilled water 100 ml
Kovacs' Reagent (for the indole test)
N-amyl or isoamyl alcohol 150 ml
Concentrated hydrochloric acid 50 ml
p-dimethy laminobenzaldehy de lOg
Working in a fume hood, dissolve the aldehyde in
alcohol and then slowly add the acid. The dry
aldehyde should be light in color. Alcohols that
result in indole reagents that become deep brown
should not be used. Store in a dark bottle with a
glass stopper in a refrigerator when not in use.
Malachite Green Solution (for endospore stain)
Malachite green oxalate 5 g
Distilled water 100 ml
Methylene Blue (Loffler' s alkaline)
Solution A: Dissolve 0.3 g of methylene blue
(90% dye content) in 30 ml of 95% ethyl alcohol.
Solution B: Dissolve 0.01 g of potassium
hydroxide inlOO ml of distilled water.
Mix solutions A and B. Filter with Whatman
No. 1 filter paper before use.
Methylene Blue Stain (simple staining)
Methylene blue 0.3 g
Distilled water 100.0 ml
Methyl Red Reagent (for detection of acid)
Methylred 0.1 g
95% ethyl alcohol 300 ml
Dissolve the dye in alcohol and add sufficient
distilled water to make 500 ml. Positive tests are
red-orange, and negative tests are yellow.
Naphthol, Alpha (for the Enterotube II System)
5% oc-naphthol in 95% ethyl alcohol.
Nessler's Reagent (for the ammonia test)
Working in a fume hood, dissolve 50 g of potassium
iodide in 35 ml of cold (ammonia-free) distilled water.
Add mercuric chloride drop by drop until a slight
precipitate forms. Add 400 ml of a 50% solution of
potassium hydroxide. Dilute to 1 liter, allow to settle,
and decant the supernatant for use. Store in a tightly
closed dark bottle.
Alternate procedure:
Solution A:
Mercuric chloride 1 g
Distilled water 6 ml
Dissolve completely.
Solution B:
Potassium iodide 2.5 g
Distilled water 6 ml
Solution C:
Potassium hydroxide 6 g
Distilled water 6 ml
Dissolve solution C completely and add to the
mixture of solutions A and B. Add 13 ml of
distilled water. Mix well and filter through
Whatman No. 1 filter paper before use. Store in a
dark, stoppered bottle.
440 Appendix H Reagents, Solutions, Stains, and Tests
Harley-Prescott:
Laboratory Exercises in
Microbiology, Fifth Edition
Appendixes
H. Reagents, Solutions,
Stains, and Tests
©The McGraw-Hill
Companies. 2002
Nigrosin Solution (Dorner's, for negative staining)
Water-soluble nigrosin 10.0 g
Distilled water 100.0 ml
Formalin (40% formaldehyde) 0.5 ml
Gently boil the nigrosin and water approximately
30 minutes. Add 0.5 ml of 40% formaldehyde as a
preservative. Filter twice through Whatman No. 1
filter paper and store in a dark bottle in the
refrigerator.
Nitrate Test Reagent (see under diphenylamine)
Nitrite Test Reagents (Caution—solution B may be
carcinogenic. Use safety precautions such as the
avoidance of aerosols, mouth pipetting, and contact
with skin.)
(A) Solution A: Dissolve 8 g of sulfanilic acid in
1 liter of 5 N acetic acid (1 part glacial acetic acid
to 2.5 parts distilled water).
(B) Solution B: Dissolve 6 ml of N, N,-dimethyl-
1-naphthylamine in 1 L of 5 N acetic acid.
DO NOT MIX SOLUTIONS.
Oxidase Test Reagent
Mix 1 g of dimethyl-/?-phenylenediamine
hydrochloride in 100 ml of distilled water. This reagent
should be made fresh daily and stored in a dark bottle
in the refrigerator.
O-nitrophenyl-P-D-Galactoside(ONPG)
0.1 M sodium phosphate buffer 50.0 ml
ONPG (8 xlO-4 M) 12.5 mg
Phosphate Buffers
Stock buffers:
Alkaline buffer, 0.067 M Na2HP04 solution.
Dissolve 9.5 g of Na2HP04 in 1 liter of distilled
water.
Acid buffer, 0.067 M NaH2P04 solution. Dissolve
9.2 g of NaH2P04 • H20 in 1 liter of distilled
water.
Buffered water (pH 7.0 to 7.2)
Acid buffer (NaH2HP04) 39 ml
Alkaline buffer (Na2HP04) 61 ml
Distilled water 900 ml
BE SURE GLASSWARE IS CLEAN. Buffered water,
if sealed, is stable for several weeks.
Physiological Saline
Dissolve 8.5 g of sodium chloride in 1 liter of
distilled water (0.85%) or 9 g in 1 liter of distilled
water (0.9%).
Physiological Saline (Buffered)
Sodium chloride (0.85%; 8.5 g in 1 liter of
distilled water) is buffered to pH 7.2 with 0.067 M
potassium phosphate mixture.
Phosphate-Buffered Saline
lOx stock solution, 1 liter
80 g NaCl
2gKCl
llgNa2HP04-7H20
2 g KH2P04
Stock Solutions
1 M CaCl2 1 M HC1
147 g Mix in the
CaCl2 • 2H20 following order:
H20 to 1 liter 913.8 ml H20
86.2 ml
concentrated HC1
1 M KCL 1 M MgCl2
74.6 g KC1 20.3 g
H20 to 1 liter MgCl2 • 6H20
H20 to 100 ml
5 M NaCl 10 M NaOH
292 g NaCl Dissolve 400 g
H20 to 1 liter NaOH in 450 ml
of distilled water.
Add water to 1 liter.
Triton X-100 Stock Solution (10%)
Triton X-100 10 ml
Distilled water 90 ml
Mix and store in a tightly stoppered bottle at room
temperature; the solution will keep indefinitely.
Trommsdorf's Reagent (for the nitrite test)
Working in a fume hood with a beaker on a hot
plate, slowly add, with constant stirring, 100 ml of
a 20% aqueous zinc chloride solution to a mixture
of 4 g of starch in water. Continue heating until
the starch is completely dissolved and the solution
is clear. Dilute with water and add 2 g of
potassium iodide. Dilute to 1 liter with distilled
water, filter once through Whatman No. 1 filter
paper, and store in a capped, dark bottle.
Vaspar
Melt 1 pound of Vaseline and 1 pound of paraffin.
Store in small student-use bottles.
Voges-Proskauer Reagent (see Barritt's reagent)
West Stain (flagella)
Solution A:
Mordant: 50 ml of saturated aqueous aluminum
potassium sulfate + 100 ml of 10% tannic acid
solution + 10 ml of 5% ferric chloride. This
solution should be stored in an aluminum foil-
covered bottle at 5°C until used.
Appendix H Reagents, Solutions, Stains, and Tests 441
Harley-Prescott: I Appendixes I H. Reagents, Solutions, I I ©The McGraw-Hill
Laboratory Exercises in Stains, and Tests Companies. 2002
Microbiology, Fifth Edition
Solution B:
Stain: 7.5 g of silver nitrate (AgN03) in 150 ml of
distilled water. While working in a fume hood,
add concentrated NH4OH dropwise to 140 ml of
the silver nitrate solution while it is being stirred
on a magnetic mixer. A brown precipitate will
form at the start of NH4OH addition. Enough
NH4OH should be added so that the brown
precipitate just dissolves. Finally, add 5% silver
nitrate dropwise until a faint cloudiness persists.
This solution should be stored at 5°C in an
aluminum foil-covered bottle until used.
Ziehl-Neelsen Acid-Fast Stain
(A) Solution A: Dissolve 0.3 g of basic fuchsin
(90% dye content) in 10 ml of 95% ethyl alcohol.
Solution B: Dissolve 5 g of phenol in 95 ml of
distilled water.
Mix solutions A and B. Note: Add either 1 drop of
Tergitol No. 4 per 30 ml of carbolfuchsin or 2
drops of Triton X-100 per 100 ml of stain for use
in the heatless method. Tergitol No. 4 and Triton
X act as detergents, emulsifiers, and wetting
agents.
(B) Acid-alcohol, 3%
Concentrated hydrochloric acid 3 ml
95% alcohol 97 ml
442 Appendix H Reagents, Solutions, Stains, and Tests
Harley-Prescott:
Laboratory Exercises in
Microbiology, Fifth Edition
Appendixes
I. Culture Media
©The McGraw-Hill
Companies. 2002
APPENDIX I
Culture Media
Sterilization of all tubed media is accomplished at 15 lb
pressure (121°C) for 15 minutes unless otherwise specified.
Longer sterilization times will be required for large volumes
of media. Most of the media are available commercially in
powdered form, with specific instructions for their
preparation and sterilization.
Sources of Microbiological Media
Difco Laboratories
Division of Becton Dickinson Company
1 Becton Drive
Franklin Lakes, NJ 07417
1-202-847-6800
FAX 1-410-584-7121
www. bd. com/microbiology
ICN Pharmaceuticals Inc.
1263 South Chillicothe
Aura, Ohio 44202
1-800-854-0530
FAX 1-800-334-6999
www.biomark@icnbiomed.com
Thomas Scientific
PO Box 99
Swedesboro, NJ 08085
1-800-345-2100
FAX 1-800-345-5232
www. thomassci. com
EM Science
480 Democrat Road
Gibbstown, NJ 08027
1-800-222-0342
FAX 1-856-423-4389
www. emscience. com
In addition to making media from commercially prepared
supplies, companies such as Oxoid Unipath, 800 Proctor
Avenue, Ogdensburg, NewYork 13669-2205; Scott
Laboratories, West Warwick, Rhode Island 02893 and Carson,
California, 90746; Fisher Scientific, 711 Forbes Avenue, Pittsburgh,
Pennsylvania 15219; The Scientific Products Division of
Baxter Healthcare Corporation, 1430 Waukegan Road, McGraw
Park, Illinois 60085; Wards Natural Science Establishment,
5100 West Henrietta Road, P.O. Box 92912, Rochester, New
York; and Carolina Biological Supply, 2700 York Road,
Burlington, North Carolina 27215 can supply most of the
media used in this manual already prepared in tubes, bottles,
and plates. Some offer special services for diagnostic media.
Actidione (Cycloheximide) Agar (pH 5.5)
Glucose 50.0 g
Agar 15.0 g
Pancreatic digest of casein 5.0 g
Yeast extract 4.0 g
Potassium dihydrogen phosphate 0.5 g
Potassium chloride 0.42 g
Calcium chloride 0.12 g
Magnesium sulfate 0.12 g
Bromcresol green 22.0 mg
Actidione (cycloheximide) 10.0 mg
Ferric chloride 2.5 mg
Distilled water 1,000.0 ml
Agar, Noble
Noble agar is carefully washed agar that is purified and
essentially free from impurities. It is used in electrophoretic
procedures, nutritional studies, and wherever an agar of
increased purity is needed.
Ammonium Sulfate API Broth (pH 7.5)
Bacto yeast extract 1 g
Ascorbic acid 0.1 g
Sodium lactate 5.2 g
Magnesium sulfate 0.2 g
Dipotassium phosphate 0.01 g
Ferrous ammonium sulfate 0.1 g
Sodium chloride 10.0 g
Distilled water 1,000.0 ml
Azotobacter Nitrogen-Free Broth (pH 7.2)
Dipotassium phosphate 1.0 g
Magnesium sulfate 0.2 g
Sodium chloride 0.2 g
Ferrous sulfate 5.0 mg
Distilled water 1,000.0 ml
443
Harley-Prescott:
Laboratory Exercises in
Microbiology, Fifth Edition
Appendixes
I. Culture Media
©The McGraw-Hill
Companies. 2002
Bile Esculin Agar (pH 6.8)
Oxgall 20.0 g
Agar 15.0 g
Pancreatic digest of gelatin 5.0 g
Beef extract 3.0 g
Esculin 1.0 g
Ferric citrate 0.5 g
Distilled water 1,000.0 ml
Blood Agar (pH 7.3)
Infusion from beef heart 500.0 g
Tryptose 10.0 g
Sodium chloride 5.0 g
Agar 15.0 g
Distilled water 1,000.0 ml
Note: Dissolve the above ingredients and autoclave. Cool
the sterile blood agar base to 45° to 50°C and aseptically
add 50 ml of sterile, defibrinated blood. Mix thoroughly
and then dispense into plates while a liquid. Blood agar
base for use in making blood agar also can be purchased.
A combination of hemoglobin and a commercial nutrient
supplement can be used in place of defibrinated blood.
Bottom Agar (pH 7.0)
Use 12-ml sterile nutrient agar pours to prepare plates.
Brain-Heart Infusion Agar (pH 7.4)
Calf brains, infusion from 200.0 g
Beef hearts, infusion from 250.0 g
Proteose peptone 10.0 g
Dextrose 2.0 g
Sodium chloride 5.0 g
Disodium phosphate 2.5 g
Agar 15.0 g
Distilled water 1,000.0 ml
Brewer's Anaerobic Agar (pH 7.2)
Bacto tryptone 5.0 g
Proteose peptone 10.0 g
Bacto yeast extract 5.0 g
Bacto dextrose 10.0 g
Sodium chloride 5.0 g
Agar 20 g
Sodium thioglycollate 2 g
Sodium formaldehyde sulfoxylate 1 g
Resazurin 0.002 g
Distilled water 1,000.0 ml
Brilliant Green Bile Lactose (2%) Broth
Peptone 10.0 g
Oxgall 20.0 g
Lactose 10.0 g
Brilliant green 0.0133 g
Distilled water 1,000.0 ml
Chocolate Agar (pH 7.0)
Proteose peptone 20.0 g
Dextrose 0.5 g
Sodium chloride 5.0 g
Disodium phosphate 5.0 g
Agar 15.0 g
Distilled water 1,000.0 ml
Note: Aseptically add 5% sterile, defibrinated sheep
blood to the sterile and molten agar. Heat at 80°C for
15 minutes or until a chocolate color develops.
Cystine Tryptic Agar (pH 7.3)
Tryptose 20.0 g
L-cystine 0.5 g
Sodium chloride 5.0 g
Sodium sulfite 0.5 g
Agar 2.5 g
Phenol red 0.017 g
Distilled water 1,000.0 ml
After autoclaving and cooling to 50°C, add appropriate
Bacto Differentiation Disk Carbohydrate (e.g.,
dextrose, fructose, maltose, sucrose). Allow to cool
unslanted in an upright position.
Deoxyribonuclease (DNase Test) Agar (pH 7.3)
Deoxyribonucleic acid 2.0 g
Phytone peptone 5.0 g
Sodium chloride 5.0 g
Trypticase 15.0 g
Agar 15.0 g
Distilled water 1,000.0 ml
Endo Agar (pH 7.5)
Peptone 10.0 g
Lactose 10.0 g
Dipotassium phosphate 3.5 g
Sodium sulfite 2.5 g
Basic fuchsin 0.4 g
Agar 15.0 g
Distilled water 1,000.0 ml
Enriched Nitrate Broth
See Nitrate Broth.
Eosin-Methylene Blue (EMB) Agar (pH 7.2)
Peptone 10.0 g
Lactose 5.0 g
Sucrose 5.0 g
Dipotassium phosphate 2.0 g
Agar 13.5 g
EosinY 0.4 g
Methylene blue 0.06 g
Distilled water 1,000.0 ml
Eugon Agar (pH 7.0)
Tryptose 15.0 g
Soytone 5.0 g
Dextrose 5.0 g
L-cystine 0.2 g
Sodium chloride 4.0 g
Sodium sulfite 0.2 g
Agar 15.0 g
Distilled water 1,000.0 ml
444 Appendix I Culture Media
Harley-Prescott:
Laboratory Exercises in
Microbiology, Fifth Edition
Appendixes
I. Culture Media
©The McGraw-Hill
Companies. 2002
Eugon Broth (pH 7.0)
Tryptose 15.0 g
Soytone 5.0 g
Dextrose 5.0 g
L-cystine 0.2 g
Sodium chloride 4.0 g
Sodium sulfite 0.2 g
Distilled water 1,000.0 ml
Gel Diffusion Agar
Noble agar 10 g
Distilled water 1,000.0 ml
(A 1/1,000 dilution of merthiolate can be added as a
preservative. Dispense in appropriate dishes.)
Glucose-Minimal Salts
Prepare solutions A-D
A. Minimal salts
(NH4)2S04 20.0 g
K2HP04 140.0 g
KH2PO4 60.0 g
Sodium citrate • 2H20 10.0 g
MgS04 • 7H20 2.0 g
Distilled water 1,000.0 ml
Autoclave under standard conditions.
B. 50% glucose
Glucose 50.0 g
Distilled water 100.0 ml
Autoclave under standard conditions.
C. Amino acids
Prepare solutions of individual amino acids to give
2 mg/ml and filter sterilize.
D. Agar solution
Agar 15.0 g
Distilled water 880.0 ml
To prepare final glucose-minimal salts mix
aseptically:
Agar solution (50°C)—
solution D 880.0 ml
Minimal salts—solution A 100.0 ml
50% glucose—solution B 10.0 ml
Amino acids—solution C 10.0 ml
KF Streptococcus Agar (pH 7.2)
Proteose Peptone, No. 3 Difco 10.0 g
Yeast extract 10.0 g
Sodium chloride 5.0 g
Sodium glycerophosphate 10.0 g
Maltose 20.0 g
Lactose 1.0 g
Sodium azide 0.4 g
Bromcresol purple 0.015 g
Agar 20.0 g
Distilled water 1,000.0 ml
Kligler Iron Agar (pH 7.4)
Beef extract 3.0 g
Yeast extract 3.0 g
Peptone 15.0 g
Proteose peptone 5.0 g
Lactose 10.0 g
Dextrose 1.0 g
Ferrous sulfate 0.2 g
Sodium chloride 5.0 g
Sodium thiosulfate 0.3 g
Agar 12.0 g
Phenol red 0.024 g
Distilled water 1,000.0 ml
Lactose Fermentation Broth (lx and 2x, pH 6.9)
Beef extract 3.0 g
Peptone 5.0 g
Lactose 5.0 g
Distilled water 1,000.0 ml
Note: For the 2x, use twice the ingredients.
Lauryl Tryptose Broth (pH 6.8)
Tryptose 20.0 g
Lactose 5.0 g
Potassium phosphate, dibasic 2.75 g
Potassium phosphate, monobasic 2.75 g
Sodium chloride 5.0 g
Sodium lauryl sulfate 0.1 g
Distilled water 1,000.0 ml
Levine EMB Agar (pH 7.1)
Peptone 10.0 g
Lactose 10.0 g
Dipotassium phosphate 2.0 g
Agar 15.0 g
EosinY 0.4 g
Methylene blue 0.065 g
Distilled water 1,000.0 ml
Litmus Milk
Skim milk powder 100.0 g
Litmus 0.75 g
Distilled water 1,000.0 ml
Note: Autoclave at 12 lb pressure for 15 minutes.
Lowenstein-Jensen Medium
Asparagine 3.6 g
Monopotassium phosphate 2.4 g
Magnesium sulfate 0.24 g
Magnesium citrate 0.6 g
Potato flour 30.0 g
Malachite green 0.4 g
Distilled water 600.0 ml
Lysine Iron Agar (pH 6.7)
Peptone 5.0 g
Yeast extract 3.0 g
Dextrose 1.0 g
Appendix I Culture Media 445
Harley-Prescott:
Laboratory Exercises in
Microbiology, Fifth Edition
Appendixes
I. Culture Media
©The McGraw-Hill
Companies. 2002
L-lysine hydrochloride 10.0 g
Ferric ammonium citrate 0.5 g
Sodium thiosulfate 0.04 g
Bromcresol purple 0.02 g
Agar 15.0 g
Distilled water 1,000.0 ml
Mannitol Salt Agar (pH 7.4)
Beef extract 1.0 g
Peptone 10.0 g
Sodium chloride 75.0 g
D-mannitol 10.0 g
Agar 15.0 g
Phenol red 0.025 g
Distilled water 1,000.0 ml
M-Endo Broth (pH 7.5)
Yeast extract 6.0 g
Thiotone peptone 20.0 g
Lactose 25.0 g
Dipotassium phosphate 7.0 g
Sodium sulfite 2.5 g
Basic fuchsin 1.0 g
Distilled water 1,000.0 ml
Note: Heat until boiling but do not autoclave.
M-FC Broth (pH 7.4)
Biosate peptone or tryptose 10.0 g
Polypeptone peptone or proteose peptone.... 5.0 g
Yeast extract 3.0 g
Sodium chloride 5.0 g
Lactose 12.5 g
Bile salts 1.5 g
Aniline blue 0.1 g
Distilled water 1,000.0 ml
Note: Add 10 ml of rosolic acid (1% in 0.2 N sodium
hydroxide). Heat to boiling with gentle agitation. Do
not autoclave.
MM 1 Medium (pH 7.4)
Spizizen's salts supplemented with the following:
Vitamin-free casein hydrolysate 0.2 g
L-tryptophan 0.05 g
Dextrose 5.0 g
Distilled water 1,000.0 ml
MM 2 Medium (pH 7.4)
Spizizen's salts supplemented with the following:
Vitamin-free casein hydrolysate 0.2 g
L-tryptophan 0.005 g
Dextrose 5.0 g
Magnesium sulfate to a final
concentration of 5.0 mM
Distilled water 1,000.0 ml
MacConkey's Agar (pH 7.1)
Bacto peptone 17.0 g
Proteose peptone 3.0 g
Lactose 10.0 g
Bile salts mixture 1.5 g
Sodium chloride 5.0 g
Agar 13.5 g
Neutral red 0.03 g
Crystal violet 0.001 g
Distilled water 1,000.0 ml
Moeller's Decarboxylase Broth with
Ornithine (pH 7.2)
Peptone 5.0 g
Beef extract 5.0 g
Dextrose 0.5 g
Bromcresol purple 0.01 g
Cresol red 0.005 g
Pyridoxal 0.005 g
L-ornithine 10.0 g
Distilled water 1,000.0 ml
In the place of 10 g (1%) of L-ornithine, 10 g (1%)
of L-lysine or L-arginine can be used.
Motility Test Media (pH 7.2)
Tryptose 10.0 g
Sodium chloride 5.0 g
Agar 5.0 g
Distilled water 1,000.0 ml
MR-VP Broth (pH 6.9)
Peptone 7.0 g
Dextrose 5.0 g
Potassium phosphate 5.0 g
Distilled water 1,000.0 ml
Mueller-Hinton Agar (pH 7.4)
Beef, infusion 300.0 g
Casamino acids 17.5 g
Starch 1.5 g
Agar 17.0 g
Distilled water 1,000.0 ml
Nitrate Agar Slants (pH 6.8)
Peptone 5.0 g
Beef extract 3.0 g
Potassium nitrate 1.0 g
Agar 12.0 g
Distilled water 1,000.0 ml
Nitrate Broth (pH 7.2)
Peptone 5.0 g
Beef extract 3.0 g
Potassium nitrate 1.0 g
Distilled water 1,000.0 ml
Nitrate-Free Broth (pH 7.2)
Peptone 5.0 g
Beef extract 3.0 g
Distilled water 1,000.0 ml
Nutrient Agar (pH 7.0)
Peptone 5.0 g
Beef extract 3.0 g
Agar 15.0 g
Distilled water 1,000.0 ml
Note: Autoclave at 121 lb pressure for 15 minutes.
446 Appendix I Culture Media
Harley-Prescott:
Laboratory Exercises in
Microbiology, Fifth Edition
Appendixes
I. Culture Media
©The McGraw-Hill
Companies. 2002
Nutrient Broth (pH 7.0)
Peptone 5.0 g
Beef extract 3.0 g
Distilled water 1,000.0 ml
Nutrient Gelatin (pH 6.8)
Peptone 5.0 g
Beef extract 3.0 g
Gelatin 120.0 g
Distilled water 1,000.0 ml
Peptone Broth (pH 7.2)
Peptone 10.0 g
Sodium chloride 5.0 g
Distilled water 1,000.0 ml
Phenol Red Dextrose Broth (pH 7.4)
Trypticase (proteose peptone) 10.0 g
Beef extract 1.0 g
Dextrose 5.0 g
Sodium chloride 5.0 g
Phenol red 0.025 g
Distilled water 1,000.0 ml
Note: Autoclave at 15 lb pressure for 15 minutes. Be
careful not to autoclave longer.
Phenol Red Lactose Broth (pH 7.4)
Trypticase (proteose peptone) 10.0 g
Beef extract 1.0 g
Lactose 10.0 g
Sodium chloride 5.0 g
Phenol red 0.025 g
Distilled water 1,000.0 ml
Note: Autoclave at 15 lb pressure for 15 minutes.
Be careful not to autoclave longer.
Phenol Red Sucrose (Saccharose) Broth (pH 7.4)
Trypticase (proteose peptone) 10.0 g
Beef extract 1.0 g
Sucrose (saccharose) 10.0 g
Sodium chloride 5.0 g
Phenol red 0.025 g
Distilled water 1,000.0 ml
Note: Autoclave at 15 lb pressure for 15 minutes.
Be careful not to autoclave longer.
Phenylalanine Deaminase (Phenylalanine) Agar
(pH 7.3)
Yeast extract 3.0 g
Dipotassium phosphate 1.0 g
Sodium chloride 5.0 g
DL-phenylalanine 2.0 g
Agar 12.0 g
Distilled water 1,000.0 ml
Plate Count Agar (Standard Methods Agar, Tryptone
Glucose Yeast Agar; pH 7.0)
Tryptone 5.0 g
Yeast extract 2.5 g
Dextrose (glucose) 1.0 g
Agar 15.0 g
Distilled water 1,000.0 ml
Presence-Absence Broth (P-A Broth)
Pancreatic digest of casein 10.0 g
Lactose 7.5 g
Pancreatic digest of gelatin 5.0 g
Beef extract 3.0 g
Sodium chloride 2.5 g
Dipotassium phosphate (K2HP04) 1.375 g
Potassium dihydrogen phosphate
(KH2P04) 1.375 g
Sodium lauryl sulfate 0.05 g
Bromcresol purple 8.5 mg
Distilled water 1,000.0 ml
Add components to distilled/deionized water and
bring volume to 333.0 ml. Mix thoroughly.
Distribute into screw-capped 250.0-ml milk dilution bottles
in 50.0-ml volumes. Autoclave for 15 min at 15 psi
pressure—121°C.
Potato Dextrose Agar (pH 5.6)
Potatoes, infusion from 200.0 g
Dextrose 20.0 g
Agar 15.0 g
Distilled water 1,000.0 g
Sabouraud (Dextrose) Agar (pH 5.6)
Peptone 10.0 g
Dextrose 40.0 g
Agar 15.0 g
Distilled water 1,000.0 ml
Salt Medium-Halobacterium
Sodium chloride 250.0 g
Magnesium sulfate • 7H20 10.0 g
Potassium chloride 5.0 g
Copper chloride 0.2 g
Yeast extract 10.0 g
Tryptone 2.5 g
Agar 20.0 g
Distilled water 1,000.0 ml
SIM Agar (pH 7.3)
Peptone 30.0 g
Beef extract 3.0 g
Ferrous ammonium sulfate 0.2 g
Sodium thiosulfate 0.025 g
Agar 3.0 g
Distilled water 1,000.0 ml
Simmons Citrate Agar (pH 6.9)
Ammonium dihydrogen phosphate 1.0 g
Dipotassium phosphate 1.0 g
Sodium chloride 5.0 g
Sodium citrate 2.0 g
Magnesium sulfate 0.2 g
Agar 15.0 g
Bromothymol blue 0.08 g
Distilled water 1,000.0 ml
Appendix I Culture Media 447
Harley-Prescott:
Laboratory Exercises in
Microbiology, Fifth Edition
Appendixes
I. Culture Media
©The McGraw-Hill
Companies. 2002
Spirit Blue Agar with 3% Lipase (pH 6.8)
Tryptone 10.0 g
Yeast extract 5.0 g
Agar 20.0 g
Spirit blue 0.15 g
Distilled water 1,000.0 ml
After the above has been autoclaved and allowed to
cool to 50° to 55°C, add 30 ml of Bacto lipase reagent
(Difco) slowly while agitating the medium in the flask
to obtain an even distribution.
Spizizen's Salts
Sodium sulfate 2.0 g
Dipotassium phosphate 14.0 g
Monopotassium phosphate 6.0 g
Sodium citrate 1.0 g
Magnesium sulfate 0.2 g
Distilled water 1,000.0 ml
SS Agar (pH 7.0)
Beef extract 5.0 g
Peptone 5.0 g
Lactose 10.0 g
Bile salts no. 3 8.5 g
Sodium citrate 8.5 g
Sodium thiosulfate 8.5 g
Ferric citrate 1.0 g
Agar 13.5 g
Brilliant green 0.33 mg
Neutral red 0.025 g
Distilled water 1,000.0 ml
Standard Methods Agar
See under Plate Count Agar.
Starch Agar (pH 7.5)
Beef extract 3.0 g
Soluble starch 10.0 g
Agar 12.0 g
Distilled water 1,000.0 ml
T-Broth (pH 7.3)
Nutrient broth 8.0 g
Peptone 5.0 g
Sodium chloride 5.0 g
Glucose 1.0 g
Distilled water 1,000.0 ml
To make 2x concentrated T-broth, double all of the
above ingredients except the distilled water. Adjust
the pH to 7.3 with 0.1 M NaOH.
Thayer-Martin Modified Medium (pH 7.0)
Bacto GC medium base 36.0 g
Hemoglobin 10.0 g
Bacto supplement B or VX 10.0 ml
Bacto antimicrobic vial CNVT 10.0 ml
Distilled water 1,000.0 ml
Thioglycollate Broth (pH 7.1)
Peptone 15.0 g
Yeast extract 5.0 g
Dextrose 5.0 g
L-cystine 0.75 g
Thioglycollic acid 0.5 g
Agar 0.75 g
Sodium chloride 2.5 g
Resazurin 0.001 g
Distilled water 1,000.0 ml
Todd-Hewitt Broth (pH 7.8)
Beef heart, infusion 500.0 g
Neopeptone 20.0 g
Dextrose 2.0 g
Sodium chloride 2.0 g
Disodium phosphate 0.4 g
Sodium carbonate 2.5 g
Distilled water 1,000.0 ml
Top Agar (pH 7.0)
Nutrient broth plus 0.75% agar.
Prepare 4.5 ml pours.
Triple Sugar Iron Agar (pH 7.4)
Beef extract 3.0 g
Yeast extract 3.0 g
Peptone 15.0 g
Peptose-peptone 5.0 g
Lactose 10.0 g
Saccharose 10.0 g
Dextrose 1.0 g
Ferrous sulfate 0.2 g
Sodium chloride 5.0 g
Sodium thiosulfate 0.3 g
Phenol red 0.024 g
Agar 12.0 g
Distilled water 1,000.0 ml
Tryptic Nitrate Broth (pH 7.2)
Tryptose 20.0 g
Dextrose 1.0 g
Disodium phosphate 2.0 g
Potassium nitrate 1.0 g
Distilled water 1,000.0 ml
Trypticase (Tryptic) Soy Agar (pH 7.3)
Trypticase (tryptone) 15.0 g
Phytone (soytone) 5.0 g
Sodium chloride 5.0 g
Agar 15.0 g
Distilled water 1,000.0 ml
Trypticase Soy Agar with Lecithin and Polysorbate 80
(pH 7.3)
Tryptone 15.0 g
Soy peptone 5.0 g
Sodium chloride 5.0 g
Lecithin 0.7 g
Sorbitan monooleate complex 5.0 g
Agar 15.0 g
Distilled water 1,000.0 ml
448 Appendix I Culture Media
Harley-Prescott:
Laboratory Exercises in
Microbiology, Fifth Edition
Appendixes
I. Culture Media
©The McGraw-Hill
Companies. 2002
Trypticase (Tryptic) Soy Broth (pH 7.3)
Tryptone 17.0 g
Soytone 3.0 g
Dextrose 2.5 g
Sodium chloride 5.0 g
Dipotassium phosphate 2.5 g
Distilled water 1,000.0 ml
Tryptone Agar
Tryptone 10.0 g
Calcium chloride (reagent) 0.01 M
Sodium chloride 5.0 g
Agar 11.0 g
Distilled water 1,000.0 ml
Tryptone Broth
Tryptone 10.0 g
Calcium chloride (reagent) 0.01 M
Sodium chloride 5.0 g
Distilled water 1,000.0 ml
Tryptone Glucose Yeast Agar
See under Plate Count Agar.
Tween 80 (Polysorbate 80)
Tween 80 (polysorbate 80) is a surface-active agent
that lowers the interfacial tension around bacteria
suspended in the medium. This permits more rapid
entry of desired compounds into the bacterial cell.
As a result, there may be more rapid growth or other
activity between the bacteria and the reactive
compounds in the medium.
Urea Broth (pH 6.9)
Yeast extract 0.1 g
Monopotassium phosphate 0.091 g
Disodium phosphate 0.095 g
Urea 20.0 g
Phenolred 0.01 g
Distilled water (sterile) 1,000.0 ml
Violet Red Bile Agar (pH 7.4)
Yeast extract 3.0 g
Peptone 7.0 g
Bile salts no. 3 1.5 g
Lactose 10.0 g
Sodium chloride 5.0 g
Agar 15.0 g
Neutral red 0.03 g
Crystal violet 0.002 g
Distilled water 1,000.0 ml
Vogel-Johnson Agar (pH 7.2)
Tryptone 10.0 g
Yeast extract 5.0 g
Mannitol 10.0 g
Dipotassium phosphate 5.0 g
Lithium chloride 5.0 g
Glycine 10.0 g
Agar 15.0 g
Phenol red 0.025 g
Distilled water 1,000.0 ml
Yeast Extract
Yeast extract is the water-soluble portion of autolyzed
yeast. The autolysis is carefully controlled to preserve
the naturally occurring B-complex vitamins. In
concentrations of 0.3 to 0.5%, as it is generally employed, it
forms sparklingly clear solutions with a pH of
approximately 6.6.
YM Agar
Yeast extract 3.0 g
Malt extract 3.0 g
Peptone 5.0 g
Dextrose 10.0 g
Agar 20.0 g
Distilled water 1,000.0 ml
YM Broth
Yeast extract 3.0 g
Malt extract 3.0 g
Peptone 5.0 g
Dextrose 10.0 g
Distilled water 1,000.0 ml
Appendix I Culture Media 449
Harley-Prescott:
Laboratory Exercises in
Microbiology, Fifth Edition
Appendixes
J. Sources and
Maintenance of
Microbiological Stock
Cultures
©The McGraw-Hill
Companies. 2002
APPENDIX J
Sources and Maintenance of
Microbiological Stock Cultures
Sources of Microbiological Cultures
In addition to the major biological supply houses such as
Carolina, Fisher, and Wards, the following organizations
also supply microbiological cultures:
American Type Culture Collection
12301 Parklawn Drive
Rockville, MD 20852-1776
USA/Canada 1-800-638-6597
Outside USA/Canada 1-301-881-2600
FAX 1-301-231-5826
www.atcc.org
REMEL
PO Box 14428
12076 Santa Fe Drive
Lenexa, KA 66215-3594
1-800-255-6730
FAX 1-800-447-3643
www. remelinc. org
Difco Laboratories
Division of Becton Dickinson Company
1 Becton Drive
Franklin Lakes, NJ 07417
1-202-847-6800
FAX 1-410-584-7121
www. bd. com/microbiology
ICN Pharmaceuticals Inc.
1263 South Chillicothe
Aura, Ohio 44202
1-800-854-0530
FAX 1-800-334-6999
www.biomark@icnbiomed.com
Thomas Scientific
PO Box 99
Swedesboro, NJ 08085
1-800-345-2100
FAX 1-800-345-5232
www. thomassci. com
VWR Scientific Products
Educational Division
1310 Goshen Parkway
West Chester, PA 19380-5985
1-800-932-5000
FAX 1-610-436-1761
www. vwrsp. com
Becton Dickinson
Microbiological Systems
PO Box 243
Cockeysville, MD 21030-0248
1-201-818-8900
FAX 410-584-7121
www.bd.com
Maintenance of Microbiological
Stock Cultures
In microbiology, a stock culture is a standard strain that
conforms to typical morphological, biochemical,
physiological, and serological characteristics of the species it
represents. Over time, the culture will possess sufficient
stability to display or retain these characteristics.
Stock cultures can be maintained at little expense
(compared to buying new ones each time a strain is needed)
and require small amounts of time with respect to upkeep.
The two following general procedures are commonly used:
I. Freeze-drying (lyophilization) or quick-freeze
methods requiring specific equipment
A. Freeze-drying (lyophilization): In this
procedure, microorganisms in a liquid medium are
quick-frozen in dry ice with a solvent and
dried under high vacuum from the frozen
state. Many microorganisms can be preserved
by freeze-drying almost indefinitely.
B. Quick-freeze method: This method is
recommended for both anaerobic and aerobic
microorganisms. Most will survive for 6 months
or longer.
1. Grow the microbiological culture on
either an agar plate or slant for 24 hours.
450
Harley-Prescott:
Laboratory Exercises in
Microbiology, Fifth Edition
Appendixes
J. Sources and
Maintenance of
Microbiological Stock
Cultures
©The McGraw-Hill
Companies. 2002
2. Label small, sterile, screw-cap vials with
the name of the microorganism and date.
3. Add 1.0 ml of sterile defribrinated sheep's
blood to the vials.
4. Using aseptic technique, remove a loopful
of culture and suspend in the blood within
the vial.
5. Prepare a dry-ice bath by using crushed
dry ice and acetone.
6. Place the vials in the dry-ice bath for
about 15 seconds. This rapidly freezes the
culture in the vial.
7. Store at -40°C or colder.
8. To reconstitute the culture, place the
frozen vial in a 37°C water bath for only
1 to 2 minutes. Using aseptic technique,
remove a loopful and subculture onto an
appropriate growth medium.
II. Special media maintenance methods involve
holding at room temperature, incubator
temperature, or refrigeration
A. CTA (cysteine-trypticase agar) without
carbohydrates is available commercially. This
medium will support growth for a long period
of time at room temperature.
1. Aseptically inoculate a loopful of culture
into a tube of tryptic soy broth. Incubate
at 35°C for 18 to 24 hours.
2. Using a sterile 1-ml pipette, inoculate a
few drops of the tryptic soy broth into the
CTA tube.
3. Usually, this stock culture can be
maintained up to 6 months at room temperature.
4. Every 2 to 3 months check for viability
by subculturing onto appropriate growth
media.
5. If the subculture growth is scanty but
displays typical characteristics of the
microorganism, make a transfer from the
new culture to a new CTA tube.
6. If the subculture is not in good condition,
the stock culture should be discarded and
a new one made.
B. More fastidious microorganisms: Pneumo-
coccus, a- and B-hemolytic streptococci, ente-
rococcus, and others can be maintained on
blood agar or tryptose agar slants in screw-cap
tubes streaked for heavy growth. Keep the
tubes in a refrigerator and transfer the cultures
every 2 weeks to a fresh slant.
C. Cooked meat medium: Commercially
available cooked meat medium is an excellent
medium for both aerobes and anaerobes.
Many gram-negative bacteria (e.g.,
Salmonella, Shigella, Proteus) can remain viable for
years. Coryne bacteria and staphylococci can
remain viable up to 6 months and must then
be subcultured.
The microbiological stock culture is
inoculated into the meat layer of a tube of cooked
meat medium. To maintain anaerobes, first
boil the medium to drive off the dissolved
oxygen. After inoculation and incubation for
24 to 48 hours, add a layer of 1 ml of sterile
paraffin oil. Check the culture for viability
every 2 to 3 months.
D. TSA slants: TSA slants with screw caps can
be inoculated with a specific microorganism
and incubated for 24 to 48 hours. It is then
covered with a small amount of sterile sheep
or horse serum and frozen at -50°C. Most
microorganisms can be maintained this way for
6 or more months.
Overall considerations. Regardless of the procedure
used to maintain specific microbiological cultures, the
following special considerations should always be followed:
1. Do not use media that contain
fermentable carbohydrates if you plan to
keep the cultures for long periods.
2. Never use selective media.
3. Never allow a culture to dry out. Always
use tightly closed screw-cap tubes for
storage.
4. Do not refrigerate temperature-sensitive
microorganisms (e.g., N. gonorrhoeae, N.
meningitidis) although they survive well
by quick-freezing.
Rehydration of freeze-dried cultures. Recipients of
ATCC (or from any of the previously listed sources)
microbiological cultures should use those media and incubation
temperatures specified in the catalog entry for each strain when
first subculturing to ensure optimal conditions for recovery.
It is suggested that each culture be thoroughly checked
upon receipt. If a culture is found to be unsatisfactory in
any respect, the supplier should be notified so the strain in
question can be investigated.
The technique (p. 478) in the accompanying
illustrations should be followed to recover bacteria, fungi, or algae
from freeze-dried cultures.
III. Use of PROTECT Bacterial Preservers to store
bacteria for future use.
The PROTECT organism preservation system—marketed
by KEY Scientific Products, 1402 Chisholm Trail, Suite D,
Round Rock, Texas, 78681—is a method for preserving
bacterial cultures without freeze drying or frequent
transfers. The system consists of a sterile vial containing porous
beads in a cryopreservative fluid. Each bead acts as a
carrier for bacteria during storage. If the vials are kept at
-70°C, cultures may remain viable for several years. In a
-20°C freezer that does not self-defrost, hardy bacteria
Appendix J Sources and Maintenance of Microbiological Stock Cultures 451
Harley-Prescott:
Laboratory Exercises in
Microbiology, Fifth Edition
Appendixes
J. Sources and
Maintenance of
Microbiological Stock
Cultures
©The McGraw-Hill
Companies. 2002
such as E. coli may survive for two years or more.
Neisseria and other fastidious bacteria will last about a year at
-20°C. Survival times are shorter if a self-defrosting
refrigerator must be used. When working with fastidious
bacteria, several vials should be stored frozen and a new
one used each time one needs to start fresh cultures from
the stocks.
PROTECT bacterial preservers are used as
described below.
A. Preparation of the cultures:
1. Aseptically transfer bacteria with a loop from an
18 to 24 hour slant or plate culture to a labelled
PROTECT vial. Enough paste should be added
to make the cryopreservative fluid moderately
turbid. One loopful will probably be sufficient.
Completely emulsify the paste in the fluid so
that there are no visible clumps of bacteria.
2. Cap the tube and invert it six times to mix.
DO NOT VORTEX THE VIAL.
3. After mixing by inversion, allow the vial to
stand upright for 30 to 60 seconds. During
this interval, the bacteria bind to the beads.
4. Carefully and aseptically remove all excess
cryopreservative fluid with a sterile Pasteur
pipette. The beads should be as free of fluid
as possible. Close the vial finger tight.
5. It is essential to freeze the vials immediately
after preparation. Freeze the vial as rapidly as
possible in a slanted position. If a -70°C
freezer is available, it should be used. The vials
will cool more rapidly in a regular -20°C
freezer if they are placed in a polypropylene or
styrofoam vial container that has been frozen
overnight. Where at all possible, use a freezer
that is NOT self-defrosting.
B. Recovery and use of culture beads:
1. When a culture is needed, take a vial from the
freezer and carefully open it.
2. Remove a single bead using a sterile needle,
sterile forceps, or the special PROTECT hook. If the
remainder of the vial's contents is to be saved for
future use, it should immediately be returned to
the freezer before it thaws. (A special aluminum
cryoblock may be used to keep vials cold when
they are outside the freezer.)
3. After removing the bead from the vial, drop it
into the appropriate broth, such as tryptic soy
broth, or rub it over solid culture medium.
Incubate at the appropriate temperature.
452 Appendix J Sources and Maintenance of Microbiological Stock Cultures
Harley-Prescott:
Laboratory Exercises in
Microbiology, Fifth Edition
Appendixes
J. Sources and
Maintenance of
Microbiological Stock
Cultures
©The McGraw-Hill
Companies. 2002
Double-vial preparations
£
Tip
Insulator
Cotton plug
Outer vial (soft glass)
IH- Inner vial
Freeze-dried pellet
Cotton
Desiccant with indicator
Single-vial preparations
A
QV
•Borosilicate glass
'Freeze dried cells
Opening the vial
1. Heat the tip of the outer
vial in a flame.
2. Squirt a few drops
of water on the hot
tip to crack glass.
3. Strike with file or
pencil to remove tip
4. Remove insulation
and inner vial.
5. With forceps, gently
raise cotton plug.
Opening the vial
1. These preparations may be enclosed in a thin skin of cellulose. This
skin must be removed (either with a sharp blade or by soaking in
water for a few minutes). Score the ampule once briskly with a
sharp file about one inch from the tip.
2. Disinfect the ampule with alcohol-dampened gauze.
3. Wrap gauze around the ampule, and break at the scored area. Care
should be taken not to have the gauze too wet, or alcohol could be
sucked into the culture when the vacuum is broken. Rehydrate
material at once.
Use a sterile Pasteur pipette to
rehydrate the freeze-dried
culture as described below.
Inner vial
Single vial
Redrawn with permission from American Type Culture Collection Catalogue of Bacteria and Bacteriophages, Eighteentli Edition,1992.
Appendix J Sources and Maintenance of Microbiological Stock Cultures
453
Harley-Prescott:
Laboratory Exercises in
Microbiology, Fifth Edition
Back Matter
Specific Guidelines for Lab
Safety
©The McGraw-Hill
Companies. 2002
SPECIFIC GUIDELINES
FOR LAB SAFETY
1. Place all extra clothing, unnecessary books,
purses, backpacks, and paraphernalia in an
appropriate place. Racks are provided for these
materials. The laboratory work area must be kept
free of articles not actually in use.
2. Eating, drinking, and smoking are forbidden at all
times in the laboratory.
3. Keep your locker or laboratory door clean. Do
not allow your locker drawer to become filled
with cultures that have no value in your current
work.
4. Return all reagents, cultures, and glassware to
their appropriate places.
5. Wear a laboratory coat, smock, or lab apron when
working in the laboratory. This will protect
clothing from contamination or accidental
discoloration by staining solutions.
6. Do not place anything in your mouth while in the
laboratory. This includes pencils, food, and
fingers. Learn to keep your hands away from your
mouth and eyes.
7. Avoid contamination of benches, floor, and
wastebaskets.
8. Clean your work area (laboratory bench) with a
phenolic disinfectant such as 5% Lysol or 5%
phenol or a quaternary compound such as
cetylpyridinium (Ceepyrn) before and after each
laboratory period. This standard procedure lessens
the chance for accidental infection as well as for
contamination of cultures.
9. Special receptacles will be provided for infectious
materials and used glass slides. Place all
discarded cultures and contaminated glassware
into these receptacles. Do not let unwanted and
unneeded materials accumulate. Tall jars filled
with a solution such as 5% Lysol or special
receptacles will be provided for pipettes.
10. When infectious material is accidentally spilled,
cover it immediately with a disinfectant such as
5% Lysol or 5% phenol and notify your instructor
at once.
11. Flame wire loops and needles before and
immediately after transfer of cultures. Do not
move through the laboratory with a loop or
pipette containing infectious material.
12. Wash your hands thoroughly before and after each
experiment, using disinfecting soap if possible.
13. Label all experimental material with your
a.
b.
c.
d.
e.
Name
Date
Exercise number
Lab section
Specimen/
Organism
M. Porter
1/18/01
Ex.5
8-10 M
Water/
E. Coli
14. Telephone number to call in case of an emergency
Harley-Prescott:
Laboratory Exercises in
Microbiology, Fifth Edition
Back Matter
Credits
©The McGraw-Hill
Companies. 2002
CREDIT S
Photos
Part Openers: 2: © Bettmann/CORBIS; 6: National
Library of Medicine; 7: © Bettmann/CORBIS;
Chapter 1: Laboratory Report 1: Photograph courtesy
of Leica, Inc., Deerfield, IL; Chapter 3: Fig. 3.2: ©
Arthur M. Siegelman/Visuals Unlimited; Chapter 12:
Fig. 12.3a: Reprinted by permission of American
Society for Microbiology; Fig. 12.3b: © E.S.
Chan/Visuals Unlimited; Chapter 31: Fig. 31.1: ©
Raymond B. Otero/Visuals Unlimited; Chapter 35:
Fig. 35.1: Analytab Products, Inc.; Chapter 44: Fig.
44.2a-d: Courtesy of Milhpore Corporation; Chapter
47: Fig. 47.3 and Fig. 47.4b: Courtesy of Key
Scientific Products; Chapter 54: Fig. 54.9d: Wellcome
Diagnostics
Line Art
Chapter 8: Figure 8.4 Alpha-Tec Systems, Inc.;
Chapter 36: Figure 36.1 Copyright © Becton-
Dickinson Microbiology Systems, Cockeysville, MD.
Reprinted by permission
454
Harley-Prescott: Back Matter Index
Laboratory Exercises in
Microbiology, Fifth Edition
©The McGraw-Hill
Companies. 2002
ABO blood group, 322-24
Abscess, S. aureus, 202, 334
Acetate precipitation, of proteins,
404-5
Acetoin, 155-56
Achromobacter, characterization, 438
Acid-alcohol solution, 439
Acid-fast staining, 231
Kinyoun procedure, 51-53
Ziehl-Neelsen procedure, 51-53
Acidophile, 243
Acid production
fermentation, 127-29
triple sugar iron agar test, 134-36
Acid soil, 305
Acinetobacter, characterization, 438
Actidione Agar, 305
recipe, 443
Actinomycetes, 110
soil, 305-7
Action limit, 292
Adonitol fermentation test, 218
Aerobacter, maintenance of culture, 86
Aerobe, obligate, 110
Aeromonas hydrophila,
characterization, 438
Aerotolerant anaerobe, 110
Agar, 77-78
Noble, 443
Agar deep tube, 77-78, 87, 110
Agaricus, 375
Agar plate, 77-79
preparation, 80
smear preparation from, 37-38
Agar pour, 77, 117-19
Agar slant, 77-78
culture of anaerobic bacteria, 113
smear preparation from, 37-38
storage of culture on, 85
Agar stab culture, 86
Agglutination reactions, 322-24
Agglutinin, 322-24
Agglutinogen, 322-24
Alcaligenes
identification, 231
maintenance of culture, 86
Alcaligenes denitrificans, capsule
staining, 63-65
Alcaligenes faecalis, 153
characterization, 438
fermentation tests, 126-30
flagella staining, 69-72
normal microbiota from human
body, 330
oxidase test, 179-81
pH sensitivity, 243^14
triple sugar iron agar test, 133-36
Alcoholic fermentation, 128
Alcohol solutions, recipes, 439
Alkaline soil, 305
Alkalophile, 243
Amino acids
casein hydrolysis test, 161-62
catalase test, 169-70
coagulase test, 173-75
DNase test, 173-75
gelatin hydrolysis test, 161-62
hydrogen sulfide production and
motility test, 147-49
IMViC tests, 153-58
lysine decarboxylase test, 189-92
nitrate reduction test, 201-3
ornithine decarboxylase test, 189-91
oxidase test, 179-81
phenylalanine deaminase test,
195-97
urease test, 185-86
Ammonium sulfate API broth, 443
Amphitrichous flagella, 70
Ampicillin, 259
a-Amylase, 139^10
Amylopectin, 139
Amylose, 139
Anaerobic agar, 111
Anaerobic bacteria
aerotolerant, 110
body sites occupied by, 110
cultivation, 109-14
endospore-forming, 361-63
facultative, 110
isolation from soil, 113
maintenance of culture, 85-86
obligate, 110
strict, 110
Anaerobic culture, 362-63
Anaero-Pack System, 109
INDEX
Analog spectrophotometer, 120
Annular diaphragm, 21-23
Anthony, E. E., 64
Anthony's capsule staining
method, 64
Anthrax, 58, 63, 202, 361
Antibiogram, 258
Antibiotic disks, 257-60, 333
Antibiotic resistance, 257
Antibiotic-resistant plasmid, 393-96
Antigens, capsular, 63
Antimicrobial sensitivity testing
Kirby-Bauer method, 257-60
staphylococci, 338
Antisepsis, 237
Antiseptics, 251-53
Anti-streptolysin O titration (ASO) test,
streptococci, 348-50
API 20E Profile Index Booklet, 209
API 20E Profile Recognition
System, 209
API 20E Quick Index Booklet, 212
API 20E System, 208-12
gram-negative rods, 435-36
Arabinose fermentation test, 218
Archaea, identification using Internet
and computer-assisted gene
analysis, 409-13
Area, units of, 427
Arginine dihydrolase test, 210-11
Ascomycetes, 373-76
Ascospore, 368
Asepsis, 85
Aseptic technique, 85-88, 237, 393
ASO test. See Anti-streptolysin O
titration test
Aspergillus, 375
soil, 305
Aspergillus niger, morphology and life
cycle, 373-76
Autoclaving, 78-80
Auxotroph, 387-89, 393-96
Axial filament, 14
Azotobacter, maintenance of culture, 85
Azotobacter nitrogen-free broth, 443
Bacillary dysentery, 208, 291, 327
Bacilli (rod-shaped bacteria), 4, 39
455
Harley-Prescott: Back Matter
Laboratory Exercises in
Microbiology, Fifth Edition
Index
©The McGraw-Hill
Companies. 2002
Bacillus
endospores, 21-23
identification, 231
maintenance of culture, 85-86
normal microbiota from human
body, 330
phase-contrast microscopy, 21-23
Bacillus anthracis, 361
capsule, 63
endospores, 58
nitrate reduction test, 202
Bacillus cereus, 361
motility, 13-14
phase-contrast microscopy, 22
Bacillus circulans, endospore staining,
57-59
Bacillus globisporus, temperature
sensitivity, 238-39
Bacillus macerans, endospore staining,
57-59
Bacillus megaterium
endospore staining, 57-59
identification of endospore-
forming bacteria, 361-63
negative staining, 33
Bacillus stearothermophilus,
temperature sensitivity, 238-39
Bacillus subtilis
casein hydrolysis test, 161-62
identification of endospore-
forming bacteria, 361-63
negative staining, 32-34
pour-plate technique, 105-6
shape, 4
simple staining, 37^10
spread-plate technique, 93-95
starch hydrolysis test, 139-40
streak-plate technique, 99-101
temperature sensitivity, 238-39
transformation, 387-89
Bacitracin, 259
Bacitracin disks, 347-49
Bacitracin sensitivity test, streptococci,
348-50
Background staining. See Negative
staining
Bacteremia
P. vulgaris, 70
S. aureus, 202
Bacteria
arrangement of cells, 39, 231
conjugation, 393-96
determination of bacterial numbers,
117-20
in food, 311-12
identification, 2-6, 27-28, 51-53.
See also Staining
using Internet and computer-
assisted gene analysis,
409-13
in milk, 315-18
motility, 13-14, 17-18
mutations, 382-83
non-motile, 13-14
shapes, 2-6, 39, 231
soil, 305-7
transformation, 387-89
Bacterial dysentery, 154
Bacterial smear. See Smear preparation
Bacteriological filter, 79
Bacteriophage. See Phage
Bacteroides, 110
Bacteroides fragilis, 110
gelatin hydrolysis test, 166
Bacti-Cinerator, 85-87
Bacto lipase reagent, 143^14
Baker's yeast, 368-69
Barrier filter, 28
Baii-itt's reagent, 153, 155-57, 212
recipe, 439
Base, number in exponential form, 430
Basic fuchsin, 70
Basidiomycetes, 373-76
Bauer, A. W., 257
Beef extract, 77
Bending-type motion, 14
Bergey, David Hendricks, 223
Bergey 's Manual of Determinative
Bacteriology, 223
Bergey's Manual of Systematic
Bacteriology, 223, 230
identifying unknown bacteria,
224-26
Betadine, 263
P-oxidation, 143
2% Bile, 341
Bile esculin agar, 347
recipe, 444
streptococci, 349-51
Bile solubility test
pneumococci, 342^13
reagents, 439
staphylococci, 334
BioBag, 109
Biochemical tests, 125-206
casein hydrolysis test, 161-62
catalase test, 169-70
coagulase test, 173-75
DNase test, 173-75
fermentation and p-galactosidase
tests, 126-30
gelatin hydrolysis test, 161-62
hydrogen sulfide production and
motility test, 147^19
IMViC tests, 153-58
lipid hydrolysis test, 143^14
lysine decarboxylase test, 189-91
nitrate reduction test, 201-3
ornithine decarboxylase test,
189-92
oxidase test, 179-81
phenylalanine deaminase test,
195-97
starch hydrolysis test, 139^40
triple sugar iron agar test, 133-36
urease test, 185-86
Bioinformatics, 409-10
Biomass, 118,272
Bismark brown stain, 43-47
Blank (turbidity determination), 120
Bleach, 251
Blood agar, 77, 230, 327-29, 333,
335-36, 338, 341, 348, 361
culture of pneumococci, 341^43
recipe, 444
Blood groups, 322-24
Blood typing, 322-24
Blow-out pipette, 83-84
Bordetella bronchiseptica,
characterization, 438
Bordetella pertussis
flagella staining, 70
methyl red test, 154
Bottom agar, 300-301
recipe, 444
Botulism, 58, 361-62
Brain-heart infusion media, 77, 271,
273-74
recipe, 444
Brewer, John H., Ill
Brewer's anaerobic agar, 109-14
recipe, 444
Brewer's anaerobic petri plate, 111
Bright-field microscope, 2-6
Bright-phase-contrast microscope, 22
Brilliant green, 431
Brilliant green lactose bile broth, 285-88
recipe, 444
Bromcresol green, 431
Bromcresol purple, 126, 190-91,431
Bro mo phenol blue, 431
Bro mo thymol blue, 155, 431
Broth culture, 77-78
anaerobic bacteria, 113
growth patterns, 88
smear preparation from, 37-38
Brownian movement, 13-14
Brucella, in milk, 284
Brucellosis, 284
Bud, yeast, 368
Budding, yeast, 22, 368
Buffer, in culture media, 244
2,3-Butanediol fermentation, 128,
154-56
Butyric acid fermentation, 128
CAMP factor, 349
CAMP test, streptococci, 349-51
Candida albicans, 368-69
Candidiasis, 369
Candle jar, 357
Capsid, 283
Capsule, 64
Capsule staining, 63-64
Cai'benicillin, 259
Carbohydrates
fermentation tests, 126-30, 232
P-galactosidase test, 126-30
starch hydrolysis test, 139^40
triple sugar iron agar test, 133-36
Carbolfuchsin, Ziehl's, 37^10, 51-53
Carbolic acid. See Phenol
456 Index
Harley-Prescott: Back Matter
Laboratory Exercises in
Microbiology, Fifth Edition
Carbuncle, 334
Cardinal temperatures, 239
Casein, 161
Casein hydrolysis test, 161-62
Catalase, 170
Catalase test, 169-70, 210-11,
231-32, 355
identification of normal
microbiota, 329
neisseriae, 356-57
on slants, 170
on slides, 170
staphylococci, 334
C carbohydrate, 348
Cell lysate solution, 403-6
Cell wall, Gram stain, 43^17
CFU. See Colony-forming units
Cheese, 284
Chemically defined media, 77, 80
Chicken, bacterial count, 311-12
Chimera, 381
Chloramphenicol, 259
Chloramphenicol resistance, 393-96
Chlorine, in water, 295
Chloroplast, 22
Chocolate agar, 444
Cholera, 70, 283, 291
Chromobacterium violaceum,
characterization, 438
Citrase, 157
Citrated rabbit plasma, 173-75, 333, 336
Citrate permease, 155, 157
Citrate utilization test, 153-58, 210-11,
218,232
identification of normal
microbiota, 329
Citrobacter
triple sugar iron agar test, 134
in water sample, 285-88
Citrobacter freundii
lysine and ornithine decarboxylase
test, 189-92
normal microbiota from human
body, 330
Classical growth curve, 271-74
Cleaning solution, glassware, 439
Clindamycin, 259
Clinical microbiology. See Medical
microbiology
Clinical microbiology laboratory, 321
Clostridium, 110
endospores, 21-23
fermentation, 128
identification, 231
maintenance of culture, 86
phase-contrast microscopy, 21-23
Clostridium botulinum, 361-62
endospores, 58
Clostridium butyricum, endospore
staining, 57-59
Clostridium histolyticum, 362
Clostridium novyi, 362
Clostridium perfringens, 110, 361-62
endospores, 58
Index
gelatin hydrolysis test, 166
identification of endospore-
forming bacteria, 361-63
Clostridium septicum, 362
Clostridium sporogenes, anaerobic
cultivation, 109-14
Clostridium tetani, 361-62
endospores, 58-59, 361
Coagulase, 173
Coagulase test, 173-75
staphylococci, 335-37
streptococci, 333-34
Cocci, 4, 39
Coenocytic hyphae, 374
Coliforms, 283
fecal. See Fecal coliforms
microbiota of human body, 327
in milk, 315-18
most probable number test, 283,
285-88
presence-absence test, 283,
285-88
total. See Total coliforms
Coliphage, 299-302
Colistin, 259
Colony, 94
morphology on agar media, 93-95
Colony counter, 118-19
Colony-forming units (CFU), 118
Comparative genomics, 381
Competent bacterium, 388
Complex media, 77, 80
Computer-assisted gene analysis,
identification of microorganisms,
409-13
Congo red, 431
Conidia, 374
Conidiospore, 374
Conjugation, bacterial, 393-96
Conjugative plasmid, 393-96
Conjunctivitis, pneumococcal, 341
Conklin, Marie E., 58
Cooked meat medium, 86, 110-11
culture maintenance on, 451
Copper sulfate, 63-65, 439
Coprinus, 375
Corkscrew-type motion, 14
Corynebacterium
gelatin hydrolysis test, 165
identification, 231
normal microbiota from human
body,330
Corynebacterium
pseudodiphtheriticum, simple
staining, 37^10
Counterstain, 44
Cresolphthalein, 431
Cresolred, 431
Cryptococcosis, 63
Cryptococcus neoformans, capsule, 63
Cryptosporidiosis, 52
Cryp tosporidium
acid-fast staining, 52
waterborne, 291
©The McGraw-Hill
Companies. 2002
Crystal violet, 37^10, 70
Gram's, 43^17, 63-65
Tyler's, 63-65
Crystal violet capsule stain, 439
CTA medium, 86
Culture, pure. See Pure culture
Culture media
broth, 77-78
buffers in, 244
chemically defined (synthetic),
77,80
commercial sources, 443
complex (nonsynthetic), 77, 80
differential, 75
maintenance media, 86
preparation, 76-80
recipes, 443-49
semisolid, 77
solid, 77
sterilization, 76-80
Culture techniques, 75-124. See also
Pure culture
Culture transfer, instruments and
techniques, 83-88
Culture tube, 78
Cupule, 209
Cycloheximide, 305
Cysteine desulfurase, 147^48
Cysteine-trypticase agar, culture
maintenance on, 355, 444, 451
Cytochrome oxidase, 179-81
DAPI, 28
Dark-field microscope, 17-18
Dark-phase-contrast microscope, 22
Deamination, of phenylalanine, 195-97
Death phase, growth curve, 271-72
Decarboxylase, 190
Decarboxylation, 190
Decline phase. See Death phase
Decolorizers, 439
Decontamination procedures, 263-66
Desiccation, storage of stock
cultures, 85
Dextrose fermentation, 126
Dichotomous key, 230-31
Difco Dry Slide Oxidase, 179-80
Difco Gas Generating envelope, 109
Difco HYcheck System for
Disinfection Control, 263-65
Difco Oxidase Disks, 179-80
Difco SpotTest Catalase Reagent,
169-70
Difco SpotTest Indole Reagent
Kovacs, 153
Difco SpotTest method, flagella
staining, 69-72
Difco SpotTest Nitrate Reagent A, 201-3
Difco SpotTest Nitrate Reagent B, 201-3
Difco SpotTest Nitrate Reagent C, 201-3
Difco SpotTest Oxidase Reagent,
179-80, 355
Difco SpotTest Voges-Proskauer
reagents A and B, 153-58
Index 457
Harley-Prescott:
Laboratory Exercises in
Microbiology, Fifth Edition
Back Matter
Index
©The McGraw-Hill
Companies. 2002
Differential media, 75
Differential staining, 43^4-7
Digital spectrophotometer, 120
Dilution(s), 417-19
serial, 418-19
to specified volume, 417-18
to unspecified volume, 417-18
Dilution factor, 417
Dilution ratio, 118,418
7V,/V-Dimethyl-l-naphthylamine, 202-3
2,4-Dinitrophenol, 431
Diphenylamine reagent, 439
Diplococcus (cell arrangement), 39
Disinfectants, 263
effectiveness, 264
effect on growth of
microorganisms, 251-53
use-dilution, 252
Disinfection, 263-64
DNA, 381
bacterial transformation, 387-89
genomic
isolation from E. coli, 403-6
isolation from S. cerevisiae,
399^100
packaging of, 399
plasmid, 394
structure, 399
DNase, 174
DNA sequences, 409-13
DNase test, 173-75
agar for, 355, 444
neisseriae, 356-57
staphylococci, 335, 337-38
Donor bacterium, in conjugation, 394
Double-layered culture technique, 300
Doubling time, 272
Drinking water. See Potable water
Dry-heat sterilization, 79
Dulcitol fermentation test, 218
Durham tube, 126-29, 285, 287-88
Edwardsiella, triple sugar iron agar
test, 134
Edwardsielleae, Enterotube II
System, 437
Ehrlich, Paul, 321
EMB agar. See Eosin methylene blue agar
ENCISE, 216
Endo agar, 444
Endocarditis
S. aureus, 334
streptococcal, 348
Endospore, 58, 231
Bacillus, 21-23
B. anthracis, 58
B. circulans, 57-59
B. macerans, 57-59
B. megaterium, 57-59
C. botulinum, 58
C. butyricum, 57-59
Clostridium, 21-23
C. perfringens, 58
C. tetani, 58-59, 361
morphology, 362
position within cell, 58, 361
temperature sensitivity, 238-39
Endospore-forming bacteria
aerobic, 361-63
anaerobic, 361-63
life cycle, 58
Endospore staining, 232, 361-63
Schaeffer-Fulton procedure, 57-59
Wirtz-Conklin procedure, 57-59
English measurement system, 427-28
Enteric bacteria
API 20E System, 208-12
Enterotube II System, 215-19, 437
fermentation, 128
IMViC tests, 153-58
lysine and ornithine decarboxylase
test, 190
maintenance of culture, 85
microbiota of human body, 327-30
nitrate reduction test, 201-3
oxidase test, 180
phenylalanine deaminase test, 195
triple sugar iron agar test, 133-36
Enterobacter
fermentation, 128
identification, 231
methyl red test, 154
triple sugar iron agar test, 134
in water sample, 285-88
Enterobacter aerogenes, 153
examination of milk for bacteria,
315-18
gelatin hydrolysis test, 165-66
IMViC tests, 153-58
lysine and ornithine decarboxylase
test, 189-91
microbiota of human body, 327-30
Enterobacteriaceae, 153. See also
Enteric bacteria
Enterococci, 349
Enterococcus faecalis, catalase test,
169-70
Enterotube II Computer Coding
Manual, 215, 217
Enterotube II System, 215-19
ENCISE, 216
Enterobacteriaceae, 437
Environmental factors, in growth of
microorganisms, 237-81
Environmental microbiology, 283-84
E. coli phages from sewage,
299-302
enumeration of soil
microorganisms, 305-7
KONFIRM test for fecal
coliforms, 291-95
membrane filter technique for
coliforms and fecal
streptococci, 291-95
presence-absence coliform test,
285-88
standard coliform most probable
number test, 285-88
Environmental sampling, 263-66
Enzymes, 125
casein hydrolysis test, 161-62
catalase test, 169-70
coagulase test, 173-75
DNase test, 173-75
gelatin hydrolysis test, 161-62
hydrogen sulfide production and
motility test, 147^19
IMViC tests, 153-58
lysine decarboxylase test, 189-92
nitrate reduction test, 201-3
ornithine decarboxylase test, 189-92
oxidase test, 179-81
phenylalanine deaminase test, 195-97
urease test, 185-86
Eosin, 33
Eosin blue, 439
Eosin methylene blue (EMB) agar, 230,
285-87, 327-29
recipe, 444^15
Erysipelas, 348
Erythrogenic toxin, streptococcal, 348
Erythromycin, 259
Escherichia
identification, 231
maintenance of culture, 86
triple sugar iron agar test, 134
in water sample, 285-88
Escherichia coli, 153
acid-fast staining, 51-53
anaerobic cultivation, 109-14
antimicrobial susceptibility testing,
257-60
API 20E System, 208
casein hydrolysis test, 161-62
conjugation, 393-96
culture media, 76-80
determination of bacterial numbers,
117-20
fermentation tests, 126-30
fluorescence microscopy, 28
gelatin hydrolysis test, 165-66
Gram staining, 43-47
growth curve, 271-74
IMViC tests, 153-58
as indicator bacteria, 283
isolation of genomic DNA, 403-6
microbiota of human body, 327-30
nitrate reduction test, 201-3
osmotic tolerance, 247^18
oxidase test, 179-81
phages in sewage, 299-302
phenylalanine deaminase test,
195-97
pH sensitivity, 243^14
pour-plate technique, 105-6
starch hydrolysis test, 139^40
streak-plate technique, 99-100
temperature sensitivity, 238-39
triple sugar iron agar test,
133-36
urease test, 185-86
waterborne, 291-95
458 Index
Harley-Prescott: Back Matter
Laboratory Exercises in
Microbiology, Fifth Edition
Escherichieae
API 20 System, 435
Enterotube II System, 437
Ethanol
as antiseptic, 253
as disinfectant, 263
solutions, 439
Ethylene oxide sterilization, 79, 253
Ethyl violet, 431
Eucaryotic microorganisms, 367-79
phycomycetes, ascomycetes, and
basidiomycetes, 373-76
yeasts, 368-69
Eugon agar, 109-14
recipe, 444
Eugon broth, 445
Evans, Florence L., 64
Excitation filter, 28
Exponent, 432
Exponential form, 430
Exponential notation, standard,
432-33
Extreme halophile, 248
Eyepiece, 2-3
Facultative anaerobe, 110
Fatty acids, zinc salts, 253
FC/FS ratio, 293
Fecal coliforms, 292-93
FC/FS ratio, 293
KONFIRM test, 291-95
membrane filter technique,
291-95
Fecal contamination, 283
human versus animal, 293
Fecal streptococci, 292-93
FC/FS ratio, 293
membrane filter technique,
291-95
Fermentation, 127
major pathways, 128
Fermentation tests, 126-30, 210-11
neisseriae, 356, 358
staphylococci, 334-35
yeasts, 368-69
Ferric chloride, 195-97, 212, 439
Filter sterilization, 79
Fixation, 38
Flagella, 70
amphitrichous, 70
lophotrichous, 70
monotrichous, 70
periplasmic, 17-18
peritrichous, 13-14, 69-72
polar, 13-14, 69-72
Flagellar motion, 13-14
Flagella staining
Difco SpotTest method, 69-72
Gray method, 70
Leifson method, 70
West method, 69-72, 441^12
Flavobacterium, characterization, 438
Fleming, Sir Alexander, 125
Fluorescence microscope, 27-28
Index
Fluorochrome, 27-28
Focal length, 3
Food, bacterial count of food product,
311-12
Food intoxication, 284
Food microbiology, 283-84
bacteria in milk, 315-18
bacterial count of food product,
311-12
Food poisoning, 284
C. perfringens, 361
S. aureus, 202, 333-34
Food spoilage, 144, 284
"beneficial," 284
Formaldehyde
as disinfectant, 253
sterilization with, 253
Freeze-drying. See Lyophilization
Fulton, MacDonald, 58
Functional genomics, 381
Fungi, 367-79
colony morphology, 374
microscopic examination,
374-75
phycomycetes, ascomycetes, and
basidiomycetes, 373-76
sexual reproduction, 374
slide culture, 374
soil, 305-7
spores, 374-75
yeasts, 368-69
Fusobacterium, 110
Galactosidase, 293
P-Galactosidase, 127
P-Galactosidase test, 126-30
Gametangia, 375
Gas gangrene, 58, 362
GasPak Systems, 362
GasPak Anaerobic Jar, 109, 113
GasPak Disposable Anaerobic
Pouch, 111-13
GasPak Disposable Anaerobic
System, 109, 111-13
GasPak envelope, 111
Gas production
Enterotube II System, 219
fermentation, 127-29
triple sugar iron agar test,
134-36
Gastroenteritis
B. cereus, 361
waterborne disease, 283
Gelatin, 165
Gelatinase, 165-66, 338
Gelatin deep tubes, 165-66
Gelatin diffusion test, 210-11
Gelatin hydrolysis test, 165-66, 232
staphylococci, 335, 338
Gel diffusion agar, 445
Gene analysis, computer-assisted,
identification of microorganisms,
409-13
General unknown, 229-32
©The McGraw-Hill
Companies. 2002
Generation time, 272
mean, 272
Genetic engineering, 381
Genetics, 381
microbial. See Microbial
genetics
Genomic library, 404
Genomics
definition, 381
genomic DNA from E. coli,
403-6
genomic DNA from S. cerevisiae,
399^100
identification of microorganisms
using Internet and computer-
assisted gene analysis,
409-13
Gentamicin, 259
Giardia lamblia, fluorescence
microscopy, 28
Glassware cleaning solution, 439
Gliding motion, 14
Glomerulonephritis, streptococcal, 348
Glucose
fermentation, 126-30, 133-36,
153-58
oxidation, 153
Glucose fermentation test, 219
Glucose-minimal salts, 79
recipe, 445
Glucuronidase, 293
Glutaraldehyde, sterilization with, 253
Glycerol, as antiseptic, 253
Glycerol yeast extract agar, 305-6
Gonorrhea, 355
Gradient-agar plate method,
isolation/selection of streptomycin-
resistant mutants, 383
Graham and Evans capsule staining
method, 64-65
Gram, Christian, 44
Gram-negative bacteria, 43^17, 225
Gram-negative rods
API 20E System, 435-36
oxidative-fermentative, 438
Gram-positive bacteria, 43^17, 225
Gram-positive cocci, 333-38
Gram's crystal violet, 43-47, 63-65
Gram's iodine, 43^17, 139^10
recipe, 440
Gram stain, 43^17, 225, 230-31
control slide, 46-A1
indistinct, 45
recipe, 440
three-step procedure, 46
traditional technique, 45-46
Gram-variable cells, 44^15
Gray flagella staining method, 70
Green algae, phase-contrast
microscopy, 22
Growth curve
classical, 271-74
phases, 271-72
two-hour method, 271-74
Index 459
Harley-Prescott: Back Matter
Laboratory Exercises in
Microbiology, Fifth Edition
Index
©The McGraw-Hill
Companies. 2002
Growth of microorganisms. See also
Growth curve
antimicrobial agents and, 257-60
disinfectants and, 251-53
environmental effects, 237-81
osmotic pressure and, 247-48
oxygen and, 113
patterns in broth media, 88
pH and, 243^4
temperature and, 238-39
Growth rate constant, 272
mean, 272-73
HACH m-ColiBlue 24 broth, 291, 293
Halobacterium salinarium, osmotic
tolerance, 247-48
Halophile, 248
Hamburger, bacterial count, 311-12
Handheld colony counter, 118-19
Hand soap, 263-64
Hand washing, 263-66
Hanging drop slide, 13-14, 230
Heat-fixation, 38
Hemagglutination, 322
Hemolysis pattern
a-hemolysis, 335, 341^2, 348
P-hemolysis, 335, 338, 348
endospore-forming bacteria, 363
identification of normal
microbiota, 328-29
pneumococci, 341^2
staphylococci, 334-36, 338
streptococci, 348, 350-51
Hepatitis A virus, 291
Heterotrophic plate count, on food
product, 311-12
Hexachlorophene, as disinfectant, 253
Hyaluronidase, 348
HYcheck System for Disinfection
Control, 263-65
Hydrogen peroxide, 169-70
as antiseptic, 253
detoxification, 169-70
as disinfectant, 251
Hydrogen sulfide production,
134-36, 190
Hydrogen sulfide production test,
147^9,210-11,219,232
Hydrolase, 139
Hypertonic solution, 248
Hyphae, 374-75
Hyphomonas neptunium
Gram staining, 43^7
life cycle, 45
Hypotonic solution, 248
Identification charts, 434-38
Immersion oil, 3^1
Immunofluorescence procedures, 27
IMViC tests, 153-58
India ink, 33, 63-65
recipe, 440
Indicator microorganisms, 283-84
Indirect staining. See Negative staining
Indole production test, 149, 153-58,
210-11,219,232,293-95
identification of normal
microbiota, 329
Indophenol oxidase reagent, 355
Induced mutation, 382
Inoculating loop, 84-87, 99-100, 105-6
Inoculating needle, 84-85, 87
Inositol fermentation test, 210-11
Internet, identification of Archaea and
Bacteria using, 409-13
Iodine, 368-69
as disinfectant, 253
Gram's, 43^17, 139^10, 440
Iodophors
as antiseptics, 253
as disinfectants, 253
Iris diaphragm, 3
Isoantibodies, 322
Isoantigens, 322
Isopropyl alcohol
as disinfectant, 251
precipitation of DNA, 404-5
Isotonic solution, 248
Kanamycin, 259
KEY strips
Gelatin Test Strips, 165-66, 333
ornithine, lysine, decarboxylase,
189-92
Oxidase Test Strips, 179-80
KEY tablets
Fermentation Tablets, 129
Indole Test Tablets, 153, 155
ONPG tablets, 127, 129-30
ornithine, lysine, and
decarboxylase, 189-91
phenylalanine deaminase, 195-97
urease test tablets, 185-86
KF streptococcus agar, 291-93
recipe, 445
Kinyoun acid-fast staining procedure,
51-53
recipe for stain, 440
Kirby, W., 257
Kirby-Bauer method, antimicrobial
sensitivity testing, 257-60
Klebsiella
identification, 231
triple sugar iron agar test, 134
in water sample, 285-88
Klebsiella oxytoca, IMViC tests, 153-58
Klebsiella pneumoniae
antimicrobial susceptibility
testing, 257-60
capsule staining, 63-65
examination of milk for bacteria,
315-18
hydrogen sulfide production and
motility test, 147^19
lysine and ornithine decarboxylase
test, 189-92
methyl red test, 154
nitrate reduction test, 202
normal microbiota from human
body, 330
urease test, 185-86
Klebsielleae
API 20 System, 435-36
Enterotube II System, 437
Kligler, I. J., 134
Kligler Iron Agar, 134
recipe, 445
KONFIRM Test, fecal coliforms, 283,
291-95
Kovacs, Nikolaus, 149
Kovacs' reagent, 147^49, 153-58, 212,
215,217,327,329
recipe, 440
Laboratory techniques, 75-124
P-Lactamase test, staphylococci, 337
Lactic acid bacteria, 128
Lactic acid fermentation, 128
Lactobacillus
fermentation, 128
identification, 231
maintenance of culture, 86
Lactococcus lactis, in milk, 316
Lactose broth, 286-87
double-strength, 285, 288
recipe, 445
single-strength, 285
Lactose fermentation, 126-27, 129,
133-36,154
Lactose fermentation test, 218, 231-32,
286-88
Lag phase, growth curve, 271-72
Lancet, blood collection using, 323-24
Lauryl tryptose broth, 285-86
recipe, 445
Lederberg, Joshua, 381
Leeuwenhoek, Anton van, 1
Leifson flagella staining method, 70
Length, units of, 427
Leprosy, 52
LES Endo agar, 285-87, 291, 294
Leuconostoc, maintenance of culture,
85-86
Leukocidin, 348
Levine's EMB agar, 285-87
recipe, 445
LIA. See Lysine iron agar
Life cycle
endospore-forming bacteria, 58
H. neptunium, 45
Light intensity, 22
Linear magnification, 2-3
Lipase, 143^14
Lipid hydrolysis test, 143^14, 232
Liquid capacity, units of, 428
Liquid media. See Broth culture
Lister, Barron Joseph, 237
Listeria, in milk, 284
Listeria monocytogenes
flagella staining, 70
gelatin hydrolysis test, 165
Listeriosis, 284
460 Index
Harley-Prescott: Back Matter
Laboratory Exercises in
Microbiology, Fifth Edition
Litmus, 431
Litmus milk, 445
Loeffler's alkaline methylene blue,
37-40, 440
Logarithm(s), 430
Logarithmic phase, growth curve,
271-72
Lophotrichous flagella, 70
Lowenstein-Jensen medium, 445
Low-power, high-dry objective, 2-3
Lycoperdon, 375
Lyophilization, 85-86, 450-51
rehydration of lyophilized
culture, 451
Lysine deaminase test, identification of
normal microbiota, 329
Lysine decarboxylase, 190
Lysine decarboxylase test, 189-92,
210-11,219
identification of normal
microbiota, 329
Lysine iron agar (LIA), 189-92, 327, 329
recipe, 445^6
Lysis, of bacteria by phage, 300
Lysol, 251-53, 263
Lysozyme, 125, 387-88
MacConkey, Alfred Theodore, 75
MacConkey's agar, 75
recipe, 446
"Magic bullet" concept, 321
Magnification, 3
Malachite green, 57-59, 431
recipe, 440
Mannitol fermentation test,
staphylococci, 335-36
Mannitol salt agar, 230, 336
recipe, 446
Mannose fermentation test, 210-11
Mass, units of, 428
Maximum growth temperature, 239
Mean generation time, 272
Mean growth rate constant, 272-73
Measurement
metric and English equivalents,
427-28
of microorganisms, 2-6
Meat tenderizer, 399-400
Media. See Culture media
Medical microbiology, 321-66
agglutination reactions, 322-24
endospore-forming bacteria, 361-63
neisseriae, 355-57
normal microbiota from human
body, 327-30
pneumococci, 341^3
staphylococci, 333-38
streptococci, 347-51
Membrane filter technique, 283
coliforms and fecal streptococci,
291-95
Membrane sterilization, 79
M-Endo broth, 446
M-Endo broth MF, 291-94
Index
Meningitis
bacterial, 165
N. meningitidis, 355
pneumococcal, 341
Meningoencephalitis, L.
monocytogenes, 70
Mepercrine, 321
Mercurochrome, 253
Mercury vapor arc lamp, 28
Merthiolate, 253
Mesophile, 239
Methicillin, 259
Methicillin-resistant Staphylococcus
aureus, 338
Methylene blue, 111, 316, 368-69, 373
alkaline, 51-53
Loeffler's alkaline, 37^0, 440
recipe, 440
Methylene blue reductase test, on milk,
315-18
Methyl red, 431
Methyl red test, 153-58, 232
identification of normal
microbiota, 329
recipe for methyl red reagent, 440
Methyl red-Voges-Proskauer broth,
153, 327, 329
recipe, 446
Metric system, 427-28
M-FC broth, 291-93
recipe, 446
Microaerophile, 110
Microbial genetics, 381
bacterial conjugation, 393-96
bacterial mutation, 382-83
bacterial transformation, 387-89
Microbicidal chemical, 252
Microbiological monitoring, 263-66
Microbiological stock cultures. See
Stock cultures
Micro bio static chemical, 252
Microbiota, normal
isolation from human body, 327-30
oral organisms, 17-18, 369
rectal organisms, 330
skin organisms, 330
throat organisms, 330
Micrococcus
distinguishing gram-positive
cocci, 334
identification, 231
identification of staphylococci,
333-38
maintenance of culture, 85
Micrococcus (cell arrangement), 39
Micrococcus luteus
catalase test, 169-70
negative staining, 32-34
normal microbiota from human
body,330
simple staining, 37^0
Micrococcus lysodeikticus, 125
Micrococcus roseus
pour-plate technique, 105-6
©The McGraw-Hill
Companies. 2002
spread-plate technique, 93-95
streak-plate technique, 99-100
Micrometer
ocular, 5-6
stage, 5
Microscope
bright-field, 2-6
dark-field, 17-18
fluorescence, 27-28
phase-contrast, 21-23
Microscopic measurement, 2-6
Microscopic techniques, 1-30
Milk
examination for bacteria, 284,
315-18
pasteurization, 284, 315
Millipore Membrane Sampler and
Swab Test Kits, 263-66
temperature and incubation
times, 267
Mineral oil, sealing of cultures under, 85
Minimal salts agar, 387
Minimum growth temperature, 239
Mixed acid fermentation, 128, 154, 156
MM1 medium, 387-88
recipe, 446
MM2 medium, 387-88
recipe, 446
Mobiluncus, 110
Moderate halophile, 248
Moeller' s lysine decarboxylase broth,
189-91
Moeller's ornithine decarboxylase
broth, 189-91,446
Mohr, Francis, 83
Mohr measuring pipette, 83-84
Molds, 373-76. See also Fungi
Monitoring, microbiological, 263-66
Monotrichous flagella, 70
Moraxella, characterization, 438
Moraxella nonliquefaciens, identification
of neisseriae, 355-57
Morchella, 375
Mordant, 44, 46
Morganella
identification, 231
phenylalanine deaminase test, 195
triple sugar iron agar test, 134
Morganella morganii, nitrate reduction
test, 202
Most probable number (MPN) test, 283
coliforms, 285-88
completed test, 285-88
confirmed test, 285-88
MPN Index, 287
presumptive test, 285-88
Motility, of bacteria, 13-14, 17-18
Motility test, 147^9, 232
identification of normal
microbiota, 329
Motility test medium, 147^9
recipe, 446
Mouse susceptibility test, pneumococci,
342^3
Index 461
Harley-Prescott: Back Matter
Laboratory Exercises in
Microbiology, Fifth Edition
Index
©The McGraw-Hill
Companies. 2002
MPN test. See Most probable number test
M-staphylococcus broth, 333, 336
Mucor, soil, 305
Mueller-Hinton agar, 257-60, 333, 338
recipe, 446
MUG test, 293-95
Mushroom, 373-76
dissection, 375
Mutagen, 382
Mutation, 382
bacterial, 382-83
Mycelium, 374
Mycobacterium
identification, 231
in milk, 284
Mycobacterium leprae, 52
Mycobacterium phlei, acid-fast
staining, 51-53
Mycobacterium smegmatis, acid-fast
staining, 51-53
Mycobacterium tuberculosis
acid-fast staining, 51-53
fluorescence microscopy, 27-28
Mycolic acid, 52
a-Naphthol, 215, 217, 440
Neelsen, Friedrich, 52
Negative staining, 32-34
Neisseriae, 355-57
catalase test, 356-57
DNase test, 356-57
fermentation tests, 356, 358
identification, 231
maintenance of culture, 86
morphology, 356
nitrate reduction test, 356-57
nitrite reduction test, 356-57
normal microbiota from human
body, 330
oxidase test, 356-57
pigmentation, 356
on Thayer-Martin agar, 356-57
Neisseria flavescens, 355-57
Neisseria gonorrhoeae
identification of neisseriae, 355-57
oxidase test, 180
Neisseria lactamica, 355-57
Neisseria mucosa, 355-57
Neisseria sicca, 355-57
Neisseria subflava, 355-57
Neomycin, 259
Nephelo culture flask, 271
Nessler's reagent, 440
Neufeld, Fred, 342
Neufeld reaction, 342
Neutral red, 431
Neutrophile, 243
Nigrosin, 33
recipe, 441
Ninhydrin, 189-92
Nitrate agar, 201-3
recipe, 446
Nitrate broth, 201-3
recipe, 446
Nitrate-free broth, recipe, 446
Nitrate reductase, 202-3
Nitrate reduction test, 201-3, 210-11,
232, 355
neisseriae, 356-57
recipe for reagents, 441
staphylococci, 334-35
Nitrite, 202
reduction, 202-3
Nitrite reduction test
neisseriae, 356-57
recipe for reagent, 441
Nitrite test reagent A, 201-3
Nitrite test reagent B, 201-3
Noble agar, 443
Nocardia asteroides, acid-fast
staining, 52
Nocardia brasiliensis, acid-fast
staining, 52
Nocardiosis, 52
Non-acid-fast cells, 52
Non-motile bacteria, 13-14
Nosocomial infections, 263
P. mirabilis, 202
Novobiocin, 259
Novobiocin sensitivity test,
staphylococci, 335, 338
Nutrient agar, 77, 86, 299
recipe, 446
Nutrient broth, 77, 299, 387
recipe, 447
Nutrient gelatin deep, 333, 338
recipe, 447
Objective lens, 2-3, 21-22
Obligate aerobe, 110
Obligate anaerobe, 110
Ocular lens. See Eyepiece
Ocular micrometer, 5-6
Oil immersion objective, 2-A
Oleandromycin, 259
ONPG disks, 126, 129
ONPG tablets, 126
ONPG test, 127,129-30,210-11,
293-95
reagents, 441
Optimum growth temperature, 239
Optochin test, pneumococci, 341^43
Organic mercury compounds, as
antiseptics, 253
Ornithine decarboxylase, 190
Ornithine decarboxylase test, 189-92,
210-11,219
Osmotic pressure, 248
effect on growth of
microorganisms, 247^18
Osteomyelitis, S. aureus, 333
Otitis media
pneumococcal, 341
streptococcal, 348
Oxidase test, 179-81, 216, 232
neisseriae, 356-57
reagents, 179-81, 441
staphylococci, 334
Oxidative-fermentative gram-negative
rods, 438
OxyDish, 109, 112, 114
Oxygen
damaging effects on anaerobes, 110
relationship to bacterial
growth, 113
toxic oxygen products, 169-70
Oxy Plate, 109, 112
Oxyrase For Agar, 109, 112, 114
Oxyrase For Broth, 109, 112, 114
Palladium catalyst, 111, 362
Papain, 400
Paramecium, phase-contrast
microscopy, 21-23
Paramecium caudatum, phase-contrast
microscopy, 22
Pararosaniline, 70
Paratyphoid fever, 291
Pasteur, Louis, 283
Pasteurella, characterization, 438
Pasteurization, 283
of milk, 284, 315
P-A test. See Presence-absence test
Pathogen, potential, 321
Penicillin, discovery, 125
Penicillin G, 259
Penicillin-resistant Staphylococcus
aureus, 338
Penicillium, soil, 305
Penicillium notatum, morphology and
life cycle, 373-76
Peptone(s), 77
Peptone broth, 447
Peptostreptococcus, 110
Periplasmic flagella, 17-18
Peritonitis, pneumococcal, 341
Peritrichous flagella, 13-14, 69-72
Peroxidase, 170
pH, 243,431
effect on growth of
microorganisms, 243^14
growth optimum, 243
growth range, 243
pH indicators, 431
pH meter, 431
Phage, 283
E. coli, isolation from sewage,
299-302
plaques, 300-301
Phage T4, 284
Phage titer, 299-302
Phase-contrast microscope, 21-23
bright-phase-contrast
microscope, 22
dark-phase-contrast microscope, 22
Phase plate, 21-22
Phenol, 237, 251-52
Phenol coefficient, 251-52
Phenolphthalein, 431
Phenol red, 126, 128, 133-34, 185-86,
190, 341
Phenol red dextrose broth, 447
462 Index
Harley-Prescott: Back Matter
Laboratory Exercises in
Microbiology, Fifth Edition
Phenol red lactose broth, 447
Phenol red sucrose broth, 447
Phenylalanine deaminase, 195-96
Phenylalanine deaminase test,
195-97,218
recipe for agar, 447
Phenylpyruvic acid, 195-96
Phosphate buffer, 244
recipe, 441
Phospholipids, 143
Phycomycetes, 373-76
Physiological saline, 441
Pigmentation
neisseriae, 356
staphylococci, 335
Pipette, 83
blow-out (serological), 83-84
sterilization, 84
to-deliver (Mohr measuring), 83-84
Pipette bulb, 84
Pipette can, 84
Pipette filler, safety bulb, 84
Pipetting, 84, 86
Pipetting device, electronically
powered, 84
Plague, 154, 208
Plaque, phage, 300-301
Plasmid, 381, 394
antibiotic-resistant, 393-96
conjugative, 393-96
Plasmolysis, 248
Plate count, 117-18
on food product, 311-12
Plate count agar, 161-62, 311-12
recipe, 447
Plate culture, anaerobic bacteria, 113
Pleomorphic bacteria, 39
Plesiomonas shigelloides,
characterization, 438
Pneumococci, 341^13
bile solubility test, 342^13
culture on blood agar, 341-43
hemolysis pattern, 341^12
identification, 341^13
microbiota from human body, 330
morphology, 341^12
mouse susceptibility test, 342^13
optochin test, 342^13
quellung reaction, 342^13
Pneumonia
K. pneumoniae, 154, 202
pneumococcal, 341
P. vulgaris, 70
S. aureus, 333-34
S. mutans, 63
Polar flagella, 13-14, 69-72
Polio virus, 291
Polymyxin B, 259
Polyporus, 375
Pond water, 21-23
Potability, 291
Potable water, 283, 291
standard set for, 292
Potassium alum, 70
Index
Potassium permanganate, as
antiseptic, 253
Potato dextrose agar, 374-75
recipe, 447
Potential pathogen, 321
Pour-plate technique, 105-6
Presence-absence (P-A) test, coliforms,
283, 285-88
recipe for P-A broth, 447
Primary stain, 44
Prodigiosin, 83
Profile index number, 209, 212
Prontosil red, 321
Propidium iodine, 28
Propionibacterium, fermentation, 128
Propionic acid bacteria, 128
Propionic acid fermentation, 128
Proskauer, Bernhard, 154
Proteae
API 20E System, 436
Enterotube II System, 437
PROTECT bacterial preservers,
451-52
Proteins
casein hydrolysis test, 161-62
catalase test, 169-70
coagulase test, 173-75
DNase test, 173-75
gelatin hydrolysis test, 161-62
hydrogen sulfide production and
motility test, 147^19
IMViC tests, 153-58
lysine decarboxylase test, 189-91
nitrate reduction test, 201-3
ornithine decarboxylase test, 189-92
oxidase test, 179-81
phenylalanine deaminase test,
195-97
urease test, 185-86
Proteolytic enzymes, 161-62, 165-66
Proteus
fermentation, 128
identification, 231
maintenance of culture, 85-86
phenylalanine deaminase test, 195
Proteus mirabilis
API 20E System, 208
lipid hydrolysis test, 143^14
normal microbiota from human
body,330
urease test, 185
Proteus vulgaris, 153
flagella staining, 70
gelatin hydrolysis test, 165-66
hydrogen sulfide production and
motility test, 147^19
IMViC tests, 153-58
lysine and ornithine decarboxylase
test, 189-91
phenylalanine deaminase test,
195-97
starch hydrolysis test, 139^40
triple sugar iron agar test, 133-36
urease test, 185-86
©The McGraw-Hill
Companies. 2002
Protoslo, 21-23
Protozoa, phase-contrast
microscopy, 22
Providencia
identification, 231
phenylalanine deaminase test, 195
Pseudomonas
identification, 231, 438
maintenance of culture, 85-86
Pseudomonas aeruginosa
anaerobic cultivation, 109-14
antimicrobial susceptibility testing,
257-60
casein hydrolysis test, 161-62
effectiveness of disinfectants,
251-52
flagella staining, 70
motility, 13-14
normal microbiota from human
body, 330
oxidase test, 179-81
temperature sensitivity, 238-39
triple sugar iron agar test, 133-36
Pseudomonas fluorescens
flagella staining, 69-72
nitrate reduction test, 201-3
Psychrophile, 239
Puccinia, 375
Pure culture, 393
isolation, 83-88
maintenance, 83-88
pour-plate technique, 105-6
spread-plate technique, 93-95
streak-plate technique, 99-100
Pyrogallol, 109, 111
Quebec colony counter, 118-19
Quellung reaction, pneumococci, 342^13
Quick-freeze preservation methods,
450-51
Radiolarian shells, 18
Rancidity, 144
Rapid multitest systems, 207-22
API 20E System, 208-12, 435-36
Enterotube II System, 215-19, 437
Reagents, recipes for, 439^12
Recipient bacterium, in
conjugation, 394
Recipient cell, in genetic
engineering, 381
Rectal culture, 328-30
Refractive index, 3
Refrigeration, storage of stock
cultures, 85
Reproductive hyphae, 374
Resazurin, 111, 431
Resident microorganisms, 263
Rheumatic fever, 348
Rhizoidal hyphae, 374
Rhizopus, 375
soil, 305
Rhizopus stolonifer, morphology and
life cycle, 373-76
Index 463
Harley-Prescott: Back Matter
Laboratory Exercises in
Microbiology, Fifth Edition
Index
©The McGraw-Hill
Companies. 2002
Rhodospirillum rubrum, 4
Rhodotorula, morphology and culture,
368-69
Ribonuclease, 404-5
Ribosomal Database Project, 410
Ribosomal RNA, 409
Ribosomal RNA gene sequencing,
409-13
Ribosomes, 409
Rifampin, 259
Rifampin resistance, 393-96
RODAC plates, 263-65
Rod-shaped bacteria, 4
Sabouraud dextrose agar, 305-6, 368-69,
373-74
recipe, 447
Saccharomyces, fermentation, 128
Saccharomyces cerevisiae
fermentation tests, 126-30
isolation of genomic DNA, 399^00
morphology and culture, 368-69
phase-contrast microscopy, 22
pH sensitivity, 243^4
Safety bulb pipette filler, 84
Safranin, 43^7, 57-59, 63-65
Salmonella
identification, 231
maintenance of culture, 86
in milk, 284
Salmonella cholerae-suis
fermentation tests, 126-30
urease test, 185-86
Salmonella paratyphi, 291
Salmonella typhi
API 20E System, 208
flagella staining, 70
methyl red test, 154
non lactose fermenter, 327
triple sugar iron agar test, 134
waterborne, 291
Salmonella typhimurium, hydrogen
sulfide production and motility
test, 147-49
Salmonelleae
API 20 System, 435
Enterotube II System, 437
Salmonellosis, 283-84
Salt medium-halobacterium, 447
Saprolegnia, 375
Sarcina (cell arrangement), 39
Scarlet fever, 348
Schaeffer, Alice B., 58
Schaeffer-Fulton endospore staining
procedure, 57-59
Scientific notation, 432-33
Selection method, 381
Semisolid media, 77
Septate hyphae, 374
Septic sore throat, streptococcal, 348
Septisoft, 263
Septum, 374
Serial dilutions, 418-19
Serological pipette, 83-84
Serratia
fermentation, 128
maintenance of culture, 86
triple sugar iron agar test, 134
Serratia marcescens
culture transfer, 83-88
pour-plate technique, 105-6
spread-plate technique, 93-95
streak-plate technique, 99-100
Sewage, E. coli phages from, 299-302
Sex pili, 394
Sexual spore, 368
Sheep blood agar, 347
Shells, radiolarian, 18
Shigella
identification, 231
triple sugar iron agar test, 134
urease test, 185
Shigella dysenteriae, 153
API 20E System, 208
methyl red test, 154
non lactose fermenter, 327
waterborne, 291
Shigella flexneri, triple sugar iron agar
test, 133-36
Shigellosis, 283
Shill, 118
Side chain theory, 321
Signature sequence, 410
Silver nitrate
as antiseptic, 253
flagella staining, 70
SIM agar deep, 147^19, 153-58,
327, 329
recipe, 447
Simmons, J. S., 149
Simmons citrate agar, 153-58, 327, 329
recipe, 447
Simple staining, 37^10
Skin culture, 328-30
Skin infection, P. aeruginosa, 70
Slide culture, of fungi, 374
Smear preparation, 33-34, 37^10
Sodium deoxycholate, 341
Sodium dodecyl sulfate, cell lysis
with, 404
Sodium hypochlorite, 253
Sodium lauryl sulfate, 287
Soil
acid, 305
alkaline, 305
enumeration of microorganisms in,
305-7
isolation of anaerobes from, 113
microorganisms in, 284
Solid media, 77
Solute, 248
Solutions, recipes, 439-42
Solvent, 248
Sorbitol fermentation test, 210-11, 218
Spectrophotometer, 118-20
analog, 120
digital, 120
growth curve determination, 271-74
Spectrophotometry. See also
Turbido metric analysis
transmission-absorbance table, 429
Spirilla, 4, 39
Spirillum volutans
motility, 13-14
negative staining, 32-34
shape, 4
simple staining, 37^10
Spirit blue agar with 3% lipase, 143^44
recipe, 448
Spirochete, dark-field microscopy,
17-18
Spirogyra, phase-contrast
microscopy, 22
Spizizen's salts, 448
Spontaneous mutation, 382
Spore. See also Endospore
fungal, 374-75
SpotTest method. See Difco SpotTest
entries
Spread-plate technique, 93-95
Sputum specimen, 27
culture of pneumococci from, 342
SS agar, 448
Stab technique, for transferring bacteria,
87-88
Stage micrometer, 5
Stain. See also specific stains and dyes
primary, 44
recipes for, 439^12
Staining
acid-fast staining, 51-53, 231
capsule, 63-65
differential, 43^17
endospore, 57-59, 232, 361-63
flagella, 69-72, 441^12
Gram stain, 43^17,225, 230-31,440
negative, 32-34
simple, 37^10
Standard exponential notation,
432-33
Standard plate count. See Viable plate
count
STAPHAUREX rapid latex test kit,
333, 337
Staphene, 263
Staphylococci, 333-38
antimicrobial sensitivity, 338
bile solubility test, 334
catalase test, 334
coagulase negative, 174, 333
coagulase positive, 173, 333-34
coagulase test, 333-37
DNase test, 335, 337-38
fermentation tests, 334-35
gelatin hydrolysis test, 335, 338
hemolysis patterns, 334-36, 338
identification, 231
P-lactamase test, 337
maintenance of culture, 86
mannitol fermentation test, 335-36
morphology, 334
nitrate reduction test, 334-35
464 Index
Harley-Prescott:
Laboratory Exercises in
Microbiology, Fifth Edition
Back Matter
Index
©The McGraw-Hill
Companies. 2002
novobiocin sensitivity test, 335, 338
oxidase test, 334
pathogenic versus nonpathogenic,
173-75, 333
pigmentation, 335
Staphylococcus (cell arrangement), 39
Staphylococcus aureus
antimicrobial susceptibility testing,
257-60
catalase test, 169-70
coagulase test, 173-75
distinguishing gram-positive
cocci, 334
DNase test, 173-75
effectiveness of disinfectants,
251-52
gelatin hydrolysis test, 165
Gram staining, 43^17
identification of staphylococci,
333-38
identification of streptococci,
347-51
methicillin-resistant, 338
mutations, 382-83
nitrate reduction test, 202
normal microbiota from human
body, 330
osmotic tolerance, 247^18
penicillin-resistant, 338
shape, 4
temperature sensitivity, 238-39
Staphylococcus epidermidis
coagulase test, 173-75
DNase test, 173-75
gelatin hydrolysis test, 165
identification of staphylococci,
333-38
lipid hydrolysis test, 143^14
nitrate reduction test, 201-3
normal microbiota from human
body, 330
Staphylococcus saprophyticus, 333-38
Starch agar, 448
Starch hydrolysis test, 139-40, 232
Stationary phase, growth curve,
271-72
Sterilization, 79
autoclaving, 78-80
of culture media, 76-80
dry-heat, 79
of equipment, 79
with ethylene oxide, 79, 253
with formaldehyde, 253
with glutaraldehyde, 253
membrane filter, 79
of pipettes, 84
ultraviolet radiation, 79
Stock cultures, 85. See also Pure
culture
commercial sources, 450
maintenance, 450-53
Stock solution, 417
Streak-plate technique, 99-100
Streptobacillus (cell arrangement), 39
Streptococci, 347-51
anti-streptolysin O titration test,
348-50
bacitracin sensitivity test, 348-50
on bile esculin agar, 349-51
CAMP test, 349-51
distinguishing gram-positive
cocci, 334
fecal. See Fecal streptococci
fermentation, 128
Group A, 348, 351
Group B, 349, 351
Group C, 351
Group D, 349
hemolysis pattern, 348, 350-51
identification of streptococci, 231,
347-51
from Bergey 's Manual,
224-26
identification of staphylococci,
333-38
maintenance of culture, 85-86
morphology, 347^18
SXT sensitivity test, 349-50
viridans, 330, 341^13, 348^19
Streptococcus (cell arrangement), 39
Streptococcus agalactiae, 347-51
Streptococcus bovis
identification of pneumococci,
341-43
identification of streptococci,
347-51
Streptococcus equi, 347-51
Streptococcus mitis, 347-51
Streptococcus mutans
capsule, 63
identification of streptococci, 347-51
Streptococcus oralis, 341^43
Streptococcus pneumoniae. See
Pneumococci
Streptococcus pyogenes
identification of streptococci,
347-51
normal microbiota from human
body,330
Streptococcus salvarius
identification of staphylococci,
333-38
identification of streptococci,
347-51
Streptodornase, 348
Streptokinase, 348
Streptolysin O, 347-50
Streptolysin S, 348
Streptomycin, 259
Streptomycin resistance, 382-83
Strict anaerobe, 110
Structural genomics, 381
Subculturing, 85, 87
Substage condenser, 3
Sucrose fermentation, 126, 133-36
Sugar-differentiation disk, 129-30
Sulfanilic acid, 202-3
Sulfate reduction, 147-49
Sulfide-indole-motility agar deep. See
SIM agar deep
Sulfite reduction, 147^19
Sulfonamides, 259
Superoxide, 169-70
Superoxide dismutase, 169-70
SXT disks, 347, 349
SXT sensitivity test, streptococci,
349-50
Synthetic media. See Chemically
defined media
Syphilis, 32, 321
Tannic acid, 70
Taxo P disks, 341
T-broth, 299, 301
recipe, 448
Temperature effect, on growth of
microorganisms, 238-39
Tergitol No. 4, 41-42
Tetanus, 58, 361-62
Tetracycline, 259
Tetramethyl-p-phenylenediamine
dihydrochloride, 179-81
TFTC plate. See Too few to count plate
Thallus, 374-75
Thayer-Martin agar
neisseriae on, 356-57
recipe, 448
Thermoduric bacteria, 239
Thermophile, 239
Thin smear, 33-34
Thioglycollate medium, 109-14
recipe, 448
Thioglycollate medium with calcium
carbonate, 86
Thiosulfate reductase, 147^18
Thiosulfate reduction, 147^19
Throat culture, 328-30
Throat swab, 328-29
Thymol blue, 431
Titer, phage, 299-302
TNTC plate. See Too numerous to
count plate
Todd, E. W., 348
Todd-Hewitt broth, 448
Todd unit, 348
To-deliver pipette, 83-84
Tonsillitis, streptococcal, 348
Too few to count (TFTC) plate, 118
Too numerous to count (TNTC)
plate, 118
Top agar, 300-301
recipe, 448
Total coliforms, 283, 292
membrane filter technique, 291-95
most probable number test, 285-88
Toxic shock syndrome, 334
Transferring techniques, 87-88
Transformation, bacterial, 387-89
Transfusion reactions, 323
Transient microorganisms, 263
Transmission-absorbance table, for
spectrophotometry, 429
Index 465
Harley-Prescott: Back Matter
Laboratory Exercises in
Microbiology, Fifth Edition
Treponema denticola, dark-field
microscopy, 17-18
Treponema pallidum, negative
staining, 32
Triacylglycerols, 143
Triclosan, 251-52, 263
Triglycerides, 143
Triple sugar iron (TSI) agar,
327-29
recipe, 448
Triple sugar iron (TSI) agar test,
133-36
identification of normal
microbiota, 329
Triton-X, 51-53
Triton X-100 stock solution, 441
Trommsdorf's reagent, 441
Trypticase (tryptic) soy agar, 86, 88,
93-95, 99-101, 105-6, 109-14,
169-70, 179-81, 230, 238-39,
271, 273, 285, 305-6, 327, 355,
361,382-83
recipe, 448
Trypticase (tryptic) soy agar with
lecithin and polysorbate 80, 448
Trypticase (tryptic) soy broth, 77-78,
80, 120, 333, 337-38, 393, 449
Tryptic nitrate broth, 448
Tryptone agar, 449
Tryptone broth, 449
Tryptone glucose yeast agar, 117-19,
161-62
Tryptophanase, 154-55
Tryptophan degradation, 153-55
Tryptophan deaminase test, 210-11
TSA agar, 230, 263-64
culture maintenance on, 451
TSI agar. See Triple sugar iron agar
Tuberculosis, 27, 52, 284
Turbidity, 271-72
Turbidometric analysis
determination of bacterial
numbers, 117-20
growth curve determination,
271-74
transmission-absorbance table
for, 429
Tween 80, 449
Two-hour growth curve, 271-74
Tyler's crystal violet, 63-65
Typhoid fever, 70, 154, 208, 283,
291, 327
Typhus, 70
Index
Ultraviolet radiation, sterilization
using, 79
Unknown identification, 223-35
general unknown, 229-32
using Bergey 's Manual of Systematic
Bacteriology, 224-26
Urea, hydrolysis, 185-86
Urea broth, 185-86
recipe, 449
Urease, 185
Urease test, 185-86, 210-11, 218, 232
Urethral discharge, 356
Urethritis, gonococcal, 356
Urinary tract infection
E. aerogenes, 154
E. coli, 154, 202, 208
Morganella, 195
P. mirabilis, 185, 208
Proteus, 195
Providencia, 195
P. vulgaris, 70
S. saprophyticus, 334
Use-dilution, 252
Vancomycin, 259
Vaspar, 441
Vegetative hyphae, 374
Veillonella, identification, 231
Viable plate count, 117-20
on food product, 311-12
Vibrio, characterization, 438
Vibrio (cell shape), 39
Vibrio cholerae
flagella staining, 70
waterborne, 291
Vibrio natriegens, growth curve, 271-74
Violet red bile agar, 315, 317
recipe, 449
Virion, 283
Virus, waterborne, 283, 291
E. coli phages, 299-302
Vogel-Johnson agar, 78, 333-34, 336
recipe, 449
Voges, Daniel, 154
Voges-Proskauertest, 153-58, 210-11,
218,232
identification of normal
microbiota, 329
Volume, units of, 428
Water activity, 248
Water quality
action limit, 292
©The McGraw-Hill
Companies. 2002
KONFIRM test for fecal
coliforms, 291-95
membrane filter technique for
coliforms and fecal
streptococci, 291-95
phage titer, 299-302
presence-absence coliform test,
285-88
standard coliform most probable
number test, 285-88
West flagella staining method,
69-72
West stain, 69-72
recipe, 441^12
Wet-mount slide, 3, 17-18, 230
Whooping cough, 70, 154
Wine, sour, 283
Wirtz, Robert, 58
Wirtz-Conklin endo spore staining
procedure, 57-59
Wound infection, P. aeruginosa, 70
Wright, James H., Ill
Wright's tube, 111
Wurster's blue, 181
Yeast(s), 368-69. See also
Saccharomyces cerevisiae
fermentation tests, 368-69
phase-contrast microscopy, 22
spores, 368
Yeast extract, 77, 449
Yersiniae
API 20E System, 436
Enterotube II System, 437
Yersinia pestis
API 20E System, 208
methyl red test, 154
YM agar, 449
YM broth, 449
Yogurt, 284
Zephiran, 263
Ziehl, Franz, 52
Ziehl-Neelsen acid-fast staining
procedure, 51-53
solutions, 442
Ziehl's carbolfuchsin, 37-40, 51-53
Zinc oxide, as antiseptic, 253
Zinc powder/dust, 201-3
Zone of inhibition, 258-59
Zone of proteolysis, 161-62
Zygospore, 375
Zymomonas, fermentation, 128
466 Index