/


Tags: weapons military affairs
Year: 1939

Text
Boyes’
Anti-Tank Rifle
Small Arms Training
Volume I, Pamphlet No. 5
NOT TO BE PUBLISHED
The information given in this docu-
ment is not to be communicated, either
directly or indirectly, to the Press or to
any person not holding an official posi-
tion in His Majesty's Service.
____________________1937____________________
Reprinted with Amendments (No. 1), 1939)
Crown Copyright Reserved
Printed under the Authority of HIS MAJESTY'S STATIONERY OFFICE
by William Clowes & Sons, Ltd., London and Beccies.
By Commend of Ав Army Council,
Tme War Omoi(
28/A June. I£i3».
3
CONTENTS
General:— page
Characteristics .. .. .. .. .. . > 5
Description and weight .. ,, ., .. 5
Carriage . . .. .. .. . . .. 5
Training . . . . .. . . .. .. 6
Lesson 1. Stripping and cleaning .. .. . . .. 8
,, 2. Loading» unloading, sight setting and aiming 11
„ 3. Holding and firing .. .. .. .. 13
,, 4. Handling . . .. .. .. . . 16
Tests of elementary training .. .. .. .. 18
GENERAL
1. The tactical employment of the anti-tank rifle is referred
to in Infantry Training, 1937. Sections 6, 56, 70, 7G and 79
should be read in conjunction with this pamphlet.
The anti-tank rifle affords a means of protection against
enemy light-armoured fighting vehicles. Its bullet will
penetrate their armour up to about 500 yards range and inflict
casualties on the crew, although it may not seriously damage
the vehicle itself. A trained soldier can produce a rate of fire
of about nine rounds a minute. It is essentially a weapon of
surprise and will always be carried in action.
2. Its chief characteristics are :—
i. A single shot, hand-operated weapon with a simple
bolt action.
ii. Great accuracy and good penetration.
iii. Comparative lightness and mobility.
iv. When fired, it has a pronounced flash and muzzle blast.
3, General description :—
36 lb.
•55-in.
i. Weight
Calibre
Weight of magazine
containing 5 rounds
Total length
2 lb. 7 oz.
5 ft. 4 in.
ii. Recoil.—This is considerable, but a recoil reducer,
together with a strong buffer spring and padded
shoulder piece, reduces the shock of discharge on the
firer’s shoulder.
iii. Mechanism.—This is similar to that of the service
rifle.
4. Carriage*—In the infantry the anti-tank rifle with its
ammunition is carried on the platoon truck, or corresponding
vehicle, until required for use. It can be man-handled by one
individual for short distances . otherwise two men are required
to carry it and its ammunition.
6
5. Training.—There are so many similarities between the
anti-tank rifle and existing weapons that a trained soldier
should be capable of handling it with a small amount of
instruction. Training policy should, therefore, be directed to
giving practice in handling and firing the weapon at moving
targets.
As the rifle has a range almost double that of the S.M.L.E.,
it is unsafe to fire full charge ammunition on rifle ranges,
except where danger areas have been extended and passed
as safe.
The -55-inch aluminium bullet has been evolved to enable
practice to be carried out on classification ranges, etc., where
suitable facilities and danger areas exist.
It will be found, however, that valuable practice can be
carried out using a reduced scale range. This will consist
of 1/5th or l/30th scale shooting at about 100 yards on a classi-
fication range using the -22-inch rifle attachment. The
method of carrying out this training is contained in Pamphlet
No. 14.
Anti-tank rifles are not specialist weapons, and all ranks will
be taught to fire them. Men will be trained to aim at the
places in tanks and armoured vehicles where the driver and
the gunner will be, rather than at the vital parts of the machine.
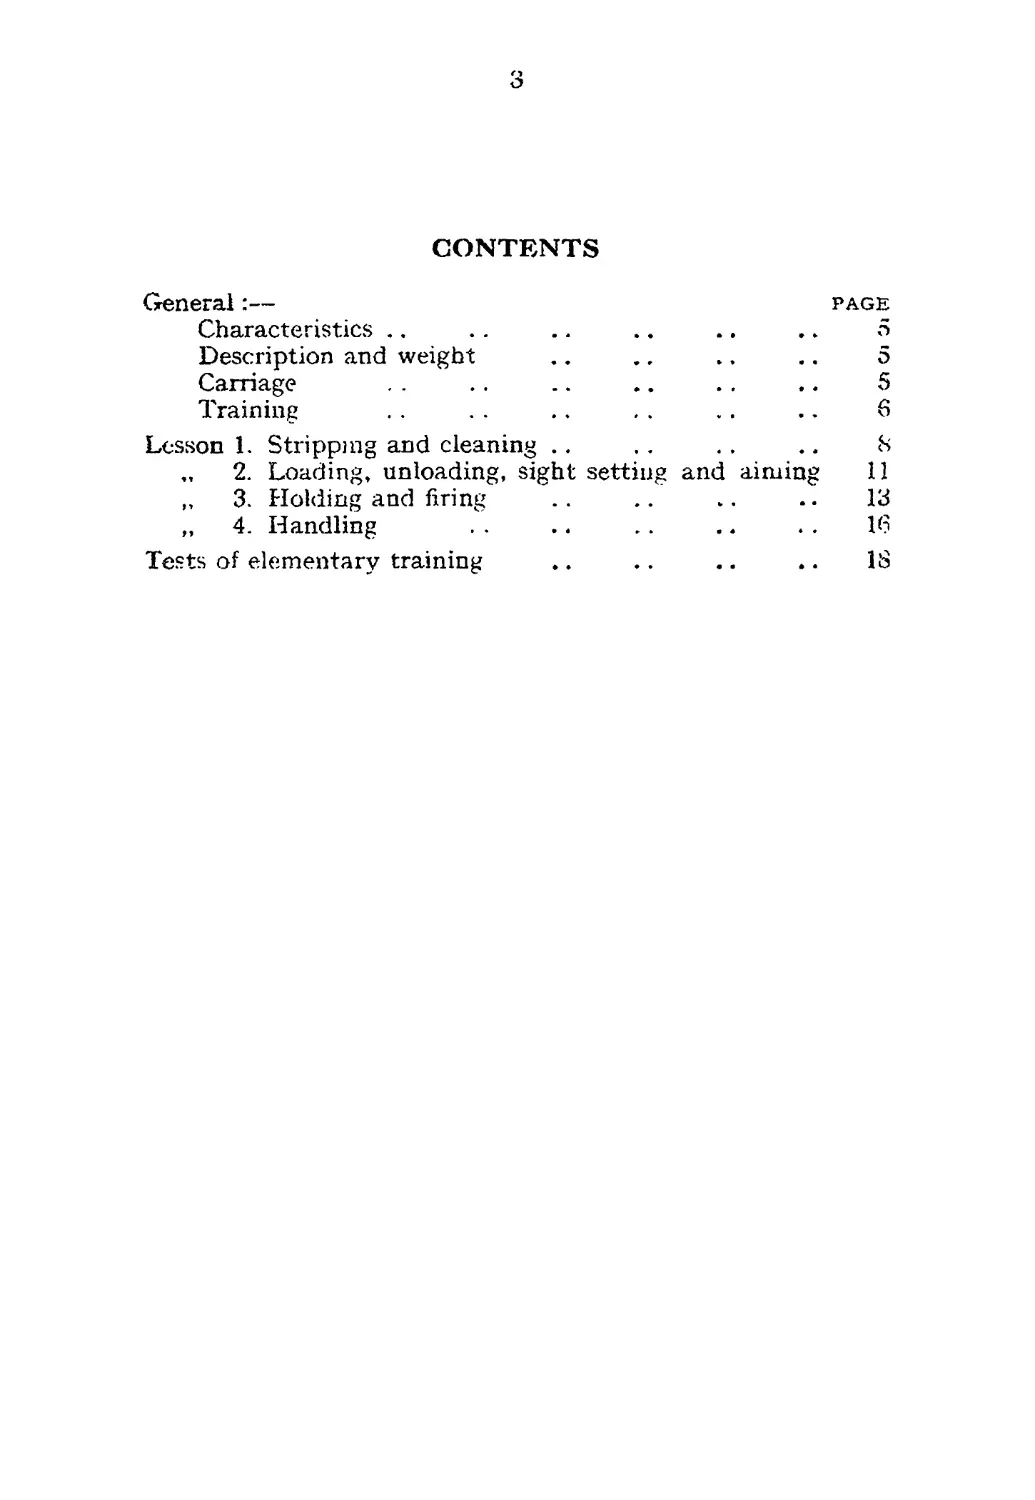
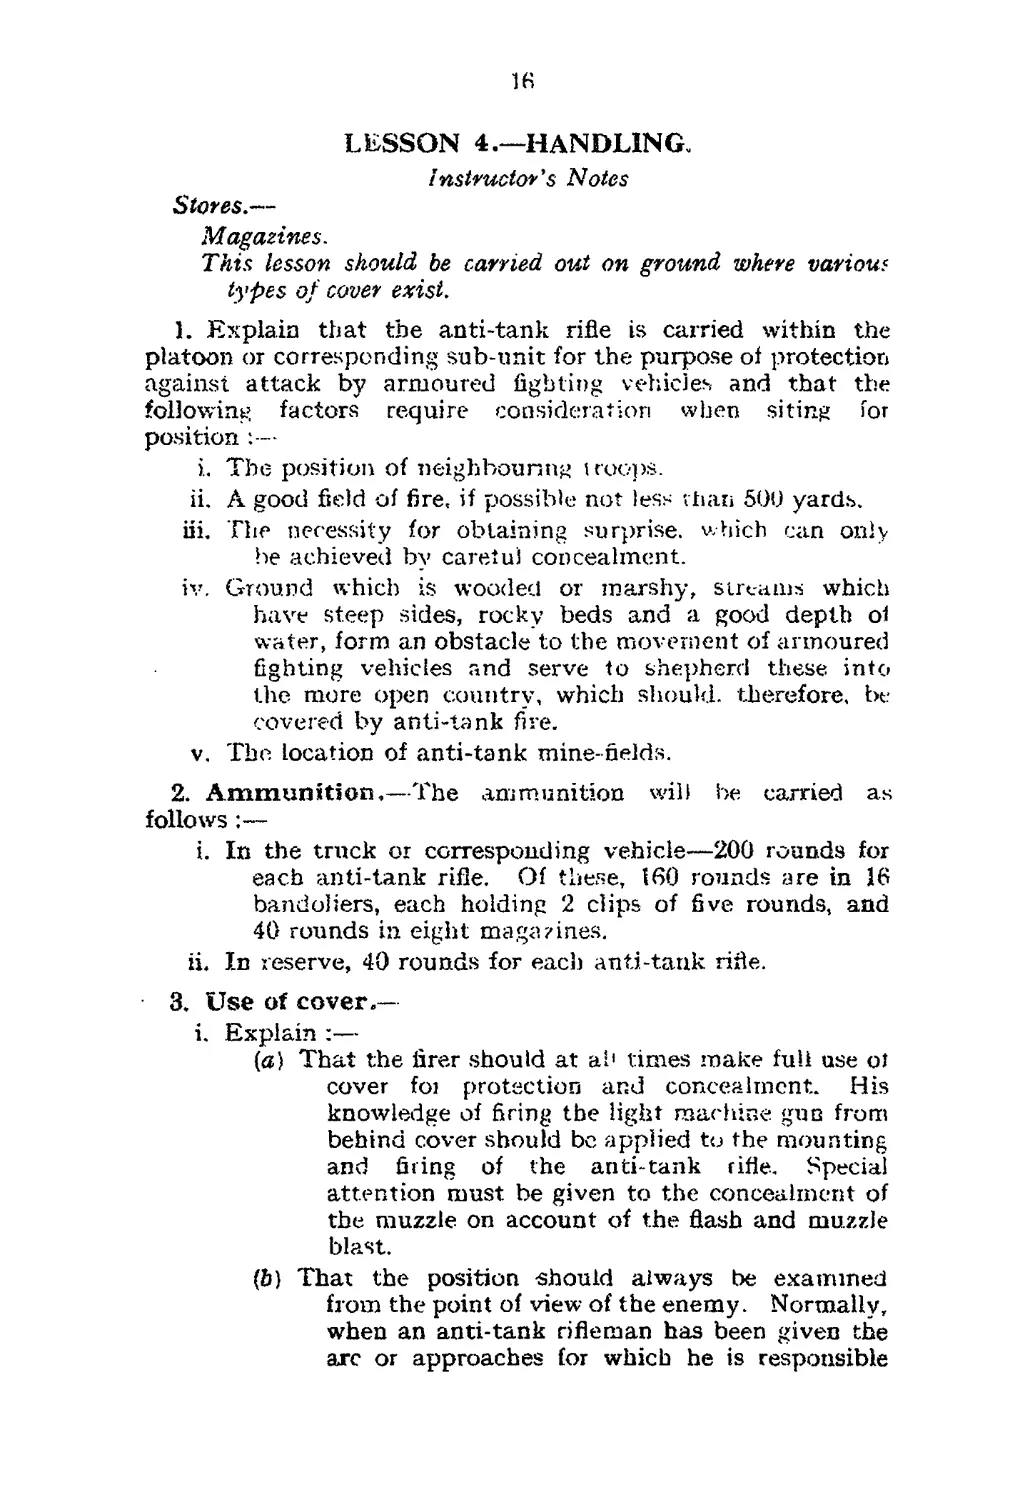
Fig. 1.
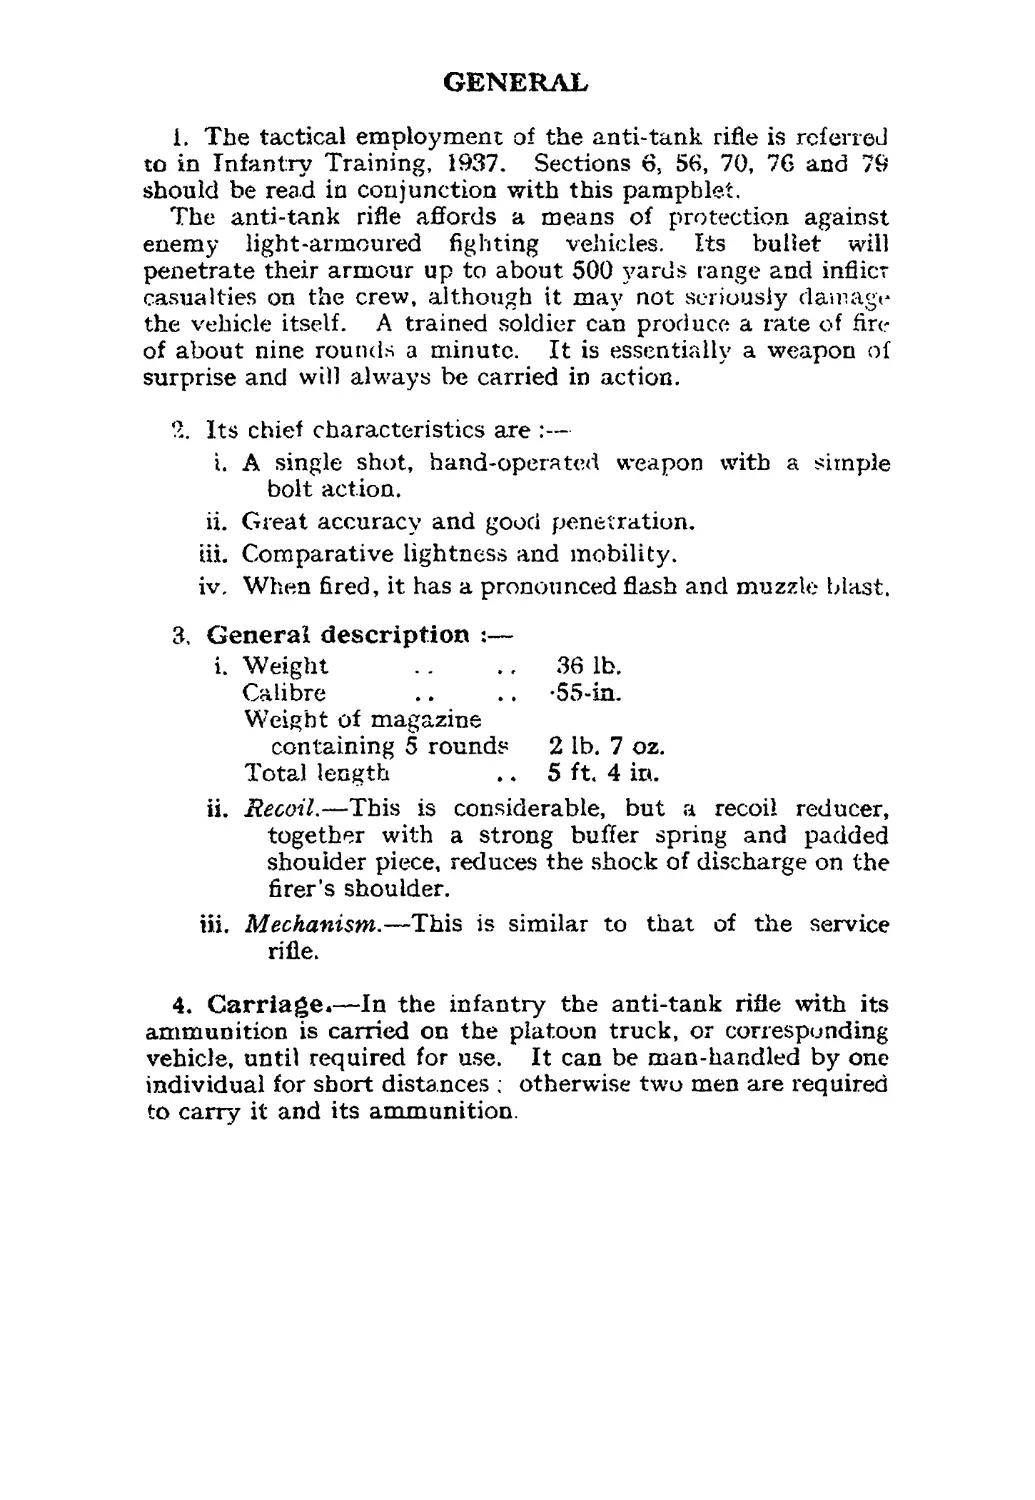
The anti-tank rifle (near-side view)
M.oGnzine (5 roundsJ
Fig. 2
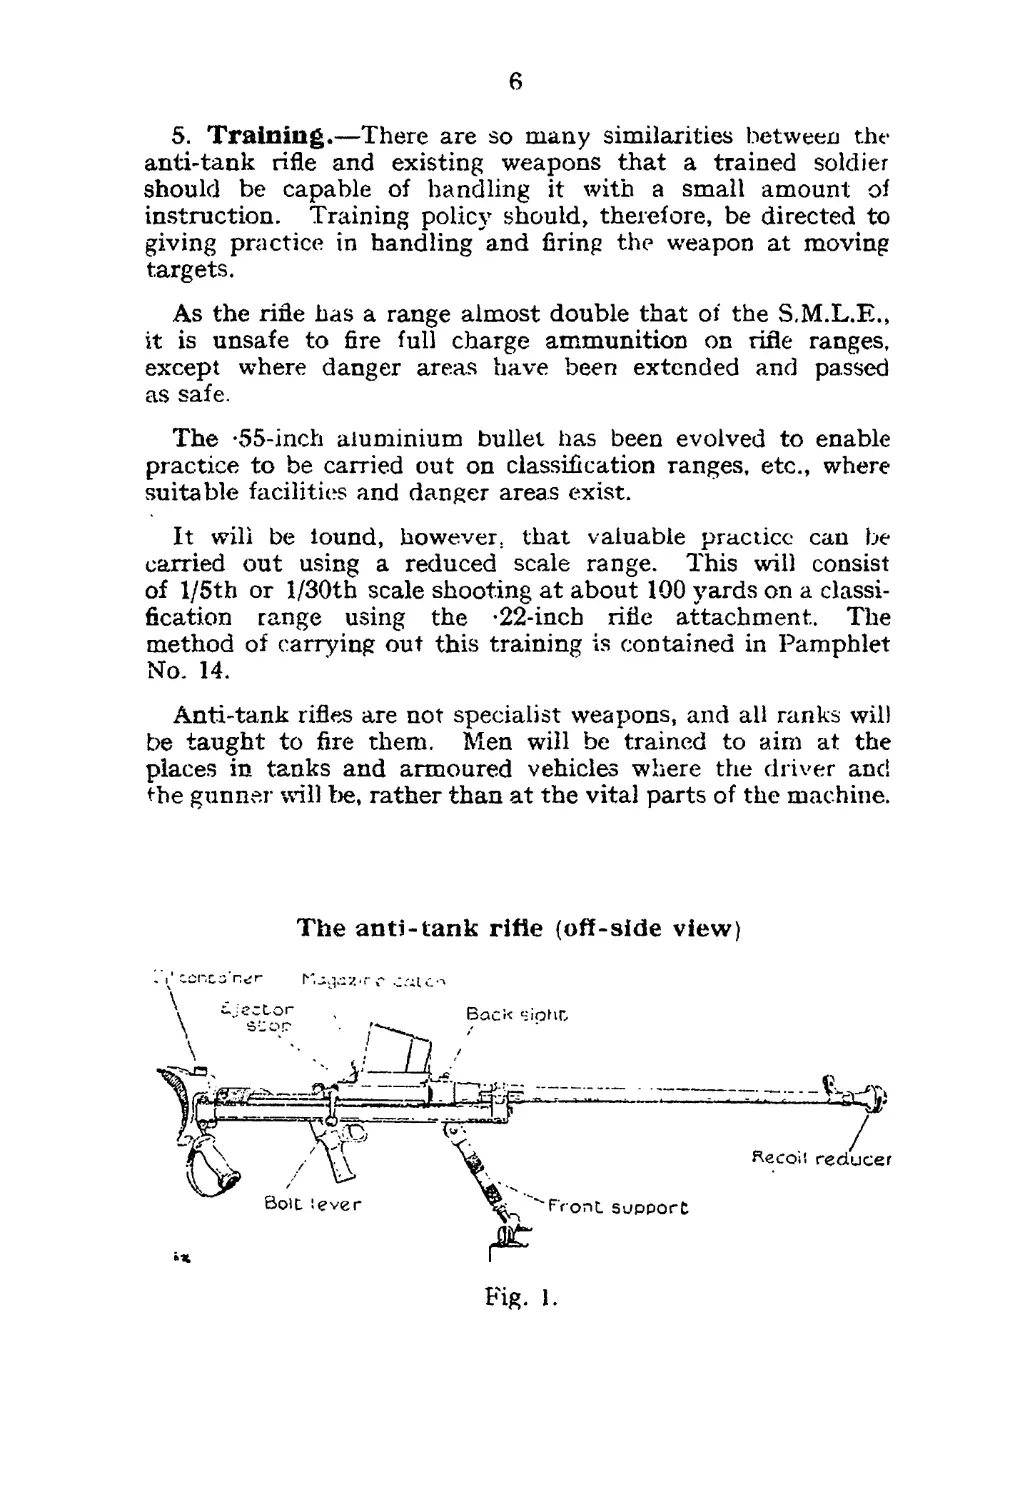
The anti-tank rifle (top view)
Fig. 3
8
LESSON L—STRIPPING AND CLEANING
Instructor's Notes
Stores.—
Magazine, combination tool, cleaning rod, brushes, flannel-
ette in breech cover, oil and ground sheet.
Throughout the lesson each part of the rifle will be named a>
handled.
L Explain paras. 1 to *3. page 5.
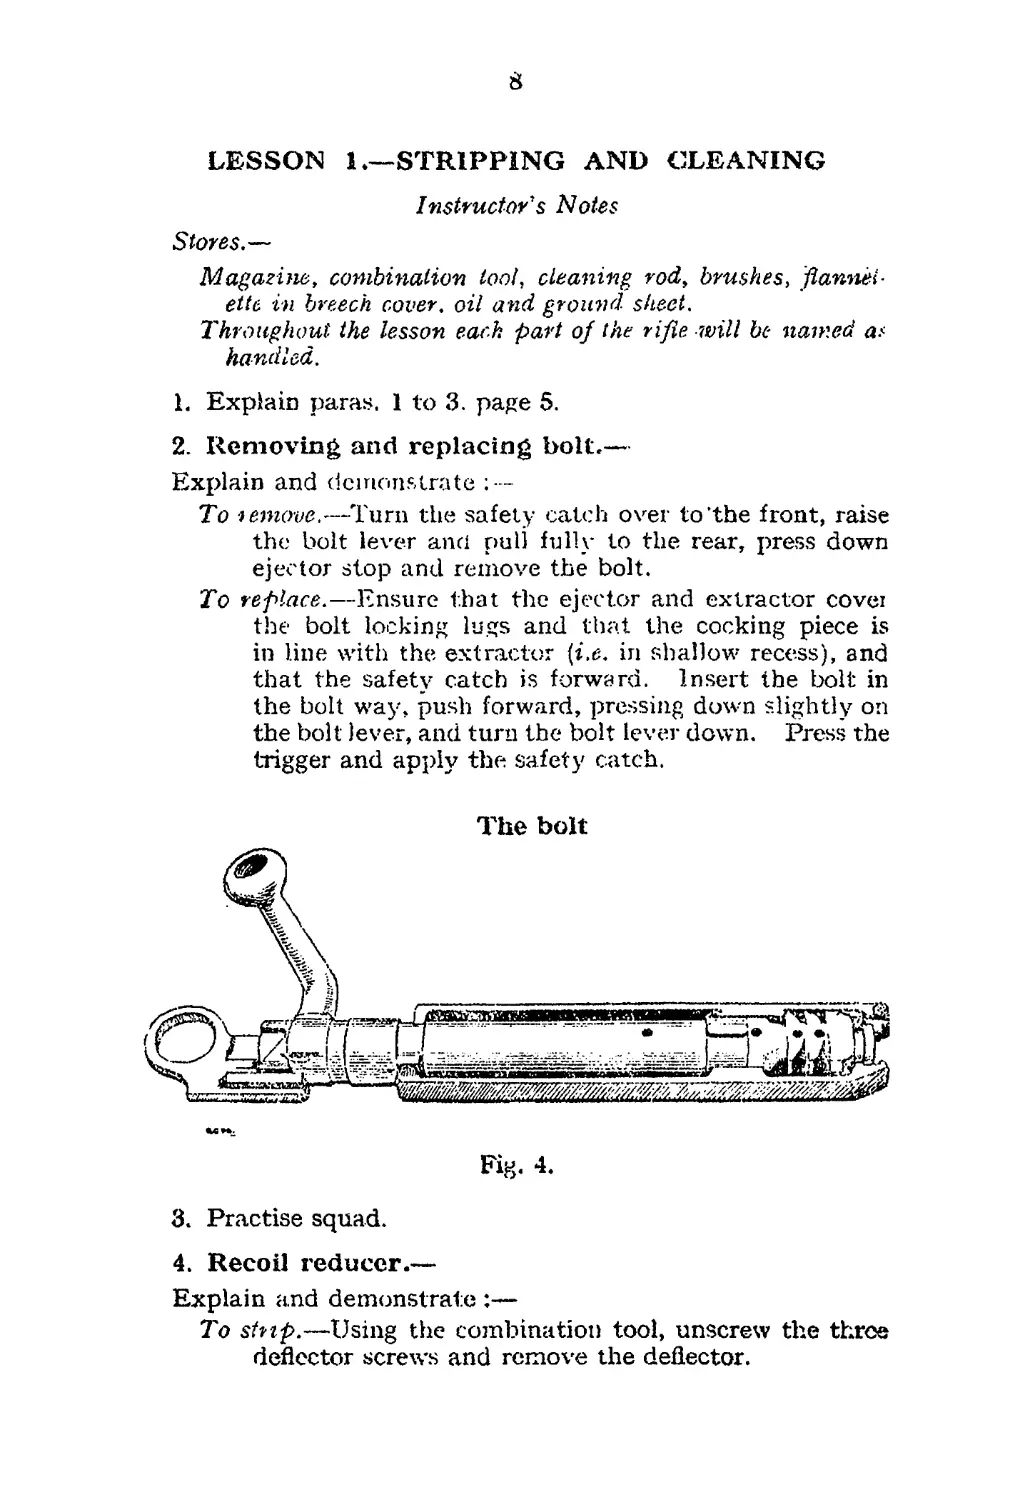
2. Removing and replacing bolt.—
Explain and demonstrate : —
To t emove.—Turn the safety catch over to’the front, raise
the bolt lever and puli fully to the rear, press down
ejector stop and remove the bolt.
To replace.—Ensure that the ejector and extractor covei
the bolt locking lugs and that the cocking piece is
in line with the extractor {i.e. in shallow recess), and
that the safety catch is forward. Insert the bolt in
the bolt way, push forward, pressing down slightly on
the bolt lever, and turn the bolt lever down. Press the
trigger and apply the safety catch.
3. Practise squad.
4. Recoil reducer.—
Explain and demonstrate :—
To strip.—Using the combination tool, unscrew the throe
deflector screws and remove the deflector.
9
To assemble.—Assemble in the reverse order. Care should
be taken to replace the deflector on the same flanges.
5. Practise squad in 2 and 4.
6. Magazine platform.
Explain and demonstrate :—
To strip.—Press in the stud on the bottom plate of the
magazine, and slide it off, controlling the spring as it
comes out. Lift out the spring and platform.
Assemble in the reverse order.
Note :—The magazine will be held so as to prevent injury
should premature release of spring occur. The maga-
zine will not normally be stripped, except for cleaning
after a gas attack. In peace, should it not work
correctly, it will be taken to the armourer.
7. Cleaning.—
Explain and demonstrate :—
i. Cleaving materials are similar to chose, used for the
service rifle, but in place of a pull-through there is a
brass tubular nxl with loop and wire brush, the latter
for the' removal of fouling. These, with flannelette
and a bristle brush, are carried in the breech cover.
Oil is boused in the shoulder piece. To prepare the
rod for use, assemble the four sections. Pull the
cord tight and secure b$’ inserting it in the notches
of the handle.
it. Daily cleaning.—Remove bon, insert a piece of dry
flannelette, 4 in. by 6 in., in the loop of the rod.
Insert rod in the muzzle end of the barrel and clean
thoroughly, taking care to keep the rod central in the
barrel. Oil the barrel, using a smaller piece of
flannelette. Clean all remaining parts and leave
slightly oiled.
iii. Before firing.—As taught for the service rifle and. in
addition, wipe all trace of oil from the recoil reducer
by taking ofi the deflector and cleaning it.
iv. After firing.—Remove the bolt and take oft the deflector
from the recoil reducer. Then, with the aid of dry
flannelette, clean all loose fouling from the barrel.
Next, scour out the barrel with an oily brush, and
clean with dry flannelette. Clean the breech with
the bristle brush.
Clean and oil the deflector and the body of the
recoil reducer.
10
All remaining parts will be cleaned as in daily
cleaning.
The outside of the magazine and magazine platform
will be wiped and oiled, but not stripped. Finally
oil the barrel, using flannelette. Replace the deflector
and bolt.
v. During and after gas attack.—As for the service rifle.
Question squad on this method.
vi. Dreech caver.—Removing and replacing.
11
LESSON 2.—LOADING, UNLOADING, SIGHT-
SETTING AND AIMING
/nstructor’s Notes
Stores.—
Magazines, dummies and ground sheets.
1. Filling magazines.—
Explain and demonstrate :—
i. The magazine.—Holds five rounds. Inside is a plat-
form and powerful spring.
ii. To fill.—Hold the magazine in one hand, resting it on
the knee or on a solid surface. Press down the
platform and insert the base of the cartridge under the
magazine lips. Push the cartridge into the magazine.
Continue this action until the magazine is filled.
iii. 7'o empty.—Push each round forward with the nose of
a bullet and remove.
2. Practise squad.
3. Loading and unloading.—
Explain and demonstrate :—
i. Loading position.—Lie down with the body straight
behind the rifle ; grasp the pistol grip with the right
hand, forefinger outside the trigger guard and the.
left hand on the shoulder piece grip.
ii. To load.—Turn the safety catch over to the front, put
the magazine on, forward portion first. Open and
close the breech as taught with the service rifle,
taking care to turn the bolt lever completely down.
Apply the safety catch.
iii. To unload.—Turn the safety catch over to the front :
press the magazine catch with the palm of the band
and remove the magazine. Open and close the
breech. Raise the shoulder piece into the shoulder
and press the trigger. Apply the safety catch, lower
the rifle and stand up.
4. Practise squad.
5. Sight setting. -
Explain that the body of the backsight is marked on the
left M 300 ”, and on the right “ 500 ”.
To set the backsight.
For 300 yards turn the lever to the left
12
For 500 yards turn the lever to the right. The aperture
is thus raised or lowered to the required height.
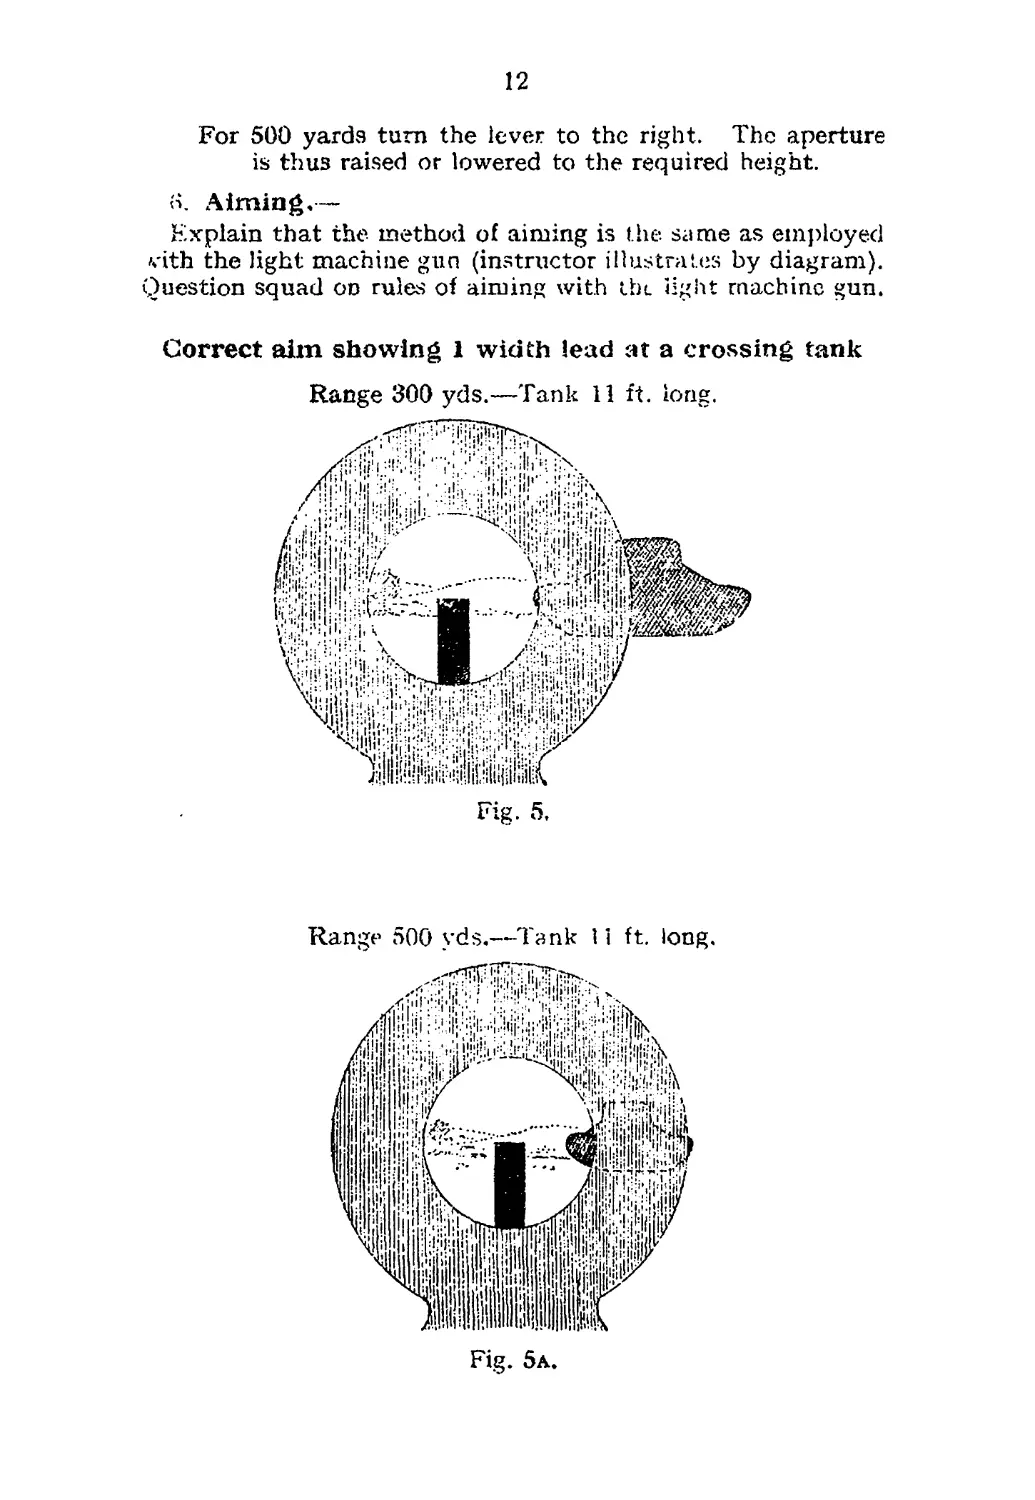
o. Aiming,—
Explain that the method of aiming is the same as employed
vith the light machine gun (instructor illustrates by diagram).
Question squad on rules of aiming with the light machine gun.
Correct aim showing 1 width lead at a crossing tank
Range 300 yds.—Tank 11 ft. long.
Fig. 5,
Range 500 yds.—Tank Ii ft. long.
Fig. 5a.
13
LESSON 3.—HOLDING AND FIRING
Instructor's Noles
Stores.—
Magazines and dummies.
A.F. Г. targets and ground sheets.
i. Explain that the trigger has two pressures, which will be
taken in the same way as with the service rille.
2. Holding.-
Explair» and demonstrate :—
i. Adopt the loading position and load. Adjust sights.
Turn the safety catch over to the front. Raise the
shoulder piece into the shoulder, lower the cheek' on
to the cheek rest and take the first pressure. Hold
firmly with both hands and aim as taught. Explain
that it may be necessary to adjust the elevation ot
the barrel and that this i* done by rotating the sleeve
on the front support.
n. biting. — -The method of firing i.:= similar to that of the
service rifle. Having fired, reload at once in tbr
shoulder, and declare the point of aim.
3. Practise squad.
4. Changing magazines.--
Explain and demonstrate that, when necessary, the firei
will change magazines with the rifle in the shoulder. The boh
will not go forward when the magazine is empty. It must
therefoie. be fully withdrawn before a new magazine is placed
on the rifle
5. Practise squad.
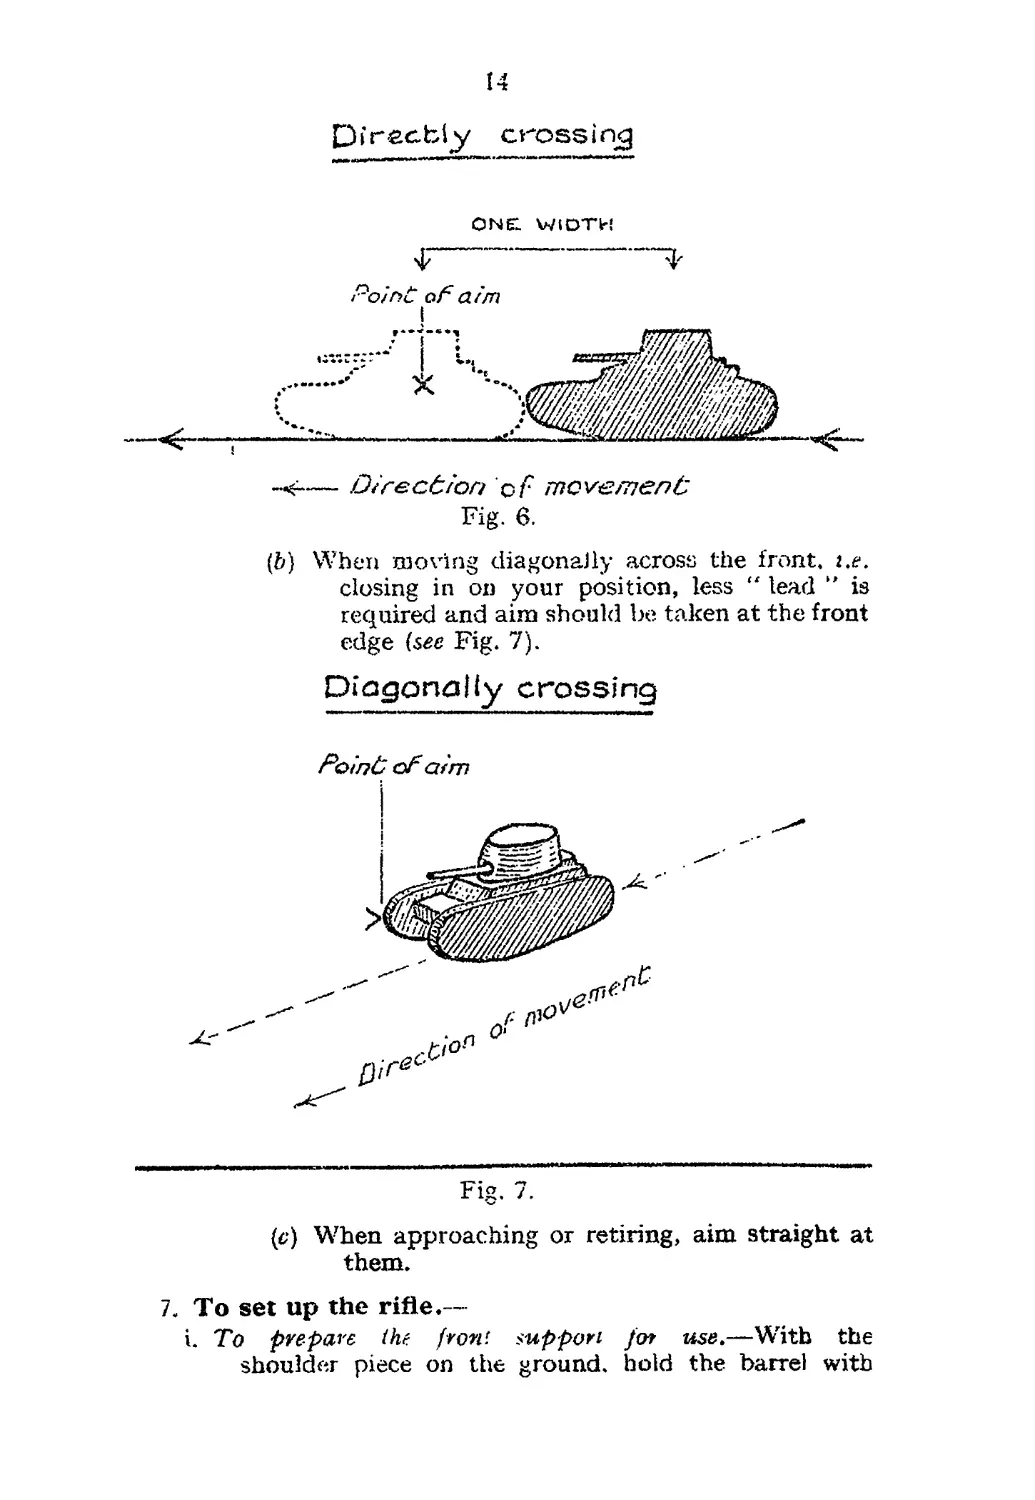
B. Moving targets.—
i. Explain that the method of engaging moving target*
is the same as taught with the rifle. Question squad
on this method and emphasize that the swing of the
rifle must nor be checked at the moment of pressing
the trigger.
ii. The following are guides in firing at armoured fighting
vehicles :—
(a) When moving directly across the front, aim
' one width from the centre of the target (see
Fig. 6).
Dir&ably crossing
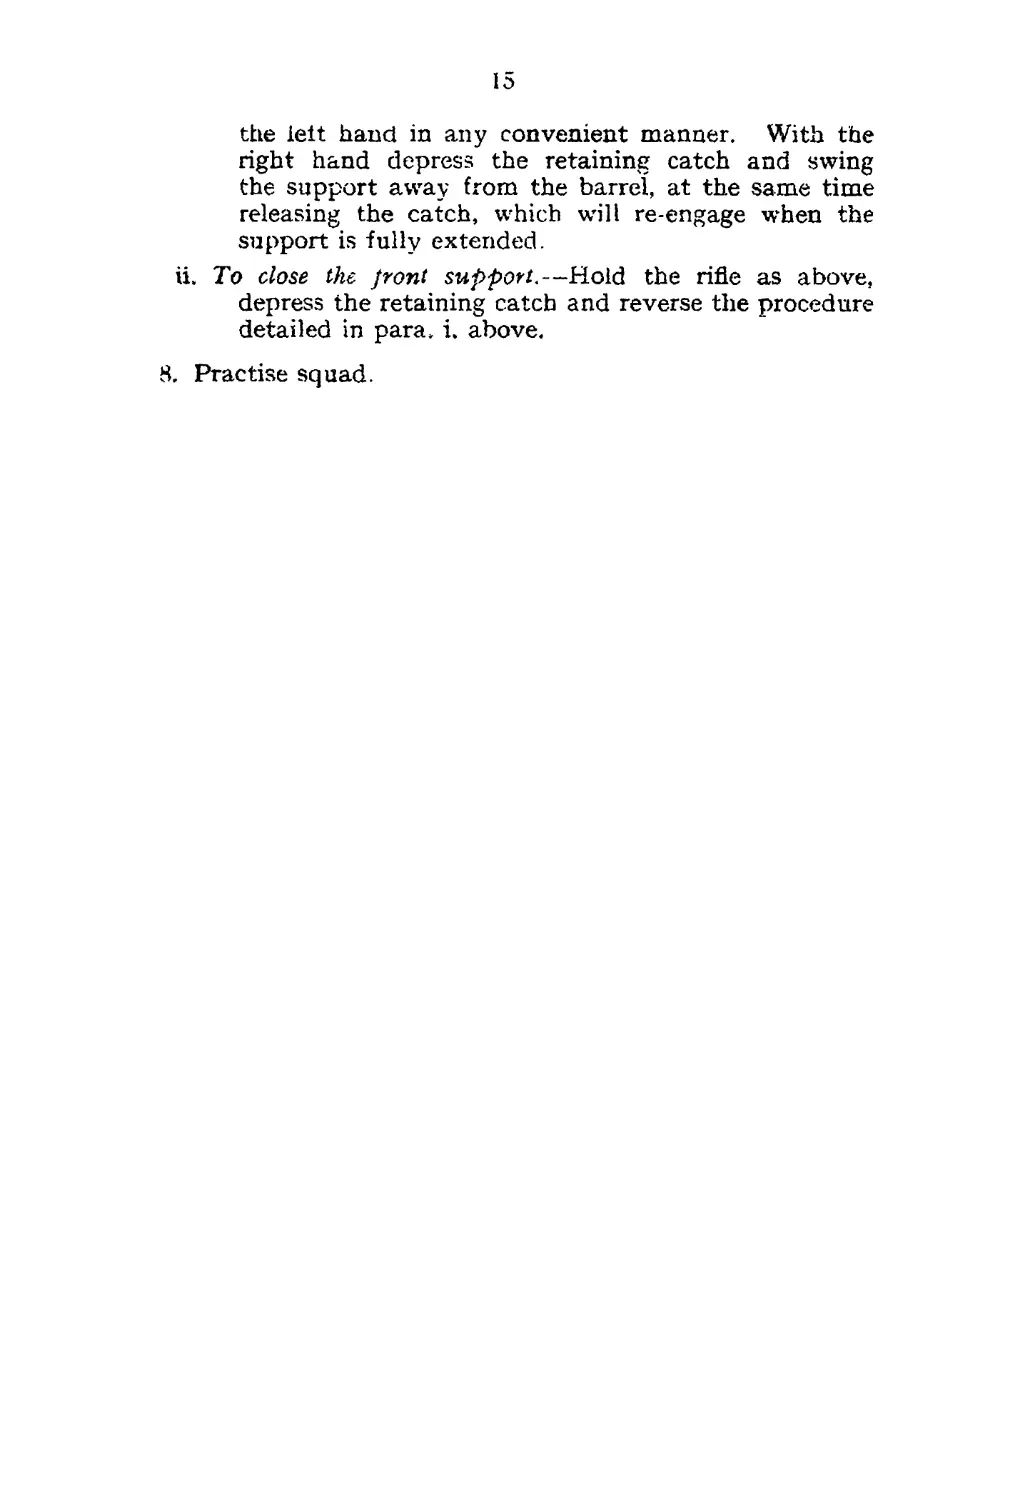
(b) When moving diagonally across the front, i.e.
closing in on your position, less “ lead ” is
required and aim should be taken at the front
edge (see Fig, 7).
Diagonally crossing
Fig. 7.
(<?) When approaching or retiring, aim straight at
them.
7. To set up the rifle.—
i. To prepare the front support for use.—With the
shoulder piece on the ground, hold the barrel with
15
the left hand in any convenient manner. With the
right hand depress the retaining catch and swing
the support away from the barrel, at the same time
releasing the catch, which will re-engage when the
support is fully extended.
ii. To close the /rent support.—Hold the rifle as above,
depress the retaining catch and reverse the procedure
detailed in para. i. above.
8. Practise squad.
16
LESSON 4.-—HANDLING.
Instructor's Notes
Stores.—
Magazines.
This lesson should be carried out on ground where various
types of cover exist.
L Explain that the anti-tank rifle is carried within the
platoon or corresponding sub-unit for the purpose of protection
against attack by armoured fighting vehicles and that the
following factors require consideration when siting for
position
i. The position of neighbouring troops.
ii. A good field of fire, if possible not less than 500 yards.
iii. The necessity for obtaining surprise, which can only
he achieved by caretul concealment.
iv. Ground which is wooded or marshy, streams which
have steep sides, rocky beds and a good depth of
water, form an obstacle to the movement of armoured
fighting vehicles and serve to shepherd these into
the more open country, which should, therefore, be
covered by anti-tank fire.
v. The location of anti-tank mine-fields.
2. Ammunition.—The ammunition will be carried as
follows :—
i. In the truck or corresponding vehicle—200 rounds for
each anti-tank rifle. Of these, 160 rounds are in 16
bandoliers, each holding 2 clips of five rounds, and
40 rounds in eight magazines.
ii. In reserve, 40 rounds for each anti-tank rifle.
3. Use of cover,—
i. Explain :—
(a) That the firer should at ai1 times make full use ol
cover foi protection and concealment. His
knowledge of firing the light machine gun from
behind cover should be applied to the mounting
and firing of the anti-tank rifle. Special
attention must be given to the concealment of
the muzzle on account of the flash and muzzle
blast.
(Ь) That the position -should always be examined
from the point of view of the enemy. Normally,
when an anti-tank rifleman has been given the
arc or approaches for which he is responsible
17
and the approximate position from which he
will fire, he should leave the rifle in the best
cover and reconnoitre alternative positions for
it. He should decide how it is to be mounted
at each place, bearing in mind that free use of
the weapon is a factor of primary importance.
Unless concealment is complete, both from air
and ground, the rifle should be kept under cover
near at hand, and mounted only when the
necessity arises.
That the anti-tank rifle is not easy to swing across
a wide arc when being fired in the lying position.
A position should therefore be chosen, when
possible, from which it can be fired either sitting
or standing, but no support behind the shoulder
should be given owing to the shock of discharge.
In the early stages this will mean placing behind
natural cover, which allows the firer to sit. At
the earliest opportunity a weapon pit should be
dug, and later a trench from which the weapon
can be fired. In an emergency the anti-tank rifle
may have to be fired from the lying position.
(4) That on all ranges where anti-tank rifle practice
(both l/5th scale and full charge) is carried out
weapon pits should be constructed. These
emplacements should be made so as to provide
a firm base for the front support and so that
the firer can adopt either the sitting or standing
position and cover the required arc of fire.
ii. Explain and demonstrate setting up the rifle, using
various types of cover, with and without the front
support, and introduce camouflage where necessary,
4. Practise squad.
L 2471; 100M. 4/41. (2704) W. С. & S. Ltd. Gp. 394. T.S.
TESTS OF ELEMENTARY TRAINING
(1) (2) j (3) i (4)
Name of test and stores required Conditions before test i Time i . ; 1 Remarks
No. 1—Magazine filling. Magazines and dummy cartridges. Magazine empty. Dummy cartridges in clips. Position—any service position. 15 secs, from the word ° Go ” until maga- zine is filled. The man will be required to carry out this test 3 times correctly out of 4 attempts.
No. 2—Aiming and firing. As for Practice 2, Part I, A.Tk. Rifle Course (see Pamphlet No. 14). Nil. i 4 shots out of the 6 must be in the scoring area of the target.