/


Tags: weapons military affairs
Year: 1937

Text
Small Arms Training
Volume I, Pamphlet No. 3
Rifle
1937.
embodying Amendment Л’<ъ i, tiul U I M i\ . i<> c
>
Ctvttn Copyrifh. UfWVid
iI •'< ран»- ! un Icr «luthouly i/l H.M Ы.Лкнк гу OHit<•. fai th«* Си*п<ча1
SUitf, N Z Mibt.uy lune, Jhxember, 1940 )
NOT TO BE FPUBLISHED.
Small Arms Training
Volume I, Pamphlet No. 3
Rifle
1937.
Reprinted embodying Amendment No. r, and W.T.M. No. 2, 1940.
Crown Copyright Reserved.
(Reprinted under authority of H.M. Stationery Office, for the General
Staff, N.Z. Military Forces, December, 1940.)
By Command of the Army Council,
H. J. CREEDY.
The War Office,
31 st March, 1937.
5
GENERAL.
1. Characteristics.—When cared for and handled correctly,
the rifle is :—
(i) Capable of a high and accurate rate of fire.
(ii) Suitable, with the bayonet, for hand-to-hand fighting.
2. Service Standard.—Instruction in this pamphlet is designed
to make the soldier :—
(i) A steady and accurate shot.
(ii) A quick shot at targets appearing at short and indefinite
intervals.
(iii) A handyman with the rifle, able to fire bursts of 5 to 10
rounds at a rapid rate.
SECTION 1.—MECHANISM AND CLEANING.
(Lessons i to 5.)
1. Object.—To teach the soldier from the beginning of his
service that he must take proper care of his weapons so that
they are in working order at all times.
2. Scope.—Only such mechanism as is required for the care
and maintenance of the rifle is included. Further knowledge
may be obtained from the Text-book of Small-arms.
6
LESSON 1.—MECHANISM AND TRIGGER-PRESSING.
Instructor's Notes.
This lesson will be taught immediately after the rifle is
issued to the recruit.
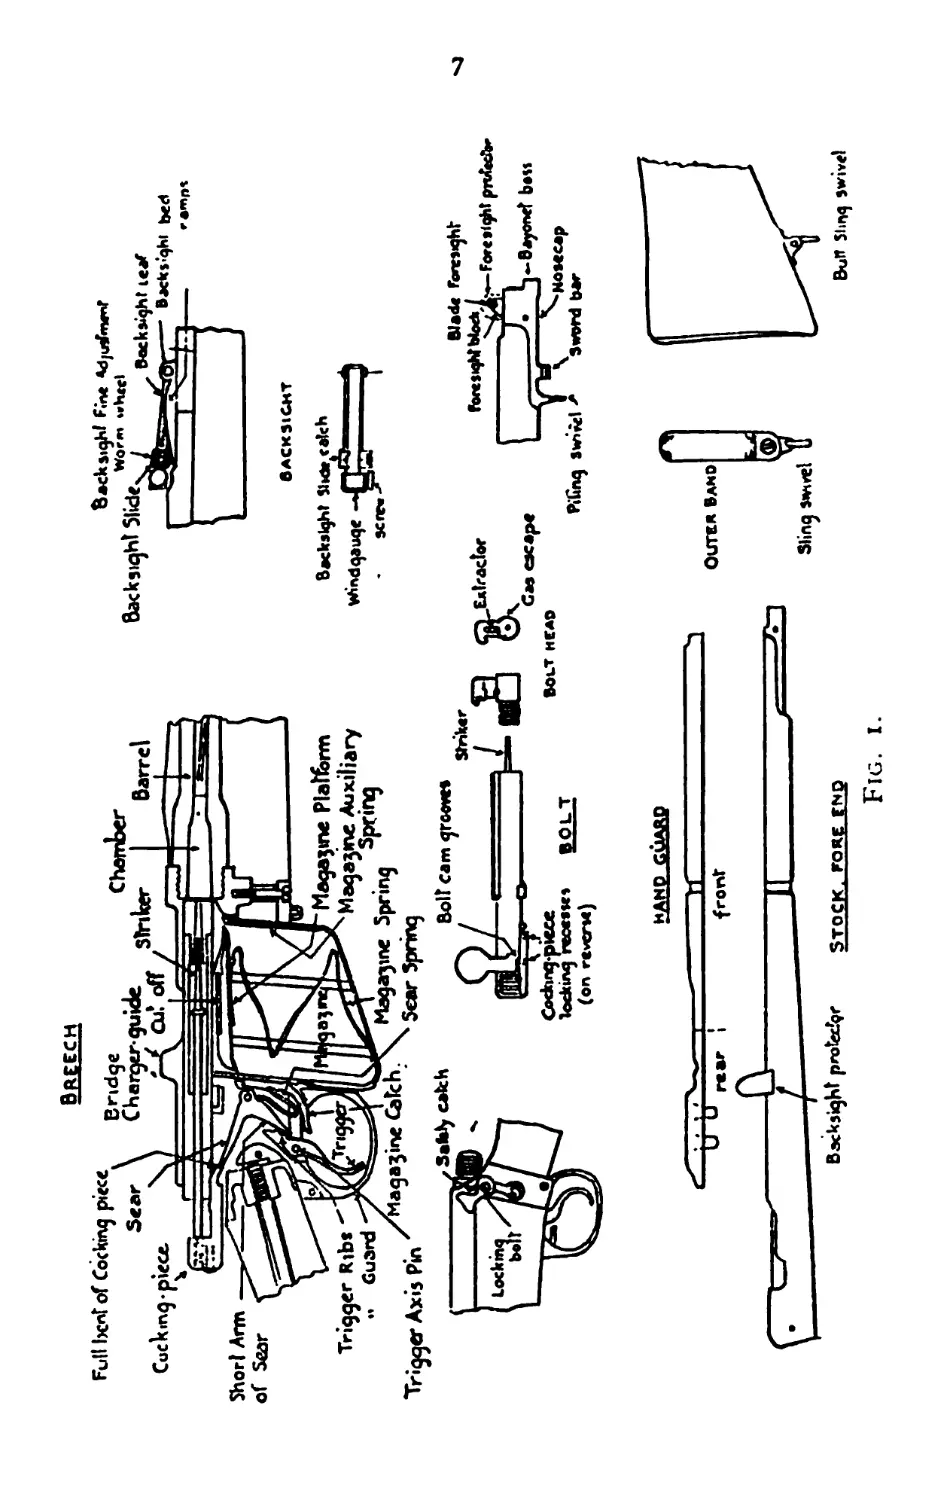
Name each part of the rifle as dealt with.
Explain paragraphs i and 2 (General) (page 5).
Mechanism.
Explain and demonstrate with squad imitating :—
1- Recognizing the Rifle.—Every rifle can be recognized by
some peculiarities of colour or marking.
The number stamped on bolt lever must agree with that
stamped on right front of body.
2. Removing and replacing Bolt
To remove :—
(i) Push forward safety-catch with thumb of right hand.
Pull out cut-off by pressing downwards and out-
wards with thumb of right hand.
(ii) Raise knob as far as it will go ; draw back bolt head
to resisting shoulder; release it from retaining
spring.
(iii) Raise bolt head as far as possible and remove bolt
by drawing it backwards.
To replace :—
(iv) Ensure that number on bolt and on right of body
of rifle correspond and that safety-catch is forward.
Bolts of rifles must not be exchanged. The use of
the wrong bolt may affect the accuracy of the rifle.
(v) See that resisting lug and cocking-piece are in one
straight line and that bolt head is screwed home.
(vi) Place bolt in body with extractor uppermost and
push it forward until head is clear of resisting
shoulder.
(vii) Turn bolt head over to right, pull it back, then press
bolt head down until it is caught by retaining
spring.
(viii) Close cut-off, close breech, press trigger, and apply
safety-catch with forefinger, and with remaining
fingers ensure that bolt lever is fully down.
(ix) Practise squad.
Full l>cnt of Cocking piece
Sear
Cuckmg-piece.
Breech
B^‘d9e .. Chamber
Cb"?7 ^?^r Sinker
5-4 Ou: off
Backsight F«ne ^djuW*nrnr
Backs-qhl bed
Barrel
Short Arm
of Sear
Magazine Catch.
Trigger Ribs
•i Guard
Trigger Axis Pin
ЗаЫу cafch
'Kir
Magazine Platferm
Magazine Auxiliary
Magayne Spring ^P^,n9
Scar Spring
Bolt Cam grooves
<4 / 1 Striker
Cochng-picoe
locking recesses BOLT
*AHP gMBBP
Z3C
front
в ACK St CH T
Backsight Slidrcolch
Windgauqe -47-^
sere»
.Extractor
BOUT HEAD
Blade Fonesght
foresight Mock /
Fore sight pnZrdfc-
t I < — Bayonet best
.I \ ^Nosocap
Pihng strict * Sword bar
trtr
Backsight protedgr STOCK. FORE END
Sling smvel
Outer Band
Burt simg swivel
Fig. i.
8
3. Removing and replacing Magazine
(i) To remove.—Depress magazine catch inside trigger guard
and withdraw magazine. Magazine must not be
removed from the rifle except for cleaning purposes
or as laid down in Lesson 3 (4) ; and, to avoid weaken-
ing the spring, cartridges should only be kept in it
when necessary.
(ii) To replace.—Put front end of magazine in first and press
upwards until catch is engaged.
4. Half-cock and how to re-cock.—At half-cock trigger cannot
be pressed nor can bolt be rotated until action is placed at
full-cock by drawing back cocking-piece. After action has been
cocked, breech will be opened to ascertain if chamber is empty
before trigger is finally pressed and safety-catch applied.
5. Leaf and slide of backsight will be lowered and cocking-
piece forward when rifle is not in use.
Trigger Pressing.
Instructor's Notes.
Individual instruction is necessary to teach trigger pressing.
Demonstrate in the correct position each phase and seat
squad so that they can imitate correctly (i.e., both elbows on a
table and butt into shoulder).
Test trigger action of all rifles for two pressures.
Test each man's trigger finger to see that it can be moved
freely without disturbing the grip.
When a recruit cannot understand the two pressures,
demonstrate them by placing the hand over that of the recruit.
6. Importance of and Aids to Trigger-pressing
(i) Unless trigger is pressed correctly, bad shooting will
result.
(ii) Physical fitness, with determination and good nerve-
control, is essential.
(iii) There are two distinct pressures required to fire the
rifle. The first is taken as the butt comes into the
shoulder to aim, the second when the aim is correct.
(iv) A firm grip with the right hand must be maintained.
7. Method of Triggor-pressing
(i) Cock the action. Grip with right hand, forefinger out-
side trigger guard.
(ii) Raise butt into shoulder, at the same time put first
joint of forefinger on trigger.
9
(iii) Press or squeeze across the small of the butt in the
direction of the thumb, until the first pressure is
taken.
(iv) Without relaxing grip, restrain breathing and con-
tinue to squeeze until second pressure is taken.
8. Give conditions of test.
8. Practise squad.
10. Action on pressing Trigger.—On taking second pressure,
cocking-piece is released and mainspring carries forward striker,
which is attached to cocking-piece. Striker hits cartridge cap,
which explodes the charge.
11. Action on opening Brooch.—When bolt is fully forward—
i.e., breech closed—extractor grips rim of cartridge. When bolt
is pulled back, extractor draws empty cartridge case back until
it is ejected.
IO
LE88ON 2.—CLEANING MATERIALS AND DAILY CLEANING.
Instructor’s Notes.
Stores : All cleaning materials.
Explain and demonstrate with squad imitating :—
1. Materials.—No material other than that issued from store
will be used to clean the rifle.
(i) The Pull-through.—Used to clean the bore, will be kept
in the butt-trap of the rifle. It has three loops.
That nearest the weight is for wire gauze. The
middle loop is for flannelette ; the loop at the end
is for use by the armourer so that the pull-through
can be removed from the bore should it break or
jam.
Before using it, run the cord through the fingers
to straighten and remove grit; insert flannelette
in the correct loop. Drop the weight through the
bore from the breech end. Hold the rifle firmly
at the muzzle, and do not put the butt plate on
stone or concrete. Pull the cord, in one motion,
straight through so that it does not touch the muzzle
of the bore. If the cord rubs against the muzzle,
it will make a groove, known as cord wear, and the
accuracy of the rifle will be spoilt.
When permission is given to use wire gauze (see
Lesson 4), a soldier may obtain the assistance of a
comrade to hold his rifle. The owner is, however,
responsible for avoiding cordwear.
The pull-through will be packed in the butt-
trap as follows : Hold the pull-through (loop end)
between the forefinger and thumb, so that the end
falls about 2 in. below the third finger ; roll it loosely
once round the fingers. Slip the coil off the fingers
and twist the remainder of the cord tightly round it,
leaving sufficient to allow the weight to drop easily
into the recess made for it in the butt. Push the
cord into the trap, leaving the loop end uppermost,
and close the trap.
It
(ii) Flannelette, Oil and Oil-bottle.—To clean or dry the bore,
a piece of flanelette 4 in. by 2 in. will be used.
To oil the bore, the size will be 4 in. by ij in.
with oil well rubbed in. If a larger piece is used,
the oil is squeezed out of the flannelette as it enters
the bore.
The oil-bottle is carried in the butt trap.
2. Examination Of the Boro.—Hold the muzzle close to the
ye and look into the bore, but not through it. Draw the eye
jack gradually, looking for rust and fouling. Examine the
chamber from the breech end.
3. Daily Cleaning.—The bolt magazine and sling will be
removed and put in a clean place. No further stripping is
allowed, and no screws may be loosened or tightened by N.C.O.s
or men.
The bore will be pulled through with dry flannelette until
clean, and then oiled. This is particularly important for a
period of four or five days after firing.
The exterior of the rifle will be cleaned with an oily rag.
Attention will be paid to the gas escapes and crevices.
The working parts will be oiled.
Unnecessary rubbing of the browned parts of the rifle will be
avoided. Browning prevents rust.
In dusty climates, working parts will be kept dry. Muzzle
and bolt protectors may be issued, but anything in the nature
of a plug for the muzzle is forbidden.
4. Practise squad.
12
LE88ON 3.—LOADING AND UNLOADING.
Explain and demonstrate with squad imitating :—
1. To load
(i) Push forward safety-catch.
(ii) Pull out cut-off.
(iii) Open breech by pulling bolt back to its full extent.
(iv) Take a charger between thumb and first two fingers
of right hand, and place it vertically in guides.
(v) Place ball of the thumb on top cartridge immediately
in front of charger, hook forefinger under cut-off
force cartridges down with a firm and continuous
pressure until top cartridge is clear of charger- and
has engaged in magazine. If there is no cut-off,
hook fingers under woodwork.
(vi) Force bolt sharply home with thumb and forefinger,
turning knob fully down, and with forefinger of right
hand turn safety-catch completely to rear, ensuring
at the same time, by means of the remaining fingers,
that bolt-lever is fully down. Button up pouch.
2. To unload
(i) Push safety-catch forward, draw back bolt, work it
rapidly backwards and forwards jto its full extent,
without turning knob down, until all cartridges are
removed from magazine and chamber.
(ii) Close cut-off by placing right hand over body and
pressing inwards, then close breech, press trigger and
apply safety-catch.
3. Practise squad.
4. Alternative Method of unloading.—Sometimes necessary on
service—e.g., for cleaning purposes ; in the dark ; or in a muddy
trench.
Remove magazine, open breech, then secure round from
chamber with fingers of left hand. Allow it to fall through
magazine opening into palm of left hand. Close cut-off and
breech. Press trigger and apply safety-catch. Empty maga-
zine and replace it in rifle.
5. Practise squad.
13
6. Charging Magazine
(i) Magazine holds two chargers, each of 5 rounds.
(ii) Sometimes for safety reasons—i.e.t anti-aircraft pre-
cautions—it is necessary to charge magazines without
allowing a round to enter chamber. The order for
this will be " Charge magazine/'
(iii) On this order, load with two chargers; press down
top cartridge; close cut-off. If there is no cut-off,
hold top cartridge down with thumb of right hand
and draw bolt head over top cartridge with little
finger. Then close breech, press trigger, apply
safety-catch, button up pouch.
7. Loading when Magazine is already charged.—Push forward
safety-catch, pull out cut-off. Open and close breech and
apply safety-catch.
8. Practise squad.
9. Jams and Remedies.—In peace, if immediate action does
not remedy a jam, the rifle will be taken to the armourer.
Jams seldom happen, but may be caused by :—
Faulty handling of the bolt—the fault of the soldier.
Dirt or oil in the magazine—neglect by the soldier.
Dirty, damaged, or defective ammunition.
Badly filled chargers.
Worn or damaged parts.
(i) No round enters the chamber.
Draw back bolt.
Press rounds into magazine and release them suddenly.
Tap bottom of magazine sharply.
(ii) Damaged lips of magazine.
On service, lever up lips with a round of ammunition.
(iii) Missfire.
Reload.
(iv) Badly filled charger.
Load with fresh charger.
LE88ON 4.—CLEANING. BEFORE AND AFTER FIRING.
Instructor's Notes.
Stores:—
Chamber-cleaning stick.
Wire gauze for each man in squad.
Flannelette.
Explain and demonstrate with squad imitating.
Additional Cleaning Materials.
1. Chamber-Cleaning stick.—Place a piece of dry flannelette
in the slot, and wind it round the stick to ensure that the latter
is covered. Insert the stick into the chamber through the bolt
way, and turn it round several times.
This is the only satisfactory method of cleaning the chamber.
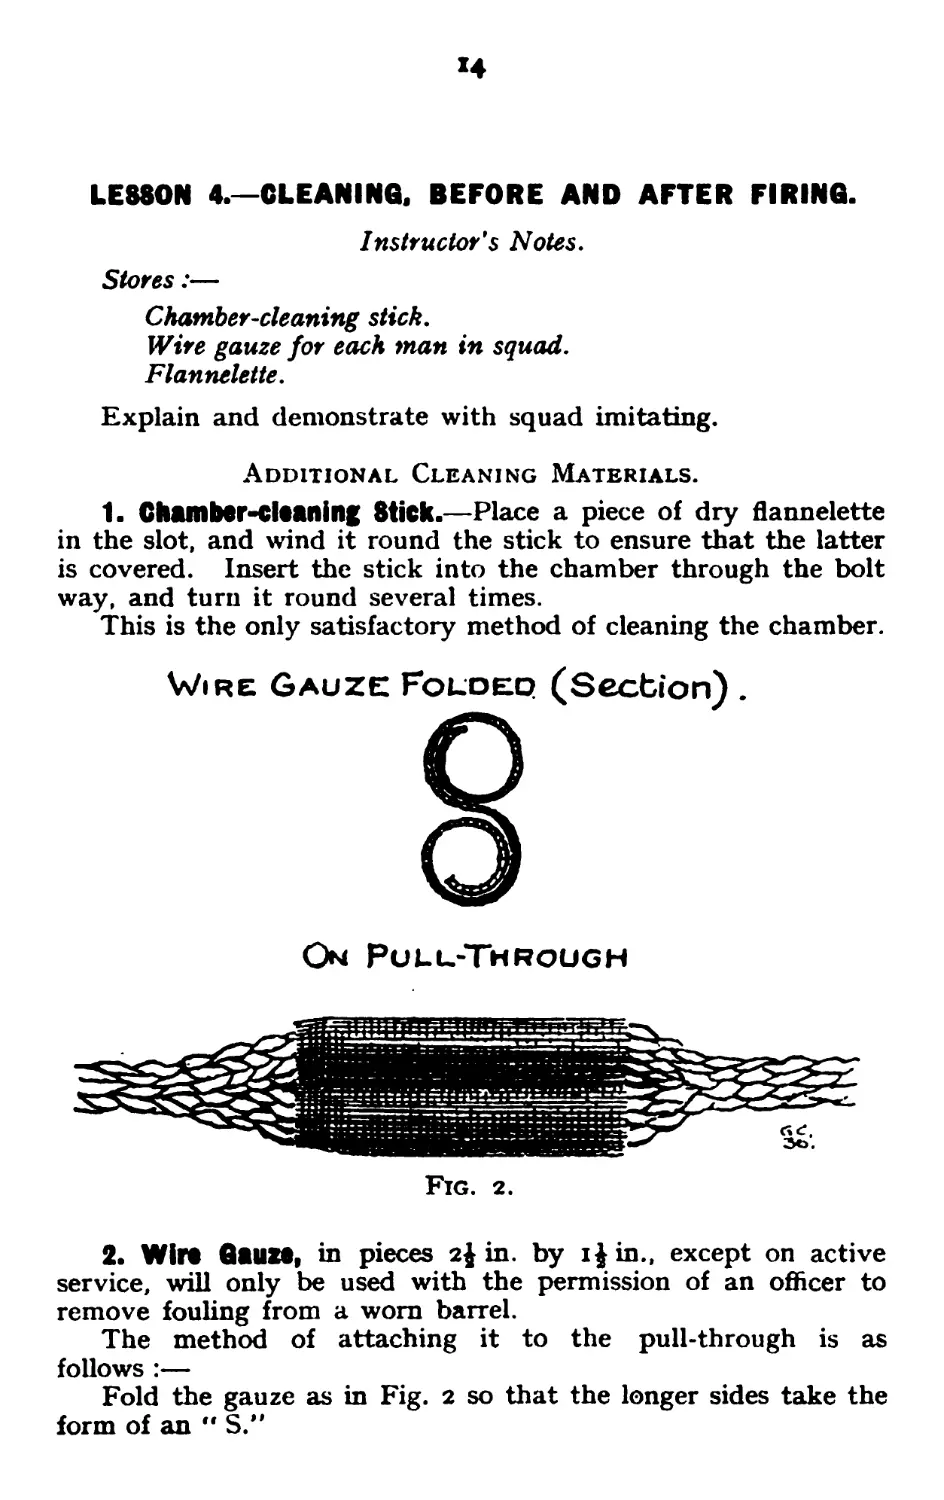
Wire Gauze Folded (Section) .
On Pull-Through
Fig. 2.
2. Wire Gauze, in pieces 2$ in. by i|in., except on active
service, will only be used with the permission of an officer to
remove fouling from a worn barrel.
The method of attaching it to the pull-through is as
follows :—
Fold the gauze as in Fig. 2 so that the longer sides take the
form of an " S.”
15
Open the first loop of the pull-through and put one side of it
in each loop of the " S.M
Coil each half of the gauze tightly round that portion of the
cord over which it is placed until the two rolls thus formed
meet.
Oil the gauze before use, and remove loose strands of wire.
These might scratch the bore. The gauze must fit the bore
tightly and will, if necessary, be packed with a small piece of
flannelette. The gauze will not be allowed to remain on the
pull-through except on active service.
Stripping.
3. Removing and replacing Magazine Platform
To remove.—Press down wide end until narrow end is dis-
engaged from front lips. Remove platform.
To replace.—Insert wide end under rear lips and press it
down until narrow end engages under front lips.
Cleaning before firing.
4. The following details must be performed :—
(i) Remove oil from bore and chamber with dry flannelette.
(ii) Dry face of bolt and make sure that gas escapes are
dear.
(iii) Oil action slightly, except in dusty countries, where it
should be kept dry.
(iv) Test working of magazine platform.
Cleaning after firing.
5. The explosion of the charge in the cartridge leaves a
deposit in the bore, which hardens and rusts unless quickly
removed. This deposit is known as “ fouling ” and appears
for several days after firing. Boiling water poured through
the barrel helps to remove fouling by dissolving the deposit,
and should be used after firing. y
The method of cleaning after firing any type of ammunition
is :—
(i) Pull through with dry flannelette.
(ii) Pour 5 or 6 pints of boiling water through bore from
breech end, using a funnel. Avoid spilling water
between barrel and fore-end.
(iii) Dry bore with flannelette and oil it. This helps subse-
quent removal of fouling.
(iv) Clean remainder of rifle, including chamber and inside
of magazine.
(v) Pull through with dry flannelette until it comes out
clean, and oil barrel.
1б
If boiling water is not available :—
(i) Pull through with dry flannelette.
(ii) Oil bore.
(iii} Pull through with wire gauze and clean as in para. 5
(iv) and (v).
General Precautions.
6. To prevent rust, barrels will always be kept oily except—
Immediately before firing.
At rifle inspections, as ordered.
7. After firing blank ammunition, rifle will always be cleaned
before firing ball ammunition.
8. Give conditions of test No. 1.
Action during and after Gas Attack.
This part of the lesson will be taught during post depot
training after the recruit has been instructed in defence against
gas, (See Pamphlet No. 1, Sec. I. Post depot training
syllabus.)
8. During a Gas Attack,—Keep weapon oiled and move
working parts backwards and forwards at frequent intervals.
10. After Gas Attack.—If splashed with blister gas, weapon
must be decontaminated before cleaning :—
Decontamination,—Adjust respirator, cover hands with
protective ointment or gloves if available. Strip
rifle as for cleaning after firing and remove all surface
contamination, oil, and dirt with a rag, which should
afterwards be burnt or buried.
Cleaning.—Clean all parts of weapon with oil and/or
boiling water as for cleaning after firing. In case of
blister gas cover wooden portions of weapon with
bleach paste, which will render it temporarily safe to
handle.
11. Ammunition.—In position warfare, ammunition will be
kept in shelters protected by a moist curtain. Boxes should
be kept closed. After a gas attack any rounds corroded will
be cleaned with oil and used as early as possible.
17
LESSON 5.—EXAMINATION OF THE RIFLE.
(For officers and N.C.O.s only.)
ЛИ officers and N.C.O.s must possess a thorough know-
ledge of the inspection and care of rifles. Young officers will
be instructed by the armourer and N.C.O.s by a qualified
instructor in the various components of the rifle as below:—
(i) With the barrel dry, examine it for rust, cuts, bulges,
and fouling.
(ii) Foresight; that blade is not deformed and that nose
cap is not loose.
(iii) Backsight, for firmness ; that it is not bent; that
slide moves smoothly ; that thumb-piece and fine
adjustment worm work freely and engage in rack
on side of leaf ; and that “ U ” is not deformed.
(iv) Magazine ; that it is not dented, and that platform
works freely; also magazine catch and auxiliary
spring.
(v) Bolt; that it bears same number as body; that
striker is not screwed beyond end of cocking-piece ;
also that striker-keeper screw is not broken and is
in its proper position ; and that bolt works smoothly.
(vi) Striker point; that it is correct shape and projects
sufficiently through face of bolt-head ; also extractor
and spring.
(vii) Sear; that it holds cocking-piece back securely when
bolt is driven forward sharply to closed position.
(viii) Cocking-piece ; for firmness on striker, that bents are
in good condition.
(ix) Safety-catch and locking-bolt; that safety-catch
engages in camway of bolt and locks it; that it
does not move too easily ; and that cocking-piece is
withdrawn slightly to rear when locking bolt is
applied, whether it is at " full cock ” or " fired ”
position.
(x) Cocking-piece and striker ; that they fly forward freely
on pressing the trigger. Test two pressures of the
latter.
(xi) Stock, fore-end and butt; general condition and butt
not loose.
Inset i—Pamph. No. 3.
i8
SECTION 2.—AIMING INSTRUCTIONS.
(Lessons 6 to 12.)
1. Object.—To teach the soldier to aim correctly at any
target.
2. Aids.—Full use will be made by instructors of diagrams
on paper, blackboards, or ground to illustrate rules and explain
faults.
3. Standard of Accuracy.—There is only one correct aim at
any target and it is essential to insist on accuracy at all times.
In the early stages, targets are provided with clearly defined
aiming marks, and are replaced by service targets as progress
is made. Experience compensates for the difficulty of aiming
in the later stages. Aiming and trigger pressing will be tested
constantly throughout the training, and sights inspected to see
that they are adjusted as ordered.
4. Aim Corrector.—When used, the aim corrector will be
placed on the rifle behind the backsight with the reflecting
glass to the left, sights being raised to 400 yards to give a clear
view. (See S.A.T., 1931, Vol. V, Plate 54.)
19
LESSON S.—ACCURACY OF AIM.
Instructor's Notes.
Stores:—
Grouping target fixed at 100 yards.
Aiming-rests, tripods, and sandbags.
Paper and pencil.
When checking an aim, the eye must be in the correct position
and head rested. If the aim is found to be incorrect, make the
man look at it again ; if he sees it is wrong, let him lay another,
but if he still thinks it is correct, convince him that it is incorrect.
This may be done by holding a piece of white paper in front of
the muzzle ; the man is then told to get the tip of the foresight in
line with the shoulders and in the centre of the'1 U " of the backsight.
The paper is then removed quickly, and replaced after a short pause,
when the man is asked where his aim was directed.
Common faults in aiming and their effects will be explained
as they arise :—
Taking too much or too little foresight in the “ U ” of the
backsight, causing the bullet to strike high or low
respectively.
Inaccurate centring—i.e., failure to get the blade of the
foresight in the centre of the “ U ” of the backsight—
causing the bullet to be directed to the right or left
according to the error.
Looking at the sights rather than the aiming-mark. This
will cause the aiming-mark to become blurred and thus
make the firer lose sight of a small target.
Inclining the backsight to one side. This, if exaggerated,
will cause the bullet to strike on the side to which the
sights are inclined and may cause it to go low.
1. Sight-setting
(i) Explain that sights are placed on the rifle in order to
give both direction and elevation.
(ii) Explain and demonstrate with squad imitating:—
Adjustment of backsight: Hold rifle in a convenient
position. With thumb of left hand press in stud
on side of backsight. Move slide till line on it is
even with mark on leaf giving elevation for dis-
tance named. Ensure that slide is firmly fixed.
Alterations will be made in 100 and/or 50 yards.
20
To adjust slide : If, when sights are set at 200 yards,
it is found that line on slide does not exactly
agree with mark on leaf, then adjust it by the
following method. Press stud on slide with thumb
of left hand until worm wheel can be easily re-
volved ; turn worm wheel with thumbnail of
right hand, until lines agree. Stud must not be
pressed to such an extent that worm wheel is
entirely disengaged from rack.
(iii) Give conditions of test.
(iv) Practise squad by word of command. Alterations
ordered will be in multiples of 50 yards.
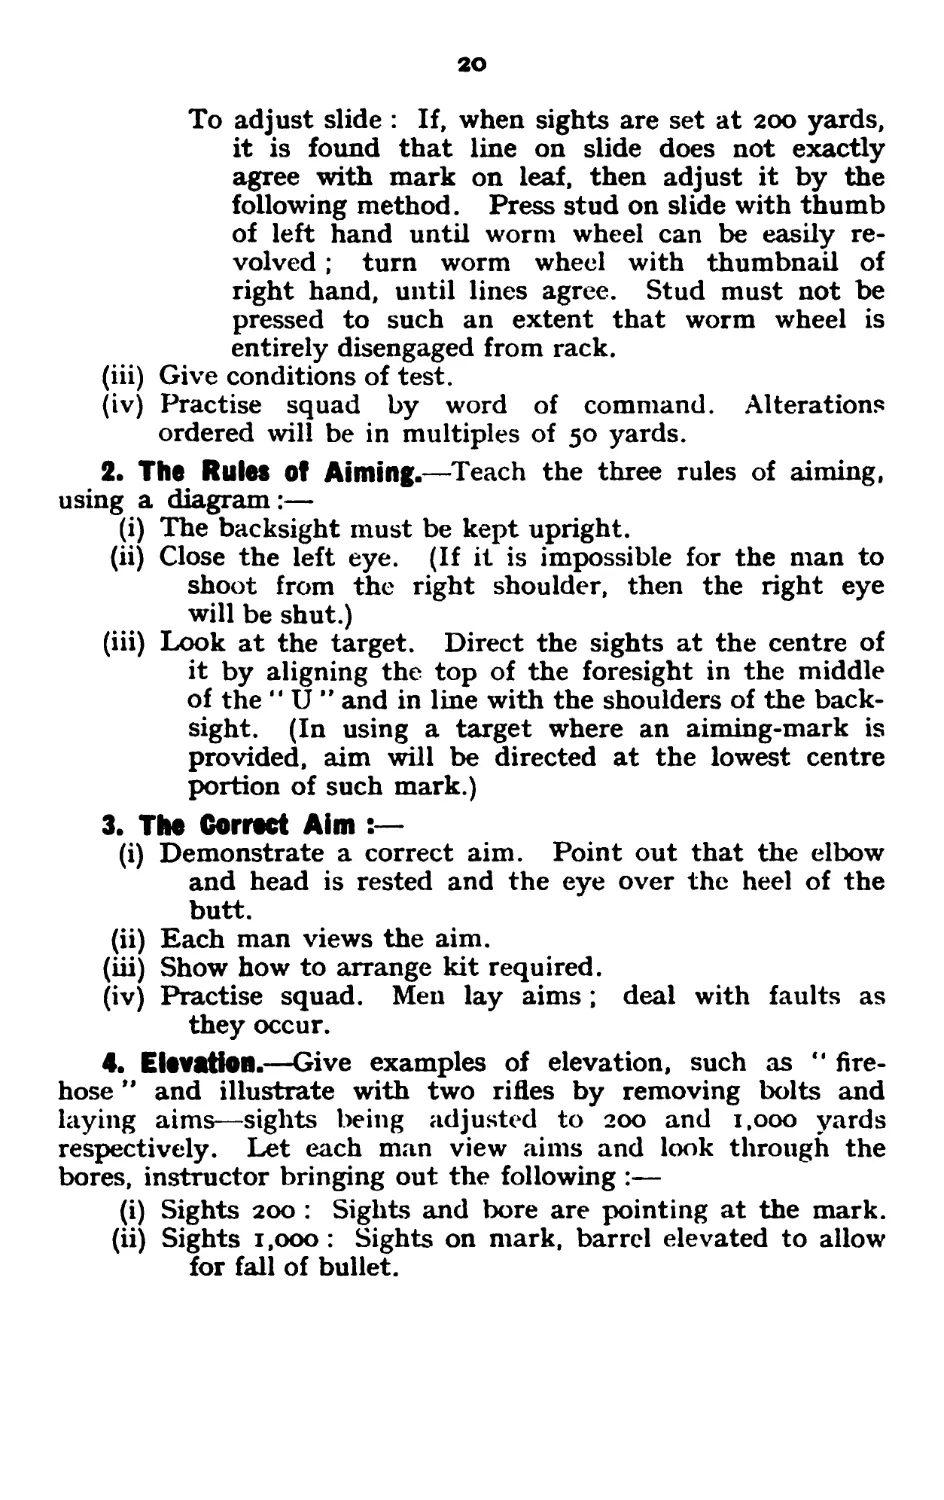
2. The Rules of Aiming.—Teach the three rules of aiming,
using a diagram:—
(i) The backsight must be kept upright.
(ii) Close the left eye. (If it is impossible for the man to
shoot from the right shoulder, then the right eye
will be shut.)
(iii) Look at the target. Direct the sights at the centre of
it by aligning the top of the foresight in the middle
of the " U ” and in line with the shoulders of the back-
sight. (In using a target where an aiming-mark is
provided, aim will be directed at the lowest centre
portion of such mark.)
3. The Correct Aim :—
(i) Demonstrate a correct aim. Point out that the elbow
and head is rested and the eye over the heel of the
butt.
(ii) Each man views the aim.
(iii) Show how to arrange kit required.
(iv) Practise squad. Men lay aims; deal with faults as
they occur.
4. Elevation.—Give examples of elevation, such as “ fire-
hose ” and illustrate with two rifles by removing bolts and
laying aims—sights being adjusted to 200 and 1,000 yards
respectively. Let each man view aims and look through the
bores, instructor bringing out the following :—
(i) Sights 200 : Sights and bore are pointing at the mark,
(ii) Sights 1,000 : Sights on mark, barrel elevated to allow
for fall of bullet.
21
LESSON 7.—AIMING AT TARGETS AT SERVICE DISTANCES.
Instructor's Notes.
Stores :—
Small and large targets fixed at distances of 200 yards to
500 yards.
Silhouette figure targets fixed at distances up to 500 yards.
Where facilities do not permit of distances of 200 to
500 yards being obtained, shorter distances may be intro-
duced, and a representative target at 25 yards may be used
by the Territorial Army.
Sights will always be adjusted to the range at which
aiming is taking place.
In aiming at silhouette figures, the aim will be considered
correct if it is approximate to the centre of the target.
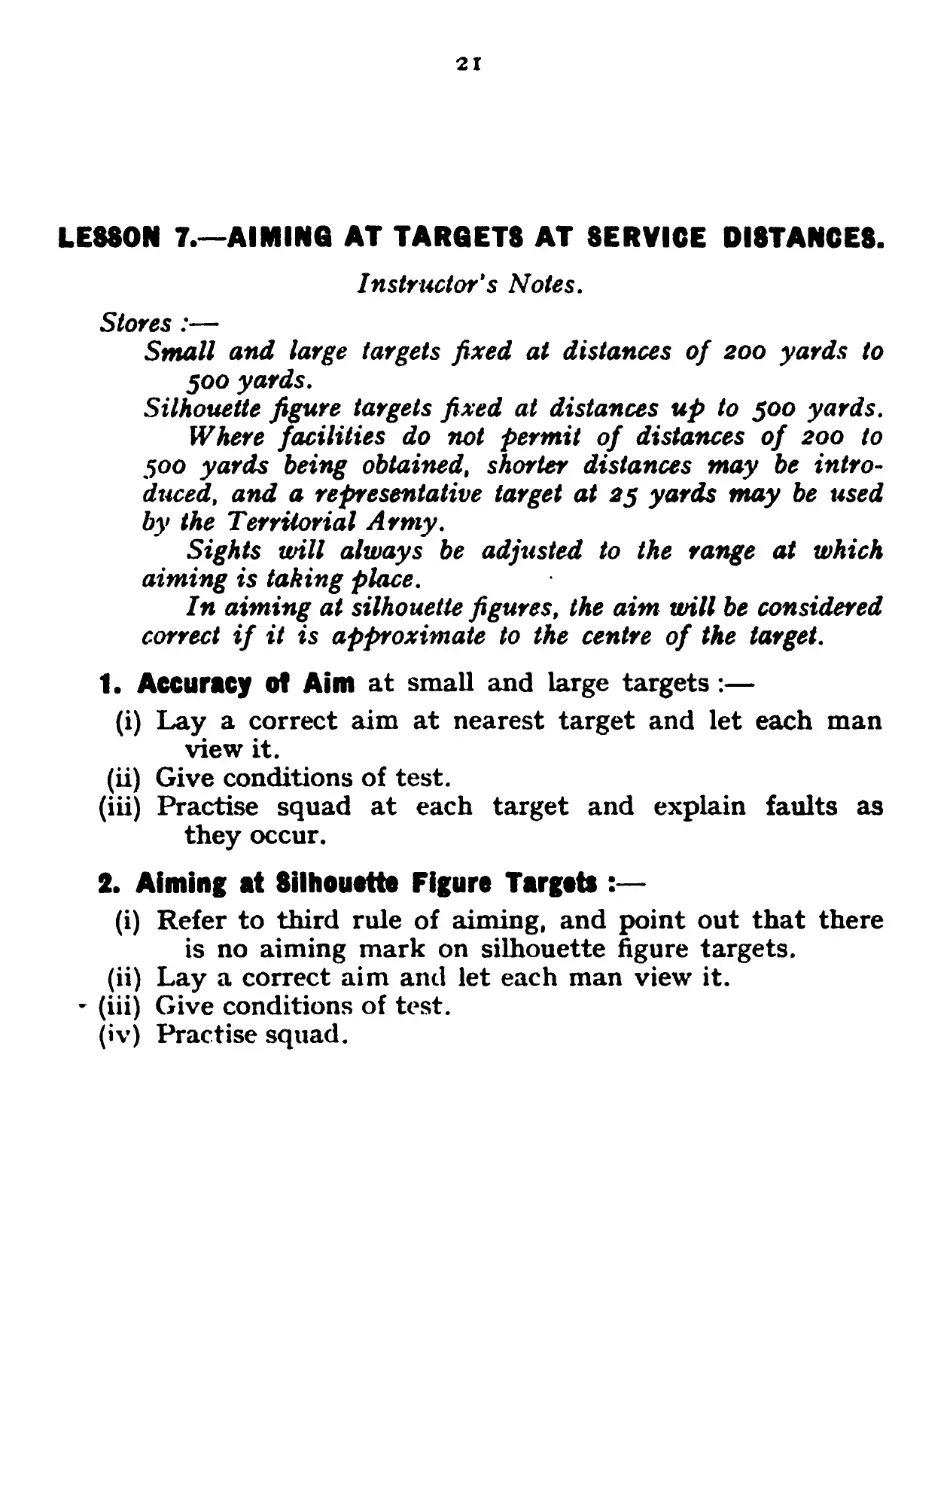
1. Accuracy Of Aim at small and large targets :—
(i) Lay a correct aim at nearest target and let each man
view it.
(ii) Give conditions of test.
(iii) Practise squad at each target and explain faults as
they occur.
2. Aiming at Silhouette Figure Targets
(i) Refer to third rule of aiming, and point out that there
is no aiming mark on silhouette figure targets.
(ii) Lay a correct aim and let each man view it.
- (iii) Give conditions of test.
(iv) Practise squad.
22
LESSON 8.—AIMING AT GROUND.
Instructor's Notes.
To obtain full value this lesson must be done on the ground.
If this is not possible, landscape targets may be used.
Stores :—
Aiming-rests, tripods, sandbags, signalling flag (and land-
scape targets when required).
When two fatiguemen are available they will be used in 4
below and will be rehearsed to appear at prearranged
places for a few seconds and then disappear on signal.
Select four positions.
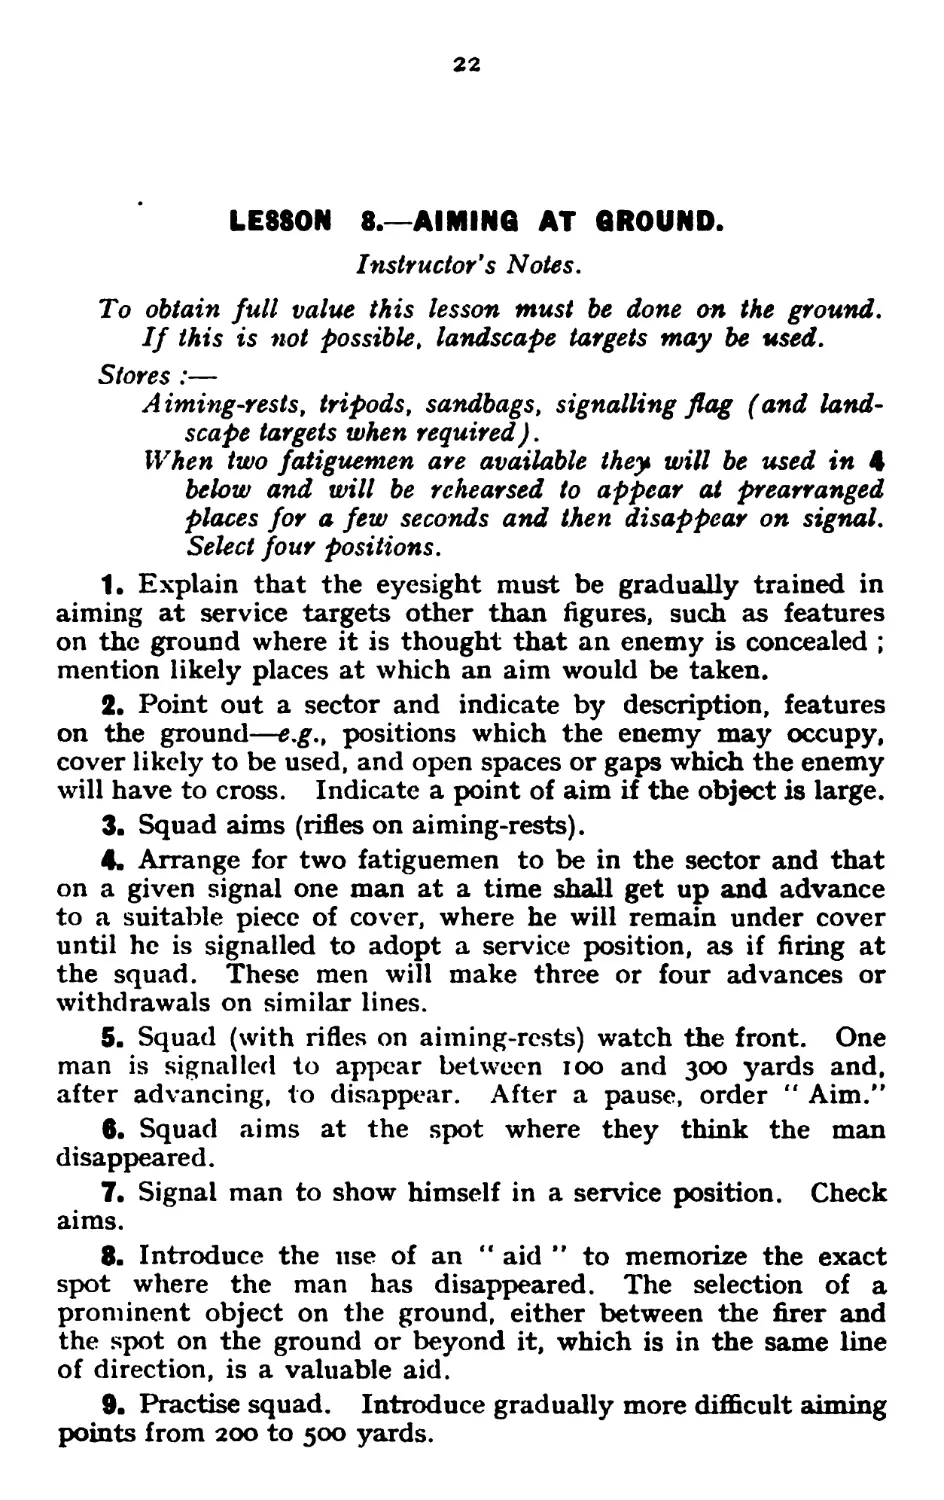
1. Explain that the eyesight must be gradually trained in
aiming at service targets other than figures, such as features
on the ground where it is thought that an enemy is concealed ;
mention likely places at which an aim would be taken.
2. Point out a sector and indicate by description, features
on the ground—e.g., positions which the enemy may occupy,
cover likely to be used, and open spaces or gaps which the enemy
will have to cross. Indicate a point of aim if the object is large.
3. Squad aims (rifles on aiming-rests).
4. Arrange for two fatiguemen to be in the sector and that
on a given signal one man at a time shall get up and advance
to a suitable piece of cover, where he will remain under cover
until he is signalled to adopt a service position, as if firing at
the squad. These men will make three or four advances or
withdrawals on similar lines.
5. Squad (with rifles on aiming-rests) watch the front. One
man is signalled to appear between ioo and 300 yards and,
after advancing, to disappear. After a pause, order “ Aim.*’
6. Squad aims at the spot where they think the man
disappeared.
7. Signal man to show himself in a service position. Check
aims.
8. Introduce the use of an " aid ” to memorize the exact
spot where the man has disappeared. The selection of a
prominent object on the ground, either between the firer and
the spot on the ground or beyond it, which is in the same line
of direction, is a valuable aid.
9. Practise squad. Introduce gradually more difficult aiming
points from 200 to 500 yards.
23
LEMON 9.—ELEMENTARY AIMING OFF FOR WIND.
Instructor's Notes,
Stores, &c.:—
Aiming-rests, tripods, and sandbags.
Classification targets (representative targets where neces-
sary) : auxiliary aiming marks and marking disks.
One or more assistants.
Record book (A .B. 142) for each man.
Signalling flag.
1. Targets.—Explain (each man using his record book
(A.B. 142))
(i) Size of targets, i.e.—
Small target, 4 ft. by 4 ft.
Large target, 6 ft. by 6 ft.
Large snapshooting, 22 in.
(ii) Dimensions of scoring areas, i.e.—
Small and large targets showing bull, inner, magpie,
and outer.
Snapshooting target—the whole target as a scoring
surface.
(iii) Method of signalling.—
Demonstrate, using a target and signalling disk,
the method of signalling bull, inner, magpie, outer
and miss and a hit on a snapshooting target (see
Pamphlet No. 1).
2. Explain
(i) The necessity for aiming off. Quote examples, such as
taking a comer in a football match on a windy day.
(ii) That, when considering the effect of side winds, the
firer must:—
Judge the strength of wind ;
Select a point of aim to give the required allow-
ance ;
Maintain elevation while aiming off.
24
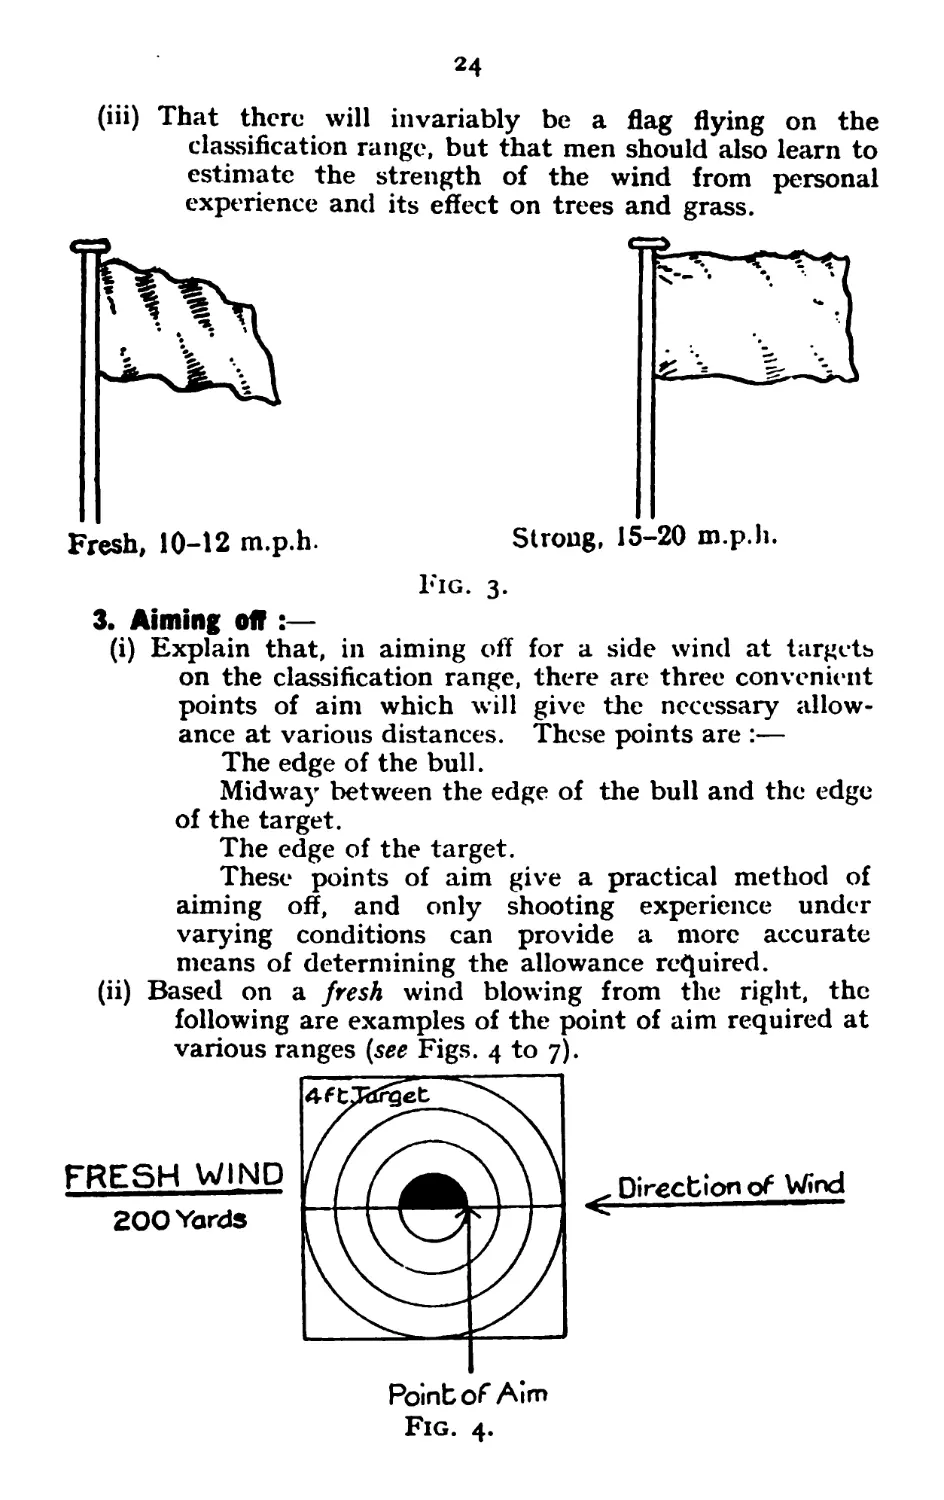
(iii) That there will invariably be a flag flying on the
classification range, but that men should also learn to
estimate the strength of the wind from personal
experience and its effect on trees and grass.
Strong, 15-20 m.p.h.
Fig. 3.
3. Aiming off :—
(i) Explain that, in aiming off for a side wind at targets
on the classification range, there are three convenient
points of aim which will give the necessary allow-
ance at various distances. These points are :—
The edge of the bull.
Midway between the edge of the bull and the edge
of the target.
The edge of the target.
These points of aim give a practical method of
aiming off, and only shooting experience under
varying conditions can provide a more accurate
means of determining the allowance required.
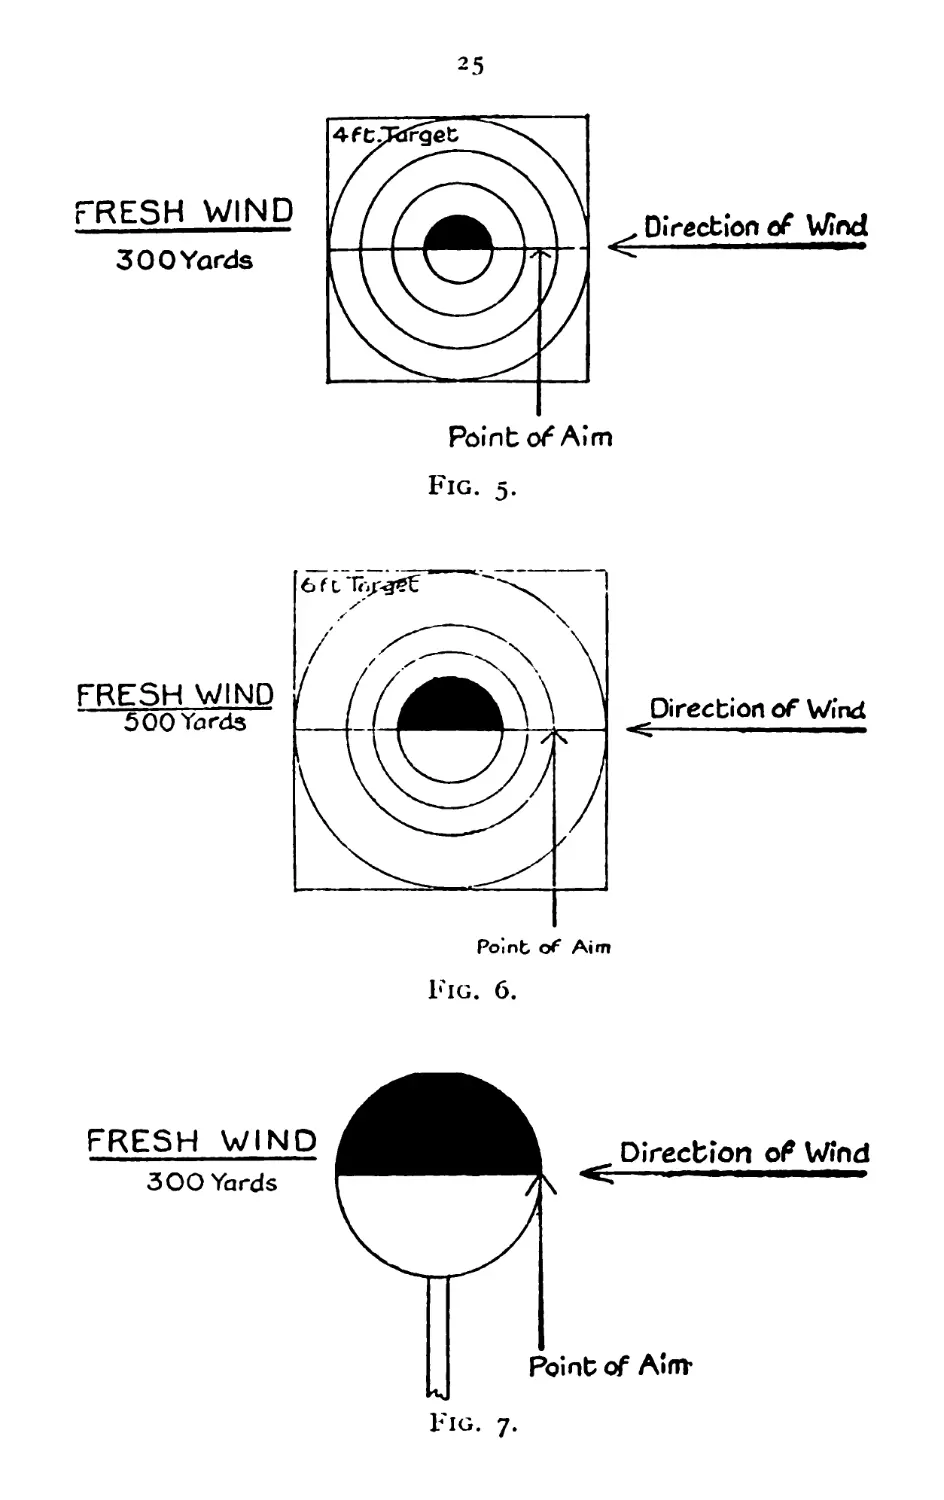
(ii) Based on a fresh wind blowing from the right, the
following are examples of the point of aim required at
various ranges (see Figs. 4 to 7).
FRESH WIND
200 Yards
Fig. 4.
25
FRESH WIND
300Yards
Fig. 5.
FRESH WIND
500 Yards
Fig. 7.
2б
(iii) For an oblique or strong wind, move in or out to the next
point of aim to give a lesser or greater allowance
respectively. A more detailed method of calculating
the allowance is given in A.B. 142 in the form of a
wind table.
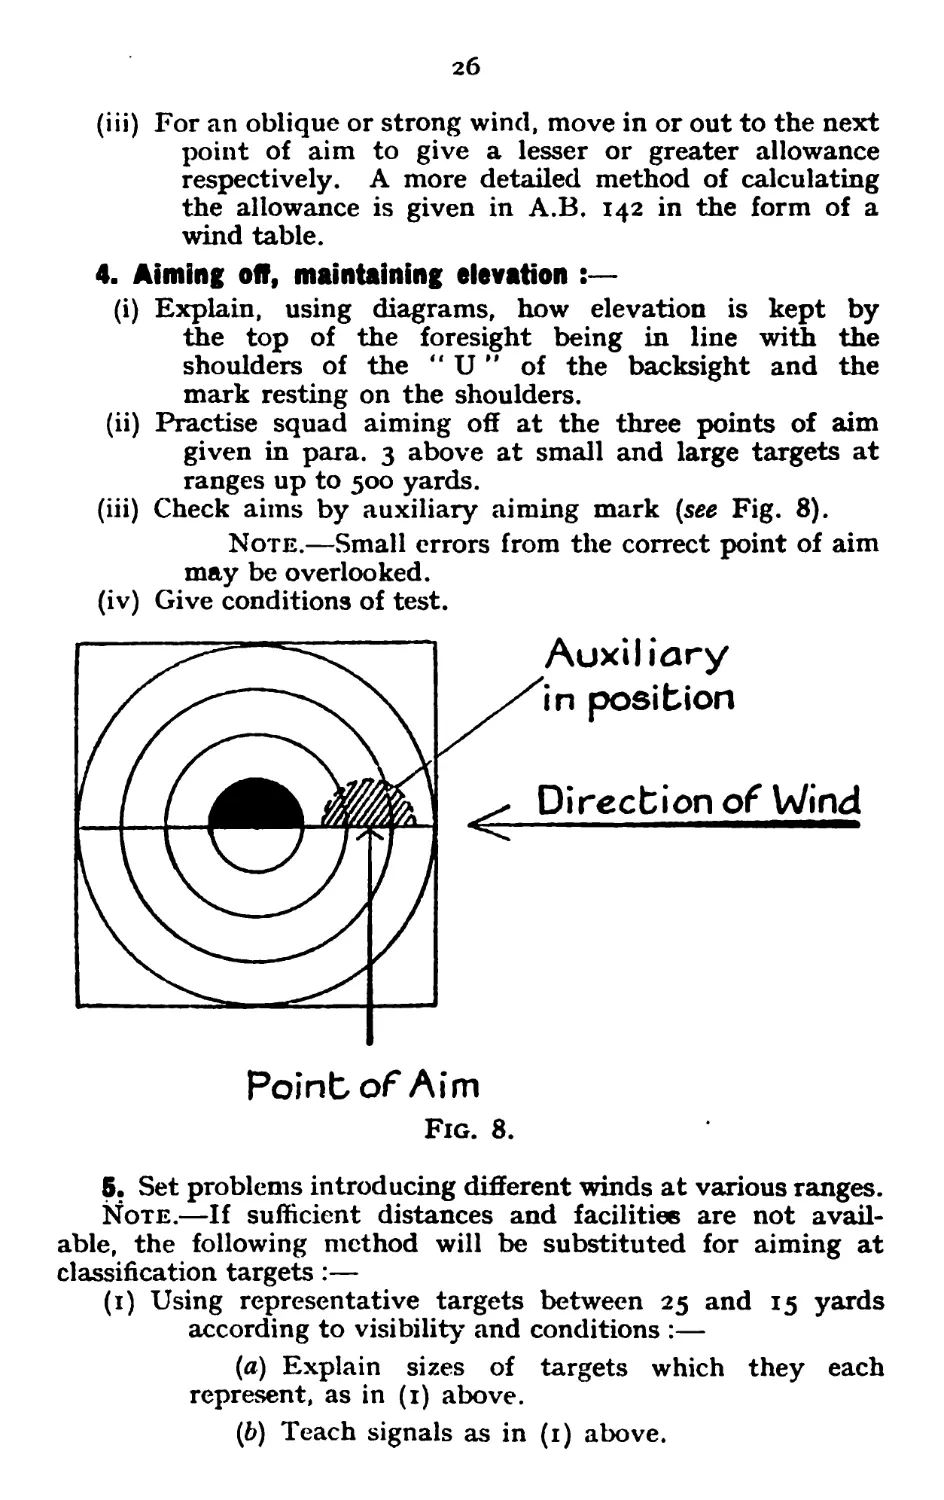
4. Aiming off, maintaining elevation
(i) Explain, using diagrams, how elevation is kept by
tbe top of the foresight being in line with the
shoulders of the “ U ” of the backsight and the
mark resting on the shoulders.
(ii) Practise squad aiming off at the three points of aim
given in para. 3 above at small and large targets at
ranges up to 500 yards.
(iii) Check aims by auxiliary aiming mark (see Fig. 8).
Note.—Small errors from the correct point of aim
may be overlooked.
(iv) Give conditions of test.
Point of Aim
Fig. 8.
5. Set problems introducing different winds at various ranges.
Note.—If sufficient distances and facilities are not avail-
able, the following method will be substituted for aiming at
classification targets:—
(1) Using representative targets between 25 and 15 yards
according to visibility and conditions :—
(a) Explain sizes of targets which they each
represent, as in (1) above.
(b) Teach signals as in (1) above.
*1
(2) Explain, using diagram, how elevation is kept by the
top of the foresight being in line with the shoulders
of the " U M of the backsight and the mark resting
on the shoulder.
(3) Squad ordered to aim at the three points of aim right
or left. Pin up auxiliary and check.
(4) Squad practise aiming off at the equivalent of 200 to
500 yards.
28
LE880N 10.—ELEVATION AND AIMING UP OR DOWN.
Instructor’s Notes.
Stores :—
Record books.
Classification targets with auxiliary aiming marks, 200 to
500 yards ; signalling flag and one assistant at each
target to use the marking disk.
Aiming-rests, tripods, and sandbags.
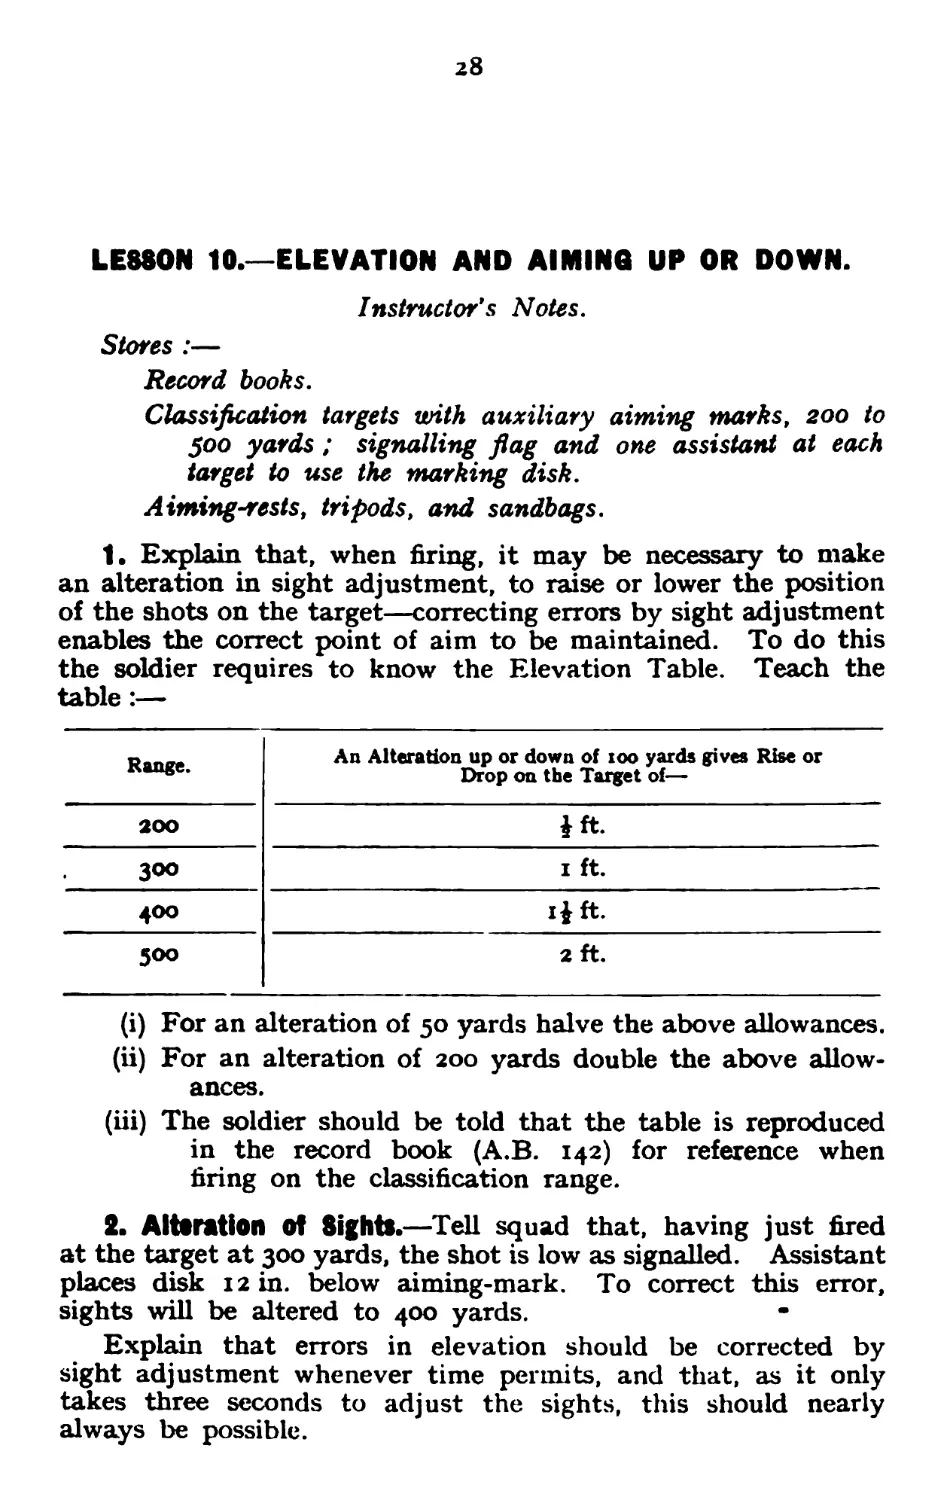
1. Explain that, when firing, it may be necessary to make
an alteration in sight adjustment, to raise or lower the position
of the shots on the target—correcting errors by sight adjustment
enables the correct point of aim to be maintained. To do this
the soldier requires to know the Elevation Table. Teach the
table:—
Range. An Alteration up or down of 100 yards gives Rise or Drop on the Target of—
200 J ft.
300 I ft.
4OO IJ ft.
500 2 ft.
(i) For an alteration of 50 yards halve the above allowances.
(ii) For an alteration of 200 yards double the above allow-
ances.
(iii) The soldier should be told that the table is reproduced
in the record book (A.B. 142) for reference when
firing on the classification range.
2. Alteration of Sights.—Tell squad that, having just fired
at the target at 300 yards, the shot is low as signalled. Assistant
places disk 12 in. below aiming-mark. To correct this error,
sights will be altered to 400 yards.
Explain that errors in elevation should be corrected by
sight adjustment whenever time permits, and that, as it only
takes three seconds to adjust the sights, this should nearly
always be possible.
*9
Set simple problems, using a marking disk on the target at
from 200 to 500 yards, to show the supposed strike of the
shot—above and below the aiming mark.
Give further practice at targets at ranges from 200 to 500
yards.
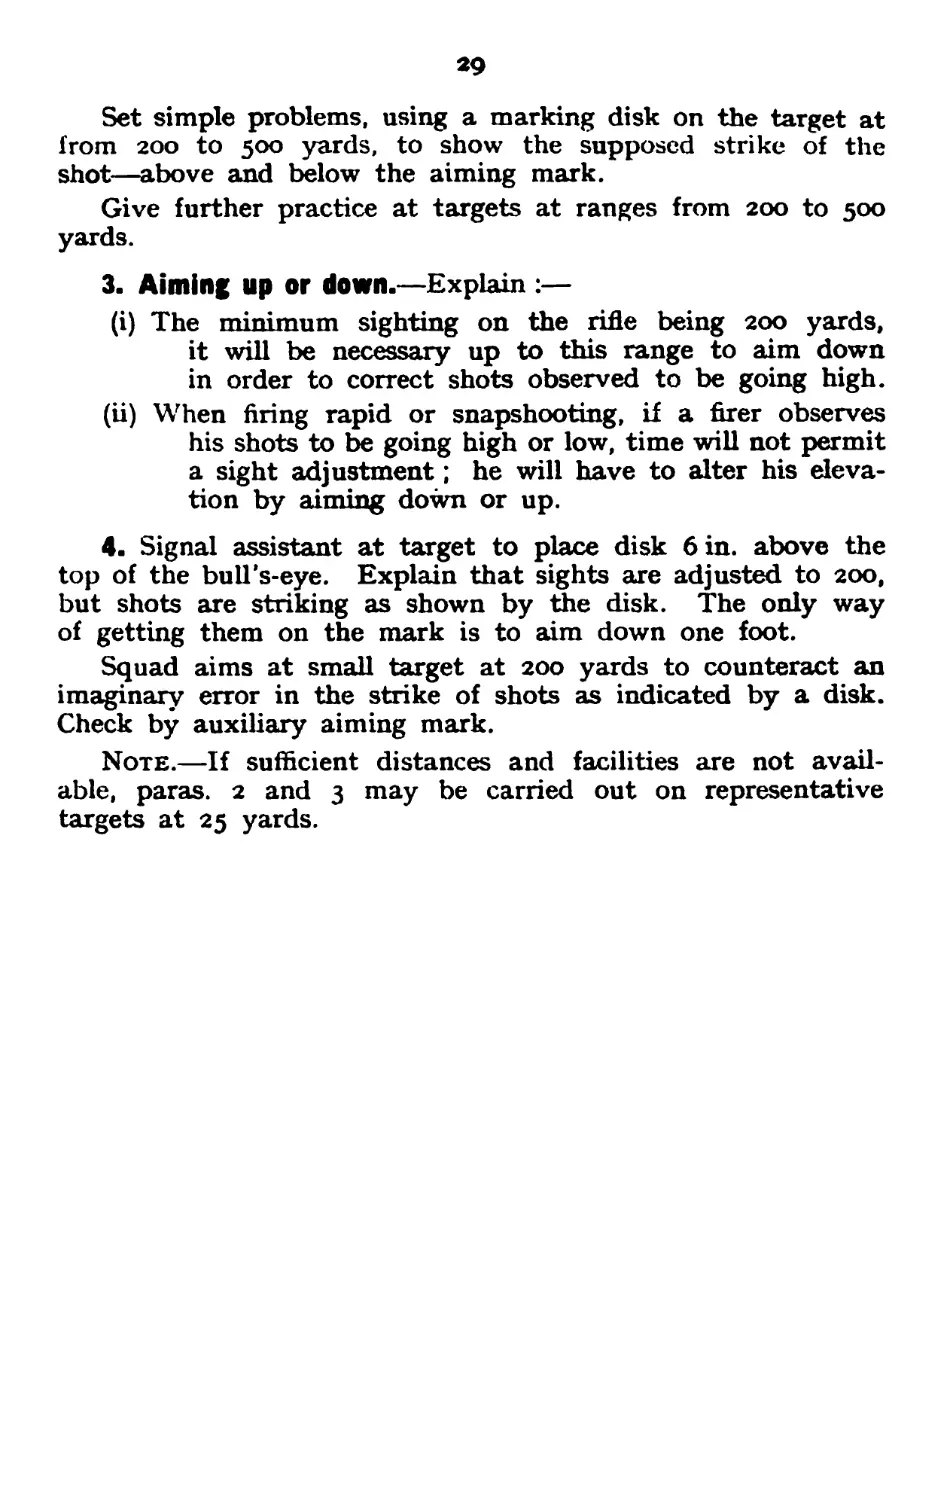
3. Aiming up or down.—Explain :—
(i) The minimum sighting on the rifle being 200 yards,
it will be necessary up to this range to aim down
in order to correct shots observed to be going high.
(ii) When firing rapid or snapshooting, ii a firer observes
his shots to be going high or low, time will not permit
a sight adjustment; he will have to alter his eleva-
tion by aiming down or up.
4. Signal assistant at target to place disk 6 in. above the
top of the bull’s-eye. Explain that sights are adjusted to 200,
but shots are striking as shown by the disk. The only way
of getting them on the mark is to aim down one foot.
Squad aims at small target at 200 yards to counteract an
imaginary error in the strike of shots as indicated by a disk.
Check by auxiliary aiming mark.
Note.—If sufficient distances and facilities are not avail-
able, paras. 2 and 3 may be carried out on representative
targets at 25 yards.
30
LESSON 11.—AIMING OFF FOR WIND AT SERVICE
TARGETS.
Instructor's Notes.
Stores :—
Silhouette figure targets at from 200 to 500 yards (two
targets at each distance).
Aiming-rests, tripods, sandbags.
Assistant at each distance.
To obtain full value this lesson must be carried out in the open
at proper distances. When this is impossible, representative
targets at 25 yards may be used.
In aiming off at silhouette figures, the aim will be considered
correct if it is approximate to the centre of the auxiliary
figure.
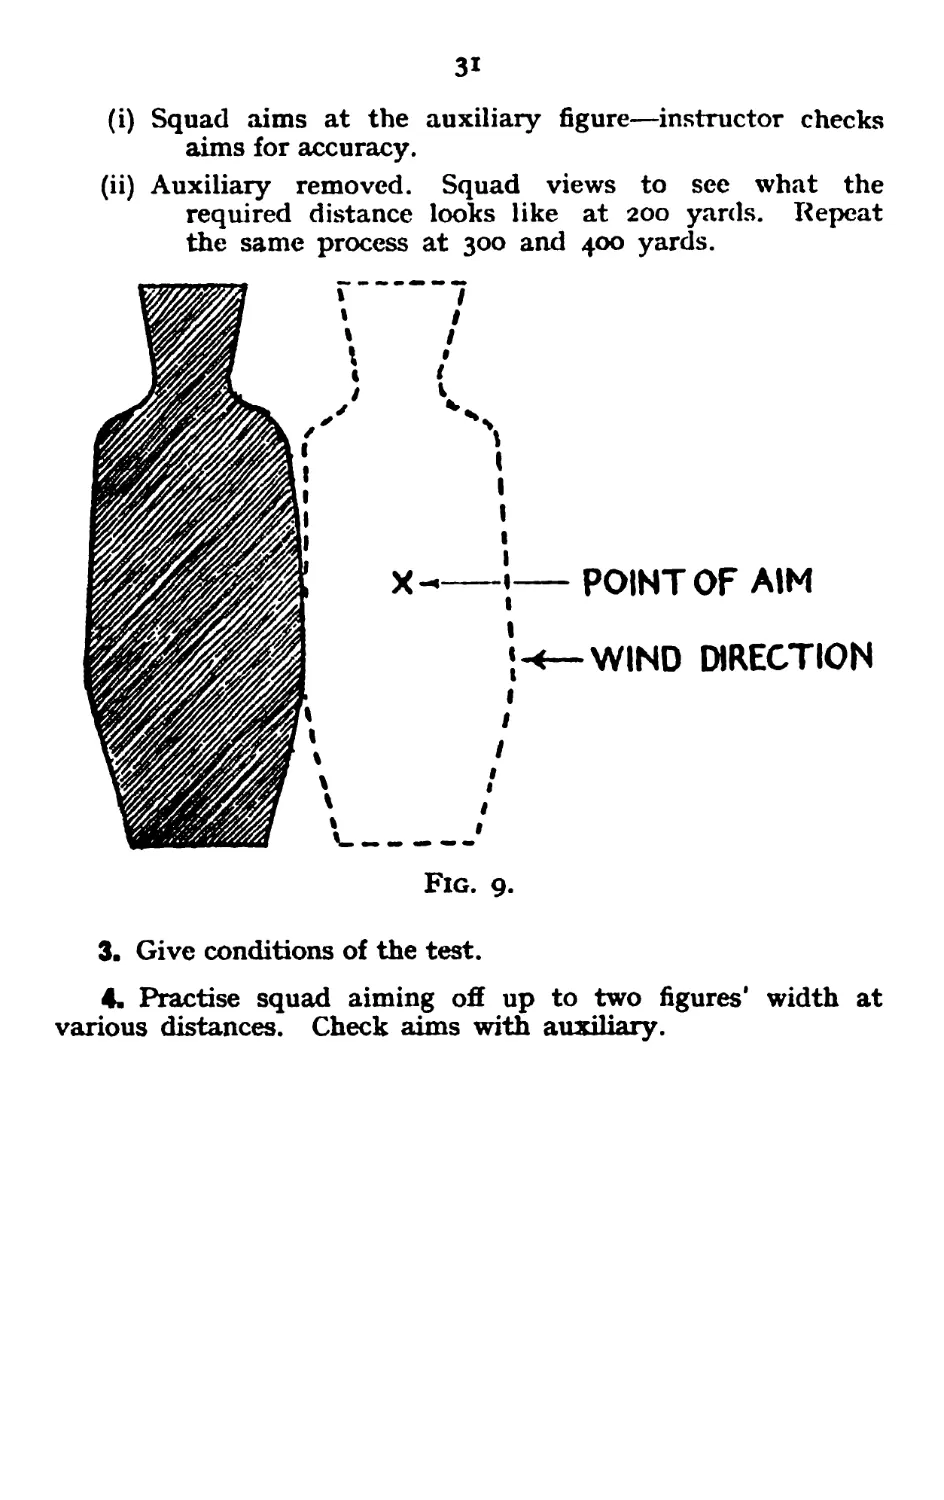
1. Explain : The bullet is blown off its course to the point
aimed at by the wind. It is therefore necessary to aim off
into the wind a distance which is enough to counter the effect
of the wind on the bullet. Each individual will be responsible
at all times for making the necessary allowance for wind when
engaging a target.
If you can feel the wind fresh on the side of your face, it is
necessary to aim off.
The following rules are given as a guide for service con-
ditions. They must be applied with common sense according
to the direction and strength of the wind.
(i) It is never necessary to aim off for any wind at ranges
under 200 yards.
(ii) Up to 400 yards, if you can feel the wind fresh on the
side of your face, aim off one figure’s width from the
centre. (Imagine another figure standing beside that
which is to be fired at.)
(iii) At distances over 400 yards, aim off two figures’ width.
Note.—The above rules refer to direct or oblique right and
left winds. No allowance will be made for head or rear winds.
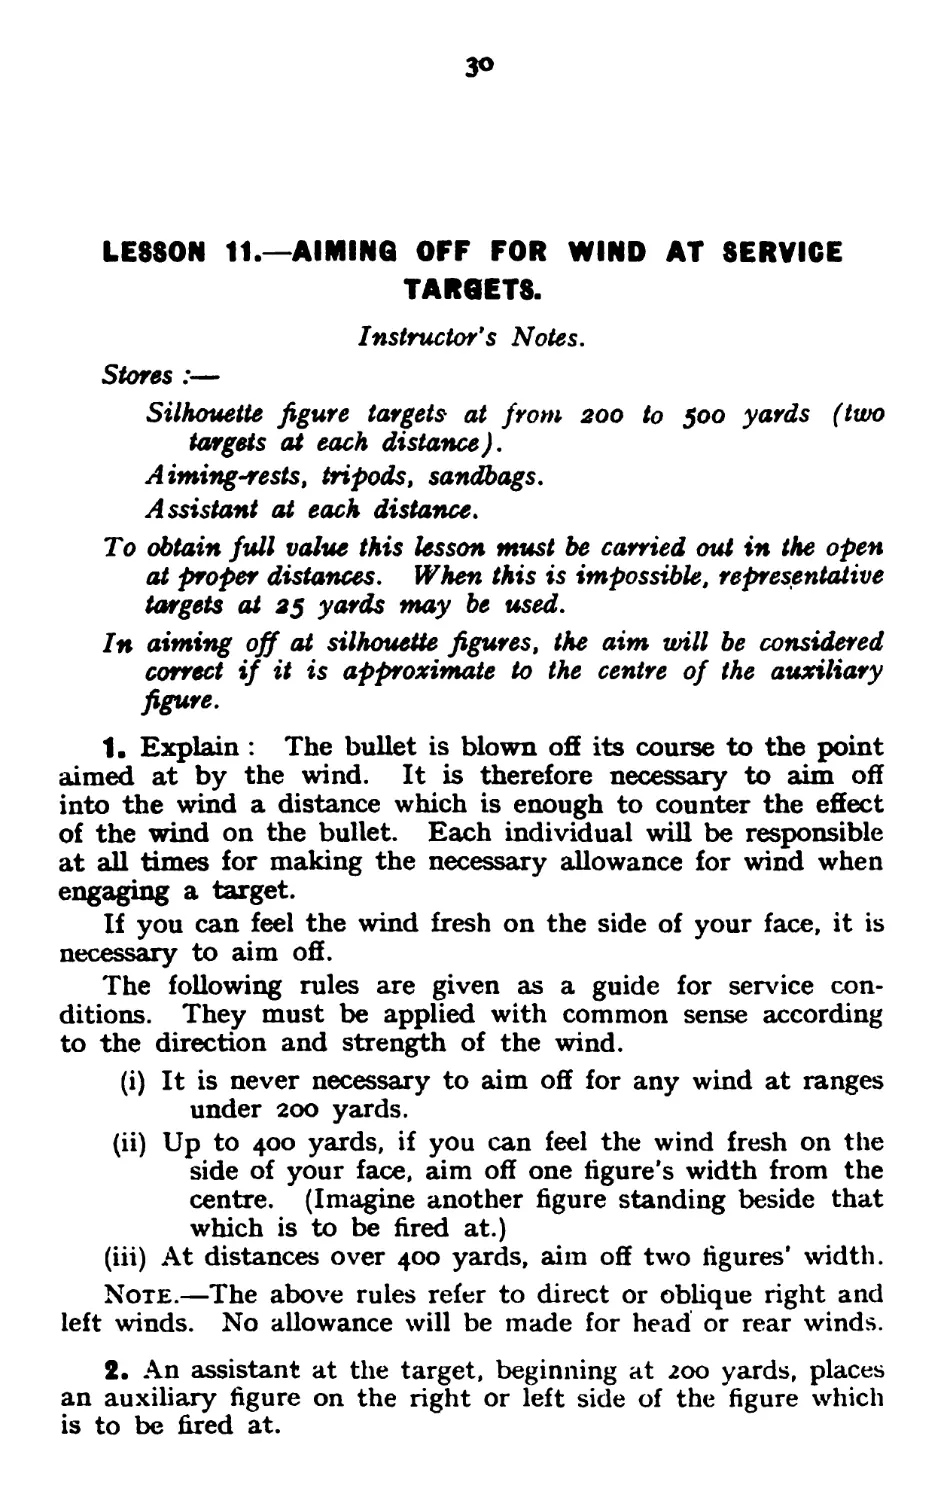
2. An assistant at the target, beginning at 200 yards, places
an auxiliary figure on the right or left side of the figure which
is to be fired at.
31
(i) Squad aims at the auxiliary figure—instructor checks
aims for accuracy.
(ii) Auxiliary removed. Squad views to see what the
required distance looks like at 200 yards. Repeat
the same process at 300 and 400 yards.
Fig. 9.
3. Give conditions of the test.
4, Practise squad aiming off up to two figures* width at
various distances. Check aims with auxiliary.
32
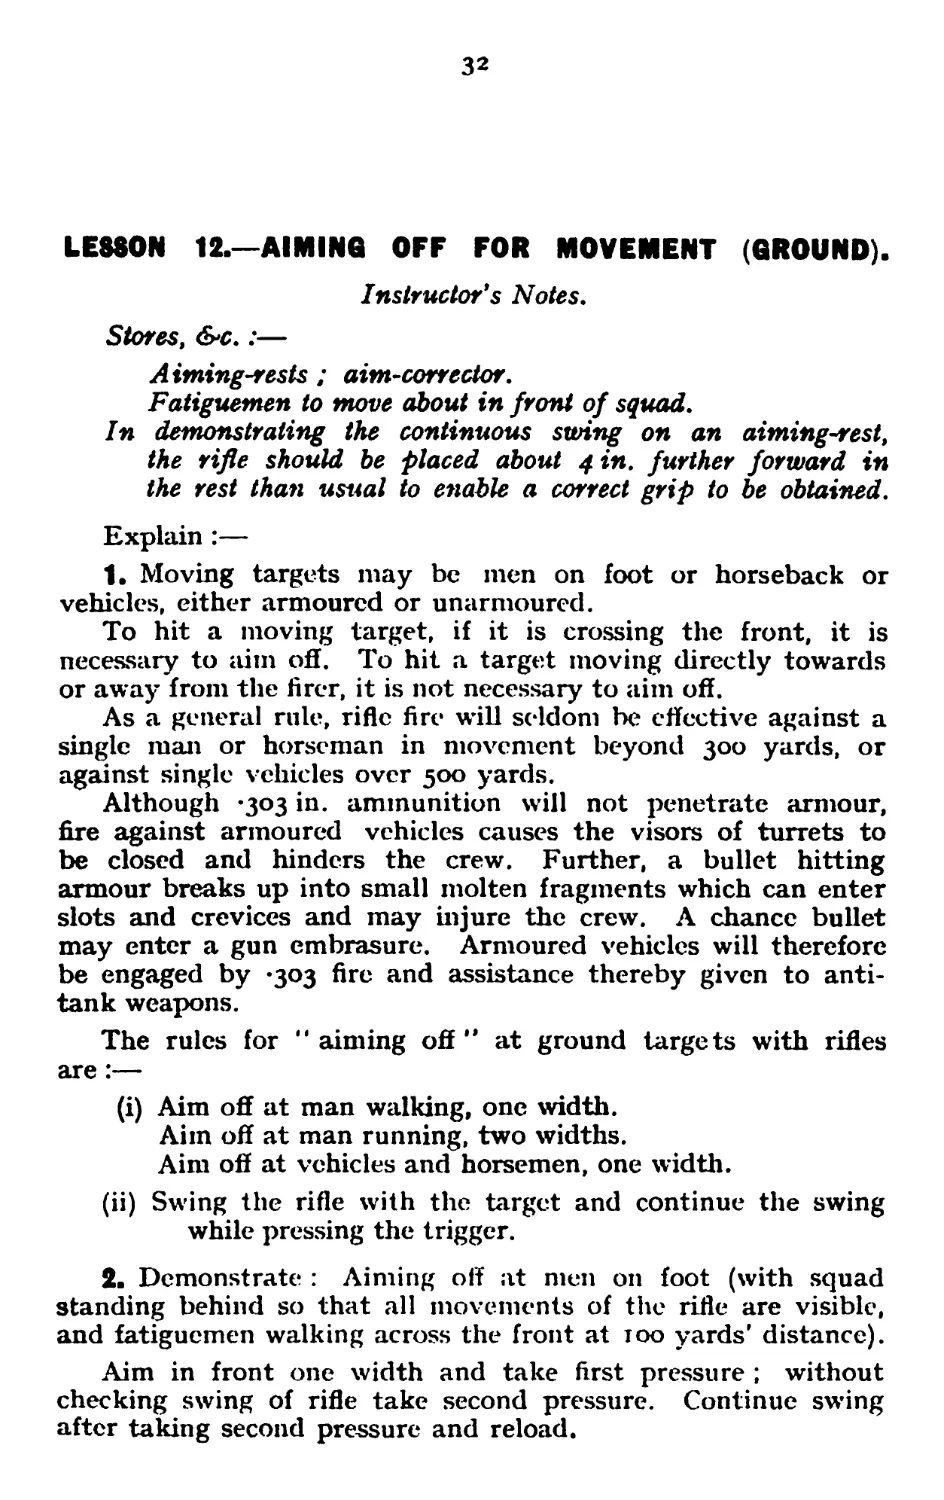
LEMON 12.—AIMING OFF FOR MOVEMENT (GROUND).
Instructor's Notes.
Stores, &c.:—
Aiming-rests ; aim-corrector.
Fatiguemen to move about in front of squad.
In demonstrating the continuous swing on an aiming-rest,
the rifle should be placed about 4 in. further forward in
the rest than usual to enable a correct grip to be obtained.
Explain :—
1. Moving targets may be men on foot or horseback or
vehicles, either armoured or unarmoured.
To hit a moving target, if it is crossing the front, it is
necessary to aim off. To hit a target moving directly towards
or away from the firer, it is not necessary to aim off.
As a general rule, rifle fire will seldom be effective against a
single man or horseman in movement beyond 300 yards, or
against single vehicles over 500 yards.
Although -303 in. ammunition will not penetrate armour,
fire against armoured vehicles causes the visors of turrets to
be closed and hinders the crew. Further, a bullet hitting
armour breaks up into small molten fragments which can enter
slots and crevices and may injure the crew. A chance bullet
may enter a gun embrasure. Armoured vehicles will therefore
be engaged by -303 fire and assistance thereby given to anti-
tank weapons.
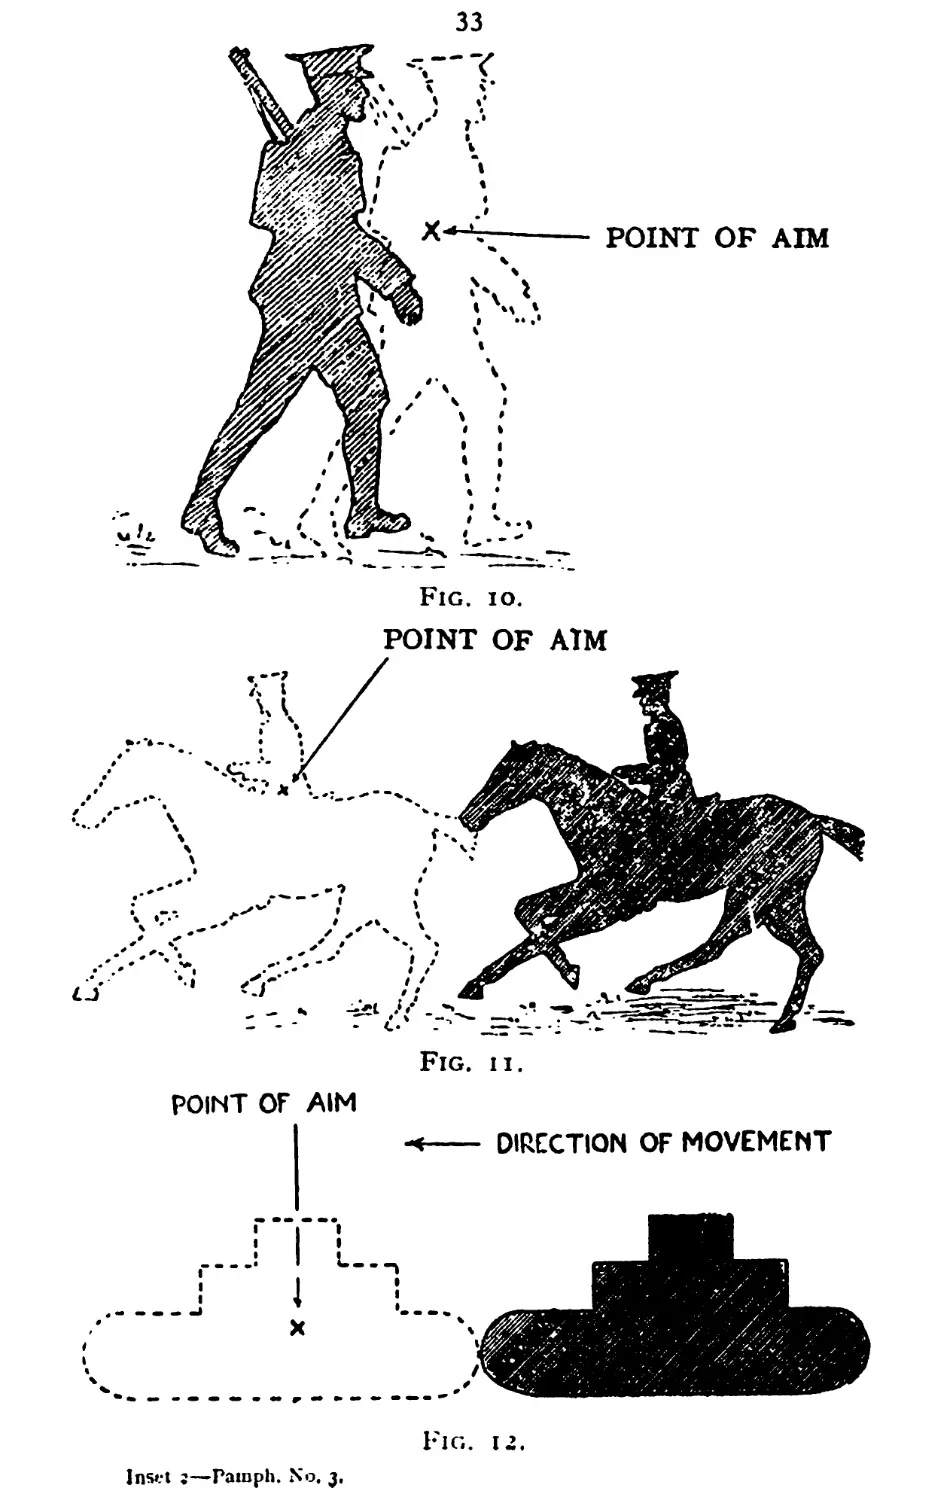
The rules for "aiming off" at ground targets with rifles
are:—
(i) Aim off at man walking, one width.
Aim off at man running, two widths.
Aim off at vehicles and horsemen, one width.
(ii) Swing the rifle with the target and continue the swing
while pressing the trigger.
2. Demonstrate : Aiming off at men on foot (with squad
standing behind so that all movements of the rifle are visible,
and fatiguemen walking across the front at too yards’ distance).
Aim in front one width and take first pressure ; without
checking swing of rifle take second pressure. Continue swing
after taking second pressure and reload.
Fig. ii.
POINT OF AIM
-4--- DIRECTION OF MOVEMENT
Inset г—Painph. No. 3.
Fig. iг.
34
3. Practise squad taking first pressure only.
4. Demonstrate to each man in turn, using an aiming-rest
and aim-corrector, the continuous swing taking both pressures.
5. Practise squad in complete action up to distances of
300 yards at men walking and doubling ; check each man in
turn with aim-corrector.
6. Aiming off at vehicles : Teach as abqve, using traffic on
any available road.
35
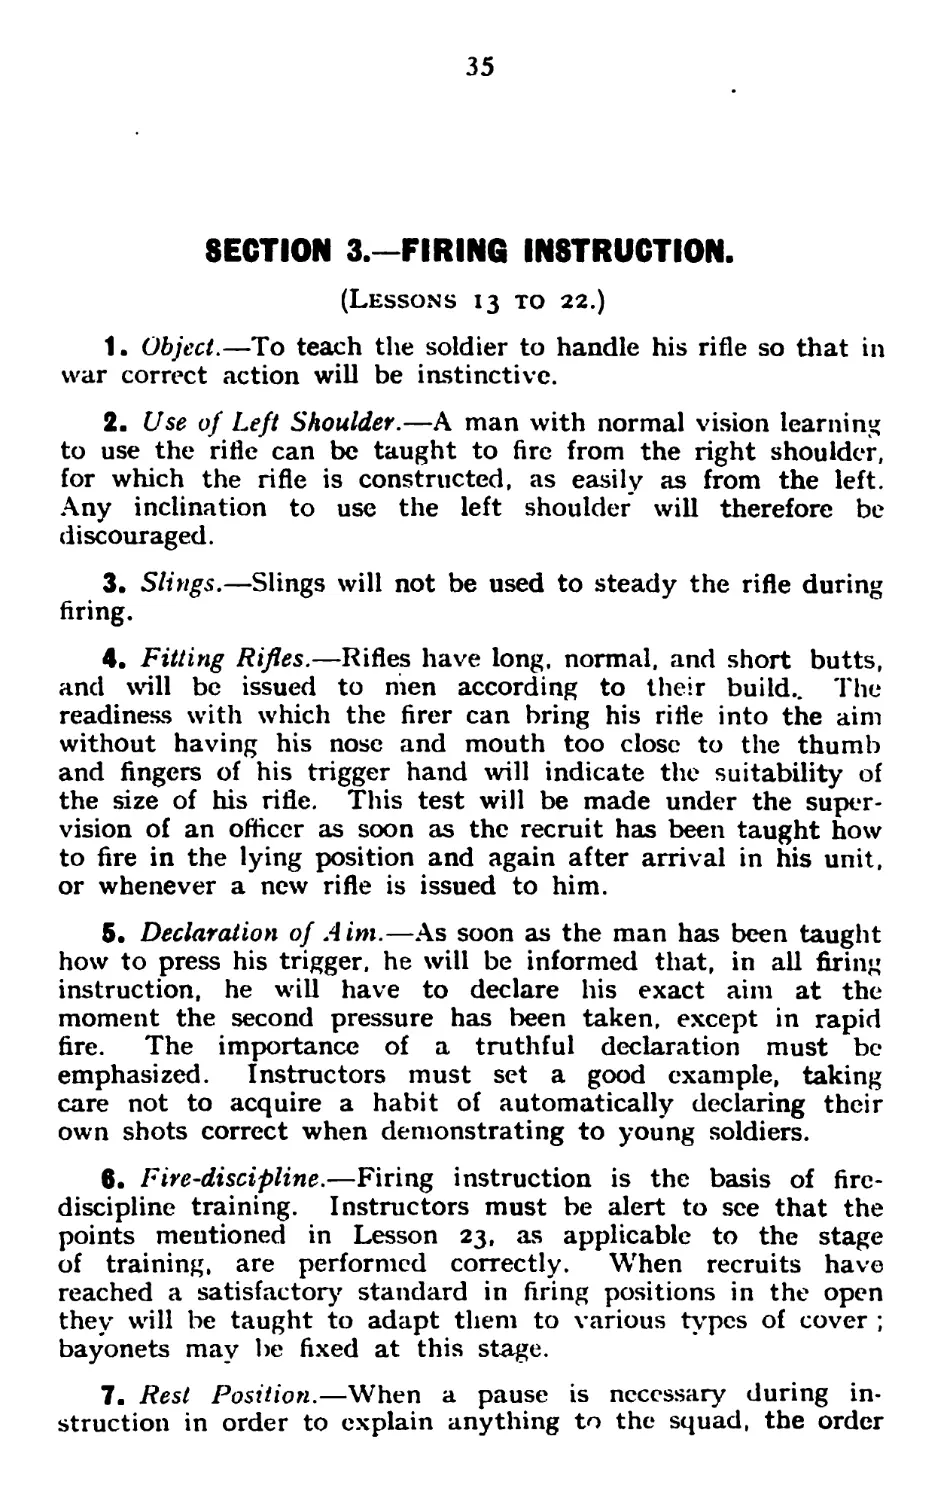
SECTION 3.—FIRING INSTRUCTION.
(Lessons 13 to 22.)
1. Object.—To teach the soldier to handle his rifle so that in
war correct action will be instinctive.
2. Use of Left Shoulder.—A man with normal vision learning
to use the rifle can be taught to fire from the right shoulder,
for which the rifle is constructed, as easily as from the left.
Any inclination to use the left shoulder will therefore be
discouraged.
3. Slings.—Slings will not be used to steady the rifle during
firing.
4. Fitting Rifles.—Rifles have long, normal, and short butts,
and will be issued to men according to their build.. The
readiness with which the firer can bring his rifle into the aim
without having his nose and mouth too close to the thumb
and fingers of his trigger hand will indicate the suitability of
the size of his rifle. This test will be made under the super-
vision of an officer as soon as the recruit has been taught how
to fire in the lying position and again after arrival in his unit,
or whenever a new rifle is issued to him.
5. Declaration of Aim.—As soon as the man has been taught
how to press his trigger, he will be informed that, in all firing
instruction, he will have to declare his exact aim at the
moment the second pressure has been taken, except in rapid
fire. The importance of a truthful declaration must be
emphasized. Instructors must set a good example, taking
care not to acquire a habit of automatically declaring their
own shots correct when demonstrating to young soldiers.
6. Fire-discipline.—Firing instruction is the basis of fire-
discipline training. Instructors must be alert to see that the
points mentioned in Lesson 23, as applicable to the stage
of training, are performed correctly. When recruits have
reached a satisfactory standard in firing positions in the open
they will be taught to adapt them to various types of cover ;
bayonets may be fixed at this stage.
7- Rest Position.—When a pause is necessary during in-
struction in order to explain anything to the squad, the order
зб
“ Rest ” will be given, whereupon safety-catches will be applied
and a convenient position of rest adopted. When the expla-
nation. &c., is finished, the order “ Position ” will bring the
men back into their original position.
8. Final Five Minutes.—Five minutes at the end of each
lessen will be set aside to exercise those muscles directly used
in holding and firing the rifle and to quicken men in its hand-
ling, particularly in the actions connected with snapshooting
and rapid fire. Such exercises are left to the discretion of the
instructor, who may include any lessons previously taught in
firing instruction.
37
LESSON 13.—LYING POSITION.
Instructor's Notes.
Stores :—
Suitable targets for each man and instructor.
Man will be taught to adopt the lying position rapidly and
to handle the rifle with as little movement as possible. The
oblique angle of the body (see Fig. 13) must not be exaggerated.
1. Explain :—
The lying position is generally used on service for firing
in the open or from low, continuous cover such as a bank or
fold in the ground, and from isolated cover such as rocks,
trees, &c.
2. Demonstrate position, naming each phase :—
Position for loading.
Loading and sight setting.
Unloading.
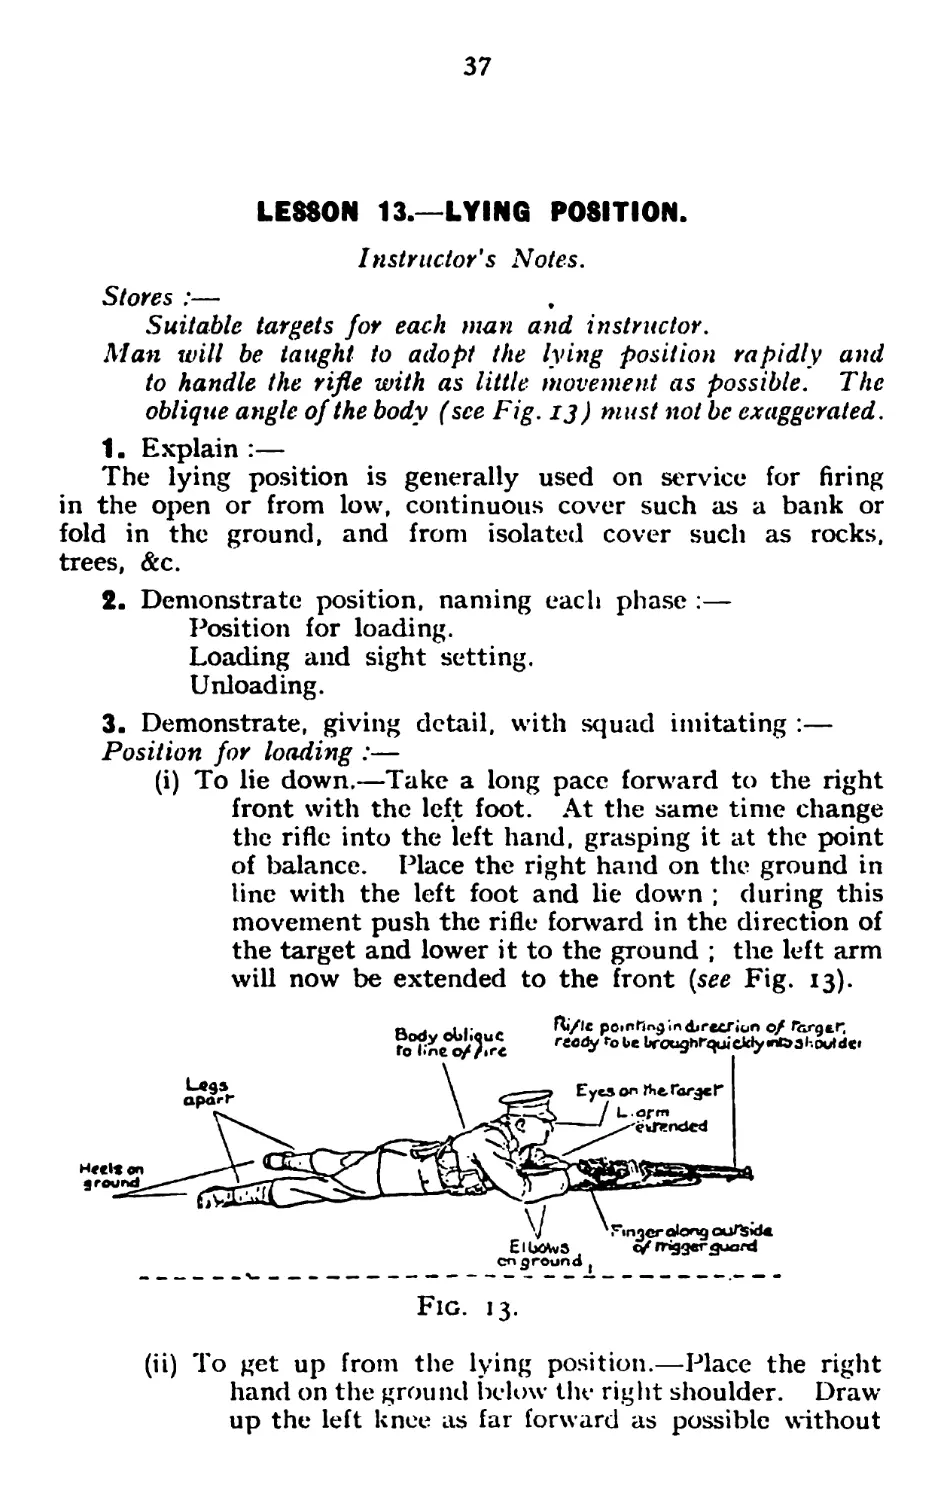
3. Demonstrate, giving detail, with squad imitating :—
Position for loading :—
(i) To lie down,—Take a long pace forward to the right
front with the left foot. At the same time change
the rifle into the left hand, grasping it at the point
of balance. Place the right hand on the ground in
line with the left foot and lie down ; during this
movement push the rifle forward in the direction of
the target and lower it to the ground ; the left arm
will now be extended to the front (see Fig. 13).
Body oUliouC
ro line с/Arc
Ri/lc pointing in direcriun о/ ГЬгдьг;
reedy robe broughFquickly'n&dhDutdet
Fig. 13.
(ii) To get up from the lying position.—Place the right
hand on the ground below the right shoulder. Draw
up the left knee as far forward as possible without
38
unduly raising the body. At the same time draw
back the rifle with the left hand. From this position
stand up as quickly as possible, bringing the right
foot up to the left, and return to the order. Stand
at ease.
4. Practise squad.
5. Demonstrate, giving detail, with squad imitating :—
Loading, sight-setting, unloading :—
(i) Loading (as already taught).
(ii) Sight-setting : Quit the rifle with the right hand.
Draw the rifle back with the left hand, taking care
not to raise the head and avoiding any unnecessary
movement, until the lines on the backsight can be
clearly seen. Set the sights and resume the position
for loading.
(iii) Unloading (as already taught). Lower sights and
stand up.
6. Practise squad.
7. Final five minutes (see para. 8, page 36).
30
LESSON 14.—LYING POSITION (continued).
Instructor's Notes.
Stores:—
As for Lesson 13 with the addition of the aiming disk.
To avoid any tendency to develop a habit of declaring every
shot correct, the declarations of some of the squad must be
checked with the aiming disk. Dummies will not be used.
The following are the methods of getting the eye back from the
cocking-piece:—
(i) Raise the head a little and draw it back.
(ii) Raise the butt a little higher in the shoulder.
(iii) Turn the body less obliquely to the target,
(iv) If these methods fail, obtain a longer butt.
1. Demonstrate, naming each phase :—
Holding and aiming.
Firing.
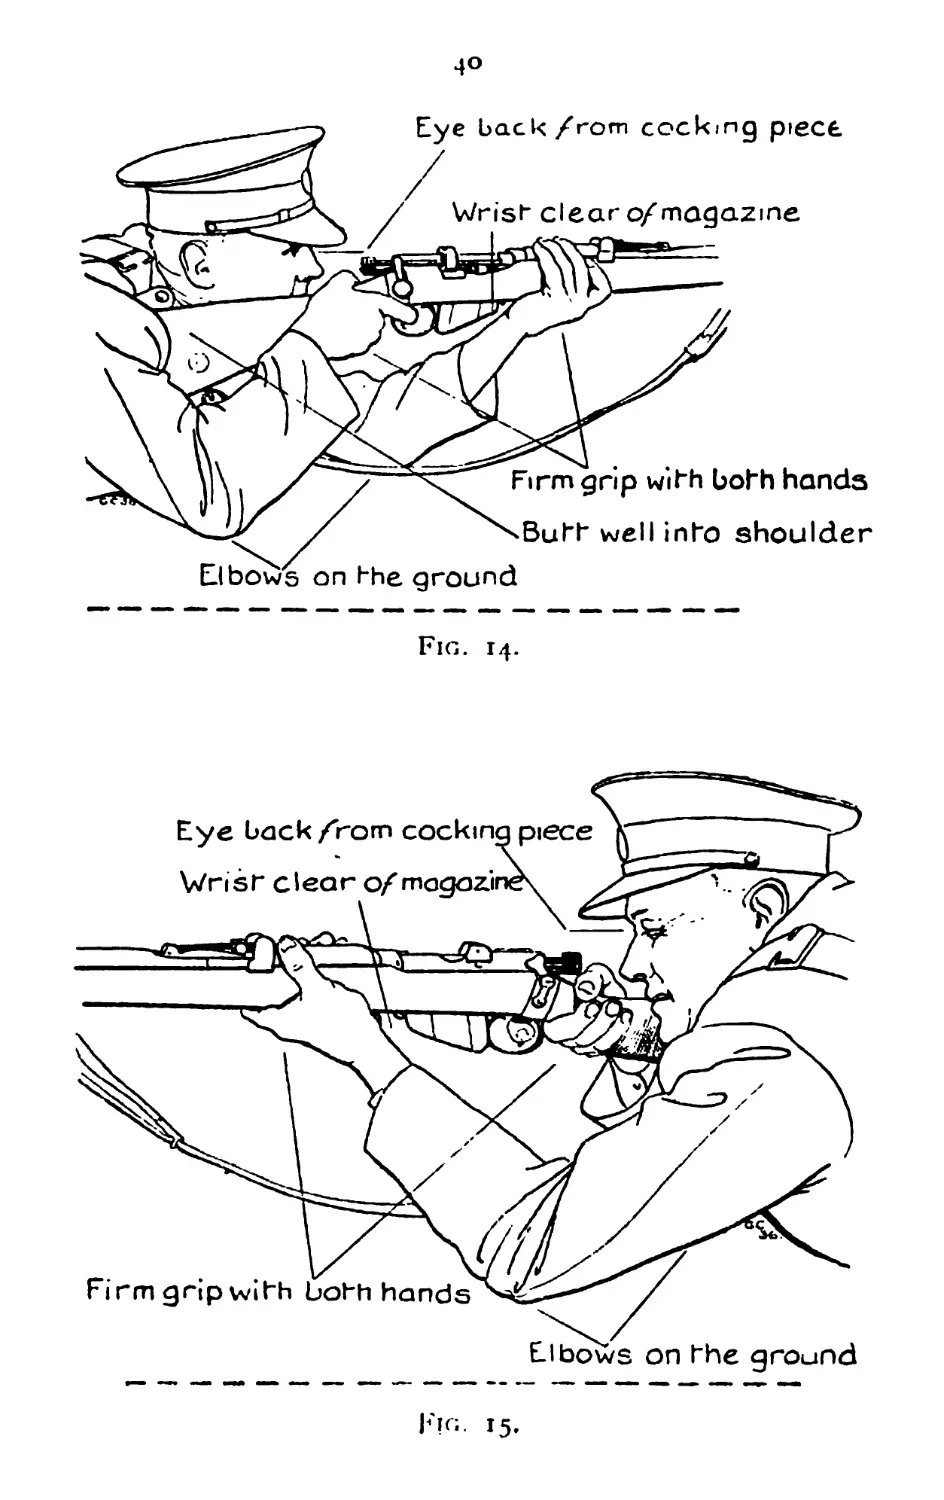
2. Demonstrate, giving detail with squad imitating, having
been ordered to load :—
Holding and aiming.
Look at the target. Push forward the safety-catch. Bring
the rifle into the shoulder, keeping both elbows on the
ground. Hold the rifle firmly with both hands. Take
the first pressure the moment the butt comes into the
shoulder. Lower the cheek to the butt, eye well back
from the cocking-piece. Close the left eye and aim.
To raise or lower the muzzle, if this is necessary, move the
body backwards or forwards on the elbows without
altering the grip on the rifle. Return to the position for
loading. (See Figs. 14 and 15.)
3. Practise squad.
4. Explain :—
Slow rate of fire and responsibility for loading.
The normal slow rate of fire is five rounds a minute. On
service, after the rifle has once been loaded, the soldier
is responsible that his magazine is kept filled until
“ Unload ” is ordered. When the command " Stop ”
is given, the soldier will come to the loading position and
apply the safety-catch. WЪenever necessary, advantage
should be taken of this opportunity for loading.
4°
Eye back /rom cocking piece
me
Firm grip wirh bohh hands
^ВиГГ well into shoulder
Elbow's on rhe ground
Eye bock/rom cockm<
V/risr clear of magazii
Elbows on rhe ground
Fig. 15,
41
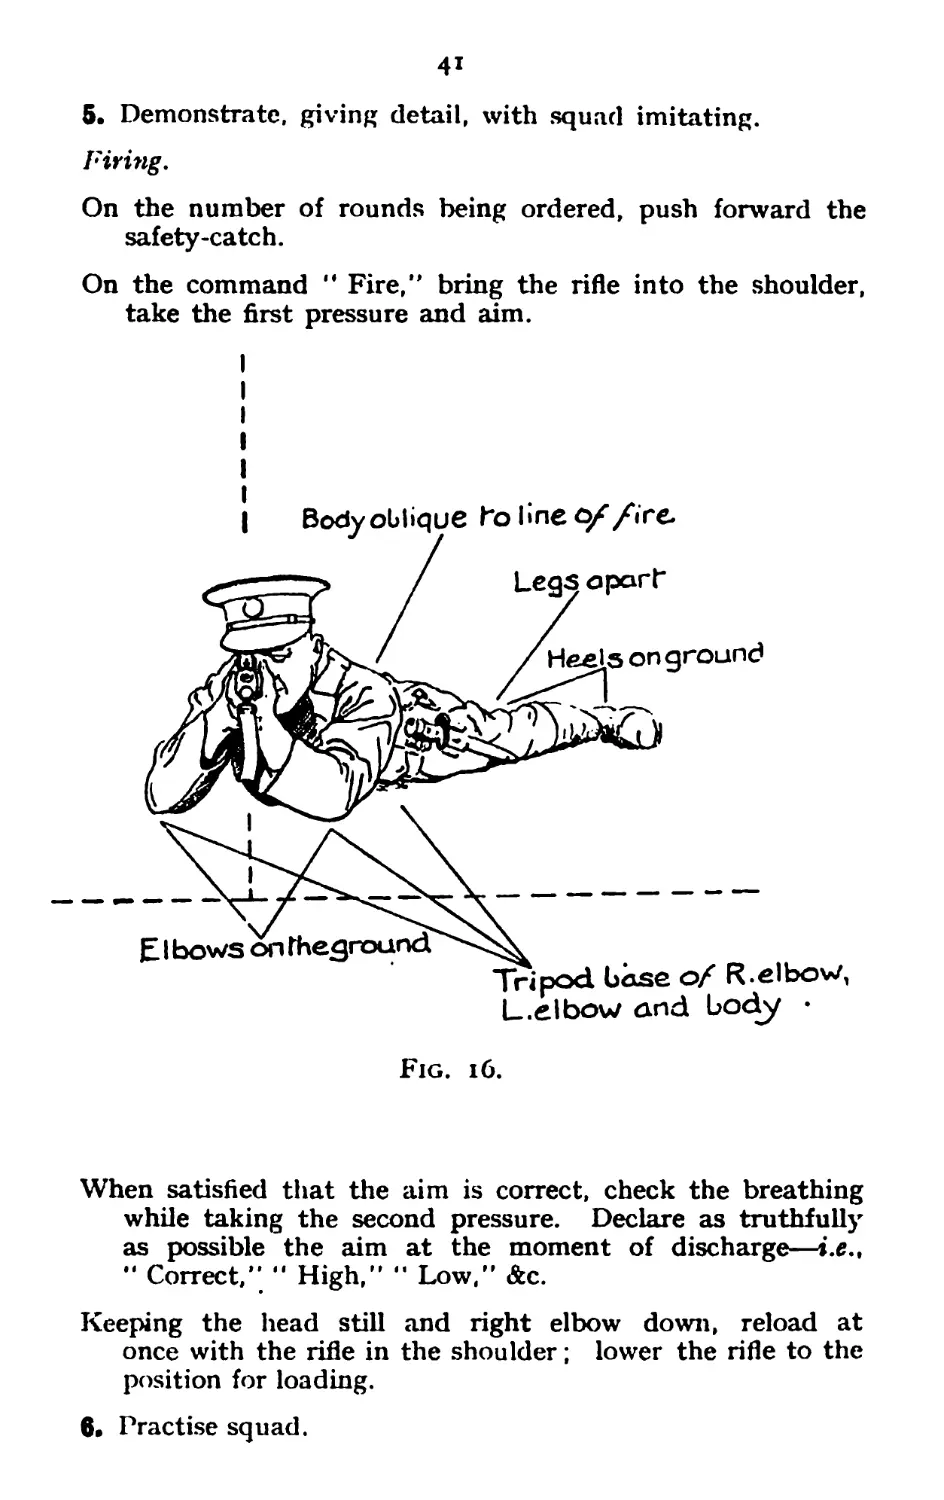
5. Demonstrate, giving detail, with squad imitating.
Firing.
On the number of rounds being ordered, push forward the
safety-catch.
On the command ” Fire,” bring the rifle into the shoulder,
take the first pressure and aim.
Fig. 16.
When satisfied that the aim is correct, check the breathing
while taking the second pressure. Declare as truthfully
as possible the aim at the moment of discharge—i.e.,
” Correct,” ” High,” ” Low,” &c.
Keeping the head still and right elbow down, reload at
once with the rifle in the shoulder; lower the rifle to the
position for loading.
6» Practise squad.
42
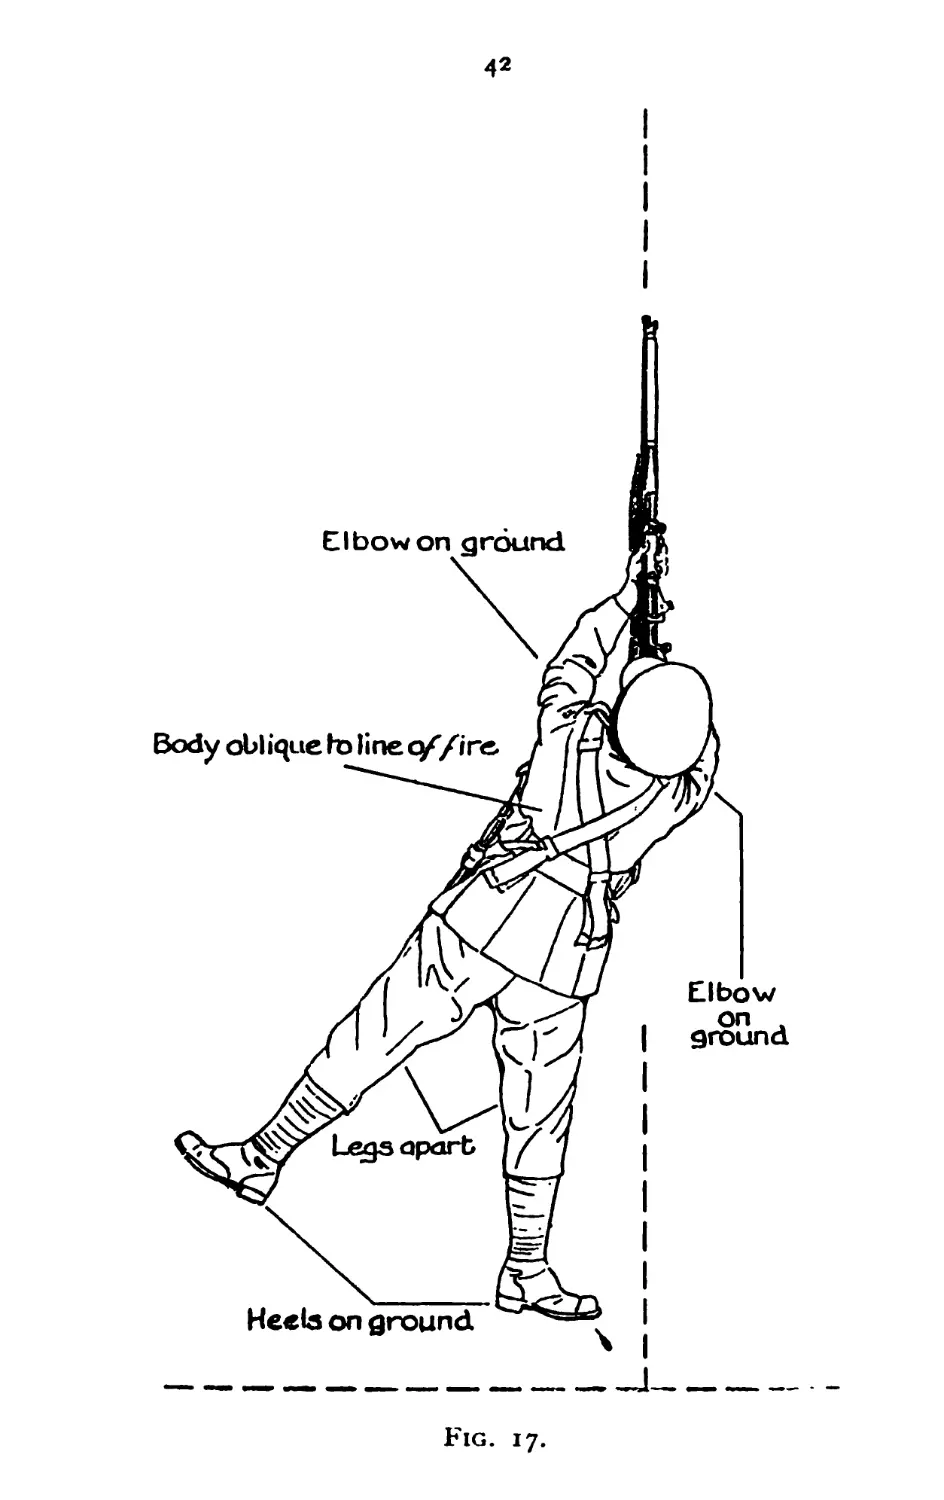
Fig. 17.
43
7. Explain:—
Aids to good shooting :—
Physical fitness.
Bolt to be " bright clean ” and slightly oifed.
Firm grip with both hands.
Tilt the rifle slightly to the right when reloading.
Keep the head still.
Count the number of rounds.
•• Practise squad, in Lessons 13 and 14, occasionally checking
aims. Dummies must not be used in checking with the aiming
disk.
9. Final five minutes (see para. 8, page 36).
44
LE88ON 15.—KNEELING POSITION.
Instructor's Notes.
As for Lesson 14.
1. Explain :—
The kneeling position is used on service for firing from a
low wall, a bank, in long grass, or in crops or scrub which would
obstruct the line of sight if the lying position were adopted.
2. Demonstrate the position, naming each phase :—
Position for loading.
Loading and sight setting.
Unloading.
3. Demonstrate, giving detail, with squad imitating :—
Position for loading.
To kneel: Take a walking pace forward to the right
front with the left foot. At the same time change the
rifle into the left hand, grasping it at the point of balance,
rifle on the right side of the body, muzzle up and to the
front. Kneel down on the right knee, keeping it well out
to the right; sink the body on to the right heel, right
hand grasping the small of the butt, left forearm resting
behind the left knee, butt of rifle resting on the right
thigh (see Fig. 18).
To return to the order: Stand up, grasping the rifle near
the band with the right hand and, at the same time,
bring the left foot back to the right, return to the order
and stand at ease.
4. Practise squad.
5. Loading, sight-setting, and unloading : As already taught.
Practise squad by word of command.
6. Demonstrate, naming each phase—Holding and aiming—
firing.
7. Demonstrate, giving detail, with squad imitating, having
been given the order “ Kneeling, Load .... hundred.”
. Holding and aiming—firing.
Look at the target; push forward the safety catch ; without
raising the left arm, slide the left elbow forward until it rests
either behind or in front of the left knee, whichever is the more
convenient (see Fig. 19).
45
Fig. 18.
Fig. 19.
То raise or lower the muzzle, if this is necessary, move the
body backwards or forwards on the right heel. Fire as in the
lying position. Return to the loading position.
8t Practise squad.
9. Practise squad in complete lesson.
*10. Final five minutes (see para. 8, page 36).
47
LESSON 16.—STANDING AND SITTING POSITIONS.
Instructor's Notes.
As for Lesson 14.
Standing Position.
1. Explain : The standing position is used to fire over high
cover, to take a snapshot during an advance, to fire at aircraft
and to charge magazines.
2. Demonstrate the position, naming each phase :—
Position for loading.
Loading and sight setting.
Unloading.
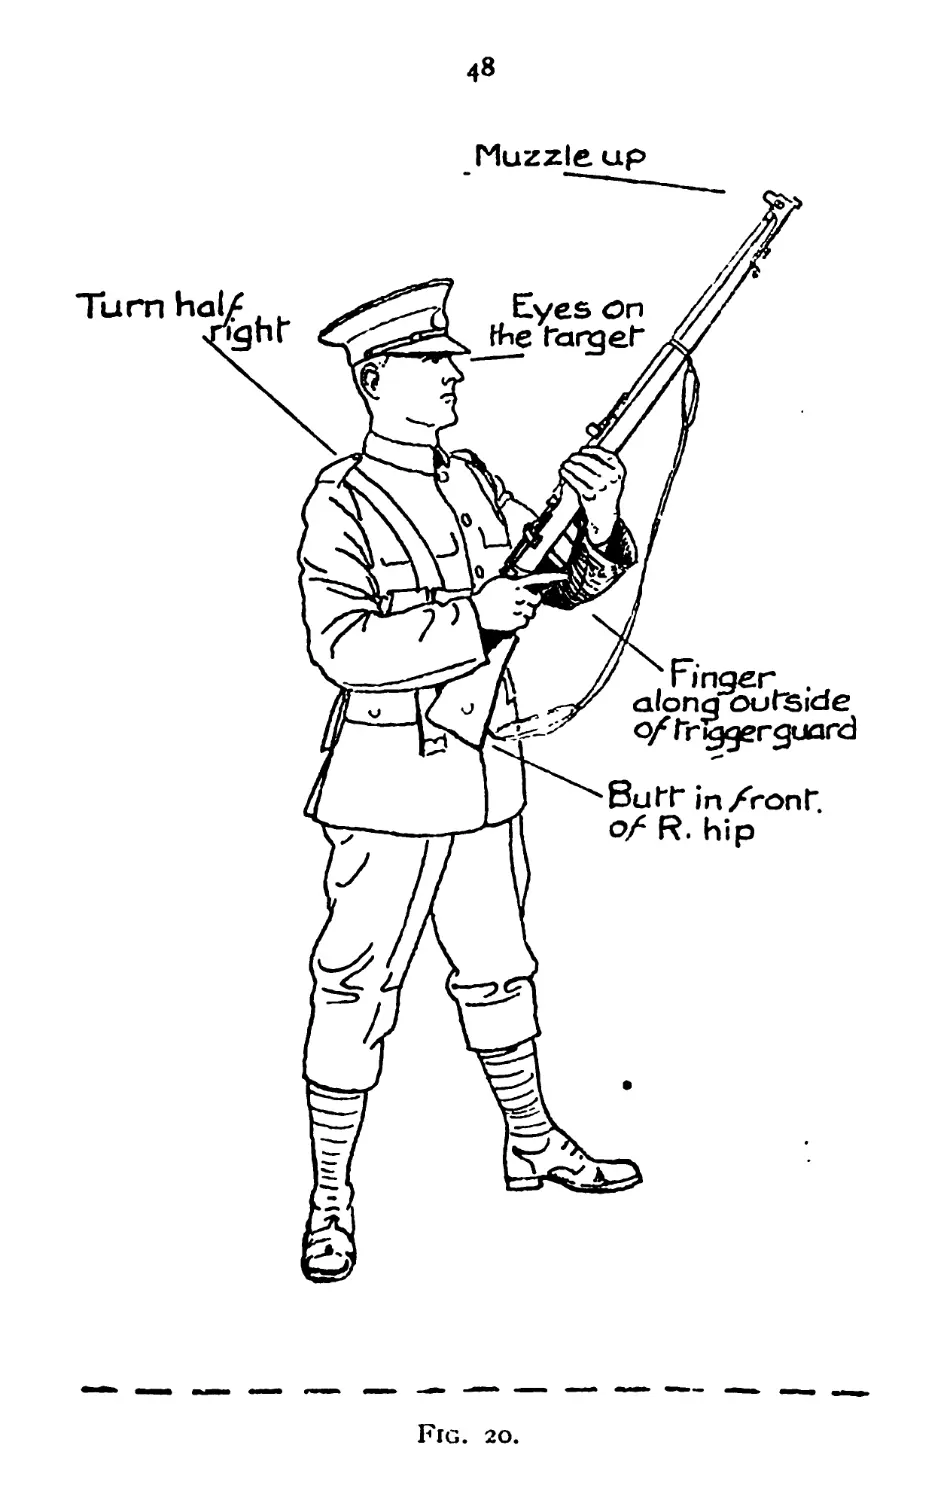
3. Demonstrate, giving detail, with squad imitating :—
Position for loading.
Turn half right.
Carry the left foot to the left so that the body is equally
balanced on both feet. Cant the rifle forward and catch
it at the point of balance with the left hand, the muzzle
pointing upwards, small of the butt just in front of the
hip.
To return to the order : Seize the rifle with the right hand
near the band ; at the same time bring the left foot
back to the right, return to the order and stand at ease.
4. Practise squad.
5. Loading, sight setting, and unloading, as already taught.
Practise squad by word of command.
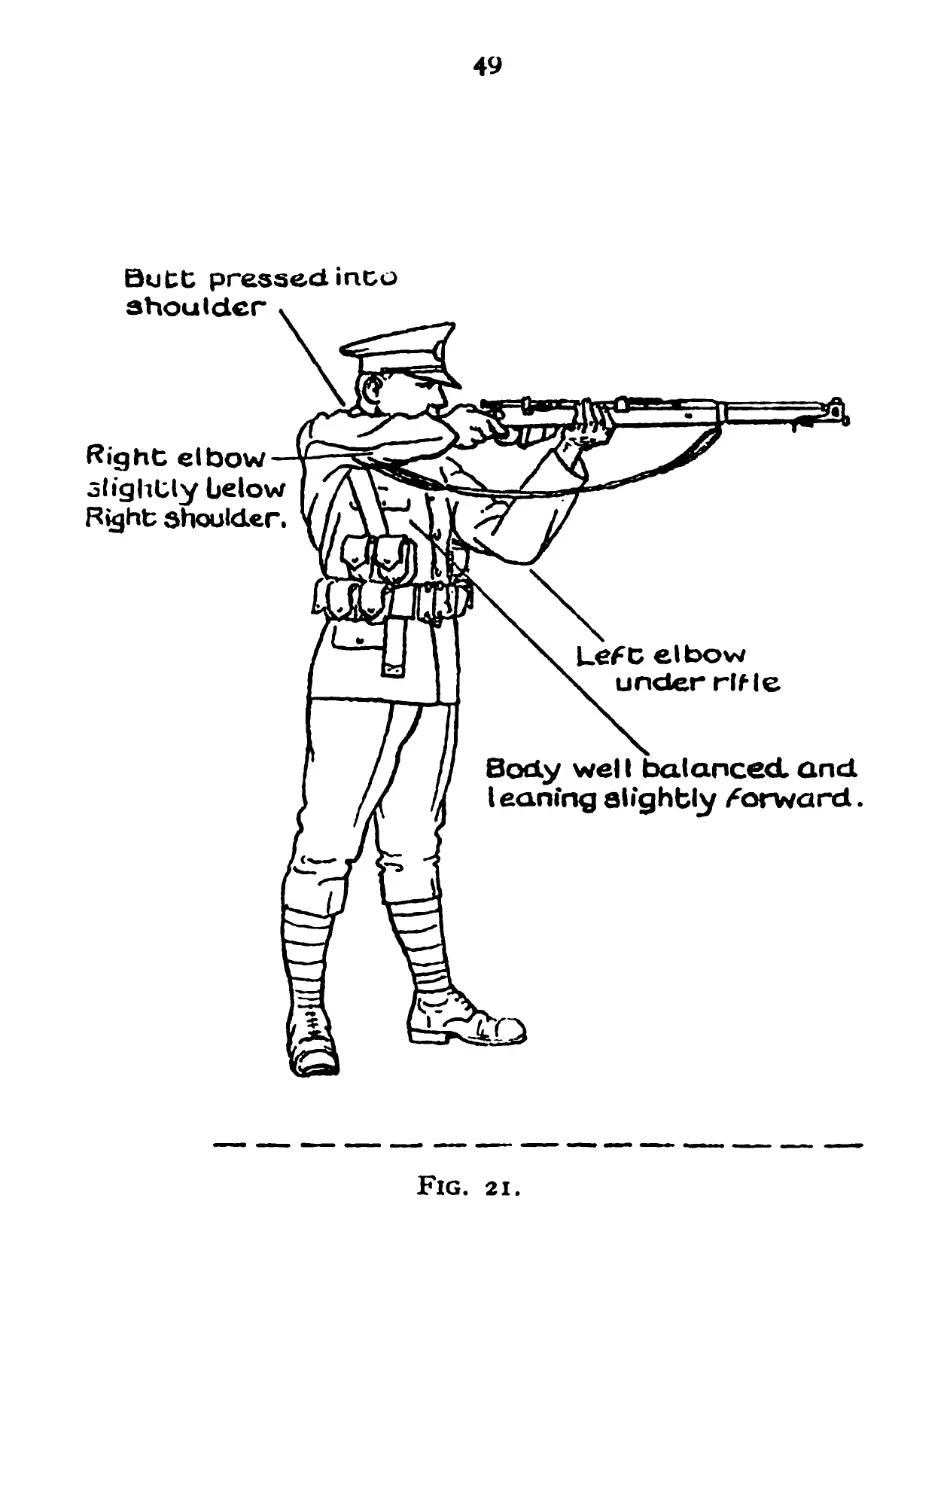
6. Demonstrate holding, aiming, and firing.
7. Practise squad.
8. Practise squad in complete position.
48
Muzzle up
Fig. 20.
49
Fig. 21.
5°
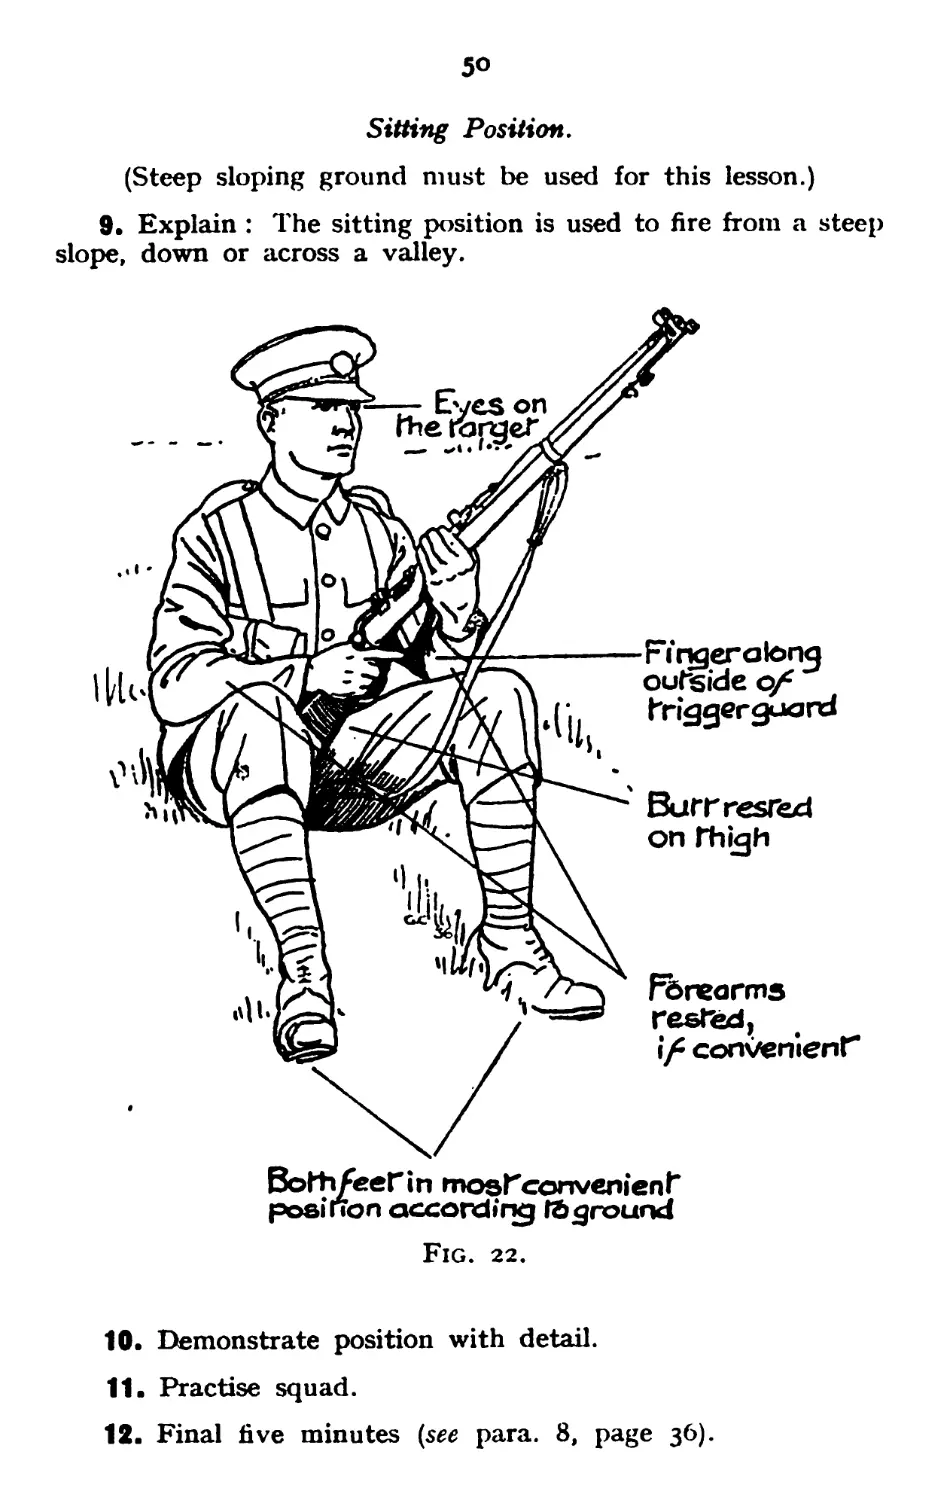
Sitting Position.
(Steep sloping ground must be used for this lesson.)
9. Explain : The sitting position is used to fire from a steep
slope, down or across a valley.
10. Demonstrate position with detail.
11. Practise squad.
12. Final five minutes (see para. 8, page 36).
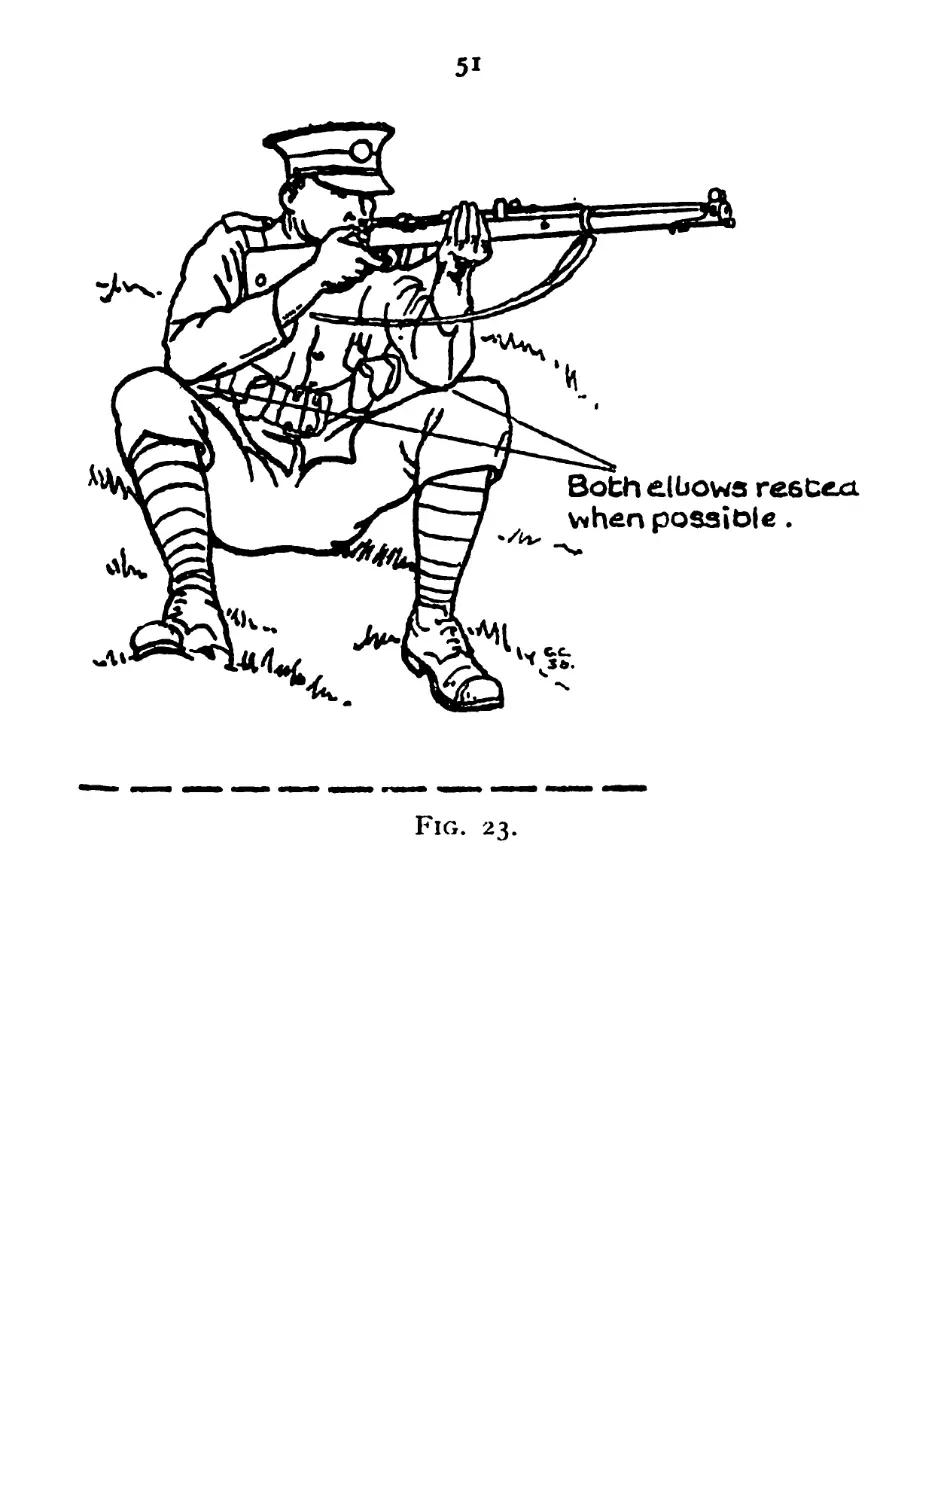
5i
Fig. 23.
52
LEMON 17.—SNAPSHOOTING
Instructor's Notes.
Stores:—
A iming disks and small aiming marks for half the squad.
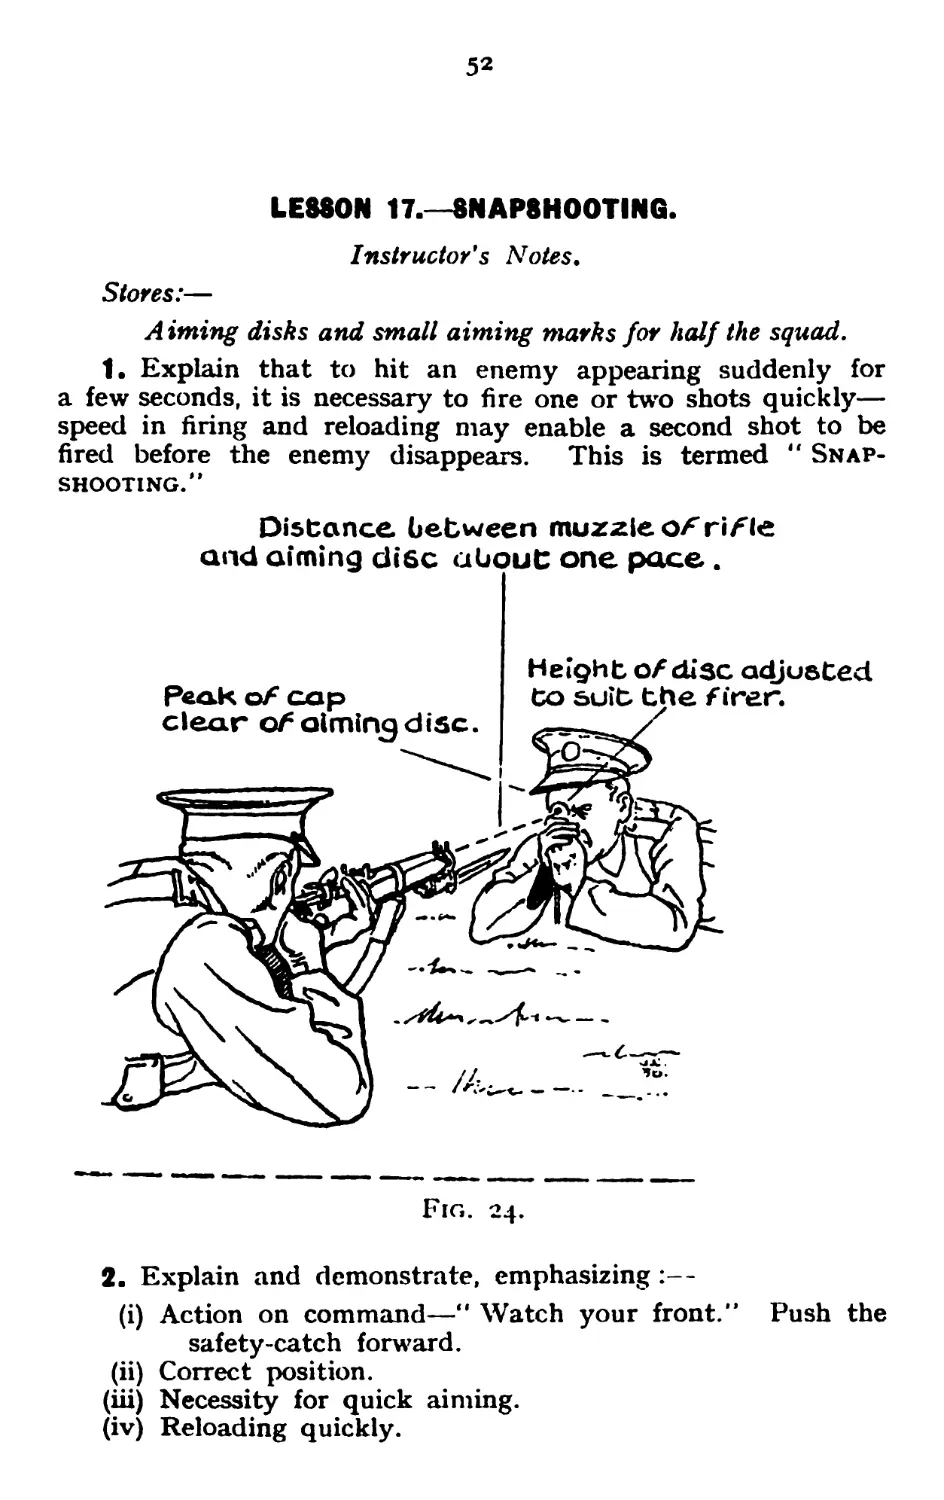
1. Explain that to hit an enemy appearing suddenly for
a few seconds, it is necessary to fire one or two shots quickly—
speed in firing and reloading may enable a second shot to be
fired before the enemy disappears. This is termed “ Snap-
shooting/’
Distance between muzzle oXriЛе
and aiming disc about one pace .
Height of disc adjusted
Co suit the firer.
Fig. 24.
2. Explain and demonstrate, emphasizing :—
(i) Action on command—" Watch your front.” Push the
safety-catch forward.
(ii) Correct position.
(iii) Necessity for quick aiming.
(iv) Reloading quickly.
53
3 • Give conditions of test.
4. Teach squad the method of using the aiming disk and
practise squad in pairs as follows :—
Squad opened in two ranks. Mutual inspection of arms
and pouches in pairs. Ranks facing each other at
six paces. Dummies will not be used. Men of one
rank, using aiming disk, give the order “ Fire ” and
check the aims of men of the other rank. Instructor
occasionally checks individuals with aiming disk. Fix
bayonets and introduce a time-limit of five seconds as
progress is made.
5. Final five minutes (see para. 8, page 36).
54
LESSON IS.—SNAPSHOOTING (continued).
Instructor's Notes.
Stores :—
Small snapshooting targets at 100 yards.
Large snapshooting targets at 300 yards.
Silhouette targets, Figs. 3 and 4 at ranges up to 300 yards.
Fatiguemen to work targets on prearranged signal.
Signal flag.
Representative targets for Territorial Army if the lesson can-
not be given at proper distances.
A s progress is made, exposure will be reduced from 5 seconds
to 3 seconds and then increased to 10 and 6 seconds so that
two shots can be fired. Exposures will be from different
places. Bayonets will occasionally be fixed.
Fatiguemen may be used to represent an enemy in the later
stages, moving and disappearing as previously rehearsed.
1. Explain the arrangement of exposures and that squad
will fire at any targets that appear.
2. Order squad to *' Load .... hundred/’ Watch your
front.”
3. Signal exposure of targets in the order small, large, and
silhouette, as previously arranged.
4. Final five minutes (see para. 8, page 36).
55
LESSON IS.—RAPID FIRE.
Instructor’s Notes.
Stores:—
Targets for each man.
Aiming disks for half the squad.
1. Explain :—
Rapid fire is the maximum effort of the rifleman, and is
only required for short but critical periods. For this reason
every effort must be made to reach a high standard.
2. Demonstrate :—
Rapid fire (io rounds) and emphasize the following :—
Rifle into the aim on the word ** Rapid.*’
Butt into the shoulder except when loading with a fresh
charger.
No declaration of aim.
No sacrifice of accuracy for speed.
Apply safety-catch after firing the number of rounds
ordered or on command " Stop.”
3. Give conditions of test.
4. Practise squad with aiming disks in pairs as in Lesson 17.
Fix bayonets as progress is made.
5. Practise squad with dummies without aiming disks,
gradually working up to a speed of 10 rounds in 40 seconds.
6. Final five minutes (see para. 8, page 36).
56
LESSON 20.—FIRING BEHIND COVER—LYING POSITION.
Instructor’s Notes.
A rrange for suitable cover to be available.
** Standing load ** and ground arms.
Assemble squad beside cover.
Avoid precise drill movements.
Do not insist on exact similarity of action on the part of
individuals.
Criticism and correction of positions, actions, &c., will be
made as far as possible by interrogation, to encourage those
under instruction to use their intelligence.
Js progress is made, bayonets will be fixed.
When all positions behind cover have been learnt, squad
should be given a demonstration of using cover incorrectly
and correctly in all positions. Squad should face the cover
in the lying position and note the amount of movement and
exposure.
1. Explain :—
(i) On service it is necessary to make use of ground to
give protection and concealment. Every soldier is
therefore taught to select positions behind cover and
to use his weapons to the best advantage from such
positions. When circumstances permit, all move-
ments which entail exposure should be carried out
cautiously.
(ii) The types of cover which may be met with on service
are :—
Folds in the ground.
Ranks,
Hedgerows.
Trees and bushes.
Shell-holes.
Walls.
Rocks.
Trenches.
Cover may be continuous or isolated, and may be cover
from fire or only cover from view.
Good cover should :—
Permit a free use of the weapon.
Have a good field of fire.
Be bullet-proof.
Be inconspicuous.
Be easy to advance from.
57
(iii) The main conditions to be observed by a firer when
using cover are :—
Modification of position to suit the cover so that
he can see his target and use his rifle effectively.
No undue movement or exposure.
Correct resting of the rifle (see Fig. 29).
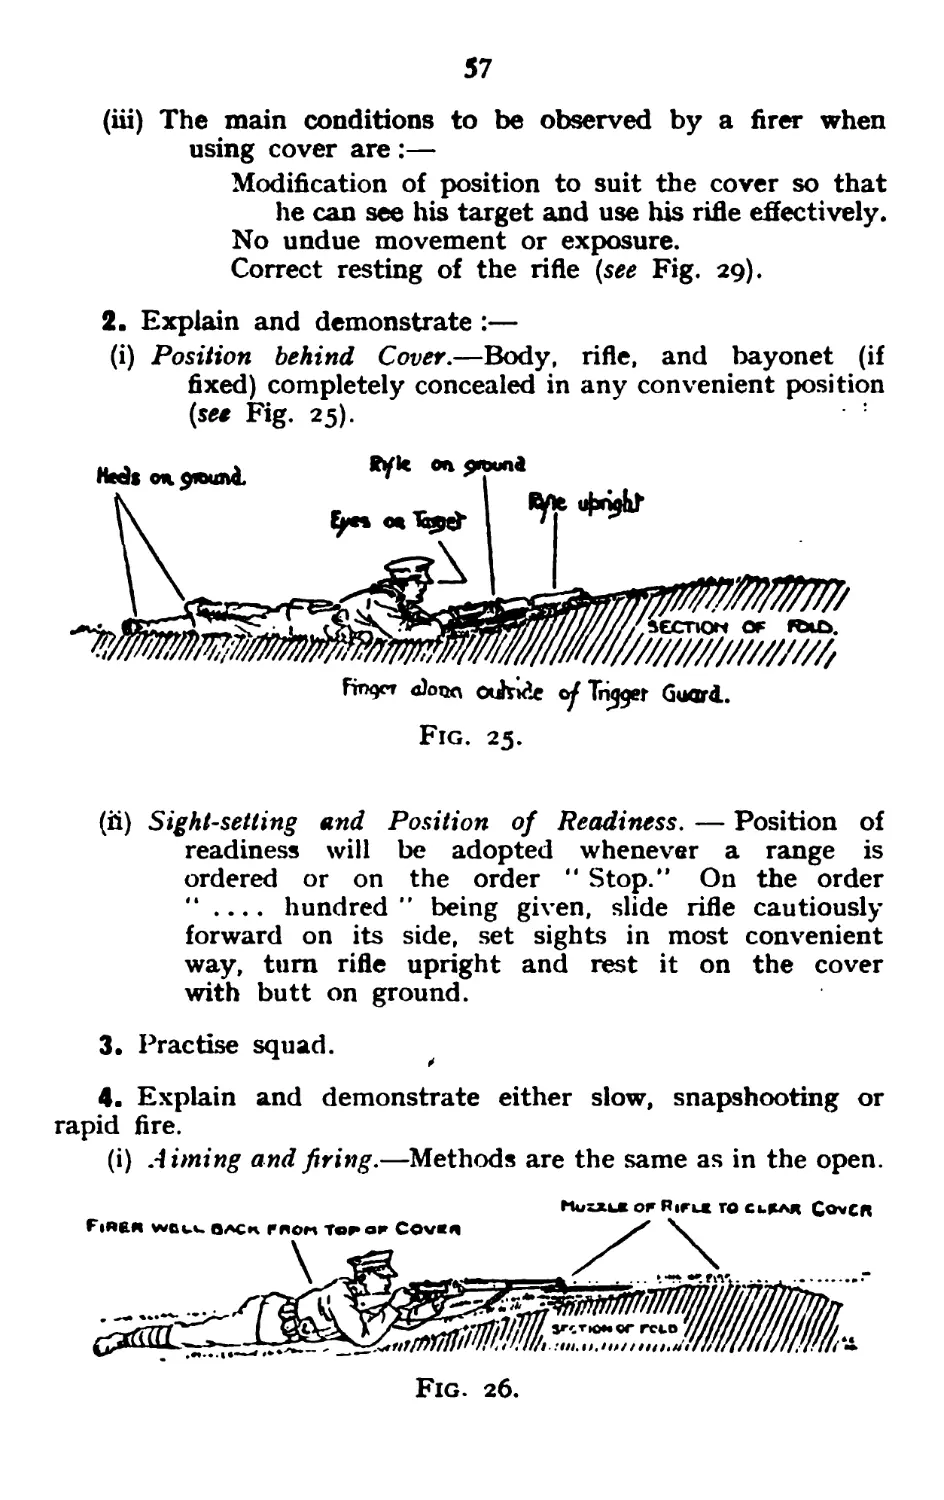
2. Explain and demonstrate :—
(i) Position behind Cover.—Body, rifle, and bayonet (if
fixed) completely concealed in any convenient position
(see Fig. 25).
Finger oJoqc ouhide Trigger Guard..
Fig. 25.
(ii) Sight-setting and Position of Readiness. — Position of
readiness will be adopted whenever a range is
ordered or on the order ” Stop/’ On the order
” .... hundred” being given, slide rifle cautiously
forward on its side, set sights in most convenient
way, turn rifle upright and rest it on the cover
with butt on ground.
3. Practise squad.
4. Explain and demonstrate either slow, snapshooting or
rapid fire.
(i) Aiming and firing.—Methods are the same as in the open.
MuiXLI OF RlFL* ГО СЬ£АД COVCR
Fig. 26.
58
(ii) Position of Observation.—This enables a man to watch
his front in a comfortable position. Rifle held as in
position behind cover.
5. Practise squad slow fire, snapshooting, and rapid firing
by word of command.
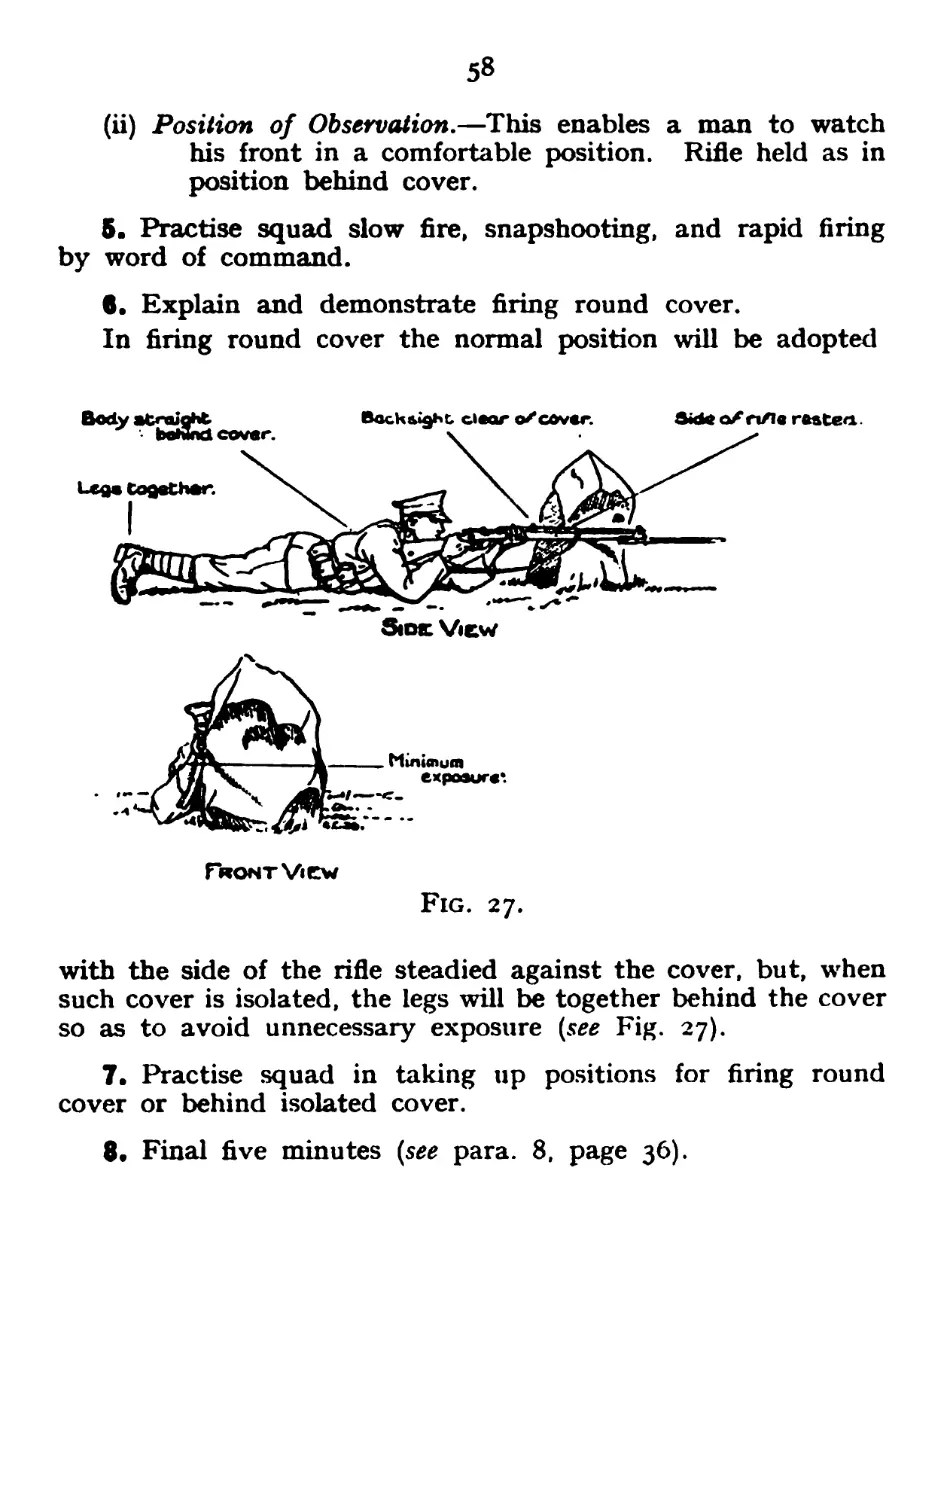
6. Explain and demonstrate firing round cover.
In firing round cover the normal position will be adopted
Front View
Fig. 27.
with the side of the rifle steadied against the cover, but, when
such cover is isolated, the legs will be together behind the cover
so as to avoid unnecessary exposure (see Fig. 27).
7. Practise squad in taking up positions for firing round
cover or behind isolated cover.
8. Final five minutes (see para. 8, page 36).
59
LESSON 21.—FIRING BEHIND COVER—KNEELING OR
SITTING POSITION.
Instructor’s Notes,
As for Lesson 20.
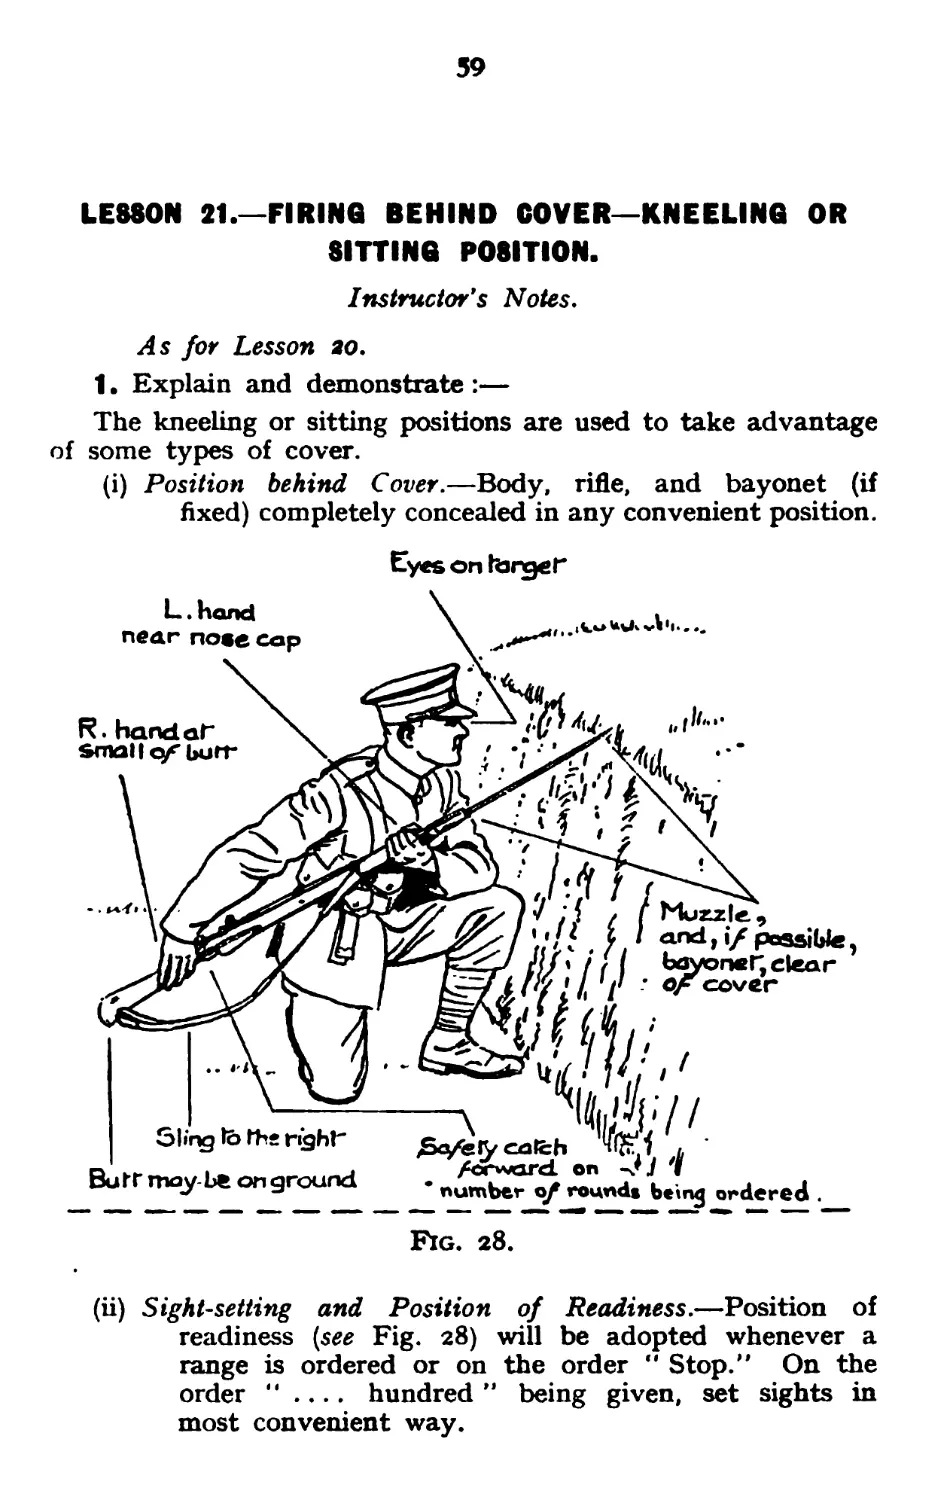
1. Explain and demonstrate :—
The kneeling or sitting positions are used to take advantage
of some types of cover.
(i) Position behind Cover.—Body, rifle, and bayonet (if
fixed) completely concealed in any convenient position.
Eyes on farmer
Fig. 28.
(ii) Sight-setting and Position of Readiness.—Position of
readiness (see Fig. 28) will be adopted whenever a
range is ordered or on the order " Stop." On the
order “ .... hundred ” being given, set sights in
most convenient way.
6о
2. Practise squad.
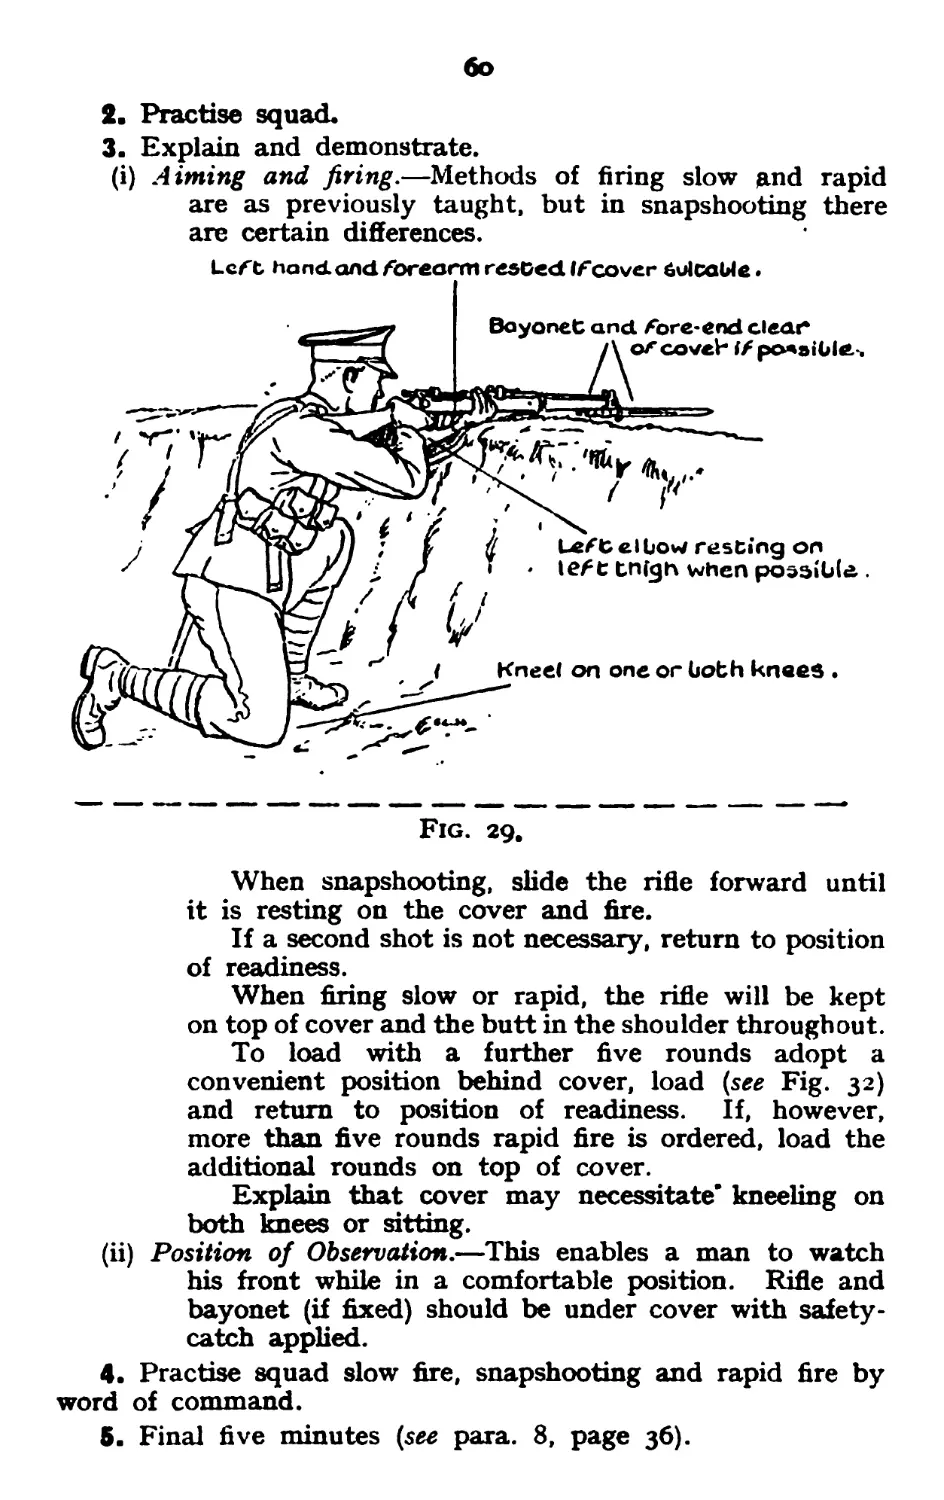
3. Explain and demonstrate.
(i) Aiming and firing.—Methods of firing slow and rapid
are as previously taught, but in snapshooting there
are certain differences.
Left hand, and forearm reseed If cover 6и1саЫе.
Fig. 29.
When snapshooting, slide the rifle forward until
it is resting on the cover and fire.
If a second shot is not necessary, return to position
of readiness.
When firing slow or rapid, the rifle will be kept
on top of cover and the butt in the shoulder throughout.
To load with a further five rounds adopt a
convenient position behind cover, load (see Fig. 32)
and return to position of readiness. If, however,
more than five rounds rapid fire is ordered, load the
additional rounds on top of cover.
Explain that cover may necessitate’ kneeling on
both knees or sitting.
(ii) Position of Observation.—This enables a man to watch
his front while in a comfortable position. Rifle and
bayonet (if fixed) should be under cover with safety-
catch applied.
4. Practise squad slow fire, snapshooting and rapid fire by
word of command.
5. Final five minutes (see para. 8, page 36).
LESSON 22.—FIRING BEHIND COVER—STANDING POSITION.
Instructor's Notes,
As for Lesson 20.
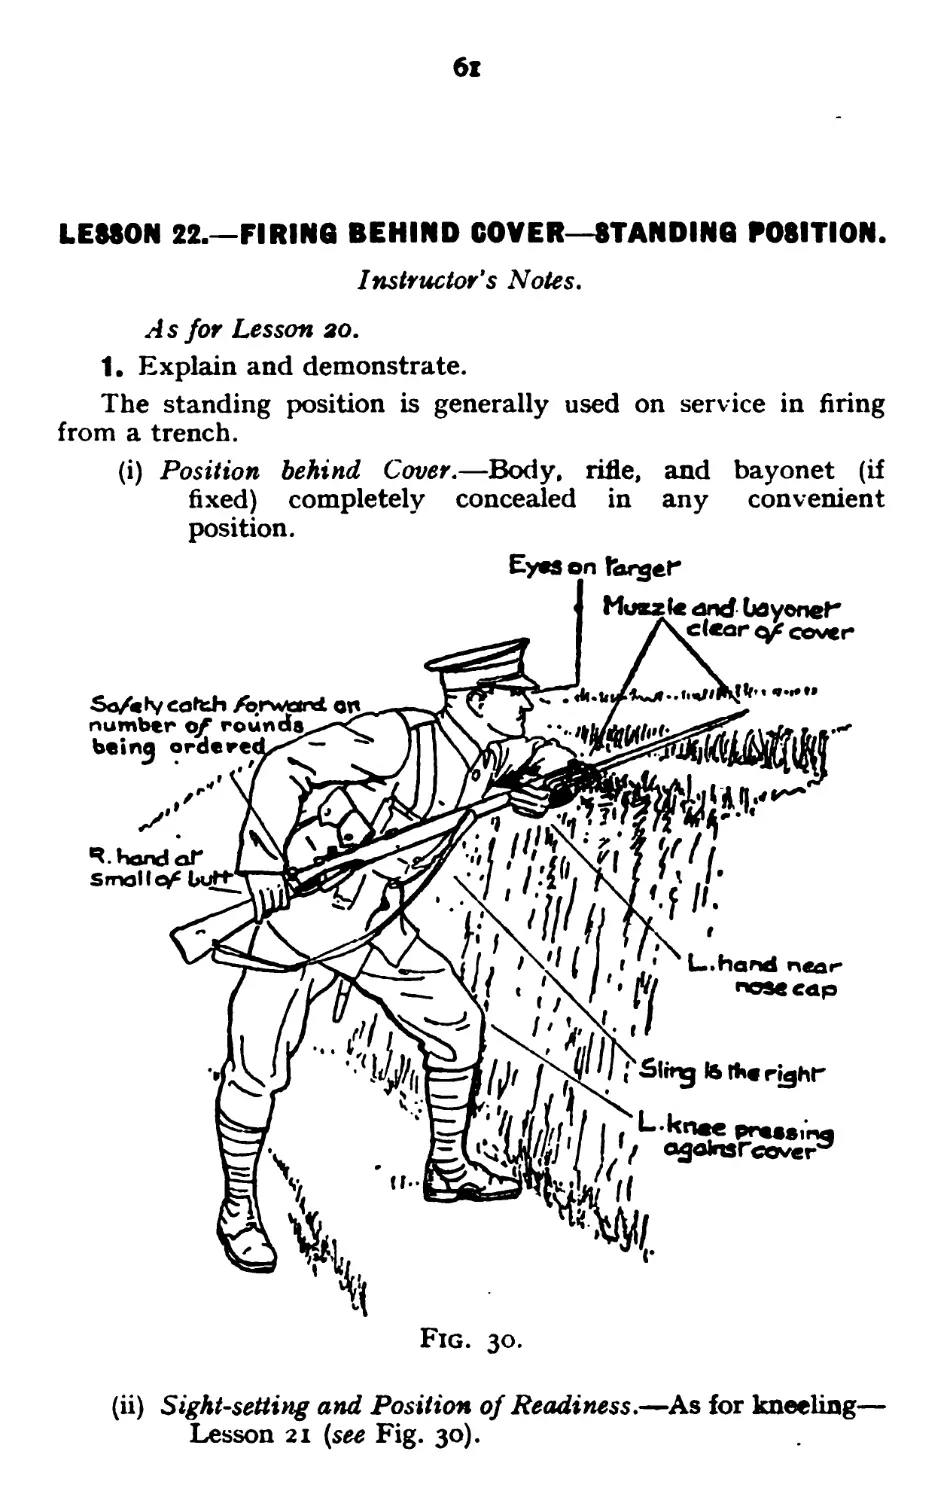
1. Explain and demonstrate.
The standing position is generally used on service in firing
from a trench.
(i) Position behind Cover.—Body, rifle, and bayonet (if
fixed) completely concealed in any convenient
position.
Fig. 30.
(ii) Sight-setting and Position of Readiness.—As for kneeling—
Lesson 21 (see Fig. 30).
62
2. Practise squad.
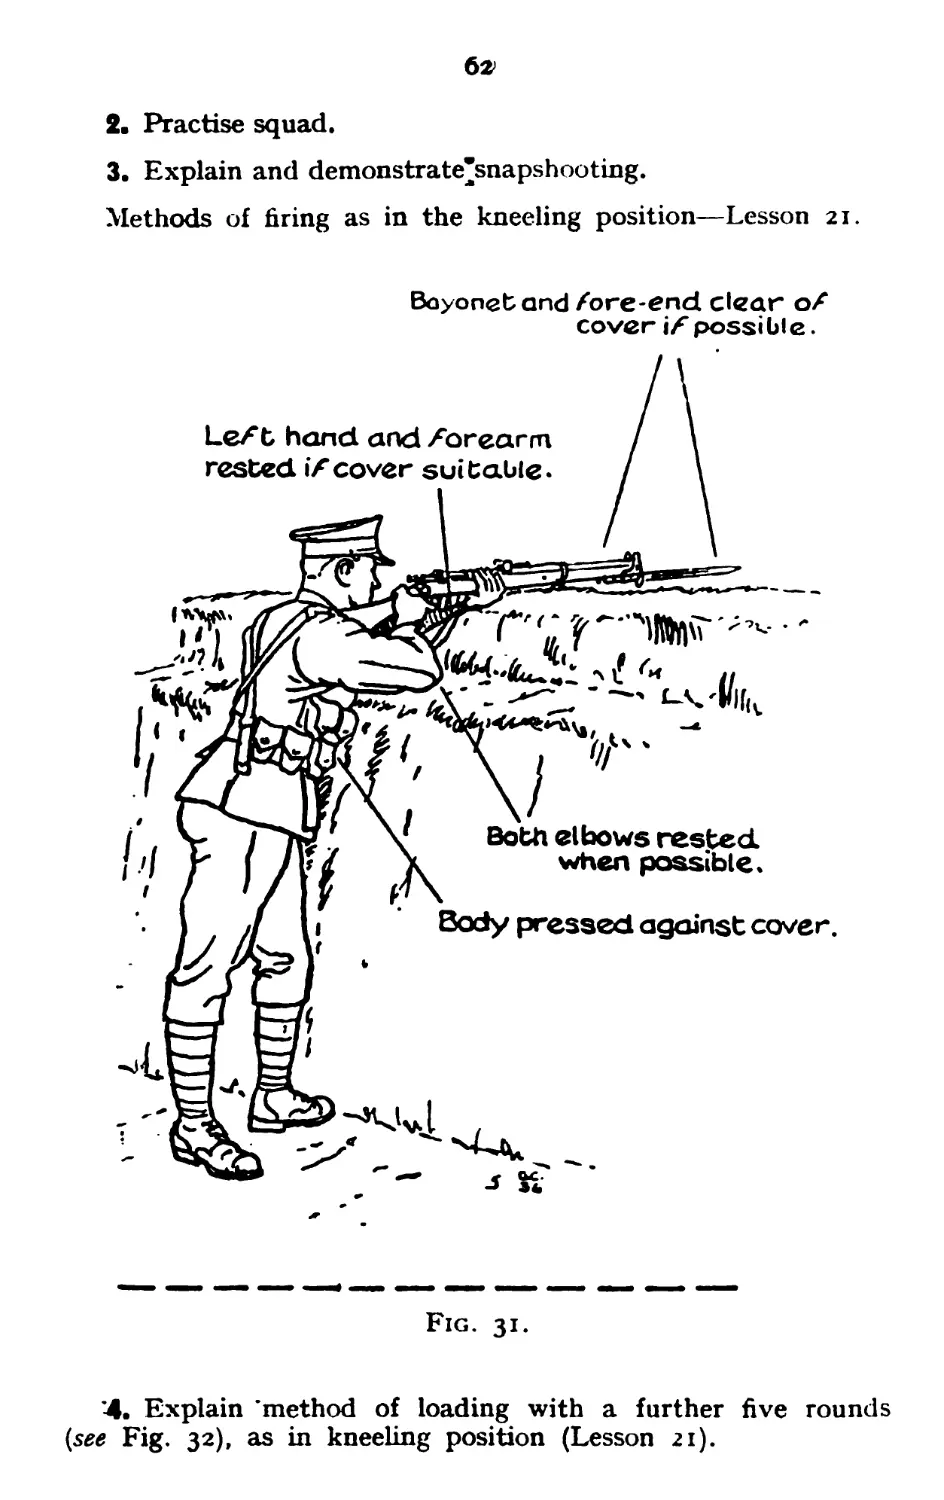
3. Explain and demonstrate’snapshooting.
Methods of firing as in the kneeling position—Lesson 21.
Bayonet and Zore-end clear oX
cover iX possi Ы e.
Fig. 31.
’4. Explain ’method of loading with a further five rounds
(see Fig. 32), as in kneeling position (Lesson 21).
бз
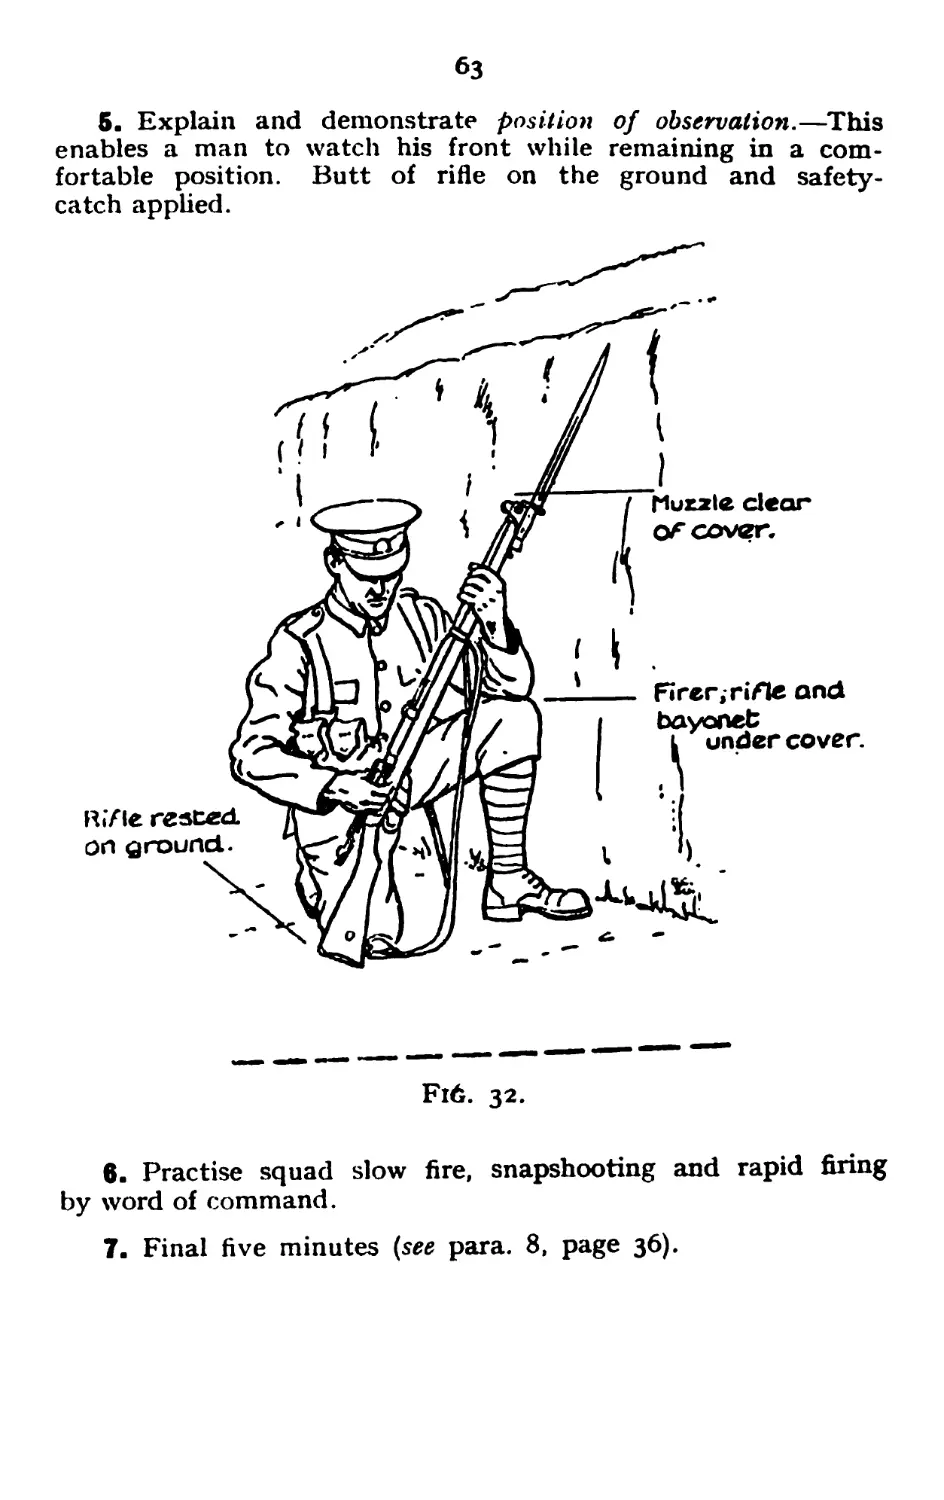
5. Explain and demonstrate position of observation.—This
enables a man to watch his front while remaining in a com-
fortable position. Butt of rifle on the ground and safety-
catch applied.
F16. 32.
6. Practise squad slow fire, snapshooting and rapid firing
by word of command.
7. Final five minutes (see para. 8, page 36).
64
SECTION 4.—FIRE-DI8CIPLINE TRAINING.
1. Object.
This subject will be introduced as soon as firing positions in
the open and behind cover have been taught, with the object
of producing rapid and accurate obedience to all orders and a
correct and intelligent use of the rifle in all circumstances.
2. Method.
(I) The lesson in this subject must be repeated frequently.
It may be carried out collectively, although it is
particularly for training the individual. It should
consist of a simple exercise to teach accurate and
quick obedience to fire orders, and to develop the
accurate use of weapons.
(ii) The lesson will be given concurrently with other lessons
in elementary training on which it Is based, namely:
Use of the rifle in the open and behind cover.
Visual training and recognition.
Judging distance.
Rapid fire and snapshooting.
Range practices on miniature, 30 yards and open
ranges.
Anti-gas training.
(iii) A supposed position of the enemy will always be pointed
out. The position of the instructor must be that of
the fire-unit commander in battle until he has com-
pleted his fire orders. He will then move about to
check faults. Individuals are responsible for recog-
nizing the target.
(iv) Standing, kneeling, and sitting positions will only be
practised under conditions under which they would
be used.
(v) Rapid fire should never be ordered or allowed, unless
the target justifies its use.
(vi) Bayonets will normally be fixed when operating within
300 yards of the enemy, unless instructions are issued
to the contrary.
<*5
LEB80N 23.—INDIVIDUAL FIRE-DISCIPLINE TRAINING.
Instructor's Notes,
(See page 64 to find the stage at which this lesson should be
introduced.)
The normal firing position will be lying, unless other orders
are given.
Select a supposed enemy position at a suitable range.
Extend squad.
As progress is made, each man will use existing cover
and adapt his position to it.
1. At the Halt (with Dummies).—Easy service aiming marks
will be used and ranges given must be approximately correct.
Order “ Load ” and give a fire order.
Check squad, paying attention to the following points:—
Position adopted by the firer, quick manipulation of bolt,
loading, safety-catch, and buttoning of pouch.
Correct sight-setting.
Recognition of targets.
Difference between rapid, slow, and snapshooting.
Action on " Stop ” and " Unload.’*
Alertness of the men in attending to fresh orders.
Count the number of rounds.
2. On the move (no Dummies) :—
After a short advance give a fire order.
Check as in para. 1 above. Additional points are:—
Keeping proper extensions.
Cautious preparatory movement before getting up.
Getting down quickly.
3. Repeat 1 and 2 as necessary.
66
ТЕ8Т8 OF ELEMENTARY TRAINING.
General.
There are nine tests. Of these, certain must be carried out
by testing one man at a time; others may be carried out
collectively, and this should be done whenever possible.
During instruction in aiming and firing, the attention of
recruits will be drawn to these tests, so that they will realize
what standard will eventually be expected from them.
Particular attention will be paid to the correct firing positions
before each test is begun.
No. 1.—Care of the rifle and ammunition.—Each man will
be asked four questions.
Standard.—Three out of four to be answered correctly.
NO. 2.—Adjustment Of sights.—Four distances will be named.
The position of the individual being tested will be varied^z.^.,
lying and kneeling in the open. Bayonet fixed, except for
recruits.
Variations between distances ordered will not exceed 400
yards.
Standard.—Three correct adjustments out of four. Each
within three seconds, time to be taken from the last sound of
the range given to the moment when the slide is fixed.
No. 3.—Aiming.*—This test is carried out from aiming-
rests. Aims will be laid at:—
(a) Small target 200 yards (two aims).
(b) Figure 3 silhouette 200 yards (two aims).
On the figure targets the aim will be considered correct if
it is approximate to the centre of the target.
Standard.—Three aims correct out of four.
No. 4.—Trigger-pressing.—Trigger-pressing will be tested by
means of the aiming disk. Accuracy of aim and correct trigger
pressure are essential. Dummies will not be used.
Standard.—Three correct trigger pressures out of four.
No. 5.—Aiming-off
A. Regular Army.
The test will be carried out with rifles and aiming-rests,
using small target and Fig. 2 silhouette up to 300 yards.
• In the Territorial Army this test may be carried out on representative targets.
67
Men will be ordered to aim their rifles at different points
of aim in the case of the small target (see Lesson 9) or target
widths in the case of the Fig. 2 silhouette target.
Two aims will be laid at each target.
Limit.—Small target—edge of target.
In checking, the aim will be considered correct if it is
approximate to the centre of the auxiliary.
Standard.—Three correct aims out of four.
B. Territorial Army.
The test will be carried out as for the Regular Army, except
that representative targets may be used at 25 to 15 yards
according to visibility and conditions.
No. 6.—Snapshooting.—The man is required to bring the
rifle from the loading position to the shoulder, to align the
sights on an aiming disk held to the eye, to press the trigger
and instantly reload in the shoulder. Unless these actions are
completed, he will fail.
The time allowed from the order 11 Fire *' until the trigger
is pressed will be 4 seconds. For timing, a stop-watch or
ordinary watch with a second hand will be used. Position—
lying. Bayonet will not be fixed. Dummies will not be used.
Standard.—Three out of four aims to be correct.
No. 7.—Rapid firing.—The man (rifle loaded with 5 rounds)
on the command " Rapid ” comes into the aim, and on the
order " Fire ” will fire 10 rounds at a target; the pouch will
be buttoned up when each charger is withdrawn. On com-
pletion of the 10 rounds he will load with a fresh charger,
apply safety-catch, and button up the pouch. All actions to be
completed in one minute from tfie order 11 Fire.” Bayonets
fixed, except for recruits. Aim will be checked with an aim
corrector.
Standard.—Eight shots to be correct out of ten.
No. 8.—Firing positions behind cover.—Bayonets fixed.
Inspections in all positions behind suitable cover. Those who
make serious faults will fail.
No. 9.—Recognition (to be carried out in the open whenever
possible) :—
The men being tested should each have an aiming-rest.
The instructor will describe some suitable target.
68
The men aim their rifles at the point which they recognize
from the description. Four targets will be indicated for every
man tested and each method of indication (see Pamphlet No. 2)
will be employed.
Standard.—Three out of four points described must be
recognized.
For test in connection with the adjustment of the respirator, ms Defence Against
Gas, 1935, Sec. 49, 3.
69
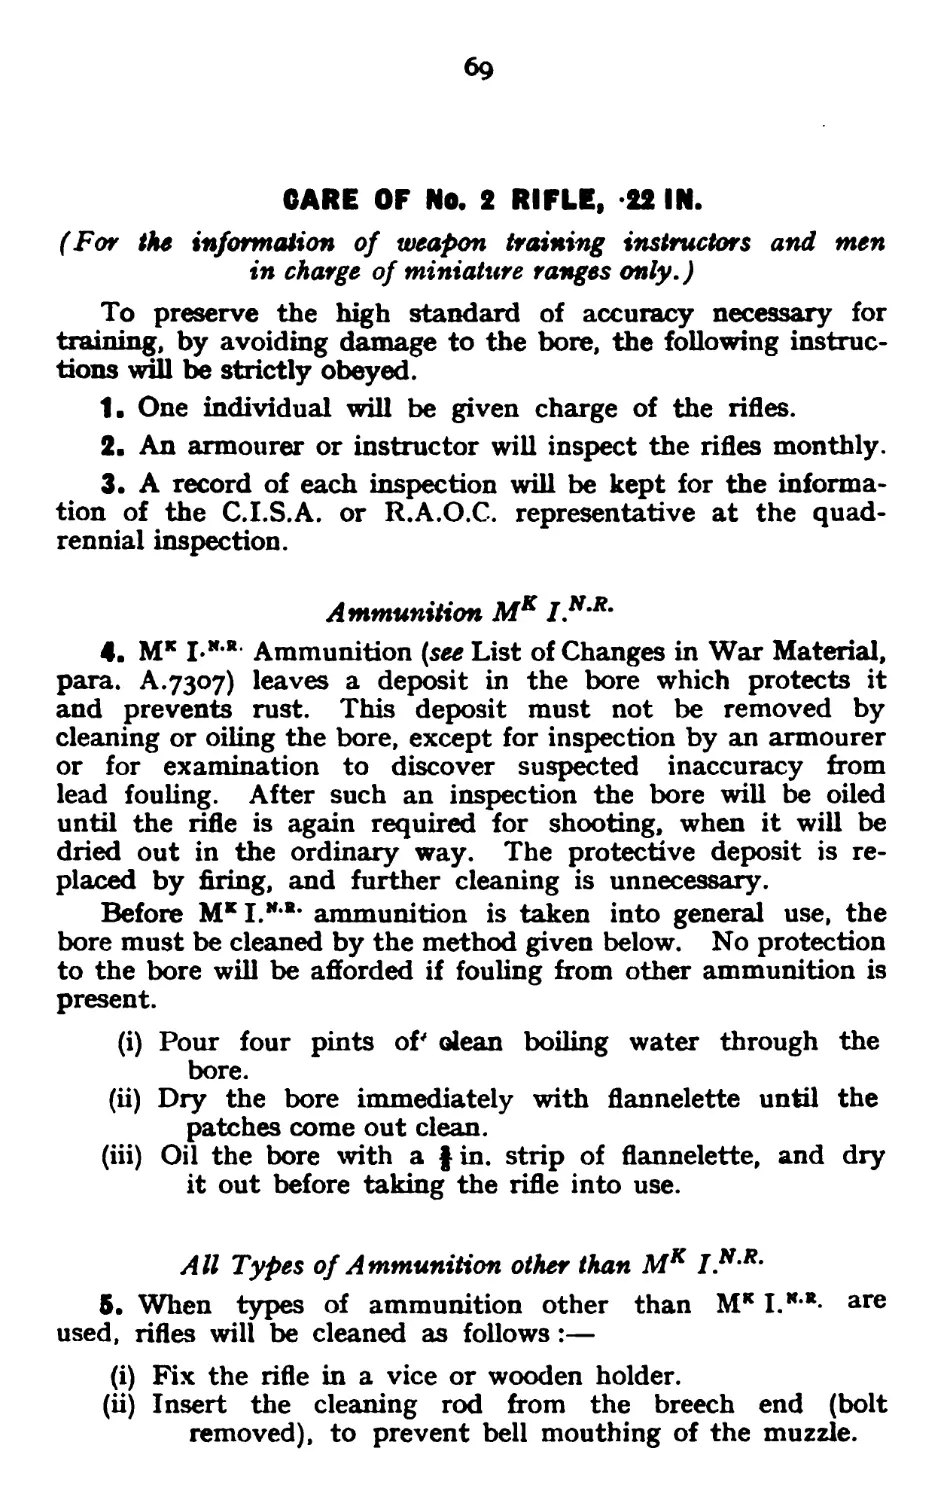
CARE OF NO. 2 RIFLE, 22 IN.
(For the information of weapon training instructors and men
in charge of miniature ranges only.)
To preserve the high standard of accuracy necessary for
training, by avoiding damage to the bore, the following instruc-
tions will be strictly obeyed.
1. One individual will be given charge of the rifles.
2. An armourer or instructor will inspect the rifles monthly.
3. A record of each inspection will be kept for the informa-
tion of the C.I.S.A. or R.A.O.C. representative at the quad-
rennial inspection.
Ammunition Мк
4. MK I-*-* Ammunition (see List of Changes in War Material,
para. A.7307) leaves a deposit in the bore which protects it
and prevents rust. This deposit must not be removed by
cleaning or oiling the bore, except for inspection by an armourer
or for examination to discover suspected inaccuracy from
lead fouling. After such an inspection the bore will be oiled
until the rifle is again required for shooting, when it will be
dried out in the ordinary way. The protective deposit is re-
placed by firing, and further cleaning is unnecessary.
Before ammunition is taken into general use, the
bore must be cleaned by the method given below. No protection
to the bore will be afforded if fouling from other ammunition is
present.
(i) Pour four pints of' olean boiling water through the
bore.
(ii) Dry the bore immediately with flannelette until the
patches come out clean.
(iii) Oil the bore with a |in. strip of flannelette, and dry
it out before taking the rifle into use.
A U Types of A mmunition other than MK I.1 (ii)*'*'
5. When types of ammunition other than M* !.*•*• are
used, rifles will be cleaned as follows:—
(i) Fix the rifle in a vice or wooden holder.
(ii) Insert the cleaning rod from the breech end (bolt
removed), to prevent bell mouthing of the muzzle.
71
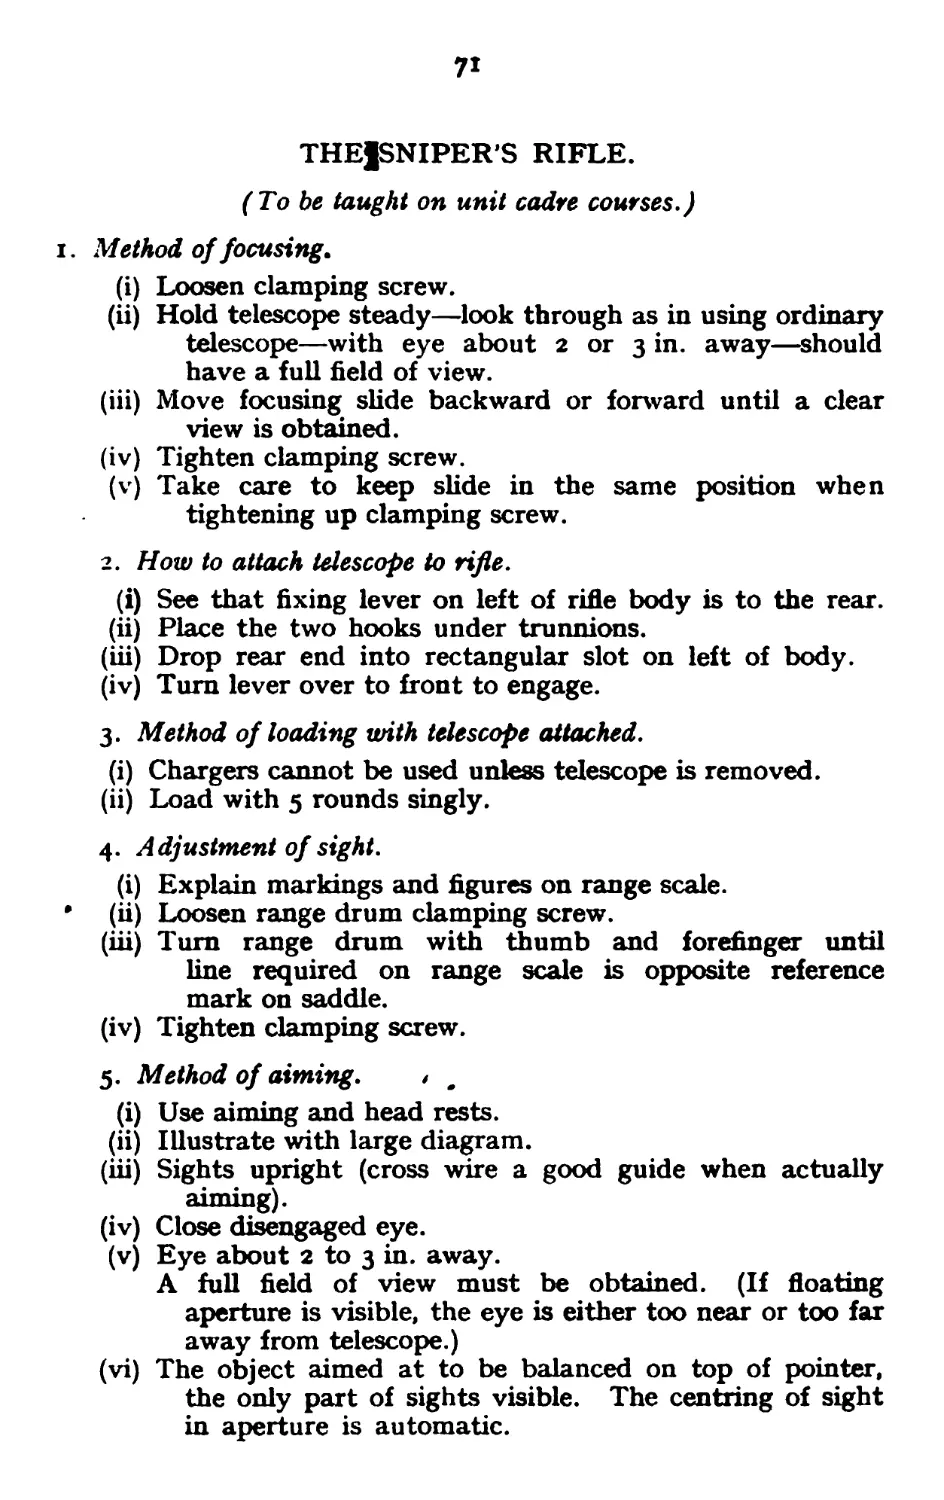
THEJSNIPER’S RIFLE.
(To be taught on unit cadre courses.)
i. Method of focusing.
(i) Loosen clamping screw.
(ii) Hold telescope steady—look through as in using ordinary
telescope—with eye about 2 or 3 in. away—should
have a full field of view.
(iii) Move focusing slide backward or forward until a clear
view is obtained.
(iv) Tighten clamping screw.
(v) Take care to keep slide in the same position when
tightening up clamping screw.
2. How to attach telescope to rifle.
(i) See that fixing lever on left of rifle body is to the rear.
(ii) Place the two hooks under trunnions.
(iii) Drop rear end into rectangular slot on left of body.
(iv) Turn lever over to front to engage.
3. Method of loading with telescope attached.
(i) Chargers cannot be used unless telescope is removed.
(ii) Load with 5 rounds singly.
4. Adjustment of sight.
(i) Explain markings and figures on range scale.
• (ii) Loosen range drum clamping screw.
(iii) Turn range drum with thumb and forefinger until
line required on range scale is opposite reference
mark on saddle.
(iv) Tighten clamping screw.
5. Method of aiming. < .
(i) Use aiming and head rests.
(ii) Illustrate with large diagram.
(iii) Sights upright (cross wire a good guide when actually
aiming).
(iv) Close disengaged eye.
(v) Eye about 2 to 3 in. away.
A full field of view must be obtained. (If floating
aperture is visible, the eye is either too near or too far
away from telescope.)
(vi) The object aimed at to be balanced on top of pointer,
the only part of sights visible. The centring of sight
in aperture is automatic.
72
Methods of adjusting Errors of Telescope.
i. For deflection.
(i) Remove ray shade.
(ii) Slacken the three screws fixing prism cell;
With adjusting key turn cell containing prism as required—
viz., clockwise if rifle is shooting to the right; anti-clockwise
if rifle is shooting to the left.
By turning the cell the prism is also turned, thus bending
the ray of light. The sight itself is not moved.
One division on adaptor gives approximately 5 in. for each
100 yards.
2. For elevation—i.e., incorrect reading of range scale.
Example.—Rifle shooting correct at 200 yards range with
300 yards line opposite reference mark on saddle.
To get sighting elevation and reading to coincide :—
(i) See that range drum clamping screw is securely
tightened.
(ii) Loosen the two small twin screws securing washer in
centre of range scale ring.
(iii) Turn range scale ring until correct reading is obtained.
(iv) Tighten up twin screws.
Note.—When a lateral adjustment is made, the accuracy of
the range scale for elevation should be checked, as it may
happen that the elevation was altered during the lateral adjust*
ment. In adjusting, therefore, it is important that the adjust-
ment for lateral deflection should be made first (if necessary) ;
then the adjustment for elevation should be made.
E. V. Paul, Government Printer, Wellington.
[8,500/12/40—13366