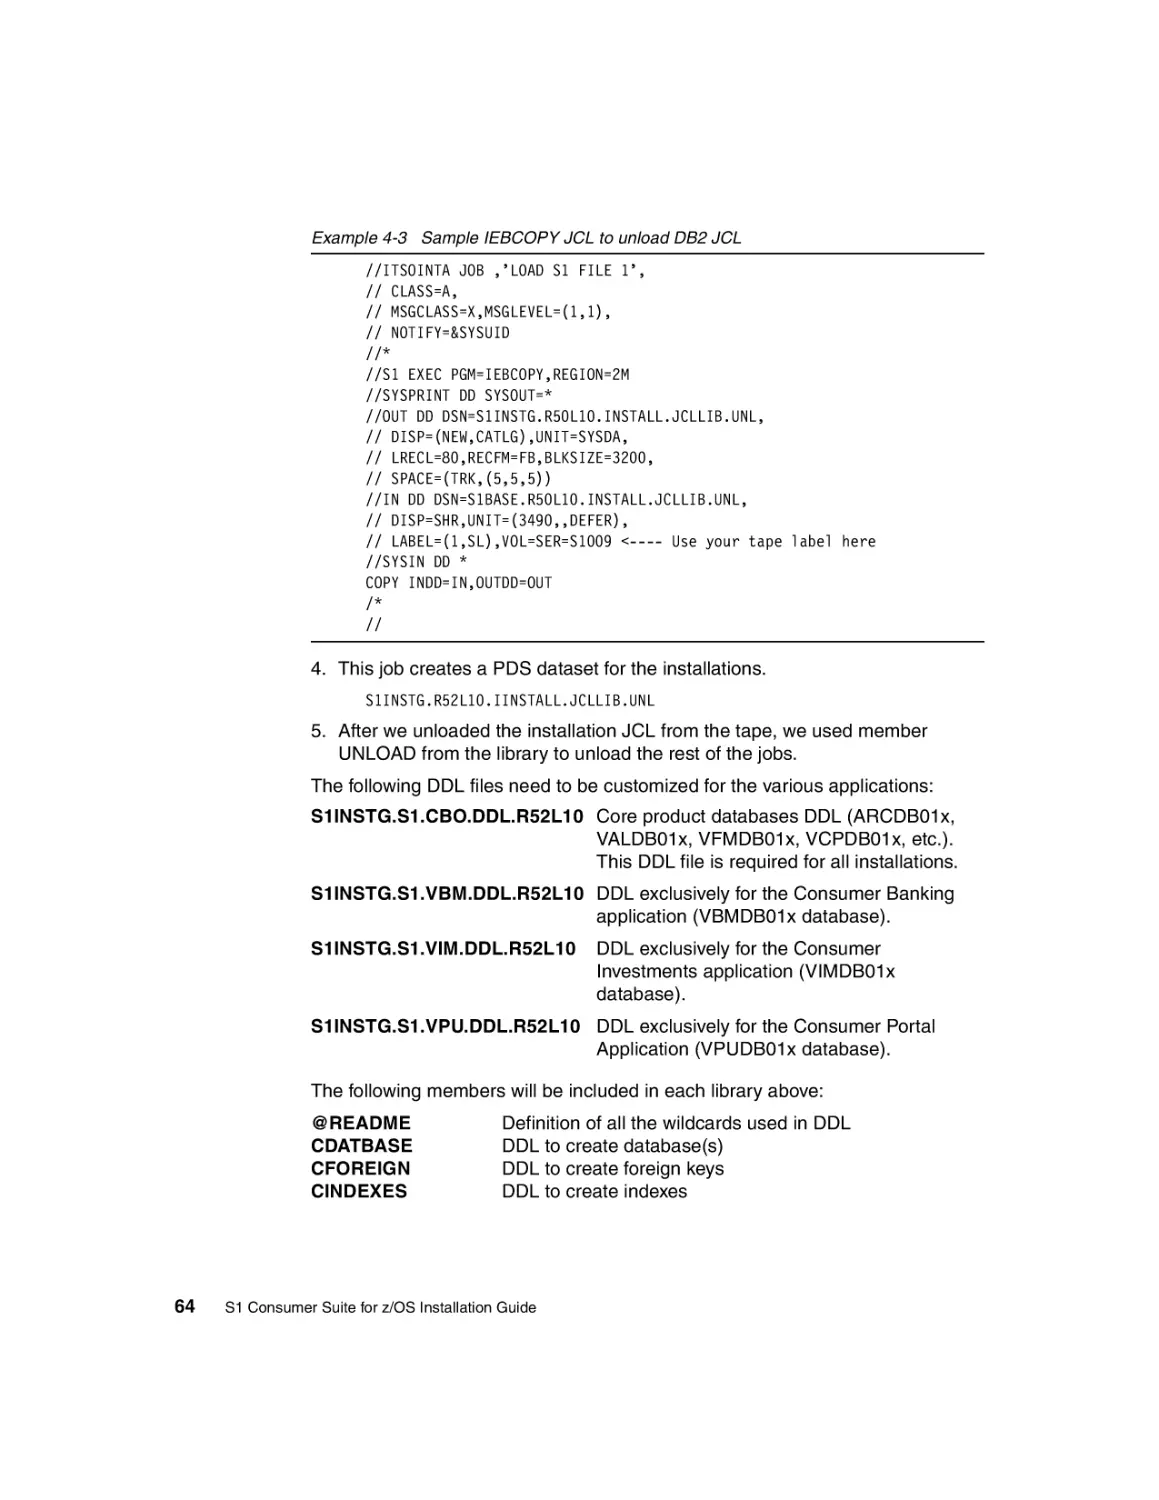
/


Text
Front cover
S1 Consumer Suite
for z/OS
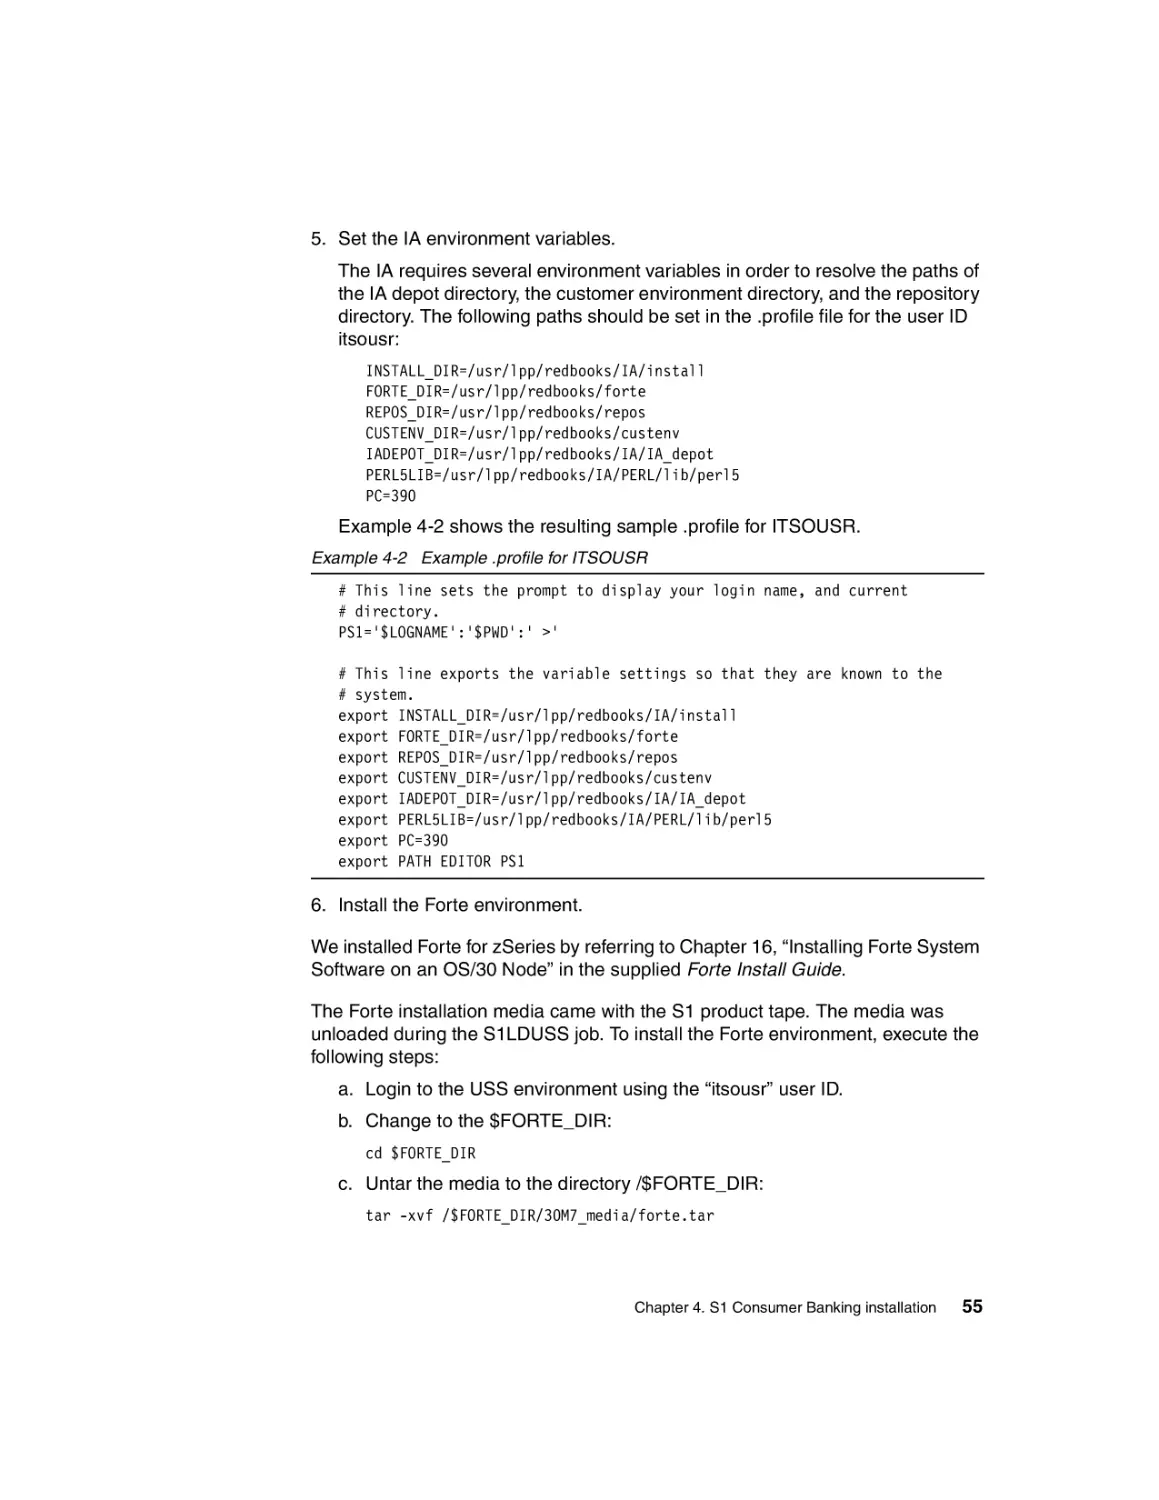
Installation Guide
S1 Consumer Suite architecture and
configuration on the zSeries platform
Planning and configuration
methodology
Step-by-step installation
Vasilis Karras
Hoson Rim
ibm.com/redbooks
International Technical Support Organization
S1 Consumer Suite for z/OS Installation Guide
July 2002
SG24-6288-00
Take Note! Before using this information and the product it supports, be sure to read the
general information in “Notices” on page vii.
First Edition July 2002
This edition applies to Version 5, Release 3 of the Security One (S1) Banking Consumer Suite to
be used on the zSeries platform.
Comments may be addressed to:
IBM Corporation, International Technical Support Organization
Dept. HYJ Mail Station P099
2455 South Road
Poughkeepsie, NY 12601-5400
When you send information to IBM, you grant IBM a non-exclusive right to use or distribute the
information in any way it believes appropriate without incurring any obligation to you.
© Copyright International Business Machines Corporation 2002
Note to U.S Government Users – Documentation related to restricted rights – Use, duplication or disclosure is subject to
restrictions set forth in GSA ADP Schedule Contract with IBM Corp.
Contents
Notices . . . . . . . . . . . . . . . . . . . . . . . . . . . . . . . . . . . . . . . . . . . . . . . . . . . . . . vii
Trademarks . . . . . . . . . . . . . . . . . . . . . . . . . . . . . . . . . . . . . . . . . . . . . . . . . . . viii
Preface . . . . . . . . . . . . . . . . . . . . . . . . . . . . . . . . . . . . . . . . . . . . . . . . . . . . . . . ix
The team that wrote this redbook . . . . . . . . . . . . . . . . . . . . . . . . . . . . . . . . . . . . ix
Comments welcome . . . . . . . . . . . . . . . . . . . . . . . . . . . . . . . . . . . . . . . . . . . . . . x
Chapter 1. S1 Consumer Suite overview. . . . . . . . . . . . . . . . . . . . . . . . . . . . 1
1.1 Product architecture . . . . . . . . . . . . . . . . . . . . . . . . . . . . . . . . . . . . . . . 2
1.2 The S1 Consumer Suite of products . . . . . . . . . . . . . . . . . . . . . . . . . . . 3
1.2.1 Consumer Banking . . . . . . . . . . . . . . . . . . . . . . . . . . . . . . . . . . . . . . . 4
1.2.2 Consumer Investments . . . . . . . . . . . . . . . . . . . . . . . . . . . . . . . . . . . . 5
1.2.3 Relationship Management . . . . . . . . . . . . . . . . . . . . . . . . . . . . . . . . . 5
Chapter 2. zSeries platform overview . . . . . . . . . . . . . . . . . . . . . . . . . . . . . . 9
2.1 Benefits of the zSeries platform . . . . . . . . . . . . . . . . . . . . . . . . . . . . . 10
2.1.1 Powerful architecture . . . . . . . . . . . . . . . . . . . . . . . . . . . . . . . . . . . . 10
2.1.2 Availability: always on . . . . . . . . . . . . . . . . . . . . . . . . . . . . . . . . . . . . 11
2.1.3 Safe and secure . . . . . . . . . . . . . . . . . . . . . . . . . . . . . . . . . . . . . . . . 11
2.1.4 Innovative technology = leading server performance . . . . . . . . . . . . 12
2.2 Powered by z/OS . . . . . . . . . . . . . . . . . . . . . . . . . . . . . . . . . . . . . . . . 12
2.2.1 Smoothing the path . . . . . . . . . . . . . . . . . . . . . . . . . . . . . . . . . . . . . . 13
2.2.2 An open, flexible server. . . . . . . . . . . . . . . . . . . . . . . . . . . . . . . . . . . 14
2.2.3 Reasons to run your applications on z/OS . . . . . . . . . . . . . . . . . . . . 14
2.3 zSeries hardware benefits . . . . . . . . . . . . . . . . . . . . . . . . . . . . . . . . . 15
2.3.1 Reliability features . . . . . . . . . . . . . . . . . . . . . . . . . . . . . . . . . . . . . . . 15
2.3.2 Availability features . . . . . . . . . . . . . . . . . . . . . . . . . . . . . . . . . . . . . . 16
2.3.3 Customer-Initiated Upgrade (CIU) . . . . . . . . . . . . . . . . . . . . . . . . . . 16
2.4 Advantages of running applications on zSeries . . . . . . . . . . . . . . . . . 18
2.4.1 Background . . . . . . . . . . . . . . . . . . . . . . . . . . . . . . . . . . . . . . . . . . . . 18
2.4.2 Availability . . . . . . . . . . . . . . . . . . . . . . . . . . . . . . . . . . . . . . . . . . . . . 19
2.4.3 Scalability . . . . . . . . . . . . . . . . . . . . . . . . . . . . . . . . . . . . . . . . . . . . . 19
2.4.4 Concurrent workload . . . . . . . . . . . . . . . . . . . . . . . . . . . . . . . . . . . . . 20
2.4.5 Security . . . . . . . . . . . . . . . . . . . . . . . . . . . . . . . . . . . . . . . . . . . . . . . 21
2.5 zSeries benefits for ERP solutions . . . . . . . . . . . . . . . . . . . . . . . . . . . 22
2.6 DB2 features that benefit S1 Consumer Suite . . . . . . . . . . . . . . . . . . 23
2.6.1 Backup and recovery . . . . . . . . . . . . . . . . . . . . . . . . . . . . . . . . . . . . 24
2.6.2 DB2 Restart. . . . . . . . . . . . . . . . . . . . . . . . . . . . . . . . . . . . . . . . . . . . 26
2.6.3 DB2 online reorganization . . . . . . . . . . . . . . . . . . . . . . . . . . . . . . . . . 27
© Copyright IBM Corp. 2002
iii
2.6.4 Other DB2 features . . . . . . . . . . . . . . . . . . . . . . . . . . . . . . . . . . . . . . 28
Chapter 3. S1 Consumer Banking planning . . . . . . . . . . . . . . . . . . . . . . . 31
3.1 Planning . . . . . . . . . . . . . . . . . . . . . . . . . . . . . . . . . . . . . . . . . . . . . . . 32
3.1.1 Basic options . . . . . . . . . . . . . . . . . . . . . . . . . . . . . . . . . . . . . . . . . . . 32
3.1.2 Localization . . . . . . . . . . . . . . . . . . . . . . . . . . . . . . . . . . . . . . . . . . . . 32
3.2 Configuration . . . . . . . . . . . . . . . . . . . . . . . . . . . . . . . . . . . . . . . . . . . 33
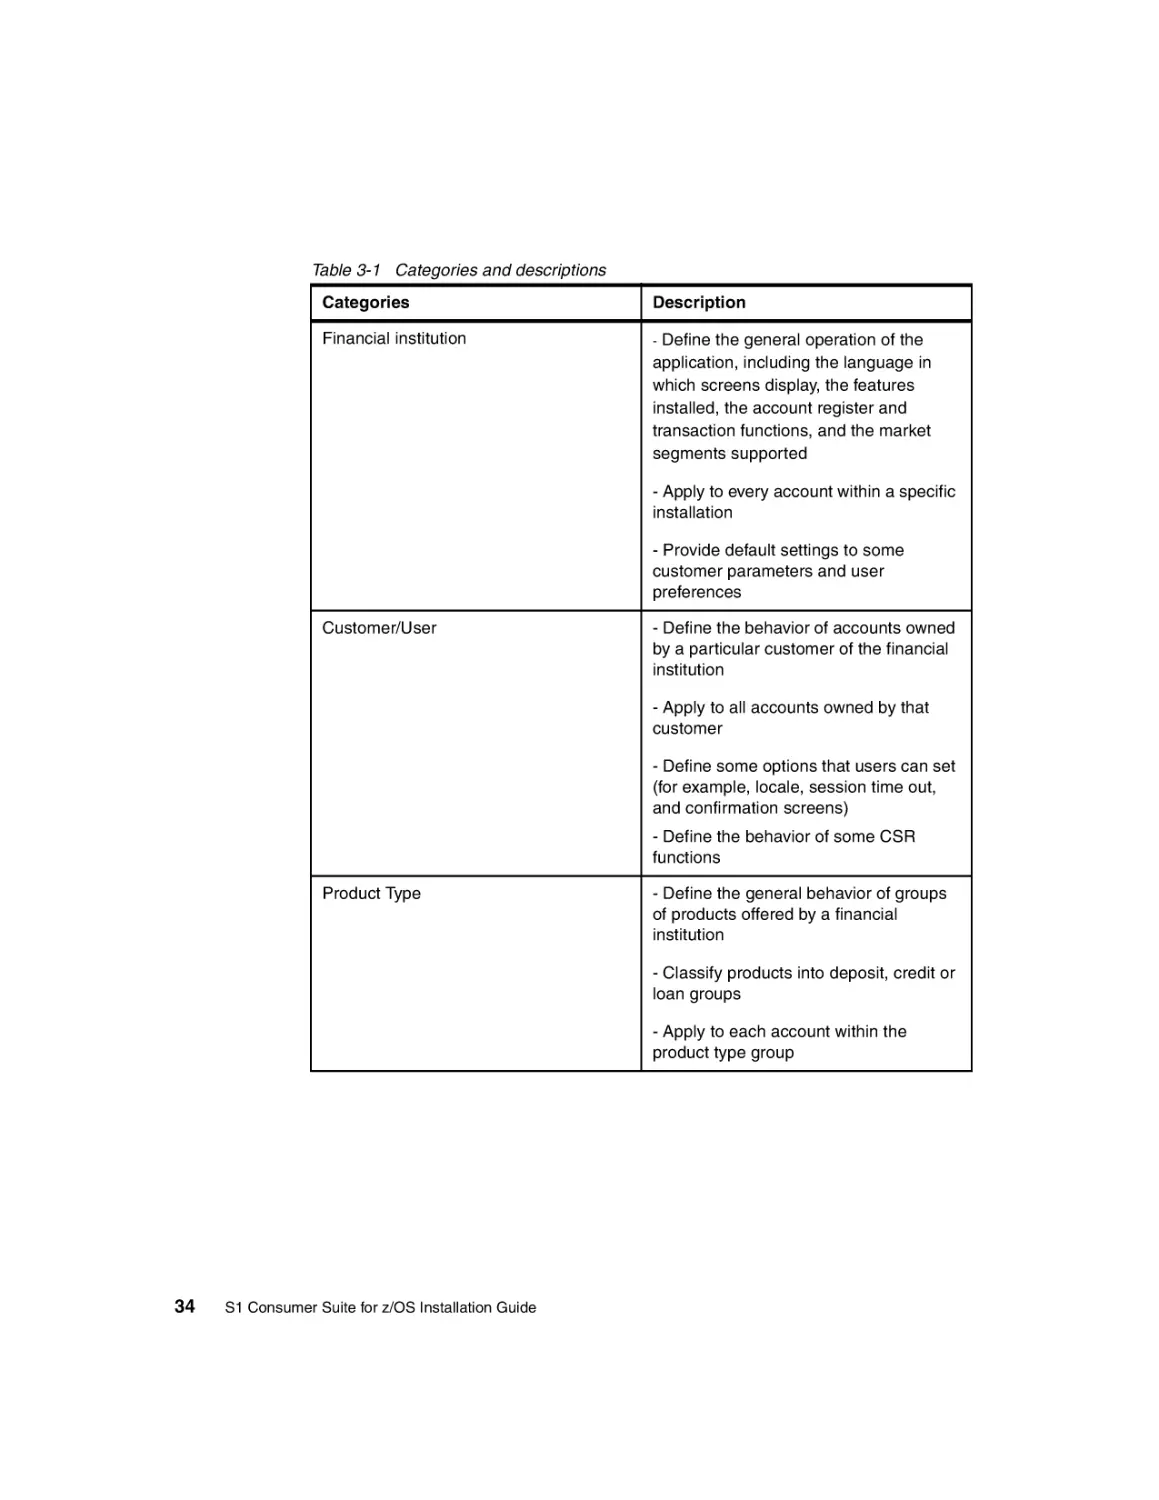
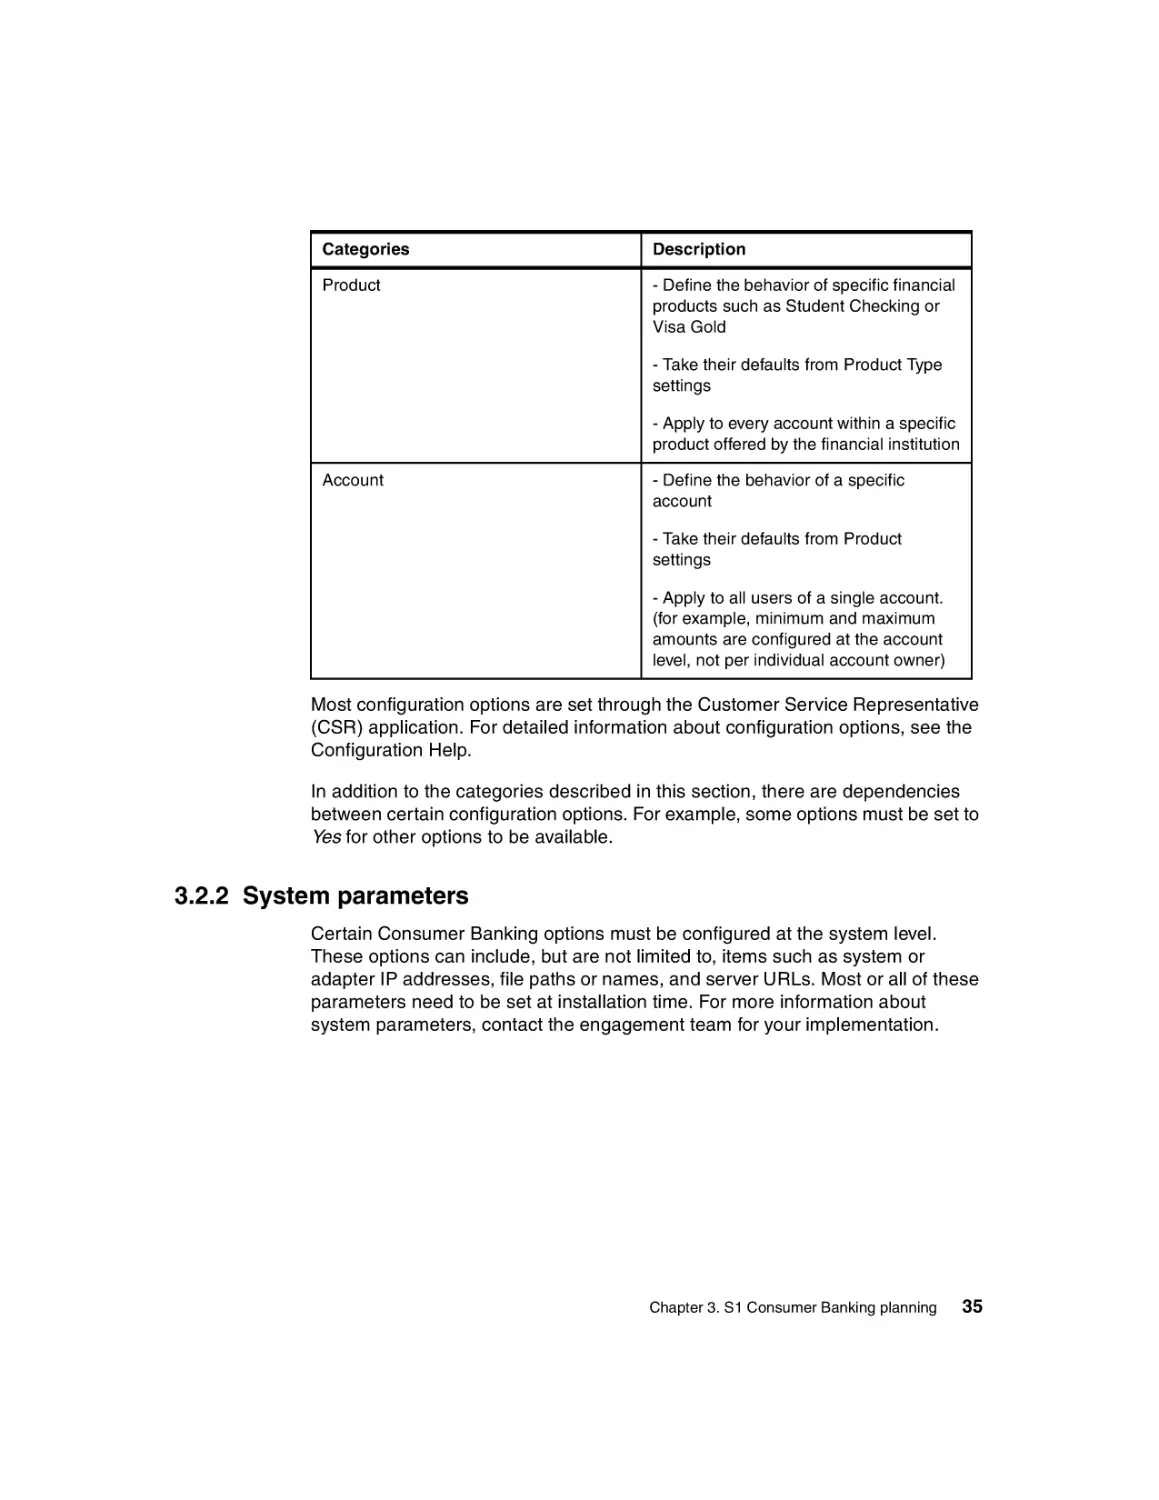
3.2.1 Configuration categories . . . . . . . . . . . . . . . . . . . . . . . . . . . . . . . . . . 33
3.2.2 System parameters . . . . . . . . . . . . . . . . . . . . . . . . . . . . . . . . . . . . . . 35
3.3 Data storage . . . . . . . . . . . . . . . . . . . . . . . . . . . . . . . . . . . . . . . . . . . 36
3.3.1 Local storage. . . . . . . . . . . . . . . . . . . . . . . . . . . . . . . . . . . . . . . . . . . 36
3.3.2 Remote storage. . . . . . . . . . . . . . . . . . . . . . . . . . . . . . . . . . . . . . . . . 37
3.3.3 Mixed implementations . . . . . . . . . . . . . . . . . . . . . . . . . . . . . . . . . . . 38
3.4 Security . . . . . . . . . . . . . . . . . . . . . . . . . . . . . . . . . . . . . . . . . . . . . . . 38
3.4.1 Application security . . . . . . . . . . . . . . . . . . . . . . . . . . . . . . . . . . . . . . 38
3.4.2 Network security . . . . . . . . . . . . . . . . . . . . . . . . . . . . . . . . . . . . . . . . 38
3.4.3 Operational security . . . . . . . . . . . . . . . . . . . . . . . . . . . . . . . . . . . . . 39
3.5 Custom adapters . . . . . . . . . . . . . . . . . . . . . . . . . . . . . . . . . . . . . . . . 39
3.5.1 Real-time adapters . . . . . . . . . . . . . . . . . . . . . . . . . . . . . . . . . . . . . . 39
3.5.2 Batch adapters . . . . . . . . . . . . . . . . . . . . . . . . . . . . . . . . . . . . . . . . . 40
3.6 Tunneling . . . . . . . . . . . . . . . . . . . . . . . . . . . . . . . . . . . . . . . . . . . . . . 40
3.6.1 Restrictions on tunneled data . . . . . . . . . . . . . . . . . . . . . . . . . . . . . . 41
3.6.2 XML encoding . . . . . . . . . . . . . . . . . . . . . . . . . . . . . . . . . . . . . . . . . . 41
3.7 XML API . . . . . . . . . . . . . . . . . . . . . . . . . . . . . . . . . . . . . . . . . . . . . . . 41
Chapter 4. S1 Consumer Banking installation . . . . . . . . . . . . . . . . . . . . . . 45
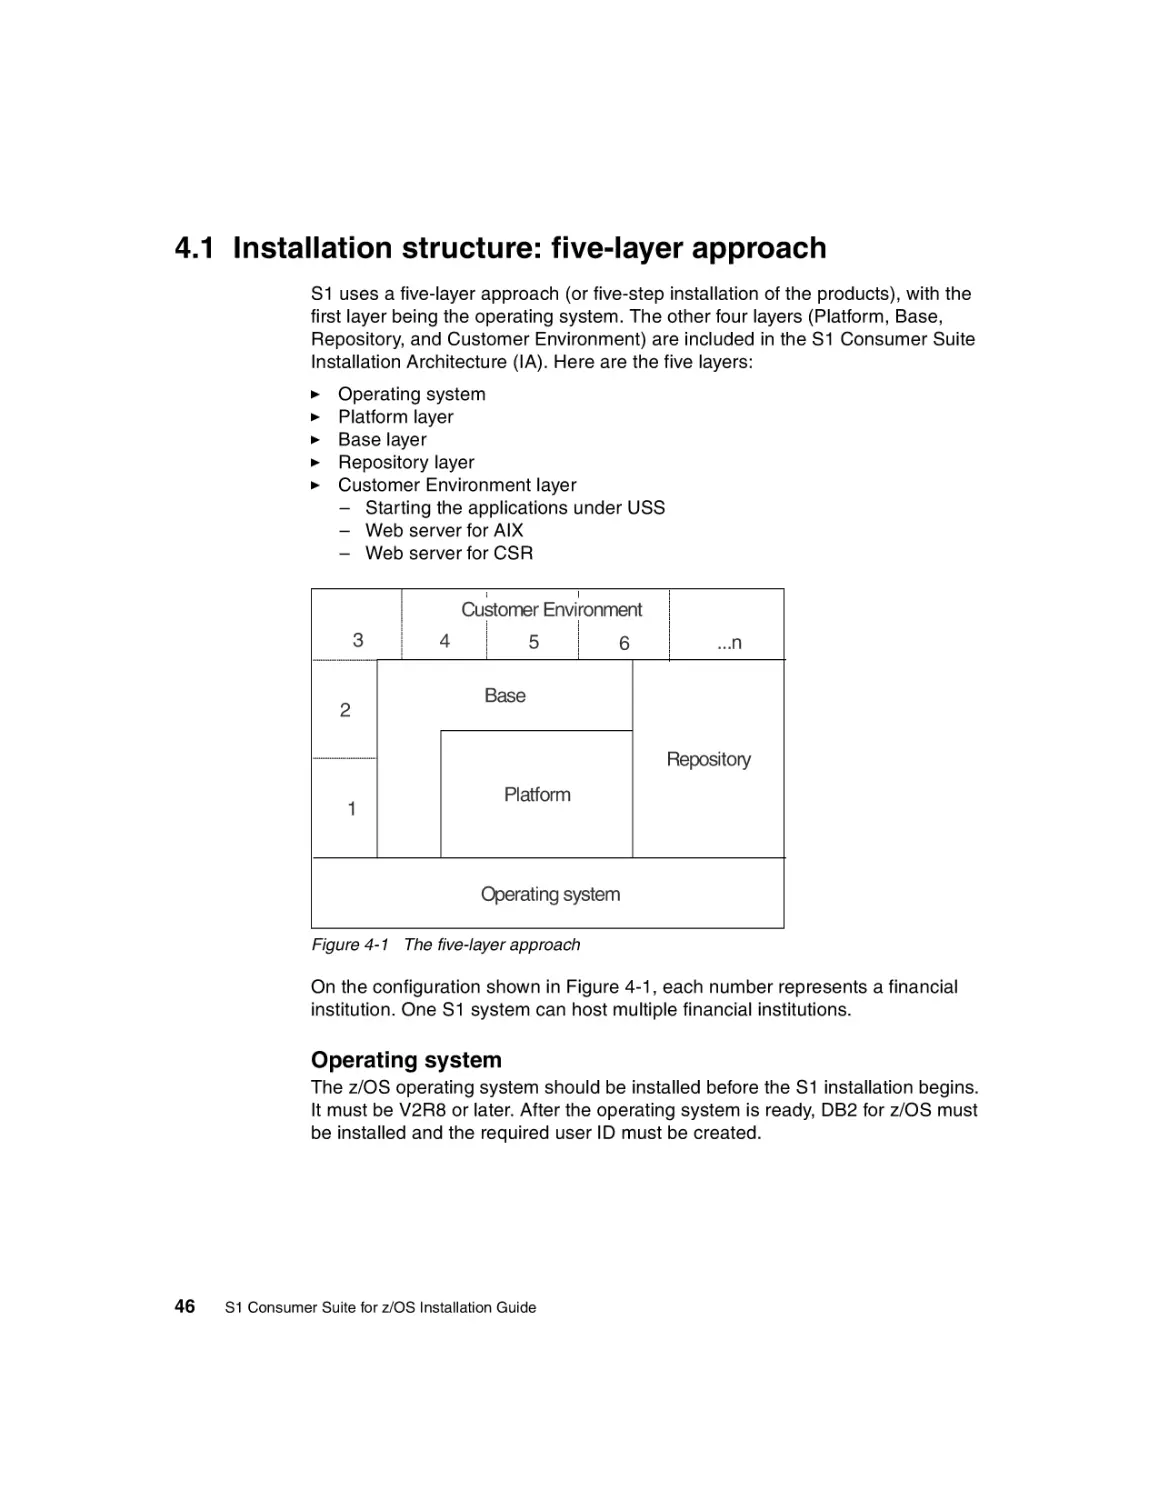
4.1 Installation structure: five-layer approach . . . . . . . . . . . . . . . . . . . . . . 46
4.1.1 What is Forte and what does it provide . . . . . . . . . . . . . . . . . . . . . . . 47
4.2 Preparing for the installation . . . . . . . . . . . . . . . . . . . . . . . . . . . . . . . . 48
4.2.1 z/OS setup . . . . . . . . . . . . . . . . . . . . . . . . . . . . . . . . . . . . . . . . . . . . 49
4.2.2 DB2 for z/OS setup . . . . . . . . . . . . . . . . . . . . . . . . . . . . . . . . . . . . . . 50
4.2.3 Web servers . . . . . . . . . . . . . . . . . . . . . . . . . . . . . . . . . . . . . . . . . . . 50
4.2.4 SNMP monitor setup . . . . . . . . . . . . . . . . . . . . . . . . . . . . . . . . . . . . . 50
4.3 Installing the operating system layer - z/OS . . . . . . . . . . . . . . . . . . . . 50
4.4 Installing the platform layer . . . . . . . . . . . . . . . . . . . . . . . . . . . . . . . . 56
4.5 Installing the base layer . . . . . . . . . . . . . . . . . . . . . . . . . . . . . . . . . . . 56
4.6 Installing the repository layer . . . . . . . . . . . . . . . . . . . . . . . . . . . . . . . 57
4.7 Installing the Customer Environment layer . . . . . . . . . . . . . . . . . . . . . 57
4.7.1 Create the customer environment . . . . . . . . . . . . . . . . . . . . . . . . . . . 58
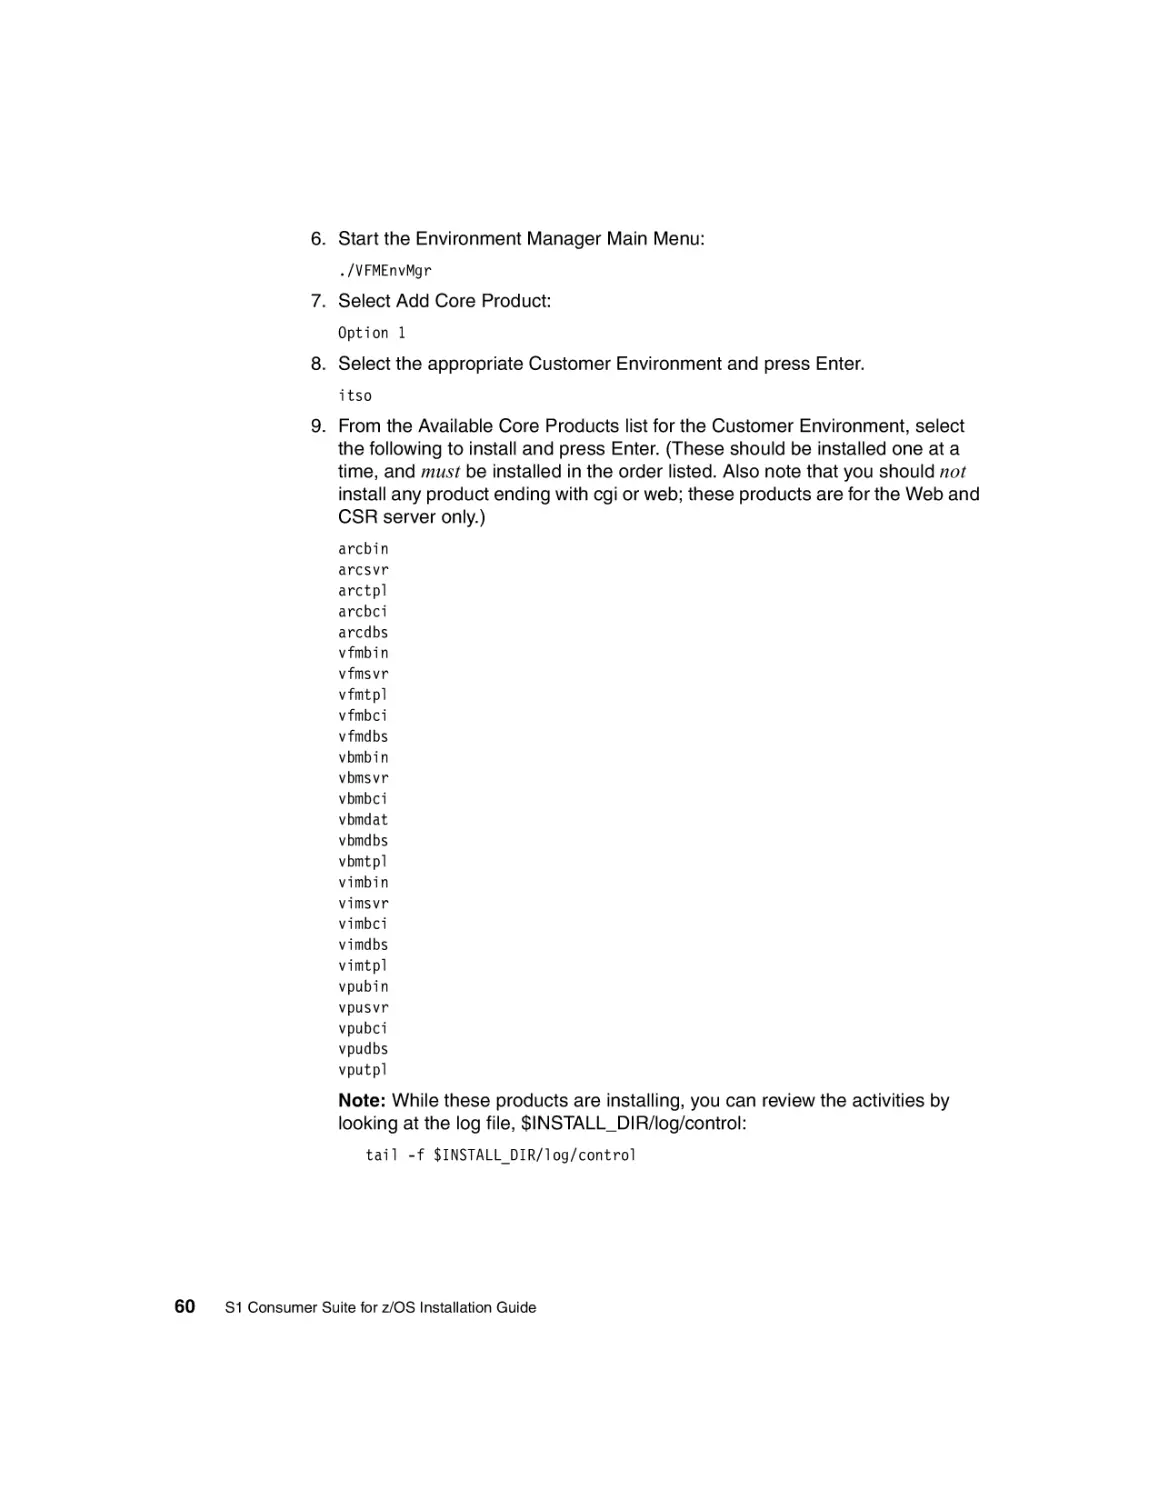
4.7.2 Install core software products . . . . . . . . . . . . . . . . . . . . . . . . . . . . . . 59
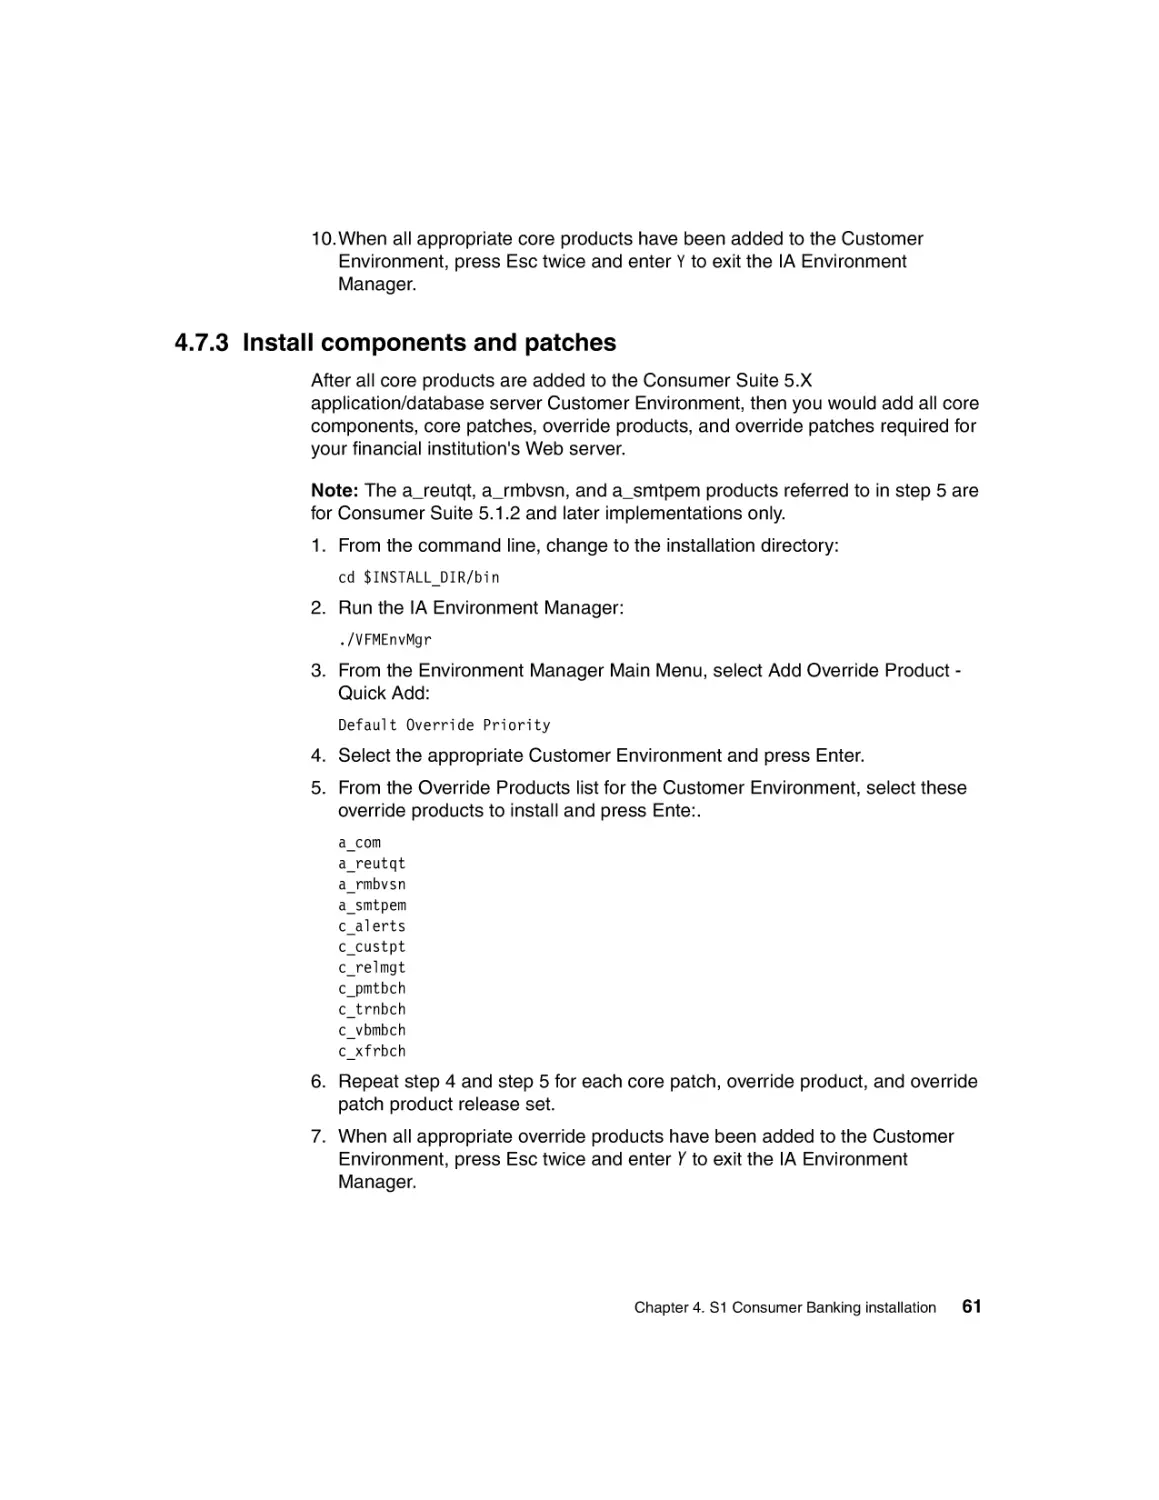
4.7.3 Install components and patches . . . . . . . . . . . . . . . . . . . . . . . . . . . . 61
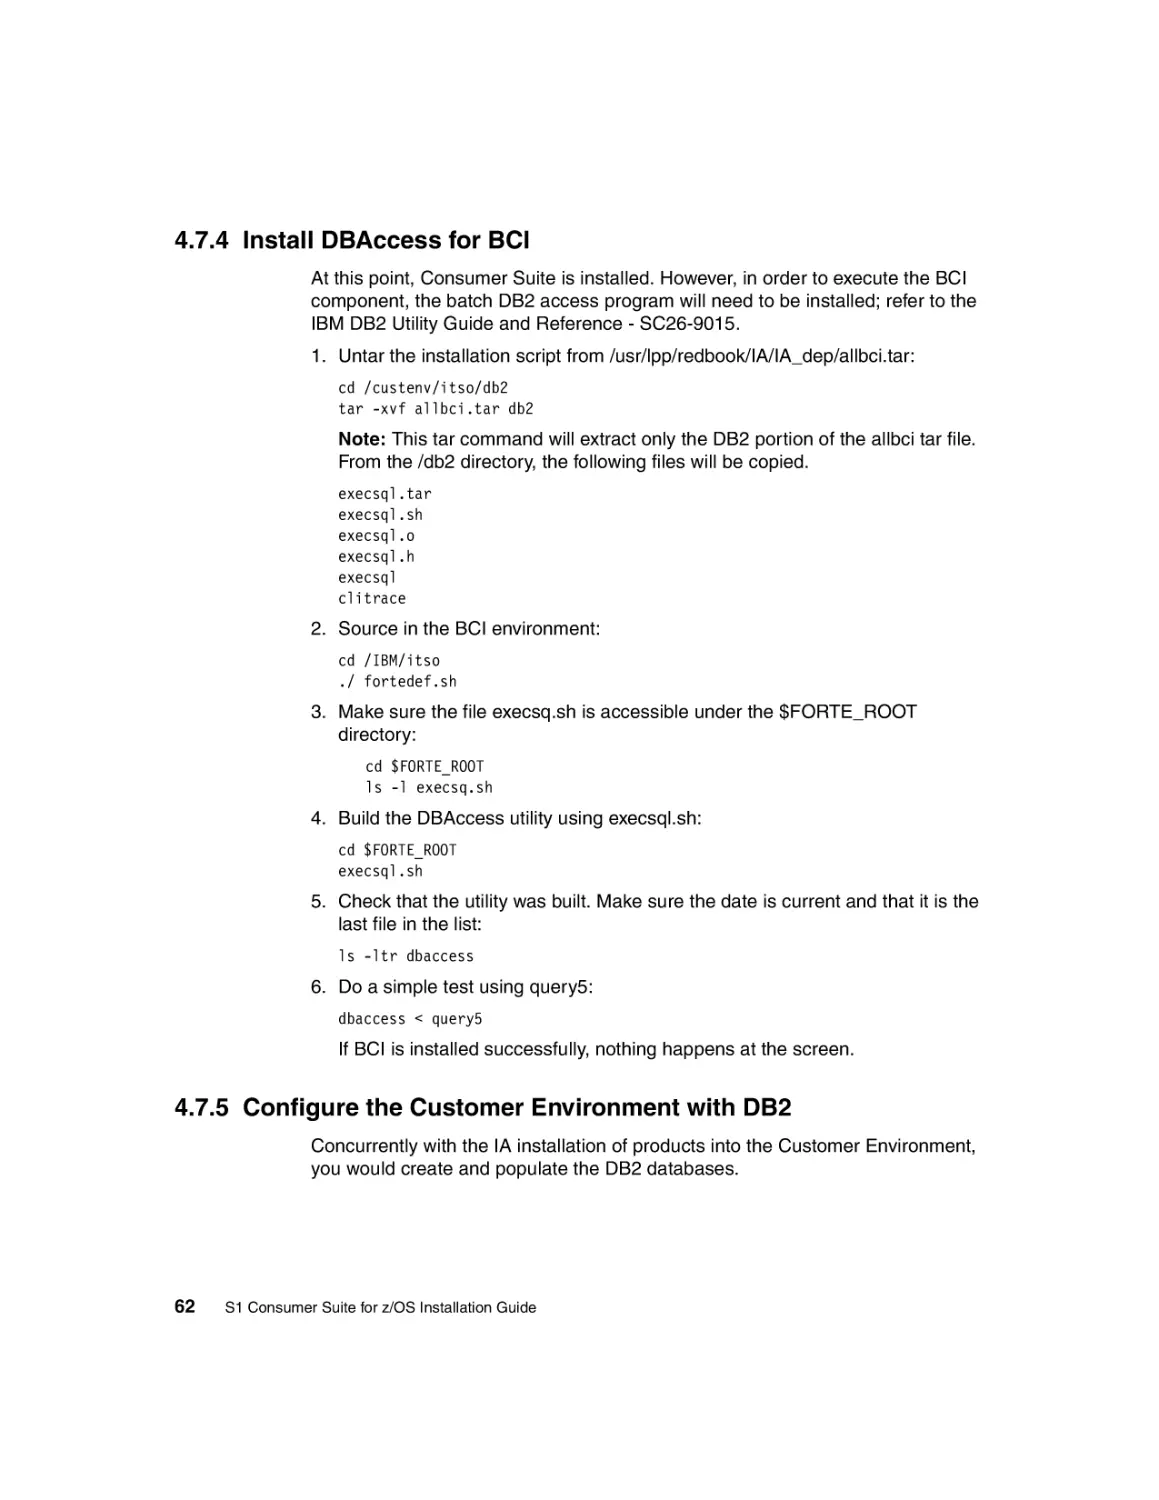
4.7.4 Install DBAccess for BCI . . . . . . . . . . . . . . . . . . . . . . . . . . . . . . . . . . 62
4.7.5 Configure the Customer Environment with DB2 . . . . . . . . . . . . . . . . 62
iv
S1 Consumer Suite for z/OS Installation Guide
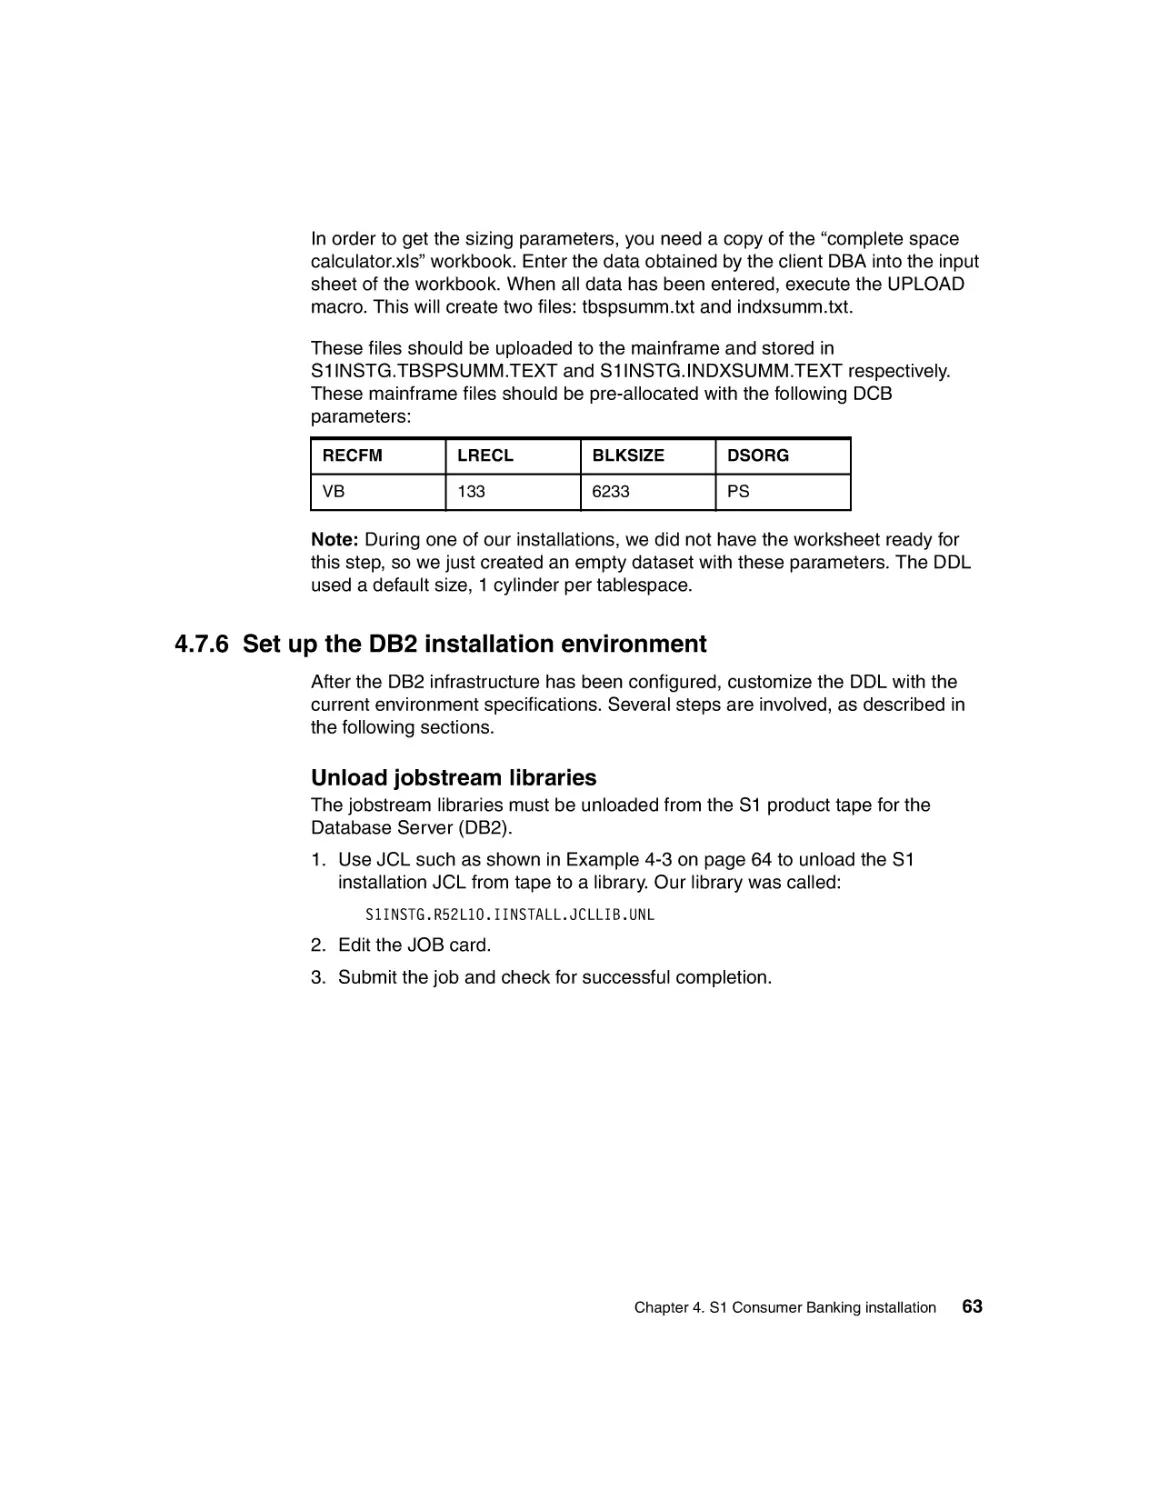
4.7.6 Set up the DB2 installation environment . . . . . . . . . . . . . . . . . . . . . . 63
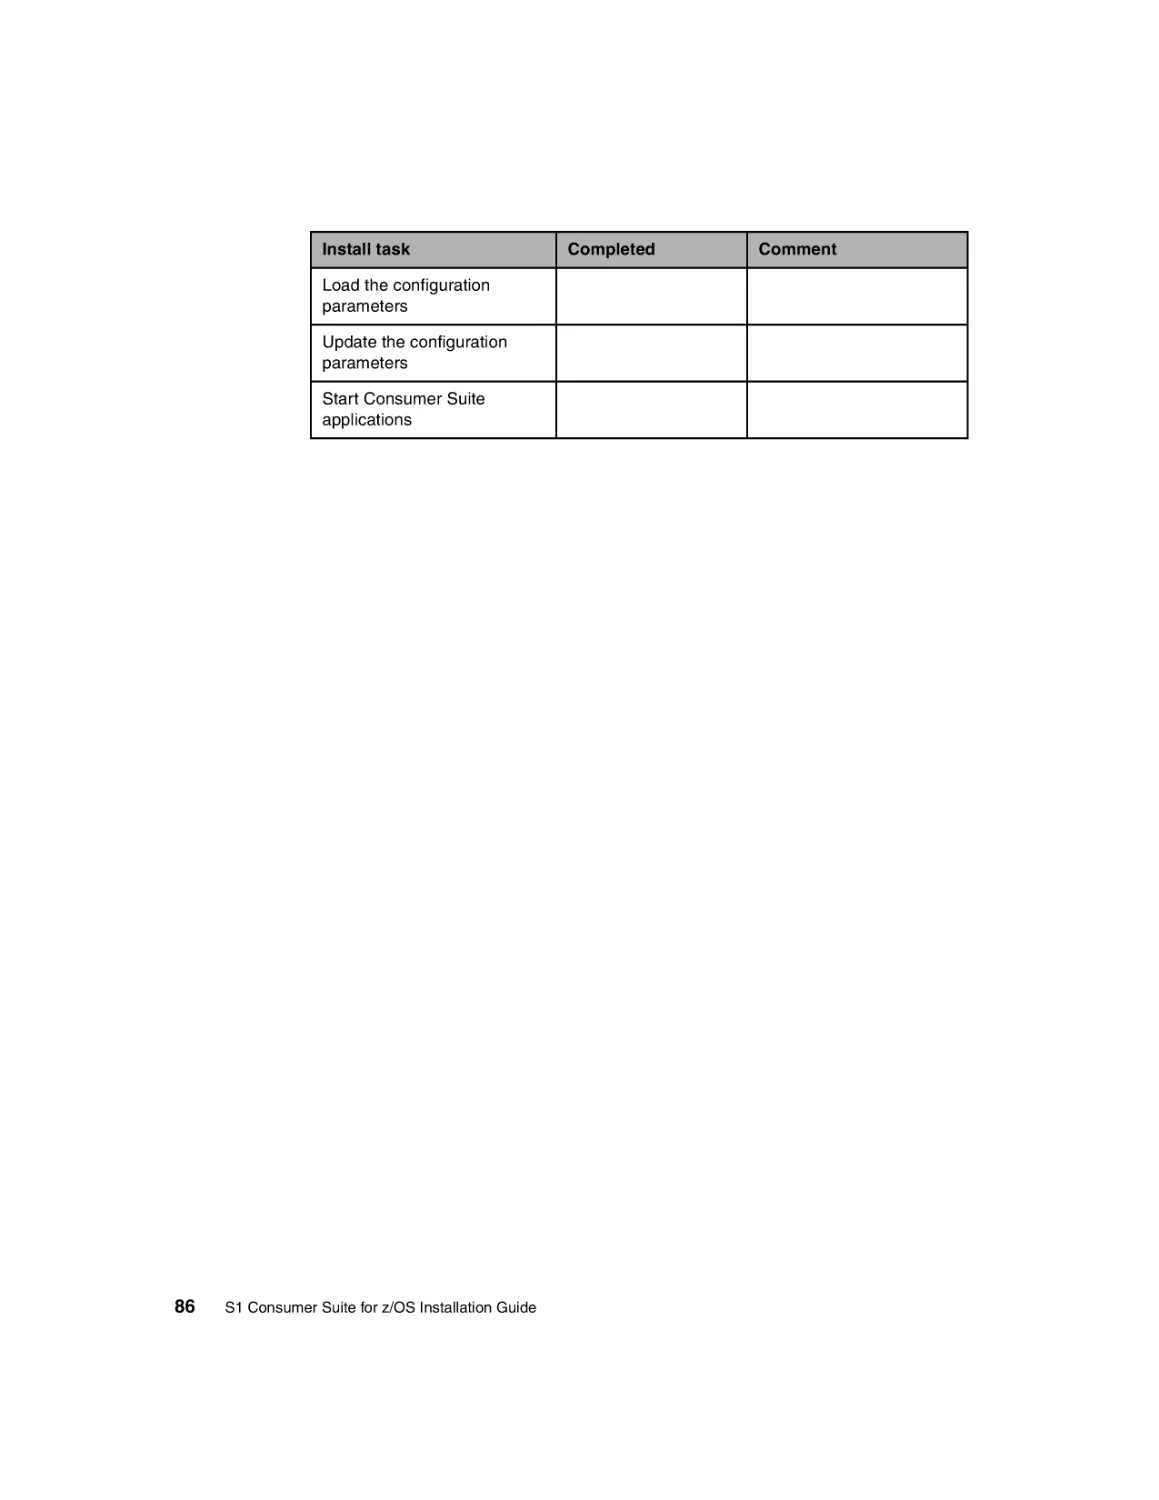
4.8 Starting Consumer Suite applications on USS . . . . . . . . . . . . . . . . . . 73
4.9 Webserver installation on AIX . . . . . . . . . . . . . . . . . . . . . . . . . . . . . . 74
4.9.1 Installing the code . . . . . . . . . . . . . . . . . . . . . . . . . . . . . . . . . . . . . . . 74
4.9.2 Installing Apache . . . . . . . . . . . . . . . . . . . . . . . . . . . . . . . . . . . . . . . . 75
4.9.3 Installing the IA . . . . . . . . . . . . . . . . . . . . . . . . . . . . . . . . . . . . . . . . . 77
4.9.4 Starting and stopping the Webserver . . . . . . . . . . . . . . . . . . . . . . . . 79
4.9.5 Verifying the Webserver configuration . . . . . . . . . . . . . . . . . . . . . . . 80
4.10 Webserver installation for CSR on AIX . . . . . . . . . . . . . . . . . . . . . . . 80
4.10.1 Configuring Apache. . . . . . . . . . . . . . . . . . . . . . . . . . . . . . . . . . . . . 80
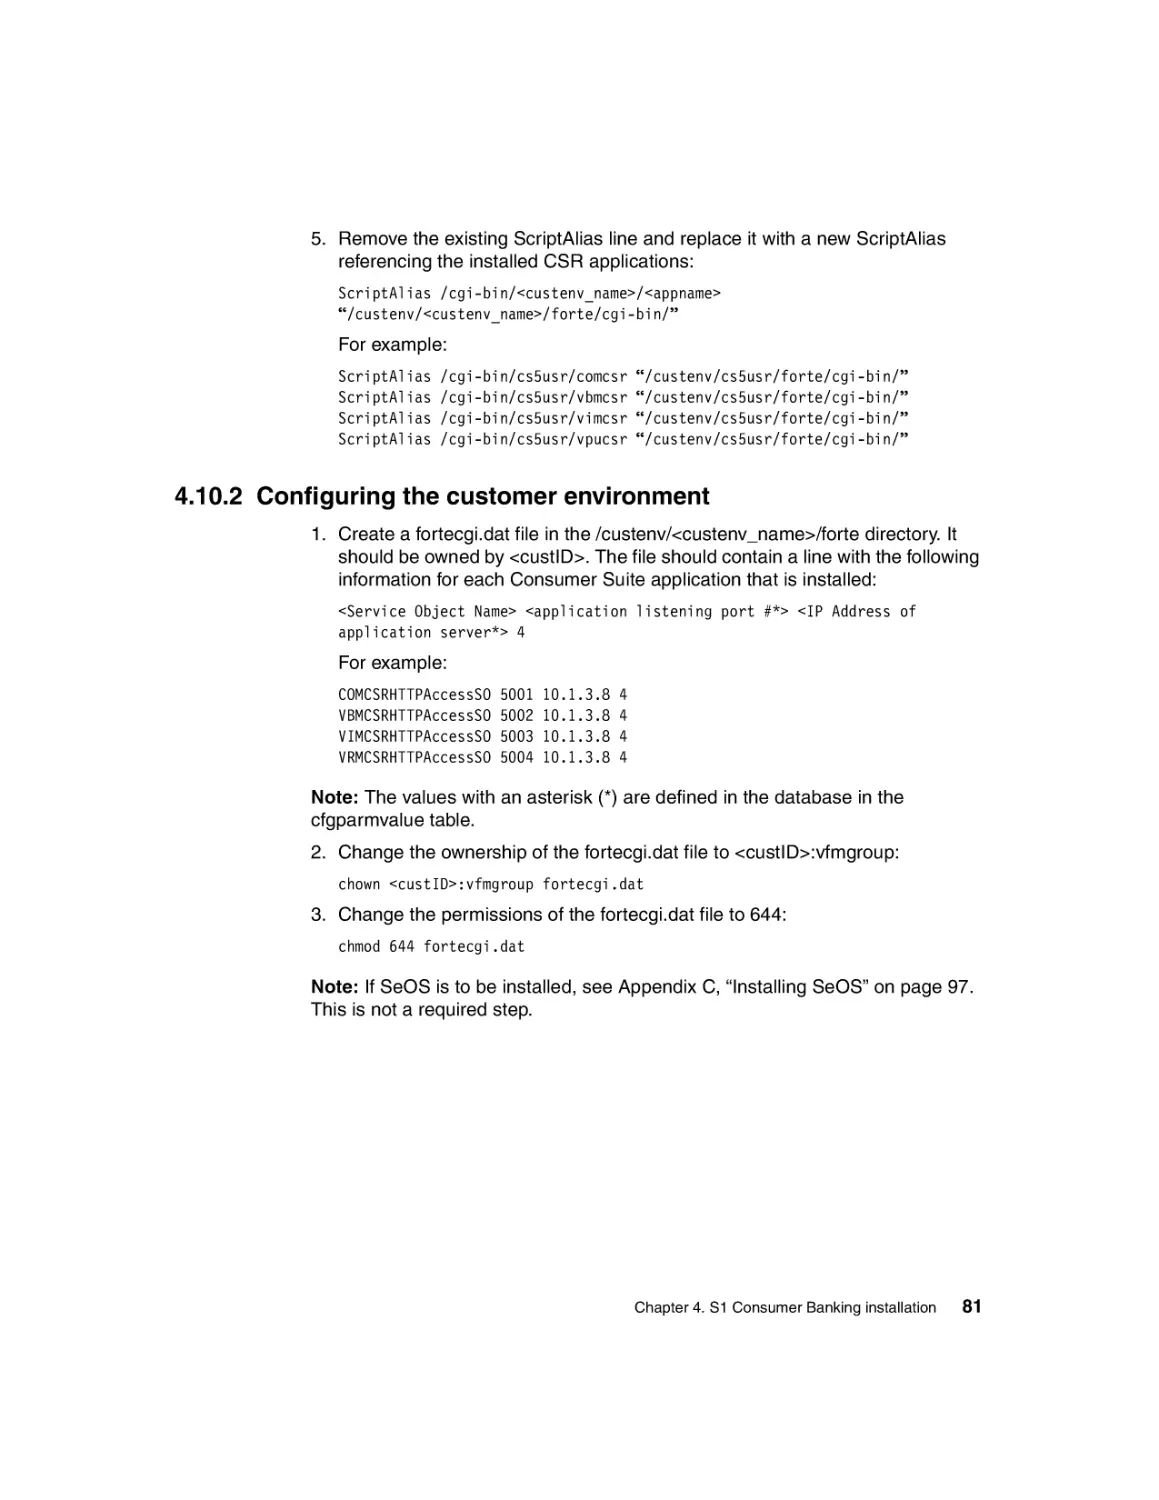
4.10.2 Configuring the customer environment . . . . . . . . . . . . . . . . . . . . . . 81
Appendix A. Installation checklists . . . . . . . . . . . . . . . . . . . . . . . . . . . . . . . 83
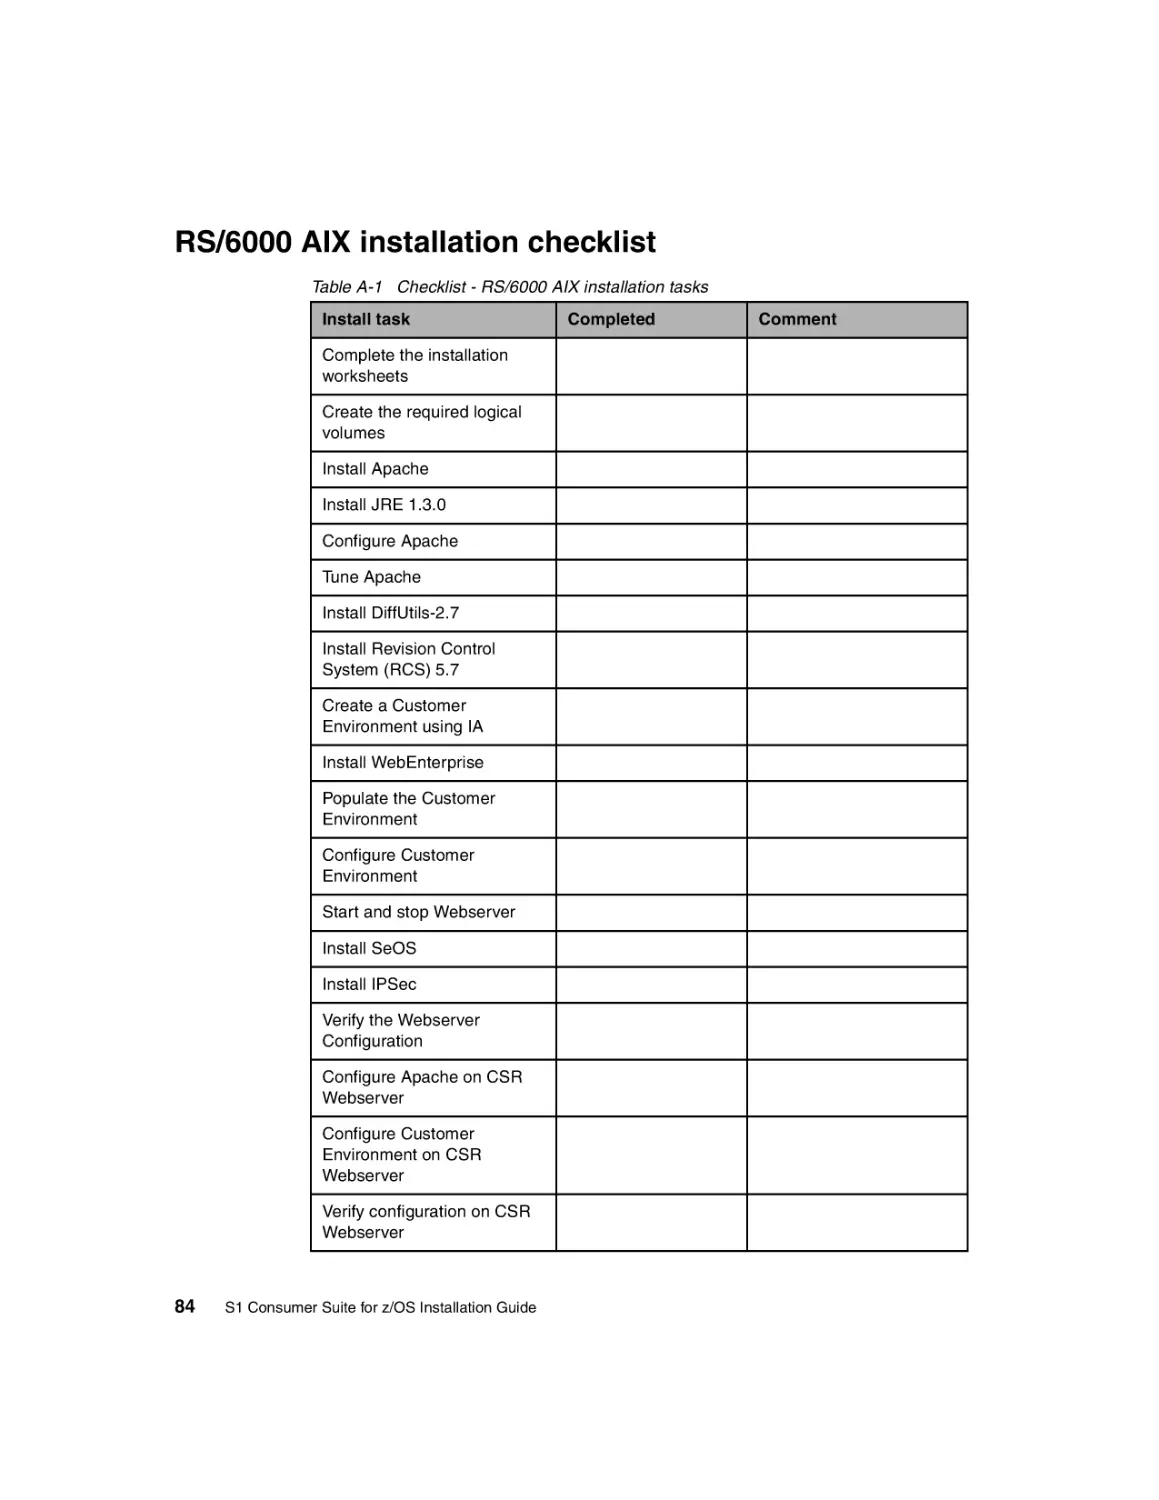
RS/6000 AIX installation checklist . . . . . . . . . . . . . . . . . . . . . . . . . . . . . . . 84
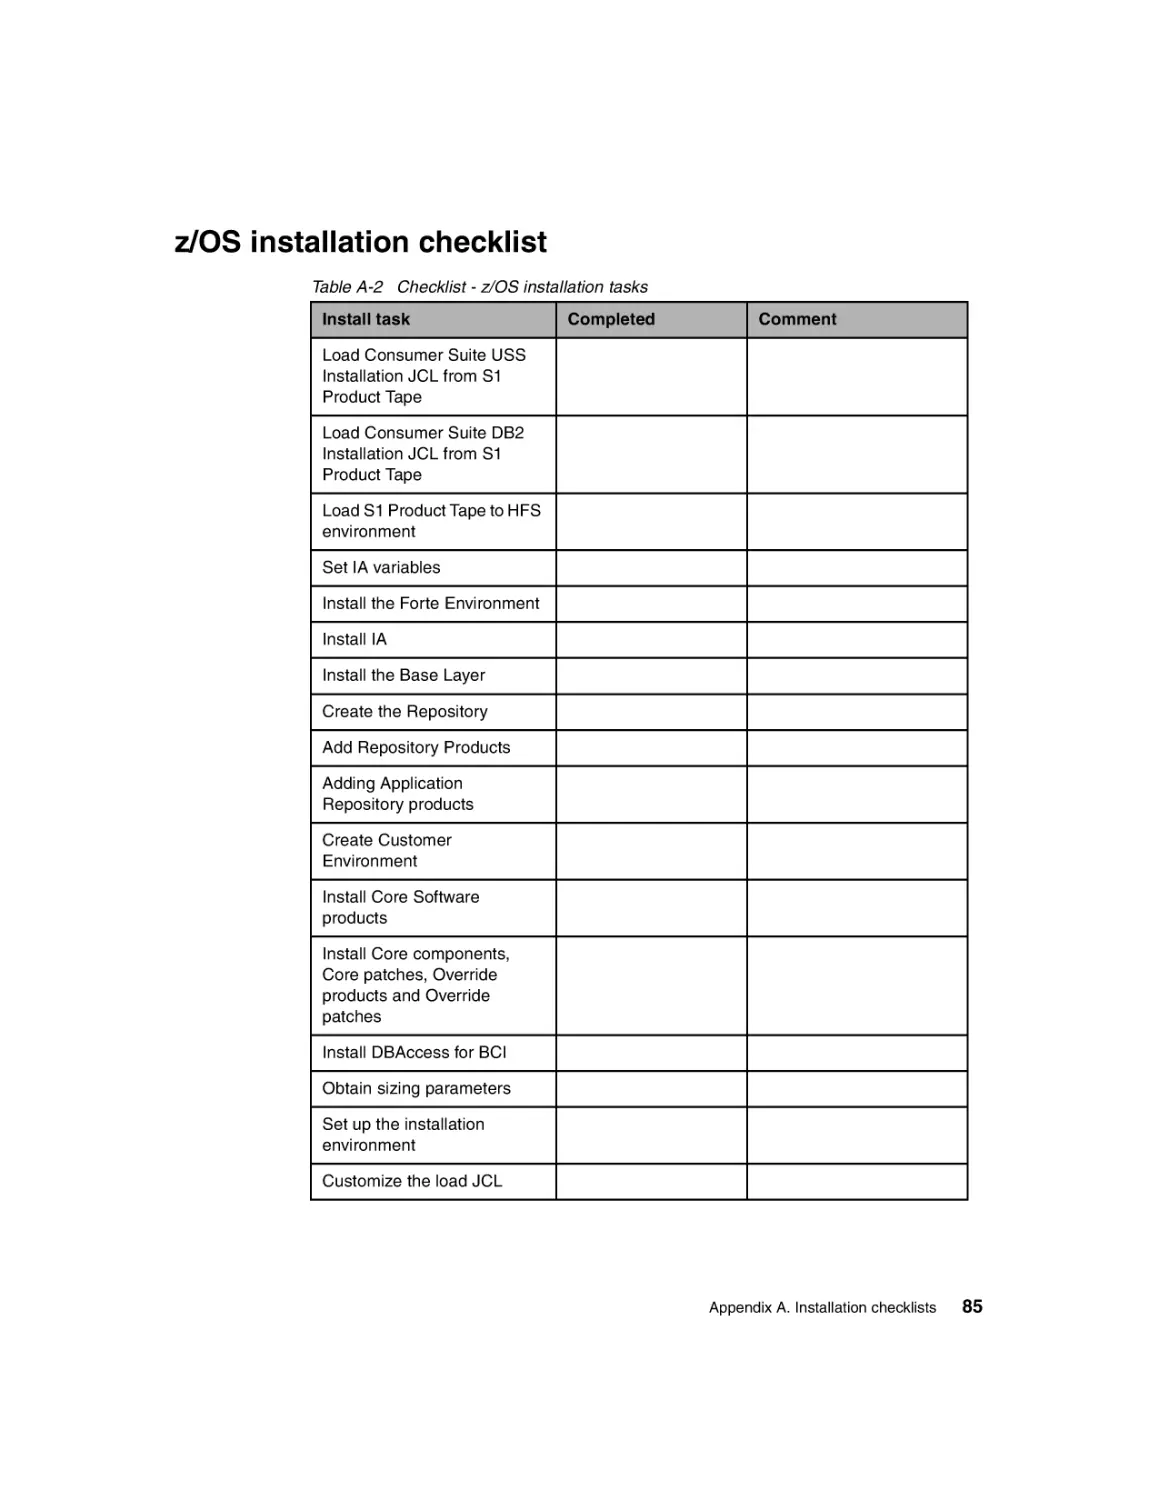
z/OS installation checklist . . . . . . . . . . . . . . . . . . . . . . . . . . . . . . . . . . . . . 85
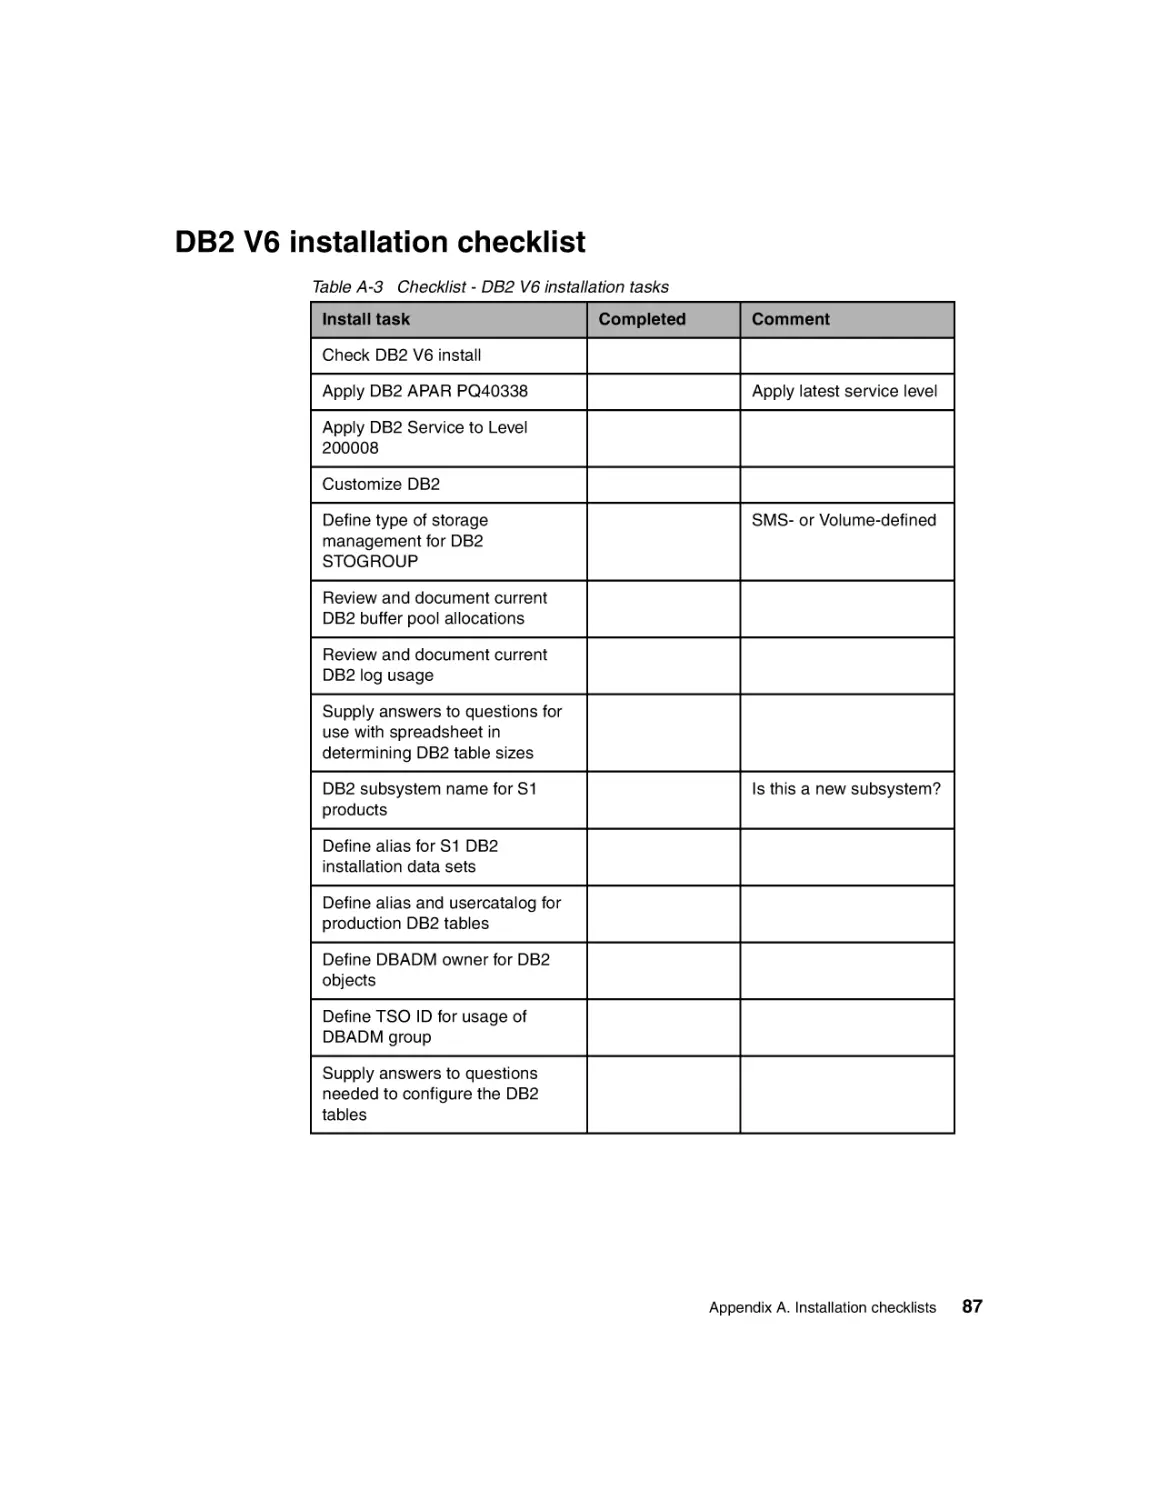
DB2 V6 installation checklist . . . . . . . . . . . . . . . . . . . . . . . . . . . . . . . . . . . 87
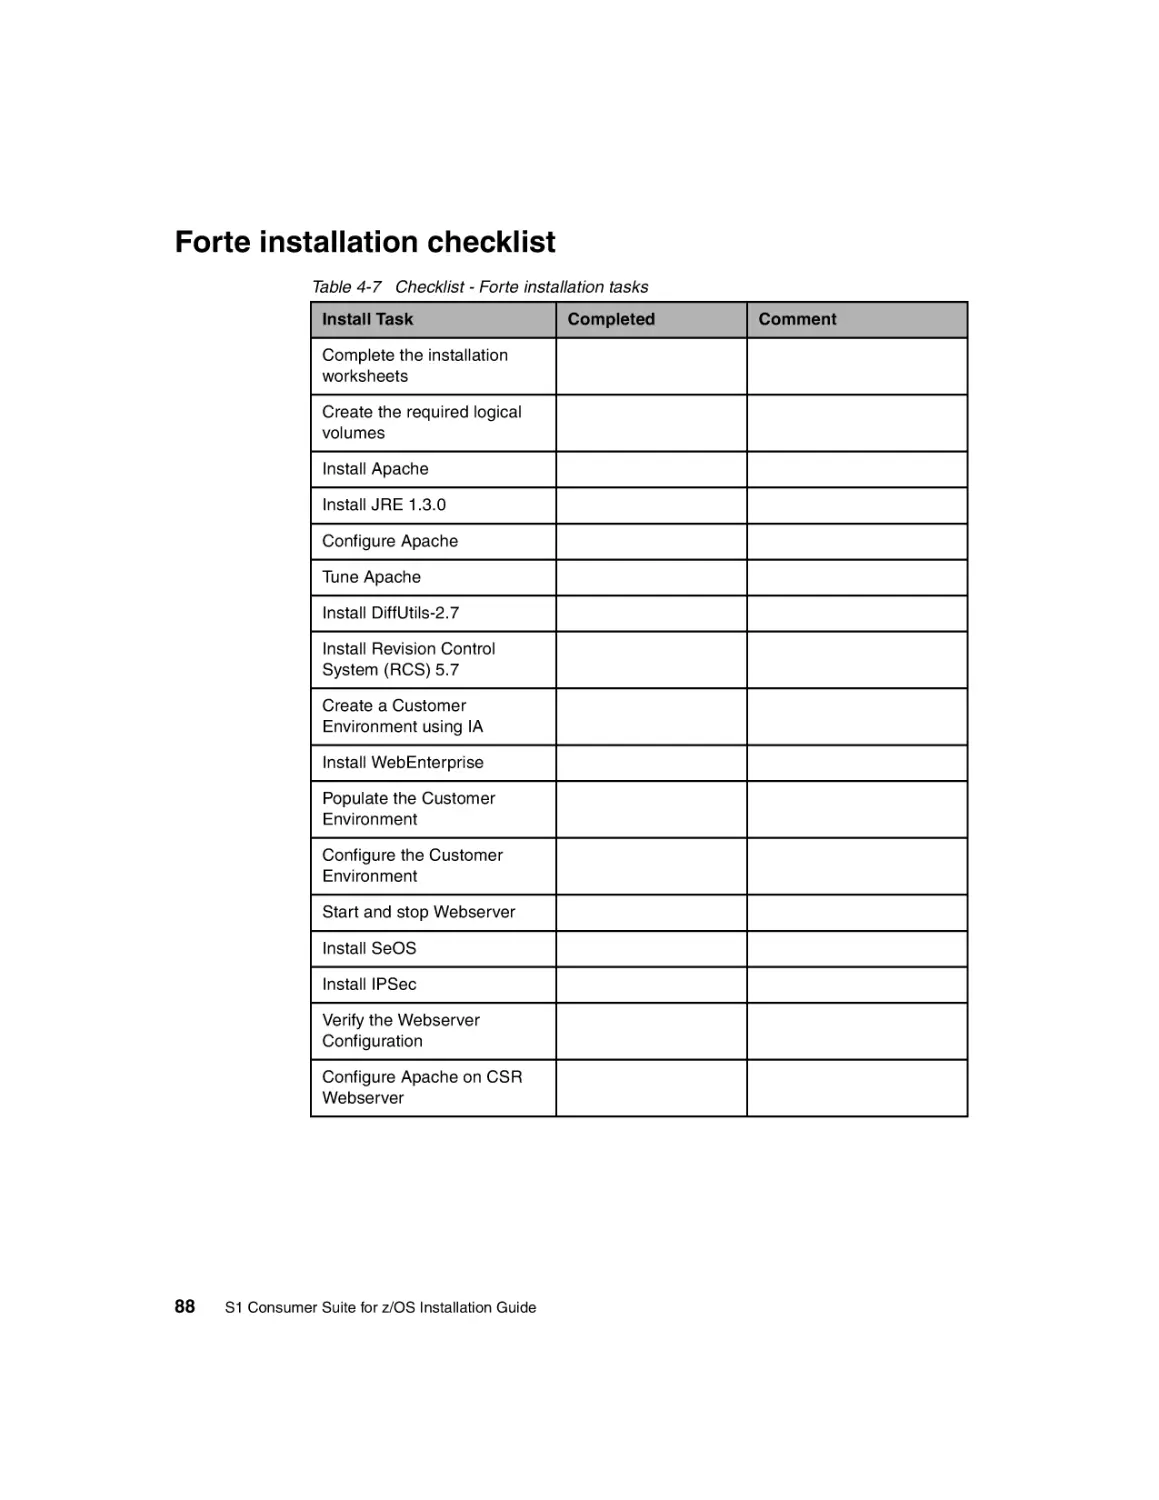
Forte installation checklist . . . . . . . . . . . . . . . . . . . . . . . . . . . . . . . . . . . . . 88
Appendix B. Forte installation on z/OS . . . . . . . . . . . . . . . . . . . . . . . . . . . . 89
Installing Forte . . . . . . . . . . . . . . . . . . . . . . . . . . . . . . . . . . . . . . . . . . . . . . . . . 90
Hardware and software requirements . . . . . . . . . . . . . . . . . . . . . . . . . . . . . . . 91
Performing the installation . . . . . . . . . . . . . . . . . . . . . . . . . . . . . . . . . . . . . . . . 91
What happens when you install Forte . . . . . . . . . . . . . . . . . . . . . . . . . . . . . . . 94
4.10.3 Understanding the FORTE_ROOT directory structure . . . . . . . . . . 94
Understanding the fortedef script . . . . . . . . . . . . . . . . . . . . . . . . . . . . . . . . . . . 95
Understanding the forteboot script . . . . . . . . . . . . . . . . . . . . . . . . . . . . . . . . . . 95
Appendix C. Installing SeOS . . . . . . . . . . . . . . . . . . . . . . . . . . . . . . . . . . . . 97
Installing SeOS. . . . . . . . . . . . . . . . . . . . . . . . . . . . . . . . . . . . . . . . . . . . . . . . . 98
Configuring IPSec . . . . . . . . . . . . . . . . . . . . . . . . . . . . . . . . . . . . . . . . . . . . . . 98
Related publications . . . . . . . . . . . . . . . . . . . . . .
IBM Redbooks . . . . . . . . . . . . . . . . . . . . . . . . . . . .
Other resources . . . . . . . . . . . . . . . . . . . . . . . .
Referenced Web sites . . . . . . . . . . . . . . . . . . . . . .
How to get IBM Redbooks . . . . . . . . . . . . . . . . . . .
IBM Redbooks collections . . . . . . . . . . . . . . . . .
......
......
......
......
......
......
.......
.......
.......
.......
.......
.......
......
......
......
......
......
......
.
.
.
.
.
.
109
109
109
110
110
110
Index . . . . . . . . . . . . . . . . . . . . . . . . . . . . . . . . . . . . . . . . . . . . . . . . . . . . . . . 111
Contents
v
vi
S1 Consumer Suite for z/OS Installation Guide
Notices
This information was developed for products and services offered in the U.S.A.
IBM may not offer the products, services, or features discussed in this document in other countries. Consult
your local IBM representative for information on the products and services currently available in your area.
Any reference to an IBM product, program, or service is not intended to state or imply that only that IBM
product, program, or service may be used. Any functionally equivalent product, program, or service that
does not infringe any IBM intellectual property right may be used instead. However, it is the user's
responsibility to evaluate and verify the operation of any non-IBM product, program, or service.
IBM may have patents or pending patent applications covering subject matter described in this document.
The furnishing of this document does not give you any license to these patents. You can send license
inquiries, in writing, to:
IBM Director of Licensing, IBM Corporation, North Castle Drive Armonk, NY 10504-1785 U.S.A.
The following paragraph does not apply to the United Kingdom or any other country where such
provisions are inconsistent with local law: INTERNATIONAL BUSINESS MACHINES CORPORATION
PROVIDES THIS PUBLICATION "AS IS" WITHOUT WARRANTY OF ANY KIND, EITHER EXPRESS OR
IMPLIED, INCLUDING, BUT NOT LIMITED TO, THE IMPLIED WARRANTIES OF NON-INFRINGEMENT,
MERCHANTABILITY OR FITNESS FOR A PARTICULAR PURPOSE. Some states do not allow disclaimer
of express or implied warranties in certain transactions, therefore, this statement may not apply to you.
This information could include technical inaccuracies or typographical errors. Changes are periodically made
to the information herein; these changes will be incorporated in new editions of the publication. IBM may
make improvements and/or changes in the product(s) and/or the program(s) described in this publication at
any time without notice.
Any references in this information to non-IBM Web sites are provided for convenience only and do not in any
manner serve as an endorsement of those Web sites. The materials at those Web sites are not part of the
materials for this IBM product and use of those Web sites is at your own risk.
IBM may use or distribute any of the information you supply in any way it believes appropriate without
incurring any obligation to you.
Information concerning non-IBM products was obtained from the suppliers of those products, their published
announcements or other publicly available sources. IBM has not tested those products and cannot confirm
the accuracy of performance, compatibility or any other claims related to non-IBM products. Questions on
the capabilities of non-IBM products should be addressed to the suppliers of those products.
This information contains examples of data and reports used in daily business operations. To illustrate them
as completely as possible, the examples include the names of individuals, companies, brands, and products.
All of these names are fictitious and any similarity to the names and addresses used by an actual business
enterprise is entirely coincidental.
COPYRIGHT LICENSE:
This information contains sample application programs in source language, which illustrates programming
techniques on various operating platforms. You may copy, modify, and distribute these sample programs in
any form without payment to IBM, for the purposes of developing, using, marketing or distributing application
programs conforming to the application programming interface for the operating platform for which the
sample programs are written. These examples have not been thoroughly tested under all conditions. IBM,
therefore, cannot guarantee or imply reliability, serviceability, or function of these programs. You may copy,
modify, and distribute these sample programs in any form without payment to IBM for the purposes of
developing, using, marketing, or distributing application programs conforming to IBM's application
programming interfaces.
© Copyright IBM Corp. 2002
vii
Trademarks
The following terms are trademarks of the International Business Machines Corporation in the United States,
other countries, or both:
Redbooks(logo)™
AIX®
Balance®
DB2®
e (logo)®
eLiza™
Enterprise Storage Server™
ESCON®
FICON™
IBM®
MVS™
OS/390®
Parallel Sysplex®
Perform™
PR/SM™
pSeries™
RACF®
RS/6000®
S/390®
SecureWay®
SP™
System/36™
System/360™
VM/ESA®
VSE/ESA™
WebSphere®
z/Architecture™
z/OS™
z/VM™
zSeries™
The following terms are trademarks of International Business Machines Corporation and Lotus Development
Corporation in the United States, other countries, or both:
Lotus®
Word Pro®
Approach®
Lotus Notes®
Notes®
The following terms are trademarks of other companies:
ActionMedia, LANDesk, MMX, Pentium and ProShare are trademarks of Intel Corporation in the United
States, other countries, or both.
Microsoft, Windows, Windows NT, and the Windows logo are trademarks of Microsoft Corporation in the
United States, other countries, or both.
Java and all Java-based trademarks and logos are trademarks or registered trademarks of Sun
Microsystems, Inc. in the United States, other countries, or both.
C-bus is a trademark of Corollary, Inc. in the United States, other countries, or both.
UNIX is a registered trademark of The Open Group in the United States and other countries.
SET, SET Secure Electronic Transaction, and the SET Logo are trademarks owned by SET Secure
Electronic Transaction LLC.
Other company, product, and service names may be trademarks or service marks of others.
viii
S1 Consumer Suite for z/OS Installation Guide
Preface
Today’s financial institutions face a demanding and competitive environment. The
S1 Corporation has produced a widely accepted suite of products, banking,
investments, and relationship management.
This IBM Redbook discusses the S1 Banking product, called Consumer Suite,
which has been deployed on the zSeries platform. It is written for technical
professionals involved in planning and installing the banking product. The
information in this guide is for Version 5.3 of S1 Consumer Banking.
We begin by explaining the S1 Consumer Suite environment as it exists today.
The emphasis is on the S1 Consumer Banking module as developed for the
zSeries architecture.
Next, we introduce zSeries architecture and discuss the advantages of using the
zSeries and z/OS as a proven Web server.
Then we discuss planning for the installation of S1 Consumer Banking on z/OS
and UNIX System Services, as well as using AIX as a CSR Web server.
Finally, we describe in detail the installation and customization steps of the S1
Banking module on z/OS. A step-by-step procedure outlines the customization of
the S1 Banking module under UNIX System Services. A Web server installation
is described on the AIX platform. A Web server installation is also described for
CSR.
The team that wrote this redbook
This IBM Redbook was produced by a team of specialists from around the world
working at the International Technical Support Organization, Poughkeepsie
Center.
Vasilis Karras is a Senior IT Specialist at the International Technical Support
Organization, Poughkeepsie Center. He has frequently contributed to IBM
Redbooks. He also provides technical support to residencies at the ITSO.
Hoson Rim is a Principal IT Consultant with e-business Support for the
Americas. He has more than 20 years of experience in the IT field.
Thanks to the following people for their contributions to this project:
© Copyright IBM Corp. 2002
ix
Jim Sloan
S1 Corporation, OS/390 Systems Support, Atlanta, GA
Tim Cowan
S1 Corporation, UNIX Support, Atlanta, GA
Richard Conway
International Technical Support Organization, Poughkeepsie Center, NY
Robert Haimowitz
International Technical Support Organization, Poughkeepsie Center, NY
Viviane Anavi-Chaput
International Technical Support Organization, Poughkeepsie Center, NY
Comments welcome
Your comments are important to us!
We want our IBM Redbooks to be as helpful as possible. Send us your
comments about this or other Redbooks in one of the following ways:
Use the online Contact us review redbook form found at:
ibm.com/redbooks
Send your comments in an Internet note to:
redbook@us.ibm.com
Mail your comments to the address on page ii.
x
S1 Consumer Suite for z/OS Installation Guide
1
Chapter 1.
S1 Consumer Suite overview
This chapter provides an overview of S1 Consumer Suite of products, including:
Consumer Banking
Consumer Investments
Relationship Management
© Copyright IBM Corp. 2002
1
1.1 Product architecture
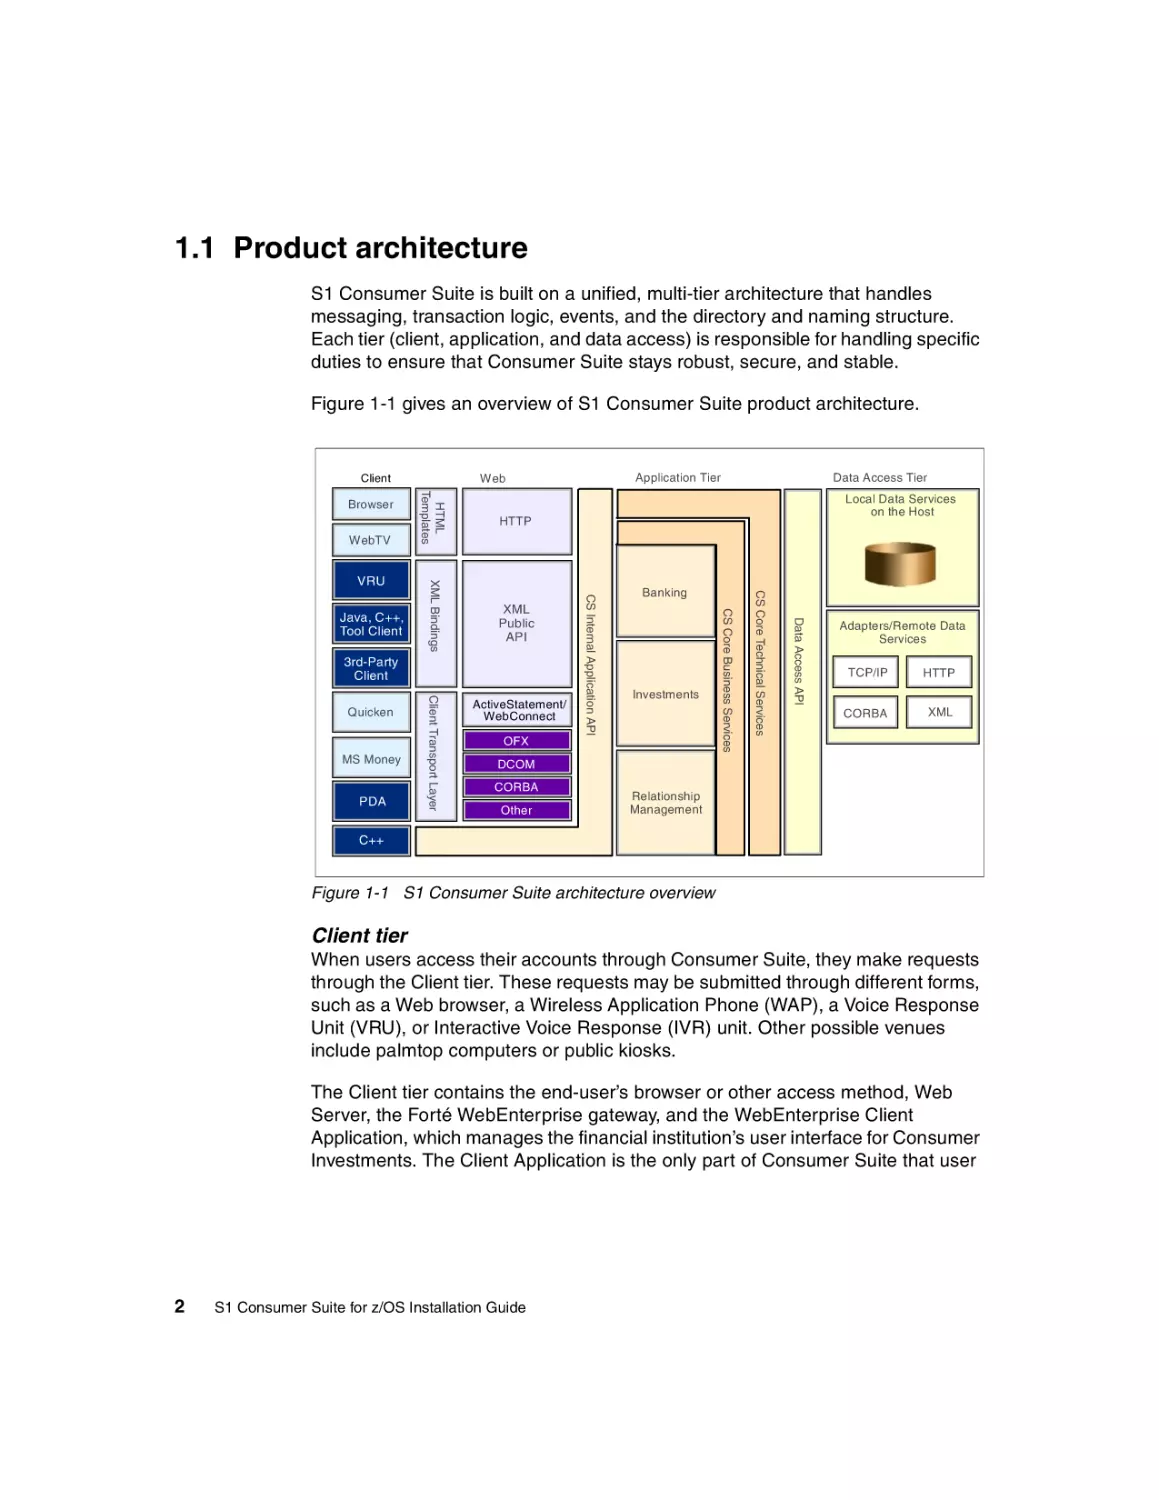
S1 Consumer Suite is built on a unified, multi-tier architecture that handles
messaging, transaction logic, events, and the directory and naming structure.
Each tier (client, application, and data access) is responsible for handling specific
duties to ensure that Consumer Suite stays robust, secure, and stable.
Figure 1-1 gives an overview of S1 Consumer Suite product architecture.
Client
WebTV
Investments
OFX
Data Access API
ActiveStatement/
WebConnect
Banking
CS Core Technical Services
PDA
Client Transport Layer
MS Money
Local Data Services
on the Host
CS Core Business Services
XML
Public
API
3rd-Party
Client
Quicken
Data Access Tier
HTTP
CS Internal Application API
Java, C++,
Tool Client
XML Bindings
VRU
HTML
Templates
Browser
Application Tier
Web
Adapters/Remote Data
Java, C++,
Services
Tool Client
TCP/IP
HTTP
CORBA
XML
DCOM
CORBA
Other
Relationship
Management
C++
Figure 1-1 S1 Consumer Suite architecture overview
Client tier
When users access their accounts through Consumer Suite, they make requests
through the Client tier. These requests may be submitted through different forms,
such as a Web browser, a Wireless Application Phone (WAP), a Voice Response
Unit (VRU), or Interactive Voice Response (IVR) unit. Other possible venues
include palmtop computers or public kiosks.
The Client tier contains the end-user’s browser or other access method, Web
Server, the Forté WebEnterprise gateway, and the WebEnterprise Client
Application, which manages the financial institution’s user interface for Consumer
Investments. The Client Application is the only part of Consumer Suite that user
2
S1 Consumer Suite for z/OS Installation Guide
requests (such as presentation logic) actually reach. From there, the requests
are channeled through a variety of firewalls and secure servers, ensuring that the
Application and Data Access tiers remain fully secure and unavailable from the
Internet.
For more information, refer to 3.4, “Security” on page 38.
Application tier
The Application tier shows all the major components of the S1 Consumer
products - banking, investments, and relationship management. It contains the
business logic for those components. In this tier, user requests are validated and
processed, and the physical transactions are managed. The Application tier
contains logic to support trades, balances, transactions, portfolio, and quotes. All
application logging, monitoring, and auditing activities take place in this tier. It
also contains business logic common to the entire S1 Consumer Suite.
Data Access tier
The Data Access tier typically contains the application data.The business logic in
the application tier submits requests to the Data Access tier to add, update, or
delete physical data from the supporting data storage facility. Consumer Suite is
designed to allow the physical data to be stored in a local database or in a
remote storage facility on the financial institution’s host systems.
If the data is stored remotely, it is accessed using a real-time call to the host
system. If the data is stored locally, it is synchronized with the host system using
real-time adapters and a batch process.
The Data Access tier also includes communications servers where adapters are
implemented. It is the integration point between the Consumer Suite core
application and a financial institution’s vendors. A variety of host protocols can be
used to communicate through the Data Access tier. Protocols such as 3270,
sockets, TUXEDO, CORBA, and DCOM can be implemented through
custom-developed interfaces.
1.2 The S1 Consumer Suite of products
Today’s financial institutions face a demanding and competitive environment,
including factors such as:
Huge and constantly growing operational databases
A demanding customer base
Customer-centric vs. product-centric marketing
Rapidly advancing technology that delivers new opportunities
Reduced time to market
Chapter 1. S1 Consumer Suite overview
3
A highly competitive environment with non-traditional competitors
Mergers and acquisitions that often cause turmoil and confusion
The S1 Corporation has produced a widely-accepted suite of products to
address the demands of the financial industry. The three modules of the S1
Consumer Suite are:
Consumer Banking
Consumer Investments
Relationship Management
The S1 team has ported only the Banking module to the zSeries platform. In the
following sections, however, we discuss each of these modules in greater detail.
1.2.1 Consumer Banking
Consumer Banking is built on a unified, multitier technical architecture that
handles messaging, transaction logic, events, and the directory and naming
structure. Each tier is responsible for handling specific duties to ensure that
Consumer Banking stays robust, secure, and stable.
Consumer Banking provides a powerful and versatile banking solution. It is
customizable and configurable, and can be implemented in a variety of settings
to meet the changing needs of modern financial institutions. Consumer Banking
allows users to:
View and retain an unlimited account history, depending on the configuration
View account balances
View cleared transactions
Enter transactions in the register and assign categories and memos to
transactions
Generate detailed reports to track spending
Interface with popular financial software, such as Microsoft Money and Intuit
Quicken
Make online payments and transfer funds between accounts
Schedule recurring payments and transfers
Because of its flexibility, Consumer Banking presents a financial institution with a
wide variety of choices. This redbook is designed to assist in helping you to
understand the following:
Consumer Banking’s capabilities and features
Implications of various configuration and implementation decisions
Dependencies among various implementation choices
4
S1 Consumer Suite for z/OS Installation Guide
We cover the Consumer Banking module in greater detail in Chapter 3, “S1
Consumer Banking planning” on page 31.
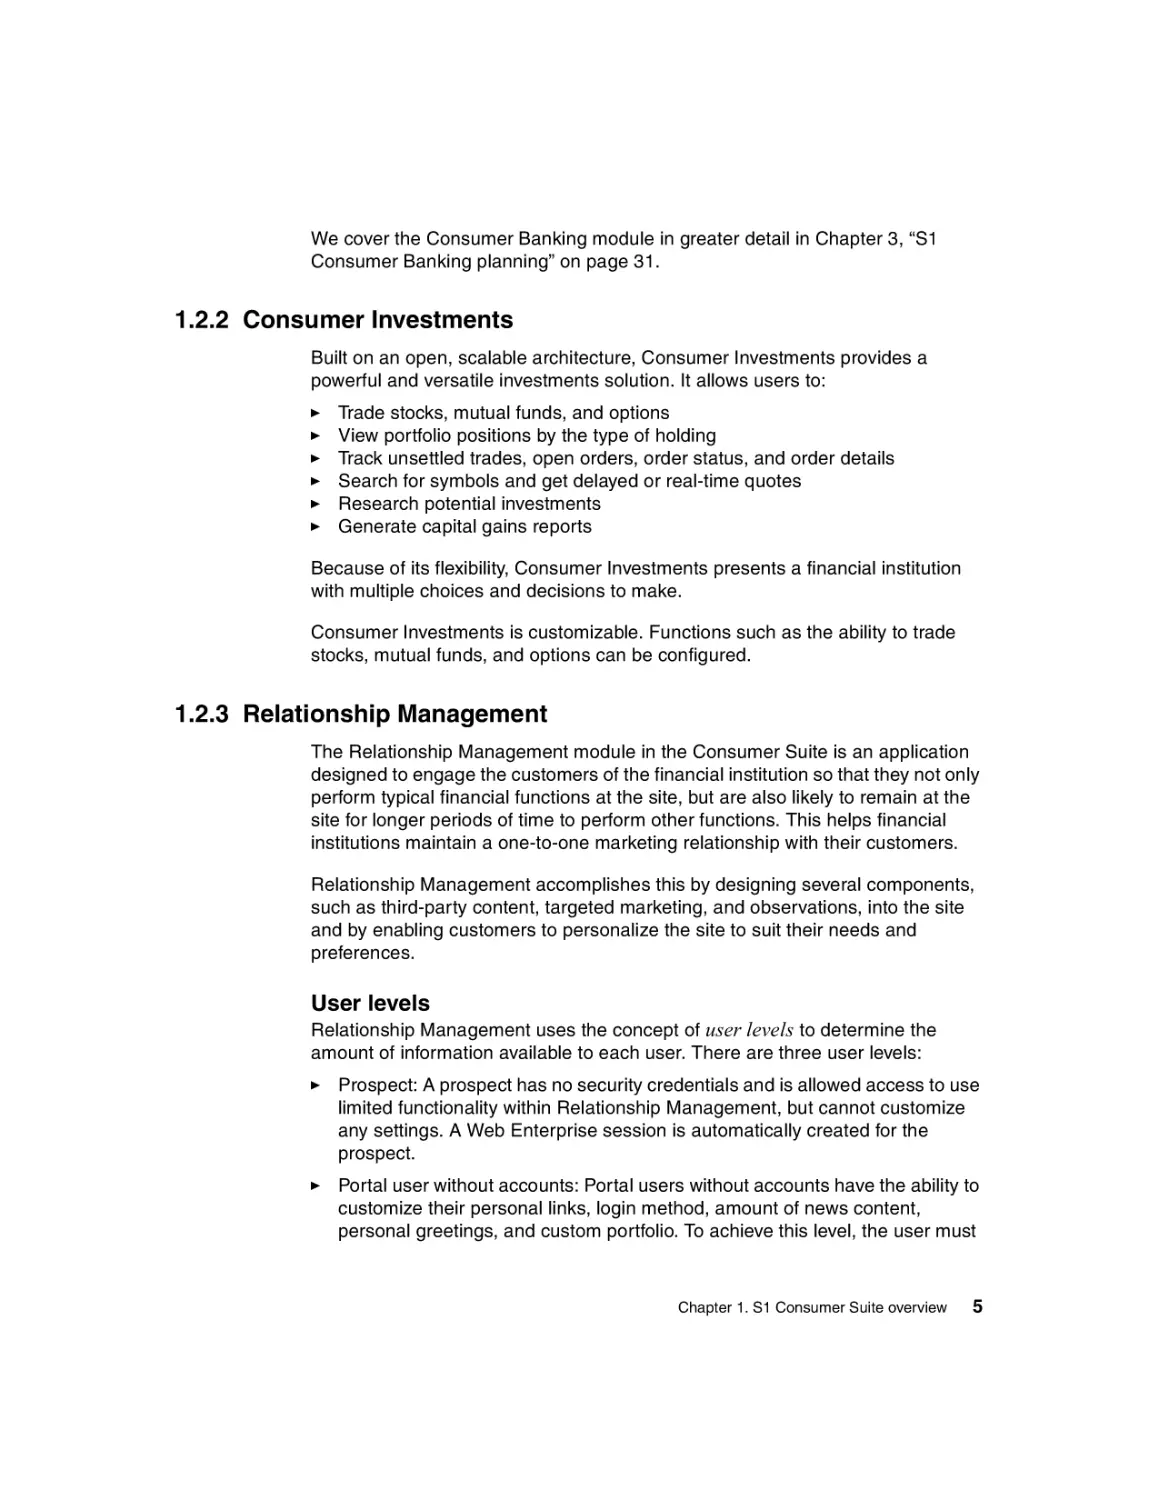
1.2.2 Consumer Investments
Built on an open, scalable architecture, Consumer Investments provides a
powerful and versatile investments solution. It allows users to:
Trade stocks, mutual funds, and options
View portfolio positions by the type of holding
Track unsettled trades, open orders, order status, and order details
Search for symbols and get delayed or real-time quotes
Research potential investments
Generate capital gains reports
Because of its flexibility, Consumer Investments presents a financial institution
with multiple choices and decisions to make.
Consumer Investments is customizable. Functions such as the ability to trade
stocks, mutual funds, and options can be configured.
1.2.3 Relationship Management
The Relationship Management module in the Consumer Suite is an application
designed to engage the customers of the financial institution so that they not only
perform typical financial functions at the site, but are also likely to remain at the
site for longer periods of time to perform other functions. This helps financial
institutions maintain a one-to-one marketing relationship with their customers.
Relationship Management accomplishes this by designing several components,
such as third-party content, targeted marketing, and observations, into the site
and by enabling customers to personalize the site to suit their needs and
preferences.
User levels
Relationship Management uses the concept of user levels to determine the
amount of information available to each user. There are three user levels:
Prospect: A prospect has no security credentials and is allowed access to use
limited functionality within Relationship Management, but cannot customize
any settings. A Web Enterprise session is automatically created for the
prospect.
Portal user without accounts: Portal users without accounts have the ability to
customize their personal links, login method, amount of news content,
personal greetings, and custom portfolio. To achieve this level, the user must
Chapter 1. S1 Consumer Suite overview
5
be authenticated using login credentials. These credentials can be entered in
the login page or delivered by a persistent cookie set on the user’s browser.
Portal user with accounts: Portal users with accounts have all of the
customization and personalization available to portal users without accounts.
They also have the ability to access their accounts and other S1 Consumer
Suite applications. This level can only be achieved by explicit authentication
using the S1 Consumer Suite authentication procedure.
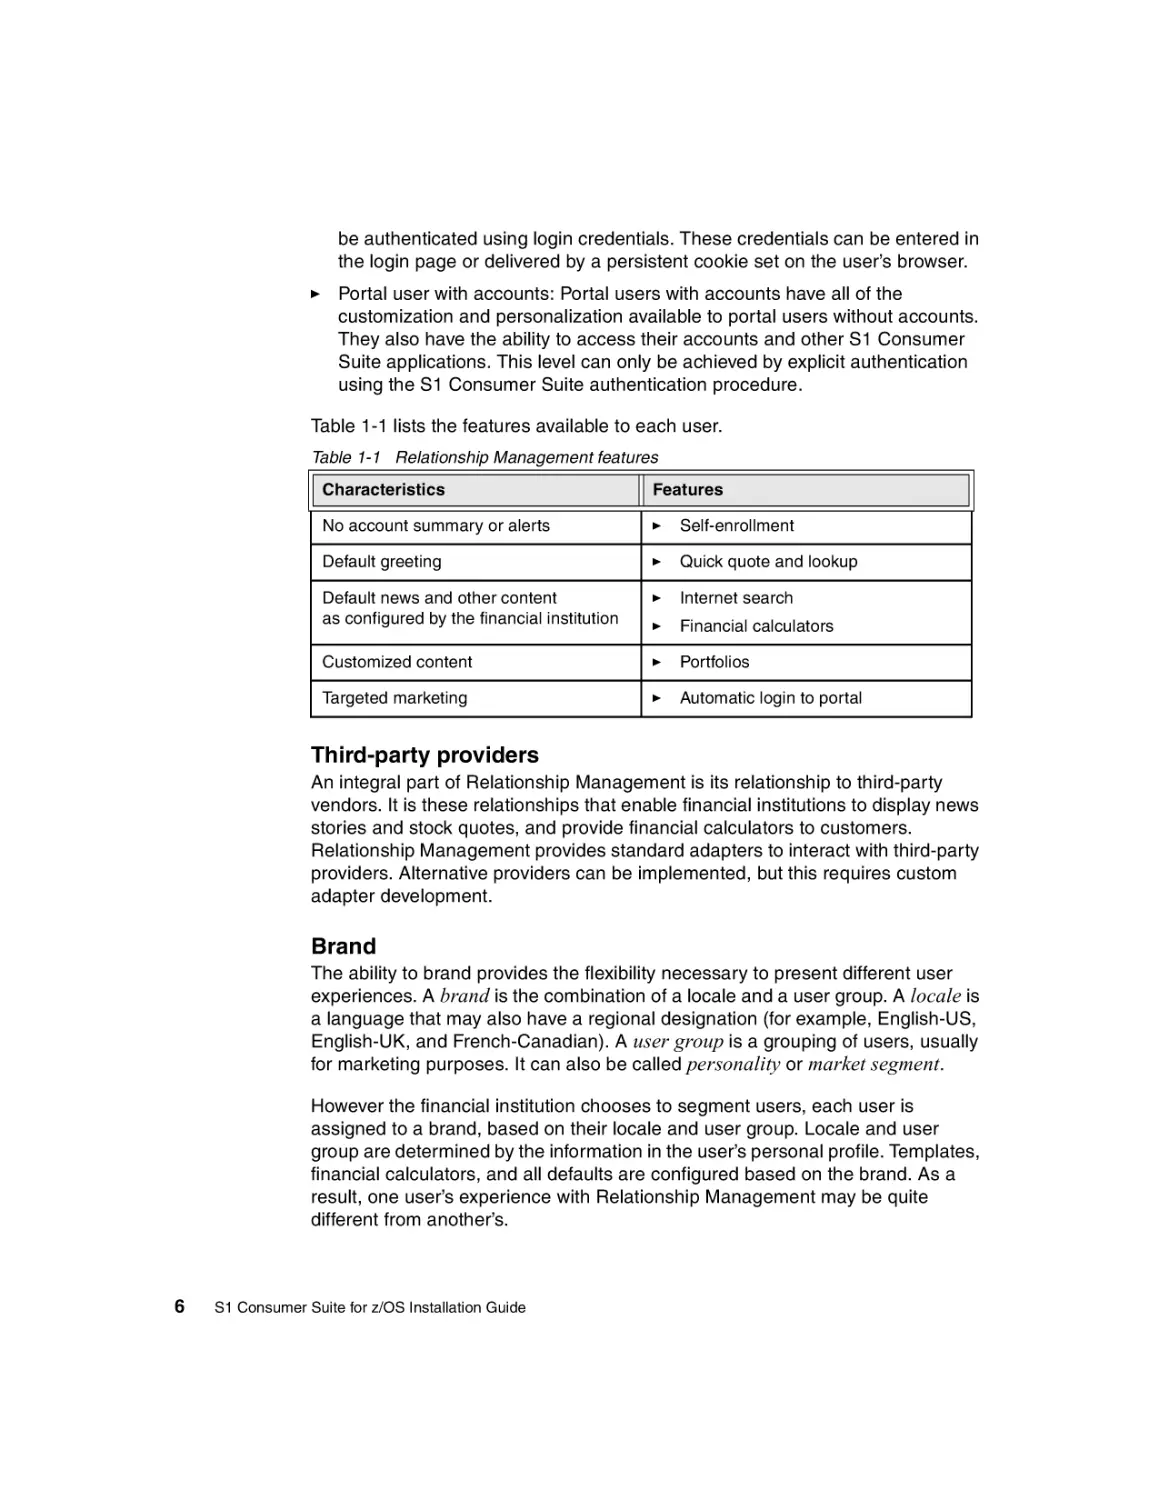
Table 1-1 lists the features available to each user.
Table 1-1 Relationship Management features
Characteristics
Features
No account summary or alerts
Self-enrollment
Default greeting
Quick quote and lookup
Default news and other content
as configured by the financial institution
Internet search
Financial calculators
Customized content
Portfolios
Targeted marketing
Automatic login to portal
Third-party providers
An integral part of Relationship Management is its relationship to third-party
vendors. It is these relationships that enable financial institutions to display news
stories and stock quotes, and provide financial calculators to customers.
Relationship Management provides standard adapters to interact with third-party
providers. Alternative providers can be implemented, but this requires custom
adapter development.
Brand
The ability to brand provides the flexibility necessary to present different user
experiences. A brand is the combination of a locale and a user group. A locale is
a language that may also have a regional designation (for example, English-US,
English-UK, and French-Canadian). A user group is a grouping of users, usually
for marketing purposes. It can also be called personality or market segment.
However the financial institution chooses to segment users, each user is
assigned to a brand, based on their locale and user group. Locale and user
group are determined by the information in the user’s personal profile. Templates,
financial calculators, and all defaults are configured based on the brand. As a
result, one user’s experience with Relationship Management may be quite
different from another’s.
6
S1 Consumer Suite for z/OS Installation Guide
Note: You may also hear the term branding used when discussing S1 Consumer
Suite products. The processing of customizing the templates and the user
interface is sometimes referred to as “branding the application”. This should not
be confused with brand as discussed in this section.
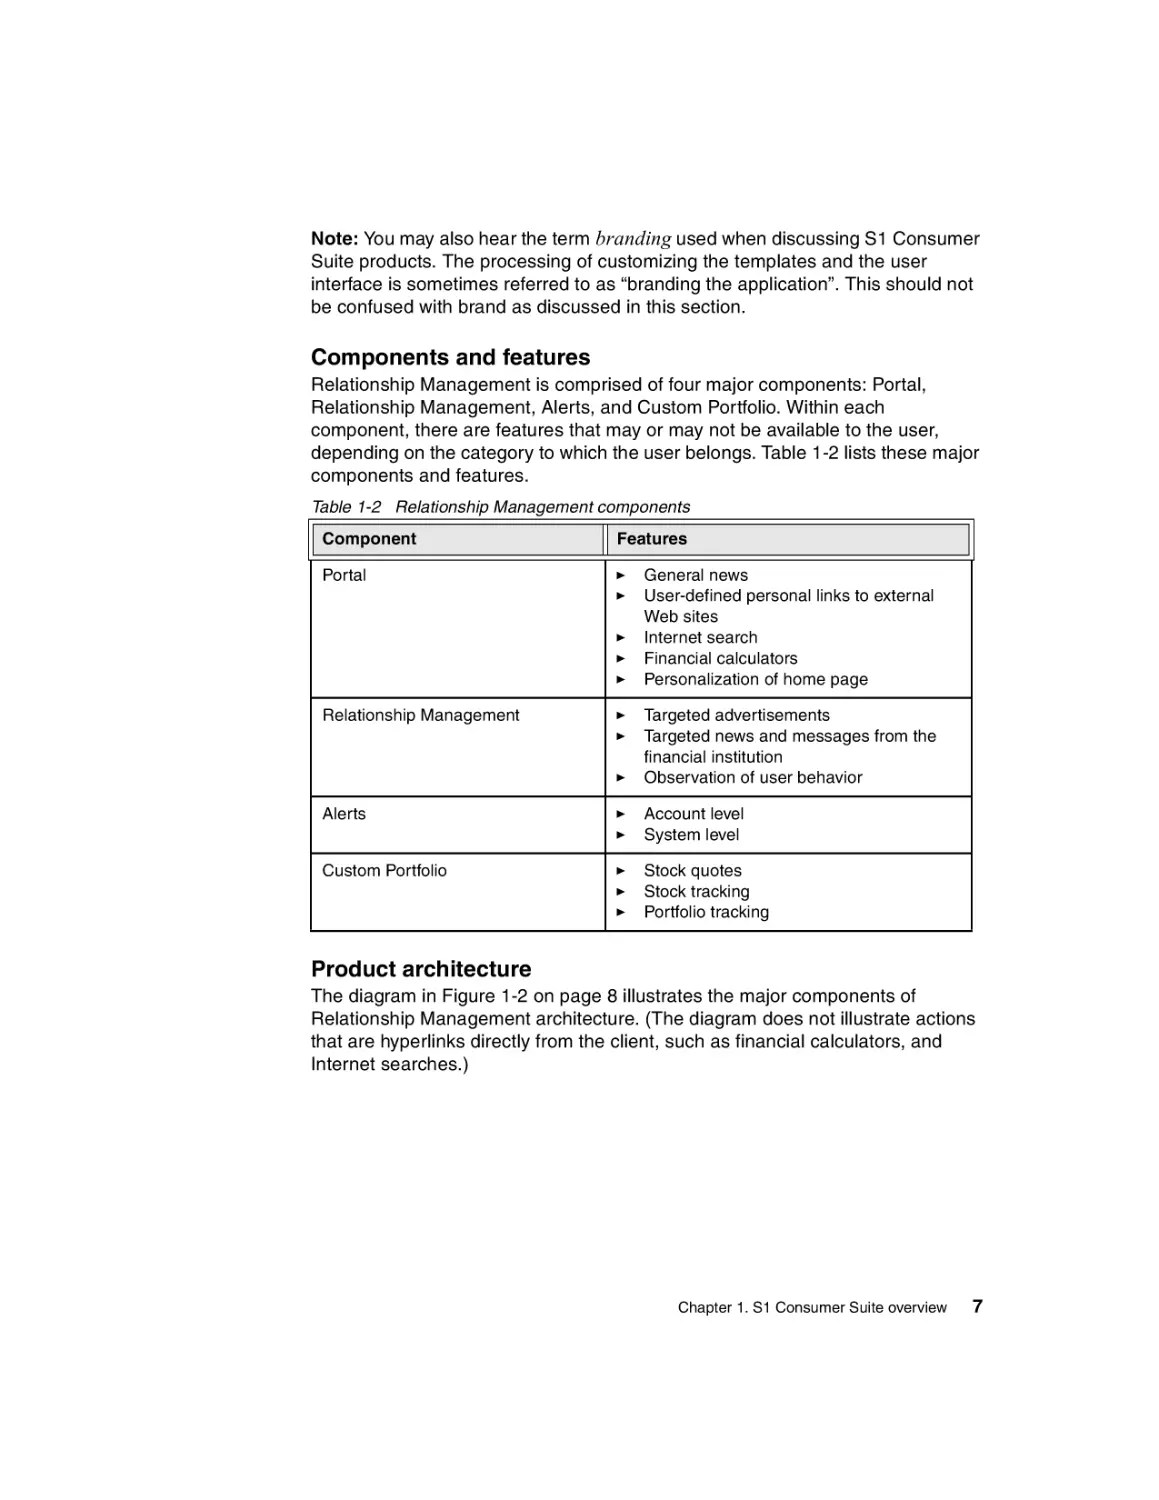
Components and features
Relationship Management is comprised of four major components: Portal,
Relationship Management, Alerts, and Custom Portfolio. Within each
component, there are features that may or may not be available to the user,
depending on the category to which the user belongs. Table 1-2 lists these major
components and features.
Table 1-2 Relationship Management components
Component
Features
Portal
Relationship Management
General news
User-defined personal links to external
Web sites
Internet search
Financial calculators
Personalization of home page
Targeted advertisements
Targeted news and messages from the
financial institution
Observation of user behavior
Alerts
Account level
System level
Custom Portfolio
Stock quotes
Stock tracking
Portfolio tracking
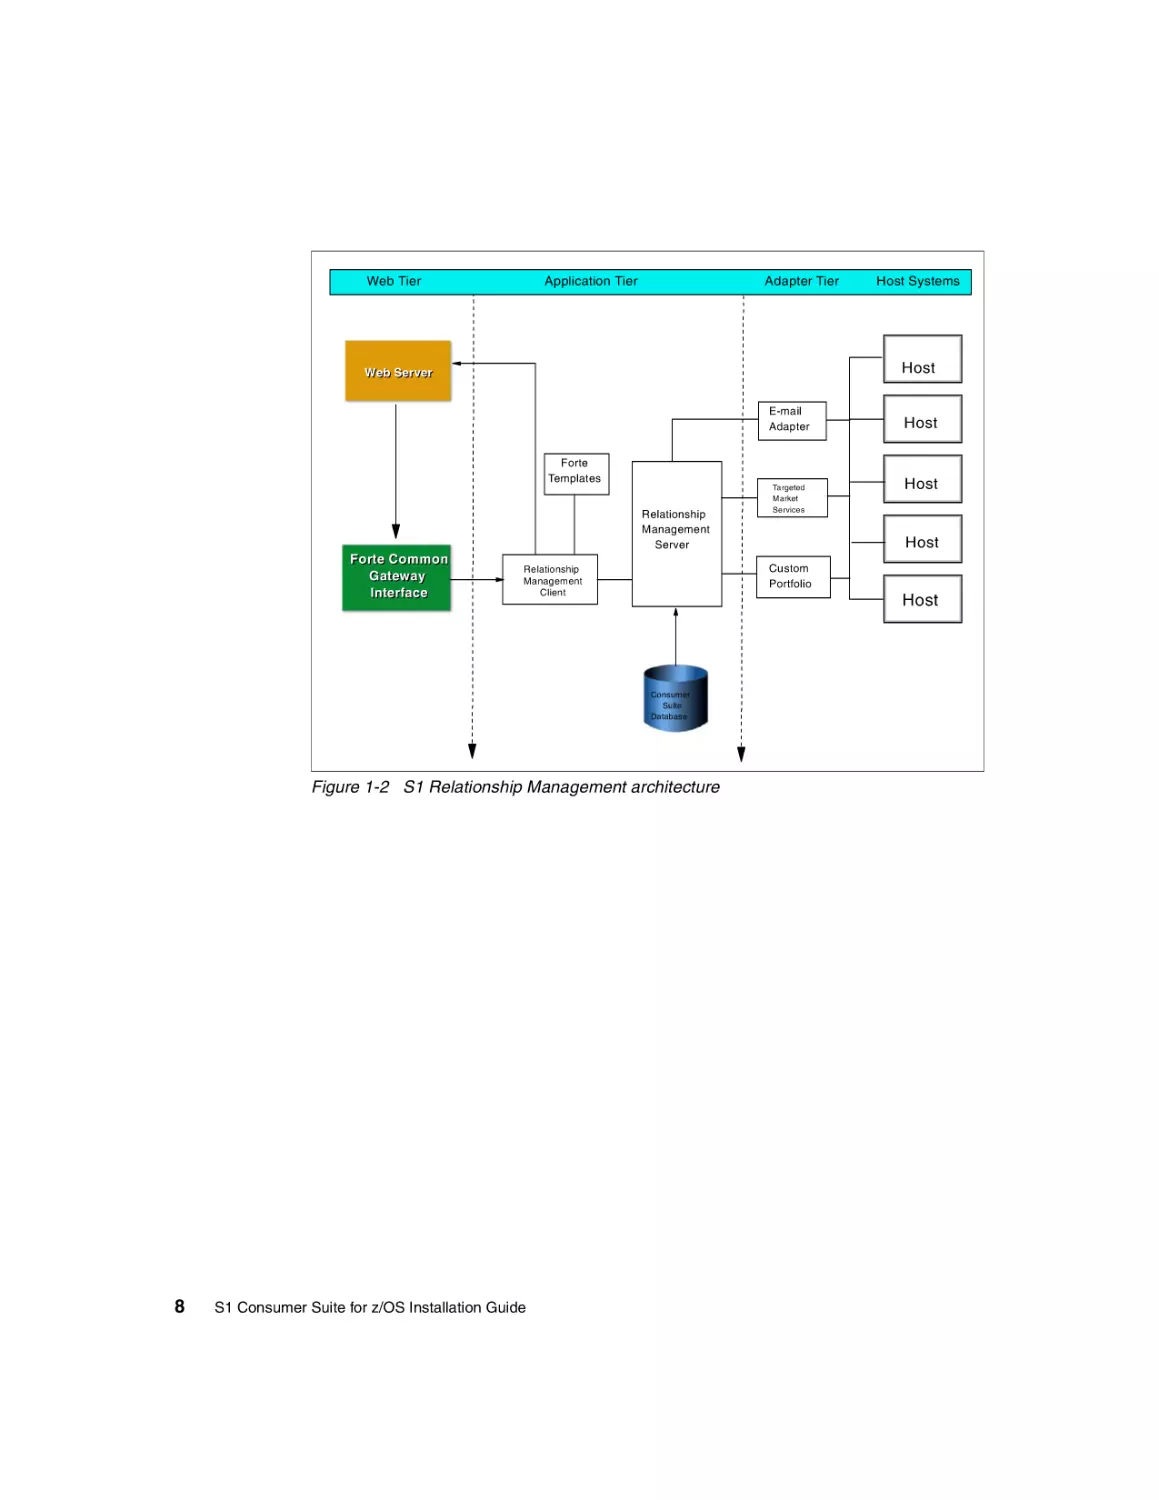
Product architecture
The diagram in Figure 1-2 on page 8 illustrates the major components of
Relationship Management architecture. (The diagram does not illustrate actions
that are hyperlinks directly from the client, such as financial calculators, and
Internet searches.)
Chapter 1. S1 Consumer Suite overview
7
Web Tier
Application Tier
Adapter Tier
Host
Web Server
E-mail
Adapter
Forte
Templates
Relationship
Management
Server
Forte
Forte Common
Gateway
Interface
Host
Host
Host
Figure 1-2 S1 Relationship Management architecture
S1 Consumer Suite for z/OS Installation Guide
Targeted
Market
Services
Host
Custom
Portfolio
Relationship
Management
Client
Consumer
Suite
Database
8
Host Systems
2
Chapter 2.
zSeries platform overview
Although some industry watchers had predicted the end of the mainframe as the
client-server philosophy rose in popularity, this scenario has not come true. This
is because the zSeries hardware and software has been refined for four decades
to provide unparalleled performance and reliability.
This technology makes the zSeries an excellent server platform, in both highly
centralized and client-server environments. The growing popularity of the World
Wide Web has increased the demand for powerful zSeries servers with their
extremely high availability.
© Copyright IBM Corp. 2002
9
2.1 Benefits of the zSeries platform
Complexity is a way of life for businesses today. An average business must
contend with five different architectures in its e-business infrastructure. The
challenge customers face is how to manage all of these resources effectively,
while transforming their infrastructures. Compounding the problem is the
projected shortfall of skills and the explosive growth of the Internet.
Although it sounds like a daunting task, IBM is designing its product line to be
“self-managing” so customers can concentrate on their business needs. At the
core of many infrastructures is the IBM zSeries 900™ powered by z/OS™.
Specifically designed to handle the massive growth in transactional and data
demands of the e-business world, z900 and z/OS intelligently manage a
multitude of diverse workloads within a single server, out to the network and to
data, all according to each customer's business priorities.
2.1.1 Powerful architecture
The z900 servers are based on the z/Architecture, which enables applications to
have large memory and can eliminate bottlenecks associated with the lack of
addressable memory. This architecture supports a new standard of performance
and integration by expanding on the balanced system approach of the S/390®
architecture.
zSeries servers automatically direct resources to priority work through Intelligent
Resource Director (IRD). The zSeries IRD combines the strengths of three key
technologies: Workload Manager, Logical Partitioning, and Parallel Sysplex
clustering.
This powerful combination of z900 servers and z/OS provides the ability to
intelligently self-manage numerous operating system images executing on a
single server, as a single compute resource, with dynamic workload
management and physical resource balancing across logical partitions. In short,
the system can dynamically allocate processors, channel paths, and
channel-and-controller work across multiple virtual servers to ensure that the
unpredictable needs of e-business workloads can be managed according to
business priorities.
The zSeries and z/OS extend the power of Workload Manager from the edge of a
network to the heart of data. Business priorities are used for real-time
prioritization of network and I/O requests when combined with Cisco technology
and through the IBM Enterprise Storage Server™. The Sysplex Distributor
10
S1 Consumer Suite for z/OS Installation Guide
function of z/OS provides intelligent load balancing of TCP/IP traffic across a
Parallel Sysplex cluster. Dynamic Virtual Internet Protocol Addressing (VIPA)
support extends the workload distribution and availability features of Parallel
Sysplex technology to the TCP/IP network.
2.1.2 Availability: always on
zSeries servers can deliver the highest level of application availability required in
today’s global networked environment. Even in a single footprint, zSeries servers
are designed to avoid or recover from failures to minimize business disruptions.
High availability is realized through very high component reliability and design
features that assist in providing fault avoidance and tolerance, as well as
permitting concurrent maintenance and repair.
For even higher levels of availability, the superior choice is zSeries 900 with IBM
Parallel Sysplex clustering technology. New and faster Coupling Links provide
balanced performance for the powerful z900 in a sysplex. ISC-3 links provide up
to 2 gigabits/second transfer rates; ICB links provide up to 1 gigabyte/second. In
addition, complete backward compatibility exists with S/390 ISC and ICB links.
Another aspect of availability is nondisruptive growth, enabled in the zSeries by
Capacity Upgrade on Demand. z900 servers have the capability to add server
capacity and virtual servers in a nondisruptive manner, as well as to install
FICON, FICON Express, ESCON, OSA-Express Gigabit and Fast Ethernet,
Token Ring and ATM, and PCI Cryptographic Coprocessor (PCICC), PCI
Cryptographic Accelerator (PCICA) cards, and to activate memory without
bringing down the system.
2.1.3 Safe and secure
IBM leads the industry in bringing security to e-business with the integrated
security features of z/Architecture. The high-availability CMOS Cryptographic
Co-processors feature has earned Federal Information Processing Standard
(FIPS) 140-1 level 4, the highest certification for commercial security ever
awarded by the U.S. Government. Further, these co-processors are designed as
single-chip modules that are individually serviceable, eliminating downtime in the
event of a crypto chip repair action.
z900 servers can also support a combined total of 16 optional PCICC and/or
PCICA co-processors, leading the industry in supporting up to 3,850 SSL
transactions/second. The combination of the three co-processor types enables
applications to invoke industry-standard cryptographic capabilities—such as
DES, Triple DES and RSA—for scalable e-transaction security and the flexibility
to quickly adopt new standards.
Chapter 2. zSeries platform overview
11
Linux for zSeries running on standard z900 engines is capable of exploiting the
hardware cryptographic feature provided by the PCI card for SSL acceleration.
This enables customers implementing e-business applications on Linux for
zSeries to utilize enhanced security of the hardware.
2.1.4 Innovative technology = leading server performance
zSeries technological leadership means that you can reduce the cost and
complexity of e-business through self-managing features such as Intelligent
Resource Director (IRD), 64-bit architecture, copper technology, HiperSockets,
and up to 640 processors working together. With this ability to self-manage,
zSeries is a model for IBM's Project eLiza, a project whose purpose is to make
the e-business infrastructure, including storage and software, a self-managing
system. With systems that self-optimize, self-configure, self-heal and self-protect,
Project eLiza will enable IBM to start removing the complexity of ever-expanding
e-business infrastructures and help you overcome systems management
challenges.
Some examples of zSeries self-management
z/OS Workload Manager (WLM) and IRD on the IBM z900 and z800 can handle
unpredictable workloads. This means minimal human intervention to set up and
operate the system and effective utilization of CPU and I/O resources.
The zSeries IRD LPAR CPU management function dynamically manages
non-z/OS operating systems such as Linux. This means the Workload Manager
policy establishes the goal and business importance of a non-z/OS partition like
Linux.
2.2 Powered by z/OS
While z900 servers are supported by a multitude of operating systems, their most
advanced features are powered by z/OS. z/OS is the foundation for the future of
zSeries servers. It is an integral part of the z/Architecture, designed and
developed to quickly respond to the demanding quality of service requirements
for enterprise e-business.
As a robust operating system, z/OS is based on the new 64-bit z/Architecture.
Using the latest software technologies, z/OS delivers the highest qualities of
service for enterprise transactions and data, while extending these qualities to
new applications. It provides a highly secure, scalable, high-performance base
on which to build and deploy Internet and Java-enabled applications.
12
S1 Consumer Suite for z/OS Installation Guide
z/OS takes advantage of the latest software technologies: new object-oriented
programming models that permit the rapid design, development, and deployment
of applications essential to enterprise e-business. It protects investments in
present S/390 applications by providing options for integrating existing
applications within an e-business infrastructure.
In addition, z/OS provides a solid base for delivering on the benefits of industryspecific UNIX® and e-business applications, supporting ISO standard C++
libraries as well as new technologies such as Enterprise JavaBeans™, XML,
HTML, and Unicode. It supports such technological advances as Parallel Sysplex
processing and TCP/IP networking capability, and it complies with industry
standards.
z/OS helps make critical data and processing functions accessible to end users
regardless of their location. The z/OS base includes z/OS Communications
Server, which enables world-class TCP/IP, SNA, and HiperSockets networking
support. Enterprise class dependability, performance, scalability, highly secure
connectivity, and support for multiple protocols are included.
The SecureWay® Security Server feature and additional security functions help
ensure data and transaction integrity. Furthermore, z/OS supports user
authentication via Kerberos protocol, or via digital certificates as well as through
local user ID. Other cryptographic functions include support of Secure Socket
Layer (SSL) protocol and support of typical smart card applications.
2.2.1 Smoothing the path
The systems management function and features of z/OS provide more robust
control and automation, as well as better serviceability and availability. For
example, Intelligent Resource Director extends the classic strengths of I/O
priority queuing by prioritizing requests across zSeries 900 channels via Channel
Subsystem Priority Queuing. In addition, it allows I/O channels to move
automatically to those workloads that require additional connectivity through
Dynamic Channel Path Management.
Furthermore, z/OS provides an entirely new approach for installing and
configuring products: a managed system infrastructure. This approach goes
beyond Web-based wizards by furnishing a step-by-step installation guide and
automated system updates. For example, Managed Systems Infrastructure for
Setup can establish a Parallel Sysplex quickly and easily by transparently
creating the policies, parmlib specifications, and initialization parameters
necessary to configure a basic Parallel Sysplex environment.
Chapter 2. zSeries platform overview
13
2.2.2 An open, flexible server
z900 servers offer the flexibility to manage numerous operating systems on a
single server, including z/OS, OS/390, z/VM, VM/ESA, VSE/ESA, TPF, Linux for
zSeries and Linux for S/390.
Using virtualization technology as a foundation, z/VM Version 4 (V4) offers new
functions that exploit IBM Virtual Machine (VM) capabilities on the mainframe.
Virtualization technology allows customers to virtualize processor,
communications, storage, and I/O resources, which may reduce the overhead of
planning, purchasing, and installing new hardware to support new workloads.
Building upon the solid VM/ESA base, z/VM delivers support for hardware
technologies such as FICON and FICON Express channels,
OSAExpress—high-speed communication adapters, low-latency HiperSockets,
and advanced storage solutions. z/VM also takes advantage of 64-bit real and
virtual memory.
Linux for zSeries supports the new 64-bit architecture and HiperSockets on z900
processors. In addition, Linux for S/390 will run 31-bit applications.
Multiple Linux systems can be easily managed on the zSeries 900 with z/VM.
z/VM V4 offers an ideal platform for consolidating Linux workloads on a single
zSeries 900, enabling you to run hundreds of Linux guest images. Linux images
are able to share resources and internal high-speed communications.
The Integrated Facility for Linux is a feature that dedicates a processor for Linux
images. Additional processing capability can be purchased exclusively for Linux
workloads, without impacting the z900 model designation nor increasing charges
for zSeries software on the rest of the server. z/VM V4 supports the IBM
Integrated Facility for Linux feature for Linux-based workloads.
2.2.3 Reasons to run your applications on z/OS
Opening up the information system to casual—and occasionally,
unknown—users through the World Wide Web means that the unequaled
security provided by the zSeries is essential to the protection of critical data.
Making the information available to existing and potential customers, rather than
just employees of an organization, means that maximum availability is critical. If
your Web site is down, a competitor's Web site is often just a click away.
14
S1 Consumer Suite for z/OS Installation Guide
z/OS incorporates many new functions such as integrated UNIX, Web
enablement, Print Server, and so on, to make it a super server. While retaining all
the features of classic MVS, other features have been added to make it an open
server. zSeries provides DCE function, integrates object-oriented support,
provides Web serving, and packages TCP/IP in the base product. In addition, it is
UNIX branded; that is, z/OS is certified that it has a standard set of UNIX APIs.
z/OS is totally compliant with UNIX 95 (XPG4).
z/OS continues to support online transaction and batch processing. The industry
is growing in the area of e-business (network computing), data mining (business
intelligence), server consolidation, and the use of packaged applications. We
expect the z/OS to have significant usage growth in these new areas. Our
development efforts are directed at supporting the OLTP and batch as well as all
the technologies needed for these growth areas.
z/OS has a number of attributes that distinguish it from other enterprise category
servers. A single z/OS can provide 99.9 percent uptime. Parallel Sysplex is the
industry’s ultimate configuration, providing 99.999 percent uptime.
2.3 zSeries hardware benefits
Several features are implemented in the zSeries hardware to provide high
reliability, availability, and serviceability (RAS) for applications. Every zSeries
generation over the years has contained more and further enhanced features as
the platform matured, and there will surely be more of those features coming in
future generations.
Many of zSeries RAS features were developed at a time when the failure of
hardware elements was more frequent, and they are very rare nowadays.
However, these hardware availability features are just as valuable today. The
design concept is to avoid single points of failure (SPOFs). Therefore, most
zSeries hardware elements have built-in redundancy or can be circumvented if
they fail.
This section lists many of the features that are implemented in the zSeries
architectural design.
2.3.1 Reliability features
Reliability is designed into zSeries hardware, including features like these:
High-reliability technology components
Parts integration, to reduce the number of parts in the machine
Chapter 2. zSeries platform overview
15
MCM System Run-In Test in manufacturing, to simulate 9000 hours of
extreme customer operation
2.3.2 Availability features
zSeries contains a number of features to enhance availability of the system and
its applications. These include
Fault-tolerant design
Error correction code
Storage recovery
LPAR dynamic storage reconfiguration
Dynamic I/O configuration
Dual power feeds
Concurrent hardware maintenance
Capacity update on demand (see 2.3.3, “Customer-Initiated Upgrade (CIU)”
on page 16)
Lastly, there are a number of features that provide excellent ability to service
hardware and software in a zSeries environment:
Automatic error detection and fault isolation concurrent with system operation
Automatic remote support capability
High degree of concurrent maintenance capability in hardware and code
Multiple Channel Swap—an enhancement for channel problem determination
allowing up to four channels to be swapped concurrently with system
operation
Status Panel showing status of N+1 power system
Enhanced diagnostics for Coupling Links
2.3.3 Customer-Initiated Upgrade (CIU)
As with other IBM platforms, zSeries offers IBM Capacity Advantage. This
enables businesses to plan for unpredictable new e-business opportunities or
surges of transactions on the Internet. You can prepare now to add future
capacity quickly and without disrupting your users, applications, or systems.
We provide new approaches to capacity growth that are aligned with business
expenditures and individual needs, offering these features:
More processors
16
S1 Consumer Suite for z/OS Installation Guide
Pay when you activate
Avoid disruption
Capacity Advantage from IBM consists of two approaches:
1. Capacity Upgrade: Preinstalling hardware upgrade features can prepare for
the ability to add capacity quickly without ship and install delays.
2. Capacity Standby: Financing options provide cost-effective assurance that
capacity will be there for the next online business opportunity.
Capacity Upgrade allows companies to manage unpredictable growth by having
extra “dormant” capacity shipped with the original machine for a small premium
at initial purchase. When an upgrade is needed, it can be purchased and
activated rapidly and in a nondisruptive manner. Growth is easily managed at the
lowest cost.
Extra processors are provided within a single server. Although the most likely
type of workload is data/transaction serving, this type of capacity on demand can
be used for any purpose, including Web servers, application servers, or special
purpose servers. Even better, every server with Capacity Upgrade offers you
tremendous flexibility:
A trial period during which you can try out the additional capacity before
committing to permanent activation and payment.
The ability to turn on the capacity immediately when you need it, with billing
and payment after the activation.
Flexibility to pay for additional capacity activation in line with your need matching expenditures directly to need.
The flexibility to work with IBM Business Partners or IBM directly to order and
pay for capacity you have activated.
You never need to activate the additional capacity if you don't need it.
How you get Capacity Upgrade
There are four steps to order and implement Capacity Upgrade:
1. Acquisition - Order and Acquire the hardware necessary to deliver built-in
processor capacity on demand.
2. Trial Period - If desired, “test drive” the capacity for a number of days. If you
turn it off in this period, you will not need to pay for the extra capacity.
3. Permanent Activation - Activate the capacity permanently.
4. Ordering and Payment - Order and pay for the additional activated capacity
through IBM or business partners.
Chapter 2. zSeries platform overview
17
With Capacity Upgrade, you are not required to activate the additional capacity
on any pre-established schedule, except for Storage, which requires additional
capacity to be activated within 12 months of installation.
Which servers support capacity upgrade
Capacity Upgrade is available on:
IBM zSeries
S390 G5 and G6 servers
2.4 Advantages of running applications on zSeries
Since the IBM System/360 became available in 1964, companies have been
running their mission-critical applications on this centralized platform. It is a
system that has evolved into an open architecture compatible with new
technologies. More important, most companies have a staff with the necessary
knowledge and skills.
While IBM has maintained this heritage, it has also kept up with the innovations
in the industry. zSeries has all the infrastructure to play in the world of
e-business. WebSphere, Java, Lotus Notes, and many other products have been
added to the zSeries repertory. In short, zSeries is an excellent server platform.
2.4.1 Background
Applications benefit from being on the zSeries platform because it offers the
highest degree of security, availability and scalability for mission-critical
applications, compared to other platforms. Mainframes run a high percentage of
business applications around the world for the following reasons:
Most large companies run their core business applications on z/OS.
End users are accustomed to good response time.
z/OS uses known and reliable techniques.
The benefits of running an application on zSeries include:
18
Availability
Scalability
Concurrent workload
Security
S1 Consumer Suite for z/OS Installation Guide
2.4.2 Availability
Availability is a very important factor and a critical concern in more and more
business applications. What is the impact to your business if your application
becomes unavailable? In fact, continuous availability is almost a necessity for
many business processes.
You must have a strategy to handle unplanned short-term outages, as well as
complete disasters. Every component of the system must be analyzed to see if
and where any potential point of failure exists. Ideally, each component should
have a backup alternative, so that there should never be any unplanned outages.
In addition to hardware and software outages, other causes of failure include
incorrect procedures in operations or in handling upgrades. Over the years, the
zSeries platform has developed system management procedures that address
these issues and minimize these types of failures.
The zSeries architecture is designed to isolate and recover failed components.
There are many built-in facilities to tolerate failures, such as redundant power
supplies, alternative CPU recovery, memory error detection and recovery, and
others. Additional components can be added without affecting availability.
There are also built-in remote diagnostics. Certain errors will trigger the system
to phone home to an IBM Support Center, so that a customer engineer can be
dispatched to take corrective action. The z/OS operating system has a host of
features that ensure availability, and system integrity, such as storage protection
keys and an automatic restart manager. In fact, 50 percent of z/OS code is
devoted to reliability, availability, and serviceability (RAS) of the operating
system.
2.4.3 Scalability
Providing better performance for end users has been a key requirement of
mainframe systems over the years. During the development of zSeries,
sophisticated system management tools were created. These tools, coupled with
zSeries’ efficient use of hardware, has produced an environment that provides
excellent performance even with varying workloads. It should be noted that part
of this hardware efficiency is the result of its very powerful I/O capability
These factors, combined with the continuing increase in the processing power of
the new IBM chip technology, make zSeries the best scalable platform for
excellent performance.
zSeries has a full range of processing power.
As your workload grows, you can increase processing power by adding or
using more processors and memory.
Chapter 2. zSeries platform overview
19
zSeries has the most efficient SMP ratio of any platform. Each additional
processor contributes a larger percentage of its power to the total than on any
other platform.
zSeries development continues to enhance the processing power.
IBM’s mainframe division has over 30 years of experience with SMP
(symmetrical multiprocessing). They have architected the hardware and software
to make the most efficient use of each additional processor. Because of the
contention in accessing common resources, multi-engine machines incur
incremental overhead as more processors are added. When two or more
processors need to access a resource at the same time, they need to take turns
accessing the resource.
Reducing this interference increases the total power of the machine, as the
processors do not get tied up waiting and thus can devote more processing
power to useful work. This is the MP ratio, and zSeries has the best in the
industry.
2.4.4 Concurrent workload
There are many resources to manage in any computing system.These resources
are managed and allocated to workloads in a way that affects both the efficiency
of the system (which has a direct relation to cost) and the level of service that
users receive.
There can be many types of workloads on a single z/OS system.
z/OS is designed to handle diverse workloads efficiently.
Goals are set by the customer based on business need.
Workload goals are defined in a customer-written policy that controls how
much resource each job is allocated.
The workload and resource scheduling components of z/OS have for a long time
enabled the efficient running of many concurrent applications. Large batch runs,
large print runs, and online transaction systems are commonly found together on
a zSeries platform.
The resource management algorithms have been modified and improved with
each new level in processor performance, memory size addressing capability,
disk I/O performance, and disk size. This has resulted in changes to the task
dispatchers and the resource managers in z/OS that allow zSeries to make much
better use of the available resources.The zSeries can run concurrent diverse
workloads on one server that can achieve processor utilization of close to
100 percent, while still achieving sub-second response times for
transaction-based systems.
20
S1 Consumer Suite for z/OS Installation Guide
2.4.5 Security
Data security is critical for business applications. User access security is handled
by the application itself. zSeries and z/OS offer system integrity, software
reliability and data protection from other users.
The application manages user access security and user access to data (for
example, a DB2 database). For protection of the application, z/OS provides the
most secure environment for protecting data. Because data is stored in z/OS
VSAM data sets, it can be protected by the z/OS Security Server functions
(RACF).
In terms of security, z/OS minimizes the risk as follows:
Resource security
The z/OS Security Server, which has evolved from MVS RACF, provides an
extremely secure environment by providing the ability to protect data sets,
transactions, and subsystem access.
Data security
Data is essential to your business, and data security means more than just
protecting the data from unauthorized user access. Because of the possibility
of operational problems or a “disaster”, it is essential that it be backed up.
z/OS simplifies backups by providing high-speed data movement and
concurrent copy. These proven concepts ensure that even offsite disaster
recovery can be managed without losing data.
Network security
As more and more companies open up their network environment, it is very
important to control who has access to what data and how they can access it.
The Internet is one means of communication with the “outside world”. Every
company has to make sure that access is controlled and that the data sent
and received is safe.
Chapter 2. zSeries platform overview
21
Security integrity and software reliability
Concepts and techniques to secure both the zSeries and z/OS have been
developed continuously for over 20 years. It is a mature and secure system
with hardware techniques such as storage protection, error handling for main
storage and channels, and software techniques including significant error
handling code in the base operating system. These are coupled with mature
Transaction Monitors and Database Managers, creating an integrated
environment ensuring system integrity.
2.5 zSeries benefits for ERP solutions
The recent resurgence of the IBM zSeries has been particularly strong in the
ERP arena. Because many ERP implementations now provide Web access to
users, customers have been very interested in the strengths that the zSeries can
provide. This growing number of users means that the scalability of the zSeries is
more crucial than ever before. Unpredictable numbers of users and unpredictable
use patterns mean that the flexibility of zSeries to reassign compute power
based on customer-defined priorities, and its ability to add compute power
without bringing the system down, are crucial in meeting unpredictable demand
quickly and easily, with the least disruption and cost.
Opening up the information system to casual and occasionally unknown users
via the World Wide Web means that the unequaled security provided by the
zSeries is essential to the protection of critical data. Opening up the information
system to existing and potential customers, rather than just employees of an
organization, means that maximum availability is critical. If your Web site is down,
a competitor's Web site is often just a click away.
For these reasons, the z/OS has been gaining more ERP market share than any
other platform. AMR's most recent surveys indicate that zSeries’s share has
tripled from 1997 to 1999, and grown faster in percentage (4 points) than any
other platform (closest is NT's growth of 3 points from 1997 to 1999). IBM plans
to continue to enhance the zSeries in order to build on this growth by providing
continuous improvements in capacity, price performance, security, manageability
and availability.
z/OS incorporates many new functions such as integrated UNIX, Web
enablement, Print Server and so on, to make it a super server. While retaining all
the features of classic MVS, other features have been added to make it an open
server. zSeries provides DCE function, integrates object-oriented support,
provides Web serving, and packages TCP/IP in the base product. In addition, it is
UNIX branded, that is, z/OS is certified that it has a standard set of UNIX APIs.
z/OS is totally compliant with UNIX 95 (XPG4).
22
S1 Consumer Suite for z/OS Installation Guide
z/OS continues to support online transaction and batch processing. The industry
is growing in the area of e-business (network computing), data mining (business
intelligence), server consolidation, and the use of packaged applications. We
expect the z/OS to have significant usage growth in these new areas. Our
development efforts are directed at supporting the OLTP and batch as well as all
the technologies needed for these growth areas.
z/OS has a number of attributes that distinguish it from other enterprise category
servers. A single z/OS can provide 99.9 percent uptime. As previously
mentioned, Parallel Sysplex is the industry’s ultimate configuration, providing
99.999 percent uptime. Currently, there is a lot of “posturing” in the availability
arena. When IBM says Parallel Sysplex can provide 99.999 percent availability, it
is not just referring to hardware uptime, but the availability of the operating
system to an application (user).
Note: It cannot, nor can any other vendor’s hardware/software, protect against
bad applications (for example, an application outage due to an application
software problem).
When the term availability is used by non-z/OS people, scheduled outages to
upgrade the operating system, for example, are not usually considered as a loss
of availability (that time is subtracted from the base). Similarly, the length of an
outage does not have a universal definition.
2.6 DB2 features that benefit S1 Consumer Suite
DB2 UDB for z/OS was designed so that you should not have to take DB2 down
in order to perform traditional database activities. Every new version of DB2
delivers new functions that are designed to ensure high availability. The
development of the latest two versions (V6 and V7) has been especially focused
on key vendors such as SAP, Oracle, S1. They contain several high impact
features which make S1 more reliable, more scalable, and easier to manage.
Another key area of improvement was performance, based on benchmarks and
customer experiences. In this section we discuss the main features that are built
into DB2 UDB for z/OS to improve high availability and continuous operation of
the database.
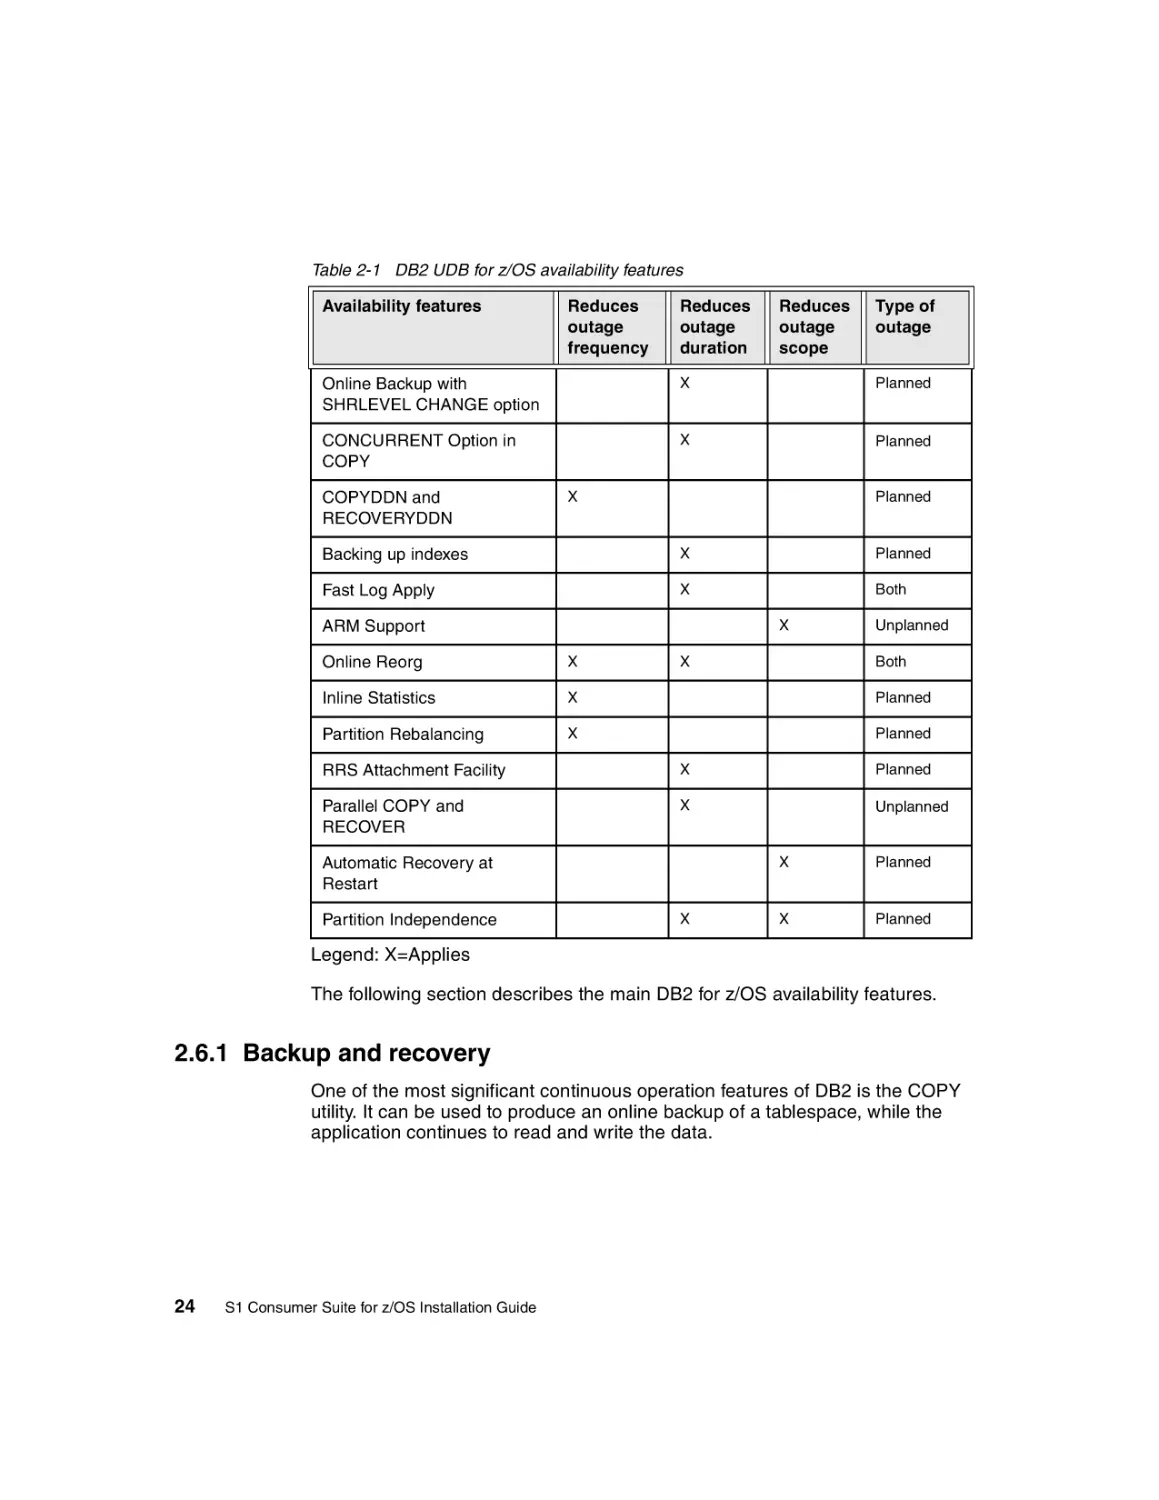
Table 2-1 on page 24 summarizes the features which are implemented in the
design of DB2 UDB for z/OS. It shows which availability features apply to the
frequency, duration, and scope of an outage. It further explains whether this
feature helps eliminate planned or unplanned outages, or both.
Chapter 2. zSeries platform overview
23
Table 2-1 DB2 UDB for z/OS availability features
Availability features
Reduces
outage
frequency
Reduces
outage
duration
Reduces
outage
scope
Type of
outage
Online Backup with
SHRLEVEL CHANGE option
X
Planned
CONCURRENT Option in
COPY
X
Planned
COPYDDN and
RECOVERYDDN
X
Planned
Backing up indexes
X
Planned
Fast Log Apply
X
Both
X
ARM Support
Unplanned
Online Reorg
X
Inline Statistics
X
Planned
Partition Rebalancing
X
Planned
X
Both
RRS Attachment Facility
X
Planned
Parallel COPY and
RECOVER
X
Unplanned
Automatic Recovery at
Restart
Partition Independence
X
X
Planned
X
Planned
Legend: X=Applies
The following section describes the main DB2 for z/OS availability features.
2.6.1 Backup and recovery
One of the most significant continuous operation features of DB2 is the COPY
utility. It can be used to produce an online backup of a tablespace, while the
application continues to read and write the data.
24
S1 Consumer Suite for z/OS Installation Guide
Online Backup with SHRLEVEL CHANGE option
The use of the SHRLEVEL CHANGE option produces a fuzzy image copy during
concurrent application workload. To recover to a point of consistency, you may
apply necessary log records.
An important aspect of the online backup is the “incremental” online backup. This
is a copy of only those tablespace data pages that have been changed since the
last backup. Except for a small processor and DASD overhead, the online backup
has no impact on the concurrent application activities.
CONCURRENT Option in COPY
If you perform an offline backup of a tablespace, concurrent write activity on this
particular table space is not allowed. However, the usage of the CONCURRENT
option can significantly reduce the time during which the tablespace is
unavailable for write activity. The database activity will be quiesced and made
available again automatically. This method does not need the separate quiesce
and restart steps.
CHANGELIMIT Option in COPY
The CHANGELIMIT Option in COPY allows DB2 to determine whether to take a
full or incremental image copy, depending on the number of pages changed
since the last image copy.
With this option, you can avoid running image copy jobs when very few (or no)
pages of a table space have changed since the last image copy was taken. The
savings in time can be used to maximize the use of batch windows.
COPYDDN and RECOVERYDDN
The options COPYDDN and RECOVERYDDN allow you to create up to four
identical copies of the table space.
Parallel COPY and Parallel RECOVER
Previously objects were restored serially, and you could never copy multiple
objects in a single COPY job. Now with DB2 UDB for z/OS V6, when you specify
a list of table spaces and index spaces, you can also copy and recover some or
all of those objects in parallel using the new PARALLEL option of COPY and
RECOVER. This feature enables a faster backup and restore of DB2, as it
reduces the elapsed time of those jobs.
Backing up indexes
In previous DB2 versions, you could not make image copies of indexes.
Therefore, you could recover indexes only by rebuilding the indexes from existing
data. This process could be lengthy, especially if index recovery had to wait until
the data was recovered, making those indexes unavailable until the rebuild was
complete.
Chapter 2. zSeries platform overview
25
In DB2 V6, you can take a full image copy or a concurrent copy of an index, just
as you have always done for table spaces. To recover those indexes, you use the
RECOVER utility, which restores the image copy and applies log records.
2.6.2 DB2 Restart
Fast Log Apply
A faster log apply process in DB2 UDB for z/OS V6 improves restart and
recovery times up to 5 times in order to reduce unplanned outages. The new
process sorts out log records so that changes that are to be applied to the same
page or same set of pages are together. Then, using several log-apply tasks,
DB2 can apply those changes in parallel. This feature requires fewer I/O
operations for the log apply and can reduce CPU time.
Alter Checkpoint Frequency
The new SET LOG LOGLOAD(n) command allows you to dynamically change
the LOGLOAD system parameter. This parameter controls the frequency of
checkpoints. The more frequent checkpoints, the faster the DB2 restart after
abnormal termination. On the other hand, too frequent checkpoints negatively
affect performance. The new command allows you to adjust the frequency
according to your site objectives and do it dynamically, without restarting the
system.
Another interesting aspect of the new command is initiating checkpoint on
demand by specifying SET LOG LOGLOAD(0). For example, it is recommended
to issue this command before suspending log writes in order to reduce the
number of database writes during the log write suspension, and consequently
reducing the exposure of generating inconsistent 32 K size pages.
Automatic Restart Manager (ARM) Support
ARM is a component that helps availability by providing a fast, efficient restart of
critical applications. The purpose of using automatic restart is to reduce the time
a particular system is down. When DB2 stops abnormally, the surviving z/OS
systems analyze the situation to determine whether the corresponding z/OS has
failed too and where DB2 should be restarted. It then restarts DB2 appropriately,
either on the same or on a different system.
Automatic Recovery at Restart
When a subsystem failure occurs, a restart of DB2 automatically restores data to
a consistent state by backing out uncommitted changes and completing the
processing of the committed changes.
26
S1 Consumer Suite for z/OS Installation Guide
2.6.3 DB2 online reorganization
Since DB2 V5, the REORG utility allows the reorganization of an S1 tablespace
or index during online operation. The keyword SHRLEVEL allows you to choose
standard, read-only online, and read-write online reorganization. With the
SHRLEVEL CHANGE option, you have both read and write through almost the
entire reorganization process. The process involves these steps:
1. The utility unloads the data from the original tablespace, sorts the data by
clustering key, and reloads the data into a shadow copy. Concurrently, S1 has
read and write access to the original tablespace, and changes are recorded in
the log.
2. The utility reads the log records and applies them to the shadow copy
iteratively. During the last iteration, the application has only read access.
3. The utility switches the application access to the shadow copy by renaming
the data sets for the table and the indexes. During the actual switch, S1 R/3
has no access to the data.
4. The application reads and writes to the renamed shadow copy. DB2 UDB for
z/OS V6 contains several features which further improve online reorg. You
can now select rows to be discarded during a REORG, and optionally write
the discarded records to a file. An external UNLOAD can be performed faster
in comparison to the formerly used DSNTIAUL sample program.
Furthermore, processor and elapsed time is greatly reduced.
COPYDDN Option in LOAD/REORG
If you run REORG or LOAD REPLACE and use LOG(NO), then an image copy is
required for data integrity. By default, DB2 will place the tablespace in
copy-pending status, and you must perform an image copy before you can
further change the tablespace.
If you run REORG or LOAD REPLACE with the COPYDDN option, a full image
copy is produced during the execution of the utility and DB2 does not place the
tablespace in copy-pending status. This eliminates the period of time when the
table space is in copy-pending status and a separate COPY step is not required.
Therefore, the data is available sooner.
Inline statistics
Prior releases of DB2 require the user to update statistics by executing
RUNSTATS after common utility operations on table spaces such as LOAD,
REORG and REBUILD INDEX. Version 6 lets you include RUNSTATS within the
execution of those utility operations. This avoids the need for separate
RUNSTATS jobs and uses less processing resource by making fewer passes
over the data. Furthermore, tablespaces will be made available sooner.
.
Chapter 2. zSeries platform overview
27
2.6.4 Other DB2 features
ALTER column lengths in indexes
Changing the length of a column of a partitioning index can affect partition
boundaries and the limit key of a partition. With DB2 V6, the length of the limit
key can be changed. If the length of a column that is part of the limit key is
altered, and the changed column length affects the partition boundary, the limit
key can change. Changing the length of the limit key ensures that the partition
boundary does not change.
Partition independence
A key availability feature of DB2 UDB for z/OS is the ability to partition a DB2
tablespace into as many as 256 partitions. In DB2 V6, each partition can be up to
64 GB. This means that one table space can hold up to 16 terabytes of data in a
compressed or uncompressed format.
Partition rebalancing
When data in a partitioned table space becomes heavily skewed, performance
can be negatively affected because of contention for I/O and other resources. In
that case, you might want to shift data among partitions. DB2 V6 enables you to
rebalance those partitions more efficiently. Partitioning key ranges can be
altered, while applications that access data not affected by the rebalance
continue to run.
The actual redistribution is accomplished by running the REORG utility for
affected partitions after adjusting the key ranges. The REORG both reorganizes
and rebalances the range of partitions. In prior releases of DB2, this task would
require that the table space be unloaded, dropped, recreated, and reloaded.
RRS attachment facility
The ICLI server exploits the Recoverable Resource Manager Services
Attachment Facility (RRSAF). The RRSAF is a DB2 attachment facility that relies
on an z/OS component called z/OS Transaction Management and Recoverable
Resource Manager Services (z/OS RRS).
z/OS RRS provides system-wide services for coordinating two-phase commit
operations across z/OS products. It is an z/OS system logger application that
records events related to protected resources. The system logger allows an
application to log data from one system or from multiple systems across a
Parallel Sysplex.
28
S1 Consumer Suite for z/OS Installation Guide
Type 2 indexes and row level locking
Until Version 4, DB2 supported a single index structure, now known as a type 1
index. Version 4 introduced a new type of index known as a type 2 index. Type 2
indexes eliminate locks on index pages. Because there are usually fewer rows to
a data page than there are index entries on a index page, locking only the data
when you lock pages is likely to cause less contention than locking the index.
This way you can avoid most of the deadlock and time-out problems on the index
that often caused application abends because data was not available.
Another advantage of type 2 indexes is that they let you use other functions (such
as processing multiple parallel tasks, improved partition independence, the
read-through locks, and row locking).
Chapter 2. zSeries platform overview
29
30
S1 Consumer Suite for z/OS Installation Guide
3
Chapter 3.
S1 Consumer Banking
planning
This chapter describes planning considerations for the S1 Consumer Banking
environment. It contains the following topics:
Planning
Configuration
Local and remote data storage
Security
Custom adapters
Tunneling
XML API
© Copyright IBM Corp. 2002
31
3.1 Planning
Consumer Banking was designed so that a financial institution can change the
look and feel of the product easily, to meet its unique requirements. The
appearance of the user interface is controlled by a set of templates that can be
changed without rebuilding or recompiling Consumer Banking.
3.1.1 Basic options
Consumer Banking uses Cascading Style Sheets (CSS) that allow a financial
institution to make the following global changes:
Text font, font size, and format
Colors for screen background, fonts and links, and message text
Icon appearance and other images (replaced with same size and type of
image)
Consumer Banking also features a Template Object Model (TOM) to facilitate
customization. The TOM allows Consumer Banking to reuse templates or forms
in multiple screens, providing a consistent look and feel throughout the product.
The user interface templates allow customized implementation of:
Navigation such as adding, removing, or moving links, sections and section
groupings
Cosmetic changes
Standard corporate images and logos
Placement and appearance of fields
Types of controls used
Process and program flow, such as confirmations and return screens
More in-depth customization options are also available. For more detailed
information about the customization options available in Consumer Banking, see
the following documentation, available from S1:
– S1 Consumer Banking User Interface Customization Guide
– S1 Template Object Model
3.1.2 Localization
Localization options allow the financial institution to support multiple versions of
the user interface in different languages and locales. The locale determines what
language and cultural presentation is displayed to the user.
32
S1 Consumer Suite for z/OS Installation Guide
A financial institution can implement a number of template sets within a single
installation. This offers the ability to support several different, unique
look-and-feel options, known as identity, through one implementation of
Consumer Banking. This can increase the user’s comfort level with the
Consumer Banking user interface, and enlarge the financial institution’s customer
base by providing options that are attractive to different market segments.
Each template set comes with a unique message set, style sheet, and date-time
formats. Items supporting localization include:
Multiple languages and currencies
Currency and numbers (sign placement, decimal, thousands separator)
Dates and times (different formats for different countries)
3.2 Configuration
Consumer Banking was designed so that a wide selection of features can be
disabled within the installation, if a financial institution does not want to
implement these features. Most of the feature selection process is completed
through the Customer Service Representative (CSR) application. Through the
configuration process, features such as Payments can be removed or enabled
separately, individual items can be added to or removed from a screen, and
various options within a feature, such as PFM or Transaction History, can be
enabled or disabled on demand.
3.2.1 Configuration categories
Consumer Banking features can be configured within different categories.
Table 3-1 on page 34 shows the configuration categories and the relationships
among the categories.
Consumer Banking uses these categories to configure different functions.
Chapter 3. S1 Consumer Banking planning
33
Table 3-1 Categories and descriptions
Categories
Description
Financial institution
-
Define the general operation of the
application, including the language in
which screens display, the features
installed, the account register and
transaction functions, and the market
segments supported
- Apply to every account within a specific
installation
- Provide default settings to some
customer parameters and user
preferences
Customer/User
- Define the behavior of accounts owned
by a particular customer of the financial
institution
- Apply to all accounts owned by that
customer
- Define some options that users can set
(for example, locale, session time out,
and confirmation screens)
- Define the behavior of some CSR
functions
Product Type
- Define the general behavior of groups
of products offered by a financial
institution
- Classify products into deposit, credit or
loan groups
- Apply to each account within the
product type group
34
S1 Consumer Suite for z/OS Installation Guide
Categories
Description
Product
- Define the behavior of specific financial
products such as Student Checking or
Visa Gold
- Take their defaults from Product Type
settings
- Apply to every account within a specific
product offered by the financial institution
Account
- Define the behavior of a specific
account
- Take their defaults from Product
settings
- Apply to all users of a single account.
(for example, minimum and maximum
amounts are configured at the account
level, not per individual account owner)
Most configuration options are set through the Customer Service Representative
(CSR) application. For detailed information about configuration options, see the
Configuration Help.
In addition to the categories described in this section, there are dependencies
between certain configuration options. For example, some options must be set to
Yes for other options to be available.
3.2.2 System parameters
Certain Consumer Banking options must be configured at the system level.
These options can include, but are not limited to, items such as system or
adapter IP addresses, file paths or names, and server URLs. Most or all of these
parameters need to be set at installation time. For more information about
system parameters, contact the engagement team for your implementation.
Chapter 3. S1 Consumer Banking planning
35
3.3 Data storage
One of the first and most important decisions faced by a financial institution when
implementing a banking solution is the location of data storage and the method
of data retrieval. Local storage means keeping the end user, transaction, and
other data in the S1 Consumer Suite database. Remote storage means services
and data are accessed through third-party, back-end data systems. This section
explores the basic advantages and disadvantages of each implementation
strategy.
Storage considerations are divided into three major categories:
Local storage
Remote storage
Mixed implementations
3.3.1 Local storage
In a local storage implementation, data is stored in the S1 Consumer Suite
database. The financial institution sends the data from their host systems to the
data server through a series of batch programs. This allows the financial
institution to format the data in an approved, standardized format and reduces
the likelihood of runtime errors. Some Consumer Banking features are only
available in a local storage implementation, including:
Personal Financial Management (PFM), including Categories and Reports
Payee and Account nicknames
Longer-term data storage
Local storage is only supported in batch mode. However, all Consumer Banking
batch processes have been designed so that they can be run more than once a
day at the discretion of the financial institution. This is called near-time
processing.
Scalability can be a deciding factor regarding a local storage implementation. An
extremely large financial institution (with millions of customers) must consider
physical limitations, such as the batch processing window required to post high
volumes of transactions.
Another consideration in a local storage implementation is the speed at which the
user is able to view financial transactions. In a local implementation, the user
must wait until the batch process runs.
36
S1 Consumer Suite for z/OS Installation Guide
3.3.2 Remote storage
A remote implementation involves accessing data that is stored on the third-party
or financial institution system, not in the S1 Consumer Suite database. Some
potential advantages of a remote implementation include:
Reduced operational costs due to reduced data storage and processing
needs
More control by the financial institution of scheduling and business rules
Elimination of the need for data synchronization of account and transaction
information between Consumer Banking and the financial institution’s system
of record
In a fully remote implementation, there is no batch processing other than
customer enrollment. All features are implemented using a real-time request and
response architecture.
As a result, the financial institution is limited to the features supported by their
back-end and third-party processors. For example, if a financial institution wants
to offer Intra-Day Transaction retrieval, but its host system does not provide
support for this feature, the financial institution cannot implement Intra-Day
Transactions.
In remote storage, data retrieval is subject to the constraints of the financial
institution’s back-end systems. This can affect performance and availability. Any
connectivity problems or back-end host issues can affect the real-time retrieval of
data and are beyond the ability of Consumer Banking to support. With local
storage, the recovery and failover procedures of a dedicated data center protect
the institution and its users from system downtime and lack of access.
Finally, a remote storage implementation eliminates some Consumer Banking
functionality, including:
Personal Financial Manager (PFM) data, including Categories and Reports
Filter and sort capability on the Register
Payee and Account nicknames
Longer-term data storage and archiving, with added revenue potential to the
financial institution
Chapter 3. S1 Consumer Banking planning
37
3.3.3 Mixed implementations
A financial institution can implement Consumer Banking with both local and
remote storage. However, a decision regarding the type of storage used must be
made for each feature. Some dependencies exist between features. For
example, if Transactions are implemented with local storage, Accounts and
Customers must also use local storage.
3.4 Security
Like the rest of the S1 Consumer Suite, Consumer Banking protects the financial
institution and its users with the highest industry standard for Internet security. At
present, the best available security standard is HTTPS using Secure Sockets
Layer (SSL) Version 3. A secure server system protects the data within the S1
Consumer Suite database.
Encryption is controlled at the financial institution rather than within Consumer
Banking. This allows each financial institution to set its own security policy and
decide what level of security its users must adhere to. S1 highly recommends
RC4 encryption with 128-bit keys. A secure browser capable of supporting
128-bit encryption—such as Internet Explorer 4.0 or higher or Netscape 4.0 or
higher—protects users and ensures that their information is encrypted while
moving between the browser and the financial institution.
3.4.1 Application security
When a user logs in to Consumer Banking, the user is authenticated with a
username - password pair. SSL ensures that this information is protected from
other users on the Internet. Once authenticated, the user begins a session in
Consumer Banking. The session idle time is set by the financial institution. Once
the session times out, the user must log in again.
3.4.2 Network security
From the Internet, a user’s query must pass though filtering routers, hardened
servers, and at least two firewalls before reaching the application servers that
host Consumer Banking. These application servers in turn communicate with the
database and communications servers that contain sensitive information such as
account records.
38
S1 Consumer Suite for z/OS Installation Guide
The network is configured so that the database server and communications
server never communicate directly to each other; instead, queries are passed
through the application server or servers to provide another layer of
authentication and protection. The communications server then must send its
requests through another firewall before external servers, such as the financial
institution’s dedicated database or a third-party host processor, can be
contacted.
3.4.3 Operational security
Operational security depends on the security policy in place at the data center
hosting the financial institution’s database. The S1 Hosting Services division has
a thorough and robust security policy in place to protect both the data and the
physical devices hosting the data.
3.5 Custom adapters
Adapters enable communication with a financial institution’s existing processing
systems to fulfill Consumer Banking data and service requirements. In a typical
customization effort, adapters are designed, developed, and created to fit the
specific needs of a financial institution’s implementation. Adapters can be
real-time or batch.
Adapters are designed for specific financial institution needs identified during the
engagement process. They convert data from the Consumer Banking format into
a format that can be read by the back-end processor, then transmit the data to
the back-end processor. Adapters also receive data from the processor and
convert the data into the Consumer Banking format.
3.5.1 Real-time adapters
Real-time adapters are designed according to the rules and conventions of the
Real-Time Adapter Architecture (RTAA). The RTAA was developed in Forté to
organize the sequence of events within a real-time adapter and to standardize
the development approach.
For more information about designing real-time adapters, see the following
documentation, available from S1:
RTAA Approach
RTAA Programmer’s Guide
Adapter Interface documentation
Chapter 3. S1 Consumer Banking planning
39
3.5.2 Batch adapters
Batch adapters ensure that the files sent to Consumer Banking conform to the
standard format defined by Consumer Banking, and that the files sent from
Consumer Banking to the financial institution’s host processors conform to the
financial institution’s requirements. For more information about the file formats
and constraints on developing batch adapters, see the S1 Consumer Banking
Program Reference Guide, available from S1.
3.6 Tunneling
Financial institutions may need to customize a part of the application processing
or a user interface screen to collect or display information that is not part of
Consumer Banking (for example, a combined interest balance or an invoice
numbe)r. Tunneling allows Consumer Banking to pass financial
institution-specific data from back-end hosts to the end-user’s browser and back,
or vice-versa, without any change to the Consumer Banking software.
Tunneled data consists of simple string data in relatively small packet sizes, in
the form of name/value pairs. Depending on the specific implementation,
Consumer Banking may store the data items in the local database, but does not
use or alter the data in any way. It is up to the financial institution, in conjunction
with the engagement team, to decide what type of business solution might
require tunneling. The size of the custom database column for the tunneled data
can be specified during the engagement.
Tunneling can be implemented in the following product areas:
Customers and Accounts
Transactions (Ledger and Register)
Payments and Payees
Transfers
Categories
Customizing the user interface templates to collect or display the results of the
tunneled data is a separate engagement issue from the tunneling code itself. For
example, if a financial institution wishes to display an average weekly balance for
a specific account on the Balances screen, the label “Average Weekly Balance”
must be coded into the template as a separate effort.
40
S1 Consumer Suite for z/OS Installation Guide
To implement tunneling, all customization must be coordinated among the
following areas:
Templates
Batch Jobs
Adapters
3.6.1 Restrictions on tunneled data
A size restriction of 255 bytes of data is suggested to minimize the impact on the
database. If a size of greater than 255 bytes is needed, it will require
customization of the database schema. Also, the adapters and batch jobs must
be coded to enforce size restrictions because Consumer Banking is essentially
unaware of the data being passed through it and therefore does not check it or
enforce any restrictions.
3.6.2 XML encoding
For tunneled data, Consumer Banking only validates compliance with XML
syntax. Tunneled data encoding is a very simple XML-based syntax and must
adhere to the following rules:
Begin with MAP
Contain 0 or more tag and value pairs in the format: TagName=”value”
End with />
The following is an example of an XML string:
<MAP CurrentAccountBalance=”7888.65” MarketingMessage=”Open a new CD
Account” CusterServiceNumber= ” 1-888-555-5555” />
For more information about tunneling, see the following documentation:
VFM Tunneling Approach Document
VFM Tunneling Functional Description
3.7 XML API
S1 provides a well-defined application programming interface (API) to create
custom front-end interfaces for the S1 Consumer Suite. This API is defined in
Extensible Markup Language (XML).
Chapter 3. S1 Consumer Banking planning
41
XML is a platform-independent method for putting structured data, such as
configuration parameters or financial information, in a text file. XML files are
unambiguous, extensible, and easy to internationalize or localize.
Like HTML, XML uses tags and attributes. But unlike HTML, the tags are
completely application-specific. For example, in HTML code, a <p> tag always
means paragraph, but in XML it could mean price, person, parameter, or
anything else that is specified in the Document Type Definition (DTD).
The S1 XML API allows financial institutions to integrate additional business
services and devices with the S1 Consumer Suite business logic. The
implementation of the XML API is based on the request/response model outlined
in the Interactive Financial Exchange (IFX) specification, version 1.0, and
includes support for standard IFX messages as well as S1-specific proprietary
extensions.
XML messages currently supported for Consumer Banking include:
Account Activation
Customer Enrollment
Payments Enrollment
Account Inquiry
Customer Authorization
CSR Authorization
Change Login ID
Customer Profile Inquiry
Third-party application connection through Secure Connect
Support for Single Sign On
Create Recorded Entries
Through the Client tier, the XML API can support integration with additional
front-end access devices such as:
Standard Web browsers that allow access to the World Wide Web
Personal computers with personal financial packages, for example, Quicken
and Microsoft Money
Voice response units (VRUs) and interactive voice response (IVR) units with
bank-by-phone capabilities
Consumer hand-held devices such as personal digital assistants (PDAs)
Mobile telephones with data capabilities
42
S1 Consumer Suite for z/OS Installation Guide
For information about how to use the XML interfaces, see the XML API
Developer’s Guide http://w3.pdc.ibm.com/avitraining/AVI51home/xmlapi_ug/index.html
t provides an overview of Interactive Financial Exchange (IFX) client/server
processing and describes in detail the interface services and message set
descriptions that are defined for the S1 Consumer Suite.
Chapter 3. S1 Consumer Banking planning
43
44
S1 Consumer Suite for z/OS Installation Guide
4
Chapter 4.
S1 Consumer Banking
installation
In this chapter, we describe the preparation and installation of S1 Consumer
Suite on a zSeries environment. The required subsystem consists of DB2 for
z/OS, UNIX System Service in zSeries, and Web server on IBM pSeries.
Specifically, we explain the concept of the S1 five-layer installation, as well as the
preparation steps needed for the environment. We then describe how to install
each component.
© Copyright IBM Corp. 2002
45
4.1 Installation structure: five-layer approach
S1 uses a five-layer approach (or five-step installation of the products), with the
first layer being the operating system. The other four layers (Platform, Base,
Repository, and Customer Environment) are included in the S1 Consumer Suite
Installation Architecture (IA). Here are the five layers:
Operating system
Platform layer
Base layer
Repository layer
Customer Environment layer
– Starting the applications under USS
– Web server for AIX
– Web server for CSR
Customer Environment
3
2
4
5
6
...n
Base
Repository
Platform
1
Operating system
Figure 4-1 The five-layer approach
On the configuration shown in Figure 4-1, each number represents a financial
institution. One S1 system can host multiple financial institutions.
Operating system
The z/OS operating system should be installed before the S1 installation begins.
It must be V2R8 or later. After the operating system is ready, DB2 for z/OS must
be installed and the required user ID must be created.
46
S1 Consumer Suite for z/OS Installation Guide
Platform layer
The platform layer is the first IA layer in an S1 Consumer Suite installation. It
contains the third-party software required. These include Java Development Kit
1.2.1, Perl 5.6, and Forte 3.0.N.1. All third-party products are included with the
S1 product package, but need to be installed manually with their own
configuration values.
Base layer
The base layer is the second IA layer in a S1 Consumer Suite installation. The
base layer is very similar to the platform layer, but involves S1 products rather
than third-party products. The platform layer and the base layer combine to form
the foundation of the Consumer Suite structure, upon which multiple Customer
Environments can be installed. Base layer products include any programs and
data files that are installed once on an operating system.
There are currently no base layer products created for the z/OS DB2 platform.
Repository layer
The third IA layer of an S1 Consumer Suite installation is the repository layer.
This is the layer where the Consumer Suite 5.X Common Architecture and
application (Banking, Investment, Relationship Management, or Insurance) are
installed. Multiple repositories can exist simultaneously on a server.
Customer Environments layer
Customer Environments is the fourth and last layer of the IA. After a repository is
installed, use the IA Environment Manager to create one or more Customer
Environments for one or more financial institutions. The Customer Environments
layer is the execution environment for each financial institution.
4.1.1 What is Forte and what does it provide
The S1 Consumer Suite is designed to meet the following operational objectives:
Scalability
Security
Reliability
Portability
Manageability
Forte provides a solution to address each of these objectives. It provides a
flexible infrastructure from development, through execution, to deployment. Its
strengths are in the deployment of applications and the flexibility of the system;
it’s easy to change to meet specific needs.
Chapter 4. S1 Consumer Banking installation
47
To help meet the operational objectives, Forte provides:
Base development, execution and management infrastructure
Integrated repository-based development environment and the Transactional
Object Oriented Language (TOOL)
Portable, scalable execution environment
Robust management and operations infrastructure
Forte is an application solution running on several platforms at the same time. It
is installed on the CSR Server, the AIX server, and in the USS environment
under z/OS. No customization is needed when installed on the CSR server and
the AIX server. The code is installed as part of the CD unload process. Under the
USS environment, some customization is necessary to connect with the DB2
Database application. Appendix A outlines the Forte installation steps.
You can monitor and respond to events in the S1 Consumer Suite applications
using the Forte Process Monitor application. This application is sometimes
referred to as “Watchdog”. It allows the user to define responses to state
changes in the registered agents, such as nodes, partitions, or applications in the
Forte environment, and to restart them if they fail.
Appendix B provides a detailed description of the steps required to implement
the Forte Interface under z/OS USS.
4.2 Preparing for the installation
We named our sample financial institution the ITSO. Therefore, the customer
environment name is itso and the customer’s user ID is itsousr.
To prepare this redbook, we installed the S1 Consumer Suite on a zSeries server
in two locations. The first installation exercise was performed at the IBM ITSO in
Poughkeepsie, NY. Then we moved to the S1 data center in Norcross, GA.
Following are the major installation steps:
z/OS setup
DB2 for z/OS setup
Web server setup on AIX
SNMP monitor setup
48
S1 Consumer Suite for z/OS Installation Guide
4.2.1 z/OS setup
The first task was to create user IDs and a high level qualifier (HLQ) for the
environment.
We followed the steps below:
1. We created a group for the installation ID and for the customer environment
ID.
vfmadmin
vfmgroup
2. We created a user ID. Since the installation requires unique user IDs for the
customer environment (financial institution), we created user IDs and
privileges for the sample financial institution using RACF, as shown in
Table 4-1.
Table 4-1 Sample user IDs and privileges
User ID
TSO
USS
DB2 privilege
Group
ITSOUSR
No
Yes
No
VFMADMGRP
ITSOINT
Yes
Yes
Yes
VFMADMIN
3. We customized our UNIX System Service (USS) user ID. We used RACF to
modify the user ID to have the following usage:
ALU
ALU
ALU
ALU
(itsousr)
(itsousr)
(itsousr)
(itsousr)
OMVS
OMVS
OMVS
OMVS
(CPUTIMEMAX(2147483647))
(ASSIZEMAX(268435456))
(PROCUSERMAX(200))
(FILEPROCMAX(1000))
4. We created a HLQ called S1, and its own user catalog:
S1INSTG
S1TEMP
S1BASE
S1PRD
5. We created a mountpoint in USS, /usr/lpp/redbook, from a TSO command
prompt:
mkdir /usr/lpp/redbook
Chapter 4. S1 Consumer Banking installation
49
4.2.2 DB2 for z/OS setup
We used DB2 V6 with PUT level 20008 and PTF PQ40338:
db2 zparms
Note: The DB2 subsystem must be installed before Consumer Suite.
We used the following parameter for the S1 Consumer Suite:
<Customer Environment Owner ID>
itso
<Fully Qualified Application/Database Server Inside Hostname>
grummpy.devlab.nor.s1.com
<Database Port>
5021
<DB2 CLI Plan Name>
cspaclix
<DB2 Subsystem ID>
dsn1
<Database Client Names> (space delimited list)
390LOC
<Database Client IP Addresses> (space delimited list)
10.1.3.8
<Owner ID Password>
itsousr
<Forte Environment Name>
take the default
4.2.3 Web servers
We installed two different Web servers for S1. One was for outside the firewall for
normal users, and the other was for inside the firewall, for Customer Service
Representative (CSR) use.
4.2.4 SNMP monitor setup
We installed the Simple Network Management Protocol (SNMP) monitor on a
workstation with the NT operating system.
4.3 Installing the operating system layer - z/OS
In this section we describe in detail how to start the installation on the z/OS
platform. We follow the five-layer installation approach.
50
S1 Consumer Suite for z/OS Installation Guide
AIX
SNMP
CSR Desktop
HTTP
CSR Web server
iPlanet 4.0
IPSec
VRU
Logical App/Batch
Server
z/OS
USS
Forte
IPSec
SNMP
Java, C++,
Tool Client
AIX
3rd Party
Client
Logical Database
Server
z/OS
DB2 UDB
Internet
Client Browser
OFX
Web server
Forte 3M
SeOS 2.5
IPSec
PDA
z/OS
Other
C++
Figure 4-2 S1 Consumer Business environment on z/OS
To install the S1 Consumer Suite on the z/OS platform:
1. Unload Consumer Suite Installation JCL for the application server (USS) from
the S1 product tape.
a. Select a library. We used:
S1INSTG.S1.PRODUCT.INSTALL.JCL
b. Edit the JCL. Check the cross-reference of installation jobs with installation
variables.
•
•
•
We changed the <SET DHQL> JCL statement to S1INSTG
We changed the <SET THQL> JCL statement to S1INSTG
We changed the <SET TVOL> JCL statement to S10001
c. Submit the job and check for successful completion.
d. The job shown in Example 4-1 on page 52 created a PDS dataset for the
installation.
Chapter 4. S1 Consumer Banking installation
51
Example 4-1 Sample IEBCOPY JCL to unload installation JCL from tape to DASD
//ITSOINTA JOB ,’LOAD S1 FILE 1’,
// CLASS=A,
// MSGCLASS=X,MSGLEVEL=(1,1),
// NOTIFY=&SYSUID
//*
//****************************************************************
//*
//* Function: Load S1 Installation JCL to Disk
//*
//****************************************************************
//*
// SET S1INSTG= DISK OUTPUT
// SET S1INSTG= TAPE INPUT
// SET S10001 = TAPE VOLSER
//*
//S1 EXEC PGM=IEBCOPY,REGION=2M
//SYSPRINT DD SYSOUT=*
//TAPE DD DSN=&THLQ..S1.PRODUCT.INSTALL.JCL,
// DISP=SHR,UNIT=(3490,,DEFER),
// LABEL=(1,SL),VOL=SER=&TVOL
//DISK DD DSN=&DHLQ..S1.PRODUCT.INSTALL.JCL,
// DISP=(NEW,CATLG),UNIT=SYSDA,
// LRECL=80,RECFM=FB,BLKSIZE=3200,
// SPACE=(TRK,(5,5,5))
//SYSIN DD *
COPY INDD=TAPE,OUTDD=DISK
/*
//
2. Create the HFS environment.
The IA requires one or more mounted Hierarchical File Systems (HFS). Each
mounted HFS hosts one or more components of the S1 Consumer Suite 5.X.
The HFS environment should include the mount points and directories shown
in Table 4-2 on page 53:
52
S1 Consumer Suite for z/OS Installation Guide
Table 4-2 The HFS environment
Consumer
Suite
component
Size
(MB)
Mount point
RCS
4
/usr/lpp/redbooks/IA/RCS
PERL
10
/usr/lpp/redbooks/IA/PERL
IA Install
100
/usr/lpp/redbooks/install
Forte
350
/usr/lpp/redbooks/forte
Repository
4096
/usr/lpp/redbooks/repos/<repository>
Customer
Environment
4096
/usr/lpp/redbooks/custenv/<custenv>
IA Depot
4096
/usr/lpp/redbooks/IA_depot
a. Use the member DFHFS in S1INSTG.S1.PRODUCT.INSTALL.JCL to
define the required HFS datasets.
Each 3390 is about 2 gigabytes. In order to meet this requirement, we
used eight 3390 spindles. Since all 16 gigabytes are expanded as a
contiguous space, we used SMS pooled DASD.
b. To dynamically mount the HFS data set, use the TSO MOUNT command
or the ISHELL file_systems Mount function:
Mount filesystem (‘s1base.hfs.sc04.data’) type(hfs) mode(rdwr)
mountpoint(‘/usr/lpp/redbooks’)
Note: s1base.hfs.sc04.data is the HFS dataset we created using DFHFS.
c. Define directories at the TSO prompt, as follows:
mkdir
mkdir
mkdir
mkdir
mkdir
mkdir
mkdir
mkdir
mkdir
/usr/lpp/redbooks/custenv
/usr/lpp/redbooks/repos
/usr/lpp/redbooks/forte
/usr/lpp/redbooks/forte/351_media
/usr/lpp/redbooks/IA
/usr/lpp/redbooks/IA/PERL
/usr/lpp/redbooks/IA/RCS
/usr/lpp/redbooks/IA/Install
/usr/lpp/redbooks/IA/IA_depot
d. Change owner and group IDs to itsoint:vfmadmin.
e. Update BPXPRM00 as recommended by S1.
Chapter 4. S1 Consumer Banking installation
53
3. Configure the security architecture.
According to the S1 installation documentation, this step sets up security
using IPSEC, but does not implement the security. IPSEC setup is optional for
each financial institution.
4. Load the S1 product tape to the HFS environment.
We used the member S1LDUSS found in
S1INSTG.S1.PRODUCT.INSTALL.JCL to load the S1 product into the HFS
environment. S1LDUSS will copy the PAX MVS data sets from tape to disk,
and then executing a shell script will move the files to the HFS environment.
Before executing this job, the HFS environment must be completely set up.
a. We modified the JCL with following information.
SHLQ-->
THLQ-->
SHLQ-->
TVOL-->
DVOL-->
S1INSTG
S1BASE
S1TEMP
S10001,S1002
OS39M1
Note: DVOL is used by the last step of the job S1LDUSS. Since SRCS
needs a large temporary space, the step requires a dedicated volume.
b. Before submitting the job S1LDUSS, we modified the following members:
SFORTE
SIAD
SIAI
SPERL
SRCS
When we did the installation in the IBM lab in Poughkeepsie, NY, we had a
problem on all BPXCOPY steps. To solve it, after we copied each library to an
MVS library, we used the oput command to copy from an MVS library to an
OMVS file. Then we continued with the steps. Here is an example of using
BPXCOPY steps with TSO:
oput 'S1BASE.S1.PRODUCT.INSTALL.JCL(SPERL)'
'/tmp/PERL'
c. After submitting the job, we checked all return codes from JES2 output
and “SYSOUT” at the USS file to make sure we received a return code of
zero (0) from all steps before continuing.
54
S1 Consumer Suite for z/OS Installation Guide
5. Set the IA environment variables.
The IA requires several environment variables in order to resolve the paths of
the IA depot directory, the customer environment directory, and the repository
directory. The following paths should be set in the .profile file for the user ID
itsousr:
INSTALL_DIR=/usr/lpp/redbooks/IA/install
FORTE_DIR=/usr/lpp/redbooks/forte
REPOS_DIR=/usr/lpp/redbooks/repos
CUSTENV_DIR=/usr/lpp/redbooks/custenv
IADEPOT_DIR=/usr/lpp/redbooks/IA/IA_depot
PERL5LIB=/usr/lpp/redbooks/IA/PERL/lib/perl5
PC=390
Example 4-2 shows the resulting sample .profile for ITSOUSR.
Example 4-2 Example .profile for ITSOUSR
# This line sets the prompt to display your login name, and current
# directory.
PS1='$LOGNAME':'$PWD':' >'
# This line exports the variable settings so that they are known to the
# system.
export INSTALL_DIR=/usr/lpp/redbooks/IA/install
export FORTE_DIR=/usr/lpp/redbooks/forte
export REPOS_DIR=/usr/lpp/redbooks/repos
export CUSTENV_DIR=/usr/lpp/redbooks/custenv
export IADEPOT_DIR=/usr/lpp/redbooks/IA/IA_depot
export PERL5LIB=/usr/lpp/redbooks/IA/PERL/lib/perl5
export PC=390
export PATH EDITOR PS1
6. Install the Forte environment.
We installed Forte for zSeries by referring to Chapter 16, “Installing Forte System
Software on an OS/30 Node” in the supplied Forte Install Guide.
The Forte installation media came with the S1 product tape. The media was
unloaded during the S1LDUSS job. To install the Forte environment, execute the
following steps:
a. Login to the USS environment using the “itsousr” user ID.
b. Change to the $FORTE_DIR:
cd $FORTE_DIR
c. Untar the media to the directory /$FORTE_DIR:
tar -xvf /$FORTE_DIR/30M7_media/forte.tar
Chapter 4. S1 Consumer Banking installation
55
d. We changed directory, then began to install Forte:
cd $FORTE_DIR/ALL_UNIX
./INSTALL.SH
e. We used all default parameters:
ServerNode
Default port number
CentralEnvironmnet
Central Repository
CSPACLIX for database connect
Now that the operating system is prepared, we proceeded to install the S1
Consumer Suite Installation Architecture (IA).
4.4 Installing the platform layer
Perform the following steps for the platform layer, in preparation for installing the
IA environments.
1. Add the following directory path to the PATH environment variable:
export PATH=$PATH:$IADEPOT_DIR/tools/sw_mfg/s1bin
2. Run the prepare_IA.ksh script from the $IADEPOT_DIR:
cd $IADEPOT_DIR
./prepare_IA.ksh
3. Respond to the following at the prepare_IA.ksh:
– Enter: yes to install PERL and RCS.
– Enter path for RCS: /usr/lpp/redbooks/RCS
– Enter path for PERL: /usr/lpp/redbooks/PERL
– Choose option 3 for app server/database server.
4.5 Installing the base layer
No base layer products are required on the z/OS DB2 platform at this time.
56
S1 Consumer Suite for z/OS Installation Guide
4.6 Installing the repository layer
The next layer of the Consumer Suite 5.X installation is the repository layer. The
repository for the Consumer Suite 5.X application/database server holds all of
the available Consumer Suite 5.X software products that can be added to a
Customer Environment.
Follow these steps to create the repository.
1. Change to the repository directory:
cd $REPOS_DIR
2. Create the s1repos directory in $REPOS_DIR:
mkdir s1repos
a. If ReposList file exists, delete the file:
ls ReposList -- if the file exists, then do the following command.
rm ReposList
b. Put the directory list into the ReposList:
ls > ReposList
c. Check to ensure the $IADEPOT_DIR/tools/sw_mfg/s1bin directory path is
in the PATH environment variable.
d. From the command line, change to the product release directory in the
IA_depot, then issue:
mk_390_repos
Note: At the $IADEPOT_DIR, we found products installed. We
entered each product and release directory, then did the
mk_390_repos.
cd $IADEPOT_DIR/VBM/vbn_5.3.0.0
mk_390_repos
cd $IADEPOT_DIR/VFM/vfm_5.3.0.0
mk_390_repos
4.7 Installing the Customer Environment layer
Creating a Customer Environment allows you to configure Consumer Suite 5.X to
meet the specific needs of your financial institution. The Customer Environment
should contain only those products that are necessary to operate your financial
institution's application/database server. You need to have Forte available to
install the Customer Environment.
Chapter 4. S1 Consumer Banking installation
57
4.7.1 Create the customer environment
Follow these steps to create the customer environment.
1. Change to the installation directory:
cd $INSTALL_DIR/bin
2. Run the IA Environment Manager:
./VFMEnvMgr
3. Select Customer Environment Maintenance from the Main Menu:
Option 6
4. On the Customer Environment Maintenance Menu, select Create Customer
Environment:
Option 1
5. At the Customer Environment Creation screen, enter the name of your
Customer Environment (name of the financial institutions), then press Enter:
itso
6. From the Repository Selection screen, select the repository on which you
want to build the Customer Environment and press Enter. (This happens
automatically.)
7. On the Version Specification screen, enter 5 as the version number.
8. You are now prompted to enter the information listed below. There might be
multiple values for the variables. Refer to your Installation Worksheet from the
Planning chapter of the Consumer Suite installation guide for assistance with
values to all of these variables.
<Customer Environment Owner ID>
itso
<Fully Qualified Application/Database Server Inside Hostname>
grummpy.devlab.nor.s1.com
<Database Port>
5021
<DB2 CLI Plan Name>
cspaclix
<DB2 Subsystem ID>
dsn1
<Database Client Names> (space delimited list)
390LOC
<Database Client IP Addresses> (space delimited list)
10.1.3.8
<Owner ID Password>
itsousr
<Forte Environment Name>
take the default
58
S1 Consumer Suite for z/OS Installation Guide
Note: When the menu asks for the database client, it refers to the
DB2 database location.
9. At the Review Properties screen, verify that you have entered all of your
information correctly. If you have, enter Y. If any of these values are incorrect,
select N and re-enter the customer information.
The preceding steps created the following location:
/usr/lpp/redbooks/custenv/itso/forte/DSNAOINI
The IA Environment Manager now creates the Customer Environment and
returns to the Main Menu.
4.7.2 Install core software products
When installing products into the Customer Environment, it is important to
adhere to the proper order.
1. Copy the envagent default file from /misc/install/data to custenv/forte directory
and rename it to envagent.def:
cp envagent.def
This file must be edited according to the instructions in the file.
2. Change ownership to the CustID:
su -s itsousr
3. cd to the $CUSTENV_DIR. Source in fortedef.sh, and then run forteboot.sh.
This will start the node manager:
cd $CUSTENV_DIR
./fortedef.sh
./forteboot.sh
4. At this time we made sure we started the SNMP Monitor on our NT
workstation and connected to the node manager.
During one of our installations, we did not have the SNMP monitor ready at
the time of installation, so we renamed the accessmo directory in the
repository. When we renamed the directory, then the installation script
installed the renamed product. If you do not have the SNMP monitor, then
remove the directory—otherwise, the installation will fail.
5. Change to the install directory:
cd $INSTALL_DIR/bin
Chapter 4. S1 Consumer Banking installation
59
6. Start the Environment Manager Main Menu:
./VFMEnvMgr
7. Select Add Core Product:
Option 1
8. Select the appropriate Customer Environment and press Enter.
itso
9. From the Available Core Products list for the Customer Environment, select
the following to install and press Enter. (These should be installed one at a
time, and must be installed in the order listed. Also note that you should not
install any product ending with cgi or web; these products are for the Web and
CSR server only.)
arcbin
arcsvr
arctpl
arcbci
arcdbs
vfmbin
vfmsvr
vfmtpl
vfmbci
vfmdbs
vbmbin
vbmsvr
vbmbci
vbmdat
vbmdbs
vbmtpl
vimbin
vimsvr
vimbci
vimdbs
vimtpl
vpubin
vpusvr
vpubci
vpudbs
vputpl
Note: While these products are installing, you can review the activities by
looking at the log file, $INSTALL_DIR/log/control:
tail -f $INSTALL_DIR/log/control
60
S1 Consumer Suite for z/OS Installation Guide
10.When all appropriate core products have been added to the Customer
Environment, press Esc twice and enter Y to exit the IA Environment
Manager.
4.7.3 Install components and patches
After all core products are added to the Consumer Suite 5.X
application/database server Customer Environment, then you would add all core
components, core patches, override products, and override patches required for
your financial institution's Web server.
Note: The a_reutqt, a_rmbvsn, and a_smtpem products referred to in step 5 are
for Consumer Suite 5.1.2 and later implementations only.
1. From the command line, change to the installation directory:
cd $INSTALL_DIR/bin
2. Run the IA Environment Manager:
./VFMEnvMgr
3. From the Environment Manager Main Menu, select Add Override Product Quick Add:
Default Override Priority
4. Select the appropriate Customer Environment and press Enter.
5. From the Override Products list for the Customer Environment, select these
override products to install and press Ente:.
a_com
a_reutqt
a_rmbvsn
a_smtpem
c_alerts
c_custpt
c_relmgt
c_pmtbch
c_trnbch
c_vbmbch
c_xfrbch
6. Repeat step 4 and step 5 for each core patch, override product, and override
patch product release set.
7. When all appropriate override products have been added to the Customer
Environment, press Esc twice and enter Y to exit the IA Environment
Manager.
Chapter 4. S1 Consumer Banking installation
61
4.7.4 Install DBAccess for BCI
At this point, Consumer Suite is installed. However, in order to execute the BCI
component, the batch DB2 access program will need to be installed; refer to the
IBM DB2 Utility Guide and Reference - SC26-9015.
1. Untar the installation script from /usr/lpp/redbook/IA/IA_dep/allbci.tar:
cd /custenv/itso/db2
tar -xvf allbci.tar db2
Note: This tar command will extract only the DB2 portion of the allbci tar file.
From the /db2 directory, the following files will be copied.
execsql.tar
execsql.sh
execsql.o
execsql.h
execsql
clitrace
2. Source in the BCI environment:
cd /IBM/itso
./ fortedef.sh
3. Make sure the file execsq.sh is accessible under the $FORTE_ROOT
directory:
cd $FORTE_ROOT
ls -l execsq.sh
4. Build the DBAccess utility using execsql.sh:
cd $FORTE_ROOT
execsql.sh
5. Check that the utility was built. Make sure the date is current and that it is the
last file in the list:
ls -ltr dbaccess
6. Do a simple test using query5:
dbaccess < query5
If BCI is installed successfully, nothing happens at the screen.
4.7.5 Configure the Customer Environment with DB2
Concurrently with the IA installation of products into the Customer Environment,
you would create and populate the DB2 databases.
62
S1 Consumer Suite for z/OS Installation Guide
In order to get the sizing parameters, you need a copy of the “complete space
calculator.xls” workbook. Enter the data obtained by the client DBA into the input
sheet of the workbook. When all data has been entered, execute the UPLOAD
macro. This will create two files: tbspsumm.txt and indxsumm.txt.
These files should be uploaded to the mainframe and stored in
S1INSTG.TBSPSUMM.TEXT and S1INSTG.INDXSUMM.TEXT respectively.
These mainframe files should be pre-allocated with the following DCB
parameters:
RECFM
LRECL
BLKSIZE
DSORG
VB
133
6233
PS
Note: During one of our installations, we did not have the worksheet ready for
this step, so we just created an empty dataset with these parameters. The DDL
used a default size, 1 cylinder per tablespace.
4.7.6 Set up the DB2 installation environment
After the DB2 infrastructure has been configured, customize the DDL with the
current environment specifications. Several steps are involved, as described in
the following sections.
Unload jobstream libraries
The jobstream libraries must be unloaded from the S1 product tape for the
Database Server (DB2).
1. Use JCL such as shown in Example 4-3 on page 64 to unload the S1
installation JCL from tape to a library. Our library was called:
S1INSTG.R52L10.IINSTALL.JCLLIB.UNL
2. Edit the JOB card.
3. Submit the job and check for successful completion.
Chapter 4. S1 Consumer Banking installation
63
Example 4-3 Sample IEBCOPY JCL to unload DB2 JCL
//ITSOINTA JOB ,’LOAD S1 FILE 1’,
// CLASS=A,
// MSGCLASS=X,MSGLEVEL=(1,1),
// NOTIFY=&SYSUID
//*
//S1 EXEC PGM=IEBCOPY,REGION=2M
//SYSPRINT DD SYSOUT=*
//OUT DD DSN=S1INSTG.R50L10.INSTALL.JCLLIB.UNL,
// DISP=(NEW,CATLG),UNIT=SYSDA,
// LRECL=80,RECFM=FB,BLKSIZE=3200,
// SPACE=(TRK,(5,5,5))
//IN DD DSN=S1BASE.R50L10.INSTALL.JCLLIB.UNL,
// DISP=SHR,UNIT=(3490,,DEFER),
// LABEL=(1,SL),VOL=SER=S1009 <---- Use your tape label here
//SYSIN DD *
COPY INDD=IN,OUTDD=OUT
/*
//
4. This job creates a PDS dataset for the installations.
S1INSTG.R52L10.IINSTALL.JCLLIB.UNL
5. After we unloaded the installation JCL from the tape, we used member
UNLOAD from the library to unload the rest of the jobs.
The following DDL files need to be customized for the various applications:
S1INSTG.S1.CBO.DDL.R52L10 Core product databases DDL (ARCDB01x,
VALDB01x, VFMDB01x, VCPDB01x, etc.).
This DDL file is required for all installations.
S1INSTG.S1.VBM.DDL.R52L10 DDL exclusively for the Consumer Banking
application (VBMDB01x database).
S1INSTG.S1.VIM.DDL.R52L10
DDL exclusively for the Consumer
Investments application (VIMDB01x
database).
S1INSTG.S1.VPU.DDL.R52L10 DDL exclusively for the Consumer Portal
Application (VPUDB01x database).
The following members will be included in each library above:
@README
CDATBASE
CFOREIGN
CINDEXES
64
Definition of all the wildcards used in DDL
DDL to create database(s)
DDL to create foreign keys
DDL to create indexes
S1 Consumer Suite for z/OS Installation Guide
CREATDDL
CSTOGROU
CTABLES
CTABSPCS
CTRIGGER
DROP_ DDL
GRANTTAB
SYSTSIN
Optional JCL to create DB2 objects
Sample DDL to create DB2 STOGROUP.(it can be
executed if the DB2 storage group has not been created
previously)
DDL to create tables
DDL to create tablespaces
DDL to create triggers
DDL to drop tablespaces and storage groups
DDL grant access on application tables
Control cards for installation
Note: These members will be customized based on the following
steps. If you need to partition the database, then go to that member
and make your changes.
Customize the DDL members
To customize the members of the DDL library, proceed with the following steps.
1. After all libraries and flat files have been restored, go to ISPF Option 6.
Allocate the ISPPLIB and CLIST library to the TSO user ID, as follows:
At ISPF option 6 or a TSO Ready prompt, key:
ex 'S1INSTG,R52L10.CLIST(ALLOC) 'S1INSTG'
This will allocate the ISPPLIB and CLIST libraries. Now we are ready to start
the installation tailoring process.
2. Start the DB2 customized panel after the prompts:
%instdb
This command starts the DB2 Database Installation Panel.
3. Select Option 1 to customize most of the DDL parameters. A list of PDSs to
be modified is displayed. We selected one PDS at a time to customize.
Table 4-3 on page 66 lists the DDL wildcard parameters to be modified. The
values are obtained from the IBM DB2 UDB Installation Guide (GC26-9008)
in the section “Installation Variable List”.
Note: Each of these parameters are required. For information on the different
wildcard parameters used in the DDL PDS files, review the @README
member located in each file.
Chapter 4. S1 Consumer Banking installation
65
Table 4-3 DDL wildcard parameters and values
DDL wildcard parameters
Values
DB2 subsystem ID (DB2 MVS subsystem ID).
DSN1
DB2 Data set prefix (the high-level qualifier under which the DB2
libraries are allocated).
DSN610
Database ID is the last digit of the database name that the customer
will use to identify the current application environment. This will
identify the customer with the same DB2 environment.
Note: Ensure that you use double quotes.
“x”
Table Creator is the SQLID that will be used to create all the DB2
objects.
Note: Make sure this ID has DBADM authority.
itsoint
SQLID is the ID that will be used as the OWNER of the CLI plan. It
needs access to all the application tables.
Note: Make sure this ID has DBADM authority.
itsoint
DB2 Storage group name is the STORAGE group that will be used to
define tablespaces/indexes.
S1STGD40
HLQ is the high-level qualifier that will be used in the storage group
definition.
S1PRD
Bufferpool for indexes is a DB2 4k bufferpool to be used for the
application indexes.
BP1
Bufferpool for code Indexes is a DB2 4k bufferpool to be used for the
code table indexes.
BP3
Bufferpool for code tables is a DB2 4k bufferpool to be used for code
tables.
BP5
Bufferpool for active tables is a DB2 4k bufferpool to be used for active
tables.
BP4
Bufferpool for inactive tables is a DB2 4k bufferpool to be used for
inactive tables.
BP2
8K pages Bufferpool is the default size to be used by DB2. If the client
wants to use a 4K page bufferpool instead, the screen will allow him
to type a bufferpool from BP1 - BP49 in this entry.
BP8k0
4. Once all the necessary parameters have been typed on the screen, press
Enter. A macro will be executed to substitute the corresponding wildcard
parameters into the DDL PDS files.
66
S1 Consumer Suite for z/OS Installation Guide
5. Additionally, the sizing information obtained from the spreadsheet will be
incorporated into the DDL. This DDL should be manually inspected to ensure
that the various parameters besides PRIQTY and SECQTY have been
properly assigned.
Suggested values for some of the parameters
Use LOCKPART YES for the partitioned tablespaces. With selective partition
locking, each accessed partition is locked independently. If you are routing
work in the sysplex and there are affinities between members and partitions,
the use of SPL can help reduce data sharing locking overhead by allowing the
child locks (Row/Page) to be granted locally without having them be
propagated to the Coupling Facility.
Use the PIECESIZE parameter option of the create index to indicate how
large DB2 should make the data sets that make up a non-partitioned index. To
choose the PIECESIZE value, divide the size of the non-partitioning index by
the number of data sets that you want. For example, to ensure that you have
five data sets for the non-partitioned index, and your non-partitioned index is
10 MB (and not likely to grow much), specify PIECESIZE 2M. If your
non-partitioned index is likely to grow, choose a larger value.
Keep in mind that not more than 32 data sets can be created. Ideally, the
value of the primary quantity (PRIQTY) plus (N * Secondary Quantity) should
be evenly divisible into PIECESIZE to avoid wasting space.
TRACKMOD NO on all tablespaces created will enhance the application
response time by avoiding the maintenance of the space map page. It will
result in less Coupling Facility overhead. The downside is that Incremental
Image copies will perform slower.
FREEPAGE and PCTFREE parameters for tablespaces and indexes should
be monitored as the system is tracked in production.
Utilize 8KB page sizes. Large page sizes cause fewer pages to be written to
the Coupling Facility (CF), which reduces accesses to the CF. More data is
returned with each page access and fewer locks are taken on a large page
size. Use this in tablespaces that are larger (> 20,000 pages) and do not have
any known concurrency issues.
Create the Consumer Suite 5.X database
To create the database, we followed these steps:
Customize load JCL
Once changes have been applied in the previous step to each DDL file, it is
necessary to execute jobs to define the DB2 objects for the Core product and any
associated applications.
Chapter 4. S1 Consumer Banking installation
67
Before execution of any jobs, we recommend that you have the local DBA review
the various DDL members in the PDS.
Note: Unless the installer has been given at least DBADM authority by the client
DBA, they will not be able to execute the CREATDDL jobs.
The job to create the objects for the Core product is contained in the PDS
member:
S1INSTG.S1.DDL.CBO.DDL.R52L10.LOCAL(CREATDDL)
Note: Before submitting these jobs, we found that it is necessary to log off from
TSO and log on again. This will free all datasets that have been customized, so
that executing jobs will not have dataset contention.
CREATDDL jobs are multi-step jobs with condition code checking. If any step
gets a condition code greater than 4 (4 was OK because of unknown DB2 plans),
execution will stop. Once the problem has been identified and corrected,
comment out any steps that have previously successfully executed. The order of
the steps is:
1. DROP (this step is commented out by default; it should be only used if
needed.)
2. CSTOGROU
3. CDATBASE
4. CTABSPS
5. CTABLES
6. CINDEXES
7. CFOREIGN
8. CTRIGGER (in case there are any for the Core product)
9. GRANTTAB
10.CCLIPLAN (Executed just for the Core product installation)
11.Refer to the @README member in each DDL file for more information on
these members. For more information on the creation of the application CLI
plan and Collection ID, see Appendix B (Forte Installation) in the back of this
book.
Create object definitions
Now that the Consumer Suite Core product databases have been created, the
product-specific database/object definitions need to be created.
68
S1 Consumer Suite for z/OS Installation Guide
Review the product-specific installation guidelines to determine if there are any
inter-application dependencies that require the DB2 objects to be created in a
specific order. Execute the CREATDDL member for each required product.
Repeat the process
We had to repeat the above process on the following products using the following
PDS library:
S1INSTG.S1.VBM.DDL.R52L10.LOCAL -- Exclusively for Consumer
Banking database (VBMDB01X and tables)
S1INSTG.S1.VIM.DDL.R52L10.LOCAL -- Exclusively for Consumer
Investments database (VIMDB01X and tables)
S1INSTG.S1.VPU.DDL.R52L10.LOCAL -- Exclusively for Portal user
database (VPUDB01X and tables)
Load configuration parameters
After the objects have been created, you need to load them with default data.
Follow these steps (note that not all tables will be loaded):
1. Select Option 2 from the DB2 Database Installation panel.
2. Select Option 1 on the Configuration Parameters Setup panel.
3. Complete the fields on the Default Data JCL Info panel. Some fields will be
pre-loaded, while other values need to be obtained from the IBM DB2 UDB
Installation Guide, section “Installation Variable List”.
4. The JCL Load dataset contains the DB2 Load JCL to load default data into
the tables after the databases have been created.
– DB2 subsystem ID is the DB2 MVS subsystem ID.
– DB2 Data set prefix is the high-level qualifier under which the DB2 data
sets are allocated.
– Database ID is the last digit of the database name that the customer will
use to identify the current application environment.
– Table Creator is the SQLID creator of all the application tables
– Temporary UNIT type is the unit type for temporary data sets. In cases
where there is no special unit type for temporary data sets, then use the
unit type used for permanent data sets.
– UNIT type is the unit type for permanent data sets.
– Data set High Level is the high-level qualifier that will be used to catalog
the data sets created in the LOAD utilities. Use the same high-level
qualifier for files downloaded from tape.
– DB2 Plan for program DSNTEP2 is the plan name used by DB2 program
DSNTEP2.
– DB2 Load Library for DSNTEP2 is the DB2 load library where the
DSNTEP2 load module resides.
– Installing VBM (y/n) indicates if the Banking application is being installed.
Chapter 4. S1 Consumer Banking installation
69
– Installing VIM (y/n) indicates if the Investments application is being
installed.
– Installing VPU (y/n) indicates if the Portal User application is being
installed.
– Installing ABV (y/n) indicates if the BroadVision application is being
installed.
– Installing ARQ (y/n) indicates if the Reuters application is being installed.
– Installing AEM (y/n) indicates if the e-mail application is being installed.
5. Once all the values are typed, press <ENTER>. Immediately a macro will be
executed that modifies the LOAD JCL with the values specified on the screen.
The Load JCL modified by the macro will depend on the applications selected
on the screen.
6. Once this step is executed, edit the library with Load utilities and determine if
other changes are needed to execute the Load JCL in this environment.
Note: It may be useful to logoff/logon before any jobs are executed. This will free
all datasets that have been customized, so that executing jobs will not have
dataset contention.
7. In order to execute the Load utility against tables in DB2, the user ID
executing the JCL needs LOAD utility authority on the different application
databases:
ARCDB01x
VFMDB01x
VCPDB01x
VALDB01x
VBMDB01x
VIMDB01x
VPUDB01x
Architecture database installed with all the products
Common database installed with all the products
Customer portfolio database installed with all the products
Alerts database installed with all the products
Banking database installed with Consumer Banking
Investments database installed with Consumer Investments
Portal user database installed with Portal User.
Here is an example of how to grant this authority:
GRANT LOAD ON DATABASE ARCDB01x TO INSTALLER_ID;
8. The Load JCL should be executed based on the applications being installed
in this environment:
Execute
always be
Execute
Execute
Execute
Execute
Execute
Execute
Execute
70
LOADDCBO to load
executed.
LOADDVBM to load
LOADDVIM to load
LOADDVPU to load
LOADDABV to load
LOADDARQ to load
LOADDAEM to load
CLEARCK to clear
S1 Consumer Suite for z/OS Installation Guide
common tables default data. This JCL should
Banking default data.
Investments default data.
Portal User default data.
BroadVision default data.
Reuters default data.
e-mail default data.
any pending problems
Update the configuration parameters
Now you can update the configuration parameters, with these steps:
1. Once the LOAD jobs have been executed successfully, execute Option 2 of
the Configuration Parameters Setup menu. This allows the modification of the
different configuration files, %hilevel.ppp.CONFIG.PARMS.RxxLxx, where
ppp is the application identifier (VBM, VPU, VFM, etc.). Enter the data set
name of the configuration file to be edited and modified.
2. The following files could be edited, depending of the applications being
installed. Update the file with the appropriate information.
S1INSTG.VFM.CONFIG.PARMS.R52L10
S1INSTG.VBM.CONFIG.PARMS.R52L10
S1INSTG.VIM.CONFIG.PARMS.R52L10
S1INSTG.VPU.CONFIG.PARMS.R52L10
S1INSTG.ABV.CONFIG.PARMS.R52L10
S1INSTG.AEM.CONFIG.PARMS.R52L10
S1INSTG.ARQ.CONFIG.PARMS.R52L10
For
For
For
For
For
For
For
CBO (common) default data.
Consumer Banking default data
Consumer Investments default data
Portal User default data
BroadVision default data
e-mail default data
Reuters default data
3. The following is a list of items to check to make sure that the lines exist in
each file exactly as they are listed below. If not, add or modify them.
S1INSTG.VFM.CONFIG.PARMS.R52L10
CSR.Web.ExternalServer System Value 'http://<Fully Qualified Application
Server Outside Hostname/'
CSR.Web.InternalServer System Value 'http://<Fully Qualified Application
Server Outside Hostname/'
CSR.Web.LogonInternalServer System Value 'http://<Fully Qualified
Application Server Outside Hostname/'
CSR.Web.CGIPath System Value 'cgi-bin/<Customer
EnvironmentName>/comcsr/fortecgi'
CSR.Web.LogonCGIPath System Value 'cgi-bin/<Customer Environment
Name>/comcsr/fortecgi'
CSR.Web>servicePortRange System Value '<Application Outside IP
Address>:<CSR Application Port Range>'
CSR.Web.CookieDomain System value '.<system>.com'
CSR.Web.DocumentRoot System Value '/custenv/<Customer Environment Name>'
In the following example, we have included our configuration of
S1INSTG.VFM.CONFIG.PARMS.R52L10.
Note: The lines above use http:// instead of https:// because the CSR
application is accessed through the Application Server, not the Web Server as
in other products.
Chapter 4. S1 Consumer Banking installation
71
4. To determine the ServicePortRange, you will need to consult the app_ports
file on the application server in the directory: /custenv/itso/forte. Look for an
entry similar to the following:
10001-10100 COMCSRWebAccess COMCSRHTTPAccessSO
This tells us that the ports from 10001 to 10100 have been reserved for the
Common CSR application. For the VFM.Web.ServicePortRange field, select
the first n ports from this range, where n is the number of replicates
determined in the Capacity Planning Guide. For example, if we need five
replicates of the Common CSR application, our variable would look like the
following:
CSR.Web.ServicePortRange System Value ‘<IP>:10001-10005’
5. After all the changes have been applied to the file, press PF3 to exit and save
the changes.
Note: At this point, we generated the parameter using REXX.
6. Execute Option 3 of the Configuration Parameters Setup menu. This executes
the REXX program UPDCONFG that reads the file modified in the previous
step and creates the necessary UPDATE statements to apply in the
corresponding DB2 tables.
Note: Keep in mind that the file used by this step is the same file modified in
Option 2. Do not exit before completing this step.
If you exit the Database Installation menu prior to executing Option 3 from the
Configuration Parameters Setup menu, execute the %INSTDB again and
select Option 3 and then Option 2, without modifying the file. Then execute
Option 3 to apply file changes into DB2 tables.
The result of DB2 UPDATE statements will appear on the screen. To verify
successful completion for all the UPDATE statements executed for a
particular configuration file, execute the following command from the
COMMAND line:
F ‘= -’ all
7. If any SQLCODE < 0 is found, verify the reason. If an SQLCODE = 100 is
found, it is because one of the loads did not work properly. Verify execution of
the Load jobs again. Scroll through the file and search for any errors. Make
sure that everything is correct. Exit by pressing PF3.
8. If any problems are found, make the appropriate changes to the file using
Option 2 in the Configuration Parameters Setup. After changes are completed
in the file, execute Option 3 from the same panel.
9. Repeat the above for each %hilevel.ppp.CONFIG.PARMS.RxxLxx file. Refer
to the Installation Document for each Consumer Suite Application for steps
and tasks to edit other files.
72
S1 Consumer Suite for z/OS Installation Guide
Data backup and recovery
Although data backup and recovery are not specifically addressed as part of the
Consumer Suite 5.X installation, they are extremely important topics. Before
financial data is loaded into the databases, a plan should be in place for backing
up the data on a regular basis and for archiving the DB2 Active logs.
DB2 offers several different backup and recovery options, each of which has
advantages and disadvantages. You must determine which options are best for
your financial institution. For information about data backup and recovery
options, refer to DB2 UDB Utility Guide/Reference SC26-9015 and DB2 UDB
Administration Guide Vol 1 SC26-9003.
4.8 Starting Consumer Suite applications on USS
As a final task, installers need to start each Forte application under USS on
z/OS. At this point in the installation process, the following conditions exist:
The Customer Environment is created and configured.
The Database Server is configured. The database exists and is populated
with default data.
The Forte environment files contain all of the appropriate variables and
scripts, for example:
fortedef.sh –
forteboot.sh – This script starts the Forte’ node manager for the
Application/Database Server.
AppStartup.esc – This script is generated at install time. It contains
instructions for starting each application in the Forte environment. These
instructions are taken from the applications’ individual start scripts, or
from a default script.
To start up every Consumer Suite Forte application in the Customer
Environment, perform the following tasks:
1.
2.
3.
4.
Change directory to the customer environment’s Forte directory.
Source the fortedef.sh file.
Start the node manager, if it is not already running.
Start the applications using Forte the AppStartup script.
Following are sample commands to perform those operations:
cd $CUSTENV_DIR/<Customer Environment Name>/forte.
. ./fortedef.sh
. ./forteboot.sh
escript –i AppStartup.esc
Chapter 4. S1 Consumer Banking installation
73
4.9 Webserver installation on AIX
This section tells how to install the Webserver component on an AIX workstation.
Note: The following commands are useful when we were not using the
terminal directly attached to the IBM pSeries (AIX).
DISPLAY=<the PCs IP address>:0.0
export $DISPLAY
4.9.1 Installing the code
1. Create the logical volumes with the mount points shown in Table 4-4.
Table 4-4 ) Logical volumes with mount points
Logical Volume (LV)
Size
Mount Point
lvIA
100 MB
/install
lvcustenv
252 MB
/custenv/itso
lvrepos
252 MB
/repos/s1repos
lvpackage
200
/usr/package
Purpose
Installation
2. Create the groups and user IDs shown in Table 4-5.
Table 4-5 Groups
Groups
vfmadmin
vfmgroup
3. Create the user IDs with attributes shown in Table 4-6.
Table 4-6 User IDs
User Name
(user ID)
Purpose
Primary
group
Secondary
Group
vfmadmin
AIX system administration
vfmgroup
vfmadmin
hsruser
Unique user ID for each financial
institute or customer environment
vfmgroup
vfmadmin
4. We took the defaults except for the password requirement. We set the
minimum password length to six.
74
S1 Consumer Suite for z/OS Installation Guide
5. Mount the CD.
We mounted the CD-ROM on mount point /cdrom. The S1 installation manual
asks you to create a file system, and then copy the CD contents to the
directory. We did not follow this instruction, since we did not have any problem
untarring the files from the CD directly.
6. Untar the files.
We untarred the HTTP1312 (Apache) and latest AIX fixes from CD to the
/package directory:
Untar HTTP1312.tar
cd /usr/package
tar -xvf/cdrom/http1312.tar
Untar the latest AIX fixes.
cd /usr/package
tar -xvf/cdrom/aix43307.tar
7. Since our AIX server did not have the IBM HTTP server by Apache, we
installed the product with the source from the preceding steps.
8. Install JRE 1.3.0. It comes on the S1 product tape in tar format.
untar JRE to /usr
cd /usr
tar -xvf/cdrom/jre130.tar
4.9.2 Installing Apache
1. Configure Apache.
2. Copy http.conf.sample to http.conf:
cp /usr/HTTPServer/conf/http.conf.sample /usr/HTTPServer/conf/http.conf
3. Edit /usr/HTTPServer/conf/http.conf with following attributes:
a. Change user to itsousr.
b. Change group to vfmadmin.
c. Change DocumentRoot and corresponding <directory> tag to
/custenv/hsr.
d. Uncomment the ServerName line and change to <hostname>.
e. Remove the existing ScriptAlias line and replace it with a new ScriptAlias:
ScriptAlias /cgi-bin/cs5usr/vim “/custenv/cs5usr/forte/cgi-bin/”
f. Configure the SSL key according to IBM HTTP server documentation.
4. Tune Apache performance.
Chapter 4. S1 Consumer Banking installation
75
We changed these parameters in /usr/local/apache/conf/httpd.conf to values
recommended by S1:
Set
Set
Set
Set
Set
KeepAliveTimeout = 60
MinSpareServers = 5
MaxSpareServers = 10
StartServers = MinSpareServers
MaxRequestsPerChild = 10000
In addition to those parameters, the following two parameters should be
adjusted according to the expected number of users of the system. Settings
should be obtained from the S1 performance team.
MaxKeepAliveRequests
MaxClients
Save and exit the httpd.conf file.
5. Install DiffUtils-2.7
Note: Although the standard UNIX diff utilities are typically installed in
/usr/bin during an AIX OS installation, the standard versions result in
incompatibility problems with RCS 5.7.
Therefore, GNU diffutils-2.7 must be downloaded and installed into the
/usr/local/bin directory in order to run RCS 5.7. It is available for
download as freeware from http://freeware.bull.net or an equivalent site.
Follow the installation instructions for a bff type install, or use the following
from the S1 CD. Change to the root and untar the file:
cd /
tar –xvf /usr/packages/diff27.tar
Ensure that /usr/local/bin is in the UNIX path. Update the /etc/environment.
6. Install the Revision Control System (RCS) 5.7, if not previously installed.
Note: This product is required to run the Installation Architecture. It is
available for download as freeware from http://freeware.bull.net or an
equivalent site.
Follow the installation instructions for a bff type install, or use the following
from the S1 CD. Change to the root (/) directory, then untar the rcs.
cd /
tar –xvf /cdrom/rcs57.tar
Ensure that /usr/local/bin is in the UNIX path.
76
S1 Consumer Suite for z/OS Installation Guide
4.9.3 Installing the IA
1. Install the Installation Architecture (IA).
a. Change to the S1 install directory: cd /install
b. Untar the IA file:
tar –xvf /usr/packages/AIX_IA.tar
c. Execute the prepare_IA.ksh script and follow the prompts:
./prepare_IA.ksh
o Press Enter to continue
o Enter ‘y’ to set up RCS.
o Enter ‘/usr/local/bin’ as the RCS installation path.
o Enter ‘y’ to set up Perl.
o Enter ‘/usr/local/bin’ as the Perl installation path.
d. Change to the repos directory: cd /repos
e. Untar the repos files:
tar –xvf /usr/packages/repos52.tar
f. Change the ownership of the /repos directory tree to vfmadmin:vfmgroup
from the root directory.
chown –R vfmadmin:vfmgroup /repos
2. Create a Customer Environment using the IA.
a. Change to the /install/bin directory: cd /install/bin
b. Run the IA Environment Manager: ./VFMEnvMgr
c. Select Option 6, Customer Environment Maintenance.
d. Select Option 1, Create Customer Environment. Follow the prompts.
•
Enter the Customer Environment Name = <custenv_name>
itso
•
Select the Repository = <repos_name>
s1repo
•
Consumer Suite Version = 5
Take the default value
•
Customer Environment Owner ID = <custID>
itsousr
•
Fully Qualified Webserver Outside Hostname =
<web_outside_hostname>
aixrt.devlab.nor.s1.com
Chapter 4. S1 Consumer Banking installation
77
•
Webserver Outside IP Address = <web_outside_IP>
10.0.20.8
•
Webserver Port Number = <port#>
80
•
Fully Qualified Application Server(s) Inside Hostnames
=<app_inside_hostname>(the address of USS hostname)
uss hostname WTSCPLX1
•
Application Server Inside IP Address(es) = <app_inside_IP>
10.1.3.84
•
Environment Properties Correct (Y/N) = Y
y
The customer environment is now created.
3. Populate the Customer Environment.
Once the customer environment has been created, it must be populated with
the required core and override products.
a. Start IA Environment Manager:
cd /install/bin
./VFMEnvMgr
b. Enter the Customer Environment Name = <custenv_name>: itso
c. Add Core Product (1) (Quick Add –Default Override Priority):
Select all products that contain the <>web extension. Press Enter. Do
NOT install the <>cgi products.
Note: Multiple products can be selected by using the space bar and arrow
keys.
d. Select d to disable prompting by the Environment Manager.
If you add multiple products at the same time, then d is useful because it
does not prompt you every time that the system is ready to install a
product. If you install one product at a time, then using y is OK.
All core <>web products should be added successfully. Go back to the
main menu of the Environment Manager.
4. Continue to install the override products.
a. From the Main Menu, select (2) Add Override Product (Quick Add –
Default Override Priority).
b. Select and install all override products displayed in the list.
c. Select d to disable prompting by the Environment Manager.
78
S1 Consumer Suite for z/OS Installation Guide
All override products should be added successfully.
From the Main Menu, press Esc twice and enter y to exit the Environment
Manager.
5. WebEnterprise installation
Change to the customer environment and untar the forte.tar file:
cd /custenv/ibm_env
tar –xvf cdrom/forte.tar
6. Configure Customer Environment
a. Change to the customer Forte environment:
cd /custenv/itso/forte/cgi-bin
b. Change the owner ID and group ID of the fortecgi to customer ID and
group:
chown itsousr:vfmadmin fortecgi
c. Create a fortecgi.dat file in the /custenv/itso/forte/cgi-bin directory.
The file should contain the following line for each Consumer Suite
application that is installed:
<Service Object Name> <application listening port #*> <IP Address of
applicationserver*> 4
For example:
VBMHTTPAccessSO 7005 10.1.3.8 4
VIMHTTPAccessSO 5006 10.1.3.8 4
PortalHTTPAccessSO 5007 10.1.3.8 4
Note: The values with an asterisk (*) are defined in the database in the
cfgparmvalue table.
d. Change the ownership of the fortecgi.dat file to itsousr:vfmgroup:
chown itsoudr:vfmgroup fortecgi.dat
e. Change the permissions of the fortecgi.dat file to 640:
chmod 640 fortecgi.dat
4.9.4 Starting and stopping the Webserver
This section documents the commands used to start and stop the IBM HTTP
Apache Webserver on the AIX system.
1. Change to the /usr/HTTPServer/bin directory:
cd /usr/HTTPServer/bin
Chapter 4. S1 Consumer Banking installation
79
2. To start the Webserver, issue the Apache start command:
./Apached start
3. To stop the Webserver, issue the Apache stop command:
./apachectl stop
4.9.5 Verifying the Webserver configuration
Start the Apache Webserver if it is not already running. Open a Web browser and
connect to the following URL for each application that is installed on the system.
A fortecgi usage error should be displayed onto the screen. This confirms that
the Webserver is correctly configured to access the fortecgi.
Banking
http://<fully qualified webserver outside hostname>:<port #>/cgi-bin/<
custenv_name>/vbm/fortecgi
Investments
http://<fully qualified webserver outside hostname>:<port #>/cgi-bin/<
custenv_name>/vim/fortecgi
Portal
http://<fully qualified webserver outside hostname>:<port #>/cgi-bin/<
custenv_name>/vpu/fortecgi
Note: The port # is only required in the URL if it is set to a value other than port
80.
4.10 Webserver installation for CSR on AIX
The installation and configuration of the Customer Service Representative (CSR)
Web server is very similar to that of the front-end Webserver. This section
documents the changes necessary to install and configure the CSR Webserver.
All procedures that are not documented in the following sections are assumed to
be identical to those of the front-end Web server.
4.10.1 Configuring Apache
Modify the following parameters:
1. Change User to <custID> (e.g. hsruser).
2. Change Group to vfmadmin.
3. Change DocumentRoot to /custenv/<custenv_name>.
4. Uncomment the ServerName line and change ServerName to <hostname>.
80
S1 Consumer Suite for z/OS Installation Guide
5. Remove the existing ScriptAlias line and replace it with a new ScriptAlias
referencing the installed CSR applications:
ScriptAlias /cgi-bin/<custenv_name>/<appname>
“/custenv/<custenv_name>/forte/cgi-bin/”
For example:
ScriptAlias
ScriptAlias
ScriptAlias
ScriptAlias
/cgi-bin/cs5usr/comcsr
/cgi-bin/cs5usr/vbmcsr
/cgi-bin/cs5usr/vimcsr
/cgi-bin/cs5usr/vpucsr
“/custenv/cs5usr/forte/cgi-bin/”
“/custenv/cs5usr/forte/cgi-bin/”
“/custenv/cs5usr/forte/cgi-bin/”
“/custenv/cs5usr/forte/cgi-bin/”
4.10.2 Configuring the customer environment
1. Create a fortecgi.dat file in the /custenv/<custenv_name>/forte directory. It
should be owned by <custID>. The file should contain a line with the following
information for each Consumer Suite application that is installed:
<Service Object Name> <application listening port #*> <IP Address of
application server*> 4
For example:
COMCSRHTTPAccessSO
VBMCSRHTTPAccessSO
VIMCSRHTTPAccessSO
VRMCSRHTTPAccessSO
5001
5002
5003
5004
10.1.3.8
10.1.3.8
10.1.3.8
10.1.3.8
4
4
4
4
Note: The values with an asterisk (*) are defined in the database in the
cfgparmvalue table.
2. Change the ownership of the fortecgi.dat file to <custID>:vfmgroup:
chown <custID>:vfmgroup fortecgi.dat
3. Change the permissions of the fortecgi.dat file to 644:
chmod 644 fortecgi.dat
Note: If SeOS is to be installed, see Appendix C, “Installing SeOS” on page 97.
This is not a required step.
Chapter 4. S1 Consumer Banking installation
81
82
S1 Consumer Suite for z/OS Installation Guide
A
Appendix A.
Installation checklists
This appendix supplies the installation checklists for AIX, z/OS, DB2 V6, and
Forte.
© Copyright IBM Corp. 2002. All rights reserved.
83
RS/6000 AIX installation checklist
Table A-1 Checklist - RS/6000 AIX installation tasks
Install task
Complete the installation
worksheets
Create the required logical
volumes
Install Apache
Install JRE 1.3.0
Configure Apache
Tune Apache
Install DiffUtils-2.7
Install Revision Control
System (RCS) 5.7
Create a Customer
Environment using IA
Install WebEnterprise
Populate the Customer
Environment
Configure Customer
Environment
Start and stop Webserver
Install SeOS
Install IPSec
Verify the Webserver
Configuration
Configure Apache on CSR
Webserver
Configure Customer
Environment on CSR
Webserver
Verify configuration on CSR
Webserver
84
S1 Consumer Suite for z/OS Installation Guide
Completed
Comment
z/OS installation checklist
Table A-2 Checklist - z/OS installation tasks
Install task
Completed
Comment
Load Consumer Suite USS
Installation JCL from S1
Product Tape
Load Consumer Suite DB2
Installation JCL from S1
Product Tape
Load S1 Product Tape to HFS
environment
Set IA variables
Install the Forte Environment
Install IA
Install the Base Layer
Create the Repository
Add Repository Products
Adding Application
Repository products
Create Customer
Environment
Install Core Software
products
Install Core components,
Core patches, Override
products and Override
patches
Install DBAccess for BCI
Obtain sizing parameters
Set up the installation
environment
Customize the load JCL
Appendix A. Installation checklists
85
Install task
Load the configuration
parameters
Update the configuration
parameters
Start Consumer Suite
applications
86
S1 Consumer Suite for z/OS Installation Guide
Completed
Comment
DB2 V6 installation checklist
Table A-3 Checklist - DB2 V6 installation tasks
Install task
Completed
Comment
Check DB2 V6 install
Apply DB2 APAR PQ40338
Apply latest service level
Apply DB2 Service to Level
200008
Customize DB2
Define type of storage
management for DB2
STOGROUP
SMS- or Volume-defined
Review and document current
DB2 buffer pool allocations
Review and document current
DB2 log usage
Supply answers to questions for
use with spreadsheet in
determining DB2 table sizes
DB2 subsystem name for S1
products
Is this a new subsystem?
Define alias for S1 DB2
installation data sets
Define alias and usercatalog for
production DB2 tables
Define DBADM owner for DB2
objects
Define TSO ID for usage of
DBADM group
Supply answers to questions
needed to configure the DB2
tables
Appendix A. Installation checklists
87
Forte installation checklist
Table 4-7 Checklist - Forte installation tasks
Install Task
Complete the installation
worksheets
Create the required logical
volumes
Install Apache
Install JRE 1.3.0
Configure Apache
Tune Apache
Install DiffUtils-2.7
Install Revision Control
System (RCS) 5.7
Create a Customer
Environment using IA
Install WebEnterprise
Populate the Customer
Environment
Configure the Customer
Environment
Start and stop Webserver
Install SeOS
Install IPSec
Verify the Webserver
Configuration
Configure Apache on CSR
Webserver
88
S1 Consumer Suite for z/OS Installation Guide
Completed
Comment
B
Appendix B.
Forte installation on z/OS
This appendix describes how to set up and run the Forte application under the
z/OS USS environment.
© Copyright IBM Corp. 2002
89
Installing Forte
Installing Forte consists of the following tasks:
Checking the hardware and software requirements for the node
Using a platform-specific installation program to copy the Forte system
software directory structure and source files to your target node
Setting Forte environment variables
Configuring Forte system management processes for the target node
Forte provides platform-specific installation programs to install the application
and set environment variables on each kind of Forte node. The installation
programs and the Forte source files they require are included on the Forte
System Software CD. In the case of Forte for z/OS, they are included on IBM
3490 tape media.
The Forte DB2 interface is implemented using the IBM-supplied CLI/ODBC
interface. When any Forte application connects to DB2 using this interface, the
application provides a user ID, password, and database name (Communication
database defined in DDF).
The DB2 ODBC driver does not use the provided user ID and password to
validate the user connection or to name the default object qualifier for the
connection; instead, the default object qualifier is the z/OS user ID that started
the Forte Node manager. In other words, all Forte applications in a given Forte
environment connect to DB2 with the same user ID and security privileges. None
of the queries generated by Forte are qualified, so by default, the user ID used to
start the node manager will be the qualifier of the tables.
The Forte system software for the OS/390 platform comes on IBM 3490 tape
media, with standard labels, in IEBGENER format. The MVS user who unloads
the tape and runs the Forte installation script must be able to do the following:
Run MVS batch jobs
Login to the UNIX Services environment (using OMVS, telnet, or rlogin)
having read/write access to the Forte unload directory and the Forte
installation directory in the Hierarchical File System (HFS)
Edit and submit JCL from TSO
Execute basic commands in the OS/390 UNIX Services environment
90
S1 Consumer Suite for z/OS Installation Guide
Hardware and software requirements
The Forte system software Release 3 for OS/390 requires IBM OS/390 Release
Release 10 with Program Update Tape (PUT) maintenance level 9808 or later.
You must have an MVS installation at or above the maintenance level required.
To unload and install the Forte system software, you create two directories, in
different locations, in the z/OS UNIX HFS:
A temporary unloading directory, which can be deleted after the installation is
complete
A permanent installation directory that will be used by all users who connect
to the Forte partitions to execute Forte applications
Disk space
The unloading directory requires at least 90 MB of disk space for the HFS path
where you will unload the software, and the installation directory requires at least
110 MB of disk space for the Forte software.
Performing the installation
The Forte system software for the z/OS platform comes on IBM 3490 tape
media, with standard labels, in IEBGENER format. The tape contains a UNIX
tape archive (tar) file that contains the Forte System Software.
To install Forte, you must unload the tar file into a temporary directory in your
UNIX Hierarchical File System (HFS), run the UNIX tar command to expand the
file, and then run the UNIX installation shell script INSTALL.SH to build your
Forte distribution in a permanent location.
Depending on the installation options you choose, the INSTALL.SH program
does the following:
It requests certain environment information from you.
It creates the Forte installation directory, and copies the Forte directory
structure and source files to the installation directory.
It sets the Forte installation’s environment variables.
It configures the appropriate Forte system management services for the
installation.
The following steps describe how to install Forte on your z/OS node.
Appendix B. Forte installation on z/OS
91
Installing the Forte application on a z/OS node with USS
1. Log in to the UNIX Services environment using the user ID that will be used to
unload the Forte product tape and install the Forte software.
You can log in using either the TSO OMVS command, or by using an rlogin or
telnet client on another system.
2. Create a temporary directory for unloading the tape.
For example, to create /tmp/forte for unloading the tape, issue the UNIX
command:
mkdir /tmp/forte
3. Log on to TSO.
4. Create and submit an IEBGENER batch job to unload the tar file from the
3490 tape cartridge into the temporary unloading directory created in step 2.
Following is an example JCL file you can use to place the FORTE.TAR file
into the temporary HFS directory /tmp/forte:
//FRTEUNLD JOB (0000)
//*
//UNLOAD EXEC PGM=IEBGENER
//SYSIN DD DUMMY
//SYSPRINT DD SYSOUT=*
//SYSUT1 DD DSN=FORTE.TAR,DISP=OLD,
// UNIT=3490,
// VOL=SER=FOR3G0,
// LABEL=(1,SL),
// BLKSIZE=27920,LRECL=80,RECFM=FB
//SYSUT2 DD PATH='/tmp/forte/forte.tar',
// PATHOPTS=(OWRONLY,OCREAT,OEXCL),
// PATHMODE=(SIRWXU,SIRGRP,SIROTH)
5. Log in to the UNIX Services environment, again using the same user ID you
used to unload the Forte product tape.
6. Expand the tar file that you unloaded in step 4 .
If you unloaded the Forte tar file into /tmp/forte/forte.tar, use the following two
UNIX commands to complete this step:
cd /tmp/forte
tar xovf forte.tar
92
S1 Consumer Suite for z/OS Installation Guide
7. Run the Forte installation script from the ALL_UNIX directory by doing the
following:
cd ALL_UNIX
./INSTALL.SH
The installer will prompt you for the information required in the following steps.
8. Specify a Forte installation path.
The default target directory for your installation is /forte, which the
INSTALL.SH program will create for you. You can place the installation
wherever you wish, but all directories in your target installation path must
conform to the 8.3 naming convention, in which no name may exceed eight
characters, with a three-character extension. This convention guarantees the
directory will be portable. If you specify a non-existent directory path, the
INSTALL.SH program will create the path for you.
9. Choose an installation option.
– Install and set up the Central Server Node
This specifies that your node will support Forte server partitions and will
host Forte system management processes—the Environment Manager
and Repository Server—for your Forte environment. The Repository
Server can run elsewhere on other servers, but is installed here by default.
– Install and set up for Server Node
This specifies that your node will support Forte server partitions, but will
not be a central server node.
– Install Files only:
This specifies that you want to copy only the Forte directory structure and
source files to your node, and leave the node setup for later.
10.Confirm your installation options.
After you confirm your choices, the INSTALL.SH program checks that the
target disk is mounted and that it has enough free space for the installation. If
either of these checks fails, the installation aborts.
If all checks pass, the installation program creates the $FORTE_ROOT
directory, copies the installation files, installs the example applications, if
applicable, and configures the appropriate Forte system management
processes without requiring further input.
Appendix B. Forte installation on z/OS
93
11.Remove the temporary directory where you unloaded the tape:
If you unloaded the tape into /tmp/forte, you can remove the directory with the
command:
rm -rf /tmp/forte
What happens when you install Forte
Your Forte installation consists of three components:
FORTE_ROOT directory structure
The FORTE_ROOT directory structure is your Forte development software.
fortedef.sh file
The fortedef file is a shell script that defines the Forte configuration for your
node in a a series of environment variables, whose values INSTALL.SH sets
at installation.
forteboot.sh file
The forteboot file is a shell script that you use to start Forte. The script
contains commands to start Forte components in whatever configuration you
may define (INSTALL.SH provides a default configuration).
The following sections describe these components in further detail.
4.10.3 Understanding the FORTE_ROOT directory structure
Your FORTE_ROOT directory is the directory you define as the target directory
for your Forte installation. The INSTALL.SH program sets the location of your
FORTE_ROOT directory as the value of the FORTE_ROOT environment
variable in your fortedef file.
Do not change the structure of your FORTE_ROOT directory. The directory
structure within the FORTE_ROOT directory must remain intact in order for Forte
to function properly, as Forte relies on the path links within the structure to locate
and use Forte components.
The setup program installs the FORTE_ROOT structure wherever you choose,
and you can move the structure after installation wherever you choose, as long
as you keep the structure intact.
Note: Keep in mind if you move FORTE_ROOT, you must change the Forte
environment variables (in your FORTEDEF and FORTEBOOT files) defining the
location of files and directories in the structure.
94
S1 Consumer Suite for z/OS Installation Guide
The FORTE_ROOT/install directory contains much of the workings of Forte (that
is, what the system uses to run itself), organized into a group of subdirectories
containing such things as:
Executables
Forte dynamically linked libraries
B-tree seed repositories
Example programs (if you have installed them) \
Scripts
Diagnostic tools
Understanding the fortedef script
The fortedef shell script defines the Forte configuration for your node in a series
of environment variables, according to the information you pass to it at
installation time. It also defines the appropriate dynamically linked library path for
your platform.
You can use the fortedef script as a template for creating other fortedef scripts for
other Forte configurations, or for other users. To use your own fortedef scripts,
you can either source them manually before starting Forte, or reference them in
your .login file.
You can also include a fortedef script in your .profile file to automatically initialize
your UNIX Services environment for Forte access.
Understanding the forteboot script
The INSTALL.SH creates the forteboot script as an encapsulated way for you to
start Forte or any of its components. The script contains commands to start Forte
server processes.
The forteboot script starts Forte system management processes in accordance
with the setup options you chose during installation. For example, if you selected
the central server setup option, the forteboot script starts an environment
manager process and repository server process.
In its default configuration, the script sources the fortedef script to set your Forte
environment variables at Forte runtime, and defines command lines for starting
Forte development applications.
Appendix B. Forte installation on z/OS
95
You can modify the forteboot script to add whatever shell-based logic you like
(such as prompts for using different fortedef files), or different command lines for
starting various Forte applications. You can also use the forteboot script as a
template to make other forteboot scripts.
You can include the forteboot script in your /etc/rc file to automatically bring up
your Forte node manager and repository server whenever UNIX Services starts
running in your z/OS environment.
You should place the forteboot command at the end of your /etc/rc file, after the
startup of the TCP/IP INETD daemon. Because of the time it takes to start Forte
server processes, this portion of the startup can take a noticeable length of time.
96
S1 Consumer Suite for z/OS Installation Guide
C
Appendix C.
Installing SeOS
This appendix describes how to install SeOS. This is an optional step to be
performed during the configuration of a Customer Environment, when installing
WebServer for CSR.
© Copyright IBM Corp. 2002
97
Installing SeOS
If SeOS (a Computer Associates eTrust Access Control product) is to be
installed, install it according to the Computer Associates (CA) documentation.
This is not a required step and should not conflict with existing security
measures.
Configuring IPSec
IPSec may be configured on AIX, and the rules exported, run through an
AIX-to-390 configuration script, transferred to the 390 and imported on the 390.
This is only a suggested configuration for IPSec configuration. Existing security
should not be compromised.
Start smit
Select “Communications Applications and Services”
Select “TCP/IP”
Select “Configure IP Security (IPv4)”
Select “Basic IP Security Configuration”
Select “Add IP Security Tunnel”
Select “Use Manual Session Key Refresh Method (Manual Tunnel)”
This next selection depends on if there is a physical firewall between the AIX and the
390, or it is a direct Host-Host connection.
Select Authentication with AH, Encryption with ESP
Source Address is webserver inside IP address
Destination Address is application server inside IP address
If a physical firewall is between the AIX and the 390, the firewall IP must be added.
Encapsulation Mode = tunnel
Policy = encr/auth
Authentication Algorithm = HMAC_MD5
Encryption Algorithm = 3DES_CBC
Source Authentication Key, Source Encryption Key, Destination Authentication Key,
Destination Encryption Key are left blank, AIX will create these keys randomly
Set all SPI parameters to 500
Tunnel Lifetime = 0
Replay Prevention = no
Select OK to create the tunnel
Next, you must modify this tunnel to create the remaining keys and authentication
algorithms for export
Fill in blank authentication algorithms with HMAC_MD5 and select OK.
Select Export IP Security Tunnel and export this newly created tunnel definition
(ipsec_tun_manu.exp) to /usr/packages
Exit smit
Run aixtunnl.ksh script in the /usr/packages directory
Two files will be created in the /usr/packages directory. These are fwexpmctx.manual
and fwexppolicy. Transfer these two files to the 390 and import them into the 390 IPSec
tunnel.
# Page to display indicating the Administration Server is not installed
<files apadminred.html>
ErrorDocument 404 /9ainterim.htm
</files>
98
S1 Consumer Suite for z/OS Installation Guide
Example 4-4 S1INSTG.ABV.CONFIG.PARMS.R52.L10
# Database Parameter Initialization File
#######################################################################
# CMVC STRING
# @(#) vfmdbs/inst/data/default/vfmConfigParms.dat, csCBODatabase, csCommon_5.2 1.7 00/10/11
08:35:11 /home/beavis/webCMVC/vc/1/1/3/2/s.77
#######################################################################
# File................: vfmConfigParms.dat
# Create Date.........: 03/19/1999
# Author..............: David Brunner
# Copyright (C).......: Security First Technologies
# Usage...............: (See usage function)
#
# Description.........:
# This file contains VFM Configuration parameter definitions which are
# initialized/updated at initallation time. This file is passed to the
# updateConfigParms.ksh script, which reads each parameter and value
# and updates the value in the database.
#
# Installer Notes:
# Installers are instructed to make the necessary changes to the Value
# data below before running the updateConfigParms.ksh script.
#
# Developer Notes:
# The Type values below are fixed. To create a new type, support for
# the Type must be added to the updateConfigParms.ksh script.
#
# Field Definitions:
# Parameter Name - This is a human readable name for the parameter and
#
is the same name as defined in the Forte' Business model. This name
#
is ignored by the script, so it can be changed without impact.
# Type - This specifies the type or class of parameter. A new type
#
cannot be added without adding support for it in the
#
updateConfigParms.ksh script.
# DatabaseField - Specifies the exact name of the column in the database
#
table corresponding to the parameter. This value is used by the
#
script directly to build the appropriate SQL statement.
# Value - The exact value that will be assigned to the parameter.
#
Note: If the Value is non-numeric (i.e. text, date, time, etc.), it
#
must be specified with surrounding single quotes (i.e. 'My Text String').
# Usage - A user-specified comment which must start with # and continues to
#
the end of the line.
#
# General:
# Comment lines beginning with # are allowed. Comments at the end of a line are
# also allowed; the comment must begin with #. Because the script processing
# this file filters comments by truncating the rest of any line when it sees a #,
Appendix C. Installing SeOS
99
# you cannot include a # as part of any of the Data Fields. Blank lines are
# allowed as well.
#
# Modification History:
# Date
Who
Description
# ---------- ---------- ------------------------------------------# 03/18/1999 dbrunner
Script created
# 11/08/1999 seong
modified for maintanance
# 03/20/2000 seong
changed for split Banking component
# 06/02/2000 jbuyze
added CSR config values
# 09/19/2000 jbuyze
added session persistences config parameters
# 10/11/2000 jparks
added web encrypt key
#######################################################################
##################
# FI Parameters
##################
.
.<deleted the line>
.
.####################
# System Parameters
####################
# Parameter Name
Usage
# -------------#
#
#
#
#
DatabaseField
Value
----
-------------
-----
-----
CSR.Web.HasClient (Boolean) true OR false
This parameter flags whether the product is being run as a Forte server
application or a client application. The S1 standard is to deploy
applications as server applications which would REQUIRE this value to be
"false". This parameter should be set to "true" in a development database.
CSR.Web.HasClient
#
#
#
#
#
#
Type
System
value
'FALSE'
CSR.Web.ExternalServer (TextData)
Set to the fully qualified address of the external webserver.
For end-user applications, this is the address of the webserver machine, accessible
to the world-at-large.
For CSR applications, this is the address of the appserver machine, accessible to CSR
users already on the secure network.
CSR.Web.ExternalServer
System
value
# CSR.Web.InternalServer (TextData)
100
S1 Consumer Suite for z/OS Installation Guide
'http://aixrt1.devlab.norc.s1.com/'
CSR.Web.InternalServer
System
value
'http://aixrt1.devlab.norc.s1.com/'
value
'http://aixrt1.devlab.norc.s1.com/'
# CSR.Web.LogonInternalServer (TextData)
CSR.Web.LogonInternalServer
System
# CSR.Web.CGIPath (TextData)
CSR.Web.CGIPath
System
value
'cgi-bin/itso/comcsr/fortecgi'
# CSR.Web.LogonCGIPath (TextData)
CSR.Web.LogonCGIPath System
value
'cgi-bin/itso/comcsr/fortecgi'
# CSR.Web.ServiceName (TextData)
CSR.Web.ServiceName
System
value
'COMCSRHTTPAccessSO'
value
'COMCSRHTTPAccessSO'
# CSR.Web.LogonServiceName (TextData)
CSR.Web.LogonServiceName
#
#
#
#
System
CSR.Web.ServicePortRange (TextData)
The value of this parameter should match the port number generated for the application
on the appserver. Check CSR_port files in the /custenv/<Customer Environment Name>/forte
directory.
CSR.Web.ServicePortRange
System
value
'10.1.3.8:10002-10002'
# CSR.Web.AutoLogonTemplate (TextData)
# The auto-logon template.
CSR.Web.AutoLogonTemplate
System
value
'vfmtpl/support/csr_autologon.tmpl'
# CSR.Web.LogonTemplate (TextData)
# The logon template.
CSR.Web.LogonTemplate
System
value
'vfmtpl/support/logon.tmpl'
# CSR.Web.PostLogonTemplate (TextData)
# The post-logon template.
Appendix C. Installing SeOS
101
CSR.Web.PostLogonTemplate
System
value
'vfmtpl/support/base_index.tmpl'
# CSR.Web.UnexpectedErrorTemplate (TextData)
# The unexpected error template.
CSR.Web.UnexpectedErrorTemplate
System
'vfmtpl/support/unexpected_error.tmpl'
value
# CSR.Web.DocumentRoot (TextData)
# The document root
CSR.Web.DocumentRoot
System
value
'/custenv/itso'
# CSR.Web.CookieDomain (TextData)
# The value for this parameter should be set to be the same as the
# corresponding parameter in VBM4.0 in the html.rc file.
CSR.Web.CookieDomain
System
value
'.s1.com'
# CSR.Web.CookiePath (TextData)
# The value for this parameter should be set to be the same as the
# corresponding parameter in VBM4.0 in the html.rc file.
CSR.Web.CookiePath
#
#
#
#
#
value
'/cgi-bin'
CSR.Web.SessionTimeout (TextData)
years:months:days:hours:minutes:seconds:milliseconds
This parameter is optional and may not be specified. Forte has a default
timeout for all session set to 30 minutes. This allows a change in that
default value.
CSR.Web.SessionTimeout
#
#
#
#
System
System
value
'0:00:00:00:15:00:000'
CSR.Web.UseSecureCookies (Boolean) true OR false.
This parameter flags whether common CSR application will use secure webserver
(i.e., https) or not. This parameter should be set to "false" in a
development database.
CSR.Web.UseSecureCookies
System
value
'FALSE'
# VFM.Web.SessionPersist (Boolean) true OR false.
# This parameter defines whether the web enterprise sessions will be backed up to a file
102
S1 Consumer Suite for z/OS Installation Guide
# or not. This parameter should be set to "false" in a development database.
VFM.Web.SessionPersist
#
#
#
#
System
System
value
'/tmp'
VFM.Web.SessionPersistNumRoots (Integer)
This parameter defines how many file systems are used to store the persisted files.
This has been added mainly for os390 it will default to one in most cases.
This parameter has no effect if the VFM.Web.SessionPersist is set to FALSE.
VFM.Web.SessionPersistNumRoots
#
#
#
#
'false'
VFM.Web.SessionPersistRootDir (TextData)
This parameter defines where session backup files are stored if the VFM.Web.SessionPersist
configuration parameter is set to true. This parameter has no effect if the
VFM.Web.SessionPersist is set to FALSE.
VFM.Web.SessionPersistRootDir
#
#
#
#
value
System
value
'1'
VFM.Web.EncryptKey (TextData)
This parameter defines the key used by web enterprise to encrypt session ids
when they are sent across the network.
This parameter should be different for every installation.
VFM.Web.EncryptKey
System
value
'a;sldkfj'
# Database Parameter Initialization File
#######################################################################
# CMVC STRING
# @(#) a_rmbvsn/vrmdbs/inst/data/default/bvsnConfigParms.dat, csCBORelMgtDatabase,
ad_rmbvsn_5.1.3 1.1 00/11/20 16:55:47 /home/beavis/webCMVC/vc/1/6/3/5/s.71
#######################################################################
# File................: bvsnConfigParms.dat
# Create Date.........: 06/20/2000
# Author..............: cdaniell
# Copyright (C).......: Security First Technologies
# Usage...............: (See usage function)
#
# Description.........:
# This file contains Broadvision Configuration parameter definitions which are
# initialized/updated at initallation time. This file is passed to the
# updateConfigParms.ksh script, which reads each parameter and value
# and updates the value in the database.
#
# Installer Notes:
# Installers are instructed to make the necessary changes to the Value
# data below before running the updateConfigParms.ksh script.
# Once you make the necessary changes below, run the following
# command to update the parameters in the database:
#
updateConfigParms.ksh -d dbname -f vimConfigParms.dat
Appendix C. Installing SeOS
103
# To verify the current value of a System parameter in the database,
# run modifyCfg.ksh -d dbname -p ParameterName
#
# Developer Notes:
# The Type values below are fixed. To create a new type, support for
# the Type must be added to the updateConfigParms.ksh script.
#
# Field Definitions:
# Parameter Name - This is a human readable name for the parameter and
#
is the same name as defined in the Forte' Business model. This name
#
is ignored by the script (except for System parameters). For System
#
parameters, the name cannot be changed and represents the parameter
#
name exactly as stored in the CFGParmValue table.
# Type - This specifies the type or class of parameter. A new type
#
cannot be added without adding support for it in the
#
updateConfigParms.ksh script. Types currently supported:
#
FI
#
PortalFI
#
AlertFI
#
System
# DatabaseField - Specifies the exact name of the column in the database
#
table corresponding to the parameter. This value is used by the
#
script directly to build the appropriate SQL statement.
# Value - The exact value that will be assigned to the parameter.
#
Note: If the Value is non-numeric (i.e. text, date, time, etc.), it
#
must be specified with surrounding single quotes (i.e. 'My Text String').
# Usage - A user-specified comment which must start with # and continues to
#
the end of the line.
#
# General:
# Comment lines beginning with # are allowed. Comments at the end of a line are
# also allowed; the comment must begin with #. Because the script processing
# this file filters comments by truncating the rest of any line when it sees a #,
# you cannot include a # as part of any of the Data Fields. Blank lines are
# allowed as well.
#
# Modification History:
# Date
Who
Description
# ---------- ---------- ------------------------------------------# 06/20/2000 cdaniell
File created
# 06/21/2000 vlimdi
Relationship.JavaScript changed to RelationshipJavaScript
# 06/17/2000 cdaniell
Corrected various configuration parameters
# 07/31/2000 vlimdi
Adding VRM.RelationshipJavaScript.BVIM
# 10/23/2000 vlimdi
Adding VRM.Component.Disable and RelationshipTunneledDataAdapterSO
#######################################################################
####################
# System Parameters
####################
104
S1 Consumer Suite for z/OS Installation Guide
# Parameter Name
Usage
# ------------------
Type
----
DatabaseField
-------------
Value
-----
VRM.Relationship.BVHostName
System value 'kovu.devlab.norc.s1.com'
VRM.RelationshipJavaScript.BVObservation System value 'vrm_observe.jsp'
VRM.RelationshipJavaScript.FINews System value 'vrm_banknews.jsp'
VRM.RelationshipJavaScript.FILink System value 'vrm_banklinks.jsp'
VRM.RelationshipJavaScript.FIAd System value 'vrm_bankad.jsp'
VRM.RelationshipJavaScript.BVLogin System value
'http://%1/cgi-bin/bv1to1/inetcgi/vrm_login.jsp?username=%2&password=%3'
VRM.RelationshipJavaScript.CreateUser System value 'vrm_create_new_user.jsp'
VRM.RelationshipJavaScript.UpdateUserPrefs System value 'vrm_update_profile.jsp'
VRM.RelationshipJavaScript.DetermineUserGroup System value 'vrm_determine_usergroup.jsp'
VRM.RelationshipJavaScript.GetUserPreferences System value 'vrm_get_user_prefs.jsp'
VRM.RelationshipJavaScript.BVObservationParms System value
'&item=%1&type=%2&trgtinfo=%3&infopvdr=%4'
VRM.RelationshipJavaScript.BVReassignUser System value 'vrm_reassign_user.jsp'
VRM.RelationshipJavaScript.BVReassignUserParms System value '&oldUsername=%1&newUsername=%2'
VRM.RelationshipJavaScript.DeleteUser System value
'http://%1/cgi-bin/bvtest/bvtest/vrm_delete_user.jsp?username=%2&password=%3'
VRM.RelationshipJavaScript.BVIM
System value
'<interaction_manager>'
VRM.Component.Disable
System value
'false'
RelationshipTunneledDataAdapterSO
System value
'site/BVTunneledDataAdapter_CL0/BVAdapters_cl0-BVTunneledDataAdapterSO'
# Database Parameter Initialization File
#######################################################################
# CMVC STRING
# @(#) a_reutqt/vcpdbs/inst/data/default/reutqtConfigParms.dat, csCBOCustPortDatabase,
ad_reutqt_5.1.3, 0 1.1 00/11/20 17:08:21 /home/beavis/webCMVC/vc/1/6/3/6/s.18
#######################################################################
# File................: reutqtConfigParms.dat
# Create Date.........: 06/20/2000
# Author..............: cdaniell
# Copyright (C).......: Security First Technologies
# Usage...............: (See usage function)
#
# Description.........:
# This file contains Reuters Adapters Configuration parameter definitions which are
# initialized/updated at initallation time. This file is passed to the
# updateConfigParms.ksh script, which reads each parameter and value
# and updates the value in the database.
#
# Installer Notes:
# Installers are instructed to make the necessary changes to the Value
Appendix C. Installing SeOS
105
# data below before running the updateConfigParms.ksh script.
# Once you make the necessary changes below, run the following
# command to update the parameters in the database:
#
updateConfigParms.ksh -d dbname -f vimConfigParms.dat
# To verify the current value of a System parameter in the database,
# run modifyCfg.ksh -d dbname -p ParameterName
#
# Developer Notes:
# The Type values below are fixed. To create a new type, support for
# the Type must be added to the updateConfigParms.ksh script.
#
# Field Definitions:
# Parameter Name - This is a human readable name for the parameter and
#
is the same name as defined in the Forte' Business model. This name
#
is ignored by the script (except for System parameters). For System
#
parameters, the name cannot be changed and represents the parameter
#
name exactly as stored in the CFGParmValue table.
# Type - This specifies the type or class of parameter. A new type
#
cannot be added without adding support for it in the
#
updateConfigParms.ksh script. Types currently supported:
#
FI
#
PortalFI
#
AlertFI
#
System
# DatabaseField - Specifies the exact name of the column in the database
#
table corresponding to the parameter. This value is used by the
#
script directly to build the appropriate SQL statement.
# Value - The exact value that will be assigned to the parameter.
#
Note: If the Value is non-numeric (i.e. text, date, time, etc.), it
#
must be specified with surrounding single quotes (i.e. 'My Text String').
# Usage - A user-specified comment which must start with # and continues to
#
the end of the line.
#
# General:
# Comment lines beginning with # are allowed. Comments at the end of a line are
# also allowed; the comment must begin with #. Because the script processing
# this file filters comments by truncating the rest of any line when it sees a #,
# you cannot include a # as part of any of the Data Fields. Blank lines are
# allowed as well.
#
# Modification History:
# Date
Who
Description
# ---------- ---------- ------------------------------------------# 06/20/2000 cdaniell
File created
# 06/21/2000 vlimdi
Customportfolio changed to CustomPortfolio
#######################################################################
####################
106
S1 Consumer Suite for z/OS Installation Guide
# System Parameters
####################
# Parameter Name
Usage
# ------------------
Type
----
VCP.CustomPortfolio.SymbolLookupTail System
VCP.CustomPortfolio.Base
System
VCP.CustomPortfolio.DelayedQuote
System
VCP.CustomPortfolio.Host
System
VCP.CustomPortfolio.LookupBySymbol
System
VCP.CustomPortfolio.PartnerId
System
VCP.CustomPortfolio.RealTimeQuote
System
VCP.CustomPortfolio.SymbolLookup
System
VCP.CustomPortfolio.SymbolLookupMaxResults
DatabaseField
-------------
value
value
value
value
value
value
value
value
System
Value
-----
'&ANYWHERE=Y&COUNT='
'http://data.moneynet.com/data'
'rawquotes/quote.asp?SYMBOL='
'data.moneynet.com'
'rawlookup/lookup.asp?SYMBOL='
'SECURITY'
'rawquotes/rtquote.asp?SYMBOL='
'rawlookup/lookup.asp?NAME='
value
'1000'
Appendix C. Installing SeOS
107
108
S1 Consumer Suite for z/OS Installation Guide
Related publications
The publications listed in this section are considered particularly suitable for a
more detailed discussion of the topics covered in this redbook.
IBM Redbooks
For information on ordering these publications, see “How to get IBM Redbooks”
on page 110.
DB2 UDB Server for OS/390 and z/OS Version 7 Presentation Guide,
SG24-6121
DB2 for z/OS and OS/390 Version 7 Using the Utilities Suite, SG24-6289
Other resources
These publications are also relevant as further information sources:
DB2 PM for OS/390 V7 Installation and Customization, SC27-0860
DB2 UDB for OS/390 and z/OS Utility Guide and Reference, SC26-9945
DB2 UDB for OS/390 and z/OS V7 Administration Guide, SC26-9931
DB2 for z/OS and OS/390 Version 7 Installation Guide, SG26-9936
DB2 for z/OS and OS/390 Version 7 Command Reference, SG26-9934
DB2 for z/OS Version 7 Program Directory, GI10-8182
Information on the XML interfaces on the Web:
http://w3.pdc.ibm.com/avitraining/AVI51home/xmlapi_ug/index.html/
S1 Corp publications (for more information, refer to the S1 Web site at
http://www.qup.com/Products/ibs.htm/):
Consumer Suite Installation Guide, Version 5.X
S1 Consumer Banking User Interface Customization Guide
S1 Consumer Banking Program Reference
S1 Template Object Model document
RTAA Approach
RTAA Programmer’s Guide
© Copyright IBM Corp. 2002
109
Adapter Interface documentation
VFM Tunneling Approach Document
VFM Tunneling Functional Description
DB2Access Install Guide
Referenced Web sites
These Web sites are also relevant as further information sources:
http://www.qup.com/Products/ibs.htm/ S1 Web site
http://www.ibm.com/ IBM Web site
How to get IBM Redbooks
Search for additional Redbooks or redpieces, view, download, or order hardcopy
from the Redbooks Web site:
ibm.com/redbooks
Also download additional materials (code samples or diskette/CD-ROM images)
from this Redbooks site.
Redpieces are Redbooks in progress; not all Redbooks become redpieces and
sometimes just a few chapters will be published this way. The intent is to get the
information out much quicker than the formal publishing process allows.
IBM Redbooks collections
Redbooks are also available on CD-ROMs. Click the CD-ROMs button on the
Redbooks Web site for information about all the CD-ROMs offered, as well as
updates and formats.
110
S1 Consumer Suite for z/OS Installation Guide
Index
Numerics
3270 3
DB2 Restart 26
other DB2 features 28
DB2 online reorganization 27
DCOM 3
A
Application tier 3
availability features 16
B
F
features of DB2 UDB for z/OS
backup and recovery 24
features of the zSeries platform 14
benefits of the zSeries platform 10
advantages of running applications on zSeries
18
availability always on 11
DB2 features that benefit S1 Consumer Suite
23
innovative technology = leading server performance 12
powered by z/OS 12
powerful architecture 10
safe and secure 11
zSeries benefits for ERP solutions 22
zSeries hardware benefits 15
installation structure
five-layer approach
base layer 47
Customer Environments layer 47
operating system 46
platform layer 47
repository Layer 47
installing SeOS 97
C
local and remote data storage
local 36
mixed implementations 38
remote 37
Consumer Banking
local and remote data storage 36
Consumer Banking configuration
categories 38
system parameters 38
Consumer Banking customization
localization 38
Consumer Suite 5
CORBA 3
custom adapters
batch 40
real-time 39
customization
basic options 38
D
I
L
R
Redbooks Web site 110
Contact us x
Relationship Management 5
components and features
7
product architecture 7
reliability features 15
running S1 Consumer Banking on zSeries
availability 19
concurrent workload 20
scalability 19
security 21
Data Access tier 3
DB2 features that benefit S1 Consumer Suite
© Copyright IBM Corp. 2002. All rights reserved.
111
S
S1 Consumer Banking installation
installing the base layer 56
installing the customer environment layer 57
installing the operating system layer -- z/OS 50
installing the platform layer 56
installing the repository layer 57
preparing for the installation 48
starting Consumer Suite applications on USS
73
structure
five-layer approach 46
Webserver installation for CSR on AIX 80
Webserver installation on AIX 74
S1 Consumer Suite overview 1
product architecture 2
products 3
The S1 Consumer Suite of products
Consumer Banking 4
Consumer Investments 5
Relationship Management 5
security
application 38
network 38
operational 39
T
third-party providers 6
tunneling
restrictions on tunneled data 41
XML encoding 41
TUXEDO 3
U
user levels 5
Z
zSeries platform overview 9
112
S1 Consumer Suite for z/OS Installation Guide
S1 Consumer Suite for z/OS Installation Guide
(0.2”spine)
0.17”<->0.473”
90<->249 pages
Back cover
®
S1 Consumer Suite
for z/OS
Installation Guide
S1 Consumer Suite
architecture and
configuration on the
zSeries platform
Planning and
configuration
methodology
Step-by-step
installation
Today’s financial institutions face a demanding and competitive
environment. The S1 Corporation has produced a widely
accepted suite of products, which includes banking,
investments, and relationship management.
This IBM Redbook discusses the S1 Banking product, which has
been deployed on the zSeries platform. It is written for technical
professionals involved in planning and installing the banking
product. The information in this guide is for Version 5.3 of S1
Consumer Banking.
We begin by explaining the S1 Consumer Suite environment as
it exists today. The emphasis is on the S1 Consumer Banking
module as developed for the zSeries architecture.
Next, we introduce zSeries architecture and discuss the
advantages of using the zSeries and z/OS as a proven Web
server.
Then we discuss planning for the installation of S1 Consumer
Banking on z/OS and UNIX System Services, as well as using AIX
as a CSR Web server.
Finally, we describe in detail the installation and customization
steps of the S1 Banking module on z/OS. A step-by-step
procedure outlines the customization of the S1 Banking module
under UNIX System Services. A Web server installation is
described on the AIX platform. A Web server installation is also
described for CSR.
INTERNATIONAL
TECHNICAL
SUPPORT
ORGANIZATION
BUILDING TECHNICAL
INFORMATION BASED ON
PRACTICAL EXPERIENCE
IBM Redbooks are developed by
the IBM International Technical
Support Organization. Experts
from IBM, Customers and
Partners from around the world
create timely technical
information based on realistic
scenarios. Specific
recommendations are provided
to help you implement IT
solutions more effectively in
your environment.
For more information:
ibm.com/redbooks
SG24-6288-00
ISBN 0738423211