/


Text
®
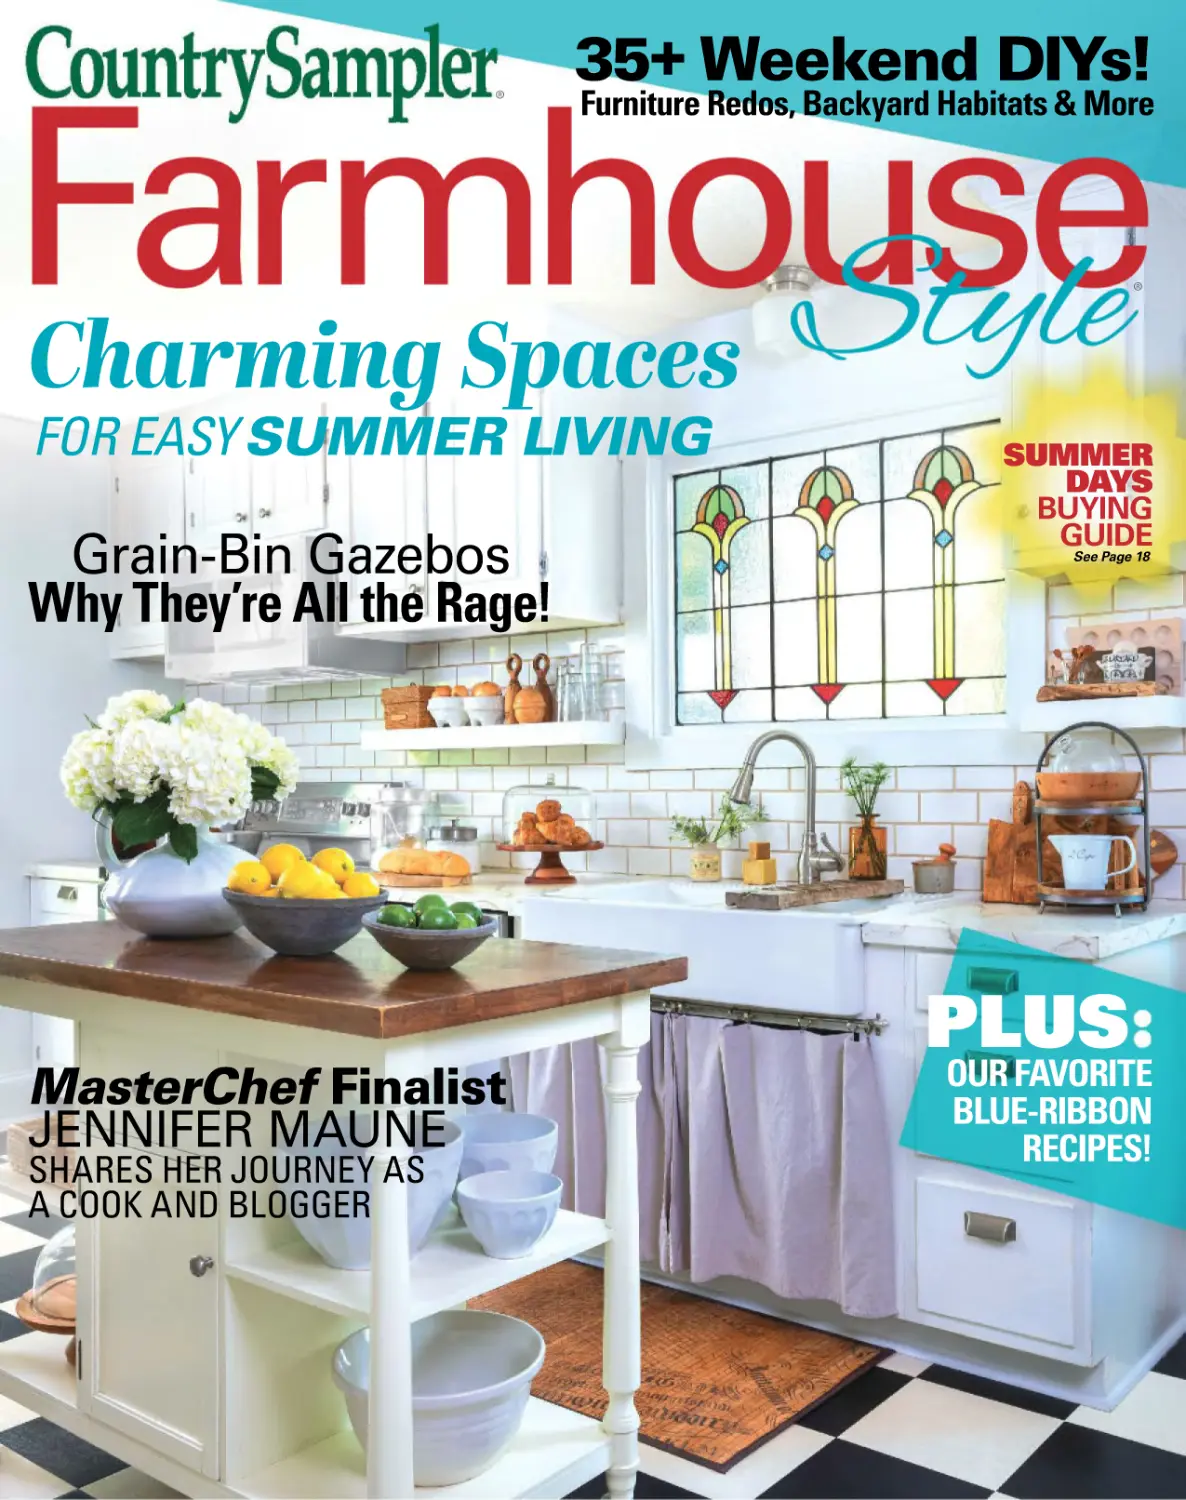
35+ Weekend DIYs!
Furniture Redos, Backyard Habitats & More
®
Charming Spaces
FOR EASY SUMMER LIVING
Grain-Bin Gazebos
Why They’re All the Rage!
MasterChef Finalist
JENNIFER MAUNE
SHARES HER JOURNEY AS
A COOK AND BLOGGER
SUMMER
DAYS
BUYING
GUIDE
See Page 18
PLUS
OUR FAVORITE
BLUE-RIBBON
RECIPES!
A fresh take on farmhouse decor
Summer
Breezes
Bring warm
savings
SPEND $50
& SAVE $10!
Use Code: C24CHDSR *
5GCUQPCN&ÅEQT
All the summer trends
coming your way.
4QQO$[4QQO
À}yÜiÀÃ>`ÀiÌ
your home this Summer.
retail.colhousedesigns.com | 800.777.1442
IExpires 06/24/24. Cannot combine with any other offers; in-stock items only.
)GVVKPI)TCRJKE
Let your tee do the talking.
Shop exclusive shirt designs.
Farmhouse
Style
SUMMER 2024 VOL. 7, NO. 2
EDITOR Susan Wagner
MANAGING EDITOR Lisa Sloan
COPY EDITOR Jessica Moorman
STYLIST/DESIGNER Nancy Borsodi
ART DIRECTOR Brad Snow
PUBLISHING SERVICES MANAGER Michelle Harger
SENIOR GRAPHIC DESIGNER Nick Pierce
SENIOR PRODUCTION ARTIST Edith Teegarden
PRODUCTION ASSISTANT Brianna Moore
DIRECTOR OF DIGITAL IMAGING Scott Campbell
PHOTOGRAPHY SUPERVISOR Tammy Christian
PHOTOGRAPHY Scott Campbell, Luke Myers
ADVERTISING
DIRECTOR OF PARTNERSHIPS & PUBLIC RELATIONS
Michelle Thorpe
michelle_thorpe@annies-publishing.com
ADVERTISING COORDINATOR
Courtney Shoda
courtney_shoda@annies-publishing.com
ACCOUNT MANAGERS
Molly Beals, molly_beals@annies-publishing.com
Kim Gard, kim_gard@annies-publishing.com
Responsibility for quality and fulfillment of advertised products lies
with the advertisers. Though Country Sampler Farmhouse Style will not
knowingly publish fraudulent information, we are not liable for any
damages arising from the purchase or use of any products. Should
there be any consumer complaints regarding goods purchased from
our advertisers, we would appreciate written notification to that
effect to aid our screening. Contact us at Country Sampler Farmhouse
Style, Customer Service, PO Box 8561, Big Sandy, TX 75755-8561.
EDITORIAL OFFICES
306 East Parr Rd., Berne, IN 46711
260-589-4000; FAX: 260-589-8093
GROUP CHIEF EXECUTIVE OFFICER Tyler Kitt
CHIEF TRANSFORMATION OFFICER Melissa Kelly
CHIEF DESIGN OFFICER Laura Scott
EDITORIAL DIRECTOR Susan Wagner
PUBLISHING SERVICES DIRECTOR Brenda Gallmeyer
FINANCE DIRECTOR / TREASURER Jack Sloan
DESIGNER SUBMISSIONS
If you have a project you’d like for us to consider in a
future issue, please send a description of the project and
photos to DesignerSubmissions@CountrySampler.com.
NEED HELP WITH YOUR SUBSCRIPTION?
SUBSCRIPTION CUSTOMER SERVICE
800-829-0425
ONLINE SUBSCRIPTION CUSTOMER SERVICE
go to FarmhouseStyleMag.com
To order more copies of this magazine or
any other Country Sampler publications, go to
SamplerMagazines.com or call 800-829-0425.
RETAIL STORES: If you are not presently being
provided copies of this magazine by your area
newsstand wholesaler, visit us at AnniesWSL.com.
Editor’s
Note
When Your
Summers Are
Filled With
Fun and Creativity
One of my favorite songs that puts me in a lazy-days-of-summer mood is the
classic from Porgy and Bess sung by Ella Fitzgerald, which begins: “Summertime,
and the livin’ is easy. Fish are jumpin’ and the cotton is high.” I realize it represents
a bygone time, but the slow drawl of it just reminds me of relaxing on a front
porch swing, slowly rocking back and forth and enjoying a faint breeze. Birds
are chirping and kids are laughing down the street. I smile and wave at the
neighbor as she works in her garden. I can smell summer’s perfume and feel its
warmth. Summer days like this are beyond compare. In this issue of Farmhouse
Style, we showcase three homes that exude that simple summer atmosphere.
Two of the three even feature delightfully inviting porch swings! You’ll see how
the homeowners mingle rustic natural surfaces with found objects that tell an
enticing story and sun-filled rooms that will inspire your own spaces. Summer
is also a great time to get a little dirty, whether that means digging in a flower
bed, exploring a shady creek, or picking up a paintbrush. Our DIY section has
several fun projects that you can complete by yourself or with kids, such as
arranging a wildflower bouquet in an old straw hat or building a bee hotel to help
our pollinator friends. There are even some ideas on how to turn typical travel
souvenirs into memorable decorative accents. We have other features that will
have you paging through this issue on your front porch, including the story of how
a mom of six took her home-cooking skills to a new level and landed as a finalist
on Fox’s “MasterChef.” And what would the season be without blue-ribbon dishes
from the county fair? The recipes in this issue are all winners that you’ll want to
try out on your family. Revel in these long days, taking inspiration from another
one of my favorite lines, which truly expresses how I aim to spend my summer
days: “Live in the sunshine, Swim the sea, Drink the wild air.” —Ralph Waldo Emerson
Susan Wagner
Drop me a line and tell me your
favorite thing in this issue!
Susan_Wagner@Annies-Publishing.com
On the Cover
PHOTOGR APHY BY GRIDLE Y + GR AVES.
NOW GET MORE FARMHOUSE STYLE!
We’re bringing you more tips and ideas between each issue with
our social media sites and online blog.
VISIT US AT:
FarmhouseStyleMag.com
80
LIVING THE LIFE
6 Milk Glass Magic
This opaque glassware, commonly found in
shades of white, is an abundant, affordable
and versatile collectible.
12 Coastal Vibes
Seaside color schemes, organic elements
and rustic accents infuse farmhouse style
with a laid-back, beachy appeal.
22 The Evolution of a Cook ...
and Her Kitchen
Blogger Jennifer Maune went from a home
cook to a professional chef and finalist
on “MasterChef,” and her kitchen has
undergone several transformations as well.
28 Grain Bin Gazebos
Upgrade your outdoor living space by
installing a backyard getaway that recalls
traditional agrarian architecture.
34 Sharing a Heritage of
Homesteading
Teach kids the value of being self-sufficient
by providing hands-on experiences in
gardening, raising livestock, cooking from
scratch and more.
12
68
2
Country Sampler Farmhouse Style
34
42
FRESH FARM-STYLE
HOMES
42 Layering on the Charm
A neutral palette and collected finds define
this lake-community retreat in South
Carolina all year round.
56 Poetry of Place
Years after falling in love with a North
Carolina cottage, a creative couple make it
their own, crafting a home that tells their
story one room at a time.
68 Understated Elegance
See how a couple built the Lowcountryinfluenced home of their dreams in coastal
Florida, with decor that reflects the style’s
gracious, casual feel.
ALSO
4 Just a Click Away
DO-IT-YOURSELF
FARMHOUSE
Check out these farmhouse finds from
around the web.
80 Bright & Breezy
Centerpieces
Colorful flowers, garden produce and
vintage finds help make ordinary table
settings into seasonal highlights.
86 Summer Souvenirs
Hold on to vacation memories by crafting
personalized travel keepsakes that will
instantly transport you to that special place
and time.
90 Furniture Flips
18 Summer Days
Buying Guide
Preview new products for your home
and garden.
108 Blue Ribbon Recipes
Whether you’re headed to the fair, a
potluck or your dining room, these dishes
will earn you plenty of praise and maybe
even a prize.
Try these easy designer techniques to
give fresh style and personality to old
furnishings.
98 Projects for a PollinatorFriendly Garden
Incorporate features that attract beneficial
creatures and create a thriving outdoor
habitat that’s good for you and the planet.
102 6 Clever Container
Makeovers
Think outside the box, bottle or basket to
refashion everyday containers as novel
home accessories.
102
108
Country Sampler Farmhouse Style (ISSN 2641-0125, USPS 22210) is published four times a year (January, April, July and October) by Annie’s, LLC, 306 East Parr Road, Berne, IN 46711. Periodicals postage paid
at Berne, IN and additional mailing offices. Subscriptions: In the U.S. and its possessions, $37.99 for four issues, $65.99 for eight issues; Canada add $10 per year in U.S. funds (includes GST—IPM #40014183).
Single issues $12.99, in Canada $14.99. For subscription inquiries, address changes, and adjustments, write to: Country Sampler Farmhouse Style, PO Box 8561, Big Sandy, TX 75755-8561, visit our customer service
site at FarmhouseStyleMag.com/customercare, or call 800-829-0425. When writing about subscriptions, please enclose your mailing label. For address changes, please send us your old address with ZIP code and
your new address. Allow six weeks for change to become effective. If the Postal Service alerts us that your magazine is undeliverable, we have no further obligation unless we receive a corrected address within
two years.
All photography in this issue is copyrighted and is the property of Country Sampler Farmhouse Style and Annie’s. No reproductions may be made under any circumstances. This copyright is actively
protected. Copyright © 2024 Annie’s. All rights reserved. Reproduction in whole or in part of any text, photograph or illustration without written permission from the publisher is strictly prohibited.
We make portions of our customer list available to carefully screened companies that offer products and services we believe you may enjoy. If you do not want to receive those offers and/or
information, please let us know by contacting us at PO Box 8561, Big Sandy, TX 75755-8561.
Distributed internationally by Comag Marketing Group.
POSTMASTER: Send address changes to: Country Sampler Farmhouse Style, PO Box 8561, Big Sandy, TX 75755-8561.
PRINTED IN THE U.S.A.
Summer 2024 3
JUST A
AWAY
Farmhouse Finds from the Web
SWECKER FARM
NATIONAL FARMERS MARKET
DIRECTORY
Tammy Swecker shares her insights on the
beauty of the country lifestyle through her
Instagram page @sweckerfarm. Her posts
and reels convey the joy of farm living
through glimpses inside her cozy farmhouse;
the antics of the farm’s cattle, sheep and
chickens; and the ever-changing rural
landscape outside her home.
If you’re looking for a place to shop for farmfresh fruits and veggies, flowers and other
locally produced items, either near your home
or in areas you’re visiting, check out the
National Farmers Market Directory. Simply
enter a ZIP code or city and state to generate
information on farmers markets in the area,
including the location, schedule, and types of
products for sale.
www.instagram.com/sweckerfarm
https://nfmd.org
MY CREATIVE DAYS
Featured Farmhouse Style blogger Lindsay
Eidahl of My Creative Days not only has
a blog and YouTube channel full of great
content but also a podcast! On the My
Creative Days podcast, Lindsay offers advice
on home decor, DIY projects and furniture
flipping for both fun and profit. Tune in for
episodes on “Choosing the Perfect Paint
Finish,” “How to Shop a Yard Sale Like a Pro”
and other helpful topics.
https://learn.mycreativedays.com/
podcasts/my-creative-days
DIY SUBSCRIPTION BOX
Want the fun of creating handmade home
goods without the stress of coming up
with an idea and gathering materials?
Treat yourself to a subscription to Annie’s
Farmhouse Style Kit Club. About every four
weeks, you’ll receive a package with all the
components and easy-to-follow instructions
to make a new project. Past projects have
included garlands, wreaths and wall decor
like this 3D sign.
Find unique, uncommon and heirloom flower
varieties for your garden at Floret. You may
recognize the name from the documentary
series “Growing Floret,” which is available to
watch on streaming services. The family-run
flower farm based in Washington state offers
a curated assortment of seeds, tools and
supplies to help you grow beautiful flowers.
Founder Erin Benzakein has written several
books, and the company also offers online
instructional workshops.
www.annieskitclubs.com/products/
farmhouse-style
https://shop.floretflowers.com
THE FIRST POPSICLE WAS INVENTED BY 11-YEAR-OLD FRANK EPPERSON
IN THE WINTER OF 1905. FRANK ACCIDENTALLY LEFT A CUP OF FRUIT-FLAVORED
SODA, WITH THE STIRRING STICK STILL IN IT, ON HIS PORCH OVERNIGHT.
HE INITIALLY CALLED THE FROZEN TREAT THE “EPSICLE.”
4
Country Sampler Farmhouse Style
(www.popsicle.com)
TENNESSEE
Memphis
ARKANSAS
Tunica
Helena
MISSISSIPPI
Greenville
Explore the Lower
Mississippi River
with the Leader in U.S. Cruising
Mississippi R
ive
r
LOUISIANA
Houmas
House
Vicksburg
Natchez
St. Francisville
Baton Rouge
Oak New Orleans
Alley
Delight your senses on this amazing journey
along the Lower Mississippi River. From the
French Quarter to Beale Street, be treated to the
ƂPGUVNQECNƃCXQTUKPENWFKPIDCTDGSWGDQWTDQP
and the blues. Enjoy the simple pleasures and
WPKSWGVTGCUWTGUHQWPFKPVJGUOCNNVQYPUCNQPI
VJGYC[CU[QWETWKUGKPRWTGEQOHQTVCDQCTFQWT
ƃGGVQHPGY#OGTKECPTKXGTDQCVU
Your Lower Mississippi River Cruise Includes:
9-day/8-night exploration
RQTVUQHECNNYKVJIWKFGFGZEWTUKQP
options at each
#NNQPDQCTFOGCNUCPFQWTUKIPCVWTG
evening cocktail hour
Full enrichment package with guest
speakers and nightly entertainment
Call today
888-458-5979
to request a
free Cruise Guide
#NNVKRUCPFITCVWKVKGU
Small Ship Cruising Done Perfectly®
This compact vignette demonstrates the
decorative versatility of milk glass. A bud vase,
pedestal bowl and candleholder—all bearing
different patterns—are used as originally
intended, while a serving dish is mounted on
the wall to show off its pretty underside.
This opaque glassware, commonly found in
shades of white, is an abundant, affordable and
versatile collectible.
Written by JESSICA MOORMAN.
I
t’s hard to avoid falling in love with milk glass. Named for its milky
appearance, this opaque glassware looks at home almost anywhere.
Its neutral hue and simple yet elegant patterns allow it to coordinate
with nearly any decor style, season or holiday. It was produced in
myriad functional forms that can still be used today. Its best feature, though,
might be its accessibility. Milk glass is easy to find and inexpensive to acquire.
With origins in 16th-century Venetian opal glass, the milk glass we are
familiar with today became popular during the Victorian era as an affordable
alternative to porcelain. It was most often white but was sometimes rendered in
pink, blue, green, yellow, brown and black. To produce these durable yet decorative pieces, molten glass containing additives for opaque coloring was blown into
shape or pressed into molds before firing.
Much of the milk glass that now fills shelves and tables at antiques stores, flea
markets and thrift shops was produced when U.S. demand skyrocketed after
World War II. From the 1950s until the 1970s, American manufacturers such as
Westmoreland, Fenton and Anchor Hocking mass-produced a multitude of forms
and patterns. Today, only a few American companies produce this type of glassware. One current standout, Mosser Glass in Cambridge, Ohio (www.mosserglass.
com), manufactures hand-pressed glass products in several colors, including a
familiar milky white.
When gathering milk glass for your home, choose the period, forms and
patterns that appeal to you. Victorian pieces will be harder to find, and thus more
expensive. Designs from the 1950s onward are readily available and often cost less
than $15. If authenticity is important to you, look for smooth surface texture, even
coloring and distinct patterns. Otherwise, simply look for glass in good condition,
with no chips, cracks or permanent stains.
Enjoy your milk glass collection as functional wares or versatile display pieces.
Many common forms, such as vases and tableware, can be used as intended and
are replaceable if broken. Show off milk glass in groupings that highlight differences in size, shape or pattern. Natural light and dark backgrounds will let these
nostalgic pieces truly shine.
Summer 2024 7
Shauna Oberg of Satori Design for
Living has more than 50 pieces of
milk glass in her collection, most of
which she picked up for less than
$5 at thrift shops and garage sales.
DESIGNED AND PHOTOGR APHED BY SHAUNA OBERG
OF SATORIDESIGNFORLIVING.COM.
Groupings of milk glass
offer the most interest
when you combine pieces
in different sizes, textures
and subtle variations
in color, says collector
Shauna Oberg.
DESIGNED AND PHOTOGR APHED
BY SHAUNA OBERG OF
SATORIDESIGNFORLIVING.COM.
A dark background allows the
elegant details of white milk glass
to pop. Dawn Smith of Revel and
Glitter painted this wall niche in
her living room Sherwin-Williams’
Tricorn Black, making it a dramatic
display spot for her collection.
DESIGNED AND PHOTOGR APHED BY DAWN SMITH OF
RE VEL ANDGLIT TER.COM.
Milk glass lamps old or new
can add timeless beauty to a
living area or bedroom. Vintage
examples can be rewired and
outfitted with a new shade to
make them more suitable for
everyday use.
Summer 2024 9
Bud vases are one of the easiest to find and
least expensive milk glass forms. These
floral trade pieces can hold cut flowers or
taper candles, but they also look lovely piled
casually in a wood bowl, as Rachel Harper
from The Ponds Farmhouse shows here.
DESIGNED AND PHOTOGR APHED BY R ACHEL HARPER OF
THEPONDSFARMHOUSE.COM.
Fenton Art Glass debuted
the hobnail pattern in
1939, and by 1952, milk
glass hobnail was its
flagship pattern.
Fresh summer blooms and
fruits appear even more
vibrant when gathered
in white hobnail pattern
vessels for a quick table
centerpiece. Fabiana
of Ciao Newport Beach
heightens her display
with two lemon cypress
topiaries planted in large
milk glass goblets, perfect
for a sunny dining spot.
DESIGNED AND PHOTOGR APHED BY
FABIANA OF CIAONE WPORTBE ACH.
BLOGSPOT.COM.
10
Country Sampler Farmhouse Style
The Essential
Knit Dress
WAS
$64.99
NOW
19.99
$
USE CODE WWC4I4
Raspberry Polka Dot
+ ++++
EASY-CARE
SOFT KNIT
Raspberry
Pretty Blossom
Raspberry
Paradise Blue
Polka Dot
“Pretty and very
comfortable. A lot of
room for movement.
I love this dress.”
Convenient
Paradise Blue
Pretty Blossom
-Mary, Online Customer
SIDE
POCKETS
Paradise Blue
Deep Teal
Graphic Bloom
Save Up To
45
ESSENTIAL KNIT
DRESS. Easy, relaxed
fit with wide scoopneck
and empire waist.
Full button front.
Front pleating. Side
pockets. Cotton/poly.
Machine wash.
Average:
5-30335-1156
48" length.
Sizes S-7X
Petite: 5-30337-1156
46" length.
Sizes S-6X
WAS 59.99 64.99
Waterfall
Polka Dot
Waterfall Pretty
Blossom
Black Multi Garden
Radiant Purple
Polka Dot
Radiant Purple
Blossom
White Multi Garden
Navy Polka Dot
NOW 19.99
Navy Pretty Blossom
$
Petite
Navy Pretty
Blossom
Navy
Sizing
Equivalents:
S(12),
M(14-16),
L(18-20),
1X(22-24),
2X(26-28),
3X(30-32),
4X(34-36),
5X(38-40),
6X(42-44),
7X(46-48).
Petite
Navy
Polka Dot
Navy Multi Garden
Black Polka Dot
FREE SHIPPING
Black Pretty Blossom
Black
USE CODE WWC4I4 SEE DETAILS BELOW
The TRUSTED EXPERTS in SIZES 12W TO 44W
Item #
5-30335-1156
Color
Essential Knit Dress
Item name
Size
Qty
Price
Total
Charge my
(circle one):
Card# ______________________________________
Use code WWC4I4 to get items 5-30335-1156, 5-30337-1156 for
$19.99 and get free shipping on your order. Free shipping applies to
standard shipping only, not including any additional shipping surcharges. Shipping upgrades additional. Does not apply to clearance.
Discount is priced as marked in checkout. Not applicable to gift cards
or prior purchases. May not be redeemed for cash or combined with
other offers. Returns credited at discounted price. Only applies to instock merchandise. Expires 6/15/2024. Order by mail: Woman Within,
500 S. Mesa Hills Drive, El Paso, TX 79912
Merchandise total
Shipping & handling FREE
For express delivery add $11.99
Sales Tax: We collect sales tax where legally
required. These states include: CA, FL, IN, KY,
NY, RI, TX, and WA, but are subject to change
at any time.
Total
Your satisfaction is guaranteed!
Signature ____________________________________
Card expires (month/year) _______________________
Name _______________________________________
Address _____________________________________
City/State/Zip ________________________________
Phone ______________________________________
Email _______________________________________
READY TO SAVE? HERE’S HOW TO SHOP ONLINE!
1 Go to:
WOMANWITHIN.COM
2 Find at the top of the page
3 Type in your item number
CLICK CATALOG TO ORDER FROM CATALOG
Call 1.800.248.2000 Now... or go to WOMANWITHIN.COM
4 Hit SEARCH
ACT FAST! SPECIAL INTRODUCTORY OFFER PLUS FREE SHIPPING!
1 IN
COMFORT
& VALUE
#
Coastal
Seaside color schemes, organic
elements and rustic accents
infuse farmhouse style with a
laid-back, beachy appeal.
Written by LISA SLOAN.
This room shows off
several staples of coastal style,
including watery hues on both the upholstery
fabric and painted drop-leaf coffee table, a natural
woven jute rug, and artwork depicting fishing knots.
PHOTOGR APH COURTESY OF MAINECOT TAGE.COM.
Delicate Daisy Napkins
Cotton gingham napkins with a
delightful daisy edge add a floral
flourish to any summer party.
Set of four, $65.
Ceramic
Berry
Colander
W W W.MERIMERI.COM
With a vibrant
floral print inside
and out, this
pint-size ceramic
colander is both
functional and
pretty. $19.
W W W.NATUR ALLIFE.COM
Preview new products for your home and garden.
Floral Salad Servers
Carved from durable sapele wood, these
flower-shaped servers are perfect for
dishing up summer salads. $55.
W W W.FOOD52.COM
Rustic Bread Box
Store bread in style with this punched-tin style metal bread box,
available in three colors, including this Weathered Zinc finish. $105.95.
W W W.ALLYSONSPL ACE.COM
18
Country Sampler Farmhouse Style
Paint at Home Kit
Have some “Cotton Pickin’ Fun” with an Art
to Go paint kit. Canvas, paints, brushes and
step by step instructions are included. $39.
W W W.THEPAINTEDPETAL.COM
Mixed Berries Tea Towel
Adorned with a colorful array of summer berries, this
tea towel adds seasonal flair to the kitchen. $8.50.
W W W.STONEWALLKITCHEN.COM
Handwoven Market Bag
Ideal for trips to the farmers market, these
sturdy baskets handwoven from pallet
banding are made by artisans in Myanmar.
Multiple sizes and colors, starting at $42.
W W W.YGNCOLLECTIVE.COM
All-American
Tins
What would you stow
in this trio of handled
tin boxes adorned with
vintage-style patterns
in red, white and blue?
Set of three, $96.
W W W.ANTIQUEFARMHOUSE.COM
in America...
Summer 2024 19
Lavender Pot
Handcrafted in Virginia, this hand-painted stoneware
flower pot features a delicate lavender design. $42.
HT TPS://EMERSONCREEKPOT TERY.COM
Garden
Gloves
These pretty
garden gloves
made from
environmentally
friendly materials
blend function,
sustainability and
style. $23.99.
W W W.WATSONGLOVES.COM
From Land...
Butterfly Buckets
A set of lightly distressed metal
buckets feature a whimsical
cutout butterfly design and
could be filled with florals or
serve as lanterns with the
addition of flameless candles.
Set of two, $15.89.
HT TPS://RETAIL.COLHOUSEDESIGNS.COM
Haute Hose
Garden hoses can be both beautiful and functional,
as proven by this one, available in a range of
stylish colors, including Rusty Rosé. Coordinating
nozzles and spray guns are sold separately. $129.
W W W.G ARDENGLORY.COM/US
20
Country Sampler Farmhouse Style
Coastal Candles
Scalloped Shade
Stackable Aegean Candlescape
sets are inspired by natural
shapes from the ocean floor.
Available in multiple colors and
scents. Set of two, $65.
This scalloped raffia shade comes in multiple
sizes and different trim colors, including soft
pink and navy blue. Starting at $85.
W W W.THESHADESHOP.COM
W W W.SKEEMSHOP.COM
Buoy Pillows
Shaped like anchored floats but fashioned from cotton,
these pillows exude nautical charm. Set of three, $59.99.
W W W.VINTAGECROSSROADS.COM
Starfish
Utensil
Holder
With its stamped
starfish design
and distressed
finish, this utensil
holder fits right
into a coastal
farmhouse
kitchen. $14.99.
W W W.DJFARMHOUSE
COLLECTIONS.COM
to Sea...
Summer 2024 21
Jennifer Maune says she
learned a lot from her
time on “MasterChef,”
calling it “exhilarating and
fun” despite the pressure
of cooking within a tight
timeline and being away
from her family for eight
weeks. Being mentored
by renowned chefs and
restaurateurs was a
highlight, she says, as was
forging relationships with
the other contestants.
PHOTOGR APH COURTESY OF FOX.
The Evolution of a
Blogger and ‘MasterChef’ finalist Jennifer Maune has
grown her passion for home cooking and hospitality
into a career, transforming her kitchen along the way.
Photographed by JENNIFER MAUNE. Written by LISA SLOAN.
22
Country Sampler Farmhouse Style
and Her
Through the years, Jennifer
has remodeled her kitchen
twice. Find all the details of
her remodeling projects at
https://jennifermaune.com/
kitchen-remodel-ideas.
ABOVE: When Jennifer first
moved into her home, the kitchen
featured cream-colored cabinets with
a brown glaze, beige tiles and brown granite
countertops. The color scheme and L-shaped layout made
the room feel closed off and dark.
ABOVE RIGHT: The first remodel eliminated the L-shaped
peninsula and opened up the room, while fresh paint on
the walls and existing cabinetry, along with white polished
quartz countertops and porcelain backsplash tile, brightened
the space even further. A custom hood replaced the
awkward bookcase above the range, and a larger island gave
Jennifer the extra cooking space she needed.
RIGHT: Added in 2022, the new red oak island features a mix
of whitewash and coffee stain to match the kitchen floors.
Coordinating trim on the range hood brings that wood tone
higher on the wall for a unified look. In addition to replacing
the island in this phase of the kitchen remodel, a small wall
was removed to make way for a larger refrigerator.
24
Country Sampler Farmhouse Style
RIGHT: For the second kitchen update,
Jennifer went with a slightly sleeker look,
replacing the tiled backsplash with slabs of
quartz for a more seamless design. She also
swapped the glass-door display cabinet
for white oak open shelving and added
custom-made feet to the base cabinets.
BELOW: For the first remodel, Jennifer
chose a white porcelain backsplash tile
with a curvy arabesque lantern shape to
introduce pattern while maintaining the
neutral palette.
W
hile Jennifer Maune was expecting her
sixth child, the Arkansas mom and
avid home cook decided to chase her
culinary dreams and enroll in cooking
school. She never imagined that just three years later, she’d
be a contestant on the 13th season of “MasterChef,” Fox’s
popular competitive cooking show featuring Gordon
Ramsay. Representing her home region, the South, she made
it all the way to the final round.
Jennifer’s earliest kitchen memories are of helping her
grandma make Thanksgiving dressing and macaroni and
cheese. “My maternal grandmother was an amazing Southern cook, and my love for cooking came from her,” she says.
As an adult, Jennifer relished preparing traditional
Southern favorites for her family and friends and began
sharing some of her recipes on the eponymous home decor,
recipe and lifestyle blog she started in 2017. But it wasn’t
until 2020, when she was 40 years old, that she enrolled in
a culinary program through a local college, taking classes at
night or when her kids, whose ages now range from 3 to 14,
were in school. She earned degrees in pastry arts and
culinary arts and later completed advanced certificates at
Le Cordon Bleu Paris.
As Jennifer has expanded her cooking skills, the kitchen
in her Little Rock home has also undergone its own transformation—with most of the changes highlighted in posts on
her blog. The first and most extensive remodel was in 2018,
and Jennifer was involved with every aspect of the project,
overseeing changes to everything but two walls of existing
cabinets and the appliances.
Summer 2024 25
A 2022 plumbing leak necessitated further modifications,
including rebuilding the island, which allowed for the
addition of chef-approved elements such as a larger farmhouse sink, warming drawer and built-in spice storage.
“We’ve completely remodeled it from top to bottom—every
piece of trim, every door. I think there’s one light fixture left
that we haven’t changed,” Jennifer says.
For now, she is content with the way the room looks and
functions. “If we were to build and I got to design my dream
kitchen, I would go a step further with column refrigerators
on either side of the range, but for our current house and
floor plan, it’s great. A busy family can always use a bigger
kitchen, but I love how ours has evolved over time.”
Fortunately, the kitchen has plenty of space for the family
to gather and cook together. Jennifer invites her children to
participate in food preparation, just as her grandma did.
“We might be a little messy, but messy is fun,” she observes.
While she didn’t take top prize on “MasterChef,” Jennifer
still considers herself a winner. In the months since the
show’s finale, she has been busy planning her future in the
food industry and has recently released a line of seasonings,
with a cookbook, licensed kitchenware and a farm-to-table
restaurant also in the works. In addition, she has been
cooking for private dinners and special culinary events. “I’m
super-proud of my run on the show and to represent female
chefs,” she says. “It shows you can be a mom and still chase
your dreams, and that it’s never too late to start.”
Follow Jennifer on her blog at https://jennifermaune.com or on
Instagram at www.instagram.com/jennifermaune. Catch her
season of “MasterChef,” which originally aired on FOX, streaming
on Hulu.
ABOVE: Jennifer, seen here with her two
daughters, enjoys sharing her love of cooking
with her children. Her eldest daughter also
aspires to compete on a cooking show.
RIGHT: Jennifer has developed a line of
seasonings to naturally enhance the flavor
of your favorite dishes, based on her own
recipes. Sold as a set of three, they include
All-Purpose, Lemon Pepper and Garlic Pepper
varieties. Learn more at www.instagram.
com/heritageseasoning.
Want to win a set of your own?
Jennifer and Heritage Seasoning are partnering
with Farmhouse Style to give away three sets. Enter
for your chance to win at FarmhouseStyleMag.com/
HeritageSeasoningGiveaway.
26
Country Sampler Farmhouse Style
SHRIMP AND GRITS
Serves 6
Jennifer’s fresh spin on a Southern classic combines Gouda cheese
grits, seasoned shrimp and fresh vegetables.
INGREDIENTS
For Grits
3 cups chicken stock
½ teaspoon salt
1 cup white corn grits
2 tablespoons unsalted butter
1 cup shredded Gouda cheese
For Shrimp
1 pound shrimp, peeled and deveined
Salt
Pepper
2 tablespoons unsalted butter
2 ears fresh corn, kernels cut from the cob
1 bunch asparagus, trimmed and cut into 2" pieces
2 tablespoons olive oil
1 yellow onion, diced
1 cup chicken stock
1 tablespoon All-Purpose Heritage Seasoning
2 teaspoons minced garlic
1 red bell pepper, diced
INSTRUCTIONS
1. Bring 3 cups chicken stock and salt to a boil in a medium
pot. Whisk in corn grits and reduce heat to low. Cook for
30 minutes, stirring occasionally, until liquid is absorbed.
2. Remove pot from heat and cover to keep warm.
3. Stir in 2 tablespoons butter and shredded Gouda cheese
before serving.
4. Rinse peeled and deveined shrimp and pat dry. Season with
salt and pepper. Set aside.
5. Heat a large sauté pan over medium-high heat. Melt
2 tablespoons butter and cook corn for 10 minutes, stirring
frequently. Add asparagus and sauté for another 2 to 3 minutes.
Remove from pan and set aside.
6. Add olive oil and onion to the sauté pan and cook until
softened and translucent.
7. Stir in chicken stock and All-Purpose Heritage Seasoning.
8. Add garlic and red bell pepper and sauté for 2 minutes.
9. Add shrimp, turning until they are pink, about 3 to 4 minutes.
10. Stir in corn and asparagus and remove pan from heat.
11. Portion grits and top with the shrimp and vegetable mixture.
PHOTOGR APH AND RECIPE BY JENNIFER MAUNE, W W W.JENNIFERMAUNE.COM.
Summer 2024 27
Upgrade your outdoor living space
by installing a backyard getaway
that recalls agrarian architecture
and provides a stylish spot for
relaxing and socializing.
Written by CHERYL HACKETT.
W
hen traveling your favorite country
roads, you’ll likely encounter a landscape dotted with farmhouses, barns,
silos and grain bins. These iconic
structures have long inspired elements in farmhouse decorating, but in recent years, the galvanized-metal grain bin
has found new purpose—as a backyard gazebo!
Whether newly manufactured by specialists or repurposed by architectural salvage artisans, grain bin gazebos
offer endless forms and functions. Today, the corrugated
steel structures house sitting areas, kitchens, dining areas,
bars, firepits and spas. Some grain bin enthusiasts are even
taking this trend a step further and venturing to create she
sheds and cozy cottages.
Authentically Aged
Some examples of these backyard structures are constructed
from salvaged grain bins, giving them new life. “Grain bin
gazebos are popular because they epitomize upcycling,”
observes Mary Adam of Quakertown, Pennsylvania, who
bought hers on Facebook Marketplace. “Our grain bin was
built on a local farm for use in a wedding. The owner
sourced the materials to build the gazebo directly from his
family farm.”
Mary likes to host small parties in her gazebo as well as
use it as a quiet afternoon reading spot. “It adds a rustic
element to our summer landscape, and it is functional and
beautiful,” she says.
28
Country Sampler Farmhouse Style
Randy and Denise Doshier of Loomis, California, worked with Josh Bell of Georgia-based Orchard Hill
Bins to construct this grain bin gazebo on their property. The gazebo complements the barn where they
host events through their business, R&D Love Barn. The design has two side wings and a roomy interior,
making it perfect for dinner parties and other small gatherings. A large dining table provides ample seating
inside, while pub tables crafted from repurposed whiskey barrels are ideal for enjoying cocktails.
PHOTOGR APHED BY WANDER LOVE PHOTOGR APHY, WANDERLOVECAPTURES.COM, COURTESY OF R ANDY AND DENISE DOSHIER OF INSTAGR AM.COM/
RDLOVEBARN.
DIY Flair
If you’d like to see
more of Mary’s
home, check out the
Spring 2024 issue
of Country Sampler.
You can also follow
her on Instagram at
www.instagram.com/
upperbucksfarmhouse.
Mary Adam’s gazebo was crafted by a local farmer and features seating made from
vintage milk cans fitted with tractor seats. It was designed for entertaining but also serves
as Mary’s reading retreat. “It’s shady inside and always catches a nice breeze,” she says.
PHOTOGR APHED AND ST YLED BY GRIDLE Y + GR AVES.
If you’re an adventurous DIYer, you
might construct your own grain bin
gazebo from salvaged pieces. Blogger
Rhonda Kaiser of Southern Home and
Farm in Katy, Texas, bought an antique
grain silo in Illinois and reassembled it
on her family’s property. Finding new
uses for agricultural mainstays represents nostalgia for Rhonda. “I love the
look of farm buildings as well as their
purpose and history,” she says. “I knew
one would be the perfect addition
flanking our garden, greenhouse and
vintage farmhouse table. I wanted a
space for entertaining and lounging
throughout the seasons.”
Because she primarily uses her
gazebo for entertaining, Rhonda
removed side panels for ventilation and
installed fans inside for cooling. She
appointed the interior with vintage
treasures, including a chandelier she
had made from a hog feeder she found
at the Round Top Antiques Fair.
Artistic Renderings
If you can’t tackle such a project
yourself, there are many skilled
artisans who have a passion for the
past. One such individual is Zack King,
owner of Hinged Bins, based in
Hartford, Kentucky. Zack transforms
decommissioned grain bins into
one-of-a-kind gazebos, studios, kennels
and cottages.
Zack connects with farmhouse style
aficionados mainly through Etsy.
“Grain bin gazebos hold tremendous
appeal for those passionate about
recycling structures,” he says. “The
round geometries are eye-catching, and
when they are modified as new structures, they have their own character.
The potential for reuse is limitless.”
One of Zack King’s designs built from
salvaged bin parts and new lumber, this
grain bin gazebo has low walls and a raised
wood floor.
PHOTOGR APHED BY Z ACK KING OF HINGEDBINS.COM.
30
Country Sampler Farmhouse Style
Alfresco Decor
Furnishing an open-air gazebo that encounters sunlight, wind, rain and dust calls for careful
orchestration. Whether your gazebo will be used as a peaceful retreat, a culinary hub or multipurpose
venue, function should always follow form. Blogger Rhonda Kaiser shows off her grain bin gazebo on
her popular blog, Southern Home and Farm. Her gazebo is decorated with metal gliders and chairs that
withstand weather, and she incorporates pillows and throw blankets to make it cozier. “Entertaining is
a big part of our time spent on the farm. Our gazebo is the perfect outdoor entertaining area,” she says.
“We installed a big-screen TV just under the entryway. This is our favorite place to watch football and
movies.” Here are more of Rhonda’s tips for decorating a grain bin gazebo:
❖ Find Flexible Furniture.
Sunlight fades surfaces. Wind
topples furniture, resulting in
chips. Source vintage metal
and wicker outdoor furniture
that require little maintenance.
Look for versatile items, such
as expandable tables, benches
for seating and dining areas,
and stools that double as
accent tables.
Durable metal furniture with a chippy finish matches the rustic vibe of
Rhonda Kaiser’s grain bin gazebo.
PHOTOGR APHED BY RHONDA K AISER OF SOUTHERNHOME ANDFARM.COM.
❖ Think Tough Textiles.
Rainwater wreaks havoc on
upholstery, pillows, tablecloths
and area rugs. Invest in quality
outdoor fabrics that resist
moisture and mildew. Pick
colorfast materials that you can
spot clean or machine wash.
❖ Light the Way. Gazebos are a delightful
gathering space on a summer evening. Consider
safety and use solar lights to illuminate paths
leading to the structure. Amplify ambience inside
with battery-operated chandeliers, sconces,
lanterns and string lights designed for outdoor use.
❖ Pick Portable Props. Shop for trays, baskets
and buckets to easily transport food, beverages
and dinnerware from the house to the gazebo.
❖ Go for Greenery. To create a seamless
connection between the gazebo and your garden
or landscaping, liven the space with easy-care
container plantings, potted trees and freshly cut
flower bouquets.
The chandelier in Rhonda’s gazebo includes part of a metal
hog feeder—an apt choice for the agrarian structure.
PHOTOGR APHED BY RHONDA K AISER OF SOUTHERNHOME ANDFARM.COM.
Summer 2024 31
Creative Kits
If you favor sleek new steel, invest in a
grain bin gazebo kit. Some advantages of
these kits over a salvaged grain bin are
that they are designed specifically to be
gazebos and are built to be long-lasting
and easy care. Available in a variety of
sizes, ranging from 12 feet to 36 feet or
more in diameter, the kits are made to be
installed on a concrete foundation.
Grain Bin Gazebos, based in Durango,
Iowa, sells kits to homeowners across the
United States. Several years ago, Grain
Bin Gazebos cofounder Robin Pfotenhauer collaborated with a grain bin
manufacturer to design the assemblyfriendly kits. Robin’s enthusiasm for the
structures is contagious. “My favorite
thing is that they are maintenance free.
I like to call them an adult erector set. If
you can handle a nut and bolt, you can
install these gazebos,” Robin says. “Grain
bin gazebos have a flexible aesthetic and
blend in with farmhouse, industrial and
modern designs.”
With so many options, you might find
this summer’s plans include enhancing
your backyard with a feature that captures the essence of farming heritage.
Resources
GRAIN BIN GAZEBOS
www.grainbingazebos.com
When childhood sweethearts Amber and Brad Kober purchased their dream farm in
Sparta, Michigan, in 2015, Amber envisioned someday having a wedding venue there.
In 2020, they did just that. While their son works alongside Brad, a fifth-generation
farmer, Amber and her daughters run the Whippoorwill Farm Venue. Local tradespeople
helped them add this charming grain bin gazebo, and it has been a popular spot for
gatherings, including the weddings of the two oldest of the Kobers’ four daughters.
PHOTOGR APHED BY AMBER KOBER OF WHIPPOORWILLFARMVENUE.COM.
32
Country Sampler Farmhouse Style
HINGED BINS
www.hingedbins.com
ORCHARD HILL BINS
www.facebook.com/
bellgrainbingazebo
Friendly chickens are ideal for teaching children
about livestock. Kids can learn to handle the
animals, provide food and water, clean their
living area and keep them safe from predators.
FROM THE CHILDREN’S HERITAGE SOURCEBOOK , PHOTOGR APHED BY
SAR A PRINCE, COURTESY OF RIZ ZOLIUSA .COM.
Sharing a Heritage of
Teach kids the value of being self-sufficient by providing
hands-on experiences in gardening, raising livestock, cooking
from scratch and more.
Written by JESSICA MOORMAN.
I
n this age of screens, social media and sameday delivery, it’s more important than ever for
kids to learn basic skills that will put them on
the path to a confident, productive life. Homesteaders past and present have provided children with a
real-life education in self-sufficiency, often through daily
hands-on tasks. While much of this old-fashioned knowhow isn’t necessary today, practicing homesteading-related
skills like gardening, cooking, or animal care can provide
untold benefits to the youngsters in your life.
Getting kids interested in learning practical skills
shouldn’t be very hard. Teri Page, author of the book Family
Homesteading and blogger at Homestead Honey (https://
homestead-honey.com), notes that homesteading pursuits
are particularly appealing to young people. “Homesteading
is an inherently creative process that cultivates a sense of
wonder, a connection to nature, and sense of place and
seasonality,” she says. “Children both embody and crave
these qualities and thrive when given the opportunity to
participate in meaningful work.”
You can provide kids with skill-building opportunities
no matter where you live or your current level of knowledge.
Teri notes that homesteading encompasses so many activities that you’re sure to find an entry point that meets your
family’s lifestyle and budget. “My advice is to pick something that is appealing to all of you to take baby steps toward
growing your skill set,” she says.
Gaining experience with gardening
can be as simple as a basil plant and a
watering can for a young child. Most kids
thrive when they are allowed to test their
physical abilities.
PHOTOGR APHED BY WHITNE Y BINGHAM OF INSTAGR AM.COM /
BINGHAMFARM.
Summer 2024 35
When starting out, allow kids to observe or participate in
whatever way suits their age and interest, advises Colleen
Hinds, a previous child and adolescent therapist who offers
immersive farm-based experiences at Frenchie Farm in
Illinois (www.thefrenchiefarm.com). “The key is giving them
the exposure while also providing the space and time for
children to choose their passions for themselves,” she says.
You can plan hands-on activities at home or join an
established program at a local farm, park or museum. Read
on for easy ideas that can be personalized for your family.
their food and instill responsibility and sustainability in our
future generation,” she says.
Bring kids along as you start a garden from scratch or
designate a special growing spot for kids in an established
garden. Help them find engaging tasks that match their
personalities. For example, teach a young butterfly enthusiast how to plant pollinator-friendly flowers among the
vegetables, or show a boisterous child which plants are weeds
and hand over the hoe. Let kids see, touch and taste as they
make a personal investment in their food system.
Grow a Garden
Care for Animals
From starting seeds to harvesting vegetables, gardening will
allow kids to learn where their food comes from—and get
their hands dirty. Whitney Bingham of Bingham Farm in
North Carolina (www.instagram.com/binghamfarm) runs a
homeschool farm co-op that includes hands-on, naturebased activities for children. “Gardening is a wonderful way
to teach science, promote healthy eating, connect kids with
Find a way for kids to interact with animals, whether it’s
farm livestock or a family pet. “Getting kids involved in
animal husbandry is a great way to promote responsibility,
help foster empathy for other living things, and teach time
management and self-sufficiency—not to mention it’s great
physical activity!” says Whitney of Bingham Farm.
Consider smaller livestock such as chickens or rabbits,
which are manageable even in a small backyard and can
provide both food for your table and fertilizer for your
garden. Depending on their age, kids can handle feeding
and watering, cleaning up, grooming, training and bonding
with the animals. Even very young children can toss treats
or collect eggs.
BELOW: Livestock (and pets!)
depend on their caretakers, and
youngsters can learn to scoop and
distribute rations on a schedule.
PHOTOGR APHED BY WHITNE Y BINGHAM OF
INSTAGR AM.COM / BINGHAMFARM.
ABOVE: A garden offers so many learning and
growth opportunities. “Little ones experience the
sensory benefits of exploring in the dirt, older kiddos
continue to gain expertise in gardening skills, and
picky eaters expand their palates simply due to their
personal investment in the garden process,” says
Colleen Hinds of Frenchie Farm.
PHOTOGR APHED BY COLLEEN HINDS OF THEFRENCHIEFARM.COM.
36
Country Sampler Farmhouse Style
ABOVE: Gathering
chicken eggs is a fun
activity that almost
any child will enjoy.
PHOTOGR APHED BY WHITNE Y
BINGHAM OF INSTAGR AM.COM /
BINGHAMFARM.
Back-to-Roots
SKILL STARTERS
Ready to teach the young people in your life some old-fashioned
skills? A great place to start is The Children’s Heritage Sourcebook:
100+ Back-to-Roots Activities for Kids & Teens (Welcome Books,
2023). Written by Ashley Moore, Lauren Malloy and Emma Rollin
Moore, this book is a year-round resource packed with ideas and
inspiration to engage kids in the art of self-sufficiency. Try one of
these kid-friendly projects, which are described in step-by-step
detail in the book.
❑ Grow microgreens. Sprout edible seedlings in your kitchen
no matter the season. In a bowl filled with moist potting soil,
kids can plant seeds for kale, clover, pea, radish or sunflower
and then watch them grow. Once the seedlings are a few
inches tall, carefully cut across the stems with scissors and let
kids taste their harvest.
❑ Raise a few chicks. Gather supplies to set up a brooder box that
will be a cozy home for chicks for their first weeks of
life. Show kids how to add bedding, food, water and a
heat source to the box. Help them learn how to handle
the fragile babies and keep their temporary home
clean and dry. Once the chicks are old enough to move
outside, you can continue raising them for eggs or
meat or transfer ownership to a ready farmer friend.
Creative kids will love
making rolled candles using dyed
beeswax sheets and cotton wicks.
FROM THE CHILDREN’S HERITAGE SOURCEBOOK ,
PHOTOGR APHED BY SAR A PRINCE, COURTESY OF
RIZ ZOLIUSA.COM.
COURTESY OF RIZ ZOLIUSA.COM
❑ Bake sourdough biscuits. Prepare delicious, flaky biscuits that
can be topped with jam, honey or butter. You’ll need to make a
sourdough starter first or borrow a bit from a sourdough-loving
friend. Kids can stir the dough, roll it flat and cut out circles with a
drinking glass before you bake the biscuits in a cast-iron pan.
❑ Sew a washcloth. Use new material or pieces of old
textiles to create a handmade washcloth. Kids can pair
up squares cut from terry cloth material and cotton
or flannel fabric and then sew around the perimeter
using a needle and thread or a sewing machine.
Simple stitches such as the running stitch, whipstitch
and blanket stitch are ideal for beginning sewers.
❑ Roll beeswax candles. Rolled candles are a fun
introduction to candle making. You’ll need beeswax
sheets, candle wicks and scissors. Kids can measure
and cut the sheets and wicks to size and then roll the
beeswax around the wick to form a candle. Discuss
the importance of caution and supervision before you
light the candle and enjoy the glow.
Summer 2024 37
RIGHT: Helping adults complete building and maintenance
tasks will pave the way for children to take the lead on
future projects. Young kids can hold materials for an adult,
while older kids can gain hands-on experience.
PHOTOGR APHED BY WHITNE Y BINGHAM OF INSTAGR AM.COM / BINGHAMFARM.
BELOW: Let children stand on chairs or sit on the counter to
help prepare dishes that showcase whole, fresh ingredients.
A tasty option like deviled eggs allows kids to practice
multiple skills as they make a connection with their food.
PHOTOGR APHED BY WHITNE Y BINGHAM OF INSTAGR AM.COM / BINGHAMFARM.
Sew, Craft or Build
Cook a Meal
As with gardening, learning to cook from scratch lays the
foundation for a lifetime of healthy eating. “Teaching
children that real food does not come in a package or box
from a young age is a beautiful gift,” notes Colleen of
Frenchie Farm. “Cooking from scratch while utilizing whole
food ingredients not only teaches children the importance
and value of nutrient-dense foods for our health and wellbeing, but it also teaches them long-forgotten skills that can
be passed down through generations to come.”
Kids will love all the sensory experiences—and mess—of
the kitchen. Start with simple recipes for baked goods such
as bread or biscuits. Try seasonal dishes that feature fresh
produce that kids have harvested from the garden or selected
at a farmers market. Allow them to measure, stir, scoop,
pour and taste. As older kids grow into competent cooks, let
them choose and prepare a meal all on their own.
38
Country Sampler Farmhouse Style
Look for other activities that kids can tackle, both indoors
and out. Teach a bit of hand-sewing and kids will be able to
repair their own clothing and home textiles. The ability to
knit or crochet can result in useful goods like warm blankets
and winter apparel.
Pick up a set of small hand tools so kids can work
alongside adults on basic construction or maintenance
projects. “Building can provide unique opportunities for
children to learn math by incorporating numbers, measurements and angles while building,” explains Whitney of
Bingham Farm.
Have Fun!
As you embark on this adventure, remember that every kid
is different and will have varying levels of interest and
attention span. Don’t be afraid to change course when
necessary. Practicing new skills will be challenging at times,
but it should be rewarding overall. “Make learning fun and
hands-on, and you will cultivate a true love for learning that
will last them a lifetime,” Whitney says.
There’s Gnome Place
L i ke H o m e !
Hand-applied
glitter accents
Handcrafted and
painted by hand
Hand-numbered
Certificate
of Authenticity
Measures approximately
4½" high
Adorable cat gnome makes a ‘tweet’ new friend!
This paws-itively charming debut — ONLY from Hamilton — brings
friendship and a little gnomish luck and protection to your home with a
fabulous feline twist. Introducing “There’s Gnome Place Like Home.”
A wealth of magical details!
Based on an original design by artist Blake Jensen, every whimsical detail is
handcrafted and hand-painted — from the hand-applied glitter accents,
faux gems and etched fur to the cat’s bluebird buddy with its own
birdhouse and nest full of sparkling eggs.
Send no money now for your FREE PREVIEW.
Send no money now. Simply mail the coupon below and, upon acceptance,
we’ll send you “There’s Gnome Place Like Home” to preview FREE for 30
days. Then it’s yours for the issue price of $39.99 (plus $9.99 shipping and
service, and sales tax; see HamiltonCollection.com); billed with shipment.
More ‘meow-velous’ friendship
and ‘gnomish’ luck await!
Say “yes,” and you’ll be among the first to preview future issues in
Hamilton’s EXCLUSIVE Gnomies Meow And Fur-ever collection as released.
Inspired by Blake’s artwork, each handcrafted cat gnome features glittery
accents and is paired with a cute-as-can-be companion. Limited to 95
casting days, every issue is hand-numbered and arrives with a Certificate
of Authenticity. Collect as many as you like or cancel at any time. Your
satisfaction is 100% guaranteed or your money back. Reply today!
©2024 HC. All Rights Reserved.
Fastest way to shop:
HamiltonCollection.com/CatGnome
Name____________________________________________________
(Please print clearly.)
Address__________________________________________________
YES! Please send the Gnomies Meow And Fur-ever collection for my
review as described. I need send no money now. I will be billed with
shipment. I am under no obligation. I understand that I can return my
item free of charge.
Subject to product availability and credit approval. Allow 4 to 6 weeks for shipment.
City______________________________State_______Zip_________
Email____________________________________________________
Optional (for product & shipping confirmation).
Signature_________________________________________________
SEND NO MONEY NOW.
935227-E12601
Fresh
Farm-Style
Homes
The allure of the casual, comfortable nature of
farmhouse style is conveyed by many homes,
whether they are on farms or not. The three
houses in this issue are far from Midwestern
rural fields, taking root instead near a lake
in South Carolina, nestled among nature in
North Carolina and amidst ancient oaks and
marshland in northeast Florida. But one thing
they all have in common is that familiar blend
of weathered furnishings, carefully curated
found objects, and relaxing open spaces.
Summer 2024 41
LAYERING
on the
A neutral palette and collected finds
make this lake-community cabin in
South Carolina a year-round retreat.
Photographed by GRIDLEY + GRAVES. Written by ELYSE MAJOR.
The original stone fireplace
in Sandra Boylan’s living
room ties in with natural
wood tones and woven
goods but is balanced by
the white walls, beams and
furniture. A cowhide rug
bought at the famed Round
Top Antiques Fair in Texas
anchors the seating area
with a layer of pattern and
down-home style.
Summer 2024 43
The Boylans
suspended leadedglass windows
from chains over
the living room
windows to provide
architectural
interest and a bit
of privacy while
keeping the space
flooded with light.
W
hen it comes to creative pursuits, there’s not
much Sandra Boylan won’t try. She’s worked as
an interior designer, a cosmetologist and a seller of vintage
goods. Along the way, she’s painted pet portraits, refurbished
furniture, stitched Halloween costumes and built a backyard
koi pond. So, when she and her husband, Travis, considered
purchasing a 1980s cabin on Lake Keowee in Salem, South
Carolina, the fact that it needed a major update didn’t give her
pause. “I’ve got to be doing something every day,” says Sandra
of her drive to create.
When the couple took ownership of the property in 2017,
they were living in Georgia and had to travel to work on the
cabin. “We spent that whole first summer entertaining friends
every weekend, then in the fall we started renovating and
doing a lot of the work ourselves. I would come up mid-week
while my hubby held down the fort at home, and I’d work,”
Sandra recalls.
She picked up a nail gun and never looked back, installing
shiplap-style wall and ceiling treatments in several rooms as
part of the renovation. “Mind you, I’d never done this before;
I learned as I went,” she says. Other updates included removing carpet and linoleum flooring, installing wide window and
door trim, painting cherry ceiling beams and cabinets, and
reconfiguring the kitchen.
Though she’s comfortable with tools, designing interiors is
where Sandra truly shines. The cabin’s refurbished rooms are
balanced and flow seamlessly thanks to her cohesive use of
warm natural materials, such as wood flooring, architectural
salvage pieces and woven baskets, paired with blocks of
creamy white. Layering is also key, whether it’s mounting
decorative windows over standard ones, placing an accent rug
over an area rug, or hanging a boxwood wreath atop a shutter.
Sandra describes her decorating style as a blend of curated
collections acquired over time and a casual, welcoming vibe.
“I like to decorate with items that have history and tell a
story,” she says.
While that style perfectly suits the lake-community retreat
where the couple now live year-round, Sandra insists that it is
more a reflection of her personality than the space. “I would
decorate the same way if I was in a high-rise,” she says.
Antlers hung on the living room wall offer an organic flourish that
connects with nearby shapes in this asymmetrical composition.
Follow Sandra on Instagram at www.instagram.com/
vintagewhisperer.
Summer 2024 45
TOP: Techniques like varying heights, grouping items and mixing textures—all within
a limited color range—make for vignettes that look collected, not cluttered. This is
the case with this dining room display, which features ironstone plates mounted on
the wall, various sizes of topiaries, collections of glass bottles and books, and more.
ABOVE: A dining room cabinet upcycled with distressed chalky-finish paint becomes
a neutral base for a collection of fallen bird’s nests perched on carved wood
candlesticks. Two demijohn bottles—one old, one new—add shine among dull
surfaces. The chalkboard tags are sentimental reminders of family birthdays.
46
Country Sampler Farmhouse Style
Thin plywood underlayment
cut into shiplap-style strips is
a budget-friendly way to add
natural warmth to ceilings.
Though they hail from different sources, the
dining table and chairs are united by their
wood tones. Woven wood shades and wicker
baskets contribute to the room’s warm vibes,
while the blue-gray hutch offers cool contrast.
Summer 2024 47
STYLED
Not Staged
An interior designer and avid
DIYer, Sandra is a literal pro
when it comes to creating living
spaces that are as inviting as
they are interesting; a large part
of achieving that is an effective
use of layering, maintaining a
limited color scheme, and giving
each grouping space to breathe
and shine. Here are some tips and
takeaways to try at home:
EXPLORE.
Take time when building collections
and investigate various retailers,
from small sellers and thrift shops
to larger stores and venues. If
aiming for a storied look, avoid
buying themed decor sets and opt
for single items.
ASSEMBLE.
Many of Sandra’s vignettes begin
with something tall surrounded by
items in odd-numbered groupings,
and she’s sure to employ different
shapes and finishes as well. Take
photos during the process to guide
you as you play and style.
LIMIT.
Sandra keeps her colorway
restrained, starting with a neutral
base and adding beige, taupe
and natural browns in different
textures. This directive can be
applied to any color for tone-ontone impact.
48
Country Sampler Farmhouse Style
Sandra put her interior design knowledge to
use in the kitchen by reconfiguring the floor
plan, replacing upper cabinets with open
shelves, installing a larger window over the
sink, and covering ceiling space between
beams with unpainted shiplap-style wood.
Summer 2024 49
Sandra cleverly uses
swing-arm sconces
for task lighting in the
kitchen. The custom
range hood gets an
industrial look via affixed
straps and dowel caps
spray-painted in layered
iron and brass finishes.
BELOW LEFT: While topping cabinets
with faux greenery may be out of
fashion, arranging a few cascading
houseplants, herbs and topiaries on
open shelving is a great way to bring
a bit of nature indoors.
BELOW RIGHT: A tray centerpiece is
finished with silver-plate vessels filled
with mother-of-pearl buttons. “They
always come out on display in the
summer,” says Sandra of the collection.
50
Country Sampler Farmhouse Style
Adhering to a taupe-and-white palette in the primary
bedroom, Sandra assembles layers of coordinating
bedding that provide texture and mesh well with the
upholstered headboard and accent pieces.
To put their own touch on the
house, the Boylans repainted the
exterior, removed the porch railing,
added board-and-batten shutters
and replaced the front door.
Ways
to Prime
1.
Incorporate seating. Nothing makes even a
postage stamp–sized porch into a gathering
place like a chair or two. Look for all-weather pieces
and durable fabrics.
YOUR PORCH 2.
for
Entertaining
A large front porch is one of the features
that attracted the Boylans to their home.
Over the years, they’ve made some
modifications to ensure it’s a charming
spot for morning coffee and evening
wine. Whether you have a porch, deck or
front stoop, consider these five ideas for
making the most of it.
52
Country Sampler Farmhouse Style
Keep it clean. Whether this means a regular
power-wash or a quick sweep, a tidy area
promotes serenity.
3.
Add extra lighting. Plug-in string lights, solarpowered Edison bulbs, candles, and batteryoperated lanterns will all keep the party going long
after the sun goes down.
4.
Include leafy greens. Potted plants, herbs and
flowers provide instant seasonal appeal. No time
to water? Check your nearby crafts or discount store
for realistic faux versions.
5.
Be ready to serve. Keep the kitchen fridge
stocked with favorite summer drinks so you can
offer refreshments outdoors at a moment’s notice.
Nothing says summer
like white wicker
softened up with
checked cushions.
Sandra started
collecting the wicker
pieces before the
couple moved into
the home.
Soft sculptured Grandma Broom® Vacuum Covers,
Grandma Broom® Covers, and Small Free Standing
Grandmas. Available in country, Victorian
and farmhouse fabrics, lace, muslin.
www.butterflymornings.com ❖ 706-878-1262
www.appletreewoodcrafts.com
Summer 2024 53
Decorative birdhouses on the
porch are a nod to the winged
creatures that frequent the
woodsy locale; the wicker
chaise lounge, a Facebook
Marketplace purchase, is a
coveted spot for bird-watching.
Sandra and Travis enjoy spending
time on the porch of their home in
upstate South Carolina.
“
I
like
to decorate
with items that
have history
and tell a story.”
54
Country Sampler Farmhouse Style
The porch
overlooks a
landscaped
backyard and
brick path and is
a favorite place
for relaxing on
the comfortable
daybed. A fan
mounted beneath
the overhang not
only keeps the
area cool but also
deters insects.
Summer 2024 55
of Place
Years after falling in love with a North Carolina
cottage, a creative couple make it their own, crafting
a home that tells their story one room at a time.
Photographed by GRIDLEY + GRAVES. Written by KHRISTI ZIMMETH.
56
Country Sampler Farmhouse Style
Designed by an architect
from Louisiana, Daune and
Keith Pitman’s cottage has
an authentic Acadian design,
including a steep sloped gable
roof and covered porch. Through
the years, the couple have
planted a garden, updated the
interiors and made the home
suitable for their growing family.
“L
Daune looks forward
to time outdoors.
“We start each
day with an early
morning walk and
end each day with
a nightly bike ride,”
she explains.
ove at first sight” is how Daune Pitman describes
her first encounter with Oak Cottage, the authentic Acadian cottage that she and her husband, Keith, now
call home. It was the early 1990s and the 2,500-square-foot
house was empty, but the newly engaged couple stopped for
a peek and could see it was filled with potential. However, as
professional ballet dancers with a busy travel schedule and
aspirations to live in New England, they weren’t planning on
settling down in Greenville, North Carolina.
A few years later, while awaiting the birth of their first
child, they started thinking about putting down roots. “I
realized we had a lot of family in eastern North Carolina and
remembered that house,” Daune recalls. She “pulled out her
best Nancy Drew skills” and discovered that the house in
Greenville was being used as a rental, but the lease was up
and the homeowner wanted to sell. “After that,” she says,
“everything fell into place.”
Built in 1985, the five-bedroom, three-bath cottage
features a high foundation, an open layout and an expansive
front porch. Brick from a Civil War–era structure in Virginia and heart-pine floors from an antebellum house in
Alabama provide charm and character. However, in 1995,
the home’s unique architecture, uncoordinated wallpapers
and dark knotty pine cabinets probably deterred other
potential buyers. Luckily, the Pitmans could look past those
undesirable elements to envision the light-filled sanctuary it
would become. And as a bonus, the house didn’t need
structural work, only cosmetic changes.
Daune’s distinctive decorating style, rooted in nature and
favorite locales, helped guide the home’s transformation. She
arranges a meaningful mix of new items, antiques and art,
which is a reflection of the couple’s diverse interests. Daune
describes the result as an “eclectic European cottage … a
curated home that tells our story without words.”
Her blog, Cottage in the Oaks, offers a window into her
life and style and links people to the workshops she leads,
both close to home and around the world. Her classes are
designed to help others explore and harness their creativity
and shape their homes to reflect it. “Our homes should be a
life-giving, soul-refreshing soft place to land—a beautiful
place to recharge and rejuvenate,” she says. “Your home
should mirror who you are and the stories you carry.”
Visit Daune’s blog at www.cottageintheoaks.com, or follow her on
Instagram at www.instagram.com/cottageintheoaks.
Summer 2024 57
Natural Selection
“I love the colors and textures that
nature adds to a space,” says Daune,
who leads online and in-person
workshops that include advice on
finding and using foraged beauty.
“Luckily for me, I have a big garden,”
she says, explaining that many of
the dried plants and greens in her
home come from her own backyard,
an oasis she and Keith have created
in the 28 years since they bought
the house. She offers a few tips for
integrating natural materials into
your own interiors.
n Cut and Dried. Search your
yard and neighborhood for pods,
stems, flowers and vines with
interesting lines and shapes.
Dried shelf fungi from trees are
another eye-catching option.
Watch out for materials when you
go for walks or bike rides. “Many
flowers and greens will keep their
color beautifully when dried,”
Daune says. “They can be used for
all kinds of projects, including art,
gift wrapping, arrangements or
table settings.”
n Herbal Harvest. Your garden
or local garden center is ripe for
the picking. Dry herbs and display
them indoors for long-lasting
texture and scent. To dry, bundle
the stems with twine, fabric or
wire and hang upside down in an
area that gets good air circulation.
“Our gathering and inspiration board is ever evolving with reminders and ideas for
life, home and business,” Daune says of the large piece mounted on a kitchen wall.
“It reminds us of what we hold as important, what we envision for the future, where
we’ve been, and where we’re going.”
n Green Scene. Mix dried and
textural elements with seasonal
fare, such as fruits or evergreens,
which are readily accessible and
retain their color.
Find out more about Daune’s workshops
and mini courses on everything from
planning picnics to seasonal decorating
to creating an inspiration board at
www.thecottagetableexperience.com.
58
Country Sampler Farmhouse Style
White cabinetry
and subway
tile allow the
stained-glass
window over the
kitchen sink to
take center stage
in the compact
space. As in
several other
areas of the
home, a curtain
stylishly conceals
a storage spot.
Give a soaring fireplace
wall even more
prominence with a
pair of built-in shelving
units and vintage book
pages upcycled as
wallpaper.
OPPOSITE: Daune and Keith recently swapped
the locations of the living room and dining room.
Known for their large dinner parties and their
gracious entertaining skills, the couple wanted
space for a long trestle table. “Gathering and
spending time at the table is treasured time for
us,” Daune says.
RIGHT: A knotted tassel garland is the perfect
textural counterpoint to the outdoorsy accents
arranged on the dining room mantel.
BELOW: Evidence of the couple’s varied interests
can be found throughout the home. “Keith has
a big rock collection,” Daune says, adding that
she collects art, natural items, vintage European
linens and other things of beauty.
Curtains Up!
Take a cue from European cottages, and introduce softness, color and pattern by replacing select doors
and cabinet fronts with curtains. “When we bought Oak Cottage, every closet sported louvered doors,”
Daune says of one of her least favorite elements. Whether you do it on a hall closet, dining room
bookshelf or kitchen sink cabinet, hanging curtains is a wonderful way to add character and charm—and
hide stuff, according to Daune. Follow these basic instructions for any application.
MATERIALS & TOOLS
Spring tension curtain rod to fit
opening
Metallic spray paint (optional)
Curtain clip rings in desired finish
Fabric for curtain (1½ times the
opening width)
INSTRUCTIONS
STEP 1 Spray-paint a spring tension rod if you can’t find one in the finish you desire.
Let dry.
STEP 2 Slide curtain clip rings onto the rod, and then position it in the opening and
twist to tighten.
STEP 3 Cut fabric and sew to create a curtain with simple hems on each edge.
Matching thread
Sewing machine
STEP 4 Hang the curtain using the clip rings.
Summer 2024 61
ABOVE: The Pitmans’
children are grown,
but their presence
is felt in the dining
room, where a
favorite family photo
hangs above a buffet.
Many of Daune’s
signature decor
elements are also
on display, including
ferns and dried
natural materials.
RIGHT: Speckled eggs,
variegated feathers
and other collected
natural treasures find
a home alongside
wood mushrooms
on the mantel in the
dining room.
62
Country Sampler Farmhouse Style
This bedroom was covered in primary-hued heart wallpaper when the
couple purchased the house. Today, it features the same fresh look seen
in other rooms. The solid-wood door resembles a European antique
thanks to extra trim added by Keith and a paint treatment applied by
Daune. Above the headboard, dried palm leaves become a work of art.
Summer 2024 63
Would you like to
make a garland similar
to this with yarn?
Scan code to find an
assortment of beautiful
farmhouse-style colors.
ABOVE: The family
philosophy is displayed
on a banner above the
welcoming front door.
Windows are dressed
simply or left unadorned to
let in as much natural light
as possible.
RIGHT: Layered
breadboards on a living
room cabinet provide a
rustic backdrop for smaller
art pieces.
64
Country Sampler Farmhouse Style
Garlands spanning the
space between curtain
panels are a casual
alternative to a valance.
Once the dining room, the cozy living
room has the same white and wood
palette found throughout the home.
“A lot of the base colors in the house
are neutral,” Daune explains, adding
that simple backgrounds “open the
door to whatever season it is.”
Summer 2024 65
Installing open shelving at
the bottom of the stairs is
among the couple’s recent
projects and transforms a
seldom-used space into a
dynamic display area.
66
Country Sampler Farmhouse Style
LEFT: The long front porch caught the couple’s eye
when they first looked at the house. Today, they
often eat breakfast at a small dining table and spend
evenings unwinding on the cushioned bench swing.
BELOW: Keith and Daune often use their front porch
to relax or visit with friends and family.
House Lamp
(with linen or gray
check shade) available
in Rustic White or
Weathered Zinc finish
Warmly
Welcome Guests
W I T H I M A G I N AT I V E D E S I G N
Milk Jug Lamp
(with linen or
gray check shade)
www.allysonsplace.com 816-569-3911
Summer 2024 67
The patio dining room in Ellen and Gregg
Winter’s home is a breezy indoor/outdoor
entertaining spot that sits between the
main kitchen and the outdoor kitchen.
This supersize kitchen island with butcher-block top can
seat up to seven people. That’s because, as Gregg says, “the
kitchen ends up being the center of the universe when you
have good friends over, and we wanted to facilitate that.”
70
Country Sampler Farmhouse Style
The Winters gravitated to soft colors rather than an allwhite look for their new coastal farmhouse home. This
beachy blue was the perfect compromise. Ellen says
the dining room is probably their home’s most formal
space—and it’s still quite casual, with a nautical rope
chandelier and cool blue hues adding coastal flair.
Making the Walls Sing
Inside the Winter home, you’ll be hard-pressed to
find a plain wall (or plain ceiling). The couple opted
for visual interest and millwork over standard white
drywall throughout the house. Here are some of
their choices:
❖ Grasscloth. A textured wallpaper woven from
natural plant fibers, as seen in the dining room.
❖ Wainscoting. Decorative wood paneling,
usually installed on the lower part of a wall.
❖ Board-and-batten. Thin wood strips that
are arranged into geometric shapes or patterns,
as seen in the dining room.
❖ Nickel gap. Named for the spacing between
boards (nickel width), versus shiplap’s typically
flush look, as seen in the bunk room and other
spaces in the home.
❖ Deconstructed walls. Unfinished two-byfours and beams that were whitewashed but not
painted, as seen in the guest room.
Summer 2024 71
This mudroom doubles as a “dog room” for the couple’s labradoodle, with a dog
bathing area and subtle storage for bowls, food and leashes. The herringbone
floor looks like brick, but it’s an easy-to-clean ceramic tile.
Pretty Patterns
The Winter home is packed with
pattern, from unique wallpapers,
including a petite puppy-print in
the mudroom, to painted wood
floors. In fact, Gregg says the
painted floor on the landing and
in the hall is his favorite part of
the whole house. The Winters
hired a professional to paint the
eye-catching design on their
white-oak floor, but it can also
be a DIY project. If you choose
to tackle it yourself, seek out
online tutorials that address your
specific surface and design goals,
since each requires a different
method and materials.
72
Country Sampler Farmhouse Style
With a tiled backsplash,
floating shelves holding
glasses and barware, and
a beverage fridge, the
built-in alongside the
fireplace serves as a wine
and cocktail center.
Plucked from a farmhouse in Georgia that had
been torn down, the bulky, hand-hewn wood
beams on the family room ceiling and around
the Winters’ front doorway offer top-to-bottom
visual interest and an authentically rustic feel.
A white cane bed adds
to the timeless feel in
the Winters’ primary
bedroom. The same
room “could have had a
bed like that a hundred
years ago,” Ellen says.
Ellen wanted the primary suite to be a refuge, so the couple aimed
to make the bathroom feel spa-like and relaxing, with his-andhers sinks flanking a white soaking tub.
ABOVE: A bunk room
was on the Winters’
wish list for the new
home, but most they’d
seen before were tucked
in dark corners. For
theirs, they requested
large windows—and a
very long window seat—
to be the dominant
feature, with the bunks
occupying the sides.
White woodwork keeps
the space bright.
LEFT: The deconstructed
walls in this guest
bedroom are made from
unfinished two-by-fours
and beams that were
whitewashed but not
fully painted. The goal
was for it to look like “an
old-school addition to
the house, tacked on at
some point,” Gregg says.
Summer 2024 75
ABOVE: Brick, siding and wood work in harmony
while bringing texture to this screened-in side porch.
ABOVE LEFT: This upstairs porch off the primary
bedroom is the perfect spot to sit with a cup of tea in
the morning and look out at the local park.
LEFT: Every home in the Crane Island community is
different, but all are inspired by Lowcountry design
and the idea of porch living.
76
Country Sampler Farmhouse Style
What Is
Lowcountry Style?
The term Lowcountry refers to the geographical and cultural region along the southeastern coast
of the United States. Most closely identified with South Carolina, it also extends to Georgia and
northeastern Florida. The architecture reflects both relaxed living and elegant, classic style.
Homes typically feature spacious rooms with high ceilings and large double-hung windows to
bolster air circulation. Multiple porches or verandas, often with “haint blue” ceilings to ward
off evil spirits, allow for outdoor living and encourage Southern hospitality. Light-colored
metal roofs that reflect the hot sun and stand up to subtropical rains are also common.
Summer 2024 77
Do-It-Yourself
Farmhouse
The long sunny days of summer may have
you spending hours hanging around outside,
but that doesn’t mean you have to give
up your DIY plans. Those endless days are
perfect for completing a painting project on
your driveway (no fumes in the house!) or
crafting charming decor or wildlife habitats.
We’ve got some great ideas for summer DIYs
in this issue, including fresh centerpieces,
personalized travel keepsakes, furniture redos
and cool creations for backyard critters.
Summer 2024 79
Bright
Breezy
Fresh flowers, garden produce and
vintage finds help turn ordinary table
settings into seasonal highlights.
Try out other fruit-andflower combos, such as
limes or small melons
with zinnias or dahlias.
Curate a Bulb Exhibit
Apothecary-style vases are ideal for
showcasing tulips, daffodils and hyacinths
any time of the year. Just fill the containers
with water and add layers of moss and
rocks around the bulbs for visual interest.
You can find easy instructions online for
coaxing each variety into bloom indoors.
Arrange Delicious Layers
Top rows of bright berries with a justpicked bouquet to fashion a display that
looks luscious all around. Set a slender
cylindrical vessel inside a wider cylindrical
vase. In the space between the containers,
carefully arrange layers of fresh blueberries
and strawberries. Then, pour water into the
center vase and add a mix of white daisies
and red ranunculus.
Pair Fruits With Florals
Make a floral sculpture that’s perfect for the
kitchen or the dining room by combining
green pears, yellow roses and pretty greens.
Line the bottom of a wire bowl with vibrant
green moss. Place a shallow bowl on top of the
moss and set a rectangle of soaked floral foam
upright in the bowl. Stake pears with bamboo
skewers and arrange them around the bottom
and top of the foam. Cut roses and arrange
them around the center of the foam. Tuck
in ferns and ivy to fill gaps. Continue adding
foliage until all the foam is covered.
Summer 2024 81
Pack a Campy Picnic Basket
Gather a collection of retro camp dishes in a
painted basket to set a cheery picnic-style table.
Fill the bottom of the basket with dry floral foam.
Arrange a few plates at an angle and push them
into the foam. Quarter-fold bandannas and drape
one over each corner of the basket. Quarter-fold
and loosely roll more bandannas and lay them
between the plates to hide the foam. Create small
flower arrangements in slim containers filled with
wet floral foam. Set the containers between each
plate. Place more small bouquets in mugs and
position them at the front and back corners of
the basket and on the table. Pen playful phrases
on pennant-shaped tags tied to skewers, and tuck
these into the centerpiece to greet your guests.
Plant a Fancy
Straw Hat
A whimsical bloom-filled
hat is sure to bring a smile
on any summer table. Wrap
a striped ribbon around your
hat as a band and tie the
ends into a bow in front. Cut
a block of wet or dry floral
foam to fit inside the hat,
and push in fresh or faux
flower stems and greenery.
If using fresh cuttings, be
sure add a waterproof liner
inside the hat first.
Repurpose Vintage
Bedsprings
Rusty bedsprings are a hot decorating
item. Put some to good use in a long
table arrangement that everyone can
appreciate from their own seat. This
design uses two sections of bedsprings
that are still connected with their original
curled wires. If you can’t find springs
that are still connected, attach lengths
of curled wire to recreate the look. Start
your centerpiece by laying down a burlap
runner. Then, arrange your springs in a
serpentine shape down the table, atop
the runner. Place small terra-cotta pots
into every other spring. Place test tubes
in the center of the remaining springs,
using a curled-wire stand at the base of
each tube to keep it upright. To make
the stands, twist annealed wire around a
dowel rod and bend it into circles. Fill the
tubes with fresh floral cuttings and water,
and tuck votive candles into the clay pots.
19.99
$
PLUS FREE
STANDARD SHIPPING*
If you love jewelry, you’ll love us!
TOTAL
PACKAGE
With this 10ctw white cubic
zirconia ring and earring
set, you have everything
you need for an undeniably
stylish outfit. Set in rhodium
over sterling silver.
71%
BELOW
ESTIMATED RETAIL
VALUE OF $70
Our new pearl-edged Kimberly adds a “little
touch of color” to our popular exclusive Kimberly
Ruffled Curtains. Proudly made in the USA.
www.thecurtaincottage.com
Support@thecurtaincottage.com
800-235-4088 and 336-434-7989
5221 Ellen Ave, Archdale, NC 27263
Item:
BCB145
One coupon code per customer; one coupon code per order.
Offer valid through July 9, 2024 at 11:59p ET. While supplies last.
*Restrictions apply. See jtv.com for details.
USE CODE: TOTAL24
800-315-9618
jtv.com/picture
Summer 2024 83
Grow Real
Grass
Indoors
Love the look of
fresh green grass?
Wheatgrass is
super easy to grow
indoors! Plant
seeds in pots, or
sow directly into
a unique piece
such as this wood
sugar-cone mold.
Let the grass grow
for a week or two,
and then use it
as part of a living
centerpiece.
Fill a Charming
Milk Crate
An old wood dairy crate
packed with glass milk bottles
can become the host for a
colorful floral arrangement.
Add water and your favorite
fresh-cut flowers to select
bottles, leaving some empty
for an airy arrangement. Open
handles on the crate sides
make this centerpiece easy to
move when necessary.
DESIGNED AND PHOTOGR APHED BY
ELIZ ABE TH JONES OF COUNTRYPEONY.COM.
84
Country Sampler Farmhouse Style
Look for tiny metal
bee embellishments
in the scrapbooking
or jewelry section of
hobby or crafts stores.
Wrap Candles With
Honeycomb Patterns
T
IN
AT HO
ZLWKDQ
E
"Art To Go"
Paint Kit!
M
PA
Give a plain candle centerpiece a one-of-a-kind
boost with chicken wire and metal bees. For
each candle, cut a piece of chicken wire 1" to
1½" larger than the circumference of the candle.
Cut away the wire on the top and bottom to
create random-shaped edges. Wrap the chicken
wire around each candle, cut open the closed
ends where necessary, and overlap and bend the
ends to secure. Glue or wire on the metal bees.
“MATILDA THE COW”
Everyone has an artist within them waiting to bloom.
3UHSULQWHGFDQYDVSDLQWVEUXVKHVDQGVWHSE\VWHSLQVWUXFWLRQV
LQFOXGHG1RSDLQWLQJH[SHULHQFHQHFHVVDU\IXQIRUWKHZKROHIDPLO\
$29
ZZZWKHSDLQWHGSHWDOFRP
Summer 2024 85
Summer
Souvenirs
Hold on to vacation memories by crafting personalized travel keepsakes
that will instantly transport you to that special place and time.
86
Country Sampler Farmhouse Style
Family Gathering
Cushy Destination
Have a beloved souvenir T-shirt or
sweatshirt that is damaged or doesn’t fit?
Use it to cover a pillow!
STEP 1 Choose a pillow form appropriate
for the shirt size and design. This one is
12" x 18".
STEP 2 Cut around the shirt design in a
rectangle, adding 1" to the top and side
(13" x 19").
Repurpose materials to create a
shadow box that can showcase
sweet reminders of time spent
with loved ones. This project
by Fabiana of Ciao Newport
Beach was inspired by “a
visit to Grandma’s farm” and
includes vintage postcards, a
handwritten recipe, spools of
thread and more. To make a
shadow box like Fabiana’s,
match up an antique frame
with a shallow wood crate
and then attach with a
strong adhesive. Cut a
length of chicken wire and
secure it inside the crate
to help hold items in
place and provide texture
and farmhouse charm.
DESIGNED AND PHOTOGR APHED BY
FABIANA OF CIAONE WPORTBE ACH.
BLOGSPOT.COM.
STEP 3 Cut two solid-colored shirt pieces,
one longer than the other, for the back
(7" x 19" and 11" x 19").
STEP 4 Pin and then sew the top edge
of the front piece to the long edge of the
larger back piece, right sides in. Fold the
remaining end of the larger back piece over
½" and sew across the width to create a
finished edge.
STEP 5 Pin and then sew the bottom edge
of the front piece to the long edge of the
smaller back piece, right sides in. Fold the
remaining end of the smaller back piece
over ½" and sew across the width to create
a finished edge.
STEP 6 With all right sides facing in, pin
the open sides together with the larger
back piece overlapping the smaller piece.
Sew along each side (½" seam allowance)
to close the pillow.
STEP 7 Turn the cover right side out and
insert the pillow form. Add loose batting to
fill the corners if desired.
Heartwarming
Coastal Art
Arrange a group of collected
beach finds as a new work
of art. This project from
Jasmine Dhillon at Feeling
Nifty is a beautiful addition
to summer decor. Start
with a black shadow-box
frame with a linen-style
backing. Use a pencil to
trace a heart shape onto the
frame backing or a piece
of card stock cut to fit the
frame. Starting with larger
seashells, evenly distribute
them inside the shape and
secure with tacky glue.
Adhere medium-size shells
next. Fill in gaps and edge
the shape with small shells.
Finish with decorative
pearls for a little shine.
DESIGNED AND PHOTOGR APHED BY
JASMINE DHILLON OF FEELINGNIF T Y.COM.
Summer 2024 87
Sand Samples
Display natural souvenirs with a set of
test tubes filled with sand, beach glass
or earth gathered at your favorite spots.
Secure several 20 x 150 mm test tubes on
a whitewashed wood plaque using a ¾"
galvanized-steel hanger strap. Use the
strap’s first hole to screw the strap to the
wood base. Then, bend the strap with pliers
around a ¾" dowel to match the curve of
the first test tube and secure with another
screw. (Do not bend the strap around the
fragile glass tubes.) Repeat for all your
test tubes, allowing about 1" between
tubes. When the entire strap is shaped and
secured, gently slide the tubes into place. If
one won’t slide in easily, slightly loosen the
screws on either side. Label your collection
with industrial-style tags printed with the
location where the contents were gathered.
Spell out “Memories” or another word with
letter stamps below the tubes.
Serving of Nostalgia
LEARN MORE
TRANSFER METHODS
ONLINE
Get instructions from
The Graphics Fairy at
http://thegraphicsfairy.com/
12-easy-image-transfermethods-for-diy-projects.
88
Country Sampler Farmhouse Style
Preserve a vacation snapshot from
the past by transferring it to a wood
tray that you can enjoy every day. This
tray was created from a photocopied image
and fun sentiment that were transferred using an
image transfer medium. Enlarge and copy your photo
and text in reverse with a toner or laser copier. Apply
transfer medium to the front of the image and the area on an
unfinished wood tray where it will be placed. Press the image onto
the tray and smooth out bubbles. Let dry completely. Lightly wet the
paper with a sponge. Gently rub to remove the paper, leaving the image
on the tray. Let dry, and then tape off the image with painter’s tape. Paint the
tray a coordinating color and let dry. Lightly sand the corners and edges to give
it an aged look. Coat the entire tray with waterproof sealer for protection.
Memorable Journey
Stitch the path of a summer adventure on a canvas map to hang on your wall.
STEP 1 Print your desired map area in black and white on an 8½" x 11" natural
canvas photo fabric sheet.
STEP 2 Thread a needle with two to three strands of embroidery floss, securing
the far end with a knot. Stitch along the path with short, straight lines, keeping
the stitch lengths as even as possible. Finish with the floss on the underside of
the canvas and secure with a knot. Stitch additional paths from your trip in
other colors if desired.
STEP 3 Measure and cut 1½"w x ¼"d unfinished craft wood strips into four
11½" lengths. Brush with a brown paint wash or stain and let dry.
STEP 4 Using hot glue, adhere one strip across the top of the map, covering
approximately ½" of the canvas. Glue a second strip to the back, aligning it
with the first. Clamp or weight the strips until the glue sets.
STEP 5 Attach the remaining two wood strips to the
bottom of the canvas in the same fashion.
STEP 6 Insert two small eye screws through the top
wood strips. Reinforce with hot glue if necessary.
STEP 7 Thread a ribbon through the eye hooks and
secure each end with a knot.
Treasure Chest
Turn an unfinished wood box into a themed
container to hold vacation mementos.
Camilla Fabbri at Family Chic used an
eye-catching London tourist map to create
her memory box. Choose a box like hers
and remove the hinges and front clasp.
Trace all sides of the box onto map paper
or scrapbook paper. Cut out the pieces and
adhere them to the box with decoupage
medium, following the manufacturer’s
directions. Once dry, reinstall the hinges.
Fill the box with photos and small
souvenirs from your trip.
DESIGNED AND PHOTOGR APHED BY CAMILL A FABBRI OF FAMILYCHIC.COM.
Summer 2024 89
Try these easy designer
techniques to give fresh
style and personality to
old furnishings.
Textured Wallpaper Treatment
Make over a wood nightstand with a roll of paintable anaglypta wallpaper and cool gray
and white hues.
STEP 1 Remove hardware and lightly sand all wood surfaces. Use an air compressor or
bristle brush to remove all surface dust, especially in corners.
STEP 2 Measure the areas where you will apply wallpaper and mark on the back of the
paper. Cut pieces using a metal-edge ruler and sharp craft knife.
STEP 3 Working with one wallpaper piece at a time, apply a generous coat of spray
adhesive to the back. Carefully place it on the nightstand, starting at the top edge. Press
the paper outward, smoothing out any wrinkles or air pockets. As the adhesive dries,
smooth any additional wrinkles. Once all the pieces are attached, allow to dry overnight.
STEP 4 Paint the nightstand with a medium-gray
matte-finish paint, including the wallpapered
sections. Let dry.
STEP 5 Using a bristle brush, dry brush
white paint over the gray paint on only the
wood portions. Let dry.
STEP 6 Add a small amount of white
paint to a sponge brush and lightly swipe
across the wallpaper, highlighting the
raised areas. Let dry.
STEP 7 Paint and reinstall the original
hardware or replace with new knobs or pulls.
90
Country Sampler Farmhouse Style
DESIGNER HINT
Cut and orient the
wallpaper pieces to
focus on a specific
portion of the pattern or
direction of the design.
Planted Purpose
Turn a slim wood table into a
stylish stand for your favorite
plants. Camilla Fabbri at
Family Chic offers the details.
Start by roughly sanding
the table with sandpaper.
Remove dust and wipe
down all the wood. Brush
on paint in your desired
hue and finish, letting dry
between coats. Attach 1"
round wood knobs evenly
around the table’s top edge
with wood glue. Adhere wood
appliqués to the table’s front
apron. Allow to dry. Paint
the applied wood details to
match the rest of the table.
DESIGNED AND PHOTOGR APHED BY
CAMILL A FABBRI OF FAMILY-CHIC.COM.
Farmhouse Swap
S HORT
OR TALL?
Pine table legs
like
these are avai
lable
in different he
ights
to suit your pr
oject.
Hate the legs on a table? Change them
out for a style that’s a better fit! Christina
Muscari from Pretty Distressed replaced
the dated scrolled-metal base on a coffee
table with turned-wood legs that have a
farmhouse look. On your table, remove
the old base or legs and then strip and
sand the tabletop and apron. Attach four
unfinished-wood legs, which you can
find at most home improvement stores.
Replace any hardware necessary to ensure
the legs fit securely. Apply a water-based
gel stain in light coats to the tabletop,
apron and legs. The goal is to create a
uniform finish across all the pieces. Finish
with a topcoat for extra protection.
DESIGNED AND PHOTOGR APHED BY CHRISTINA MUSCARI OF
PRE T T YDISTRESSED.COM.
Tile Topper
Tabletops with frame-like edging are a ready canvas for creative
embellishment. Do Dodson purchased this curvy pie-crust table
for just $5 and gave it a one-of-a-kind look with white penny
tiles and paint. To complete a project like hers, clean and prep
your table and paint as desired, avoiding the area you plan to tile.
Measure the area and purchase ceramic tile in a size and shape
that will fit well without requiring any cutting. To attach, use a soft
rubber scraper or spatula to spread ceramic tile adhesive across
the tabletop and then press the tiles into place. Allow the adhesive
to dry for 24 hours. Apply premixed grout with sealer between the
tiles and around the outer edges using the same
tool. Fill in all the gaps. Let dry
for 30 minutes and then
carefully wipe across the
tiles with a damp sponge
to remove excess grout.
Wash out the sponge
frequently. After another
30 minutes, wipe again
with a damp sponge. Repeat
until the tiles are clean and
no film is visible. Allow to
dry for 24 hours.
DESIGNED AND PHOTOGR APHED BY DO
DODSON OF DODODSONDESIGNS.COM.
Summer 2024 93
DIXIE BELLE
PAINT COMPANY:
Anchor
Contemporary
Stenciling
Get the look of a boneinlay design without
the actual bones! Do
Dodson made this
statement piece using
stencils instead. For
best results, choose a
wood dresser with flat
surfaces and no raised
details. Paint the base
in the dark matte-finish
color of your choice. Let
dry at least 24 hours. Do
stripped and stained the
wood top of her dresser
for contrast. Trim or
combine bone-inlay
stencils as needed for
your project and secure
in place with delicatesurface painter’s tape.
Load a stencil brush
with a small amount of
cream-colored paint,
offload onto a paper
plate and then tap over
the stencil. Add paint
in light layers to cover
the stencil without paint
bleeding underneath.
If you make a mistake,
simply paint over it and
try again.
DESIGNED AND PHOTOGR APHED BY
DO DODSON OF DODODSONDESIGNS.
COM.
Two-Tone Design
Highlight the classic lines of an Eastlake dresser with a black-and-wood color
scheme. Lindsay Eidahl of My Creative Days found her dresser at a thrift store
and gave the distressed piece an updated look. Choose a similar furnishing and
make any necessary repairs first. Then scuff-sand the entire piece and remove all
dust. Apply a neutral wood-restoring product to the drawer fronts, following the
manufacturer’s directions. Paint the rest of the dresser with a black all-in-one paint
using a synthetic brush. Once dry, reassemble the dresser and install new hardware.
DESIGNED AND PHOTOGR APHED BY LINDSAY EIDAHL OF MYCRE ATIVEDAYS.COM.
94
Country Sampler Farmhouse Style
DIXIE BELLE
PAINT COMPANY:
Coffee Bean
DIXIE BELLE
PAINT COMPANY:
Buttercream
WHAT IS BONE
INLAYING?
A centuries-old decora
tive
art that involves cuttin
g
bone fragments and app
lying
them in intricate patter
ns on
a contrasting backgrou
nd.
BENJAMIN
MOORE:
Garden Oasis
Lightened Up
Sometimes a furniture piece has a distinctive feature that
doesn’t shine like it could. A case in point is this carvedwood chair that Jen Crider from Girl in the Garage had
stowed in her garage for several years. Jen decided on
a layered paint technique to accentuate the carving and
hide imperfections. When working with a similar chair,
start by removing the seat and tightening the frame.
Apply brown-gray chalky-finish paint over the wood,
leaving some areas of the original finish showing through.
Next, apply dark cream paint to select areas to highlight
details and add dimension. Finally, add one more layer
of brown-gray paint, allowing previous layers to peek
through in spots. Lightly sand with 320-grit sandpaper to
blend paint lines and highlight details. Reinstall the seat,
or follow Jen’s lead and reupholster it with foam padding
and fabric before installing.
DESIGNED AND PHOTOGR APHED BY JEN CRIDER OF GIRLINTHEG AR AGE.COM.
ANNIE SLOAN
CHALK PAINT:
Coco
ANNIE SLOAN
CHALK PAINT:
Old Ochre
Modern Styling
Keep an unwanted furniture piece out of the landfill by
updating it to fit your preferred look. Colleen Pausley at Life
on Kaydeross Creek salvaged a damaged Duncan Phyfe–style
hutch and revived it with a more modern top line and chic
green paint. For your project, fix or remove any damaged or
undesirable elements first. Colleen pried off the decorative
scrolled piece on her hutch to produce a cleaner look. Rough
up the finish with sandpaper and wipe down with a tack cloth.
Apply coats of primer to cover the original finish and let dry.
Paint the entire piece a green shade like Colleen did or choose
another color that suits your decor.
DESIGNED AND PHOTOGR APHED BY COLLEEN PAUSLE Y OF MYLIFEONK AYDEROSSCREEK.COM.
96
Country Sampler Farmhouse Style
PROJEC TS FOR A
Pollinator-Friendly
Incorporate features
that attract beneficial
creatures and create
a thriving outdoor
habitat that’s good for
you and the planet.
Install a Repurposed Birdhouse
Many birds are avid insect eaters and can help control
garden pests as well as disperse seeds and assist with
pollination. Provide a nesting spot for feathered friends
by turning a vintage cathedral-style radio cabinet into
a birdhouse. Detach the back panel of a nonfunctioning
radio and remove the internal components so that only
the wood case remains. Create an opening for birds
to enter, perhaps by removing a dial from the front of
the cabinet and enlarging the hole slightly. Replace the
backing, making sure it can be removed for an annual
cleanout. Mount the birdhouse on a post that is at least
5 feet off the ground to deter predators. Situate it in a
shady area facing the opposite direction from prevailing
winds. Since nesting birds prefer privacy, locate the
birdhouse away from feeding and watering stations.
Leave out safe, natural
nesting material, such as
twigs, dry leaves and moss,
but don’t place it in areas
that call attention to a
bird’s potential nest.
Build a Bee Hotel
Honeybees tend to be the celebrities of the garden, but many
species of solitary bees and wasps are wonderful pollinators as well.
These species nest in natural nooks, such as hollow plant stems,
which you can replicate with a bee hotel.
STEP 1 Start with a hexagon-shaped wood
box that is at least 4" deep. The closed
bottom of the box will become the back of
your bee hotel.
STEP 2 Measure two of the sides for the
peaked roof, adding extra to have at least
a 1" overhang on the sides and front. The
back should remain flush. Cut a thin board
to size and then cut in half. Sand one piece
along the center edge at an angle so it
will rest somewhat flat against the second
at the pitch. Attach the roof to the box
with waterproof adhesive or short nails or
screws that do not protrude inside the box.
STEP 3 Paint the outside of the box a light
color if desired. Use a water-based paint to
avoid deterring or harming the bees.
STEP 4 Using the wood roof measurement,
cut a single piece of vinyl faux-tin
backsplash material. Orient the tile design
so a seam aligns with the peak of the
roof. Carefully bend the piece so it will fit
over the roof. Attach with a waterproof
adhesive, holding in place until the glue is
set. Drive in short metal tacks across the
top and bottom of the roof.
STEP 5 Cut a 2- to 2½"-diameter natural
branch into a length that matches the
depth of the box. Drill ¼" or smaller holes
in one of the cut ends. Place the branch in
the center of the box.
STEP 6 Cut phragmite reed or cardboard
bee tubes, which can be ordered online,
into lengths that match the depth of the
box. Arrange the tubes around the branch
to fit snugly with no movement. Do not
apply any glue. This allows you to clean the
box and replace the tubes as necessary.
STEP 7 Attach a D-ring hanger to the back
of the box. Mount your completed bee
hotel in a sunny spot near flowers or trees,
3'–15' off the ground.
Summer 2024 99
MAKE YOUR
YA R D A
Wildlife
Habitat
No matter its size, your yard can
become a haven for local wildlife
and help combat habitat loss and
species decline. Bees, butterflies,
birds, amphibians and other
beneficial creatures require basic
resources to survive, and you can
ensure those resources are readily
available. Follow guidance from
the National Wildlife Federation
and take steps to provide the four
essential elements of a wildlife
habitat on your property.
Craft a Toad House
A garden isn’t complete without a friendly toad or two, and these
beneficial amphibians are an indicator of a healthy ecosystem. Most are
nocturnal and avoid the sun, preferring to shelter in cool, shady spots.
With a terra-cotta pot and a few other supplies, you can build an inviting
home for Mr. (or Mrs.) Toad.
STEP 1 Gather a short terra-cotta pot and two saucers, one for the floor
and one for the roof.
STEP 2 Soak the pot overnight to soften the clay. Mark a half-circle at the
edge and drill a series of closely placed holes along the line using a small
masonry bit. Connect the dots using a rotary cutting tool and a carbide
tile-cutting bit. Dampen the pot with a sponge as you drill, letting the bit
cool about every 15 seconds. File the edge smooth.
STEP 3 Dry brush the surface of the pot and the saucers with off-white
paint. Stamp “Mr. Toad” over the opening using permanent ink.
STEP 4 Turn one saucer upside down. Apply masonry epoxy to the inside
edge of the pot. Center the overturned pot over the upside-down saucer
so it rests against the edge. Adhere the other saucer in place as the roof.
STEP 5 Nestle the completed toad house among lush plants in a cool area
of your garden.
FOOD: Your space should have
native plants, foliage, nectar,
berries, seeds, pollen and sap to
nourish wildlife. Supplement with
seed, suet or nectar feeders.
WATER: Sources of water should
be available year-round for wildlife
to get a drink, bathe or breed. This
can include natural water sources,
such as a lake or stream, as well as
birdbaths, butterfly puddlers, and
garden ponds.
COVER: To escape harsh weather
and predators, wildlife needs
shelter in the form of wooded
areas, brambles, groundcover, log
piles and evergreen shrubs.
PLACES TO RAISE YOUNG: Special
areas are required for wildlife to
successfully reproduce. Make sure
there are mature trees, dense
shrubs, caterpillar host plants,
fallen leaves and branches, and
nesting boxes in your yard.
100
Country Sampler Farmhouse Style
Toads and frogs feed
on common garden
pests like caterpillars,
grasshoppers and slugs.
Add a Water Feature
Some wildlife will
stop by your pond
for a drink, while
others will make
it their home.
All living things need water to survive,
so a small pond is a surefire way to bring
more pollinators and other wildlife to your
garden. Galvanized-metal stock tanks
make excellent container ponds, according
to Melissa Will at Empress of Dirt. She
recommends situating your garden pond in
a location with access to a GFCI electrical
outlet for powering a recirculating pond
pump and near an outdoor water spigot
for topping up the pond. Choose a pump
sized appropriately for the volume of
water your stock tank holds and with
any attachments you may want, such as
a bubbler or fountain spray. Add hardy
aquatic plants in the pond, using bricks,
rocks or other materials to hold them at
their preferred depths in the water. Plant
layers of greenery around the tank to help
it blend into your garden. Just be sure to
arrange elements thoughtfully to ensure
any creatures can get in and out of the
pond safely.
DESIGNED AND PHOTOGR APHED BY MELISSA WILL OF
EMPRESSOFDIRT.NE T.
Assemble Butterfly Waterers
Invite a variety of butterflies to your garden by providing
them with a safe sipping spot. These colorful pollinators enjoy
“puddling” in wet areas to take in liquid and dissolved minerals,
but they cannot land on water. Shallow vessels filled with a small
amount of water, plus optional sand and rocks, allow butterflies to
perch while visiting—and they make a pretty garden focal point.
STEP 1 Choose ceramic dipping bowls in flower and leaf shapes
and then gather appropriate-size hardware. For each waterer,
you’ll need a flat metal washer that fits inside the recessed area
on the underside of the bowl, a length of ¼" copper pipe that is
hollow and a long flat-head screw that is slightly smaller than the
pipe interior for a snug fit.
STEP 2 Feed each screw through a washer and apply a waterproof
adhesive around the opening. Let dry.
STEP 3 Place the bowls facedown on a flat surface. Lightly sand
the recessed area with sandpaper and then cover it with silicone
or waterproof glue. Press the screw head and washer into the glue.
Apply additional adhesive over the washer. As the adhesive dries,
make sure the screws remain vertically straight.
STEP 4 Insert the screw secured to the base of each bowl into
the top of a copper pipe. Add adhesive around the screw before
inserting it to stabilize the pieces or to permanently attach them.
STEP 5 Choose a sunny, protected area in your garden for the
watering station. To avoid bending the lightweight copper, use a
screwdriver to create pilot holes in the ground before inserting the
pipes. Add water to the bowls as well as sand and rocks if desired.
Summer 2024 101
Clever
Container
Makeovers
Think outside the box, bottle or
basket to refashion inexpensive
everyday containers as novel
home accessories.
1
Berry Basket Planter
The classic shape of a berry basket
makes for a cute hanging planter. Using
a paper punch, make a hole on each side of all
four corners of a molded fiber berry basket. Put on
gloves and spread adhesive grout mix evenly over
the entire basket, inside and out. Clear open areas
and holes and let dry. Apply additional layers of
grout mix if necessary; the container should feel
stronger and firm to the touch when dry. Thread a
length of twine through the holes in the top rim and
tie the ends in a tidy knot. Cut four even lengths of
twine and knot one end of each to the twine on the
inside corners of the container. Gather the other
ends together and tie in a single knot. Use hot glue
or silicone to attach the bottom of a short plastic
cup to the bottom of the basket as a waterproof
liner. Add soil and a low-growing plant. Fill in
around the cup with moss or excelsior. Hang your
planter on a protected patio or covered porch.
2
Woven Basket Mirror
Reinvent a retired basket as a farmhouse wall mirror.
Start by applying a gray paint wash over the basket if
desired. When dry, add small areas of a lighter gray paint wash to
highlight the woven texture. If your basket is recessed in the center,
attach a beveled round wood plaque, facedown, with silicone or hot
glue to even out the depth and provide a larger area for securing the
mirror. Apply hot glue or silicone to the underside of an appropriatesize mirror or mirrored candle plate and press into place. Add a
weighted item to the center until set. Create a hanger by attaching a
loop of sturdy wire through the top back of the woven frame.
Summer 2024 103
4
3
Cloche Basket Pendant Light
Reassign a wicker cloche basket from protecting plants in the
garden to illuminating an outdoor dining area. Fabiana of Ciao
Newport Beach suspended hers from an olive tree in her backyard. To
power the fixture, an extension cord runs discreetly from the light, down
the tree trunk and to an outdoor outlet. Choose a cloche basket for your
project and install a plug-in pendant light kit through the small opening at
the top. Secure the kit’s cord from a branch or other overhead feature to
hold the fixture in place.
Spice Jar Mini Vase
Turn an empty spice bottle
into a charming bud vase for
fresh-cut blooms. Create holes in the metal
lid to accommodate flower
stems using a drill or a
metal punch. Hammer
down any jagged
edges. Use a sponge
brush to apply matte
metallic silver paint to
the lid. When dry, dab
small amounts of lighter gray
paint over the silver. Apply painter’s tape
around the bottle about 1" from the bottom
and then paint the area below the tape as
you did the lid. Remove the tape and allow
the paint to dry. Embellish the neck of
the bottle by wrapping with thin wire and
attaching a metal dragonfly.
DESIGNED AND PHOTOGR APHED BY FABIANA OF CIAONE WPORTBE ACH.BLOGSPOT.COM.
DESIGNER
HINT
Before painting,
be sure the bottle
is completely
free of labels and
adhesive. Acetone
works well to
remove glue.
6
Rustic
Crate
Cooler
Put summer party beverages on ice in
a patriotic DIY cooler like this one from
Camilla Fabbri of Family Chic. Lightly
sand a large wood crate and then
apply white chalky-finish paint to the
exterior and interior. Once dry, lightly
sand the painted finish for a distressed
look. Paint a vintage cast-aluminum
eagle wall mount and attach it to the
front of the crate with screws. To hold
a waterproof liner, secure an adhesive
plastic trash bag cinch at each interior
top corner of the crate. Fold or roll
down the top of a 50-gallon clear
plastic trash bag to fit the depth. Tuck
the top edges into the cinches. Fill the
crate with ice and beverages.
DESIGNED AND PHOTOGR APHED BY CAMILL A FABBRI OF
FAMILY-CHIC.COM.
5
Cloth-Wrapped Storage Boxes
Start collecting cardboard shipping boxes now to make these
crafty storage boxes from Kati Farrer at Crafting my Home.
STEP 1 For each cardboard box, cut two pieces of canvas drop-cloth
material that will cover the right and left sides, adding 2" to the width
and height of both. Also cut one long piece that will cover the front,
bottom and back of the box, adding 2" to the length and 1" to the width.
Iron a crisp ½" seam on each side of the front/bottom/back piece.
STEP 2 Apply a heavy coat of spray adhesive to the wrong side of
one canvas side piece. Center it on the side of the box and fold
over the extra 1" all around. Cut notches at the bottom to allow
the corners to lay flat. Repeat to attach the other side.
STEP 3 Apply spray adhesive to the wrong side of the front/
bottom/back piece. Line up the piece so there is a 1" overhang
on the top and it is centered on the front of the box. Press into
place and then rotate the box to attach the canvas to the bottom
and then the back. Fold over the overhang inside the box.
STEP 4 Secure any loose areas with hot glue. Cover the raw
edge of the canvas inside the box with a glued-on ribbon. Add
cotton rope handles and a custom iron-on label if desired.
CLOSET
HELPERS
Kati applied
script labels to
help keep clothes
organized in her
bedroom closet.
DESIGNED AND PHOTOGR APHED BY K ATI FARRER OF CR AF TINGMYHOME.COM.
Summer 2024 105
ts
en
es
r
p
Q U I LT | C R O C H E T | C R A F T S | N OTI O N S
Honeybloom Layer Cake
42/pkg.
100% Cotton. 10" squares. 42/pkg.
Honeybloom Designed by 3 Sisters
for Moda.
281053 $47.99
Home Sweet USA Cross Stitch Pattern
Create a piece of farmhouse-style decor with this
stylish design, complete with a full alphabet for easy
personalization.
AX00646 $5.99
Good Old Days Table Runner Pattern
Here’s a fun new twist to the traditional Log Cabin
pattern. Use cheerful 1930s reproduction fabrics to
make a joyful look for your table.
YQ02250 Print $8.99
AQ02250 Download $6.99
Ombre Wall Hanging
Crochet Pattern
Stitch this modern
farmhouse-style wall hanging
using worsted-weight yarn and
a size H/5mm crochet hook.
RAC3232 $4.99
Farmhouse Chicken
Trivet Crochet Pattern
This crochet chicken trivet potholder
makes the perfect farmhousestyle accent for the kitchen
counter, dining room table,
or part of a themed
centerpiece.
RAC3528
$5.00
ANNIE’S
SIGNATURE DESIGNS
Farmhouse Granny
Afghan & Pillow
Crochet Pattern
A new take on the classic
granny square afghan!
Y886471 Print $8.00
A886471 Download $6.00
Sweet ‘N Sharp
Macaron
Sharpen your needles on this
pretty pastel macaron! 1/pkg.
148079 $11.99
Hanging Garden Shelf Kit
Monogram Barn Quilt Kit
Patriotic Signs Kit
Assemble classic all-American signs with a modern
farmhouse twist!
KFHS023 $19.99
Special $6.99
Annie’s Tiger Cat Meow Mug
A cute tiger cat mug to use for your
morning coffee mug or as a gift for a friend!
411610 $9.99
Make a farmhouse-fresh piece of decor, customized
for your home!
KCWC177 $19.99
Special $6.99
Build a rustic hanging shelf for your favorite
succulents or herbs!
KFHS021 $19.99
Special $6.99
Annie’s
Wild About
Crafting
Reusable Tote
Take your craft
supplies with you
wherever you go
with this market tote!
T20049 $6.99
Annie’s Zipper Pouches
2/Pkg.
Handy bags for a handy crafter!
T20042 $7.99
Scan code to
purchase any of
these products at
Annie’s Craft Store.
Bee’s Wax Polish
Made with natural beeswax,
this spray keeps wood from
drying out and is used to
clean, protect, preserve and
restore furniture.
6531 $12.99
A N N I E S C R A F T S TO R E .CO M
Summer 2024 107
Blue Ribbon
Whether you’re headed to the fair, a potluck
or your dining room, these dishes will earn
you plenty of praise and maybe even a prize.
S’MORES CHOCOLATE CHIP
COOKIES
Makes 24 cookies
Reminiscent of a favorite campfire treat, these soft and chewy cookies
earned Heather Alemu of My Sweet Precision first prize in a baking
competition.
INGREDIENTS
For Dough
2¼ cups all-purpose flour
For Topping
½ cup chocolate chips
1 teaspoon baking soda
1 cup miniature marshmallows
1 cup butter, softened
2 sheets graham crackers,
broken into pieces
¾ cup brown sugar, packed
¼ cup granulated sugar
1 box vanilla instant pudding
mix (3.4 ounces)
2 eggs, room temperature
1 teaspoon vanilla extract
2 cups chocolate chips
INSTRUCTIONS
1. Sift together flour and baking soda in a medium bowl and then
set aside.
2. In a large bowl, cream together butter, brown sugar and
granulated sugar. Beat in instant pudding mix until blended. Stir
in eggs and vanilla. Blend in the flour mixture. Finally, stir in
chocolate chips.
108
Country Sampler Farmhouse Style
3. Cover the dough and chill for 2 to 3 hours or overnight. Before
baking, remove dough from the refrigerator and allow to warm at
room temperature for 20 minutes.
4. Preheat oven to 350°F. Line two large baking sheets with
parchment paper and set aside.
5. Roll 1½ tablespoons of dough into balls and place on
baking sheets. Bake for 10 minutes and remove. Press some
marshmallows, chocolate chips and graham cracker pieces into
each cookie and return to the oven for 2 minutes.
6. Remove cookies from the oven and immediately use a kitchen
torch to brown the marshmallows and graham crackers.
7. Allow cookies to cool on the sheets for 10 minutes and then
remove to a wire rack to cool completely.
PHOTOGR APH AND RECIPE BY HE ATHER ALEMU OF MYSWEE TPRECISION.COM.
EASY AND FAST
CINNAMON TWIST LOAF
Serves 12
You’ll score big points if you make this delicious treat from
Emily Barlow at Handmade Farmhouse. The glaze melts
onto the twist beautifully and creates a sweet topping to
complement the filling.
INGREDIENTS
For Dough
1½ cups warm water
1 tablespoon dry active yeast
2 tablespoons granulated sugar
3½ cups all-purpose flour
1 teaspoon salt
For Filling
2 tablespoons salted butter, melted
2 teaspoons cinnamon
⅓ cup packed brown sugar
For Glaze
1 cup powdered sugar
4 tablespoons butter, room temperature
3–4 tablespoons heavy cream
INSTRUCTIONS
1. In the bowl of a stand mixer, combine warm water
with yeast and sugar. Stir together and allow to proof
for about 5 minutes or until foamy.
2. Add flour and salt to yeast mixture. Mix on medium
speed until well combined. Dough should be smooth
and elastic. Turn dough onto a floured counter. Allow
to rise covered with a tea towel for about 10 minutes.
3. Sprinkle flour on top if the dough is sticky. Roll
dough into a 10" x 12" rectangle. Brush with melted
butter. Sprinkle and spread cinnamon and brown
sugar to cover the dough.
4. Roll dough lengthwise as if you were preparing
cinnamon rolls. Place roll on a baking sheet lined
with parchment for easy cleanup.
5. With a sharp knife, make a long slice down the
center of the roll, leaving about ½" uncut at one end.
With the cut side up, twist the dough ropes together
and then tuck the ends under.
6. Cover with a tea towel and allow to rise for 20
minutes. Preheat oven to 375°F.
7. Bake for 23 to 25 minutes or until lightly golden.
Allow twist to cool for 10 to 15 minutes before adding
buttery glaze.
8. Mix glaze ingredients together and pour over the
slightly cooled twist.
The tighter you roll your
dough, the more layers your
twist will have once cut.
PHOTOGR APH AND RECIPE BY EMILY BARLOW OF HANDMADEFARMHOUSE.COM.
Summer 2024 109
DOUBLE CHOCOLATE
PECAN PIE
Serves 6–8
This decadent pie from Fabiana of Ciao Newport
Beach always gets top marks! It requires no corn
syrup and uses chocolate chips twice—melted
and whole—for rich, chocolatey flavor.
INGREDIENTS
1 pie crust (9"), unbaked
2 cups semisweet chocolate chips, divided
2 eggs
⅛ teaspoon salt
½ cup firmly packed brown sugar
1 cup chopped pecans
12 pecan halves
INSTRUCTIONS
1. Preheat oven to 375°F.
2. Par-bake pie crust for 8 minutes.
3. Melt 1 cup chocolate chips over double
boiler filled with hot water (not boiling) on
bottom. Remove from heat and let cool to
room temperature, about 5 minutes.
4. In a small bowl, combine eggs and salt.
Beat until very thick and lemon colored,
about 5 minutes. Gradually beat in brown
sugar, a little at a time. Slowly blend in
cooled melted chocolate.
5. Stir in chopped pecans and the
remaining 1 cup chocolate chips. Pour into
par-baked pie crust. Decorate the top with
pecan halves.
6. Bake for 20 to 24 minutes.
7. Serve hot or cold, with whipped cream or
ice cream.
PHOTOGR APH AND RECIPE BY FABIANA OF CIAONE WPORTBE ACH.
BLOGSPOT.COM.
110
Country Sampler Farmhouse Style
PRIZE-WINNING
RHUBARB CRUMBLE
Serves 8
With its mix of fresh berries, tangy rhubarb and crisp topping, it’s no
wonder a version of this dessert once won a $5,000 prize. Amanda Davis
of Amanda’s Cookin’ got the original recipe from Pat Harmon, a “recipe
contester” who is a member of the recipe Facebook group connected with
Amanda’s blog.
INGREDIENTS
For Filling
2 cups rhubarb, cut into
1" pieces
For Topping
1 cup all-purpose flour
2 cups fresh strawberries,
sliced
½ teaspoon salt
1 cup fresh blueberries
1½ cups granulated sugar
2 tablespoons cornstarch
½ cup granulated sugar
⅓ cup sliced almonds
1 large egg
3 tablespoons unsalted butter,
melted
1 tablespoon balsamic vinegar
INSTRUCTIONS
1. Preheat oven to 375°F. Grease a 9" x 13" baking pan with butter
or cooking spray.
2. In a large bowl, combine rhubarb, strawberries and blueberries.
3. Add sugar, cornstarch and balsamic vinegar. Toss and stir until
fruit is well coated.
4. Place sugared fruit mixture into prepared pan and set aside.
5. Mix together flour, sugar, salt and sliced almonds. Stir in egg
until crumbly. Toss with your fingers to make sure the topping
mixture is completely combined.
6. Crumble topping over the sugared fruit in the pan. Drizzle with
melted butter.
7. Bake for 35 to 40 minutes or until topping is golden brown and
fruit mixture is bubbly.
8. Let cool until slightly warm. Serve topped with vanilla ice cream.
PHOTOGR APH AND RECIPE BY AMANDA DAVIS OF AMANDASCOOKIN.COM.
Taste of the County Fair
Want a blue ribbon of your own? Enter your best recipe in the county fair! Since the early 1800s, local agricultural
fairs have been a venue for people of all ages to come together to socialize, share information, and engage in friendly
competition. There is usually a division for adults as well as one for children. Follow the tips below to join in the fun!
Start at your county fair board. Most will have a physical
office or a website. Look for a “fair book,” published annually
to provide current entry rules, categories, instructions,
awards and more.
Pick an entry category. Using the fair book as a guide,
choose your best recipe that fits one of the categories
to be judged. Food competitions are often grouped into
departments such as Bakery Goods, Main Dishes, and
Preserved Foods. Those are broken down further as needed;
for example: Bakery Goods-Cakes-Layer Cakes-Carrot Cake.
Review the fine print. The book will give instructions for
how your entry must be prepared and when, where and how
it must be presented. Follow the rules exactly. Also review
any explanation of judging; for example, Bakery Goods
might be judged on shape, size, flavor, texture and lightness.
Prepare your entry and cross your fingers. Test your recipe
multiple times so it will come out perfect for fair day. Once
it’s safely delivered, browse the other entries and talk to the
other exhibitors. Even if your entry doesn’t win, you’re sure
to pick up helpful tips and make some new foodie friends.
Summer 2024 111
SHOWSTOPPING CARROT CAKE
Serves 15–18
Karri Perry from Blue Ribbon Favorites says this recipe is a two-time Best
of Show fair winner! It’s a perfect make-ahead dessert because the flavor
and texture are even better the next day.
INGREDIENTS
For Cake
2 cups all-purpose flour
2 teaspoons baking soda
2 teaspoons ground cinnamon
¼ teaspoon ground nutmeg
1 tiny pinch ground cloves
½ teaspoon salt
3 large eggs, room
temperature
For Frosting
2 sticks (16 tablespoons)
butter, softened
16 ounces cream cheese,
softened
2 pinches salt
4 teaspoons vanilla extract
6 cups powdered sugar
1 cup chopped toasted walnuts
2 cups granulated sugar
¾ cup vegetable oil
¾ cup buttermilk, room
temperature
2 teaspoons vanilla extract
2 cups finely grated carrot
1 can (8 ounces) crushed
pineapple, drained very well
½ cup flaked sweetened
coconut
1 cup chopped toasted walnuts
(optional)
INSTRUCTIONS
1. Preheat oven to 350°F. Line three 9" round cake pans with
parchment paper and lightly grease/spray. Set aside.
2. Stir together flour, baking soda, cinnamon, nutmeg, cloves and
salt. Set aside.
7. Let cakes rest on a wire rack for 10 minutes and then remove
from pans and discard parchment paper. Let cool to room
temperature.
3. In a large bowl with an electric mixer, combine eggs, sugar, oil,
buttermilk and vanilla, mixing until combined and smooth with no
oily puddles.
8. To prepare frosting, whip softened butter and cream cheese
until smooth and fluffy. Add salt and vanilla. Slowly mix in
powdered sugar until you reach a spreadable consistency. If
frosting is too thick, add 1 teaspoon milk or cream at a time until
desired consistency is reached.
4. Slowly add the flour mixture, stopping to scrape down the bowl.
Mix cake batter just until flour mixture is incorporated.
9. Spread frosting between the cake layers and a light crumb coat
on the sides and top.
5. Fold in grated carrot, crushed pineapple, flaked coconut and
chopped walnuts.
10. Chill cake in the refrigerator for 30 to 60 minutes and then
apply a final layer of frosting. Add walnuts to the sides for garnish.
6. Pour batter into prepared cake pans. Bake for about 30 minutes,
or until a toothpick inserted in the center comes out clean.
11. Refrigerate overnight, up to 24 hours, and then serve.
PHOTOGR APH AND RECIPE BY K ARRI PERRY OF BLUERIBBONKITCHEN.BLOGSPOT.COM.
If you don’t have buttermilk on hand,
add 1 tablespoon of lemon juice or vinegar
to whole or 2% milk for a quick substitute.
112
Country Sampler Farmhouse Style
BUY ONE, GET ONE
AND
%
200
$
OFF
OFF
1
Windows and Patio Doors!
AND
0 Money Down
$
TAKE AN
ADDITIONAL
Your Purchase
1
| $0 Monthly Payments | $0 Interest for 12 months
1
MINIMUM PURCHASE OF 4 – INTEREST ACCRUES FROM THE DATE OF PURCHASE BUT IS WAIVED IF PAID IN FULL WITHIN 12 MONTHS
TESTED, TRUSTED, AND TOTALLY PROVEN.
3
“My overall experience was great. I love the window,
and from sales to scheduling, the experience
was very good. The installers are highly skilled
professionals and I would recommend Renewal
by Andersen to all my contacts.”
LYNN F. | RENEWAL BY ANDERSEN CUSTOMER
Nation's Best
Warranty†
70%
MORE ENERGY
EFFICIENT IN
SUMMER2
KEEP THE COOL AIR IN AND THE HEAT OUT!
Solving your window problems and having a comfortable home
is easy and enjoyable when you choose Renewal by Andersen.
Take advantage of this great offer to save money on your window
project – and help save on high energy bills for years to come!
SmartSun
glass
Helps keep
the heat
out and the
cool in.
Offer Ends August 31
Call for your FREE consultation.
844-670-2756
FINDYOURWINDOW.COM
DETAILS OF OFFER: Offer expires 8/31/2024. Not valid with other offers or prior purchases. Buy one (1) window or entry/patio door, get one (1) window or entry/patio door 40% off, and 12 months $0 money down, $0 monthly payments, 0% interest when you
purchase four (4) or more windows or entry/patio doors between 4/20/2024 and 8/31/2024. 40% off windows and entry/patio doors are less than or equal to lowest cost window or entry/patio door in the order. Additional $200 off your entire purchase,minimum
purchase of four (4) required, taken after initial discount(s), when you purchase by 8/31/2024. Subject to credit approval. Interest is billed during the promotional period, but all interest is waived if the purchase amount is paid before the expiration of the promotional
period. Financing for GreenSky® consumer loan programs is provided by federally insured, federal and state chartered financial institutions without regard to age, race, color, religion, national origin, gender, or familial status. Savings comparison based on purchase
of a single unit at list price. Available at participating locations and offer applies throughout the service area. See your local Renewal by Andersen location for details. CA License CLSB #1050316. Central CA License #1096271. License #RCE-50303. OR License
#198571. WA License #RENEWAP877BM. WA License #RENEWAW856K6. FL License #CGC1527613. All other license numbers available upon request. Some Renewal by Andersen locations are independently owned and operated. 2Values are based on comparison
of Renewal by Andersen® double-hung window U-Factor to the U-Factor for clear dual-pane glass non-metal frame default values from the 2006, 2009, 2012, 2015, and 2018 International Energy Conservation Code “Glazed Fenestration” Default Tables. 3Based
on testing of 10 double-hung units per ASTM E2068 20 years after installation. ‡Review aggregator survey of 5-star reviews among leading full service window replacement companies. December 2022 Reputation. †It is the only warranty among top selling window
companies that meets all of the following requirements: easy to understand terms, unrestricted transferability, installation coverage, labor coverage, geographically unrestricted, coverage for exterior color, insect screens and hardware, and no maintenance requirement.
Visit renewalbyandersen.com/nationsbest for details. “Renewal by Andersen” and all other marks where denoted are trademarks of their respective owners. © 2024 Andersen Corporation. All rights reserved. RBA13821
*Using U.S. and imported parts.
1
NEW! Bring country
to your walls, naturally.
Our new wall decor brings country beauty,
whimsy, and calm to your home. Shop large
format to create impact or smaller format for
accent. Framed in natural wood.
Home Canvas - Framed 33x23, $139.95
Leaves Art Canvas - Framed 23x33,
$139.95
Floral Art Canvas - Framed 14x14, $55.95
Brown & White Highland Cow with Flowers Framed 25x25, $79.95
Leaves Canvas - Framed 18x24, $74.95
Old Country Church 2 - Framed 25x25, $79.95
Floral Art Canvas - Framed
23x33, $39.95
Gumdrop Sam
Vintage
Santa14x14, $55.95
Live in the Moment Canvas
- Framed
Products represented are either traditional
printed canvas or printed artwork affixed to
masonite board backing, framed in natural
barnwood or maple. Other sizes and styles
available. Images not shown to scale.
Small Bird on Branch - Framed 16x10, $31.95
countryvillageshoppe.com
1.888.380.1799
144 Mall Drive, Appleton, WI 54913