/
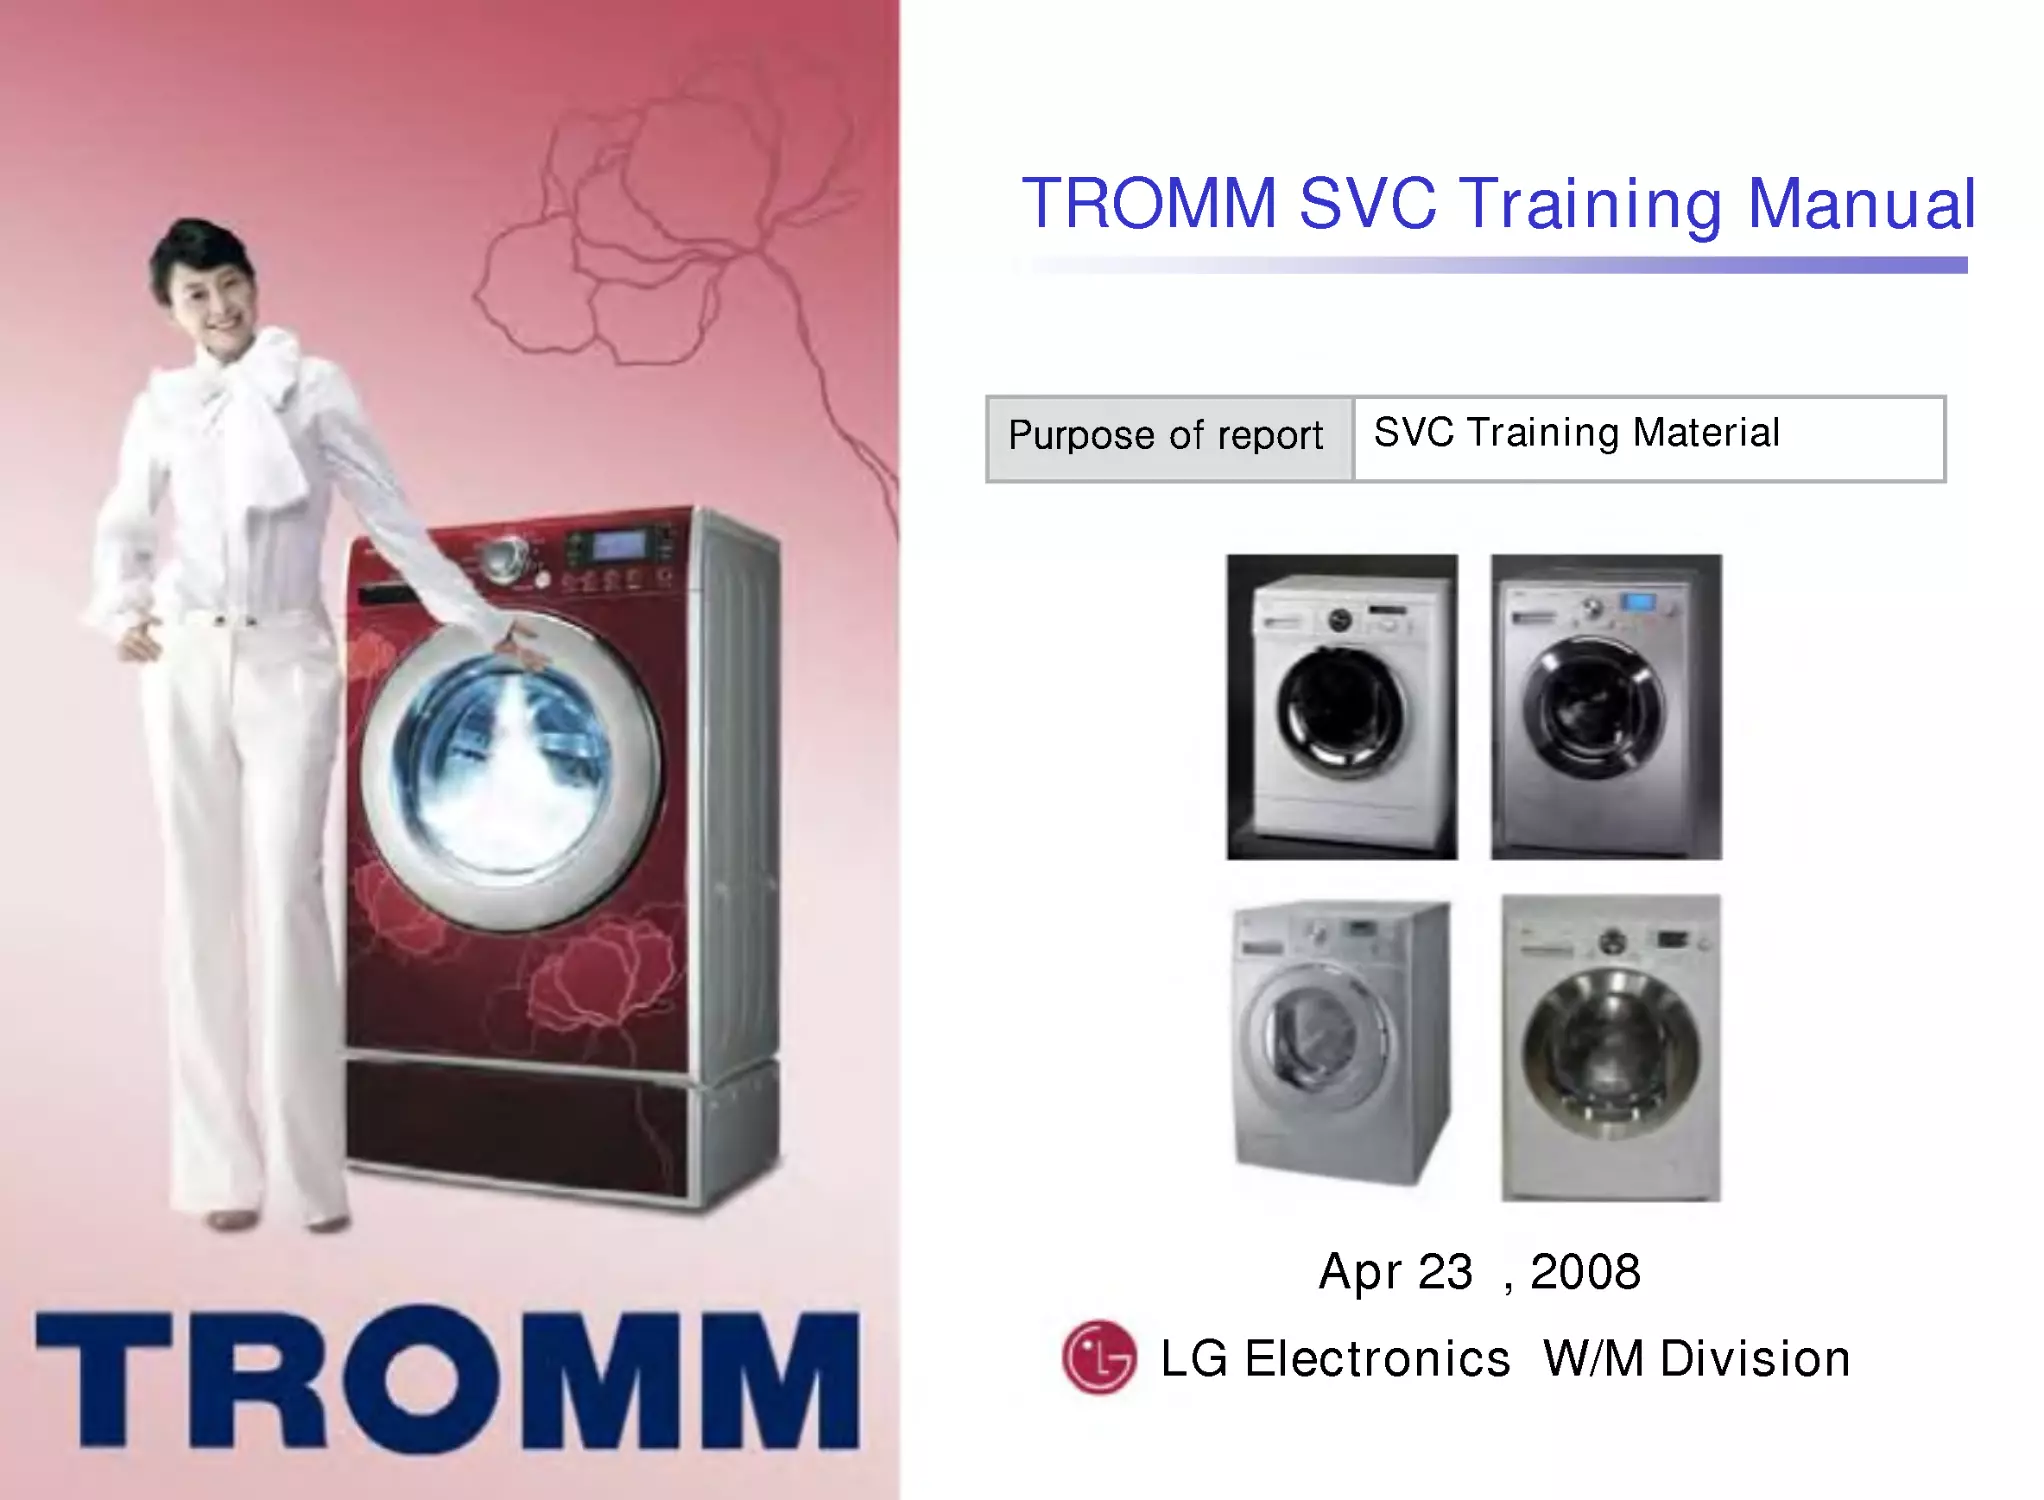


Tags: training manual washing machines household electronics electrical appliances
Year: 2008
Text
                    LG Electronics W/M Division
TROMM SVC Training Manual
Apr 23 , 2008
SVC Training Material

Model number
Motor Type
Size, Sourcing,
Dry (R,A)
Serial No.
Tool & Look
Spin rpm
Size, Sourcing
< Before Function>
- B : 27" Wash Only (include with 25")
- F : 24" (Depth 60cm) Wash Only
- R : 24"(Depth 60CM) over Washer & Dryer
-T:24"( " 55cm)WashOnly
-N:24"( " 44cm) "
-S:24"( " 34cm) "
<Additional Function>
- A : 24"( " 55cm) Washer & Dryer
- C : 24"( " 44cm) Washer & Dryer
- E : 24"( " 34cm) Washer & Dryer
Motor Type
-D:DDmotor
-F,U:Unimotor
-B:BLDCmotor
200606-M-1

구
분
Tool
No.
PJT
Look
Motor
Model
출시
2/3
B
Uni.
BLDC
WD-1021WF/WD-1223FB
WD-1041WFH WD-1042FH WD-1045FH
WD-1243FH WD-1245FHB
WD-1050FHB WD-1055FHB
WD-1253FHB WD-1255FHB
WM-1260FHB WM-1265FHD
WM-1460FHD WM-1465FHD
WM-1170FHB WM-1175FHB
WM-1370FHB WM-1375FHB
WM-1280FHD WM-1285FHD
WM-1480FHD WM-1485FHD
WM-1090FHB WM-1095FHB
WM-1290FHB WM-1295FHB
WD-16100FD/WD-16105FD
98.2
4C
Uni.
BLDC
98.2
5D
Uni.
BLDC
99.5
6T
A
1
DD
00.6
7F
BLDC
DD
01.1
8T
A
2
DD
01.3
9
G
(DC5)
BLDC
01.6
10
TA
LCD
DD
02.1
Model List and Design
Model Design
200606-M-2
General 1/28

구
분
Tool
No.
PJT
Look
Motor
Model
출시
11
TA
LED
DD
WD-16110FD/WD-16115FD
WD-16112FD/WD-16117FD
WD-16120FD/WD-16125FD
WD-14124RD/WD-14126RD WD-12120ND
WD-10130F
WD-10130N(T)
WD-13150FB/13155FB
WD-10150S(N,T)
WD-10160F
WD-10160S(N,T)
WD-12170S(N,T)D
WD-10180S(N,T)
02.1
12 KGD2
DD
02.2
13 Swing
Uni.
02.3
14
Alexander
Bellagio
DD
15
Blue
Bird
BLDC
Uni.
02.6
16
Elan
Uni
02.11
17
Tzar
DD
DD
02.10
18
Tzar
Uni
Uni
02.10
Model List and Design
Model Design
200606-M-3
General 2/28

구
분
Tool
No.
PJT
Look
Motor
Model
출시
19 Colombus1
DD
WD-12190BD/12195BD
WD-12200TD
WD-12210BD/12215BD
WD-12210RD
WD-16220FD/16225BD
WD-13230FB/13235FB
WD-10230N(T)
WD-10240F
WD-10240N(T)
WD-10260N(T)
WD-80250N(T)
03.12
20
Tzar2
DD
04.9
21 Colombus2
DD
03.1
22
TRIO
DD
03.7
23
Corona
(다국어)
BLDC
03.7
24
Sweeper
Uni
03.7
25
Luna
Uni
04.5
26
Mir
Uni
03.8
Model List and Design
Model Design
200606-M-4
General 3/28

구
분
Tool
No.
PJT
Look
Motor
Model
출시
27
May
flower
DD
WD-12270BD/12275BD
WD-12270RD
WD-90280BD/90282BD
WD-10290N(T)P
WD-10300N(T)P
WD-14310FD/14315FD
WD-14311RD/14316RD
WD-12320BD/12325BD
WD-12320RD
WD-16330FD/16335FD
WD-12330ND
WD-14330AD/14335AD
WD-16340FD/16345FD
WD-12340ND
04.2
28 Hudson
DD
04.3
29
PN1
Uni.
03.3
30
PN2
Uni.
03.3
31 Fantasy
DD
04.2
32
EPIC
DD
04.2
33
Viking
LED
(다국어)
DD
04.9 / 05.8
34
Viking
LCD
(다국어)
DD
05.1
04.11
Model List and Design
Model Design
200606-M-5
General 4/28

구
분
Tool
No.
PJT
Look
Motor
Model
출시
35
Erik
(다국어)
DD
WD-16350FD/16355FD
WD-14360TD
WD-12360ND
WD-14375FD
WD-14370FD(TD)
WD-14380TB
WD-12390TD
WD-14390TD
WD-16690FD
WD-16400FD/14400TD
WD-14400TB
WD-16420FDS
WD-14420FDS
WD-16440FDS
WD-14440FDS(TDS)
WD-14440RD
05.3
36
STAR
DD
04.8
37
HI-Five
LCD
DD
`06.1
38
Euros
BLDC
05.3
39
Mega
Uni.
DD
05.4
40
Ladon
DD
BLDC
05.6
42
Baikal
LCD
DD
`06.1
44
Baikal
LED
DD
`06.1
Model List and Design
Model Design
200606-M-6
General 5/28

구
분
Tool
No.
PJT
Look
Motor
Model
출시
47
Tiffany
DD
WD-12470BD
WD-12470RD
WD-10480TU/NU
WD-12480TU
WD-14480TU
WD-10490TU
WD-12590BD
WD-14570FD
WD-14570RD
WD-12650TU
'06.5
48
Konsul
+Best
Uni
06.1
49
Konsul
+Better
Uni
06.1
59
Elf
DD
`07.4
57
Hi-Five
LED
DD
`06.1
65
Konsul
8kg
Uni
07.3
Model List and Design
Model Design
200606-M-7
General 6/28

Model number
Model Design
Size, Dry
- F : 24" (Depth 60cm ) Wash Only
-T:24"( " 55cm)WashOnly
-N:24"( " 44cm) "
-S:24"( " 34cm) "
- R : 24"(Depth 60CM) Washer & Dryer
- A : 24"( " 55cm) Washer & Dryer
- C : 24"( " 44cm) Washer & Dryer
- E : 24"( " 34cm) Washer & Dryer
Motor Type
-D:DDmotor
-F,U:Unimotor
-B:BLDCmotor
200701-M-1
F means Front Loader
General 7/28

Model Design
200703-M-2
Model number
Prime
LCD(02)
Prime
LED(03)
Steam O
Steam X
Steam O
Steam X
RMOåM
RMXåS
RMOåH
RMXåNone
RMOåM
RMXåS
RMOåH
RMXåNone
F1402FDM
F1402FDS
F1402FDH
F1402FD
F1403FDM
F1403FDS
F1403FDH
F1403FD
example
General 8/28

구
분
Tool
No.
PJT
Look
Motor
Model
Remark
01
Next
DD
F1201FD
F1402FDS
F1403FDS
F1305FDM
F1406TDS
F1407TDS
F1408TDS
07.4
02
PRIME
LCD
DD
08.01
03
PRIME
LED
DD
08.01
04
Tiffany2
LCD
DD
Domestic
05
Triton
DD
N.America
06
Hi-Five
Refresh
LCD
DD
08.01
Capa up
Allergy Care
07
Hi-Five
Refresh
LED
DD
08.01
Capa up
Allergy Care
08
Baikal
Refresh
LCD
DD
08.01
Capa up
Allergy Care
Model List and Design
Model Design
200703-M-3
General 9/28

구
분
Tool
No.
PJT
Look
Motor
Model
Remark
09
Baikal
Refresh
LED
DD
F1409TDS
F1409QDS
F1211N(T)DR
F1212N(T)DR
F1210N(T)DP
08.01
Capa up
Allergy Care
10
Tiffany2
LED
DD
Domestic
11
Harrier
LCD
DD
08.01
RA,Capa up
12
Harrier
LED
08.02
RA,Capa up
13
Harrier
LCD
DD
14
Universe
15
Colum
-bus 4
16
Macro
(LCD)
Model List and Design
Model Design
200702-M-4
General 10/28

구
분
Tool
No.
PJT
Look
Motor
Model
출시
17
Macro
(LED)
F1218N(T)D(R)
F1219N(T)D(R)
F1220N(T)D(R)
F1221N(T)D(R)
F1222N(T)D(R)
F1223N(T)D(R)
18
Viking
Refresh
LCD
DD
08.01
Capa up
19
Viking
Refresh
LED
DD
08.01
Capa up
20
Ladon
Refresh
DD
08.01
Capa up
21
Star
Refresh
DD
08.01
Capa up
22
Mega
Refresh
DD
08.01
Capa up
23
Erik
Refresh
DD
08.01
Capa up
24
Model List and Design
Model Design
200701-M-5
General 11/28

Technical Info.
Drum USP
World first no brush and no belt
Direct Drive Front Loader
Lowest Noise & Vibration Level
Direct Drive System
Longer Product Life
Low Noise and Vibration
Power is delivered directly to the drum
Powerful & reliable motor
Lowest vibration & noise
Optimum energy consumption
Low and Soft Noise
No Friction Noise
Washing : 52.9dB, Spinning : 66.4 dB
50
60
70
[dB], PWL
Wash
52.9
51.5
54
56.3
Spin HIGH
62.7
66.3
69.1
70
Spin Extra high
66.4
0
74.2
71.5
WM2032H KENMORE( MAYTAG(M
LG Tromm
200606-D-3
General 12/28

Conventional System
Direct Drive System
Low Noise
Quiet and durable motor
without brush & belt that
generates unpleasant
noise
Low Vibration
More stable Balancing
system by aligning axis
of Motor to the Drum
Technical Info.
Drum USP
Direct Drive System
Low Noise
Low Vibration
200606-D-4
General 13/28

Silent Cycle
[Conventional Motor]
LG Direct Drive
TM
Motor
Motor
DD Motor
Drum
Motor directly attached to centre of drum:
• Increased Stability, Minimal Vibration
• Less Noise -- no frictional noise
• Increased Durability -- fewer moving parts
• Increased Energy Efficiency -- direct power
onto dr
m
res lting in no loss of energy
~ 1600 max rpm
Belt Pulley Drum
Whenever you want to laundry~
even at night!
Whenever you want to laundry~
even at night!
General 14/28

Technical Info.
Drum USP
Optimum cycle time and
water amount is automatically
set by Fuzzy logic system.
Best wash performance
Water and electricity saving
Convenience - "Easy to Wash"
User gets...
8
Fuzzy Logic Control Process
200606-D-5
General 15/28

Technical Info.
Drum USP
Mechanical vs. Fuzzy Logic
Load
detection
Balance
Check
Balancing
High Spin
rpm
Balancing
Balance
Check
100
max
Feed-Back System
rpm
100
max
Too much Vibration
Fixed Spin
Time
Not enough High Spin Time
Not reached Max Spin rpm.
Gap of actual Performance of Spin
Automatic control of the Spin Time
Spin at 70dB
(normally)
Spin at 63dB
Conventional control (Mechanically control)
LG Fuzzy Logic control
Low Spin Performance
200606-D-6
General 16/28

Technical Info.
Drum USP
Suds-Free System -- LG, Miele, Bosch
Improve "wash" and "rinse" performance by detecting and removing excessive suds
in the drum
200606-D-8
General 17/28

Technical Info.
Drum USP
Circulation System
Drain Pump Circulation Pump
1) High wash performance
: prevents detergent loosing
2) Reduce wash time
: Moistens clothes quickly
3) Improve rinsing performance
: Spray system
4) High energy efficiency
: Reduces water consumption
Spray Nozzle
Inside
Of the drum
Principles
Principles
Operating
Operating
Benefits
Benefits
1) Moistness speed
:load (7kg)
Performance
Performance
Normal LG
12min
5min
2) Water consumption
Normal LG
75
49
:load (2kg)
Normal LG
55
32
Wash & rinse cycle
:load (7kg)
200606-D-9
General 18/28

1. BIO function
BIO function is possible to be selected at 60℃ or 95℃.
When BIO is selected, the water is heated to 40℃ for the first step, and then the
washing cycle is done at 40℃ for 15 minutes.
After 15 minutes, the water is heated to the selected temperature.
This function activates the enzyme in the detergent at 40 ℃ and
gives the best wash performance.
40℃
Temp
time
15 minutes
Wash
<fig 2 temp & time chart >
<fig 1 Example of WD-1270 >
Special Program
Explanation
Button sample
Program chart
Special program
200606-SP-1
General 19/28

2. Quick 30
Special Program
Explanation
Button sample
Program chart
This function is used when a customer wants to wash small amount of laundry in a short
time. "Wash cycle" is finished in 10 minutes and it does not do "Rinse spin". After finishing
"Drainage' it does "Water supply" again and does only a "Rinse" and a "Main Spin" in total
30 minutes.
Total 30 minute
Wash
Rinse Main Spin
<fig 2 Time chart >
<fig 1 Example of WD-1290 >
Special program
200606-SP-2
General 20/28

3. ECO
Special Program
Explanation
Economy course is selected when the customer wants to get a better wash
performance with lower energy consumption. Water temperature is
lower than selected, but wash time is increased automatically.
When 95℃ is selected, water is heated to 60℃
When 60℃ is selected, water is heated to 40℃
<fig 2 Comparison of white & white-eco >
<fig 1 Example of WD-1460 >
Temp
Time(M)
60℃
Normal
Economy
90℃
1.13kWh
2.74kWh
Energy
162 173
Button sample
Program chart
Special program
200606-SP-3
General 21/28

4. Hand wash
Special Program
Explanation
Button sample
Program chart
This function is for the laundry which normally has to be washed by the hand, like wool.
Wash cycle is done by cold water in the period of on / 3seconds & off / 50
seconds for 20 minutes.
A Rinse and a spin is done at 400rpm rinsing twice.
When No spin is selected, the intermittent spin of rinse is also skipped.
* No spin function is applied in Wool and Delicate course from new model.
<fig 2 Time chart >
<fig 1 Example of WD-1375 >
Wash cycle
3
50
3
50
3
50
3
50
Time(S)
Total 20 minutes
on
off
Special program
200606-SP-4
General 22/28

5. Pre-Wash
Special Program
Explanation
Button sample
Program chart
Use this option for load that need pretreatment. Add 16 minutes pre wash and drain.
-.When using Pre Wash option, do not use liquid detergent in the main wash comportment.
Use powder for the main wash.
Available in Cotton, Baby care.
<fig 2 Time chart >
<fig 1 Example of WD-1460 & 1290 >
Wash cycle
Time(S)
Total 16 minutes
on
off
Special program
200606-SP-5
General 23/28

6. Rinse+
Special Program
Explanation
Button sample
The "Rinse+" adds one more rinse on the basic rinse time.
The water level is higher than normal to get the better rinse performance.
For example, The basic rinse time in WHITES course is 3, rinse time becomes
4 times by selecting "Rinse+".
<fig 1 Example of WD-1460 >
Special program
200606-SP-6
General 24/28

7. Wrinkle free (Crease care)
Special Program
Explanation
The purpose is to prevent laundry from wrinkling.
After finishing main spin and during program, disentangling program is done.
rpm
Main spin
PUMP OFF
Disentangle
2 minutes
Disentangle
5 minutes
Disentangle
Wrinkle free
Wrinkle free
* Process : Drain -> Intermittent spin (400/600rpm) -> Disentangling 2 minutes
-> Intermittent spin -> Main Spin 3 minutes -> Remaining spin ->
Disentangling 5 minutes.
Program chart
Special program
200606-SP-7
General 25/28

8. Rinse hold
Special Program
Explanation
Button sample
Program chart
This function can be used when the customer wants to leave laundry in the machine
without spinning after it has been rinsed to prevent it from getting wrinkled.
To drain out the water, push "Start / Pause" button and then start spin.
Rinse hold
Wash
Rinse
Stop
1. Push "Start / Pause" button
2. Do the Spin course
To drain
water out
Special program
200606-SP-8
General 26/28

9. Child Lock
Special Program
Explanation
Button sample
Operation
To select or cancel 'Child lock', push simultaneously two buttons which have
'Child Lock mark' for 2 seconds. It can be set during operation , test mode and Power off.
When it works, 'CL' is displayed and all other functions are not selected.
( In the case of some new model, 'Power' button can be selected).
CAUTION If there a water in drum, don't open the door.
After the drain, open the door.
Special program
200606-SP-9
General 27/28

10. Time delay
Special Program
Explanation
Button sample
Preparing washing before using
-.Turn on the water tap
-.Load laundry and close the door
-.Place the detergent and fabric softener
in the drawer
How to set "Time delay"
-. Press the power button
-. Turn the program dial to select the program
you require
-. Press the Time delay button and set the
desire time, finally press the start button
11. Steam Wash
Explanation
Steam Wash is
-.For tough stained clothes, underwear,
or baby clothes.
-.Steam wash is available with Cotton,
Synthetic, Baby care cycles.
-.This option features upgraded washing
performance with lower energy.
-.Do not load delicates such as wool, silk,
and easily discolored clothes.
Button sample
Special program
< WD-14375/1457FD >
200606-SP-10
General 28/28

LG Electronics W/M Division
Prime SVC Training Manual
Apr 23 , 2008
SVC Training Material

Prime Specifications
Prime Specifications
Comparison
Item
F1202FDS /
F1402FDS
F1203FDS /
F1403FDS
WD-14420FDS/
WD-16420FDS
BOSCH
LOGIXX8
Tool
PRIME
PRIME
BAIKAL
LCD(46*60)
Not Apply
Picture
1,400
8kg
7.4 /kg
32 cm
Energy Rating
A++
A++
A+
Display
LCD(72*40)
LED
LCD/LED
Steam
Apply
Apply
Max. rpm
F1202FDS / F1203FDS : 1,200
F1402FDS / F1403FDS : 1,400
WD-14420FDS :
1,400
WD-16420FDS:
1,600
Dimensions
(W*D*H)
600*640*842
600*640*842
Capacity
9kg
8kg
Water
Consumption
6.5 /kg
6.5 /kg
Door Size
35 cm
30 cm
Prime 1/32

Prime Specifications
Prime Specifications
Big Capacity (9kg) 68L
New Drum
- Biggest Porthole(35cm)
Bosch(32cm)
Biggest Door
-Washing Performance
:The Biggest Drum(68L, Hoover 66),
å the Better W/Performance
: Duvet, Curtain Washable
Easy to Use
- Large LCD / LED
- Embossed Drum
å Less Crease (LG Only)
Easy to take out,
å Better Washing Performance
-LoadDetection
Capacity Display
Steam
Steam
-A++ Energy Rating
-Water Saving
-Refresh
-Allergy Care-Steam
-Waved Lifter:
å Better Washing Performance
Design
Various Colors
å Silver, Black, Titanium
Waved line design
Non Steam
 DD
-Low Noise, Vibration
-Medic Rinse
-Baby Care
Best Claim : 1. Capacity, 2. Door, 3. Effective Porthole, 4. New Drum
Best Claims
Prime 2/32

Prime Specifications
Prime Specifications
-Doorsize:φ34cm
.Position : 73cm from floor
* Fagor
* Candy
-Doorsize:φ35cm
.Position : 75cm from floor
* Hoover
- Door size & Door position
: same as present
- Big door & Tilted control
* Miele
-Door:φ35cm
.Position : 75cm from floor
Competitors- Big Capacity Models with Big Door Design
(30cm 35cm)
Biggest Door
Prime 3/32

Prime Specifications
Prime Specifications
World Largest Capacity in 24" full size - Drum Washer Development
̌ Base Model : Baikal
̌ Target Capacity : 64 (Baikal:60 )
Capacity
21
̌ How to increase
1. Drum Diameter : Same ( 484)
2. Drum Depth : Longer than20mm
- Gap between Tub~Cabinet : Same 21mm
Tool common use with Baikal :
Drum Front, Drum Back, Spider ASM
17.6
Baikal(307) +20
484( )
Drum
Prime 4/32

Prime Specifications
Prime Specifications
Display
LED Model
LCD Model
Prime 5/32

Prime Specifications
Prime Specifications
Special Functions
Tub Clean
Beep on / off
Change the
language
Prime 6/32

Prime Specifications
Prime Specifications
On Dispenser
Before
Prime
Prime 7/32

Item
Allergy Care
Baby Care
Steam Refresh
Purpose
Removal of Allergens
Removal of Protein
Stains
& remaining detergent
Crease Release
Odor Release
Fluffing the Clothes
Steam
Default
Option
Default
Application
Cold <Steam < 35℃
35 <Heater < 60℃
60℃=Steam
For better allergen
removal,
Steam is on around
60℃
Cold <Steam < 35℃
35 <Heater < 60℃
Only Steam On
Default Temp.( )
60℃
60℃
60~95℃ (Only available)
Temp
Variation( )
Only 60
40↔60↔95℃
No available
Default Rinse Default + 1 more cycle
Medic Rinse
No Rinse
Motor Motion
Normal
Gentle
Normal
Comparison
Steam Cycles
Steam Cycles
Prime 8/32

Allergy Care
Baby Care
Steam Cycles
Steam Cycles
Removal Of Allergens
- House Mite / Fur of Pets / Pollen / Bacteria / Germ
Communication
Step 1 : Allergen Sanitization
Miniscule steam(1/1600 of water size) penetrates into
each corner of clothes fiber and sanitizes allergen.
Detergent Water Circulation loosens allergen from
clothes and steam keeps optimal temperature, or 60℃
for allergen Dissolution
Step 2 : Allergen Dissolution
4 Step Power Rinsing Cycle and Pounding Washing Action
completely separates allergen from clothes
Step 3: Allergen Removal
High Spinning Power drains Allergen out
Step 4: Allergen Removal
Prime 9/32

Removal of Protein stains
(blood, skin dirt, chocolates etc..)
Minimizing detergent residue for baby skin care
- Medic Rinse System (Warm Rinse)
Gentle Care for delicate clothes fabric protection
- Ultra Gentle Washing Action
Allergy Care
Baby Care
Steam Cycles
Steam Cycles
The purpose of this option is to minimize detergent residues
after the whole cycle, In order to implement this effect, the
washer adds 1 more rinsing and keeps the optimal water
temperature at last rinsing cycle, that is, 40 to have
detergent-free clothes.
Medic Rinse?
Communication
Prime 10/32

Crease Release
Odor Release
Fluffing the
Clothes
Communication
Steam Refresh
Steam Cycles
Steam Cycles
No time to wash your shirt, but you have an important
meeting? Simply pop it into the washing machine and
activate the Steam Refresh Course, which releases
wrinkles and odor making your shirt fresh with no fuss.
Prime 11/32

Heater
Water
Steam
Container
Continuity Steam Injection
Steam Structure
Steam Structure
Steam
Generator
Water Hose
Steam Hose
Steam Injection Nozzle
Dual Spray System
Steam
Generator
Highly-concentrated
Detergent Water
Circulation
Spray
Nozzle
Prime 12/32

Steam Structure
Steam Structure
* Inlet Valve : Water supply into the TSG(Turbo Steam Generator)
* Water Low Level Sensor : Senses low level of water supply.
* Water High Level Sensor : Senses high level of water supply.
* Thermistor Assembly : Senses water temperature of TSG.
* Empty Water Level : Controlled by Long Water Level Sensor.
* Full Water Level : Controlled by Short Water Level Sensor.
Functions
SVC Method
*
*
* TSG : Turbo Steam Generator
TSG(Turbo Steam Generator) SVC is
provided as assembly only.
Be cautious of hot water inside TSG during
SVC to avoid burn injuries.
To prevent from water dropping and spilling,
use a large towel under the TSG
Prime 13/32

Steam Cycles
Steam Cycles
Test Mode
Press the Button
Displayed Information
Remark
Intensive + Rinse
Water Level Sensor : long electrode (low level)
Intensive + Option(R)
Water Level Sensor : short electrode (high level)
Intensive + Temp
Temperature of inside TSG
Steam + Option(R) : 5 times
Heater Error
If initial heating temperature difference is 4
for 2 minutes,
then change to normal course.
Change TSG Assembly.
Water remains : below 150
No Water : over 150
Steam + Option(R) : 1 time
"00" displayed is o.k
Steam + Option(R) : 2 times
If AG temp is above 116 ℃,
then change to normal course
.
Steam + Option(R) : 3 times
Water Level Sensor error
If water level in long electrode >150(No water)
,and water level in short electrode<150( overflow) for
2 seconds,then change to normal course.
Check inlet hose connections
Steam + Option(R) : 4 times
Water Inlet Error
If water level in short electrode is over 150
for more than 1 minute,
then change to normal course.
Check inlet Valve.
Check connection of Valve.
Intensive+Temp
Intensive+Rinse
Intensive+Option(R)
Steam + Option(R)
*
* TSG : Turbo Steam Generator
Prime 14/32
Press & Hold for 3 sec.

How to Demonstration
Press the Button
Press the Button
'
Press the Button
again,
'
*Repeat 10 cycles for 150 minutes.
(For demonstration, needs water supply)
*If you have some problems,then check by "Test Mode".
Steam Cycles
Steam Cycles
Prime 15/32

Trouble Shooting
Trouble Shooting
Wiring
Fan Motor
Thermistor
Pressure Switch
Inlet Valve
Pre. Main
Dry
AG
AQUA
Drain
Pump
Door Switch
AG
Sensor
Heater
Dry
AG
Wash
Motor
(Hall Sensor)
Circulation
Pump
In wash only, remove wires for DRY.
AG C/Duct DRY Wash
MAIN PCB
DISPLAY PCB
Prime 16/32

Trouble Shooting
Trouble Shooting
PCB Layout
WH Housing BK ~
YL Housing Sky Blue
(152.5~175.5 )
Drain Pump Control
BK~BN+YL
(152.5~175.5 )
Door Switch Control
BK~BN+YL
Measure RESISTANCE
impossible here
Heater Control
Measure Resistance
impossible here.
Circulation Pump Control
Inlet Valve Control
Hall Sensor Control
Ha
Hb
Pressure Switch Control
VT+WH ~
Sky Blue
Measure Hz
Impossible
Here.
Just check
cut-off
Thermistor Control
Motor Stator Control
AG Sensor Control
PCB Power
VUW
V~U(5~15)
U~W(5~15)
W~V(5~15)
R is 44~53K
at 25
Measure resistance impossible
here.just check cut-off.
BK :Black
BN : Brown
YL : Yellow
WH : White
VT : Violet
Common
AQUA Control
Prime 17/32

Trouble Shooting
Trouble Shooting
Electric Parts
Pump
Inlet Valve
Pressure Switch
Door Switch
Hall Sensor
Motor Stator
VUW
 V~U (5~15)
 U~W(5~15)
 W~V (5~15 )
Common ~ Sb (9~10 )
Common ~ Sa (9~10 )
Sb
Sa
Common
1
2
3
 ''
 ''
Measurement of 'Hz' Impossible here.
Just check cut-off.
Measurement of 'R' Impossible
here.
Just check cut-off.
Prime 18/32

Trouble Shooting
Trouble Shooting
Door Switch Control
Heater Control
Resistance : 42.8 ~ 49.2
* Door Locking time : 1~8 sec.
Check the time interval from input power to parts 1
move up ,then Door is locked.
Resistance : 24.7 ~ 28.0
* Door Releasing time : 25~100 sec.
Check the time interval from power off to parts 1
move down,then Door is released.
How to Demonstration
Power Cord
Noise Filter
AG
Wash
DRY
Common
Prime 19/32

Trouble Shooting
Trouble Shooting
No Power
Is the Power Plug connected
firmly to the power outlet?
No
Reconnect Power Plug firmly.
Yes
Is Multi-plug socket used ?
Yes
Don't use Multi-plug socket.
Use single plug socket for Washer.
Is the connectors connected correctly and firmly
to PCB and Noise Filter?
No
No
Check, reconnect or repair the connector.
Is Red LED ON while power supplied ?
Noise Filter
PCB
Check and replace Main PCB.
Is the connectors connected
Correctly to the Display
PCB?
Check connectors otherwise.
Replace Display PCB.
No
Yes
Yes
Yes
Prime 20/32

Trouble Shooting
Trouble Shooting
LE Error
Press the Power button,
Does the Drum rotate when the start/pause
button is pressed to start the cycle ?
Is the connector connected correctly to
PCB, Housing and Motor ?
Reconnect or repair the connector.
Motor Locked Error
Disassemble the rotor.
Are the magnet of rotor
cracked or broken?
Replace the rotor.
Magnet
Are the resistance same
between Stator points?
Replace the stator.
Ω
※ Resistance limits 5~15Ω
UVW
Replace the hall sensor.
Replace the Stator Assembly.
Disassemble hall sensor carefully.
No
Yes
No
No
Yes
No
Yes
Prime 21/32

Trouble Shooting
Trouble Shooting
LE Error
1) Disassemble the hook of Hall Sensor by (-) driver.
2) Pull up Hall Sensor slowly as shown in picture.
1. Disassemble the Hall Sensor
Caution
If you disassemble by force,not following the directions,
the hooks of stator(red circled) might broke up.
Hence need change of stator assembly.
So disassemble cautiously.
1) Adjust the hole of Hall Sensor to the hooks of
stator as picture.(red circled)
2. Assemble the Hall Sensor
2) Push down the Hall sensor, and assemble to the
hook for sure.
Prime 22/32

Trouble Shooting
Trouble Shooting
OE Error
Water Outlet Error
Is the pump filter clogged ?
Is the drain hose kinked ?
Check drain hose for kink. Straighten the hose.
Continue
Clean the Filter
Open the Cover by coin,
or finger(only new model)
Drain water by removing
the hose cap.
Disassemble the pump filter
by turning the filter cap
counterclockwise
Assemble & close cap
Filter Cap
Hose Cap
Filter clogged by foreign objects
Filter Cap
< How to disassemble and clean pump filter >
Pump Filter
Cover
Check & Clean pump filter.
Drain Hose
This kind of accumulation
on the drain filter not only
prevents proper drainage,
but also will promote
bacteria growth and cause
odors.
This drain filter should be
cleaned once a month.
Yes
Yes
No
No
Prime 23/32

Trouble Shooting
Trouble Shooting
OE Error
Water Outlet Error
Is the standpipe height greater than 1.0 m
above the floor?
Observe standpipe height requirements of 1.0m maximum.
-Your washer will not be able to drain out water adequately
if the standpipe exceeds 1.0 m.
In this case, water may flow back into the washer.
Is the connector connected correctly to
PCB,Housing and Drain Pump ?
Reconnect or repair the connector.
Is the resistance of Pump Motor
Within 152.5 ~ 175.5 Ω ?
Replace Pump Motor.
OR
Is the Impeller operating normally?
Escape
Binding
X
Yes
When checking the voltage between connectors (1,2), is the voltage 220~240V ?
2
1
Replace PCB
Yes
No
Yes
No
No
No
< Abnormal operating >
Prime 24/32

Trouble Shooting
Trouble Shooting
IE Error
Is the inlet hose kinked or damaged?
Check the water tap and open it fully.
Is the inlet filter clogged?
Check and Clean the inlet filter.
Is the water tap closed?
Straighten the inlet hose.
If damaged,the inlet hoses will need to be replaced.
Turn off the
water tap
Unscrew the
water hose
Pull out the
water filter
Clean the filter
by hard brush
Tighten the
Inlet hose
Yes
Yes
Yes
No
No
No
Water Inlet Error
Prime 25/32

Trouble Shooting
Trouble Shooting
IE Error
Water Inlet Error
Is the connector connected correctly to
PCB,Housing and Inlet valve?
Reconnect or repair the connector.
Is the each resistance of Inlet Valve within
3.6~4.5㏀?
Replace the Inlet Valve.
1
2
3
1
2
3
Pre. Valve Main Valve
AG Valve
No
No
Yes
Prime 26/32

Does the water level over reference
line?
Replace the pressure switch.
If FE is displayed again, then replace PCB
Is the water level frequency 26.1Khz(LED) or 25.9Khz(LCD)?
Check the air chamber and the tube (clogged)
Is the water coming in drawer
continuously?
Replace the pressure switch.
If FE is displayed again, then replace PCB
Replace the inlet valve assembly.
Yes
No
No
Yes
No
Yes
Trouble Shooting
Trouble Shooting
FE Error
Water over Flow Error
LED
LCD
How to check the water level frequency
-. Push the two button. (Press and Hold 3sec)
LED Intensive + Option (left)
LCD Medic Rinse + Rinse
Prime 27/32

Trouble Shooting
Trouble Shooting
PE Error
Pressure sensor Error
Is the connector to pressure sensor
disconnected or disassembled?
Reconnect or repair the connector.
Is the resistance of the pressure sensor out of range?
Replace the pressure switch.
Is the air chamber and the tube clogged?
Replace the Main PCB.
Fix air chamber and remove the foreign material.
No
No
Yes
Yes
Yes
(Pin1 ~ Pin3) (21~23Ω)
No
Prime 28/32

Trouble Shooting
Trouble Shooting
TE Error
Is the connector to Thermistor
disconnected or disassembled?
Reconnect or repair the connector.
Is the resistance of the thermistor out of range
(44~53KΩ)at25℃?
Replace the pressure switch.
Replace the Main PCB.
Wash
AG
Yes
No
Yes
No
Prime 29/32

Trouble Shooting
Trouble Shooting
Vibration during Spin
Had all 4 shipping bolts and/or
packaging materials not removed?
Remove all shipping bolts and/or packaging materials.
Is the washer installed on a pedestal?
If the brackets are not installed properly, noise and vibration
may result. Be sure to remove the paper backing and to use
all screws to install the brackets. Once properly attached,
Firmly press the top part of the bracket to ensure that double-sided
tape sticks firmly on washer or dryer.
There are two kinds of brackets. The bigger one is for the
washer; the smaller is for the dryer. If small brackets are
attached to the washer and vice versa noise and vibration may result.
Note: There is only one bracket after January 2006.
Dryer
Washer (Large)
After Jan. 2006
Pedestal
Brackets
Or if brackets are correct
Four brackets should be securely attached.
Packaging material
Unscre
w
Remove Shipping Bolts
4 Shipping Bolts
Rear of a Washer
Shipping Bolt
Cover Bolts holes using Caps
Pedestal
4 Brackets (2 on each side)
Cap
4 Caps
No
No
Yes
Yes
Prime 30/32

Trouble Shooting
Trouble Shooting
Vibration during Spin
using leg spanner
If the washer is on the pedestal, you should adjust pedestal legs.
Use level. If the customer does not
have a level , OK! Next step
How to check and level the washer
Diagonal Test : Important !!!
When pushing down the edges of the washing machine
top plate diagonally, the machine should not move up
and down at all.( Please, check both directions.)
If the machine rocks when pushing the machine top plate
Diagonally, adjust the feet again till machine doesn't rock.
During the diagonal test, if the washer
moves at this test then adjust front leg in direction
shown in picture. ( If opposite, adjust opposite
front leg)
Turn the leg clockwise by 45 degree,
and do diagonal test again. If the washer still
moves, repeat turning leg clockwise
by 45 degree till the washer does not move at all
Clockwise
Adjustment to make
higher
How to adjust leg -- 45 degree method!!
After adjustment
fasten Lock nut
(Turn counter-
clockwise)
Lock Nut
Yes
No
Prime 31/32

Trouble Shooting
Trouble Shooting
Vibration during Spin
Is the floor flexing or bouncing?
Do you hear or feel the vibration
throughout your floor?
(Especially for wooden floor)
Move the washer or reinforce the floor to make it more
rigid. If the floor is not solid, your washer may vibrate
and you may hear and feel the vibration throughout your
floor.
Refer to the owner's manual and installation instructions
for floor requirements.
If possible,place a machine in the corner of the space.
Does vibrations occur intermittently
according to the size and type of
items in the washer?
Vibrations result from the unbalanced load in the
machine. As drum spins in an up and down rotation, the
proper balancing of the load inside the drum is very
important for the drum to spin smoothly. If the load is not
evenly distributed across the drum surface, there will be
more weight in some areas and less weight in others.
So when it reaches the higher RPM the drum will spin
slightly out of alignment. Try to redistribute the load
across the drum surface to reduce the vibrations.
Are there any foreign objects under
the legs?
If there are foreign materials between the legs and floor,
It can cause vibration and also result in washer
movement during operation. So remove the foreign
materials and level the washer by adjusting the legs.
Foreign objects
No
No
No
Yes
Yes
Yes
Prime 32/32

LG Electronics W/M Division
Baikal SVC Training Manual
Apr 23 , 2008
SVC Training Material

Trouble Shooting
Trouble Shooting
Wiring
Fan Motor
Thermistor
Pressure Switch
Inlet Valve
Pre. Main
Dry
AG
AQUA
Drain
Pump
Door Switch
AG
Sensor
Heater
Dry
AG
Wash
Motor
(Hall Sensor)
Circulation
Pump
In wash only, remove wires for DRY.
AG C/Duct DRY Wash
MAIN PCB
DISPLAY
PCB
Baikal 1/14

Trouble Shooting
Trouble Shooting
PCB Layout
WH Housing BK ~
YL Housing Sky Blue
(152.5~175.5 )
Drain Pump Control
BK~BN+YL
(152.5~175.5 )
Door Switch Control
BK~BN+YL
Measure R impossible
here
Heater Control
Measure resistance
impossible here.
Circulation Pump Control
Inlet Valve Control
Hall Sensor Control
Ha
Hb
Pressure Switch Control
VT+WH ~
Sky Blue
Measure Hz
Impossible
Here.
Just check
cut-off
Thermistor Control
Motor Stator Control
AG Sensor Control
PCB Power
VUW
V~U(5~15)
U~W(5~15)
W~V(5~15)
R is 44~53K
at 25
Measure resistance impossible
here. Just check cut-off.
BK :Black
BN : Brown
YL : Yellow
WH : White
VT : Violet
Common
AQUA Control
Baikal 2/14

Trouble Shooting
Trouble Shooting
Electric Parts
Pump
Inlet Valve
Pressure Switch
Door Switch
Hall Sensor
Motor Stator
VUW
 V~U (5~15)
 U~W(5~15)
 W~V (5~15)
 Common~Sb (9~10 )
 Common~Sa (9~10 )
Sb Sa
Common
1
2
3
 ''
 ''
Measure 'Hz' Impossible Here.
Just check cut-off.
Measure 'R' Impossible Here.
Just check cut-off.
Baikal 3/14

Trouble Shooting
Trouble Shooting
Door Switch Control
Heater Control
Resistance : 42.8 ~ 49.2
* Door Locking time : 1~8 sec.
Check the time interval from input power to parts 1
move up ,then Door is locked.
Resistance : 24.7 ~ 28.0
* Door Releasing time : 25~100 sec.
Check the time interval from power off to parts 1
move down,then Door is released.
How to Demonstration
Power Cord
Noise Filter
AG
Wash
DRY
Common
Baikal 4/14

Trouble Shooting
Trouble Shooting
No Power
Is the Power Plug connected
firmly to the power outlet?
No
Reconnect Power Plug firmly.
Yes
Is Multi-plug socket used ?
Yes
Don't use Multi-plug socket.
Use single plug socket for Washer.
Is the connectors connected correctly and firmly
to PCB and Noise Filter?
No
No
Check, reconnect or repair the connector.
Is Red LED ON while power supplied ?
Noise Filter
PCB
Check and replace Main PCB.
Is the connectors connected
Correctly to the Display
PCB?
Check connectors otherwise.
Replace Display PCB.
No
Yes
Yes
Yes
Baikal 5/14

Trouble Shooting
Trouble Shooting
LE Error
Press the Power button,
Does the Drum rotate when the start/pause
button is pressed to start the cycle ?
Is the connector connected correctly to
PCB, Housing and Motor ?
Reconnect or repair the connector.
Motor Locked Error
Disassemble the rotor.
Are the magnet of rotor
cracked or broken?
Replace the rotor.
Magnet
Are the resistance same
between Stator points?
Replace the stator.
Ω
※ Resistance limits 5~15Ω
UVW
Replace the hall sensor.
Replace the Stator Assembly.
Disassemble hall sensor carefully.
No
Yes
No
No
Yes
No
Yes
Baikal 6/14

Trouble Shooting
Trouble Shooting
LE Error
1) Disassemble the hook of Hall Sensor by (-) driver.
2) Pull up Hall Sensor slowly as shown in picture.
1. Disassemble the Hall Sensor
Caution
If you disassemble by force,not following the directions,
the hooks of stator(red circled) might broke up.
Hence need change of stator assembly.
So disassemble cautiously.
1) Adjust the hole of Hall Sensor to the hooks of
stator as picture.(red circled)
2. Assemble the Hall Sensor
2) Push down the Hall sensor, and assemble to the
hook for sure.
Baikal 7/14

Trouble Shooting
Trouble Shooting
OE Error
Water Outlet Error
Is the pump filter clogged ?
Is the drain hose kinked ?
Check drain hose for kink. Straighten the hose.
Continue
Clean the Filter
Open the Cover by coin,
or finger(only new model)
Drain water by removing
the hose cap.
Disassemble the pump filter
by turning the filter cap
counterclockwise
Assemble & close cap
Filter Cap
Hose Cap
Filter clogged by foreign objects
Filter Cap
< How to disassemble and clean pump filter >
Pump Filter
Cover
Check & Clean pump filter.
Drain Hose
This kind of accumulation
on the drain filter not only
prevents proper drainage,
but also will promote
bacteria growth and cause
odors.
This drain filter should be
cleaned once a month.
Yes
Yes
No
No
Baikal 8/14

Trouble Shooting
Trouble Shooting
OE Error
Water Outlet Error
Is the standpipe height greater than 1.0 m
above the floor?
Observe standpipe height requirements of 1.0m maximum.
-Your washer will not be able to drain out water adequately
if the standpipe exceeds 1.0 m.
In this case, water may flow back into the washer.
Is the connector connected correctly to
PCB,Housing and Drain Pump ?
Reconnect or repair the connector.
Is the resistance of Pump Motor
Within 152.5 ~ 175.5 Ω ?
Replace Pump Motor.
OR
Is the Impeller operating normally?
Escape
Binding
X
Yes
When checking the voltage between connectors (1,2), is the voltage 220~240V ?
2
1
Replace PCB
Yes
No
Yes
No
No
No
< Abnormal operating >
Baikal 9/14

Trouble Shooting
Trouble Shooting
IE Error
Water Inlet Error
Is the inlet hose kinked or damaged?
Check the water tap and open it fully.
Is the inlet filter clogged?
Check and Clean the inlet filter.
Is the water tap closed?
Straighten the inlet hose.
If damaged,the inlet hoses will need to be replaced.
Turn off the
water tap
Unscrew the
water hose
Pull out the
water filter
Clean the filter
by hard brush
Tighten the
Inlet hose
Yes
Yes
Yes
No
No
No
Baikal 10/14

Trouble Shooting
Trouble Shooting
IE Error
Water Inlet Error
Is the connector connected correctly to
PCB,Housing and Inlet valve?
Reconnect or repair the connector.
Is the each resistance of Inlet Valve within
3.6~4.5㏀?
Replace the Inlet Valve.
1
2
3
1
2
3
Pre. Valve Main Valve
AG Valve
No
No
Yes
Baikal 11/14

Trouble Shooting
Trouble Shooting
FE Error
Water over Flow Error
Does the water level over reference
line?
Replace the pressure switch.
If FE is displayed again, then replace PCB.
Is the water level frequency 25.5Khz(LED) or 25.9Khz(LCD)?
Check the air chamber and the tube (clogged)
Is the water inserted in drawer
continuously?
Replace the pressure switch.
If FE is displayed again, then replace PCB
Replace the inlet valve assembly.
LED
LCD
How to check the water level frequency
-. Push the two button.
LED Temp.+ Rinse
LCD Medic Rinse + Rinse
Yes
No
No
Yes
No
Yes
Baikal 12/14

Trouble Shooting
Trouble Shooting
PE Error
Pressure sensor Error
Is the connector connected to pressure
sensor disconnected or disassembled?
Reconnect or repair the connector.
Is the resistance of the pressure sensor out of range?
Replace the pressure switch.
Is the air chamber and the tube clogged?
Replace the Main PCB.
Fix air chamber and remove the foreign material.
No
No
Yes
Yes
Yes
(Pin1 ~ Pin3) (21~23Ω)
No
Baikal 13/14

Trouble Shooting
Trouble Shooting
TE Error
Is the connector connected to Thermistor
disconnected or disassembled?
Reconnect or repair the connector.
Is the resistance of the thermistor out of range
(44~53KΩ)at25℃?
Replace the pressure switch.
Replace the Main PCB.
Wash
AG
Yes
No
Yes
No
Baikal 14/14

LG Electronics W/M Division
Star SVC Training Manual
Apr 23 , 2008
SVC Training Material

Trouble Shooting
Trouble Shooting
Wiring
Pressure
Switch
Star 1/14

Pressure Switch & Heater Thermistor Control
Motor & Hall Sensor Control
Display Control
Display Control
PCB Power & Heater Control
Trouble Shooting
Trouble Shooting
PCB Layout
Drain Pump & Door & Inlet Valve Control
Drain Pump
(160~177 )
Door Switch
Measure R impossible here
Common
Pre. Valve
(3.6~4.5 )
Main Valve
(3.6~4.5 )
PCB Power
Heater
(24.7 ~ 28.0 )
Ha
(9~10 )
Hb
(9~10 )
Pressure Switch
VUW
V~U(5~15)
U~W(5~15)
W~V(5~15)
Heater Thermistor
(44~53K , 25 )
Measure Hz impossible here
Just check cut-off.
Common
Common
Star 2/14

Trouble Shooting
Trouble Shooting
Electric Parts
Pump
Inlet Valve
Pressure Switch
Door Switch
Hall Sensor
Motor Stator
VUW
 V~U (5~15)
 U~W(5~15)
 W~V (5~15)
 Common~Sb (9~10 )
 Common~Sa (9~10 )
Sb Sa
Common
1
2
 ''
 ''
Measure 'Hz' Impossible Here.
Just check cut-off.
Measure 'R' Impossible Here.
Just check cut-off.
Star 3/14

Trouble Shooting
Trouble Shooting
Door Switch Control
* Door Locking time : 1~8 sec.
Check the time interval from input power to parts 1
move up ,then Door is locked.
* Door Releasing time : 25~100 sec.
Check the time between from power off to parts 1
move down,then Door is released.
How to Demonstration
Star 4/14

Is the Power Plug connected
firmly to the power outlet?
No
Reconnect Power Plug firmly.
Yes
Is Multi-plug socket used ?
Yes
Don't use Multi-plug socket.
Use single plug socket for Washer.
Is the connectors connected correctly and firmly
to PCB and Noise Filter?
No
Check, reconnect or repair the connector.
Is Red LED ON while power supplied ?
Check and replace Main PCB.
Is the connectors connected
Correctly to the Display
PCB?
Check connectors otherwise.
Replace Display PCB.
No
Yes
Yes
Yes
Trouble Shooting
Trouble Shooting
No Power
No
Star 5/14

Press the Power button,
Does the Drum rotate when the start/pause
button is pressed to start the cycle ?
Is the connector connected correctly to
PCB, Housing and Motor ?
Reconnect or repair the connector.
Disassemble the rotor.
Are the magnet of rotor
cracked or broken?
Replace the rotor.
Are the resistance same
between Stator points?
Replace the stator.
Replace the hall sensor.
Replace the Stator Assembly.
Trouble Shooting
Trouble Shooting
LE Error
Motor Locked Error
Ω
※ Resistance limits 5~15Ω
Disassemble hall sensor carefully.
No
Yes
No
No
Yes
No
Yes
Star 6/14

Trouble Shooting
Trouble Shooting
LE Error
1) Disassemble the hook of Hall Sensor by (-) driver.
2) Pull up Hall Sensor slowly as shown in picture.
1. Disassemble the Hall Sensor
Caution
If you disassemble by force,not following the directions,
the hooks of stator(red circled) might broke up.
Hence need change of stator assembly.
So disassemble cautiously.
1) Adjust the hole of Hall Sensor to the hooks of
stator as picture.(red circled)
2. Assemble the Hall Sensor
2) Push down the Hall sensor, and assemble to the
hook for sure.
Star 7/14

Trouble Shooting
Trouble Shooting
OE Error
Clean the Filter
Open the Cover by coin,
or finger(only new model)
Drain water by removing
the hose cap.
Disassemble the pump filter
by turning the filter cap
counterclockwise
Assemble & close cap
Filter Cap
Hose Cap
Filter clogged by foreign objects
Filter Cap
How to disassemble and clean pump filter
Pump Filter
Cover
Drain Hose
This kind of accumulation
on the drain filter not only
prevents proper drainage,
but also will promote
bacteria growth and cause
odors.
This drain filter should be
cleaned once a month.
Is the pump filter clogged ?
Is the drain hose kinked ?
Check drain hose for kink. Straighten the hose.
Continue
Check & Clean pump filter.
Yes
Yes
No
No
Star 8/14

Is the standpipe height greater than 1.0 m
above the floor?
Observe standpipe height requirements of 1.0m maximum.
-Your washer will not be able to drain out water adequately
if the standpipe exceeds 1.0 m.
In this case, water may flow back into the washer.
Is the connector connected correctly to
PCB,Housing and Drain Pump ?
Reconnect or repair the connector.
Is the resistance of Pump Motor
Within160~177Ω?
Replace Pump Motor.
Yes
When checking the voltage between connectors (1,2), is voltage b/n 220~240V ?
Replace PCB
Yes
No
Yes
No
No
No
Trouble Shooting
Trouble Shooting
OE Error
Water Outlet Error
Is the Impeller operating normally?
Binding
< Abnormal operating >
Star 9/14

Trouble Shooting
Trouble Shooting
IE Error
Water Inlet Error
Is the inlet hose kinked or damaged?
Check the water tap and open it fully.
Is the inlet filter clogged?
Check and Clean the inlet filter.
Is the water tap closed?
Straighten the inlet hose.
If damaged,the inlet hoses will need to be replaced.
Turn off the
water tap
Unscrew the
water hose
Pull out the
water filter
Clean the filter
by hard brush
Tighten the
Inlet hose
Yes
Yes
Yes
No
No
No
Star 10/14

Is the connector connected correctly to
PCB,Housing and Inlet valve?
Reconnect or repair the connector.
Is the each resistance of Inlet Valve within
3.6~4.5㏀?
Replace the Inlet Valve.
No
No
Yes
Trouble Shooting
Trouble Shooting
IE Error
Water Inlet Error
1
2
Star 11/14

Does the water level over reference
line?
Replace the pressure switch
If FE is displayed again, then replace PCB
Is the water level frequency 25.5Khz ?
Check the air chamber and the tube (clogged)
Is the water coming in drawer
continuously?
Replace the pressure switch.
If FE is displayed again, then replace PCB
Replace the inlet valve assembly.
Yes
No
No
Yes
No
Yes
Trouble Shooting
Trouble Shooting
FE Error
Water over Flow Error
How to check the water level frequency
-. Push the two button.
LED Time delay + Rinse+
Star 12/14

Trouble Shooting
Trouble Shooting
PE Error
Pressure sensor Error
Is the connector connected to pressure
sensor disconnected or disassembled?
Reconnect or repair the connector.
Is the resistance of the pressure sensor out of range?
Replace the pressure switch.
Is the air chamber and the tube clogged?
Replace the Main PCB.
Fix air chamber and remove the foreign material.
No
No
Yes
Yes
Yes
(Pin1 ~ Pin3) (21~23Ω)
No
Star 13/14

Trouble Shooting
Trouble Shooting
TE Error
Is the connector connected to Thermistor
disconnected or disassembled?
Reconnect or repair the connector.
Is the resistance of the thermistor out of range
(44~53KΩ)at25℃?
Replace the pressure switch.
Replace the Main PCB.
Yes
No
Yes
No
Star 14/14

LG Electronics W/M Division
Hi-Five SVC Training Manual
Apr 23 , 2008
SVC Training Material

Trouble Shooting
Trouble Shooting
Wiring
Fan Motor
Thermistor
Pressure Switch
Inlet Valve
Pre. Main
Dry
AG
AQUA
Drain
Pump
Door Switch
AG
Sensor
Heater
Dry
AG
Wash
Motor
(Hall Sensor)
Circulation
Pump
In wash only, remove wires for DRY.
AG C/Duct DRY Wash
MAIN PCB
DISPLAY
PCB
Hi-Five 1/14

Trouble Shooting
Trouble Shooting
PCB Layout
WH Housing BK ~
YL Housing Sky Blue
(152.5~175.5 )
Drain Pump Control
BK~BN+YL
(152.5~175.5 )
Door Switch Control
BK~BN+YL
Measure R impossible
here
Heater Control
Measure resistance
impossible here.
Circulation Pump Control
Inlet Valve Control
Hall Sensor Control
Ha
Hb
Pressure Switch Control
VT+WH ~
Sky Blue
Measure Hz
Impossible
Here.
Just check
cut-off
Thermistor Control
Motor Stator Control
AG Sensor Control
PCB Power
VUW
V~U(5~15)
U~W(5~15)
W~V(5~15)
R is 44~53K
at 25
Measure resistance impossible
here.just check cut-off.
BK :Black
BN : Brown
YL : Yellow
WH : White
VT : Violet
Common
AQUA Control
Hi-Five 2/14

Trouble Shooting
Trouble Shooting
Electric Parts
Pump
Inlet Valve
Pressure Switch
Door Switch
Hall Sensor
Motor Stator
VUW
 V~U (5~15)
 U~W(5~15)
 W~V (5~15)
 Common~Sb (9~10 )
 Common~Sa (9~10 )
Sb Sa
Common
1
2
3
 ''
 ''
Measure 'Hz' Impossible Here.
Just check cut-off.
Measure 'R' Impossible Here.
Just check cut-off.
Hi-Five 3/14

Trouble Shooting
Trouble Shooting
Door Switch Control
Heater Control
Resistance : 42.8 ~ 49.2
* Door Locking time : 1~8 sec.
Check the time interval from input power to parts 1
move up ,then Door is locked.
Resistance : 24.7 ~ 28.0
* Door Releasing time : 25~100 sec.
Check the time between from power off to parts 1
move down,then Door is released.
How to Demonstration
Power Cord
Noise Filter
AG
Wash
DRY
Common
Hi-Five 4/14

Trouble Shooting
Trouble Shooting
No Power
Is the Power Plug connected
firmly to the power outlet?
No
Reconnect Power Plug firmly.
Yes
Is Multi-plug socket used ?
Yes
Don't use Multi-plug socket.
Use single plug socket for Washer.
Is the connectors connected correctly and firmly
to PCB and Noise Filter?
No
No
Check, reconnect or repair the connector.
Is Red LED ON while power supplied ?
Noise Filter
PCB
Check and replace Main PCB.
Is the connectors connected
Correctly to the Display
PCB?
Check connectors otherwise.
Replace Display PCB.
No
Yes
Yes
Yes
Hi-Five 5/14

Trouble Shooting
Trouble Shooting
LE Error
Press the Power button,
Does the Drum rotate when the start/pause
button is pressed to start the cycle ?
Is the connector connected correctly to
PCB, Housing and Motor ?
Reconnect or repair the connector.
Motor Locked Error
Disassemble the rotor.
Are the magnet of rotor
cracked or broken?
Replace the rotor.
Magnet
Are the resistance same
between Stator points?
Replace the stator.
Ω
※ Resistance limits 5~15Ω
UVW
Replace the hall sensor.
Replace the Stator Assembly.
Disassemble hall sensor carefully.
No
Yes
No
No
Yes
No
Yes
Hi-Five 6/14

Trouble Shooting
Trouble Shooting
LE Error
1) Disassemble the hook of Hall Sensor by (-) driver.
2) Pull up Hall Sensor slowly as shown in picture.
1. Disassemble the Hall Sensor
Caution
If you disassemble by force,not following the directions,
the hooks of stator(red circled) might broke up.
Hence need change of stator assembly.
So disassemble cautiously.
1) Adjust the hole of Hall Sensor to the hooks of
stator as picture.(red circled)
2. Assemble the Hall Sensor
2) Push down the Hall sensor, and assemble to the
hook for sure.
Hi-Five 7/14

Trouble Shooting
Trouble Shooting
OE Error
Water Outlet Error
Is the pump filter clogged ?
Is the drain hose kinked ?
Check drain hose for kink. Straighten the hose.
Continue
Clean the Filter
Open the Cover by coin,
or finger(only new model)
Drain water by removing
the hose cap.
Disassemble the pump filter
by turning the filter cap
counterclockwise
Assemble & close cap
Filter Cap
Hose Cap
Filter clogged by foreign objects
Filter Cap
< How to disassemble and clean pump filter >
Pump Filter
Cover
Check & Clean pump filter.
Drain Hose
This kind of accumulation
on the drain filter not only
prevents proper drainage,
but also will promote
bacteria growth and cause
odors.
This drain filter should be
cleaned once a month.
Yes
Yes
No
No
Hi-Five 8/14

Trouble Shooting
Trouble Shooting
OE Error
Is the standpipe height greater than 1.0 m
above the floor?
Observe standpipe height requirements of 1.0m maximum.
-Your washer will not be able to drain out water adequately
if the standpipe exceeds 1.0 m.
In this case, water may flow back into the washer.
Is the connector connected correctly to
PCB,Housing and Drain Pump ?
Reconnect or repair the connector.
Is the resistance of Pump Motor
Within 152.5 ~ 175.5 Ω ?
Replace Pump Motor.
OR
Is the Impeller operating normally?
Escape
Binding
X
Yes
When checking the voltage between connectors (1,2), is the voltage 220~240V ?
2
1
Replace PCB
Yes
No
Yes
No
No
No
< Abnormal operating >
Hi-Five 9/14

Trouble Shooting
Trouble Shooting
IE Error
Is the inlet hose kinked or damaged?
Check the water tap and open it fully.
Is the inlet filter clogged?
Check and Clean the inlet filter.
Is the water tap closed?
Straighten the inlet hose.
If damaged,the inlet hoses will need to be replaced.
Turn off the
water tap
Unscrew the
water hose
Pull out the
water filter
Clean the filter
by hard brush
Tighten the
Inlet hose
Yes
Yes
Yes
No
No
No
Hi-Five 10/14

Trouble Shooting
Trouble Shooting
IE Error
Is the connector connected correctly to
PCB,Housing and Inlet valve?
Reconnect or repair the connector.
Is the each resistance of Inlet Valve within
3.6~4.5㏀?
Replace the Inlet Valve.
1
2
3
1
2
3
Pre. Valve Main Valve
AG Valve
No
No
Yes
Hi-Five 11/14

Trouble Shooting
Trouble Shooting
FE Error
Does the water level over reference
line?
Replace the pressure switch
If FE is displayed again, then replace PCB
Is the water level frequency 25.5Khz(LED) or 25.9Khz(LCD)?
Check the air chamber and the tube (clogged)
Is the water inserted in drawer
continuously?
Replace the pressure switch.
If FE is displayed again, then replace PCB
Replace the inlet valve assembly.
LED
LCD
How to check the water level frequency
-. Push the two button.
LED Temp.+ Rinse
LCD Medic Rinse + Rinse
Yes
No
No
Yes
No
Yes
Hi-Five 12/14

Trouble Shooting
Trouble Shooting
PE Error
Pressure sensor Error
Is the connector connected to pressure
sensor disconnected or disassembled?
Reconnect or repair the connector.
Is the resistance of the pressure sensor out of range?
Replace the pressure switch.
Is the air chamber and the tube clogged?
Replace the Main PCB.
Fix air chamber and remove the foreign material.
No
No
Yes
Yes
Yes
(Pin1 ~ Pin3) (21~23Ω)
No
Hi-Five 13/14

Trouble Shooting
Trouble Shooting
TE Error
Is the connector connected to Thermistor
disconnected or disassembled?
Reconnect or repair the connector.
Is the resistance of the thermistor out of range
(44~53KΩ)at25℃?
Replace the pressure switch.
Replace the Main PCB.
Wash
AG
Yes
No
Yes
No
Hi-Five 14/14

LG Electronics W/M Division
Konsul SVC Training Manual
Apr 23 , 2008
SVC Training Material

Trouble Shooting
Trouble Shooting
How to Demonstration
Heater & Power Control
Motor Control (Stator, Rotor, TP)
Ther. & P.S & Tacho. Control
Inlet Valve & Drain Pump Control
Door Switch Control
Measure R impossible here
Konsul 1/3

Trouble Shooting
Trouble Shooting
Electric Parts
Pump
Inlet Valve
Pressure Switch
Door Switch
Heater
1
2
 TheallRis3.6~4.5
 Ris160.5~177.5
Measure Hz Impossible Here.
Just check cut-off.
Measure R Impossible Here.
Just check cut-off.
 Ris24~28
Konsul 2/3

Trouble Shooting
Trouble Shooting
How to Demonstration
Door Switch Control
Motor
Sky Blue
White /
Red
Pink
Violet /
White
Gray
Blue
Red /
White
Yellow
Brown
1
0
9
8
7
6
5
4
3
2
1
Name
Connected Wire
Spec.
3~4
62.6 ~74.6 (check rpm)
TP
6~7
When Temp. increase,
cut-off.(190 ~240 )
Rotor
8~9
1.5 ~ 3.0
Stator coil #1
1~5
0.6 ~ 0.9
Stator coil #2
5~10
2.0 ~ 2.5
Tacho Meter
* Door Locking time : 1~8 sec.
Check the time between from input the power to parts 1
move up ,then Door locked.
* Door Releasing time : 25~100 sec.
Check the time between from off the power to parts 1
move down,then Door released.
Konsul 3/3