/


Text
The Wiltoi Method of Cake Decorating
Cuursc 11
г Flowers a,ulMore!
Welcome to Course II and
thanks for making Wilton your decorating resource.
There is always something new to discover in cake decorating. Course II builds on the skills you learned in Course I and challenges your abilities with new and exciting techniques. Your skills will soar to neW heights as you create spectacular cakes and beautiful food ideas The fun continues as
Enjoy all that Course II has to
offer I wish you many happy hours of decorating and celebrating as you become the accomplished decorator you want to be.
z у w г* *
Vincent Naccarato
President
your family and friends sample
r
Contents
Decorating Tools.............
Preparing the Bag............
Three Essentials of Decorating The Flower Nail .............
Color
Lesson 1
Build on the Basics Additional Icings
Royal ........
Color Flow....
Star Tip Decorating Shell ......................
Rosette .................
Reverse Shell ...........
New Flowers
Rosebud .................
Lily of the Valley.......
Flower Nail Templates.......
Chrysanthemum ...........
Getting Ready for Lesson 2 .. Preparing Color Flow Patterns
Lesson 2
New Additions
16
Color Flow
17
More New Flowers
Violet ................
Violet Leaf............
Apple Blossom..........
Getting Ready for Lesson 3
Wilton online!
Keep up with Wilton on the web! Discover new decorating ideas, great products and more.
www.wilton.com
2
4
6
7
7
Lesson 3
Decorations in Bloom
The Victorian Rose
More New Flowers
8
Daisy .
Daffodil . Pansy ... Primrose
Getting Ready for Lesson 4
8 .9
Lesson 4
The Grand Finale
10
10
11
.12 .13 14 .14
.15
15
Basketweaving ...........
Rope.....................
Removing Color Flow......
Fern ....................
Decorate Your Cake ......
Congratulations!.........
Sprays...................
Flower Variations........
Sign Up for Course III...
Glossary of Terms........
How to Divide an Oval Cake Oval Cake Pattern........
Pattern Sheets...........
Tip Positions for Rose Petals Color Flow Patterns......
Flower Nail Templates....
18
.18
.19
19
20
.2
22
23
24
25
25
26
26
27
28
28
30
31
32
33
34
35
35
36
37
39
40
43
©1997 WItem industries, Inc. All rights reserved. No part of this publicai on may be reproduced or transmitted in any form, or by any means, electronic or mechanical, including photocopy, recording or any information storage and retrieval system, without the written permission of WJtcn Enterprises, 2240 W. 75th Street. Woodridge, IL 60517.
Total product availability to support this course is at the discretion of the individual store.
Cakes on this book were cecoroted by both nght- and lefthanded decorators.
Decorating Tools
To get the professional results you're striving for, you'll need some basic professional decorating tools. Your teacher will demonstrate the professional cake decorating tools you'll be using in this class. Be certain to ask any questions if you have them!
You already have many of the other "tools" you’ll need right around your kitchen. Bring them to each class after this first lesson.
Tools from Your Kitchen
4 Air-tight plastic containers for icing
♦ Apron
4 Transparent tape
4- Container for supplies
♦ Damp cloth or sponge
4- Note pad and pencil or pen
4 Plastic bags to take home decorating tools used in class
4 Scissors
4 Toothpicks
4 Wax Paper
Course II Decorating Supplies
In addition to the items from your kitchen you'll need some decorating supplies for the course. These may include:
4 Course II Student Kit (or equivalent), including tips 1,2,5,14,47,593/59°, 81, 97, 101,103,104, Color Flow Packet, Flower Formers Set and two 73/4 in. Oval Pans
4 Decorator's brushes
4 Featherweight Decorating Bags (2)
4 Parchment paper triangles (approx. 40 parchments are used in class)
4 Icing Colors
4 Piping Gel
4 Practice Board Set
4 Small straight or angled spatula
4 Trim-N-Turn Decorating Turntable
4 Wilton Tool Caddy (optional)
4 Tip 101s, replaces 59s/59" for left handers (optional)
4 Tip 352 (optional)
4 Course I Student Kit (including tips 2D, 3,12,16,21,67,104, Flower Nail no. 7}
Note: Tip 1 and tip 104 are used multiple times during class. Having 2 or 3 of each of these tips is helpful.
2
Course II Student Kit. Includes many of the items needed for the course: Tips 1,2, 5,14,47,595/59°, 81,97,101,103,104; Color Flow Packet, Flower Former Set and two 73A in. Oval Pans.
Spatulas. Invaluable decorating tools have quality stainless steel blades with rosewood handles. Ideal for frosting cakes, filling decorating bags, color blending and striping bags with colored icing.
Practice Board Set. Reusable decorating board and patterns makes it easy to improve your decorating skills. Clear overlay allows you to decorate over each pattern for borders, figures, drop flowers, writing and printing.
Featherweight Bags are lightweight vinyl-coated polyester; flexible, reinforced for strength and long lasting. Used with couplers when more than one tip is needed with the same color icing (e.g. shell borders in two sizes). Dishwasher safe.
Disposable Bags are strong, flexible plastic. Easy-to-handle. they can be used with or without a coupler. Microwave heat Candy Melts® brand confectionery coating in them, too!
Parchment Paper Triangles are recommended when tip changes are not called for, particularly when using smaller amounts of icing (e.g. accent colors). Also recommended for brush striping application where concentrated icing colors could stain a Featherweight bag. Available in 12 and 15 in. sizes.
Wilton Meringue Powder. The key ingredient in long-lasting. hard-drying royal icing. You can also use it to strengthen your sugar mold mixture. Use royal icing when you're
making flowers in advance or decorating display cakes.
Piping Gel. Transparent gel with lots of decorating uses.Tint it any color you want for decorating or writing, or add a small amount to icing if you want to have a
shinier finish. You can even use Piping Gel to stabilize whipped cream when you want to use that for decorating.
Wilton Flavorings and Extracts. Add taste without adding color. Available in Clear Van Ila Extract, Almond Extract, and Butter Flavor. Ideal for icing, cookies and cakes.
Trim 'n Turn Decorating Turntable. Decorate and serve on this all-purpose cake turntable. Made of durable plastic, 12 in. diameter stand holds up to 100 lbs. Easy-roll ball bearings allow you to turn cake easily as you level, torte, frost and deco ate. Wipes clean with a damp cloth.
Wilton Icing Colors. Concentrated in a rich creamy gel; will not change icing consistency, fast-mixing and easy to use. Extensive color range makes it convenient for you to achieve the colors you need and want.
Publications. The annual Wilton Yearbook of Cake Decorating presents over 200 new cake ideas for all occasions. Fullcolor pages feature easy-to-follow directions; a complete How-to-
Decorate section featuring new borders, flowers and techniques; plus a vast selection of exclusive new products. A candy making section is also included. The annual Pattern Book supplies the patterns to help you create the designs from the Yea book.
Pattern Press Sets. Imprint into iced cakes for a easy guideline of lettering, words, script, designs and more.
Cake leer Tip. Lets you ice a cake the fast, easy way. For a smooth surface, place the serrated side to the cake. Fora ribbed effect place the smooth side to the cake. It's
so easy to get a perfect у uniform finish...great for icing the sides
of shaped and character cakes!
For fewer refills while decorating, use the Cake leer Tip with the larger 16 in. Featherweight Bag.
Show 'N Serve Cake Serving Boards. Beautiful scalloped edge and lace pattern boards present baked goods perfectly. Protected with a grease-resistant coat ng. Available in five sizes
Cake Circles. Sturdy corrugated cardboard shapes can be covered with Wilton Fancy-Foil Wrap. Use them to practice on, too!
Bake Even Cake Strips. Innovative way to bake perfectly leve moist cakes and avoid high-rise centers, cracked tops or crusty edges Just dampen and wrap around pan before bakng.
Cake Leveler. Metal slicer that easily levels and tortescake layers up to 10 in.diameter and 3 in. high.
Color Flow Mix. Add confectioners' sugar and water to make Color Flow Icing for flow-in designs. Outline patterns and fill in—for beautiful, hard-drying
decorations. 4 oz.can yields ten 1 1/2 cup batches.
Cake Sparkles™. Brilliant edible glitter decorates cakes, cupcakes, cook es and ice cream. Great for stenciling and adding sparkle to messages, borders, flowers, snow scenes and more. Packaged in 1/2 oz. shaker bottles. Available in White, Purple, Pink Green Orange, Black, Red,Yellow, Blue and Rainbow.
9 Pc. Flower Former Set. Make your flowers more realistic and create exciting icing shapes for decorating! Place icing leaves and flowers in a convex or concave shape to dry. Set includes three of each size: 1 1/2, 2 and 2 1/2 in. wide x 11 in. long.
3
Preparing The Bag
Decorating bags hold the icing and decorating tip so you can create all kinds of decorations.
Choose from three types of bags: Parchment, Featherweight and Disposable.
Lets see what makes each of these bags unique:
Parchment Bags are made from parchment paper triangles. Generally, you'll use parchment bags to make decorative highlights with small amounts of icing, then discard each bag when it's empty. We recommend using a new parchment bag after each use.
Featherweight Bags are lightweight, strong, washable polyester Specially coated to prevent any seepage of grease, these bags can be used over and over and still stay flexible.
Disposable Bags are clear plastic. Handy for fast decorating, these bags are just thrown away when the decorating is done.
The Coupler, and How It Works
The two parts of the coupler are the base and the ring. The base fits INSIDE THE BAG, then you put the decorating tip of your choice over the portion of the coupler that sticks out of the bag. When you screw' the ring on, you've locked the decorating tip onto the coupler and bag.
Parchment Bags
Preparing the Parchment Bag
Note that the points of the triangle have been labeled A, B, C in the drawing. Place the triangle on a flat surface with the В facing you.
Curl A up and under, bringing it toward you until points A and В meet. The curled edge from A should lie on top of the edge between C and 8, as the drawing show's.
Hold points A and 8 together with your left hand while you pick up C with your right. Wrap C around to meet points A and В in back. All 3 points align to form 1 point This helps form the cone; the point should be sharp.
Hold the bag with both hands, thumbs inside and slide A and C in opposite directions to make the upside down “W" as shown.
Finally, fold the points of the bag down into the bag, tear two notches along folded edge and fold tab down, then refold to secure. Tape the outside seam of the bag if desired.
To make the opening for your decorating tip, clip 3/4 in. off the end of the bag. It is better to be cautious in the beginning with the amount you cut off—the tip will drop right through if the opening is too large. Drop the tip in, narrow end first. Make sure the small end of the tip protrudes through the opening. Don't be concerned if the tip doesn't fit snugly, the icing will hold it in place.
Using the Coupler
Prepare your parchment bag. After you have taped the bag, unscrew the coupler. Insert the coupler base, narrow end first, and push as far dow'n into the bag as possible. Holding the tip in place with one hand, twist on the ring. When secure, tear away the tip of the parchment bag. Unscrew the ring, position the decorating tip on the coupler and twist on the ring, locking the decorating tip in place.
Filling the Bag
Hold the bag near the bottom. Using your spatula, scoop about three tablespoons of icing at a time and place well down into the bag Fill the bag only half full.
To remove the icing from the spatula, hold the bag on the outside between your thumb and fingers, then pull the spatula out of the bag. using the bag and your fingers to squeeze the icing off.
Closing the Bag
Squash the top of the bag flat above the icing and fold in first one side, then the other and finally the top. Continue to roll top down.
Featherweight & Disposable Bags
These bags can be used with or without a coupler. To use the Disposable Bag without a coupler, cut off the po’nted end of the tip (Featherweight Bag is ready to use). Simply drop the decorating tip you want into the bag with the narrow end down.
Using the Coupler
Filling the Bag
Featherweight Bags
A new Featherweight bag will have to be trimmed with scissors to accommodate the coupler base. First, twist the ring off the coupler base. Drop the coupler base, narrow end first, into the bag and push as
fa down as you can.
With a pen or pencil, mark the spot on the outside where the bottom thread is outlined against the bag material. Push the coupler back up into the bag, and cut across where you have made the mark.
Push the coupler base back down through the bag opening. One thread should be showing.
Choose the decorating tip you want to use and slip it onto the coupler base. Now twist the coupler ring over the tip, locking it in place. Changing decorating tips is easy: Twist off the ring, replace with new tip, then screw the ring back on.
Disposable Plastic Bags
Unscrew coupler ring. Push the coupler base into the bag as far down as possible. With scissors, trim bag about 1/4° below where threading begins,closest to narrow end. Position decorating tip over coupler base and bag. Screw ring in place to secure. To change decorating tips, unscrew ring, replace decorating tip and screw on ring.
The most impo tant thing to remember is don’t overfill, or icing may squeeze out the wrong end. The right amount of icing to start with is about ’/2 cup.
Fold down the top to form a generous cuff,and hold the bag beneath the cuff. Use your spatula to fill the bag with approximately three tablespoons of icing at a time.
Closing the Bag
Unfold the cuff and twist the bag closed, forcing the icing down into the bag. You can make sure you've eleased any air trapped in the bag by squeezing some of the icing out of tip into the bowl. This is called "burping"the bag.
To remove ic ng from the spatula, hold the bag on the outside between the thumb and fingers. Then pull the spatula out of the bag, using the bag and your fingers to squeeze the icing off.
Decorating Bags at a glance.,.
Parchment
• Use with or without coupler
• Small amounts of icing
• Cut in half for smaller bag
• Grease free
• Twosizes—12and IS in.
Featherweight
• Use with or without coupler
• Dishwasher safe
• Durable
• Available in many sizes
• Flexible/soft to the touch
Disposable
• Use with or without coupler
• Economical
• Grease free
• Transparent
3 Essentials of Decorating
Every decoration you make is the result of three things working together:
1. Icing consistency
2. Correct bag position and
3. Pressure control
Understand these three essentials and you'll get perfect decorating results!
1, Icing Consistency
If the consistency of your decorating icing isn't just right, your decorations won't be right either. Just a few drops of liquid will make a great deal of difference in your results.
Stiff icing holds a 3/4 in. peak on the spatula. Use it for flowers with upright petals—if icing is not stiff enough, petals will droop.
Medium Icing is used for flowers with flat petals and for borders—when the icing is too stiff or too thin, you can't get the uniform designs that characterize a perfect border.
Thin Icing is used for writing, stems, leaves and for frosting a cake.
2. Correct Position
The way your decorations curl and point and lie depends not only on the icing consistency but also on the way you hold the bag and the way you move it.
Bag positions are described in terms of both angle and direction. Angle refers to the position of the bag relative to the work surface. There are two basic angle positions:
90° angle, or straight up, perpendicular to the surface. Used when making stars or flat flowers or rosettes.
45° angle, or half way between vertical and horizontal. Used for writing and borders.
The angle in relation to the work-surface is only half the story on a bag position. The other half is the direction in which the back of the bag is pointed
When you hold the bag at з 45” angle to the surface, you can sweep out a circle with the back end of the bag by rolling your wrist and holding the end of the tip in the same spot. (If you do not have a bag, try it with a pencil). Pretend that the circle you formed in the air is a clock face. The hours of the clock face correspond to the direction you should point the back end of the bag.
Look for these clock icons throughout Course II. They’ll show you at a glance, in which direction to point the back of the bag.
3. Pressure Control
The size and uniformity of your icing design are affected by the amount of pressure you apply to the bag and the steadiness of the pressure— how you squeeze and relax your grip on the decorating bag. Your goal is to learn to apply pressure so consistently that you can move the bag in a free and easy glide while just the right amount of icing flows through the tip. Practice will achieve this control.
Note to Left-Handed Decorators
When bag positions or tip selection differ from those of the right handed decorator, the position is listed in parentheses.
6
The Flower Nail
The flower nail is used as a revolving platform on which to build roses and other flowers.
The key to making any flower on the nail is to coordinate the turning of the nail with the formation of a petal.
You simply hold the flower nail between the thumb and forefinger of your left (right) hand, beginning at your knuckle crease and roll it slowly out to the ends of your fingers as you squeeze out icing with your right (left) hand. Your right (left) hand moves in and out, or up and down, as it holds the decorating bag and tip at just
the right angle (in most cases 45°) and keeps the icing flow ng at just the right even speed If the flower nail is put in the knuckle crease, and you use the tip of the thumb and roll it out toward the ends of the finger, it will automatically turn in the correct direction.
Color
Vital to your decorating, color adds realism to flowers and personalizes special event and holiday cakes. Wilton Icing Colors are concentrated in a rich gel base, are fast-mixing and easy to use, and will not change icing consistency. The extensive range of icing colors makes it convenient for you to have the colors you want and need without the guesswork of mixing.
Basic Color Mixing
Coloring for Special Effects
4
Begin with white icing and add color a little at a time until you achieve the shade you desire. Use a toothpick to add icing color—just dip it into the color, swirl it in the icing, and blend well with spatula. Always use fresh toothpicks when adding more color. Colors intensify or darken in buttercream icing 1 -2 hours after mixing, so keep this in mind when mixing colors.
Always mix enough of any one icing color. It is difficult to duplicate an exact shade of any color. To mix deep or dark color icing (such as red, black, brown), you will need to add color in larger amounts. You may want to add flavor or extract to cut the taste of the color.
Brush Striping gives multiple and deep color effects to icing. Apply one or more colors to the inside of a parchment paper bag with a brush. Fill the bag with white or pastel-colored icing, and as the icing is squeezed past the color, out comes striped decorations.
Spatula Striping produces two tone and realistic pastel tones in flowers and figure piping. Using a spatula, stripe the inside of a decorating bag with pastel-colored icing. Then fill the bag with white icing, or another shade of the same color as the striping. Squeeze out decorations with soft contrasts.
7
Lesson 1
Build On The Basics
New borders, innovative decorations and beautiful flowers.
In this lesson, you'll discover more ways to add extra excitement to your cakes.
Additional Icings
Ingredients
Each icing ingredient plays an important role in creating perfect icing.
Confectioners' sugar is a sweetener. Sifting it also helps to make the icing smoother. When available, pure cane sugar should be used.
Meringue Powder is used instead of egg whites in various icings. It enables you to rebeat royal icing to restore stiffness. It can also be used to help stabilize buttercream icing.
Liquid is used to achieve proper consistency. Water, fruit juice, milk., cream or light corn syrup can be used.
Royal
Smooth, hard drying icing for decorations that last indefinitely—ideal for flowers and trims made in advance. Once hardened, and properly stored, royal icing decorations will not soften or crumble.
\OlCI For medium or thin icing consistency, add water a little at a time until the desired consistency is reached. Royal icing takes less water to thin than class buttercream.
Recipe
Stiff Consistency
Single Batch
3 level tablespoons meringue powder
1 lb. sifted confectioners' sugar
5-6 tablespoons lukewarm water
Double Batch
6 level tablespoons meringue powder
2 lbs. sifted confectioners' sugar
10-12 tablespoons lukewarm water
If using a hand-held mixer, make a single batch at a time.
Combine all ingredients. Mix 7-10 minutes at low-medium speed until icing loses its sheen. To prevent drying, be sure to cover the bowl with a damp cloth while working with icing.
Store in an air-tight container for up to 2 weeks. To reuse, beat on low to restore original texture.
Any bit of shortening will break doven this icing into a thin, soupy mixture. Be sure utensils are completely greaseless.
Flavors or extracts are used to give icings personal tastes. Wilton flavorings will not change your icing color.
Color Flow
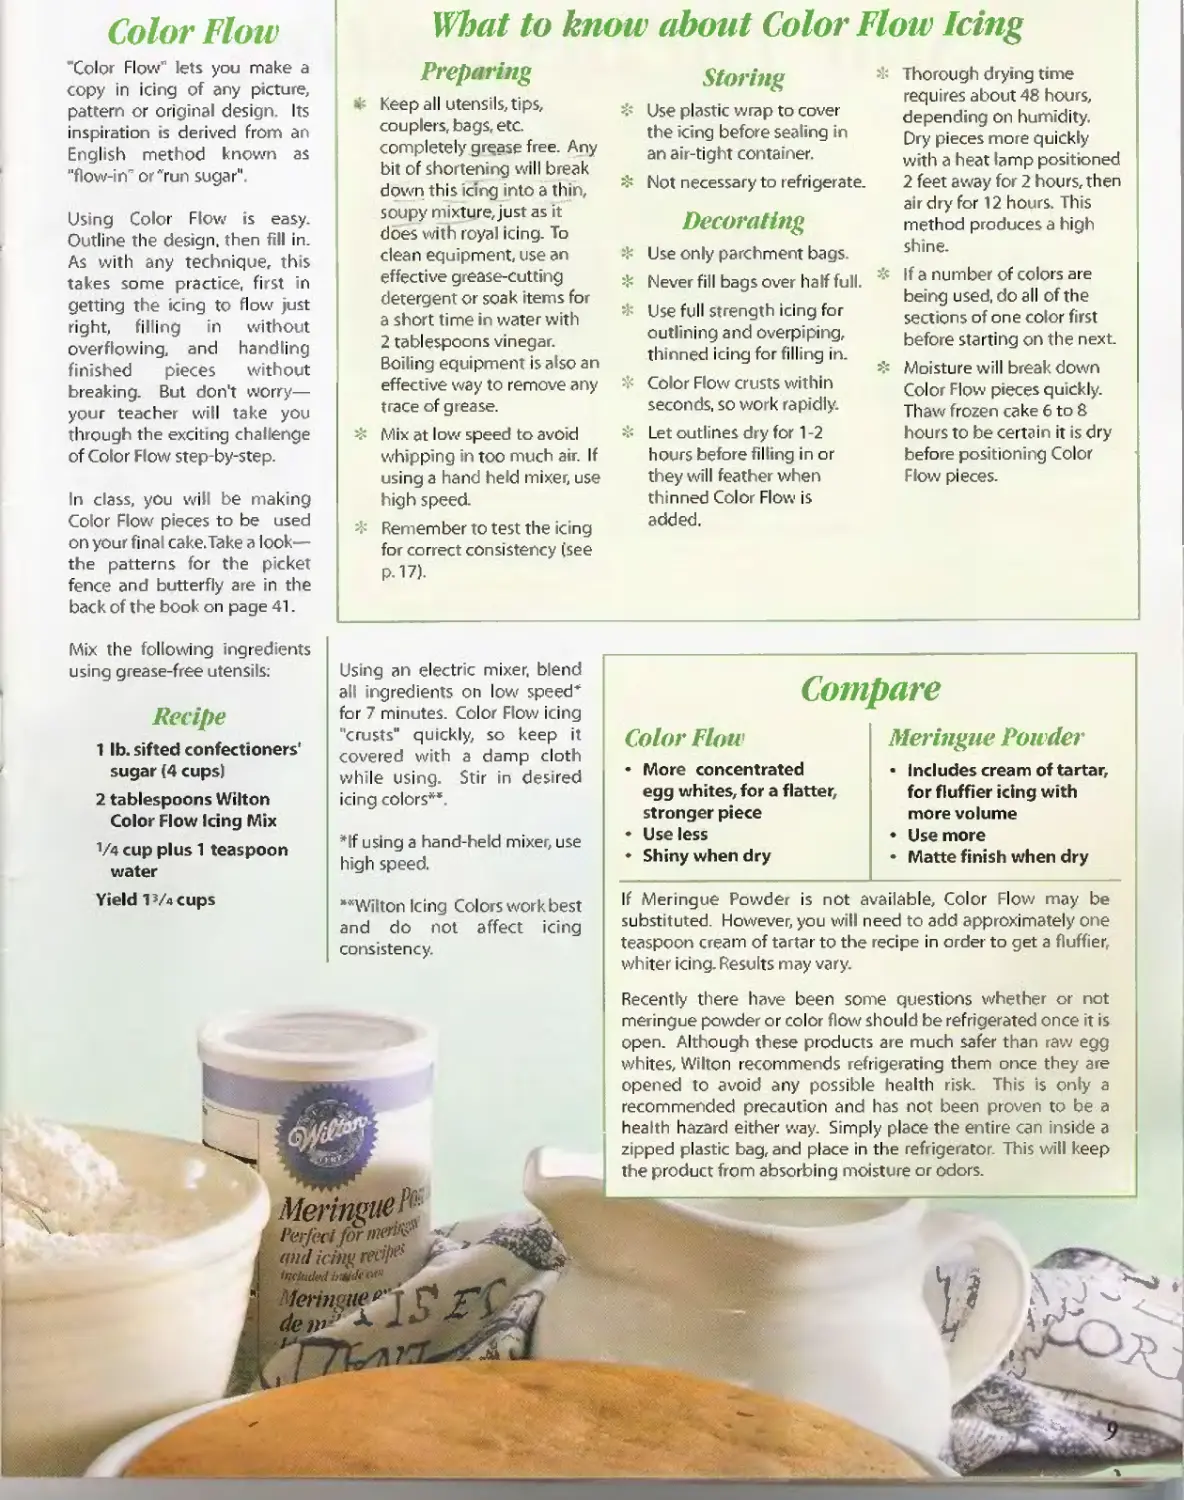
"Color Flow" lets you make a copy in icing of any picture, pattern or original design. Its inspiration is derived from an English method known as "flow-in” or "run sugar".
Using Color Flow is easy. Outline the design, then fill in. As with any technique, this takes some practice, fi st in getting the icing to flow just right, filling in without overflowing, and handling finished pieces without breaking. But don't worry— your teacher will take you through the exciting challenge of Color Flow step-by-step.
In class, you wil be making Color Flow pieces to be used on your final cake.Take a look— the patterns for the picket fence and butterfly are in the back of the book on page 41.
What to know about Color Flow Icing
Preparing
• Keep all utensils, tips, couplers, bags etc. completely g rease free. Any bit of shorten ng will break down this icing into a thin, soupy mixture, just as it does with royal icing. To clean equipment, use an effective grease-cutting detergent or soak items for a short time in water with 2 tablespoons vinegar. Boiling equipment is also an effective way to remove any trace of grease.
❖ Mix at low speed to avoid whipping in too much air. If using a hand held mixer, use high speed.
❖ Remember to test the icing for correct consistency (see p-17).
_____________________________
Storing
❖ Use plastic wrap to cover the icing before sealing in an air-tight container.
❖ Not necessary to refrigerate.
Decorating
Use only parchment bags 5k Never fill bags over half full. 5k Use full strength icing for outlining and overpiping, thinned icing for filling in.
:k Color Flow crusts within seconds, so work rapidly.
❖ Let outlines dry for 1 -2 hours before filling in or they will feather when thinned Color Flow is added.
sk Thorough drying time requires about 48 hours, depending on humidity. Dry pieces more quickly with a heat lamp positioned 2 feet away for 2 hours, then air dry for 12 hours. This method produces a high shine.
=k If a number of colors are being used, do all of the sections of one color first before starting on the next.
>k Moisture will b eak down Color Flow pieces quickly. Thaw frozen cake 6 to 8 hours to be certain it is dry befo e positioning Color Flow pieces.
Mix the following ingredients using grease-free utensils:
Recipe
1 lb. sifted confectioners' sugar (4 cups)
2 tablespoons Wilton Color Flow Icing Mix
1/4 cup plus 1 teaspoon water
Yield 1’/д cups
Using an electric mixer, blend all ingredients on low speed* for 7 minutes. Color Flow icing "crusts" quickly, so keep it covered with a damp cloth while using. Stir in desired icing colors**
*lf using a hand-held mixer, use high speed.
**Wilton Icing Colors work best and do not affect icing consistency.
PerfecifornV^' and и frig r
Iiifit deiiinAith’Ot’1
Compare
Color Flow
• More concentrated egg whites, for a flatter, stronger piece
• Useless
• Shiny when dry
If Mer ngue Powder is not available. Color Flow may be substituted. Howeve you will need to add approximately one teaspoon cream of tartar to the recipe in о der to get a fluffier, whiter icing. Results may vary.
Recently there have been some questions whether or not meringue powder or color flow should be refrigerated once it is open. Although these products are much safer than raw egg whites, Wilton recommends refrigerating them once they are opened to avoid any possible health r sk. Ths is only a recommended precaution and has not been proven to be a health haza d either way. Simply place the entire can inside a zipped plastic bag, and place in the refrigerator. This will keep the product from absorbing moisture or odors.
Meringue Powder
• Includes cream of tartar, for fluffier icing with more volume
• Use more
* Matte finish when dry
LESSON 1
Star Tip Decorating
Shell Review
Getting Ready:
Set up practice board, insert
Course II, Lesson 1 pattern
Fit decorating bag with tip 21
4- Fill bag half full with medium consistency buttercream icing
Tip: 2i
Icing: Medium consistency
Position:
— Bag:45' at 6:00
— Tip: slightly above surface
Rosette
Getting Ready:
♦ Set up practice board, insert Course II, Lesson 1 pattern
♦ Fit deco rati ng bag
with tip 16
Tip: 16
Icing: Medium consistency
Position:
— Bag: straight up
— Tip: '/4 in. above surface
♦ Fill bag half full with medium consistency butter cream icing
Sequence:
Squeeze hard, let icing fan out. Let the pressure of the icing coming out of the bag
lift the tip slightly. Relax pressure, lower tip Stop pressure, pull to form tail without lifting tip off the surface.
Sequence:
Position tip slightly above surface. Squeeze and, without
releasing pressure, move the tip in a tight complete rotation beginning at 9:00 (3:00) to 12:00, to 3:00 (9:00), to 6:00 and ending at 9:00 (3:00). Lift tip away.
The Shell Border is simply a series of shells in a row. Start the second shell so that the fanned end covers the tail of the preceding shell to form an even chain.
The Rosette Border is simply a line of uniform rosettes, barely touching one another.
10
Reverse Shell
The Reverse Shell Border is simply a chain of swirling reve se shells . The fan end covers the tail of the previous shell. If you're making the border on a round cake,turn the cake as you go so that the back of the bag is at 6:00 working towards yourself.
Sequence
1. Squeeze hard, let icing fan out. To form curve, move tip from 3:00 (9:00) to 12:00 to 6:00. Relax pressure, lower tip. Pull tip straight towards yourself to 6:00 to form tail.
2. Repeat, curving 9:00 (3:00) to 12:00 to 6:00.
Getting Ready:
Tip:21
Icing: Medium consistency
Position:
— Bag: 45° angle at 6:00 — Tip: slightly above surface
♦ Set up practice board, insert Course II, Lesson 1 pattern
♦ Fit decorating bag with tip 21
♦ Fill bag half full with medium consistency buttercream icing
LESSON 1
New Flowers
Alone, and gathered in bouquets, flowers make cakes blossom! Begin with the beloved Rosebud, then move on to two more traditional favorites.
Rosebud
Getting Ready:
• Set up practice board, insert Course II, Lesson 1 pattern
• Fit decorating bag with tip 104; fill half full with stiff consistency buttercream icing for petals
Fit decorating bag with tip 3; fill half full with thin consistency green buttercream icing for sepals and calyx
Tips: 104,3
Icing: Stiff consistency for petals; thin consistency for sepals and calyx
Position:
— Bog: 45 'angle at 4:30 (7:30) for petals, 454 angle at 6:00 for sepals and calyx
Tip 104 for petals—wide end of tip resting on surface, tip 3 for sepals—touching bottom center of bud, tip 3 for calyx—touching base ofcenter sepal
Sequence:
Base Petal
Overlapping Petal
Sepals
Calyx
1. Start with the wide end of tip 104 resting on decorating surface. Hold
the bag at a 45' angle to the surface. Point the back of the bag to 4:30 (7:30) with the narrow end of the tip leaning up and slightly to the right (left). Form the base petal: while squeezing, move the tip along the surface away from you in a straight line about 1/4 inch, hesitate, then continue squeezing as the icing fans out. Returning the tip to the original position and halfway back, start to release pressure, move tip to starting point and pull tip away
2. Touch the large end of the tip to surface just to the left (right) of where you ended the base petal. The bag is positioned as for the base petal—4:30 (7:30); hold it steady in this position until the second petal is completed. As you continue squeezing, the icing will catch the edge of the base petal and roll it over naturally. When the second petal looks complete, stop pressure completely, touch the tip back down to the surface and pull tip away.
3. Pipe3 sepals on each rosebud using tip 3. Position the
end of the tip against the bottom center of the bud. Hold the bag in 6:00 position. Form the middle sepal first. Squeeze and let icing build up. Lift the bag up and away from the flower. Stop pressure as you pull away to form the point • of the sepal Repeat, making a sepal on the left and right sides.
4. Insert tip 3 into the base of the center sepal.
Squeeze, letting the icing build up. Slowly draw the tip towards you, relaxing pressure as you move away from the flower. Stop pressure, pull away. You may want to blend the calyx into the stem using dampened Decorator's Brush.
12
Lily of the Valley
Getting Ready:
Ф Set up practice board, insert Course II, Lesson 1 pattern
Ф Fit two decorating bags with couplers
Fill bags half full with buttercream icing; one thin consistency green, one medium consistency white
Attach tip 81 onto bag with white icing; attach tip 67 onto bag with green icing
Tips: 67,2,81,1
Icing: Medium consistency; white for flower; thin consistency green for leaf, sterns and stame is Position:
— Bag: 45' angle at 3:00 (9:00) for leaf and stems;
30‘ angle at 4:30 (7:30) for flower
— Tips:
67 for leaf, slightly touching decorating surface
2 for sterns; slightly touching decorat'ng surface
81 for flower; tip above decorating surface
1 for s ramens; ligh tly touching inside of flower
Sequence:
TEACHER'S TALK
9
for a 3-0 leaf effect angle the top edge of the decorating tip to about 45°. (he greater the angle, the more dimension your leaf will have.
Stems
Flowers
1. Using tip 67, press out icing, letting it build up slightly for a broad
width. Move upward, curve to right and gradually stop pressure to bring leaf to a point.
2. Add tip 2 stem along center of leaf, moving off to an angle. Pipe short green secondary stems outward from the main stem.
inner curve of tip facing you. Press out a curve of icing and continue
Using tip 81, squeeze with light pressure ABOVE surface with
squeezing until a tiny bell shape is formed. Stop pressure. Lightly touch tip to surface; give an additional quick squeeze, stop and lift away. Add two tip 1 stamens to center.
LESSON 1
Flower Nail Templates
Just as you used a marked flower nail in Course I to learn how to make a rose/ these Course II templates will guide you in petal positioning and flower size.
Look at the templates on p. 43. Positioned on top of the flower nail, they make flower formation easier to achieve! Cut out each template, attach to flower nail using floral clayOcing can also be used, but will stain the template), position wax paper square over template, attaching with floral clay. Pipe flower then remove waxed paper with flower on it. Reuse again and again!
TEACHER'S
TALK
₽
Laminate your flower nail templates and they’ll last for years!
The Chrysanthemum
Getting Ready:
Sequence:
• Attach mum template onto flower nail
♦ Prepare two decorating bags, one with tip 81, one with tip 5
• Fill bags half full of medium consistency buttercream icing
Tips: 5,81
Icing: Medium consistency;
yellow
Position:
— Naif: in left (right) hand
— Bag. 90'for mound
45" angle at 3:00 (9:00)
for petals;
— Tips:
for mound: ’/n in. above center
for petals: curved side up (like a smiley face)
Completed flower size. 3/4 the size of the top of the flower nail
1. Pipe tip 5, mound of icing
2. Insert tip 81 into mound (indent up), squeeze firmly and
pull up slightly as you release pressure to form
petals.
3. Repeat, positioning next row of petals between petals in first row.
4. Make third row of petals slightly shorter and pull tips up slightly for next row of petals.
5. Continue until mound is covered, with each row slightly shorter.
I
Getting Ready For
Lesson 2
Read through Lesson 2 at home. Pay special attention to page 17. Have any questions? Write them down and bring them to class to be answered and discussed!
Here's what to bring to the next class:
1 recipe Royal Icing, colored as follows:
]/4 c. yellow for flower centers
1/2 c. violet for violet blooms
1/2 c. deep green for violet leaves
Vi c.pink for apple blossoms
1 recipe full strength Color Flow Icing
4- 2 empty cups or bowls to mix colors (grease free)
4- yellow icing color
4- spatula
♦ Tips 1,2,101,103 and either 59s/59‘ or 101s
4- Flower formers, small size
4- Wax paper squares (V/2"X V/2")
4 Flower Nail No. 7
4- Parchment paper bags
4- Wilton Cake Sparkles
Cake Circle (for Color Flow pieces to dry on) Your kitchen supplies listed on page 2 Toothpicks Prepared Color Flow patterns (see below).
Preparing Color Flow Patterns for Lesson 2
In Lesson 2, you will make a butterfly and fences using your colorflow foryourfinal cake. To save time, you will need to prepare your patterns at home before class.
It's always a good idea to make extra color flow pieces to allow for breakage.
Here’s what you'll need to prepare the patterns: Patterns on page 41, parchment paper, репс I, cake circle, waxed paper and transparent tape.
Trace the patterns onto parchment paper. Tape the parchment pattern onto the cake circle; smooth out any wrinkles. Cut a p’ece of waxed paper a little larger than parchment paper. Cover parchment with waxed paper.
smooth out any wrinkles and tape waxed paper in place. Be sure to review Color Flow, page 17 before you come to the next class, and bring this prepared pattern to class for Lesson 2!
Lesson 2 New Additions
Our decorating adventure continues with an inspiring new option— Color Flow, and two beautiful new flowers.
Color Flow
Discover the virtually unlimited possibilities of the Color Flow technique! Use it to bring patterns, ideas and your own designs to life.
Outlining
Icing: Full strength Color Flow
Tip: 2
Patterns: Prepared
Tools: Decorator's brush, parchment bag, cut in half to make о small bag
Positions:
— Bag: almost 90”
— Tip: slightly above surface
Filling In
Icing: Thinned Color Flow Tip: None, simply cut approx.
'/is in. off tip of parchment bag
Tools: Corsage or straight pin. parchment bag
Positions:
— Bag: 45”, clock position changes depending on what shape is being filled in
— Tip: Slightly above surface
Drying
Let decorations air dry thoroughly at least 48 hours. Allow extra drying time in
Sequence:
Squeeze, pull and drop icing string, following pattern outlines. Stop,
Blend lines using a damp Decorator's Brush.
touch tip to surface and lift
away.
Sequence:
VC
Have your parchment bags half full and ready for filling in with color flow.
Color flow crusts quickly and lines will show if icing begins to dry before you finish filling in the pattern. Begin filling in along the outlines first, aiming bag opening
humid conditions. Bring color flow pieces to class for Lesson 4.
towards outline for a pillow effect. Work from the outside in, top to bottom. Pop
air bubbles, if any, with pin while icing is wet. Check for any low spots and fill in; color flow should dry with a slight pillow effect.
Color Flow Technique at a glance...
Trace pattern onto parchment paper
Tape parchment pattern on cardboard cake circle
Cover pattern with wax paper.
Tape wax paper over pattern-smooth out wrinkles
Outline using tip 2 and half size parchment bag half full with full strength color flow
Fill in with thinned Color
Flow Icing using parchment bag, no tip.
Thinning Color Flow
A small amount of water needs to be added to full strength Color Flow until the icing flows properly for filling in. To test, spoon out a small amount and let it drop back into the bowl. When it takes a full count of ten for the icing to sink back into the mixture and the outline ring disappears completely, the icing is ready.
Color Flow test puddles are dollops of color flow icing placed next to your finished Color Flow piece to dry. 'Remove the puddles first and check for dryness. Test
Test Puddles
A fun way to test if your Color Flow piece is dry! puddles eliminate the possibility of removing a color flow piece too soon and breaking it. Don't throw away the puddles; add facial features and they become puddle faces—great additions
to cookies, cupcakes and cake borders. Set a face in the center of a rose for a cute baby shower decoration j
TEACHER'S TALK
After your Color Flow piece is dry, you inay want to add a message or trim to it. Useyour leftover Color Flow icing (full strength) in a parchment bag fitted with tip 2.
17
LESSON 2
More New Flowers
о
Violet
Getting Ready:
Sequence:
Ct Attach Violet template onto flower nail
Ct Prepare two decorating bags, one with tip 59s/59‘ (tip 101s for left handers) for petals, one with tip 1 for center
Ct Fill bags half full with medium consistency royal icing
Tips: 1,591/59“ (101s)
Icing: Medium consistency; violet for petals, yellow for center Position:
— Nail: in left (right) hand
— Bag: 45° angle at 3:00 (9:00) for petals, 90° for center
— Tips: for petals: v/ide end of tip lightly touching center of nail, narrow end pointing out and raised 'Zs in. above nail surface.
For center: slightly above flovrer.
Completed flower size: no larger than the nickel size on the violet template.
1. Squeeze with light pressure, move tip out as you spin the nail to
form first1 /4 in. elongated petal. Relax pressure as you move tip back to starting point. Stop, lift away.
z z Violet Leaf
2. Repeat to make two more bottom petals.
3. Make one Vs in. round peta
4.
Repeat to make the second round petal. Add two center dots. Dry in
small Flower Former.
Getting Ready:
Ct Fit decorating bag with tip 103
Ct Fill bag half full with medium consistency royal icing
Ct Attach wax paper square onto flower nail
Tip: 103
Icing: Medium consistency royal
Positions:
— Nail: in hand, spinning the nail to the end of your finger.
— Bag: 45' angle at 3:00 (9:00)
— Tip: wide end tightly touching surface, narrow end lifted slightly
Sequence:
Squeeze with medium pressure, using jiggling motion, slide tip out about V4 in. as
you turn the nail.
Relax pressure, move back to starting point, stop pressure, pull away Optional: Dry in medium Flower Former.
18
Apple Blossom
Getting Ready:
Sequence:
й Attach Apple Blossom template onto flower nail
ft Prepare two decorating bags, one with tip 101 for petals, one with tip 1 for center
й Fill bags half full of medium consistency royal icing
Tips: 1,303
Ic'ng Medium consistency; pink for petals, yellow for center
Positions;
— Nail: in left (right) hand
— Bag; 45° angle at 3.00 (9:00) for petals, 90' angle for center
— Tips: for petals: wide end lightly touching center of nail, narrow end point'ng out and raised T/8 in. above nail surface.
For center: slightly above flower.
Completed flower size: no larger than the nickel size on your template.
1. Squeeze bag with light pressure and move tip out as
you spin the nail to form first ’/4 in. petal. Relax pressure, move tip back to starting point. Stop, lift tip away.
2. Repeat to make four more petals.
3. Add five dots; one in center and four around center dot. Dry in small
Flower Former.
Getting Ready For Lesson 3
Read through Lesson 3 at home. Have any questions? Write them down and bring them to class to be answered!
Here's what to bring to the next class:
* 2 recipes Royal icing, prepared as follows:
1 cup stiff consistency pink for Roses— parchment bag fitted with tip 12, parchment bag fitted with tip 97
- 1 cup medium consistency pink for Primrose—full parchment with coupler for tips 103,1; half size bag with tip 14
- 1 cup stiff consistency white for Daisy— parchment bag fitted with tip 104
- 2 cups medium consistency yellow for Daffodil and Pansy—a half full parchment bag fitted with tip 1, parchment bag fitted with tip 104, and a parchment bag fitted with coupler and tip 5 (tip 3 or 14 will also be used on this bag)
- 1 cup medium consistency violet for Pansy— parchment bag fitted with tip 104
- Container to carry completed flowers home
* Wax paper roll and 1 ’/z in. x 11/z in. squares
* Flower Formers
* Flower Nail No. 7
* Cornstarch (1 tablespoon)
* Tape
* Your kitchen supplies listed on page 2
Note: Tip 1 and 104 are used multiple times in Lesson 3. To save time, we suggest having three of each tip for class.
Do not fill bags at home.
Bring colored icing to class in an airtight container. Prepare bags with tips and mark with corresponding flower, tip number and icing color.
19
5
Imagine blossoms to fill baskets, dozens of roses, beautiful flowers-all made in icing! We'll begin with a review of the most popular flower the rose, then continue with four new flowers!
Lesson 3
Decorations in Bloom
The Victorian Rose
Roses are the most impressive, beautiful and popular of all icing flowers. Try using an instant curved petal tip for spectacular results!
Getting Ready:
• Fit a decorating bag with tip 97 and fit another decorating bag with tip 12
• Fill both bags ‘Л full with stiff consistency Royal Icing
• Attach a 1 Vz in. square of waxed paper to the flower nail with a dot of icing or floral clay
NOTE: Tip 97 is a right-handed tip. Left-handers will use tip 103.
Tip: 12 for base, 97 for center and petals
Icing: Stiff consistency
Pos> ions
— Nail: in left (right) hand
— Bag: 90°angle (straight up) for base, 4S ‘ angle at 4:30 (7:30) for center and petals
— Tip: slightly above nail for base; wide end touching base at midpoint, narrow end up and in slightly for center and petals
Sequence:
Base
Center
Top Row Petals
Middle
Row Petals
Bottom Ro w Petals
1. Use tip 12. Hold the bag at 90’ angle
with tip slightly above center of nail. Squeeze with heavy pressure, keeping bottom of tip in icing until you've made a full, round base. Ease pressure as you raise tip up and away narrowing base to a pyramid shape. Mound should be IVi times the length of the opening of tip 97.
2. Use tip 97. Hold bag at 45’
angle to nail with wide end of tip just below top of mound, and narrow end angled in slightly. Do three things simultaneously ...squeeze, pull tip up and away from top, stretching icing into a ribbon as you spin the nail to the end of your finger. Relax pressure as you bring ribbon of icing around top, overlapping the point at which you started.
3. Touch wide end of tip to midpoint
of bud base, narrow end straight up. Spin nail and move tip up and back down to midpoint of mound forming first petal of rose. Start again, slightly behind end of first
petal and squeeze out 2nd petal. Repeat for 3rd petal, ending by overlapping the starting point of 1st petal. Rotate the nail Чз for each petal.
4. Touch wide end of «Р
slightly below center of a petal in top row. Angle narrow end of tip out slightly more. Squeeze bag and spin nail moving tip up, then down to form 1 st petal. Repeat for a total of 5 petals. Rotate the nail Vs for each petal.
5. Touch wide end of tip below
center of petal in middle row, again angling narrow end of tip out a little more. Squeeze bag and spin nail to end of fingers, moving tip up, then down to form 1st petal. Repeat for a total of 7 petals. Rotate the nail 4? for each petal.
Curved Petal Tips
Tip 118
Tip 119
21
LESSON 3
More New Flowers
Daisy
Getting Ready:
Sequence:
Attach Daisy template onto flower nail
Prepare two parchment decorating bags, one with tip 104 one with tip 5 in 'h. size bag
# Fill bags half full with stiff consistency royal icing
TEACHER'S
TALK
f I
Try these Daisy variations:
Tips: 104,5
Icing: Medium consistency;
white for petals, yellow for center Position:
— Nail: in left (right) hand
— Bag: 45° angle at 3:00 (9:00) for petals; 90° angle for center
— Tips: for petals: wide end lightly touching J/4 in. away from center of nail, narrow end pointing out to outer edge for cen ter: sligh tty above flower
Completed Flower Size: the size of the top of th e flower nail.
1. Position tip 104 almost parallel to nail, wide end Va in. from center,
narrow end at outer edge of nail. With even pressure, squeeze bag; relax pressure as you move to center to form petal on one line. Stop. Turn nail slightly; repeat for total of twelve or more petals.
2. Add tip 5 center dot; when flattened dot should be the size
of opening of tip 12. Cover dot with Cake Sparkles. Dry in medium Flower Former.
Use Cake
Sparkles™ to highlight all your flowers.
yellow petals with yellow or blue renters, violet petals with yellow centers, blue petals with yellow centers, peach petals with
orange centers.
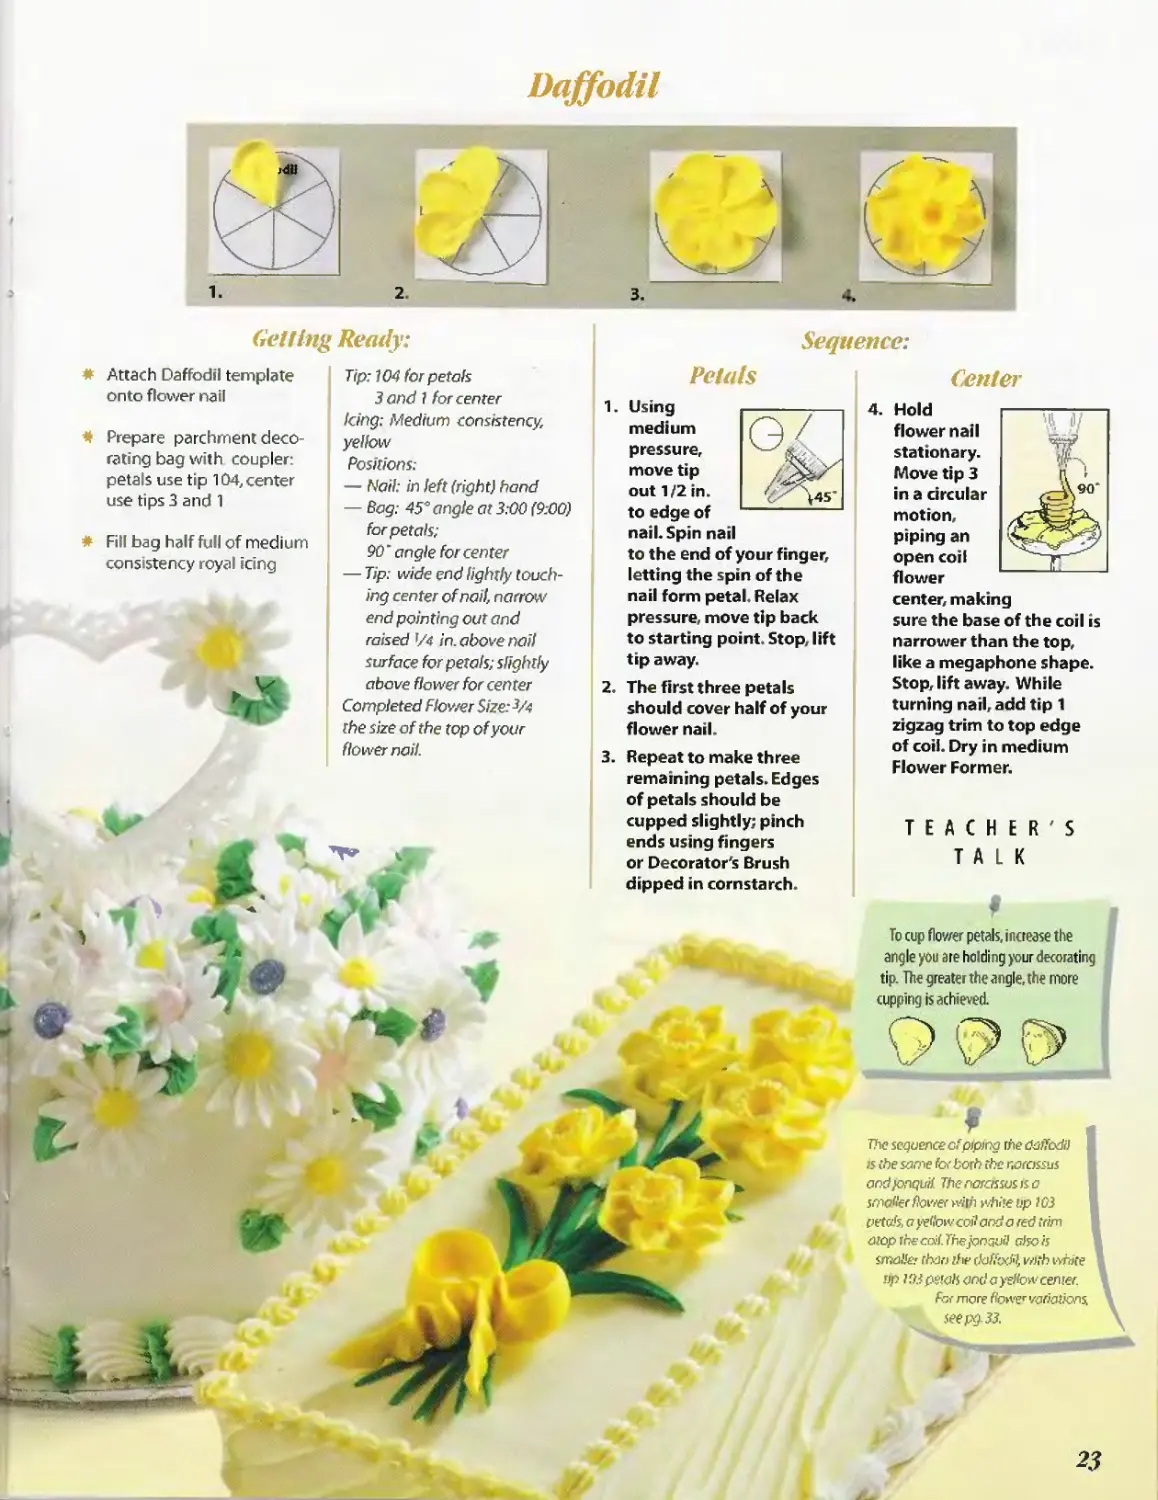
Daffodil
Getting Ready:
Sequence:
* Attach Daffodil template onto flower nail
* Prepare parchment decorating bag with coupler: petals use tip 104, center use tips 3 and 1
* Fill bag half full of medium consistency royal icing
Tip: 104 for petals
3and 1 for center
Icing: Medium consistency, yellow
Positions:
— Nail: in left (right) hand
— Bag: 45° angle at 3:00 (9:00) for petals;
90 ’ angle for center
— Tip. wide end lightly touching center of nail, narrow end pointing out and raised ’/4 in. above nail surface for petals; slightly above flower for center
Completed Flower Size: 3/4 the size of the top of your flower nail.
To cup flower petals, increase the angle you are holding your decorating tip. The greater the angle, the more cupping is achieved.
TTie sequence of piping the daffodil is the same for both the narcissus and jonquil. The narcissus is a smaller flower with white tip 103 petals a yellow coil and a red trim atop the coil. The jonquil also is smaller than the daffodil, with white tip it'/.t pevls and a yellow center.
For more flow wiobons see pg 33.
Petals
1. Using medium pressure, move tip out 1/2 in. to edge of nail. Spin nail to the end of your finger, letting the spin of the nail form petal. Relax pressure, move tip back to starting point. Stop, lift tip away.
zX и5'
2. The first three petals should cover half of your flower nail.
3. Repeat to make three remaining petals. Edges of petals should be cupped slightly; pinch ends using fingers or Decorator's Brush dipped in cornstarch.
Center
4. Hold flower nail stationary. Move tip 3 in a circular motion, piping an open coil flower
center, making sure the base of the coil is narrower than the top, like a megaphone shape. Stop, lift away. While turning nail, add tip 1 zigzag trim to top edge of coil. Dry in medium Flower Former.
TEACHER'S TALK
23
LESSON 3
Pansy
Getting Ready:
Sequence:
* Attach Pansy template onto flower nail
* Prepare two parchment decorating bags with tip 104 in each, one half parchment with tip 1
* Fill each bag half full with medium consistency royal icing
Tips: 104,1
Icing: Medium consistency; yellow and violet for petals, yellow for center
Positions
— Nail: in left (right) hand
— Bag; 45° angle at 3:00 (9:00) for petals; 90° angle for center
— Tips: for petals: wide end of tip lightly touching center of nail, narrow end pointing out and raised rZ« inch above nail surface, for center: sligh tiy above flower
Completed Flower Size: as large as the top of your flower nail
1. Using medium pressure, move tip out to edge of nail to
form first curved petal. Spin nail letting the spin of nail form petal. Relax pressure as you move back to starting point Stop, lift tip away. Repeat for second petal. These two petals should cover half of your flower nail.
2. Add two shorter curved petals on top of first two petals.
3. Add a single bottom petal using а gentle back and forth motion to
create a ruffled effect.
Add tip 1 teardrop center. Dry in medium Flower Former.
TEACHER'S TALK
Adding Color to Pansies
I
When making lower Nail flowers spinn ng the nail to the end of your fingertips will turn the nail in the correct direction.
Pansy variations: Dark blue petals with yellow centers, orange petals with yellow centers, red petals with yellow centers, white petals with yellow centers.
Color Strip ‘ng
For another variety of pansy, use the Color Striping techniques reviewed in Lesson 1 (p. 7). Brush a stripe of violet icing color down the side of a parchment paper bag and fill with yellow icing. Be certain to turn tip 104 so the color stripe will come out the narrow end. Use the Color Striping technique when making the primrose and violet,too.
Painting
Pansies also can be painted with a fine art brush dipped in icing color. If color does not flow easily onto flower, dip brush into color, then into a small amount of Wilton Clear Vanilla Extract to thin color slightly before painting. For best results, paint royal icing pansies after flower has dried and before
24
i
Primrose
„/’Lb j.,p u
Getting Ready:
Sequence:
*
Attach Primrose template onto flower nail
*
Prepare two parchment decorating bags, one with coupler (tip 103 used for petals, tip 1 used for star center) one with tip 14
*
Fill each bag half full with medium consistency royal icing.
Read through Lesson 4 at home. Have any questions? Write them down and bring them to class to be answered!
Next week, you'll make a spectacular cake. To save class time—color icing, prepare bags and frost cake at home. Bring all extra icings to class!
iS»,. V <
Ready For Lesson 4
Tips: 103,14,1
Icing: Medium consistency; for petals, yellow and pink for center Positions:
— Nail: in left fright) hand
— Bag: 45° angle at 3:00 (9:00) for petals; 90" angle for center
— Tips: for petals: wide end lightly touching center of nail, narrow end pointing out and raised ’Zs inch above nail surface.
for center: tip slightly above flower Completed Flower Size: 3/4 the size of the flower nail top
Here's what to bring to the next class:
* 2 recipes BUTTERCREAM ICING, colored and prepared in bags as follows:
- 3 cups medium consistency; colored for basketweave, rope and shell border — to be used with a Featherweight bag, a coupler and tips 47,21
- 1 cup thin consistency; colored for basketweave, used to lightly frost cake at home
- i/2 cup thin consistency; in white, used to frost and smooth top of cake at home
1. Each petal is shaped like a modified shamrock
leaf. Using medium pressure, move tip out 1/4 in., using a curve, dip, curve motion to form first petal. Spin nail letting spin of nail form petal. Relax pressure as you move tip back to starting point, letting the spin of the nail and your curve, dip and curve motion form the petal.
1/2 cup medium consistency; in white, for attaching color flow pieces — to be used with a half size parchment bag with tip 5
- 1 cup thinned with piping gel; in green for leaves — in parchment bag with coupler and tip 67 or 352
1/2 cup thin consistency; in green for writing — in parchment bag with tip 3
* Practice Board Set
* Color Flow pieces from Lesson 2
2. Repeat to form the remaining four petals.
3. Add tip 14 small star center. Add tip 1 small dot to star,
dry in medium Flower Former.
* One oval 2-layer cake. Positioned on a Fanci-Foil Wrap covered cake circle or cake circle with doily Frost the cake with buttercream AT HOME as indicated at left
* Sugar cubes or mini marshmallows, to be used for positioning Color Flow pieces (optional)
+ Tips 5,3,21,47 and a leaf tip 67 or 352
* Flowers from Lessons 2 and 3; any additional flowers you made at home
* Your kitchen supplies listed on page 2
25
Lesson 4
The Grand Finale
Lesson 4 presents a final, exciting technique-realistic basketweaving with rope border.
Finally, you'll use the skills learned in this Course as well as your color flow and floral decorations to create a spectacular cake!
Basketweaving
This clever technique turns icing into natural-looking weave. Simply combine long vertical bars of icing with short horizontal bars to produce basketweaving.
Variation
serrated sides
Variation
Tip 18
Getting Ready:
Sequence:
Set up practice board on stands. Insert Course II, Lesson 4 pattern
I Prepare a Featherweight bag with tip 47
Fill bag half full with medium consistency buttercream icing
I Refer top. 35 for how to divide your cake
Tip : 47
Icing: Medium consistency
Positions:
— Practice Board: upright
— Bag: 45" angle at 6:00 for vertical stripes, at 3.00 (9:00) for horizontal bars
— Tip: lightly touching surface, serrated side up
at the bottom Spacing between bars should be
1. Squeeze out a vertical stripe of icing from top to bottom.
2. Squeeze out short horizontal bars across the vertical bar starting
the same as the width of the tip opening. Each new set should fit between the previous set.
3. Squeeze next vertical bar over ends of horizontal bars.
TEACHER'S TALK
To guarantee an even basketweave pattern, pipe a dab of icing the width of the tip opening being used between the horizontal bars.
Use the Wilton Revolving Cake Stand to elevate your cake for working at eye level. This makes techniques such as basketweaving easier to do.
For deep 3- dimensional basketweaving, be sure to tuck the tip under the vertical bar when making a horizontal bar.
26
Rope
Getting Ready;
Sequence.
A sequence of words will help as you make your rope border. Say:
Pull down
Up over & hook
Tuck in
Refill bag half full with medium consistency buttercream icing
Change tip 47 on your
Featherweight bag to tip 21
The Rope Border is simply a series of "S^s.
2. Insert tip under the bottom curve of the "S" shape. Squeeze bag with steady pressure as you pull down, then lift tip. Move up over the tail of the *S" as you continue to squeeze and form a hook. Keep spacing as even as possible and "S" curves uniform in thickness, length and overall size. Don't be afraid to tuck the tip into the bottom curve of the previous "S" before you begin squeezing; this insures the clean, continuous look of a rope.
Set up practice board; insert Course II, Lesson 4 pattern
Using a l^ 7 steady, even /
pressure, i
move tip in gentle
sideways "S" curve. Stop pressure and pull tip away.
Tip: 21
Icing: Medium consistency
Positions:
— Practice board: flat
— Bag: 45' angle at 4:30 (7:30)
— Tip: lightly touching surface
LESSON 4
Removing Color Flow
Remember to handle your finished Color Flow pieces with care. Color Flow pieces can be removed by one of the following methods:
Place your Color Flow piece on the waxed paper near the edge of a table or other firm, level surface. Use your one hand to hold the paper firmly, yet gently on the table. Slide the
piece slowly over the table's edge while you carefully pull half of the waxed paper down and away from the Color Flow decoration with the other hand. Turn the Color Flow
piece around, again begin to remove the remaining waxed paper, placing one hand under the piece to prevent it from falling off the table. Set the pieces aside as you decorate your cake.
Small color flow pieces are most easily removed from the waxed paper by sliding a small tapered spatula under each to release.
Fem
TEACHER'S TALK
I
Widen the opening of tip 67 by inserting the end of a tapered spatula and gently rocking back and forth. This will help produce distinct, well-shaped leaves!
Getting Ready:
Sequence:
Set up practice board; insert Course 11, Lesson 4 pattern
Prepare a parchment bag, with a coupler and tip 67
* Add piping gel to thin consistency buttercream icing, fill bag half full
Tips: 67, 1
Icing: Thin consistency
Positions:
— Practice Board: flat
— Bog: slightly less than
90° angle at 6:00
— Tip: lightly touching the surface with wide opening parallel to surface
Starting at the bottom, using heavy pressure, hold bag stationery as you pipe a tip
Add tip 1 dots to complete.
67 leaf. Stop pressure to break off leaf point.
It’s Time to Decorate Your Cake!
Folloiv these steps:
• Divide your cake (See p. 35).
2. Cover sides of cake with basketweave
Add bottom shell border and top rope border.
4. Position Color Flow fences. Place several dabs of icing, sugar cubes or miniature marshmallows dabbed with icing to hold Color Flow in place.
. Position flowers: Remember to make a mound of icing and place your largest flowers in the focal point. Flowers should decrease in size as you move away from the focal point. This will give your basket a more natural look. Insert Color Flow butterfly wings into place on the border. It is not necessary to pre-assemble it.
Add leaves where needed among the flowers.
30
Congratulations!
Your dedication and practice has paid off. Ybu have progressed from primary decorating skills to higher techniques with spectacular results.
The Wilton Method of Cake Decorating has been proven for years to be the simplest way to learn and perfect the art of cake decorating. There's more to learn...are you ready for the challenge?
Sprays
Flowing vines and their blossoms come in varying configurations. A little home practice will help you perfect a beautiful floral spray!
Crescent Spray
Begin in center of cake. Pipe main stems from center to right outer edge of cake top. Then pipe stems from center of left outer edge of cake top. Add shorter stems randomly.
Rambling Rose
& Wild Flower Spray
Start at cake center and pipe stem to resemble backward "S" placing it at 12:00 posit on. Add others at 3:00,6:00 and 9:00 positions. Add shorter stems between each main stem
Cascading Spray
Pipe a main stem to resemble an elongated backward "S': Add short sweeping stems.
Vine Spray
Pipe an even curving line from left to right. Add secondary stems approximately half as long as the curves following the flow of the curves. Pipe short stems in the same direction to complete.
Corner Spray
Begin at the corner and pipe a stem upwards, pipe a secondary stem sweeping in the opposite direction. Return to the corner, and pipe a stem across to the opposite side of the cake, repeat and p ipe a secondary stem sweeping in the opposite direction. Add shorter stems to balance
“5” Spray
Begin at the center of the cake and pipe a upward curve out to the left; return to center and pipe a downward curve out to the right. Add secondary curves half as long as the curve following the flow of the curve Repeat with shorter stems.
spray.
Flower Variations
Many flowei variations are simply an offshoot of a basic bloom.
Once you've mastered the basic flower, doing the variation is easy! Look to the many Wilton publications for detailed flower так ng directions!
If you can make a
Makin» this flower is easy!
Find Direct ions in
The Wilton Way of Decorating
Volume One, page 118
The Wilton Way of Decorating
Volume Three, page 321
Apple Blossom
Daisy
Brown Eyed Susan
The Wilton Way of Decorating Volume One, page 113;
Volume Two, page 9
The Wilton Way of Decorating Volume Three, page 183
The Wilton Way of Decorating Volume One, Page 112
The Wilton Way of Decorating Volume One, page 149
Daffodil
Narcissus
The Wilton Way of Decorating Volume One, page 116
Primrose
The Wilton Way of Decorating
Volume One, page 112
The Wilton Way of Decorating
Volume One, page 150
33
Ask for more details.
Bring the Course til Student Cake Decorating Kit to th>‘ first class. Your teacher m jy also suggest other supples necessary to
Build on the cake decorating techniques you have just performed so well! The Wilton Method of Cake Decorating Course III introduces tiered cake assembly, rolled fondant, icing "embroidery" lily nail flowers and morel
Oval Cake Pattern
32 Divisions
Rosette
37
Course II
LESSON 1
Rosebud
Tip 104,3
Tip 104 Petal
Tip 3 Sepals and Calyx
О
Course II
LESSON 4
Tip 21 Rope
38
Course II
LESSON 4
39
Course II
4
LESSON 4
i
Tip 67 Fern and Tip 1 Dot
1
Color Flow Patterns
Playing Card Suits
40
Color Flow Patterns
41
Flower Nail Templates