/


Text
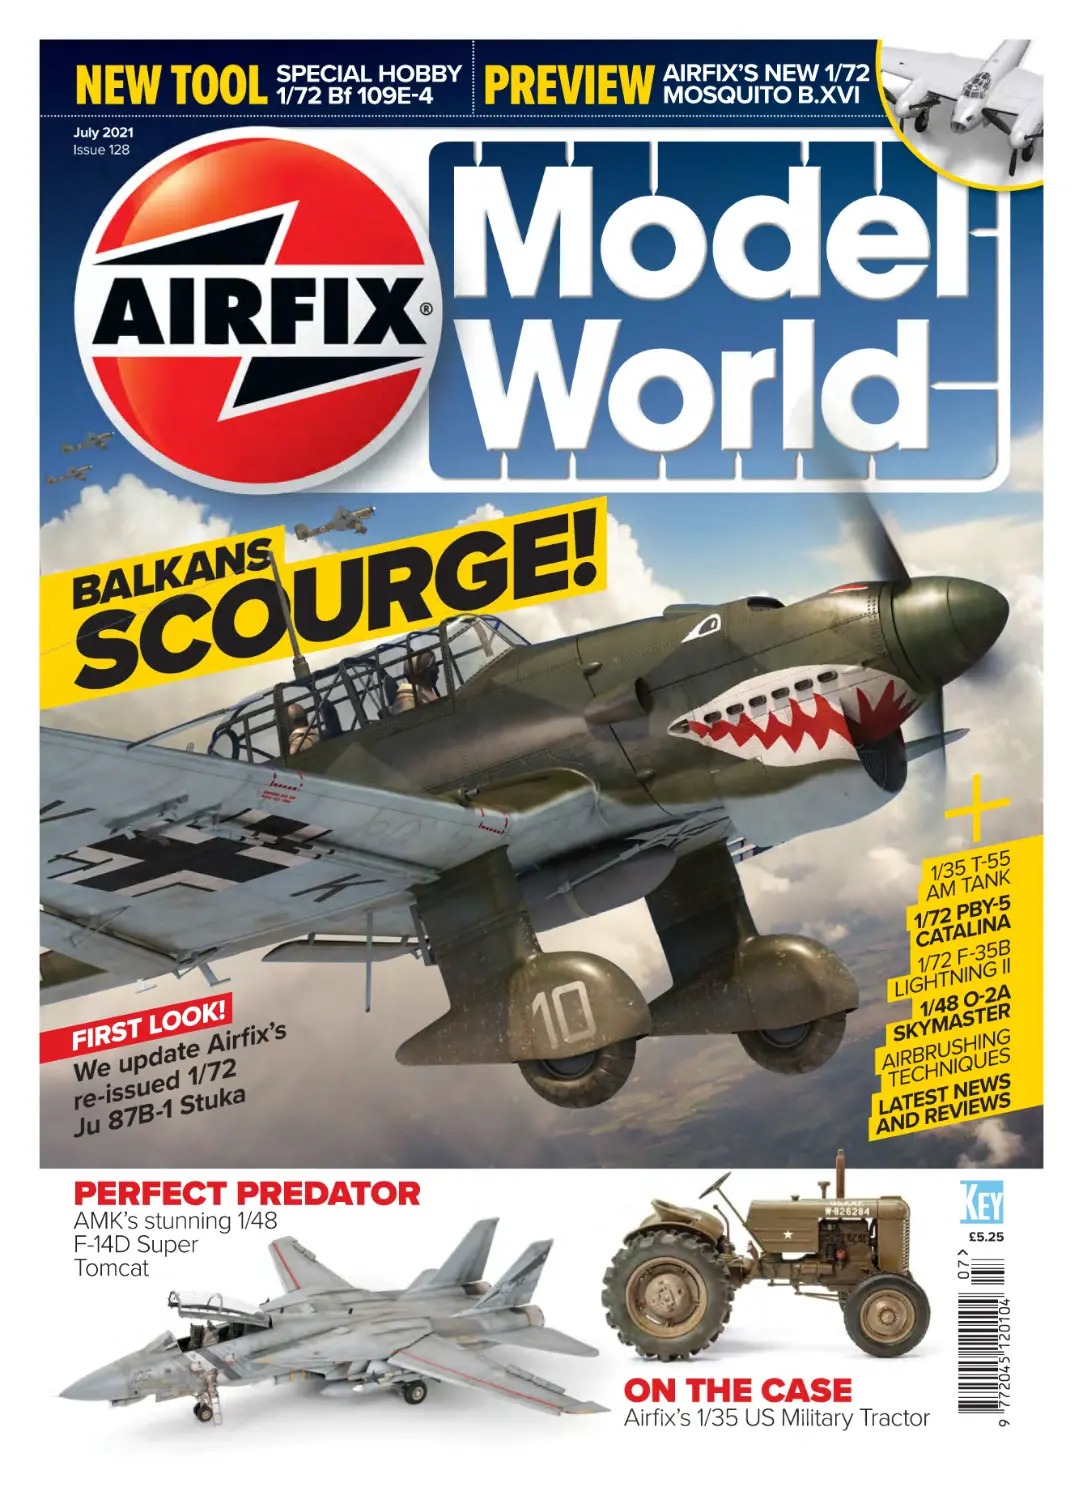
NEW 1/72
HOBBY
MOSQUITO B.XVI
1/72 Bff 109E-4
NEW TOOL SPECIAL
PREVIEW AIRFIX’S
July 2021
Issue 128
!
E
G
R
U
O
SC
S
N
A
K
BAL
-55
1/35 T
NK
AM TA 5
BY1/72APLINA
CAT 5B
-3 I
1/72 FIN
GI
N
LIGHT O-2A
1/48 STER
A
SKYM HING
RUS UES
AIRBH
IQ
TEC N EWS
ST NIEWS
LATER
EV
AND
OOK! ix’s
L
T
S
R
FI
e Airf
t
a
d
p
We u ed 1/72
re-issu -1 Stuka
Ju 87B
PERFECT PREDATOR
AMK’s stunning 1/48
F-14D Super
Tomcat
ON THE CASE
Airfix’s 1/35 US Military Tractor
9 772045 120104
07
£5.25
AMMO_FP.indd 1
14/05/2021 10:46:22
EDITOR’S DESK
keymodelworld.com/
scale-modelling
facebook.com/
airfixmodelworld
twitter.com/
airfixworldmag
T
WELCOME TO ISSUE 128
his month, I’ve hijacked
Stu’s ‘pulpit’ to let you
know that I’ve returned
to Airfix Model World as
editor at large. I will be keeping
an eye on the magazine, but
my main role will be creating
regular content for www.
keymodelworld.com. My focus
will be expanding reviews and
news items from AMW (adding
extra text and imagery), but there
will also be exclusive articles
not available in print. AMW
subscribers already have full
access to Keymodelworld, but if
you’re a casual purchaser, there’s
arguably no better time to take
out a subscription to AMW by
post or simply subscribe to the
website alone if you prefer. For
more information, please turn to
p.14-15 or pay a visit to
www.keymodelworld.com.
Stu and John will still be editing
AMW day to day, but if you’d
like to ask anything relating to
keymodelworld.com, or you have
products you’d like highlighting
specifically on the site, please
email me at the address below.
This month AMW marks the 80th
anniversary of the Battle of the
Denmark Strait, which resulted
in the loss of HMS Hood and the
EDITORIAL TEAM
Editor: Stu Fone
Assistant Editor: John Fuller
Contributors this issue: Jay Blakemore,
David Holmes, Joe Turner, Kev Baxter,
Malcolm V Lowe, Mike Williams, Huw Morgan,
Steve Budd, Chris Jones
Editor at Large: Chris Clifford
Group Production Editor: David Taylor
Production Editors: Sally Hooton, Sue Rylance
Angharad Moran, Suzanne Roberts
Designer: Tom Bagley
ADVERTISING TEAM
Advertising Sales Executive: Melanie Cumbridge
Advertising Sales Executive: Leanne Mawer
Advertising Production Manager: Debi McGowan
Advertising Production/Design: Becky Antoniades
EDITORIAL CONTACT
Airfix Model World, Key Publishing Ltd,
PO Box 100, Stamford, Lincs, PE9 1XQ, UK.
BUSINESS AND MANAGEMENT
Head of Production: Janet Watkins
Head of Design: Steve Donovan
Head of Advertising Sales: Brodie Baxter
Head of Operations & E-commerce: Karen Bean
Head of Content Management: Finbarr O’Reilly
Head of Creative: Hans Seeberg
Chief Digital Officer: Vicky Macey
Chief Content & Commercial Officer: Mark Elliott
Group CEO: Adrian Cox
KeyModelWorld.com
demise of Germany’s Bismarck.
Malcolm V Lowe explores the
hunt for the latter, while Kev
Baxter builds the Catalina that
was responsible for re-sighting
this infamous maritime behemoth
during the fight, which led to its
eventual scuttling.
Modellers who favour jets
have a treat in store via AMK’s
recent 1/48 F-14D, as well as
Italeri’s newtool 1/72 F-35B.
We also delve into the Vietnam
era with ICM’s newly tooled 1/48
O-2A Skymaster. If World War
Two German aircraft get your
creative juices flowing, you’ll
relish Special Hobby’s all-new
1/72 Messerschmitt Bf 109E-4,
and Airfix’s same-scale re-issued
Ju 87B-1 Stuka. Those who prefer
vehicles have builds of Takom’s
1/35 T-55AM tank and Airfix’s
re-boxing of Thunder Model’s
1/35 US Military Tractor.
The usual welcome will resume
from next month, but for now, I’ll
simply say it’s great to be back!
Chris Clifford, Editor at Large
chris.clifford@keypublishing.com
SUBMISSIONS
We will gladly accept and review for publication
any, products, articles, letters, photographs
or other contributions. We cannot guarantee
publication nor, regrettably, return items sent to
us or be responsible for their loss. We will try and
reply where possible. Any letters are assumed
suitable for publication unless we are otherwise
notified. All items submitted for publication are
subject to our terms and conditions. These are
regularly updated
without prior notice and are freely available
from Key Publishing Ltd or downloadable from
www.keypublishing.com.
Printed by: Acorn Web Offset Ltd,
Normanton, UK.
Distributed by: Seymour Distribution Ltd,
2 Poultry Avenue, London, EC1A 9PP
Tel: 020 7429 4000.
Airfix Model World, ISSN 2045-1202
(USPS 4440), is published monthly by
Key Publishing Ltd, PO Box 300, Stamford,
Lincolnshire, PE9 1NA, UK.
The US annual subscription price is $72.99.
Airfreight and mailing in the USA by agent
named World Container Inc, 156-15, 146th Avenue,
2nd Floor, Jamaica, NY 11434, USA.
Periodicals postage paid at Brooklyn NY 11256.
US Postmaster: Send address changes to
Airfix Model World, World Container Inc, 156-15,
146th Avenue, 2nd Floor, Jamaica, NY 11434, USA
Subscription records are maintained at Key
Publishing Ltd, PO Box 300, Stamford, Lincolnshire,
PE9 1NA, UK.
Air Business Ltd is acting as our mailing agent.
Readers in the USA can place subscriptions by
visiting www.imsnews.com or calling toll-free 757428-8180. Alternatively, you can subscribe in writing
to: Airfix Model World, International Media Service,
PO BOX 866, Virginia Beach 23451, USA.
We are unable to guarantee the bona fides of
any of our advertisers. Readers are strongly
recommended to take their own precautions
before parting with any information or item of
value, including, but not limited to, money,
manuscripts, photographs or personal information
in response to any advertisements within this
publication. The entire contents of Airfix Model
World is © Copyright 2021.
No part of it can be reproduced in any form or
stored on any form of retrieval system without the
prior permission of the publisher.
Publisher: Mark Elliott.
“AIRFIX’’ is a registered trade mark of Hornby
Hobbies Limited and is used under licence.
To find a stockist near you, visit
keypublishing.com/storefinder
The average sale for the period
Jan – Dec 2020 was 14,879 print
and digital copies monthly.
Airfix Model World 3
CONTENTS
REGULARS
06 News
The latest happenings in the
world of plastic modelling
12 Show Guide
Here’s our handy at-a-glance
guide for provisional model
show dates in 2021
44
14 Free Model!
Subscribe to Airfix Model
World and claim your free
1/72 Airfix Supermarine
Spitfire Mk.Vc model kit
REVIEWS:
ON THE SHELF
88 Books
90 Aircraft
92 Military
94 Sci-Fi
96 Figures
97 Auto
98 Decals
102 Accessories
114 Display Case
Sydney, snow and space all
take the spotlight in another
dazzling selection of
reader-submitted
modelling projects
72
58
4 Airfix Model World
KeyModelWorld.com
CONTENTS | What’s inside?
32
80
FEATURES
16 Intermediate Build – Perfect Predator
Jay Blakemore gets up close and personal with a big cat in the
form of AMK’s superb 1/48 F-14D Super Tomcat
24 Intermediate Build – Lightning Strikes
with Accuracy
One of the latest additions to the Royal Navy’s aircraft roster is
the F-35B Lightning II, replicated by Italeri in 1/72 and built here
by David Holmes
32 Intermediate Build – Soviet Menace
Young modeller Joe Turner adds myriad aftermarket additions to
Takom’s 1/35 T-55A, before situating the model in an impressive
scratch-built diorama
16
40 The Next Step – Help is at Hand
In the seventh and final part of our mini-series on airbrushing,
Jay Blakemore covers helpful tools, techniques and tips to aid
decorating models via spraying
44 Intermediate Build – Catalina Conspiracy
Marking 80 years since Germany’s Bismarck was sunk, Kev
Baxter uses Academy’s 1/72 PBY-5 Catalina to replicate the
airframe that rediscovered the infamous vessel
52 In Focus – Hunting the Bismarck
Malcolm V Lowe uncovers myths and secrets as he delves into
the RAF Catalina operations employed to find the Bismarck
during May 1941
58 Basic Build – Miniature Messerschmitt
Masterpiece
Special Hobby’s new-tool 1/72 Messerschmitt Bf 109E-4 is
finished as Helmut Wick’s famous airframe, as Mike Williams
assesses this latest take on an ever-popular subject
64 Intermediate Build – Balkans Scourge
Junkers’ Ju 87 Stuka was effective under conditions of air
superiority – such as those on World War Two’s Balkan front
– and Huw Morgan replicates a B-1 deployed there with Airfix’s
re-issued 1/72 kit
72 Intermediate Build – On the Case
Representing an unsung workhorse of World War Two, Steve
Budd builds Airfix’s 1/35 US Military Tractor as the Case VAI type
used on numerous airfields
80 Intermediate Build – Glover’s Chariot
24
KeyModelWorld.com
The film BAT*21 – starring Danny Glover, Gene Hackman and the
Cessna O-2A – inspires Chris Jones as he builds ICM’s brandnew 1/48 Skymaster
Airfix Model World 5
EXCLUSIVE PREVIEW
MOSSIE SNEAK PEAK
Interior detail on both fuselage halves is excellent for the scale, including
wiring looms, throttle quadrants and side-mounted instrument dials
Here’s a neat touch – on the left the
doors used for when the undercarriage
is raised, and on the right a styrene
mask ‘plug’ to aid painting
Airfix has provided a standard load of four 500lb bombs, with a choice of
open/closed bay doors – note these have fittings for a TT.35 variant, which must
be removed for a B.XVI
m
The Mosquito’s stalky undercarriage is replicated faithfully with single
components for each side of the ‘legs’, although the presence of numerous
injection moulding stubs will require neatening
co
VIE
Ke y
6 Airfix Model World
E
IN
WITH THE release of Airfix’s newly
or bulged side panels. Internal and
tooled 1/72 Mosquito B.XVI fast
external moulded detail is to the
approaching, here is a preview of
firm’s recent high standards, with
the kit’s contents, in preparation for the cockpit sidewalls notable for
next month’s exclusive build feature. their refinement (see photo), plus
Given the subject’s popularity
there’s the usual choice of raised
among aviation
or lowered undercarriage.
enthusiasts and
There’s also a neat touch
MORE ONL
W
modellers alike, it’s
in the shape of a masking
perhaps surprising
‘plug’, designed to fit
that this is the first
the open wheel wells
styrene kit of this
when painting, while the
M
.
o d e or ld
variant in the scale and
familiar combined floor/
lW
just the second (after
wing spar ensures a robust
Matchbox’s 1976 offering)
structure and correct dihedral.
to feature two-stage MerlinThe bomb bay is a faithful replica,
configured nacelles. There are
with the ‘overhead’ fuel tanks above
seven styrene runners in all, with
the munitions attachment points,
one frame supplying transparent
and four 500lb bombs are included.
parts including a choice of ‘blown’
Markings are also included for
A rugged wing spar and interior
‘floor’ ensures a strong structure and
correct parts alignment, providing
attachment for fuel tanks and bombs
ML983/8K-K, a 517 Squadron
pathfinder and ML957/HS-D, a 109
Squadron aircraft.
Airfix scanned a TT.35 airframe
when researching this kit, and
that’s where one slight ‘gotcha’
creeps in, as the bulged bomb bay
doors (which should be smooth
on a B.XVI) feature the raised
fittings associated with the target
tug, although it would be a simple
matter to file/sand these. That aside,
the detail is arguably on a par with
the likes of Tamiya’s single-stage
Merlin-powered Mosquito offerings,
making it likely to be a popular
choice with modellers.
More on this and other Airfix kits is
at: www.airfix.com
KeyModelWorld.com
NEWS | Latest updates
STARTER FOR TWO
adorned in the livery of a
perennial favourite – the Red
Arrows – while the Spitfire is
AB174/RF-Q, flown by Plt Off
Antoni Głowacki of the famed
303 (Polish) Squadron at RAF
Northolt in 1942. Another fun
feature is that the bases of the
two display stands have been
shaped in the plan form of
each aircraft.
More ‘beginner’ kits are
currently under development
and will be presented as
Starter Sets which, as with the
Hawk/Spitfire product, include
acrylic paints, paintbrushes
and Poly Cement.
For further details please visit:
www.airfix.com
Despite the simplified parts, there is still plenty of fine engraving
and other worthy detail on Airfix’s newly tooled beginner kits. Here’s
the Spitfire Mk.Vc’s lower wing, with integrally moulded cannon barrels
WHAT HAPPENS when you
combine what is arguably the
most famous fighter aircraft
ever with a highly successful jet
trainer? The answer is Airfix’s
new 1/72 scale Best of British
dual kit (A50187), featuring the
legendary Supermarine Spitfire
and BAe Systems Hawk.
The package is notable as
it’s the first in Airfix’s newly
developed beginner format,
where there are slightly fewer
components and some are
simplified or reworked to
ease construction for novice
builders. It’s the ideal first step
in modelling, aimed at easing
people into the hobby without
denting their confidence
during the assembly process –
a halfway house between fine
detail and ‘buildability’.
The Spitfire Mk.Vc can be
finished with its undercarriage
up or down, but the Hawk is
wheels-down only. Both offer
fine engraved panel lines and
deft moulding to ensure a
quality, authentic appearance.
In terms of colour schemes,
the Hawk is the RAF’s XX310
KeyModelWorld.com
The Spitfire’s exhaust stubs are
moulded with the upper engine
cowling to ease assembly
A fun addition to both kits is that each has a display stand in which
the base is moulded in the shape of the aircraft’s plan form
The Hawk’s fuselage halves
feature double attachment slots
for the horizontal tails. Note the
sturdy pins on the underside
for positive wing locating
NEWS
DAZZLING DELTA
released a newly tooled example
(72073), featuring refined
moulding and engraved panel
lines – a world apart from what
has gone before. The cockpit has
a well-appointed six-part MartinBaker Mk.10 ejection seat, while a
NEW TOOL ARMOUR
FANS OF small-scale armour and
military vehicles have an evergrowing selection of subjects to
build, and the quality seems to
improve constantly.
A good example is Italeri’s
newly tooled 1/72 T-55A tank
(7081), which comprises five
styrene runners packed with
parts – some being very small
and delicate. The standard of
moulding is impressive, notably
on the turret, with its miniscule
(to-scale) bolt head detail and
crisply moulded hatches, which
are separate items – a six-piece
12.7mm DShK machine gun
adds a finishing touch. There
are individual engine screens
8 Airfix Model World
and maintenance covers, and
these are combined with a
splendid 11-part engine – more
experienced modellers may want
to pose the covers open and
embellish the surrounding bay.
Those familiar with T-55s will
appreciate the busy rear area,
which includes fuel drums,
unditching beam and snorkel.
Tracks are supplied as two-piece
lengths with the suggestion
they are heated with a hairdryer
before being bent.
There are four schemes, with
Soviet, East German, Polish
and Romanian examples. More
about this and other Italeri kits is
available at: www.hobbyco.net
m
co
VIE
Ke y
DASSAULT’S MIRAGE 2000C is
one of those strange modelling
subjects – there are quality kits
available in 1/48, however, a 1/72
equivalent has remained elusive…
until now.
Ukrainian firm Modelsvit has
E
IN
photo-etched metal fret includes
release), such as Matra Super
an instrument panel facing and
530F long-range and Magic R.550
side consoles, seat harness, chaff
short-range missiles, is catered for
and flare dispenser and fuel
on a generic runner. Two wing
tank fins.
fuel tanks, and one for the
MORE ONL
A pleasing provision is
centreline, also feature.
W
that of two individual
Markings for five colour
vertical tails – a
schemes (three French,
standard unit for
one Indian and one
M
French 2000Cs, and
Greek) are provided,
o d e or ld .
lW
another sporting radar
with all but one being
warning receivers, as
painted in standard air
employed on Hellenic Air Force
defence two-tone grey. For more
airframes. Separate flying control
information on Modelsvit kits, visit:
surfaces are present, along with
www.modelsvit-eshop.com
the associated actuator fairings.
Another reason this kit knocks
older equivalents out of the park
is the undercarriage – the legs are
well replicated, as are the onepiece ‘weighted’ wheel/tyres,
featuring brake units.
All the type’s air-to-air weaponry
(including some not used in this
OPTIONAL EXTRAS
HOT ON the tail of Tamiya’s
recently re-released 1/24 Lotus
Super Seven, Motobitz has
produced a pair of aftermarket
‘trans-kits’, allowing for a range
of variants other than the 1960s
design depicted in the kit.
Distinguished by the style of
wheels included (MBC-2413-A
containing 15in alloys and MBC2413-C with 14in Minilites) the
sets primarily cover changes
made to the examples built by the
Caterham company from 1973 to
the present day.
As such, each provides a
replacement louvred bonnet,
bicycle-style wing/mudguards,
new seating, a fresh dashboard
with separate controls plus a range
of exhaust components, while
clear parts cater for the lights – all
items are provided as 3D-printed
resin. Decals are provided for
badging, instrumentation and
stone chip protection – the last of
these being metallic-finished.
The large-diameter alloy wheels
reflect those on the Lotus seen
in TV’s The Prisoner plus various
anniversary models, while the
Minilite fittings cater for most
mainstream vehicles – both
appear wider than the kit-supplied
examples. Limited instructions
and a lack of supporting photos
of real vehicles mean modellers
are advised to check references
to ensure parts are suitable for
an accurate reproduction of any
specific machine.
Priced at £35 plus delivery, the
sets are available direct from:
www.motobitz.uk
KeyModelWorld.com
NEWS | Latest updates
’TWIXT PAINT AND PRIMER
AMUSING HOBBY’S latest 1/35
Sd.Kfz. 184 heavy tank destroyer
covers a fascinating subject: the
last of the 91 ‘Ferdinand’ vehicles,
chassis number 150100, decorated
by the factory staff before receiving
its camouflage.
These initial machines used the
chassis proposed by Porsche for
its version of the Tiger tank, fitted
with an 88 mm Panzerjägerkanone
43/2 gun. After poor combat
performance during the Battle of
Kursk in 1943, which highlighted
close-quarter and self-defence
vulnerabilities, surviving vehicles
were modified and renamed
‘Elefant’ (elephant).
Along with the decals, there
are minor changes to the kit’s
components compared with
previous offerings, with this
iteration comprising 21 runners
plus separate lower hull and upper
fighting compartment – eight of
the frames are for the individuallink tracks. Staying with the
running gear, six pre-shaped wire
springs are provided for workable
suspension. A wire length is
supplied for a tow cable, while
spare shells and other weaponassociated fittings are carried over
from previous boxings, though
none are suggested for use in this
particular version.
AMMO-MIG has produced the
painting guide, with white-toned
motifs applied over the red oxidetoned primer supplied as crisply
printed decals, replicating the
vehicle as built on May 8, 1943.
For further details, visit:
www.albionhobbies.com
FLYING TARGET
MODELLERS SEEKING something a
little different may wish to consider
ICM’s splendid (and brightly
coloured) new tooling of the KDA-1
(Q-2A) Firebee target drone.
It comprises two styrene runners:
one is dedicated to the drone itself
while the second provides parts
for a neat handling dolly, which
doubles as a display stand. For such
KeyModelWorld.com
a simple kit there’s plenty of detail,
from the full-length jet pipe and
intake sub-assembly to the finely
engraved panel lines. Clever design
means both main and tail wings are
secured via interlocking sections,
ensuring a strong join (required for
the former due to the type’s tiptanks) and correct angle with the
fuselage. Provision is made for use
with a launch aircraft – a launch
pylon is marked as unused – for
inclusion with the firm’s forthcoming
DB-26B/C release (48286), but this
will make for a striking solo display.
Markings are supplied for three
airframes: two US Navy (including
the boxtop prototype version named
I Go Pogo No VI) and a single US
target. Visit: www.hannants.co.uk
for more information.
TERRIFIC TRAINER
FOR ALL its popularity as a trainer,
warbird and occasional film star,
there are surprisingly few kits of the
North American T-6 Texan (known
as the Harvard in RAF service), so
the re-boxing of Academy’s splendid
1/72 offering by Special Hobby is
sure to be welcome.
This initial release (SH72447)
supplies the same three styrene
runners as the original iteration,
but adds a new styrene runner
with three styles of replacement
rear canopy sections (for which the
fuselage will require minor cutting
to fit). Resin and photo-etched brass
extras are included for the cockpit
and wing pitots, while new exhausts
allow modellers to build the kit as a
Mk.II/IIA/IIB variant. Five colourful
schemes, all with varying amounts
of yellow coverings, are provided,
featuring machines based in the UK,
Canada, Rhodesia, India and New
Zealand. Further details are available
via: www.specialhobby.eu
BIG LITTLE TANK KILLER
SMALL VEHICLES can be
challenging as kit subjects as the
resulting model is rather diminutive
in the standard scales, but Takom’s
recent venture into 1/16 allows
types such as the Wiesel A1
Armoured Weapons Carrier to be
portrayed at a reasonable size.
This newly tooled offering (Item
#1011) depicts the TOW missilearmed tank hunter variant,
with beautifully moulded parts
presented on 12 styrene runners
plus separate upper and lower
hull components, while a photoetched brass fret supplies exhaust
grilles. As with most releases in
this large-scale series, Takom has
included a lovely 25-piece figure
to pose in the one of the open
hatches (modellers should note that
no interior is supplied). While this
adds an extra element to the kit it
also highlights just how small this
vehicle is in real life.
Tracks are supplied in individuallink moveable form and a handy jig
will aid assembly; with four pieces
for each link the resulting lengths
are faithful replicas, but they will
take time and care to construct.
The standout item must the be
intricate TOW missile launcher and
associated targeting equipment
(including a spare round for the rear
of the vehicle), which together are
almost mini kits in their own right.
Five markings options are provided
for German Army machines: four
are in standard NATO threetone camouflage with options
for Wiesels deployed to Croatia,
Kosovo and Afghanistan, while the
fifth wears a two-colour scheme
for an ISAF asset, also based in
Afghanistan. Details on this and
other Takom releases are at:
www.bachmann.co.uk
Airfix Model World 9
PREVIEW
PREVIEW | Special Hobby Whirlwind F Mk.I
CANNON-TOTING TWIN
With a 43cm wingspan, this will be a large model once completed. The
mainplane parts are beautifully moulded, with delicate rivets and panel lines
The mainwheel tyres are also moulded to depict weight, although Special
Hobby’s sub-brand CMK offers separate aftermarket versions cast in resin. On
the styrene items, though, there is good depth between the spokes and even a
tyre inflation valve
The type’s structural cockpit framework is replicated by these shallow strips.
On the real aircraft, they were deeper and had lightening holes
m
Ke y
10 Airfix Model World
The inclusion of bombs and other
alternative parts signals that at
least one other release will follow.
On first inspection, the firm’s F Mk.I
is a great-looking rendition of an
interesting type.
For more details on the Whirlwind,
other Special Hobby kits and CMK
accessories, visit these websites:
www.specialhobby.eu and
www.cmkkits.com
co
VIE
gun bay and a pilot figure climbing
obtaining generic aftermarket 1/32
into the cockpit available under the
belts or making your own.
firm’s CMK sub-brand.
There is plenty of detail inside
Fine engraved panel lines are
the undercarriage nacelles, each
evident across all surface areas,
half having separate components
as are delicate rivets – the latter
to attach to the inner faces, plus
also appear on some interior
there are strengthening ribs in the
components. The cockpit is a
inner nacelle halves. The 20mm
busy area, with a well-moulded
cannon barrels are moulded in
instrument panel featuring integral
twin units featuring recoil spring
dials/bezels – the latter benefit from detail, and these are attached to a
individual decals. Throttle quadrants backplate and fed through holes
are particularly impressive, and
in the nosecone. Undercarriage
Special Hobby provides the later
leg moulding is good too, while
style of gunsight seen on this
the halved wheel/tyre parts have a
aircraft. As for the seat,
weighted appearance… and
MORE ONL
it’s well moulded but no
even a tyre inflation valve.
W
harnesses are supplied,
The decals are rich in
so it’s either a case of
hue, in register, but are
slightly thicker than
some
seen with other
M
o d e or ld .
lW
kits from this firm. They
provide markings for four
RAF aircraft, all from 263 Squadron:
• P6985/HE-J, Exeter, March 1941
• P7061/HE-A, Charmy Down,
September 1941
• P7116/HE-F Bellows Argentina
No.2, Colerne, winter 1941-42
The instrument panel is superb and decals are provided for the dial detail. Part
• P7117/HE-E Bellows Argentina
54 (on the left) needs to be used for this kit, while the spare points to another
boxing of the type from Special Hobby
No.3, Charmy Down, October 1941
E
IN
CZECH FIRM Special Hobby has
pleasing form when it comes to
producing aircraft in 1/32 scale,
and its latest offering of a Westland
Whirlwind is something special.
Kits of this twin-engined type
across all scales are few and far
between – Special Hobby’s is the
first styrene example in 1/32 and
depicts the F Mk.I variant (32047).
There are nine medium-grey runners
and one clear frame, the latter
holding glazed parts such as the
canopy, windscreen and lights, plus
a self-adhesive mask set. As with
some other companies, Special
Hobby produces aftermarket parts
for particular releases, with more
refined resin gun barrels, wheels, a
There’s plenty of refinement on this
kit, via parts such as the access ladder
(top) and just below it in this photo, the
twinned cannon barrel parts. Note the
accurate ring-style handle on the
control column (bottom)
KeyModelWorld.com
Plastic Model Kits
Exclusive UK Distributors
available from your
Bachmann stockist
plastic model kits are GO!
Avro Lancaster B Mk 1
Roy Chadwick’s masterpiece
PKHK01F005
Markings for 2 aircraft:
• W4118/ZN-Y, 106 Sqn RAF, Syerston December 1942.
• R5868/PO-S, 467 Sqn RAAF, Waddington May 1944.
L: 648mm, W: 443mm, Total parts 362.
For more information on our products and to find your nearest stockist visit www.bachmann.co.uk
Model • Collect • Create
Bachmann_FP.indd 1
14/05/2021 10:27:29
SHOW GUIDE
At-a-glance model show calendar
KEY
SHOW GUIDE
Model Display
Aircraft Display
Refreshments
Model Competition
Military Display
Free Parking
Trade Stands
Automotive Display
Make ‘N’ Paint
Chiltern Model Show
July
3
Newark Air Museum
Aeroboot & Aerojumble
Hosts: Newark Air Museum
Address: Newark Air Museum, Drove
Lane, Winthorpe, Newark
NG24 2NY
Times: 9am-4pm, prices TBC
Email: enquire@newarkairmuseum.org
Web:
www.newarkairmuseum.org
25
Hosts:
Essex Modeller’s Show
IPMS South East Essex,
Hornchurch and Chelmsford,
and MAFVA
Address: Hannakins Farm Community
Centre, Rosebay Avenue,
Billericay CM12 0SZ
Times: 10am-4pm
Prices: Adults £3.50, child/OAP £1.50
Email: wifflesnoop@yahoo.co.uk
Web:
www.theessexmodellers
show.com
15
Stoke-on-Trent Model Show
Hosts: IPMS Stoke-on-Trent
Address: The Prestwood Centre,
Stafford County Showground,
Weston Road, Stafford
ST18 0BD
Times: 10am-4pm
Prices: Adults £4, Concessions £3,
accompanied Under 16s free
Email: ipmsstokemodelclub@
gmail.com
Web:
SOT Model Club (IPMS)
Facebook
18-21
IPMS/USA National
Convention 2021
Hosts: IPMS USA
Address: Rio All-Suite Hotel and Casino,
3700 W Flamingo Road,
Las Vegas, NV 89103,
USA
Times: Weds: 10am-5pm,
Thurs/Fri/Sat: 8am-4pm
Prices: TBC
Email: director.nats2021@aol.com
Web:
www.natslv2021.com
August
1
Coventry and Warwickshire
IPMS Show
Hosts: Coventry and Warks IPMS
Address: Midland Air Museum, Rowley
Road, Baginton, Coventry
CV3 4FR
Times: 10am-4pm, prices TBC
Email: ipms.covandwarks@hotmail.com
Web:
coventryandwarwickipms.
weebly.com
28-30
Newark Air Museum CockpitFest & Aeroboot
Hosts: Newark Air Museum
Address: Newark Air Museum,
Drove Lane, Winthorpe,
Newark NG24 2NY
Times: TBC
Prices: TBC
Email: enquire@newarkairmuseum.org
Web:
www.newarkairmuseum.org
September
12
Romsey Scale Model Show
Hosts: Romsey Modellers
Address: Crossfield Hall,
Broadwater Road, Romsey
SO51 8GL
Times:: 10am-4pm
Prices:: Adults £3, children and
concessions free
Email: info@romseymodellers.co.uk
Web:
www.romseymodellers.co.uk
19
Wings and Things
Hosts: IPMS Fenland and Spalding
Address: University Academy,
Park Road, Holbeach,
Spalding PE12 7PU
Times: 10am-4pm
Prices: Adults £2, children and
OAPs £1
Email: ipms.fenlandandspalding@
gmail.com
Web:
www.fenlandandspalding.
wixsite.com/ipms
19
Hosts:
IPMS Keighley 'Edition IV'
IPMS Keighley Plastic Model
Club
Address: University Academy Keighley,
Greenhead Road,
Keighley BD20 6EB
Times: 10am-4pm
Prices: TBC
Email: keighleyplasticmodelclub
@gmail.com
Web:
N/A
Date:
September 12
Hosts:
IPMS Chiltern/Beds
MAFVA
Address:
The Weatherley Centre,
Eagle Farm Road,
Biggleswade, Beds
SG18 8JH
Times:
10am-4pm
Prices:
Adults £3, OAPs £2,
under 16s £1
Email:
barrywood123@hotmail.
co.uk
Web:
N/A
26
St Ives Model Show
Hosts: Brampton IPMS
Address: The Burgess Hall,
One Leisure St Ives,
Westwood Road, St Ives
PE27 6WU
Times: 10am-4pm
Prices: TBC
Email: bramptonsecretary@hotmail.
co.uk
Web:
www.ipmsbramptonscale
modelclub.co.uk
October
2-3
Gibraltar Scale Model Society
4th Annual Competition
Hosts: Gibraltar Scale Model Society
Address: Central Hall, 11 North
Pavilion Road, GX11 1AA,
Gibraltar
Times: Saturday 10am-8pm,
Sunday 10am-12pm
Prices: TBC
Email: information@
gibscalesmodelsociety.com
Web:
www.gibscalesmodel
society.com
3
Abingdon IPMS Show
Hosts: Abingdon IPMS
Address: Larkmead School,
Faringdon Rd,
Abingdon
OX14 1RF
Times: 10am-4pm
Email: jv44sf@gmail.com
Web:
www.abingdonipms.co.uk
With COVID lockdown restrictions set to be lifted gradually over the coming months, there’s hope for the return of in-the-flesh model shows during 2021. The listing above is based on provisional
information from clubs and other organisers of events currently planned for the not-too-distant future. Please note, all events are subject to national government guidance and restrictions, which may
result in short-notice postponement or cancellation – readers are urged to check with organisers before committing to travel. To advertise your event here, email: stuart.fone@keypublishing.com
12 Airfix Model World
KeyModelWorld.com
SELL YOUR PLASTIC
KIT STASH FOR CASH
Trade in with Hattons for payment within 1 or 2 days of your items arriving with us!
REE
F
A
GET UATION
VALN YOUR N
O ECTIO
L
COL
Get cash for your items in just four easy steps...
1. List
Prepare & submit a list of your items at
www.HattonsModelMoney.com or send
spreadsheets, documents or photographs via
www.HattonsModelMoney.com/upload
2. Offer
3. Send
Our expert staff will review
your list and create your
bespoke valuation.
Once the offer is accepted,
send your items to us.
4. Pay
Items are checked, the offer
confirmed and payment
made via Bank Transfer,
Cheque or PayPal.
Find out more at www.hattonsmodelmoney.com
Call us on 0151 305 1755 or email preowned@hattons.co.uk
17 Montague Road, Widnes, WA8 8FZ
Phone opening times: Mon to Sun 9:30am - 5:30pm.
A4-PreOwnedKits-SinglePage-AirfixModelWorldJune2021-260321.indd 1
Hattons_FP.indd 1
26/03/2021 15:17:00
29/03/2021 10:25:52
!
T
E
F
L
GI LAB
W I
NE AVA
W
O
N
FREE GIFT
1:72 Airfix Spitfire Mk.Vc
when you subscribe for 2 years
or by easy Direct Debit
keymodelworld.com
Print, digital and bundle subscriptions: Quoted rates
are for UK subscriptions paying by Direct Debit. Quoted
savings based on those rates versus purchasing individual
products. Standard one-year print subscription prices:
UK - £49.99, EU - £59.99, USA - £62.99, ROW - £64.99
207 AMW Subs DPS.indd 12
OR CALL: +44(0) 1
Your customer code: AMW0721
19/05/2021 10:13:43
O
SAVE
E 4
45%
UP
TO
Choose your 12-month subscription offer:
PRINT
From £43.99
by Direct Debit
(saving 30%)
DIGITAL
£34.99
(saving 40%)
FREE G
AVAILABIFT
LE
FREE G
AVAILABIFT
LE
FREE
WHY SUBSCRIBE?
•FREE delivery to your door
•SAVE on the cover price
•NEVER miss an issue
•Exclusive DISCOUNT offers
for subscribers
FOR SUB
S
Premium CRIBERS
access to
Now inclu
ding EAR
LY DIGITA
to every n
L ACCESS
ew issue.
R
e
a
d
your
copy befo
re it arrive
s!
/airfix-model-world
) 1780 480404
1
PRINT + DIGITAL
From £53.99
(saving 45%)
Offer closes 31 August 2021
207 AMW Subs DPS.indd 13
Lines open
Monday-Friday;
9am-5.30pm
GMT
207/21
19/05/2021 10:14:11
INTERMEDIATE BUILD
Jay Blakemore discovers
that you don’t have to go
on safari to experience
big cats at close hand,
especially with AMK’s
stunning 1/48 scale
F-14D Super Tomcat
PERFECT
PREDATOR
G
rumman’s final
fighter design, the
F-14 Tomcat, needs
little introduction for
many, thanks to stealing the
scenes in films such as The Final
Countdown and Top Gun.
The genesis of this twinengined, swing-wing long-range
interceptor was the failure of an
earlier ‘joint fighter’ effort that
spawned the F-111A, with the
overweight and underpowered
B-variant rejected by the US
Navy. Into this gap stepped
Grumman, with a fresh design
that balanced the ability to carry
long-range air-to-air missiles with
greater manoeuvrability than its
F-4 Phantom predecessor. It was
operated by just the US Navy
and Imperial Iranian Air Force
(renamed the Islamic Republic
of Iran Air Force after the 1979
Despite the kit’s 13-piece ejection seats being perfectly adequate, Eduard’s
resin replacements (648535) provided added finesse. The floor panel or the
lower seat require modification, though, before they will fit
16 Airfix Model World
revolution) and fewer than 40
airframes remain in service.
Envisaged as carrying longrange missiles to protect US
Carrier Battle Groups from Soviet
bomber formations, it evolved
into a formidable multi-role
platform. Unfortunately, these
developments occurred towards
the end of its service life with the
US Navy, where it was regarded
as one of the ‘go-to’ Forward
Air Controller (Air) platforms.
Its replacement in the US Navy
during 2006 by the F/A-18E/F
Super Hornet is still regarded as a
point of contention by some.
Uncaging the beast
Surprising care was taken by
AMK to package the contents
of the big, top-opening box,
which hinted immediately at the
pleasures to come. Lining the
AMK’s air-to-air missiles benefitted from slide-mould technology. Each item
was ‘caged’ in its own protective styrene frame, then cellophane-wrapped and
packaged within white cardboard boxes
KeyModelWorld.com
INTERMEDIATE BUILD | F-14D Tomcat
The large upper and lower fuselage halves feature crisply
engraved panel lines, while the raised wiring looms within
the wheel bay ‘ceilings’ were particularly impressive
sides were two white cartons
and slotted between these
was the first of the runners,
nestled beneath an A4 colour
instruction booklet. Easing
these out revealed successive
layers of individually bagged
runners, each getting smaller
as you descended, and each
wedged firmly between yet more
white cartons, themselves of
diminishing size. Like the layers
of a Russian doll, the contents
kept giving, and glimpsed
through the packaging the quality
of the parts appeared sublime.
But the best was yet to come, for
the most impressive mouldings
were hidden tantalisingly within
the cartons.
Modellers are faced with a
comprehensive selection of
air-to-air, air-to-ground and
reconnaissance stores, with four
each of AIM-9L/M Sidewinder,
AIM-7M Sparrow and AIM54C Phoenix, GBU-31 and
GBU-38 JDAM, GBU-12 and
GBU-16 laser-guided bombs,
plus single examples of the
LANTIRN targeting pod and
TARPS reconnaissance pod.
All of the above, along with
the undercarriage units, have
benefitted from slide-moulding
technology, being either singlepiece items or otherwise
requiring minimal construction.
Each item comes caged within its
own rectangular frame, featuring
a minimum of attachment points,
and requiring very little cleanup once removed. Most notable
amongst these slide-moulded
Packaged separately, and secured within its own styrene ‘cage’, the forward
fuselage section was a marvel of slide-mould engineering. All parts associated
with the nose were also conveniently located on the same runner
KeyModelWorld.com
Choices must be made
as to the positioning of
the wings prior to the
fuselage halves being
closed. Three positions
are offered: fully
extended, swept-back
or over-swept
Although only minimal clean-up of the side-moulded parts was required,
thanks mainly to the near lack of any attachment points, there were a few
ejector pin release marks that had to be removed
Airfix Model World 17
INTERMEDIATE BUILD
components, however, was the
forward fuselage section, which
was a marvel of engineering.
At the very bottom lay three
luxuriously printed decal sheets
and a small photo-etched (PE)
metal fret. So snugly secured
were the 350 medium grey
styrene components that it
seemed almost a crime to cut
them free, but this modeller
believes strongly that no big cat
should remain caged.
Perplexed puss
Simplified wings are provided that feature neutrally positioned control
surfaces, while those used were more complicated. They’re pictured here with
the separately (and delicate) actuator arms in position
The variable exhaust nozzles are offered in both their closed and open
positions. Those used were finished in Alclad polished aluminium (ALC105)
sprayed directly onto the plastic and then varnished
The cockpit and nosewheel bay
feature a stunning array of levers
and pipes. Sadly, since the Eduard
interior PE set was being used,
much of the console detail
required removal, but...
Naturally, construction began with
the cockpit. This was furnished
comprehensively and included
separate consoles and sidewalls,
with delicately moulded detailing
that would reward careful brushwork. Decals were also provided
for the instruments, though in this
instance a third route was taken:
Eduard’s FE1053 colour-printed
PE cockpit set (www.eduard.com)
features 30 individual and very
busy-looking panels and offers an
attractive alternative to painting.
Unfortunately, it necessitated the
removal of most of the original
styrene detailing.
The kit provides two 13-piece
ejection seats, featuring PE
harnesses, though oddly no
mention is made of the latter in
the instructions, and they are
easily overlooked.
For added finesse, however,
the Czech manufacturer’s resin
replacement seats (648535)
were used, though some
modification was required before
they would fit. This involved the
removal of the raised ‘steps’
moulded into the cockpit floor
and over which the styrene
originals would have slotted.
Situated to the starboard side
of the cockpit was the refuelling
probe housing, while attached to
the underside of the floor panel
was the nose-wheel bay, the
latter comprising highly
detailed panels covered in piping
and electrical components.
After painting, and with the PE
additions in place, the elaborate
interior and bay assembly
formed a compact unit that slid
effortlessly into the gaping rearend of the single-piece nose
section. A circular blanking plate
is included which, if allowed,
will slide wholly inside the nose
section, but care should be taken
to align it such that it sits slightly
proud of the latter’s forward
edge to provide purchase for
the separate radome. Although
…once in place, the consoles and instrument panels looked stunning. The
raised rectangular frames on the cockpit floor hinder the fitting of the resin
ejection seats and will need to be removed
“Clamps were
used to force the
trunks into place while
the cement hardened”
18 Airfix Model World
KeyModelWorld.com
INTERMEDIATE BUILD | F-14D Tomcat
Basic but adequate turbofan and exhaust cone details are provided as inserts.
Once assembled and in place, these can just be glimpsed within the deeply
recessed intakes and nozzles
doubtless unnecessary, the
conical end cap was filled with
lead weight as a precaution
against tail-sitting.
Assembly continued with the sixpiece engines, nozzles and intake
trunks, all of which required prior
painting. Everything had thus far
been relatively straightforward,
though progress was about to
get slightly confusing as work
began on the intake ramps.
Positioned within the intakes
and designed to alter the airflow
during different flight envelopes,
the kit offered three ramp options:
fully open (subsonic), partially
closed (transonic) and lowered
(supersonic). Three differing
sets of hydraulic arms were
therefore provided – 12 sets in
all – each specific to a particular
configuration. Getting everything
in order took some working out,
especially as two pairs of ramps
were numbered incorrectly (all the
ramps being numbered ‘U6’ on
the assembly diagram while two
were actually situated on frame
‘V’ and numbered ‘V6’).
More confusion ensued when
fitting the completed ramps and
Three alternative sets of intake ramp and hydraulic arms are provided, each
specific to a particular configuration. Getting everything in order took some
working out as two pairs of ramps were numbered incorrectly on the instructions
wheel bay components to the
lower fuselage. It was difficult to
discern the correct positioning
of these components due to a
multitude of irregularly shaped
openings, making the lower
fuselage appear seemingly
misshapen. Unfortunately, the
instructions were particularly
vague at this stage and somewhat
puzzling throughout, being
relatively compact and
crammed with tiny
details – some of
which were
difficult
to discern. Throughout the build,
dry-fitting was definitely required
before any cement was applied.
Fat cat
With many of the openings now
filled in the lower fuselage,
the large and impressively
formed single-piece intake
trunks, complete with prepainted internal tunnels, were
positioned about the engines.
Unfortunately, they refused
to sit flush with the lower
fuselage despite repeated
dry-runs failing to reveal
MODEL SPEC
Grumman F-14D Super Tomcat
By: AvantGarde Model Kits
Stock Code: 88007
Scale: 1/48
Price: £64.99
Available from: AMK Stockists
KeyModelWorld.com
Airfix Model World 19
INTERMEDIATE BUILD
“The delicate slats
and flap components
were not attached
until after painting”
any hindrances. Eventually clamps
were utilised to force the trunks
into place while the cement
hardened. Once fixed firmly, the
resulting gaps were filled with
lengths of stretched runner and
Milliput (www.milliput.com).
Choices must be made before
the fuselage can be closed
regarding the positioning of the
horizontal stabilisers and wings.
Three sets of differently angled
supports are provided for the
former – these pass through holes
in the rear fuselage and allow
a choice of raised, horizontal or
drooped surfaces. A trio of inserts
for the latter allow the wings to be
positioned either fully extended,
swept-back or over-swept (in the
parked position). These simple
components meant there was
no wing-sweep mechanism to
assemble and cram into the
airframe, though even without
such complications, difficulties
once again arose when trying to
close the fuselage halves. Again,
nothing appeared amiss, and as
no other remedy suggested itself,
cement was applied in stages
along the various mating surfaces,
with clamps and rubber bands
used to progressively force the
halves into position. This resulted
in further gaps that required
attention, with those along the
wing box leading edges being
particularly obvious.
Alternatives were also provided
for the wings themselves: a
simplified set featuring the
slats and flaps moulded in-situ
comprising just upper and
lower halves or else a more
complex ensemble that allowed
everything to be positioned in
the open/extended position.
Though the delicate slats and
flap components would not be
attached until after painting, it
was decided to add the eight,
fragile flap actuator arms, and
much effort had to be taken to
ensure they remained intact. In
hindsight, it would have been
more sensible to have added
these during final assembly.
Feline finesse
Despite having been perplexed
by the misaligned fuselage
components, which was most
likely due to builder error,
there was still no doubting
the parts quality, and this was
reflected in the undercarriage.
As mentioned previously, the
landing gear benefit from slidemould technology, the legs being
single-piece items to which two-
part scissor jacks, shackles,
landing lights and various small
details were added. There was
also a choice of front landing
gear, one being a catapult-ready
compressed unit, though the
longer of the two was added to
allow use of the extended access
ladder. Separately moulded
hinges and actuating arms were
provided for the bay doors, as
well as clear parts for the landing
and formation lights. Further
options included open/closed
airbrakes and afterburner nozzles.
Wheels were split conventionally
down the middle and, to avoid
Construction of the fuselage began with the insertion of the intake ramps,
followed by the engine assemblies. The rod-like items seen at right in the
photos are the inserts for the horizontal stabilisers
20 Airfix Model World
KeyModelWorld.com
INTERMEDIATE BUILD | F-14D Tomcat
A close-up of the aft fuselage ‘beaver tail’ insert shows the PE chaff/flare
launchers in place on the underside, while...
sanding away the
tyre tread along with the seams,
resin replacements from Eduard
(648530) were used.
Persian greys
One aspect that most modern
jet fighters share is their drab,
overall grey appearance, though
if such mundane attire is not
to your taste, then the kit’s five
decal options do allow for some
variation (see Tomcat colours). In
fact, most of these drab machines
were painted in three subtly
different shades of grey, making
the painting process less than
straightforward. It
was decided to mix
the colours using
Humbrol 127 Ghost
Grey (www.humbrol.
com) as a mid-way starting
point and carefully examining
photographs to get the shades
as accurate as possible. Haynes’
F-14 Owners’ Workshop Manual
(ISBN:978-1785211003) was
invaluable for this purpose.
The soft demarcation line
between the lower surface
colours and fuselage sides was
achieved using the rolled Blu
Tack ‘sausage/worm’ technique,
while the solid line of the darker
upper fuselage grey was created
with household masking tape.
Having chosen to model the
airframe from VF-2 ‘Bounty
Hunters’, it also proved necessary
to paint the large diagonal stripes
adorning the fuselage sides, the
centre sections of which are
...on the upper surface, the separately moulded air brake and the internal
detailing of the corresponding bay are pictured
TOMCAT COLOURS
AMK provides five schemes, including regular ‘line’ jets, ‘double nuts’
(Carrier Air Group Commander) airframes and an overall black test/trials aircraft:
• 164438/100/NH, VF-213 ‘Black Lions’, USS Carl Vinson, February 2002
• 164342/106/NE, VF-2 ‘Bounty Hunters’, USS Constellation, May 2003
• 164600/100/NK, VF-31 ‘Tomcatters’, USS Abraham Lincoln, 1997
• 164604/XF Vandy One, VX-9
‘Vampires’, Naval Air Weapons
Station China Lake, spring 2000
• 163900/155/AD, VF-101 ‘Grim
Reapers’, Naval Air Station
Oceana, 2005
Clamps and rubber bands were needed to hold the fuselage halves together,
which left gaps along the wing box leading edges that required filling, as did
those along the mating edges of the ‘beaver tail’ and the ‘fabric’ wing seals
KeyModelWorld.com
Airfix Model World 21
INTERMEDIATE BUILD
The airframe
received an overall
dark brown shadow
coat, which would
remain partially
visible beneath the
camouflage greys
to create subtle
shading effects.
Masking has been
applied to the
windscreen, which
is awaiting an initial
black layer
clearly shown in photos to be
much paler in appearance than
those that the decals provided.
The latter were useful, though, as
a template for a painting mask,
which made the task relatively
pain-free. Unfortunately, this
also required the painting of the
background for the off-white
national insignia, which (due to
its small size) proved somewhat
more troublesome. For this, a
mask was made from tracing
paper, once again relying on
the decals to provide
the dimensions.
Having
served in the
Persian Gulf from 2003–2005,
the pale grey airframes of these
combat-cats suffered terribly
from the elements and the almost
constant corrosion repairs carried
out by deck crews, allowing
plenty of scope for
weathering.
was most definitely avoided, as
accentuating every panel line
in the author’s opinion makes
models appear very toy-like. The
decals were applied onto a glosscoat and proved to be beautifully
thin – almost too thin – as they
were extremely delicate and tore
easily, especially those featuring
the extravagant tail artwork.
Final construction began with
the adding of the flying surfaces.
Earlier dry-fitting had confirmed
the difficulty of sliding the wings
over the full-length inserts,
incurring inevitable damage to
the delicate flap actuator arms.
The inserts were therefore
trimmed significantly, which had
a beneficial effect of making
the wingless airframe far easier
to handle during painting. With
the airframe sitting securely
on its undercarriage, the many
extraneous items were now
added. These included bay doors,
flaps, extended leading-edge
slats, access ladder and steps
and the blade aerials. Finally the
canopy was added in the open
position – this incorporated
separate clear parts that required
fixing to a multi-part frame. Care
was necessary to avoid clouding
the crystal-clear transparencies
by careless use of cement or
superglue, therefore water-based
PVA adhesive was used for this
delicate task. Several light coats
of much-diluted Humbrol AC5601
Matt Varnish were required to
give a uniform finish overall.
“This is a truly
magnificent kit”
Hanging out
Humbrol enamels were used
exclusively in this procedure,
utilising the paint’s slow-drying
properties to blend brown and
grey shades directly onto the
model’s exterior surfaces, using
white spirit and a wide, soft
brush to manipulate the soft
enamels to achieve grime streaks
and oil staining of an almost
airbrushed-on appearance. The
same method was used to pick
out those lines that delineated
hatches and access panels,
though an overall pin-wash
22 Airfix Model World
Having initially applied the lower surface colour, Blu Tack ‘sausages’ were employed to create a soft-edged
demarcation line for the mid-fuselage grey, while hard-edged masks were used for the upper camouflage colour
KeyModelWorld.com
INTERMEDIATE BUILD | F-14D Tomcat
All praise the Tomcat
Bastet was a fearless ancient
Egyptian Goddess who often
took the form of a lioness, but
who we are more familiar with
today as she appears in the
form of a seated cat. It seems
appropriate to mention her
because if we modellers ever
felt the need to worship a god
in cat form, then we could do
no better than AMK’s F-14D
Super Tomcat model before
which to prostrate ourselves.
This is a truly magnificent kit
that, despite being somewhat
complex in places, is difficult to
fault. If flaws are to be found,
then the diminutive size of many
instruction diagrams can lead to
confusion over the position of
some sub-assemblies. There was
also noticeable warping of the
GBU-12 guided bombs, leaving
them banana-shaped
and therefore unusable.
Even so, if you can get your
hands on one, this kit comes
highly recommended.
Utilising the decals as templates, masks were produced to
recreate the striking three-tone fuselage bands, as...
...it was realised the decals had
the incorrect tone for the central
light grey stripes when compared to
reference photographs
Awaiting final assembly: the
much-trimmed wing inserts are
clearly visible, as are the metal pins
inserted into the tail planes. The
canopy framework is devoid of the
transparent inserts which were fixed
using PVA glue
KeyModelWorld.com
INTERMEDIATE BUILD
LIGHTNING STRIKES
WITH ACCURACY
David Holmes builds Italeri’s detailed
new-tool 1/72 F-35B Lightning II,
representing an aircraft from the Royal
Navy’s Lightning Force aboard HMS
Queen Elizabeth
C
reated from the
requirements of the
Joint Strike Fighter
programme, the F-35
Lightning II is a single-seat,
fifth-generation multi-role
‘stealth’ aircraft.
The single-engined
design combines advanced
aerodynamics, decreased
radar signature (thanks to its
radar-absorbent coatings)
and a comprehensive array of
sensors – this last item provides
arguably unsurpassed battlefield
situational awareness, including
the ability to ‘look through the
floor’ due to the placement of
antennas and optical equipment.
Intended at the outset to replace
ageing F-16, A-10, F/A-18 and
24 Airfix Model World
AV-8B airframes, there are three
variants, aimed primarily at
serving the needs of the US Air
Force (A), US Marine Corps and
Royal Air Force/Royal Navy (B)
and US Navy (C).
The F-35 is currently serving
with at least nine nations,
including Australia, Israel, Italy,
Japan, Netherlands, Norway,
South Korea, United Kingdom
and USA, with firm orders from
a further five. In UK ‘home’
service, the Royal Air Force and
Royal Navy operates a Lightning
Force of F-35Bs. with aircraft
currently assigned to 617 and 207
Squadrons.
Detailed moulding
Italeri’s 1/72 F-35B Lightning
II was packaged in a smooth,
carton-type box with a closefitting lid. Attractive artwork
MODEL SPEC
F-35B Lightning II STOVL Version
By: Italeri
Stock Code: 1425
Scale: 1/72
Price: £29.99
Available from: www.hobbyco.net
The kit cockpit tub and ejection seat were improved with Eduard’s PE instrument
panel and firing handle; the green oxygen bottle was sourced from spares
KeyModelWorld.com
INTERMEDIATE BUILD | F-35B Lightning II
...and so the features
were reduced in size
by a gentle rubbing
with 1,000-grade
sandpaper
Italeri has moulded the RAM
panel lines as a raised feature,
aiding painting. However, these
seemed too prominent and
would probably present a trip
hazard on the real aircraft...
Weapon bays were airbrushed white and given a dark grey wash to
accentuate the detailing and add depth Highly detailed cabling was picked out
with a fine brush and Docrafts Deep Orange acrylic. Cable ties were highlighted
with Canary Yellow, Azure Blue and Blanc for visual interest
included photos of a built,
unpainted model, decals and
profile illustrations for three
schemes, while instructions came
as a detailed booklet with stepby-step line drawings and colour
profiles to aid painting.
It comprises three mid-grey
styrene runners with a tinted
frame for the canopy. All
parts were moulded crisply
with no evidence of flash and
few seam lines were visible
– internal weapon bays were
particularly impressive with
convincing cabling and pipework.
Horizontally split upper and
lower fuselage sections were
the largest parts – each with
integrally moulded wings and
radar absorbent
material
(RAM) panel lines. Italeri renders
these as raised features, which
helps when painting, but they
appear overscale and would
probably present a trip hazard if
this size on the real aircraft!
‘Have Glass’ finish
Decisions regarding the painting
of the model needed to be
made before any building could
take place allowing for suitable
products to be sourced. Italeri
suggested its own acrylic paints:
4725AP Flat Gunship Gray FS
36118 and 4762AP Flat Light
Ghost Gray FS36300. However,
these would not achieve the
reflective, metallic, almost
‘slimy’ appearance seen on
actual F-35 aircraft (note, the
firm recently announced that
“All parts were
moulded crisply
and accurately
with no evidence
of flash”
KeyModelWorld.com
Airfix Model World 25
INTERMEDIATE BUILD
its Model Master acrylics line is
to be discontinued). The ‘Have
Glass’ coating was successfully
achieved by Toby Page with his
excellent build of an Italeri 1/32
F-35A in AMW86 – January 2018,
using a two-part system from Mr.
Paint (www.mrpaint.sk), which
comprised a lacquer-based
acrylic MRP-280 Camouflage
Grey FS 36170 and MRP-278
Have Glass Special Matt Varnish
– in this case, these items were
sourced from Premier Hobbies
(www.premierhobbies.co.uk).
Although intended to
be an out-of-the-box
build, Eduard’s SS702
photo-etched (PE) metal
instrument panel and
harness set
(www.eduard.
com) was
purchased for
the highly visible cockpit,
along with a CX562 canopy and
surface mask to assist painting
the intricate RAM lines.
Assembly began with the
ejection seat, which was
airbrushed with Vallejo’s 71.057
Black (www.creativemodels.
co.uk) and detail dry-brushed
lightly with 71.275 USAF
Medium Gray. This was then
further enhanced with the PE
harness and firing handle.
Internet research revealed the
presence of what seemed to be
a bright green oxygen bottle
There were ejection marks on the
internal surface of the air intakes,
but dry-fitting confirmed these
would not be visible upon assembly
so they were left as they were
Test-fitting the horizontally split fuselage revealed the only area that would
need filling and sanding on the entire model: a small gap on both sides of the
fuselage ahead of the air intakes
26 Airfix Model World
fixed just behind the ejection
seat’s headrest. Surprisingly,
this highly visible item was not
included in the kit, so the ‘bits
box’ was searched and a suitable
candidate sourced from a 1/48
Ju 88. Obviously, this was from
the wrong period and scale, but
it fitted perfectly and didn’t look
out of place. After an airbrushed
layer of 71.275 USAF Medium
Gray had dried, the cockpit
received a 76.517 Dark Grey
Model Wash to enhance the
moulded detail.
Prominent parts
The next stage involved
the assembly of the engine
components, which were
painted with 71.065 Steel, and
the air intakes – these received
Surfaces of the main engine
components featured
moulded relief, which was
hidden when the fuselage
was joined – the intake
fan and afterburner would
remain visible
A little ‘artistic licence’ was employed to add further detailing in the form of a
few thin wire strips which added a metallic glint to the wheel wells and weapon
bays when the model was viewed from below
KeyModelWorld.com
INTERMEDIATE BUILD | F-35B Lightning II
Mr. Paint’s MRP-280
Camouflage Grey was
airbrushed lightly to cover
but not eliminate the black
pre-shading. This paint
gave an impressively
smooth, slightly glossy,
metallic finish
The cockpit was
covered with masking
tape and the edges
sealed with Humbrol
Maskol before the
model was pre-shaded
roughly with black
Using pre-cut masks from Eduard was a time-consuming task, but the accuracy
of the product made it relatively simple to apply each piece carefully – as per the
diagram provided
After 71.046 Pale Blue Grey, the RAM lines were over-sprayed carefully with
MRP-280 Camouflage Grey to reduce the contrast, and to add the all-important
metallic sheen
71.001 White – before they were
glued together and attached
to the powerplant. Ejector pin
release marks were noted on
the inner sides, but dry-fitting
confirmed they would not be
visible upon assembly, so they
were left untreated. Surfaces of
the main engine components
featured detailed moulding, but
unfortunately this would also
prove to be hidden once the
fuselage was joined. Conversely,
the intake fan would be visible,
KeyModelWorld.com
as would be the downturned
afterburner nozzle at the rear
of the aircraft, so efforts to
highlight the moulded detail were
concentrated on those areas.
Before the horizontally split
fuselage could be joined, the
issue of the prominently raised
panel lines was addressed. It
was decided to use 1,000-grade
sandpaper, which was coarse
enough to remove a tiny layer of
styrene without the beautifully
crisp panel lines disappearing
altogether. A fine-grade
polishing cloth was then used to
buff the surface in readiness for
pre-shading and painting.
Perfect fit
Wheel wells and weapon bays
received 71.001 White, followed
by 76.517 Dark Grey Model Wash
to add depth and accentuate
the highly detailed moulding.
The cabling and pipework in
the munition
bays was
particularly impressive as even
cable ties were present. Further
research showed these areas are
festooned with orange cabling,
so Docrafts Artiste All-purpose
Deep Orange acrylic paint (www.
everythingartandcraft.com) was
applied via a fine paint brush
to highlight the cabling in the
weapon bays. Cable ties were
picked out with Docraft’s Canary
Yellow, Azure Blue and Blanc
(white) tones. A little ‘artistic
licence’ was employed
Airfix Model World 27
INTERMEDIATE BUILD
Following a
further thin coat
of MRP-280
Camouflage
Grey, the
undercarriage
was added to
support the
model and
protect the paint
from scratches
Taking advantage of Italeri’s prominent moulding, a fine paint brush was used
to pick out each unmasked RAM panel line
Upper and lower wing surfaces required thin strips of masking tape to mask
the demarcation between the RAM panel lines successfully
It was easier to pre-shade,
mask and paint vertical
stabilisers before cementing
them to the model
to add further detailing in the
form of thin wire strips, which
added a metallic glint when the
model was viewed from below.
One final step before joining
the fuselage was to cement small
lead fishing weights (akin to lead
shot) inside the nose of the lower
fuselage – just in case there was
an issue with tail-sitting. Engine
and undercarriage bay
assemblies were then
attached, and the
fuselage was joined with the help
of Tamiya Extra Thin Cement
(www.hobbyco.net) – the fit was
perfect, with just a tiny gap either
side of the air intakes requiring a
minimal amount of filler.
All-important sheen
After the cement had cured,
the model was pre-shaded with
black along
panel
lines and
‘marbled’ roughly over the flat
surfaces of the wings. Once this
was dry, MRP-280 Camouflage
Grey FS 36170 was airbrushed
lightly to cover, but not eliminate,
the black pre-shading. MRP’s
paint gave an impressively
smooth, slightly glossy metallic
finish, which allowed the preshading to remain just visible.
I usually use ‘normal’ (waterbased) acrylics, but this was the
first experience of lacquer-based
paint, and I was thoroughly
impressed with its performance.
Surfaces were left to cure
overnight before any attempt
was made to mask the RAM
panel lines using pre-cut masks
from Eduard. This was a timeconsuming task, but the accuracy
of the product made it relatively
simple to apply each piece
carefully – as per the diagram
provided. Once set, the panels
were airbrushed lightly with
“Eduard’s set
didn’t cover all of
the RAM panels”
28 Airfix Model World
KeyModelWorld.com
INTERMEDIATE BUILD | F-35B Lightning II
71.046 Pale Blue Grey to produce
a contrasting tone. It was also
matt-finished, so to reduce the
contrast and to add the allimportant metallic sheen, the
hue was over-sprayed carefully
with a thin coat of MRP-280
Camouflage Grey.
Unfortunately, Eduard’s set
didn’t cover all of the
RAM panels, with those on
the lower surface aft of the
weapon bays and the nose of the
aircraft requiring the modeller
to solve this problem without
such pre-cut assistance. Rather
than slicing Tamiya tape (www.
hobbyco.net) into thin strips
to create covers,
it was decided to take
advantage of Italeri’s
prominent moulding by using
a fine paint brush to pick out
each unmasked RAM panel line
carefully with a pale blue-grey
shade. This was not as difficult or
as tedious as one might expect
despite the features having
earlier been reduced by sanding.
Upper and lower wing surfaces,
plus both the horizontal and
vertical stabilisers, also required
thin strips of masking tape to
define the demarcation between
the RAM panel lines. This was
again time-consuming, but
necessary for an effective and
accurate representation. Once
again, 71.046 Pale Blue
Grey was airbrushed
over the panels and
nose, followed by
a light coating
of MRP-280
Camouflage
Grey. All
masks were
removed
and
All masks were removed and the whole model was
given a light coat of Intermediate Gauzy Agent
Shine Enhancer to provide a smooth, gloss surface
in preparation for the application of the decals.
Such covering was tedious and time-consuming, but necessary for an effective
and accurate representation
The canopy and other transparent parts were dipped into AK894 Glass Coat
Gauzy agent to create a glass-like appearance. These parts were then masked
prior to painting
KeyModelWorld.com
Decals were applied with DecalFix to aid conformity – the Union Flag was the
only out-of-register item. Navigation lights were added using Tamiya X-27 Clear
Red and X-25 Clear Green
Airfix Model World 29
INTERMEDIATE BUILD
“Weapons were
detailed with decals
and subsequently
added to their bays for
more visual interest”
the whole model was given
a light coat of AK Interactive
Intermediate’s AK894 Gauzy
Agent Shine Enhancer (www.
ak-interactive.com) to provide
a smooth, glossy surface in
preparation for the markings.
These were applied with the
help of a fine brush, tweezers
and Humbrol DecalFix (www.
humbrol.com) to ensure the
decals conformed to the model’s
sometimes complex surfaces.
Impressive quality
After being left overnight, the
whole airframe received a thin
coat of MRP-278 HAVE Glass
Special Matt Varnish. This not only
sealed and protected the decals,
but also supplied a semi-gloss
metallic sheen that effectively
mimicked the distinctive ‘Have
Glass’ finish of the real aircraft.
Weapons were detailed with
the supplied markings and
subsequently added to their
bays for more visual interest,
while undercarriage bay doors
were fitted and the canopy was
masked, painted and fitted in the
unusual front open position.
Being a short take-off and
vertical landing (STOVL) aircraft,
the F-35B has numerous
hatches, which were fixed in
the open position so the large
intake fan would be visible on
the finished model. This allowed
for another distinctive feature of
the model – the Union Flag – to
be visible on the internal surface
of the panel over the intake fan.
This was the only decal that was
out of register, but not to the
extent where it would detract
from the model’s appearance.
Impressed with the quality
and accuracy of the kit,
further internet research was
undertaken to compare the
model with photographs of the
real aircraft. At this point it was
noticed there were inaccurate
panel lines engraved on the
nose just under the front section
of the canopy on the port side.
As these were not evident on
the real aircraft, they were
gently removed with a needle
file, sanded, filled and repainted
to finally complete the model.
Final thoughts
This was an interesting and
challenging build, and apart
from an easily fixed inaccurate
panel line on the nose of the
aircraft, Italeri has produced an
excellent 1/72 representation of
the STOVL F-35B Lightning II.
The decals performed extremely
well, and the fit of the skilfullyengineered parts was superb,
with hardly any filling needed.
This really was a delightful kit
to build and paint, with splendid
levels of detail incorporated
into the parts, although I would
highly recommend the purchase
of a suitable surface mask set to
aid painting. Cockpit detailing
products are also recommended
to add refinement in this area
of the model – particularly if
the canopy is modelled in an
open position.
Overall, this detailed little kit
comes highly recommended
– provided you can cope with
sanding and masking all
those RAM panel lines!
Detail just under the front section of the canopy on the port side of the
fuselage was not evident on the real aircraft, so was gently removed with a
needle file, sanded, filled and repainted
Numerous hatches and doors for the weapon and undercarriage bays were
assembled and painted before attaching to the model. Weapons were detailed
with kit-supplied decals
30 Airfix Model World
KeyModelWorld.com
Aviation & Military Book Centre
Military & Civil Aviation – Military Weapons & Equipment – Naval Vessels
SPECIALIST IN AVIATION, MILITARY & MODELLING BOOKS WITH THOUSANDS OF TITLES IN STOCK
23402AVI
UH-60 Black Hawk
- The US Army’s
Tactical Transport
Helicopter R Burik
The Black Hawk was
designed to replace the
Huey during the 1970s. It
made its combat debut in
1983 during the invasion
of Grenada. Black Hawk
has participated in every
major US Army campaign
since.
PB 126pp £21.50
31036AVI
F-14 Tomcat: Part 1
Atlantic Fleet and
Reserve Squadrons
B Kinzey Part 1 is a
comprehensive look at
the schemes and unit
markings used by operational F-14 squadrons
assigned to the Atlantic
Fleet from 1974 to 2006.
PB 127pp £21.99
37562AVI
Nachtjager: Luftwaffe Night Fighter Units 1939-45
This is a compendium
edition of the highly
regarded and long out of
print Nachtjäger volumes
in the acclaimed Classic
Colours series on the
aircraft and markings.
HB 192pp £25.00
79465MIL
Britain’s Airborne
Forces of WWII:
Uniforms and
Equipment
M Magreehan WWII
saw huge advancements
in tactics and technology
that included forces able
to deploy by parachute
across the globe.
HB 224pp £25.00
12241MIL
Tanker Techniques
IDF Special Issue
Vol.2
An excellent step-by-step
guide to creating realistic
miniatures of IDF AFVs in
1-35 scale. Our goal is
to provide artistic inspiration
and necessary guidance
for your projects.
PB 215pp £18.99
83551MIL
Photobook Series
22: German Support Vehicles on
the Battlefield
T Cockle Photos of
a variety of motorised
transport vehicles
including cars and trucks,
armoured cars, halftracks, both armoured
and unarmoured, used by
the German Wehrmacht
during WWII. English/
Hungarian text.
HB 112pp £25.99
85398AVI
Images of War:
US Naval Aviation
1898-1945 The Pioneering Years to the
Second World War
Before WWI the navy had
recognised the potential
of aircraft at sea, and
developed techniques
and equipment that contributed so much to the
defeat of the Japanese.
PB 224pp £14.99
36356AVI
Middle East@
War 31: Operation
Desert Storm Vol.2
- The Coalition Liberation of Kuwait
1991 T Cooper
Early in the morning of 2
August 1990 the Iraqi Air
Force bombed Kuwaiti
air bases, and then the
Iraqi Republican Guards
stormed into the country.
PB 72pp £16.95
60923MIL
Legends of Warfare: Sherman Tank
Vol.3 America’s
M4A2 Medium Tank
in WW II D Doyle
History of the Sherman,
with dozens of archival
(many unpublished)
photos and detailed
photos of some of the
finest existent examples
of surviving vehicles.
HB 112pp £20.99
36318AVI
Europe@War 10:
Tsar Bomba - Live
Testing of Soviet
Nuclear Bombs
1949-62 K Dabrowski
In 1961, the USSR conducted a live test of the
most powerful nuclear
weapon ever created, the
RDS-202 hydrogen bomb
that unleashed a force of
58 megatons of TNT.
PB 56pp £16.95
78017MIL
Tank Battles of the
Cold War 1948-91
A Tucker-Jones Covers
each major phase in the
evolution of the tank and
of tank warfare during
this period, from the
battles fought in the late
1940s to the M1 Abrams
in the 1991 Gulf War.
HB 240pp £25.00
42879MIL
Arab Armour vs
Israeli Armour - Six
Day War 1967 C NcNab
The Six-Day War in 1967
was a lightning Israeli
campaign that changed
the face of the Middle
East. Israel, despite being
heavily outnumbered
managed to dominate.
PB 80pp £13.99
26214AVI
The Royal Australian
Air Force in South
Australia During
WWII P Ingman
At the start of WWII
there was no permanent
RAAF presence in South
Australia, but within just
two years there were
several facilities housing
thousands of personnel
and hundreds of aircraft.
PB 94pp £18.95
92776AVI
Battle of Britain
- Prelude - Air
Combat Archive 18
Jun-9 Jul 1940 S Parry
Completely ignored by
historians, for the first time,
those early combats,
fought day and night over
the UK, are fully detailed
in the usual warts and
all style. B&W photos,
combat scenes & more.
PB 112pp £25.00
09716AVI
The Merlin Engine
Spitfires Handbook
The inside story of the
most famous engine and
aircraft combination in
history. The Merlin Engine
Spitfires Handbook. Using
the original RAF Pilot’s
Notes from the archive,
this handbook reproduces
the unabridged content
and illustrations.
HB 36pp £8.99
95820AVI
RAF Aircraft of the
Battle of Britain
L Chapman Features
a brief history of all the
front-line RAF fighter aircraft involved and some
of the major training and
support aeroplanes that
contributed to the iconic
events. The story is told
using over 150 photos
of surviving and restored
aircraft in the air, on the
ground and in unique
formations together.
PB 126pp £17.99
AID017
Aircraft in detail
017 Sukhoi Su-25
Frogfoot D Hawkins
A complete portrait of
this iconic aeroplane and
its variants containing
photos of all the features
including action shots,
Cockpit views, Fuselage,
Weapons and Maintenance in addition to
up-to-date information.
PB 114pp £23.99
AID018
Aircraft in detail 018
Dassault/Dornier
Alpha Jet D Hawkins
A complete portrait of
this iconic aeroplane and
its variants containing
photos of all the features
including action shots,
Cockpit views, Fuselage,
Weapons and Maintenance in addition to
up-to-date information.
PB 114pp £23.99
08813AVI
British Fighter
Aircraft in World
War I M Wilkins
WWI witnessed
unprecedented growth
and innovation in aircraft
design, construction and
mass production. This
book focuses on the
British approach.
HB 192pp £35.00
44203AVI
20th Century
Passenger Flying
Boats L Dawson
From Henri Fabre’s first
successful take off from
water and landing near
Marseilles, to the worldwide development of
huge luxurious oceancrossing flying boats.
HB 128pp £25.00
03520MIL
The Second World
War Tank Crisis:
The Fall and Rise
of British Armour
1919-45 D Taylor
British WWII tanks performed so badly that few
other British weapons of
the period provoked such
a strong sense of failure.
HB 240pp £25.00
08047MOD
Modelling Historic
Buildings and Imaginary Structures
D Wright Demonstrates
the many different modelling techniques used in
the creation of realistic
historical buildings and
convincing imaginary or
fantasy structures.
PB 192pp £19.99
08312MIL
WWII German Most
Iconic SS Vehicles
Vol.1
Features the most iconic
vehicles of the Waffen
SS and focuses on
medium tanks, half-tracks,
armoured cars, self-propelled guns and softskins
with step by step articles.
PB 160pp £24.99
51933AVI
Carrier Attack
Darwin 1942: The
Complete Guide
to Australia’s Own
Pearl Harbor
T Lewis & P Ingman
Tests many Darwin myths
and reveals new information including the actual
intent of the attack.
HB 368pp £31.95
36363avi
Middle East@War
33: MiGs in the
Middle East Vol.1
Soviet Designed
Combat Aircraft in
Egypt, Iraq & Syria
1955-63
Photos & Illustrations
PB 64pp £16.95
59100avi
Latin America@War
22: Air Wars Between Ecuador and
Peru Vol.3 Aerial
Operations over
the Cenepa River
Valley A Tincopa
Photos & Illustrations
PB 80pp £19.95
90004avi
Samurai Phantoms
- The McDonnell
Douglas F-4 Phantom II in Japanese
Service Vol.2 F-4 EJ
Kai and Reconnaissance Variants
Colour Photos
PB 68pp £34.50
12210MOD
Damaged Weathered & Worn Models Magazine (11)
High quality magazine
with great features
always seen from a very
special point of view to
surprise it’s followers.
PB 78pp £5.99
TAH35AVI
The Aviation Historian Issue 35
In this issue of Aviation
Historian: Clippers of the
Clouds - PanAm’s rogue
Atlantic constellations.
Plus much more.
PB 130pp £13.50
AMIG5219
The Weathering
Aircraft 19 Wood
Shows you, in clear steps,
how to use standard
techniques plus very
specific processes for realistic weathering. Colour
photos throughout.
SB 64pp £8.99
FFI2022
After The
Apocalypse
Brings you the very
best in post-apocalyptic
modelling, with stalkers,
zombies and all manner
of horrors from a dystopian future.
SB 82pp £19.99
09469MIL
German Mountain
Troops 1942-45
Y Beraud
Men, Battles and
weapons. Illustrated with
Photos & Illustrations.
PB 128pp £19.99
UK Delivery £3.95. Delivery charges for Europe and Worldwide available via the website.
Unit 1 Highfield Rd, Clitheroe, BB7 1AQ • sales@aviationbookcentre.com • 01200 401468
www.aviationbookcentre.com
Chapel_FP.indd 1
14/05/2021 10:28:42
INTERMEDIATE BUILD
Joe Turner upgrades
Takom’s T-55AM with
a wealth of aftermarket
accessories
MENACE
T
SOVIET
he T-55 is one of
the most-produced
tanks in history with
an estimated total
of 100,000 units having
been manufactured.
First conceptualised at the
end of World War Two, the
design has proved incredibly
successful. Many local upgrades
and refurbishments have kept
the tank still relevant and in
service with many countries
to this day. The 1983 ‘AM’
upgrade was one of the most
sophisticated at the time,
bringing the tank level with
many of its contemporaries,
featuring increased armour and
an improved fire control system,
Volna. The latter featured
a highly advanced ballistic
computer using laser range
finders and upgraded sights;
when coupled with a stabilised
gun mound, this enabled more
accurate gunnery, even on
the move. By the late 1990s,
the T-55 was retired from the
Russian army, but a number were
retained in reserve and have
since been recalled to service.
The lower hull featured additional armour detail, which although accurate,
unfortunately would not be visible once the model was assembled
32 Airfix Model World
Heart of iron
Takom has been producing a
wide range of T-55 variants for
some time, the first being the
T-55AM. The kit features 18
styrene runners, a single-piece
lower hull and turret, vinyl mantlet
cover, two metal cables and a
small photo-etched (PE) brass
fret. Construction began with
the lower hull, which needed
the additional armour elements
to be added and, although
barely visible, this area was well
detailed. Attention then turned
to the running gear, which was
MODEL SPEC
Russian Medium Tank T-55 AM
By: Takom
Stock code: 2041
Scale: 1/35
Price: £49.99
Available from: pocketbond.co.uk
The wheels were accurate, although they appeared too new for this project,
so the tread was sanded and gouges cut to represent damage to the rubber
KeyModelWorld.com
INTERMEDIATE BUILD | T-55AM
Takom’s tracks were swapped with metal alternatives, as these were more
detailed and the weight added a realistic natural sag
While the kit sported a high level of detail on the hull, the moulded features
were enhanced by adding a rolled steel texture and updating the weld lines to
create a more realistic appearance
The characteristic unditching beam was switched with a custom-made version
fashioned from a small piece of dowel
Kit fuel tanks were replaced with resin alternatives, although the associated
pipes were styrene and represented the real system accurately
simple to assemble and the
components fitted well. The ten
roadwheels each consisted of
two wheels plus tyres and while
the latter featured accurately
reproduced tread, this was
sanded to replicate worn
surfaces. Takom suggested the
wheels should be fixed; instead,
these were left loose to allow for
easier painting later.
The tracks were next and,
although the kit provided
perfectly adequate individuallink versions, it was decided
to be replace them with metal
alternatives from MasterClub.
These were the correct OMSh
type for an upgraded T-55AM
and were far more detailed than
the styrene items, with welldefined foundry marks. However,
each link must be cleaned of
flash and the holes drilled to
clear them of
debris. After this
they were joined
by inserting two
small resin pins
into each side.
The latter were tiny, so tweezers
were employed and (although
not stated in the instructions), a
small amount of cyanoacrylate
(CA) glue was used to ensure
they stayed in place.
The upper hull was next and
this came largely as one piece
fixed to the model. Detail was
very good with fine mouldings,
but with the armour on the
front there was a distinct lack
of rolled steel texture seen in
reference photos. Areas where
the texture would be added
were sanded until smooth and
random patches of fairly thick
Mr. Hobby SF284 Mr. Surfacer
1000 (www.albionhobbies.com)
were dabbed onto the surface
to improve this, ensuring to
leave some gaps for a realistic
“Takom supplied
the associated
mantlet cover as
a vinyl item”
KeyModelWorld.com
Airfix Model World 33
INTERMEDIATE BUILD
As with the main hull, the turret texture and weld
lines were reworked to produce a more authentic
appearance plus the styrene grab handles were
substituted for thinner wire versions
A turned metal barrel was used as this had a better shape, with PE clasps for
the thermal sleeve. The resin fire control unit (left centre) was one of the
highlights of the model, featuring crisply cast detail
“Takom’s decals were
a challenge as they
didn’t conform to the
curved surfaces”
patchy appearance. After
drying, the same product was
thinned with liquid cement and
stippled over the whole surface
and subsequently sanded so the
surface was smooth. Similarly,
moulded weld lines – although
very fine – were replaced as they
were too uniform and had an
unnatural shape. A fine line was
The kit’s DShK AA gun was improved
greatly thanks to a PE ammunition
box, belt feed and sights
34 Airfix Model World
a cocktail stick,
creating a more
natural-looking surface.
scored and the gap filled with
a line of Tamiya 87052 Epoxy
Putty (www.hobbyco.net) to
prepare these areas. After the
filler was touch-dry, the welding
texture was created via a curved
section of foil fixed to the end of
Multi-media menace
While the kit was highly detailed,
two upgrade sets from Voyager
Model and Miniarm (see Field
upgrades) were used, which
contained a number of resin
and PE replacements. After
the upper hull was completed,
attention turned to the back and
the famous ‘Soviet log’ (more
accurately termed an unditching
beam). The kit part was very
basic and lacked detail, so this
was replaced using PE straps
and a piece of wooden dowel
for the unditching apparatus. A
wood grain texture was added by
dragging a saw along the surface
of the log, while sandpaper
was used to create varieties
in texture and shape. Track
guards came next and the first
extras comprised the pioneering
tools on the left-hand unit. The
shovel blade and straps were
replaced with in-scale PE items
and a length of copper cable
replaced the kit’s thread. Just the
forward-mounted storage box on
the left-hand track guard used
Takom’s parts, with the rear and
central stowage sourced from
the aftermarket products as they
were more accurate in shape and
used PE attachment points.
On the opposite track guard,
resin alternatives were used
instead of the exterior fuel tanks,
although the fuel lines came from
the kit. These were accurately
recreated with the correct
shape and details, although the
assembly proved to be quite
fiddly in places. Spare track
mounts were replaced with a
KeyModelWorld.com
INTERMEDIATE BUILD | T-55AM
combination of left-over metal
links and PE mounting brackets.
On the front of the tank, the
headlight cover was exchanged
for a metal component from a
Miniarm set as the original part
was designed poorly. The
tow cables were next and
to add interest, the
metal cable from the
kit was bent around
surface features to
give the impression
it had been
slung on the tank
without much
care. Just one
fuel drum was
added on the back
of the model, which
created another point
of interest – but the
straps were pushed
to look as if they were hanging
down. The final stage of the
lower hull was attaching the
rubber side skirts, which were
supplied as single pieces for
each side. However, reference
photos revealed the kit parts
were far too uniform. Both were
sanded on the inner faces to
make them as thin as possible,
After a black primer, a base green
colour was applied in several
uniform layers to create a firm
foundation for subsequent shades
after which the lines between
individual panels were scribed
and, recreating a specific photo,
the connecting pin was cut.
Following this, liquid cement
was brushed onto the desired
section, and the rubber was
bent to simulate old and worn
material, in some cases removing
small chunks to create a broken
surface. Finishing touches
involved the application of
heavily diluted Mr. Surfacer 1000,
which was stippled gently onto
the surface to differentiate it from
surrounding areas.
Topside
The main turret came as a single
piece, to which other parts would
be added. As with the hull, the
moulding was high quality, but
needed enhancing in places.
An improved cast texture was
fashioned by covering the surface
with liquid cement and stippling
it with a hard stiff brush; this was
followed with a coat of diluted
Mr. Surfacer 1000 which was
also stippled. Weld lines
were recreated in a similar
fashion to the hull.
The first details
added were the grab
handles – Takom’s
parts were too thick
with considerable
flash, so they were
replaced with brass wire.
The turret’s BDD addon armour (nicknamed
‘Brezhnev’s eyebrows’ for
its appearance) was next
to be attached and a slight
steel texture was created after
consulting references.
Many of the styrene parts
were replaced with aftermarket
resin items, including the
searchlight, turret rings,
commander’s cupola, laser
rangefinder and infrared sight.
While these generally had a
good fit, they often required
the removal of adjacent plastic
in order to sit correctly. The
T-55AM’s smoke grenade
launchers and coaxial machine
gun were replaced with turned
metal parts as these were far
superior to the kit offerings.
Turret ammunition boxes,
commonly mounted on the
sides of many Soviet Russian
FIELD
UPGRADES
Modulation was created by lightening
the base colour gradually and
applying these tones to areas that
would receive more light naturally.
The effects were sealed under a
gloss coat before the decals were
applied – a tan-hued filter then
muted contrasts
KeyModelWorld.com
Rather than rely on just Takom’s
kit parts, a number of aftermarket
resin and PE sets were employed
throughout this build:
Voyager Model
(www.voyagermodel.com)
35846 Russian T-55AM Medium
Tank basic
Miniarm (www.miniarm.com)
B35134 Correct Set For T-55AM
MasterClub (www.masterclub.ru)
MTL35048 T-54, T-55, T-62
OMSh Type
Evolution Miniatures
(www.evolution-miniatures.com)
EM35115 Crew of the Russian
T-72 Tank
Airfix Model World 35
INTERMEDIATE BUILD
Washes and oil paints were used to further enhance the contrast between
light and dark, while also helping to define the tank’s overall shade
tanks, were made by combining
the Miniarm resin components
with the complex PE mounting
brackets/clasps from Voyager.
One box was omitted and the
bracket was left loose to add a
further point of interest. A turned
metal alternative was used for
the main gun barrel, with PE
being added to recreate the
straps for the thermal sleeve.
Takom supplied the associated
mantlet cover as a vinyl item and
although this was convincing,
a resin replacement was
considered to have the
more refined detail.
A set of resin crew for a T-72
was acquired (see Populating
the scene) and they required a
degree of adjustment to fit into a
T-55, with changes achieved via
the use of jewellers’ files.
Eastern Europe attire
To prepare for painting, the model
was cleaned with soapy water
and, after drying, Mr. Hobby
MP242 Mr. Metal Primer (www.
albionhobbies.com) was brushed
Initial chipping was created with a lightened version of the basecoat, with
dark grey and rust tones used to ‘fill’ these areas to emulate bare metal
onto all the metal components.
An initial coat of Alclad II ALC309 Black Primer and Microfiller
(www.alclad2.com) was then
applied to the model, with any
surface blemishes remedied
using Revell’s 39607 Plasto Putty
(www.revell.de/en) and sanding,
after which a further two layers of
primer were sprayed.
The kit came with four sets of
markings: Russian Army, Russian
Naval Infantry, Cuban Army and
Angolan Army. The first of these
was selected, as the intention
was to create a model of an old
T-55 called out of retirement to
operate for the
Russian Ministry
of Internal
Affairs
(MVD) during the Second
Chechen War, which lasted from
1999-2009.
The base colour was AK
Interactive’s RC098 Russian
Modern Green (www.
ak-interactive.com) from its
lacquer-based Real Colors range.
This was airbrushed uniformly
over the entire model, with
modulated tones then created by
mixing the base shade equally
with RC100 Russian Grey Green
and applying it generally onto
areas that would receive the
most light. Stronger contrasts
were produced by spraying
‘pure’ Grey Green onto the most
exposed areas, such as edges
and corners – these effects were
deliberately left quite stark, as
subsequent weathering would
mute everything significantly.
Lastly, the tracks received
several uniform coats
of Tamiya X-83
Medium Sea
“This kit comes
highly recommended
to any fans of Cold
War and modern
Russian armour”
36 Airfix Model World
KeyModelWorld.com
INTERMEDIATE BUILD | T-55AM
A heavy layer of dust and dry mud was applied to the entire tank to
show years of dirt accumulation
Grey (www.hobbyco.net), after
which everything was sealed
under a varnish layer of X-35
Semi-Gloss Clear.
Unfortunately, Takom’s decals
were a challenge as they didn’t
conform to the curved surfaces.
This was resolved by cutting
them with a sharp hobby knife so
that they fitted better; resulting
gaps were filled with white
acrylic paint. Another semi-gloss
coat then sealed the decals. The
next stage was a filter, which
came in the form of AMMO-MIG’s
A.MIG-1510 Tan for 3-Tone Camo
(www.migjimenez.com). This
was applied in two thin uniform
coats, which tied together the
decals and underlying tones.
Next, A.MIG-1008 Dark Wash
was applied around details and
in crevices to accentuate the fine
surface detail. A combination
of Burnt Umber, Lamp Black
and Titanium White oil paints
were then used to further the
contrasts. White was placed
on the tips of the surfaces with
the most extreme highlight and
blended subtly with a thinnerdamped brush. The Burnt Umber
and Lamp Black were applied to
the dark and recessed areas and
treated similarly.
Weathered warrior
The first step in replicating a worn
finish was to add chipping effects
to the model. This stage was quite
aggressive, as the tank being
recreated would have been in
service for a considerable
time. Initially, chips
made from
KeyModelWorld.com
Tracks were weathered in the same way as the lower hull, concentrating the
fresher mud in the centre of the tracks, as observed in reference photos
the colour of the most extreme
highlight, mixed from Vallejo
acrylics, were applied with a
sponge and fine paint brush to
edges of surfaces and any other
areas likely to be worn down
from continued use. After this
had dried a second, darker grey
colour, was used to ‘fill in’ the
chips, leaving some of the lighter
colour around the edges, to
show areas where the wear had
reached the steel surface. The
final stage was to add A.MIG-1004
Enamel wet effects were used to add water patches and streaks as if
Light Rust Wash to the chips and
from recent rainfall
blend it to the surroundings; this
was also a fairly heavy treatment
as Soviet tanks were prone to
rust, particularly older vehicles.
The tone was also speckled onto
the tracks to show elements
of corrosion and darken the
individual link colours.
The next step was to add
faint rain marks to the model,
representing grime pushed down
the vehicle by falling rain. For this
project, A.MIG-1203 Streaking
Grime was selected, being
Resin figures for a T-72 tank were modified to fit the T-55 and were painted
applied in thin lines on vertical
using acrylic paints
and sloped surfaces. After a
short time drying, a thinnerdampened flat brush was used to
gently blend the effect into the
One challenge when replicating this scene was to obtain accurate figures for
model. The same product was
the late-1990/early-2000 era, so aftermarket items were used extensively:
brushed onto horizontal surfaces
Evolution Miniatures
in crevices to show areas of
EM-3516 Russian soldier (Chechnya)
Tank (www.tank.model.ru)
accumulated grime.
T35054 Russian Modern Tank officer Chechnya 1994-2005
Before the main mud effects
T35069 Russian mod. Soldiers w/SVD & PK Winter, Chechnya 1993-04
were started, small amounts of
T35068 Tank Russian modern soldier with RPG-7 winter Chechnya 1993-04
real soil from the garden were
MasterClub
collected and placed onto certain
MCF35017 Russian Modern Soldier #2
areas of the tank where thick
MCF35019 Russian Modern Soldier #4
mud would collect and was
MCF35157 Modern Russian Soldier with p-159 Radio
secured with AK-118 Gravel and
MiniArt (www.miniart-models.com)
Sand Fixer, simulating clumps
35541a Telegraph Poles
of earth thrown onto the
35539 Miniart Village Accessories
POPULATING THE SCENE
Airfix Model World 37
INTERMEDIATE BUILD
A mock-up of the
diorama was made
to test the size
and composition,
ensuring that the
arrangement and
positioning of all
parts was realistic
“Matchsticks
served as
suitable door
and window
frames”
38 Airfix Model World
upper surfaces. On the lower
hull, A.MIG-1702 Turned Earth
was used to simulate build ups
of dirty mud, with A.MIG-1750
Dry Earth then flicked onto the
model to create splashes and
chunks of dried mud. The
same product was applied
on the upper surfaces, creating
accumulations of dust and dirt.
The intention was for the tank
to be operating in late summer/
early autumn in light rain. The
still-wet mud would
be mostly darker
so A.MIG-
1752 Loose Ground and A.MIG1753 Turned Dirt were added to
the lower hull, simulating fresher
deposits just beginning to dry,
making sure to leave some of the
underlying lighter mud showing.
A similar process was then
adopted for the upper surfaces
to ensure a degree of uniformity.
Next, recent wet mud was
simulated, for which A.MIG1402 Fresh Mud was speckled
onto the lowest parts of the hull,
before a mix of A.MIG-1008 Dark
Wash with AK 079 Wet Effects
Fluid was applied in corners
on the horizontal surfaces and
in thin streaks on the sloped
ones to replicate rainwater. The
edges weren’t blended, creating
a sharp transition with dry
areas. Tracks were weathered
in the same way as the hull.
Once completed, the tops were
sanded gently to the reveal the
metal, simulating areas where
they had been cleaned through
usage. The last step was to
add fuel stains around the filler
caps on the fuel tanks, with
dried smears created by mixing
A.MIG-1008 Dark Wash with
Burnt Umber oil paint.
INTERMEDIATE BUILD | T-55AM
A small house was made mostly from balsa wood, with details fashioned
from wire and styrene strip
Setting the scene
It was decided to finish the
model by placing it in a diorama
– the scene would show a squad
resting in a small rural house
as a tank drove past. The base
was made from insulation foam
with a small groove cut for the
road, while the small building
(based on
reference
photos
of houses
in that region)
was fashioned
from balsa wood.
Matchsticks served as suitable
door and window frames, with
the door and shutters built from
balsa wood. Strips of the latter
were then used to replicate
the wood panelling, with a saw
blade employed to add further
grain texture. The roof was made
with a plastic frame onto which
individually cut wooden tiles
were affixed.
A fence and telegraph poles
came from Miniart accessories
sets, while the barrel was
sourced from the spares box;
everything was then painted
The house was painted in colours common to the region and was weathered
mainly with oil paints to give an aged appearance
with acrylics and weathered with
oils and enamels. The mud was
made with the same products
used when weathering the tank,
plus the surrounding vegetation
was a mix of shop-bought grass/
reed tufts, laser-cut paper plants
and natural products. All figures
were painted with Vallejo acrylic
products, following reference
photographs for the camouflage
patterns and uniform colours.
Final thoughts
Unquestionably Takom’s base kit
is the best model of this variant
on the market and its other
variants no doubt retain the same
level of excellence.
Using a large amount of
aftermarket products was
relatively new to this modeller,
which allowed for a highly
detailed model and helped
make the build more enjoyable.
This in turn meant that
weathering and painting was
more rewarding due to the work
put into it. Overall this kit comes
highly recommended to any fans
of Cold War and modern
Russian armour.
Accessories were added and weathered to match the house, after which various vegetation was
secured to the base, employing grass tufts, laser-cut paper plants and natural materials
Airfix Model World 39
In his final airbrushing article, Jay Blakemore
examines available techniques and
tools to aid your painting skills
HELP
AT HAND
I
Many double-action airbrushes are equipped with a needle travel adjusting
screw, situated on the handle. Utilising this will give you total control over the
amount of paint flowing from your airbrush
Masking is not cheating – straight lines and sharp edges require the use of
masks. Airfix’s 1/48 scale Boulton Paul Defiant benefits from airbrushed markings
utilising commercially available vinyl mask sets
40 Airfix Model World
t has been my aim in these
tutorials to help you master
the complexities of your
airbrush. As you will find
in this, the last of my current
guides, there are certain tools
and techniques you can employ
that mean you don't have to
rely solely on your freehand
airbrushing skills.
Needle control
As briefly mentioned in the
second tutorial (see Choosing
and using, Feb 2021 issue),
double-action airbrushes often
come equipped with a useful
adjustment screw situated at
the rear of the end-piece (often
described as the handle). These
commonly come in the form
of threaded nuts, which when
screwed all the way in prevent
the needle from moving. By
adjusting the nut, it is therefore
possible to pre-set the needle’s
travel from one extreme to the
other and limit the amount of
paint released when the lever is
pulled rearward. The benefits of
this are immediately obvious and,
in addition to managing paint-mix,
Rolls of masking film
can be purchased from
specialist art shops,
though their usefulness
is limited due to its very
low-tack adhesive. Its
transparent nature does
allow complicated
patterns to be traced
and masks cut
air pressure
and distance
(as described in
last month’s article), restricting
the paint flow adds one more
important element of control. I
would personally recommend
buying an airbrush so equipped,
as are all of mine.
It’s not cheating!
Do not think that mastering an
airbrush means that you must
paint everything freehand; on the
contrary, you should use every
trick and aid available to you to
achieve the finish you require to
up your game; and that includes
all forms of masking:
Tape
It is impossible to spray a hard
edge without using a mask, and
the most common material is
tape. There are various types
available that are beneficial to
the modeller, but we’ll just look
at three:
Decorator’s masking tape
Often ignored in favour of more
exotic types, decorator’s tape
is a versatile product that is
KeyModelWorld.com
Sponsored by
Paper masks are great for masking
soft-edged camouflage patterns. In this
example, the paper has been torn to
create an even softer effect. Remember
to always angle the spray away from
the mask edge to prevent under-spray
Decorator’s masking tape is cheap,
readily available and extremely
versatile. However, to mask curved
surfaces, such as the fuselage of this
Eduard MC.202, narrow lengths of
flexible PVC tape is best
cheap and readily available.
As well as producing a hard
edge against which to spray,
it is ideal for masking areas in
their entirety to protect them
from over-spray. It is advisable
to create a new edge using a
fresh scalpel blade to get the
best results, rather than relying
on the existing edge, which
is likely to be rounded or
ragged and can potentially
be a cause of bleeding (paint
leaking beneath the tape)
during spraying.
PVC tape
This soft and malleable plastic
tape comes in various widths
and is invaluable for masking
curved surfaces or creating
meandering camouflage
patterns that require a hard
edge. Unlike plumber’s PVC
tape, products specifically
intended for airbrushing feature
a matt surface which does not
repel wet paint. Being lowtack, however, it invariably lifts
if used to create overly tight
corners and must be constantly
monitored during spraying.
Kabuki tape
Traditionally, Japanese Kabuki
tape was made from rice paper
or other plant-based materials.
The modern equivalent is a
yellow-coloured plasticized
paper, which when cut, offers
a neat, sharp edge. Practically
it offers few advantages over
decorator’s tape and is far
more expensive.
Masking fluid is a versatile liquid that dries to a rubbery consistency. It is useful
for covering awkwardly shaped items, and for creating weathered effects, such
as on the walkways of this 1/48 Eduard Fw 190
KeyModelWorld.com
Alternative materials
Unsurprisingly, there have been
several common household and
craft items that have found their
way into the modeller’s toolset,
along with products designed
specifically for the hobby; the
most frequently employed
for achieving a hard-edged
demarcation are:
Masking film
Rolls of masking film are
available from most art and craft
retailers, though they tend to be
expensive and their usefulness
is limited as far as modelling
is concerned. It is primarily
designed for use on flat artwork
and is very 'low-tack'. It does
not therefore adhere well to
undulating or curved plastic
surfaces, though it can be used
in a limited capacity. Because
the film is transparent, it is very
useful for laying over instruction
or decal sheets, allowing the
modeller to trace designs in
order to create pre-cut, low-tack
masks for the reproduction of
letters or numbers or complex
camouflage patterns.
Masking fluid
This is a versatile product that
forms a rubberised coating
when brushed onto a surface. It
is perfect for masking awkward
areas and curves and, when
used in conjunction with tape,
it is particularly useful for
masking transparencies.
Spotted randomly on a model’s
surface and over-sprayed, it is
possible to create a patchwork
effect useful for recreating
areas of wear.
Commercial sets
As an alternative to using
decals, markings can be
painted using the vast array
of commercially produced
mask sets available. These are
generally cut from vinyl and
feature an adhesive side that
attaches securely to the model.
They can be awkward to use,
however, particularly when
tackling multi-colour national
insignia such as RAF roundels,
each comprising three or four
ringed masks.
Blurred lines
Spraying an accurate camouflage
pattern freehand requires a
steady hand and a good eye.
If you have yet to acquire the
skill and patience to spray an
TIP: SPRAY-AWAY
When using a mask of any kind,
maintaining light passes of the
airbrush and angling the direction
of spray away from the mask
edge helps to prevent paint
bleeding (often described as paint
creep) beneath the mask. This is
especially so when using paper or
Blu Tack masks.
Airfix Model World 41
Sponsored by
Malleable putty, such as Blu Tack, can be rolled
into lengths and used as masks to create a softedged effect. The winding rolls are particularly
effective for creating meandering camouflage
patterns, such as on this Airfix 1/48 Hurricane
accurate line while holding the
airbrush close to the model's
surface, then the resultant
pattern may be overly softedged and so appear out of
scale. Consequently, modellers
have employed a variety of
materials to replicate this
effect. Examples include:
Paper masks
A far more controlled pattern
can be achieved by masking.
Utilising torn or cut paper masks
will enable you to create a softedged, pre-determined pattern
with less chance of making
mistakes. As with masking
tape, the secret to
successful softedged masking is
to airbrush the paint
sparingly. Do not flood the area
you are spraying as the wet
paint will simply run beneath the
mask and ruin the effect. And
remember to spray away from
The meandering dark green camouflage pattern on
this 1/72 Fujimi Phantom was achieved using Blu Tack
‘sausages’, secured to the model with small strips of
decorator’s masking tape. More tape was used to
prevent overspray on the grey areas
can also be achieved by using
different edges; for example
neatly cut or torn paper will
give very different finishes.
Putty ‘sausages’
There are many commercially
available adhesive putties,
such as Bostik’s Blu Tack or
the similar White Tack, that are
suitable for creating masks.
By rolling out chunks of putty
into thin rolls (commonly
called ‘sausages’ or ‘worms’),
disruptive patterns can be set
easily. The thinner the rolls, the
more ‘in-scale’ the resultant
sprayed edges will appear. The
downside of using putty
sausages is the oily or
sticky residue that some
will leave on the model’s
surface when removed.
This residue can generally be
removed once the paint is dry.
Conclusion
the masked
edge – the angle
at which you spray
will determine how 'soft'
the resultant pattern appears.
Different camouflage styles
There has always been
friendly rivalry between those
traditionalists who swear that
they will never swap their ‘hairy
sticks’ for an airbrush, and
those who have converted
that vow, never to return to
the dark ages of paint brush
use. The more enlightened
amongst us preach that there is
a time and place for both. I do
believe though that having an
airbrush amongst your modelling
tools will transform your work
and raise it to new heights –
but only once you’ve mastered
it. I hope that these tutorials
have answered some of your
questions and helped you to
achieve just that.
Commercially produced masking sets are available featuring many marking
options. They are ideal for producing weathered markings as an alternative to
decals, which often detract from a carefully ‘aged’ model
42 Airfix Model World
KeyModelWorld.com
Spitfire Mk.IIb
1/48
Cat. No. 82154 @ www.eduard.com
043_AMW_JUL21_ad.indd
1
Eduard_HP.indd 1
Release June 2021
17/05/2021
14/05/2021 15:02:23
10:32:29
INTERMEDIATE BUILD
CATALINA
CONSPIRACY
“SMITH, YOU
WERE NEVER
ON BOARD”
Commemorating the 80th Anniversary of the sinking of the Bismarck,
Bismarck
Kev Baxter builds Academy’s 1/72 PBY-5 as the Catalina Mk I responsible
for re-sighting this formidable threat to Allied Atlantic convoys
44 Airfix Model World
KeyModelWorld.com
INTERMEDIATE BUILD | PBY-5 Catalina
Parts were neatened after removal from the runners - a punch-and-die tool
furnished discs of coffee-cup lid plastic to fill ejector pin marks on the sponsons
A
t 03:25 on May 26,
1941 Ens Leonard B
“Tuck” Smith took
off from Lough Erne
in Northern Ireland in PBY-5
Catalina Mk.I AH545. Beside
him sat Plt Off Denis
A Briggs RAF,
nominally the
aircraft commander.
Their mission: hunt the
battleship Bismarck!
While it was known the
United States’ Navy had
delivered Catalinas
“Flying surface
leading edges
were masked to
represent antiicing boots”
KeyModelWorld.com
to the RAF as early as the
preceding month, operational
training of British pilots by the
Americans and their inclusion
in combat missions was not.
Indeed, President Roosevelt
(who was enduring criticism of
his government’s Lend-Lease
policies) feared impeachment
should the secret be revealed of
US involvement in RAF offensive
operations. In the inhospitable
North Atlantic, politics was
secondary to the loss of contact
of Bismarck and its escort
Prince Eugen after the Battle
of the Denmark Strait. After an
arduous transit and long hours
of searching in marginal weather
conditions, the crew acquired
their quarry – to a barrage of
accurate anti-aircraft fire. Having
dispatched the contact report
and overseen repairs to the
hull, Plt Off Briggs received
all the accolades. No
mention could be
made of Ens Smith’s
After a dry-fit of the cockpit parts, it appeared as if the control yokes would
end up at an incorrect angle if this locating lug were left untouched
involvement, although he later
received the US Distinguished
Flying Cross but was forbidden
to mention the circumstances.
Assigned to the Pacific Theatre
once the US declared hostilities
in December 1941, he would
eventually rise to the rank of
Captain USN.
Assembling elements
Modellers wishing to build this
small part of military history in
1/72 can do little better than
purchase Wolfpack Designs’ latest
Catalina boxing (17208). However,
at the time of writing, this was
unavailable, so the preceding
‘Pacific Theatre’ version (17204)
Not as hard as it looked. Once it was ascertained how the masks were
arranged, the sequence was straightforward, but instructions might have helped
Not a great deal was
done to the interior,
since little would be
seen once the fuselage
was glued together
Airfix Model World 45
INTERMEDIATE BUILD
The Catalina’s conspicuous
overhead throttle quadrants
were scratchbuilt from
plastic card and attached to
the ‘roof’ of the cabin
The only seam that required remedial attention once the fuselage halves were
mated occurred just forward of the cockpit, always a focal point on a model and
just as luck would have it
The observation
blister machine guns
were removed from
their stands using a
fine razor saw and a
micro-chisel
Planning ensured the tunnel
machine gun door/access hatch did
not disappear into the fuselage when it
was attached to the underside
One item that showed the ageing of
the moulds was the amount of flash
that needed clearing out from the
locating holes to attach the tailplanes
It proved better to deal with the
fuselage seam prior to adding the
observation blisters and risk dust in the
model than try to avoid the clear parts
The sponsons required some
diligent fettling to bring them up to
standard and even more work, when
the model was mishandled badly
was enlisted – it’s a re-issue of
Academy’s splendid PBY-5 and
includes a set of painting masks
for the transparencies.
Thankfully, its quality has
endured the intervening
years well and it builds into a
convincing model, with excellent
engraved surface detail. After a
fruitless search for suitable 209
Squadron markings, the spares
box was raided and markings
‘robbed’ for AH545.
A previous ‘happy accident’
illustrated that cyanoacrylate
(CA) glue and transparent glass
paint could be made to replicate
convincing water. Although
this method uses plenty of
the adhesive, making it rather
expensive, I’ve found it more
realistic than other bespoke
products. The Catalina is a
sizeable model, even in the ‘one
true scale’, so thought was given
to space and managing the
build logistics prior to assembly;
obviously, foreseeing a problem
and executing a workable
solution were two distinctly
different sides of the coin, as
would be seen.
of coffee-cup lid plastic cut with a
punch-and-die set – these were
then filled and sanded until a
satisfactory finish was achieved.
As with most aircraft kits,
construction started with the
cockpit – the interior was
relatively spartan and little was
visible once the model was
assembled. Nevertheless, seat
straps were added from masking
tape; throttle and propeller
pitch levers, which dangle from
the roof, were fashioned from
plastic card. An internal controllock was also attached, which
meant that externally the kit
could be assembled out-ofthe-box, since there would be
no control deflection. A decal
was provided for the instrument
panel, but it was virtually invisible
with the roof fitted. This left just
the control wheels to be fixed
– a dry fit revealed these would
lie almost horizontally, but after
adjustments they sat at a more
convincing angle.
Cat out of the bag
Building the Catalina was
straightforward, bearing in mind
there would be minimal interior
and no landing gear. Prior to
any gluing, though, parts were
prepared as they came off the
runner, such as holes being
drilled in the lower mainplanes to
receive the depth charge mounts.
Unfortunately, the float sponsons
had prominent ejector pin marks
and these were treated with discs
46 Airfix Model World
MODEL SPEC
Consolidated PBY-5 Catalina
‘Pacific Theatre’
By: Wolfpack Designs
Stock Code: 17204
Scale: 1/72
Price: £30.99
From: www.wolfpack-d.com
KeyModelWorld.com
INTERMEDIATE BUILD | PBY-5 Catalina
A mixture of Tamiya vinyl and
standard masking tape made
fairly light work of setting the
camouflage pattern
Having primed the wing in black,
the de-icing boots were simply
masked in readiness for applying
the camouflage
Bulkheads, hemispherical and
straight walkways, weapon
mounts and machine guns
were provided for the rear
compartment under the type’s
characteristic bulged observation
blisters. In line with reference
material, it was decided to omit
the machine guns – instead,
choosing to indicate that these
would have been stored/
maintained in the armoury and
taken out for each mission, rather
than be exposed to the damp
conditions on Lough Erne. As
the fuselage must be sprayed
with US Interior Green, other
parts of the kit requiring similar
attention were also prepared.
These included masking the
transparencies – at first glance,
this appeared challenging as
there was nothing to match
Wolfpack’s pre-cut items to the
glazing, but careful examination
revealed the sheet was laid
out quite intuitively and the
time saving offered was most
helpful. Unfortunately, although
the masks were robust and
conformed well to the clear
plastic, there was some leakage;
this may have been user error
and resulted in considerable
remedial action, not all of which
was successful.
Halves joined
While these elements were left
to dry, the Pratt and Whitney
R-1830s received a coat of black
primer. Detail was accentuated
by dry-brushing aluminium paint
onto the cooling fins and picking
out the gearbox in a generic
dark grey, after which everything
was treated with a dark-toned oil
wash. Crew windows were then
fitted into the fuselage halves,
while the opening for the rear
‘stinger’ machine-gun position
was covered with a sliver of
plastic card to prevent the kit part
disappearing into the closed hull
later. Note, the nose turret must
be completed prior to it being
fitted, because photos revealed
it would be turned to starboard,
enabling the rear access hatch
to be positioned towards the
mooring station. The fuselage was
joined using liquid polystyrene
cement and the fit overall was
acceptable, although one section
that required attention was just
forward of the windscreen, where
a marked step between the
halves was evident.
As this area was mostly flat,
a light coat of filler and deft
sanding made relatively quick
work of the problem.
The only other troublesome
seam was between the
observation blisters, which
would have been awkward
had the glazing been attached
beforehand. Inevitably, and
despite having carefully blown
out any sanding debris,
INTERMEDIATE BUILD
Don’t panic!
The upper-wing
decals reacted
to the matt
varnish and
required sanding;
thankfully, the
surface was
hardy and stray
scratches were
treated in the
weathering
phase
Having been unable to acquire the Bismarck edition of the kit, various sources
of decals were exploited to complete the model
several tiny particles remained
and would later become statically
charged and attached to the
inside of the transparencies.
Machine gun mounts, with the
weapons removed beforehand
for ease of handling, were
fitted before the blister glazing,
which allowed the restoration
of engraved panel lines and
rivet detail above them on
the fuselage – once satisfied,
the guns and clear parts were
attached. With the fuselage
together, it received Halfords
Grey Primer to highlight any
blemishes; thankfully, these
were neatened in short order.
Attention then shifted to the
float sponsons, which required
considerable filling/sanding to
achieve a satisfactory result and
would prove to be one of the
logistical problems foreseen but
handled badly later in the build.
The wing came in three sections
- a central block, including
engine mounts, and two outer
panels that carried the wing’s
dihedral. Fabric covering on the
trailing edge was reproduced
neatly and included a multitude
of zip inspection covers.
Wing fit was adequate, although
there was a small amount of
warping due to the parts’ size;
this was corrected by taping
them to a flat surface and the
glue applied while they were
under tension. The mainplane
was left off until after all the
detailing was completed, its fit to
the fuselage pillar was snug and
required no filler.
A coat of Halfords Black Primer
was then applied and this
reacted with the styrene in some
48 Airfix Model World
areas, causing surface ‘crazing’.
This was unexpected as usually
this firm’s products are reliable.
Affected areas were buffed with
a sanding stick and polished with
automotive T-cut compound.
Maritime hues
The black primer proved
advantageous, with the flying
surface leading edges masked
to represent anti-icing ‘boots’.
Rather than mix paints to match
the required Temperate Sea
Scheme, it was decided to try
Vallejo’s 71.148 RAF Colors
Coastal Command 1939-45
(www.creativemodels.co.uk).
These tones differed slightly from
those by other manufacturers,
hence the decision to use them
together, but they blended well
– any criticism of the hue could
be attributed to the differences
in paint batches. First, 71.302
Sky Type S was sprayed on
the undersides and, once dry,
topcoats of 71.110 Extra Dark
Sea Grey and 71.309 Dark Slate
Grey were applied. Tamiya’s
vinyl masking tape (www.
hobbyco.net) was used
to set the camouflage
demarcations as this
product conforms
well to the
model’s
contours and leaves no
adhesive residue.
A conscious decision was
made to indicate that 209
Squadron’s aircraft were recently
delivered. Therefore, despite
a temptation to weather the
model to reflect a harsh maritime
environment, with chipped paint
on the hull and salt-stained/
sun-bleached upper surfaces,
restraint was the key. Moreover,
had a uniform dark wash
been added, the panel
lines and rivet depiction
would have been quite stark.
Instead, after a gloss coat, the
decals were added. Such was
the mix-and-match nature of the
markings, some settled better
than others. Mr. Hobby’s Mr.
Super Clear Matt varnish (www.
albionbhobbies.com) was then
sprayed over them.
Nothing can ever be easy - although the masking was
pressed down firmly, primer leaked underneath in
places and etched itself into the clear plastic
Sanding and polishing clear parts to
remove blemishes or contaminants
and restore their sheen is not as
daunting as it looks, given patience
and the right tools
KeyModelWorld.com
INTERMEDIATE BUILD | PBY-5 Catalina
“Academy’s Catalina was
enjoyable to build and
exudes presence”
compromise. Further attention
risked causing more damage.
Weathering via pastels and
diluted oil paints mainly involved
highlighting the transition on
the wings from metal to fabric
surfaces, plus exhaust
staining and water
marks on the hull.
Online colour
photographs of
this scheme
(albeit of
pristine
machines)
Unfortunately, one of
the upper wing roundels
reacted to the varnish,
crazing quite badly. Having
experienced this situation
previously, the solution was to
sand the affected area to the
decal pigment.
Protected by varnish, most
markings are quite sturdy and
can accept a certain amount of
abuse; even if things are taken
Weathering was kept to a minimum,
bearing in mind these aircraft had
only just been delivered to the
squadron.
KeyModelWorld.com
too far, any damage can be
re-touched without any great
drama in the weathering phase.
Removal of the canopy masks
caused dismay as, despite
careful application, paint had
bled underneath and as most
of this was primer, it was fixed
firmly to the clear styrene. After
attempts of aggressive but
cautious scraping, sanding and
re-polishing, the finish was a
indicated the colour matching
of the paint used was accurate.
Black and white period photos
of the aircraft (presumably taken
after the May 26, 1941 Bismarck
sinking) revealed paint
Various tones of oil paints
were used to modulate the
underside panelling instead
of the usual dark-toned
wash, which would have
appeared far too stark
Airfix Model World 49
INTERMEDIATE BUILD
A combination of MDF, pine beading strips, PVA glue and
iron-on veneer provided the materials for the base
chipping was evident on the hull
plates, so modellers can choose
to show this detail.
Point of no return
Flying boats can be seen as
tricky subjects by some, yours
truly included, even though
construction was quick and
straightforward. Incidentally, the
difference between a PBY-5 and a
PBY-5A in US Navy nomenclature
indicates the latter to be a Patrol
Boat (PB), Consolidated-built (Y),
50 Airfix Model World
fifth-design iteration in the role
(5) and suffixed A for amphibian
– namely those Catalinas with
tricycle landing gear that tucked
into the hull – making life easier
for modellers. Beaching gear
was included in this kit, but a
challenge was accepted to show
the PBY moored at its base on
Lough Erne, Northern Ireland.
A piece of ¼in-thick MDF was
cut in a random polygon shape
and ¼in strip softwood glued to
form a ‘bed’, which was lined with
aluminium foil to prevent leakage,
plus it reflects light to create
depth. Using iron-on kitchen
edging laminate, the base was
then ‘planked’; this would spark
an idea to disguise a forthcoming
school-boy blunder. Translucent
blue and green glass paint was
then applied randomly over the
foil before a liberal coat of CA
sealed the layer. The model was
positioned and secured with PVA
glue, which was manipulated to
indicate flow lines in the water
around the hull. Before the PVA
dried fully, a layer of CA was
poured over it to seal the ‘motion’
– and indicated the point of no
return because the model could
not be removed without causing
damage. I was committed.
More layers of CA and paint
were built gradually, waves and
ripples were created by dribbling
CA over a bottle and before the
glue had cured it was removed
with a chisel to form curls.
These were laid on preceding
layers, creating an irregular
surface. Splashes were made by
introducing Zip Kicker accelerant
to the CA with a pipette, which
turned the glue white; if these
areas were treated with heavily
diluted transparent paint, capillary
action drew the liquid into the
splashes to varying degrees,
giving a pleasing effect.
Modellers should be aware,
CA gives off dangerously
irritating fumes, particularly
when accelerant is introduced,
so the work area must be well
ventilated plus protective gloves
and mask should be worn. Also,
the reaction with the accelerant
generates heat – at one point this
was sufficient to stress the hull
enough to crack a lift strut from
its mounting point. Not what you
need on your fingers!
The good, the bad
Misting of transparencies by thin
CA is a known issue for modellers
and can be avoided by using
thicker adhesive or covering
the glazing; here, it provided a
beneficial result. In this case,
the blister canopies were left
uncovered and their lower halves
took on a pleasant misted effect
– akin to
the dew
KeyModelWorld.com
INTERMEDIATE BUILD | PBY-5 Catalina
Aluminium kitchen foil was used to reflect light through the transparent glass
paint and prevent the CA ‘water’ leaking through any cracks
Once a base of glass paint had been applied over the foil, waves/ripples were
constructed by carefully chipping off partial coils of CA poured over a bottle
Splashes under the hull were created by introducing Zip-Kicker to turn the CA
white, after which is was layered with more CA
Fly Fishing by J R Hartley might have helped the ‘imagineering’ used to create
a mooring buoy from a syringe tube, pipette bulbs and waxed string
forming on them on a chilly spring
morning. Although this was a
positive happenstance, modeller’s
impatience was about to create
the worst flaw in the project.
While swirling a fairly deep layer
of CA around, not enough care
was taken to limit the angle of the
base and a quantity was spilled.
There was no way to remove
the glue without damaging the
laminate or fix the damaged
surface without significant risk to
the model. Thanks to watching
the film Deadpool recently, an
idea of ‘breaking the fourth wall’
sprang to mind: namely water
slopping over the edge, as with
an overflowing bath. Closer
examination revealed the clear
glue didn’t appear convincing
and wouldn’t hold colour, having
dried hard. Instead, a ‘ship’s
planking’ approach was adopted:
glass paint was diluted heavily to
create a weathered deck effect
that served to distract attention
from the spillage. It was just as
well the base wasn’t masked, as
this would have made the tape
impossible to remove cleanly and
KeyModelWorld.com
would have looked even worse.
A mooring buoy was fashioned
from the ends of pipettes and a
syringe body – ‘imagineering’ and
waxed thread were required here
as knowledge and references of
such nautical technicalities were
severely lacking.
The exhaust weathering needed
to be applied plus HF aerials
from Lycra thread, but both float
sponsons were broken while
handling the model, despite
having foreseen the problems of
an unwieldy wingspan attached
to a heavy base. Lacking enough
hands to invert the model at this
stage, there ensued much cursing
and a tortuous time coaxing the
badly broken pieces against
gravity and back into a semblance
of order as the denuded wing
dangled over the edge of the
modelling bench.
Finally, having attached and
weathered the last HF aerial, a
gentle spin of the turntable to
inspect the model resulted in
the still wet part falling into the
airbrush water trap and springing
into a rats’ nest of oily Lycra. Once
cleaned and re-attached, pictures
were taken for the article and the
build was placed in the display
cabinet for safekeeping.
Epitaph
Grumblings aside, Academy’s
Catalina was enjoyable to
build and exudes presence in
the cabinet. Moreover, having
removed myself from an albeit
richly diverse comfort zone and
building something different,
the process refreshed old skills.
Like any project, things didn’t
go strictly to plan, but we can
all learn from the persistence
and determination displayed by
the crews of Coastal Command
– never giving up and pressing
through until the job is done.
Unlike Ens Smith, at no point
was I ‘not on board’ with this
project, and it was an education
and a pleasure to be asked to
play even the smallest role in
the commemoration of such
historical events.
The final article after layering paint and CA. Note the leeching into the veneer
that was later disguised by giving the wood a wash of heavily diluted glass paint
emulating the decking planks of the Catalina’s intended quarry
Airfix Model World 51
IN FOCUS
B
Catalina flying boats of RAF’s Coastal Command
played a major part in locating the German battleship
Bismarck during May 1941. Malcolm V Lowe tells the
story of their epic search
ritain’s lifeline during
the dark early years
of World War Two was
supply from the US,
for which convoys of merchant
ships plying across the northern
expanse of the Atlantic Ocean
were vital.
Although escorted by Royal
Navy vessels, these convoys
were at the mercy of German
warships (and later, U-boats). In
the wider context, Britain’s naval
supremacy, on which its own
security depended, was also
at serious risk from opposing
maritime assets. Germany’s
navy, the Kriegsmarine, had
The substantial wing area and the
camouflage pattern used for RAF
Catalinas are shown here on W8406.
It was a much-photographed example
but certainly not the aircraft that
found the famous German warship
52 Airfix Model World
KeyModelWorld.com
IN FOCUS | Consolidated PBY Catalina
been built to an overwhelming
strength during the 1930s,
following Hitler’s accession
to power in 1933. Among
the impressive line-up of the
country’s warships, few were
more powerful and dangerous
than the battleship Bismarck.
As such, any deployment at
sea by this formidable vessel,
with or without its powerful
accompanying warships and
escorts, was of great danger to
Britain’s North Atlantic supply
route, and the country’s security
in general.
With a main battery of eight
15in calibre guns plus heavy
secondary armament, the
Bismarck was as potent as
virtually anything the Royal
Navy could field. Furthermore,
warships such as the heavy
cruiser Prinz Eugen, which
could offer accompaniment on
any forays into the Atlantic to
seek out Allied shipping, posed
an additional threat. Clearly,
intelligence regarding the
whereabouts of these capital
ships was of vital importance
to Britain. In reality, just aerial
reconnaissance by fast cameracarrying fighters, coupled with
long ocean patrols by maritime
aircraft, could possibly allow
Germany’s shipping movements
to be known.
One of the main ‘targets’ for
RAF reconnaissance aircraft was
the major port of Kiel in northern
The Catalina Mk.I of 209 Squadron used to locate the Bismarck on May 26, 1941 was this aircraft, AH545/WQ-Z. The
US Navy co-pilot from the sortie subsequently wrote a report for his superiors in which he specifically referred to this
aircraft’s serial number
Germany. However, the distances
involved and the obvious
dangers from anti-aircraft fire
plus patrolling Luftwaffe fighters
were obvious. It was only in April
1940 that the RAF was able to
provide the type of recce cover
needed to keep track of the
Kriegsmarine’s major warships
from long range.
The advent of specially
converted versions of the iconic
Supermarine Spitfire able to fly
considerable distances and carry
aerial cameras was a major step
forward in this process. The type
also offered sufficient speed and
could fly high enough to give its
pilots some hope of protection
when operating alone, as was
necessary. Specifically, it was the
development of the Mk.I-related
Spitfire PR.Ic with additional
fuel tankage that allowed the
northern German ports to be
within practical reach. This
variant’s range was sufficiently
increased over its predecessors’
to allow a sortie to Kiel and back
to be flown on April 7, 1940.
From then onwards, the
activities of recce Spitfires
proved vital in giving the
Admiralty in London a clearer
picture of the Kriegsmarine
warships’ movements. One
of the German vessels that
was of specific interest to the
For many years, it was thought Mk.I W8406/WQ-Z was the ‘Bismarck Catalina’, but that has now been disproved. The
Catalina did fly with 209 Sqn, but earlier in 1941 (All photos Malcolm V Lowe collection)
KeyModelWorld.com
British was the Bismarck, and in
particular when she was likely
to sail out of port and go to war
against the Atlantic convoys.
Short career
In the course of the warship's
nine-month military life under
its only commanding officer,
Ernst Lindemann, the Bismarck
in fact made just one major
offensive operation. This lasted
slightly more than a week in
May 1941, under the code name
Rheinübung. Nevertheless, it
led to one of the most famous
encounters in recent naval
history, resulting in considerable
loss of life on both sides.
Operation Rheinübung
commenced early on May 19,
when Bismarck and several
accompanying ships departed
from the port of Gotenhafen
(today Gdynia in Poland) to join
Prinz Eugen, which was already
underway. Around noon on May
21, the German flotilla reached
Bergen in Norway and anchored
briefly at Grimstadfjord, before
leaving later that day. However,
while positioned there, Fg
Off Michael Suckling flew his
camera-equipped Spitfire
directly over the German ships
at a height of approximately
26,000ft and took what were to
become historic photographs of
Bismarck and her escorts.
Thus alerted with confirmation
of the location of the German
ships, the Royal Navy was
Airfix Model World 53
IN FOCUS
Catalina Mk.I W8406 before it featured unit markings.
Misidentified as the aircraft used to find the Bismarck, it was
included in a series of air-to-air publicity photographs as it
was one of the first examples ordered for RAF service
able to mount an operation to
intercept them at sea. This led to
the Battle of the Denmark Strait
on May 24, during which HMS
Prince of Wales was damaged
and HMS Hood sunk with
massive loss of life: just three of
her 1,418 crew survived.
Thereafter, the German ships
broke into the Atlantic Ocean,
where they potentially posed a
major threat to Allied shipping.
However, the battle had forced
the Kriegsmarine to abandon
its intended operation, and
Bismarck had suffered damage
by receiving hits from the
battleship HMS Prince of Wales.
Nevertheless, she was able to
sail away from the chasing British
warships, which eventually lost
contact with the German vessel.
While Prinz Eugen slipped away
undetected, Bismarck intended
This historic photograph was taken by Flg Off Michael Suckling on May 21,
1941 over Grimstadfjord in Norway when he flew his camera-equipped Spitfire
directly over the Bismarck (right) at a height of approximately 26,000ft
54 Airfix Model World
to sail to Brest on France’s
northwest coast for repairs.
In arguably the largest single
maritime operation of the war
at that time, the Royal Navy and
the RAF’s long-range patrol
assets set about trying to find
the damaged German warship
before it reached the safely of
the French coastline.
Long-range search
The only aircraft available to
the RAF that could fly far into
the Atlantic with sufficient fuel
and endurance needed for the
long distances involved in a
worthwhile search were the fourengined Short Sunderland and
the US-supplied twin-engined
Consolidated PBY Catalina.
Already in service with the US
Navy prior to World War Two,
a large number of Catalinas
had been ordered by British
purchasing officials operating
in the US. This was before
the Lend-Lease programme
commenced, and the type had
been bought with hard cash
backed up by Britain’s dwindling
gold supplies.
Initial deliveries were made
during the second half of 1940,
and the type subsequently
became a very important asset
for the RAF’s Coastal Command
squadrons. Among these units
were three that were to play a
pivotal role in finding the highly
dangerous Bismarck, leading to
her ultimate destruction.
Located on Lough Erne in
Northern Ireland were the
Catalina-operating 209 and 240
Squadrons. The base used by
the former unit was named RAF
Castle Archdale, but according to
the station’s record books, it had
been temporarily re-named RAF
Lough Erne at the time of the
Bismarck operations. Officially,
240 Squadron was stationed
at nearby RAF Killadeas, these
KeyModelWorld.com
IN FOCUS | Consolidated PBY Catalina
locations being in the area near
to the town of Enniskillen. From
there, both units were already
highly experienced in flying longendurance North Atlantic patrols
looking for German surface
warships and, increasingly,
trying to find the Kriegsmarine’s
elusive U-boats because these
submarines were fast becoming
a vital element in the overall
Battle of the Atlantic.
From Lough Erne, the Catalinas
could access the open sea
by using a little-known facility
referred to as the Donegal
Corridor. This comprised a
narrow strip of Irish airspace
between Lough Erne and the
international waters of the
Atlantic Ocean, through which
the Irish government in Dublin
permitted flights by British
military aircraft from Northern
Ireland during the war. This
transit permission contravened
the Republic of Ireland’s declared
neutrality and was therefore not
publicised at the time.
On May 26, a number of
Catalinas were sent out to help
in the quest to find the Bismarck;
they were assigned specific
search areas in the Atlantic,
estimated to be where the ship
would be located as it headed
for Brest. Both 209 and 240
Squadrons were represented,
The home base for 209 Squadron and its Catalinas was RAF Castle Archdale near Enniskillen, Northern Ireland. At the
time of the Bismarck’s sinking, the base went under the name RAF Lough Erne. This image dates from later in the war
but shows the facilities and slipway, along with Catalinas and Sunderlands
although none of these units’
aircraft were fitted with Air-toSurface Vessel (ASV) radar.
Major discovery
Over the years, there has been
confusion as to which Catalina
actually found the Bismarck. For
a long time, it was assumed the
aircraft was 209 Squadron’s Mk.I
W8406, which was coded WQ-Z
when with the unit in early 1941.
However, this aircraft had been
replaced, as far as the code letter
‘Z’ was concerned, by another
Mk.I: AH545. According to the
latter’s record card (as originally
held by the RAF Museum) it was
delivered to 209 Squadron late
in April 1941.
Flown by Plt Off Denis Briggs,
the Catalina had an American
as its co-pilot: Ens Leonard
B Smith of the US Navy. At
In total, three Catalinas
were ultimately involved
in locating and shadowing
the Bismarck prior to the
decisive action in which
she was sunk. One of
those present was Mk.I
AH546/BN-M of 240
Squadron, a sister aircraft
of which (Mk.II AM269/
BN-K) is seen here
KeyModelWorld.com
Airfix Model World 55
IN FOCUS
that time the country was still
neutral and American personnel
in Britain that were helping to
assimilate the Catalina into RAF
service were supposed to be
non-combatant. As such, there
were apparently seven US Navy
members at Lough Erne acting
as ‘observers’; in reality they
often flew on the patrol flights.
Taking off at 0325hrs, AH545
arrived in the search area
approximately six hours later.
Following the events of that day,
Ensign Smith wrote an official
report on the incident, which
was communicated by the US
Naval Attaché in London to
the US Navy’s headquarters in
Washington DC. This document
still exists in the naval archives
and confirms the take-off time –
and the Catalina’s identity was
definitely AH545.
The crew searched for some
time until breaking out of the
cloud at around 2,000ft, Smith
positively identified the Bismarck
at a position approximately 790
miles northwest of Brest.
Totally pointless, the Catalina’s
depth charges were jettisoned
(apparently all ‘Cats’ flying from
Lough Erne were armed in this
way, whether it was necessary
or not) and Plt Off Briggs went
aft to report the sighting,
confirming the location at
approximately 1030hrs.
The Catalina immediately came
under fire from the Bismarck.
The warship was well armed with
anti-aircraft guns and AH545 was
flying low enough to be within
range. Piloting the machine, Ens
Consolidated Catalinas were a major asset for the RAF’s Coastal Command, equipping a variety of units involved
in the
Battle of the Atlantic. This 202 Squadron aircraft was photographed over the Rock of Gibraltar during World
War Two
Smith enacted avoiding-action
manoeuvres, although light
damage was caused – indeed,
the American stated in his
subsequent report that if he had
not been taking evasive action,
the Catalina would certainly have
been shot down.
Nearby was Catalina Mk.I
AH546/BN-M of 240 Squadron,
which joined AH545 and
continued to shadow the
Bismarck. The information sent
from these two aircraft was vital.
Passed to the British ships in
the area, it allowed the German
vessel to be intercepted once
again. At that time, Force H was
steaming north from Gibraltar,
and among its ships was the
aircraft carrier HMS Ark Royal.
Launched that evening, an attack
by 810, 818 and 820 Naval Air
Squadrons’ Fairey Swordfish
biplanes took part in a crucial
torpedo strike on the Bismarck,
resulting in the port rudder
shaft being disabled, locking
the steering device. This made
the ship sail roughly in circles,
and allowed the British surface
vessels to locate her easily and
move in for the ‘kill’.
Final action
During the night of May 26-27,
the Bismarck was shadowed
and observed by a third Catalina
Mk.I; this was W8416/DA-O of
210 Squadron, based at RAF
Oban in Scotland, which also
had a US Navy Ensign aboard as
Germany’s Bismarck was a large, powerful battleship; her main armament was contained in four huge turrets, making her
a formidable warship and a feared commerce-raider. Her destruction in May 1941 was a major victory for Britain
56 Airfix Model World
an ‘observer’. At 2140hrs on the
evening of May 26, this Catalina
had also discovered the Bismarck
in virtual darkness and stayed on
station all night so as not to lose
her. The aircraft’s crew observed
the sporadic action during the
early hours of May 27 as the
German ship was harried by
several Royal Navy destroyers.
On the morning of May 27
came the final battle. Starting
at around 0845hrs and led
by the battleship HMS King
George V accompanied by the
equally formidable HMS Rodney,
Bismarck was engaged by a host
of British ships.
The action was decisive: at
1040hrs the heavily damaged
battleship sank after an order by
a surviving senior officer to set
off the vessel’s scuttling charges.
While intended to minimise the
further loss of life, the vessel
capsized, trapping many on
board – just 111 survivors were
recovered subsequently by
British ships.
Catalina W8416 subsequently
regained its Oban base after
more than 26 hours in the air
– a testament to the type’s
excellent endurance. That
aircraft, in addition to AH546
of 240 Squadron and the bestknown of the three, AH545
of 209 Squadron, had played
a significant role in this
decisive victory.
KeyModelWorld.com
SCALE 1:35
1/48 B-17 Flying Fortress
Dedicated for
Also available
at 1/32 scale
4 electric engines
Complete start-up to shutdown cycle
Wings and tail navigation lights
Cockpit and bomber lights (+ additional option)
Authentic & remastered soundtrack with full range stereo
And much more at www.magicscalemodeling.com
057_AMW_JUL21_ad.indd 1
17/05/2021 15:16:59
BASIC BUILD
What can a newly tooled
depiction of a classic
and popular aircraft type
bring to a market full of
competitors’ takes on the
subject? Mike Williams
finds out with Special
Hobby’s brand-new
1/72 Bf 109E-4
MINIATURE MESSERSCHMITT
MASTERPIECE
M
esserschmitt’s Bf
109 should need no
introduction; any
aviation modeller
would surely have at least
heard of it and know what one
looks like, even if they have
never built an example.
There have been countless
models of the ’109 from pretty
much every model manufacturer
over the years, so one has to
wonder what Special Hobby
could bring to the table with yet
another kit. This newly tooled
1/72 Bf 109E-4 offering was
entering what some might say is
a saturated model market.
Small simulation
Special Hobby’s
cockpit was fitted
before the engine
was painted,
weathered and
mounted ahead of
the sidewall carefully.
Note the separate
exhausts and engine
serial decals, adding
welcome detail
58 Airfix Model World
You sometimes forget just how
small an aeroplane the Bf 109
was; a completed 1/72 model will
fit in the palm of your hand and
to that end, the box was relatively
small and there were just two
runners plus a small clear frame.
Upon closer inspection, the
detail Special Hobby managed to
cram into this little model almost
defied belief. The riveting and
panel lines would be expected
in larger scales but in 1/72 they
can make or break a model,
sometimes appearing overscaled
and slightly ‘clunky’. Here,
these features were just perfect,
although whether they would
stand up to a couple of layers of
paint would remain to be seen –
on the runners, they seemed to
bode well.
Of further note, there were
extremely finely moulded details
including a very well-appointed
cockpit containing separate
rudder pedals, trim wheel,
control column and oxygen
regulator all appearing in-scale.
Such was their delicacy, care
would be needed when removing
the pieces from the runners lest
they broke.
Special Hobby supplied a set
of decals for the seat belts and,
while being a welcome inclusion,
these were somewhat lacking
in comparison with the rest of
the cockpit detailing. As such, a
set of YMS7213 WW2 Seatbelts
– Luftwaffe photo-etched (PE)
brass examples was sourced
KeyModelWorld.com
BASIC BUILD | Messerschmitt Bf 109E-4
Masking the canopy took time as the panes were
very small, but a new blade and a little patience
payed dividends – the central section was held
temporarily with slivers of Blu Tack
Exhausts were masked and the
cowling panels held in position
temporarily via Blu Tack –
these would fit perfectly if
secured permanently
Flaps were fitted in the
lowered position for added
visual interest; of note is the
delicately moulded fabric
effect on these parts
from Yahu (www.yahumodels.
com), which finished the cockpit
off perfectly once fitted, painted
and weathered in situ.
The whole cockpit was built
as far as was practical before
everything was airbrushed with
a base layer of Mr. Hobby’s
H60 RLM02 Grau (www.
albionhobbies.com), after which
the entire area was given a
light oil wash to accentuate the
delicate mouldings. Detail such
as the oxygen regulator and trim
wheel were picked out carefully
with various acrylic colours and
a fine paintbrush. Decals were
supplied for the
Wheel bays and radiator
bays were painted with
RLM02 Grau – housings
for the latter could be
fitted later
dial faces on the instrument
panel; these worked wonderfully
using clear gloss varnish as a
setting solution, drawing them
down into the moulded relief.
Injected power
A thoughtful inclusion was a
rather fine, if somewhat basic
MODEL SPEC
Messerschmitt Bf 109E-4
By: Special Hobby
Stock Code: SH72439
Scale: 1/72
Price: €16.30
Available from: specialhobby.eu
rendition of the Daimler-Benz DB
601 engine with its associated
mounting bearers and firewall.
It took a little fettling to align
everything squarely – not
forgetting to paint and add the
exhausts – but once fixed in
position, the unit appeared
suitably ‘full’ in the engine bay.
The choice to have the
cowling panels removed
needed to be made fairly
early on as there were
alternative pieces
supplied for the guns;
complete items
for display or a
one-piece unit
with just the barrels protruding
through the upper cover. The
weapons were left off until
“Care would be needed when
removing the pieces from the runners”
KeyModelWorld.com
Airfix Model World 59
BASIC BUILD
With the high fuselage demarcation
masked, the first upper hue – H70
RLM 02 Grau – was sprayed on the
body and upper wing surfaces
The first colour to
be applied was RLM
76 Lichtblau, with
C117 lacquer going
on smoothly and
drying quickly
later in the build, however. The
cowling panels could then be
held in position with Blu Tack
to enable continuity of the
camouflage when painting. Some
parts for the engine mounts
were extremely small, moulded
seemingly to scale thickness,
such was their finesse; they
required care when handling to
get them into position.
The engine was simply
airbrushed matt black,
after which kit-supplied
production batch number
decals were applied –
a thoughtful inclusion.
When dry, the
powerplant was
rubbed gently
with graphite
powder to
impart
a worn
metallic sheen; it was then
fitted to its mounting arms with
small drops of thick superglue.
With the interior parts painted,
60 Airfix Model World
weathered and installed, the
fuselage closed perfectly. Care
was needed to ensure the tail
wheel was trapped between
the fuselage halves into its
locating points, though it would
be broken off in short order as it
was just so delicate. It was saved
until the later stages of the build
to make sure it wasn’t lost after
a further breakage. Fuselage
seams were then cleaned up
and sanded until smooth, not
forgetting to reinstate the lengthwise panel lines along the top
and bottom of the fuselage.
The real aircraft was built not
unlike a model, with fuselage
halves coming together, leaving
a panel gap along its length: a
commonly missed detail.
Separate solutions
Attention then turned to the
wings and control surfaces.
The tailplanes were dry-fitted
to check alignment and were a
perfect fit, so could be left off to
ease painting and masking later
– they could potentially get in the
way when applying the mottle
pattern. Special Hobby’s wings
assembled without any issues,
including the separate moulded
control surfaces, all of which
could be positioned as required.
The rudder was then fitted,
clicking into place positively.
The wings were kept from the
fuselage as a separate subassembly after a test-fit showed
they joined absolutely flawlessly
and could be secured after
main painting and decaling.
This was fortuitous as a set
of decals was supplied –
K72031, available separately
from Special Hobby – which
covered the tiny stippled mottle
pattern exclusive to German
‘ace’ Helmut Wick’s machine.
This was one of the markings
options given in the kit and
the aftermarket product was a
very welcome decal sheet, as
the mottle would have been
nigh-on impossible to replicate
successfully over the model
KeyModelWorld.com
BASIC BUILD | Messerschmitt Bf 109E-4
“A thoughtful inclusion was a rather
fine, if somewhat basic rendition of
the Daimler-Benz DB 601 engine”
either via airbrush, paintbrush
or sponge. It also included the
myriad miniscule stencil data
decals as part and parcel of
the large decals covering the
camouflage patterns.
As the saying goes, a picture
is worth a thousand words.
Photos of the finished model
accompanying this article will
show this much better
than writing can convey,
but suffice to say the
decals were a godsend in
finishing this model as Helmut
Wick’s famous machine.
Test your mottle
Before painting could commence,
the clear parts for the canopy
were carefully
removed from
their runners
and masked
so they
could be
offered
to the
fuselage. Some sources had
mentioned the transparent items
being too wide, but this was
found not to be the case and the
rear section was glued in position.
The central element was held
in place with small slivers of Blu
Tack, so it could be removed and
glued in the open configuration
later. The windshield was also
secured permanently. With the
clear parts fitted, the cowling
Further covering was followed by
the second, and darker, camouflage
colour: H64 RLM 71 Dunkelgrün
Once dry and
unmasked, the
airframe could be
brought together
as the camouflage
was matched to the
wings, their roots and
leading-edge slats
Special Hobby’s separate sheet designed for the speckled mottle pattern on
Helmut Wick’s aircraft appeared very clever, if a little daunting...
Wing roots were also masked and sprayed to ensure continuity when the
surfaces were fitted. Note the aerial post was fitted here – it would subsequently
break and was reinstated later in the build
KeyModelWorld.com
Airfix Model World 61
BASIC BUILD
Perhaps overkill…
the trim tabs were
set and sprayed with
Tamiya’s LP-7 Red
With the fuselage decals drying, the
undersides were airbrushed with C117
RLM 76 Lichtblau, with the wheel wells
plugged with wet tissue to mask them
sections were held temporarily
to cover the engine and ensure
matching camouflage over the
entirety of the fuselage.
The model was painted in the
standard fighter scheme used by
the Luftwaffe during the summer
of 1940. Undersides and lower
fuselage were to be Mr. Color’s
C117 RLM 76 Lichtblau, followed
by masking for a hard-edged
splinter camouflage pattern of
Mr. Hobby H70
RLM 02 Grau
and H64 RLM 71
Dunkelgrün on
the upper surfaces. It was also
important to ensure the wing root
sections of the fuselage matched
the mainplanes. Once painted
and given a generous coat of
clear gloss varnish the fuselage
was then ready for those decals...
Decorations for the speckled
mottle comprised six or seven
pieces for each fuselage half:
starting at the rudder, they
were applied in order from tail
to nose on both sides. The only
items from the kit-supplied sheet
used on the fuselage were the
centres for the swastikas (these
contained cut-out sections)
and the main Balkenkreuz –
everything else was incorporated
onto the aftermarket sheet. As
such, it was very clever and much
easier than applying lots of very
tiny stencils in 1/72. The ‘speckle
decals’ worked well, but did
need plenty of water underneath
them to ensure they could be
moved around and positioned
before the excess water could
be wicked away with paper towel
or cotton buds. Once in place,
they were brushed carefully with
Micro Sol setting solution
“Special
Hobby’s newly
tooled 1/72
Messerschmitt
Bf 109E-4 is
exquisite”
62 Airfix Model World
(www.microscale.com) and left
overnight until fully dry.
Coming together
The tailplanes and wings plus
the associated control surfaces
were painted with the same RLM
colours and were far easier to
mask for the camouflage while
they were unattached from the
fuselage. The few markings
needed for the wings came from
the kit sheet and all performed
well over a gloss coat. Once
everything was dry and cured and
the decals had settled into the
moulded detail, the fuselage and
wings were joined together deftly
with Tamiya Extra Thin Quick
Setting cement (www.hobbyco.
net) – with care, this can be used
after painting without damaging
the surrounding surfaces.
Weathering was applied in the
form of artists’ oil diluted with
white spirit, which was used as
a wash over the entire model,
flowing into the surface detail
and around the prominent
features such as the intakes and
radiators. A few streaks were
added using the wonderfully
named A.MIG-3513 Starship Filth
from AMMO-MIG’s Oilbrusher
range (www.migjimenez.com),
concentrating on the undersides
from the engine and oil cooler
areas. Exhaust stains were
airbrushed with care as it could
be all too easy to overdo the
effect on such a small model.
Final additions including the
undercarriage legs and wheels,
propeller and hub and aerial
mast were all painted and
added without issue. In fact the
undercarriage was a precise fit,
KeyModelWorld.com
BASIC BUILD | Messerschmitt Bf 109E-4
ensuring the correct splay/rake
angles were set. The central
canopy piece had its armoured
headrest fitted with small dots of
superglue and was then attached
in the open position to show off
the cockpit detail.
After a light finishing matt
varnish coat was airbrushed,
small items were added including
an aerial wire made from Uschi
van der Rosten rigging thread
(www.albionhobbies.com) plus
the red and green wingtip
navigation lights were small dots
of Tamiya clear paints applied
via cocktail stick. Last, but by
no means least, was the pesky
little tail wheel, which had broken
earlier: this was drilled and
then pinned with a small brass
rod before being secured with
medium-viscosity superglue.
With care, the wings and fuselage could be joined with Tamiya
Extra Thin Cement once painted and decaled. However, it can
damage the paint, so use it sparingly
Saturated verdict
Special Hobby’s newly tooled
1/72 Messerschmitt Bf 109E-4
is exquisite – there, I’ve said it.
There really is no criticism you
can level against it: everything
fits perfectly, the details are
beautifully fine and really enliven
the model. Excepting perhaps a
set of aftermarket seatbelts, there
really is little that needs adding to
this kit that wouldn’t be classed
as gilding the lily. Special Hobby
has really come on in leaps and
bounds recently, particularly
regarding its kit design, detailing
and parts fit – as evidenced
by its superb Bf 109.
The undercarriage fitted perfectly
with excellent alignment –
the doors had location points
moulded integrally with the very
fine rivet and panel line detail
KeyModelWorld.com
On such a small aeroplane, adding a wash was easier if applied
to the whole model. Hence, Paynes Grey and Burnt Umber oils
were diluted with white spirit and applied via fine brush
INTERMEDIATE BUILD
SCOURGE!
BALKANS
Airfix's excellent 1/72 Stuka makes
a welcome return, with this Balkantheatre version built by Huw Morgan
P
Airfix includes a small additional frame containing parts to differentiate the B-1
variant: a narrow-chord propeller and associated spinner, chin radiator and
cowling sides with straight exhaust stacks
Surface detail was excellent and, while slightly deep, the engraved panel lines
would be softened by primer and paint
64 Airfix Model World
rinciples and origins
of dive bombing as
an attack technique
can be traced back to
World War One, where accurate
over-the-horizon placement
of bombs on specific ground
targets was seen as a vital
extension to field commanders'
artillery options.
By World War Two, the
technique was refined by three
major proponents: the USA and
Japan employed it during Pacific
naval battles and Germany’s
Luftwaffe had a ‘dress rehearsal’
during the Spanish Civil War,
subsequently dive-bombing
with devastating effect on its
conquest of the low countries
and Poland.
Perhaps the most infamous
dive bomber of the late
1930s and early 1940s was
Junkers’ Ju 87, nicknamed
‘Stuka’ after a shortening of
Sturzkampfflugzeug, the generic
German word for dive bomber.
The aircraft’s design emerged
from a competition initiated
in 1933 by the famous World
War One ace Ernst Udet, who
had been deeply impressed
by American tactics using the
then-new Curtiss Helldiver. Four
companies responded to the
Reichsluftfahrtministerium (RLM)
tender: Arado, Blohm & Voss,
Heinkel and Junkers, but it was
the latter’s modern monoplane
that scored highest. Inevitably,
the prototype airframes were
MODEL SPEC
Junkers Ju 87B-1 Stuka
By: Airfix
Stock Code: A03087A
Scale: 1/72
Price: £14.99
Available from: www.airfix.com
KeyModelWorld.com
INTERMEDIATE BUILD | Junkers Ju 87B-1 Stuka
Eduard’s PE set was typical of the firm’s products, comprising a pre-coloured
fret (primarily cockpit parts) and an undecorated example
AB&K’s resin propeller was terrific and even included the obligatory jig to aid
setting the blades at the correct angle
Despite excellent moulded detail on Airfix’s separate sidewall inserts (centre
right), Eduard’s PE (left) offered further refinement – note the seatbelts have
already been removed
Beautifully thin and clear
components allowed for
the canopy to be posed
open or closed
!
developed and modified heavily:
the initial (and underpowered)
production Ju 87A used in the
Spanish Civil War was replaced
rapidly by the 1,000hp Junkers
Jumo 211-engined Ju 87B with an
improved canopy, undercarriage
and armament. From then on,
the type was used in almost
every World War Two theatre in
various guises.
In the early war years, the
Stuka earned itself an almost
mythical reputation, epitomised
by the wail of its ‘Jericho trumpet’
– a siren fitted to the front of the
undercarriage struts. However,
in the face of determined antiaircraft fire or modern fighter
aircraft, the type soon found
itself on the receiving end of
serious punishment and was
really only successful when
operating under conditions
of air superiority. After the
successes in Spain, plus northern
Europe during 1939-40, the
stiff opposition and consequent
losses suffered during the Battle
of Britain showed the Stuka’s
vulnerability to determined
fighter defence.
Therefore,
most of the
Stukageschwader were
withdrawn from northern
Europe to the Mediterranean
and Balkans where the lack
of effective opposition once
again allowed degrees of active
freedom. In the latter theatre,
Hitler's impatience with the
lack of progress the Italians
were making caused him to
move to invade Greece through
Yugoslavia and Bulgaria,
aiming to protect his
force’s right flank in anticipation
of the impending invasion of the
Soviet Union.
“Perhaps the most infamous dive bomber of the
late 1930s and early 1940s was Junkers’ Ju 87”
KeyModelWorld.com
Airfix Model World 65
INTERMEDIATE BUILD
Options included
a plain seat
(intended to take
the pilot figure) or
an example with
moulded seatbelts;
the former was
used with Eduard
PE straps, plus
weathered via
chipping
Airfix has engineered the wheels and spats cleverly, so that alternative
placement of the former allows either flat-spotted (left) or unweighted (right)
appearances for ‘on the ground’ or airborne models, respectively
The cockpit components assembled onto the floor, which was moulded as part
of the lower wing – the substantial wing spar was also added to this area
Kit return
For 2021, Airfix has re-issued
its 2016 tooling of the Ju 87B-1
with new decals to represent two
airframes placed at the time of
the Balkans campaign (see panel).
Both these are in the standard
early-war RLM 65/70/71 splinter
pattern with Alfons Orthofer's
machine sporting a dramatic
“Alternative
styrene 250kg
or 500kg bombs
were supplied
in the kit for the
main centreline
loadout”
66 Airfix Model World
sharkmouth (though this may
have been painted specially for
the Signal magazine photoshoot).
The kit comprises four
main runners, containing
approximately 100 parts moulded
crisply in pale blue-grey styrene
– no flash or serious ejector
pin marks were in evidence. A
transparent frame carrying ten
All cockpit parts laid out for inspection ready for final assembly – note the
Eduard detailing on the sidewalls plus the busy instrument panel
items was very clear indeed and
included options for an open/
closed main canopy. As with the
original B-1 release, this issue
supplied a separate frame with
the components specific to the
earlier variant: a narrow-chord
propeller, plain exhaust stacks
and radiator cowling without
movable cooling gills. The decals
were typical of Airfix's recent
offerings, being sharp and
cleanly printed, with excellent
colour density.
In addition to the base kit,
Eduard masks and photoetched (PE) metal
detailing sets,
Brassin SC50
bombs and an AB&K
resin propeller were supplied to
enhance the build (see the
panel Aftermarket extras for
full details).
Construction began with the
crew cabin, involving the main
floor (with its integrated wing
spar) being fitted to the lower
centre wing panel. The builder
was faced immediately with
a choice of seat; ostensibly
a plain example to take
the (well moulded)
pilot figure or an
KeyModelWorld.com
INTERMEDIATE BUILD | Junkers Ju 87B-1 Stuka
faces and adding small
items such as map cases,
handles and framing. Innards
were painted H70 RLM
02 Gray and detail
was picked out using
Vallejo, Tamiya (www.hobbyco.
net) and Citadel (www.gamesworkshop.com) colours.
The fuselage closed without
any drama and was set onto
the centre wing/cockpit floor
assembly with just some
minor fettling of the joins and
re-scribing required.
“As with the
original B-1
release, this
issue supplied
a separate
frame with the
components
specific to the
earlier variant”
Cranking it up
alternative with integrally
moulded seatbelts. Since
Eduard’s PE harnesses were
available, the plain seat was
chosen, and painted with Mr.
Hobby H70 RLM 02 Gray (www.
albionhobbies.com) with chipping
courtesy of Vallejo’s 77.701
Aluminium (www.creativemodels.
Airfix’s sturdy
wing spar
was a great
help in getting
the gull-wing
anhedral/
dihedral
angles correct
The under-engine radiator cowing
has a complex joining arrangement,
although it makes for a very positive,
strong fixing
KeyModelWorld.com
co.uk) applied with a sponge.
The bulk of the cockpit sidewall
detail was provided by separate
components and with careful
painting these would appear
acceptable for the scale. In
this build, the features were
enhanced by substituting PE
parts for the main instrument
All remaining outer wing
panels could now be fitted,
having drilled openings for the
bomb racks and dive brakes,
and again Airfix's engineering
of the location tabs led to an
excellent fit – just the slightest
smear of water-soluble filler was
used to neaten the wing roots.
Horizontal stabilisers and rudder
were attached without any
difficulty, though the moulded tab
actuators were shaved from the
latter in anticipation of PE brass
replacements from Eduard’s set.
The kit’s tailplane bracing struts
were left off until later to ease
masking efforts.
The 11-piece engine cowling
was a fairly complex affair;
outer ‘shells’ had inner saw-
SIGNAL’S SHARK
Airfix’s pair of markings schemes included two options, with Alfons Orthofer’s
sharkmouth-adorned airframe featured in a photoshoot for the Signal
propaganda magazine:
• T6+IH, I./Sturzkampfgeschwader (St.G) 2 ‘Immelmann’, Krainici Airfield,
Bulgaria, March 1941
• VK+ER, II./St.G 77, Major Alfons Orthofer, Breslau-Schöngarten, Germany,
May 1939
On the upper cowling, Airfix’s oil
cooler exhaust duct appeared very
crude, so Eduard’s PE version came to
the rescue
Airfix Model World 67
INTERMEDIATE BUILD
Inevitably,
smoothing of
the fuselage
seams meant
that some of
the panel lines
were lost; these
were re-instated
using a fine
razor saw
Test-fitting suggested the
engine cowling would be
slightly wider than the
fuselage, so the latter
was spread slightly with a
length of spare runner
tooth fittings to act as spacers
and locators, plus there were
separate exhaust stacks and
radiator front as well as a rather
clunky piece to represent the
engine-mounted oil cooler intake
and vent. Usefully, the last of
these was replaced by a folded
brass vent flap, which could be
posed open or closed.
Despite the complexity,
alignment wasn't a problem,
although when test-fitted against
the fuselage front, the cowling
appeared a touch too wide. This
was fixed by inserting a small
section of runner material into
the fuselage to spread it slightly.
Airfix’s undercarriage was a tidy
section with a neat arrangement,
whereby a location tab on the
wheels could be fitted in two
alternative positions to give
a flattened or fully-inflated
effect, and there are alternative
concertina sections to depict
versions with or without the
mountings for the dive sirens.
Wheels were painted with
matt black and tyre black
before fitting, and the strut/
spat assemblies were left off for
separate painting.
With the majority
of the airframe
work completed,
the rather delicate
flaps could
be added to
the underside of the wing. Again
Eduard’s aftermarket set offered
alternative, finer actuators so the
styrene examples were removed.
However, plastic mass balances
were retained to represent their
bulkier appearance.
Separate details
Airfix’s kit offered underwing
racks and the SC50 bombs
often carried by Stukas, but both
were rather crude and ungainly.
“Despite the attraction of the
sharkmouth livery, the airframe
markings chosen were those of
I./St.G 2, in Bulgaria during 1941”
Kit-supplied bomb shackles for the underwing-mounted SC50 munitions were
relatively crude and Eduard replacements were well worthwhile
68 Airfix Model World
AB&K’s resin propeller assembled in a conventional way for an aftermarket set
– note the spinner tip has been painted white and masked
KeyModelWorld.com
INTERMEDIATE BUILD | Junkers Ju 87B-1 Stuka
Eduard’s PE set
had very attractive
brass bomb
shackles, which fitted to the cutdown styrene mounts and would
look lovely unloaded. But in this
case, these elements would be
enhanced with the additional
detail offered by the same firm’s
Brassin bombs.
Alternative styrene 250kg or
500kg bombs were supplied in
the kit for the main centreline
loadout, both with their
appropriate trapeze release
frames; the larger munition
was chosen, ‘dressed
up’ with PE stays
on the fins, but
was painted
separately and left off
pending final assembly.
The canopy fitted well and, as
always, Eduard’s mask set was
an absolute boon for the type’s
multi-paned ‘greenhouse’. There
were options for a fully closed
arrangement or partially open
with some panels exposed. In
this case, the windscreen and
retracted centre sections were
fitted permanently, and the rear
gunner's glazing was tacked
in position with white glue so
it could be removed later and
placed in the retracted position.
Colouring in
Having primed the entire airframe
and fixed one or two flaws around
seams, the underside was given
a crude pre-shade application
of Mr. Hobby H65 RLM 70
Schwarzgrün (black green) before
the same firm's H67 represented
RLM 65 Lichtblau (light blue). The
latter was sprayed thinly to allow
the pre-shading to show through,
and subsequently highlighted by
spraying panel centres with the
base tone lightened with 20%
white. The underside was masked
using Blu Tack ‘worms’ along
the fuselage and tape, taking
particular care on the wings,
where the projecting flaps and
brass actuators were especially
vulnerable to damage. The lighter
green – H64 RLM 71 Dunkelgrün
(dark green) – was then applied
over the upper surfaces to make
subsequent masking easier, and
once again selectively highlighted
using a lightened base hue.
The early-war splinter
camouflage was relatively easy
to mask, being based entirely on
straight lines, although a sharp
blade was needed to cut the
masking
tape and care
was required
in the placement
to achieve sharp
demarcations. Despite the
attraction of the sharkmouth
livery, the airframe markings
chosen were those of
I./St.G 2, in Bulgaria
during 1941, due to this
definitely being part of the
Balkans campaign. Airfix's
decals went on without any
drama, being quick to release
from their backing, tough and
reasonably thin. Although
quite slow to respond to
Microscale’s Micro Sol softener
(www.microscale.com), they
did so eventually, and settled
reasonably into the panel lines.
No swastikas were included so
a pair of typical 540mm whitebordered examples were taken
from Xtradecal’s generic X72036
sheet (www.hannants.co.uk).
Dirtying decisions
Most B-1 airframes deployed to
the Balkans would have been
withdrawn from the northwest
European fronts, and as such
would have had relatively few
combat hours. They would
have been subject to varying
degrees of refurbishment en
route, so in general would not
Main airframe parts were prepared
for paint with a primer coat, while
Eduard’s mask set was used to good
effect on the canopy, which was fitted
temporarily with white glue
Brassin SC50 bombs were superb, including individual tiny parts for the four
whistles attached to the fins
KeyModelWorld.com
Airfix Model World 69
INTERMEDIATE BUILD
The lighter of the two
camouflage greens
was applied over the
upper airframe, while
panel centres were
highlighted using a
lightened base tone
After an initial preshading using dark grey,
the underside colour of
H67 RLM 76 blue was
applied lightly
“The model
was subjected
to just subtle
dirtying using a
combination of
oil paints and
pastel chalks”
have exhibited serious wear or
weathering during their early
deployment. In keeping with
this, the model was subjected
to just subtle dirtying using a
combination of oil paints and
pastel chalks.
First (after the decals were fully
dry but while the base paint
was still gloss), was to apply
random dots of brown, ochre
and green oil paints to the upper
surfaces, blending these into a
faint streaky finish with a broad
The typical early-war
splinter pattern was
relatively easy to
mask, being based
on straight lines
brush dampened lightly with
white spirit, following the likely
airflows and static rain effects.
One advantage of this technique
is its flexibility: more colour can
be added, or removed with more
white spirit until the effect is
satisfactory. With the oils fully
dry, the whole airframe was
brought back to a matt finish via
several thin airbrushed coats of
Mr. Hobby GX113 varnish, before
adding further dirt and exhaust
stains with black and brown
pastel chalks.
Final word
Airfix's 1/72 Ju 87B-1 is a
straightforward kit which builds
without any serious pitfalls into
an excellent replica of this early
version. Detail is impressive,
particularly in the cockpit,
although Eduard's modest PE
set adds welcome finesse, and
the ability to pose the canopy
70 Airfix Model World
open offers extra visual interest.
The marking options are
interesting, although the
sharkmouthed machine is rather
atypical of the Balkans campaign.
There are aftermarket options
available from Kora (www.
lfmodels.com), Printscale (www.
printscale.org) and Xtradecal,
while Airfix's own earlier release
of the B-1 includes a Spanish
Civil War option.
AFTERMARKET
EXTRAS
The following additional products
were used during this project:
Eduard (www.eduard.com)
CX436 Ju 87B masks
SS633 and 73633 Ju 87B2/R2
interior/exterior set
672115 SC50 bombs
AB&K Hobby Kits
(www.abkmodels.cz)
720001 Ju 87B resin propeller
KeyModelWorld.com
European Airlines Books
Two New books
The definitive monograph
describing the Curtiss Design
75 and one of its major
production variants, the
USAAC’s P-36, and its many
international derivatives.
368 pages, A4, hardback, 433
photographs, 34 color profiles,
and a few maps.
£ 32 *
A book based on extensive research in the archives and it contains
a unique collection of photos that
will bring the reader back in time
to a mix of historical fact, technical
detail and nostalgia. 192 pages ,
250 photographs, advertisements,
drawings and 8 colour profiles by
Ulrich Leverenz and Tom Cooper.
£ 26 *
* + pp - local VAT or custom charges not included
Order your copy now at WWW.EUROPEANAIRLINES.NO
European Airlines Rob Mulder, Norway
Aeroplane Monthly - June 2021 - kvart.indd 1
07.04.2021 22:02:42
1/72 SH72447
HARVARD
Mk.II/III/IV
‘The British Commonwealth
Air Training Plan’
1/48 SH48214
HI-TECH KIT
Tempest Mk.II
‘The Last RAF Radial Engine Fighter’
1/72 SH72435
Mirage F.1AZ/CZ
‘The South African Commie Killers’
facebook.com/specialhobby | WWW.SPECIALHOBBY.EU | WWW.CMKKITS.COM
071_AMW_JUL21_ad.indd 1
18/05/2021 12:42:35
INTERMEDIATE BUILD
ON THE CASE
Airfix has re-boxed Thunder
Models’ 1/35 US Military
Tractor, and Steve Budd
makes the Case for this
diminutive model
W
hen
thoughts
turn to
military
vehicles, the usual
suspects inevitably
come to mind:
armoured vehicles and
trucks, but as vital as these
are to any war effort, tractors
are perhaps equally crucial.
At the
outset
of World
War Two,
the US
government
put out tenders
for a rugged,
reliable and easy-tomaintain tractor, and the Case
VAI was the preferred choice.
During the conflict, this compact
machine travelled to every
theatre the Americans fought in –
a testament to its versatility and
value for day-to-day operations.
Rugged re-box
Before launching into any build,
it’s always useful to take a look
at the parts and check for any
obvious potential issues linked
to removal from the runners,
assembly and subsequent cleanup. In this instance, immediately
apparent was the components’
beautiful finesse and the almost
complete absence of mould
seams, even on the smallest
items. The latter is generally a
prime source of frustration in
many kits but here it was reduced
to a mere trace.
Airfix’s ex-Thunder Models runners were awash with beautifully moulded
parts, which were also blessed with intelligently placed runner attachment gates
72 Airfix Model World
KeyModelWorld.com
INTERMEDIATE BUILD | Case VAI Tractor
Thunder Models’ original
release contained black-andwhite instructions, but Airfix’s
re-boxing included the latter’s
signature red – a great help.
In fact, the build guide was so
good its sequence was mostly
followed, and the deviations
were mainly just to leave the
completed cowling and wheels
separate for painting.
Stages 1 through 4 covered
assembly of the engine block
and gear housing, along
with ancillaries including the
distributor, oil filter, alternator
and cooling fan. Care needed
to be exercised with the photoetched (PE) metal parts for the
latter, as it was required to bend
the blade trailing edges back
towards the engine face with
the correct clockwise rotation.
This was not noticed initially, but
I managed to reverse my selfinflicted error successfully.
Seams present on the vinyl
tyres were a feature of the real
items – despite this, freezing
the parts to stiffen the material
made sanding easier
MODEL SPEC
WWII US Military Tractor
By: Airfix
Stock Code: A1367
Scale: 1/35
Price: £21.99
Available from: www.airfix.com
trimmed with a new scalpel blade.
This gave a ‘track’ and supporting
set of straight edges to run a very
fine strip of Tamiya tape (www.
hobbyco.net), joined out of sight
under the lower pulley.
Then, CA was applied via fine
wire with a hooked end to hold
tiny drops of the glue, over
and under the tape, locking it
to the fishing line – this made
the tape firmer and added
thickness for realism. Note, the
fan itself was left off until after this
work was completed.
As both sides of the engine
block would be clearly visible
on the finished model, it
Added detail
The radiator fan pulleys
‘deserved’ an in-scale
belt, so construction
of this began by
fixing 0.05mm
Reflo fishing
line in a
taught loop
with Deluxe
Materials’
Roket Hot
cyanoacrylate
(CA) glue
(www.deluxe
materials.com).
Overlapping ends
at the underside of
the bottom pulley were
In this modeller’s view, the number of PE parts was just right to enhance detail
sufficiently – the material was easy to cut with a used scalpel
KeyModelWorld.com
“This compact
machine travelled
to every theatre the
Americans fought in”
Regrettably, the decals for this release contained faults and gaps in the
numerals and artwork – they were also brittle during application
Airfix Model World 73
INTERMEDIATE BUILD
Fuse wire was the first
choice for the tension
leads and Tamiya tape
was used to enhance the
former material to form a
scratch-built fan belt
A seven-part cowling assembly fitted together easily, making it simple to
paint and weather separately from the main tractor. Note the PE instrument panel
The tractor’s central ‘core’
went together easily in
readiness for adding the
axles and other ancillaries
– note the replacement
nuts punched from a
Historex Agents set
was decided to drill and fit
rudimentary spark plugs, plus
indent the distributor cap
connection towers for the
four high-tension leads and
alternator feed. A pin was
used to produce gentle recesses
for the wires to glue onto more
securely. A simple stretched
runner was used to form the
plugs, and holes for these were
drilled right through into the
“The radiator and
front-axle mount
came as four pieces”
74 Airfix Model World
block, which made it easy to
slot in each example, adjust
and glue all at an equivalent
height. Fine fuse wire was then
cut and connected for
this straightforward
increase in detail, and
manipulated with fine tweezers.
As a separate caution, a test
fit of the radiator indicated
the diameter of the fan was
slightly greater than the circular
aperture in the rear of the
radiator itself. This issue proved
the one odd anomaly with the
kit – examples in real radiators
are usually designed to sit
within the housing. As a
consequence, the front
face of the engine
(Part A10) and its
mating surface
on the front of
the engine
block had to
be sanded
absolutely
flat and
reduced
slightly in
thickness for
the fan to sit
snuggly behind
the radiator.
Airfix would have
the exhaust ‘can’ (Part A9)
KeyModelWorld.com
INTERMEDIATE BUILD | Case VAI Tractor
added in Step 6 but this was
neatened and set aside
until the point
when the subassemblies
would be
ready for
primer and it
would be less
susceptible to
damage. The
only enhancement
necessary was to drill the exit
point of the pipe and smooth the
hole with a little liquid cement.
The radiator and frontaxle mount came as
four pieces and it
was important to
verify everything
sat perpendicular when viewed
from the front and in profile.
Surprisingly, the tabs joining the
radiator to the lower cowling
didn’t bond securely using my
now-standard glue: Deluxe
Materials’ Plastic Magic (www.
deluxematerials.com). This
seemingly quite ‘hot’ cement
normally has no difficulty welding
parts together, so I could only
conclude there must have been
some difference in the kit plastic,
which was oddly less susceptible
to the bonding characteristics.
With this discovery, my last
to Plastic Magic
manifested at other
times in the build, so
Tenax 7R took the
lead for the remainder
of the project.
Rolling on
remaining bottle of Tenax
7R (no longer produced)
was deployed and the tabs
co-operated obediently, although
bets were hedged with CA as
reinforcement. This response
Wheel hubs came as two parts each and test-fitting demonstrated the vinyl
tyres slipped over them perfectly
The diesel tank and its three-part
mounting bracket were a minor
fiddle to assemble, and again, the
contact points were made more
secure with water-thin CA. A join
seam, which would normally have
been eliminated, was left alone
as it would later disappear under
the cowling – this was provided
as seven parts, including the
driver’s instrument panel, and
was assembled front-to-back. On
reflection, if the kit was tackled
again, I would add the diesel tank
and its supporting frame to the
completed cowling as a separate
sub-assembly. This would enable
precise location of the frame (Part
A34) with the cowling edges (A13
and A14). The instructions were
fine but adapting the method
would have facilitated the correct
fit slightly more easily and helped
support the side panels.
Hub joints were pinned with brass rod for added strength and great care was
taken to set the height of the steering rack correctly
Minor bending of the PE footplates was required prior to adding the support
bracket and foot pedal parts
The mudguards’ inner faces bore some of the very few ejector pin marks in the
kit, though these were easily disguised or removed
KeyModelWorld.com
Airfix Model World 75
INTERMEDIATE BUILD
Tiny PE seat support brackets were a fiddly proposition and were added after
the main unit itself was in position
The seven-part front axle
assembly in Stage 24 was
perhaps the trickiest phase of
the build, as the wheel hubs
involved basic butt joins and
the steering rack rods could
potentially be fitted at a variety
of angles. It was therefore critical
to avoid positioning the steering
rack (comprising Parts A24, A26
and A32) too high, as it needed
to fit under the engine block
while still allowing the associated
actuator rod to lay clear on top.
The solution was to cement the
axle (A31) and its bracing bars
(A11) together and set these
temporarily into the underside
of the engine block. Once
cured, the steering rack was
fitted and adjusted to reflect the
illustrations in the instructions.
Erring on the side of caution,
the wheel hubs and front axle
attachment points were drilled
to accept fine brass rod sections
that robustly ensured the joints
were secure. Otherwise, the
mating surfaces were small and
very slightly loose when trialled.
On the subject of the front wheel
hubs, test-fitting indicated they
sat too close inboard to the
steering actuator arms (Parts
A26 and A32). The cure was
extremely simple: punched
plastic discs were cemented
in position, and once set, the
holes for the axle stubs were
reinstated via drilling. With that,
the wheels were assembled
and left aside for primer and
finishing later. Vinyl tyres, which
were not yet fitted, carried
a noticeable seam – though
this was also present on the
“When the time
came for paint had
arrived, the model
had been assembled
into three sections”
76 Airfix Model World
The tractor’s main section was an outright pleasure to assemble before
degreasing with isopropyl alcohol – note the wealth of detail apparent
real vehicle. As an aside, vinyl
can be problematic to sand
conventionally, but this issue can
be remedied by placing parts in
a freezer to stiffen the material.
Final finessing
It may have been a personal
issue, but I found the left foot
pedal (Part A50) sat a little close
to the drivetrain housing, so a
plastic card disc was inserted to
move the part slightly outboard.
Gear selector lever (Part A47) and
seat components (A4) were the
last items to be fitted – being so
prominent on the finished model,
I wanted to ensure both were
aligned properly. The instructions
would have you deal with the
chair and its frame as a single
sub-assembly but fitting the
latter separately made accurate
vertical locating much easier. The
downside was fitting the PE metal
supports (PE5) last, as access
was unavoidably restricted by
the seat and frame already being
in situ. However, a light dab of
60-second CA and fine tweezers
saw the job through successfully.
Mudguards for the drive
wheels (Parts B2) were the only
components to feature ejector
pin marks that needed to be
sanded. These were on the
inner faces and
thankfully didn’t
require complete
removal, as the
faux dirt and
AK Interactive’s
AK046 Light Rust
(www.ak-interactive.com),
plus the wheels themselves,
would obscure and shield any
remaining traces. A cone-shaped
sanding attachment in a motor
tool made
short work
of the marks,
all exercised with due
care to avoid damaging the
inner braces. Mounting brackets
(Parts B6) were fixed to the
rear axle rather than the
mudguards (as
directed), making
it simpler to
complete
these
assemblies
and angle the
part correctly.
KeyModelWorld.com
INTERMEDIATE BUILD | Case VAI Tractor
The first topcoat applied
was Mr. Hobby’s H304 Olive
Drab (www.albionhobbies.
com), diluted with cellulose
thinner, which had a satin finish
that moved the paint closer
to the gloss required for the
decals. These were few and
were concentrated on the
driver’s instrument panel and
the cowling. While they were
certainly thin and neatly printed,
the markings were found to
be very brittle and broke with
relative ease. Delicate handling
was therefore the order of the
day, and areas where they
would be applied needed
to be moistened with a
little water to allow easy
positioning. Microscale’s
Micro Sol (www.microscale.
com) was the ideal softener
and simple tests with a
couple of spare decals
confirmed anything stronger
was unsuitable.
AMMO-MIG’s One Shot Grey primer did a perfect job of unifying
plastic, wire and PE before application of the final hues
Airfield dirt
feathered in without
issue. A routinely
reliable primer had
been something of
a holy grail for me and
the Grey, White and Rusttoned versions are now always
constantly on hand.
Colourful Case
When the time came
for paint, the model
had been assembled
into three sections:
the engine/drivetrain,
seat, mudguards and
axles; the cowling; and the
wheels, minus their tyres. This
gave easy access for the primer
used – AMMO-MIG’s excellent
A.MIG-2024 One Shot Grey
(www.migjimenez.com). Surfaces
were thoroughly degreased with
isopropyl alcohol in preparation
for the primer, which was sprayed
at 30psi without the need for
any dilution. This excellent paint
preferred a few misted passes
before adding heavier coverage;
under a hairdryer, it was touchdry in a matter of seconds and if
necessary, could be sanded and
KeyModelWorld.com
Light washes
of the always
creamytextured Michael
Harding oil
paints (specifically,
an equal blend of
No.128 Lamp Black and
No.126 Burnt Umber), diluted
with white spirit were added in
single layers. Each was sealed
Mr. Hobby’s H304 Olive Drab
was the base colour. Note the
punched plastic card spacer
added to ensure the wheels
sat in the correct position
Airfix Model World 77
INTERMEDIATE BUILD
Weathering began with an oil
wash and grey pastel chalk dust,
the latter sealed with the excellent
A.MIG-3000 Pigment Fixer
Similarly, the seat was given light
sponge-applied chipping on its edges
with Humbrol Grey and layered washes
The exhaust system was treated with
several layered applications of
AMMO-MIG’s ‘rust’ products
with Johnson’s Klear to prevent
reactivation by subsequent
washes. It was easy to build the
degree of weathering in this way,
and if there was any need to
adjust with tiny amounts of white
spirit, then this could be achieved
quickly before locking in with
Klear and moving on.
The same principle was
followed with earth and pale
dust-toned pastels, which were
applied by brush and sealed
with the excellent A.MIG-3000
Pigment Fixer. This seems to be
an extremely thin matt varnish
of sorts, and needs to be
applied in small drops and
allowed to flow across
the surface into the
dust via capillary
action, fixing the
dirt and drying beautifully flat.
Before acquiring this great
addition to the workbench, I was
sealing pastel chalks under light
sprays of Klear, which worked
after a fashion but eliminated
approximately 75% of the effect,
making repeat applications
necessary in order to build the
required densities.
A general overriding principle
of weathering is to move from
‘factory fresh’ to the required
finish in progressively thin
layers, each built upon the other.
With this model, I was happy to
concentrate A.MIG-1009 Starship
Wash and AK082 Engine Grime
over the wheel hubs and the
undersides of the tractor’s
engine, drivetrain footplates and
axles, with lighter weathering
towards the top of the vehicle.
As with any finishing stage,
there needed to be an overall
objective – an end ‘destination’
that the techniques employed
would head towards. That said, if
a different approach manifested
as the process unfolded, it might
turn out to be one of those happy
accidents that sometimes leads
to that joyful ‘a-ha’ moment
when new and unanticipated
effects are discovered.
In this instance, the plan was
to produce an airfield tractor
appearing ‘lived-in’ and used
daily, but nonetheless receiving
regular maintenance. Hence, the
reliance was solely on brushapplied effects, and having
reviewed the finished photos, I
am happy with the outcome.
An enticing Case
“Options with this subject span everything
from ‘factory fresh’ to wrecked and derelict”
78 Airfix Model World
The options with this subject
span everything from ‘factory
fresh’ to wrecked and derelict
and therein lies the charm and
appeal of these Case
VAI vehicles. Having
considered the
evidence from
Airfix’s 1/35
kit, it was
deemed
‘guilty’
of being
huge fun,
providing
superb quality and being
a marvellous weathering
‘target’. So, if you fancy a model
that’s off the usual beaten track,
offering military and colourful
civilian options, this kit is an
open and shut Case!
KeyModelWorld.com
1/35 scale
WWI ITALIAN OFFICERS
AVAILABLE
N OW
®
MINIBASE – SU33
Incredible detail,
folding wing mechanism
faithfully reproduced,
pilot access ladder
and much more
BORDER MODEL
LEOPARD A2
Possibly one of the best
ever 1/72 scale armour kits
– the precision mouldings
and detail is incredible
DAS WERKRAMMTIGER
Let your imagination
and weathering skills
run wild on this unusual
subject, 1/35 scale
MC35151 $18.00
MC35152 $18.00
(Sold separately or together as MC35153 combo set $33.00)
Please Note: all our figures and accessories are unassembled and unpainted
To place an order and to see more
please visit our website:
www.ModelCellar.com
079_AMW_JUL21_ad.indd 1
Contact us for details of your nearest dealer:
01202 511232 I sales@albionalloys.co.uk
Please visit our website to see news of all the
exciting new releases we have coming up
www.albionhobbies.com
17/05/2021 15:39:41
INTERMEDIATE BUILD
CHARIOT
GLOVER’S
Inspired by the film BAT*21 plus a childhood spent in and around Cessna-built
aeroplanes, Chris Jones builds ICM’s newly tooled 1/48 O-2A Skymaster
C
essna’s O-2A
Skymaster was used
extensively by the
USAF over Vietnam;
its high wing afforded excellent
visibility which, combined with
its manoeuvrability, loiter time
and comparatively slow speed,
made it an ideal platform for
the Forward Air Controller
(FAC) role.
Skymaster pilots patrolled areas
of interest, observed enemy
movements and used smoke
rockets to mark targets for air
strikes by faster, more heavily
Job number one was to fill and sand multiple ejector pin marks inside the
cockpit – these would otherwise have been obvious through the glazing
80 Airfix Model World
armed warplanes. Beyond that,
the O-2A also had a starring role
in a Vietnam War film...
Family resemblance
Perhaps unusually, I grew up in
and around Cessna products; my
Dad had a private pilot’s licence
and I was extremely fortunate
to fly from a very young age. As
a result, I’ve always felt a great
affinity to the Cessna 172s in
which I often travelled. However,
it wasn’t until much later in
life that I
stumbled
ICM’s instrument panel consisted of excellent raised detailing and separate
decals were supplied for the dials themselves
KeyModelWorld.com
INTERMEDIATE BUILD | Cessna O-2A Skymaster
across the film
BAT*21, which stars
the Cessna O-2A
Skymaster alongside
actors Danny Glover
and Gene Hackman.
The connection
resonated with me
immediately, and seeing
an O-2A getting ‘chucked
around’ over the jungle was
an excitingly stark contrast to
the leisurely ‘patrols’ over East
Anglia I was used to! The family
resemblance between the O-2A
and the same manufacturer’s 172
was immediately clear, but the
Skymaster seemed beefed up
MODEL SPEC
Cessna O-2A Skymaster
By: ICM
Stock Code: 48290
Scale: 1/48
Price: £28.40
Available from: www.hannants.co.uk
on steroids. As such, when ICM
announced a newly tooled O-2A,
I simply had to build one.
Now for something
completely different…
It’s fair to say the Skymaster is
a quirky-looking aeroplane and
therefore building one in model
form was going to reflect that
fact. Out of the box, plenty of
good-quality recessed panel
lines and detailing was apparent,
alongside excellent glazing.
The odd thing about this
project was how it felt slightly
similar to a model car in several
areas. Admittedly, the fuselage
came in the ‘usual’ format of
halves, instead of a singlepiece body atop a chassis, but
in other areas the parallels were
striking. There was significant
glasswork, which surrounded
the entire cabin, car-style
doors, what amounted to
parcel shelves at the back for
the radio and communications
equipment, side-by-side seating
and harnesses that fed down
from mounting points on the
roof. There was even a glass
panel akin to a sun roof. I
certainly wasn’t used to military
aeroplanes being like this.
Construction began by filling
ejector pin marks on the cabin
sidewalls. Although tedious,
this was vital because any
internal blemishes would have
been obvious via the extensive
glazing. Cockpit detail was of
a good standard, with a busy
Several rounds of masking and spraying were required to paint the interior,
particularly given the soundproof cladding wasn’t represented
That said, it was
much easier to
paint the radio
shelf as separate
sub-assemblies
prior to its full
construction
Once complete, the equipment shelf
allowed a wealth of extra detail to be
included inside the cockpit
Airbrushed dust effects and
pencil-applied chipping gave a sense
of wear and tear to the cockpit
“When ICM
announced a newly
tooled O-2A, I simply
had to build one”
KeyModelWorld.com
Airfix Model World 81
INTERMEDIATE BUILD
The nosewheel leg was extremely delicate, so before assembling it as part of
the associated undercarriage bay, it was cut in half to be pinned with brass rod
Although little of it would be seen
on the finished model, the engine
detailing ICM provided was quite
attractive once painted/weathered
Exhaust pipes run through the
nosewheel bay, and would have been
awkward to mask around, so were left
off and attached later
equipment rack and associated
‘black boxes’, plus an attractive
instrument panel with individual
dial decals. However, one minor
point was the lack of soundproof
cladding; reference photos of
O-2A cockpits reveal a large
amount of fabric cushioning
fitted around the interior, but this
wasn’t represented. Regardless,
the inclusion of a pair of M-16s
to be mounted on wall brackets
more than made up for this, as I
don’t recall ever building a model
aeroplane with a pair of rifles
inside the cockpit.
After spraying the engine bay
Tamiya XF-4 Yellow Green
(www.hobbyco.net), the area was
masked and the windows were
secured with Tamiya Extra Thin
Cement, applied with extreme
care so as not to mark the
transparencies. White
Glue is often the normal
preference for clear parts,
but it’s weaker than liquid
cement – as the glazing
was so extensive and covered
such a large surface area, it
had to be completely secure.
Accidentally pushing a window
into the cockpit near the end
of the build would have been
an unrecoverable error, which
Home-made lap belts were
attached to the seats, but Eduard’s
PE items would be used for the
shoulder harnesses – though this
required a degree of ingenuity
“Plenty of quality recessed panel
lines and detailing was apparent”
82 Airfix Model World
KeyModelWorld.com
INTERMEDIATE BUILD | Cessna O-2A Skymaster
It’s not very often that
scale aircraft modellers
get to make M-16s – and
even less common is the
chance to fix them inside
an aircraft cockpit
“Considering how tricky twin-boom airframes
can be to assemble, ICM has done a great job
at making this relatively pain-free”
had to be avoided at all costs.
Home-made Interior Green
was mixed with a 4:1 ratio of
XF-67 NATO Green and XF-3
Flat Yellow and sprayed over the
remaining internal areas, before
being masked. The uncovered
areas of the cockpit (namely the
cladded areas) were covered
with another shade, this time a
5:1 blend of XF-11 JN Green and
XF-1 Flat Black.
Guerrilla radio
The equipment/radio rack
assembly was fairly complex and
a reasonable amount of mental
effort was expended to figure out
how to paint and assemble it all.
Meanwhile, the instrument panel
received XF-69 NATO Black
before being glossed with ALC600 Aqua Gloss (www.alclad2.
com) to prevent any silvering.
After applying the dials and
sealing them with more gloss, a
matt coat was applied with Winsor
& Newton Galeria Flat Varnish
(www.winsornewton.com) diluted
approximately 50:50 with
an equal blend of
KeyModelWorld.com
99.9% Isopropyl Alcohol and
deionised water.
The cockpit floor was treated
to dust effects courtesy of a
very thin mottled overspray of
XF-55 Deck Tan and chipping
from a Silver Prismacolor Pencil
(www.prismacolor.com). The next
stage was to attach the seats
to the cockpit floor, where one
of the Skymaster’s many quirks
came into play. The ceilingmounted shoulder harnesses
posed a constructional dilemma;
how could they be attached to
the seats but also to the roof
correctly, when the latter couldn’t
be secured until the seats were
fixed and encapsulated by
transparencies? In the end, the
solution was to use Eduard's
FE1120 photo-etched (PE) metal
shoulder harnesses (www.
eduard.com) attached to the
seat back rests with superglue –
the upper part of each was then
bent slightly so the metal would
tension itself against the ceiling
when the roof was attached.
However, before the fuselage
could be joined, the engine
bay had to be constructed.
This formed an attractive subassembly and thankfully, it also
left a reasonable gap between
itself and the nosewheel well/
bulkhead assembly. At this
stage, the fragility of the leading
undercarriage section was noted,
so it was decided to separate the
nosewheel leg into two parts and
pin these with brass rod. Once
these sub-units were attached
A vast amount of fishing weight was required to stop the model becoming a
tail-sitter – luckily the engine bay contained a useful aperture for this packing
When all elements
were assembled
fully, it was time to
bring the cockpit
floor and fuselage
halves together
It seemed wise to construct and neaten various sub-assemblies – such as the
booms and wing – before bringing the parts together, as this avoided
unnecessary stress on vulnerable areas
Airfix Model World 83
INTERMEDIATE BUILD
“Panel lines were also
post-shaded with a very
thin mix of Dark Sea Grey”
to the starboard fuselage half,
the aforementioned gap was
filled with fishing weights to
prevent tail-sitting. The radio
shelf was also attached at this
stage, before the cockpit floor
was slid into position. At long
last, the fuselage halves were
then joined with Revell Contacta
Cement (www.revell.de/en).
Boom boom!
Another quirk concerned
the Skymaster’s twin-boom
layout. These were assembled
individually, along with each
wing and horizontal stabiliser in
readiness for bringing the whole
airframe together. Avoiding the
prospect of placing undue stress
on the airframe, the glue was
allowed to harden and the seams
were dealt with on these sections
before they were attached.
Shoulder harnesses
fed down from the
roof – recreating this
effect was achieved
by using Eduard PE
belts, which were
bent back to tension
themselves against
the cockpit roof
upon its fitting
84 Airfix Model World
With the pesky shoulder
harnesses in place, the wing/roof
was combined with the fuselage
with the aid of pressure from
clamps. However the windscreen
was too wide, so was left off
until the glue had set – once dry,
this gave a secure framework.
One side of the windscreen
was attached with a tiny drop of
gel superglue, before the other
side was held with Tamiya tape
(www.hobbyco.net) in the corner,
making sure this covered just the
metal frame area. This was to
prevent the liquid glue wicking
under the tape and ruining the
clear windscreen. Next, Tamiya
Extra Thin was run very carefully
around the mating surfaces and
left to dry overnight.
Both main undercarriage legs
came as a one-piece bar, but
this was very flimsy and the
instructions showed it must
be attached to the cockpit
floor before being sealed by a
separate panel. I was convinced
the leg bar was so fragile it
simply couldn’t be attached at
this stage, so it was decided to
cut it in half, and slide each into
place through its respective
locating hole at the end of the
build – more on that later.
With the fuselage completed, all
seams were sanded, filled where
necessary and once the windows
were masked, XF-54 Dark Sea
Grey was used to prime the joins.
With remedial work concluded,
it was finally time to attach the
booms, which had been left off
for as long as possible to avoid
breakages. Thankfully, the joins
were very strong thanks to
lengthy locating rods and just a
slight step on each boom had
to be sanded. Overall,
considering
how tricky
twin-boom
airframes
can be to
assemble, ICM
has done a great
job at making this
relatively pain-free.
A few seams around
the booms and
horizontal stabiliser
were neatened with
Milliput Superfine White
(www.milliput.com)
and re-primed.
Green jungle,
grey plane
For O-2A pilots over Vietnam, the
main threat was from ground fire
and not enemy air activity. With
that in mind, one theory on the
Pressure was applied
from a clamp to ensure
the rear fuselage went
together neatly
KeyModelWorld.com
INTERMEDIATE BUILD | Cessna O-2A Skymaster
light grey colour is that it was
intended to provide concealment
against clouds when viewed from
the ground. As for the white,
perhaps it was there for cooling
purposes – it certainly didn’t
conceal the plane from above,
but even a MiG-17 couldn’t turn
inside an O-2A, so if ‘bounced’,
a wily Skymaster pilot could just
keep turning.
When airbrushing, it’s often
easier to try to spray light
colours first, before moving onto
darker tones. This isn’t always
possible depending on the
masking involved, but on this
occasion, it seemed sensible
Twin-boom aeroplane subjects can be tricky to assemble, but ICM included
exceptionally strong, positive locating rods on the booms themselves, which
made the whole assembly surprisingly robust
KIT-SUPPLIED DECALS
Strangely, ICM provided little information on the three grey/white schemes and
interesting black livery supplied in this iteration – though subsequent versions
do feature specifics of the airframes depicted. The options here were defined
by their tail numbers:
• 21407 (grey/white)
• 10868 (grey/white)
• 11053 (grey/white)
• 418 Kudy Jay (overall black)
ICM’s windscreen was slightly too wide,
so wasn’t attached until the fuselage
and wing were joined – these provided a
framework to mount the clear section against
KeyModelWorld.com
Airfix Model World 85
INTERMEDIATE BUILD
Grey areas were mottled with lighter and darker
versions of the base hue, while panel lines were
post-shaded with an ultra-fine Dark Sea Grey mix
The white areas of the wing were
sprayed with XF-3 Flat White, before
being post-shaded with XF-19 Sky Grey
to start spraying the wings with
XF-3 Flat White. These areas
were mottled with a thin mix of
XF-19 Sky Grey and the panel
lines were
also post-
shaded with the same mix. After
a light coat of ALC-600 Aqua
Gloss to protect the paintwork,
the white areas were masked in
preparation for the next coats.
Each tail boom had red warning
bands on account of the pusher
propeller, but wrapping decals
can be tricky. With that in mind,
after a white undercoat, these
areas were sprayed XF-7 Flat
Red, along with red trim
on the vertical stabilisers. With a
light spray of gloss for protection,
these areas were also masked
before the rest of the airframe
was painted.
This was accomplished with an
equal mix of XF-19 Sky Grey
and XF-3 Flat White. The
next stage was to mottle
and weather the paint
with lightened and
darkened versions
of the base colour. Panel lines
were also post-shaded with
a very thin mix of Dark Sea
Grey at this stage. Once more,
a protective gloss misting
followed, before the
anti-glare panel was
set and sprayed with
XF-69 NATO Black, then
weathered with mottles of
XF-1 Flat Black and Dark
Sea Grey.
Final countdown
“ICM has packed some very
attractive detail into this 1/48 kit”
86 Airfix Model World
After the mandatory predecal glossing was completed,
various shades of homemade oil washes were applied
to the panel lines before the
markings were applied. These
were extremely well printed,
but a touch fragile, so care was
required. Once the decals were
sealed with yet more gloss, a
Galeria Flat coat was applied
and it was time for bring the
remaining sub-assemblies
and parts together.
The wing struts fitted
really well, so it was
possible to add
them right at the
KeyModelWorld.com
INTERMEDIATE BUILD | Cessna O-2A Skymaster
end of the build, and most of the
final assembly was hassle-free.
Aerials were represented with
ultra thin plastic rod or EZ Line
(www.modellingtools.co.uk).
Unfortunately though, the
spectre of the main landing
gear area raised its head once
more, because the wheels
didn’t fit very well onto the
legs themselves. The biggest
issue once again was those
feeble main struts – over
time, these have sagged very
noticeably and the model will
probably have to be attached
to a base to remedy this, or at
least to prevent it from getting
any worse.
Adding the anti-glare
panel ahead of the
cockpit involved some
fiddly masking
Goodnight Saigon
Cessna’s O-2A is certainly an
unusual aeroplane and this
project posed several interesting
challenges that are not usually
encountered when building
more conventional military
aircraft. ICM has packed some
very attractive detail into this
1/48 kit and the finished model is
certainly a head-turner.
However, it really should be
mounted on a base or hung
from the ceiling to prevent
the weak main gear legs from
sagging to the point of collapse.
Alternatively, an aftermarket
supplier could offer a
replacement metal part.
EZ Line Fine Black elastic thread and
plastic rod was used to reproduce the
aerials on the Skymaster’s exterior
KeyModelWorld.com
As ever, the decaling process added ‘extra
life’ to the model – the items were printed
brilliantly, but were found to be quite fragile
Unfortunately, the main undercarriage strut was remarkably
fragile and sagged considerably – fixing the model to a base
would be one solution to this problem
ON THE SHELF
METICULOUS MOTORCYCLE-MAKING
BMW R75: Escaping from the
Falaise Pocket
By: Robert Doepp
ISBN: 978-0-9935646-6-6
Price: £25 Pages: 112 Format: A4
Web: www.casematepublishers.co.uk
While many modellers may use
period photos for reference, few
would seek to reproduce the
scene exactly, but award-winning
modelmaker and writer Robert
Doepp has, as this volume reveals.
The starting point is an image of
four Fallschirmjäger (paratroopers)
fleeing the Allied invasion of
Normandy (hence the book’s
subtitle) on a BMW R75 motorcycle
and sidecar, replicated in this project
by Revell’s ex-ESCI 1/9 kit. Chapters
cover construction, painting,
sculpting the figures, decorating
these and building the base –
these feature a mass of incredible
super-detailing, scratch-building,
sculpting, plus hand and airbrush
painting techniques. All stages are
depicted by superb photography,
with brief, but informative, text
elements and captions highlighting
any important features or aspects.
For anyone wishing to undertake
a similar project, period reference
and modern walk-round photos (of
a restored machine) are supplied
before a portfolio of finished shots
finishes the story. While highly
specific, this book is an inspirational
marvel of what can be achieved. JF
SHIMMERING DELTA
B-58 Hustler
By: David Doyle
ISBN: 978-0-7643-6131-9
Price: US$19.99
Pages: 112 Format: 236 x 236mm
Web: www.schifferbooks.com
Convair’s B-58 Hustler isn’t popular
with kit manufacturers, but those
with Revell/Monogram, Italeri or
Academy offerings will appreciate
Schiffer’s new Legends of Warfare
walk-round guide. After a brief
introduction covering the type’s
88 Airfix Model World
genesis, the book is split into two
sections: the first covers the YB-58
pre-production airframes and
development programme, while
the second focuses on production
bombers. Both parts open with
a single-page contextualisation,
before moving to period photos
covering a range of scenes from
construction, testing, operation
and storage. There’s a mix of blackand-white and colour imagery, with
the latter capturing a wealth of
shimmering finishes on the naturalmetal panels – combined with red/
white adornments on the testing
airframes – arguably the most
inspiring element for modellers.
The final section is dedicated to
walk-rounds of preserved airframes
49-2458 Cowtown Hustler at the
USAF’s National Museum, Ohio;
61-2080 at the Pima Air & Space
Museum, Arizona; and 61-2059
Greased Lightning at the Strategic
Aerospace Museum, Nebraska. JF
HEAVY TROOP CARRIER
Namer Heavy IFV Part 1
By: Michael Mass and Adam O’Brien
ISBN: 978-965-7700-18-1
Price: £33.90
Pages: 106 Format: 215 x 278mm
Web: www.aviationbookcentre.com
Regarded by many modellers as
the ‘gold standard’ for reference on
Israeli armoured vehicles, Desert
Eagle’s IDF Armor Series turns
its attention to the Namer (male
leopard) heavy infantry fighting
vehicle (IFV). This first volume on
the type serves as an introduction
to the role of heavy IFVs and their
history in the IDF, before focusing
on a ‘family’ of Namer derivatives
– itself based on the chassis of the
Merkava 4 main battle tank. It’s
then familiar territory, with a superb
collection of photos depicting early
(fitted with Merkava 4 tracks), late
(Merkava 3-type tracks), technical
and command variants, including
those also equipped with the
Trophy active protection system.
A short section is then devoted to
crew equipment, highlighting items
such as access ramp, engineering
tools and stretchers, which segues
neatly into coverage of a recent
exercise, where Namers operated
alongside Merkava 4s. Attention
then returns to close-ups of the
vehicle’s suspension, weapons
and interior, with a final touch
of detailing the types of tactical
and formation markings applied
to in-service Namers. This is an
invaluable guide for any modeller
building either the Legend
Productions or Meng 1/35 kits. SF
MODELLING LARGESSE
Wingspan 4
By: Toni Canfora (ed)
ISBN: 978-91984776-1-0 Price: €27
Pages: 128 Format: 290 x 210mm
Web: www.canfora.se
The fourth volume of Canfora
Publishing’s 1/32 scale modelling
guides contains another fascinating
array of aviation subjects, covering
more than 100 years of flight – from
a World War One Royal Aircraft
Factory Fe.2b to a present-day
Lockheed F-35A Lightning II. Other
types covered are a Dornier Do
335 Pfeil, Mikoyan MiG-23 Flogger,
Focke-Wulf Fw 190A-8, Polikarpov
I-16 Type 24, Northrop F-5E Tiger
II, North American P-51A Mustang,
PZL P.11C and Douglas C-47
Skytrain. Each receives a similar
treatment, with a mix of overview
narrative discussing each project,
interspersed with step-by-step
photos. While, at first glance, this
may seem to be aimed at the more
experienced modeller, the clear
photo-montage layouts are arguably
more useful for those wanting to
learn new skills. Best of all, the
writers are honest about the kits
and their own efforts, highlighting
mistakes made but also (more
importantly) how to rectify them.
However, it’s the photography that
makes this modelling guide stand
out, with well-lit shots featuring
good depth of field, so everything is
in focus for the reader. SF
KeyModelWorld.com
ON THE SHELF | Books
HEBREW HAWKS
RED-STAR IFS, BUTS AND MAYBES
Israeli Vipers F-16A/B Netz
By: Amos Dor
ISBN: 978-88-95011-20-2 Price: €48
Pages: 238 Format: 218 x 305mm
Web: www.casematepublishers.co.uk
Of all the nations operating the
General Dynamics/Lockheed
F-16A/B, Israel is arguably the most
secretive when it comes to how it
operates the type, so photo-studies
of this nation’s airframes, where
they are known as the Netz (hawk)
are few and far between. Perhaps
unsurprisingly, there is considerable
Israeli Air Force input into this lavish
compilation, which opens with
personal anecdotes from two highranking ex-Netz pilots and a list
of the aircraft sold to Israel before
taking a squadron-by-squadron
look at these single and twoseat fighters. Of course, mention
Israel and F-16s and thoughts will
immediately leap to the long-range
attack against Iraq’s Osirak nuclear
reactor in 1981 and a full chapter is
devoted to this mission (designated
Operation Opera), including rare
Russian and Soviet Ground
Attack Aircraft
By: Alberto Trevisan and
Anatoly P Borovik
ISBN: 978-88-75654-86-3
Price: €30 Pages: 272 Format: A4
Web: www.ibneditore.it
photos of the participating aircraft.
Each squadron is treated similarly,
with summaries of that unit’s
operations but also providing
valuable insight into the weapons
carried, followed by a sumptuous
photo gallery of the aircraft,
focusing on markings, equipment,
modifications and munitions. With
its coffee-table format, this is ideal
for anyone interested in early F-16s,
but modellers will find it an absolute
treasure trove of information. SF
WORLD’S FIRST JET FIGHTER
The Messerschmitt Me 262
By: Richard A Franks
ISBN: 978-1-912932-15-3
Price: £24.95
Pages: 208 Format: A4
Web: www.valiant-wings.co.uk
Here’s the hotly anticipated
second edition of Valiant Wings’
Airframe & Miniature guide to the
Messerschmitt Me 262, which
updates and expands on the
firm’s first-ever publication. It
follows the now firmly established
format of chapters covering the
type’s genesis, evolution, testing,
production, development and
operations, followed by sections
focusing on kits, aftermarket
products and build projects, plus
a walk-round element and scale
plans. The last of these are 1/48
scale and are supplied on a foldout sheet also featuring several
technical diagrams and photos.
Such visual aids are a highlight of
the main pages, plus superb period
photos are included – notably,
the late-war subject matter has
allowed several colour images
to be incorporated – useful for
KeyModelWorld.com
Aircraft development is a
fascinating subject, whether it’s
how an existing design came to
fruition or the concepts that failed
to make it off the drawing board.
Combine this with the secrecy
adopted by the Soviet Union/
Russia since the mid-1940s and you
have this engaging book, which
seeks to peel back some of those
layers to reveal how their ground
attack aircraft were created. It is
split into two main sections, which
deal with how existing fighter and
bomber designs were modified to
fulfil this tactical function, followed
by specialised concepts. Given
the subjects’ nature, photography
is minimal, but that which is
included provides plenty of insight.
Where this volume really scores,
though, is with the multitude of
scale drawings (specific sizes
are not included, although there
are scaling bars), depicting often
bizarre configurations, such as
twin-fuselage Su-25 derivatives or
a side-by-side seating arrangement
for a MiG-31-based strike platform.
While Russian and Soviet Ground
Attack Aircraft will be of use to
any aviation enthusiast, ‘what-if’
modellers will regard it as a gold
mine of unusual designs, especially
those that have resemblance to
Western projects, but arrived at by
means of convergent evolution,
rather than spying. SF
PACIFIC ANNIVERSARY
Battle of Midway
By: John Grehan
ISBN: 978-1-52675-834-7
Price: £14.99
Pages: 164 Format: 190 x 241mm
Web: www.pen-and-sword.co.uk
comparison with the camouflage
and markings section profiles.
As is becoming common with
updated versions, the kit appraisal
covers products in production
or readily available during the
book’s composition – similarly,
full-builds cover recent toolings:
Airfix’s 1/72 B-1a/U-2, the Hobby
Boss 1/48 A-2a/U2 and Revell’s
1/32 B-1/U-1. A gallery showcases
the authors’ other Me 262
projects, while the product listing
is another exhaustive index of kits,
accessories and decals. JF
Occurring between June 3-7, 1942,
it’s been 79 years since the Battle of
Midway – a major turning point on
World War Two’s Pacific front, and
the subject of Pen & Sword’s Images
of War volume. This is essentially
a chronological breakdown of
events illustrated by period photos
– though not all of these are from
Midway, with pre-war shots and
those from elsewhere during World
War Two highlighting machinery
and personnel. The introduction
underlines the tactical reasoning
behind the Japanese attack, plus
how American forces intercepted
communications and countered
their opposition effectively –
this section also includes maps,
diagrams and period photos of the
islands. From there, the captions
handle the narrative, with the time
and date used as a heading and the
key events recounted in detail. The
images themselves understandably
vary in quality, but cover the ships
and aircraft employed by both sides,
plus the personnel and key leaders
from both forces. Arguably, it’s the
post-combat scenes that are of
most interest to modellers, as these
most effectively illustrate damage
and weathering – particularly on
airborne elements – but there’s
plenty of other inspiration. JF
Airfix Model World 89
ON THE SHELF
FLUSH-WINGED ‘DOODLEBUSTER’
Tempest Mk.V Series 2
By: Eduard Scale: 1/48
Item no: 84170 Price: £16.02
Web: www.eduard.com
Following the release of its newly
tooled 1/48 Hawker Tempest in
2018, this is the first of Eduard’s
styrene-only Weekend Edition
versions. As such, the seven runners
are unchanged from the preceding
Series 2 iteration, denoting
airframes produced from the second
batch onwards, with non-protruding
wing cannons, smaller mainwheels
and provision for underwing stores.
Despite the lack of photo-etched
or resin enhancements, detail is
superb, including extremely fine
engraved panel lines and rivets, a
three-piece instrument panel and
rudder-bar sub-assemblies, and
separate cockpit framework. Options
include open/closed canopy and
drop tanks. Decals are included for
the seat harnesses, stencilling and
insignia for two schemes:
• NV724/JF-E, Flt Lt Pierre
Clostermann, 3 Sqn, Kastrup,
Denmark, July 1945
• EJ705/W2-X, 80 Sqn, 2nd Tactical
AF, autumn 1944
ULTIMATE FISHBED DEVELOPMENT
MiG-21bis Fishbed
By: Italeri Scale: 1/72
Item no: 1427 Price: £24.99
Web: www.hobbyco.net
This Italeri MiG-21bis is a re-boxing
of Fujimi’s 1991-tooled 1/72 kit,
and while hardly long in the tooth,
it faces competition from more
modern offerings from Eduard
and Zvezda, among others.
Nonetheless, parts across the
five runners feature engraved
exterior panel lines and fine raised
interior detail, while a pilot figure
90 Airfix Model World
is also included. Interior decals
are passable but not exemplary
for the scale and other markings
are somewhat thick, but are wellprinted and cater for four schemes:
• Blue 08, MiG Design Bureau,
MAKS Airshow, Zhukovsky ,
Moscow Oblast, Russia, 2005
• Black 9483, 41 Eskadra Lotnictwa
Taktycznego (Tactical Sqn),
Malbork, Poland, 2003
• Black 116/25, Croatian AF, ZagrebPleso, September 2016
• Black 698, Free Libyan National
Army, Ras Lanuf, October 2016
AVIATION SCENE
WWII Luftwaffe Airfield
By: ICM Scale: 1/48
Item no: DS4801 Price: £39.80
Web: www.hannants.co.uk
Here’s another great multi-set
ensemble from ICM, comprising
the firm’s 1/48 Bf 109F-4 (48103),
HS 126B-1 (48212) and German
Pilots and Ground Personnel set
(48082) – and for almost 20%
less than the cost of these items
separately. It’s an almost instant
diorama (just add a base) and ideal
for recreating a Luftwaffe airfield
scene during World War Two. There
are four styrene runners for the
Bf 109, with an additional four for
the Hs 126 and a single frame for
the figures. All parts are moulded
to the firm’s high standards, with
nary a sink mark in sight, while all
transparencies are crystal clear.
Figure poses are convincing,
with three mechanics, two senior
officers and a pilot being helped
into his parachute harness by
another Luftwaffe airman. Aircraft
markings are unchanged from the
original boxings.
DESERT VISIONS
Mirage F.1EQ/ED
By: Special Hobby Scale: 1/72
Item no: SH72386 Price: €18.80
Web: www.specialhobby.eu
Special Hobby’s 1/72 Mirage F.1s
have been hugely popular since
their initial release, and this has
been so true of the EQ/ED version
(as used by Iraq, Iran, Qatar and
Libya) that it has been reissued.
Parts are unchanged, being
presented on seven styrene runners,
with resin components for a single
AM 39 Exocet missile. The subtype’s characteristic ‘Irakien’ drop
tank – the largest carried by the
Mirage F.1 – is also included, along
with a choice of air-to-air-missiles.
The five choices are:
• F.1EQ, 4014, 79 Sqn, Wahda, Iraqi
AF, September 1981-June 1982
• F.1EQ-5, 4577, 81 Sqn, Qayyarah,
Iraqi AF, June 1985
• F.1EQ-6, 3-6211, 102 Tac Ftr Sqn,
Chahbahar, Iran AF, 2011
• F.1ED, 502 or 508, Libyan People’s
AF, Luqa, Malta, 2011-12
KeyModelWorld.com
ON THE SHELF | Aircraft kits
LARGE-SCALE ‘EMIL’
Messerschmitt Bf 109E
By: Airfix Scale: 1/24
Item no: A12002V Price: £49.99
Web: www.airfix.com
Arguably, Airfix revolutionised largescale modelling with its 1/24 ‘Super
Kits’; its Bf 109E was one of the last
of the initial batch released between
1970-73, making it a logical inclusion
in the firm’s Vintage Classics
series. Parts are unchanged, being
presented on six styrene runners,
with rubber tyres supplied for the
main and tailwheels. The decal sheet
features the same two schemes
as the original 1972 release, but
AVENGING RETURN
has otherwise been revised and
updated, with additional airframe
stencilling plus individual instrument
dials for the cockpit. While there is
flash present, it’s unsurprising as
the moulds are almost 50 years old,
but there’s a well-appointed cockpit
and engine, plus moveable control
surfaces and undercarriage and it
would form a sound base for those
wanting to super detail the model.
The two markings options are:
• Bf 109E-3, Yellow 10+1, 9./JG 26
‘Schlageter’, France, summer 1940
• Bf 109E-4, Black << +, Oblt Helmut
Paul Emil Wick, 1./JG 2 ‘Richtofen’,
France/Belgium, October 1940
SIRENS AND SKIDS
Ju 87B-2/U4 ‘Stuka’ with Skis
By: Zvezda Scale: 1/72
Item no: 7323 Price: £11.50
Web: www.hobbyco.net
Zvezda has reworked its recent
1/72 Junkers Ju 87 Stuka snapfit offering to depict the type as
fitted with skis on World War Two’s
Eastern Front. A new runner is
added for these parts plus the
tailwheel has been modified to
replicate a skid – otherwise the
three frames are unchanged. Glue
isn’t required for construction,
KeyModelWorld.com
Junkers Ju 188A-2 ‘Rächer’
By: Revell Scale: 1/48
Item no: 03855 Price: €51.99
Web: www.revell.de/en
As the only injection-moulded
quarter-scale depiction of the type,
Dragon’s 1/48 Junkers Ju 188A-2
Rächer (avenger) is highly soughtafter, because it has not been
available since the 1990s – happily,
it’s been re-boxed by Revell.
It comprises 15 styrene runners
plus a small photo-etched brass fret
and House of Phantoms-designed
decals. Modellers have noted the
propellers appear undersized, but
otherwise the detail is good, with
the busy interior a highlight.
Notes with the painting/decaling
instructions highlight the first
option depicts an A-2 modified for
a pathfinder role, and is based on
photographs where the aircraft is
undergoing repair to its port wing,
which has different colouration:
• Wk.Nr. 0404, 3E+HK, 2./KG 6,
Melsbroek, Belgium, Oct 1944
• Wk.Nr. 160096, U5+KH, 1./KG 2,
Bron, France, Mar 1944
DRAGON IN PIXELS
yet there’s no scrimping on
detail: exterior surfaces feature
exceptionally fine panel line
engravings and raised rivets, plus
separately fitted dive-brakes.
Similarly, the interior features
moulded sidewall detail, a choice
of instrument panels with/without
raised dial facings plus a pair of
crew figures.
This is a superb Luftwaffe offering
for beginners and experienced
modellers alike. A single markings
scheme is supplied:
• DJ+KA, Eastern Front, winter 1941
JASDF F-15J Eagle 60th Anniversary
Special Painting
By: Platz Scale: 1/72
Item no: AC-33 Price: US$36.57
Web: www.platz-hobby.com
Platz has certainly got the most from
its 1/72 F-15J Eagle tooling, and its
new iteration offers a 303 Squadron
machine in digital grey camouflage
to mark the Japan Air Self-Defense
Force’s 60th anniversary in 2014.
It features impressive panel line
engraving, but a real bonus is the
presence of full-length air intake
trunking. The cockpit is a busy affair,
benefiting from a five-piece ejection
seat, an instrument panel and side
consoles with moulded detail, plus a
superb rear bulkhead and avionics
bay. Mitsubishi AAM-3 missiles are
provided in line with the type’s airdefence role, as are AAM-4s plus
three fuel tanks.
The special scheme is provided in
decal form, along with formation
light strips and a plethora of stencils
– airframe details are:
• 62-8864/864, 303 Sqn ‘Fighting
Dragon’, Komatsu, Japan, 2014
Airfix Model World 91
ON THE SHELF
SHOOT AND SCOOT
M12 GMC
By: Airfix Scale: 1/35
Item no: A1372 Price: £24.99
Web: www.airfix.com
Academy’s M12 returns in Airfix
packaging with a new set of
markings for two late-war machines.
It’s one of the former’s best Sherman
variant kits, with a superbly detailed
interior and fighting compartment.
The six styrene runners are
unchanged and these are
accompanied by vinyl tracks, lengths
of thread for the towing cable and
recoil/entrenching spade, which can
be raised or lowered.
ARMOURED DEMAG
Unlike similar offerings from other
companies, there are plenty of
extras in the form of spare/readyto-fire ammunition, engineering
tools and hull stowage – arguably
all that’s missing is a gun crew.
All parts are moulded crisply and
the detail is excellent throughout,
notably for the hull fittings plus
driver’s compartment and engine
transmission. The two schemes are:
• 9A557-F/B10 The Persuader, B Bty,
557th Armd Field Arty Bn, US 9th
Army, Linnich, Germany, Feb 1945
• Choo-Choo-Bam, C Bty, 557th
Armd Field Arty Bn, US 9th Army,
Echternach, Luxembourg, Feb 1945
PETITE DEFENDER
Sd.Kfz. 250/1 Ausf.A
(Alte Ausführung)
By: Special Armour Scale: 1/72
Item no: SA72019 Price: €15
Web: www.specialhobby.eu
On a theme of small-scale German
half-tracks, Special Armour has
re-boxed MK 72’s 1/72 Sd.Kfz.
250/1 Ausf.A Demag-built troopcarrier, which features a hexagonal
cross-section. It differs slightly from
the initial release, with a photoetched brass fret included, plus a
sand-toned runner now features
a selection of jerrycans – three
grey frames are unchanged. Finely
moulded detail is impressive, with
delicate floor texture, internal
controls and separate armament
visible through the type’s
open top, plus external panel
lines and rivets are engraved/
embossed, respectively. Three
camouflage schemes include a
winter-whitewashed vehicle, plus
Panzergrau and desert liveries
– the latter with a selection of
additional jerrycans and stowage:
• WH-1449561, 1.
Schützenpanzerwagen, 16. Pz.Div,
Eastern Front, winter 1942-43
• WH-1030186, Pz.Div
‘Großdeutschland’, Voronezh
Oblast, Soviet Union, June 1942
• WH-679984/White 1004, 90.
Leichte Infanterie-Div, Gazala,
Africa, April 1942
DINKY-SIZE GENERAL
US Light Tank M3A1 Stuart
By: Zvezda Scale: 1/100
Item no: 6265 Price: £4.25
Web: www.hobbyco.net
FCM 36
By: ICM Scale: 1/35
Item no: 35336 Price: £28.40
Web: www.hannants.co.uk
French armour subjects are gaining
in popularity, with the Forges et
Chantiers de la Méditerranée (FCM)
36 light tank being ICM’s latest
new-tool offering. Despite the
type’s compact size, parts are held
on six busy runners, with two-piece
vinyl tracks supplied for the running
gear. External detail is superb,
92 Airfix Model World
comprising delicately engraved
panel lines and raised rivets, while
there are also separate engine
deck and crew hatches. There’s
no lower hull interior and the turret
contains just the breech for the
37mm gun, so ICM’s crew figures
(35467 – see p93, June 2021) may
be of use. Markings options are:
• 30002/White 53, 7th Bataillons
de Chars de Combat (BCC),
Chemery, France, May 14, 1940
• 30097, 4th BCC, France,
June 10, 1940
Intended for wargaming via the Art
of Tactic linkup, this 1/100 snaptogether M3A1 is ideal for those
just entering the hobby, with low
parts count – just 11 items on the
single styrene runner – and ease of
construction.
That said, there
has been no
scrimping on detail,
with impressive
moulded features
on the five-part
hull and onepiece running gear
sections. Options
are limited to
just a rotatable
turret making it
a splendid rainy
afternoon or
weekend build, depending on how
much painting is undertaken, and
it could be displayed solo or with
one or more of Zvezda’s other
same-scale releases. No markings
or colour schemes are provided,
although most M3A1 Stuarts were
either painted overall Olive Drab
or in desert camouflage; national/
unit markings would also need to be
obtained from other sources.
KeyModelWorld.com
ON THE SHELF | Military kits
TANK AND ‘BATTLE TAXI’
FV 432 Mk.2/1 and Chieftain Mk.5
By: Takom Scale: 1/72
Item no: 5008 Price: £36.99
Web: www.bachmann.co.uk
Having surprised and delighted
modellers with its newly tooled
1/72 Chieftain Mk.10/11 combo,
Takom has included different parts
to allow an earlier Mk.5 tank to
be built, plus original components
for a same-scale FV432 Mk.2/1
armoured personnel carrier. The
former comprises six runners plus
two photo-etched (PE) brass frets,
with Mk.5-specific items held on a
replacement frame (Runner J) and a
separate upper turret – these allow
for either a British Mk.5 or export
Mk.5/5P for Iran to be built. As with
its previous offerings, there is no
interior, but the external detail is
splendid, with clever use of PE to
enhance the engine grilles, turret
stowage baskets and to provide
scale-thickness side skirt panels.
Tracks are supplied in link-and-
length form, and these fit snuggly
around the running gear, which
includes accurately rendered
Horstmann-style suspension
bogies. Differences between the
later variants and the Mk.5 appear
to have been captured faithfully,
including the changed turret profile
(lacking the Stillbrew armour
package), storage boxes, baskets
and smoke dispenser mounts. Three
schemes are included for the tank:
• Chieftain Mk.5, White 11B,
BATUS, 1991.
• Chieftain Mk.5/5P, 4MM57,
242nd Bn, 4th Bde, 21st Inf Div,
Shalamche, Iran, May 1983
• Chieftain Mk.5/5P, Red 12,
242nd Bn, 4th Bde, 21st Inf Div,
Shalamche, Iran, May 1983
The newly tooled FV 432 Mk.2/1
appears to have benefited from
the firm’s recent 1/35 offering and
comprises four styrene runners and
a single PE fret. Like the Chieftains,
this kit lacks an interior, but Takom
has really gone to town on the
Brengun appears to have
‘downsized’ the ex-Extratech 1/72
FuSE-65 Würzburg-Riese radar
system in subsidiary firm Hauler’s
range to produce this 1/144 version.
As with the larger rendition, it
comprises 24 cast components
(covering the concrete base,
turning and lifting apparatus) plus
there are two photo-etched brass
KeyModelWorld.com
– this also has a neat styrene jig to
help modellers achieve the correct
angles/shape. There are three
markings options:
• FV432 Mk.2/1, Royal Scots
Dragoon Guards, 7th Armd Bde,
British Army, Iraq, 2003
• FV432 Mk.2/1, Yellow 11, British
Army
• FV432 Mk.2/1, White 31, OPFOR
THE LEADER’S HEAVY HITTER
DOWNSIZED DISH
FuSE-65 Würzburg-Riese
By: Brengun Scale: 1/144
Item no: 144049 Price: £30.64
Web: www.brengun.cz
external features, from the integrally
moulded grab handles and hatches
to the torsion-bar suspension plus
link-and-length tracks. A pintlemounted GPMG is supplied for the
commander’s hatch, and there’s a
full set of engineering tools, while
PE components are included for
the engine grilles, light guards and
optional roof-mounted stowage box
frets containing parts to recreate
the 24ft antenna dish used for
enhanced range/accuracy. Note, no
material is supplied for the mesh
that should cover the inner face of
this item. Given the small scale, it’s
unsurprising some of the fine detail
hasn’t been carried over, but parts
still exhibit crisp concrete panelling
and rivetted metal textures. Basic
painting instructions suggest light
grey for the base section, with a
darker tone for the remaining areas
– though modellers may wish to
check references.
JS-2 Stalin II
By: Dragon Scale: 1/35
Item no: 6537 Price: £54.99
Web: www.hobbyco.net
Dragon’s 1/35 JS-2 Stalin II Soviet
heavy tank includes parts for three
options: either a JS-1 early model
with 85mm gun, a JS-2 with 122mm
weapon or a JS-2m with a lateproduction simplified hull front.
Compared with the firm’s other
‘3in1’ packages, the instructions
are well designed, making them
easy to follow. Furthermore, the
firm’s 1/35 Soviet Infantry Tank
Riders (6197) are also included –
though modellers should note the
two frames for these feature heavy
flash in places. Parts for the tank
are held on seven styrene runners
with a separate lower hull and DS
Magic Track individual links, plus a
selection of schemes:
• JS-2, White 051, Polish People’s
Army, Eastern Front, 1944
• JS-2, White 32, Polish People’s
Army, Eastern Front, 1944
• JS-2m, White 454 БОЯВАЯ
ПОАРУГА, 7th Gds Tk Bde, 85th
Gds Hvy Tk Regt, Red Army,
Berlin, Germany, 1945
• JS-2m, White 443, 7th Gds Tk Bde,
104th Gds Hvy Tk Regt, Berlin,
Germany, 1945
• JS-1, unidentified unit, 1943
Airfix Model World 93
ON THE SHELF
ON THE SHELF | Sci-fi kits
TOW-CABLE SPEEDER
Snowspeeder
By: Revell Scale: 1:29
Item no: 5679 Price: £42.49
Web: www.revell.de/en
Released to celebrate the 40th
anniversary since The Empire Strikes
Back first appeared at the cinema,
Revell’s 1/29 Snowspeeder has
returned in Model Set packaging,
with six pots of own-brand acrylic
paint, a Contacta Professional
Mini liquid cement applicator and
a paintbrush. Components are
unchanged since it’s initial release
as a snap-together ‘easykit’ offering,
with large locating pins that will
READY FOR RESCUE
Thunderbird 2 Launch Bay
By: Adventures in Plastic
Scale: 1/350
Item no: AiP10011 Price: £89.99
Web: www.bachmann.co.uk
Fans of the 1960s TV series
Thunderbirds are in for a treat with
this 1/350 set from Adventures
in Plastic, which is a re-boxing of
the IMAI/Aoshima kit. It comprises
23 styrene runners, which are
supplied in a mix of red, yellow,
blue, white, green and grey,
plus separate Thunderbird 2
94 Airfix Model World
allow assembly without the need for
glue. Perhaps unsurprisingly, there’s
a low parts count, and this would
make for a great weekend project,
although basic assembly could be
achieved within half-an-hour. Unlike
other large-scale Snowspeeder kits,
moving parts are limited to just the
canopy; the effective cockpit will be
easily visible through the crystalclear transparencies, so it’s fortunate
Revell’s crew figures are among the
more convincing currently available.
All ’speeder trim is supplied in
decal form, which will ease painting
considerably and there is an A3 film
poster for The Empire Strikes Back.
upper/lower body halves and
‘beak’, two walls, a printed floor
panel and base, making this a
comprehensive package. When
assembled this creates a section
of the International Rescue hangar,
and includes three cargo pods for
the Thunderbird vehicle, each of
which has a detailed interior. There
is also a choice of miniatures to
place inside the pods: The Mole,
Thunderbird 4, Radio Transmitter,
Thunderizer, Fire Appliance,
Firefly, Recovery and two types
of Excavator, allowing for a great
diorama scene.
As a bonus there
are extras in the
form of samescale FAB 1,
helicopter and US
Army/Police helijets. Markings for
the machinery are
supplied in decal
form, with selfadhesive stickers
for the walls.
SCOTT TRACY’S RESPONDER
Thunderbird 1
By: Adventures in Plastic
Scale: 1/144
Item no: AiP10001 Price: £29.99
Web: www.bachmann.co.uk
Modellers have been eagerly
awaiting Adventures in Plastic’s
Thunderbirds kits, and these
re-boxed Aoshima/Imai offerings
have now been released. First to
arrive – in both 1/144 model form
and usually on the scene of an
International Rescue mission – is
Scott Tracy’s Thunderbird 1 rapidresponse rocket, which comprises
five styrene runners and six plastic
rods to act as ballast. Parts are
moulded beautifully with delicate
engraved panel lines, while a
cleverly engineered locking system
means the variable-geometry
wings can be posed, plus there
are optional parts for deployed
undercarriage – this also features
a choice of skis or wheels, to suit
appearances in different episodes.
The styrene is a silvery-grey colour,
so beginners may wish to paint
just the red nosecone and blue
accents – otherwise, Humbrol
paint references and crisply printed
decals are provided for decorating
the completed model.
POD-DEPLOYED DRILL
The Mole
By: Adventures in Plastic Scale: 1/72
Item no: AiP10007 Price: £45.99
Web: www.bachmann.co.uk
International Rescue’s specialised
pod vehicles are arguably
more fascinating than the main
Thunderbirds themselves, with The
Mole tunnelling machine being a
firm fan favourite. Adventures in
Plastic’s 1/72 offering is one of the
more technical kits in its range,
comprising seven styrene runners,
a separate
lower hull,
vinyl trackmounting
loops, plus a
selection of
metal washers,
screws and
rods. These
allow both
sets of running
gear to roll,
the drill
to spin, the lifting gantry to be
posed and the main section to be
removed from its carrying vehicle
from one construction sequence.
As such, this is a superb offering,
but sadly isn’t suitable for a novice.
Along with options for different
rear facings, sharply printed
decals include a choice of serial
numbers pertaining to episode
appearances:
56156, Pit of Peril
53250, City of Fire, The Duchess
Assignment, Cry Wolf
KeyModelWorld.com
V
NEW quarter AD Airfix July OUTPUT.pdf
ETERANUS
01765 605 315
www.veteranus.co.uk
09:19
THE KITS YOU
WANT!
Join us at Veteranus Auction Group on Facebook
KITS TO SELL?
The easiest way to sell your surplus & unwanted kits
What we do... •
•
•
•
Collect your kits free of charge*
Sell them for you.
Handle all payments, pack & despatch.
Pay you promptly.
£40
M
inc p&p
Y
CM
MY
CY
CMY
K
• Box them up and tell us when to collect.
• Straight forward single commission charge.
• No hidden extras.
Email: sales@veteranus.co.uk
www.veteranus.co.uk
each
C
Call 01765 605 315
*minimum value applies
095_AMW_JUL21_ad.indd 1
07/05/2021
DAYS ofTHUNDER
HOBBIES
Bargain buys & hard to find... You’ll find plenty of choice
on our Facebook auctions, easy & transparent bidding
and fast despatch from our warehouse
Your bit...
1
Lightning F6 XS904 of No.11
Squadron powering off the
runway at RAF Binbrook...
For reference, I built the superb AIRFIX
1/48 kit (photo’s outside for lighting and
angle). I also had invaluable help from the
LPG at Bruntingthorpe, where ‘904 is now based.
If you’d like a print for yourself, these come individually artist-signed on
quality stock, print size 58cmx44cm, image area 42cmx26cm. Priced at
£40 including signing and P&P. Please ask about remarques.
• If you’d like a unique Lightning painting/drawing (or other
aircraft) please ask about my great value commissions
07747 529880 grahamhe@hotmail.co.uk
www.grahamhendersongava.co.uk
follow me on
Graham Henderson, GAvA Aviation
19/05/2021 15:38:06
ON THE SHELF
GUSTAV ‘DRIVER’
DEALING WITH DANGER
Soviet Firemen (1980s)
By: ICM Scale: 1/35
Item no: 35623
Price: £9.80
Web: hannants.co.uk
Bf 109G German Pilot seated
By: CMK Scale: 1/48
Item no: F48368 Price: €9.80
Web: www.cmkkits.com
Modellers wanting to pose their
Eduard Bf 109 with a crew figure
in the cockpit will find CMK’s fourpart pilot ideal. The main torso and
arms component is cast integrally
with the seat back and ‘bucket’
PILOTS AND
PUPPIES
Italian Pilots in Tropical Uniform
(1939-1943)
By: ICM Scale: 1/32
Item no: 32110 Price: £12.99
Web: www.hannants.co.uk
While perhaps one of ICM’s
more unusual figure sets, this trio
of 1/32 Italian aircrew wearing
tropical-theatre uniforms captures
a common image from World
War Two: combatants with their
mascots – in this case, a pair
of dogs. These appear to be a
Rottweiler adult and puppy – the
former is a standalone threepiece figure, while the latter is
held in the arms of a standing
overall- and cap-wearing man.
The other figures are sitting on
a wheel spat (ICM’s same-scale
CR.42 is suggested on the box
art) while petting the other dog,
and standing while leaning on a
propeller, respectively. Both wear
shorts but the seated figure has a
flying cap and goggles.
96 Airfix Model World
section and features superb
sculpting and detail, notably on the
harnesses and flying overalls, while
the separate booted feet include a
flare pistol pouch and associated
cartridges – details often missed.
The head is excellent, with a
convincing facial expression and an
accurate rendering of the Luftwaffe
flying helmet, complete with topmounted adjustable strap.
ON PARADE
Polish Fighter Pilot in full
dress uniform
By: ToRo Model Scale: 1/48
Item no: 48F45 Price: €8
Web: www.toro-model.com.pl
Here’s a smart-looking addition for
a parade/ceremonial diorama scene
in the form of a 1939 Polish fighter
pilot, complete with a short sword in
a scabbard. The figure is depicted in
a relaxed pose, with left hand on the
sword hilt and the right hand resting
on his waist. Sculpting and casting
are first-rate, with well-rendered
tunic pockets, sword harness and
belt, although the fragile sword was
damaged in AMW’s sample.
Released originally as
part of ICM’s Chernobyl
series (35902, see
Reviews, August 2020),
this neat four-figure
set of fire fighters has
now been issued as a separate
product. Ideal either on its own
or with associated tenders,
there’s plenty for modellers to
savour: one figure is holding a
fire hose (included as a length of
vinyl tubing), two appear to be
discussing/directing events (one
NOT ALL SOLDIERS
WEAR CAPES...
Soviet Machine Gun Squadron
Berlin 1945
By: Zvezda Scale: 1/72
Item no: 6269 Price: £4.25
Web: www.hobbyco.net
While intended for use with the
firm’s Art of Tactic wargaming
system, Zvezda’s small-scale
figure sets cover unusual subjects
– such as this Soviet machine gun
squadron – and the inclusion of a
combined base could even lend
itself to a vignette. Five soldiers
can be constructed without
glue via large locating/securing
pins, and these include a pair of
individuals wearing plash palatka
(cloak tents). Finely moulded
weapons boots, straps and even
binoculars are also discernible
on the figures, while a large joint
base depicts a worn piece of
roadway with neatly engraved
paving detail; alternatively,
individual stands are supplied.
However, no painting guidance is
provided for any of the elements.
has a grapple/hook tool) while the
fourth is depicted as if operating
controls on a tender. All poses are
convincing and there is a choice
of adding a backpack/respirator
equipment to each figure, while
clear styrene visors are supplied
for the protective headgear.
KOREAN WAR
COMBATANTS
Chinese Volunteers
By: Dragon Scale: 1/35
Item no: 6806 Price: £12.99
Web: www.hobbyco.net
Dragon’s 1/35 Chinese Volunteers
depict forces sourced from the
country’s official People’s Liberation
Army reclassified as the People’s
Volunteer Army to avoid direct
conflict with the United States. It’s a
re-issue of a 1995-tooled package,
comprising a mammoth 73 parts on
a pair of runners – this breakdown
allows fine detail to be captured
without obvious seam lines or flash.
As such, the padded uniform is
replicated via delicate engravings
and ushanka hats include moulded
texture denoting fur sections. A
range of armaments and associated
ammunition pouches are provided,
such as PPS 43, PPSH 41 and
ZB vz. 30 machine guns – poses
include two soldiers walking with
these weapons raised, a crouched
individual firing and another
throwing a hand grenade.
KeyModelWorld.com
ON THE SHELF | Figures and auto kits
QUATTRO RACER
Audi R8 LMS 2015 Macau FIA GT
By: Hobby NuNu Scale: 1/24
Item no: PM24024 Price: US$42
Web: www.platz-hobby.com
Hobby NuNu’s second boxing of
its Audi R8 LMS contains the same
eight styrene runners, single-piece
bodyshell and four vinyl tyres as the
initial offering, but complements
these with markings for a grandtourer racer at the Macau Grand
Prix (#6) or a ‘factory’ machine
(#7). This means there’s just a basic
representation of the suspension,
LOTS OF TROUBLE, USUALLY SERIOUS
but the cab interior is excellent.
Detail is provided mostly in moulded
form, with decals for the dashboard
and steering wheel controls/displays
plus five-point harness. The new
markings are arguably the highlight,
as they supply all the elaborate trim,
plus all necessary sponsorship and
company logos. All the modeller
needs to do is paint the overall
colour, as the decals appear to
have sufficient opacity to prevent
underlying tones from being visible,
most notably on the white sections
for the Macau racer.
PICK UP THE HOBBY!
Ford F-150 Raptor
By: Airfix Scale: N/A
Item no: J6037 Price: £14.99
Web: www.airfix.com
Here’s another Quickbuild release
aimed at drawing younger
modellers to the hobby, in the form
of a Ford F-150 pick-up truck with
a deep blue finish and ‘Raptor’
branding, denoting this is the highperformance version. As usual,
it takes the form of a push-fit kit,
KeyModelWorld.com
with the 43 shaped ‘blocks’ also
being pre-coloured – some items
will require removal from runners
and, therefore, adult supervision.
Adding to the ease of construction,
bodywork legends, head/tail lights
and registration plates are supplied
as self-adhesive stickers. Despite
the simplicity, there’s still a good
level of detail, with the one-piece
chassis featuring moulded exhaust
and drivetrain, while there’s a full
interior and rear cargo area.
Lotus Europa Special
By: Tamiya Scale: 1/24
Item no: 24358 Price: £39.99
Web: www.hobbyco.net
Tamiya’s 1/24 Lotus Europa has
returned with a newly tooled runner
containing RS Watanabe wheels
(similar to Minilites) and optional
rear wing – both were popularised
in Japan by The Circuit Wolf manga.
Otherwise, the four frames, onepiece bodyshell, vinyl tyres, photoetched metal fret, decals and selfadhesive markings are unchanged,
depicting the 1971-onwards
vehicles with cut-away rear
bodywork. ‘Special’ features were
added to celebrate the Lotus F1
team’s partnership with John Player
Special cigarette sponsorship –
these included an uprated ‘big
valve’ engine, badges on the
b-pillar and gold-toned pinstriping.
These are represented by a
separate sub-assembly, plus selfadhesive and waterslide markings.
The interior is right-hand drive only,
while a single British registration
plate is supplied – no front bumper
equivalent or raised letters for the
grille housing are provided.
BOXY BEEMER
BMW M3 E30 Gr.A ’91 Auto Tech
By: Hobby NuNu Scale: 1/24
Item no: PN24014 Price: US$42
Web: www.platz-hobby.com
Comprising eight styrene runners,
a one-piece bodyshell and four
vinyl tyres, Hobby NuNu’s BMW M3
Grand Tourer returns in Auto Tech
racing team livery, as it appeared at
the 1991 Japanese Touring Car (JTC)
and Macau Group A events. It’s a
typical ‘kerbside’ offering – despite
the provision of a separate bonnet
– with a well-appointed cab with full
roll-cage assembly and all racing
accoutrements, such as Recaro-style
seat and even a fire extinguisher.
Markings are included for cars #35
(crewed by Roland Ratzenberger
and Thomas Danielsson) and #34
(Andrew G Scott and Philippe
Adams) for the JTC race, plus #18
(R Ratzenberger), and include team
and sponsorship logos/legends. The
window trim is also a neat touch.
Airfix Model World 97
ON THE SHELF
PAINTED PURSUERS
MAGYAR MESSERSCHMITTS
Messerschmitt Bf 109G-6 in
Hungarian Service Vol.II
By: SBS Model Scale: 1/48
Item no: D48021 Price: €10
Web: www.sbsmodel.com
Pacific Warriors Vol.1
By: Exito Decals Scale: 1/48
Item no: 48011 Price: €12.75
Web: www.exito.site
It’s rare aftermarket companies can
supply beautiful markings, reference
material and display options in one
package, but these are hallmarks
of Exito Decals’ products, including
this collection of three 1/48 Pacific
theatre aircraft. As usual, painting
instructions take the form of doublesided posters, with side-view
profiles and airframe information on
one side, with other views, insignia
details, notes and period photos on
the other, while Cartograf-printed
decals exhibit perfect register and
impressively fine detail.
Three airframes all feature
striking artwork:
• P-51D-25-NA, 44-72640/Black
501, Capt Evelyn Neff, 457th FS,
506th FG, Iwo Jima, Japan, late
spring/summer 1945
• P-40N, Yellow 47 Mary Lou, Lt
David R Winternitz, 8th FS,
49th FG, New Guinea, February
14, 1944
• P-38L-5-LO, 44-26490/Black E
Jean Creamer, Lt ET Johnson,
36th FS, 8th FG, Ie Shima, Ryukyu
Islands, late summer 1945
SENNA’S RALLYING EXCURSION
MG Metro 6R4 Wales 1986 Ayrton
Senna – Test Car
By: Decalcas Scale: 1/24
Item no: DCL-DEC040
Price: £17.49
Web: www.decalcas.com
Arguably one of the sport’s
greatest-ever drivers, Ayrton
Senna is revered by Formula 1
fans, but it’s a little-known fact he
tested rally machinery in Wales
during 1986: one of these was
the MG Metro 6R4 replicated by
these Decalcas markings. The set
is intended for Belkit’s recent 1/24
kit, and comprises a small sheet
with all appropriate MG, Austin
98 Airfix Model World
Rover, Michelin, Ferodo, Cars,
Champion, Exide and Bilstein
branding, plus registration plates
and even metallic bonnet locks.
Despite these colourful graphics,
the otherwise gloss white livery
is somewhat bland – note the
instructions suggest red front
wing endplates and omit a gold/
yellow strip around the underlying
bumper. Furthermore, reference
photos are somewhat scarce (most
show Senna posing with all the
test vehicles), but these indicate
minimal weathering. Nonetheless,
Decalcas should be applauded for
putting this unfamiliar but highly
interesting subject in the spotlight.
This splendid collection of four
Hungarian Air Force Bf 109G6s is the second of its type from
SBS Model. As is usual for this
manufacturer, just the basic
national and unit insignia are
included, but there are enough of
the former to make four models,
including noted Hungarian aces
László Pottyondy and Kálmán
Nánás. All examples are clad in
standard latewar RLM 74, 75,
76 camouflage
with Eastern
Front theatre
bands on the
wings and
fuselage. All
items are well
printed on gloss
carrier film,
with excellent
register and
opacity – spare long and short
spiralschnauze (the spiral on the
spinner) are included. There are
four airframes:
• V3+74, Cpt. Jósef Kovács, 102.
Önálló Vadászszázad, Mokre,
Poland, April 1944
• V.8+53, Hadnagy Kálmán
Nánási, 101/5. Vadászszázad,
Zalaszentgrót, August 1944
• Red 2, 102/1. Vadászszázad,
Zamose-Mokre, Poland,
August 1944
• Black 1, Wk.Nr. 167209, Cpt.
László Pottyondy, 102/2.
Vadászszázad, Munkáes,
October 1944
BOMBER BIRDS AND DUCKS
F-15E Strike Eagle Iraqi Freedom Pt3
By: LPS Hobby Scale: 1/72
Item no: LPM72-39 Price: £13.99
Email: Ipsi1973@yahoo.com.br
Fans of F-15Es have plenty to
choose from with LPS Hobby’s
collection of Iraqi Freedomassociated decals. The third part
of its study provides complete
markings and airframe stencils
for two Al Udeid, Qatar-based
airframes, including items on the
inner tails commemorating the
centenary of the Wright Flyer’s first
‘hop’ and labelling
for the type’s
Litening, LANTIRN
and Sniper pods.
Both options are
from the 336th
Fighter Squadron
and wear colourful
nose art, depicting
an eagle leaning
on a bomb and
a duck riding
a laser-guided
bomb, respectively
– several decals (including the
caricatures) are two-part ensembles,
with separate colour and black and
white sections to prevent register
issues. The decals are printed on
gloss carrier film, which should
minimise silvering, although they
appear slightly thicker than usual, so
modellers may want to use setting
solutions for best results. The two
schemes are:
• 89-0494 Dirty Bird, 336th FS,
4th FW, March-April 2003
• 88-1687 Mad Duck, 336th FS,
4th FW, March-April 2003
KeyModelWorld.com
ON THE SHELF | Decal sheets
FELINE BUGS AND GUPPYS
m
Ke y
co
VIE
E
IN
several French Tiger Moths.
Dissimilarities aside, the set
forms a superb resource for
these types, with decals,
contextual information,
interior painting advice
plus kit suggestions. While
placement instructions are
greyscale, these also include
helpful notes and reference
for the selection, including:
• Avenger TBM-3E, 774/6.F-3,
Flotille 6F, Lartigue,
Algeria, 1953
• Avenger TBM-3S, 53461/15.
S4, Escadrille de Servitude
15S, Alger Maison-Blanche,
Algeria, 1953
• Avenger TBM-3W, 9.F 11,
Flotille 9F, Arromanches,
Suez, 1956
Grumman Avenger Aéronautique
• Avenger AS.4, XB296/366,
Navale/Royal Navy, DH.82 Tiger
815 NAS, RNAS Ford, West
Moth Armée de l’Air
Sussex, 1955
• Avenger AS.5, XB320/998/J,
By: Model Art Decal System
Ship’s Flight, HMS Warrior,
Scale: 1/72
Operation Grapple, 1957
Item no: 72/079 Price: £9
• Tiger Moth, Black 5, EC
Web: www.modartdec.com
2/595, Armée de L’Air
de Vichy, Tong,
Model Art Decal System’s
MORE ONL
W
Indochina, 1941
products tend to
• Tiger Moth, NL867/
combine unrelated
Yellow 46, École de
subjects – this 1/72
Pilotage (piloting
sheet covers postM
o d e or ld .
school) Meknès,
war French and British
lW
Morocco, 1946
Grumman Avengers, plus
AIR FORCE RUNABOUTS
Jeeps in Service with the RAF
Part 2
By: H-Models Decals
Scale: 1/35 Item no: HMDT35051
Price: £14.50
Web: www.ghstudio.net
H-Models’ extensive compilation of
Jeep Willys MB markings continues
with this limited-edition set that
focuses on vehicles operated by
the RAF during World War Two.
Although small, the single sheet
supplies enough markings for four
models, and includes large and
small roundels often seen on the
bonnet and bumpers or windshield
frames, respectively. All items are
KeyModelWorld.com
commendably thin, with excellent
register and opacity – the latter is
particularly apparent on the white
and yellow sections.
Four options are included, with two
RAF Grey machines and a pair
clad in disruptive Olive Drab/Dark
Earth camouflage:
• Ambulance, RAF63576/White
T/25, England, 1943
• Utility, Type 1900, RAF83, 127 Wg
(RCAF), RAF Kenley, England 1944
• Utility, Type 1900, White 83, 127
Wg (RCAF), Calvados, France,
summer 1944
• Utility, Type 1900, 989
XUK/B/100/126375, 100 Wg,
England 1944
COMMEMORATIVE SPITS
Supermarine Spitfire Battle of
Britain 75th Anniversary Pt.2
By: Xtradecal Scale: 1/72
Item no: X72224 Price: £7.99
Web: www.hannants.co.uk
Released for the 75th Anniversary
of the Battle of Britain, this tenaircraft ensemble from Xtradecal
is ideal for those wanting to build
an early Spitfire that participated
in that pivotal struggle in the
summer of 1940. It caters for Mk.Ia
and Mk.IIa variants, and provides
national and unit markings
(including fin flashes) – stencils
must be sourced from the kit. The
choices are:
• Mk.Ia, PE-R, 609 Sqn, RAF
Middle Wallop
• Mk.Ia, X4253/FY-N, Sgt Wilfred
Duncan-Smith, 611 Sqn,
RAF Rochford
• Mk.Ia, L1027/LO-A Izal Get You,
602 Sqn, RAF Westhampnett
• Mk.Ia, R6691/PR-J, Flt Lt Frank
Howell, 609 Sqn, RAF
Middle Wallop
• Mk.IIa, P7351/L-Z-I, Flt Lt Charles
Green, 421 (Reconnaissance) Flt,
RAF Gravesend
• Mk.Ia, LO-P, 602 Sqn,
RAF Westhampnett
• Mk.Ia, EB-L, Plt Off Ted Shipman,
41 Sqn, RAF Catterick
• Mk.Ia, EB-G, Plt Off Eric S Lock,
41 Sqn, RAF Hornchurch
• Mk.Ia, L1004/LO-Q Kedoying, Sqn
Ldr A Johnstone DFC, 602 Sqn,
RAF Drem
• Mk.Ia, X4278/ZD-D, Fg Off JW
Cutts, 222 Sqn, RAF Hornchurch
MEDITERRANEAN BEAUTIES
B-25 (Late) Pin-Up Nose Art Part IV
By: Foxbot Scale: 1/48
Item no: 48-044A Price: £16.70
Web: www.foxbot.com.ua
Also available as a combined
package with stencils (48-044),
Foxbot’s collection of late-model
B-25 Mitchell schemes is an ideal
means of replicating World War Two
airframe artwork on the type.
National insignia, airframe/
serial numbers, piloting
details plus airframe-specific
items are held on a small,
gloss-printed sheet – the
artwork is arguably the most
impressive aspect, though
paler tones appear somewhat
translucent. Six options are:
• B-25J-15, 44-28938/03
Heaven Can Wait, 445th
BS, 321st BG, 12th Air Force
(AF), Mediterranean, 1944
• B-25J-1, 43-27559
She’s Engaged, 380th
BS, 310th BG, 12th AF,
Mediterranean, 1944
• B-25H-10, 43-4244/White
13 Ol Grammaw/Peggy, 81st
BS, 12th BG, Italy, 1944
• B-25G Strafer, Rhode Island Red,
probably 41st BG, 7th AF,
Okinawa, 1945
• B-25J-1, 43-27490/White 45 Mrs
‘C’, 446th BS, 321st BG, 12th AF,
Mediterranean, 1944
• B-25J-1, 43-27769/Black I Miss
Fancy Pants, 445th BS, 321st BG,
12th AF, Mediterranean, 1944
Airfix Model World 99
ON THE SHELF
PIXEL PERFECT
F-4EJ Phantom II JASDF ADTW
‘Digital Camouflage’ 2017
By: DXM Decals Scale: 1/48
Item no: 01-4339 Price: US$27
Web: www.dxmdecals.com
While this mix of green, black
and brown tones in the ‘digital’
camouflage scheme may be
reminiscent of the video game
Minecraft, it’s also a real-world livery
applied to one of Japan’s F-4EJ
Phantom II aircraft, replicated in
1/48 by DXM Decals. This four-sheet
package provides beautifully printed
markings for the paler elements
ON THE SHELF | Decal sheets
of the striking
scheme, plus a
stunning array of
stencils, national
insignia, walkway
indicators, warning
bands and unit
markings. Even the
tiniest of stencils
features fully
legible characters.
Register appears
perfect and the
high-gloss carrier
film should ease
fears of silvering,
particularly given
the camouflage sections must be
applied before all other items.
Put simply, this is a one-stop
package for depicting this jet’s
exceptional livery:
• F-4EJ, 87-8409/409, Air
Development and Test Wing
(ADTW), Gifu Airbase,
November 2017
Those with Hong Kong Model’s
monstrous 1/32 Boeing B-17F Flying
Fortress offerings may wish to
consider Kits-World’s aftermarket
markings, which cater for a pair of
RAF Coastal Command-operated
airframes used for meteorological
reconnaissance sorties. Both
100 Airfix Model World
Vietnam Part 5: NVA Tanks, AFVs,
Generic Markings
By: Star Decals Scale: 1/35
Item no: 35C1277 Price: US$9
Web: www.star-decals.net
Star Decal’s fifth collection of
North Vietnamese Army (NVA)
decals also supplies handy
generic national markings and
flags to accompany the seven
types of armoured vehicles
and trucks, including several
captured machines. There’s a
splendid variety, from tanks to
armoured personnel carriers
and anti-aircraft guns
making this ideal for any
modellers interested in
NVA subjects. The decals
are well printed, with crisp
colour boundaries and
more than enough opacity
to prevent underlying
tones from showing,
although they are on matt
carrier film, so will need a
gloss surface to minimise
silvering. The choices are:
• M41A3, 83045, Hanoi, 1976
• SU-100 SPG, F144
• M37 Truck, Loc Ninh, 1973
• T-34/85M, White 226, 202nd
Armd Regt
• T-34/85M, White 111
• PT-76B, White 525
• PT-76B, White 720
• ZSU-23-4M, White Z003, 237th
Anti-Aircraft Arty Regt, Xuan
Loc, 1975
• T-34/85M, White 565
• T-34/85M, White 139
• T-34/85M, White 219
• BTR-50P, White 609, My Chanh,
May 1972
FLYING DUKES
AIRBORNE WEATHER LADIES
Boeing B-17 Flying Fortress
RAF Mk.II
By: Kits-World Scale: 1/32
Item no: KW132134 Price: £10.20
Web: www.kits-world.co.uk
PEOPLE’S ARMOUR
feature the RAF’s
Temperate Sea
camouflage
of Extra Dark
Sea Grey/Dark
Slate Grey
upper surfaces
with White
undersides.
Similarly, artwork
and nicknames
were painted
on the aircrafts’
noses – these are replicated by
finely printed decals, adding an
attractive dose of colour to the
liveries. Airframe serials plus
squadron/aircraft lettering are
also supplied but stencil data and
national insignia/fin flashes must be
sourced from elsewhere.
• B-17 Mk.II, FA696/AD-B
Borganes Bess, 251 (Met) Sqn,
Reykjavik, Iceland
• B-17 Mk.II, FA699/AD-H
Hekla Hettie, 251 (Met) Sqn,
Reykjavik, Iceland
Wellington in RAF Service Part 2
By: DK Decals Scale: 1/72
Item no: 72066 Price: £15.70
Web: www.dkdecals.cz
The second batch of RAF Vickers
Wellingtons covers B Mk.Ic and
Mk.VIII bomber/maritime patrol
machines plus a single C Mk.XVI
cargo/transport version. It’s a twosheet package with one providing all
unit codes, artwork and bomb tallies
plus most of the serial numbers,
while the second features tail
flashes, roundels,
the remaining
serials plus several
aircraft names. All
items are printed to
the highest quality,
with sharp tonal
demarcations and
strong opacity. The
ten schemes are:
• Mk.Ic, W5711/
KX-H, 311 (Czech)
Sqn, 1942
• Mk.Ic, L7794/
AA-D, 75 (NZ)
Sqn, 1940
• Mk.Ic, N2873/WS-E, 9 Sqn, 1939
• Mk.Ic, HX392/K So What the Hell,
40 Sqn, 1942
• Mk.Ic, DV507/KX-W, 311 (Czech)
Sqn, 1943
• Mk.Ic, HX509/F Little Joe, 458
(RAAF) Sqn, 1943
• Mk.Ic, DV671/D, 304 (Polish)
Sqn, 1943
• Mk.VIII, W5731/R, 221 Sqn, 1942
• C Mk.XVI, N2990/NQ-D Duke of
Cornwall, 24 Sqn, 1943
• Mk.Ic, T2972/KX-G, 311 (Czech)
Sqn, 1942
KeyModelWorld.com
Build Better Models!
• Learn to build and share • The bi-monthly IPMS/USA
your skills
Journal magazine
• 200 active local chapters
• Local model contests
• The IPMS/USA website
with product reviews,
galleries, and discussion
forums
IPMS/USA
By Modelers, For Modelers
www.ipmsusa.org
Further reading from
253/20
If you enjoy Airfix Model World, you may also be
interested in our other market-leading magazines...
Visit: shop.keypublishing.com for more details
Your Aviation Destination - Visit www.Key.Aero today
101_AMW_JUL21_ad.indd 1
19/05/2021 15:39:44
ON THE SHELF
DECK HAULAGE
US Navy Tow Bar
By: Brengun Scale: 1/144
Item no: BRL144115 Price: €6.96
Web: www.brengun.cz
For something as simple as a
tow bar, Brengun’s 1/144 replica
of the type used by the US Navy
is a surprisingly complex affair,
comprising two relatively long resin
sections plus 16 delicate photoetched brass parts. However, these
do allow for a highly accurate
extended-V shaped apparatus that
fits to the nosewheel of an aircraft
on both sides, with the folding
point attached to the towing
tractor. As such, this will be useful
for airliner-scale deck dioramas, but
is best suited to an experienced
modeller due to its finesse.
BOMBS AWAY!
FELINE DIALS
F4F-4 Wildcat Early
By: Yahu Models Scale: 1/48
Item no: YMA4886 Price: £3.80
Web: www.yahumodels.com
Intended to complement Hobby
Boss’ recent F4F-4 (Early) kit, this
replacement instrument panel
comprises 14 pre-painted, photoetched brass components, with
the main unit coming as two preassembled items with convincing
dials. The remainder provide the
consoles on the right-hand side
of the cockpit, plus a separate
central dial for the main panel.
As one of the
firm’s more
complex
offerings,
there’s
more gluing
required than
usual, but
no folding.
NAILED TO THE...
Tapered Masts Set No2
By: Master Model Scale: 1/700
Item no: SM-700-048 Price: £4.20
Web: www.master-model.pl
Sometimes, metal components are
used to add strength and rigidity
rather than enhanced detail – this is
especially prevalent with maritime
kits, where styrene masts can be
flimsy, so Master Model’s turnedbrass examples are a boon. Each of
the four parts is 60mm in length and
features a tapered profile – sizes
are: 1.4mm-0.4mm, 1.6mm-0.5mm,
1.8mm-0.6mm and 2mm-0.7mm.
Primarily, these measurements
pertain to 1/700 scale models,
but these parts may be useful for
projects in other scales – and not
necessarily just maritime subjects.
Airfix’s 1/72 B-17 is set for
re-release this year, and while
the kit is otherwise superb, one
omission is the bomb-aimer’s
position in the aircraft’s nose.
Happily, CMK’s resin set provides
this missing detail. It comprises
nine cast components, including
a replacement bulkhead (with
enhanced detail), new floor
section, plus separate seating,
equipment/radio boxes and the
all-important Norden bombsight.
Note, CMK’s instructions aren’t
explicitly clear how these parts
integrate with Airfix’s styrene, so
test-fitting will be required.
102 Airfix Model World
Modellers wanting to portray their
Tamiya 1/72 Ki-61s with dropped
landing flaps will find Eduard’s
photo-etched versions of great
assistance – although, given
their complex nature, they aren’t
for beginners. Each comprises
a single-piece interior, with
the various ribs needing to be
rotated through 90° before being
folded into position, so a great
deal of dexterity and patience
is needed. Five other parts then
add laminating strips for the
framework, plus actuating arms –
surgery to the styrene is marked
clearly, to allow the completed
flap sets to fit.
STORAGE VESSELS
P-47D Wheels
By: Eduard Scale: 1/72
Item no: 672221 Price: £3.61
Web: www.eduard.com
Boeing B-17G Bomb Aimer’s
Station
By: CMK Scale: 1/72
Item no: 7383 Price: €9.30
Web: www.cmkkits.com
Ki-61-Id Landing Flaps
By: Eduard Scale: 1/72
Item no: 72714 Price: £6.28
Web: www.eduard.com
STANDOFF
DISPENSER
’BOLT BOOTS
While the styrene wheels supplied
in Tamiya’s 1/48 Republic P-47D
Thunderbolt kits are more than
acceptable for the scale, the added
refinement of resin units is a draw
for many modellers. As such,
Eduard’s Brassin set provides a pair
of two-piece mainwheels, plus a
combined tailwheel/strut part – all
three of the tyres are cast with a
convincing flat-spot, which is missing
from the kit’s representations. A
choice of mainwheel hubs includes
delicate spoked examples or
smooth versions with three raised
rivets, while the diamond tread
pattern is subtle but effective. A
painting mask is also included,
aiding decoration greatly.
SWALLOW’S
‘FEATHERS’
Square Cans
By: Plus Model Scale: 1/35
Item no: EL059 Price: €4.24
Web: www.plusmodel.cz
AGM-154A/C Block I
By: Eduard Scale: 1/72
Item no: 672175 Price: £5.44
Web: www.eduard.com
Modern weapons remain
something of a hit-and-miss
aspect for modellers; many of the
JDAM types are available, but the
similar AGM-154 Joint Standoff
Weapon receives less attention.
Thankfully, Eduard has stepped
up to the plate with its lovely
resin and photo-etched brass
rendering, which offers enough
parts for two complete munitions,
plus full airframe stencilling. It
can be built in either carriage
(wings folded) or launched
(wings extended) configurations
and can be carried by US Navy
and Marine Corps F/A-18s and
European F-16s.
Part of Plus Model’s ‘Easy’ line
of accessories, these cast fuel
containers will be of interest to 1/35
armour and diorama modellers –
though they appear to be of early
or civilian design. There’s a total of
12 individual, supplied as four sets:
these contain two sizes of plain
pressed can, joined by an example
with a stamped indentation on
the sides – this strengthened the
material. Handles and caps are cast
integrally atop each unit – these are
crisp and neat but lack the finesse of
other manufacturer’s offerings.
KeyModelWorld.com
ON THE SHELF | Accessories
PURR-FECT GEAR
START SWITCHING
THINGS UP
COALITION
COMPONENTS
Electrical Boxes
By: ResiCAST Scale: 1/35
Item no: 35.2411 Price: €17.50
Web: www.resicast.com
F-14D Tomcat Wheels Set
By: Brengun Scale: 1/72
Item no: BRL72238 Price: €6.96
Web: www.brengun.cz
With the recent crop of new 1/72
Tomcats from FineMolds, Great
Wall, Hobby Boss and Academy
(released as an F-14A but with all
the parts needed for a D-variant)
and the still-available offerings
from Hasegawa, Revell and Fujimi,
it’s perfect timing for Brengun to
release this beautifully cast set
of resin wheels. Each comes as a
single piece, with the mainwheels
featuring convincing brake
detail, while the sidewalls have
embossed representations of the
manufacturer’s legend. These are
drop-in replacements for the kit
items and will add a neat finishing
touch to any Tomcat.
SMALL SONIA
SEGMENTS
Modellers building dioramas
featuring domestic buildings
will find this set of electricalassociated boxes, sockets and
switches ideal. All appear to be
of the types found during the
1930s and 1940s, and come as
finely cast components. There
are single examples of the larger
items, such as the mains and fuse
boxes, while there are three light
switches and four separate power
sockets that would be common
to most European homes during
that period.
DIVE-BOMBER
DIALS
2S35 Koalitsiya Howitzer
By: Eduard Scale: 1/35
Item no: 36430 Price: £10.98
Web: www.eduard.com
Zvezda’s recent 1/35 2S35
Koalitsiya-SV (coalition) selfpropelled howitzer is the
recipient of this photo-etched
brass fret upgrade from Eduard.
Unsurprisingly, most attention is
given to replacing moulded features
with delicate folded pieces or
small sub-assemblies for a more
in-scale appearance. These include
mounting points on the lower hull,
hatches, plus clasps and straps for
tools. A new saw blade and shovel
head are also supplied for the last of
these. Larger pieces cater for grilles
and vents on the vehicle’s hull.
Ki-51 Sonia
By: Shelf Oddity Scale: 1/144
Item no: SO214426 Price: €7
Web: www.shelfoddity.com
This small photo-etched brass fret
from Shelf Oddity is designed to
add further detail to Clear Prop’s
equally minute 1/144 Ki-51 Sonia
kits – as these provide for a pair
of airframes, the aftermarket set
also has sufficient parts for two
models. As usual, instructions
can be downloaded from the
manufacturer’s website and
these highlight the quality of the
base kit – the additions provide
finesse and strength, such as
replacement canopy bulkheads,
antennas and pitot tubes, seat
harnesses, plus armaments.
KeyModelWorld.com
Royal Navy 25ft Fast Motor Boat
By: Black Cat Models Scale: 1/350
Item no: AC350054d Price: €7.46
Web: www.blackcatmodels.eu
Built to a standard design from
1940 onwards, a pair of the Royal
Navy’s Fast Motor Boats (FMBs)
are the subject of Black Cat
Model’s superb 1/350 3D-printed
accessory. These craft were
carried on many vessels during
World War Two and adding them
to a ship model couldn’t be
easier; simply remove the onepiece representations from the
printing block, paint and attach.
Detail is incredibly fine, with
seats visible inside the boats’
structures. Fine aerials, hand rails
and masts are also present on the
upper surfaces.
TIGER TRIMMINGS
SBD-3 Dauntless
By: Yahu Models Scale: 1/72
Item no: YMA7310 Price: £3.80
Web: www.yahumodels.com
Intended for the Hasegawa SBD-3
kits (or Hobby 2000 re-boxings), this
pre-painted, photo-etched metal
set from Yahu is a slight departure
from the firm’s usual approach. It
has a pre-assembled central console
joined by a series of additional
sections that are attached to the
kit’s front instrument panel and
rear cockpit bulkhead. There’s also
a bonus, in the shape of the pilot’s
fold-out navigation table – a feature
omitted from the kit and one that
adds a focal point in the cockpit.
BOATS ON SHIPS
FLAPS IN A STORM
Hurricane Mk.I Control Surfaces
By: CMK Scale: 1/72
Item no: 7463 Price: €7.80
Web: www.cmkkits.com
Tiger Ausf.H
By: Hauler Scale: 1/72
Item no: HLH72069 Price: £6.96
Web: www.hauler.cz
Hauler is unusual in that it offers
upgrade packages for older kits
– in this case, Revell’s 1/72 Tiger
Ausf.H tank, which has been
available for almost a quarter of
a century. Despite its age, there’s
little refinement needed; Hauler
supplies new handles for the
turret and hull hatches, hand-grab
and stowage tabs for the former
section plus exhaust shrouds and
track guard additions. The fine
material allows all items to appear
convincing for the scale, while
some elements can be distressed
to simulate wear and damage.
While Arma Hobby’s 1/72 Hurricanes
have earned many plaudits, they
lack poseable control surfaces, a
feature favoured by many modellers.
Thankfully, CMK has addressed this
issue with the release of its all-resin
upgrade package, which supplies
replacement landing flaps, ailerons,
rudder and vertical stabiliser. Clear
guidance is given as to where the kit
parts should be cut to accommodate
the new components, notably for the
flaps, which have upper/lower halves
for both inner and outer sections.
Airfix Model World 103
ON THE SHELF
EXQUISITE BAYS
ON THE SHELF | Accessories
EMERGENCY
SEATING
INSIDE THE
DRAGON
MiG-21MF Ejection Seat
By: Eduard Scale: 1/72
Item no: 572197 Price: £3.61
Web: www.eduard.com
F6F-3/5 Hellcat
By: Kazan Model Dynamics
Scale: 1/48 Item no: KLG4808EDU
Price: US$39.99
Web: kazanmodeldynamics.com
Kazan has established a reputation
for in-depth and well-designed
upgrades and this set, designed for
Eduard’s 1/48 Hellcats, is typical. It
provides replacement single-piece
wheel wells, doors, three different
styles of mainwheels (radial,
diamond and block tread) and
the firm’s trademark HybridCAST
undercarriage legs. All parts are cast
crisply and feature stunning detail,
from integral hydraulic and brake
lines to accurate tread on the tyres.
Here’s another of Eduard’s
upgrades for its 1/72 MiG-21MF
kits, in the form of the KM-1M
ejection seat replicated via resin
and photo-etched (PE) steel
components. The main structure
and a separate head section are
supplied in the former material,
while strapping, seat harnesses,
a firing handle and a pair of rear
facings are pre-coloured PE items.
Basic painting instructions are
also supplied, which combined
with the sharp cast detail and
separate fittings will result in a
suitably busy appearance.
RACING
UPGRADES
Volvo 240 Turbo ’86 ETCC
Hockenheim Winner
By: NuNu Scale: 1/24
Item no: NE24013
Price: Approx £17
Web: www.platz-hobby.com
As featured in AMW125’s fullbuild feature The Flying Brick,
the Detail Up package NuNu has
produced for its 1/24 Volvo 240T
is an ideal enhancement for those
with the kit or Beemax-packaged
iterations. The set contains a
large photo-etched (PE) steel fret
with components ranging from
large underside/interior facings to
delicate windscreen wipers, brake
discs and even bonnet/boot
locks. A length
of black ribbon is
combined with PE
buckles to form
racing harnesses,
plus a turnedmetal antenna
base is provided
to fit between
the bonnet and
windscreen.
104 Airfix Model World
FISHBED COVERS
MiG-21 FOD
By: Eduard Scale: 1/72
Item no: 672218 Price: £3.61
Web: www.eduard.com
Foreign Object Debris (FOD) covers
are a convenient way of adding
prototypical accuracy to a model
while also easing construction, as
their presence hides inaccurate
or undecorated inlets and outlets.
Eduard’s bespoke Brassin product
for its 1/72 MiG-21 kits contains
six resin components plus a small
photo-etched brass fret – the latter
for tiny handles and locking keys,
meaning the detail is exceptionally
fine. These are attached to a
conical cover for the nose, a circular
example with raised detail for the jet
nozzle plus a pair of small
items for the ‘gills’ used to
regulate air supply on
the ground.
J-35 Draken Interior
By: Eduard Scale: 1/48
Item no: 491008 Price: £8.21
Web: www.eduard.com
Czech firm Eduard has re-boxed
Hasegawa’s 1/48 Saab J-35 Draken,
so it’s no surprise aftermarket
upgrade sets have followed – such
as this package, mainly for the
interior, but also containing several
external components. It comprises
two photo-etched metal frets;
one pre-coloured for replacement
instrument and control panels/
levers, while a plain brass example
includes facings for the canopy and
undercarriage upgrades. All surgery
to the kit parts is highlighted clearly.
BUZZING BOOTS
DH Hornet Mainwheels
w Block Tread
By: BarracudaCast Scale: 1/72
Item no: BR72444 Price: US$5.50
Web: www.barracudacast.com
Also available with a smooth
tread pattern (72443),
BarracudaCast’s 1/72 de Havilland
Hornet mainwheels are ideal for
upgrading the ‘boots’ on newly
tooled offerings from AZ Model
plus older kits by Special Hobby
and Frog/Novo. These are onepiece representations, supplied
on a single casting block –
removal will result in a convincing
flat-spot at the base of each tyre.
Neat block tread is replicated
delicately, while Dunlop branding
is apparent on the sidewalls and
both sides of the four-spoke hub
feature crisply cast detailing.
FILL HER UP!
KATYUSHA
RELOADS
Tempest Mk.V Fuselage Fuel and
Oil Tanks
By: CMK Scale: 1/32
Item no: 5132 Price: €21.50
Web: www.cmkkits.com
RS-132 Ammunition Boxes
By: ICM Scale: 1/35
Item no: 35795 Price: £11.80
Web: www.hannants.co.uk
Suitable for either Special Hobby’s
Tempest Mk.V kits (especially the
Hi-Tech versions) or the recent
Revell re-boxing, this lovely resin
upgrade set allows modellers to
display the fuselage fuel and oil
tanks and includes a replacement
cockpit bulkhead on which to mount
the latter container. It shares one
component (the firewall) with the
firm’s Napier powerplant set (5110),
and this serves as a locating point
for the larger fuel tank. CMK has
also included oil tank pipework plus
a new airframe panel.
Intended to complement the
firm’s BM-13-16 MLRS Vehicle
Crew (35648) and recent BM-1316 on WOT 8 (35591) truck, this
styrene set provides parts for
four crates of RS-132 rockets,
each containing four munitions.
Component breakdown is in
‘flatpack’ style, with separate side
pieces, into which rocket racks
are added. These could be used
either as a diorama with a launch
vehicle or as cargo.
KeyModelWorld.com
Trains4U.com
27 St. David’s Square, Fengate
Peterborough, PE1 5QA
Opening times: Tuesday – Saturday 10am-5pm, Sunday 10:30-3:30, Monday Closed
Plastic Kits, Tamiya Radio Controlled Cars, Model Railways, Games Workshop & more..
We stock 1000’s of kits in stock from dozens of brands
Tel: 01733 895989 e-mail: Trains4U@BTConnect.com
V
ETERANUS
01765 605 315
www.veteranus.co.uk
HOBBIES
• Paints, tools & consumables
forconsumables
all modellers
Paints, tools &
for all modellers
• Mr
Airbrushes
MrHobby
Hobby Procon
Procon Airbrushes
• Maquett
Sections
MaquettPlastic
Plastic Sections
www.veteranus.co.uk
www.veteranus.co.uk
26 sizes - 20 fonts - 36 finishes
£3.00 to £6.00 including engraving
Send a large s.a.e. for a copy of the
new 16 page catalogue to:
Name It!
12 Savay Lane, Denham Green,
Denham, Bucks. UB9 5NH or
Telephone 01895 832757
Email: Nameitplates@gmail.com
www.nameitplates.co.uk
605 605
315 315
Call01765
01765
Email: sales@veteranus.co.uk
sales@veteranus.co.uk
www.veteranus.co.uk
www.veteranus.co.uk
105_AMW_JUL21_ad.indd 1
17/05/2021 15:42:47
MAIL ORDER
F-111: FORT WORTH SWINGER
Historic Military Aircraft
Series: Volume 3.
Illustrated with 180 colour
photographs, covering the
operational period of the
F-111 Aardvark and
EF-111A Raven.
Softback, 96 pages
Subscribers call for your £2 discount
ONLY £15.99
Code: KB0065
ALLIED AIRCRAFT OF D-DAY
Subscribers call for your £2 discount
A Photographic Guide
to the Surviving
Aircraft of the
Normandy Invasion.
Featuring many of
the aircraft types
that were involved
in the operations
surrounding D-Day.
Softback, 144 pages
ONLY £17.99
Code: KB0058
RAF AIRCRAFT IN THE COLD WAR 1970-90
Air-to-Air Images.
A unique illustrated
look at the Cold War
planes of the RAF
as seen from the
cockpit.
194/21
MUSTANG: THE UNTOLD STORY
Examines the history of
the Mustang afresh,
within the orbit of tactical
doctrine, strategy and
even politics, as well as
the changing nature of
World War II.
Hardback, 304 pages
Subscribers call for your £4 discount
ONLY £20.00
Code: KB0036
QANTAS AND THE EMPIRE FLYING BOAT
Subscribers call for your £2 discount
This book details the
history of the Empire
flying boats as they
went from luxurious
carriers to military
service in roles that
included the resupply
and evacuation of
Allied military forces.
Softback, 96 pages
ONLY £17.99
Code: KB0055
RAF AIRCRAFT OF THE BATTLE OF BRITAIN
A photographic
guide to surviving
planes from the
Battle of Britain.
Softback, 160 pages
Softback, 128 pages.
Subscribers call for your £4 discount
ONLY £17.99
Code: KB0012
Subscribers call for your £2 discount
ONLY £17.99
Code: KB0005
TO VIEW OUR FULL
shop.keypublishing.com/books
RANGE OF BOOKS,
Or call UK: 01780 480404 - overseas: +44 1780 480404
VISIT OUR SHOP
194 Key Books MO FP.indd 97
Monday to Friday 9am-5:30pm GMT. Free 2nd class P&P on all UK & BFPO orders. Overseas charges apply.
All publication dates subject to change
11/05/2021 12:42:01
services
in in
Effingham
residents'
homes
Telephone:
01372
454004
services
Effingham
residents'
homes
Contact
EFFRA
Contact EFFRA
Email: register@effinghamresidents.org.uk
www.effinghamresidents.org.uk
www.effinghamresidents.org.uk
Telephone:
01372
454004
Telephone:
01372
454004
Email:
register@effinghamresidents.org.uk
Email: register@effinghamresidents.org.uk
Est. 1986
Est.Est.
1986
1986
Est. 1986
Come and visit Surrey’s friendly
Model Shop with easy parking.
Come and
visit Surrey’sview
friendly
Come and visit Surrey’s friendly
our Website
Come and visit Surre
ComeAlternatively
and visit Surrey’s
friendly
Model Shop with easy parking.
model shop with eas
Model Shop with easy parking.
Model
Shop
with easy
with
a Fast
Mailparking.
Order Service,
Gift Vouchers ava
Alternatively view our Website
Alternatively view our Website
Alternatively
view
our the
Website
or
order
over
phone
with
We now have a love
with a Fast Mail Order Service,
with a Fast
Mail
Order
Service,
with a Fast Mail Order Service,
same
Click
of Tamyia kits, paints
or order over
theday
phone
with& Collect.
or order over the phone withor order over the phone with
along with Carre
same day
Clickhelp
& Collect.
advice on your
sameExpert
day Click
&and
Collect.
same day Click & Collect.
cars and set
Model
Expert help and
adviceRailway
on your Layout.
help
and advice
on your
Expert help and advice on your Expert
Model
Railway
Layout.
Model Railway
Layout.
DCC
Chips
& Digital Sound
Model
Railway
Layout.
DCC Chips & Digital Sound installations
at our Shop.
DCCinstallations
Chipscompleted
& Digitalcompleted
Sound
at our Shop.
DCC Chips & Digital Sound
installations completed at our Shop.
installations completed at our Shop.
01372
452976
• enquiries@roxleymodels.co.uk
01372
452976
enquiries@roxleymodels.co.uk
01372
452976
enquiries@roxleymodels.co.uk
01372
452976www.roxleymodels.co.uk
enquiries@roxleymodels.co.uk
www.roxleymodels.co.uk
www.roxleymodels.co.uk
www.roxleymodels.co.uk
Opening Hours: Weds - Sat 9.30 – 17.30 | Mon & Tue – Click & Collect | Weekday time slots available
Opening Hours: Weds - Sat 9.30 – 17.30 | Mon & Tue – Click & Collect | Weekday time
4 Beckley
Beckley
Parade,
Leatherhead
Road,
Great
Bookham,
Surrey
KT23
4RQ KT23 4RQ
4
Parade,
Leatherhead
Road,
Great
Bookham,
KT23
4RQ
44 Beckley
Beckley
Parade,
Leatherhead
Road,
GreatSurrey
Bookham,
Surrey
Parade, Leatherhead Road, Great Bookham, Surrey KT23 4RQ
hours:
Opening HoursOpening
- subject
tohours:
government
Opening
hours: guidelines
Opening
Wed-Sat 9.30-17.30
9.30-17.30 •Mon-Tue
Click
&&
Collect
Weekday
timetime
slotsslots
available
Tues-Sat
Mon-Sat
Click
Collect
Weekday
available
Wed-Sat
9.30-17.30
Mon-Tue
&• Collect
time
slots available
Wed-Sat 9.30-17.30
Mon-Tue
Click
&Click
Collect
WeekdayWeekday
time slots
available
KIT KRAZY
303 The Broadway, Bexleyheath, Kent DA6 8DT
Tel: (020) 8298 7177
OPEN: Tues/Thurs/Sat 10am - 4pm
All major credit cards
accepted
SPRING SPECIAL (MAY & JUNE)
5000 KITS HALF PRICE
Over 50 Brands of Plastic Construction Kits
bought or swapped up to 1/3 discount.
Refreshments provided & Mail Order Service.
107_AMW_JUL21_ad.indd 1
17/05/2021 15:44:58
YOUR ONLINE HOME
075/21
Key Model World is the online home
of scale modelling, brought to you by
Key Publishing, publishers of Airfix Model World
You’ll find an array of scale
modelling content on Key Model
World - including staff projects,
model builds, reviews, features and
Key Model World exclusives.
UNLIMITED access to this exciting
online content from our dedicated
team starts from just £41.99/year for UK
customers. And registering couldn’t be
simpler. For instant access to the latest
Airfix Model World features and hours of
premium modelling inspiration, visit:
FOR ALL
ERS*
B
I
R
C
S
B
U
S
isit
V
/
orld.com
w
l
e
d
o
m
y
www.ke subscribe
able
ess avail ly
c
c
a
e
e
r
F
*
n
ed time o
for a limit today!
– sign up
www.keymodelworld.com
We value your feedback!
Let us know your thoughts on Key Model World
See you there!
Stu Fone
Editor - Airfix Model World
– drop us a line at subs@keypublishing.com today
visit www.keymodelworld.com today!
075 KeyModelWorld FP.indd 95
17/02/2021 11:56:50
OPEN: Tues, Fri & Sat 10am-1pm - Please call as we may open at other times.
OXONIANS
23 Chantry Way The Chantry Centre
Andover SP10 1LS
01264354885
testvalleymodels.com
PLASTIC FANTASTIC
Online Mail Order Hobby Shop Bicester, Oxon UK
We stock a wide range of plastic kits from
all the major manufacturers
The Eduard • Valom • Pavla AZ Models Master Barrels and Yahu Specialist In
Model Construction Kits • Resin • Photo Etch Accessories • Decals
Email: info@oxoniansplasticfantastic.com
Website: www.oxoniansplasticfantastic.com
follow us
Available now in our shop
www.ssnmodellbau.de
ssn-info@gmx.de
SSN MODELLBAU Shop
The very best fittings and auxilliary
products for your scale models
Airfix Model World is independently verified by ABC.
So our advertisers know they are getting
what they paid for.
ABC. See it. Believe it. Trust it.
To advertise, call Brodie Baxter on
01780 663011 Ext: 140 or
Email: brodie.baxter@keypublishing.com
109_AMW_JUL21_ad.indd 1
17/05/2021 15:53:26
The International Plastic Modellers Society was established in the United Kingdom over 55 years ago with
the aim of promoting and supporting the hobby of plastic modelling and has developed into a truly global
‘model club’ with more than 65 international bodies. Why not join us?
Some of the benefits of IPMS (UK) Membership
More than 100 local and virtual Branches throughout the United Kingdom • Over 95 Special Interest Groups covering
a multitude of subjects • Free entry to Scale ModelWorld ~ the World’s greatest model show • Access to an active
Technical Advisory Service • Access to a Society Decal Bank and Instruction Sheet Library • A high quality, full colour
Magazine six times per year • IPMS (UK) Online Forum ~ keep in touch • Exclusive discounts with modelling retailers
For an Information Pack, including a FREE sample magazine, please
send 3 First Class stamps to the Membership Secretary:
John Hebditch 45 Havisham Drive Swindon Wiltshire SN25 1SL
Email: memberAdmin@ipmsuk.org or visit ipmsuk.org/membership/ to join online
Ad 2019generic.indd 1
IPMS(UK)
Thursday21/11/2019 11:20
Retail Partners
To see the full list of all Airfix stockists visit
www.airfix.com/stockists
CUMBRIA
STAFFORDSHIRE
YORKSHIRE
• JACKSONS MODELS & RAILWAYS
• RUBICON MODELS UK LTD
• GOING LOCO MODEL RAILWAY SHOP
33 New Street, Wigton, Cumbria CA7 9AL
Telephone: 01697 342557
Email: info@jacksonmodels.co.uk
Website: www.jacksonmodels.co.uk
Allanson House, Walley Street,
Biddulph, Stoke-on-Trent ST8 6EA
Email: stevep@rubiconmodels.com
Website: www.rubiconmodels.co.uk
EAST SUSSEX
TYNE & WEAR
• EASTBOURNE MODEL CENTRE
• SUNDERLAND STATION MODELS
t/a Train Times Model Shop 37 Seaside,
Eastbourne, East Sussex BN22 7NB
Telephone: 01323 722026
Email: traintimestoo@gmail.com
Website: www.traintimesmodelshop.co.uk
LINCOLNSHIRE
• B&H MODELS
7 The Strait, Lincoln, Lincolnshire LN2 1JD
Telephone: 01522 538717
Email: shop@bandhmodels.com
Website: www.bandhmodels.com
NOTTINGHAMSHIRE
• NEWARK AIR MUSEUM SHOP
Drove Lane, Winthorpe, Newark,
Nottinghamshire, NG24 2NY
Telephone: 01636 707170
Email: namtrading@newarkairmuseum.org
Website: www.newarkairmuseum.org
No museum admission fee if you’re just
shopping – free car parking.
35C Ellesmere Court, Leechmere Industrial
Estate, Sunderland, Tyne & Wear SR2 9UA
Telephone: 07727 288574
Email:
sunderlandstationmodels@hotmail.com
Website: www.sunderlandstationmodels.co.uk
WEST YORKSHIRE
• HALIFAX MODELLERS WORLD
25 Horton Street, Halifax HX1 1QE
Telephone: 01422 349157
Email: halifaxmodellersworld@gmail.com
Website: www.halifaxmodellersworld.co.uk
WILTSHIRE
38 Potovens Lane, Lofthouse,
Wakefield WF3 3JF
Telephone: 01924 824748
Email: goinglocomodels@hotmail.com
Website: goinglocomodels.com
AUG 2021
ISSUE
COPY DEADLINE:
Tuesday 8th June
ON-SALE:
Thursday 1st July
• SALISBURY MODEL CENTRE
37 Fisherton Street, Salisbury,
Wiltshire SP2 7SU
Telephone: 01722 334757
Website: www.salisburymodelcentre.co.uk
Open 6 days a week including Sundays.
To advertise your details here please contact
LEANNE MAWER - 01780 663011 - Ext: 145
Email: leanne.mawer@keypublishing.com
AMW_CLASSI.indd 98
18/05/2021 12:35:24
TO ADVERTISE PLEASE CONTACT LEANNE MAWER
T: 01780 663011 Ext: 145 • E: leanne.mawer@keypublishing.com
AUGUST ISSUE: Copy Deadline: Tuesday 8th June • On-Sale: Thursday 1st July
MODEL MART
CLASSIFIEDS
BOOKS
ENGRAVING
York Military
Books
Military, Naval,
Aviation & Militaria Books
bought & sold.
Relevant part or whole
collections always sought
MODEL SHOPS
GRAVESEND
MODELS &
WARGAMES
Tel: 01423 360828
Mob: 07717 155619
www.yorkmilitarybooks.co.uk
ALL YOUR WARGAMING,
& MODELLING NEEDS
UNDER ONE ROOF
Freightdog Models
Home of Blue Max and Pegasus Models
Online shop for kits, decals ands accessories
www.freightdogmodels.co.uk
+44 (0) 1342 716004
Fairlight, Sandy Lane, Crawley Down, Crawley, RH10 4HX
MODELS
SHOP OPEN: Tues - Sat 9am till 4.30pm
Sunday 10am till 4pm • CLOSED Mondays
MODEL SHOPS
15 The High Street, Gravesend, DA11 0BQ
(Next to the New Ceasers Restaurant)
RIF-RAF
MODELS
E: gravesendmodelsandwargames@gmail.com
129 Albert Street, Dundee, DD4 6PR
Telephone: 01382 760313
enquiries@rif-rafmodels.uk
Find us on F a ceb o o k
Tel: 01474 328360
Find us on facebook
www.gravesendmodelcentre.co.uk
CHURCH STREET
MODELS
10A Church St, Basingstoke, Hants RG21 7QE
Tel: 01256 358060
OPEN 5 DAYS A WEEK
N
WEBESW
ITE
Mon & Wed to Sat 09.30-17.00
CLOSED 1120 JUNE
www.churchstreetmodels.co.uk
AIRFIX & REVELL KITS
• 1/35 & 1/72 Tanks 1/48 & 1/72 Planes
• Ships - various • Cars - 1/24, 1/25 & 1/32
• Paint - enamel/acrylic/ Tamiya acrylic
• Weathering Powders • Washes
• Glues • Plastruct • Balsa wood
• Scenery • Abrasives & Tools
Over 11,000 products
in stock covering
all aspects of model
making.
- THE MODELLERS MODEL SHOP -
Contact us on:
3-5 Brockwell Rd, Birmingham B44 9PF
0121 360 4521
Email: info@mikes-models.co.uk
www.mikes-models.co.uk
See our page 111 for our
DEALER DIRECTORY
ONLINE MODEL SHOPS
Great after sales
support.
From ready to go
kits, to materials for
your hobby or
anything in between.
Fast and friendly service Easy to navigate webshop
10% discount on orders over £45 plus p&p
Large range of over 3500 models, figures, tools and accessories from Revell,
Airfix, Italeri, Tamiya and many more, ready for immediate despatch
Based in the Midlands since 2001 with worldwide shipping available
models2u...like us on Facebook for all the latest info
Web: www.models2u.co.uk Email: help@models2u.co.uk
Phone: 01543 433999
SCALE MODELS
ALL PLASTIC MODEL
KITS WANTED
EST.
56 Years
VAST SELECTION OF KITS, DIECAST,
MODEL RAILWAYS & SCALEXTRIC
AUG 2021
OUR WEBSITE LISTS ONLY A FRACTION OF OUR STOCK!
COPY DEADLINE
Tuesday 8th June
1000’S OF CURRENT & OBSOLETE KITS, AIRCRAFT/
MILITARY/SHIPS/CARS BIKES, TRUCKS etc.
We carry a wide selection of Paints, Glues, Brushes, Modelling
Tools, Airbrushes, Compressors, Balsa Wood, Modelling
Materials, Plastics, Metal & Wood Section & Sheet, Foam
Board,etc. EVERYTHING FOR THE MODELLER
Visit our spacious shop. Open 10am - 4pm, Closed Wednesdays.
Worldwide mail order.
www.marcway.net 0114 244 9170
598 - 600 Attercliffe Road, Sheffield, S9 3QS
112
WANTED
ON-SALE
Thursday 1st July
Unmade or already built,
any quantity, especially
large collections, also
diecast models & books.
Will collect nationwide
and pay best cash price.
Please call 01202 976974 or
07901-890461
Email: mspicer68@hotmail.com
Thanks.
Airfix Model World
AMW_CLASSI.indd 96
19/05/2021 12:42:38
Sponsored by
24-25 July
2021
LOWER FARM, SKILLINGTON, NG33 5HF
FEATURES INCLUDE:
• Talk by Col John Blashford-Snell CBE, leader of the
Darien Gap Expedition in 1971/72
TICKET PRICES:
ADVANCE*
• SATURDAY - Adult ....................................................£12.00
• SUNDAY - Adult .........................................................£12.00
• WEEKEND camping & show admission** £30.00
£10.00**
• Dynamic display of Land Rover Special Projects
from the 1960s
• On-site camping facilities
• Relevant club stands
• Trade and food stands
• Gentle off-road course
• Trophies aplenty
• Dog show
**Subscribers to Classic Land Rover or
Classic Military Vehicle magazines purchasing
any ticket will receive a FREE off-road course ticket.
SIVE - EXCLUSIVE - EXCLU
*Advance ticket deadline 16 July, 2021
**On-site camping is available on Fri 23rd & Sat 24th
OFF-ROAD COURSE*
*Off-road course is on-site and will be in your own vehicle and will be
escorted. All drivers and passengers must wear a fitted seatbelt and
follow all instructions given by marshals.
e!
...and mor
EVENT MERCHANDISE
PLUS!
UK PREMIER screening of the
Australian film production -
‘SERIOUSLY SERIES
ROAD TO RUIN’
I R TS
T-SH 9
£19.9
HOODIES
£29.99
TO PURCHASE ADVANCE TICKETS CALL: 01780 480404
www.classiclandrovergathering.com
For all enquiries please contact clrgathering@keypublishing.com
202 CLR Gathering FP.indd 1
202/21
17/05/2021 12:00:37
DISPLAY CASE
DISPLAY CASE
1
3
NEXT
MONTH
The next issue of
Airfix Model World
(issue 129) will be
on sale in UK shops
on July 1.
Command and Service Module (CSM),
Lunar Module (LM), the rover and a
minute astronaut figure (all pictured).
2
In its most intrepid forms,
modelling can take you
across the world and
even beyond, as this
month’s reader showcase
demonstrates
1 Dragon Apollo and Moon Buggy
As a child of the 1970s, Kevin Sargeson
is understandably a fan of the moon
landings and the Lunar Rover vehicle
used to traverse the satellite’s surface.
Hence, Dragon’s 1/72 depiction of the
Apollo 17 mission was simply irresistible.
The set includes the crater-riddled base,
2 Hasegawa/Eduard Fw 190 and
Ju 88 Mistel
Ian Wilson discovered Hasegawa’s
1/72 Mistel 2 while on holiday in
Sydney, Australia – though the Fw 190
was substituted for Eduard’s samescale offering, as this allowed the
incorporation of the Czech firm’s engine,
flap and propeller upgrades. Reference
from Robert Forsyth’s book on the
subject aided the finishing of the model
as 6./JG 200’s Red 12, based in a snowy
Denmark location during 1945.
3 Airfix Nakajima B5N ‘Kate’
Adding the upper camouflage to Airfix’s
4
114 Airfix Model World
1/72 B5N torpedo-bomber – also known
by its Allied callsign of ‘Kate’ – was a
lesson in patience for Paul Wells. An
aftermarket masking set was used to
great effect on the type’s long canopy,
while selected chipping around the
engine and a restrained panel line wash
were set off by a neat base.
4 Matchbox Supermarine Seafire
Converting Matchbox’s 1976-vintage 1/32
Spitfire Mk.22/24 to represent a Seafire
FR.47 is no mean feat, but Ken Stanton
achieved superb results with the aid of
Freightdog, Iconair, Master Caster, Yahu,
Scale Aircraft Conversions, Eduard and
Master Model products. Further work
involved modifying the undercarriage
bays, tailplanes and exhausts, to capture
the type’s characteristics accurately.
Feature YOUR model!
If you’ve recently completed a model
you’re particularly proud of and
would like to showcase the build,
let AMW know! Send a high-quality
photo (1MB or larger) of the model
against a white background and tell
us about any aftermarket products
or special techniques involved. Up to
four per month will be included in the
magazine, with more featured online
at: www.keymodelworld.com. Please
email your submissions to the editor:
stuart.fone@keypublishing.com
KeyModelWorld.com
Harder_FP.indd 1
03/06/2020 09:31:51
1:72
AVRO VULCAN B.2
A12011
AVRO VULCAN B.2
As the Avro Vulcan entered squadron service
with No.83 Squadron at RAF Waddington in July
1957, Britain now possessed the fastest nuclear
capable bomber in the world. It seems strange
to describe an aircraft which possessed such
potential for untold destruction as Britain’s most
effective peace keeping asset, however, that is
what the Vulcan turned out to be. Throughout the
Cold War, the Warsaw Pact nations were in no
doubt that if they launched an attack against a
NATO member country, the consequences of a
retaliatory strike would be catastrophic. Without
doubt, during the early years of its service career,
nothing represented this doomsday scenario more
effectively than the mighty Avro Vulcan.
VRO VULCAN B.MK.2
The Scampton Wing (Nos 27, 83 and 617 Squadrons), Royal Air Force
Scampton, Lincolnshire, England, 1966. Aircraft currently preserved at the
Newark Air Museum.
Use your smartphone
to find out more!
AVRO VULCAN B.MK.2
N o. 12 Squadron, Royal Air Force Coningsby, Lincolnshire, England, 1963. Nose
section now preserved at the Avro Heritage Museum.
Length 450mm Width 470mm Pieces 277
Airfix.com
and all good retail stockists
Start as you mean to finish
Official Product
7535AX-AMW-FP-AD-A12011-Vulcan.indd 1
30/04/2021 12:35