/


Tags: military hand grenades
Year: 1942


Text
RESTRICTED
FM 23-30
BASIC FIELD MANUAL
GRENADES
UNITED STATES
GOVERNMENT PRINTING OFFICE
WASHINGTON s 1942
WAR DEPARTMENT,
Washington, June 15, 1942.
FM 23-30, Basic Field Manual, Grenades, is published for
the information and guidance of all concerned.
[A. G. 062.11 (5-22-42).]
By order of the Secretary of War:
G. C. MARSHALL,
Chief of Staff.
Official :
J. A. ULIO,
Major General,
The Adjutant General.
Distribution:
Bn and H 1-7, 9-11, 17-19 (5); IC 2, 6, 7, 17, 18 (20) ;
IC 3-5, 9, 11, 19 (10).
(For explanation of symbols see FM 21-6.)
n
TABLE OF CONTENTS
Chapter 1. Hand grenades. „
Section I. General. Paragraph Page
Types----------------------------------- 1 1
Fillers_________________________________ 2 1
Components___________________„_____ 8 3
Characteristics_________________________ 4 4
II. Throwing technique.
General_________________________________________ 5 12
Methods_________________________________ 6 14
Ш. Grenade courts and scoring.
General plan____________________________________ 7 18
Main court______________________________ 8 19
Angle court_____________________________ 9 20
Crater court___________________________ 10 20
Trenches_______________________________ 11 22
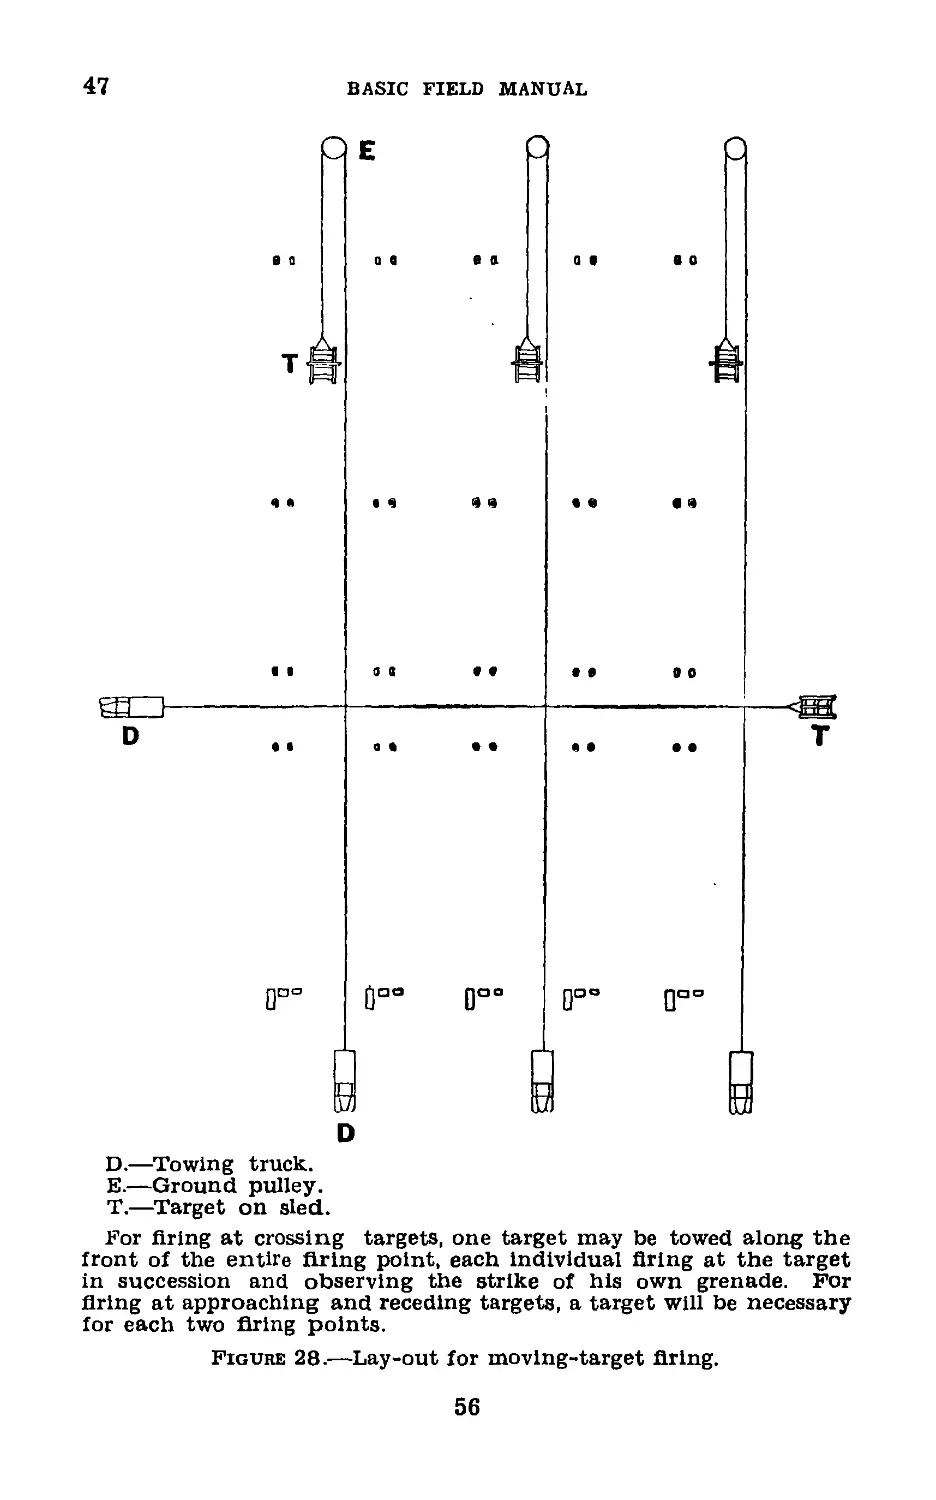
Throwing pits-------------------------- 12 22
Vertical targets_______________________ 13 24
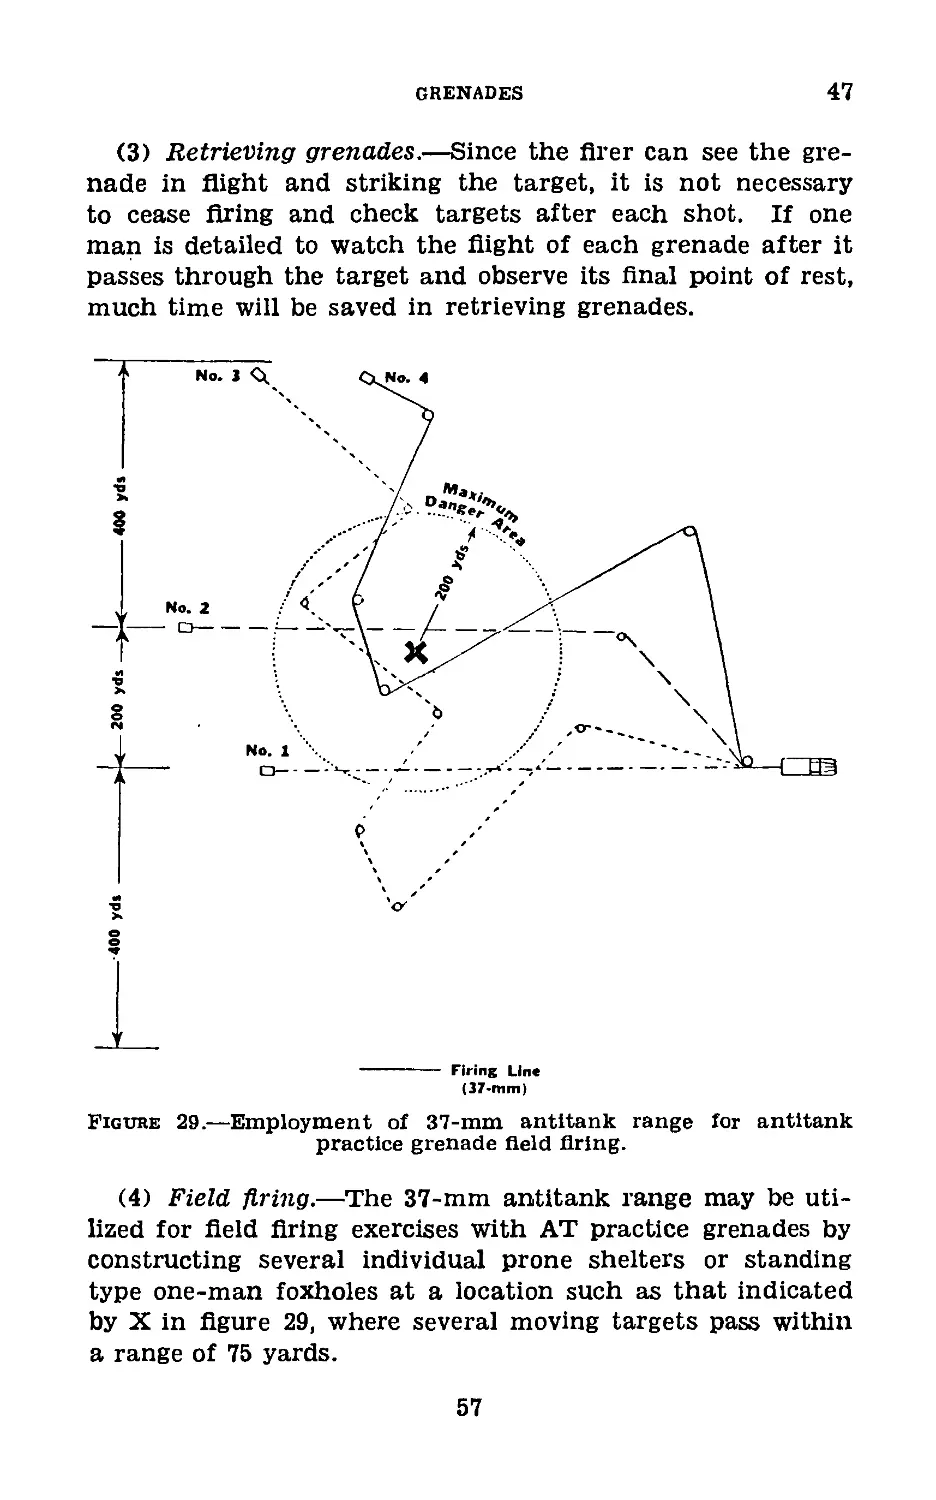
Scoring________________________________ 14 24
• Hand grenade score card_______________ 15 25
IV. Safety precautions, police of range, and
destruction of duds.
General________________________________________ 16 25
To throw or to handle live grenades
or parts thereof_______________________ 17 26
To throw fragmentation grenades_____ 18 27
To throw chemical grenades_________ 19 27
To throw practice grenades_________ 20 28
To fuze live grenades__________________ 21 28
Police of range________________________ 22 29
Method of destroying grenade duds_ 23 29
V. Advice to instructors.
General_______________________________________ 24 33
Scope of training---------------------- 25 33
Conduct of training____________________ 26 35
Equipment______________________________ 27 36
Chapter 2. Antitank grenades.
Section I. General.
Description__________________________________________ 28 37
Types__________________________________ 29 37
Characteristics------------------------ 30 37
Identification and markings-------- 31 38
Cartridge, AT grenade, caliber .30,
М3_____________I___________________ 32 38
Launcher, grenade, Ml__________________ 33 39
Pad, recoil____________________________ 34 40
Mechanical training-------------------- 35 40
Ш
TABLE OF CONTENTS
Chapter 2. Antitank grenades—Continued.
Section II. Marksmanship. Paragraph Page
General_______________________________ 36 40
Equipment_____________________________ 37 41
Sighting and aiming------------------- 38 41
Exercises in sighting and aiming___ 39 42
Positions_____________________________ 40 44
Sequence of operations________________ 41 45
Range estimation______________________ 42 50
Stationary target course______________ 43 51
Moving targets________________________ 44 51
Moving target course__________________ 45 53
Firing at field targets_______________ 46 53
Equipment, ranges, and precau-
tions_________________________________ 47 54
HI. Advice to instructors.
General______________________________________ 48 59
Method of instruction_________________ 49 59
Scope of training_____________________ 50 59
Appendix. List of references_________________________ 60
IV
FM 23-30
RESTRICTED
BASIC FIELD MANUAL
GRENADES
(This manual supersedes FM 23-30, January 2, 1940.)
CHAPTER 1
HAND GRENADES
Paragraphs
Section I. General______________________________________ 1-4
II. Throwing technique___________________________ 5-6
III. Grenade courts and scoring----------------- 7-15
IV. Safety precautions, police of range, and destruction
of duds________________________________________ 16-23
V. Advice to instructors_______________________24-27
Section I
GENERAL
1. Types.—Hand grenades are divided into the following
types:
a. Fragmentation grenades, containing an explosive charge
in a body designed to fragment with the action of the burst-
ing charge.
b. Offensive grenades, containing a high explosive charge
in a paper body, designed for demolition effect.
c. Chemical grenades, containing a chemical agent which
produces a toxic or irritant physiological effect, a screening
smoke, an incendiary action, or any combination of these.
d. Practice grenades, containing a reduced charge, to simu-
late fragmentation grenades.
e. Training grenades, containing no explosive or chemical.
2. Fillers.—The filler is the substance contained in the
body of a grenade. It may be a powerful explosive, as in the
case of the fragmentation grenade, or a gas- or smoke-produc-
ing substance. Those used are—
a. EC (explosive company) blank fire smokeless powder.—
This is a commercial type granulated nitrocellulose powder,
generally pink or yellow in color. It is less powerful than
1
2
BASIC FIELD MANUAL
TNT and is exploded by ignition rather than detonation.
Grenades loaded with this material can be issued fuzed and
ready for use and are, in general, not susceptible to mass
detonation.
b. Trinitrotoluene (TNT).—TNT is stable but, unlike blank
fire powder, it explodes by detonation. Hand grenades filled
with TNT are not stored or issued with the fuze assembled.
TNT in block form is used for demolitions.
c. Chloracetophenone (CN).—This is a lachrymatory
(tear) gas which produces a severe burning sensation in the
eyes, causing intense weeping. In one type of irritant hand
grenade, CN is combined with diphenylaminechlorarsine (d
below).
d. Diphenylaminechlor ar sine (DM).—DM is a gas which
causes a burning sensation in the nose and throat and a
heavy or tight feeling in the chest. There is also a nauseat-
ing effect, the degree of which depends on the concentration
of the gas and the length of exposure. Grenades filled with
chemicals, because of their small capacity, are not considered
suitable for war use, but are very effective in riots, civil
disorders, etc.
e. Hexachlorethane-zinc mixture (HC).—Upon ignition, HC
mixture produces a dense white smoke which is harmless.
HC smoke grenades are used by the Army Air Forces and the
Armored Force for signals.
/. В chlorvinyldichlorarsine (Ml).—Ml (lewisite) is a liq-
uid which gradually changes to a gas. It is extremely
vesicant and either gas or liquid will burn the skin or lungs
severely. Casualties do not usually develop until a few hours
after exposure. Grenades filled with Ml are suitable for
contaminating vehicles and important installations.
g. Chloracetophenone solution (CNS).—CNS is a mixture
of CN in chlorpicrin and chloroform. Chlorpicrin (PS) has
lacrimatory properties similar to CN.
h. Sulphur trioxide-chlorsulfonic acid mixture (FS).—FS
is a corrosive liquid which reacts with the atmosphere, pro-
ducing an effective screening smoke.
i. Gasoline (liquid) (GA).—Liquid gasoline is an effective
incendiary material with which to ignite combustible mate-
rials.
2
GRENADES
2-3
j. Gasoline (solidified) (GA).—The several forms of solidi-
fied gasoline burn more effectively than liquid gasoline.
k. AW filling.—The AW filling consists of phosphorus and a
rubber-gasoline solution. The rubber-gasoline solution ad-
heres to surfaces, and burns 6 to 8 minutes. The phosphorus
prevents the rubber-gasoline solution from being extinguished
with water.
I. Thermate (TH).—TH is an incendiary filling which burns
intensely. Grenades filled with TH are used against mate-
rials which are difficult to ignite.
3. Components.—a. Time fuze.—The time fuze, or safety
fuze, is a cord containing a slow-burning powder train. The
time fuze issued to the service is known commercially as
Bickford fuze and burns at the approximate rate of 15 inches
per minute. Time fuze should always be tested before using
to determine its rate of burning. The time fuze in most of
the grenade firing mechanisms is cut to burn for 5 seconds.
b. Detonators.—A detonator is a metal capsule filled with
a detonating explosive such as fulminate of mercury. Com-
mercial detonators come in 10 sizes, numbered 1 to 10. The
higher numbered sizes are larger and contain increasing
amounts of the detonating mixture. No. 6 and No. 8 are the
ones used in grenades. Detonators are sensitive to heat,
shock, and friction and should be handled carefully at all
times.
c. Fuzes.—The fuze is the mechanism that fires the grenade.
Fuzes are described in detail and their functioning explained
in .TM 9-1900. All grenade fuzes are time and automatic.
Time means that the grenade is fired after a certain lapse
of time and not on percussion. Automatic means that the
fuze begins to function automatically as it leaves the hand,
providing the safety cotter pin has been removed, thus pro-
viding a safety factor by eliminating the necessity of starting
the action of the mechanism before the grenade is on its
way. As to the final action, fuzes may be classified as
detonating or igniting.
(1) Detonating fuzes.—Those that contain a detonator.
Hie function of the detonator is either to set off the ex-
plosive charge or to burst the container and liberate the
filler.
3
4
BASIC FIELD MANUAL
MOISTURE CAP
HINGE PIN
STRIKER SPRING
PRIMER
STRIKER
RING
FUZE BODY
POWDER TRAIN
LEVER
STARTING MIXTURE
BLUE GRAY-
18 HOLES COVERED
WITH TAPE
BODY
FILLING
RED
LOT 3138-1
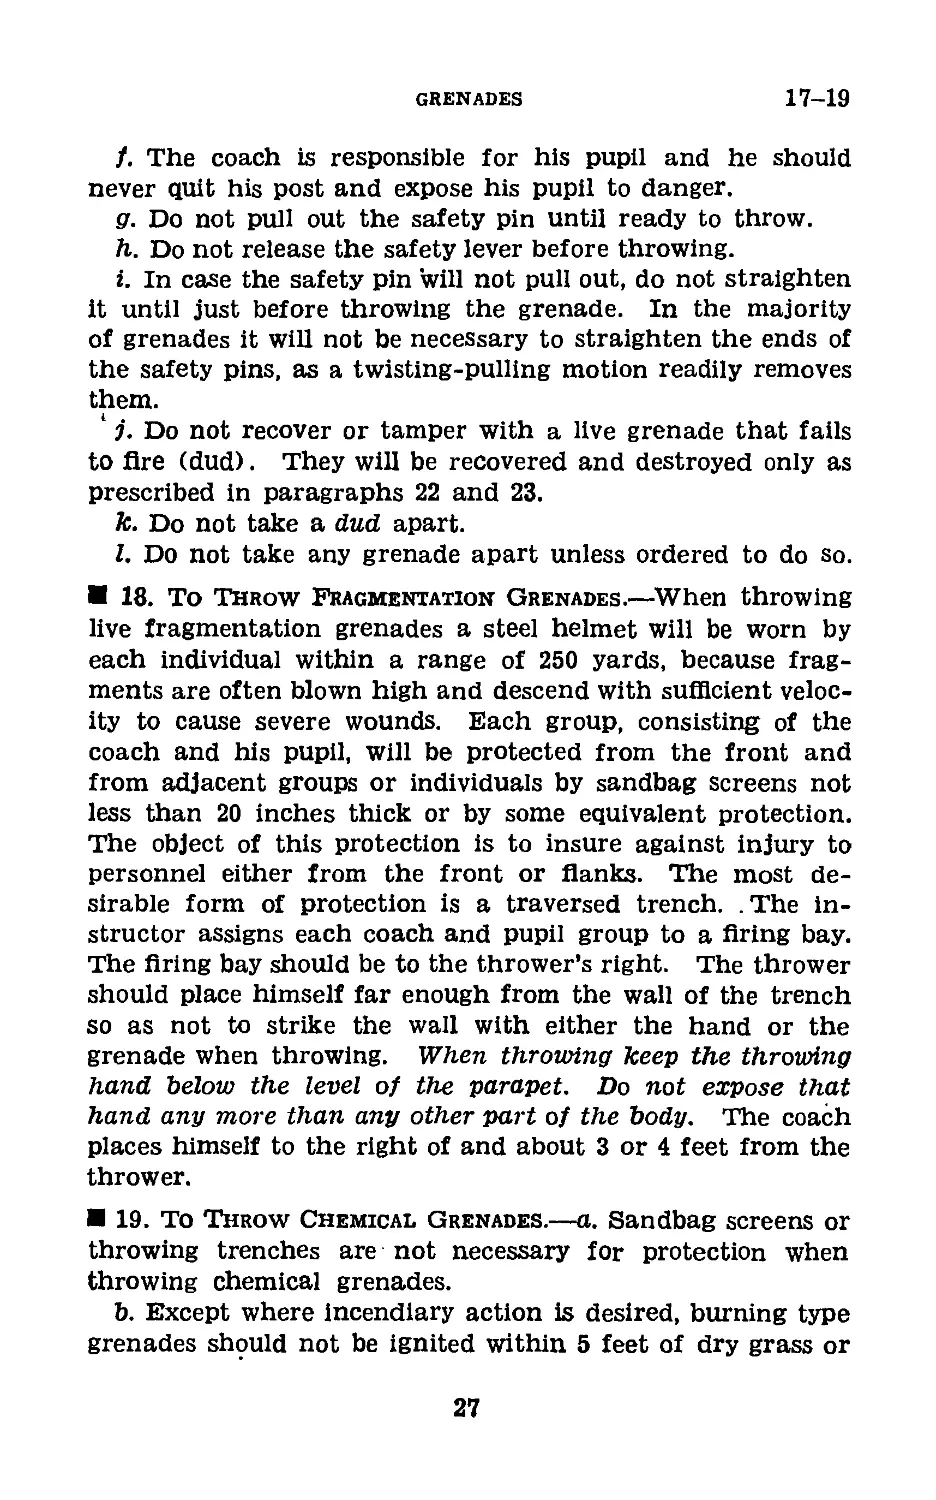
© Irritant gas hand grenade CN-DM M6.
546
® Incendiary grenade M14 and frangible grenades Ml.
Figure 3.
6
GRENADES
4
chemical filler is composed of a mixture of CN-DM and a
small amount of blank fire powder. Two seconds after the
primer is fired the grenade begins to generate a gas having
a pungent odor. One second later the gas reaches full volume
and the grenade functions for 25 to 35 seconds.
(3) Grenade, hand, gas, irritant, CN, M7.—This grenade is
similar to the M6 grenade but is filled with CN only instead
of with the CN-DM mixture.
(4) Grenade, hand practice, Mk. II.—This grenade is a lim-
ited standard practice grenade and is equipped with the ignit-
ing fuze M10A1. The grenade is loaded with a charge of
black powder contained in a paper tube. After the fuze is
assembled in the grenade, this charge is 'inserted into the
filling hole, which is closed with a cork.
(5) Grenade, hand Mk. 1A1.—This grenade is the current
standard for practice and training. It consists of a one-
piece cast iron body in the shape of the fuzed fragmentation
grenade and a removable safety pin and ring. It is inert.
(6) Grenade, hand, offensive, Mk. ША1.—This grenade con-
sists of a die-cast top, which is threaded to receive the fuze,
detonating, hand grenade, M6A2, and a body of laminated
cartridge paper which contains the high explosive charge.
This grenade is for demolition. It may be used in the open
more safely than the fragmentation grenade because there
is no marked fragmentation. Grenade bodies and fuzes are
shipped separately. Bodies are packed 25 per carton, with
8 cartons to a box.
(7) Grenade, frangible, Ml (fig. 3 ®).—This grenade is a
common glass pint bottle equipped with a screw cap and de-
signed for the following chemical fillings: Ml, CNS, AW, FS,
and GA. No bursting charge is provided. Dispersal of con-
tents is produced when the bottle is shattered by impact.
Incendiary fillings are ignited by the Ml or М2 igniter im-
mediately after impact. In the case of the AW grenade, the
white phosphorus filling ignites spontaneously upon contact
with air.
(8) Grenade, incendiary, M14 (fig. 3 ®).—This thermate-
filled grenade is similar in size and shape to the irritant gas
hand grenade CN-DM M6.
b. Summary.—A summary of the various types of hand
grenades is given in the following table;
7
Type Fuze I Weight as used (ounces) Filler
Grenade,1 hand, fragmentation, Mk. II. Igniting, M10A1. 20 EC blank Are powder.
Grenade, hand, co fragmentation, HE, Mk.II.’» Detonating, M5. 20 TNT
Grenade, hand, gas, irritant, CN-DM, M6. Igniting, M200A1. 17 Chloraceto- phenone, di- phenyiamine- chlorarsine.
Grenade, hand, gas, irritant, ON, M7. Igniting, M200A1. 17 Chloraceto- phenone.
HAND GRENADES
Body | Range (yards) Radius of burst Painting and marking Use Delay time
Cast iron, ser- rated. 50 30 yards.— . Yellow Casualty.. 5 seconds.
Cast iron, ser- rated. 50 30 yards Yellow Casualty.. 5 seconds.
Tinplate, smooth, cy- lindrical. 50 Burns; does not burst. Gray.' “CN- DM GAS” and 1 band (all in red). Harassing. Fumes start in 2 seconds; full volume, 3 seconds.
Tinplate, smooth, cy- lindrical. 50 Burns; does not burst. Gray.4 “CN GAS” andl band (all in red). Harassing. Fumes start in 2 seconds; full volume, 3 seconds.
BASIC FIELD MANUAL
Grenade, band, smoke, HC, M8. Igniting, M200A1. 17 HG smoke mixture. Tinplate, smooth, cy- lindrical.
Grenade, hand, offensive, Mk. IIIAl.® Detonating M6A2. 11 TNT Paper
Grenade, hand, training, Mk. 1A1. None 20 None Cast iron, ser- rated.
co Grenade, hand, practice, Mk. II.‘ Igniting, M10A1. 20 Reduced charge black powder. Cast iron, ser- rated.
Body, grenade, hand, fragmen- tation, Mk. II, with or with- out hand gre- nade fuze M5 (for dummy use) .5 With or with- out, M5 fuze, with- out deto- nator. 20 None Cast iron
See footnotes at end of table.
50 Burns; does not burst. Gray. “HC SMOKE” and 1 band and lot (all in yellow). Signal Fumes start in 2 se conds; full volume, 3 seconds.
50 — .Yellow,' type model and lot in black. Demoli- tion. 5 seconds.
50 None Black Training a . n d throw- ingprac- tice. Inert.
50 Does not burst; blows out cork plug. Blue Practice... 5 seconds.
50 None Black Training.. None.
GRENADES
HAND GRENADES—Continued
Type Fuze Weight as used (ounces) Filler Body Rauge (yards) Radius of burst Painting and marking Use Delay time
Grenade, fran- gible, Ml. None 42 Ml Glass 25 5 yd.’ None Casualty.. Ignites on im- pact.
I-4 о None 35 CNS Glass 25 5 yd.’ None. Harassing. Ignites on im- pact.
None 40 AW Glass 25 5 yd None Incendi- ary, cas- ualty. Ignites on im- pact.
Igniting, М2. 24 GA Glass 25 5 yd None Incendi- ary. Ignites on im- pact.
Igniting, Ml. 25 Alcohol, gaso- line. Glass 25 5 yd None Incendi- ary. Ignites on im- pact.
None 42 FS Glass 25 5 yd.’ None Casualty, screen- ing. Ignites on im- pact.
BASIC FIELD MANUAL
Grenade, incen- diary, M14. Igniti ng, M200A1. 32 Thermate T Inp 1 ate, smooth cy- lindrical. Burns; does not burst. Blue-gray. “TH IN- CENDI- ARY” and 1 band and lot (all in in purple). Incendi- ary. 2 seconds.
1 Issued fuzed ready for use.
* Limited standard. Superseded by grenade, hand, fragmentation, Mk. II, with hand grenade igniting fuze M10A1.
* Issued unfuzed but with grenade body loaded with the filler. The fuze is issued separately and must be assembled to the grenade
prior to nse.
4 Old type has green marking on gray body.
< Substitute for training grenade Mk. 1A1.
• Vapor will travel a considerable distance downwind.
GRENADES
5
BASIC FIELD MANUAL
Section П 4
THROWING TECHNIQUE
5. General.—a. Importance.—Grenade throwing is the most
important phase of hand grenade training. The thrower
must always follow accurately the prescribed method of arm-
ing and throwing so that in the latter stages of training
these operations will be performed mechanically. Perfection
of form, accuracy, and range are the desired factors in grenade
throwing. Accuracy and range are attained by practicing
the prescribed throwing form. Due allowance may be made,
however, for an individual’s conformation.
b. Chemical hand grenades.—Chemical hand grenades are
of such a highly specialized type that they cannot be employed
in the same manner as other grenades.
(1) Grenade, hand, gas, irritant, CN-DM, M6.—The CN-
DM grenade should be thrown slightly upwind of the target
area so that the gas cloud will be carried to hostile personnel
by the wind.
(2) Grenade, incendiary, M14.—This grenade must be
thrown to fall on combustible materials.
(3) Grenade, frangible, Ml.—These grenades are intended
primarily for use against the personnel and contents of ve-
hicles but may also be used against buildings. To be used effec-
tively they should be thrown inside vehicles or buildings.
Frangible grenades must be aimed accurately and thrown with
sufficient force to assure breakage.
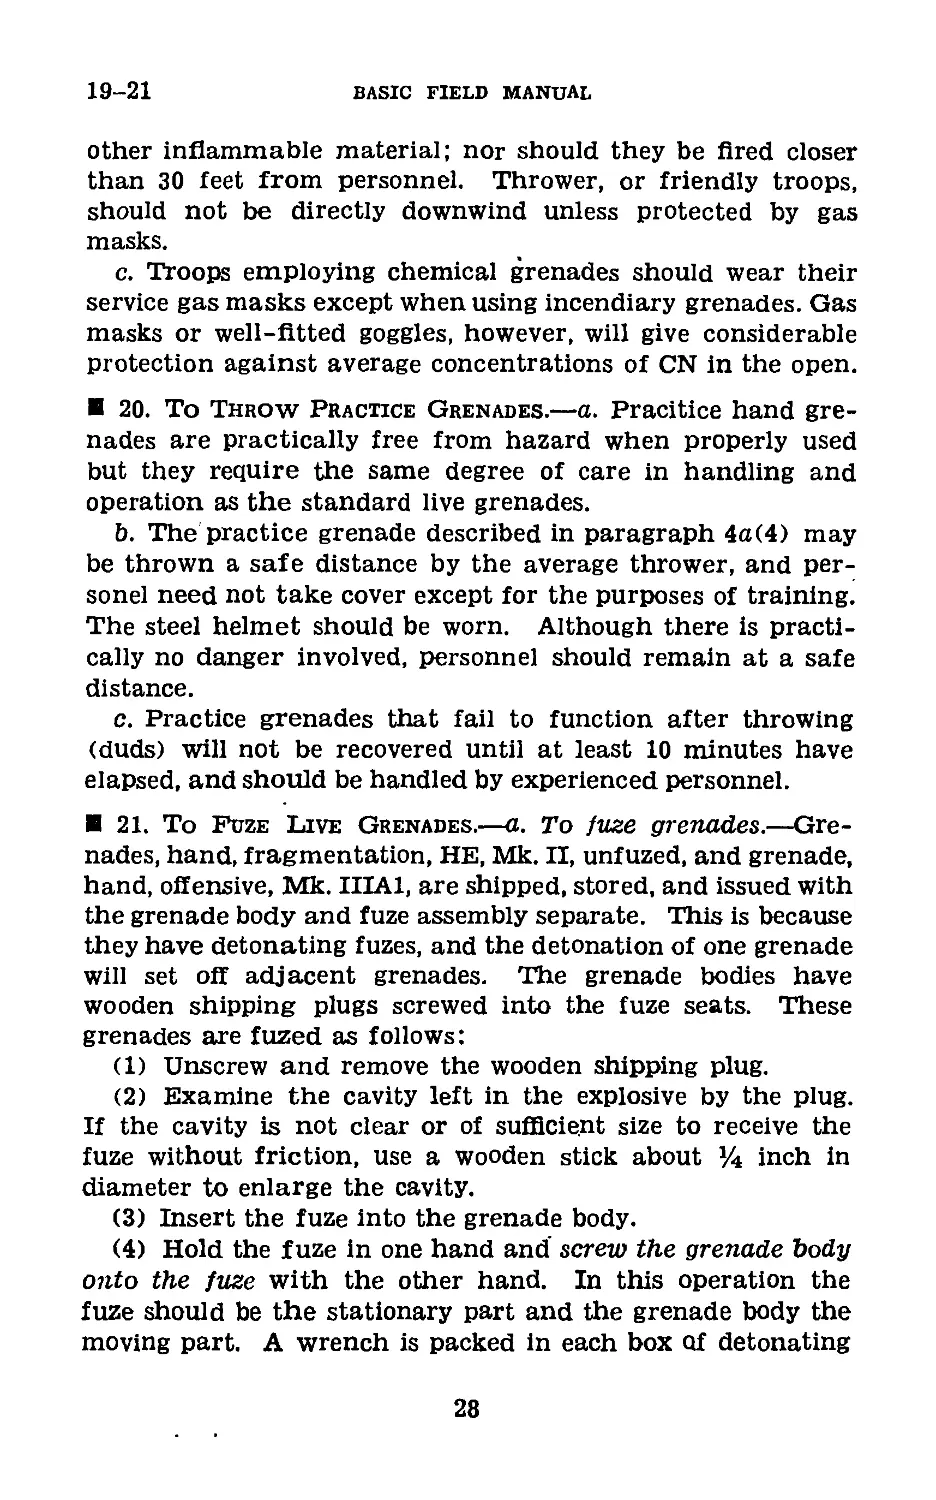
c. To hold grenade (fig. 4).—The grenade should be held
in the right hand with the safety lever firmly pressed by the
palm. The forefinger of the left hand is inserted through
the safety-pin ring. (A left-handed man may hold the gre-
nade in his left hand.) In this position the safety pin can
be removed without altering the grip for throwing. The
thrower must take every precaution after the safety pin has
been withdrawn not to release his grip on the lever until
the grenade is thrown. The thumb and forefinger of the
right hand should be around the upper horizontal serration
of the fragmentation hand grenade Mk. II. The grenade
should not be gripped directly under the fuze head because
this will result in inaccuracy, tumbling of the grenade in
12
GRENADES
5
flight, and reduction of the range. The fuze head has, on
occasion, been caught by the fingers of the thrower, causing
the grenade to drop immediately upon leaving the hand.
d. General rules for throwing.—The grenade is thrown by
a combination of a shot put and baseball catcher’s peg
motion. The biceps muscle of the throwing arm should be
contracted just before throwing. The grenade is released
just before the arm is fully extended. It is given a spin-
ning motion by being released over the tips of the fingers
as it leaves the hand so that it will rotate around its longer
axis, fuze to the rear, during its flight to the target. The
Figure 4.—Method of holding the grenade.
maximum range is obtained when the grenade leaves the
hand traveling at an upward angle of 45°. The hand being
at the shoulder, to execute the throw, carry the right hand
forward and upward without twisting the wrist. The left
arm always counterbalances the movement of the right arm.
If the grenades are striking to the right or left of the target
the entire body should be shifted to the left or right. For
the first practice no attempt should be made to throw over
20 yards, as the throwing arm might be injured. Thirty-
five yards is considered a good range after the first 100
grenades have been thrown at an average rate of 30 or 40
grenades a day for 3 or more days. A 50-yard range Is above
average.
463521°—42---3 13
6
BASIC FIELD MANUAL
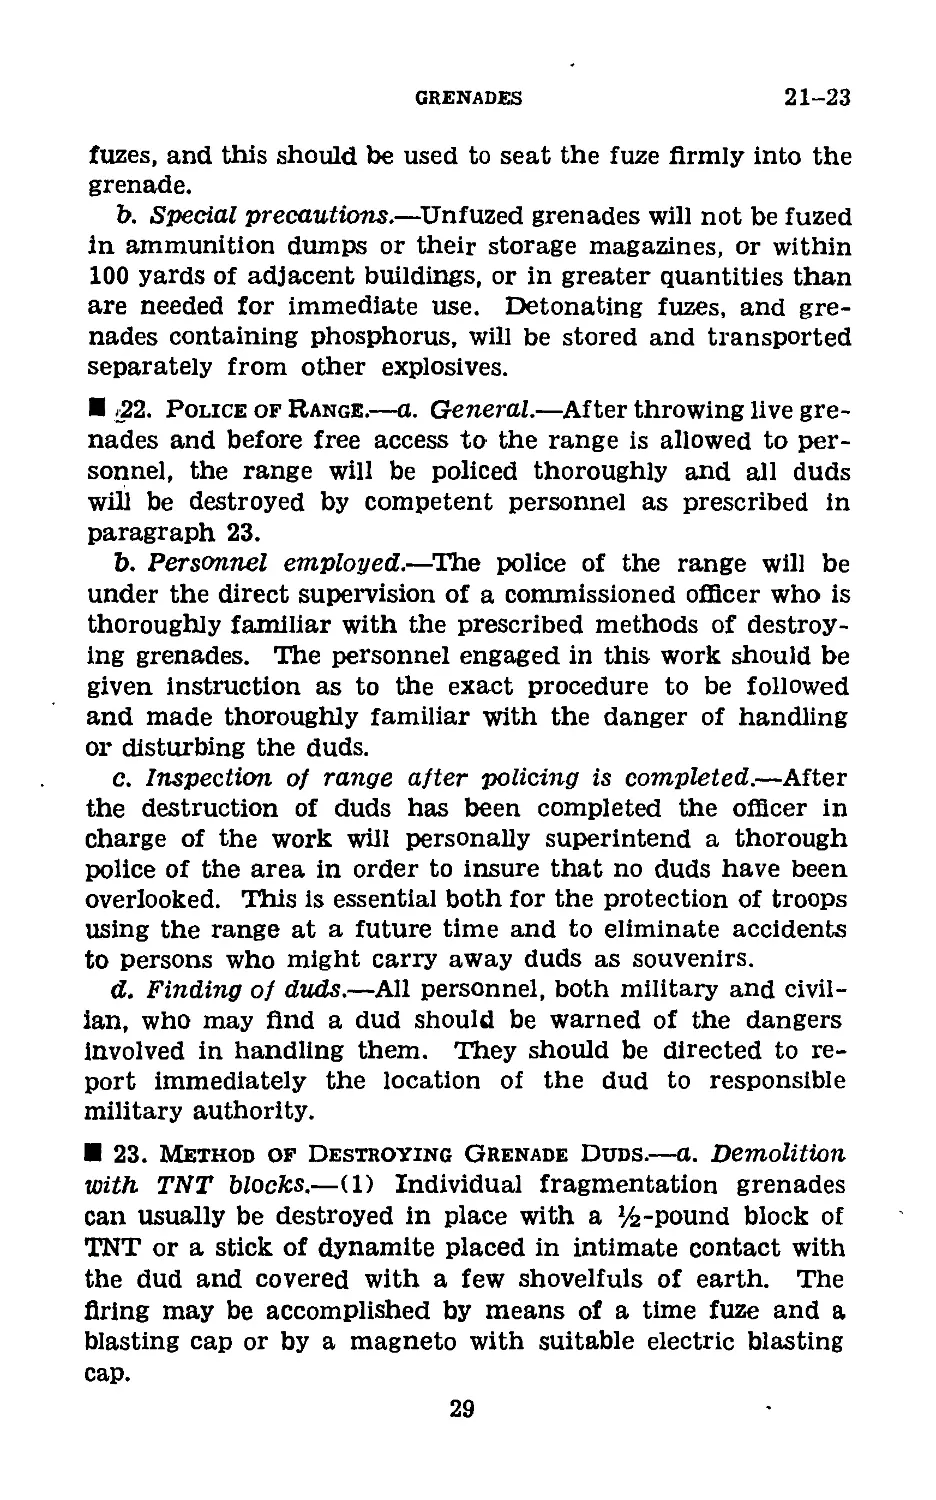
6. Methods.—a. To throw from standing position (fig. 5).—
The thrower facing the target, the commands and manner of
execution are as follows:
(1) Stand.—Face to the right. Move the left foot P/г to
2 feet toward the target, with the toe pointing in the general
direction of the target. Assume a well-balanced and easy
position. With the hands down and in front of the center of
the body, grasp the grenade in the prescribed manner. When
dummy grenades are used the left forefinger grasps the right
thumb to simulate the grasping of the safety-pin ring.
(2) pull pin.—Pull out the safety pin with a twisting-
pulling motion, holding the hands as nearly as practicable
1. STAND. 2. PREPARE TO THROW. 3. THROW.
Figure 5.—To throw from standing position.
in front of the center of the body. When dummy grenades
are used simulate this movement.
(3) prepare to throw.—Quickly bring the right arm into
position, the elbow at the height of and on line with the
shoulders, palm of the hand up, and near or touching the
shoulder. At the same time extend the left arm, palm of
the hand down, in the direction of the target. The weight
of the body is on the right foot. The body is bent to the right,
right knee bent, eyes sighting over the left hand to insure
direction and then fixed on the target. If throwing from a
trench or throwing pit, the eyes should be fixed on the parapet
or top of pit.
14
GRENADES
6
(4) THROW.—Quickly move the right arm upward and to
the front without twisting the wrist and release the grenade
just before the arm is fully extended, being sure to impart a
spinning motion. At the completion of the throw the left
foot and right toe are on the ground.
(5) recover.—Resume the position of stand.
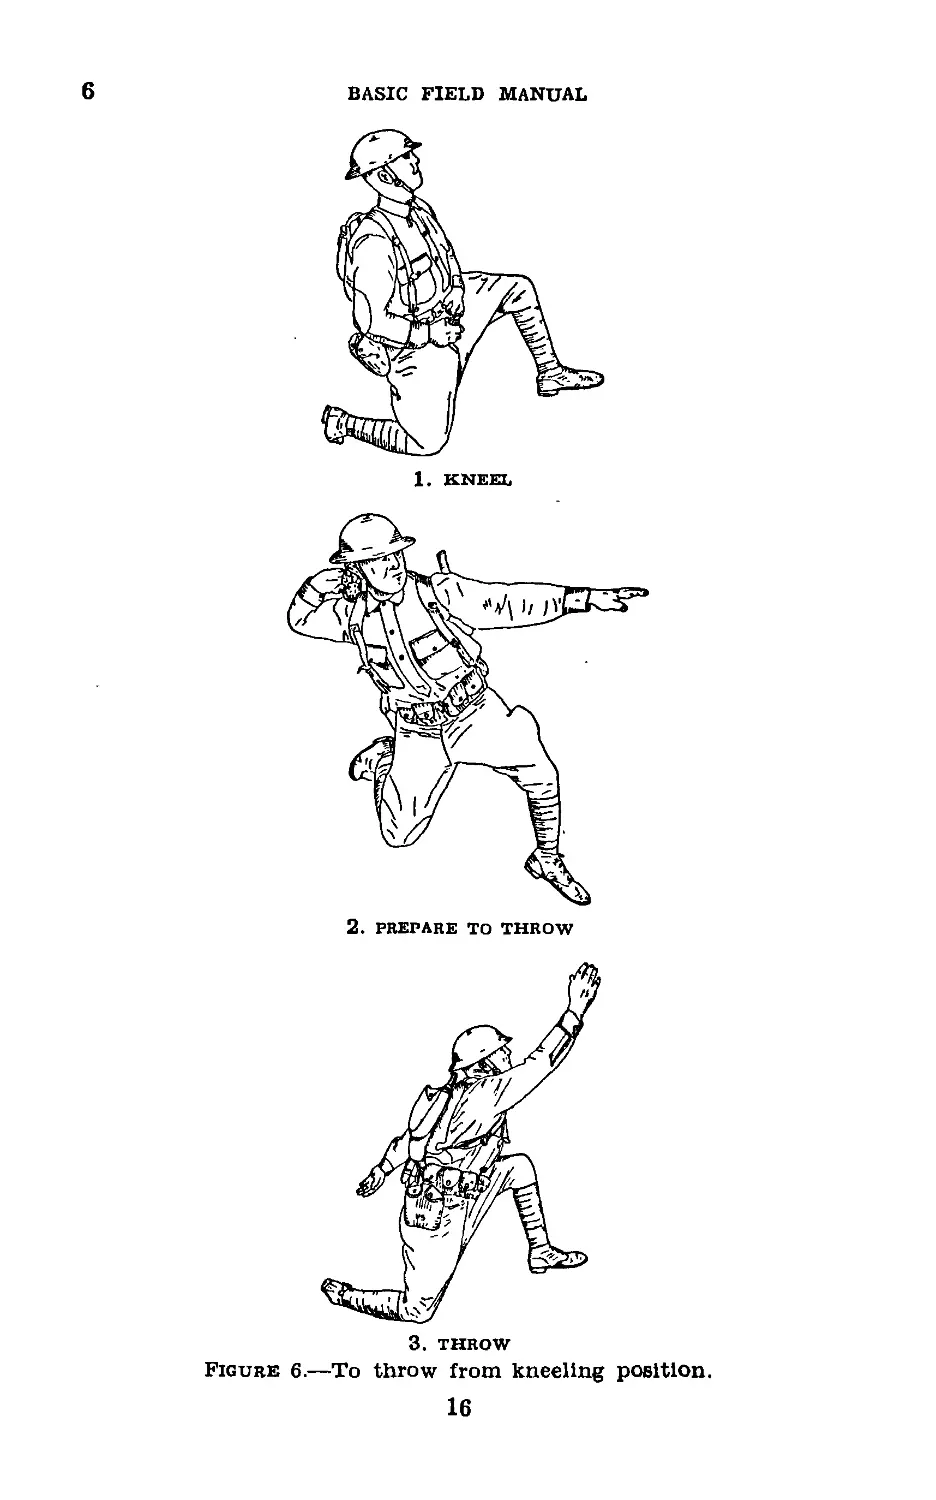
b. To throw from kneeling position (flg. 6).—The thrower,
facing the target, executes the commands in the following
manner:
(1) kneel.—Face to the right, kneel on the right knee,
right leg to the rear, left leg and foot pointing in the general
direction of the target. The weight of the body is on the right
knee.
(2) pull pin.—The execution is the same as for the standing
position.
(3) prepare to throw.—The execution is the same as for
the standing position except that the weight of the body is
on the right knee.
(4) THROW.—The execution is the same as for the stand-
ing position except that the body is brought to rest by the
chest coming in contact with the left knee and upper leg at
the completion of the throw.
(5) recover.—Resume the position of kneel.
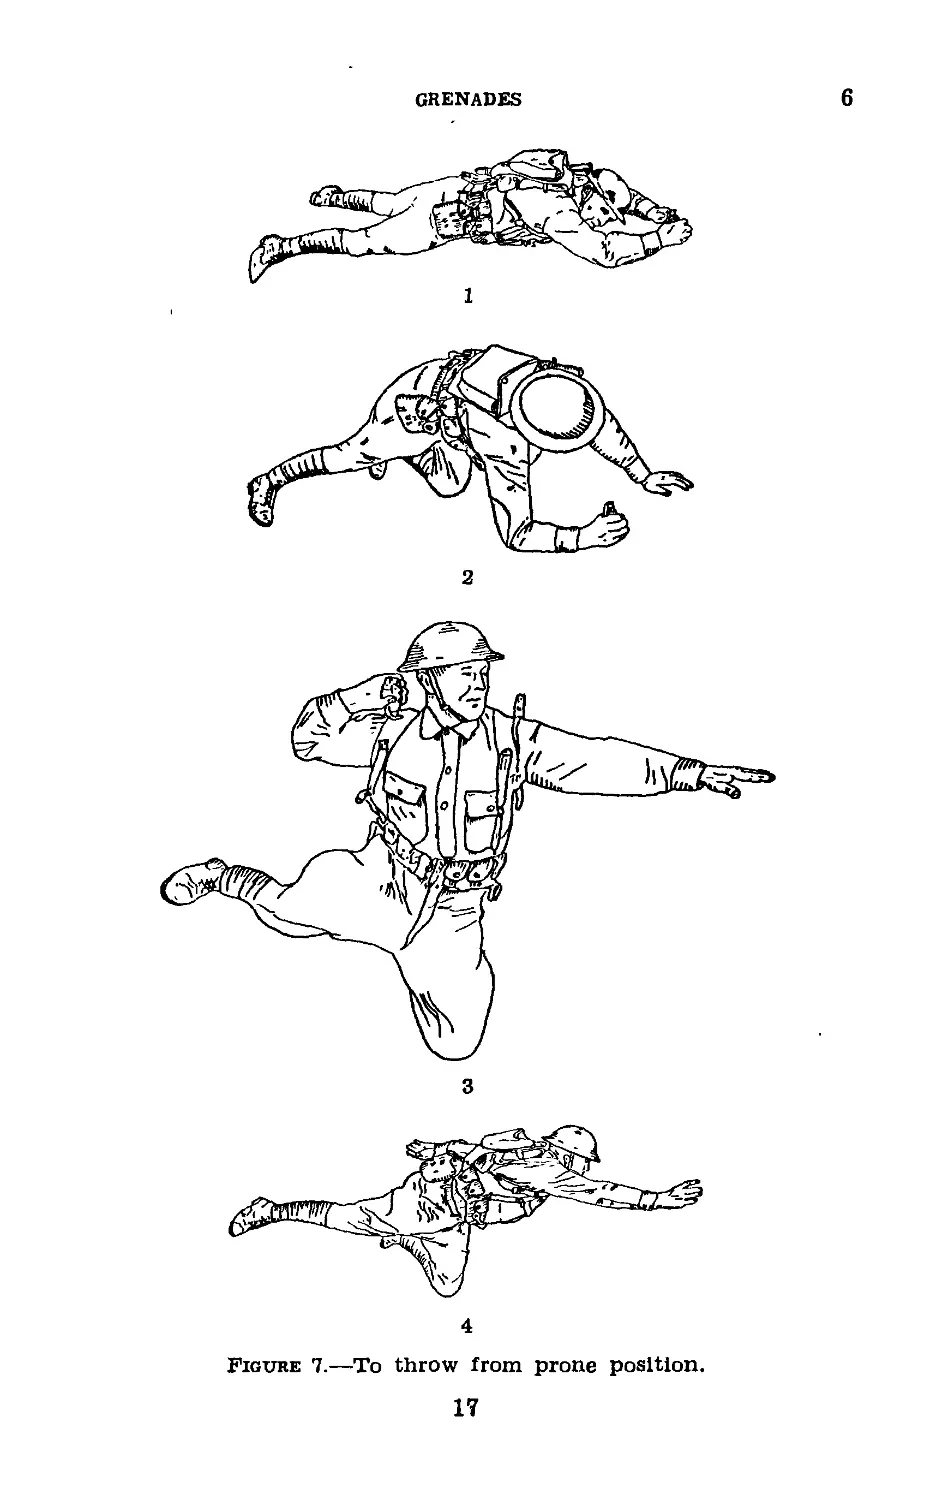
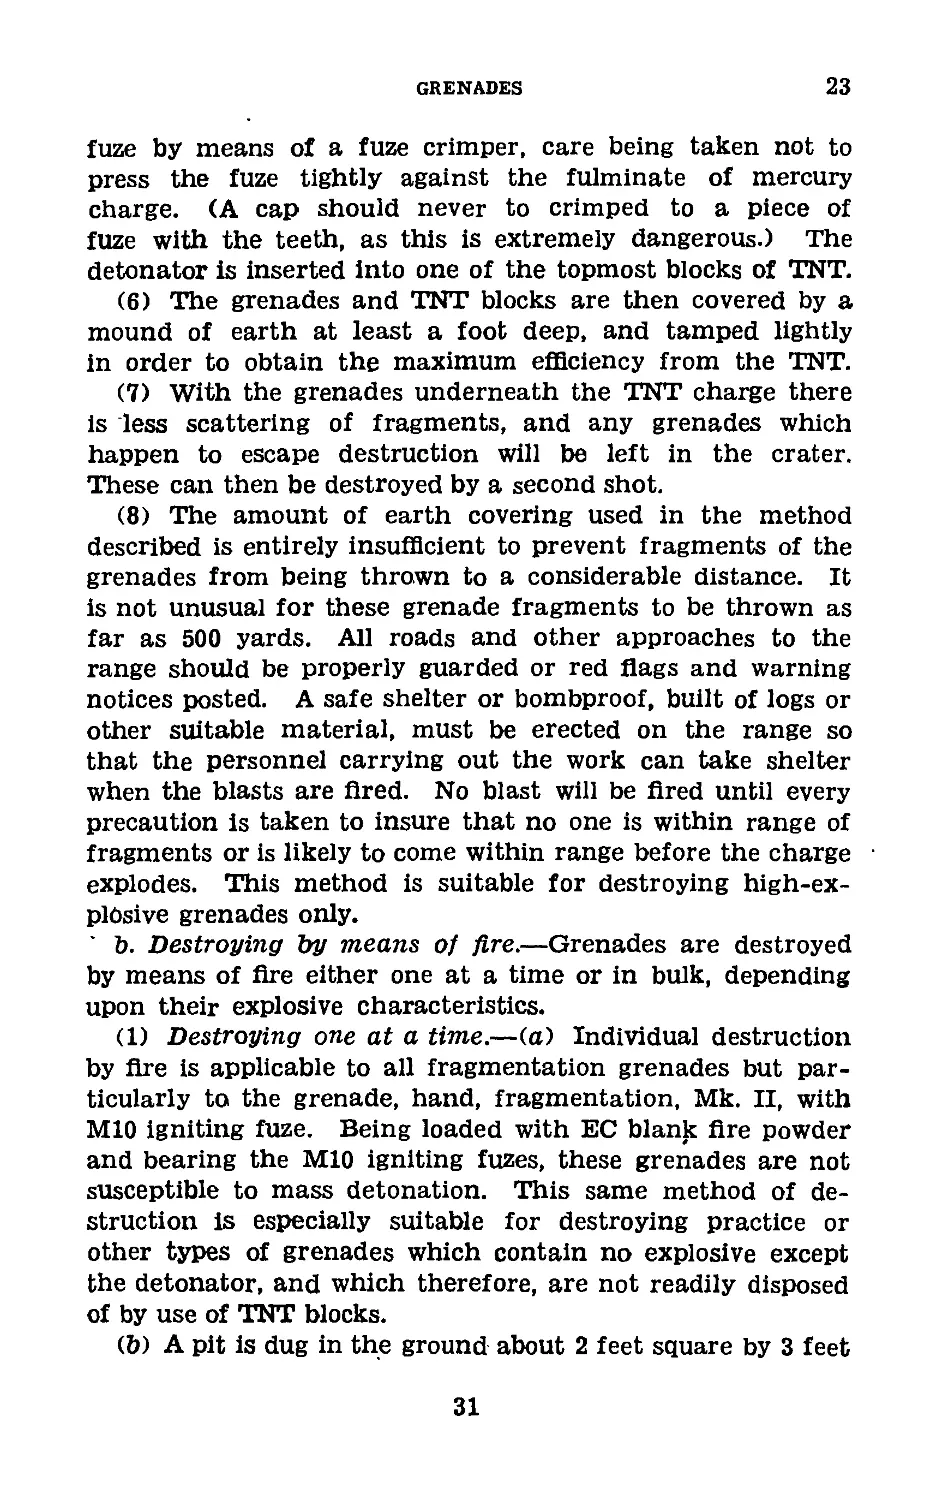
c. To throw from prone position (fig. 7).—The thrower,
facing the target, executes the commands in the following
manner:
(1) lie down.—Assume a prone position, as shown in figure
7. The body is on a line approximately in prolongation of
the target, so that when the position prepare to throw is
taken it will be unnecessary to shift the feet or left knee.
Either cheek is near or on the ground. Hold grenade as de-
scribed in paragraph 5 and as shown in figure 4, but in front
of the head, as shown in figure 7.
(2) pull pin.—Hold the grenade in front of the head and
pull the pin in the same manner as described for the standing
position.
(3) prepare to throw.—Draw back the hands and arms so
that the hands are near the shoulders, left hand and fore-
arm flat on the ground, right forearm and wrist only on the
ground; shove the body upward, pivoting the weight of body
15
6
BASIC FIELD MANUAL
3. THROW
Figure 6.—To throw from kneeling position.
16
GRENADES
6
1
2
3
4
Figure 7.—To throw from prone position.
17
6-7
BASIC FIELD MANUAL
on the left knee; straighten the right leg and extend it
straight to the rear. Hold the body upright. Do not push
up with the hand holding the grenade. Keep this hand
clear of the ground, as shown in figure 7. Continue until
a kneeling position is assumed. Being now in a kneeling
position, kneeling on the left knee, assume the same positions
for the hands, arms, body, and eyes, as given for the standing
position.
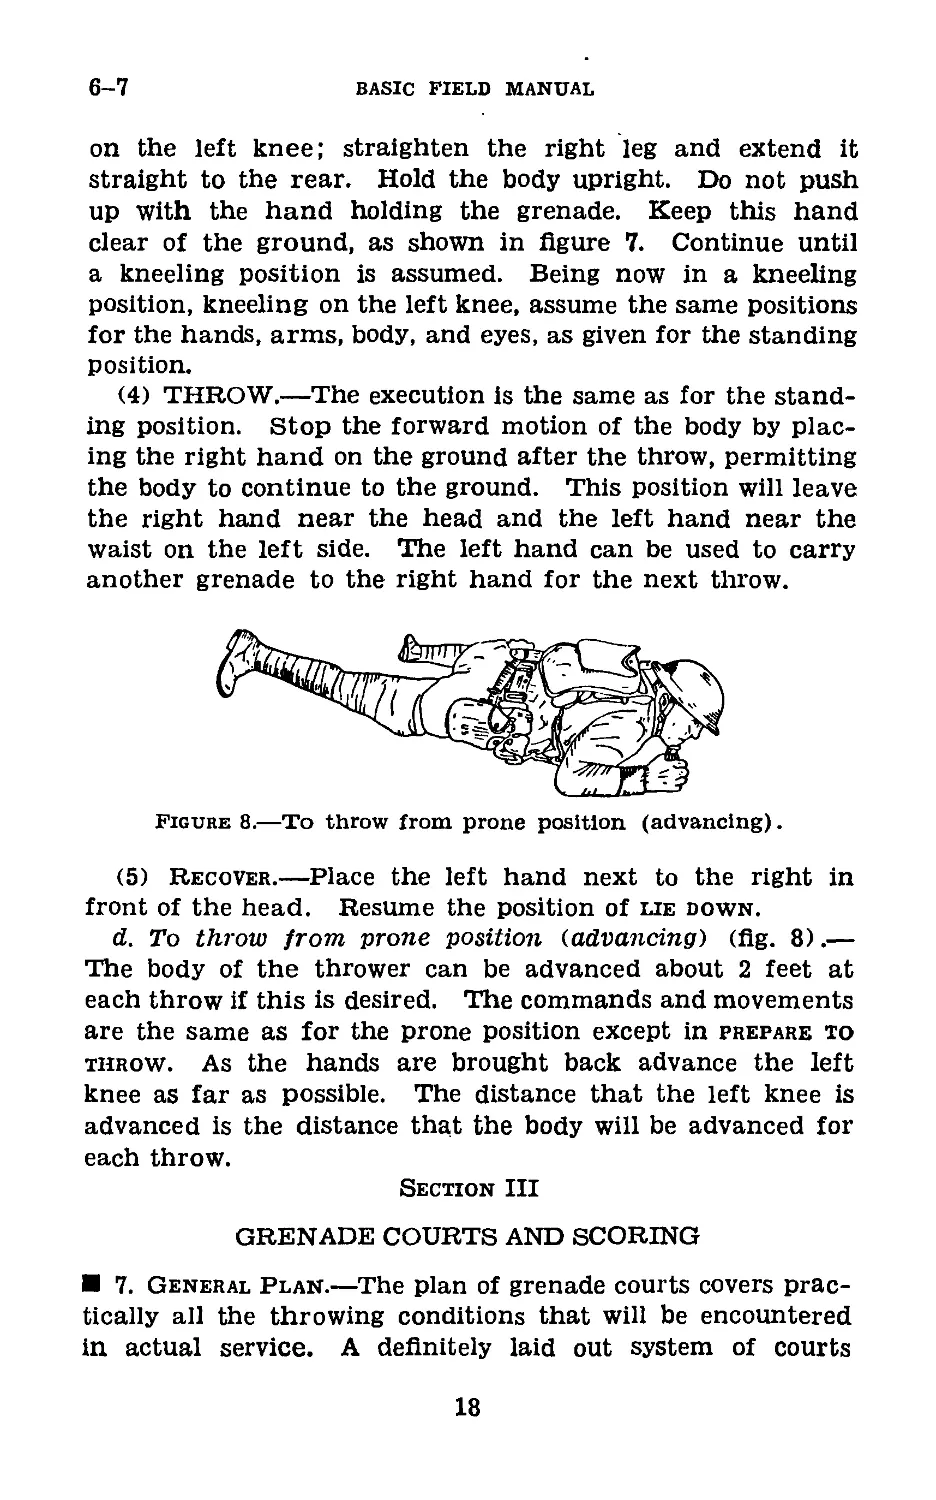
(4) THROW.—The execution is the same as for the stand-
ing position. Stop the forward motion of the body by plac-
ing the right hand on the ground after the throw, permitting
the body to continue to the ground. This position will leave
the right hand near the head and the left hand near the
waist on the left side. The left hand can be used to carry
another grenade to the right hand for the next throw.
Figure 8.—To throw from prone position (advancing).
(5) Recover.—Place the left hand next to the right in
front of the head. Resume the position of lie down.
d. To throw from prone position (advancing) (fig. 8).—
The body of the thrower can be advanced about 2 feet at
each throw if this is desired. The commands and movements
are the same as for the prone position except in prepare to
throw. As the hands are brought back advance the left
knee as far as possible. The distance that the left knee is
advanced is the distance that the body will be advanced for
each throw.
Section III
GRENADE COURTS AND SCORING
7. General Plan.—The plan of grenade courts covers prac-
tically all the throwing conditions that will be encountered
in actual service. A definitely laid out system of courts
18
GRENADES
7-8
Is a necessity for training large classes where the time is
limited and a fixed program must be followed. It eliminates
indefinite procedure. With the exception of the trenches,
or similarly constructed shelter, which must be had for live
fragmentation grenade throwing, the court may be laid out
in a short time and with very little material. The thrower
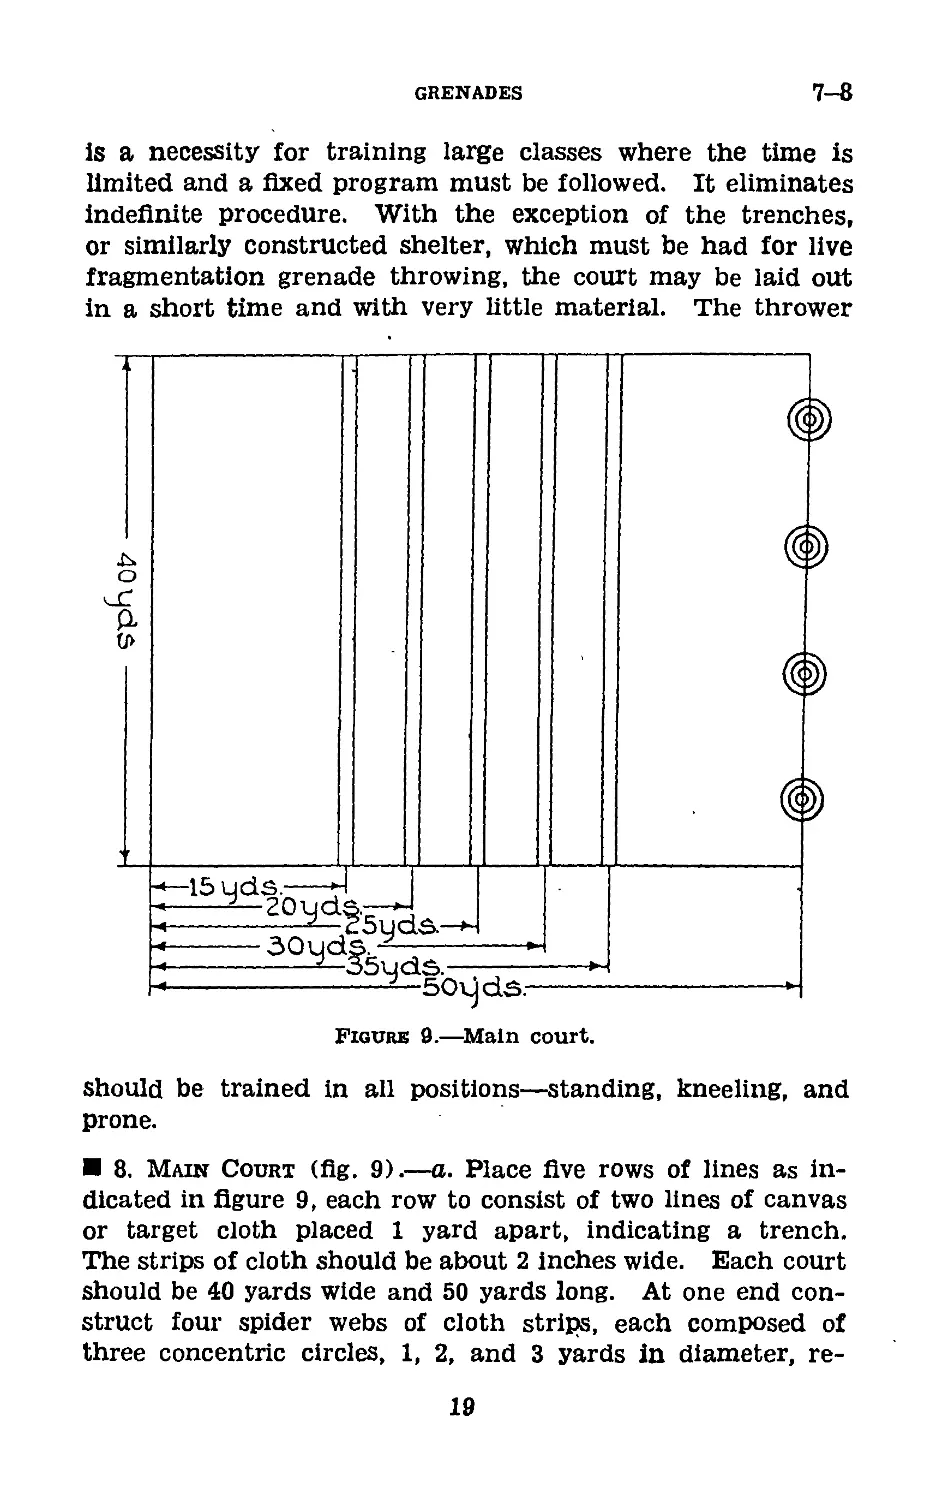
Figure 9.—Main court.
should be trained in all positions—standing, kneeling, and
prone.
8. Main Court (fig. 9).—a. Place five rows of lines as in-
dicated in figure 9, each row to consist of two lines of canvas
or target cloth placed 1 yard apart, indicating a trench.
The strips of cloth should be about 2 inches wide. Each court
should be 40 yards wide and 50 yards long. At one end con-
struct four spider webs of cloth strips, each composed of
three concentric circles, 1, 2, and 3 yards in diameter, re-
19
8-10
BASIC FIELD MANUAL
spectively. Small stakes approximately 18 inches long, with
pieces of cloth nailed, on the top, are placed in the center
of each web to give definite targets at which to aim.
b. This court will conveniently accommodate 64 men.
Where a large class is to be instructed the spider webs
should be eliminated, the court extended to approximately
75 yards in length, and both ends of the court used as throw-
ing lines.
c. The thrower places himself with the advanced foot on
the throwing line. He throws at the first trench until a direct
hit is made on or between the two tapes, at which time he
is eligible to throw at the next trench. Form and accuracy
are the objects desired; distance in throwing will be acquired
by practice.
d. All preliminary dummy throwing should be conducted on
the main court. Proficiency in form must be developed before
advancing to other courts. After suitable proficiency has been
attained in preliminary throwing work on the main court,
advance the thrower to the angle court, crater, trenches,
throwing pits, and vertical targets in order.
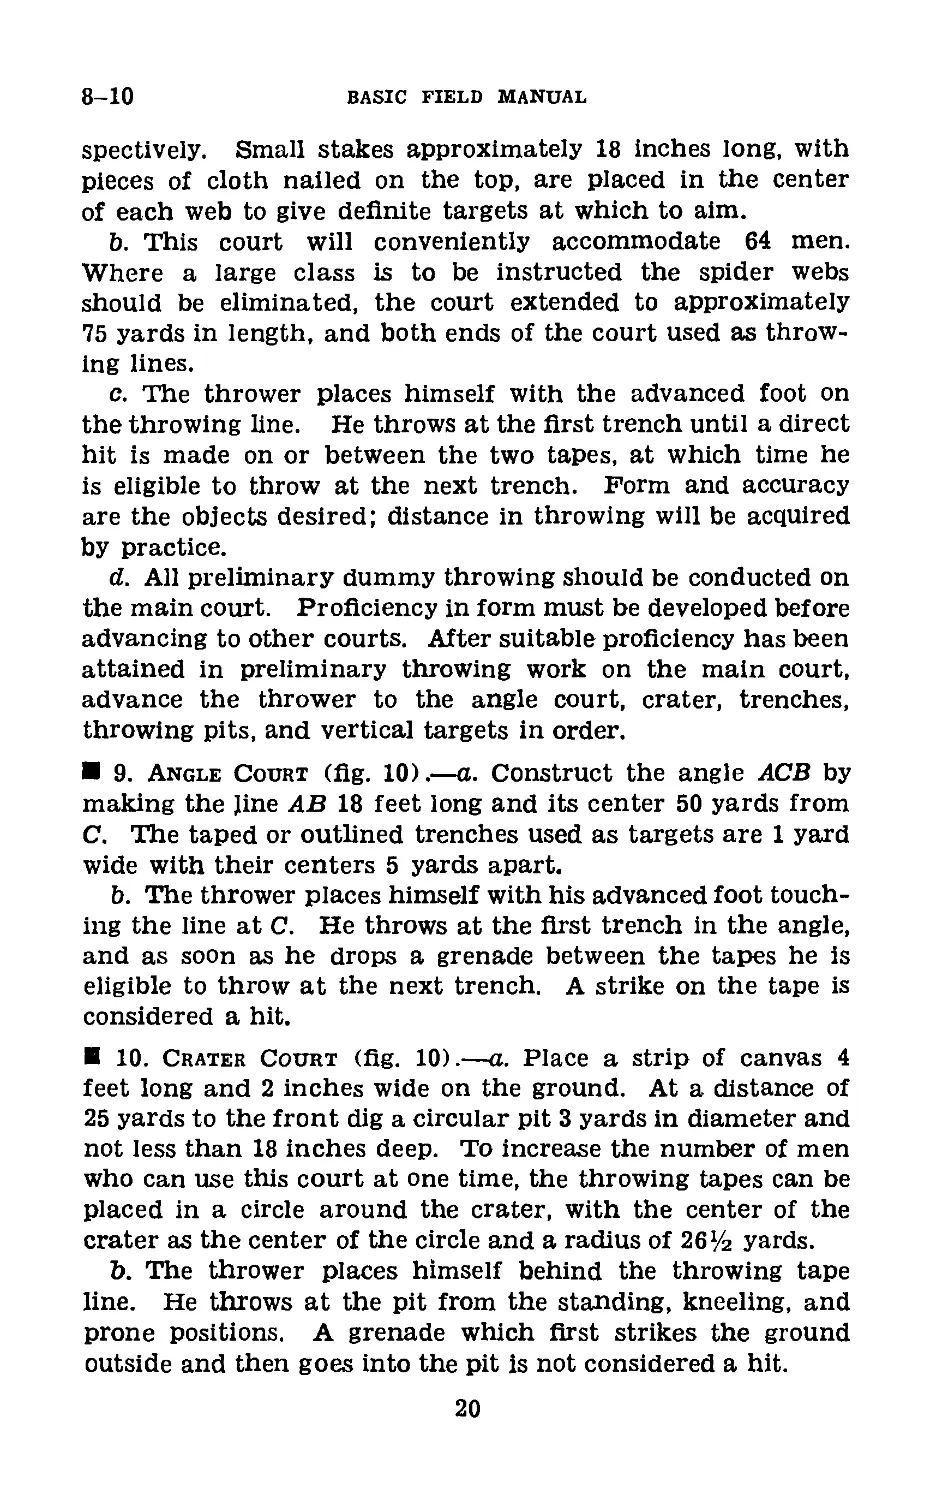
9. Angle Court (fig. 10).—a. Construct the angle ACB by
making the line AB 18 feet long and its center 50 yards from
C. The taped or outlined trenches used as targets are 1 yard
wide with their centers 5 yards apart.
b. The thrower places himself with his advanced foot touch-
ing the line at C. He throws at the first trench in the angle,
and as soon as he drops a grenade between the tapes he is
eligible to throw at the next trench. A strike on the tape is
considered a hit.
10. Crater Court (fig. 10).—a. Place a strip of canvas 4
feet long and 2 inches wide on the ground. At a distance of
25 yards to the front dig a circular pit 3 yards in diameter and
not less than 18 inches deep. To increase the number of men
who can use this court at one time, the throwing tapes can be
placed in a circle around the crater, with the center of the
crater as the center of the circle and a radius of 26 Уг yards.
b. The thrower places himself behind the throwing tape
line. He throws at the pit from the standing, kneeling, and
prone positions. A grenade which first strikes the ground
outside and then goes into the pit is not considered a hit.
20
GRENADES
10
25 yds
3yds
463521°—42-
21
-70yd.
11-12
BASIC FIELD MANUAL
11. Trenches (fig. 10).—a. The trenches should be con-
structed according to the specifications for type A fire
trenches. For classes of 150 men, at least 12 fire bays and
as many traverse bays should be made. Three masks should
be placed along the trenches about 10 yards in rear of the
parados. These masks are sandbag walls 7 feet high, 12
feet long, and built on the circumference of a 12-foot circle.
They are for the protection of the officers who have control
of the firing line during live practice with fragmentation
grenades.
b. For training other than live grenade practice the thrower
places himself in a firing bay and throws at successive bays
and traverses in turn until a hit is secured. The thrower
can make observations for any and all throws by jumping up
in the trench, but his hands must not touch any part of
the trench. The coach may place himself in such a position
as to see the strike of the grenade, but in so doing should
not expose his body unnecessarily. He should give the neces-
sary corrections after each throw.
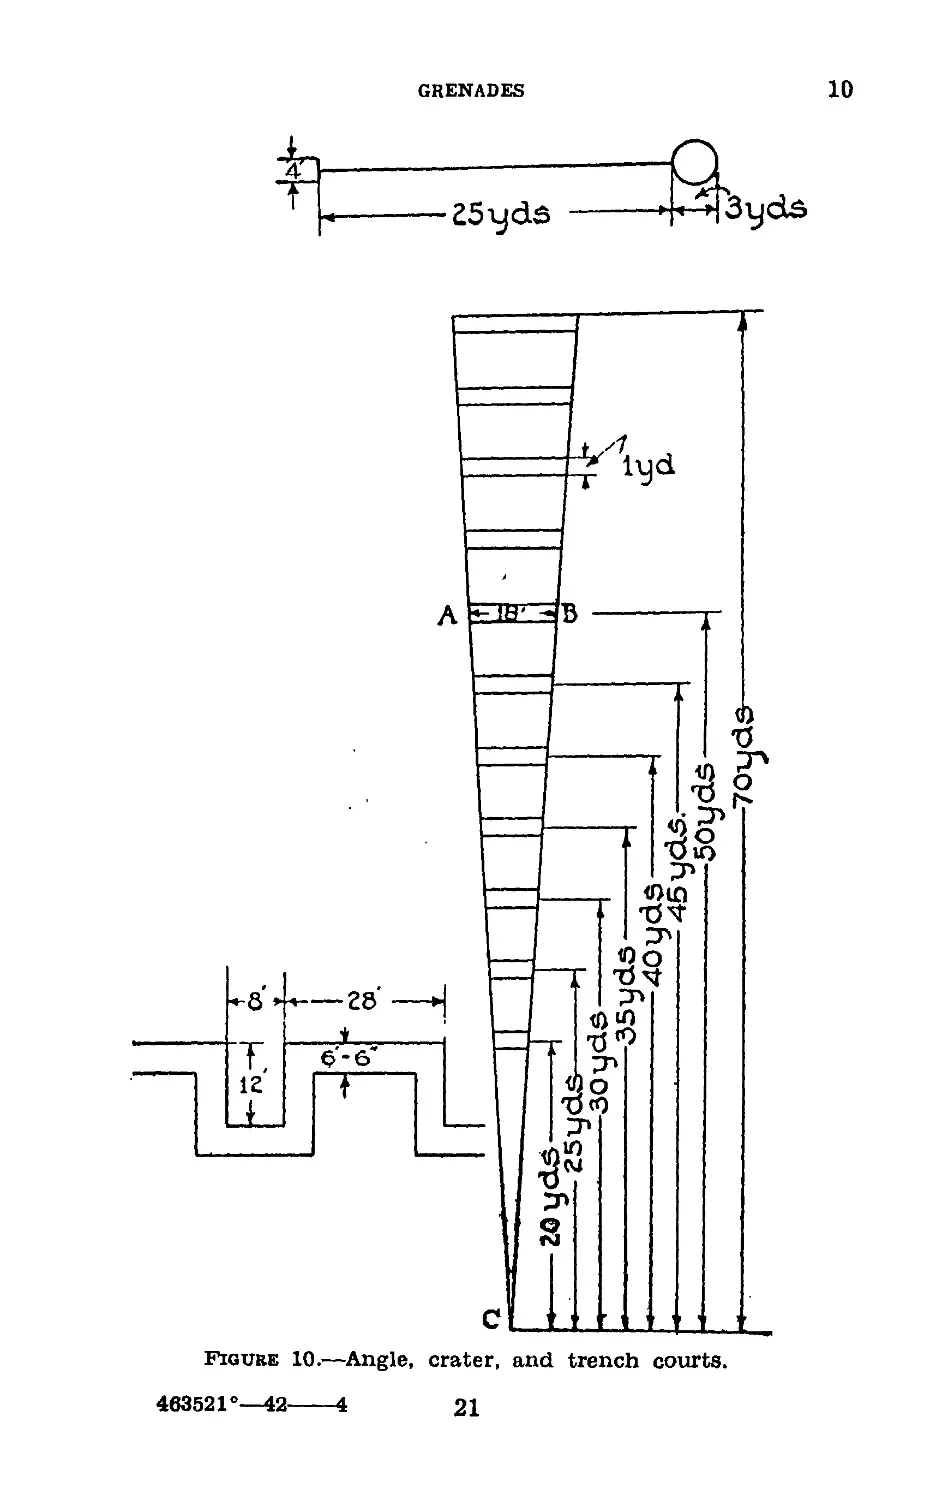
12. Throwing Pits (fig. 11).—a. A pit 8 feet long, 4 feet
wide, and 7 feet deep serves as a throwing trench. Along
the longitudinal axis and at a distance of 25 yards dig a
second pit 18 feet long, 2 feet wide, and 1 foot deep. At an
angle of 45° to the right and left of the front edge of the
throwing pit, and at a distance of 20 yards, dig similar pits so
that the longitudinal axis of each pit is perpendicular to the
45° line.
b. These pits are used for training in throwing from
behind cover, from a trench, or where a quick glance or
verbal direction must serve the thrower as a means of
locating the target. For the first few throws the thrower
is allowed to locate each pit before throwing by jumping
up for one glance. He must not support himself by plac-
ing his hands on the sides of the trench. An assistant
can call the correction after each throw as “Up five right
eight.” The correction refers to yards. This serves as
training in using the left arm for maintaining direction
and gaging distance according to the effort of the throw.
A grenade that first strikes the ground outside and then
goes into a pit is not considered a hit. The object is to
22
GRENADES
12
^-Line of targets
to
'd
о
^7)
о
CM
Plan
Throwing line
Figure 11.—Throwing pits and vertical targets.
23
12-14
BASIC FIELD MANUAL
hit each of the three targets in turn with the least number of
grenades.
13. Vertical Targets (fig. 11).—a. The vertical targets
consist of four targets. These targets represent windows at
various heights from the ground. Each target has an
interior dimension of 3 by 3 feet. Each target is con-
structed of two pieces 4 by 4 inches, used for uprights,
and two crosspieces, 2 by 2 inches, placed on the uprights.
From left to right, one target is level with the ground, one
6 feet above ground, one 12 feet above ground, and one 15
feet above ground. The height from the ground is meas-
ured from the ground to the interior edge of the bottom
crosspiece of each target.
b. The thrower places himself with his advanced foot
touching the throwing tape line. He endeavors to throw
through the frames. A grenade which strikes the frame is
not considered a hit. The object is to hit each of the four
targets in turn with the least number of grenades.
14. Scoring.—a. When local facilities permit the construc-
tion of grenade courts, and time is available for testing
organizations in grenade throwing, the system explained in
b below provides an effective means of stimulating interest
and developing accurate throwers. Tests by organizations
in grenade throwing are optional, and when conducted, nec-
essary scoring sheets will be prepared locally.
b. All targets are required to be hit regardless of the num-
ber of grenades used. The best score is made by hitting all
targets with the least number of grenades and thereby plac-
ing a premium on accuracy. It will be noted that there are
20 targets to be hit. If only 20 grenades are used the thrower
has a perfect score of 100. The number of grenades used
in excess of 20 reduces the score by a like amount.
24
GRENADES
15-16
15. Hand Grenade Score Card.
(Name)
(Army serial No.)
(Grade, company, and regiment)
Courts
Procedure
Tar-
gets
to be
bit
Num-
ber
of gre-
nades
used
Scorer's
initials
Main----------
Throws in any position at the first 4
trench lines in turn until a direct bit
is made on the tape or in the trench.
Angle___________
Throws in any position at the first 3
trench lines in turn until a direct bit
is made on the tape or in the trench.
Crater___________
Throws in each position—standing,
kneeling, and prone—until a direct hit
is made.
Trenches--------
Throws in any position down the trench
at the first 3 firing bays in turn until a
direct hit is made.
Throwing pits....
Throws in standing position at each
target in turn unti 1 a direct hit is made.
Vertical targets___
Throws in standing position at each
window in turn until a clean bit is
made.
Total__________________________ 20
The score is obtained by deducting the
number of grenades used from 120.
Score___________________________
Grading (circle the grade applicable):
Above 80...------------------------------------------------------ Superior.
Above 70________________________________________________________ Excellent.
Above 60_________________________________________________________ Satisfactory.
Below 60. _______________________________________________________ Unsatisfactory.
Date... ------------...
Certified correct------
Section IV
. SAFETY PRECAUTIONS, POLICE OF RANGE, AND
DESTRUCTION OF DUDS
16. General.—The provisions of this section pertaining to
throwing or handling live grenades in peacetime are ap-
plicable to troops. Other information necessary for safety,
25
16-17
BASIC FIELD MANUAL
administrative, and supply purposes by company and higher
headquarters is found in the references listed in the appendix.
17. To Throw or to Handle Live Grenades or Parts
Thereof.—The following safety precautions will be observed
when throwing or handling live grenades or parts thereof:
a. At all times those precautions which insure the great-
est safety to life and limb will be observed by all concerned.
b. Any alteration of loaded ammunition except in ac-
cordance with specific instructions from the chief of the
supply service concerned is hazardous and is therefore pro-
hibited.
c. A fuze containing a detonator should be handled with
extreme care at all times. The detonator contains a charge
of mercury fulminate composition and this explosive is very
sensitive to heat, shock, or friction. By heat is meant such
conditions as the direct rays of the sun when the temperature
is 70° F. or more. By shock is meant such shock as is pro-
duced by carrying fuze assemblies loose in the pocket where
the detonators strike against each other, dropping them from
any height whatever, or striking a box of fuze assemblies with
a hammer in order to open the box. By friction is meant any
friction more than is met during the ordinary handling of
the fuze assembly at the end away from the detonator. It
is not necessary to touch the detonator of the fuze assem-
bly. No attempt should be made to alter or tamper with
a detonating fuze in the field. The detonator is powerful
enough to blow fingers from a hand or cause other serious
injury. If at any time it is necessary to handle detonators
alone, grasp the open end and not the closed end. If handled
carefully detonators are not dangerous.
d. The maximinn number of men in any throwing group
for live grenade throwing will be two—the coach and his
pupil. They will both wear steel helmets.
e. If a grenade is dropped after the safety pin has been
removed, or the striker has been allowed to function acci-
dentally, the proper procedure is to pick up the grenade im-
mediately, throw it as far as possible in the direction intended,
and seek nearby shelter. If no shelter is near, drop flat on
the ground, with the helmet toward the grenade. A grenade
can be thrown farther than one can run in 3 or 4 seconds.
26
GRENADES
17-19
/. The coach is responsible for his pupil and he should
never quit his post and expose his pupil to danger.
g. Do not pull out the safety pin until ready to throw.
h. Do not release the safety lever before throwing.
i. In case the safety pin will not pull out, do not straighten
it until just before throwing the grenade. In the majority
of grenades it will not be necessary to straighten the ends of
the safety pins, as a twisting-pulling motion readily removes
them.
j. Do not recover or tamper with a live grenade that fails
to fire (dud). They will be recovered and destroyed only as
prescribed in paragraphs 22 and 23.
k. Do not take a dud apart.
I. Do not take any grenade apart unless ordered to do so.
18. To Throw Fragmentation Grenades.—When throwing
live fragmentation grenades a steel helmet will be worn by
each individual within a range of 250 yards, because frag-
ments are often blown high and descend with sufficient veloc-
ity to cause severe wounds. Each group, consisting of the
coach and his pupil, will be protected from the front and
from adjacent groups or individuals by sandbag screens not
less than 20 inches thick or by some equivalent protection.
The object of this protection is to insure against injury to
personnel either from the front or flanks. The most de-
sirable form of protection is a traversed trench. .The in-
structor assigns each coach and pupil group to a firing bay.
The firing bay should be to the thrower’s right. The thrower
should place himself far enough from the wall of the trench
so as not to strike the wall with either the hand or the
grenade when throwing. When throwing keep the throwing
hand below the level of the parapet. Do not expose that
hand any more than any other part of the body. The coach
places himself to the right of and about 3 or 4 feet from the
thrower.
19. To Throw Chemical Grenades.—a. Sandbag screens or
throwing trenches are not necessary for protection when
throwing chemical grenades.
b. Except where incendiary action is desired, burning type
grenades should not be ignited within 5 feet of dry grass or
27
19-21
BASIC FIELD MANUAL
other inflammable material; nor should they be fired closer
than 30 feet from personnel. Thrower, or friendly troops,
should not be directly downwind unless protected by gas
masks.
c. Troops employing chemical grenades should wear their
service gas masks except when using incendiary grenades. Gas
masks or well-fitted goggles, however, will give considerable
protection against average concentrations of CN in the open.
20. To Throw Practice Grenades.—a. Pracitice hand gre-
nades are practically free from hazard when properly used
but they require the same degree of care in handling and
operation as the standard live grenades.
b. The practice grenade described in paragraph 4a(4) may
be thrown a safe distance by the average thrower, and per-
sonel need not take cover except for the purposes of training.
The steel helmet should be worn. Although there is practi-
cally no danger involved, personnel should remain at a safe
distance.
c. Practice grenades that fail to function after throwing
(duds) will not be recovered until at least 10 minutes have
elapsed, and should be handled by experienced personnel.
21. To Fuze Live Grenades.—a. To fuze grenades.—Gre-
nades, hand, fragmentation, HE, Mk. II, unfuzed, and grenade,
hand, offensive, Mk. IIIA1, are shipped, stored, and issued with
the grenade body and fuze assembly separate. This is because
they have detonating fuzes, and the detonation of one grenade
will set off adjacent grenades. The grenade bodies have
wooden shipping plugs screwed into the fuze seats. These
grenades are fuzed as follows:
(1) Unscrew and remove the wooden shipping plug.
(2) Examine the cavity left in the explosive by the plug.
If the cavity is not clear or of sufficient size to receive the
fuze without friction, use a wooden stick about % inch in
diameter to enlarge the cavity.
(3) Insert the fuze into the grenade body.
(4) Hold the fuze in one hand and’ screw the grenade body
onto the fuze with the other hand. In this operation the
fuze should be the stationary part and the grenade body the
moving part. A wrench is packed in each box Of detonating
28
GRENADES
21-23
fuzes, and this should be used to seat the fuze firmly into the
grenade.
b. Special precautions.—Unfuzed grenades will not be fuzed
in ammunition dumps or their storage magazines, or within
100 yards of adjacent buildings, or in greater quantities than
are needed for immediate use. Detonating fuzes, and gre-
nades containing phosphorus, will be stored and transported
separately from other explosives.
<22. Police of Range.—a. General.—After throwing live gre-
nades and before free access to the range is allowed to per-
sonnel, the range will be policed thoroughly and all duds
will be destroyed by competent personnel as prescribed in
paragraph 23.
b. Personnel employed.—The police of the range will be
under the direct supervision of a commissioned officer who is
thoroughly familiar with the prescribed methods of destroy-
ing grenades. The personnel engaged in this work should be
given instruction as to the exact procedure to be followed
and made thoroughly familiar with the danger of handling
or disturbing the duds.
c. Inspection of range after policing is completed.—After
the destruction of duds has been completed the officer in
charge of the work will personally superintend a thorough
police of the area in order to insure that no duds have been
overlooked. This is essential both for the protection of troops
using the range at a future time and to eliminate accidents
to persons who might carry away duds as souvenirs.
d. Finding of duds.—All personnel, both military and civil-
ian, who may find a dud should be warned of the dangers
involved in handling them. They should be directed to re-
port immediately the location of the dud to responsible
military authority.
23. Method of Destroying Grenade Duds.—a. Demolition
with TNT blocks.—(1) Individual fragmentation grenades
can usually be destroyed in place with a %-pound block of
TNT or a stick of dynamite placed in intimate contact with
the dud and covered with a few shovelfuls of earth. The
firing may be accomplished by means of a time fuze and a
blasting cap or by a magneto with suitable electric blasting
cap.
29
23
BASIC FIELD MANUAL
(2) All fragmentation grenades are of the time fuze
type—that is, they are designed to explode on the burning
through of a piece of time fuze. This type of grenade dud
can safely be picked up and destroyed at some central
point, except that before a fragmentation hand grenade
is picked up the striker should be looked at to make cer-
tain that it is all the way down against the primer. If
the striker is not all the way down against the primer, but
has rotated only part of the way, it is called a hung
striker. Such a grenade dud .should not be picked up but
should be destroyed where it lies, using extreme care in
placing the demolition charge to prevent jarring the
grenade. Chemical-filled and practice grenade duds with
hung strikers can be picked up with safety because they
can be thrown out of danger range in case the striker
happens to function.
(3) When it is considered safe to move them, not to
exceed 30 or 40 grenades are stacked in a small hole dug
in the ground about V/г feet or more in depth, care being
taken that the bodies of the grenades are in close con-
tact. For example, 40 grenades may be arranged by placing
4 side by side and 4 more base to base with those for the
bottom layer, and putting 4 similar layers directly on top
of this. A number of У2-pound TNT blocks are then placed
on top of the grenades. The number of TNT blocks to be
used will depend on the number of grenades to be de-
stroyed at one time. One block is sufficient for 6 grenades
piled in 3 layers of 2 grenades each. At least 2 blocks
should be used on 12 grenades piled in 3 layers of 4 grenades
each. Five or six blocks should be used to explode 30 or 40
grenades.
(4) Where as many as 5 or 6 TNT blocks are used, it is
preferable to arrange these by placing 4 of them side by
side on top of the grenades, in close contact, the remainder
being placed on top of this layer.
(5) The desired length of time fuze is cut (time fuze
should be tested to determine rate of burning). One end
of the fuze is placed carefully in the open end of a No. 8
detonator until it just touches the fulminate of mercury
charge. Crimp the open end of the detonator tightly to the
30
GRENADES
23
fuze by means of a fuze crimper, care being taken not to
press the fuze tightly against the fulminate of mercury
charge. (A cap should never to crimped to a piece of
fuze with the teeth, as this is extremely dangerous.) The
detonator is inserted into one of the topmost blocks of TNT.
(6) The grenades and TNT blocks are then covered by a
mound of earth at least a foot deep, and tamped lightly
in order to obtain the maximum efficiency from the TNT.
(7) With the grenades underneath the TNT charge there
is less scattering of fragments, and any grenades which
happen to escape destruction will be left in the crater.
These can then be destroyed by a second shot.
(8) The amount of earth covering used in the method
described is entirely insufficient to prevent fragments of the
grenades from being thrown to a considerable distance. It
is not unusual for these grenade fragments to be thrown as
far as 500 yards. All roads and other approaches to the
range should be properly guarded or red flags and warning
notices posted. A safe shelter or bombproof, built of logs or
other suitable material, must be erected on the range so
that the personnel carrying out the work can take shelter
when the blasts are fired. No blast will be fired until every
precaution is taken to insure that no one is within range of
fragments or is likely to come within range before the charge
explodes. This method is suitable for destroying high-ex-
plbsive grenades only.
* b. Destroying by means of fire.—Grenades are destroyed
by means of fire either one at a time or in bulk, depending
upon their explosive characteristics.
(1) Destroying one at a time.—(a) Individual destruction
by fire is applicable to all fragmentation grenades but par-
ticularly to the grenade, hand, fragmentation, Mk. II, with
MIO igniting fuze. Being loaded with EC blank fire powder
and bearing the MIO igniting fuzes, these grenades are not
susceptible to mass detonation. This same method of de-
struction is especially suitable for destroying practice or
other types of grenades which contain no explosive except
the detonator, and which therefore, are not readily disposed
of by use of TNT blocks.
(b) A pit is dug in the ground about 2 feet square by 3 feet
31
23
BASIC FIELD MANUAL
deep, and a loosely fitting cover of iron plate or heavy boards
provided. A fire of wood or coke is built in the bottom of the
pit, and when a substantial bed of hot coals has been pro-
duced one of the grenades to be destroyed is dropped in, the
cover is quickly dropped in place, and the operator takes
shelter until the grenade has exploded. Grenades should be
put in the fire one at a time, so that there will be absolutely
no doubt as to whether or not there is an unexploded grenade
in the pit. К there is unusual delay in exploding, no attempt
should be made at that time to investigate. The time ‘to
investigate is after the fire has burned out and the pit is cold.
This procedure may be modified by providing an inclined
chute such as a piece of pipe placed so that one end is over
the center of the pit and the other behind a suitable barri-
cade. Precaution should be taken to baffle the open end of
the chute so that the operator cannot look down the chute.
The grenades should be fed into the fire through the chute,
care being taken to avoid an accumulation of unexploded
grenades or components in the pit.
(2) Bulk destruction.—(a) If destruction by fire is neces-
sary the grenade, hand, fragmentation, HE, Mk. II, adapted
for hand grenade detonating fuze M5, is best destroyed in
bulk lots of from 30 to 40 grenades. However, they may be
destroyed one at a time as prescribed above if it is so desired.
These grenades, being loaded with TNT and containing the
fulminate of mercury detonator, are subject to mass detona-
tion if one of the detonators explodes.
(b) A pit similar to that used for destroying fragmentation
grenades by detonation is necessary, and a heavy metal cover
should be provided to stop flying fragments and unexploded
grenades. A layer of inflammable material, such as wood or
coke, should be placed under the pile of grenades, and as soon
as the fire is started the cover should be placed over the pit
and the personnel should take cover.
c. Destruction о/ irritant or other types of chemical gre-
nades.—The destruction of irritant or other types of chemical
grenades which fail to function should be accomplished under
the supervision of the unit chemical officer.
32
GRENADES
24-25
Section V
ADVICE TO INSTRUCTORS
24. General.—Training in hand grenades must not be
restricted to hard and fast rules. Instructors must be con-
stantly on the alert for new methods of training and opera-
tion, and nothing contained in this manual is to be construed
as limiting in any way the initiative and originality of in-
structors, provided the necessary safety precautions are
observed.
25. Scope of Training.—a. General.—The schedule of in-
struction and scope of training will depend upon the length
of time available, the combat duties of the personnel to be
trained, and the importance of the grenade in the type of
warfare to be conducted. Trench warfare necessitates ex-
tensive and detailed training in all types of trench fighting.
Open warfare requires less extensive training. It should in-
clude such instruction as will form the basis for the effective
use of the grenade in the combat training of the smaller
rifle units.
b. Individual instruction.—(1) Scope.—The scope of in-
dividual instruction should include—
(a) Explosives in general and precautions to be observed
in handling them, and grenades in particular.
(b) The general principles of detonating explosives.
(c) The characteristics, mechanism, and the care and use
of service type grenades.
(d) The technique of throwing, including the throwing of
dummy, practice, and live grenades.
(e) Precautions pertaining to the handling of duds.
(2) Grenade throwing.—Grenade throwing is the most
important phase of individual grenade training and a very
high standard of accuracy should be required, for besides
the' advantage it gives in combat it diminishes the risks of
accidents and the consumption of grenades. Careful prac-
tice in the prescribed throwing technique is essential to suc-
cessful throwing, and a considerable portion of the time
available for training must be devoted to it.
c. Squad training.—After thorough training of -the indi-
33
25
BASIC FIELD MANUAL
virtual is completed the necessary teamwork should be secured
by squad training. In general, squad training may take the
form of exercises over terrain especially prepared to illus-
trate the various situations wherein the hand grenade would
play a part in actual war. These exercises should always
be carried out under conditions identical as nearly as pos-
sible with those to be expected in actual service. The dummy
or practice type of hand grenade is best suited for peace-
time training of this kind.
d. Allotment of time.—A total allotment of 12 hours in
the Thirteen Week Mobilization Training Schedule is con-
sidered suitable for a rifle company in this subject. The
following apportionment of this time is suggested:
Day Time allotted (hours) Instruction Equipment
1st 2 1 hour conference and demon- stration (secs. I and II). 1 hour throwing, standing (pars. 5 and 6 a). Sample grenade of each type issued to unit; dummy gren- ades; grenade court. (See par. 26 b (6).) Dummy or practice grenades; grenade court.
2d 2 1 hour conference and demon- stration (pars. 5 and 6 a and 6). 1 hour throwing, standing and kneeling (pars. 5 and 6 a and 6). Dummy grenades; grenade court. Do.
3d 2 1 hour conference and demon- stration (pars. 6 c and d and 16 to 21). 1 hour throwing, prone (par. 6 c and d). Dummy grenades; grenade court. Do.
4 th 1 Throwing from all positions (sec. II). Practice grenades; grenade court.
Sth 2 Throwing live grenades (sec. II and so much of sec. IV as ap- plicable) . Live grenades; grenade court.
6th 3 Squad training (c above)— Practice grenades; suitable terrain and trench facilities.
Total time for the various conferences and practice periods
is suggested above. Actual conferences and practice periods
should be short and interchanged and varied with games,
quickening exercises, and short rests. In very short courses
34
grenades
25-26
It is advisable to increase the time allotted to conferences
and live throwing and reduce that allotted to throwing prac-
tice and squad training. The latter phase of training can
be omitted completely for other than rifle units.
26. Conduct of Training.—a. Assistant instructors.—A
sufficient number of noncommissioned officers or specially
selected privates to provide one for each squad of enlisted
men should be trained in advance for use as assistant in-
structors during the training of the remainder of the or-
ganization. An assistant instructor should be in charge of
each squad and be responsible for its training, under the
supervision of the officer in charge of the instruction.
b. Method of instruction.—(1) Instruction should be both
theoretical and practical, and these two phases should be
carried on simultaneously, the one serving as a relief to the
fatigue induced by the other.
(2) Instruction periods should be short and full of interest.
Short intervals devoted to quickening movements, exercises,
or games should be employed during the period.
(3) Instruction should be imparted by means of explana-
tion, demonstration, and imitation. The coach-and-pupil
method should be used throughout.
(4) Training must be carried out under the strictest dis-
cipline, as a careless man with a live grenade is a danger to
himself and to his comrades.
(5) Throwing practice, after the initial stages of instruc-
tion, should be conducted under service conditions, the men
fully armed and equipped, less the pack.
(6) Certain theoretical instruction may best be given by
short conferences given to the assembled organization.
Wherever possible these conferences should be illustrated by
enlarged photographs, charts, and working models and by
having available and showing the class sectionalized or inert
parts of the grenades or accessories being discussed. If
initial instruction in throwing technique is to be given by
this method, trained demonstrators should be available to
take the positions and go through the motions as they are
being described by the instructor. Following the conference
the instruction imparted therein should be amplified by squad
training under assistant instructors.
35
26-27
BASIC FIELD MANUAL
(7) Training in the technique of throwing or mechanical
operation may best be conducted, by arranging the squads
under their assistant instructors on the throwing courts or
in an area where they can hear the instructor. The instruc-
tor explains the several subjects covered. Concurrently with
the instructor’s explanation, assistant instructors demon-
strate the operation. Following this each student performs
the operation closely supervised by the assistant instructors.
27. Equipment.—a. A special effort should be made to have
on hand from the outset all grenades and other equipment
that will be required during a course of training. Equip-
ment should be carefully made and in excellent condition.
Throwing courts, trenches, emplacements, etc., should be
made according to required specification; if this equipment
is old or has been in disuse, care should be taken to insure
its proper repair prior to the time it will be needed for train-
ing purposes.
Ъ. An accurate list of all of the material needed for each
individual period of training should be prepared. Steps
should then be taken to insure the availability of the mate-
rial at the place and time and in the quantities required.
Careful advance planning along this line will heighten the
standard of training, avoid long delays between phases, and
assist in obtaining the maximum amount of training in the
period allotted.
36
GRENADES
28-30
CHAPTER 2
ANTITANK GRENADES
Paragraphs
Section I. General------------------------------------- 28-35
II. Marksmanship________________________________ 36-47
III. Advice to Instructors________________________48-50
Section I
GENERAL
28. Description.—a. Antitank grenades are specially de-
signed to be fired from the U. S. rifle, caliber .30, M1903, with
the aid of a launcher which the soldier attaches to the muzzle
of the rifle. A special cartridge, AT grenade, caliber .30, М3,
which is issued with the grenade, must be used.
b. The U. S. rifle, caliber .30, M1903A1, and the U. S. rifle,
caliber .30, M1917, may be issued in lieu of the M1903 for firing
the antitank grenades. In such event a special sight will be
issued at the same time to be attached to the rifle, and, in the
case of the M1917 rifle, a launcher, especially designed to fit
the rifle, will also be issued. Training with these two rifles
should be given in addition to that prescribed herein for the
M1903 rifle.
29. Types.—The grenades are divided into two general
classes:
High-explosive grenades, containing an explosive
charge.
Practice grenades, designed for training or practice.
30. Characteristics.—a. Grenade, AT, M9 (fig. 12).—The
grenade, AT, M9, has a sheet metal body and weighs 1.5
pounds. It will detonate upon impact, providing the surface
struck and the angle of impact are such as to exert pressure
on the projection on the nose of the grenade.
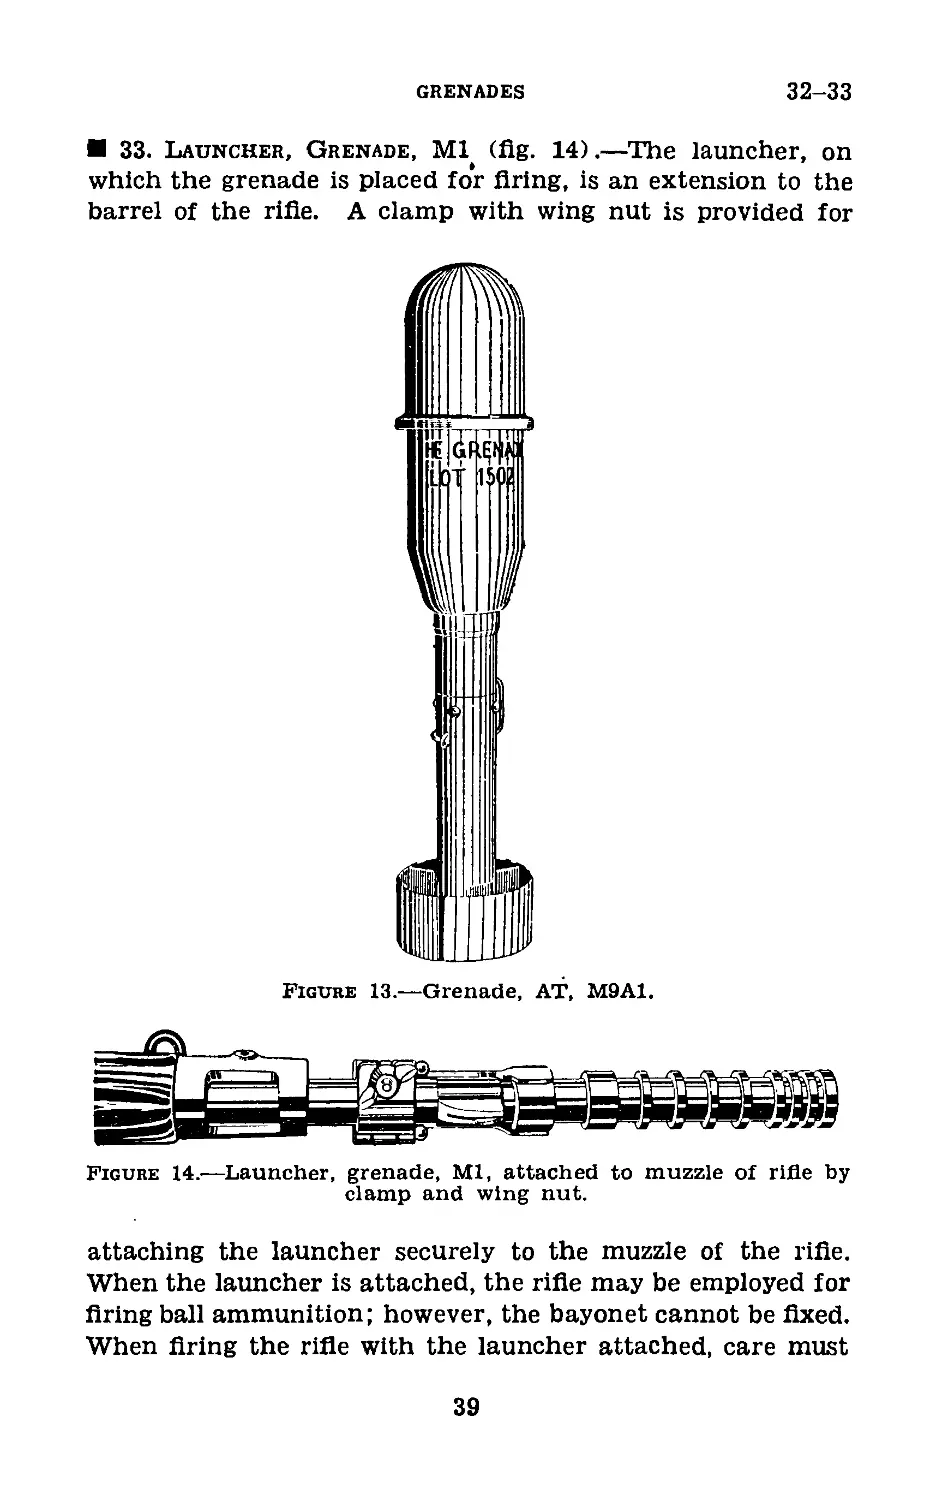
b. Grenade, AT, M9A1 (fig. 13).—The grenade, AT, M9A1,
has a sheet metal body and weighs 1.31 pounds. It is more
sensitive than the M9 and may detonate upon impact with
soft earth. However, for certainty of detonation, it should
strike the target head-on or nearly so.
37
30-32
BASIC FIELD MANUAL
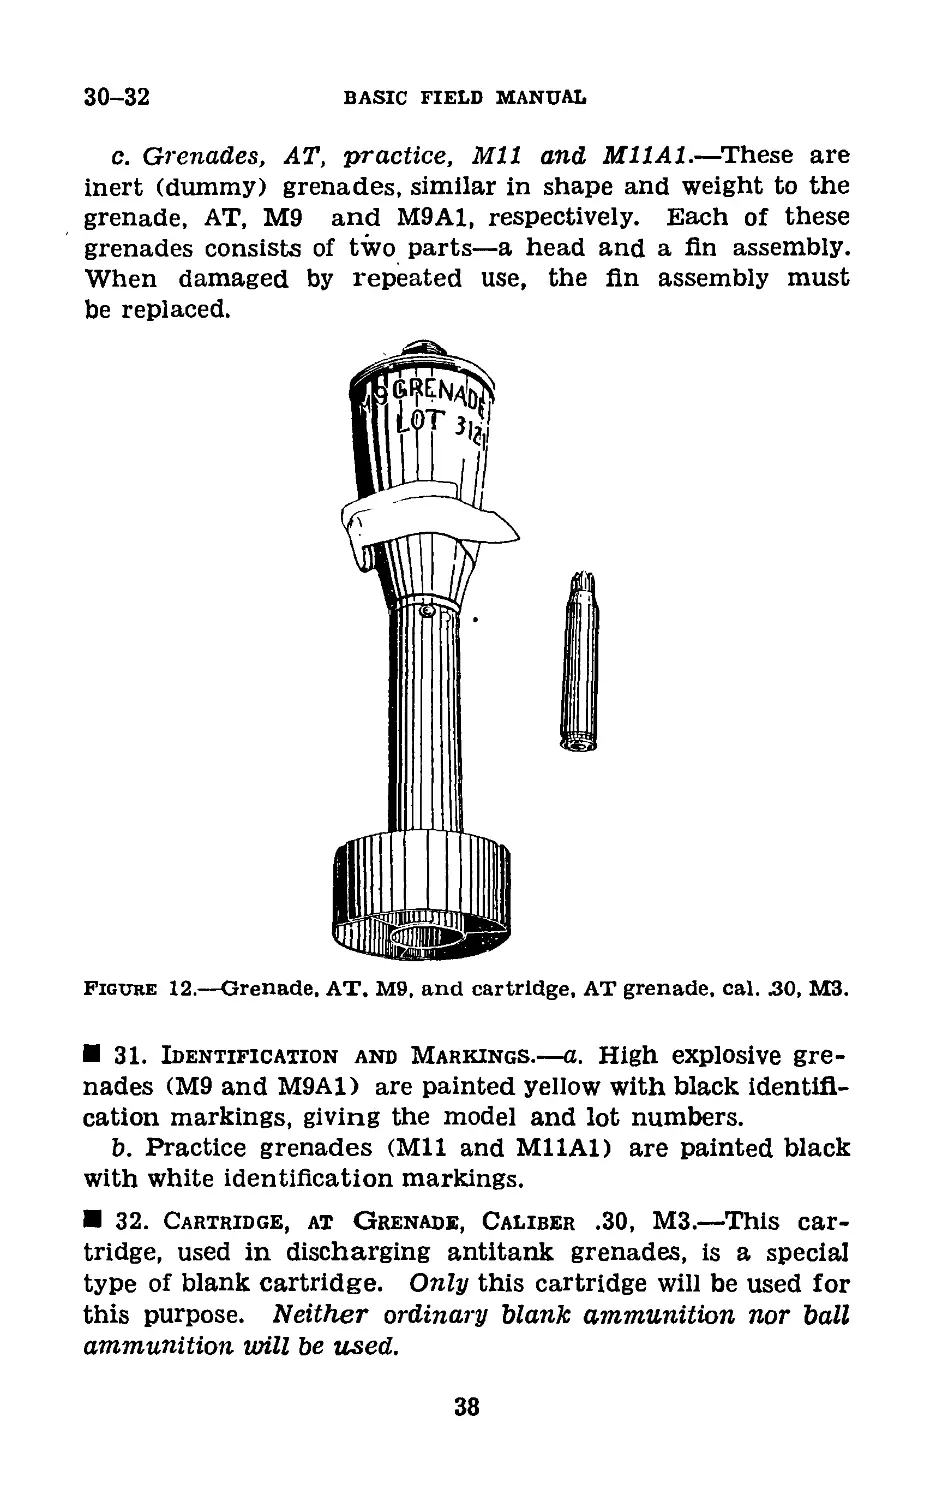
c. Grenades, AT, practice, Mil and M11A1.—These are
inert (dummy) grenades, similar in shape and weight to the
grenade, AT, M9 and M9A1, respectively. Each of these
grenades consists of two parts—a head and a fin assembly.
When damaged by repeated use, the fin assembly must
be replaced.
Figure 12.—Grenade, AT. M9, and cartridge, AT grenade, cal. 30, М3.
31. Identification and Markings—a. High explosive gre-
nades (M9 and M9A1) are painted yellow with black identifi-
cation markings, giving the model and lot numbers.
b. Practice grenades (Mil and Mil Al) are painted black
with white identification markings.
32. Cartridge, at Grenade, Caliber .30, М3.—This car-
tridge, used in discharging antitank grenades, is a special
type of blank cartridge. Only this cartridge will be used for
this purpose. Neither ordinary blank ammunition nor ball
ammunition will be used.
38
GRENADES
32-33
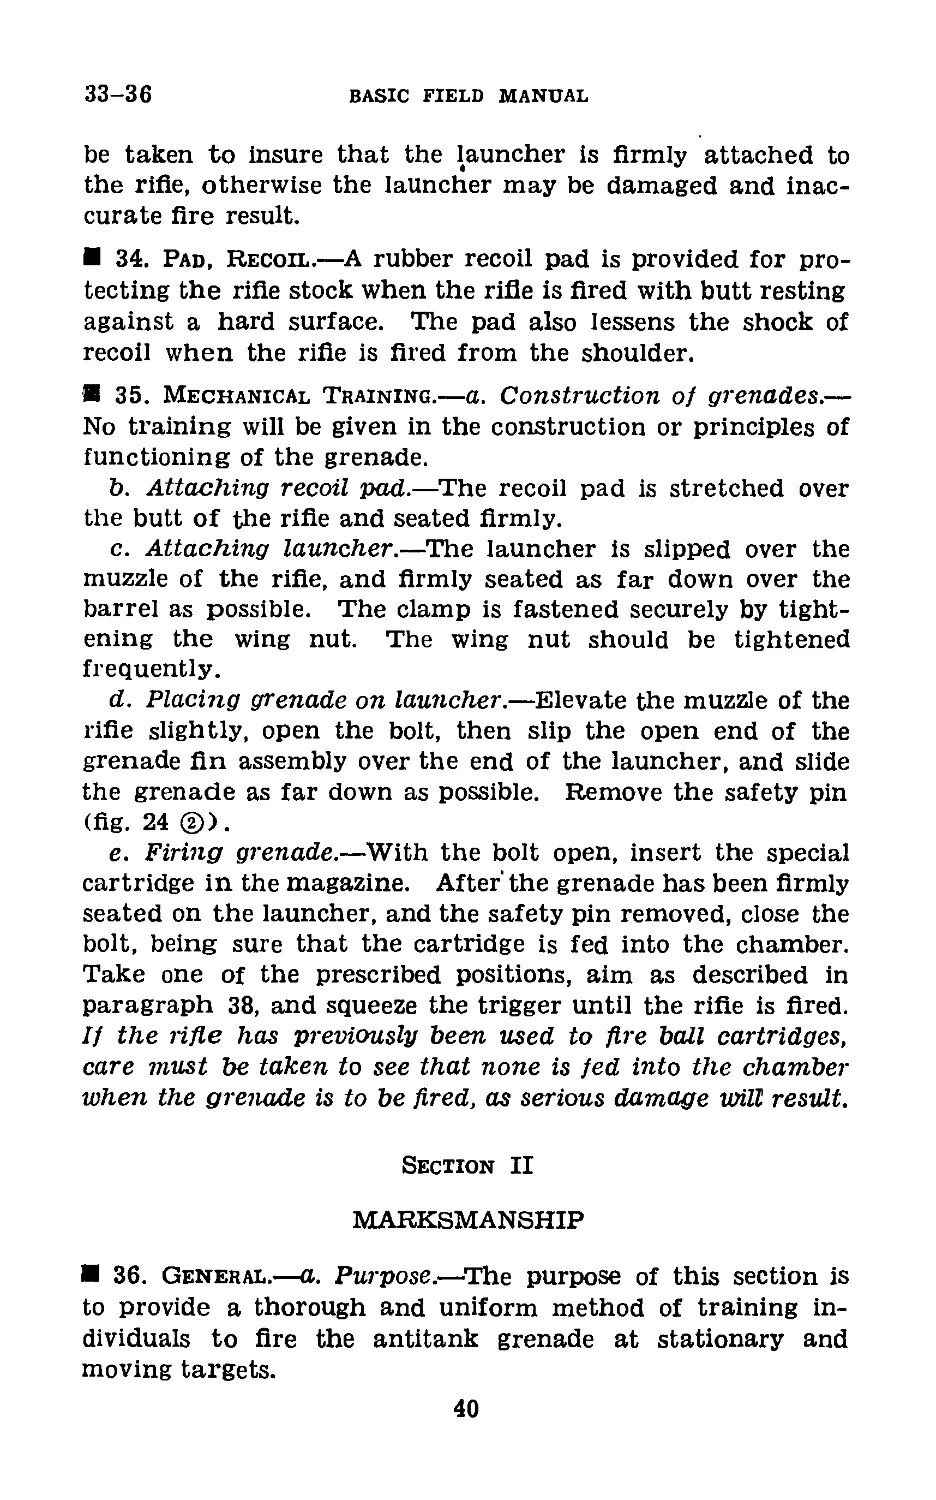
33. Launcher, Grenade, Ml (fig. 14).—The launcher, on
which the grenade is placed for firing, is an extension to the
barrel of the rifle. A clamp with wing nut is provided for
Figure 13.—Grenade, AT, M9A1.
Figure 14.—Launcher, grenade, Ml, attached to muzzle of rifle by
clamp and wing nut.
attaching the launcher securely to the muzzle of the rifle.
When the launcher is attached, the rifle may be employed for
firing ball ammunition; however, the bayonet cannot be fixed.
When firing the rifle with the launcher attached, care must
39
33-36
BASIC FIELD MANUAL
be taken to insure that the launcher is firmly attached to
the rifle, otherwise the launcher may be damaged and inac-
curate fire result.
34. Pad, Recoil.—A rubber recoil pad is provided for pro-
tecting the rifle stock when the rifle is fired with butt resting
against a hard surface. The pad also lessens the shock of
recoil when the rifle is fired from the shoulder.
35. Mechanical Training.—a. Construction of grenades.—
No training will be given in the construction or principles of
functioning of the grenade.
b. Attaching recoil pad.—The recoil pad is stretched over
the butt of the rifle and seated firmly.
c. Attaching launcher.—The launcher is slipped over the
muzzle of the rifle, and firmly seated as far down over the
barrel as possible. The clamp is fastened securely by tight-
ening the wing nut. The wing nut should be tightened
frequently.
d. Placing grenade on launcher.—Elevate the muzzle of the
rifle slightly, open the bolt, then slip the open end of the
grenade fin assembly over the end of the launcher, and slide
the grenade as far down as possible. Remove the safety pin
(fig. 24 ®).
e. Firing grenade.—With the bolt open, insert the special
cartridge in the magazine. After'the grenade has been firmly
seated on the launcher, and the safety pin removed, close the
bolt, being sure that the cartridge is fed into the chamber.
Take one of the prescribed positions, aim as described in
paragraph 38, and squeeze the trigger until the rifle is fired.
If the rifle has previously been used to fire ball cartridges,
care must be taken to see that none is fed into the chamber
when the grenade is to be fired, as serious damage will result.
Section II
MARKSMANSHIP
36. General.—a. Purpose.—The purpose of this section is
to provide a thorough and uniform method of training in-
dividuals to fire the antitank grenade at stationary and
moving targets.
40
GRENADES
36-38
b. Place in training.—(1) Training in firing the antitank
grenade should follow the course in rifle marksmanship.
Without proper training in rifle marksmanship, the soldier in-
stinctively gives the trigger a sudden pressure which results
in flinching. The added weight of the launcher and the
grenade exaggerates this tendency.
(2) The methods of instruction are similar to those used
in teaching marksmanship with any other weapon. Training
is divided into steps which must be taught in proper sequence.
c. Fundamentals.—To become proficient in firing the anti-
tank grenade, a soldier must be trained in the following
essentials:
(1) Correct sighting and aiming.
(2) Correct positions.
(3) Correct trigger squeeze.
(4) Correct sequence of operations in loading and firing.
(5) Correct range estimation.
(6) Correct application of leads for moving targets.
37. Equipment.—a. The special equipment required for pre-
paratory training is simple and readily improvised from mate-
rials at hand. The equipment required is as follows:
U. S. rifle, caliber .30, M1903.
Launcher, grenade, Ml.
Pad, recoil.
Grenades, AT, practice, Mil.
Rifle rest.
6- by- 6-foot target frame.
20-inch sighting disk.
b. For U. S. rifle, caliber .30, M1903A1, the following addi-
tional equipment is required:
Sight, grenade launcher, М2.
c. For U. S. rifle, caliber .30, M1917, the following additional
equipment is required:
Sight, grenade launcher, М2.
Launcher, grenade, М2.
38. Sighting and Aiming (figs. 15 and 16).—a. Sight set-
tings.—(1) For M9 or Mil grenades, the peep sight is set at
2,000 yards.
41
38
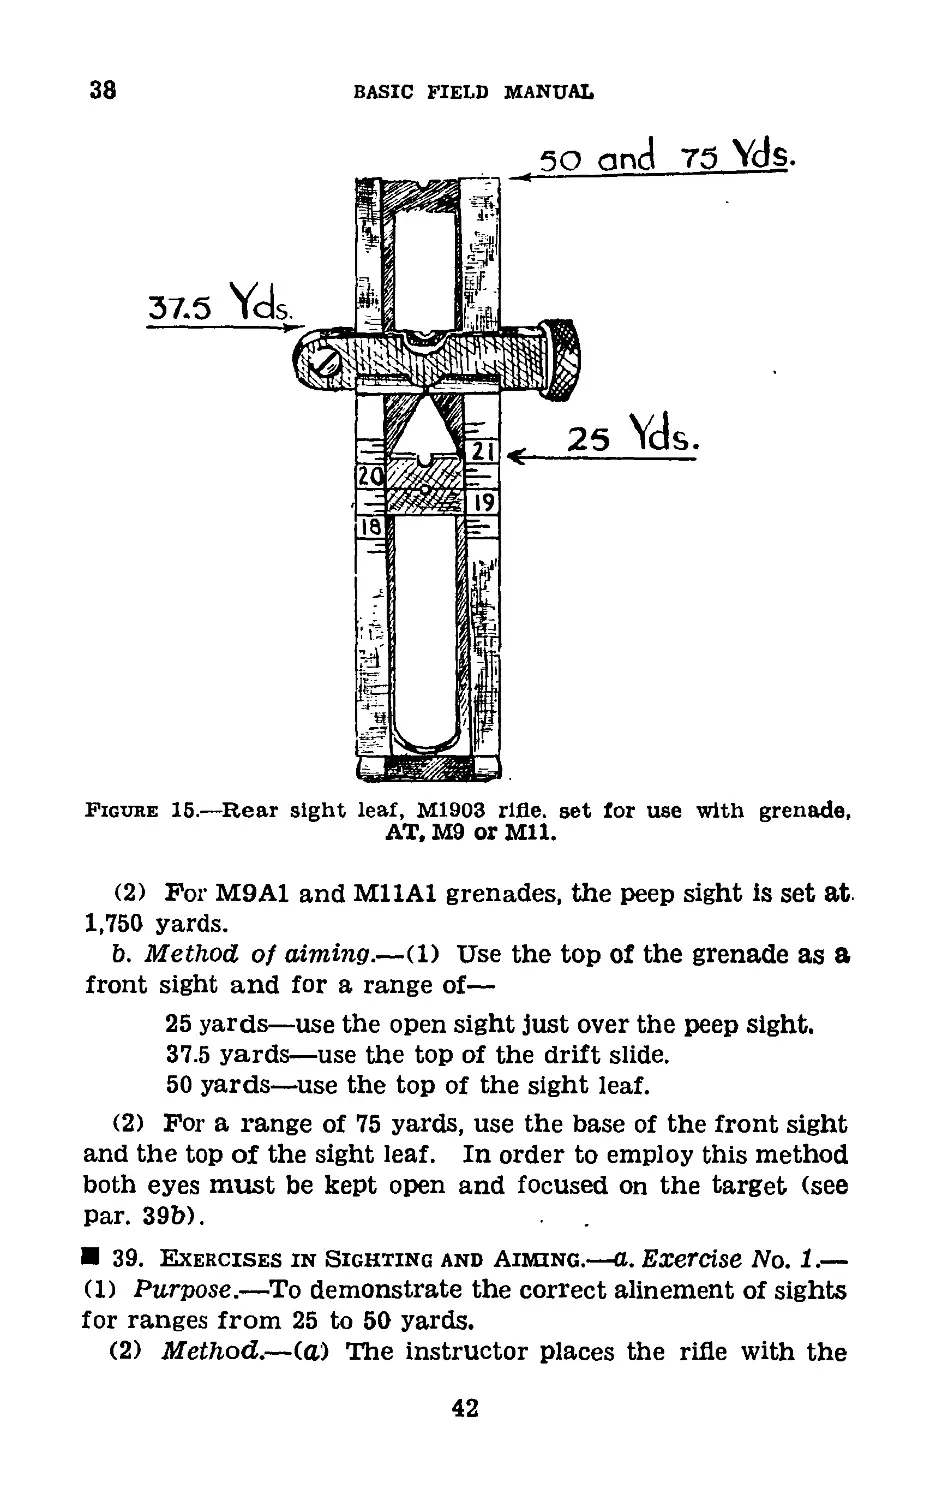
BASIC FIELD MANUAL
Figure 15.—Rear sight leaf, M1903 rifle, set for use with grenade,
AT. M9 or Mil.
(2) For M9A1 and Mil Al grenades, the peep sight is set at.
1,750 yards.
b. Method, of aiming.—(1) Use the top of the grenade as a
front sight and for a range of—
25 yards—use the open sight just over the peep sight.
37.5 yards—use the top of the drift slide.
50 yards—use the top of the sight leaf.
(2) For a range of 75 yards, use the base of the front sight
and the top of the sight leaf. In order to employ this method
both eyes must be kept open and focused on the target (see
par. 39b).
39. Exercises in Sighting and Aiming.—a. Exercise No. 1.—
(1) Purpose.—To demonstrate the correct alinement of sights
for ranges from 25 to 50 yards.
(2) Method.—(a) The instructor places the rifle with the
42
grenades
39
25 yards
37.5 yards
so yards
75 yards
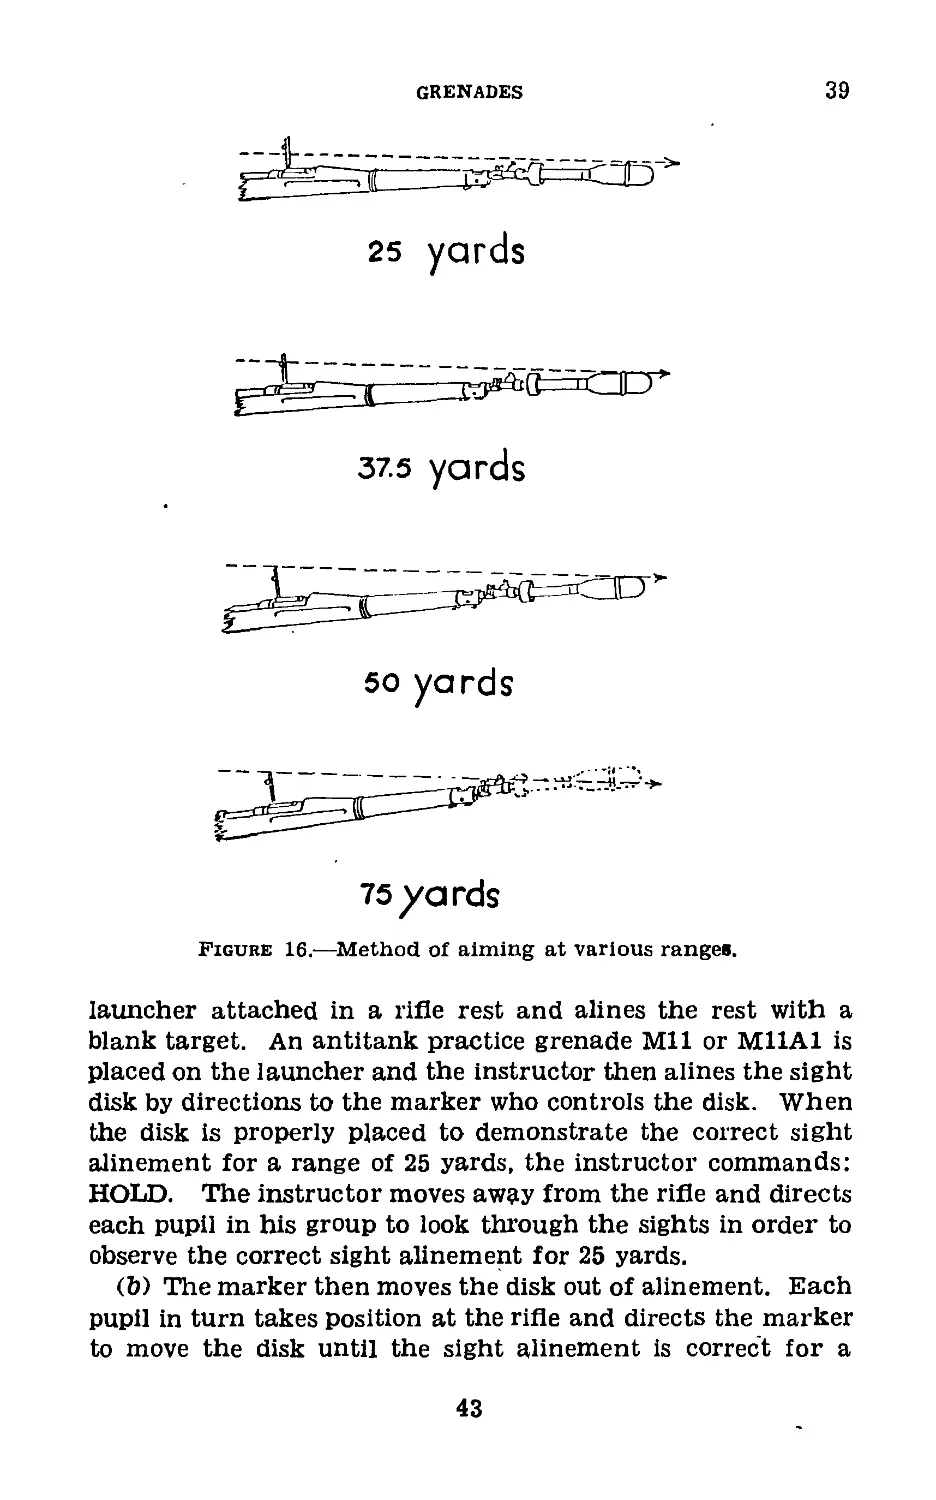
Figure 16.—Method of aiming at various ranges.
launcher attached in a rifle rest and alines the rest with a
blank target. An antitank practice grenade Mil or M11A1 is
placed on the launcher and the instructor then alines the sight
disk by directions to the marker who controls the disk. When
the disk is properly placed to demonstrate the correct sight
alinement for a range of 25 yards, the instructor commands:
HOLD. The instructor moves away from the rifle and directs
each pupil in his group to look through the sights in order to
observe the correct sight alinement for 25 yards.
(b) The marker then moves the disk out of alinement. Each
pupil in turn takes position at the rifle and directs the marker
to move the disk until the sight alinement is correct for a
43
39-40
BASIC FIELD MANUAL
range of 25 yards. The coach verifies the alinement for each
pupil. The exercise is repeated to demonstrate the correct
sight alinement for ranges of 37.5 and 50 yards.
b. Exercise No. 2.—(1) Purpose.—To demonstrate the
method of sight alinement for a range of 75 yards.
(2) Method.—The instructor demonstrates the technique of
alining the sights with both eyes open, by having each student
close his left eye and hold one or more fingers in front of his
right eye so as to obscure the sighting disk, and then having
the pupil open the left eye. With both eyes open the disk again
is visible.
c. Exercise No. 3.—(1) Purpose.—To demonstrate the cor-
rect sight alinement for a range of 75 yards.
(2) Method.—The instructor repeats exercise No. 1 with
the disk alined correctly for a range of 75 yards.
40. Positions.—a. General.—(1) The antitank rifle gre-
nade may be fired from any position used for firing a rifle.
(2) In the standing and kneeling positions, if time permits,
the hasty sling should be used.
(3) When firing from the shoulder, care must be exercised
to seat the butt of the rifle firmly. This precludes the possi-
bility of injury due to the recoil.
(4) Owing to the height of the sight, the cheek cannot be
pressed firmly against the stock. Consequently the head must
be held well away from the rifle.
(5) In firing from the prone position it is desirable to
employ a butt rest.
(6) The use of the recoil pad will be habitual when the
rifle is fired from a butt rest. It may be used when the rifle
is fired from the shoulder; however, when the grenade is
fired from the shoulder without the recoil pad, the recoil
is not excessive.
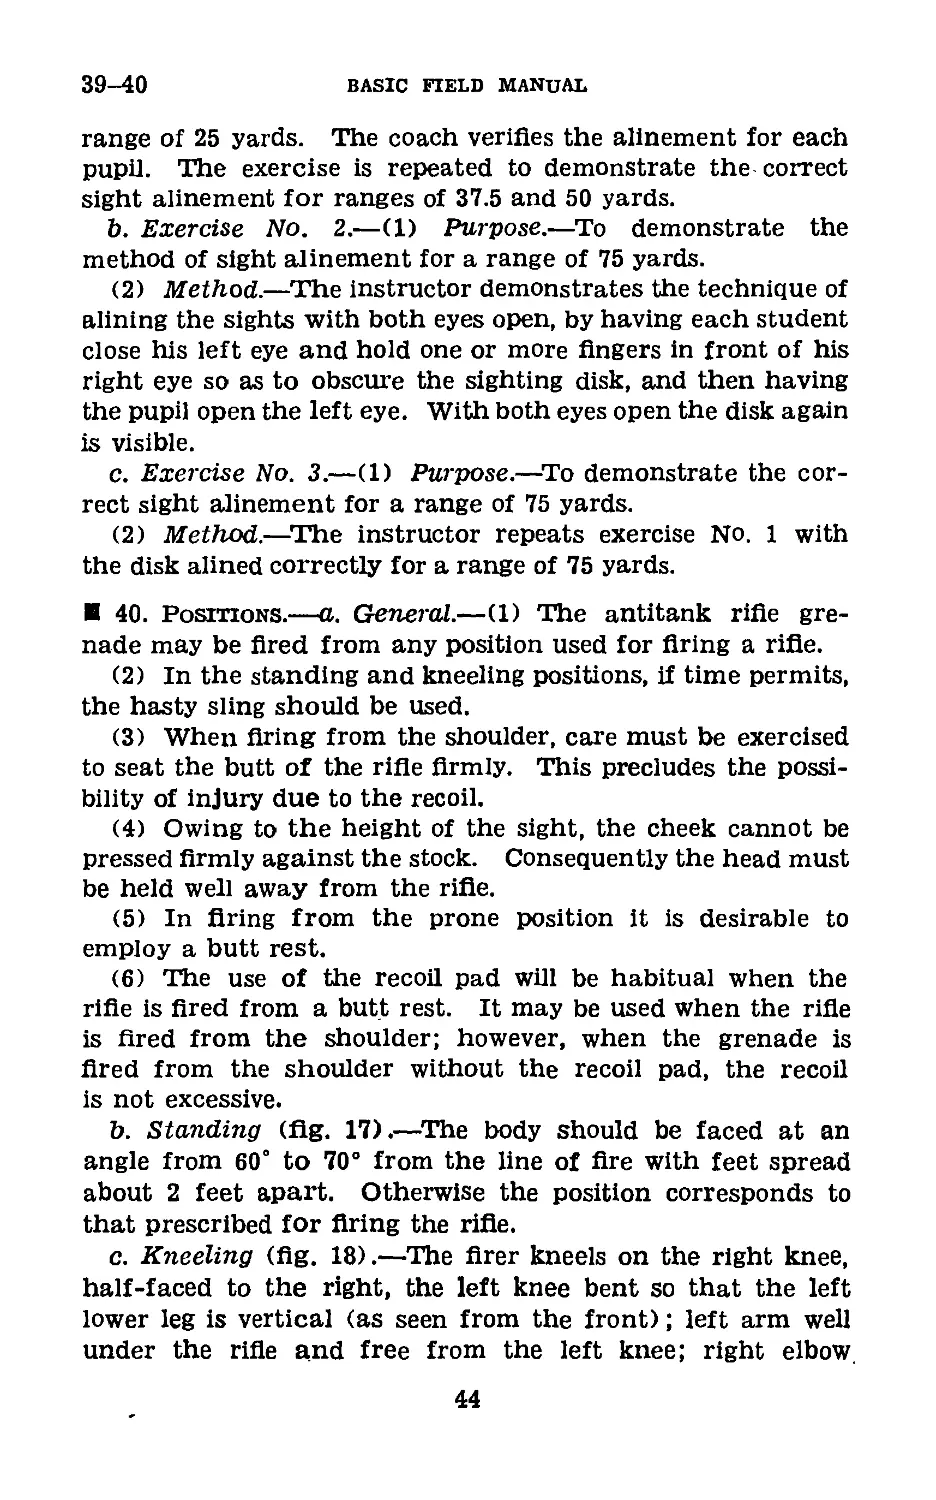
b. Standing (fig. 17).—The body should be faced at an
angle from 60° to 70° from the line of fire with feet spread
about 2 feet apart. Otherwise the position corresponds to
that prescribed for firing the rifle.
c. Kneeling (fig. 18).—The firer kneels on the right knee,
half-faced to the right, the left knee bent so that the left
lower leg is vertical (as seen from the front); left arm well
under the rifle and free from the left knee; right elbow
44
grenades
40-41
above or at the height of the right shoulder; the body well
forward so as not to be sitting on the right heel.
d. Prone with sandbag (fig. 19).—The butt of the rifle is
placed against the end of the sandbag with the right upper
arm over the sandbag, and elbow resting on the ground.
e. Prone with casual butt rest (figs. 20 and 21).—In field
firing, when firing from the prone position, any butt rest of
which the firer may avail himself quickly (stump, vehicle
rut, or other indentation) should be utilized. The right fore-
Figure 17.—Standing position.
arm is placed over the top of the butt of the rifle in order
to hold it in firing position.
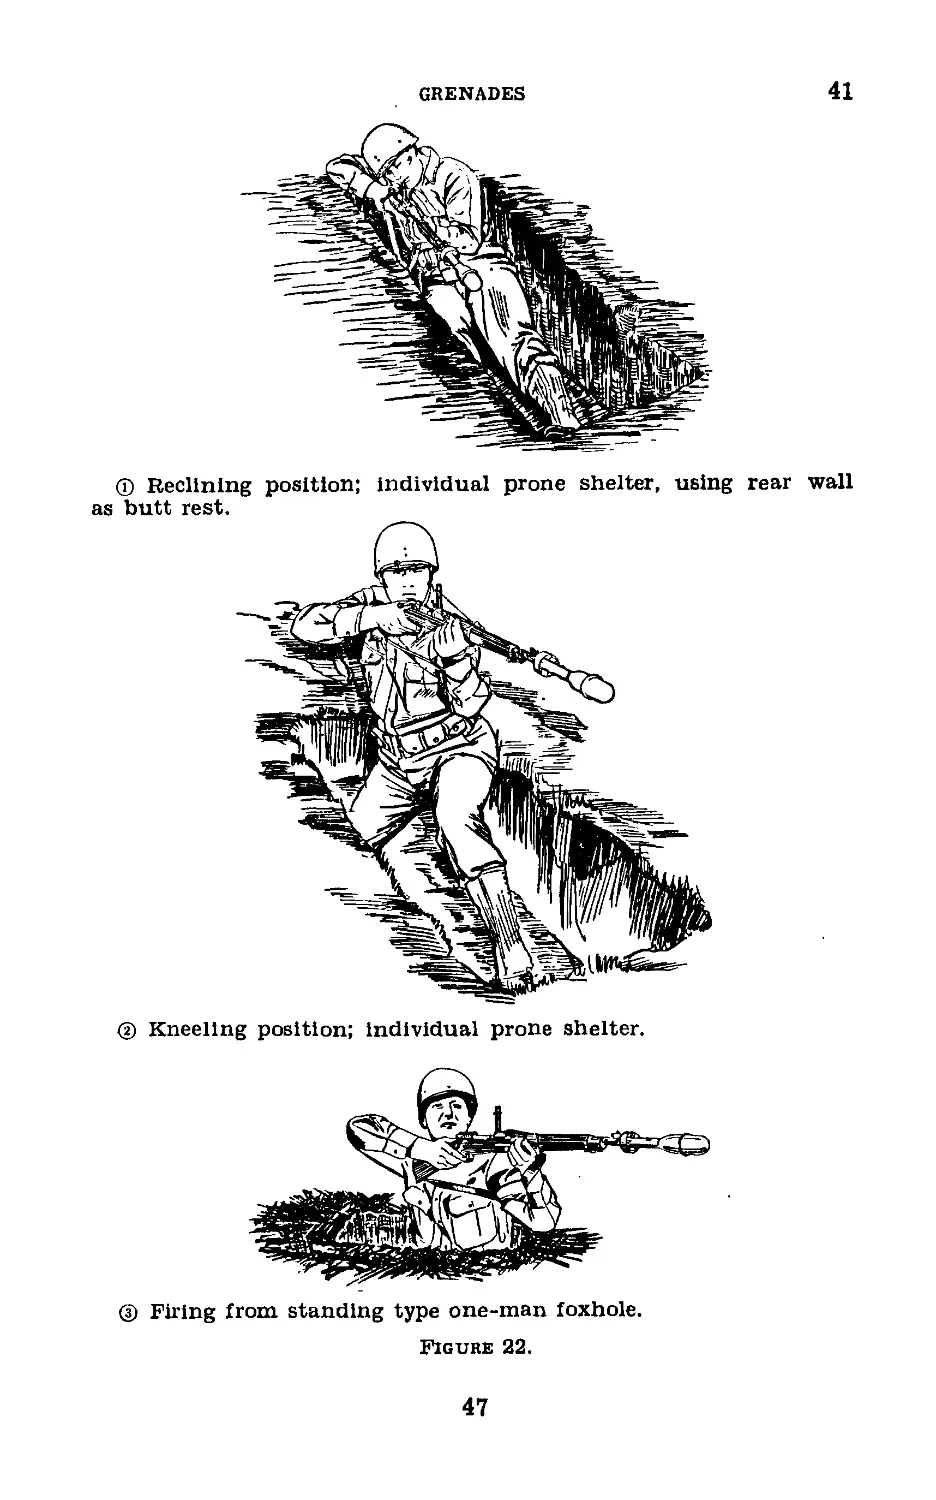
/. From individual prone shelter or foxhole (fig. 22).—In
field firing the soldier should fire from an individual prone
shelter (slit trench) or from a standing type one-man foxhole.
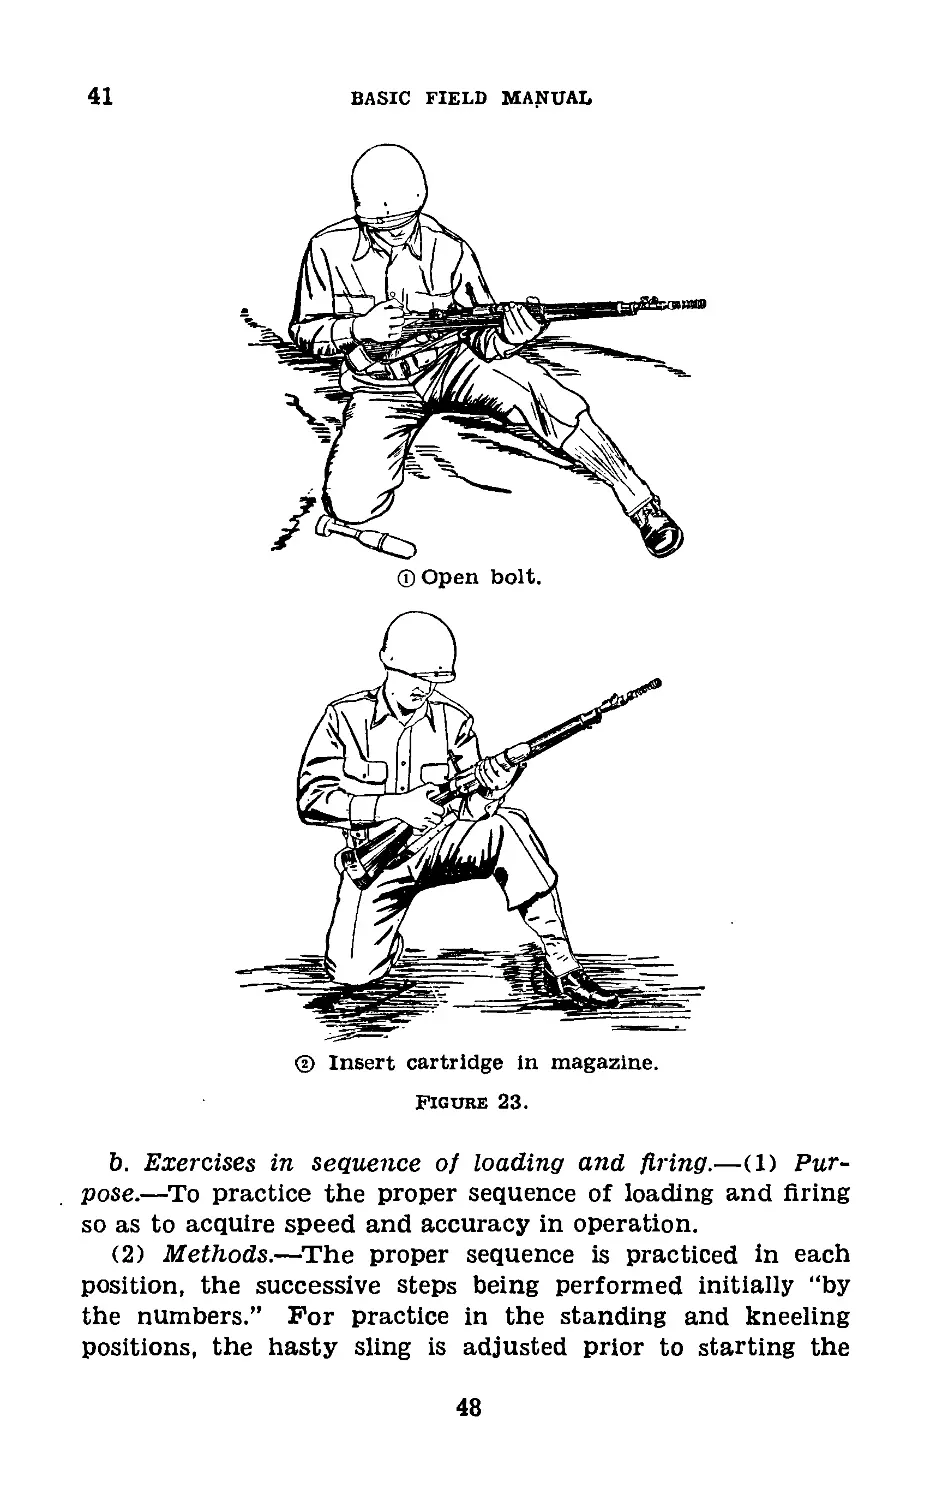
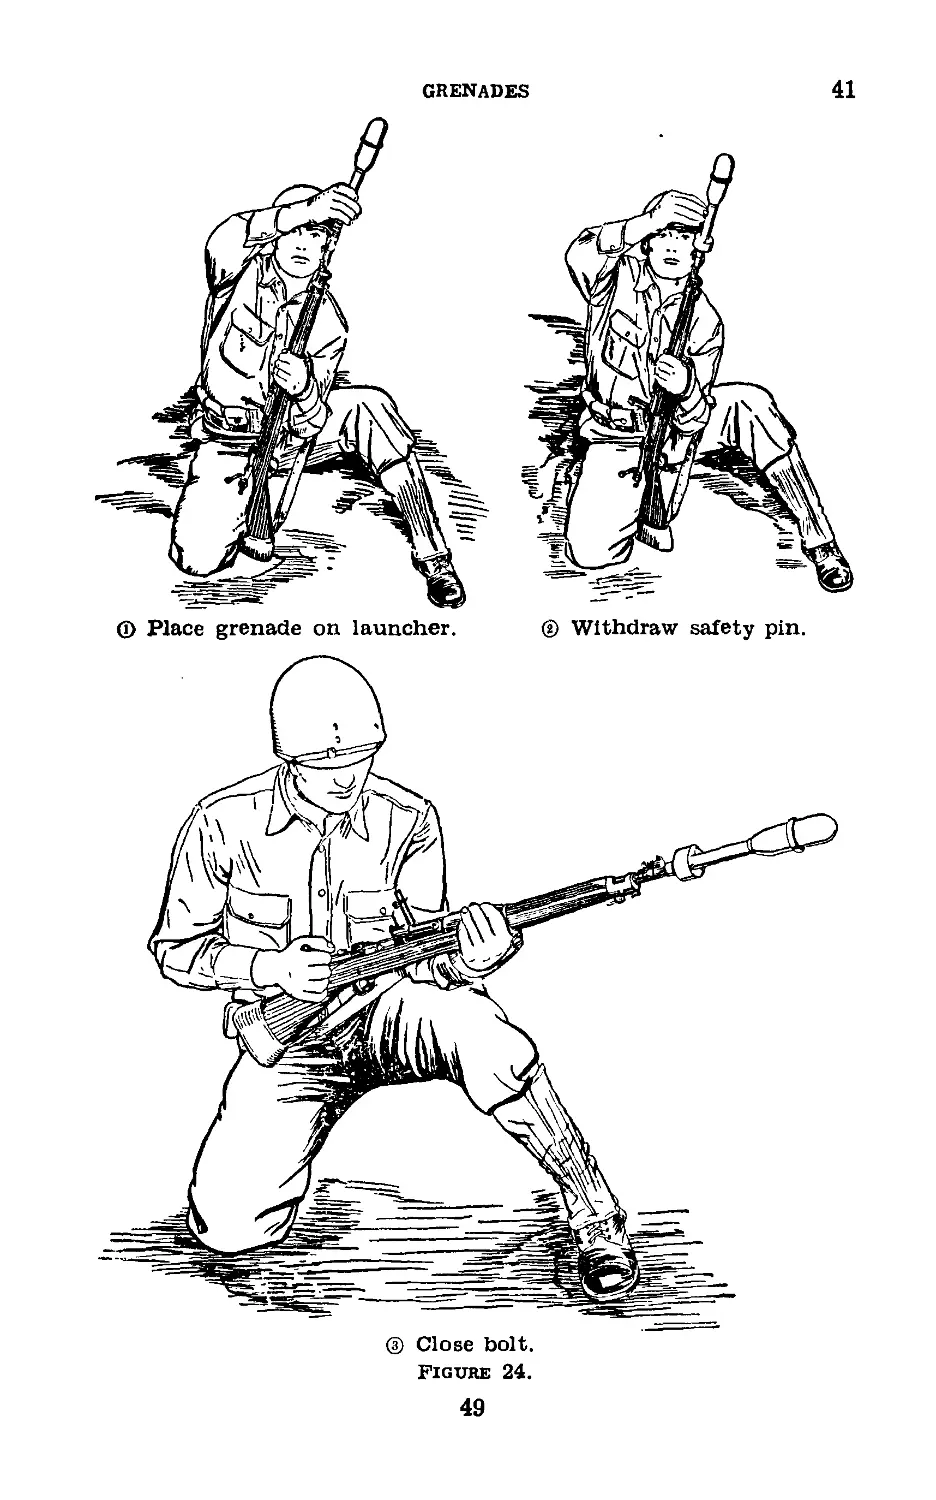
41. Sequence of Operations (figs. 23 and 24).—a. In load-
ing and firing, the following sequence will be observed:
(1) Open bolt.
(2) Insert cartridge in magazine.
(3) Place grenade on launcher.
(4) Withdraw safety pin.
(5) Close bolt.
(6) Aline sights.
(7) Squeeze trigger and fire.
45
41
BASIC FIELD MANUAL
Figure 20.—Prone position; casual butt rest (stump).
Figure 21.—Prone position; casual butt rest (wheel rut).
46
GRENADES
41
® Reclining position; individual prone shelter, using rear wall
as butt rest.
@ Firing from standing type one-man foxhole.
Figure 22.
47
41
BASIC FIELD MANUAL
® Open bolt.
© Insert cartridge in magazine.
Figure 23.
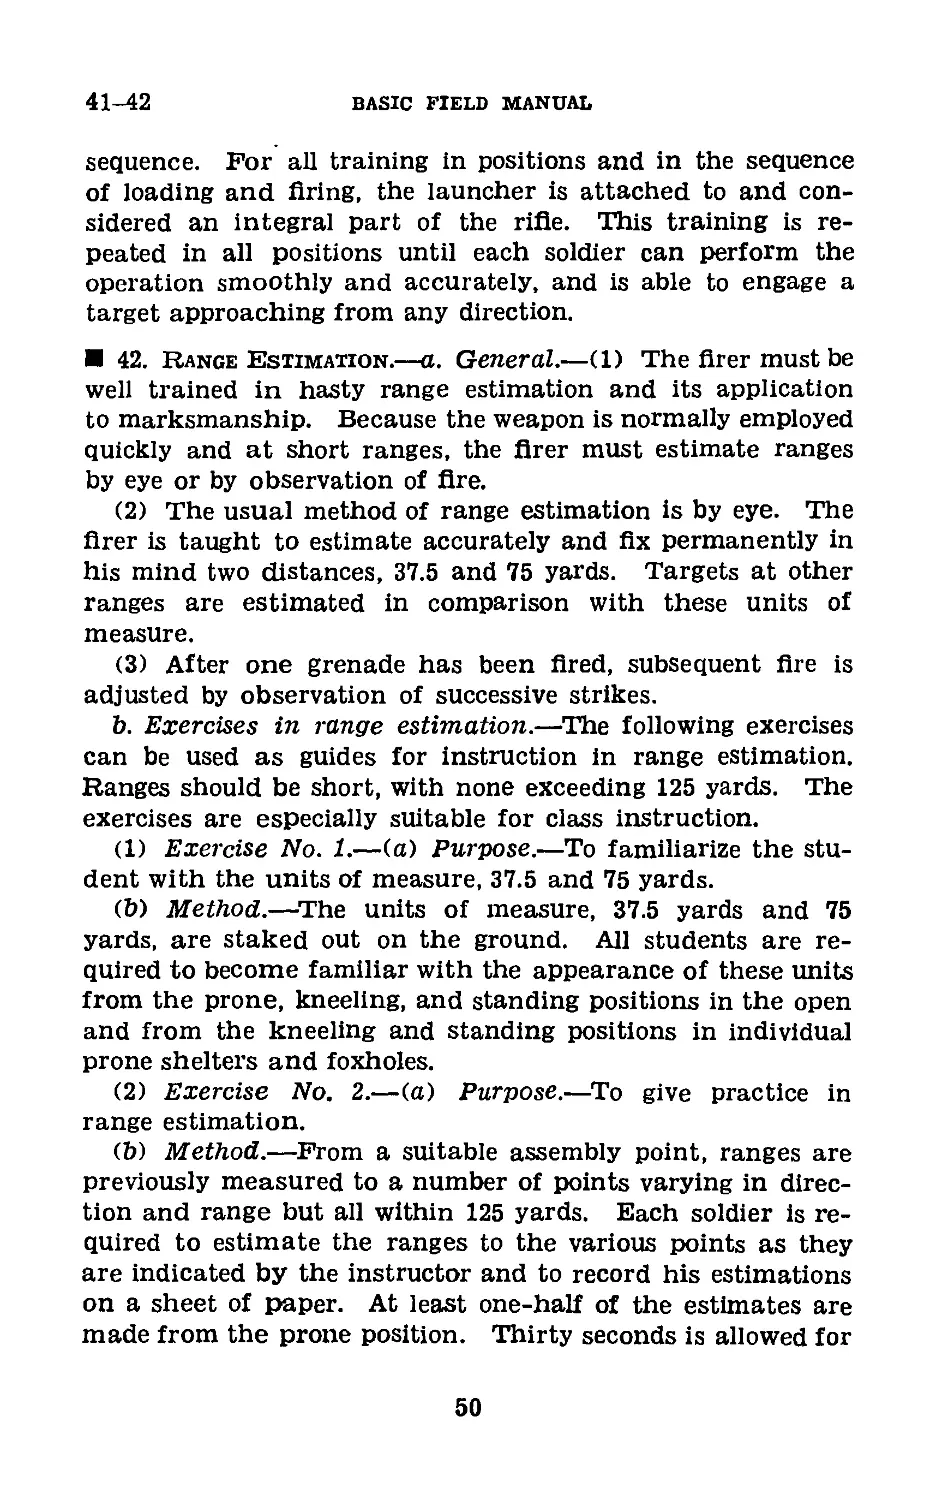
b. Exercises in sequence of loading and firing.—(1) Pur-
pose.—To practice the proper sequence of loading and firing
so as to acquire speed and accuracy in operation.
(2) Methods.—The proper sequence is practiced in each
position, the successive steps being performed initially “by
the numbers.” For practice in the standing and kneeling
positions, the hasty sling is adjusted prior to starting the
48
GRENADES
41
49
41-42
BASIC FIELD MANUAL
sequence. For all training in positions and in the sequence
of loading and firing, the launcher is attached to and con-
sidered an integral part of the rifle. This training is re-
peated in all positions until each soldier can perform the
operation smoothly and accurately, and is able to engage a
target approaching from any direction.
42. Range Estimation.—a. General.—(1) The firer must be
well trained in hasty range estimation and its application
to marksmanship. Because the weapon is normally employed
quickly and at short ranges, the flrer must estimate ranges
by eye or by observation of fire.
(2) The usual method of range estimation is by eye. The
firer is taught to estimate accurately and fix permanently in
his mind two distances, 37.5 and 75 yards. Targets at other
ranges are estimated in comparison with these units of
measure.
(3) After one grenade has been fired, subsequent fire is
adjusted by observation of successive strikes.
b. Exercises in range estimation.—The following exercises
can be used as guides for instruction in range estimation.
Ranges should be short, with none exceeding 125 yards. The
exercises are especially suitable for class instruction.
(1) Exercise No. 1.—(a) Purpose.—To familiarize the stu-
dent with the units of measure, 37.5 and 75 yards.
(b) Method.—The units of measure, 37.5 yards and 75
yards, are staked out on the ground. All students are re-
quired to become familiar with the appearance of these units
from the prone, kneeling, and standing positions in the open
and from the kneeling and standing positions in individual
prone shelters and foxholes.
(2) Exercise No. 2.—(a) Purpose.—To give practice in
range estimation.
(b) Method.—From a suitable assembly point, ranges are
previously measured to a number of points varying in direc-
tion and range but all within 125 yards. Each soldier is re-
quired to estimate the ranges to the various points as they
are indicated by the instructor and to record his estimations
on a sheet of paper. At least one-half of the estimates are
made from the prone position. Thirty seconds is allowed for
50
GRENADES
42-44
each estimate. When all the ranges have been estimated,
each soldier’s paper is checked by the instructor and the true
ranges are announced.
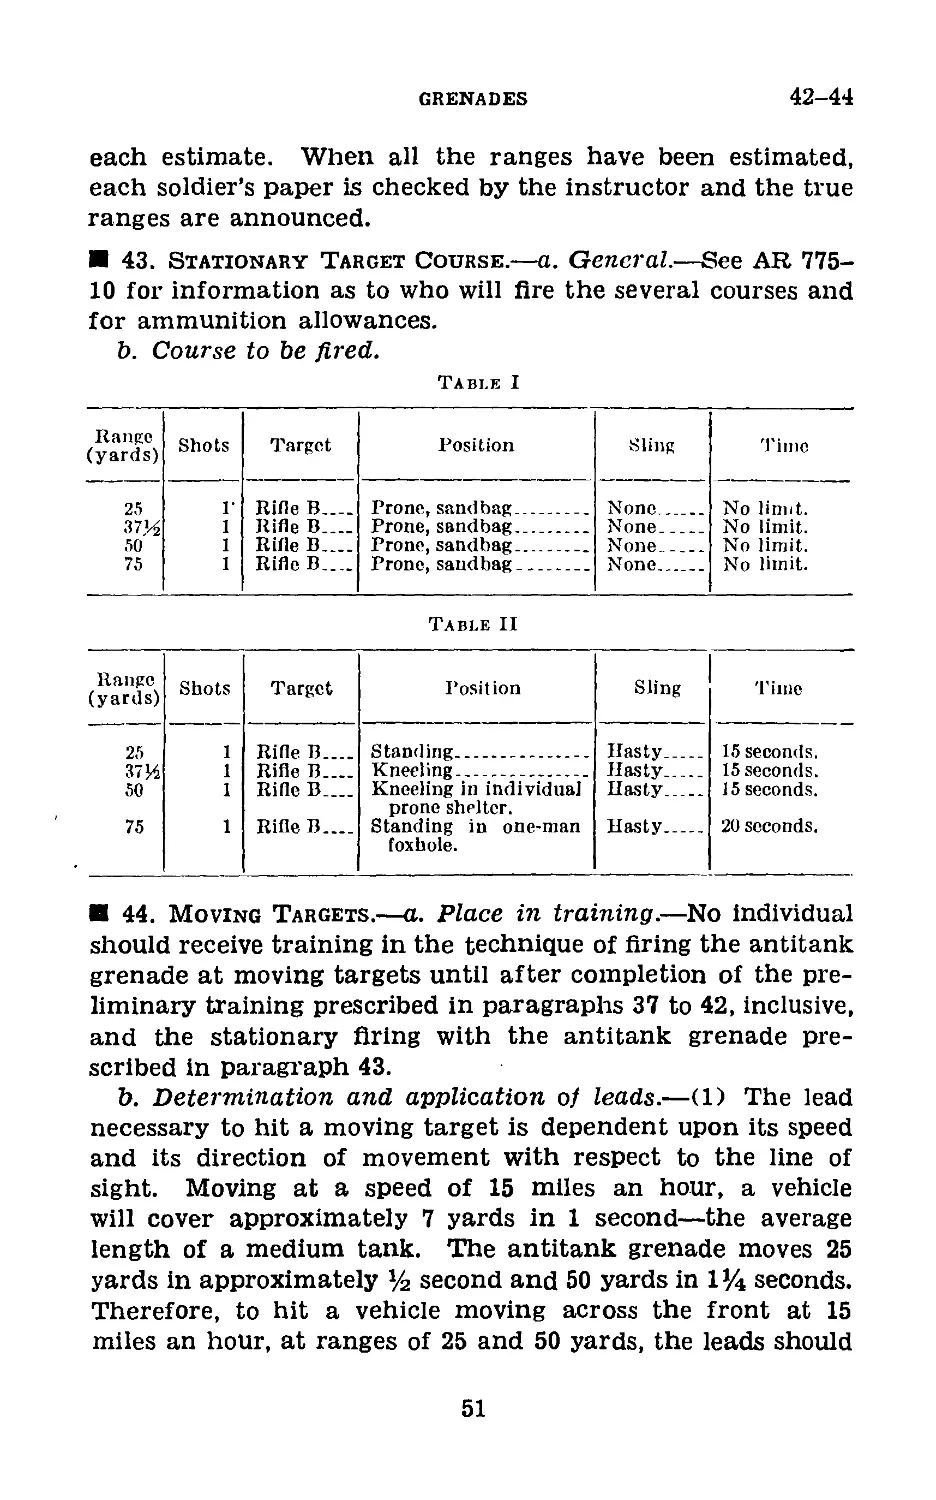
43. Stationary Target Course.—a. General.—See AR 775-
10 for information as to who will fire the several courses and
for ammunition allowances.
b. Course to be fired.
Table I
Range (yards) Shots Target Position Sling Time
25 Г Rille В Prone, sandbag None No linnt.
37.Ц 50 1 1 Rifle B.._. Rifle В Prone, sandbag Prone, sandbag None None No limit. No limit.
75 1 Rifle B..._ Prone, sandbag None No limit.
Table II
Rango (yards) Shots Target Position Sling Time
25 1 Rifle В Standing Hasty 15 seconds.
37 Ц 1 Rifle B—_ Kneeling Hasty 15 seconds.
50 1 Rifle В Kneeling in individual prone shelter. Hasty 15 seconds.
75 1 Rifle В Standing in one-man foxhole. Hasty 20 seconds.
44. Moving Targets.—a. Place in training.—No individual
should receive training in the technique of firing the antitank
grenade at moving targets until after completion of the pre-
liminary training prescribed in paragraphs 37 to 42, inclusive,
and the stationary firing with the antitank grenade pre-
scribed in paragraph 43.
b. Determination and application of leads.—(1) The lead
necessary to hit a moving target is dependent upon its speed
and its direction of movement with respect to the line of
sight. Moving at a speed of 15 miles an hour, a vehicle
will cover approximately 7 yards in 1 second—the average
length of a medium tank. The antitank grenade moves 25
yards in approximately % second and 50 yards in 1seconds.
Therefore, to hit a vehicle moving across the front at 15
miles an hour, at ranges of 25 and 50 yards, the leads should
51
44
BASIC FIELD MANUAL
be about ЗУ2 yards and 8 yards, respectively. At a speed of
25 miles an hour the leads should be about 6 and 15 yards,
respectively.
(2) Leads are applied by using the length of the target
as it appears to the firer as a unit of measure. This elimi-
nates the necessity for corrections due to the angle at which
the target crosses the line of sight because the more acute
the angle the smaller the target appears and the less lateral
speed it attains.
(3) The following table of leads is furnished as a guide:
Target moving at right angle to line of fire (mph) Leads at ranges of—
25 yards 50 yards
15. _ И 1
25 1 2
c. Technique of fire.—The following technique is suggested
for firing at moving targets:
(1) Approaching targets.—For a range of 25 yards, aim
at the bottom of the target directly below the spot it is
desired to hit. For a greater range, aim below the bottom
of the target, the amount depending upon the range and
speed of the target.
(2) Receding targets.—For a range of 25 yards, aim at
the highest point of the target; for a greater range, aim above
the target, the amount depending upon the range and speed
of the target.
(3) Crossing targets.—Aline sights at the point it is desired
to hit and, by rotating the body at the hips, swing the rifle
across in the direction of the movement of the target to
the desired lead. T/he rifle is kept swinging and the shot is
squeezed off as the proper lead is reached.
d. Preparatory exercises.—In order to familiarize the in-
dividual with different target speeds, the instructor has the
target towed at 15 and 25 miles per hour—
(1) Across the front, at 37.5 and 75 yards range.
(2) Toward the firer, from 100 to 25 yards.
(3) Away from the firer, from 25 to 100 yards.
52
GRENADES
44-46
Coaches, previously trained, illustrate the method of pick-
ing up the target, swinging through, and securing the correct
lead for each range and speed. Throughout these exercises,
the instructor reviews the technique described in b and c
above.
45. Moving Target Course. Course to be fired
Range, (yards) Number of rounds, Mil or M11A1 Position Direction of movement of target Speed (mph)
25 2 Kneeling in individual prone shelter. Across front 15
50 2 Standing in foxhole Across front 25
50 to 25 2 Reclining in individual prone shelter. Approaching 15
75 to 50 2 Standing in foxhole _ Approaching 25
25 to 75 2 Standing in foxhole Receding 15
46. Firing at Field Targets.—a. Purpose.—The purpose of
this phase of training is to develop aptitude in the individual
in the handling of his weapon under simulated battlefield
conditions.
Ъ. Extent.—The extent of this training is limited only by
available time and ammunition allowances. Care in use of
the practice grenades, and efficient maintenance of damaged
grenades, will greatly extend their period of usability.
c. Prior training.—Before receiving training in firing at
field targets, each individual will have completed the firing
prescribed in paragraphs 43 b and 45.
d. Exercises.—(1) Individual prone shelters (slit trenches)
and standing type one-man foxholes having been dug at
suitable points on the 37-mm antitank moving target range,
as suggested in paragraph 47, targets are operated at varying
speeds and time intervals so as to provide surprise targets
crossing, approaching, and receding at various angles. The
firer is required to select the position to be used, and the
proper time and method of engagement of the target.
(2) In addition to the firing exercises on the antitank
range, advantage should be taken of every opportunity to
combine training in antitank grenade firing with field exer-
cises.
53
47
BASIC FIELD MANUAL
47. Equipment, Ranges, and Precautions.—a. Targets.—(1)
For stationary target firing, a standard 6- by 6-foot target
frame, covered with target cloth, burlap, or other light ma-
terial, will be used. A 20-inch bull’s-eye should be painted
or a target repair center (B-C) pasted thereon.
(2) For a moving target, a sled 6 feet by 6 feet is con-
structed. Two frame holders are bolted to the sled. Bolt
holes should be drilled in the sled to permit the frame holders
Figure 25.—Sled for moving target.
100 FEET
Figure 26.—Manner of towing target.
to be set at various angles on the sled. A target similar to
the one used for stationary firing is then inserted in the frame
holders. This target may be towed by any available motor
vehicle by using a rope at least 100 feet long.
b. Ranges.—(1) General.—Since AT practice grenades con-
tain no explosive charge, training in their use may be given
in any area not occupied by other troops for a distance of
200 yards in rear of the target. In order to minimize damage
to fin assemblies, an area free from trees, stumps, rocks, and
other hard objects should be selected.
54
GRENADES
47
2 YDS
in
D
in
ABC
A. Individual prone shelter.
B. Standing type one-man foxhole.
C. Sandbag.
D. Standard 6- by 6-foot target frame.
E. Boxes set in ground to hold sides of targets.
Figure 27.—Lay-out for stationary firing range.
(2) Ranges.—(a) A suggested lay-out for stationary firing
is shown in figure 27.
(b) A suggested lay-out for moving-target firing is shown
in figure 28.
55
47
BASIC FIELD MANUAL
D.—Towing truck.
E.—Ground pulley.
T.—Target on sled.
For firing at crossing targets, one target may be towed along the
front of the entire firing point, each individual firing at the target
in succession and observing the strike of his own grenade. For
firing at approaching and receding targets, a target will be necessary
for each two firing points.
Figure 28.—Lay-out for moving-target firing.
56
GRENADES
47
(3) Retrieving grenades.—Since the firer can see the gre-
nade in flight and striking the target, it is not necessary
to cease firing and check targets after each shot. If one
man is detailed to watch the flight of each grenade after it
passes through the target and observe its final point of rest,
much time will be saved in retrieving grenades.
------- Firing Line
(37-mm)
Figure 29.—Employment of 37-mm antitank range for antitank
practice grenade field firing.
(4) Field firing.—The 37-mm antitank range may be uti-
lized for field firing exercises with AT practice grenades by
constructing several individual prone shelters or standing
type one-man foxholes at a location such as that indicated
by X in figure 29, where several moving targets pass within
a range of 75 yards.
57
47
BASIC FIELD MANUAL
c. Safety precautions.—(1) For AT practice grenades.—
(a) Keep the grenade clean and dry, particularly the inside
of the tube of the fin assembly.
(b) See that there are no burs on the rings of the grenade
launcher, and that the rings are free from grit.
(c) Inspect the wing nut on the clamp of the launcher fre- .
quently to insure that it is tight.
(d) Never place a grenade on the launcher unless it is in-
tended to fire it immediately.
(e) After placing the grenade on the launcher, keep the
rifle elevated above the horizontal, except for firing at a minus
angle of elevation. When firing at a minus elevation, lower
the rifle gently as the aim is taken or lead is applied in order to
prevent the grenade from being dislodged from the launcher.
(2) For high explosive AT grenades.—In addition to the
safety precautions listed above, observe the following:
(a) All rules pertaining to firearms in general.
(b) Use some object as a target which will insure detona-
tion of the grenade. Such a target may be a salvaged vehicle,
a piece of armor, boiler plate, a large stone, or a wail.
(c) In the event the special blank cartridge does not fire
and no additional special blank cartridge is available, open
the bolt, replace the safety pin, and remove the grenade.
(d) Personnel not firing should remain at least 50 yards
from the target and within an angle of 30° on either side of
the line of flight of the grenade.
(e) Grenades which fail to detonate when fired (duds) will
not be tampered with or recovered. They will be destroyed
in the manner prescribed in paragraph 23a. When a number
of duds are to be destroyed, secure a 100-foot cord equipped
with a small hook. Engage the hook in the fin assembly and
drag each grenade into a central pile; then detonate the pile
with TNT. This operation should be under the direction of
an officer or a specially trained soldier.
58
grenades
48-50
Section III
ADVICE TO INSTRUCTORS
48. General.—Training in the use of the antitank grenade
must not be restricted to hard and fast rules. Nothing in
this manual is to be construed as limiting in any way the
initiative and originality of instructors, providing necessary
safety precautions are observed.
49. Method of Instruction.—a. Applicator# system.—
Instruction should be imparted by means of explanation, dem-
onstration, and imitation. The coach-and-pupil method
should be used throughout.
b. Assistant instructors.—A number of noncommissioned
officers or specially selected privates, sufficient to provide
one assistant instructor for each group of six men to undergo
instruction at one time, should be trained in advance for use
during the training of the remainder of the organization. An
assistant instructor should be in charge of each group of ap-
proximately six men and be responsible for their training
under the supervision of the officer in charge.
50. Scope of Training.—a. General.—The schedule of in-
struction and scope of training are dependent upon the length
of time available, the combat duties of the personnel to be
trained, and ammunition allowances. A minimum of three
men should receive training and practice in firing antitank
grenades for each M1903 rifle provided for antitank defense
in Infantry Tables of Organization. Personnel thus trained
should include the assistant squad leader of each rifle squad
and each section leader of the heavy weapons company, bat-
talion antitank platoon, regimental antitank company, and
cannon company.
59
50
BASIC FIELD MANUAL
b. Allotment of time.—(1) A total of 10 hours should be
allotted for training, apportioned as follows:
Period Hours Instruction Equipment
1 1 Conference, demonstration, and practical work in use of acces- sories and in sighting and alin- ing. Rifles with launchers; grenades, AT, Mil or M11A1; rifle rest; target frame; 20-inch aiming disk.
2 1 Conference, demonstration, and practical work in positions and sequence of operations in load- ing and firing. Rifles, with launchers, and re- coil pads; target frame; grenades, AT, Mil or M 11- Al; sandbags; standing type one-man foxholes; individual prone shelters.
3 4 Firing stationary target course Same equipment as above; stationary targets; cartridges, AT grenade, caliber .30, М3.
4 4 Conference on range estimation and leads. Demonstration of method of firing at moving targets. Firing moving target course. Same equipment as above. Trucks and sleds for moving targets.
(2) At the beginning of each period of instruction, the
entire class should be assembled and the officer in charge
should cover the work of the period with a brief conference
and demonstration. Practical work should be conducted by
assistant instructors in charge of each group.
c. After the moving target course has been fired, all indi-
viduals undergoing instruction should receive further train-
ing in firing at field targets.
Appendix
LIST OF REFERENCES
TM 9-1900.
SNLS-3.
AR 775-10.
О
60