/


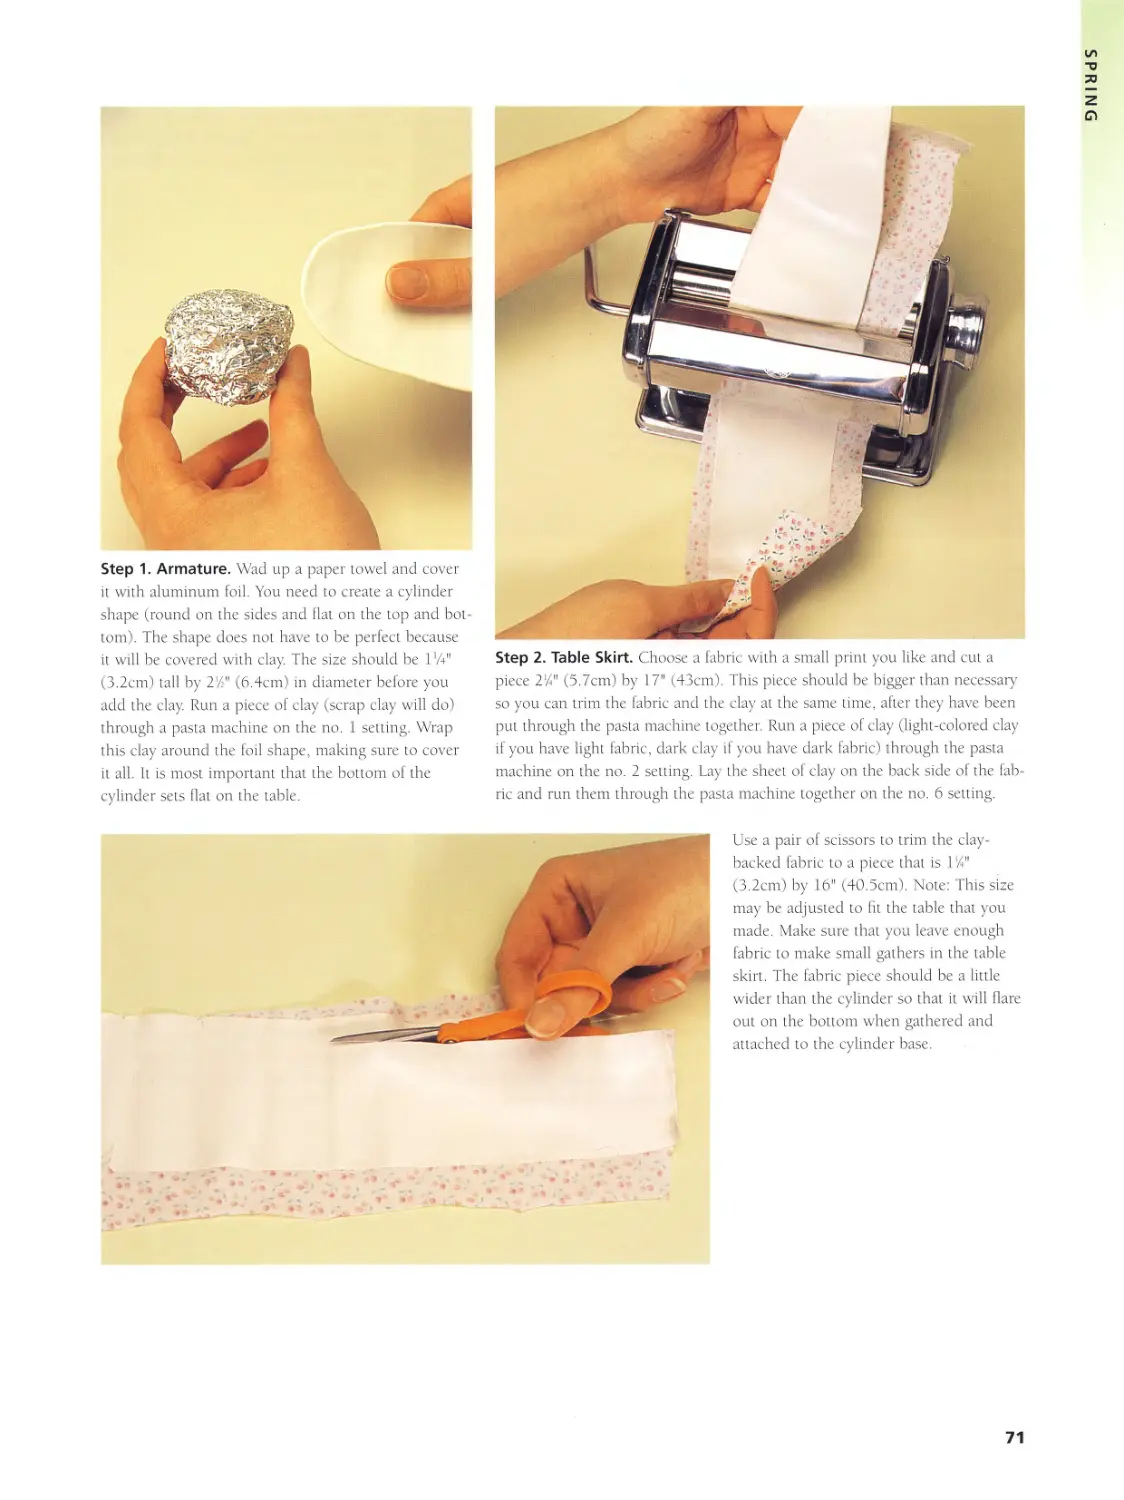

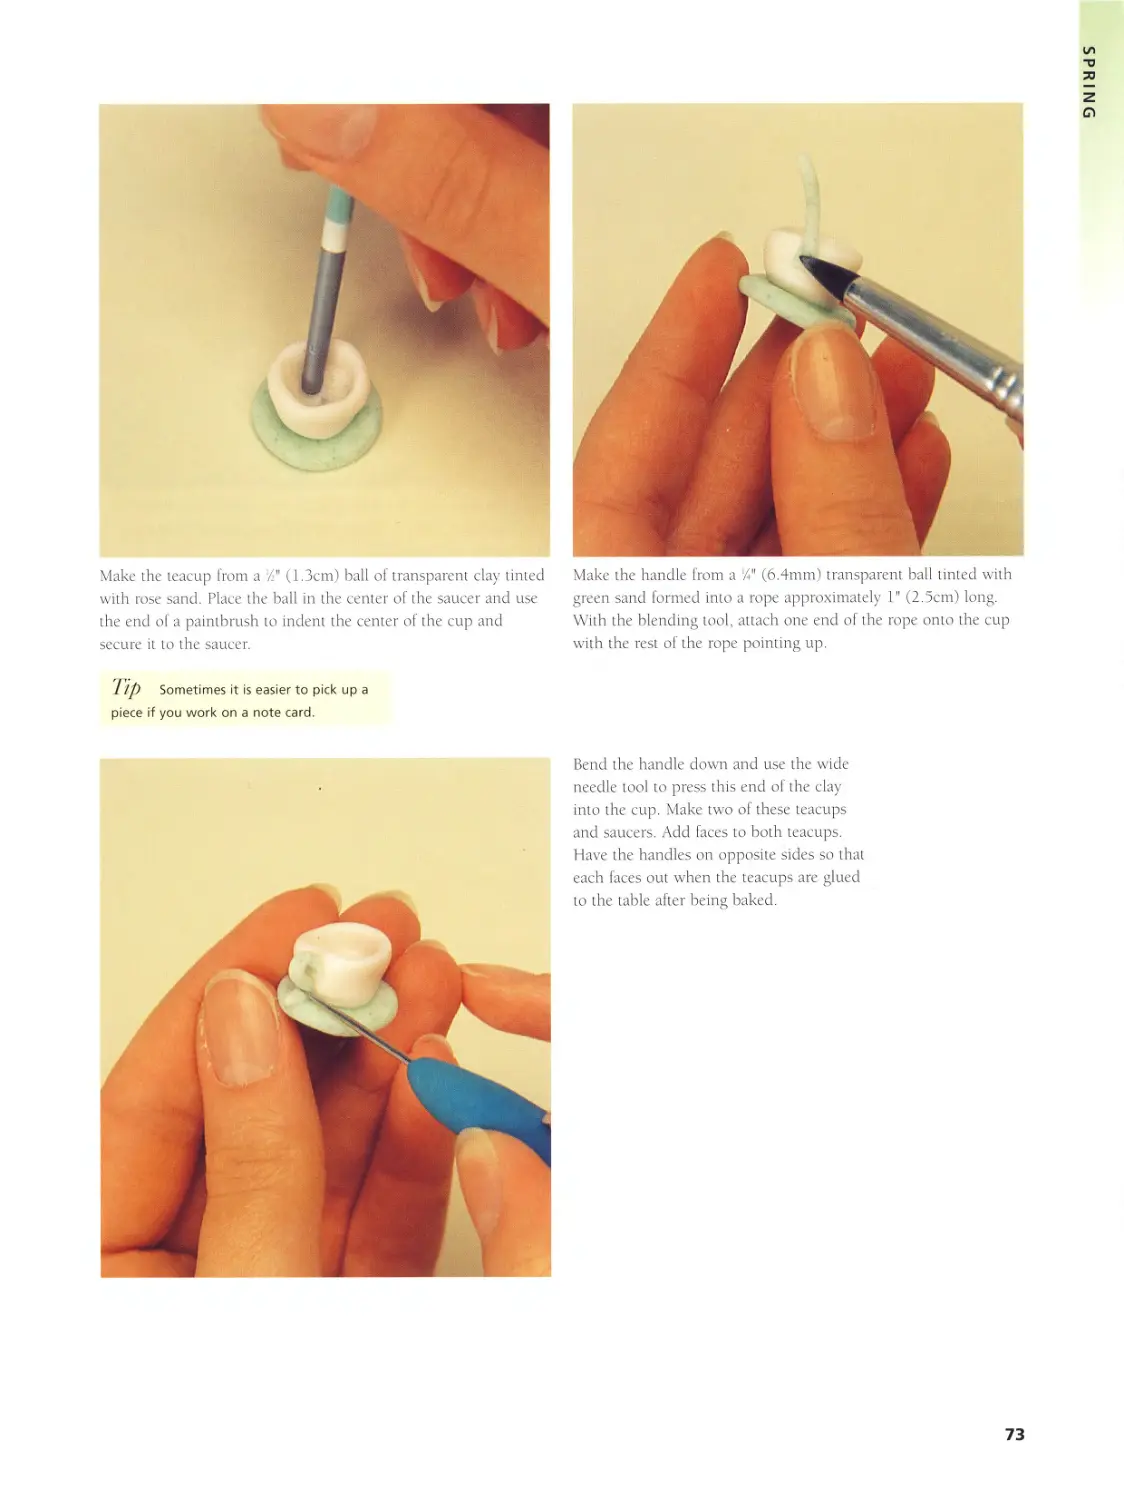


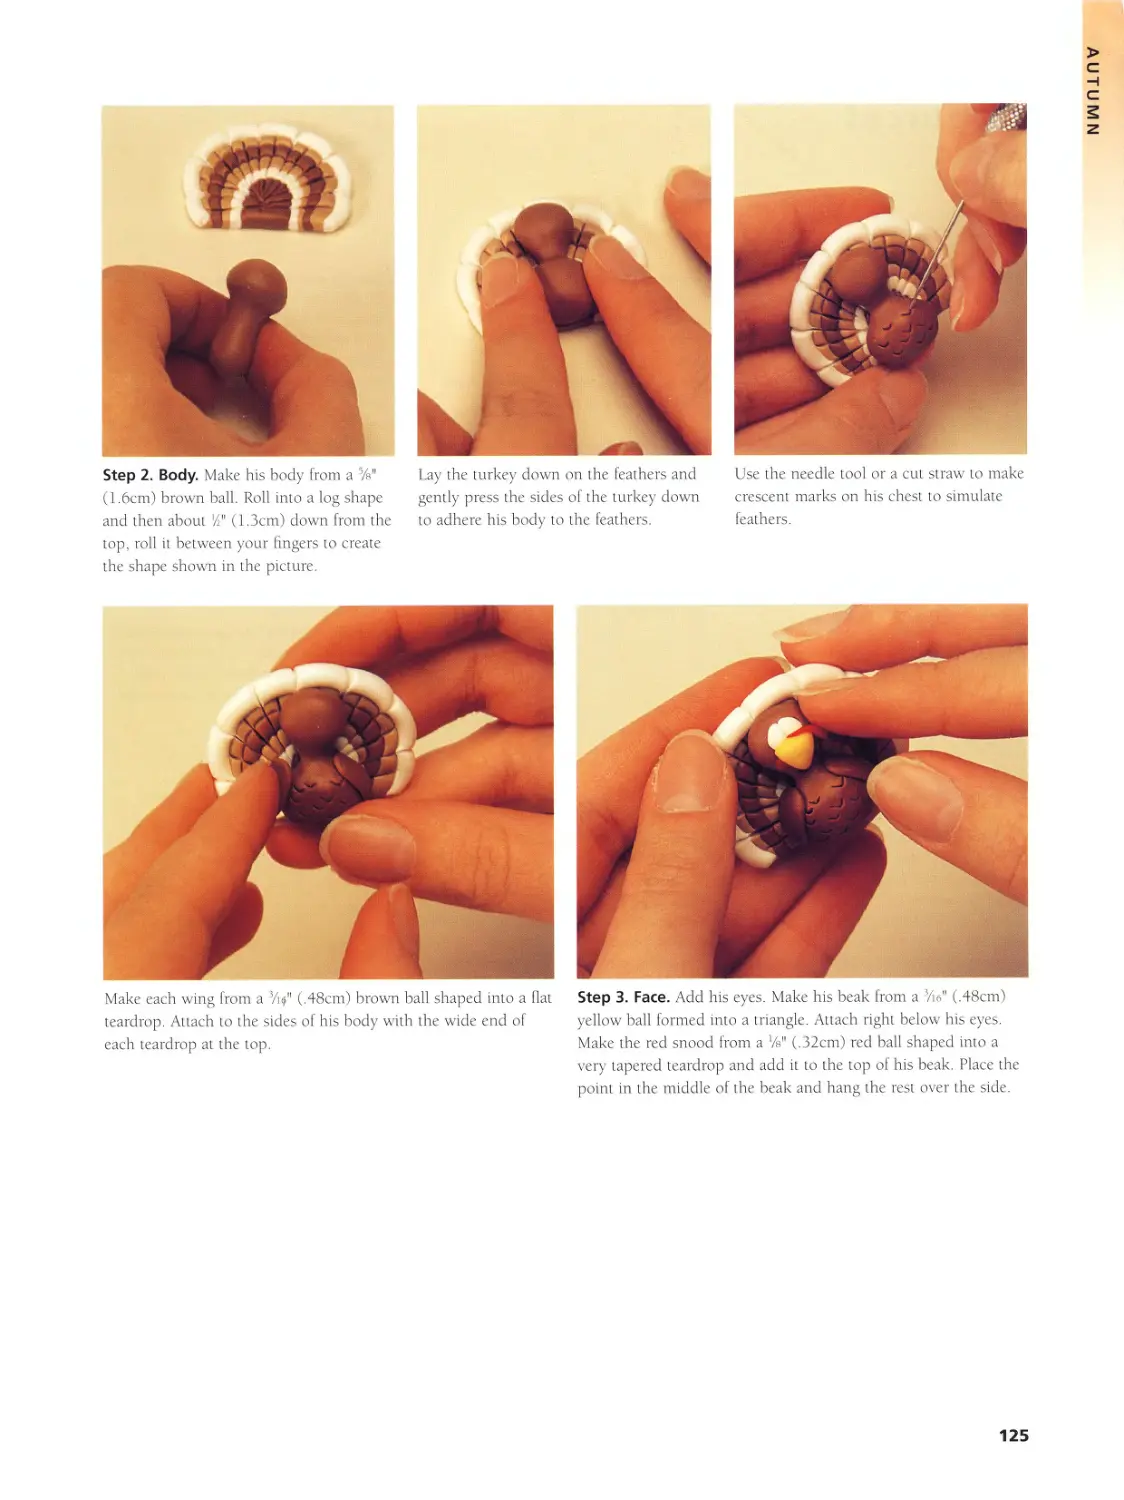


Text
Making GIFTS in POLYMER CLAY
STACEY MORGAN
NORTH LIGHT BOOKS
CINCINNATI, OHIO
www.nlbooks.com
/ JUN - - 2002
About the Author
Stacey Morgan is a designer, profes-
sional crafter, writer and teacher of
polymer clay. At the age of nineteen
she started her own business,
Tender Heart Originals. She also has
a manufactured gift line called
NorthStar Critters™ and runs a
mail-order business related to poly-
mer clay and her whimsical cre-
ations. Stacey is a member of the
National Polymer Clay Guild and
the Society of Craft Designers
(SCD). It is because of her associa-
tion with SCD and friendship with
her mentor Maureen Carlson that
this book was made possible.
Making Gifts in Polymer Clay. Copyright © 2001 by Stacey
Morgan. Manufactured in China. All rights reserved. No part of
this book may be reproduced in any form or by any electronic or
mechanical means including information storage and retrieval
systems without permission in writing from the publisher, except
by a reviewer, who may quote brief passages in a review.
Published by North Light Books, an imprint of F&W
Publications, Inc., 1507 Dana Avenue, Cincinnati, Ohio, 45207.
First edition.
05 04 03 02 01 5 4 3 2 1
Library of Congress Cataloging-in-Publication Data
Morgan, Stacey.
Making gifts in polymer clay / by Stacey Morgan.
p. cm.
Includes index.
ISBN 1-58180-104-1 (alk. paper)
1. Polymer clay craft. I. Title.
TT297 .M68 2001
731.4'2—dc21
Editor: Jane Friedman
Designer: Brian Roeth
Layout Artist: Linda Watts
Production Coordinator: Sara Dumford
Photographer: Christine Polomsky
00-068703
Acknowledgments
To my family, “Yes, the book is now
done!” Thank you for your constant
support and understanding when I
had to work on the book instead of
attending some fun family get-
togethers. And a very special thanks
to my incredible husband who is my
inspiration, keeps me going
and did all of the typing for
this book. I would not
have been able to
finish this without
him. I would like
to thank all of
my friends and
family who gave
me constant sup-
port and encourage-
ment throughout this
entire process: my hus-
band Tim, Mom & Dad (Carol &
Ken Mott), Gram (Barbara Searles),
the Morgan clan, Annie Lang, Stacie
& Karl Peabody, and all of my
friends at SCD—you are all so shar-
ing and supportive. I would also
like to thank my high school art
teacher, Susan Camin, for sparking
my interest in sculpting. And to my
late Grandma Mott from whom I
inherited my sculpting ability. To all
of my customers who return year
after year to “see what’s new,” I
appreciate your support and loyalty
for all of these years!
There are a great many people
that had a hand in the creation of
this book. First, I would like to
thank Maureen Carlson for sharing
her knowledge of poly-
mer clay, friendship
and support. This book
would not have been
possible if she had not
introduced me to the
wonderful people of
SCD (Society of Craft
Designers). I would also
like to thank Greg Albert
for asking me to do this
book; my editor, Jane
Friedman, for her hard work and
patience; and Christine Polomsky
for taking all of the beautiful pic-
tures and making the photo shoot
go smoothly. I also would like to
express my sincere thanks to all of
the wonderful and creative people at
North Light who made this book
come together. My appreciation also
goes out to AMACO and Polyform
Products for providing the supplies
for this book.
Dedication
I dedicate this book to four very
special people in my life: my best
friend and husband, Timothy
Morgan; my parents, Ken &
Carol Mott; and Gram, Barbara
Searles. I would not be the per-
son that 1 am or have the confi-
dence to follow my dreams if it
were not for these four wonderful
people. Gram, you are one of the
most understanding, loving and
patient people I have ever known
and I am very proud to be your
granddaughter. Mom and Dad,
thank you for always encouraging
me to follow my dreams and
believe in myself. You have both
set a wonderful example of faith,
courage and love that will always
be a part of me. Timothy; you are
my inspiration! Thank you seems
too simple to express how much
I love and appreciate you and
everything you have brought into
my life-—unconditional love,
friendship, teamwork and laugh-
ter. Thank you for being the
amazing man that you are.
table of contents
Introduction ... 6
Getting Started ... 8
Basic Techniques ... 13
winter
Jolly Old St. Nick
22
27
30
36
41
Blizzard
Shivers
Throb
Amore
spring
48
51
56
61
66
70 Tea for Two
123 Gobbles
78 Ms. Dot
83 Twit & Tweet
90 Bang & Boom
92 Ray
94 Marina
Ю6 Nutty
Ю9 Autumn Paige
ns Frankie
119 Celeste
autumn
Resources ... 126
Index ... 127
«
>
introduction
realize that the world isn’t always a happy place. However, in the
world of my clay characters, I can make it whatever I choose, and
you can too! Most of the time I can’t help but make a character that
smiles back at me. It is my hope that you get as much pleasure from
making these characters and learning to design your own as I had
in creating them. Polymer clay land is a wonderful place to visit,
and before you know it, you will want to go there again and
again as you create and grow with your characters.
In this book, besides giving you the
instructions for specific projects, I have
included a few other ideas that I hope
will inspire you to create some of your
own designs. I suggest keeping a note-
book with you as you read through
this book and work on the projects.
Then, if you come up with any of your
own ideas, or things that you would
like to try, you can write them
down before you forget.
Getting Started
Let’s review some basic information
before you begin making the proj-
ects in this book.
Polymer Clay
People have different opinions about
each kind of clay. Different people
like different clay for different rea-
sons. Why not get a small package
of each to play with and see which
one best suits you? Following are
brief descriptions of some polymer
clays.
FIMO Classic
Although at times this is the hardest
clay to condition, I personally like
the results the best. It is great at
holding detail while you continue to
work on a piece. It is also one of the
strongest clays after baking.
FIMO Soft
A softer version of FIMO Classic, it
is easy to condition and is available
in a range of luscious colors. FIMO
Soft and FIMO Classic were used in
most of the projects in this book.
SAFETY TIPS
• Wash your hands. (See a special note
on page 12.)
• Do not use clay tools for or with food
after they have been used with clay.
• Do not eat while working with clay.
• Do not make clay objects that will
come in contact with food even after
the clay is baked.
• Do not burn the clay.
• Adults should help children and sub-
stitute adult tools for age-appropriate
tools.
PREMO! Sculpey
This clay is relatively easy to condi-
tion, especially if you have a pasta
machine. The finished product has a
matte finish. I used the PREMO!
Sculpey flesh color in all of the proj-
ects that required a flesh color.
Sculpey III
This is the clay that most people try
first, due to its softness and price.
Although I add a small amount of
the transparent to my FIMO, I do
not recommend its use alone for
anything that you want to have
around for a while. It breaks very
easily.
Cutting Tools
A thin blade is best whether your
knife is sharp or dull. Soft clay is
easy to cut and generally does not
require a sharp blade. If you need to*
slice a thick piece of clay, such as a
cane, without distorting it, a S
NuBlade works very well.
Glues
Sobo glue
This is a white fabric glue that is a
personal favorite of many polymer
clay artists. I have found it to be
very helpful in attaching clay to
porous surfaces, such as wood,
paper, cardboard, etc. It also works
with some nonporous materials as
well. Sobo glue is most commonly
applied to the surface and allowed
to dry, then the object is covered
with clay. The dried glue gives the
clay something to attach to. If you
were to cover a wooden egg, for
MESSAGE TO PARENTS
Although the projects in this book are
meant to be enjoyed by everyone,
please realize that not all of the tools
and materials used are suitable for
younger children. I encourage you to
work on these projects with your kids
and find suitable replacements for
adult materials.
example, the surface and the clay
would have a tendency to slip
around. However, if you cover the
wooden egg with glue, let it dry and
then cover it with the clay, the dried
glue gives the clay a slightly tacky
surface to adhere to.
Silicone glue
Silicone glues, such as Goop or
E-6000, are great for bonding non-
porous materials, such as pin backs,
to clay (after the clay has been
baked). I do not recommend that
children use this kind of adhesive,
because of the harsh fumes; adults
should use it only in a well-
ventilated area. When used properly,
it is wonderful for holding pin
backs, magnets and button shanks
to clay, and it is waterproof.
Superglue
Occasionally I use superglue gel. It
can attach raw clay to raw clay, raw
clay to baked clay or either of those
combinations to porous or non-
porous materials. The thing to
remember with superglue, other
than not to touch it, is that a little
goes a long way. So use it sparingly.
8
Hot glue
I have tried many types of hot glue
and have always had the same
unfortunate results. They have a
strong hold at first, but after a few
days or weeks, depending on the
brand, whatever was glued together
pops right apart. This could, howev-
er, work to your advantage if you
only want a temporary hold. 1
would not recommend it for a per-
manent bond.
Work Surface
If you are working on a surface
where you also eat, you should
cover the table instead of working
directly on the tabletop. This will
help keep the clay residue and food
away from each other. I personally
work on a drafting table, but you
can also work on glass, foamcore
board, ceramic tiles, countertop or
posterboard.
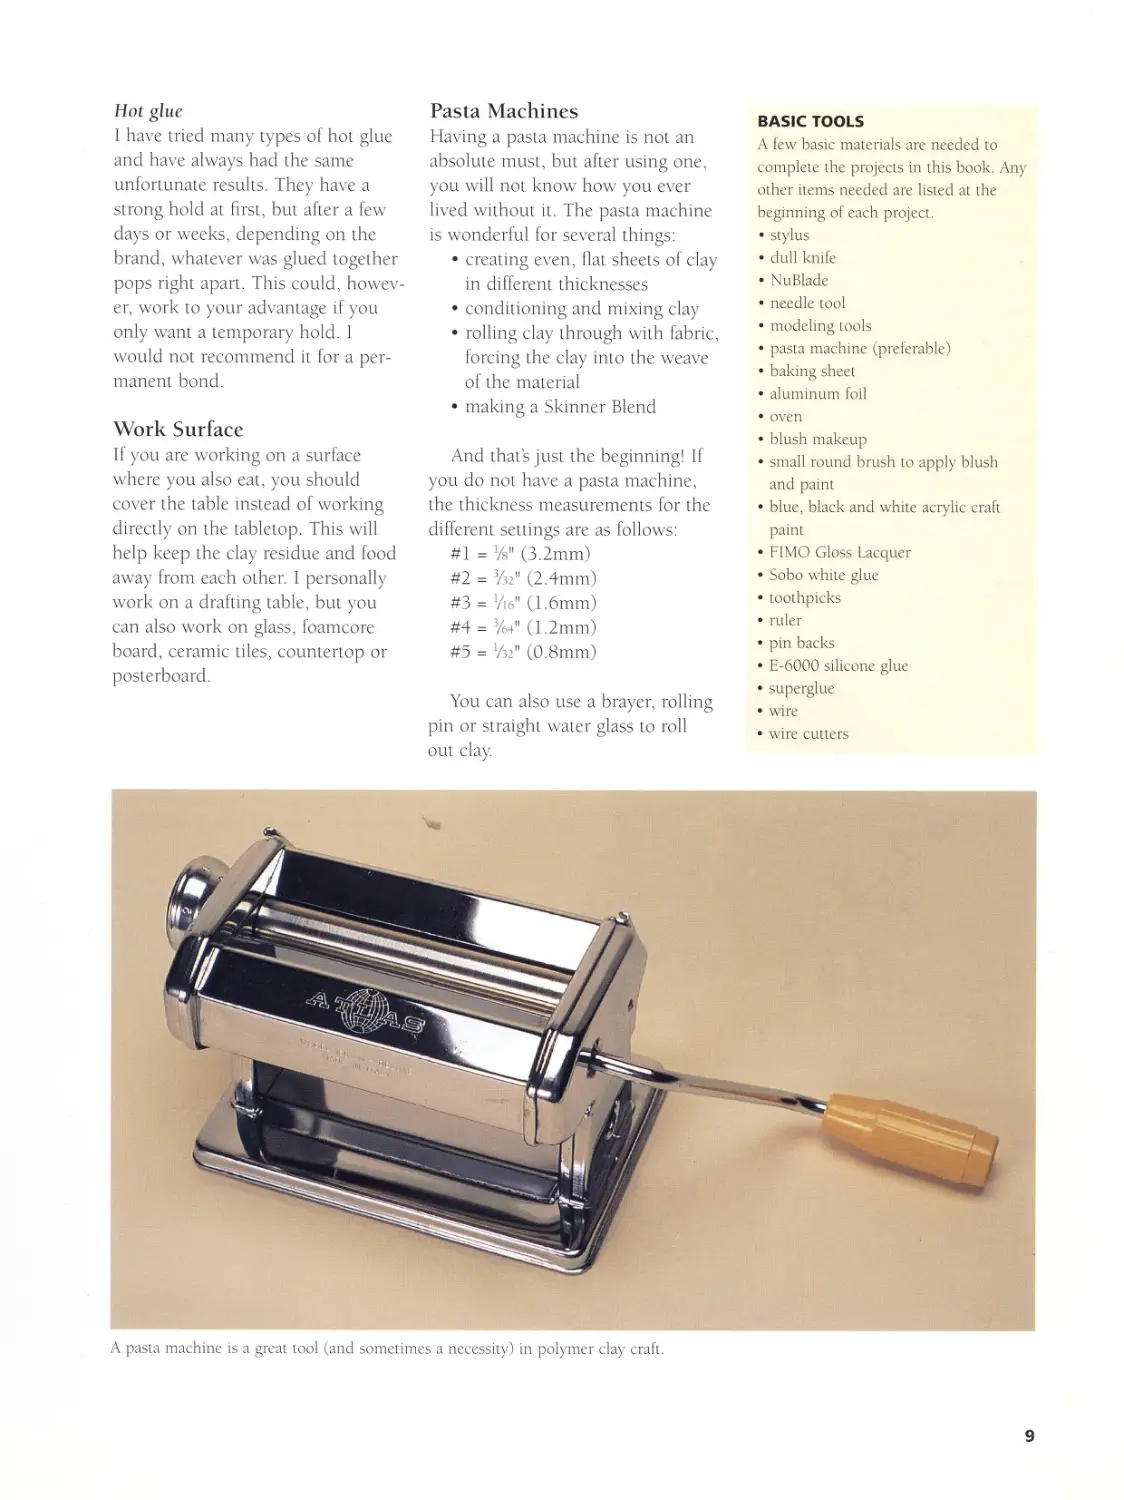
Pasta Machines
Having a pasta machine is not an
absolute must, but after using one,
you will not know how you ever
lived without it. The pasta machine
is wonderful for several things:
• creating even, flat sheets of clay
in different thicknesses
• conditioning and mixing clay
• rolling clay through with fabric,
forcing the clay into the weave
of the material
• making a Skinner Blend
And that’s just the beginning! If
you do not have a pasta machine,
the thickness measurements for the
different settings are as follows:
# 1 = 7e" (3.2mm)
# 2 = %2" (2.4mm)
# 3 = Vie" (1.6mm)
# 4 = %4n (1.2 mm)
# 5 = ‘/32" (0.8mm)
You can also use a brayer, rolling
pin or straight water glass to roll
out clay.
BASIC TOOLS
A few basic materials are needed to
complete the projects in this book. Any
other items needed are listed at the
beginning of each project.
• stylus
• dull knife
• Nu Blade
• needle tool
• modeling tools
• pasta machine (preferable)
• baking sheet
• aluminum foil
• oven
• blush makeup
• small round brush to apply blush
and paint
• blue, black and white acrylic craft
paint
• F1MO Gloss Lacquer
• Sobo white glue
• toothpicks
• ruler
• pin backs
• E-6000 silicone glue
• superglue
• wire
• wire cutters
A pasta machine is a great tool (and sometimes a necessity) in polymer clay craft.
9
Conditioning
All polymer clay needs to be condi-
tioned before you can use it to
sculpt. Similar to orange juice after
it settles, polymer clay needs to be
mixed up before it is good to use.
Some clays are more difficult to con-
dition than others, but the end
result is worth it. There are a few
ways to accomplish this.
• Warm the clay before you start.
Put the packaged clay in your pock-
et or sit on it for a while. You can
also warm it by setting it on top of a
heating pad on a low setting. When
I first started working with polymer
clay, 1 decided to try warming it on
a heating pad. It worked great, so I
thought I would heat it faster by
putting it under the heating pad on
On the left is unconditioned clay; the
sample on the right is conditioned.
medium heat. About twenty minutes
later I returned to find that several
blocks of my precious clay had
baked under the heating pad! To
avoid that kind of heartache, heed
my advice and only put the clay on
top with a low setting to avoid
cooking the clay instead of warm-
ing. After the clay is warmed a bit,
take it out of the package and cut it
into smaller chunks. You can also
add FIMO Mix Quick to the clay to
help soften it. Begin pinching and
rolling the clay. Soon you will be
able to roll and twist the clay until
you can bend it without it cracking.
• If you are using PREMO!
Sculpey clay, you can take semithin
slices right off the block and run
them through the pasta machine ten
to fifteen times. Once FIMO clay is
conditioned halfway, the rest can be
finished by doing the same thing.
• If you plan to condition a lot of
clay that is a little tougher, such as
FIMO Classic, I strongly suggest
that you invest in a food processor.
Believe me, it makes life so much
easier. To use it with the clay you
simply need to chop or slice the clay
into smaller pieces and put them
into the food processor dish. I usu-
ally do 8 to 9 ounces (227g to 255g)
of clay at a time. Put the lid on and
chop the clay for about fifteen sec-
onds. The clay should be chopped
up into tiny balls. Press them
together in the bowl and then dump
the clay onto a sheet of aluminum
foil. Finish conditioning by twisting
and rolling the clay.
• Here’s a little secret. My favorite
conditioned clay combination is
three parts FIMO Classic (any color)
mixed with one part transparent
Sculpey III. The Sculpey III does not
change the color of the FIMO clay,
but it helps the clay to be more
manageable after it has been condi-
tioned. You can also use FIMO Mix
Quick.
10
Clay Gun
One handy tool is a clay gun. The
clay gun is a metal tube that comes
with several disks. Each disk has a
different shape cut through it, and
the disks fit into one end of the clay
gun. The clay is inserted into the
opposite end of the gun. A handle is
then attached that pushes or
extrudes the clay through the
shaped disk. The extracted clay can
be used for many things including
hair, hay, ropes and strings that need
to be a consistent size. In order to
save strain on your hands when
using the clay gun, make sure that
the clay you use is well conditioned,
soft and warm. It is not necessary to
have a clay gun extruder, like the
one seen in the step-by-step photos,
but it is definitely a blessing to have.
Using a clay gun extruder gives you
more leverage without adding any
strain on your hands.
Storage
The clay will not air dry, but it is a
magnet for dust particles, so it is
best to store it in a container. I store
all of my conditioned clay in plastic
bags. You can also store clay in
glass, metal and some kinds of plas-
tic containers. Don’t be alarmed if
you store clay in plastic and it seems
to melt into the container. Certain
plastics chemically react with the
plasticizers in the clay, and a differ-
ent container should be used. It is
best to store the clay in a cool, dark
place. UV rays can begin to cure
clay that is exposed. Likewise, stor-
age next to a hot windowpane or
heater can affect the clay in the
same way.
Measuring
To be honest with you, before I
began writing instructions for proj-
ects, I never used a ruler to measure
the amount of clay that I use. In fact,
when 1 am working on things for my
shows or gifts, I pretty much just eye
everything. If you need a little more
clay here or there, add it and if you
have too much, take a little away.
After you have worked with the clay
for a while, you will not need to
measure everything either. However,
if you are a beginner, sometimes it
helps to use the measurements to get
the proportions right.
For the projects in this book, I
used the ruler on the cutting and
measuring template for polymer
clay. If you do not have one or are
unable to get one, a plain ruler will
do just fine too.
When measuring a ball of clay,
lay the ball on top of the ruler.
Measure by looking down from the
top and seeing which line the very
edge of the ball touches. The ball in
the photo is a l/i" (1.3cm) ball.
Я
85
e
Ш
5
Q-
3
i
cr
<z>
Ш
S
РЯОМАТ®
SCULPEY IH’M (1/4Bar)
— 1 1/8“ Ball —♦
F
7/8" Ball
5/8"
Ball
г
io
FIMO® / CERNIT® ( 1/2 Bar)
1 1/8" Ball 7/8“ Ball Iм’
1/2-
5/8" Ball
Cutting and measuring template for polymer clay
11
Baking
Every polymer clay artist has a pre-
ferred method of baking the clay. I
bake pieces at 250°F (109°C) for 35
minutes. It is wise to test your oven
with an oven thermometer. Some
ovens run a little hot, in which case
you should adjust the setting so the
thermometer reads 250°F to 255°F
(107°C to 110°C). I prefer to bake
pieces at a lower temperature for a
longer period of time. This also
helps to keep the colors brighter;
sometimes at higher temperatures
some clays darken a little. Another
reason I bake at a lower temperature
is to reduce the risk of burning the
clay. Severely burning the clay can
result in a release of hazardous
fumes, in which case you should
ventilate the area and leave for a
while. Do not confuse hazardous
fumes with the fumes from regular
baking. The clay does have a very
mild scent to it when it is baking.
Baking at 250°F to 255°F, I have
never burnt a piece (and I have
baked a lot of clay!).
I have used a toaster oven only a
few times. The particular oven I was
using would heat up to 300°F
(135°C) and then go down to 250°F
(109°C). So if you use one, let it
spike first before you put your
pieces in. I generally use the oven in
my kitchen, and I also have a con-
vection oven that works well.
Although many polymer clay artists
use toaster ovens, I was not com-
fortable with the fluctuating temper-
atures.
Baking Surfaces
In my opinion the best cookie
sheets to bake clay on are the ones
manufactured with an air space
inside. Line the cookie sheet with
aluminum foil with the shiny side
down. This helps to reduce the
chance of a shiny spot on the bot-
tom of the piece. You can also bake
with note cards or oven parchment
on the cookie sheet. If you bake on
something shiny, your piece will
have shiny spots left anywhere it
touched the shiny surface.
Sealers
Both Polyform Products and FIMO
make water-based finishing coats for
their clays, and both provide a
choice of gloss or matte finish. Some
spray glazes are also useful. Krylon
acrylic sprays can be used with
polymer clay but must be applied
very lightly.
WASH YOUR HANDS
Before you work with polymer clay
(and after), wash your hands. Although
your hands may seem spotless, you
wouldn’t believe the tiny dust particles
and such that end up on the clay if you
do not wash your hands directly before
working with the clay. Dry them with a
paper towel. You can use the paper
towel at your work area to wipe off
tools when needed. After you are done
working with the clay, wash your
hands again. If there is clay residue left
on your hands, it comes off easily with
waterless hand cleaner and a paper
towel. Then wash your hands with
soap and water.
12
Basic Techniques
These are the instructions for making
the basic head, face, arms, hands,
legs and feet used in the projects.
Directions for creating a Skinner
Blend are included at the end.
HINT
The face can be added either before or
after the head is attached to the body. I
usually add the face after the head is
attached to the body.
Create a Head and Face
Step 1. Start with a clay ball of desired flesh color. The size will
depend on the needs of your character.
Step 2. Position the ball of clay between your finger and thumb
and roll back and forth. The top half should be narrower than
the bottom half.
Step 3. With the side of your thumb, slightly flatten the area just
above the cheek line.
Step 4. With the head still upside down, gently bend the face
toward the front just a little.
13
Step 5. Form each eye from a small ball of white clay into a
teardrop. Place the eyes side by side just above the cheek area.
Step 6. The nose is a small ball of flesh-colored clay. Place it just
below the eyes.
Step 7. Then add the smile with a small needle tool.
Step 8. Use the end of the stylus to add a finished look to both
sides of the smile.
14
Step 9. If you choose to have an opening in the mouth, insert the
stylus and gently pull the clay down.
Step 10. Then insert a small pink tongue into the mouth opening
with a needle tool.
Step 11. To make the ears, roll two balls of flesh clay. Hold the
first ball to the side of the face. Attach with the blending tool by
inserting it into the center of the ball and pushing the clay into
the side of the head. Do the same on the other side.
Step 12. Last, with a small brush add blush to the cheeks and
the top of the nose.
15
Alternate Face Method
Step 1. A round head like the one on the
angel needs an indent for the eyes to lie
in. Otherwise the eyes will protrude too
far from the head. To make the indent, I
use the handle end of the knife.
Paint the Eyes
Step 2. For the eyes, first select the color
you want to use for the iris. Use a small
round brush to paint on the color. Use the
shape of the eye as a guide, leaving white
showing at the bottom.
Step 3. The black paint is next. This time
use the colored part of the eye as a guide
to paint the black. Try to leave an even
amount of color all the way around the
black.
Step 4. The character seems to come to
life when the white accent is added to each
eye. After the paint has dried, add two to
three coats of gloss varnish to the entire
eye. It protects the paint from getting
scratched off and adds a touch of realism.
CLAY COLORS FOR THE FACE
In the supplies list for most projects, I
list white and pink clays—even if they
are not specifically used in the step by
step demonstration—because you will
need them to make the eyes and
mouth.
16
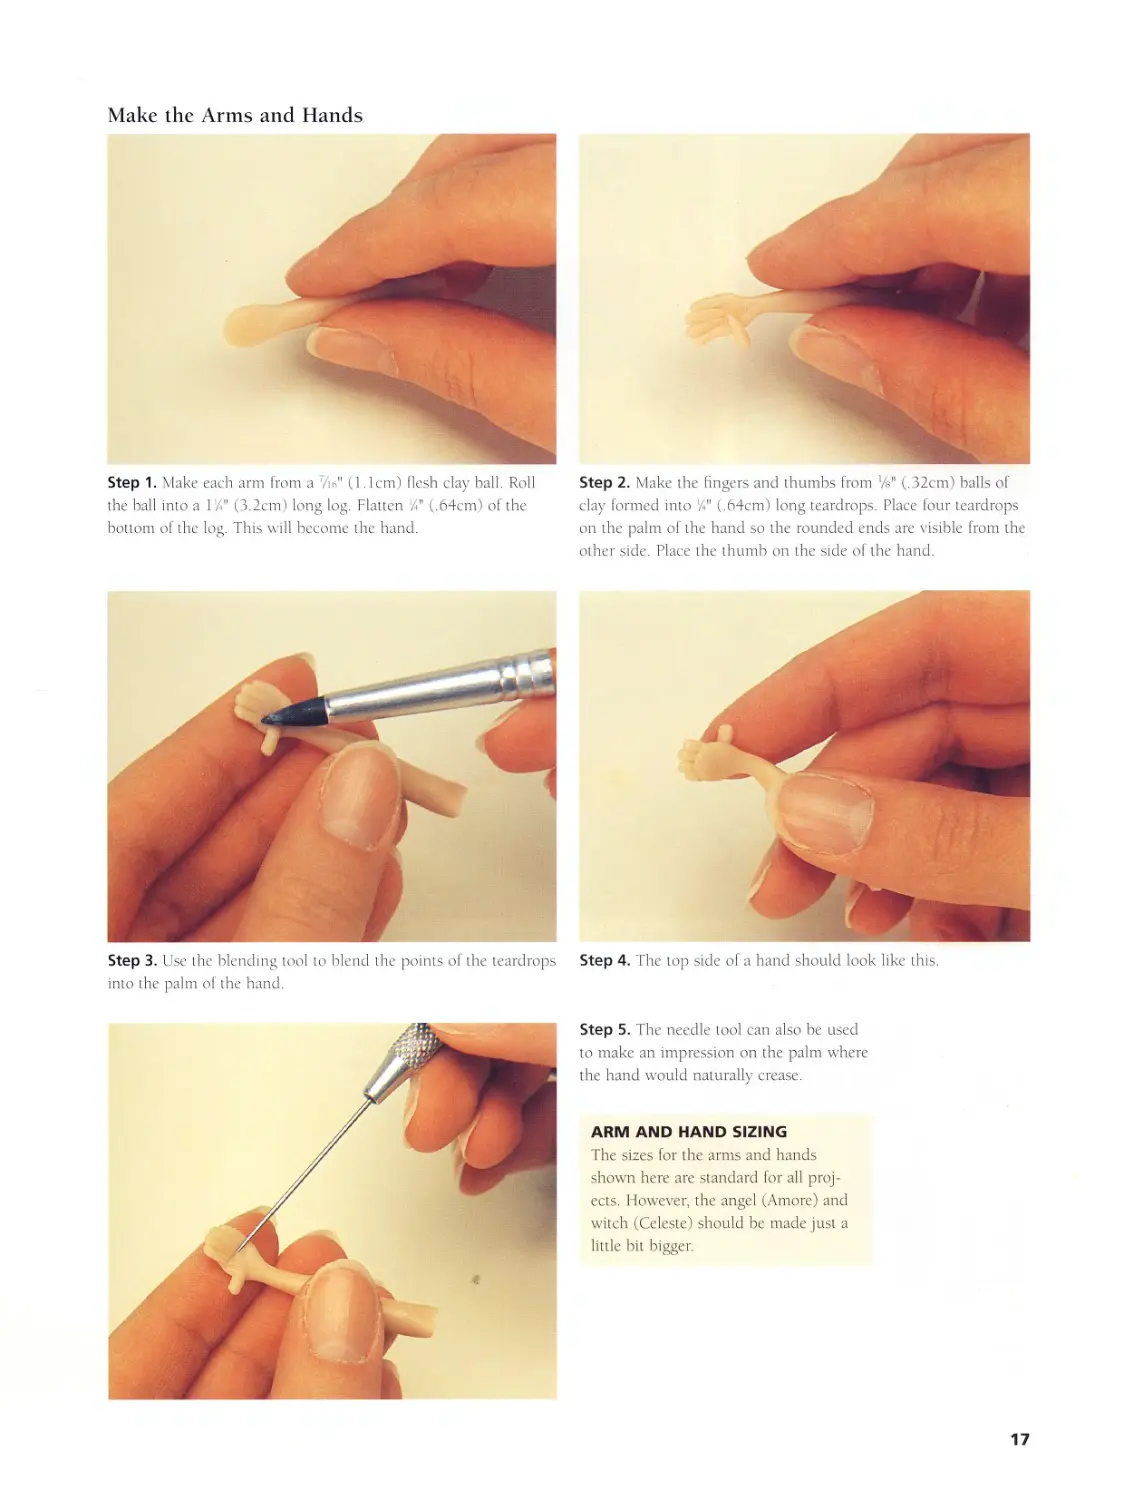
Make the Arms and Hands
Step 1. Make each arm from a Vie" (1.1cm) flesh clay ball. Roll
the ball into a 1%" (3.2cm) long log. Flatten %" (,64cm) of the
bottom of the log. This will become the hand.
Step 2. Make the fingers and thumbs from Ye" (,32cm) balls of
clay formed into %" (,64cm) long teardrops. Place four teardrops
on the palm of the hand so the rounded ends are visible from the
other side. Place the thumb on the side of the hand.
Step 3. Use the blending tool to blend the points of the teardrops
into the palm of the hand.
Step 4. The top side of a hand should look like this.
Step 5. The needle tool can also be used
to make an impression on the palm where
the hand would naturally crease.
ARM AND HAND SIZING
The sizes for the arms and hands
shown here are standard for all proj-
ects. However, the angel (Amore) and
witch (Celeste) should be made just a
little bit bigger.
17
Make the Legs and Feet
Step 1. Make each leg from a %" (2cm)
ball rolled into a 1%" (4.5cm) log. Bend
the end of the log up to create the foot.
Step 2. Roll the ankle gently between
your finger and thumb. Use your fingers
to gently pinch the heel a little.
Step 3. With the bottom of the foot facing
you, pinch the bottom part of the heal so
that the foot tapers at the bottom.
Step 4. Use the side of your finger to make the arch in the foot.
Step 5. Pinch the top of the foot just a little. Don’t forget to make
a right foot and a left foot!
LEG AND FEET SIZING
The sizes for the legs and feet shown
here are standard for all projects.
Step 6. Add the toes last. Make each big toe from a 3Xs" (.48cm)
ball and each small toe from a %" (.32cm) ball. Put the big toe on
first, then the four little ones.
18
Skinner Blend
Many creative things can be done
with a Skinner Blend, from making
beautiful cane components to won-
derful backgrounds. This technique
was developed and published by
Judith Skinner, hence the name
Skinner Blend. A Skinner Blend can
be made with a number of different
colors, but for this example we will
use only two.
Step 1. Begin with two triangles of color. Place them together using the picture as a guide.
Fold in half.
Step 2. Following the diagram, fold the slabs of clay in half.
Step 3. Place the clay in the pasta machine with the fold going into the rollers first. The
end corners will meet to form a square. 1 angled the back half of the rectangle in the dia-
gram so that you would be able to see how the ends meet colorwise. Repeat this process
about twenty-five times to get a smooth blend. It is important that you put the clay in
the pasta machine in the same direction each time.
19
20
winter
I could write a whole book about wintertime alone. Wintertime,
especially Christmas, is where I often draw my creativity from. Like
most people, I adore everything about the holidays, particularly the
extra warmth that people seem to have toward each other (despite
the chilly weather). It is not unusual to hear “Jingle Bells” chiming
out from my studio in the middle of the summer! Re-creating some
of the same feelings that I have during my favorite time of year may
be one of the reasons why my characters, for the most part, are
always happy.
21
WINTER
Jolly Old St. Nick
Santa is a great project to start
with. This project will give you
some practice making a face,
although it does not have to be
formed perfectly, because the beard
will cover most of it. By adding
simple texturing to a project, you
can create a great amount of detail.
I first learned to make a hood
like the one on this Santa, from
Maureen Carlson. She has a
wonderful collection of teach-
ing videotapes available,
including one on creating
Santas.
Once you have made the
Santa pin, experiment with
other flat-backed faces. Try
making ladies with scarves or
flowers wrapped around their
faces, different period costume
hats, etc. You can also turn Santa
into a wizard simply by changing
his hood to a metallic blue color,
eliminating the holly and adding a
star to the tip of his hood. The pos-
sibilities are endless!
SUPPLIES
• clay colors: red, flesh,
white, green, pink
• basic tools (page 9)
22
WINTER
Step 1. Santa's Face. Make the face from a 1" (2.5cm) flesh clay
ball. After making the face (see page 13), lay it down on the table
with the front of the face up, and push slightly on the edges to
make the back flat while still maintaining the roundness of the
top. After making the face, instead of making a smile, insert the
needle tool %" (,64cm) under the nose and pull it down. Gently
rock it back and forth to create a teardrop opening for the mouth.
Set the face aside.
Step 2. Beard and Mustache. Starting with a %" (1.9cm) white
ball, create a teardrop shape by pinching the side of the ball
between your thumb and finger. Then flatten to Vs" (,32cm)
thick.
With your finger, indent the wide end of the teardrop, forming a
U, to create the beard shape. If you need to, you can gently pull
on the sides so that they will reach the edge of the ears..
Attach the beard to the face. Curve a very small roll of flesh-pink
clay and attach it to the mouth for his bottom lip.
23
WINTER
Each side of the mustache starts as a %" (.95cm) white clay ball.
Start with a teardrop shape and pinch the wide end slightly. The
fat end goes under the nose.
Step 3. Texture the Beard. Hold the needle tool at a 45° angle,
instead of straight up and down, when pulling it through the clay.
This will give you better lines in his beard. Texture the beard by
slowly dragging the needle tool through the clay several times.
Stop when you like how it looks.
Step 4. Add Face Detail. Each eyelid is а Ув" (,32cm) ball of
flesh clay. Make each ball a very skinny teardrop. With the wide
ends toward the center, place the teardrop above the eyes.
A tapered-end clay shaper helps to easily blend the edges of the
eyebrows into his face.
24
WINTER
The needle tool is used to make a few wrinkles on his forehead
and at the corners of his eyes.
Use two small white clay balls, 3/ie" (,48cm) and %" (,64cm), to
make Santa’s bangs. Make two teardrops and attach them to the
top of his forehead. Again, use the needle tool to texture his hair.
Set aside.
Step 5. Make the Hood. For his hood, make a 5" X 2" (12.7cm
x 5.1cm) red clay rectangle, 'A" (0.8mm) thick (no. 5 on your
pasta machine). Holding each corner of one long side, join the
corners and pinch the sides together to form a seam.
Around the rim of the hood, roll the edge under for a finished
look.
Hint After working with red clay, wash your hands thoroughly.
Otherwise, the very strong pigment will stay on your hands and rub
off onto the next color you use.
25
WINTER
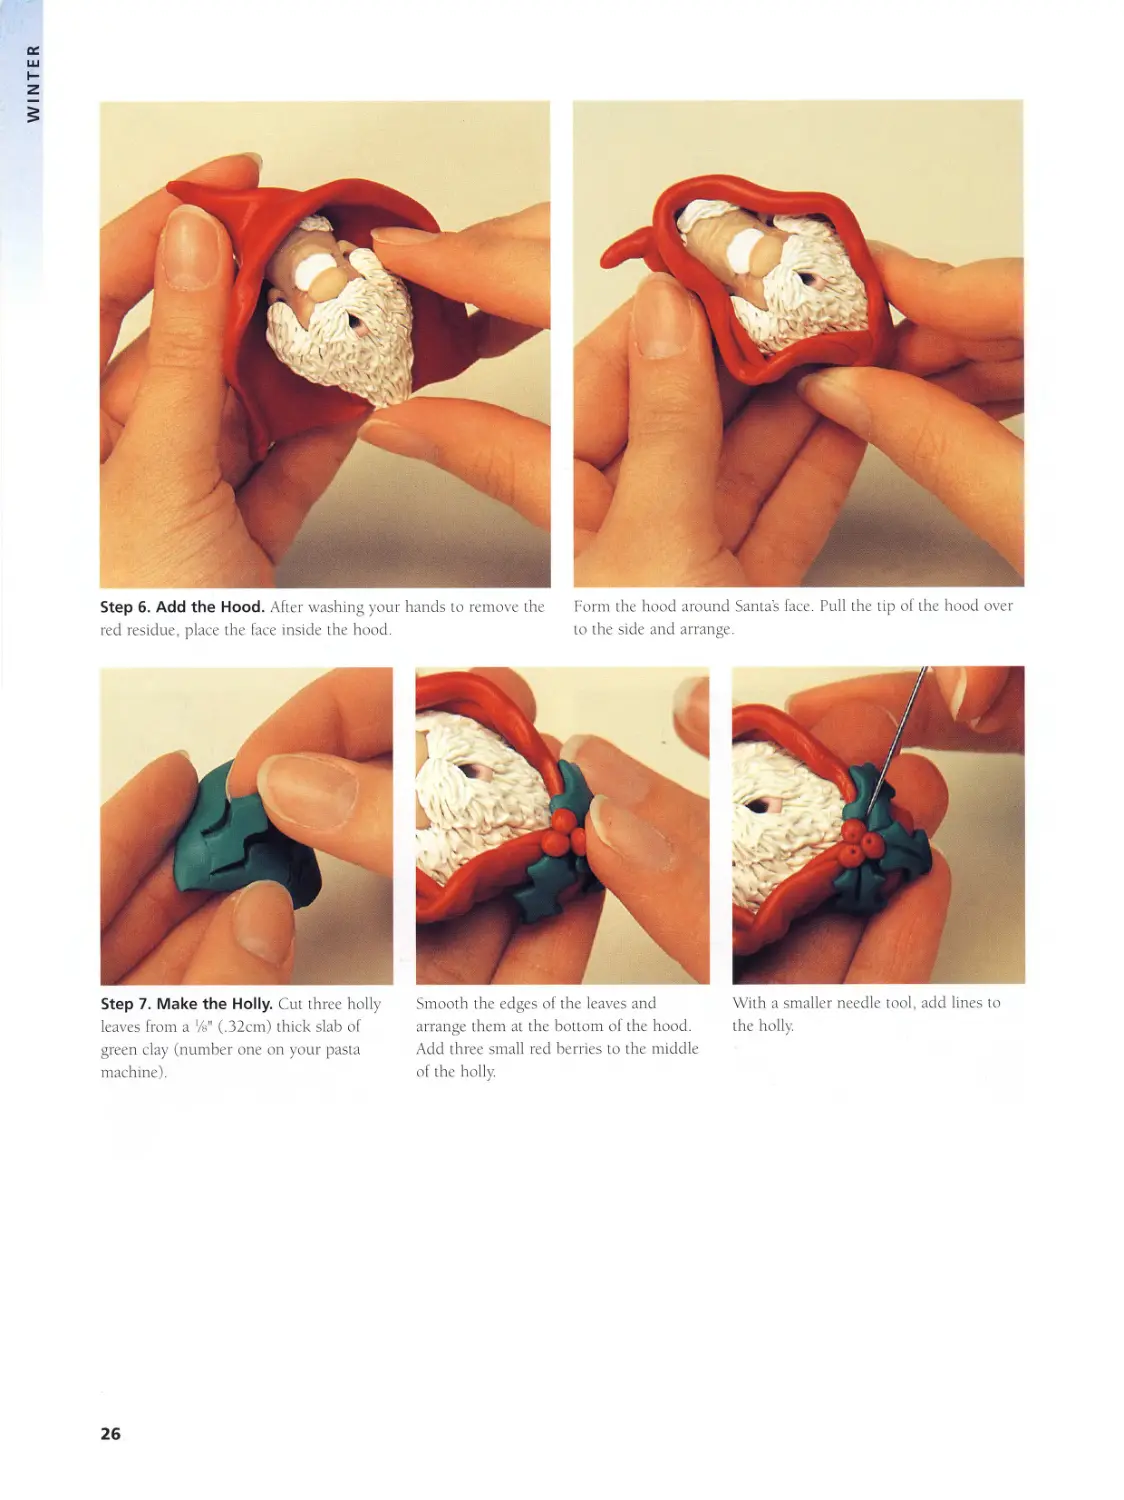
Step 6. Add the Hood. After washing your hands to remove the
red residue, place the face inside the hood.
Form the hood around Santa’s face. Pull the tip of the hood over
to the side and arrange.
Step 7. Make the Holly. Cut three holly
leaves from а Ув" (.32cm) thick slab of
green clay (number one on your pasta
machine).
Smooth the edges of the leaves and
arrange them at the bottom of the hood.
Add three small red berries to the middle
of the holly.
With a smaller needle tool, add lines to
the holly.
26
Blizzard Pin
WINTER
Most of my favorite tools are the ones that I have made or that are
found objects. I now enjoy going to the hardware store with my
husband, because I consider it a challenge to find
new things to use with polymer clay. For example,
a finishing nail, when pressed through a flat
ornament, makes a perfect-sized hole for a
string. The following are just a few exam-
ples of things that can be used as tools or
for texturing clay:
• straws
• old toothbrushes
• cookie cutters
• candy molds
• lace
• knitting needles
• textured rolling
pins
• decorative-edged
scissors
• paper punches
If you do not have a heart
paint stick like the one in the
step-by-step photo, you can
easily make your own. Here’s
how:
1. Form a slab of clay %"
(1.6cm) thick.
2. Use a %" (.65cm) heart
Kemper cutter to cut out a heart.
3. Gently press the heart on the table so it is flat. Bake.
4. Press the heart into the clay as is, or add a handle to it and
rebake it.
A three-point needle tool can be a great time-saver if you plan to
make any eyelet lace from clay or anything else needing three dots.
Here is how to make one:
1. Find or buy three needles that are the same size. I used larger
needles found in the embroidery section of the store.
2. Roll a scrap piece of clay into a log. Make it a size that will be
comfortable for you to hold.
3. Insert the needles one at a time into the end of the log. 1 have
them in a triangle pattern, but you can design it however you
like.
4. You will probably need to roll the clay around the needles.
5. Bake.
SUPPLIES
• clay colors: pearl white,
white, pink
• basic tools (page 9)
• pattern on page 28
• heart paint stick (or
handmade tool)
• blue eye shadow
• glitter paint
• three-point needle tool
27
WINTER
Step 1. Snowflake Cutout. Trace the snowflake pattern onto a
piece of card stock or posterboard and cut out. Run pearl white
clay through the pasta machine on the no. 2 setting and fold in
half. When you fold the clay in half, start at the fold and gently
slide your finger across the top sheet as you lay it down to help
prevent air from getting trapped between the two sheets. Place the
pattern on top of the clay slab. Using a dull scalpel or knife, trace
around the pattern in a continuous motion to cut it out.
Step 2. Details. Peel the pattern off the clay. Pick the snowflake
up and smooth all of the edges with your fingers. Use the paint
stick or handmade tool to emboss a heart shape into each exten-
sion of the snowflake.
With the three-point needle tool, make the pattern on the snow-
flake, using the picture as a guide. If you have not made this tool,
just use your regular needle tool to make the set of three dots.
28
NTER
Step 3. Face. Put the face in the middle of the snowflake. Add
blush to the cheeks.
Using a different brush, apply blue eye shadow or powder to the
three sides of each extension. Do not add it around the face. Bake
according to manufacturer’s directions.
To make an ornament
Enlarge the pattern, run it through number
one on your pasta machine, and push a
hole through the top of the snowflake.
Step 4. Finish. After the snowflake has baked and cooled, paint the eyes and seal them.
Paint the iridescent glitter paint into each of the embossed hearts.
29
WINTER
Shivers
Often times you may want to make a
larger project without using all of your
clay to do it. You can save clay by covering
with clay other objects such as
• wood
• glass
• metal
• paper towels
• aluminum foil
• wire mesh
• masking tape
• newspaper
• cardboard
• factory-formed papier mache
• light switch plates
Look at recyclables, such as glass or
cans, and think of creative ways to cover
them. I have also found cheap objects to
cover at garage sales, flea markets and dol-
lar stores. A base can also be created by
covering scrap clay with the good stuff.
When you cover an object with clay,
do not trap any air between the
clay and the object being cov-
ered. Trapped air can
cause a piece to crack
when it is baked. Also
watch out for air bub-
bles. Another way to han-
dle trapped air in a ball of alu-
minum foil, for example, is to
make a small pinprick in a concealed area
to allow the air to escape during baking.
SUPPLIES
• clay colors: white, blue,
black, pink, silver
• basic tools (page 9)
• extra aluminum foil
• glitter paint
• two metal snaps
Important Note Styrofoam prod-
ucts should never be used in the oven
because they can release harmful fumes.
Also, children should always check with an
adult before putting anything in the oven.
30
WINTER
Step 1. Snowy Slope. Crumple a piece of scrap aluminum foil
to about 1" (2.5cm) at the highest end, by 2" (5.1cm) wide by
17" (3.8cm) long. Make a large sheet of white clay (run through
the pasta machine on the no. 1 setting).
Cover the aluminum foil with the clay and mold clay into the
shape of a slope. Use your finger to press two ski indentations
down the slope. They should be about the same distance apart as
the skis will be on the bear. Dimensions of the covered slope are
17" (3.8cm) at the highest point by 3" (7.6cm) wide by 37"
(8.9cm) long.
Step 2. Bear's Body. Use a %" (2.2cm) ball of white clay for the
bear’s body. Shape it into a fat teardrop, and push the point back
(refer to picture). This is done to make him look as though he is
leaning forward.
Step 3. Legs. Create each leg from an n/i6" (1.7cm) ball of white
clay. Roll each ball into a 17" (3.2cm) long snake of clay, and
bend the foot up. The foot needs to be thick enough to support
the bear’s body in a standing position.
31
WINTER
Pinch the leg and form it into a semi-flat circle and bend it for- Simulataneously attach both legs toward the back of the body,
ward a little. Do the same to the other leg.
Step 4. Arms. Make each arm from a 4i" (1.3cm) white clay ball. Shape it
into a tapered log and flatten slightly between your fingers. Gently bend the
wide end forward. Put enough curve in his paws so he can hold his ski
poles.
Make sure that he can stand on his own. You might
have to move his body a little to do this. Insert two
pieces of wire into his neck to support the head.
32
WINTER
Step 5. Head. Create his head from a %" (1.9cm) white clay ball.
Roll half the ball between your thumb and finger to create a slight
impression. Push the wide end of his face up just a little to form
his cheeks. Slide his head onto the wires in his neck and gently
push his head onto his shoulders. Add his face and use a triangu-
lar nose of black clay. Add blush.
Step 6. Ski Poles. Cover an entire toothpick with white glue and
let dry. Trim the toothpick, from one end only, to 1%" (4.5cm)
long. Add superglue gel to the tip of the other end of the tooth-
pick and insert it into the hole in the middle of the snap. Repeat
to make a second ski pole.
Slightly lift an arm and place the ski pole under it. The rough end
of the pole should be gently pushed into his paw. Push the arm
back down and press the arm into the toothpick. Repeat for the
second arm.
Step 7. Hat. Mix a h" (1.3cm) ball of blue clay with a /2" (1.3cm)
ball of white clay until you have a nice marbled effect. Shape a
7s" (1.6cm) ball of the marbled clay into a teardrop, and insert
the pointed tool or the end of a paintbrush into the wide end.
Roll the paintbrush back and forth to make the opening for his
hat.
33
WINTER
Arrange his hat around his face. Remember to angle the tip of his
hat backward because he is going down a hill.
Make a !4" (.64cm) white ball for the pom-pom at the end of his
hat. With the end of a paintbrush, make a small hole in the ball
and place the tip of his hat into it.
Step 8. Ears. Each ear is made from a Vie"
(.48cm) ball of white clay. Use the clay
shaper tool to make the indent in an ear
while attaching it to his hat (head).
Step 9. Scarf. Roll the remainder of the blue and white marbled clay (from step 7) into
a log and then flatten it between your fingers to make the scarf. Wrap it around his neck,
leaving the tails off to the side toward his back. Remember to arrange them so they will
look as though they are flying in the wind.
34
WINTER
Step 10. Skis. Cut each ski from a slab of silver clay that has
been run through no. 1 on the pasta machine. The ski should be
about 1%" (4.5cm) long and %" (1.9cm) wide. Curve the tip of
each ski up a little so that it points back toward the bear.
Step 11. Assemble. Add a little bit of superglue gel to the bot-
tom of each foot where it will touch the ski. Place him on the skis
on top of the slope just to make sure that his skis fit in the
grooves made in the slope. Do not forget to add his tail; make it
from a %" (,64cm) white clay ball. Bake the bear and slope sepa-
rately and according to manufacturer’s directions.
Step 12. Finishing Touches. Paint and seal his eyes.
Add a little glue (either superglue or E-6000) to the
bottom of each ski and then attach him to the top of
the slope.
Add glitter paint to the slope, and add a couple coats of gloss sealer to the
grooves in the slope.
35
WINTER
Throb
SUPPLIES
• clay colors: transparent,
transparent pink, white
• basic tools (page 9)
• one sheet of imitation
silver leaf
• glitter
• piece of tissue paper
• burnishing tool (you can
also use the underside of
a spoon for this)
In this project, you will learn about
Mokume Gane, the technique of
stacking thin sheets of clay, distort-
ing the layers and cutting thin slices
from the multilayered stack of clay.
The thin slices will show swirls of
the colors used in the process. This
particular form of Mokume Gane,
using transparent clay and imitation
metal leaf (also known as foil), was
developed by Lindly Haunani. She
has developed many other tech-
niques, especially with transparent
clay, and has a video explaining fur-
ther techniques. You will be amazed
at the depth this technique can
achieve using transparent clays. Also
experiment with making Mokume
Gane without the imitation leaf and
with layering transparent and
opaque clays.
A few suggestions: When you
make slices from the stack of clay,
make them very thin and use
a NuBlade. Flip pieces over to see
which side has the best design. The
composition leaf is very delicate and
easily sticks to raw clay. Because it
is so thin, it would be a good idea
to turn off any fans around your
work area before even opening the
package.
36
WINTER
Step 1. Prepare the Clay. Start with half of a 2-ounce (56.7g) block or ball
of transparent clay. Run it through the no. 1 setting on your pasta machine.
(I used very fine pink glitter; you may use whatever color you want.) Add
very little glitter at a time into the clay or you will end up with a mess.
Sprinkle some in the middle of the slab of clay and fold it in half, creating a
pocket. Push the sides together so that the glitter does not fall out. Leave the
top open. Put this through the pasta machine with the folded end first. This
way, any trapped air will go right out the opening. Continue this a few more
Step 2. Skinner Blend. I chose not to add glitter to
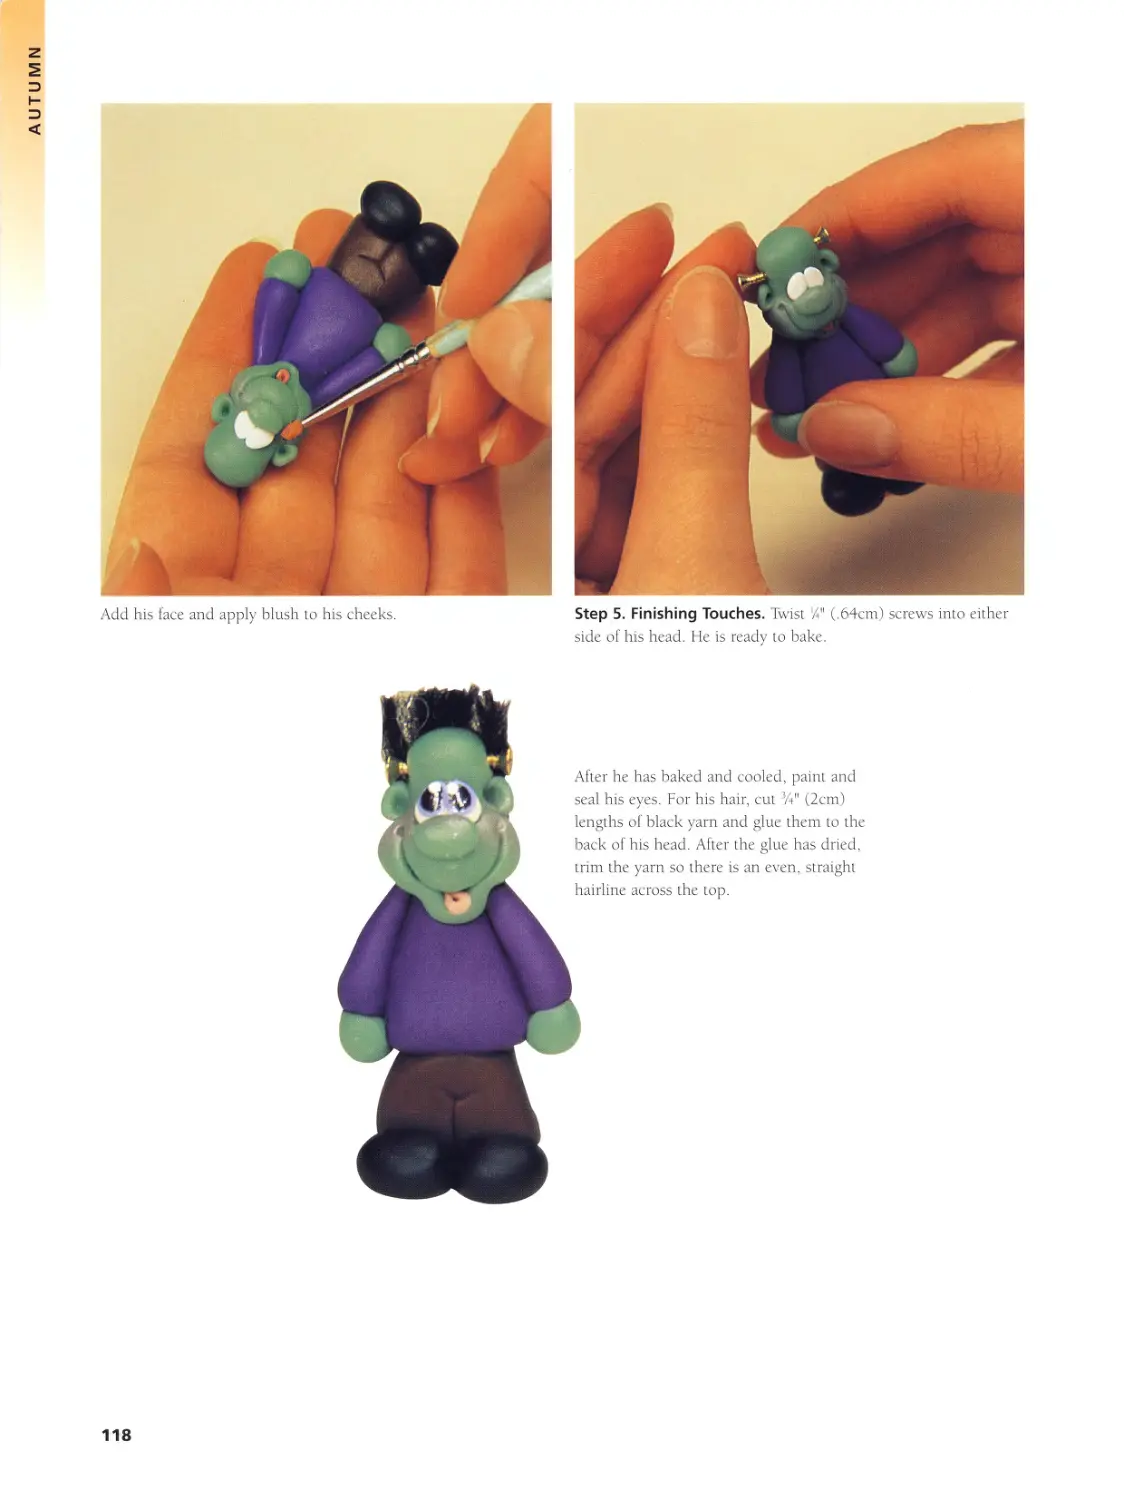
the pink half. This way, when the Skinner Blend is
made, the glitter will gradually fade into the pink as it
is blended.
unopened block of clay at the top of your rollers. This
helps you to control the width that the clay becomes as
it is repeatedly put through the rollers.
37
WINTER
Step 3. Divide. Cut the sheet of clay into seven equal pieces.
Step 4. Mokume Gane Stack. Take a piece of silver
leaf (imitation) out of the package. Be very careful
with it as it comes apart very easily. (This would also
be a good time to turn off any fans!) Lay six pieces of
clay onto the foil. Press down on them or roll over
them to make sure that the leaf sticks well to the clay.
Cut the pieces apart again and stack them going from
lightest to darkest. Press them together firmly so they
will stick to each other and to get rid of any air
pockets.
Put the seventh sheet without silver leaf on the bottom to cover the last layer
of silver. Roll a few odd-shaped balls and push them into the bottom layer.
From the top side it will help to create hills and valleys to take slices from,
giving you a more interesting pattern.
38
WINTER
With a NuBlade, take very thin slices from the top, rotating the
slab of clay as you go.
Step 5. Base. Form a heart shape out of scrap white clay. Begin
adding the Mokume Gane slices until the entire heart is covered.
Once the heart is covered, place a piece of tissue paper over the
heart and use a burnishing tool or the back of a spoon to rub all
of the slices down so you will have a smooth surface.
Place the eyes next to each other on the heart. The cheeks were
made from leftover Skinner Blend rolled into a cane from a dark
center to a light edge. Two slices from this cane create the cheeks.
Place each below the eyes and off to the side a bit.
39
WINTER
The nose is a small ball of the pink transparent placed directly
under the eyes.
Press the needle tool into the clay starting at one cheek and pull
it through the clay to the other side.
Use the wide end of the stylus to create dimples at the corners of
his mouth. Also use the stylus to gently pull the mouth open.
Make a small teardrop of pink transparent clay for the tongue.
Use the needle tool to insert it into his mouth.
40
Amore
NTER
In this project, I incorporate the
use of feathers. There are many
craft objects that can be incorpo-
rated or used with a character. A
few examples are:
• metal charms
• natural mohair/wool
• wood or bark
• stones
• terra cotta
• glass
• marbles
• shells
• paper
• cardboard
• metal
• glass beads
How you attach or include
these objects depends on whether
it is porous or nonporous. Porous
items, such as wood and paper,
can be attached with a thin layer
of Sobo white glue. Nonporous
objects, such as glass and metal,
can be baked with the polymer
clay and securely glued together
with superglue gel after baking. I
personally prefer to use the
superglue gel (as opposed to the
superglue) when attaching things
because it does not run and is
less likely to get on my fingers.
SUPPLIES
• clay colors: pearl white,
red, flesh, pink, white
• basic tools (page 9)
• needle-nose pliers
• gold wire
• two white feathers
41
WINTER
Step 1. Body and Legs. Make the angel’s body from a lYs"
(3cm) clay ball. Make each leg from a %" (1.9cm) ball rolled out
to a 1%" (4.5cm) long log. Each big toe is a Vie" (,48cm) ball, and
each small toe is a %" (,32cm) ball.
Trim each leg down to the size that you want. When you trim,
cut the end off at an angle so that it will lay flush against the
body. Attach both legs at the same time.
Step 2. Gown. Run a sheet of pearl white clay through the pasta
machine first on no. 1, then on no. 4. Cut out a circle about 3'Z>"
(8.9cm) in diameter. The circle does not have to be perfect; once
it is draped over the body, its shape will not matter.
Smooth the edges of the circle, then drape it over the angel’s
body. Place the point of his body in the center of the white circle
and drape it down the sides of his body.
42
WINTER
Adjust the gown around his body. Make sure to drape the gown between
his feet.
Create a few twists and curls at the bottom of the
gown to add some interest. Set the body aside while
you make the arms.
Step 3. Arms. Make each sleeve from a
%" (1.6cm) ball of pearl white clay. Shape
it into a long teardrop and flatten it slight-
ly with your fingers. Push the wide end up
to create an L shape.
Push a wider needle tool into the end of
the sleeve and pull it downward to create
enough of an opening to insert the hand.
Make the hand according to the directions
in the Basic Techniques (remember to
make a left and a right). Trim the extra
clay off from the wrist and insert the hand
into the opening in the sleeve. Pinch the
sides of the sleeve around the wrist to
secure the hand.
43
WINTER
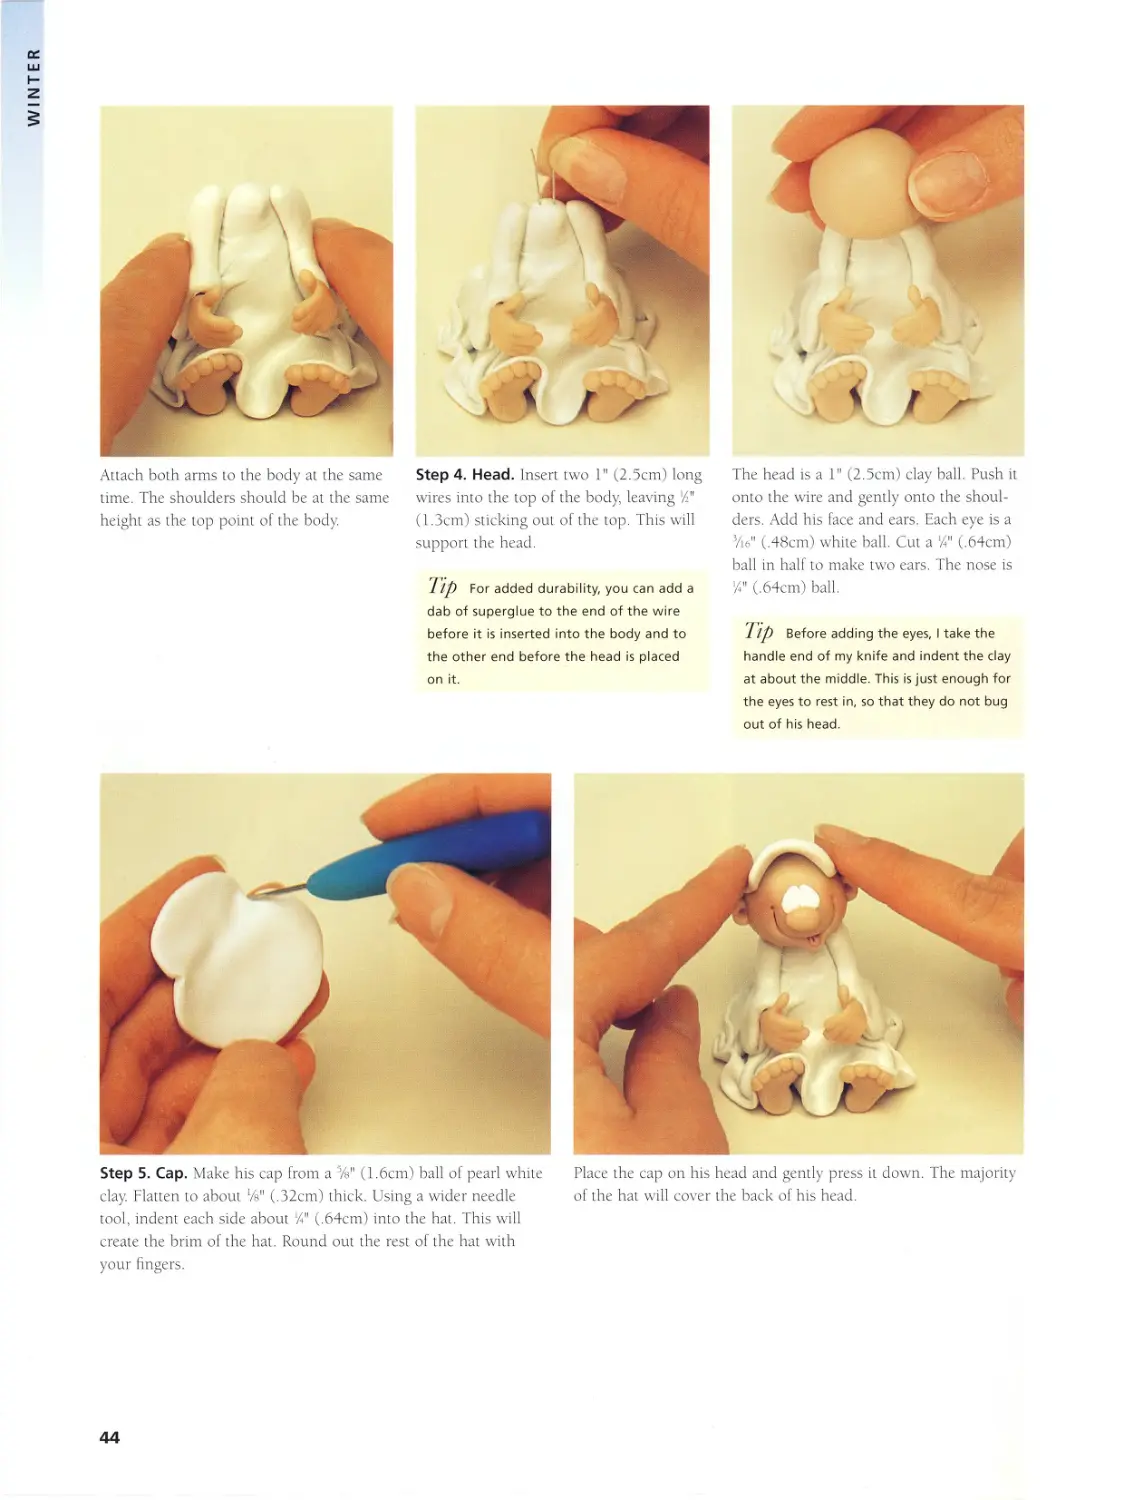
Attach both arms to the body at the same
time. The shoulders should be at the same
height as the top point of the body.
Step 4. Head. Insert two 1" (2.5cm) long
wires into the top of the body, leaving /?
(1.3cm) sticking out of the top. This will
support the head.
Up For added durability, you can add a
dab of superglue to the end of the wire
before it is inserted into the body and to
the other end before the head is placed
on it.
The head is a 1" (2.5cm) clay ball. Push it
onto the wire and gently onto the shoul-
ders. Add his face and ears. Each eye is a
Vie" (,48cm) white ball. Cut a %" (,64cm)
ball in half to make two ears. The nose is
%" (,64cm) ball.
Tip Before adding the eyes, I take the
handle end of my knife and indent the clay
at about the middle. This is just enough for
the eyes to rest in, so that they do not bug
out of his head.
Step 5. Cap. Make his cap from a %" (1.6cm) ball of pearl white
clay. Flatten to about %” (,32cm) thick. Using a wider needle
tool, indent each side about %" (.64cm) into the hat. This will
create the brim of the hat. Round out the rest of the hat with
your fingers.
Place the cap on his head and gently press it down. The majority
of the hat will cover the back of his head.
44
WINTER
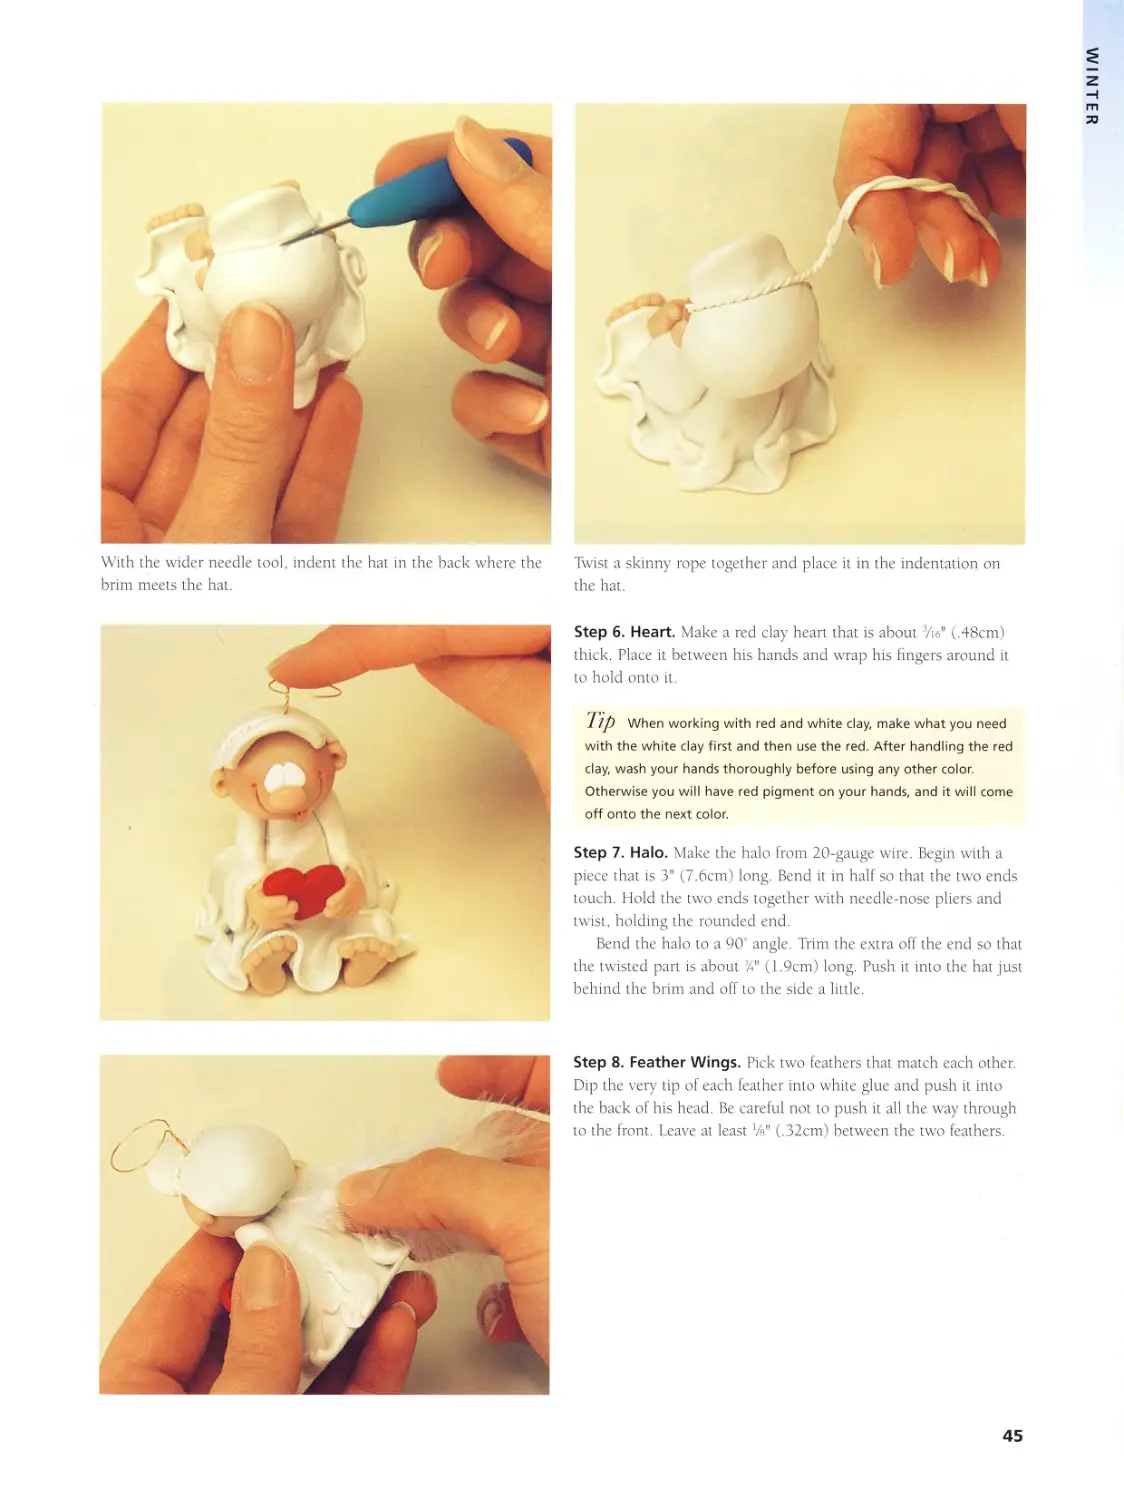
With the wider needle tool, indent the hat in the back where the
brim meets the hat.
Twist a skinny rope together and place it in the indentation on
the hat.
Step 6. Heart. Make a red clay heart that is about Vie" (,48cm)
thick. Place it between his hands and wrap his fingers around it
to hold onto it.
Tip When working with red and white clay, make what you need
with the white clay first and then use the red. After handling the red
clay, wash your hands thoroughly before using any other color.
Otherwise you will have red pigment on your hands, and it will come
off onto the next color.
Step 7. Halo. Make the halo from 20-gauge wire. Begin with a
piece that is 3" (7.6cm) long. Bend it in half so that the two ends
touch. Hold the two ends together with needle-nose pliers and
twist, holding the rounded end.
Bend the halo to a 90° angle. Trim the extra off the end so that
the twisted part is about %" (1.9cm) long. Push it into the hat just
behind the brim and off to the side a little.
Step 8. Feather Wings. Pick two feathers that match each other.
Dip the very tip of each feather into white glue and push it into
the back of his head. Be careful not to push it all the way through
to the front. Leave at least Vs" (,32cm) between the two feathers.
45
DAISY МАЕ
LUCKY
46
Springtime is a time when everything starts fresh again. For some
people its New Years Day, but for me, its springtime. Trees start to
bud and grow new leaves. Baby animals are born and Mother Nature
begins her cycle through the seasons once again. Take this time to
come up with new ideas for all seasons. Let your creativity bloom!
47
SPRING
Lucky
SUPPLIES
• day colors: green, metallic
green, black, gold, white,
pink
• basic tools (page 9)
• shamrock cookie cutter
This project uses a cookie cutter
to form the basic shape. An
amazing variety of cookie cutter
shapes, both large and small, is
available today. Some places even
offer custom-made cookie cutters.
Metal cutters work the best, but
some plastic cutters also work.
Remember, once you use a cookie
cutter with clay, you should never
use it with food products again.
Kemper cutters are similar to
cookie cutters, but they are much
smaller and have a small plunger in
the end to extrude small pieces of
clay. You can also customize some of
your own shapes by reshaping ones
that you have purchased. When you
cut out pieces, if the clay sticks to
the cutter, sprinkle some baby pow-
der on paper or a note card. Then
dip the edges of the cookie cutter in
the powder, tap the side to remove
any excess powder and then push it
through the clay. The powder acts as
a release for the clay. After you have
cut out a shape, run your finger
gently along the bottom edge of the
clay to soften it. This will give the
piece a more finished look and elim-
inate a sharp or rough edge after the
piece has been baked.
48
SPRING
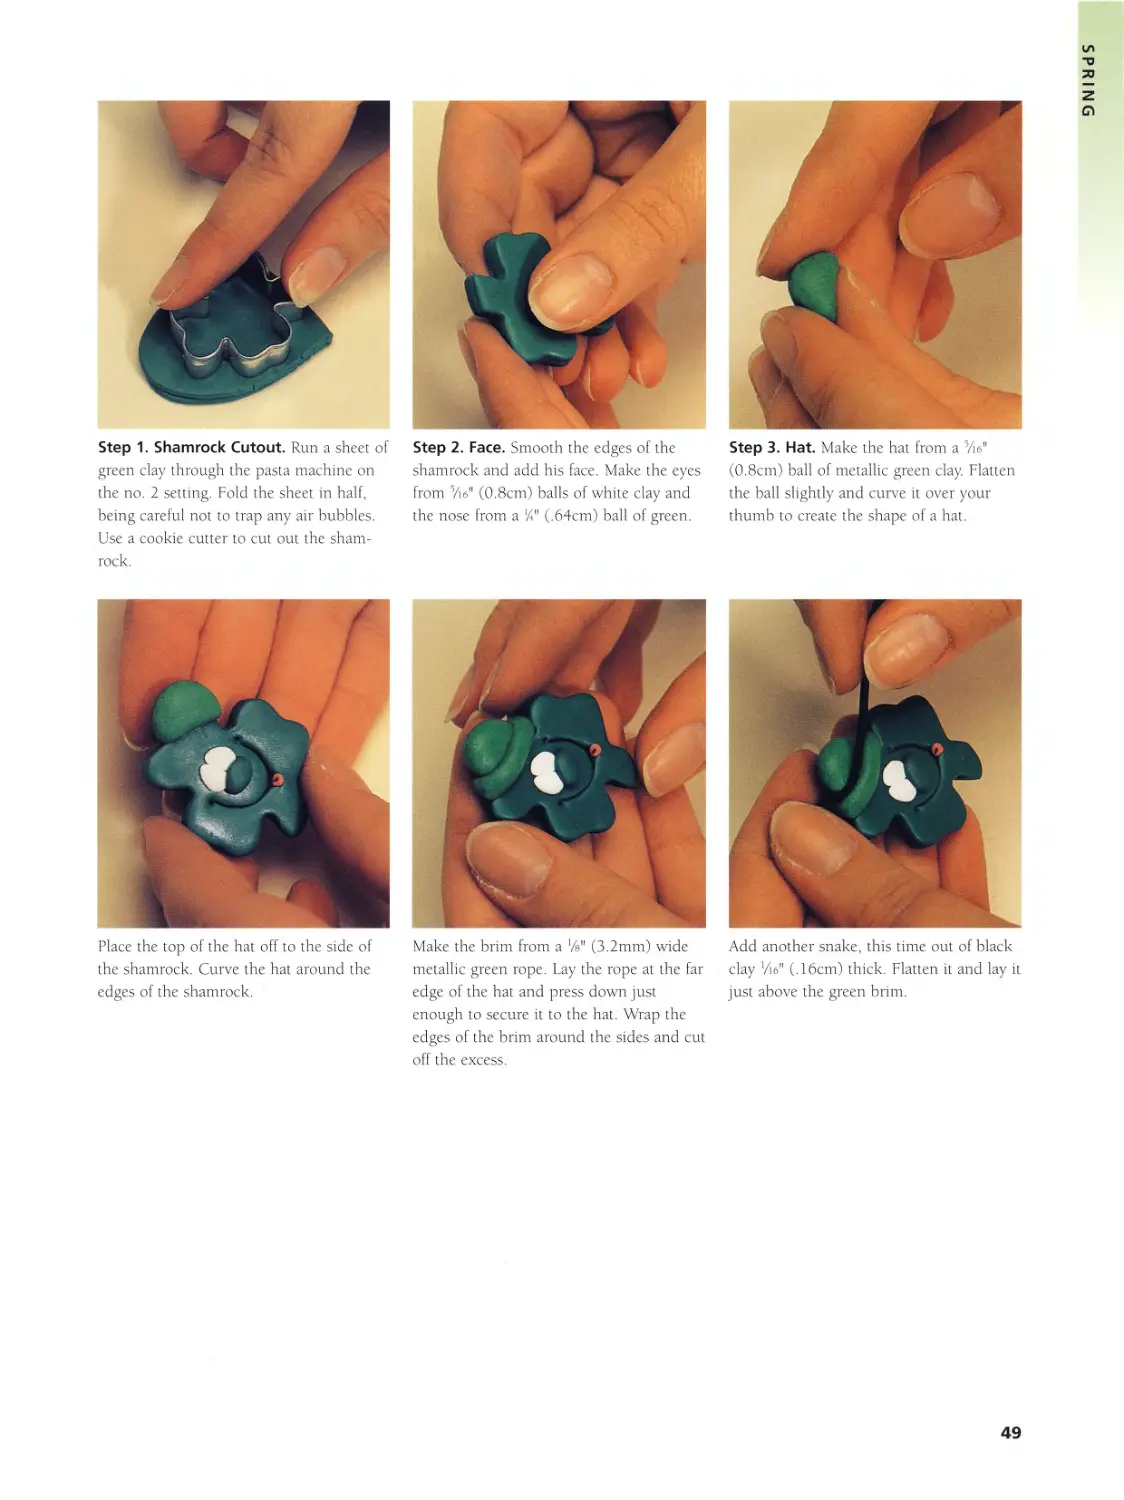
Step 1. Shamrock Cutout. Run a sheet of
green clay through the pasta machine on
the no. 2 setting. Fold the sheet in half,
being careful not to trap any air bubbles.
Use a cookie cutter to cut out the sham-
rock.
Step 2. Face. Smooth the edges of the
shamrock and add his face. Make the eyes
from Vie" (0.8cm) balls of white clay and
the nose from a %" (,64cm) ball of green.
Step 3. Hat. Make the hat from a Vie"
(0.8cm) ball of metallic green clay. Flatten
the ball slightly and curve it over your
thumb to create the shape of a hat.
Place the top of the hat off to the side of
the shamrock. Curve the hat around the
edges of the shamrock.
Make the brim from a %" (3.2mm) wide
metallic green rope. Lay the rope at the far
edge of the hat and press down just
enough to secure it to the hat. Wrap the
edges of the brim around the sides and cut
off the excess.
Add another snake, this time out of black
clay Vie" (,16cm) thick. Flatten it and lay it
just above the green brim.
49
SPRING
Make the gold buckle from a Vs" (,32cm) ball of gold clay. Roll it
into a snake. Pinch the two ends together, and then pinch the
curved end where it was folded in half. Now pinch the other two
opposite corners. You should end up with a square buckle shape.
Place it in the center of the black band.
Step 4. Bow. Construct the bow from two small triangles and a
tiny ball of metallic green clay. Make each half of the bow from a
Vis'1 (,48cm) ball of metallic green clay. Pinch each ball into a tri-
angle shape.
Place the first triangle so that the point is in the middle. Put the other triangle on the
opposite side with its point also in the center. Place a small green ball in the center to
complete the bow. You can also add folds into the bow with a needle tool, as I have done
in the photo.
Step 5. Finishing Touches. After the
shamrock has baked and cooled, you may
add gloss varnish to the hat and bow. This
will help bring out the glitter in the clay.
50
Patrick
SPRING
This project will give you some
practice making a simple arma-
ture, which is an underlying support
to add strength to a figurine’s form.
Not all pieces will need an armature.
However, if a character or project
has protruding parts, such as arms
or legs, an armature can help pre-
vent the limbs from sagging, crack-
ing or breaking. Although a piece of
clay may stay in position without an
armature while you are working on
it, once the clay is heated in the
oven, it has a tendency to droop or
move a little out of position if it is
not supported. A simple armature
can be created out of several things,
including:
• cloth-covered floral wire
• toothpicks
• wood dowels
• wire mesh
• brass rods
• telephone wire
• crumpled aluminum foil
SUPPLIES
• clay colors: FIMO Classic
Leaf Green, FIMO Soft
Tropical Green, FIMO
Soft Emerald, gold,
orange, flesh, pink, black,
white
• basic tools (page 9)
51
SPRING
Step 1. Base. Start with a I’Z" (3.8cm) ball of Leaf Green for the
base. Flatten to about Vie" (,48cm) thick. To add a little texture,
pounce an old toothbrush (dedicated to clay only) around on the
clay slab.
Step 2. Pot o' Gold. Make the pot for the “pot o’ gold” from a
llX" (3.8cm) ball of black. Using the rounded end of one of your
tools, hollow out an indentation about K" (1.3cm) deep from the
top. This is where the leprechaun’s body will be nestled.
Make the rim of the pot from a %" (,64cm) thick black snake.
Make sure that you start the rim in the back of your piece. Wrap
it around and then cut off the excess when it touches the other
end.
Step 3. Body. Make the body from a %” (2.2cm) ball of Tropical
Green formed into a fat teardrop shape. Place the wide end of the
tear drop into the indentation you created in the pot.
52
SPRING
Step 4. Armature. Since the leprechaun’s arms are raised into
the air, they need to be supported by an armature. For a very
simple armature, insert three cut toothpicks, each about 1"
(2.5cm) in length, into the body. One is for the head (an alterna-
tive to using wire), and one goes on each side for his arms.
The sleeves each start as a K" (1.3cm) ball of Tropical Green clay.
Make each into a cylinder shape and indent one end enough for
the leprechaun’s wrist. Make the hands and insert them into the
sleeves. Pinch each sleeve slightly to secure to the hand. Gently
slide the sleeve onto the armature. Position the hands the way
you want them.
Step 5. Shirt. Use the needle, tool to indent a line down the cen-
ter of his body to make the shirt.
Make a 14" (1.3cm) square of Tropical Green clay from a sheet
put through the pasta machine on a no. 3 setting. Cut it diagonal-
ly to make his collar.
53
SPRING
Place each side of the collar onto his body. Refer to the photo.
Step 6. Head. Make the head from a %" (1.9cm) ball of clay. Add
his face.
His beard and eyebrows follow. Make the beard from a %"
(1.6cm) ball of orange and each eyebrow from а Ув" (,32mm) ball
of orange. Make the beard and eyebrows the same way as Santa’s
(see pages 23-24).
Step 7. Hat. The brim of his hat is a %" (1.3cm) ball of Emerald.
Flatten it into a circle and press it down on the top of his head.
54
SPRING
Make the top of his hat from a Vie" (1.4cm) ball of Emerald
formed into a fat teardrop shape. Flatten the rounded, wide end
of the teardrop when you push the small end onto the brim.
Make the band around the hat from а Ув" (3.2cm) thick snake of
Tropical Green. Flatten the snake and wrap it around the hat just
above the brim.
Step 8. Finishing Touches. Add ‘/is" (,16cm) balls of gold clay to
the front of his jacket for buttons. Place them right on the seam
and use the wide stylus to push them on.
Make the gold buckle for his hat the same way that you made the
one for the shamrock.
Add small slices of gold clay all around the base of his coat
and add a few to the ground in front of him. Put a gold coin into
each of his hands.
55
SPRING
Chirp
Inclusions are a lot of fun to
experiment with. They are most
commonly used with transparent
clay but can also create some
interesting effects when used with
opaque clay as well. FIMO Soft
clay offers five colored transpar-
ent clays (red, yellow, green, blue
and orange) as well as uncolored
transparent. The FIMO Soft stone
colors (Rose Quartz, Lapis Lazuli,
Turquoise, China Jade, Jasper and
Granite) are transparent clays
with tiny fibers or granules added
to them. Here are some ideas for
inclusions:
• glitter
• shavings from pastels
• sawdust
• spices
• crayon shavings
• sand
• dirt
• tiny stones
• colored play sand
• dried flower petals
• coffee grounds
• powdered pigments
• embossing powders
• potpourri
• tiny glass beads
SUPPLIES
• clay colors: transparent,
yellow, orange, white
• basic tools (page 9)
• crayons (pink & purple)
• two yellow feathers
56
SPRING
Step 1. Clay Preparation. Chop small pieces of crayon on a note
card. Use pink and purple crayons. Be sure to chop them fine.
Flatten a %" (1.9cm) ball of transparent clay. Slowly add the
crayon pieces to the transparent clay.
To mix together, fold in half to create a
pocket. Run this through the pasta
machine with the folded end touching the
rollers first. Roll through a few times and
then add more of the crayon.
Once all of the crayon is added to the
transparent clay, form it into an oval (egg)
shape and cut a zigzag edge toward the
top of the egg.
57
SPRING
Step 2. Chick. Make the chick from a %" (1.9cm) ball of yellow
clay. Place the ball between your fingers and roll half of the ball
into a log. The top, rounded end will be his head.
Flatten the rounded end a little and shape it into a rounded trian-
gle. This will be his head, and the other half will be the lower
portion of his body.
Flatten his body, but not the head, even more and press it into
the back side of the egg so that the neck and head are above the
zigzag cut edge. Lay the egg on your work surface, front side up,
and press the edge down so that the back will be flat.
Make his eyes from a %" (,32cm) white clay ball and add
them to the head.
Step 3. Beak. Make the beak from a %" (,64cm) ball of orange
clay. Use both hands and rock it back and forth between your fin-
gers and thumbs. Essentially, you will be making an elongated
diamond shape.
58
SPRING
Pinch the sides of the diamond a little to form the corners of the
beak.
Place the beak just below his eyes. Only press down on the sides
of the beak to secure it to his face.
Use the stylus to add his dimples.
Use a scalpel or knife to cut open his beak and create his mouth.
Cut a line from one side to the other, leaving a majority of the
clay on the top part of his beak.
59
SPRING
Use the side of the stylus to slightly flatten the beak’s lower half.
Use the stylus to open up his mouth a little by inserting it into
the center of the opening and pulling the clay down a bit.
Step 4. Feathers. Find two small yellow
feathers that match, and cut them to fit
the size of the chick. Generally each feath-
er should not stick out more than 111
(2.5cm) from each side, unless that is how
you want it to look. Add a little white glue
to the end of one feather and gently press
it into his neck, being very careful not to
go all the way through. Do the other side
the same way.
60
Tyler & Puddles
SPRING
This project gives you the option (in the
very last steps) of using Liquid Sculpey as
a glue. Liquid Sculpey is polymer clay in a liq-
uid form. The opaque form, white, is just
referred to as Liquid Sculpey. The transparent
form is known as Translucent Liquid Sculpey
(TLS). At this time it can only be bought
through mail-order sources.
Liquid Sculpey can be used for many dif-
ferent things, but in this instance we will dis-
cuss its use as a glue for raw (unbaked) clay. It
becomes hard when it is baked, just as regular
clay does, and will hold two pieces of clay
together better than glue. It will only work
like glue if it is baked, because air alone will
not cure it. This gives you the freedom to
move a piece around after attaching it,
because Liquid Sculpey is not permanent
until it has been cured in the oven.
Liquid Sculpey can be applied
with a toothpick, glue
syringe or an old brush.
SUPPLIES
• clay colors: blue, white,
yellow, silver, brown,
pink, flesh, orange
• basic tools (page 9)
• pattern on page 62
• Liquid Sculpey (optional)
61
SPRING
Step 1. Body and Boots. To make Tyler’s
body, roll a %" (1.9cm) ball of yellow clay.
Form a fat teardrop and press the wide
end down on the work surface. To form
the boot shape, roll two %" (1.3cm) yellow
balls into two logs. For each leg, bend one
end up to form an L shape. Flatten the toe
end and give the back a little pinch to
form the heel. To make the sole on the
boot, use the needle tool to indent around
the edge of the boot about Vie" (,16cm) up
from the bottom. Make an indent across
the bottom of the boot for the heel.
Use the wide stylus to create an indenta-
tion at the top of the boot. This is where
you will attach the leg.
Make the legs by rolling a %" (1.3cm) ball
of flesh clay to %" (,64cm) by I1/" (3.8cm).
Cut two pieces %" (1.9cm) long. Taper
each rounded end to fit into the boot. Cut
the other end of each leg at a 45° angle
and attach to the body.
Step 2. Raincoat. Roll a 1" (2.5cm) yel-
low ball ’%•>" (,12cm) thick or use the no. 4
setting on a pasta machine. Lay the coat
pattern on the clay and cut it out with the
knife.
62
SPRING
Wrap the coat around his body so the ends meet in the center
front of his body. Open the bottom half of his coat outward.
Step 3. Sleeves. For sleeves, roll two !4" (1.3cm) yellow balls
into a tapered cone shape. With the stylus, indent %" (,64cm) at
the wide end of each sleeve for a hand to be inserted. Make the
hands and insert each into the end of a sleeve. Press both arms
onto his body at the same time. Do not forget to make the crease
marks in his arms.
Step 4. Head. Make the head from a %" (1.9cm) flesh clay ball,
shaped into a pear shape. Pinch the bottom of his head slightly to
form his chin. Place wire into his body and slide his head onto it.
Create his face using two %" (,32cm) white clay balls for eyes,
a !4" (.64cm) ball for his nose, and two Vie" (,48cm) balls for his
ears. Add blush to the cheeks. For his hair, roll Ve" (,32cm)
brown balls into teardrops. Press the wide end of each teardrop
into the top of his head.
Step 5. Hat. For the brim, flatten a %" (1.6cm) yellow ball into a
I'/i" (3.8cm) diameter circle. Center it on his head and press
down gently.
63
SPRING
Use the needle tool to indent crossed lines into his hat to add a
little detail.
For the top of the hat, form a %" (,95cm) yellow ball into a
pointed dome shape. Press it onto the center of the brim. Be care-
ful not to squish his face in the process.
Make а Ув" (,32cm) yellow ball and place it in the center of the
lines in the hat to finish it.
Step 6. Buckles. Make the buckles on his coat from two Vie"
(,48cm) balls of silver clay. Roll each into a small log and flatten.
Bend one end up and fold it so that it will touch the middle of
the flattened log. Press both of them onto his coat in the center.
64
SPRING
Step 7. Water Puddle. Marble together a
1" (2.5cm) white ball and a %" (,64cm)
blue ball. Stop mixing when many stripes
of color are throughout. Form the clay
into a puddle shape and set it aside.
Step 8. Duck. For the duck’s body, form a
%" (,64cm) yellow ball into a crescent
shape.
For his wings, form two %" (.32cm) yel-
low balls into teardrops, and place one on
each side with the narrow end pointing to
his tail. Indent the wings with the needle
tool.
Make his head from a Vie" (,48cm) ball of
yellow. Press it onto his body. Make the
beak from a tiny orange ball shaped into a
cone. Press the wide end of the cone onto
Step 9. Finish. Use a sparing amount of white glue or Liquid Sculpey on the bottom of
the boy and the duck. Glue and/or attach them onto the puddle and then bake.
his face.
65
SPRING
Daisy Mae
In this project you will learn to
make two simple millefiori canes.
A millefiori cane is a long log of clay
that has a design going all the way
through it that can only be seen on
the ends. The cane, once construct-
ed, can be reduced and sliced. The
image will reduce and continue to
run through the length of the cane.
So many things can be done with
canes. You can cover just about any-
thing with slices of canes, make can-
dies to decorate faux gingerbread
houses and create an array of differ-
ent jewelry pieces, to name a few.
Several books and videos give direc-
tions for making different styles of
canes, from simple canes to very
complex ones.
SUPPLIES
• clay colors: white, yellow,
green, black, terra cotta,
pink
• basic tools (page 9)
66
SPRING
Step 1. Simple Leaf Cane. To make a simple leaf cane, start by
rolling a %" (2.2cm) green ball into а 24" (6.4cm) long by Tie"
(1.1cm) wide log. Use the NuBlade to divide the log in half (long
way). Roll a sheet of black clay through the no. 5 setting on the
pasta machine. Lay one half of the log on the black sheet, flat side
down. Press on the top of the green gently so the black will stick
to it. Use the knife or NuBlade to trim the black clay around the
green log. Now place the half of the log with the black on it on
top of the other half (refer to picture). You should now have a log
with a black stripe down the center of it.
Cut a straight edge on the remaining black sheet. Lay the green
log at the edge of the black sheet. Roll the log in the black sheet,
being careful not to overlap the black. Watch out for air bubbles
too.
This is what the cane should look like when it is finished. Do not
be discouraged if the end looks a little distorted at first. Once you
slice off a piece from the end, you will have a better idea of what
the rest of the cane really looks like.
Step 2. Simple Flower Cane. To make the flower petals, repeat
the steps for the leaf cane, using a %" (2.2cm) ball of white rolled
into a log 2*4" (6.4cm) long by Vie" (1.1cm) wide. Instead of mak-
ing the center black sheet of clay go all the way across, make it go
only halfway. Also make a yellow cane that is just a %" (1.6cm)
yellow ball made into a log 1" (2.5cm) long by %" (,95cm) wide,
then wrap it in black clay. Don’t add a line in the center of this
one.
67
SPRING
Reduce the flower petal cane to Vis" (.48cm) in diameter by gently rolling it
on the table. Cut six 1’3" (3.8cm) long pieces. Reduce the yellow cane to the
same size as well and cut one piece I1/" (3.8cm) long.
Step 3. Cane Assembly. Assemble the flower petal
canes around the yellow middle. Make sure that the
black line in the petal is on the inside next to the yel-
low center on all of the pieces. Also check to make
sure that they are that way at the other end too.
Sometimes when a cane is being reduced, it can get
turned in the middle.
Step 4. Cane Reducing. Because we want to main-
tain the shape of the petals, do not roll the cane on
the table to reduce it. (That would result in a round
cane instead of a flower-shaped edge.) Instead, gently
and slowly stretch it. Use both hands to keep turning
the piece as you do this.
Step 5. Flowerpot. The flowerpot is made from a %" (1.9cm) terra cotta
ball. Form the shape of a plant pot. At the top of the pot, pull a small
amount of clay upward. This will be where the cane slices are added.
lip It is better to have a solid piece of
clay for the pin back to rest on instead of
many small pieces put together.
68
SPRING
Make the brim of the flowerpot from а 71б" (1.1cm) terra cotta
ball rolled out to a Iff" (3.8cm) long log and slightly flattened
with your finger. Attach the brim starting at one side and wrap-
ping around to the other side.
If the top part that was pulled from the pot is a little too flat to
add the flower slices, add a small ball of clay and flatten it
slightly. Add his face.
Step 6. Flowers and Leaves. Before slicing any of the leaf cane,
pinch one side of it to shape it into a leaf. This is much easier to
do before you cut it, but it can also be done after. Begin placing
flower slices and leaf slices all over the extra clay at the top of
the pot.
It is ready to bake when you are satisfied with how the flowers
look.
69
SPRING
Tea for Two
I was first inspired to use fabric
with clay when I was introduced
to some of Shelly Comiskey’s won-
derful characters. Although I do not
know how to sew yet, I love to look
at material and dream of what I will
make when I do learn to sew.
However, now I can use some of my
favorite fabric prints with the clay—
no sewing required!
When the clay and the material
are put through the pasta machine
together on the no. 6 setting or
the thickness of a sheet of paper),
the clay is forced into the weave of
the fabric. The clay backing is thin
enough that the material can be
draped a number of ways. Once it is
baked, it will hold the form perma-
nently. Also the clay backing will
stick to other pieces of raw clay.
Using polymer clay with fabric
opens many creative doors, and you
do not even have to use a sewing
machine.
SUPPLIES
• clay colors: white, trans-
parent, pink
• basic tools (page 9)
• fabric
• lace
• brown glass paint
• extra aluminum foil
• play sand colors: green,
light green, rose
70
SPRING
Step 1. Armature. Wad up a paper towel and cover
it with aluminum foil. You need to create a cylinder
shape (round on the sides and flat on the top and bot-
tom). The shape does not have to be perfect because
it will be covered with clay. The size should be 1 %"
(3.2cm) tall by 2%" (6.4cm) in diameter before you
add the clay. Run a piece of clay (scrap clay will do)
through a pasta machine on the no. 1 setting. Wrap
this clay around the foil shape, making sure to cover
it all. It is most important that the bottom of the
cylinder sets flat on the table.
Step 2. Table Skirt. Choose a fabric with a small print you like and cut a
piece 2%" (5.7cm) by 17" (43cm). This piece should be bigger than necessary
so you can trim the fabric and the clay at the same time, after they have been
put through the pasta machine together. Run a piece of clay (light-colored clay
if you have light fabric, dark clay if you have dark fabric) through the pasta
machine on the no. 2 setting. Lay the sheet of clay on the back side of the fab-
ric and run them through the pasta machine together on the no. 6 setting.
Use a pair of scissors to trim the clay-
backed fabric to a piece that is 1%"
(3.2cm) by 16" (40.5cm). Note: This size
may be adjusted to fit the table that you
made. Make sure that you leave enough
fabric to make small gathers in the table
skirt. The fabric piece should be a little
wider than the cylinder so that it will flare
out on the bottom when gathered and
attached to the cylinder base.
71
SPRING
Gather the fabric piece, making tiny folds
along the top of it. The clay will hold the
gathers when pressed up against the raw
clay on the cylinder.
Step 3. Table Cloth. Make the top tablecloth the same way as the skirt, but use a lace
material instead. Cut a 3" (7.6cm) square. Lay the square on the top and arrange it the
way you like, keeping in mind where the back of the piece is (where the two ends of the
skirt meet). You may need to glue the points of the square to the fabric with a little
white glue to help hold them down.
Step 4. Teacups. Make the saucer from
transparent clay tinted with green sand.
Roll а 7Лб" (1.1cm) ball and flatten it into a
(2.1cm) circle.
72
SPRING
Make the teacup from a !4" (1.3cm) ball of transparent clay tinted
with rose sand. Place the ball in the center of the saucer and use
the end of a paintbrush to indent the center of the cup and
secure it to the saucer.
Make the handle from a %" (6.4mm) transparent ball tinted with
green sand formed into a rope approximately 1" (2.5cm) long.
With the blending tool, attach one end of the rope onto the cup
with the rest of the rope pointing up.
lip Sometimes it is easier to pick up a
piece if you work on a note card.
Bend the handle down and use the wide
needle tool to press this end of the clay
into the cup. Make two of these teacups
and saucers. Add faces to both teacups.
Have the handles on opposite sides so that
each faces out when the teacups are glued
to the table after being baked.
73
SPRING
Step 5. Teapot. Make the teapot body from a %" (2.2cm) trans-
parent ball tinted with rose sand. Set the ball on the table and
pinch the sides a little. This will give you a flat surface to put the
face on later.
Make the top of the pot from a %" (2.2cm) ball of clay tinted
with rose sand. Place it on the top of the teapot and flatten it a
little with your finger.
Make the rim on the top from a %"
(,95cm) ball of transparent clay tinted
with green sand and roll into a rope х/в"
(,32cm) thick. Starting in the back, wrap
the rope all the way around the lid. Add a
small ball of clay to the top of the lid for a
handle.
74
SPRING
Make the spout from a W (1.1cm) ball of transparent clay tinted
with rose sand. Form into a skinny teardrop. Place the wide end
of the teardrop against the side of the teapot.
Bend the spout upward and in toward the teapot. You will basi-
cally make a backward S shape with the clay.
Step 6. Finishing Touches. In the very
end of the spout, use the stylus to make a
small indentation. Add the face to the
teapot. Bake the teacups, teapot, and the
table separately on the baking tray. After
they have all cooled, paint and seal the
eyes, and glue the teacups and teapot to
the top of the table.
75
MARINA
TWIT & TWEET
BANG & BOOM
MS. DOT
76
What better time than summer to look for natural elements from
outside to add to your creations? A hike into the woods can
become a shopping trip through nature. Especially if you live in a
four-season climate, look for things that you might want to use
during winter when the ground will be snow covered and things
won’t be so easy to find.
77
SUMMER
Ms. Dot
This leaf cane is one of my per-
sonal favorites. You can
achieve satisfying results
the first time you try it.
Thanks for this cane goes
out to Judith Skinner for
the Skinner Blend and to
Karen Lewis and Marie Segal
who developed the cane. If you
are anything like me, you will be
finding lots of things to add
leaves to!
SUPPLIES
• clay colors: red, black,
green, white, pink,
golden yellow
• basic tools (page 9)
• red wire
78
SUMMER
Step 1. Skinner Blend. Begin with a Skinner Blend of green to golden yellow, using half
a block of each color.
Step 2. Clay Rollup. Run the sheet of clay
through the no. 5 setting on a pasta
machine. Cut off the solid yellow end.
Starting at the lighter green end, begin to
roll up the Skinner Blend into a bulls eye
cane.
This is what it should look like when it is rolled up.
For a little wider cane, pinch the ends in slightly to
make it a little more stocky.
Step 3. Cane Division. With the cane standing on end, slice it into three
equal pieces. Leave them standing together.
79
SUMMER
Step 4. Leaf Veins. Roll a sheet of black clay through the pasta machine on the no. 5
setting. Lay the first end piece on the black sheet with the flat side down, and trim the
black clay to fit. Do the same with the other end piece.
Put the three pieces of the cane back
together. There should be a black sheet
between each piece.
Make a diagonal cut across the cane.
This is where the magic happens. Flip one half of the cane upside
down and put it back together with the remaining half. You
should now be able to see the vein pattern on the leaf.
80
SUMMER
Wrap the cane in a black sheet of clay put through the pasta
machine on the no. 5 setting.
Step 5. Cane Reduction. Lay the cane down and divide it in half.
Reduce half of it, and leave the other half a larger size for now.
Step 6. Slice. Cut a slice Ye" (,32cm) thick from the larger cane.
Pinch the tip of it to create a leaf shape. Do not pinch the whole
cane because it will need to be reduced and used for the next
project (Twit & Tweet on page 83).
Step 7. Ladybug. To make the ladybug, begin with a %" (.95cm)
red ball formed into a teardrop. Lay the teardrop on its side and
indent a line with the needle tool near the top for her wings.
81
SUMMER
Place a few random black dots onto the wings. Place her on the
leaf slice and fold the bottom edge of the leaf up to her.
Make her head from a Vie" (8cm) ball of black clay. Gently push
her head onto her body and the leaf. Add her face. Use red wire
for her antennas. Cut two %" (,95cm) pieces of wire and curl the
top ends to make the antennas. Push them into the top of her
head. Either glue them in now or pull them out after baking and
glue them in then.
Step 8. Finishing Touches. Cut five slices
from the smaller canes. Add two slices to
the top corner and three to the bottom
where the leaf is curled up. Then bake.
82
Twit & Tweet
SUMMER
The idea for this project was
inspired by my parents. My dad
creates three-dimensional frames to
be used for keepsakes, then my
mom designs and arranges peoples
personal items on the inside. I could
not help but imagine different poly-
mer clay scenes in these great
frames. It is another way to display
your polymer clay creations.
When you are planning your
three-dimensional picture, make a
rough drawing of your idea. This
will help you figure out how to layer
pieces. Creating something in the
foreground on the glass adds to the
three-dimensional effect. There are
also molds that will give you a
dimensional piece with a flat back,
suitable for making these pictures.
The possibilities for these frame
projects are virtually endless. Ideas
include seasons, special occasions,
such as weddings or births, or even
objects to match your home decor.
The frames are available in a range
of sizes to suit your needs.
SUPPLIES
• clay colors: pink, light
blue, sky blue, FIMO Soft
Raspberry, white, light
brown, dark brown
• basic tools (page 9)
• leaf cane (from the
Ms. Dot project)
• 3-D wood frame
• clay gun
• clay gun extruder
(optional)
83
SUMMER
Step 1. Background Preparation. Begin by taking the frame
apart. Lift the framing staples carefully and lift out the back and
the glass. Work on the back of the frame first. Squeeze some white
glue on the inside of the frame back. Smear it all over the back
until a thin film of glue covers the entire side. Let the glue dry.
Step 2. First Layer. Make a Skinner Blend from sky blue to
FIMO Soft Raspberry using a 2-ounce (56.7g) block of each
color. Lay the glue side down onto the sheet of clay. Trim the
blended sheet of clay to fit on the frame back.
Lay the sheet on top of the glue-covered frame back and roll over
it with a brayer to secure it to the glue and remove any air
bubbles.
Step 3. Mold. To make the bark on the clay tree seem more real-
istic, make a mold from a real piece of bark. You can use scrap
clay to make the mold. Lightly dust the scrap clay with baby
powder so it does not stick to the bark, and press the bark into
the raw piece of clay.
84
SUMMER
When you lift up the bark, the impression will be in the clay.
Bake the mold and let it cool.
Step 4. Tree. Lightly dust the mold with baby powder. Marble
together a l3/s" (3.5cm) light brown ball and a 1" (2.5cm) dark
brown ball, until there are very fine streaks in the clay. Press half
of the marbled brown clay into the bark mold.
Lay the first piece of the tree on the side.
Notice I left a space at the top and the
bottom of the tree. This is so that when
the backing is put back on the frame, it
can still lay flat on the ledge. With the
other half of the marbled brown clay,
make a large branch and push it into the
bark mold. Place the branch so that when
the birds are put on it, they will be cen-
tered in the frame.
Step 5. Birds. The boy bluebird’s body is
a Vz" (1.3cm) light blue ball formed into a
fat teardrop. Make the white part of his
chest from a Vz" (1.3cm) white ball formed
into a teardrop and flattened. Use your
needle tool to indent two lines on each
side of the teardrop.
85
SUMMER
Place the white piece onto his body. To
make a few scalloped impressions to simu-
late feathers, use a cut straw tool (instruc-
tions on page 101).
Make each wing from a %" (,64cm) light
blue ball formed into a teardrop and flat-
tened. With the needle tool, indent a few
lines to the side of the teardrop to shape
his wing. The tip of the teardrop should
point to his back and the rounded end
should be in the front.
Add just a touch of pink chalk or blush
makeup to his chest.
Place the bluebird on the tree branch so
that he is just above it. Make his head
from a %" (,95cm) light blue ball formed
into a slightly flattened cone. Add a few
little pieces of light blue clay to the top of
his head for “hair.” Make the girl bird in
the same way. Add a bow to her head.
Add their eyes and beaks. (See instruc-
tions for beaks on pages 58-59).
86
SUMMER
Step 6. Nest. Roll a 1" (2.5cm) light brown ball into a log and
insert it into the clay gun and slowly squeeze the clay out. Use
the disk that has seven holes in it.
To make the nest, fold in half the ropes that were made from the
clay gun and twist them.
Finish twisting the ropes until they are about 2'2" (6.4cm) long.
Attach the nest to the bottom part of the birds and part of the
branch. Add a few leaves to the background and to the end of the
branch.
87
SUMMER
Step 7. Leaves. Start by taking the glass
front out of the frame.
Tip If you cannot get the glass out and
it is a wooden frame, you can just work
from the inside of the frame. With this
project we are trying to make it seem as
though we are peeking through the leaves
on the tree to see the bluebirds. Make sev-
eral slices from the reduced leaf cane, scat-
ter them around three sides of the glass
and push them gently onto the glass. Flip
the glass over once in a while to see how it
will look from the front.
Hold the frame over the birds to make
sure that everything you want to see is vis-
ible. Finish filling in the three sides with
more leaves.
This is a view from the front; it is ready to
put in the oven with the background
piece. Bake the front of the frame with the
glass side down, not the leaf side down.
88
SUMMER
Step 8. Assemble. After the leaves and the bluebirds have been baked and cooled, place
the glass piece in first with the glass on the outside and the leaves on the inside.
Next, place the bluebirds in the frame and close the framing staples.
Push the framing staples back down with
the wide end of the stylus or the end of a
paintbrush—not a sharp object.
89
SUMMER
Bang & Boom
There are two different types of
metallic clay: one containing
mica and one containing glitter. The
FIMO Soft metallic clays are trans-
parent clays that have colored glitter
in them. The colors include silver,
gold, black, red, green and blue.
The other kind of metallic clay con-
tains small particles of mica that
reflects light. PREMO! Sculpey
metallic colors are gold, silver, cop-
per, red, green, blue and pearl.
FIMO Classic also carries a pearl
white with mica particles. A wide
range of metallic colors can be made
by mixing metallic colors with other
metallic colors or with nonmetallic
colors.
SUPPLIES
• clay colors: metallic blue,
metallic red, metallic sil-
ver, yellow, orange
• basic tools (page 9)
• red wire
• mini star cutter
• medium star cutter
90
SUMMER
Step 1. Blue Firecracker. Roll a %"
(1.6cm) metallic blue ball into a P/e"
(3cm) long log. Lay the log on the table
and gently press the sides down a little to
make the back flat but maintain the
Make a Vs" (,32cm) wide silver rope and
wrap it three times around the front side
of the blue piece. Use your finger to flat-
ten the silver rope onto the blue cylinder.
Step 2. Red Firecracker. Make a %"
(.64cm) metallic red ball. Lay it next to
the blue firecracker, slightly overlapping it,
and press down with your fingers on the
sides, making the back flat.
roundness on the front.
Use a Vie" (,48cm) star cutter to cut out blue and silver stars to
add to the bottom of the red firecracker. Alternate colors along
the bottom.
Step 3. Faces. Add faces to both of the firecrackers. Put a red
nose on the blue firecracker, and a blue nose on the red one. Use
a %" (.48cm) star cutter to cut out two yellow stars and a Vie"
(0.8cm) star cutter to cut out two orange stars. Also cut two %"
(1.9cm) lengths of red wire. Sandwich each wire between a yel-
low and orange star and insert the wires into the top of each fire-
cracker.
91
SUMMER
This beautiful cane was developed by
Donna Kato. She created this type of
cane using transparent clay and imitation
metal leaf. For some interesting effects you
can also try this technique with plain trans-
parent clay and leaf, adding the thin slices
to a colored background.
I have found that making
my own templates can be very
useful, especially if I cannot
find a cookie cutter in the shape
that I want. You can make a tem-
plate out of pretty much any-
thing, but I find that they last
longer if made from poster-
board and laminated as fol-
lows:
1. Draw or trace the
design on posterboard.
2. Trim around the edge of
your designs but not on the cut-
ting line.
3. Next, laminate it with self-
adhesive laminating sheets or a lami-
nating machine. You will get the most
from a laminating sheet if you lami-
nate more than one design at a time.
4. After both sides of the posterboard are
laminated, finish cutting out your
design, this time on the line.
To use the template, place it on a sheet
of clay and use a ceramic scalpel or thin
craft knife to trace around the design. For
the best results, move the knife in a contin-
uous motion until the design is completely
SUPPLIES
• clay colors: transparent
yellow, transparent
orange, white, pink
• gold leaf
cut out.
92
Tightly roll the sheet of clay and the gold leaf together.
SUMMER
Step 1. Preparation. Make a Skinner Blend with a 2-ounce (56.7g) block
each of yellow and orange transparent clay. Run through a pasta machine on
the no. 4 setting. Place a piece or two of imitation gold leaf on the sheet of
clay and gently pat down the leaf so that it sticks to the clay.
Use a new NuBlade to make steep slices
from the cane. Make them as thin as pos-
sible.
Step 2. Sun Rays. Cut out a sun shape
from transparent yellow clay that has been
run through the no. 1 setting on the pasta
machine. Begin laying cane slices all over
the top of the sun rays. When the piece is
covered, lay a piece of tissue paper over
the rays and burnish the surface until it is
flat and even. For a photo reference of this
step, see the heart pin on page 39. (Note:
If you’d like to create a pattern for this
project, trace around the picture of Ray
on page 92 and size it to your liking.)
Step 3. Face. Make a %" (2.2cm) ball of
marbled transparent yellow and orange.
Place it in the center of the sun rays and
gently press down on the sides of the ball
Add his face and brush blush onto his
cheeks.
93
SUMMER
Marina
n my opinion, polymer clay and snow
globes were meant to go together. Just
think of how many different things you can
make with the snow globes alone. Not
only can you design the object to go
into the globe, but you can also create
very interesting bases for the globe as
well, either painted or covered with
clay.
The snow globe can be filled
with a water mixture, allowing
snow to fall around an object, but
it can also be a creative display
container for pieces as well. Snow
globes are available in many sizes.
You can also purchase windup music
boxes to insert into the bottom of the
wooden base.
If you should decide to fill the snow
globe, mix equal parts of distilled
water and glycerin. When you add
either synthetic snowflakes or glitter, a
little goes a long way. You will need
much less than you might think.
Also, when you design the object to
put in water, remember that it will
be magnified in the filled globe.
When you glue the base of the
globe onto the rubber stopper,
glue only around the middle. The
edges of the rubber stopper need to
be able to flex and bend to achieve a
tight seal when the base is inserted
into the globe.
SUPPLIES
• day colors: FIMO Classic Champagne, flesh, tan,
metallic blue, FIMO Soft Brilliant Blue, metallic
green, FIMO Soft Lime Green, FIMO Soft
Tropical Green, transparent green, light yellow,
white, turquoise, pink, FIMO Soft Rose Quartz
• basic tools (page 9)
• 4" (10cm) snow globe
• shell
• black seed beads
• distilled water and glycerin
• coffee stir
94
SUMMER
Step 1. Base. To create the base, marble
together a %" (2.2cm) Champagne ball
and a %" (2.2cm) tan ball. Flatten the clay
into а 2'z£" (6.4cm) diameter circle. Make
sure that it fits on the gray stopper for the
snow globe. Pounce a toothbrush on the
base to create sand texture.
Step 2. Shell. Use a 2" (5cm) diameter
shell. Place a 1" (2.5cm) ball of
Champagne or light colored scrap clay on
the inside of the shell.
Place the shell, with the ball of clay under
it, on top of the sand base and press
down. This should press the clay ball into
the sand base.
Pull the narrow end of the cone over to the side and twist it a little.
Step 3. Lower Body. Make the mermaid’s lower body from mix-
ing a V (1.9cm) metallic blue ball with a V (1.9cm) metallic
green ball. Form the clay into a tapered cone shape.
95
SUMMER
Place the lower half of her body on the top of the shell. Arrange
the tip of the cone (her body) off to the side of the shell. Use the
handle of the wide stylus or another rounded, blunt-end tool to
make an indentation in the top of the cone. This is where the top
half of her body will be placed.
In the portion of her body shown, use the stylus or needle tool to
make a V shaped impression.
Step 4. Top Half of Body. Make the top of her body from a %"
(1.9cm) clay ball. Form it into a teardrop and then twist a small
portion down from the wide end to fit into the lower-half of her
body. Insert the wide end of the top half into the indentation in
the lower half.
Make а Ув" (,32cm) wide rope of transparent green clay. Wrap it
around her body where the upper and lower halves meet. Make
sure to re-create the V in the front.
96
SUMMER
Make a Vie" (,16cm) wide pink rope and wrap it around her body
'A" (,64cm) down from the top.
Make each shell from a Vie" (,48cm) pink ball. Flatten each one to
a 5/ie" (0.8cm) circle. Use the needle tool to make the shell inden-
tations on each. Place them next to each other on top of the pink
rope on her body.
Step 5. Arms and Hands.
Make each arm from a Tie"
(1.1cm) clay ball. Roll the ball
into a IK" (3.2cm) long log.
Flatten %" (,64cm) of the bot-
tom of the log for the hand.
Attach both arms to her body.
The top view of the log should
look like this.
97
SUMMER
Step 6. Head. Make her head from a %" (1.9cm) clay
ball. Attach her head to her body and add her face
and ears. Instead of making a smile, create a teardrop
opening for her mouth using the needle tool. Use a
small black holeless bead for each eye.
Step 7. Hair. Her hair is made from an п/1б" (1.7cm)
light yellow ball. Flatten it to Ye” (,32cm) thick and
form into an oval with a small indentation off to one
side. This will be the part in her bangs.
Place the hair piece on her head and form it to your
liking.
98
SUMMER
Arrange the fins in a pleasing fashion.
Step 8. Fins. Make each fin from a %"
(,95cm) transparent green ball. Shape each
ball into a flattened teardrop, Vie" to Ve"
(,16cm to ,32cm) thick, and create the
lines using the needle tool. Make two fins.
Attach the fins with the blending tool.
Press the underside of the wide end of the
fin to the edge of her body with the blend-
ing tool. Then bend the fin down to cover
where the underside is attached.
Step 9. Fish. Marble together a (1.3cm) turquoise ball and a
!4" (1.3cm) Brilliant Blue ball. An alternative is to use a leftover
piece from the Skinner Blend that was made to cover the base.
Roll the clay out and make a few folds in it.
Place the clay at the top center of the globe. Press this “wave”
onto the glass, forming it to the contours of the globe. Arrange it
the way you like.
99
SUMMER
Make the fish from a Vie" (1.1cm) Lime
Green ball. Roll into a teardrop.
Flatten all of the teardrop but the wide
end, which will become his head.
Roll his head forward to create definition
between his head and body. This picture is
a side view.
Place the fish leaning against the wave. His head will face the
front, and his body will be off to the side.
Make each of the top fins on the fish from a Vie" (,48cm) Tropical
Green and Lime Green marbled ball. Shape them the same way
that you made the mermaid’s fins. Attach them on either side of
his body with the blending tool.
100
SUMMER
Make each of the bottom fins from a %" (,64cm) Tropical Green
and Lime Green marbled ball. Shape and attach in the same way
as the mermaid’s fins.
His eyes are each a Ye" (,32cm) white ball. Attach
them to the top of his head. Press in a holeless black
bead for each eye.
Using the needle tool, create his smile and
add his tongue.
Make the cut straw tool from a small cof-
fee stir. Use a small pair of scissors or a
craft knife to cut away half of the straw
opening. This will create a U shape perfect
for making small scales.
Use the cut straw tool to make scales on
the fish’s body.
101
SUMMER
Step 10. Base Decoration. Make a Skinner Blend
from turquoise to Brilliant Blue clay. Run the sheet of
clay through the no. 5 setting on the pasta machine.
Cover the wooden base with a thin layer of glue and
let dry. Wrap the Skinner Blend around the wooden
base; do not trap any air bubbles. Bake it by itself.
Step 11. Coral. After the base has cooled, begin adding the coral pieces. 1
made the coral from flattened teardrops of Rose Quartz clay. After making the
teardrops, arrange them using the pictures as a guide. Once you decide
where you want to place them, lift each piece slightly and add a very small
dab of glue underneath.
To give the coral texture, use the wide end of the sty-
lus and make impressions all over the coral piece.
Step 12. Sand. Make the band of sand that goes along the bottom of the
base from a Vis" (4.8cm) wide and 131/" (34cm) long rope of marbled
Champagne and tan clay. Flatten the entire rope with your finger or a roller
until it is about %" wide (,64cm). Use an old toothbrush to make the sand
texture in the clay.
102
SUMMER
Add a dab of glue to the bottom edge. Begin wrapping the sand
edge along the bottom of the base. Add small amounts of glue as
you go along. With your finger or blending tool, blend the point
where the rope ends meet. Use the toothbrush again to go over
the blended seam.
Step 13. Fish. The fish are simple shapes with eyes and fins. Use
scrap pieces of bright, tropical colors to create the fish. Make
them flat, and use a dab of glue to secure them to the base. Make
the eyes and fins the same way as the mermaid’s, but smaller.
Step 14. Assemble. Bake the base, the mermaid on the shell and
the sand base. Once the clay pieces have cooled, glue the mer-
maid to the shell and the shell to the sand base. It is important to
use silicone glue if your globe will be filled with water. Make sure
to realign any impressions you may have made in the sand when
you pressed the shell into it in the beginning.
Next, after the shell and sand base have dried completely, glue
the bottom of the sand base to the rubber stopper. It is important
that the edges of the sand and the stopper are aligned. Glue the
fish to the top center of the glass globe. After the glue has dried
on all pieces, assemble the snow globe. If you wish to fill the
water globe, first insert the rubber stopper. Then pull back an
edge of the stopper and fill with a water and glycerin mixture.
Sprinkle in a little snow or glitter when the globe is half full and
then finish filling. Attach the globe to the base.
103
AUTUMN PAIGE
FRANKIE
CELESTE GOBBLES
NUTTY
104
autumn
Autumn to me is one of the most beautiful times of year. The con-
trast of the golden colors against a blue sky can make even the most
brisk days feel warm. I hope these projects can warm your heart as
you learn a few techniques such as making an ikat cane, making hair
and using colored powders with your clay.
105
AUTUMN
SUPPLIES
• clay colors: FIMO Classic
Golden Yellow, FIMO
Classic Ochre, orange,
red, tan, brown, white,
pink
• basic tools (page 9)
• cotton swab
• gold and copper Pearl Ex
Powders, from matte chalks to
metallic powders, can add visual
interest to a project. They can be
used as an accent or to cover some-
thing entirely. A few different types
of powders you can use include
• Pearl Ex
• eye shadow
• blush
• pastels
• chalks
I have also found a wealth of dif-
ferent powdered colors in makeup
departments. Eye shadows and
blush are available in matte or pearl
colors. Use brown eye shadow
around the edge of a faux cookie to
make it look more real.
The powders adhere best to raw
(unbaked) clay. They can be applied
with a fingertip, a small or large
brush, cotton swabs or makeup
sponges/applicators. It takes only a
sparse amount of powder to cover
or accent a piece. Be sure to tap any
excess powder off of the application
tool before applying. An easy way to
get only a little on your finger (or
applicator) is to slowly turn the con-
tainer upside down (with the cap
on), turn it back over, let it sit for
about thirty seconds to let the pow-
der settle and then open it. Next,
dab the applicator on the inside of
the top of the container. Tipping it
upside down allows a thin film to
stick to the top. A piece that powder
has been applied to should be sealed
with a matte or gloss sealer after it is
baked.
106
Use the needle tool to indent veins on each leaf.
AUTUMN
Step 1. Leaves. Marble together red, Golden Yellow and orange.
Marble together a separate piece of Golden Yellow and Ochre
clay. Flatten each marbled piece by putting it through the pasta
machine on the no. 2 setting. Fold it in half to create a double
thickness. Cut a leaf out of each of the marbled colors. Smooth
the edges of each leaf.
Step 2. Put Leaves Together. Join the
wide end of each leaf together overlapping
them a little. Slightly angle the orange leaf
Step 3. Acorn. Make the acorn from a %"
(2cm) tan ball. Lay the ball down on the
table and gently press the sides down to
Pick up the acorn and pinch the very tip
of one end.
down.
give it a flat back.
107
AUTUMN
Make the cap of the acorn from a !4"
(1.3cm) brown ball formed into a log. Use
the pattern on the handle of the needle
tool to impress the cap for texture. Roll it
back and forth until the top and sides are
covered.
Press the cap of the acorn onto the top of
the acorn. Use a pointed tool to make a
small indent in the top of the acorn cap
for the stem.
The stem is a Vie" (4.8cm) brown ball
formed into a teardrop. Put the small end
into the hole in the top of the acorn cap,
and bend the rest forward.
Gently press the acorn onto the leaves. Then add the face.
Use a tiny brush to apply gold powder to the yellow leaf edges
and copper powder to the the orange leaf edges to accent them.
108
Autumn Paige
AUTUMN
This cane creates zigzag patterns
that resemble the markings on a
striped cat and is referred to as an
Ikat cane. This cane was created and
developed by Donna Kato. It can be
used on more than just animals,
although it does add a great detail to
them. When you apply slices of this
cane to an animal figure, consider
the direction that the stripes would
naturally go. This will help to add
more character to your finished
piece. Also experiment with differ-
ent colors and combinations.
You can create the sweater
look by simply adding
any colored clay to
FIMO Soft Stone Jasper
clay. The tiny brown
fibers in stone effects
clay make it resemble a knit
material.
SUPPLIES
• day colors: red, yellow,
FIMO Classic Ochre,
FIMO Soft Stone Jasper,
orange, pink, white,
FIMO Classic Champagne
• basic tools (page 9)
• white or ivory wire
109
AUTUMN
Step 1. Ikat Cane. Create a checkerboard cane. To make a checkered pattern, run a 1"
(2.5cm) ball of Ochre through the pasta machine on the no. 1 setting. Fold it in half to
double its thickness. Make a few slices (refer to photo). Do the same with a 1" (2.5cm)
Champagne ball. Alternate the colors, making a block four slices across and three high.
This is what the checkerboard should look
like.
Hold the square at an angle so it looks like a diamond shape.
Flatten the points of the diamond toward the center. Run through
the pasta machine on the no. 1 setting.
Fold in half and run through the pasta machine again. Repeat this
three to four times. After the end has a good pattern, cut into
four pieces and stack them on top of each other. You need to cut
the end to see the pattern, which should be a zigzag pattern of
the two different colors.
Step 2. Cat's Body. Make the cat’s body
from a V (1.9cm) ochre and Champagne
marbled clay ball. Cover the bottom half
of her body with thin slices from the ikat
cane. Note the direction of the stripes. You
don’t need to cover the top; it will be cov-
ered by her sweater.
110
AUTUMN
Step 3. Hind Legs and Feet. For each
leg, roll a У" (1.3cm) Ochre and
Champagne marbled clay ball into а 1W
(3.2cm) log. The legs are a little thin
because you will be adding clay around
each leg. Cover with thin slices of the
cane. Make two hind legs.
Shape the foot by bending У" (1.3cm) of
the end of the log into an L shape.
Make the foot longer for the cat than you
would for a human, so that you can create
her paw. Pinch the top so that it is approx-
imately %" (1.6cm) from the top of her
foot to the bottom of her heel. The top
should be thinner than the bottom.
Use a scalpel or knife to make two cuts for
her toes. Hold the piece on your finger to
cut only if the blade that you are using is
very dull. If the blade is sharp, set the
piece on the edge of the table to cut it.
The toe in the middle should be a little
Roll the two side toe pieces down and
then roll the middle one down.
Cut the end of each leg at a 45“ angle and
attach them to the body.
larger than the two on either side.
111
AUTUMN
Step 4. Sweater. To make the sweater, roll a %" (1.6cm) ball of
mixed red and Jasper clay. Form it into a teardrop and then insert
a pointed tool into the wide end. Roll it back and forth until the
inside of the sweater is a hollow cone.
Place the sweater (cone) on the cat’s body Roll a, Vs" (3.2mm)
wide red rope and wrap it around the bottom edge of the sweater.
Use the thin needle tool to indent lines all the way around the
rope for the ribbing on the sweater.
Make each sleeve of the sweater from a %" (,95cm) red clay ball.
Form each ball into a log and make a small indent in the wide
end for her paw. Set aside.
112
AUTUMN
Step 5. Front Paws. Each front paw is a
%" (,64cm) ball covered with slices from
the cane. Flatten the ball and twist a small
piece of the clay down to be put in the
hole on the sleeve (refer to photo). Make
two cuts in the paw the same way as for
the feet.
Insert a paw into each sleeve, and attach
both arms to the body at the same time.
Arrange the arms so that she is leaning
back on one and has the other paw facing
up in the air.
Step 6. Head. To make her head, start
with a 5/e" (1.6cm) Champagne clay ball
and cover with cane slices. For her ears,
pinch a very small amount of clay on each
side of the top of the ball. Refer to picture.
Further define her ears by pinching in the opposite direction just
enough to point the ears.
Attach the head to her body and add her face. Position her head
so that she is looking at her raised paw. Add a small red bow in
front of her ear.
113
AUTUMN
Step 7. Tail. Make the cat’s tail from a '/2" (1.3cm) ball rolled into
a 2" (5cm) rope and cover it with the cane slices. Attach the tail
in the middle of her body under the sweater line.
Step 8. Finishing Touches. Add to her paw a simple leaf made
from marbling red, orange and yellow clay together.
Make her whiskers from wire cut into %"
(,95cm) long pieces and twisted together.
Push them into her head right next to her
smile.
114
Frankie
AUTUMN
Adding hair to a character can
be a lot of fun and really bring
out the personality of your creation.
When you sculpt a head, think
about how you want the hair to be.
I often have found that if the hair
does not look quite the way I
expected it to, it was because the
head was not the right shape.
Remember to leave enough of a
forehead for the character to accept
hair. Many materials can be used to
simulate hair. Here are just a few:
• yarn
• raffia
• ribbon
• mohair
• synthetic hair
• wigs
• human hair
• faux fur
• clay
• string
• embroidery floss
• strips of fabric
• silk flower petals
• paper twist
When you walk through a craft
store, begin to look in new ways at
the different materials you see.
SUPPLIES
• clay colors: green, purple,
brown, black, pink, white
• basic tools (page 9)
• black yarn
• two %" (,64cm) gold
screws
115
AUTUMN
Step 1. Legs. Make Frankie’s legs from an
п/1б" (1.8cm) brown clay ball shaped into
a cone and flattened slightly on the top
and back.
Use the needle tool to make a line from
the center of his pants down to create two
pant legs. Then create a small V indenta-
tion at the top of the pant line.
Step 2. Shoes. Make each shoe from a %"
(,95cm) black ball shaped into a teardrop.
Flatten half of the teardrop, from the mid-
dle to the tip, using your fingers. Attach
both feet to the bottom of his pants, with
the flattened half of the teardrop under his
pant legs.
Add a heel line to the bottom of each shoe
with the needle tool.
Step 3. Shirt. Make Frankie’s shirt from a
5/a" (1.6cm) purple ball shaped into a
cone. Insert the pointed tool into the wide
end of his shirt and create an opening for
the pants to go into.
Insert the tapered end of the pants into
the wide end of the shirt. Gently pinch the
top and back to secure the shirt to the
pants.
116
AUTUMN
Make each arm from a Vs" (,95cm) purple ball formed into a cone
shape. Attach both arms to the body at the same time.
Make each hand from a Vie" (0.8cm) ball of green clay. Attach
them beneath each sleeve.
Step 4. Head. Flatten the top of his shirt a little so that his head
has something more secure to rest on.
Shape his head from a 7s" (1.6cm) green ball and attach it to his
body, making sure that it overlaps onto his shirt.
117
AUTUMN
Add his face and apply blush to his cheeks.
Step 5. Finishing Touches. Twist V" (,64cm) screws into either
side of his head. He is ready to bake.
After he has baked and cooled, paint and
seal his eyes. For his hair, cut %" (2cm)
lengths of black yarn and glue them to the
back of his head. After the glue has dried,
trim the yarn so there is an even, straight
hairline across the top.
118
Celeste
AUTUMN
Many miniature accessories
found in craft and hobby
shops can be used with your charac-
ters. In fact, just looking at all of the
miniature pieces in a store can
inspire some great ideas for charac-
ters.
Most wood, glass and ceramic
items can be baked with the piece.
If you find a plastic item that you
really want to use, I suggest that you
form the piece around the object
and then pull the object out before
you bake the piece. After baking,
you can glue the item back into its
proper place.
Miniatures are a great way to
accessorize your character without
having to do all of the work, and
they add more detail to a piece.
SUPPLIES
• clay colors: black, flesh,
brown, gold, white, pink
• basic tools (page 9)
• miniature broom
119
AUTUMN
Step 1. Body. Make the body from a 1" (2.5cm) flesh clay ball.
Make each leg/foot from a %" (1.6cm) flesh clay ball.
Step 2. Gown. Run a black sheet of clay through the pasta
machine on the no. 4 setting. Cut a 3‘Z" (8.9cm) diameter circle
of clay and drape it over her body
Make each sleeve from a 5/e" (1.6cm) black ball. Form each sleeve
like the angel’s sleeves on page 43. Attach a hand to each sleeve
and put the sleeves on the body at the same time.
Step 3. Head and Hair. Make her head from a 3A" (2cm) flesh
clay ball.
Add her face and ears. For her hair, start with the bangs. Roll
a Vie" (,16cm) wide brown rope and cut into %" (,95cm) long
pieces. Attach them to her forehead.
120
Attach a pigtail to each side of her head.The back of her head
does not need hair because her hat will cover it.
AUTUMN
To make her pigtails, roll out a Vie" (.16cm) wide brown clay
rope. Cut 1" (2.5cm) long pieces. You will need about ten of
them for each side. Curl only the end of each piece. Arrange ten
pieces together for each side. Pinch them together enough to
secure them to each other, but don’t press them so hard that you
lose the detail.
Make her gold barrettes from a Vie" (,16cm) wide gold clay rope.
Wrap a small piece around each pigtail where it meets her head.
Step 4. Hat. Make the hat from а 13/1б" (2.1cm) black ball formed
into a cone. Use the pointed tool to make a hollow cone by
rolling the tool back and forth in the cone.
121
AUTUMN
When the brim of the hat is as wide as you want it, place the hat
on her head.
Arrange the top part of the hat. Add a gold buckle, and put a star
at the top.
Step 5. Broom. Add the miniature broom
to her hands. After you have figured out
just how you want the broom positioned,
add a dab of superglue to the underside of
her hands and place them on the broom.
122
Gobbles
AUTUMN
Several things can be created
with flat-backed shapes. We
have already discussed using them
in three-dimensional frames, but
you can also make magnets and
buttons. Think about adjusting
the size of the pins in this book to
make magnets and buttons.
Larger pieces may require two
magnets to hold them up.
There are at least four ways to
make buttons:
1. Glue a button shank to the
back of a flat shape.
2. Create two or more button-
holes that a needle can be
threaded through.
3. Glue a button cover on the
back of a baked piece.
4. Cover metal buttons with clay.
For inspiration for buttons,
look in sewing stores. As long as
your design is solid, put together
well and not too fragile, you can
machine wash them (as long as
you use FIMO or Premo Sculpey!).
Use cool/cold water and dry pieces
at a low to medium temperature
in the dryer. They should not be
dry-cleaned.
SUPPLIES
• clay colors: light brown,
brown, white, yellow, red
• basic tools (page 9)
123
AUTUMN
Trim the bottom of the turkey feathers to create a straight edge.
Step 1. Feathers. Start with а Vie" (1.1cm) brown
ball flattened on your work surface. Then make Ув"
(,32cm) wide ropes out of white, light brown and
brown clay. First wrap the white rope and the brown
flattened ball, arching it like a rainbow. Then add
light brown, brown and finish it with white.
Use the needle tool and pull a line through to the brown center.
Do this all the way around the feathers.
Add a line between your first lines, but start these at the light
brown rope. This helps to give the illusion of feathers.
124
AUTUMN
Step 2. Body. Make his body from a %"
(1.6cm) brown ball. Roll into a log shape
and then about (1.3cm) down from the
top, roll it between your fingers to create
the shape shown in the picture.
Lay the turkey down on the feathers and
gently press the sides of the turkey down
to adhere his body to the feathers.
Use the needle tool or a cut straw to make
crescent marks on his chest to simulate
feathers.
Make each wing from a Vi <>" (,48cm) brown ball shaped into a flat
teardrop. Attach to the sides of his body with the wide end of
each teardrop at the top.
Step 3. Face. Add his eyes. Make his beak from a Vie" (,48cm)
yellow ball formed into a triangle. Attach right below his eyes.
Make the red snood from a Vs" (.32cm) red ball shaped into a
very tapered teardrop and add it to the top of his beak. Place the
point in the middle of the beak and hang the rest over the side.
125
resources
Polymer Clay
AMACO
(American Art Clay Co., Inc.)
4717 W. Sixteenth St.
Indianapolis, IN 46222
(800) 374-1600
www.amaco.com
Wholesale supplier of FIMO Classic, FIMO
Soft, FIMO Glossy Lacquer and clay shapers.
Glass Attic (web site)
www. glassattic. com
This Web site is Diane Black’s encyclopedia of
information on polymer clay. The site contains
nearly 500 pages of information relating to all
aspects of polymer clay.
Polyform Products
1901 Estes Ave.
Elk Grove Village, IL 60007
(847) 427-0020
www.sculpey.com
Manufacturers of PREMO! Sculpey, Super
Sculpey, Sculpey III and Flex molds.
Prairie Craft Company
RO. Box 209
Florissant, CO 80816-0209
(800) 779-0615
www.prairiecraft.com
A source for PREMO! Sculpey, Super Sculpey,
Sculpey III, Liquid Sculpey, Elasticlay, FIMO
Classic and FIMO Soft. Also books, videos,
tools and tips for the polymer clay artist.
Timothy and Stacey Morgan
RO. Box 162
Owego, NY 13827
(607) 659-7755
E-mail: tmorganl@twcny.rr.com
www.StaceyMorgan.com
A source for most of the items used in this
book: clay sets for the different projects, tools,
snow globes, pattern packets for clay, 3-D
memory frames, molds. Also a limited num-
ber of finished pieces created by Stacey
Morgan.
Wee Folk Creations
18476 Natchez Ave.
Prior Lake, MN 55372
www.weefolk.com
A source for PREMO! Sculpey, Super Sculpey,
Sculpey III, Elasticlay, Cernit, FIMO Classic
and FIMO Soft. Also books, videos, tools,
metallic powders and a list of classes taught
by Maureen Carlson.
General Supplies
Kitchen Collectibles
8901 J Street, Suite 2
Omaha, NE 68127-2436
(888) 593-2436
E-mail: info@kitchengifts.com
www.kitchengifts.com
A source for over 1,200 copper cookie cutters;
also makes custom cookie cutters
Memories Kept
26 Perry Rd.
Richford, NY 13835
(607) 657-8392
3-D memory frames
National Artcraft
7996 Darrow Rd.
Twinsburg, OH 44087
(888) 937-2723
E-mail: nationalartcraft@worldnet.att.com.
www. nationalartcraft. com
Snow globes, clock movements, music move-
ments, doll-making supplies, ceramic supplies,
craft supplies, display stands and electric
supplies.
Sweet Celebrations
P.O. Box 39426
Edina, MN 55439-6722
(800) 328-6722
E-mail: sweetcel@maidofscandinavia.com
www.sweetc.com
Source for cookie cutters and other baking
tools that work great with clay.
WDP Studio
1757 Killarney Drive
Holt, MI 48842
(517) 699-7788
E-mail: wdpstudio@dellnet.com
http://wdpstudio.safeshopper.com
Carries holeless beads, polymer clay tools,
glitter, mica powder and flakes, Artistic Wire
and many inclusions for polymer clay.
126
index
A G О
Accessories, miniature, 119 Glues, 8-9 Ornament, making, 29
Armatures, 51 E-6000 glue, 8 Oven, 9
Arms, creating, 17 Autumn projects, 104-125 Goop, 8 hot glue, 9 P
В silicone glue, 8 Sobo glue, 8 Paint, 9 Pasta machines, 9
Baking, clay, 12 Superglue, 8 Pearl Ex, 106
Baking sheet, 9 Goop glue, 8 Pin backs, 9
Baking surfaces, 12 Gun, clay, 11 Powders, metallic, 106
Blades, 8 Blush makeup, 9 Brush, 9 H Hair, 115 PREMO! Sculpey clay, 8 R
Buttons, making, 123 Hands, creating, 17 Resources, 126
C Canes, 67, 78, 92, 109 Heads, creating, 13-15 Heart paint stick, 27 Hot glue, 9 Ruler, 9 S
Clay, 8 baking, 12 I Sculpey III clay, 8 Sealers, 12
conditioning the clay, 10 Ikat cane, 109 Silicone glue, 8
FIMO Classic, 8 Inclusions, 56 Skinner Blend, 19
FIMO Soft, 8 Introduction, 7 Sobo glue, 8
measuring, 11 metallic, 90 К Spring projects, 46-75 Snow globes, 94
PREMO! Sculpey, 8 Kemper cutters, 48 Snowflake pattern, 28
Sculpey 111, 8 Knives, 8 Storage, clay, 11
storage, 11 transparent, 56, 92 L Stylus, 9 Styrofoam, using, 30
Clay gun, 11 Lacquer, 9 Summer projects, 76-103
Conditioning the clay, 10 Leaf canes, 67, 78 Superglue, 8
Cookie cutters, 48 Cutting tools, 8 Legs, creating, 18 Liquid Sculpey, 61 T
E M Templates, 92 Three-dimensional frames, 83
E-6000 glue, 8 Magnets, making, 123 Three-point needle tool, 27
Eyes, creating, 16 Makeup, 106 Toothpicks, 9
Eyeshadow, 106 Measuring, clay, 11 Transparent clays, 56, 92
F Metal leaf, 92 Metallic clay, 90 W
Fabric, using with clay, 70 Metallic powders, 106 Washing your hands, 12, 25, 45
Faces, creating, 13-16 Millefiori, 66 Winter projects, 20-45
Feet, creating, 18 Miniature accessories, 119 Wire, 9
FIMO Classic clay, 8 Mokume Gane, 36 Wire cutters, 9
FIMO Soft clay, 8 Foil, 9 N Needle tool, 9 NuBlade, 8 Work surface, 9
127
Don't miss these other polymer clay project books!
Make colorful and imaginative
animal characters! You'll shape
everything from rabbits and
bears to kangaroos and more—
each one with a personality and
humor all its own. Includes 14
"animal-at-work" step-by-step
projects.
1-58180-041-X, paperback, 128
pages
Create delightful, exquisitely detailed
animal sculptures in polymer clay!
Inside you'll find step-by-step instruc-
tions for 10 charming projects,
including a sweet little bluebird, a
white-tailed fawn and more! You'll
even model animals to look like
bronze or jade.
0-89134-955-3, paperback, 128 pages
Polymer clay expert Maureen Carlson
provides you with friendly, basic guid-
ance for making the challenge of sculpt-
ing likenesses of "real people" both easy
and enjoyable. Includes all the tech-
niques you need!
0-89134-927-8, paperback, 128 pages
POLYMER
With a little imagination, you'll
learn how to bring a whole world
of cheery characters to life! Full-
color step-by-step photos show
you how to make every detail
just right, from hair to facial
expressions to feet. 21 great
projects in all!
0-89134-721-6, paperback, 128
pages
TECHNie.UES
All the techniques you need to create
hundreds of polymer clay projects,
including buttons, beads, jewelry, fig-
urines, boxes, mosaics and frames! Learn
how to create marbling effects, simulate
textures, create faux stones and more.
It's all here!
. CM, 60 ШМК»* I» ,aWMU8 °''eM'aY
1-58180-008-8, paperback, 128 pages
CRAFTS/HOBBIES
Delight your friends and family
with charming gifts year round!
Whether you’re a master at crafting
with polymer clay or just a begin-
ner, you’ll find all the fun you can han-
dle inside—21 adorable projects that
perfectly capture the spirit of the seasons.
Each one is wonderfully easy to make—
even for kids—and simple enough to be
completed in a single sitting.
You’ll find something for every friend
and every season, from jolly leprechauns
and Easter eggs to spooky witches and
Thanksgiving turkeys—even a polar
bear on skis! You’ll also find guidelines
for turning your creations into magnets,
buttons and pins.
The gifts you make are sure to bring
smiles all around—so grab your clay and
get started. There are holidays, birthdays
“Ray”
(For the complete demonstration,
see pages 94-95)
Place imitation gold leaf on the sheet of clay
and tightly roll together.
Make steep slices from the cane, as thin as pos-
sible.
and more just around the corner!
Don't miss these other great polymer clay project books!
I POLYMER
CLAY
TECHNIQUES