/


Tags: needlework embroidery
ISBN: 0-942237-66-8


Text
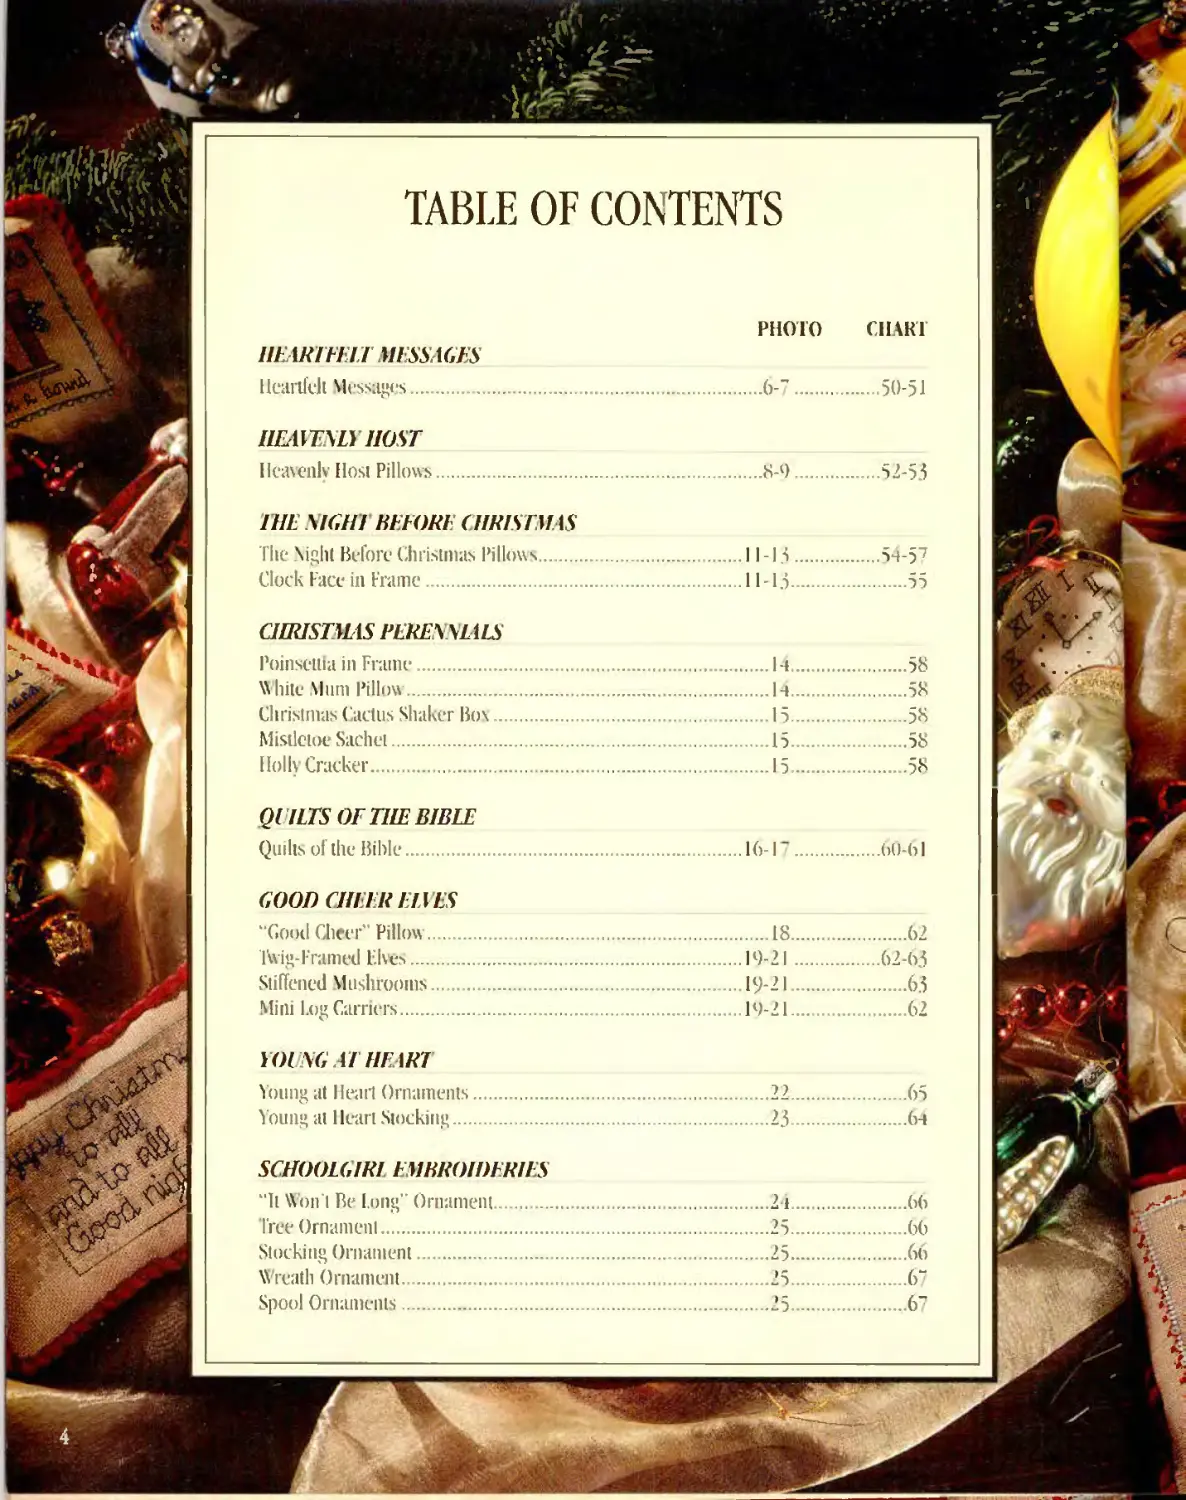
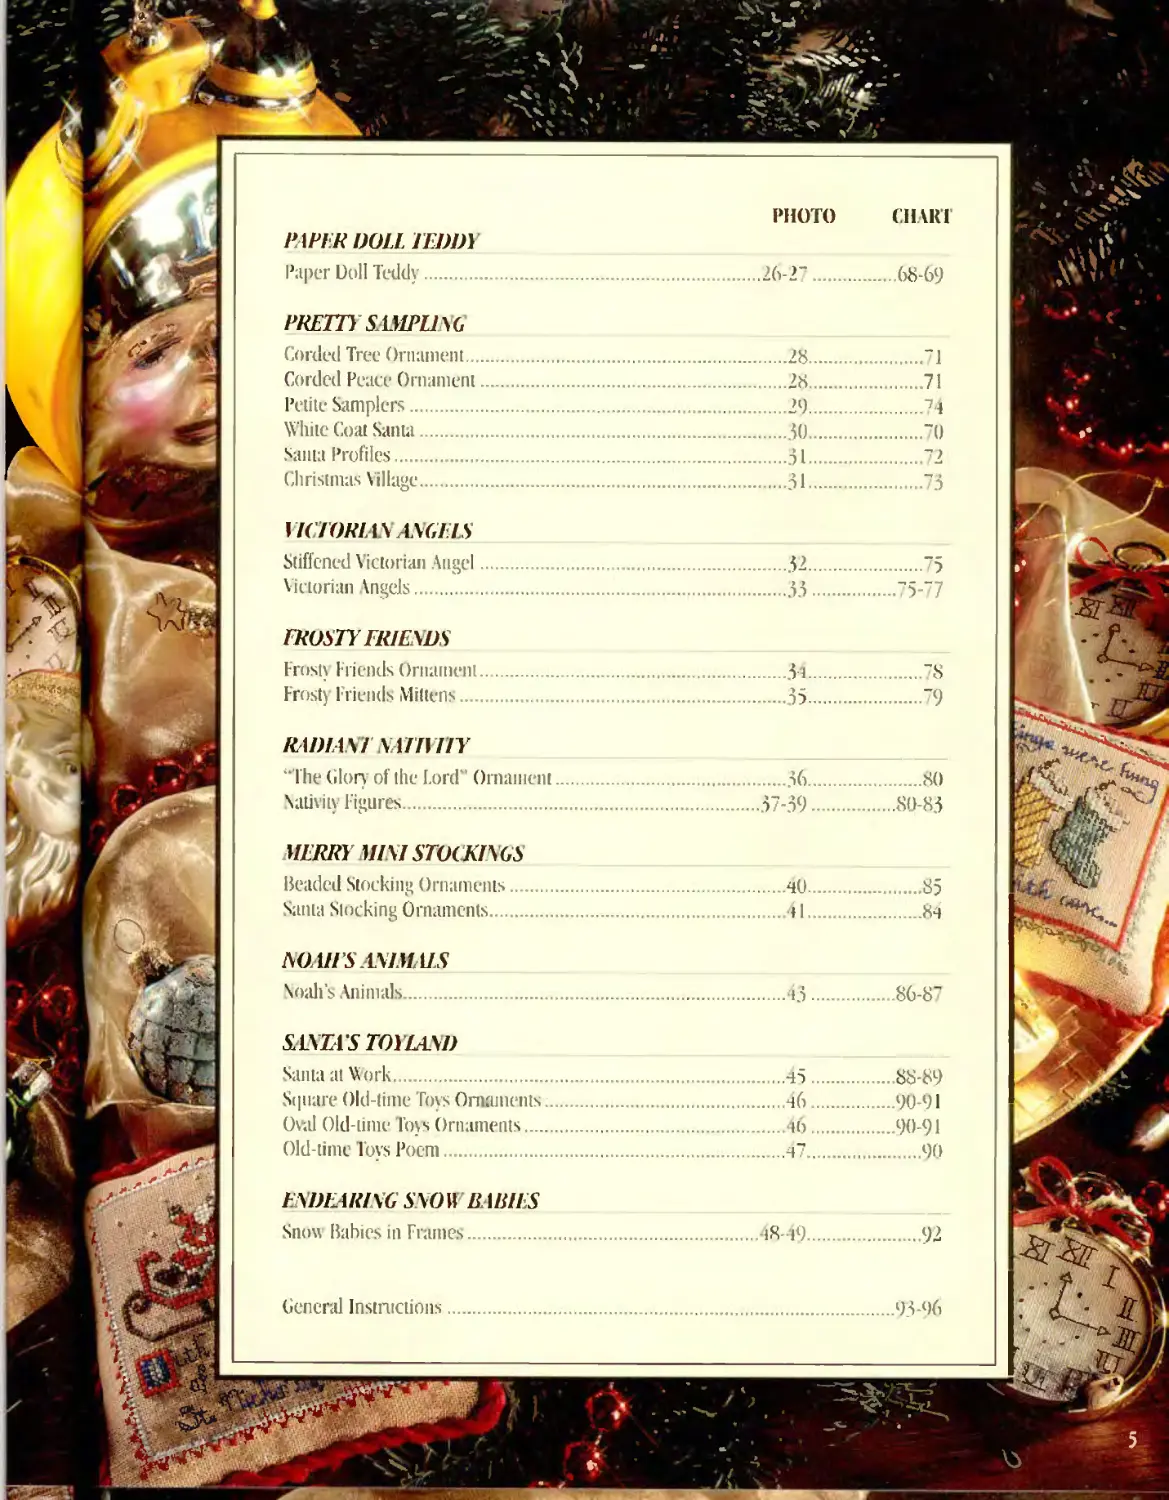
TABLE OF CONTENTS
YOl VG',47 HEART
Young at Heart Ornaments
Young at Heart Stocking...
GOOD CHEER ELVES
"Good Cheer' Pillow. . .
Twig-Framed Elves.......
Stiffened Mushrooms....
Mini Log Can lts........
CHRISTMAS PERENNIALS
Poinsettia in Frame........
W hile Mum Pillow ........
Chustmas Cactus Shaker Box .
Mistletoe Sachet...........
Ilolh Cracker..............
PHOTO CHART
QVILTS OF THE BIBLE
Quills of the Bible...
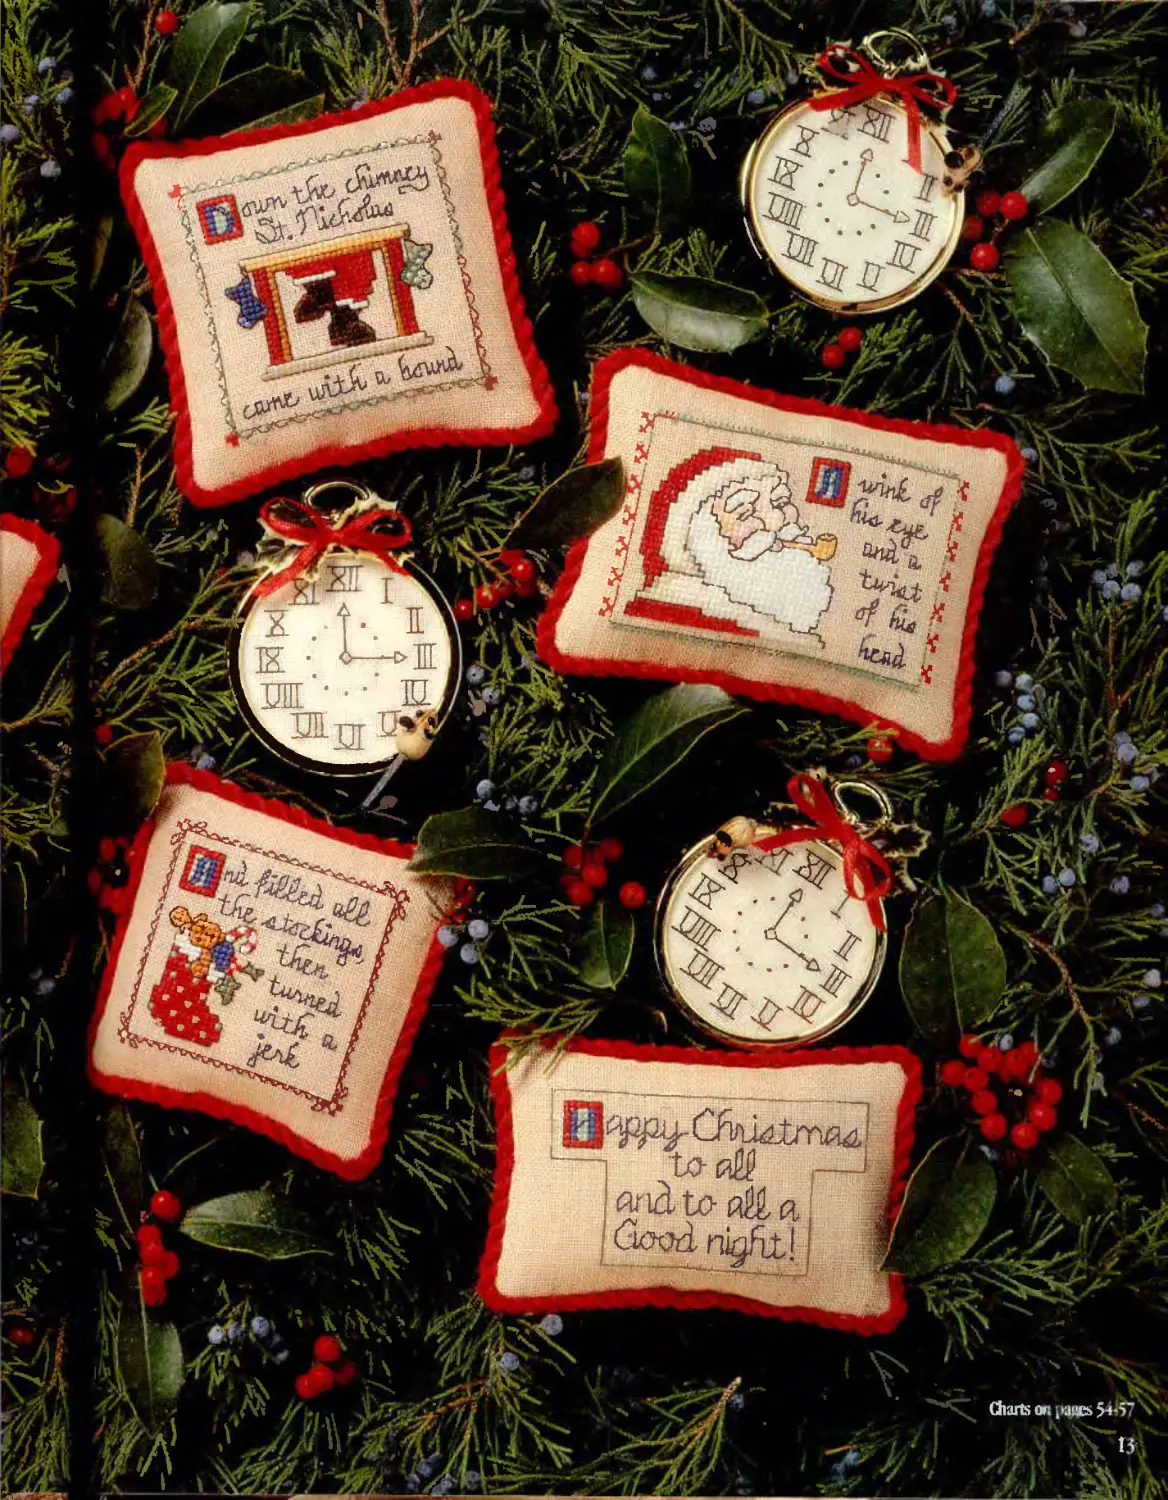
THE NIGHT BEFORE CHRISTMAS
The Sight Before Christmas Pillows.
Clock Face in Frame............
SCHOOLGIRL EMBROIDERIES
"It Won't Be Long" Ornament .
Tree Ornament...............
Stocking Ornament............
W reath Ornament......
Spool Ornaments.............
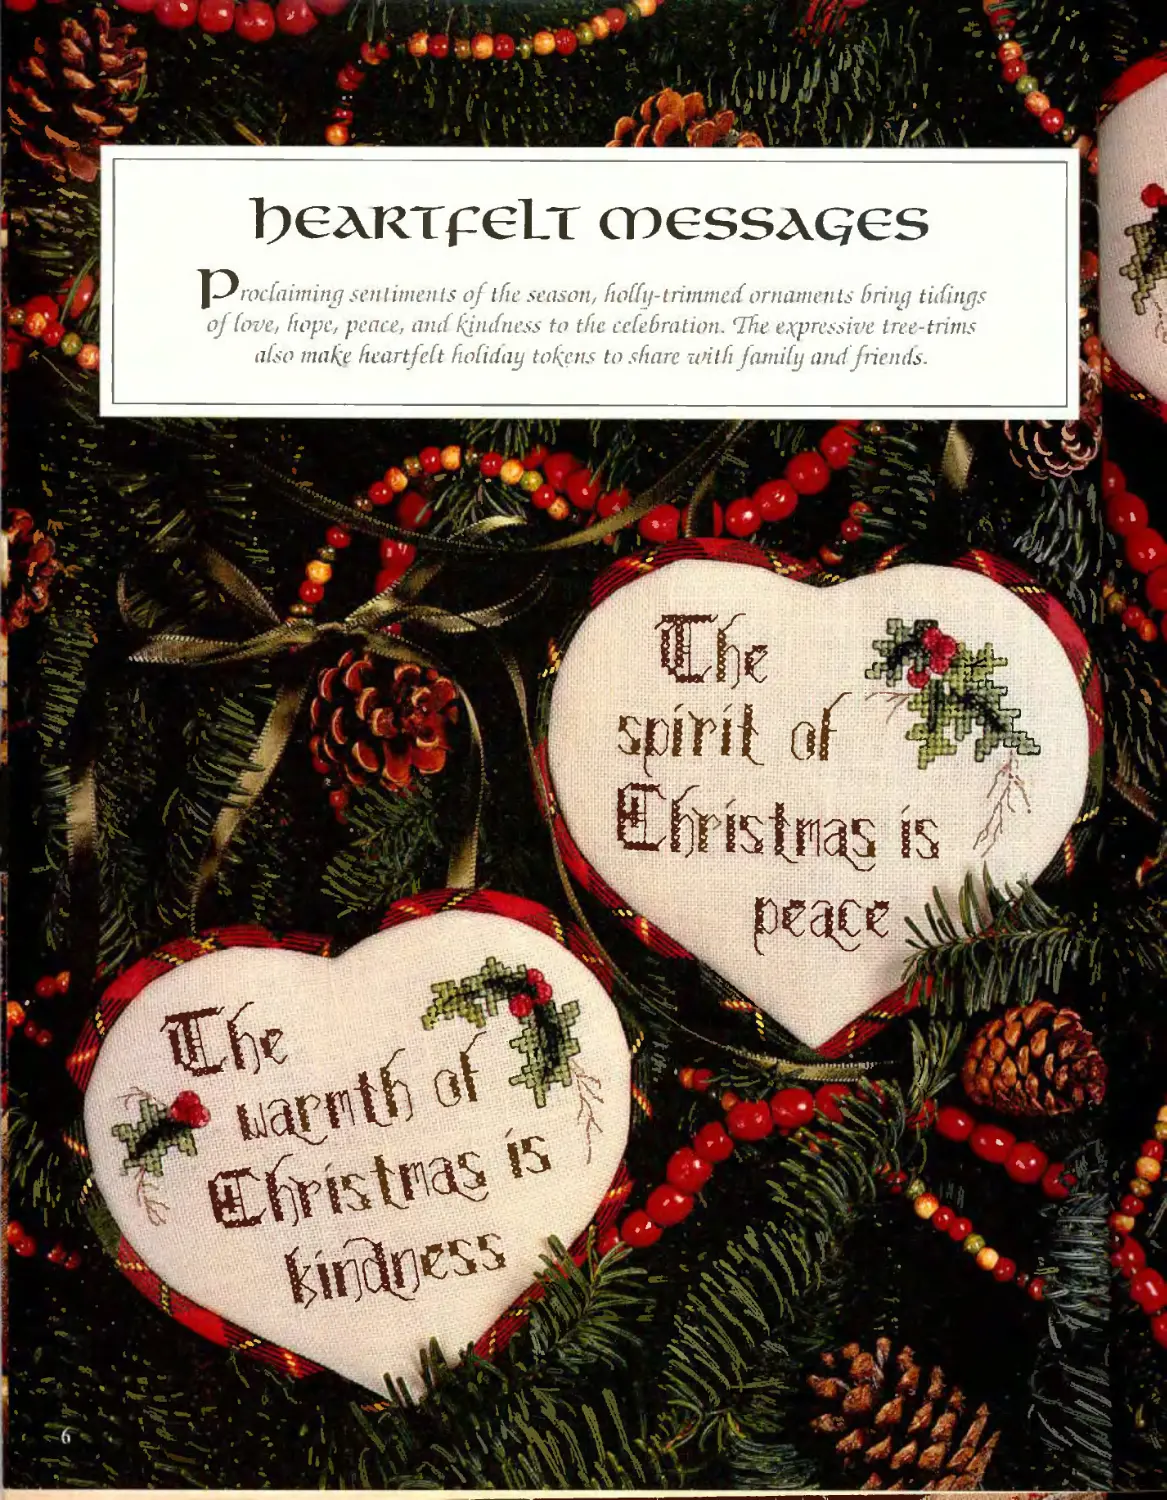
HEARTFELT MESSAGES
Heartfelt Mvssag< s.
HEAVENLY HOST
Heavenlv Host Pillow
PAPER DOLL TEDDY
Paper Doll Teddy.
PHOTO CHARI
26-2".......68-69
PRETTY SAMPLING
Corded Tree Ornament..
Corded Peace Ornament
Petite Samplers....
White Coat Santa.....
sain t Profiles......
Christmas Village..
28 71
28 71
29 74
30 70
31 ...72
VICTORIAS AYGILS
Stiffened Victorian Angel
Victorian Angels....
32............75
33........ 75-77
FROSTY FRIENDS
Frosh Friends Ornament
Frost) I riends Mittens..
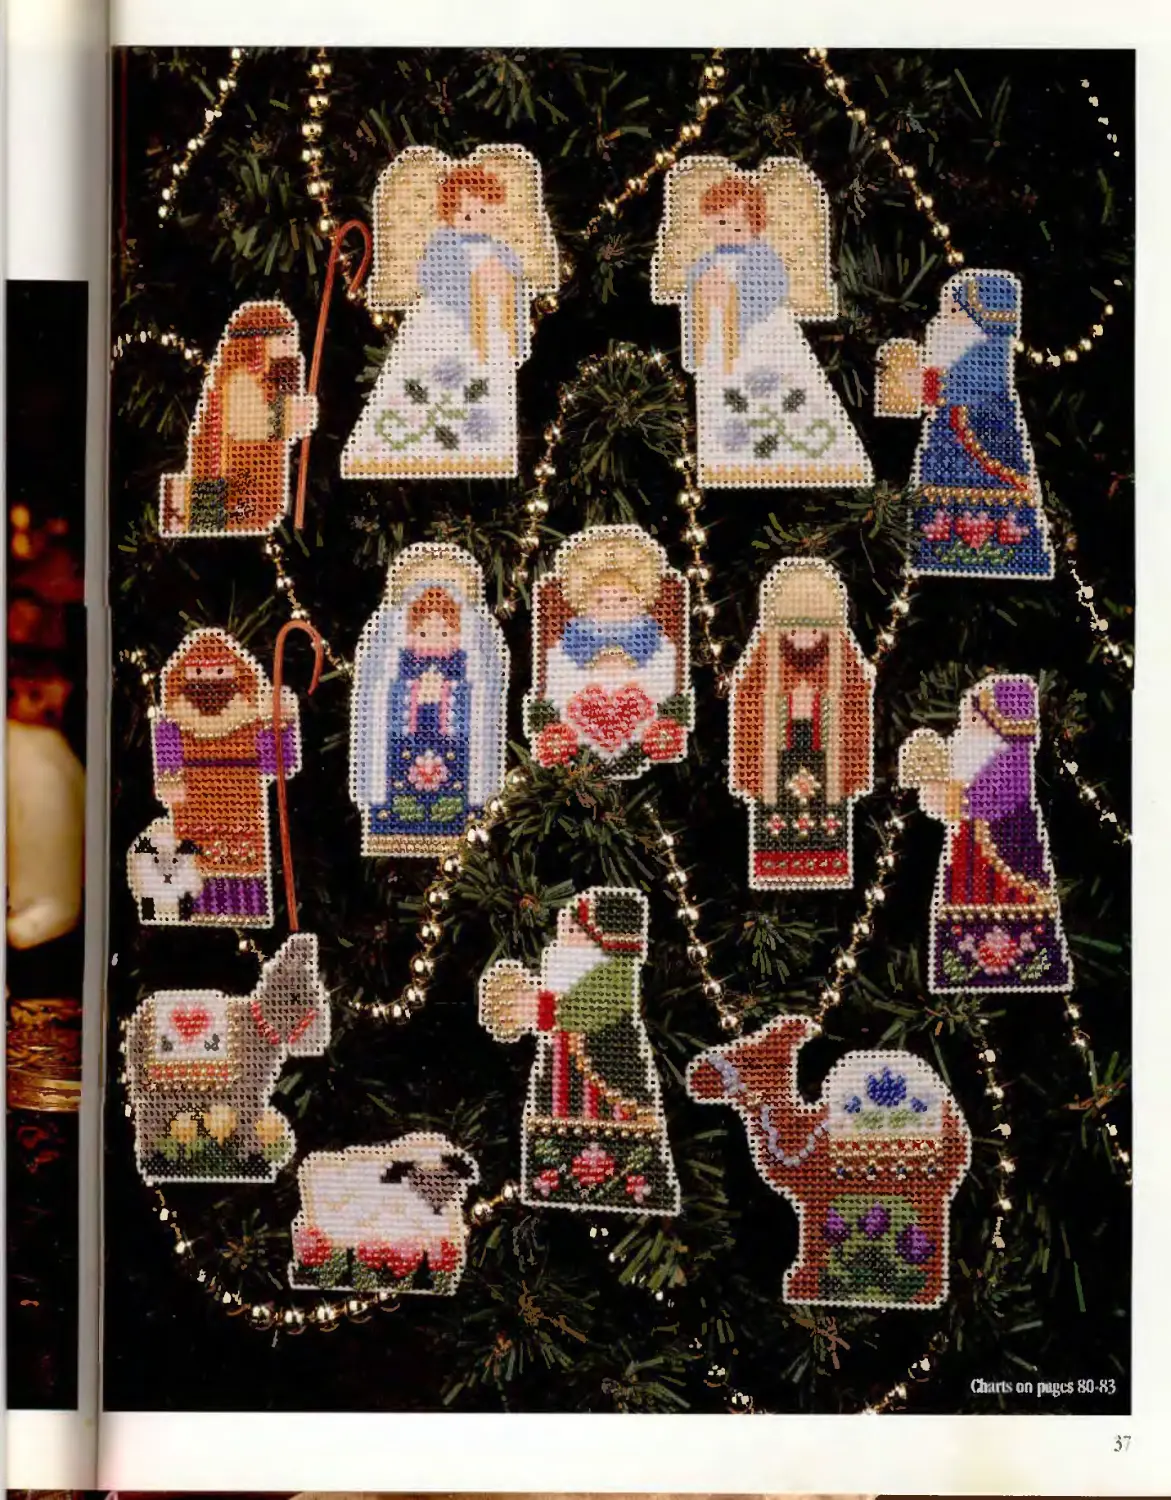
RADIANT NATIVITY
“The Glory of the Lord Ornament
Nativity Figures.............
...36.
57-39
. ...80
.80-83
MERRY MLM STOCKINGS
Beaded Stocking Ornaments....
Santa Slocking Ornaments.
NOAH S ANIMALS
Xoah’s Animals.
40........... 85
.41............84
.43..........86-87
SLVZIS TOY LAM)
Sama at Work.............
Square Old-time Toys Ornaments
Oval Old-time Toys Ornaments....
Old-time Toys Poem........
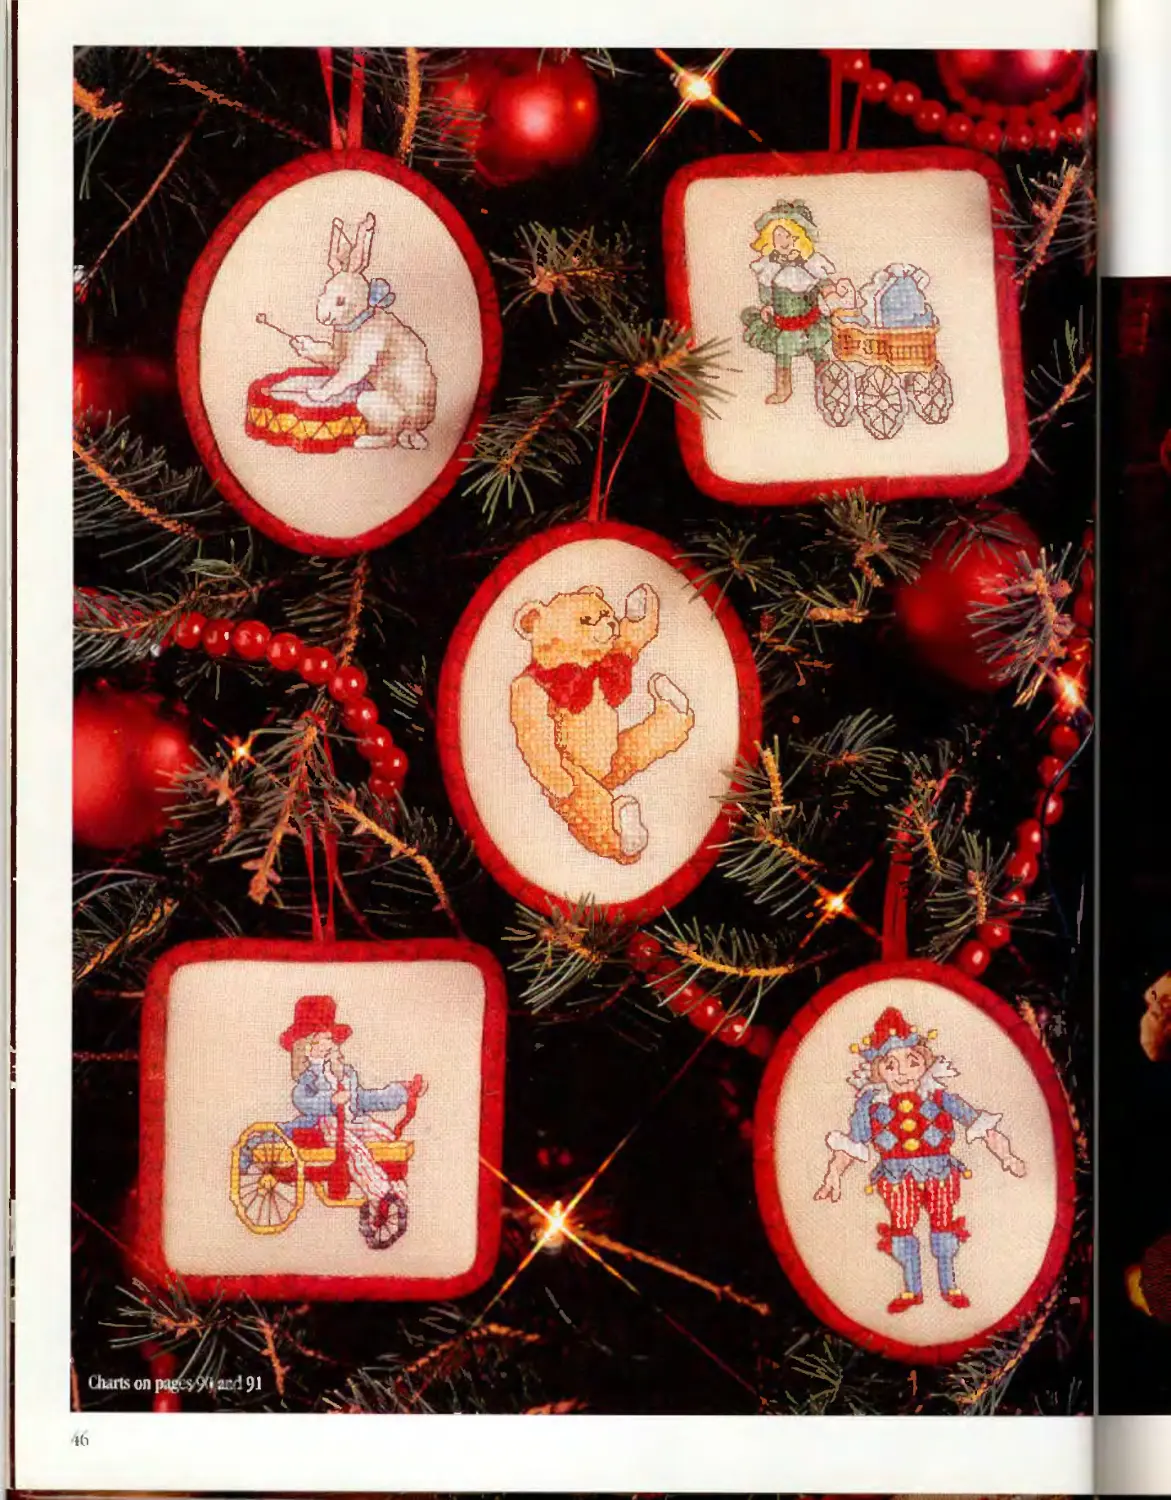
.45 ....... 88-89
.46.........90-91
.46.........90-91
.47.............90
ENDEARING A VOWBABIES
Snow Babies m frames ..
48 49
General Instructions
93-96
• т
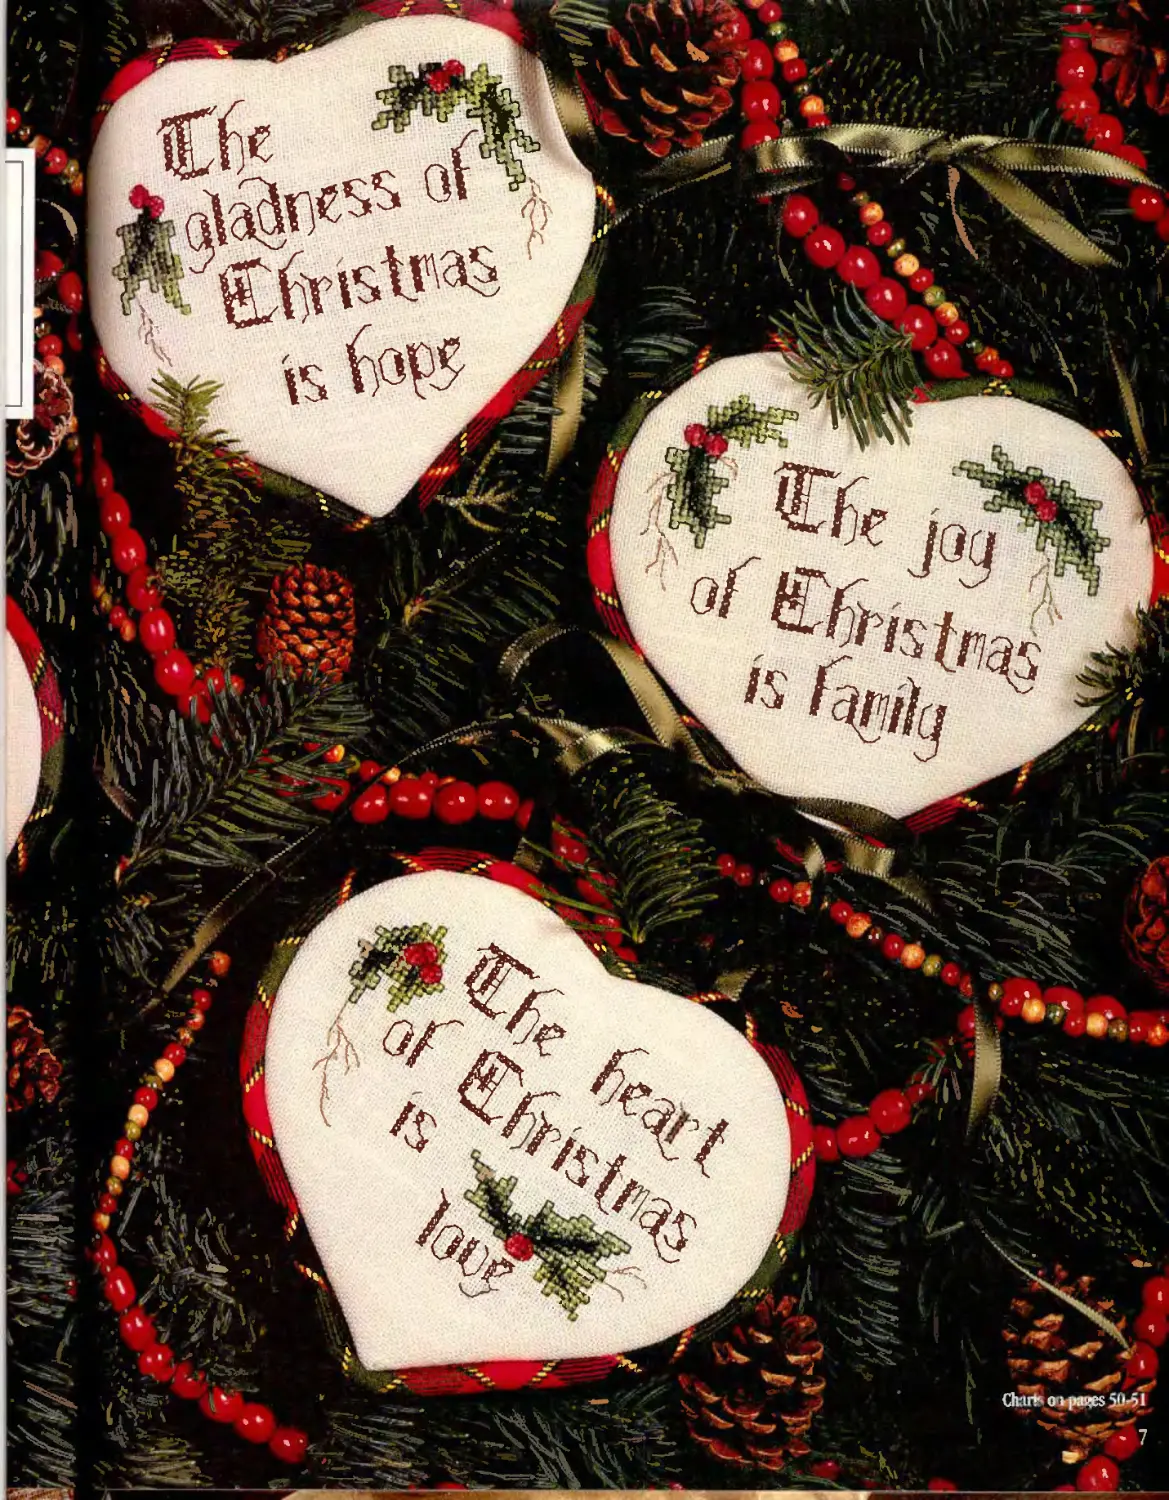
rodaiming sentiments о] t fie season, fudfij- trimmed ornament* bring tiding,
ove, hope, pence, andfondness to the cefe.6rat.ion. (The expressive tree-trims
also mafe fieartfeft hofiday tokens to share until famdy and tends.
Char* Oipazes 5B-51
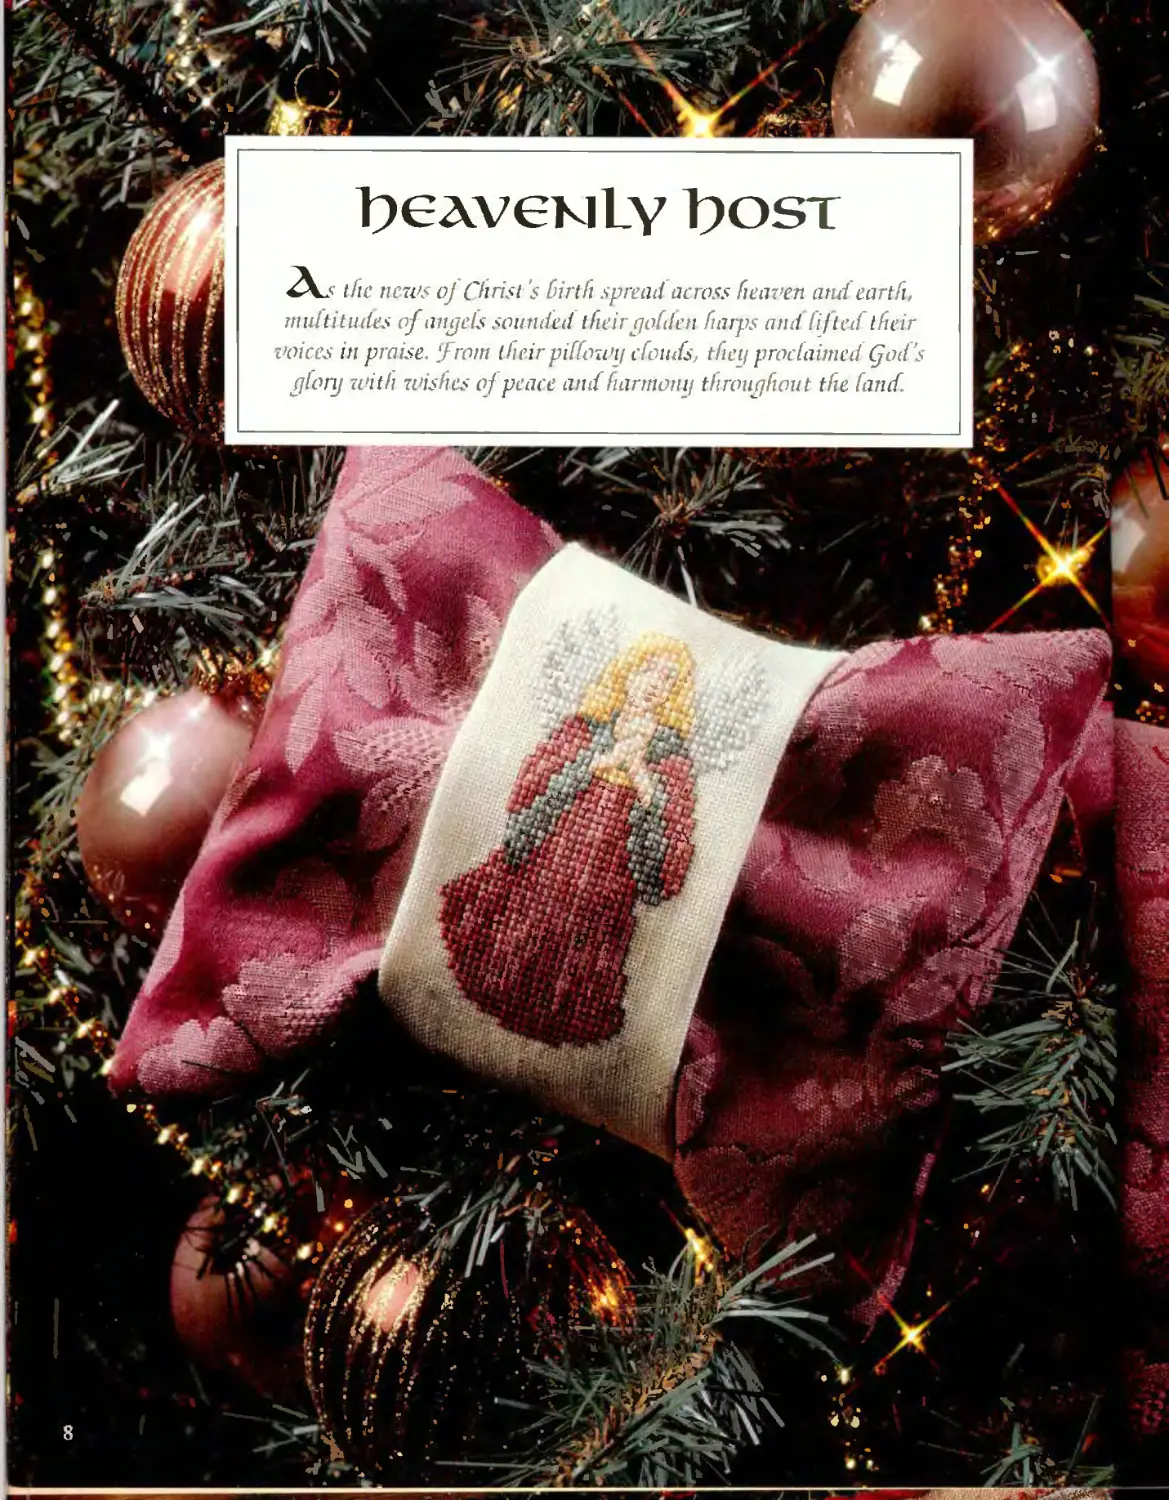
1)сл\ем1у t>osT
<
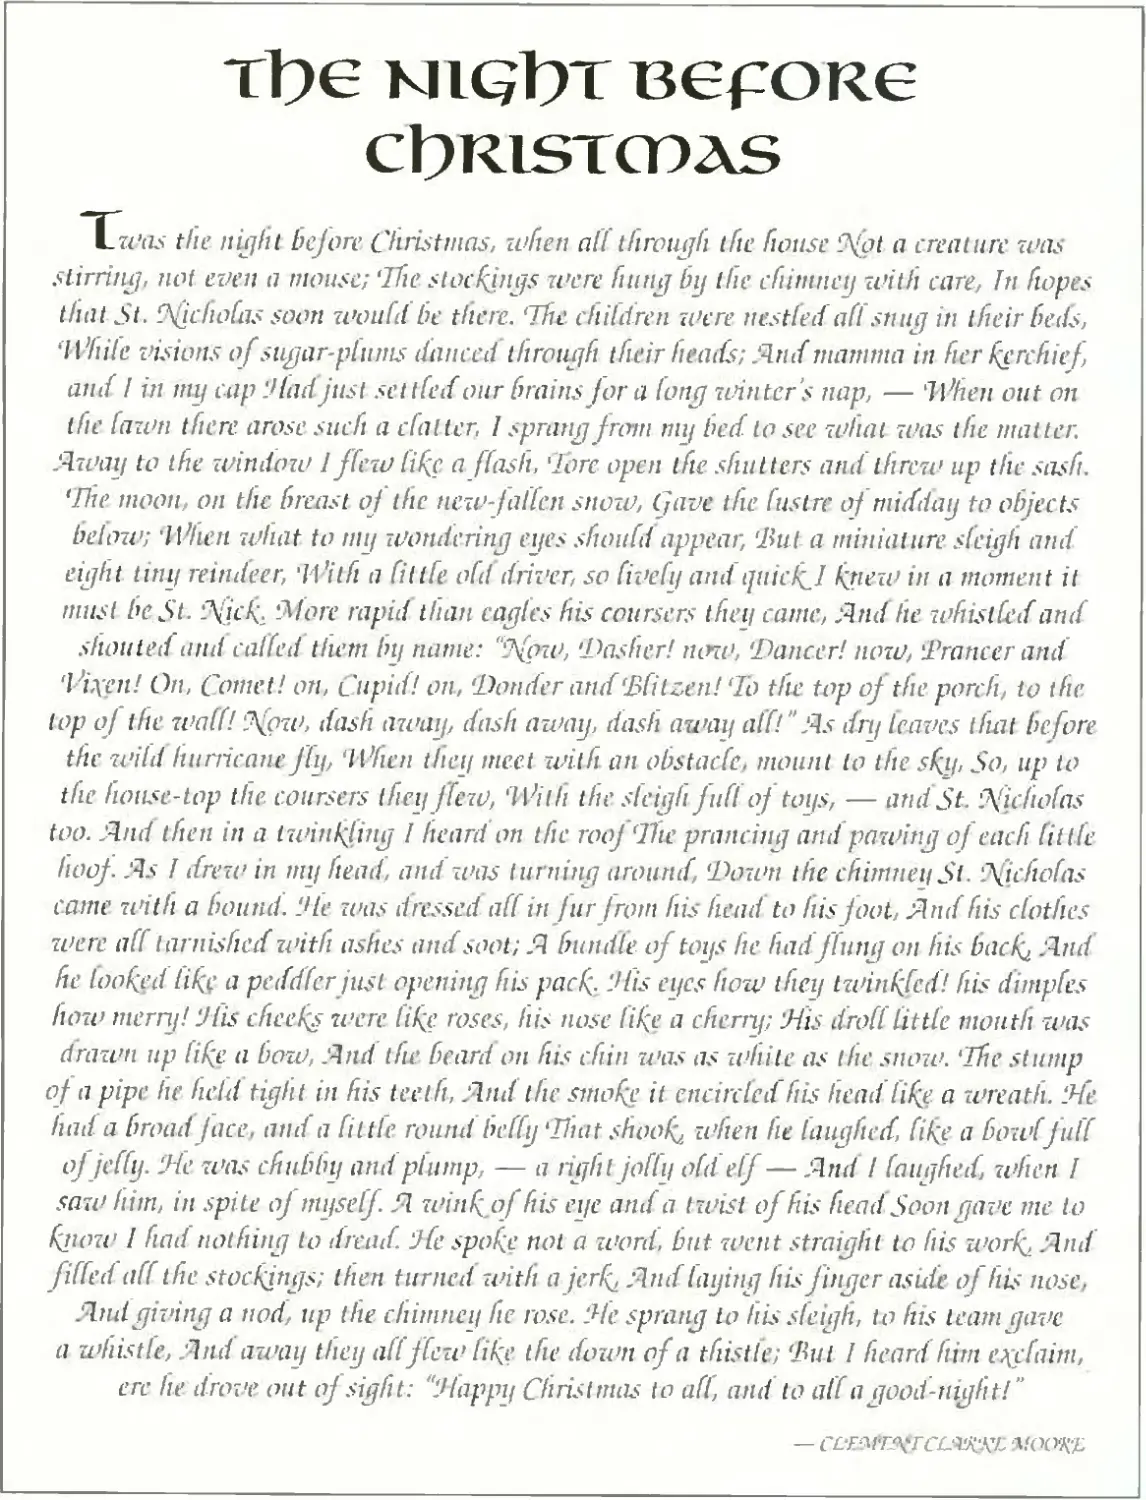
I l)c Kiiс;I и вероие
Cl?RLSTCDAS
Lzz’(/5 the night. before. Christmas, when all through the fiquse ‘Jfpt a creature was
stirring, not even a mouse; ‘The. stockings were hung by the chimney with care, hi hopes
that St. ffic/iofas soon would be there. ‘The children were nestled afl snug in their beds,
‘H’/iile visions of sugar-plums danced through their heads; Andmamma in her kerchief,
and I in my cap Siad just sett fedour brains for a long -winter’s nap, — 1 Then out on
the fawn there arose such a clatter, I sprang from my bed. to see what was the matter.
Away to the zvindow I flew life a flash, Tore open the shutters and threw up the sash.
The moon, on the breast of the new-faffc.n snow, (fave the lustre of midday to objects
below; ll-hen what to my wondering eyes shoufd appear, ‘But a miniature sleigh and
eight tiny reindeer, D’ith a fit the. ofd driver, so fivefy and yuidfl fne.w in a moment it
must be St. ‘Tficf. ‘More rapid than eagles his coursers they came, And he whistled and
shouted and cal fed them by name: "ffow, ‘Dasher! now, ‘Dancer! now, ‘.Prancer and
Di^en! On, Comet! on, Cupid! on, Dander and‘Bfilzen! ‘To the top of the porch, to the
top of the waif! f-jgw, dash away, dash away, dash away aff! As dry leaves that before
the wild hurricanefly, 'll icn they meet with an obstacfe. mount to the sfy, So, up to
t ie house-top the coursers they ffew, 'U-ilh the sleigh jufl of toys, — and St. 'Sfichofas
too. And then in a twinkling I heard on the roof The prancing and pawing of each little
hoof. As I drew in my head, and was turning around, ‘Down the chimney St. Tfic/iofas
came with a bound, ‘die was dressed afl in fur from his head to his foot, And his clothes
were afl tarnis ied with ashes and soot; A bundle of toys he had flung on his bacf And
he loafed lif? a peddferjust opening his pacf. dlis eyes how they twinffed! his dimpfes
how merry! !riis cheeks were life roses, his nose life a cherry; 'Jlis draft little mouth was
drawn up life a bow, And the beard on his chin was as while as the snow. ‘The stump
of a pipe he held tight in his teeth, And t ie smoke it encircled his head life, a wreath. ‘Tie
had. a broad face, and a Tittle round be.ffy That. shook when lie laughed, fife. a bowf Juff
of jeffy. ‘Ле was chubby and plump, — a right jofly ofd elf — And I faughed, when I
saw him, in spite oj myself. A win fof his eye and a twist of his head Soon gave me to
know I had nothing to dread. The spoke not a word, but went straight to his work. And
fiffed aff the stockings; then turned with a jerk And laying his finger aside of his nose,
Atul giving a nod, up the chimney he rose. Tie. sprang to ltd sleigh, to his team gave
a whistle, And away they afl ffew life the down of a thistle; ‘But I heard him e\cfaim,
ere he drove out oj sight: Dlappy Christmas to afl, and to aff a good-night!"
— ссг^1т:\'ГС£-‘^:кг мот
I. he tale of Santa’s mayicaljourney is immortalized in
the classic рЛт penned by Clement Clarke ^foo^e.
Illustrated with whimsical scenes, these tiiheless verses
will raise Hopes that St. \nlis.', ri-will^appe^r
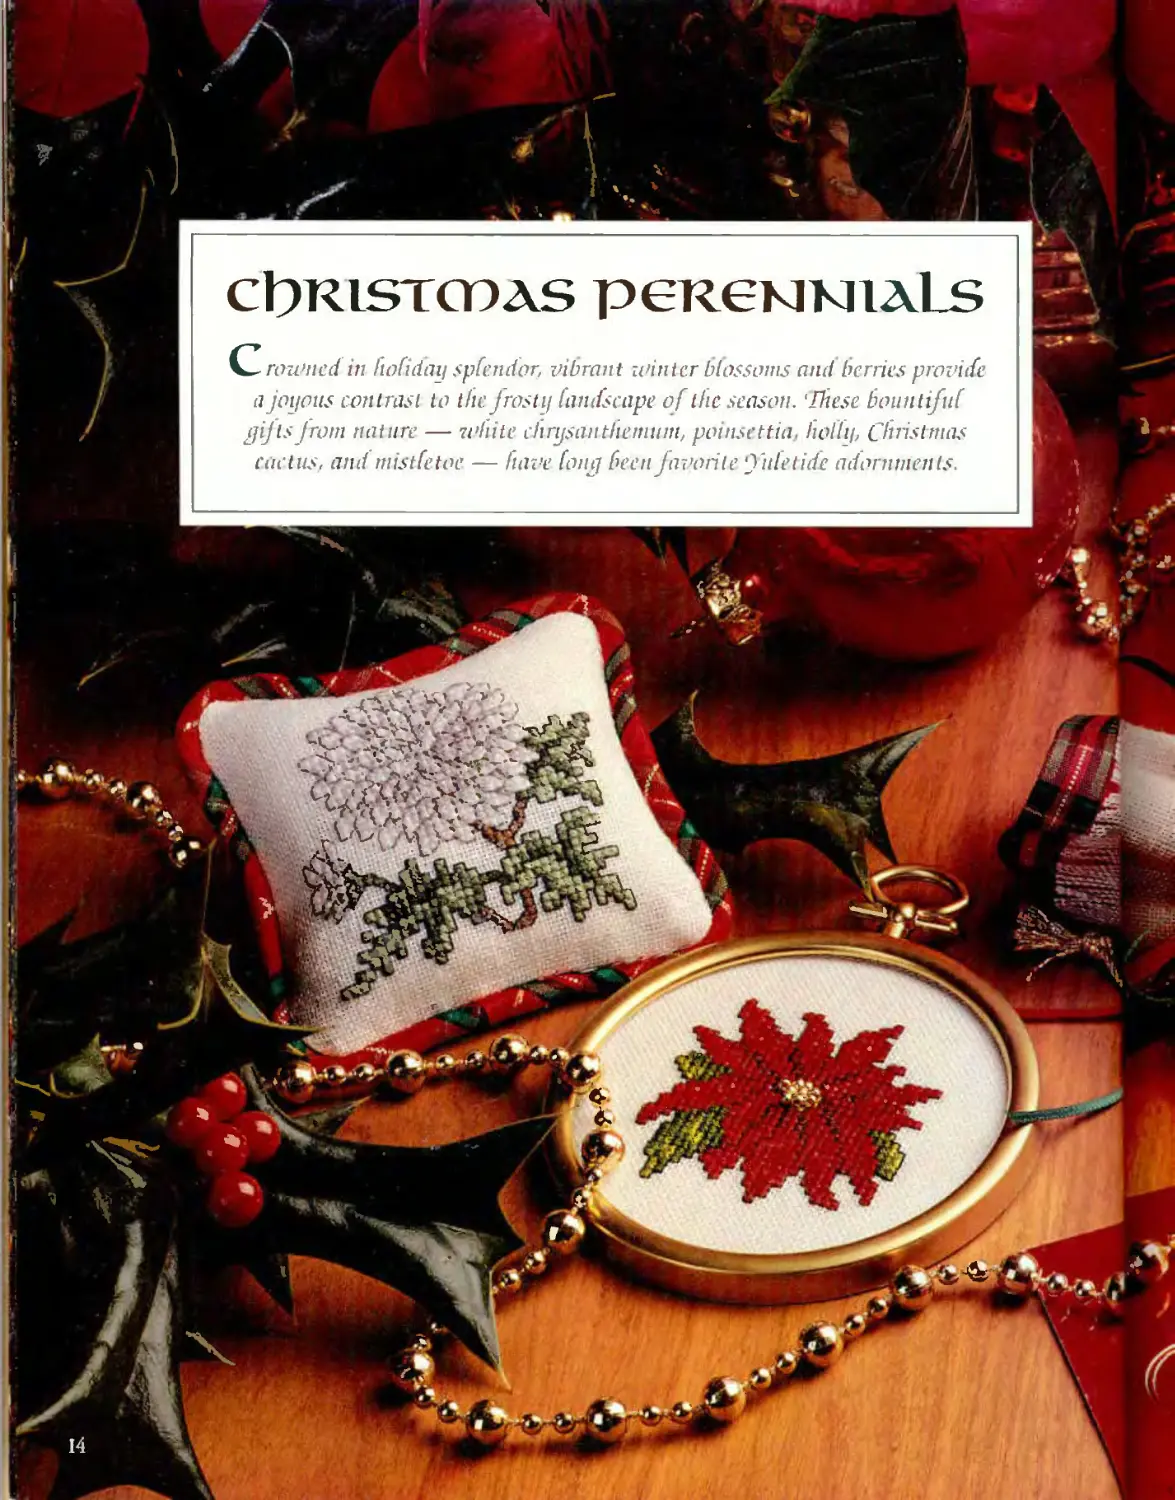
CpRlSTCPAS PCKCMKIIAI S
^rou ned in holiday sj. cndor, vibrant tinnier blossoms and berries provu
a joyous contrast to the jrosty fandscape. of the season. ‘These bountifuf
gifts from nature — white chrysanthemum, poinsettia, holly, CJp'istmas
cactus, and mist/itoe — have (ong beenfavorite ‘Уик tide adornments.
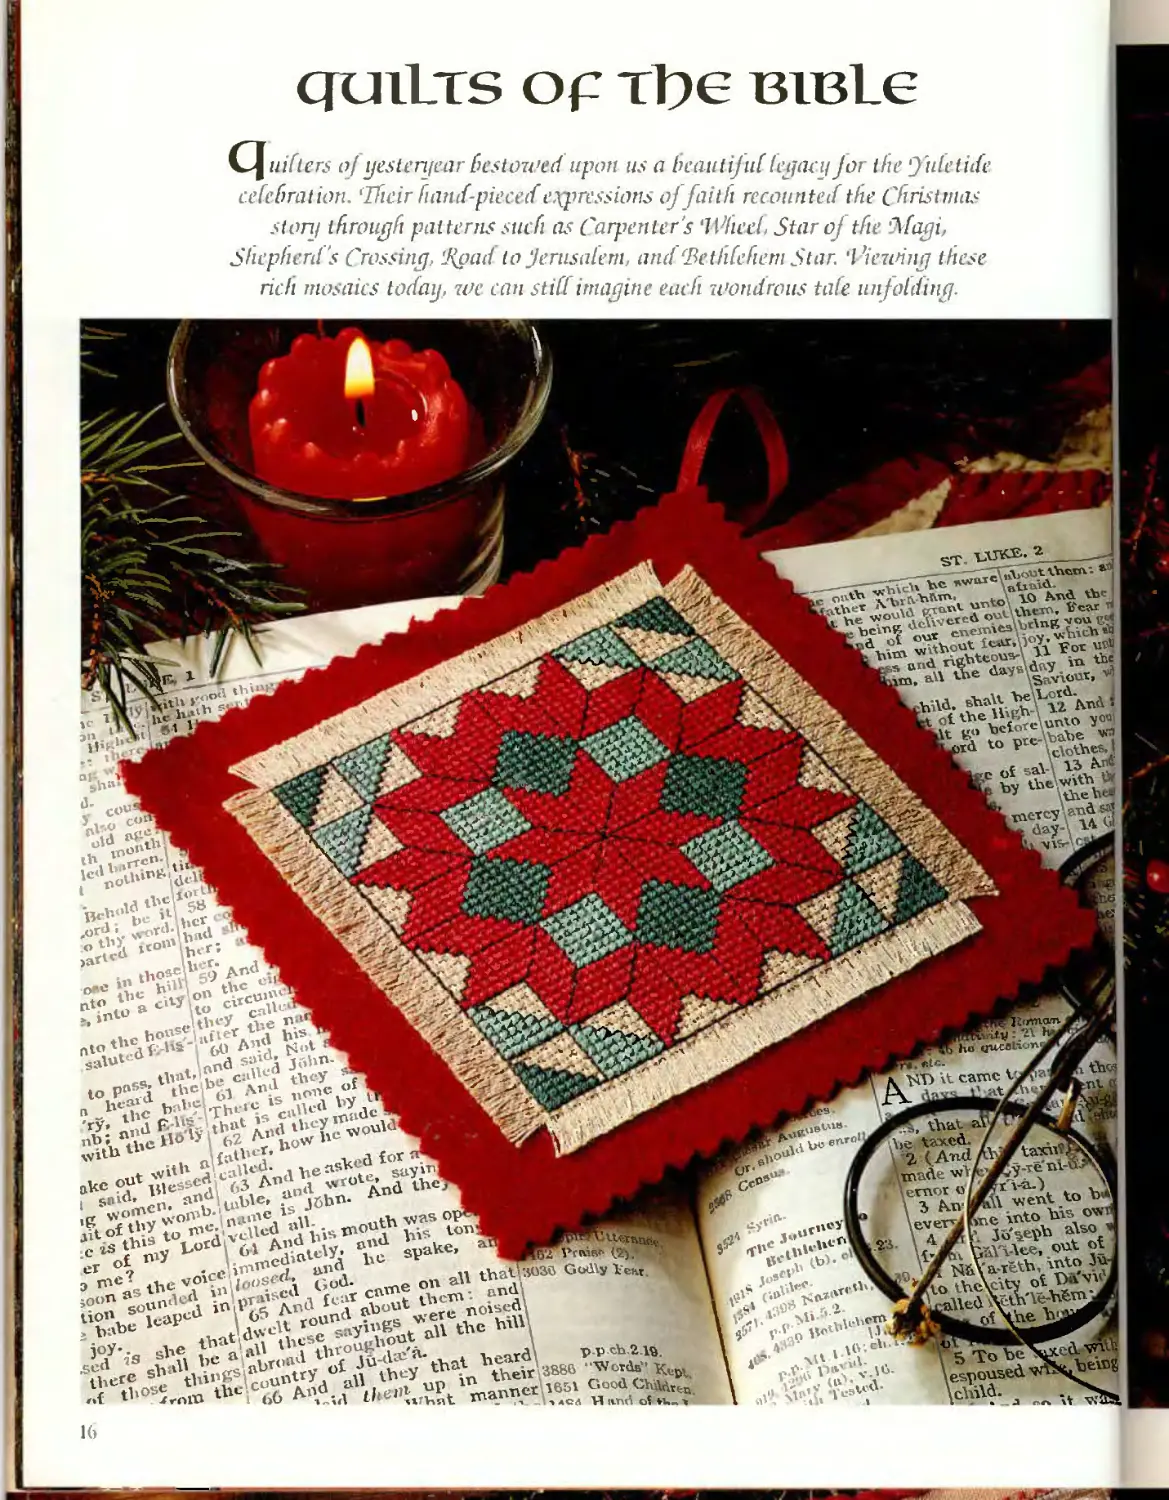
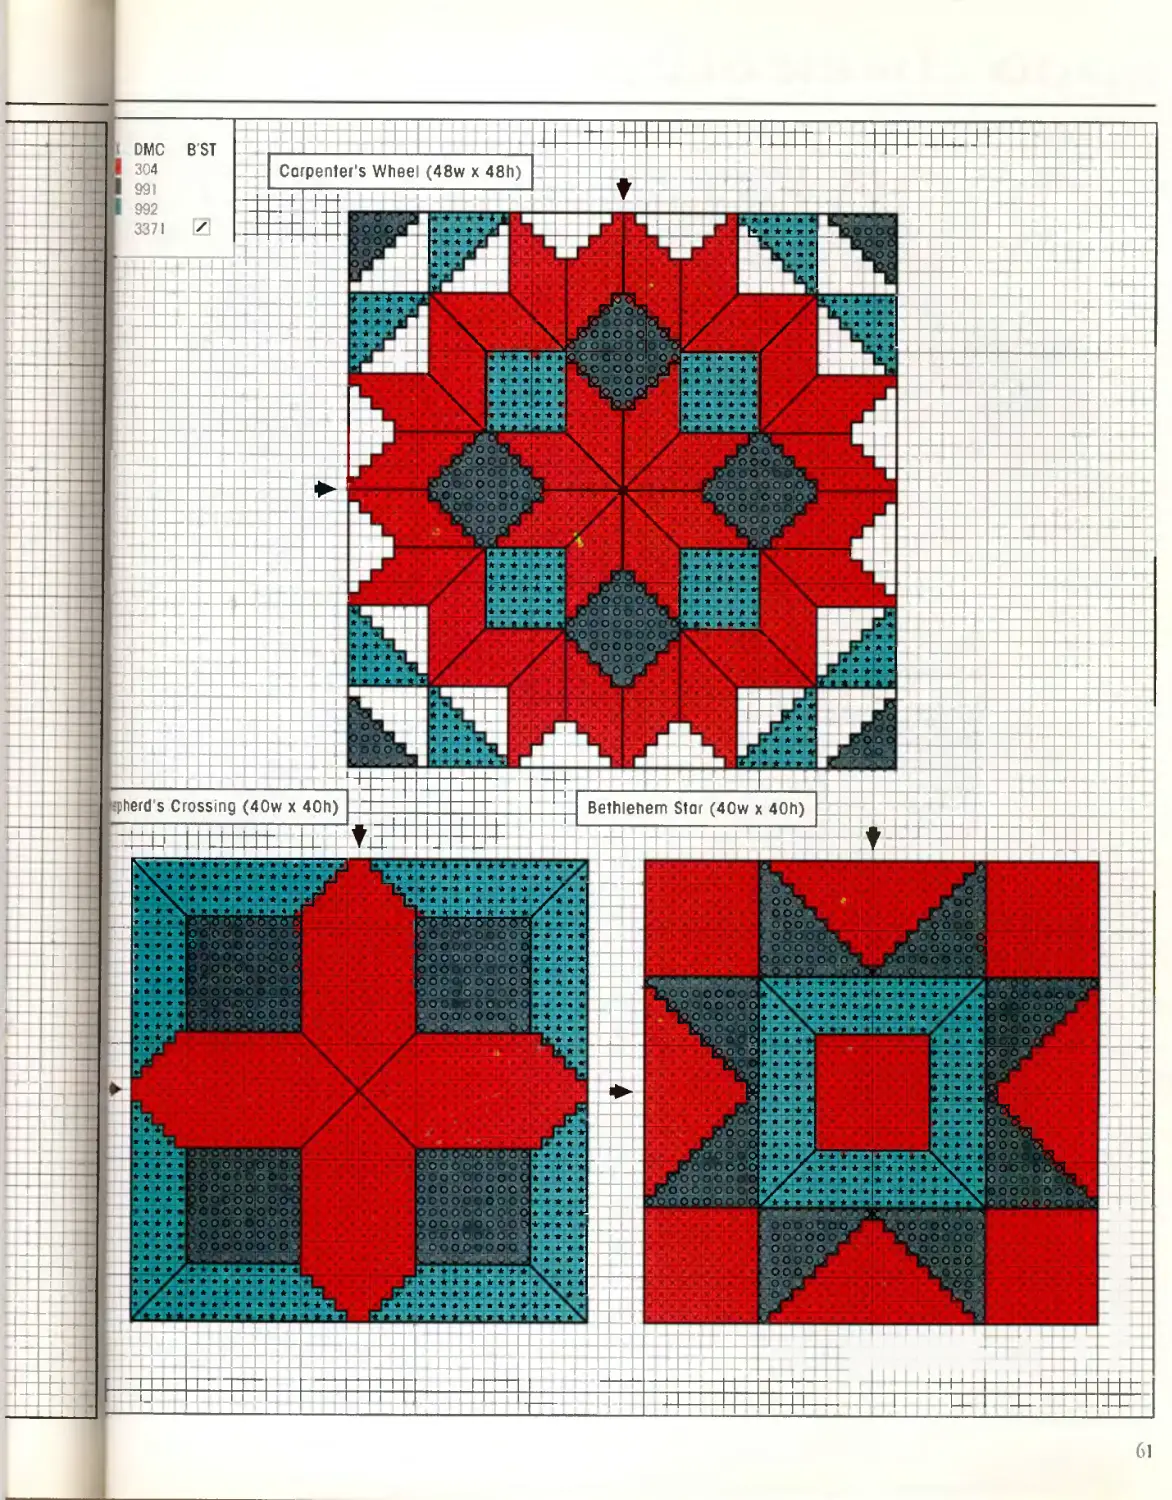
qcnlis op i l)c uiBLe
CJn/f/m о/yesteryear bestowed upon us a beautijuf legacy for the 'Juletide
celebration. ‘Ifteir fianif-piececf expressions of faith recounted the Christmas
story through patterns such as Carpenter's ‘U-liecl, Staroj the 'Magi,
Shepherd's Crossing, 'J\pad to Jerusalem, and (Bethlehem Star. ‘Clearing these
rich mosaics today, we can sti I imagine each wondrous tale unfolding.
\.-sxa4
j rmcvn
He <TU€Bll
JrZ
yro it came
Aiat al
,\>e VaxeA.
2(And/
VraaAe vA»
|&»жЯ
|hfh«
)ртЛ
K-J&
я
Я
wl
^1Я
И
| а'Л*.
V Л U^1'1 цл|
\ 4°' vid-
Л v^45Nb-
L \ ,11 'An’У •Геэ'А* •
______tYwi«v. ®”
^.AW. rt^\''w W *
Ifct ot 1Ъеъс«оге W«>
Bhu VV S 4
^-r<-c5i Bu*d to P c otAee.]
№Kl. sav\ гз M
e OJ \£b.e\itlS
raercy^A^
*• ‘ ce tbcil tl e n.
saWl i anA s?.1 1 Г’^-
w r»”al'S- ^слЦ ?^гЛ1
n h*ihcl bn' C The‘% c’A^A \^<jc4
»4 ui >1Ж ”°“Я
г «»h 4Ъе^(аеЧГаЯ
akeputvlessc*i (3 A°Jod 'vfO дпА th®
i »»ld’ Лъ »"?'table» ?? i6b«- *
S й I» " d "^''dV-s e,oUd' ®S
’ id1'"’81’ '
\“'^;^гДАъе ы»\
ДлуЧв$5 ^Ав№
~ct\he
\ДДп«лХл<;“6
\cYn\a. , _
Ur 'Ч ртт?'
.- J’ ~уУс SVaVte’ ^HjTvcb.W' (й),’
ап®. „и thatV&SG Godly t ей. 4
м* Aiir»i <=»го: SeS Н
SSSUere.
joy-. she Уи‘а>Й • >
;еА ,sJva\ '?еД\аЪГ«АА оу
16
a& «?
Fear uirt
vWcb aViffl
For unto
in tbeJ
iour, vrtn
iScnA thJ
to
к. owv
a\so v
at ot
to JCw
>a'vvj
К Лго^г*.
jknt out
?b»r.gM
A.ynth 1
fcetofi ?
j.ertt
кегф
tro Уои-’,
ibe wrat
Lothes. 'У
yj fvno
wito fhtti
theheay*
anasayw
i\ \4 tA«
РТлито you coj
0LL THOSE riEOR
□ДО DEOR T О УСУ
/•>/ •’«f .
*<-
’ •1 %r ***,•• ’
Ch^rt on page 62
к
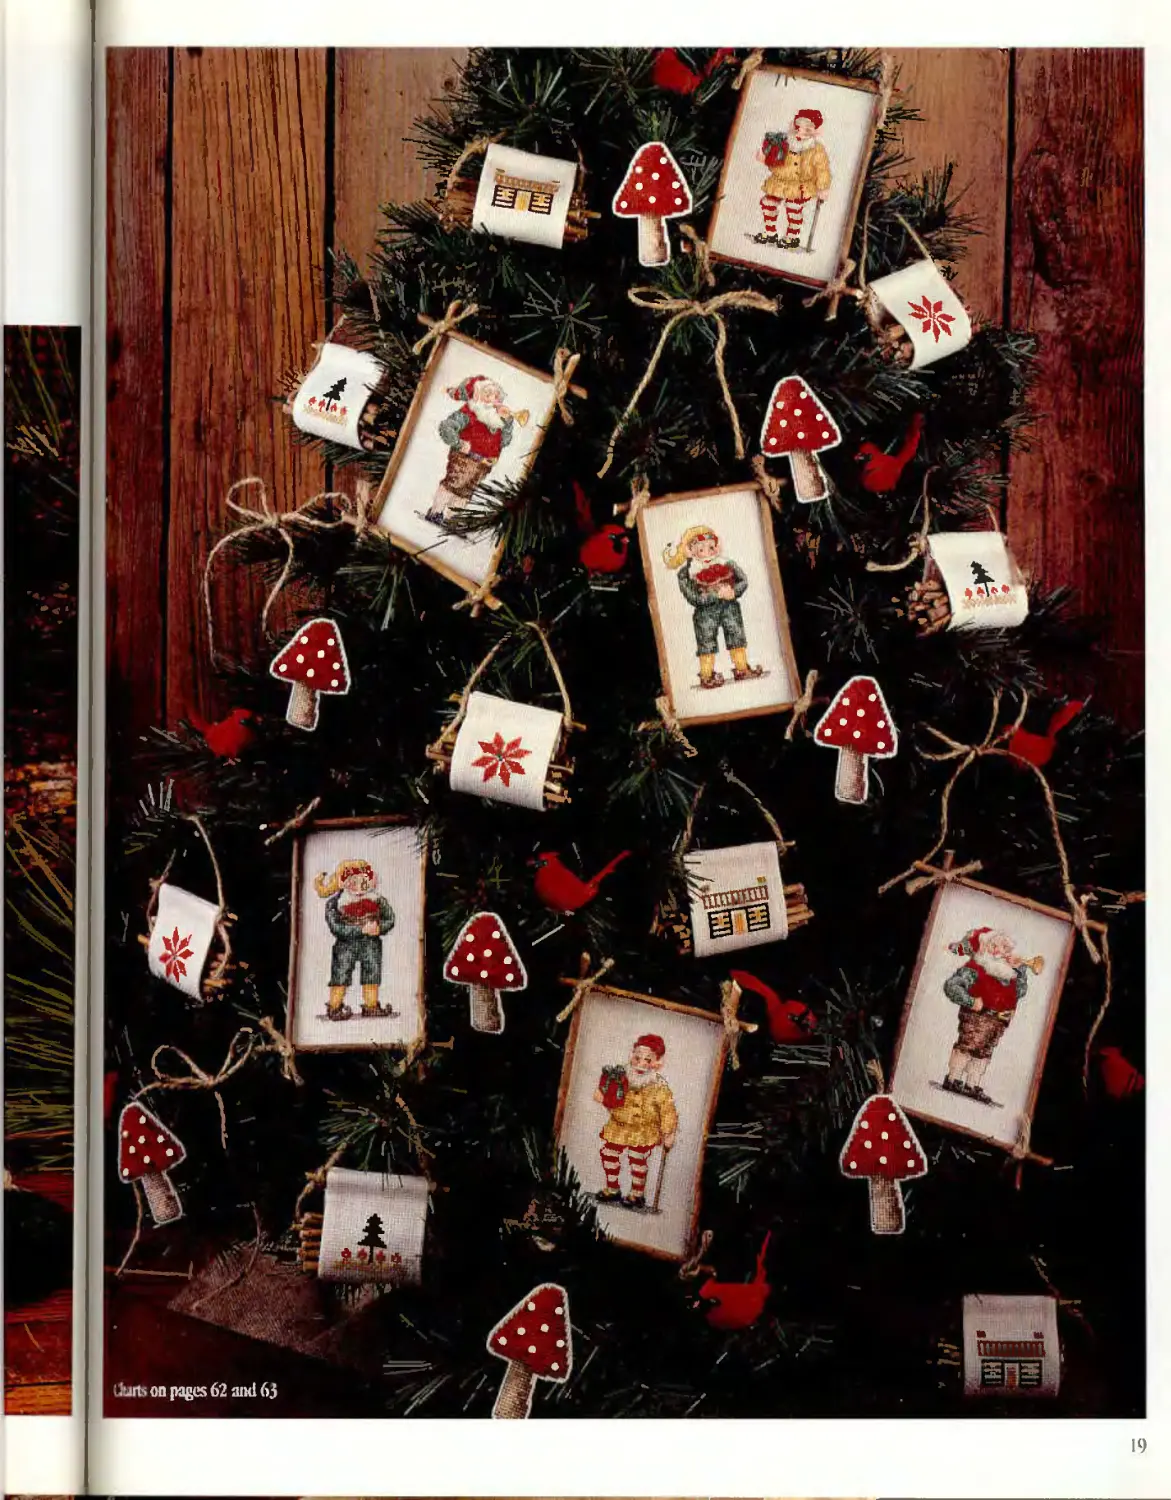
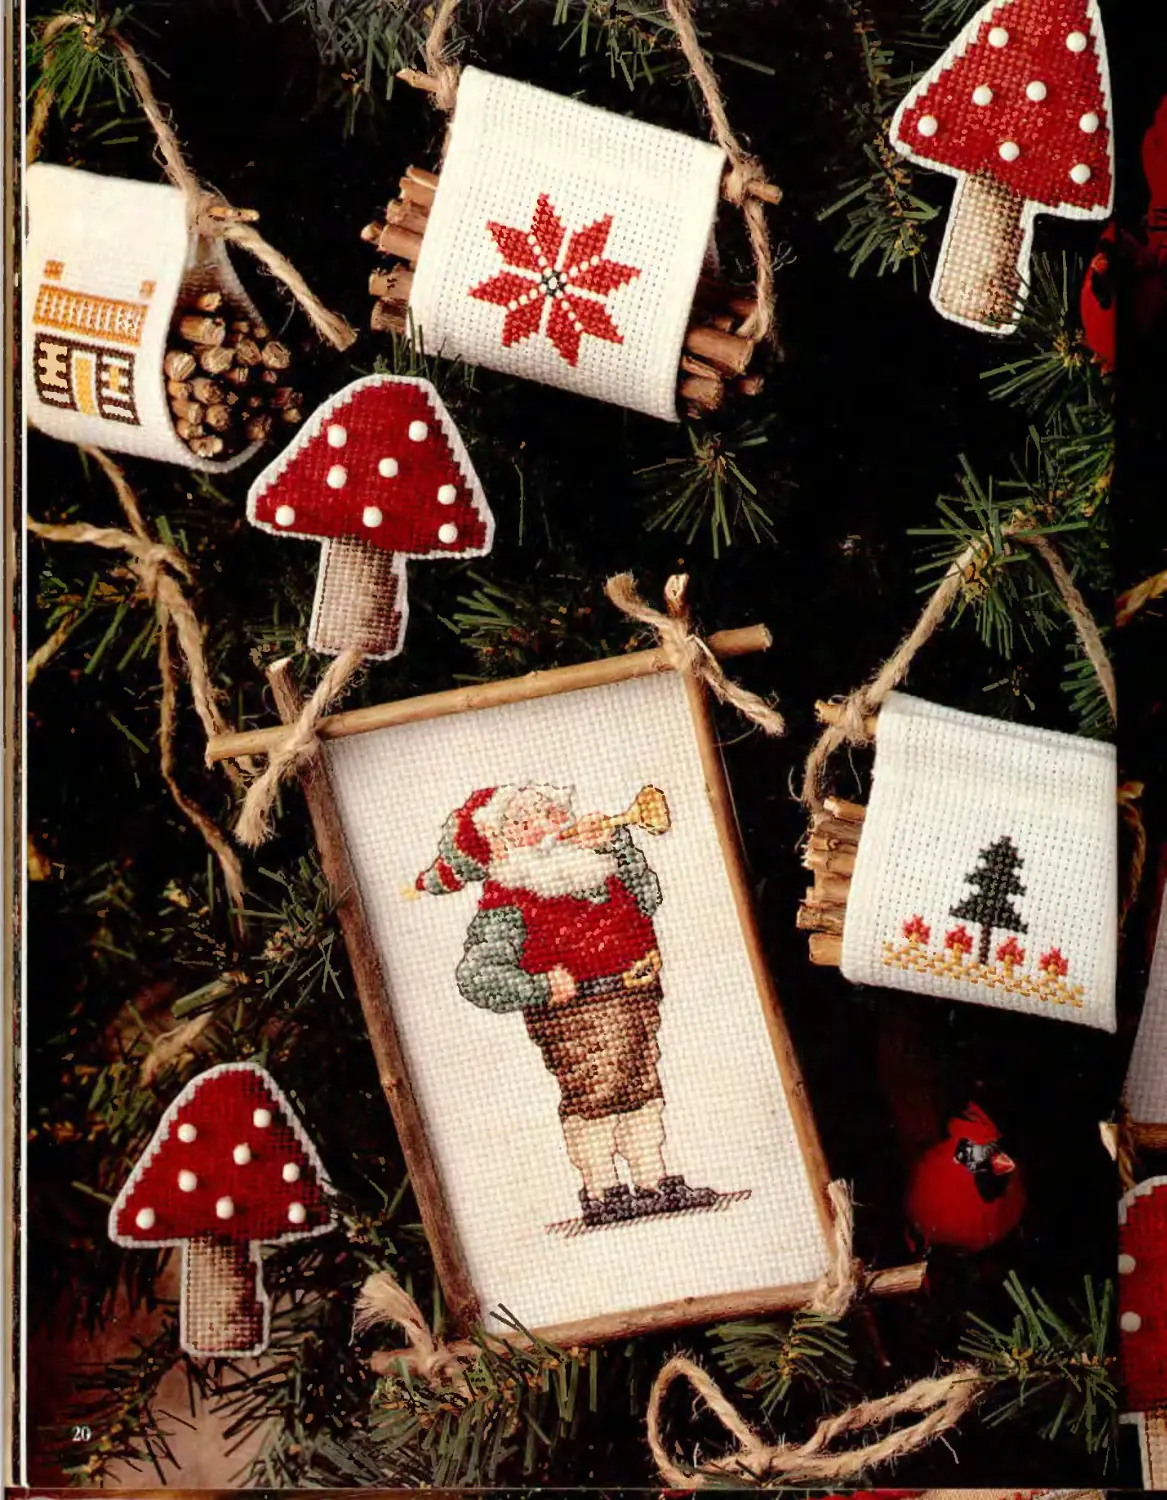
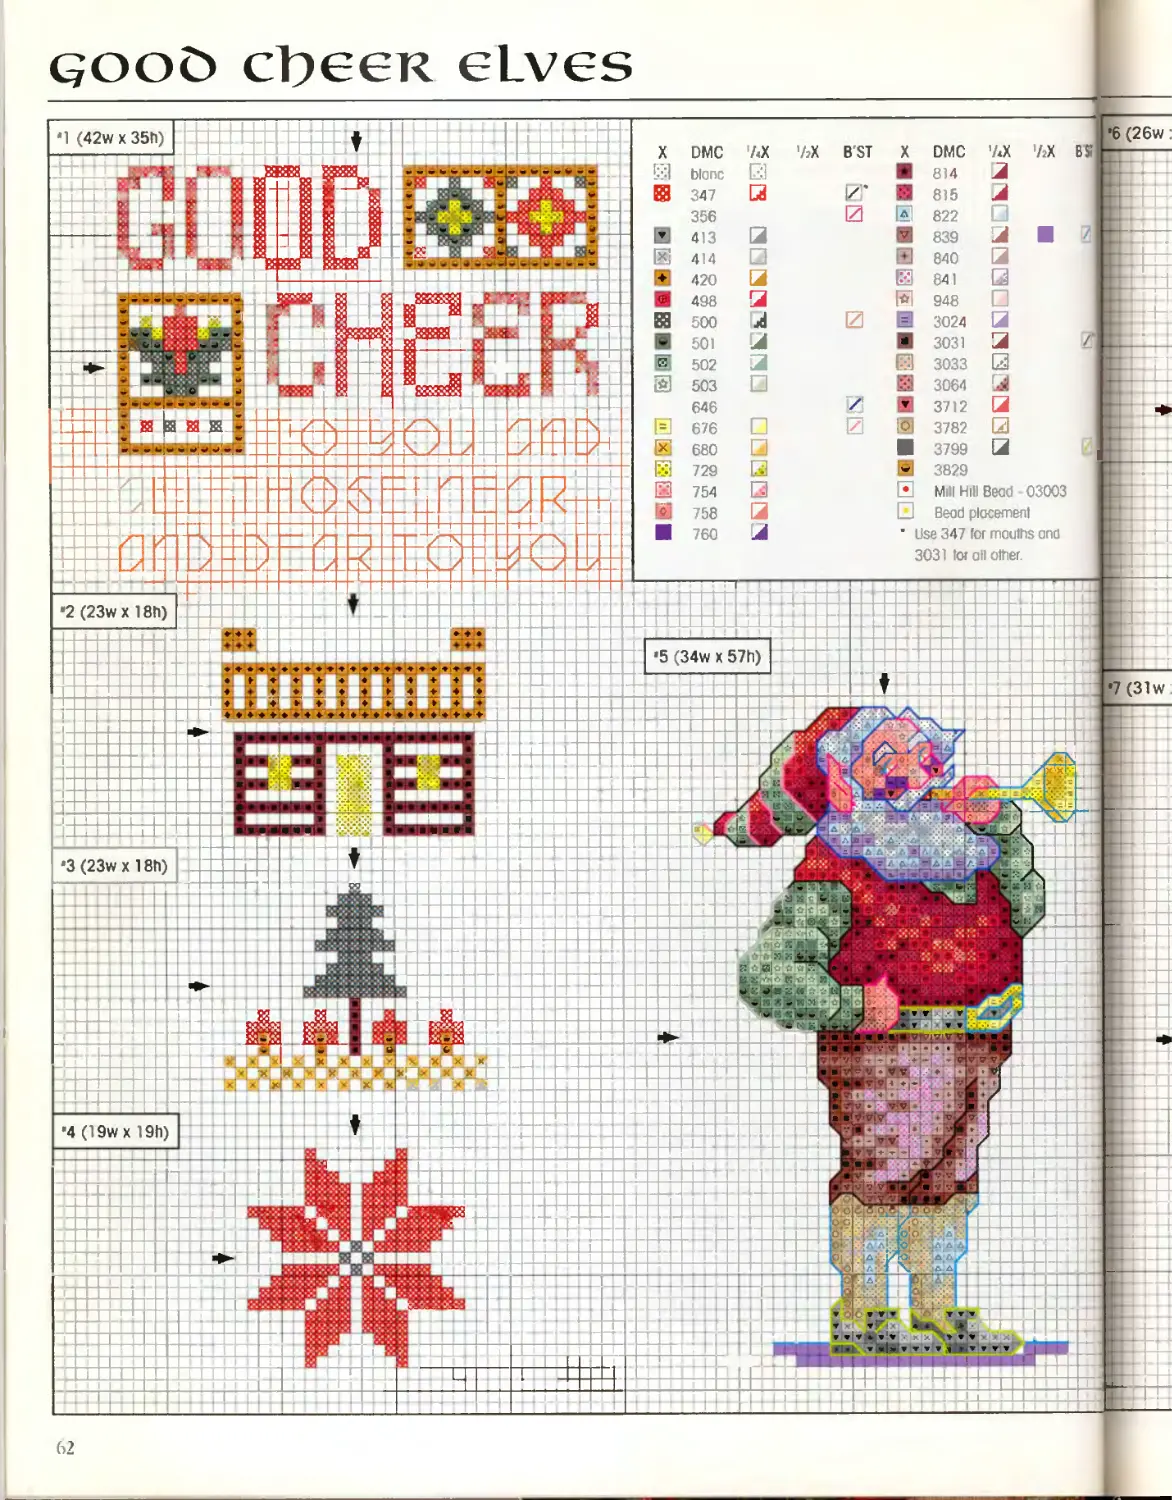
qooO cl^eeR elves
rched among lfie Branches of their woodland iome, these riterry efves are
eagerjor an evening of frolic fing fun. Qoodducf toadstools and twigs for the
fire are gathered from the forest as the tiny woodsmen prepare to worf their
elfin magic. According to me lie-oaf lore, if you feave them a bowf of rue
pudding to enjoy, they fl grant you good cheer throughout the year!
19
w »
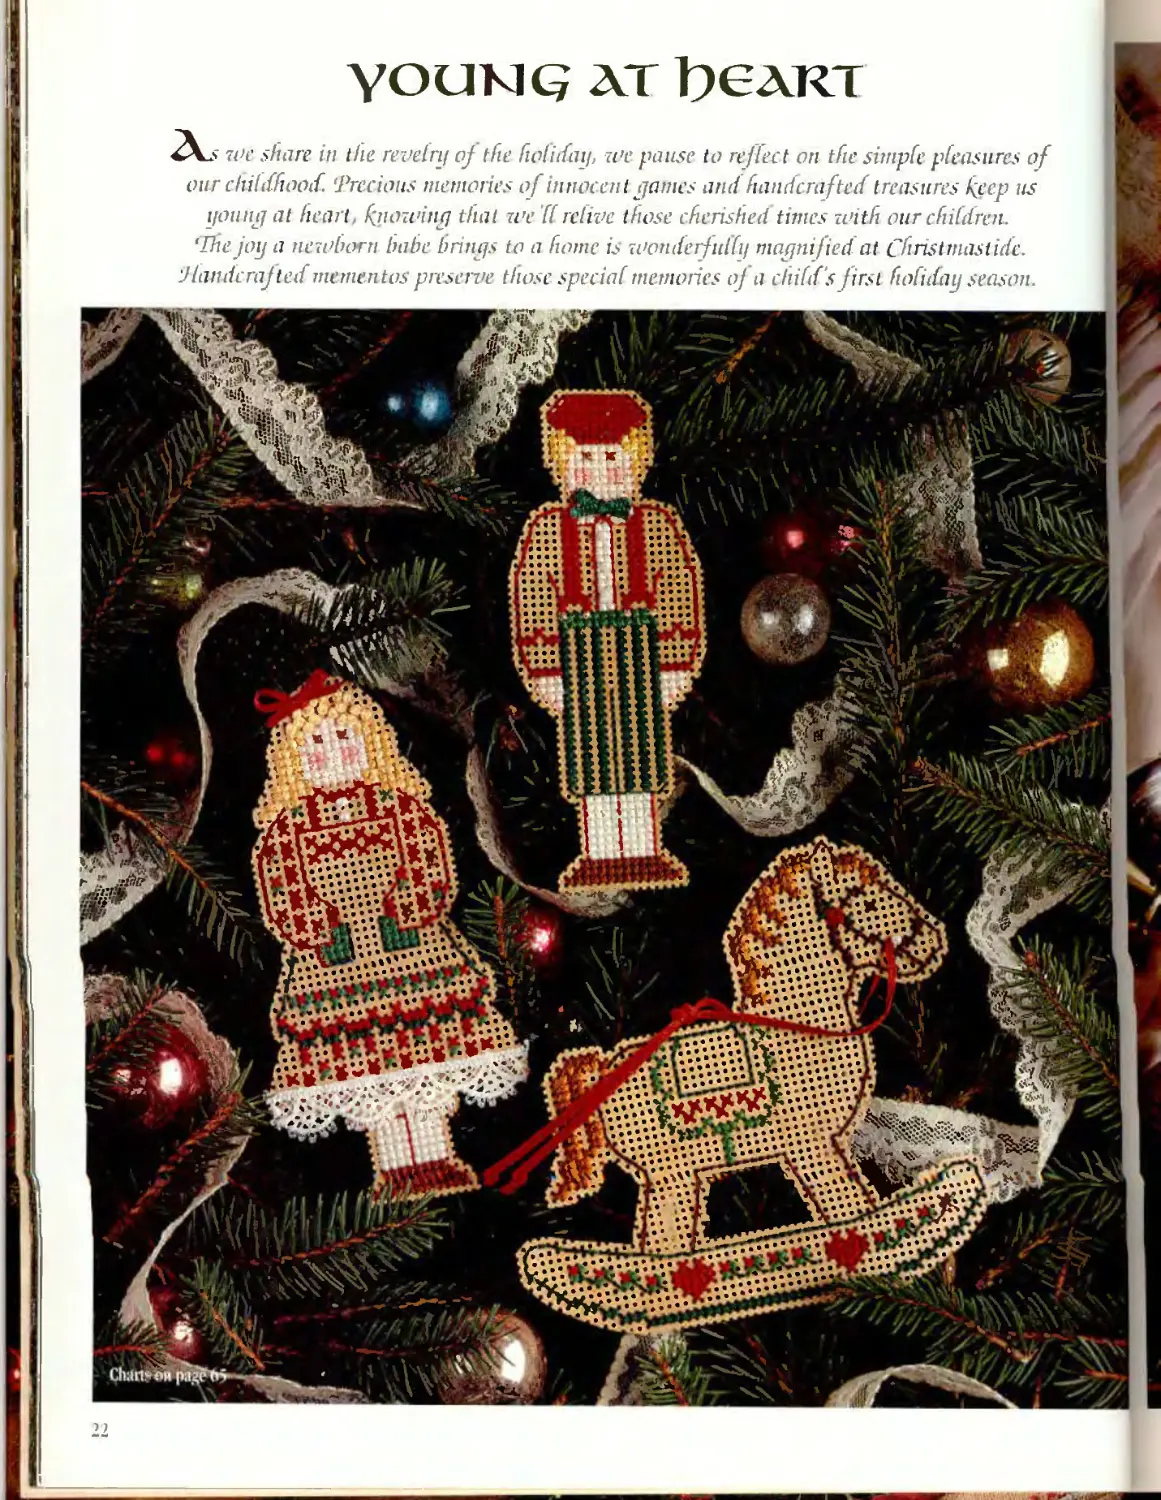
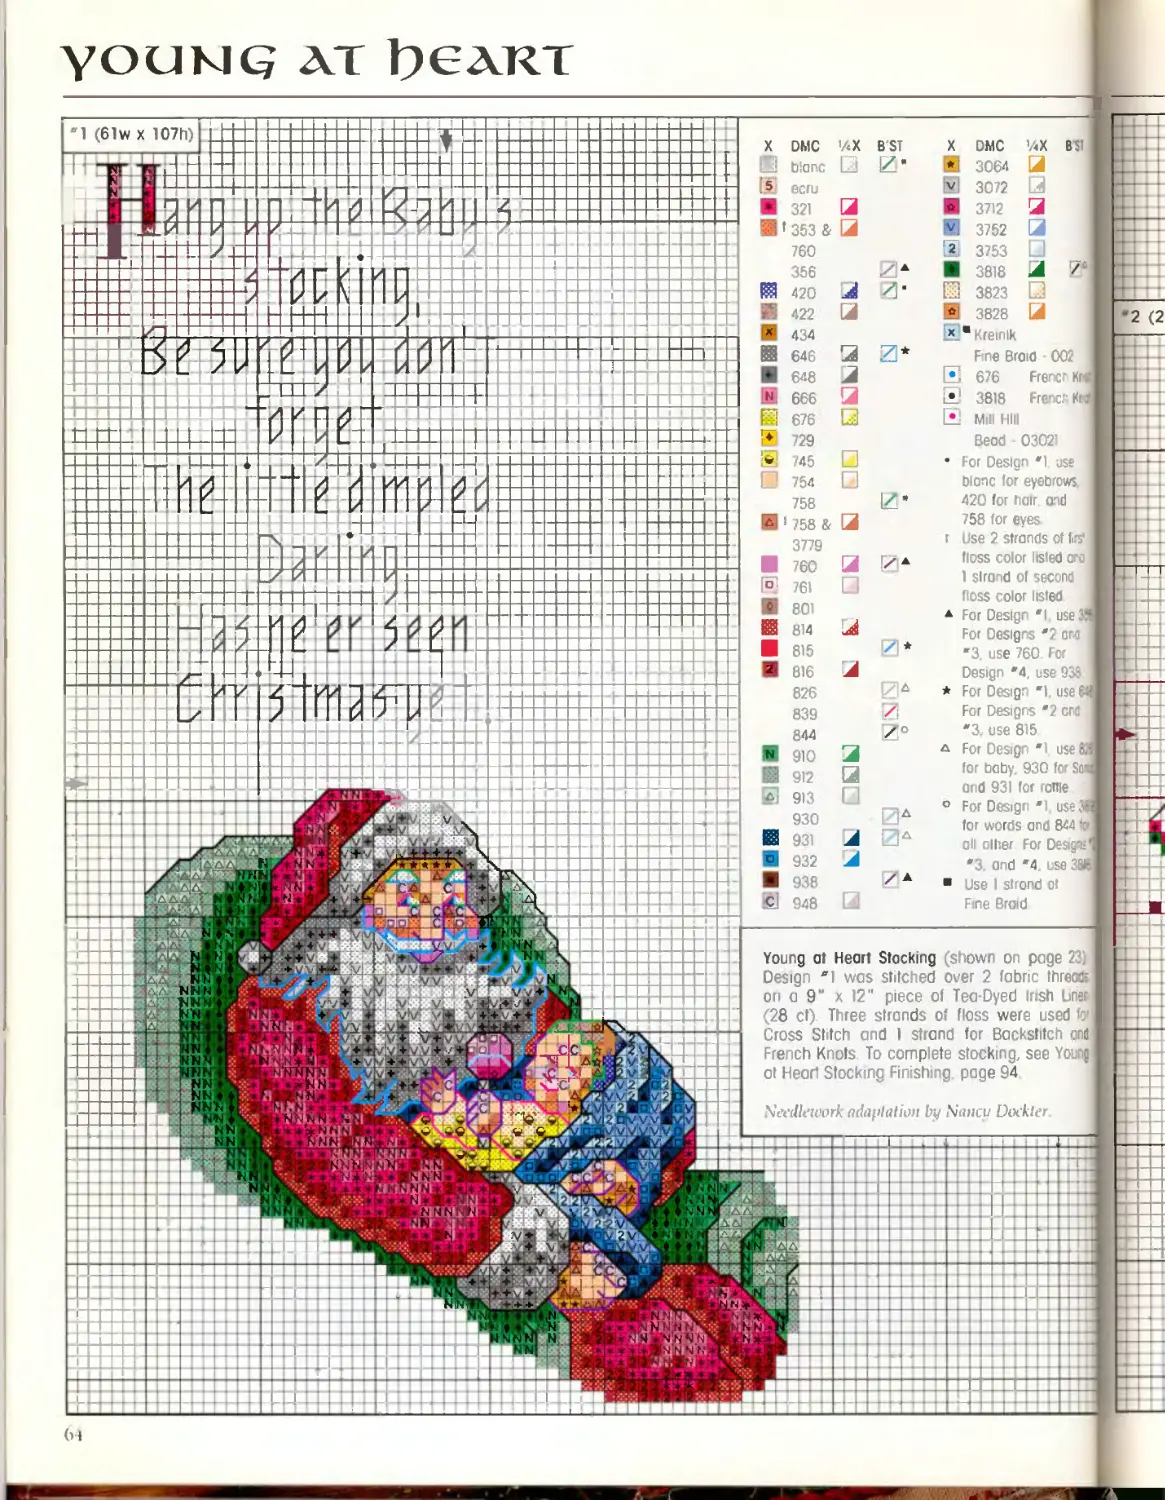
уоимс; at Ъелкт
our childhood. ‘Precious memories of innc .ent games and handcrafted treasures feep us
young at heart, knowing that we I iclive those cherished times и ith our children.
'J landcraj teif mementos preserve those special memories of a child’s first holiday season.
t'W
ЬИ
К < ж
Ж '
J
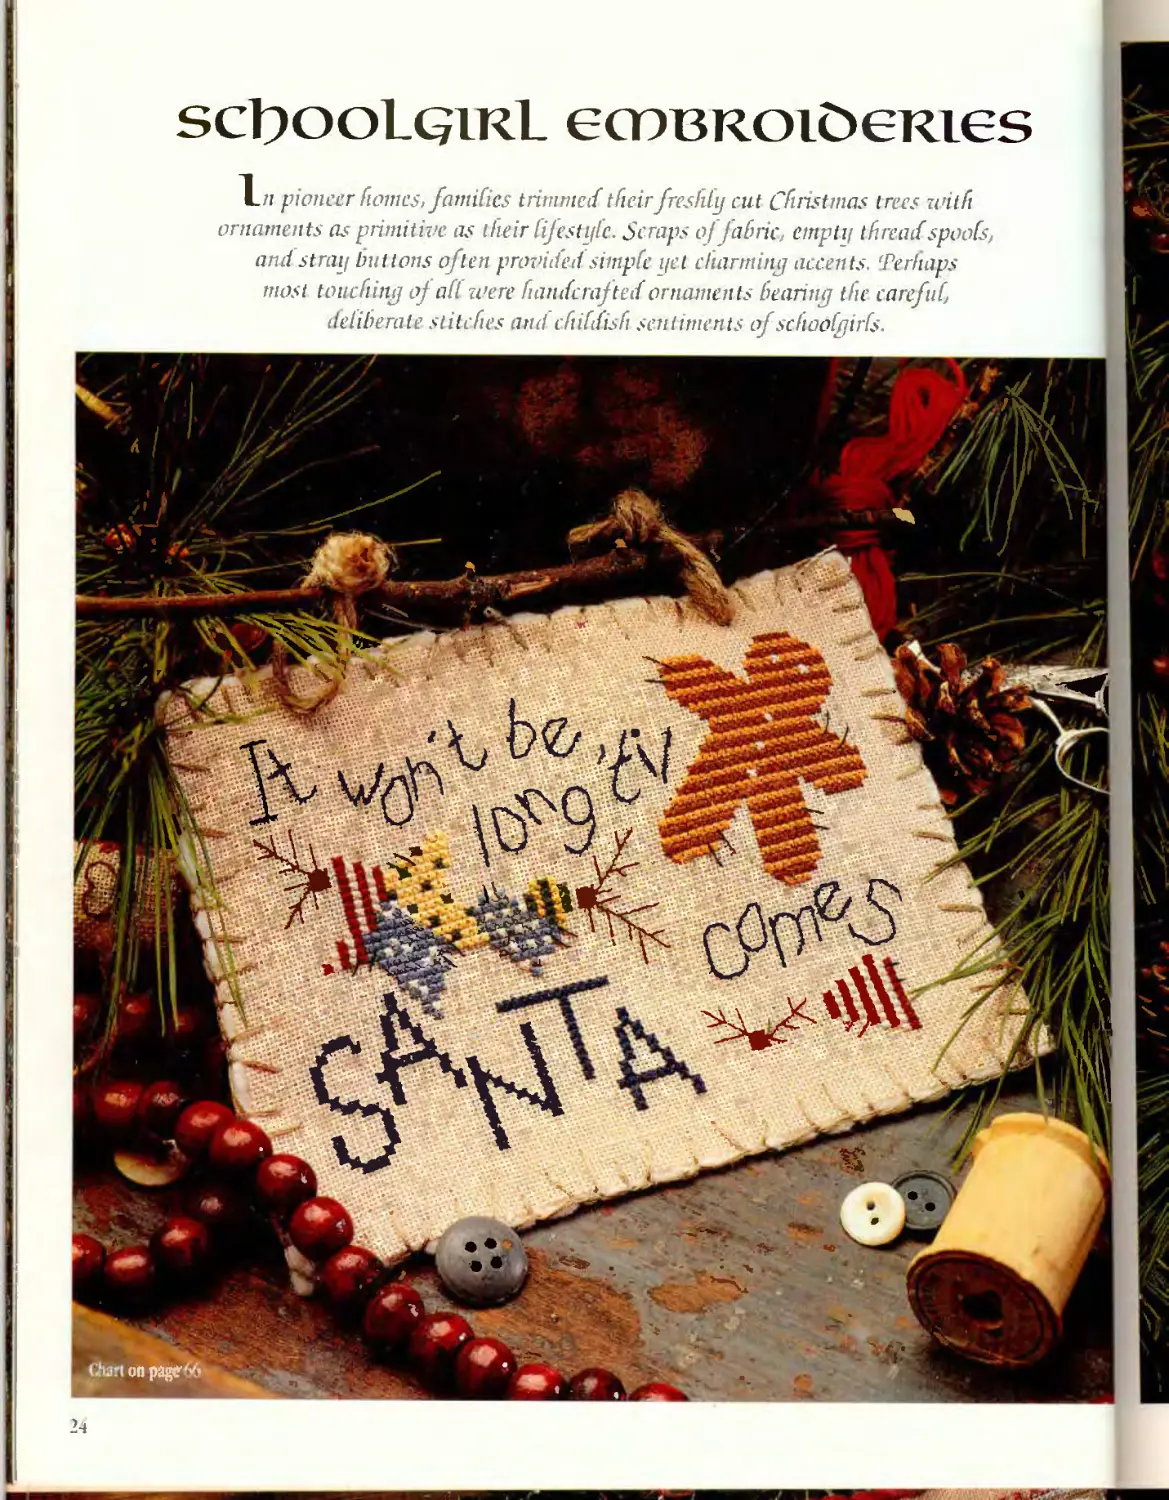
scboolc;iKL eooBRoideRies
lipioneer homes, fatuities trimmed,their freshly cut Christmas trees with
ornaments as primitive as their lifestyle. Scraps of fabric, emptij thread spoofs,
and stray buttons often providedsimpfe. yet charming accents. Perhaps
most touching of aft were hatuferafted ornaments bearing t ie cat efid,
deliberate stitches and chifdisfi sentiments of schoolgirfs
24
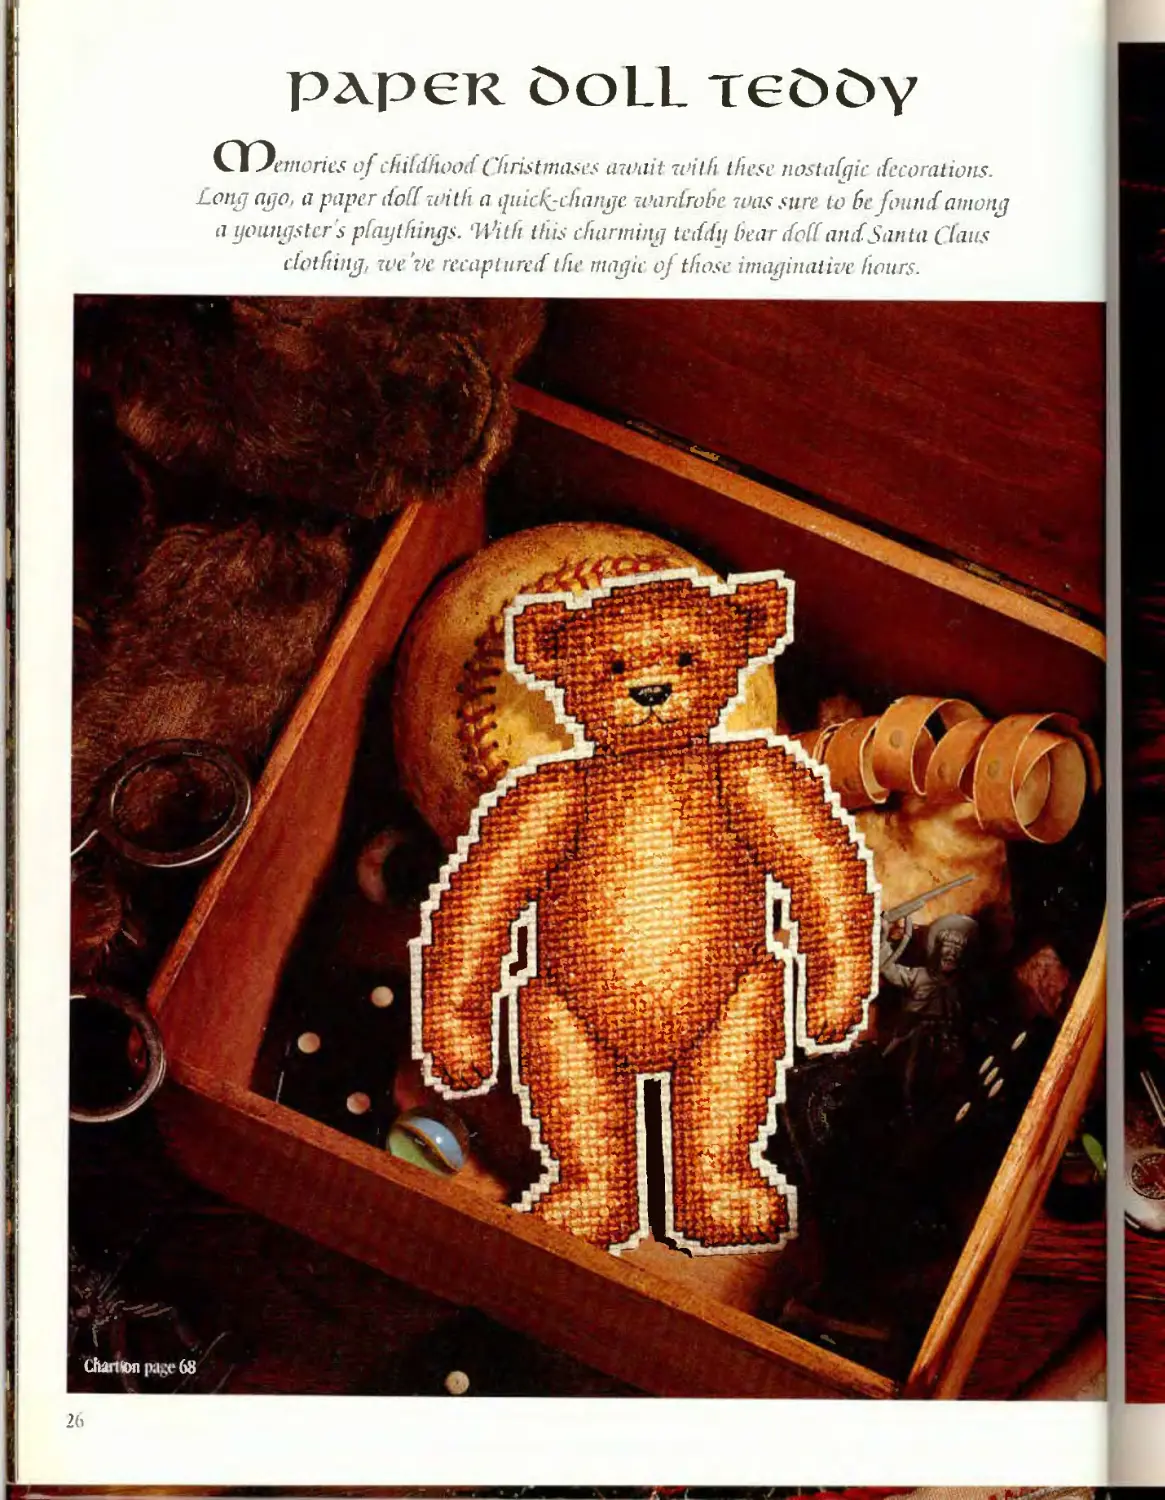
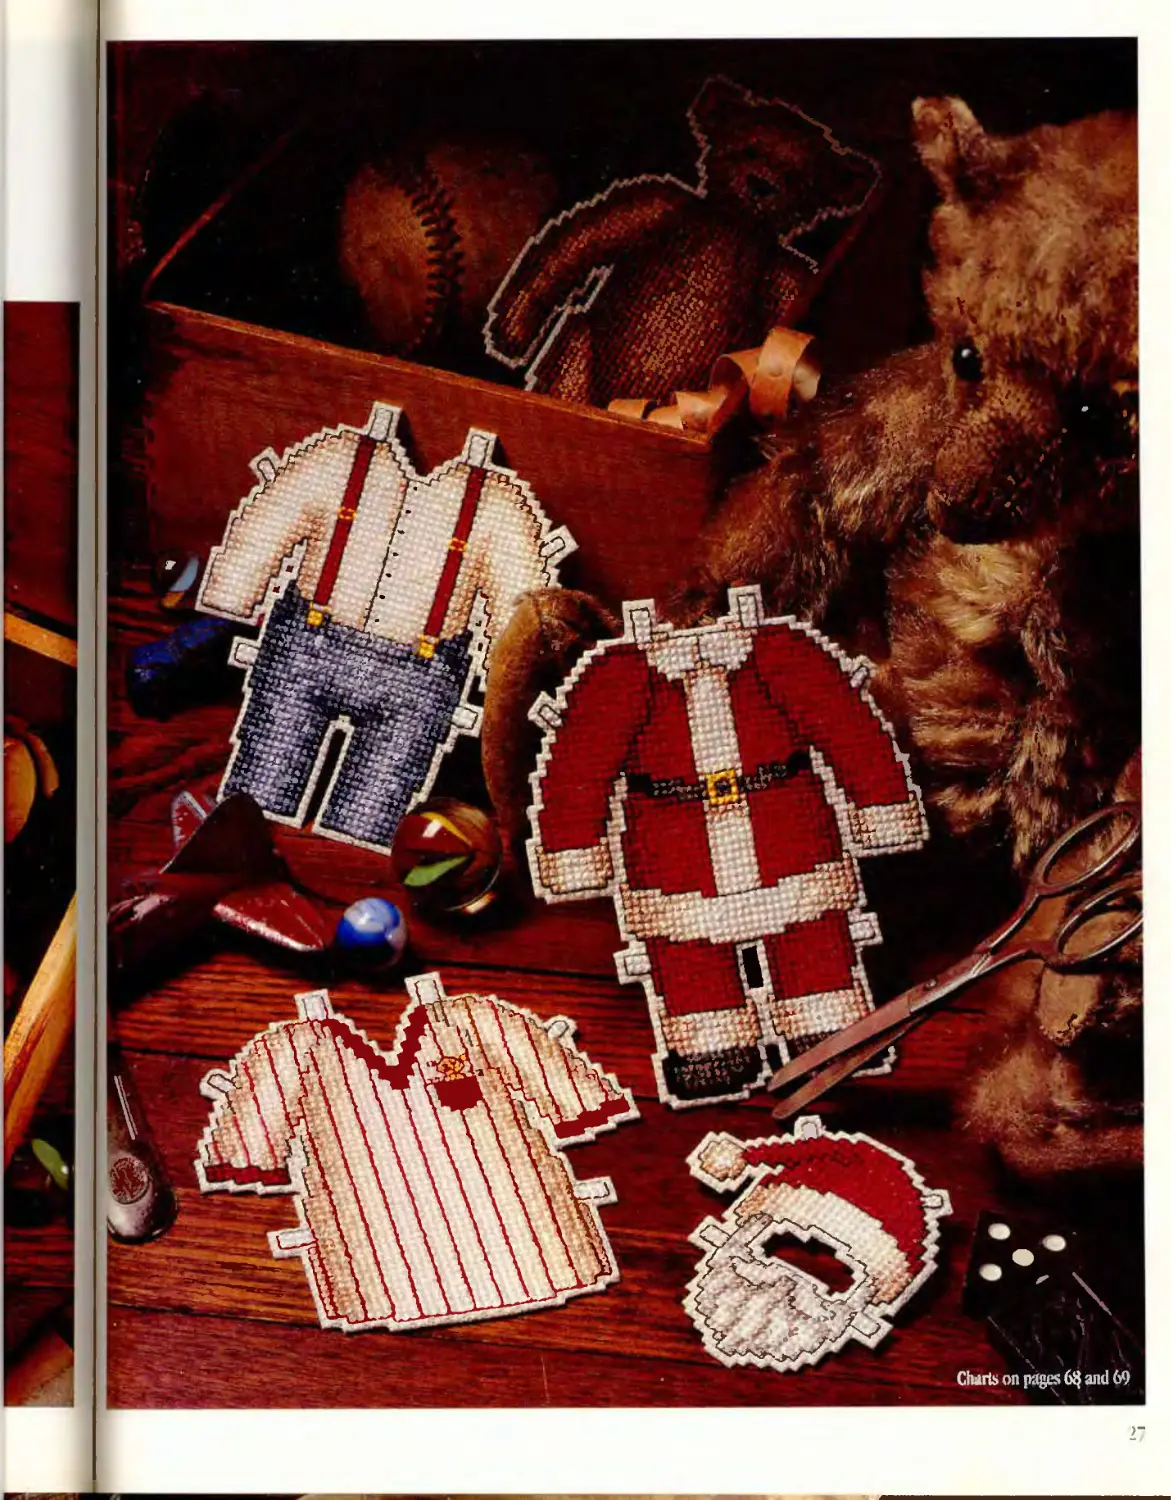
рлрек OoLL теООу
dO?'tnories of childhood ('liristmases await with these nostalgic decorations,
dong ago, a paper doff idith a quic ^change wardrobe. Idas sure to 6c found among
a youngster s pfayt tings. ‘With this charming teddy bear doff and Sarita t 'fans
i lot fling, we/vc recaptured t tc magic of those imaginative hours.
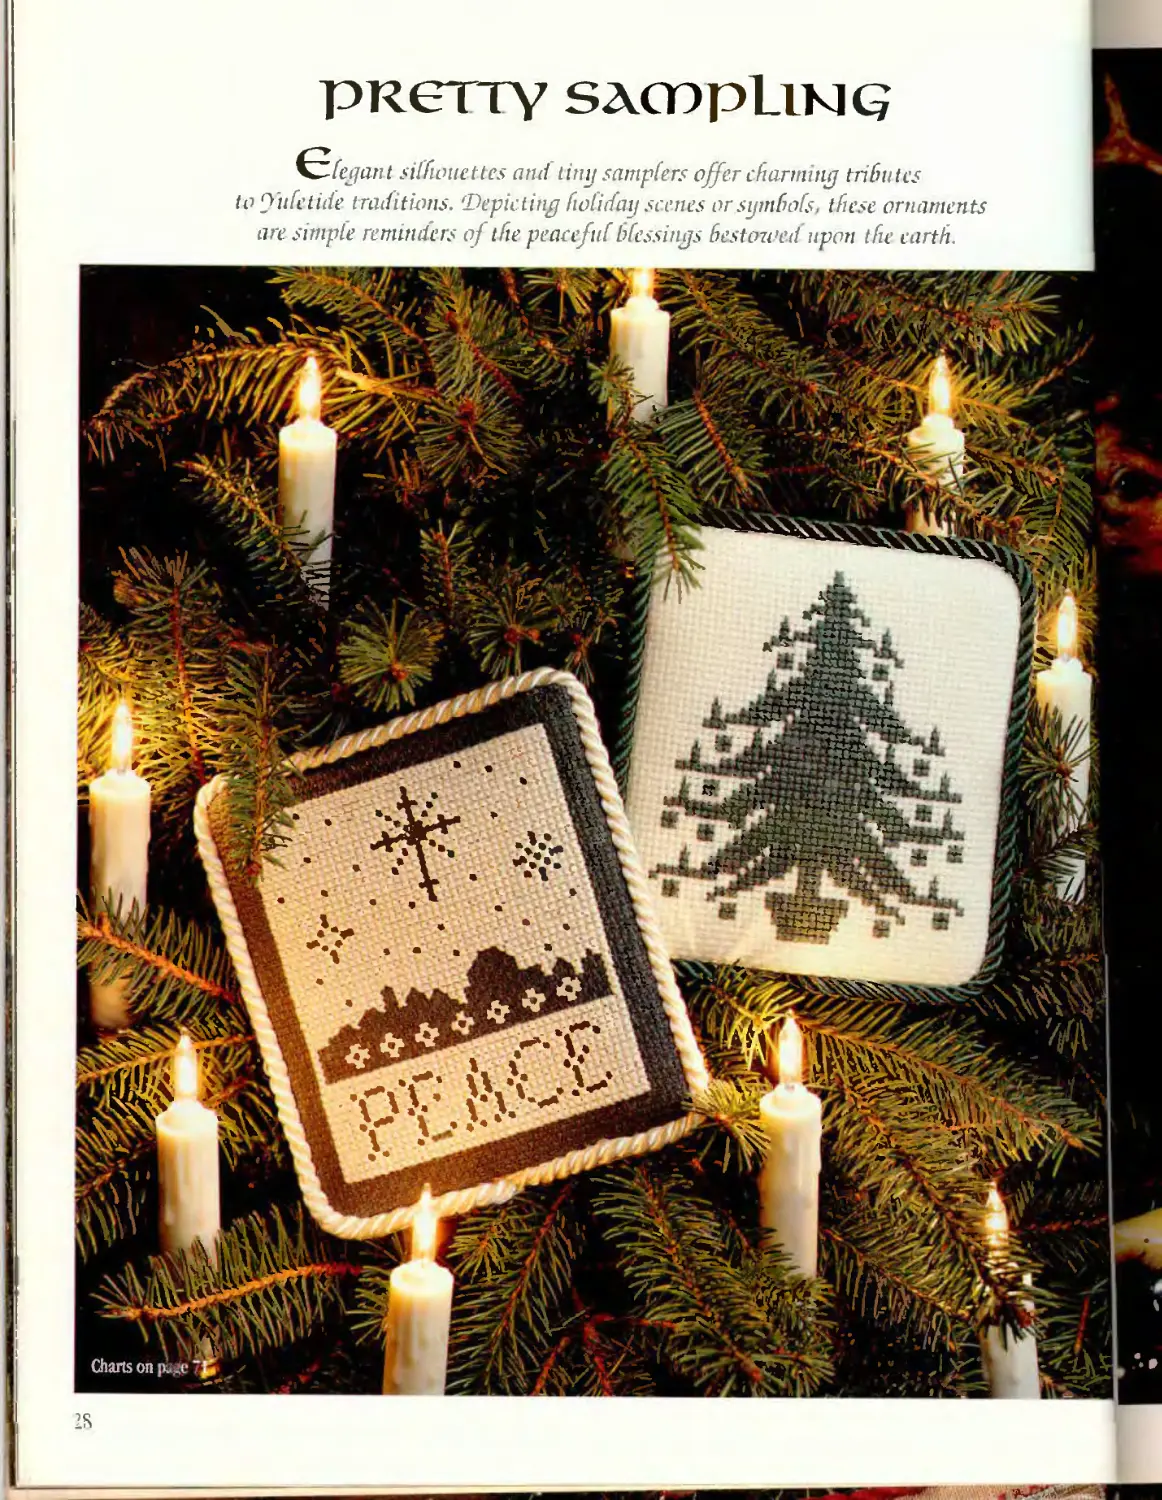
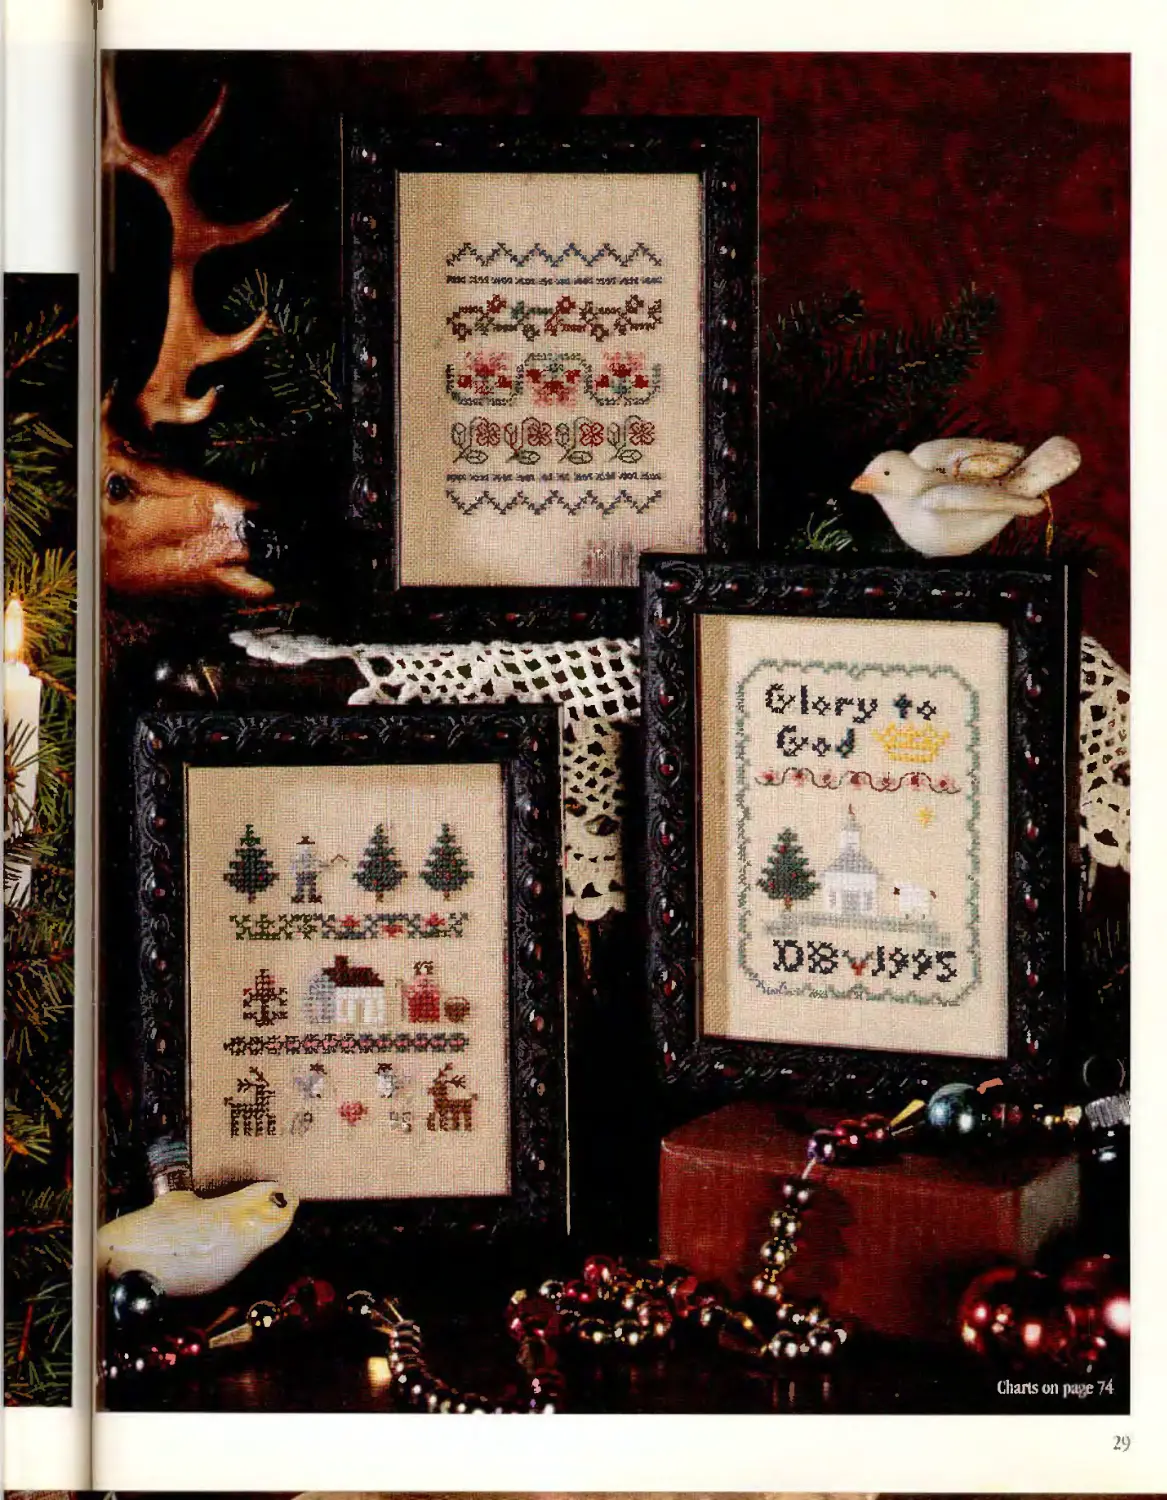
ркетту sag эр Uнс;
leg ant silhouettes and tiny samplers offer charming tributes
toD'uletide traditions. Depicting holiday scenes or symbols, these ornaments
are simple reminders oj t ie peaceful blessings Heston ed upon the earth
i is
Charts on ркде
29
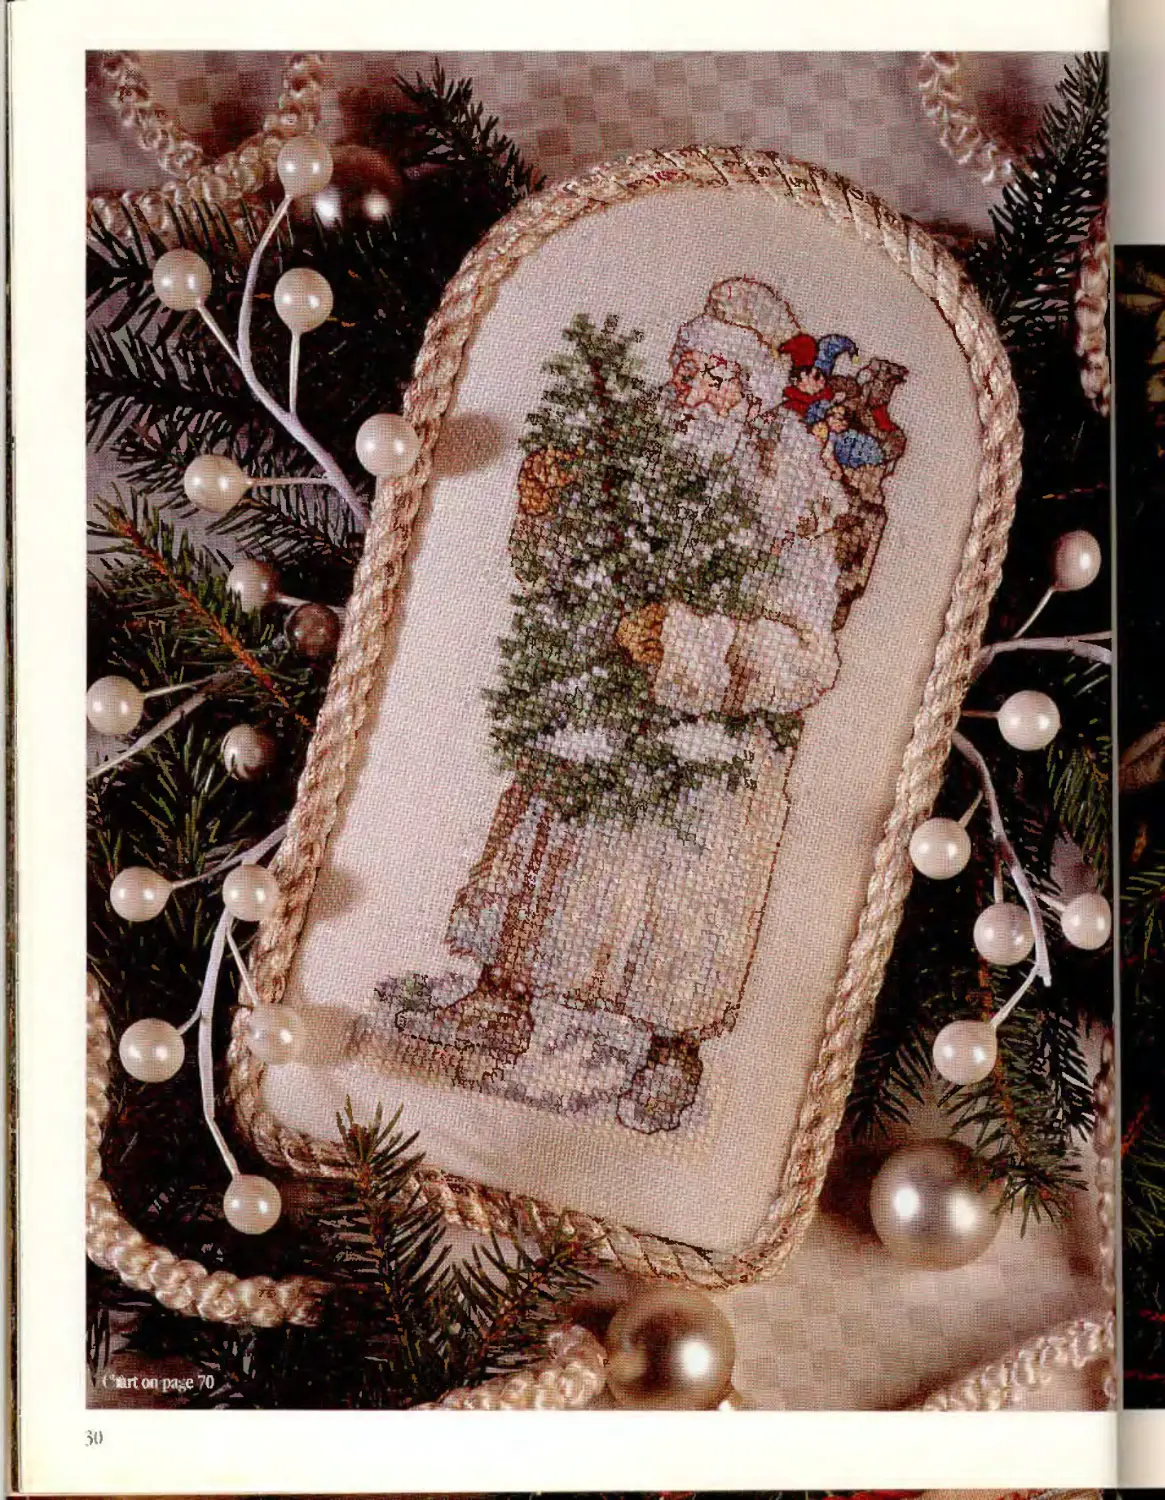
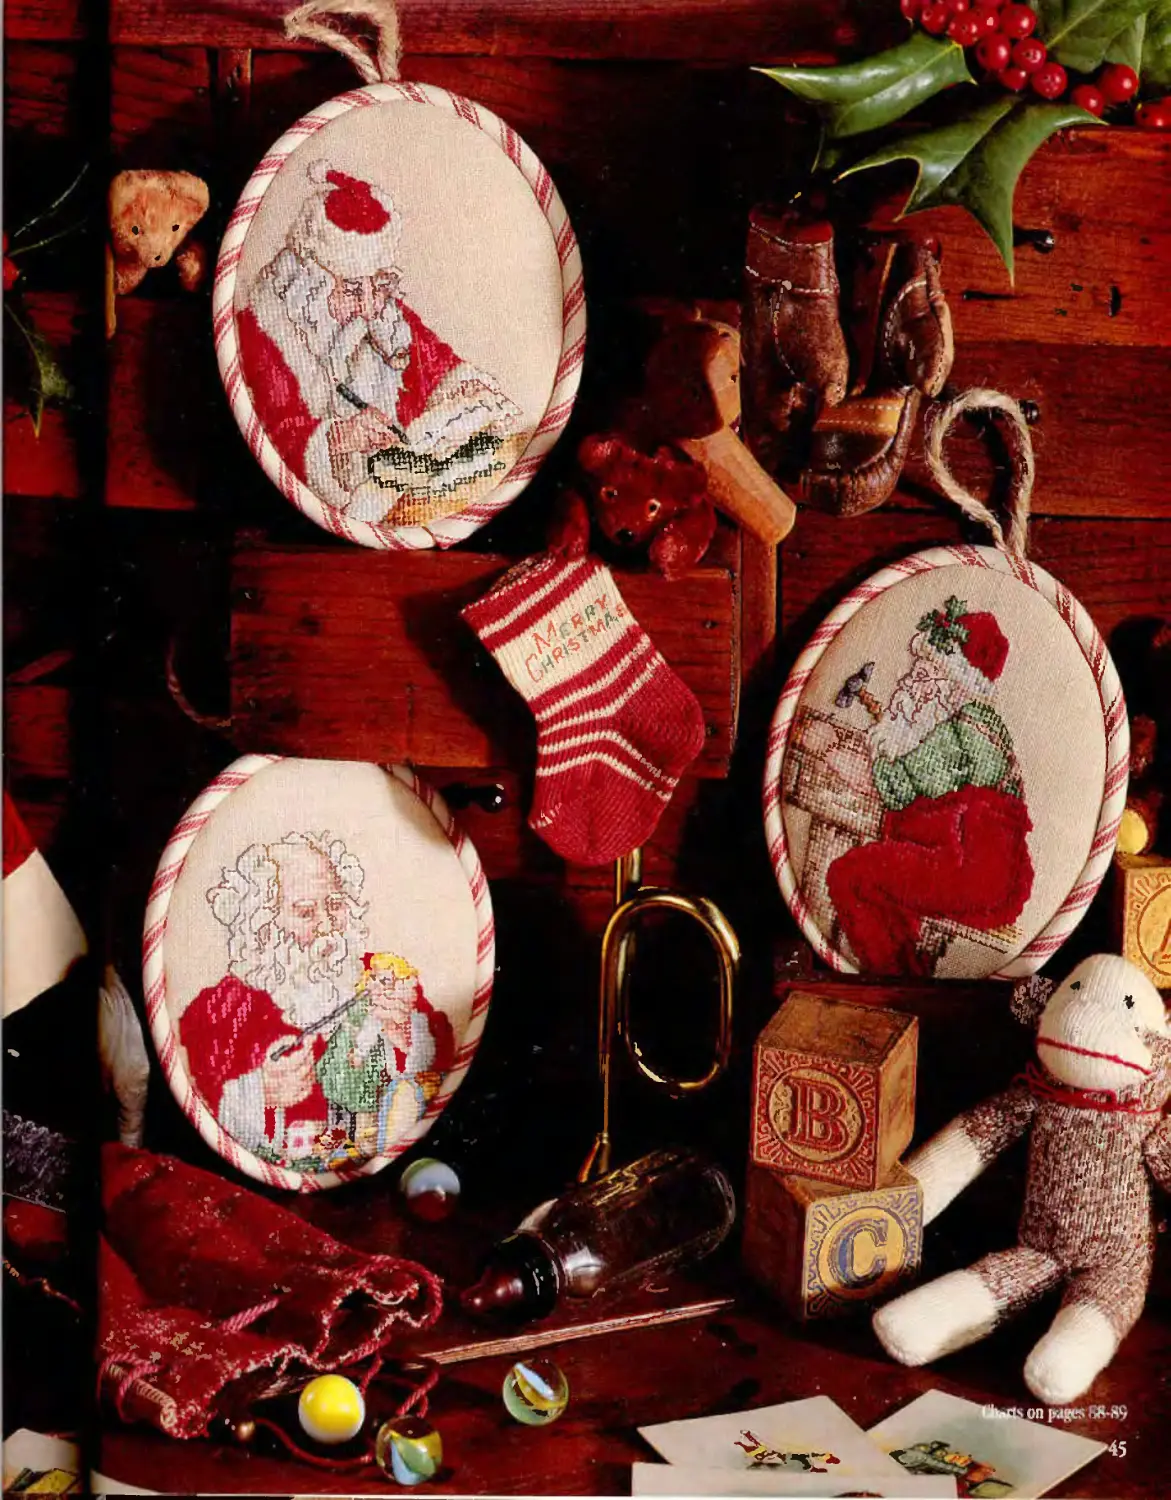
-*4ar’si
13 if ore becoming the crimson-dad elf we fyww today, Saint hoi as
was often shown robed tn snowy white or iranquit blue, dint atwais
he has been the generous yentieman who delivers his abundant
gifts around the wortd while wintry milages stum her.
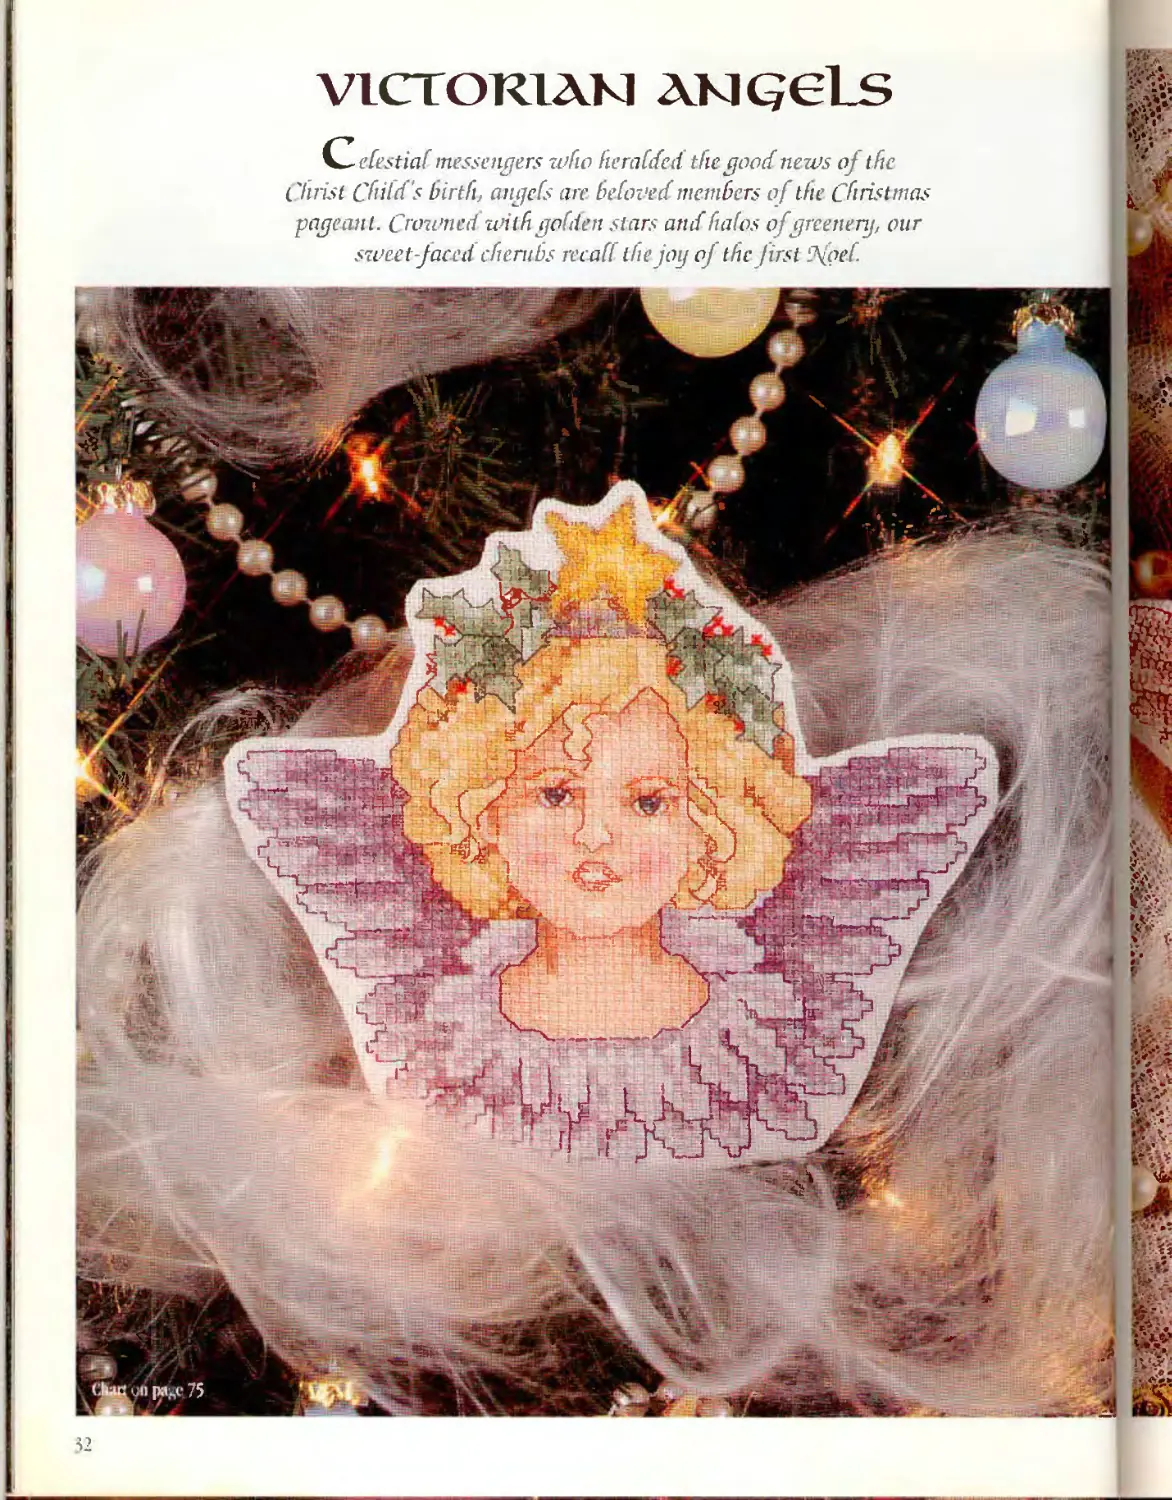
VLCTORIAM AKlCJCl S
C~ebestiaf messengers who he rabded the good news of the
Christ Child's birth, angels arc behoved members of the Christmas
pageant. Crowned with golden stars and halos of greenery, our
sweet-faced cherubs recall the joy oj the first lJfoed.
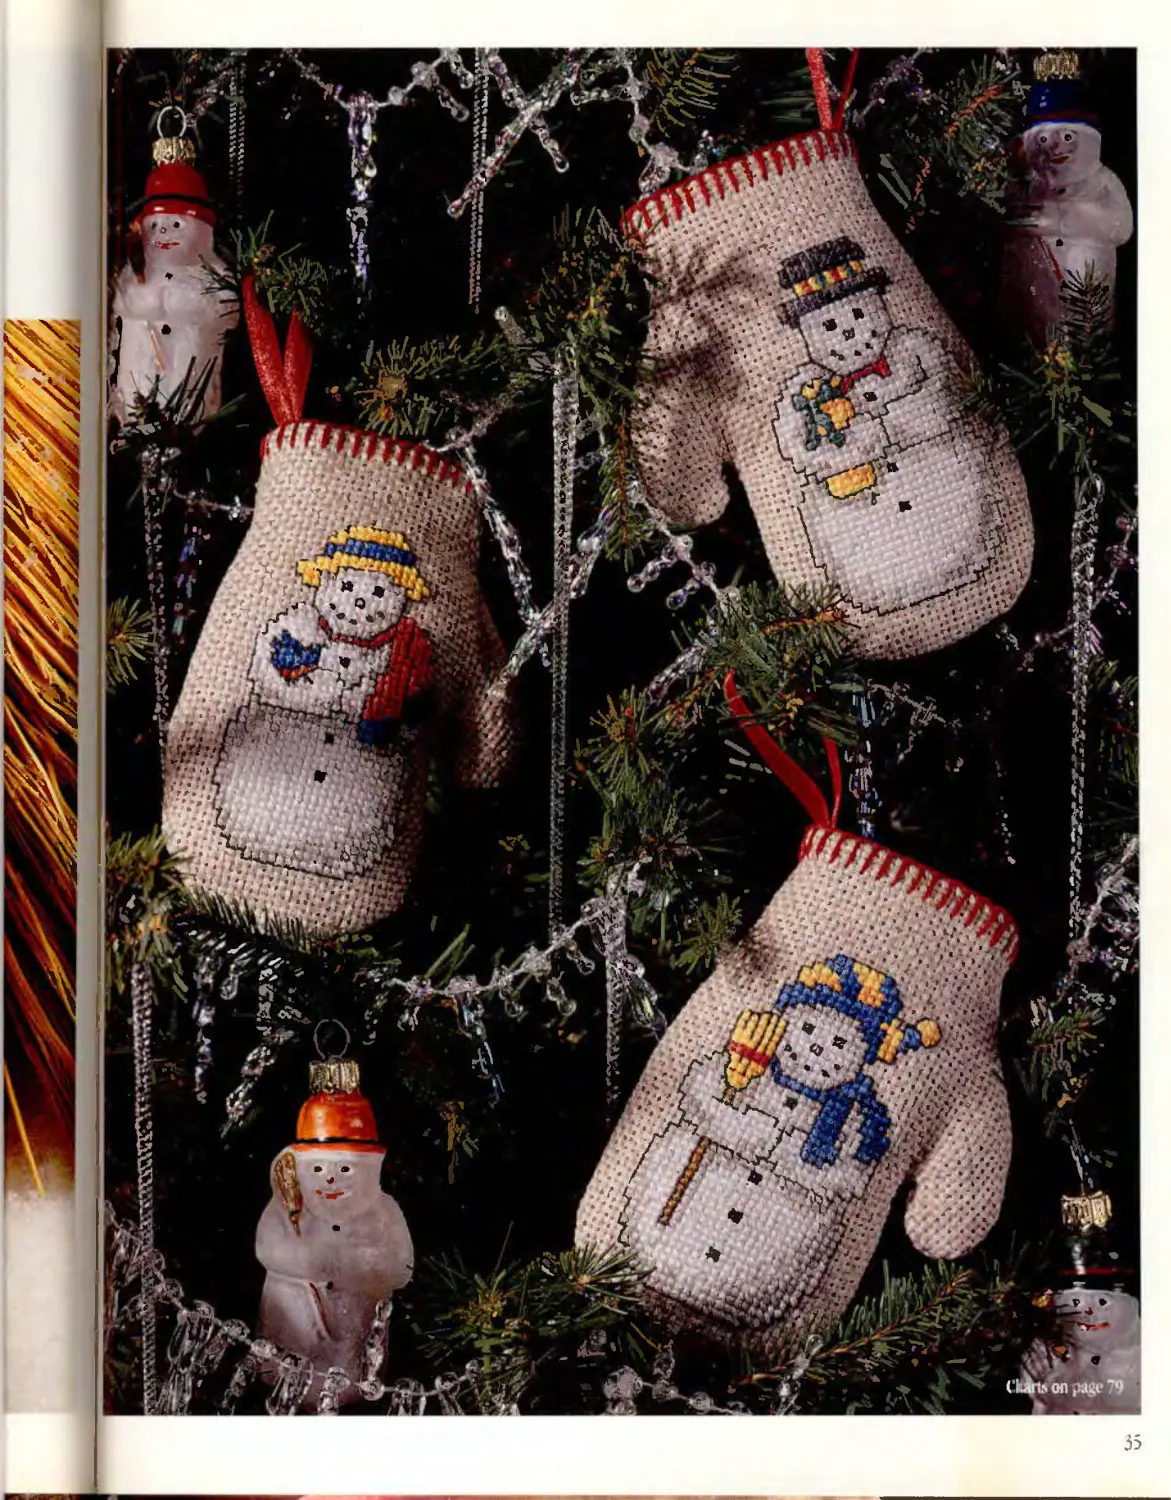
PROSTY pRieMOS
winter, we share our children s delight
create a whimsicaf personalityJor each snowman usi tg old caps, scarves,
and brooms. 41'het her peering through an icif windowpane or adorning
liny mittens, these chiffii chap's wifi bring that wintry fun indoors.
. •> /> /z
rt£*
|л -tv*, la
Ди Л
s^'. S
35
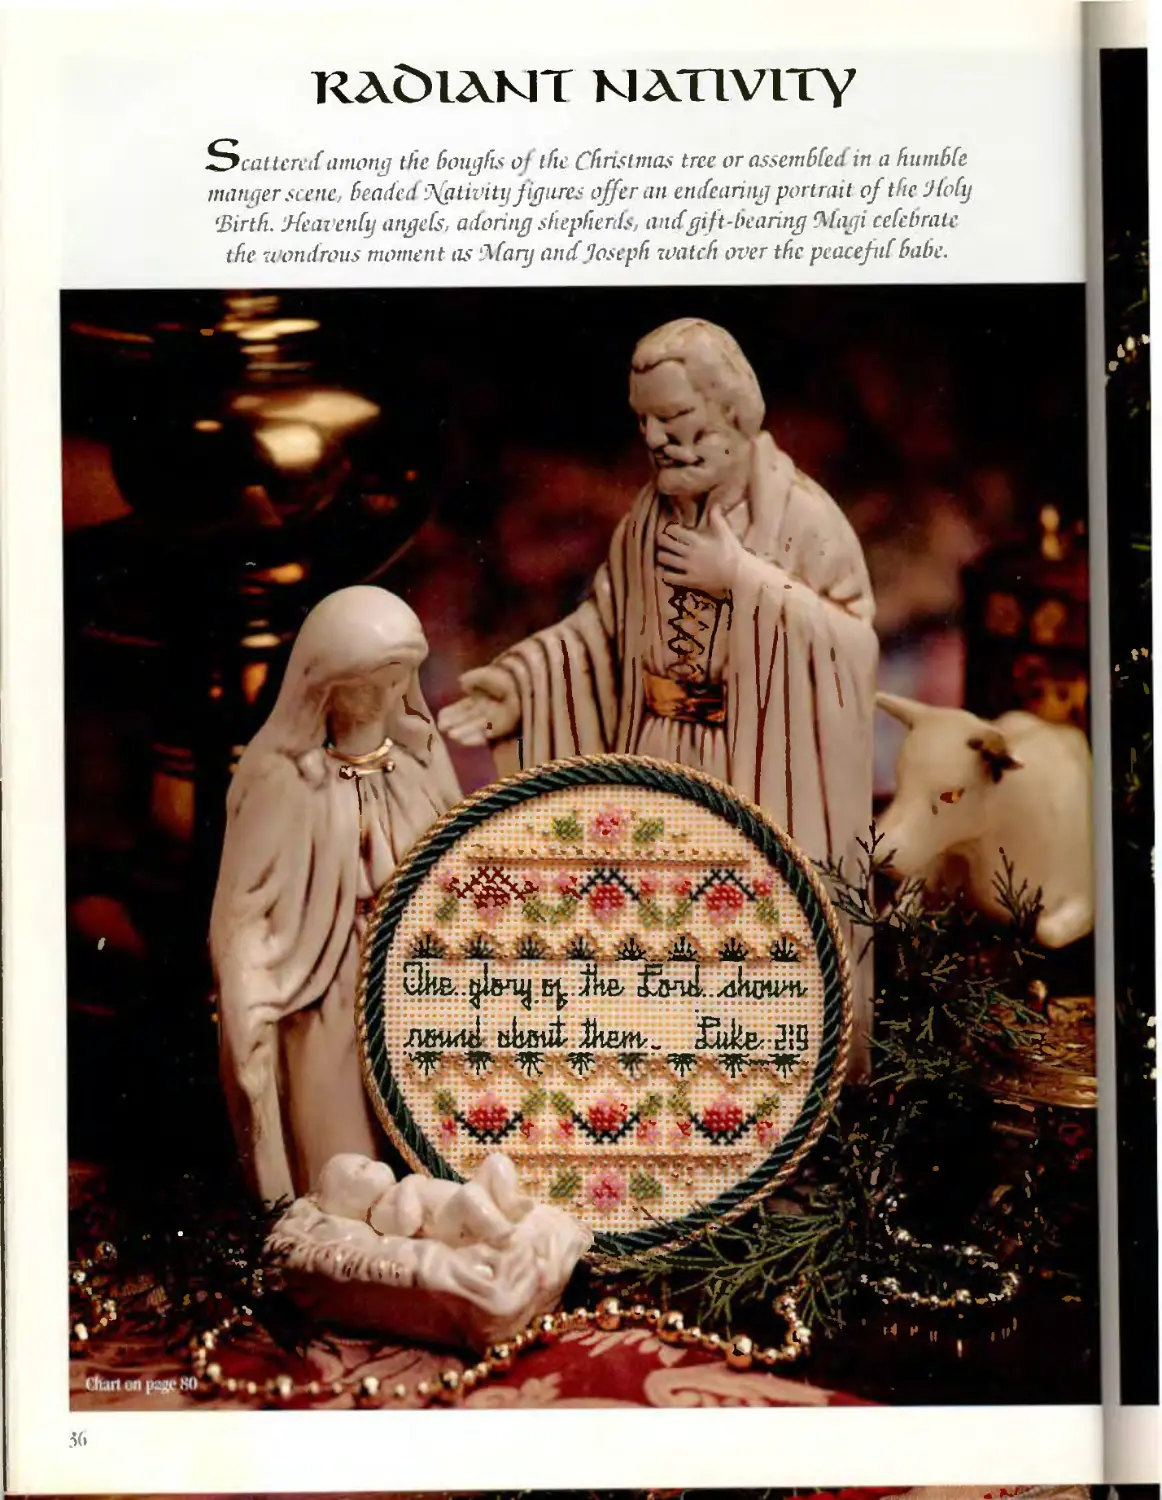
КЛСНЛНТ mat ivity
^^cattered among the houghs of the Christmas tree orassemhhed in a humble
manger scene, headed '^fglivity figures offer an endearing portrait of the ‘Jfcdy
‘Birth. dfeavetdy angels, adoring shepherds, andgift-bearing (Magi cehcbratc
the wondrous moment as ‘Mary and Joseph watch over the peacefid babe.
56
ChaifeWi ffigebi SO л
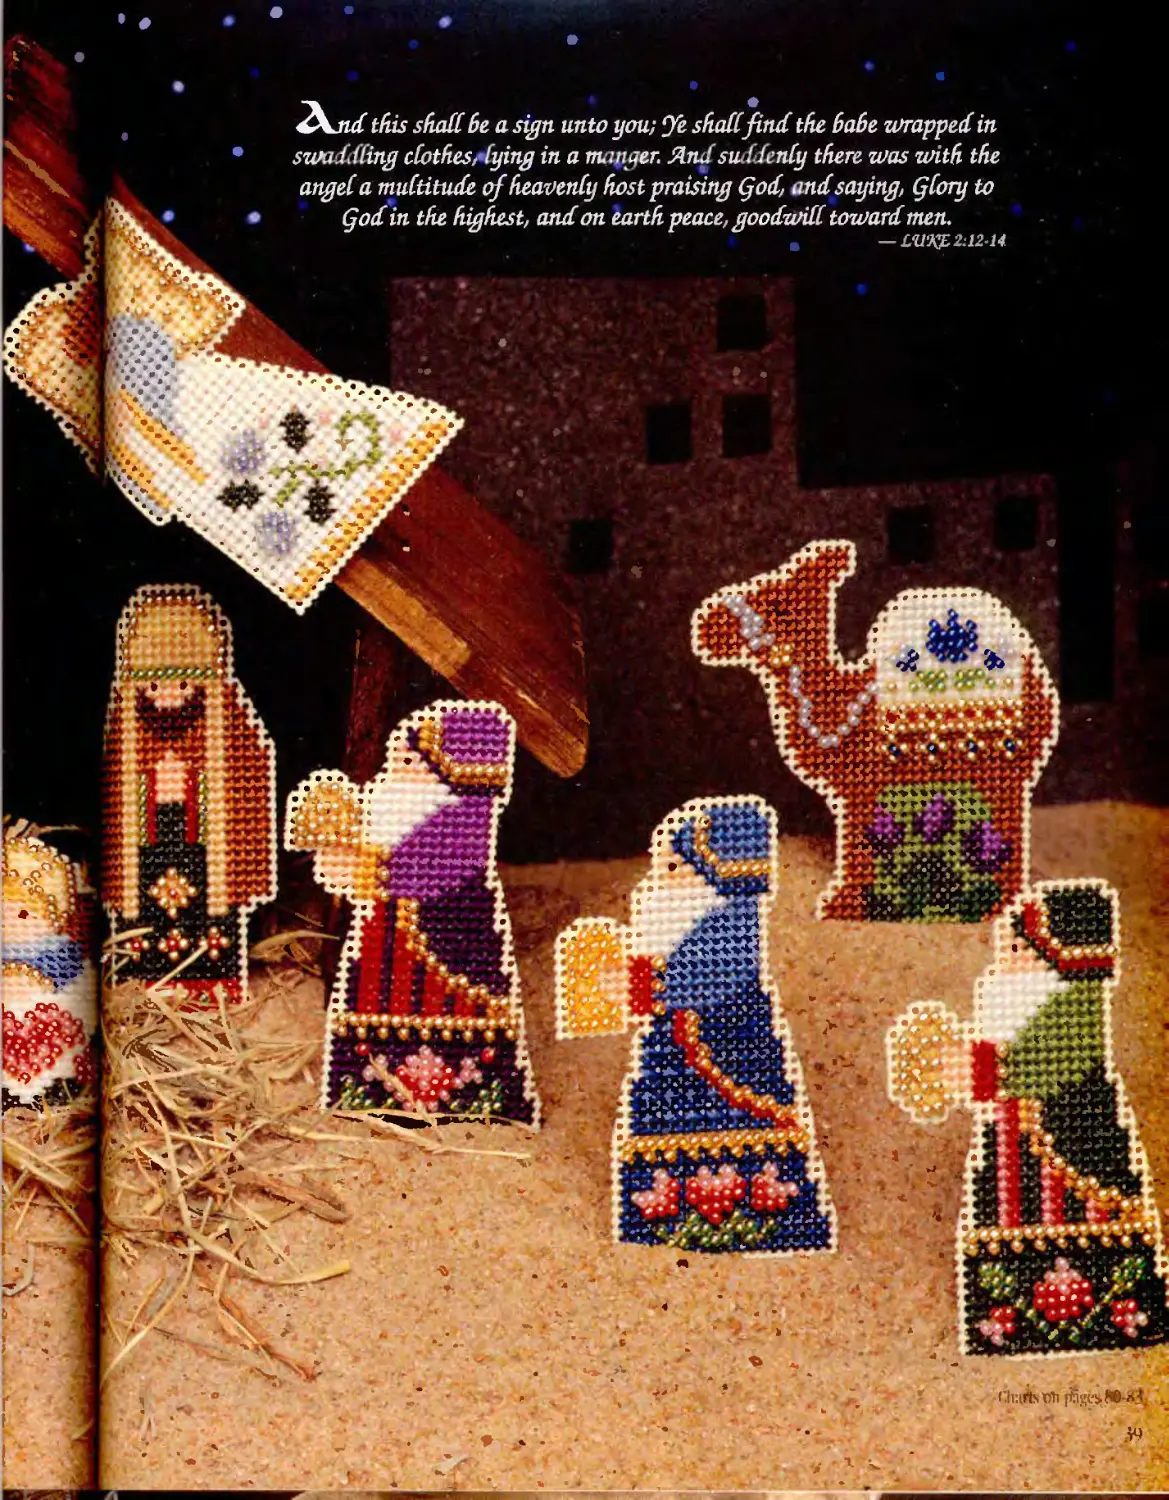
this shaft be a sign unto you; Je shaft find the. babe гита ped in
swaddfing ctothes, tying in a manger. Andsuddeidy there zoos with the
anget a muftitude of heaventy host praising (fid, and saying, Qtory to
Qod in the highest, and on earth peace goodwift toward men.
— 1Я1‘К£ 2:12-14
«.MM
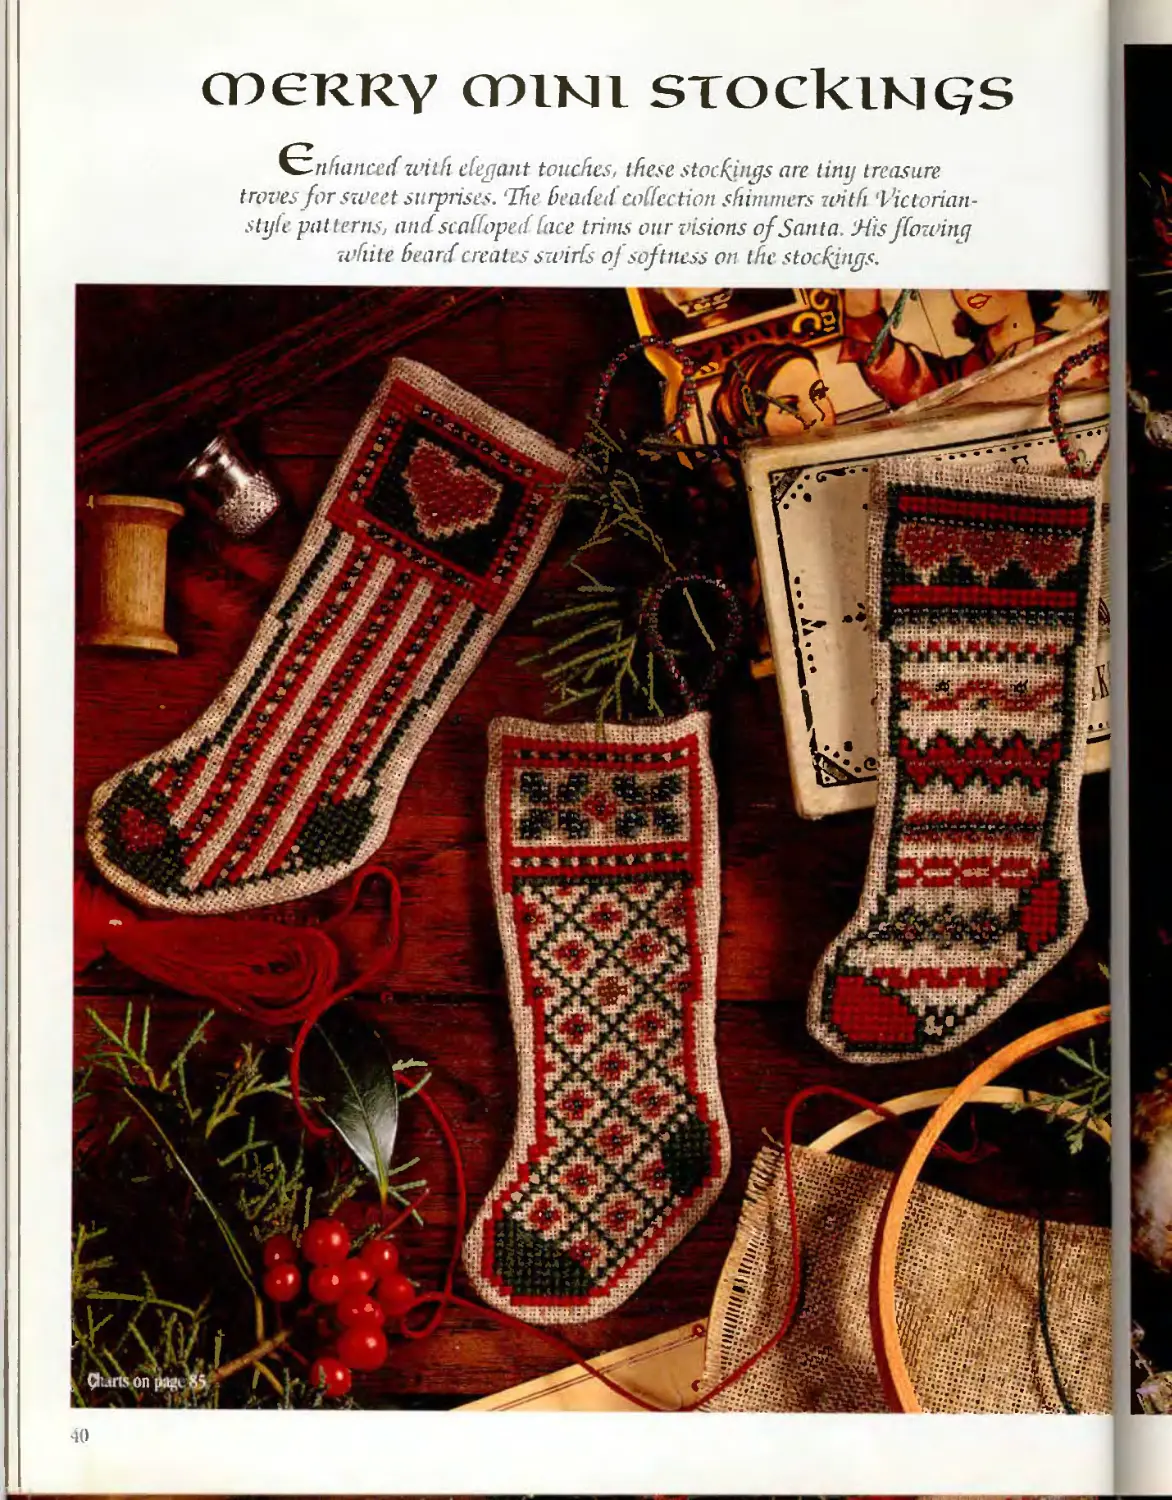
(Пекку cnlnii STOckiKiqs
C-nHancetf utitfi elegant tatuAes, tfiese stoctytgs are tiny treasure
troves for sweet surprises. ‘The beaded coffection shimmers with Tictonan-
style patterns, andscafi oped face trims our < isions of Santa. Mis Jfowiny
w tile beard creates swirls of softness on the stoefinys.
40
gM|
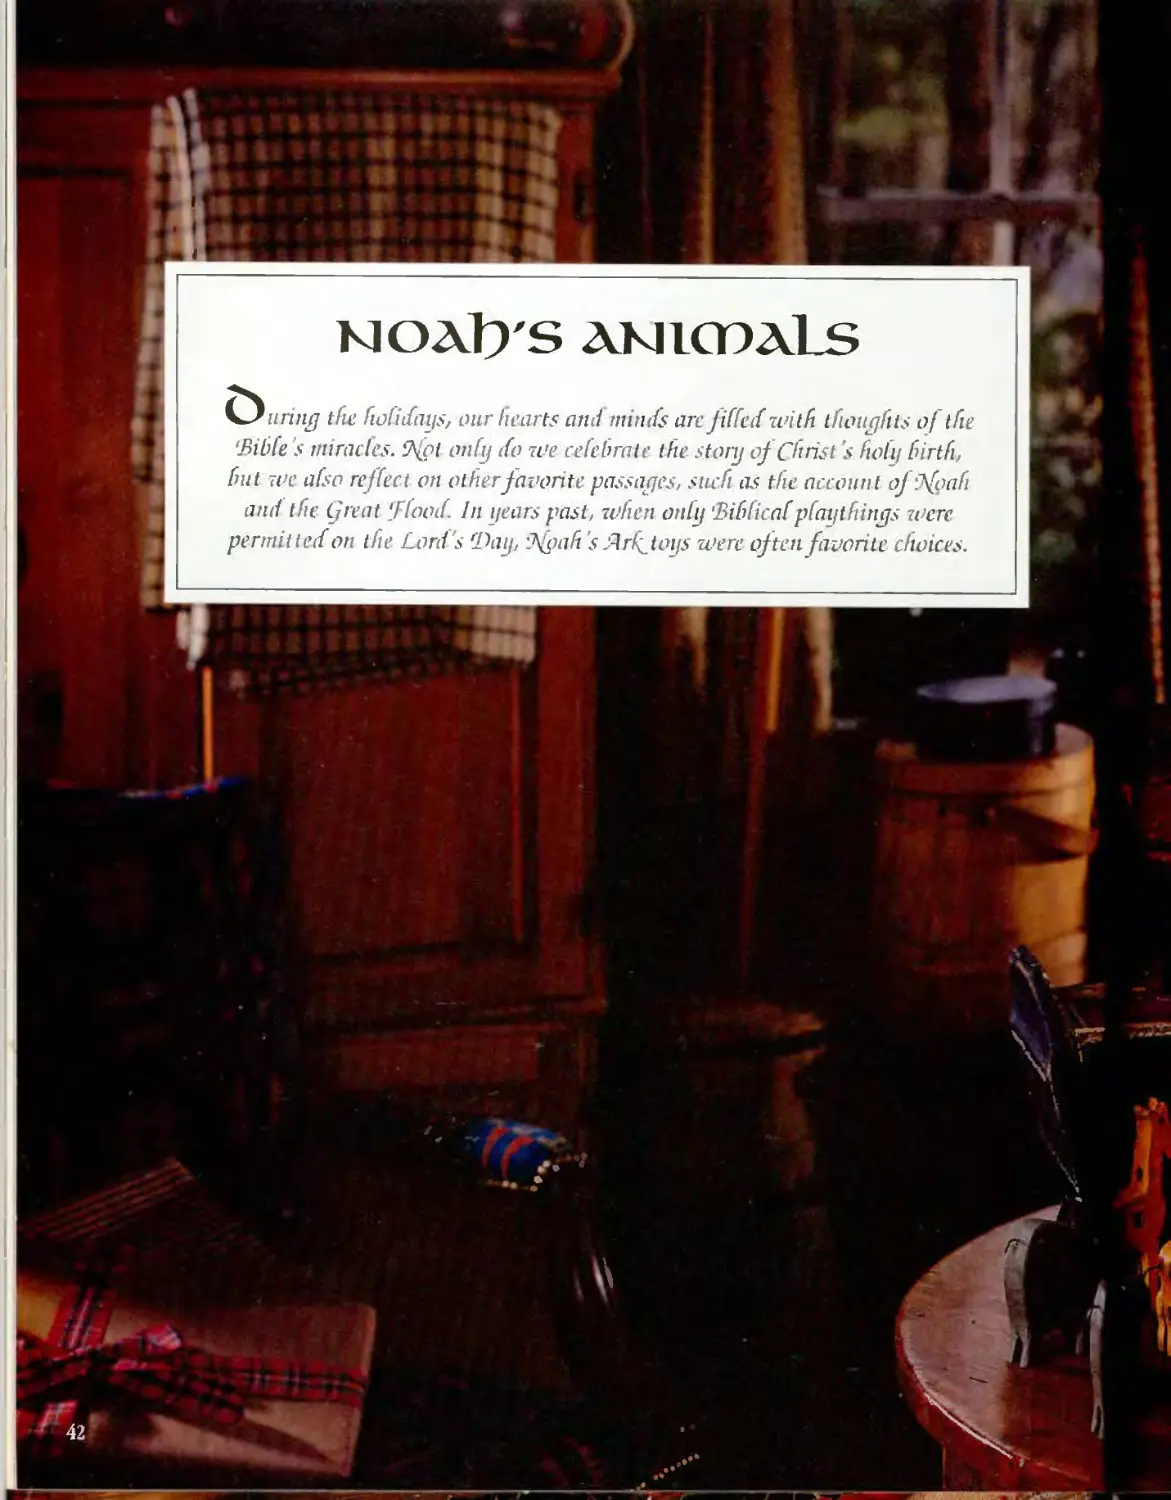
\Jiinng tJte fioGdays, our hearts and minds arc fitted with thoughts ofthe
‘Bible 's miracles. fft onby do we celebrate the story oj Christ's holy birth,
but we also reflect on other javonte passages, <uch as the account offloah
and the Ijreat ‘flood. In years past, when only ’Biblicafp aytfiings were
permitted on the Lord s (Day, flgah's Arfjoys were often favorite choices.
! Ш
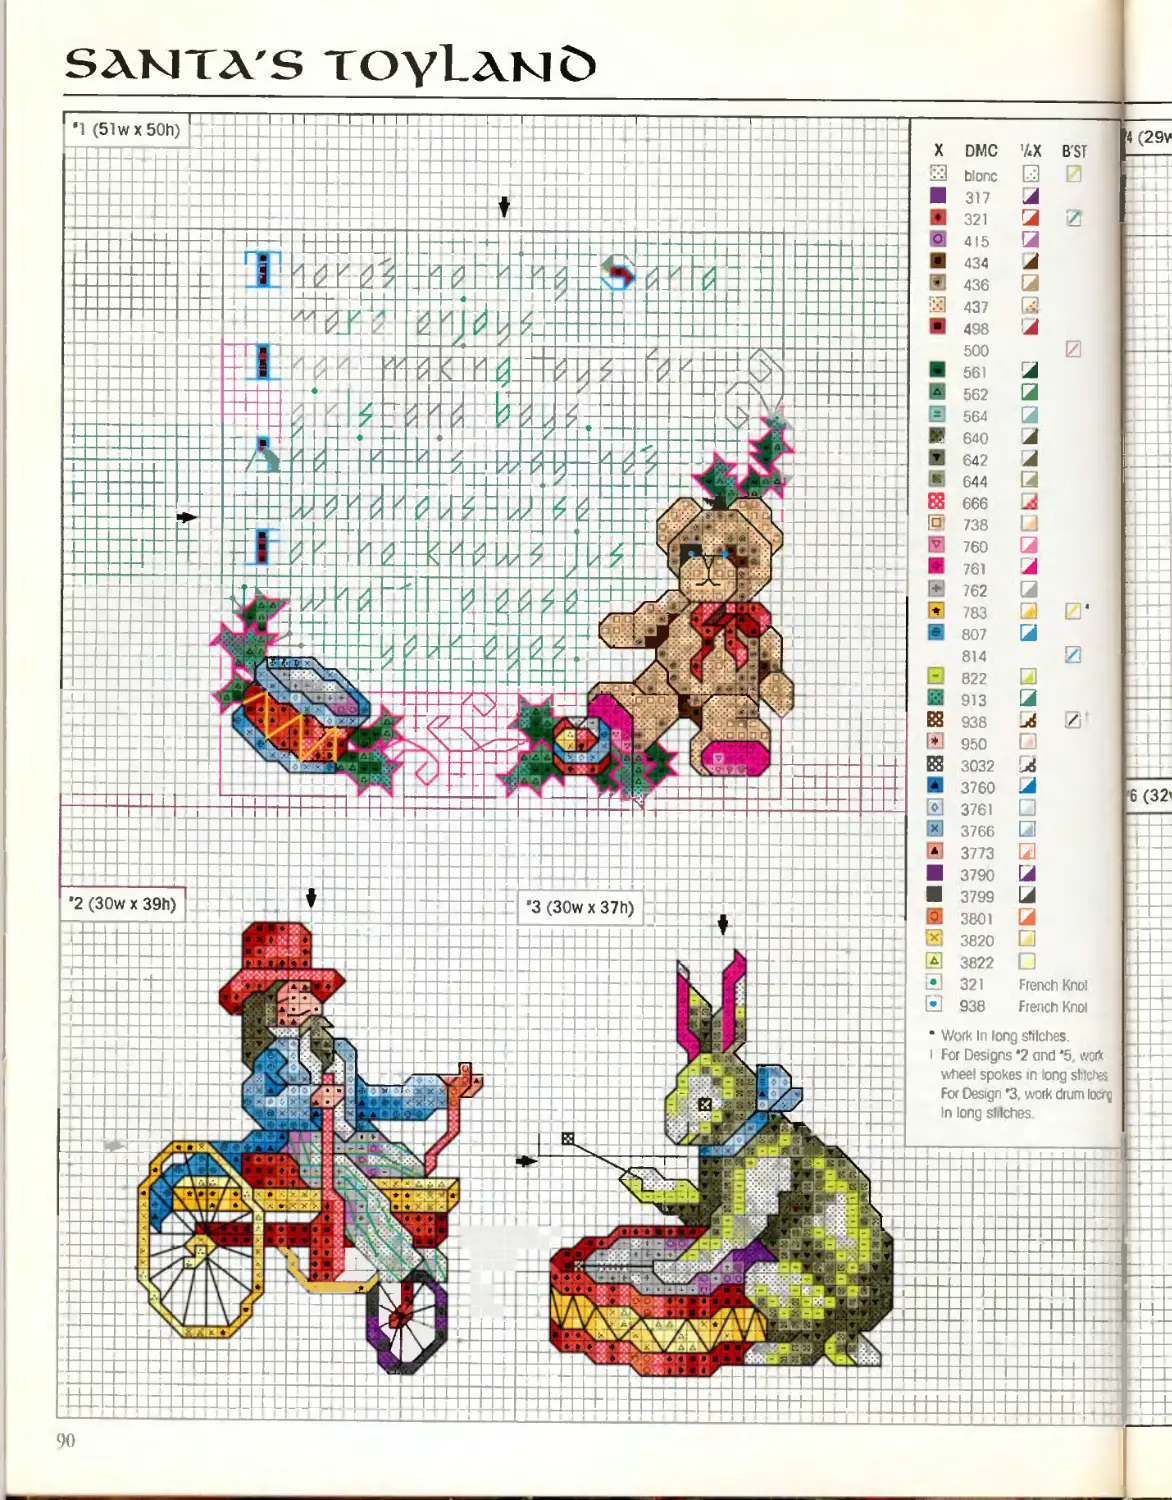
SAKHA'S
тоуЪлнО
L lere 's nothing Santa
more enjoys
Than making t oys for
girts and boys.
Sind in his way he s
wondrous wise
Tor he faurws just
what tptease
your eyes.
- я-лсоеч>--Т1^-£. I'i'ssr
on pages 88-89
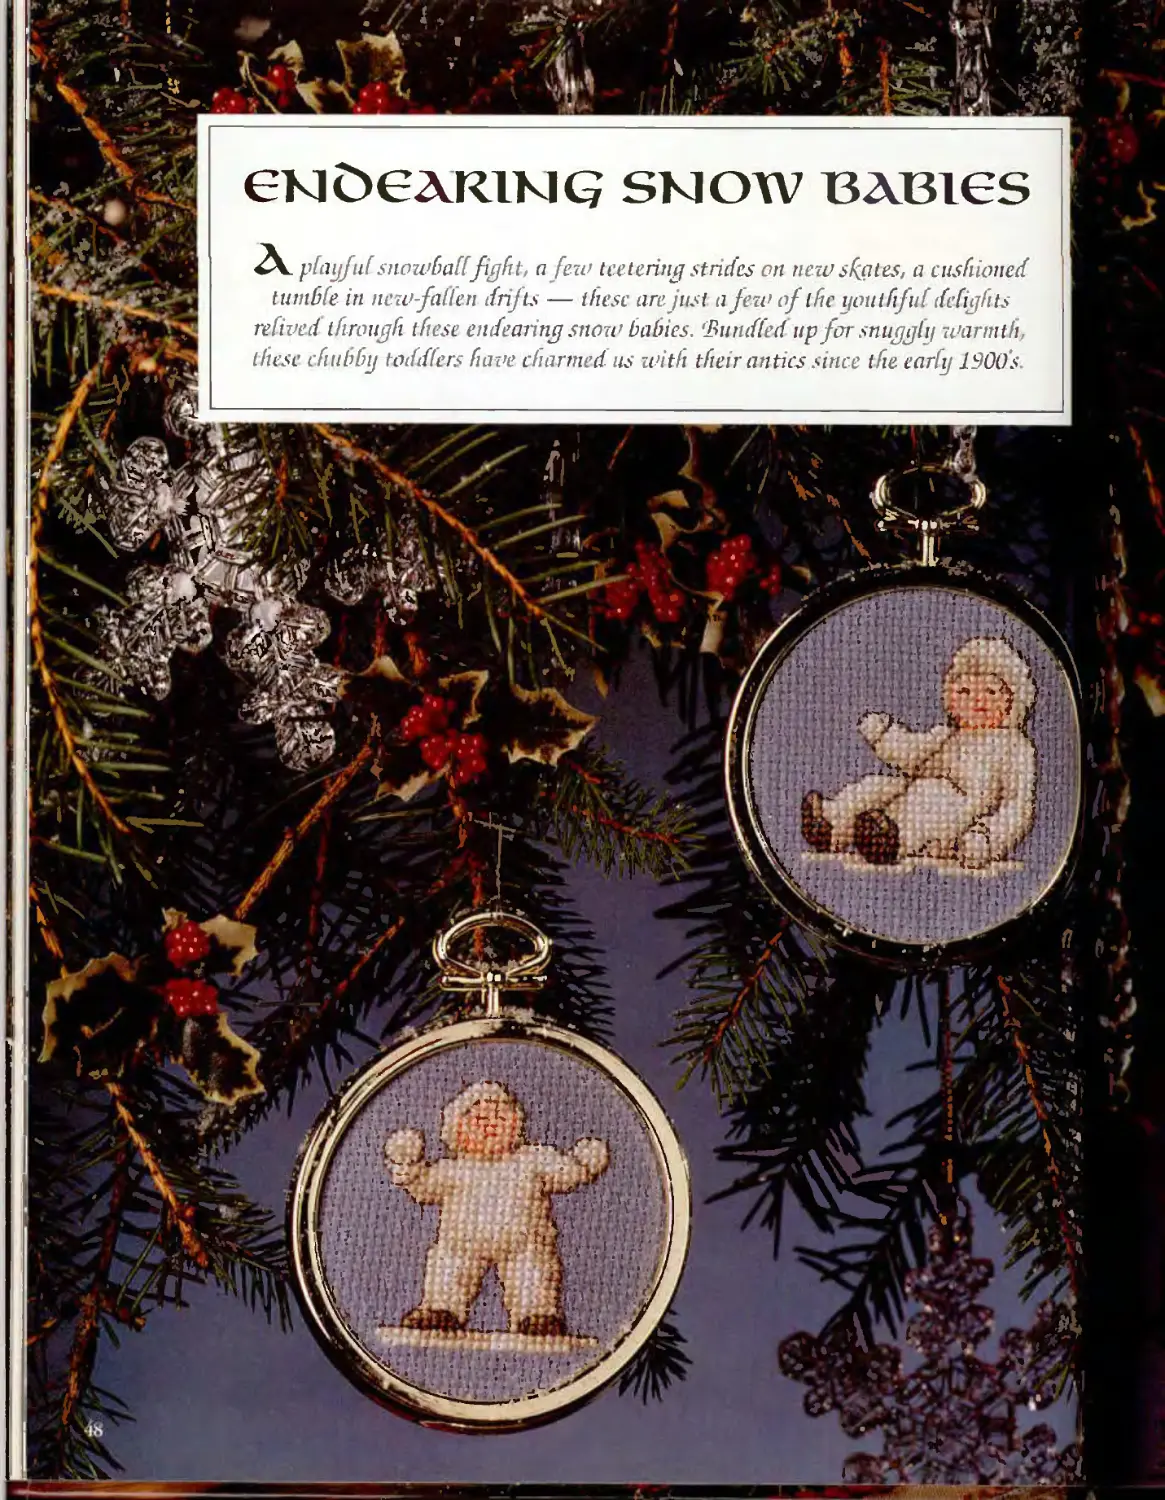
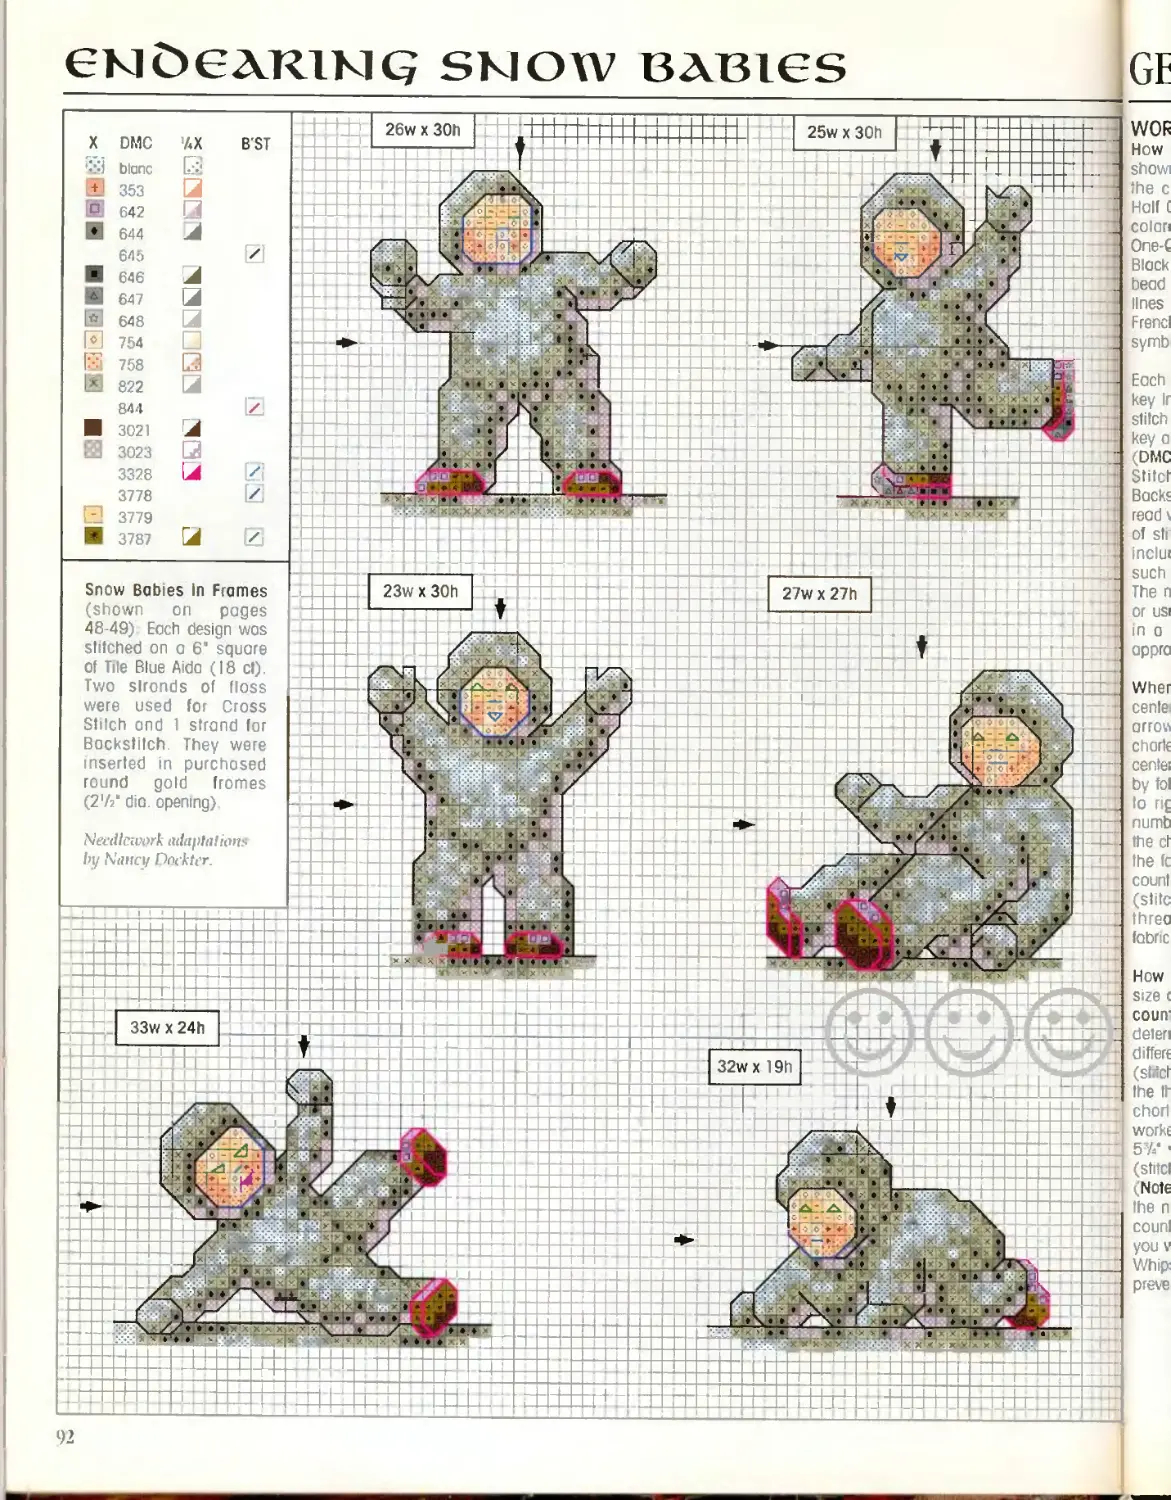
ckiOcarimc; SNOW BABieS
playful snowball fight, a few teetering strides on news fates, a cushioned
tumble in new-fallen tin ts — these are just a few of the youtfifu delights
re ived through these endearing snow babies. 'Bundled up forsnugglii warmth,
these chubby toddlers have charmed us with their antics since the early 1900s
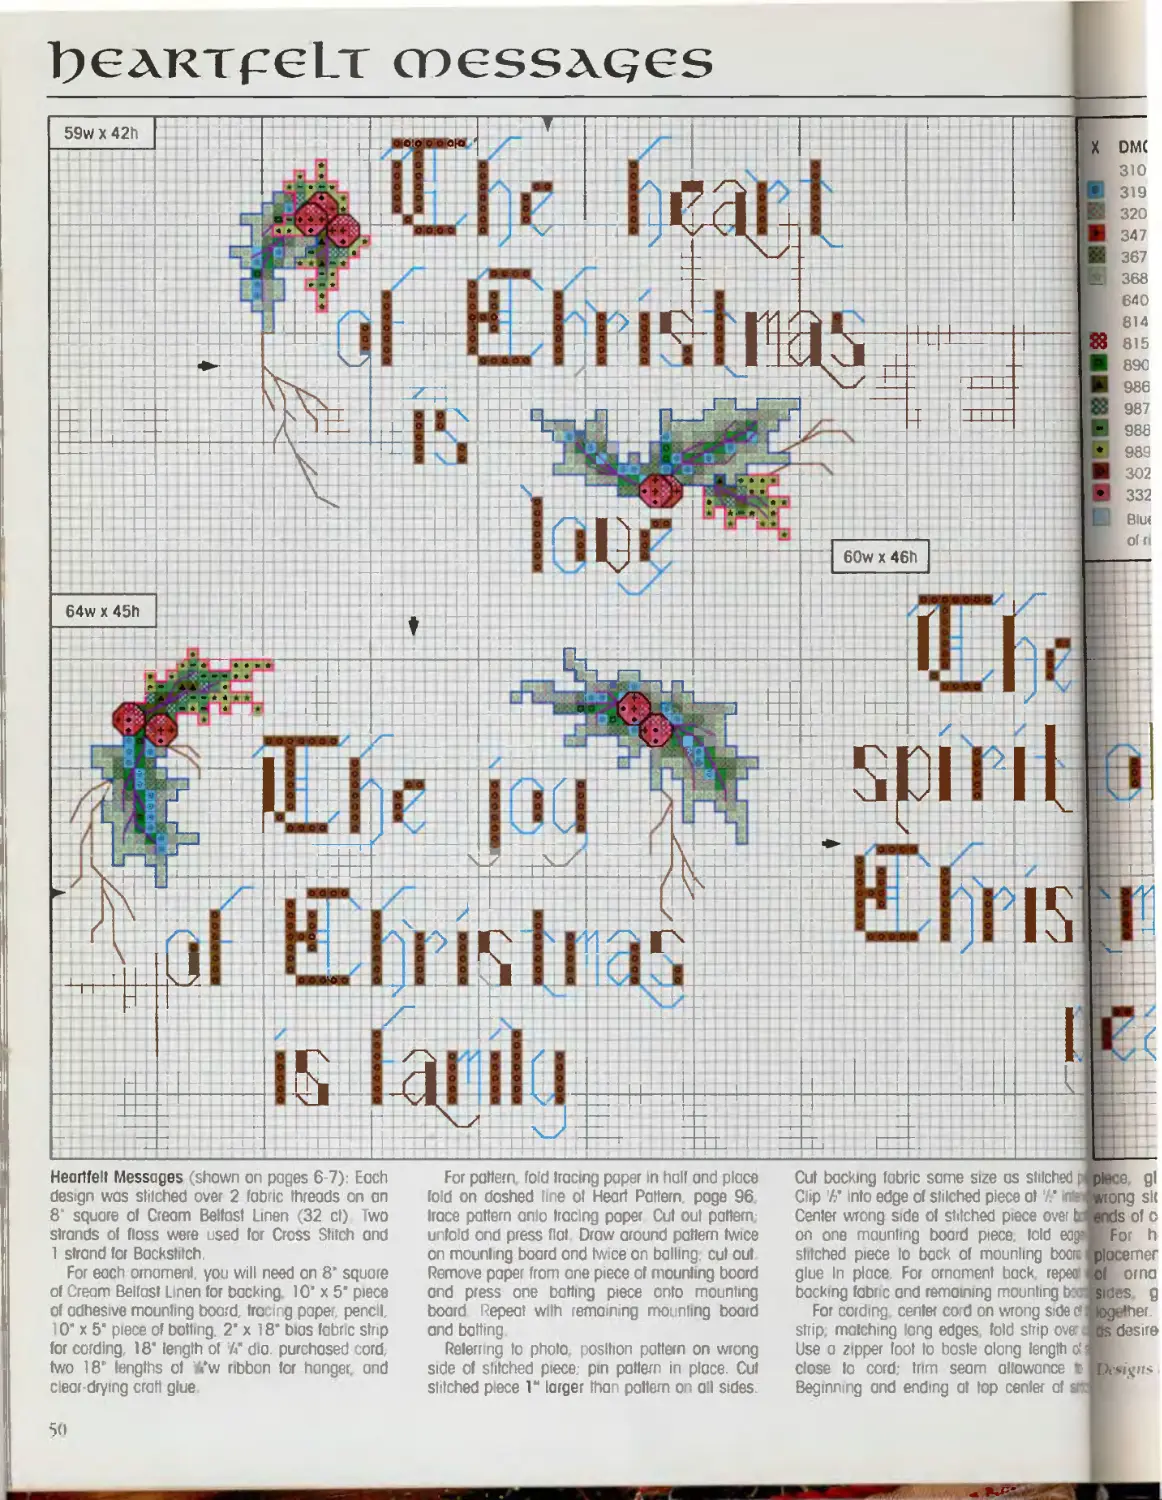
t>GARTpeLT CDGSSAQGS
Heartfelt Messages (shown on pages 6-7): Each
design was stitched over 2 fabric threads on an
8‘ square at Cream Belfast Linen (32 cf) Two
strands of floss were used for Cross Stitch and
1 strand for Backstitch.
For each ornament, you will need on 8й square
of Cream Belfast Linen for backing. 10’ x 5" piece
of adhesive mounting board, fracing paper, pencil,
10’ x 5' piece of bolting. 2* x 18’ bios fabric strip
for cording, 18’ length of A" dio. purchased cord,
two 18’ lengths of A’w ribbon for hanger, and
clear-drying craft glue
For pattern, fold tracing paper in half and place
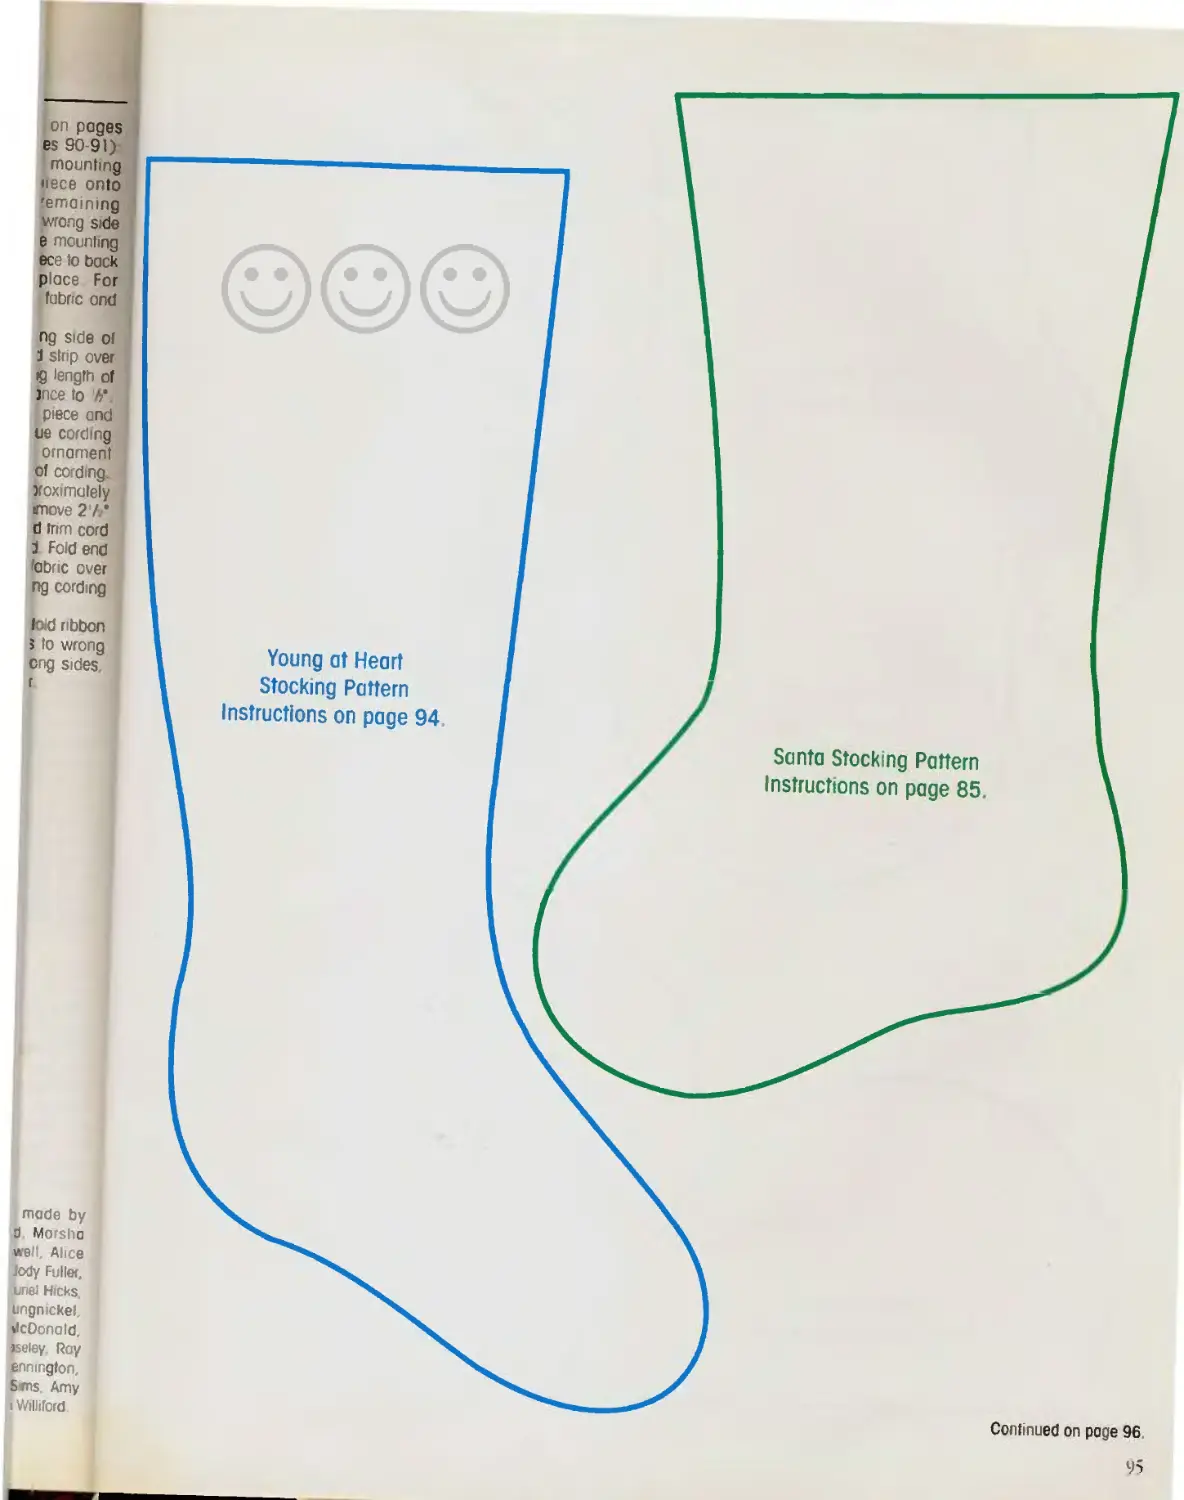
fold on dashed line of Heart Pattern, page 96.
trace pattern onto tracing paper Cut out pattern,
unfold and press flat Draw around pattern twice
on mounting board and twice on balling, cut out
Remove paper from one piece of mounting board
and press one batting piece onto mounting
board Repeat with remaining mounting board
and batting
Referring to photo, position pattern on wrong
side of stitched piece,- pm pattern in place. Cut
stitched piece Г larger than pattern on all sides.
Cut backing fabric same size os stitched piptece gl
Clip T Into edge of stitched piece al ‘A’ am wrong sit
Center wrong side of stitched piece over tJ ends of о
on one mounting board piece, told eogaB For h
stitched piece to back of mounting boon iplocemer
glue In place For ornament back, repeo (of orna
backing fabric and remaining mounting br sides g
For cording center cord on wrong sidedfiogethe
ship, matching long edges fold strip ove мнdesire
Use a zipper loot to boste along length с! Я
close Io cord; trim seam allowance UsnfHs
Beginning and ending at top center of snfl
50
62w x 46h
ЗЧС
В ST
67w x 4511
3021 1Z.
'3328 [J
Biis oreo indicoles first row
d right section of design.
I’ns fry Ijmiti Cnlf> Calhoun.
tched piece, p glue cording seam allowance to
V/ intervofcj
over b tt ng
Id edges ol
board and
I repeat witn
ng board. I
side of bids
p over cord,
igth of strip
nee to Л".
of siilcheflI
к side of ornomeni Iront. overlapping
t cording.
hr honger, referring to photo tor
Ement glue ribbons to wrong side
krnomenl front Matching wrong
glue ornament front and bock
her Tie ribbons in a bow; trim ends
wet
51
hGAveKiLv 1?ost
зГИс
Won
STITCH COUNT (3(Xv x 58h)
14 count
16 count
IBcouni
22 count
STITCH COUNT (31W x 55№
14 count 27/ l 41
16 count 2* x JI
18 count 1У/ x И
22 count 17/ x 3i
н х 55h)
B'ST
DMC
3072
3721
3722
3756
3770
3829
АогИ harp strings m
tog stitches.
❖ о о
м3 D’o ~O;<-
STITCH COUNT (28w x 57h)
14 count 2' x 47/
16 count IV/ x 3V/
18 count IV/ x 3//
22 count IV/ x 2V/
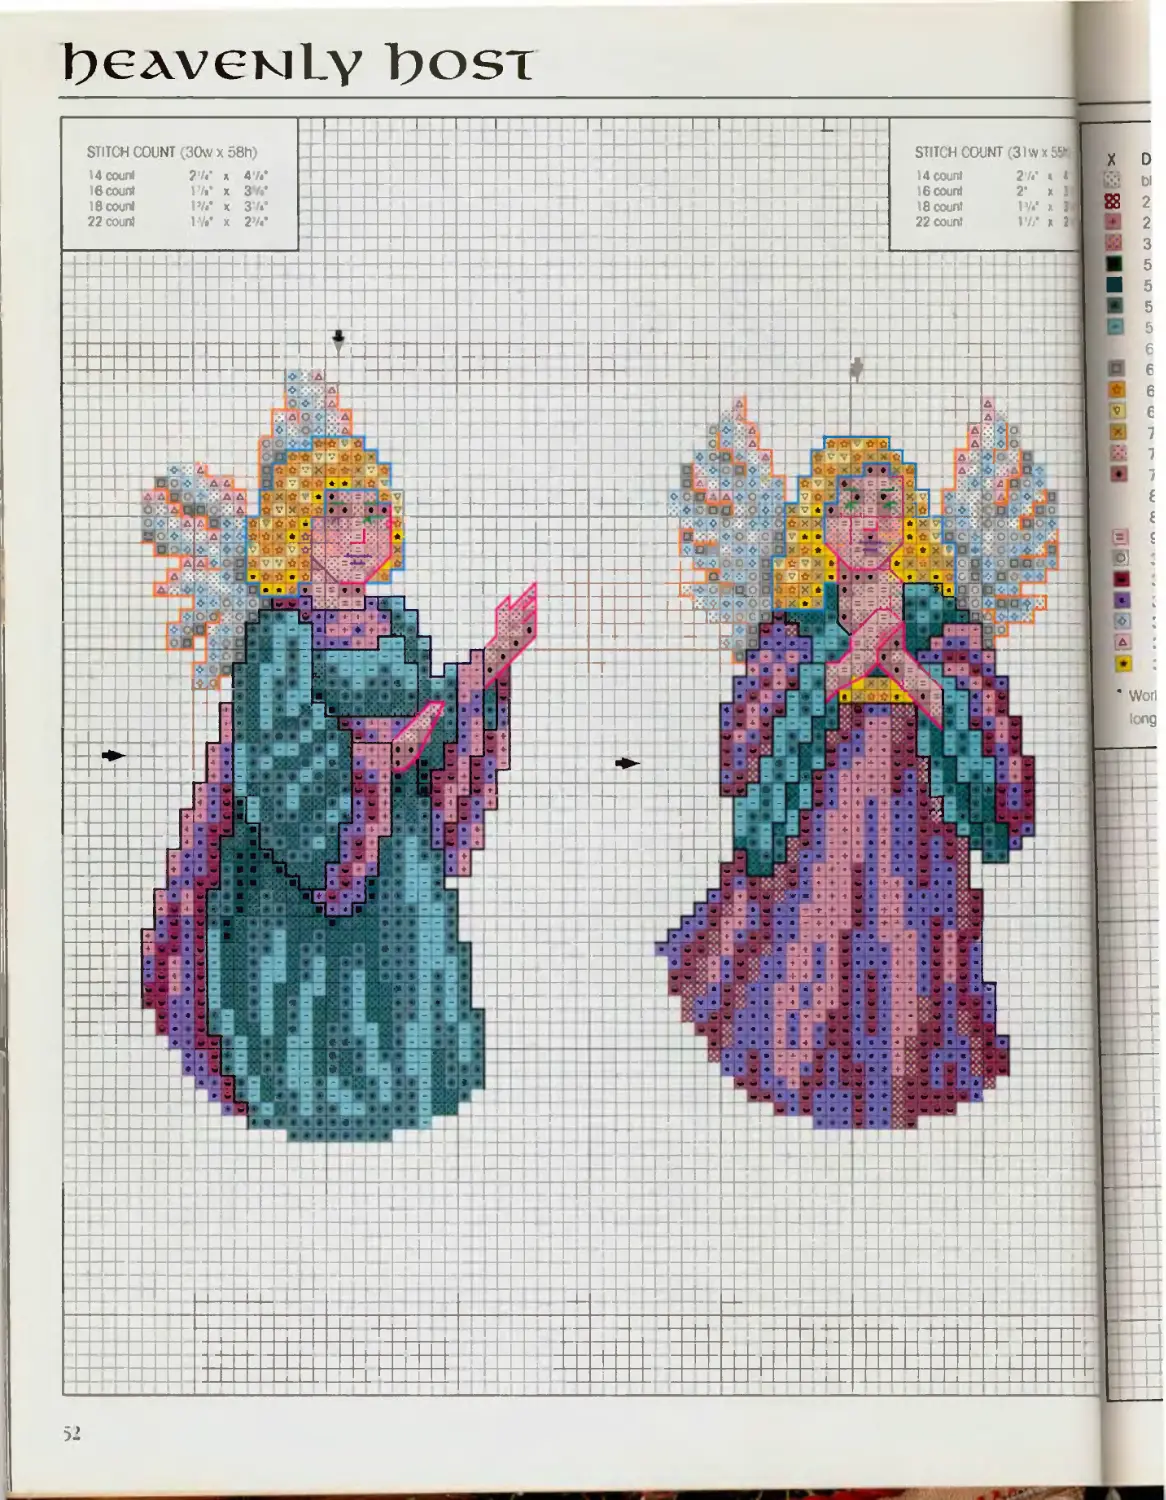
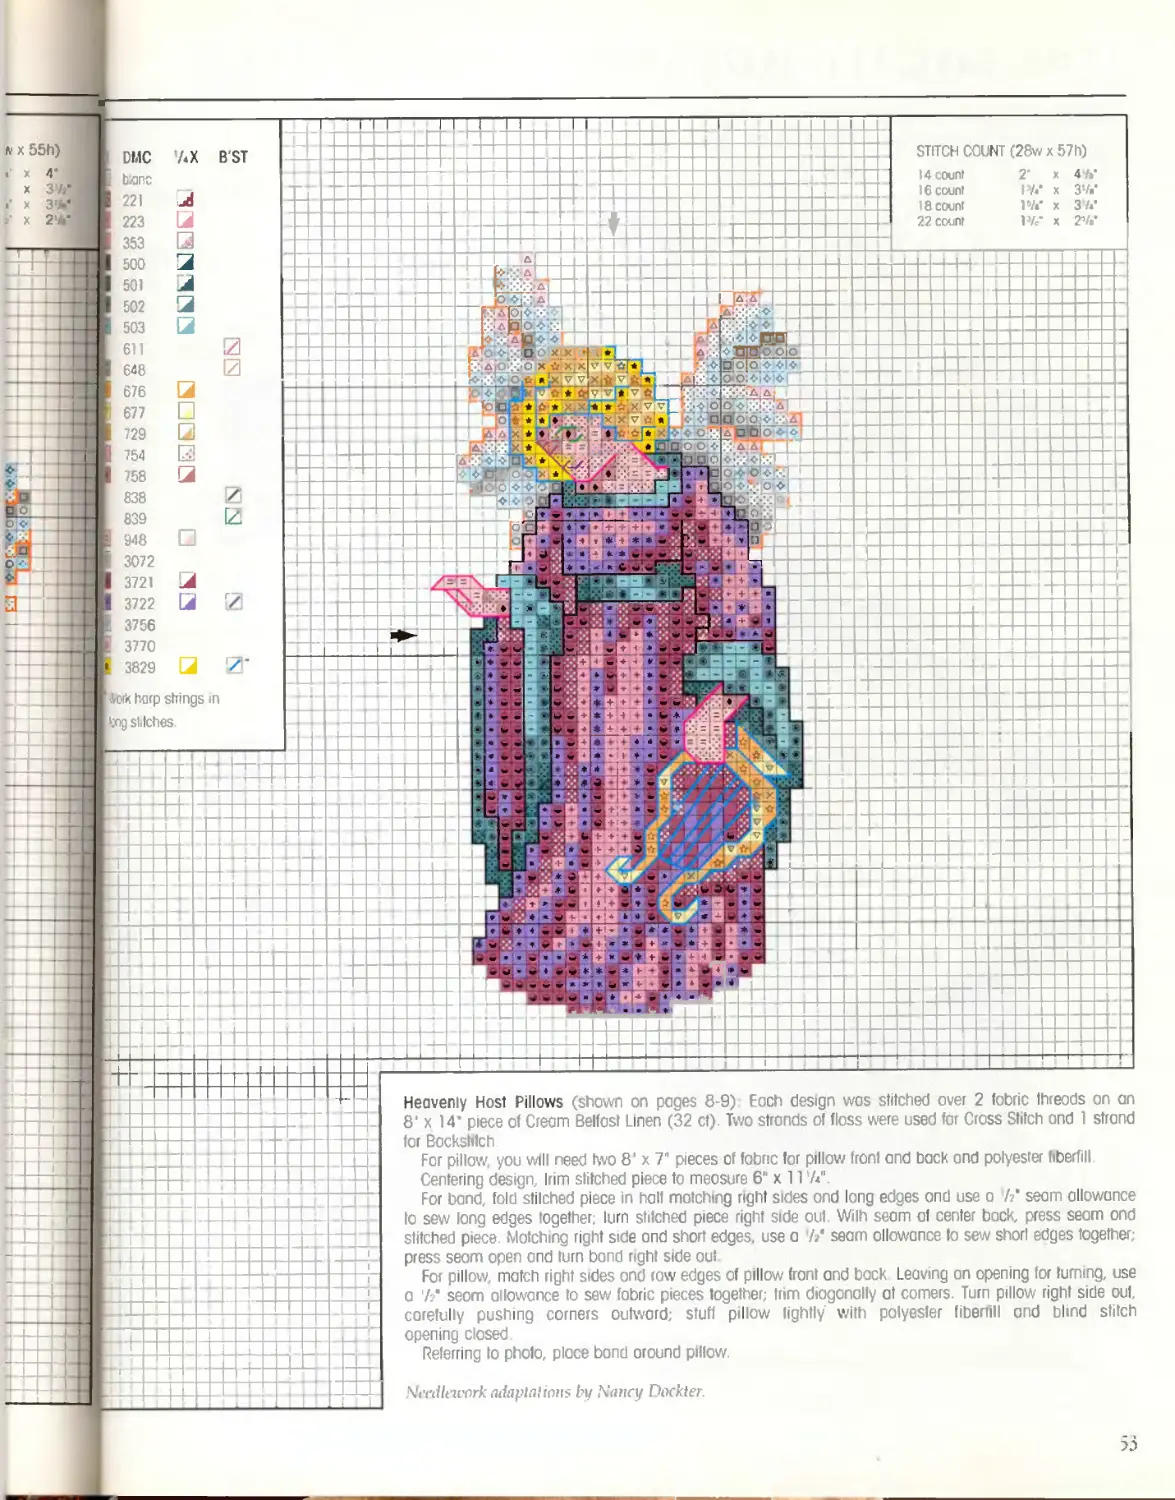
Heavenly Host Pillows (shown on pages 8-9) Each design wos stitched over 2 fabric threads on an
8‘ x 14’ piece of Cream Belfast Linen (32 ct) Two strands of floss were used for Cross Stitch and 1 strand
for Backstitch
For pillow, you will need two 8' x 7" pieces of fabric for pillow front and back and polyester fiberfill.
Centering design. Irim stitched piece to measure 6" x 117/.
For band, fold stilched piece in hall matching right sides and long edges and use a /?* seam allowance
Io sew long edges together; turn stitched piece right side out Wilh seam af center bock, press seam ond
stitched piece. Matching right side and short edges, use a h* seam allowance to sew short edges together;
press seam open and turn bond right side out
For pillow, match right sides ond row edges of pillow front and bock Leaving on opening for turning, use
a /?" seom allowance to sew fabric pieces together; trim diagonally at comers. Turn pillow right side ouf,
carefully pushing corners outward; stuff pillow lightly with polyesler fibenill ond blind stitch
opening closed
Referring to photo, place bond around pillow.
Nci’dlework adaptations by Nancy Dockter.
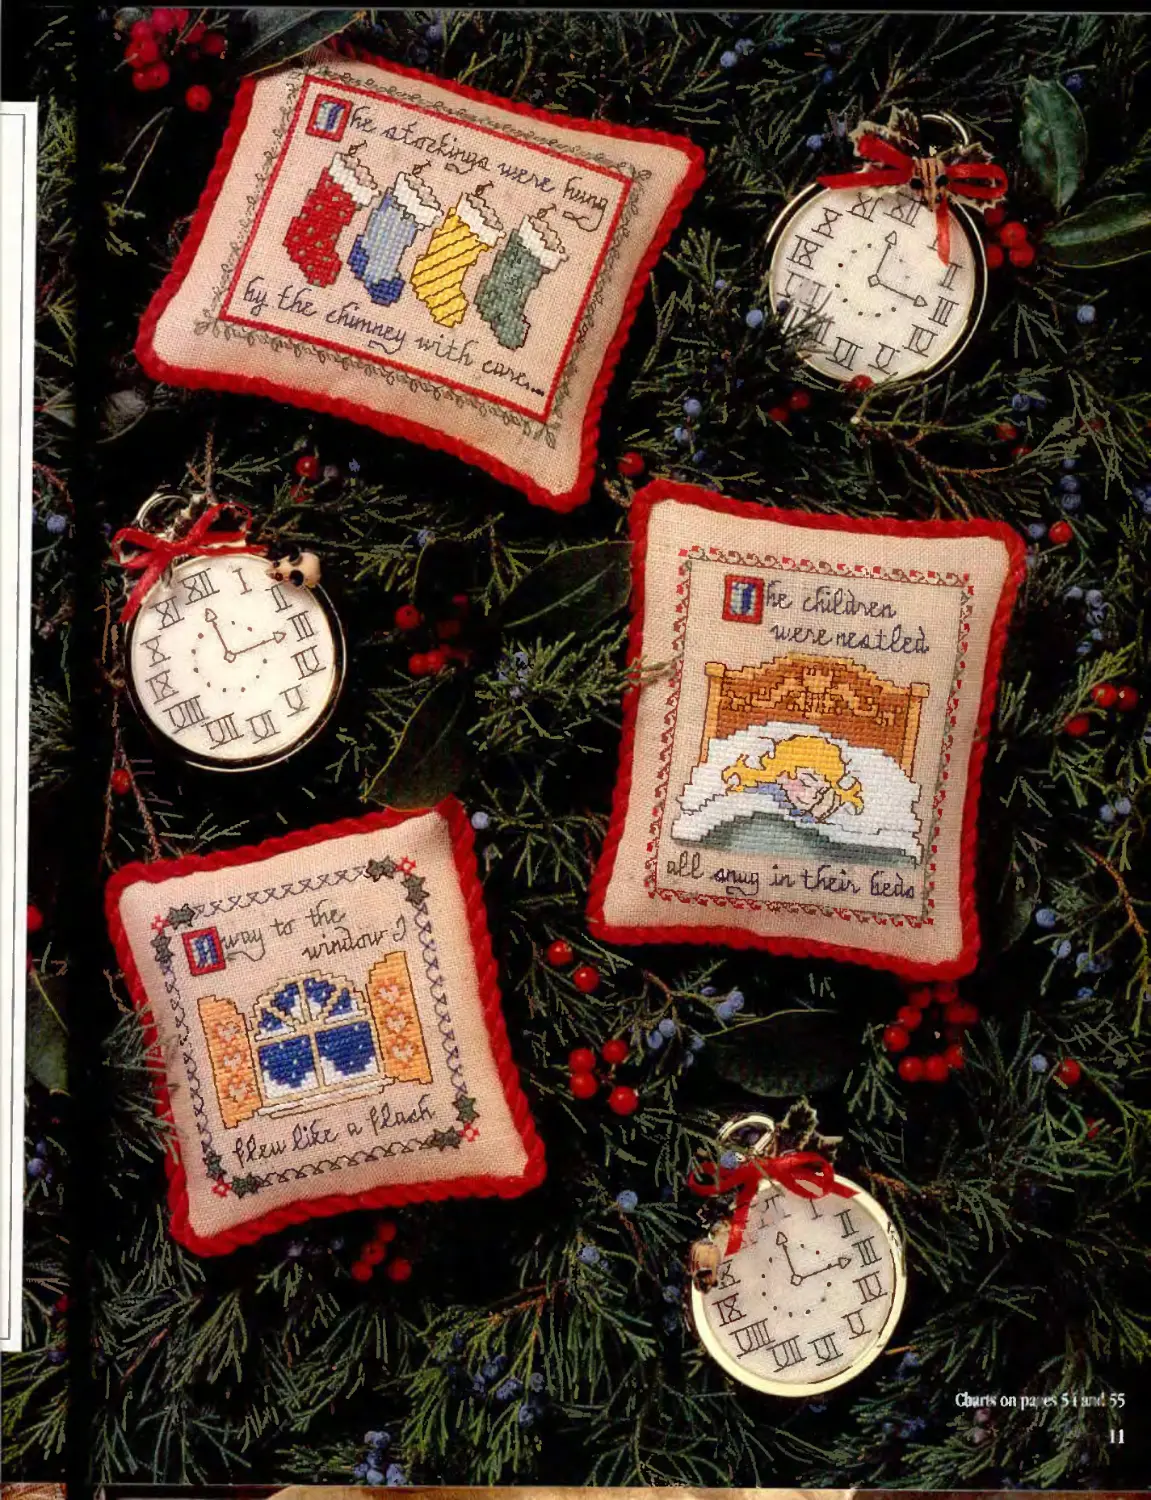
тЪе MiqbT вероке сТжгвтоэлв
Clock Face in Frame (shown on pages
11-13) The clock face design was
stitched over 2 fabric Ihreods on о
6’ square of Cream Belfast Linen
(32 cl) One strand of floss was used
far Backstitch and French Knots II wos
Inserted in a purchased round gold
frame (2’/f dio opening).
Referring to photo for placement,
glue sprig of miniature holly,
small wooden mouse, and red satin
bow Io Irome.
The Night Before Christmas Pillows
(shown on pages 11-13): Each
design wos stitched over 2 fabric
threads on 9“ square of Light Mocha
Belfast Linen (32 ct) Two strands of
floss were used for Cross Stitch
and 1 strand for Bockstilch and
French Knots
To complete pillows, see The Night
Before Christmas Pillows, роде 57,
for finishing instructions
Designs by flolly DeFount
of Kooler Design Studio.
49w x 58h
B'ST
ecru
47w x 5011
3371
30w x 30h
OILS
3326
3371
3755
3756
3815
3816
3817
3820
3821
btonc
DMC
Dtanc
D,tl a -11
L il J-'fl
French Knot
French Knot
French Knot
TbG MIQbT вероке CbRISTCDAS
45w X 4*
54w x 54h
436
666
3371
56w x 36h
ЕПЙ
The Nigh
Iwos stif
feelfast
ond 1 st i
For e
Unen fc
J floss for
Motet
fobric t
piece 1
[use о
| allowon
! pushing
stitch O|
For t\
knot 2"
I floss ur
Kit cent*
Release
898
899
938
948
963
3326
3371
3755
3756
3815
3816
3817
blanc
French Knot
French Knol
French Knot
DMC
blonc
ecru
304
ww^MKsai
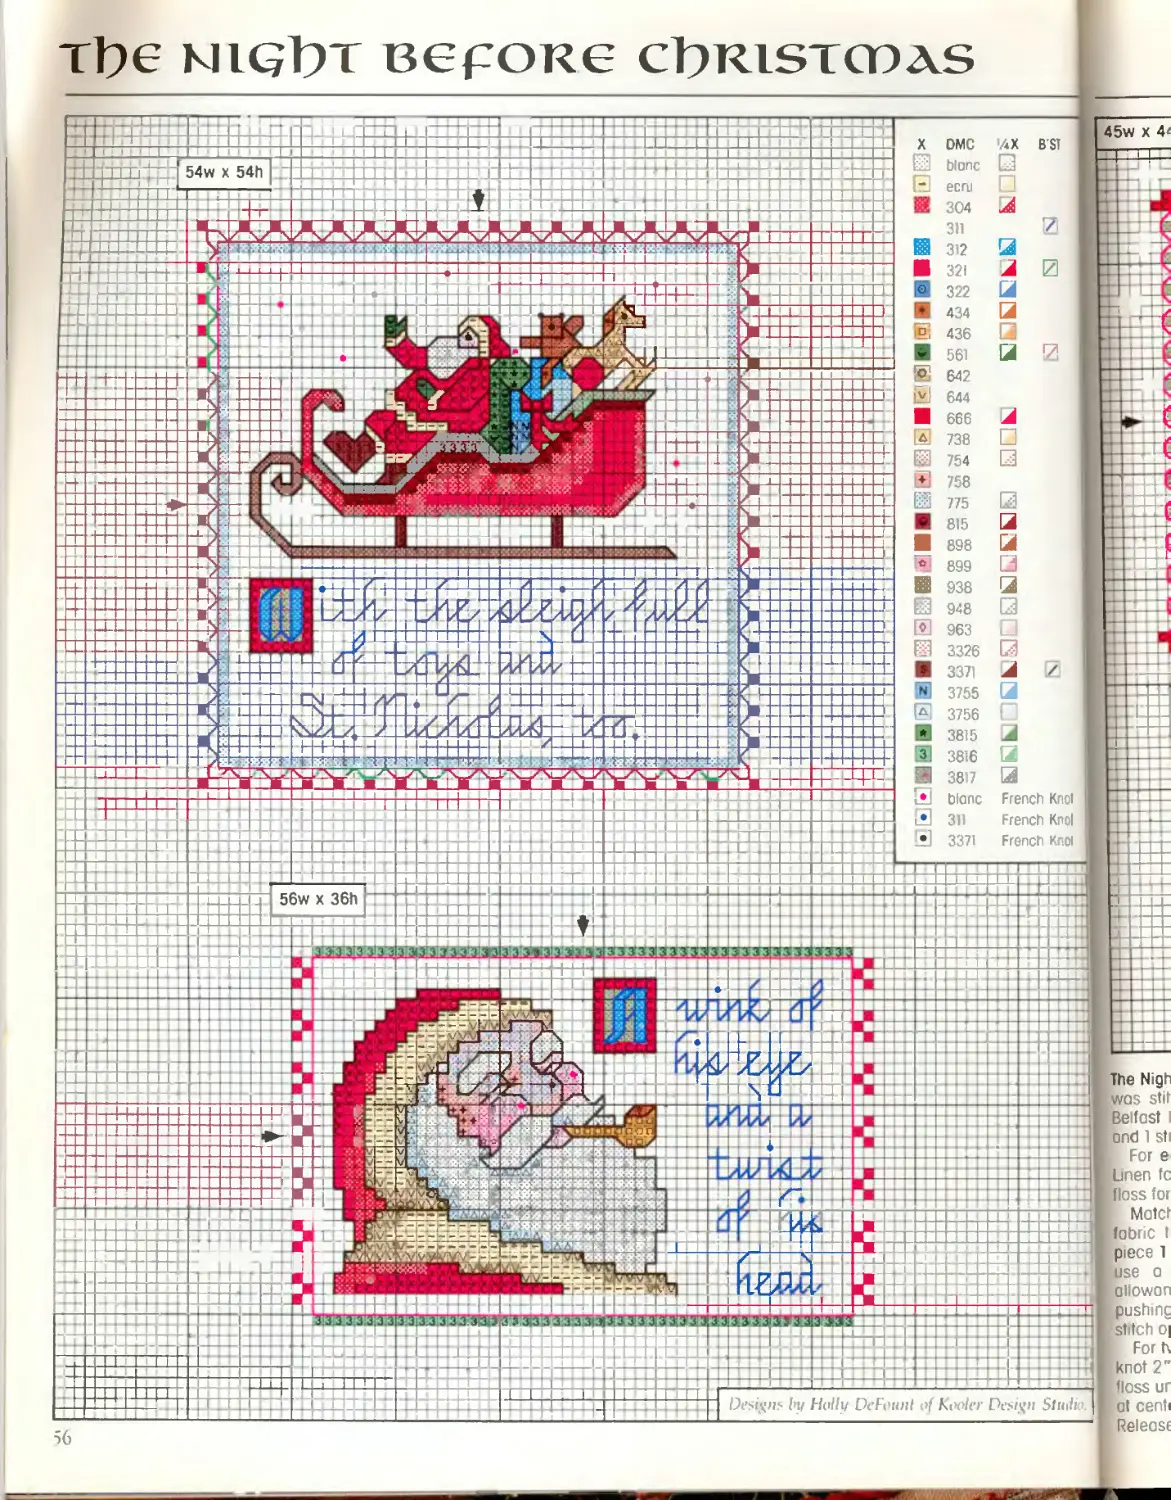
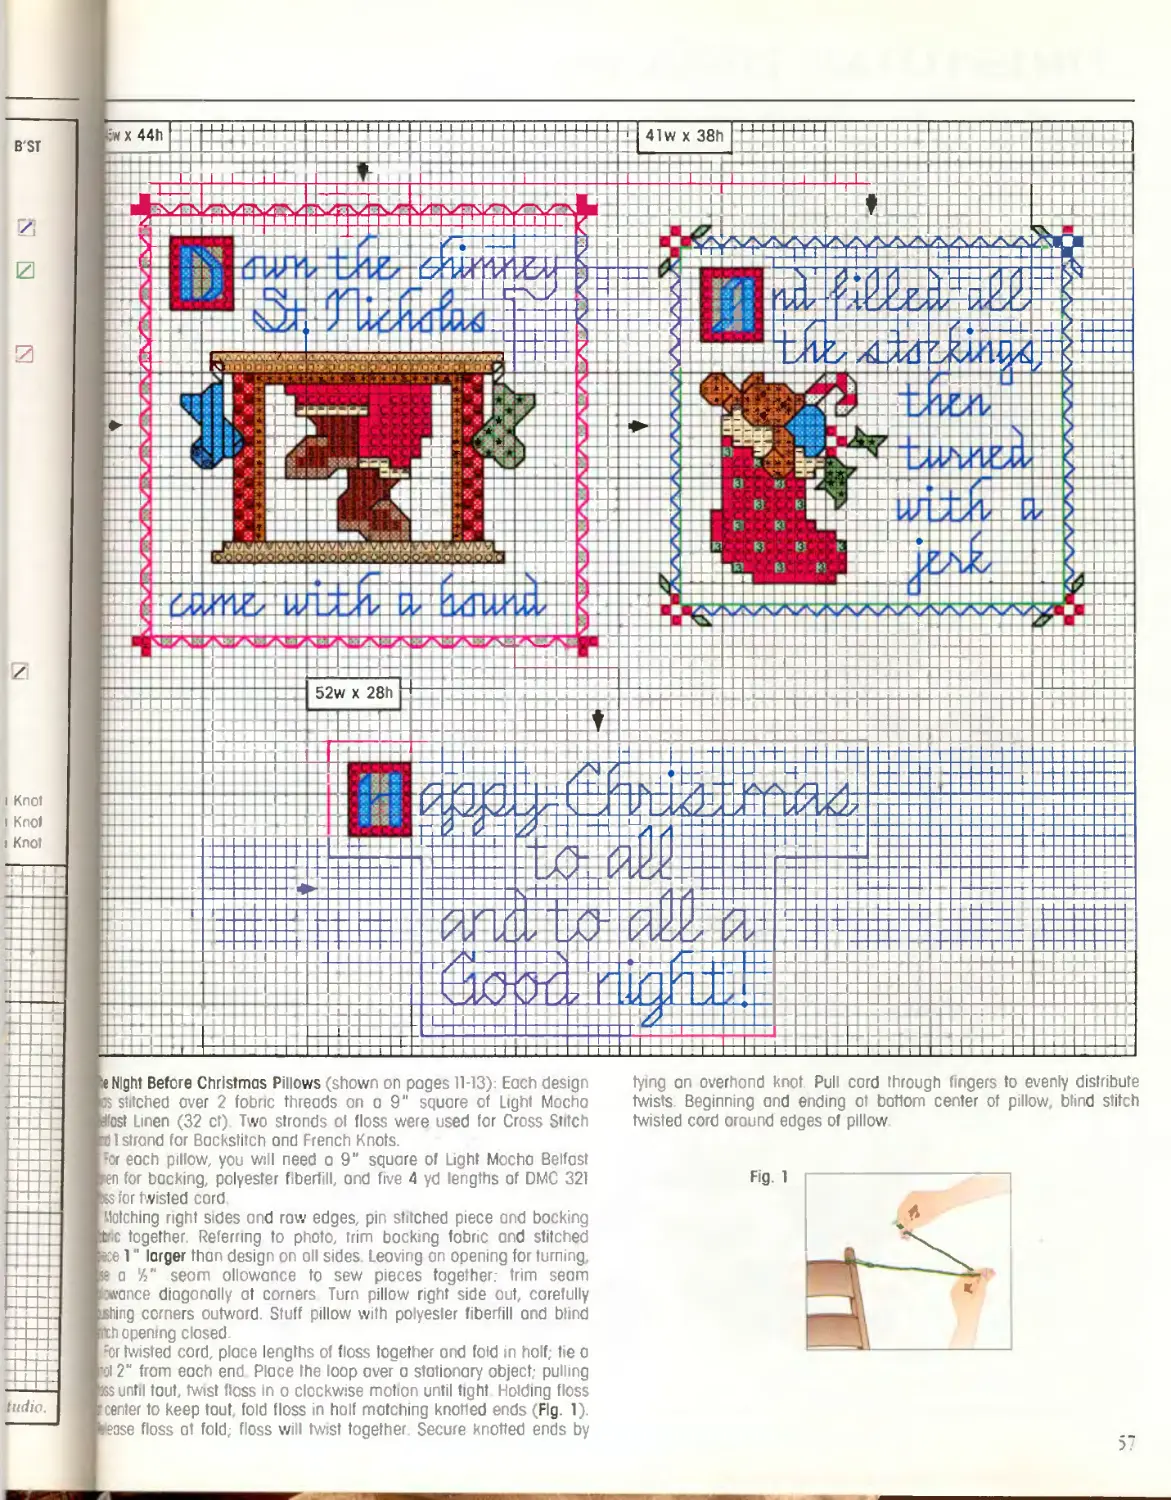
t Night Before Christmas Pillows (shown on pages 11-13): Each design
• stitched over 2 fobnc threads on a 9” square of Light Mocha
Host Linen (32 ct). Two stronds ol floss were used for Cross Stitch
fil strand for Backstitch ond French Knots.
r each pillow, you will need a 9" square of Light Mocho Belfast
?n for backing, polyester fiberfill, ond five 4 yd lengths of CMC 321
s for twisted cord
latching right sides ond row edges, pin stitched piece and backing
ifc together. Referring to photo, trim backing fobr c and stitched
ce 1" larger than design on oil sides Leaving on opening for turning,
>a seam allowance to sew peces together; trim seam
ance diagonally ot corners Turn pillow right side out, carefully
hing corners outward. Stuff pillow with polyester fiberfill ond blind
:h opening closed
for twisted cord, place lengths of floss together ond fold in half; tie о
Bl 2“ from each end Place the loop avei о stationary object; pulling
5$ until tout, twist floss in a clockwise motion until tight Holding floss
tenter to keep tout, fold floss in half matching knotted ends (Fig. 1).
ease floss ot fold; floss w I twist together Secure knotted ends by
tying an overhand knot. Pull card through fingers to evenly distribute
twists. Beginning and ending ot bottom center of pillow, blind stitch
twisted cord around edges of pillow
c1?Ristcdas peReMMiALs
DMC blonc 304 7« X LSI B'ST
3)8
319 3 z
321
326
335
367 з
368
414 z
415 з
498
666
762 □
781 z
815 з
890 а
899
902 /
904
905
906
907
3031 0
3781 3
3790 3
3799
3801 3
3820
3822
3031 French Knot
Mill Hill Bead - 00557
Mill Hill Bead - 40479
Mill Hill Bead - 40557
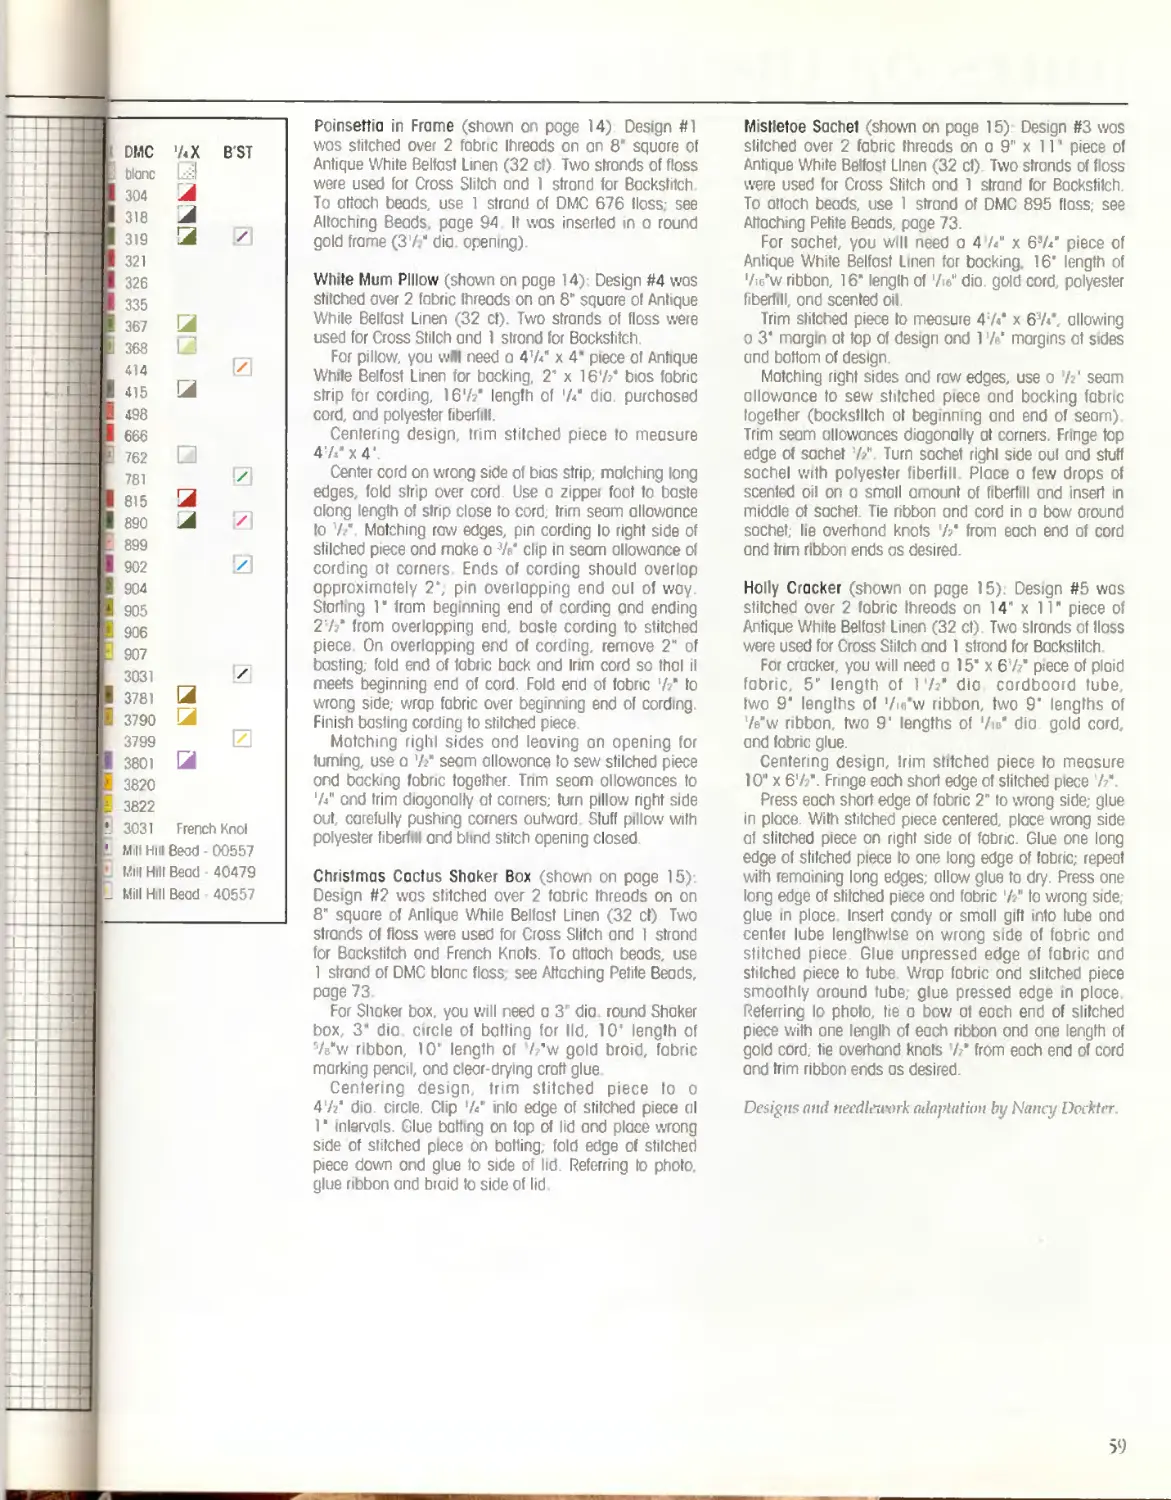
Poinsettia in Frame (shown on page 14) Design
wos stitched over 2 fobnc Ihreods on an 8й square of
Antique White Belfast Linen (32 ct) Two strands of floss
were used for Cross Slitch ond 1 strand tor Backstitch
To attach beads use 1 strand of DMC 676 floss see
Altoching Beads page 94 It was inserted m a round
gold frame (3 /dia. opening)
White Mum Pillow (shown on роде 14) Design #4 wos
stitched over 2 fabric threads on on 8" square of Antique
While Belfast Linen (32 ct). Two strands of floss were
used for Cross Stilch and 1 strand for Bockstitch.
For pillow, you win need a 47/ x 4‘ piece of Antique
While Belfast Linen for backing, 2" x 167/ bios fabric
strip for cording, 167/ length of 7/ dia. purchased
cord, and polyester fiberfill.
Centering design, trim stitched piece to measure
471" x 4'
Center cord on wrong side of bias strip, matching long
edges, fold strip over cord Use a zipper foot to baste
along length of strip close to cord, trim seam allowance
to 7/ Matching raw edges, pm cording Io right side of
stilched piece ond moke о V/ clip in seam allowance of
cording ot corners Ends of cording should overlap
approximately 2", pin overlapping end oul of way.
Starting 1 tram beginning end of cording and ending
27/ from overlopping end, baste cording to stitched
piece On overlapping end of cording, remove 2“ of
basting, fold end of fabric bock and Irim cord so thol il
meets beginning end of cord. Fold end of fobnc 7?" to
wrong side; wrap fabric over beginning end of cording
Finish basting cording to stitched piece.
Matching righi sides ond leaving on opening for
fuming, use a '// seam allowance to sew stilched piece
ond backing fabric together Trim seam allowances to
74" ond trim diagonally at corners; turn pillow right side
out, carefully pushing comers outward Stuff pillow with
polyester liberfiH and blind stitch opening closed
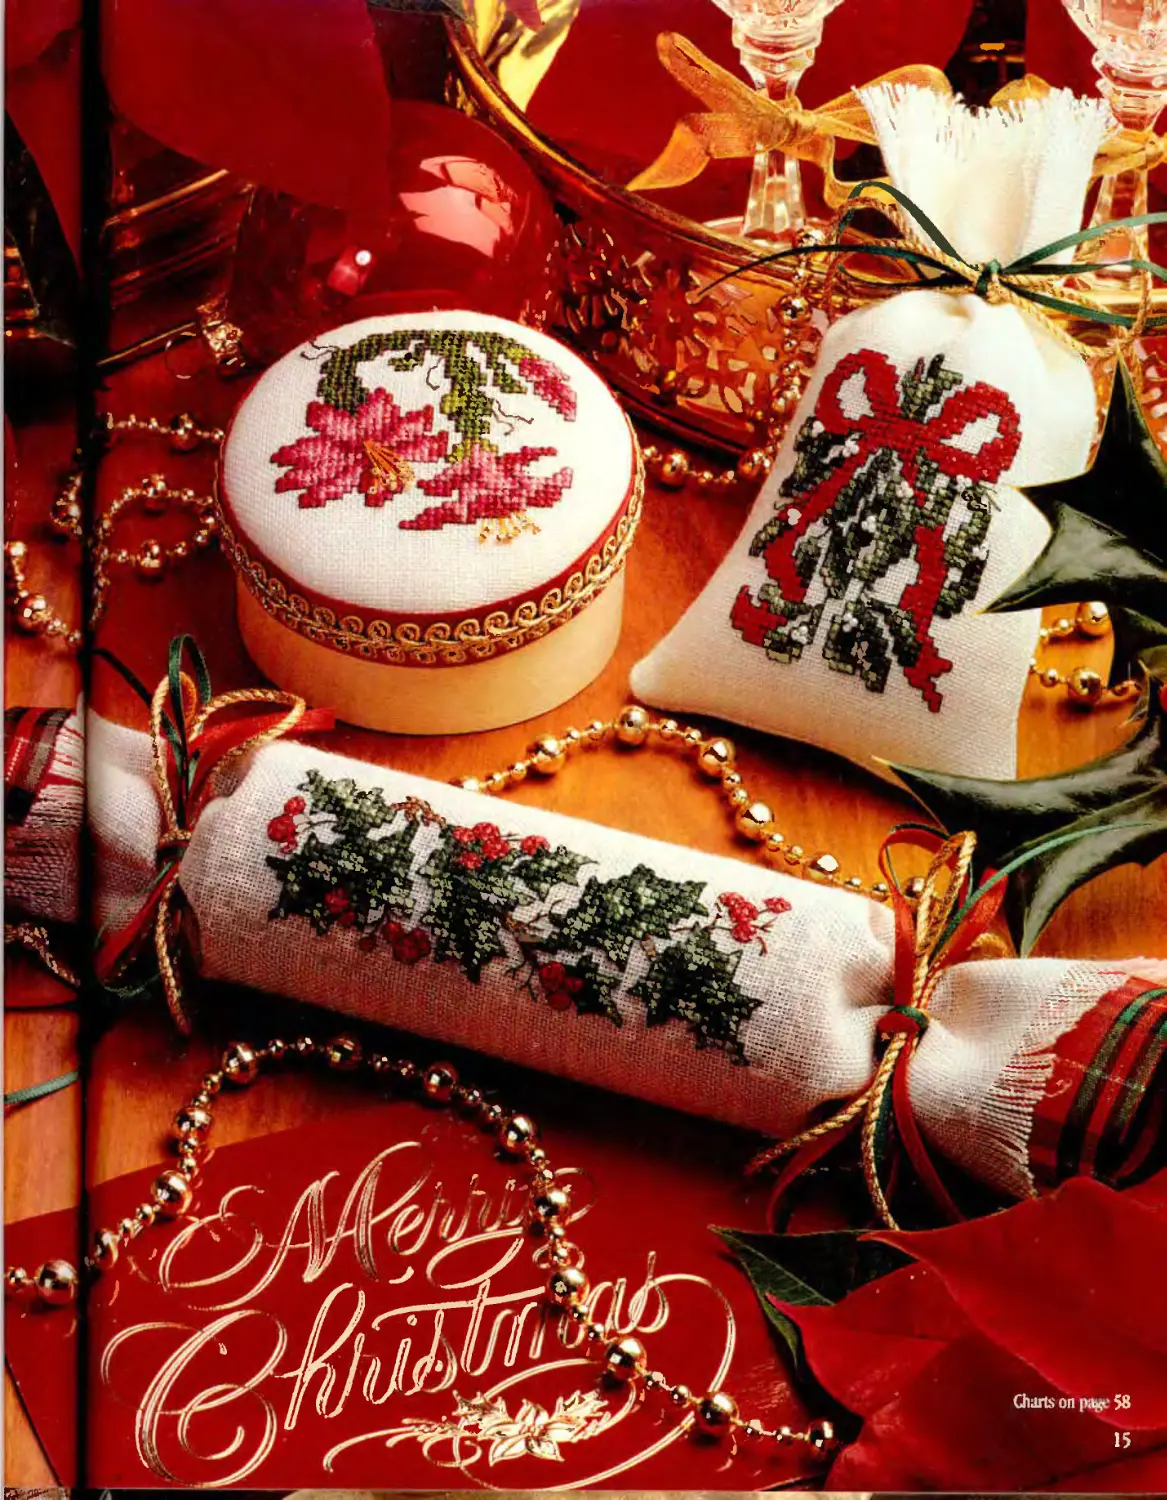
Christmas Cactus Shaker Box (shown on page 15)
Design #2 wos stitched over 2 fabric threads on on
8” square of Anlique While Belfast Linen (32 ct) Two
strands of floss were used for Cross Slitch ond 1 strand
for Backstitch ond French Knots. To attach beads, use
1 strand of DMC blonc floss see Attaching Petite Beads
page 73
For Shaker box. you will need a 3” dia round Shaker
box, 3* dia circle of batting for lid, 10’ length of
5/e"w ribbon, 10' length of //w gold broid, fabric
marking pencil, ond clear-drying croft glue
Centering design, trim stitched piece to 0
47/ die. circle. Clip 7c” into edge of stitched piece al
Г intervals. Glue batting on top of lid ond place wrong
side of stitched piece on batting, fold edge of stitched
piece down ond glue to side of lid. Referring to photo
glue ribbon ond braid to side of lid
Mistletoe Sachet (shown on page 15) Design #3 wos
stitched over 2 fabric threads on 0 9" x IT piece of
Antique White Belfast Linen (32 ct) Two strands of floss
were used for Cross Stitch ond 1 strand for Backstitch.
To attach beads, use 1 strand of DMC 895 floss; see
Attaching Petite Beads, page 73.
For sachet, you will need 0 4 /4“ x 6’// piece of
Antique White Belfast Linen for backing. 16’ length of
7 crw ribbon, 16" length of /ie“ dia gold cord, polyester
fiberfill, ond scented oil.
Trim stitched piece to measure 4 A* x 67/, allowing
0 3* margin ot top of design ond 17/ margins at sides
and bottom of design.
Matching right sides and row edges, use 0 7/ seam
allowance to sew stitched piece and backing fabric
together (bockstitch ot beginning ond end of seam)
Trim seam allowances diagonally at corners. Fringe top
edge of sachet '/>' Turn sachet righi side oul and stuff
sachel with polyester fiberfill. Place 0 few drops of
scented oil on 0 small amount of fiberfill and insert in
middle ot sachet Tie nbbon ond cord in a bow Ground
sachet, he overhand knots 7/ from each end of cord
ond trim ribbon ends as desired.
Holly Cracker (shown on page 15) Design #5 was
stitched over 2 fabric Ihreods on 14" x 11" piece of
Antique White Belfast Linen (32 ct) Two slronds of tloss
were used for Cross Stilch and 1 strand for Backslilch
For cracker, you will need 0 15* x 67z* piece of plaid
fabric, 5" length of 17г’ dia cardboard tube,
two 9‘ lengths of 7m’w ribbon, two 9' lengths of
7/w ribbon, two 9' lengths of 7i/ dia gold cord,
ond fabric glue.
Centering design, Irim stitched piece to measure
10" x 67?’. Fringe each short edge of stitched piece 7/.
Press each short edge of fabric 2" to wrong side; glue
in place. With stitched piece centered, place wrong side
of stitched piece on right side of fabric. Glue one long
edge of stilched piece fo one long edge of fabric; repeat
with remaining long edges; allow glue to dry. Press one
long edge of stilched piece ond fabric 7г" Io wrong side;
glue m place Insert candy or small gift into lube ond
center lube lengthwise on wrong side of fabric ond
stitched piece. Glue unpressed edge of fabric and
stilched piece to tube Wrap fabric ond slitched piece
smoothly around tube, glue pressed edge in place
Referring lo photo, tie a bow ot each end of slitched
piece with one length of each ribbon ond one length of
gold cord, tie overhand knots from each end of cord
and trim ribbon ends os desired.
Designs and needlework adaptation by Nancy Dodder.
59
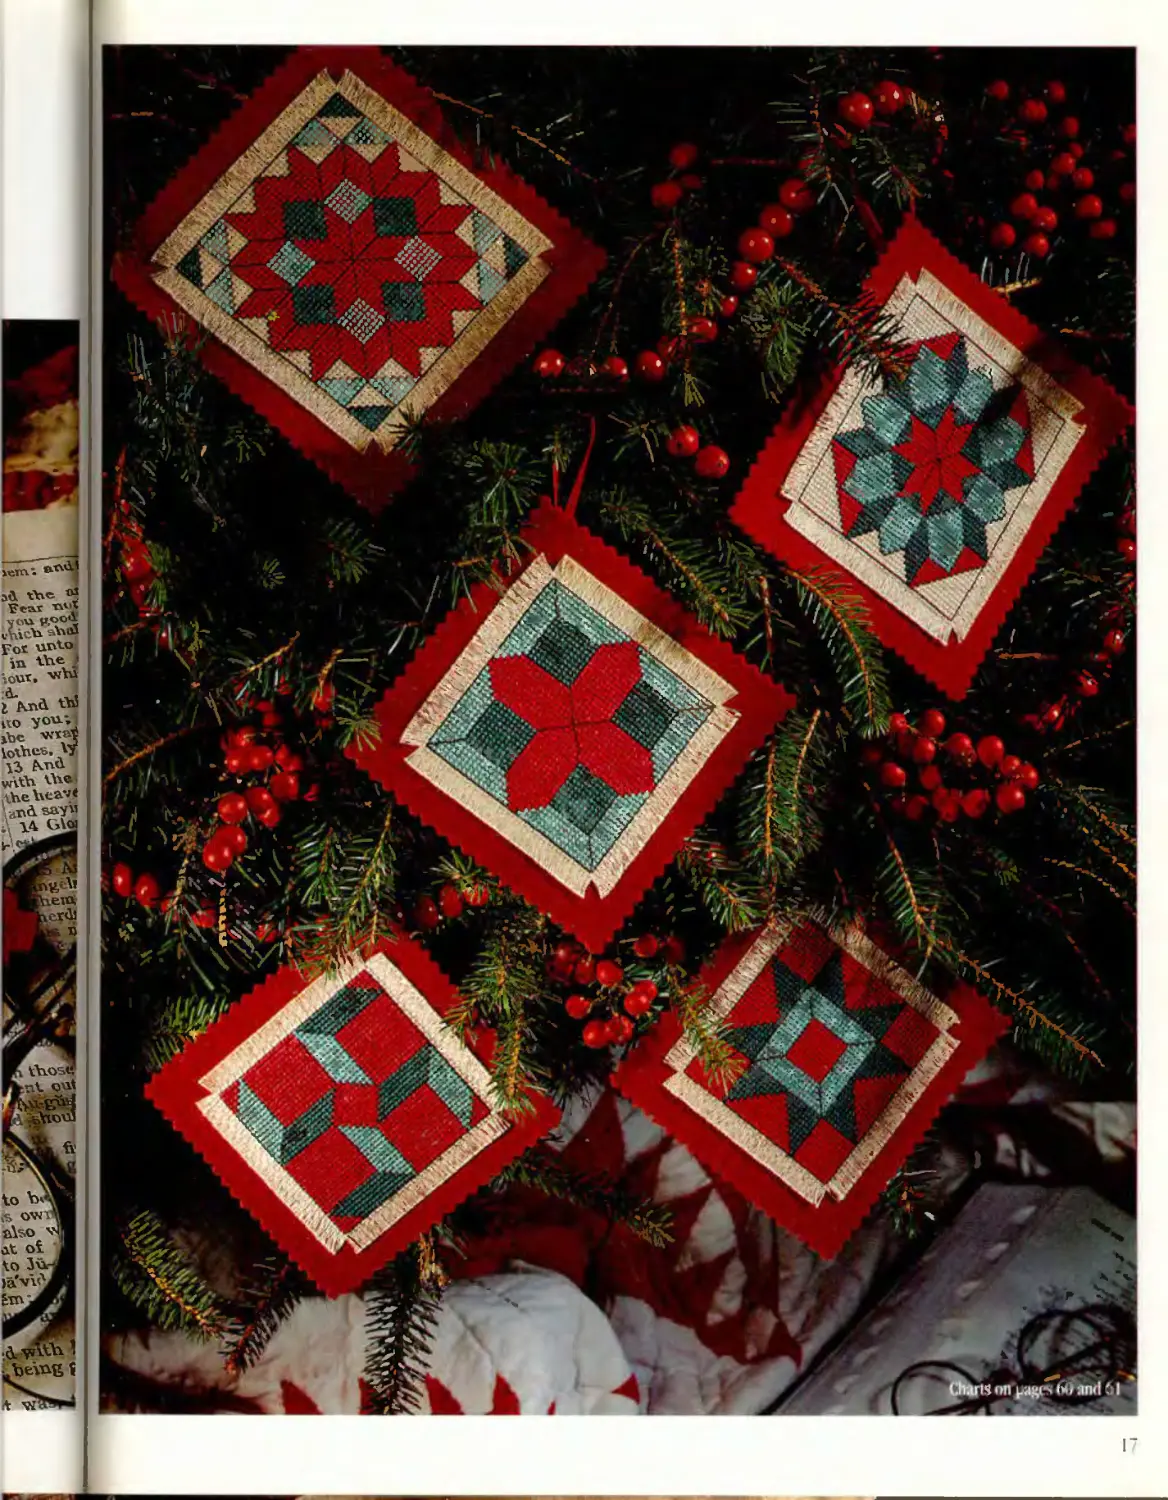
qulLts of tT?g bibLe
Quilts of the Bible (shown on pages 16-17): Each
design was stitched on a 7' square of Dirt)' Aida (16 cl).
Two strands of floss were used for Cross Stitch and
1 s‘rond for Backstitch
For each ornament, you will need two 5’ squares of
wool fabric, two 5" squares of fusible web, and a
5‘ length of '/b'vj ribbon far hanger.
Center one square of fusible web on wrong s de of one
square of wool fabric; center wrong side of remaining
square of wool fabric on fusible web. Following
manufacturer's directions, fuse wool squares together
Trim sttched piece five squares larger than design on all
sides; fringe to within one square of design. Trim
rema ning square of lusble web slightly smaller than
cross-stitched design area; center fusible web on wool
fabric ond center wrong side of stitched piece on fusible
web. Fuse stitched piece to woo fabric Trim edges of
woo! fabric with pinking shears 3/b’ from edge of fringe.
For hanger, fold ribbon in half, referring to photo, tack
ends ta back of ornament
X
[
Designs bi/ Kathf Elrod.
g q;q q q
о о o’
10 О О 01
ко o,o о о
гст в;
lopooj
oooq*
о о'о о о|
0 6(0 0 о
Штвд
(орРр’рЪр
Го о 0'0.1
бо о?
Цррр;>
боюоТЯ
О О О О 0,1
оОООо1
*(00 00 0'1
* wtoooli
* * *2.6 oi
•Joo'ooo
* о'обоо'
♦ Й.О.ООР
* o p,up а
*joo о ос»****
□ oobo q * * * *
00.000 J * * * *
ООО o'o J * * *.*
гагат
o.o о pa
PiP-ojaF
ooofT*
• * * ’ vUr-ii o,. _ j..
* ★ * * *|Ь0 0 0 0 0000 Ouv
* * * «poo'oopoo’ooooo
* *‘jojoopooopdoooo oj
* *jo010 O 0,0 6 О О О О О ОРГ
f oojo орооойобоаТ
Road lo Jerusalem (40w x 40h)
th
Star of the Magi (48w x 48h)
Shephe
«’’000:0 poo
Гс!о О 0 0 OP о о
co q:o о 0,0,0 о о O'
O'C.'OiO'o 0'0,0 Об p
0 о'6'о o o O O ООО.О^
Vopp’o о p.o'o p'o o.o
В ST
DMC
Carpenter's Wtieel (48w x 48h)
3371
kpherd s Crossing (40w x 40h)
Bethlehem Star (40w x 40h)
oo
о о о о о сГо
(Ооооооо
То о О Qо о
Jo о о о'оря
(оооо 3 01°
о о оо6[о
оОбосо«
oooIooop
ооообоо
6 о о о’р о о
ооооооо
.Joe о о о <Я_
BSwo'oo’S
оооооооо
оооооооо
Iqooqo oo d
н Гостя
>! йроооТТ
.Моо ообо от,
Jooooooo’o'o
Чорроооофо
Гкooooood
ТоО о о
боорооооб
обоборе оо
ооооооооо
ооооооооо
ооооооо 0'0
ооооооооо
ооб о о оооо
I. о о обо ООО
к.».».» .~»,ь ...
Оооо'
OOOQ.
о'оо о обок
ооооо o.oTJ
ЕГооооТЯ
КГоб'обЪба
оооооооо
оооо о о о'о
lop ООО О o’oj
Тор о о'о of^
Торсов
ТУР'а’&'б'бД'ббб
бор'о'оббоо «
ооооооооо»
об б о ооо ос «
об обооооо*
ооор оооо Of-»
о о'сто о р'о'о'О •
о оfro ооооо«
б о,0'0 ОООО »
ООО 0'0’0
foe о о > оa
Tooooooj^
о о o'opi
о о ppp б?
о бо о б’о/Ч,
ooopOooi
00ООООбI
a'.flSP.g.gQl
* О'ёр’б 6'6'0756 6
• ОбОбОООООО
* б'О!О 0,0 0 00.0 о
* ООООООО'ООО
. РФ о о ооооо с
* Ор ор оро рро
•рооброообо
о о 0 a
.а'да.з
ооообоб
OOOOOOjj
o'o'ooodr
о'О о O\J“
oooPp
бо Jr
:<нпнс
:e::ss:h:
ypr'crai
qooO сЪеетг eLves
1 (42w x 35h)
x
SI
6
S
E
a
B8
E
E
E
S
760
Mill Hill Bead 03003
I Bead placement
Use 347 for mouths and
3031 tor all other.
*2 (23wx 18П)
'5 (34w X 57h)
'7 (31 w
3 (23wx 18h)
"4 (19w x 19h)
E
62
В ST
Designs Ы/ Nancy Dockier.
Twig-Framed Elves (shown on pages 19-21): Designs #5. #7. and #8 were each stitched on a
7" x 9* piece ot Fiddler's Lite (14 ct). Three strands ot floss were used for Cross Stitch ond
1 strand for Half Cross Stitch and Backstitch To attach beads, use 1 strand of DMC 498 floss;
see Attaching Beads, page 94. To complete ornament, see Twig-Framed Ell Finishing, page 87.
"Good Cheer" Pillow (shown on page 18) Design #1 was stitched on a 10" x 9" piece
of Fiddlers Lite (14 ct). Three strands of foss were used for Cross Stitch ond 1 strand
for Backstitch.
Centering design, torn stitched piece to measure 51// x 5* To complete pillow, see 'Good
Cheer* Pillow Finishing, page 87
Mini Log Carriers (shown on pages 19-21). Designs #2, #3, and #4 were each stitched on a
7* x I Г piece of Fiddler's Lite (14 ct) with top of design 31// from one shod edge. Three strands
of floss were used for Cross Stitch
Centering design horizontally and leaving a 17/ margin at top of design, trim stitched piece to
measure 37Г x 77Л To complete tog carrier, see Mini Log Corner Finishing, page 87
iw x 43h)
•8(28wx57h) 7~t
llw x 56h)
: 4
Stiffened Mushrooms (shown on poges 19-21). Design #6 was stitched on a 6“ x 7‘ piece of
Fiddler's Lite (14 ct). Three strands of floss were used for Cross Stitch and 1 strand for Backs! tch.
For each mushroom you will need a 6" x 7* piece of lightweight cream fabric for backing, fabric
stiffener, small foam brush, eight 4mm ivory beads, and clear-drying croft glue
Apply a heavy coat of fabric stiffener to back of stitched piece using small foam brush. Malching
wrong sides place stitched piece on backing fabric, smoothing stitched piece while pressing
fabric pieces together allow to dry. Apply fabric stiffener to backing fabric; allow to dry. Cut out
close to edges of stitched design. Referring to chad for placement glue beads to mushroom.
VOUMQ лт Ik-art
2 (2
5 5|5;5
❖ x* ex
5.5.515 5:515.5 I
8®
®E
55 55*5.5
515:5.55 5.5:5
51515,55
5 5,5 55.
5,5 5
55.5.
5.5 5
.555
'4 (58w x 52h)
(26w x 61h)
.+ .
'3 (22w x 61 h)
nriDnnnnfinnrUKinnrax^LlLXJl^LlOL.
X B'ST
I
j
1
I
1
I zj° I
I I
- 002
ench Knot
ench Knot
521
1 use
itrows.
ana
s of first
Jed and
’co d
ted.
I use 356.
*2 ond
Far
se 938
1, use 646;
*2 ond
I use 826
) for Sonia,
all e
I use 3818
1 844 tor
Des gns "%
use 3818.
of
9e 23):
threads
h Linen
;sed for
'ch and
Young
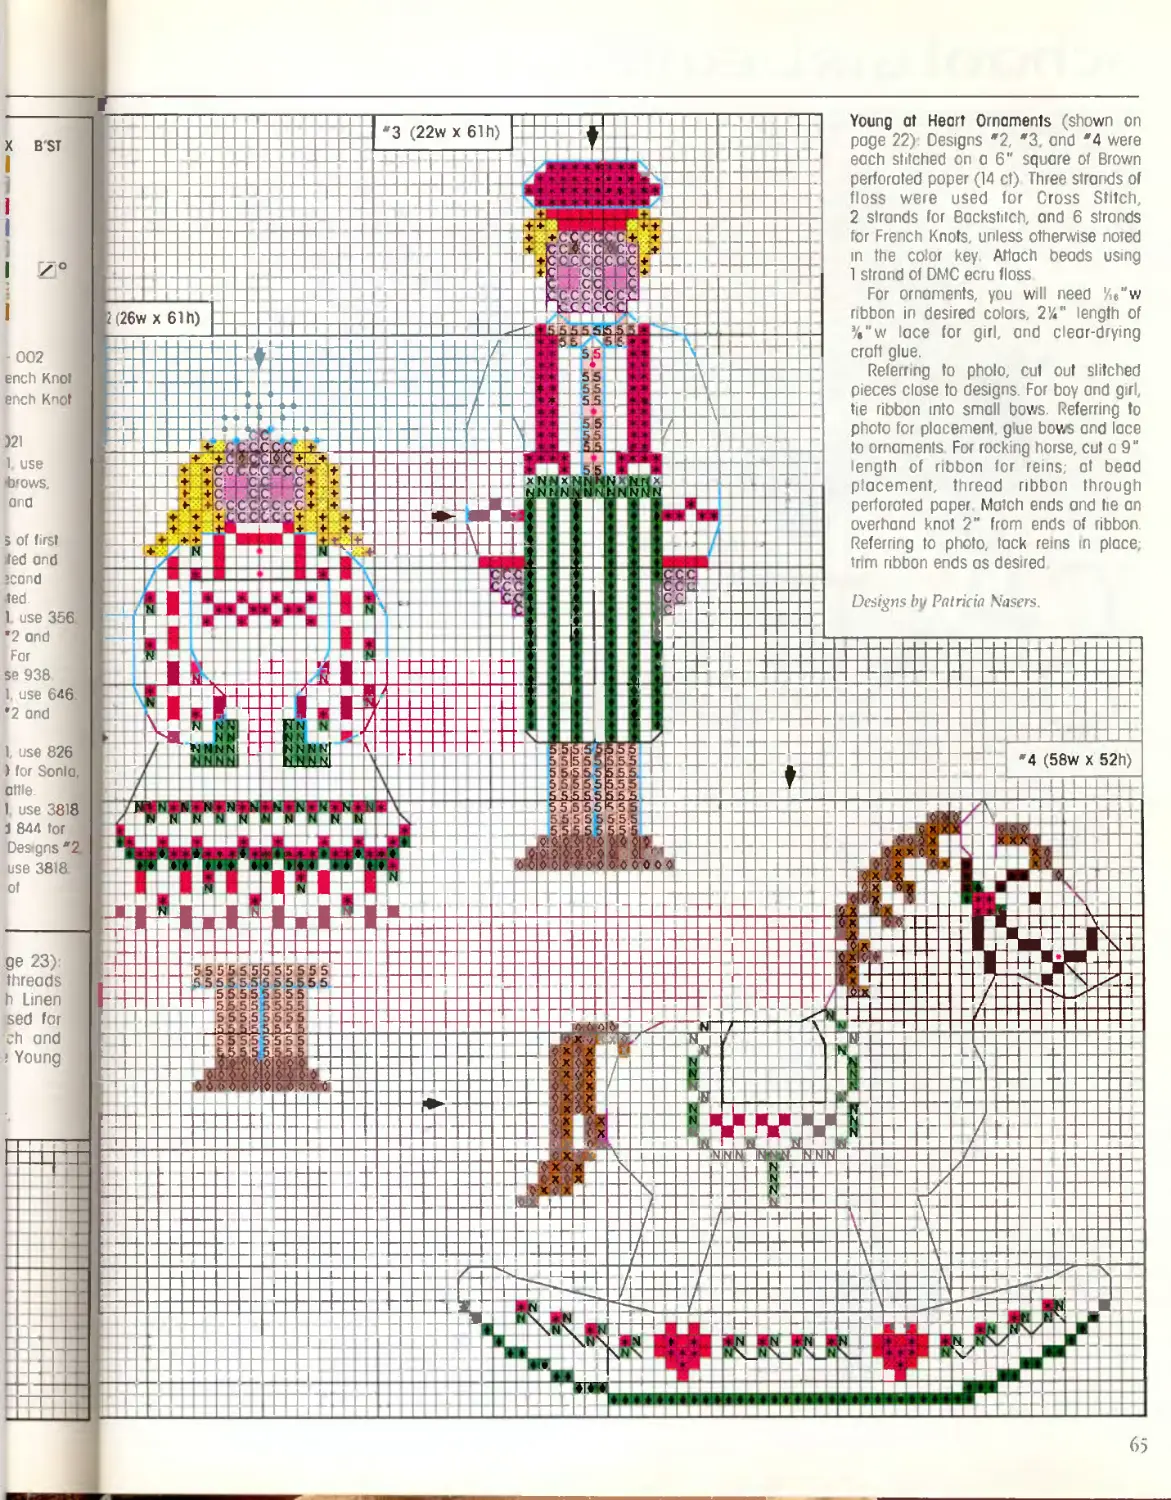
Young at Heart Ornaments (shown on
page 22) Designs *2, *3. and '4 were
each sttched on a 6" square of Biown
perforated poper (14 ct) Three strands of
floss were used for Cross Stitch,
2 strands for Backstitch, and 6 strands
for French Knots, unless otherwise noted
in the color key Attach beads using
1 strand of DMC ecru floss
For ornaments, you will need '/«“w
ribbon in desired colors, 214" length of
%"w lace for girl, and clear-drying
craft glue.
Referrng to pholo, cut out slitched
pieces close to designs. For boy ond girl,
tie ribbon into small bows. Referring to
photo for placement, glue bows and lace
to ornaments For rocking horse, cut a 9"
length of ribbon for reins; at bead
placement, thread ribbon through
perforated paper Match ends and tie an
overhand knot 2" from ends of ribbon.
Referring to photo, tack reins in place,
trim ribbon ends as des ed
Designs fry Patrick Nasers.
SChOOl QIRL eCDBROlOeRLGS
X
X
□
1 (72w x 50h)
7 (33w
I none
For Designs*! end’ll
work n long s itches.
For Designs *2 *7. er J
*8 use 2 strands ettaj
Use 2 slronds of flea
I
□ an
*2 (37w x 50h)
*3 (34w x 50h)
66
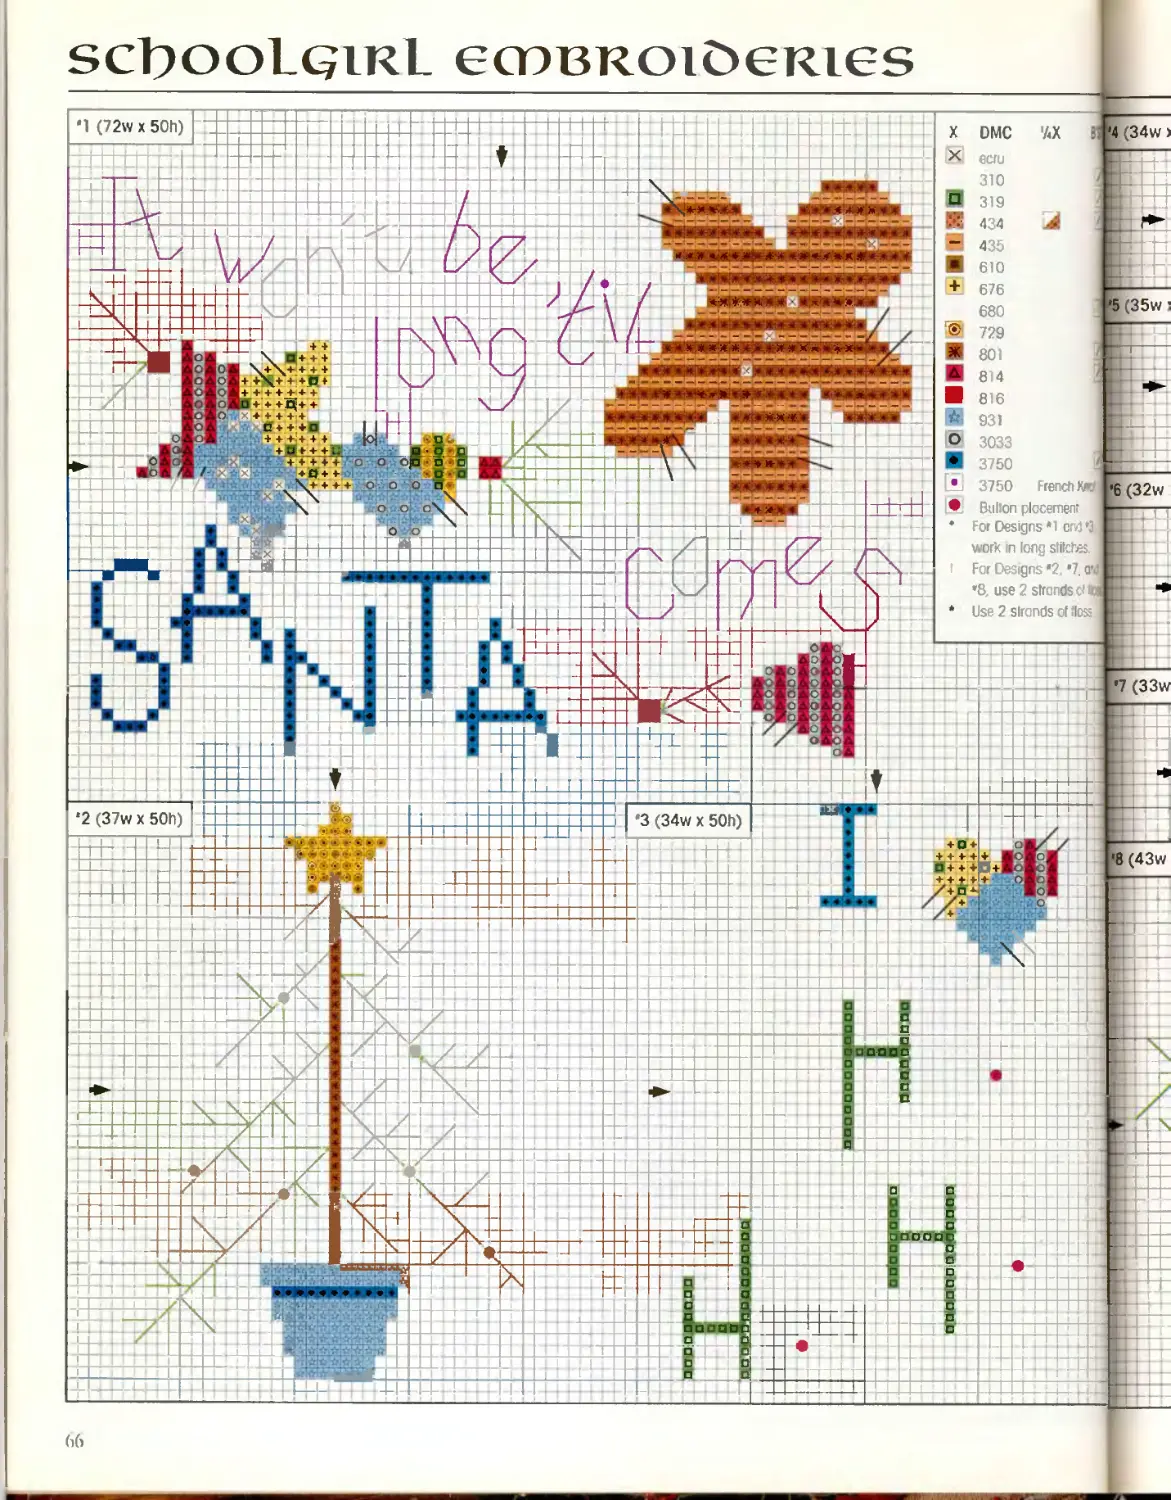
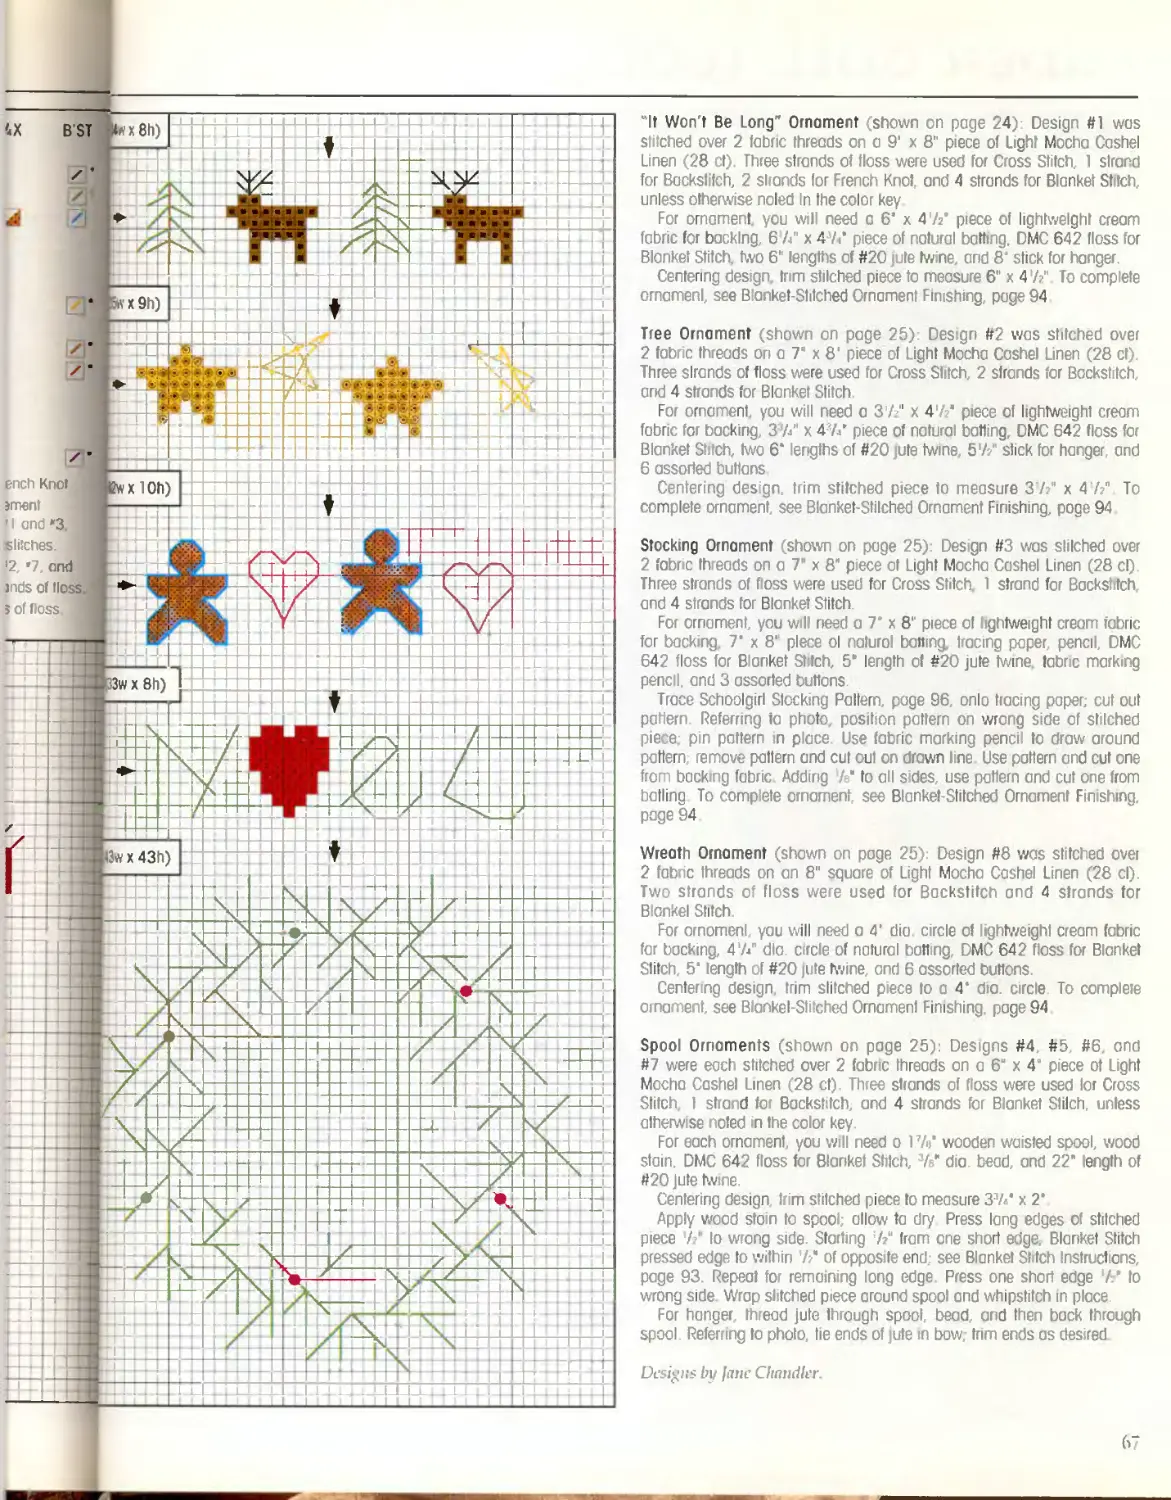
"It Won't Be Long" Ornament (shown on page 24) Design #1 was
stitched over 2 labrc ihreads on a 9‘ x 8" piece of Light Mocha Cashel
Linen (28 ct). Three strands of floss were used for Cross Stitch, 1 strand
for Backsl'tch, 2 slrands for French Knot, and 4 strands for Blanket Stilch,
unless otherwise noled In the color key
For ornament, you will need a 6’ x 4 A" piece of lightweight cream
fabric for backing, 6 Л" x 4 A* p ece of natural batting. DMC 642 floss for
Blanket Stitch, two 6“ lengths of #20 jute twine, and 8‘ stick for hanger.
Centering des gn irim stilched piece to measu e 6" x 47?.". To complete
omamenl, see В anket-Stitched Ornament Finishing, page 94
Tree Ornament (shown on page 25) Design #2 was stitched over
2 fabric th eads on a 7" x 8' piece of Light Mocha Cashel Linen (28 ct).
Three slrands of floss were used for Cross Stitch, 2 strands for Bockstitch,
and 4 strands for Blanket Stitch
For ornament, you will need a 37" x 4 A’ piece of lightweight cream
fabric for backing, 3 V x 43A" piece of natural batting, DMC 642 floss for
Blanket Stitch, two 6* lengths of #20 jute twine, 57/ stick for hanger, and
6 assorted buttons
Centering design, trim stitched piece to measure 3 /?" x 4 h” To
complete ornament, see Blanket-Stilched Ornament Finishing роде 94
Stocking Ornament (shown on page 25): Design #3 was slilched over
2 fabric threads on a 7" x 8" p ece ot Light Mocha Cashel Linen (28 cl)
Three strands of f oss were used for Cross Stitch, 1 strand for Backstitch,
and 4 strands for Blanket Stitch
For ornament, you will need a 7' x 8" piece of lightweight cream rabnc
for backing. 7' x 8' piece ol nalurol boning, tracing paper, pencil, DMC
642 floss for Blanket Stitch, 5" length of #20 jute twine fabric marking
pencil, and 3 assorted buttons
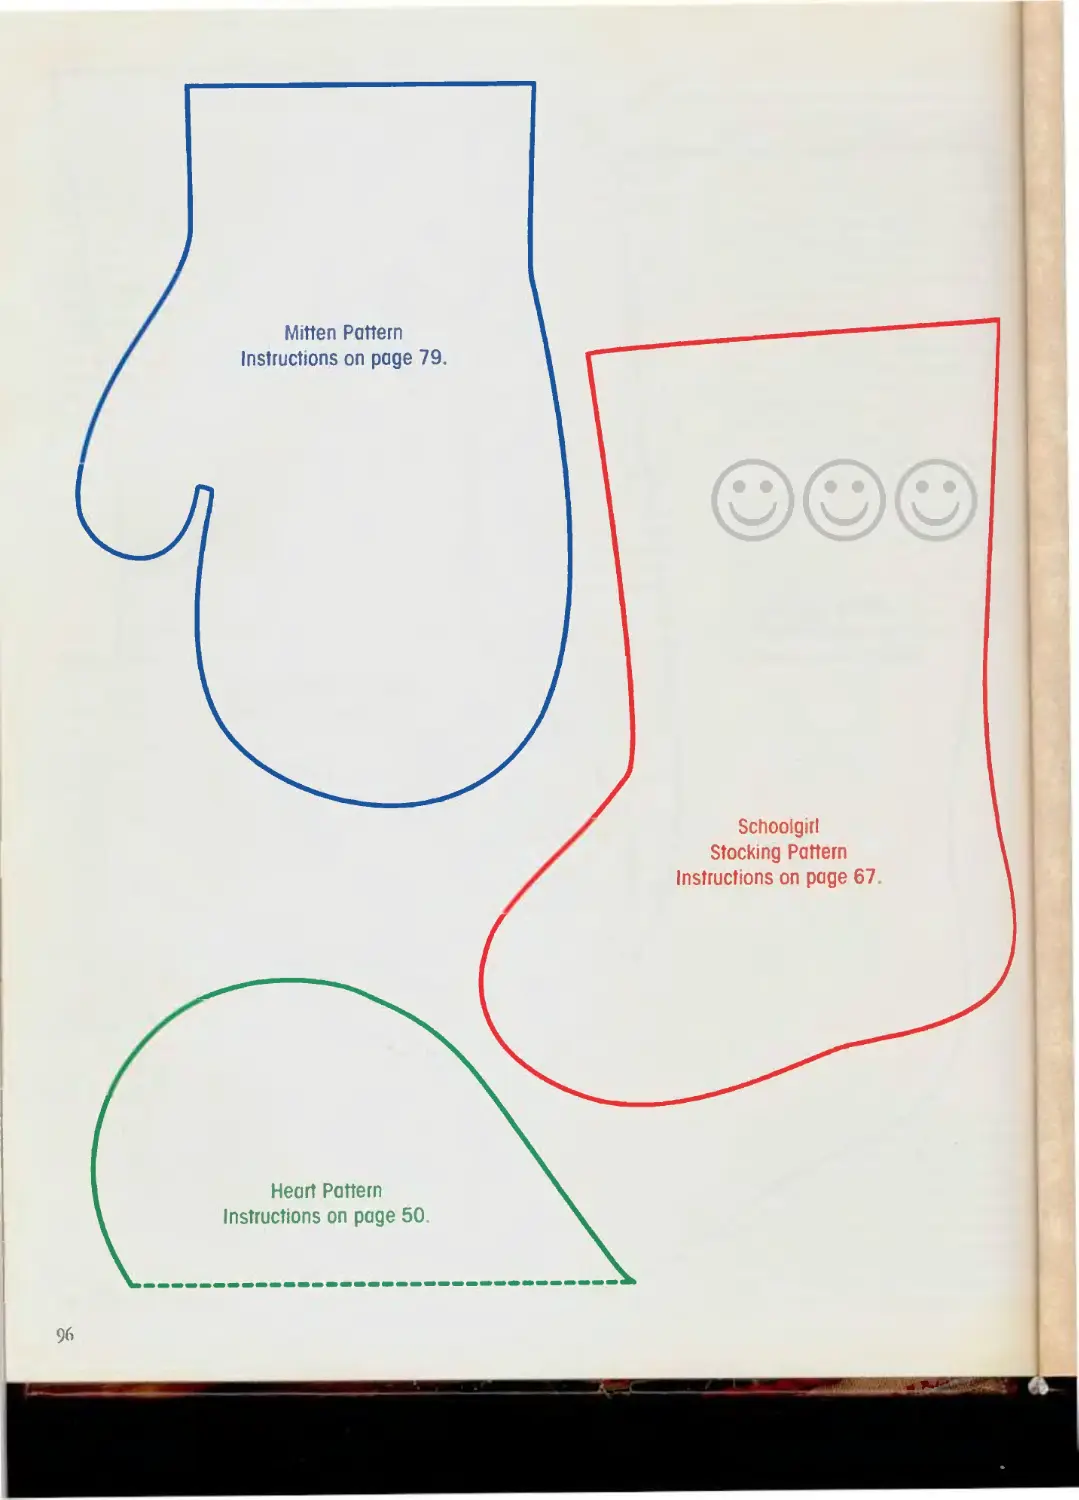
Trace Schoolgirl Stock g Paltem, роде 96, onio tracing paper, cut out
pattern. Referring ia photo, position pattern on wrong side of st Iched
piece; pin pattern in place. Use fabric marking pencil to draw around
pattern remove pattern and cut out on drawn line Use pattern and cut one
from backing fabric. Adding 7e" to all sides, use pattern and cut one from
balling To complete ornament, see Blanket-Stitched Ornament Fin snmg,
page 94
Wreath Ornament (shown on page 25): Design #8 was stitched ovei
2 fabric threads on an 8" square of Light Mocha Cashel Lnen (28 cl).
Two strands of floss were used for Backstitch and 4 strands for
Blonkel Stitch.
For ornomenl yau will need a 4' dia. c rcle of lightweight cream fabric
far backing 47/ dio. circle of natural batting, DMC 642 floss for Bonket
Stitch, 5' ength of #20 jute twine, ond 6 assorted buttons.
Centering design, trim slitched piece to a 4' da. crcle To complete
ornament see В ankel-Stitched Ornament Finishing, page 94
Spool Ornaments (shown on page 25): Designs #4. #5, #6, ond
#7 were each stitched over 2 fabric threads on a 6" x 4’ piece ot Light
Mocha Cashel Linen (28 ct). Three strands of floss were used lor Cross
Stitch, I strand for Backstitch, and 4 st ands for Blanket Stilch, unless
otherwise noted in the color key.
For each ornament, you will need о 1 7/d' wooden waisted spool, wood
stain. DMC 642 f oss for Blanket Stitch, 3/b" dia bead, and 22" length of
#20 jute twine.
Centering design trim stitched piece to measure 3’// x 2"
Apply wood stoin to spool; allow to dry Press lang edges of stilched
piece V?" Io wrong side. Starting 7?" tram one short edge, Blanket Stitch
pressed edge to within 7?" of opposite end: see Blanket St tch Instruct ons,
page 93. Repeat for remaining long edge. Press one short edge 'h* to
wrong side Wrap s tched piece around spoo and whipstitch in place
For hanger, th eod jute through spool, bead, and then back through
spool Refer ng to photo, tie ends of jute in bow, trim ends as des red
Designs by Jane Chandiet
67
paper OoLL тейду
48w X 74h
31W X 34h
яииж
50w x 60h
68
’/<X
B'ST
50w x 53h
o'oi.
-a :
4E®
48w x 55h
e
0
0
French Knot
DMC
blanc
ecru
310
321
433
434
435
437
498
645
648
666
725
738
801
814
844
930
931
932
3033
3072
3750
3752
3782
S
Я
II
•i 310
* Use 2 strands of floss.
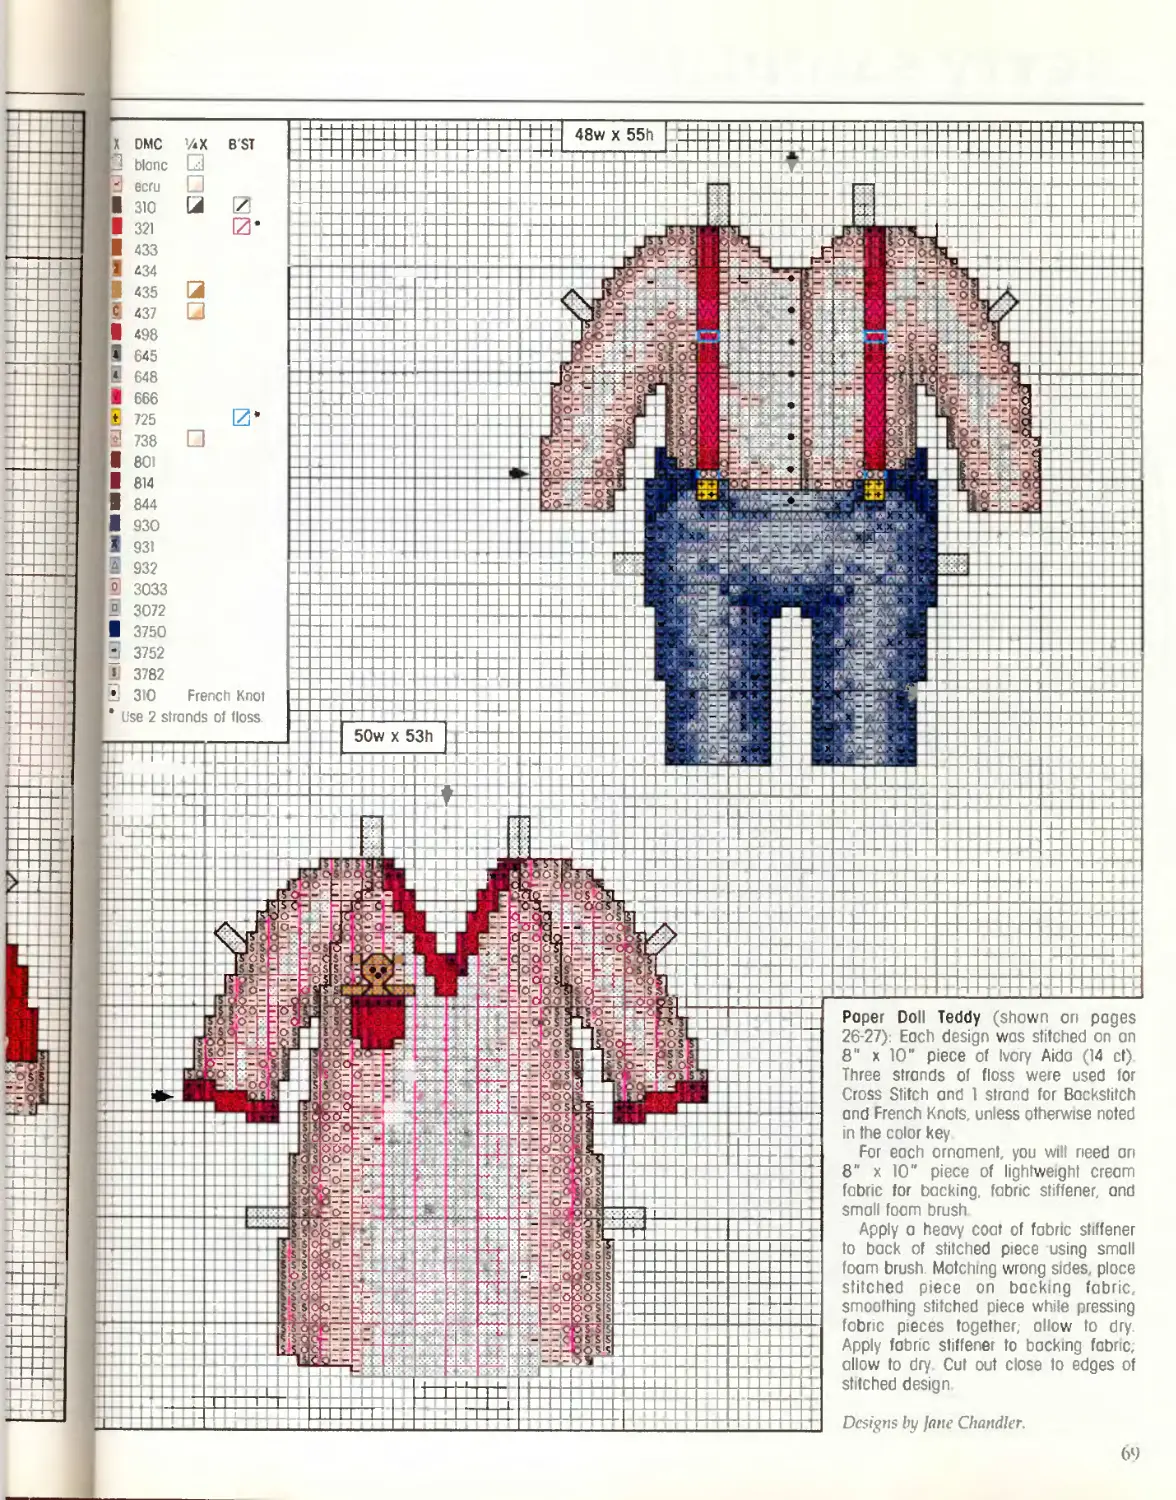
Paper Doll Teddy (shown on pages
26-27). Each design was stitched on an
8" x 10” piece of Ivory Aida (14 ct)
Three strands of floss were used for
Cross Stitch and 1 strand for Backstitch
and French Knots, un ess otherwise noted
in the color key
For each ornament, you will need an
8" x 10" piece of lightweight cream
fabric for backing, fabric stiffener, and
small foam brush
Apply a heavy coat of fabric stiffener
to back of stitched piece using small
foam brush Matching wrong sides, ploce
stitched piece on backing fabric,
smoothing stitched piece while pressing
fabric pieces together; allow to dry.
Apply fabric stiffener to backing fabric;
allow to dry Cut out close to edges of
stitched design
Designs by jane Chandler.
W
р кет ту SAcnpLiKiG
1 (41wx97h)
2(4
3/<Х
□
2
2
2
Use 2 strands of floss
and strand of Kremlk
Blending Fi ament 032
DMC
blonc
blonc
French Knot
French Knot
I2U
• 1*1а
*©6 с
г
I. *>;
<1°
т *
ф с<
О О'-Г
ъ е
♦
е е
ф ф ft ф ф ъ
-
ф ф ® ф
ф’ф »
<0
р.
о оК ?
' о ф ф, 'ф
г-
'L-lX-T
® «I
?ёг№.‘,У^'
а- г ~
L = =
Г J !' Ф ♦
s « C ,CQ
в
• * . • • • ,0 »
= := 0
f
air ♦ - = v <0
с Ф
,Лф ф)= ф
= — '1Ч -: ф
“ I — *L-‘ "'йе
; —
» “
0 е
Ф о
Ф с
е е
о ф
о
&<•
»*Ф0|С-
няг
'ЛХ
И
1=
X
□
*
7 1
UJ
ecru
318
319
320
367
368
370
371
372
498
501
632
640
642
644
666
676
754
758
760
761
762
762
822
927
928
938
948
3031
3760
3766
3768
3782
3790
676
938
*3 ('
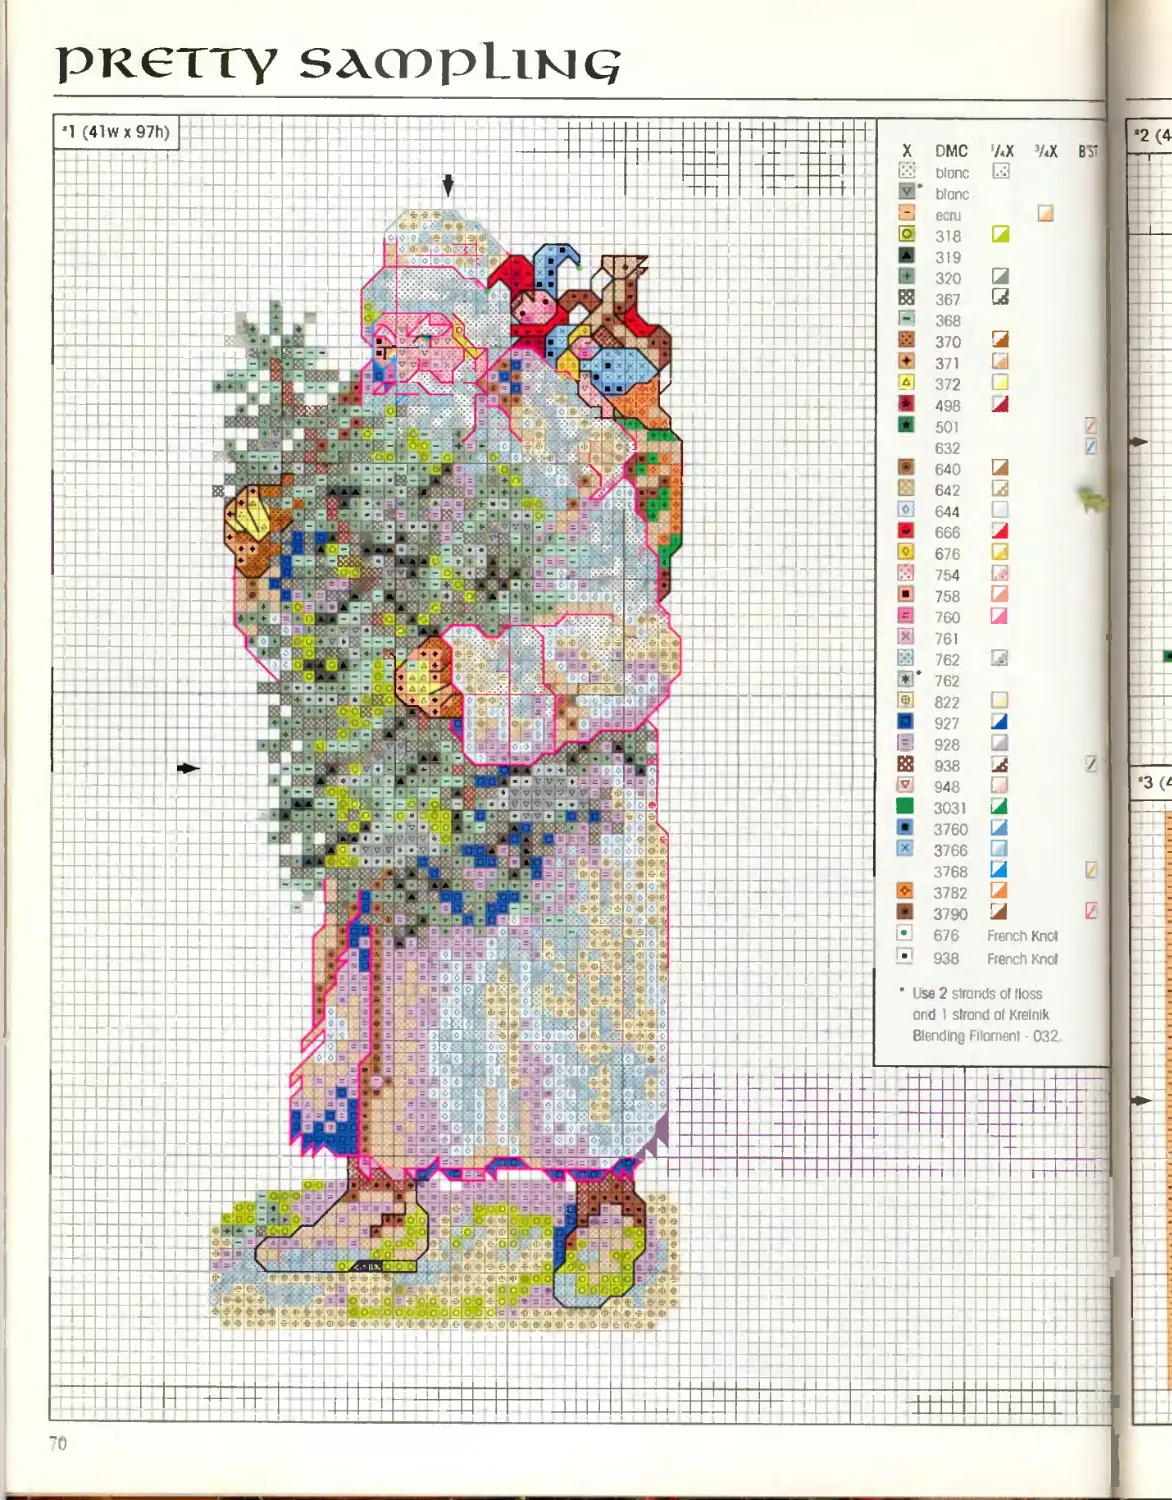
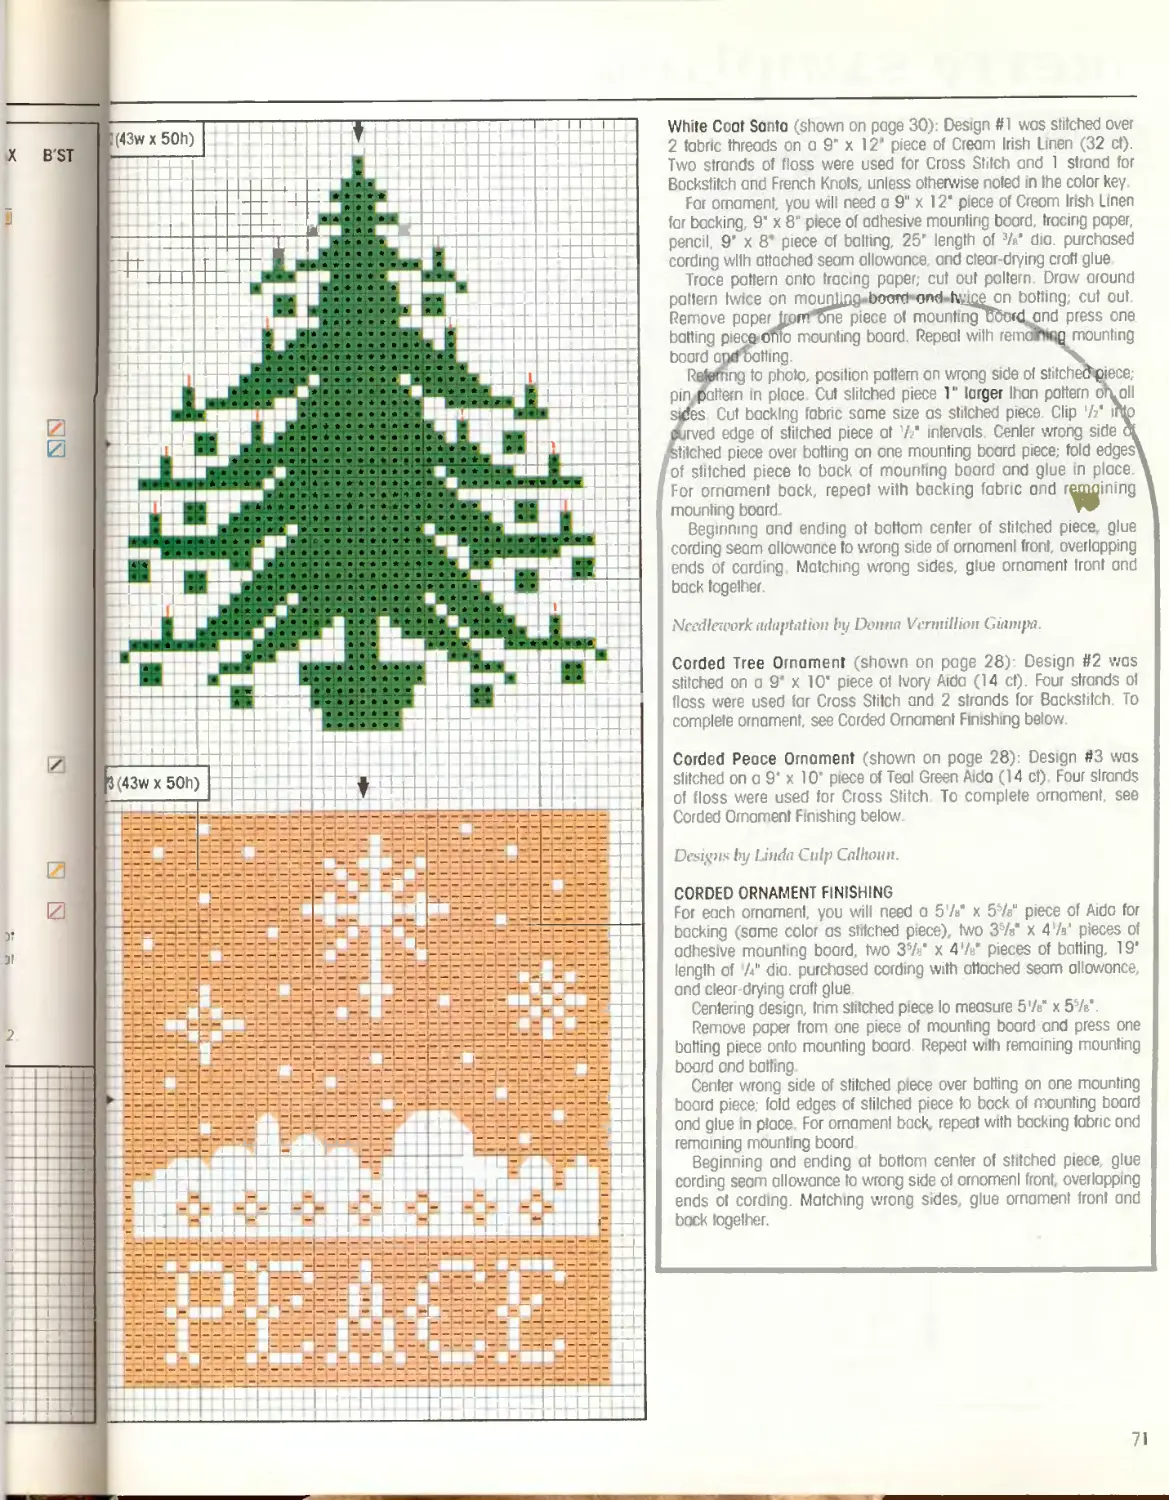
White Coot Sonto (shown on роде 30): Design #1 was stitched over
2 fabric threads on a 9" x 12* piece of Cream Irish Linen (32 ct).
Two strands of floss were used for Cross Stitch and 1 strand for
Bockstitch and French Knots, unless otherwise noted n the color key
For ornament, you will need a 9" x 12‘ piece of Creom Irish Linen
far backing, 9" x 8” piece of adhesive mounting board, tracing paper,
pencil, 9' x 8‘ piece of baiting, 25" length of 3Л* dia. purchased
cording with attached seam allowance, and dear-drying craft glue
Trace pattern onto tracing paper, cut out pattern Draw around
pattern twice on mounting board ond-twice on botting cut out
Remove paper tom^ne piece of mounting rd and press one
batting piece oh о mounting board Repeal with remdYfeig mounting
board arMfbotlmg. X.
Referring to photo, position pattern on wrong side of stitche8>piece;
pimjoottern tn place Cut slitched piece 1" larger lhan pattern oil all
stfes Cut backing fabric some size os stitched piece Clip 7/ into
curved edge of stitched piece at 7/ intervals Center wrong side at
stitched piece over batting on one mounting board piece; fold edges’
of stitched piece Io back of mounting board and glue in place
For ornament back, repeat with backing fabric and rajMining
mounting board
Beginning and ending ot bottom center of stitched piece, glue
cording seam allowance to wrong side of ornamenl front, overlapping
ends of carding Matching wrong sides, glue ornament tront and
back together
Needlework adaptation by Donna Vermillion Giampa
Corded Tree Ornament (shown on page 28) Design #2 wos
stitched on a 9' x 10’ piece of Ivory Aida (14 ct). Four strands of
floss were used far Cross Stitch and 2 strands for Backstitch. To
complete ornament, see Corded Ornament Finishing below
Corded Peace Ornament (shown on роде 28): Design #3 was
stitched on a 9’ x 10’ piece of Teal Green Aida (14 ct) Four slrands
of floss were used for Cross Stitch To complete ornament, see
Corded Ornament Finishing below.
Designs by Linda Culp Calhoun.
CORDED ORNAMENT FINISHING
For each ornament, you will need a 57в* х 55/b" piece of Aide for
backing (same color as stitched piece), two 35ЛГ x 4 /s’ pieces of
adhesive mounting board, two 3s/«* x 47b’ pieces of batting, 19’
length of A" dia. purchased cording with attached seam allowance,
and clear drying craft glue
Centering design, trim stitched piece Io measure 57b" x 57b’.
Remove paper from one piece of mounting board and press one
balling piece onto mounting board Repeat with remaining mounting
board and batting
Center wrong side of stitched piece over botting on one mounting
board piece; fold edges of stilched piece to bock of mounting board
end glue in place. For ornament back, repeat with backing fabric ond
remaining mounting board
Beginning and ending at bottom center of stitched piece, glue
cording seam allowance to wrong side ot ornomenl front, overlapping
ends ot cording. Matching wrong sides, glue ornament front ond
bock together.
ркетту SAcnpLiKiq
1 (41wx53h)
—
•2 (46w X 56h)
X DMC 7.X В ST X DMC AX
bionc a 906
352 a й 907
E 353 □ я 930
r 356 a ♦ 931
632 а Z 932 Q
• 640 а Й 935
642 □ 938 □
S 644 □ в 948 a
754 □ ffi 3328 a
Я 758 3371
♦ 760 s 3712 а
761 я 3750
E 822 □ 3778 а
H 895 3790
♦ 904 3824 a
AX B'ST X DMC 'AX B'ST
E ц 840
□ 895
904
0 ffi 906
a 907
935
a __ 948
а Щ 3031 И
/ H 3064 а
а 3371 Z
a Is 3713
и 3755
a s 3772 а
□ » 3778 а
3781
• Mill Hill Bead 42013
DMC 'AX B'ST
Dione 319 <:| J
321 □
610 □
611 ^1
647 IZ
648 □
722 &
3340
745
746
1 818
1 869 IJ
934 [Zi
945
№ 986 □
8 987 a
S 3023 □
3031 [J и
3032 a
1 3072 □
3347 □
3781 □ и
3801 □
3823 □
3825 □
3828 □
В ‘ Use 2 strands at first
В Boss color listed and
strand of second
1 floss color isted
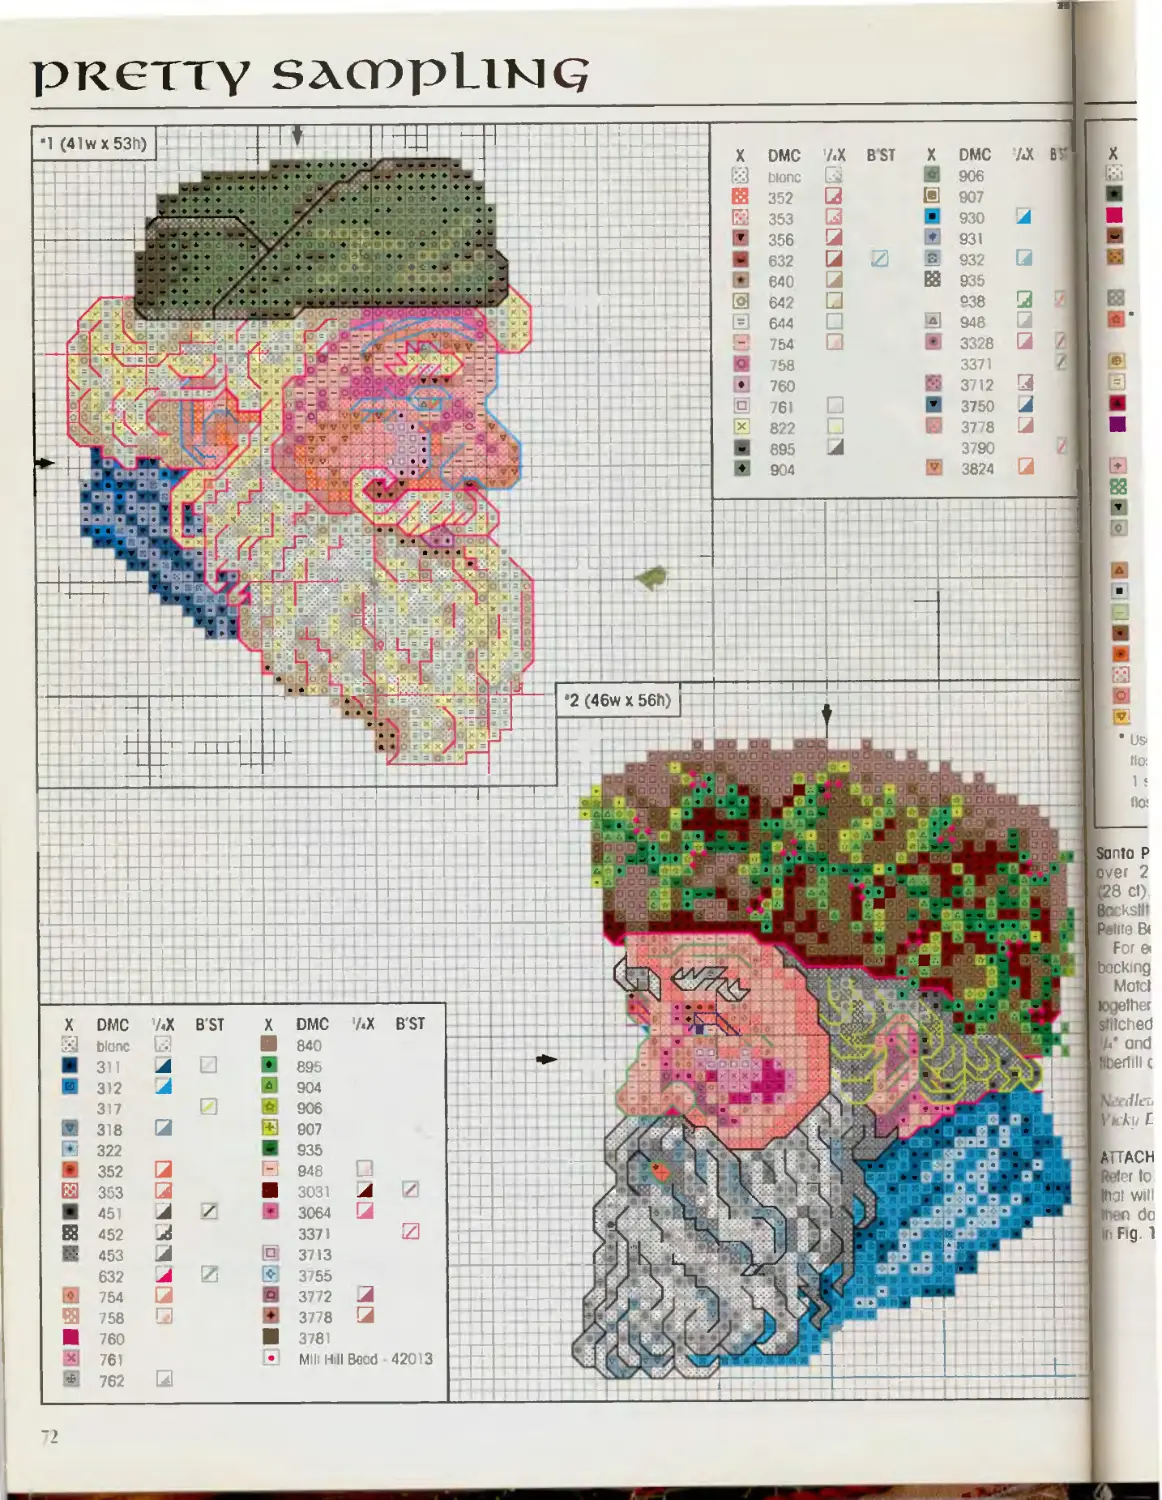
B Profiles (shown on роде 31): Designs #1 and #2 were each slitched
1-. 2 fabric threads on a 9’ square of Teo-Dyed Irish Linen
Bet) Three strands of floss were used for Cross Stitch and I strand tor
B>sh ch To attach beads, use 1 strand of DMC 3781 floss, see Attaching
№ Beads below.
iweoch ornament, you will need a 9“ square of Tea-Dyed Irish Linen for
г i ig and polyester fiberfill
Mchi ig right sides and raw edges, pin stitched piece ond backing fabric
fcltier. Leaving an opening for turning and stuffing, sew backing fabric to
tied piece 7/ away from edge of design. Trim seam allowance to
I and clip curves; lurn right side out Stuff ornamenl lightly with polyester
Mil and blind stitch opening closed.
ttdleuwrk adaptations by
rty D‘A$oshiw. Victoria's Needk *£&
’ACHING PETITE BEADS
%r to chart for bead placement and sew bead in place using a fine needle
will pass through bead. Bring needle up al 1, run needle Ihrough bead
i down al 2. Secure floss on back or move to next bead os shown
Christmas Village (shown on page 31): Design #3 was stitched over
2 fabric threads on an 8" square of Tea-Dyed Irish Linen (28 ct) Three
strands of f oss were used for C oss Stitch and 1 strand foi Backstitch
For ornamenl, you will need a 6 A" da. circle of Tea-Dyed Irish Linen for
backing, two 47.i‘ dia. circles of adhesive mounting board, two 4 A‘ dia.
circles of balling, 17" length of W dia. purchased cording with attached
seam allowance, ond clear-drying craft glue
Centering design, trim stitched piece to a 6'A" dio. circle
Remove paper from one p ece of mounting board and press one batting
piece onio mounting board Repeat with remaining mounting board
and batting.
Clip 7/ into edge of stitched piece at 7/ intervals. Center w ong side of
stitched piece over batting on one mounting board piece, tofd edges of
stilched piece to bock of mounting board and glue in place. For ornament
back, repeat with backing fabric ond remain ng mounting board.
Beginning and ending ot bollom center of slilched piece, glue cording
seam allowance to wrong side of ornament front, overtopping ends
of cording. Matching wrong j des, glue ornament front ond back together
Needlework adaptation by Nancy Dockh r.
PReTTY SACOpl.lKIQ
B'ST
it
x
И
lA.
E
|O
* •
center Initiols |
center yeor
'I (41wx51h)
'3 (41wx56h)
'2 (37w x 47h)
Dcsz
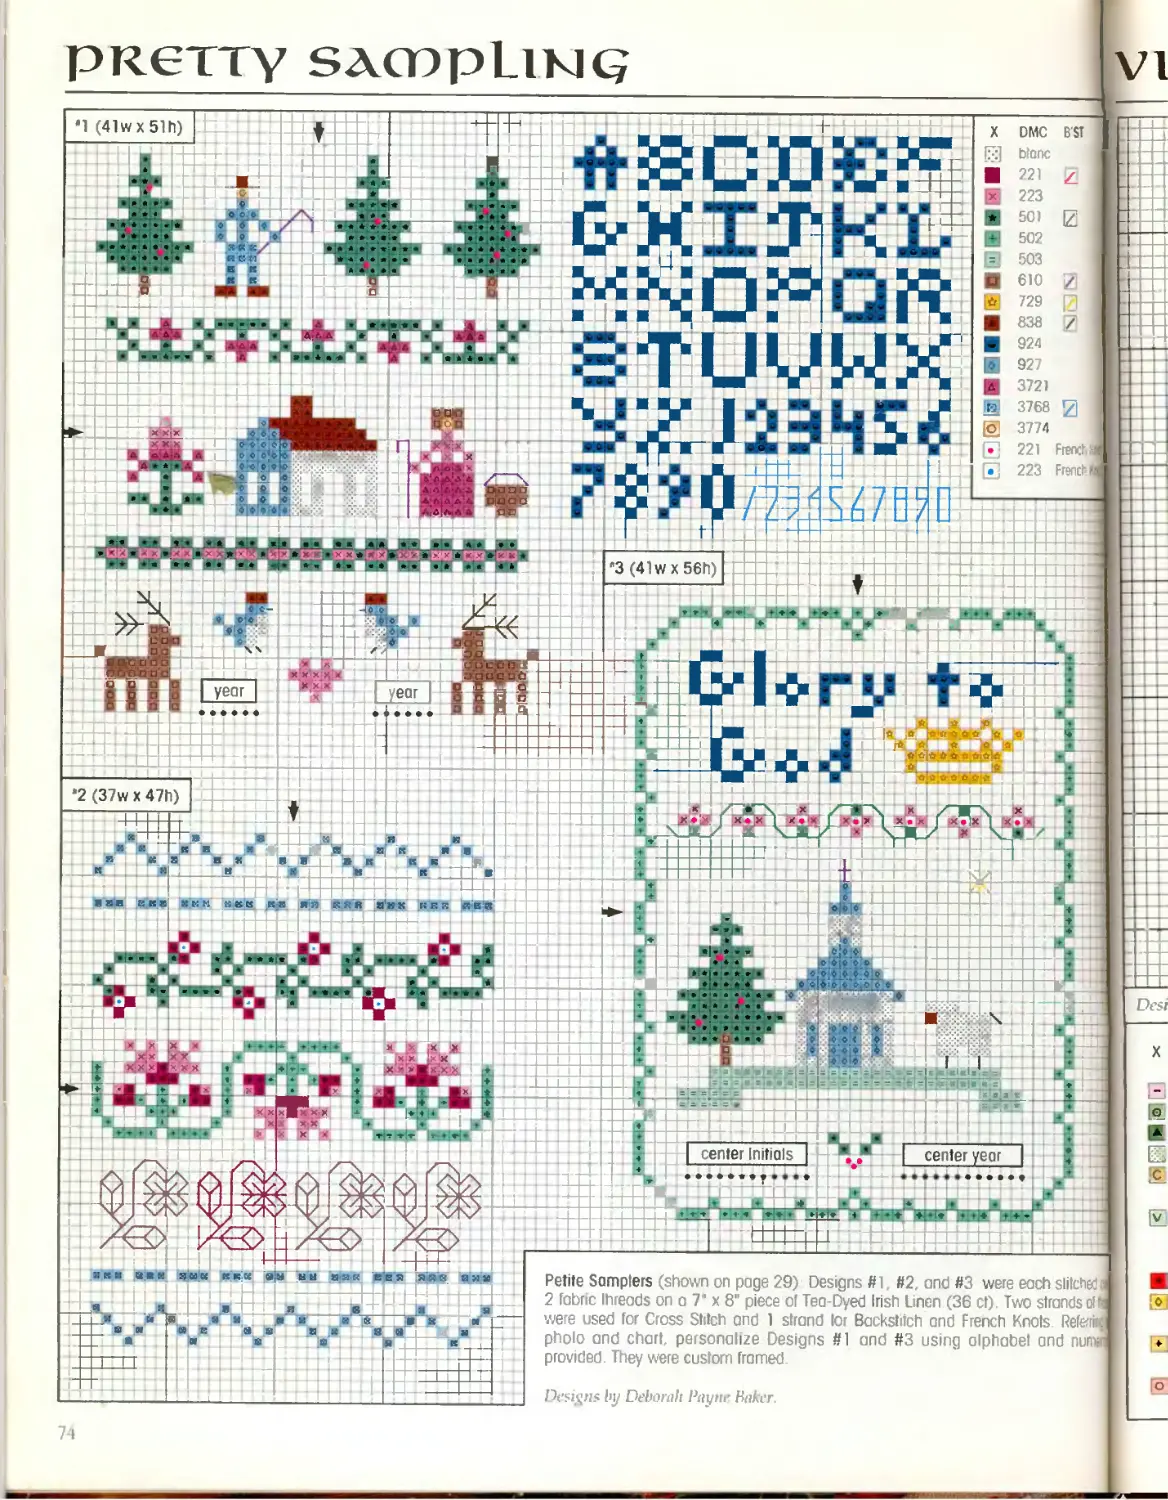
Designs by Deborah Payne tinker
Petite Samplers (shown on роде 29) Designs #1, #2, ond H3 were each slitched
2 fabric Ihreods on a 7" x 8" piece of Teo-Dyed Irish Linen (36 ct) Two strands of I
were used for Cross Stitch and 1 strand lor Backstitch ond French Knots Referrir
pholo and chart, personalize Designs #1 and #3 using alphabet ond nunn
provided. They were custom framed.
G-MIJKI.
Я
’Й‘
И i
Й
s«« кки ау ни анк еея яле аян
1 “ “ ~
._________.
» 1е-.
I
♦
DMC
blonc
221
223
501
502
503
610
729
838
924
927
3721
3768
3774
221 Frenctii
223 French Hi
74
B'ST
French Knor
French Knot;
~ПГ
'ICTOR1AH ANQelS
STITCH COUNT (78w x
5%-
4’i"
44“
3V
14 COun*
16 count
18 count
22 couni
72h)
5T
4Г
i"
3V
x
x
.3 DUp fle
ptfopp al
jx HbiCjC.ojc
1HM PCX x
’ “o’ p
Op 5.5,
нй\с'в
lCCHH
IxcCI
Л|х.С X.
-frpfr_
*1222
1б^ЗорЖТ
З.СР;ЗЖШ
к.
ЗДж..,.
Е8а ЗАЗ 3 З'ЗРАЙВ
АЗо.ЗЛ&З.З io АО
Ар 3 Д® о ЗА 3AQ л
|АЛДМО 3c|V iD'3n
Bfy Una о ;ЗВД д □
i.PiA^AOP.Ol j0 Ж
bo QO2J02AQ . N,H./C
lu'.-O2/tl*P,Z!x.cKeHjH
I» . Oft*ftppx<£<H|e!cC
рор.ор 0 0г ХН/СС,-
' a 3 ор.*3|
1 9P
OPP
Op J
fcipI3l
.-A5.S
:£ PPQ10PP. О
сор! ООрр; Р'
£,о£р;орк J9Q?
ззззз j
□ г по 3.3 А«ИвЯ
□'3:3.3 no,aia~^i
К -зззз^аЦий
2 зянЦ
□ □ з гад
азз1дАг
ооо obbboppjop
ООО 000000(0
ОЮОООО1
□’З'Вр’й"’
ata’. □ \
□ □о
□ ah__—..__
□ ДАЛ/; 1ДДД
даШпДДЬ'зд
ЗД Зада'а З.Д
3 aj.3.
рь-зо з.зЕаа!
. _ ХЮ „ CFJ37]
зр'зД
л!3р 3
8f AoSB'
дпЛа'зИ
n'$A' з[а
Afel. Зад
E&odJ
гтЗДД
м3
3.u 3>
АЗА
[□□□13
L33’3iX
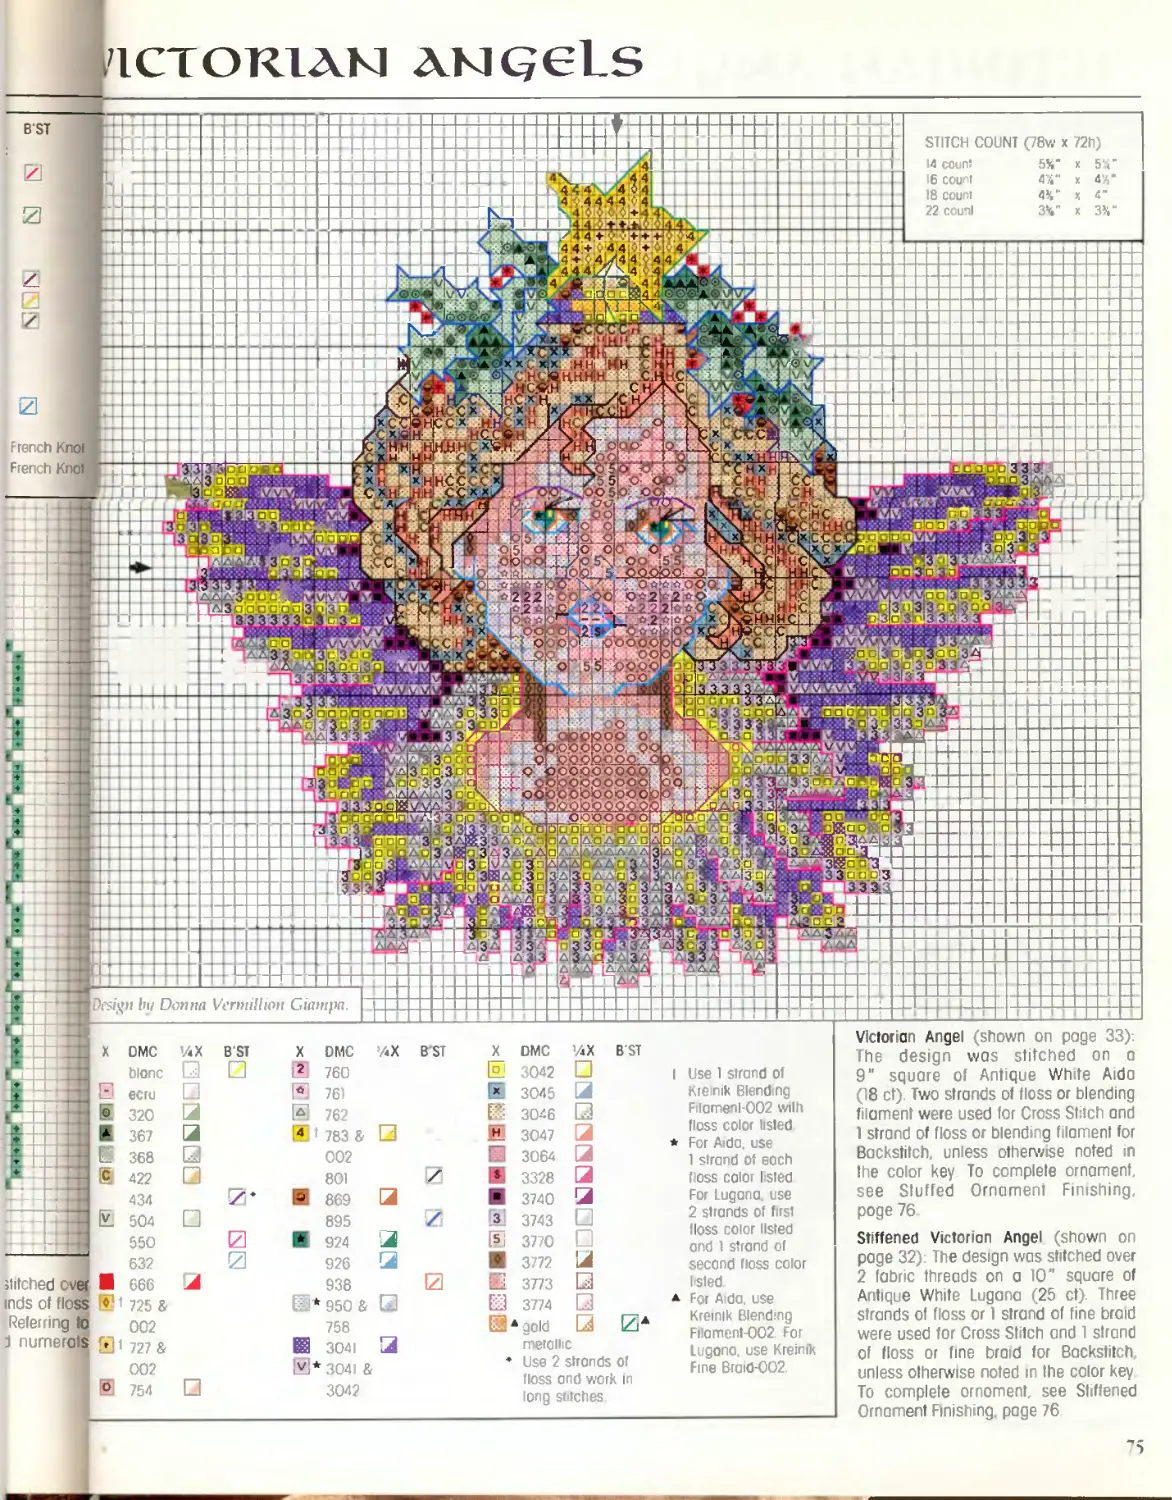
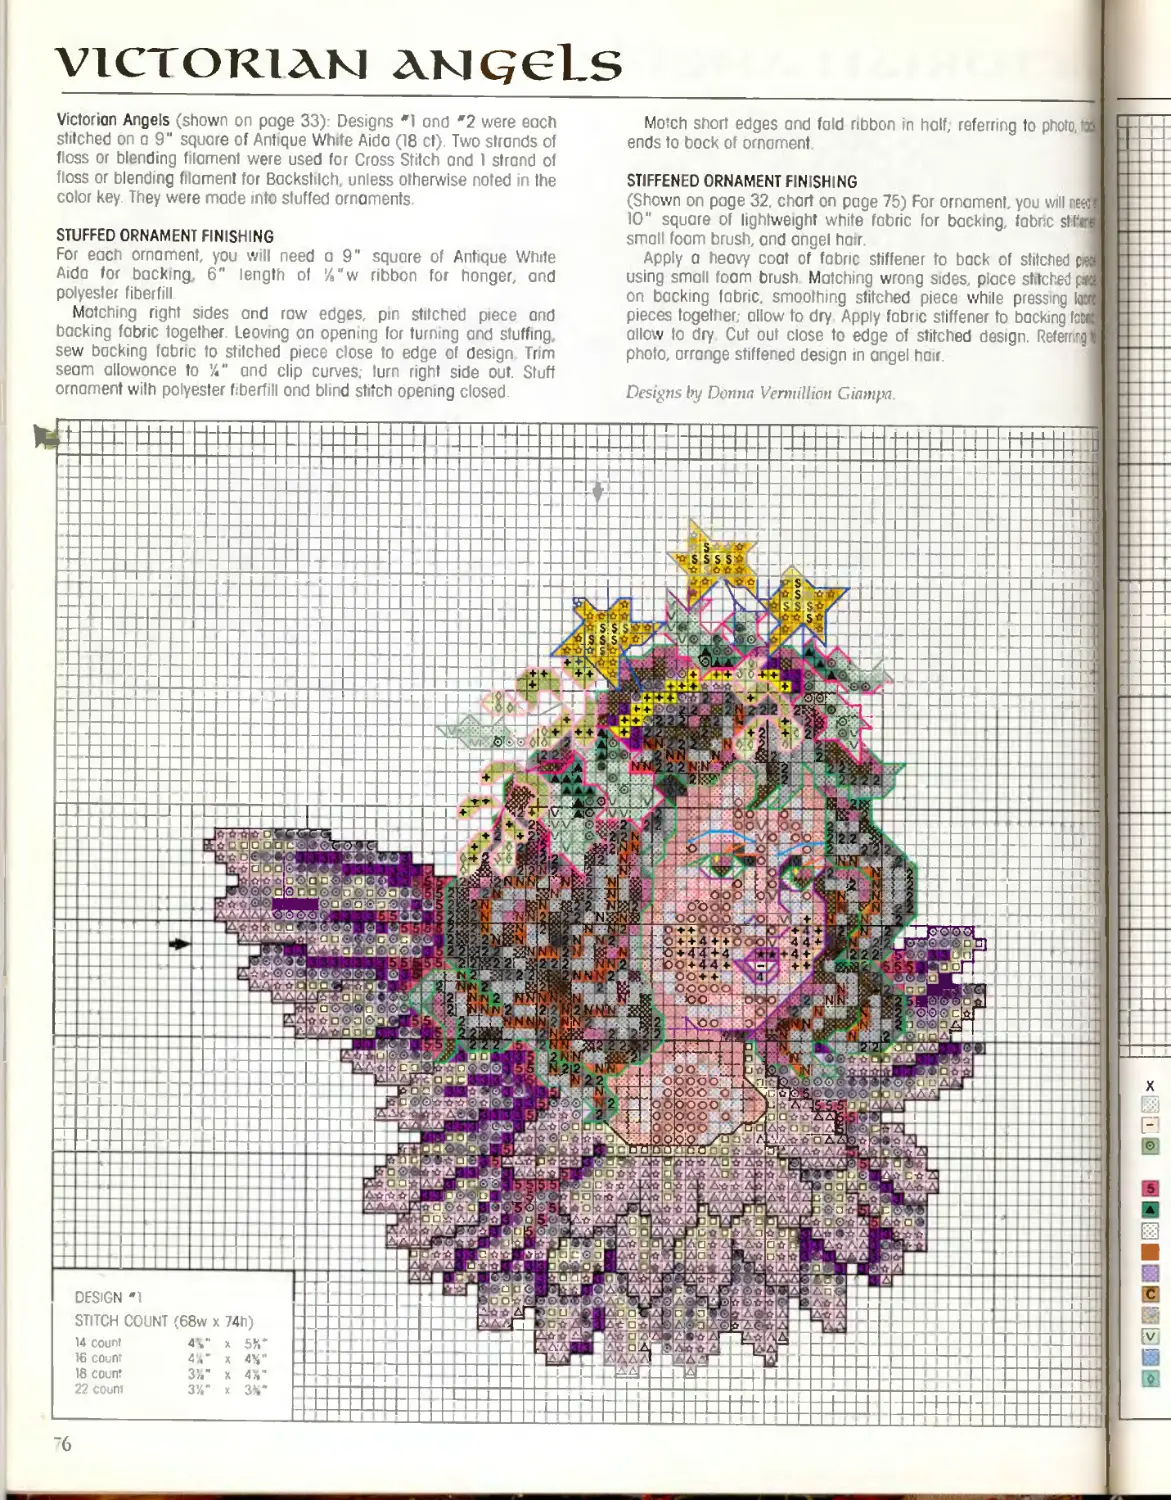
Victorian Angel (shown on page 33);
The design was stitched on a
9" square of Antique White Aida
(18 ct). Two strands of f oss or blending
filament were used for Cross Stitch ond
1 strand of floss or blending filament for
Backstitch, unless otherwse noted in
the color key To complete ornament,
see Stuffed Ornament Finishing,
роде 76
Stiffened Victorian Angel (shown on
page 32) The design was st tched over
2 fabric threads on a 10" square of
Antique White Lugana (25 ct). Three
strands of floss or 1 strand of fine braid
were used for Cross Stitch and 1 strand
of floss or fine braid for Backstitch,
unless otherwise noted in the color key
To complete ornament, see Stiffened
Ornament Finishing, page 76.
B'ST
DMC
3042
3045
3046
3047
3064
3328
3740
3743
3770
3772
3773
3774
X
DMC
blonc
ecru
320
367
368
422
434
504
550
632
666
725 &
002
Ы1 727 &
002
° 754
X
О
*
C
stitched over
tnds of floss
Referring to
j numerals
El
ЙХ B'ST X DMC /4Х BSl
□ □ 2 760
□ * 761
3 @ 762
з H1 783 & □
E 002
□ 801
/• Б 869 3
□ 895 /
И * 924 3
0 926 3
3 938 и
3* 950 & [7]
758
Б 3041 3
М* 3041 &
H
3
5.
4X
□
metallic
Use 2 strands of
floss and work in
long stitches
I Use 1 strand of
Kremik Blending
Filamenl-002 wilh
floss color listed
♦ For Aida, use
1 strand of each
floss color I sled
For Lugona. use
2 strands of first
floss color listed
ond ’ strand of
second floss color
hsled
Д For Aida, use
Kreinik Blending
Filoment-002 For
Lugona, use Kreinik
Fine Braid-002
victoriam akiqcLs
Designs In/ Donna Verntillidn Giampa
Match short edges ond fold ribbon in half, referring to photo, и
ends to bock of ornament
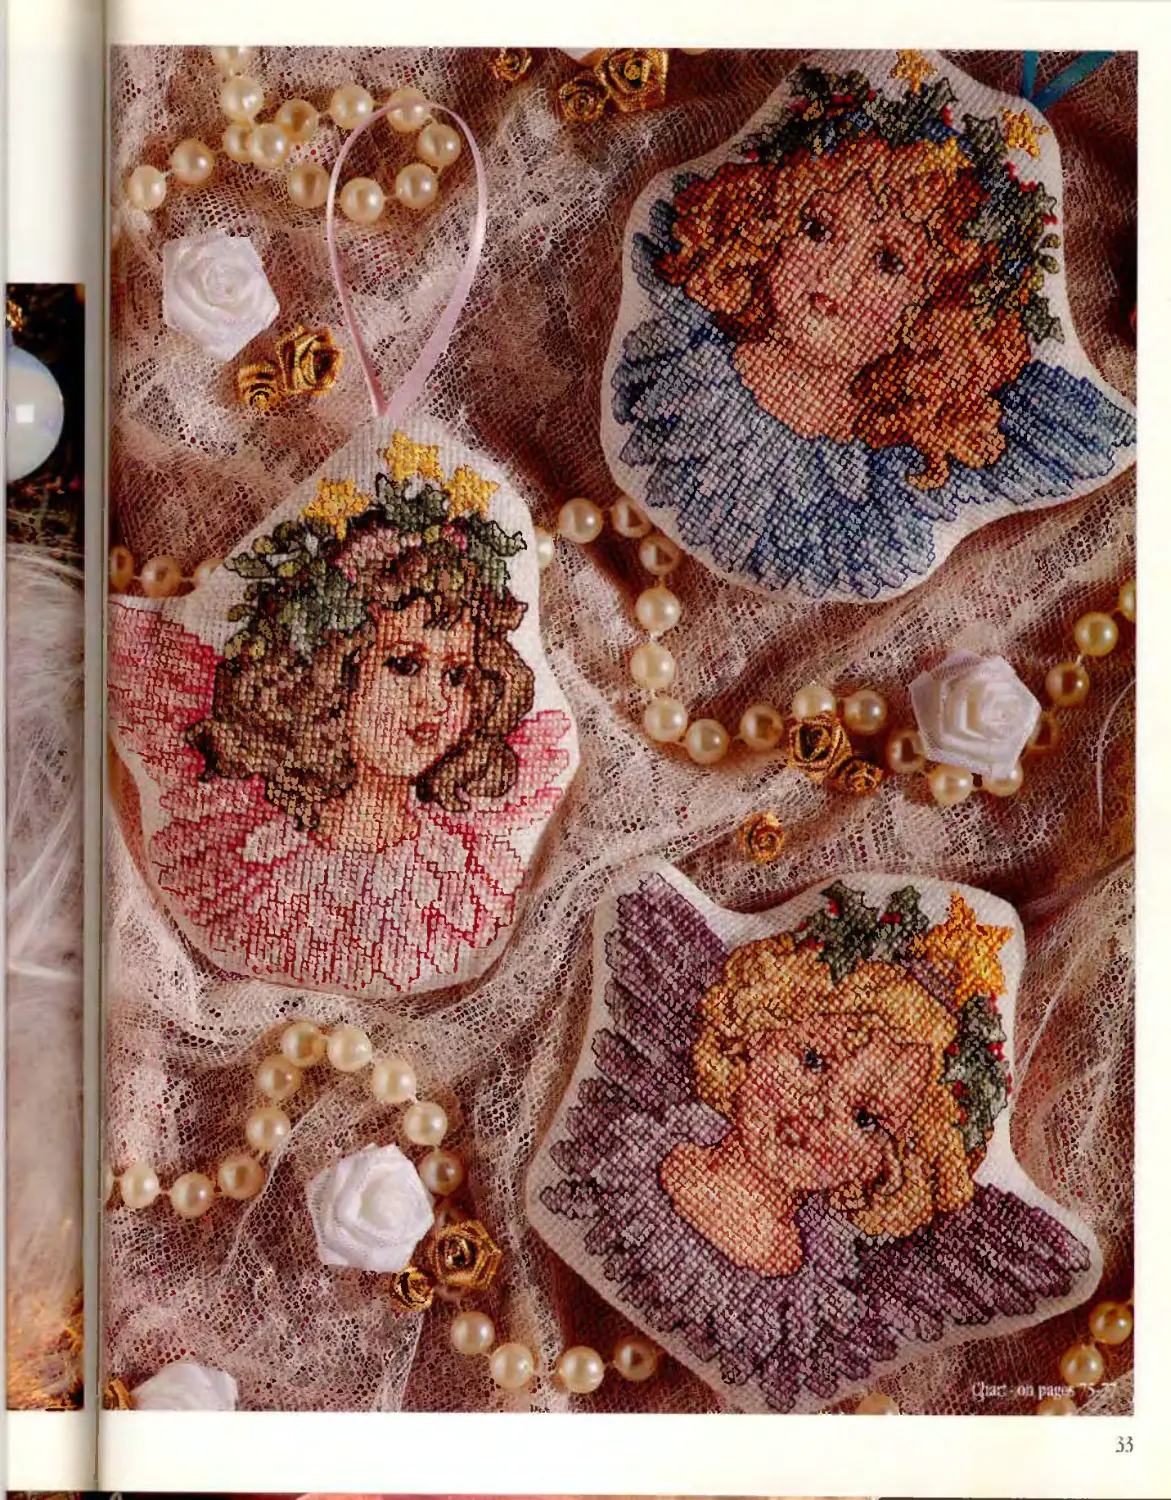
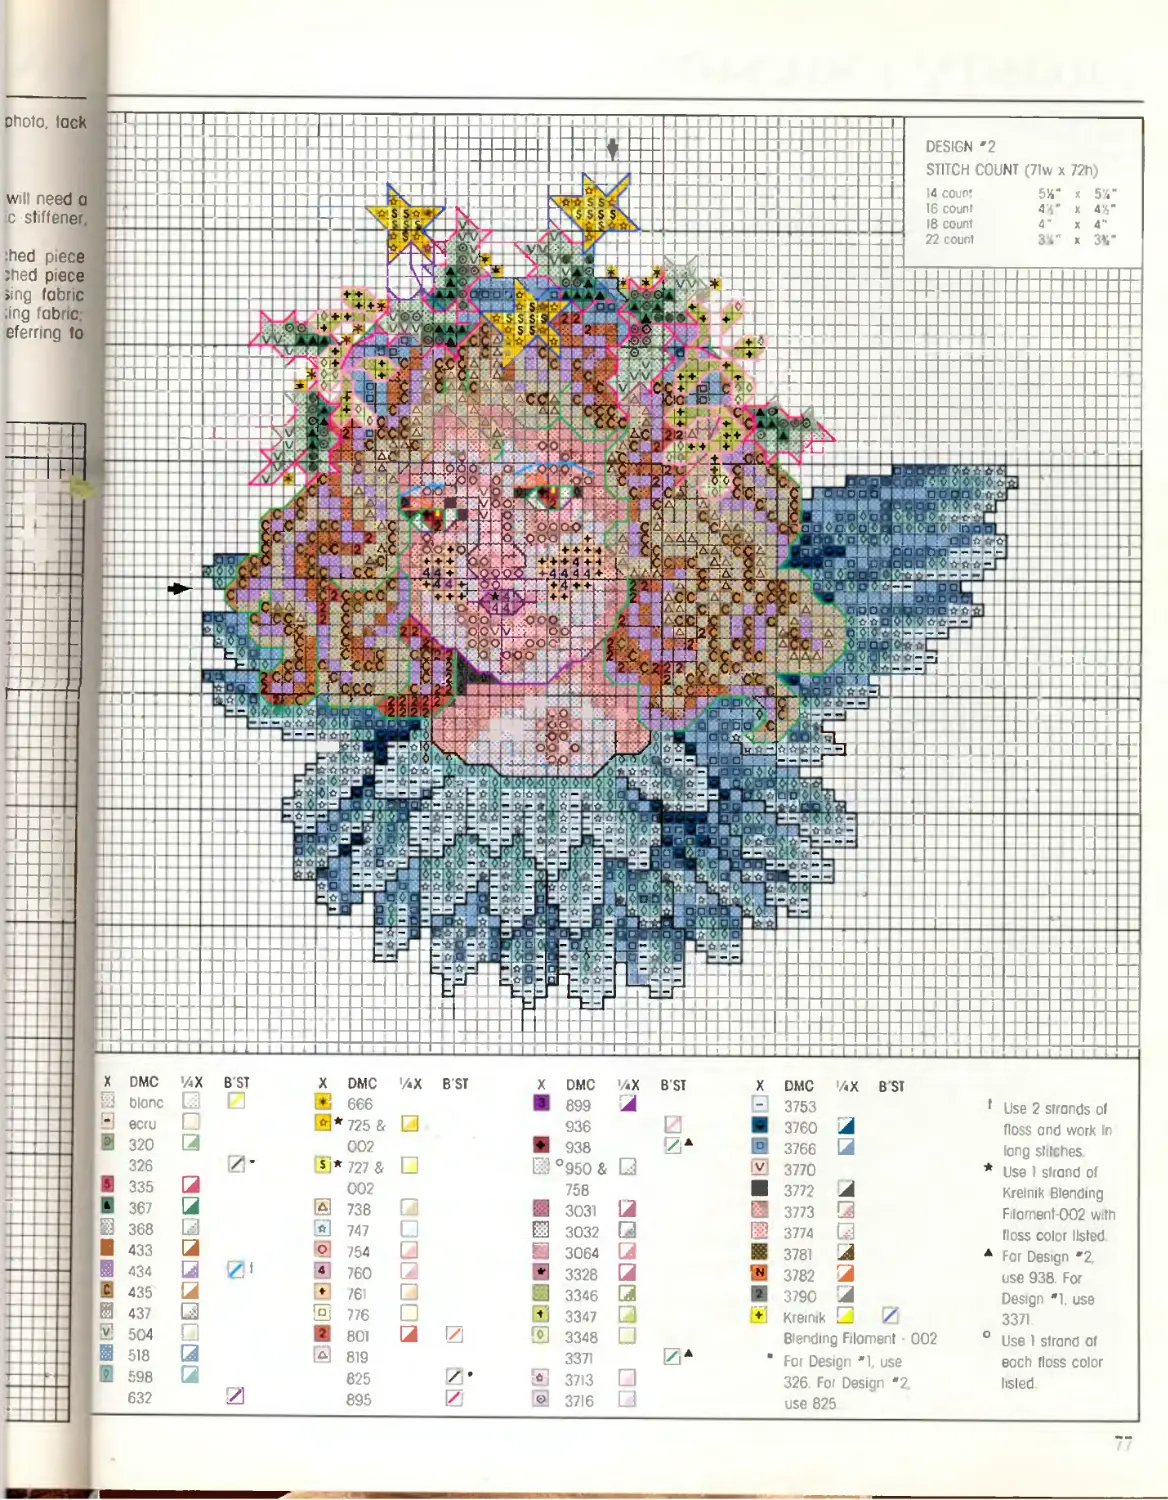
Victorian Angels (shown on page 33): Designs *1 ond *2 were each
stitched on a 9" square < f Ant que White Aida (18 cf). Two strands of
floss or blending filament were used for Cross Stitch and I strand of
floss or blending filament for Backstilch, unless otherwise noted in the
color key They were made into stuffed ornaments.
1»
N’N
©.□
2:212
л £ (t>0
ВД-Г V2
Г <!□©□ &
Ф>Гр'оЫ
’прс-д ДдЕ
lafog'n-fr ДБ
Д ц
УеоФеТТ
>& >®6-Э
’1O + + 4 + +©
7&+4Т+4
"Ьо + дд >
оо+ *
ОООоо ’
frss’sg.
л s£F“
OO ’
fefeocb
'obobl'
16Ю000,
4Y
4 V
34
x
x
X
DESIGN -1
STITCH COUNT (68w x 74h)
14 count
16 count
18 count
22 count
STUFFED ORNAMENT FINISHING
For each ornament, you will need a 9" square of Antique White
Aida for backing, 6" length of %"w ribbon for honger, and
polyester fiberfill
Matching right sides and raw edges, pm stitched piece and
backing fabric together Leaving an opening for turning and stuffing,
sew backing fabric to stitched piece close to edge of design Trim
seam allowance to V and clip curves, turn right side out. Stuff
ornament with polyester fiberfili ond blind stitch opening closed.
STIFFENED ORNAMENT FINISHING
(Shown on page 32, chart on роде 75) For ornament, you will re«
10" square of lightweight white fabric for backing, fobnc sMi
smalt foam brush, and angel hair.
Apply a heavy coat of fabric stiffener to back of stitched ₽
using small foam brush Matching wrong sides, place stitched p
on backing fabric smoothing stitched piece while pressing I
pieces together allow to dry Apply fabric stiffener to backing fc
allow to dry Cut out close to edge of stitched design. Referred
photo, arrange stiffened design in angel hair.
“6
Ohoto, tack
^'У'~
$ g й
5’4
4!4'
4"
3V
5’4“ x
4 i* x
4' x
3»” x
DESIGN *2
STITCH COUNT (71w x 72h)
14 COun’
16 count
18 count
22 count
w need a
c stffener,
:hed piece
:hed piece
»ing fabric
;ing fabric,
eferrmg to
’ ОС
_1L rt Hr
I TT
X
□
%x
в ST
0,
C
blanc □
ecru □
320 Э
326
335 3
367 a
368 | ..-*1
433 3
434 Q
435 3
437 □
504 1 1
518
598 Q
632
X DMC
IS 666
И* 725 &
002
5 * 727 &
002
738
747
754
760
761
776
801
819
825
895
A
О
В ST
X
E3
й
©
DMC
899
936
938
°95O &
758
3031
3032
3064
3328
3346
3347
3348
3371
3713
3716
«X
В ST
X
о
у
'N
'/<X В ST
DMC
3753
3760
3766
3770
3772
3773
3774
3781
3782
3790
Kreinik
Blending Filament • 002
For Design '1, use
326. For Design *2.
use 825
1 Use 2 strands of
floss ond work in
lang stitches
* Use 1 strand of
Kreinik Blending
Fil ament-002 with
floss color listed
* For Design r2,
use 938. For
Desgn *1 use
3371
° Use 1 slrond of
each floss color
listed
pROSTY pRiexiOs
72w x 72h
X
t.
о
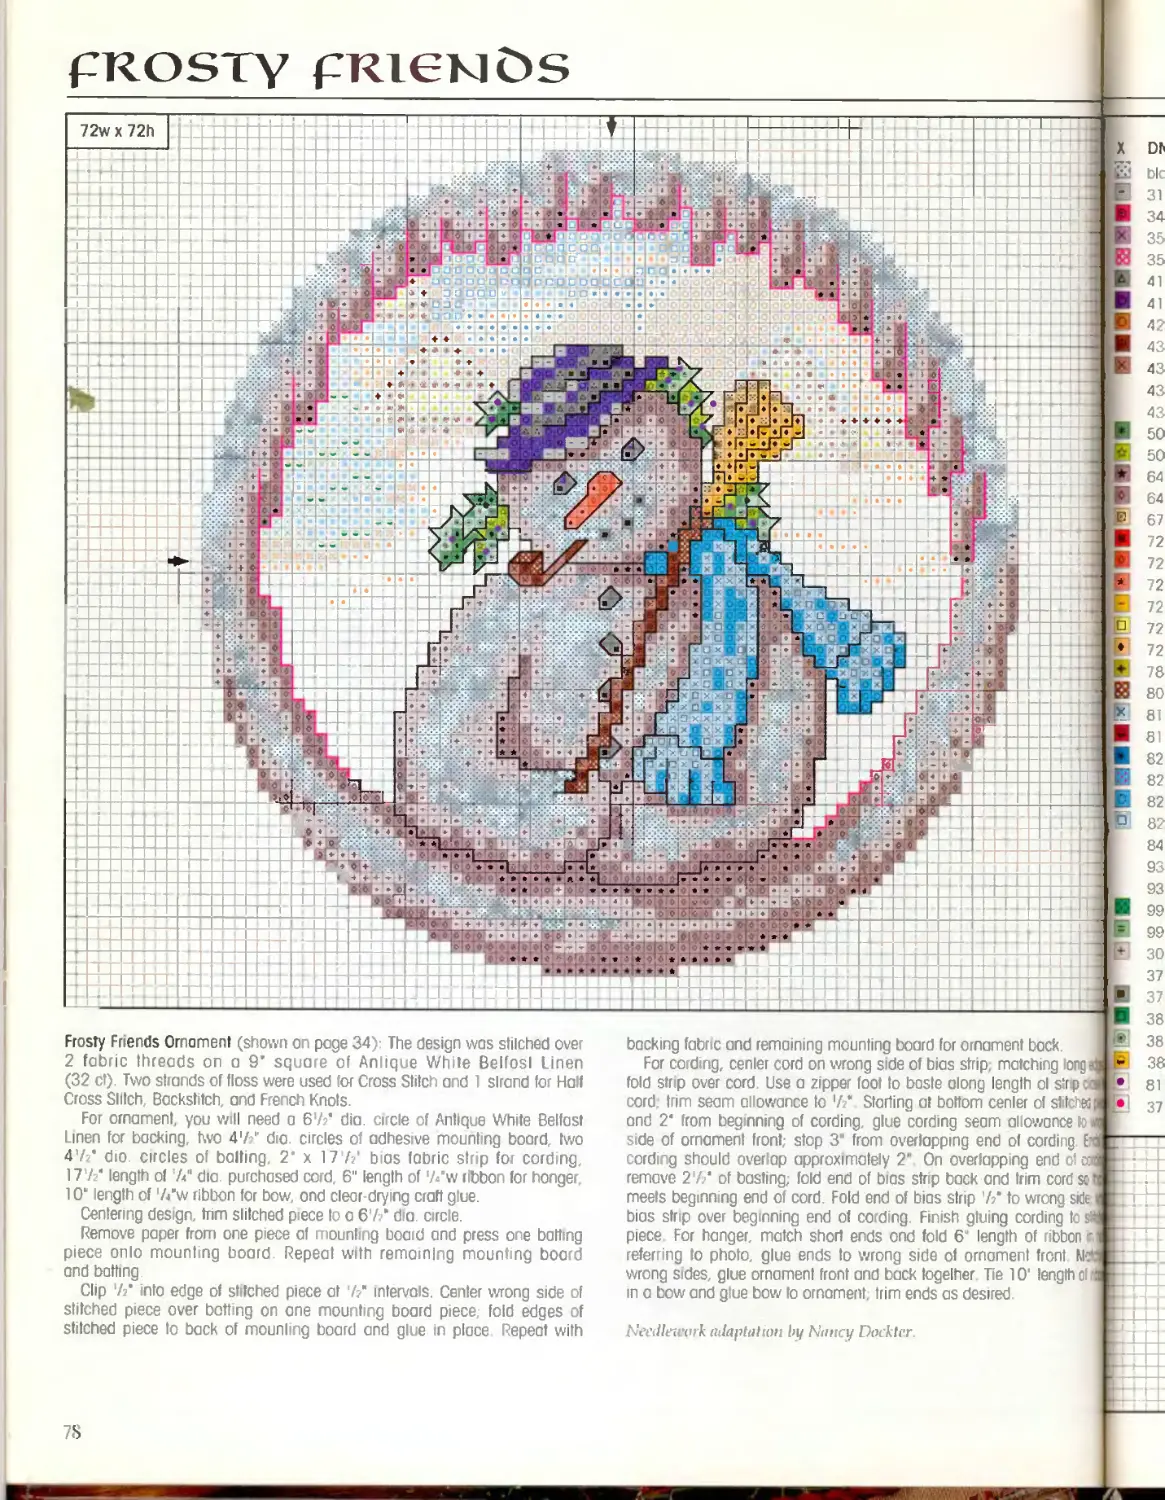
Frosty Friends Ornament (shown on page 34)- The design wos stilched over
2 fabric threads on a 9' square of Antique While Belfosl Linen
(32 ct). Two strands of floss were used for Cross Stitch and 1 slrand for Half
Cross Slitch, Backstitch, and French Knots.
For ornament, you will need a 67/ dia. circle of Antique White Belfast
Linen tor backing, two 47/ dia circles of adhesive mounting board, two
47/ dio circles of baiting, 2' x 17 // bias fabric strip for cording,
17 h" length of Л" dia purchased cord, 6" length of 7/w ribbon lor honger
10“ length of 7/w ribbon tor bow ond clear drying craft glue.
Centering design trim slitched piece to a 67/ dfa circle.
Remove paper from one p ece of mounting boaid and press one batting
piece onio mounting board Repeat with remaining mounting board
ond batting
Clip 7/ into edge of stilched piece at 7/ intervals. Center wrong side of
stitched piece over batting on one mounting board piece fold edges of
stitched piece to back of mounling board and glue In ploce Repeat with
backing fabr c and remaining mounting board for ornament back
For cording, center cord on wrong side of bias strip, matching long q
fold strip over cord. Use a zipper foot to baste along length oi strp
cord, trim seam allowance Io 7/. Storting at bottom center ot slitchwl
and 2* from beginning of cording, glue cording seam allowance to и Г
side of ornament front; stop 3' from overlapping end of cording Er Г-
cording should overlap approximately 2" On overlappng end of dm |
remove 27/ of basting, told end of bias str p back ond trim cord sc ч Г
meets beg nn ng end of cord. Fold end of bios strip // to wrong side r
bias strip over beginning end ot cording. Finish gluing cording to 4 p
piece For hanger, match short ends ond fold 6“ length of ribbon dl
referring to photo glue ends to wrong side of ornament front Nca г
wrong sides, glue ornament front ond back togelher Tie 10' length of я f
in a bow and glue bow to ornament, trim ends as desired
N'eetileuvrk adaptulion bi/ Nancy Dockter.
Dh
blc
31
34
35
35
41
41
42
43
43
43
43
50
50
64
64
67
72
72
72
72
72
72
78
80
81
81
82
82
82
82
84
93
93
99
99
30
37
37
38
38
38
81
37
78
:к.
ig tong eager
' strip close I
stitched pieo
ince to wron
ding. Ends £
id of cordlnr
cord so that
ng side; wra
ng to stitctid
Ibbon in hoi
anl Matchin
ngth of ribto
'AX
AX
B'ST
French Knol
French Knol
25w x 45h
25w x 45h
26w x 45h
aoal
DMC
Clone
318
349
350
351
413
414
420
433
434
436
437
500
501
646
648
676
720
721
722
725
726
729
783
801
813
817
824
825
826
827
844
930
93)
991
992
3072
3790
3799
3814
3815
3829
817
3799
Frosty Friends Mittens (shown on page 35): Each
design was stitched on a 6“ x 8" piece of Oatmeal
Floba (14 ct). Four strands of floss were used for
Cross Stitch, 2 strands tor Backstitch and French
Knots, and 6 strands for Blanket Stitch
For each m Iten, you will need a 6" x 8“ piece of
med urn weighl coordinating fabric lor backing,
tracing paper, pencil, fabric marking pencil,
6" length of ’A'w ribbon for hanger, and
DMC 817 floss for Blanket Stitch.
Trace Mitten Pattern, page 96, onto trocing
papei cut out pattern. Referring to photo, posit on
pattern on wrong side of st 'ched piece, pin pattern
in place. Use fabric marking pencil to draw around
pattern; remove pattern Matching right sides, pin
st tched piece end backing labr c together.
Leaving top edge open, use a short stitch length
and sew directly on drawn line (backslitch at begin-
ning and end of seam)- remove pins. Trim top edge
along drawn line and Irim seam allowance to
'/д’; clip curves and lurn mitten right side out.
Press top edge of mitten 7?" to wrong side.
Referring to photo and В onket Slitch Instructions,
page 93, Blanket Stitch top edge of mitten. For
hanger, fold ribbon in half and tack ends to inside
of mitten at seam opposite Ihumb.
Dt’srgns by Nancy Docktcr.
RADIANT MATIVITY
ОО
!о о г cjg
№ох'«33
|О'6'8К'-5?
ctloo
«coo
о ООО
о ООО
м?
SS О О йй
3/ О О|о'й/
7 ЯОО*<
л •otir
i ; лд
< £rk:i iB + ДД +
ir й>Сг g|« ♦ + ♦ Ч
*> <>•♦ ♦♦♦ + •♦- ♦
55w x 55h
25w x 4
X
DMC
B'ST
Mill Hill Bead-ОДЙ
MH Hill Bead- 00 J
f*1
24w X t
31wx30h
Design. by Linda Culp Calhoun.
Designs by Man/aiuw Mvrcck.
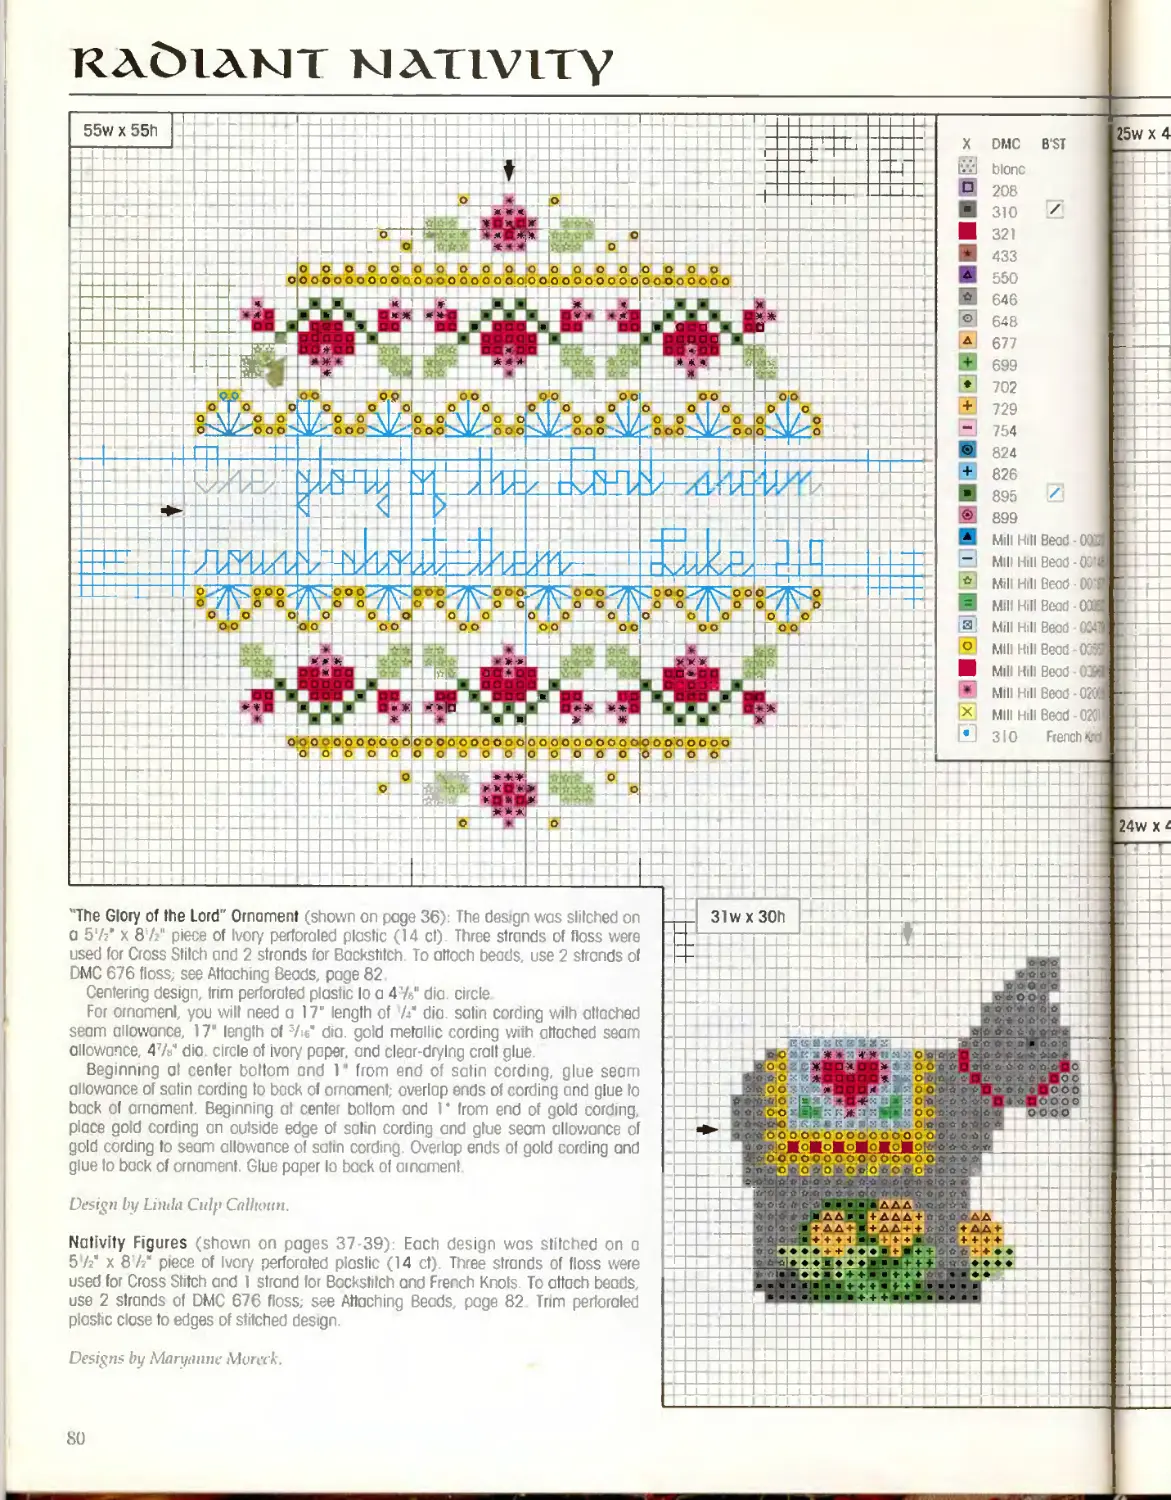
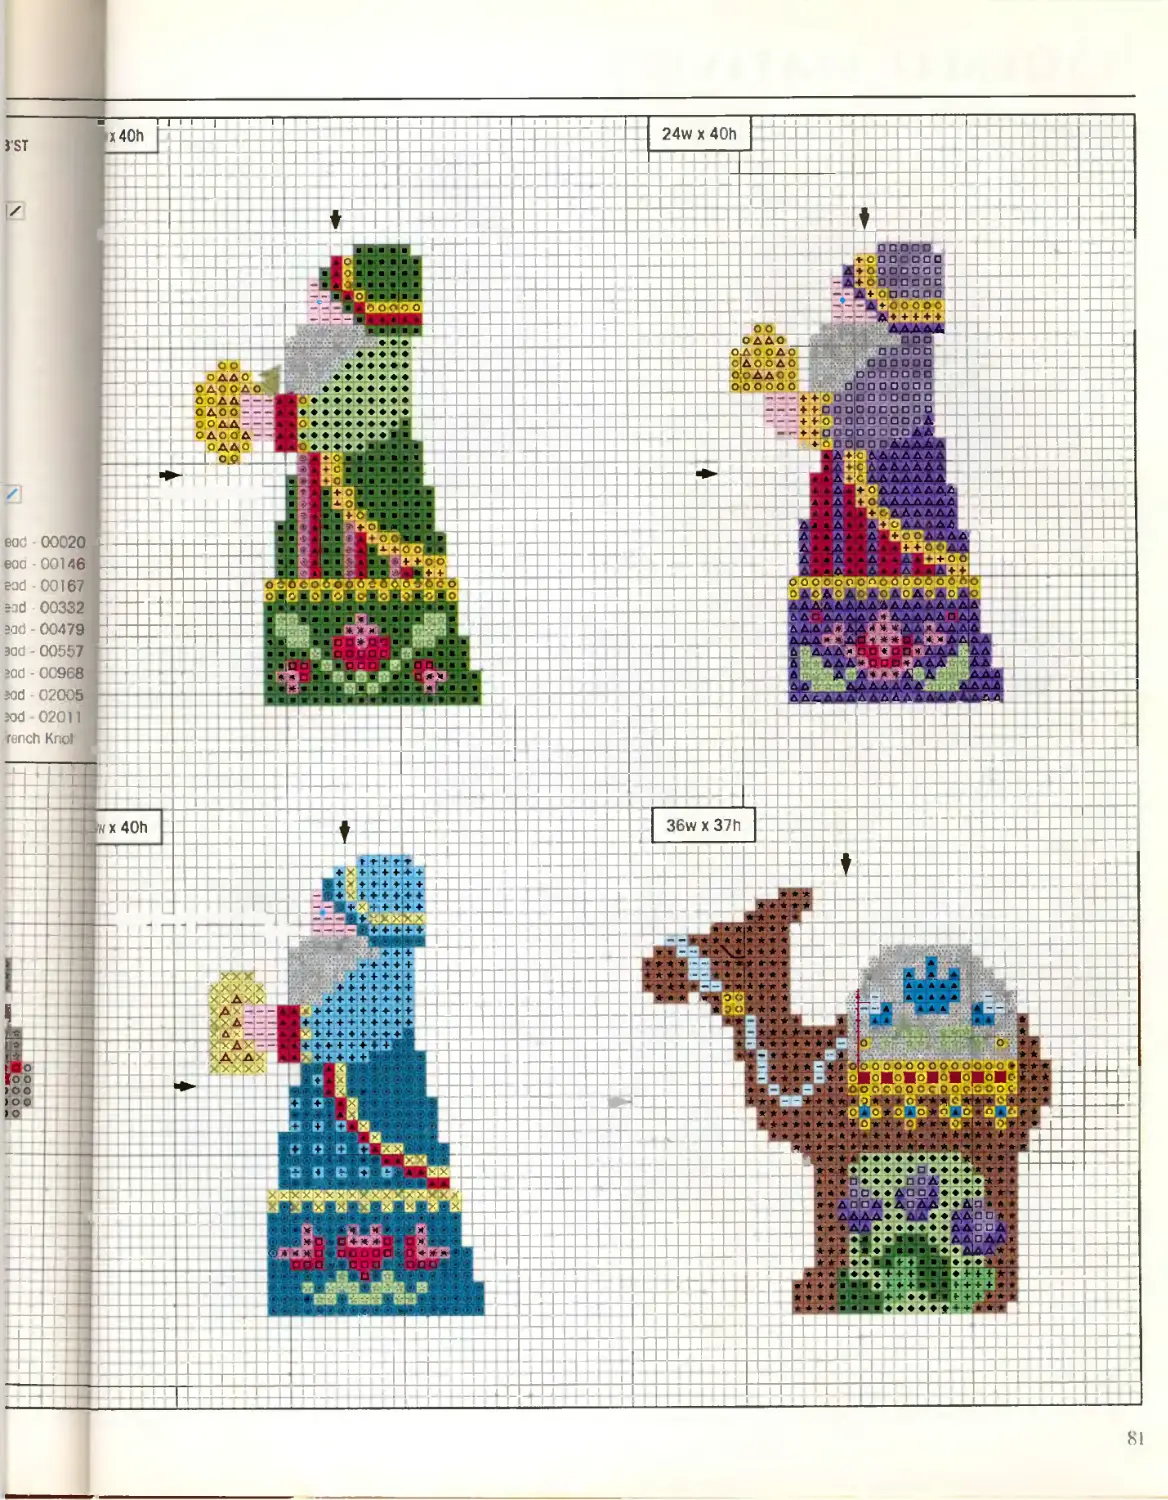
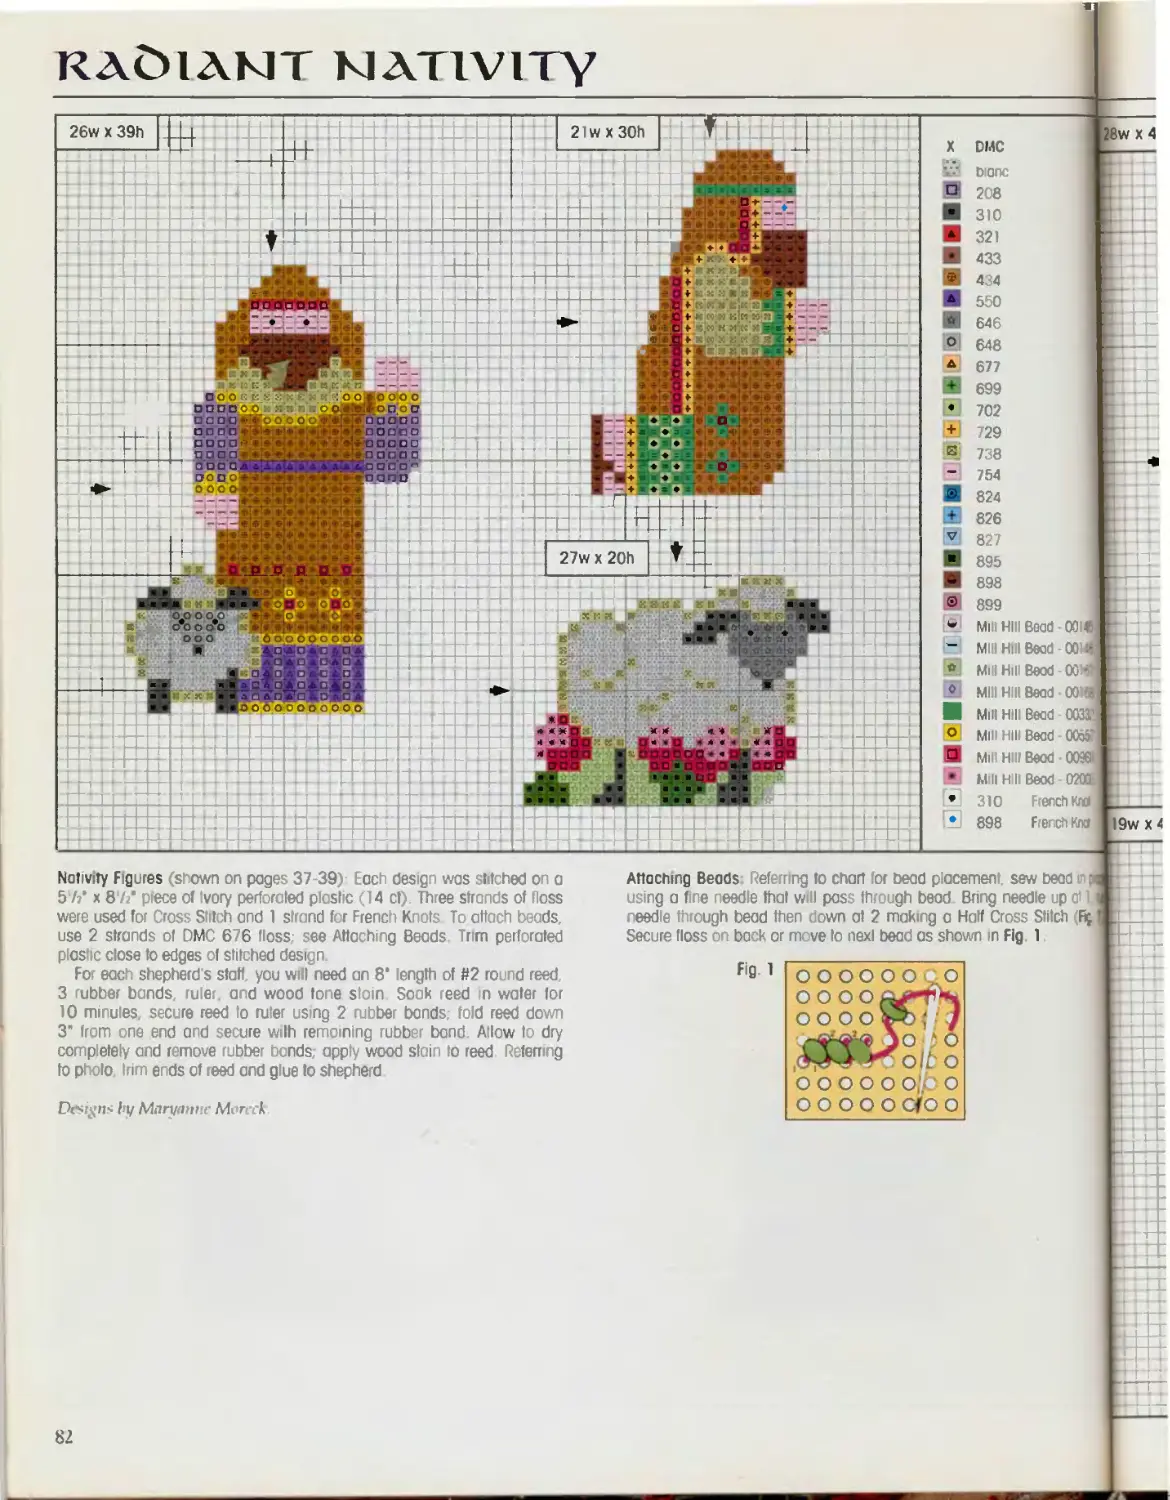
Nativity Figures (shown on pages 37-39): Each design was stitched on a
57г' x 87/ piece of Ivory perforated plastic (14 ct). Three strands of floss were
used for Cross Stitch and I strand for Backstitch and French Knots. To attach beads,
use 2 strands of DMC 676 floss; see Attaching Beads, page 82 Trim perforoled
plast c close to edges of stitched design.
3
O
blonc
208
310
321
433
550
646
648
677
699
702
729
754
824
826
895
899
Mill Hill Bead-0C6l
Milt Hill Bead ШЯ
Mill Hill Bead-OMl
Mill Hill Bead -Ocd
Mill Hill Bead Ни
Mill Hill Bead -0201
Mill Hill Bead 0201
310 Rench
"The Glory of the Lord" Ornament (shown on page 36): The design was slilched on
a 57/ x 87/ piece of Ivon/ perforoled plastic (14 ct) Three strands of floss were
used for C oss Stitch and 2 stronds for Backstitch To attach beads, use 2 strands of
DMC 676 floss; see Attaching Beads, page 82
Centering design trim perforated plastic lo a 47/ dia. circle
For ornomenl, you will need a 17” length of // dia. satin cording wilh attached
seam allowance, 17" length of 3Ле’ dia. god metallic cording with attached seam
allowance, A7/« dia. circle of ivory paper, ond clear drying crolt glue.
Beginning at center bottom ond 1" from end of satin cording, glue seam
allowance of satin cording to back of ornament; overlap ends of cording and glue lo
back of ornament. Beginning at center bottom and I ’ from end of gold cording,
pl ce gold cording an outs de edge of satin cording and glue seam allowance of
gold cording to seam allowance of satin cording. Overlap ends of gold cording and
glue to bock of ornament. Glue paper lo back of ornament
80
о
36w X 3711
x 40h
Пии DO
I .ч » C JO П ;
□ О DOC
□□□□□□
|D □ □ □ □
□□□□□□ПО
♦ +OO □□□□□□
+ + □□□□□□□□□□
+ юпопопаооД
♦ + □к io tii дд
□опоДлдДд
♦ I АДДДДАд
'♦ ’АдД’Д’ДДа
ЩС)й.А’ААДДА
в+ о Дд Дадда
•ддоп*
♦ДДОПД
♦ДДпЛА
+ О < » •
I»'-*" 4“ О ОинИ
1ЙД+ »со
• • .(• ♦
ооппо
опп о О'»
• □
хх X
х'х х’х х
х Л<х
ДХ--
яе. .
о ДАО
ОДО ОАО
О ОДА--
О до о
О ОДД--
ОДО о д-
о ддо
□. 0.9 JJ
□ □□□о
о □ а ооо
о□оооос
ОООопое
!+ Ор О □ О □
♦ооооо
л >—
л
хЛхД:
Xxxsk :
о о
оддо
ОДООАО
о!д О О АО
ооДаоо
О|О о о о о
I I I I I н
24w х 40h
+Р4
В------гг
jx40h I
end 00020
еоа- 00146
ead 00167
=id 00332
Sod 00479
aad - 00557
30d - 00968
Md- 02005
K»d 02011
f inch Knot
RAOlAMT MATIVITY
X DMC
V-’ Dione I
9 208
• 310
* 321
433
434
л 550
й 646
PI 648
A 677
+ 699
• 702
+ 729
® 738
- 754
824
+ 826
v 827
895
- 898
® 899
9 Mill Hill Bood-OOie
□ Mill Hill Bead-oom]
° Mill Hill Beod-OOffl
° Mill Hill Bead-OOHS
И Mill Hill Bead - ООЗЗЯ
° Min Hill Bead-005»
° Mill hiii Bead 00561
* MH Hill Bead - 0201
E 310 French Knoll
• 898 French Krol
28w x 4
I9w x 4
I9w x 4
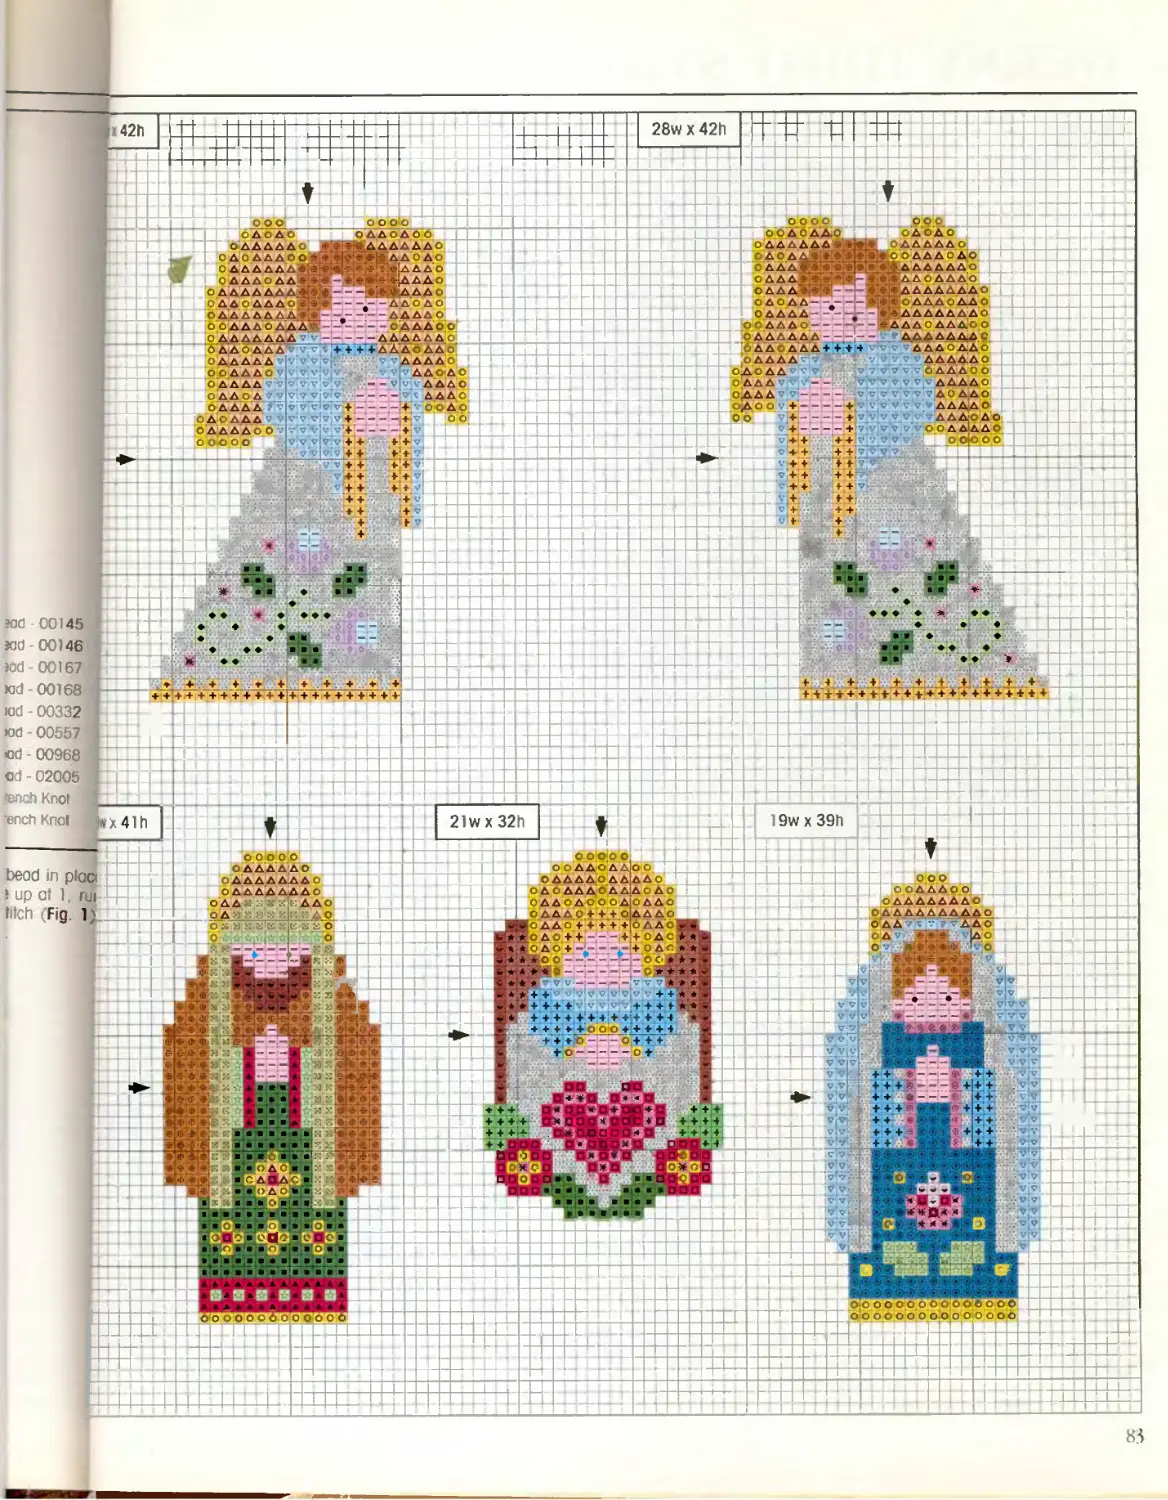
Nativity Figures (shown on pages 37-39)- Each design was stitched on a
57?* x 87г* piece of ivory perforated plastic (14 ct). Three strands of floss
were used for Cross Stitch and 1 strand for French Knots To attach beads,
use 2 strands of DMC 676 floss; see Attaching Beads Trim perforated
plastic close to edges of stitched design
For each shepherd’s staff, you will need an 8’ length of #2 round reed,
3 rubber bands, ruler, and wood tone stoin Soak reed in water for
10 minules. secure reed to ruler using 2 rubber bands; fold reed down
3" from one end and secure with remaining rubber band. Allow to dry
completely and remove ubber bands, apply wood stain to reed Referring
to photo, trim ends of reed and glue lo shepherd
Designs !>y Maryatmc Morcck
Attaching Beads*. Referring to chart for bead placement, sew bead in p
using a fine needle that will pass through bead Bn g needle up ot l.j
needle through bead then down at 2 making a Half Cross Stitch Fij.
Secure floss on back or move lo nexl bead as shown in Fig. 1
Fig 1
82
?ad 00145
sod-00)46
iad-00167
Kid-00168
rad - 00332
>ad - 00557
cd - 00968
Cd - 02005
'ench Knol
wch Knot
bead in piaci
? up at Г, rui
titch (Fig. 1)
28w X 42h
V*fX 41 h
19w x 39h
о
В
VIV
пм
Ч* Q
ОДОДАЛО
ОААЛААЛ
ОАЛЛС АЛ
о
ОД
• Ф ф
ОАО
ААЛ
ОДЛА
ААЛ
О АЛДА
АЛЛО
ДАЛО
v'
о
21wx 32h
ОЛЛАЛО
оде
О
+ в
s
О
- ®
!?
3
О О
83
60w x 75h
60w X 73Л
ж
Nirtilneork adaplati/M by
Donna Vermillion Ciumpa.
Santo Stocking Omoments (shown on page 41): !
design was stitched over 2 fabric threads on a 9' x 12' f
of Row Cashel Linen (28 cl) Three strands of floss werei
lor Cross Stitch and 1 strand for Bocks itch
For each ornament you will need a 9’ x 12’ piece of
Cashel Linen for backing, 5’ x 8" piece of Raw Cashel L
lor cuff, 2" x 5’ piece of Row Coshel Linen for hoi
8" length of 1 'A"w flat lace froc ng paper, pencil, and It
marking pencil To complete ornament, see Santa S4
Ornament Finishing, page 85
ЮОк
бймк
aa пек
'AX
B'ST
DMC
blonc
321
498
632
640
642
644
666
760
761
814
822
839
926
8-1
DMC
498
895
Mill Hill Bead - 00332
Mill Hill Bead-02013
ge 41), Each
9" x 12" piece j
toss were used |
’ piece of Raw i
/ Cashel Linen ’
n for hanger, *
oil and fabric ~
25w x 61 h
25wx61h
anta Stocking by Mary Scott.
i. i l i—i -i”.
»0w X 73h
ГО1итаЯД1ВМааЬид
<• ».* *«>* * » J
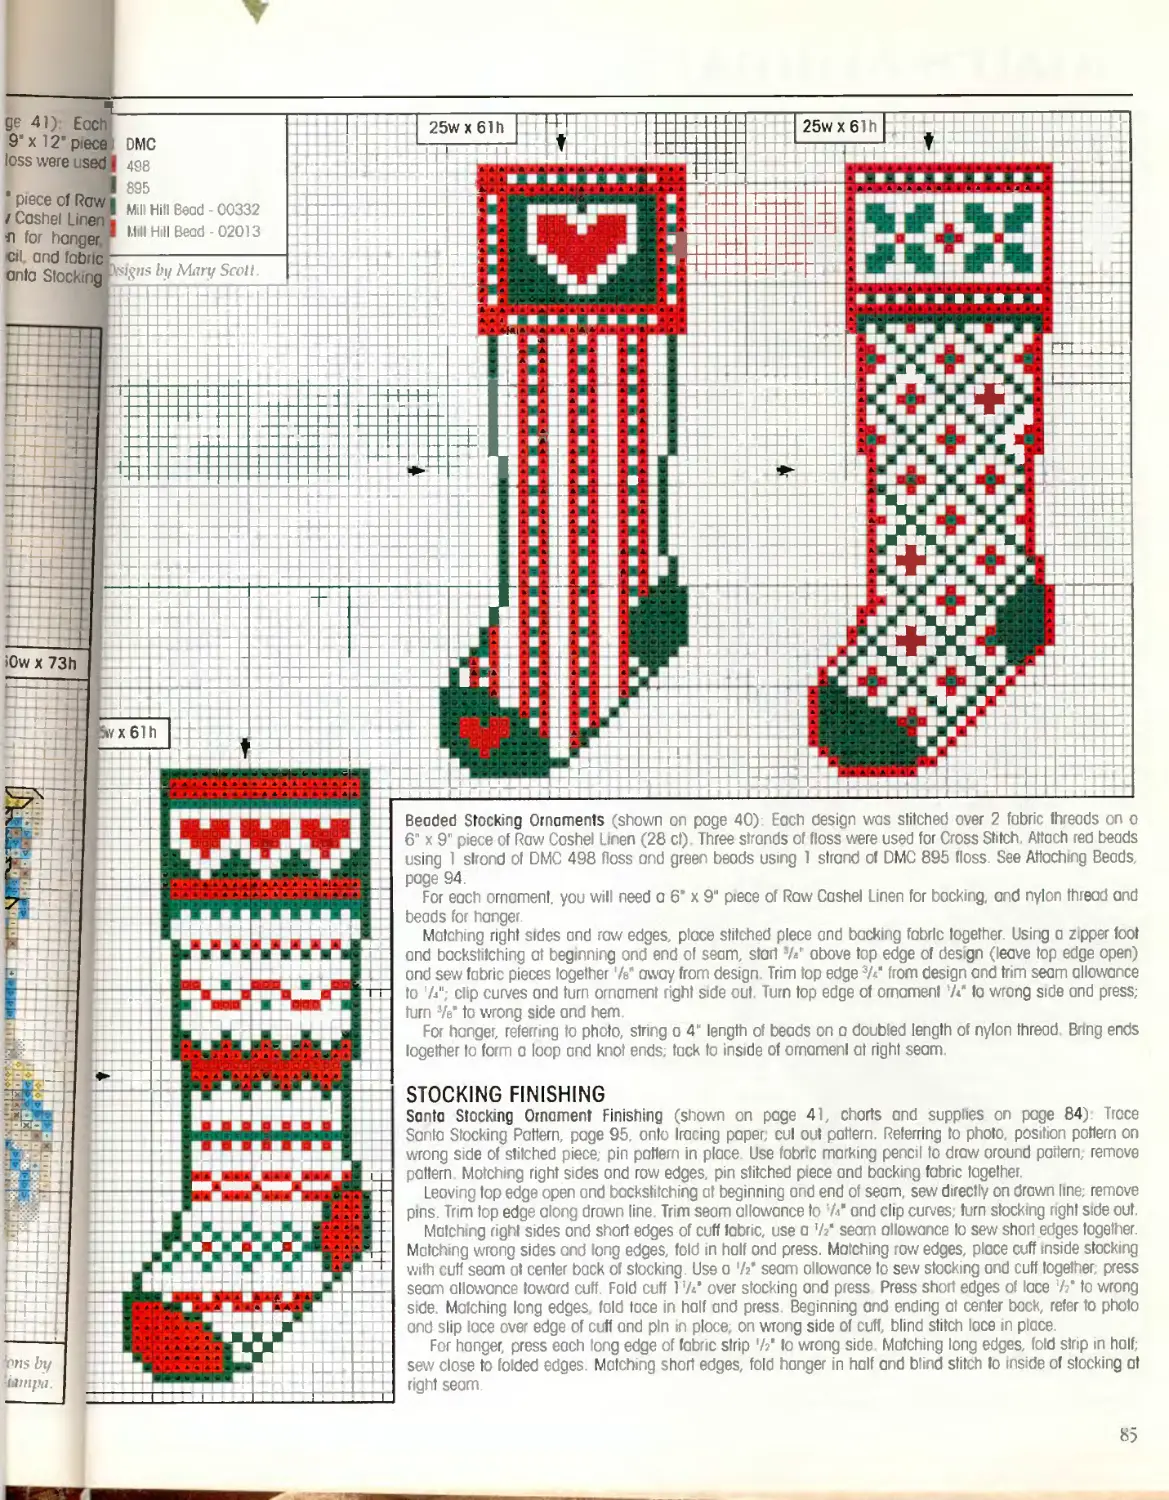
Beaded Stocking Ornaments (shown on роде 40): Each design was stitched over 2 fabric threads on о
6" x 9” piece of Row Coshel Linen (28 cl) Three strands of f oss were used for Cross Stitch Mtach red beads
using 1 slrond of DMC 498 floss ond green beads using 1 strand of DMC 895 floss. See Attaching Beads,
page 94.
For each ornament, you will need a 6* x 9“ piece of Row Cashel Linen for backing, and nylon thread and
beads for hanger.
Mate ng right sides and raw edges, place stitched piece ond backing fabric together. Using a zipper foot
ond backst fching at beginning and end of seam, start W above top edge of design (leave lop edge open)
ond sew fabric pieces together 7e" envoy from design. Trim top edge 3A* from design and trim seam allowance
to 'A" clip curves ond turn ornament right side out. Turn lop edge of ornament 7/ to wi ng side ond press;
turn %* to wrong side ond hem.
For hanger, refer ig to photo, string о 4" length of beads on a doubled length of nylon thread Bring ends
together to form a loop and knot ends; tack to inside of ornamenl at right seam
Inns by
iittipa.
STOCKING FINISHING
Santo Stocking Ornament Finishing (shown on page 41, charts and supplies on page 84); Trace
Santa Stocking Pattern, page 95. onto Iracing paper, cul out pattern. Referring to photo, pos lion polte n on
wrong side of stitched piece; pin pattern in place Use fabric marking репс I Io draw oround pattern, remove
pattern Matching right sides ond row edges, pin stitched piece ond backing fabric together.
Leaving top edge open ond backstitching at beginning ond end of seam, sew directly on drown line; remove
pins. Trim lop edge along drown line. Trim seam allowance Io 7/ ond clip curves, tarn stocking r ght side out.
Matching right sides ond short edges of cuff fabric, use о 7г* seam allowance to sew short edges together.
Matching wrong sides and ong edges, fold in half ond press. Matching row edges, place cuff inside stocking
with cuff seam ot center back of slocking. Use о 7г’ seam allowance to sew stocking ond cuff together; press
seam allowance Iowa d cuff. Fold cuff 17«* over stocking and press Press short edges of lace 7г* Io wrong
side. Malching long edges fold face in half and press. Beginning and ending al center bock, refer to photo
and slip lace over edge of cuff ond pin in ploce; on wrong side of cuff, blind slitch loce in place.
For hanger, press each tong edge of fabric strip 7г' Io wrong side Matching long edges, fold str p in half;
sew close to folded edges. Matching short edges, fold hanger in half and blind stitch to inside of stocking at
right seam
Ь5
MOAlyS ahicdaLs
32w x 25h
29w x 27h
32w x 24h
32wx21h
32w x 32h
32wx21h
FINISI
'Good
18, ctic
a 51/?
and it
jcordinc
overtop
out of
cordinc
baste c
end of
of fabi
beginr
to
end c
stitche
DMC
435
20" le>
polyest
Cent
motcbi
zipper
cord, Ir
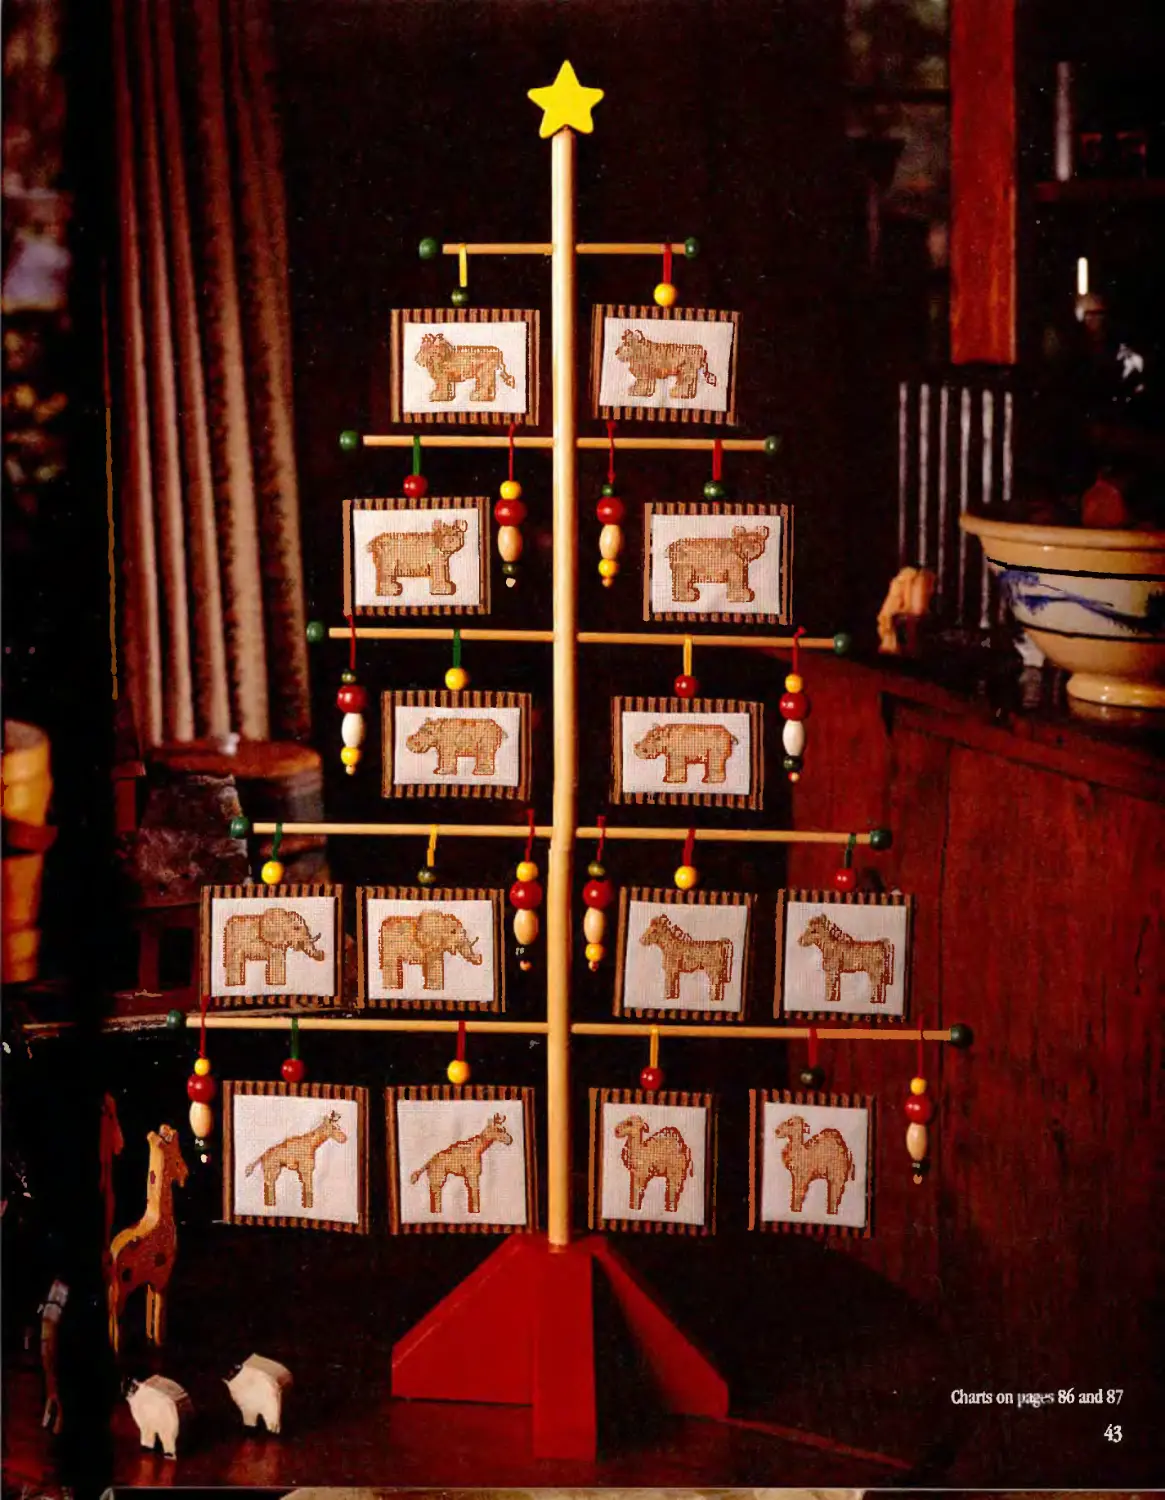
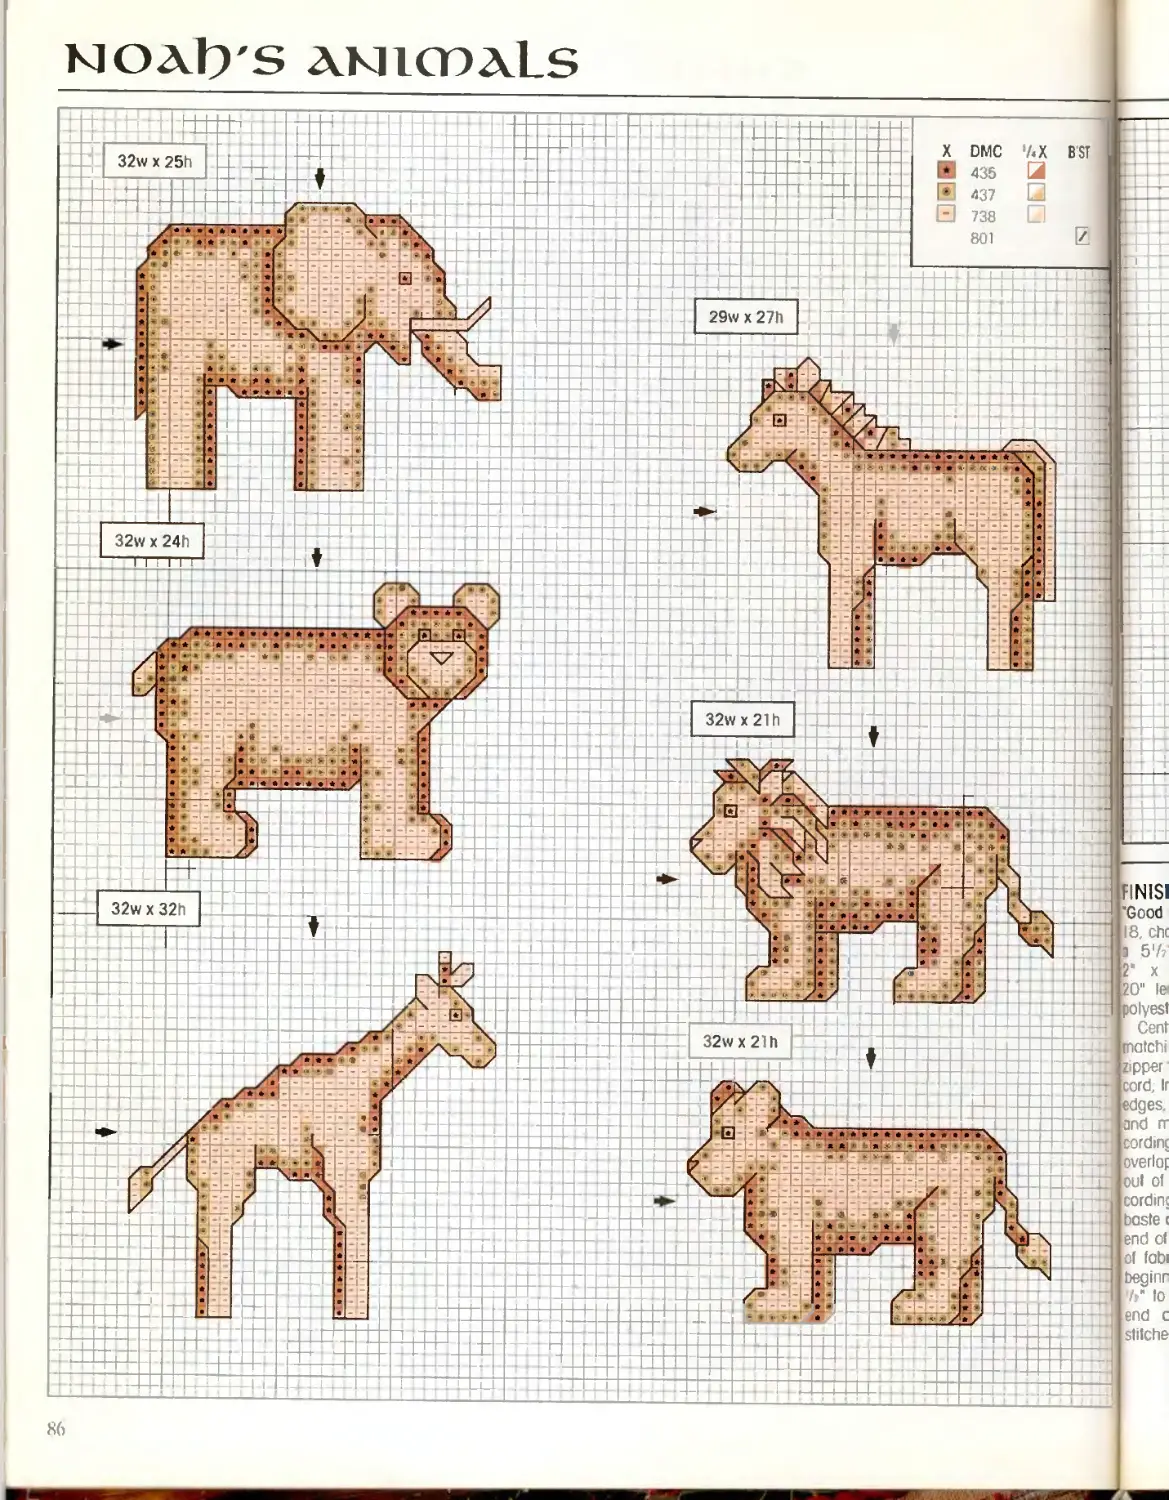
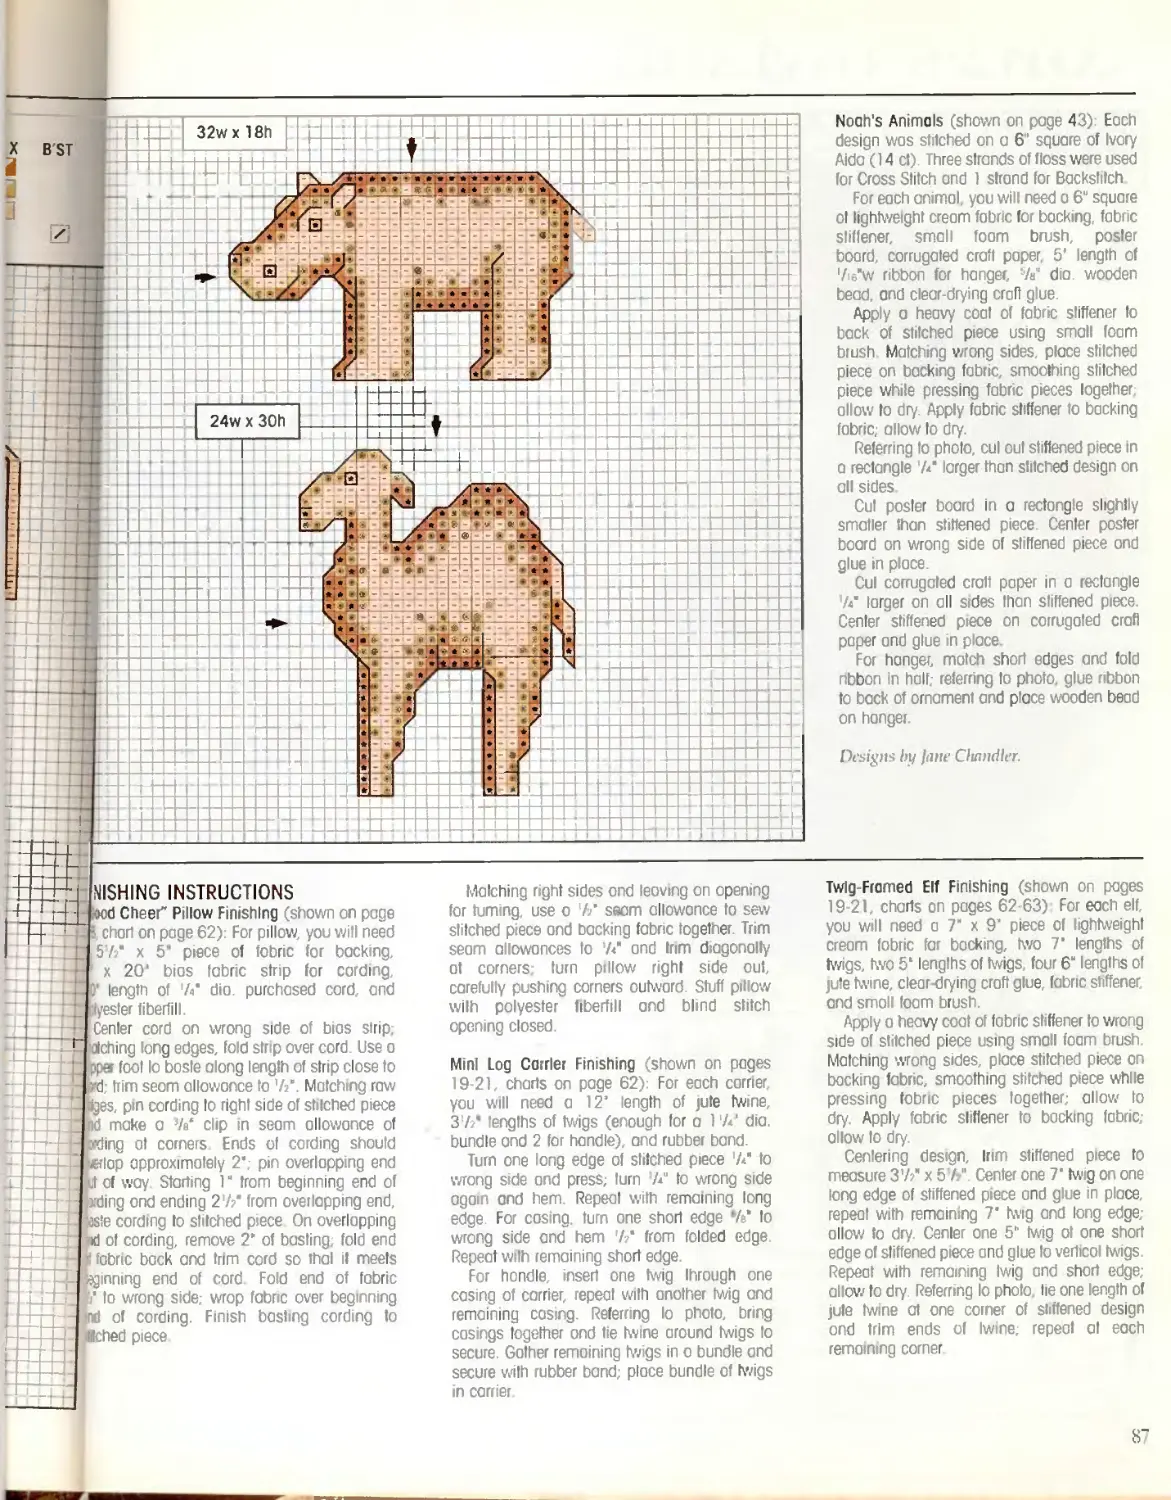
Noah's Animals (shown on page 43) Each
design was stitched on a 6' square of Ivory
Aida (14 ct). Three strands of floss were used
for Cross Slitch and 1 strand for Backstitch
For each animal, you will need a 6" square
ol lightweight cream fabric for backing, fabric
stiffener, small foam brush, poster
board, corrugated craft paper, 5' length of
7i6"w ribbon for hanger, 7/ dia wooden
bead, and clear-drying craft glue.
Apply a heavy coat of fabric stiffener to
back of slitched piece using small foam
brush Matching wrong sides, place stitched
piece on backing fabric smoothing stitched
piece white pressing fabric pieces together
allow Io dr/. Apply fabnc stiffener io backing
fabric; allow to dry.
Referring to photo, cul oul stiffened piece in
a rectangle 7/ larger than stitched design on
all sides
Cut poster board in a rectangle slightly
smaller than stiffened piece Center poster
board on wrong side of stiffened piece ond
glue in place.
Cul corrugated craft paper in a rectangle
// larger on all sides than stiffened piece.
Center stiffened piece on corrugated craft
paper ond glue in place.
For hanger, motch short edges and fold
nbbon in half; referring to photo, glue ribbon
to back ot ornament and place wooden bead
on hanger.
Designs by Jane Chandler.
(shown on роде
: Chori on роде 62): For pillow, you will need
57/ x 5" piece of tobric for booking,
x 20' bios fabric strip for cording
length of 7/ dio. purchased cord and
fester fiberfill.
Center cord on wrong side of bios strip,
ching long edges, fold strip over cord. Use a
pa fool Io bosfe along length of strip close to
; trim seom allowance to 7/. Matching raw
es, pm cording to right side of stilched piece
make a V/ cip in seom allowance of
ing al corners Ends of cording should
lap approximately 2', pin overlapping end
of way Starting 1 “ from beginning end of
ding ond ending 27/ from overlapping end,
!e cording io stilched piece On overlapping
of cording, remove 2’ of basting; fold end
fabric back and trim cord so thal il meets
inning end of cord Fold end ot fabric
7 Io wrong side; wrop fabric over begmn ng
of cording. Finish basting cording to
ched piece
Malching right sides ond leaving on opening
for turning, use о 7/ seam allowance to sew
stilched piece ond backing fabric together Trim
seom allowances to 7? ond trim diagonally
ot corners turn pillow righi side out
carefully pushing corners outward Stuff pillow
wilh polyester fiberfill ond blind stitch
opening closed.
Mini Log Carrier Finishing (shown on pages
19-21, charts on page 62): For each carrier
you will need a 12’ length of jute twine,
37/ lengths of twigs (enough for a 17/ dia.
bundle and 2 for handle), and rubber band.
Turn one long edge of slitched piece 7/ to
wrong side ond press; turn 7/ to wrong side
ogam and hem. Repeat with remaining long
edge. For cosing, turn one short edge 7/ to
wrong side and hem 7/ from folded edge
Repeat with remaining short edge.
For handle, insert one twig through one
casing of carrier, repeal with another twig and
remaining cos ng. Referring Io photo, brng
casings together ond tie twine around twigs to
secure. Gather remaining twigs in о bundle and
secure wilh rubber bond; place bundle of twigs
in carrier
Twig-Framed Elf Finishing (shown on pages
19 21, charts on pages 62 63) For each elf
you will need a 7" x 9‘ piece of lightweight
cream fabric far backing, two 7' lengths of
twigs, two 5“ lengths of twigs four 6“ lengths of
jute twine, clear-drying croft glue, fabric stiffener
and small toam brush.
Apply a heavy coat of fabric stiffener to wrong
side of stitched piece using small foam brush.
Matching wrong sides, place stitched piece on
backing fabric, smoothing stitched piece while
pressing fobnc pieces together; allow to
dry. Apply fabric slftener to backing fabric;
allow to dry.
Centering design, Irim stiffened piece fo
measure 37/ x 57/ Center one 7’ twig on one
long edge of stiffened piece ond glue in place,
repeal with remaining 7* twig and long edge;
allow to dry. Center one 5" twig ot one short
edge ol stiffened piece and glue to vertical twigs.
Repeat with remaining twig and short edge;
allow to dry Referring Io photo, lie one length of
jute twine at one corner of stiffened design
ond trim ends of Iwne; repeat at each
remaining corner
8”
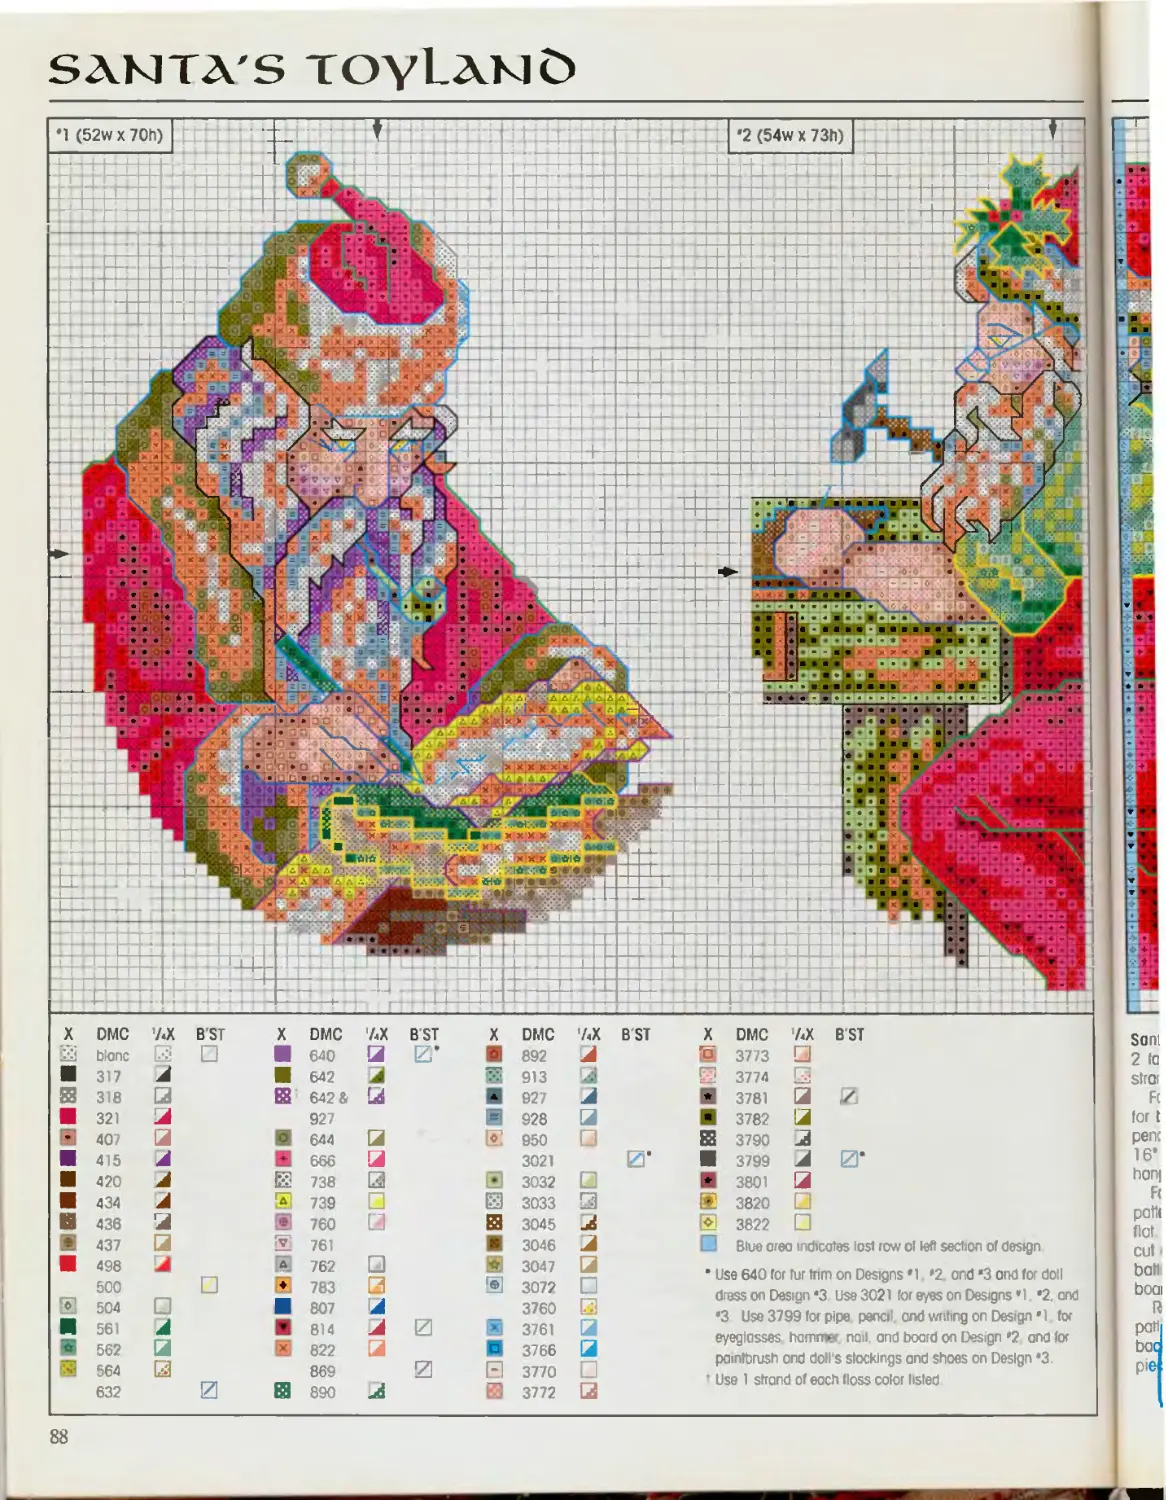
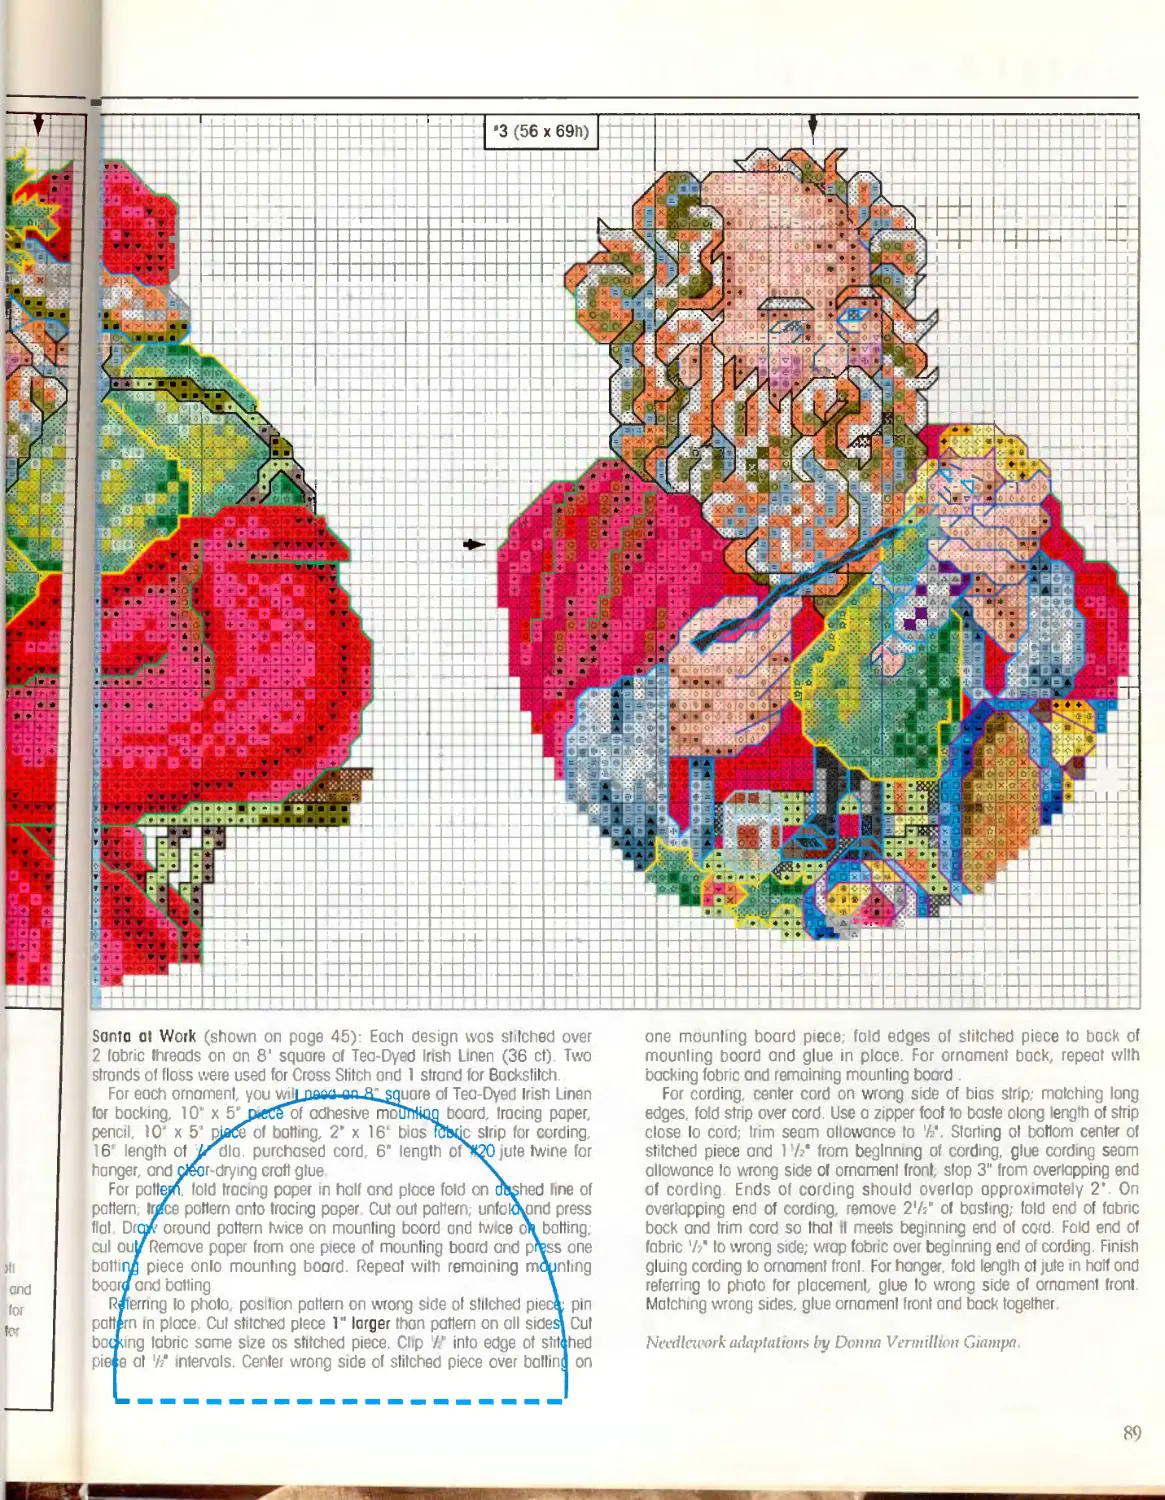
SANTA'S ТОуЬЛМй
2 (54w x 73h)
;UA
№
jx<x *t.
x --
aJgS'fe вЛКг
'х*д Л’.'ЗгВД'Ц
л'х'х'л
Sf Y л'-'Ла
57^ ‘'’ЯИГ 6 в * •/ -W-
я х х |JifcS-?xlR!vx<-:.
««*;« ’,
ЙЗД-. ...XXX М«|« МН I
S3*:.-.; «айДГ _
х х w* »!».« н
DMC ’/.X
Ыопс Е
317 А
318 □
321
407 а
415
420 А
434
436 й
437 а
498
500
504 □
561 j
562 а
564 Е
632
X DMC 'ЛХ В ST X ОМС
640 а Е ’ 892
642 а 913
Е8 642 & Ld 927
927 Е 928
S 644 а Е 950
666 а 3021
738 □ • 3032
S 739 □ |х} 3033
® 760 й вэ 3045
!vj 761 3046
А 762 □ S 3047
♦ 783 3 Е 3072
807 й 3760
814 И й 3761
8 822 а 3766
869 21 Е1 3770
S 890 й 3772
88
ill
and
tor
tC'
Santo ot Work (shown on page 45): Each design wos stitched over
2 fabric threads on an 8' square of Tea-Dyed Irish Linen (36 ct) Two
sfronds of floss were used for Cross Stitch ond 1 strand for Backstitch
For each ornament, you wiljjiaea-ea^gquore of Tea-Dyed Irish Linen
tor backing, 10" x adhesive mounkao board, tracing paper,
pencil, 10J x 5’pjede of bating, 2’ x 16" bios tcbqc strip for cording,
16" length of У/ala. purchased cord, 6" length огХЖ jute twine for
hanger, and cirar-drying craft glue
For pattern, fold tracing paper n half and place fold on atehed line of
pattern Ir^ce pattern onto tracing paper Cut out pattern unfolomnd press
flat Dear around pattern twice on mounting boord and twee oh batting;
cul ouy Remove popei from one piece of mounting board and press one
batting piece onio mounting boord. Repeat with remaining mounting
boary2nd batting. \
Referring lo photo pos tian pattern on wrong side of stilched piecl pin
pattern in place. Cut stitched piece Г larger than pattern on all sided Cut
barling fabric same size os stitched piece. Clip У? into edge ot stitehed
piele at 'Л* mten/ols. Center wrong side of stitched piece over batting on
one mounting board piece; fold edges of st tched piece to back of
mounting board and glue in place. For ornament bock, repeat with
backing fabric and remaining mounting boord
For cording, center cord on wrong side of bias strip; matching long
edges, fold strip over cord. Use a zipper foot to baste olong length of strip
close lo cord; trim seam allowance to '//. Storting ot bottom center of
stitched piece and 1’/?" from beginning of cording, glue cord ng seam
allowance to wrong side of ornament front, stop 3“ from overlapping end
of cording. Ends of cord ng should overlap approximately 2’ On
overlapping end of cording, remove 2'/i" ol bast ng; fold end of fabric
bock and Irim cord so that II meets beginning end of cord. Fo d end of
fabric ’/?' to wrong s de; wrap fabric over beg nning end of cording. Finish
gluing cording fo ornament front. For hanger, fold englh of jute in half ond
referring to photo for placement, glue to wrong side of ornament front
Matching wrong sides, glue ornament front and bock together
Needlework adaptations by Donna Vermillion Giampa.
89
SANTA'S ТОуЬАМд
[4 (29v
X
’AX
В ST
3
r*
6(32’
'3 (30w x 37h)
'1 (51wx5 Ih)
'2 (30w x 39h)
x
Work In long stitches.
For Designs *2 ond *5, weft
wheel spokes in tong stitches
For Design *3, work drum locrg
In long stitches
French Knot
French Knol
>1
1 1/
2.
A ‘S
- 4
DMC
btonc
317
321
415
434
436
437
498
500
561
562
564
640
642
644
666
738
760
761
762
783
807
814
822
913
938
950
3032
3760
3761
3766
3773
3790
3799
3801
3820
3822
321
938
a
a
и
и
90
!9w x 43h)
5 (32w x 38h)
B'ST
(32w x 47h)
‘5, work
j stitches.
Knot
Knot
Old-time Toys Poem (shown on роде 47) Design #1 was slitched over
2 fobnc threads on an 8‘ square of Teo-Dyed Irish Linen (28 ct). Three
strands of floss were used for Crass Stitch ond 1 strand for Backstitch and
French Knots
For ornament, you will need on 8" square of Tea Dyed Irish Linen for backing,
two 33Л* squares of adhesive mounting boord two 33A“ squares of batting,
2" x 18" bios fabric strip for cording, 18’ length of 7? dia. purchased cord,
6” length of '/s’w ribbon tor hanger, and clear-drying craft glue To complete
ornament, see Old-time Toys Finishing, page 94
Square Old-time Toys Ornaments (shown on page 46) Designs #2 and #5 were
each slitched over 2 fabric threads on a 7' square of Tea-Dyed Irish Linen (28 ct).
Three strands of floss were । iserl for C-toff andl strand for Bockstitch
For each ornamem^yetTwiilneed a 7’ squaraTJbteQDyed Irish Linen for
backing, two 3^>*$quares of adhesive mounting boord squares of
batting, 2'x/tf? bios fabric strip for cording. 15* length of 7<bio purchased
cord, 6‘tertglh of 'A’w ribbon for hanger, and clear-drying craft glue Incomplete
ornomytT see Old-time Toys Finishing, page 94 \
OvaT Old-time Toys Ornaments (shown on page 46); Designs #3, #4Aond
ff^were each stitched over 2 fabric threads on a 7" square of Tea-Dyed Irish Lhen
(zfe ct). Three strands of floss were used tor Cross Stitch and 1 strakd
for Backslitch 1
|For each ornoment you will need a 7’ square of Tea Dyed Irish Linen fir
becking, 10’ x 5* piece of adhesive mounting boord, tracing paper, penal.
Iff x 5" piece of batting. 2’ x 14" bios fabric strip for cording, 14" lengtlyof
7«*\dia purchased cord, 6“ length of 7« w ribbon for hanger, and cleor-dr/ng
craft\tue. /
Trade pattern onto tracing paper; cut oul pattern. Draw around pattern j/Zce on
mountin^board ond twice on batting, cut oul Referring to photo positofi pattern
on wrong sMe of stitched piece; pm pattern in place. Cut slitched pia6e 1" larger
than pattern ohsjHsides. Cut backing fabric same size os sjifefted piece. Clip
'// into edge ot sTfohe^wece and backing fabric otW>it6rvals To complete
ornoment, see Old-time Tny^Hwhing pggp Q4
/X’si^ns bi/ Dontm Vermilluvi Ginnipn.
91
gm Scaring; snow babigs
GE
26w x 30h
25w x 30h
23w x 30h
27w x 27h
33w x 24h
32wx 19h
(stitcl
WOR
How
showi
the c
Half C
colon
One-C
Block
bead
lines
Frencl
symb
How
size c
coum
deteri
differs
(strict
the If
chorl
workt
Needlaiwk adaptation;
by iVrtKci/ Dockter.
Each
key lr
stitch
key a
(DMC
Stitct
Backs
read \
of sir
inclui
such
The n
or US!
in о
appro
Wher
cente
arrow
Choris
centei
by fol
to П£
numb
the ct
the fc
count
(stitc
three
fabric
Snow Babies In Frames
(shown on pages
48-49) Each design was
slitched on a 6* square
of Tile Blue Aida (18 cl).
Two slrands of floss
were used for Cross
Stilch and 1 strand for
Backstitch They were
inserted in purchased
round gold fromes
(2'/a* dio. opening)
the n
count
+ you V
Z Whip:
] preve
♦. • •
• •
X DMC 'AX B'ST
S:i blanc 13
+ 353 a
ss 642 □
♦ 644
645 И
646 A
647 a
0 648 1 4
0 754
I**"’ 758 11
lfc 822 a
844 /
3021
a 3023
3328 u zi
3778 /
[ -1 3779
a 3787 a /
92
lENERAL INSTRUCTIONS
ORKING WITH CHARTS
- bw to Read Charts: Each of the designs is
Z mown in chart form Each colored square on
- je chart represents one Cross Stitch, one
df Cross Stitch, or a bead placement. Each
tlored triangle on the chart represents one
le-Quarter Stitch or one Three-Quorter Sntch
cck or colored dols represent French Knots or
tad placement The black or colored straight
les on the chart Indicate Backstitch When a
ench Knot or Backstitch covers a square, the
jnbol is omitted
flch chart is accompanied by a color key. This
№/ Indicates the color of Hoss to use for each
rich on the chart The headings on the color
gy are for Cross Stitch (X), DMC color number
JMC) One-Quarter Stilch (7<X) Three-Quarter
bitch (e/*X), Half Cross Stitch (’AX), and
lockstitch (B'ST). Color key columns should be
;od vertically and horizontally to determine type
f stilch and floss color Some designs may
iclude stitches worked with metallic thread
jch as a Blending Filament Braid, or Cord.
Hie metallic thread moy be blended wilh floss
r used alone. II any of these threads ore used
i a design, the color key will contain the
pproprlote ntormation
^J/here to Start: The horizontal and vertical
^renters of each charted design are shown by
^rrows. You may stort at any point on the
jrted design, but be sure the des gn will be
itered an the fabric. Locate the center of fabric
folding in half, top to bottom and agoin left
right. On the charted design, count the
H j4iumber of squares (stitches) from lhe center of
J3ie chart to where you wish to start Then from
Zizttfce fabric's center, find your starling point by
11 (Zfbunting out the same number of fabric threads
(^stitches). (Note: To work over two fabric
ireads, count out twice the number of
ibric threads)
iHow to Determine Finished Size- The finished
fsize of your design will depend on the thread
Tcounf per inch of the fabric being used To
terermine the finished size of the design on
different fabrics, divide the number of squares
-Ustitches) in the width of the charted design by
tie thread count of the fabric. For example, a
charted design with a width of 80 squares
worked on 14 count Aida will yield a design
53A’ wide. Repeat for the number of squares
(stitches) in the height ol the charted design
Note To work over two fabric threads, divide
•he number of squares by one-half lhe thread
count.) Then odd lhe amount of background
you want plus a generous amount for finishing
or zigzog the edges of your fabric to
prevent raveling.
STITCH DIAGRAMS
Note: Bring threaded needle up at 1 and all odd
numbers and down al 2 ond all even numbers.
Counted Cross Stitch (X): Work one Cross
Stitch to correspond to each colored square on
the chart For horizontal rows, work stitches in
two journeys (Fig. 1). For vertical rows,
complete each stilch as shown (Fig. 2). When
working over two fabric threads, work Cross
Stitch as shown in Fig. 3 When the chart
shows a Bockstitch crossing о colored square
(Fig. 4), о Cross Stitch should be worked first;
then the Backstitch (Fig. 9 or 10) should be
worked on top of the Cross Stitch.
Fig 2
Fig. 3
Quarter Stitch ('AX ond 3AX): Quarter Stitches
ore denoted by triangular shapes of color on the
chart and on the color key For a One Quarter
Stitch, come up ot 1 (Fig. 5); then split fabric
thread to go down at 2. When stitches 1-4 are
worked in the same color the resulting stitch is
called a Three-Quarter Slitch (3AX) Fig. 6 shows
the techn que for Quarter Stfches when working
over two fabric threads.
Half Cross Stitch (7zX): This stitch is one
journey of the Cross Stitch and Is worked from
lower left Io upper right os shown in Fig. 7
When working over two fabric rhreads, work
Holf Cross Stitch as shown m Fig 8
Fig. 7
Bockstitch (B'ST): For outline delail, Backstitch
(shown on chart and on color key by black or
colored straight lines) should be worked after
lhe design has been completed (Fig. 9). When
working over two fabric threads, work Backstitch
os shown in Fig. 10
Fig 9
Fig 10
French Knot Bung needle up at 1 Wrap floss
once around needle and Insert needle ot 2,
holding end ot floss with non-sntchmg fingers
(Fig. 11). Tighten knot; then pulf needle through
fabric, holding floss until it must be released.
For larger knol use more strands of floss, wrap
only once
Fig 11
Blanket Stitch: Knot one end of floss. Bring
needle up from wrong side al 1, even with edge
of fabric. Go down at 2 and come up at 3,
keeping floss below point ot needle
(Fig 12) Continue to stitch in this manner,
keeping tension even ond stitches evenly
spaced (Fig. 13)
Fig. 8
Fig. 12
Continued on роде 94
93
STITCHING TIPS
Working over Two Fabric Threads: Use the
sewing melhod instead of the stab method
when working over two fabr c threads. To use
the sewing method, keep your stitching hand on
the right side of the fabr c (instead of stabbing
the fobric with the needle and tak ng your
stit :hmg hond to the back of the fabric lo pick
up the needle). With the sew ig method, you
take the needle down and up with one stroke
Instead of two To add support ta stitches, it is
important that the first Cross Stitch is placed on
the fabric wilh stitch 1-2 beginning and ending
where a vertical fabric thread crosses over a
horizontal fabric thread (Fig. 14). When the tirst
stitch is in the correc position, the entire design
will be placed properly, wilh vert cal fabric
threads support ng each stitch
Fig. 14
Working on Perforated Poper: Perforated paper
has a right side and a wrong side The right
side is smoother and stitching should be done
on th s s de To find the center, do nol fold
paper; use о ruler ond mark lightly with a pencil
or count hales. Perforated paper will tear if
handled roughly; therefore, hold the poper flat
wh le stitching and da not use a hoop Begin
and end stitching by runi ig floss under several
stitches an back; never tie knots. Use the stab
method when st Iching and keep stitching
tension consistent Thread pulled oo tightly may
tear the paper. Carry floss across back os little
as possible.
Attaching Beads: Refer to chart for bead
placement ond sew bead in place using a line
needle that will pass through bead Bring needle
up at 1, run needle through bead lhen down at
2 making a Half Cross Stitch (Fig. 15) Secure
floss on back or move to next bead as shown
in Fig. 15
FINISHING INSTRUCTIONS
Young at Heart Stocking Finishing (shown on
page 23, chad on page 64) For stocking, you
will need a 9" x 12' piece of Teo-Dyed Irish
Linen for backing 1 ‘ x 37?‘ piece of Tea-Dyed
Irish Linen for hanger, (racing paper, pencil, and
fabric marking pencil
Trace Young al Heart Stocking Pattern,
page 95, onto tracing paper; cul out pattern.
Referring to photo, position pattern on wrong
side of stitched piece; pin patte n in place. Use
fobric mark ng pencil to draw around pattern;
remove pattern Matching right sides and
raw edges, pin stitched piece and backing
fabric together.
Leaving top edge open and backstitching al
beginning and end of seam, sew directly on
drawn line; remove pins. Trim top edge along
drawn line; trim seam allowance to 7? ond clip
curves. Turn lop edge of stocking ’Л" to wrong
side and press; turn W to wrong side ogam
and hem Turn stocking right side out
For hanger, press each long edge of fabric
strip 7.1 “ to wrong s de. Matching long edges,
fold strip in half and sew close to folded edges.
Malching short edges, fold hanger in half and
biind stitch to ins de of stocking al left seam.
Blonket-Stltched Ornament Finishing (shown
on pages 24-25. charts and supplies on pages
66-67): Center batting on wrong side of
backing fabric Center wrong s de of stitched
piece on botting and backing. Pin all layers
together Referring to photo ond using an
irregular stitch length. Blanket Stitch around
ornament through all layers. See Blanket Stitch
instructions page 93.
For *lt Won't Be Long' and Tree Ornamenl
hangers, fold lengths of jute in half and fie an
overhand knot 'h" from ends of jute. Referring to
photo, tack jute loops to ornament front; insert
stick through loops.
For Stocking and Wreath Ornament hangers,
fold length of jute in half and referring to photo,
lack ends of jute to ornament back.
Old-time Toys Finishing (shown on pages
46-47, charts and supp es on pages 90-91).
Remove paper from one piece of mounting
board and press one batting p ece onto
mounting board Repeal with remaining
mounting board and batting )enle w ong sfe
of stitched piece over battir g on one mounting
board piece, fold edges of stitched piece to bock
of mounling board and glue in place. For
ornament back repeat wilh backing fabric ond
remaining mounting board.
For cording, center cord on wrong side ol
bios strip; matching long edges, fold strip over
cord Use a zipper foot to baste along length ct
strip c ose to cord; trim seam allowance to 7/.
Starting at bottom center of stitched piece and
1’/»“ from beginning of cording, giue cording
seam allowance to wrong side of ornament
front, stop 3’ from overlapping end of cording
Ends of cording should overlap approximately
2‘. On overlapping end of cording, emove 27?
of bar t ng; fold end of fobric back and trim cord
so that it meets beginning end of cord. Fold end
of fabric 7/ to wrong side; wrap fabric ave-
beginning end of cording. Fin sh gluing cording
to stitched p see
For hanger, match short ends ond fold riobon
in half; referring to photo, g ue ends to wrong
side of ornament front. Match g wrong sides
glue ornament front and back together
Fig. 15
Instructions tesied ond photo items mode by
Janet Akins, Lisa Arey, Kondi Ashford, Marsho
Besoncon Vicky Bishop, Cecilia Carswelt, Alice
Crowder, Kotny Elrod Vanessa Edwards, Jody Fuller.
Joyce Graves. Neiwyn Gray, Judy Gr m Murel Hfcki
Jayce Holland. Pai Johnson. Arthur Jungnicke*
Melome Long, Phyllis Lundy, Suson McDonald.
Colleen Moline, Jill Morg n, Margaret Mose ey, Rar
Ellen Odle, Patricia O'Neil, Dave Ann Pennington,
Joyce Robinson. Suson Sego, Lovonne Sims Amy
Taylor, Tnsh Vines, Jane Walker, and Mane Williford
|on pages
es 90-91)
mounting
•iece onto
remaining
wrong side
e mounting
ece to back
place For
fabric and
ng side of
J strip over
ig length of
jnce to A‘
piece and
ue cording
ornament
of cording
Koximalely
«move 2 //
d trim cord
J Fold end
fabric over
ng cording
told ribbon
5 to wrong
ong sides,
r
made by
d Marsha
welt, Alice
Jody Fuller,
unel Hicks,
ungmckel
JcOonold,
iseley Roy
ennington
5<ns. Amy
। Williford
©©©
Young at Heart
Stocking Pattern
Instructions on page 94
Santa Stocking Pattern
Instructions on page 85.
Continued on page 96
95
©©©
Schoolgirl
Stocking Pattern
Instructions on page 67
Heart Pattern
Instructions on page 50
96
ММ
Bnii