/


Text
STEP-BY-STEP ILLUSTRATIONS
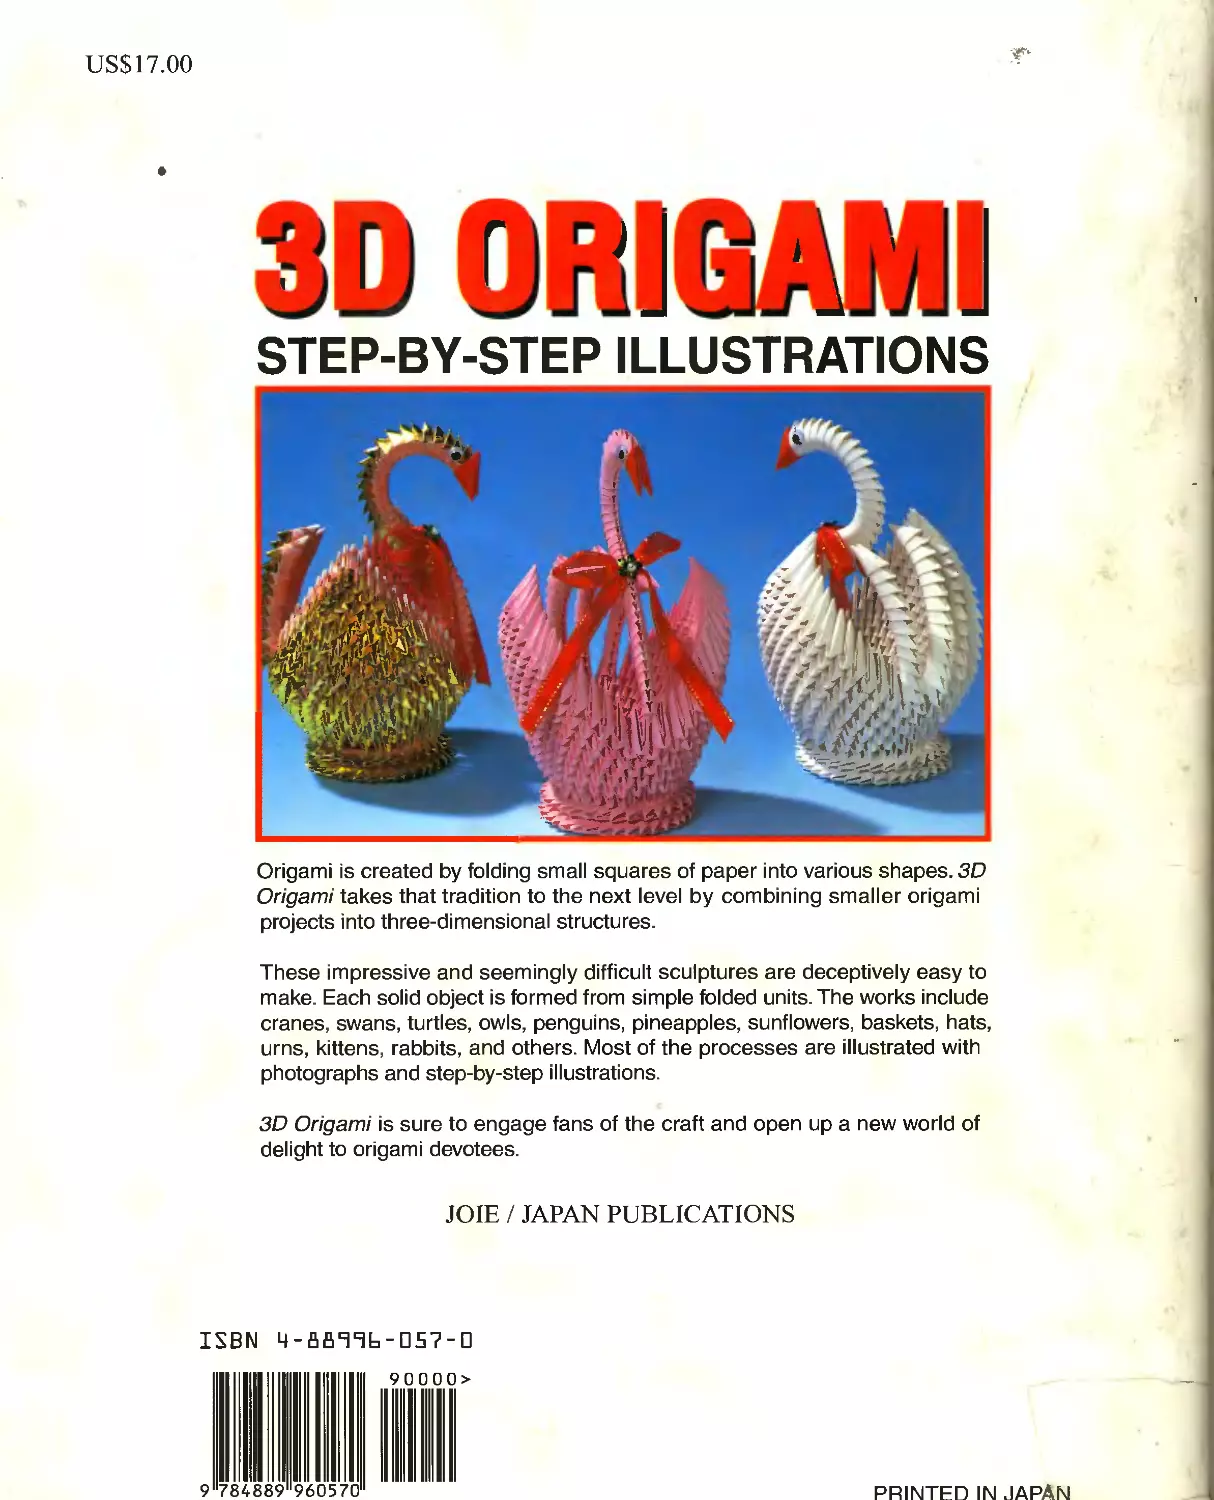
US$17.00
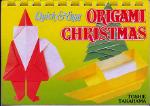
3D ORIGAMI
STEP-BY-STEP ILLUSTRATIONS
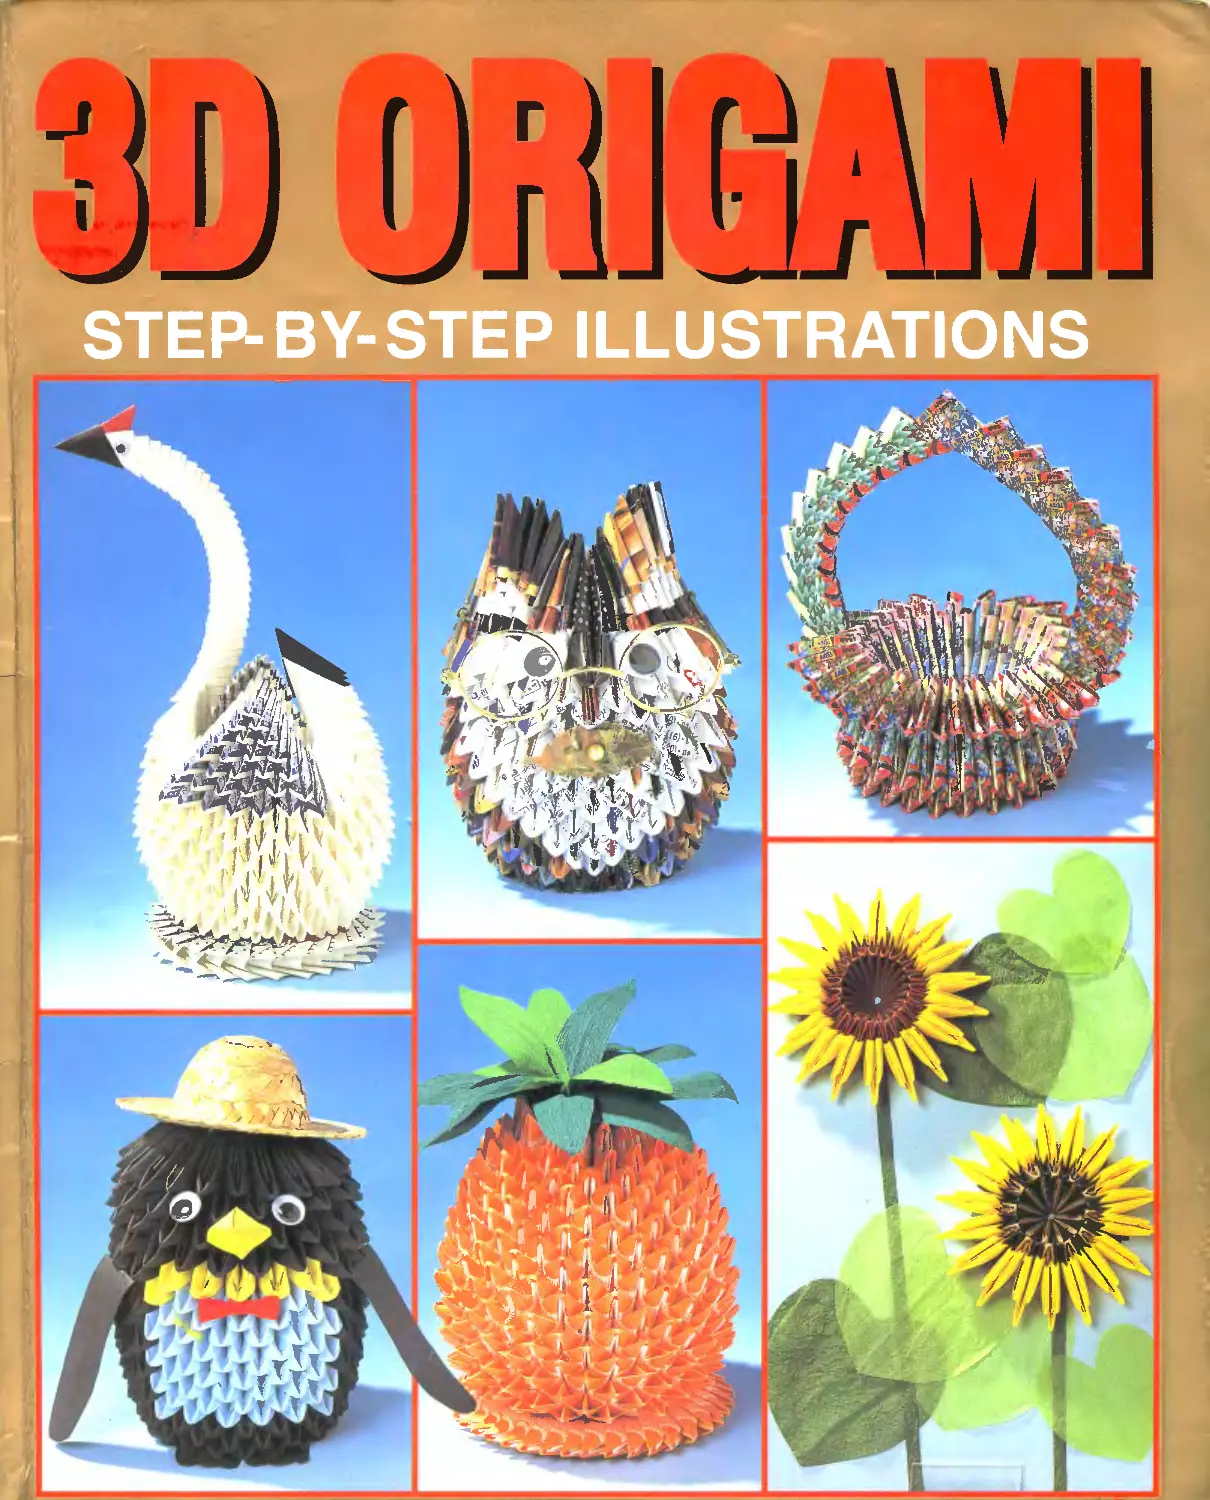
Origami is created by folding small squares of paper into various shapes. 3D
Origami takes that tradition to the next level by combining smaller origami
projects into three-dimensional structures.
These impressive and seemingly difficult sculptures are deceptively easy to
make. Each solid object is formed from simple folded units. The works include
cranes, swans, turtles, owls, penguins, pineapples, sunflowers, baskets, hats,
urns, kittens, rabbits, and others. Most of the processes are illustrated with
photographs and step-by-step illustrations.
3D Origami is sure to engage fans of the craft and open up a new world of
delight to origami devotees.
JOIE / JAPAN PUBLICATIONS
isbn ц-ааччь-057-0
9 784889 960570
PRINTED IN JAPAN
CONTENTS
Introduction 3
GRANNY OWL 3
Enjoy Recycling Papers 4
TO BEGIN 6
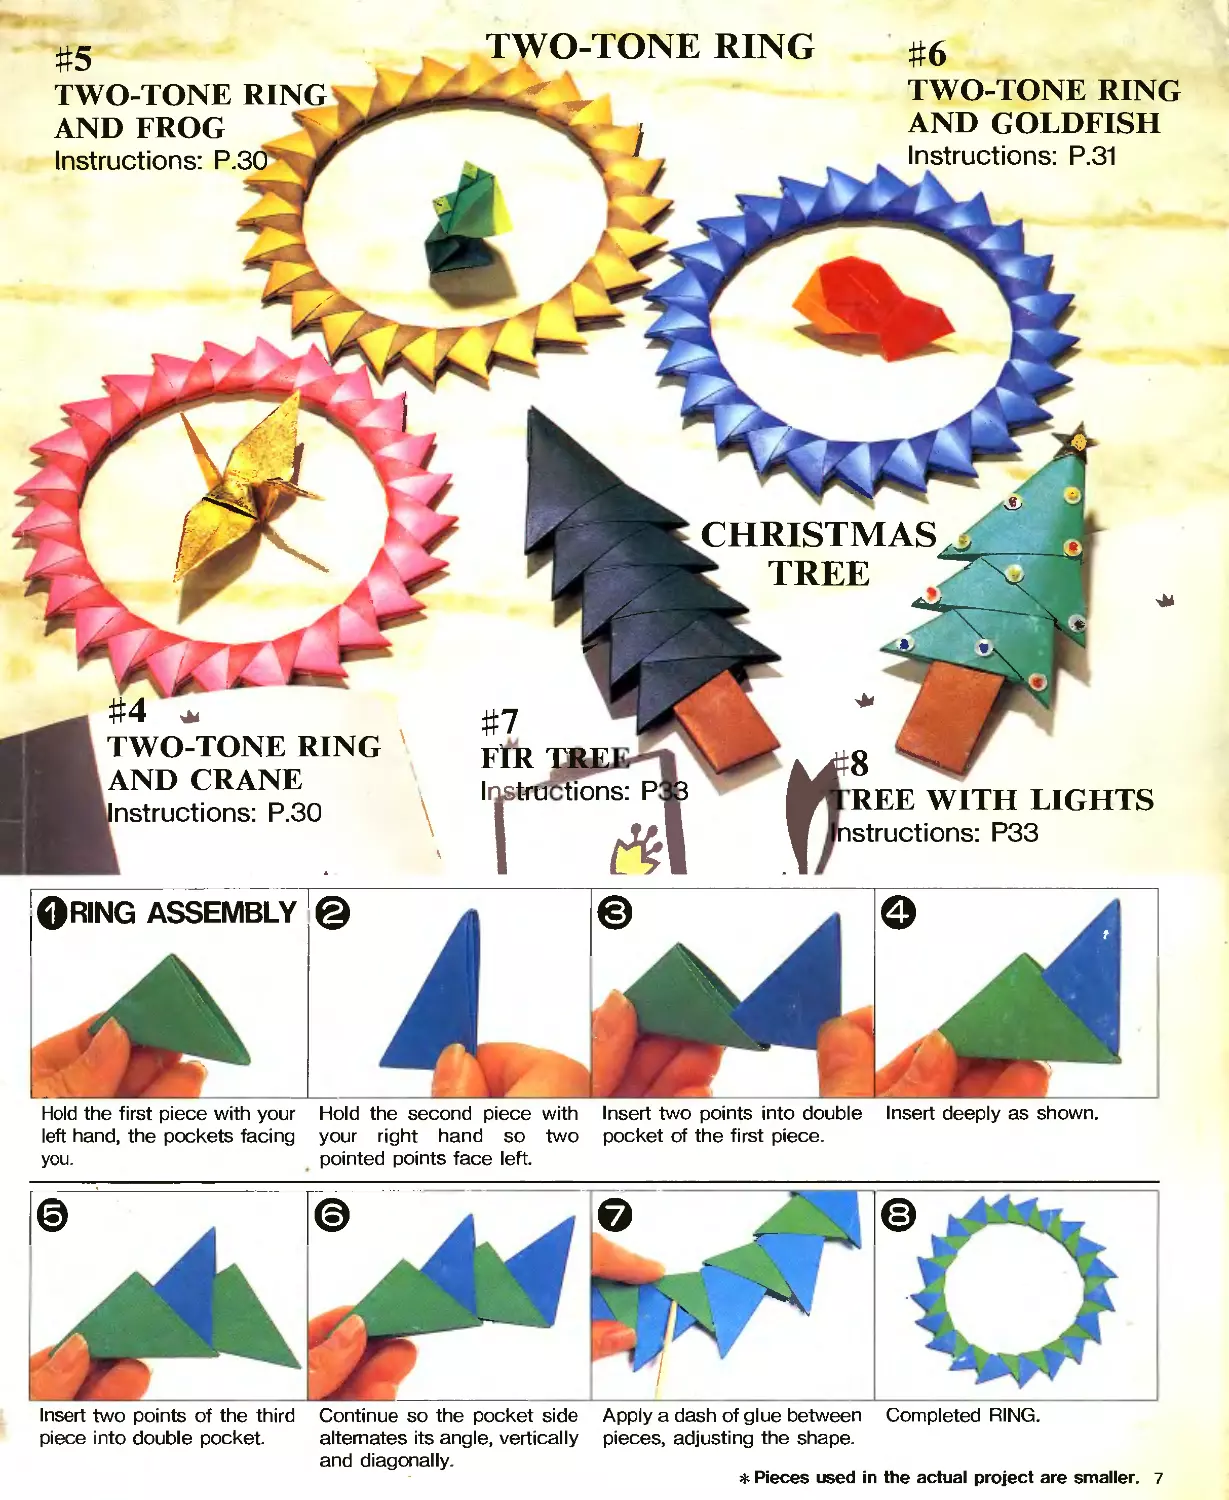
ORNAMENT STAND 6 TWO-TONE RING 7 GHRISTMAS TREE 7
EASY HORIZONTAL ASSEMBLY 8
TORTOISE 8 GOLDFISH 10 FISH 10 SOARING CRANE 10
KINGFISHER 11 SWYLLOW 11 SUNFLOWER 12
THREE-DIMENSIONAL ASSEMBLY 14
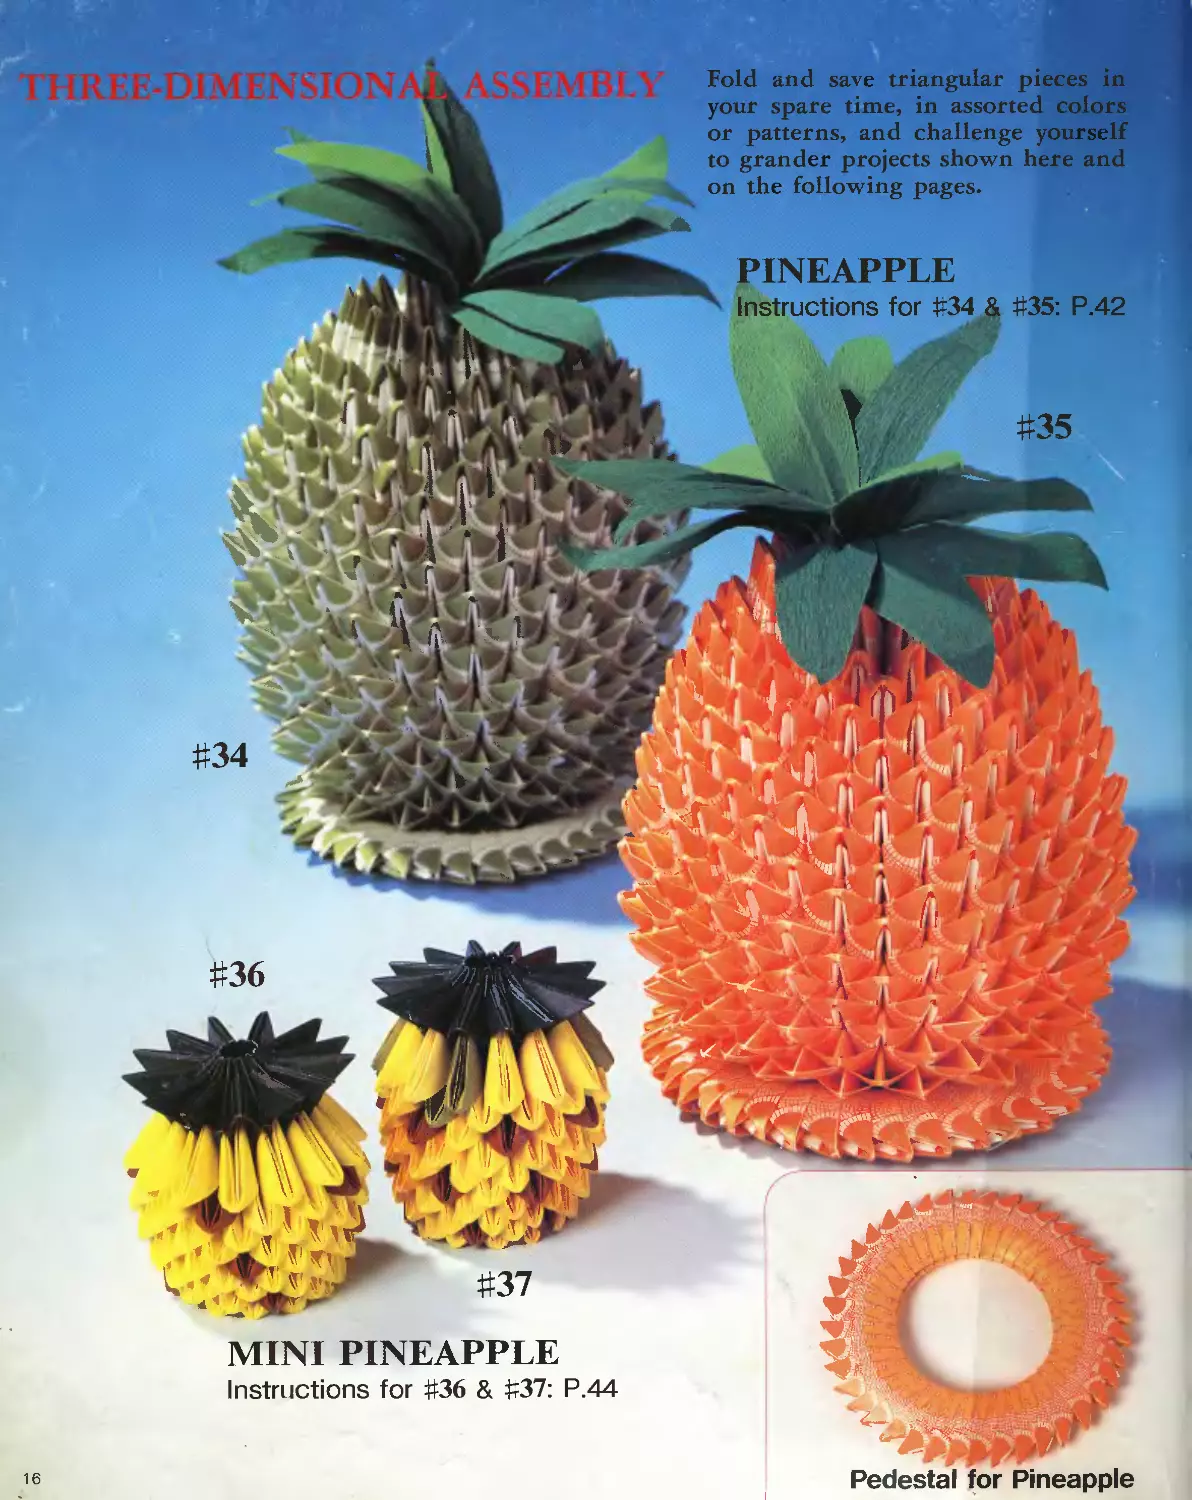
BASKET 14 TOOTHPICK HOLDER 15 HAT 15 PINEAPPLE 16
MINI PINEAPPLE 16 WATERMELON 17 LEMON 17 STRAWBERRY 17
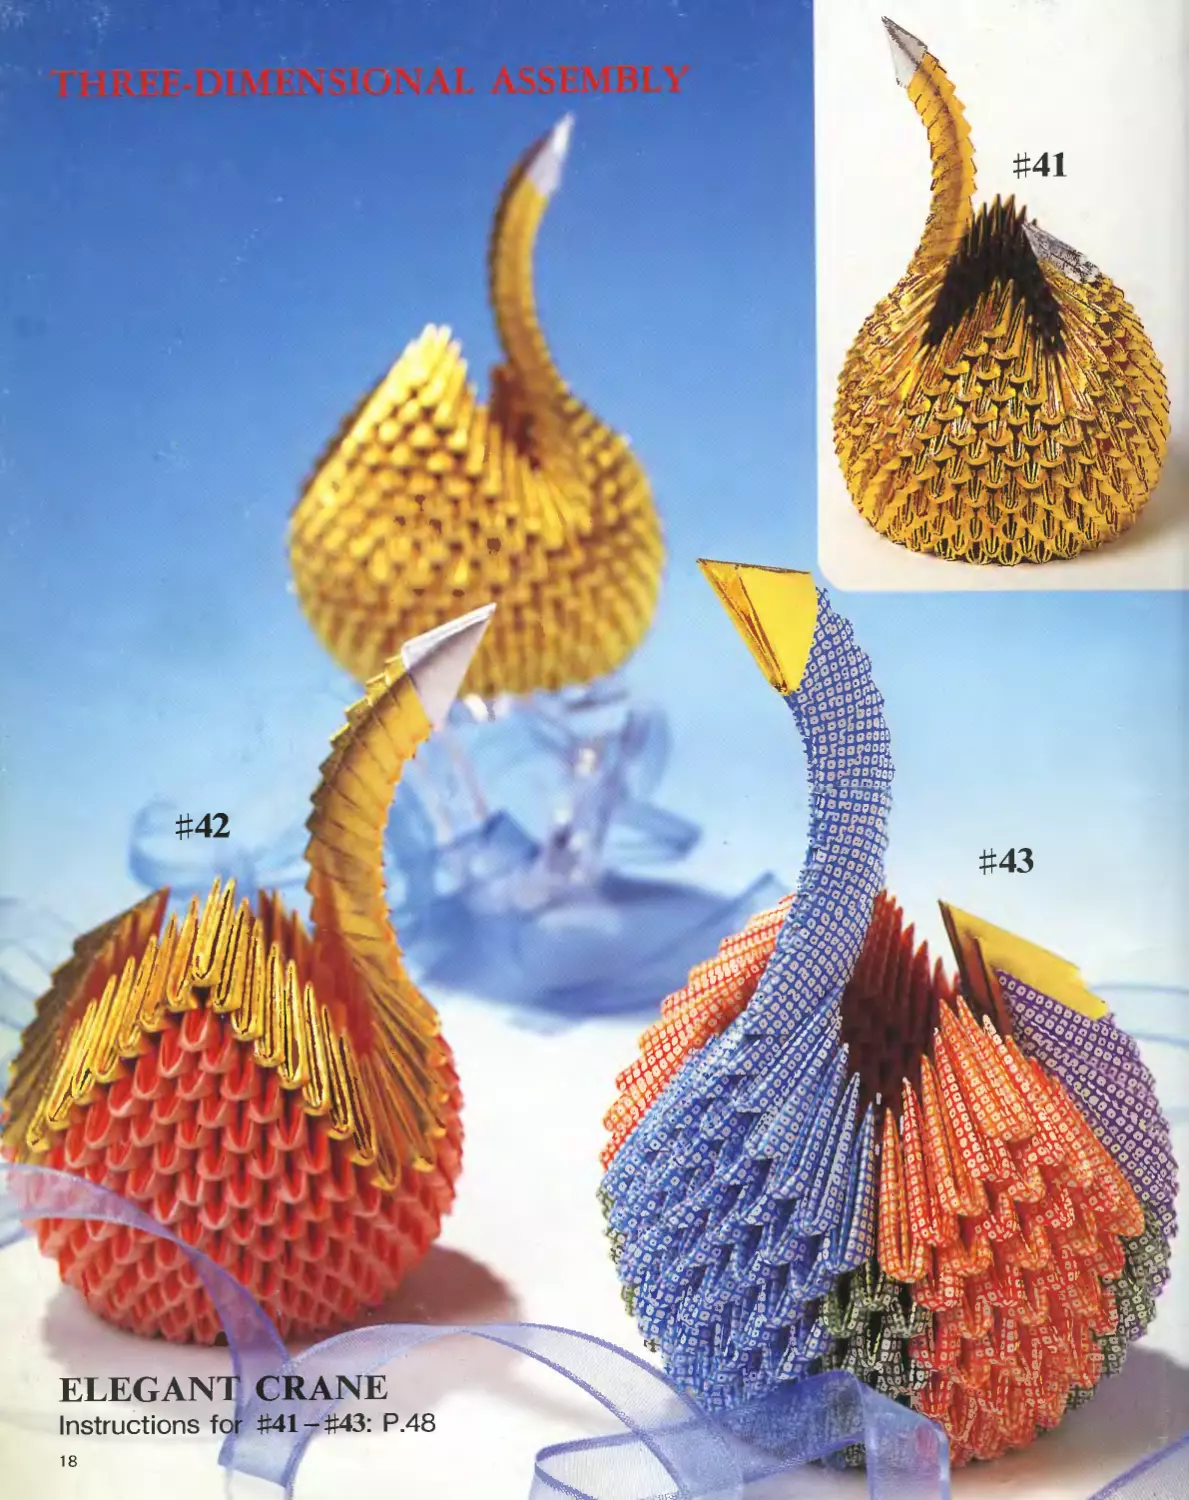
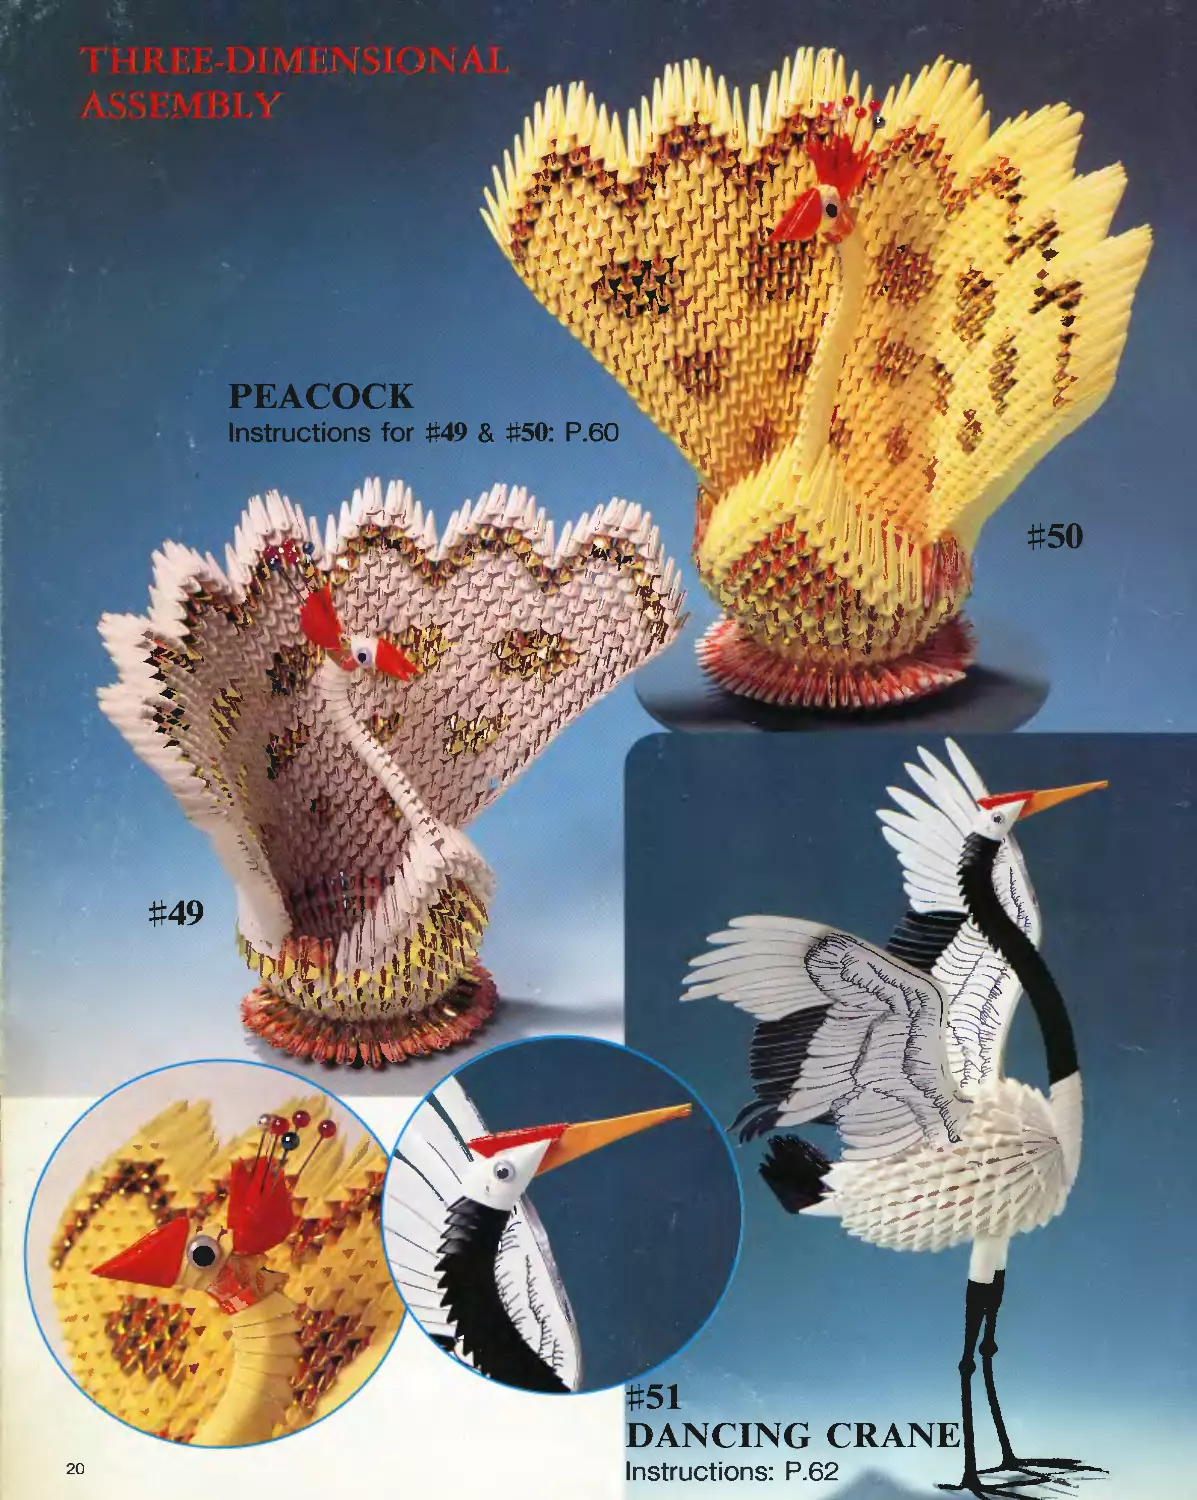
ELEGANT CRANE L8 BABY SWAN 19 SWAN 19 PEACOCK 20
DANCING CRANE 20 RED-CROWNED CRANE 21 PEDESTAL 21
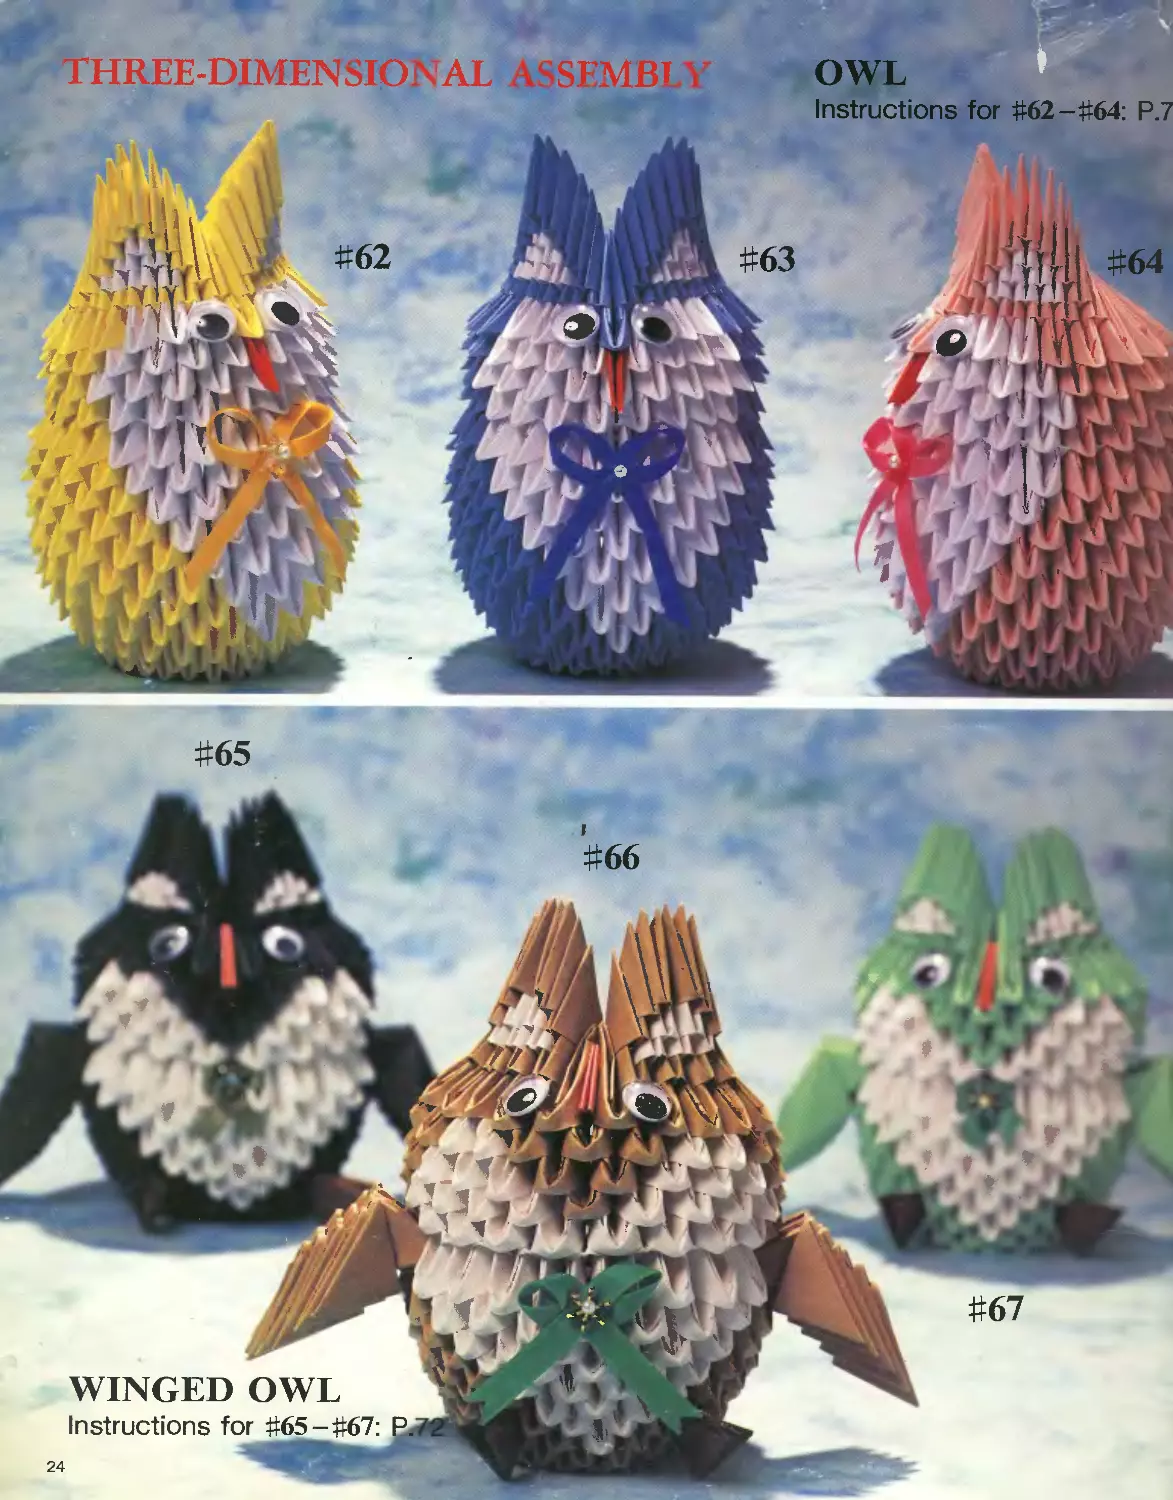
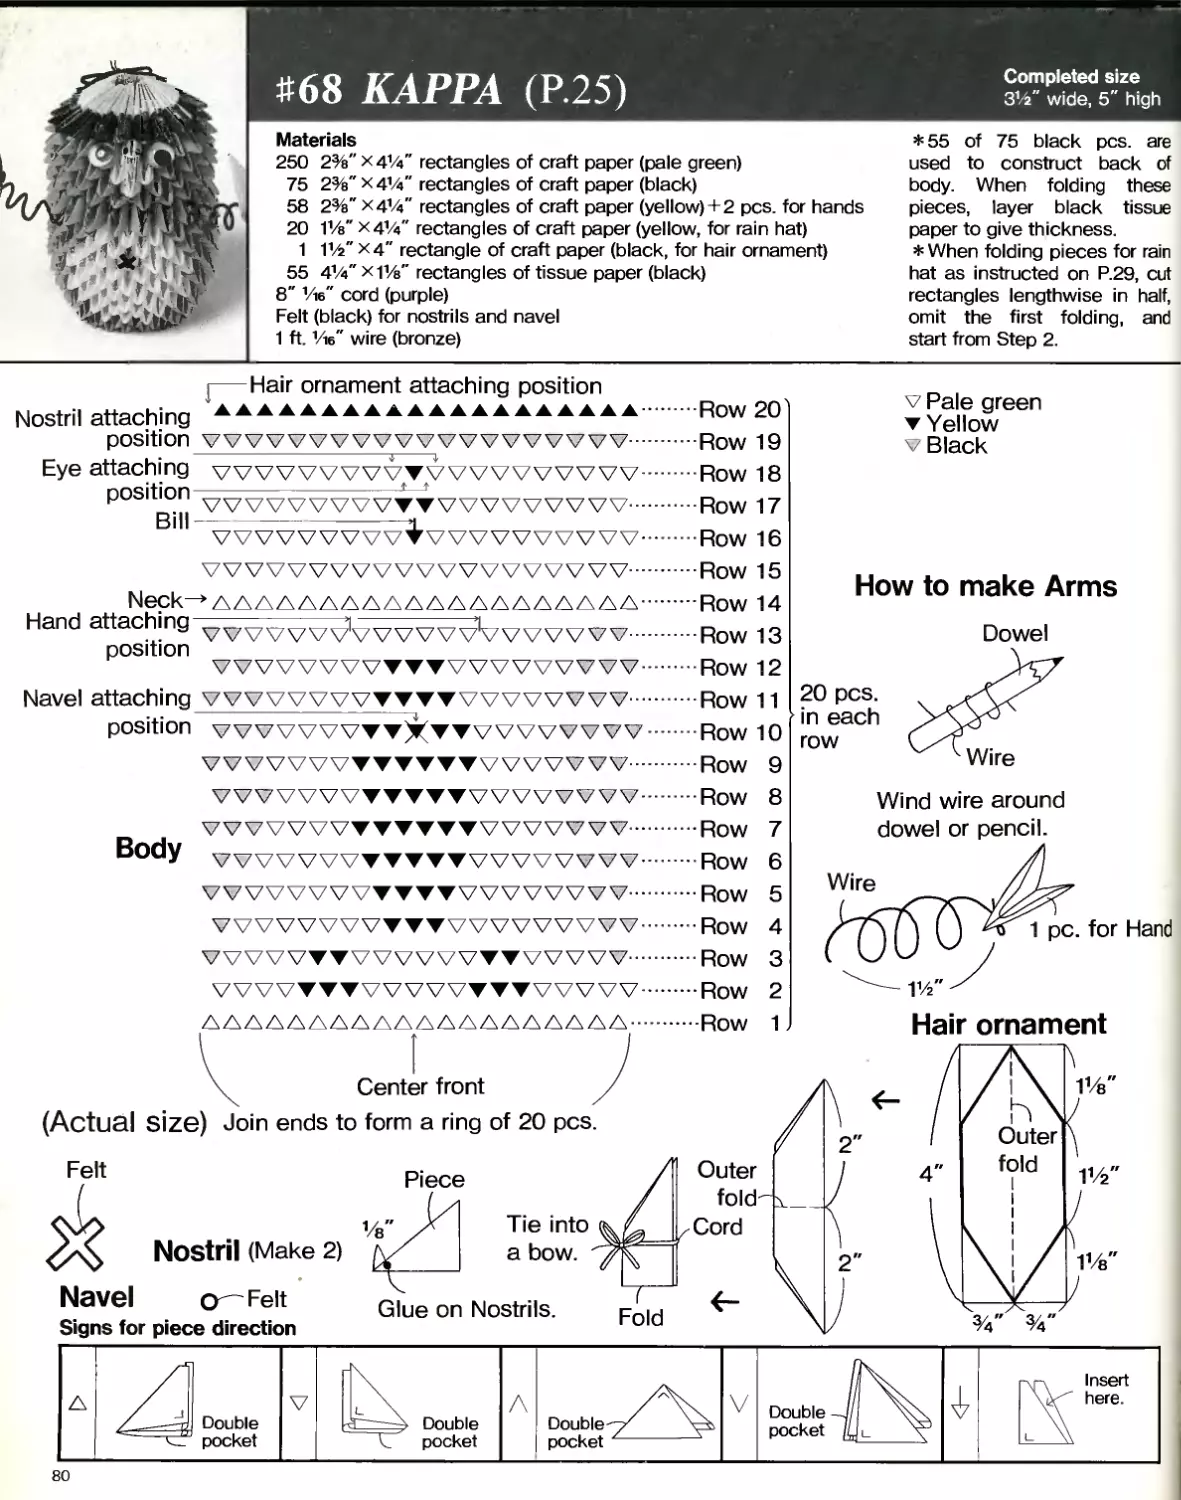
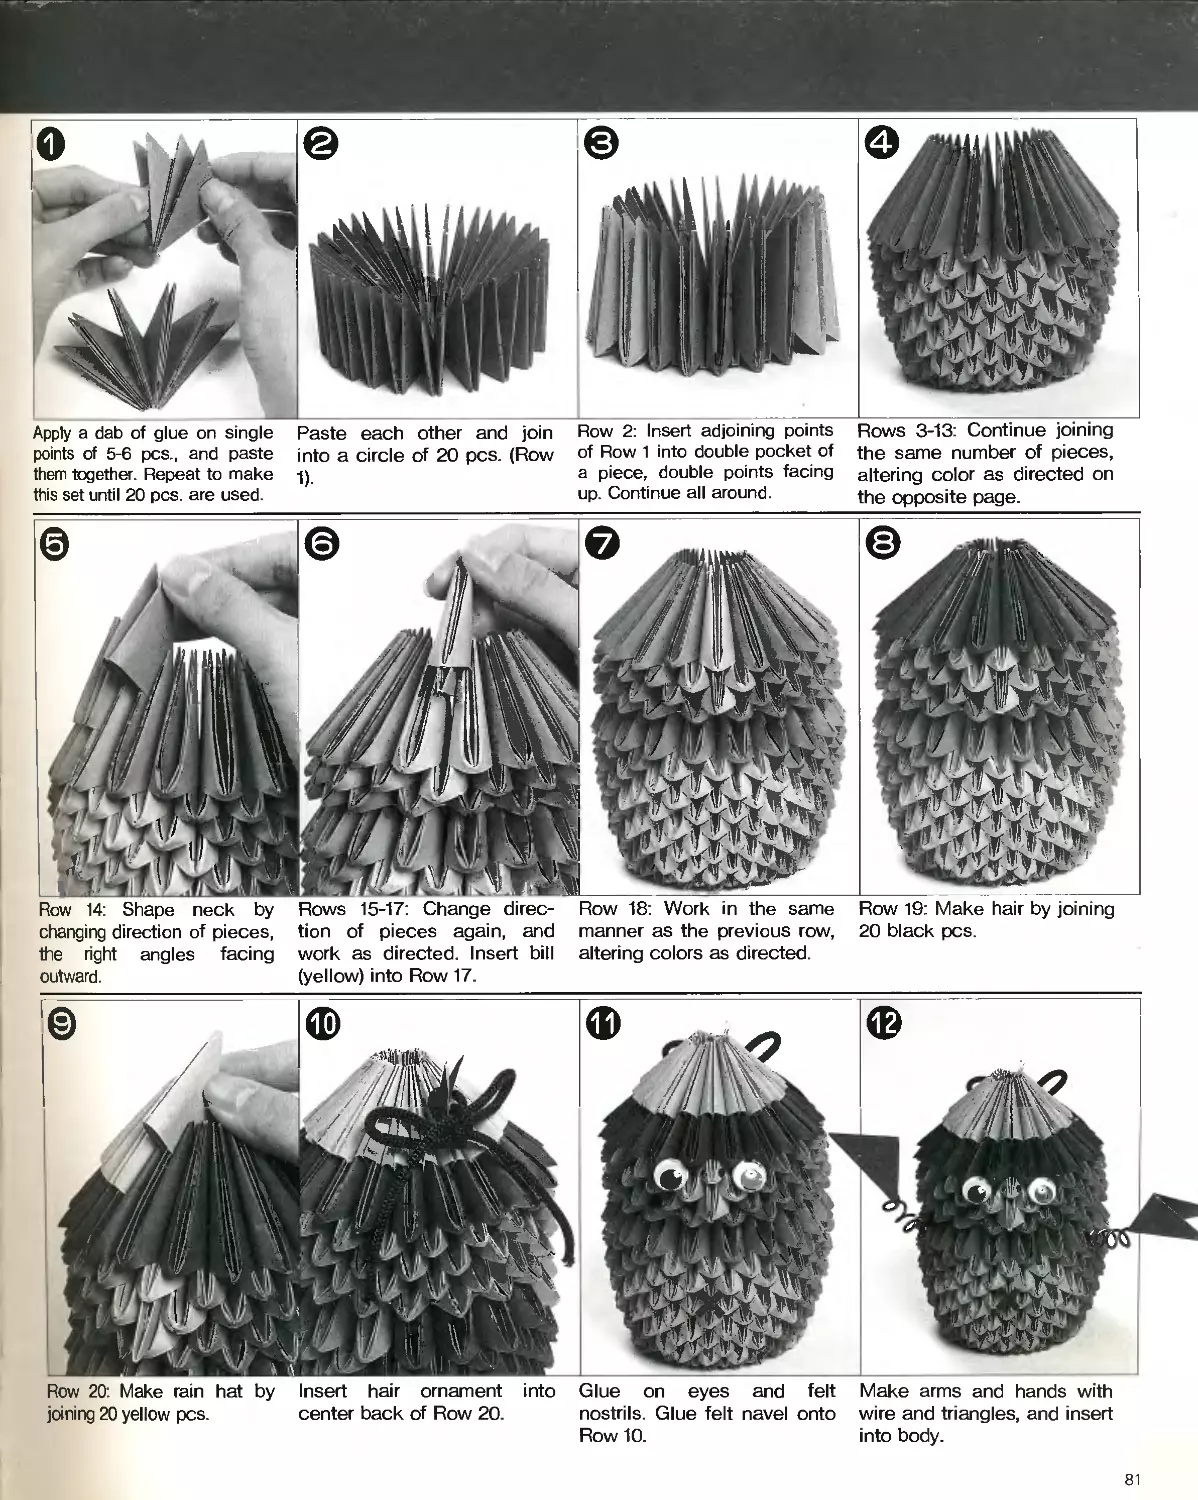
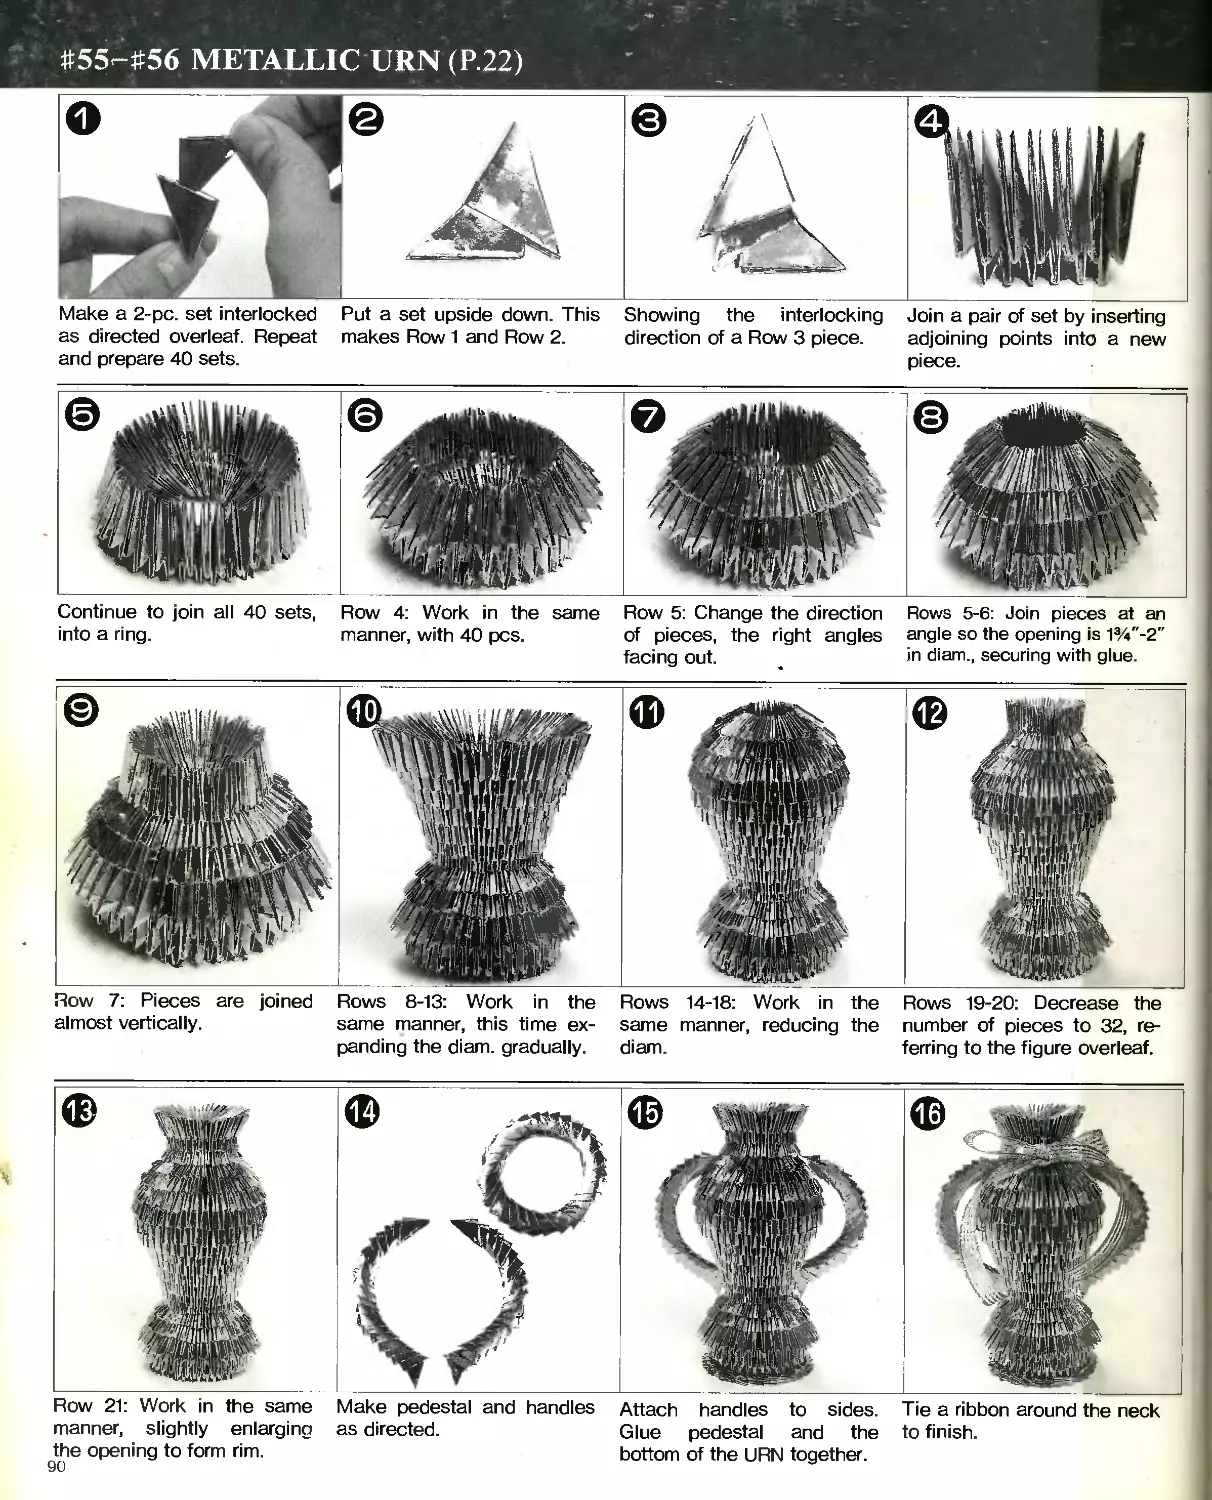
METALLIC URN 22 TEMARI BALL 22 GOOD-LUCK HYOTAN (GQURD) 23 OWL 24
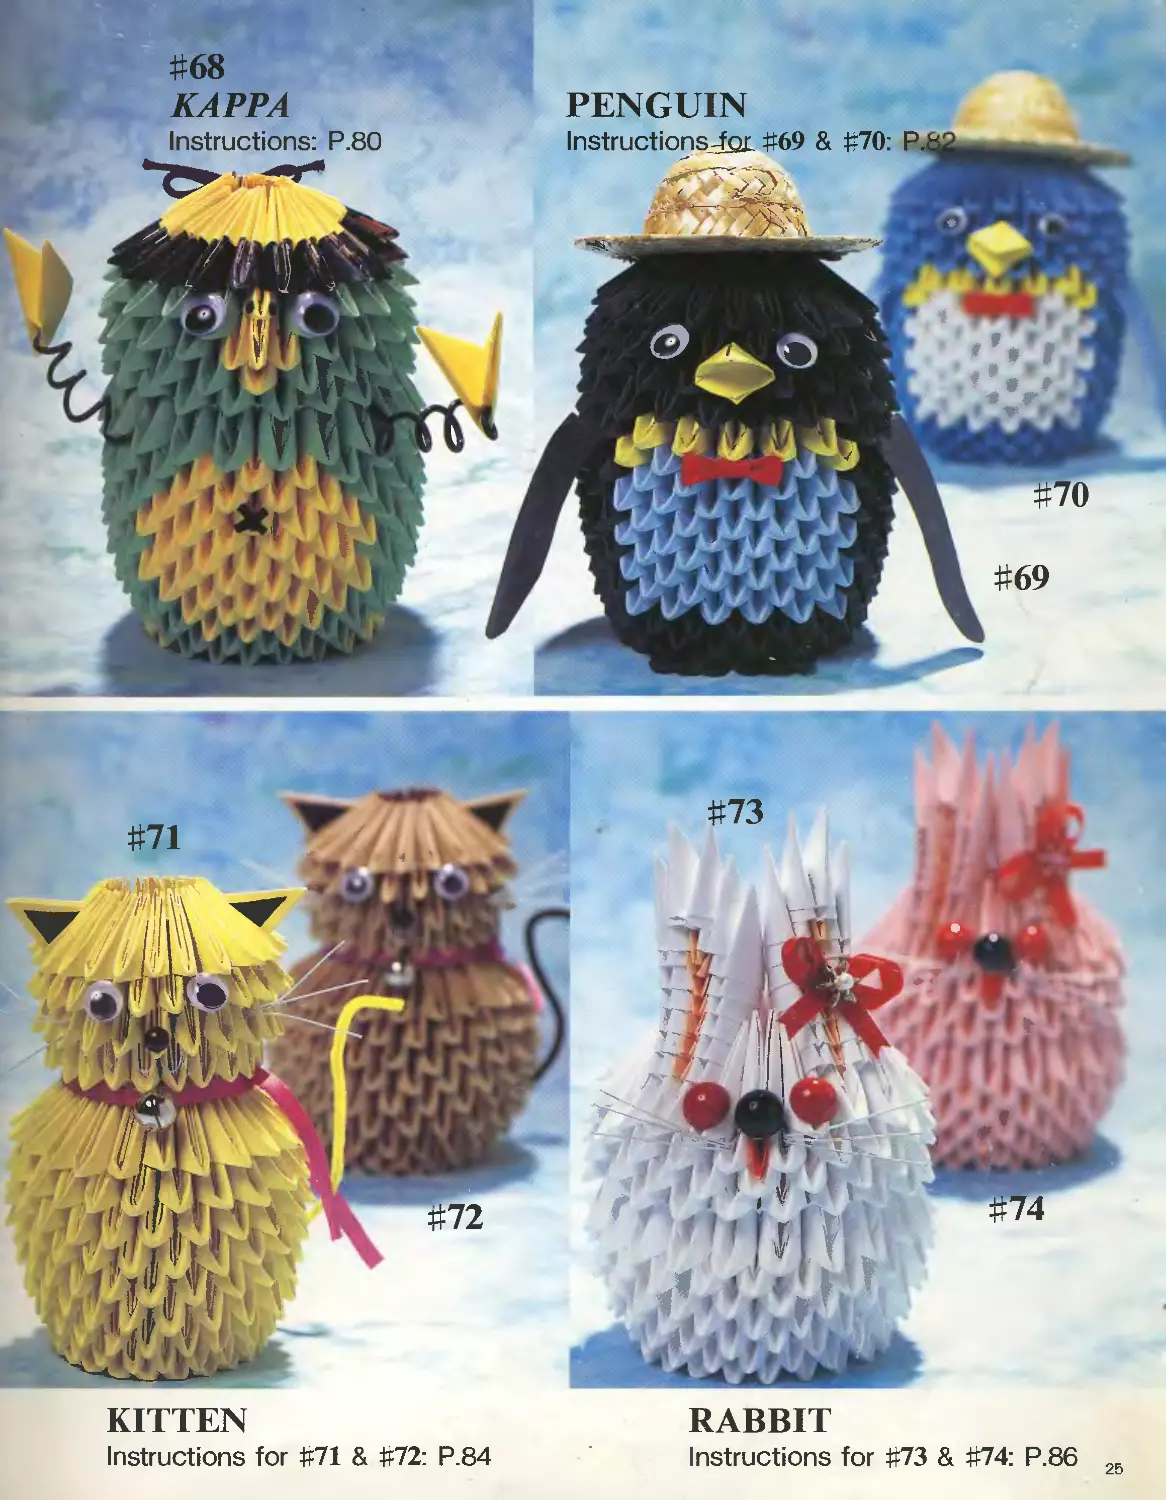
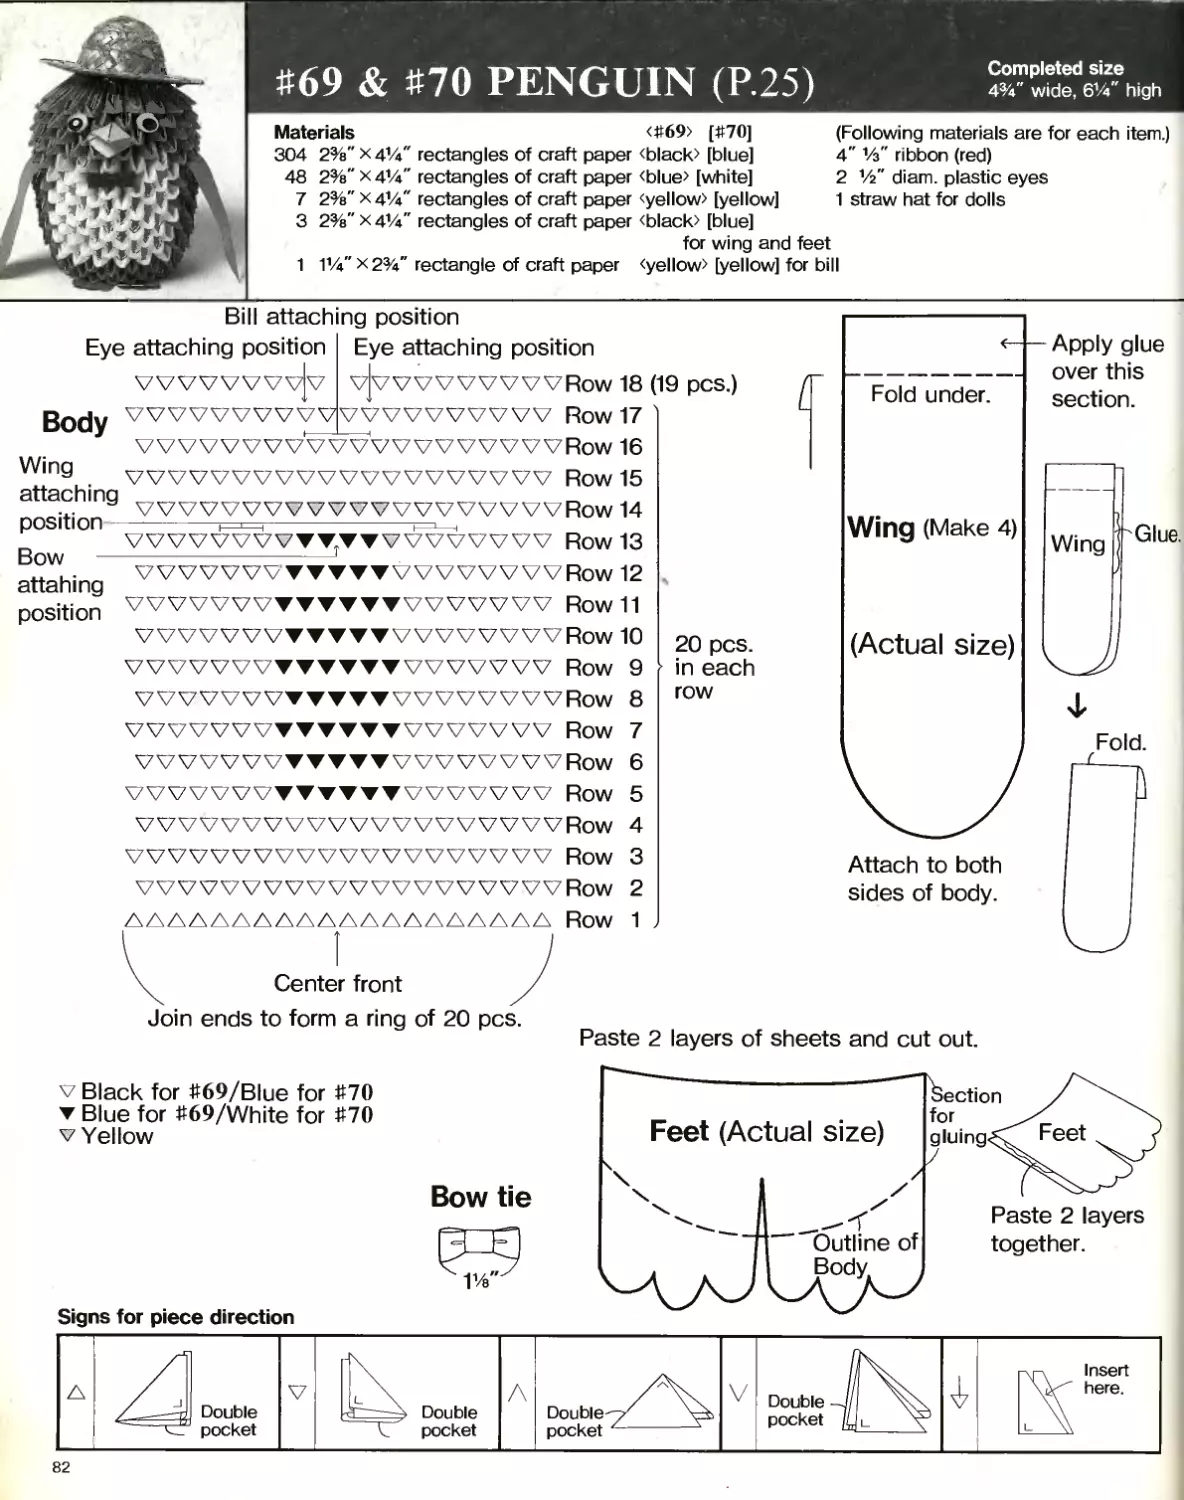
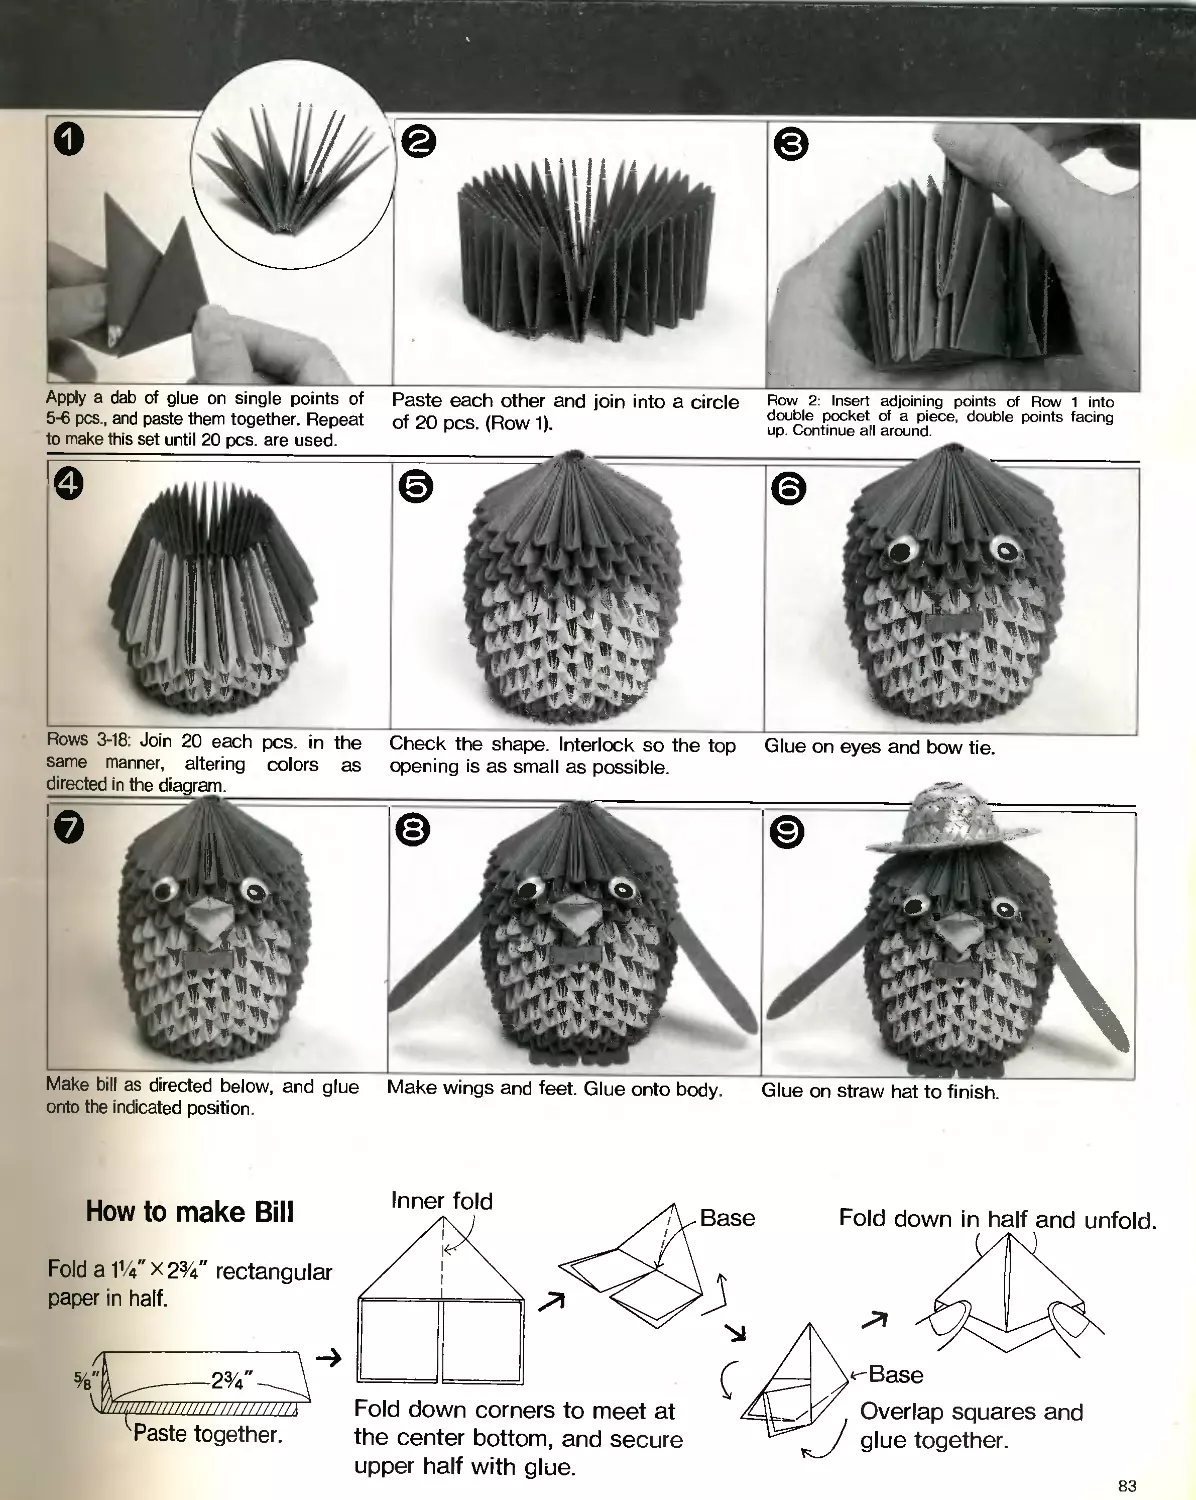
WINGED OWL 24 KAPPA 25 PENGUIN 25 KITTEN 25 RABBIT 25
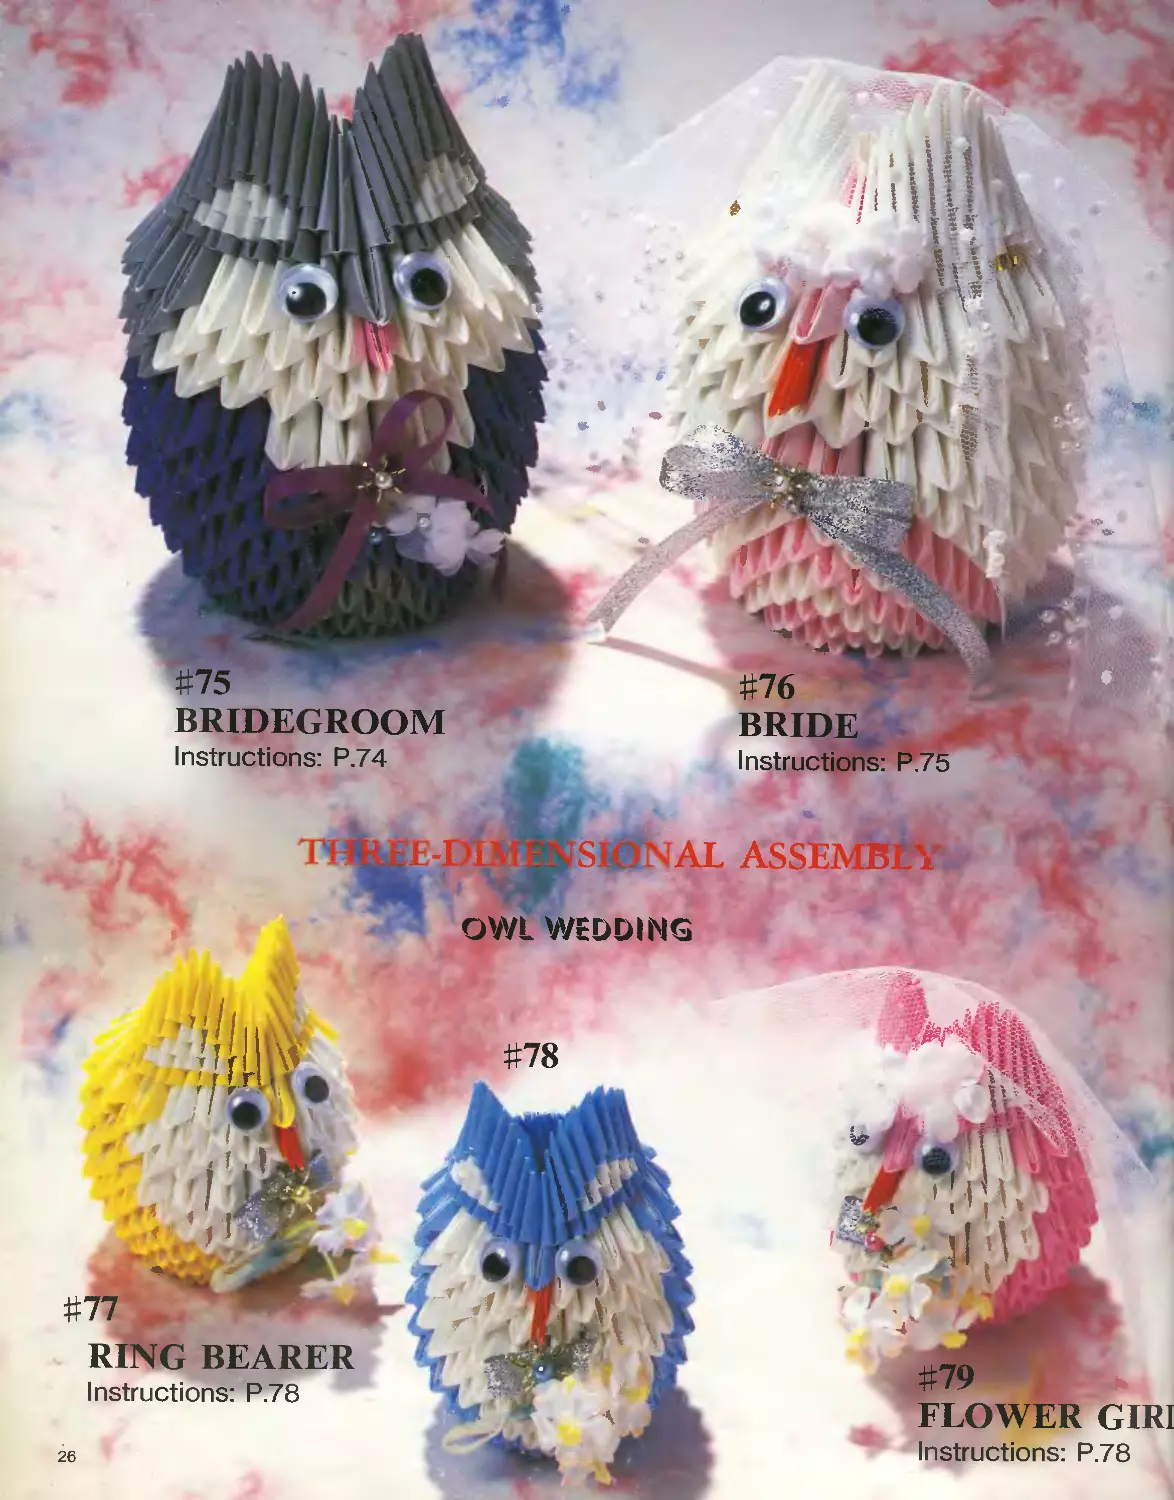
OWL WEDDING (BRIDEGROOM BRIDE RING BEARER FLOWER GIRL) 26
How to Make Triangular Pieces 27
Using origami paper 27 Using flyer or wrapping paper 28 Using craft paper 29
Instructions 30
Photographer: Yasuyuki Okada
Translator: Yoko Ishiguro
Project editor: Ikuko Mitsuoka
English editor: Mieko Baba
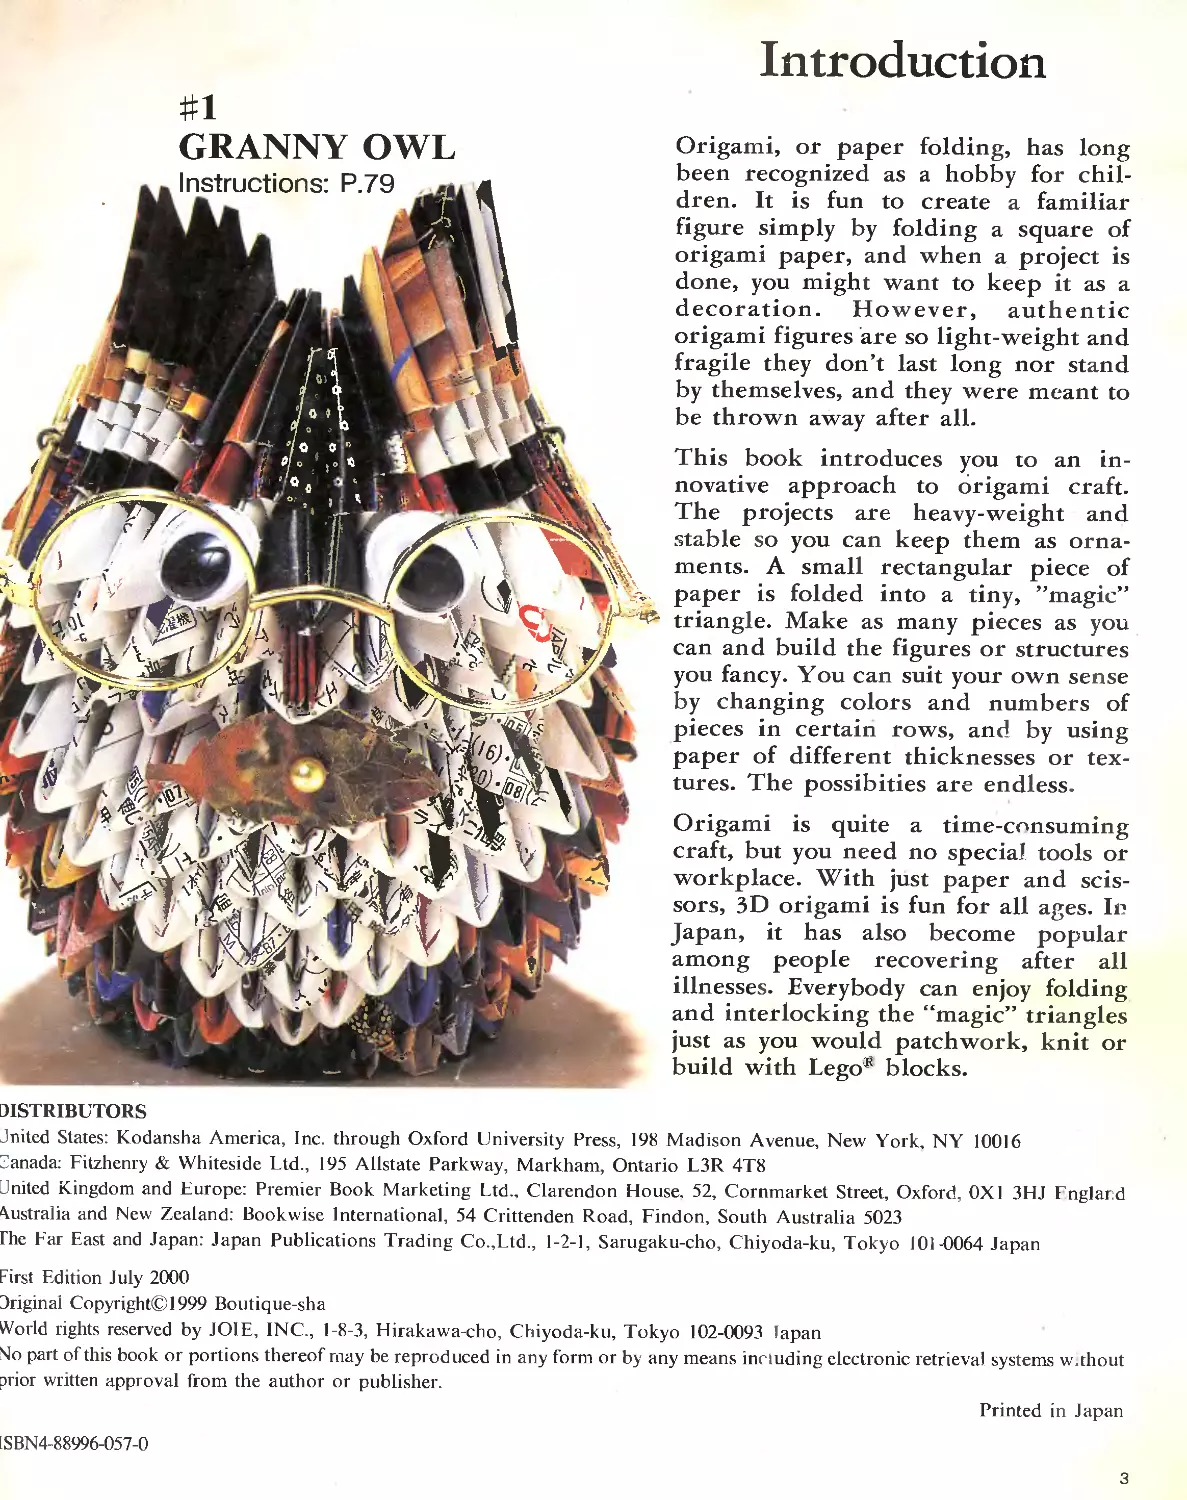
Introduction
#1
GRANNY OWL
Origami, or paper folding, has long
been recognized as a hobby for chil-
dren. It is fun to create a familiar
figure simply by folding a square of
origami paper, and when a project is
done, you might want to keep it as a
decoration. However, authentic
origami figures are so light-weight and
fragile they don’t last long nor stand
by themselves, and they were meant to
be thrown away after all.
This book introduces you to an in-
novative approach to origami craft.
The projects are heavy-weight and
stable so you can keep them as orna-
ments. A small rectangular piece of
paper is folded into a tiny, ’’magic”
triangle. Make as many pieces as you
can and build the figures or structures
you fancy. You can suit your own sense
by changing colors and numbers of
pieces in certain rows, and by using
paper of different thicknesses or tex-
tures. The possibities are endless.
Origami is quite a time-consuming
craft, but you need no special tools or
workplace. With just paper and scis-
sors, 3D origami is fun for all ages. In
Japan, it has also become popular
among people recovering after all
illnesses. Everybody can enjoy folding
and interlocking the “magic” triangles
just as you would patchwork, knit or
build with Lego® blocks.
JISTR1BLTORS
Jnited States: Kodansha America, Inc. through Oxford University Press, 198 Madison Avenue, New York, NY 10016
Canada: Fitzhenry & Whiteside Ltd., 195 Allstate Parkway, Markham, Ontario L3R 4T8
Jnited Kingdom and Europe: Premier Book Marketing Ltd., Clarendon House. 52, Cornmarket Street, Oxford, 0X1 3HJ England
Australia and New Zealand: Bookwise International, 54 Crittenden Road, Findon, South Australia 5023
Che Far East and Japan: Japan Publications Trading Co.,Ltd., 1-2-1, Sarugaku-cho, Chiyoda-ku, Tokyo 101-0064 Japan
?irst Edition July 2000
Jriginal Copyright© 1999 Boutique-sha
World rights reserved by JOIE, INC., 1-8-3, Hirakawa-cho, Chiyoda-ku, Tokyo 102-0093 Japan
4o part of this book or portions thereof may be reproduced in any form or by any means including electronic retrieval systems w.thout
)rior written approval from the author or publisher.
Printed in Japan
SBN4-88996-057-0
3
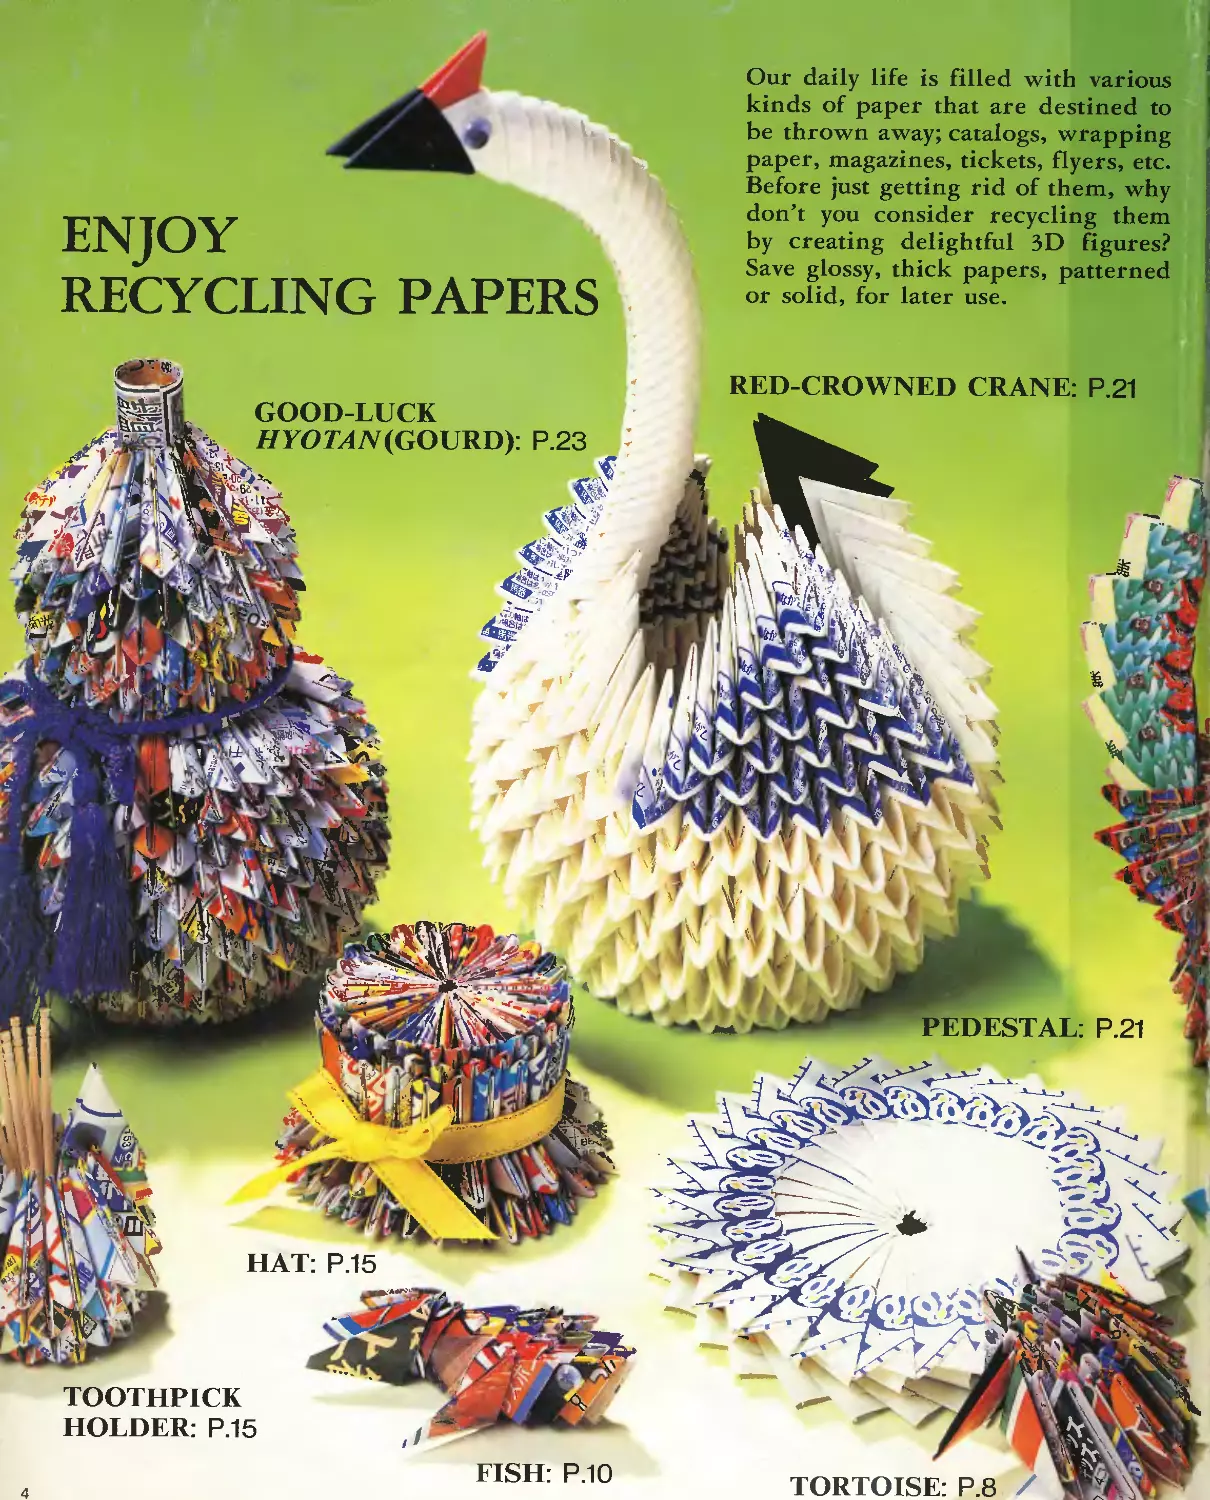
ENJOY
RECYCLING PAPERS
Our daily life is filled with various
kinds of paper that are destined to
be thrown away; catalogs, wrapping
paper, magazines, tickets, flyers, etc.
Before just getting rid of them, why
don’t you consider recycling them
by creating delightful 3D figures?
Save glossy, thick papers, patterned
or solid, for later use.
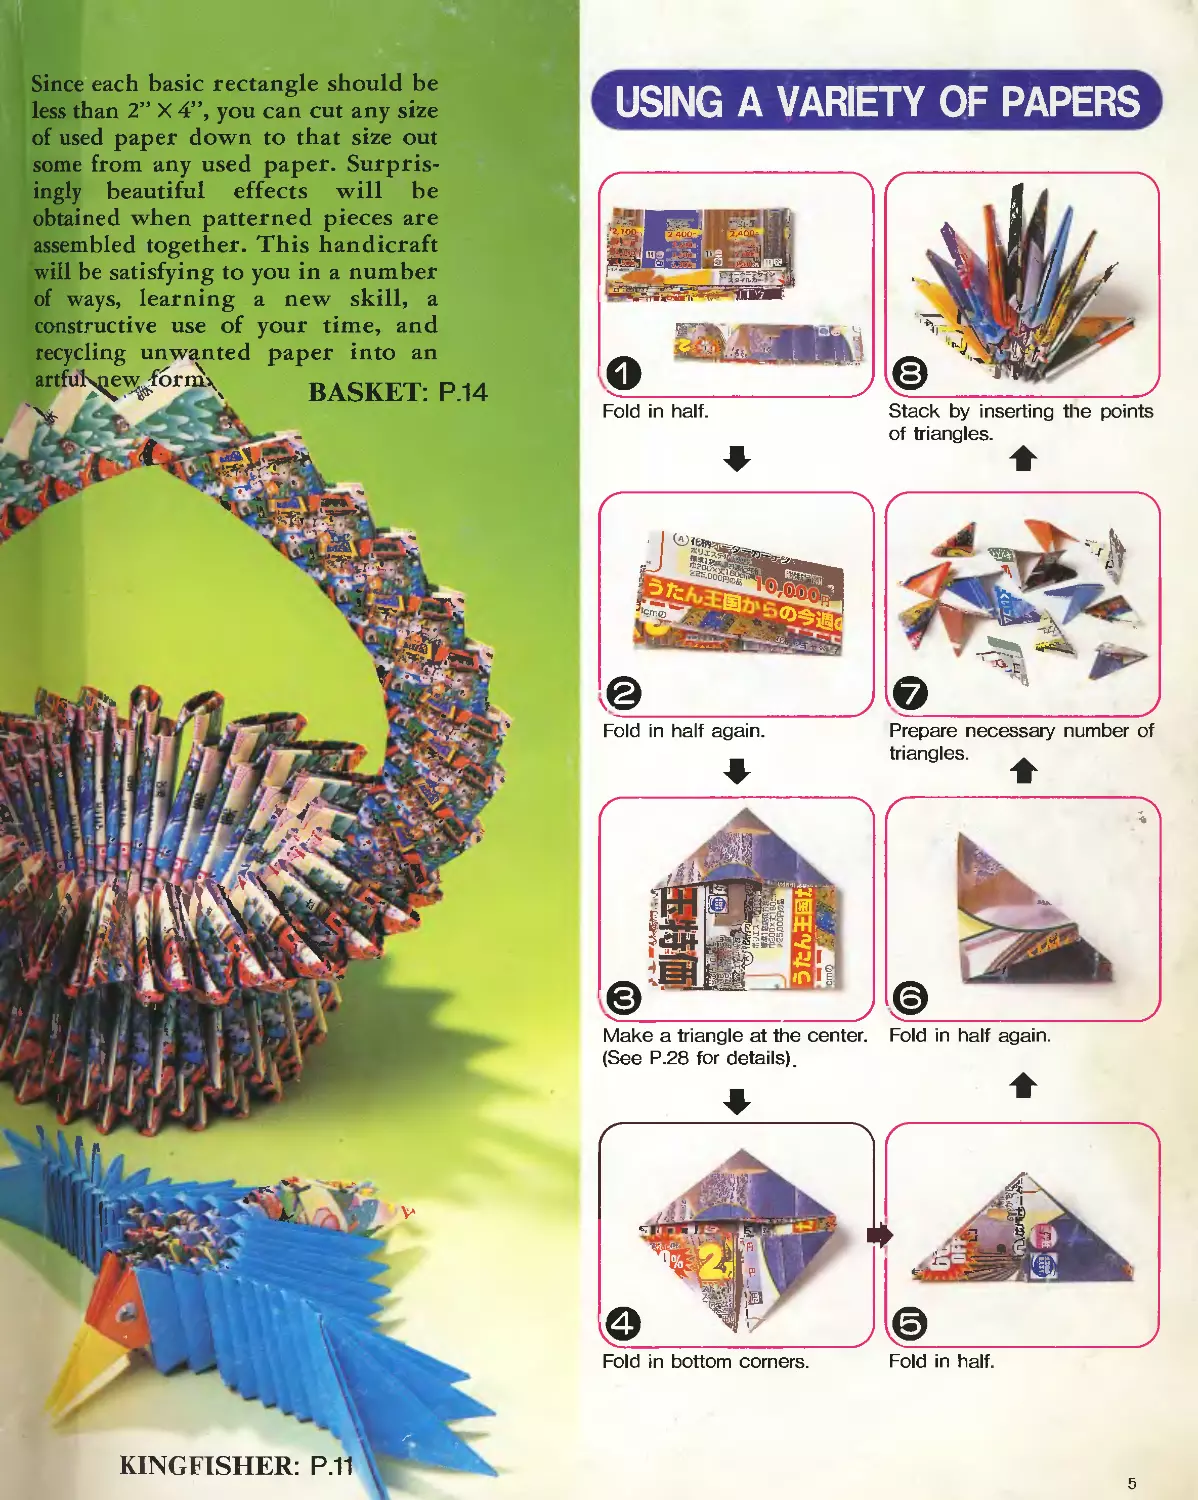
Since each basic rectangle should be
less than 2” X 4”, you can cut any size
of used paper down to that size out
some from any used paper. Surpris-
ingly beautiful effects will be
obtained when patterned pieces are
assembled together. This handicraft
will be satisfying to you in a number
of ways, learning a new skill, a
constructive use of your time, and
recycling unwanted paper into an
artfulspe^JornK BASKET: P.14
USING A VARIETY OF PAPERS л
Stack by inserting the points
KINGFISHER:
P.11
of triangles.
Make a triangle at the center. Fold in half again.
(See P.28 for details).
Fold in bottom corners. Fold in half.
5
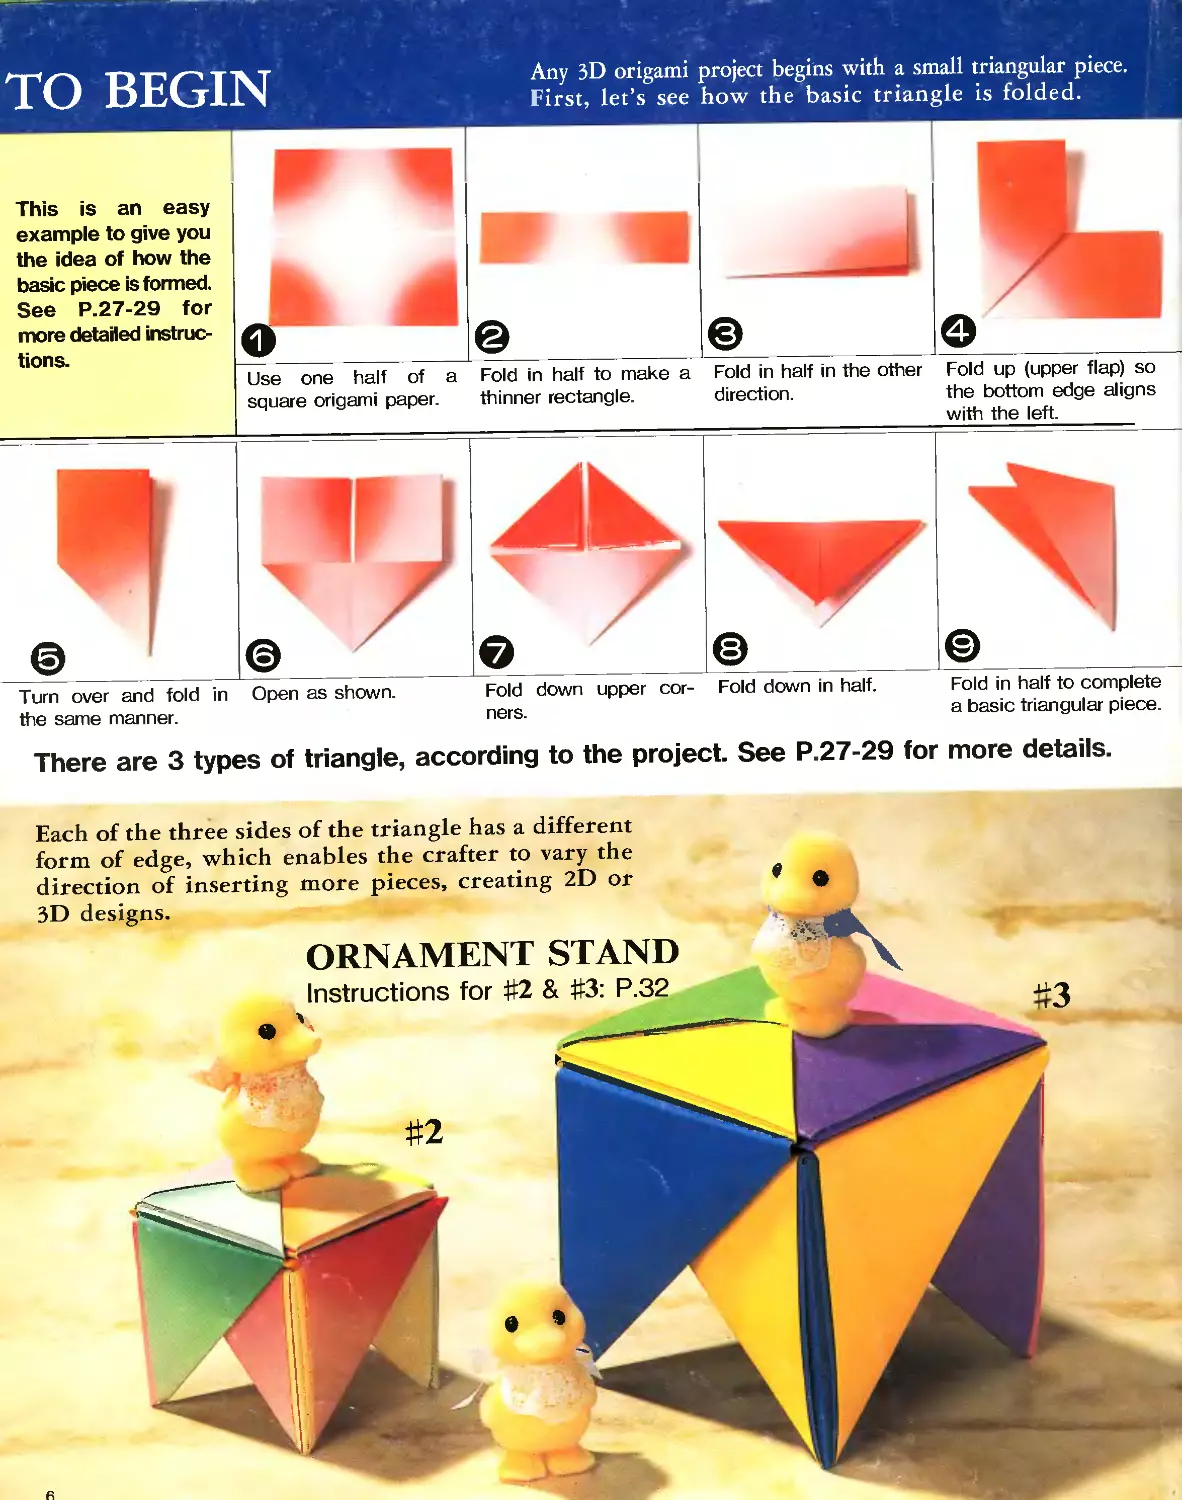
TO BEGIN
Any 3D origami project begins with a small triangular piece.
First, let’s see how the basic triangle is folded.
This is an easy
example to give you
the idea of how the
basic piece is formed.
See P.27-29 for
more detailed instruc-
tions.
|_ - —
Use one half of a Fold in half to make a Fold in half in the other Fold up (upper flap) so
square origami paper. thinner rectangle. direction. the bottom edge aligns
with the left.
Fold down upper cor- Fold down in half,
ners.
Fold in half to complete
a basic triangular piece.
Turn over and fold in Open as shown,
the same manner.
There are 3 types of triangle, according to the project. See P.27-29 for more details.
Each of the three sides of the triangle has a different
form of edge, which enables the crafter to vary the
direction of inserting more pieces, creating 2D or
3D designs.
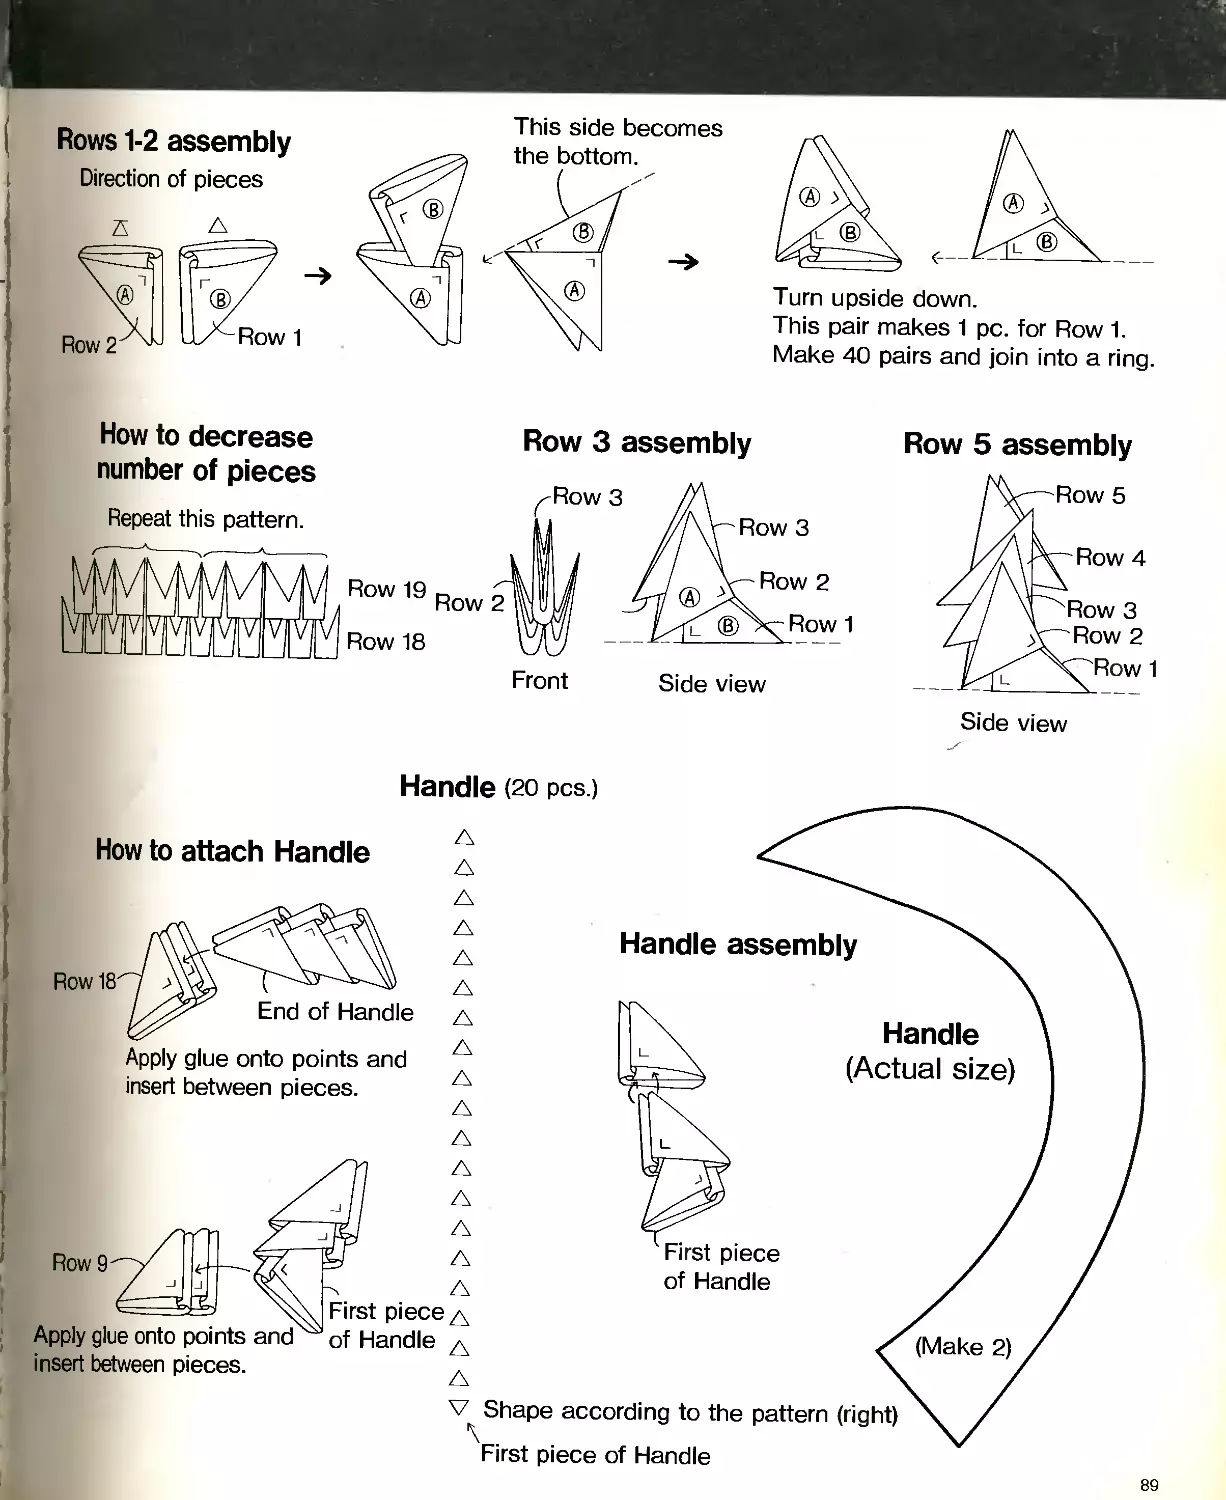
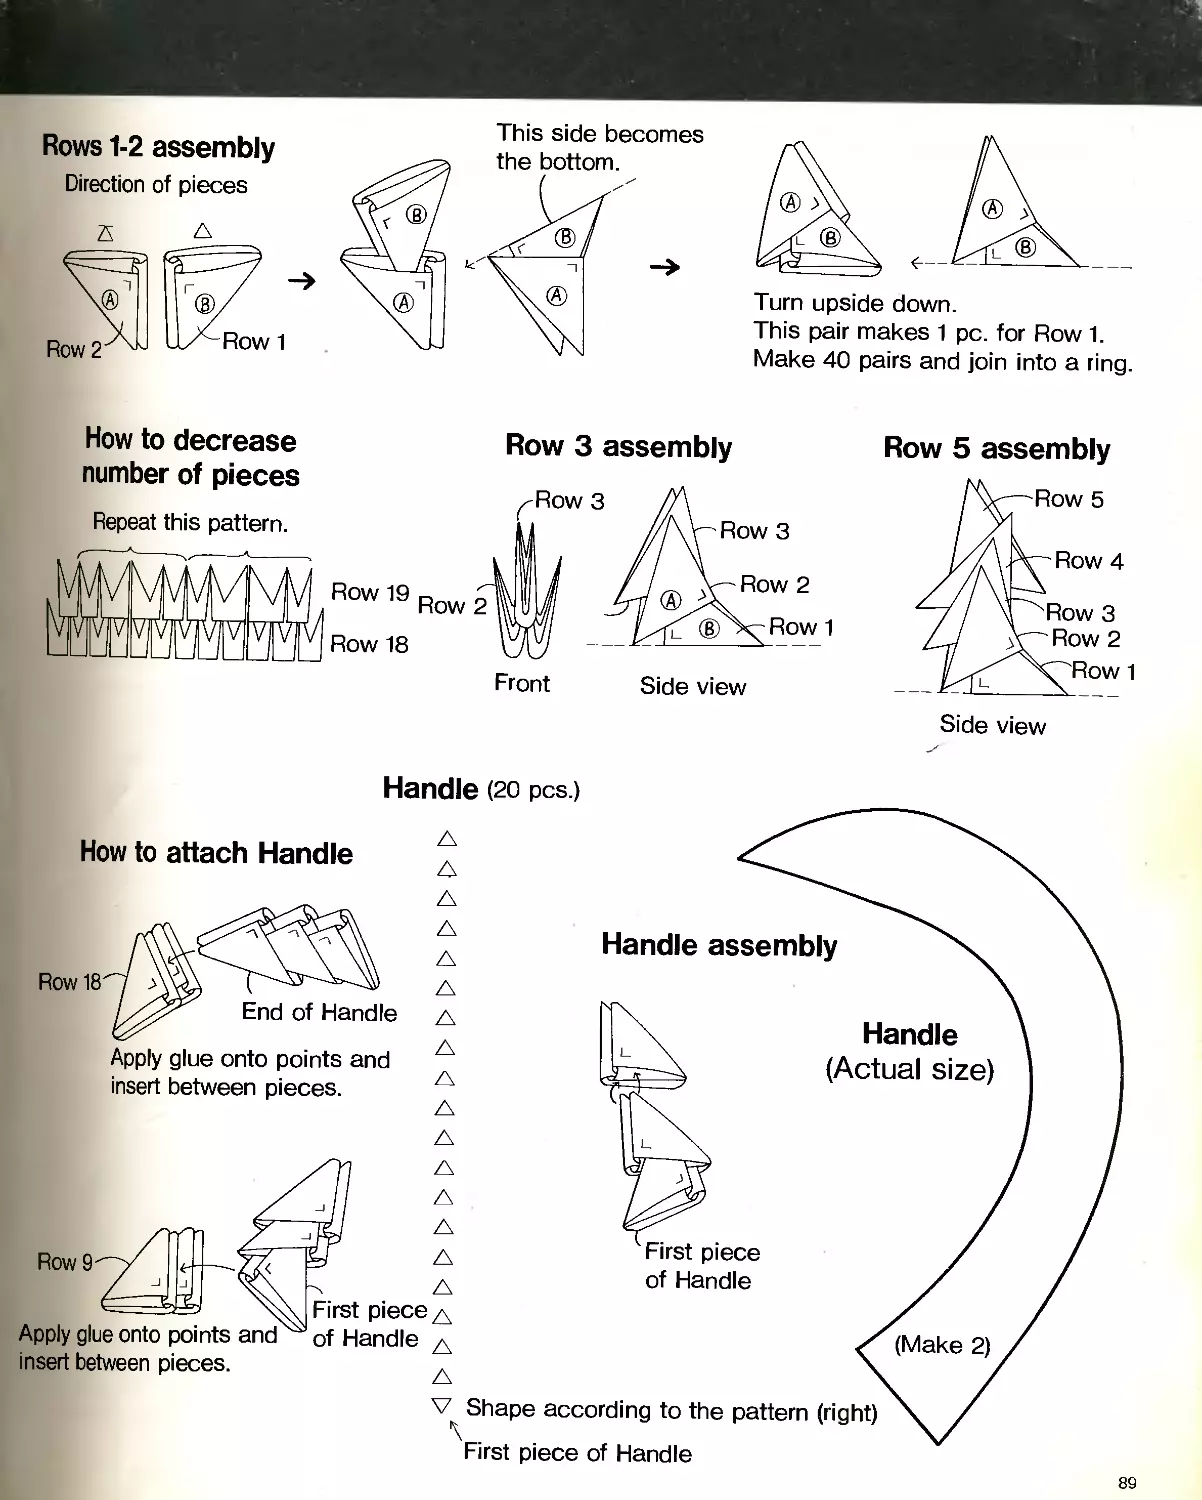
ORNAMENT STAND
Instructions for #2 & #3: P.32
Hold the first piece with your Hold the second piece with Insert two points into double Insert deeply as shown,
left hand, the pockets facing your right hand so two pocket of the first piece.
you. pointed points face left.
Insert two points of the third Continue so the pocket side Apply a dash of glue between Completed RING,
piece into double pocket. alternates its angle, vertically pieces, adjusting the shape.
and diagonally.
* Pieces used in the actual project are smaller. 7
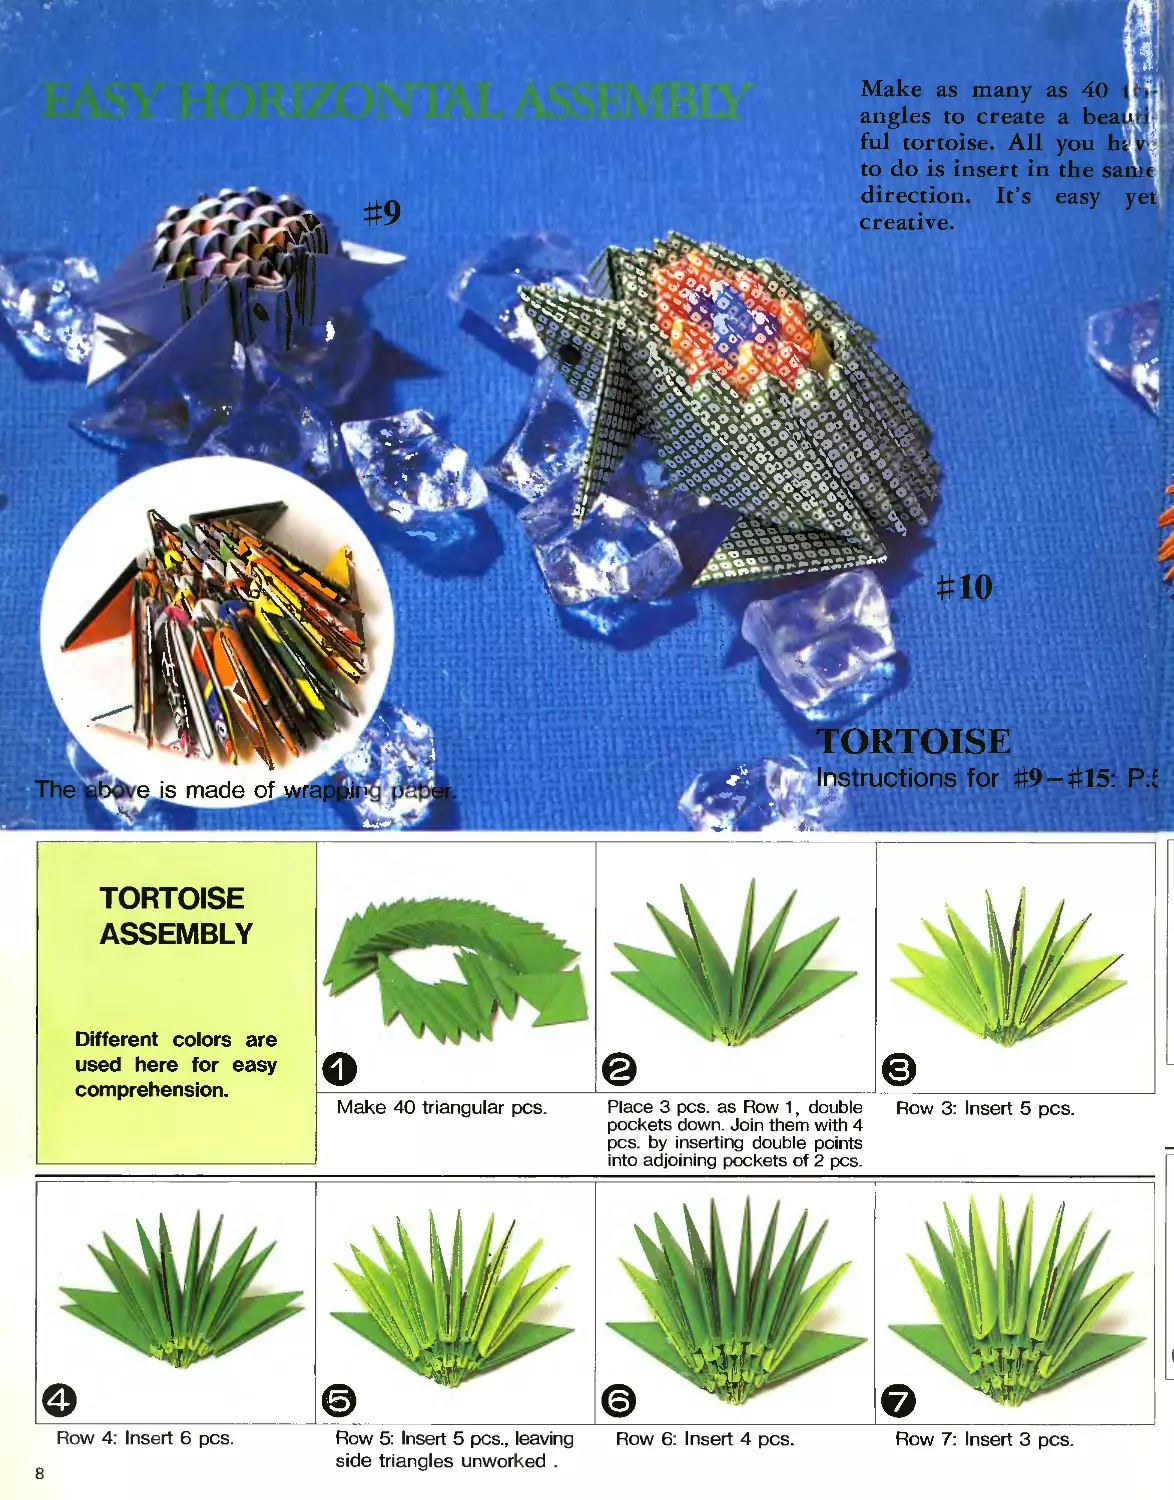
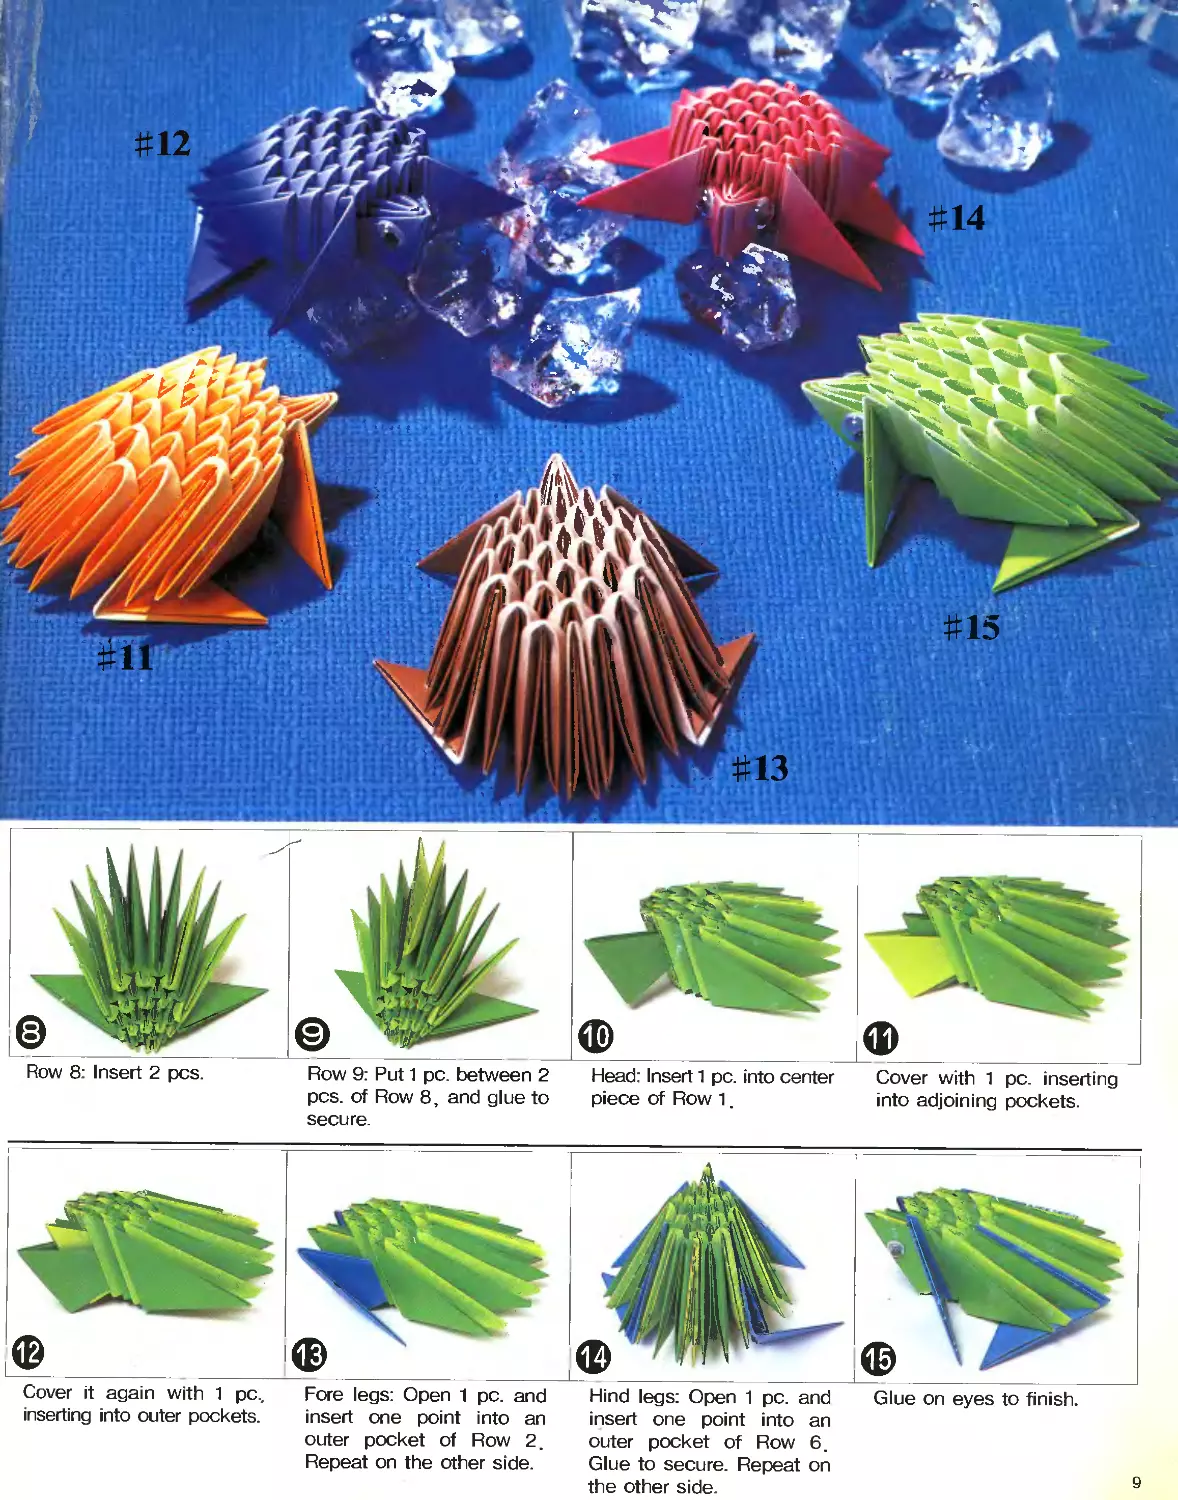
#10
The
-e is made of
#9
TORTOISE
Instructions for #9-#15: P.J
Make as many as 40 tri-
angles to create a beaud
ful tortoise. All you ht v
to do is insert in the same
direction. It’s easy yet
creative.
TORTOISE
ASSEMBLY
Different colors are
used here for easy
comprehension.
Make 40 triangular pcs.
Place 3 pcs. as Row 1, double
pockets down. Join them with 4
pcs. by inserting double points
into adjoining pockets of 2 pcs.
Row 3: Insert 5 pcs.
Row 4: Insert 6 pcs.
8
Row 5: Insert 5 pcs., leaving
side triangles unworked .
Row 6: Insert 4 pcs.
Row 7: Insert 3 pcs.
Cover it again with 1 pc..
Fore legs: Open 1 pc. and
Hind legs: Open 1 pc. and Glue on eyes to finish.
inserting into outer pockets.
insert one point into an
insert one point into an
outer pocket of Row 2.
Repeat on the other side.
outer pocket of Row 6.
Glue to secure. Repeat on
the other side.
9
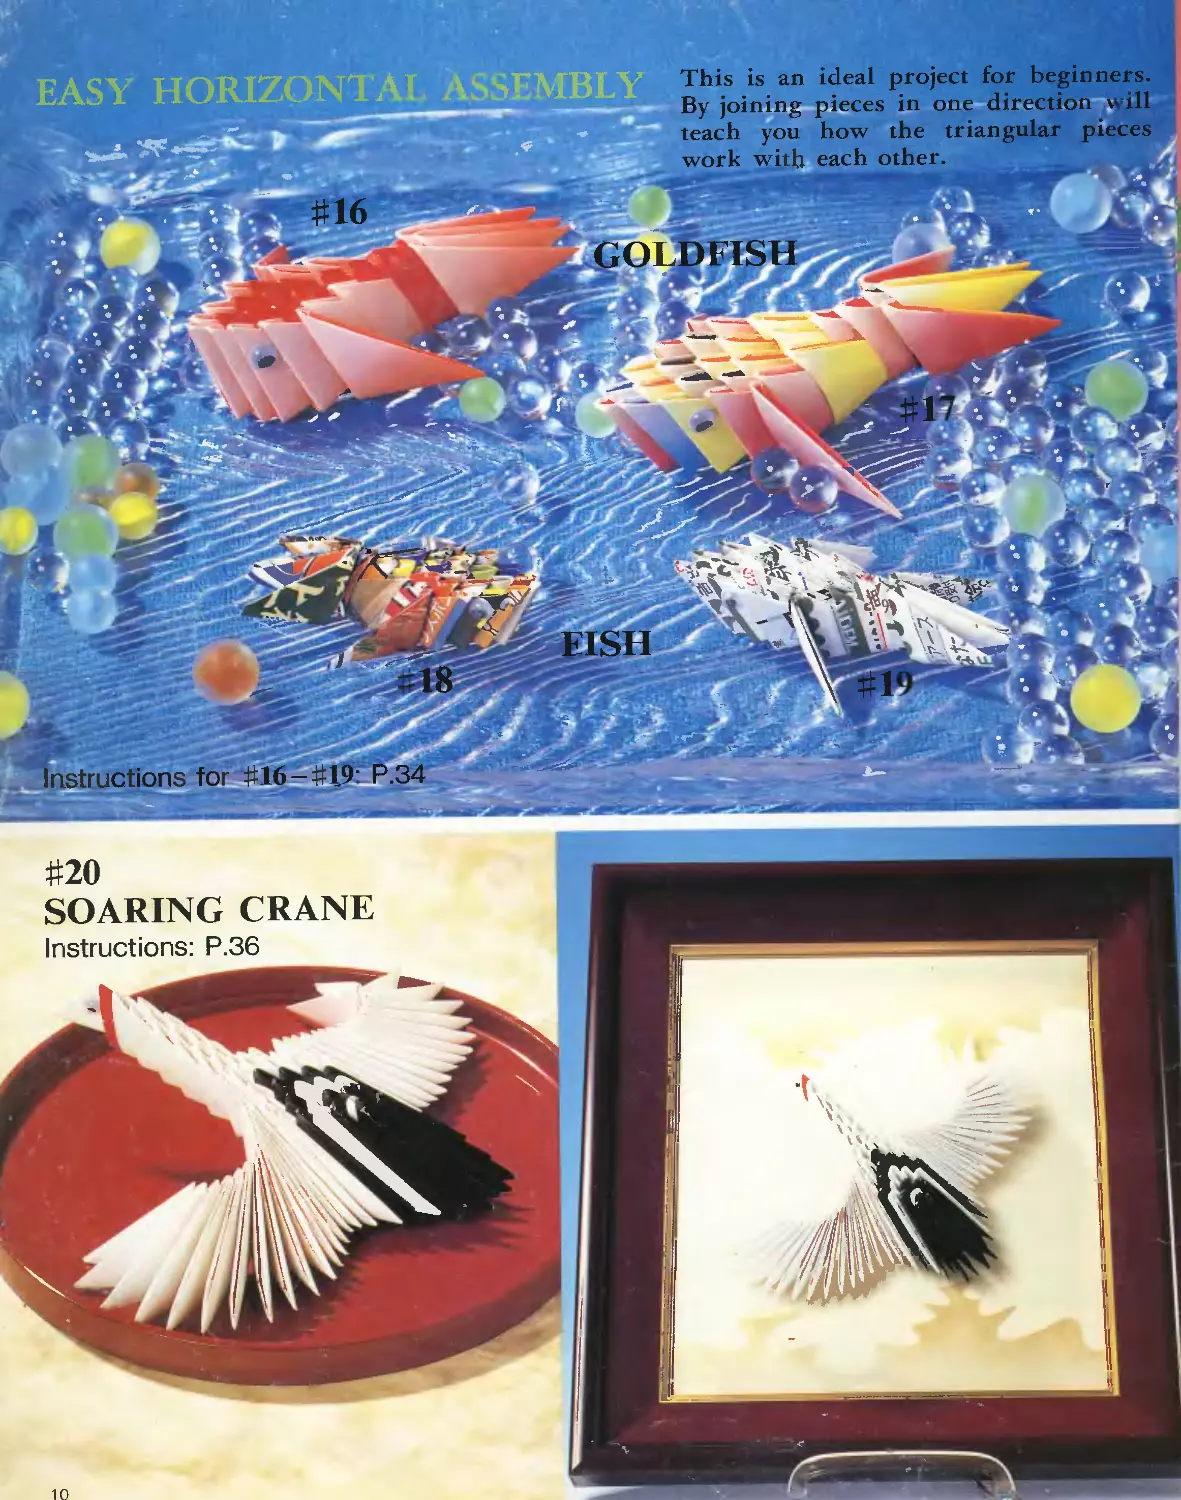
#16
nstructions for #16-#19’ P.34
This is an ideal project for beginners.
By joining pieces in one direction м ill
teach you how the triangular pieces
work with each other.
#20
SOARING CRANE
Instructions: P.36
EASY HORIZONTAL ASSEMBLY
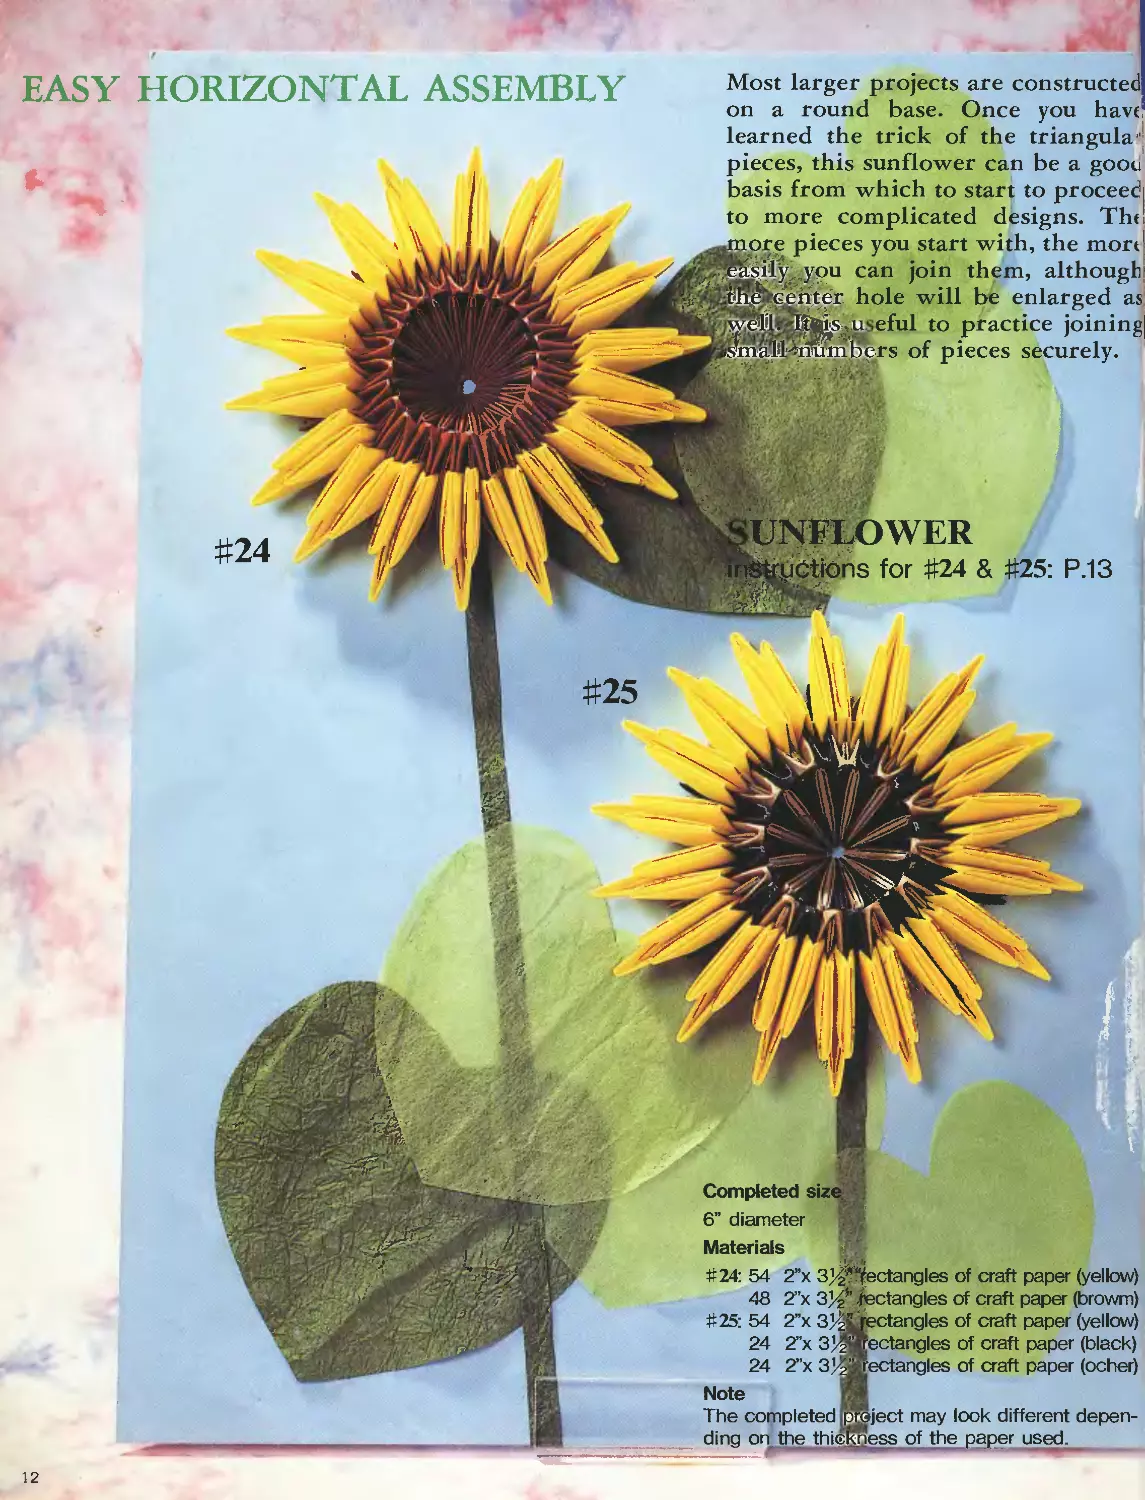
Most larger projects are constructed
on a round base. Once you have
learned the trick of the triangula"'
pieces, this sunflower can be a goou
basis from which to start to proceedi
to more complicated designs. ThJ
дороге pieces you start with, the mort
^d^sily^,ypu can join them, although
8^№s^gg'qt,er. hole will be enlarged as
r.<;i^is;,useful to practice joining)
ll<numbers of pieces securely.
w
fr OWER
Bfeictions for #24 & #25: P.13
ЙЯ
#25
Completed size •
6” diameter
Materials
#24: 54
48
#25: 54
24
24
Note
The completed pi
ding on the thiekpess of the paper used.
2”x 3’4* fectangles of craft paper (yellow)
2”x 3 ^’’.Rectangles of craft paper (browm)
2”x 3$ '
2”x 3j|
ectangles of craft paper (yellow)
ectangles of craft paper (black)
rectangles of craft paper (ocher)
iject may look different depen-
12
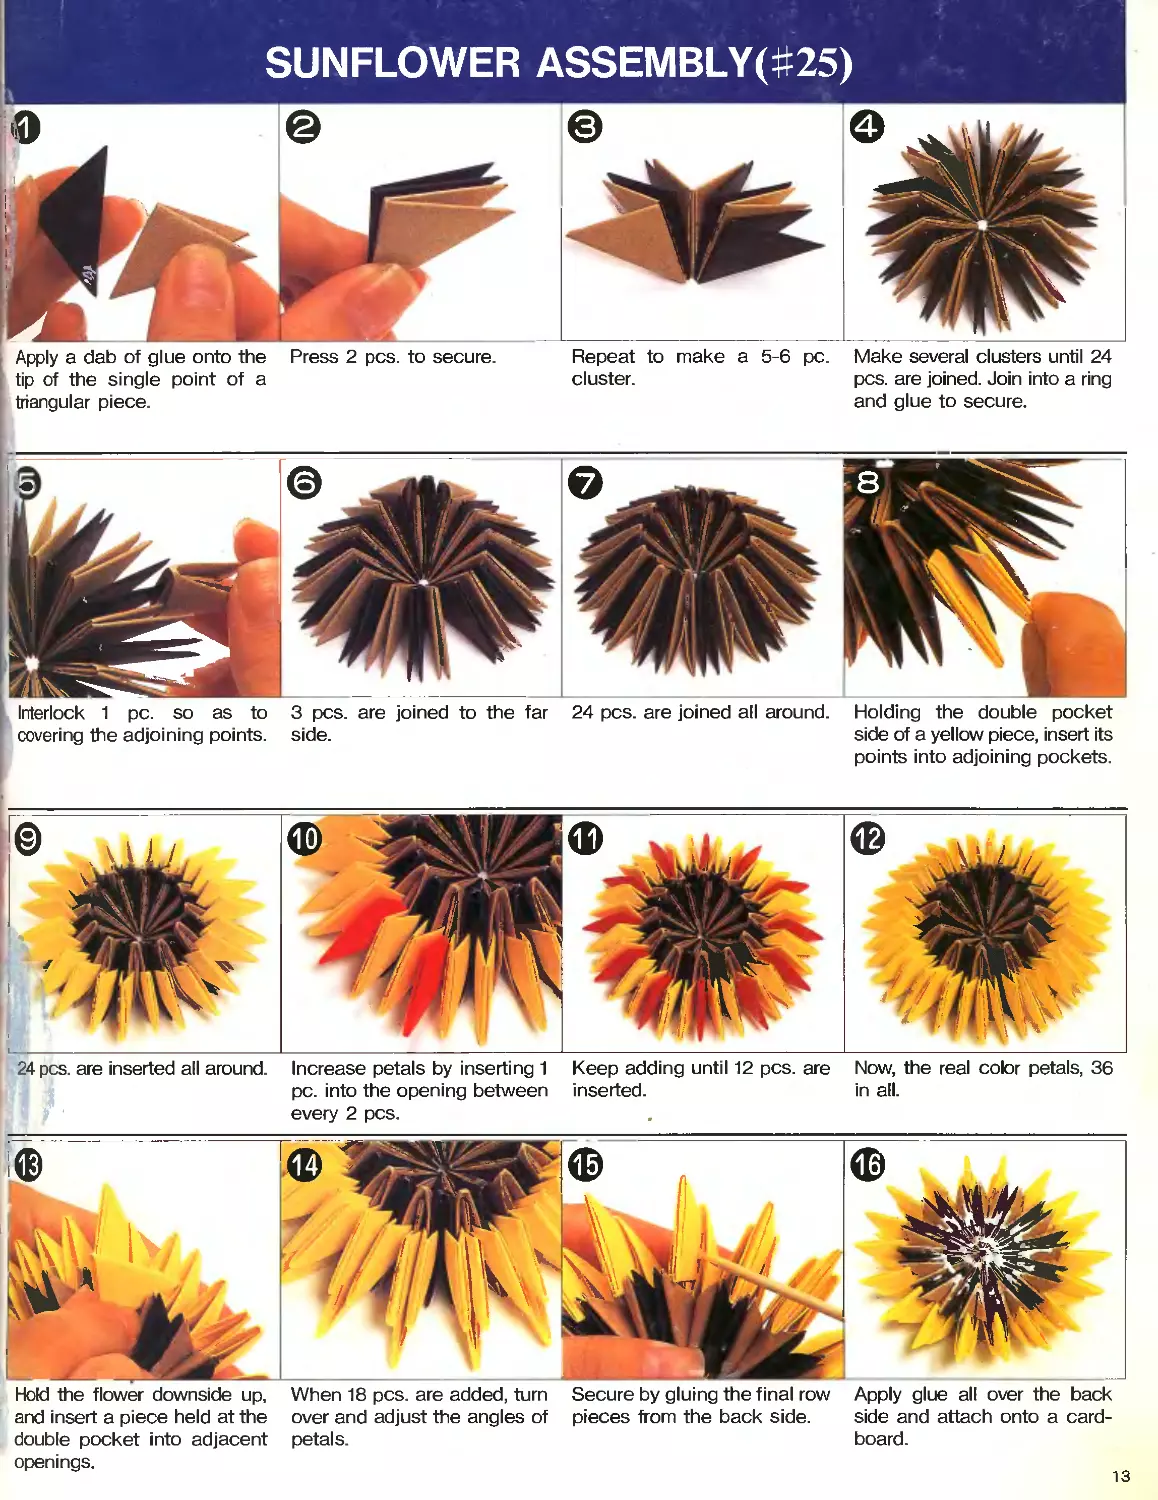
SUNFLOWER ASSEMBLY(#25)
Apply a dab of glue onto the Press 2 pcs. to secure. Repeat to make a 5-6 pc. Make several clusters until 24
tip of the single point of a cluster. pcs. are joined. Join into a ring
triangular piece. and glue to secure.
Interlock 1 pc. so as to 3 pcs. are joined to the far 24 pcs. are joined all around. Holding the double pocket
covering the adjoining points, side. side of a yellow piece, insert its
points into adjoining pockets.
24 pcs are inserted all around. Increase petals by inserting 1 Keep adding until 12 pcs. are Now, the real color petals, 36
pc. into the opening between inserted. in all.
every 2 pcs.
Hold the flower downside up, When 18 pcs. are added, turn Secure by gluing the final row Apply glue all over the back
and insert a piece held at the over and adjust the angles of pieces from the back side. side and attach onto a card-
double pocket into adjacent petals. board.
openings.
13
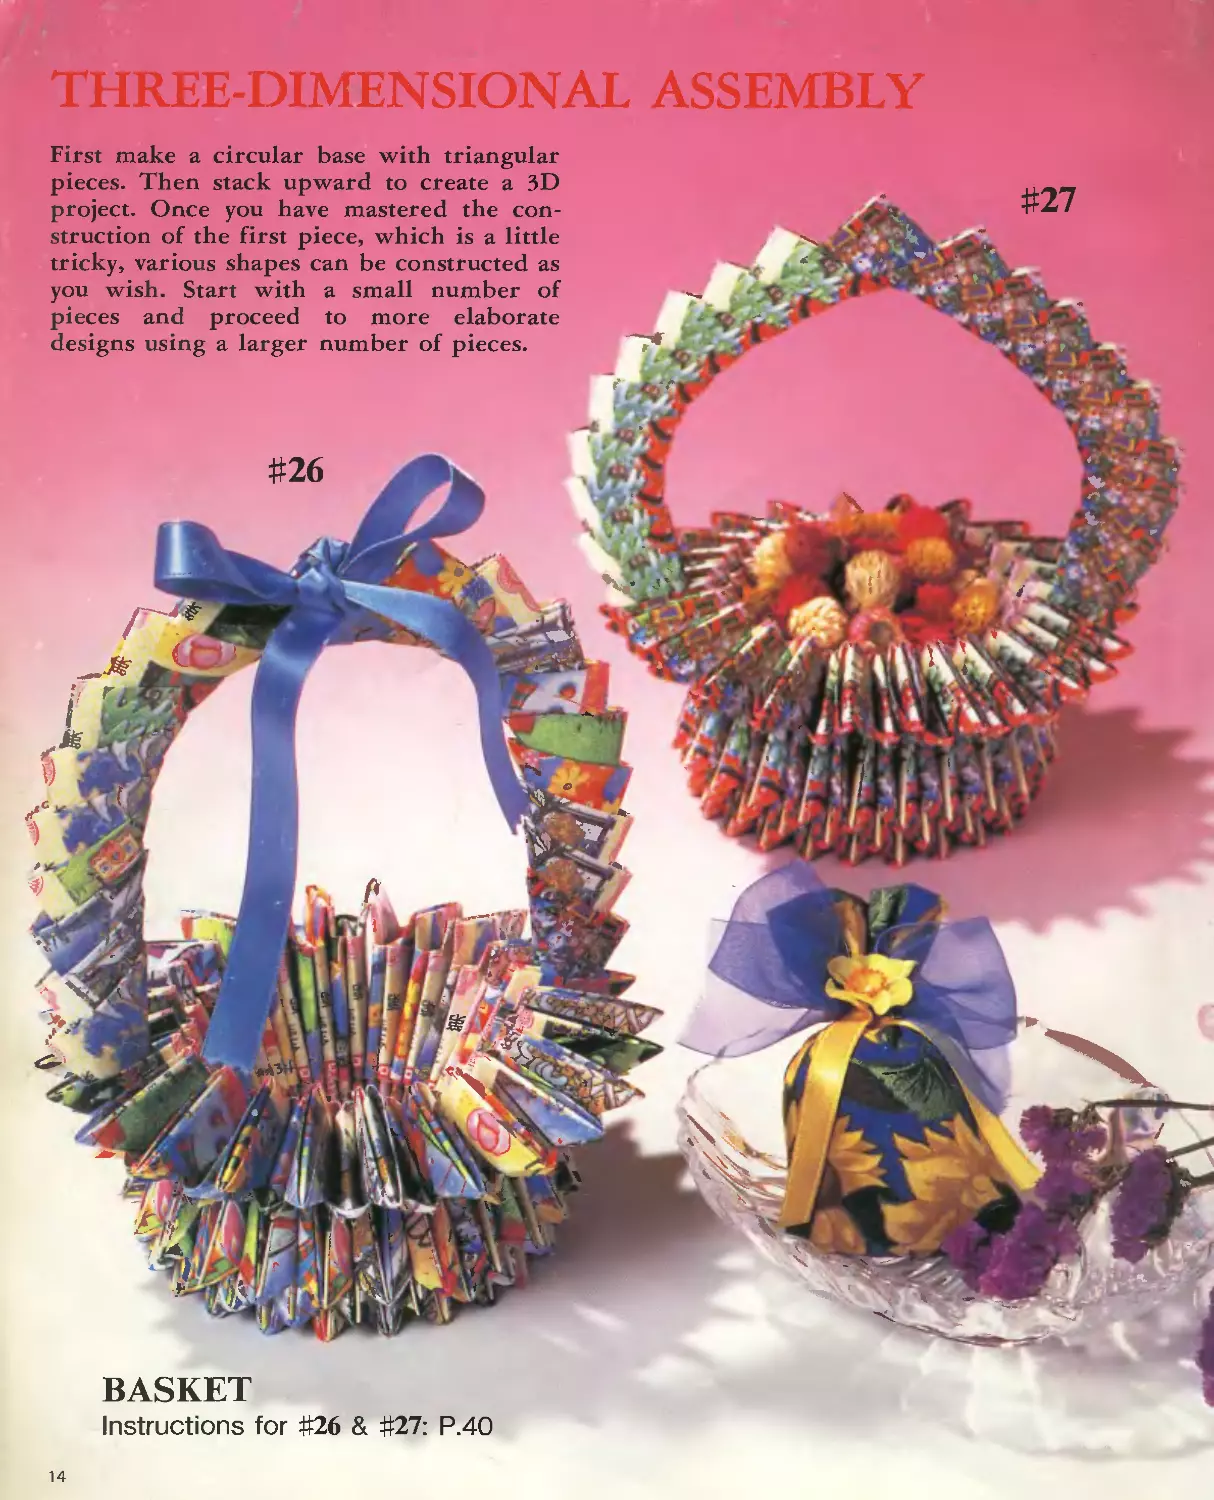
THREE-DIMENSIONAL ASSEMBLY
First make a circular base with triangular
pieces. Then stack upward to create a 3D
project. Once you have mastered the con-
struction of the first piece, which is a little
tricky, various shapes can be constructed as
you wish. Start with a small number of
pieces and proceed to more elaborate
designs using a larger number of pieces.
#27
#26
BASKET
Instructions for #26 & #27: P.40
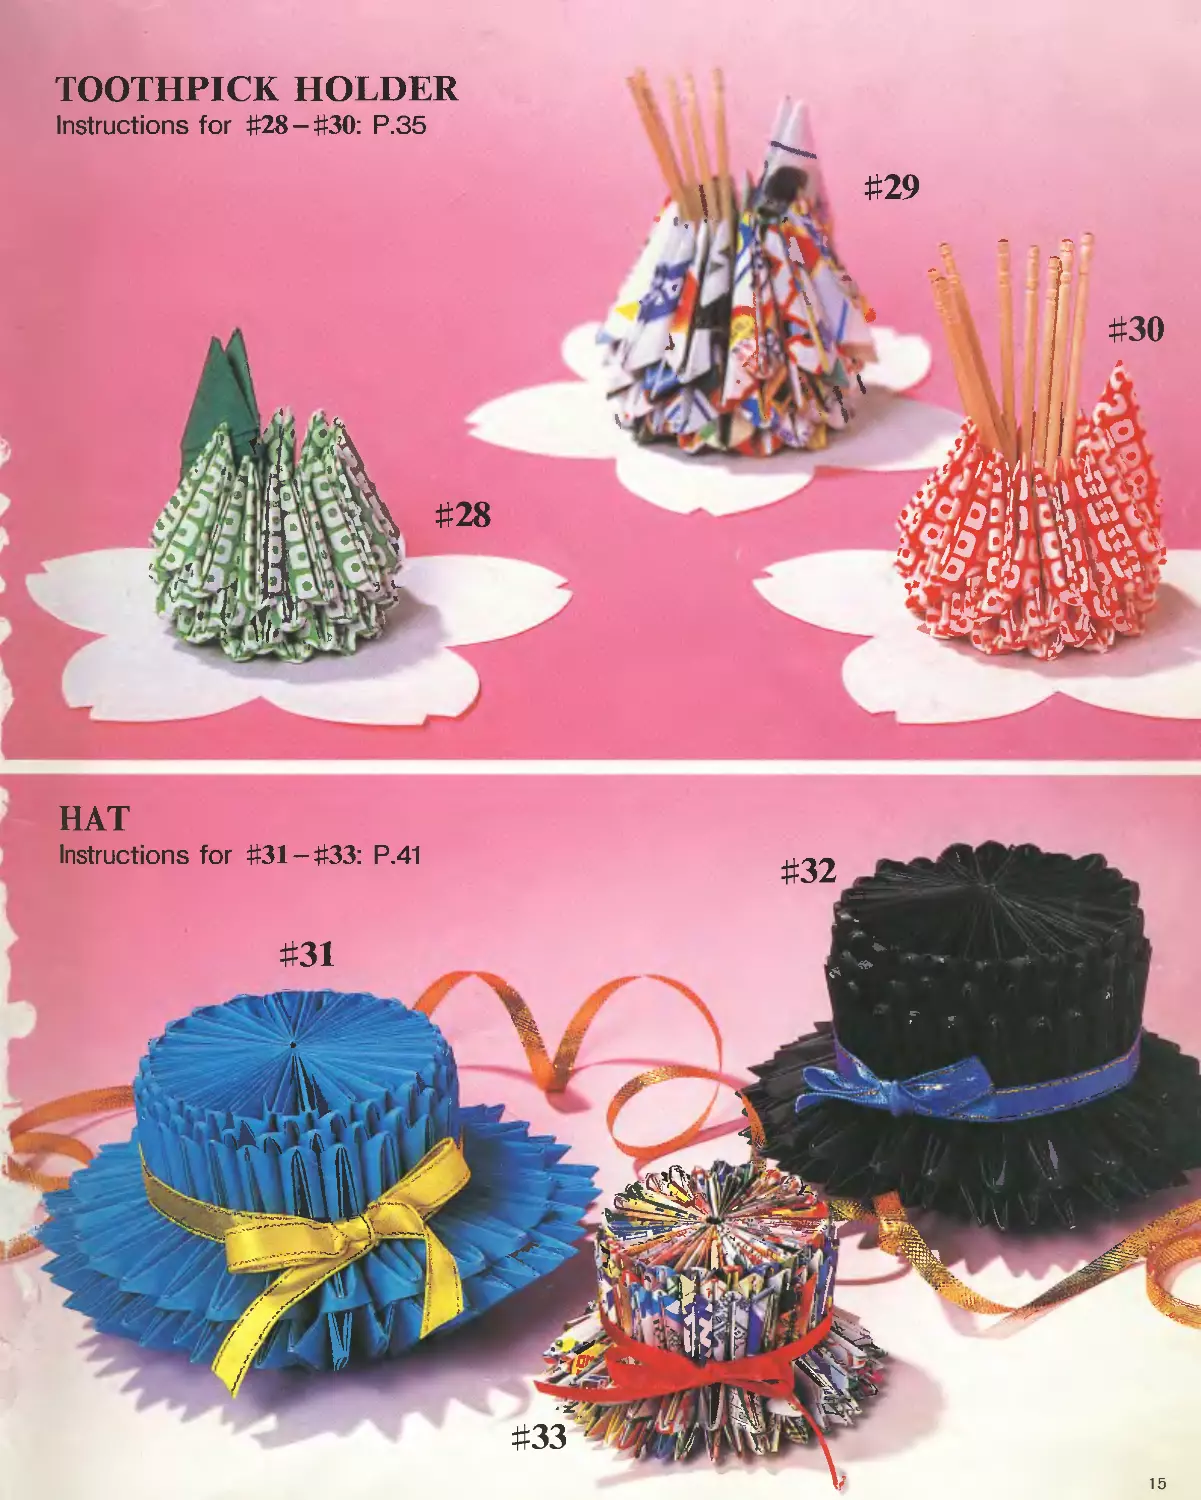
TOOTHPICK HOLDER
Instructions for #28-#30: P.35
HAT
15
ONA
MINI PINEAPPLE
Instructions for #36 & #37: P.44
PINEAPPLE
Instructions for #34 & #35: P.42
Fold and save triangular pieces in
your spare time, in assorted colors
or patterns, and challenge yourself
to grander projects shown here and
on the following pages.
16
Pedestal for Pineapple
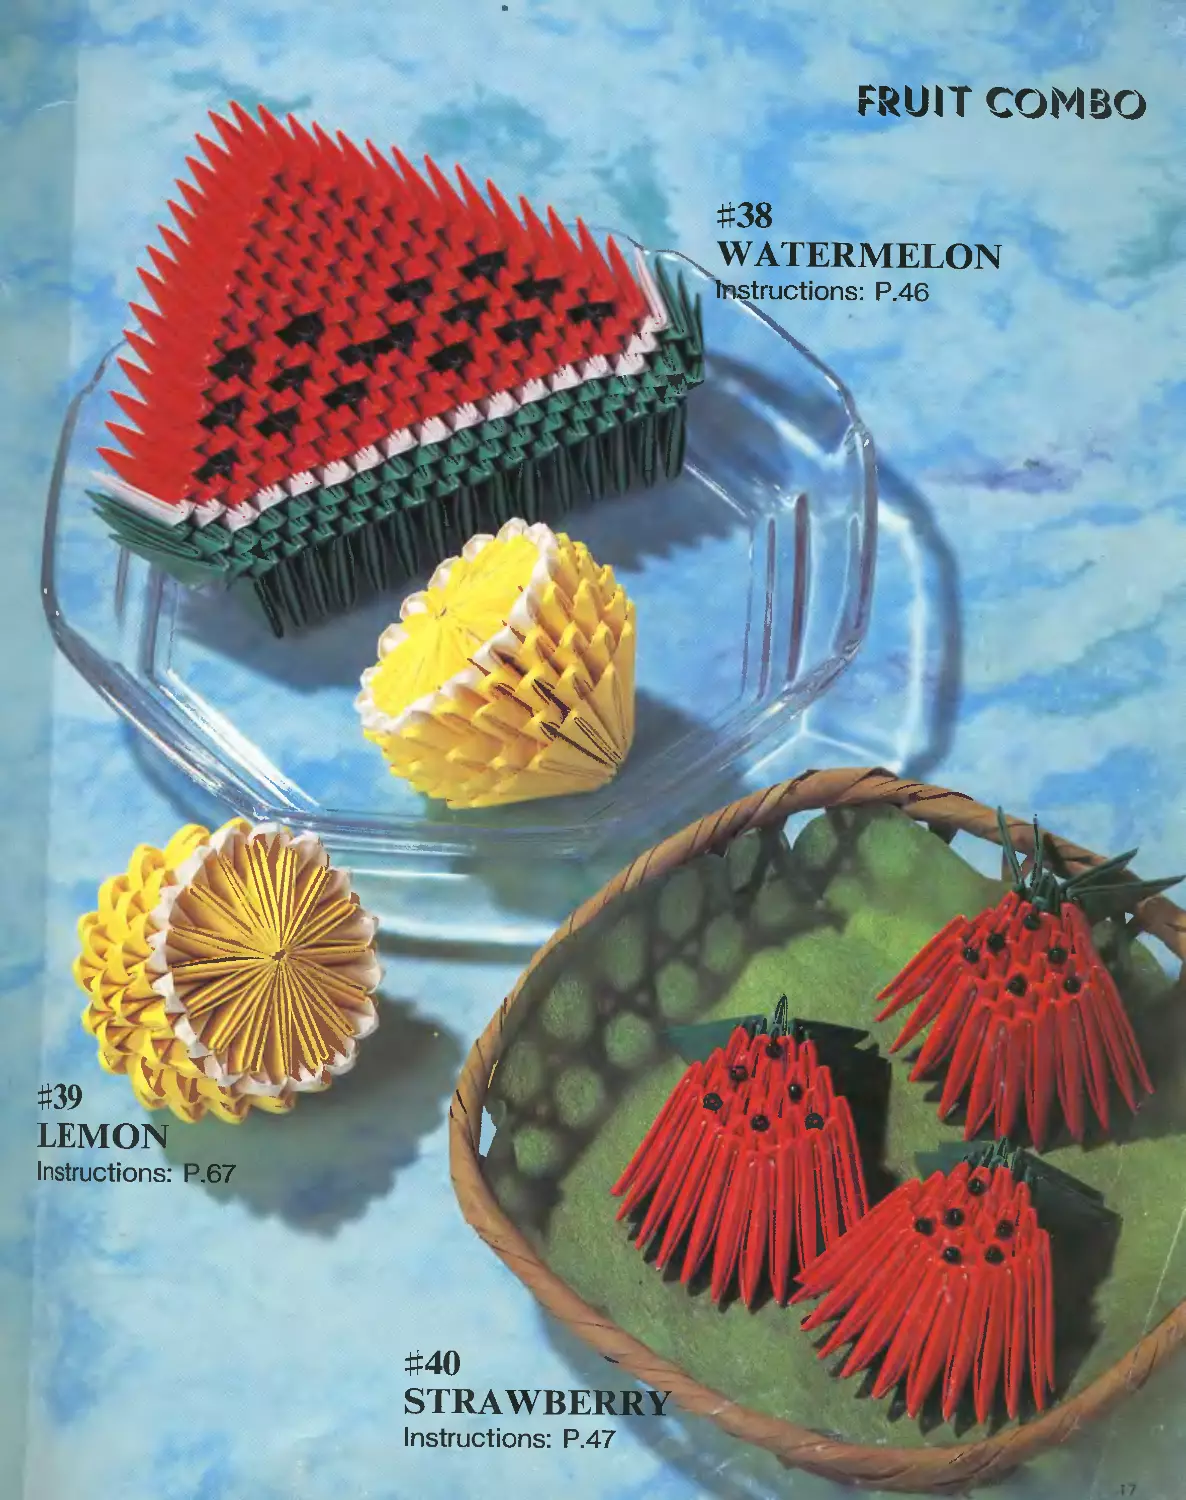
FRUIT COMBO
#45
।
#44
*• и
Г
*/Г|'ПТгП
* 1
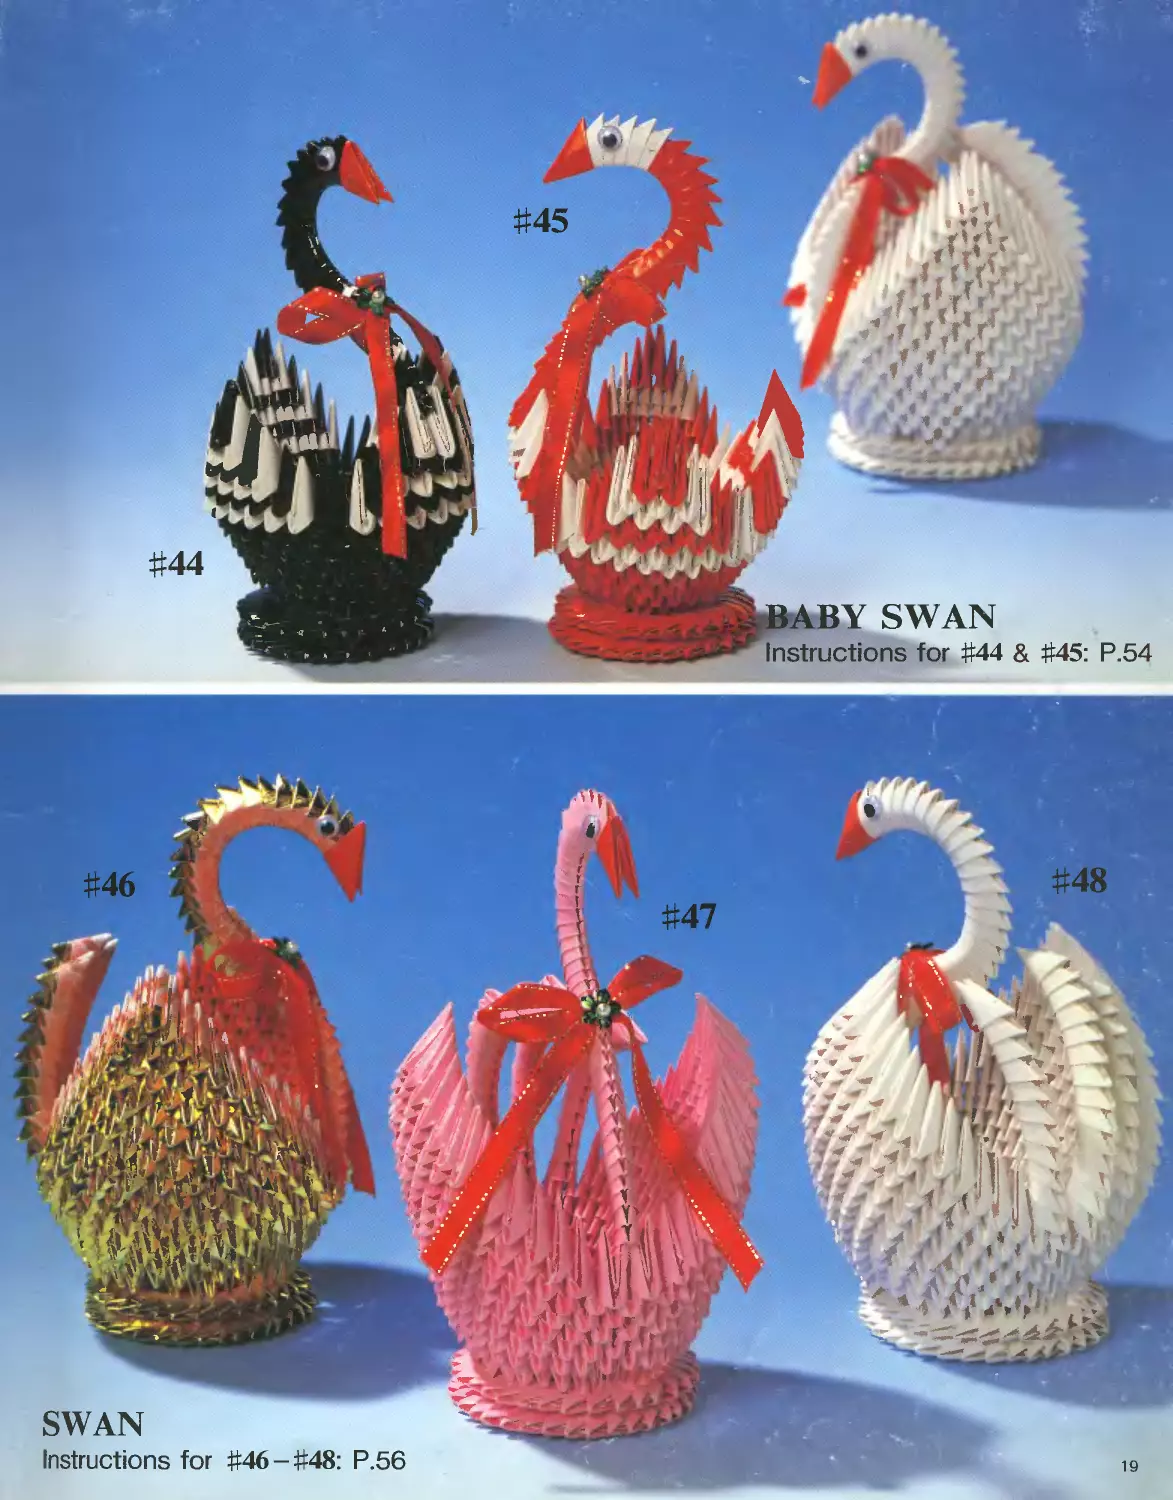
iBABY SWAN
Instructions for #44 & #45: P.54
RED-CROWNED CRANE
Instructions for #52 & #53: P.52
23
24
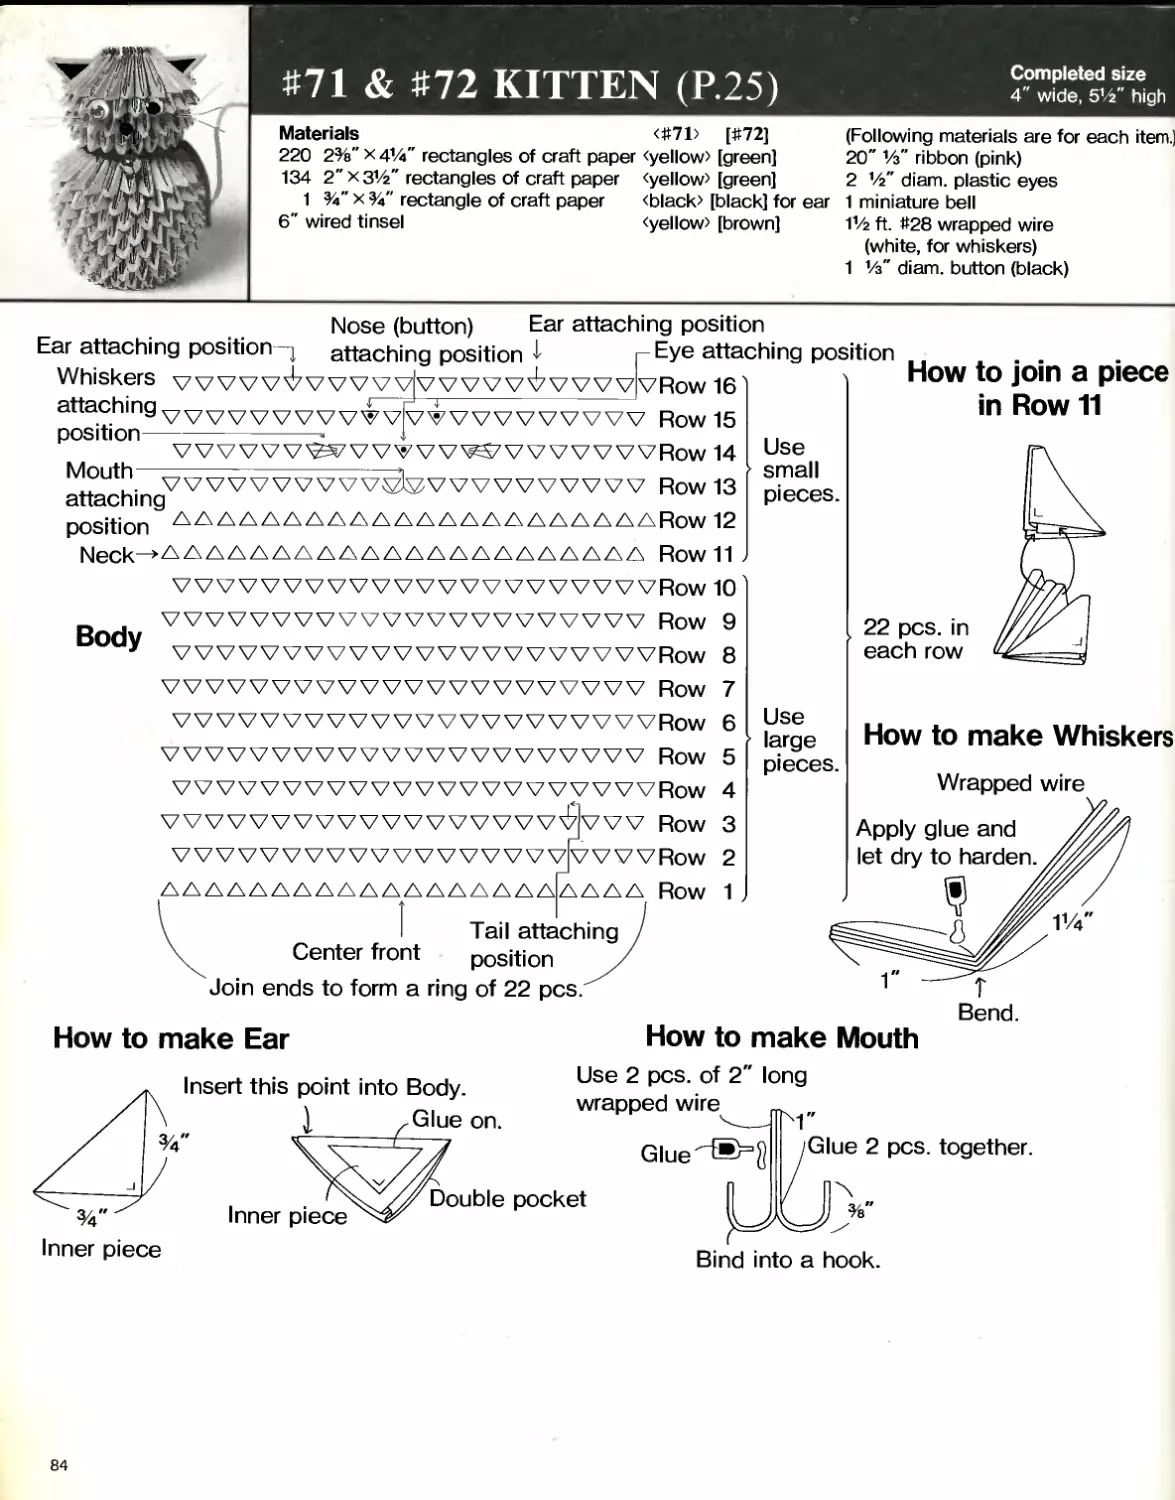
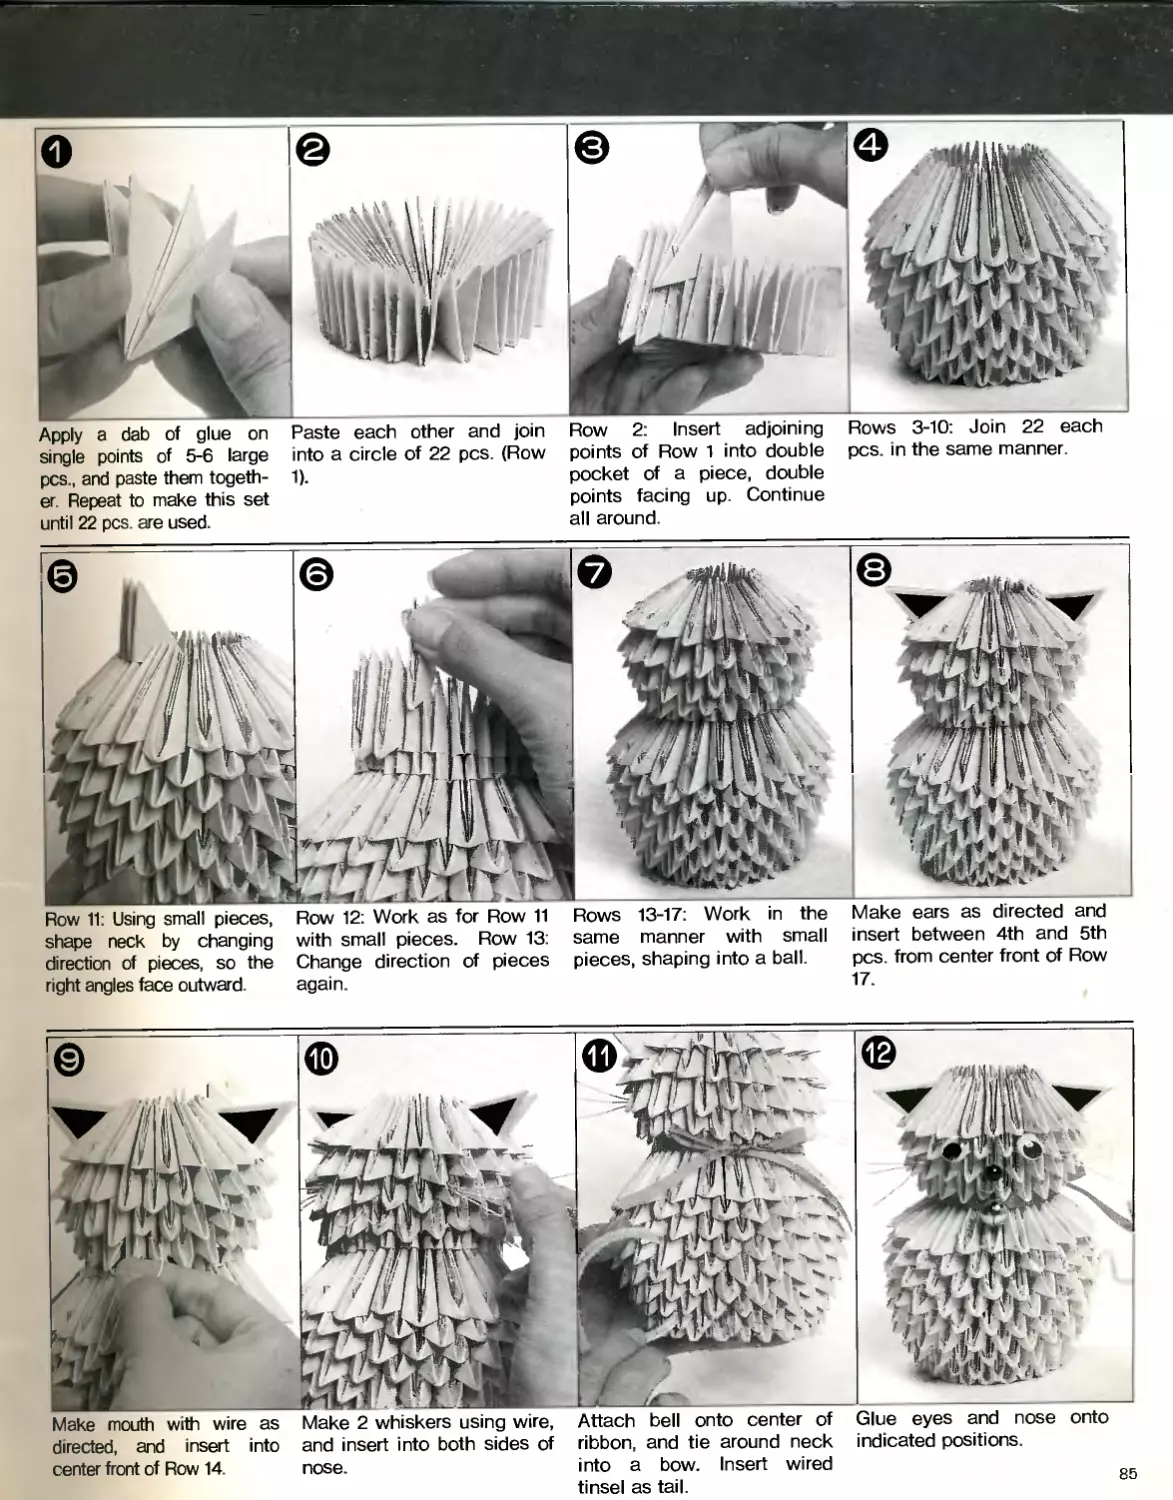
KITTEN
Instructions for #71 & #72: P.84
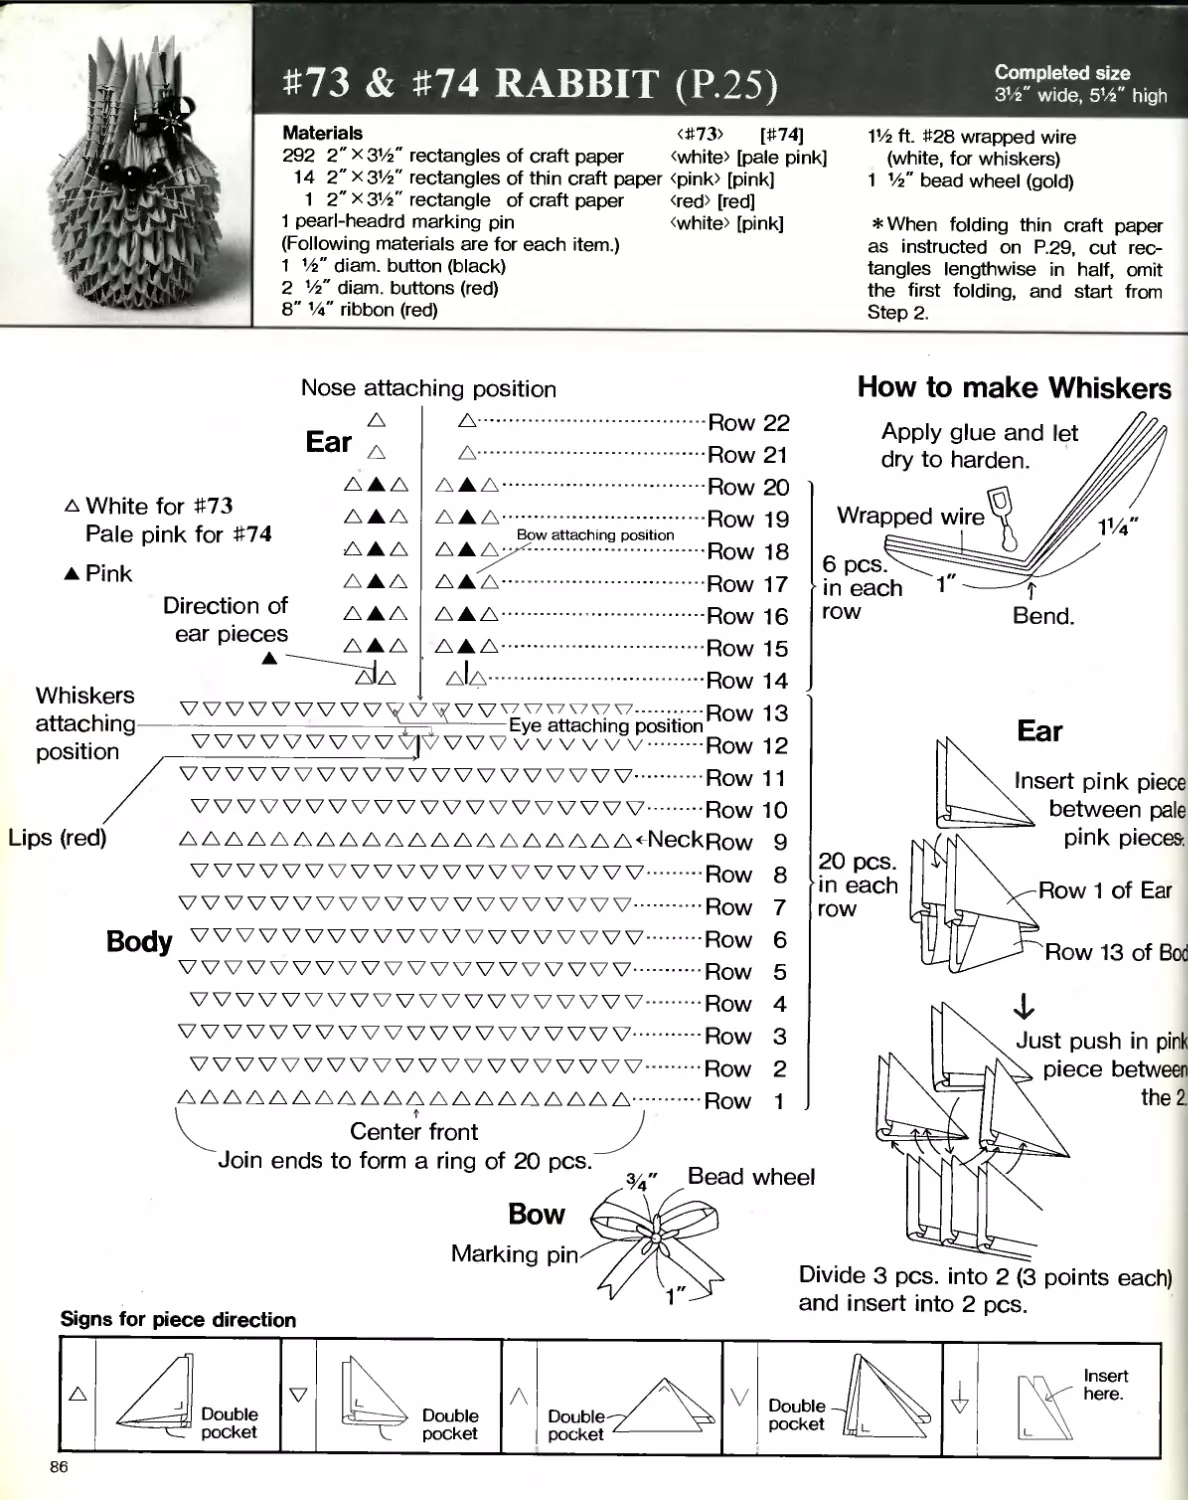
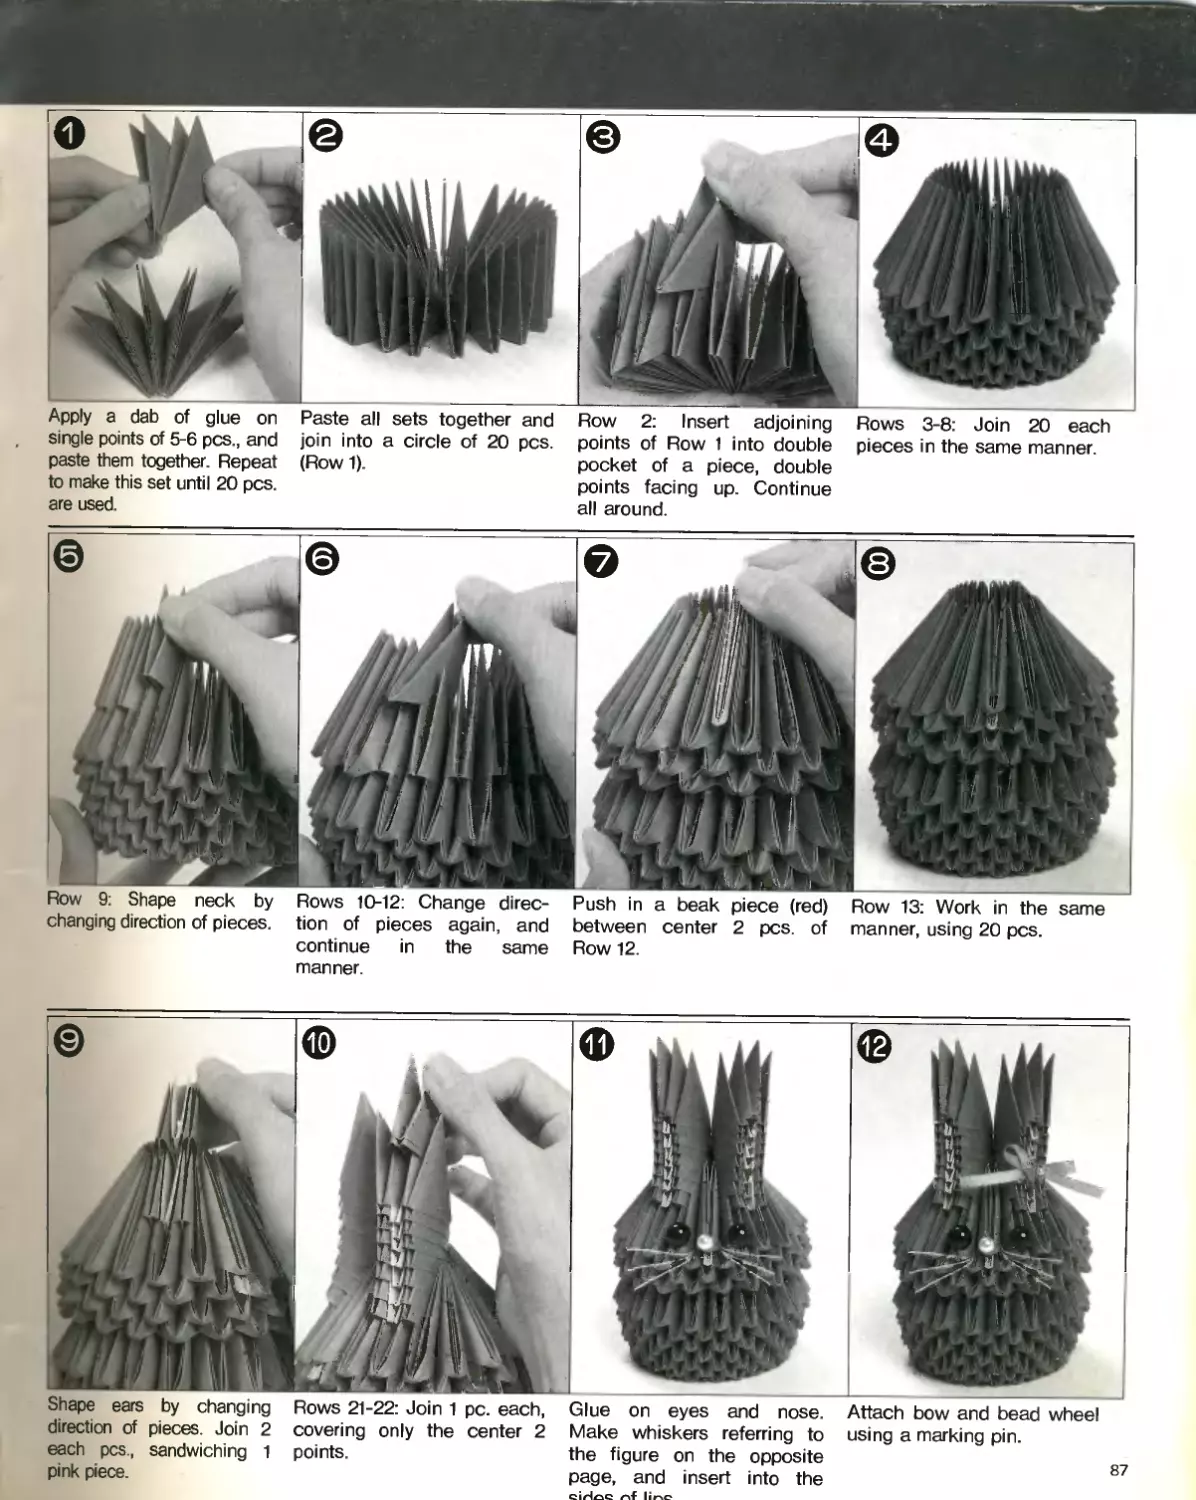
RABBIT
Instructions for #73 & #74: P.86
25
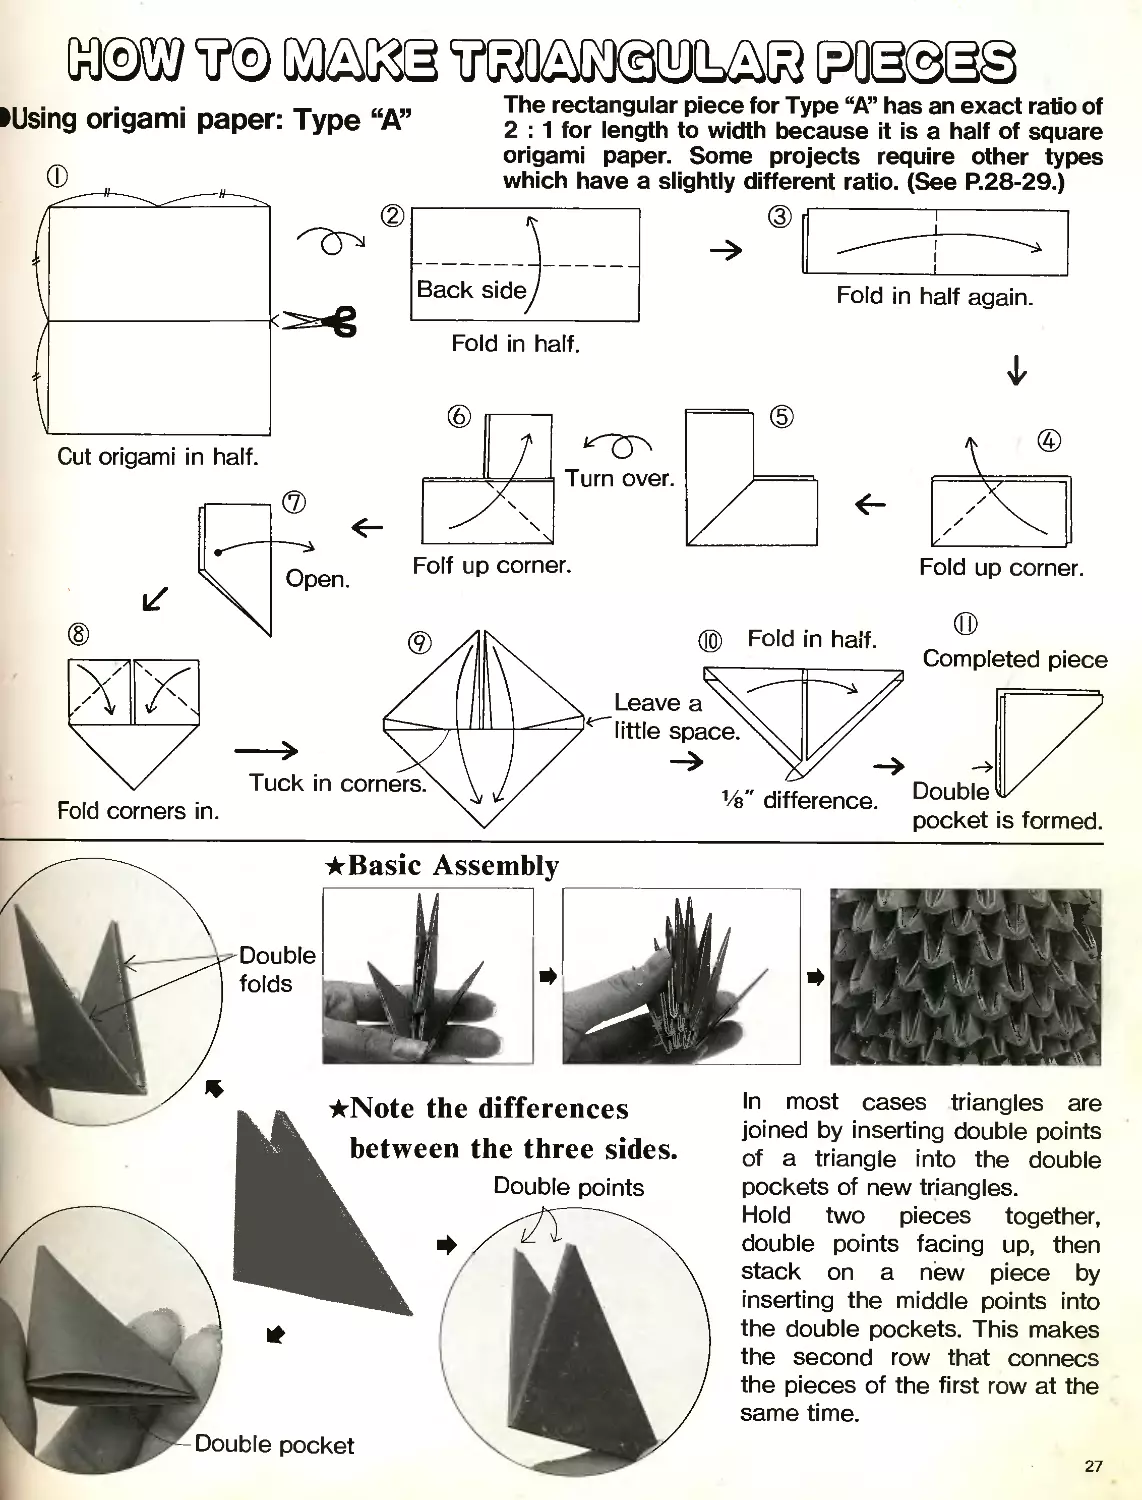
origami paper: Type “A”
The rectangular piece for Type “A” has an exact ratio of
2 : 1 for length to width because it is a half of square
folds
★Basic Assembly
★Note the differences
between the three sides.
к Double points
Double pocket
In most cases triangles are
joined by inserting double points
of a triangle into the double
pockets of new triangles.
Hold two pieces together,
double points facing up, then
stack on a new piece by
inserting the middle points into
the double pockets. This makes
the second row that connecs
the pieces of the first row at the
same time.
27
шэд те и
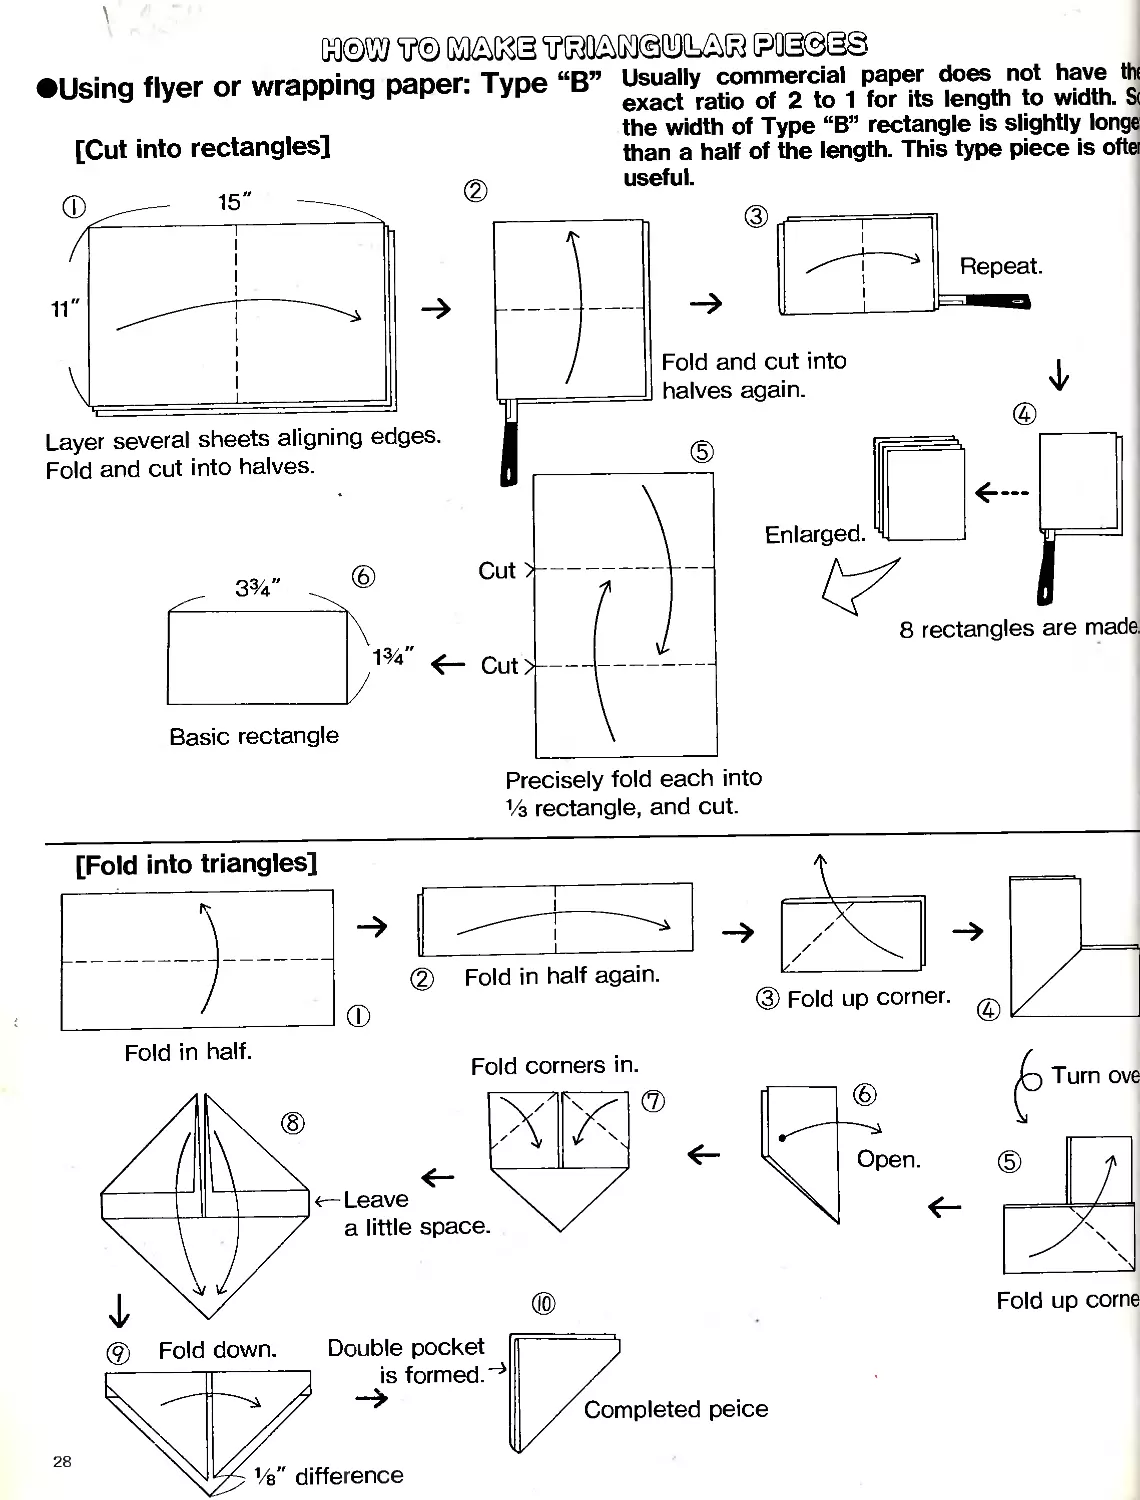
Using flyer or wrapping paper: Type “B;
[Cut into rectangles]
Usually commercial paper does not have the
exact ratio of 2 to 1 for its length to width. Sc
the width of Type “B” rectangle is slightly longer
than a half of the length. This type piece is offer
Layer several sheets aligning edges.
Fold and cut into halves.
useful.
Repeat.
Fold and cut into
halves again.
33/4"
Basic rectangle
Cut >-
8 rectangles are made,
Precisely fold each into
1/з rectangle, and cut.
[Fold into triangles]
Fold up corner.
ши те
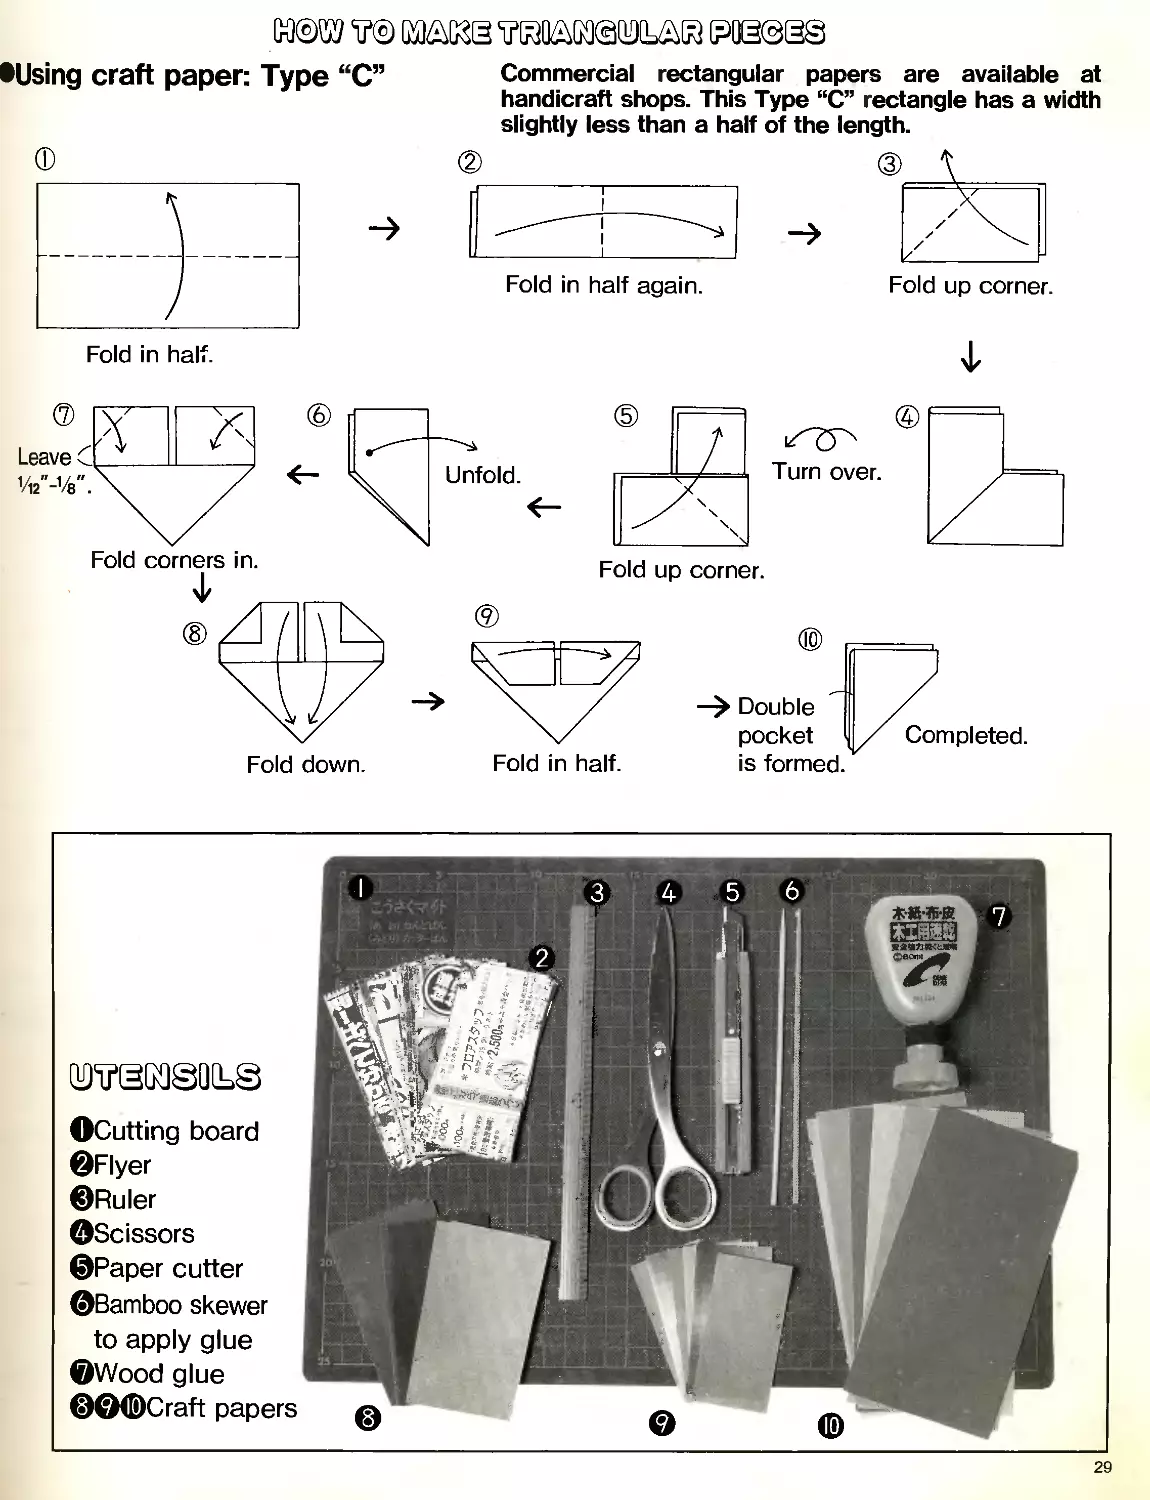
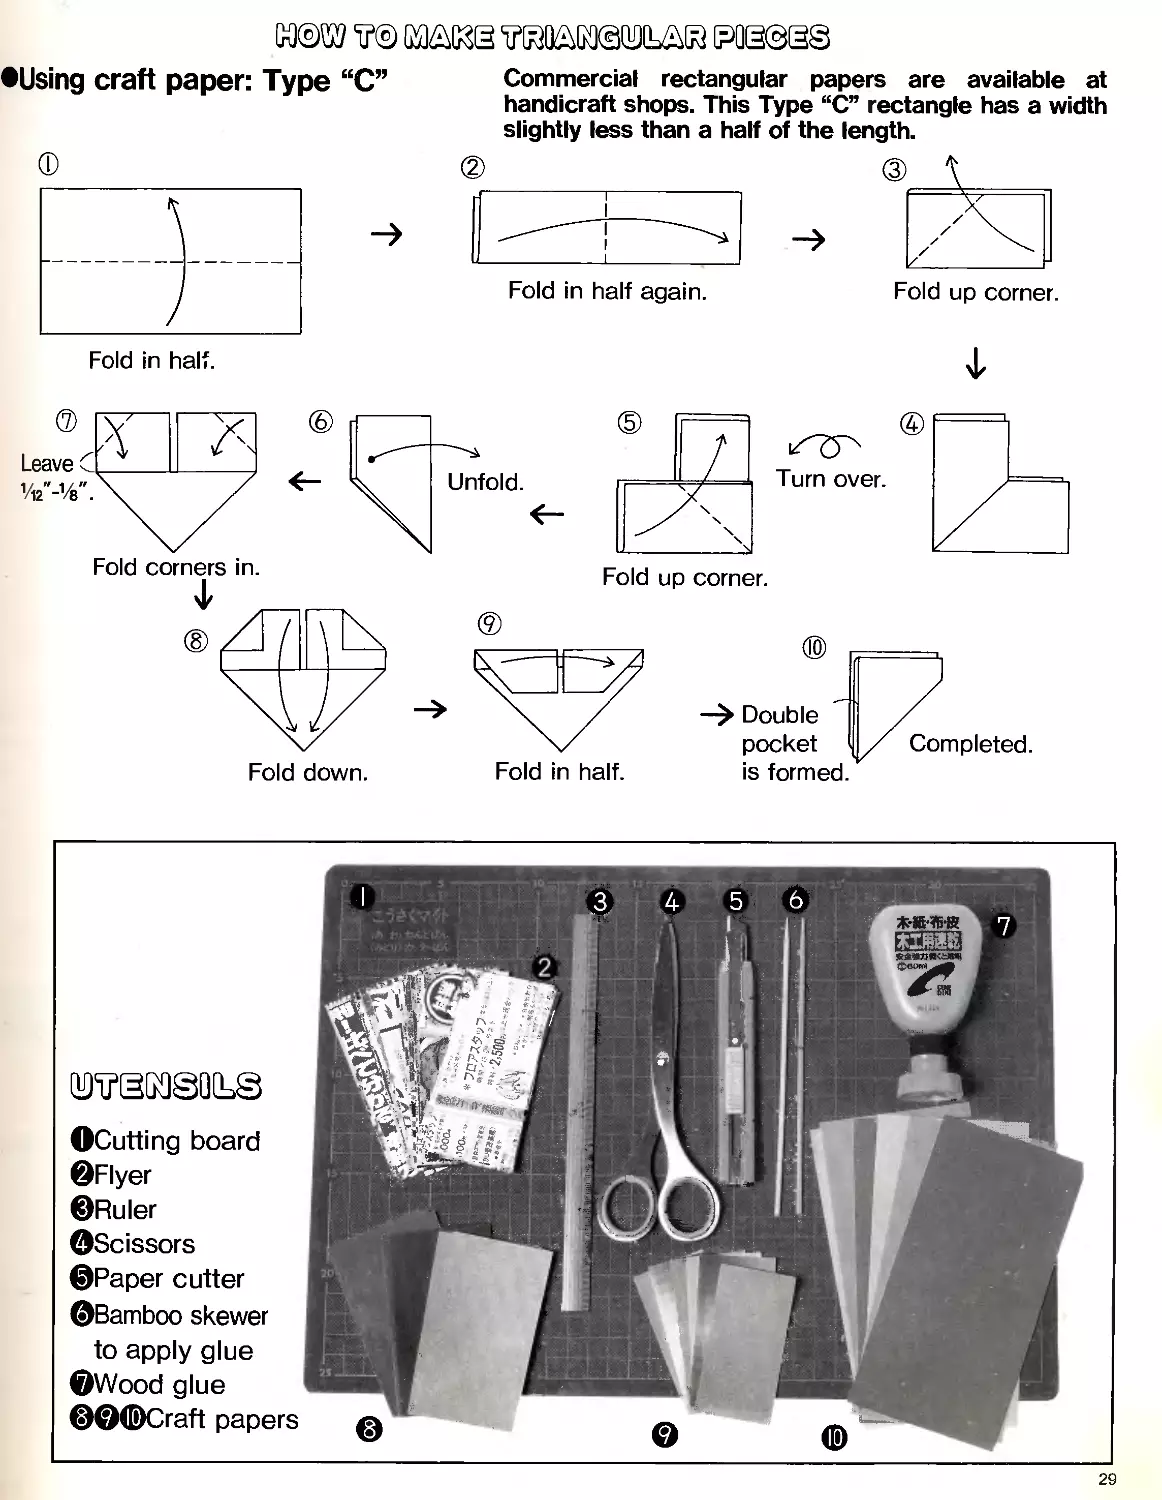
•Using craft paper: Туре “С”
Commercial rectangular papers are available at
handicraft shops. This Type “C” rectangle has a width
slightly less than a half of the length.
Fold in half again.
Fold up corner.
Fold up corner.
pocket
is formed.
Completed.
OCutting board
©Flyer
©Ruler
©Scissors
©Paper cutter
©Bamboo skewer
to apply glue
©Wood glue
©©©Craft papers
29
Using fiver or wrapping paper: Type “B” Usually commercial paper does not have th
exact ratio of 2 to 1 for its length to width. S(
the width of Type “B” rectangle is slightly longe
than a half of the length. This type piece is offtei
[Cut into rectangles]
Layer several sheets aligning edges.
Fold and cut into halves.
useful.
Precisely fold each into
1/з rectangle, and cut.
Basic rectangle
шэд ?© м
craft paper: Type “C” Commercial rectangular papers are available at
handicraft shops. This Type “C” rectangle has a width
slightly less than a half of the length.
Fold up corner.
Fold in half again.
Fold in half.
29
Fold in half.
Fold in half again.
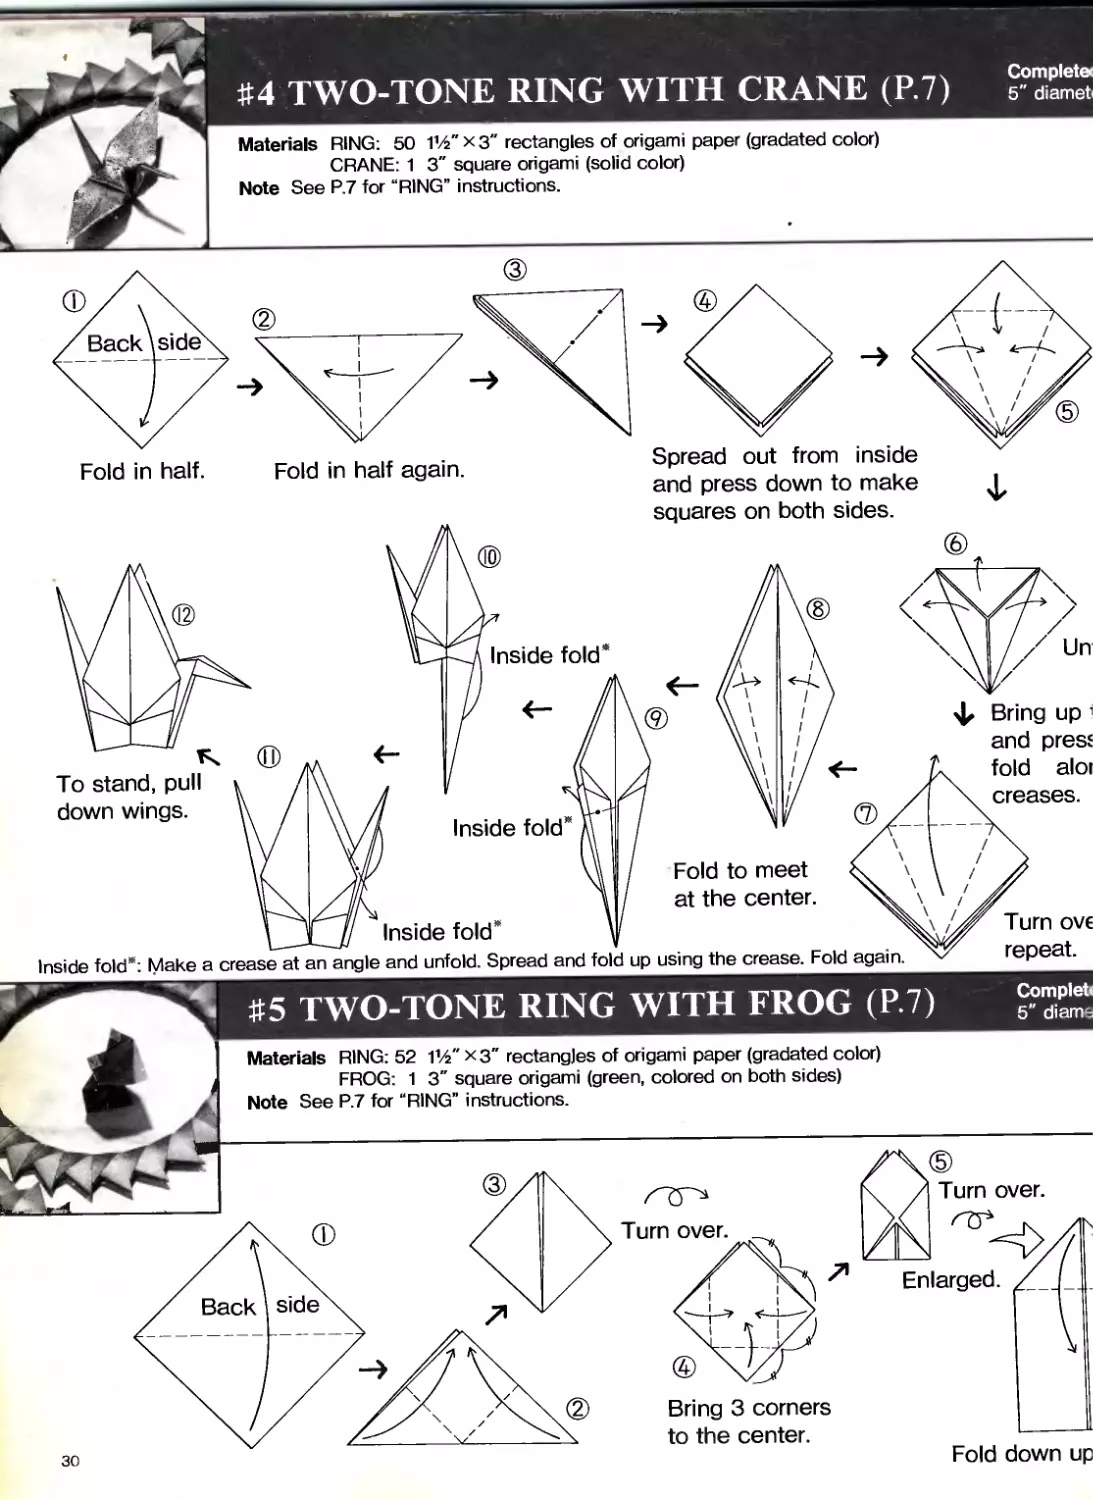
#4 TWO-TONE RING WITH CRANE (P.7)
Completi
5" diame
Materials RING: 50 11Л"хз" rectangles of origami paper (gradated color)
CRANE: 1 3" square origami (solid color)
Note See P.7 for “RING” instructions.
Inside fold
Inside fold*: Make a crease at an angle and unfold. Spread and fold up using the crease. Fold again.
Inside fold*
Spread out from inside
and press down to make
squares on
both sides.
Inside fold
To stand, pull
down wings.
Fold to meet
at the center.
ф Bring up
and pres
fold ale
creases.
Turn OV€
repeat.
#5 TWO-TONE RING WITH FROG (P.7)
Completi
5" diama
Materials RING: 52 11/г" x 3" rectangles of origami paper (gradated color)
FROG: 1 3" square origami (green, colored on both sides)
Note See P.7 for “RING” instructions.
Turn over.
side
Back
30
Bring 3 corners
to the center.
5)
Turn over.
Enlarged.
Fold down up
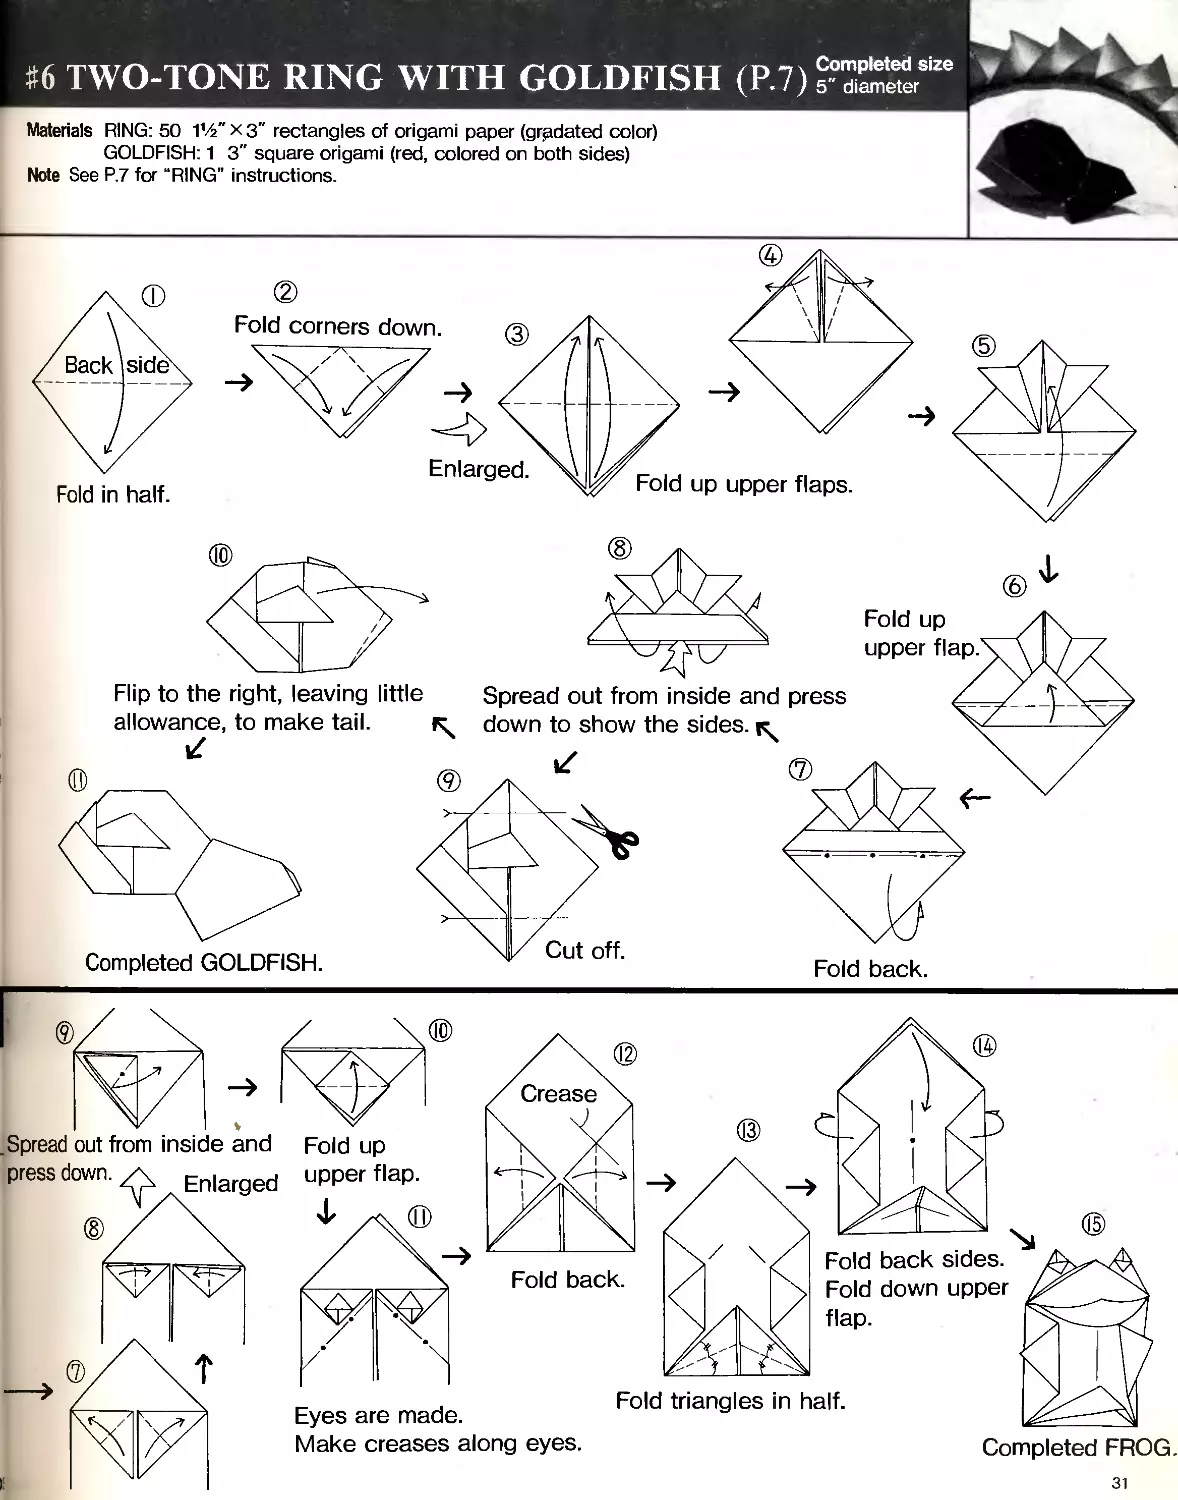
#6 TWO-TONE RING WITH GOLDFISH (P.7) 5" diameter
Materials RING: 50 V/2" x 3" rectangles of origami paper (gradated color)
GOLDFISH: 1 3" square origami (red, colored on both sides)
Note See P.7 for “RING” instructions.
i
31
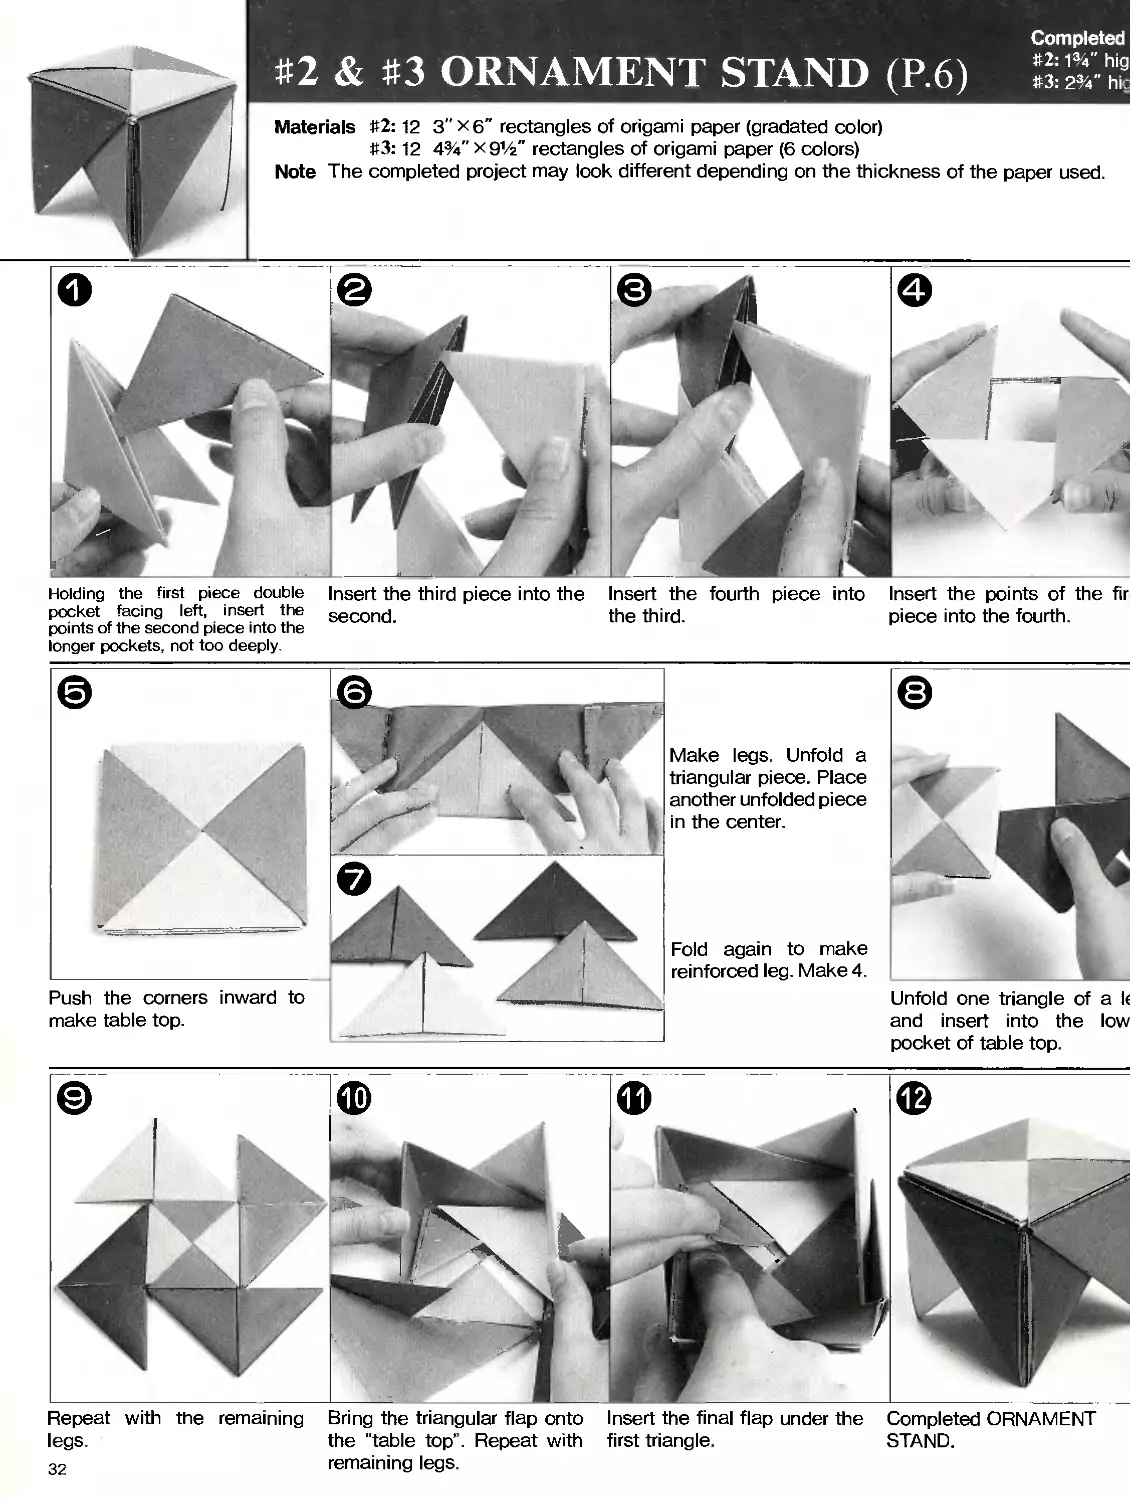
#2 & #3 ORNAMENT STAND (P.6)
Completed
#2:1%" hig
#3: 2%" hie
Materials #2:12 3"X6" rectangles of origami paper (gradated color)
#3:12 4%"x91/2" rectangles of origami paper (6 colors)
Note The completed project may look different depending on the thickness of the paper used.
№
Holding the first piece double Insert the third piece into the Insert the fourth piece into Insert the points of the fir
pocket facing left, insert the secon(j. the third. piece into the fourth,
points of the second piece into the
longer pockets, not too deeply.
Push the corners inward to
make table top.
Make legs. Unfold a
triangular piece. Place
another unfolded piece
in the center.
Fold again to make
reinforced leg. Make 4.
Unfold one triangle of a к
and insert into the low
pocket of table top.
Repeat with the remaining Bring the triangular flap onto Insert the final flap under the Completed ORNAMENT
legs. the “table top”. Repeat with first triangle. STAND.
remaining legs.
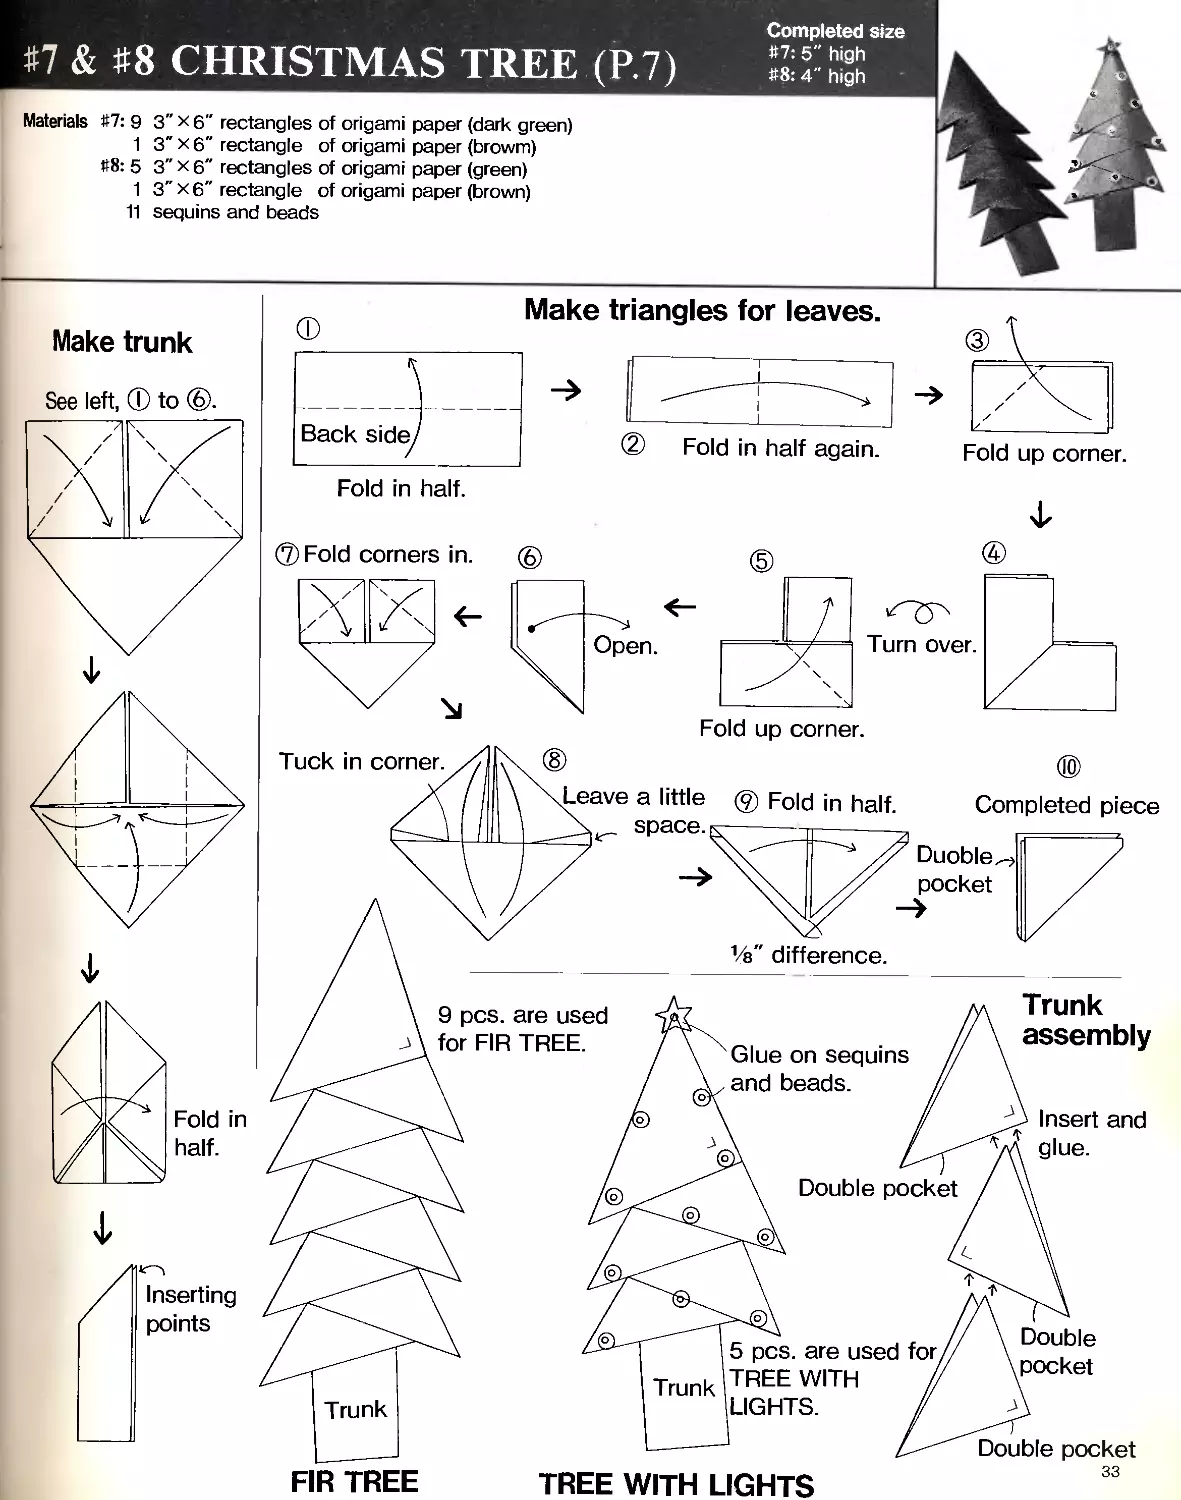
#7 & #8 CHRISTMAS TREE (P.7)
Materials #7: 9
1
#8:5
1
11
3" x 6" rectangles of origami paper (dark green)
3" x 6" rectangle of origami paper (browm)
3" x 6" rectangles of origami paper (green)
3" x 6" rectangle of origami paper (brown)
sequins and beads
Completed size
#7: 5" high
#8: 4" high
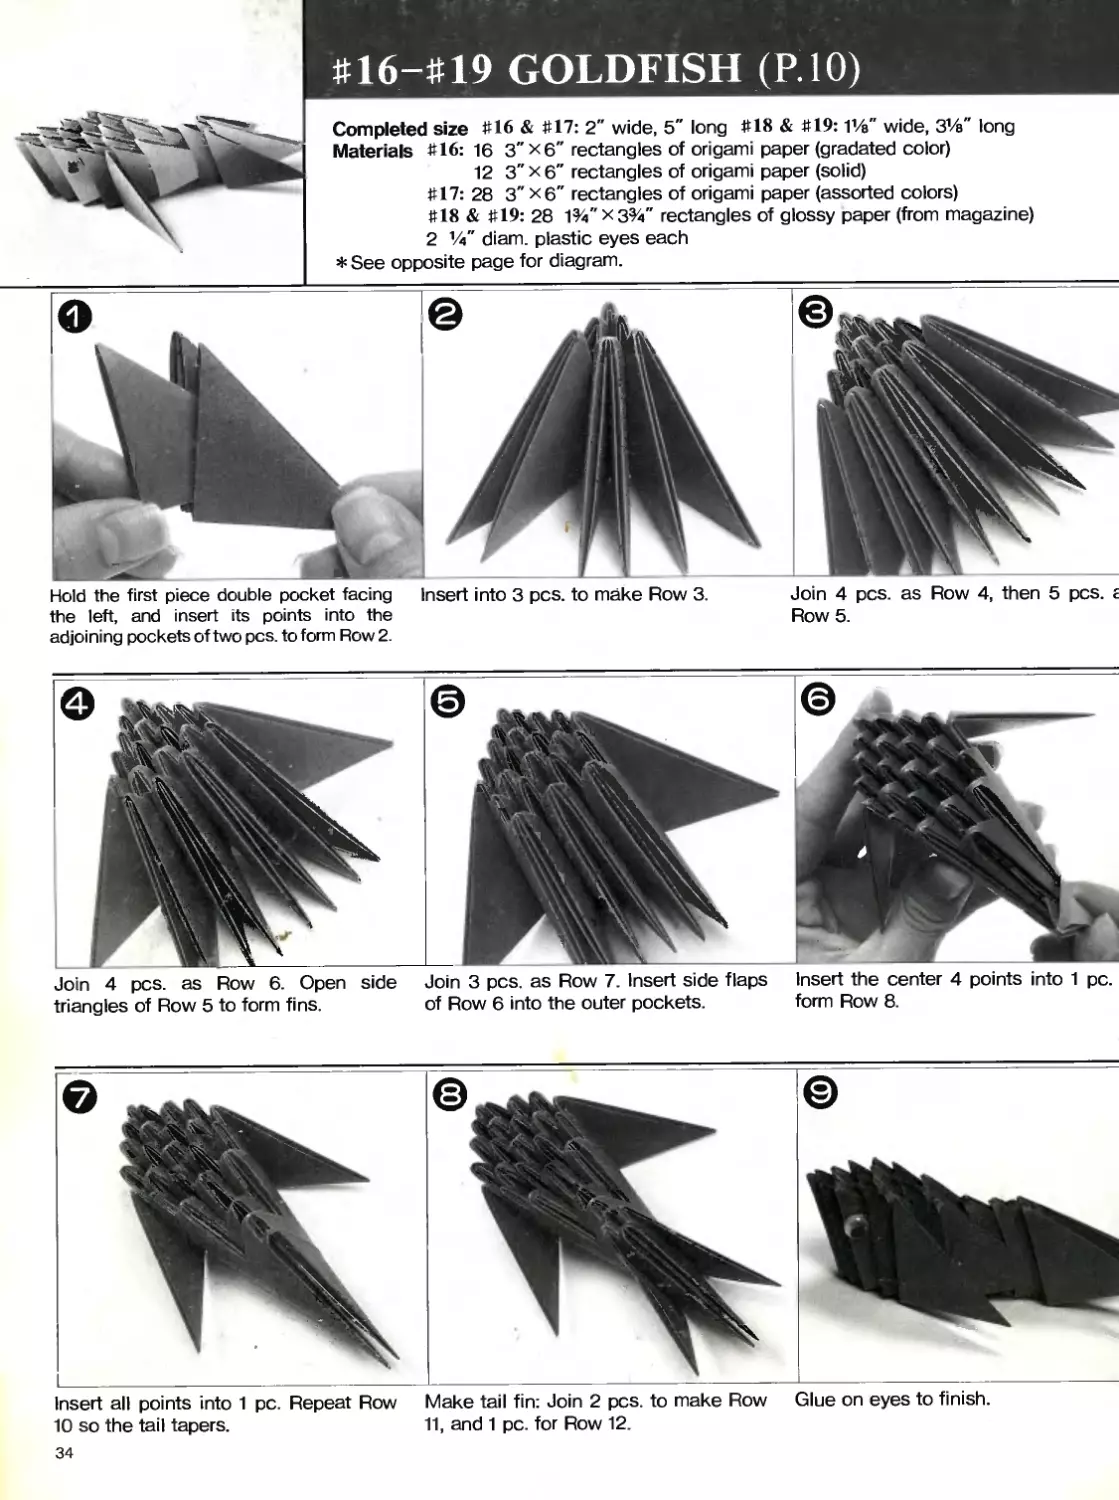
#16-#19 GOLDFISH (P.10)
Completed size #16 & #17: 2" wide, 5" long #18 & #19:11/e" wide, 31/e" long
Materials #16: 16 3" x 6" rectangles of origami paper (gradated color)
12 3" x 6" rectangles of origami paper (solid)
#17: 28 3"X6" rectangles of origami paper (assorted colors)
#18 & #19: 28 1%"хз%" rectangles of glossy paper (from magazine)
2 %" diam plastic eyes each
* See opposite page for diagram.
Hold the first piece double pocket facing Insert into 3 pcs. to make Row 3.
the left, and insert its points into the
adjoining pockets of two pcs. to form Row 2.
Join 4 pcs. as Row 4, then 5 pcs. г
Row 5.
Join 4 pcs. as Row 6. Open side Join 3 pcs. as Row 7. Insert side flaps Insert the center 4 points into 1 pc.
triangles of Row 5 to form fins. of Row 6 into the outer pockets. form Row 8.
Insert all points into 1 pc. Repeat Row Make tail fin: Join 2 pcs. to make Row Glue on eyes to finish.
10 so the tail tapers. 11, and 1 pc. for Row 12.
34
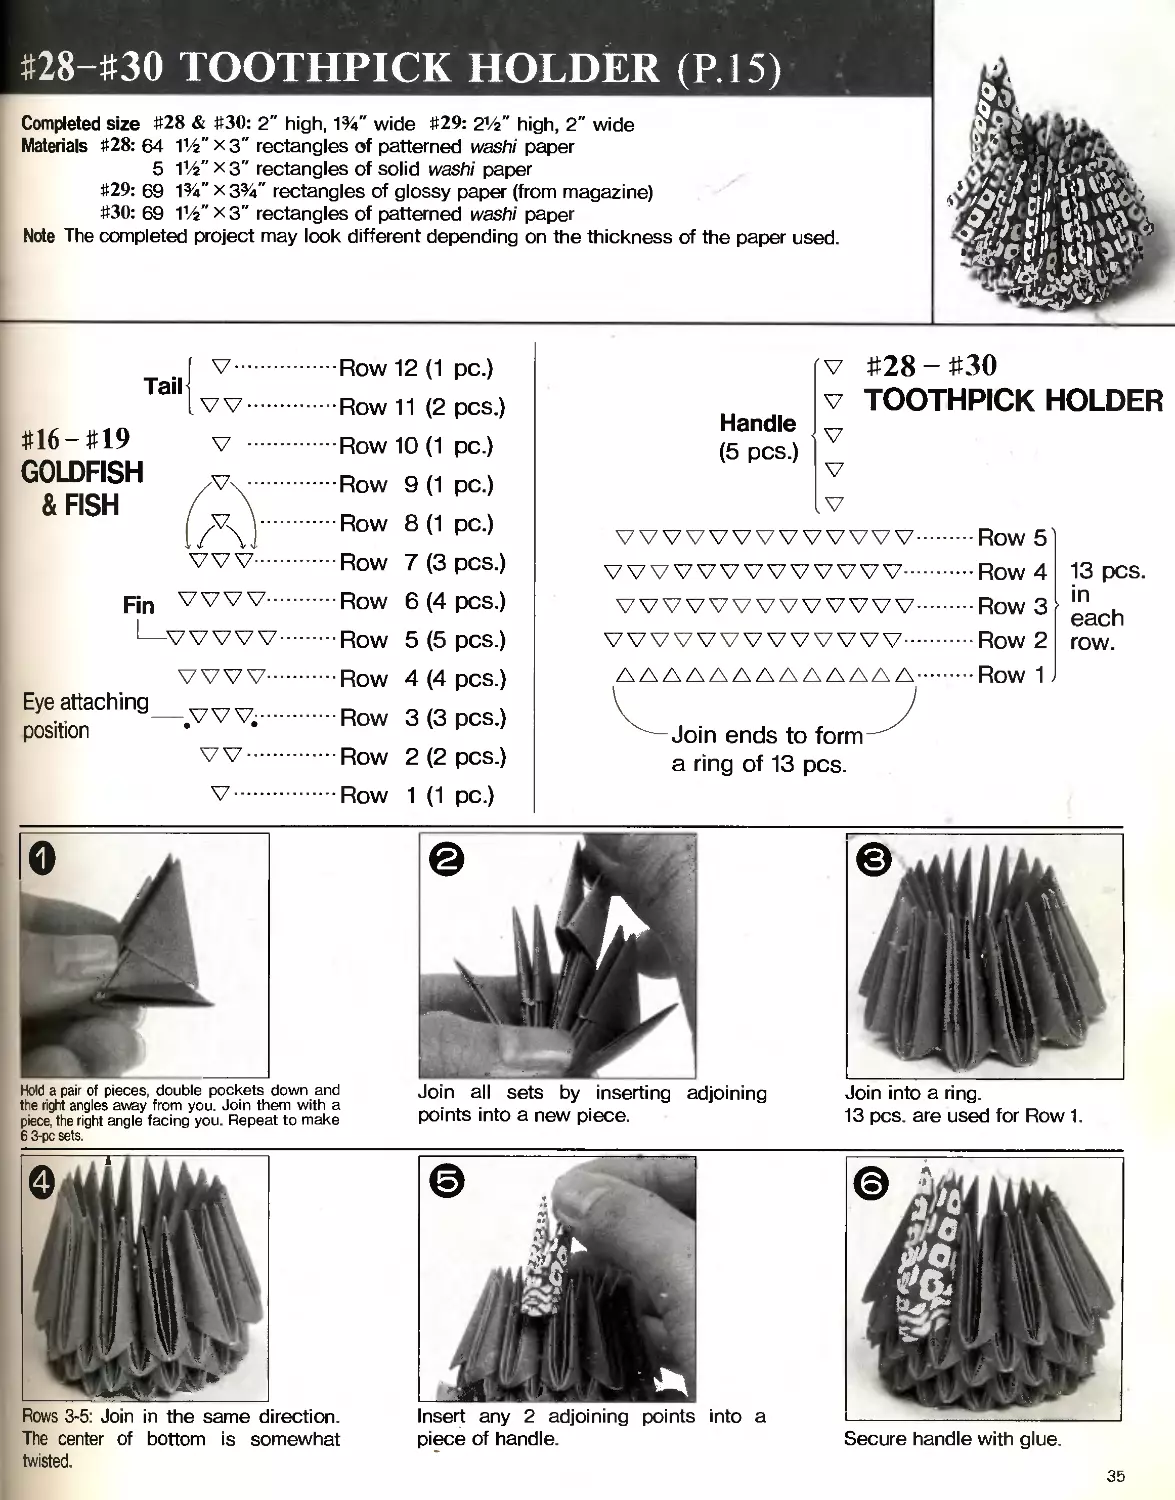
#28—#30 TOOTHPICK HOLDER (P.15)
Completed size #28 & #30: 2" high, 1%" wide #29: 21/a" high, 2" wide
Materials #28: 64 11/a" x 3" rectangles of patterned washi paper
5 11/a" x 3" rectangles of solid washi paper
#29: 69 1%" хз%" rectangles of glossy paper (from magazine)
#30: 69 11/a" x 3" rectangles of patterned washi paper
Note The completed project may look different depending on the thickness of the paper used.
Tail
Row 12 (1 pc.)
Row 11 (2 pcs.)
#16-#19
GOLDFISH
&FISH
V ...........Row 10 (1 pc.)
Row
Row
Row
9 (1 pc.)
8 (1 pc.)
7 (3 pcs.)
•v #28-#30
V TOOTHPICK HOLDER
Handle lv
(5 pcs.)
V
.V
VVVVVVVVVVVVV...Row 5
VVVVVVVVVVVVV...Row 4
Fin ....Row 6 (4 pcs.)
I—VVVW......Row 5 (5 pcs.)
VVVV........
Eye attaching_vvv........
position
VV.........
Row 4 (4 pcs.)
Row 3 (3 pcs.)
Row 2 (2 pcs.)
V............Row 1 (1 pc.)
Hold a pair of pieces, double pockets down and
the right angles away from you. Join them with a
piece, the right angle facing you. Repeat to make
6 3-pc sets.
Rows 3-5: Join in the same direction.
The center of bottom is somewhat
twisted.
VVVVVVVVVVVVV...Row 3
VVVVVVVVVVVVV...Row 2
Join ends to form
a ring of 13 pcs.
Join all sets by inserting adjoining
points into a new piece.
Insert any 2 adjoining points into a
piece of handle.
Row 1
13 pcs.
in
each
row.
Join into a ring.
13 pcs. are used for Row 1.
Secure handle with glue.
35
Completed t
8" wide, 6V4
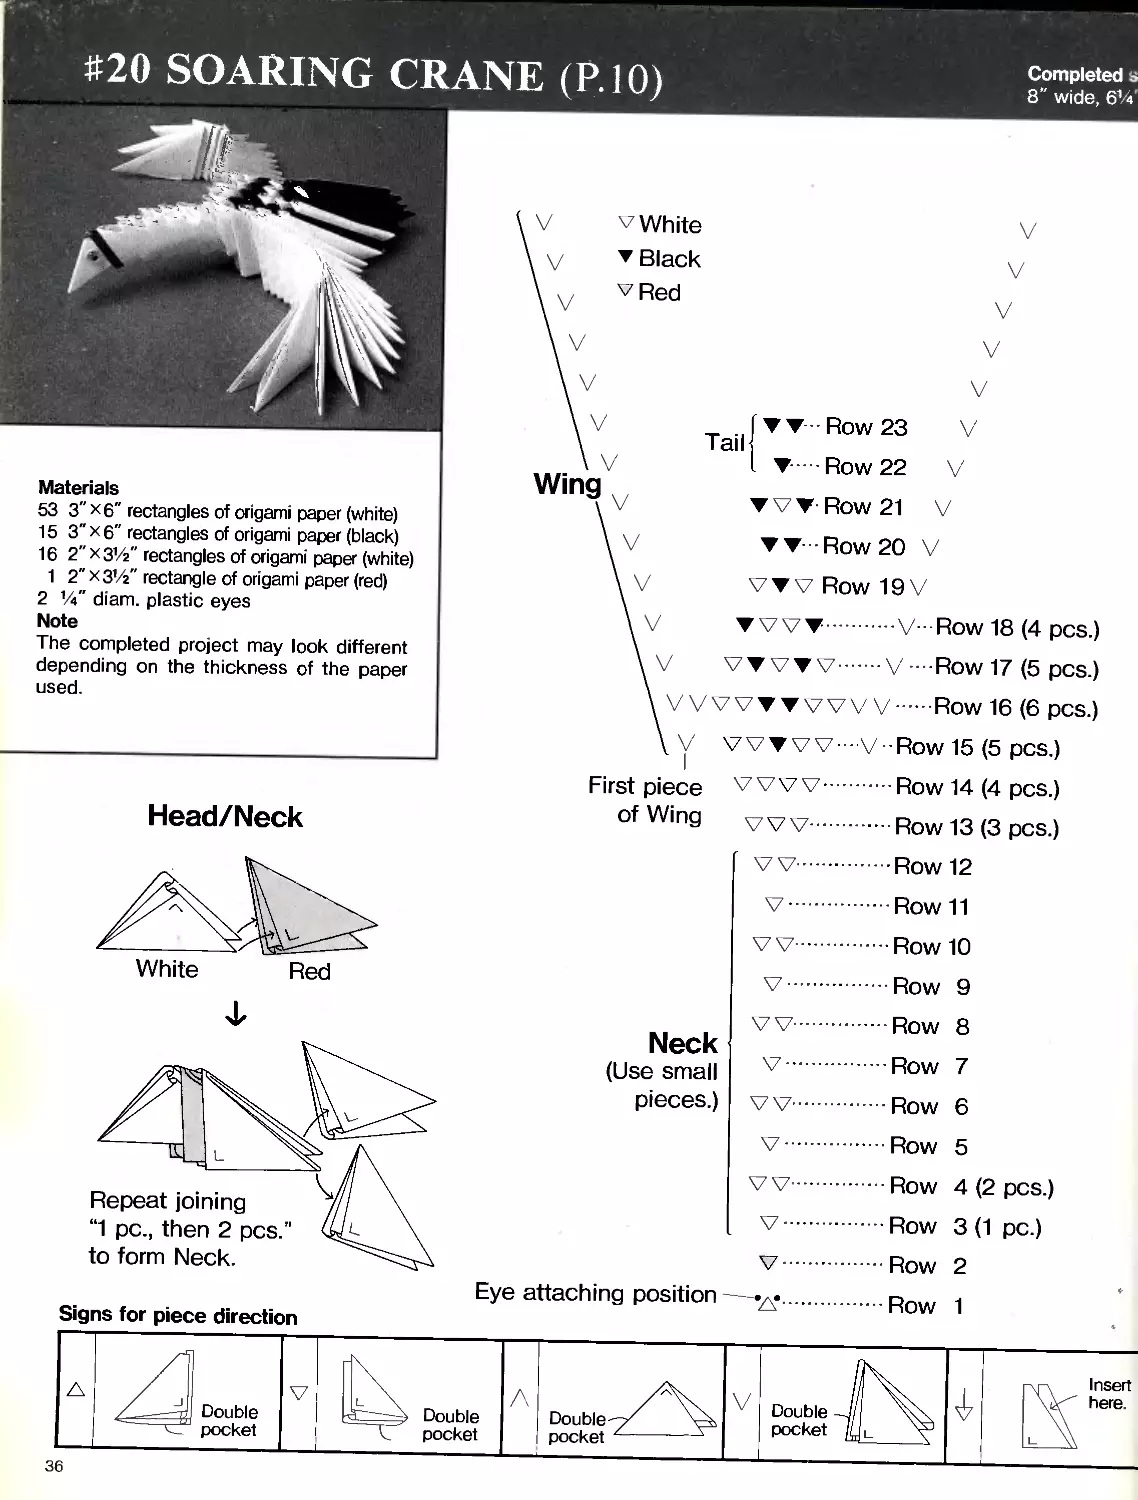
#20 SOARING CRANE (P.10)
v White
▼ Black
vRed
Tail
▼ Row 23
Materials
53
15
16
1
3" X6" rectangles of origami paper (white)
3" x 6" rectangles of origami paper (black)
2" x 3V2" rectangles of origami paper (white)
2" хз’/г" rectangle of origami paper (red)
2 Vi" diam. plastic eyes
Note
The completed project may look different
depending on the thickness of the paper
used.
Wing
Row 22
▼ Row 20
VVV Row 19V
Head/Neck
First piece
of Wing
▼ VW.......V-Row 18 (4 pcs.)
W VVV......V -- Row 17 (5 pcs.)
7 WWW V........Row 16 (6 pcs.)
VVTW-V-Row 15 (5 pcs.)
VVVV.......Row 14 (4 pcs.)
vvv......Row 13 (3 pcs.)
VV.......Row 12
Row 11
Row 10
White
Red
Neck
(Use small
pieces.)
Row
Row
Row
Row
Row
Row
9
8
7
6
5
Repeat joining
“1 pc., then 2 pcs.
to form Neck.
Eye attaching position
Signs for piece direction
Row
Row
Row
4 (2 pcs.)
3 (1 pc.)
2
1
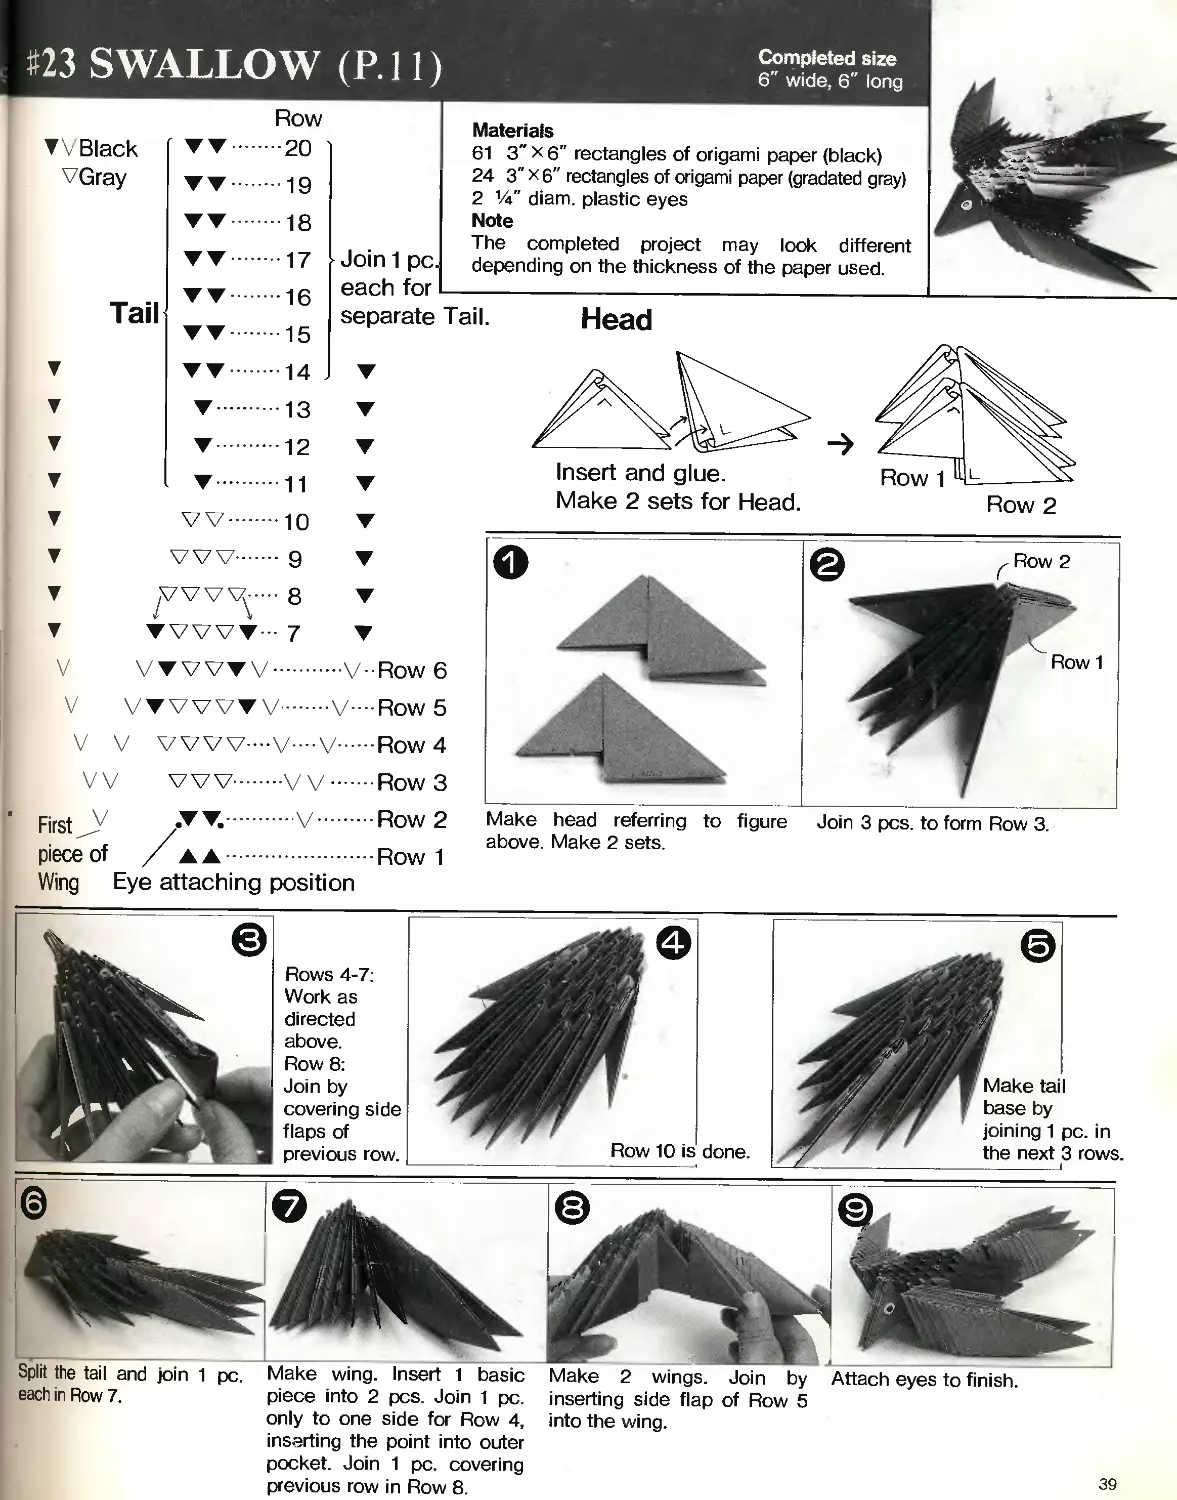
#23 SWALLOW (P. 11)
Completed size
6" wide, 6" long
▼V Black
VGray
Tail
Row
20 ]
19
18
17
16
15
14
13
12
11
VV...Ю
Join 1 pc.
each for
separate Tail.
Materials
61 3" x 6" rectangles of origami paper (black)
24 3" x 6" rectangles of origami paper (gradated gray)
2 14" diam. plastic eyes
Note
The completed project may look different
depending on the thickness of the paper used.
Head
Row 1
Row 2
Insert and glue.
Make 2 sets for Head.
▼ VW... 9 ▼
▼ yVVW^-- 8 ▼
▼ ▼ VWT- 7 ▼
V VTVVVV.V - Row 6
V VTVVVTV..V- Row 5
V V VVVV--V—V.Row 4
VV WV....VV..Row 3
Make head referring to figure Join 3 pcs. to form Row 3.
above. Make 2 sets.
First
piece of
Row 2
Row 1
Wing Eye attaching position
Rows 4-7:
Work as
directed
above.
Row 8:
Join by
covering side
flaps of
previous row.
Make tail
base by
joining 1 pc. in
the next 3 rows.
__________।
Split the tail and join 1 pc. Make wing. Insert 1 basic Make 2 wings. Join by Attach eyes to finish.
each in Row 7.
piece into 2 pcs. Join 1 pc.
inserting side flap of Row 5
only to one side for Row 4,
inserting the point into outer
into the wing.
pocket. Join 1 pc. covering
previous row in Row 8.
39
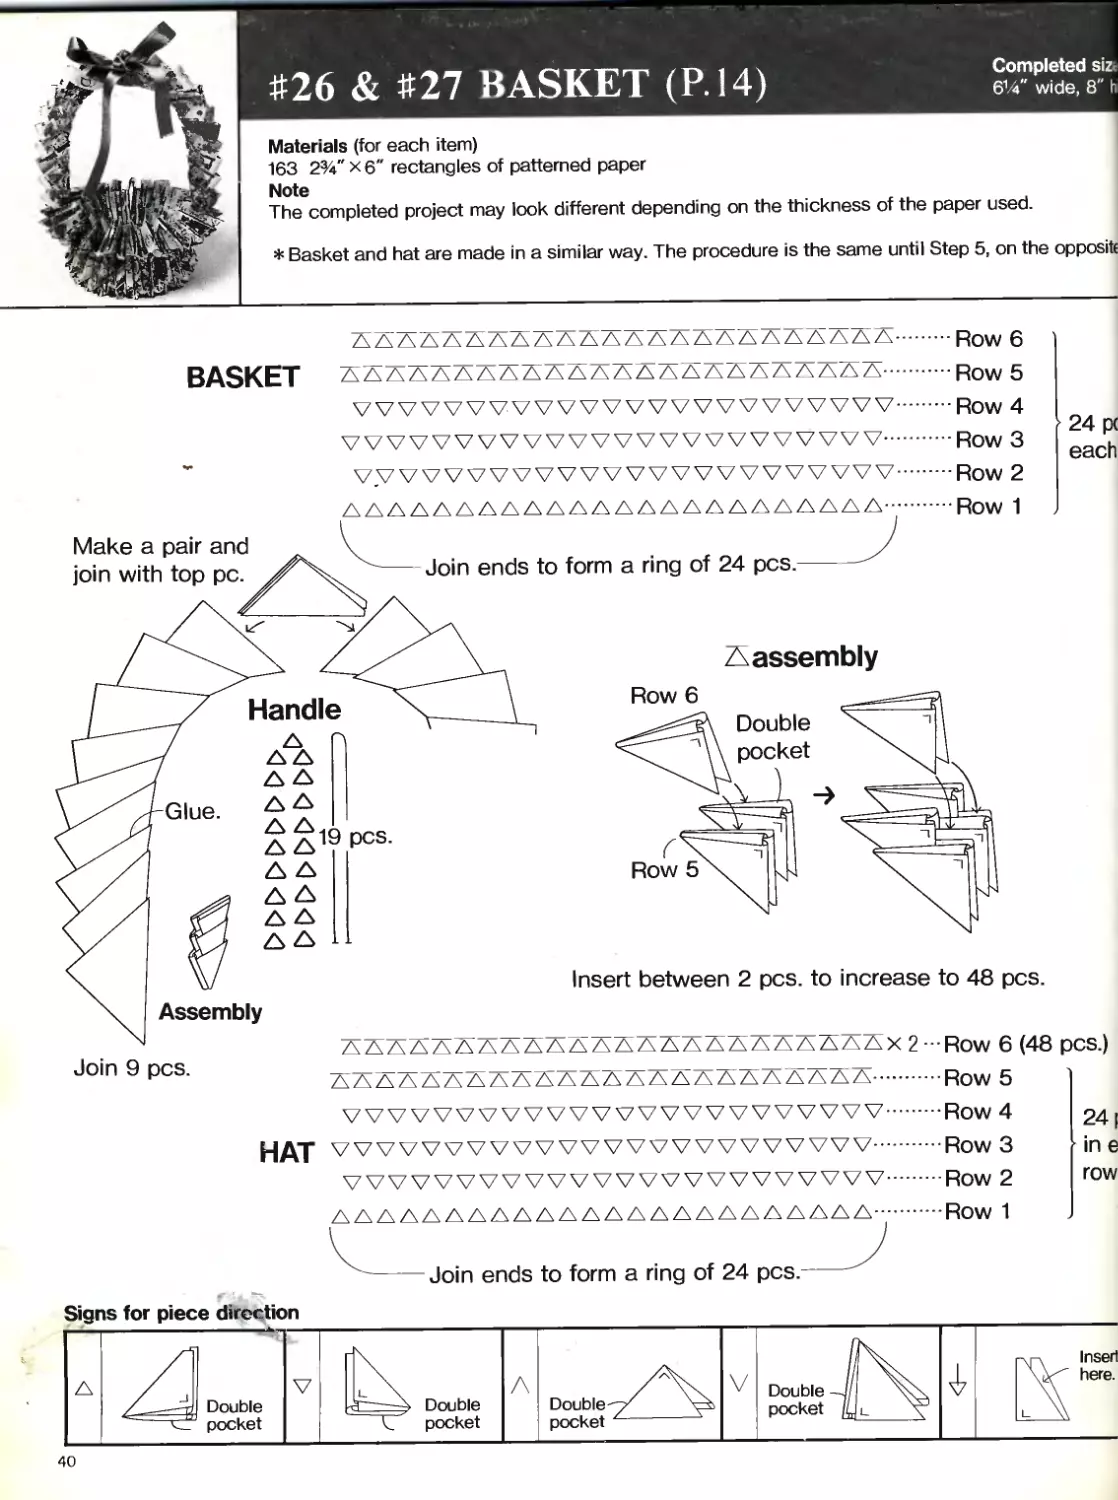
#26 & #27 BASKET (P.14)
Completed siz
6U" wide, 8" h
Materials (for each item)
163 2%" x 6" rectangles of patterned paper
Note
The completed project may look different depending on the thickness of the paper used.
* Basket and hat are made in a similar way. The procedure is the same until Step 5, on the opposite
BASKET
A AS А А SSSSSSSS А А А Л SSS АЛАА.Row 6
AAAAAAAA AAAAAA AAAAAA AAA A.Row 5
VVVVVVVVVVVVWVVVVVVVVVV............Row 4
VVVVVVVVVVVVVVVVVVVVVVVV.....Row 3
VVVVVVVVVVVVVVvwvwvvvv.Row 2
AAA ААААААДАА A AAAA AAAAAAA.Row 1
24 p(
each
Make a pair and
join with top pc.
Join ends to form a ring of 24 pcs.
Handle
A A
Glue. &
A A
pcs.
A A
a a
Assembly
Join 9 pcs.
HAT
/assembly
Row 6
Double
pocket
Row 5
Insert between 2 pcs. to increase to 48 pcs.
АДДДЛАЛАЛАЛЛЛАЛААЛААЛАЛАХ 2 Row 6 (48 PCS.)
AAAAAAAAAAAAAAAAAAASAAAA.Row 5
VVVVVVV VVVW WWW WWW...Row 4
VVVVVVVVWVVVVVVVVVWVW....Row 3
VVVVVVVVVVVVVVVVVVVVVVVV.Row 2
ДА AAA A AAA A A A AAA A A A AAA AAA.ROW 1
241
in e
row
Join ends to form a ring of 24 pcs.
Signs for piece direction
Double
pocket
Double
pocket
Double
pocket
Double
pocket
Insert
here.
40
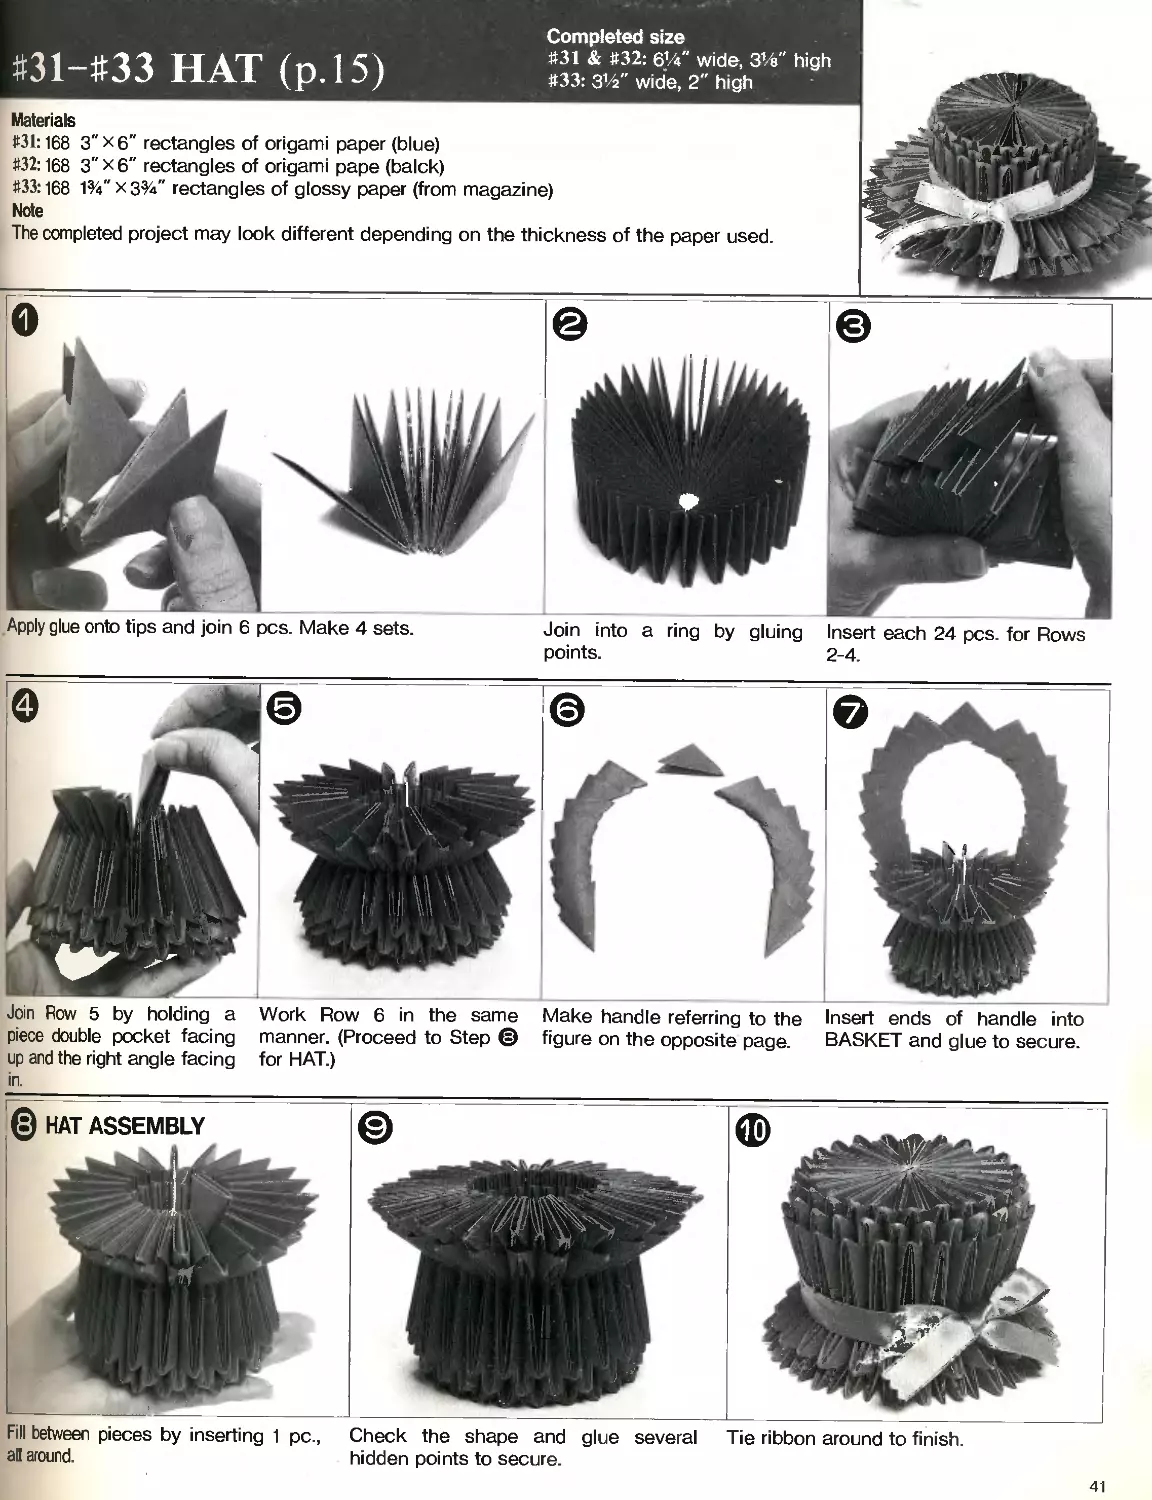
#31-#33 HAT (р.15)
Completed size
#31 & #32: 64" wide, 34" high
#33: 34" wide, 2" high
3" x 6" rectangles of origami paper (blue)
3” x 6" rectangles of origami pape (balck)
1%" хз%" rectangles of glossy paper (from magazine)
Materials
#31:168
#32:168
#33:168
Note
The completed project may look different depending on the thickness of the paper used
Apply glue onto tips and join 6 pcs. Make 4 sets.
Join into a ring by gluing
points.
Insert each 24 pcs. for Rows
2-4.
Work Row 6 in the same Make handle referring to the Insert ends of handle into
BASKET and glue to secure.
Join Row 5 by holding a
piece double pocket facing manner. (Proceed to Step © figure on the opposite page,
up and the right angle facing for HAT.)
in.
Fill between pieces by inserting 1 pc., Check the shape and glue several Tie ribbon around to finish,
all around. hidden points to secure.
41
Completed size
#34 & #35 PINEAPPLE (P.16)
Materials #34: 375 2W x 6%" rectangles of patterned paper (green)
#35: 375 2%" x 6%" rectangles of patterned paper (orange)
1 20" x 12” crepe paper (green)
7 14" #28 wrapped wire (green)
4" Viz" thick craft wire
60" 1/z" floral tape
* Materials except rectangular paper are for each item.
(Inner
diameter:
approx.6")
Turn
upside
down
here.
WWWWWWWWW Row 18
W W W WWWWWW—Row 17
WWW WWW WWW Row 16
W WWW WWW WW-’Row 15
WWW WWW WWW Row 14
W W W W W W W W W -Row 13
WWW WWW WWW Row 12
W WWW WWW WW-’Row 11
WWW WWW WWW Row 10
W W W W W W W W W—Row
WWW WWW WWW Row
W W W W W W W W W””Row
WWW WWW WWW Row
W W W W W W W WW-’Row
WWW WWW WWW Row
W W W W WW W W W—Row
VVVVVVVVVVVVVVVVVV.Row
9
8
7
6
5
4
3
2
Fruit
18 pcs. in
each row
Row
1
—Join ends to form--
a ring of 18 pcs.
Row 1 to Row 2 assembly
(Actual size)
Pedestal assembly
Glue wire onto
back side.
Leaf
(Make 14 pcs.)
€
Wire can
attached
front side
For
at e
Reft
loin
Insert deeply.
Row 1
<®
Row 1
Row 1
Make 18 sets.
r Be sure to interlock
securely.
Row 2 J
Ma
diat
RowCc
Row 2
Row 1(®)
Row 2
(Front)
(Side view)
jt <
avt
ep<
Join 18 sets to form a ring.
(See Step 2, opposite page.
42
Referring to the figures on the opposite page, Join 2 sets by inserting their adjoining points Turn over and hold in your hand,
join 3 pcs. and glue to secure. Make 18 sets. into a new piece. Continue to form a ring.
For Row 4 to Row 18, join the pieces Row 18 is completed. Turn upside down so the 1st row
at an angle to form a pineapple shape. comes on top.
Form
6%"-7
Make pedestal referring to the
diagram on the opposite page.
Direction of
creases
leaves as illustrated below.
Cover top 1/г"
with floral tape.
Jut out 14
saves from
repe paper.
Glue wrapped wire
onto back side.
Craft wire
(2%"-3")
Insert stem into the top and place on
the pedestal.
Using floral tape, attach leaves around wire, 2-3 pcs.
at a time.
Add 2-3 leaves binding with floral tape. Repeat until
all leaves are attached. Bind down the tape and make
a lump at the end. Insert into the top of the fruit.
43
Materials #36:118
26
12
#37: 123
28
21
10
Completed size
#36 & #37 MINI PINEAPPLE (P.16)
11/z" x з" rectangles of origami paper (yellow)
V /2" x 3" rectangles of origami paper (green)
11/z" x 3" rectangles of origami paper (brown)
11/z"x3" rectangles of origami paper (yellow, 4 colors)
V /2 x 3" rectangles of origami paper (green)
V /2 x 3" rectangles of origami paper (brown)
V /2" x 3" rectangles of origami paper (pale green)
#37
v Yellow
▼ Brown
vPale green
#36 v Yellow
▼ Brown
v v v v v v v v v v v v v v 4 Leaves
ДААДАДЛАДЛАДЛА 1(2 TOWS)
VV VVVW VV VVVW.Row 11
V VV VV VV VVV VVVV Row 10
VVVVVVVVVVVVVV..Row 9
14 pcs.
vvvvvvwvvvvw...Row 8 in each
„ row.
VVVVVVVVVVVVVV..Row 7
VVVVVVVVVVVVVV.Row 6
VVVVVVVVVVVVVV..Row 5
WWWVVVVVVVV....Row 4
VVvvvvvvvvvvvv..Row 3
VVVVVVVVWWW....ROW 2
АЛАЛЛЛЛДАААДДЛ..ROW 1 .
144-Join ends to form-
a ring of 14 pcs.
vvvvvvvvvvvvv 1 Leaves
ДЛЛДДЛЛАЛАААД rows)
VVVVVVVVVVVVV...Row 10
vvvvvvvvvvvvv ..Row 9
vvvvvvvvvvvvv...Row 8
VVVVVVVVVVVVV ..ROW 7
VVVTVVTVVTVVT...Row 6
VVVVVVVVVVVVV ..Row 5
VVVVVVVVVVVVV...ROW 4
▼ VVVTVVTVVTVV .Row 3
VVVVVVVVVVVVV...Row 2
АЛЛЛЛЛЛЛЛДАДЛ ..Row 1
--Join ends to form-
a ring of 13 pcs.
Signs of direction
Leaf assembly
44
#37 MINI PINEAPPLE (P.16)
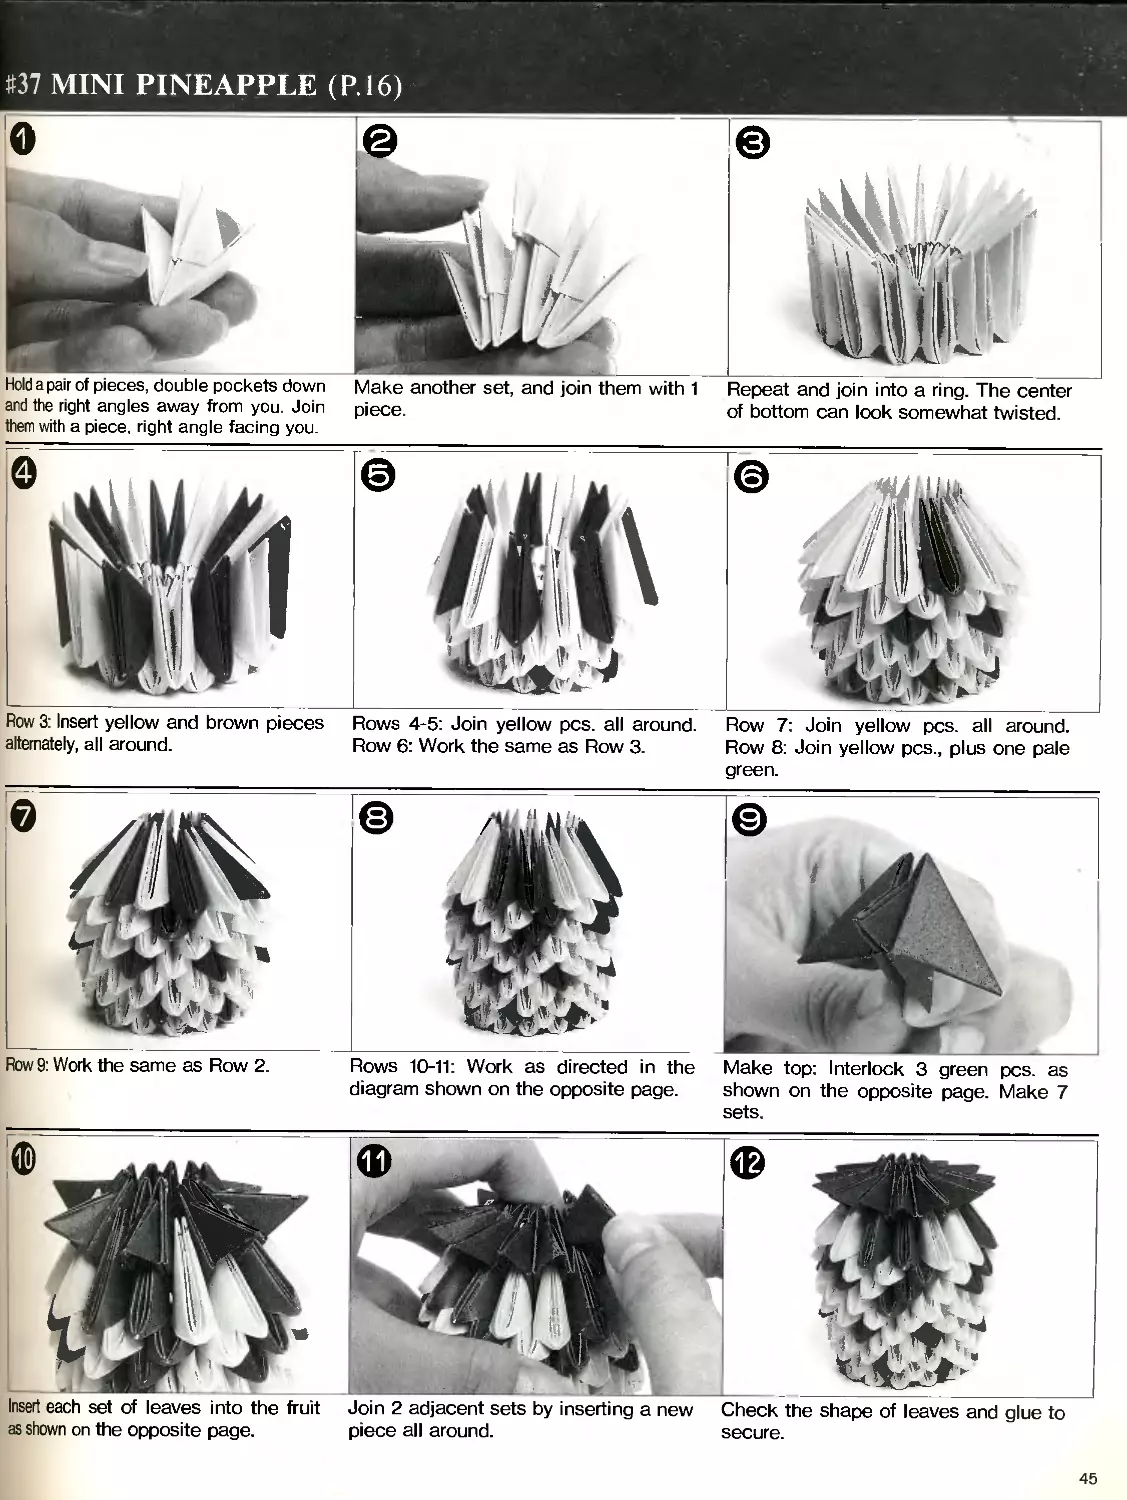
Hold a pair of pieces, double pockets down Make another set, and join them with 1 Repeat and join into a ring. The center
and the right angles away from you. Join piece. of bottom can look somewhat twisted,
them with a piece, right angle facing you.
Row 3: Insert yellow and brown pieces Rows 4-5: Join yellow pcs. all around. Row 7: Join yellow pcs. all around,
alternately, all around. Row 6: Work the same as Row 3. Row 8: Join yellow pcs., plus one pale
green.
Row 9: Work the same as Row 2. Rows 10-11: Work as directed in the Make top: Interlock 3 green pcs. as
diagram shown on the opposite page. shown on the opposite page. Make 7
sets
Insert each set of leaves into the fruit Join 2 adjacent sets by inserting a new Check the shape of leaves and glue to
as shown on the opposite page. piece all around. secure.
45
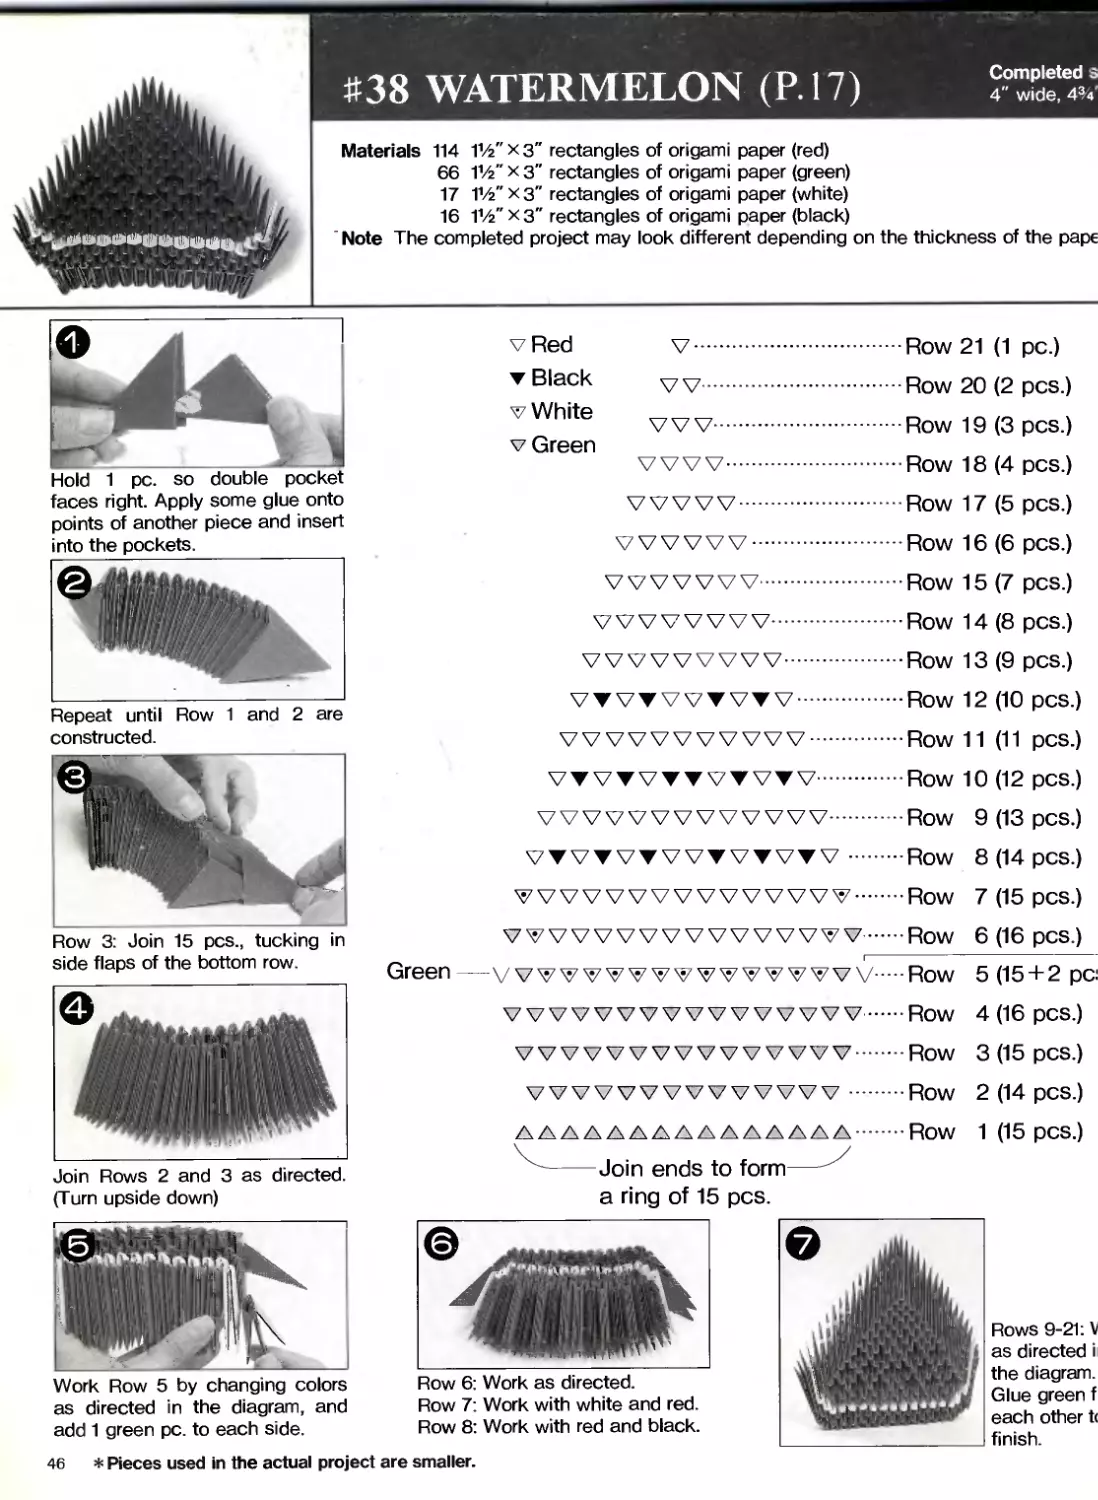
#38 WATERMELON (P.17)
Materials 114
66
17
16
11/2"хз" rectangles of origami paper (red)
V/2" хз" rectangles of origami paper (green)
V/2" x3" rectangles of origami paper (white)
V/2" хз" rectangles of origami paper (black)
Completed $
4" wide, 4%
Note The completed project may look different depending on the thickness of the pape
Hold 1 pc. so double pocket
faces right. Apply some glue onto
points of another piece and insert
into the pockets.
v Red
▼ Black
v White
Repeat until Row 1 and 2 are
constructed.
Row 3: Join 15 pcs., tucking in
side flaps of the bottom row.
V...........Row 21 (1 pc.)
V V..........Row 20 (2 pcs.)
VVV..........Row 19 (3 pcs.)
v Green
VVVV......... Row 18 (4 pcs.)
VVVW..........Row 17 (5 pcs.)
WWW............Row 16 (6 pcs.)
WVWW...........Row 15 (7 pcs.)
VV W W W........Row 14 (8 pcs.)
VVVVVVVVV........Row 13 (9 pcs.)
VTVTVVVVTV.......Row 12 (10 pcs.)
VVVVVVVVVVV.......Row 11 (11 pcs.)
VTVTVTVVVVVV.......Row 10 (12 pcs.)
vvvvvvvvvvvvv......Row 9 (13 pcs.)
VVVVVVVVVVVVVV......Row 8 (14 pcs.)
WVVVVVVVVVVVW.......Row 7 (15 pcs.)
V WVVVVVVVVVVVW......Row 6 (16 pcs.)
Join Rows 2 and 3 as directed.
(Turn upside down)
Green —VVVWWWWWWW Row 5 (15 + 2 pc
VVVVVVVVVVVVVVVV..Row 4 (16 pcs.)
VVVWVVVVVVVVVV...Row 3 (15 pcs.)
VVVVVVVVVVVVVV ..Row 2 (14 pcs.)
ЛАДДДДДДААААДАА..ROW 1 (15 PCS.)
--Join ends to form
a ring of 15 pcs.
Work Row 5 by changing colors
as directed in the diagram, and
add 1 green pc. to each side.
Row 6: Work as directed.
Row 7: Work with white and red.
Row 8: Work with red and black.
Rows 9-21: V
as directed ii
the diagram.
Glue green f
each other t<
finish.
46 * Pieces used in the actual project are smaller.
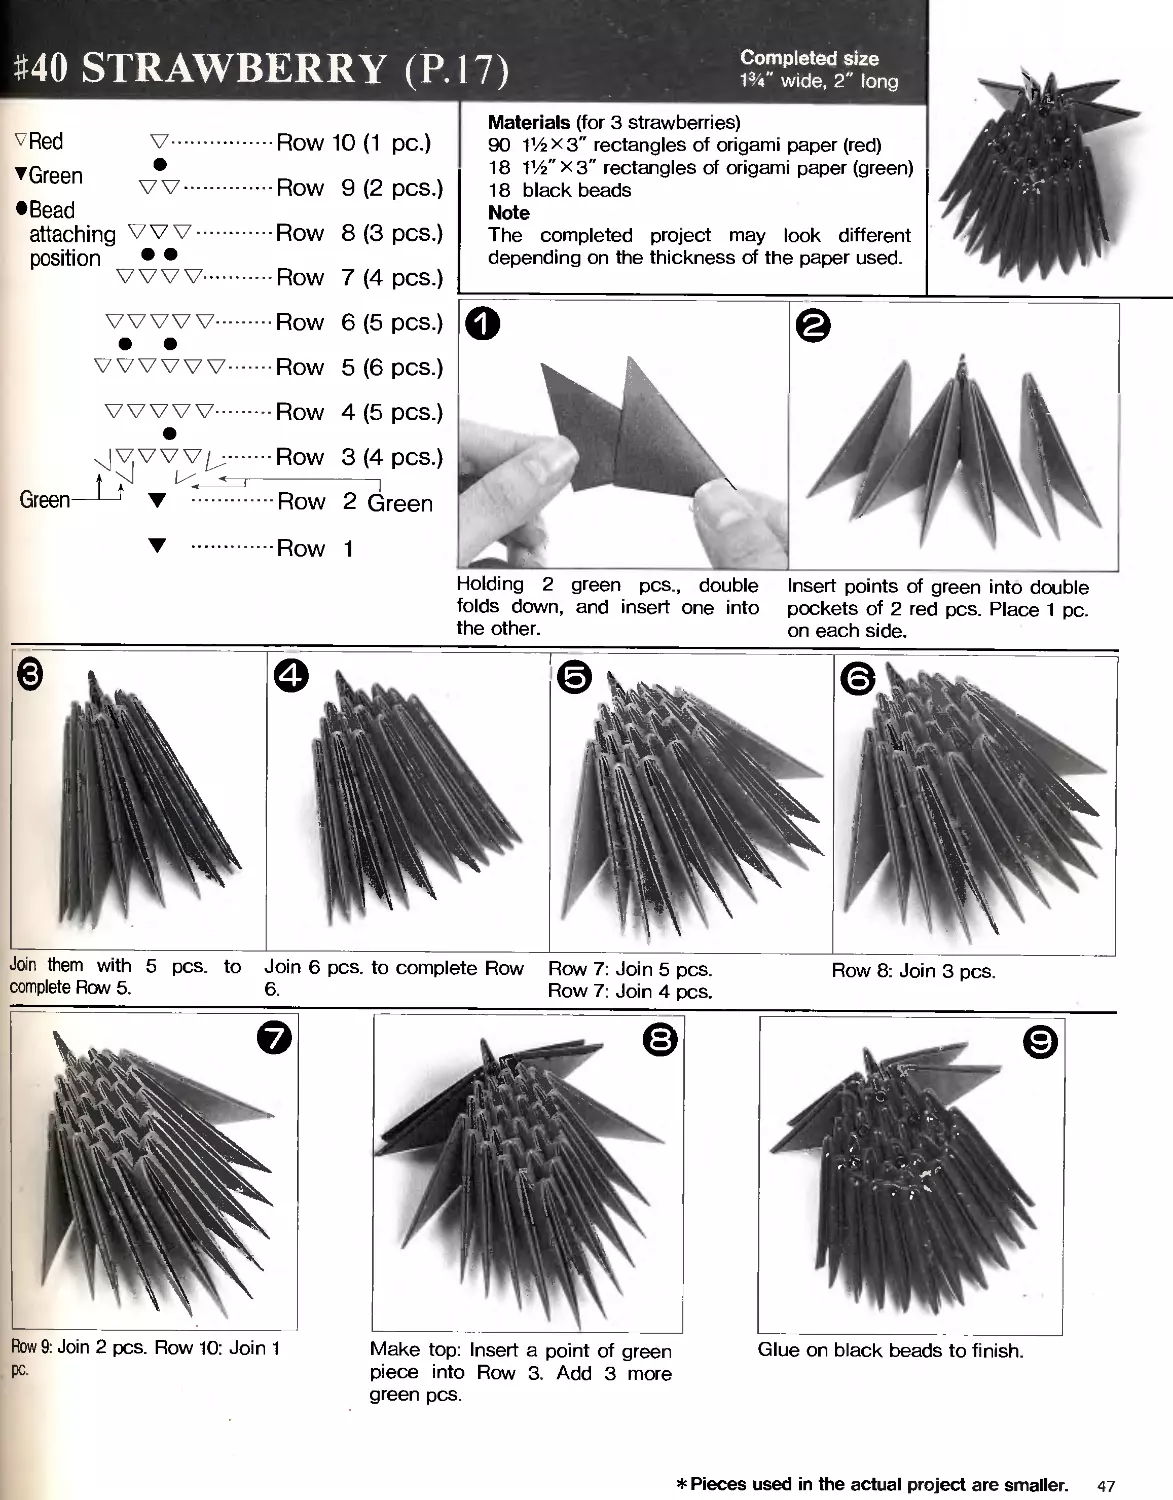
MO STRAWBERRY (Р. 17)
Completed size
Ж" wide, 2" long
Row 10 (1 pc.)
attaching
position
Row 9 (2 pcs.)
Row 8 (3 pcs.)
Row 7 (4 pcs.)
VVVW.............Row 6 (5 pcs.)
WWW...............Row 5 (6 pcs.)
VVVW.............Row 4 (5 pcs.)
jywvr.......Row 3 (4 pcs.)
t N l< *—f ]
Green--1—1 ▼ ....Row 2 Green
Row 1
Materials (for 3 strawberries)
90 Г/2 x 3" rectangles of origami paper (red)
18 V/2" x 3" rectangles of origami paper (green)
18 black beads
Note
The completed project may look different
depending on the thickness of the paper used.
Holding 2 green pcs., double Insert points of green into double
folds down, and insert one into pockets of 2 red pcs. Place 1 pc.
the other.
on each side.
tin them with 5 pcs. to
mplete Row 5.
Join 6 pcs. to complete Row
6.
Row 7: Join 5 pcs.
Row 7: Join 4 pcs.
Row 8: Join 3 pcs.
Row 9: Join 2 pcs. Row 10: Join 1
pc.
Make top: Insert a point of green
piece into Row 3. Add 3 more
green pcs.
Glue on black beads to finish.
* Pieces used in the actual project are smaller. 47
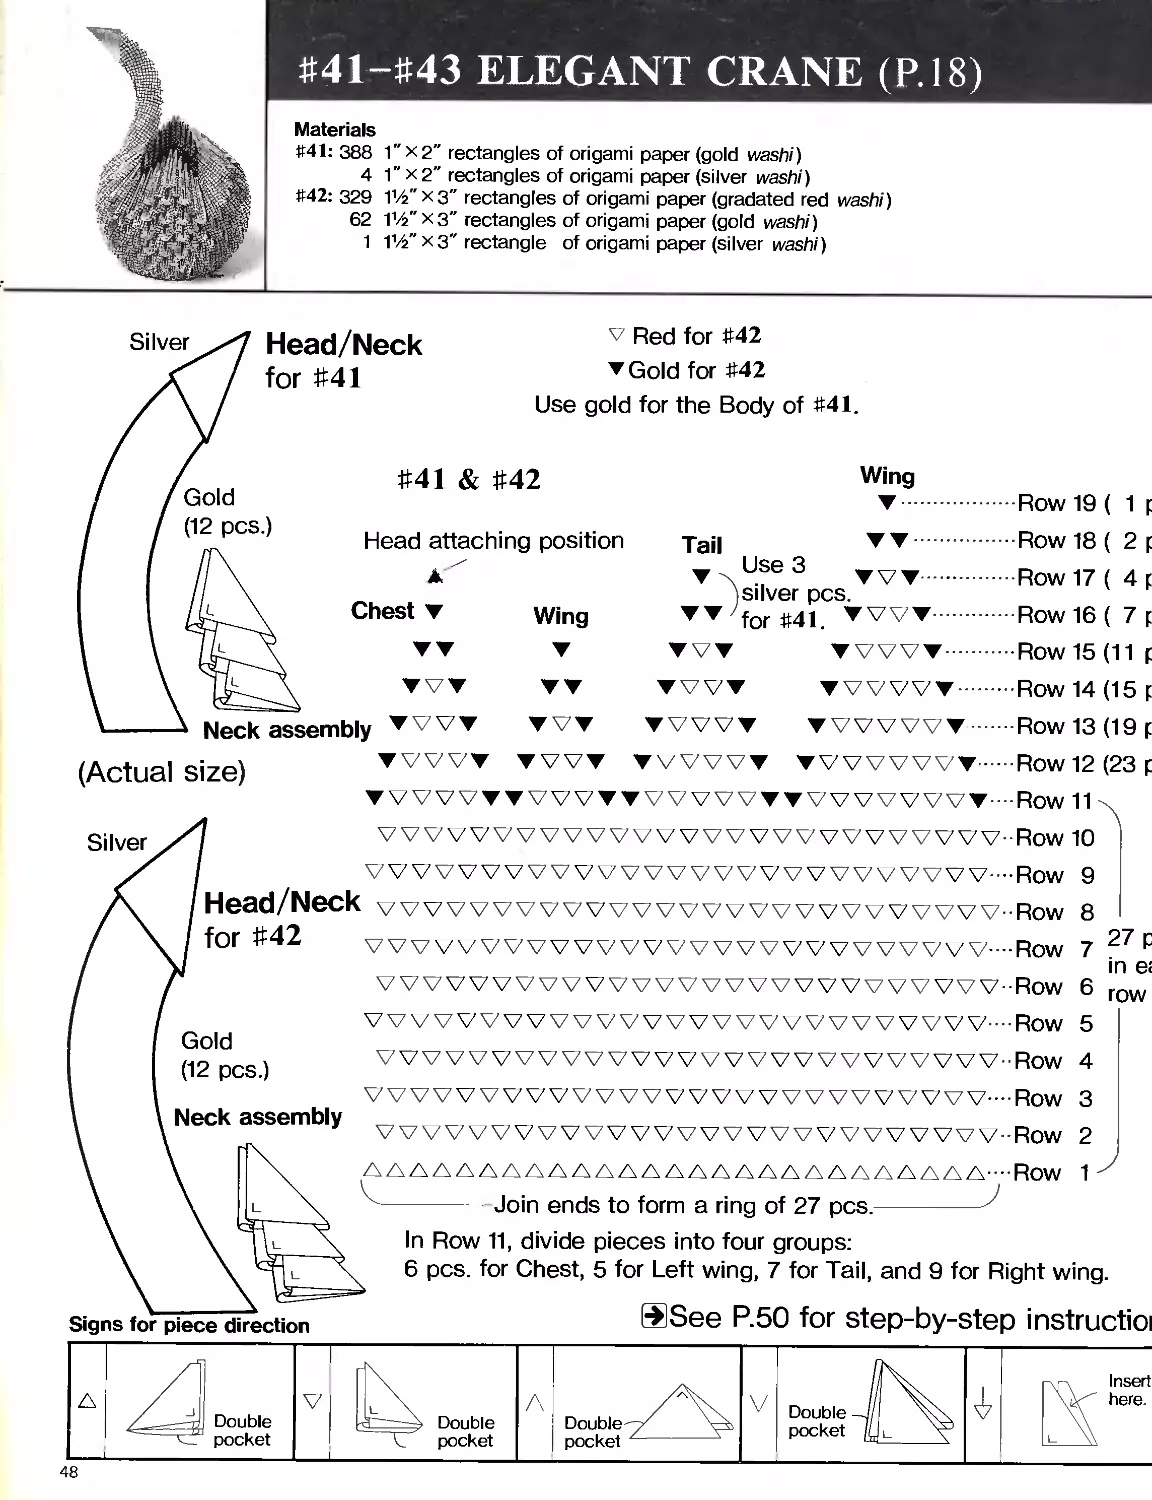
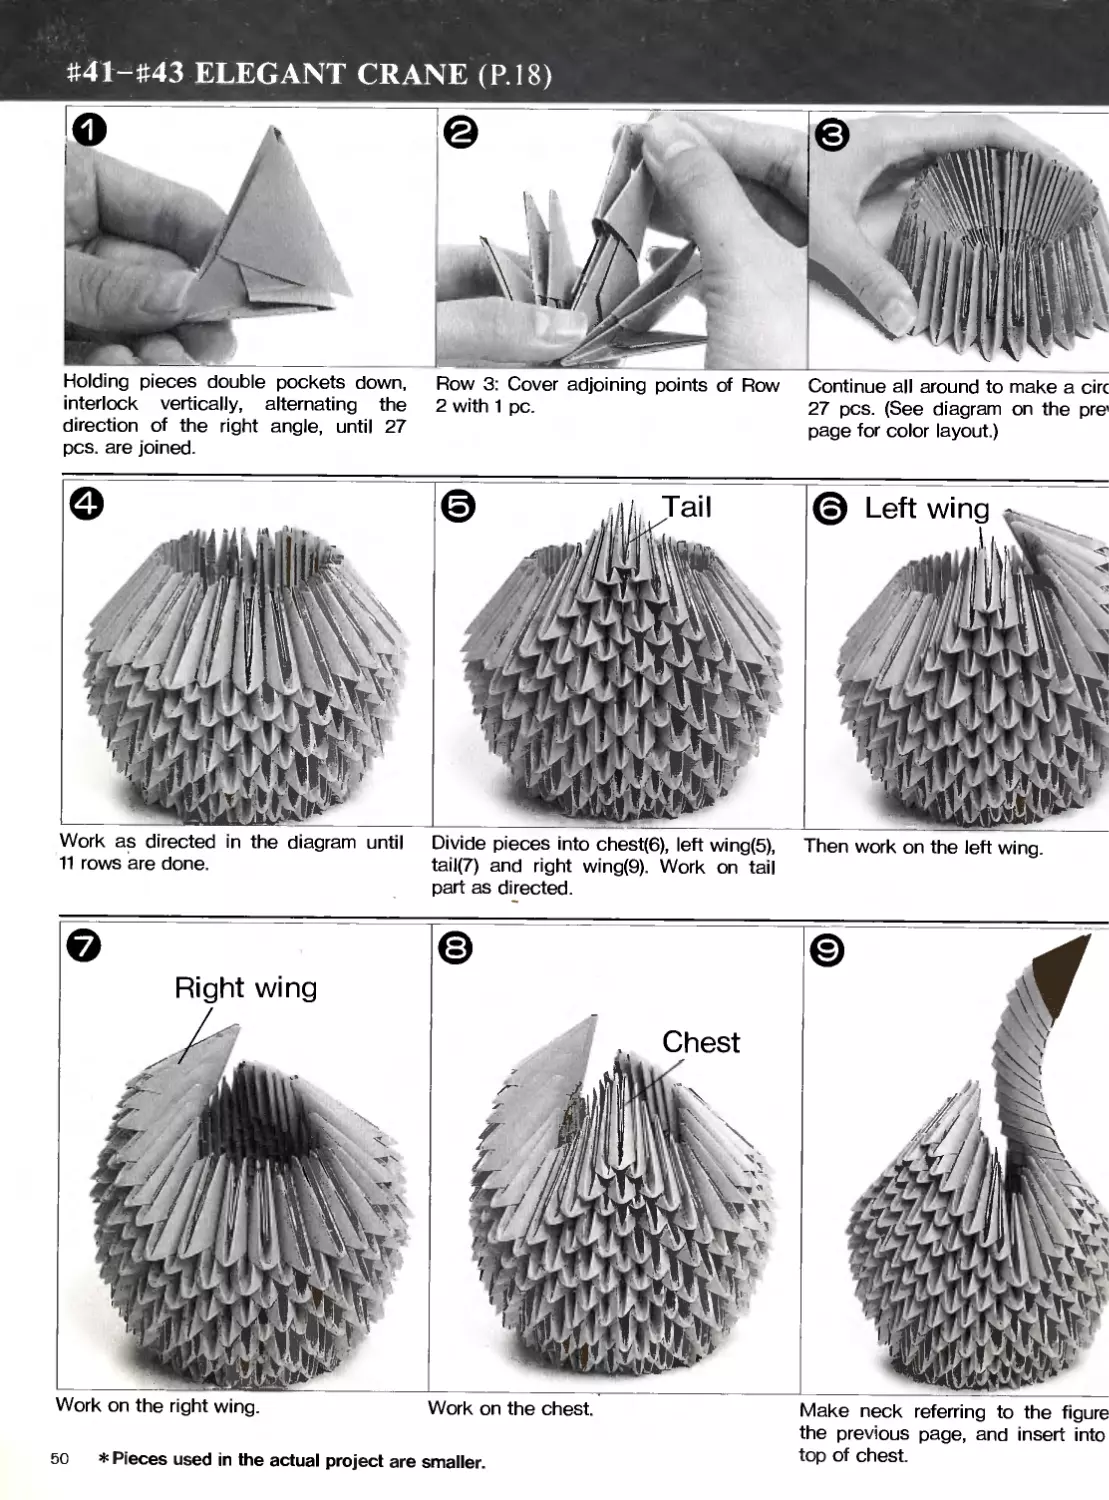
#41-#43 ELEGANT CRANE (P.18)
Materials
#41: 388 1"X2" rectangles of origami paper (gold washi)
4 1" x 2" rectangles of origami paper (silver washi)
#42: 329 11/г"хз" rectangles of origami paper (gradated red washi)
62 11/г"хз" rectangles of origami paper (gold washi)
1 11/г" x 3" rectangle of origami paper (silver washi)
Silver
Gold
(12 pcs.)
Head/Neck
for #41
Chest ▼
v Red for #42
▼ Gold for #42
Use gold for the Body of #41.
#41 & #42
Wing
Head attaching position
Tail
_ Use 3
Wing
Neck assembly ▼VVV
Row 19 ( 1 p
•Row 18 ( 2 f
Row 17 ( 4 p
Row 16 ( 7 f
Row 15 (11 f
Row 14 (15 p
Row 13 (19 f
(Actual size)
Row 12 (23 f
Silver
WWW VW VVVW VVVV VVVVVVV vv-Row
Head/Neck
VVVV VVVV VVVVVVV VVVV VV WWW-Row
for #42
V VVVV VVVV VV VVVV VW VVVV WWV—Row
Gold
(12 pcs.)
VW VVVW VVVVVVVVVVVVVV VVVW-”-Row
VW VVVVVVV VVVW VW VVVVVVV W-Row
VVVW WWW WWW VW VVVVVVV- Row
9
8
7
6
5
4
27 p
in e;
row
Neck assembly
3
2
Join ends to form a ring of 27 pcs.
In Row 11, divide pieces into four groups:
6 pcs. for Chest, 5 for Left wing, 7 for Tail, and 9 for Right wing.
ffiSee P.50 for step-by-step instructioi
Signs for piece direction
A Double pocket V L \ —•—a Double pocket A Double pocket z V Double —1 pocket L_ глгл Insert here
48
Completed size #41: 3" wide, 41/z high #42: 3 wide, 5%" high #43: 31Л" wide, 6V4"
#43:60 1%" x 31/2" rectangles of washi paper (red)
79 1%" x 31/2" rectangles of washi paper (green)
75 1%" x з1/2" rectangles of washi paper (purple)
74 1%" x 31/2" rectangles of washi paper (blue)
4 1%"хз1/2" rectangles of washi paper (gold)
Note
The completed project may look different depending on the thickness of the paper used.
®See P.50 for step-by-step instructions.
Head/Neck
for #43
#43
vRed
VPurple
vBlue
▼Green
vGold
Head attaching position Tail
ZCi V
V Wing w
hestvv V
VVV vv ww
VVVV VVV Я7 Я7 Я7 Я7 Я7
1 VVVV VVVV \|7 \|7 \|7 \|7 \|7 \|7
Wing
v.....
VV....
VVV...
VVVV..
VVVW —
vvvvvv-
vvvvvvv
Blue
(12 pcs.)
Gold
(Actual size)
Row 19 ( 1 pc.)
Row 18 ( 2 pcs.)
Row 17 ( 4 pcs.)
Row 16 ( 7 pcs.)
Row 15 (11 pcs.)
Row 14 (15 pcs.)
Row 13 (19 pcs.)
VVVVVVVV..Row 12 (23 pcs.)
TVVVVVVVVVV^^??^?^VVVVVVVVV.Row 11
WVVVVVVVVVVVVVWVVVVVVVVVV-Row 10
▼ VVVVTTVVVTTVtW^TTVVVVVVVT.Row 9
▼ vv w ▼ v v v v ▼ Я7 Я7 Я7 Я7 Я7 Я7 ▼ v v v v v v v v ▼ - R о w
▼ VVV VVV VVVTT^W^VTV VVV VVVV’T.Row
8 27 pcs.
7 in each
▼vvvvvvvvvvv?^V?^vvvvvvvvvv-Row 6 row
▼ VVVVVVVVVVV\|7\|7\|7\|7\|7VVVVVVVVVV.Row 5
Neck assembly
mVVVVVVVVWVVVVVVVVVVVWV-Row 4
yvvvvvvvvvvvvv^V^vvvvvvvvw.Row 3
VVVW VV VVV VTpTpTpTpTpTpV WWW VW-Row 2
▲ ▲▲▲▲▲▲▲▲▲▲▲▲▲▲▲▲▲▲▲▲▲▲▲▲▲A.Row
- Join ends to form a ring of 27 pcs.—
In Row 11, divide pieces into four groups:
6 pcs. for Chest, 5 for Left wing, 7 for Tail, and 9 for Right wing.
49
#41-#43 ELEGANT CRANE (P.18)
Holding pieces double pockets down. Row 3: Cover adjoining points of Row Continue all around to make a circ
interlock vertically, alternating the 2 with 1 pc. 27 pcs. (See diagram on the pre'
direction of the right angle, until 27 page for color layout.)
pcs. are joined.
Work as directed in the diagram until Divide pieces into chest(6), left wing(5),
11 rows are done. tail(7) and right wing(9). Work on tail
part as directed.
Then work on the left wing.
Work on the right wing. Work on the chest. Make neck referring to the figure
the previous page, and insert into
top of chest.
50 * Pieces used in the actual project are smaller.
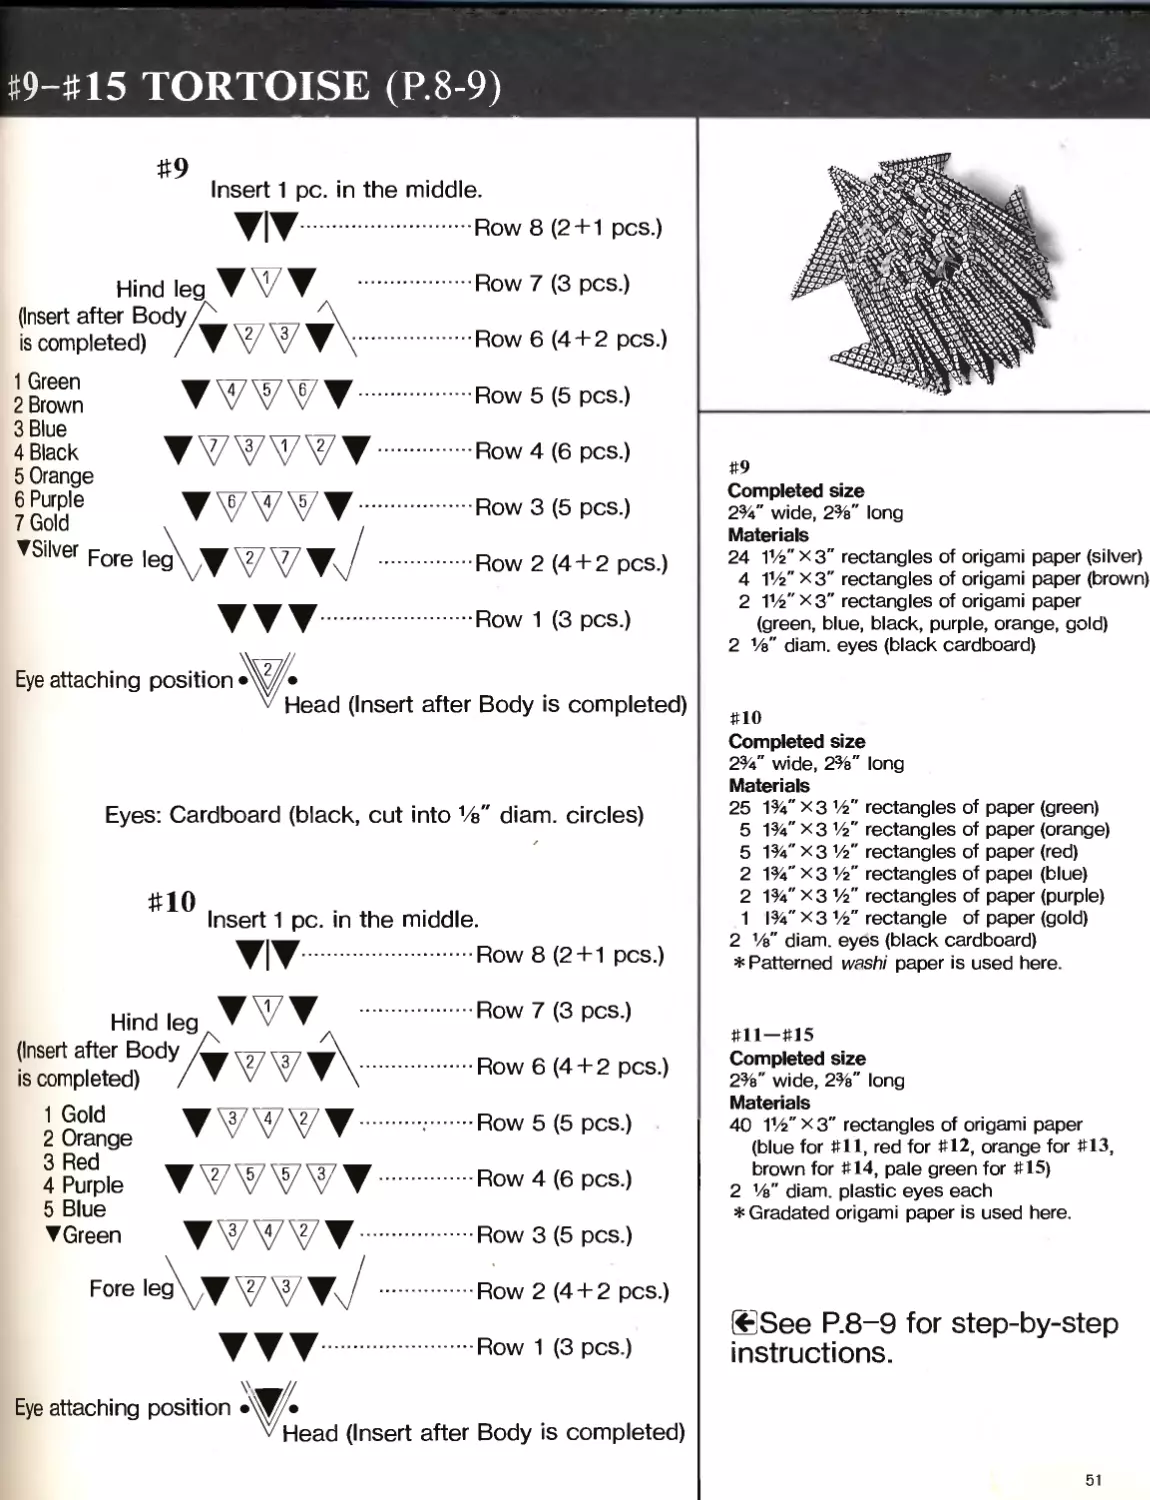
#9-#15 TORTOISE (Р.8-9)
#9
Insert 1 pc. in the middle.
Row 8 (2+1 pcs.)
Hind leg VW
(Insert after Body A
is completed) / V W \
Row 7 (3 pcs.)
Row 6 (4 + 2 pcs.)
TWT..............Row 5 (5 pcs.)
3Blue _ ____ _
4 Black VWWWWV.............Row 4 (6 pcs.)
5 Orange
7 Gold6 V W W W V.........Row 3 (5 Pcs.)
▼s'|ver Fore |eg\W\27^7y / .Row 2 (4 + 2 pcs.)
Row 1 (3 pcs.)
Eye attaching position
•W-
v Head (Insert after Body is completed)
#9
Completed size
2%" wide, 2%" long
Materials
24 11/г"хз" rectangles of origami paper (silver)
4 IV2" x 3" rectangles of origami paper (brown)
2 11Л"хз" rectangles of origami paper
(green, blue, black, purple, orange, gold)
2 1/e" diam. eyes (black cardboard)
Eyes: Cardboard (black, cut into Vs" diam. circles)
#10
Insert 1 pc. in the middle.
Row 8 (2+1 pcs.)
Hindleg VW ...................Row 7(3 pcs.)
(Insert after BodyV7T7vyy ,л , „
is completed) /V W W V\.............Row 6 (4 + 2 pcs.)
2 Orange ▼ WWW V.................Row 5 <5 Pcs)
4 Purple ▼ W W ▼..................Row 4 (6 pcs.)
5 Blue
▼ Green V W W W V.................Row 3 (5 pcs.)
Fore legVy ^7 V\J ............Row 2 (4 + 2 pcs.)
Row 1 (3 pcs.)
Eye attaching position
VHead (Insert after Body is completed)
#10
Completed size
2%" wide, 2%" long
Materials
25 1%" хз W rectangles of paper (green)
5 1%" хз 1/2" rectangles of paper (orange)
5 1%" хз 1/2" rectangles of paper (red)
2 Ж" хз 1/2" rectangles of papei (blue)
2 1%" хз 1/2" rectangles of paper (purple)
1 1%"хз 1/2" rectangle of paper (gold)
2 1/e" diam. eyes (black cardboard)
* Patterned washi paper is used here.
#11—#15
Completed size
2%" wide, 2%" long
Materials
40 IV2" x 3" rectangles of origami paper
(blue for #11, red for #12, orange for #13,
brown for #14, pale green for #15)
2 1/e" diam. plastic eyes each
* Gradated origami paper is used here.
ffiSee P.8-9 for step-by-step
instructions.
51
Completed size
#52 & #53 RED CROWNED CRANE (P.21) ISIASk
Materials
#52: 365 3’4" x 4’4" rectangles of 1-ply board (white)
3 3'A" x 41/г" rectangles of textured paper (black)
31 23A" x 4’/г" rectangles of 1-ply board (white)
1 2%" х41/г" rectangle of textured paper (black)
1 2%'' X4’/2" rectangle of textured paper (red)
2 ’/a" diam. plastic eyes
#53: 309 2%" X4’A" rectangles of 1-ply boar
56 23/a" X414" rectangles of 1-ply boar
3 23/a" x 4’4" rectangles of textured рг
31 2" x З’/г" rectangles of 1-ply board ।
1 2"хз1/2" rectangle of textured pap
1 2" хз’/г" rectangle of textured pap<
2 ’/a" diam. plastic eyes
Eye attaching position \
। \Re
▼ Black
vBlue
v White
Head/Neck for #53
(Actual size) /
For #53, use white pieces for W
Chest
Wing
Wing v
Row 18 (1 p
Row 17 (2 p
Row 16 (5 p
Row 15 (8 pi
Row 14 (12 |
Row 13 (16 ।
Row 12 (20 ।
Row 11 (24 j
7VVVVVVVVVVVVVVVVVVVVVVVVVVV Row
VV VVV VVVV VVVV VVVV VVVV VV VVVW--’-Row
7VVVVVVVVVVVVVVVVVVVVVVVVVVV Row
Row
7 V V VVVW WWW VVVW VVVVVVVVV Row
VVVVVVVVVVVVV VVVV VVV VV VVVV VV--ROW
ХАДДЛДДАДДАДААДАДЛАЛЛДАЛДААА.ROW
9
8
7
6 28 p
in ег
5 row
4
3
2
1 .
"-----------Join ends to form a ring of 28 pcs.
In Row 10, divide pieces into four groups:
5 pcs. for Chest, 7 for Left wing, 9 for Tail, and 7 for Right wing.
Signs for piece direction a а и
A Double pocket V L \ л A' w Double < pocket A Double--/ \A pocket z V Double -JI pocket L_ \ PP Insert VA here L A
52
How to fold pieces
Black
#54 PEDESTAL (P.21)
Completed size
7" diameter
Materials
For #52:32 З’/г" x 5" rectangles of 1-ply board
For #53:28 З’/г” x 5" rectangles of 1-ply board
Note
The completed project may look different depending on the thickness of the paper used.
Fold up in half.
S
Align the center
with the bottom.
Red
Head/Neck for #52
(Actual size)
White (31 pcs.)
Eye attaching
position
Make a crease.
(Front side)
32
28
pcs. for #52
pcs. for #53
#52: V2"
#53: %"
Assemble points.
Fold the edges under
(Repeat on the back side).
Fold in half pulling
center and folding
the rest diagonally.
53
26 pcs. a
for Neck A
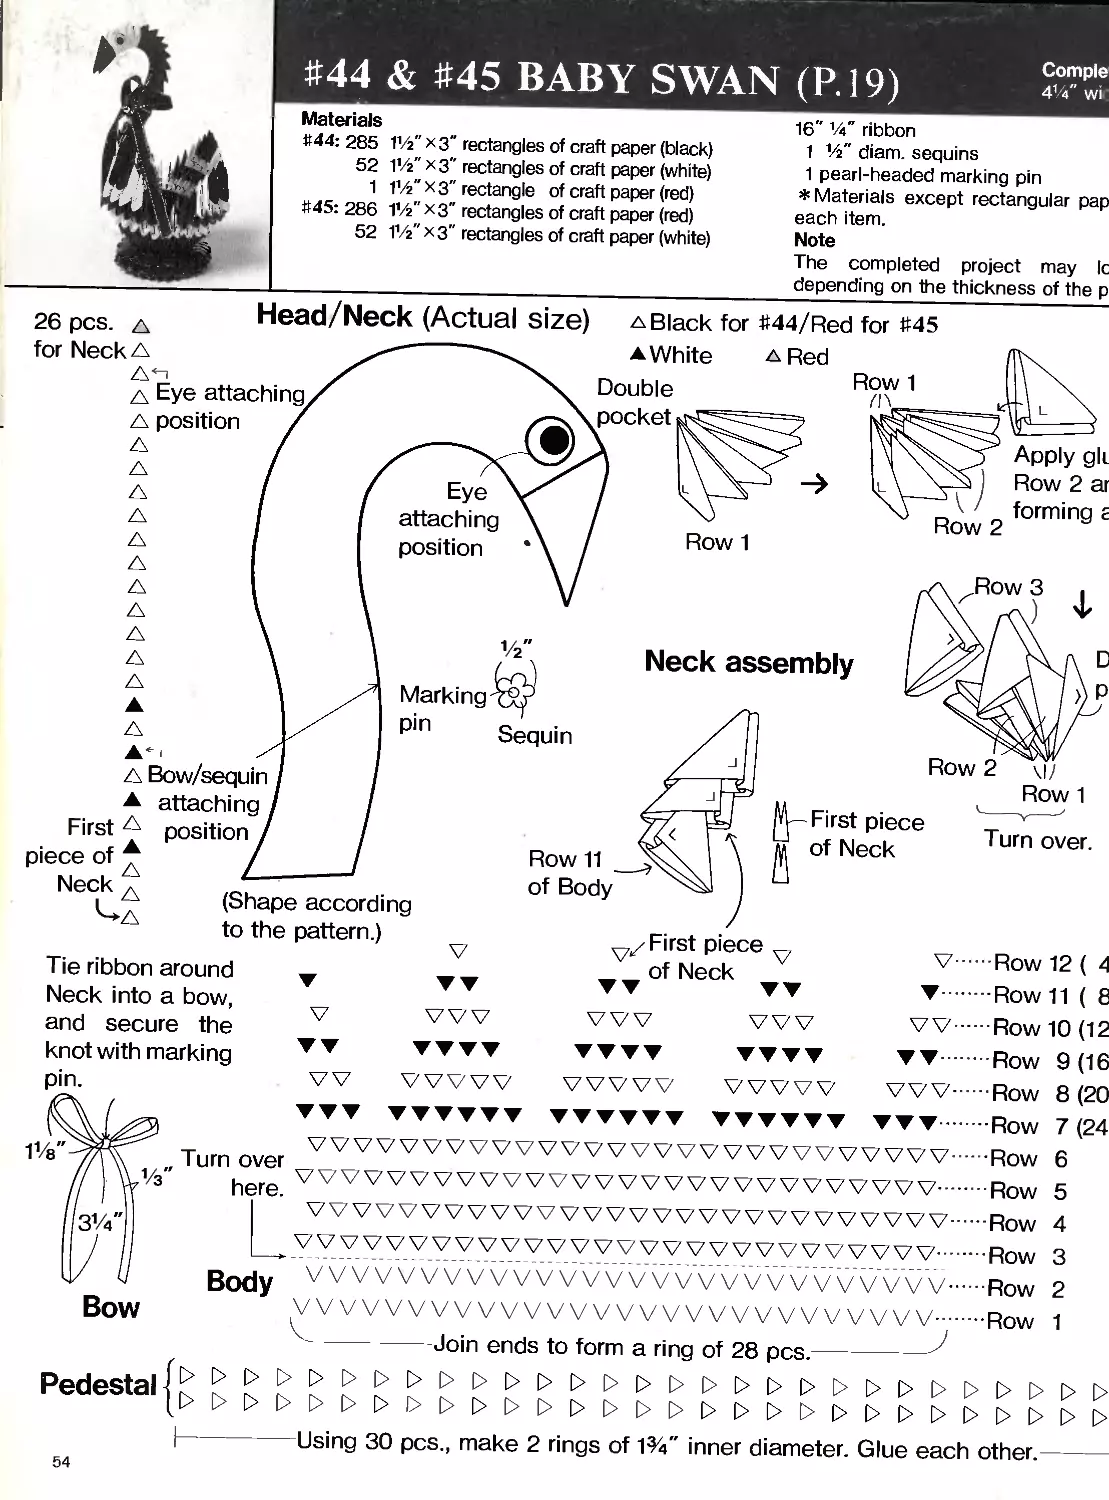
#44 & #45 BABY SWAN (P.19)
Materials
#44: 285
52
1
#45: 286
52
1’/2"x3” rectangles of craft paper (black)
f/z" X3" rectangles of craft paper (white)
T/z" x 3" rectangle of craft paper (red)
V/i" хз" rectangles of craft paper (red)
1’/z" x3" rectangles of craft paper (white)
Head/Neck (Actual size)
л Eye attaching
A position
First л
piece of *
Neck л
A Bow/sequin
attaching
position
1/2
pm
Sequin
Eye
attaching
position
Row 11
of Body
(Shape according
to the pattern.)
Tie ribbon around T
Neck into a bow,
and secure the
knot with marking v v
Turn
over
here.
Body
Comple
4%" wi
16" %" ribbon
1 1/z" diam. sequins
1 pearl-headed marking pin
* Materials except rectangular pap
each item.
Note
The completed project may Ic
depending on the thickness of the p
a Black for #44/Red for #45
a White a Red
Double
pocket
Row 1
zn
Row 1
Neck assembly
First piece
of Neck
Vj/First piece
of Neck
Pedestal J £
Apply gli
Row 2 ar
forming г
Row 2
Row 3
Row 2 \|/
Row 1
Turn over.
Row 12 ( A
Row 11(6
Row 10 (12
Row
Row
Row
VVVV WVVVVVVVV VVVV VVVVVVVVVV Row
VVVVVVVVVVVVVVVVVVVVVVVVVVVV...Row
WWW VVVW VVVV VVV VVVV WWW....Row
VVVW VVVW VVVW VVV WWW VVVV Row
'VVVVVVVVVVVVVVVVVVVVVVVVVVVV..Row
VVVVVVVVVVVVVVVVVVVVVVVVVVVV...Row
9 (16
8 (20
7 (24
6
5
4
3
2
1
4-------Join ends to form a ring of 28 pcs.-y
>>>[>[>[>>>[>[>[>[>[>>[>[>[>[>[>>[>[>[>[>>>[>[>
Using 30 pcs., make 2 rings of 1%" inner diameter. Glue each other.
54
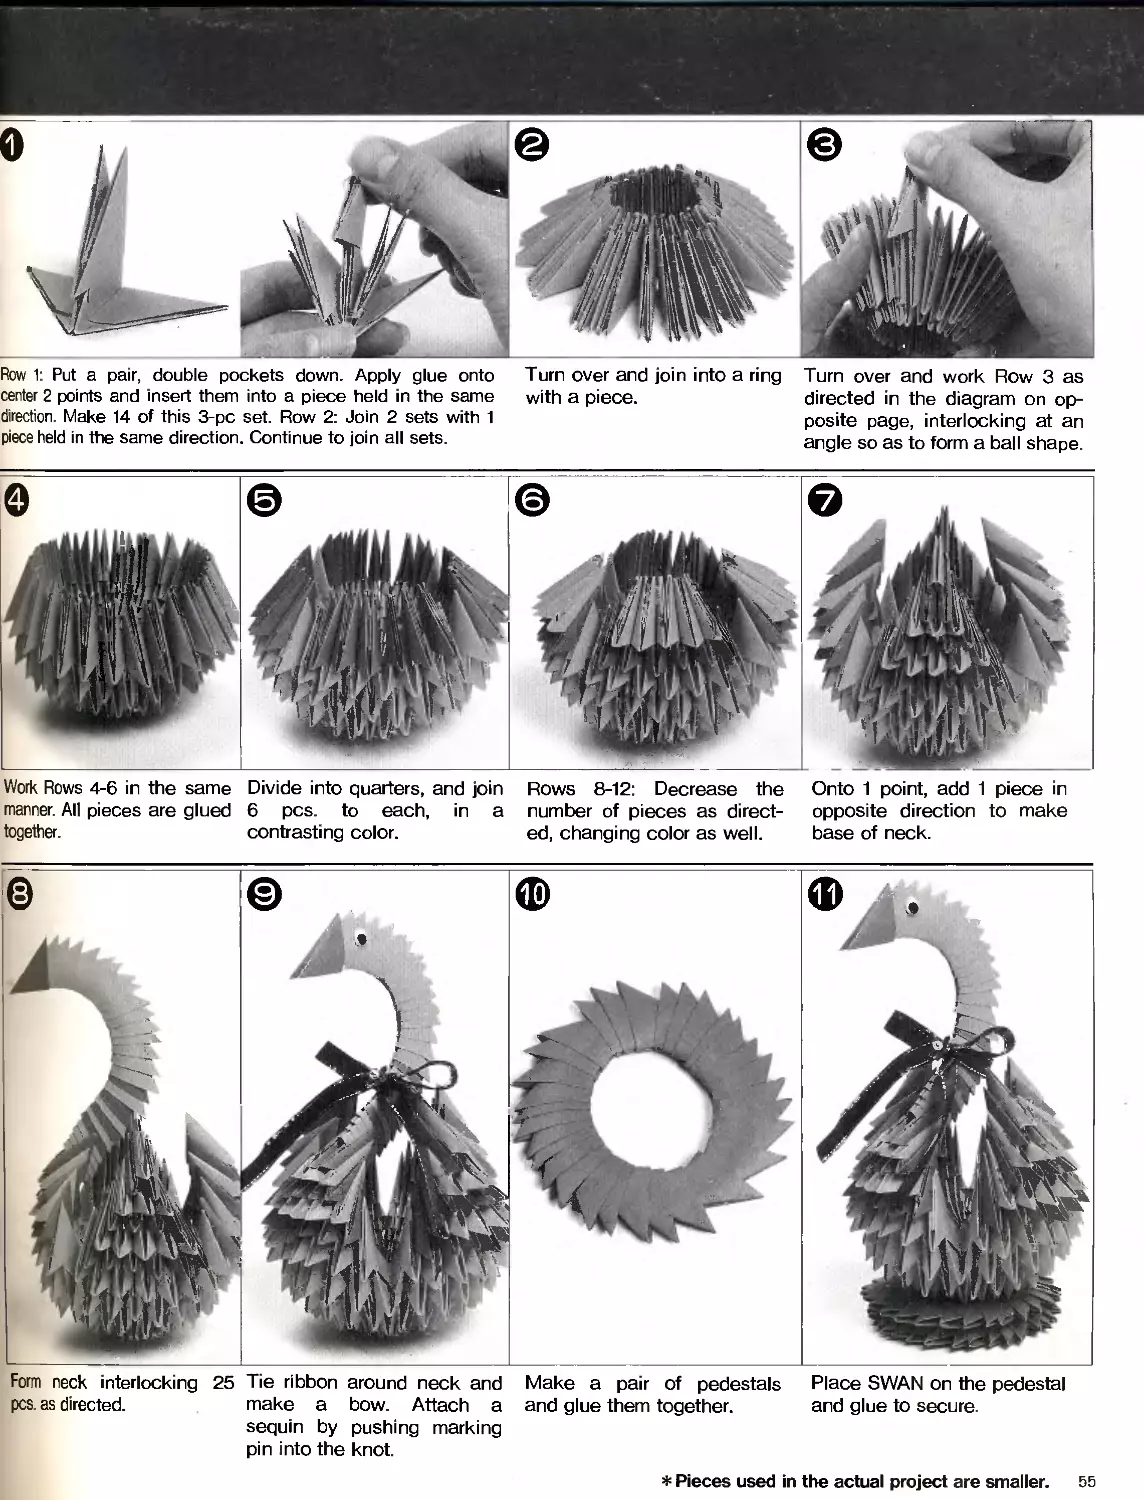
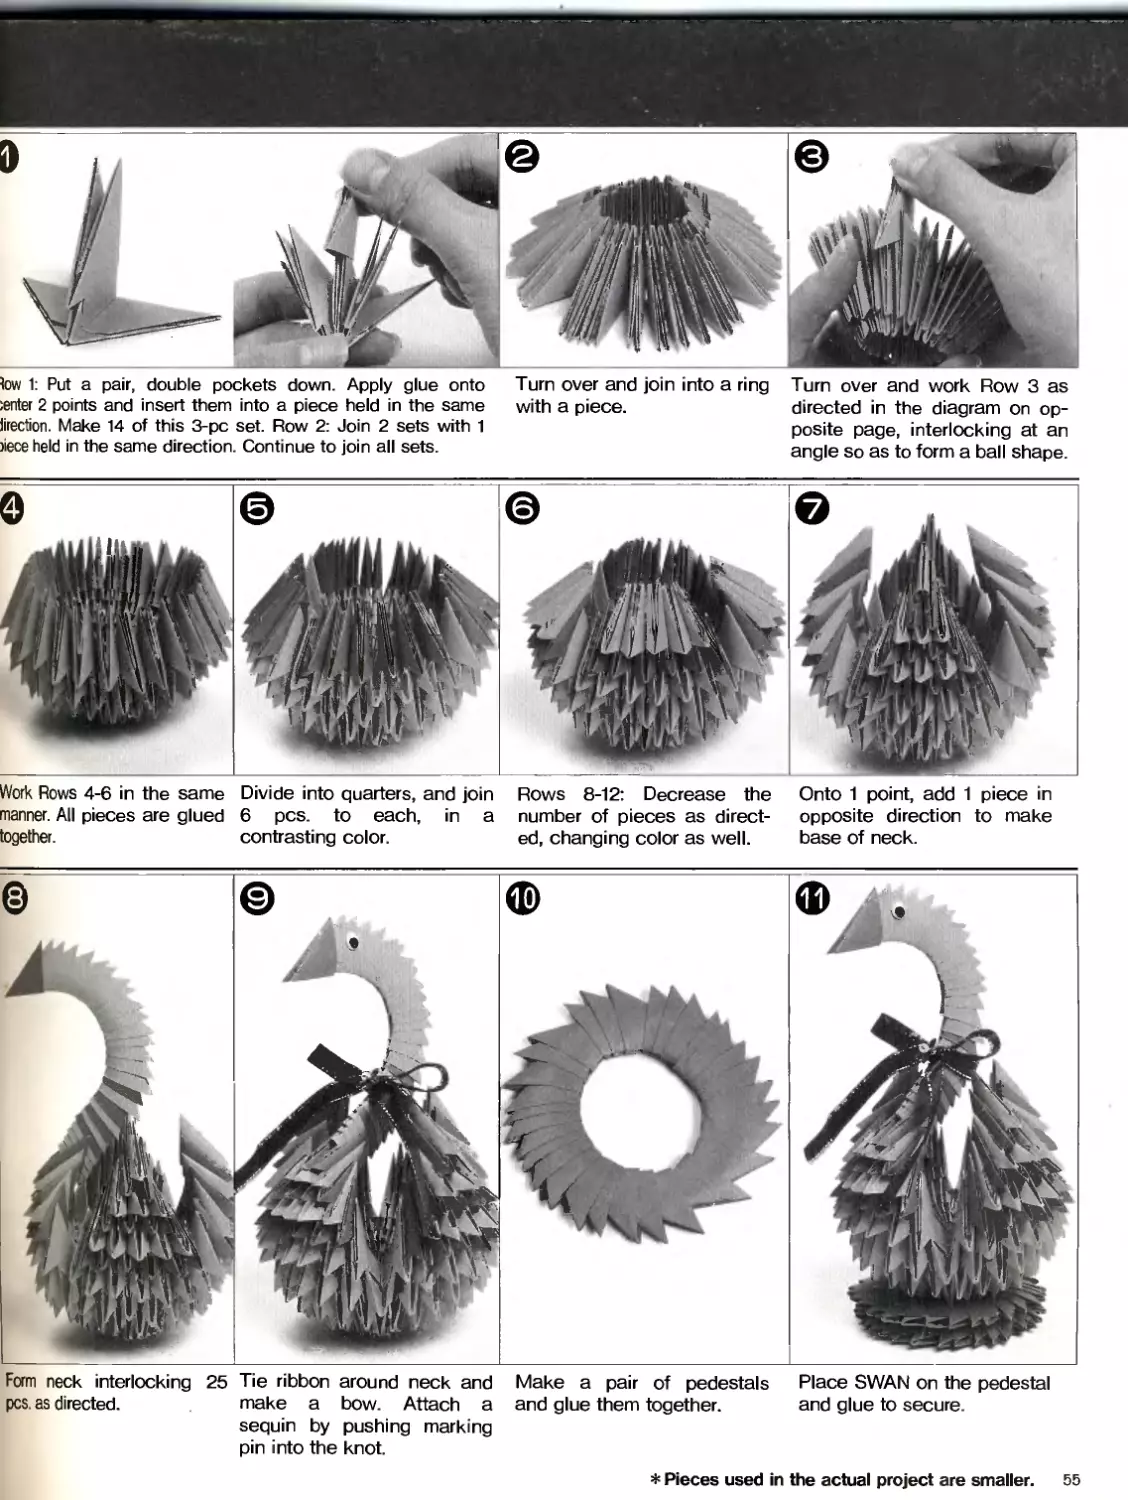
Row 1: Put a pair, double pockets down. Apply glue onto Turn over and join into a ring Turn over and work Row 3 as
center 2 points and insert them into a piece held in the same with a piece. directed in the diagram on op-
direction. Make 14 of this 3-pc set. Row 2: Join 2 sets with 1 posite page, interlocking at an
piece held in the same direction. Continue to join all sets. angle so as to form a ball shape
Work Rows 4-6 in the same
manner. All pieces are glued
together.
Divide into quarters, and join
6 pcs. to each, in a
contrasting color.
Rows 8-12: Decrease the
number of pieces as direct-
ed, changing color as well.
Onto 1 point, add 1 piece in
opposite direction to make
base of neck.
Form neck interlocking 25 Tie ribbon around neck and Make a pair of pedestals Place SWAN on the pedestal
pcs. as directed. make a bow. Attach a and glue them together. and glue to secure.
sequin by pushing marking
pin into the knot.
* Pieces used in the actual project are smaller. 55
ow 1: Put a pair, double pockets down. Apply glue onto
enter 2 points and insert them into a piece held in the same
irection. Make 14 of this 3-pc set. Row 2: Join 2 sets with 1
iece held in the same direction. Continue to join all sets.
Turn over and join into a ring Turn over and work Row 3 as
with a piece. directed in the diagram on op-
posite page, interlocking at an
angle so as to form a ball shape.
Work Rows 4-6 in the same
rianner. All pieces are glued
ogether.
Divide into quarters, and join
6 pcs. to each, in a
contrasting color.
Rows 8-12: Decrease the
number of pieces as direct-
ed, changing color as well.
Onto 1 point, add 1 piece in
opposite direction to make
base of neck.
Form neck interlocking 25 Tie ribbon around neck and Make a pair of pedestals Place SWAN on the pedestal
pcs. as directed. make a bow. Attach a and glue them together. and glue to secure.
sequin by pushing marking
pin into the knot.
* Pieces used in the actual project are smaller. 55
9Q
joqjo ровэ эпю -jojoiuBip jouui jo sBuu 3 э^вш “sod gg Buisq--------------------------------1
< < < <
< < <] <1
( sod 3g) j.
<<<<<<<<<<<<<<<<<<<<<<<<<<<<<
<<<<<<<<<<<<<<<<<<<<<<<<<<<<<
IBJSQpQd
sod 3g jo Buij в iujoj oj spuo uiop
ллоу — Л АЛЛА АЛЛА ЛЛЛЛЛЛЛЛЛЛЛЛЛЛЛЛЛЛЛЛЛЛЛ
3 ллоу.AAAAAAЛЛЛЛЛЛЛЛЛЛЛЛЛЛЛЛЛЛЛЛЛЛЛЛЛЛ
g МОН-ДДДАДAAAAAAAAAAAAAAAAAAAAAAAAAДД \
OJOll
p ЛЛОу A AAA A A A A A A A A A A A A A A A A A A A A A A A A A A A A
JOAO Ujn I
|IBJ_ JO S MOH— A A A A A A A A A A A A A A A A A A A A A A A A A A A A A A A A
d ISJI-J__ 9 ЛЛОу.AAAAAAAAAAAAAAAAAAAAAAAAAAAAAAAA
'(SOd 82) Z ЛЛОуА'Д A A A A A A A A A A A A A A A A A A A A A A A A AAA A AA
(•sod pg) 8 ллоу
(•sod 33) б ллоу
(•sod 02) 01 ллоу
( sod 81) 1Л ллоу
AAAAAAAAAAAA
-AAAAAAAAAAA
AAAAAAAAAAAA
AAAAAAAAAAA
AAA AAAAAA A >loaN J° A A A A A A AAA A „g„ IB_L JO
•AAAAAAAAA aoa!d lSJ!d ддддддддд OOOid JSJIJ
\ ..V„ l!Bl
jo oooid jsjij
(’SOd 91) 3J MOy.AAAAAAAA
AAAAAAAA
(-sod tzO 81 ллоу
( sod gO pj. ллоу
(•sod 00 SI ллоу
(sod s) 91 ллоу
( sod 9) zi ллоу
( sod p) si ллоу
( sod з) 61 ллоу
St# joj Э11ЧДЛ
LP# joj \juiy
9t# joj poj-pioo v
Aiqiuesse >poN
„гЛ ‘uid Buppoiu
Щ1ЛЛ jou>| oqj ojnoos рив
‘ллор в ojui >|oon punojB uoqqu эц
мод
шэ}! цэвэ joj junoo jaded je|n6ue;oaj jdaoxa s|BuajB[A| *
uid Bui^jbiu papBaq-|jBad j
uinbas ’lUBip „г/i j
uoqqu „91
(paj) jaded jjbjo jo biBubjobj „£ x „гЛ1 L
(Sfr# э1!Члл ‘ip# joj -MLiid ‘9^# joj pej-p|o6 paujajjBd)
jaded jjbjo jo sa|6uBjoej „£ x „гЛ1 61S
siBuajBiAj
epiw\ „9
|9|diuoo
(6 rd) NVMS 8П-9Г#
Tail “A’
Tail “B”
(12 pcs.,
make 2.)
Tail “A”
(14 pcs,
make 1.)
c. , . / Tail “B
First piece
of Tail “B’
Tail “A” & “B” assembly
First piece of Tail “A”
:irst piece
First piece
of Tail “B”
First piece of Tail “A’
st piece
Tail “В’
First piece
of Tail “B”
First piece > A
of Neck
36 pcs. for Neck
(Shape according
to the pattern.)
A\
A Eye
A attaching
A position
Bow/sequin
attaching
position
Tail (Actual size)
Gue.
Shape Neck
along this line.
Tail “B”
(12 pcs,
make 2.)
Head/Neck
(Actual size)
Red piece (Beak)
Row 7 of Body
Rows 1-3 assembly
Row 1
/1>
uble-
cket
Row 1
Row 2
Apply glue onto
points of Row 1
pcs, and insert
into Row 2 pcs.
Form into a ring.
Row 3
Row 2
Turn over.
ouble
pocket
<1/
Row 1
Tail “A”
(14 pcs.,
make 1.)
57
Put 2 pcs. double folds down.
Join them by inserting the
adjoining points into 1 pc.
Make 16 sets. Join them in
the same manner as Step 1,
and form into a ring with 32
Turn over so Row 1 faces up.
Work on Row 3 as direct® P
in the diagram on previou d
page.
held in the same direction. pcs.
When Row 6 is done, divide Form wings as directed in Make neck and head as Make three tails as directed F
pieces into three: Right wing the diagram, forming a curvy directed and interlock with according to the actual size p
(14), neck(1), left wing(14) and outline. body. pattern. e
tail(3).
Attach a sequin by pushing glue together. and glue to secure. R
a marking pin into the knot. rc
,8 Attach eyes. c<
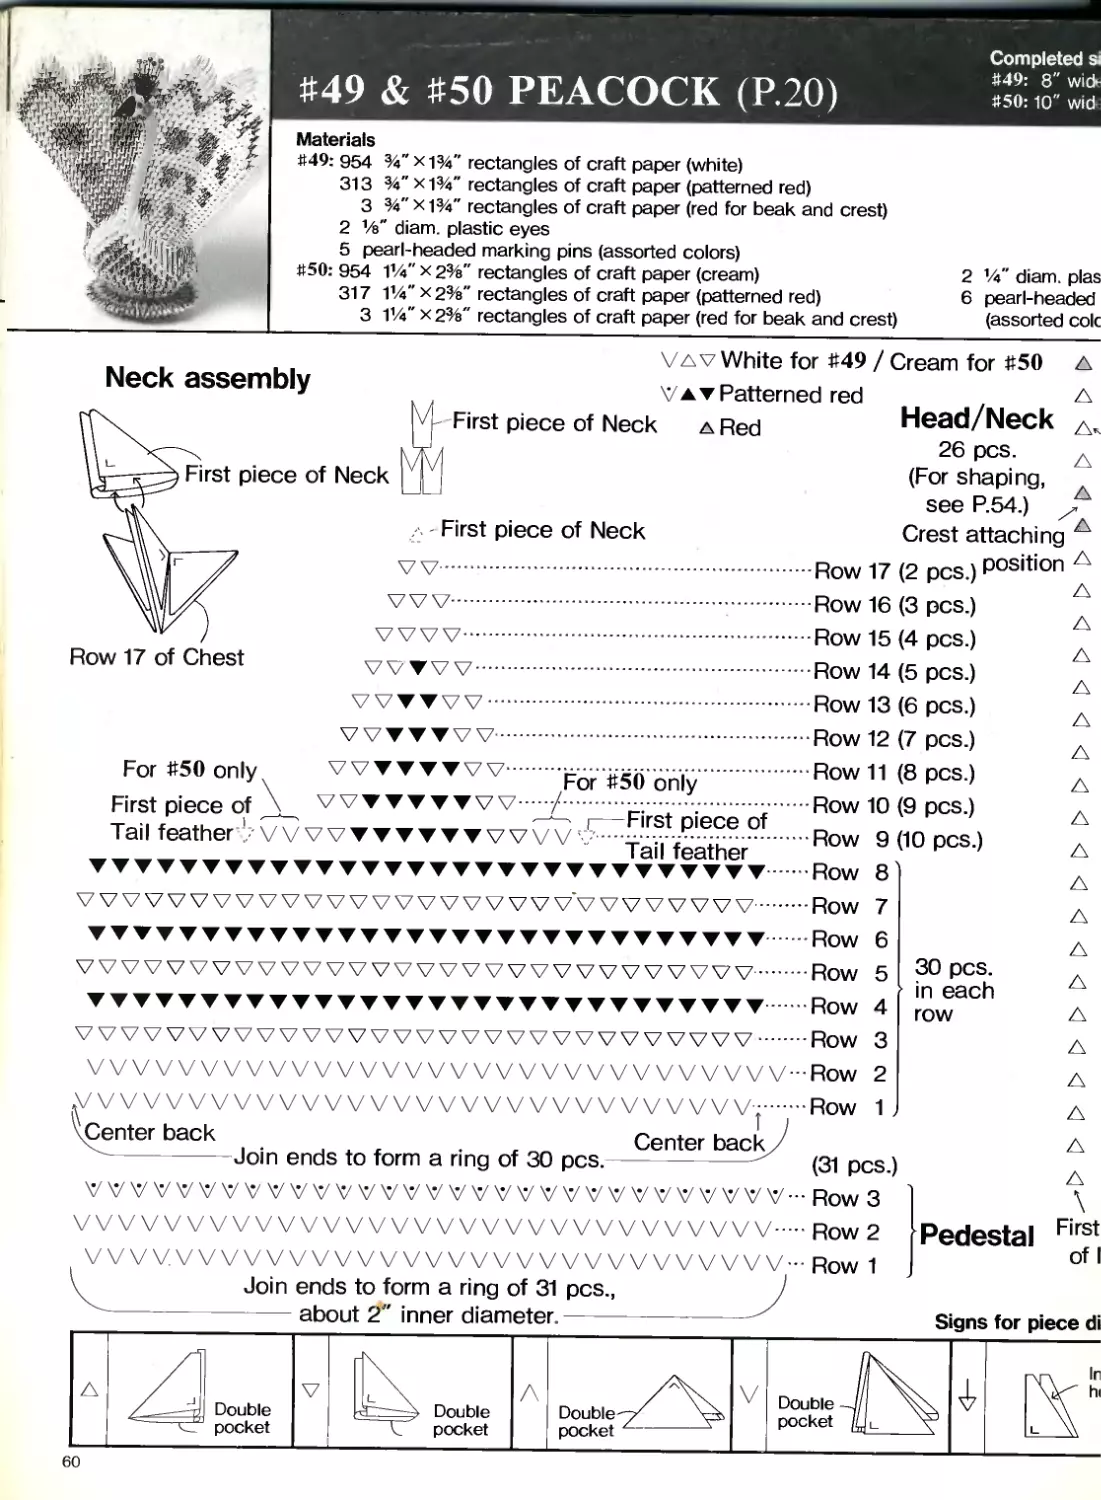
49 & #50 PEACOCK (P.20)
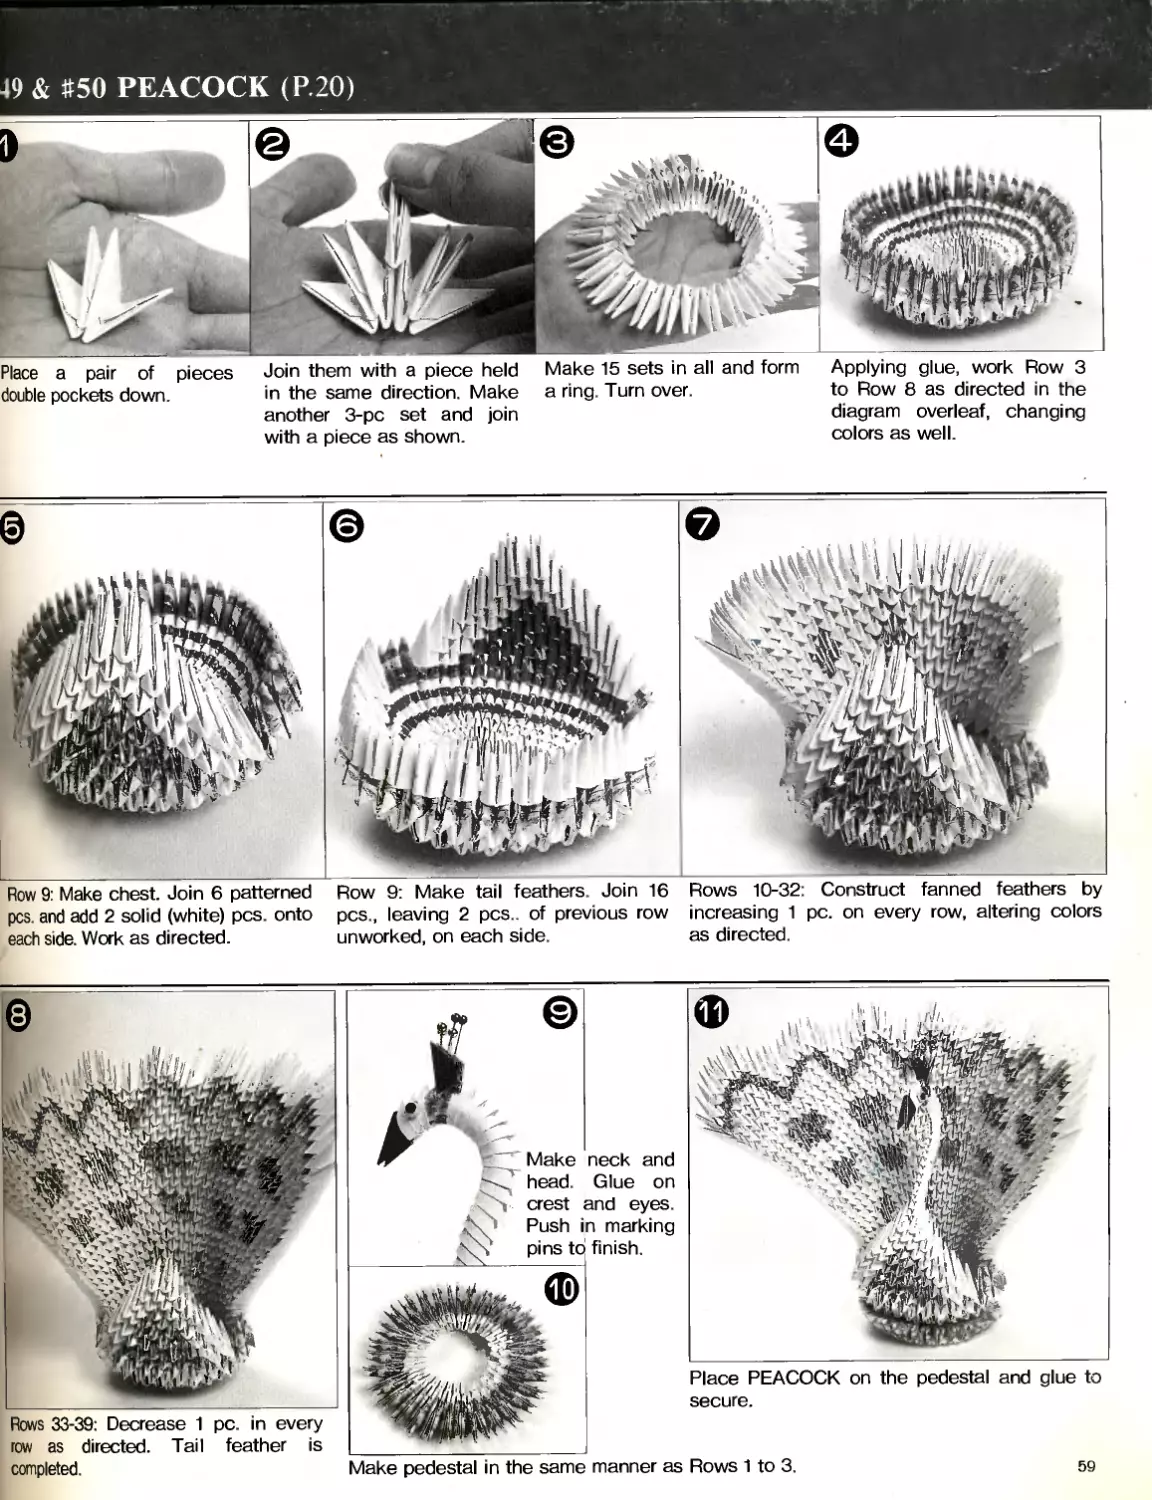
Place a pair of pieces Join them with a piece held Make 15 sets in all and form Applying glue, work Row 3
double pockets down in the same direction. Make a ring. Turn over. to Row 8 as directed in the
another 3-pc set and join diagram overleaf, changing
with a piece as shown. colors as well.
Row 9: Make chest. Join 6 patterned Row 9: Make tail feathers. Join 16 Rows 10-32: Construct fanned feathers by
pcs. and add 2 solid (white) pcs. onto pcs., leaving 2 pcs., of previous row increasing 1 pc. on every row, altering colors
each side. Work as directed. unworked, on each side. as directed.
Rows 33-39: Decrease 1 pc. in every
row as directed. Tail feather is
completed.
Make neck and
head. Glue on
crest and eyes.
Push in marking
pins to finish.
Place PEACOCK on the pedestal and glue to
secure.
Make pedestal in the same manner as Rows 1 to 3.
59
#49 & #50 PEACOCK (P.20)
Materials
#49: 954 %"хш" rectangles of craft paper (white)
313 %" x W rectangles of craft paper (patterned red)
3 %"X1%" rectangles of craft paper (red for beak and crest)
2 1/e" diam. plastic eyes
5 pearl-headed marking pins (assorted colors)
#50: 954 1%" x 2%" rectangles of craft paper (cream)
317 14" x 2%" rectangles of craft paper (patterned red)
3 14" x 2%" rectangles of craft paper (red for beak and crest)
Neck assembly
First piece
Row 17 of Chest
Completed S
#49: 8" wid.
#50:10" wid
2 4" diam. plas
6 pearl-headed
(assorted cole
Va v White for #49 / Cream for #50
Vat Patterned red
First piece of Neck a Red Head/Neck
26 pcs.
(For shaping,
see P.54.)
Crest attaching
Row 17 (2 pcs.) Pos'tion Л
Row 16 (3 pcs.)
Row 15 (4 pcs.) д
Row 14 (5 pcs.) A
Row 13 (6 pcs.) л
Row 12 (7 pcs.) д
For #50 onlyRow 11 (8 pcs) д
..••-......... Row 10 (9 pcs.) A
i—First piece of.A
.z. .........Row
Tail feather
▼ ▼▼▼▼▼▼▼.....Row
7 W WVW.......Row
▼ ▼▼▼▼▼▼▼.....Row
7 V V V VVVV..Row
▼ ▼▼▼▼▼▼▼.....Row
7VVVVVVV......Row
First piece of Neck
For #50 only
First piece of \
Tail feather1/VVVVVVTTVTWVV
9 (10 pcs.)
8)
7
6
5
4
3
2
30 pcs.
in each
row
A
^/VVVVVVVVVVVVVVVVVVVVVVVVVVWVj.....Row 1
/Center back Center backJ
Join ends to form a ring of 30 pcs.- (31 pCs.)
VVVVVVVVVWVVVVVVVVVVVVVVVVVVVV- Row 3
VVVVVVVVVVVVVVVVVVVVVVVVVVVVVVV.....Row 2
VVVV.VVVVVVVVVVVVVVVVVVVVVVVVVVV- Row 1
\ Join ends to form a ring of 31 pcs., )
about 2" inner diameter-
Pedestal
First
of I
Signs for piece di
60
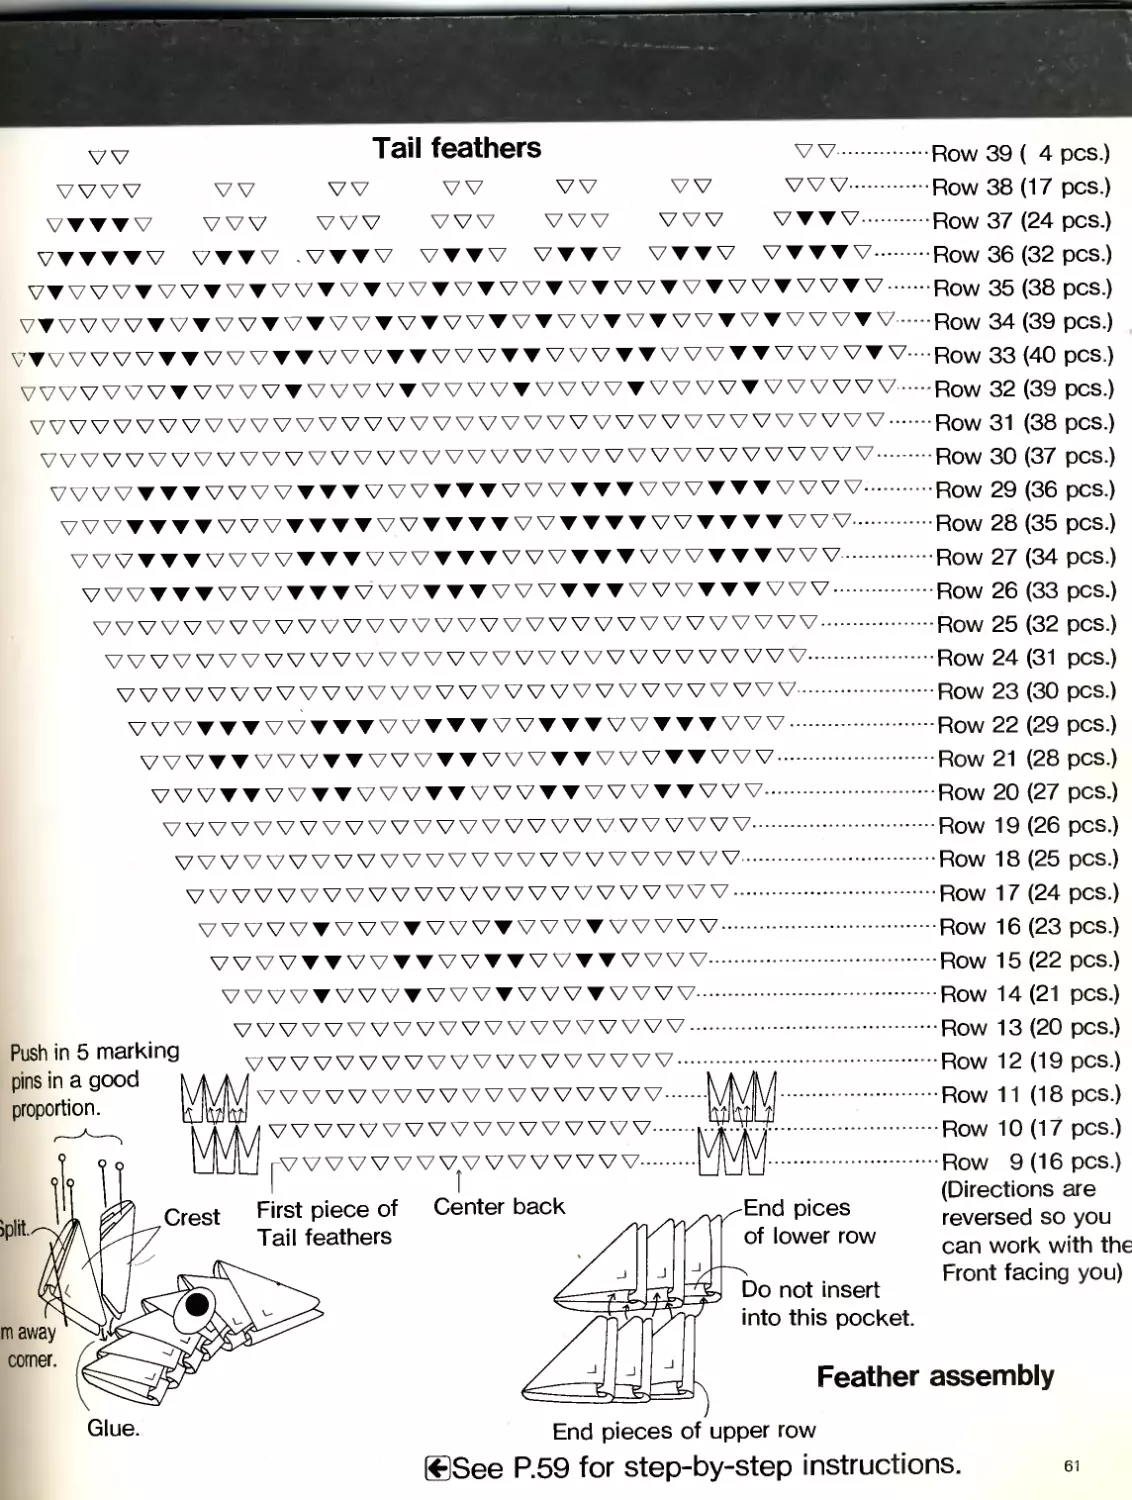
vv Tailfeathers vv....Row 39 (4 pcs.)
vvvv vv vv vv vv vv vvv................Row 38 (17 pcs.)
VVVW VVV VVV VVV VVV VVV VVVV................Row 37 (24 pcs.)
WWW VVVV -VVVV VVVV VVVV VVVV VVVW................Row 36 (32 pcs.)
WWWVVVVVVVVVVVVVVVVWVVVVVVVVVVVVVV...........Row 35 (38 pcs.)
VVVVVVVVVVVVVVVVVVVWWWWVVVWVVVVVVV............Row 34 (39 pcs.)
VVVVVVVV VVV VVV VVVV VVV VVV VVVV VVVV VVV VVVV V----Row 33 (40 pcs.)
VVVVVVVVVVVWVVVVVVVVVVVVVVVVVVVVWWW..........-Row 32 (39 pcs.)
WWWVVVVVVVVVVVVVVVVVWVVVVVVVVVVWV............Row 31 (38 pcs.)
VVVWVVVVVVVVVVVVVVVVVVVVVVVVVVVVVVVV.........Row 30 (37 pcs.)
VVVW VVVVVVVV WV W WVV VVVVVVVVV VVVW.......Row 29 (36 pcs.)
VVVVVVVWWW VVVVVVVVVVVVV WVVVVVW............Row 28 (35 pcs.)
VVVV VV VVVW VVV VVV V VVVW VV VVVV V VVVV.Row 27 (34 pcs.)
VVVVVVVVVVVV VVVW WWW WVWV VVVV............Row 26 (33 pcs.)
VVVVVVVVVVVVVVVVVVVVVVVVVVVVVVVV...........Row 25 (32 pcs.)
VVVVVVVVVVVVVVVVVVVVVVVVVVWVVV............Row 24 (31 pcs.)
VVVVVVVVVVVVVVVVVVVVVVVVWWW...............Row 23 (30 pcs.)
VVVTVVVVWVVVVVVVVV VVVVVVVVVV............Row 22 (29 pcs.)
VVVVVVVVVVVVVVVVVVVVVVVVVVVV.............Row 21 (28 pcs.)
VVVVVVVVVVVVVVWVVVVVVVVVVV..............Row 20 (27 pcs.)
VVVVVVVVVVVVVVVVVVVVVVVVVV..............Row 19 (26 pcs.)
VVVVVVVVVVVVVVVVVVVVVVVVV..............Row 18 (25 pcs.)
VV WVVVVVVVVVVVVVVVVVVVV.........Row 17 (24 pcs.)
VVVVVVVVVVVVVVVVVVVVVW..........Row 16 (23 pcs.)
VVVVVVVVVVVVVVVVVVVVVV..........Row 15 (22 pcs.)
VVV WVWV VVVVVVVVVVVV..........Row 14(21 pcs.)
Push in 5 marking
pins in a good i
proportion.
о
13 (20 pcs.)
12 (19 pcs.)
11 (18 pcs.)
10 (17 pcs.)
9 (16 pcs.)
maway
corner.
Crest First piece of Center back
Tail feathers
End pices
of lower row
Do not insert
into this pocket.
Row
Row
Row
Row
Row
(Directions are
reversed so you
can work with the
Front facing you)
Feather assembly
iplit..
Glue.
End pieces of upper row
®See P.59 for step-by-step instructions. ei
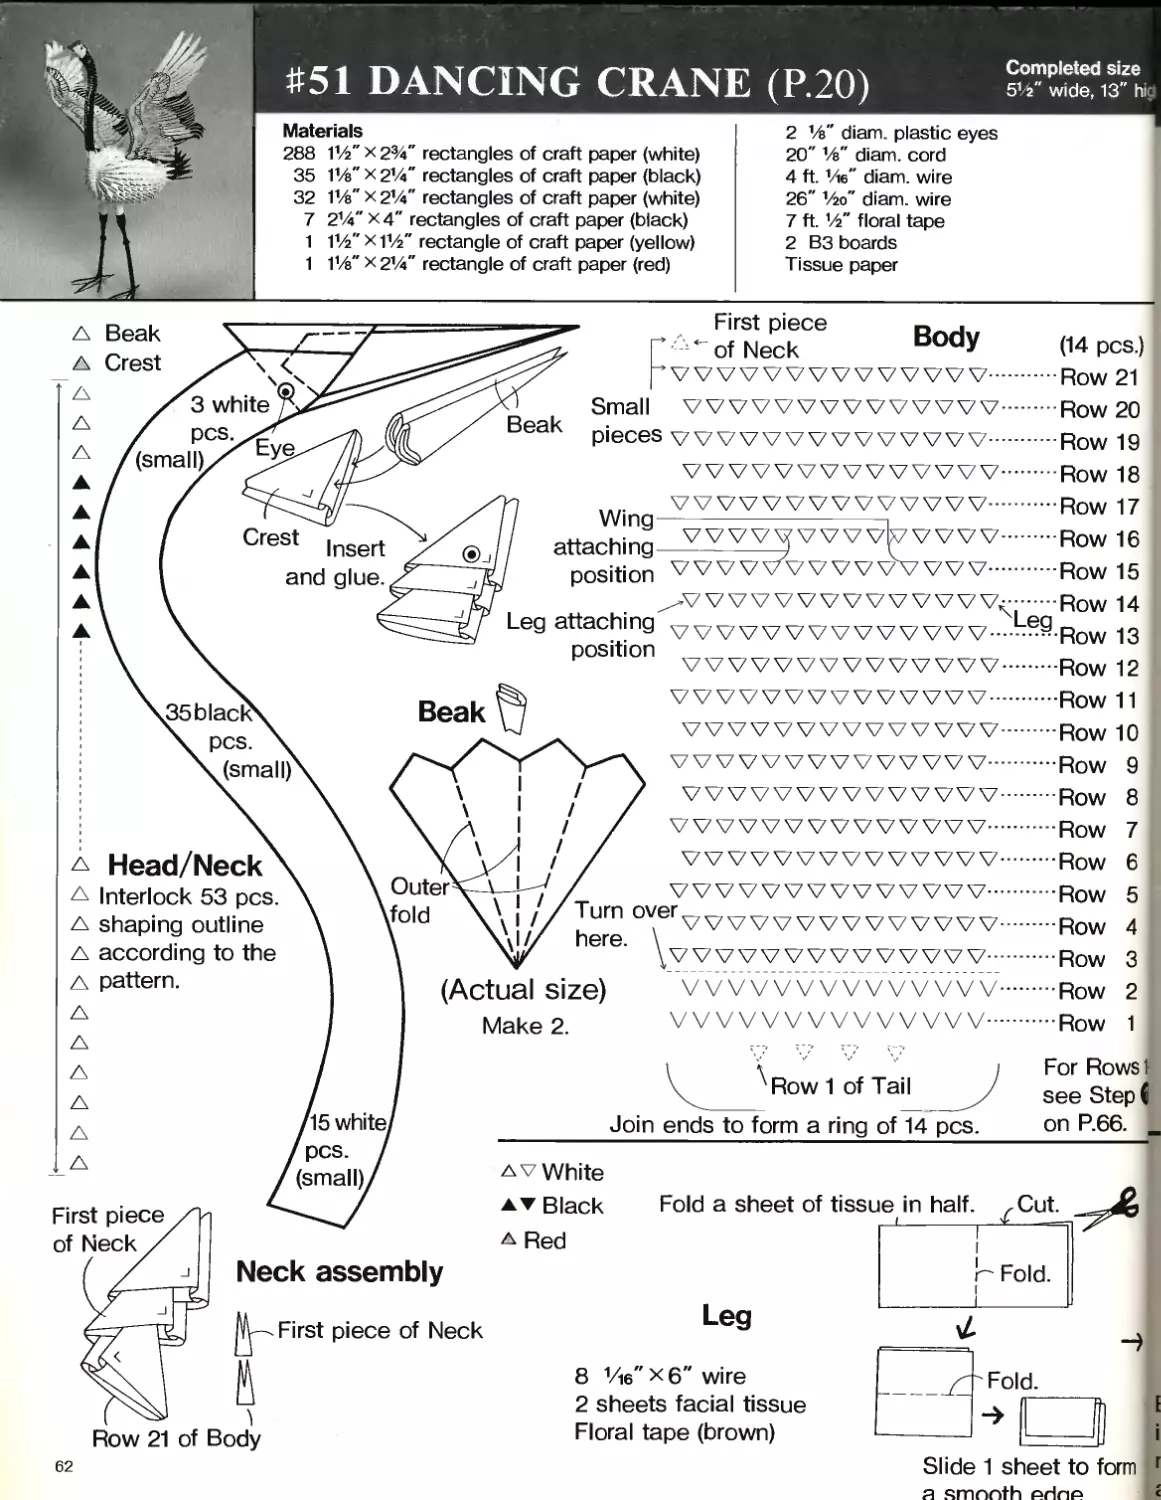
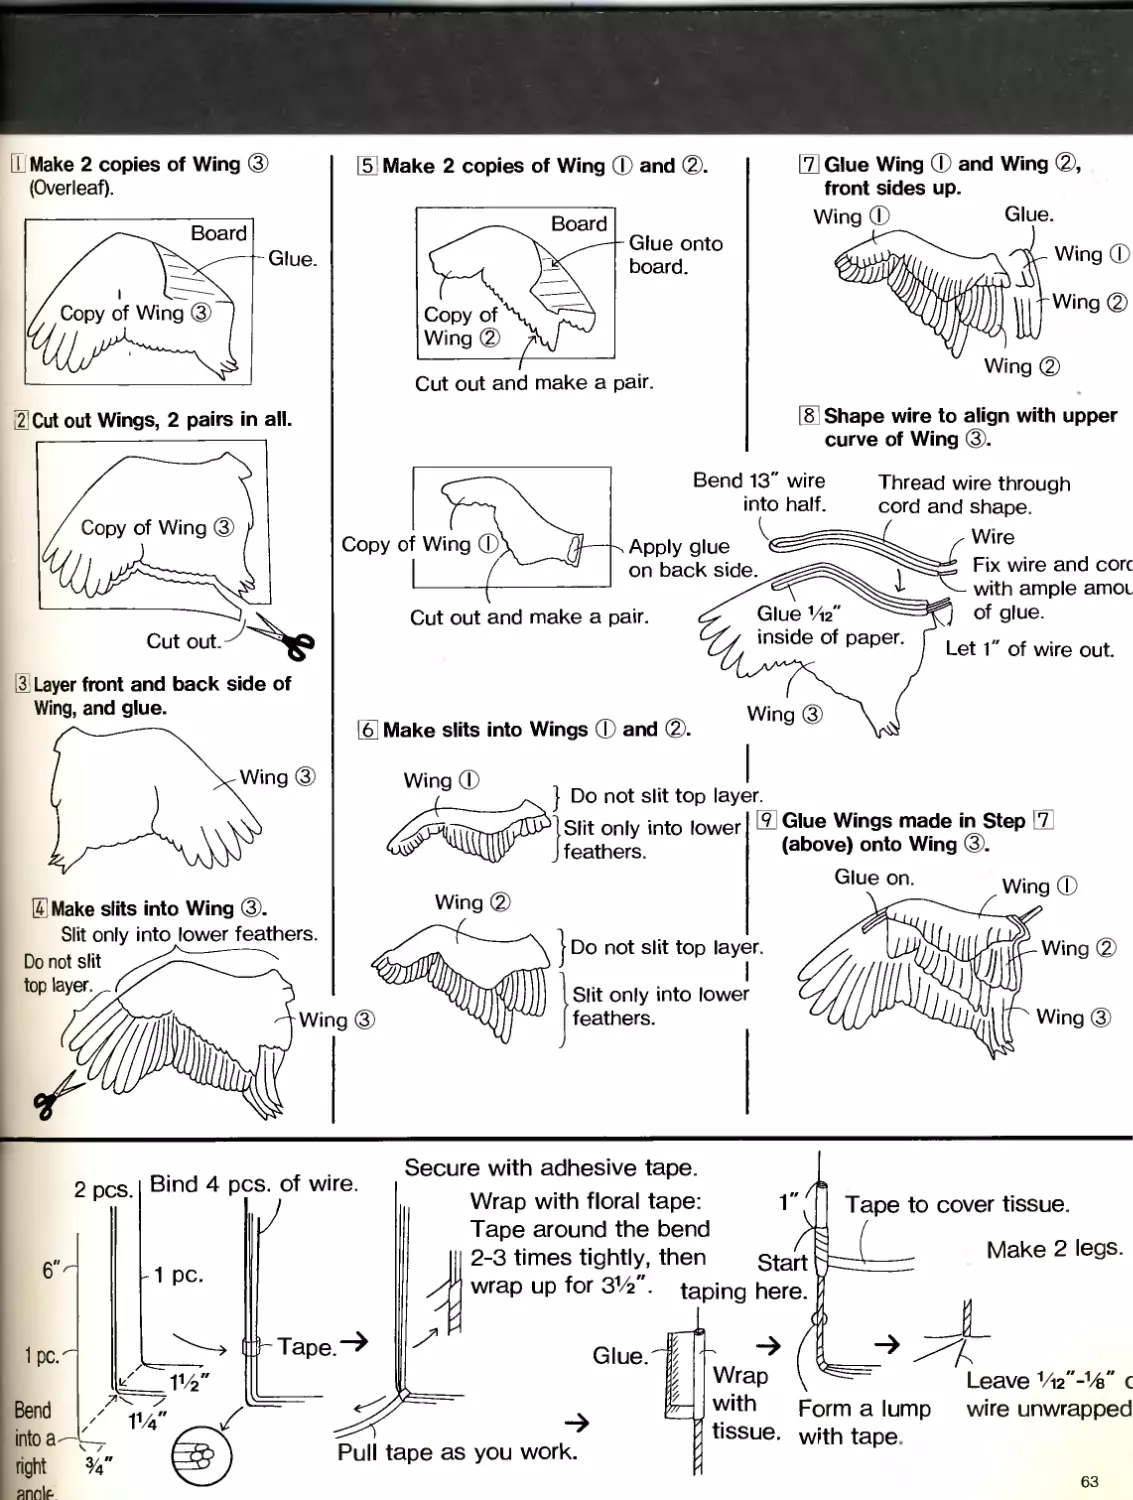
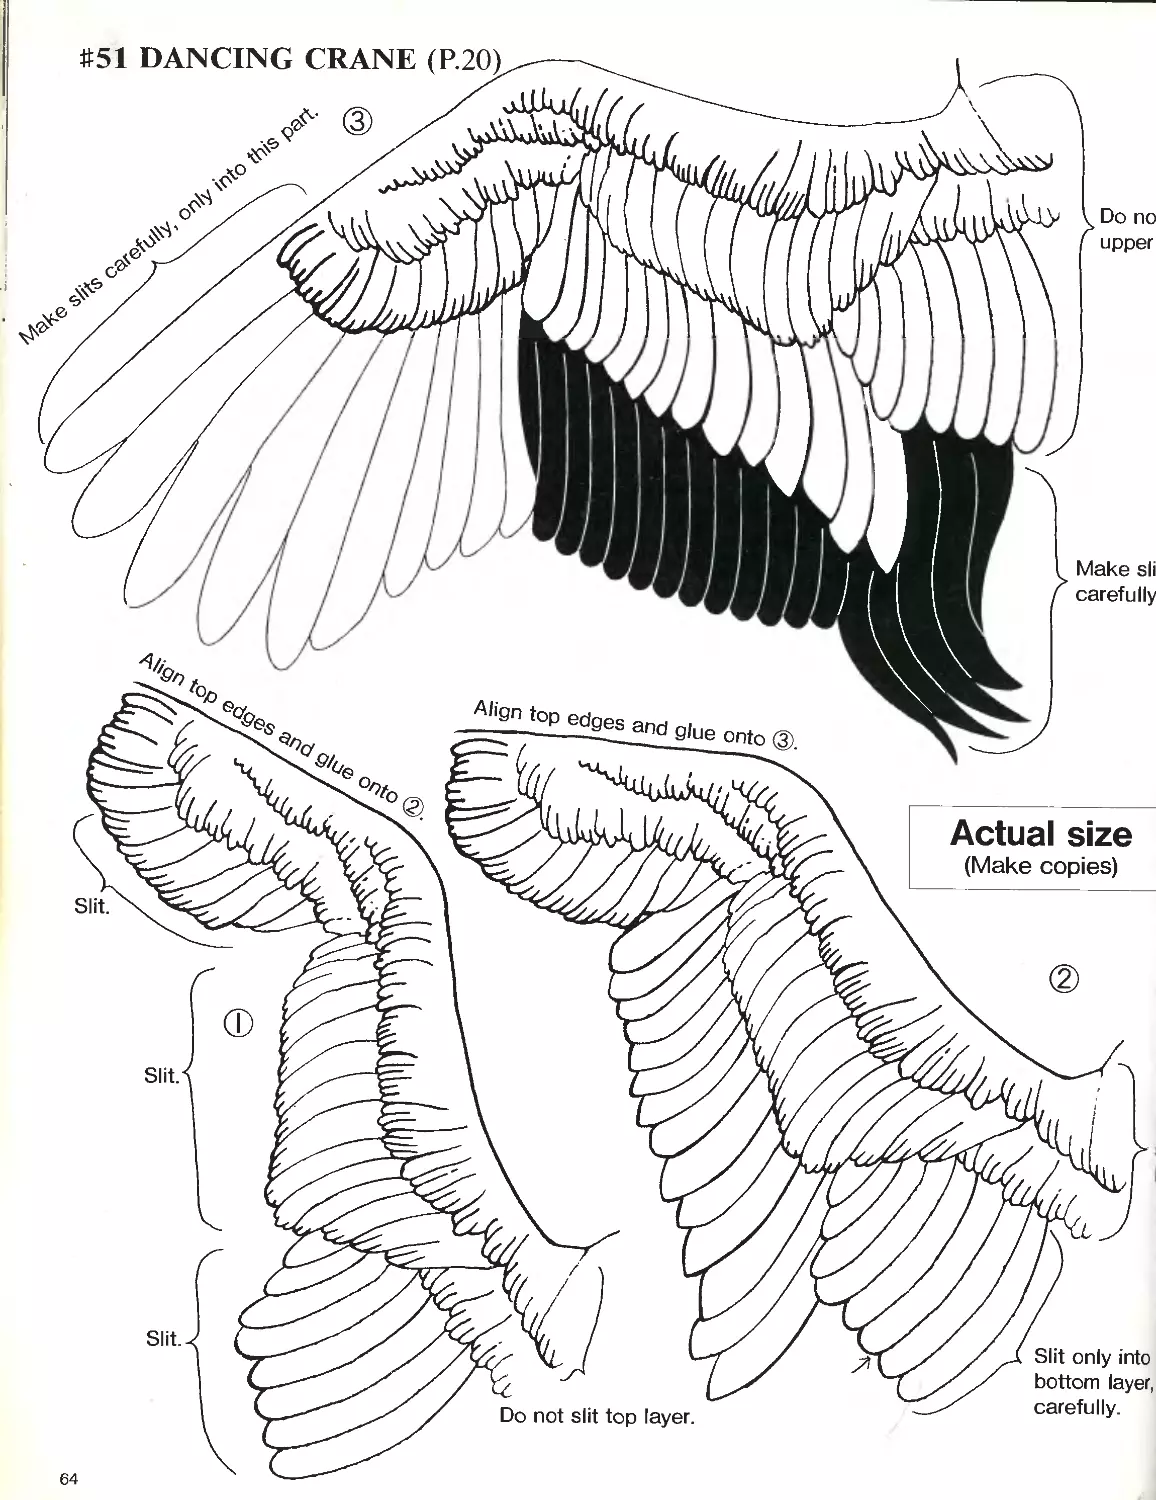
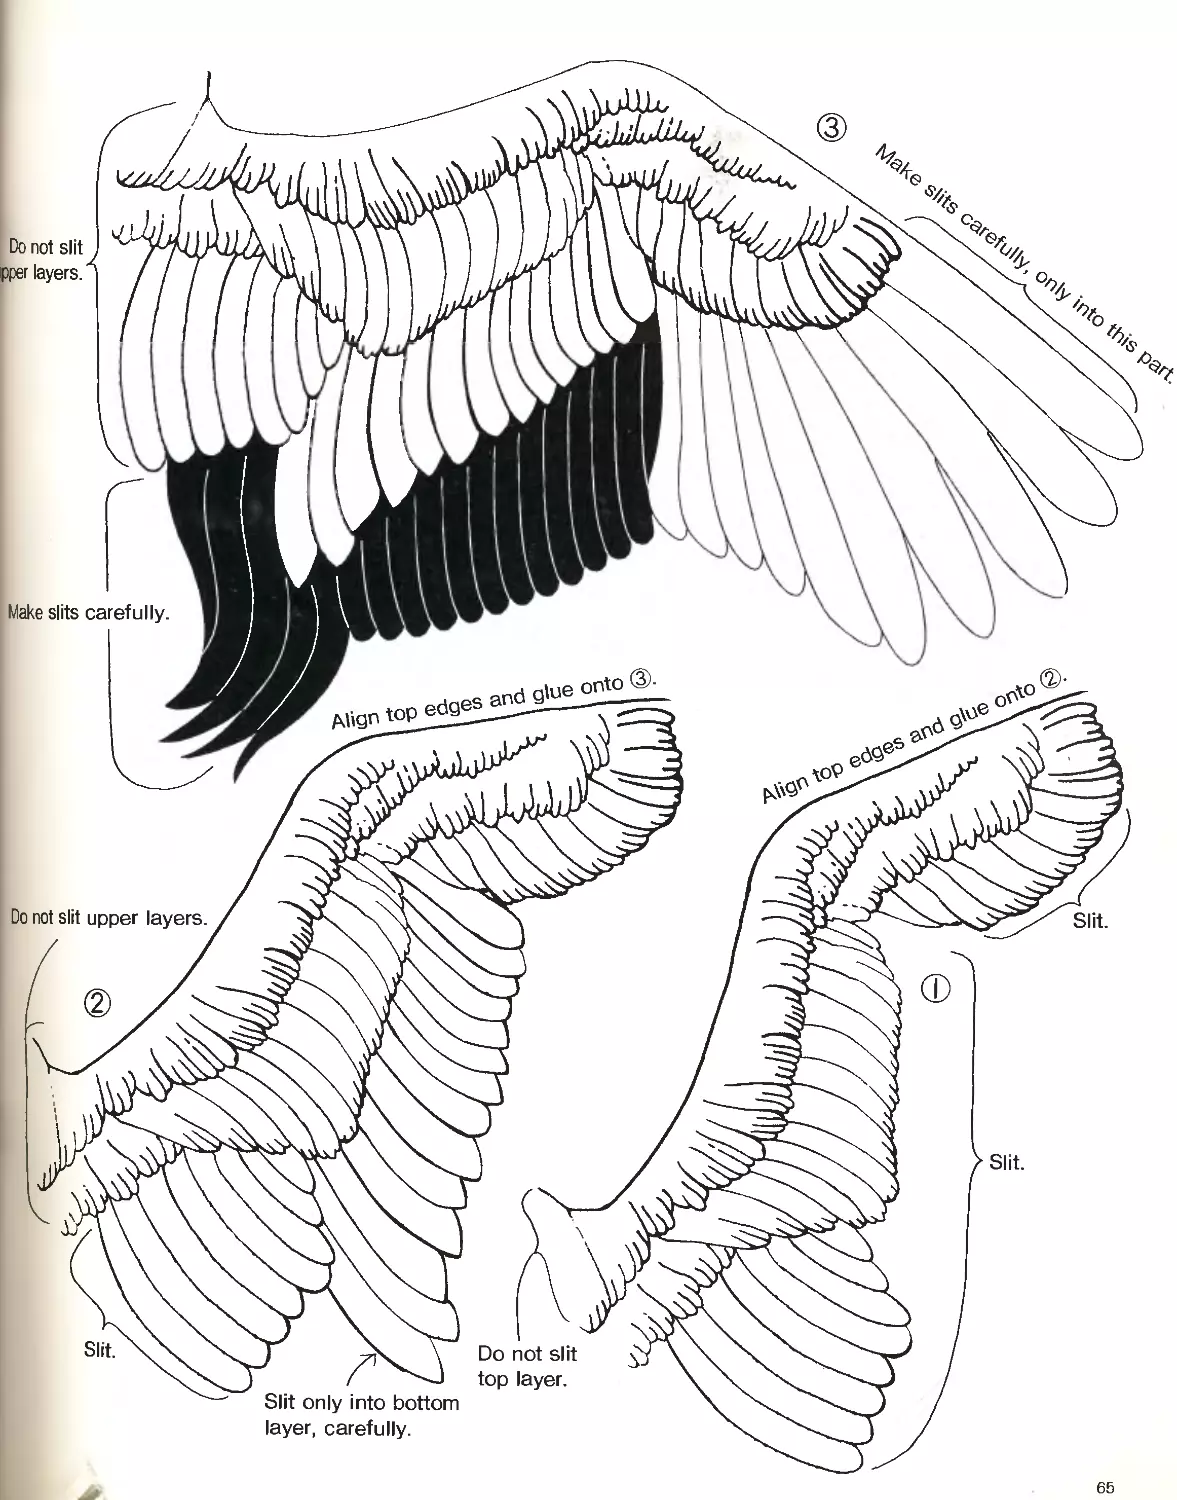
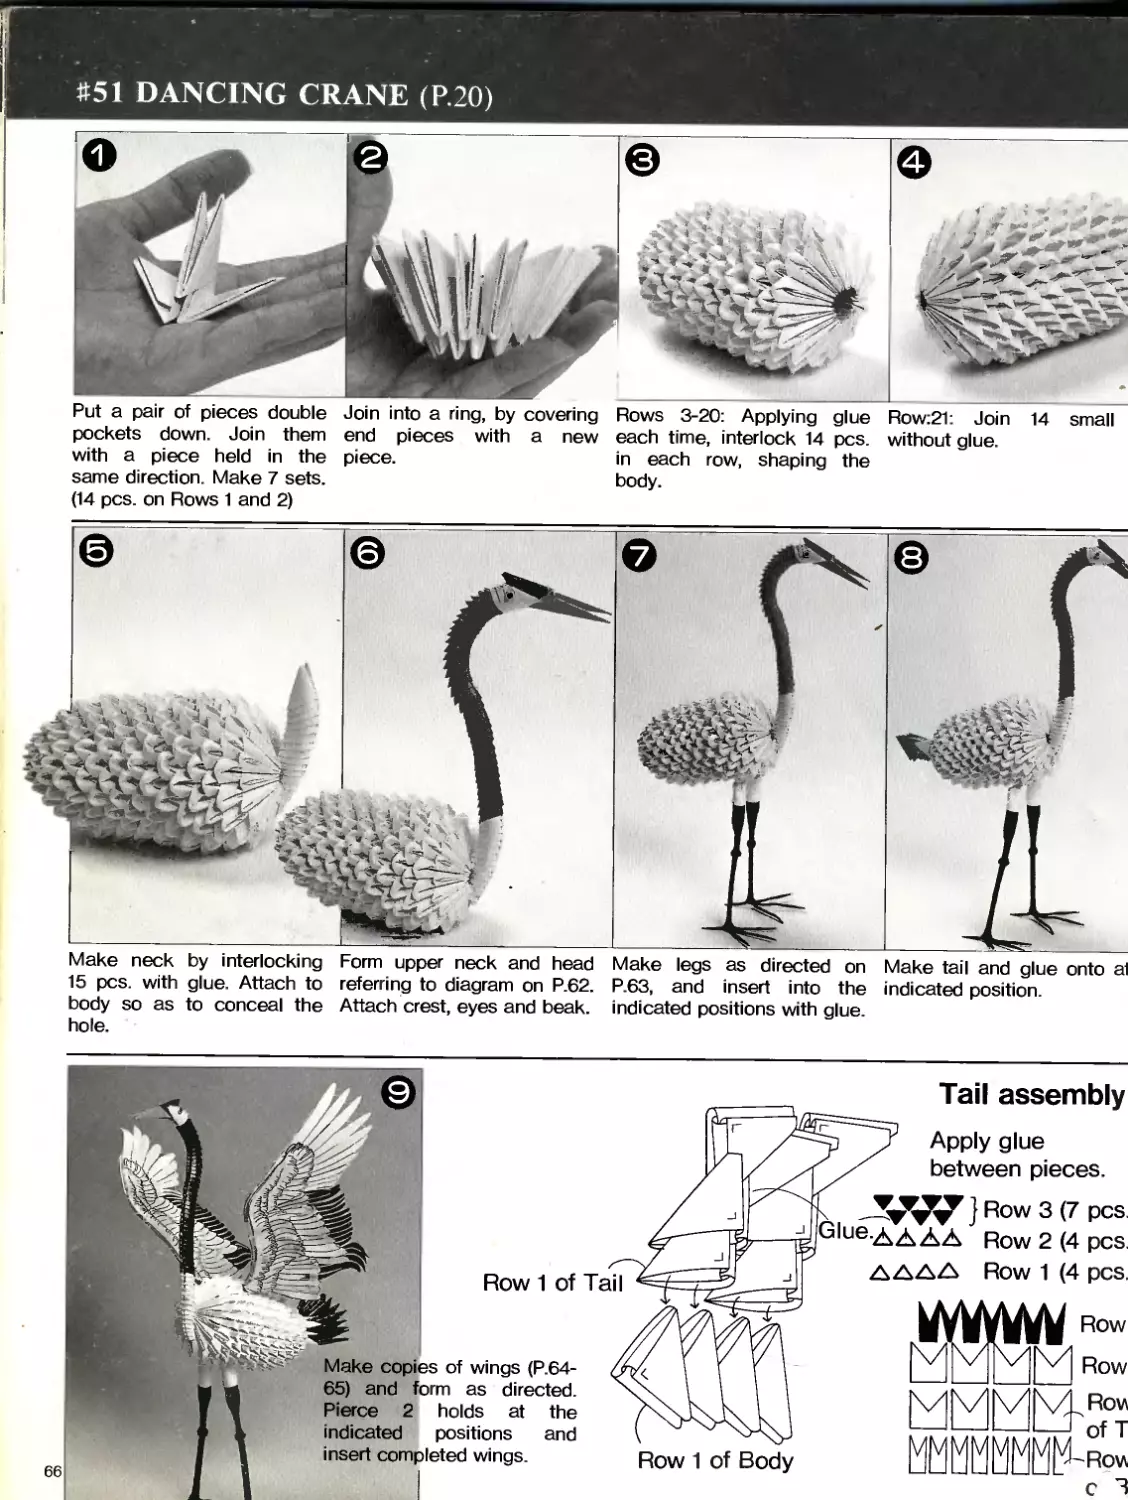
#51 DANCING CRANE (P.20)
Materials
288 IV2" x 2%" rectangles of craft paper (white)
35 11/e" x 21Л" rectangles of craft paper (black)
32 11/e" x 21A" rectangles of craft paper (white)
7 214" x 4" rectangles of craft paper (black)
1 11/г" xi1/2" rectangle of craft paper (yellow)
1 11/e" x 21A" rectangle of craft paper (red)
2 1/e" diam. plastic eyes
20" Va diam. cord
4 ft. Vie" diam. wire
26" V20" diam. wire
7 ft. '/2 floral tape
2 B3 boards
Tissue paper
Completed size
51/г" wide, 13" hid
Beak
Crest
First piece
of Neck
Body
yX 3 white
/ pcs.
(small)/^
1 Small
Beak
Crest Insert
and glue.
Wing
attaching
position
Leg attaching
position
35 bl ac kN
\ pcs. \
\ (small)
\
\
Head/Neck y
Interlock 53 pcs.
shaping outline
according to the
pattern.
Outer
.fold
/15 white,
f pcs. /
(small)/
I
I
I
/
1 //Turn
\l I/ here.
(Actual size)
Make 2.
over
vvvvvvvvvvvvvv
VVVVVVVVVVVVVV-
(14 pcs.)
...Row 21
...Row 20
...Row 19
...Row 18
...Row 17
...Row 16
...Row 15
;..Row 14
---Row 13
...Row 12
...Row 11
...Row 10
...Row
...Row
...Row
...Row
...Row
...Row
...Row
...Row
...Row
9
8
7
6
5
4
3
2
1
Row 1 of Tail
Join ends to form a ring of 14 pcs.
For Rows 15
see Step 6
on P.66.
First piece
of Neck
Row 21 of Body
62
av white
at Black
a Red
Fold a sheet of tissue in half. ,Cut.
Neck assembly
-First piece of Neck
Leg
8 1/i6"x6"wire
2 sheets facial tissue
Floral tape (brown)
к Fold.
я smnnth prlne
Board
ITl Make 2 copies of Wing (3)
(Overleaf).
Glue.
Copy of Wing @
5 Make 2 copies of Wing CD and
Board
Copy of
Wing (2)
Glue onto
board.
Cut out and make a pair.
[7] Glue Wing CD and Wing (2),
front sides up.
Wing CD Glue.
Wing CD
Wing (2)
Wing (2)
8 Shape wire to align with upper
curve of Wing
I] Cut out Wings, 2 pairs in all.
Cut out.
Copy of Wing @
Copy of Wing CD
Cut out and make a pair.
[3] Layer front and back side of
Wing, and glue.
Wing @
0 Make slits into Wing C3'.
Slit only into lower feathers.
Do not slit
top layer.,
Wing @
Wing CD
Do not slit top layer.
Slit only into lower
feathers.
Wing (2)
j Do not slit top layer.
Slit only into lower
feathers.
[6] Make slits into Wings CD and
Apply glue
on back side.
Bend 13" wire
into half.
Wing @
Glue Vi2
inside of paper.
Thread wire through
cord and shape.
Wire
Fix wire and core
with ample amoi
of glue.
Let 1" of wire out.
[9] Glue Wings made in Step 7
(above) onto Wing
Glue on.
Wing CD
Wing (2)
Secure with adhesive tape.
Wrap with floral tape:
Tape around the bend
2-3 times tightly, then
wrap up for 31/2 . taping here.
Bind 4 pcs. of wire.
2 pcs.
1 pc.
Glue.
Bend
into a
right
annla
11/2
Pull tape as you work.
1"
Tape to cover tissue.
Make 2 legs.
Start bt
Wrap
with
tissue.
Form a lump
with tape.
Leave 1/i2"-14" c
wire unwrapped
63
#51 DANCING CRANE (P.201
.лр
Do no
upper
Slit.
Slit.
Do not slit top layer.
Slit only into
bottom layer,
carefully.
A/lgn toP edges
Make sli
Actual size
(Make copies)
64
65
#51 DANCING CRANE (P.20)
Put a pair of pieces double Join into a ring, by covering Rows 3-20: Applying glue Row:21 Join 14 small
pockets down. Join them end pieces with a new each time, interlock 14 pcs. without glue,
with a piece held in the piece. in each row, shaping the
same direction. Make 7 sets. body.
(14 pcs. on Rows 1 and 2)
Make neck by interlocking Form upper neck and head Make legs as directed on Make tail and glue onto a1
15 pcs. with glue. Attach to referring to diagram on P.62. P.63, and insert into the indicated position.
body so as to conceal the Attach crest, eyes and beak, indicated positions with glue
hole.
Make copies of wings (P.64-
65) and form as directed.
Pierce 2 holds at the
indicated positions and
insert completed wings.
Tail assembly
Apply glue
between pieces.
i Row 2 (4 pcs
Row 1 of Tail
Row 1 of Body
ДДДА Row 1 (4 pcs.
Row
Row
\/1 v V \/^Rovi
c 3
66
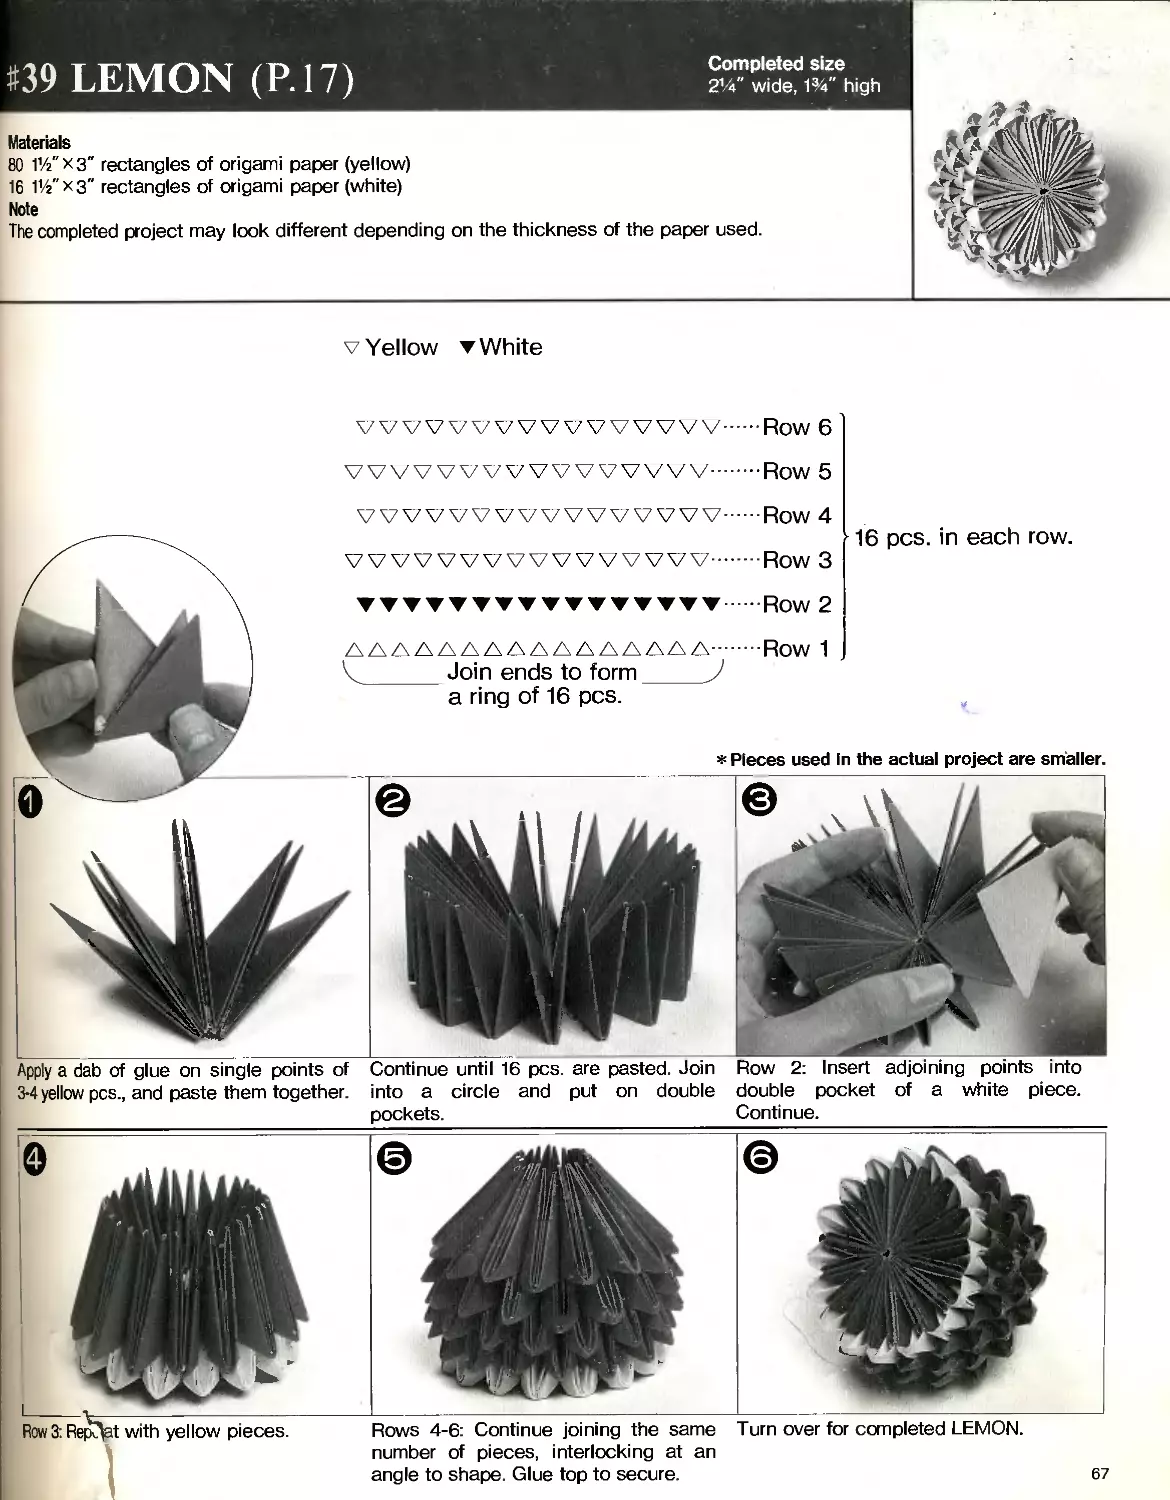
П9 LEMON (Р.17)
Completed size
214" wide, 1%" high
Materials
80 11/г"хз" rectangles of origami paper (yellow)
16 11/2"хз" rectangles of origami paper (white)
Note
The completed project may look different depending on the thickness of the paper used.
vYellow ▼ White
VVV VVVVVVV WVWV Row 6
VVVVVVVVVVVVVVW..Row 5
Row 4
16 pcs. in each row.
Row 3
Row 2
Row 1
* Pieces used In the actual project are smaller.
Apply a dab of glue on single points of
3-4 yellow pcs., and paste them together.
Continue until 16 pcs. are pasted. Join
into a circle and put on double double pocket of a white piece.
pockets. Continue.
Join ends to form
a ring of 16 pcs.
Rows 4-6: Continue joining the same Turn over for completed LEMON,
number of pieces, interlocking at an
angle to shape. Glue top to secure. 67
Row 3: Repeat with yellow pieces.
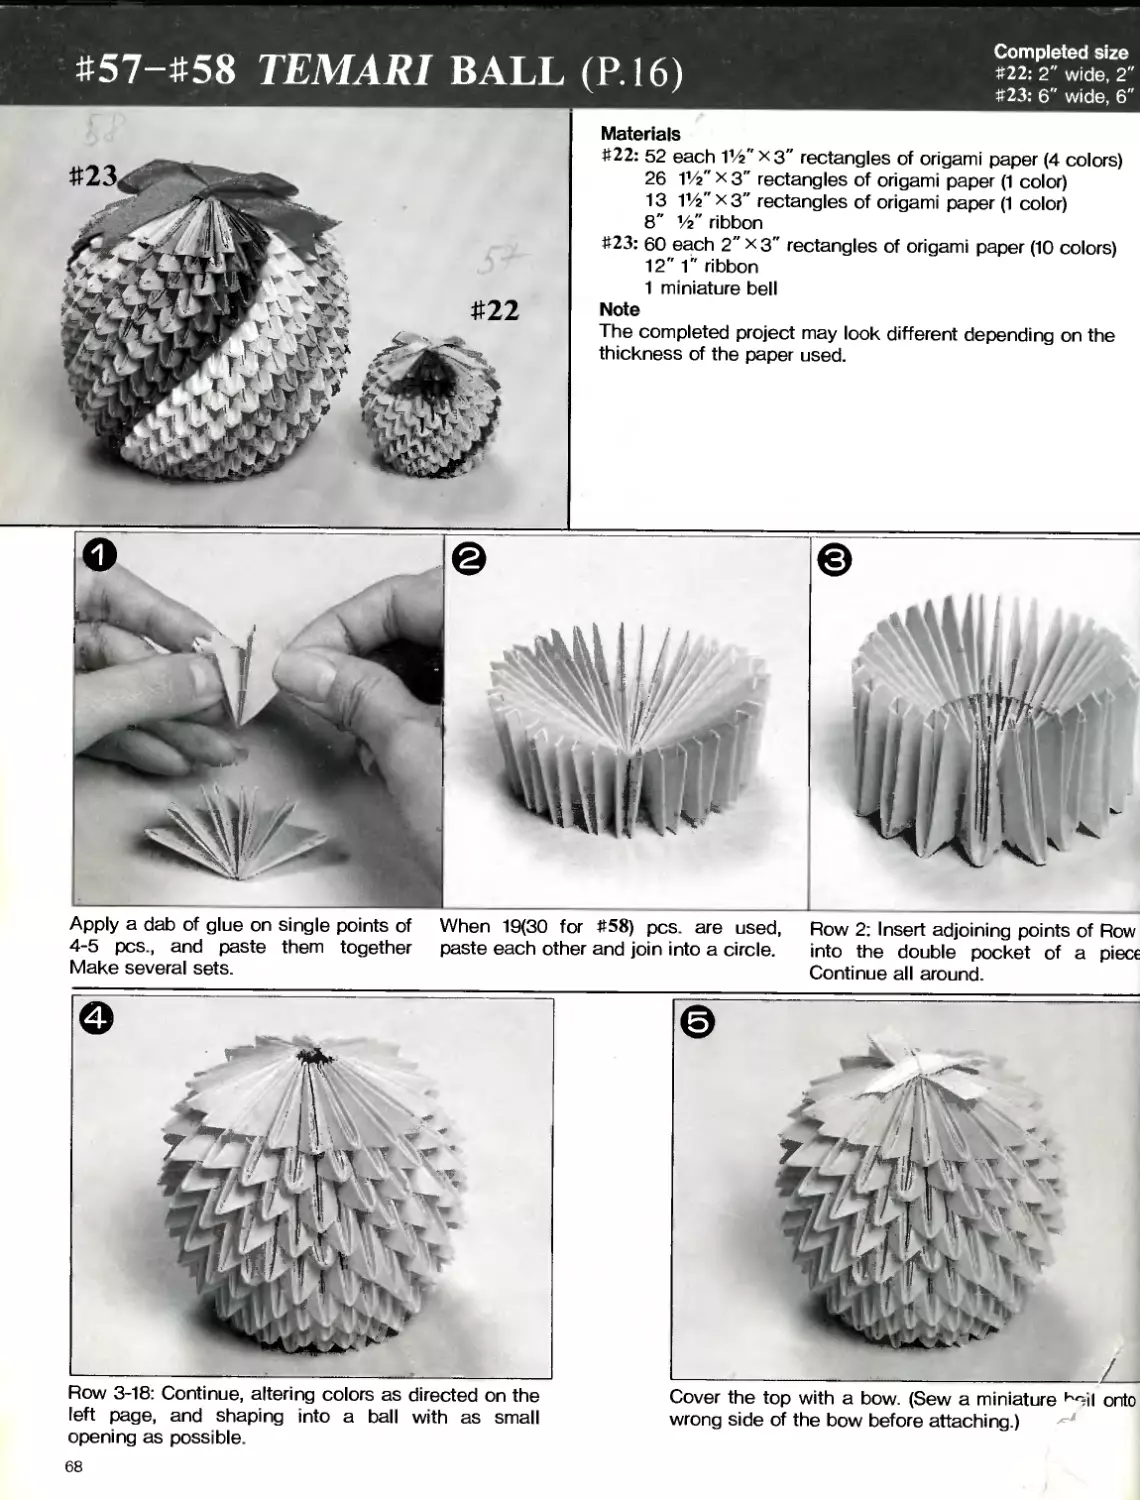
#57-#58 TEMARI BALL (P.16)
Completed size
#22: 2" wide, 2"
#23: 6" wide, 6"
Materials
#22: 52 each 11/2'’хз" rectangles of origami paper (4 colors)
26 Г/г" x 3" rectangles of origami paper (1 color)
13 Г/г" x 3" rectangles of origami paper (1 color)
8" 1/z" ribbon
#23: 60 each 2" хз" rectangles of origami paper (10 colors)
12" 1" ribbon
1 miniature bell
Note
The completed project may look different depending on the
thickness of the paper used.
Apply a dab of glue on single points of When 19(30 for #58) pcs. are used, Row 2: Insert adjoining points of Row
4-5 pcs., and paste them together paste each other and join into a circle. into the double pocket of a piece
Make several sets. Continue all around.
I
I
I
I
I
Row 3-18: Continue, altering colors as directed on the
left page, and shaping into a ball with as small
opening as possible
Cover the top with a bow. (Sew a miniature K<il onto
wrong side of the bow before attaching.)
68
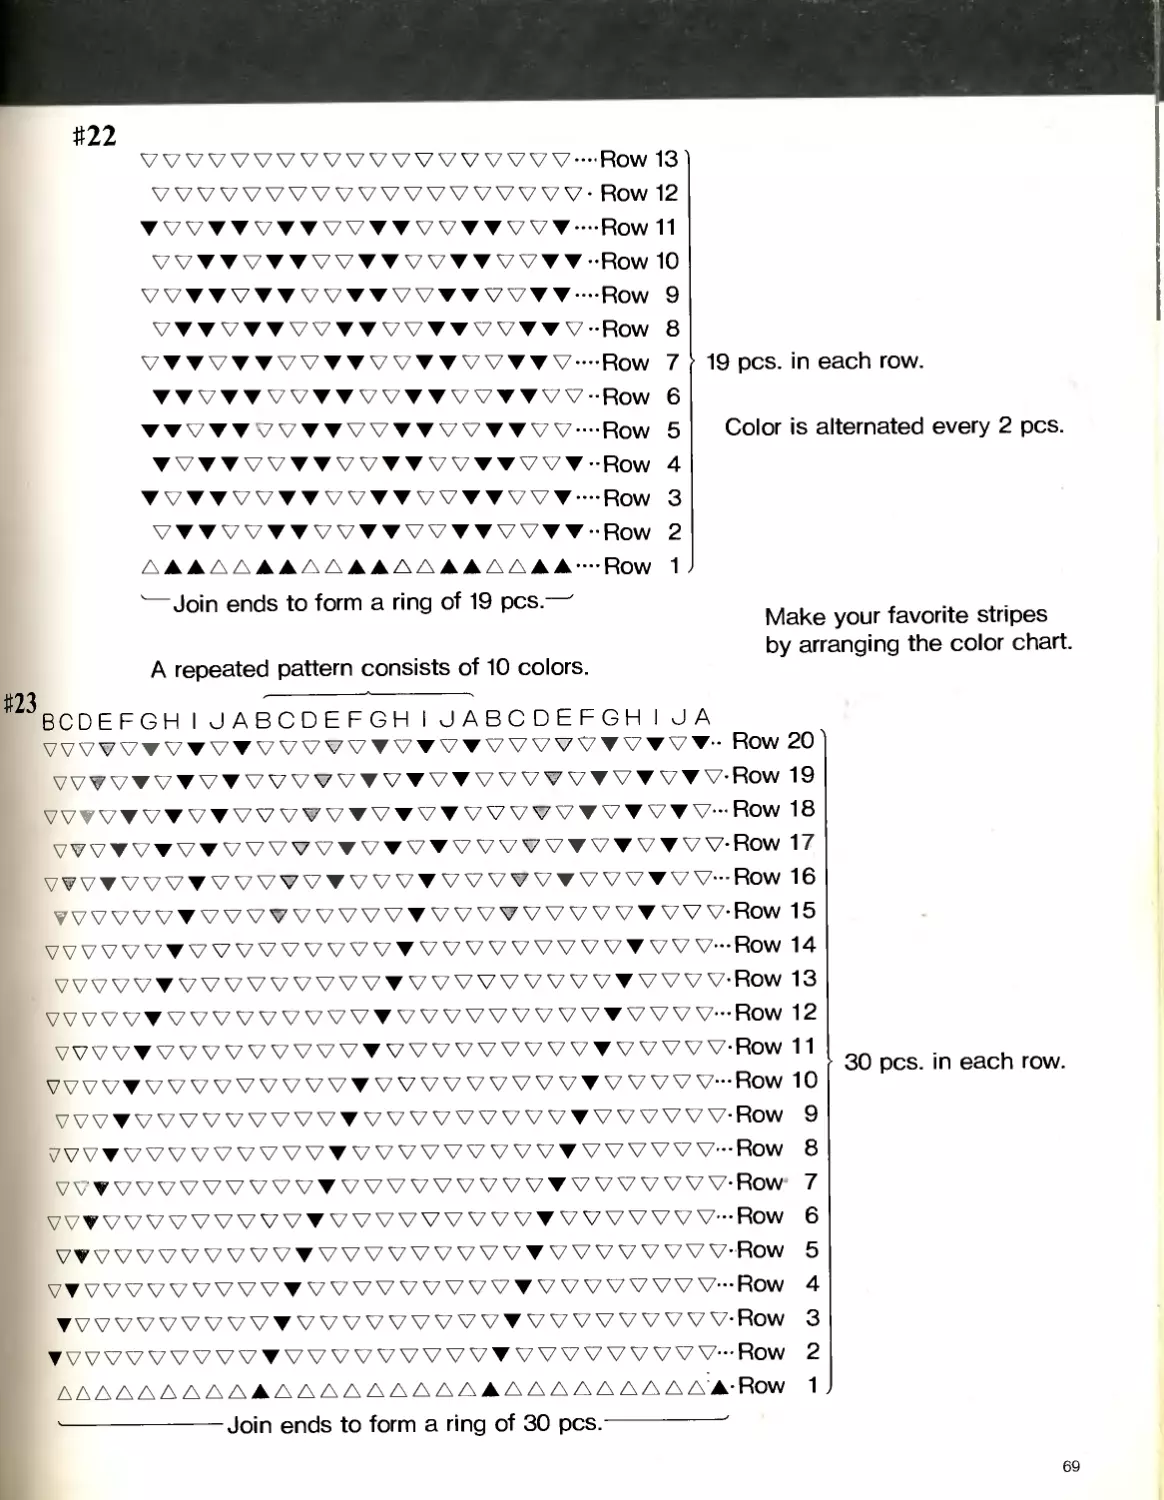
#22
VVVV VVV WWW VVV VVV —Row 13
VVVVVVVVVVVVVVVVVVV - Row 12
VVVVV VVVVVVV VVVVV W — Row 11
VVVV VV VVVV VVVV VVVV V--Row 10
VVV VVV VV VVVVVVV VVV V--Row 9
VVVVVVVVVVVVVVVVVVV”Row 8
VVVVVVVVVVVVVVVVVVV-Row 7 •
VVVVVVVVVVVVVVWVVV-Row 6
VVVVVVVVVVWVVWVVV’-Row 5
VWVVVVVVVVVVVVVVW--Row 4
V VVV VVV VVVV VVVV VVW — Row 3
VVVVVVVVVVVVVVVVWV--Row 2
AAAA ДААЛ A A A AAA A A AAA-Row 1
' Join ends to form a ring of 19 pcs.—'
A repeated pattern consists of 10 colors.
19 pcs. in each row.
Color is alternated every 2 pcs.
Make your favorite stripes
by arranging the color chart.
#23 -----'----'
BCDEFGH I JABCDEFGH I JABCDEFGH I JA
VVVVVVVVVVVVVVVVVVVVVVVVVVVVW- Row 20'
VVV VVVV VVVV VVVV VVVV V VVVV VVVVV V-Row 19
VVVVV vvvv vvvv vvvv VVVV VVVV VVVV V- Row 18
VVVVWVV VVVV VVVV VVVVV V VVVV VVV V-Row 17
WWW VV VVVV VVV VVV VVVV VVV VVVVV-Row 16
VVVVV VVV VVV VVVVV VVV VVV VVV VVVV V-Row 15
VVVV VVV VVV VVV VVV VVV VVV VVV VVVV V-Row 14
VVVV VVV VVV VVVV VVV VVVV VVV VVVVV V-Row 13
VVVVWVV VVV VVV VVV VVV VVV VVV VVV V—Row 12
VVV VVV VVV VVVV VVV VVV VVV VVV VVVV V-Row 11
VVVVV VVV VVV VVV VVV VVV VVV VVV VVV V-Row 10
VVVVV VVV VVVV VVV VVV VVV VVV VVVVV V-Row 9
7VVV VVV VVV VVV VVV VVVV VVVV VVVVV V-Row 8
VVV WWW VVVV VVV VVV VVVV VVV VVV V-Row 7
VVVVVVVVVV V VVVVWVV VVV VV WWW-Row 6
VVV VVV VVV VVV VVV VVVV VVV VVVV VVV V-Row 5
VVVV VVV VVVV VVV VVV VVV VVV VVV VVV V-Row 4
▼ VVVVVVVVVV VVV VVV VVV VVV VVVV VW-Row 3
▼ VVVV VVV VVV VVV VVVV VVV VVV V VVVV V-Row 2
30 pcs. in each row.
AAAAAA A A A A A A A A A A A A A A A A A A AAA A A'A-Row 1
Join ends to form a ring of 30 pcs.
69
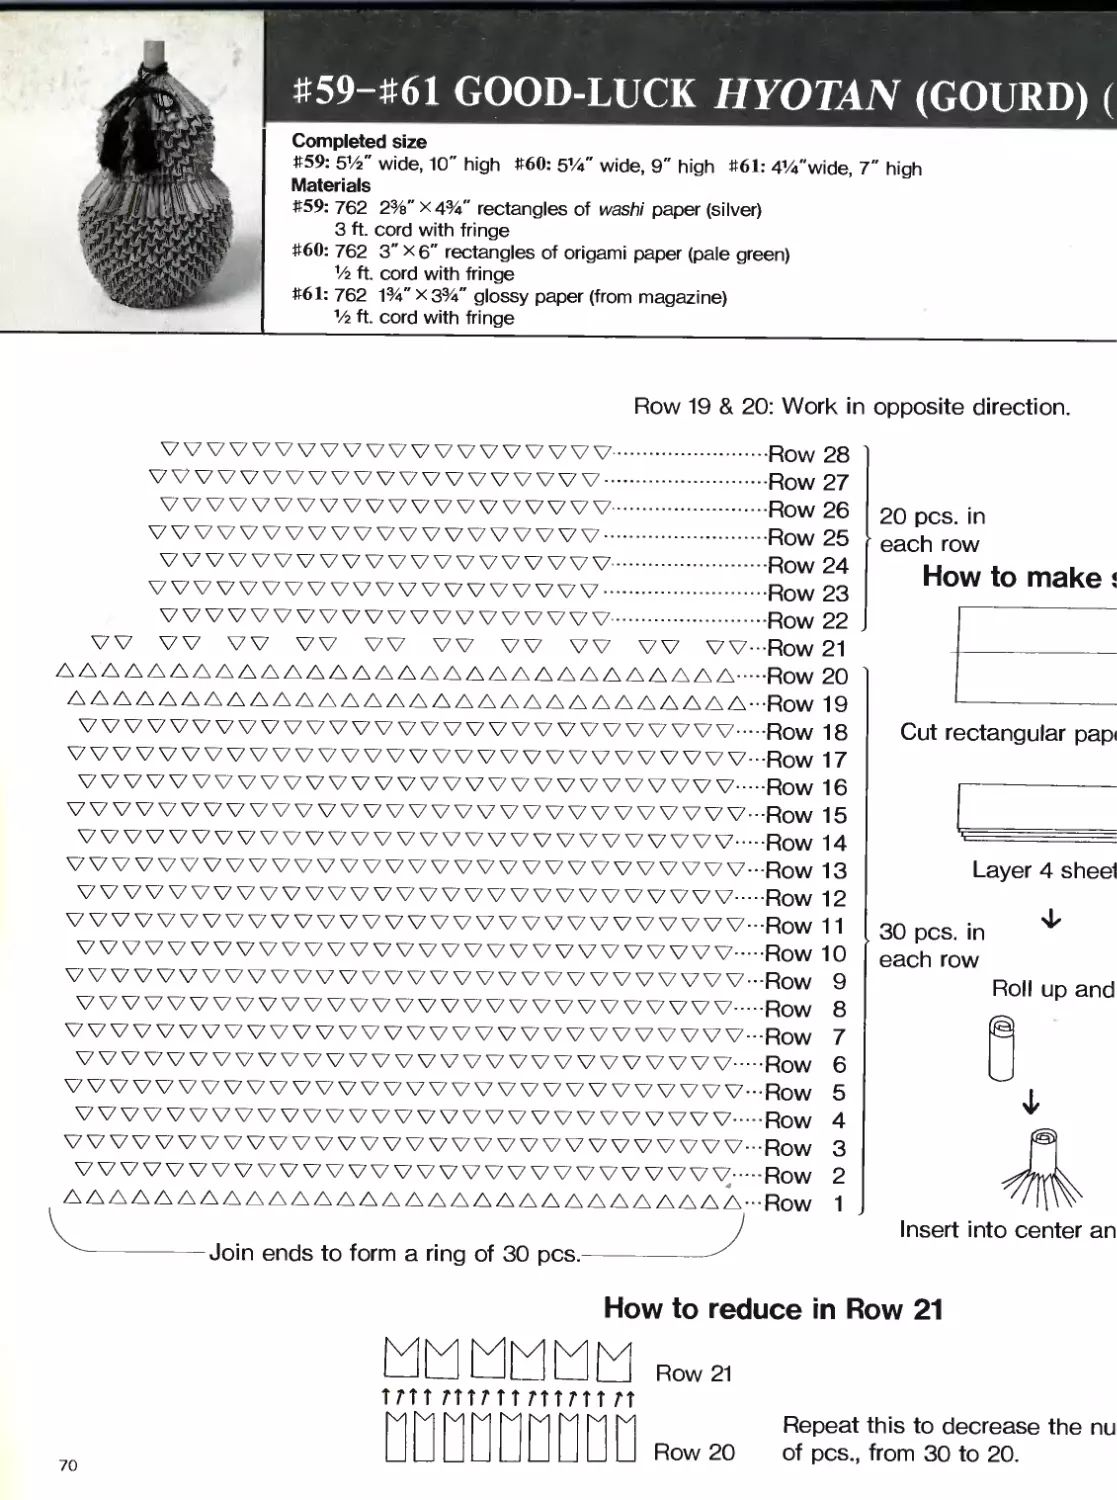
# 59-#61 GOOD-LUCK HYOTAN (GOURD) (
Completed size
# 59: 51/г" wide, 10" high #60: 5%" wide, 9" high #61: 4%"wide, 7" high
Materials
# 59: 762 2%"X4%" rectangles of washi paper (silver)
3 ft. cord with fringe
#60: 762 3" x 6" rectangles of origami paper (pale green)
1/2 ft. cord with fringe
#61: 762 1%"хз%" glossy paper (from magazine)
V2 ft. cord with fringe
Row 19 & 20: Work in opposite direction.
VVVW VW VVVVVV VVVVVV...Row 28
WVWVVVVVVVVVVVVVVV...Row 27
VVVVVVVVVVVVVVVVVVW....Row 26
VVVVVVVVVVVVVVVVVVVV...Row 25
VVVVVVVVVVVVWVVVVVV..Row 24
VVVVVVWVVVVVVWVWV....Row 23
VVVVVVVWVVVVWVWW..Row 22 .
vv vv vv vv vv vv vv vv vv vv- Row 21
ДАЛЛАДЛАДЛАДЛДААДЛАДЛДЛАДДДАЛА.Row 20
A A A A A A A A A A A A A A A A A A A A A A A A A AAA A A---ROW 19
VVV VVVV VVVW VVVV VVVV VVV VVVVVV.Row 18
20 pcs. in
each row
How to make t
Cut rectangular pap<
VVVV VVV VVV VVVV VVVW VVVW WWW-Row 17
VVVVVVVVVV VVVVVV VV VVVVVVVV VV V.Row 16
VVVV VVVV VVVW VVVV VVVV VVV VVVV VV-Row 15
VVVVVVVVVVVVVV VVVVVVVVVVVVVW......Row 14
VVVW VVVVVV VVVW VVVV VVVV WWW-Row 13
VVVW VVVVVVV VVV VVVVVVVV VVV VVV....Row 12
VVVW VVVW VVVV VVVV VVV VVV VVV VW-Row 11
VVVV VVV VVVV VVVV VVV VVVV VVVV VVV.Row 10
VVVV WV VVVVVV VVVW VVV VVV VVVWV-Row 9
VVVW VVVW VVVW VVV VVV VVVV VVVV.....ROW 8
VVVV VVVVVVV VVVVVV WWW V VVVWV-Row 7
VV VVVV VVV VVVV VVVV VVVVVVV VVVV V.Row 6
VVVVVVVVVVVVVVVVVVVVVVVVVVVVVV-Row 5
VVVV VVV VVVW VVVV VVVVVVV VVVVVV....Row 4
VVVV VVVV VVVVVVV VVVV VVVV VVVV WV-Row 3
VVVV VVVV VVVV VVV VVVW VVV VVV VVV..Row 2
A A A A A A A A AAA A A A A A A A A A A A A A A A AAA A —Row 1
------Join ends to form a ring of 30 pcs.
Layer 4 sheet
Ф
30 pcs. in
each row
Roll up and
How to reduce in Row 21
Row 21
1711 711711 711711 71
Repeat this to decrease the nu
Row 20 of pcs., from 30 to 20.
70
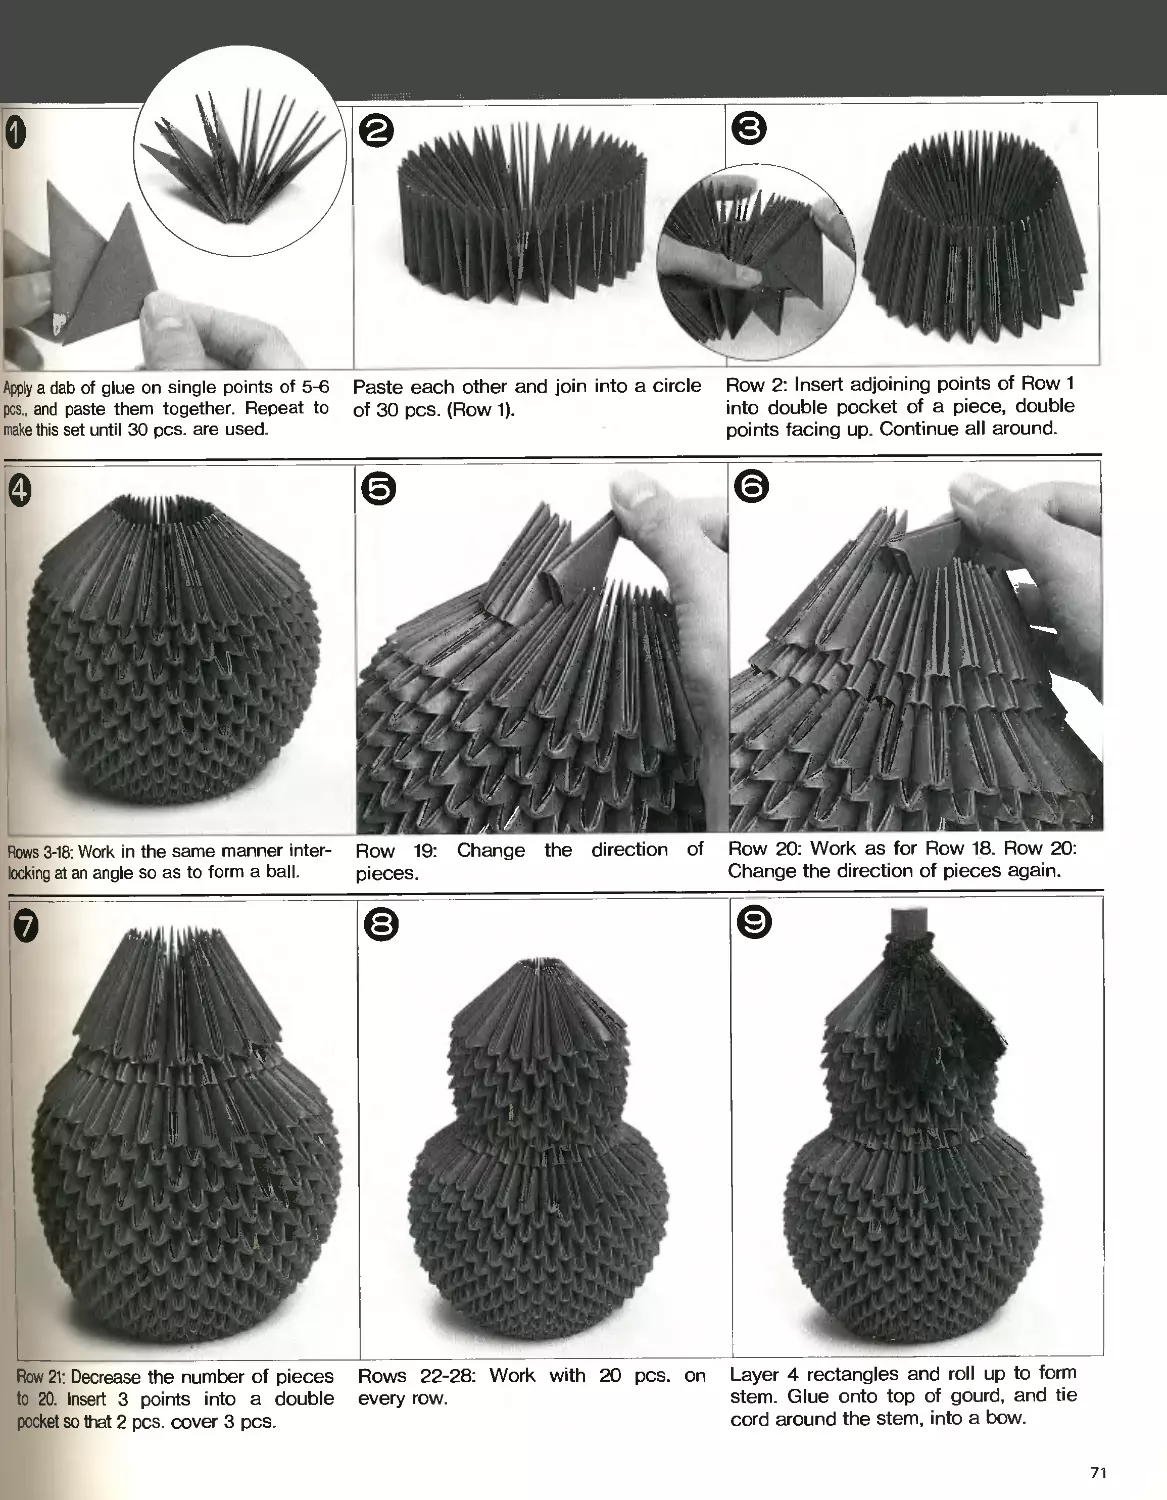
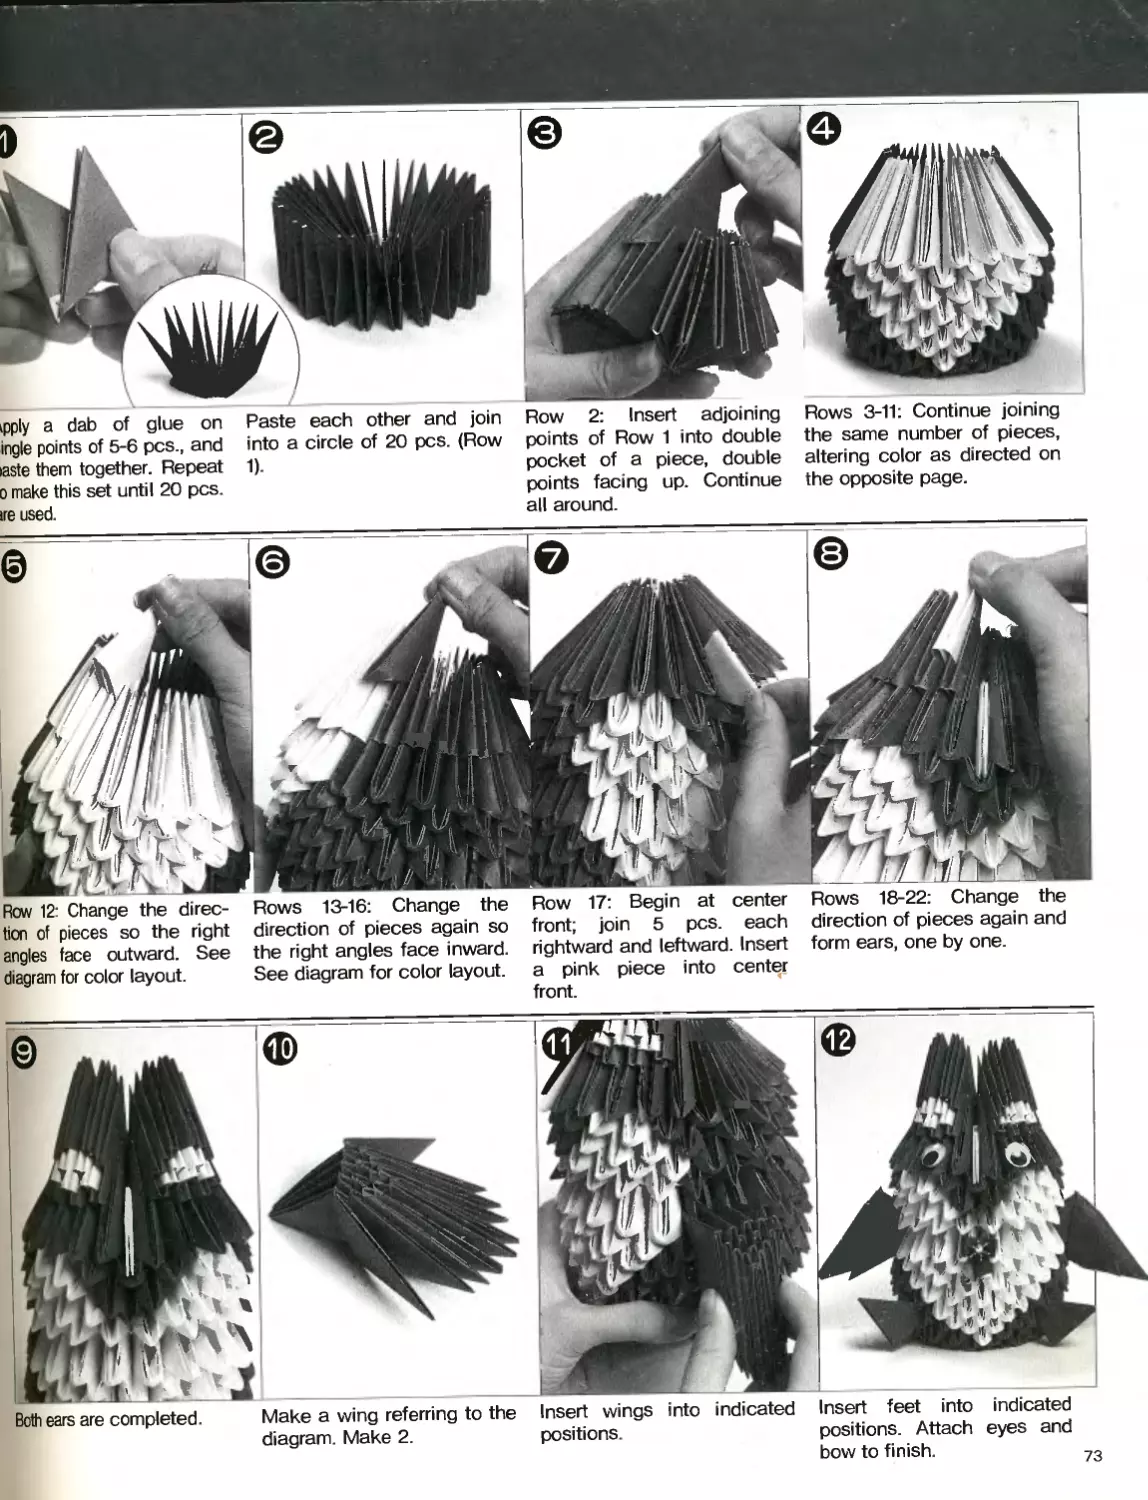
Apply a dab of glue on single points of 5-6 Paste each other and join into a circle Row 2: Insert adjoining points of Row 1
pcs and paste them together. Repeat to of 30 pcs. (Row 1). into double pocket of a piece, double
make this set until 30 pcs. are used. points facing up. Continue all around.
Rows 3-18: Work in the same manner inter- Row 19: Change the direction of Row 20: Work as for Row 18. Row 20:
locking at an angle so as to form a ball. pieces. Change the direction of pieces again.
Row 21: Decrease the number of pieces Rows 22-28: Work with 20 pcs. on Layer 4 rectangles and roll up to form
to 20 Insert 3 points into a double every row. stem. Glue onto top of gourd, and tie
pocket so that 2 pcs. cover 3 pcs. cord around the stem, into a bow.
71
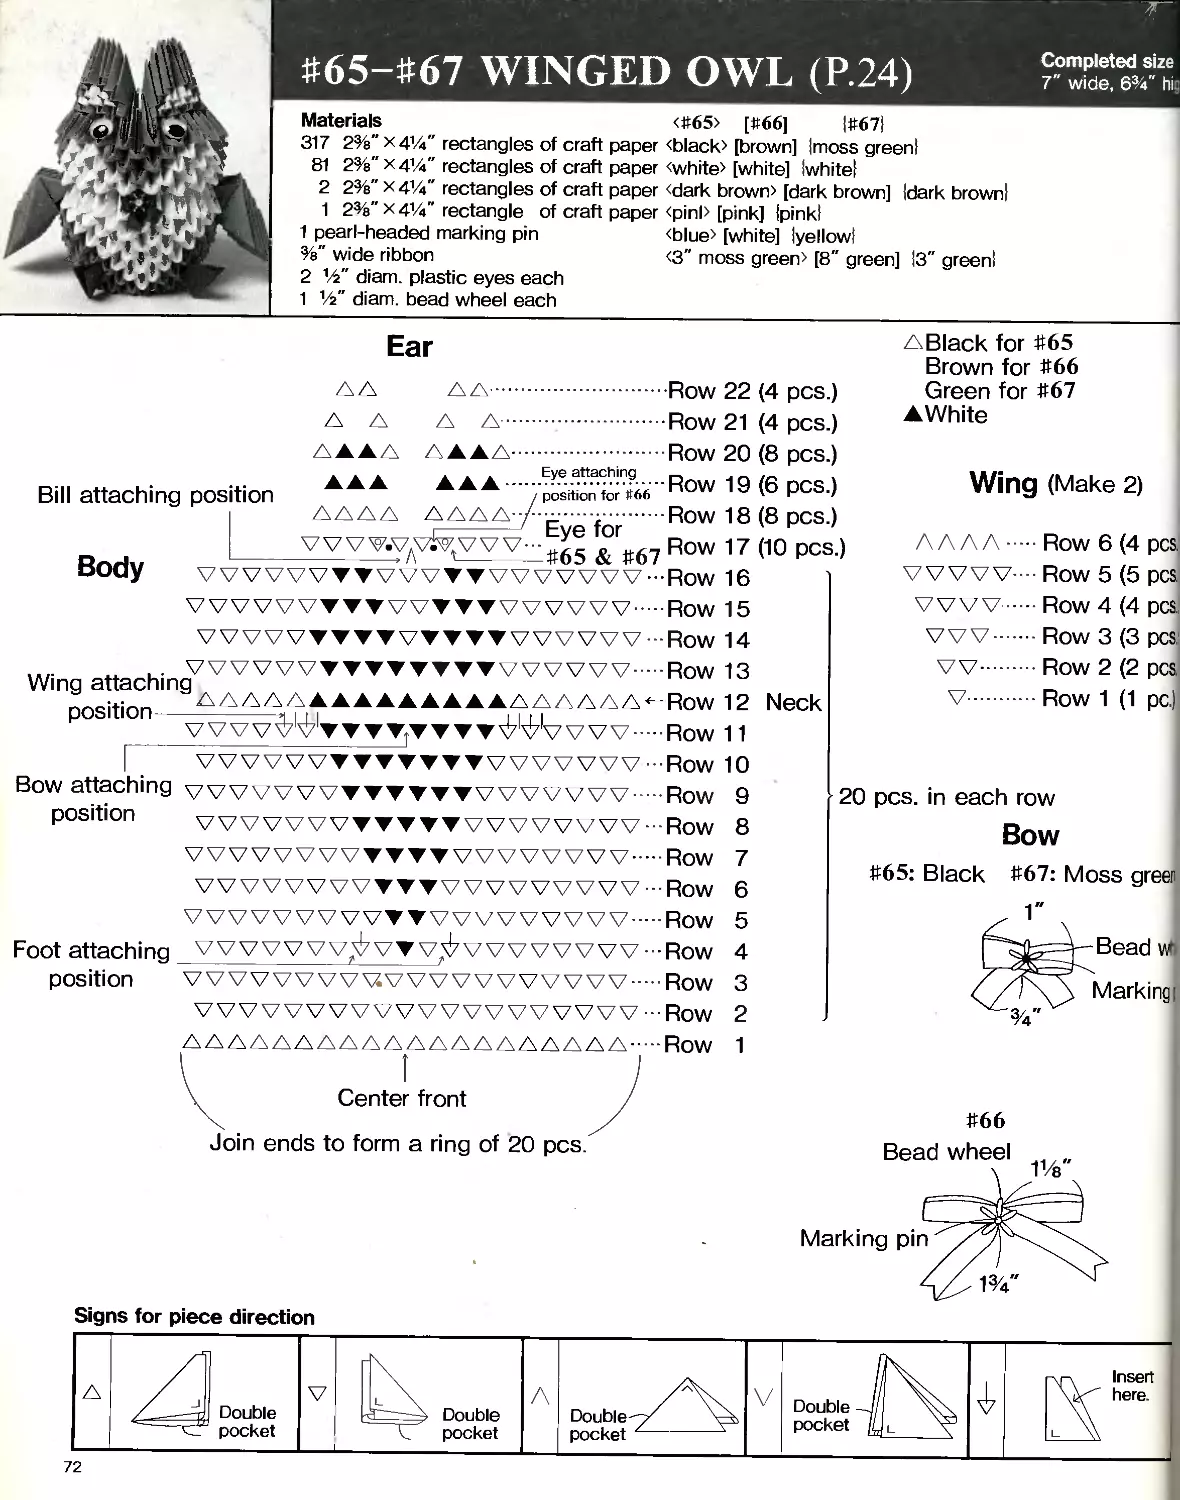
#65-#67 WINGED OWL (P.24)
Materials <#65> [#66] |#67|
317 2%" x 4V4" rectangles of craft paper <black> [brown] Imoss greenl
81 2%" x 4%" rectangles of craft paper <white> [white] Iwhite]
2 2%" x 4У4" rectangles of craft paper <dark brown> [dark brown] Idark brown]
1 2%" x 41/4" rectangle of craft paper <pinl> [pink] Ipinkl
1 pearl-headed marking pin <blue> [white] lyellowl
%" wide ribbon <3" moss green> [8" green] |3" greenl
2 Vi' diam. plastic eyes each
1 Vi' diam. bead wheel each
Ear
A A A A...................Row 22 (4 pcs.)
A A A A..............................Row 21 (4 pcs.)
Bill attaching position
Body
..............Row 20 (8 pcs.)
Eye attaching _ . _ ,
;Z" Row 19 (6 pcs.)
< position for #06 \ “ /
V ,......Row 18 (8 pcs.)
Eye for
-#65 & #67 Row 17 (10 pcs)
VVVVVVTTT VVTTTVVVVVV.Row 15
VVVVVTWTVVTTT VVVVVV-Row 14
x , . VVVVVVTVTTTTTVVVVVVV.Row 13
lng a..?C lng A AAAA A AAA A A A A AAA A AAA*—Row 12
POSI 1 П VWvWv ▼ ▼ ▼ ▼ ▼ ▼ ▼ W\7 VVV Row 11
VVVVVVTTVVTyyVVVVVVV-Row 10
Bow attaching wvvvvvvyvtvtvvvvvvv.Row 9
position VVV VVVVTVTTT VVVVWVV Row 8
VVVVVVVVTVTTVVVVVVVV Row 7
VV VVVV VVWVV VVVVVVV V Row 6
VVVVVVVVVTTVVVVVVVVV Row 5
Foot attaching VVVVVVVVVVVVVVVVVVVV•••Row 4
position VVVVVVVVVVVVVVVVVVVV---' Row 3
VVVVVVVVVVVVVVVVVVVV-Row 2
Neck
AAAAAAAAAAAAAAAAAAAA
Row
1
Center front
Join ends to form a ring of 20 pcs.
Signs for piece direction
Double
pocket
Double
pocket
Completed size
7" wide, 6%” hi.
ABIack for #65
Brown for #66
Green for #67
A White
Wing (Make 2)
АЛЛА..Row 6 (4
VVVVV- Row 5 (5
VVVV Row 4 (4
VVV...Row 3 (3
VV....Row 2 (2
V.....Row 1 (1
20 pcs. in each row
#66
Insert
here.
72
pply a dab of glue on
ingle points of 5-6 pcs., and
aste them together. Repeat
) make this set until 20 pcs.
re used.
Paste each other and join
into a circle of 20 pcs. (Row
1).
Row 2: Insert adjoining
points of Row 1 into double
pocket of a piece, double
points facing up. Continue
all around.
Rows 3-11: Continue joining
the same number of pieces,
altering color as directed on
the opposite page.
12: Change the direc-
of pieces so the right
ss face outward. See
Rows 13-16: Change the
direction of pieces again so
the right angles face inward.
Row 17: Begin at center
front; join 5 pcs. each
rightward and leftward. Insert
Rows 18-22: Change the
direction of pieces again and
form ears, one by one.
a pink piece into center
See diagram for color layout.
for color layout.
front.
Both ears are completed Make a wing referring to the Insert wings into indicated Insert feet into indicated
diagram. Make 2. positions. positions. Attach eyes and
bow to finish
v Purple
▼ Gray
v White
#75 BRIDEGROOM (P.26)
Completed t
414" wide, 51
Materials
274 2%" x 4%" rectangles of craft paper (purple)
102 2%" x 4%" rectangles of craft paper (gray)
62 2%" x 4%" rectangles of craft paper (white)
1 2%" X4%" rectangle of craft paper (pink)
2 pearl-headed marking pins (purple & white)
12" %" ribbon (purple) 2 1/г" diam. plastic eyes 1 14" diam. bead wheel 2 silk flowers (p
Eye attaching
position
Body
Row 24 ( 2 pcs.)
Row 23 ( 4 pcs.)
Row 22 ( 6 pcs.)
Row 21 ( 8 pcs.)
Row 20 (10 pcs.)
Row 19 (12 pcs.)
Row 18
Row
Row
Row
Row
Row 13
Row 12
Row 11
Row
Row
Row
Row
Row
Row
Row
Row
Row
Row
Bow
„ Mar
17
16
15
14
Bow attaching
position
Silk flower
attaching
position
Push in
marking
pin here.
10
9
8
7
6
5
4
3
2
22 pcs. in each row
How to make
Center front
Join ends to form a ring of 22 pcs.
Slit to the middle.
Signs for piece direction
®See P.77 for step-by-step instructs
74
Completed size
414" wide, 6" high
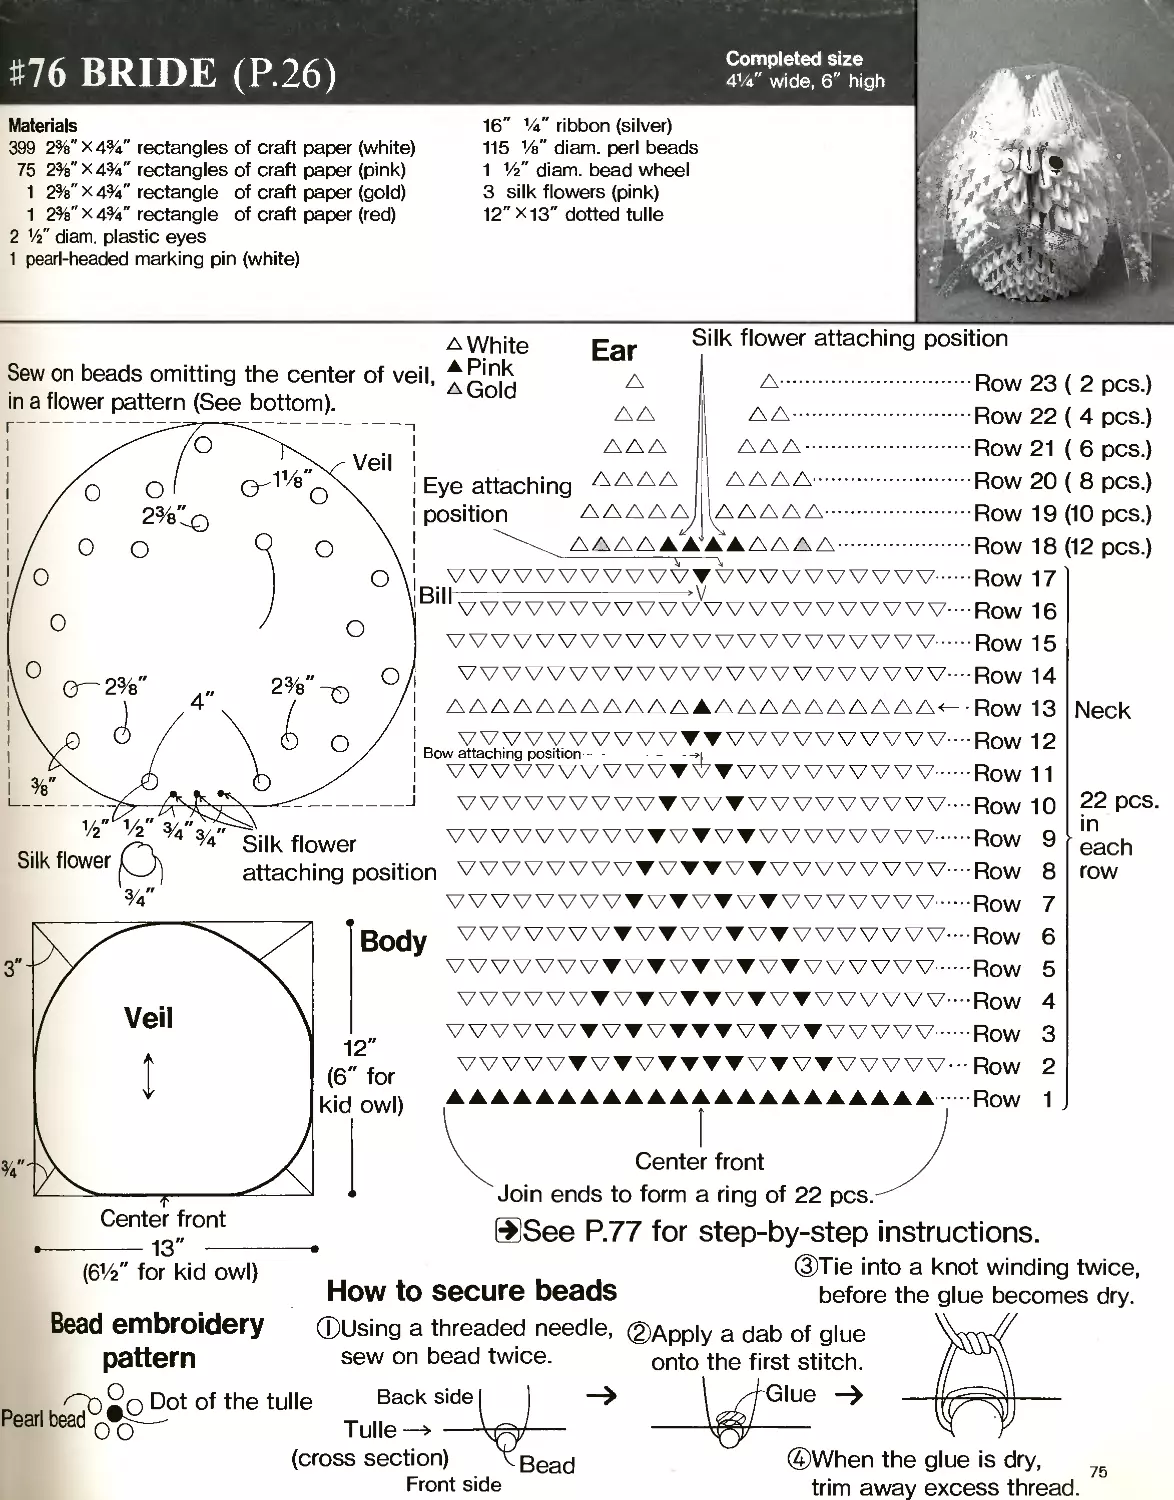
#76 BRIDE (P.26)
2%"X4%" rectangles of craft paper (white)
2%"X4%" rectangles of craft paper (pink)
2%"X4%" rectangle of craft paper (gold)
2%"X4%" rectangle of craft paper (red)
16" 14" ribbon (silver)
115 1/a" diam. perl beads
1 14" diam. bead wheel
3 silk flowers (pink)
12"xi3" dotted tulle
Materials
399
75
1
1
2 1/г" diam. plastic eyes
1 pearl-headed marking pin (white)
a White
Sew on beads omitting the center of veil, др п.^
in a flower pattern (See bottom). ° d
I -------------1
о
О
О
1V8"X
О
Veil
Eye attaching
position
0
о
О
Ear
Silk flower attaching position
о
о
Bill
Row 23 ( 2 pcs.)
Row 22 ( 4 pcs.)
Row 21 ( 6 pcs.)
Row 20 ( 8 pcs.)
Row 19 (10 pcs.)
Row 18
Row 17
(12 pcs.)
О
о
Row 15
0 q— 2%‘
О
4
О
Bow attaching position
Row 11
Neck
1/2" 1/2" %"з)4
Silk flower
Silk flower vvvvvvvvvvvvvvvvvvvvvv.Row
attaching position vvvvvvvvvvvvvvvvvvvvvv----Row
VVVV VVV VVVV VVVV VVV VVVV........Row
9
8
7
22 pcs.
in
each
row
(61/2" for kid owl)
12"
(6" for
kid owl)
Body
VVVVVVVVVVVVVVVVVVVVVV--ROW 6
VVVVVVVVVVVVVVVVVVVVVV..Row 5
V VVV VVV VVV VVV VVV VVVV VV-” Row 4
VVVVVVVVVVVVVVVVVVVVVV..Row 3
VVVVVVVVVVVVVVVVVVVVVV-" Row 2
▲▲▲▲▲▲▲▲▲▲▲▲▲▲▲▲▲▲▲▲▲A
Center front
Join ends to form a ring of 22 pcs.
Row
1
How to secure beads
Bead embroidery
pattern
Dot of the tulle Backside! I
Pearl bead q q—' Tulle
(cross section) ^Bead
Front side
®See P.77 for step-by-step instructions.
©Tie into a knot winding twice,
before the glue becomes dry.
©Using a threaded needle,
sew on bead twice.
©Apply a dab of glue
onto the first stitch.
Glue —>
©When the glue is dry, 75
trim away excess thread.
Completed size
4" wide, 6V2" high
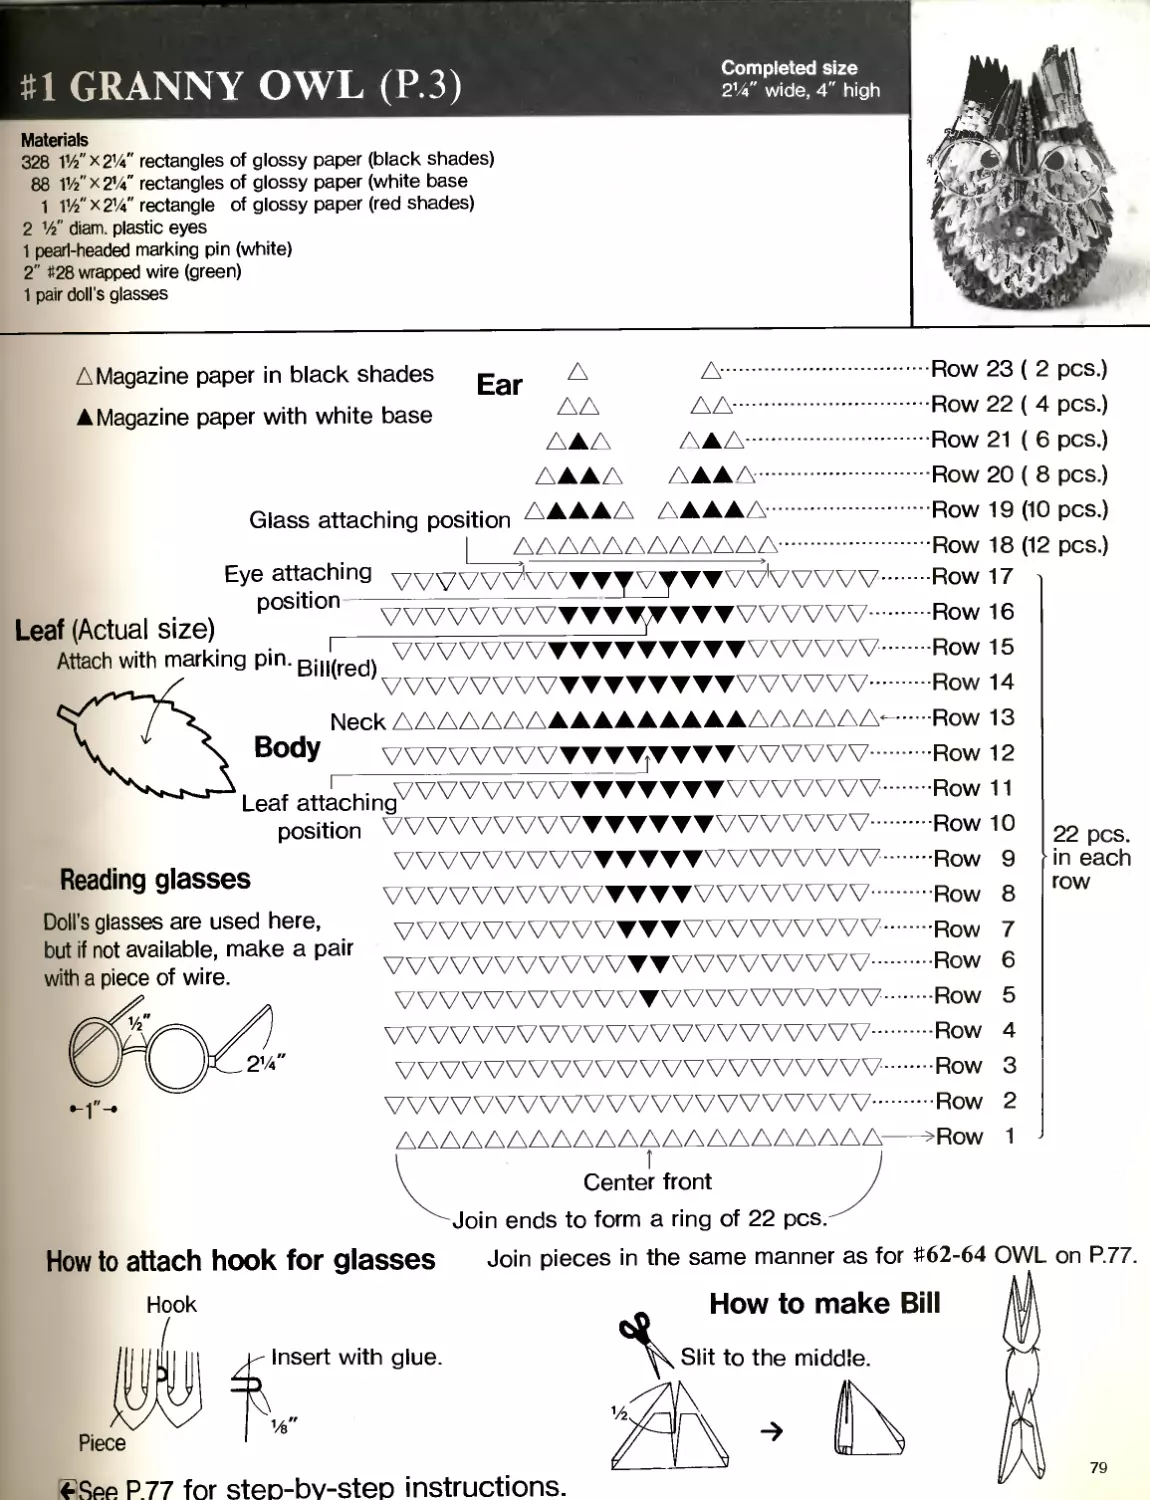
#62-#64 OWL (P.24)
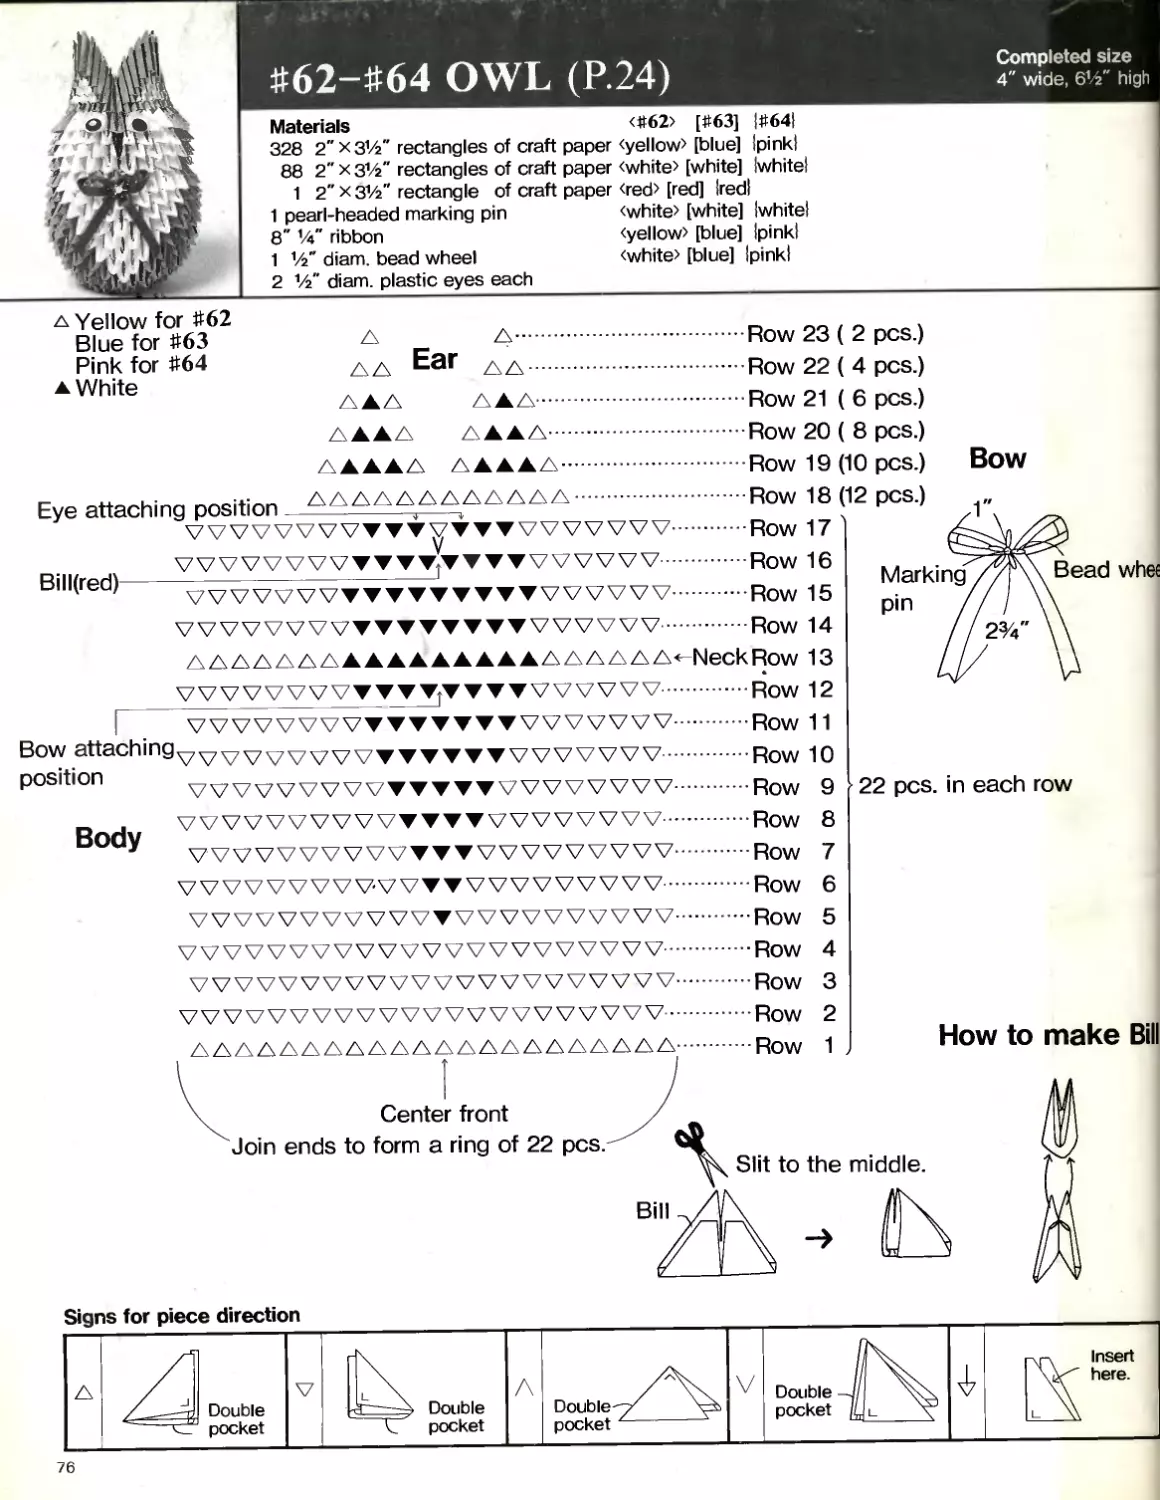
Materials <#62> [#63] |#64|
328 2" X31/2" rectangles of craft paper <yellow> [blue] Ipinkl
88 2” x 31/2" rectangles of craft paper <white> [white] Iwhitel
1 2" ХЗУ2" rectangle of craft paper <red> [red] Iredl
1 pearl-headed marking pin
8" %" ribbon
1 V2" diam. bead wheel
2 1/г" diam. plastic eyes each
<white> [white] Iwhitel
<yellow> [blue] Ipinkl
<white> [blue] Ipinkl
a Yellow for #62
Blue for #63
Pink for #64
a White
Ear
Row 23 ( 2 pcs.)
Row 22 ( 4 pcs.)
Row 21 ( 6 pcs.)
Row 20 ( 8 pcs.)
Row 19 (10 pcs.)
Bow
Bow attachmgvvvvvvvvvvvvvvvvvvvvvv.
position VVV W W VVVVVVVVVWVWV....
Row 10
Row 9 22 pcs. in each row
Body
VVVVVVVVVVVVVV VVVVWVV...Row 8
VVVVVVVVVVVTTVVVVVWVV....Row 7
VVVVVVVVVVVVVVVVVVVVVV....Row 6
76
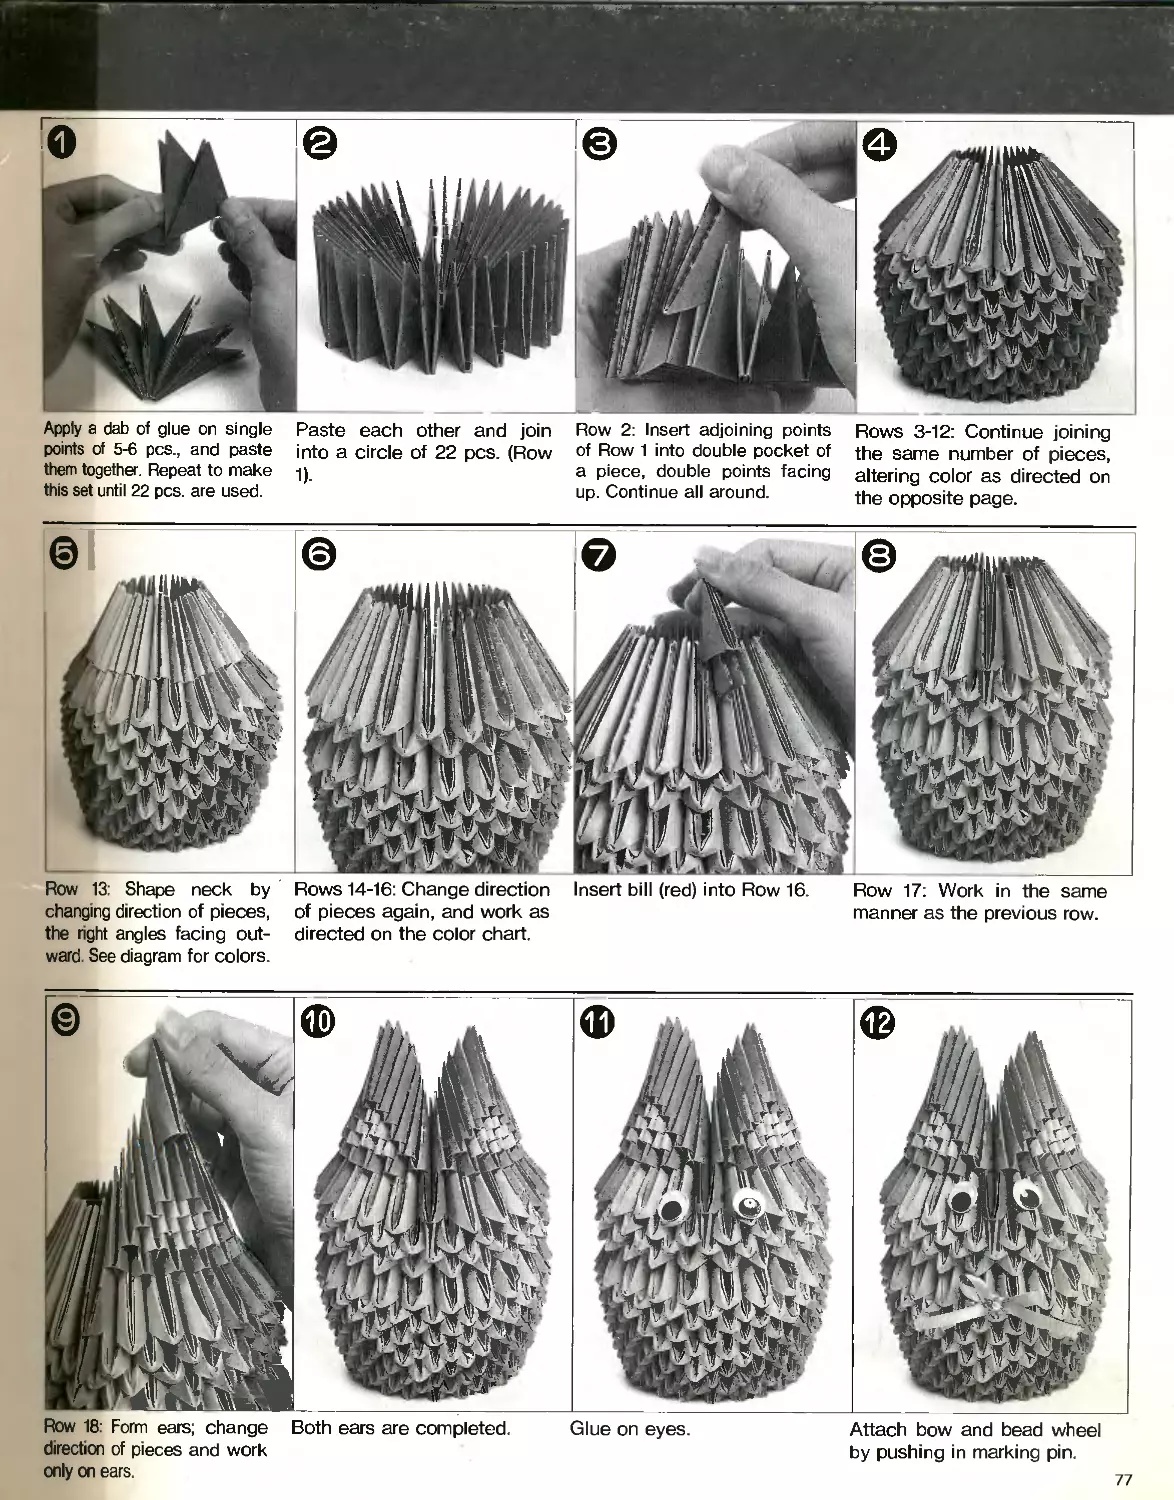
Apply a dab of glue on single
points of 5-6 pcs., and paste
them together. Repeat to make
this set until 22 pcs. are used.
Paste each other and join
into a circle of 22 pcs. (Row
1).
Row 2: Insert adjoining points
of Row 1 into double pocket of
a piece, double points facing
up. Continue all around.
Rows 3-12: Continue joining
the same number of pieces,
altering color as directed on
the opposite page.
Row 13: Shape neck by Rows 14-16: Change direction Insert bill (red) into Row 16. Row 17: Work in the same
changing direction of pieces, of pieces again, and work as manner as the previous row.
the right angles facing out- directed on the color chart.
ward. See diagram for colors.
Row 18: Form ears; change Both ears are completed. Glue on eyes. Attach bow and bead wheel
direction of pieces and work by pushing in marking pin.
only on ears.
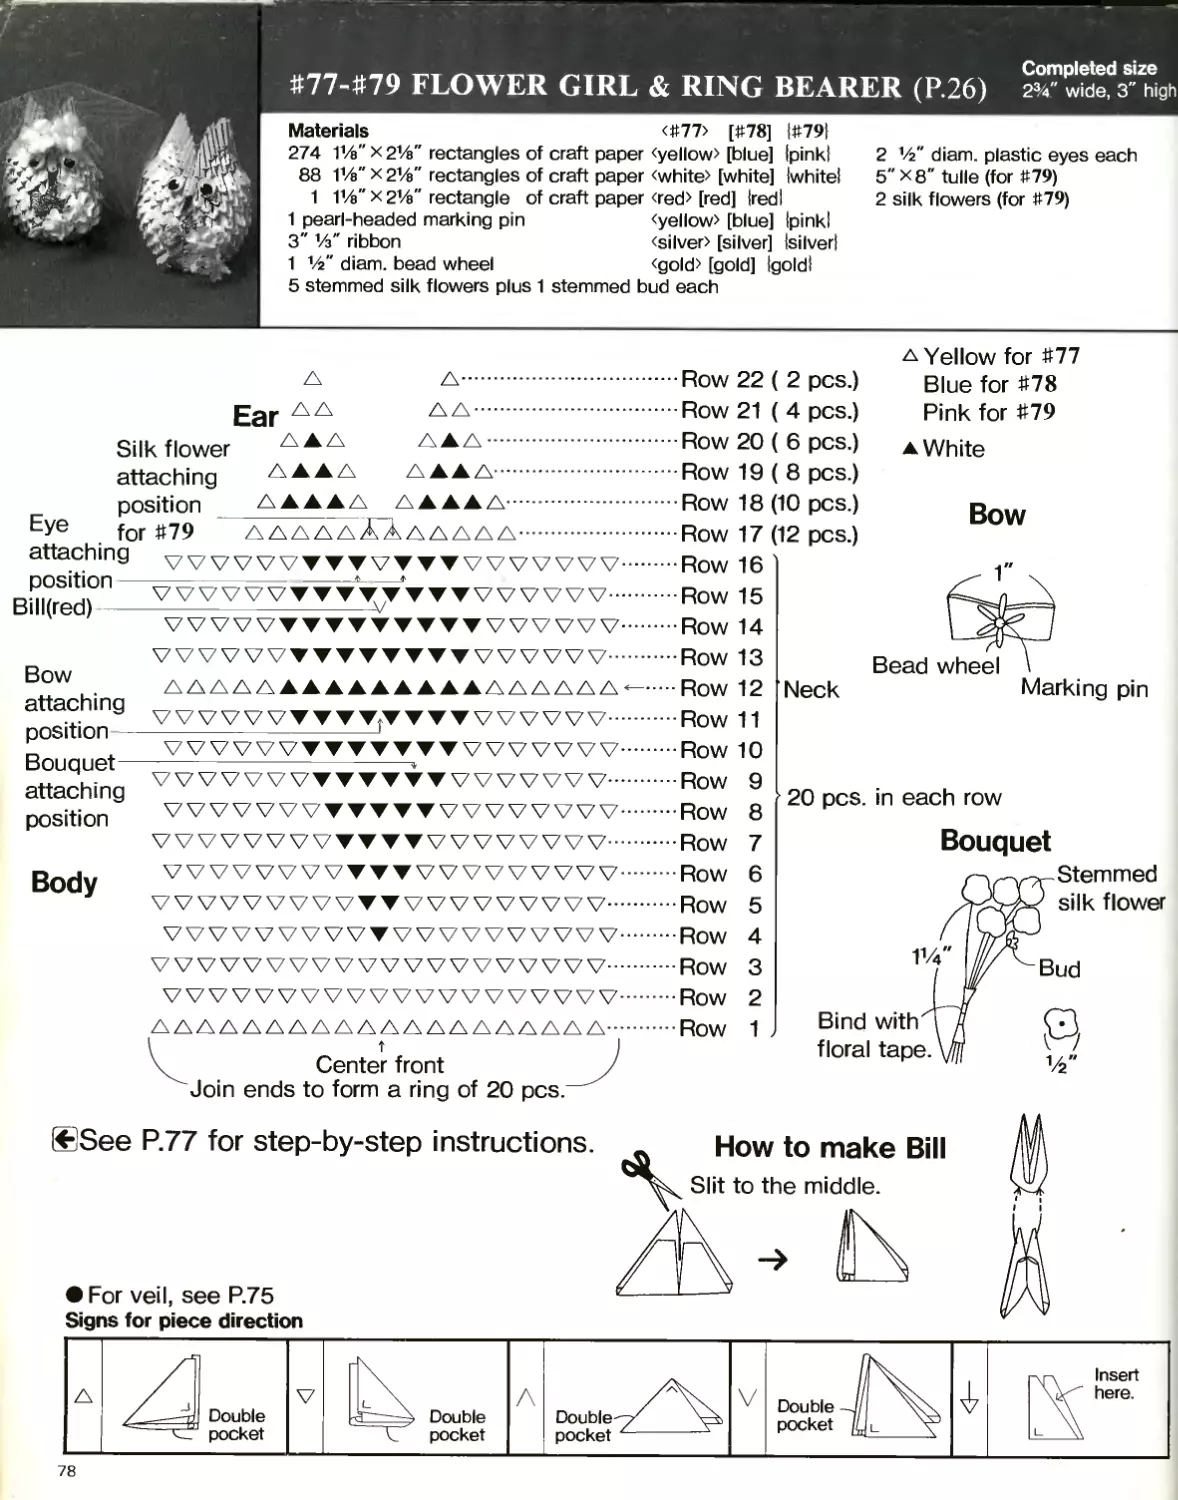
#77-#79 FLOWER GIRL & RING BEARER (P.26) 2%" wide, з high
Materials <#77> [#78] |#79|
274 11/e" x 21/a" rectangles of craft paper <yellow> [blue] Ipinkl
88 11/e" x 21/e" rectangles of craft paper <white> [white] Iwhitei
1 11/e" x 21/e" rectangle of craft paper <red> [red] Iredl
1 pearl-headed marking pin <yellow> [blue] Ipinkl
3" 1/з" ribbon <silver> [silver] {silver}
1 1Л" diam. bead wheel <gold> [gold] Igoldl
5 stemmed silk flowers plus 1 stemmed bud each
2 X6" diam. plastic eyes each
5" x 8" tulle (for #79)
2 silk flowers (for #79)
Row 22 ( 2 pcs.)
Silk flower
attaching
position
ЕУе for #79
attaching vvv
P°si*on ~wvx
Bill(red)----------
Row 21 ( 4 pcs.)
Row 20 ( 6 pcs.)
Row 19(8 pcs.)
a Yellow for #77
Blue for #78
Pink for #79
a White
Bow
attaching
position
Bouquet-
attaching
position
VVVVVVVVVTTVVTVVVVVV...
ААДАДЛАААААЛАААААААД
Body
VV VVVVVVVVVVVVV VVVW...
VVVW WWW VVV WWW........
VVVW VVVVVVVVVVVVV VV...
VVVVVVVVVVVVVVVVVVVV....
VVVVVVVVVVVVVV WWW......
ААЛАAAAAAAAAДАAAAAAA....
I t )
\ Center front 7
Join ends to form a ring of 20 pcs.
Row 18 (10 pcs.)
Row 17
Row 16
Row 15
Row 14
Row 13
Row 12
Row 11
Row 10
Row
Row
Row
Row
Row
Row
Row
Row
Row
(12 pcs.)
Bow
Neck
Bead wheel
Marking pin
©See P.77 for step-by-step instructions.
9
8
7
6
5
4
3
2
1
20 pcs. in each row
Bouquet
Stemmed
silk flower
1V4
Bind with
floral tape.
Bud
1/2
• For veil, see P.75
Signs for piece direction
78
Completed size
24" wide, 4" high
#1 GRANNY OWL (P.3)
Materials
328 116" X2%" rectangles of glossy paper (black shades)
88 11/z"x2%" rectangles of glossy paper (white base
1 116"x 24" rectangle of glossy paper (red shades)
2 Vi' diam plastic eyes
1 pearl-headed marking pin (white)
2" #28 wrapped wire (green)
1 pair doll’s glasses
Л Magazine paper in black shades
A Magazine paper with white base
Ear
A
AA
Row 23 ( 2 pcs.)
A A.....................Row 22 ( 4 pcs.)
AAA.........................Row 21 ( 6 pcs.)
AAAA
AAAA.........................Row 20 ( 8 pcs.)
Glass attaching position AAAAA.
| AAAAAAAAAAAA......
Eye attaching vVVVVWV'T'T^Vy'T'TVV'VVVVV
Leaf (Actual size) РО5Д1°П УУУУУУУУТУУуУУУУУУУУУ-
Attach with marking pin. Bi||^ed. WWVWTVyVYTTTT/WW7
VVVVVVVVTVVVTTVTVVVVVV"
/X, Neck ЛЛЛЛЛЛЛА AAAA AAAAAAAAAA-
'v \ Body VVVVVVVVTTTVjTTVVVVVVVV-
Leaf attachin7^^WvTVTVVVVVVVVVV
position VVVVVVVVWTTyyVVVVWVV"
Reading glasses
Doll’s glasses are used here,
but if not available, make a pair
with a piece of wire.
VVVVVVVVVVVVVVVVVVVVVV
VVVVVVVVVVVVVVVVVVVVVV-
VVVVVVVVVVVVVVVVVVVVVV
VVVVVVVVVVVVVVVVVVVVVV-
VVVVVVVVVVVVVVVVVVVVVV
VVVVVVVVVVVVVVVVVVVVVV-
VVVVVVVVVVVVVVVVVVVVVV
VVVVVVVVVVVVVVVVVVVVVV”
Row 19 (10 pcs.)
Row 18 (12 pcs.)
Row 17
Row 16
Row 15
Row 14
Row 13
Row 12
Row 11
Row 10 22 pcs.
Row 9 in each
Row 8 rOW
Row 7
Row 6
Row 5
Row 4
Row 3
Row 2
AAAAAAAAAAAAAAAAAAAAAA
->Row
1
l t
\ Center front
Join ends to form a ring of 22 pcs.
How to attach hook for glasses
Hook
Piece
Insert with glue.
4"
Join pieces in the same manner as for #62-64 OWL on P.77.
How to make Bill
P.77 for steo-bv-steo instructions.
Slit to the middle.
79
Completed size
31/г" wide, 5" high
#68 КАРРА (Р.25)
Materials
250 2%" x 4%" rectangles of craft paper (pale green)
75 2%" x 41Л" rectangles of craft paper (black)
58 2%" X4%" rectangles of craft paper (yellow)+2 pcs. for hands
20 11/e" Х4У4" rectangles of craft paper (yellow, for rain hat)
1 V/2" X4" rectangle of craft paper (black, for hair ornament)
55 41/4" xiy8" rectangles of tissue paper (black)
8" Vie" cord (purple)
Felt (black) for nostrils and navel
1 ft. Vie" wire (bronze)
*55 of 75 black pcs. are
used to construct back of
body. When folding these
pieces, layer black tissue
paper to give thickness.
* When folding pieces for rain
hat as instructed on P.29, cut
rectangles lengthwise in half,
omit the first folding, and
start from Step 2.
j—Hair ornament attaching position
Nostril attaching A ********** *.
position vvvvvvvvvvvvvvvvvvvv.
position -
Bill-
Row 20
Row 19
Row 18
Row 17
Row 16
v Pale green
▼ Yellow
v Black
VVVVVVVVVVVVVVVVVVVV.Row 15
Neck—” ЛЛАЛАДАДДАДДДДАДДЛАД.Row 14
Hand attaching vvvvvv^vvvvvx^lvvvvvvv.Row 13
position
VVVVVVVVVVVVVVVVVVVV.Row 12
Navel attaching vvvvvvvvvvvvvvvvvvvv.Row 11
position vvvvvvvvv)i(vvvvvvvvvv.Row 10
VVVVVVVVVVVVVVVVVVVV...Row 9
VVVVVVVVVVVVVVVVVVVV...Row 8
VVVVVVVVVVVVVVVVVVVV...Row 7
Body vvvvvvvvvvvvvvvvvvvv..Row 6
VVVVVVVVVVVVVVVVVVVV...Row 5
VVVVVVVVVVVVVVVVVVVV..Row 4
VVVVVVVVVVVVVVVVVVVV...Row 3
VVVVVVVVVVVVVVVVVVVV...Row 2
(Actual Size) Join ends to form a ring of 20 pcs.
Felt
Nostril (Make 2)
Navel oFeit
How to make Arms
20 pcs.
in each
row
Dowel
Wind wire around
dowel or pencil.
Hair ornament
Row 1
Signs for piece direction
80
Apply a dab of glue on single
points of 5-6 pcs., and paste
them together. Repeat to make
this set until 20 pcs. are used.
Paste each other and join
into a circle of 20 pcs. (Row
1).
Row 2: Insert adjoining points
of Row 1 into double pocket of
a piece, double points facing
up. Continue all around.
Rows 3-13: Continue joining
the same number of pieces,
altering color as directed on
the opposite page.
Row 14: Shape neck by
changing direction of pieces,
the right angles facing
Rows 15-17: Change direc-
tion of pieces again, and
work as directed. Insert bill
Row 18: Work in the same
manner as the previous row,
altering colors as directed.
Row 19: Make hair by joining
20 black pcs.
outward.
(yellow) into Row 17.
Row 20: Make rain hat by Insert hair ornament into Glue on eyes and felt Make arms and hands with
joining 20 yellow pcs. center back of Row 20. nostrils. Glue felt navel onto wire and triangles, and insert
Row 10. into body.
81
Completed size
4%" wide, 6У4" high
#69 & #70 PENGUIN (P.25)
Materials <#69> [#70]
304 2%" Х4У4" rectangles of craft paper <black> [blue]
48 2%" Х4У4" rectangles of craft paper <blue> [white]
7 2%" Х4У4" rectangles of craft paper <yellow> [yellow]
3 2%" x 4У4" rectangles of craft paper <black> [blue]
(Following materials are for each item.)
4" 1/з" ribbon (red)
2 V2" diam. plastic eyes
1 straw hat for dolls
for wing and feet
1 1У4" X2%" rectangle of craft paper <yellow> [yellow] for bill
Bill attaching position
Eye attaching position Eye attaching position
VVVVVVV^
VVVVVVVVVVRow 18 (19 pcs.)
Body
Wing
attaching
position -
Bow —
attahing
position
VVVVVVVVVVVVVVVVVVVV Row 17
VVVVVVVVVVVVVVVVVVVVRow 16
VVVVVVVVVVVVVVVVVVVV Row 15
VVVVVVVVVVVVVVVVVVVVRow 14
VVVVVVVVVVVVVVVVVVVV Row 13
VVVVVVVVVVVVVVVVVVVVRow 12
VVVVVVVVVVVVVVVVVVVV Row 11
VVVVVVVVVVVVVVVVVVVVRow 10
VVVVVVVVVVVVVVVVVVVV Row 9
VVVVVVVVVVVVVVVVVVVVRow 8 row
VVVVVVVVVVVVVVVVVVVV Row 7
VVVVVVVVVVVVVVVVVVVVRow 6
VVVVVVVVVVVVVVVVVVVV Row 5
VVVVVVVVVVVVVVVVVVVVRow 4
VVVVVVVVVVVVVVVVVVVV Row 3
VVVVVVVVVVVVVVVVVVVVRow 2
ЛЛАЛАЛЛЛЛЛАЛАЛЛАЛАЛА ROW 1 .
I
Center front
Join ends to form a ring of 20 pcs.
20 pcs.
in each
v Black for #69/Blue for #70
▼ Blue for #69/White for #70
v Yellow
Bow tie
Paste 2 layers of sheets and cut out.
Signs for piece direction
82
Apply a dab of glue on single points of
5-6 pcs., and paste them together. Repeat
to make this set until 20 pcs. are used.
Paste each other and join into a circle
of 20 pcs. (Row 1).
Row 2: Insert adjoining points of Row 1 into
double pocket of a piece, double points facing
up Continue all around.
Glue on eyes and bow tie.
Check the shape. Interlock so the top
Rows 3-18: Join 20 each pcs. in the
same manner, altering colors as opening is as small as possible.
Make bill as directed below, and glue Make wings and feet. Glue onto body. Glue on straw hat to finish,
onto the indicated position.
How to make Bill
Fold a IV4" x 2%" rectangular
paper in half.
2%"^
ИШШШ111П1111///1////Х
Paste together.
Base
Fold down corners to meet at
the center bottom, and secure
upper half with glue.
Fold down in half and unfold.
t'Base
Overlap squares and
glue together.
83
Completed size
4" wide, 51/г" high
#71 & #72 KITTEN (P.25)
Materials <#71> [#72]
220 2%" x 4%" rectangles of craft paper <yellow> [green]
134 2"X314" rectangles of craft paper <yellow> [green]
1 %" x %" rectangle of craft paper <black> [black] for ear
6" wired tinsel <yellow> [brown]
(Following materials are for each item]
20" 1/з" ribbon (pink)
2 ’/2" diam. plastic eyes
1 miniature bell
IV2 ft. #28 wrapped wire
(white, for whiskers)
1 ’/з" diam. button (black)
Nose (button) Ear attaching position
Ear attaching position j attaching position r—Eye attaching position
attaching wVVVVVVVVVVVVVVVVVVVV Row 15
position---« 1
VV VVVV WWV VV WW VV VWRow 14
vvvwwvvvvlwVVVVVVVVV Row 13
attaching
position ЛЛ АЛААЛЛДААААЛЛД AAAAAARow 12
VW VVVVVVV VVVW VW WWRow 10
9
8
7
6
5
4
3
2
1
Body VVVVVVVVVVVVVVVVVVVVVVRow
VVVVVVVVVVVVVVVVVVVVVVRow
VVVVVVV VVVV VVV VVVVV VWRow
VVVVVVVVVVVVVVVVVVVVVV Row
V VV VV V VV VV VV VVVVV vlv VWRow
I Tail attaching
Center front position >
Join ends to form a ring of 22 pcs.^
How to make Ear
Inner piece
Inner piece
Insert this point into Body.
Glue on.
Double pocket
Use
small
pieces.
Use
large
pieces.
How to join a piece
in Row 11
22 pcs. in
each row
How to make Whiskers
Wrapped wire
Apply glue and
let dry to harden.
11/4
Bend.
How to make Mouth
Use 2 pcs. of 2" long
wrapped wire
Glue 2 pcs. together.
Bind into a hook.
84
Apply a dab of glue on
single points of 5-6 large
pcs., and paste them togeth-
er. Repeat to make this set
until 22 pcs. are used
Paste each other and join Row 2: Insert adjoining Rows 3-10: Join 22 each
into a circle of 22 pcs (Row points of Row 1 into double pcs. in the same manner.
1). pocket of a piece, double
points facing up. Continue
all around.
Row 11 Using small pieces,
shape neck by changing
direction of pieces, so the
right angles face outward.
Row 12: Work as for Row 11
with small pieces. Row 13:
Change direction of pieces
again.
Rows 13-17: Work in the
same manner with small
pieces, shaping into a ball.
Make ears as directed and
insert between 4th and 5th
pcs. from center front of Row
17.
Make mouth with wire as Make 2 whiskers using wire, Attach bell onto center of Glue eyes and nose onto
directed, and insert into and insert into both sides of ribbon, and tie around neck indicated positions
center front of Row 14. nose.
into a bow. Insert wired
tinsel as tail.
85
Completed size
З’/г" wide, 5’A" high
#73 & #74 RABBIT (P.25)
Materials <#73> [#74]
292 2" x З’/г" rectangles of craft paper <white> [pale pink]
14 2" * З’/г" rectangles of thin craft paper <pink> [pink]
1 2" x З’/г" rectangle of craft paper
1 pearl-headrd marking pin
(Following materials are for each item.)
1 W diam. button (black)
2 ’/г" diam. buttons (red)
8" ’A" ribbon (red)
<red> [red]
<white> [pink]
V/2 ft. #28 wrapped wire
(white, for whiskers)
1 ’/2" bead wheel (gold)
♦ When folding thin craft paper
as instructed on P.29, cut rec-
tangles lengthwise in half, omit
the first folding, and start from
Step 2.
Nose attaching position
How to make Whiskers
A Ear A A A
л White for #73 < < < < AAA- AAA-
Pale pink for #74 AAA AAA;
a Pink AAA AAA-
Direction of AAA AAA-
ear pieces AAA AAA-
~aIa aIa-
19
18
17
Whiskers
attaching
position
Lips (red)
........Row 22
........Row 21
........Row 20
.......Row
Bow attaching position
.......Row
.......Row
........Row 16
........Row 15
........Row 14
.'Row 13
Eye attaching position
vvvv V V.Row 12
7VVVVV..Row 11
WWW.....Row 10
AAAAAAAAAAAAAAAAAAAA^NeckRow
W WWW WWW WWW..........Row
W WWW WWW WWW..........Row
W WWW WWW WWW..........Row
W WWW WWW WWW..........Row
W WWW WWW WWW..........Row
VVVVVVVVVVVVVVVVVVVV...Row
VVVVVVVVVVVVVVVVVVVV...Row
AAAAAAAAAAAAAAAAAAAA...Row
9
8
7
6
5
4
3
2
1
Center front
Join ends to form a ring of 20 pcs.
Bow
Marking pin
1%
Bend.
Ear
Row 1 of Ear
Row 13 of Bod
Apply glue and let
dry to harden.
Wrapped wire
6 pcs.
in each
row
20 pcs.
in each
row
Bead wheel
Insert pink piece
between pale
pink pieces
Just push in pink
piece between
the 2.
Divide 3 pcs. into 2 (3 points each)
and insert into 2 pcs.
Signs for piece direction
A Double pocket V L \ ——A Double < pocket Л Double--/ \=i pocket ' ' V Double —1 pocket “\r\ Insert \V here.
86
Apply a dab of glue on Paste all sets together and Row 2: Insert adjoining Rows 3-8: Join 20 each
single points of 5-6 pcs., and
join into a circle of 20 pcs. points of Row 1 into double pieces in the same manner.
paste them together. Repeat (Row 1).
pocket of a piece, double
to make this set until 20 pcs.
points facing up. Continue
are used.
all around.
Row 9: Shape neck by Rows 10-12: Change direc-
Push in a beak piece (red) Row 13: Work in the same
between center 2 pcs. of manner, using 20 pcs.
changing direction of pieces, tion of pieces again, and
continue in the same Row 12.
manner.
Shape ears by changing
direction of pieces. Join 2
each pcs., sandwiching 1
pink piece.
Rows 21-22: Join 1 pc. each,
covering only the center 2
points.
Glue on eyes and nose.
Make whiskers referring to
the figure on the opposite
page, and insert into the
Attach bow and bead wheel
using a marking pin.
87
#55 & #56 METALLIC URN (P.22) w
Materials
#55: 916 Р/г" x 2%" rectangles of craft paper (gold)
2 ft. %" ribbon (gold)
#56: 916 V/2" X2%" rectangles of craft paper (silver)
2 ft. %" ribbon (silver)
Note
The completed project may look different depending on the thickness of the paper used
URN ЛДДДДДДДЛДДДДДААААДДДЛДДДДДДДДДД.......Row 21 (32 pCS.)
ЛЛДДДДЛДЛДДААДАДДДДДДДДДАДДДДДДД.....Row 20 (32 pcs.)
ЛАЛЛЛЛЛЛ/\|ААЛЛЛЛАЛАЛАААЛЛ|АAAAAAAA...Row 19 (32 pCS.)
ДДДДАААДДДДДАAAAAAAAДААДАДДДДДДДАДДДДДДД ROW 18 '
ДЛЛДЛДЛЛДЛЛДДАЛДЛЛАДЛАЛЛДЛДЛДДДДЛЛЛДДЛДД-Row 17
H®nd'e АДА ДЛДДДААДАДААААДДДАДДД ДАДД АДДДД ДДДДДДД Row 16
attaching
position АДА ДЛДДДДД ДА А ДДДДДД ДАДДА ДДДДЛДДДД ДДД AAAA"Row 15
ДДДДДДДДДДДДДДДДДДДДДДДДДДДДДДДДДДДДДДДД ROW 14
АДДДД ДДДДДДД ДДД ДДДДДД ДДДДЛДДДД ДДДД ДДДДДД--Row 13
ДДДДДАДДДДДДДДДДДДДДДДДДДДДДДАДДАДАЛАДДД Row 12
ДЛЛЛЛЛДЛЛЛДЛДАЛЛДЛДЛДДЛЛДЛДЛДЛЛДЛДДДДДДД-Row 11
ДАДД ДЛААЛА|ДЛДДД ДДДДДДД ДДДД ДДДД|ЛДД ДДДДДДД Row 10
ДДДАДАДДДДДДДДДДДДДДДДДДДДДДДДДДДДДДДДДД-Row 9
ДАЛЛ АЛЛАЛЛЛДЛЛЛДЛА ДДДДДДД А АДА ДДДД ДДДДДД •••Row 8
ЛАААДДДДЛДДДДДДДДДДДДДДДДАДДДДДДДДДДДДДД-Row 7
40
pcs.
in
each
row
Change
direction of
pieces here.
I
А А ААААДДДДДДАДДАДД АДДДД ДДДД ДДДД А А ДДДДДД •••Row
ДДДАДДАДЛАДАДДДАЛАДАДДДДДАДДДДДДДДДДДДДД-ROW
VVVVVVVVVVVVVVVVVVVVV VVVVVVVV vvvv vvvwv — Row
VVVVVV VVVVVVVVVVVVVVVVVVVVVVVVVVVV VVVWV-ROW
ЛАД ДДДДДААДдДдА дДдддД АДДДД ЛАДД ДДДАДДДДДД Row
VVVVVVV VVV VVVW VVVVVV VVVW VVVV VVVV VVVVVV Row
Center
Join ends to form a ring of 40 pcs. (%" inner diameter.)
6
5
4
3
2
1 .
[>[>[>>>[>[>|>[>>|>[>[>[>>[>[>[>[>>>[>[>[>>>[>[>[>[>
Join 30 pcs. into a ring of 2" in diameter. Make 2 and glue together.--------|
Pedestal assembly
Signs for piece direction
Place URN on the pedestal and secure with glue.
ffiSee P.90 for step-by step instructions.
A Double pocket V Double < pocket A Double-// pocket ' V Double -J pocket | лгл Insert here.
88
Rows 1-2 assembly
Direction of pieces
This side becomes
Turn upside down.
This pair makes 1 pc. for Row 1.
Make 40 pairs and join into a ring.
How to decrease
number of pieces
Row 3 assembly
Row 5 assembly
Repeat this pattern.
Side view
Handle (20 pcs.)
How to attach Handle
Row 18
End of Handle
Handle assembly
and
Row 9
Apply glue onto points
insert between pieces.
First piece д
of Handle л
Apply glue onto points and
insert between pieces.
Handle
(Actual size)
(Make 2)
V Shape according to the pattern (right)
First piece of Handle
89
Turn upside down.
This pair makes 1 pc. for Row 1.
Make 40 pairs and join into a ring.
How to decrease
number of pieces
Repeat this pattern.
Row 3 assembly
Side view
Row 5 assembly
Row 18
End of Handle
and
Apply glue onto points
insert between pieces.
How to attach Handle
Row 9
Apply glue onto points and
insert between pieces.
Handle (20 pcs.)
First piece
of Handle д
Handle assembly
First piece
of Handle
Handle
(Actual size)
(Make 2)
V Shape according to the pattern (right)
X
First piece of Handle
89
#55<-#56 METALLIC URN (P.22)
and prepare 40 sets.
piece.
Continue to join all 40 sets, Row 4: Work in the same Row 5: Change the direction Rows 5-6: Join pieces at an
into a ring. manner, with 40 pcs. of pieces, the right angles angle so the opening is 13/4"-2"
facing out. in diam., securing with glue.
Row 7: Pieces are joined Rows 8-13: Work in the Rows 14-18: Work in the Rows 19-20: Decrease the
almost vertically. same manner, this time ex- same manner, reducing the number of pieces to 32, re-
panding the diam. gradually. diam. ferring to the figure overleaf.
Row 21: Work in the same Make pedestal and handles Attach handles to sides. Tie a ribbon around the neck
manner, slightly enlarging as directed. Glue pedestal and the to finish.
the opening to form rim. bottom of the URN together.
0 1cm 2 cm 3 cm 4 cm 5 cm 6 cm 7 cm 8 cm 9 cm 10 cm 11 cm 12 cm 13 cm 14 cm 15 cm
Linear Measures
inches x 2.54 = centimeters
centimetsers x 0.39 = inches
INCHES CENTIMETERS (nearest equivalent) INCHES CENTIMETERS (nearest equivalent)
1/e" 1/4 cm 41/4" 11 cm
1/4" % cm 4%" 12 cm
%" 1 cm 5" 13 cm
1/2" 11/2 cm 51/2" 14 cm
%" 2 cm 6" 15 cm
1" 21/2 cm 61/4" 16 cm
11/s" 3 cm 7" 18 cm
11/2" 4 cm 8" 20 cm
1%" 41/г cm 9" 22 cm
2" 5 cm 10" 25 cm
2%" 6 cm 1 ft. 12" 30 cm
3" 71/2 cm 11/2 ft. 18" 45 cm
31/2" 9 cm • 20" 50 cm
4" 10 cm 2 ft. 24" 60 cm
5" 6"