/


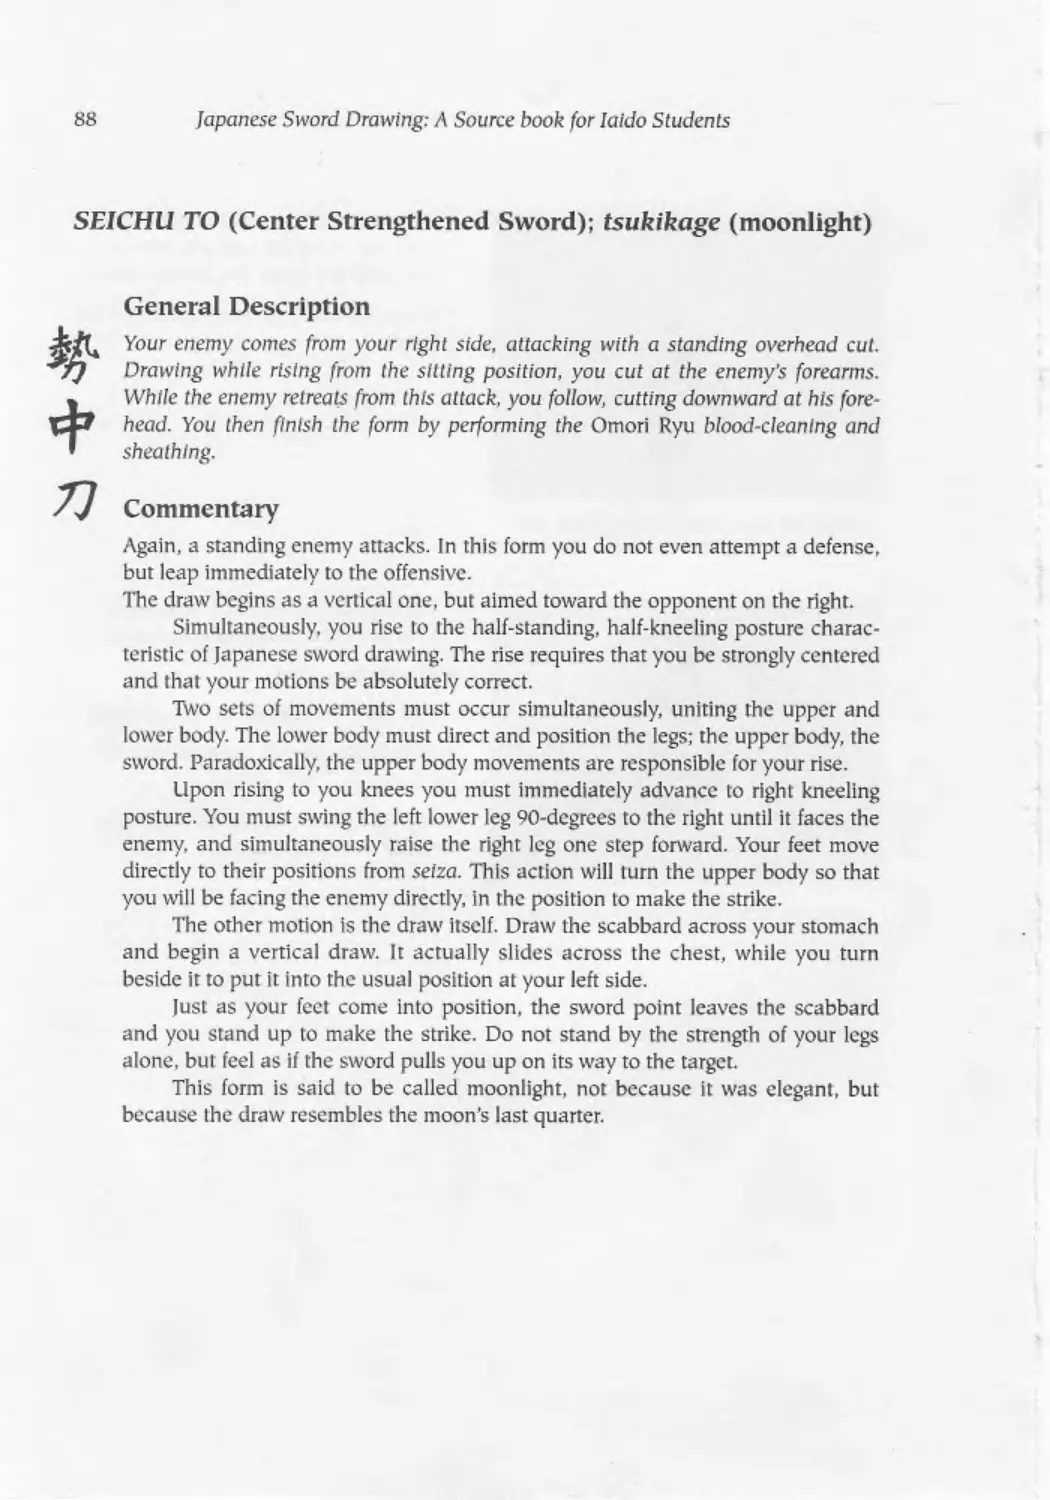
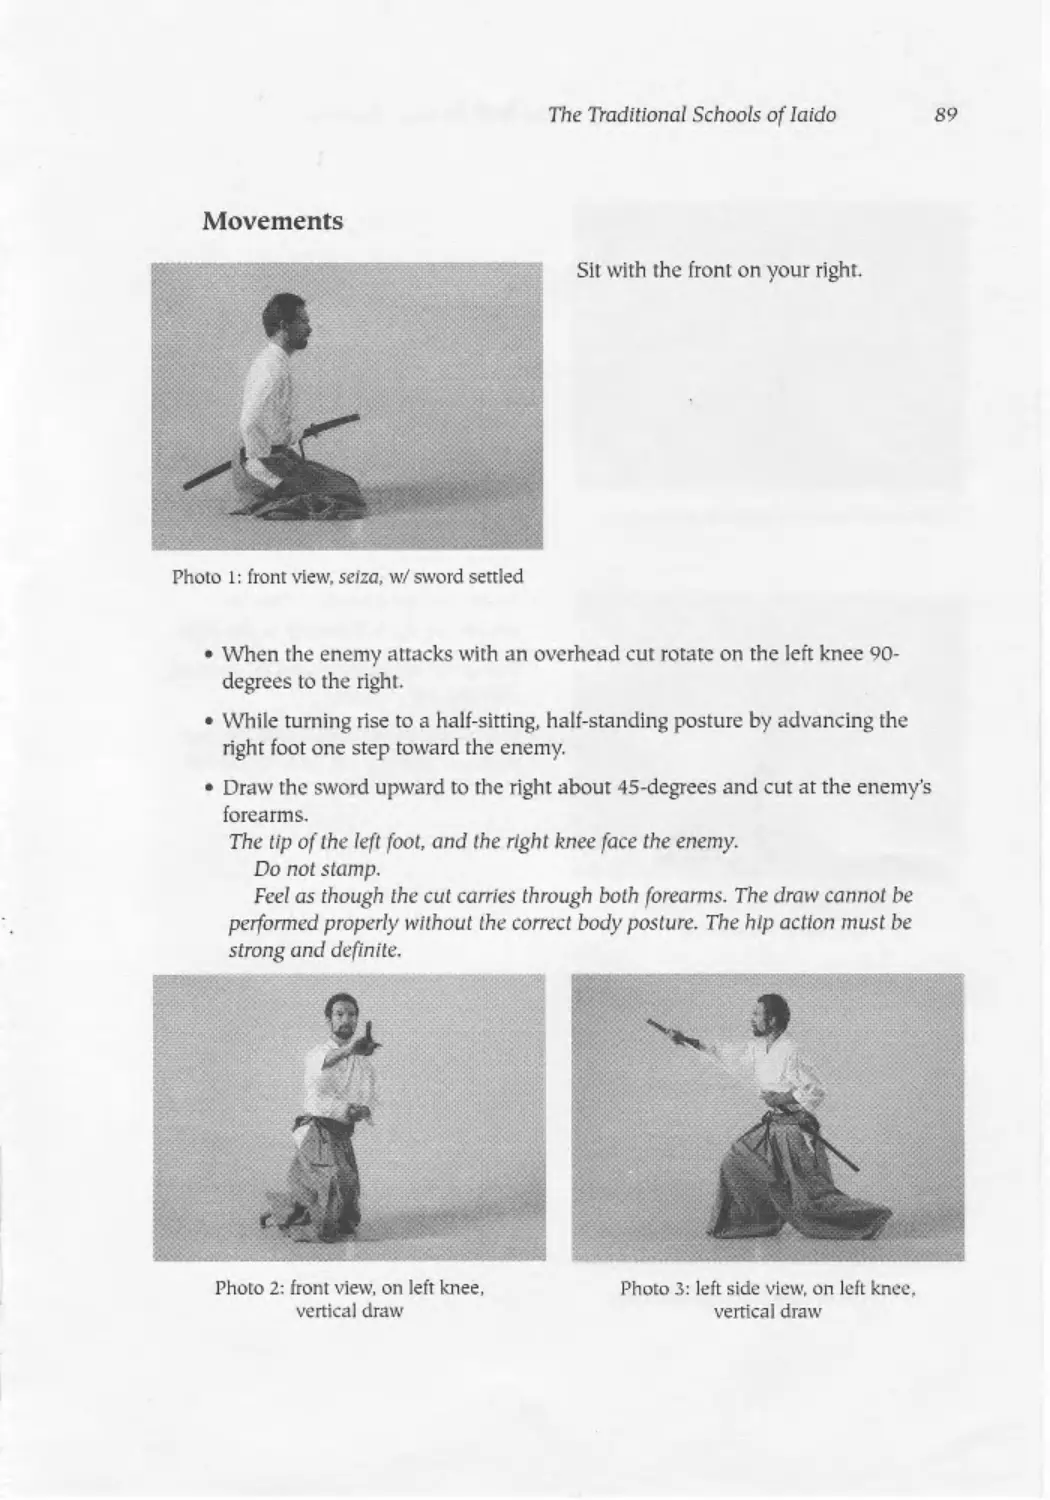
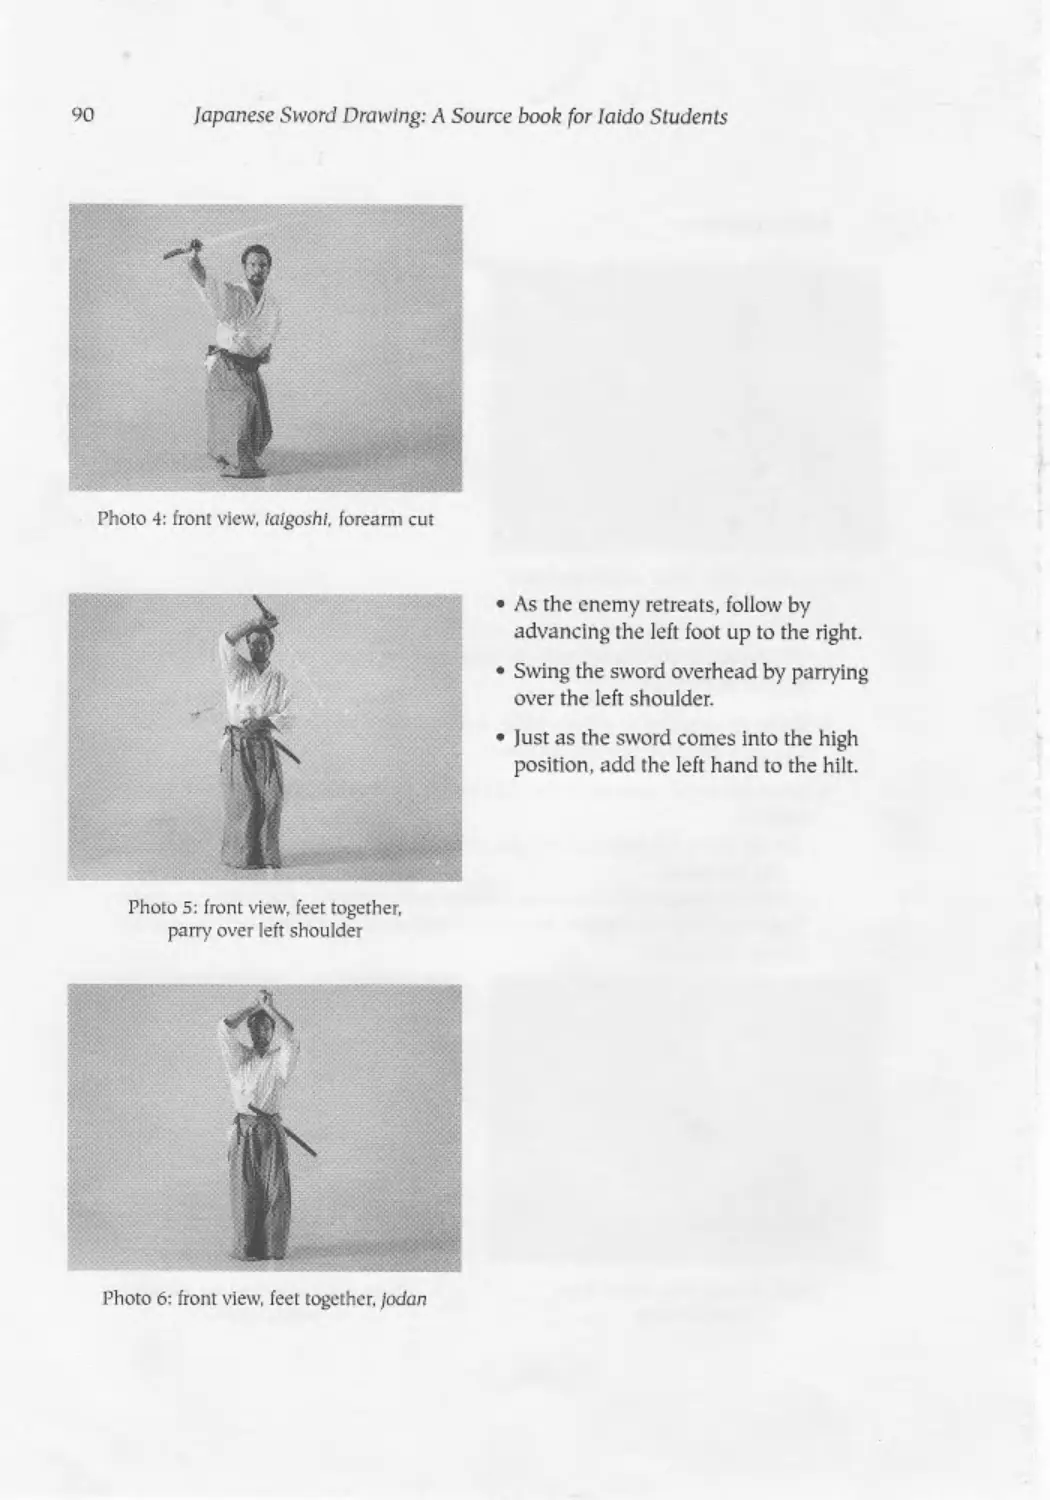
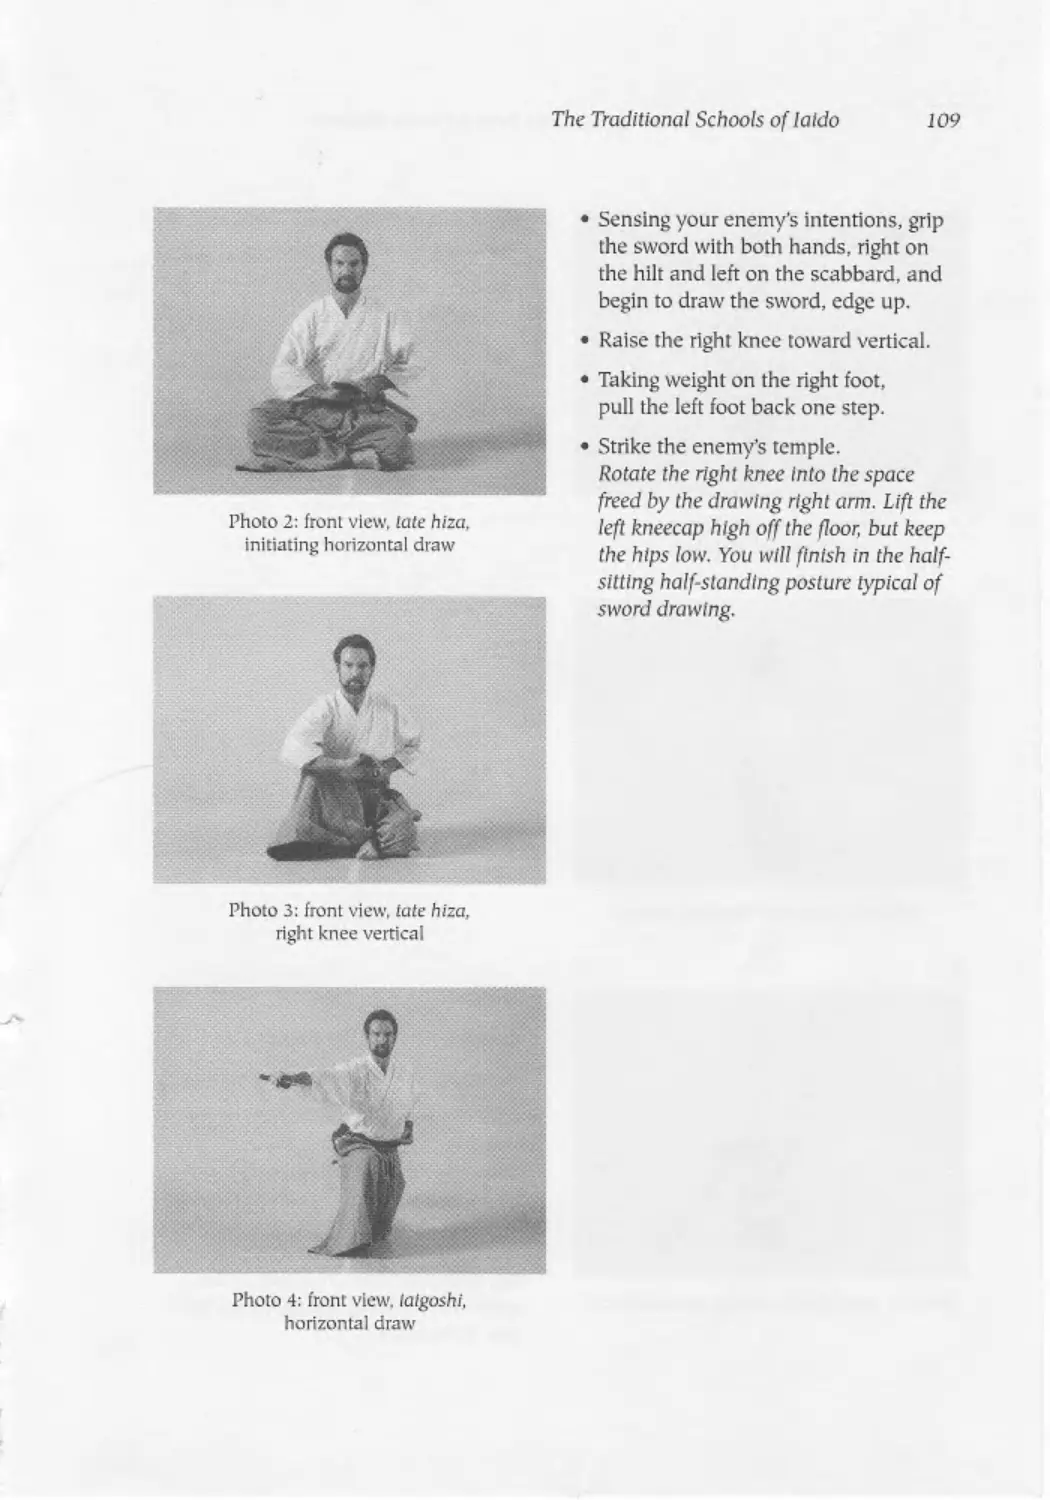
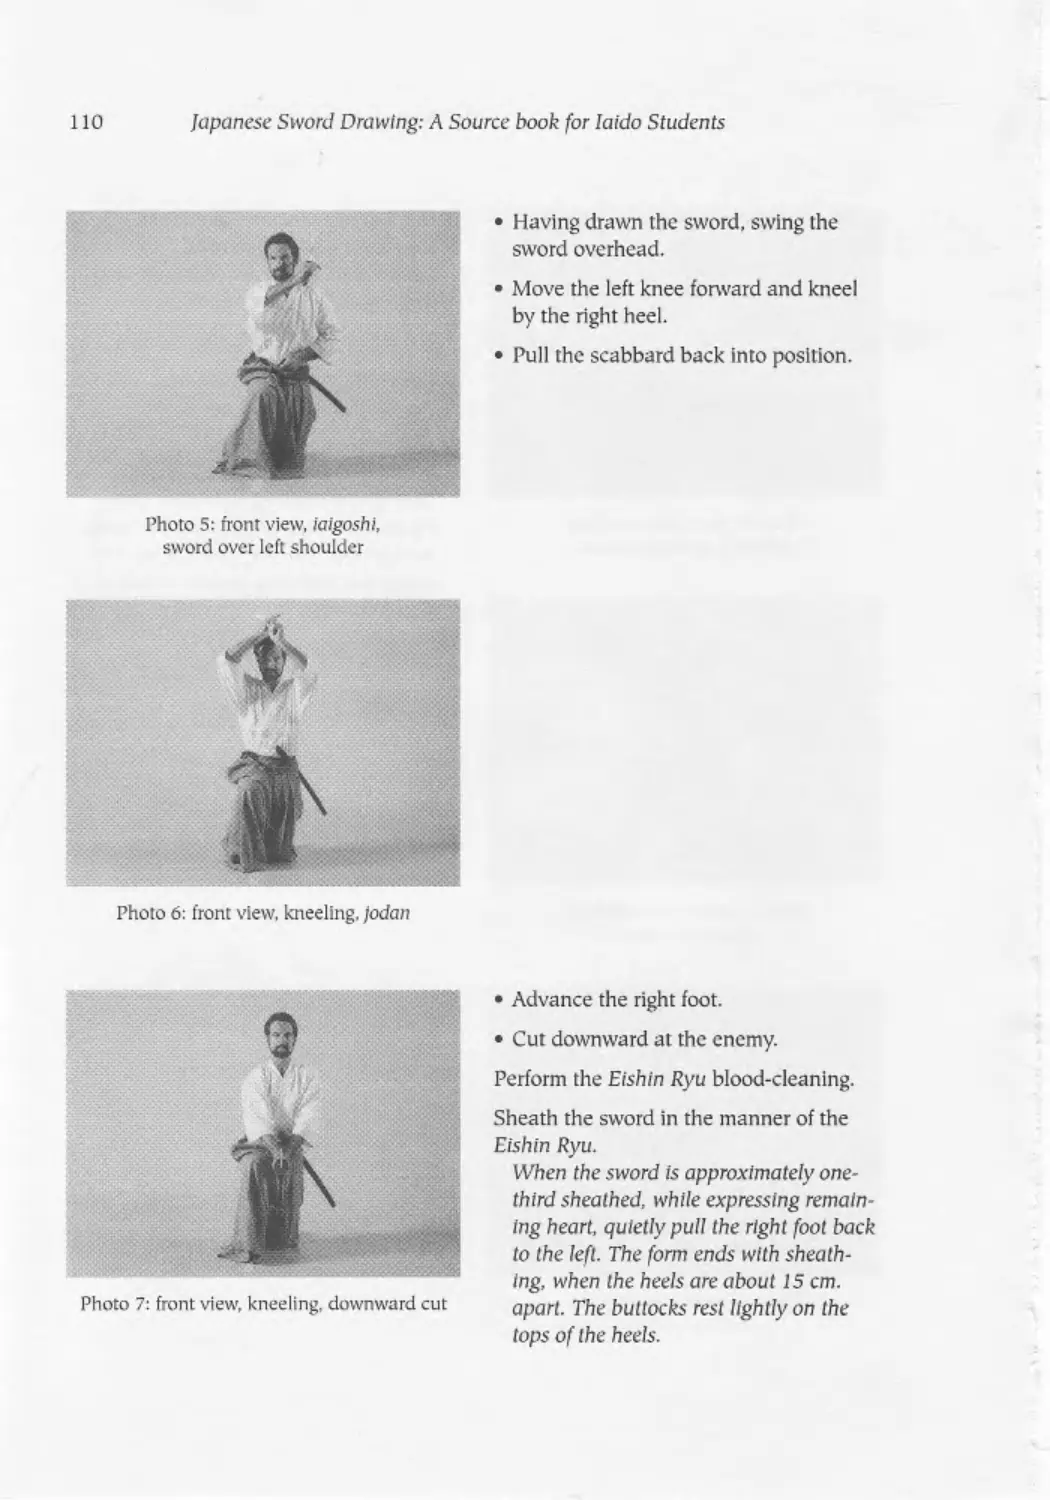


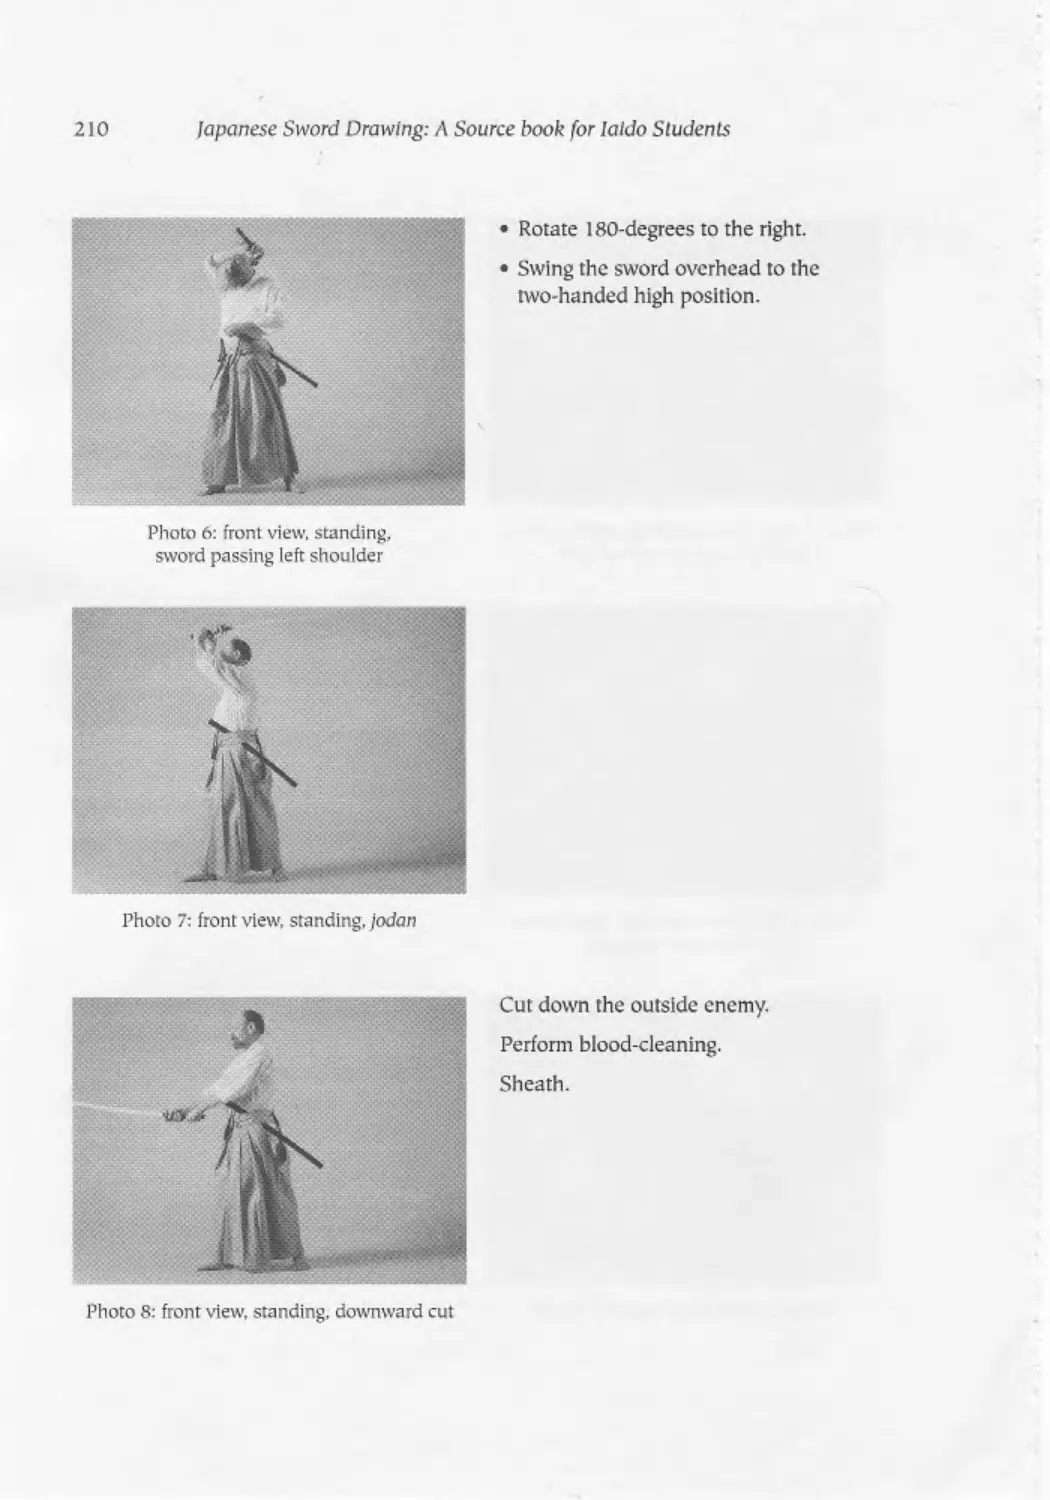

Author: Don J. Z.
Tags: martial arts swords japanese sword drawing source book fencing japanese fencing
Year: 2001


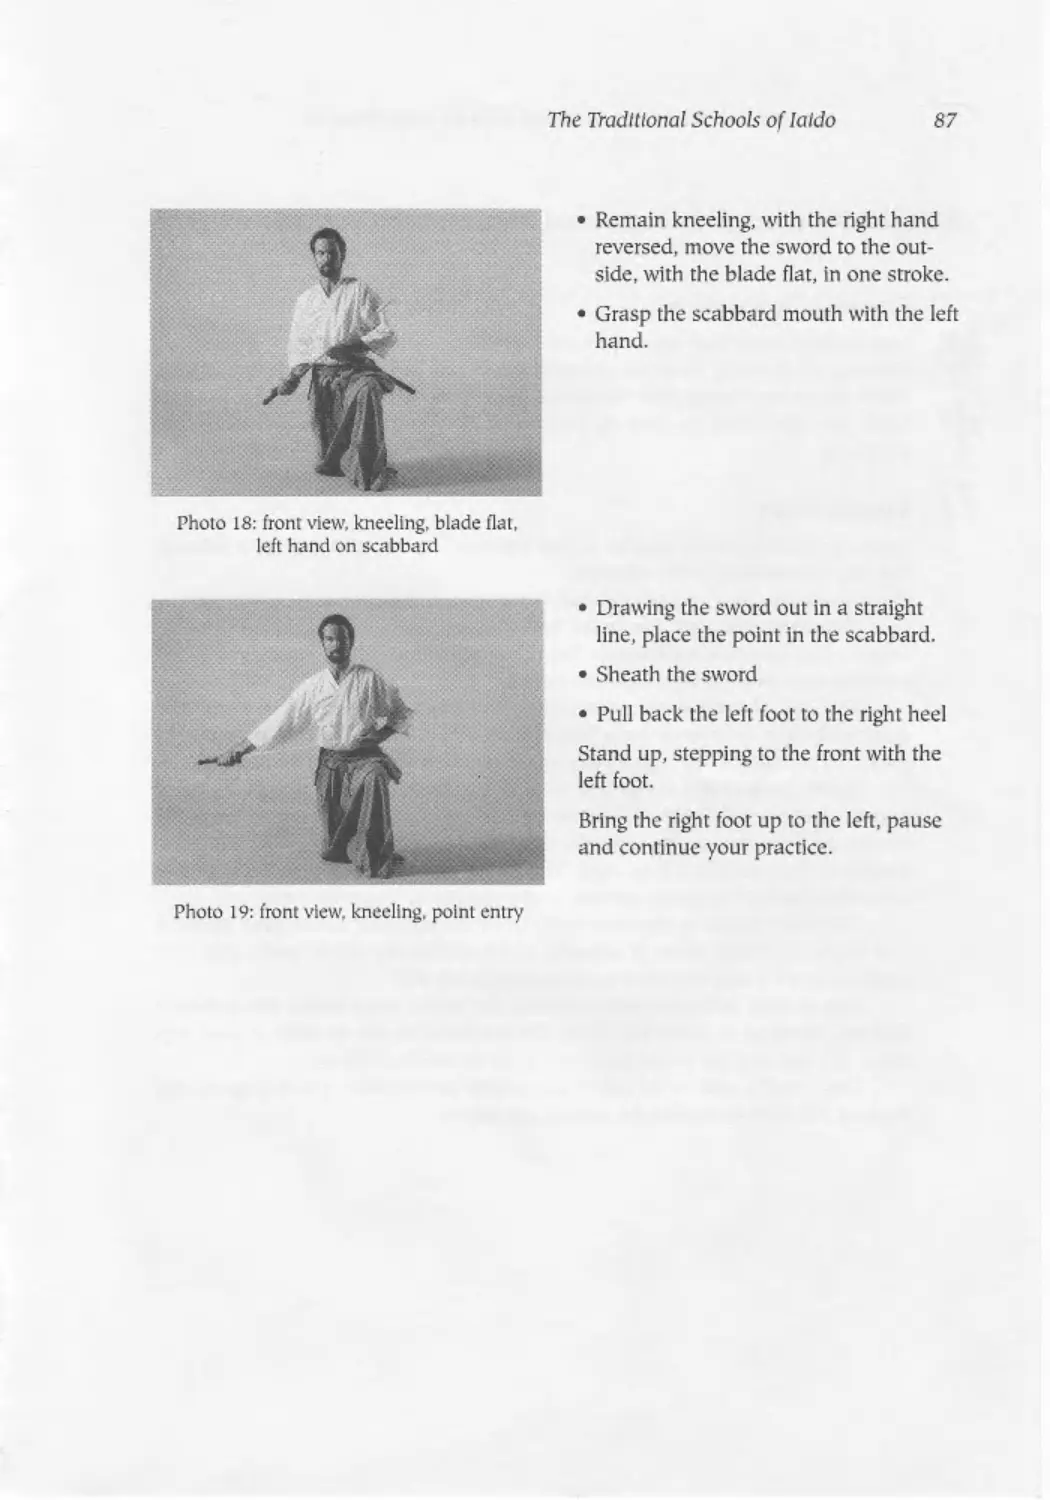
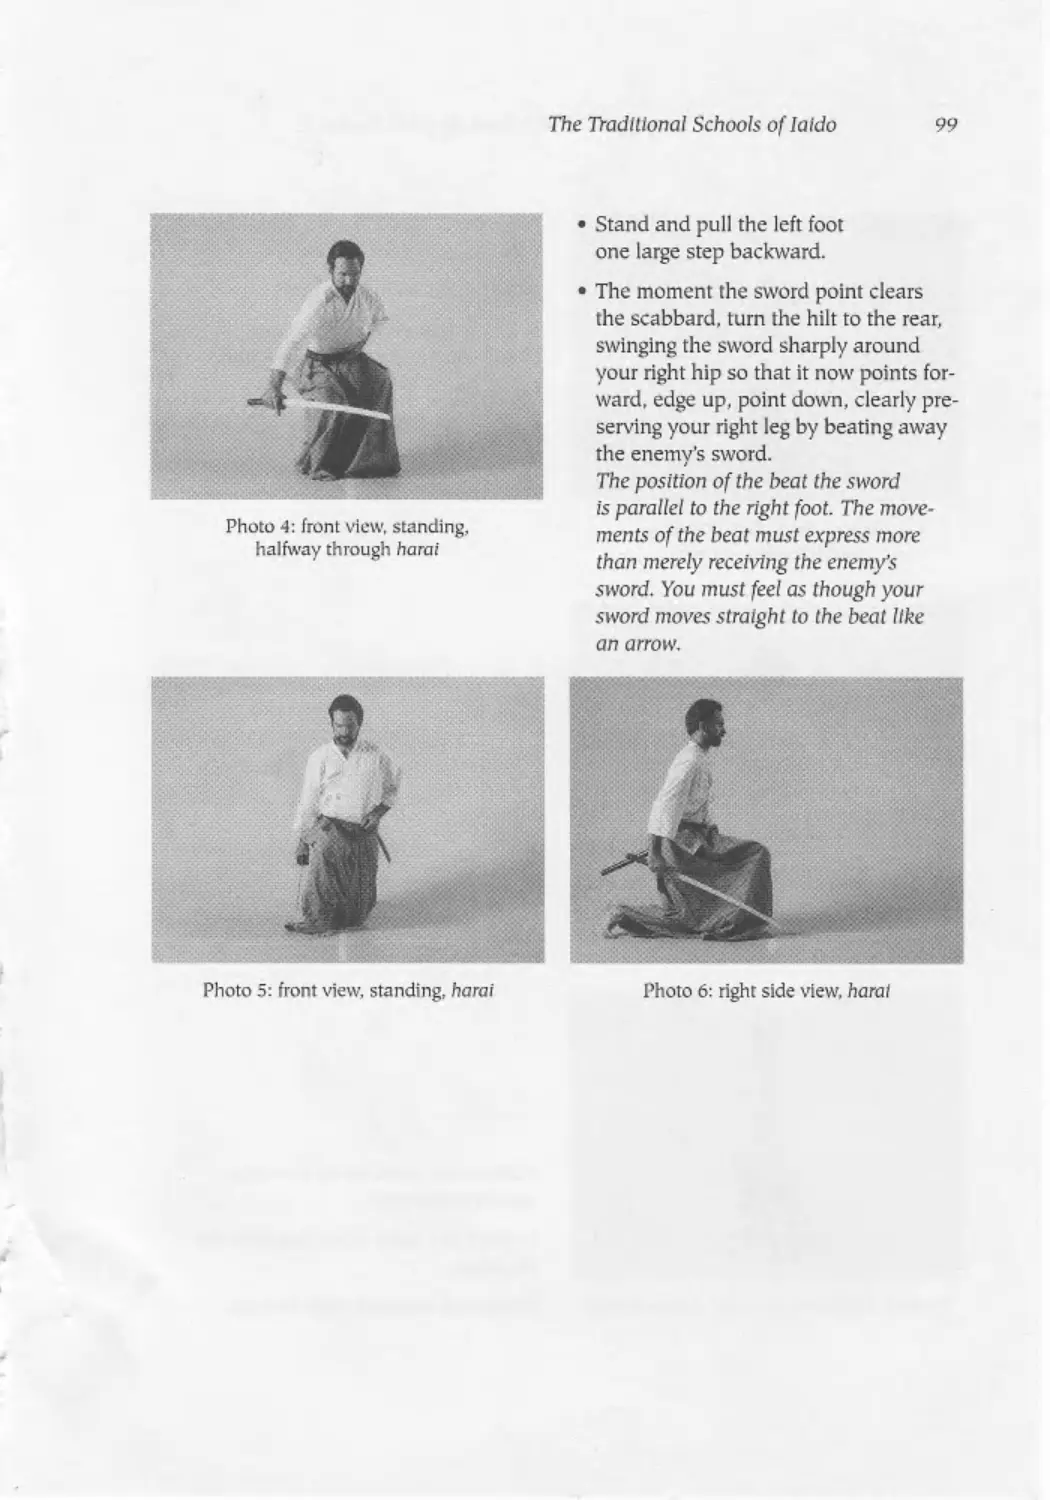
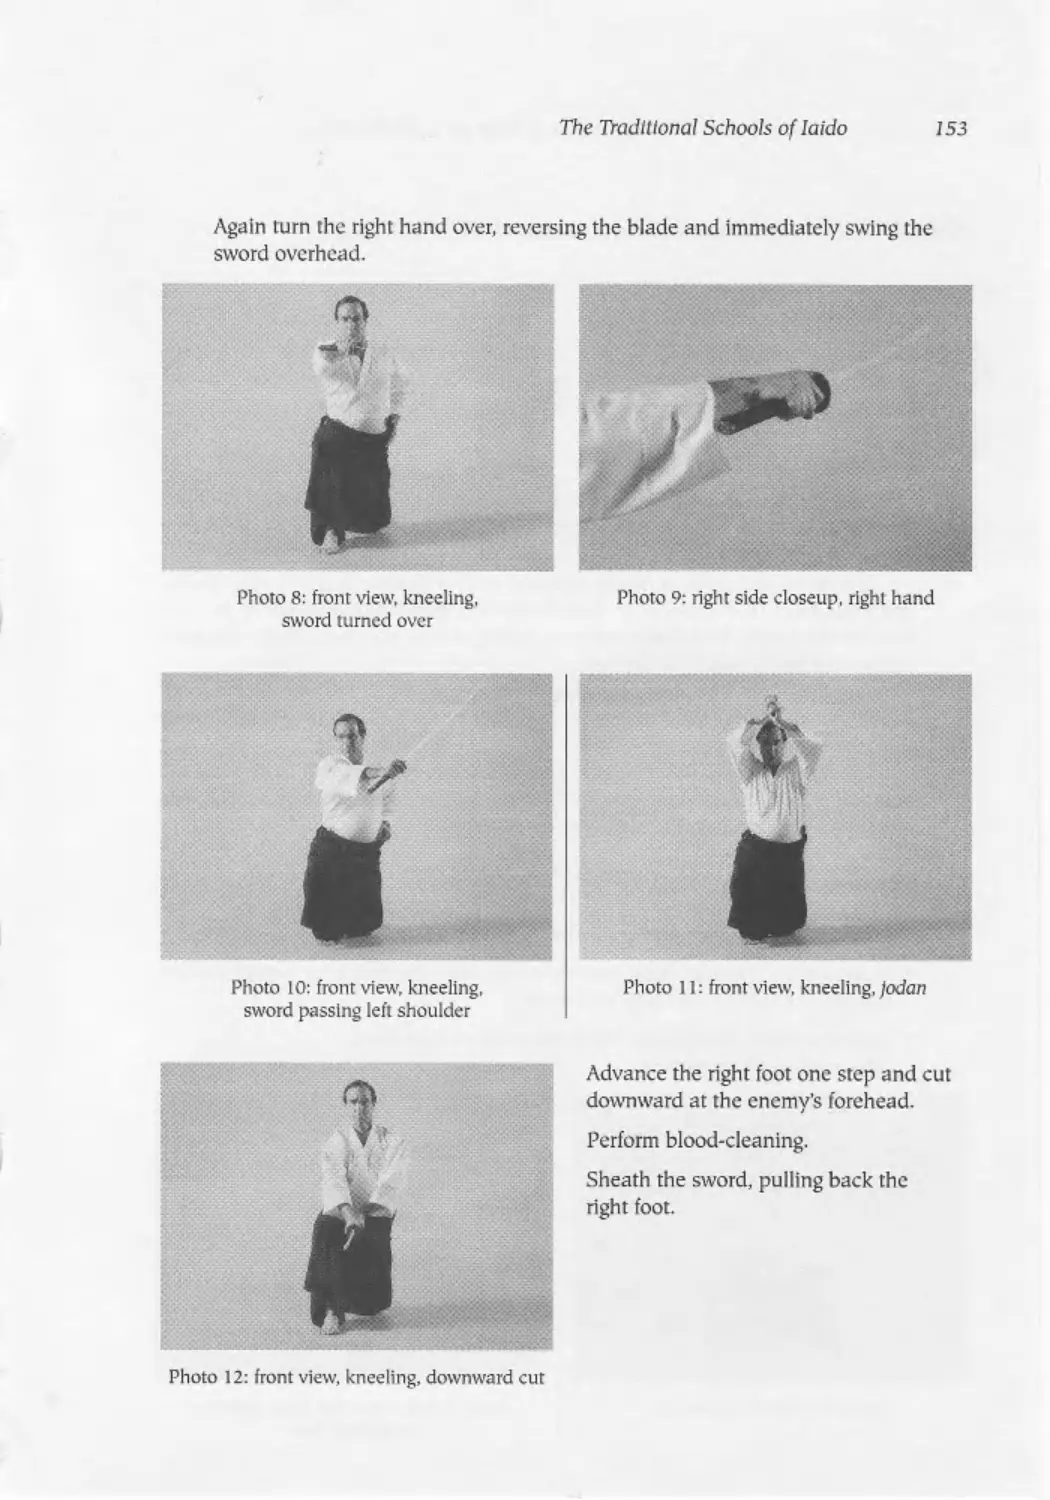
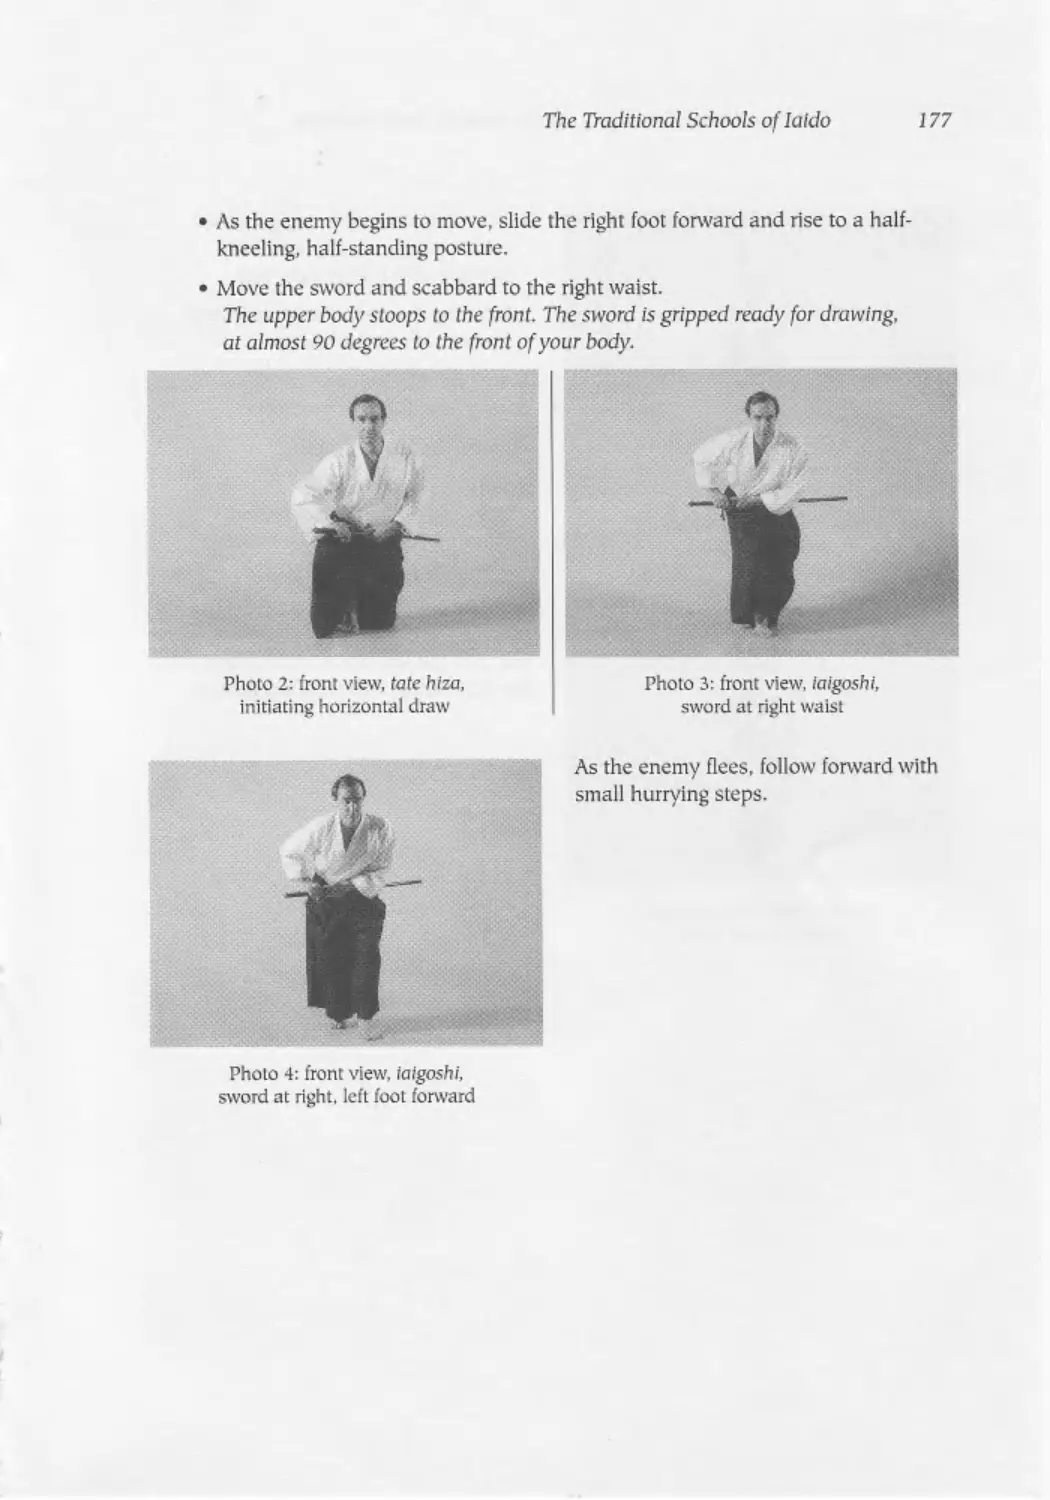
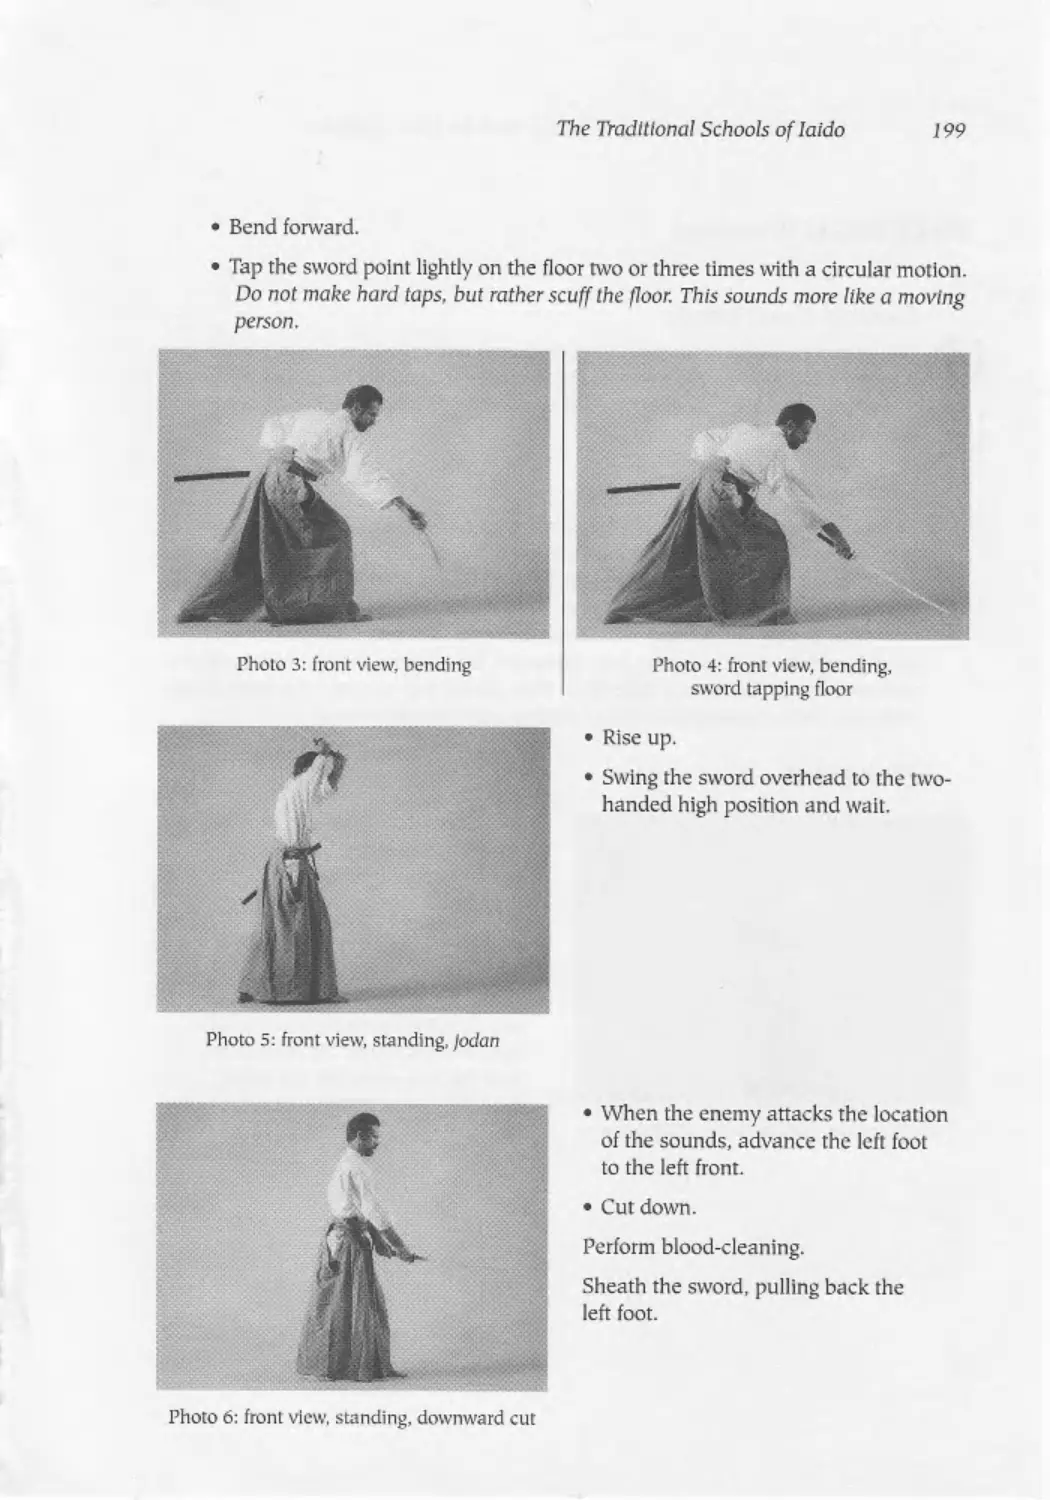
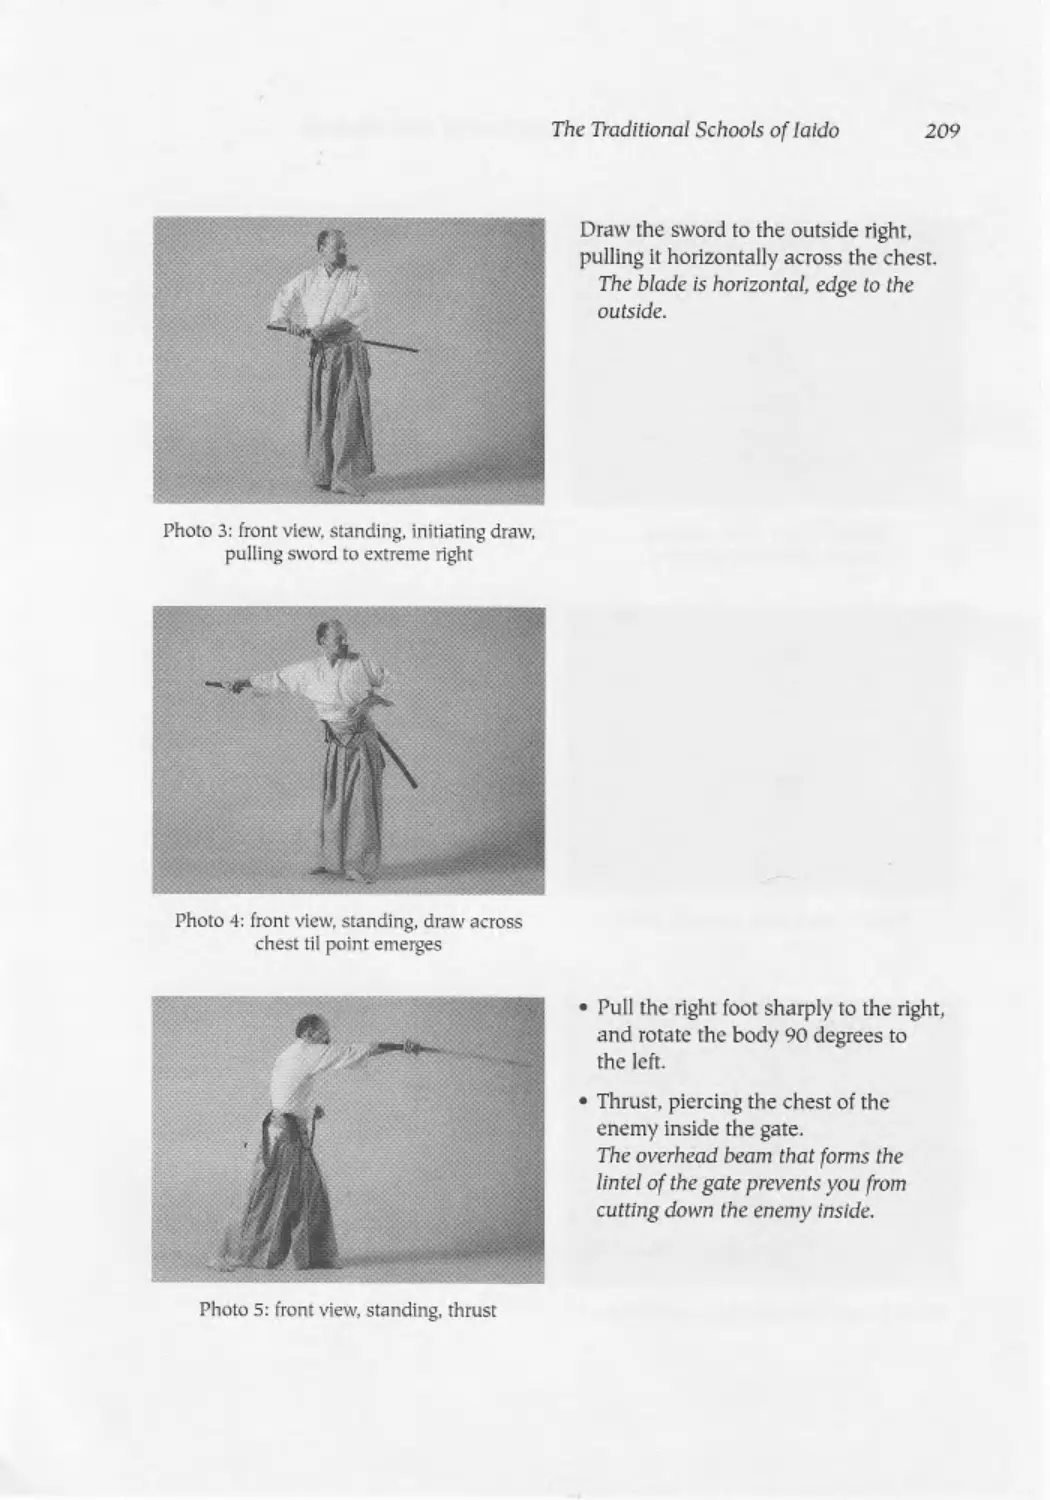
Text
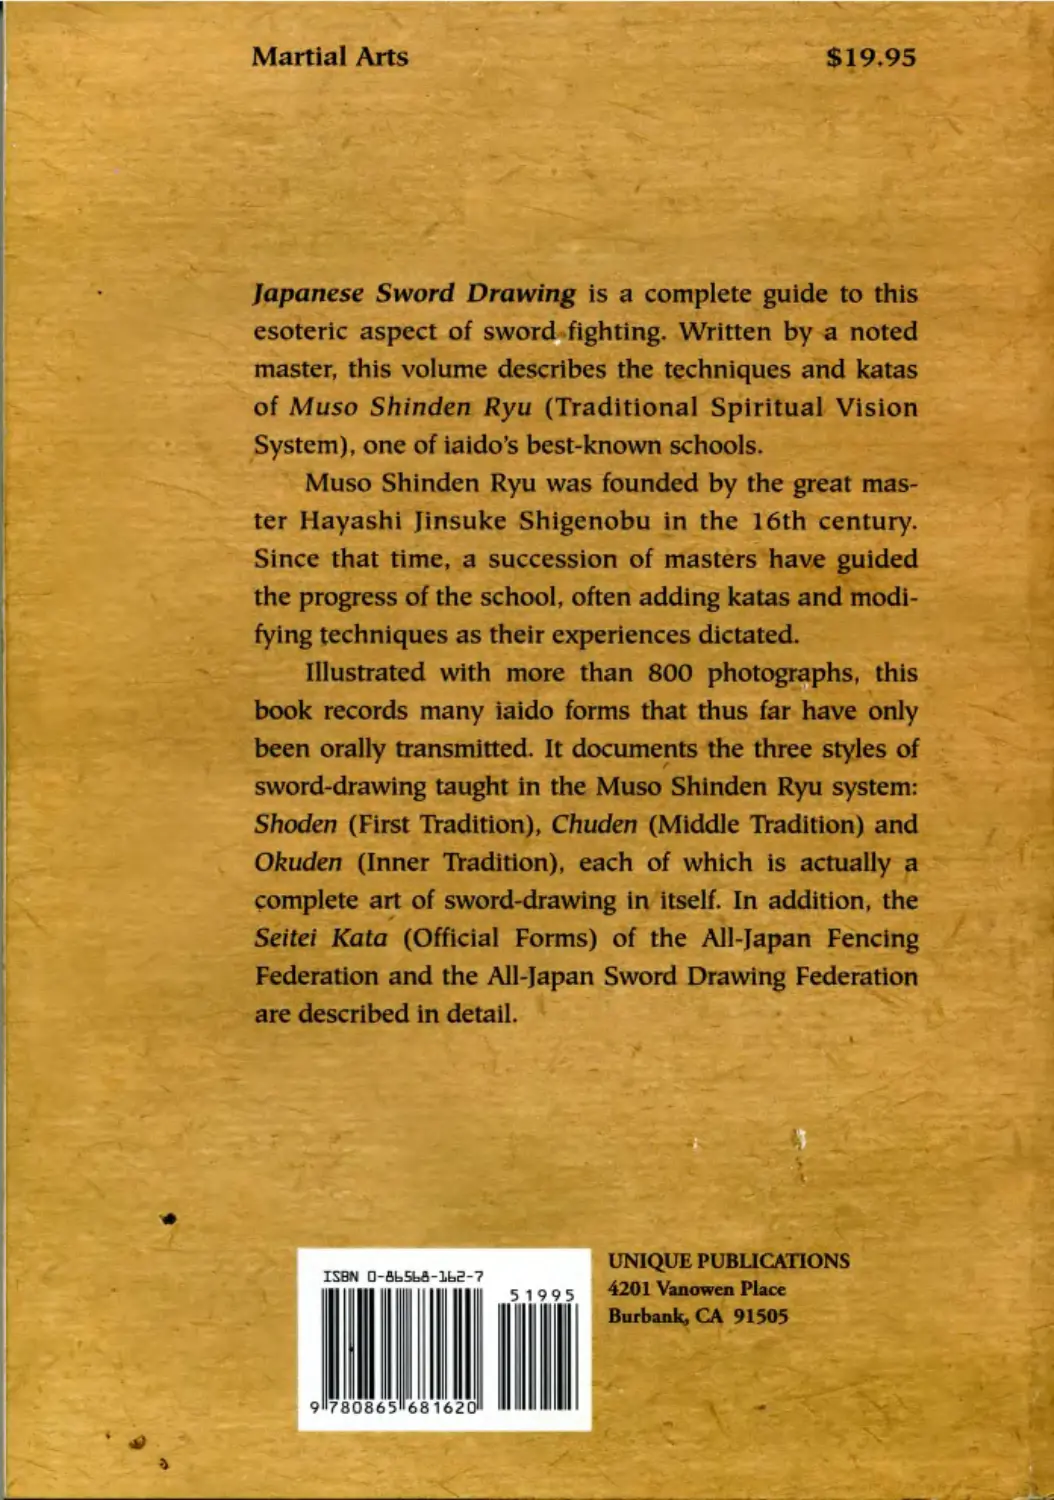
Japanese Sword Drawing
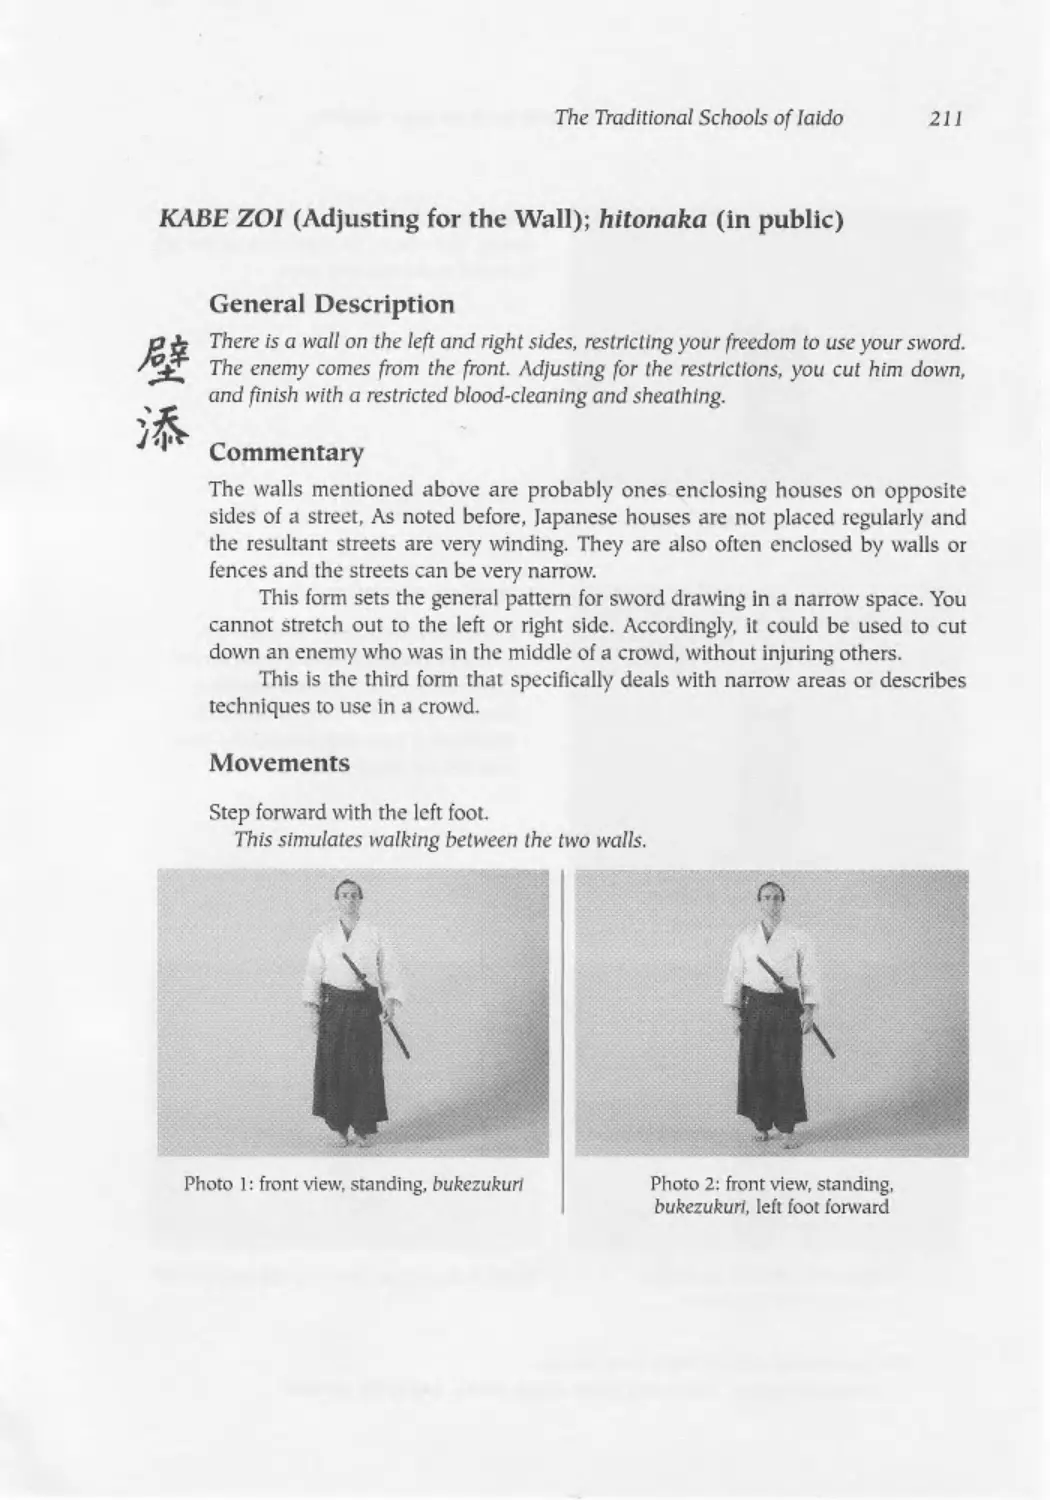
iource Book for laido Students
£3
Don J. Zier
Contents
Foreword: The Students' Perspective........................................ix
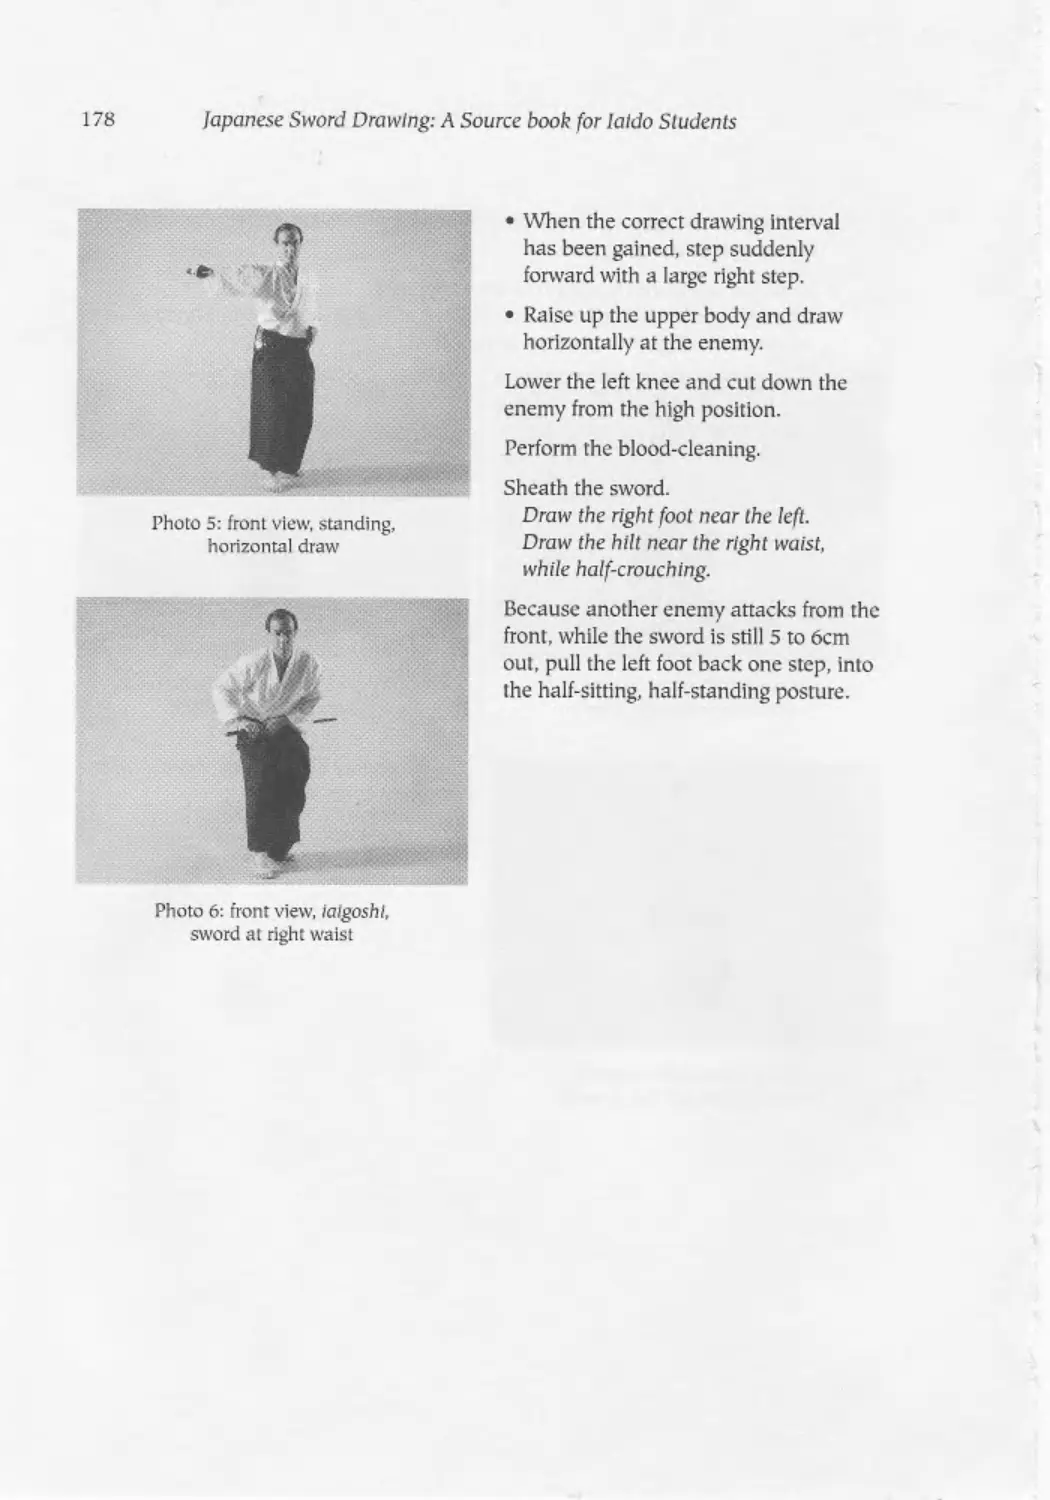
PART ONE: Preliminaries
1. Overview................................................................3
Background........................................................... 3
Scope .................................................................5
Conventions ......................................................... 6
2. Basic Techniques........................................................7
Drawing................................................................9
Cutting ..............................................................14
Blood-cleaning .......................................................18
Sheathing -------. . -................................................21
PART TWO: The Traditional Schools of laido
3. The First Tradition: Omori Ryu ...................................... 27
Background............................................................27
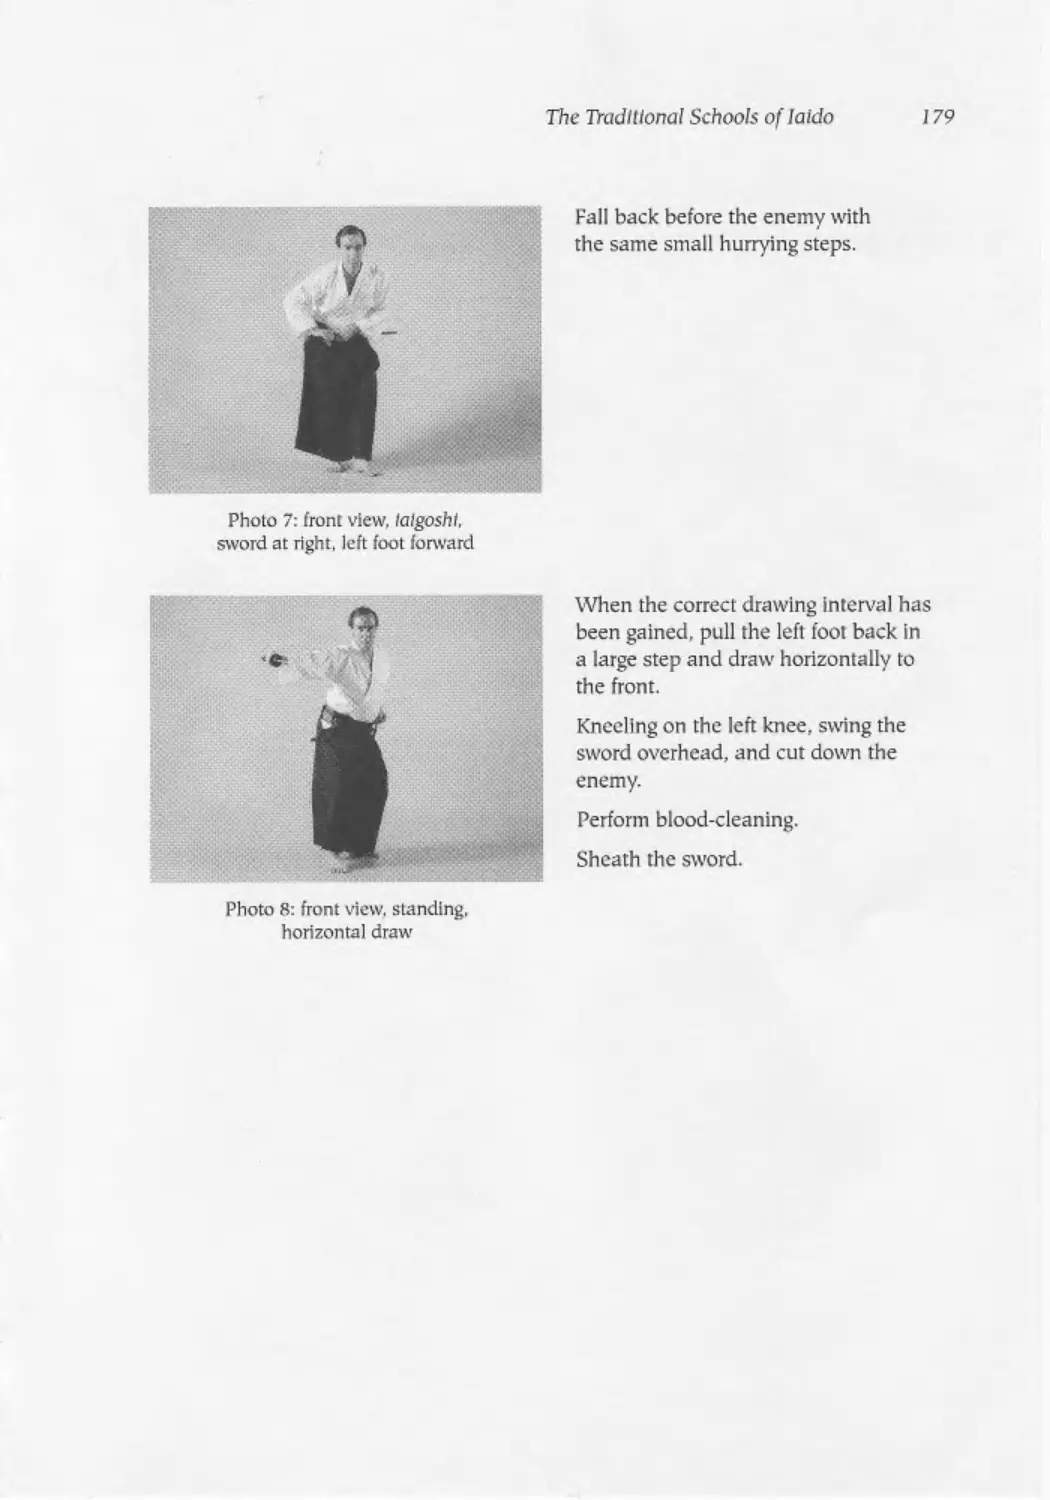
Preliminaries....................................................... 28
Beginning Formality ................................................ 32
Ending Formality .....................................................41
Shohatto (The Initial Sword)..........................................49
So To (Following Sword)...............................................56
U To (Right Sword)....................................................61
Atari To (Striking Sword).............................................63
Inyo Shintai (Advancing-Retreating Movement)..........................65
Ryu To (Flowing Sword) ...............................................71
Jun To (Obedient Sword)...............................................77
Gyaku To (Reversed Sword) ............................................31
Seichu To (Center Strengthened Sword).................................88
Koran To (Tiger Fighting Sword) .................................... 92
Nuki Uchi (Sudden Attack).............................................94
Inyo Shintai Kaewaza (Advancing-Retreating Movement) .................97
4. The Middle Tradition: Eishin Ryu .....................................101
Background......................................................... 101
Distinctive Features ................................................102
Preliminary Exercises.............................................. 104
Yokogumo (Bank of Clouds).......................................... 108
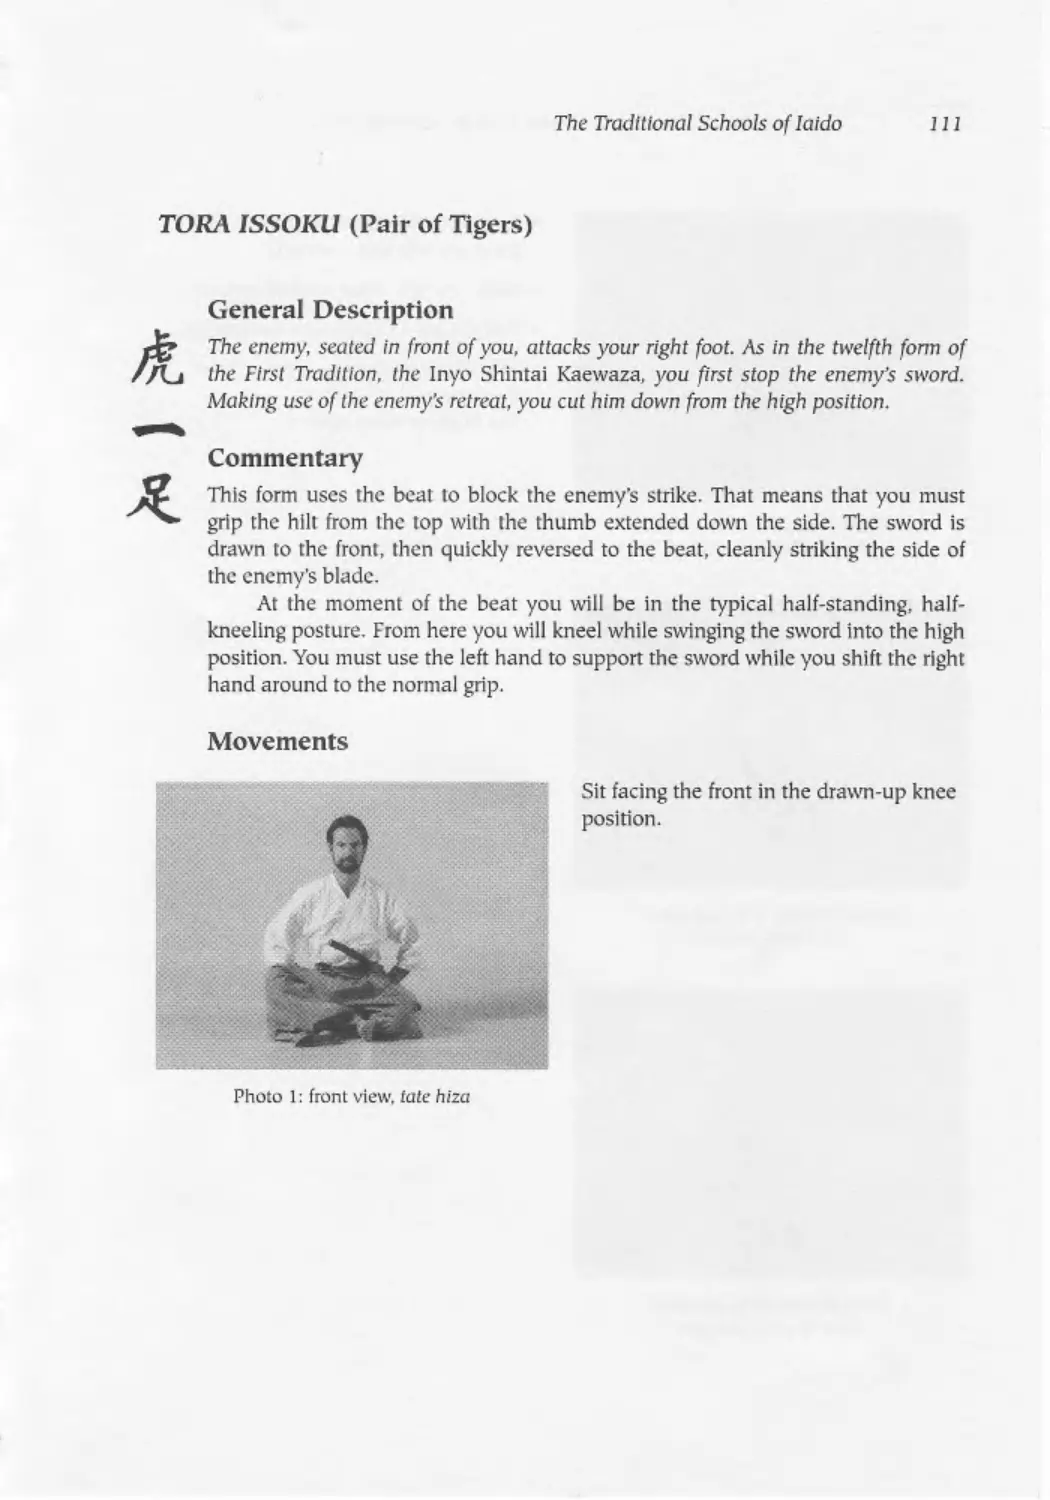
Toru Issoku (Pair of Tigers).........................................Ill
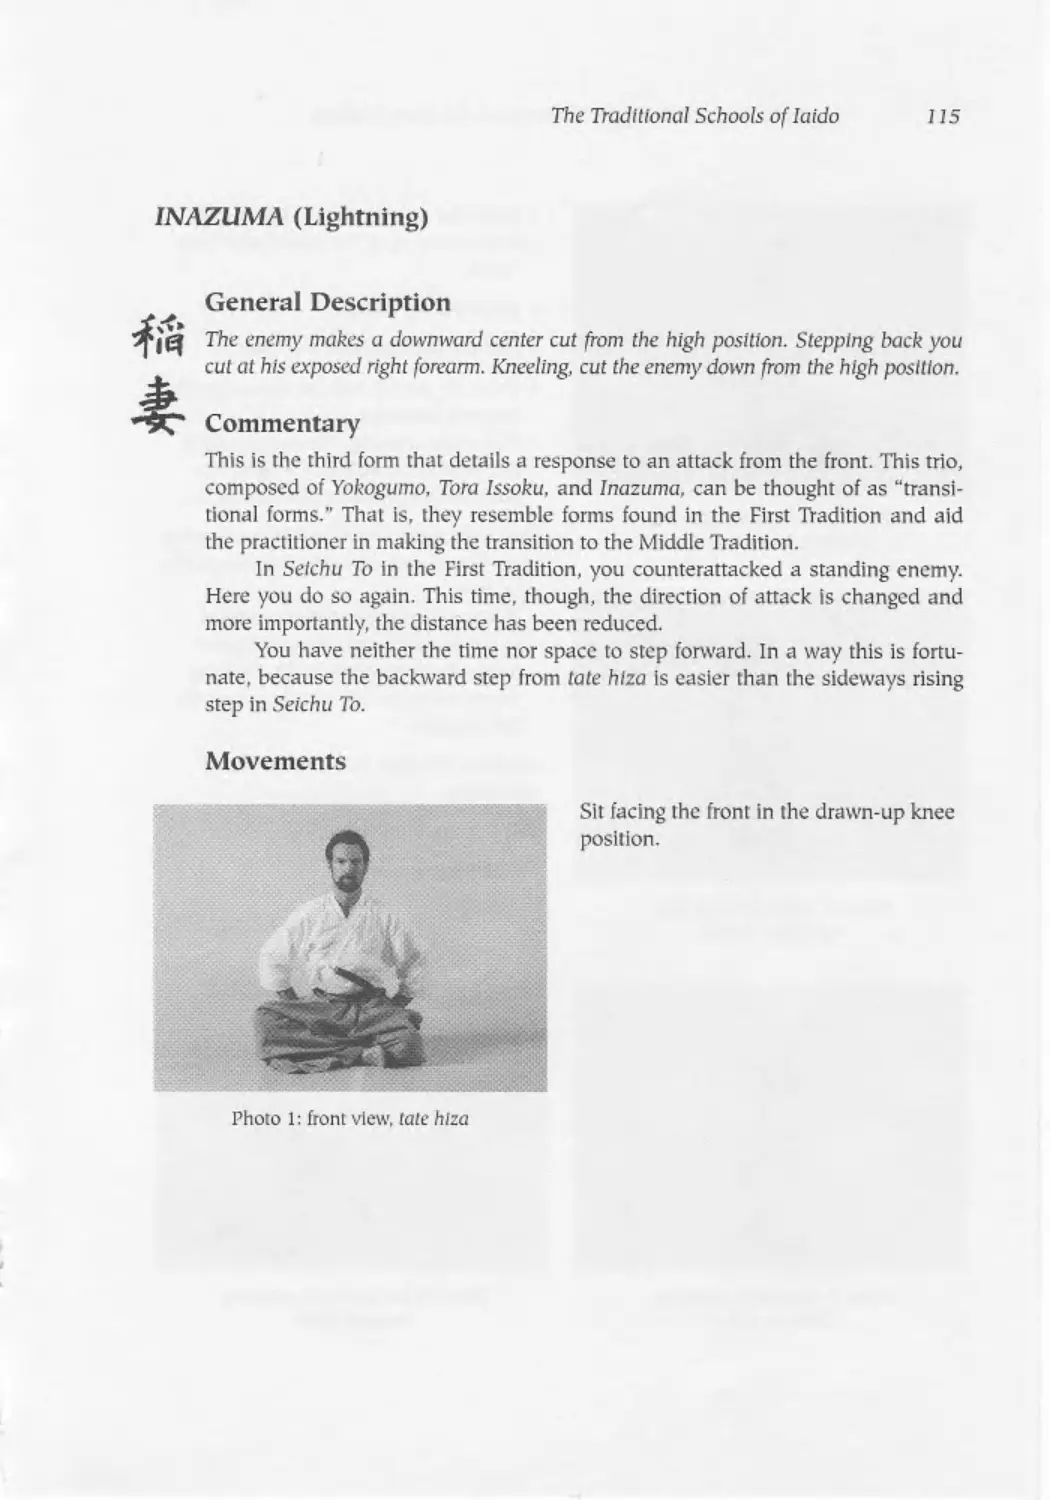
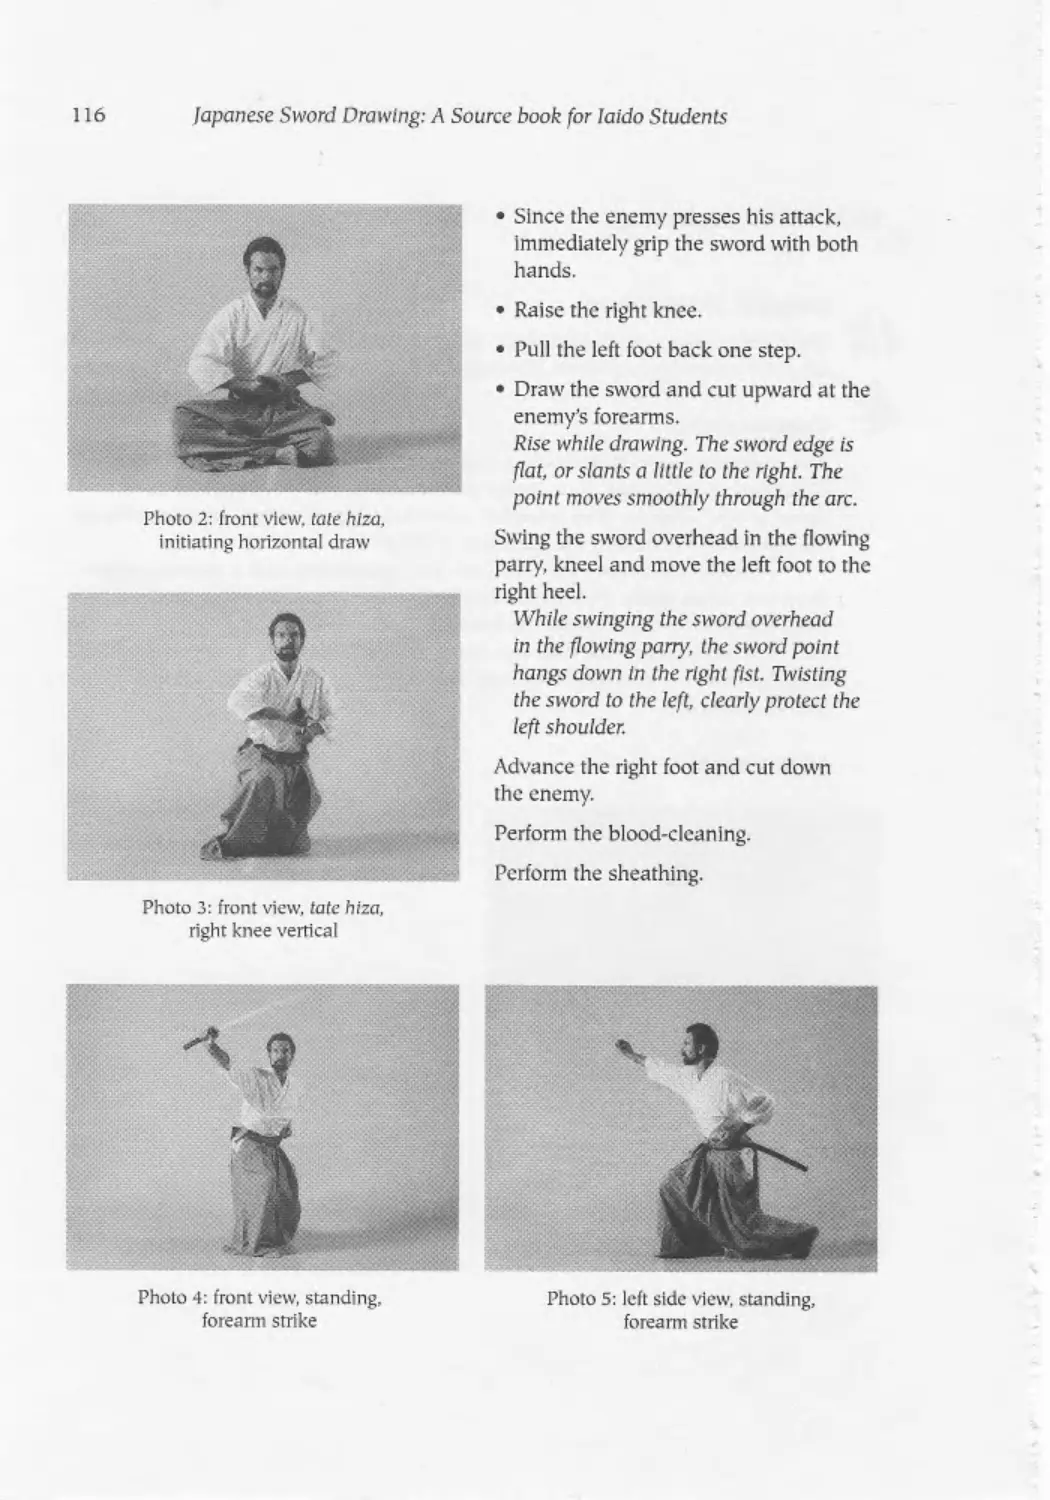
Inazuma (Lightning) ................................................... 115
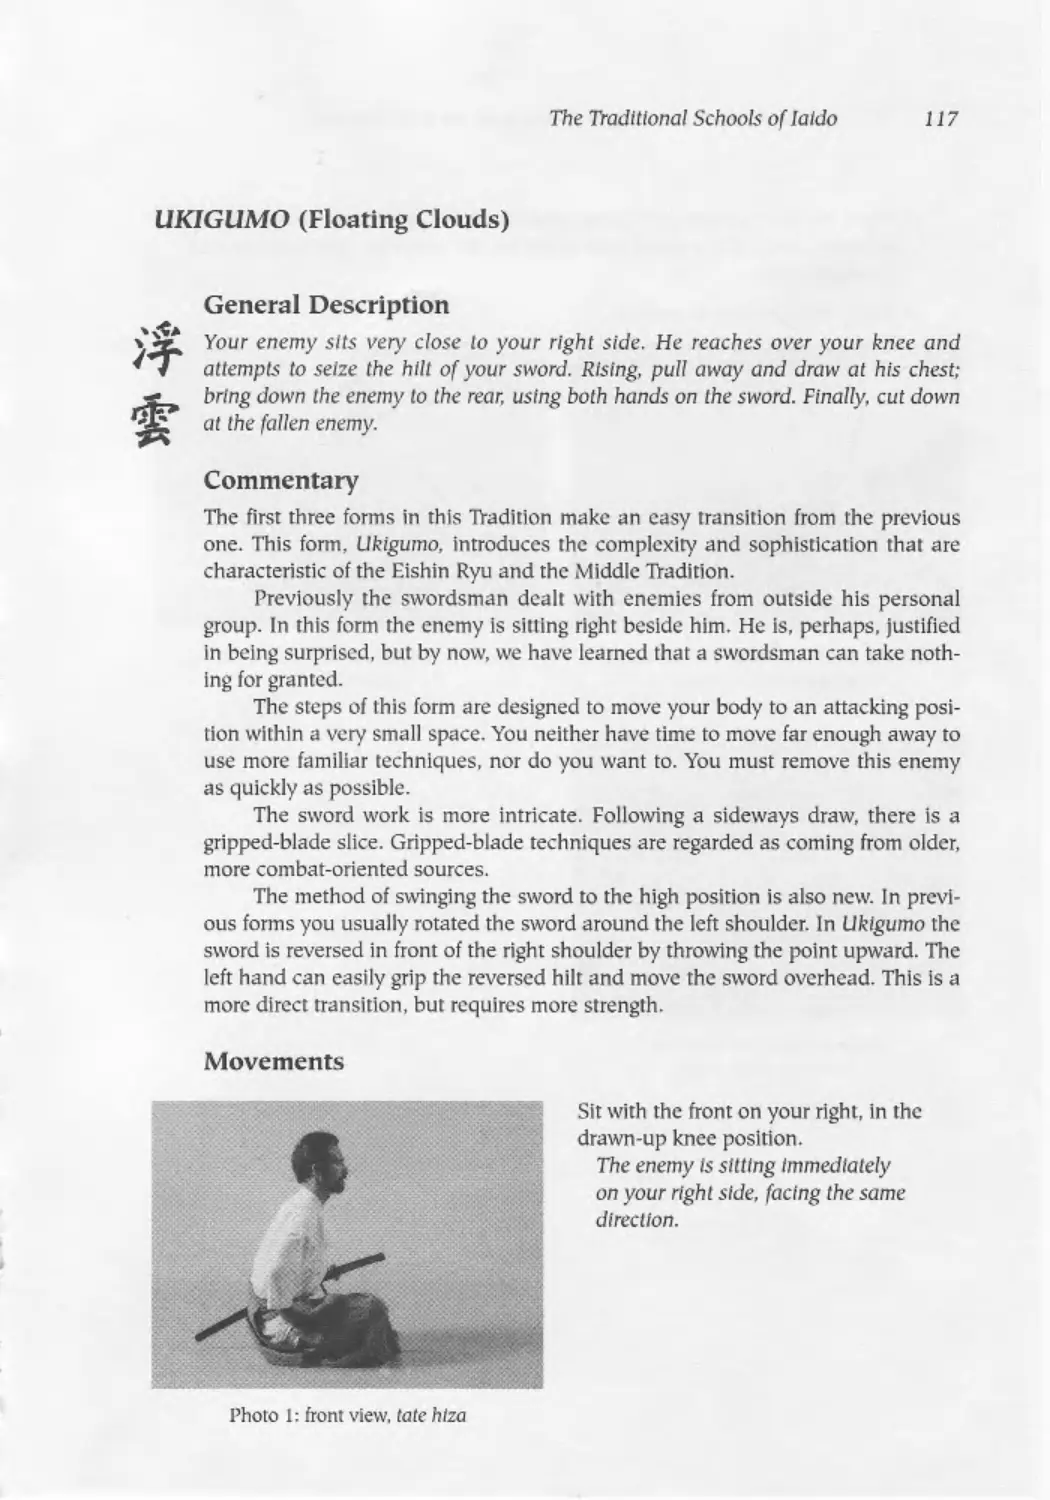
Ukigumo (Floating Clouds).................................................117
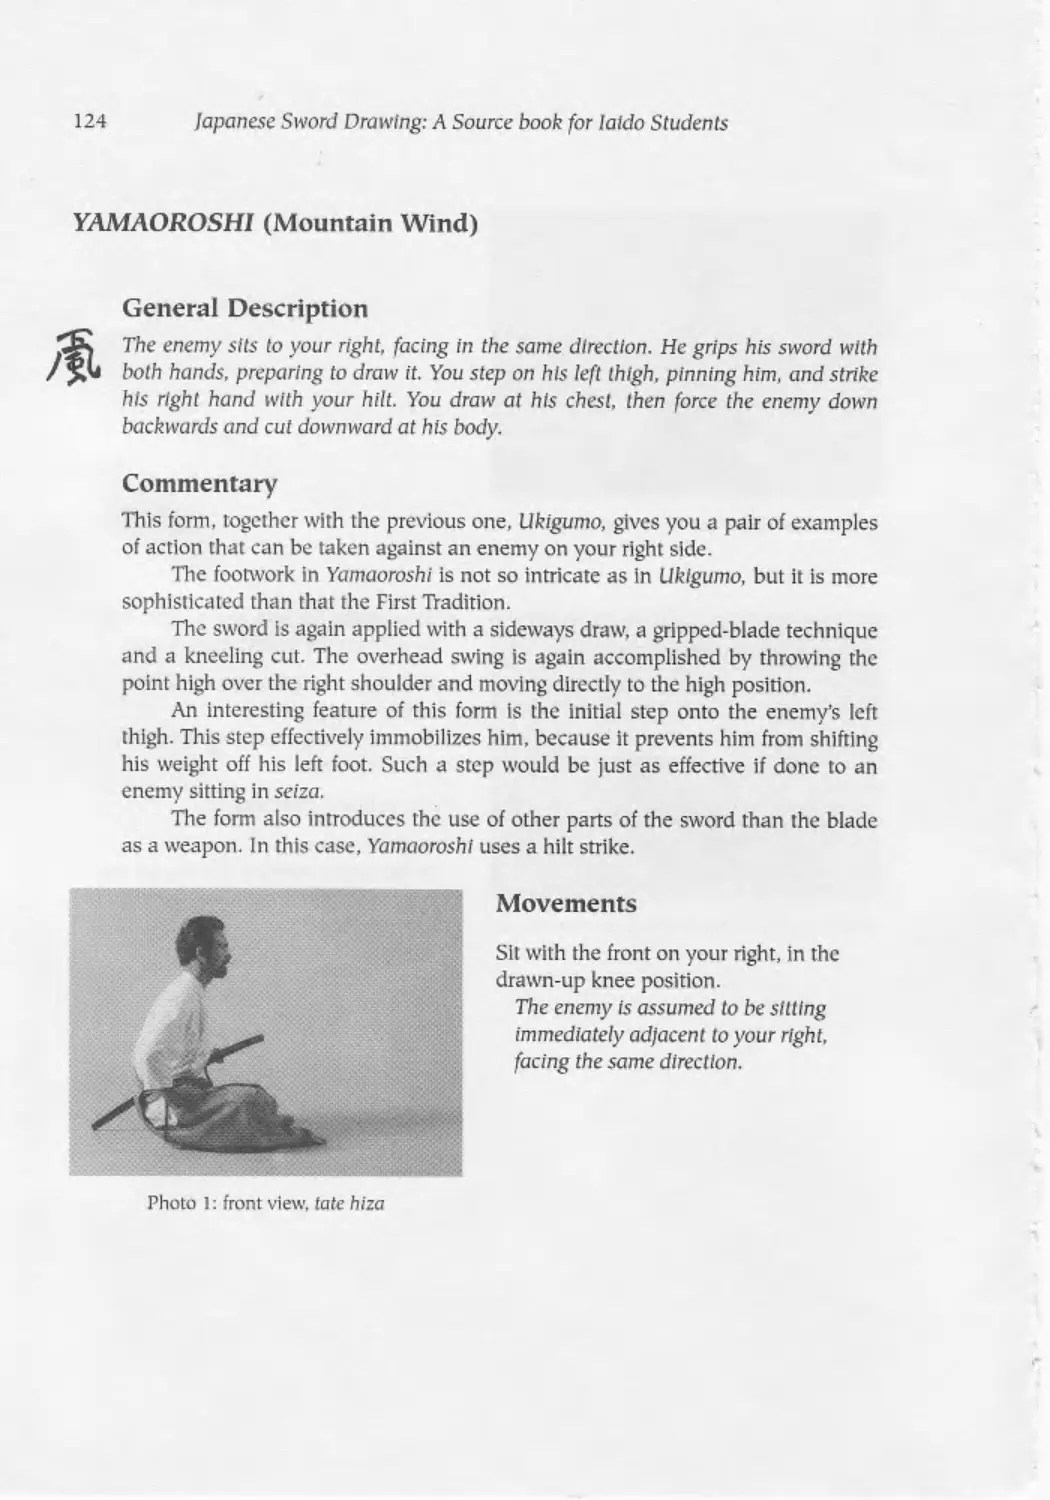
Yamuoroshi (Mountain Wind) ...............................................124
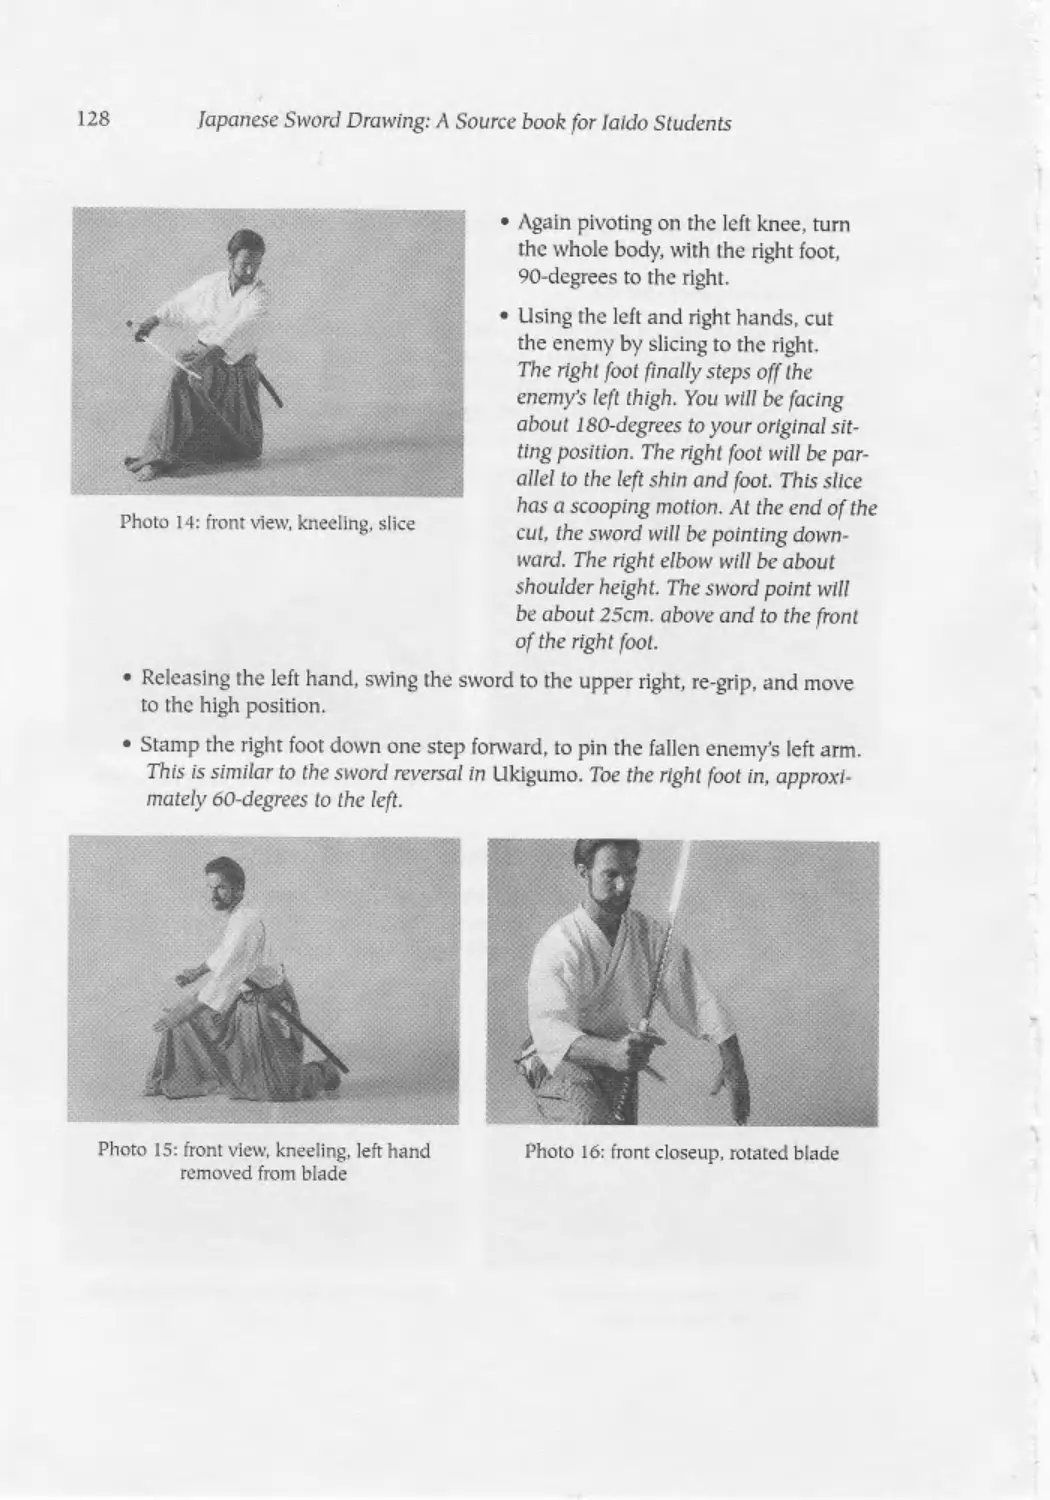
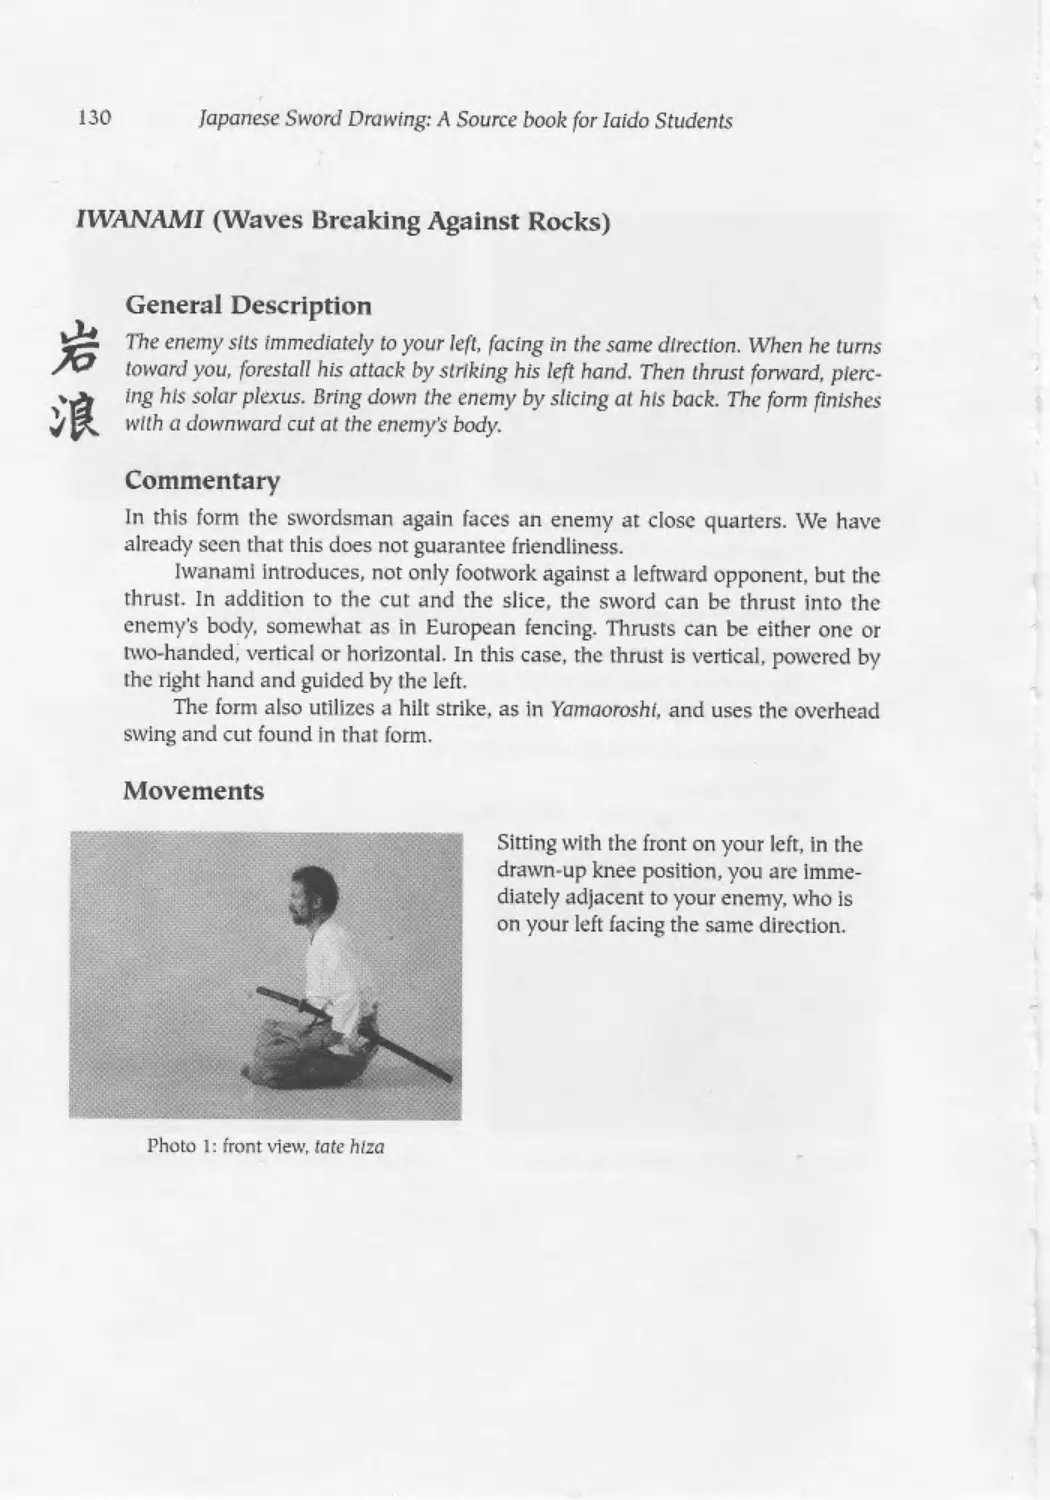
ftvancmi (Waves Breaking Against Rocks)...................................130
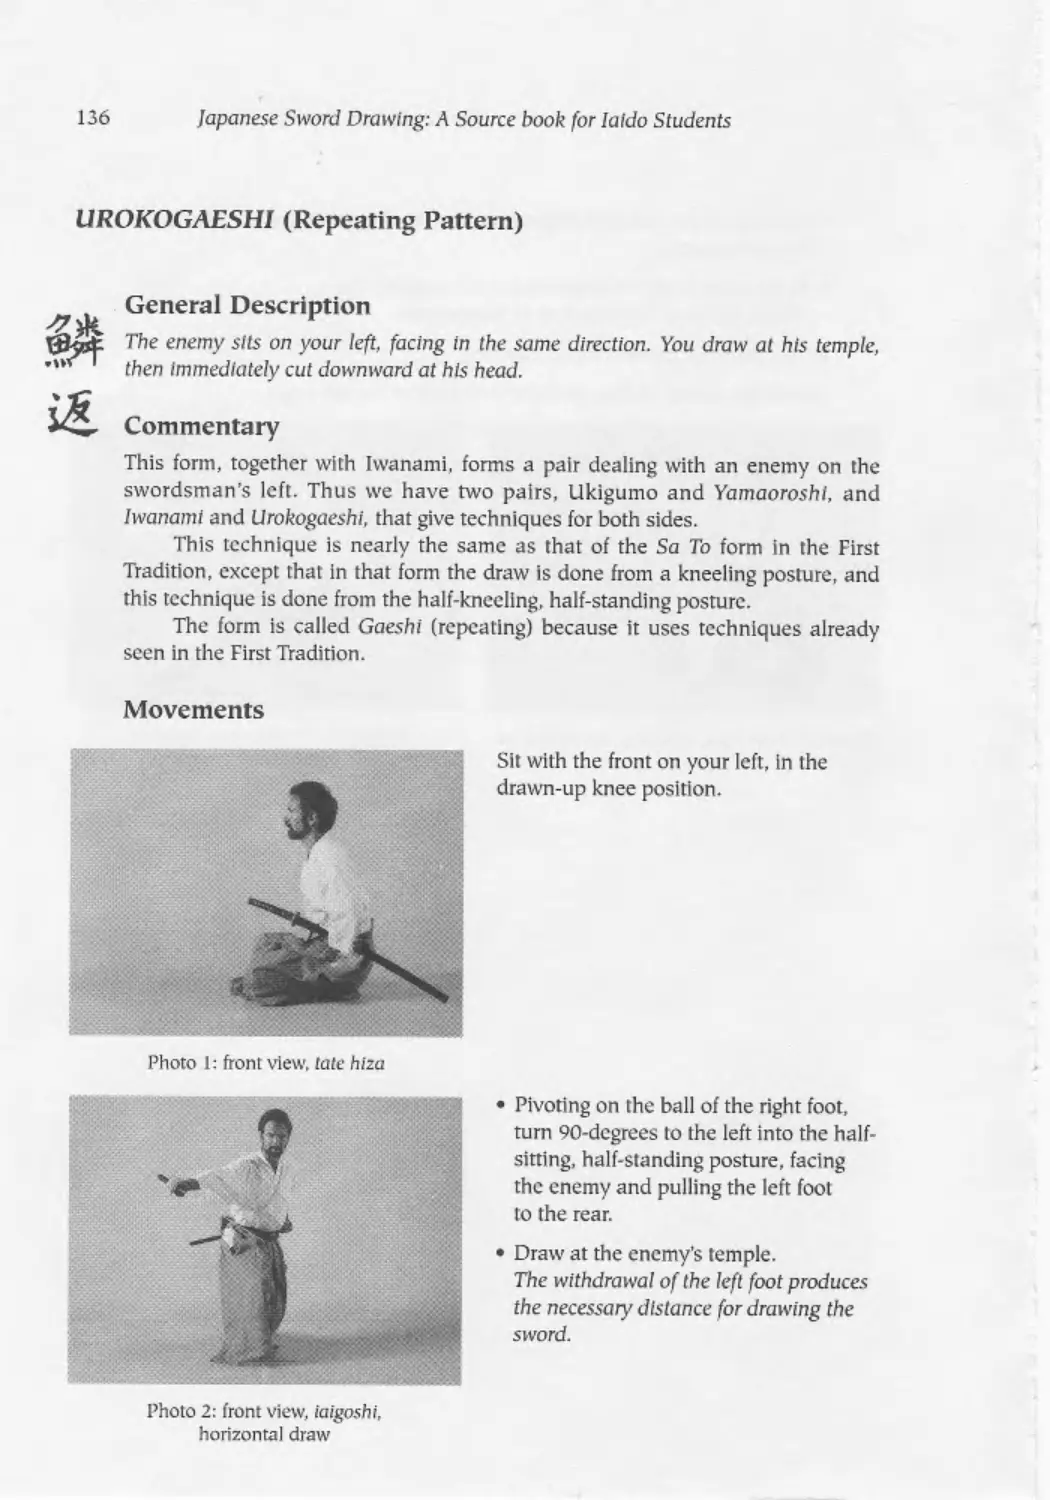
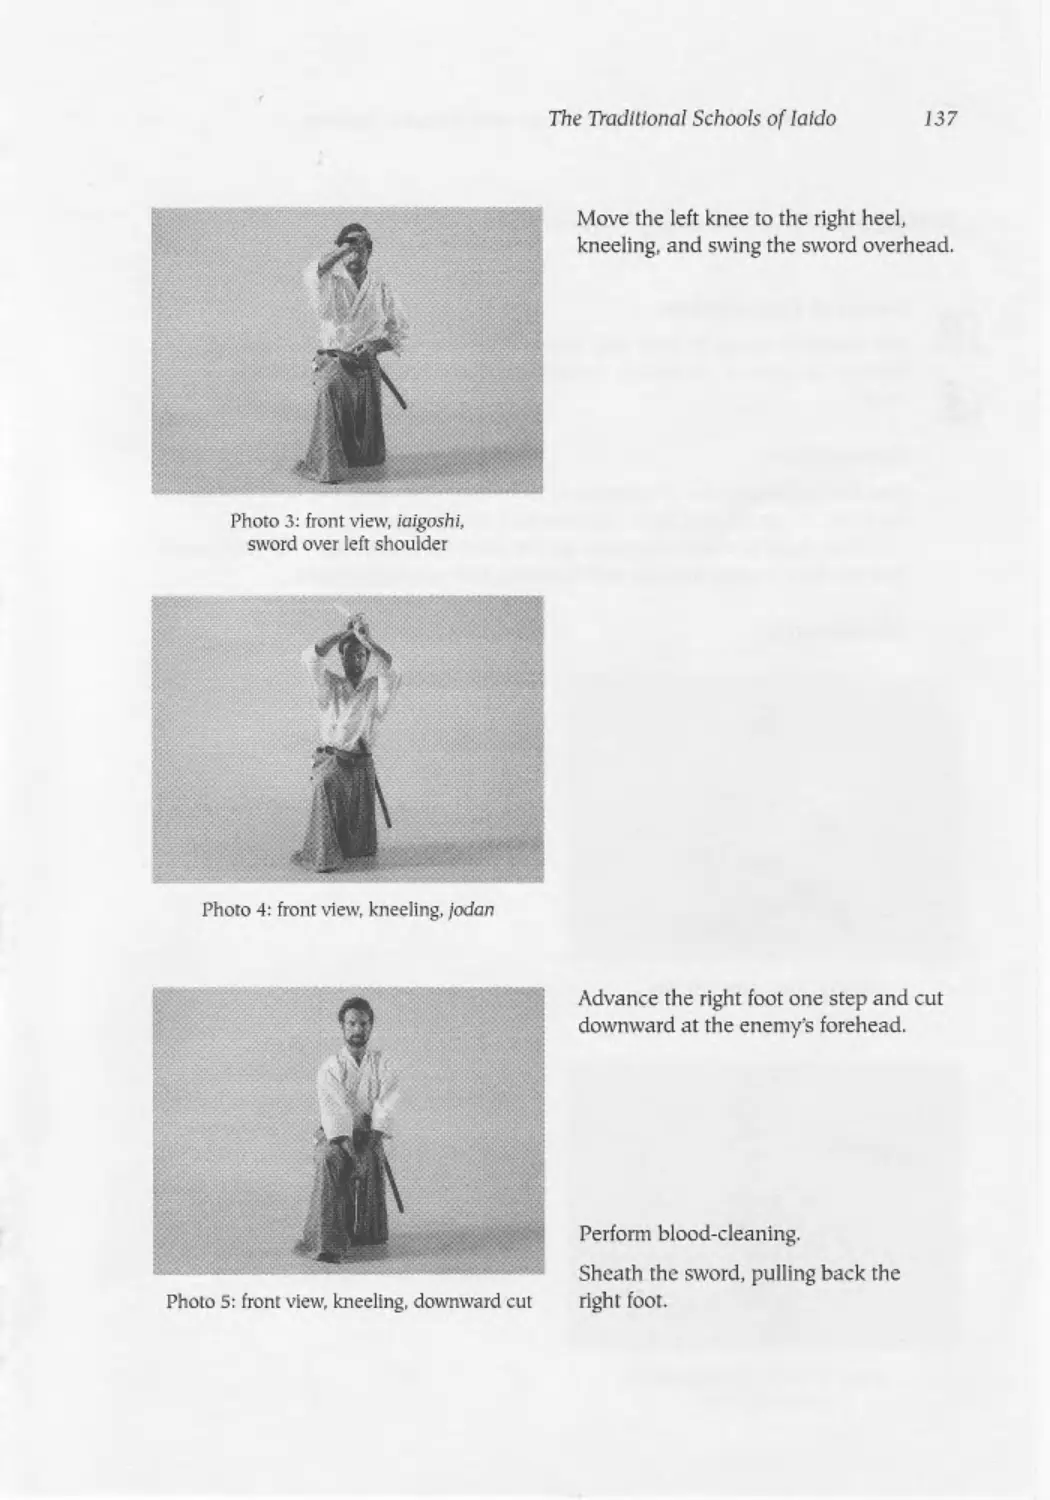
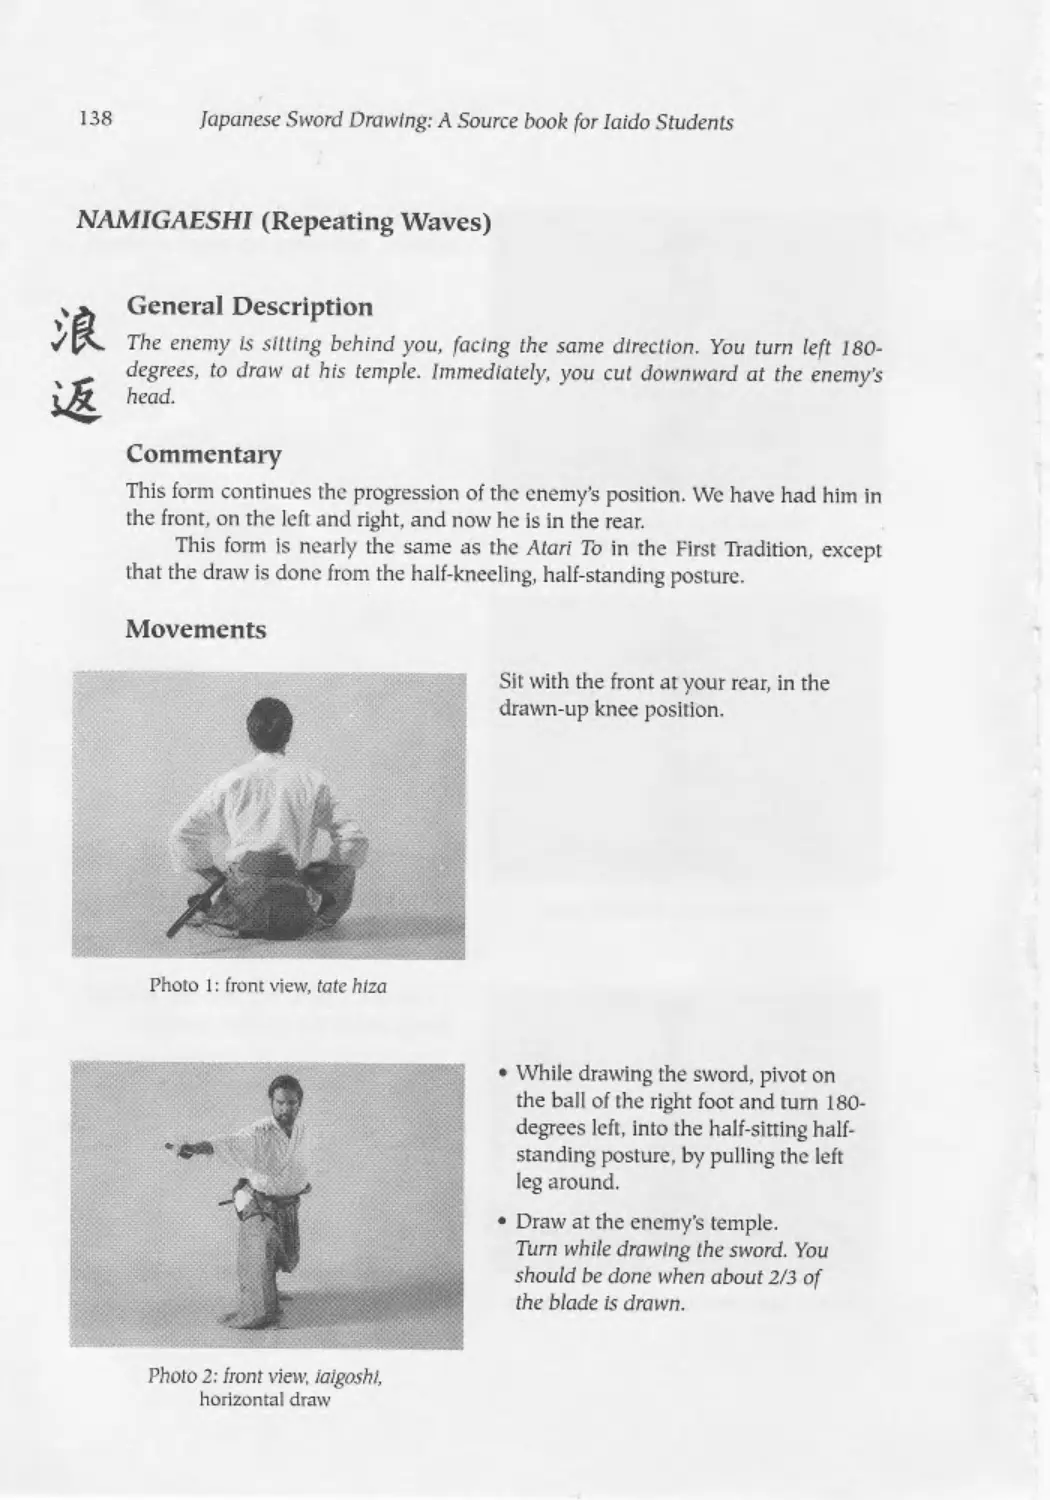
Urokogaeshi (Repeating Pattern) ..........................................136
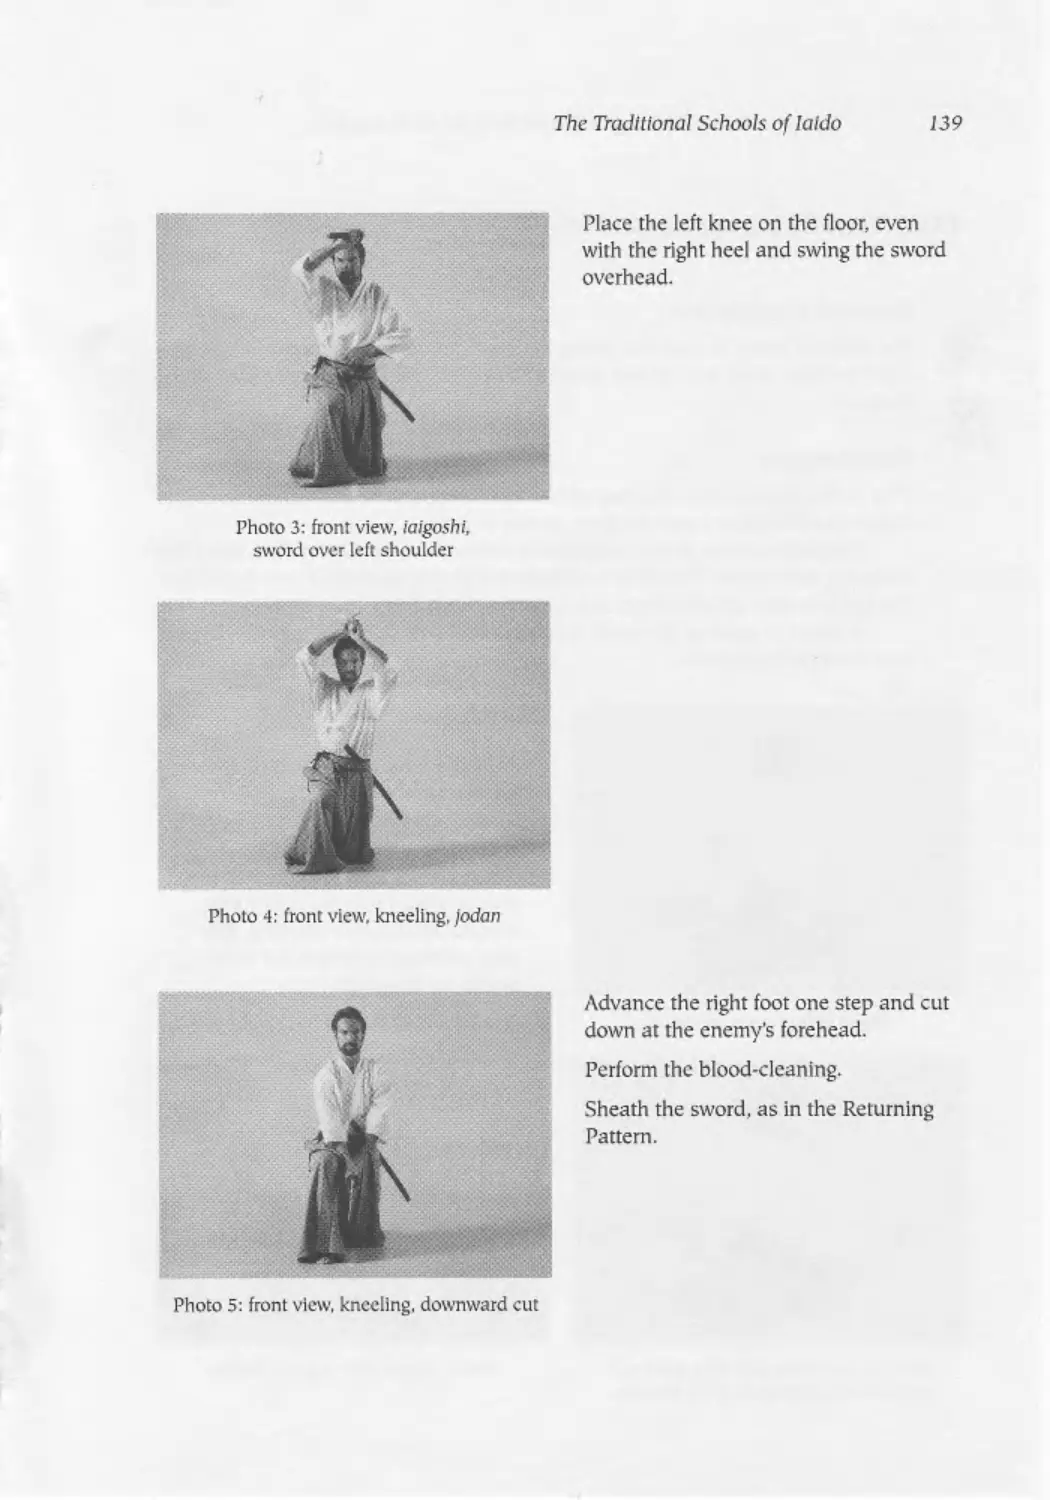
Namigaeshi (Repeating Waves) .............................................138
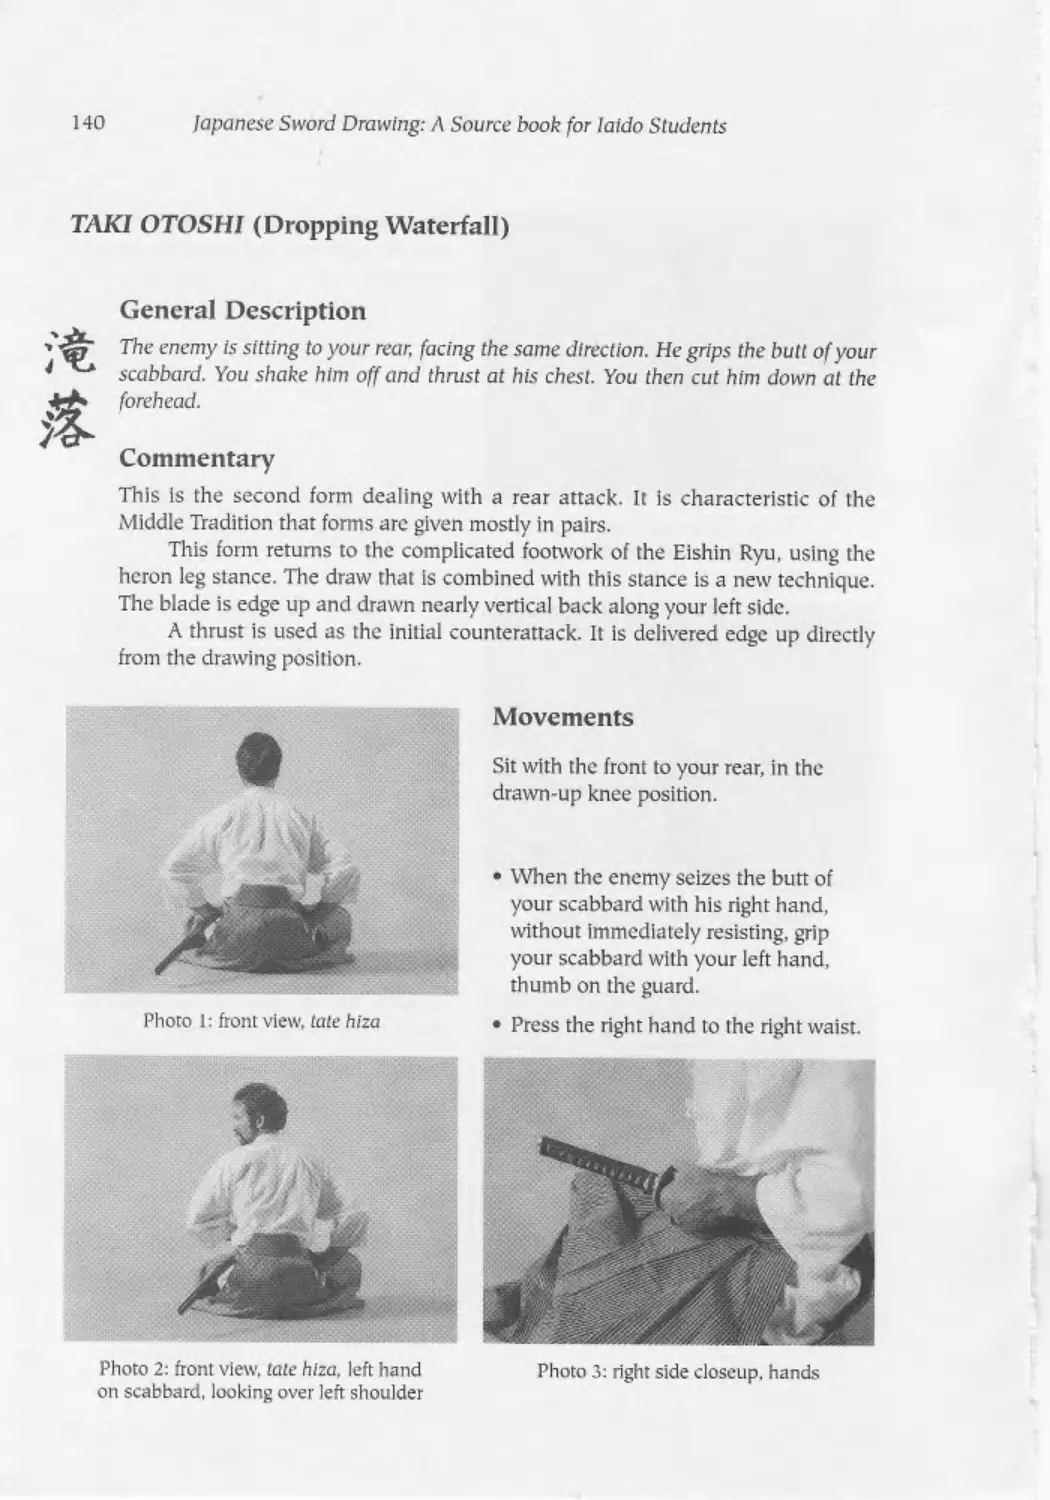
Tuki Otoshi (Dropping Waterfall)........................................ 140
Nuhi Uchi (Sudden Attack)............................................... 146
5. The Inner Tradition: Oku lai, Seated Techniques ........................ 149
Background................................................................149
Distinctive Features .....................................................150
Kasumi (Mist)......................................................... 150
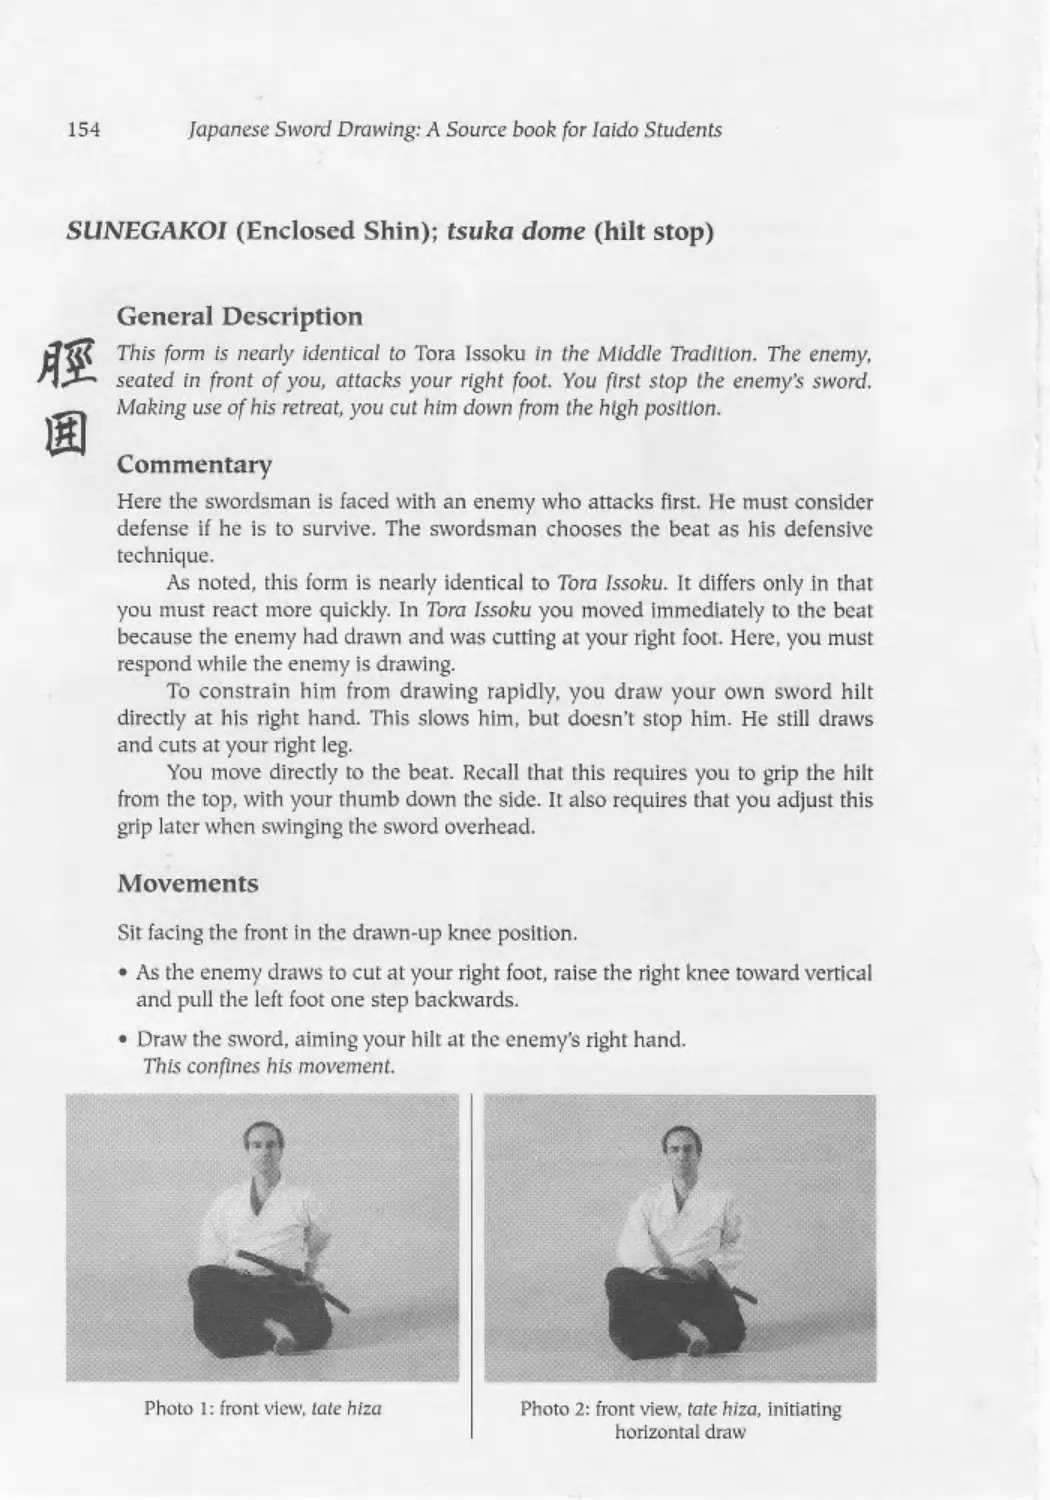
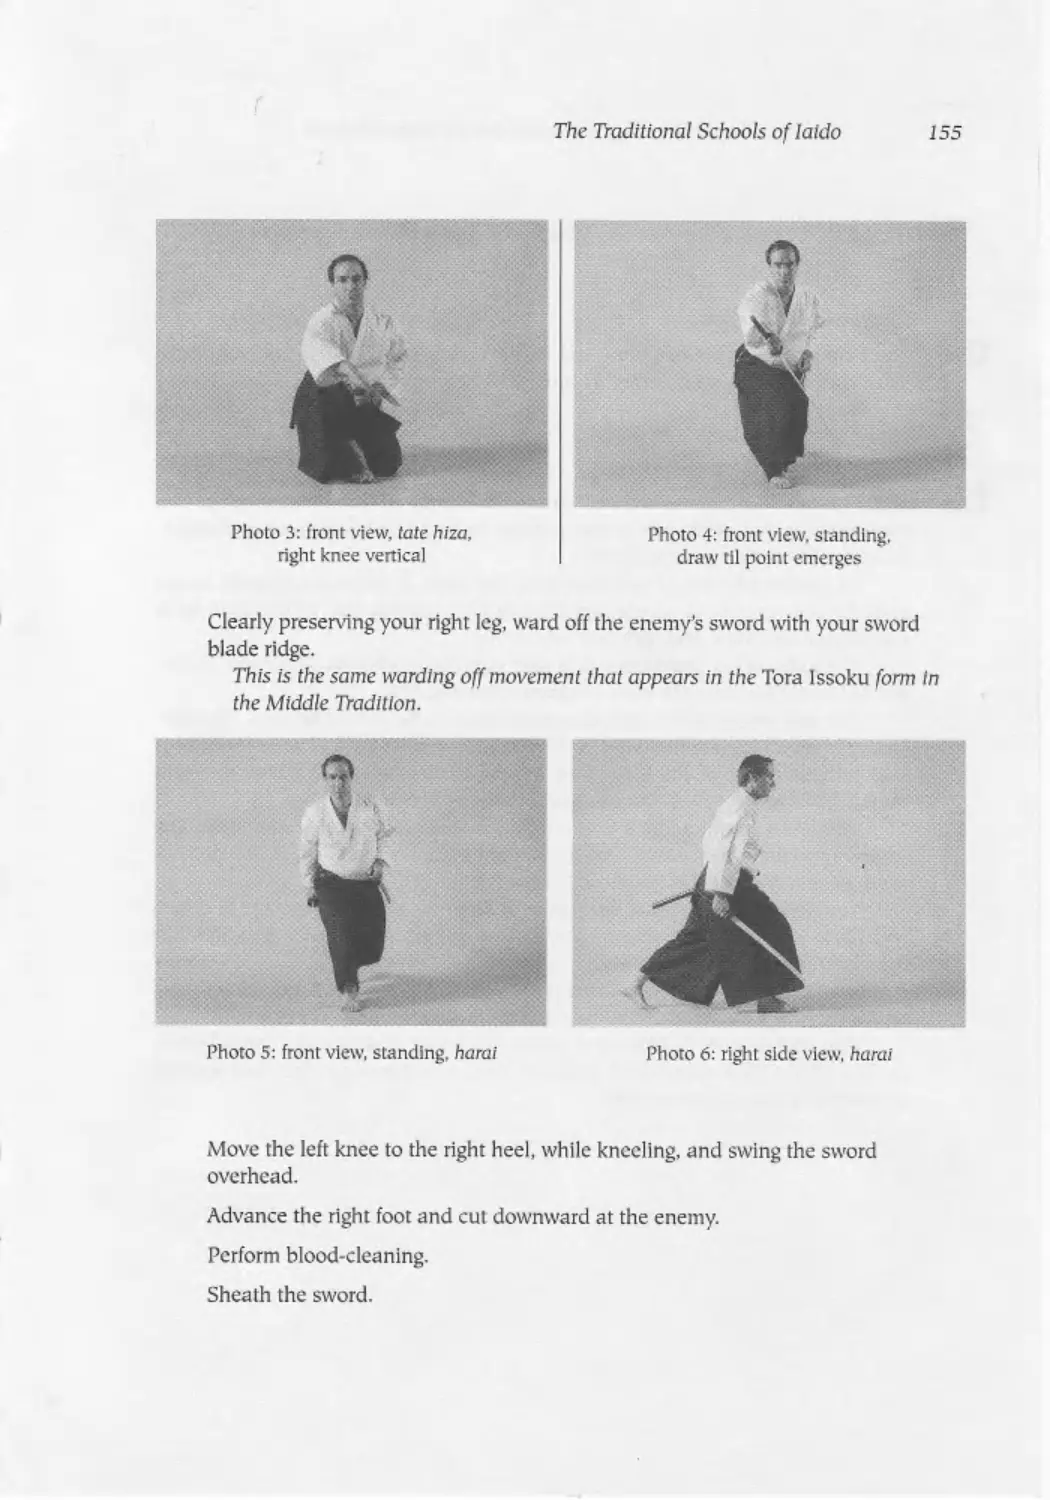
Sunegakoi (Enclosed Shin)............................................. 154
Shihogiri (Four Directional Cut) ..................................... 156
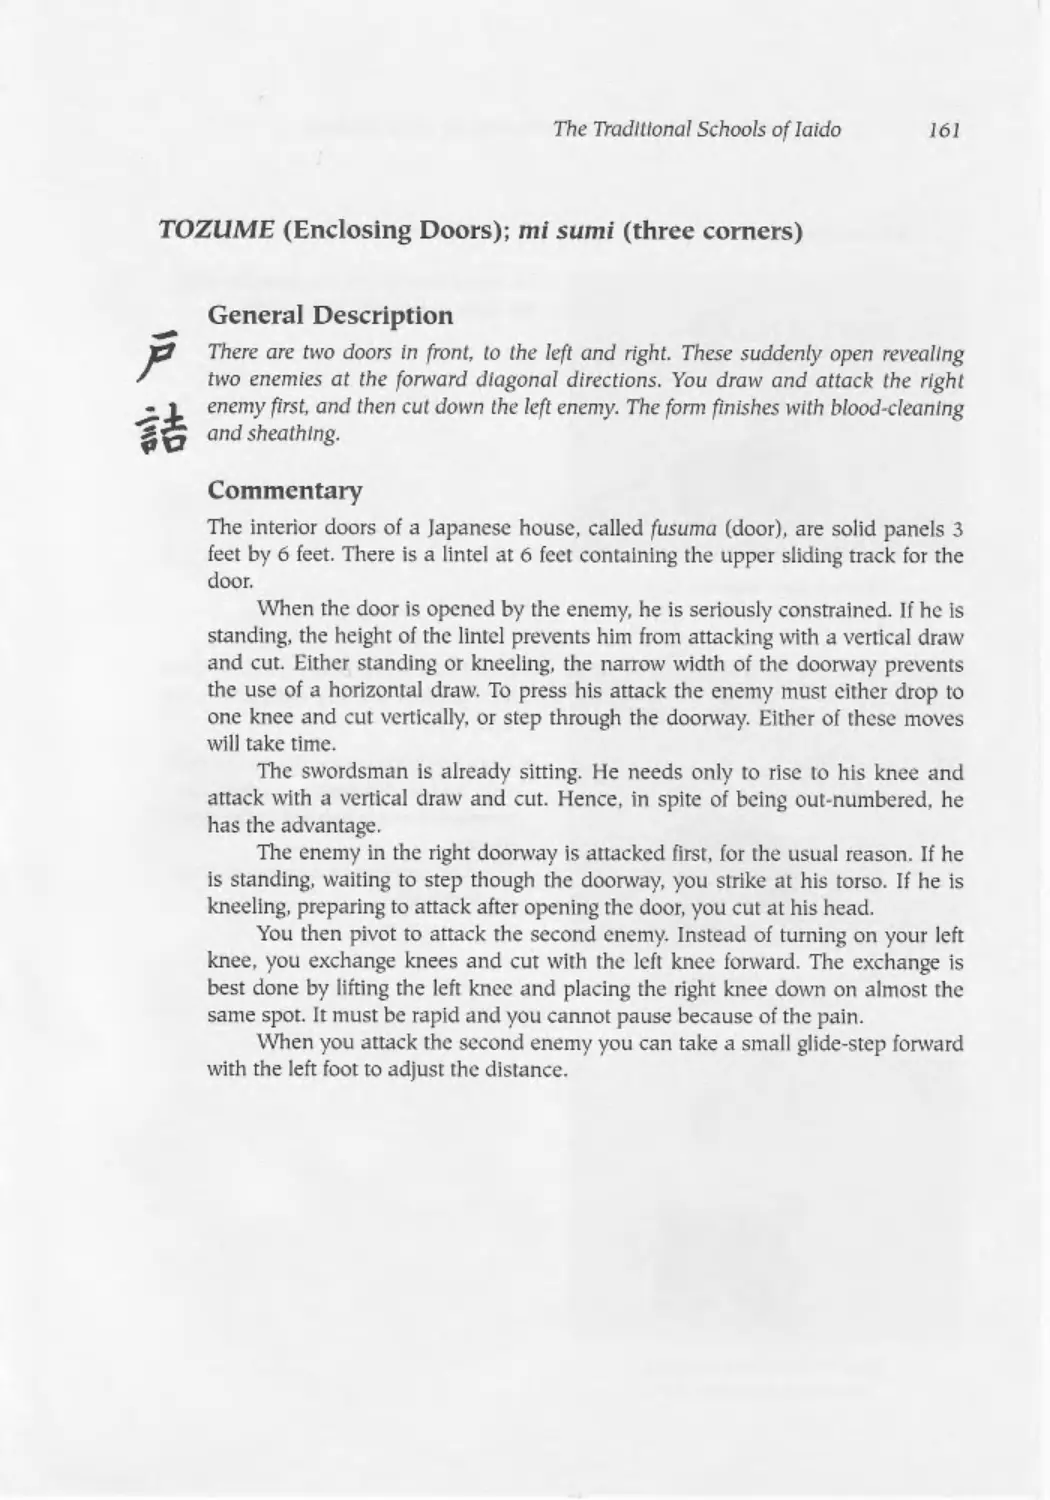
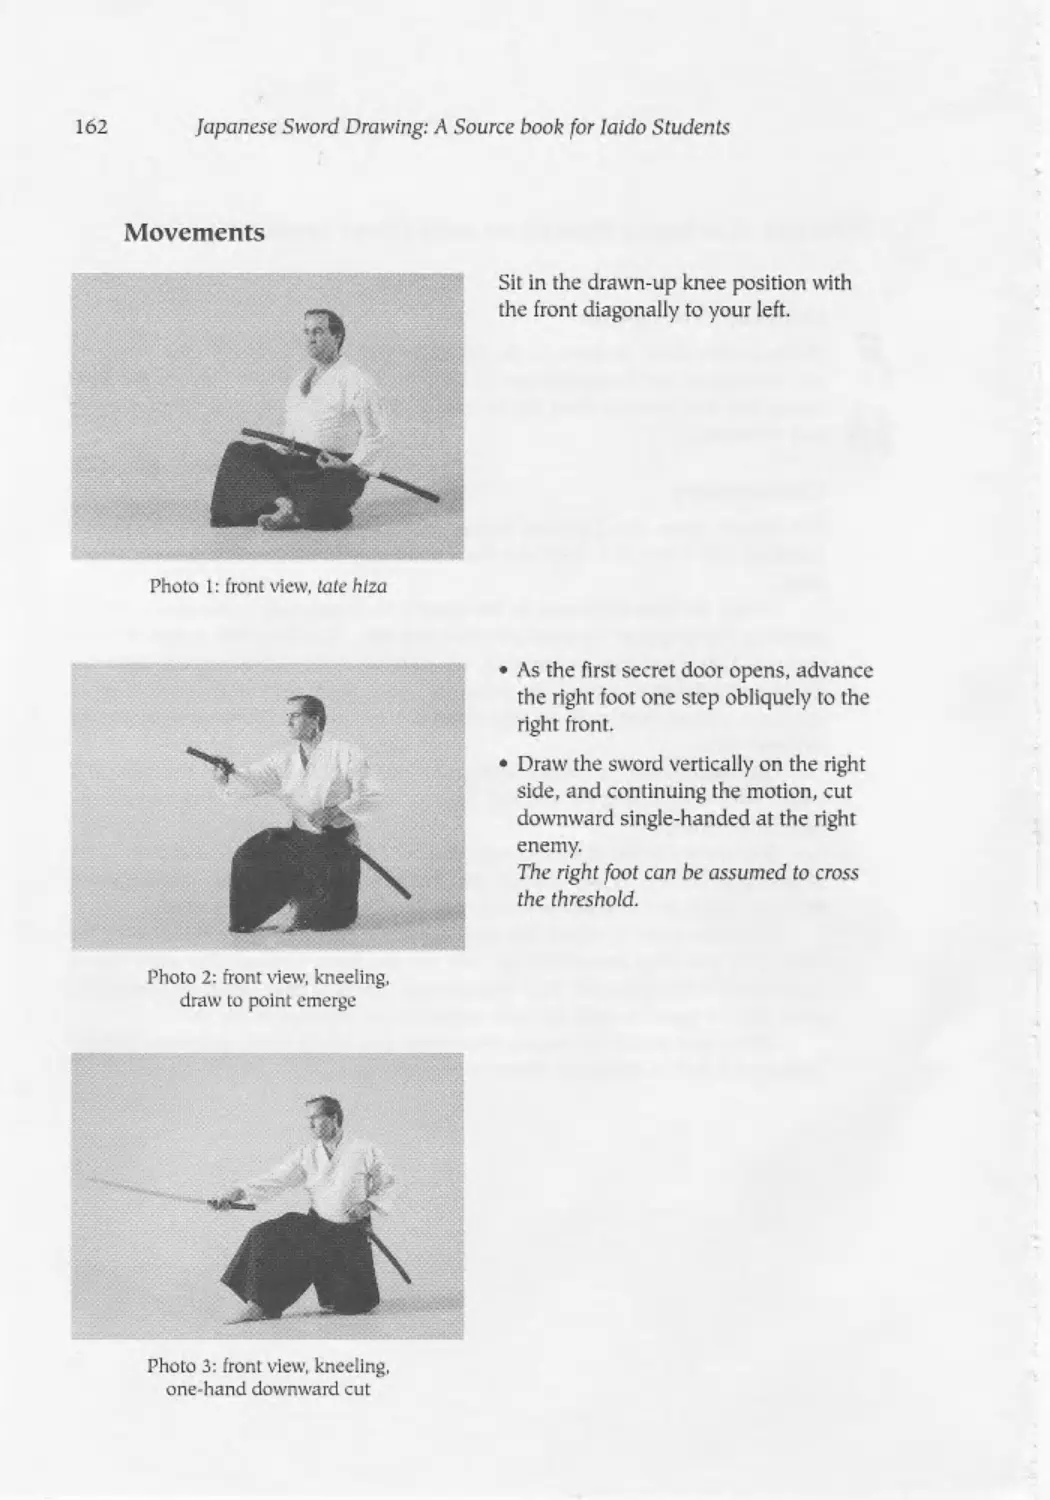
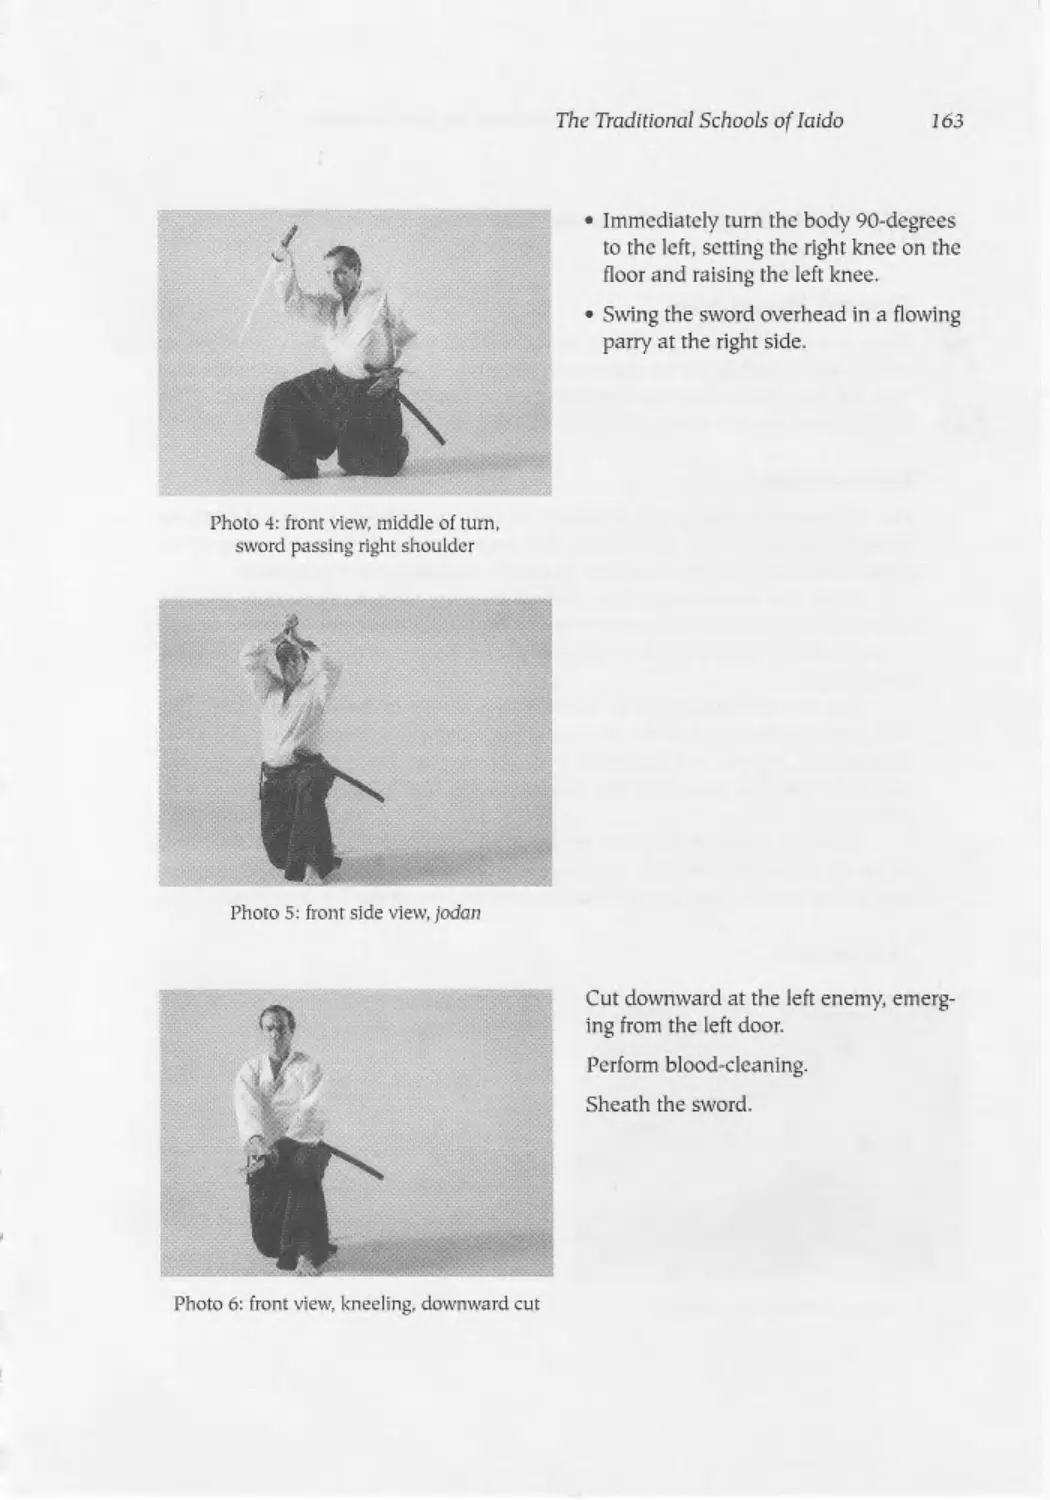
Tozume (Enclosing Doors) ................................. ............161
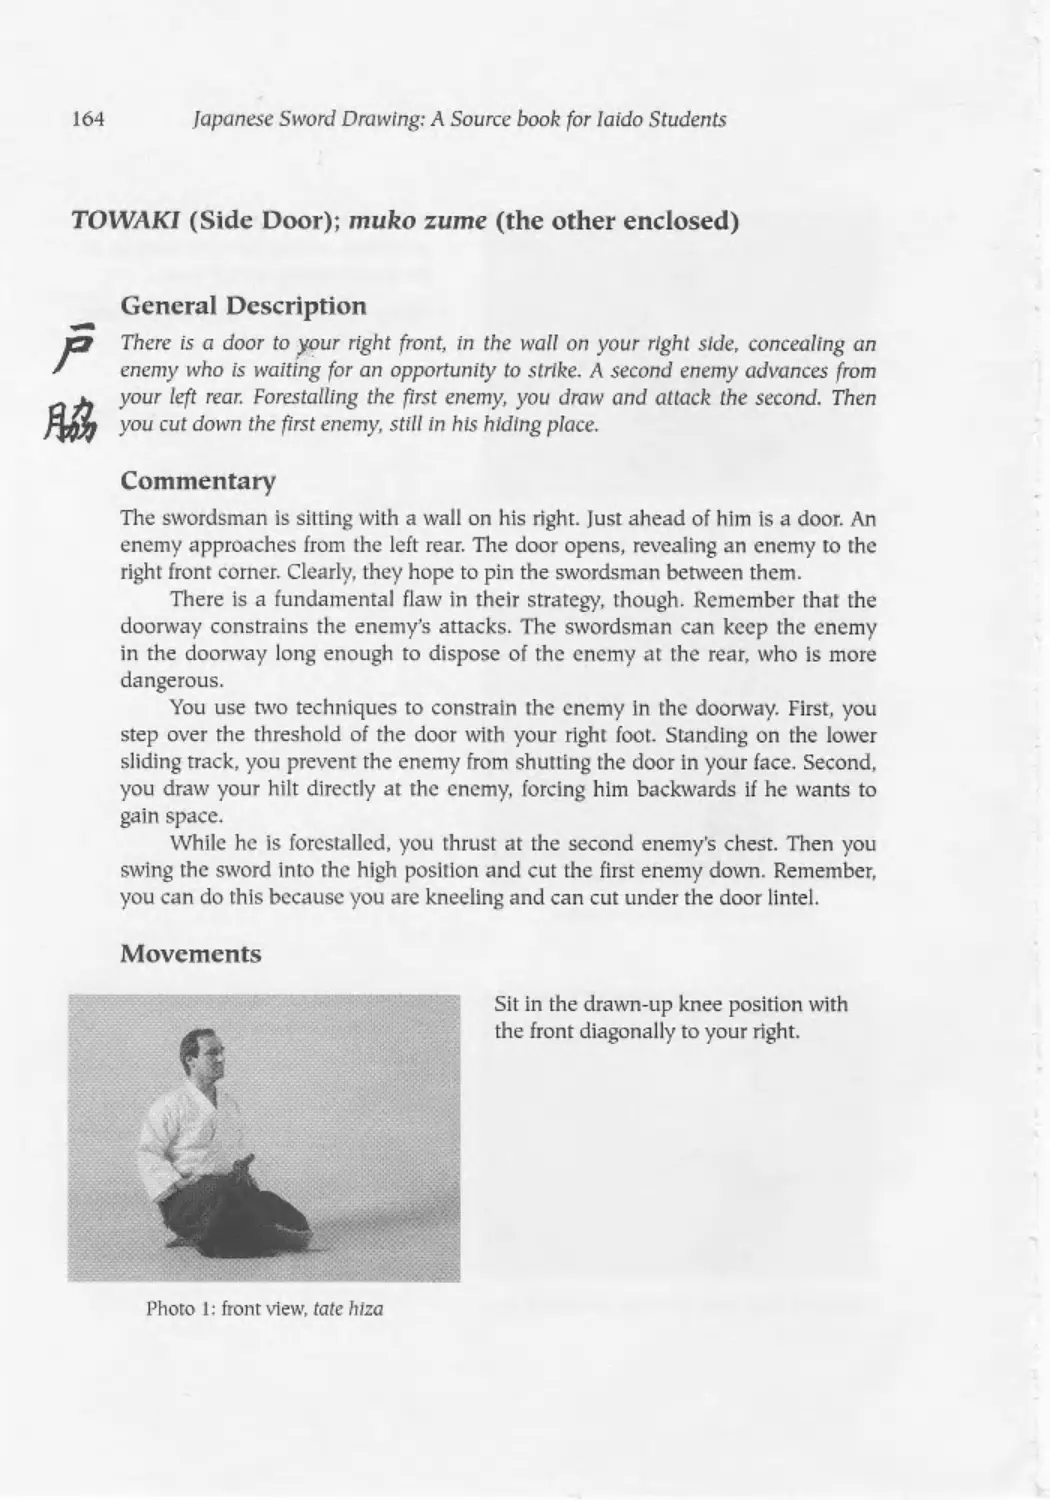
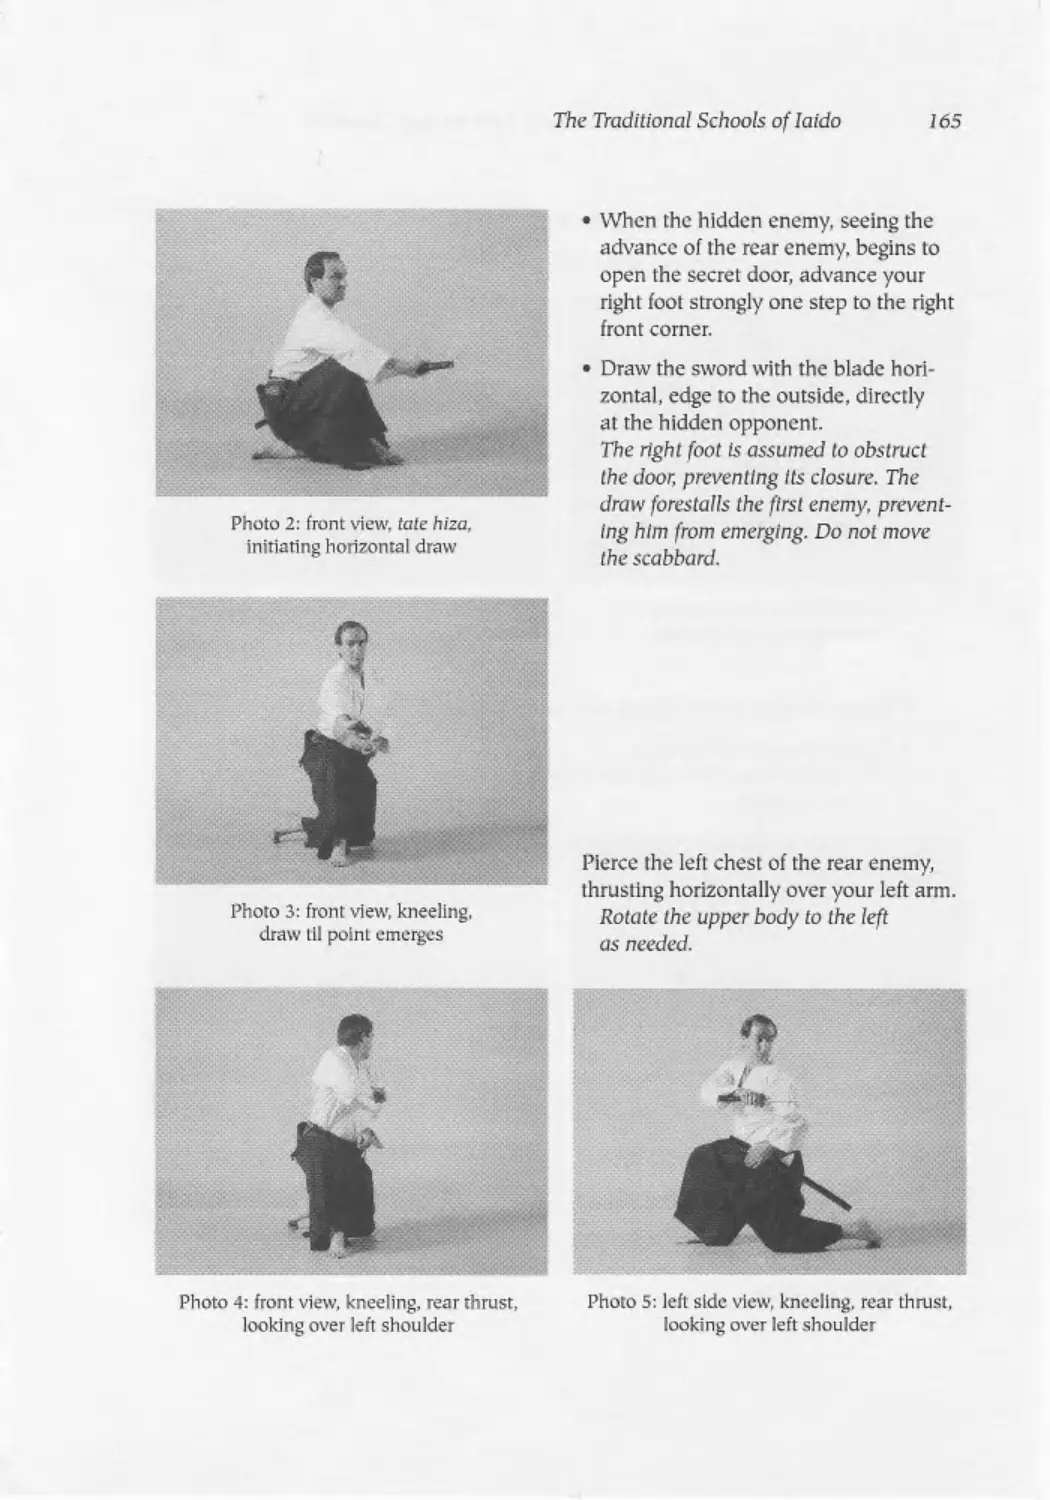
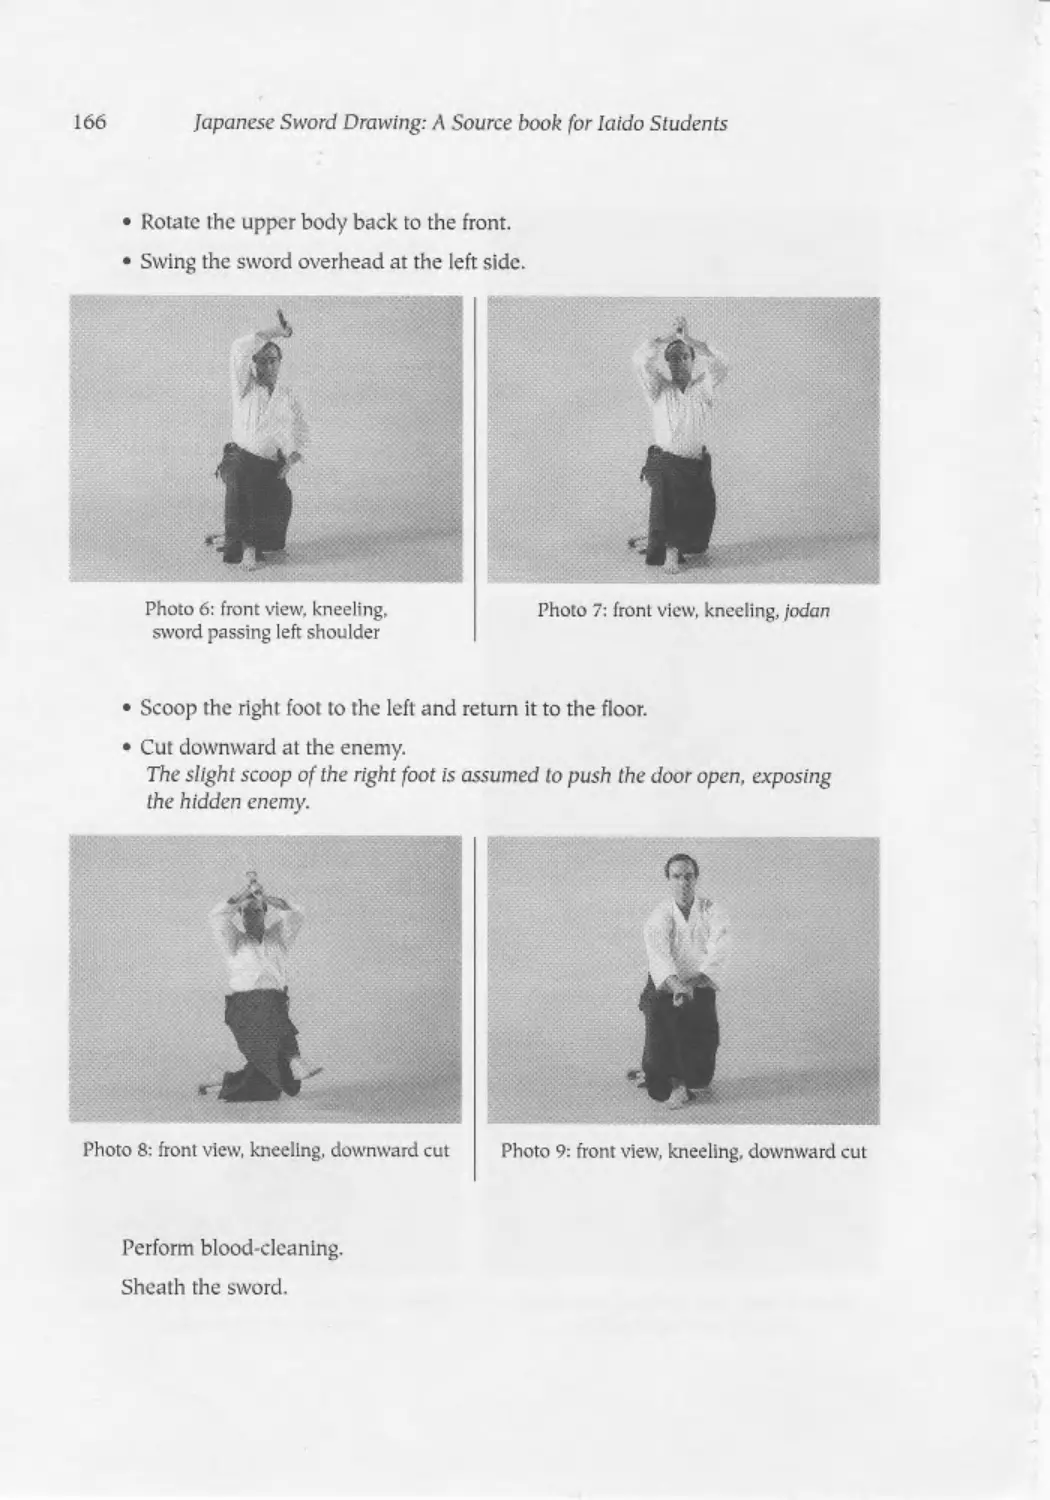
Totvafci (Side Door).................................................. 164
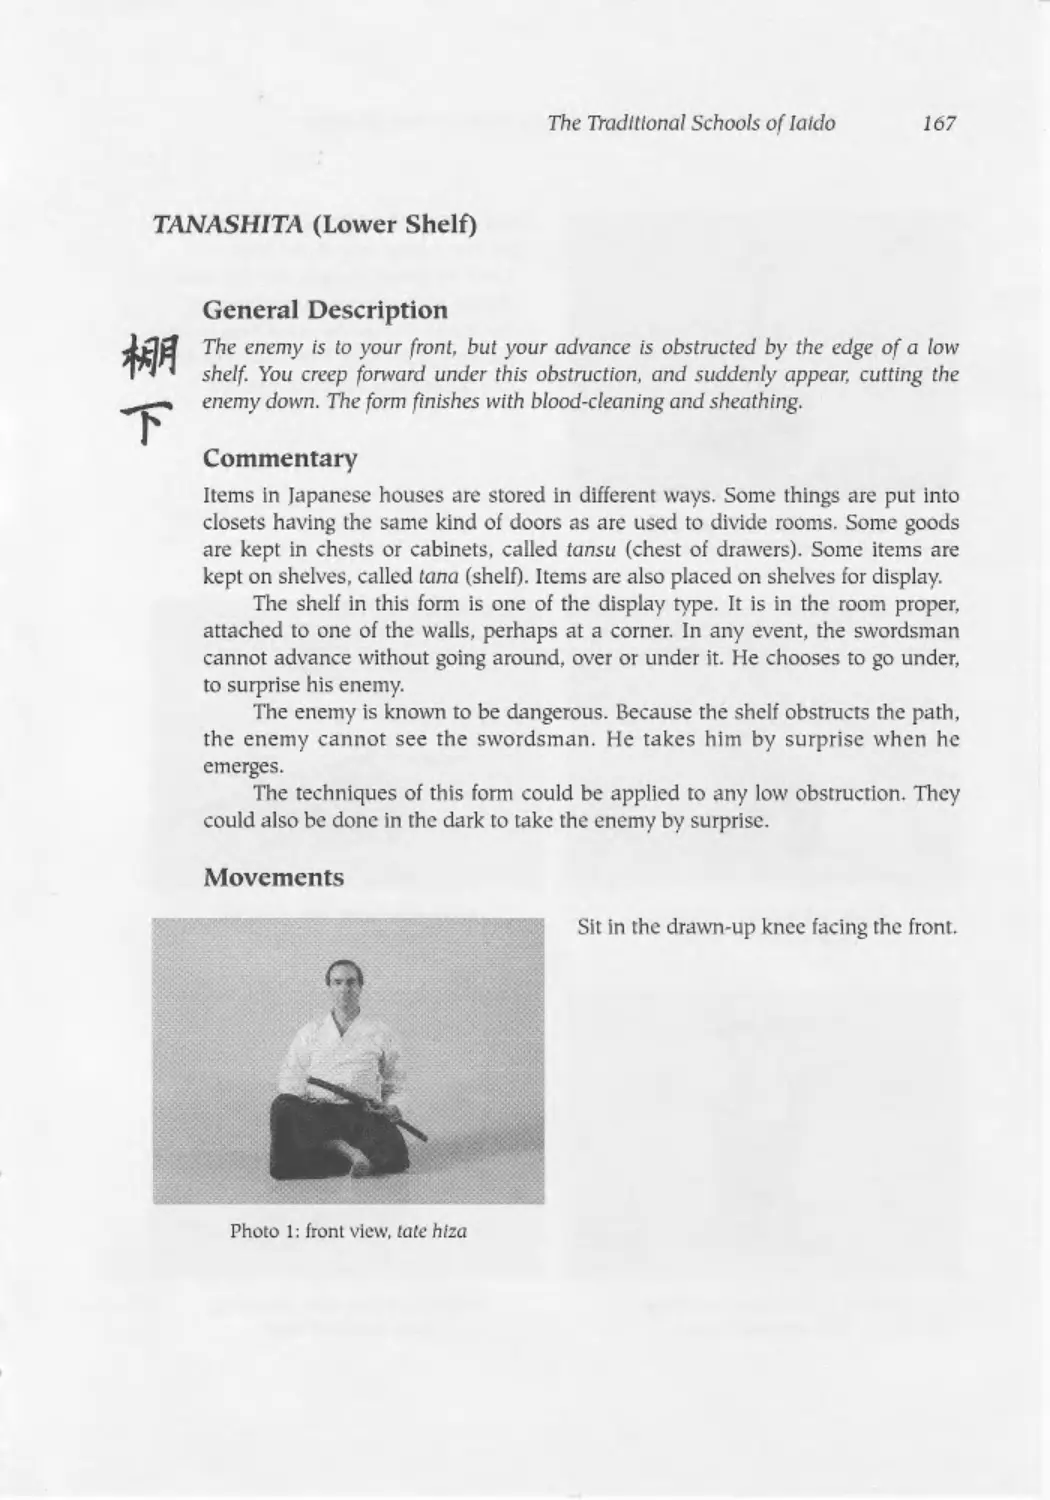
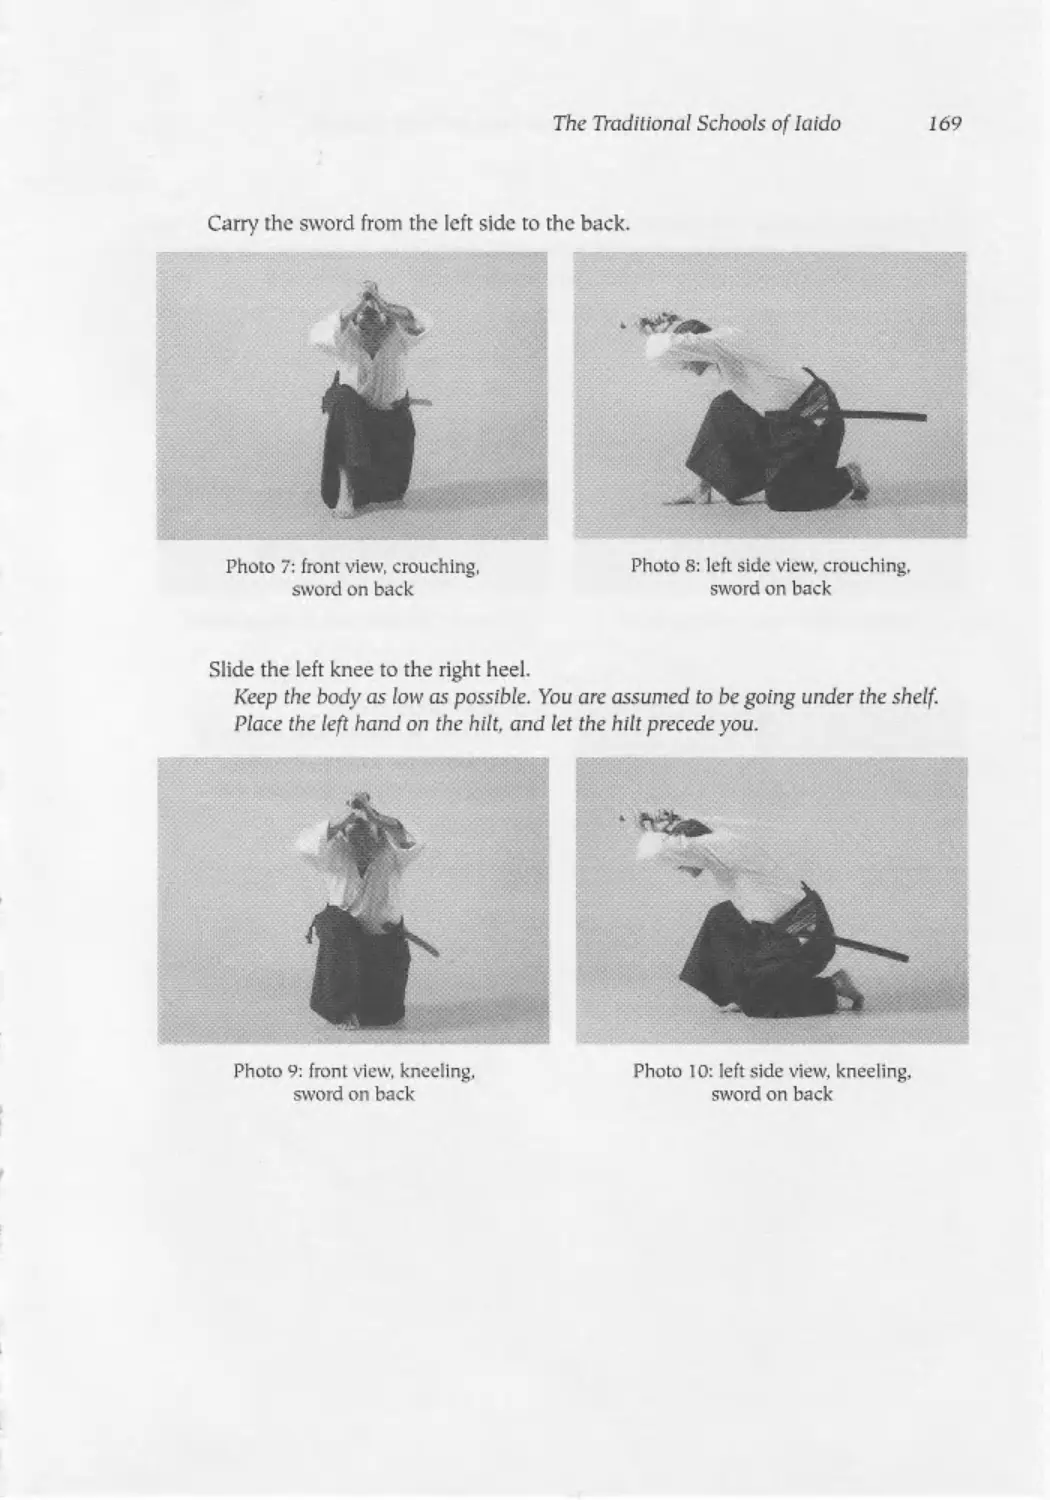
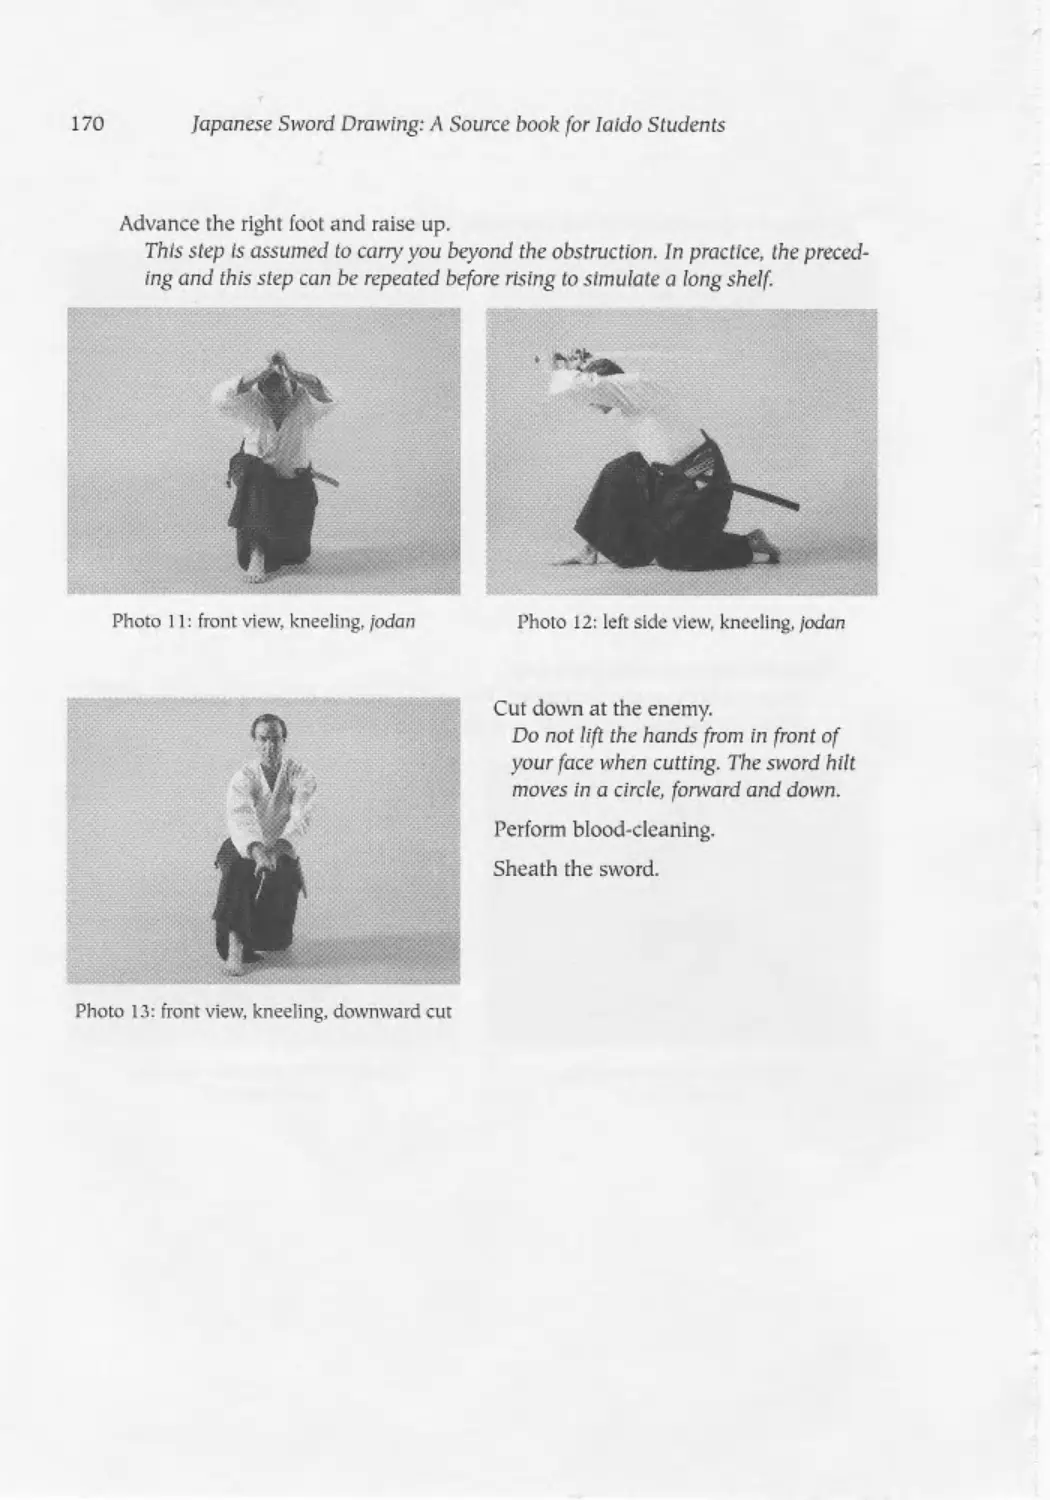
Tanashita (Lower Shelf) ................................................. 167
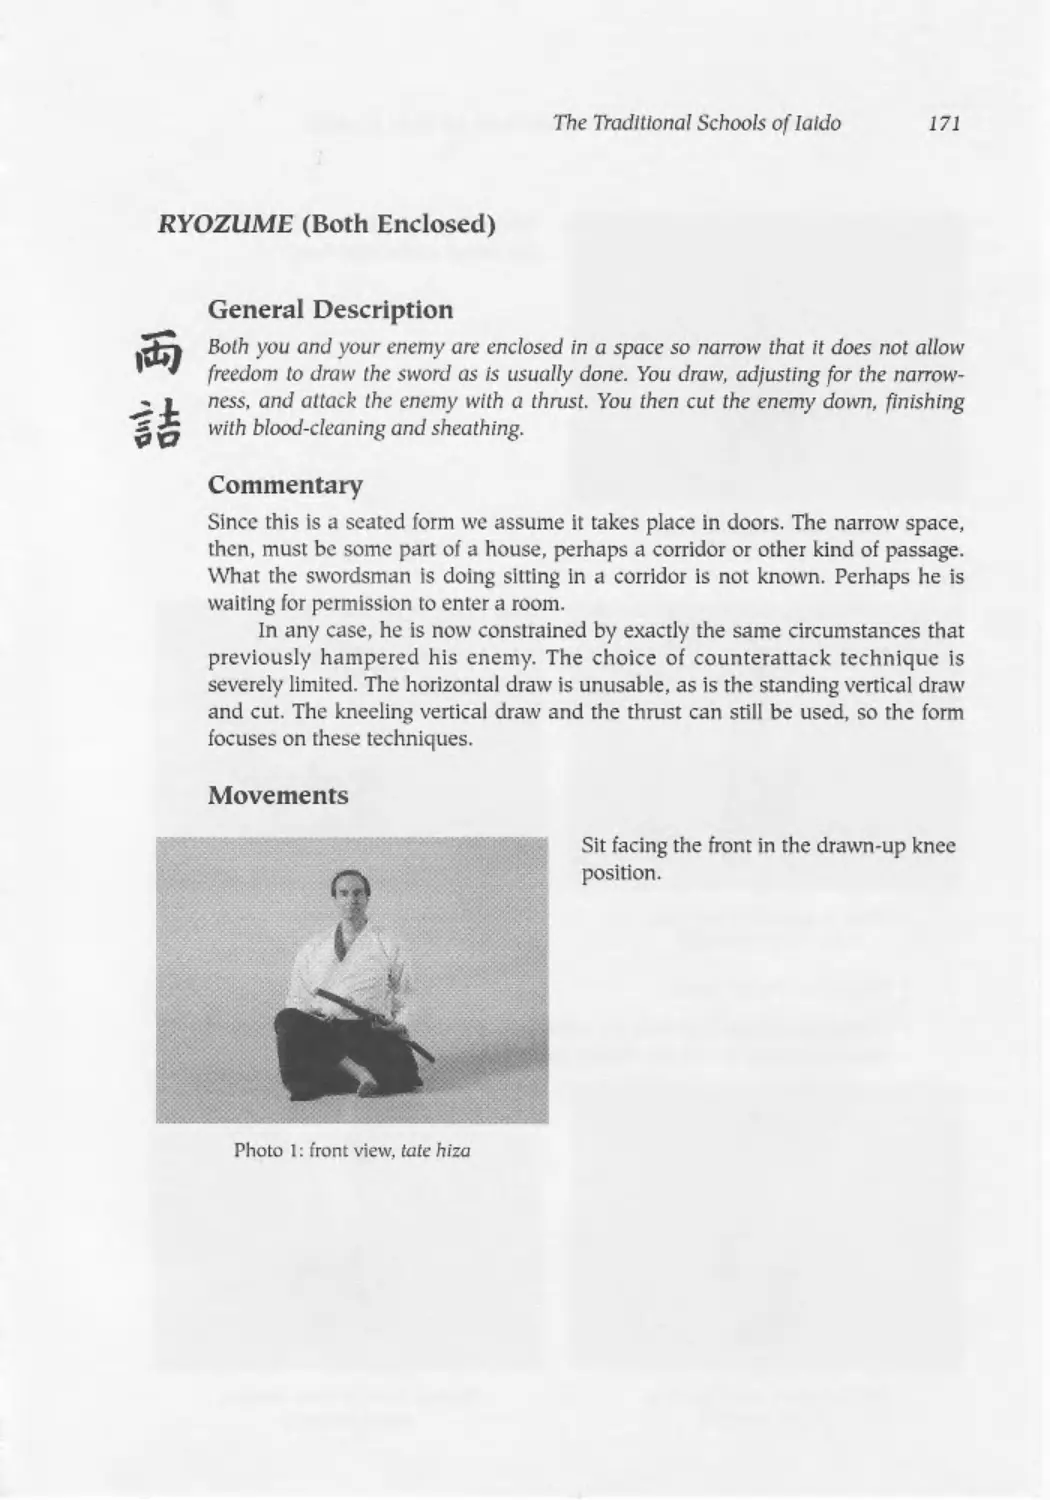
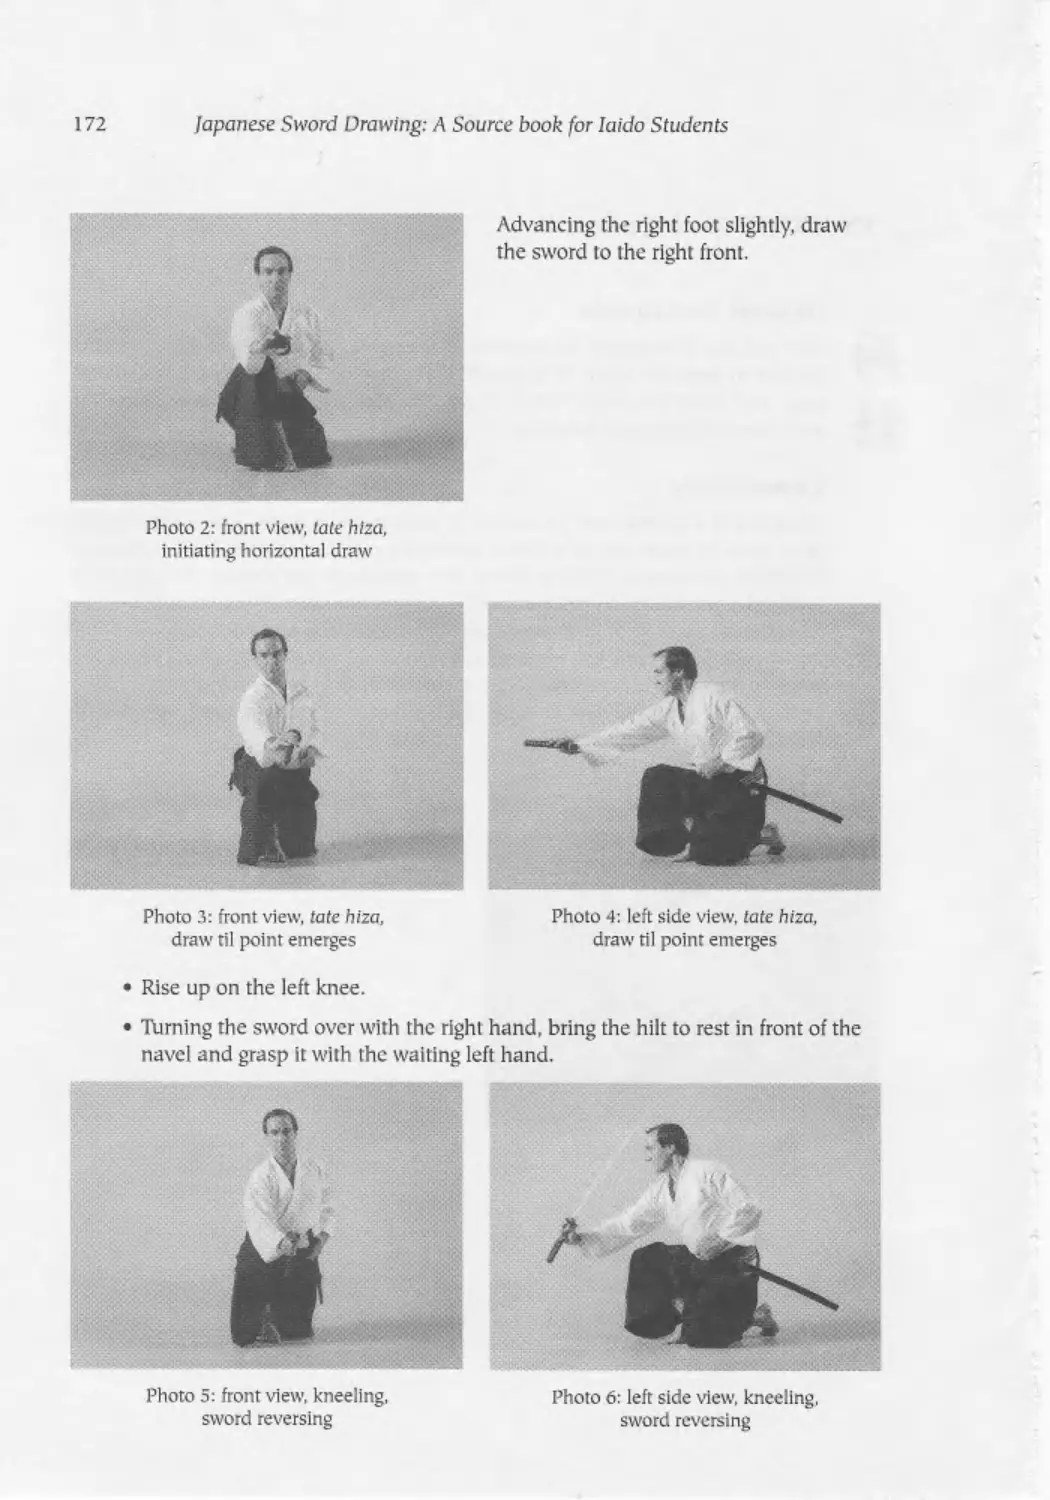
Ryozume (Both Enclosed)................................................. 171
Torn Bosh iri (Rushing Tiger) ............................................176
6. The Inner Tradition: Oku lai, Standing Techniques ..........................181
Background....... ..................................................... 181
Distinctive Features ................................................... 182
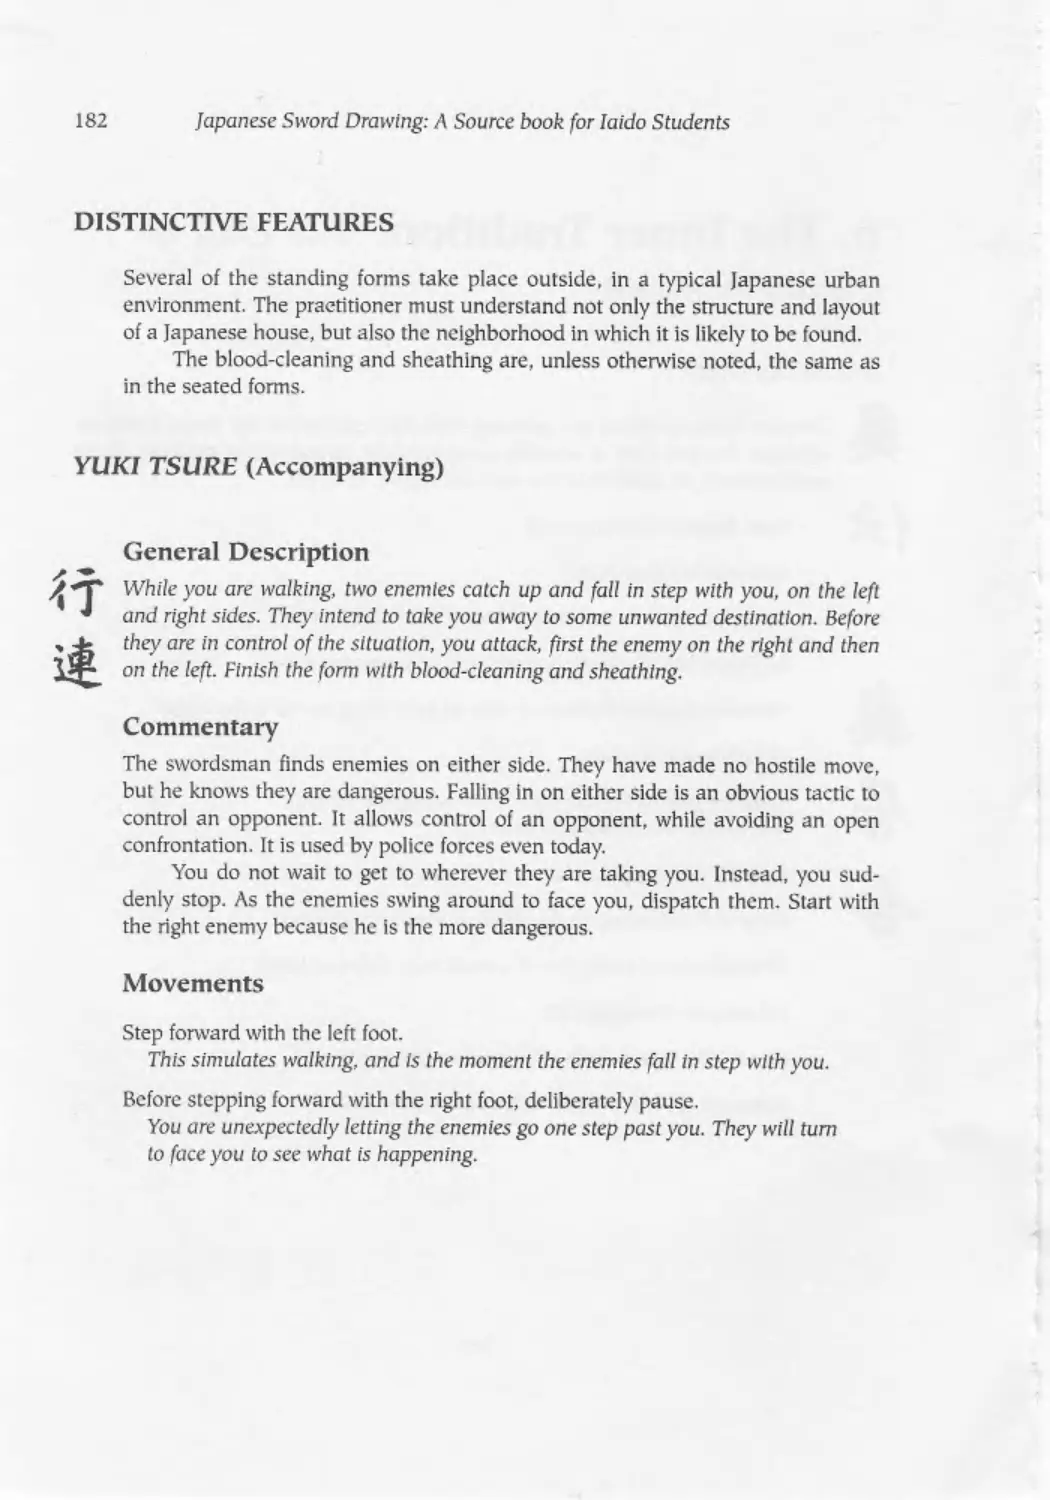
Yuki Tsure (Accompanying) ............................................... 182
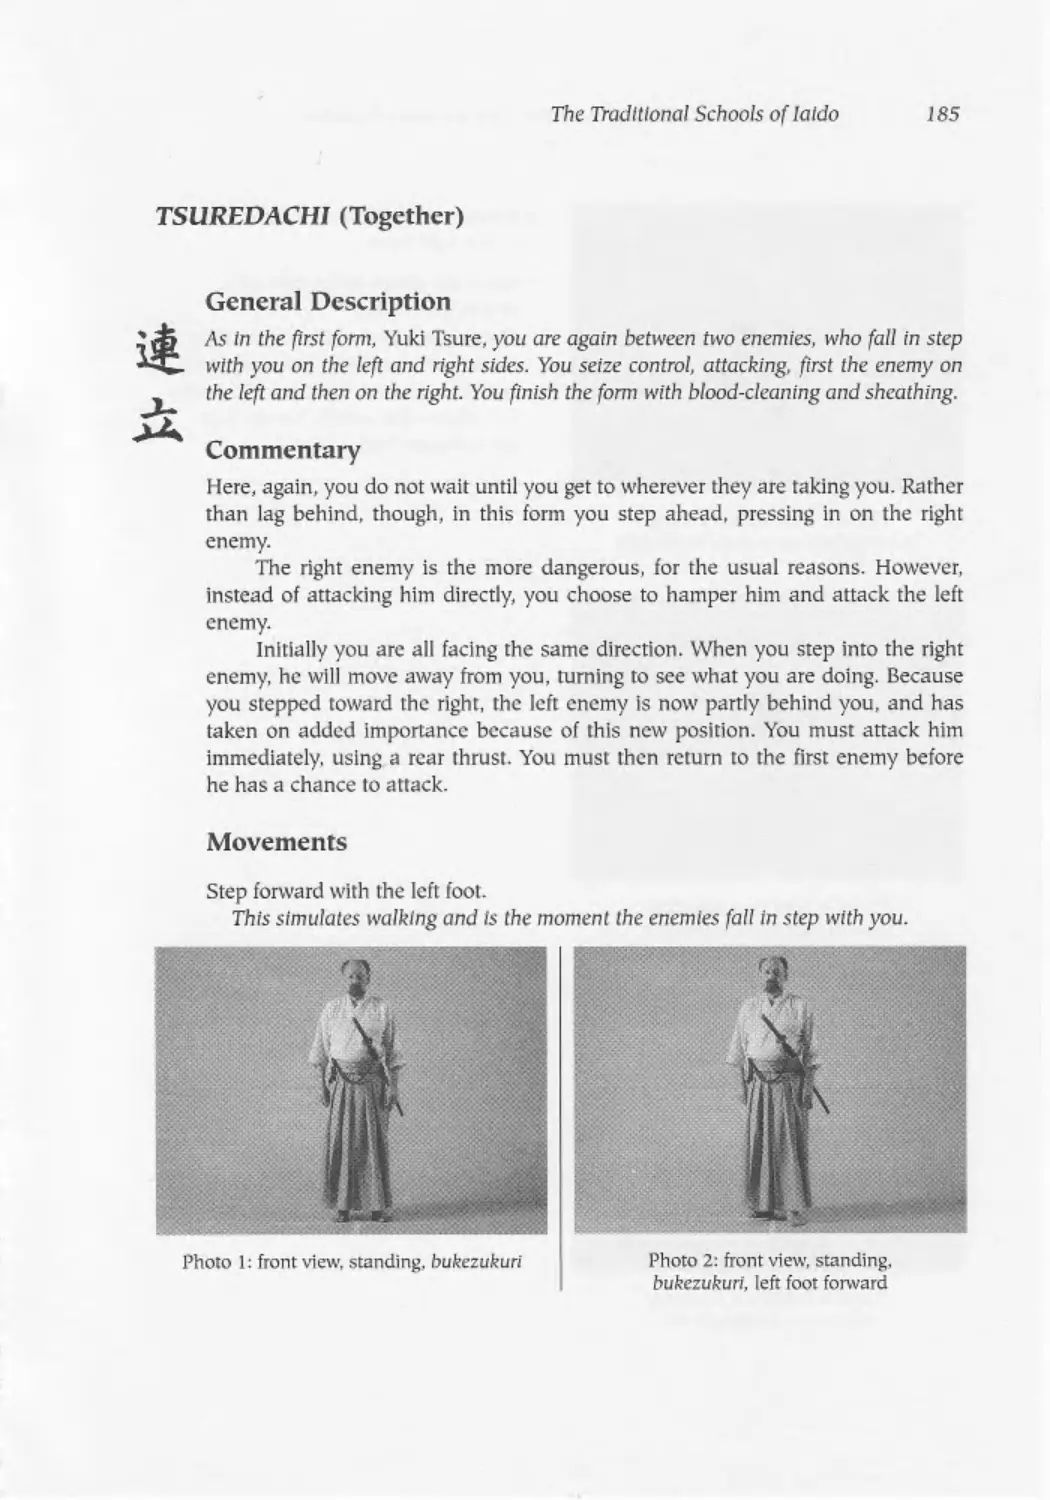
Tsuredachl (Together) .................................................. 185
So Makuri (All Rolled Lip)............................................... 188
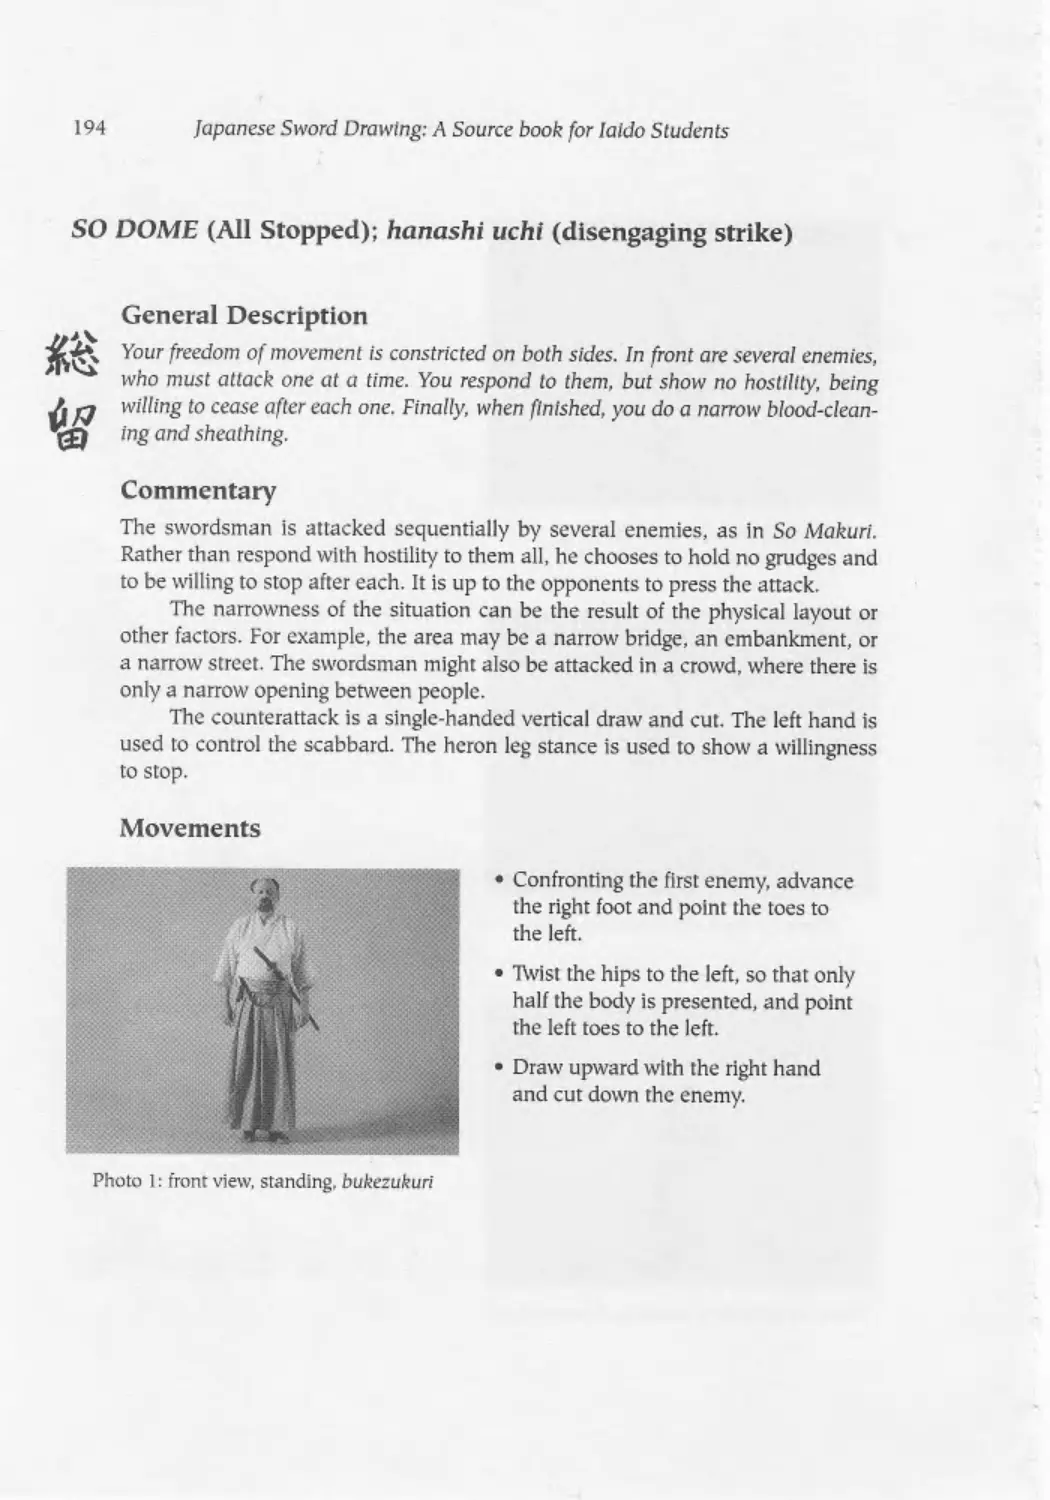
So Dome (All Stopped) .................................................. 194
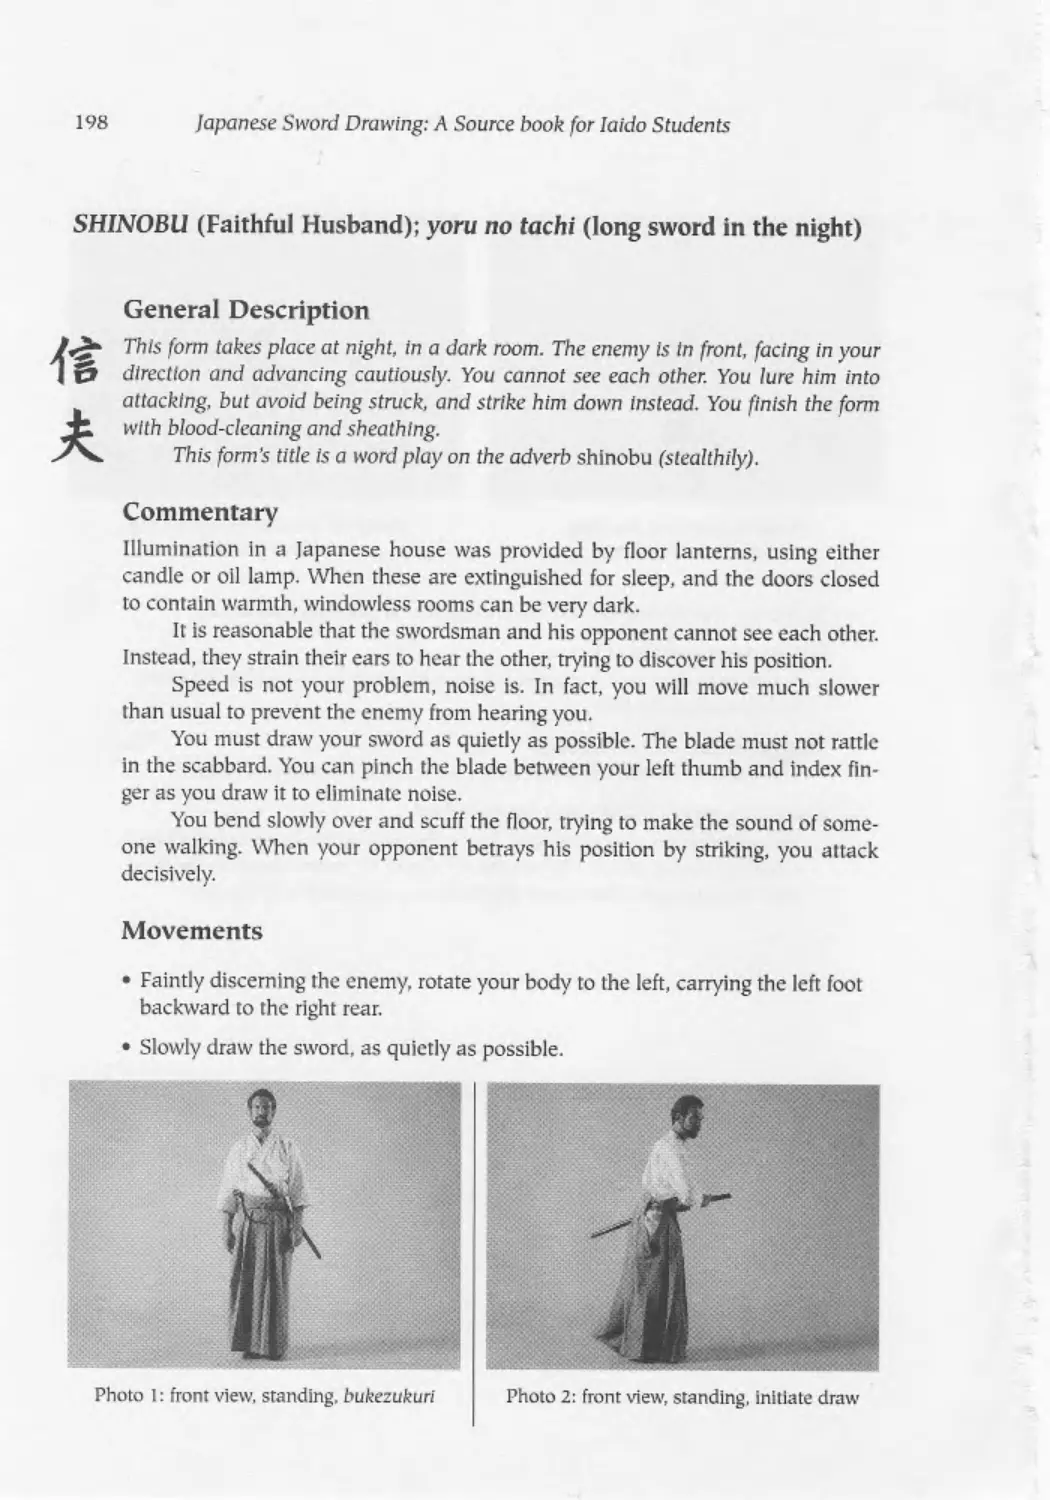
Shtnobu (Faithful Husband).............................................. 198
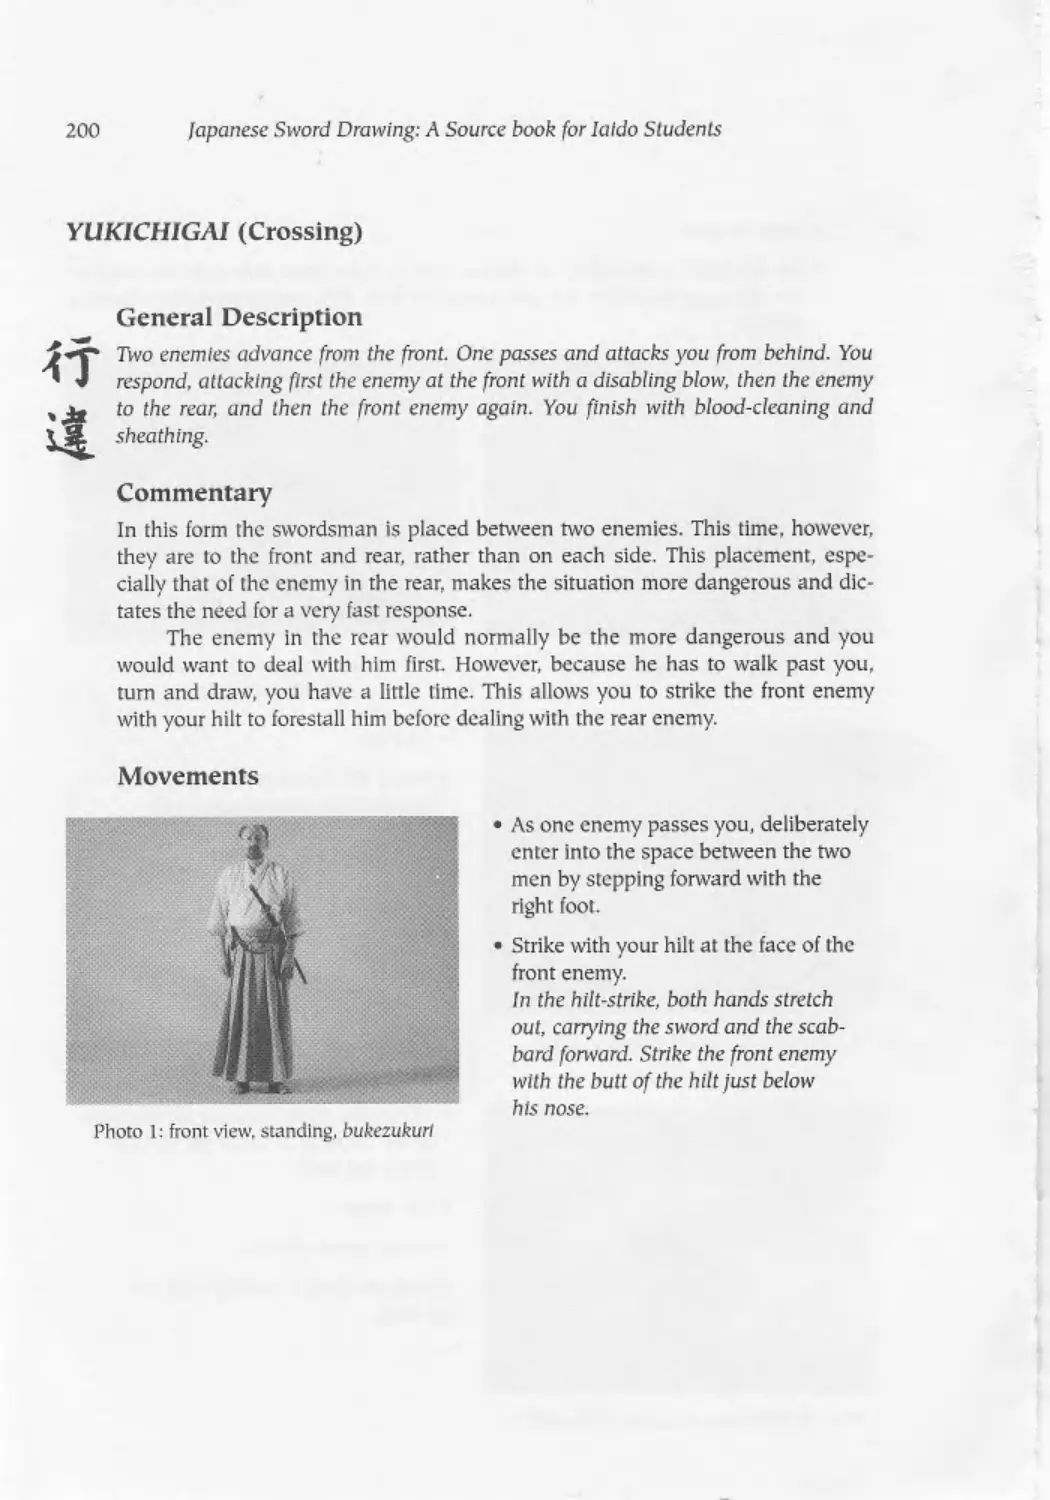
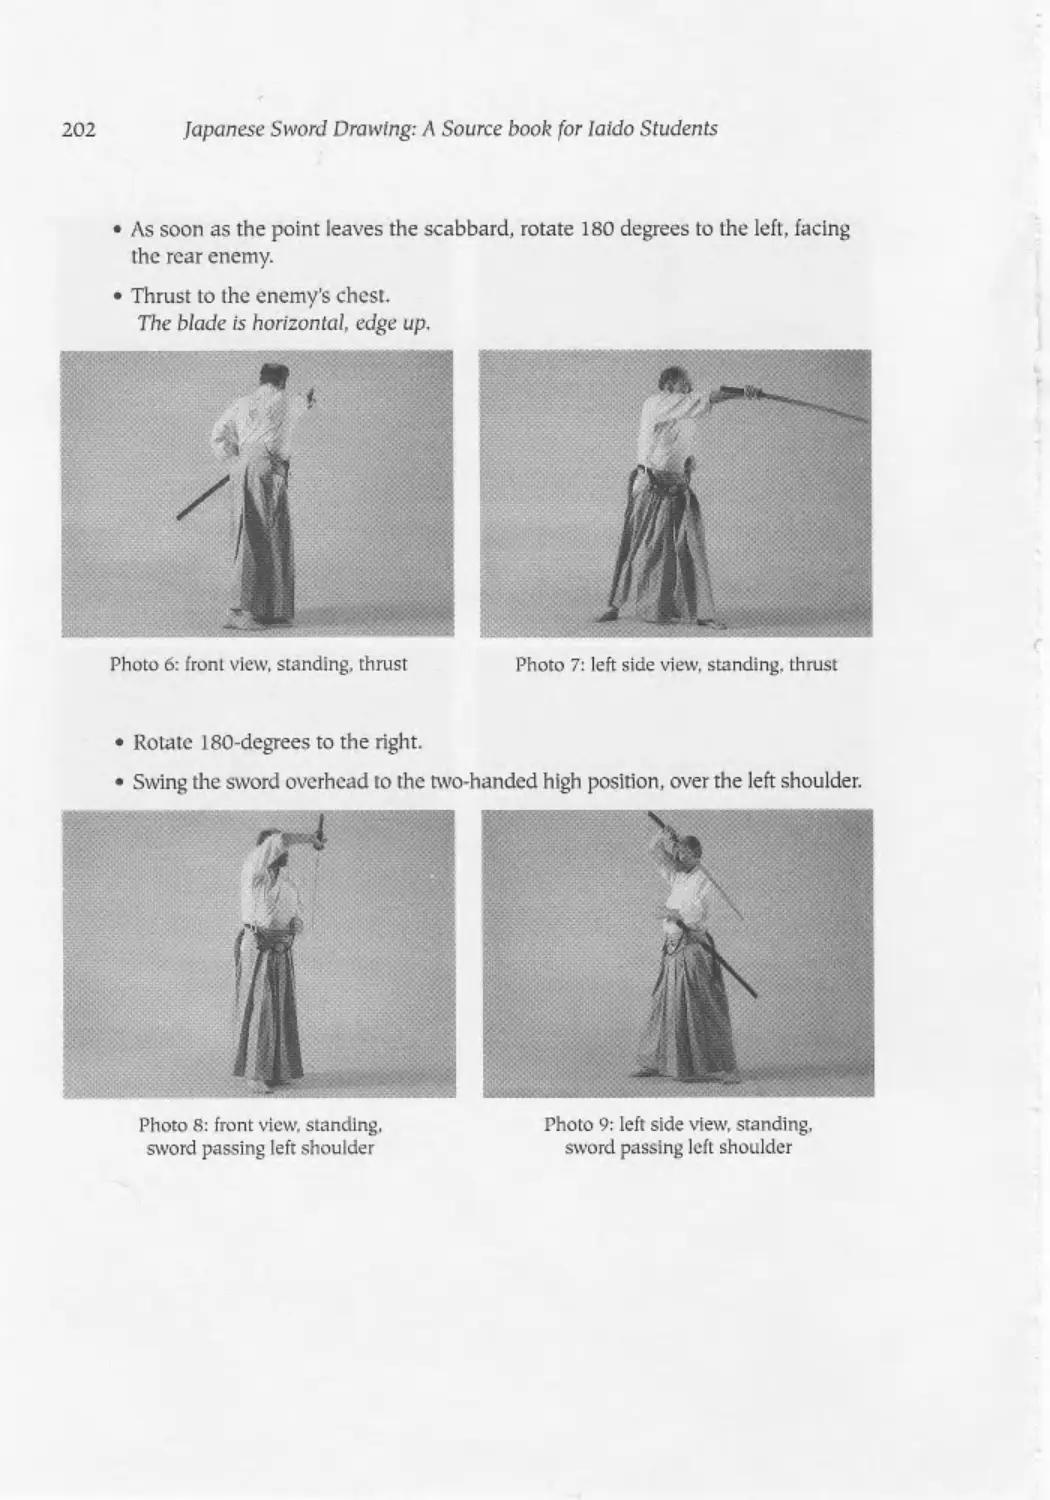
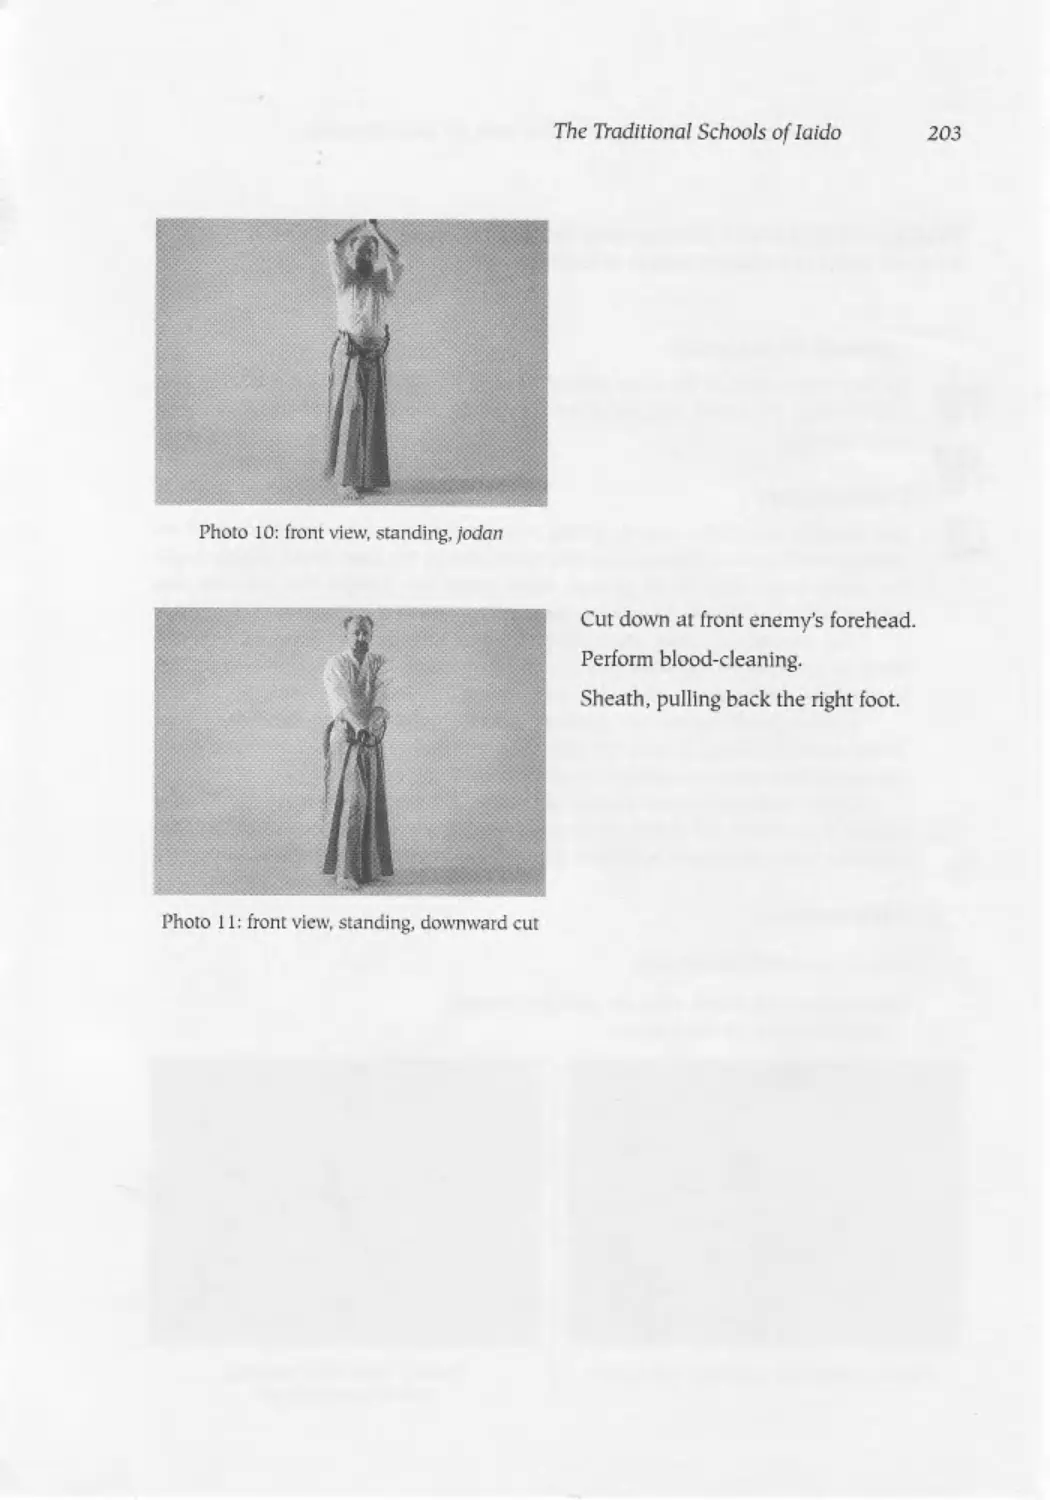
Yukichigai (Crossing) ....................................................200
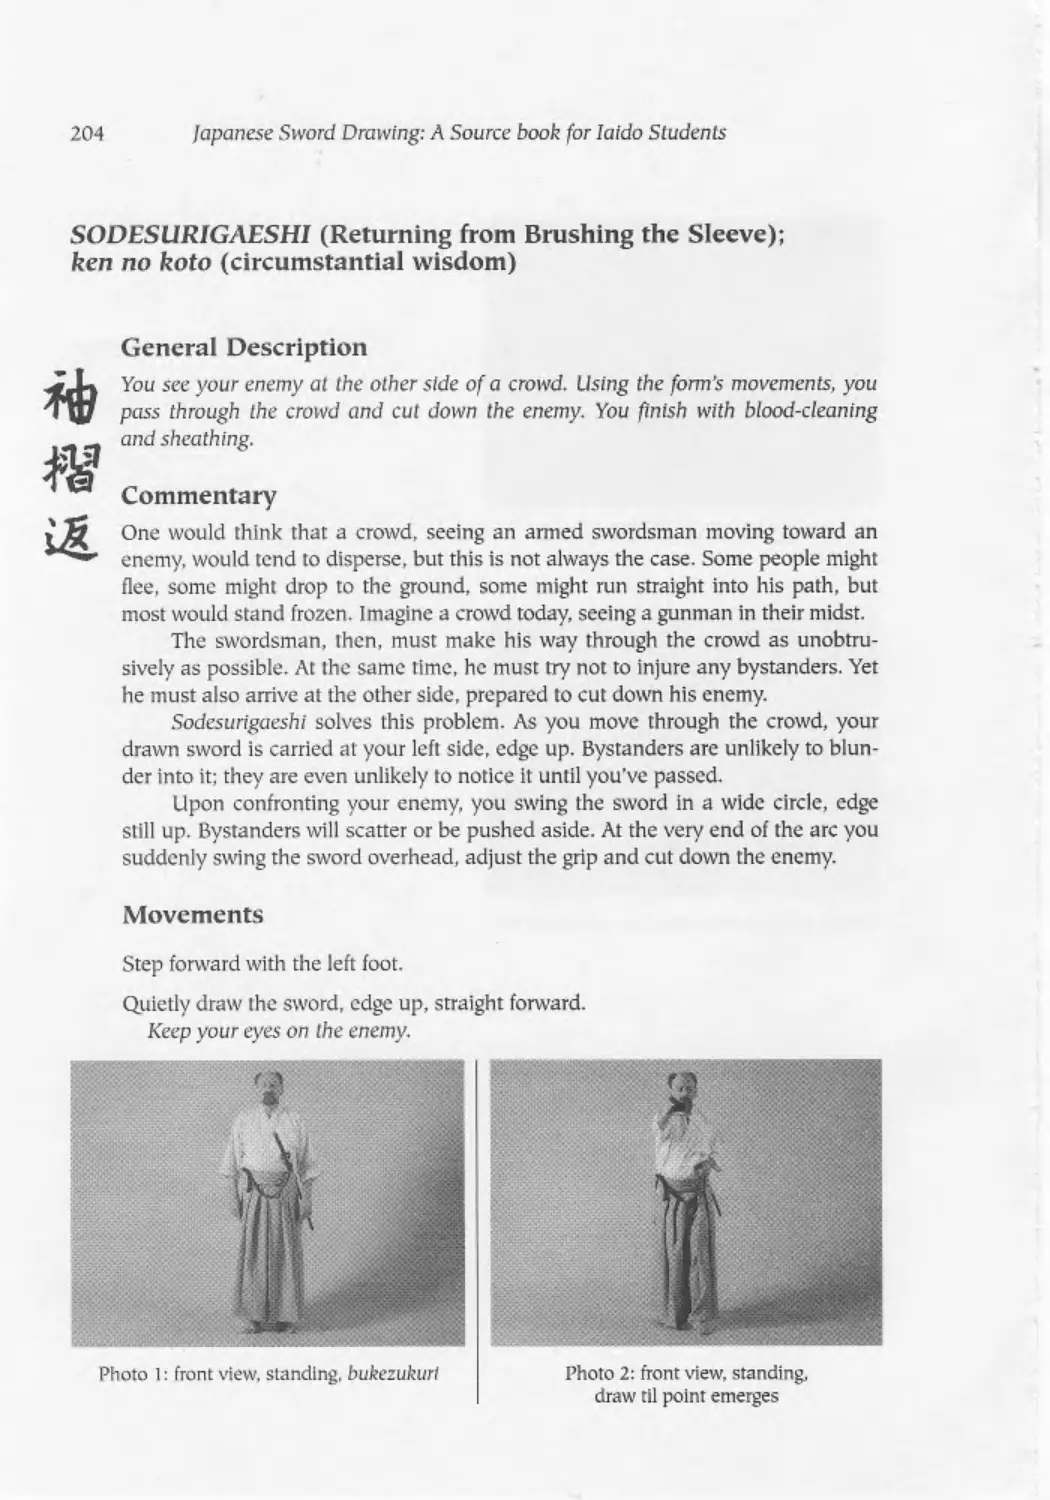
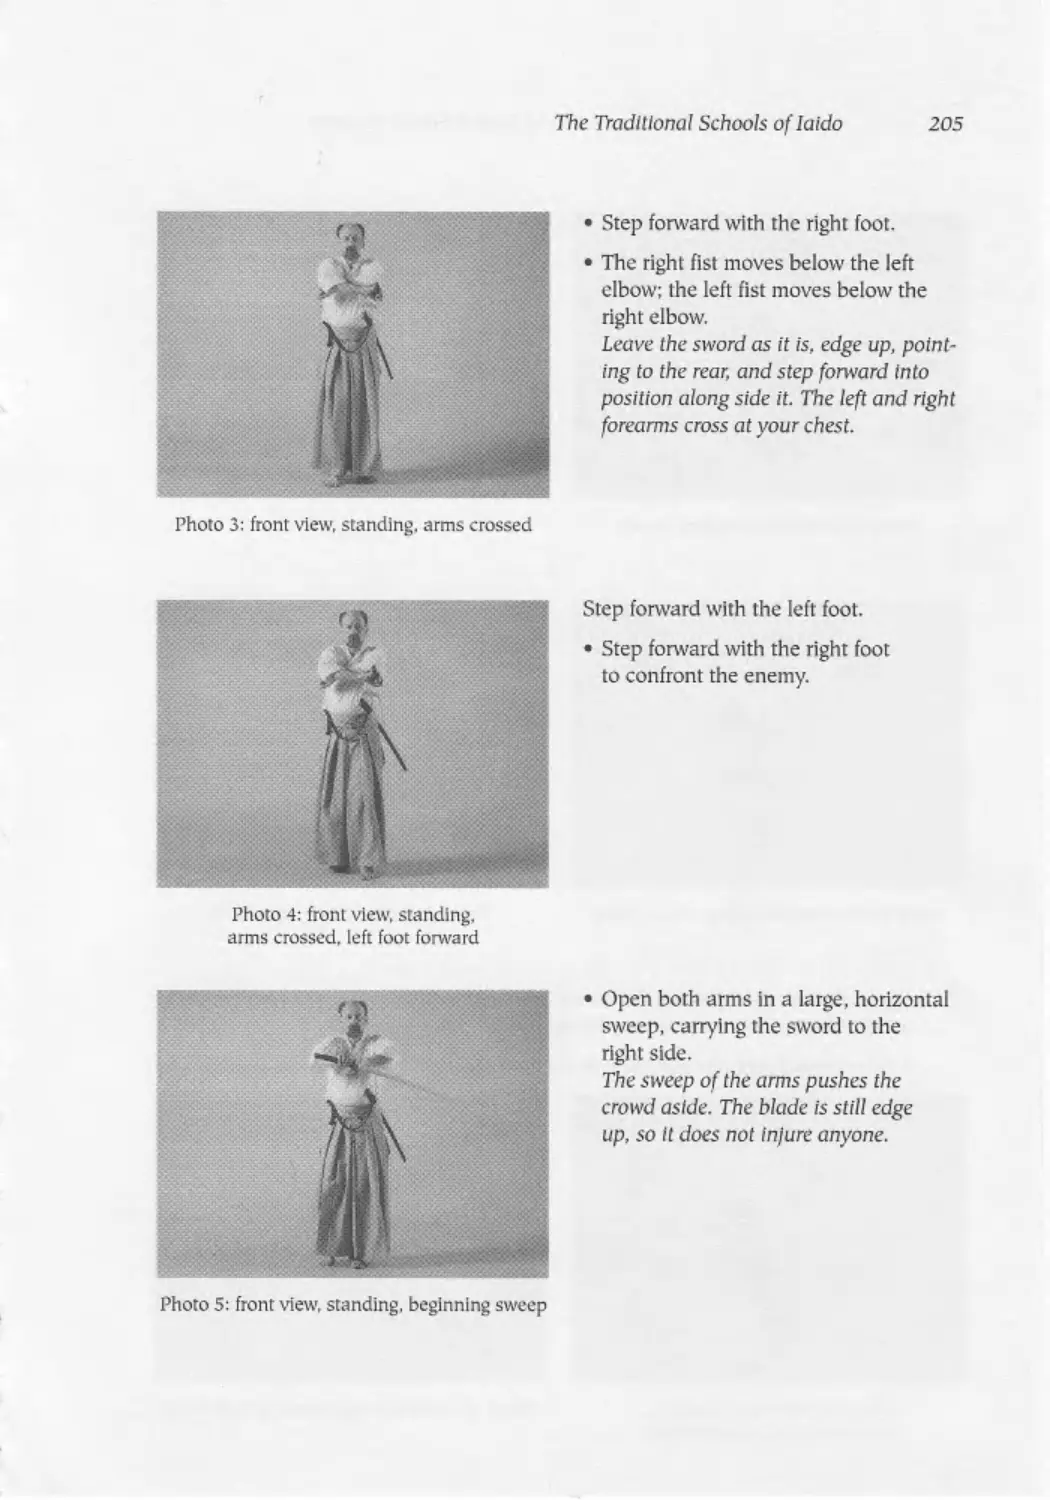
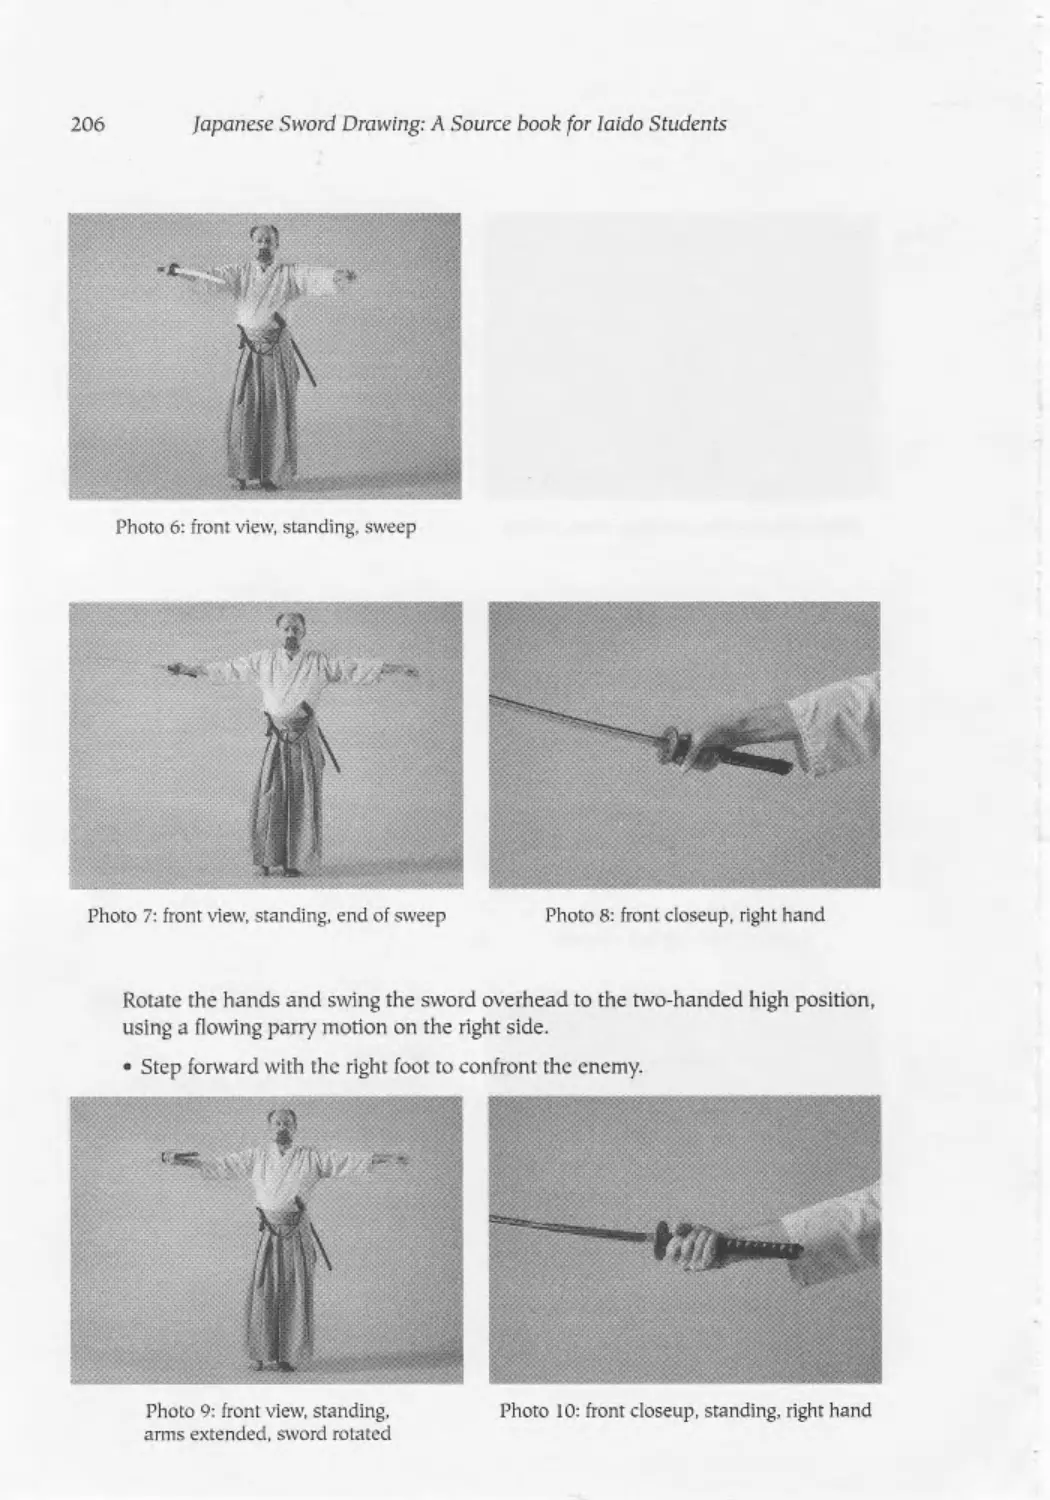
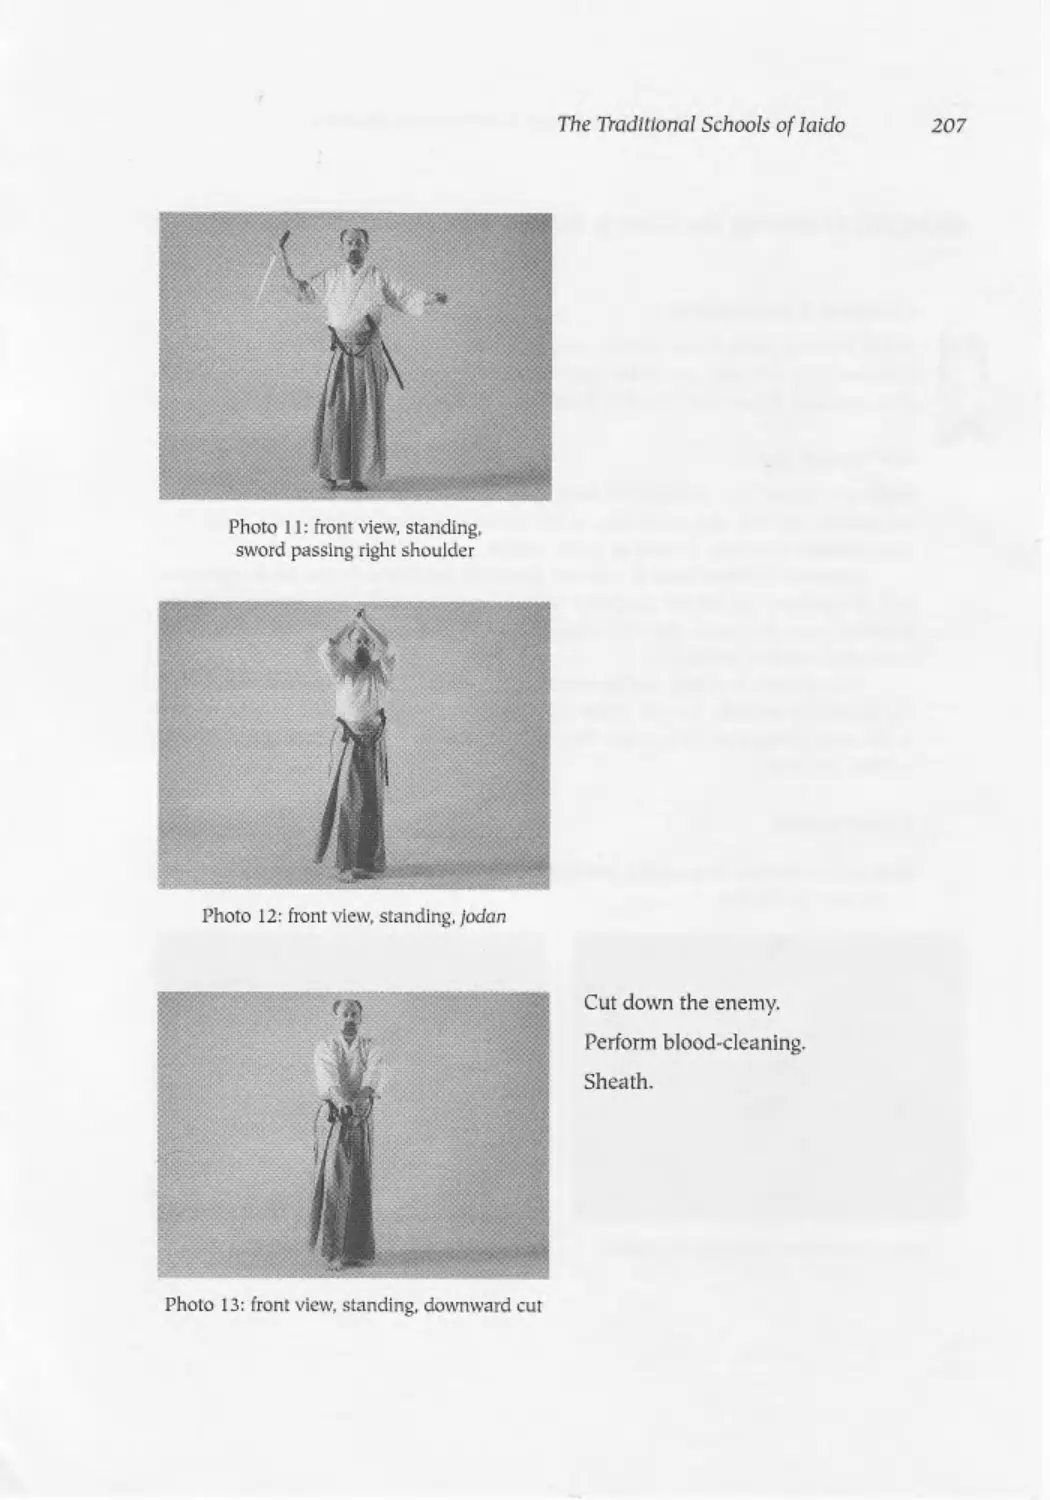
Sodesurigaeshi (Returning from Brushing the Sleeve).......................204
Mon Iri (Entering the Gate) ..............................................208
KabeZoi (Adjusting for the Wall)..........................................211
Ukenagashi (Flowing Parry) ...............................................214
Oikdkegiri (Pursuing Cut).................................................217
Ryoshi Hikitsurc (Both Warriors Brought Together) ........................218
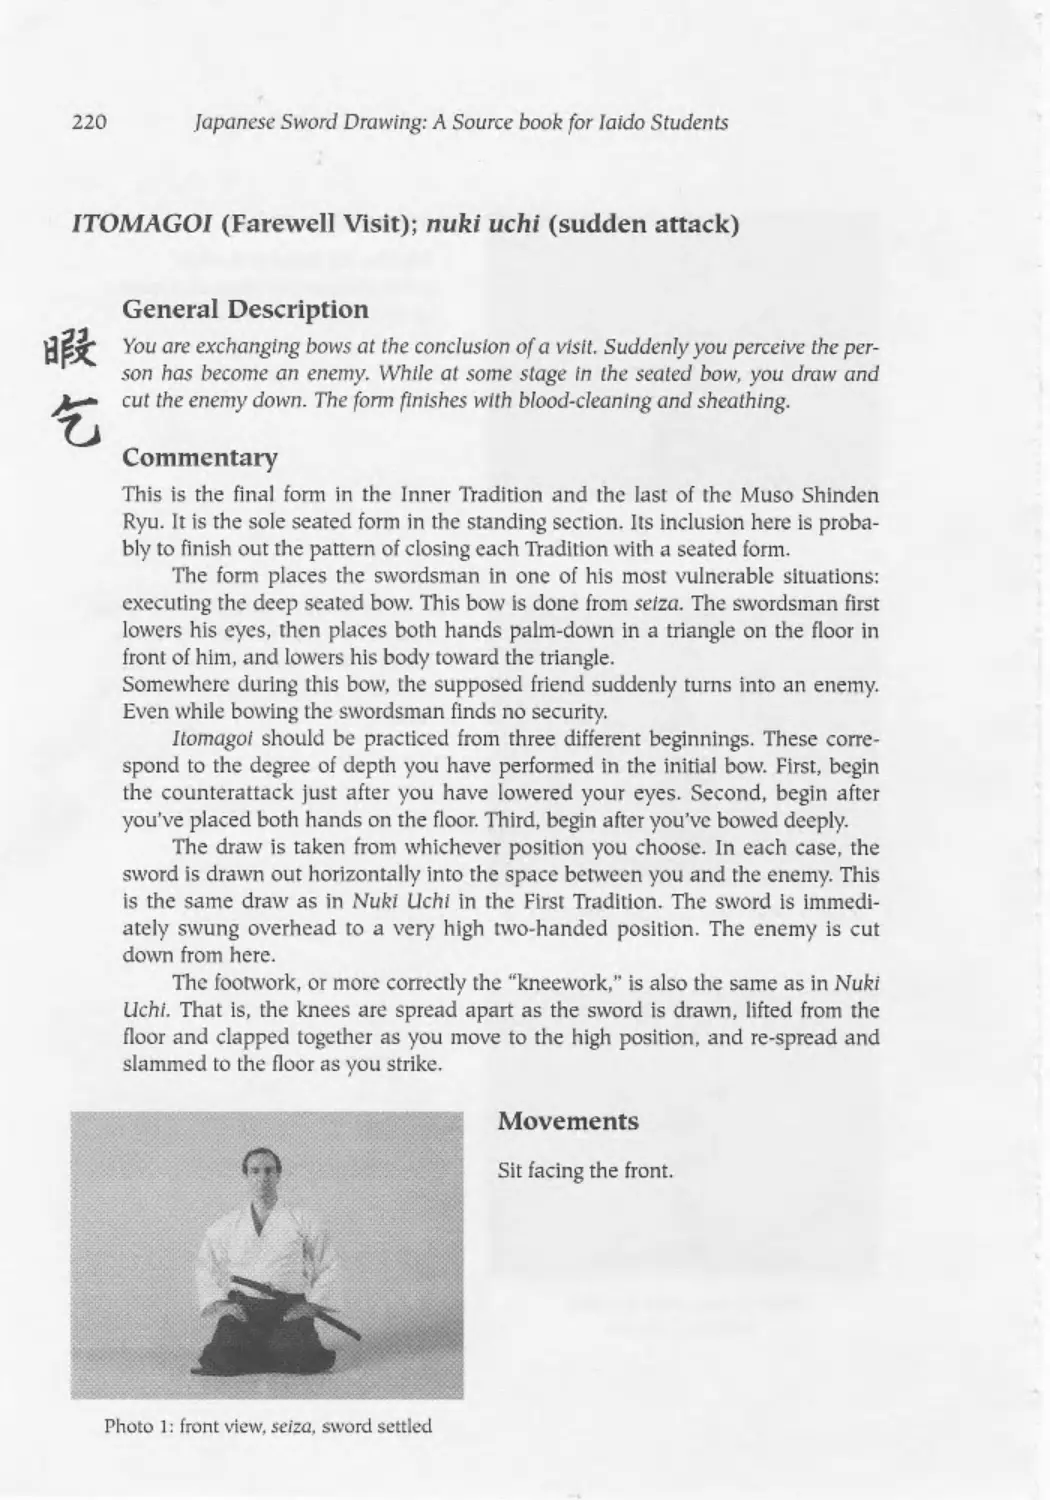
Itomagot (Farewell Visit).................................................220
PA RT THREE: Established Kata of the Japanese Federations
7. Kata of the All-Japan Fencing Federation..................................225
Background...............................................................225
Distinctive Features ................................................... 226
Preliminaries............................................................226
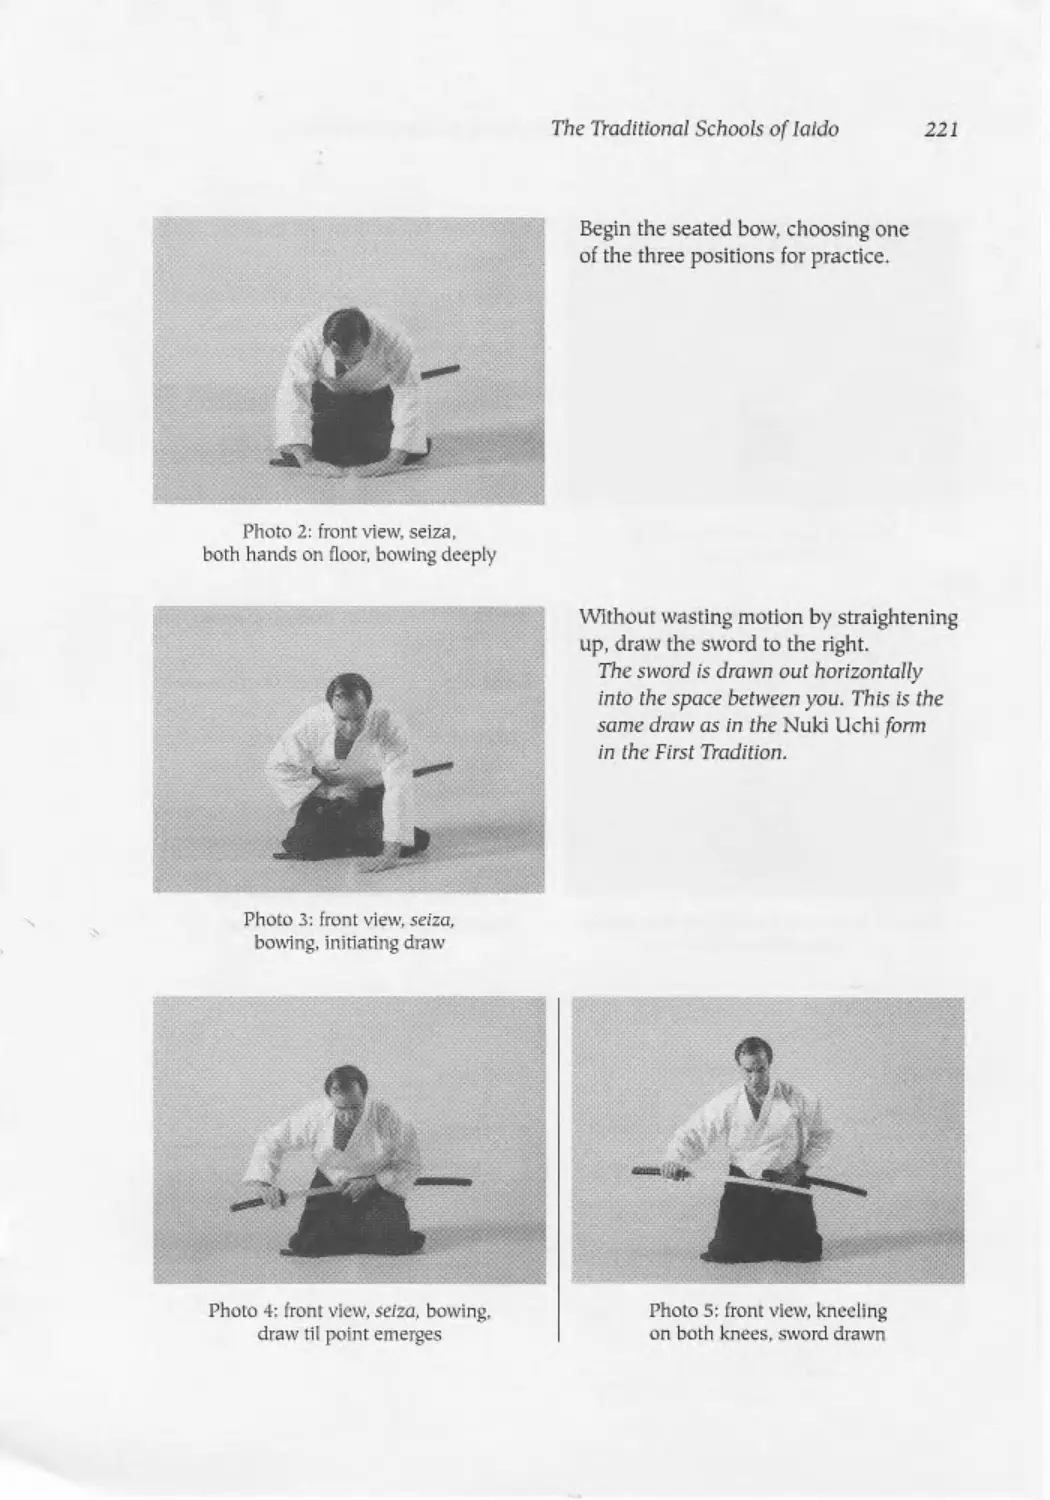
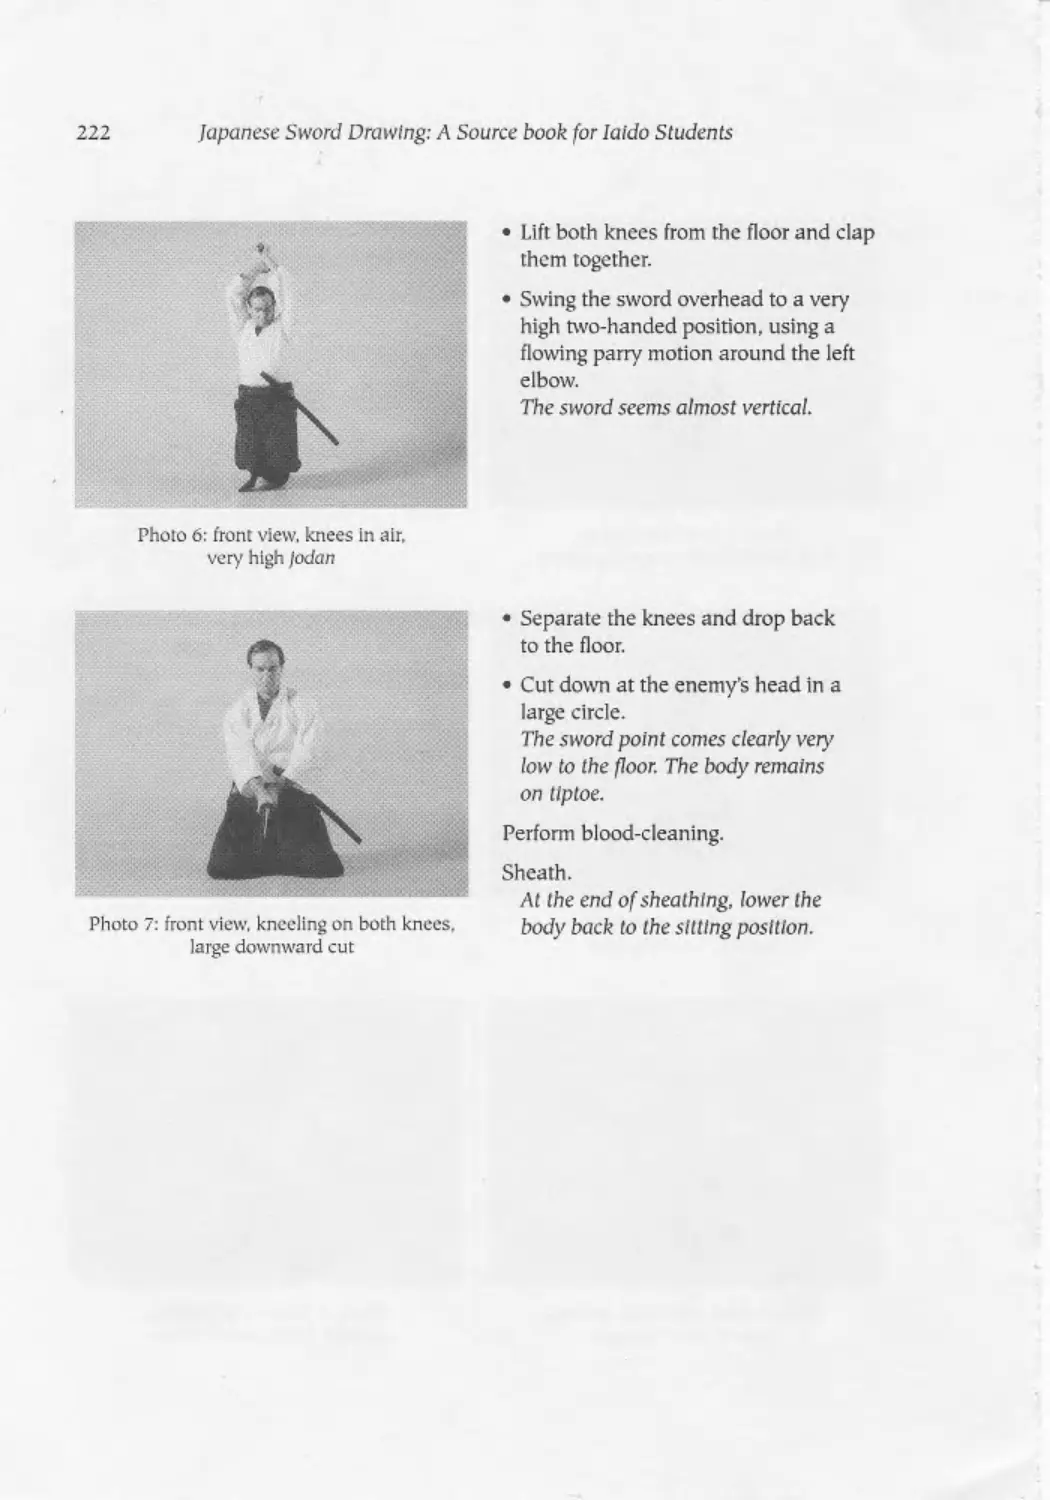
Mae (Front)............................................................ 238
Ushiro (Rear)............................................................238
Ukenagashi (Flowing Parry)............................................. 239
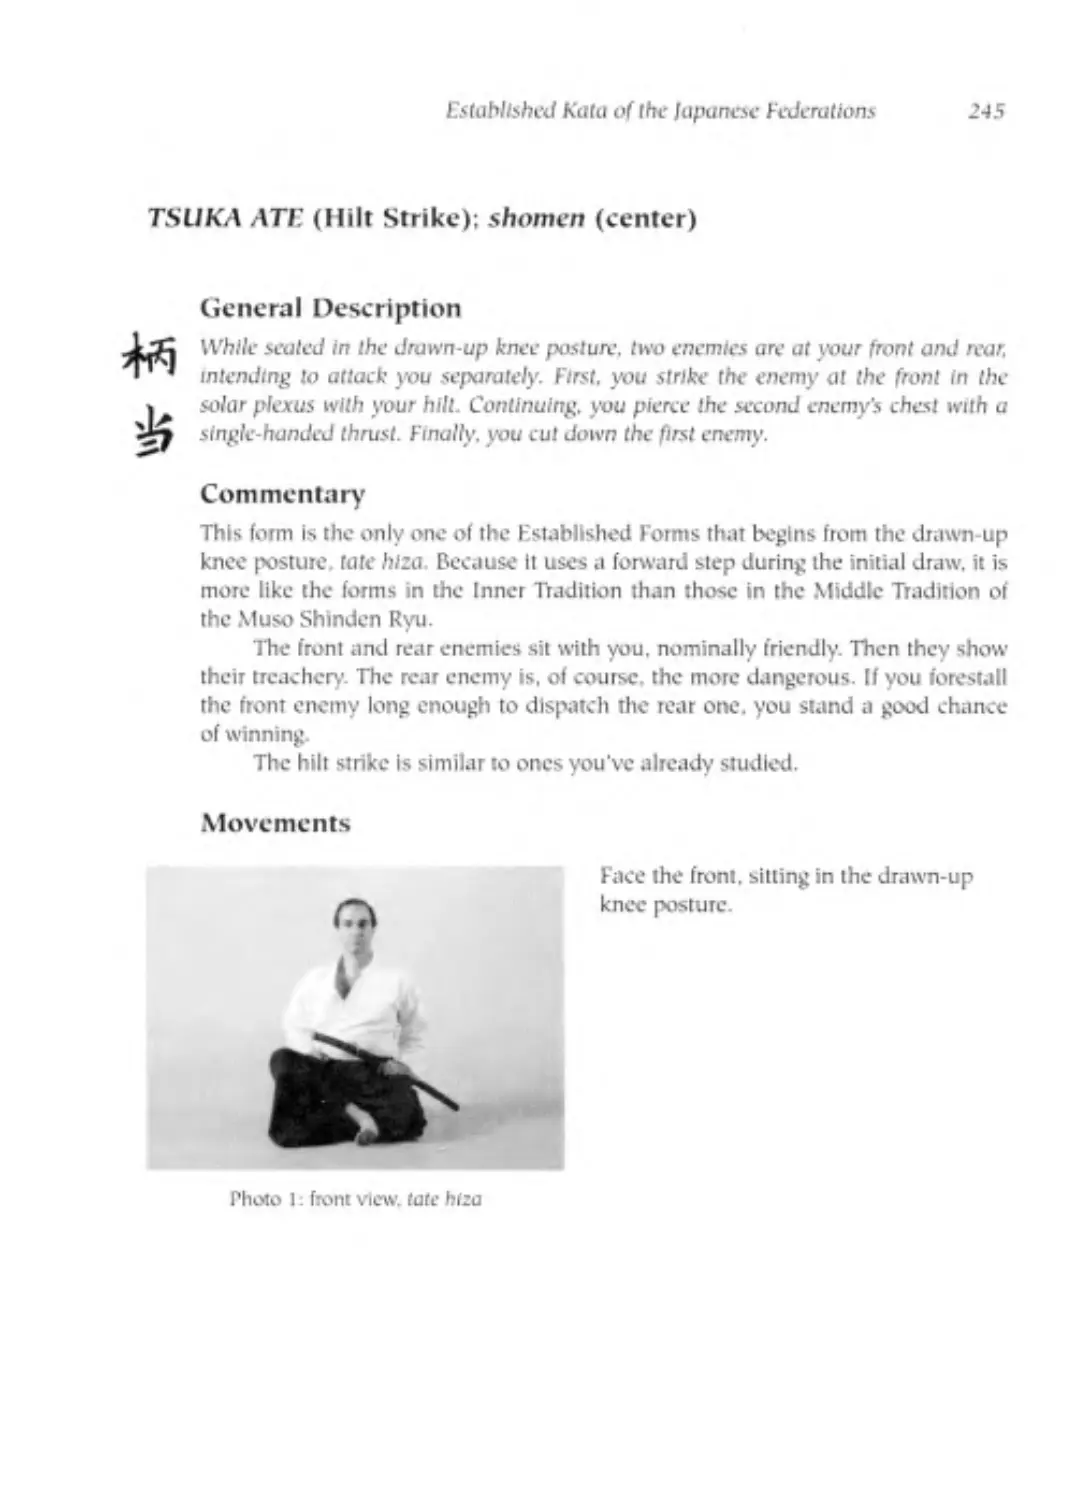
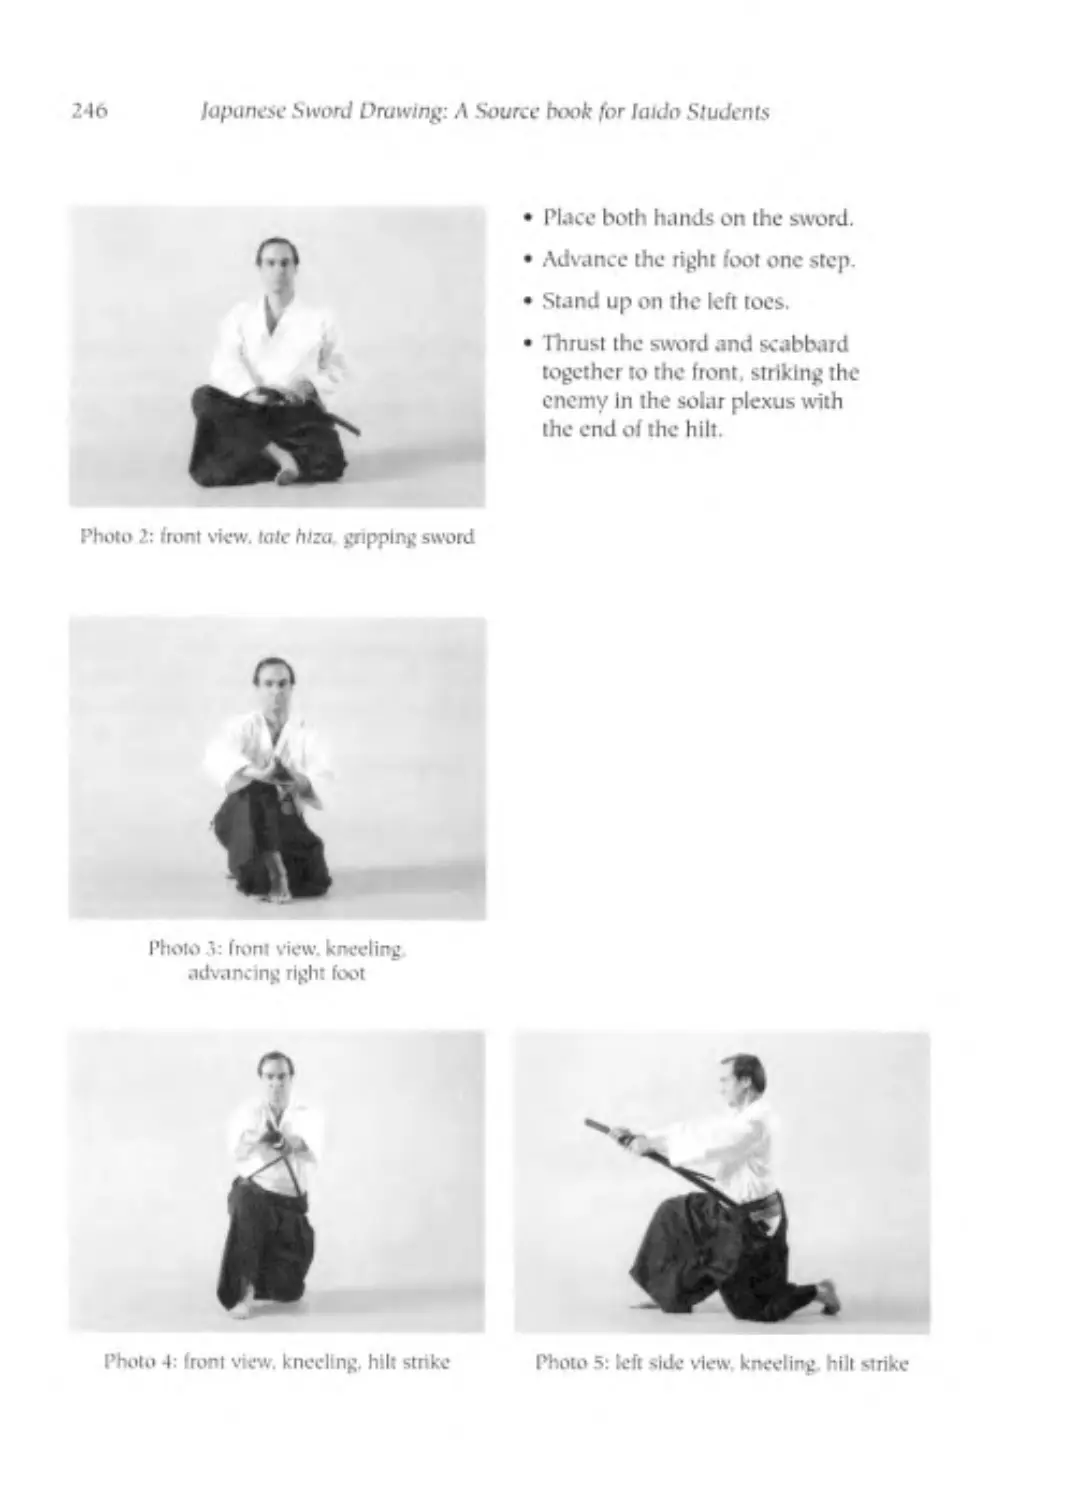
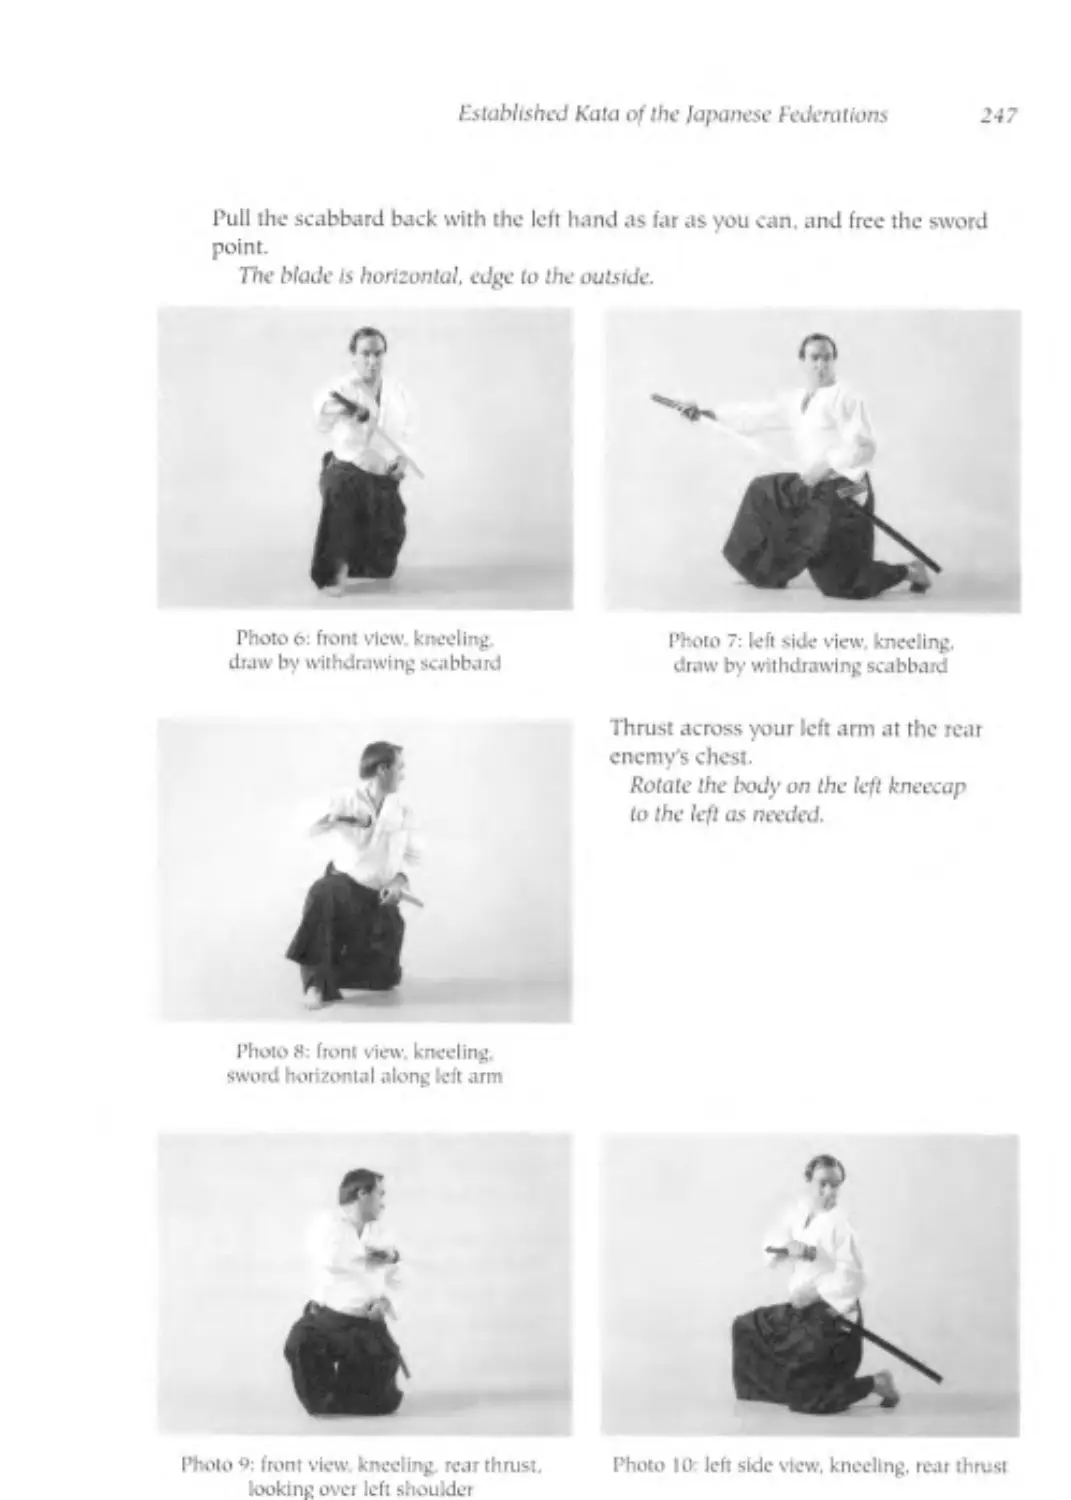
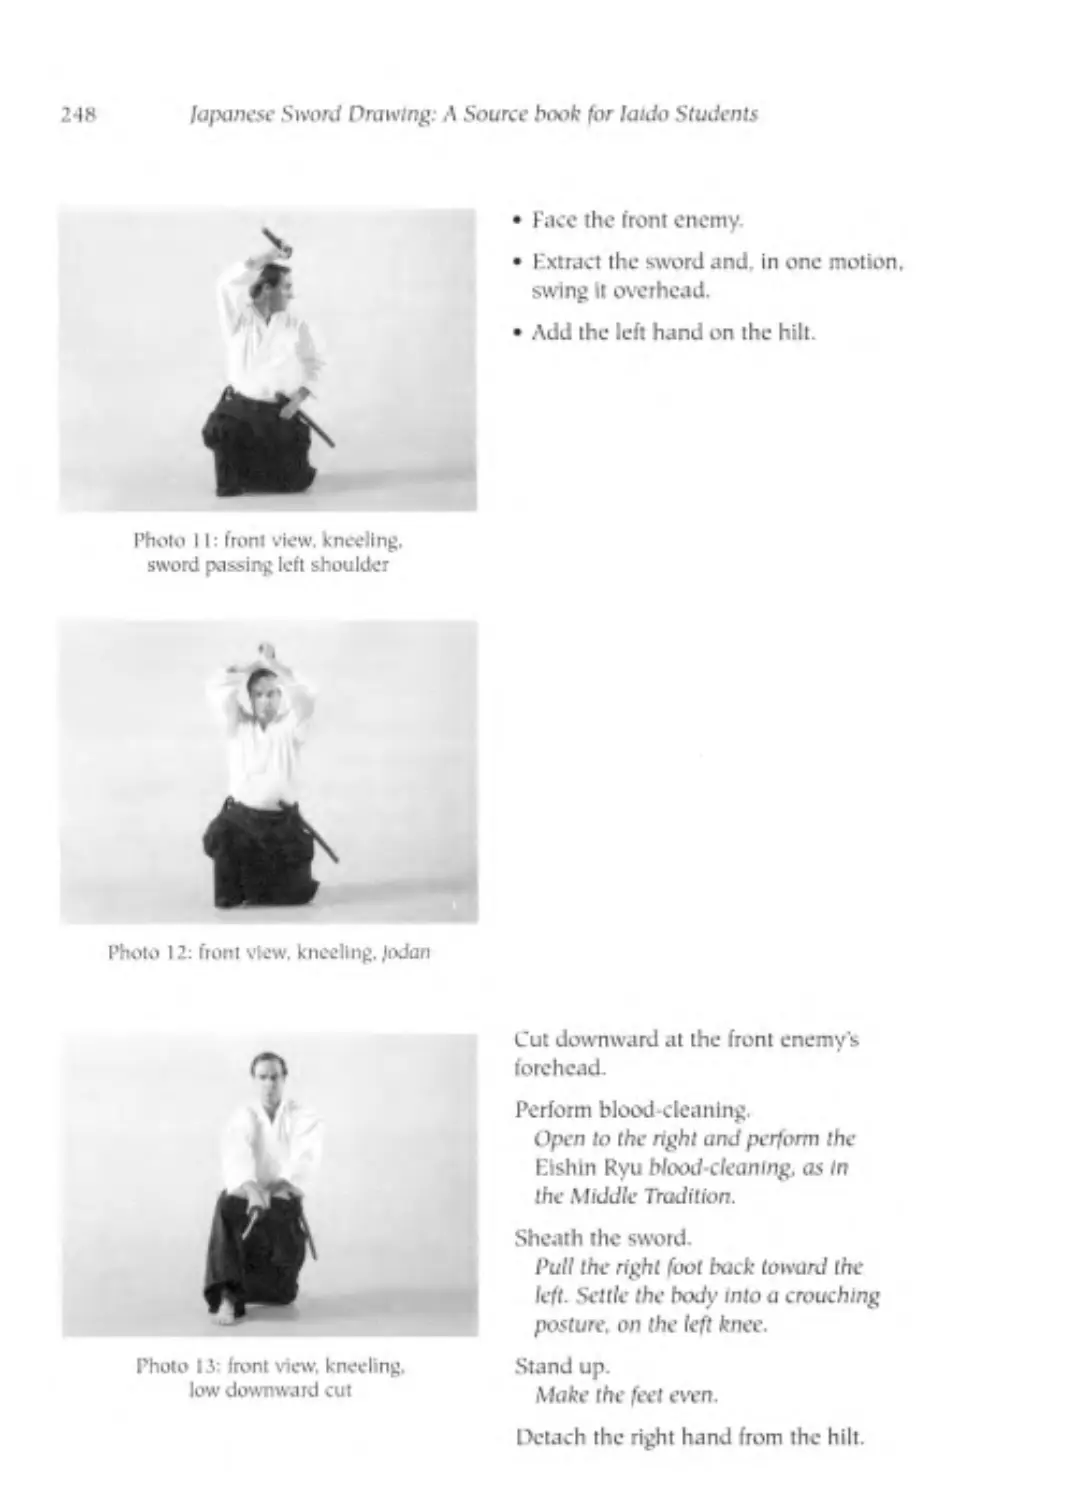
TsukaAte (Hilt Strike)...................................................245
Kcsagiri (Priest’s Stole Cut)........................................... 249
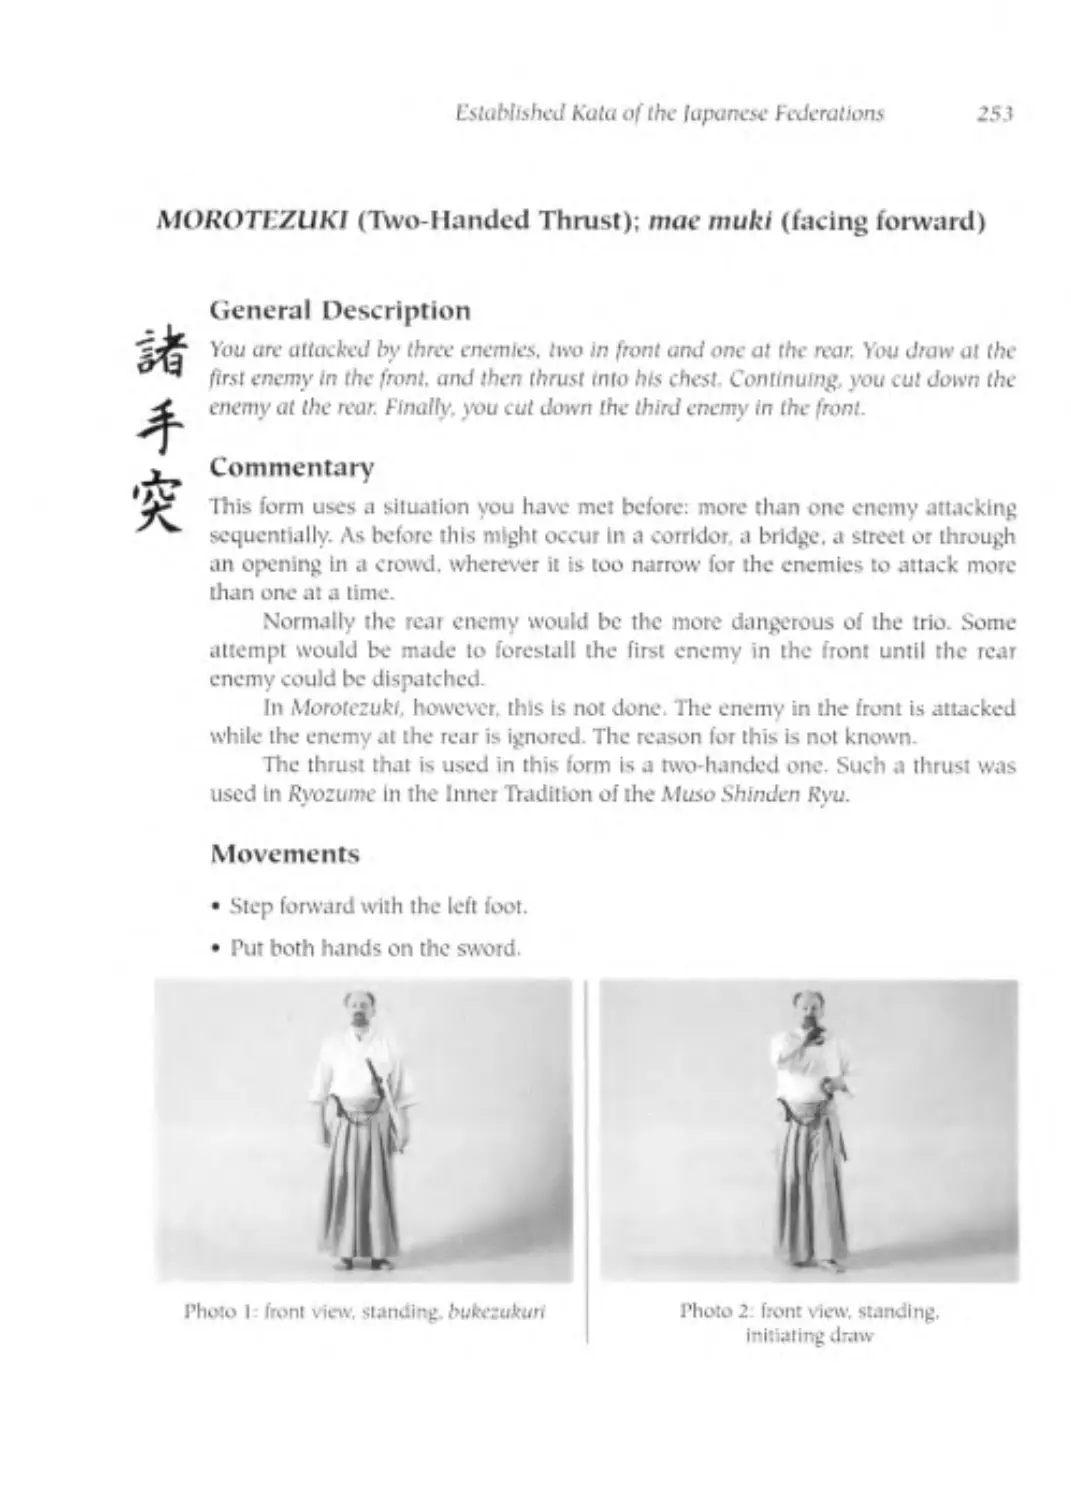
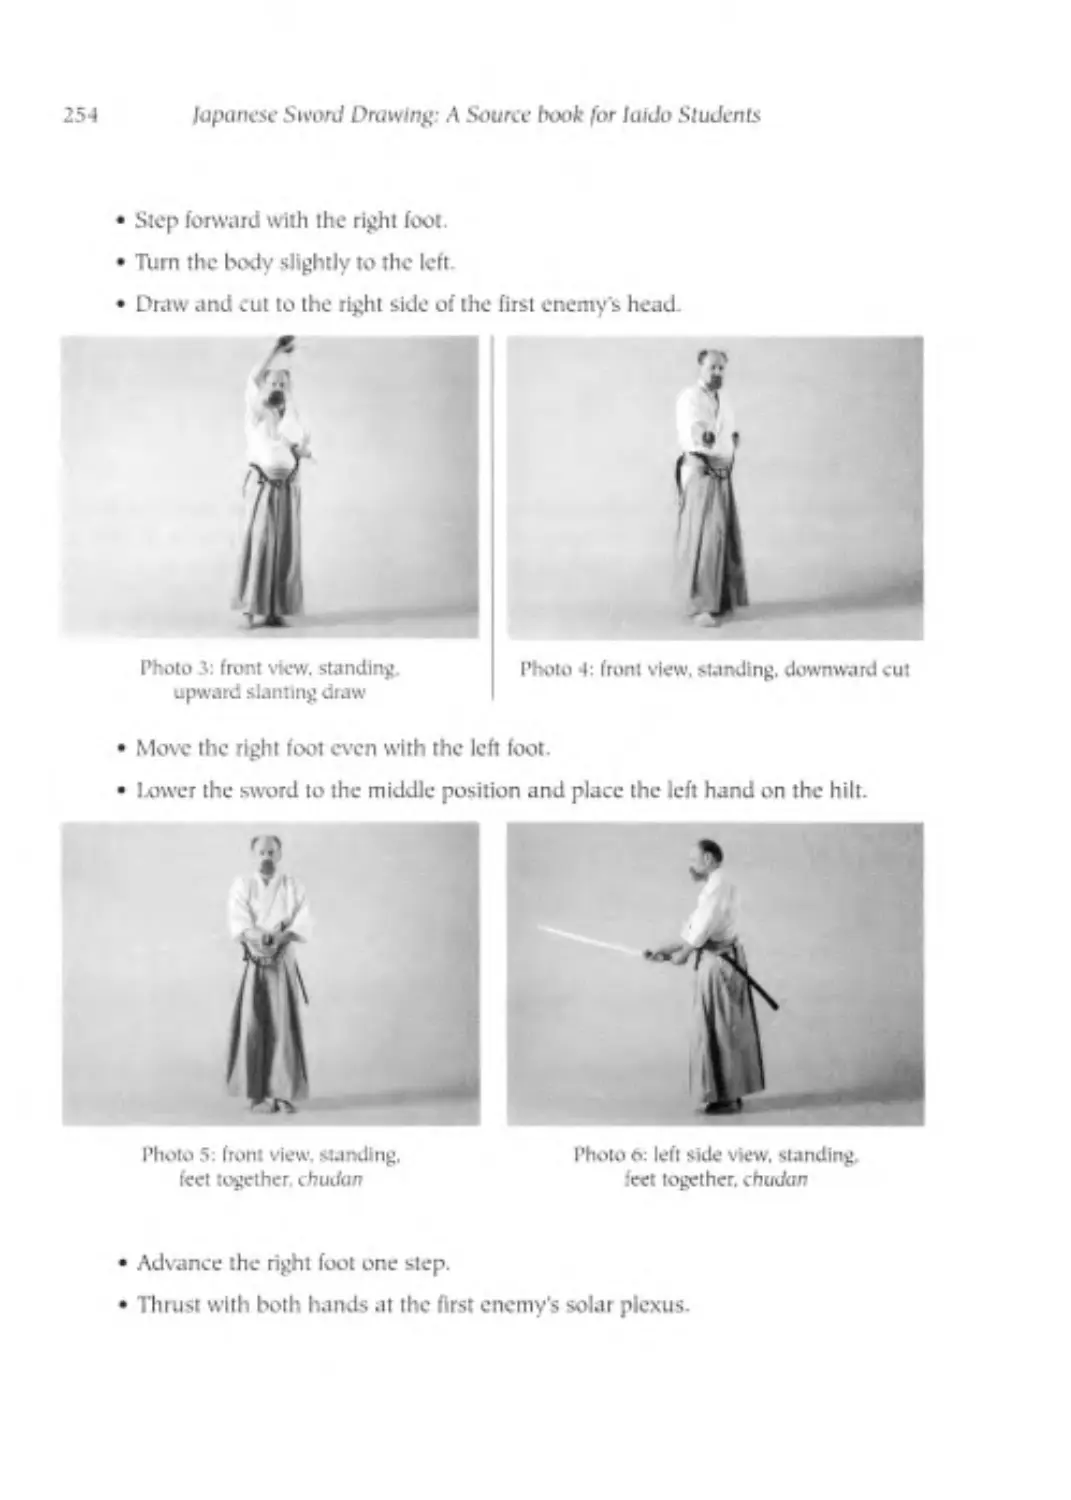
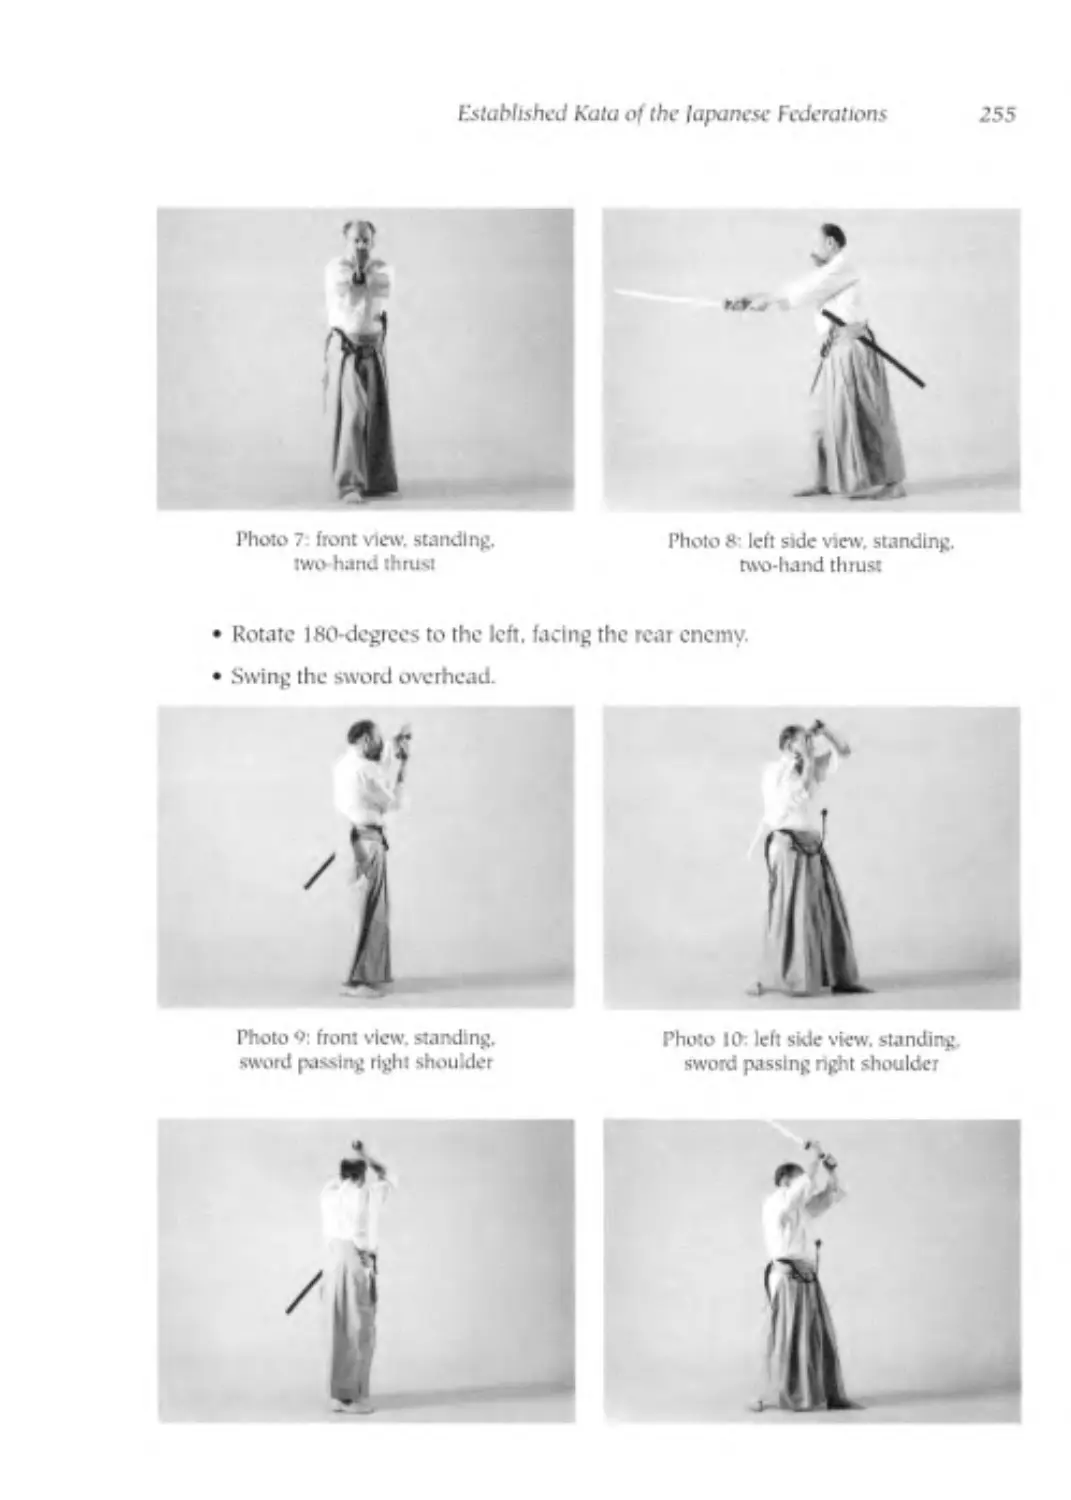
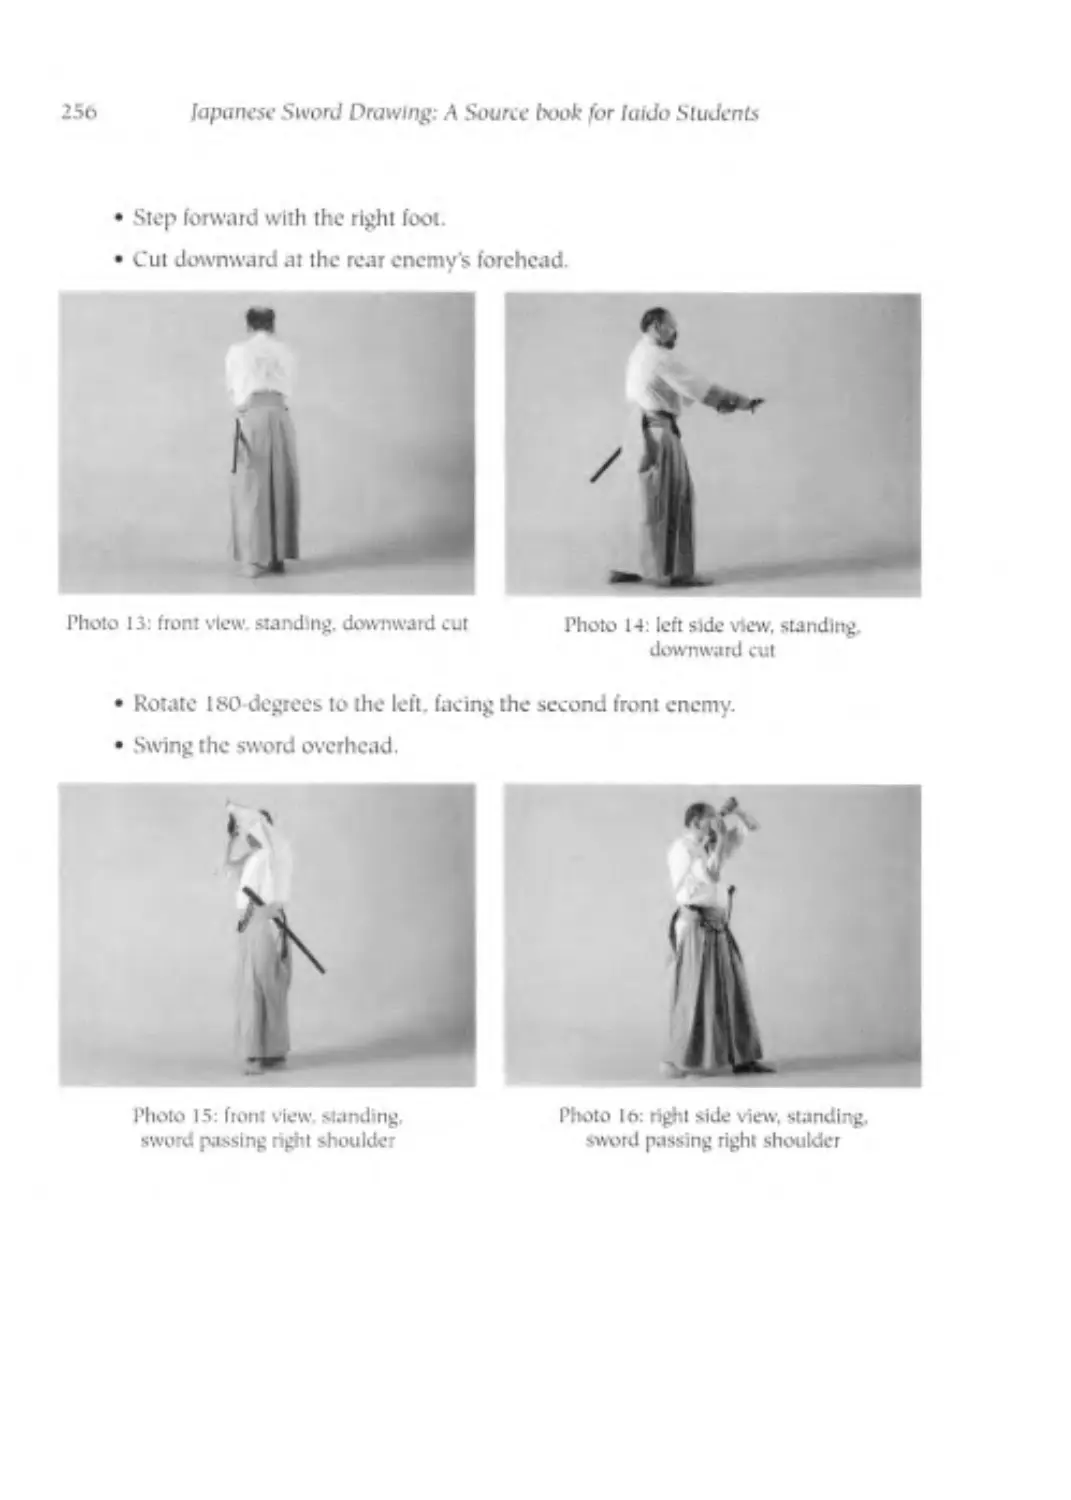
Mototezukl CI\vo-Handed Thrust)........................................ 253
Sanpogiri (Three Direction Cut) ..................................... 258
Gan men Ate (Strike Between the Eyes) . .................................262
Soetezuki (Fixing Thrust) .......................... -...................267
Shlhogiri (Four Direction Cut) ......................-...................272
8. Kata of the АН-Japan Sword Drawing Federation.............................279
Background............................ ..................................279
Distinctive Features ....................................................279
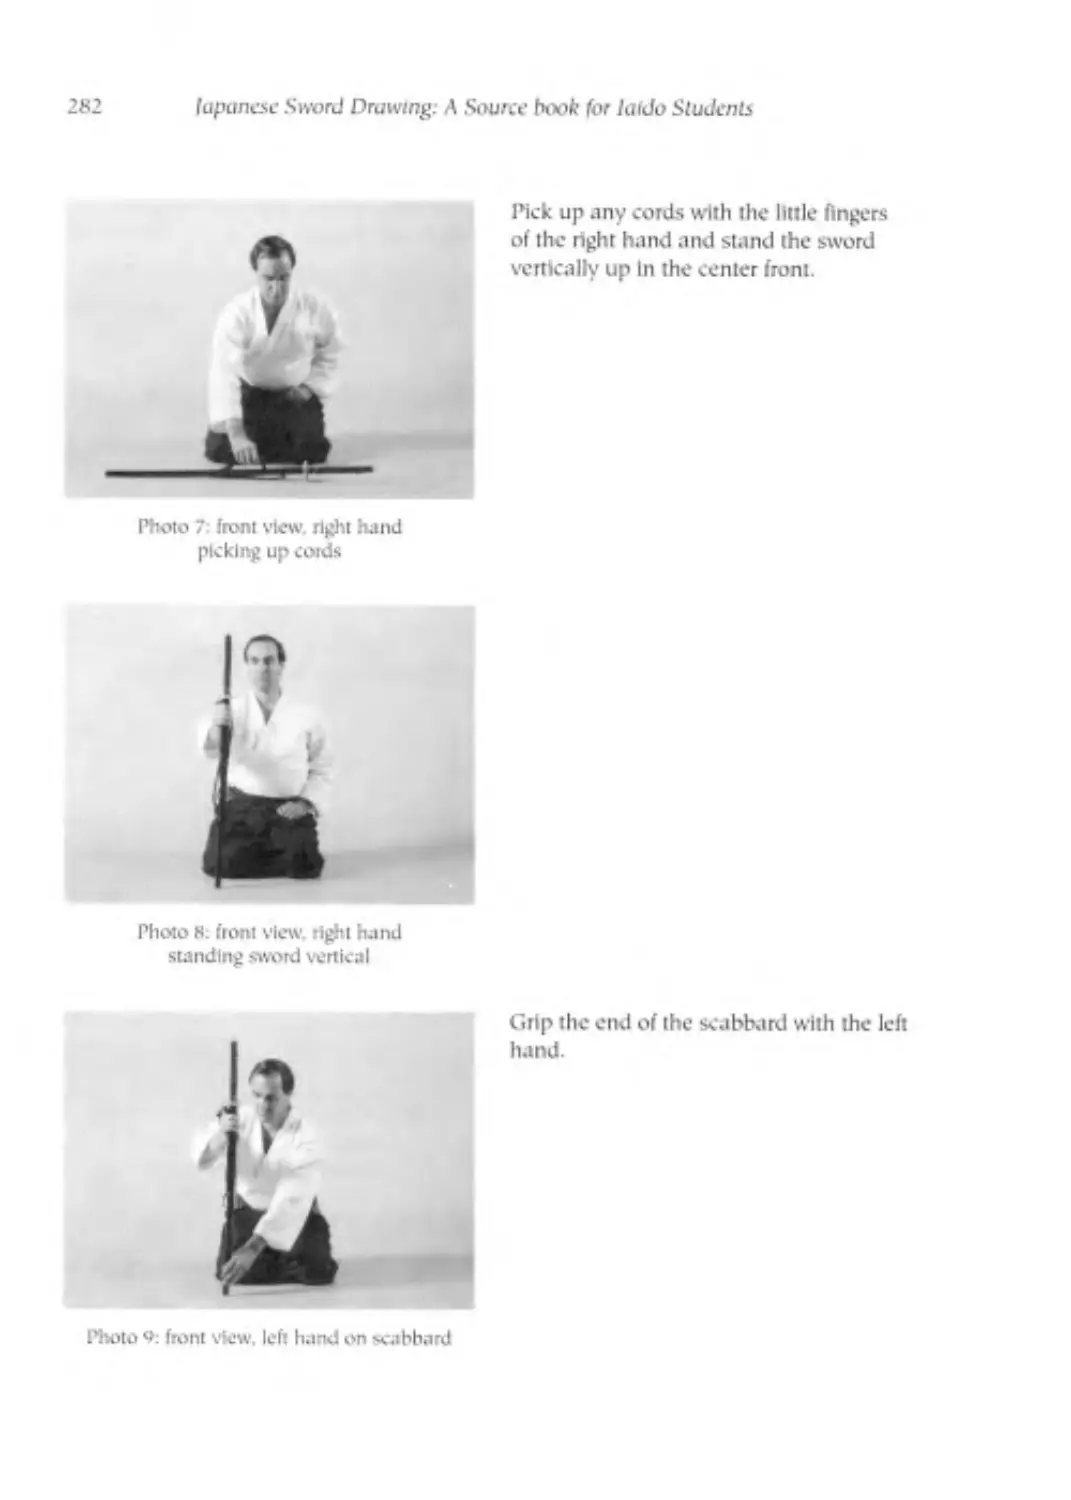
Preliminaries............................................................280
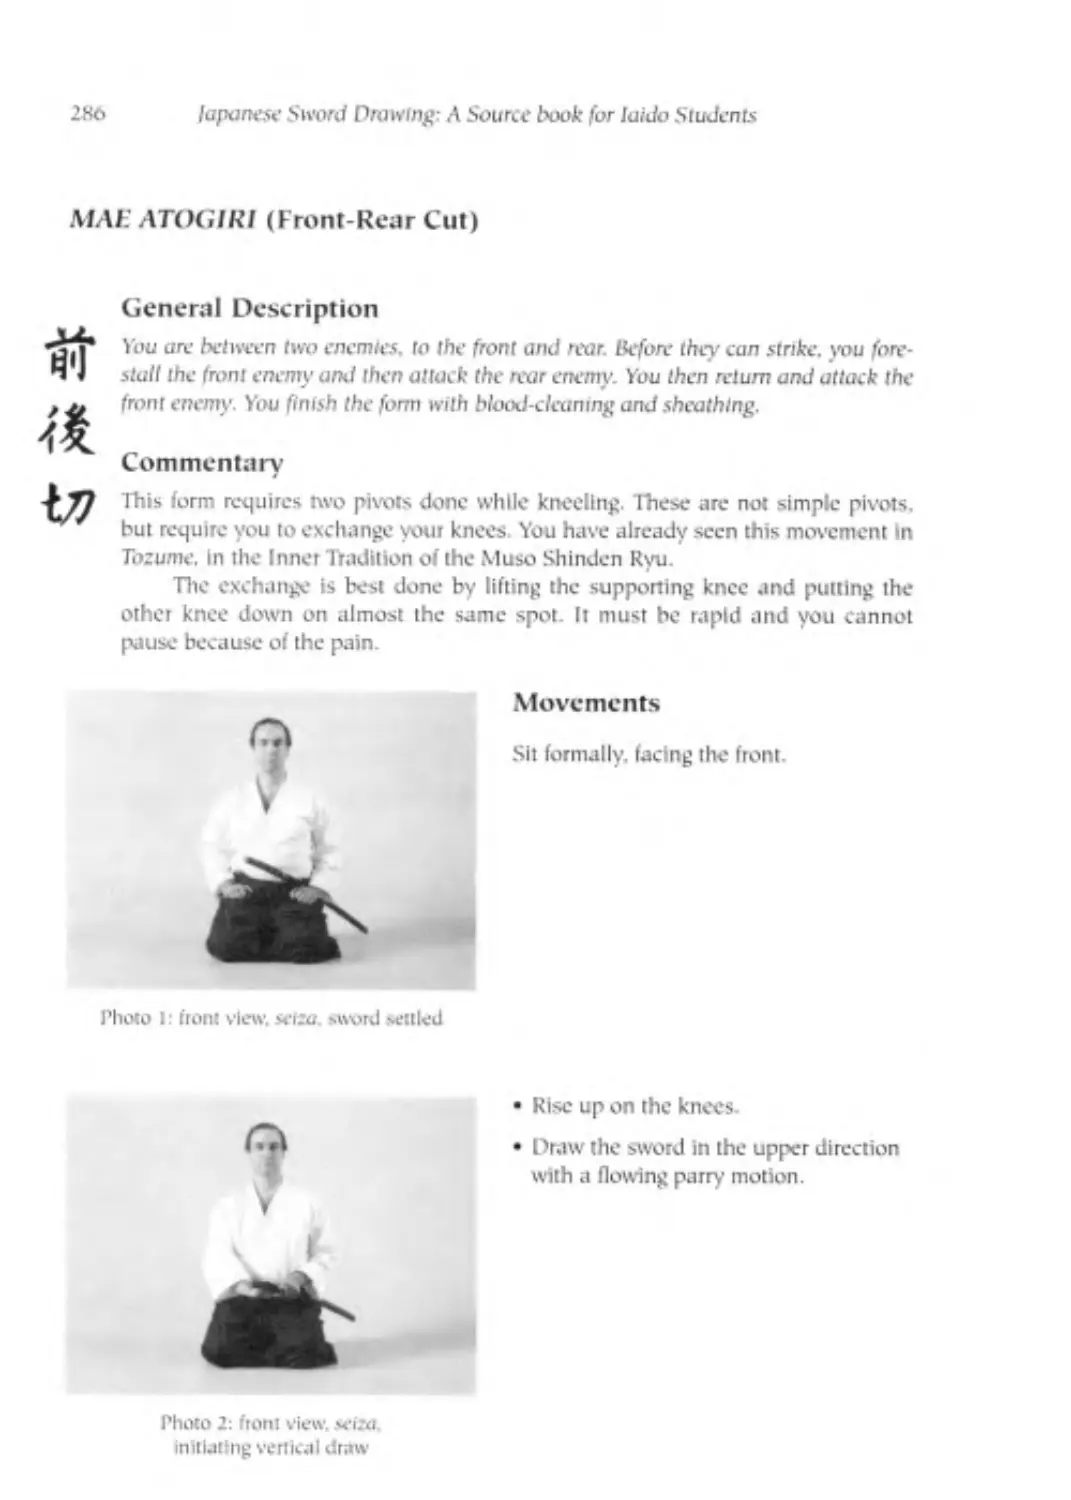
Maegiri (Front Cut)................... ..................................285
Mae Atogirt (Front-Rear Cut) .......................................... 286
Kiriage (Rising Strike)..................................................291
Shihogiri (Four Direction Cut) ....................................... 293
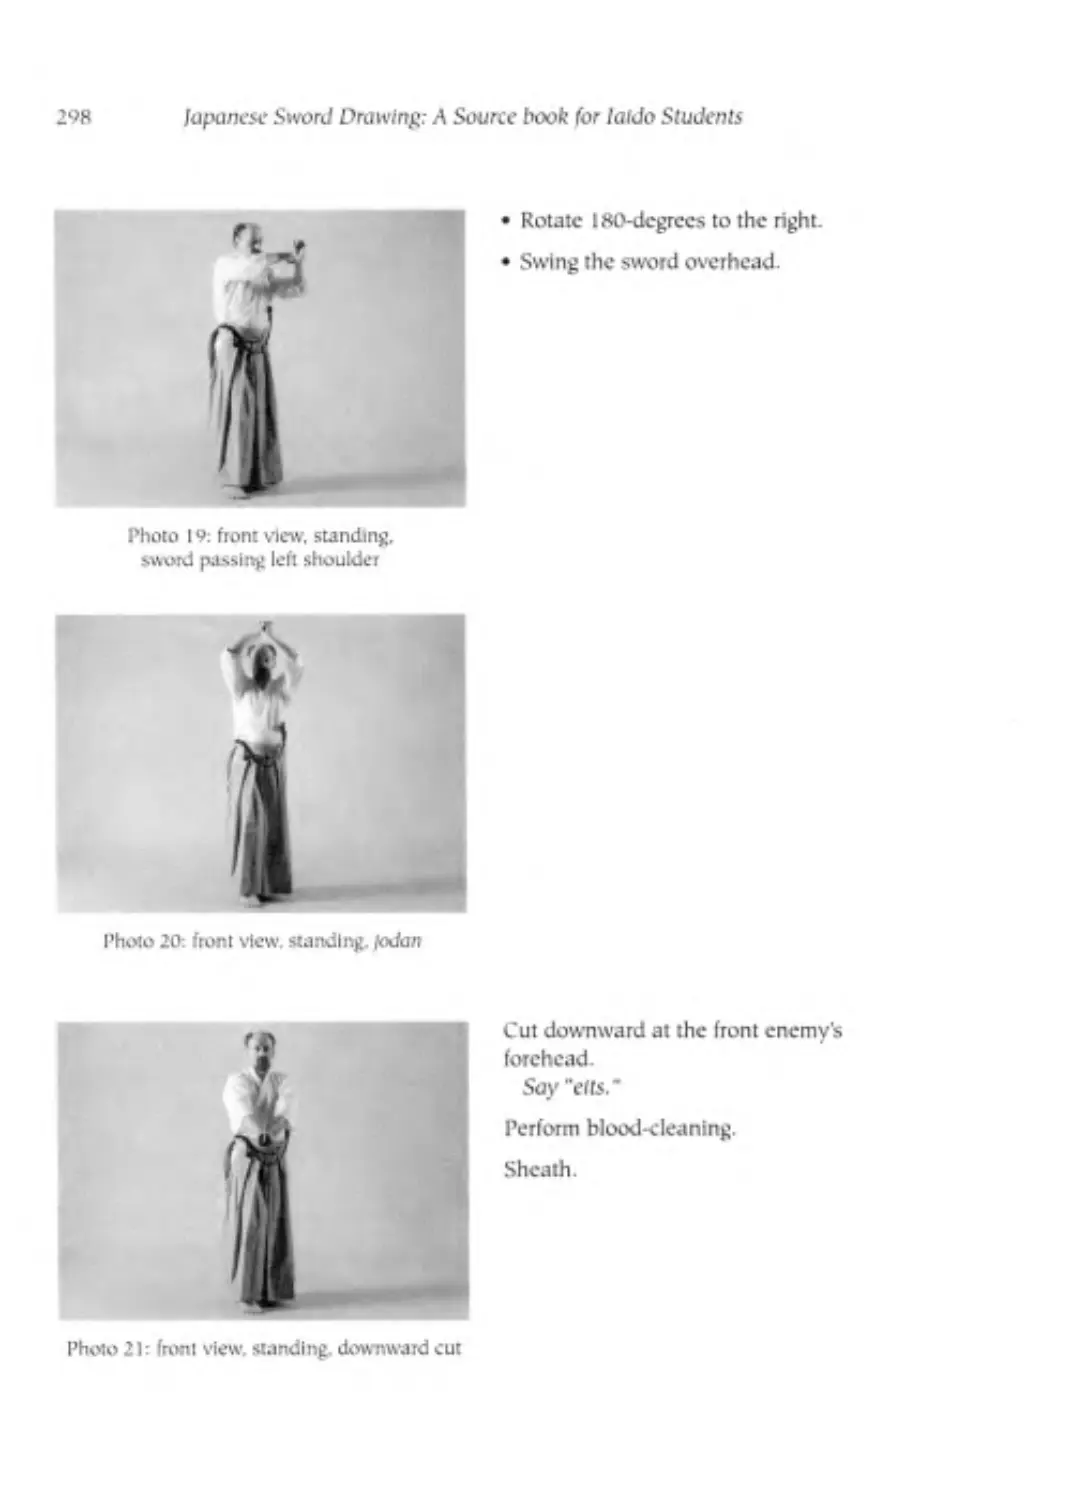
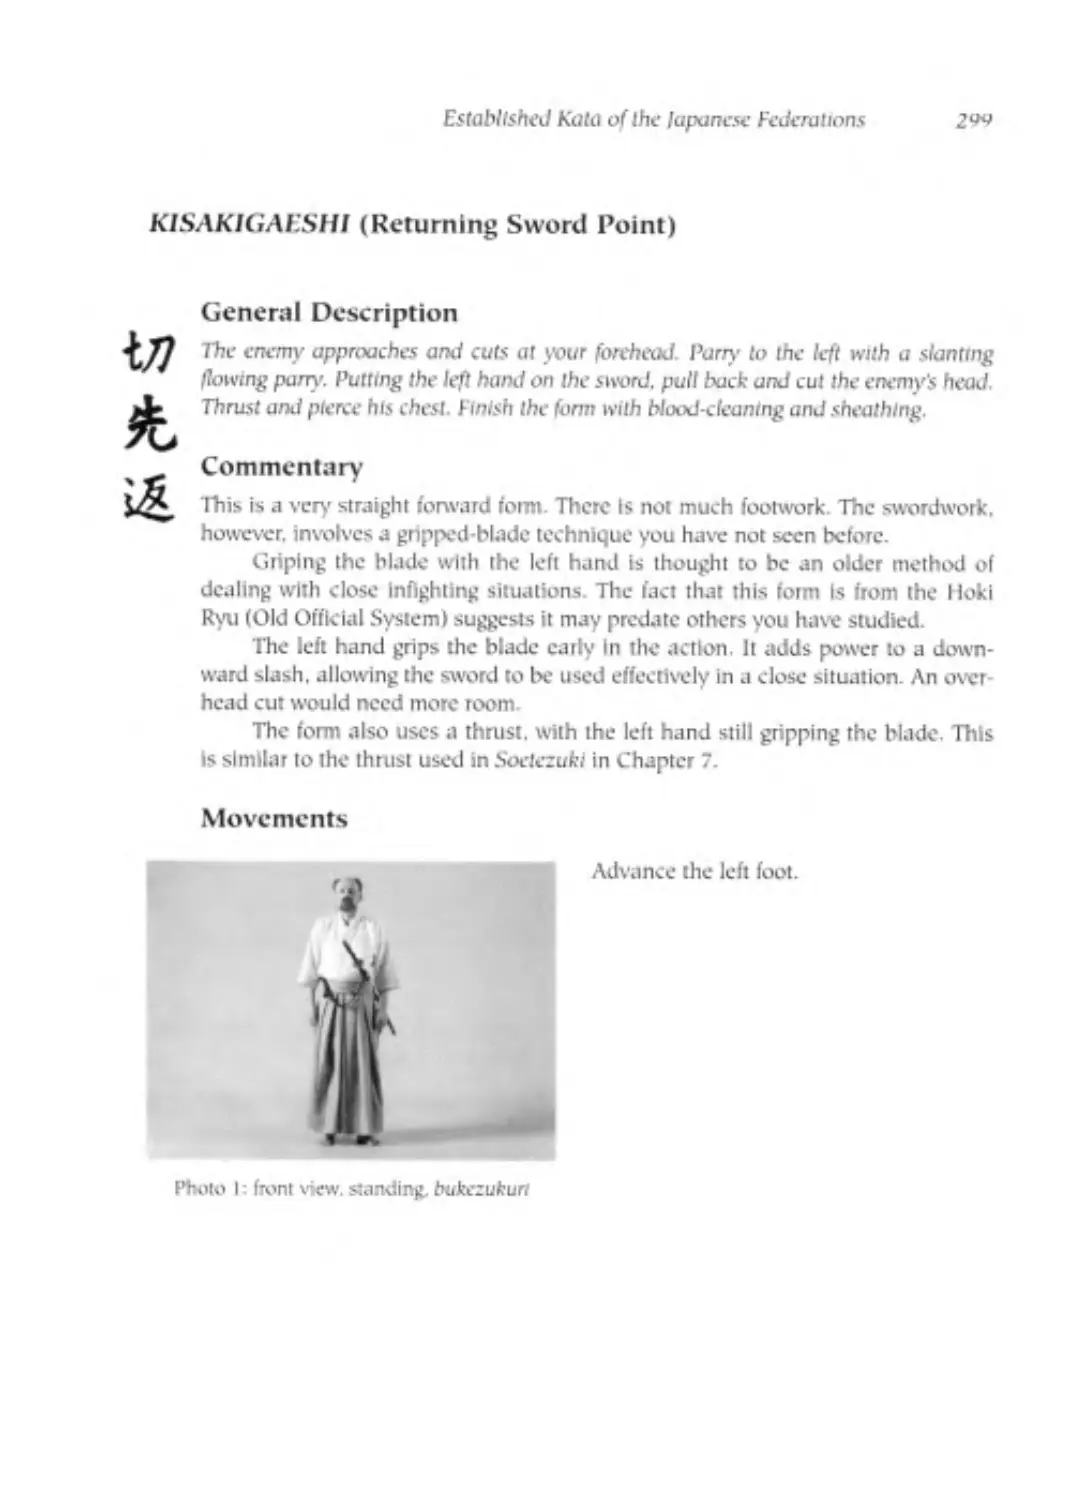
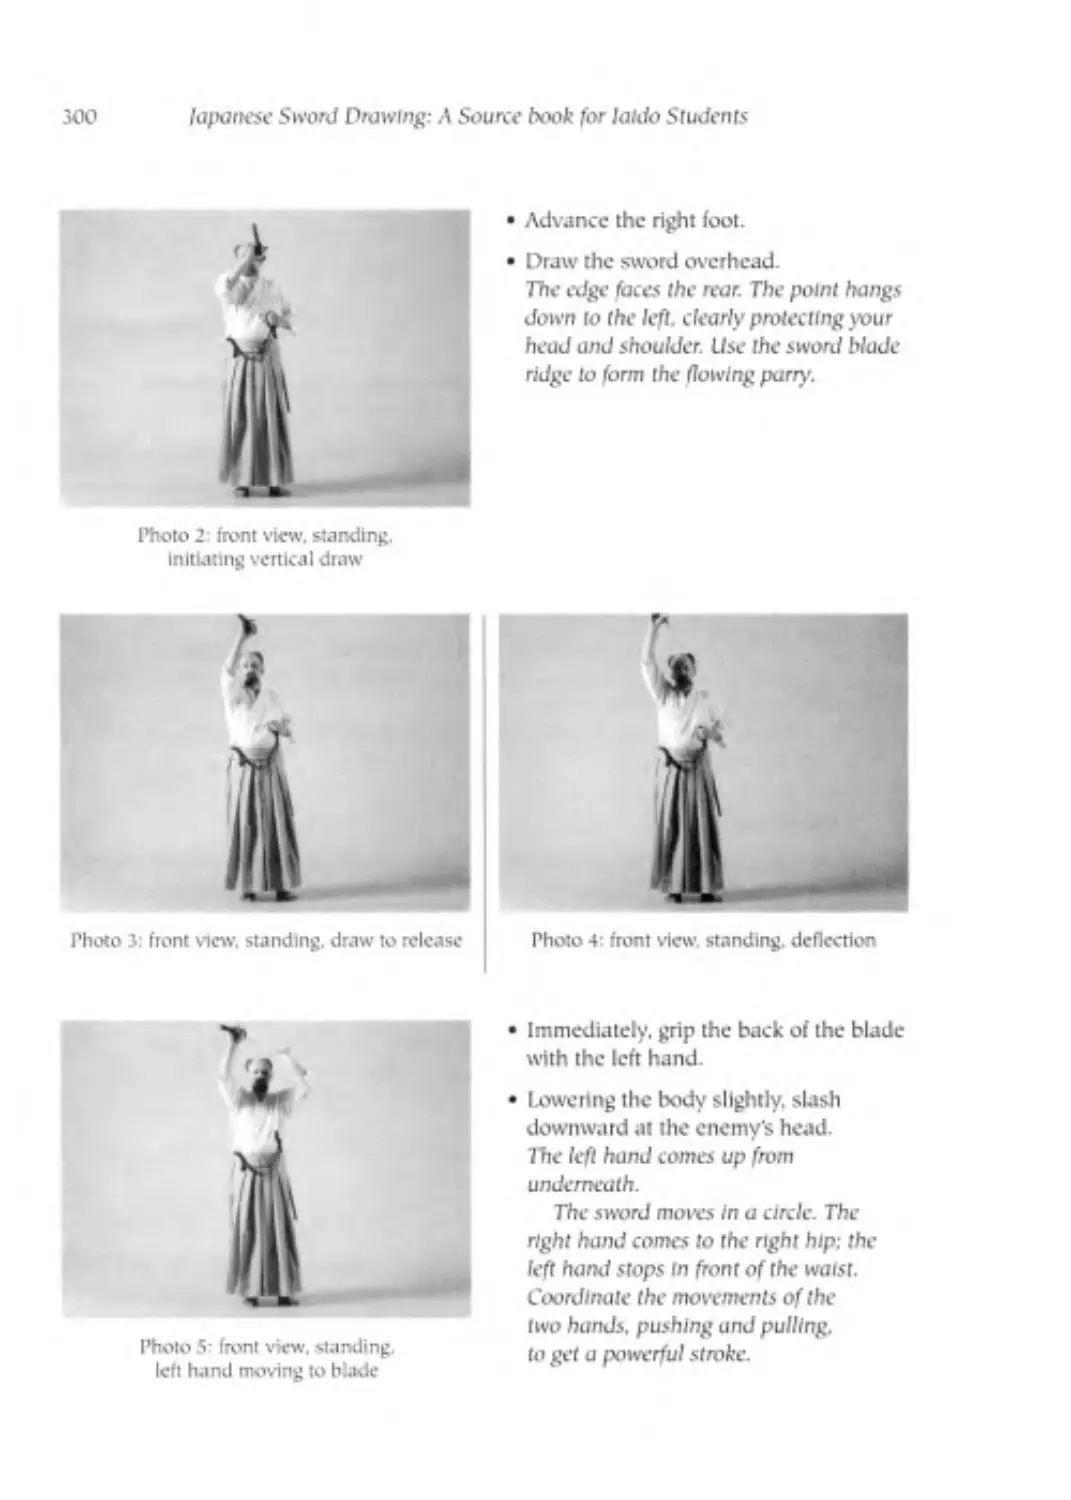
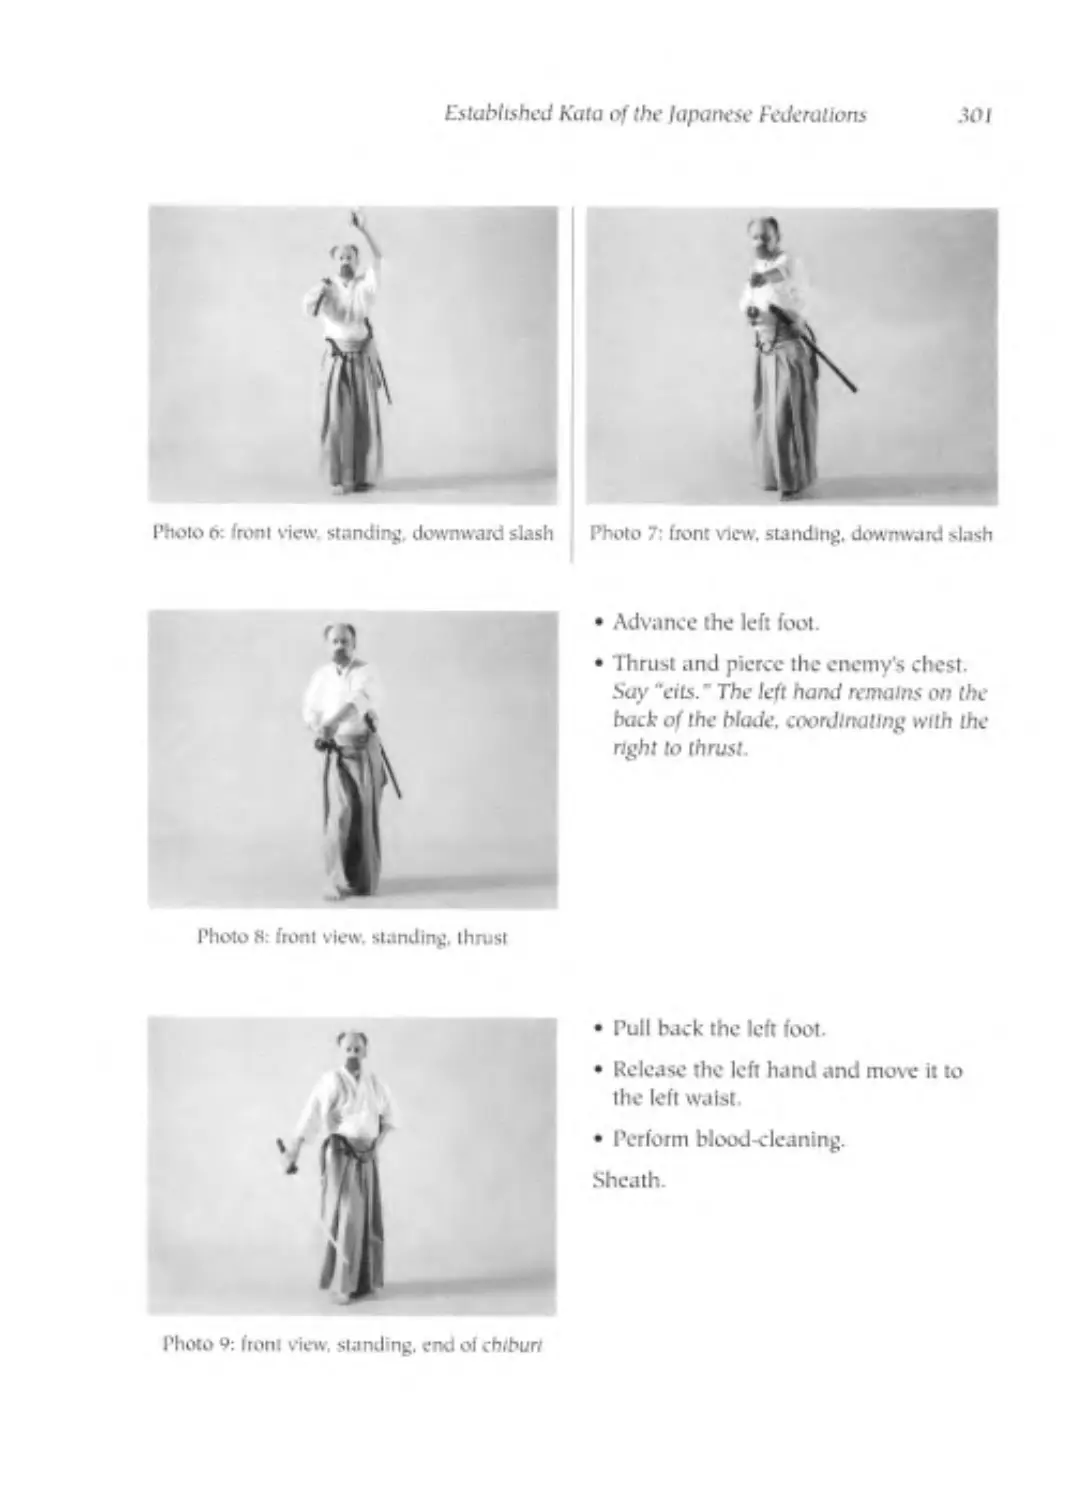
Kisakigaeshi (Returning Sword Point) .. ............................... 2°9
APPENDIX
Headmaster Lineage and Systemic Development...................................305
Japanese Sword Terms..........................................................306
Glossary................................................................... 309
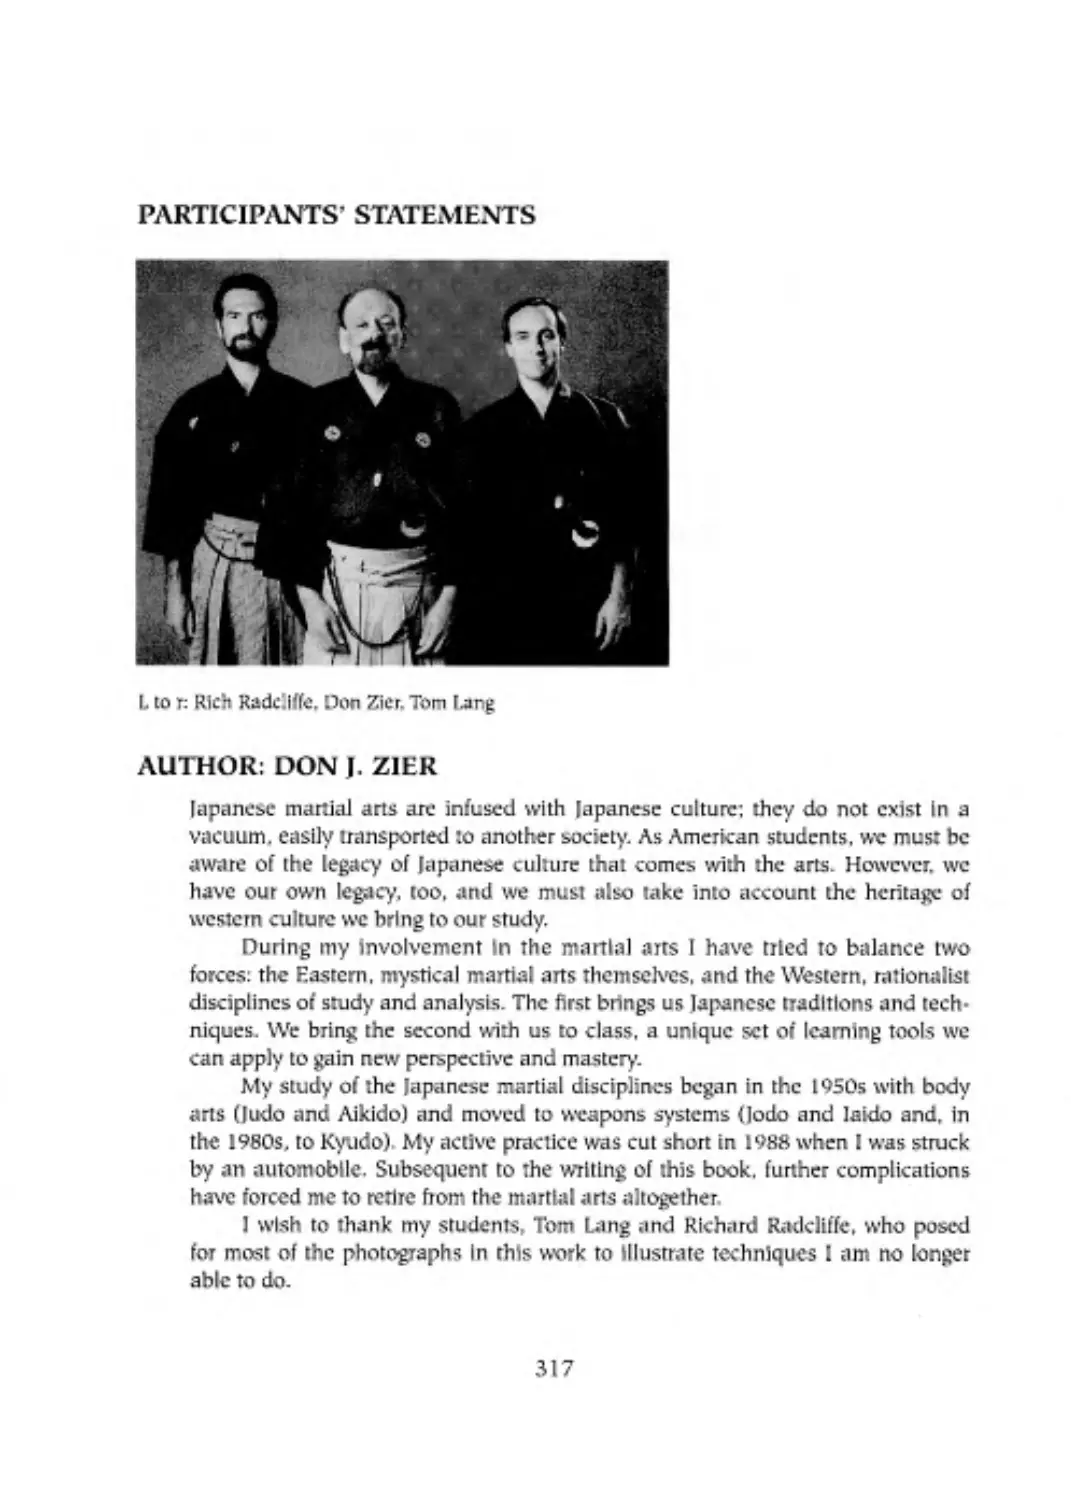
Participants' Statements .....................................................317
Foreword
'TTLte. Sfuden'I’S ’Plerspecfive
This book presents many technical details of Mum Shlnden Ryu Iaido, making this a use-
ful guide for sword drawing teachers and students. One aspect of instruction that is not
covered, however, is how the art is taught. As long-time students of the author (that’s us
in the pictures), we wanted to comment on the instruction we received, thus shedding
seme light on that aspect of the art. In addition to being a sort of tribute to Don, for
whom we both have great affection, we believe that much of the value we continue to
derive from laido comes as much from the way he taught as from what he taught.
From our first class, it was apparent that Don was technically proficient in laido.
He was teaching something that he knew how to do, and do well. As he had completed
his formal instruction in iaido some years before we began studying with him, his skill
was obvious and gave us something to aspire to. It was not just the flash of a blade
that Inspired us. He made us wait until we held black belts in another martial art
before agreeing to teach us (so he wouldn't have to start completely from scratch)—and
by then we knew the difference between flash and substance.
Don also has a thorough understanding of the art. He knows the difference
between the correct movements and similar-but-incorrect ones and is able to demon-
strate these differences. Unlike traditional instruction, which is largely based on imita-
tion. our instruction was based on analysis, explanation, and illustration. Rather than
trying to duplicate an entire form, we spent considerable time practicing individual
movements within a specific form. For example, we learned that a single, gross move-
ment, such as the overhead cut (shomen ucht), can be produced in several ways—
some strong and others not. By breaking each form into its component movements,
Don built the form from the “inside out." Thus, when the component movements were
mastered, the rest was easy. This process was the essence of cur instruction.
As you might imagine, we spent most or our time learning and refining basic
movements. We practiced with wooden swords (boken) for three years before drawing
with bladed ones. We spent ten years on the twelve Omori Ryu forms and learned the
remaining forms in about two years. That we did not get bored in these years is a trib-
ute to the detail and interest with which we were Instructed. (Although Don probably
felt safer when we trained with boken, live blades require the use of a scabbard, which
adds yet one more thing to move at the right time, in the right direction, and at the
right speed. He was simply waiting until we were ready for “advanced' techniques. Or
maybe we were Just slow learners.)
The result of our instruction is that we are different because of it. We move and
think differently than when we began: we are not just the same people who now also
do iaido. Don would be the first to say that his approach to teaching iaido is not tradi-
tional. But he has never claimed any legitimacy on the grounds of tradition, only on
performance. His instruction has been among the more gratifying experiences we have
had, and we are pleased that he has finally finished this book so that others might
appreciate it as well.
-Tom Lang & Rich Radcliffe
X
Part One
Preliminaries
1. Overview
BACKGROUND
Ando (the way of sword drawing) is one of the more formal Japanese budo (mar-
tial ways) This formality appears In the manner of practice, philosophical under
pinnlngs. and origins of the various systems. The training is very rigid, and there
Is a corresponding lack of "free practice."
Sword drawing practice Is usually done In a place designated especially for
It. Participants wear traditional Japanese martial an uniforms: a kclkogi or luban
(light jacket) on the upper body, closed with an obi (wide belli, and hakama (wide
trousers) on the lower body The jacket should fit well, not too loosely, the belt
should go around the body three times with enough extra length tv lie in a knot
in the back: the trousers should come to the ankles. Practice is dune with tradi-
tional weapons: the boJten or hokulo (wooden sword) the iuilo (practice sword),
and Irulono (actual sword)
The sword used In practice, whether wooden or steel. Is worn In twkezukun
(the warrior method). The scabbard Is placed between the second and third lay-
ers of the belt, edge-up. If a second, or short sword Is also worn, its scabbard is
Insetted between the first and second layers, also edge up. The short sword's
guard and the long sword's hilt arc both n line with the navel. Both scabbards
point to the left.
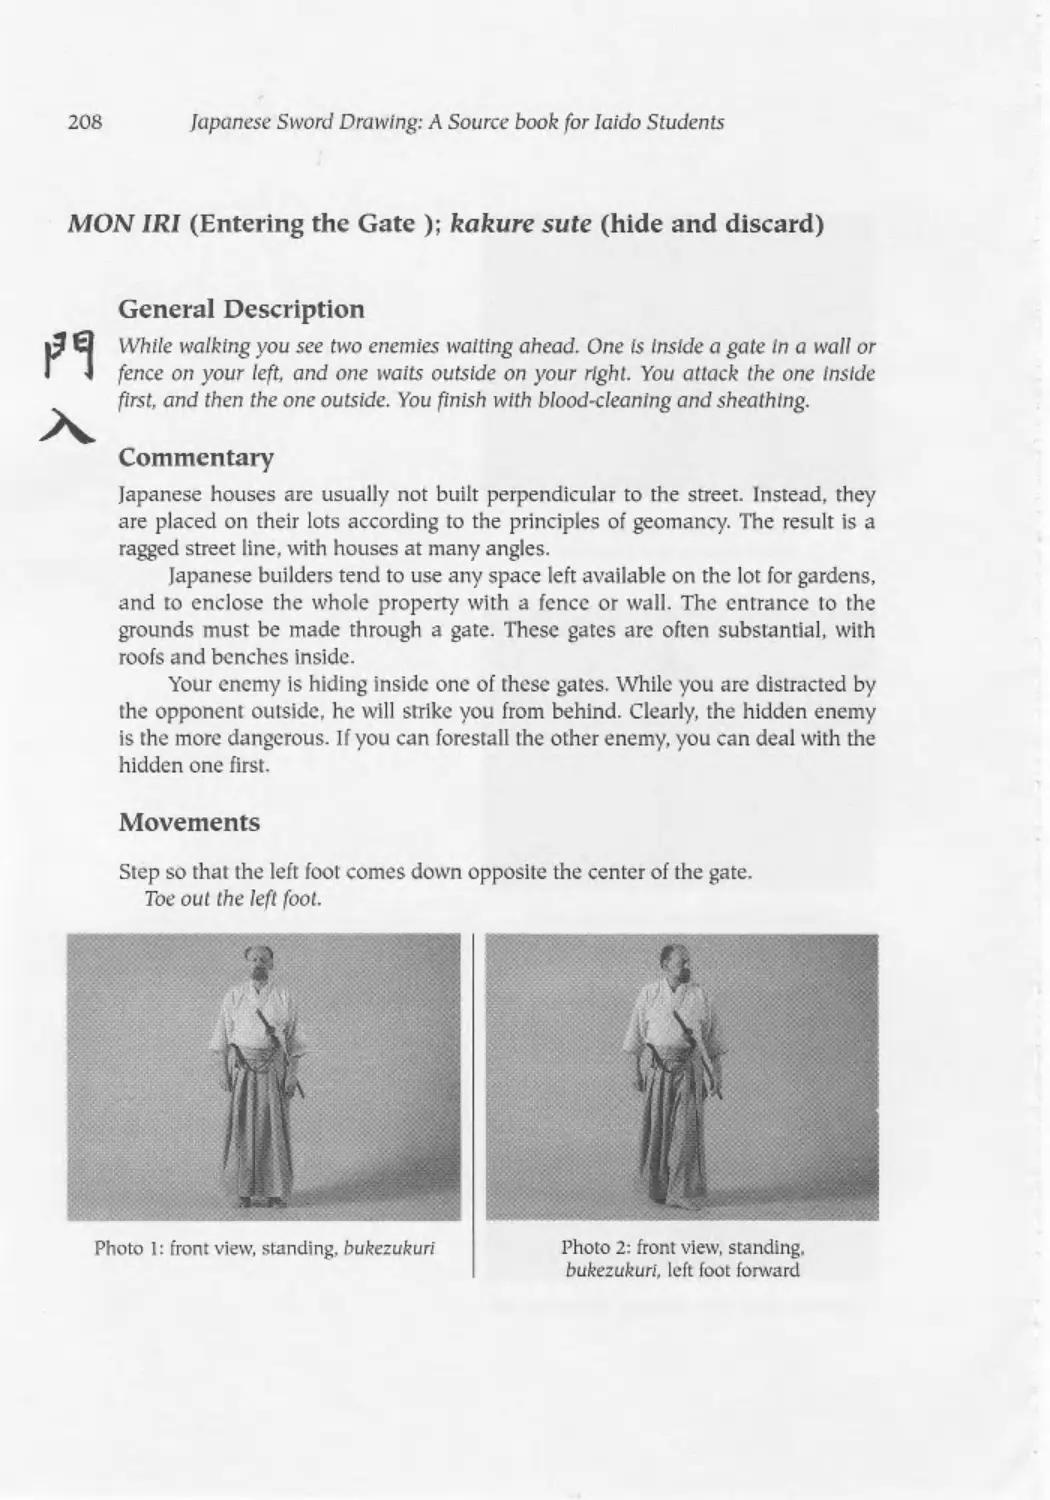
Photo I: front view, suuxilng. bukeeukurt
Photo 2 left side view, standing.
bukezukuri
3
Japanese Sword Drawing: A Source book for laido Students
^0
st
it
Muso
Shlnden
Ryu
Placing the scabbards between different layers of the belt prevents them
from touching and protects the scabbards from bodily oils and sweat.
laido practice itself is carried out in a formal manner. The positions of the
kata (forms) were those of Japanese life, even if some are no longer common
Various bows arc performed during the course of practice.
The philosophy which is most often expounded in sword drawing schools is
of relatively recent origin. The records that exist of very old systems show a phi-
losophy heavily influenced by Taoism. The more modern systems are more
closely aligned with Zen Buddhism; Zen itself was, of course, influenced by
Taoism in Its seminal phases.
The forms practiced in sword drawing (which vary from system to system)
are intended to he practiced for their own sake, rather than for any consideration
of "combat effectiveness.” The movements are designed to train the practitioner
in “internalizing.” That is, in immersing oneself into the form to such an extent
that individual characteristics fall away, The form can be said to exist independ-
ently, manifesting itself through the practitioner.
Sword drawing practice, like that of other Japanese martial ways, passes
through three sequential phases. In the first phase, shu (keeping), the practitioner
copies his Instructor, memorizing the forms, in the second phase, ha (breaking),
the practitioner seeks to analyze and understand the movements of the forms. In
the third phase, ri (leaving), the practitioner seeks to understand the essence of
the forms and to arrive at an impersonal practice. These phases also characterize
a gradually attenuating relationship between teacher and student.
It should be noted that the application of phased instruction does not
always work well with Western students.
There are many systems of sword drawing. Several have existed for more
than seventeen generations—the most successful of which are still practiced
today, while the least successful are only historical curiosities.
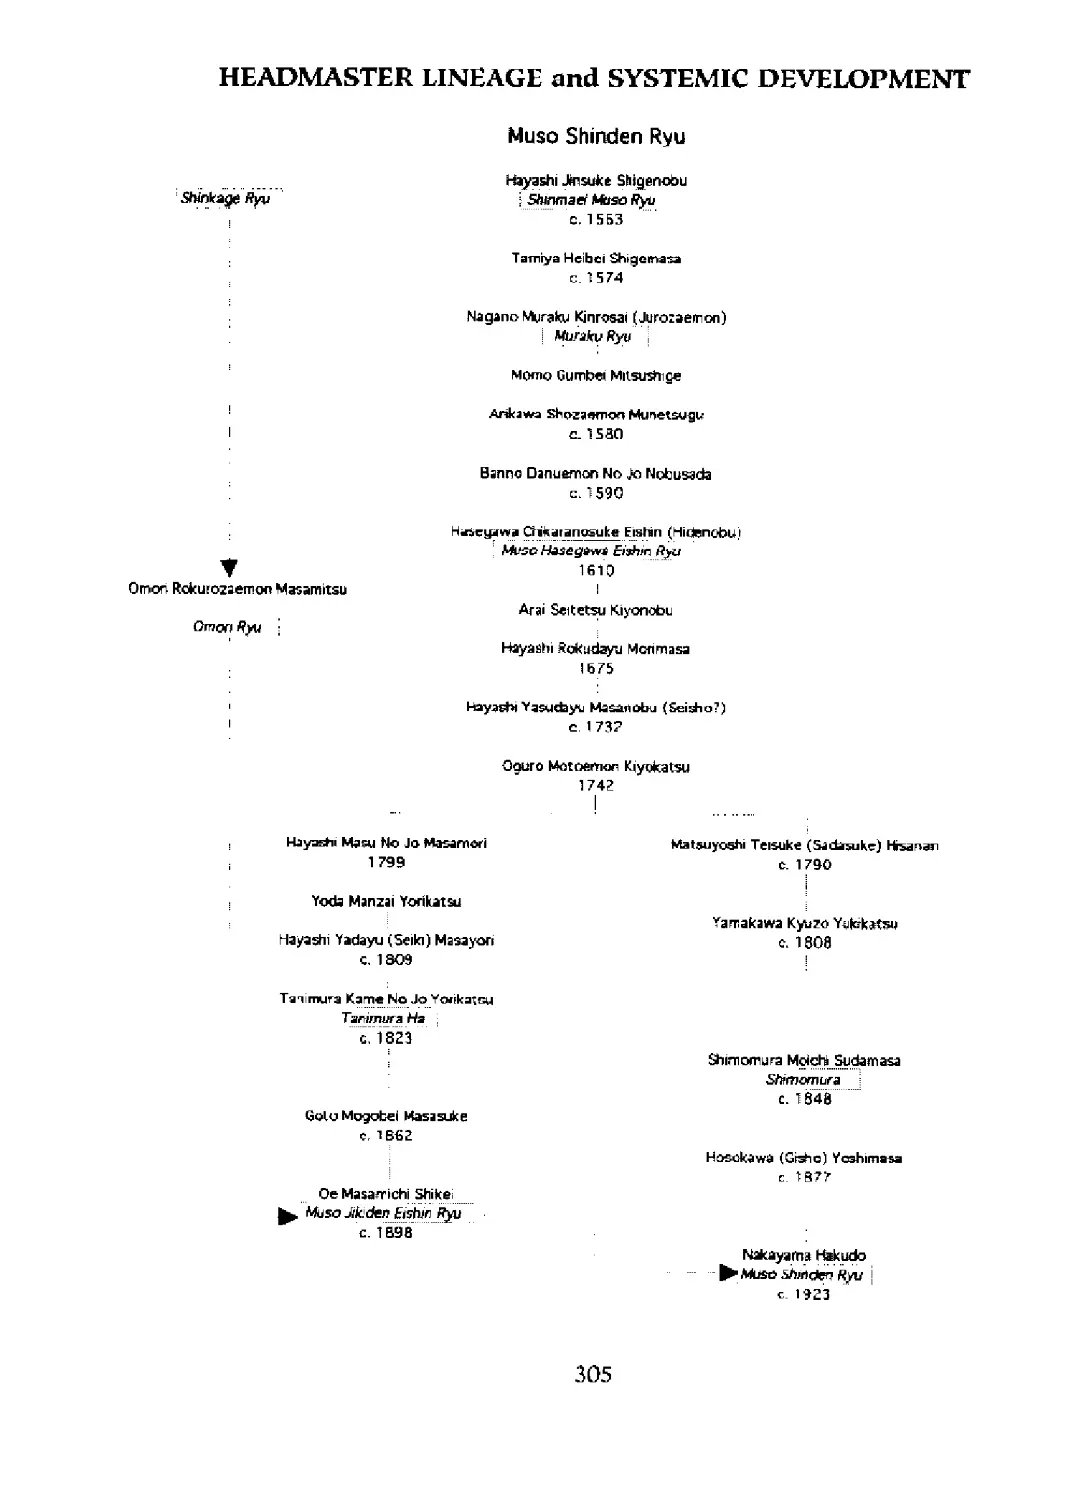
The system documented in this work, Muso Shlnden Ryu. has its roots in the
teaching of Hayashi Jinsuke Shigenobu (c. 1543 “1621). He founded the Shinmei
Muso Ryu system in the late 16th century. Since that time, the leachings have
passed through a succession of headmasters, resulting in the system's name and
forms being altered a number of times. The headmaster lineage of Muso Shlnden
Ryu is diagrammed in the Appendix
Around the year 18C0, a major split in this lineage occurred, giving rise to
wo main schools of sword drawing. One of these eventually became the Muso
Jikiden Ershin Ryu; the other, Muso Shlnden Ryu. The last headmaster of the
Muso Shlnden Ryu, Nakayama Hakudo, attempted a reconciliation between the
two branches by studying the forms of the jikiden Ryu. He formalized the Muso
Shlnden Ryu’s current structure and content after this study, tn around 1923.
Preliminaries
5
Nakayama died in 1958. and since then no one lias been named headmaster to
the Muso Shtnden Ryu.
Japanese swotd drawing, which is studied outside of a particular system
(e g., the Muso Shinden Ryu) is organized into two main administrative groups.
Thesc arc the Zen Nihon laido Renmei (the All-Japan Sword Drawing Federation),
and the Zen Nihon Kendo Renmei (the All-Japan Fencing Federation). Most sword
drawing practitioners belong to one or the other federation. However, some of the
traditional systems maintain independent schools and instruction. Of course, the
quality of practice varies widely, as does the quality of instruction,
Sword drawing instruction in the United States is mostly found in schools
teaching kendo (Japanese fencing), or in other schools where swotd drawing is an
adjunct to the martial arts normally taught. These schools often rank practitioners
in their own sword drawing forms. The ranks are sometimes recognized within
affiliate schools, but other systems often do not recognize them. The ranks with
the widest acceptance seem to be those given by the American laido Federation,
affiliated with the American Kendo Federation, headquartered in Los Angeles.
SCOPE
The intent of this book is to record—and thus being a resource to sword drawing
practitioners—the forms that are orally taught in a sword drawing class.
The information in this work documents the three styles of sword drawing
taught in the Muso Shtnden Ryu (Traditional Spiritual Vision System) of sword
drawing. These styles, or traditions arc called Shoden (the First Tradition),
Chuden {the Middie Tradition), and Okuden (the Inner Tradition). Each of these is
actually a system of sword drawing in its own right and will be discussed in detail
in Part T\vo of this work.
In addition, the Seitei Raia (Official Forms) of the All-Japan Fencing
Federation and the All Japan Sword Drawing Federation are described in Part
Three.
Japanese writing uses three styles: kaisho (the printed style), gyosho (the
semi-cursive style), and sosho (the cursive style). Each of these is progressively
harder to write (and read); mastery of each forms the foundation of the next. The
Japanese believe tlrat progression through these styles of writing cannot be done
on technical skill alone, but requires an internal esthetic development.
The three traditions of the Muso Shinden Ryu correspond to the three styles
of writing. Accordingly, practitioners must have firmly mastered each tradition
before going on to the next.
Recording the forms of a system should not be confused with transmitting
6
Japanese Sword Drawing: A Source book for Jaido Students
its traditions. And as this work merely represents resource material, it does not
transmit the traditions of the Muso Shinden Ryu.
In addition, as described above, Muso Shinden Ryu has a companion sys-
tem, the Muso Jikiden Eishin Ryu. The forms of this system arc also divided into a
three-tiered structure, and often have the same names. They are quite distinct,
however, and the reader should be well aware that this is often a source of confu-
sion. Thus, this work also docs not document the traditions of the Jikiden Ryu, its
techniques, or the differences between it and the Muso Shinden Ryu.
CONVENTIONS
In describing sword drawing forms in print, which is a difficult task at best, cer-
tain conventions will be used. First, the form will be generally described. This
description will contain the rationale for the actions of the form and describe the
position and movements of the imaginary cnemy(ies). Next, a commentary will
discuss the salient features of the form. Then the actual movements of the form
will be described in sequence; simultaneous movements will be indicated by the
use of “bullets” (•). Comments concerning important aspects of the movements
will follow.
Certain terms will also be used to describe the sword. The blade, unless oth-
erwise noted, will refer to the edge. The normal sheathed position is blade-verti-
cal, edge-upward. After being drawn, when held in both hands, the blade is
vertical, edge downward. When the sword is held horizontally, the edge will usu-
ally face away from the body.
The forms are demonstrated so that the main action directly faces the
viewer. This means that if the form contains a pivot before the main action, the
practitioner must take his seat so that the pivot will place him facing rhe viewer.
In the descriptions of the forms, the viewer's direction is denoted as the
"front." The practitioner will be directed where to sit in relation to the “front."
At the first use of any significant sword drawing term or phrase, the
Romanization of the Japanese will be given, using the Hepburn system, followed
by rhe translation in parentheses. After this, the English translation will normally
be used; only proper names wi|] continue to be given in Romanized Japanese.
The reader should be aware that written Japanese is often different than the
spoken language, wherein many written syllables are unvoiced. Where the pronun-
ciation of terms differs in this fashion, a guide will be given in quotation marks.
2. Basic Techniques
laido forms begin from either a standing or sitting position, of which there are two
sitting positions. The first, seize (straight sitting), is described in the preliminary
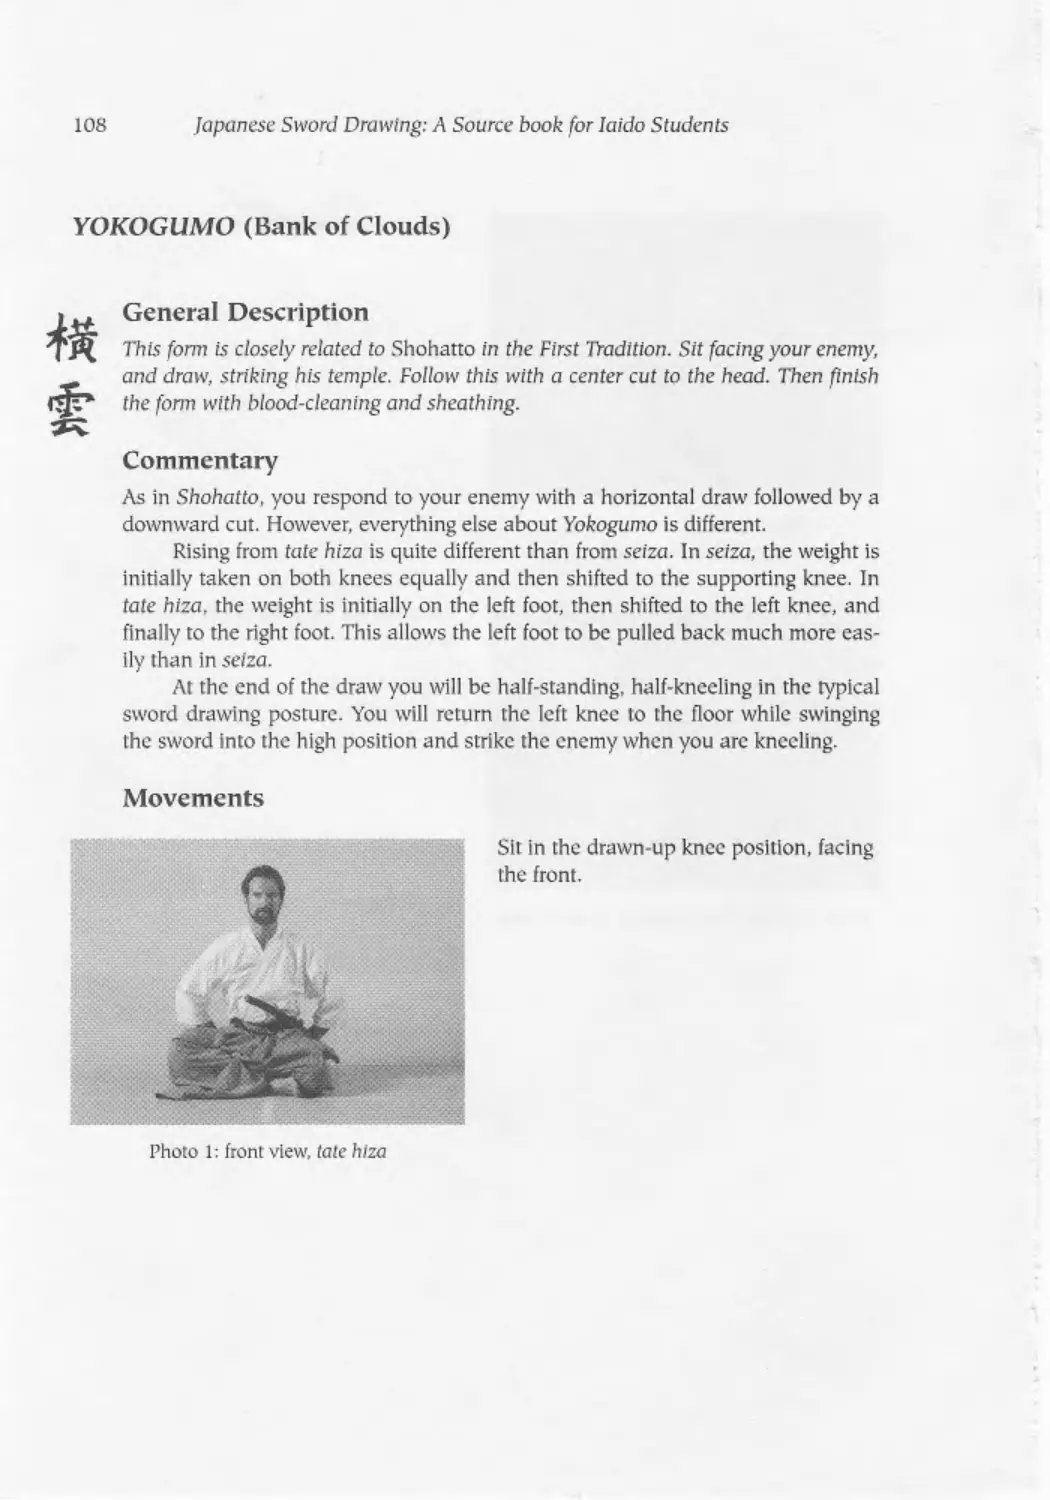
section of Chapter 3. The second, tale hlza (drawn-up knee sitting). will be dis-
cussed in the preliminary section of Chapter 4. Seize is considered the more for-
mal of the two seated positions, and is still used In dally lapanese life.
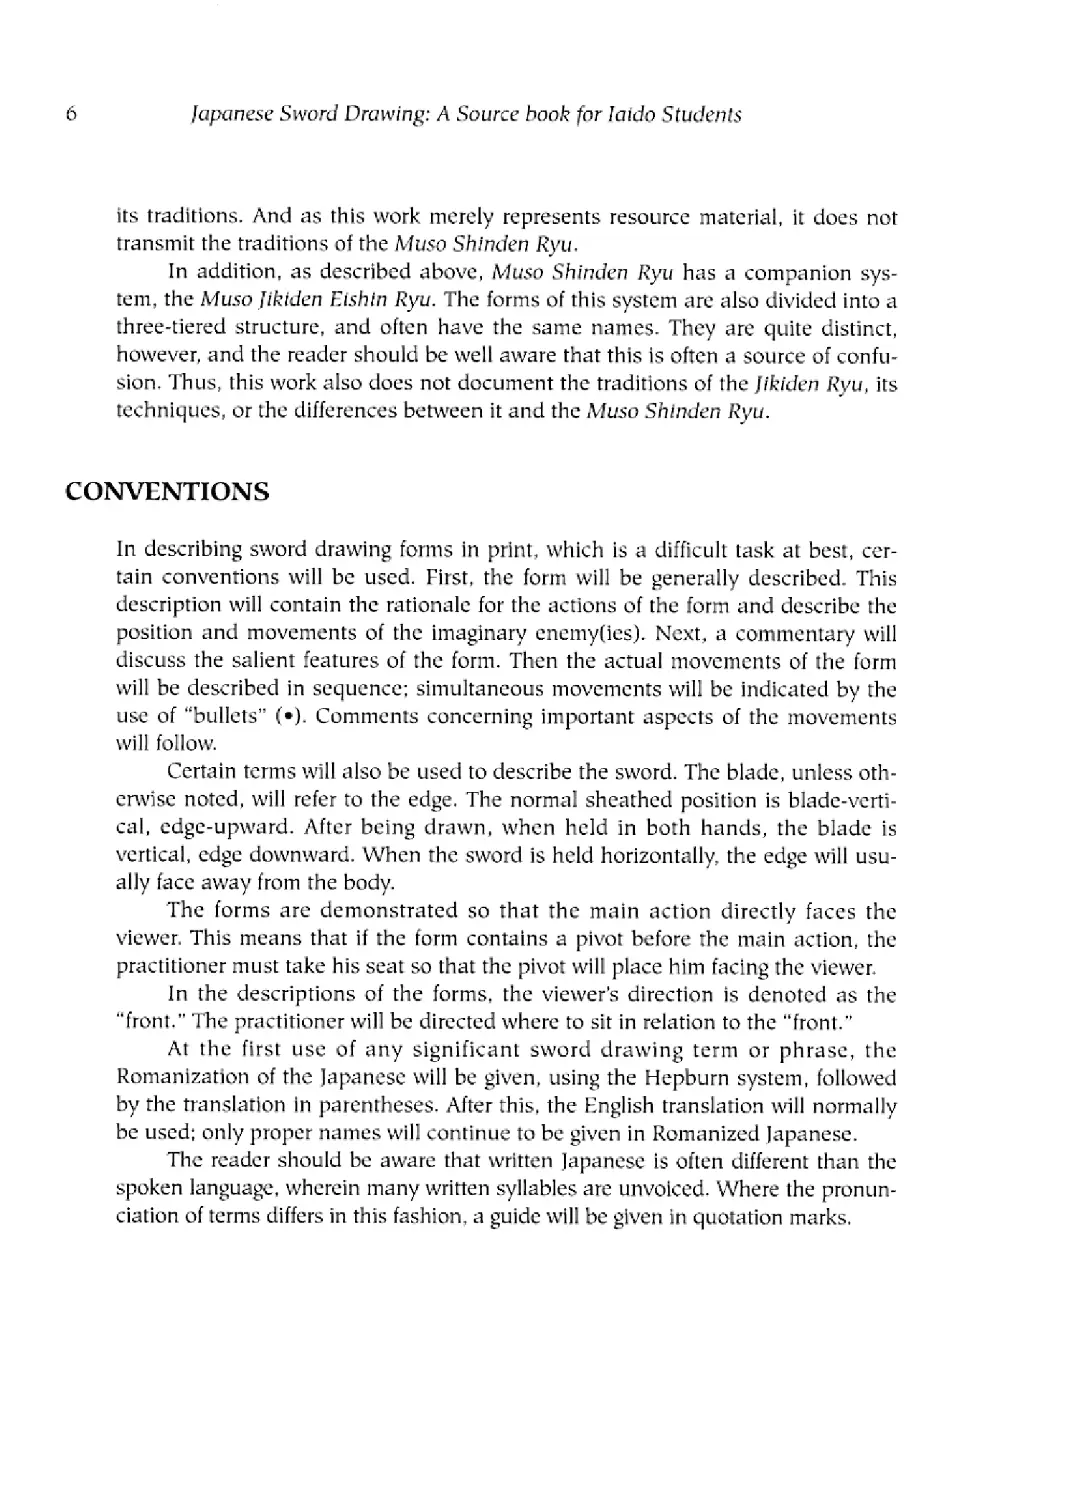
When standing, the sword is usually held with both hands. There arc five
classical postures for doing this. In the basic position, chudan (the middle posi-
tion). the sword is extended to the center front, pointing at the eyes of the imagi-
nary opponent.
Photo I: front view standing, chudan
The sword point is dropped, to point toward the opponent’s knees, in a
more passive position calledgettan (the low position).
Photo Л: front view, shtnding.gcda/t
7
H
lapancse Sword Drawing: A Source book (or lobio Students
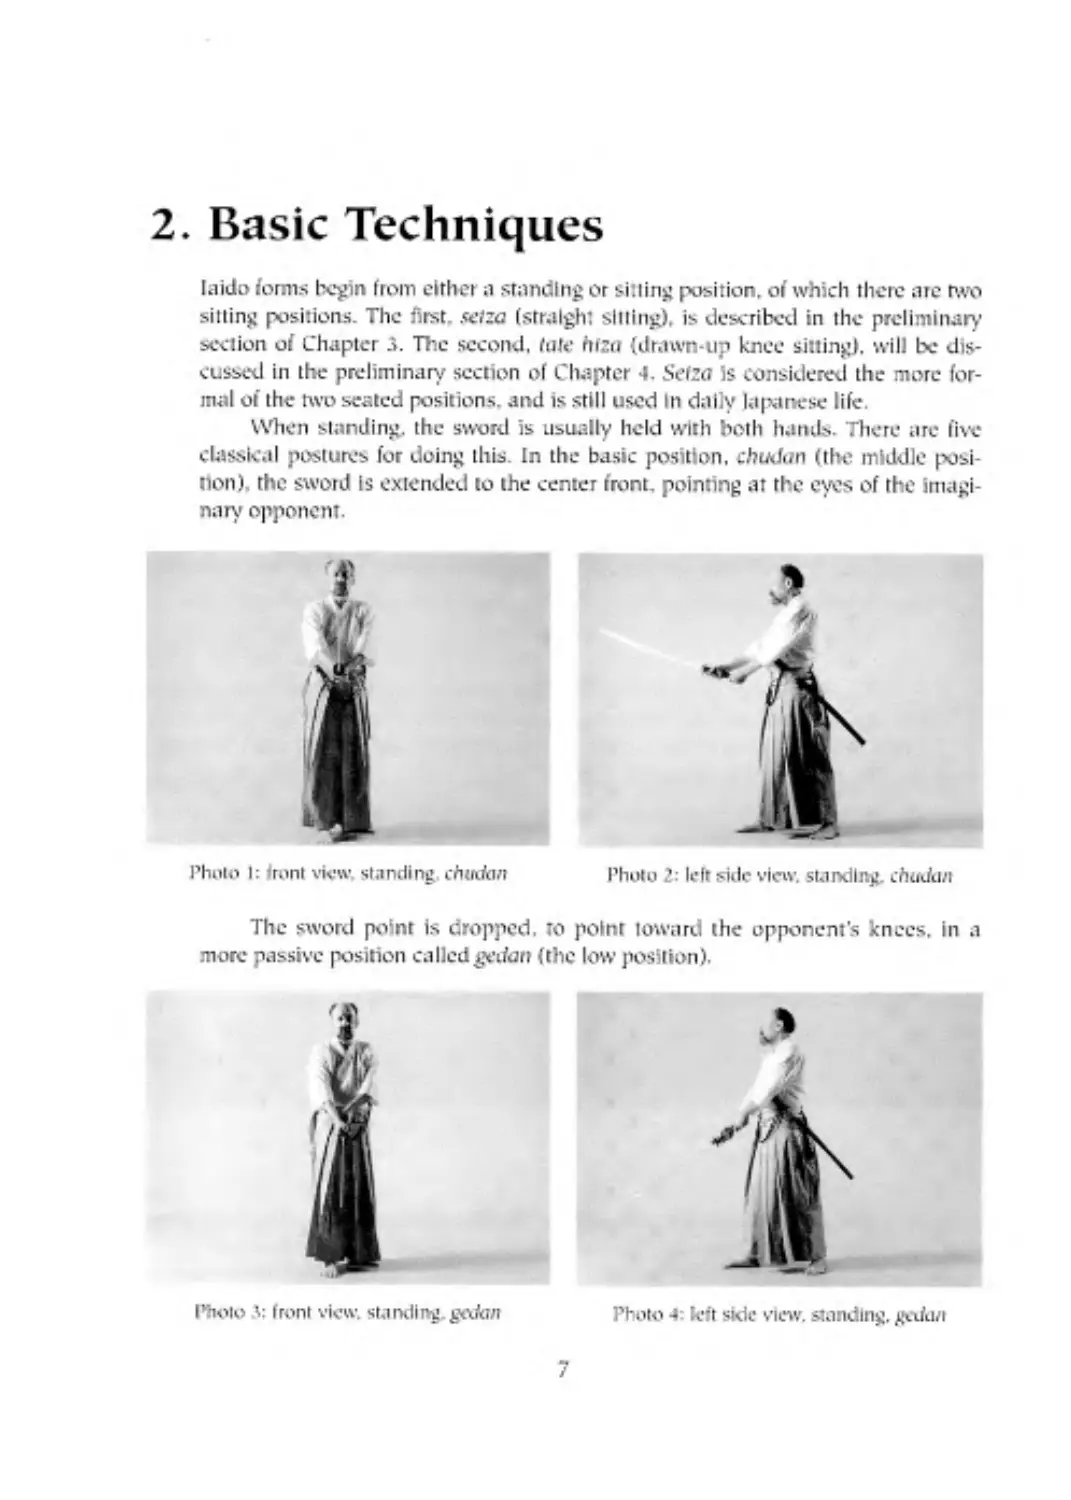
The sword is held overhead in an aggressive position called )odan (the high
position). This posture can be taken with either the left or right foot forward.
Photo 5: front View, standing, Adon
Photo 6: left side view, standing tidt-'n
The aggression displayed in the high position can be softened to an alert
watchfulness displayed in basso nogomae (the eight-phased position). Here the
sword is held in front of the right shoulder, with the blade vertical and the sword-
guard in line with the mouth.
Photo 7 front view. standing,
httsso tie gonMi-
Photo 8: right side view, standing,
basso no gamue
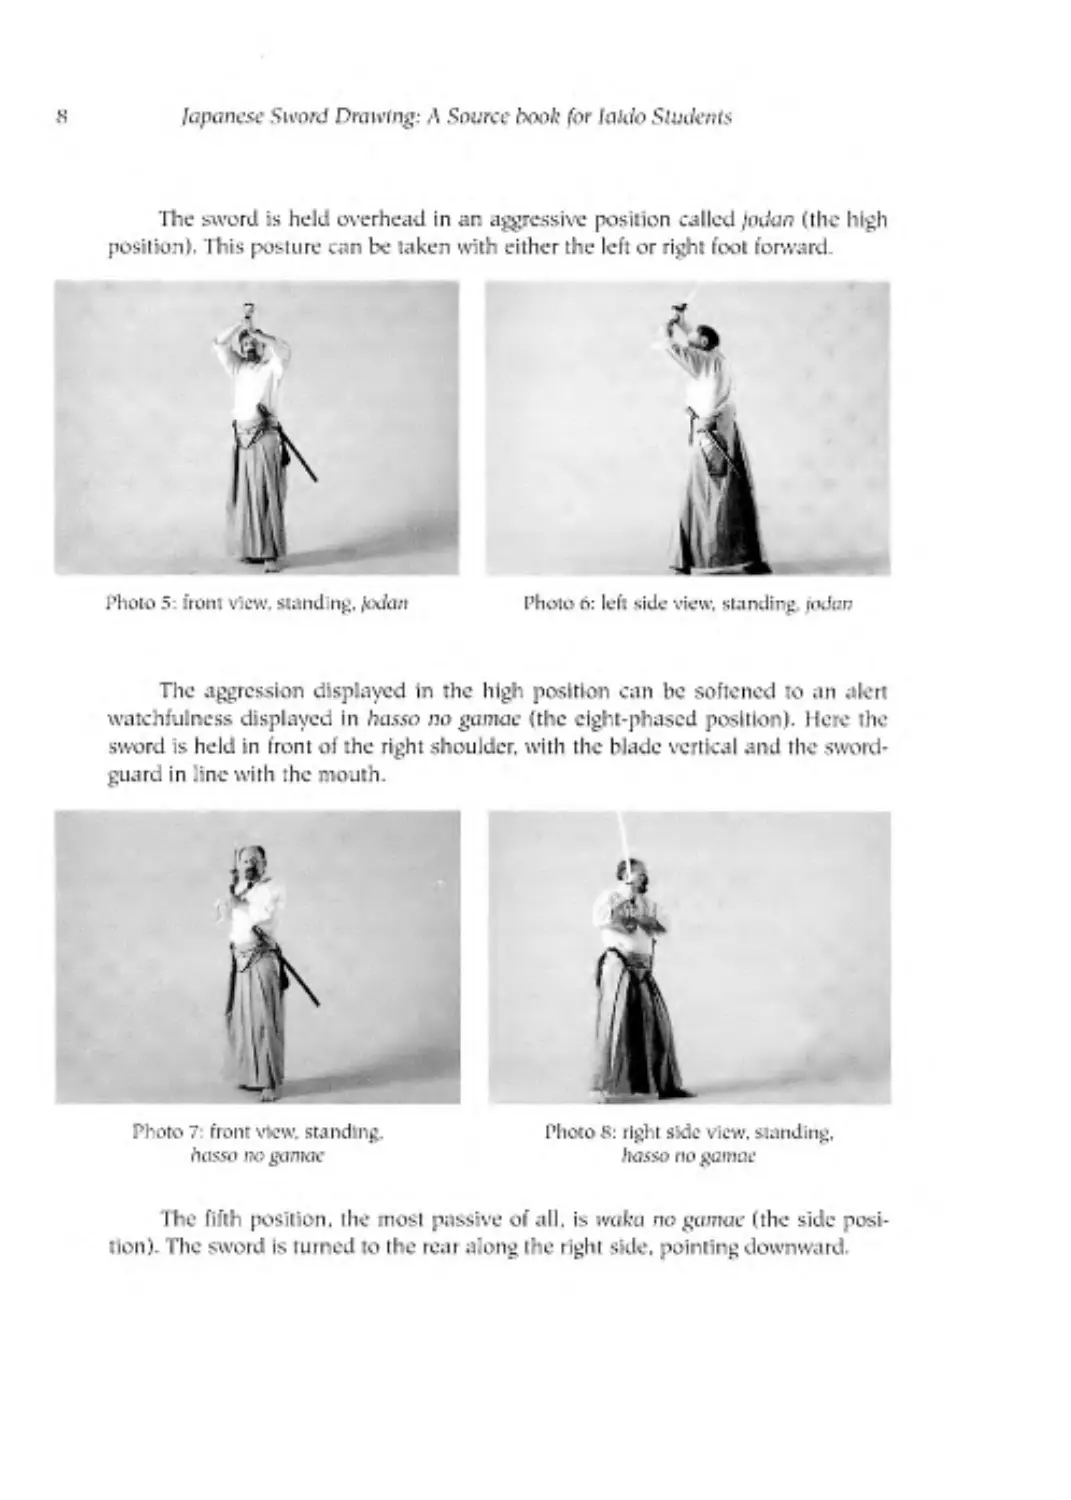
The fifth position. the most passive of all. is rvuku nogtrmtte (the side posi-
tion). The swotd Is turned to the tear along the right side, pointing downward.
Preliminaries
ч
Photo Ч: front view, standing.
Ull&U ПО gOUIUC
Photo 1ft right side view, standing,
usrlro no gainm:
The basic actions of any sword drawing form can be classified into one of
four categories: nuki (suite (drawing): kirttsufcc (cutting ): chlburl I blood cleaning):
and noto (sheathing). As a preliminary. we will examine each of these categories
separately Each of the following sections discusses a standing technique. The
reader should be aware that any of these may also be executed from either of the
sitting positions.
DRAWING
The draw is intended not only to bring the sword quickly into play, but also to
inflict injury on the enemy, lapanese sword drawing is not the same as fencing,
with its tacit give-and-take between opponents. The techniques preserved in the
sword drawing forms are the immediate and aggressive fighting actions of a deter
mined warrior The practitioner must realize this by manifesting seme (attacking)
when demonstrating the forms.
Three draws arc common: a vertical draw (in which the sword is drawn as it
is. with the edge upward); a horizontal draw (in which the sword is given a quar-
ter turn to the left and drawn with rhe edge facing horizontally to the left): and an
underhand draw (in which the sword Is hilly turned over and drawn with the
edge downward. Only the first two draws appear in the various forms comprising
the Muso .Shinden Ryu. An example of the underhand draw can be found in the
third form described in Chapter «.
Whether sitting or standing, the draw is accompanied by foot movement. In
general, the draw is started when the left foot is forward of. or ai least even with,
the right foot: the draw is completed, and the attack made on the enemy, when
10
lapanese Sword Drawing: A Source book for laido Students
the right foot is in front. This usually involves a forward right step, but occasion-
ally the left foot pulls backwards. There are. however, exceptions to this rule. The
descriptions of the forms will note these.
The sword is not pulled from the scabbard, but pushed That is. the right
hand docs not pass around the stomach, approaching the grip from the hilt and
then drawing by retracing this path. The right hand slides directly across the
stomach, taking the grip just behind the sword guard and then pushing the hilt
(butt-first) outward. The elbow stays behind the hand, which not only protects it
from an enemy's strike, but allows maximum force in the draw-and-strike which
follows.
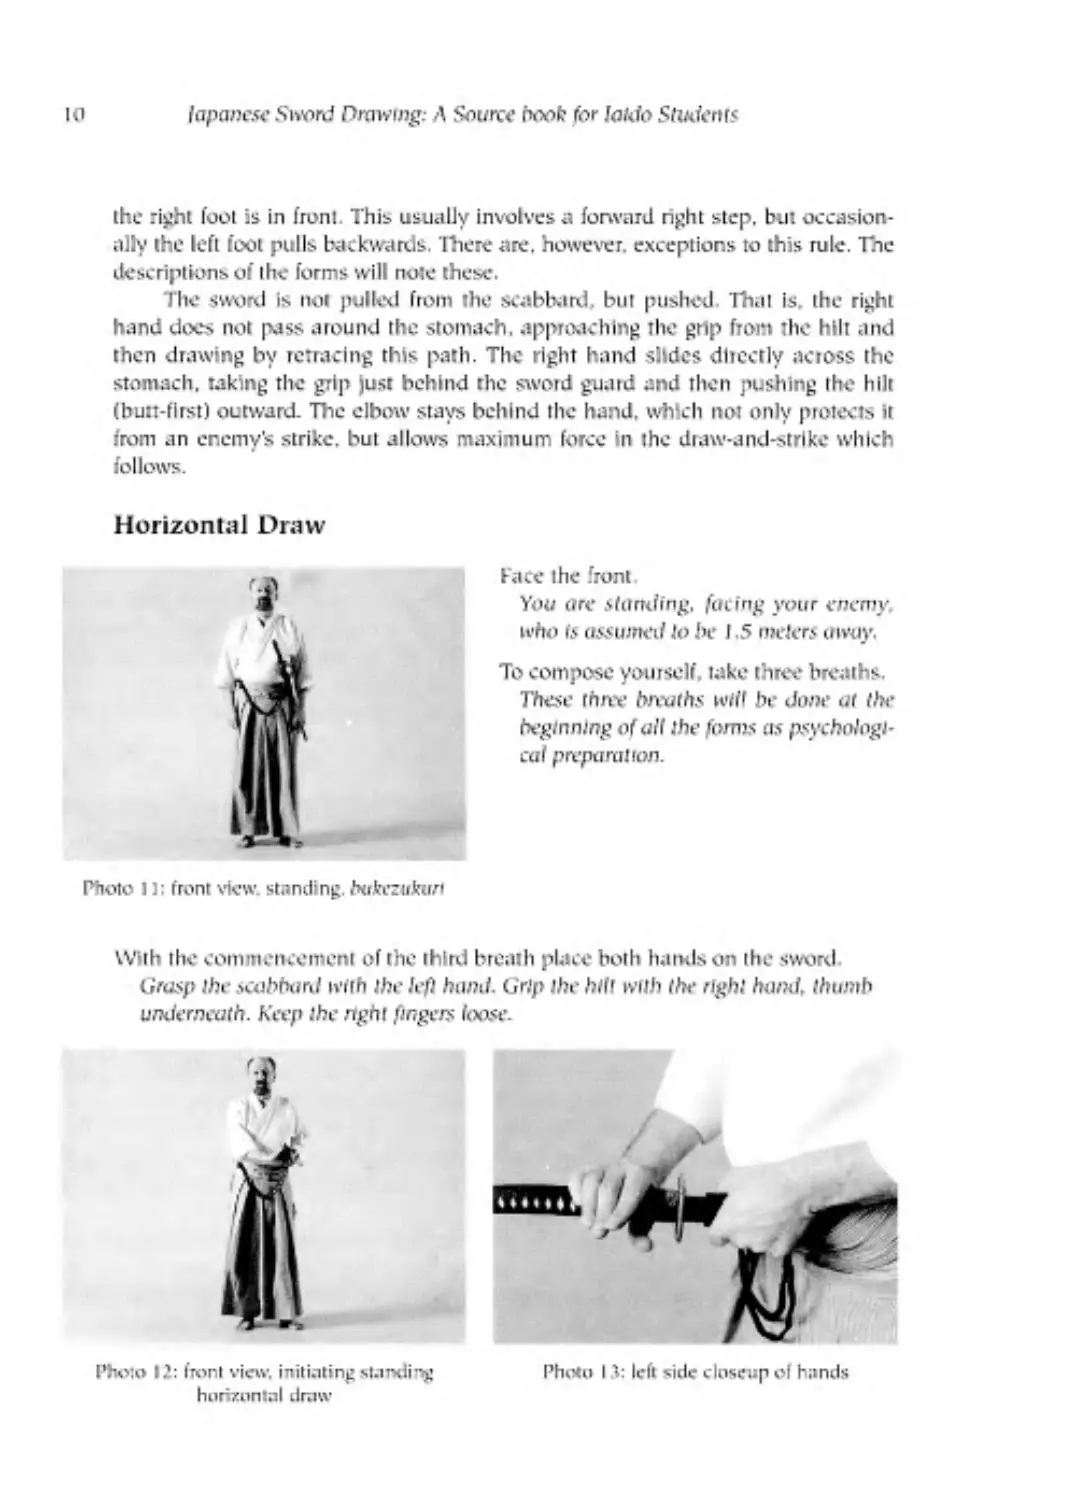
Horizontal Draw
face the front.
You are standing. fating your enemy.
who is assumed to be 1.5 meters owuy.
To compose yourself, take three breaths.
These three breaths will be done at the
beginning of alt the forms as psychologi-
cal preparation.
Photo 11: front view standing. bultezukun
With the commencement of the third breath place both hands on the sword
Grasp the scabbard with the left hand. Grip the hill with the right hand, thumb
underneath. Keep the right fingers loose.
Photo I Л: left side closeup of hands
Photo 12: front view, initiating standing
horizontal draw
Preliminaries
II
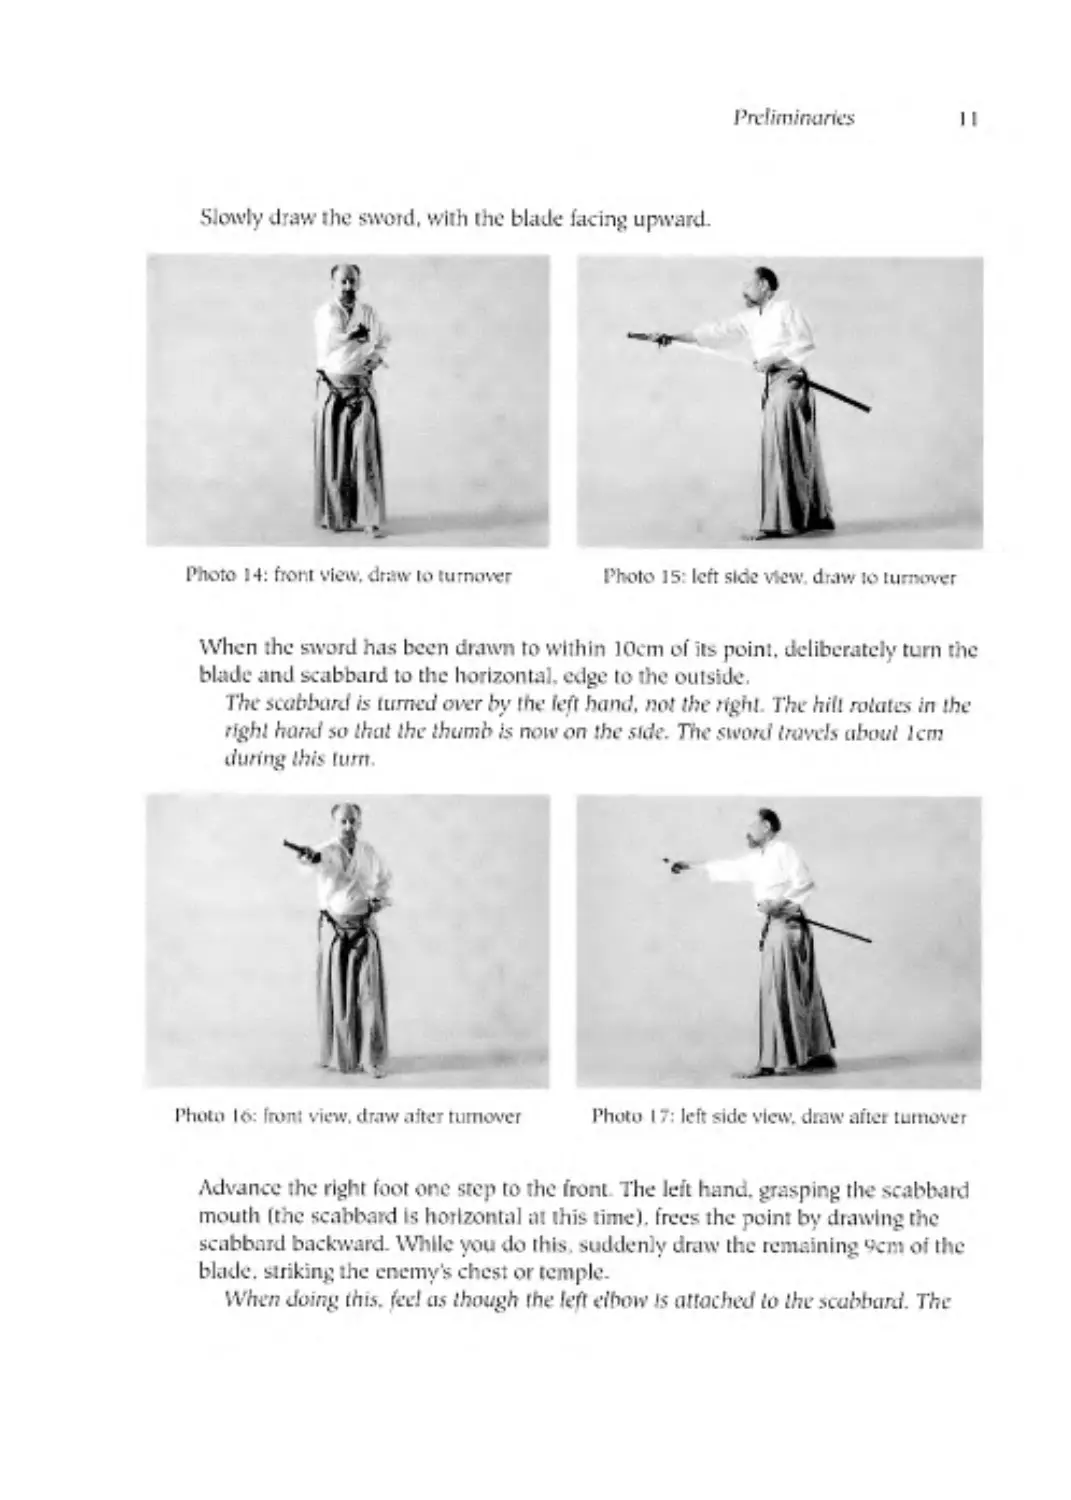
Slowly draw the sword, with the blade facing upward.
Photo 14: front view, draw to turnover
Photo 15: left side view, draw to turnover
When the sword has been drawn Io within 10cm of its point, deliberately turn the
blade and scabbard to the horizontal. edge to the outside.
The scabbard is turned over by the left hand, not the right The hill rotates in the
right hand so that the thumb is now on the side. The steord truvds about 1cm
during this turn.
Advance the right foot one step to the front The left hand, grasping the scabbard
mouth (the scabbard is horizontal at this time), frees the point by drawing the
scabbard backward. While you do this suddenly draw the remaining 9cm of the
blade, striking the enemy’s chest or temple.
When doing this, feel as though the left elbow is attached to the scabbard. The
12
Japanese Sword Drawing: A Source book for laido Students
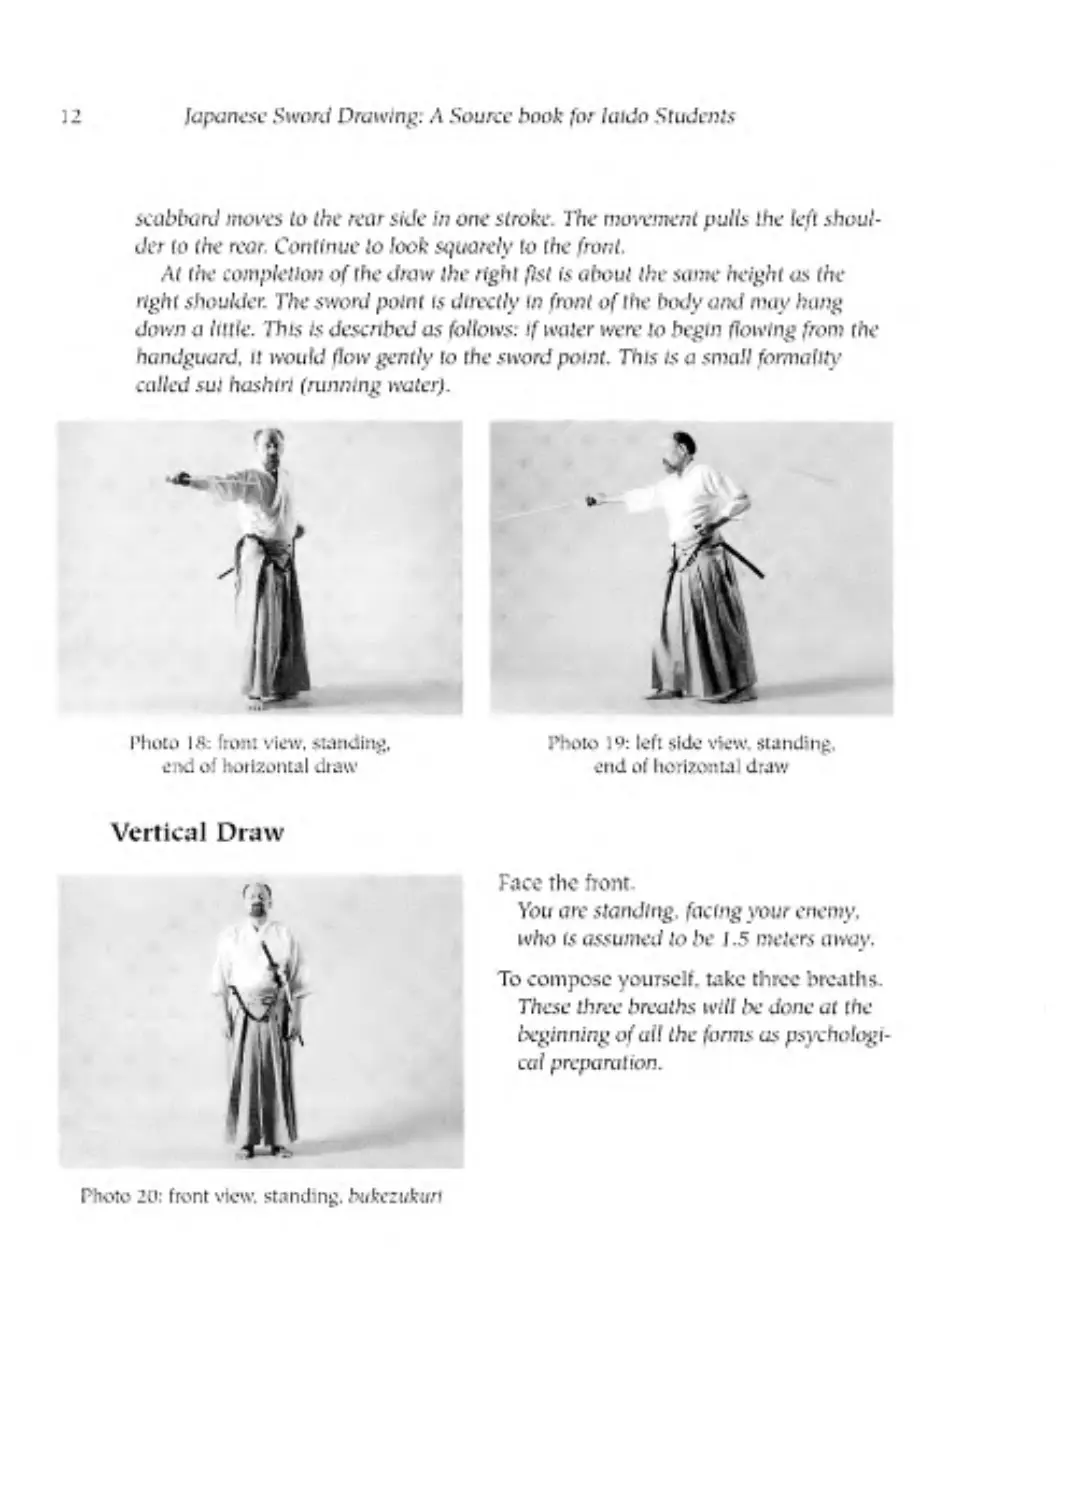
scabbard moves to the rear side in one stroke. The movement putts the left shoul-
der to the rear. Continue Io look squarely to the front.
At the completion of the draw the right fist is about the same height us the
right shoulder. The sword point is directly tn front of the body and may hung
down a little. This Is desenbed as follows, if waler weir to begin flowing from rhe
handguard, it would flow gently to the sword point. This is a small formality
called sul hashtri (running water).
Photo IS; front view. standing,
end of horizontal draw
Photo 19: left side view, standing,
end of horizontal draw
Vertical Draw
Face the front
You are standing, facing your enemy,
who is assumed to be 1.5 meters away.
To compose yourself, take three breaths.
These three breaths will be done at the
beginning of ail the forms as psychologi-
cal preparation.
Photo 20: front view, standing, bukczvktrri
Preliminaries
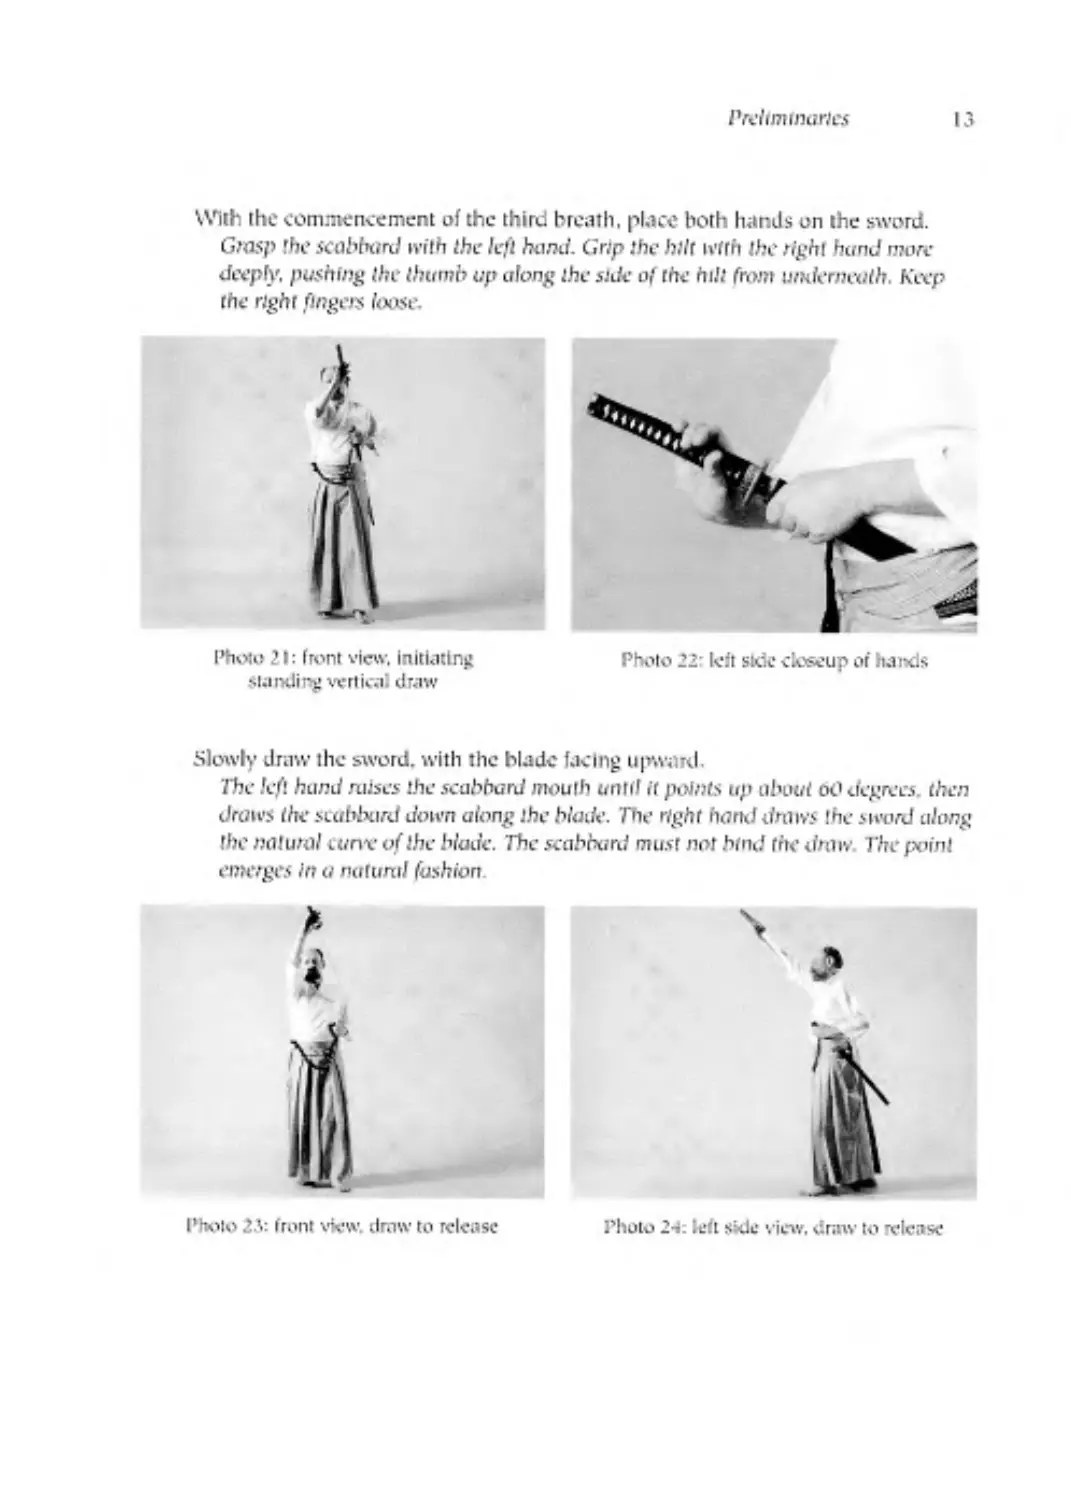
Wth the commencement of the third breath, place both hands on the sword.
Grasp the scabbard with the left hand. Grip rhe hilt ivtth the right hand ток
deeply. pushing the thumb up along the side of the hill from underneath. Keep
the right fingers loose.
Photo 2’: left side closeup or hands
Slowly draw the sword, with the blade facing upward.
The Jell hand raises the scabbard mouth unit! it points up about od degrees. then
draws the scabbard down along rhe blade. The right hand draws the sword along
the natural curve of the blade. The scabbard must nor hind the draw. The point
emerges In a natural fashion
Photo 24: left side view, draw to release
Photo 25: front view. draw to release
14
fapuncsc Sword Darning: A Source book tor laido Students
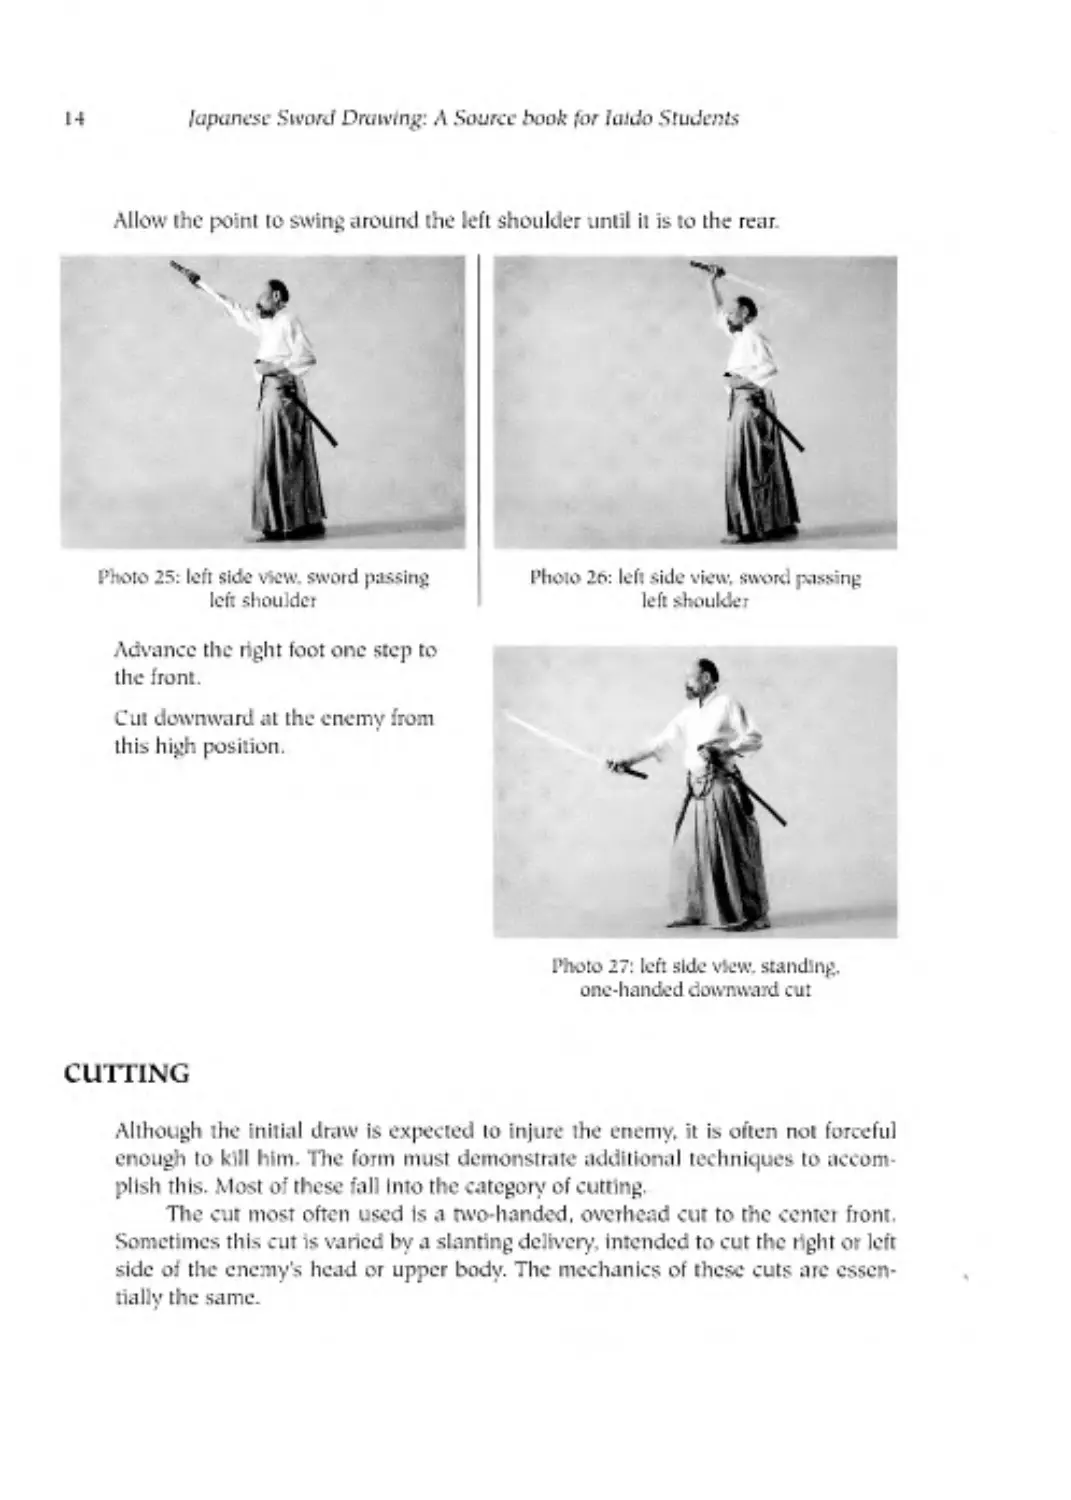
Allow the point to swing around the left shoulder until it is to the rear
Photo 25: left side view. sword passing
left shoulder
Photo 26: left side view, sword passing
left shoulder
Advance the right foot one step to
the front.
Cut downward al the enemy from
this high position.
Photo 27: left side view, standing,
one-handed downward cut
cu n ING
Although lhe Initial draw is expected to injure the enemy, it is often not forceful
enough Io kill him. lhe form must demonstrate additional techniques to accom-
plish this. Most of these fall Imo the category of cutting.
The cut most often used Is a two-handed, overhead cut to the center front.
Sometimes tills cut is varied by a slanting delivery. intended to cut the right or left
side of the enemy's head or upper body. The mechanics of these cuts ate essen-
tially the same.
Preliminaries
15
Although the cut may appear to be the same movement as lhe cut used in
lapanese fencing, it is not The fencing cut is more of a “rap." designed to allow
the fencer to rebound into follow-up techniques. The sword drawing cut is
intended to inflict as much harm on the enemy as possible, thus it must be much
more powerful.
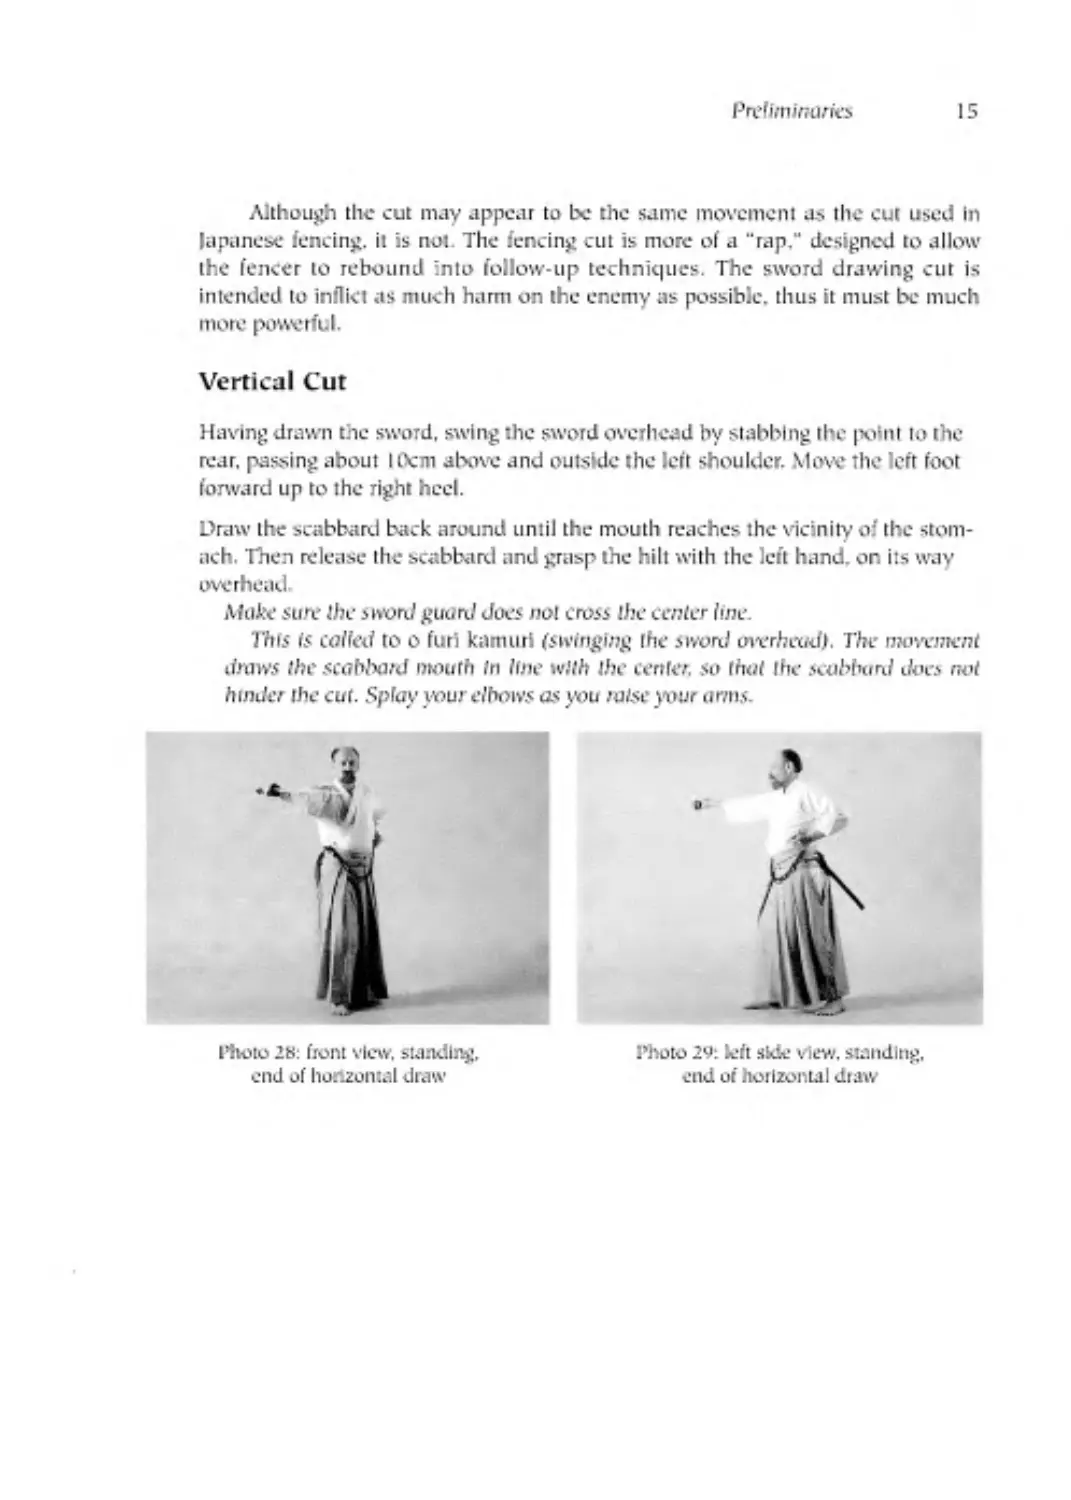
Vertical Cut
Having drawn the sword, swing the sword overhead by slabbing the point to the
rear, passing about I Ocm above and outside the left shoulder. Move the left foot
forward up to the right heel.
Draw the scabbard back around until the mouth reaches the vicinity of the stom-
ach. Then release the scabbard and grasp the hilt with the left hand, on its way
overhead.
Afufte sure the sword guard Joes not cross lhe center fine.
This Is colied to о furi kamuri (swinging the sword tnvrheud). The movement
draws the scabbard mouth In line with lhe center, so that the scabbard does riot
hinder the cut. Splay your elbows as you raise yiwr arms.
Photo 28: front view, standing,
end of horizontal draw
Photo 29: left side view, standing,
end or horizontal draw
Jo
Japanese Sword Drawing. A Source boot for kitdo Students
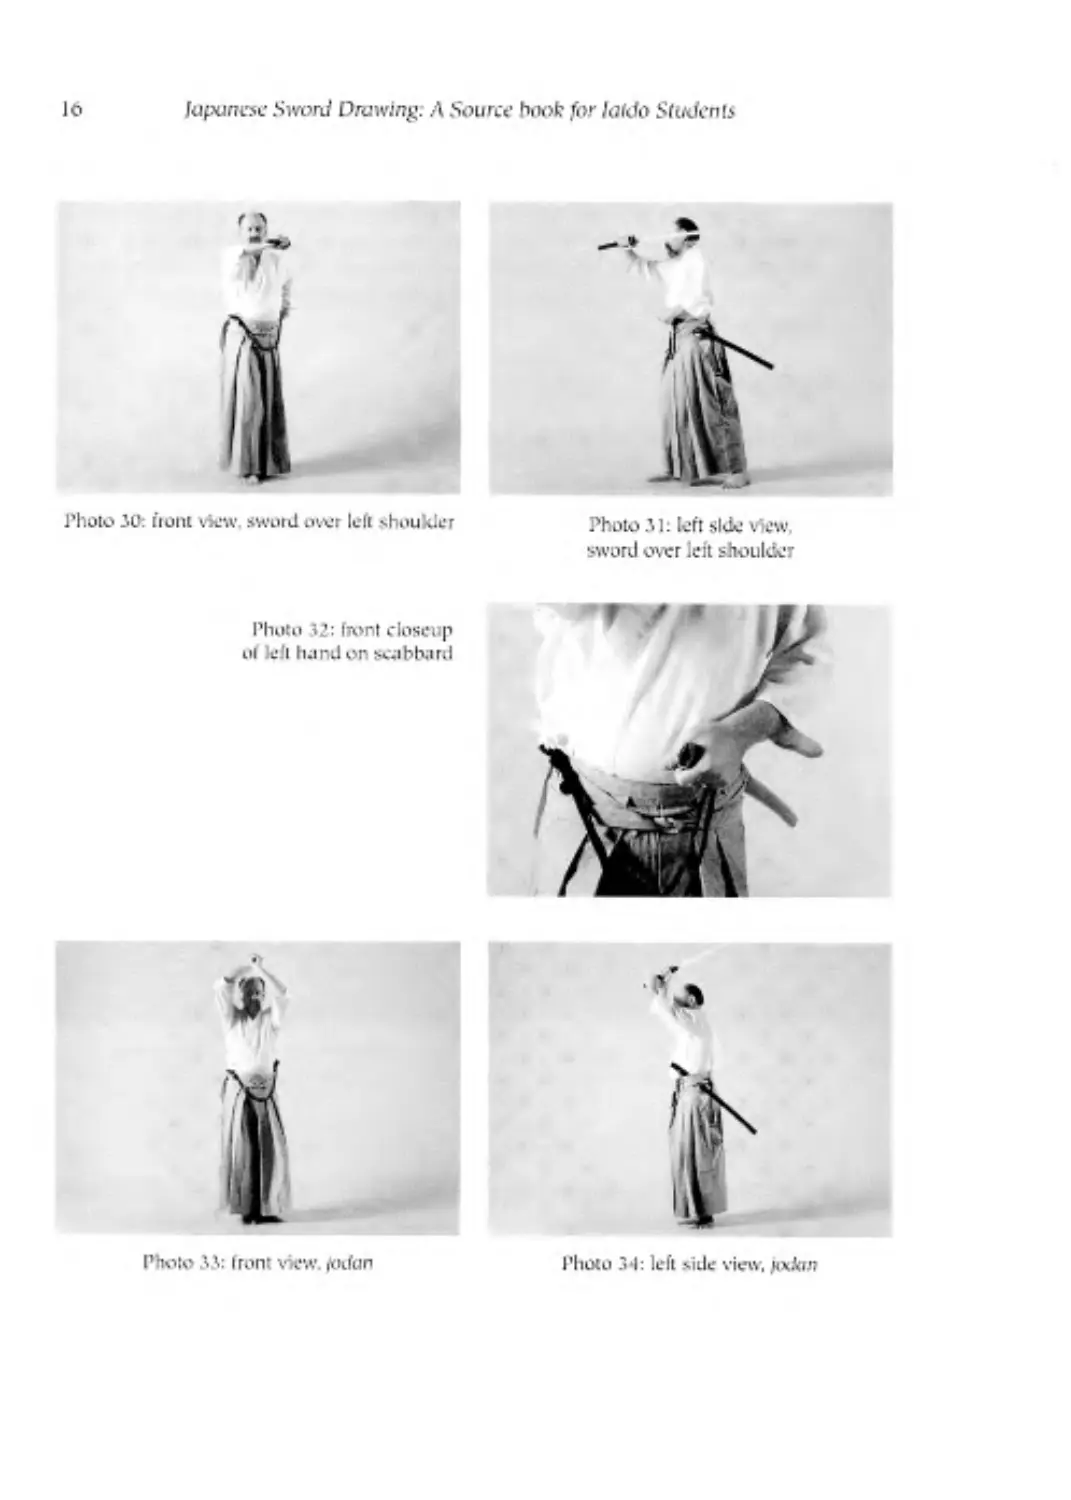
Photo 30: front view. sword снег left shoulder
Photo 31: left side View
sword over left shoulder
Photo 33: front view. todun
Photo 32: front closeup
ul left hand on scabbard
Photo 34: left side view. дхАял
Preliminaries
17
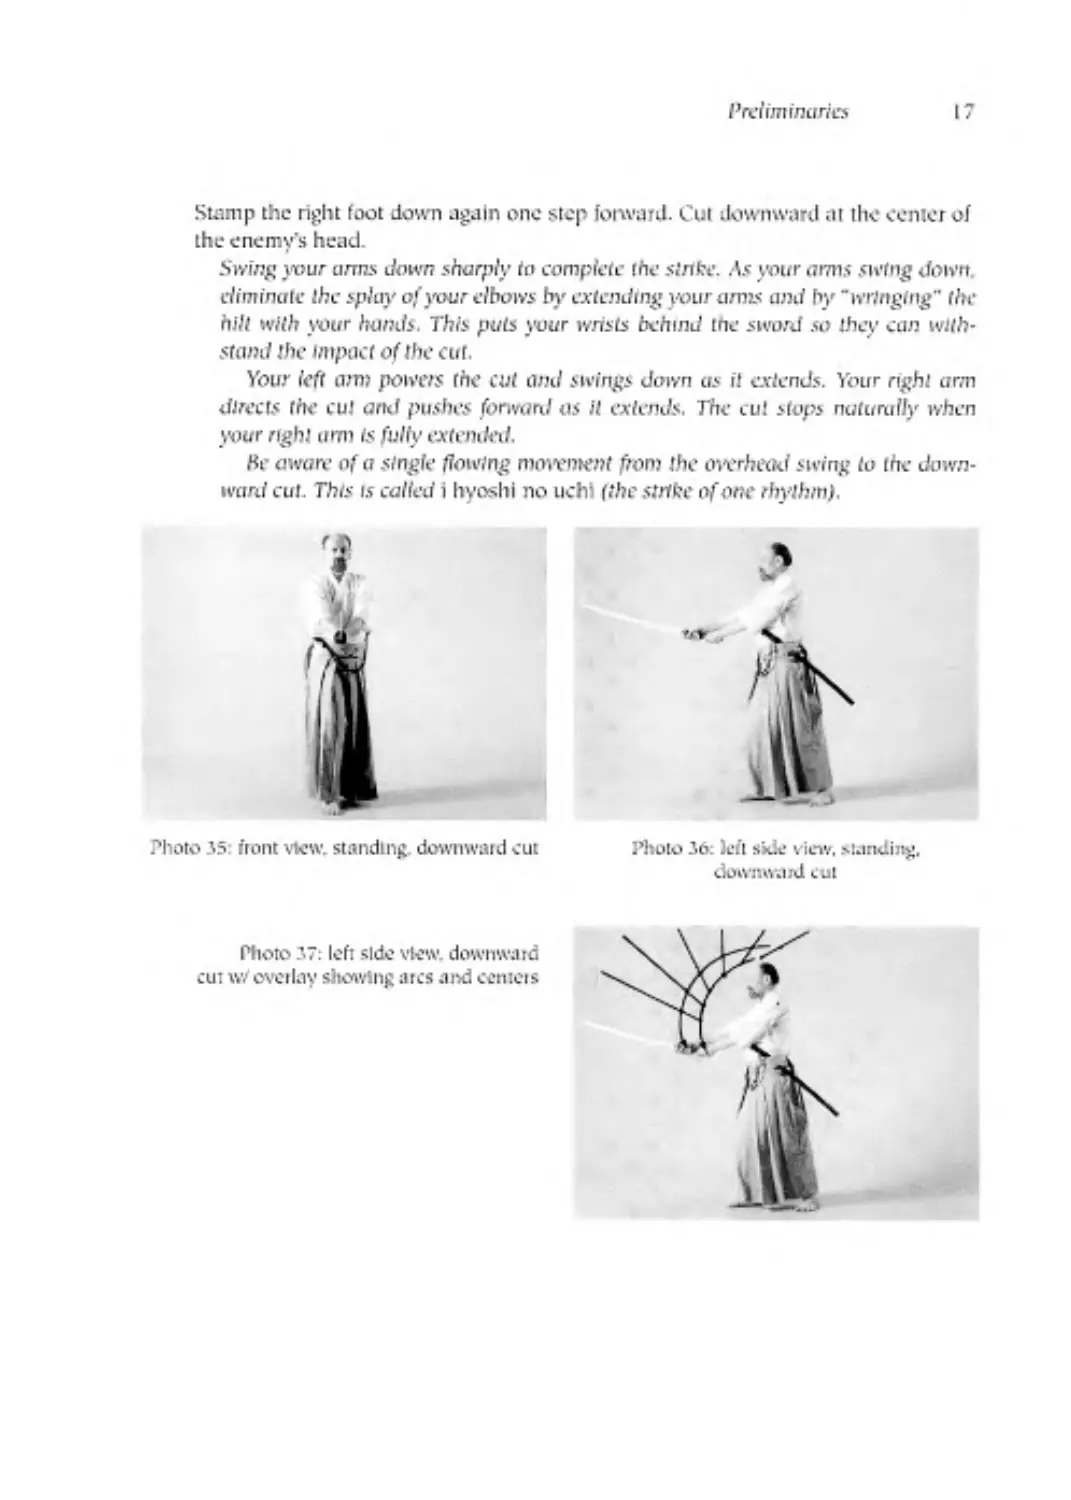
Stamp the right foot down again one step forward. Cut downward al the center of
the enemy’s head.
Swing your amts down sharply to complete the slnte. Ac your arms swing down,
drmtnale the splay of your elbows by extending your amts and by "wringing" the
hilt with your hands. This pub your wrists behind me sword so they can with-
stand the impact of the cut.
Your left arm powers the cut and swings down as it extends. Your right arm
directs the cut amt pushes forward as it extends. The cut stops nuturally when
your right arm is fully extended.
he aware of a single flowing movement from the overhead swing io the down-
ward cut. This is called i hyoshl no uchi (the strike of one rhythm).
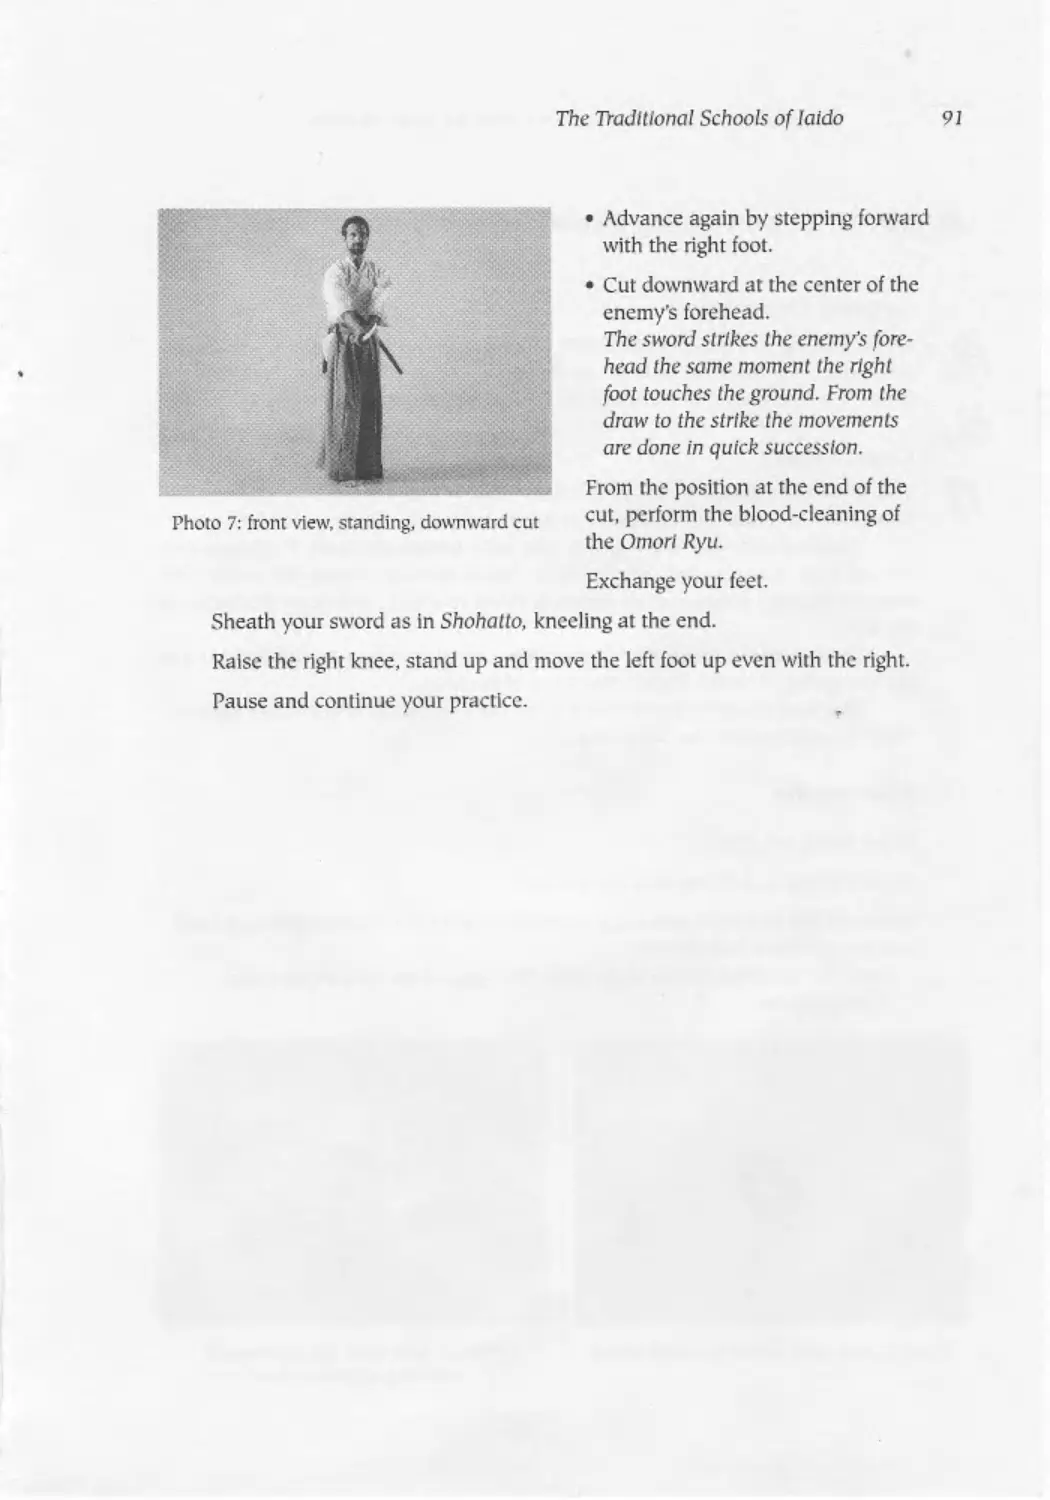
Photo 35: front view, standing, downward cut
Photo 36: left side view, standing,
downward cut
Photo 37: left side view, downward
cut w.‘ overlay showing arcs and centers
18 lapanesc Sword Drawing: A Source book (or laido Students
BLOOD CLEANING
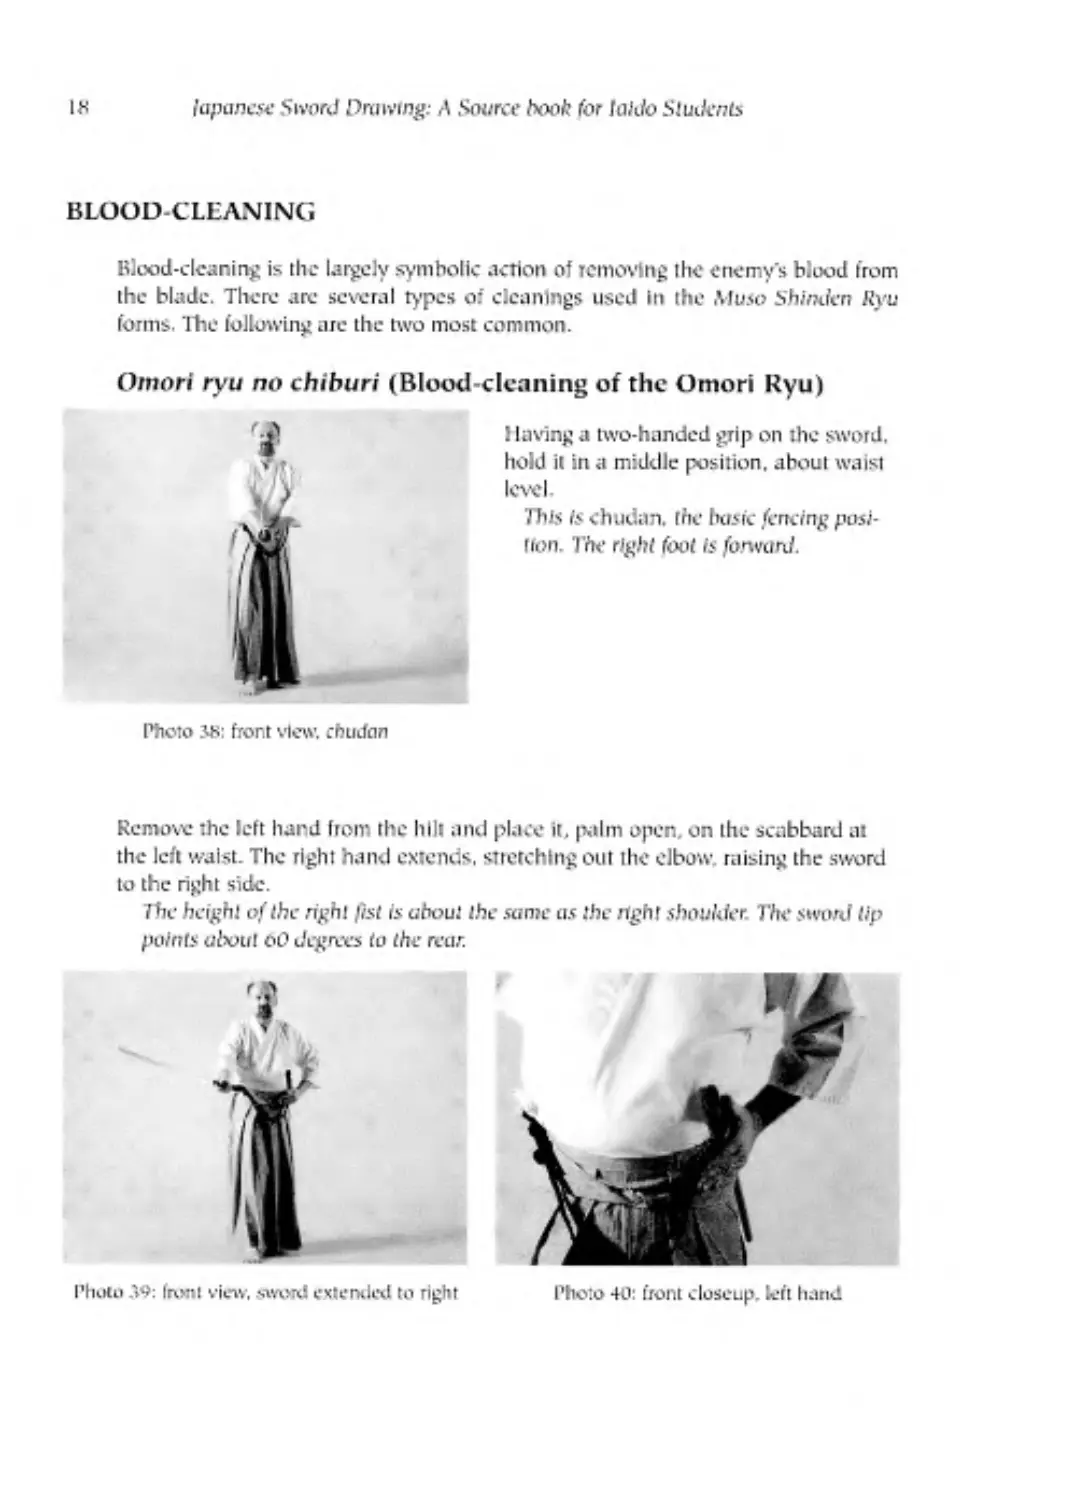
Blood-cleaning is the largely symbolic action of removing lhe enemy’s blood from
lhe blade. There are several types of cleanings used In the Muso Shlnden Ryu
forms. The following are the two most common.
Omori ryu no chiburi (Blood-cleaning of the Omori Ryu)
Photo 58: front view. rhudan
1 laving a two-handed grip on rhe sword,
hold it in a middle position, about waisl
level.
This Is chudan. the bosfc fencing posi-
tion. The right foot is forward.
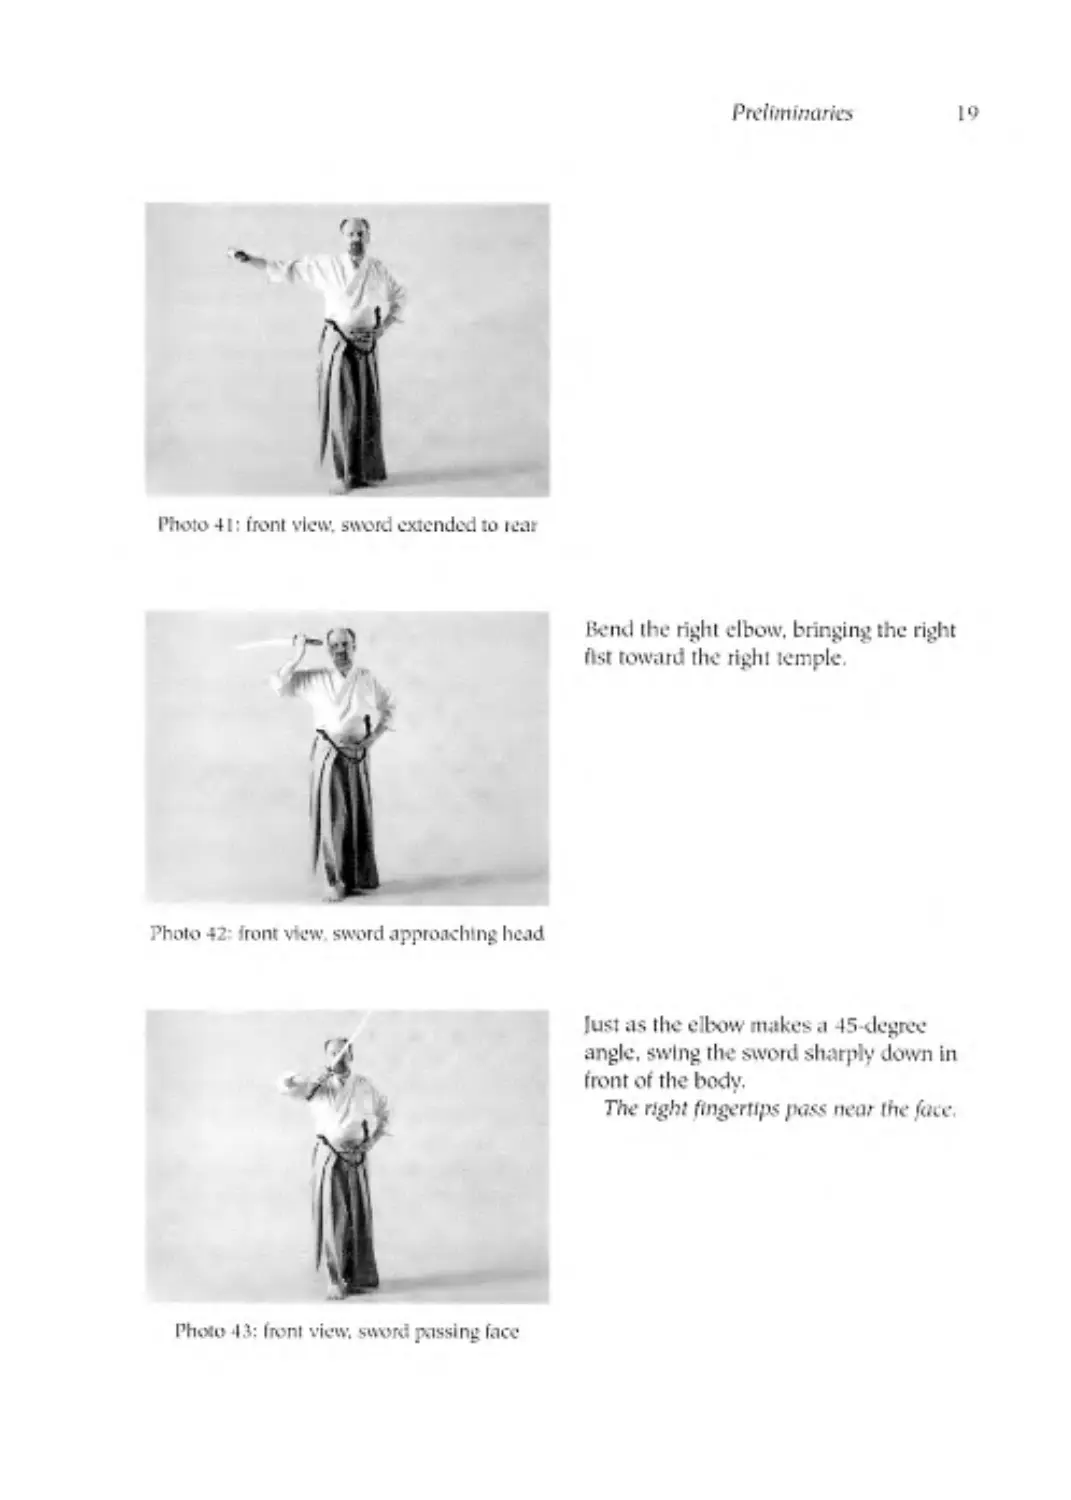
Remove the left hand from the hilt and place it, palm open, on lhe scabbard at
the left waist. The right hand extends, stretching out the elbow raising the sword
to the right side.
The heigh! of lhe right fist is about lhe same ns the right shoulder. The sword lip
points about 60 degrees to lhe rear.
Photo 40: front closeup, left hand
Photo Л9: front view. sword extended to right
Preliminaries
1«>
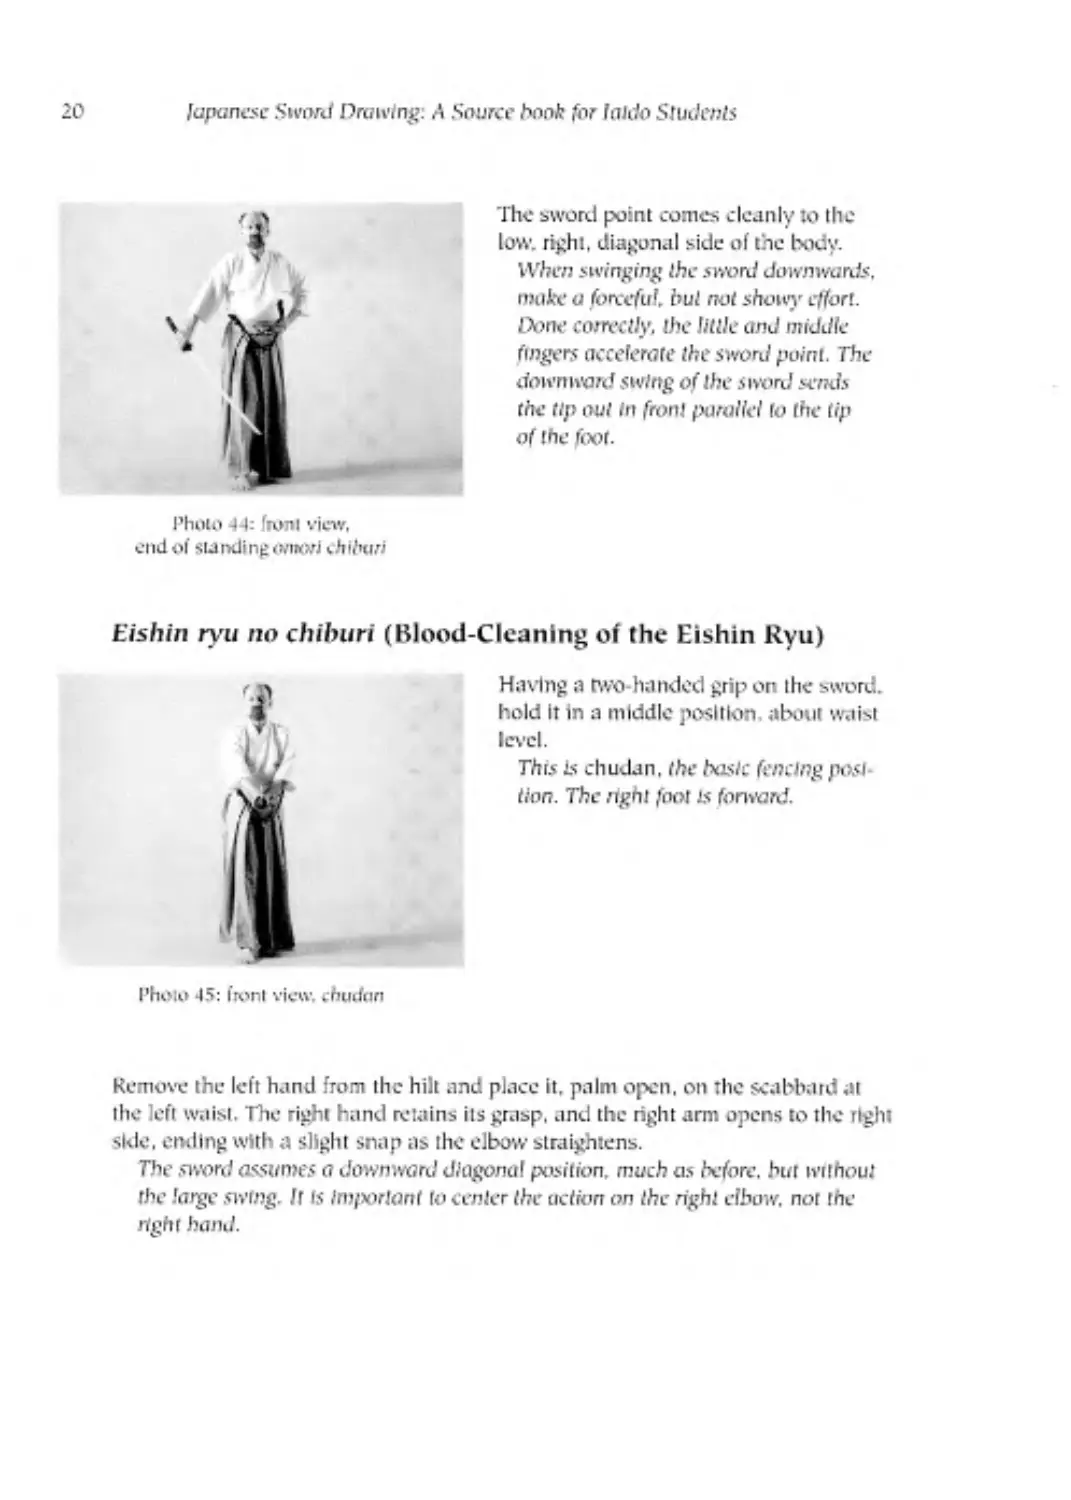
Photo 41: front view sword extended to teat
Bend the right elbow, bringing the right
fist toward the right temple.
Photo 42 front view sword approaching head
lust as the elbow makes a 45 degree
angle, swing the sword sharply down in
front of the body.
The right fingertips |xiss near the foie
Photo 4 Л: front view, sword passing face
20
lapanesc Sword Drawing: A Source book for Inldo Students
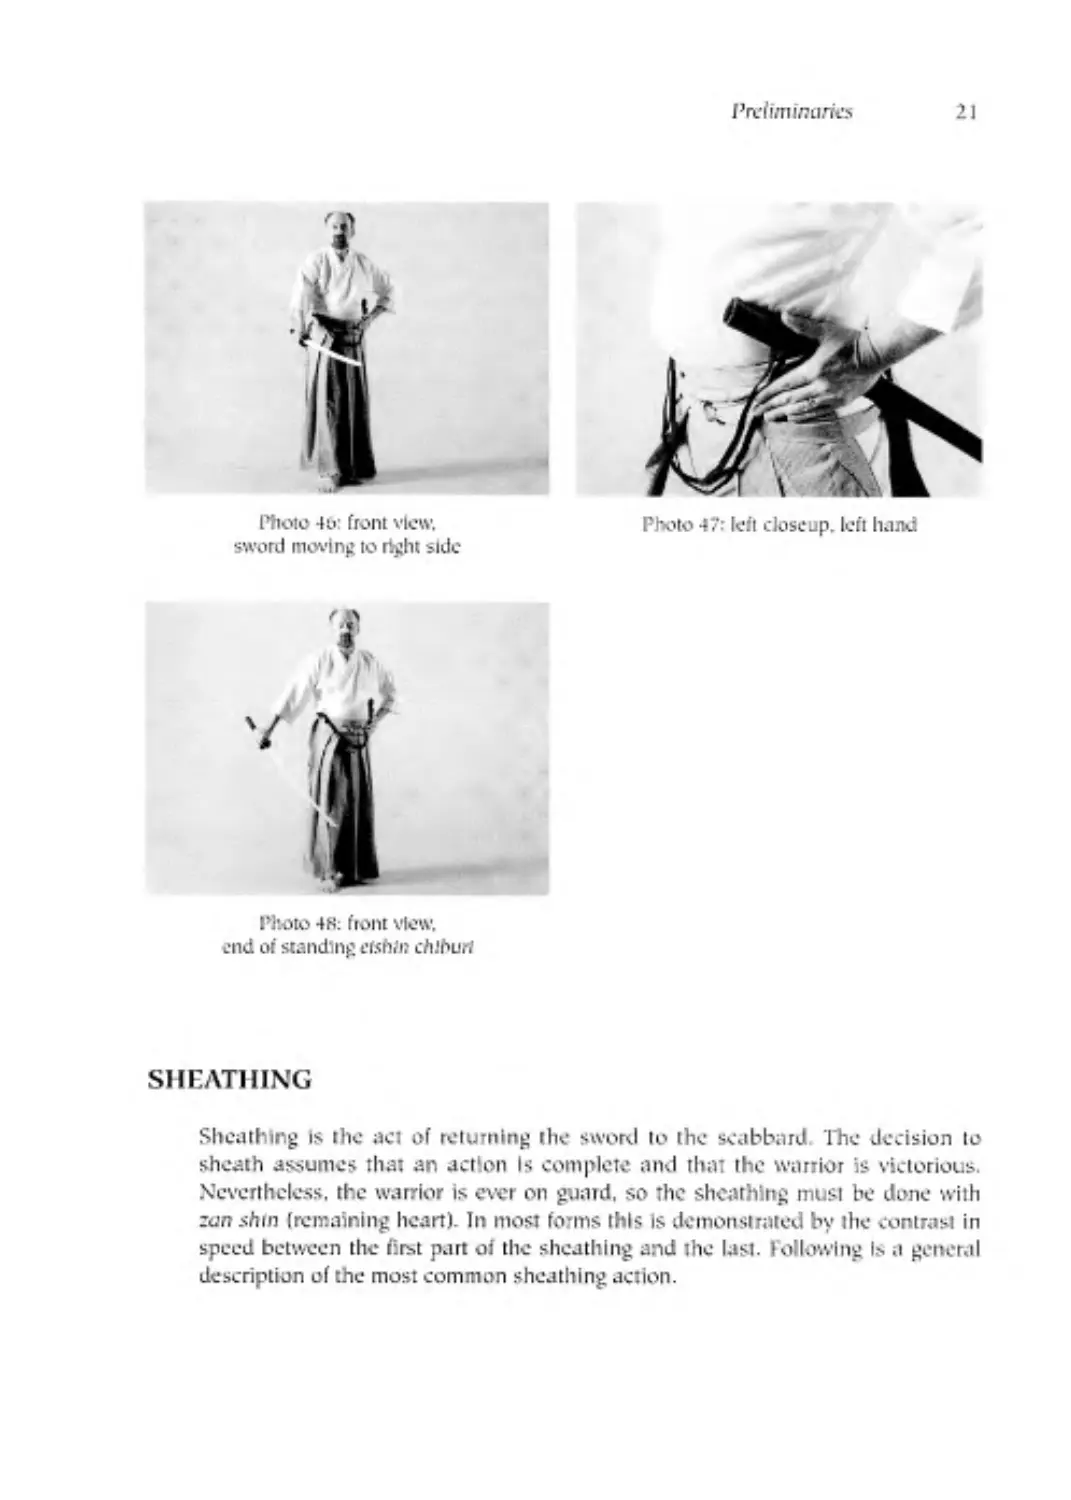
The sword point comes cleanly to the
low. right, diagonal side o( the body.
When swinging the sword downwards.
nxrfce a forceful, but not showy effort.
Done correctly, the little and middle
fingers accelerate the sword point. The
down wan! swing of the sword sends
the tip out In front pamlfef Io the tip
of the foot.
Photo 44: front view,
end of standing omori ehlburi
Eishin ryu no chiintri (Blood-Cleaning of the Eishin Ryu)
Having a two handed grip on the sword,
hold It in a middle position about waist
level.
This Is chudan, the basic fencing posi-
tion. The right fool is forward.
Photo 45: front view, chudan
Remove the left hand from the hilt and place it. palm open, on the scabbard at
the left waist. The right hand retains its grasp, and the right arm opens to the right
side. ending with a slight snap as lhe elbow straightens.
The sword assumes a downward diagonal position, much as before, but without
rhe large swing. It is Important to center the action on the right elbow, not the
right hand.
Predminanes
11
Photo 47: left closeup, left hand
Photo 46: front view,
sword moving to right side
Photo 4S: front view,
end or standing eehfir chihurt
SHEATHING
Sheathing Is the act of returning the sword lo the scabbard. The decision Io
sheath assumes that an action Is complete and that the warrior is victorious.
Nevertheless, the warrior is ever on guard, so The sheathing must be done with
renshrn (remaining heart). In most forms this is demonstrated by the contrast in
speed between the first part of the sheathing and the last, following Is a general
description of the most common sheathing action.
22
lapanese Sword Drawing: A Source book for laido Students
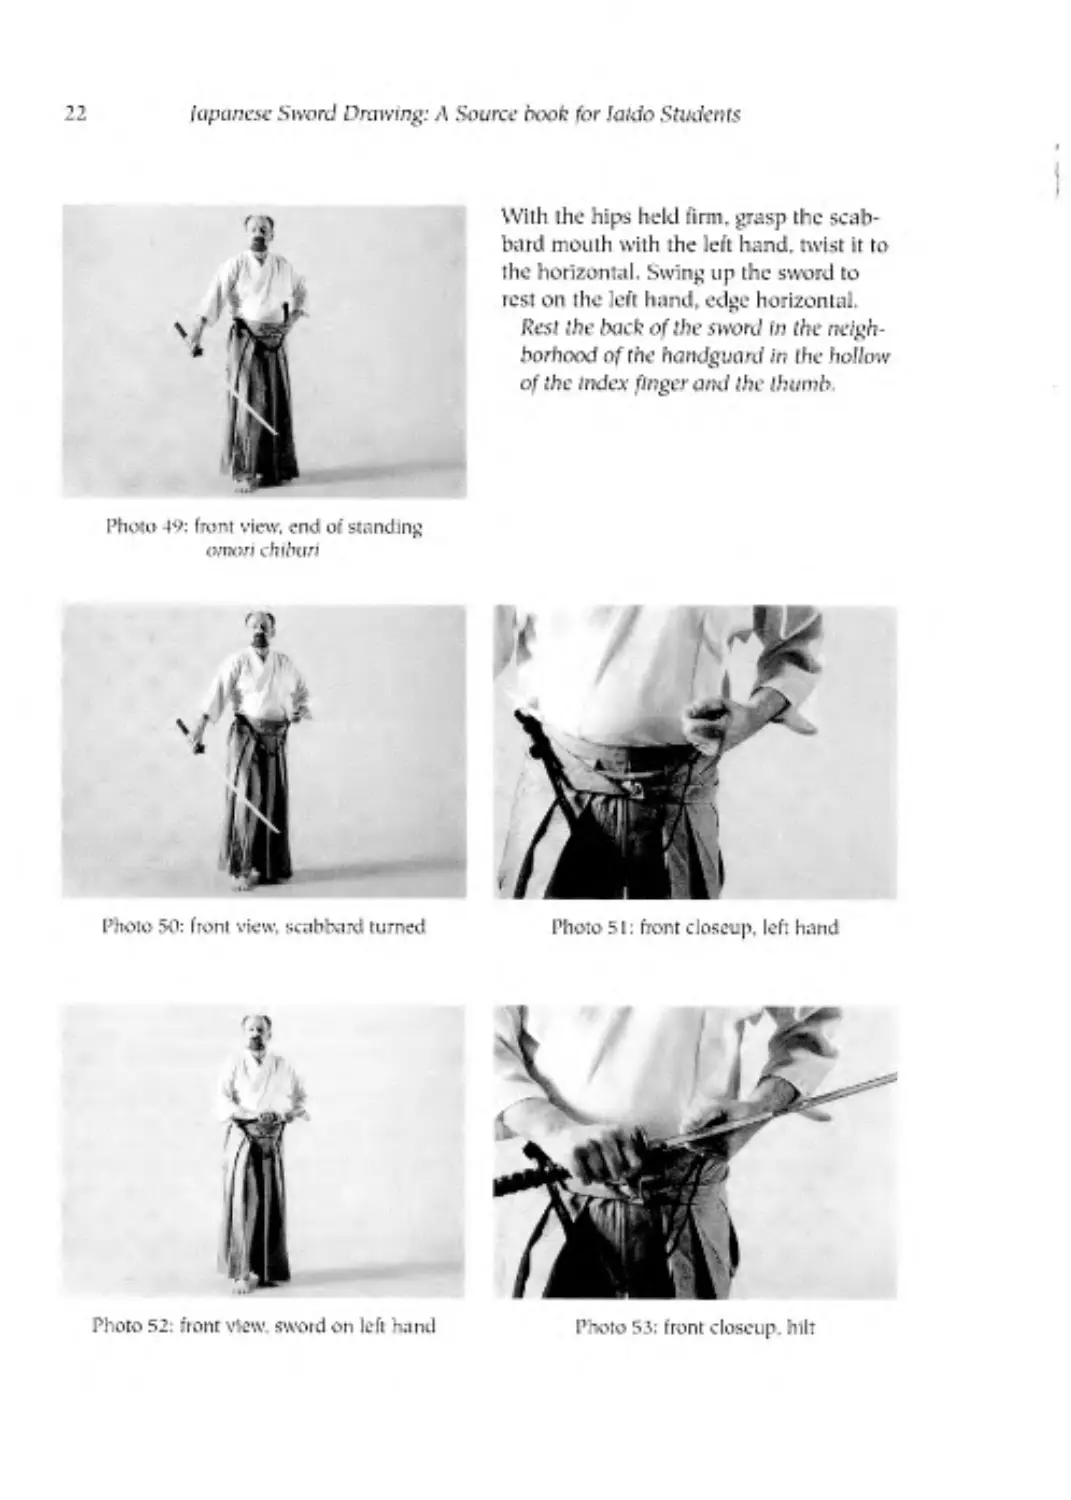
With the hips held firm, grasp the scab-
bard mouth with the left hand, twist it to
the horizontal, Swing up the sword to
rest on the left hand, edge horizontal.
Rest the back of the sword in the neigh-
borhood of the handguard in the hollow
of the index finger and the thumb
Photo 49: front view, end of standing
tvnori chtbnn
Photo 50: front view’, scabbard turned
Photo 51: front closeup, left hand
Photo 52: front view sword on left hand
Photo 55: front closeup, hilt
Preliminaries
23
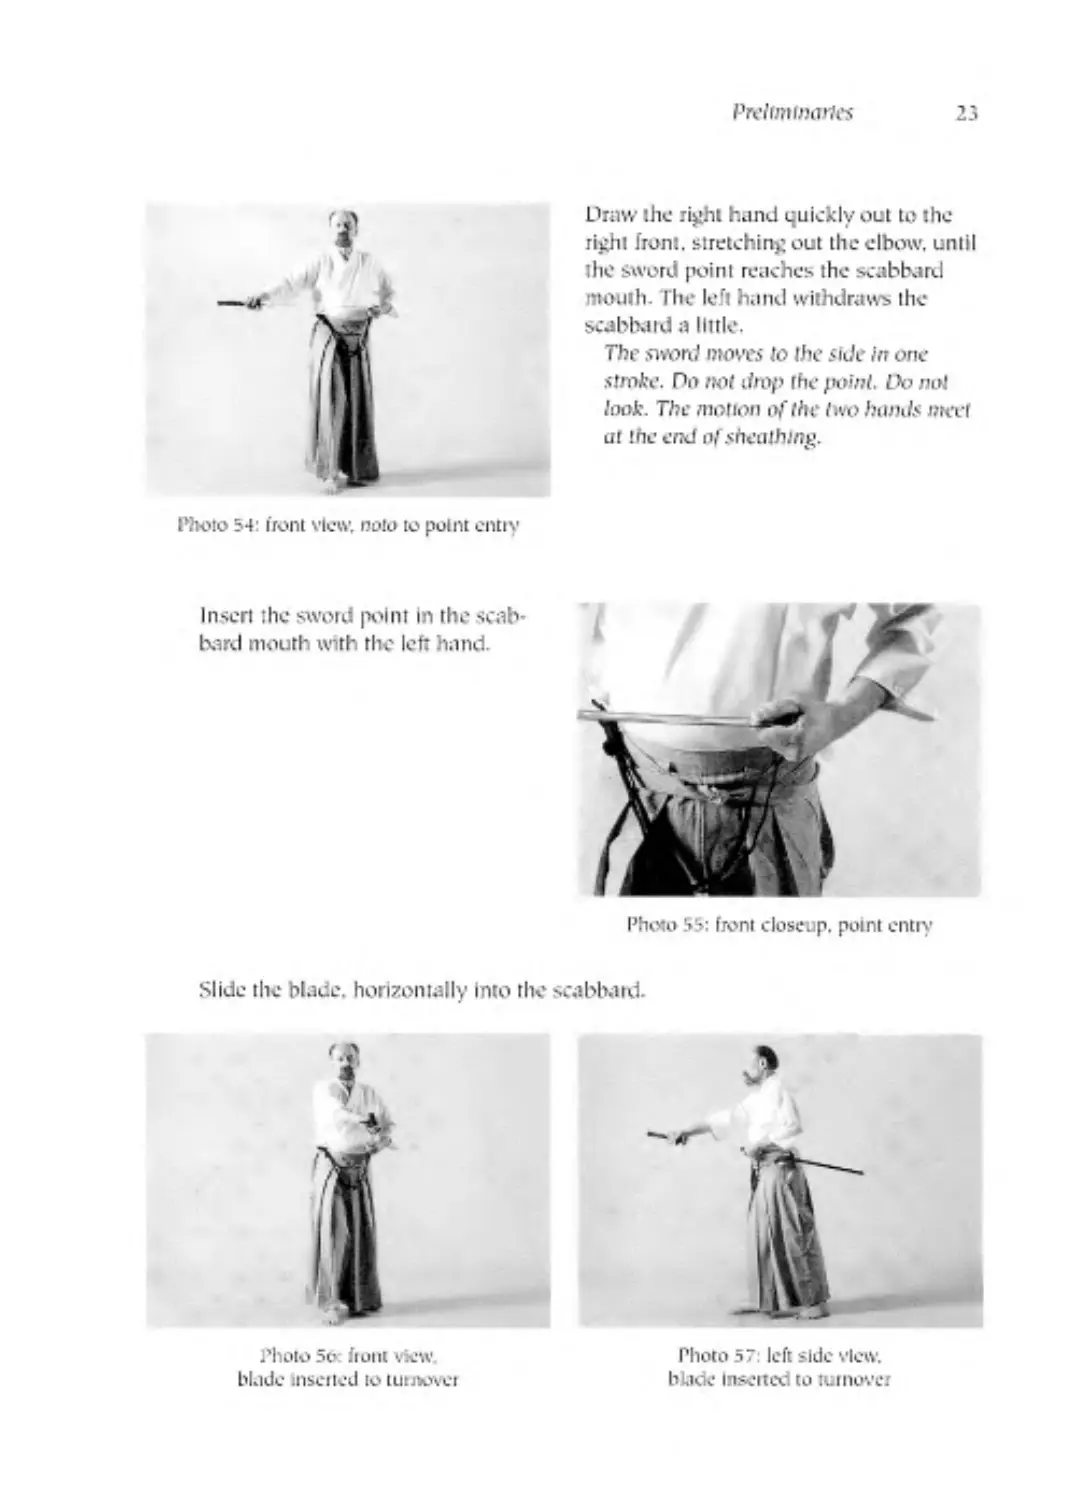
Draw the right hand quickly out to the
right front, stretchingout the elbow, until
the sword point reaches lhe scabbard
mouth. The left hand withdraws lhe
scabbard a little.
The sword moves to the side In one
stroke. По not drop the point. Do not
look. The motion of the two hands meet
ut lhe end of sheathing.
Photo 54: front view. nolo io point entiy
Insert the sword point In the scab-
bard mouth with the left hand.
Photo 55: front closeup, point entry
Slide the blade, horizontally Into lhe scabbard.
Photo 57 left side view,
blade Insetted to turnover
24 lapanese Sword Drawing: A Soukc book for iaido Students
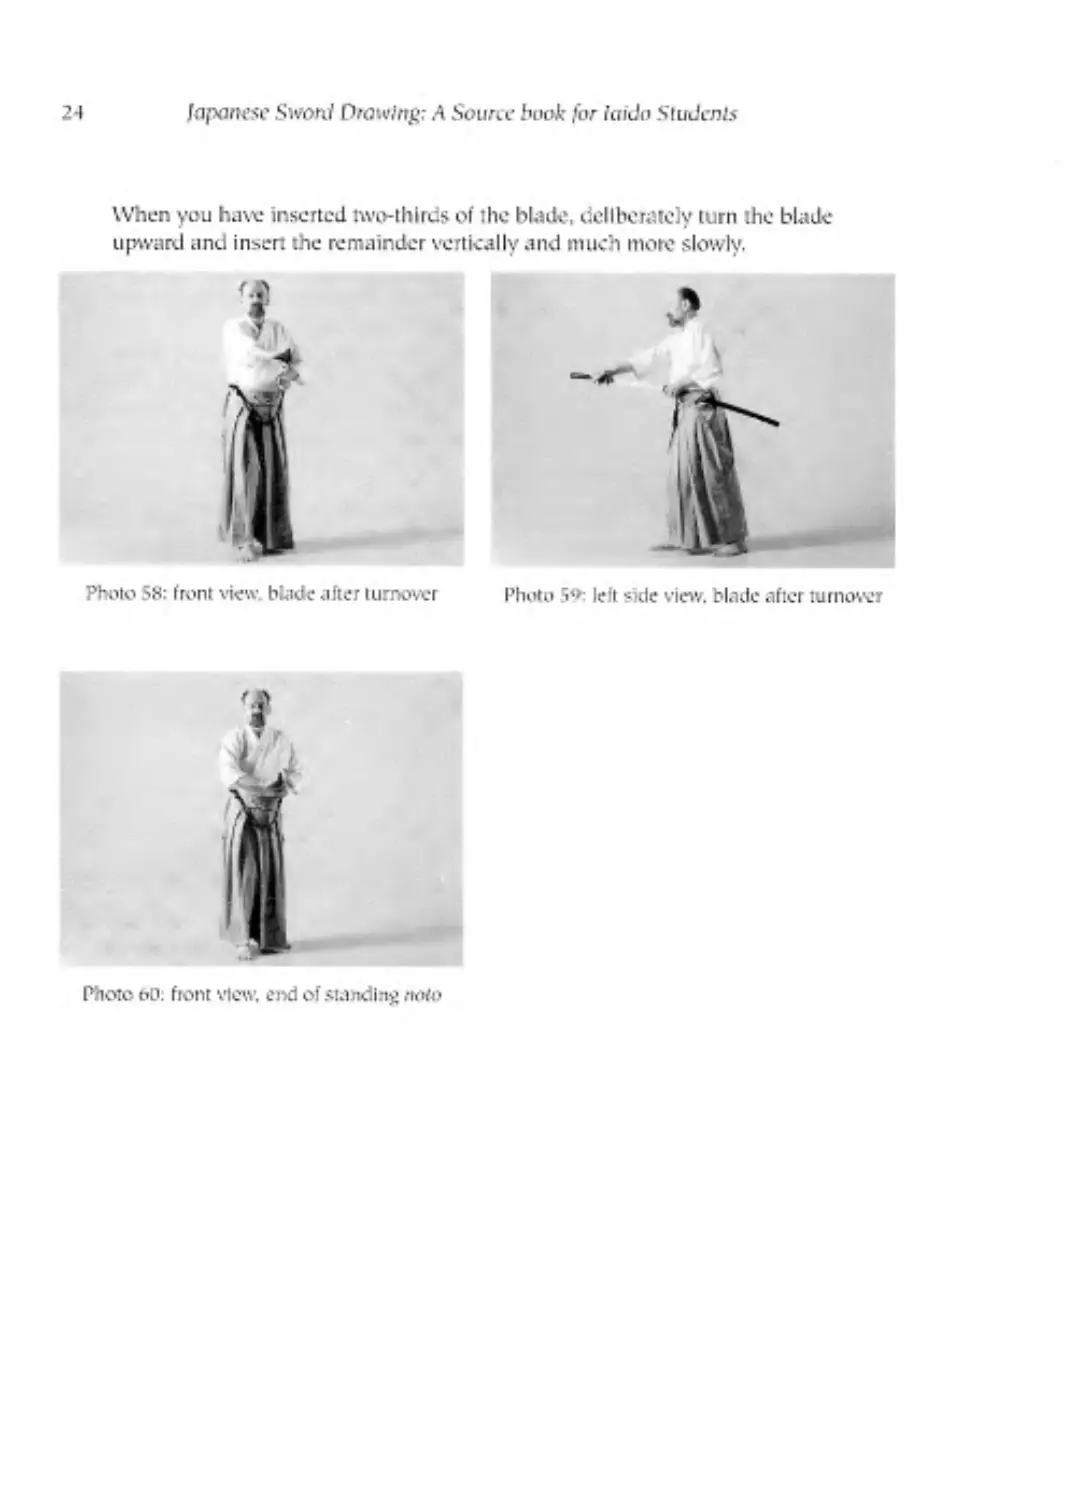
When you have inserted two-thirds of the blade, deliberately turn the blade
upward and insert the remainder vertically and much more slowly.
Photo 58: front view. blade after turnover
Photo 5<>- lell side view, blade after turnover
Photo bO: front view, end of standing noto
Part Two
~L k*? "Crodi+iotAol
Sokools of Ллк1о
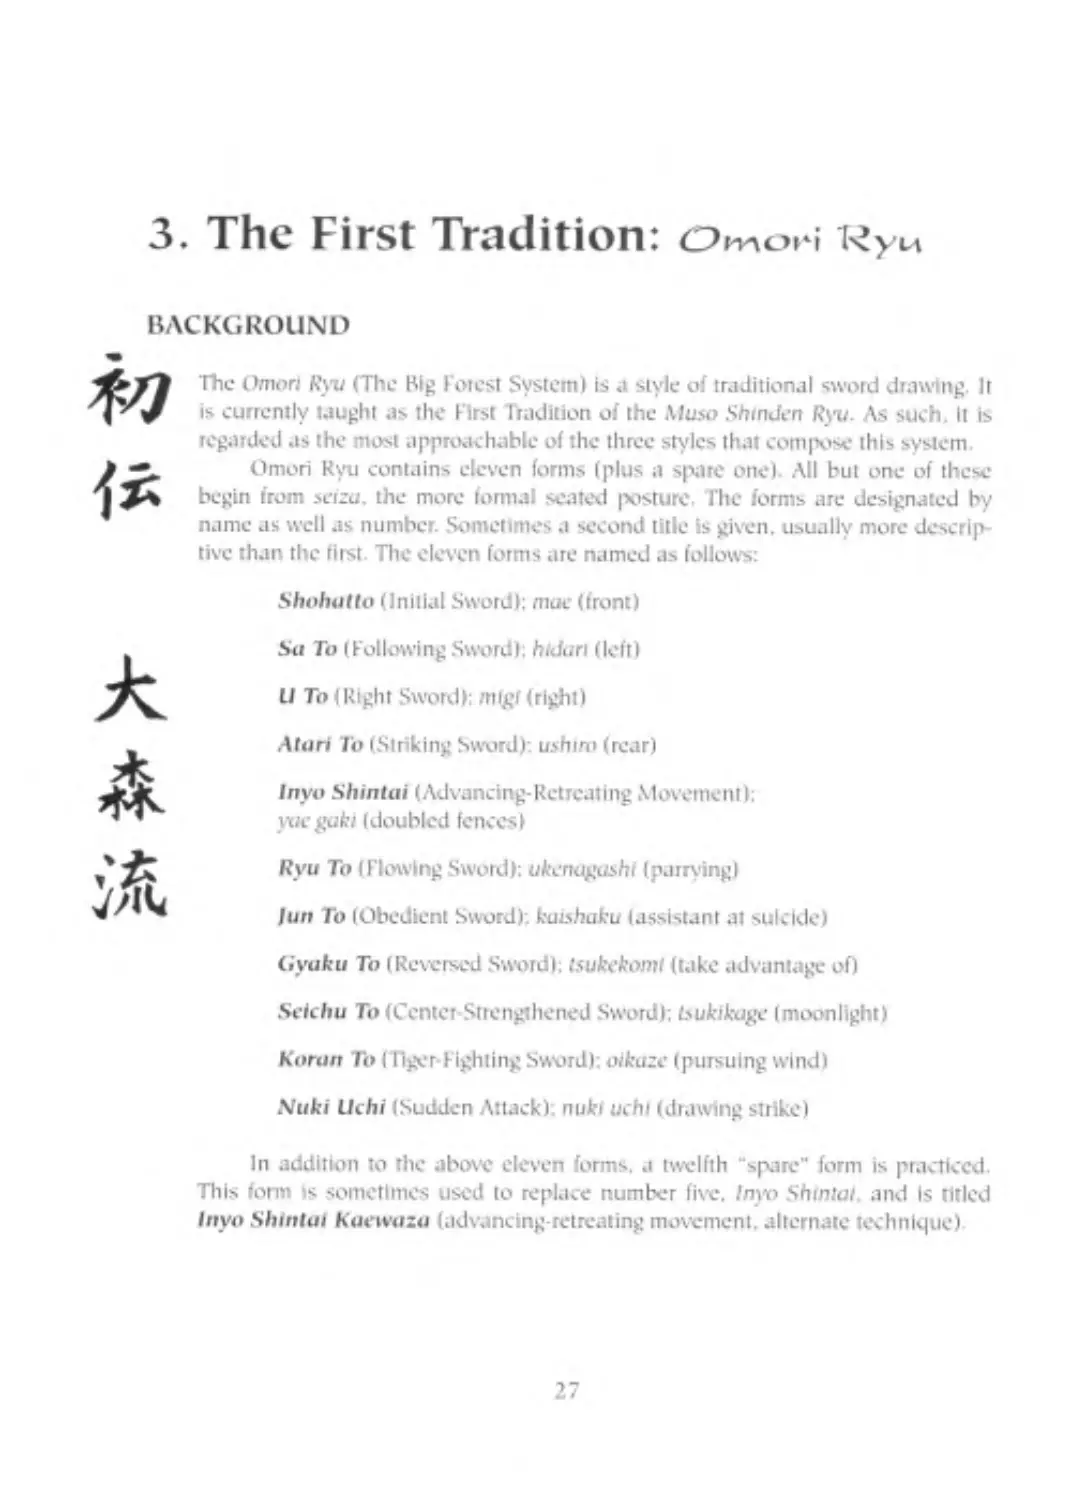
3. The First Tradition: Omori Ryu
BACKGROUND
The Omori Ryu (The Big Forest System) is a style of traditional sword drawing. It
is currently taught as the First Tradition of the Muso Shinden Ryu. As such. It is
regarded as the most approachable of the three styles that compose this system.
Omori Ryu contains eleven forms (plus a spare one) All but one of these
begin from sciza. the more formal seated posture. The forms are designated by
name as well as number. Sometimes a second title is given, usually more descrip-
tive than the first. The eleven forms are named as follows:
Shohaito (Initial Sword): тм (front)
.So To (Following Sword): hidari (left)
U To (Right Sword): mtgf (right)
.Muri To (Striking Sword): ushim (rear)
Inyo Shintai (Advancing-Retreating Movement):
yuegaki (doubled fences)
Ryu To (Flowing Sword): ukenqgushf (parrying)
lun To (Obedient Sword), kaishaku (assistant at suicide)
Gyuku To (Reversed Sword): tsukekoml (take advantage of)
Seichu To (Center Strengthened Sword): bukrkuge (moonlight)
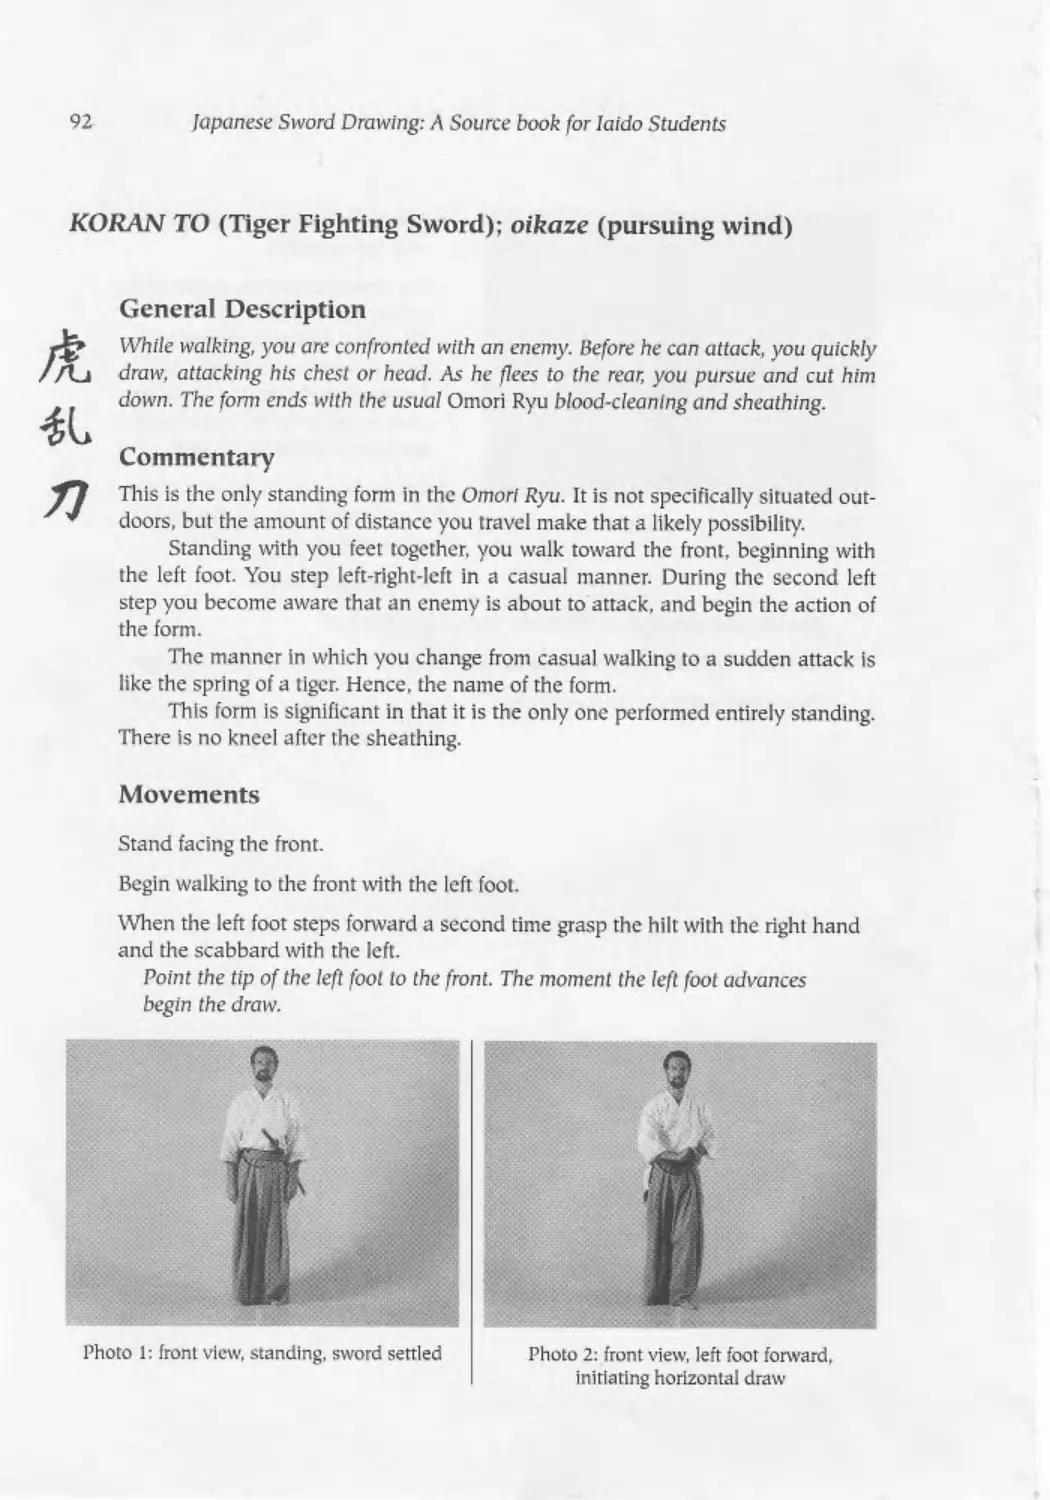
Koran To (Tiger Fighting Sword): oikuze (pursuing wind)
Nuki Uchi (Sudden Attack), nukl itch) (drawing strike)
In addition to the above eleven forms, a twelfth "spare" form is practiced.
Tills form is sometimes used to replace number five. Inyo Shtntal. and Is titled
Inyo Shlntal Kacwuza (advancing-retreating movement, alternate technique)
27
2S
lapanae Sword Drawing: Л Source book for /order Sludcnb
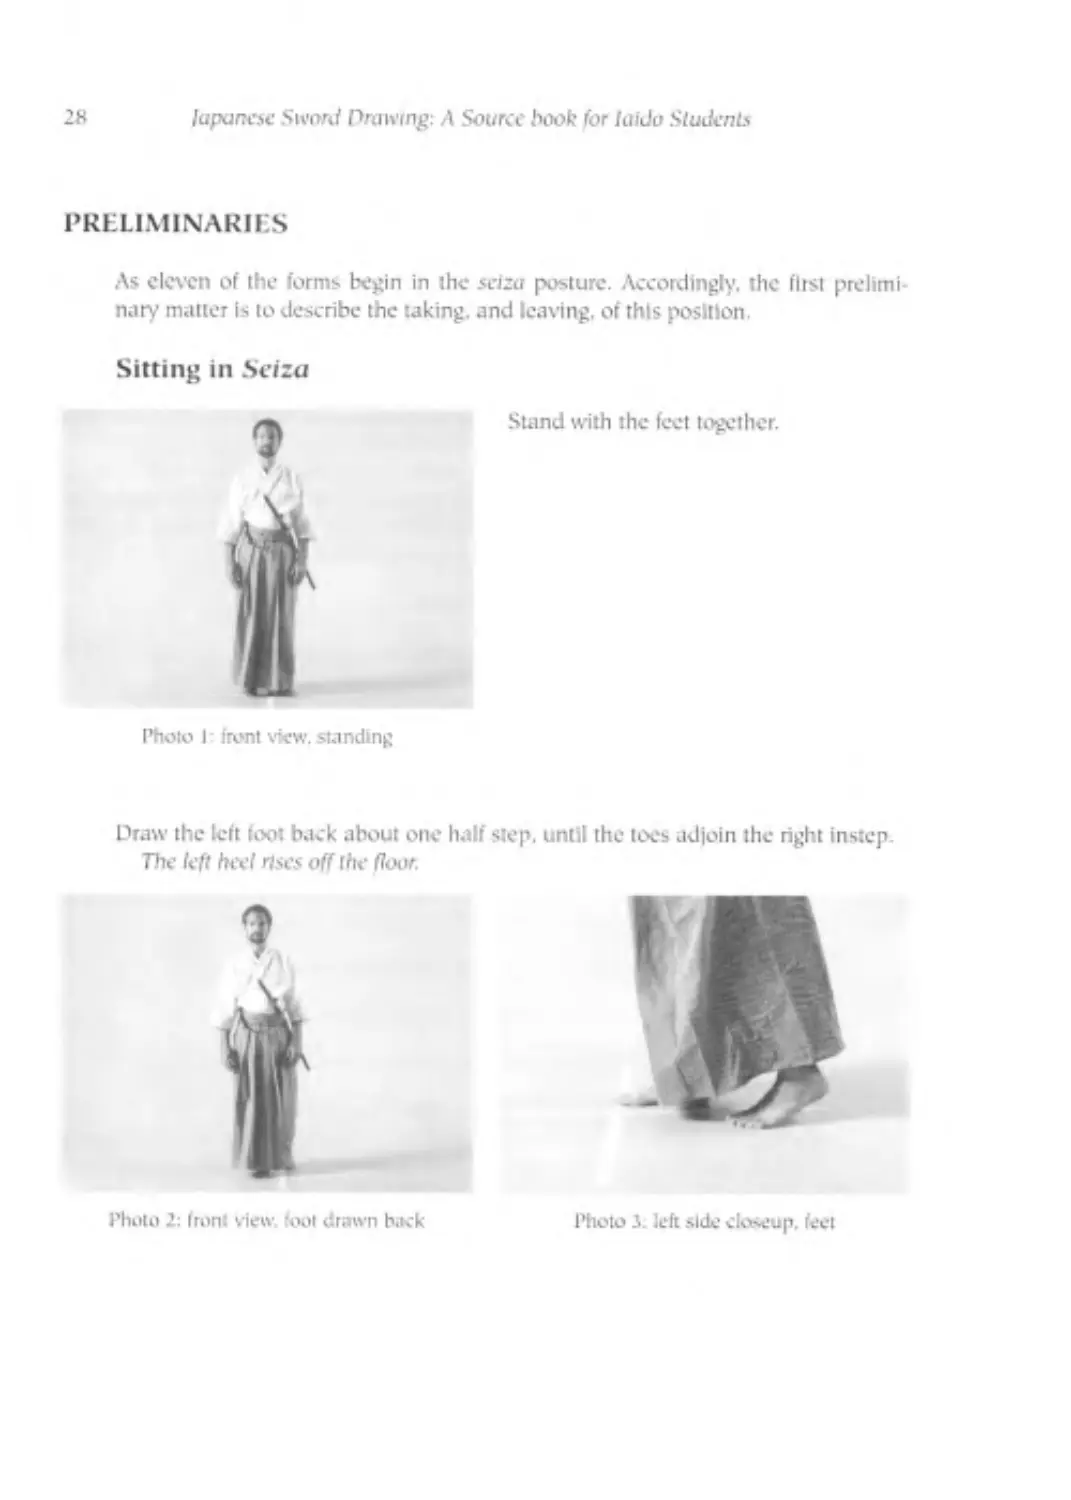
PRELIMINARIES
As eleven of the forms begin in lhe selzo posture. Accordingly. the first prelimi-
nary matter is to describe the taking, and leaving, of this position
Sitting in Sciza
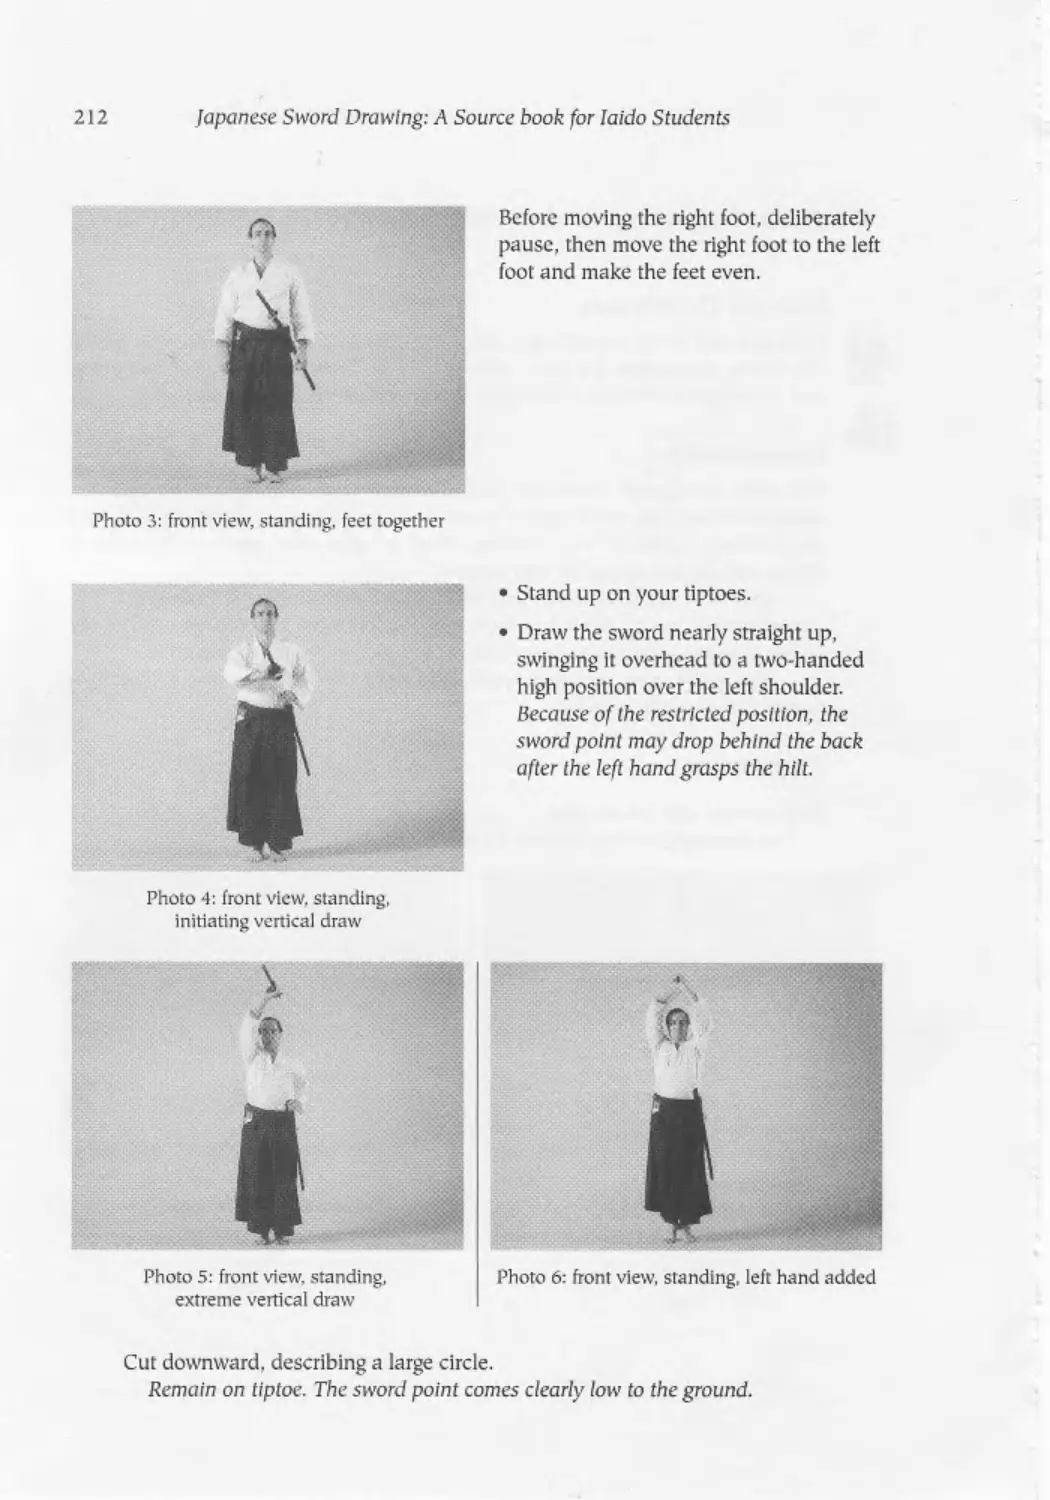
Stand with the feet together.
Photo 1 front view, standing
Draw the left toot back about one half step, until the toes adjoin the right instep.
The left heel rises off the floor.
Photo J. left side closeup, feet
Photo 2: front view foot drawn back
The Traditional Schools of laido
20
Photo 4: front stew, dropped to heel
Photo 5: iront view, left knee on floor
Photo b: front view, both knees on floor
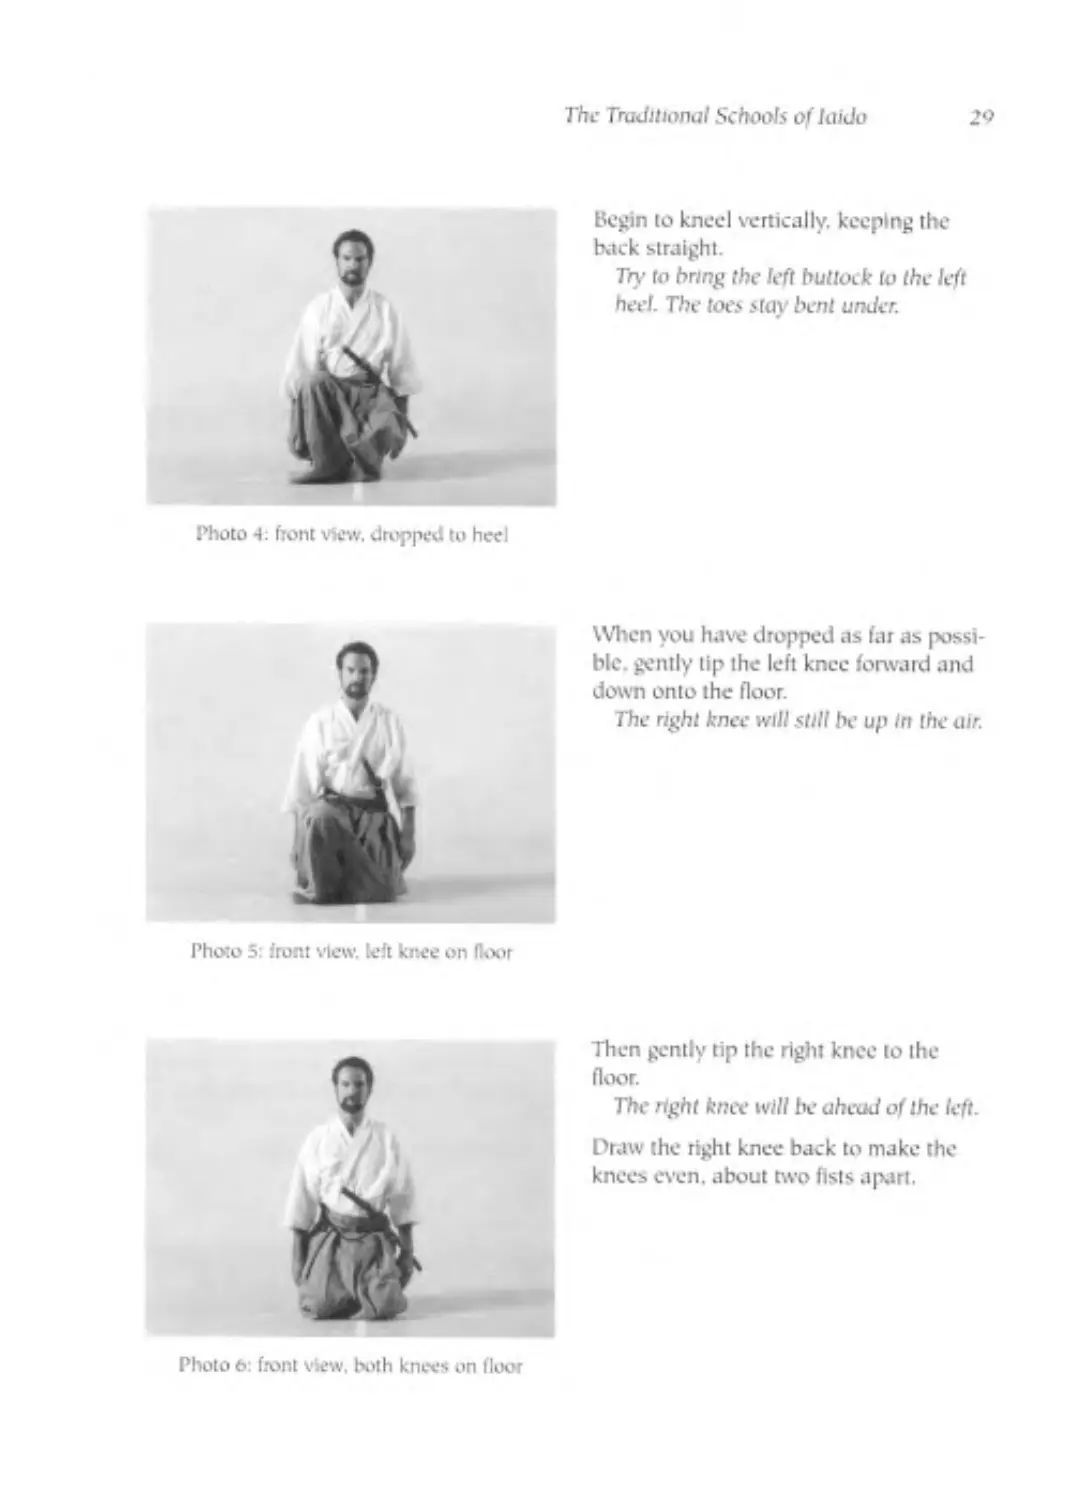
Begin to kneel vertically, keeping the
back straight.
Try to bring the left bullock to the left
heel. The toes stay bent under.
When you have dropped as far as possi-
ble. gently tip the left knee forward and
down onto the floor.
The right knee will still be up In the air.
Then gently tip the right knee to the
floor.
The right knee will be ahead of the left.
Draw the right knee back to make the
knees even, about two fists apart.
W
Japanese Sword Drawing: A Source book for laido Students
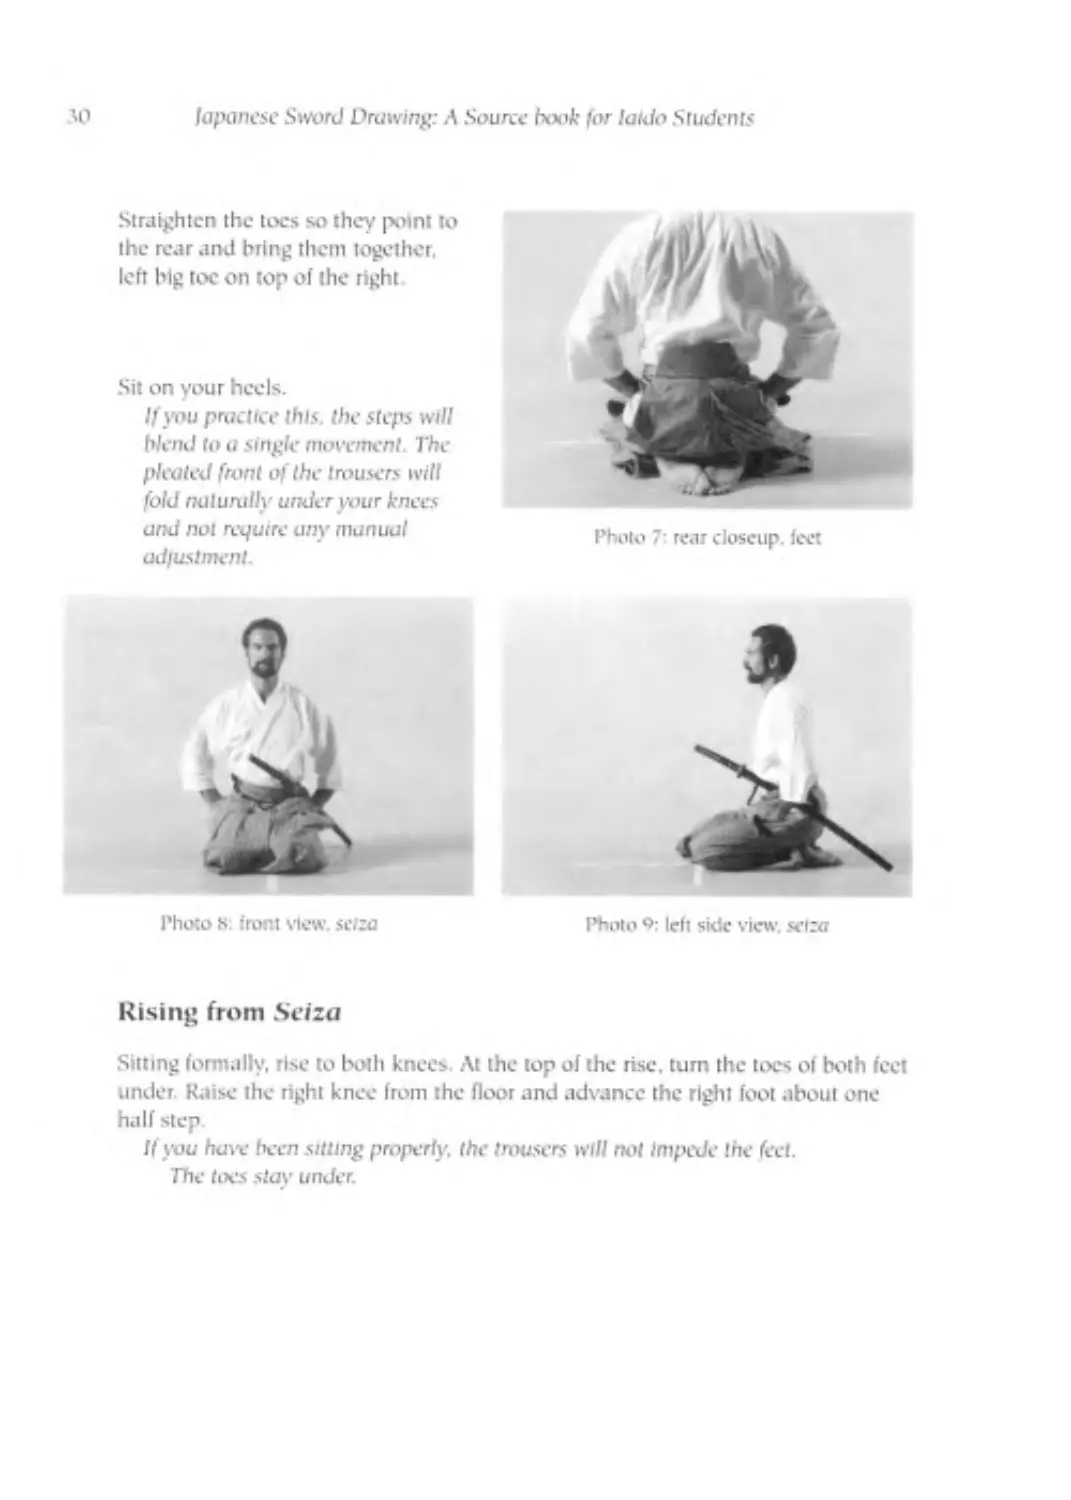
Straighten the toes so they point to
lhe rear and bring them together,
left big toe on top of the right
Sit on your heels.
If jwt practice this, the steps will
blend to a single movement. The
pleated front of the trousers will
fold naturally under your knees
and not require any manual
ad)ustmenl.
Photo o; left side view, sciza
Phoro 8: front view, sciza
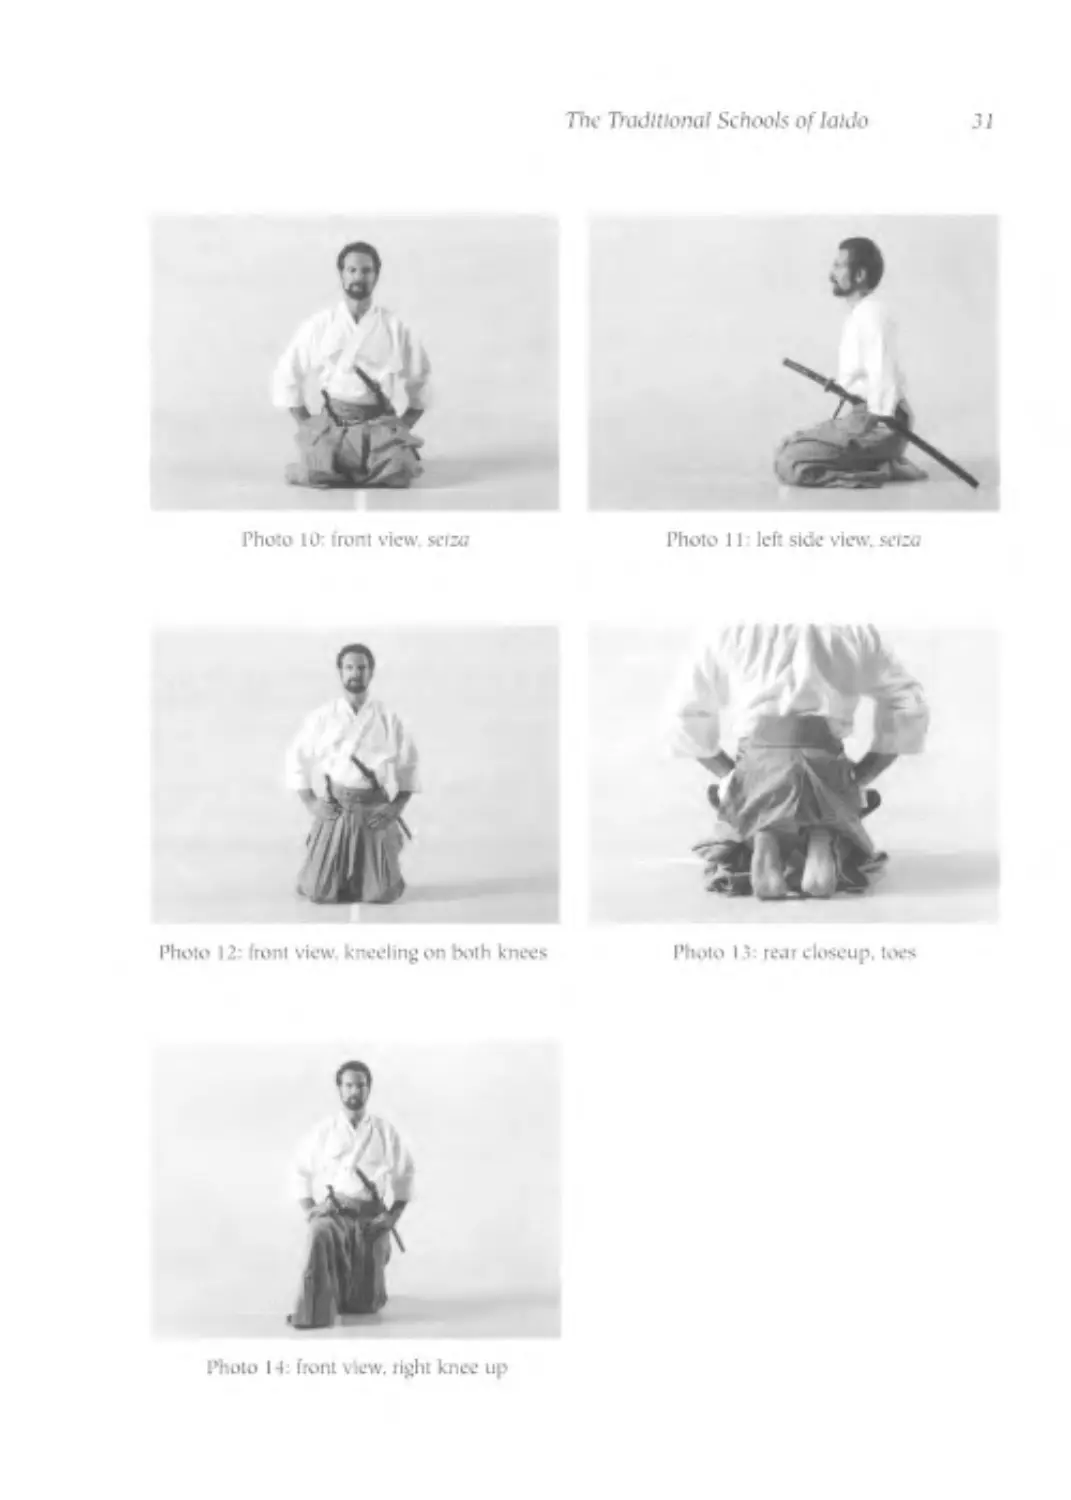
Rising from Seiza
Sitting formally, rise to both knees. At the top of the rise, turn the toes of both feet
under Raise the right knee from the floor and advance the right fool about one
half step.
Jf you haw been sitting property, the trousers will not Impede the feet.
The toes slay under.
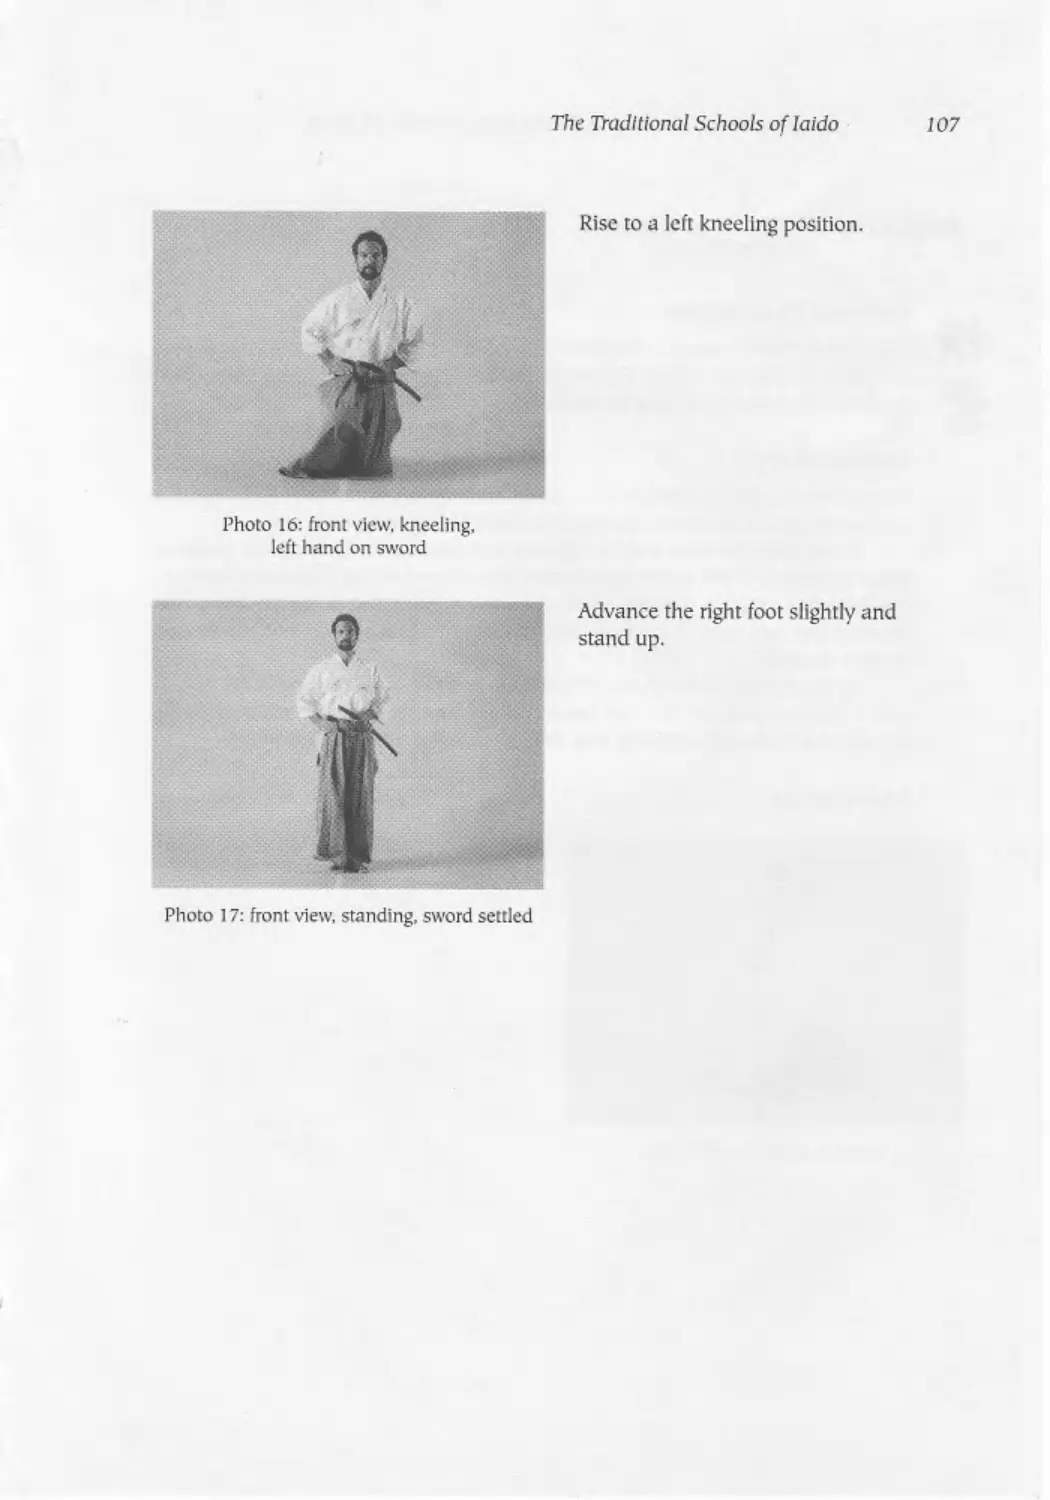
The Traditional Schools of laido 31
Photo 1! left side view. seize
Photo 13: rear closeup. toes
Photo 12: front view kneeling on both knees
t
Photo 14: from view. :ij;ht knee up
32
fupunesc Sword Drawing: A Source book for fuldo SluJenb
i
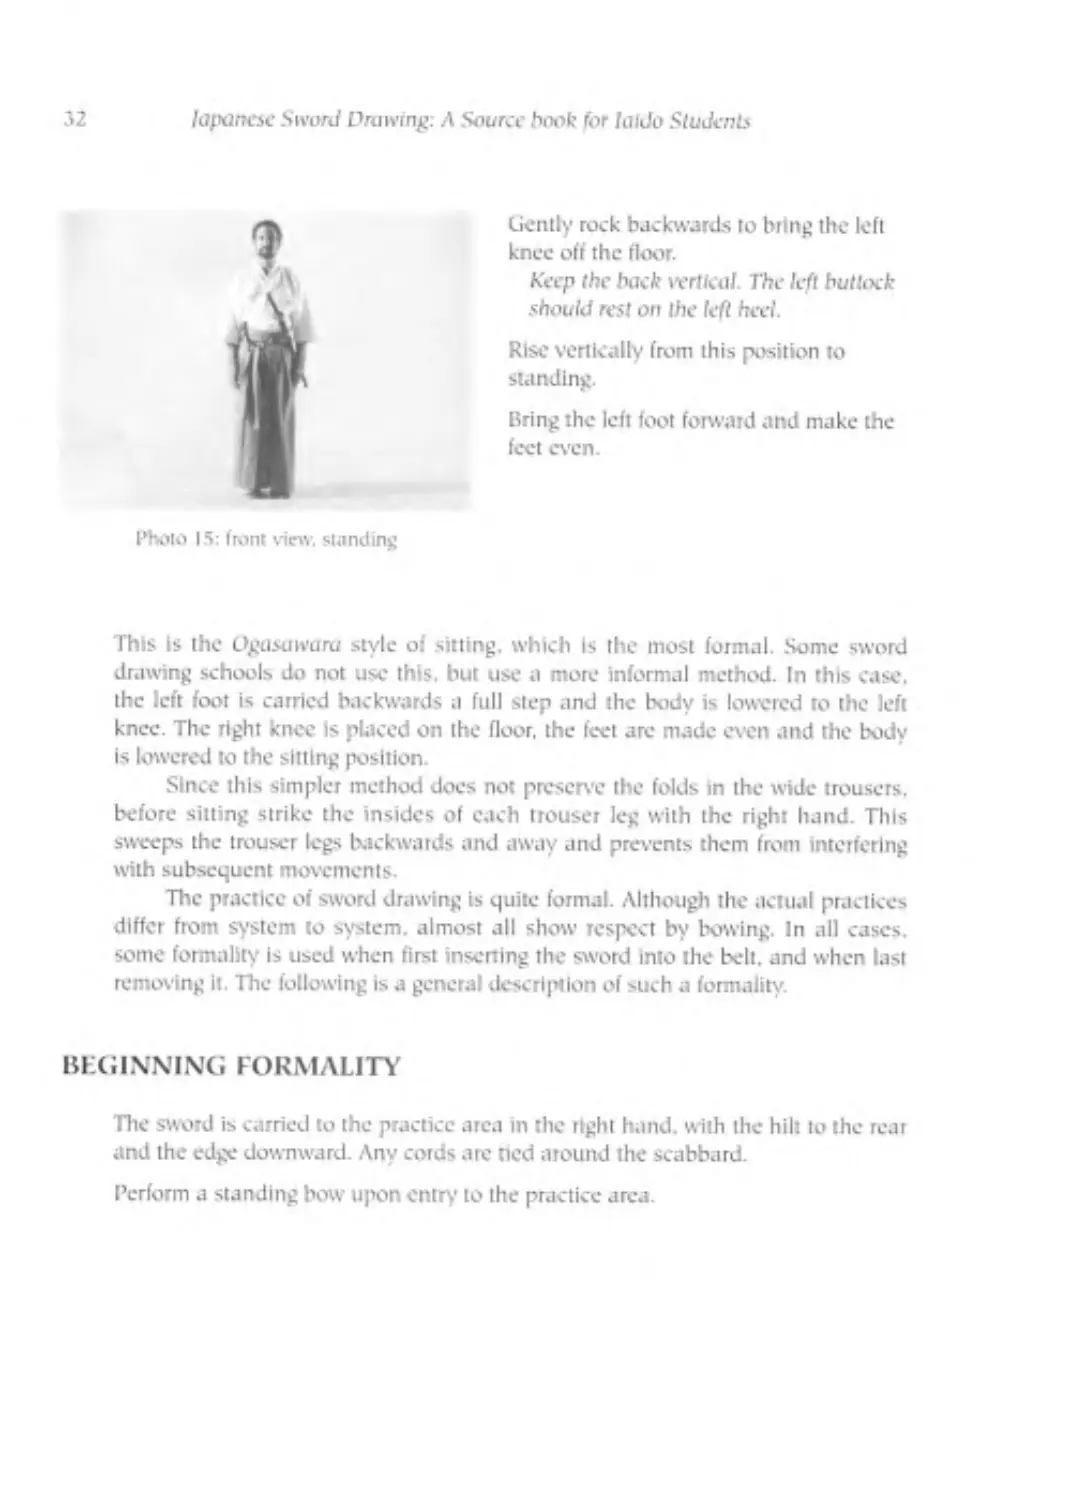
Photo 15: front view. standing
Gently rock backwards to bring the left
knee off the floor.
Keep the back vertical The left buttock
should rest on the left heel.
Rise vertically from this position to
standing.
Bring the left foot forward and make the
feet even.
This is the Ogttsowuru style of sitting, which Is the most formal. Some sword
drawing schools do not use this, but use a more informal method. In this case,
the left foot is carried backwards a full step and the body is lowered to the left
knee. The right knee is placed on the floor, the feet are made even and the body
is lowered to the sitting position.
Since this simpler method does not preserve the folds in the wide trousers,
before sitting strike the insides of each trouser leg with the right hand. This
sweeps the trouser legs backwards and away and prevents them from Interfering
with subsequent movements.
The practice of sword drawing is quite formal. Although the actual practices
differ from system to system, almost all show respect by bowing. In all cases,
some formality is used when first inserting the sword into the belt, and when last
removing it. The following is a general description of such a formality.
BEGINNING FORMALITY
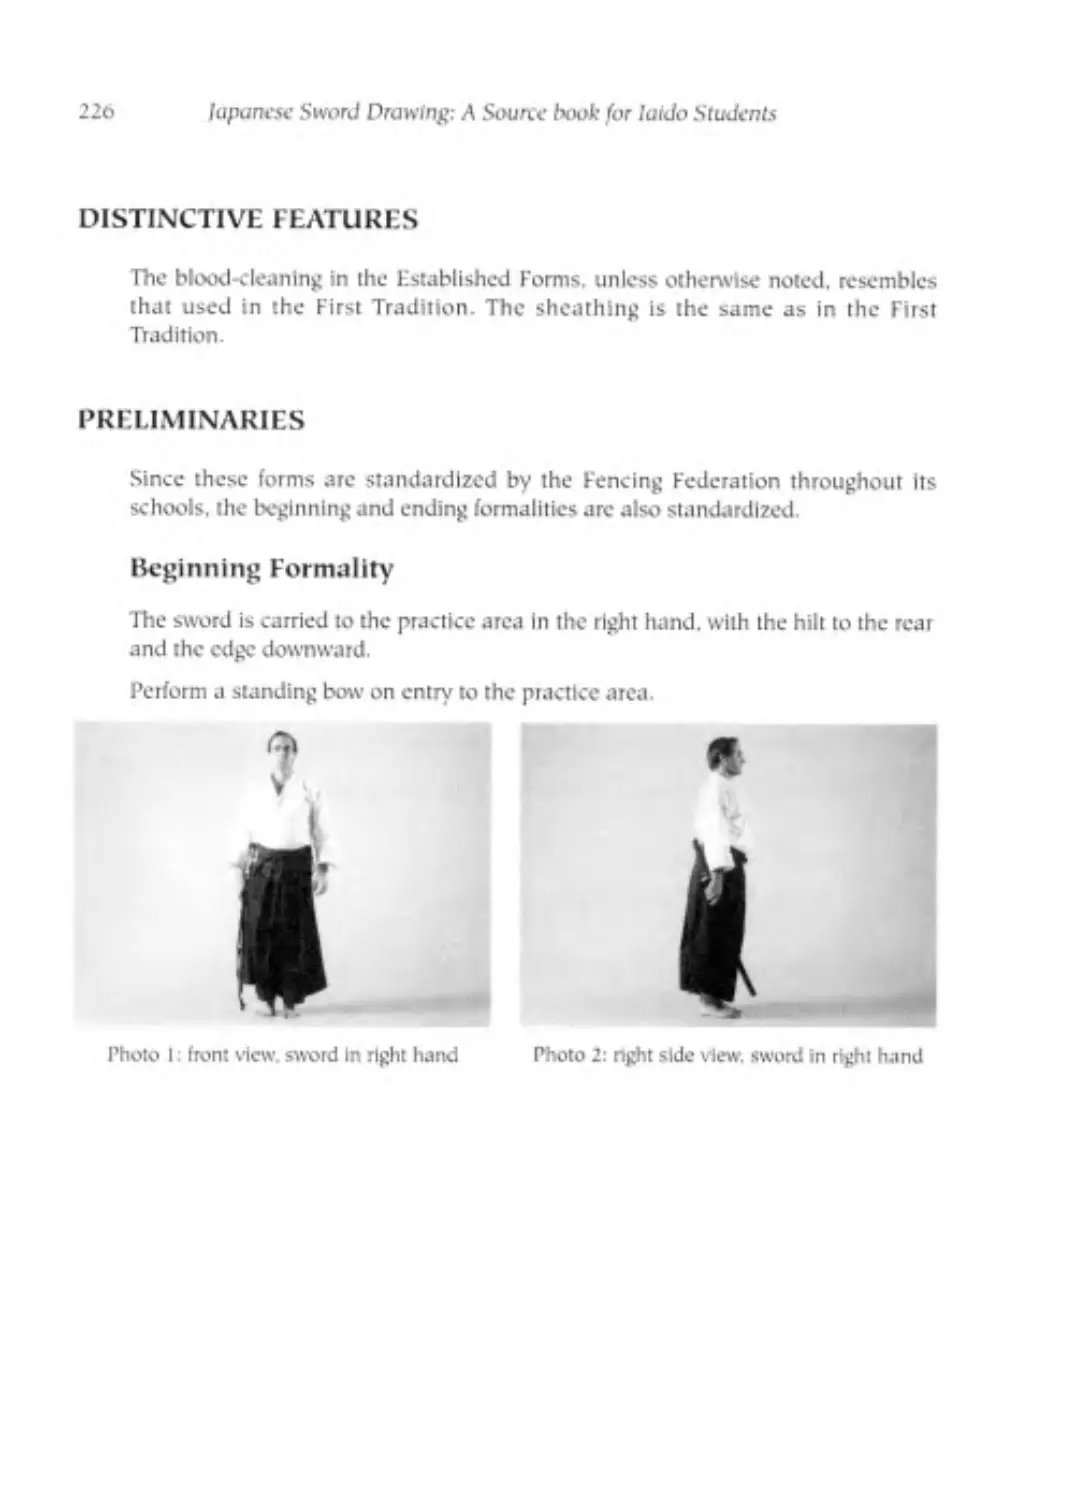
The sword is carried to the practice area in the tight hand, with the hilt to the rear
and the edge downward. Any cords arc tied around the scabbard.
Perform a standing bow upon entry to the practice area.
The Traditional Schools of laido
33
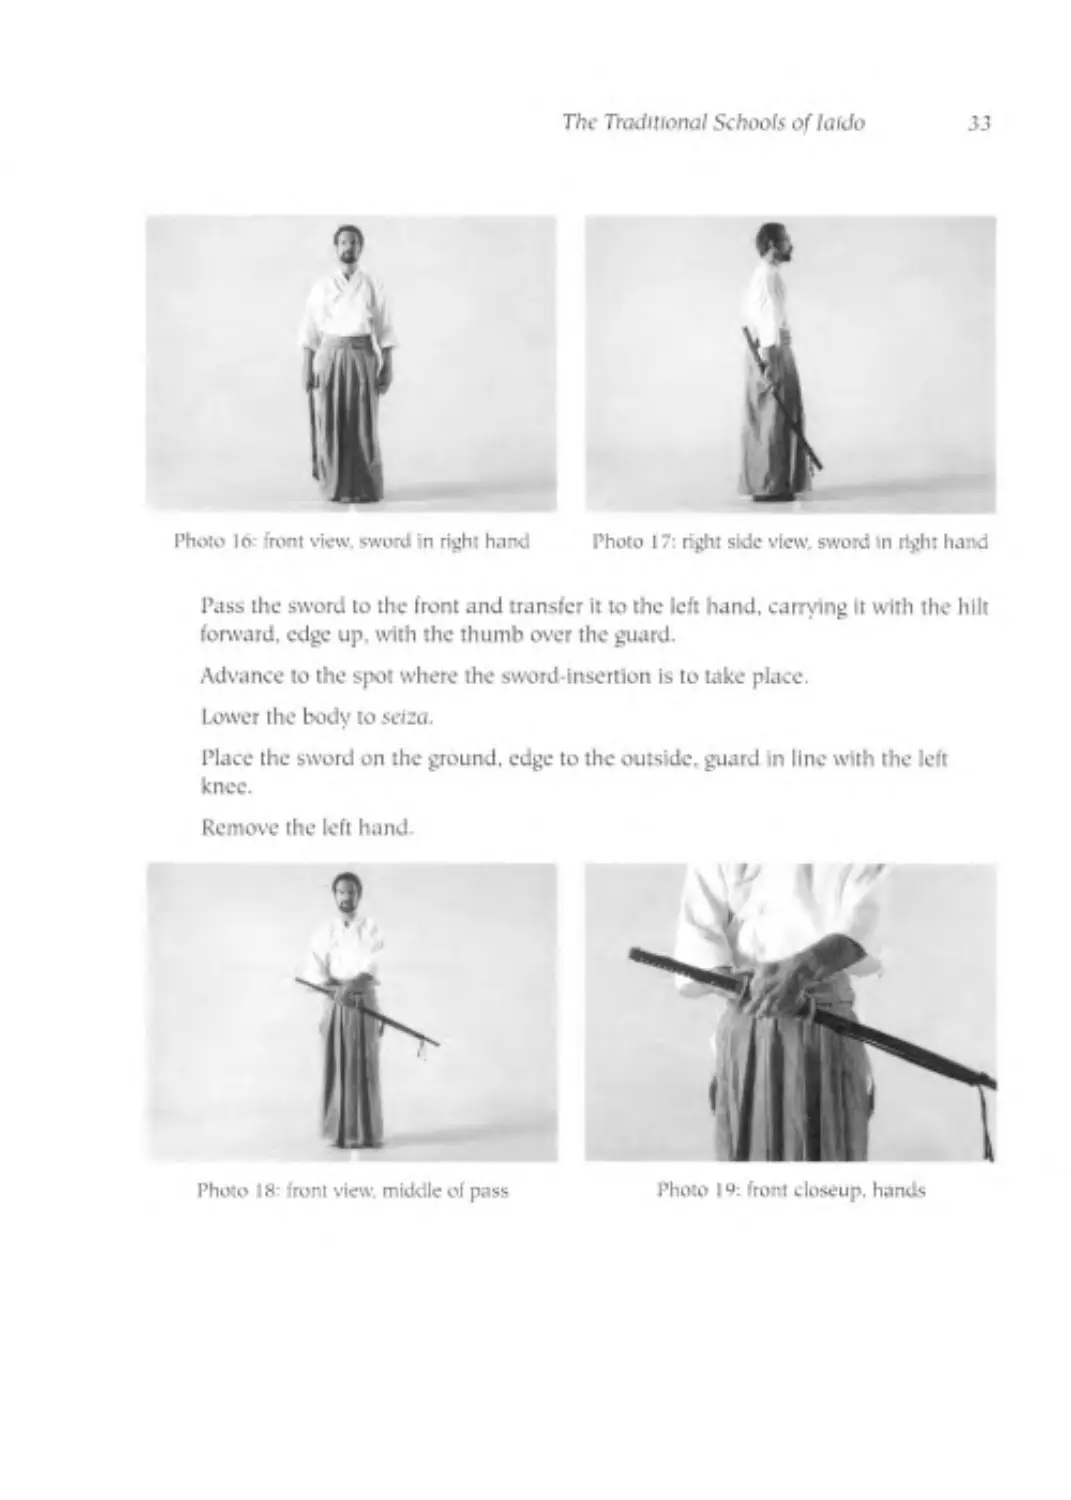
Photo 16: front view, sword in righ« hand Photo 17: right side view. sword in right hand
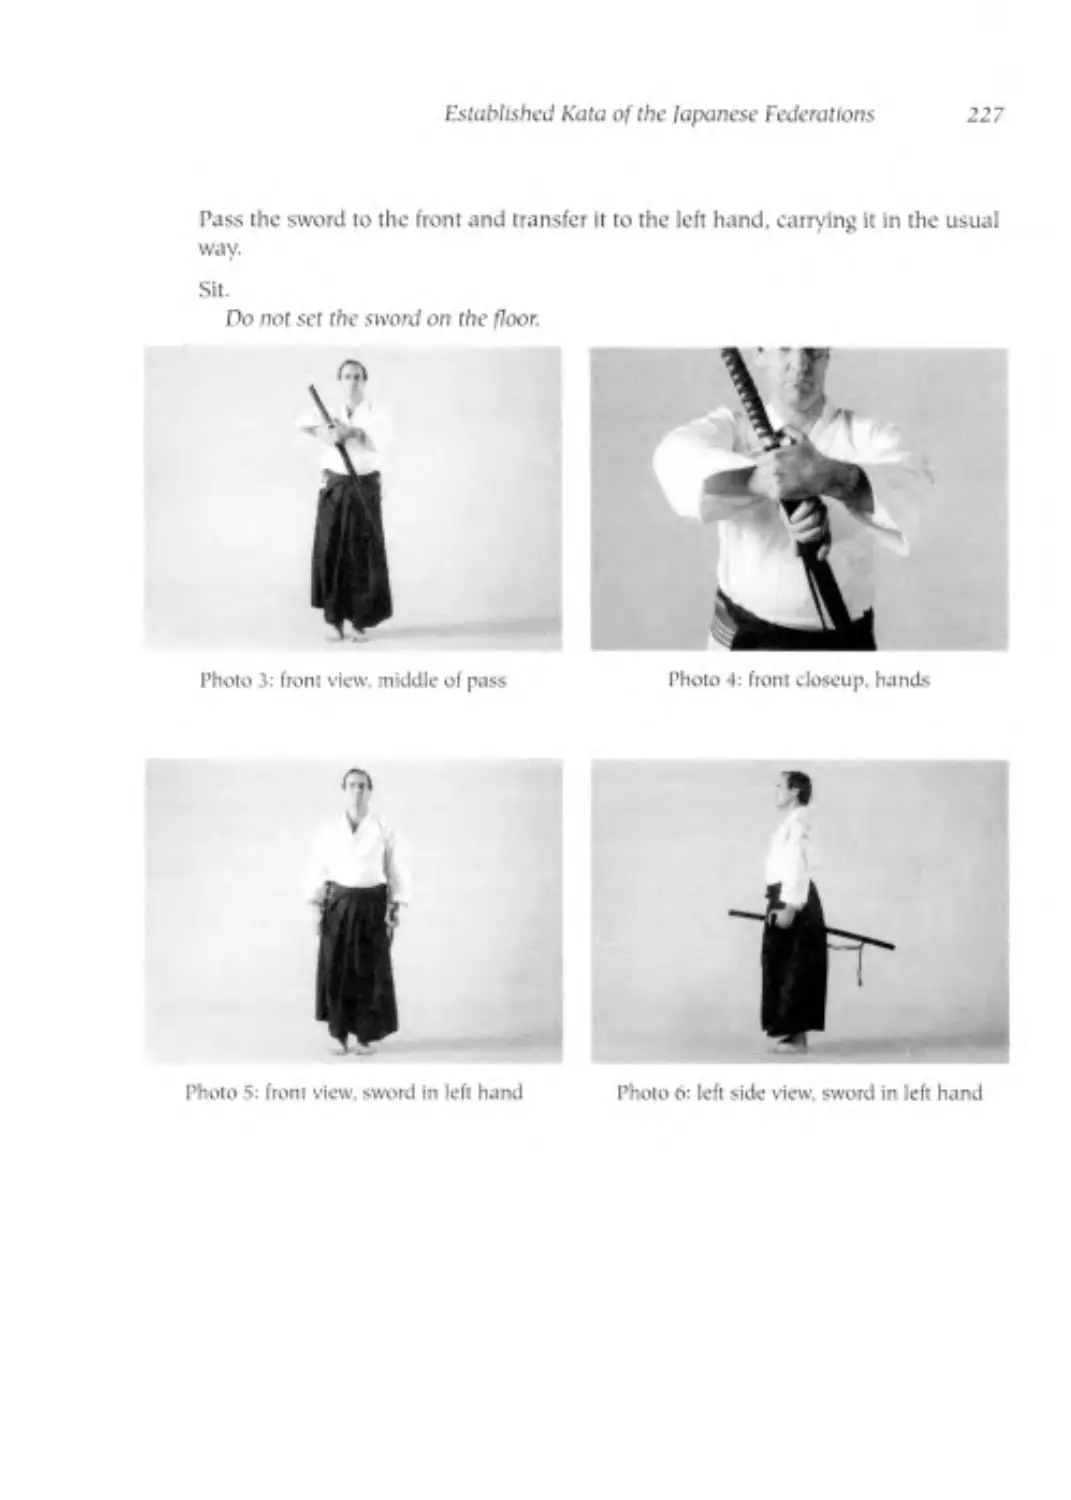
Pass the sword to the front and transfer it to the left hand, carrying It with ths’ hilt
forward, edge up, with the thumb over the guard.
Advance to the spot where the sword-insertion is to take place.
Lotver the body to seize.
Place the sword on the ground, edge to the outside, guard in line with the left
knee.
Remove the left hand
Photo 19: front closeup, hands
Photo 18: front view misidle of pass
Л4
lapanese Sword Drawing: A Source book for Iaido Students
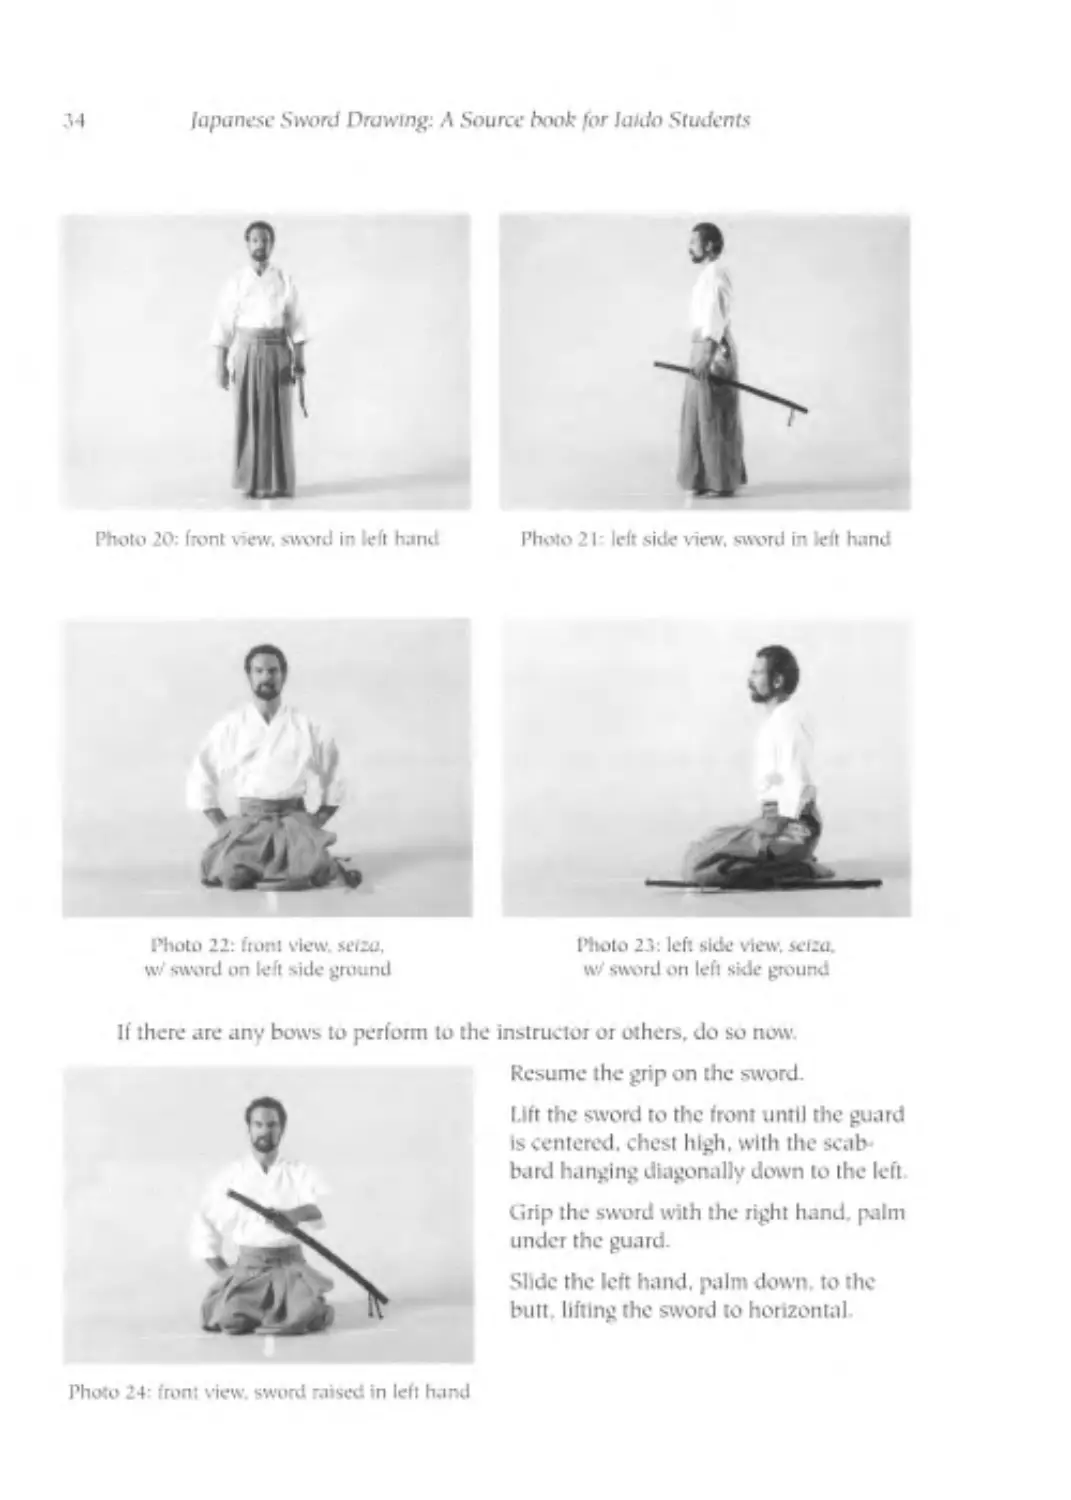
Photo 20: front view, sword in left hand
Photo 21: left side view, sword in left hand
Photo 22: front view seica.
w?' sword on left side ground
Photo 23: left side view, K'l.’ri.
w/ sword on left side ground
If there are any bows to perform to the instructor or others, do so now
Resume the grip on the sword.
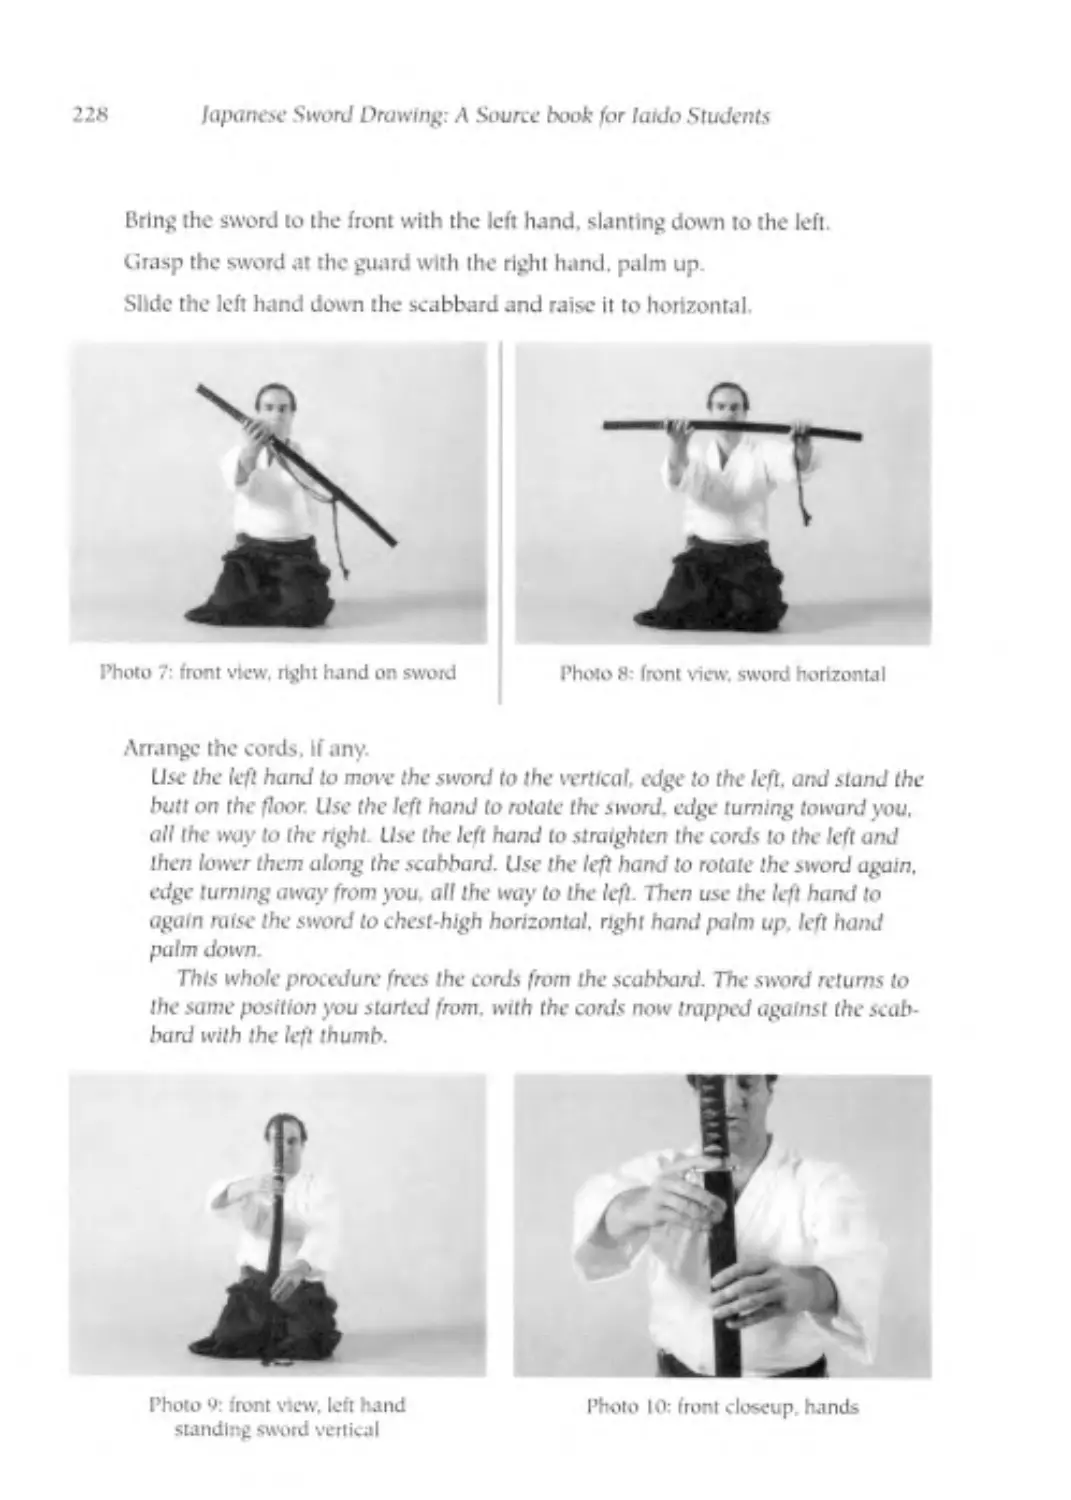
Lift the sword to the front until the guard
Is centered, chest high, with the scab
bard hanging diagonally down to lhe left
Grip the sword with the right hand, palm
under the guard.
Slide the left hand, palm down to the
butt lifting the sword to horizontal
Photo 24: front view sword raised in left hand
The Traditional Schools of laido
35
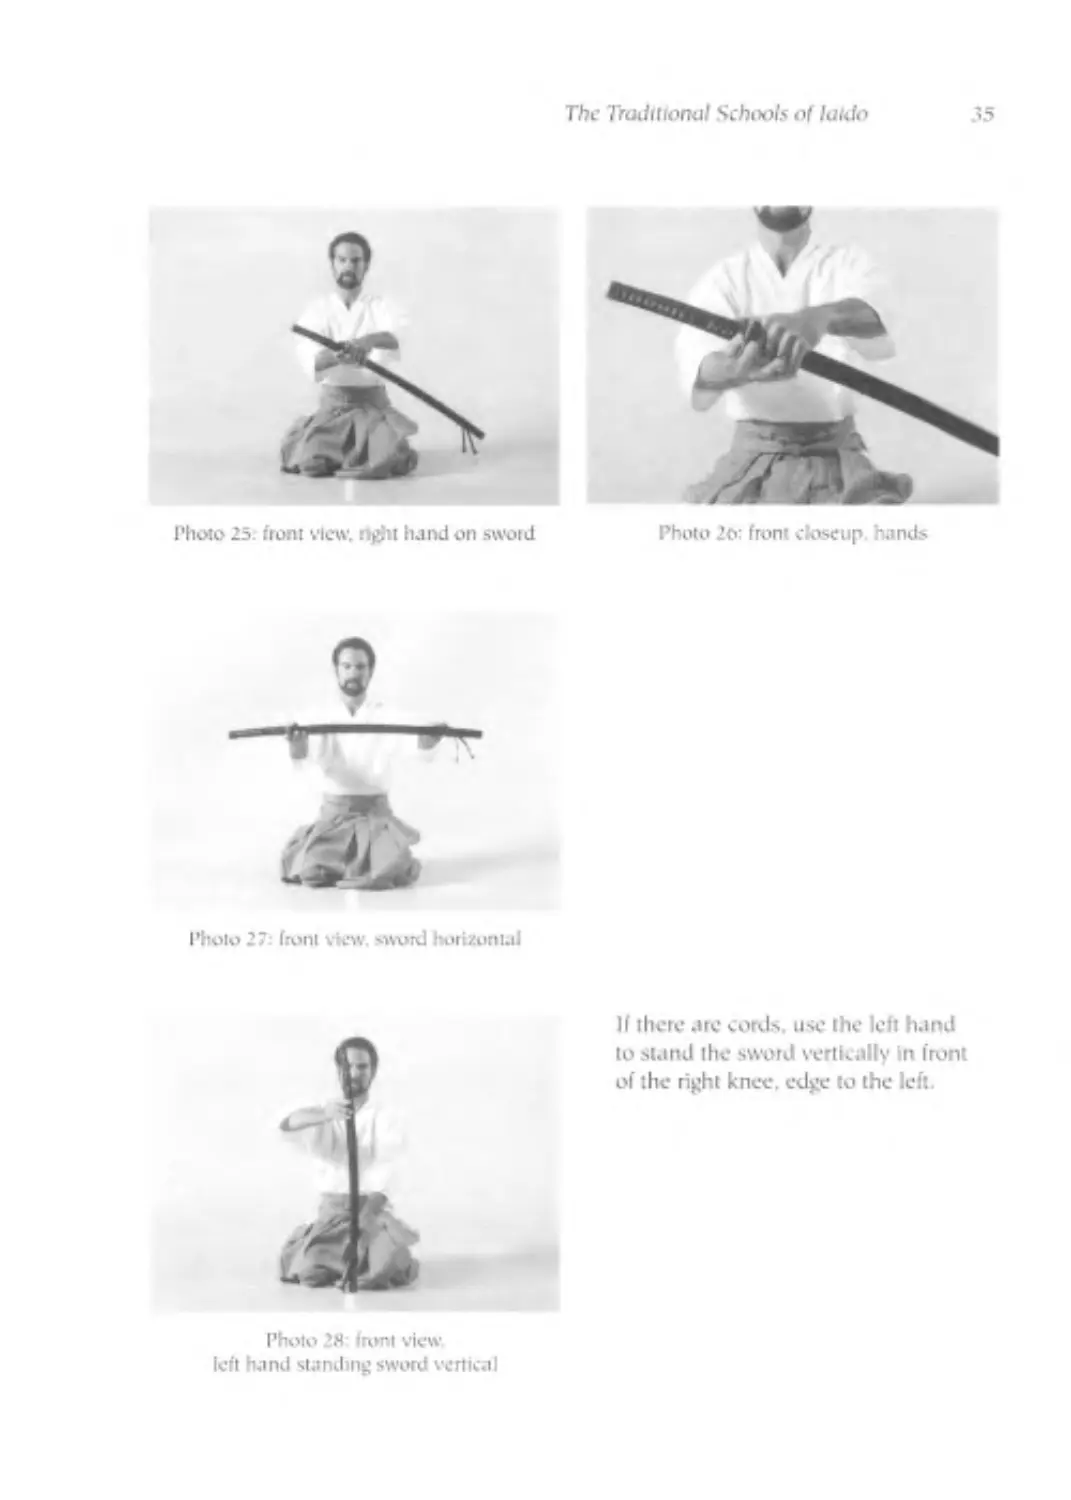
Photo 2o: front closeup, hands
Photo 25: front vic»', nght hand on sword
Photo 27* front view. sword horizontal
If there are cords, use the left hand
to stand the sword vertically in front
of the right knee, edge to the left.
Photo 28: front view,
left hand standing sword vertical
36
lapanese Sivord Drawing A Source book for luklo Students
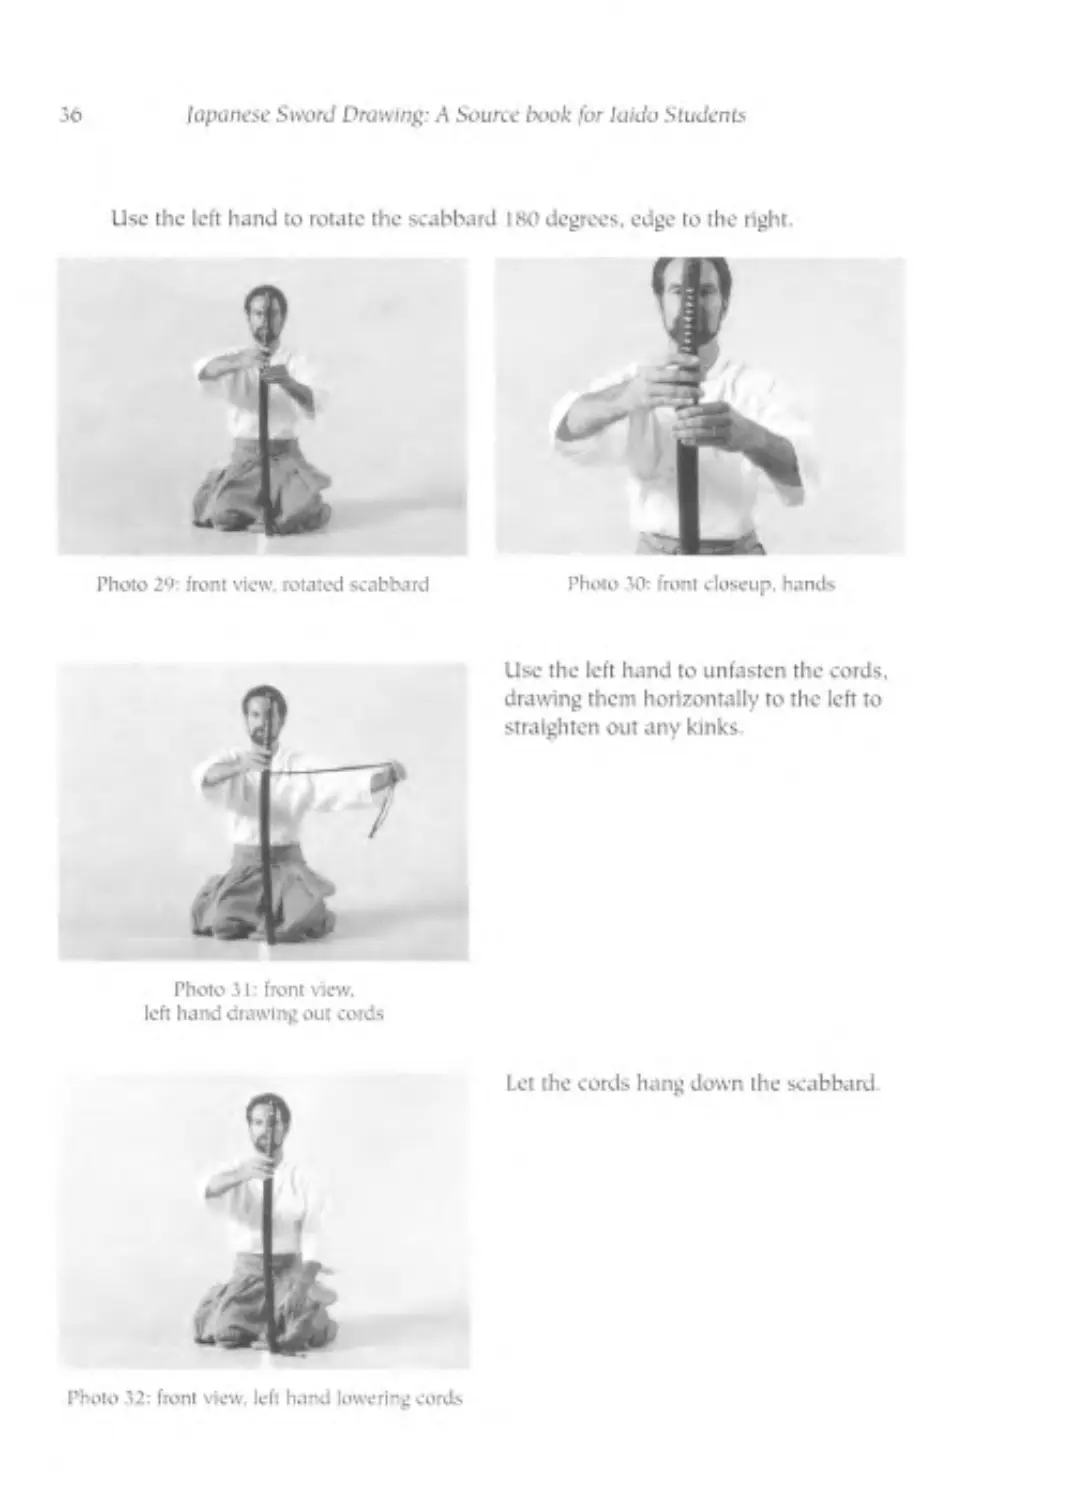
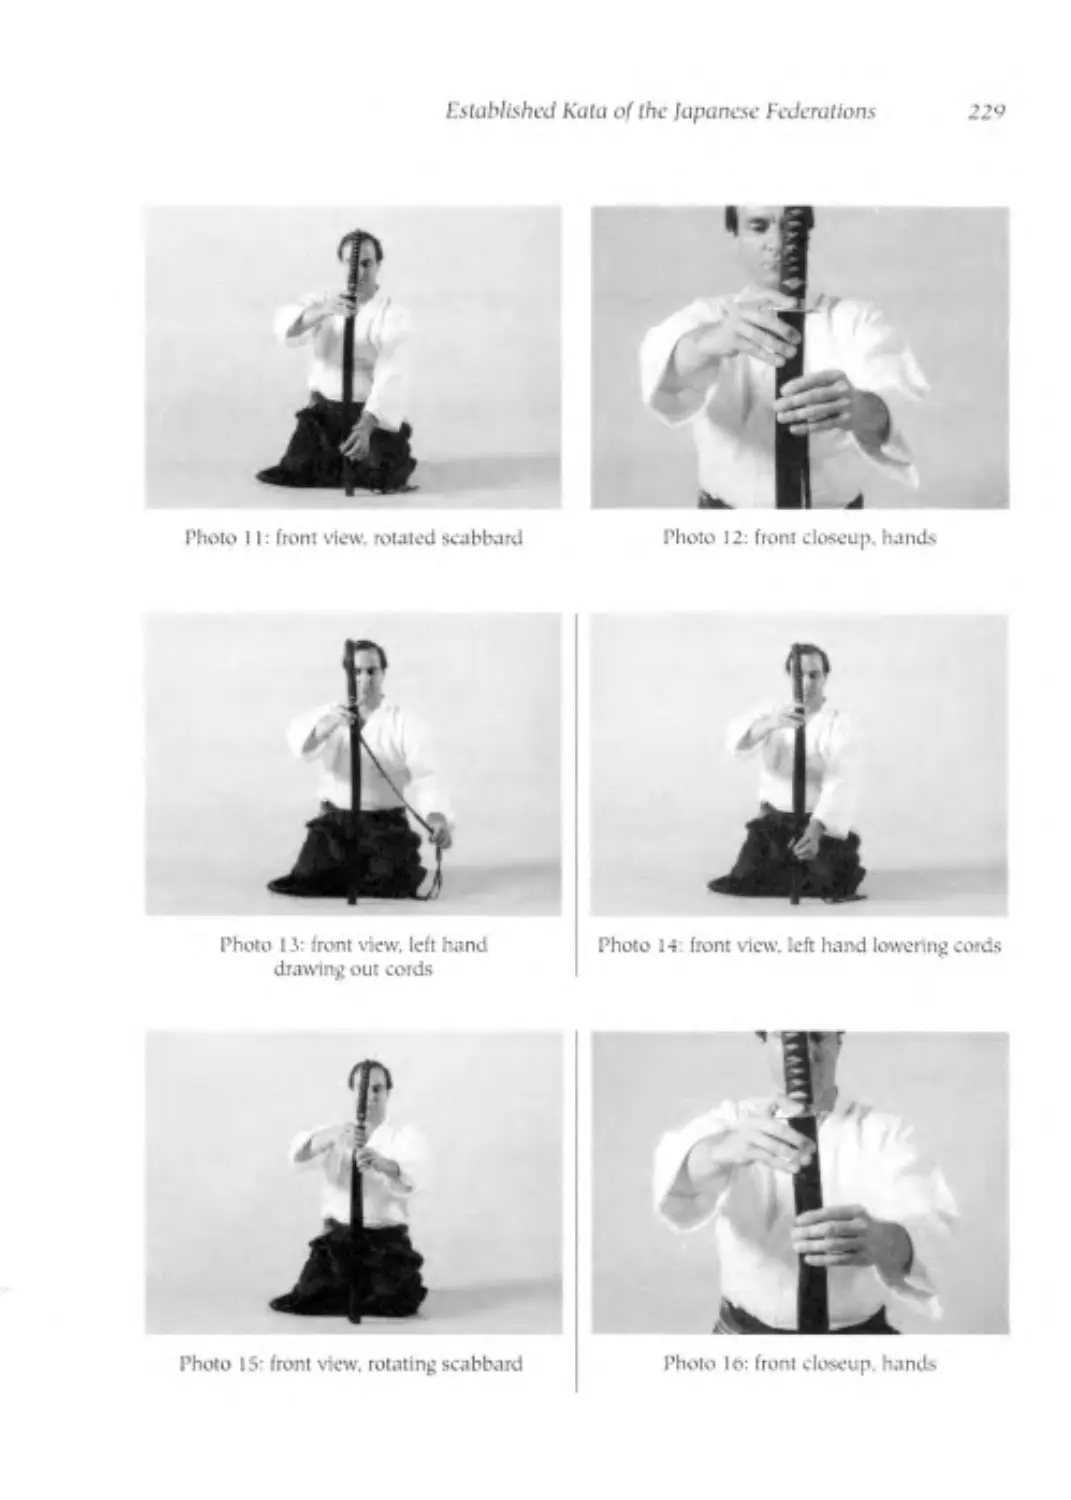
Use the left hand to rotate the scabbard I KO degrees, edge to the right
Photo 30: front closeup, hands
Use the left hand to unfasten the cords,
drawing them horizontally to the left to
straighten out any kinks.
Photo 31: front view,
left hand drawing out cords
Let the cords hang down the scabbard.
Photo 32: front view. left hand lowering cords
The Traditional Schools of laido
37
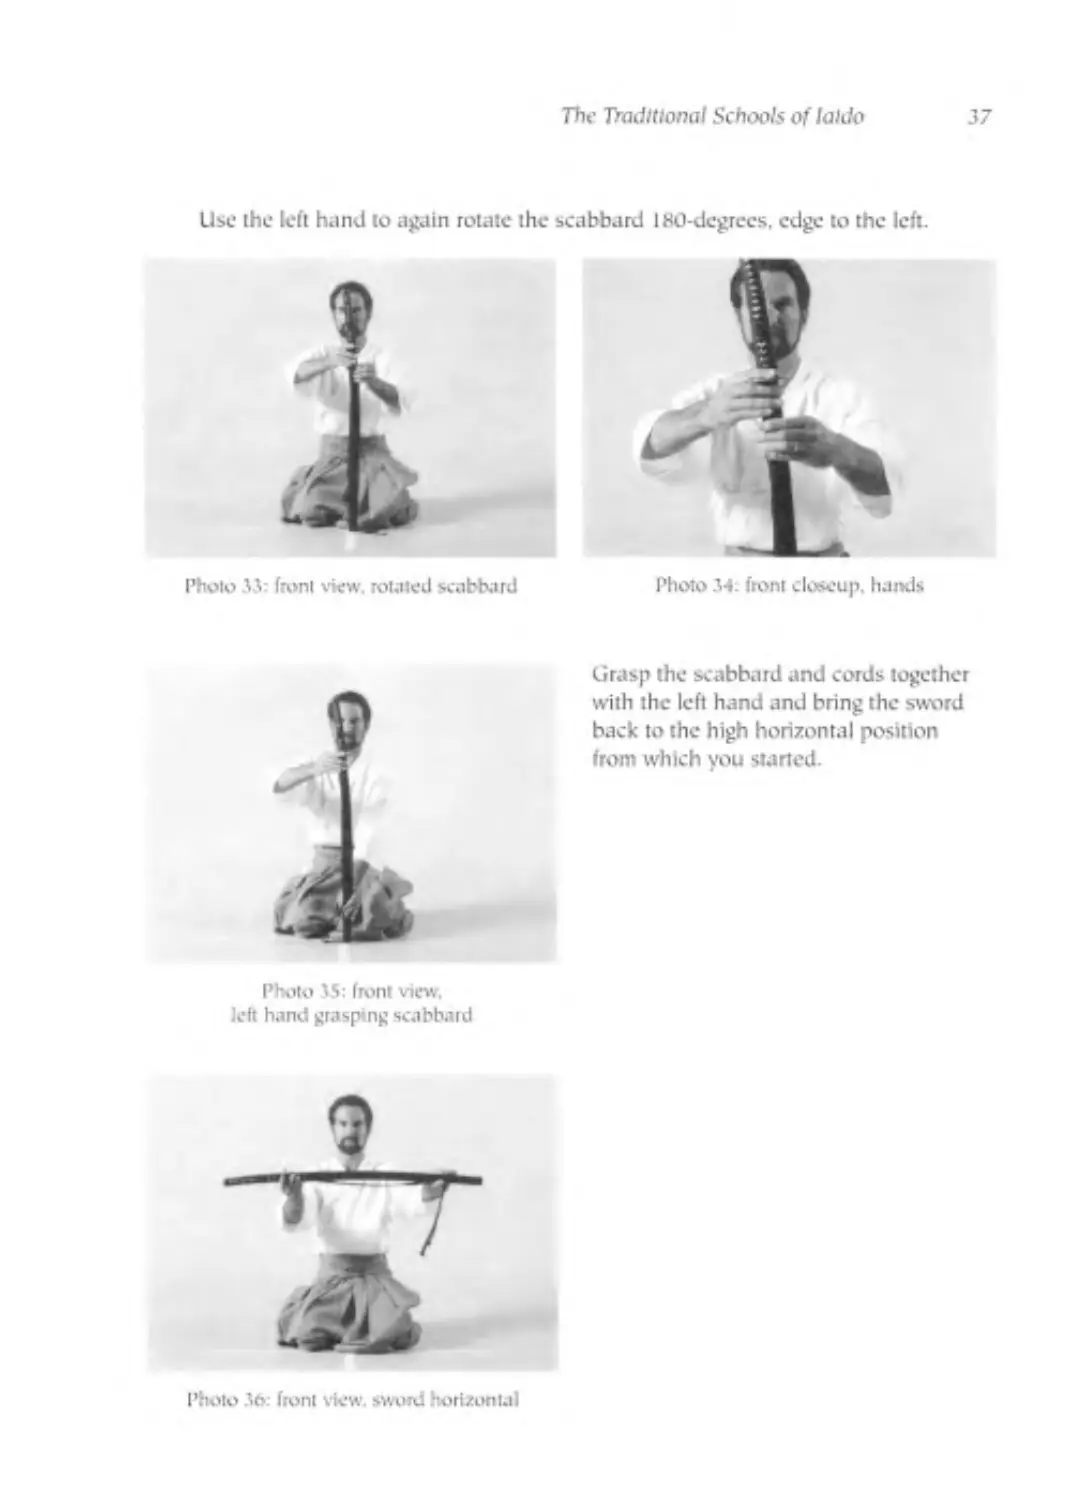
Use the left hand to again rotate the scabbard 180-dcgrecs. edge to the left.
Photo 33: front view, rotated scabbard
Photo 34: front closeup, hands
Grasp the scabbard and cords together
with the left hand and bring the sword
back to the high horizontal position
from which you started.
Photo 35: front view,
left hand grasping scabbard
Photo 36: front view, sword horizontal
ЗВ lapanese Sword Drawing: A Source hook for laido Students
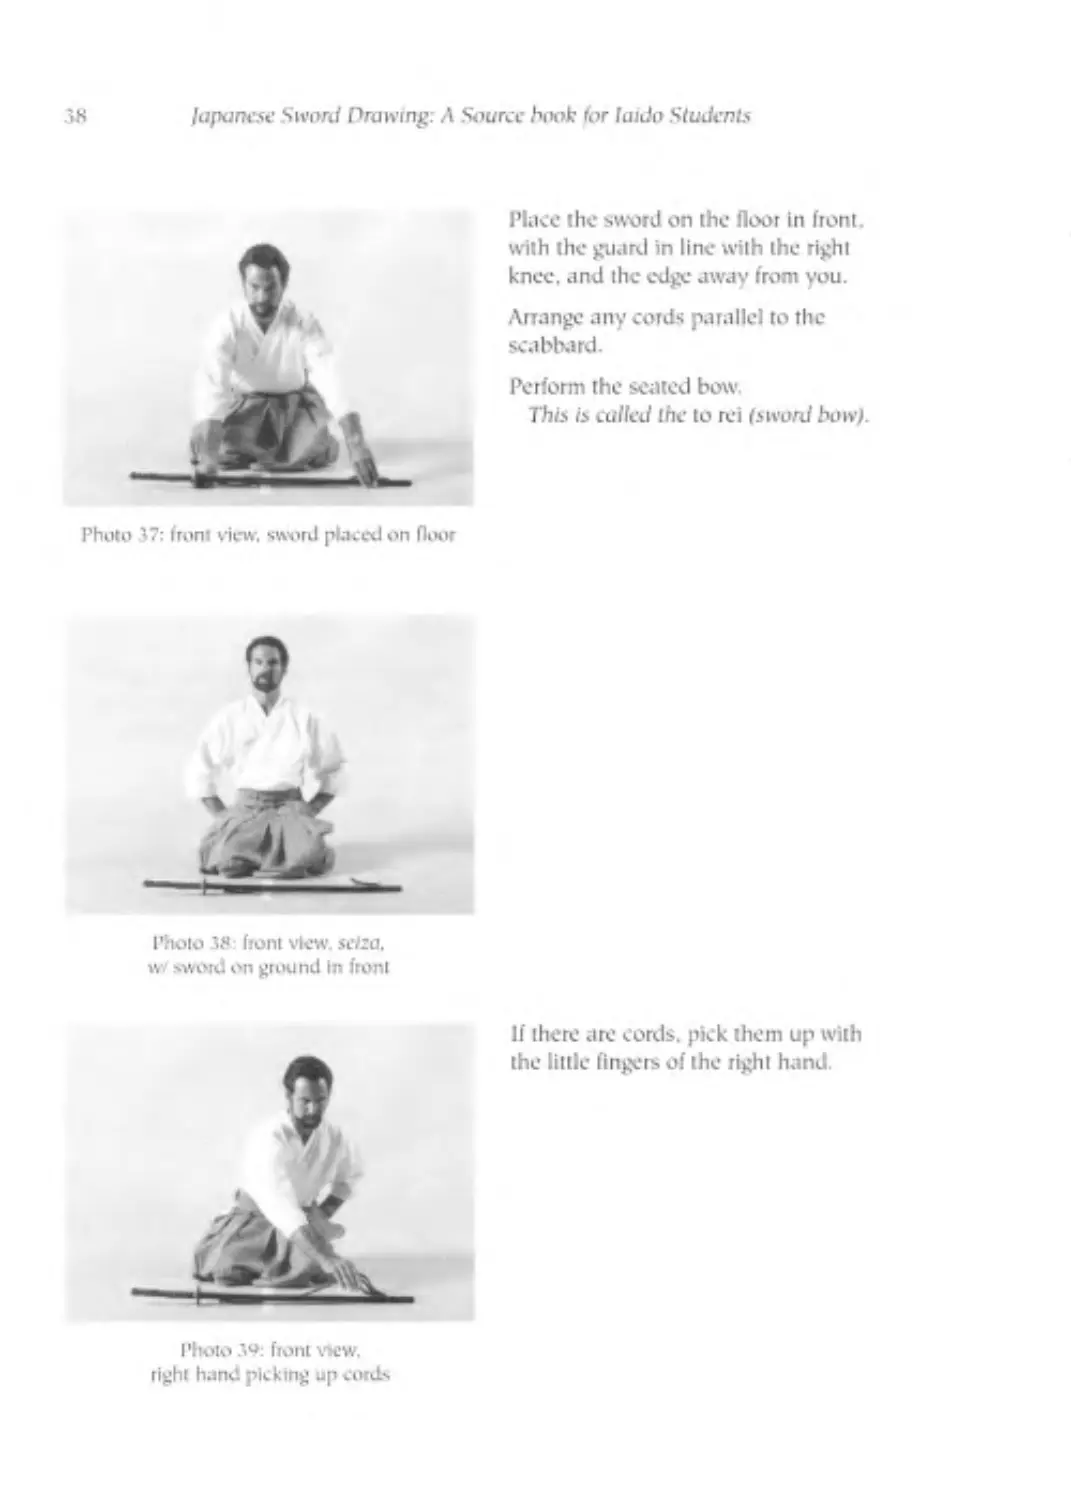
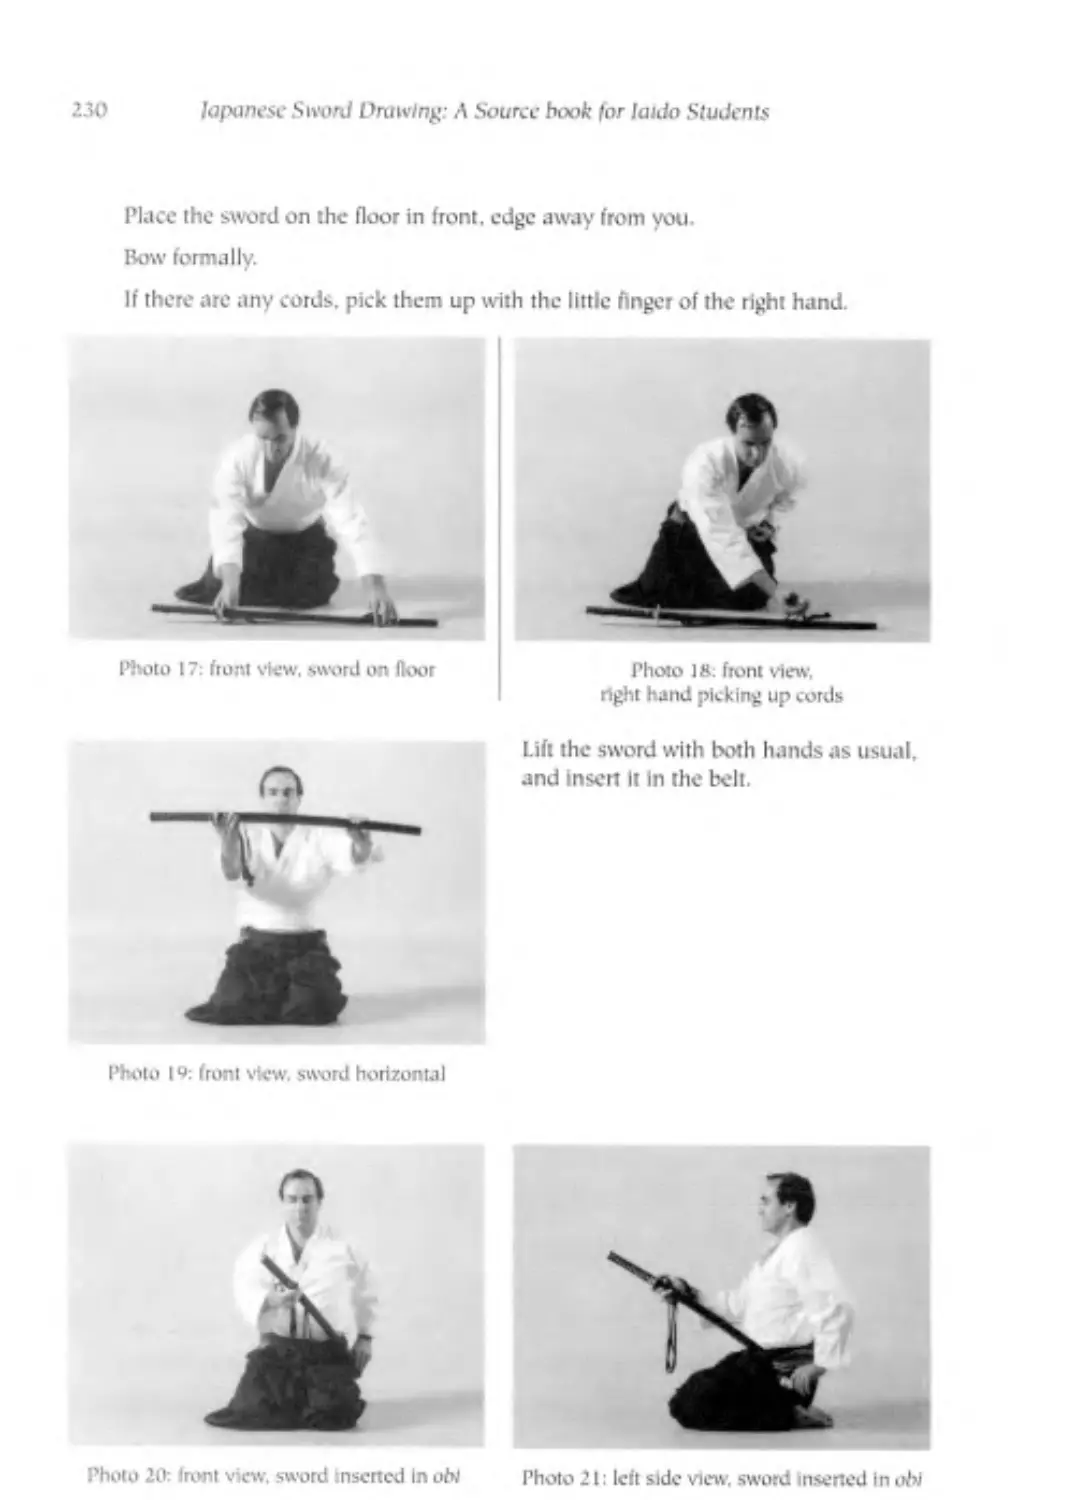
Place the sword on the Boor in front,
with the guard in line with the right
knee, and the edge away from you.
Arrange any cords parallel to the
scabbard.
Perform the seated bow
This is called the to rei tsword bow).
Photo 17: from view, sword placed on floor
Photo .1»: front view, selza,
w sword on ground in front
If there are cords, pick them up with
the little fingers of the right hand
Photo .19: front view,
right hand picking up cords
The Traditional Schools of Iaido
Photo 40: (tom view, sword horizontal
Re-grip the sword as above and raise
it again lo horizontal.
Rotate the sword in the right hand until
you can insert the left thumb Into the
belt at the center waist, between the
second and third layers.
Use the left hand to insert the butt into
the belt.
Photo 41 front view sword inserted in obi
Photo 42 left side view, sword Inserted in obi
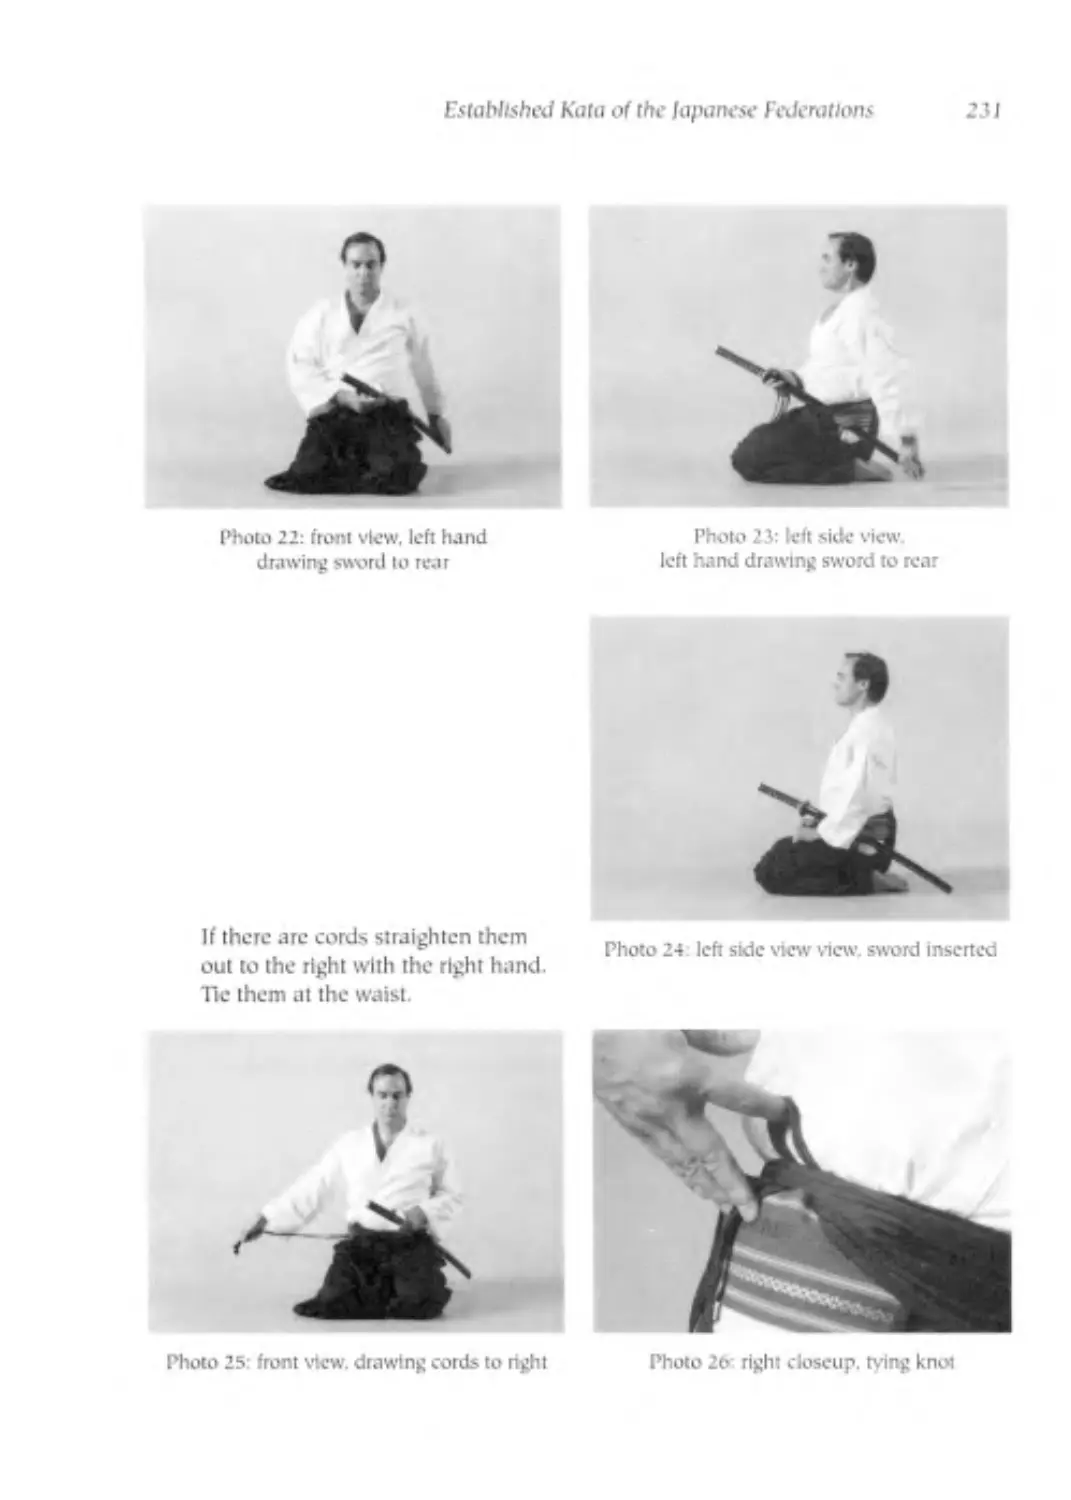
As the scabbard emerges from the belt through the left side opening of the wide
trousers, slide lhe left hand to the butt and draw the sword fully to the rear.
Photo 43: front view, left hand
drawing sword io rear
Photo 44 left side view, left hand
drawing sword to rear
ю
lapanese Sword Drawing: A Source book for laido Students
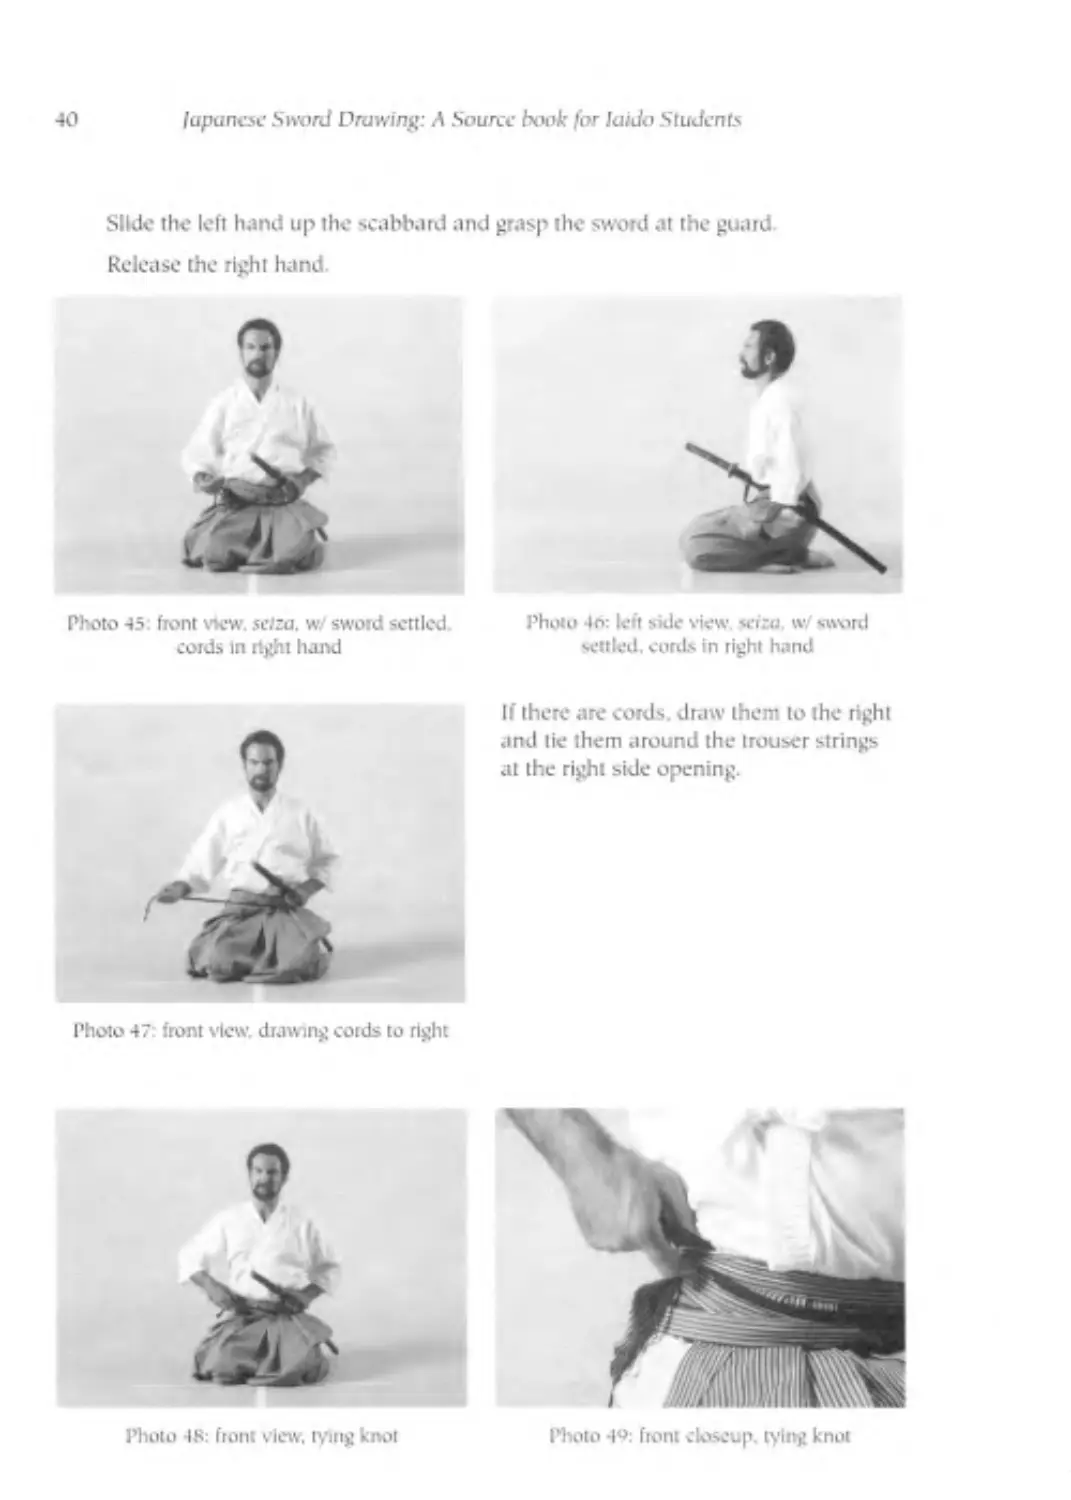
Slide the left hand up the scabbard and grasp the sword at the guard
Release the right hand.
Photo 45: front m1. setzu, w- sword settled,
cords In right hand
Photo -In: left side view sciza. w. sword
settled, cords in right hand
Photo 47 front view, drawing cords to right
If there are cords, draw them to the right
and tie them around the trouser strings
at the right side opening.
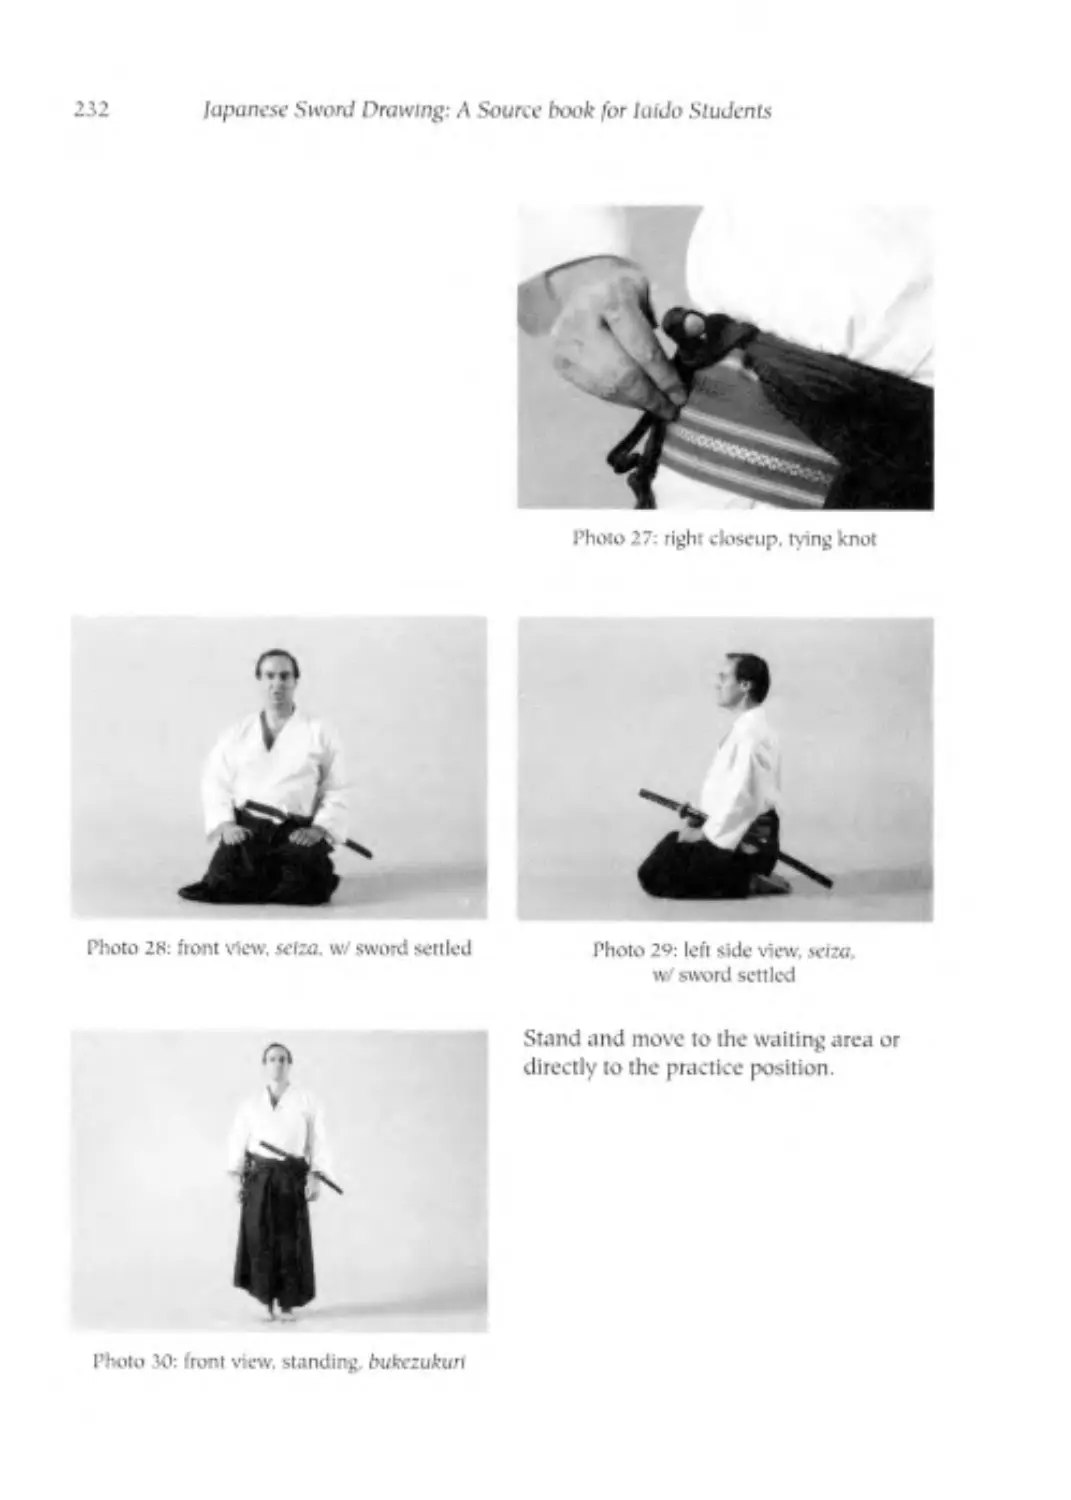
Photo 48: front view, lying knot
Photo 49: ftont closeup, tying knot
The IhkJitional Schook of laido
41
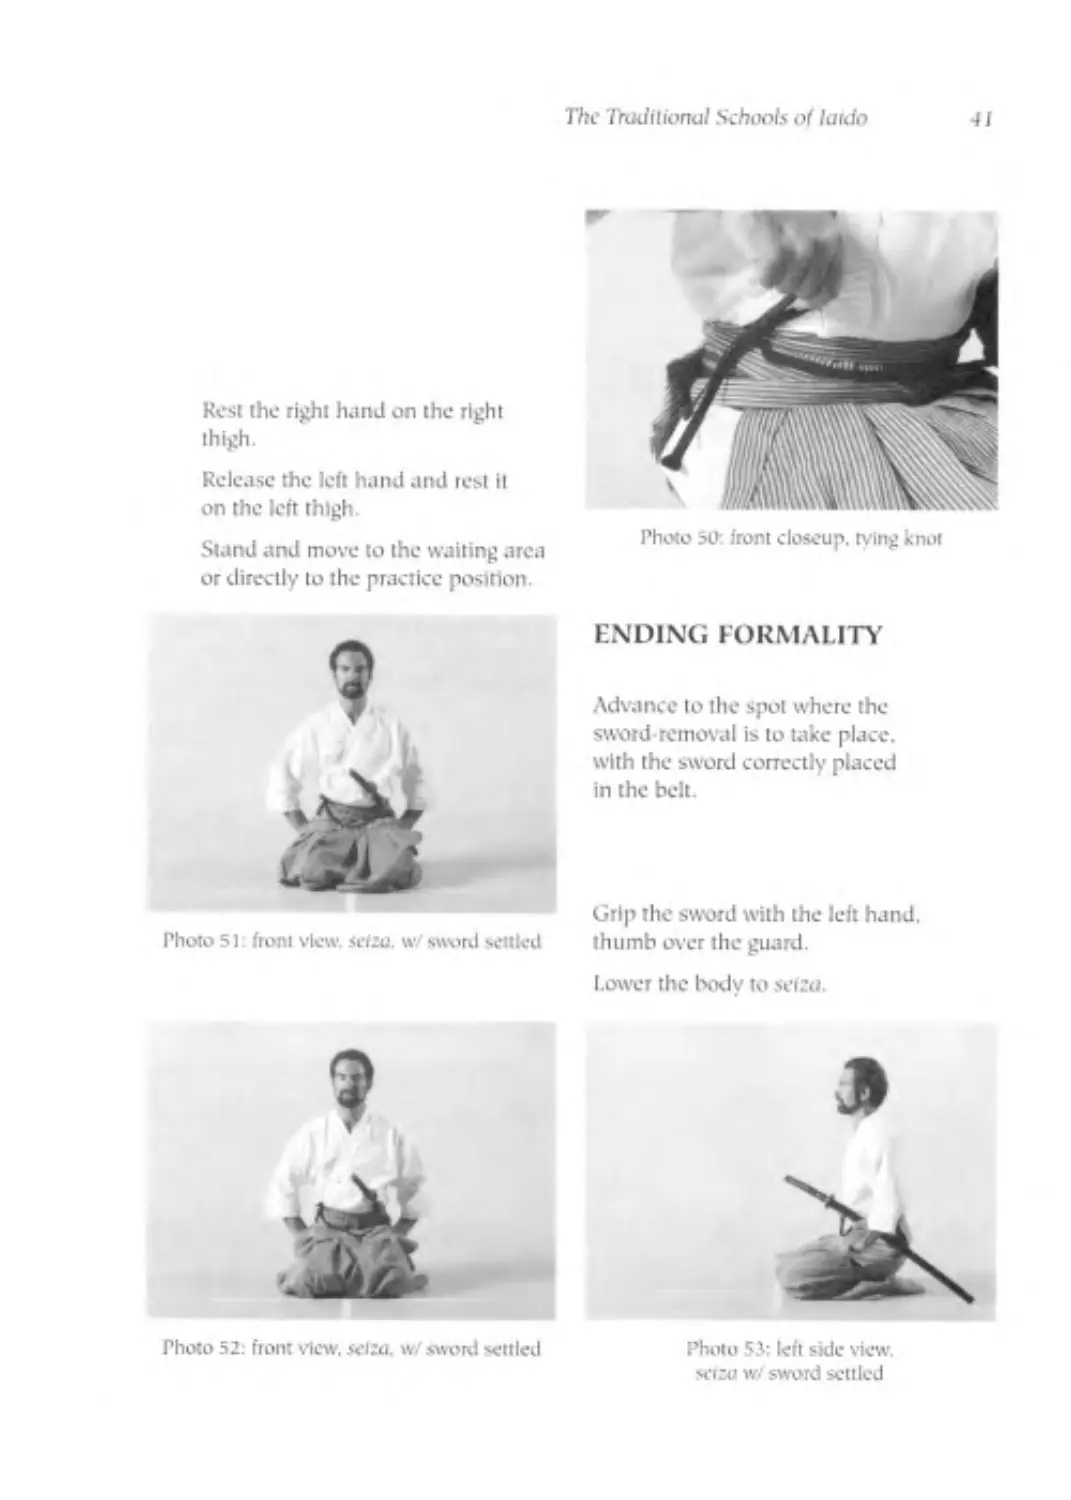
Rest the right hand on the right
thigh.
Release the left hand and test it
on the left thigh.
Stand and move to the waiting area
or directly to the practice position.
Photo 50: front closeup, tying knot
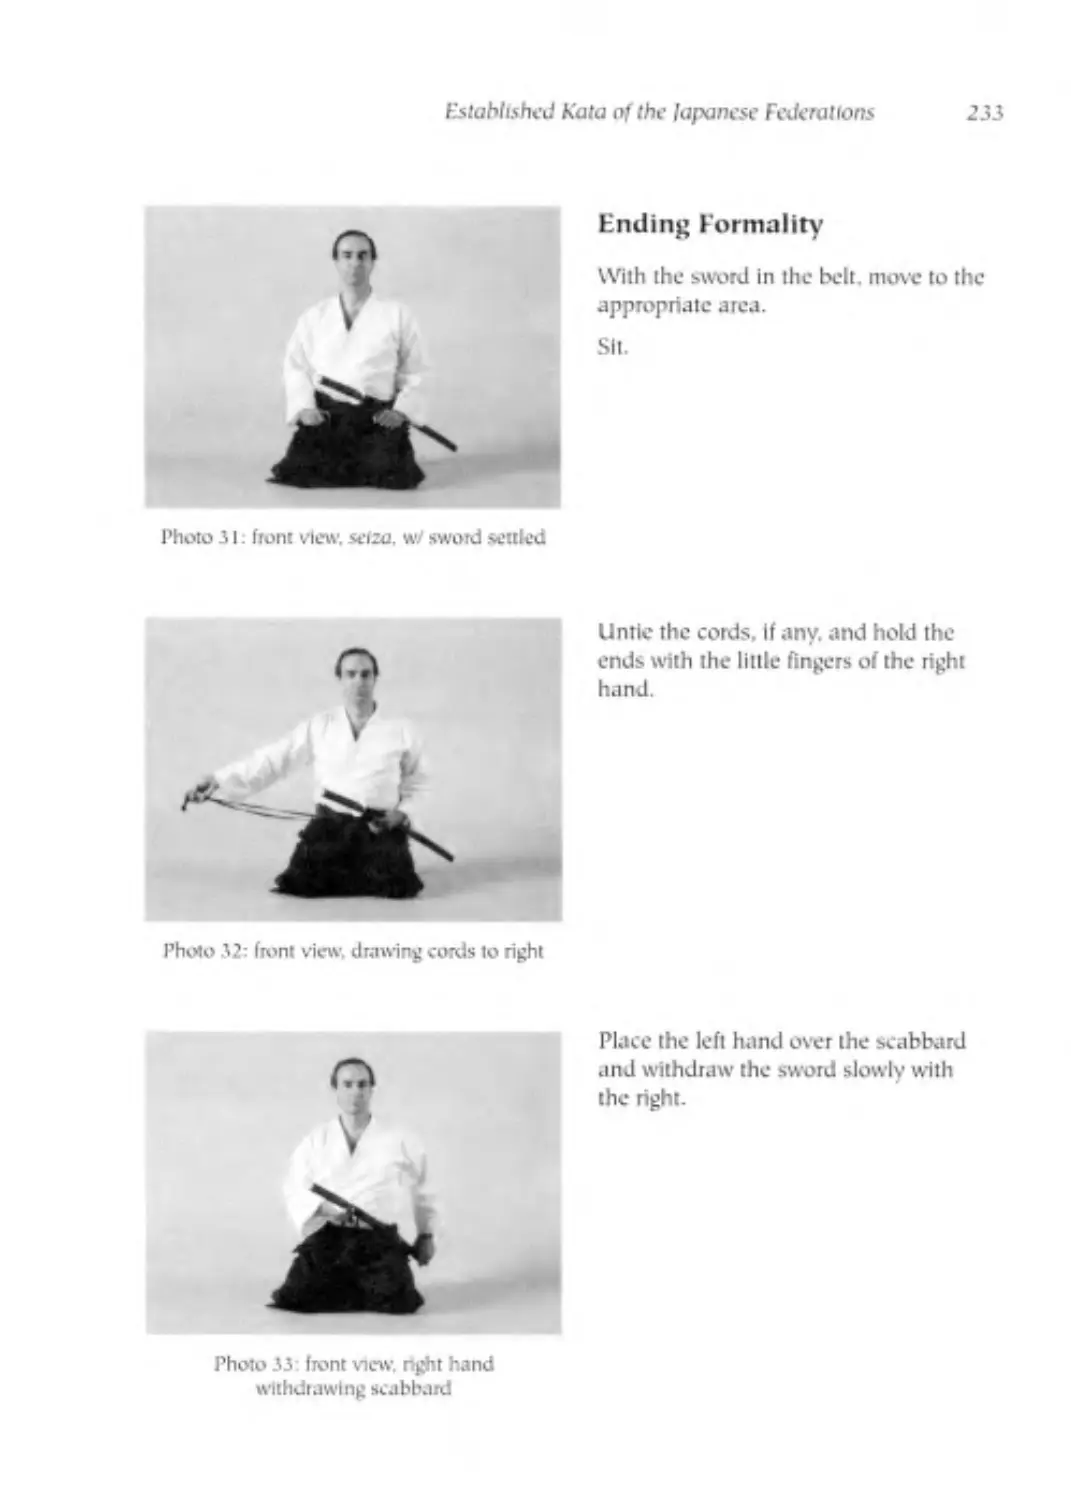
ENDING FORMALITY
Advance to the spot where the
sword removal is to take place,
with the sword correctly placed
in the belt.
Photo 51 front view seize, w sword settled
Grip the sword with the left hand,
thumb over the guard.
Lower the body to setzu.
Photo 52: ftont view, sefso. » sword settled
Photo 53: left side view
seize w. sword settled
42
/oponese Sword Drawing: A Source book for faulo Students
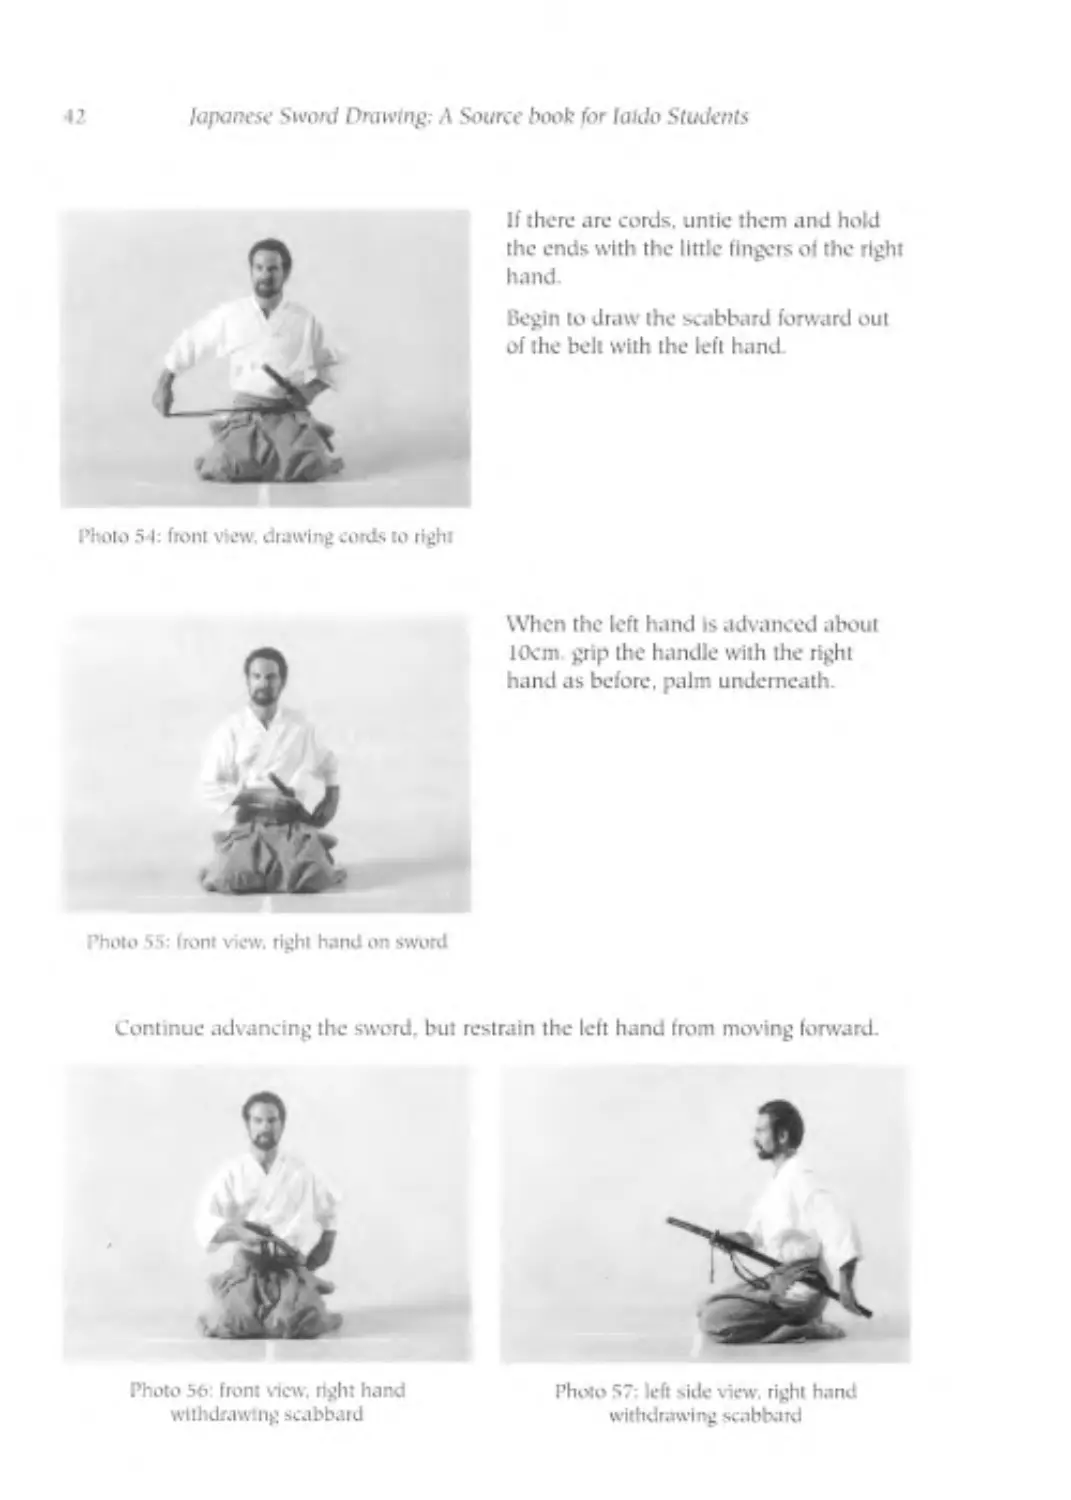
If there arc cords, untie them and hold
the ends with the little fingers of the right
hand.
Begin to draw the scabbard forward out
of the belt with the left hand
Photo 5*1: front view, drawing cords to right
When the left hand is advanced about
10cm grip the handle with the right
hand as before, palm underneath.
Photo 55: front view, right hand on sword
Continue advancing the sword, but restrain the left hand from moving forward.
Photo 50: front view, right hand
withdrawing scabbard
Photo 57: left side view, right hand
withdrawing scabbard
The liaditionul Schools o( laido 43
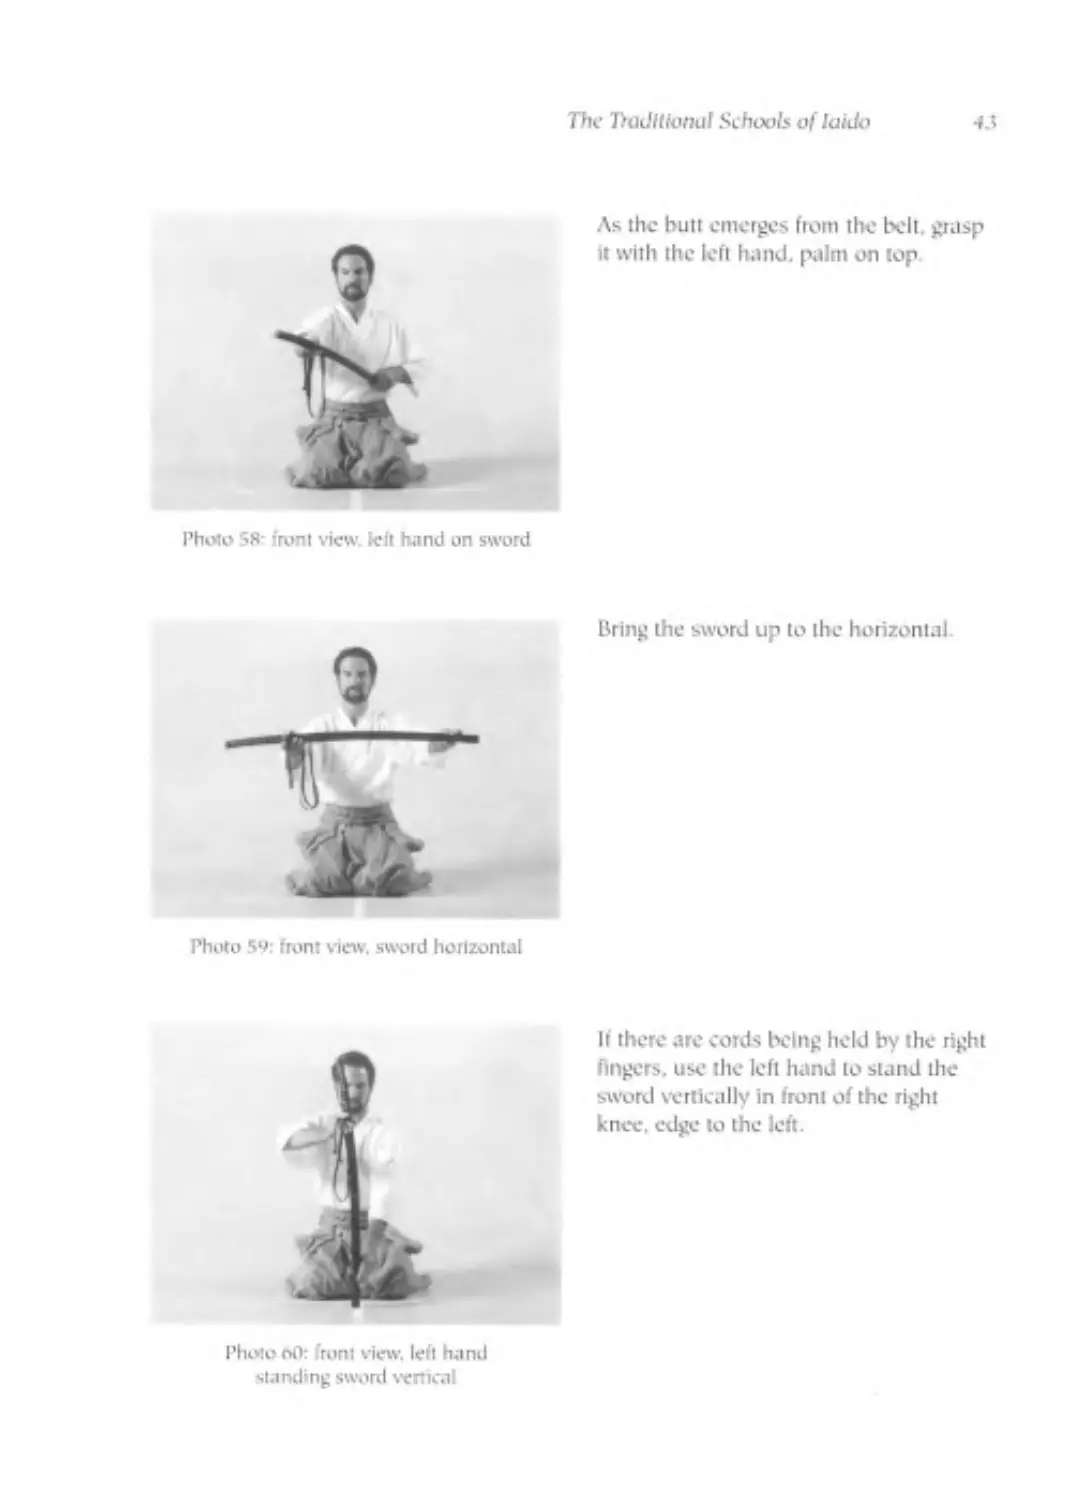
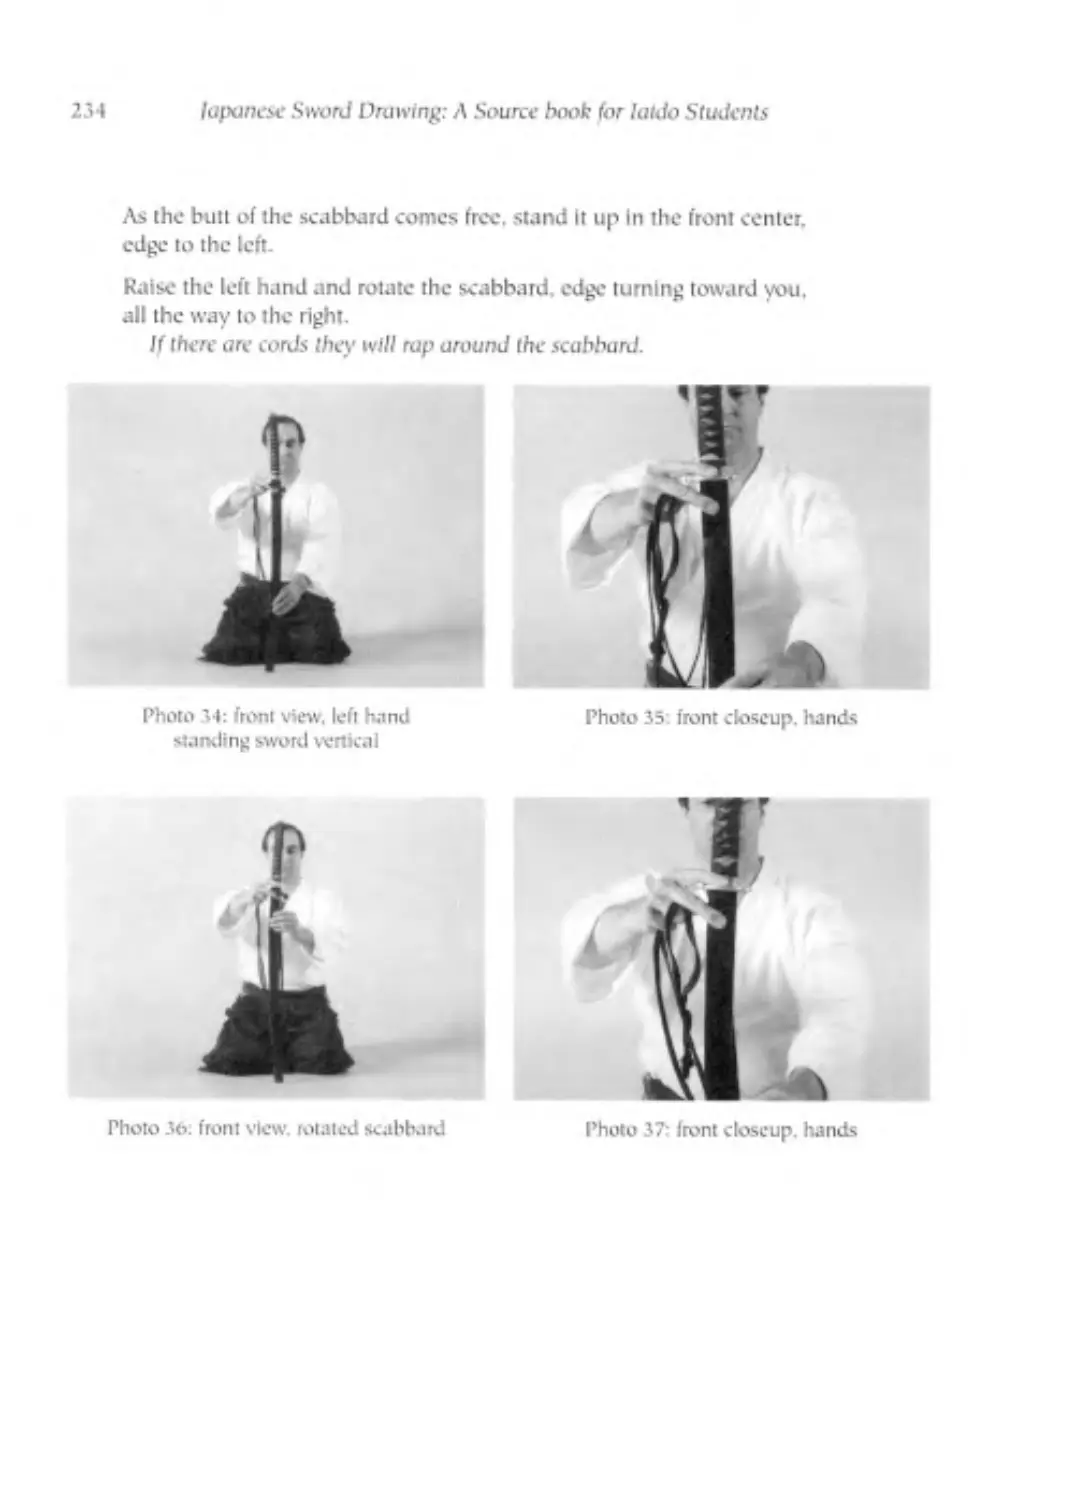
As the butt emerges (torn the belt, grasp
it with the left hand, palm on top.
Photo S8- front view left hand on sword
Bring the sword up to the horizontal
г
Photo 59: from view. sword horizontal
If there are cords being held by the right
fingers, use the left hand to stand the
swotd vertically in front of the right
knee, edge to the left.
Photo nO: front view, left hand
standing sword vertical
44
Japanese Sword Drawing: A Source book /or laido Students
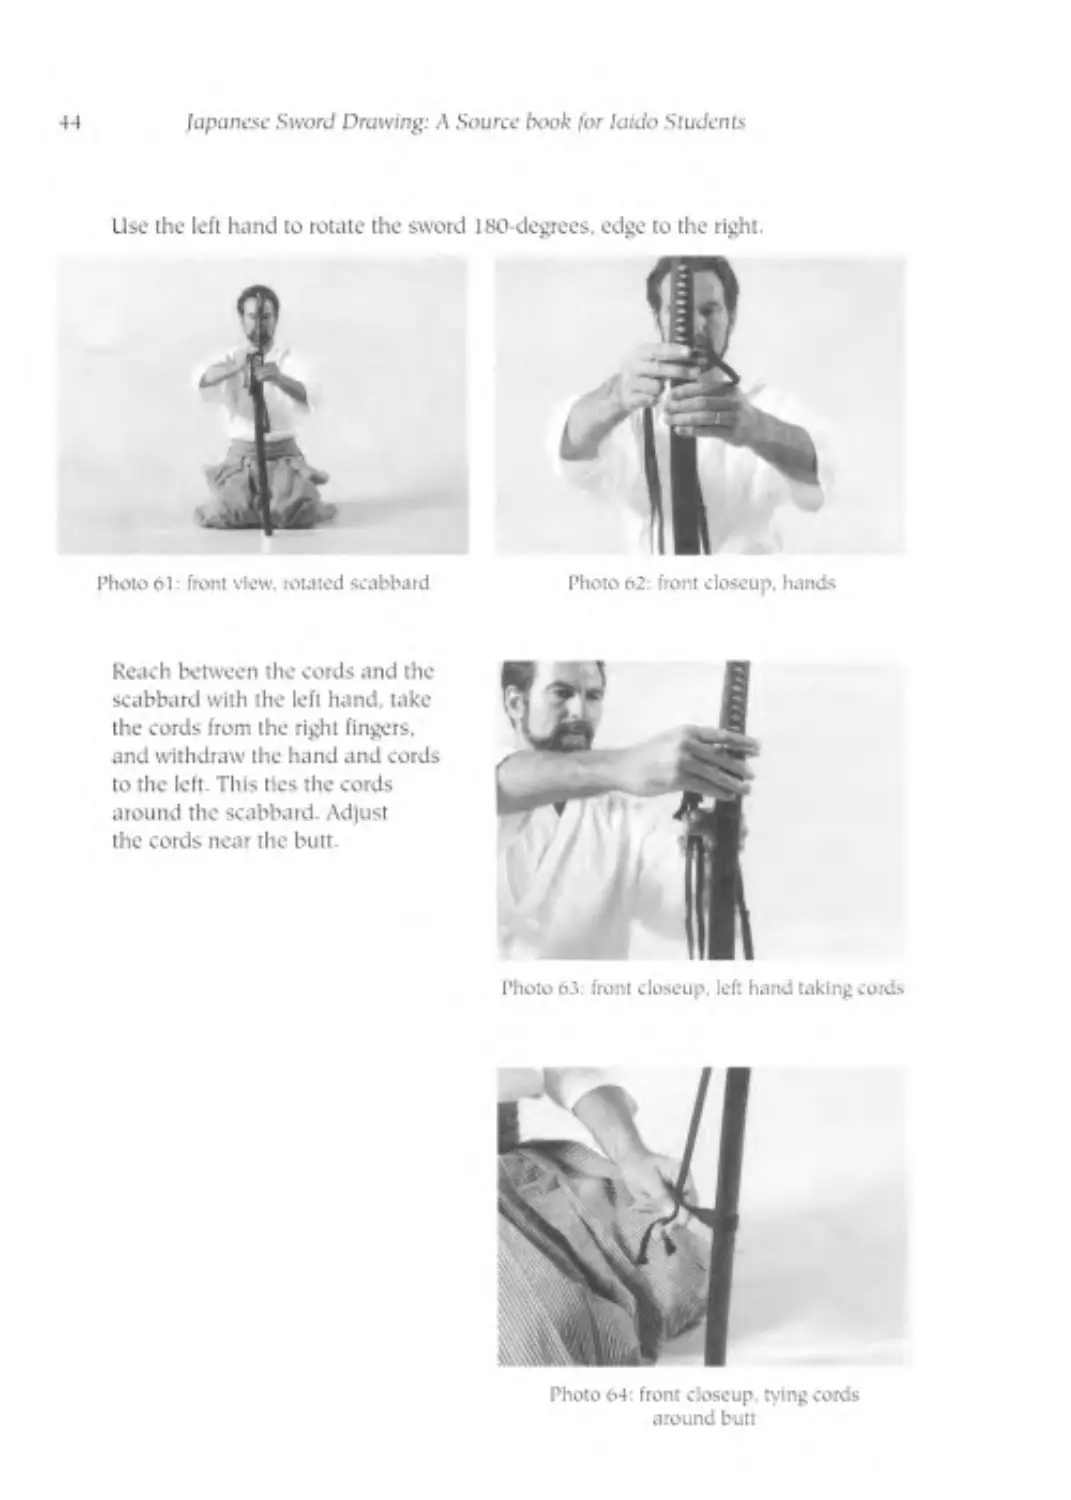
Photo 61: front view, touted scabbard
Photo 62: front closeup, hands
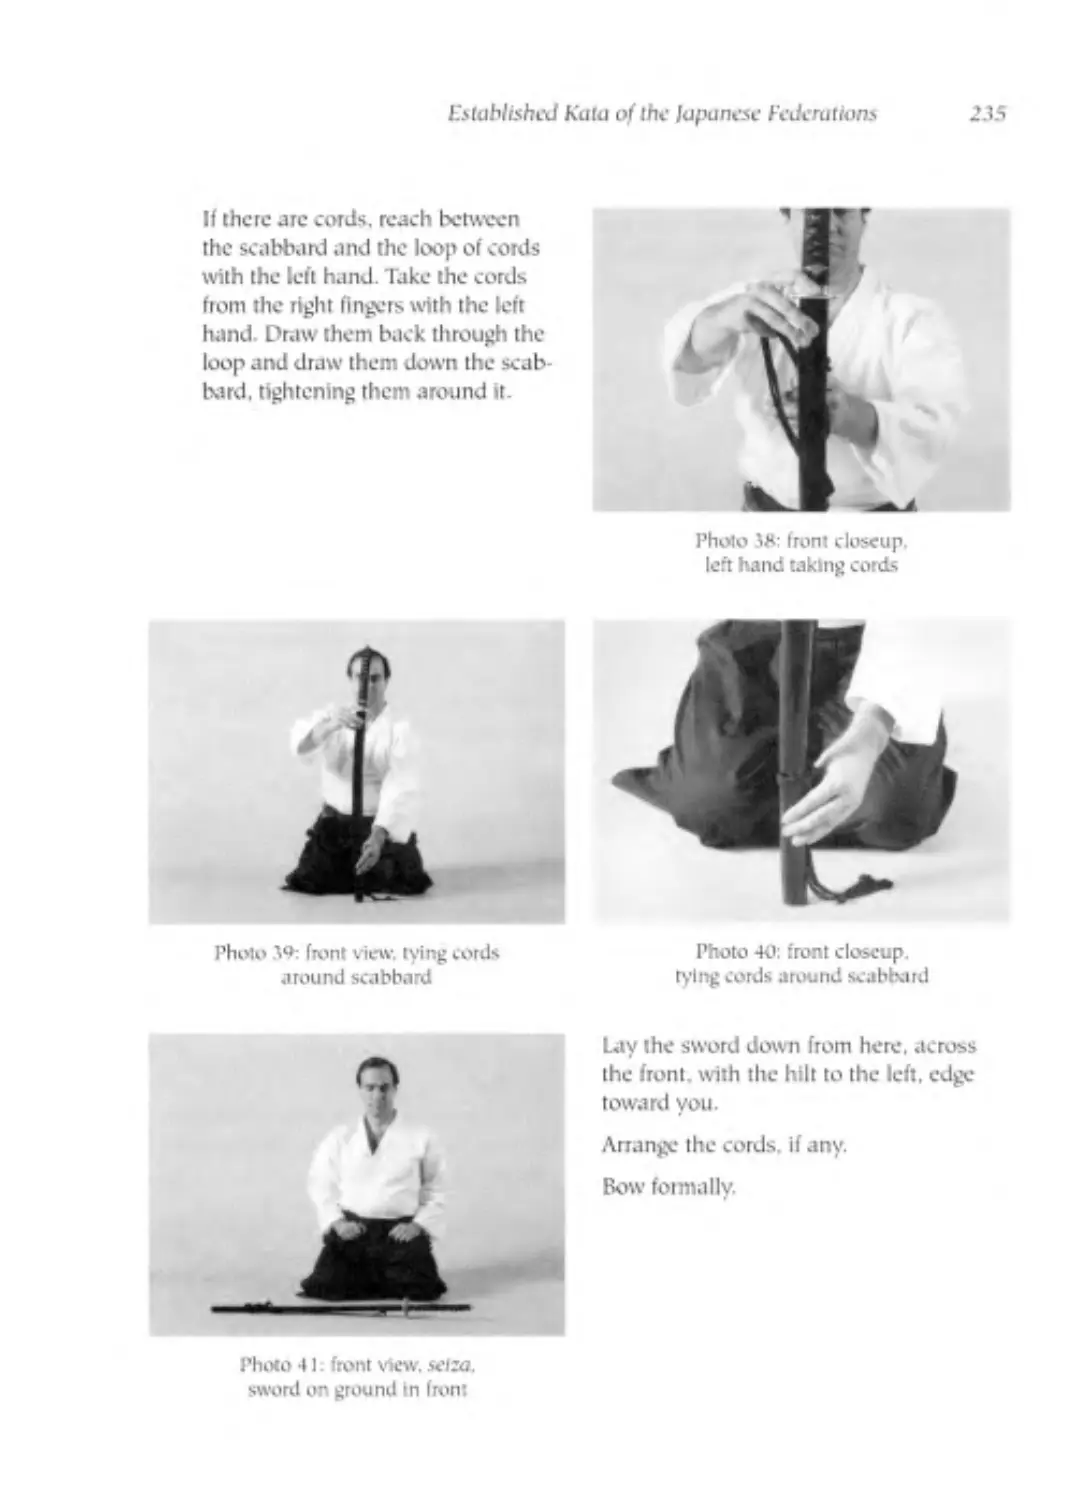
Reach between the cords and the
scabbard with the left hand, take
the cords from the right fingers,
and withdraw the hand and cords
to the left. This tics the cords
around the scabbard- Adjust
the cords near the butt
Photo 63: front closeup, left hand taking curds
Photo 64 front closeup tying cords
around butt
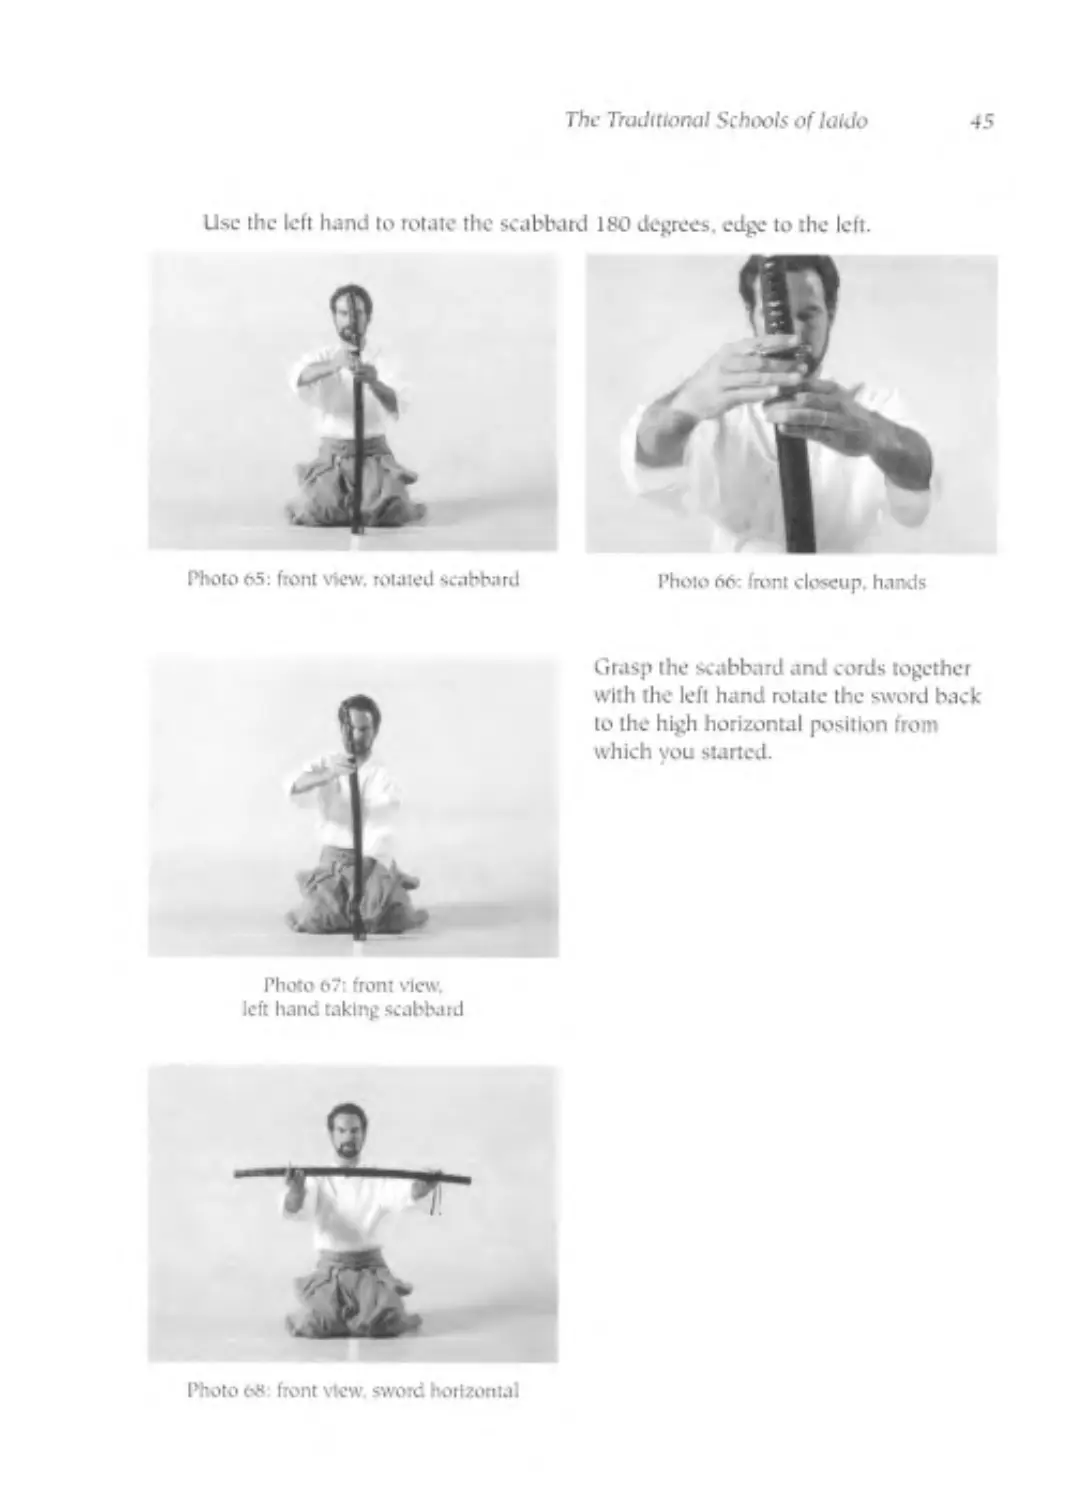
The Traditional Schools of laido 45
Use the left hand to rotate the scabbard 180 degrees, edge to the left.
Photo 66: (rent closeup, hands
Grasp the scabbard and cords together
with the left hand rotate the sword back
to the high horizontal position from
which you started.
Photo 67: front view,
left hand taking scabbard
Photo 68: front slew, sword horizontal
40
hipuncse Sword Drawing- A Source l>ook for laido Students
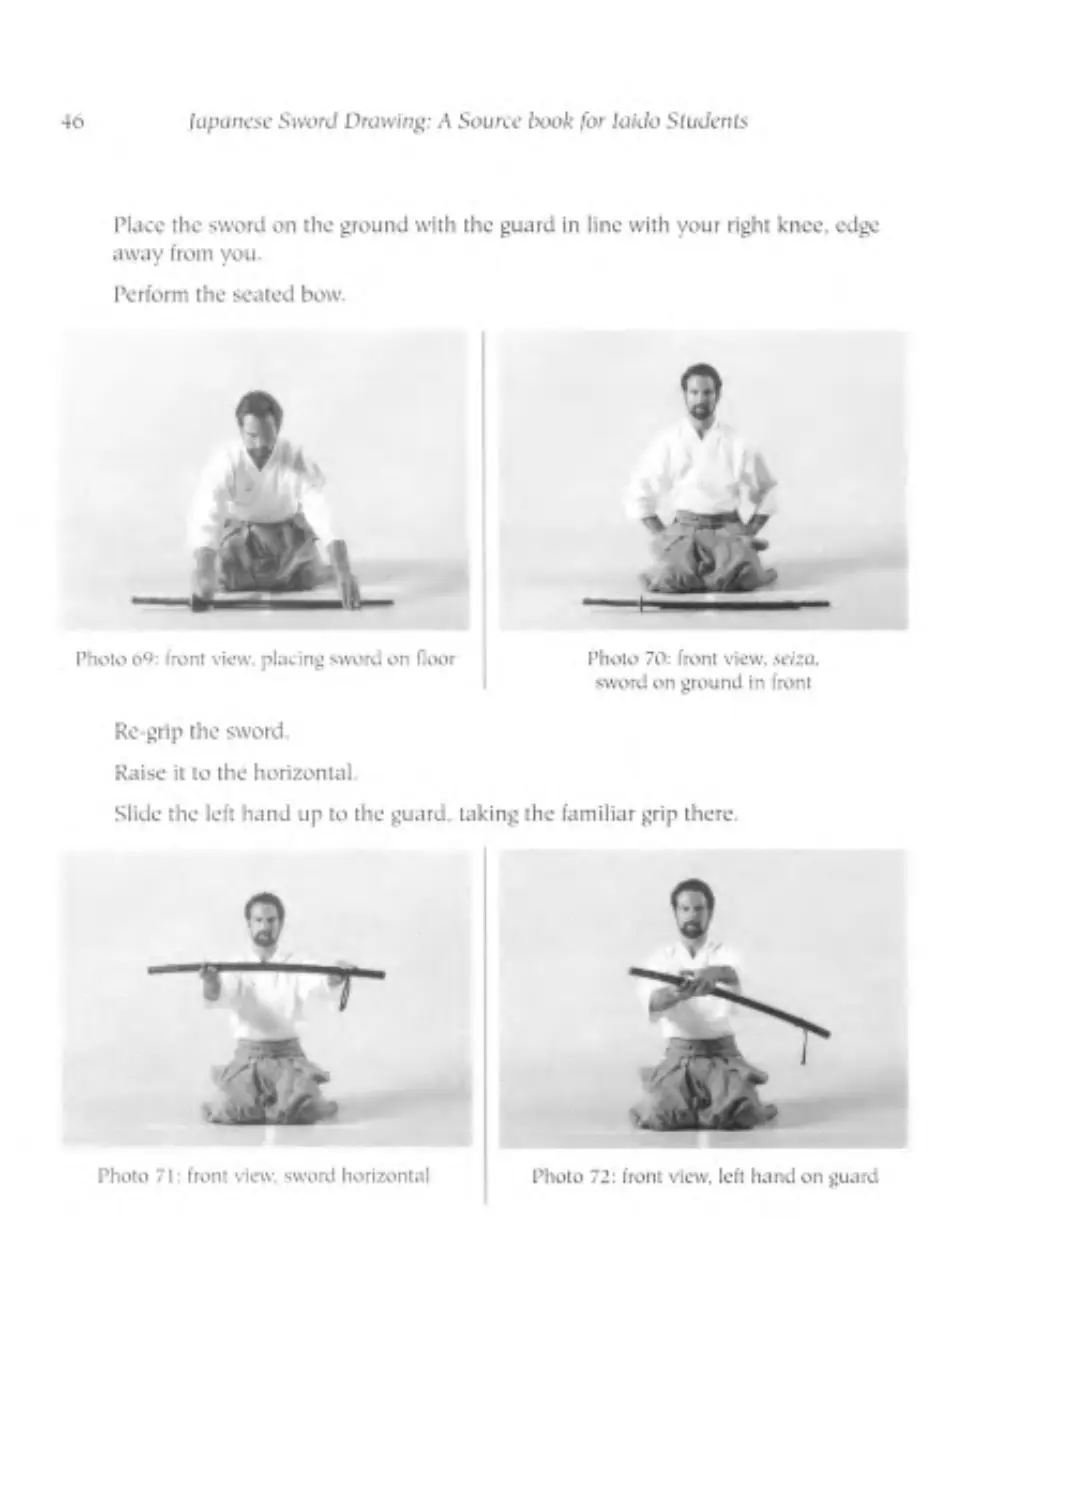
Place lhe sword on rhe ground with the guard in line with your right knee, edge
away from you.
Perform the seated bow.
Photo о1» front view, plating sword on Г.оог
Photo 70; front view. u <:u.
sword on ground in front
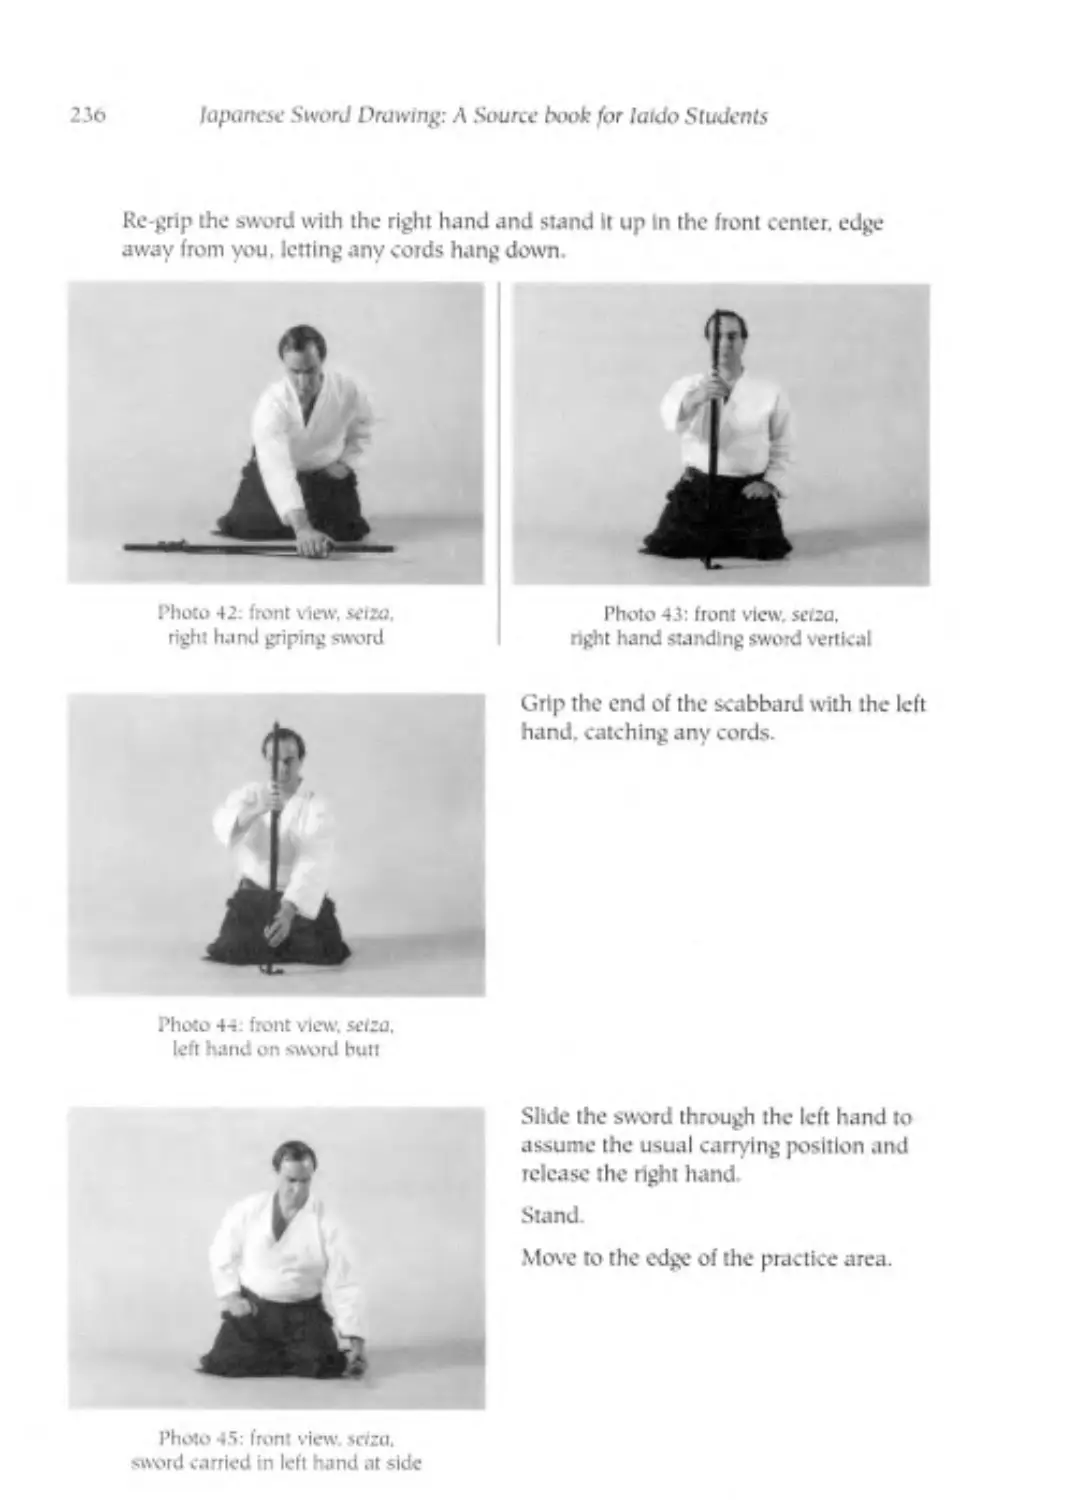
Re grip the sword
Raise it to the horizontal
Slide the left hand up to the guard, talcing the familiar grip there
Photo 72: front view, left hand on guard
77ie Traditional Schools of laido
47
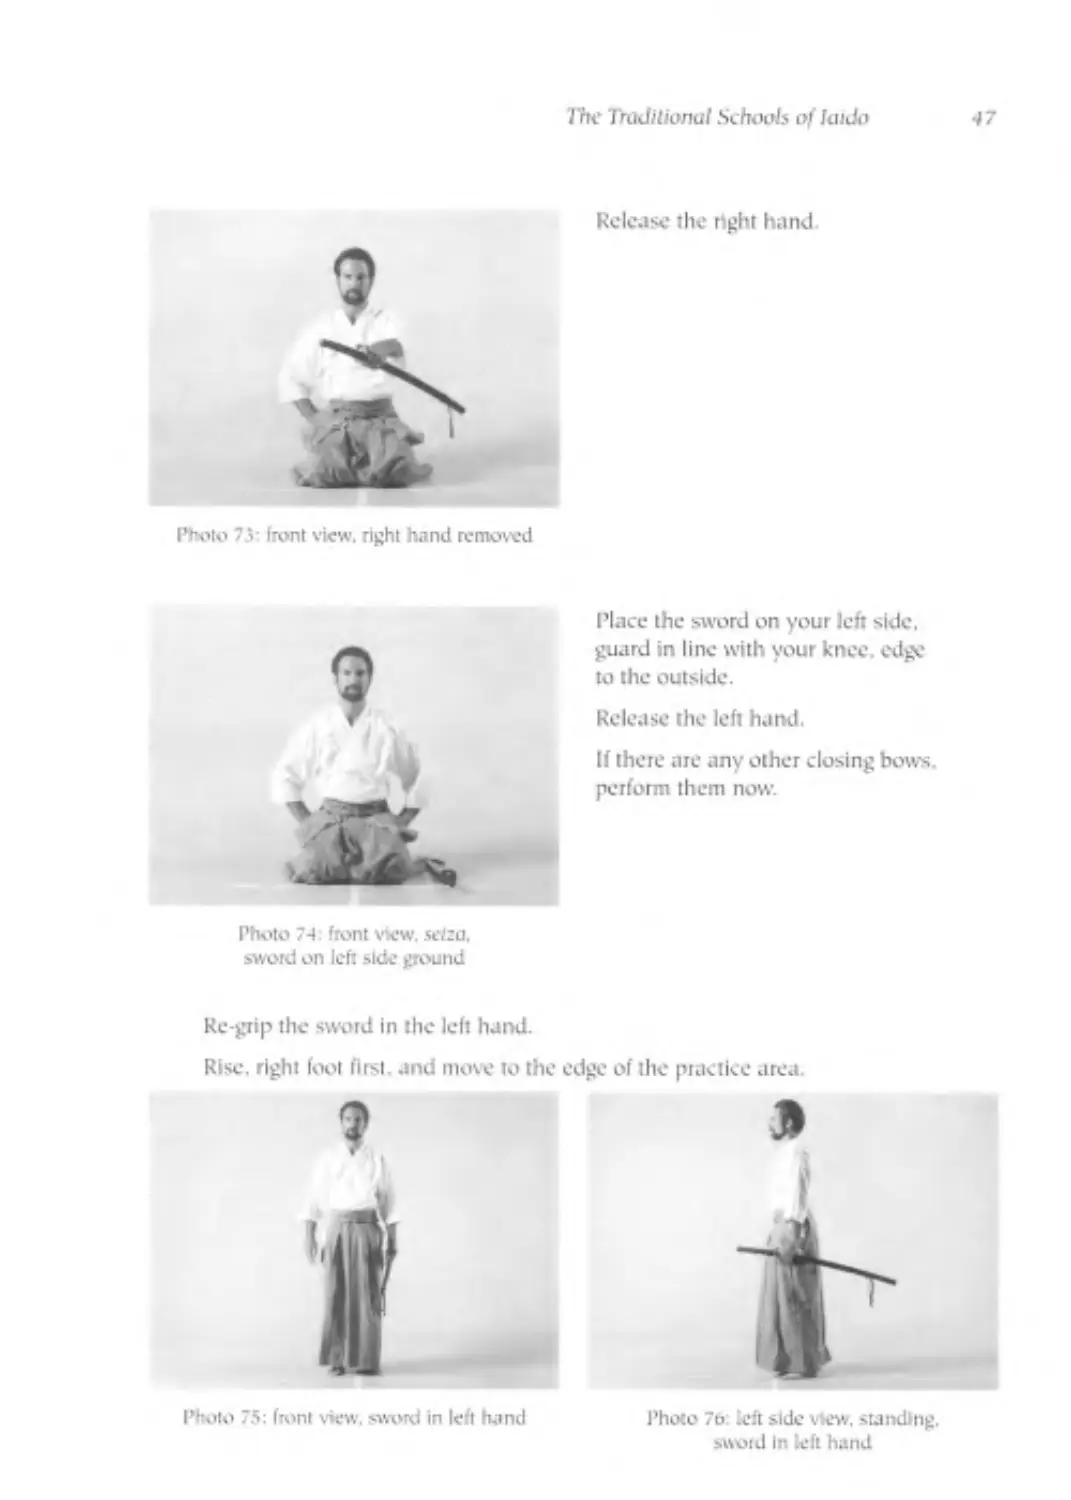
Release the tight hand
Photo 7 J: front view, right hand removed
Place the sword on your left side,
guard in line with your knee, edge
to the outside.
Release the left hand.
If there are any other closing bows,
perform them now.
Photo 74: front view, setza.
sword on left side ground
Re-grip the sword in the left hand.
Rise, right fool first, and move to the edge of the practice area.
Photo 75: front view, sword in left hand
Photo 7b: left side view, standing,
sword In left hand
48
fupuncse Sword Drawing: Л Source book for laido Students
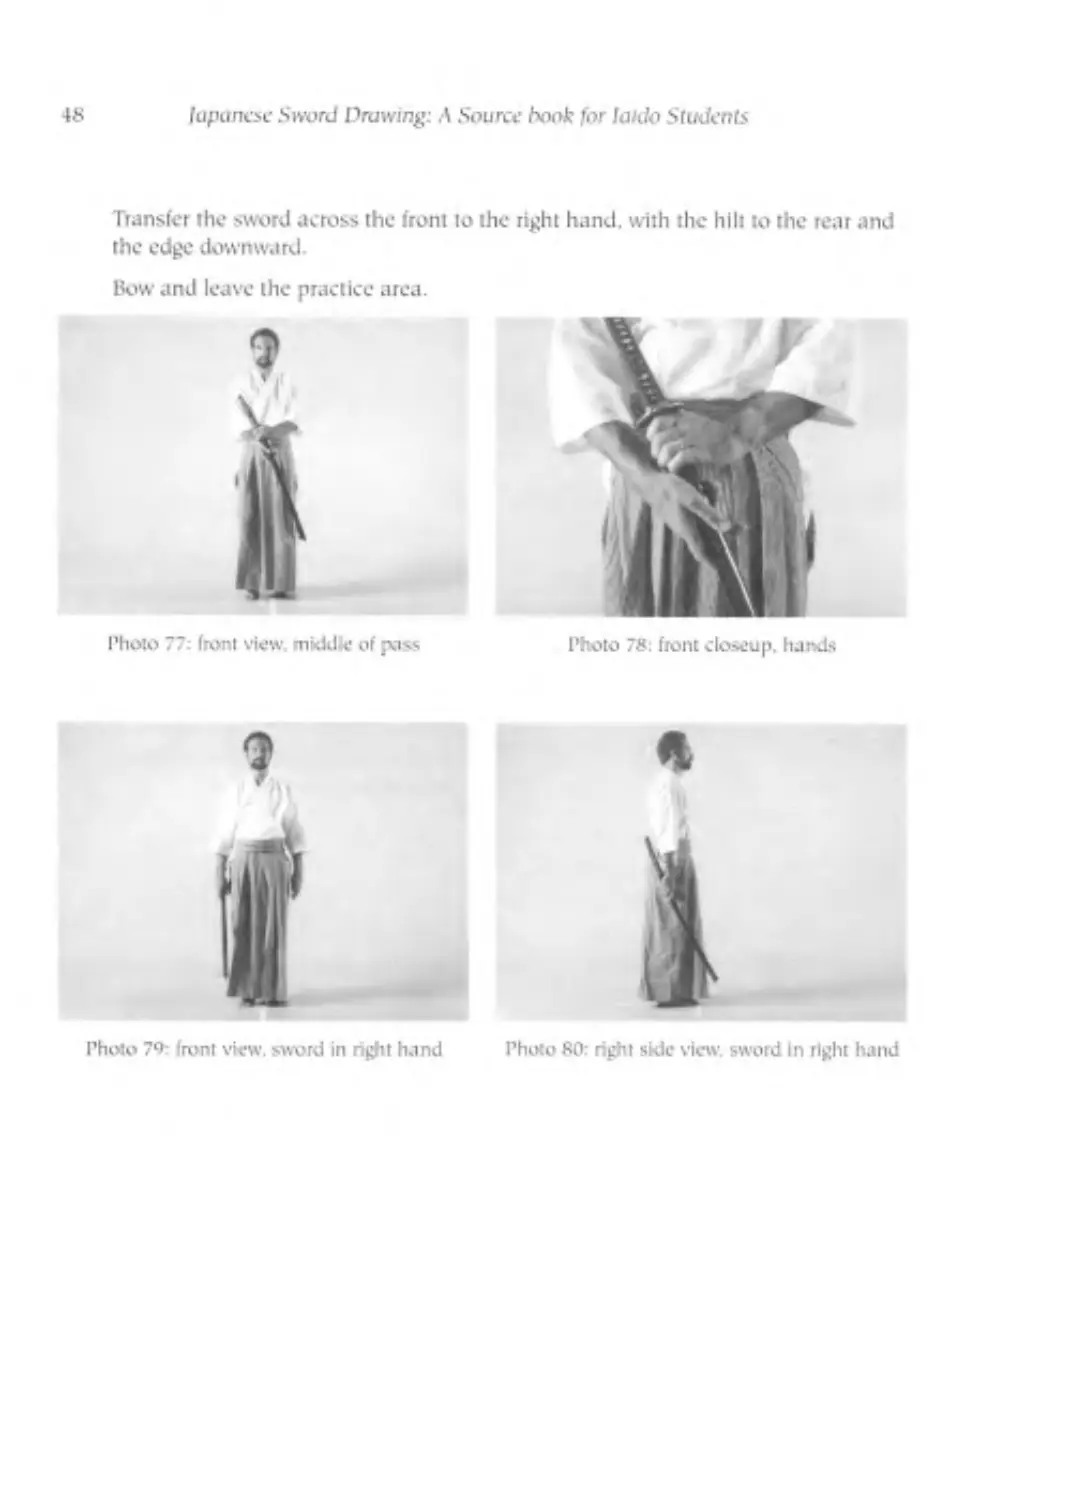
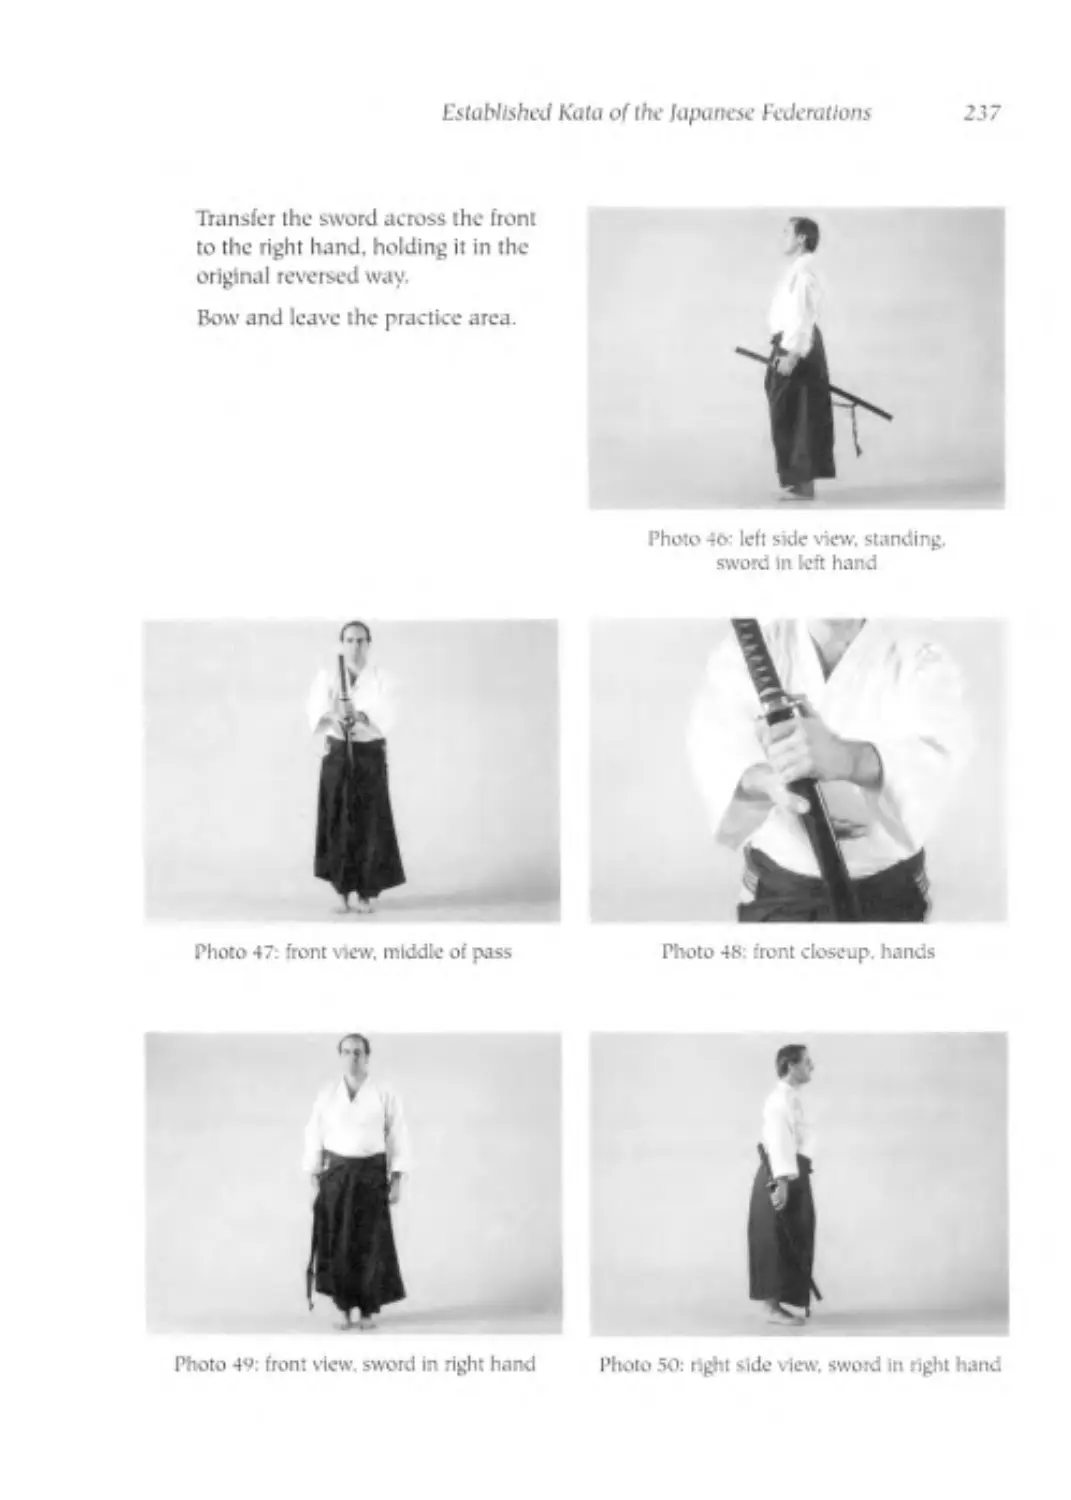
Transfer the sword across the front to the right hand, with the hilt to the rear and
the edge downward.
Bow and leave the practice area.
Photo 77 front view, middle of pass
Photo 7П- front view, sword in right hand
Photo 80: right side view, sword In right hand
The Tradilionat Schools of Iaido
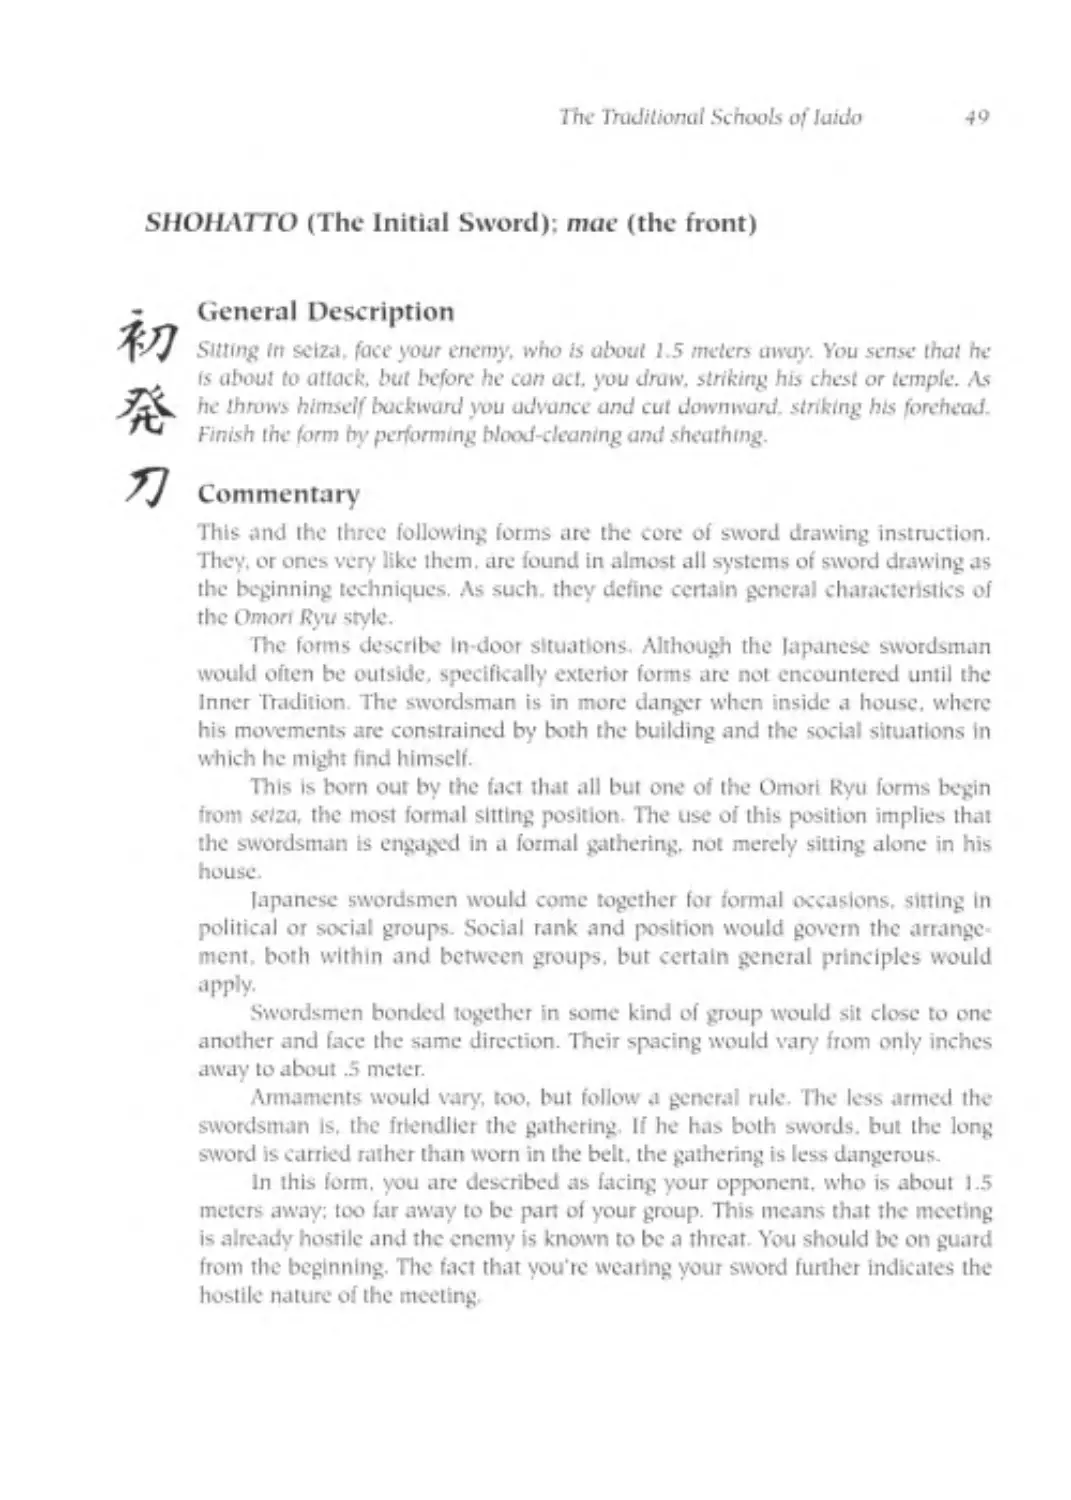
SHOHATTO (The Initial Sword): mac (the front)
General Description
J
ts about to attack. but before he can act. you draw. striking his chest or temple. As
he throws himself buckwunf sou advance and cut downward. striking his forehead-
Finish the form hy performing blood-cleaning and sheathing
7 Commentary
This and the three following forms are the core of sword drawing instruction.
They, or ones very like them, are found in almost all systems of sword drawing as
the beginning techniques As such, they define certain general characteristics of
the Omori Ryu style.
The forms describe in-door situations. Although the lapanese swordsman
would often be outside, specifically exterior forms are not encountered until the
Inner Tradition The swordsman is in more danger when inside a house, where
his movements are constrained by both the building and the social situations In
which he might find himself.
Tins Is born out by the fact that all but one of the Omori Kyu forms begin
from selza, the most formal sitting position. The use of this position implies that
the swordsman is engaged in a formal gathering, not merely sitting alone in his
house.
lapanese swordsmen would come together for formal occasions, sitting In
political or social groups. Social rank and position would govern the arrange
ment. both within and between groups, but certain general principles would
apply.
Swordsmen bonded together in some kind of group would sit close to one
another and face the same direction. Their spacing would vary from only inches
away to about .5 meter.
Armaments would vary, too. but follow a general rule The less armed lhe
swordsman is. the friendlier the gathering If he has both swords, but the long
sword is carried rather than worn in the belt, the gathering is less dangerous.
In this form, you are described as facing your opponent, who is about 1.5
meters away: too far away to be part of your group. This means that the meeting
is already hostile and the enemy is known to be a threat. You should be on guard
from the beginning. The fact that you're wearing your sword further indicates the
hostile nature of the meeting
50
lapanese Sword Drawing: A Source hook for laido Students
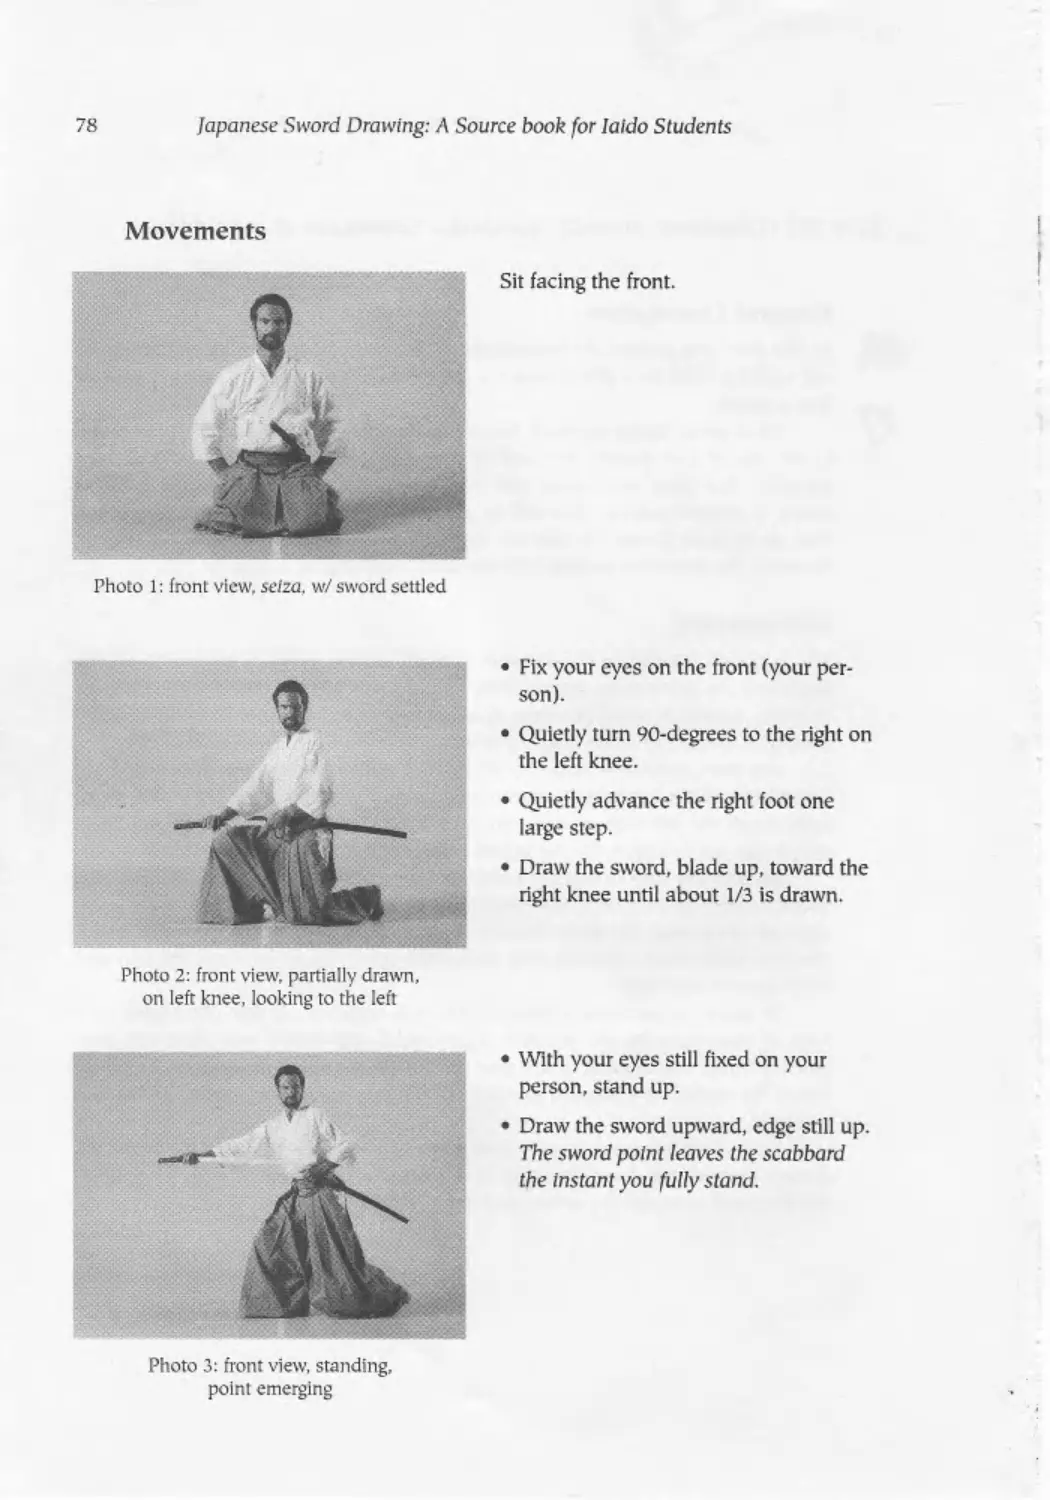
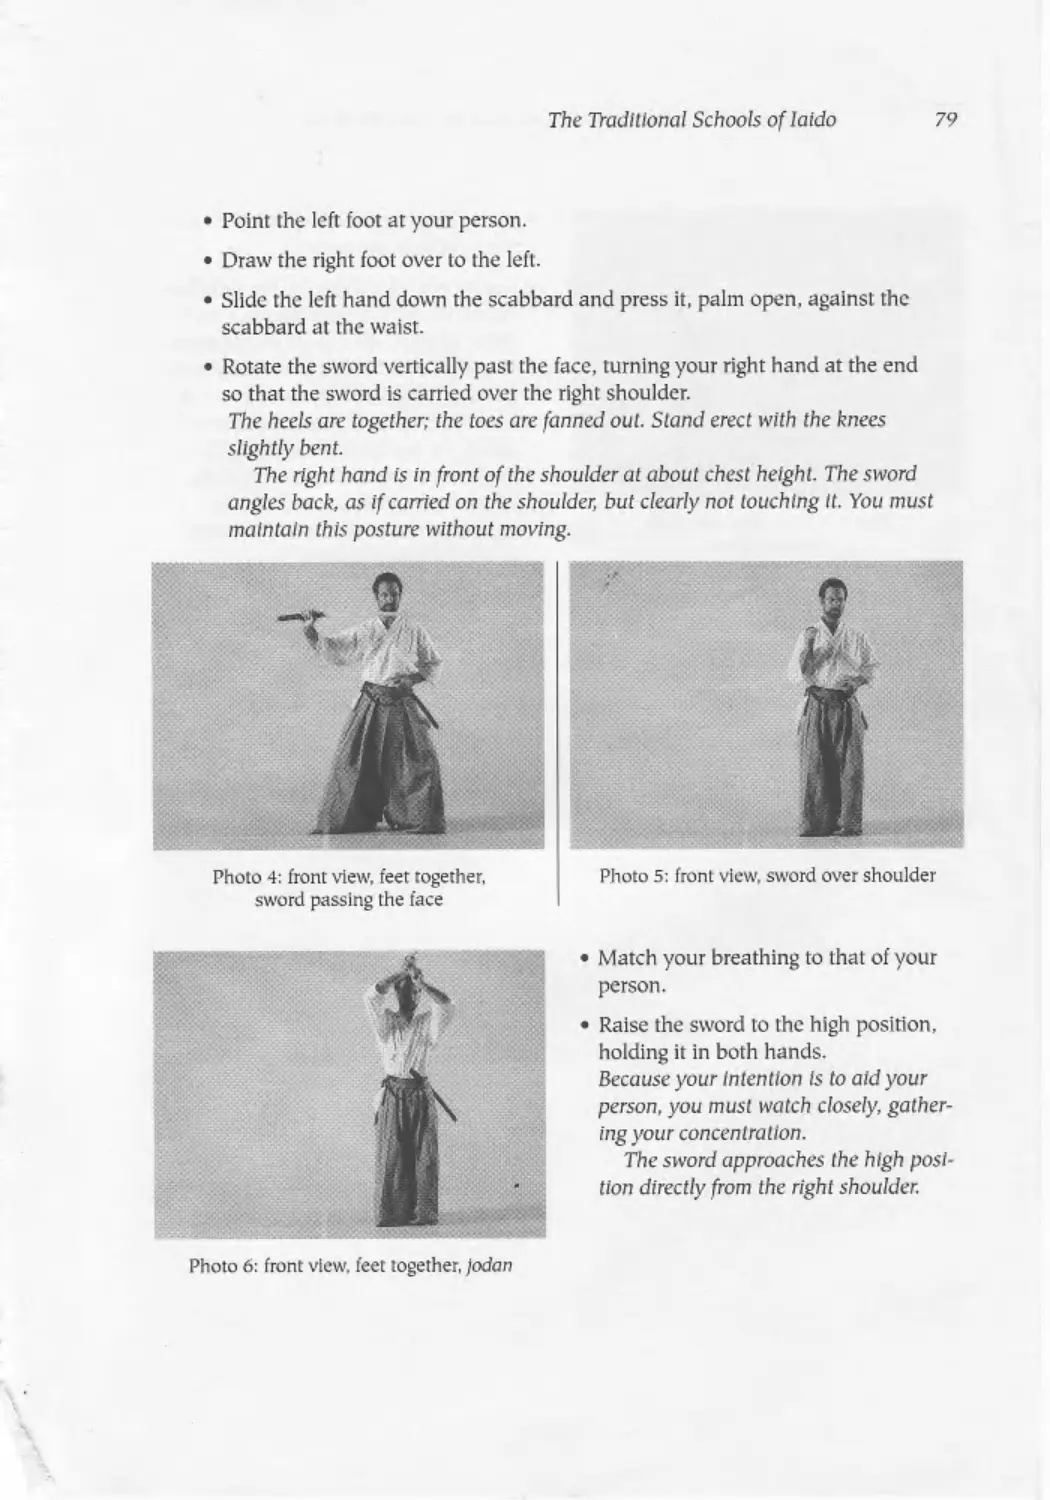
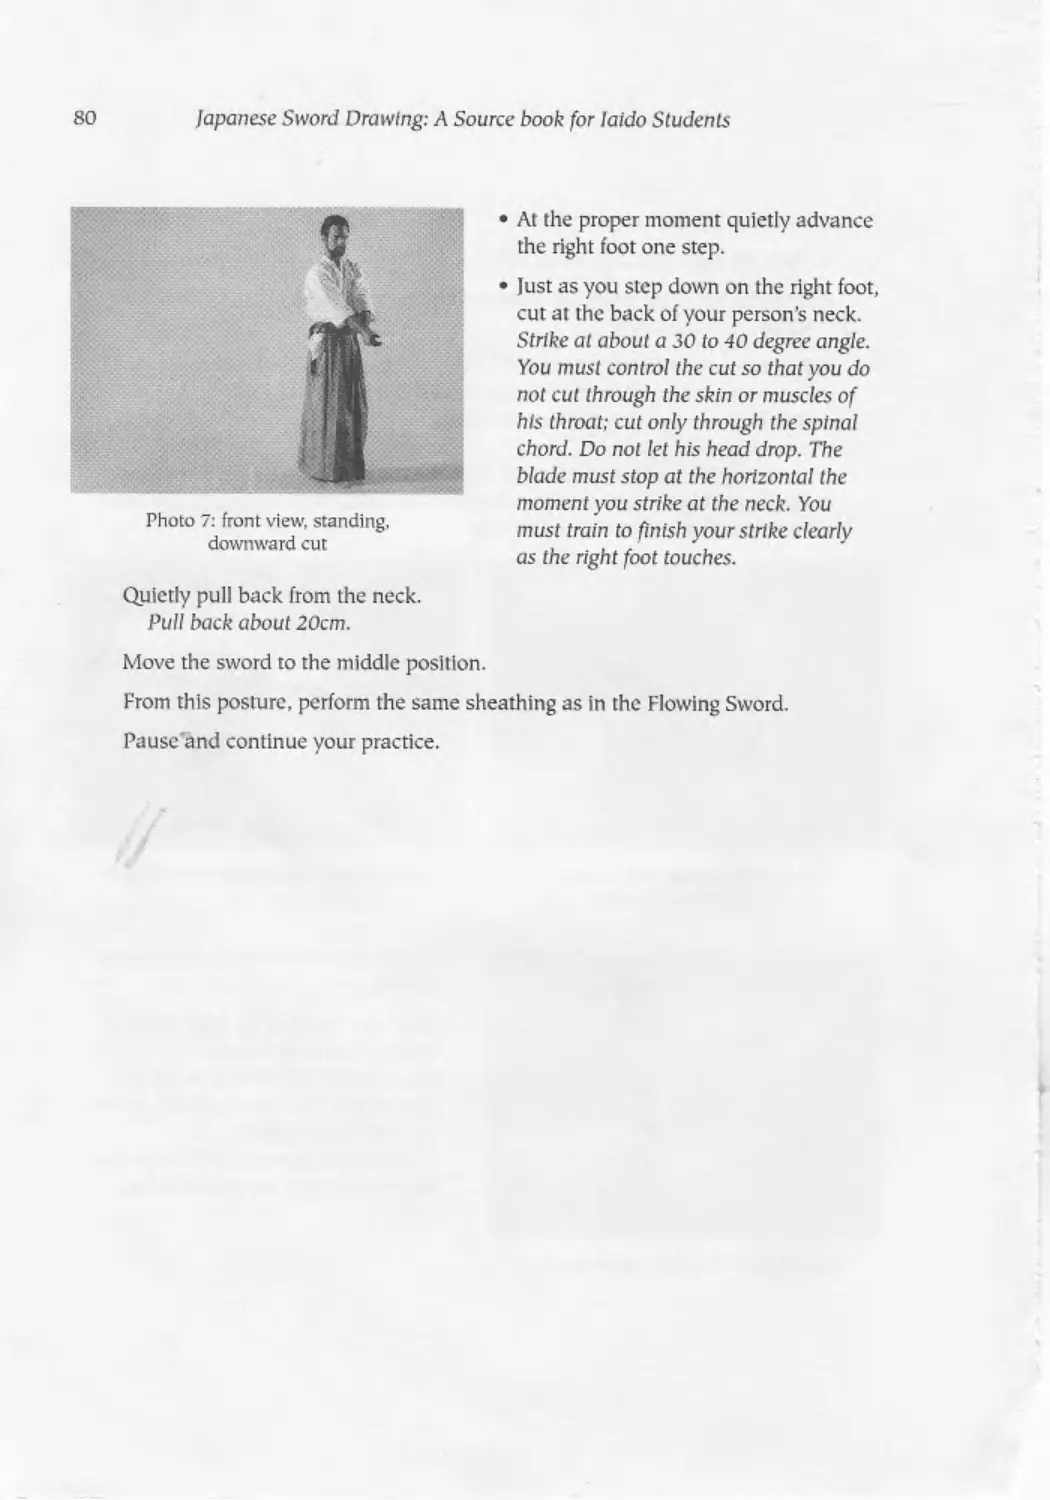
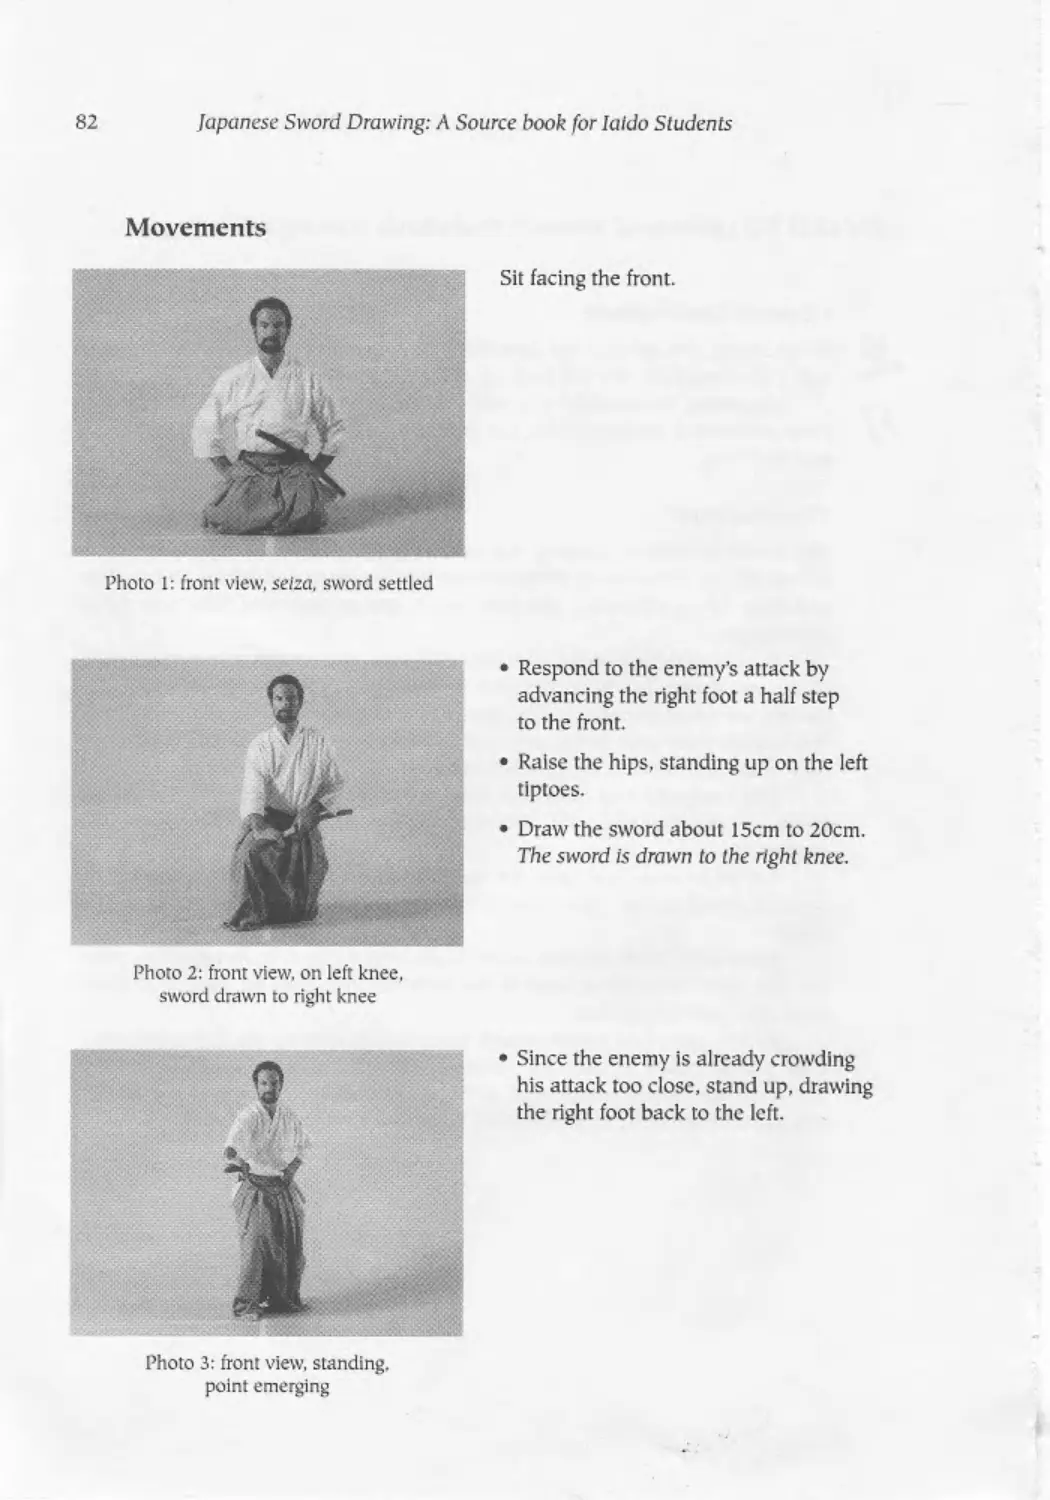
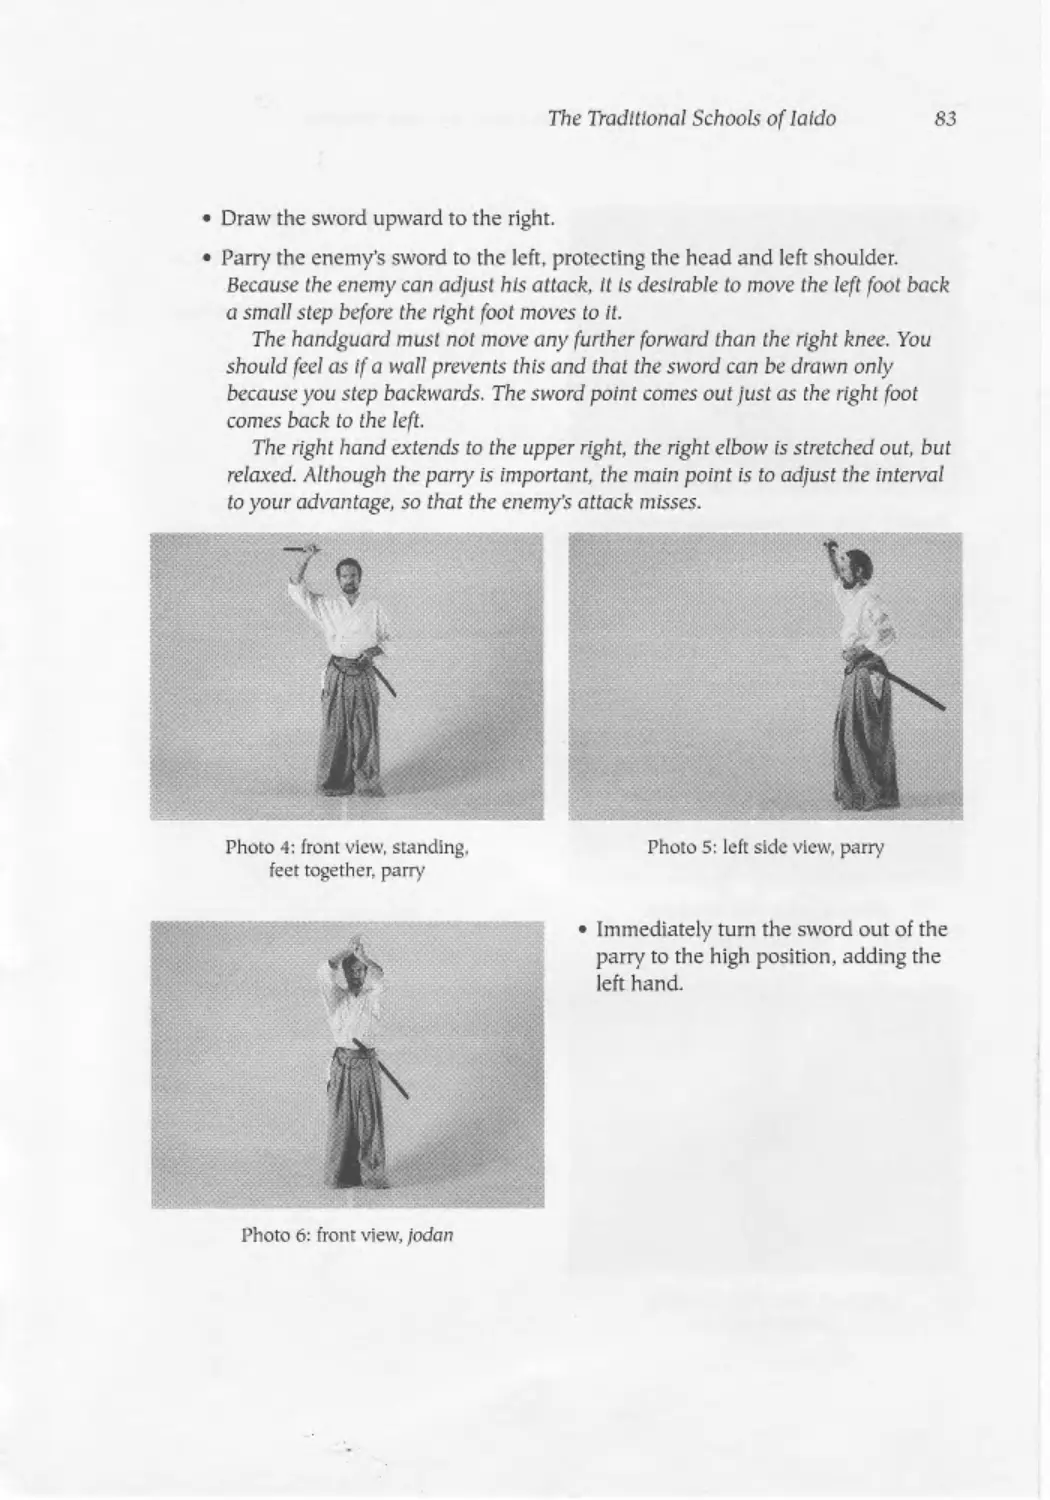
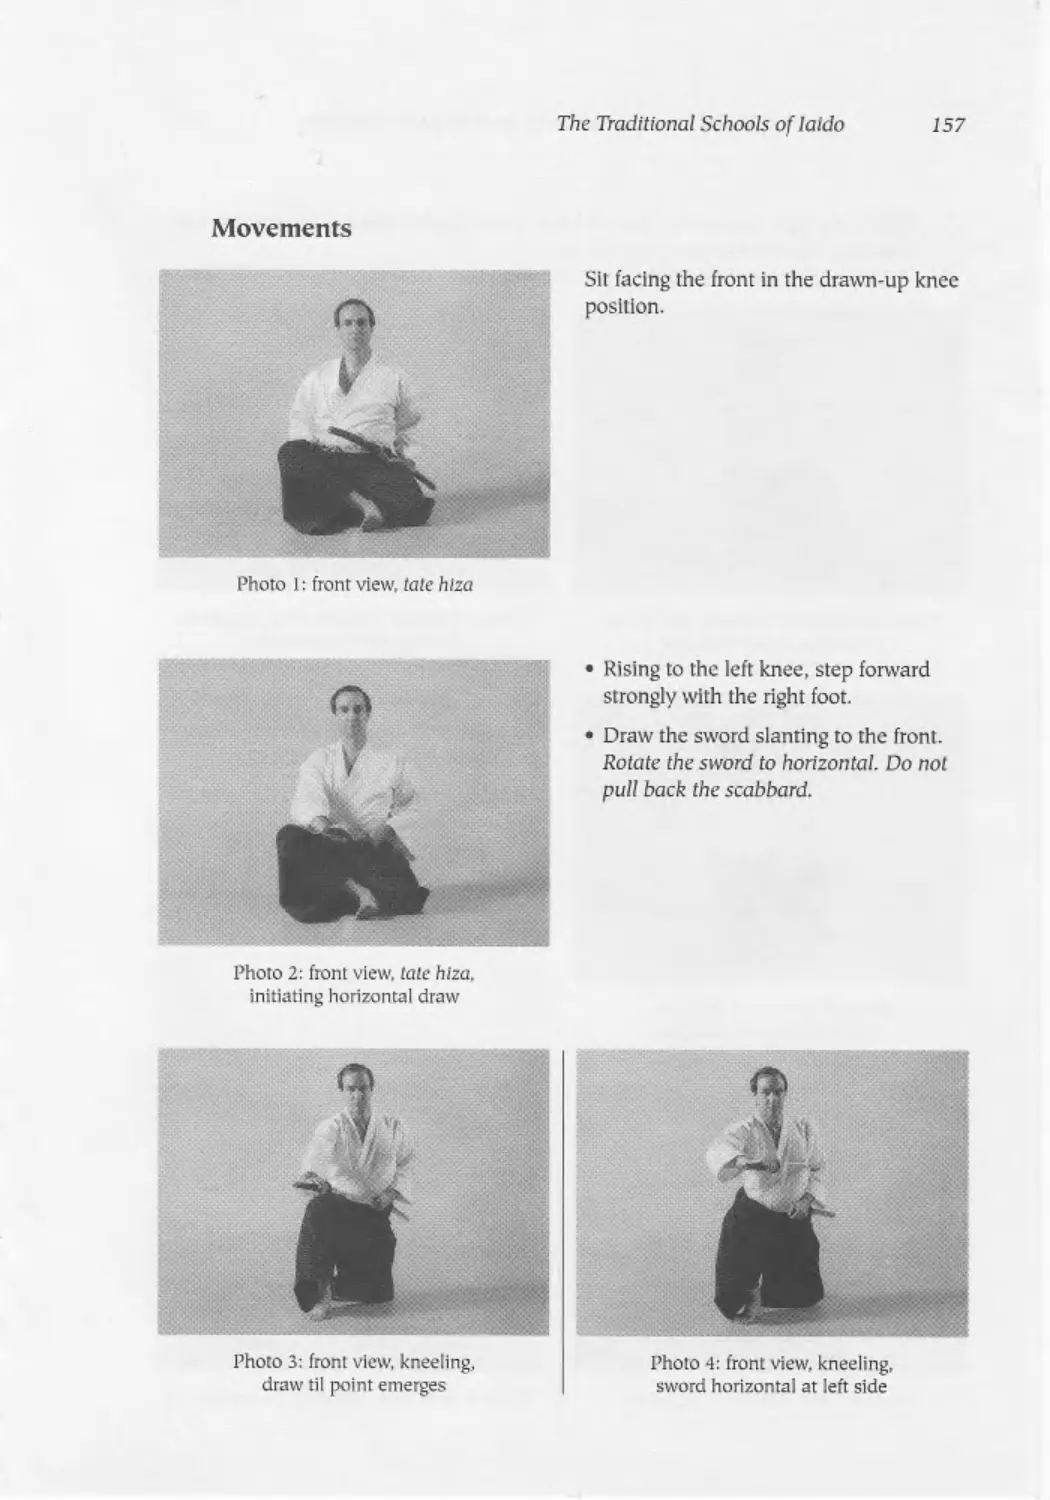
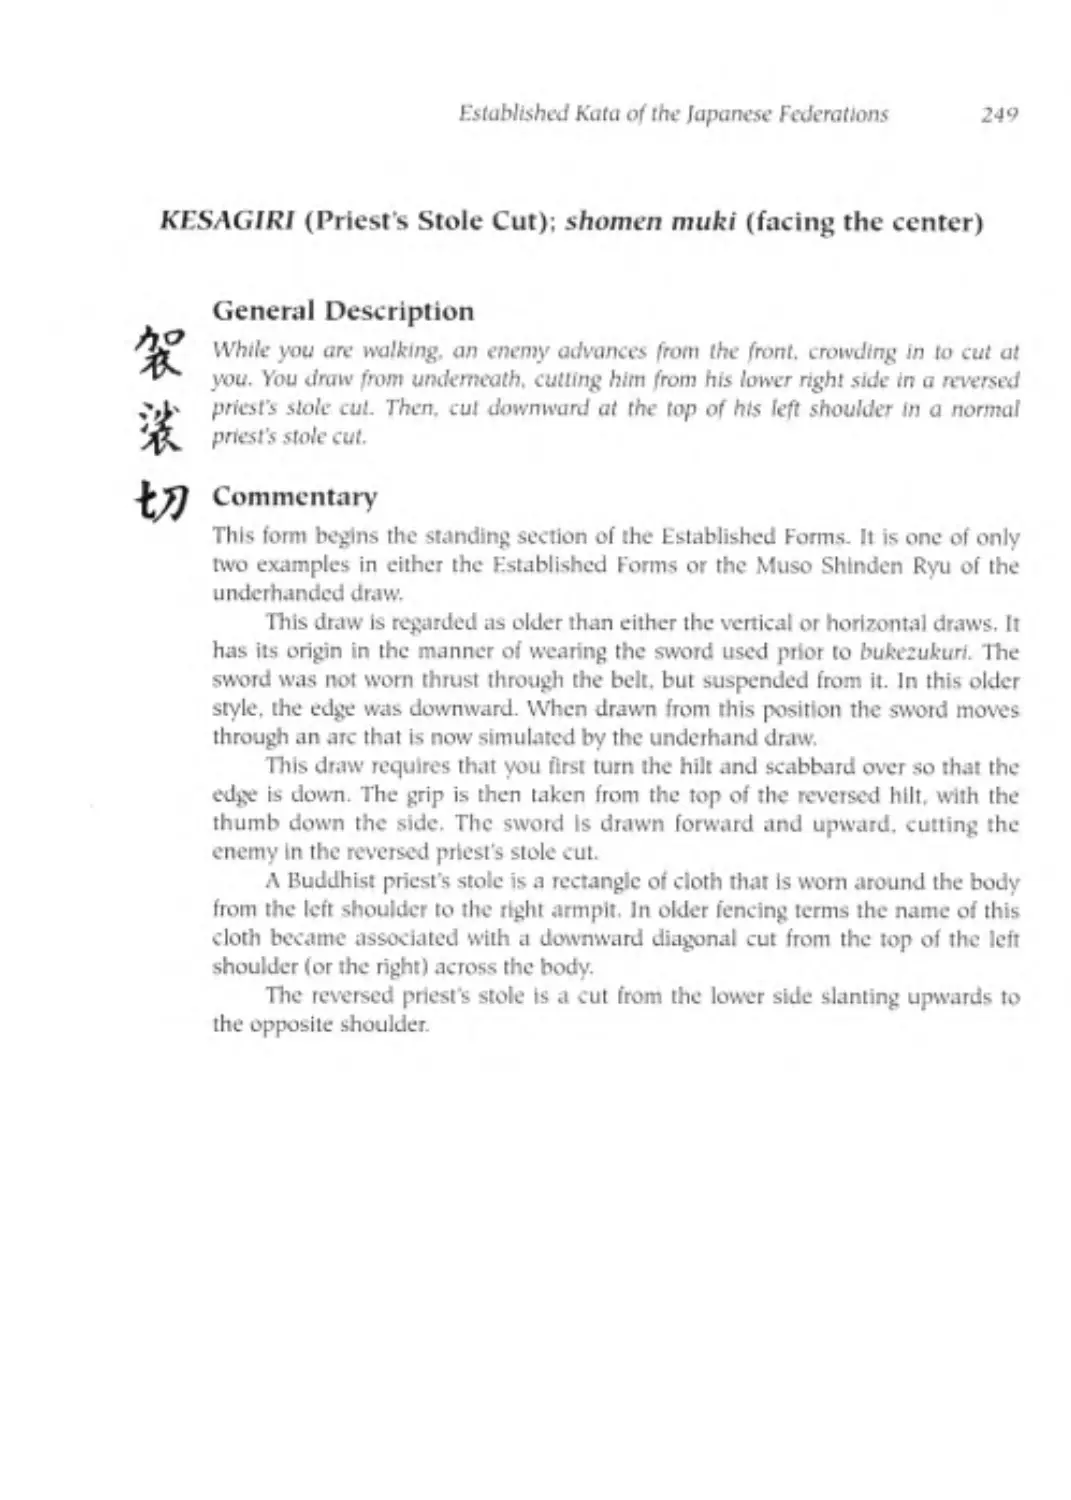
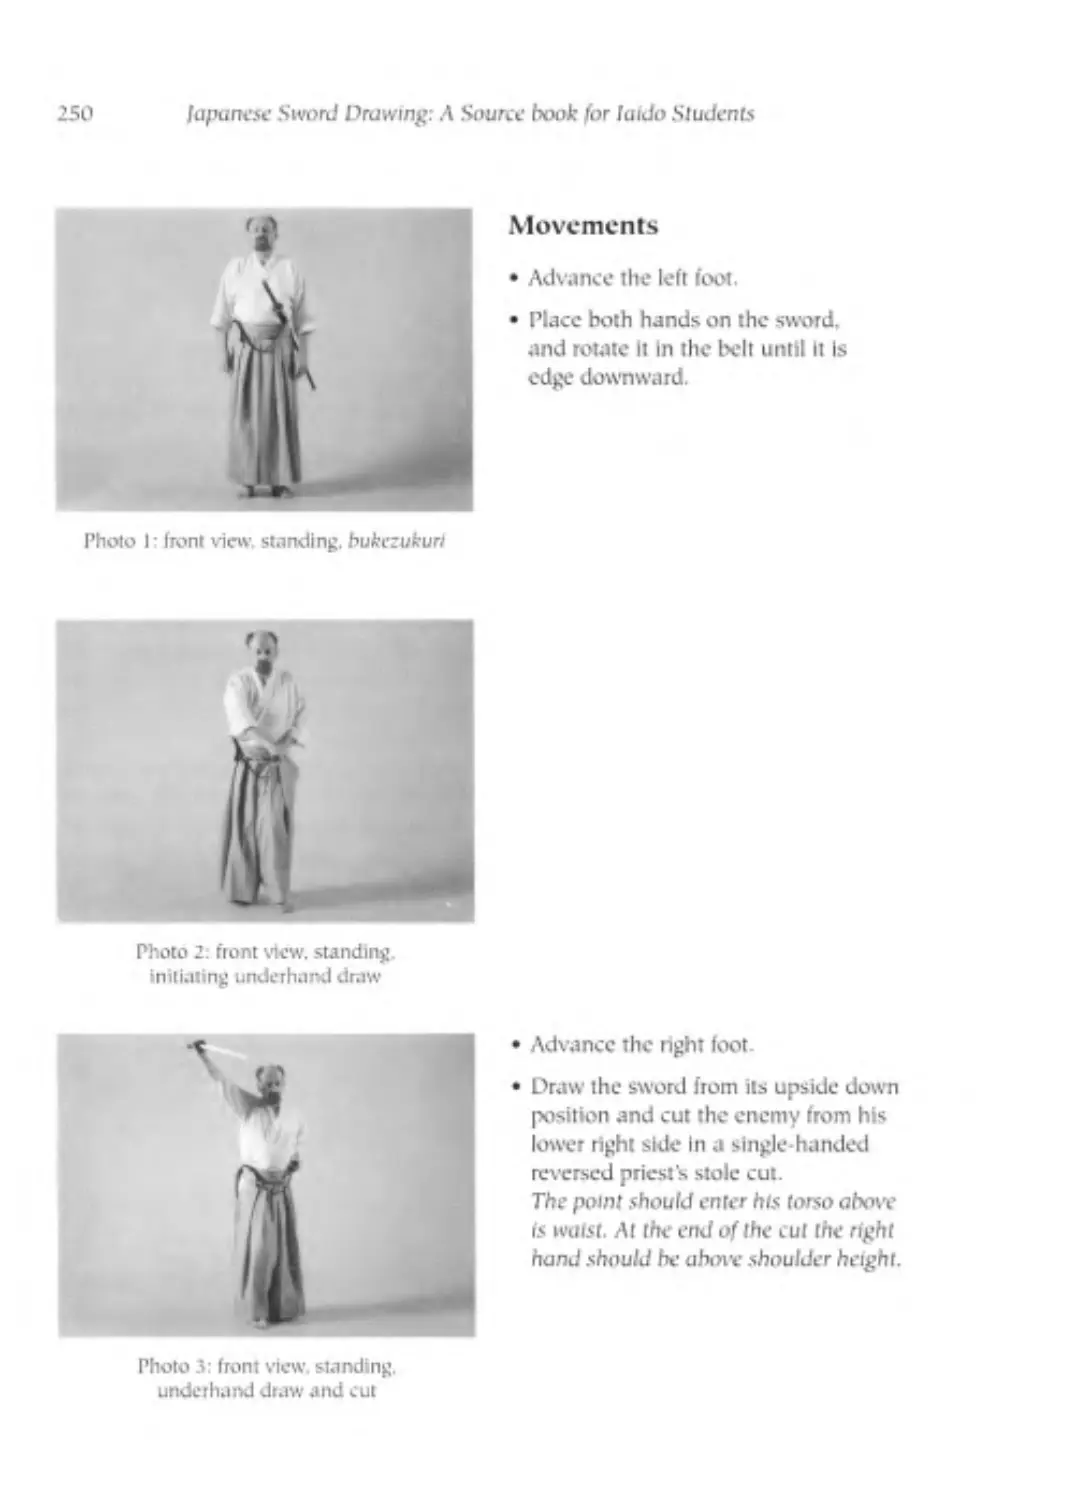
Movements
Photo I: front view. sclza. w sword settled
Sitting in si tu, face the front.
To compose yourself, take three breaths.
With the commencement of the third breath place both hands on the sword.
Photo 3: left side closeup, hands
Photo 2: front view, siicu.
initiating horizontal draw
Perform the horizontal draw coordinating your movements with a forward right
step in a kneeling posture.
the draw and step must be coordinated so that you begin the draw at the same
lime as you begin to rise up on both knees.
You must reach the top of the rise. and turn your toes under, al the same
moment that you turn the sword a quarter turn to the left.
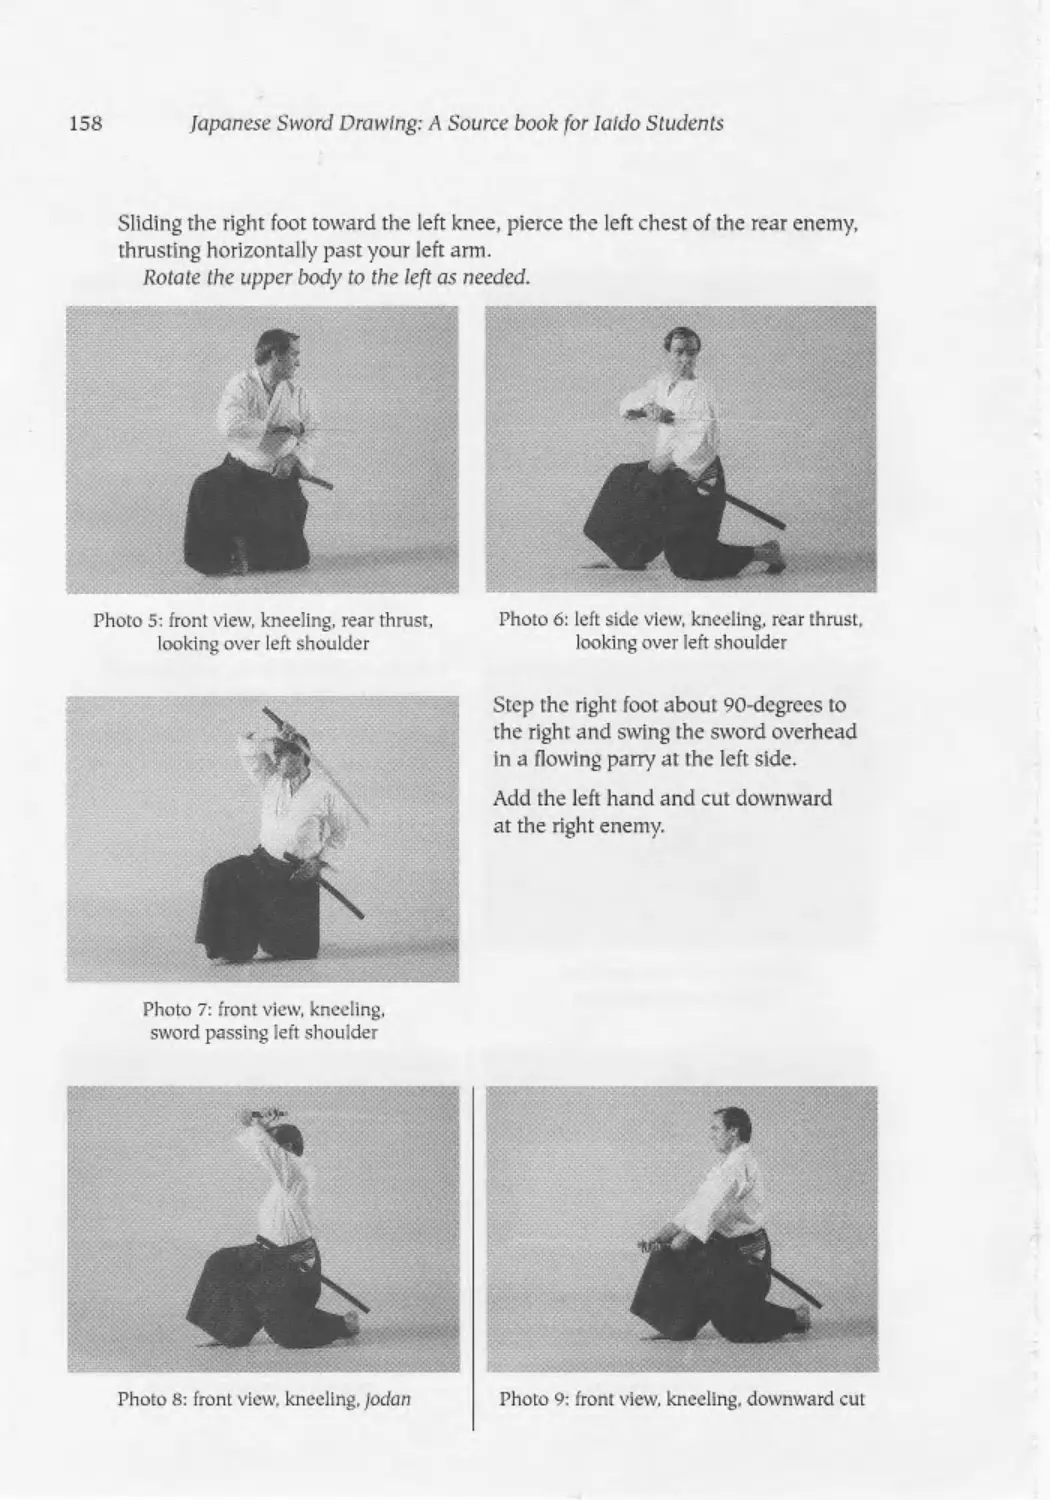
Without pausing. suddenly advance the right foot one step to the front. The
right knee makes и right angle. The left leg stands vertically upward to the knee
The left foot stands on the toes. The lower left leg should be parallel to the right
foot amt clearly to the left of the center line. This is the fundamental kneeling
posture of pain.
The Traditional Schools of laido
51
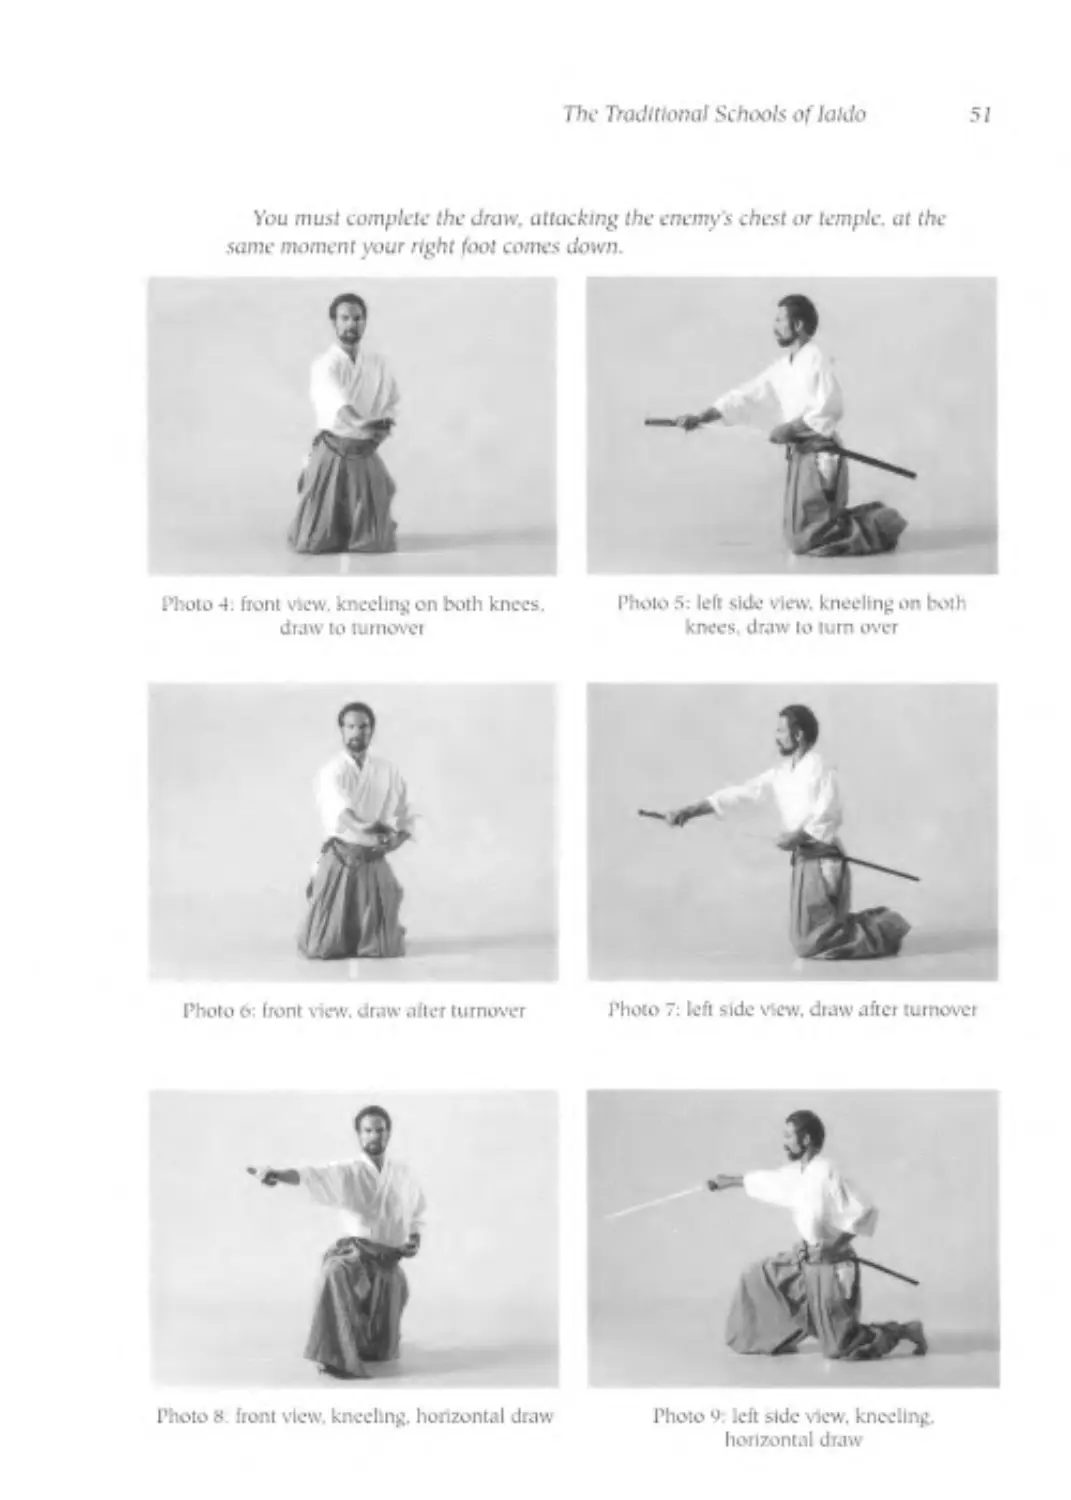
You must complete the draw, attacking the enemy s chest or temple, at the
same moment your right foot comes down.
Photo 4: front view, kneeling on both knees,
draw to turnover
Photo 5: left side view. kneeling on both
knees, draw to turn over
%
t«
Photo 8 front view, kneeling, horizontal draw
Photo 9: left side view, kneeling,
horizontal draw
52
lapumtse Sword Drawing: A .Source hook for laido Students
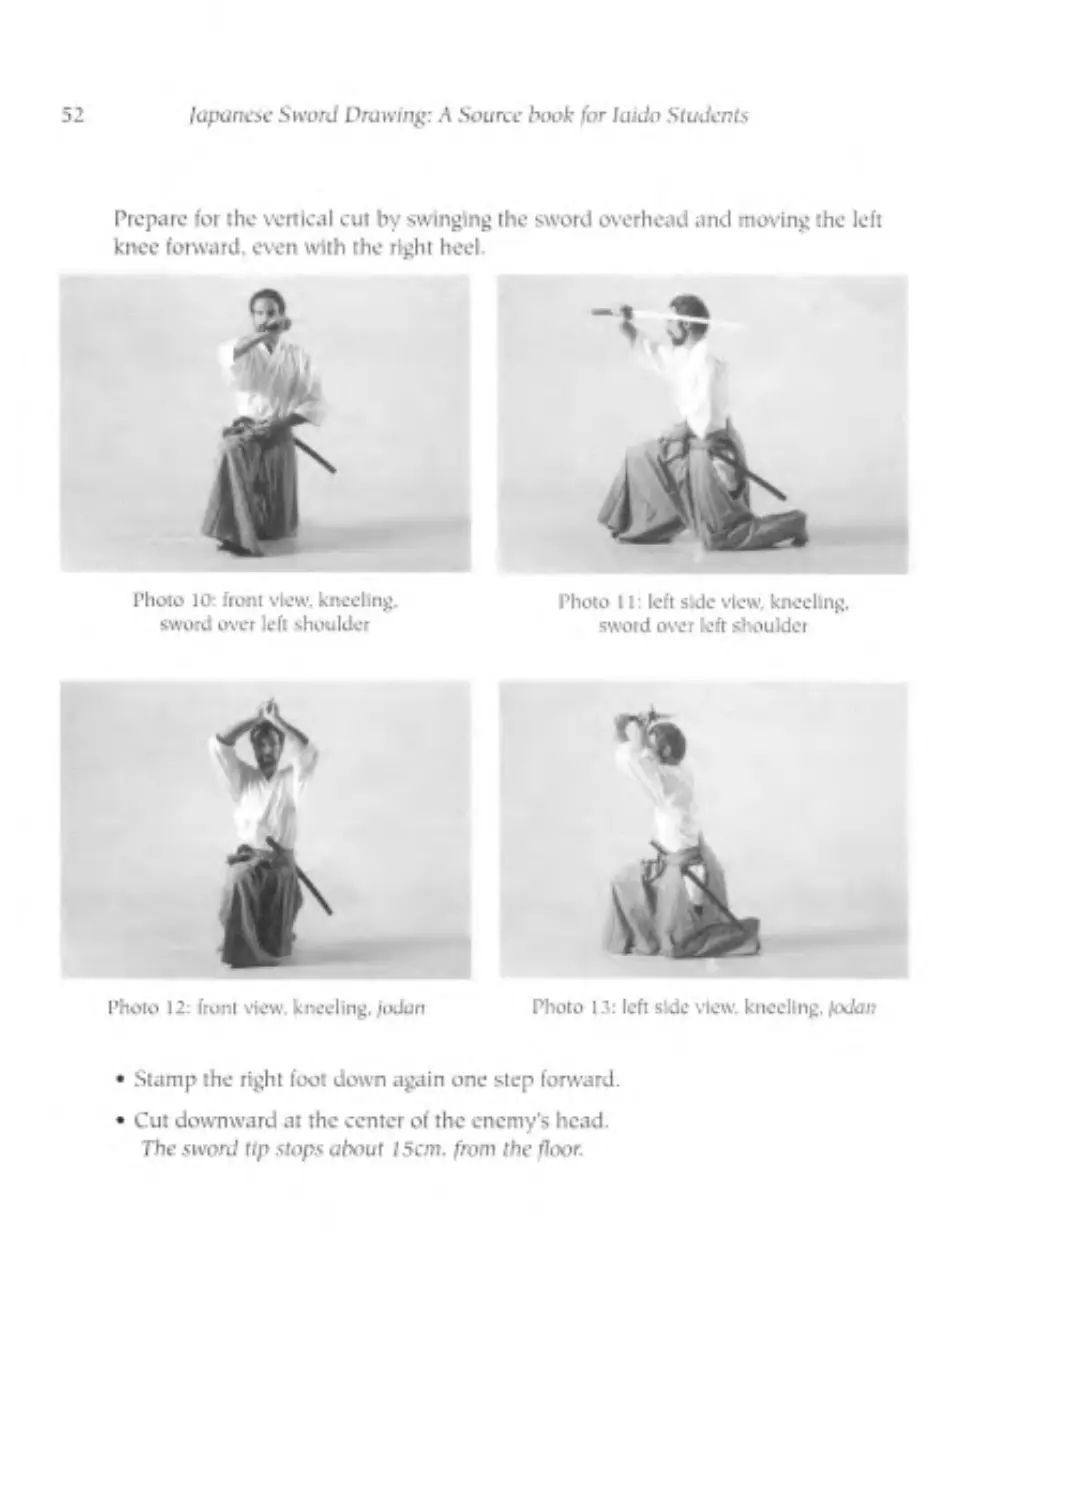
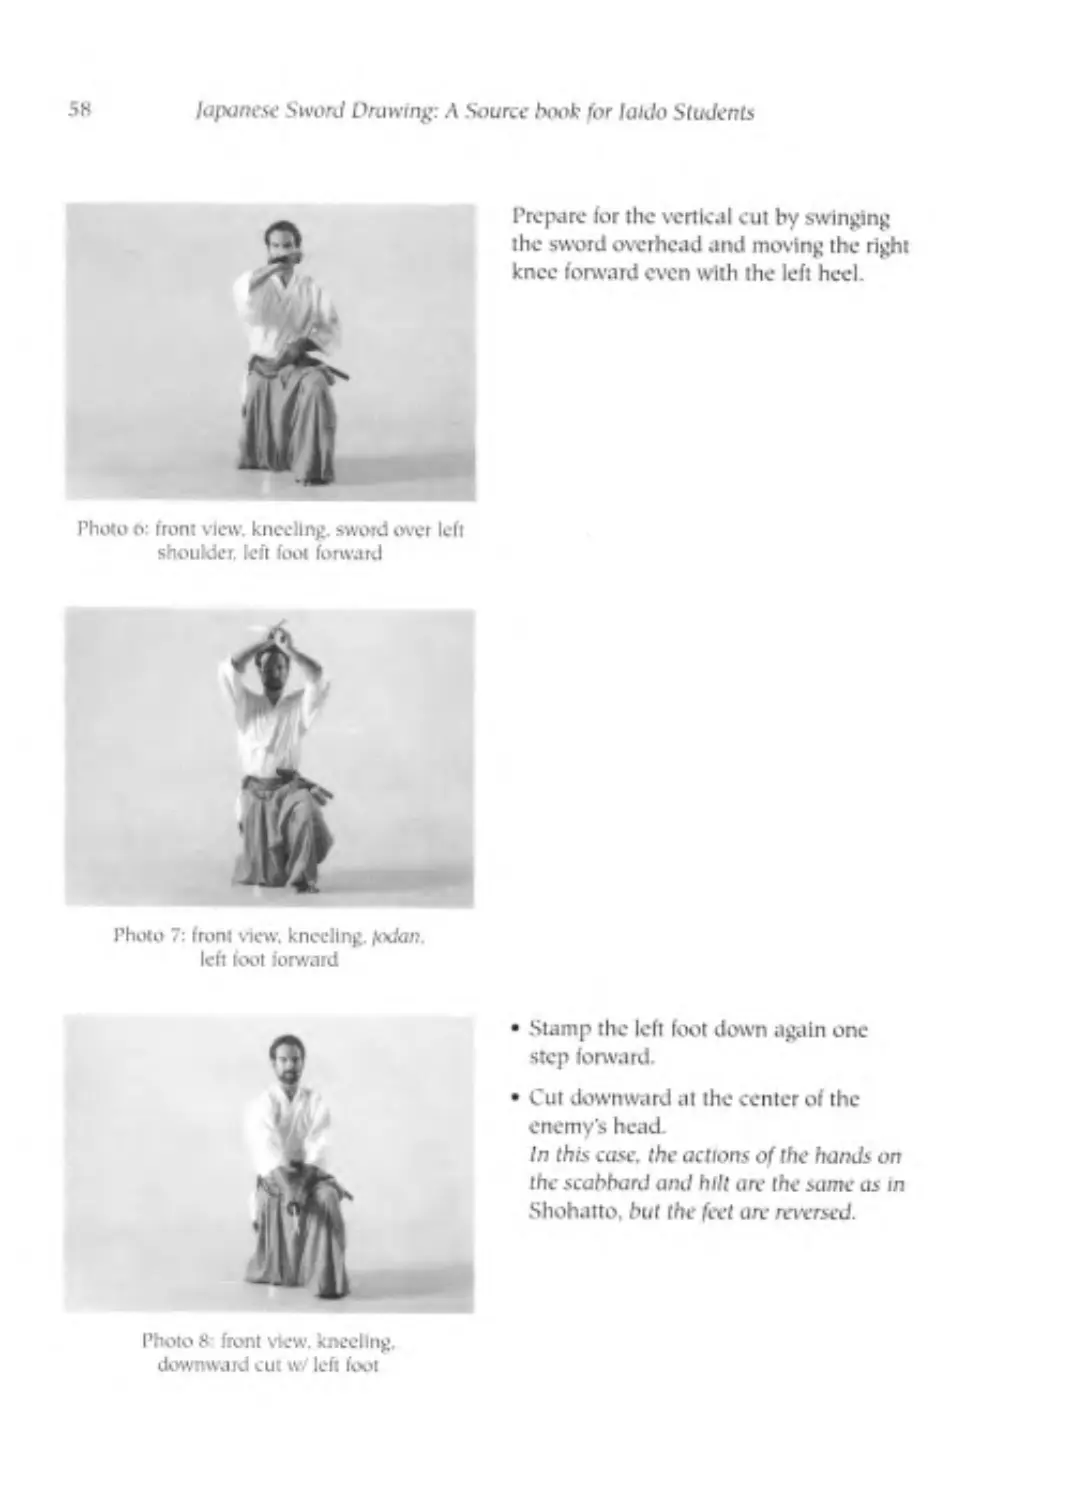
Prepare for rhe vertical cur by swinging the sword overhead and moving the left
knee forward, even with the right heel.
%
t
Photo 10-. front view, kneeling,
sword over left shoulder
Photo 11: left side view, kneeling,
swotd over left shoulder
Photo 12; front view, kneeling, jodun
Photo 13: left side view, kneeling. todai)
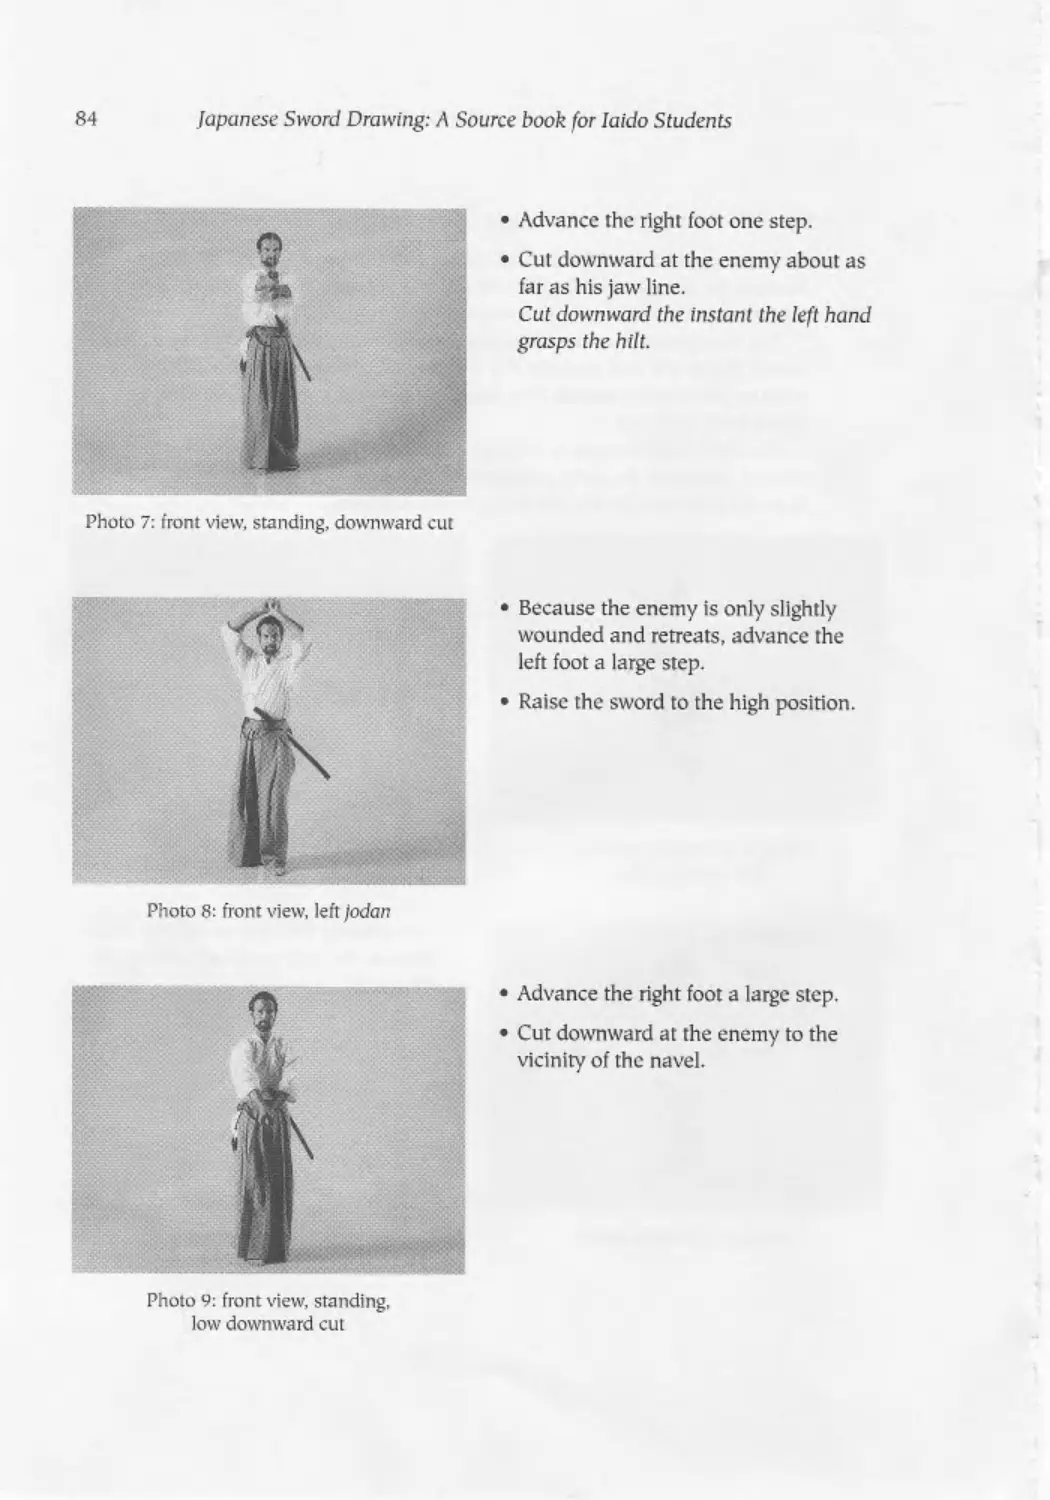
• Stamp the right foot down again one step forward.
• Cut downward at the center of the enemy's head.
The sword tip stops about 15cm. from the floor.
The Traditional Schools of laido
53
1
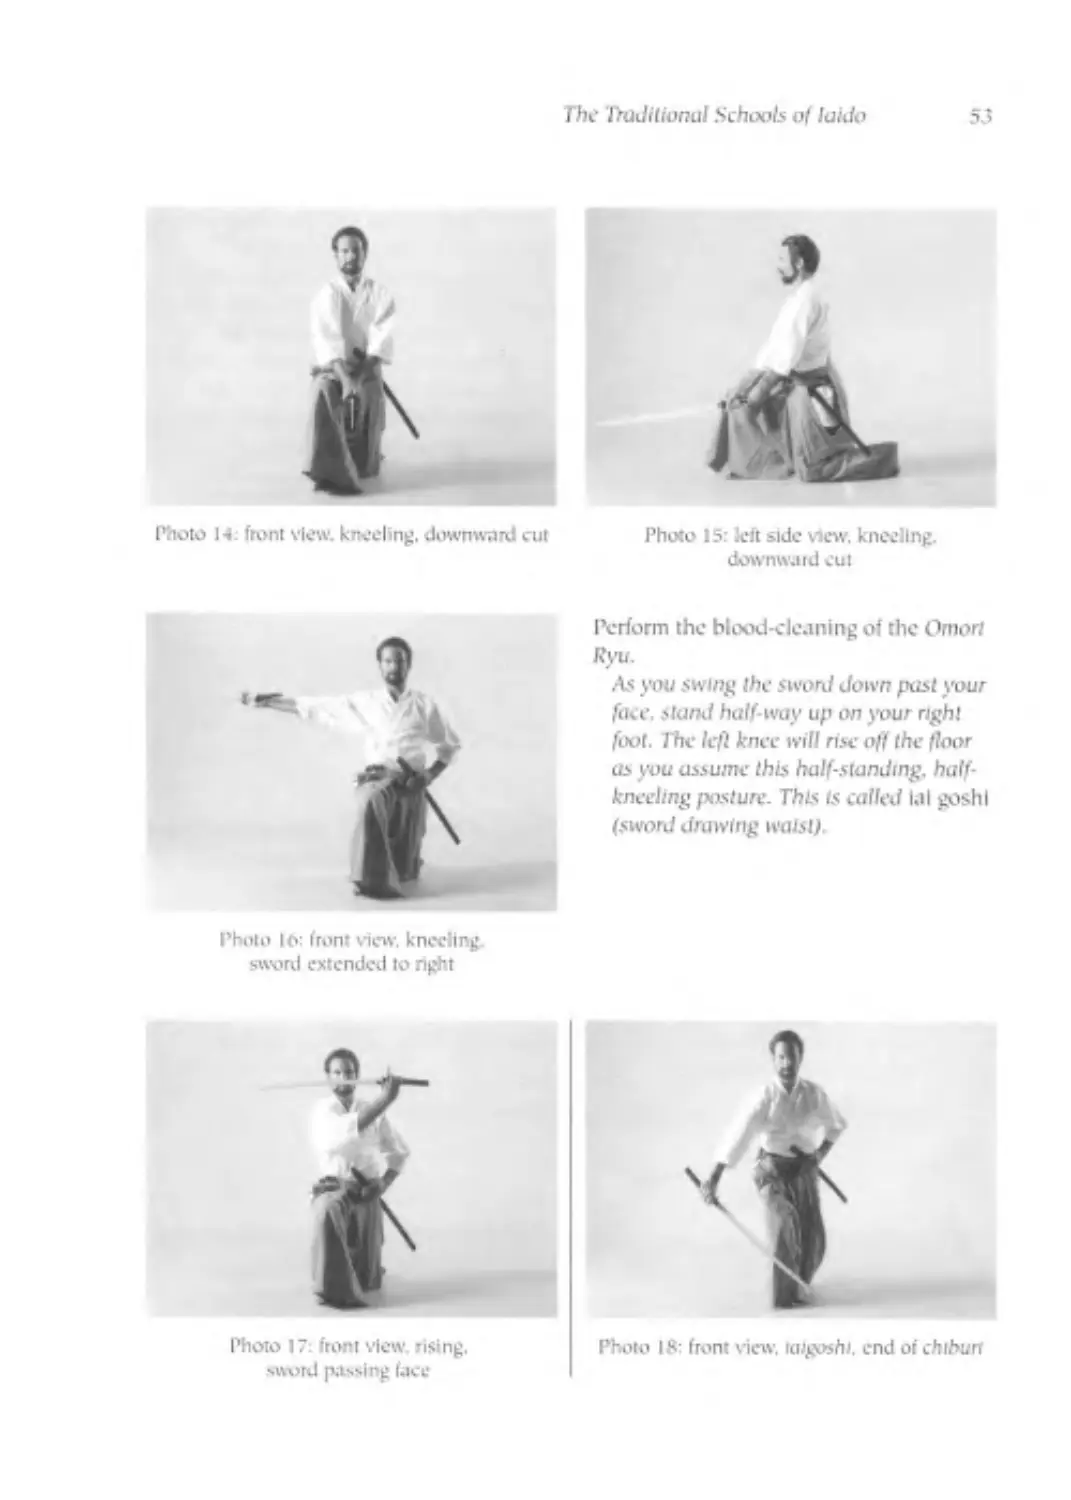
Photo 14: front view, kneeling, downward cut
Photo 15: left side view, kneeling,
downward cut
Perform the blood-cleaning of the Omori
Ryu.
As you swing the sword down past your
face, stand half-tvuy up on jirur right
foot. The left knee will rise off the floor
as you assume this half-standing, half-
kneeling pasture. This Is called lai goshl
(sword drawing waist).
Photo Io: front view. kneeling
sword extended to nght
Photo 17; front view rising,
sword passing (ace
Photo 18: front view, laigoshi. end of chibun
54
lapanese Sword Drawing: A Source book for laido Students
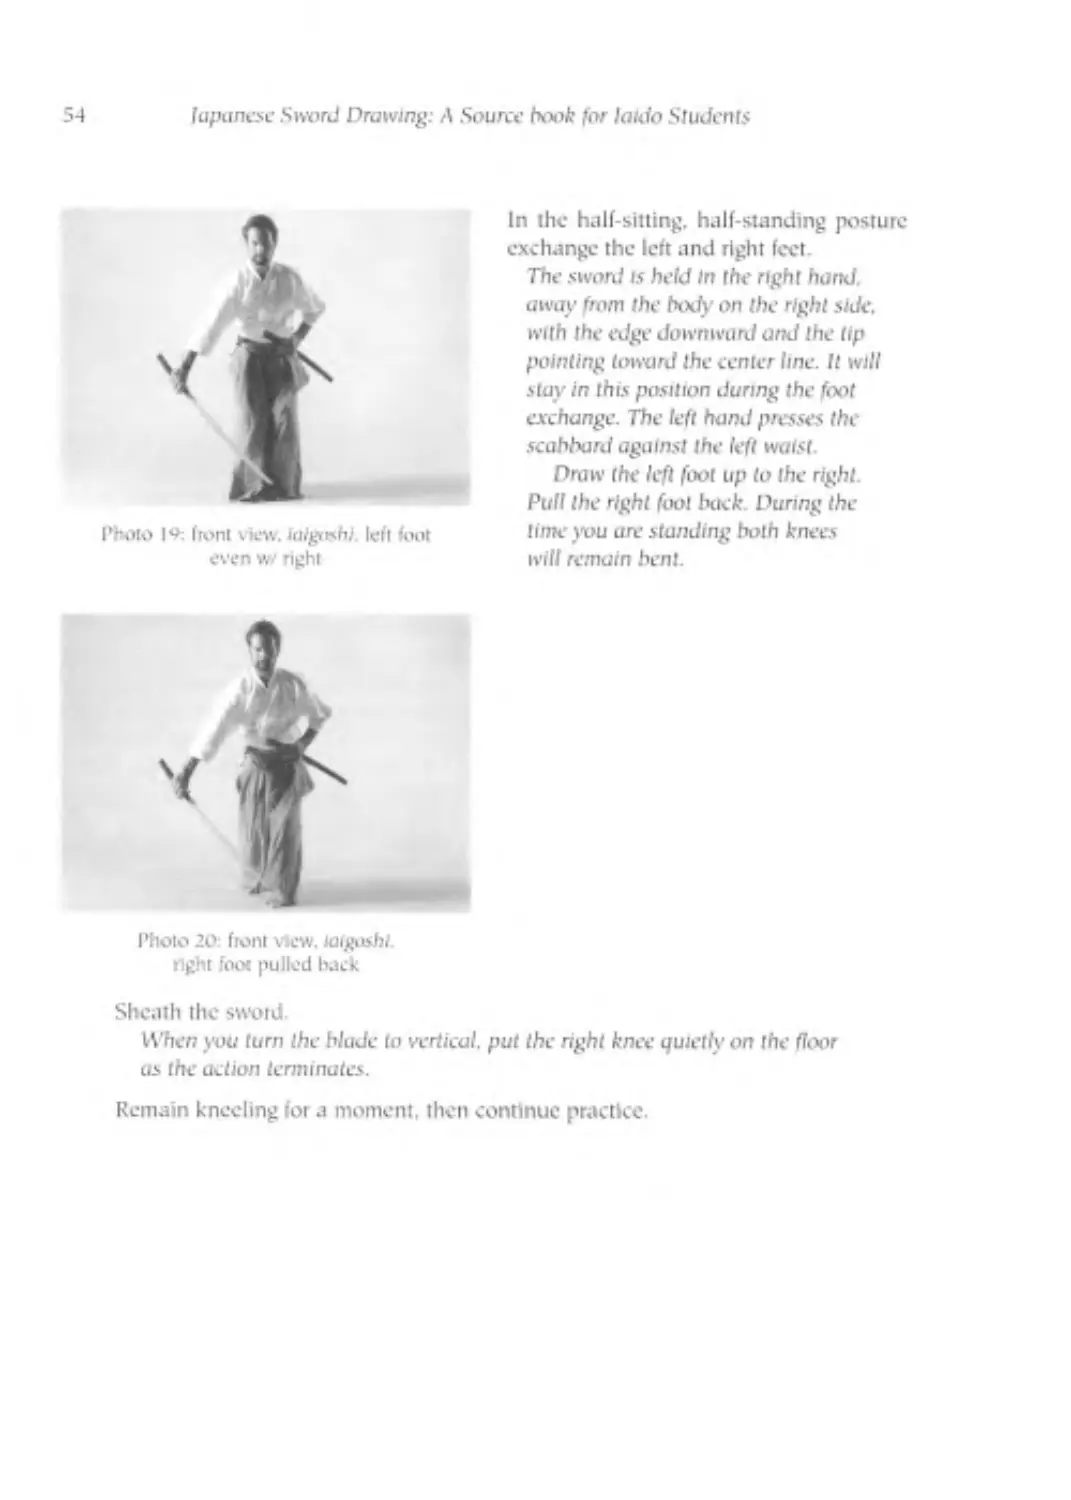
Photo 19: front view, lalgrnhi left font
even w/ right
In the half-sitting. half-standing posture
exchange the left and right feet.
The sword is held In the right hand,
away from the body on the right side.
with the edge downward and the tip
pointing toward the center line. Il will
stay in this position during the foot
exchange. The left hand presses the
scabbard against the left waist.
Draw the left foot up to the right
Pull the right Idol hack During the
time you are standing both knees
will remain bent.
Photo 20 front vtew. laigushl
right foot pulled back
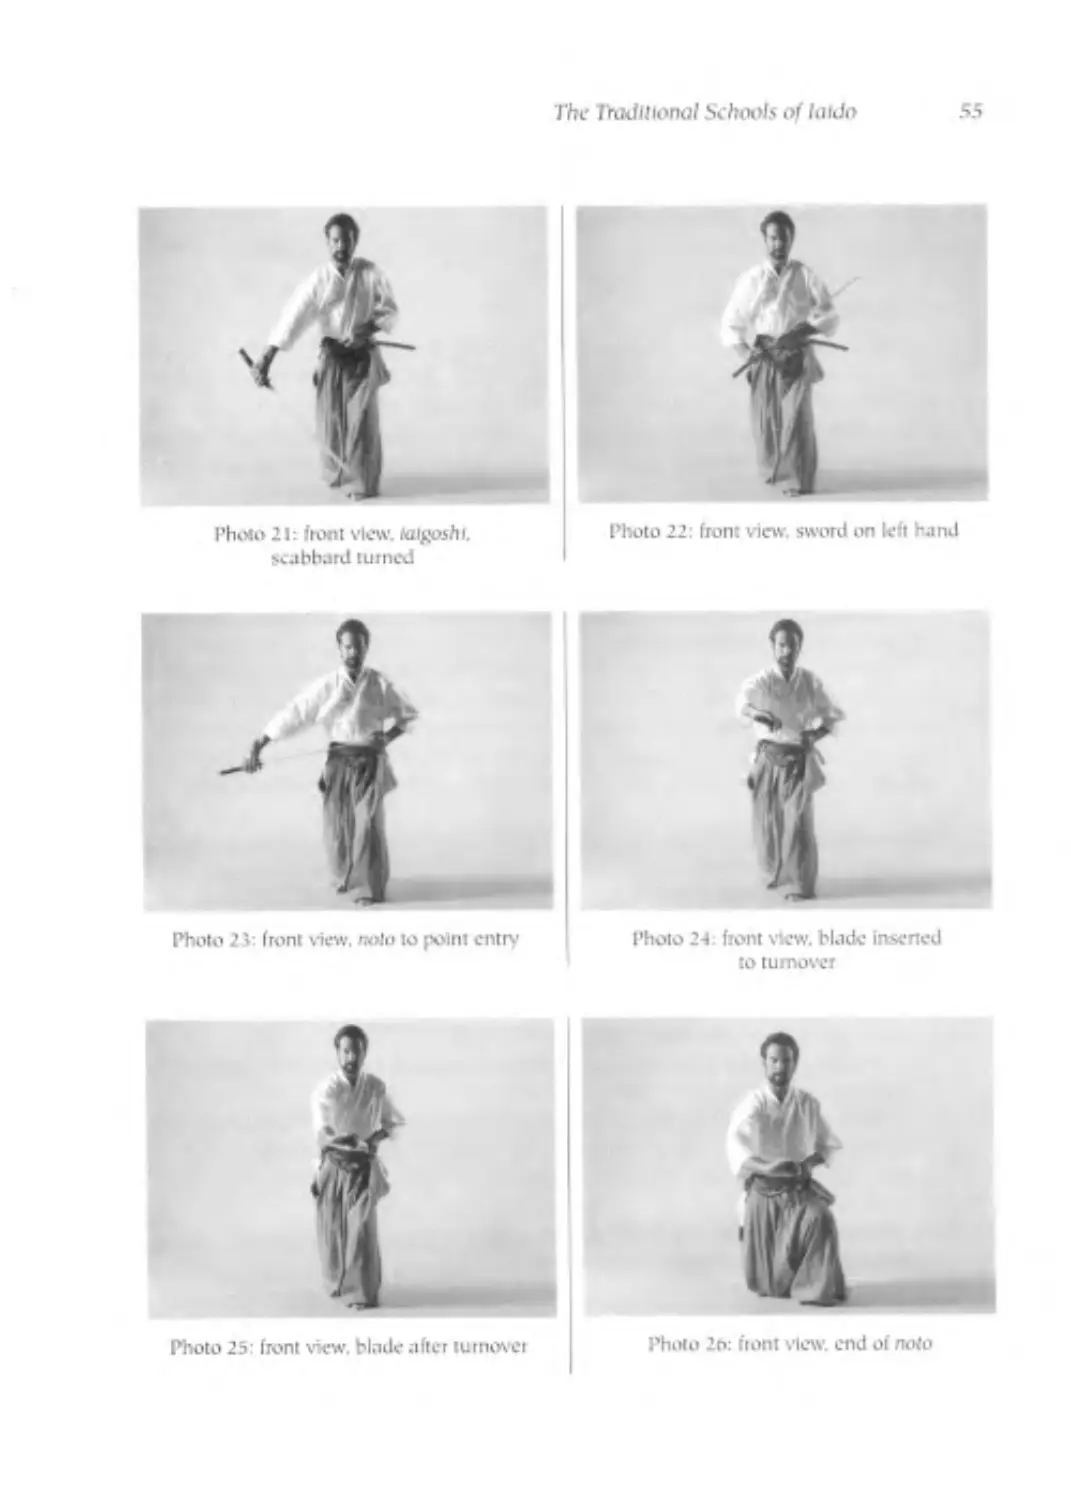
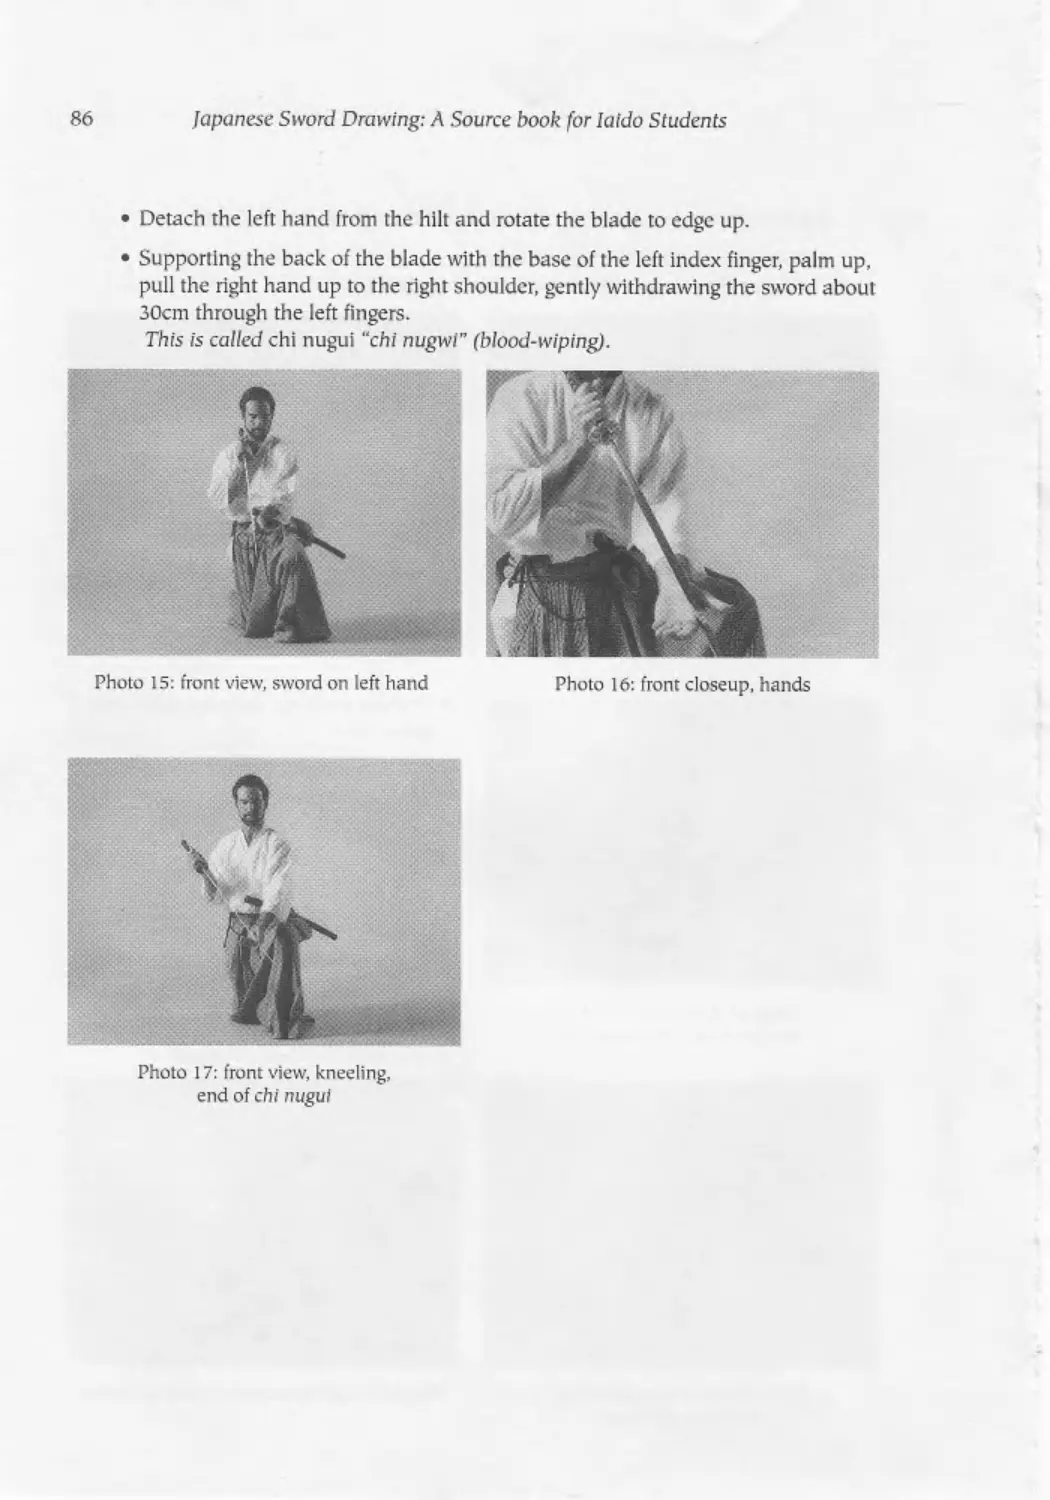
Sheath the sword.
IVher; you turn the blade to vertical. put the right knee quietly on the floor
as the action terminates.
Remain kneeling for a moment, then continue practice.
The Traditional Schools of laido
55
Photo 25: front view, bl.uk after turnover
Photo 2n: front view, end of noto
56
lapanese Sword Drawing: A Source book for laido Students
SA TO (Following Sword); hidari (left)
General Description
yy Ybu sit in the customary seiza position. The enemy is on your left, about 1.5 meters
away, facing the some direction as you. before Ire cun turn and attack, you draw,
n and then cut downwards. acting with the same formality as In Shohatto.
Commentary
In this bask form you deal with an opponent who is not from a hostile group,
but from one allied with your own. Your distance from your opponent means
you are not part of the same group, but you are sitting on the same side, facing
the same way.
Suddenly the supposed friend becomes an enemy. You. ever alert, must per-
ceive this and respond accordingly.
Because lhe enemy is on the left side, you have some advantages The
enemy's sword is on the other side of his body. To use it he must turn all the way
around to face you. This will slow the enemy's draw, whether horizontal or vertical.
Your weapon is on the same side as the enemy. If you can use it effectively,
you should be able to strike first, provided the left step does not confuse you.
Movements
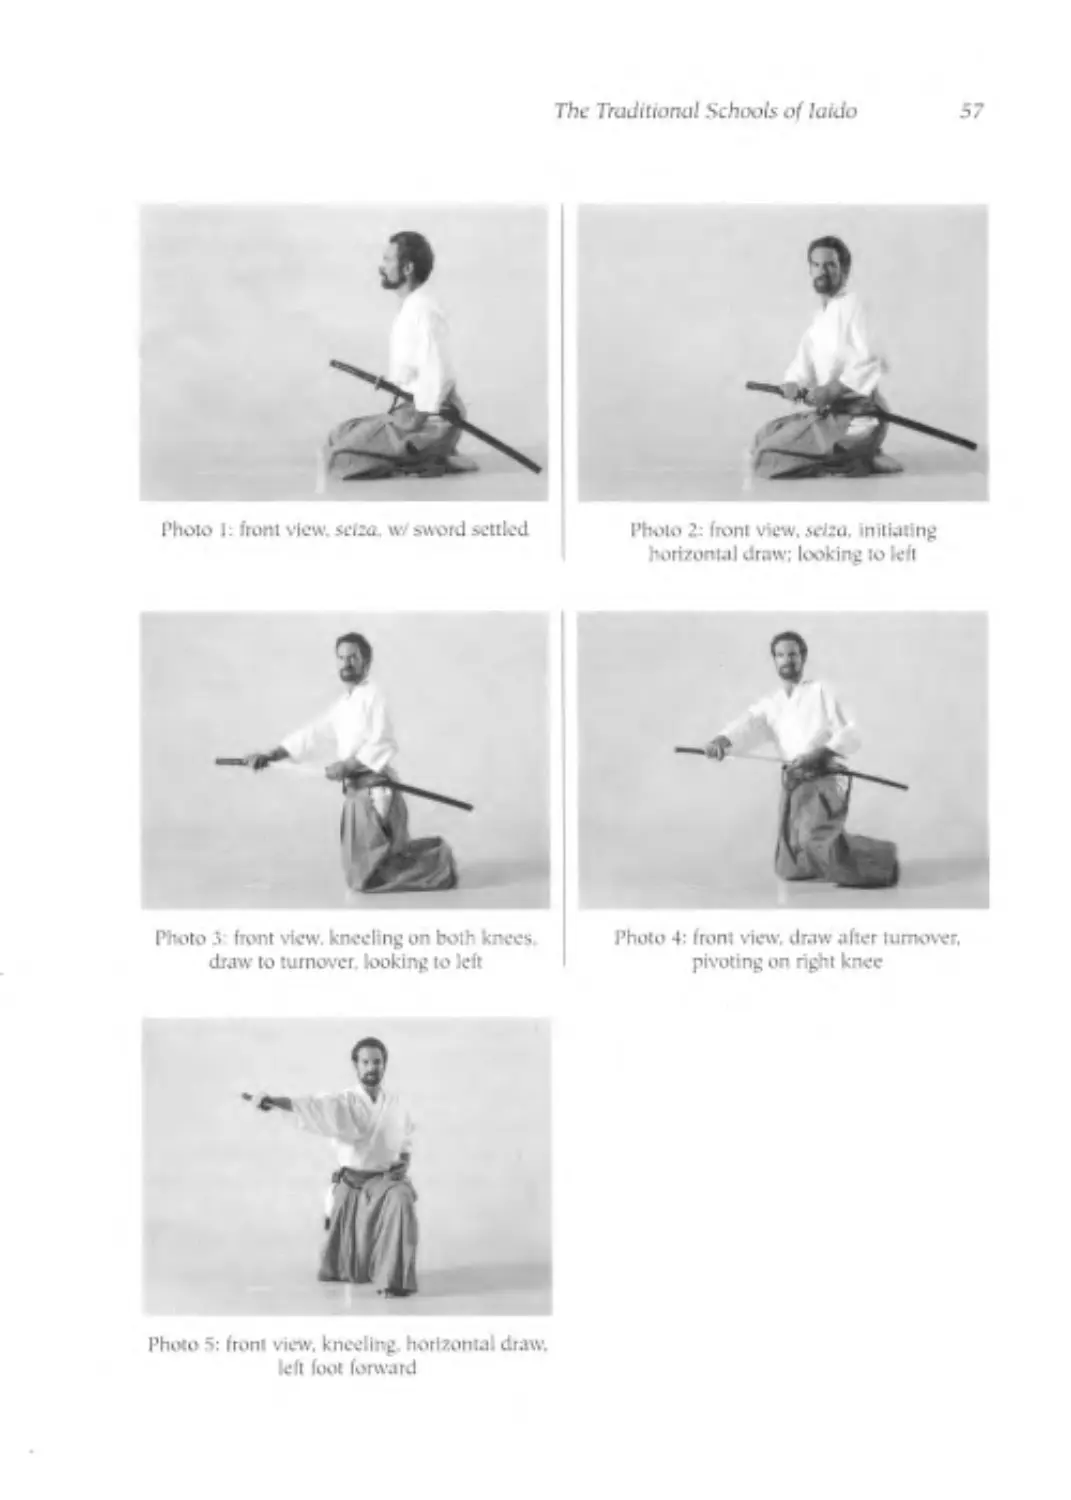
Sit with the front on your left. Look to your left and grasp the sword. Perform the
horizontal draw, coordinating your movements with a leftward step in the kneel-
ing posture.
begin the draw at the same lune as you begin to rise up on both knees.
You must reach the top of the rise, and turn your toes under, at the same move-
menl that you turn the sword a quarter turn to the left.
Without pausing, pivot on your right knee to the left. Make sure the hill pre-
cedes you during the plvol. You do not need to hurry the turn.
Suddenly advance the left foot one step. The left knee makes a right angle. The
right leg thrusts vertically downward to the knee The right foot stands on the
toes. The lower right leg should be parallel to lhe left foot and clearly to the right
of the center line.
You must complete the draw, attacking the enemy's chest or temple, at the
same moment yxrur left foot comes down.
The Traditional Schools o( laido
57
Photo 1: front view. sefza. w.1 swotd settled
Photo 2: front view, selza. initiating
horizontal draw; looking to leil
Photo J front view, kneeling on both knees
draw to turnover looking to left
Photo 5: front view, kneeling, horizontal draw,
left foot forward
58 lapanese Sword Drawing: A Source book for laido Students
Prepare for the vertical cut by swinging
the sword overhead and moving the right
knee forward even with the left heel.
Photo 6: front view. kneeling. sword over left
shoulder, left loot forward
Photo 7: front view, kneeling, /odan.
left foot forward
• Stamp the left foot down again one
step forward.
•Cut downward at the center of the
enemy’s head.
In this case. the actions of the hands on
the scabbard and hilt are the some as in
Shohatto. but the foef are reversed.
Photo 8 front view, kneeling,
downward cut w.' left foot
The Thidltlonal Schools of laido
5»
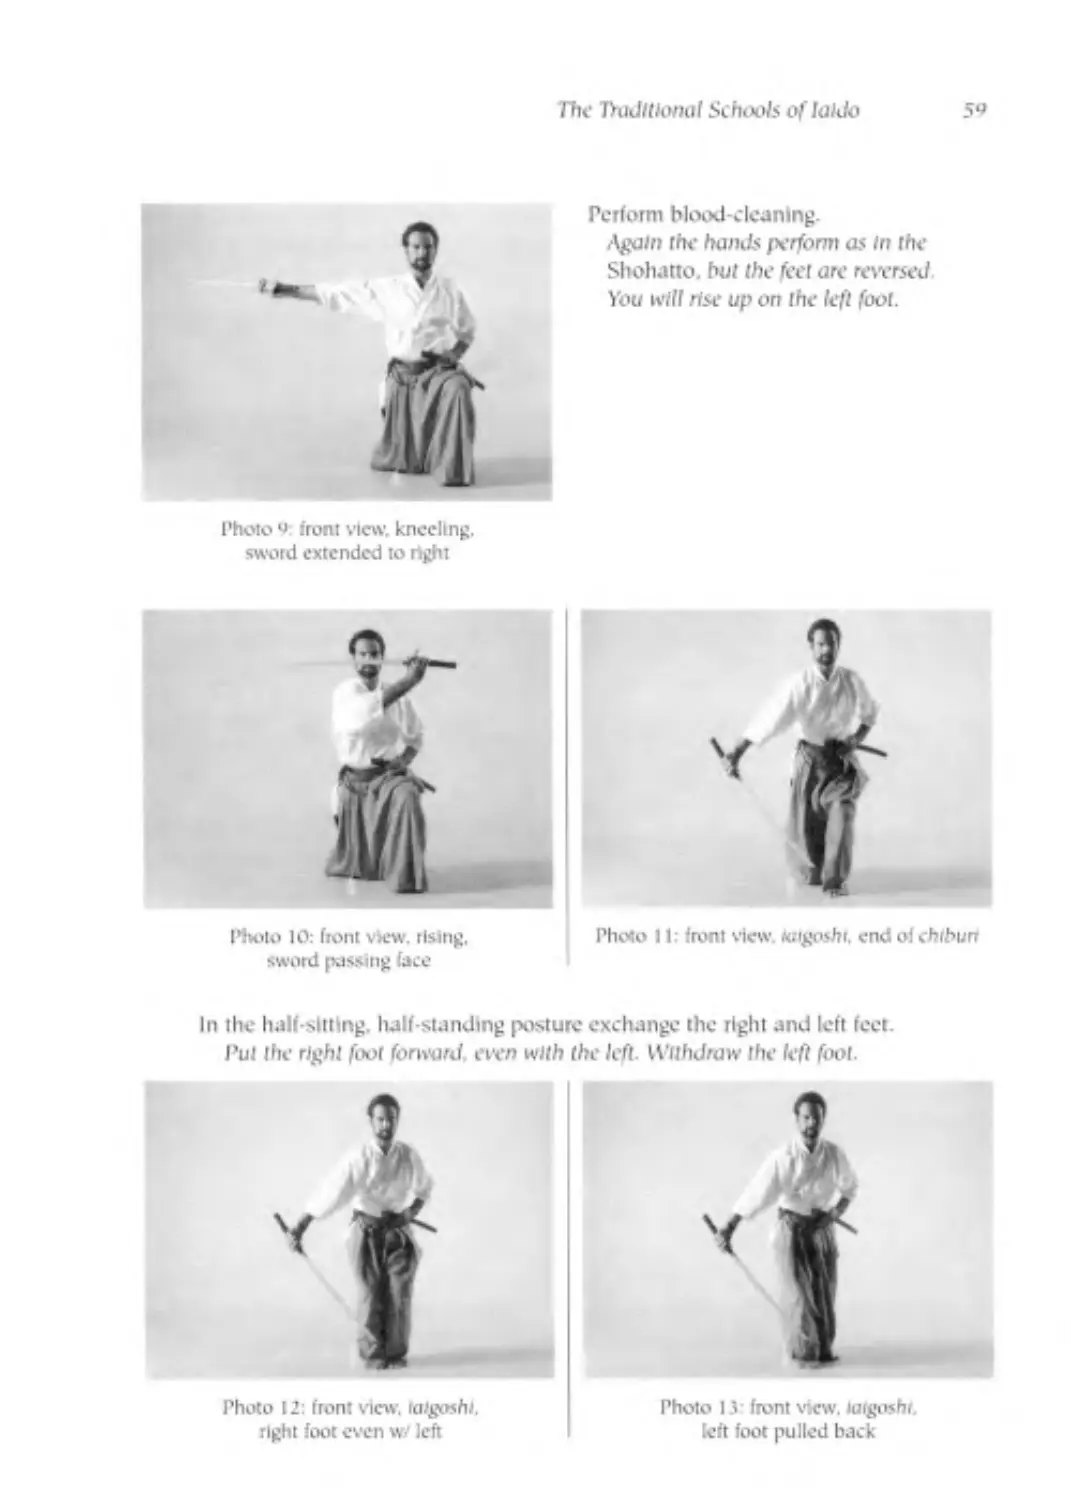
Perform blood-cleaning.
Again the hands perform os In the
Shohatto. but the feet are reivrsed
You will rise up on the left foot.
Photo 9 front view. kneeling,
sword extended to tight
Photo 11: front view wigoshr. end of chrburt
Photo IO: front view, rising,
sword passing face
In the half-sitting, half-standing posture exchange the right and left feet.
I’ul the right foot forward. even with the left. Withdraw the left foot.
Photo 12: front view. talgoshi.
right foot even vii left
Photo 13: front view. Mtgoshr
left foot pulled back
60
lapanese Sword Drawing: Л Source hoofc for laido Students
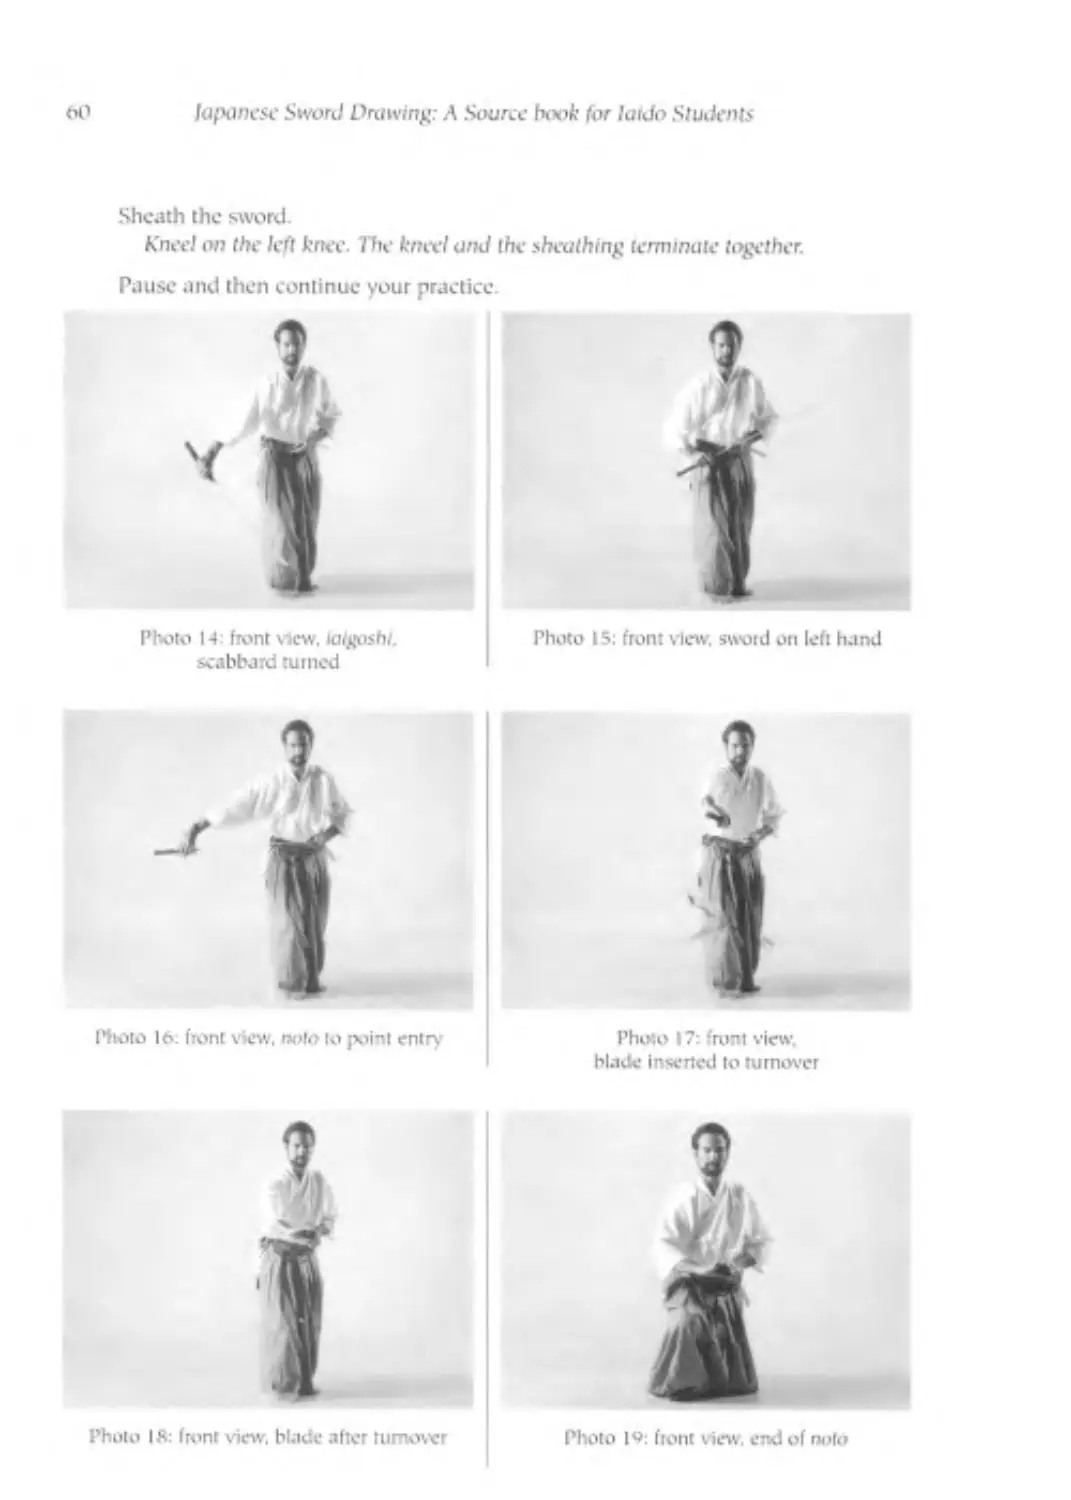
Sheath the sword.
Knee! on the left knee. The kneel and the sheathing terminate together.
Pause and then continue your practice
Photo IS: front view, sword on left hand
Photo 14 front view. lalgoshl.
scabbard turned
Photo 16: front view, nolo to point entry
Photo 17: front view.
Made inserted to turnover
The Traditional Schools of laido
01
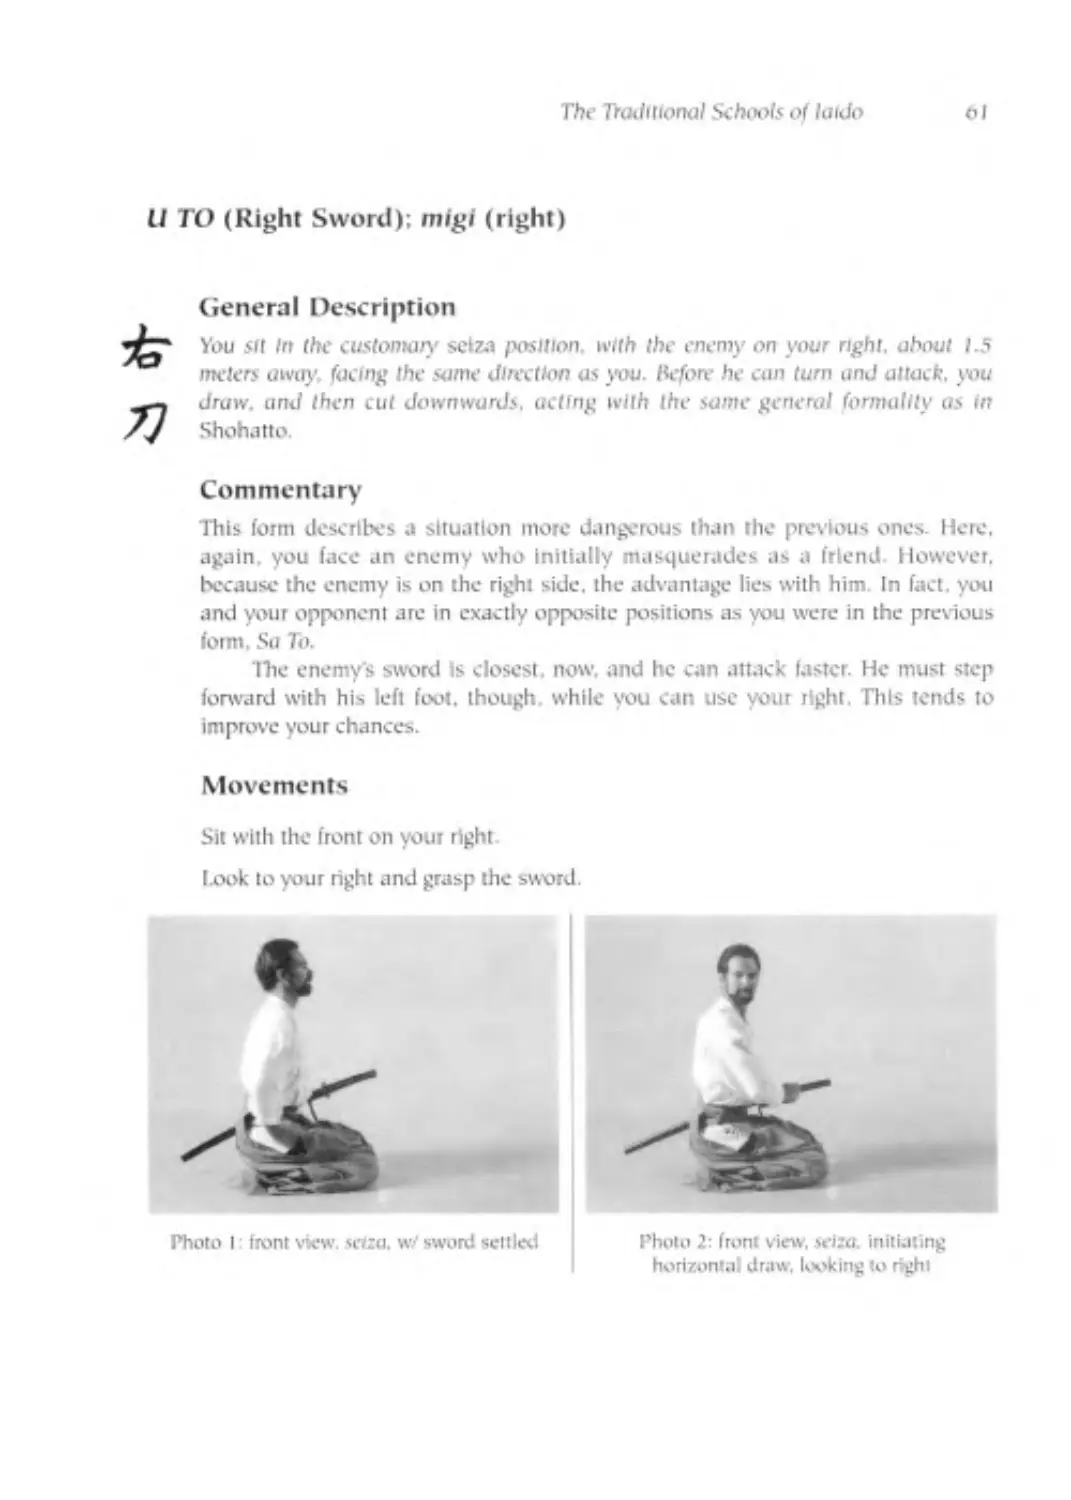
U TO (Right Sword); mfgf (right)
General Description
You sit In the customary seiza position. with the enemy on your right, about 1.5
meters away, facing the same direction as you. Before he cun turn und attack, you
draw, und then cut downwards, acting with the same general formality as in
Shohatto.
Commentary
This form describes a situation more dangerous than the previous ones. Here,
again, you (ace an enemy who initially masquerades as a friend. However,
because the enemy is on the right side, the advantage lies with him. In fact, you
and your opponent arc in exactly opposite positions as you were in the precious
form. Su To.
The enemy's sword is closest, now. and he can attack faster. He must step
forward with his left fool, though while you can use your right. This tends to
improve your chances.
Movements
Sit with the front on your right-
Look to your right and grasp the sword.
Photo I front view wiza. w sword settled
Photo 2: front view. wlla. initiating
horizontal draw, looking to right
62
lapanese Sword Drawing: A Source boot for laido Students
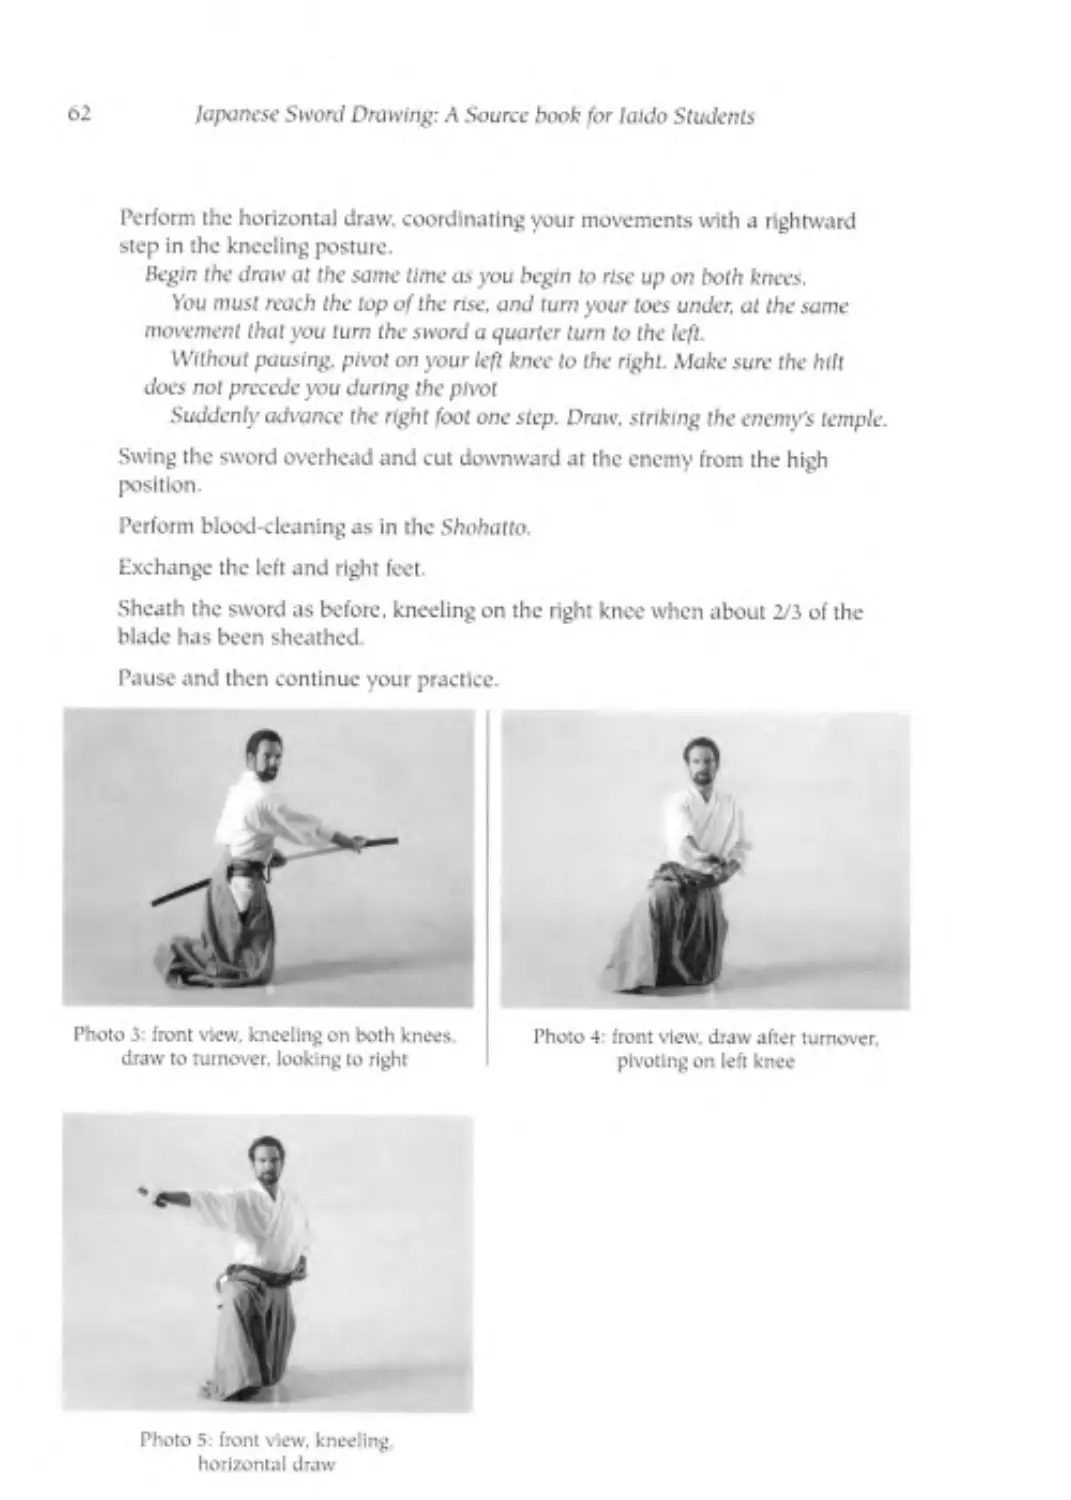
Perform the horizontal draw, coordinating your movements with a rightward
step in the kneeling posture.
Begin the draw at the same time as you begin to rise up on both knees.
You must reach the top of the rise, and шт your toes under. at the same
movement that you turn the sword a quarter turn to the left.
Without pausing, pivot on your left knee to the right. Make sure the hilt
does not precede you during the pivot
Suddenly advance the right fool one step. Draw, striking the enemy's temple.
Swing the swotd overhead and cut downward at the enemy from the high
position.
Perform blood-cleaning as in the Shohatto.
Exchange the left and right feet.
Sheath the sword as before, kneeling on the right knee when about 2JS of the
blade has been sheathed
Pause and then continue your practice.
Photo J: front view, kneeling on both knees
draw to turnover, looking to right
9
»
Photo 4 iront view. draw after turnover,
pivoting on left knee
Photo 5: front view, kneeling
horizontal draw
The Traditional Schools of laido
63
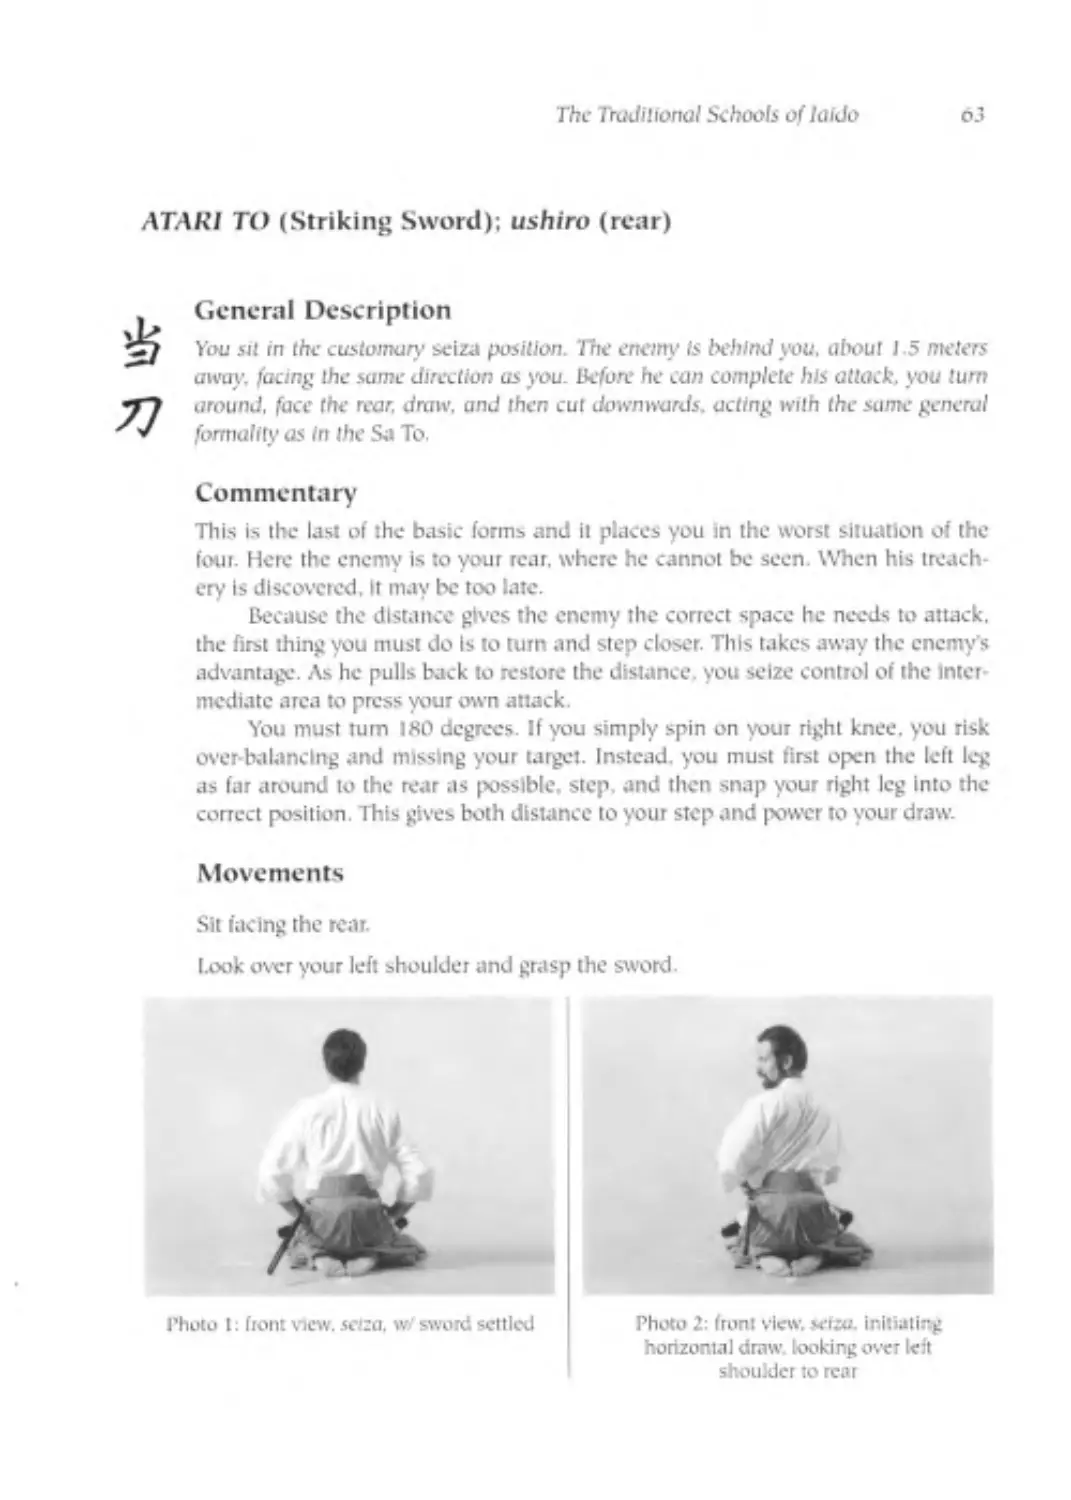
ATARI TO (Striking Sword); ushiro (rear)
. General Description
You sit in the customary seiza position lhe enemy Is behind you. about J 5 meters
away. facing lhe same direction as you. More he can complete his attack, you turn
~T~l around, face the rear. draw, and then cut downwards. acting with the same general
'J formality as In the Sa To.
Commentary
This is the last of the basic forms and it places you in the worst situation of the
(out. Here the enemy is to your rear, where he cannot be seen. When his treach-
ery Is discovered. It may be too late.
Because the distance gives the enemy the correct space he needs to attack,
the first thing you must do is to turn and step closer. This takes away lhe enemy’s
advantage. As he pulls back to restore the distance, you seize control of the Inter-
mediate area to press your own attack.
You must rum ISO degrees. If you simply spin on your right knee, you risk
over balancing and missing your target. Instead, you must first open the left leg
as far around to the rear as possible, step, and then snap your right leg into the
correct position. This gives both distance to your step and power to your draw.
Movements
Sit facing the rear.
Look over your left shoulder and grasp the sword.
1’hoto 1: ftont view. seiza. w/ sword settled
Photo 2: front view, seizu. initialing
horizontal draw, looking over left
shoulder to rear
M lapanese SiwrJ Drawing: A Source book for laido Students
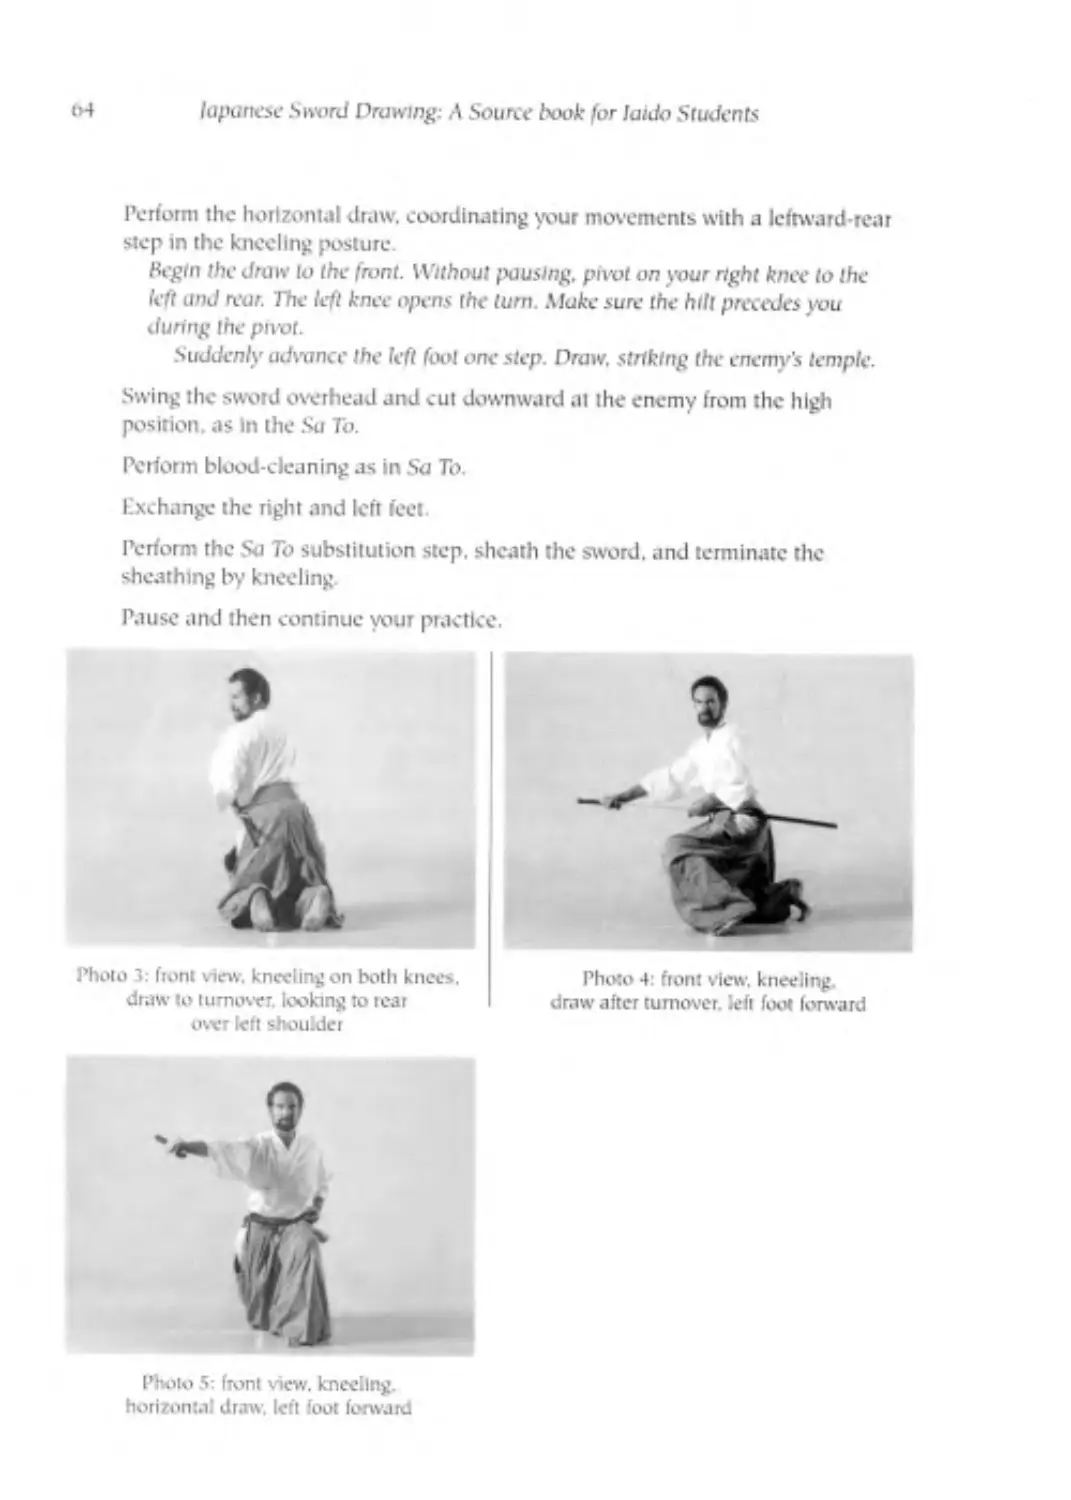
Perform the horizontal draw, coordinating your movements with a leftward-rear
step in the kneeling posture.
begin the draw Io the front. Without pausing, pivot on your right knee to the
left and rear. The left knee opens the turn. Make sure the hilt precedes you
during the pivot.
Suddenly advance the left foot one step. Draw, striking the enemy's temple.
Swing the sword overhead and cut downward at the enemy from the high
position, as in the Sa To.
Perform blood-cleaning as in Sa To.
Exchange the right and left feet.
Perform the So To substitution step, sheath the sword, and terminate the
sheathing by kneeling.
Pause and then continue your practice.
Photo J: hom view, kneeling on both knees,
draw to turnover, looking to rear
over left shoulder
Photo 4: front view, kneeling,
draw after turnover, left foot forward
Pirolo 5: front view, kneeling,
horizontal draw, left foot forward
The Traditional Schools of laido
65
INYO SHINTAI (Advancing-Retreating Movement);
yaegaki (doubled fences)
№
1Д
General Description
You sit in the customary seize position, faced by two enemies, sitting one behind the
other. at about 1.5 and 3 meters. You draw before the first can attack. but he is only
wounded and begins to retreat. You pursue by standing up and cutting downward.
You then perform a new Wood-cleunlng and sheath your swotd.
The second enemy stands and attacks you with a downward cut. Withdraw
one step and draw al his waist. Then advance and cut downwards. The form ends
with the usual blood-cleaning and sheathing.
Commentary
There are two enemies in this form and they arc both openly hostile. They are sit-
ting in rows, and can attack you sequentially. The closer one presents the imme-
diate threat, since he will attack first, but it Is the second one who Is more
dangerous.
The first enemy Is close enough to attack while kneeling, with either a hori-
zontal or vertical draw. You have seen this before, in Shohatto. You respond in
essentially the same way. and win.
The second enemy, however, has both the time and space to stand and
press his attack with a strong downward cut. The power of a standing cut is
greater than one done from kneeling. His footwork can be more complicated and
more responsive to your defenses.
Even while your arc dealing with the first opponent, you must react to the
second. Your choice of the smaller, quicker Eishin Ryu blood-cleaning shows that
you do not want to open yourself as widely as an Omori Ryu blood-cleaning
would. Similarly, the careful sheathing demonstrates your watchfulness.
You aren't sure that the second opponent will attack, and you are willing to
disengage This is demonstrated by your returning to a kneeling position during
blood-cleaning.
When the second enemy attacks, you pull back one large step to dodge his
cut and counterattack. When the enemy falls, you follow him down to finish the
action.
6f> lapanese Sword Drawing: A Source book for kudo Students
Movements
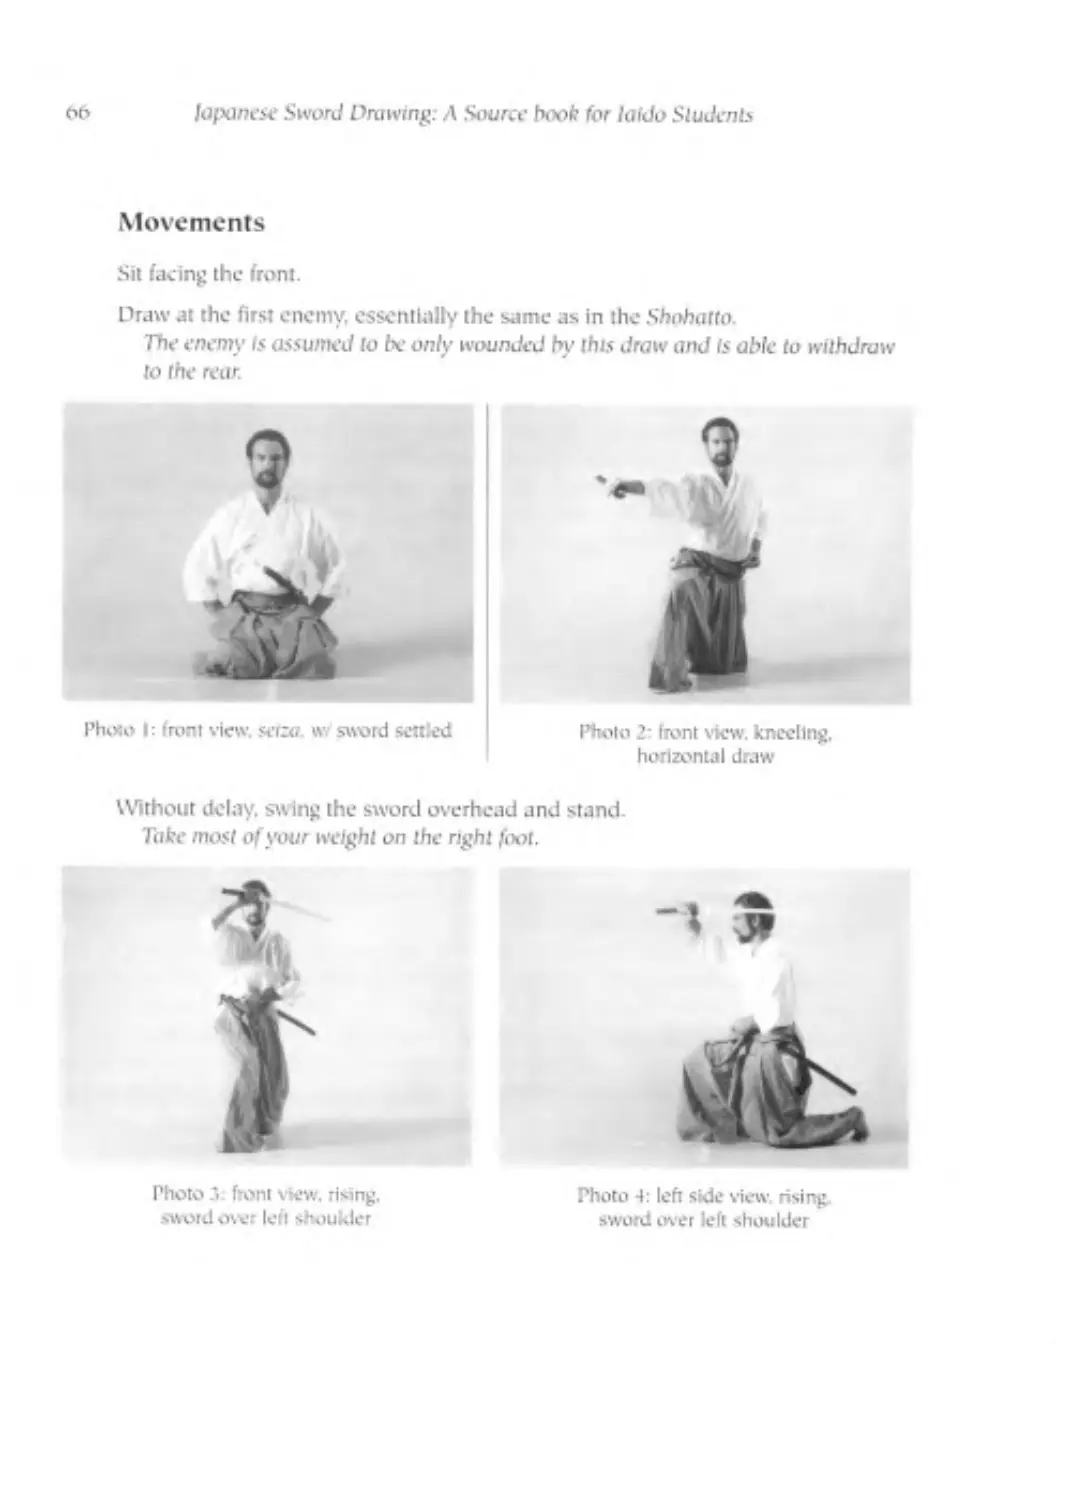
Sit facing the front.
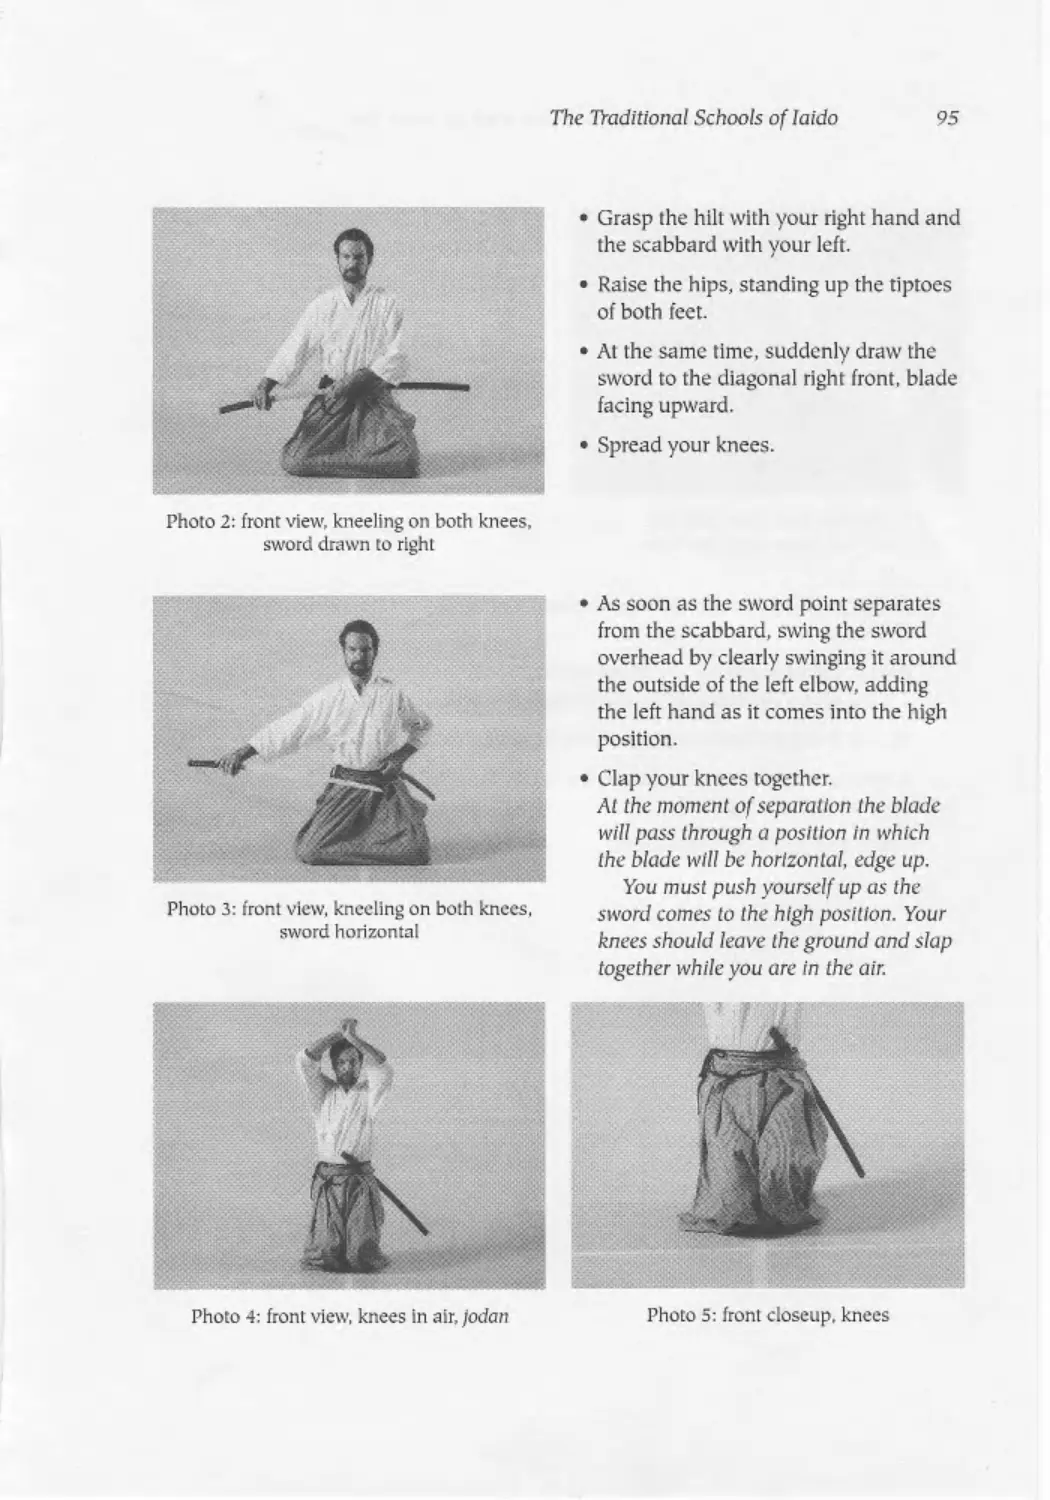
Draw at the first enemy, essentially the same as in the Shohatto
The слешу Is assumed to be on/у wounded tn’ this draw and Is able to withdraw
to the rear.
Photo I: front view, seize w sword sealed
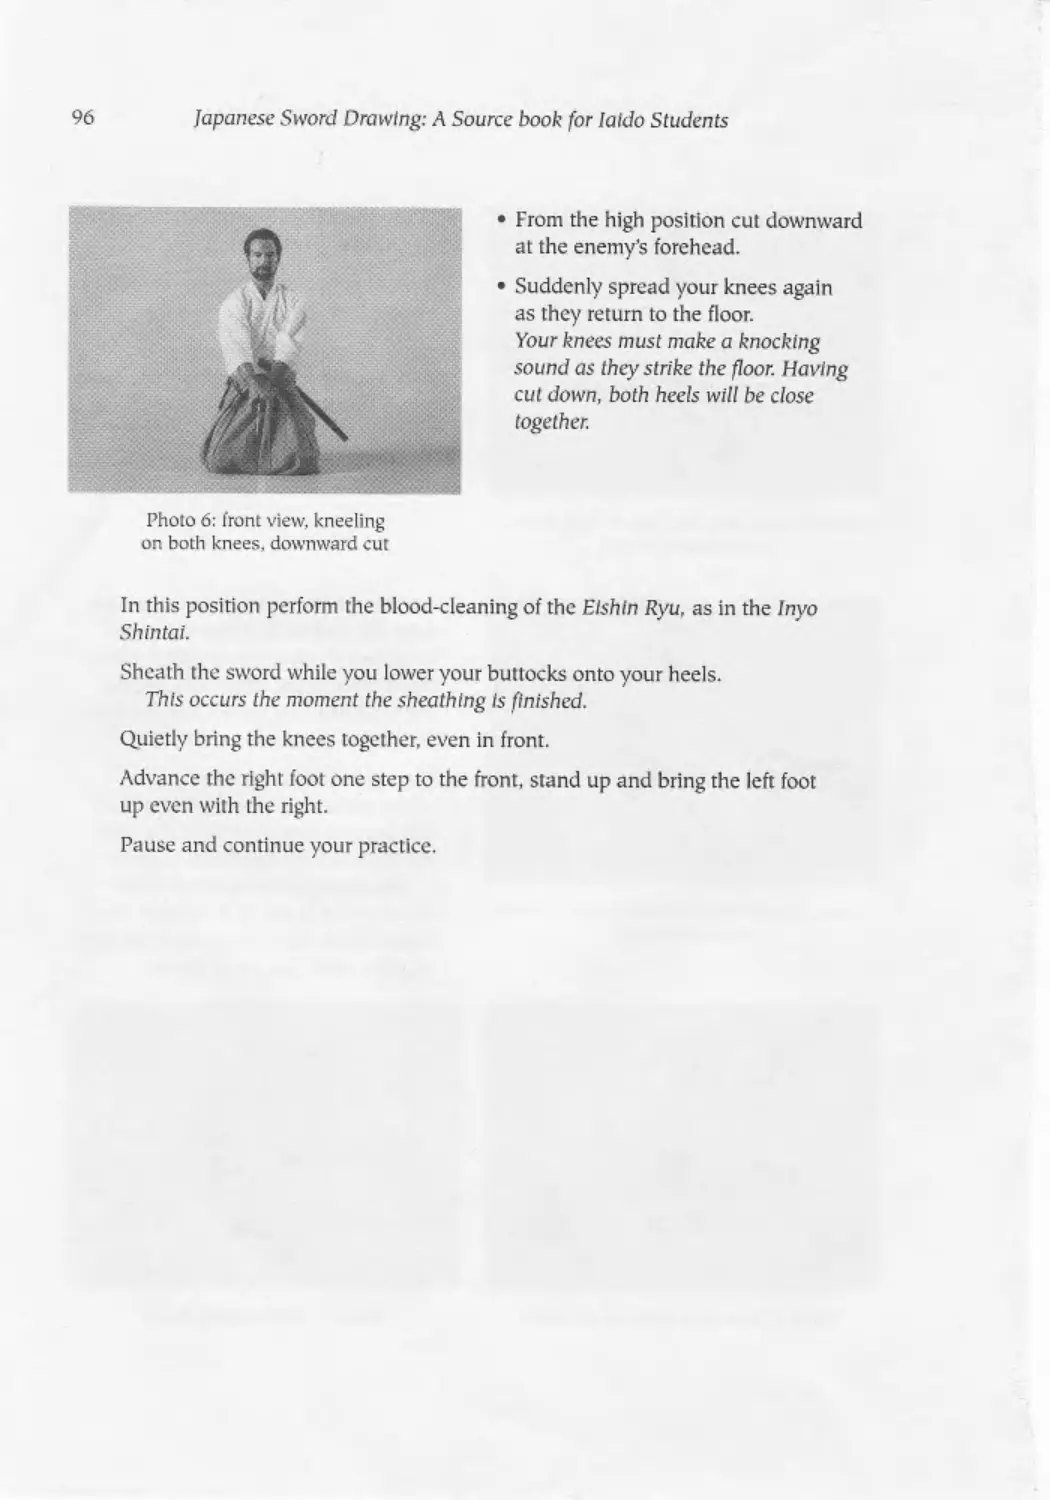
Photo 2- front view, kneeling,
horizontal draw
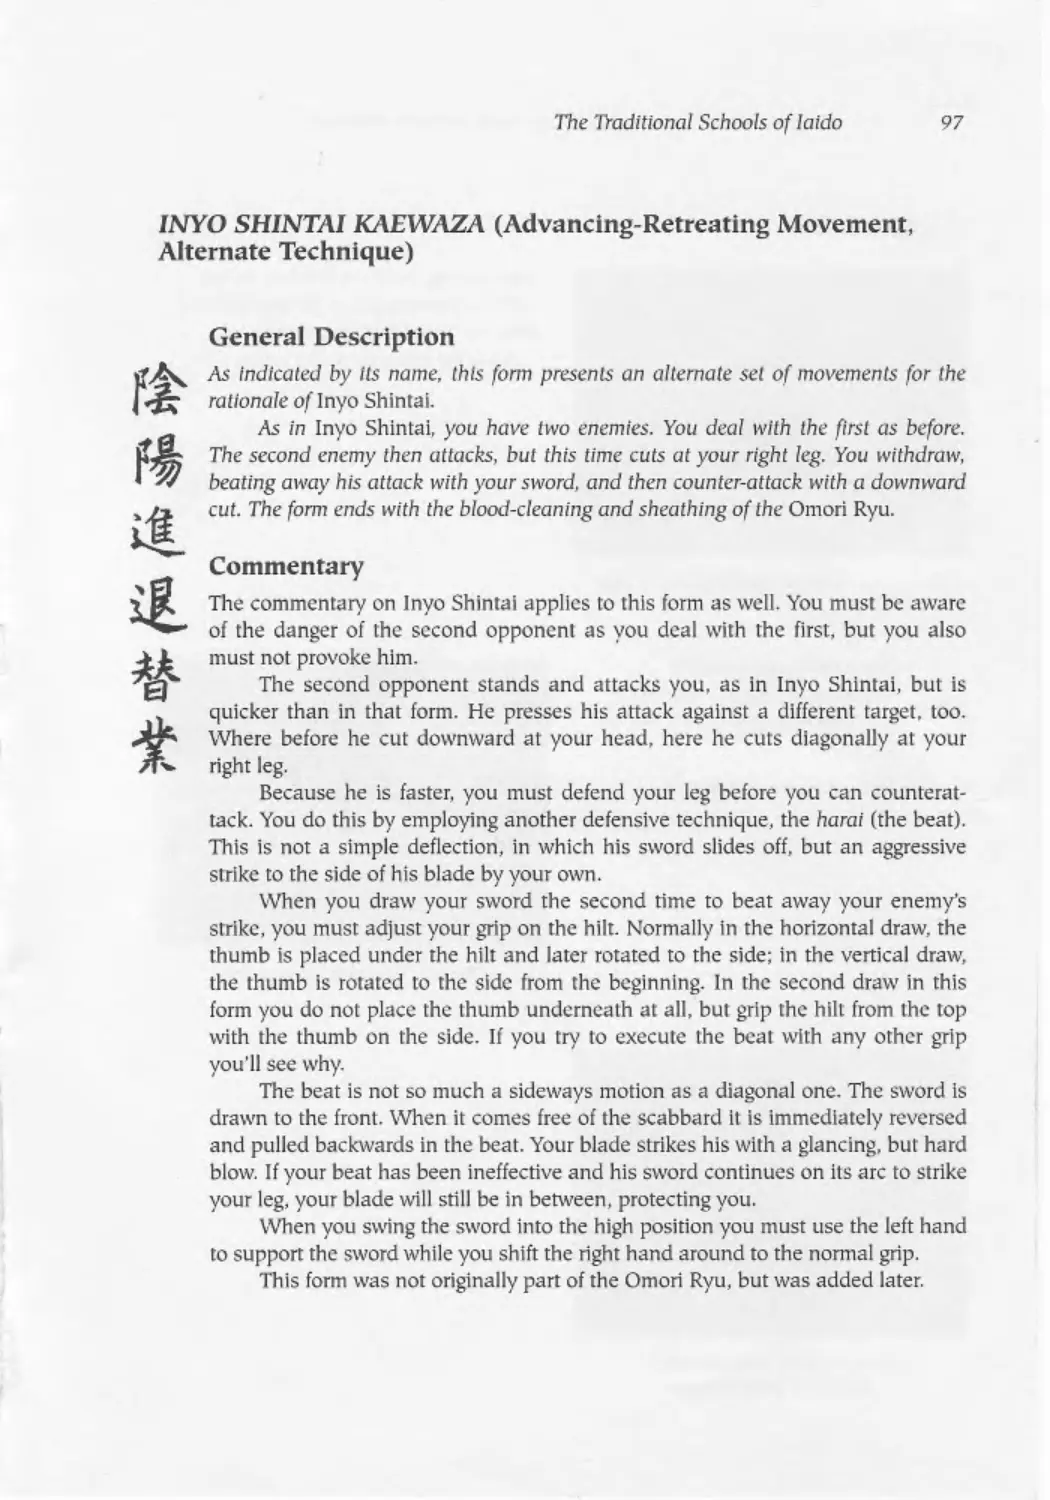
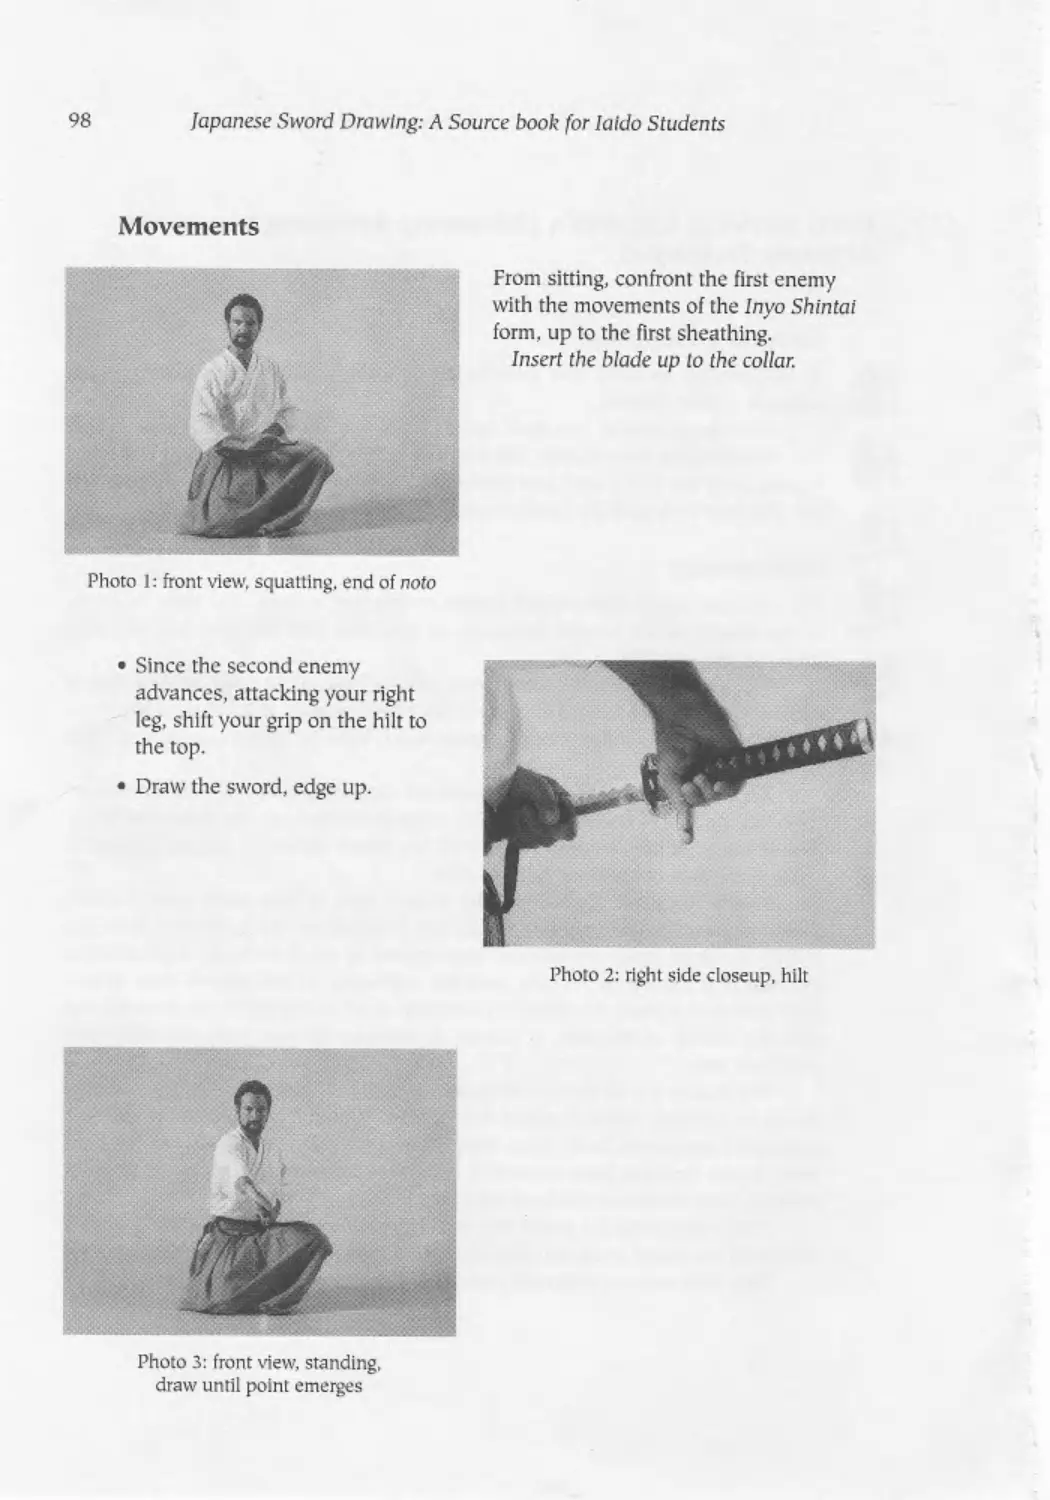
Without delay, swing the sword overhead and stand
Tobe most of your weight on the right foot.
Photo 3: front view, rising,
sword over left shoulder
Photo 4: left side view, rising,
sword over left shoulder
The Traditional Schools of Iaido
67
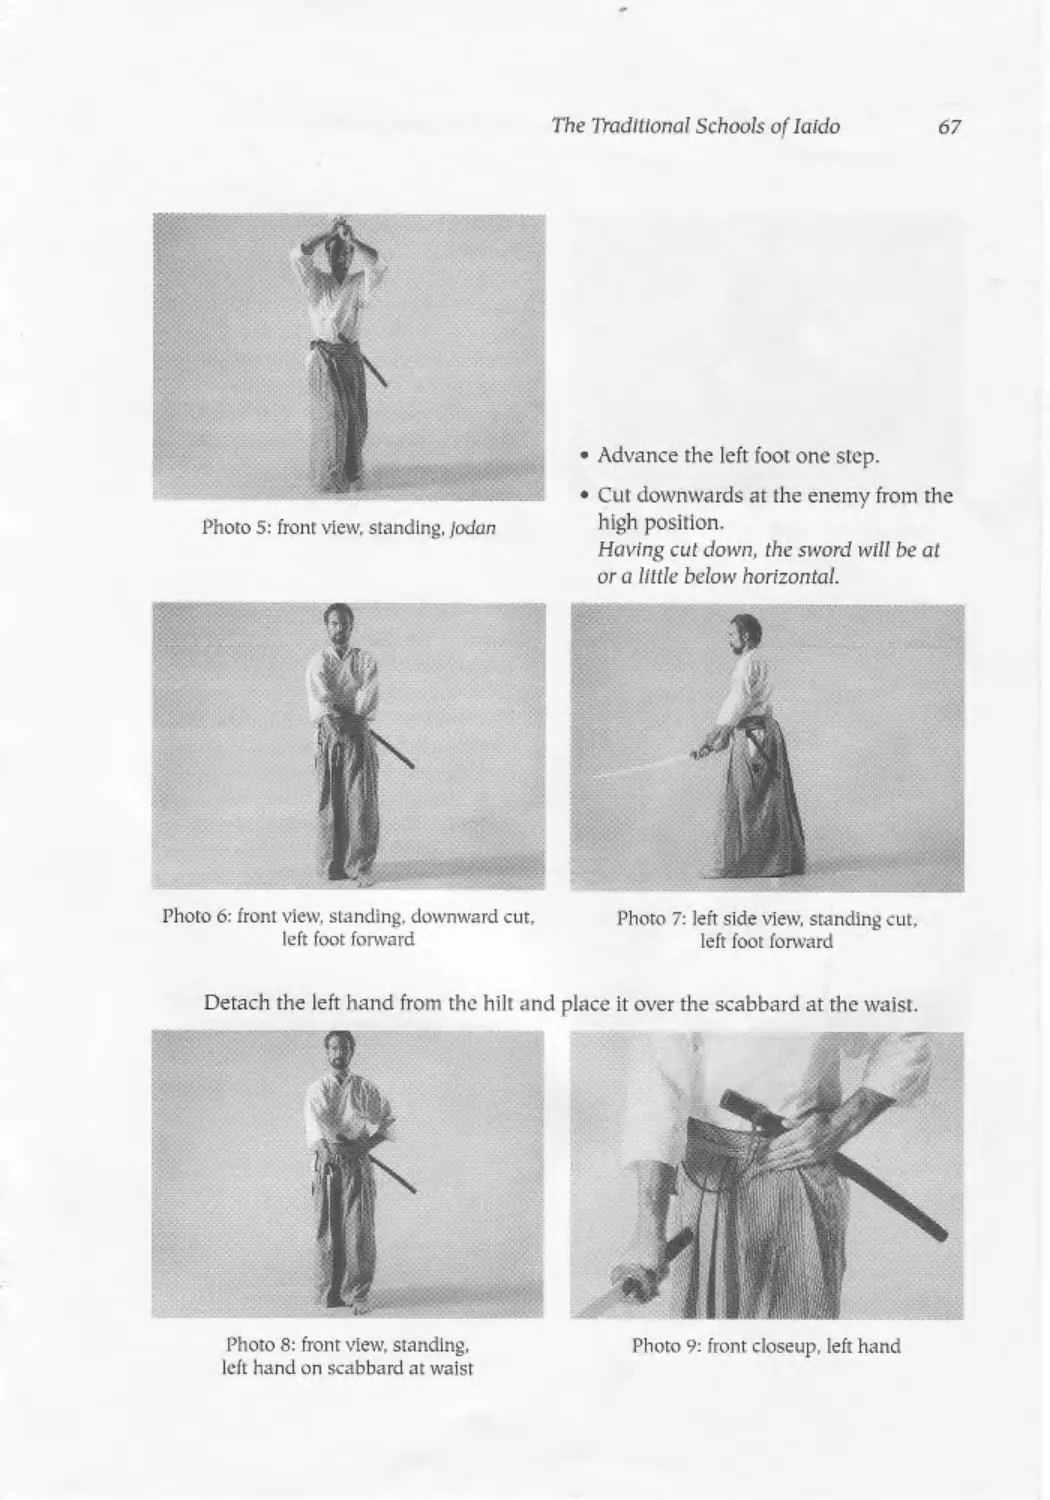
Photo 5: front view, sending. indan
• Advance the left foot one step.
• Cut downwards at the enemy from the
high position.
Having cut down, the sword will be at
or a little below horizontal.
Photo 6: front view, standing, downward cut,
left foot forward
Photo 7: left side view, standing cut.
left foot forward
Detach the left hand from the hilt and place it over the scabbard at the waist.
Photo 9: front closeup, left hand
Photo 8: front view, standing,
left hand on scabbard at waist
68
Japanese Sword Drawing: A Source book for laido Students
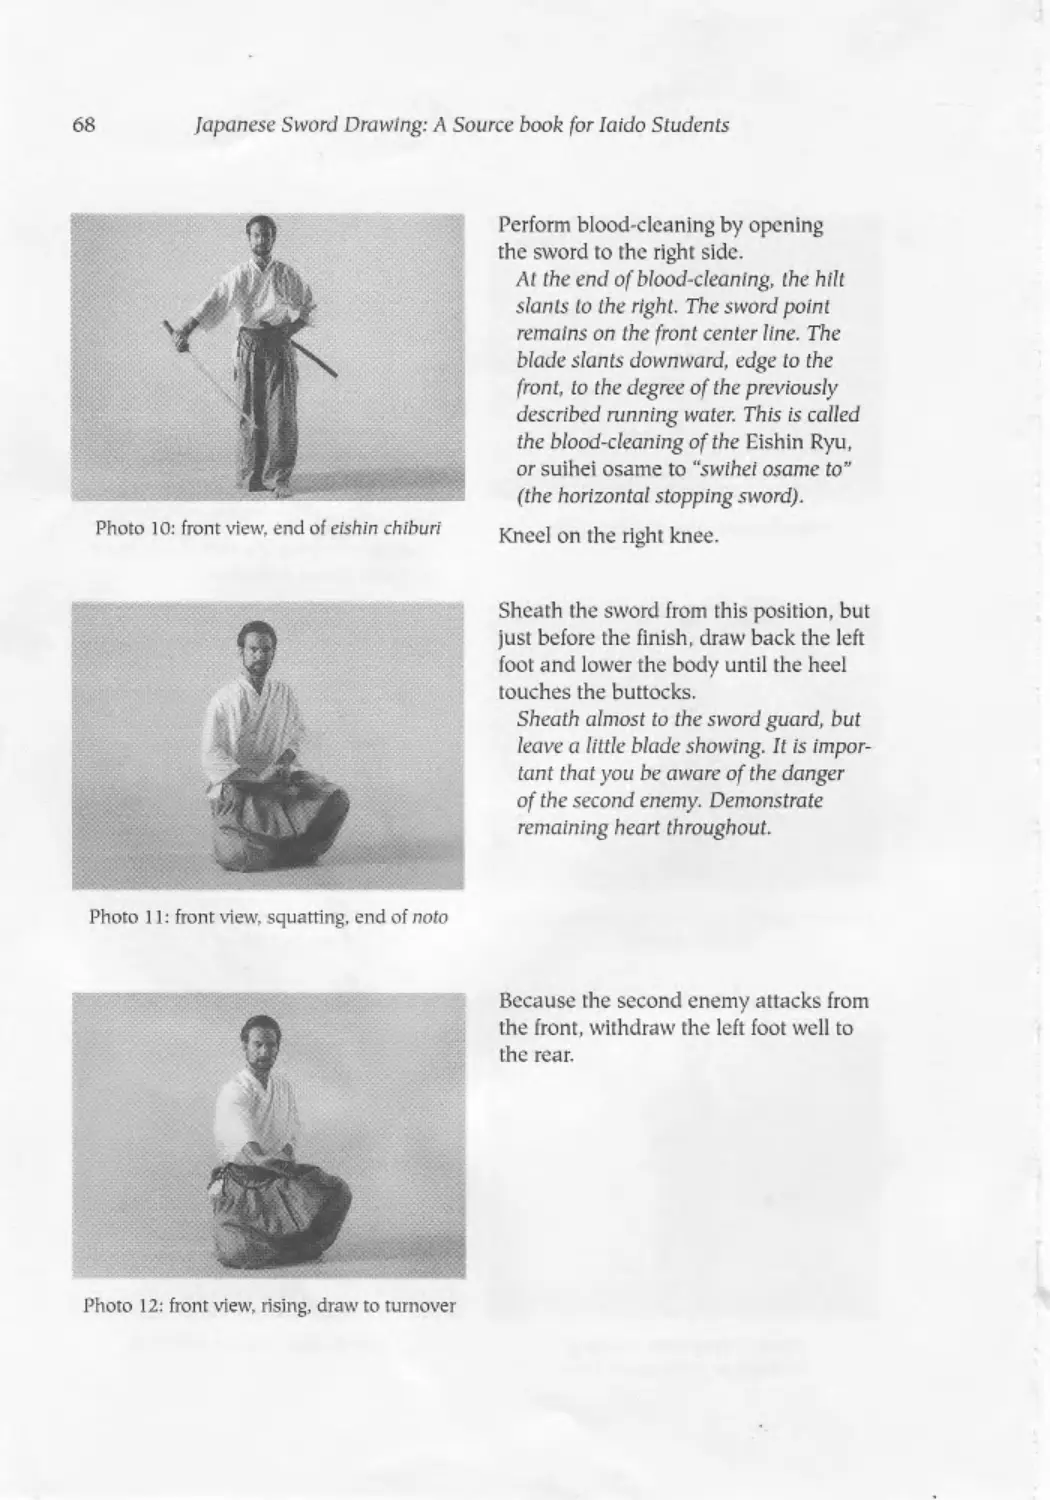
Photo 10: front view, end of eishin chiburi
Photo 11: front view, squatting, end of noto
Photo 12: front view, rising, draw to turnover
Perform blood-cleaning by opening
the sword to the right side.
At the end of blood-cleaning, the hilt
slants to the right. The sword point
remains on the front center line. The
blade slants downward, edge to the
front, to the degree of the previously
described running water. This is called
the blood-cleaning of the Eishin Ryu,
or suihei osame to “swthet osame to”
(the horizontal stopping sword).
Kneel on the right knee.
Sheath the sword from this position, but
just before the finish, draw back the left
foot and lower the body until the heel
touches the buttocks.
Sheath almost to the sword guard, but
leave a little blade showing. It is impor-
tant that you be aware of the danger
of the second enemy. Demonstrate
remaining heart throughout.
Because the second enemy attacks from
the front, withdraw the left foot well to
the rear.
The Traditional Schools of laido
69
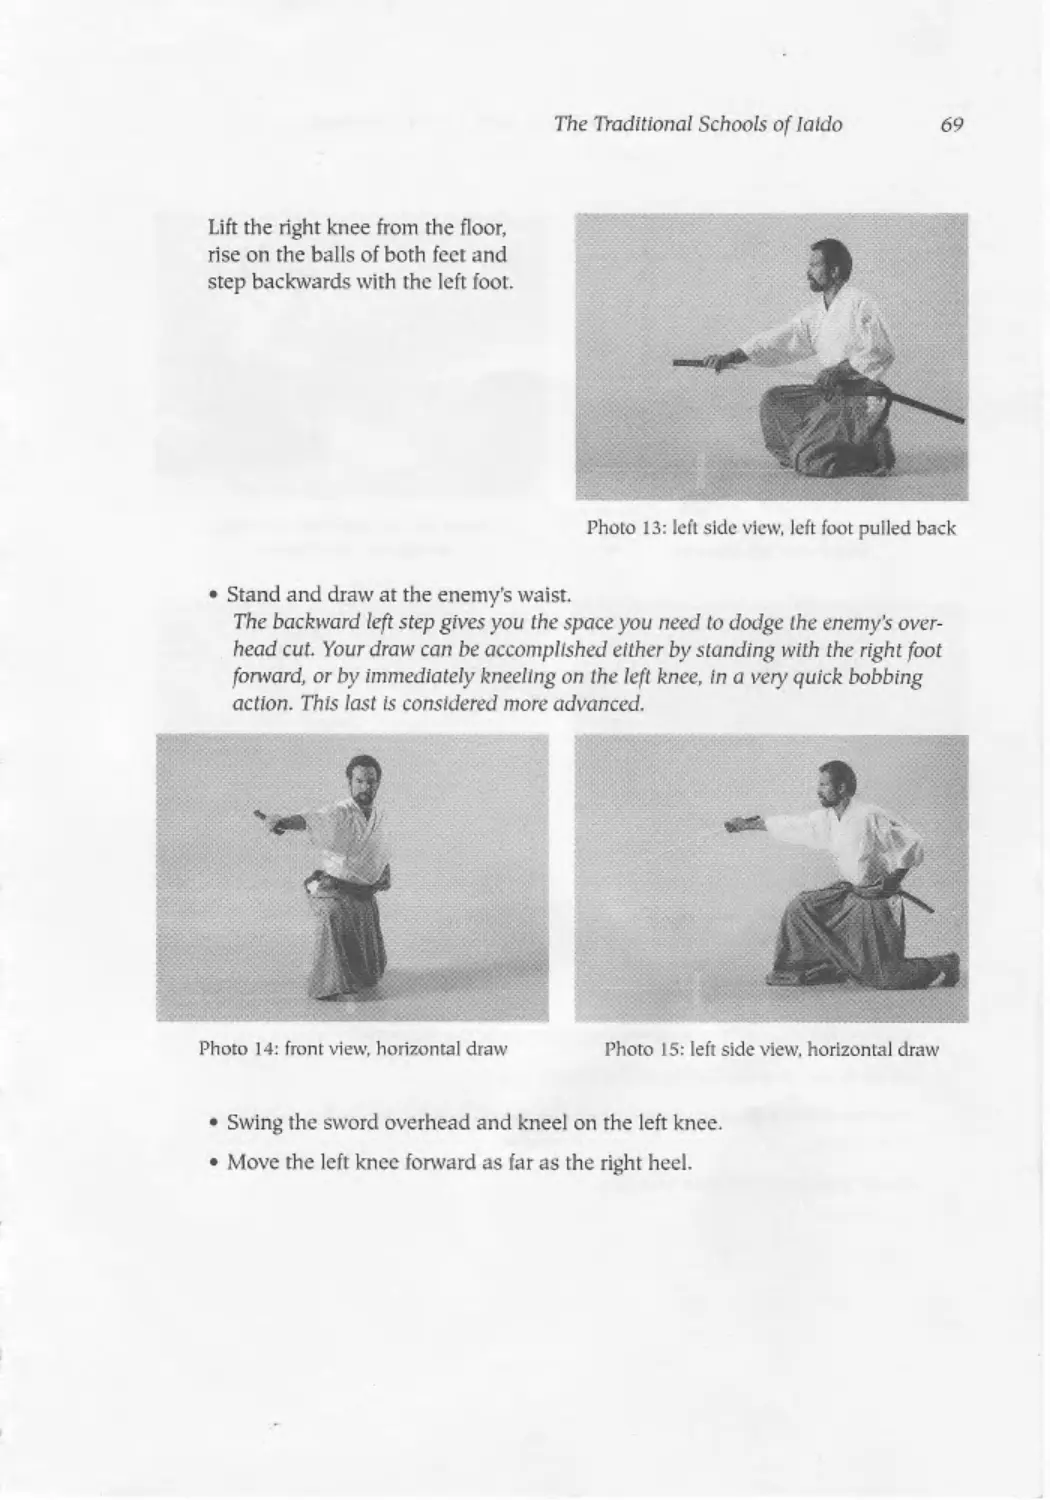
Lift the right knee from the floor,
rise on the balls of both feet and
step backwards with the left foot.
Photo 13: left side view, left foot pulled back
• Stand and draw at the enemy’s waist.
The backward left step gives you the space you need to dodge the enemy's over-
head cut. Your draw can be accomplished either by standing with the right foot
forward, or by immediately kneeling on the left knee, in a very quick bobbing
action. This last Is considered more advanced.
Photo 14: front view, horizontal draw
Photo 15: left side view, horizontal draw
• Swing the sword overhead and kneel on the left knee.
• Move the left knee forward as far as the right heel.
70
Japanese Sword Drawing: A Source book for Iaido Students
Photo 16: front view, kneeling,
sword over left shoulder
Photo 17: left side view, kneeling,
sword over left shoulder
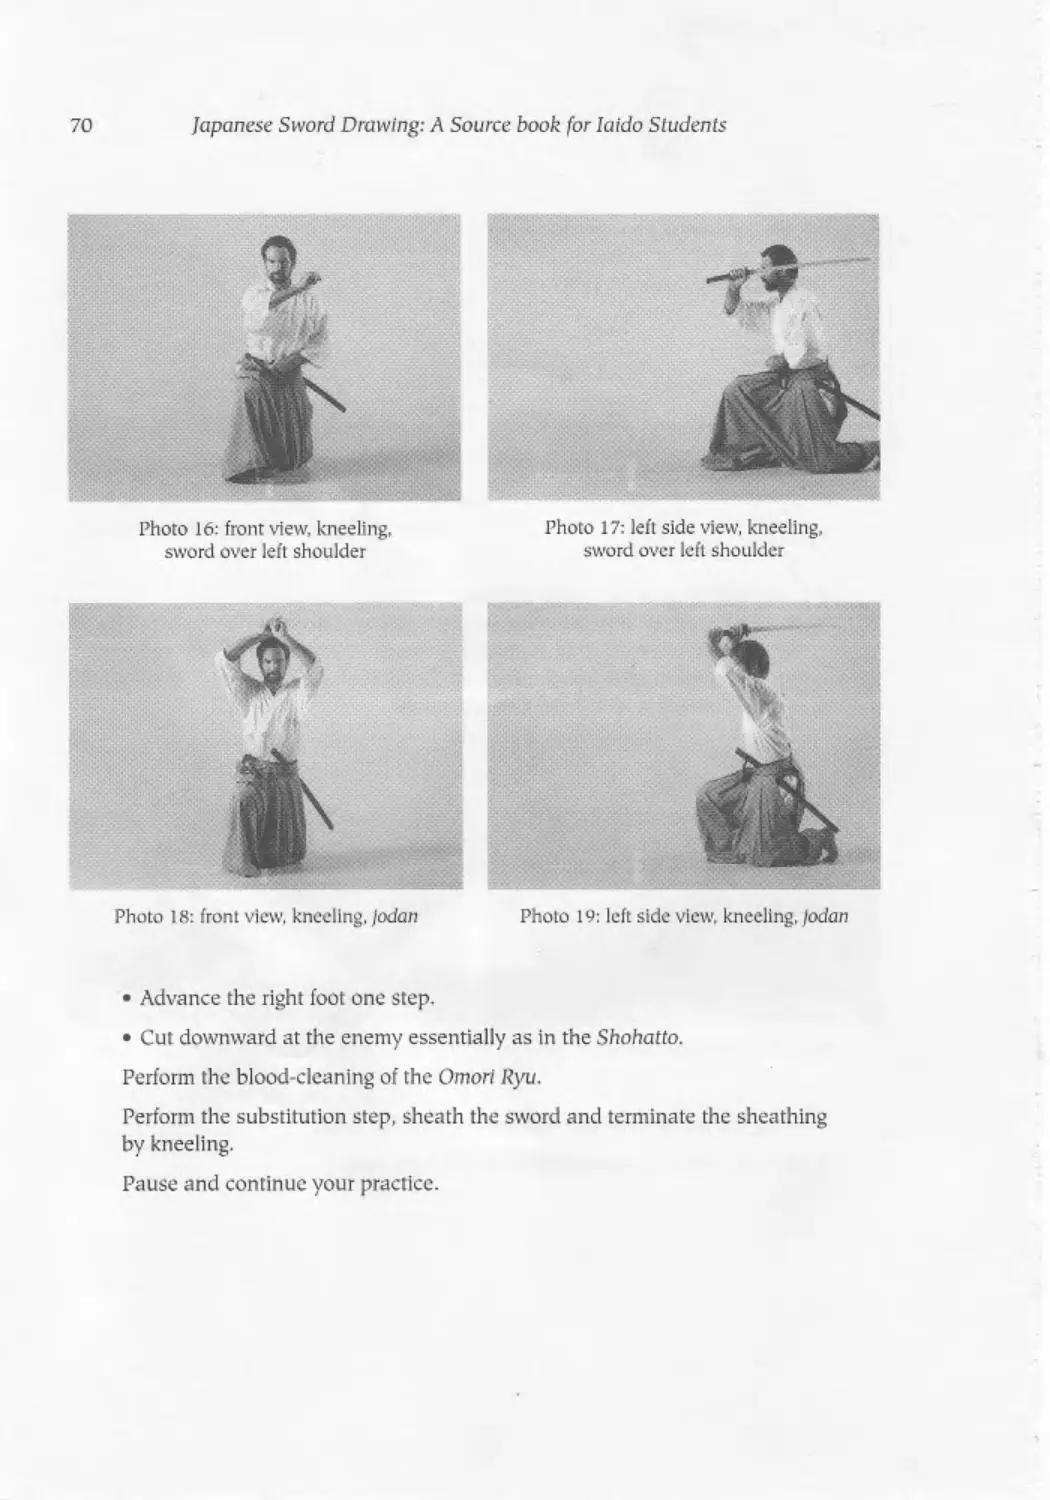
Photo 18: front view, kneeling, /odan
Photo 19: left side view, kneeling, )odan
• Advance the right foot one step.
• Cut downward at the enemy essentially as in the Shohatto.
Perform the blood-cleaning of the Omori Ryu.
Perform the substitution step, sheath the sword and terminate the sheathing
by kneeling.
Pause and continue your practice.
The Traditional Schools of laido
71
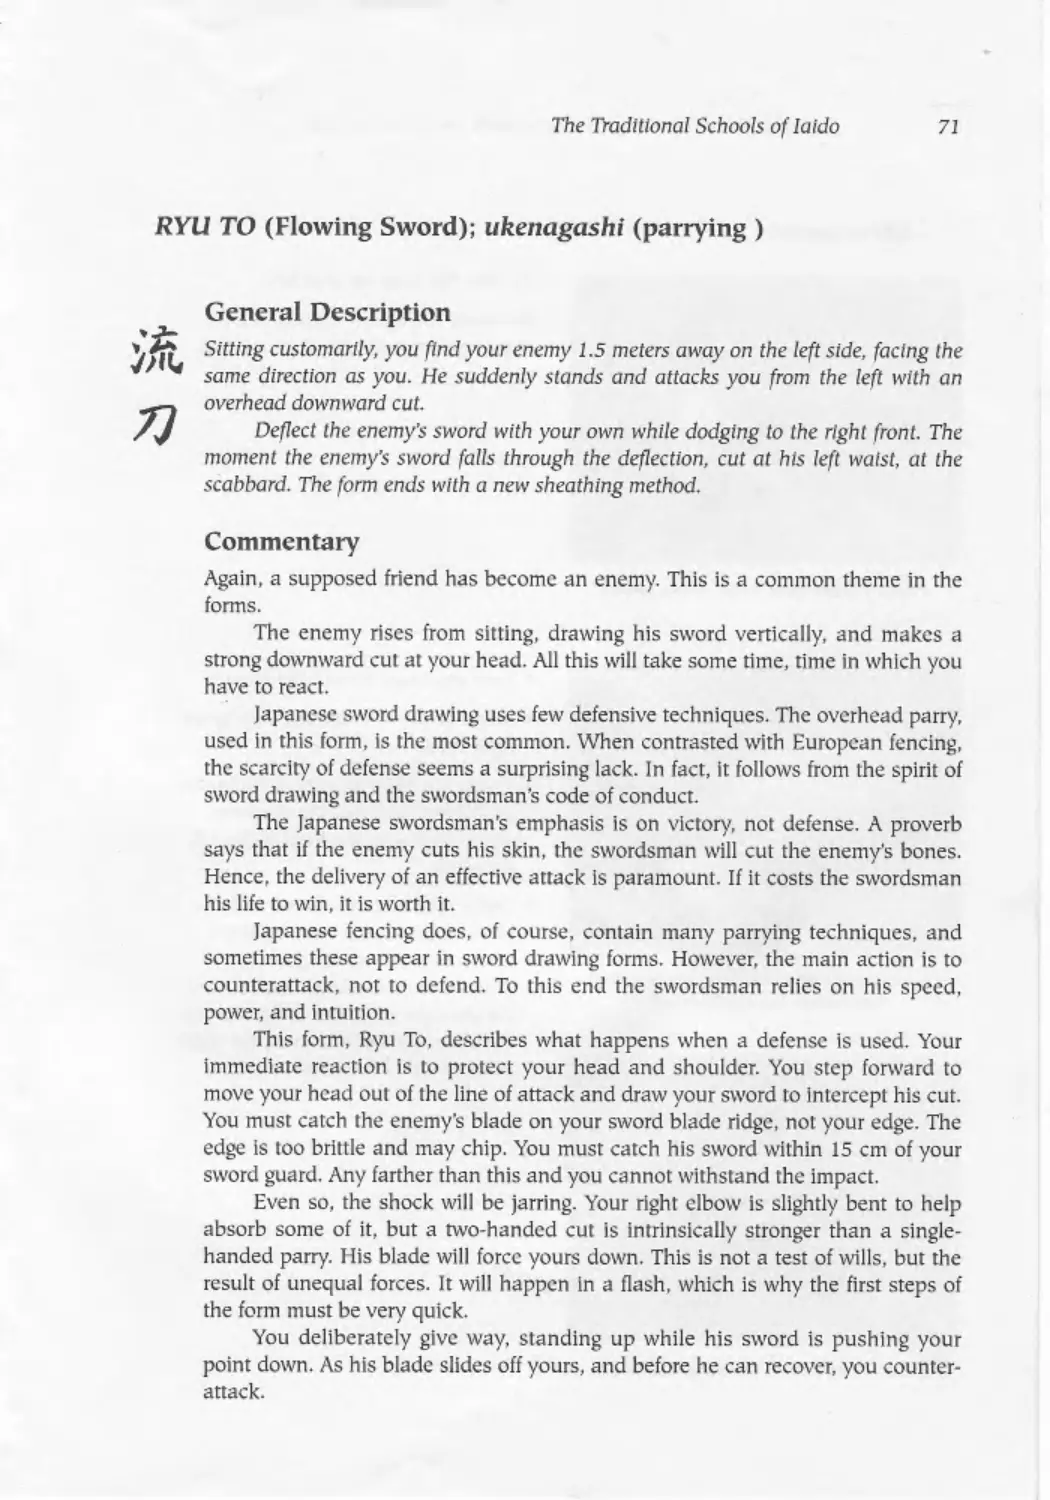
I TO (Flowing Sword); ukenagashi (parrying )
General Description
Sitting customarily, you find your enemy 1.5 meters away on the left side, facing the
same direction as you. He suddenly stands and attacks you from the left with an
overhead downward cut.
Deflect the enemy’s sword with your own while dodging to the right front. The
moment the enemy’s sword falls through the deflection, cut at his left waist, at the
scabbard. The form ends with a new sheathing method.
Commentary
Again, a supposed friend has become an enemy. This is a common theme in the
forms.
The enemy rises from sitting, drawing his sword vertically, and makes a
strong downward cut at your head. All this will take some time, time in which you
have to react.
Japanese sword drawing uses few defensive techniques. The overhead parry,
used in this form, is the most common. When contrasted with European fencing,
the scarcity of defense seems a surprising lack. In fact, it follows from the spirit of
sword drawing and the swordsman’s code of conduct.
The Japanese swordsman's emphasis is on victory, not defense. A proverb
says that if the enemy cuts his skin, the swordsman will cut the enemy’s bones.
Hence, the delivery of an effective attack is paramount. If it costs the swordsman
his life to win, it is worth it.
Japanese fencing does, of course, contain many parrying techniques, and
sometimes these appear in sword drawing forms. However, the main action is to
counterattack, not to defend. To this end the swordsman relies on his speed,
power, and intuition.
This form, Ryu To, describes what happens when a defense is used. Your
immediate reaction Is to protect your head and shoulder. You step forward to
move your head out of the line of attack and draw your sword to intercept his cut.
You must catch the enemy’s blade on your sword blade ridge, not your edge. The
edge Is too brittle and may chip. You must catch his sword within 15 cm of your
sword guard. Any farther than this and you cannot withstand the impact.
Even so, the shock will be jarring. Your right elbow is slightly bent to help
absorb some of it, but a two-handed cut is intrinsically stronger than a single-
handed parry. His blade will force yours down. This is not a test of wills, but the
result of unequal forces. It will happen In a flash, which is why the first steps of
the fonn must be very quick.
You deliberately give way, standing up while his sword is pushing your
point down. As his blade slides off yours, and before he can recover, you counter-
attack.
72
Japanese Sword Drawing: A Source book for laido Students
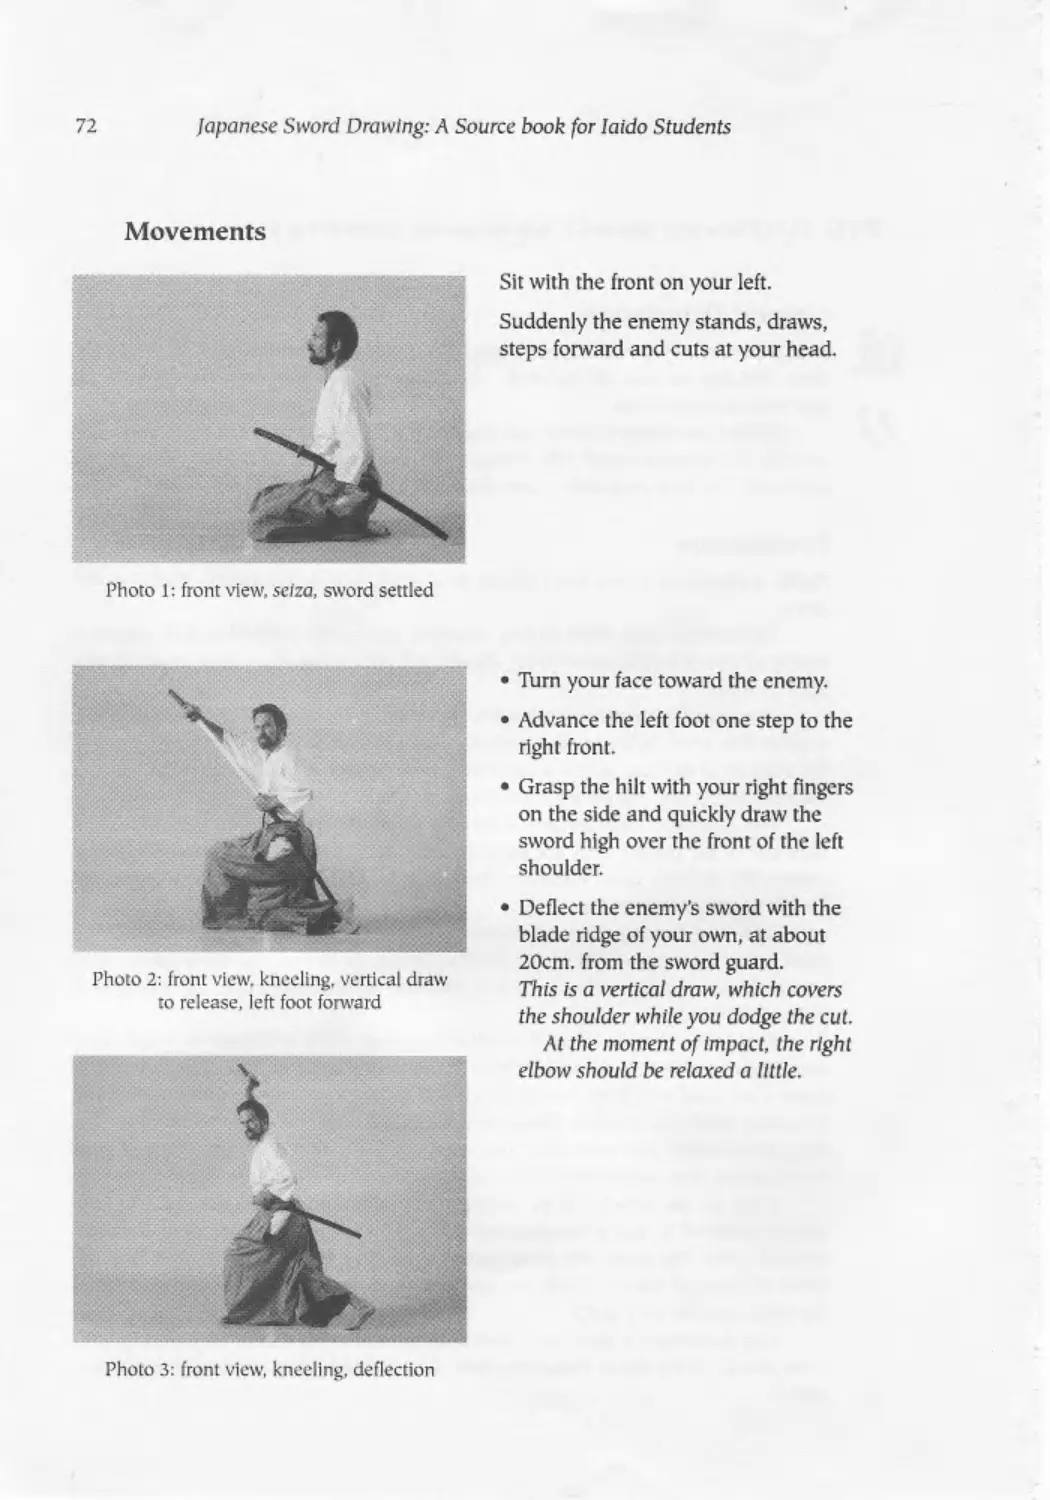
Movements
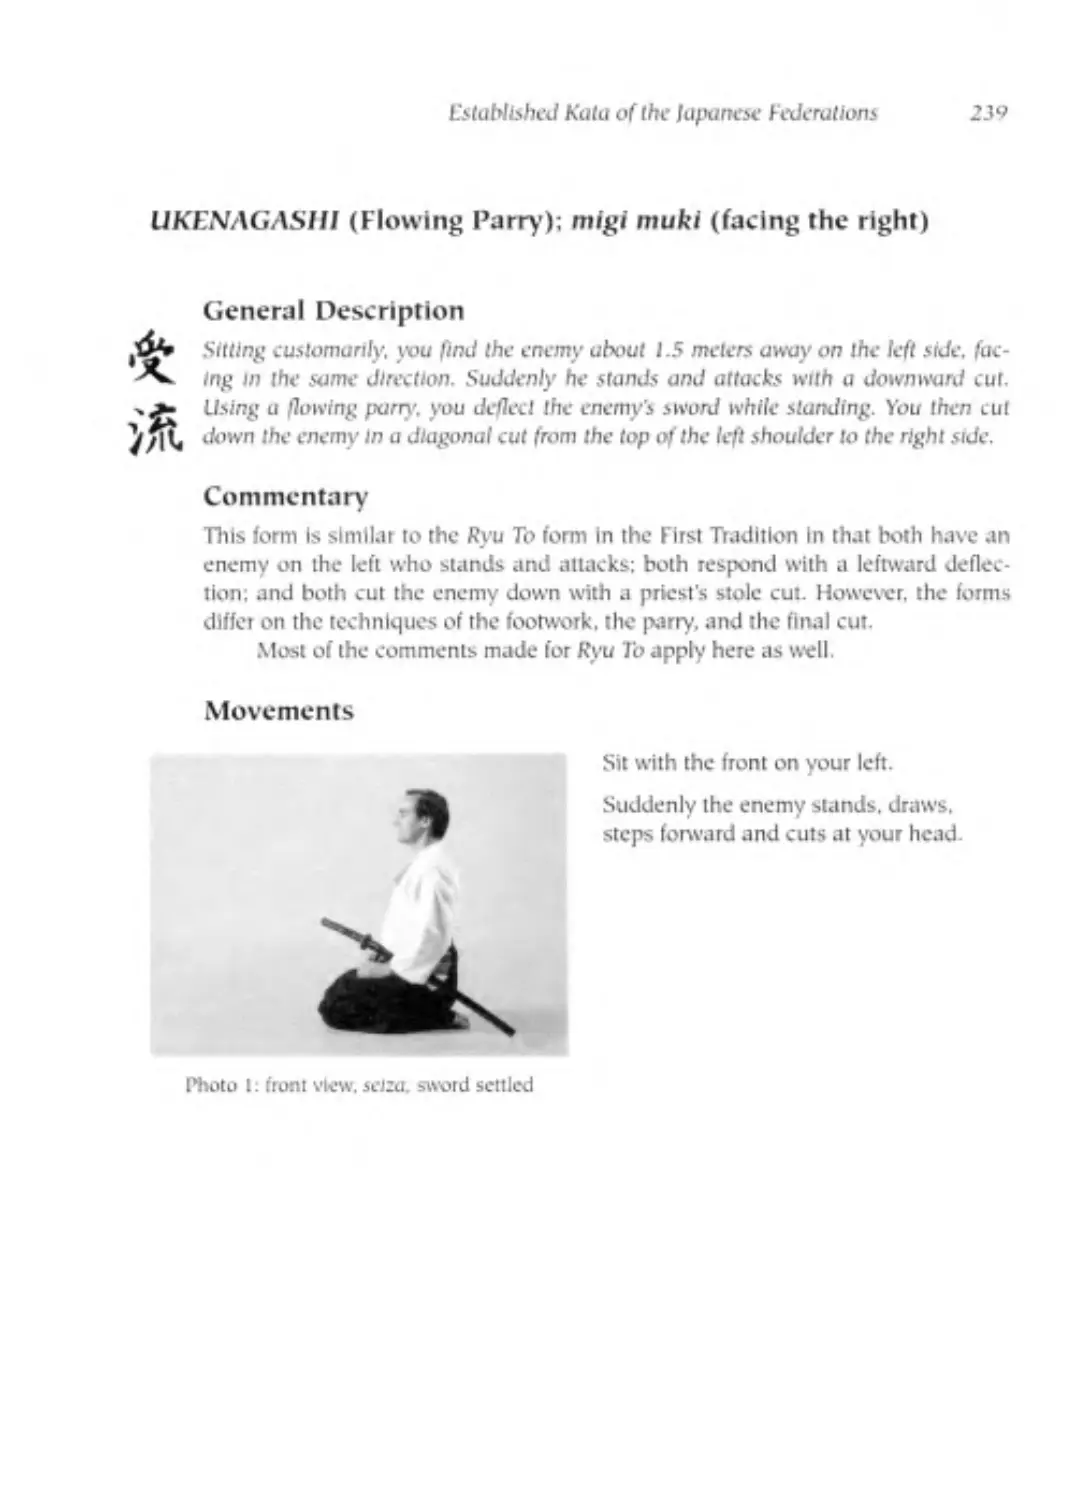
Photo 1: front view, seize, sword settled
Sit with the front on your left.
Suddenly the enemy stands, draws,
steps forward and cuts at your head.
Photo 2: front view, kneeling, vertical draw
to release, left foot forward
Photo 3: front view, kneeling, deflection
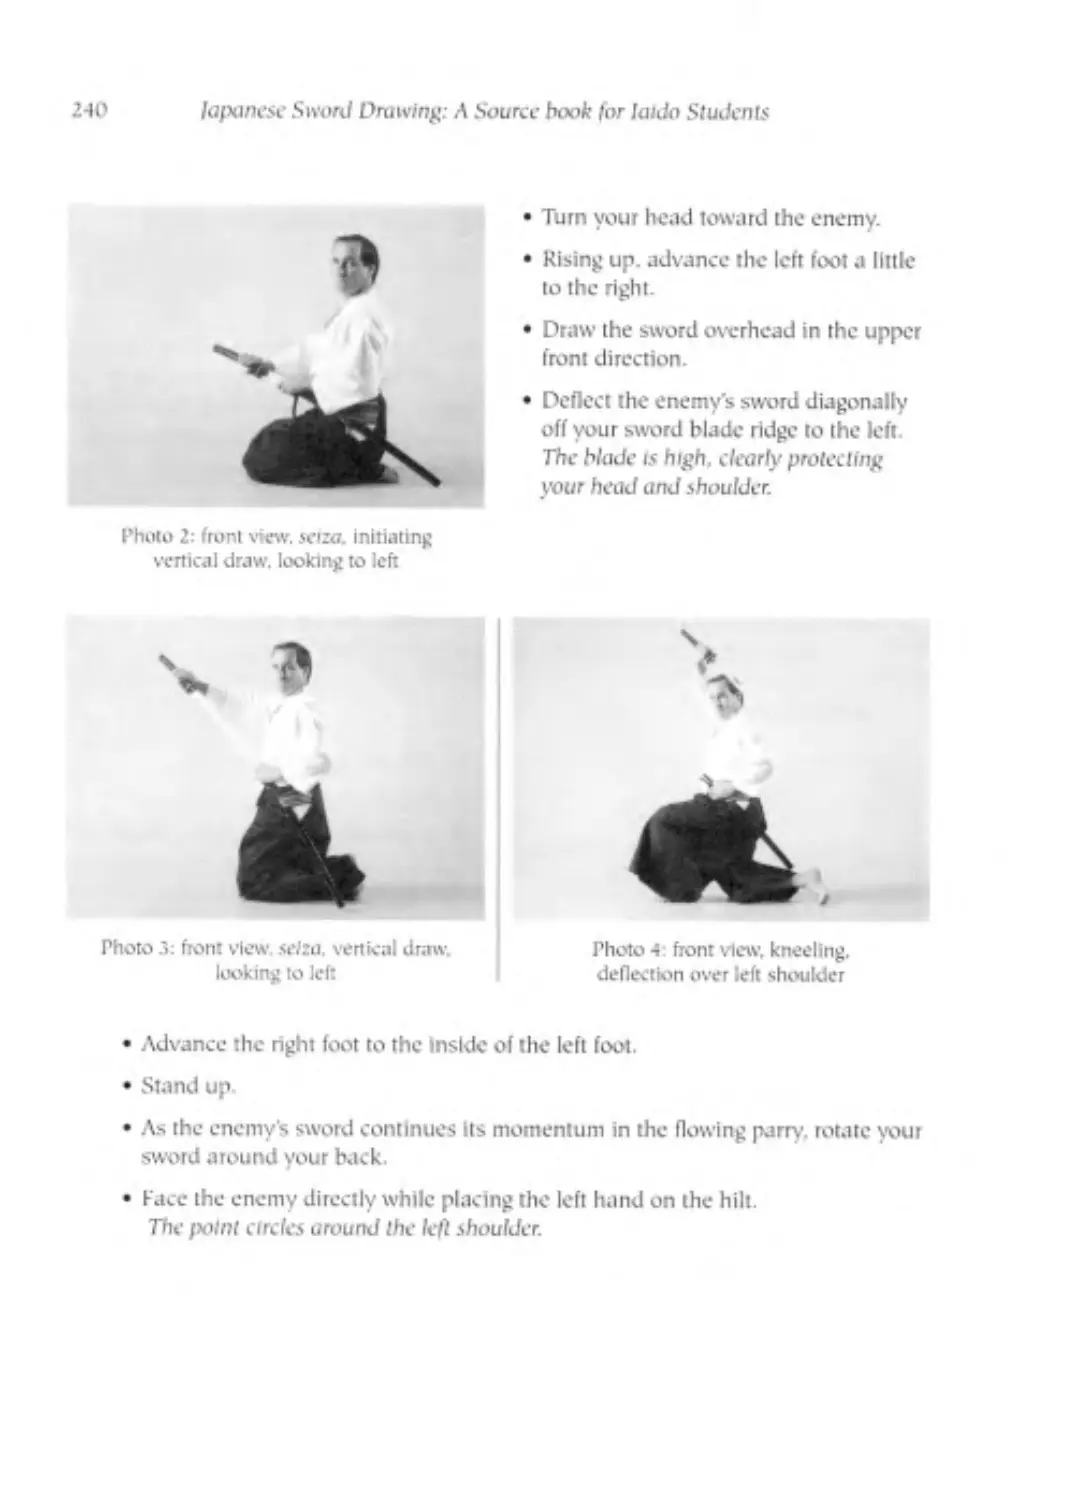
• Turn your face toward the enemy.
• Advance the left foot one step to the
right front.
• Grasp the hilt with your right fingers
on the side and quickly draw the
sword high over the front of the left
shoulder.
• Deflect the enemy’s sword with the
blade ridge of your own, at about
20cm. from the sword guard.
This is a vertical draw, which covers
the shoulder while you dodge the cut.
At the moment of impact, the right
elbow should be relaxed a little.
The Traditional Schools of Iaido
73
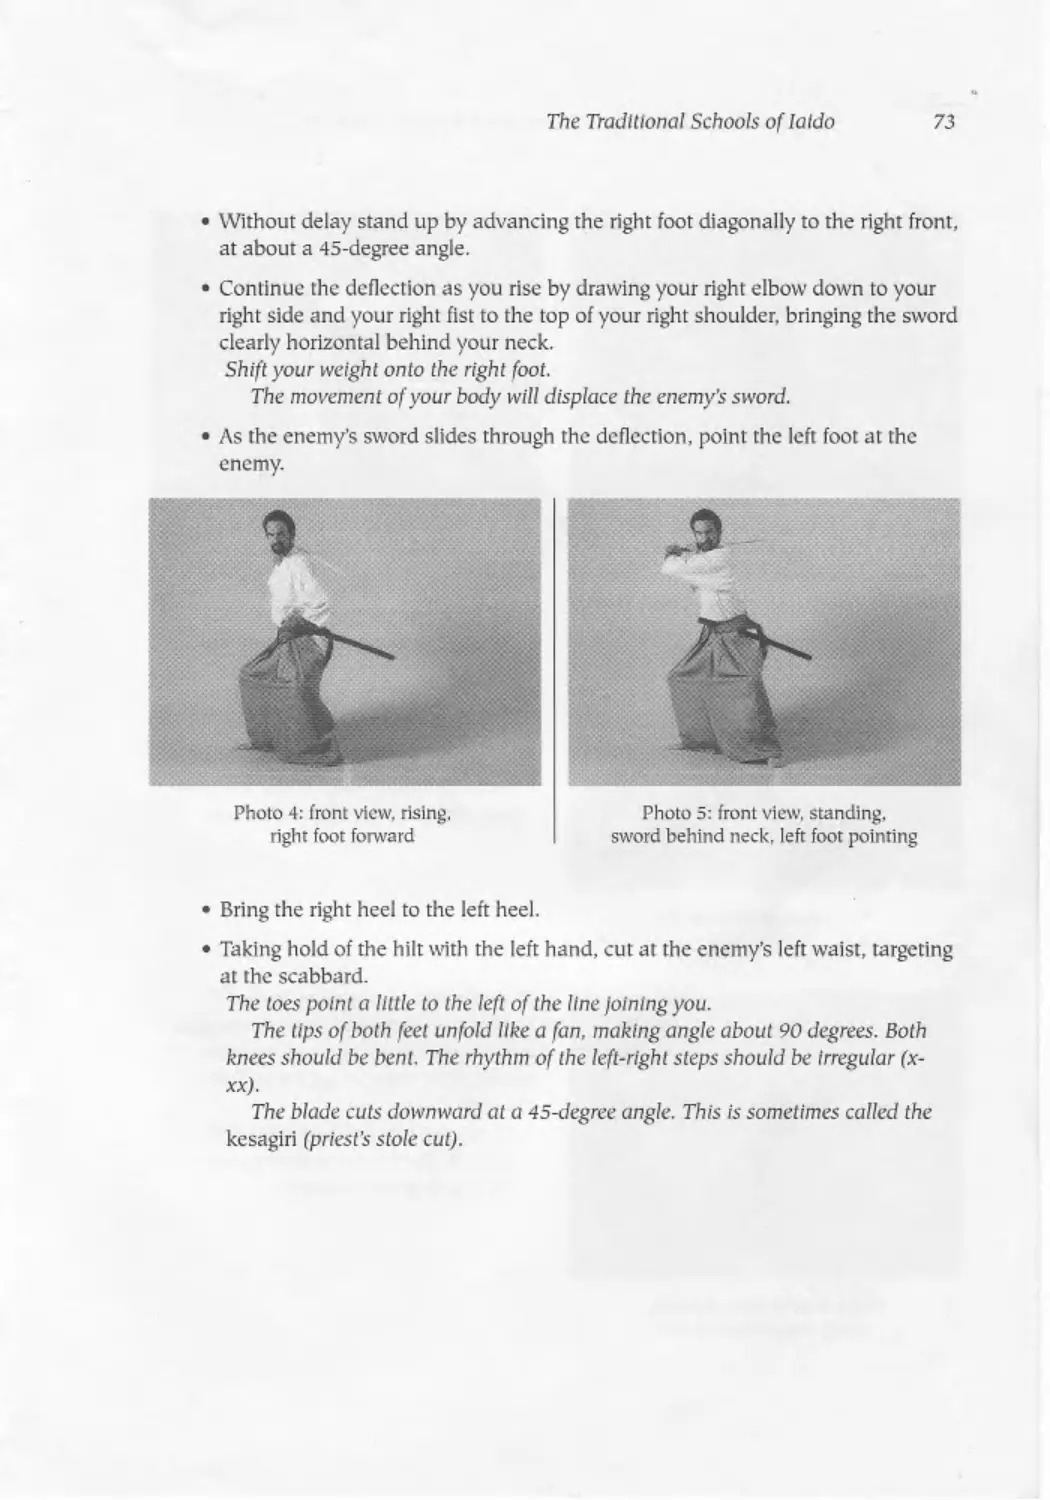
• Without delay stand up by advancing the right foot diagonally to the right front,
at about a 45-degree angle.
• Continue the deflection as you rise by drawing your right elbow down to your
right side and your right fist to the top of your right shoulder, bringing the sword
clearly horizontal behind your neck.
Shift your weight onto the right foot.
The movement of your body will displace the enemy’s sword.
• As the enemy’s sword slides through the deflection, point the left foot at the
enemy.
Photo 4: front view, rising,
right foot forward
Photo 5: front view, standing,
sword behind neck, left foot pointing
• Bring the right heel to the left heel.
• Taking hold of the hilt with the left hand, cut at the enemy’s left waist, targeting
at the scabbard.
The toes point a Utile to the left of the line joining you.
The tips of both feet unfold like a fan, making angle about 90 degrees. Both
knees should be bent. The rhythm of the left-right steps should be irregular (x-
xx).
The blade cuts downward at a 45-degree angle. This is sometimes called the
kesagiri (priest's stole cut).
74
Japanese Sword Drawing: A Source book for laido Students
Photo 6: front view, standing, heels
together, both hands on hilt
Photo 7: front view, standing,
strike at enemy's scabbard
Photo 8: front view, gedan
• While in the posture of the strike,
change the direction of the feet,
turning right to the front.
• Move the sword to the middle position.
• Pull the left foot to the rear.
• Drop the sword point to the low posi-
tion, about 15cm. above the floor.
Draw the hilt upward and to the left
so that the left fingers point downwards
and the right point upward, and the
sword point stops about 10cm. from
the right knee.
At this point both hands are a little
relaxed. The left elbow approaches
the height of the shoulders.
Photo 9: front view, standing,
sword drawn towards left
The Traditional Schools of laido
75
Reverse the grip of the right hand on the hilt.
Photo 11: front close up, right hand
Photo 10: front view, standing,
reverse right hand grip
Remove the left hand from the hilt
and grasp the mouth of the scabbard.
Photo 12: front view, standing,
left hand on scabbard
Holding the sword in the reversed right
hand, roll it over by the left elbow so that
the right palm faces upward and the
sword points to the left.
Rest the reversed sword on the left hand
at the scabbard mouth.
Photo 13: front view, standing,
sword halfway through swing
Photo 14: front view, standing,
sword on left hand
76
Japanese Sword Drawing: A Source book for Iaido Students
Draw the sword to the right with the right hand in one stroke, and sheath the
blade.
When the blade in 2/3 inserted, kneel on the left knee.
As usual the kneeling and the sheathing terminate together. During the first part
of the sheathing the right hand inserts the blade horizontally; as the sheathing
finishes the sword rotates to the vertical, edge up. This form of sheathing is called
the yakuza no osame ho (gambler’s sheathing style), and Is not much used.
Photo 16: front closeup, point entry
Photo 15: front view, standing,
sword drawn to right
Photo 17: front view, kneeling, end of noto
At the end of sheathing slide the right
hand forward and momentarily cover
the pommel.
The Traditional Schools of laido
77
JUN TO (Obedient Sword); kaishaku (assistant at suicide)
General Description
In this form you perform the movements of the assistant at seppuku (Japanese rit-
' ual suicide). This form differs from the rest because, instead of an enemy, you now
7 face a friend.
Sit in seiza, facing the front. You are to the left side and about 50 cm to 60 cm
to the rear of your person, who will be facing to your left. Watch for the suitable
moment, then draw your sword and rise. Your person will use a dagger, or short
sword, to commit suicide. This will be placed on a small offering stand in front of
him. As he leans forward to take the dagger, you will cut downward at the back of
his neck. The form then finishes with the same sheathing as in Ryu To.
Commentary
The Japanese developed the concept of ritual suicide early. It originated on the
battlefield, to prevent an enemy from killing a swordsman and confiscating his
property, family, or social position. Gradually, it spread to other situations until it
became a method to avoid disgrace of any sort.
For men, suicide is done by slicing the abdomen in a prescribed pattern:
horizontally from left to right, continuing vertically up the right side, then verti-
cally down the left side, making an open-sided triangle. Needless to say, most
people did not complete the cut before being overcome by pain and shock.
To prevent any unsightly behavior, the person committing suicide was
accompanied by a second. His function is to kill his friend when he shows any
signs of weakening. He does this with a special cut that leaves the head intact.
The cut, when done correctly, only severs the spinal chord between the fifth and
sixth cervical vertebrae.
In more recent times, before suicide was outlawed, it was often used as a
form of execution. As the practice degenerated, the victim was often not even
given a knife, but instead, a fan was placed on the offering stand in its place.
When the victim bent forward to reach for the fan, his second struck, killing him
instantly.
Since a swordsman’s suicide took place before a large group of his peers, the
actions arc performed very formally. It is important not to depart from the spirit of
the form and to regard the action as a mere “killing.”
78
Japanese Sword Drawing: Л Source book for Iaido Students
Movements
Sit facing the front.
Photo 1: front view, seize, w/sword settled
• Fix your eyes on the front (your per-
son).
• Quietly turn 90-degrees to the right on
the left knee.
• Quietly advance the right foot one
large step.
• Draw the sword, blade up, toward the
right knee until about 1/3 is drawn.
Photo 2: front view, partially drawn,
on left knee, looking to the left
• With your eyes still fixed on your
person, stand up.
• Draw the sword upward, edge still up.
The sword point leaves the scabbard
the instant you fully stand.
Photo 3: front view, standing,
point emerging
The Traditional Schools of laido
79
• Point the left foot at your person.
• Draw the right foot over to the left.
• Slide the left hand down the scabbard and press it, palm open, against the
scabbard at the waist.
• Rotate the sword vertically past the face, turning your right hand at the end
so that the sword is carried over the right shoulder.
The heels are together: the toes are fanned out. Stand erect with the knees
slightly bent.
The right hand is in front of the shoulder at about chest height. The sword
angles back, as if carried on the shoulder, but clearly not touching It. You must
maintain this posture without moving.
Photo 5: front view, sword over shoulder
Photo 4: front view, feet together,
sword passing the face
Photo 6: front view, feet together, jodan
• Match your breathing to that of your
person.
• Raise the sword to the high position,
holding it in both hands.
Because your Intention Is to aid your
person, you must watch closely, gather-
ing your concentration.
The sword approaches the high posi-
tion directly from the right shoulder.
80
Japanese Sword Drawing: A Source book for laido Students
Photo 7: front view, standing,
downward cut
• At the proper moment quietly advance
the right foot one step.
• Just as you step down on the right foot,
cut at the back of your person's neck.
Strike al about a 30 to 40 degree angle.
You must control the cut so that you do
not cut through the skin or muscles of
his throat; cut only through the spinal
chord. Do not let his head drop. The
blade must stop at the horizontal the
moment you strike at the neck. You
must train to finish your strike clearly
as the right foot touches.
Quietly pull back from the neck.
Pull back about 20cm.
Move the sword to the middle position.
From this posture, perform the same sheathing as in the Flowing Sword.
Pause'and continue your practice.
The Traditional Schools of Iaido
SI
GYAKU TO (Reversed Sword); tsukekomi (taking advantage)
General Description
rp While sitting, you are attacked from the front by a standing enemy who crowds in
with a downward cut. You fall back one step while parrying to the left.
— Recovering immediately, you strike at the enemy, who flees to the rear. You
J press your attack, cornering him. The form ends with a new blood-cleaning and a
new sheathing.
Commentary
The enemy is already standing. He catches you by surprise, rushing at you to
deliver his cut. This is quite different than Ryu To, where the enemy had to stand
and draw before attacking. You have much less to react and little time for an
effective parry.
Instead of relying on the parry for protection, you employ a more basic tech-
nique: you dodge- You begin the form as if you have time to draw and parr)', but
quickly see this is impossible. The force of the enemy’s attack Is like a solid wall.
You cannot draw your sword any farther forward. Instead, you pull backwards,
away from your hilt and the sword draws itself.
This backward step pulls your head out of the target area. If it is done cor-
rectly, your enemy will miss, overshooting his mark, and will be open for a
counter attack.
Just to be sure, you raise the sword to the parrying position. Ideally, the
enemy’s sword misses yours completely. If not, you must be prepared for the
shock.
Receive his blade on your sword blade ridge as close to the guard as possi-
ble. The right elbow takes some of the force: the rest must be dissipated down-
ward over your left shoulder.
In any case, you counterattack immediately, striking the opponent twice.
Then you withdraw to study the situation. Finding that more action is required,
you strike the enemy a third time. Although this seems sufficient, some instruc-
tors add a thrust to the form, done just before the final blood-cleaning.
82
Japanese Sword Drawing: A Source book for laido Students
Movements
Sit facing the front.
Photo 1: front view, selza, sword settled
• Respond to the enemy’s attack by
advancing the right foot a half step
to the front.
• Raise the hips, standing up on the left
tiptoes.
• Draw the sword about 15cm to 20cm.
The sword is drawn to the right knee.
Photo 2: front view, on left knee,
sword drawn to right knee
• Since the enemy is already crowding
his attack too close, stand up, drawing
the right foot back to the left.
Photo 3: front view, standing,
point emerging
The Traditional Schools of laido
83
• Draw the sword upward to the right.
• Parry the enemy’s sword to the left, protecting the head and left shoulder.
Because the enemy can adjust his attack, It Is desirable to move the left fool back
a small step before the right foot moves to it.
The handguard must not move any further forward than the right knee. You
should feel as If a wall prevents this and that the sword can be drawn only
because you step backwards. The sword point comes out just as the right foot
comes back to the left.
The right hand extends to the upper right, the right elbow is stretched out, but
relaxed. Although the part)' is important, the main point is to adjust the interval
to your advantage, so that the enemy’s attack misses.
Photo 5: left side view, parry
Photo 4: front view, standing,
feet together, parry
Photo 6: front view, jodan
• Immediately turn the sword out of the
parry to the high position, adding the
left hand.
84
Japanese Sword Drawing: A Source book for Iaido Students
Photo 7: front view, standing, downward cut
Photo 8: front view, left jodan
• Advance the right foot one step.
• Cut downward at the enemy about as
far as his jaw line.
Cut downward the instant the left hand
grasps the hilt.
• Because the enemy is only slightly
wounded and retreats, advance the
left foot a large step.
• Raise the sword to the high position.
• Advance the right foot a large step.
• Cut downward at the enemy to the
vicinity of the navel.
Photo 9: front view, standing,
low downward cut
The Traditional Schools of laido
85
• Move the left foot up to the right and pull the right foot to the rear.
• Raise the sword to the high position.
During the raising, demonstrate remaining heart.
Photo 11: front view, left jodan
Photo 10: front view, feet together,
sword at chudan
• Without warning, drop the right knee
to the floor.
• Cut down on the enemy, feeling as if
you are dropping a great weight.
Photo 12: front view, kneeling
on right knee, downward cut
Detach the right hand from the hilt and
re-grip with the hand reversed.
Photo 14: right side closeup closeup, hands
Photo 13: front view, kneeling,
reversed right hand
86
Japanese Sword Drawing: A Source book for laido Students
• Detach the left hand from the hilt and rotate the blade to edge up.
• Supporting the back of the blade with the base of the left index finger, palm up,
pull the right hand up to the right shoulder, gently withdrawing the sword about
30cm through the left fingers.
This is called chi nugui “chi nugwl" (blood-wiping).
Photo 15: front view, sword on left hand Photo 16: front closeup, hands
Photo 17: front view, kneeling,
end of chi nugui
The Traditional Schools of Iaido
87
• Remain kneeling, with the right hand
reversed, move the sword to the out-
side, with the blade flat, in one stroke.
• Grasp the scabbard mouth with the left
hand.
Photo 18: front view, kneeling, blade flat,
left hand on scabbard
Photo 19: front view, kneeling, point entry
• Drawing the sword out in a straight
line, place the point in the scabbard.
• Sheath the sword
• Pull back the left foot to the right heel
Stand up, stepping to the front with the
left foot.
Bring the right foot up to the left, pause
and continue your practice.
88
Japanese Sword Drawing: Л Source book for laido Students
SEICHU TO (Center Strengthened Sword); tsukikage (moonlight)
+
General Description
Your enemy comes from your right side, attacking with a standing overhead cut.
Drawing while rising from the sitting position, you cut at the enemy's forearms.
While the enemy retreats from this attack, you follow, cutting downward at his fore-
head. You then finish the form by performing the Omori Ryu blood-cleaning and
sheathing.
Commentary
Again, a standing enemy attacks. In this form you do not even attempt a defense,
but leap immediately to the offensive.
The draw begins as a vertical one, but aimed toward the opponent on the right.
Simultaneously, you rise to the half-standing, half-kneeling posture charac-
teristic of lapanese sword drawing. The rise requires that you be strongly centered
and that your motions be absolutely correct.
Two sets of movements must occur simultaneously, uniting the upper and
lower body. The lower body must direct and position the legs; the upper body, the
sword. Paradoxically, the upper body movements are responsible for your rise.
Upon rising to you knees you must immediately advance to right kneeling
posture. You must swing the left lower leg 9O-dcgrces to the right until it faces the
enemy, and simultaneously raise the right leg one step forward. Your feet move
directly to their positions from selza. This action will turn the upper body so that
you will be facing the enemy directly, in the position to make the strike.
The other motion is the draw itself. Draw the scabbard across your stomach
and begin a vertical draw. It actually slides across the chest, while you turn
beside it to put it into the usual position at your left side.
Just as your feet come into position, the sword point leaves the scabbard
and you stand up to make the strike. Do not stand by the strength of your legs
alone, but feel as if the sword pulls you up on its way to the target.
This form is said to be called moonlight, not because it was elegant, but
because the draw resembles the moon’s last quarter.
The Traditional Schools of laido
89
Movements
Photo 1: front view, seiza, w/sword settled
• When the enemy attacks with an overhead cut rotate on the left knee 90-
degrees to the right.
• While turning rise to a half-sitting, half-standing posture by advancing the
right foot one step toward the enemy.
• Draw the sword upward to the right about 45-degrees and cut at the enemy's
forearms.
The tip of the left foot, and the right knee face the enemy.
Do not stamp.
Feel as though the cut carries through both forearms. The draw cannot be
performed properly without the correct body posture. The hip action must be
strong and definite.
Photo 2: front view, on left knee,
vertical draw
Photo Л: left side view, on left knee,
vertical draw
90
Japanese Sword Drawing: A Source book for Iaido Students
Photo 4: front view, lalgoshl, forearm cut
• As the enemy retreats, follow by
advancing the left foot up to the right.
• Swing the sword overhead by parrying
over the left shoulder.
• Just as the sword comes into the high
position, add the left hand to the hilt.
Photo 5: front view, feet together,
parry' over left shoulder
Photo 6: front view, feet together, Jodan
The Traditional Schools of laido
91
Photo 7: front slew, standing, downward cut
• Advance again by stepping forward
with the right foot.
• Cut downward at the center of the
enemy's forehead.
The sword strikes the enemy’s fore-
head the same moment the right
foot touches the ground. From the
draw to the strike the movements
are done in quick succession.
From the position at the end of the
cut, perform the blood-cleaning of
the Omori Ryu.
Exchange your feet.
Sheath your sword as in Shohatto, kneeling at the end.
Raise the right knee, stand up and move the left foot up even with the right.
Pause and continue your practice.
92
Japanese Sword Drawing: A Source book for Iaido Students
KORAN TO (Tiger Fighting Sword); oikaze (pursuing wind)
Л
General Description
While walking, you are confronted with an enemy. Before he can attack, you quickly
draw, attacking his chest or head. As he flees to the rear, you pursue and cut him
down. The fomt ends with the usual Omori Ryu blood-cleaning and sheathing.
Commentary
This is the only standing form in the Omori Ryu. It is not specifically situated out-
doors, but the amount of distance you travel make that a likely possibility.
Standing with you feet together, you walk toward the front, beginning with
the left foot. You step left-right-lcft in a casual manner. During the second left
step you become aware that an enemy is about to attack, and begin the action of
the form.
The manner in which you change from casual walking to a sudden attack is
like the spring of a tiger. Hence, the name of the form.
This form is significant in that it is the only one performed entirely standing.
There is no kneel after the sheathing.
Movements
Stand facing the front.
Begin walking to the front with the left foot.
When the left foot steps forward a second time grasp the hilt with the right hand
and the scabbard with the left.
Point the tip of the left fool to the front. The moment the left fool advances
begin the draw.
Photo 1: front view, standing, sword settled
Photo 2: front view, left foot forward,
initiating horizontal draw
The Traditional Schools of laido
93
• Advance the right foot a large step.
• Draw the sword essentially as in the
Shohatto.
You should attack as suddenly as a tiger
attacks its prey. This may be why the
form Is named Tiger Fighting. Your
response to the enemy’s attack should
be immediate. Your draw should slice
the air.
Photo 3: front view, standing,
large horizontal draw
Photo 4: front view, left jodan
Photo 5: front view, standing, downward cut
• Advance the left foot one step to the
front.
• Swing the sword overhead by parrying
over the left shoulder.
• Immediately advance the right foot a
large step.
• Strike down the enemy.
You must clearly pursue the enemy.
Observers should be able to discern
the enemy’s actions from your own.
The distinctive feature of this form
Is the sudden difference in the quality
between this pursuit and the initial
walking.
Having cut down, perform the Omori Ryu
blood-cleaning.
Move the left foot forward to the right.
Pull the right foot back half a step and
sheath the sword.
Do not finish sheathing by kneeling.
Pause and continue your practice.
94
lapanese Sword Drawing: A Source book for laido Students
NUKI UCHI (Sudden Attack)
General Description
You are sitting face to face with an enemy who Is much closer than before, about
75cm. Before he can attack, you swiftly draw your sword. The space between you is
too narrow to permit this draw to be an attack, so you Immediate swing the sword
overhead and cut downward at the enemy's forehead. The form finishes with the
blood-cleaning of the Eishin Ryu, as in Inyo Shintai, and then sheathing.
Commentary
A swordsman would sit as close to an enemy as is done in this form only if he
thought himself safe. The fact that this proves not to be the case reinforces a
growing perception of the world of the Japanese swordsman, with its insecure
political and social relationships.
A horizontal draw requires a minimum distance to be effective. From kneel-
ing, a horizontal draw extends about 1.5 meters from your original sitting posi-
tion. This is why the beginning forms of this Tradition placed the opponent at this
distance. Other distances will be introduced in later Traditions.
One way to decrease the effective distance of the draw is to take a shorter
forward step. Because the enemy in this form is so close, you cannot take any
steps at all.
The form must be done without pause, uniting the movements in an unbro-
ken sequence. It also must be done without regard to pain, as the knees arc lifted
from and slammed back to the floor.
Movements
Sit facing the front.
Photo 1: front view, seiza, sword settled
The Traditional Schools of laido
95
• Grasp the hilt with your right hand and
the scabbard with your left.
• Raise the hips, standing up the tiptoes
of both feet.
• At the same time, suddenly draw the
sword to the diagonal right front, blade
facing upward.
• Spread your knees.
Photo 2: front view, kneeling on both knees,
sword drawn to right
Photo 3: front view, kneeling on both knees,
sword horizontal
• As soon as the sword point separates
from the scabbard, swing the sword
overhead by clearly swinging it around
the outside of the left elbow, adding
the left hand as it comes into the high
position.
• Clap your knees together.
At the moment of separation the blade
will pass through a position in which
the blade will be horizontal, edge up.
You must push yourself up as the
sword comes to the high position. Your
knees should leave the ground and slap
together while you are in the air.
Photo 4: front view, knees in air, jodan
Photo 5: front closeup, knees
96
Japanese Sword Drawing: A Source book for laido Students
* From the high position cut downward
at the enemy’s forehead.
• Suddenly spread your knees again
as they return to the floor.
Your knees must make a knocking
sound as they strike the floor. Having
cut down, both heels will be close
together.
Photo 6: front view, kneeling
on both knees, downward cut
In this position perform the blood-cleaning of the Eishin Ryu. as in the Inyo
Shintai.
Sheath the sword while you lower your buttocks onto your heels.
This occurs the moment the sheathing Is finished.
Quietly bring the knees together, even in front.
Advance the right foot one step to the front, stand up and bring the left foot
up even with the right.
Pause and continue your practice.
The Traditional Schools of Iaido
97
fa fay
INYO SHINTAI KAEWAZA (Advancing-Retreating Movement,
Alternate Technique)
General Description
As indicated by Its name, this form presents an alternate set of movements for the
rationale of Inyo Shintai.
As in Inyo Shintai, you have two enemies. You deal with the first as before.
The second enemy then attacks, but this time cuts at your right leg. You withdraw,
beating away his attack with your sword, and then counter-attack with a downward
cut. The form ends with the blood-cleaning and sheathing of the Omori Ryu.
Commentary
Hie commentary on Inyo Shintai applies to this form as well. You must be aware
of the danger of the second opponent as you deal with the first, but you also
must not provoke him.
The second opponent stands and attacks you. as in Inyo Shintai, but is
quicker than in that form. He presses his attack against a different target, too.
Where before he cut downward at your head, here he cuts diagonally at your
right leg.
Because he is faster, you must defend your leg before you can counterat-
tack. You do this by employing another defensive technique, the harai (the beat).
This is not a simple deflection, in which his sword slides off, but an aggressive
strike to the side of his blade by your own.
When you draw your sword the second time to beat away your enemy’s
strike, you must adjust your grip on the hilt. Normally in the horizontal draw, the
thumb is placed under the hilt and later rotated to the side; in the vertical draw,
the thumb is rotated to the side from the beginning. In the second draw in this
form you do not place the thumb underneath at all, but grip the hilt from the top
with the thumb on the side. If you try to execute the beat with any other grip
you'll see why.
The beat is not so much a sideways motion as a diagonal one. The sword is
drawn to the front. When it comes free of the scabbard it is immediately reversed
and pulled backwards in the beat. Your blade strikes his with a glancing, but hard
blow. If your beat has been ineffective and his sword continues on its arc to strike
your leg, your blade will still be in between, protecting you.
When you swing the sword into the high position you must use the left hand
to support the sword while you shift the right hand around to the normal grip.
This form was not originally part of the Omori Ryu, but was added later.
98
Japanese Sword Drawing: A Source book for laido Students
Movements
Photo 1: front view, squatting, end of noto
From sitting, confront the first enemy
with the movements of the Inyo Shintai
form, up to the first sheathing.
Insert the blade up to the collar.
• Since the second enemy
advances, attacking your right
leg, shift your grip on the hilt to
the top.
• Draw the sword, edge up.
Photo 2; right side closeup, hilt
Photo 3: front view, standing,
draw until point emerges
The Traditional Schools of laido
99
Photo 4: front view, standing,
halfway through harai
• Stand and pull the left foot
one large step backward.
• The moment the sword point clears
the scabbard, turn the hilt to the rear,
swinging the sword sharply around
your right hip so that it now points for-
ward, edge up, point down, clearly pre-
serving your right leg by beating away
the enemy's sword.
The position of the beat the sword
is parallel to the right foot. The move-
ments of the beat must express more
than merely receiving the enemy’s
sword. You must feel as though your
sword moves straight to the beat like
an arrow.
Photo 6: right side view, harai
Photo 5: front view, standing, harai
100
Japanese Sword Drawing: A Source book for Iaido Students
• Suddenly move the left knee forward
to the right heel.
• Swing the sword overhead.
• Cut downward at the enemy.
You will be in a kneeling position.
Photo 7: front view, standing,
sword moving to jodan
Photo 8: front view, kneeling, lodan
Photo 9: front view, kneeling, downward cut
Perform the same blood-cleaning
as in the Shohatto.
Perform the same sheathing as in the
Shohatto.
Pause and continue your practice.
4. The Middle Tradition: Siskin Ryu
BACKGROUND
&
The Hasegawa Eishin Ryu (Deep River Valley Excellent Faith System) is another
style of sword drawing. It is often simply referred to as the Eishin Ryu (Excellent
Faith System). The Eishin Ryu is currently taught as the Middle Tradition of the
Muso Shinden Ryu, following the study of the Omori Ryu. As such, it is regarded
as more difficult than the Omori Ryu.
It contains ten forms. All but the last begin from tate hiza (the drawn-up knee
sitting position). This position is more difficult than the formal sitting position.
The drawn-up knee position is said to be an older sitting position and to
derive from the sitting method used when wearing Japanese armor, in which the
shin guards prevented formal sitting.
Like the Omori Ryu, the basic actions of any Eishin Ryu form belong to the
four standard classes: drawing, cutting, blood- cleaning, and sheathing.
The forms are designated by name, as follows:
Yokqgumo (Bank of Clouds)
Tora Issoku (Pair of Tigers)
Inazuma (Lightning)
Ukigumo (Floating Clouds)
Yamaoroshi (Mountain Wind)
Iwanami (Waves Breaking Against Rocks)
Urokogaeshi (Returning Pattern)
Namigaeshi (Returning Waves)
Taki Otoshi (Dropping Waterfall)
Nuki Uchi (Sudden Attack)
In the descriptions that follow, the forms will have the structure introduced
in the previous chapter. The other usual conventions of the descriptions will still
be followed.
101
102
Japanese Sword Drawing: A Source book for laido Students
DISTINCTIVE FEATURES
As noted previously, the first nine forms begin in the drawn-up knee position. The
movements from this position arc more varied than in the Omori Ryu.
In the First Tradition the forms used a single-step forwards to define the
drawing interval, maai (the distance needed to reach the enemy with the sword).
The Middle Tradition often defines the drawing interval with a single-step back-
wards. This is because the enemy is assumed to be sitting much closer than pre-
viously. Frequently, he is assumed to be sitting immediately adjacent.
The cutting actions that follow the draw often involve more complex steps
than previously.
The blood-cleaning of the Middle Thidition is quite different from that of the
First. It involves much less sword movement. Care must be taken that it is still
conducted to demonstrate remaining heart.
While in a kneeling posture the left hand
releases the hilt and grips the scabbard
at the left hip. The right hand, retaining
its grasp, opens to the right, ending with
a slight snap as the elbow straightens.
The sword assumes a slight downward
diagonal position. The reader has
already encountered this in the first
part of the Inyo Shintat form of the
Omori Ryu.
Photo I: front view, kneeling,
end of overhead cut
Photo 2: front view, kneeling,
left hand on scabbard at waist
The Traditional Schools of Iaido
103
Photo 3: front view, kneeling,
sword moving to right
Photo 4: front view, kneeling,
end of eishin chiburl
The sheathing is also new.
In the First Tradition the back of the blade was placed at the scabbard mouth
in the vicinity of the hand guard. In the Middle Tradition, the back of the blade
is placed at the scabbard mouth in the vicinity of the center of the blade.
As before, the sword is sheathed by pulling it to the right in a single movement,
until the point slips into the scabbard, and then inserting slowly. Because the sword
is started closer to the point, the sheathing is faster. The last third of the sheathing,
as before, is done with deliberate slowness to demonstrate remaining heart.
Photo 6: left side closeup, left hand
Photo 5: front view, kneeling,
blade on left hand
104
Japanese Sword Drawing: A Source book for laido Students
Photo 7: front view, kneeling, point entry
Photo 8: front view, kneeling,
nolo after point entry
Photo 9: front view, squatting,
end of eishin nolo
PRELIMINARY EXERCISES
Because the initial posture of all but one of the forms in the Eishin Ryu is that of (he
drawn-up knee, the obvious preliminary exercise involves assuming that position.
Sitting in Tate Hiza
The sword is inserted into the belt with the standard formalities, while sitting
formally.
The Middle Tradition may be practiced directly, or may follow a period of practice
of the First Tradition.
The Traditional Schools of laido
105
Photo 10: front view, standing, sword settled
• With the sword already inserted in the
belt, advance to the place of practice.
• Hold the sword with the left hand,
thumb on the guard.
Carry the left foot one step backward.
The left foot should be in line with
the right.
• Slowly settle into a left kneeling
posture.
• Allow the left toes to straighten
and lie on the floor.
Photo 11: front view, kneeling,
left hand on sword
• Sit down directly over the top of the left heel.
• To avoid tangling the right foot in the right wide trouser leg, sweep away the
inside of the cuff to the right with the right hand.
• Pull the right foot back toward the left ankle and then position the heel against
the lower left leg behind the knee.
The outside right instep rests on the floor. The right toes point clearly away from
the left knee, toward the front. The right knee is not allowed to touch the floor,
being raised 10 cm to 20 cm. Take care that the scabbard does not strike the floor.
Rest the hands on the thighs, palms up.
Both elbows bend slightly.
106
Japanese Sword Drawing: A Source book for laido Students
Photo 12: front view, kneeling,
sweep away cuff
Photo 13: front view, tale hiza
Photo 14: front view, tale hiza
Rising from Tate Hiza
• Grip the scabbard with the left hand,
thumb over the guard.
• Roll the right knee to the vertical.
Photo 15: front view, right knee vertical
The Traditional Schools of laido
107
Rise to a left kneeling position.
Photo 16: front view, kneeling,
left hand on sword
Photo 17: front view, standing, sword settled
Advance the right foot slightly and
stand up.
108
Japanese Sword Drawing: A Source book for laido Students
YOKOGUMO (Bank of Clouds)
General Description
This form is closely related to Shohatto in the First Tradition. Sit facing your enemy,
and draw, striking his temple. Follow this with a center cut to the head. Then finish
Op1, the form with blood-cleaning and sheathing.
Commentary
As in Shohatto, you respond to your enemy with a horizontal draw followed by a
downward cut. However, everything else about Yokogumo is different.
Rising from tate hiza is quite different than from seiza. In seiza, the weight is
initially taken on both knees equally and then shifted to the supporting knee. In
tate hiza, the weight is initially on the left foot, then shifted to the left knee, and
finally to the right foot. This allows the left foot to be pulled back much more eas-
ily than in seiza.
At the end of the draw you will be half-standing, half-kneeling in the typical
sword drawing posture. You will return the left knee to the floor while swinging
the sword into the high position and strike the enemy when you arc kneeling.
Movements
Photo 1: front view, tate hiza
Sit in the drawn-up knee position, facing
the front.
The Traditional Schools of laido
109
Photo 2: front view, late hiza,
initiating horizontal draw
• Sensing your enemy’s intentions, grip
the sword with both hands, right on
the hilt and left on the scabbard, and
begin to draw the sword, edge up.
• Raise the right knee toward vertical.
• Taking weight on the right foot,
pull the left foot back one step.
• Strike the enemy’s temple.
Rotate the right knee into lhe space
freed by the drawing right arm. Lift the
left kneecap high off the floor, but keep
the hips low. You will finish in the half-
sitting half-standing posture typical of
sword drawing.
Photo 3: front view, late hiza,
right knee vertical
Photo 4: front view, talgoshi,
horizontal draw
110
Japanese Sword Drawing: A Source book for laido Students
• Having drawn the sword, swing the
sword overhead.
• Move the left knee forward and kneel
by the right heel.
• Pull the scabbard back into position.
Photo 5: front view, iaigoshi,
sword over left shoulder
Photo 6: front view, kneeling, jodan
Photo 7: front view, kneeling, downward cut
• Advance the right foot.
• Cut downward at the enemy.
Perform the Eishin Ryu blood-cleaning.
Sheath the sword in the manner of the
Eishin Ryu.
When the sword is approximately one-
third sheathed, while expressing remain-
ing heart, quietly pull the right foot back
to the left. The form ends with sheath-
ing, when the heels are about 15 cm.
apart. The buttocks rest lightly on the
tops of the heels.
The Traditional Schools of laido
111
TORA ISSOKU (Pair of Tigers)
General Description
rf» The enemy, seated in front of you, attacks your right foot. As in the twelfth form of
/Ci the First Tradition, the Inyo Shintai Kaewaza, you first stop the enemy's sword.
Making use of the enemy’s retreat, you cut him down from the high position.
Commentary
This form uses the beat to block the enemy’s strike. That means that you must
grip the hilt from the top with the thumb extended down the side. The sword is
drawn to the front, then quickly reversed to the beat, cleanly striking the side of
the enemy’s blade.
At the moment of the beat you will be in the typical half-standing, half-
kneeling posture. From here you will kneel while swinging the sw'ord into the high
position. You must use the left hand to support the sword while you shift the right
hand around to the normal grip.
Movements
Photo 1: front view, tate hiza
Sit facing the front in the drawn-up knee
position.
112
Japanese Sword Drawing: A Source book for Iaido Students
• As the enemy cuts at your right foot,
grasp the hilt and scabbard.
• Raise the right knee toward vertical.
• Pull the left foot one step backwards.
• Gripping from the top, swiftly draw
the sword.
The blade remains vertical.
Photo 2: front view, tate hiza,
initiating horizontal draw
Photo 3: front view, tate hiza,
right knee vertical
Photo 4: front view, standing,
draw til point emerges
The Traditional Schools of laido
113
Clearly preserving your right leg, ward off the enemy's sword with your sword
blade ridge.
At this moment, your hips twist a little to the left. During the draw, when the
sword point is within 9cm. of being free, the sword springs cleanly to the block.
The blade is edge up, point to the front.
Photo 5: front view, standing, haral
Photo 6: right side view, harat
Move the left knee to the right heel, kneel and swing the sword overhead.
During the swing overhead the blade moves from the blocking position directly
to the high position. It does not swing around the left shoulder. After the left
hand grasps the hilt, adjust the right grip.
Photo 7: front view, standing,
sword moving to vertical
Photo 8: right side view,
sword moving to vertical
114
lapanese Sword Drawing: A Source book for laido Students
Photo 9: front view, kneeling, jodan
Photo 10: front view, kneeling, downward cut
Advance the right foot and cut
downward at the enemy.
Perform blood-clcaning.
Sheath the sword.
The Traditional Schools of Iaido
115
INAZUMA (Lightning)
General Description
The enemy makes a downward center cut from the high position. Stepping back you
cut at his exposed right forearm. Kneeling, cut the enemy down from the high position.
ЙГ Commentary
This is the third form that details a response to an attack from the front. This trio,
composed of Yokogumo, Tora Issoku, and Inazuma, can be thought of as “transi-
tional forms.” That is, they resemble forms found in the First Tradition and aid
the practitioner in making the transition to the Middle Tradition.
In Seichu To in the First Tradition, you counterattacked a standing enemy.
Here you do so again. This time, though, the direction of attack is changed and
more importantly, the distance has been reduced.
You have neither the time nor space to step forward. In a way this is fortu-
nate, because the backward step from tate hiza Is easier than the sideways rising
step in Seichu To.
Movements
Photo 1: front view, tate hiza
Sit facing the front in the drawn-up knee
position.
116
lapanese Sword Drawing: A Source book for laido Students
Photo 2: front view, tale hiza,
initiating horizontal draw
• Since the enemy presses his attack,
Immediately grip the sword with both
hands.
• Raise the right knee.
• Pull the left foot back one step.
• Draw the sword and cut upward at the
enemy’s forearms.
Rise while drawing. The sword edge is
flat, or slants a little to the right. The
point moves smoothly through the arc.
Swing the sword overhead in the flowing
parry, kneel and move the left foot to the
right heel.
While swinging the sword overhead
in the flowing parry, the sword point
hangs down tn the right fist. Twisting
the sword to the left, clearly protect the
left shoulder.
Advance the right foot and cut down
the enemy.
Perform the blood-cleaning.
Perform the sheathing.
Photo 3: front view, tate hiza,
right knee vertical
Photo 4: front view, standing,
foreann strike
Photo 5: left side view, standing,
forearm strike
The Traditional Schools of laido
117
UKIGUMO (Floating Clouds)
General Description
Your enemy sits very' close to your right side. He reaches over your knee and
attempts to seize the hilt of your sword. Rising, pull away and draw at his chest;
bring down the enemy to the rear, using both hands on the sword. Finally, cut down
at the fallen enemy.
Commentary
The first three forms in this TYadition make an easy transition from the previous
one. This form, Ukigumo, introduces the complexity and sophistication that are
characteristic of the Eishin Ryu and the Middle Tradition.
Previously the swordsman dealt with enemies from outside his personal
group. In this form the enemy is sitting right beside him. He is, perhaps, justified
in being surprised, but by now, we have learned that a swordsman can take noth-
ing for granted.
The steps of this form are designed to move your body to an attacking posi-
tion within a very small space. You neither have time to move far enough away to
use more familiar techniques, nor do you want to. You must remove this enemy
as quickly as possible.
The sword work is more intricate. Following a sideways draw, there is a
gripped-blade slice. Gripped-blade techniques are regarded as coming from older,
more combat-oriented sources.
The method of swinging the sword to the high position is also new. In previ-
ous forms you usually rotated the sword around the left shoulder. In Ukigumo the
sword is reversed in front of the right shoulder by throwing the point upward. The
left hand can easily grip the reversed hilt and move the sword overhead. This is a
more direct transition, but requires more strength.
Movements
Photo 1: front view, tate htza
Sit with the front on your right, in the
drawn-up knee position.
The enemy is sitting Immediately
on your right side, facing the same
direction.
118
Japanese Sword Drawing: A Source book for laido Students
• Since the enemy attempts to seize your sword hilt, grip the scabbard with your
left hand and pull the sword over to the left hip; press the right hand against
the right waist.
• Raise the right knee to vertical.
Photo 2: front view, tate hiza, left hand
pulling scabbard away
Photo 3: left side view, left hand pulling
scabbard away
Photo 4: front view, kneeling,
scabbard at left waist
The Traditional Schools of laido
119
Quietly stand and move the left foot one large step to the left, further removing
the hilt from the enemy.
Point your right foot directly al the enemy. Turn your face so you are looking
at him.
Photo 5: front view, standing,
scabbard at left waist
Photo 6: left side view, standing,
scabbard at left waist
• Move the left foot across the front in a semi-circle so that it arrives to the right
outside of the right foot.
•Using the left hand, lift the sword over the enemy’s head, pulling it around to
your right waist and your waiting right hand.
This places the left foot very close to the enemy's left thigh. To accomplish this,
both knees must bend. The left foot must stand on tiptoe. The left calf crosses in
front of the right shin. This is said to resemble sagi ashi (the legs of a heron).
Photo 8: left side closeup, feet
Photo 7: front view, standing,
left foot crossing
120
Japanese Sword Drawing: A Source book for laido Students
Photo 9: front view, standing, left foot
crossing, initiating draw
• Grasp the hilt with the right hand and
draw the sword to the right side,
attacking the enemy’s chest and right
arm.
• Twist the hips to the left, turning the
upper body in that direction, and pull
the scabbard to the left waist.
• Turn the left foot over as the attack
finishes.
Time the leftward twist with the left-
hand pull on the scabbard as the point
is drawn. Both knees bend more deeply
to accommodate the twist. The left foot
Photo 10: front view, standing, draw
Photo 11: left side view, standing, draw
turns over; turn the arch of the
foot up and roll the top of the
instep onto the floor. At the end of
the draw, the right fist is near and
a little below the right hip. The
blade is turned flat, and slants
upward toward the enemy’s right
shoulder.
Photo 12: left side closeup, feet
The Traditional Schools of Iaido
121
Photo 13: front view, iaigoshi,
left hand on blade
• Turn the left foot back over.
• Pull back the right foot a large step to
the right rear.
• Extend the left hand and grip the back
of the blade.
Twist the hips back to the right. Do not
let the sword shift from its current posi-
tion. In gripping the back of the blade
with the left hand, pinch the blade ridge
firmly between the thumb and the base
of the middle finger.
• Continue the backward pull of the foot
into a kneel, bringing the right knee to
the floor.
Photo 14: front view, kneeling,
left hand on blade
• Using the continued twist of the hips,
cut the enemy down to the right by
slicing against his chest.
During the movements of the back-step
and slice, the upper body twists strongly
to the right. Slice the sword to the right,
raising the right hand, so that the point
slants down. At the end of the move-
ment the right fist is about the height
of the right shoulder. The right elbow
is bent; the left stretches out straight.
The edge faces the right.
Photo 15: front view, kneeling, slice
Photo 16: front view, kneeling, end of slice
122
Japanese Sword Drawing: Л Source book for laido Students
• Remove the left hand from the blade.
• Using the right hand, and turning the sword a little to the front, throw the
point high over the right shoulder.
• Move the sword to the high position diagonally over the right shoulder,
re-gripping with the left hand on the way.
• Move the right knee to the left heel, turning the right foot to the left.
This is a new form of swinging the sword overhead, in which the sword is kept
on the right side. The right fist rises above the right shoulder. The sword travels
diagonally to the left, to the high position in a straight line.
Photo 18: front closeup, rotated blade
Photo 17: front view, kneeling, left hand
removed from blade
Photo 19: front view, kneeling, sword
diagonally over right shoulder
The Traditional Schools of laido
123
Photo 20: front view, kneeling, left /odan
Photo 21: front view, kneeling, downward cut
• Turning the left foot to the right, step
heavily on the fallen enemy’s arm.
• Avoiding your left knee, cut down
at the enemy’s body.
The hands will finish the cut outside
of the left knee.
Perform blood-cleaning.
Sheath the sword.
At the proper moment pull the left foot
back to the right thigh, and turning,
face the front.
124
Japanese Sword Drawing: A Source book for laido Students
YAMAOROSHI (Mountain Wind)
General Description
The enemy sits to your right, facing in the same direction. He grips his sword with
both hands, preparing to draw it. You step on his left thigh, pinning him, and strike
his right hand with your hilt. You draw at hts chest, then force the enemy down
backwards and cut downward at hts body.
Commentary
This form, together with the previous one, Ukigumo, gives you a pair of examples
of action that can be taken against an enemy on your right side.
The footwork in Yamaoroshi is not so intricate as in Ukigumo, but it is more
sophisticated than that the First Tradition.
The sword is again applied with a sideways draw, a gripped-blade technique
and a kneeling cut. The overhead swing is again accomplished by throwing the
point high over the right shoulder and moving directly to the high position.
An interesting feature of this form is the initial step onto the enemy’s left
thigh. This step effectively immobilizes him, because it prevents him from shifting
his weight off his left foot. Such a step w'ould be just as effective if done to an
enemy sitting in seiza.
The form also introduces the use of other parts of the sword than the blade
as a weapon. In this case, Yamaoroshi uses a hilt strike.
Photo 1: front view, tate hiza
Movements
Sit with the front on your right, in the
drawn-up knee position.
The enemy is assumed to be silting
immediately adjacent to your right,
facing the same direction.
The Traditional Schools of laido
125
• The moment the enemy puts both
hands on his sword, grip your sword
with your left hand, thumb on the
guard.
• Place your right hand at your right
waist.
• Look squarely at the enemy.
Photo 2: front view, tale htza, grasp
scabbard w/ left hand, looking to right
• Raise your right knee and, pivoting on the left knee, turn 90-degrces to face the
enemy.
• Turn the sword and scabbard upside down and lift the hilt up toward your face.
The blade will now be facing down. The left hand will be about chest height.
Photo 3: front view, kneeling, hilt to face
Photo 4: front closeup, kneeling, left hand
126
Japanese Sword Drawing: A Source book for laido Students
• Stamp strongly down on the enemy with your right foot, pinning his left thigh.
• Strike a hard blow to the enemy’s right hand with the end of the upside down hilt.
Photo 5: front view, kneeling,
stamp and strike
Photo 6: left side closeup,
strike at enemy’s right hand
Photo 7: front view, kneeling, hilt lift
Lift the hilt up and push it down to the
right, bringing the guard close to the right
waist and the hilt to your waiting right
hand.
Lift the hilt as you pull it to the right, so
the end passes close to your nose. The
right foot remains on the enemy's thigh.
Photo 9: front closeup, right hand
Photo 8: front view, kneeling,
hilt drop Into right hand
The Traditional Schools of laido
127
• Draw the sword to the right, attacking the enemy’s chest and right arm, pulling
the scabbard back to the left rear.
• Twist the hips to the left.
• Pivoting on the left knee, turn the left shin 90-degrees toward the right heel.
The edge is now flat. It passes over your right thigh. In practice, simulate the
draw by stopping sharply. At the end, the blade will angle up. The right fist will
be in the neighborhood of the right hip. The right and left heels come close
together. All this time the right foot still pins the enemy’s thigh.
Photo 10: front view, kneeling, draw to right
Photo 11: right side view, draw to the right
• Release the scabbard and grip the blade with the left hand.
• Pivoting on the left knee, turn the left foot 90-degrees back to the left.
Do not disturb lhe position of the sword. The left foot will return to approximately
its position before the draw. The right foot Is still on the enemy's thigh.
Photo 13: left side view, left hand on blade
Photo 12: front view, kneeling,
left hand on blade
128
Japanese Sword Drawing: A Source book for laido Students
Photo 14: front view, kneeling, slice
• Again pivoting on the left knee, turn
the whole body, with the right foot,
90-degrees to the right.
• Using the left and right hands, cut
the enemy by slicing to the right.
The right foot finally steps off the
enemy’s left thigh. You will be facing
about 180-degrees to your original sit-
ting position. The right foot will be par-
allel to the left shin and foot. This slice
has a scooping motion. At the end of the
cut, the sword will be pointing down-
ward. The right elbow will be about
shoulder height. The sword point will
be about 25cm. above and to the front
of the right fool.
• Releasing the left hand, swing the sword to the upper right, re-grip, and move
to the high position.
• Stamp the right foot down one step forward, to pin the fallen enemy's left arm.
This is similar to the sword reversal in Ukigumo. Toe the right foot in, approxi-
mately 60-degrees to the left.
Photo 16: front closeup, rotated blade
Photo 15: front view, kneeling, left hand
removed from blade
The Traditional Schools of laido
129
Photo 18: front view, kneeling, jodan
Photo 17: front view, kneeling, sword
diagonally over right shoulder
• From the high position, cut downward at the fallen enemy's body.
• Pivoting on the ball of the right foot, twist the body 90-dcgrccs to the left.
The left knee Is lifted and pulled around to the rear. The cut coincides with the
knee dropping back to the floor.
In this posture, perform the blood-cleaning.
Sheath the sword.
Pull back the right heel to the left thigh.
Photo 19: front view, kneeling, downward cut
Photo 20: left side view, downward cut
130
Japanese Sword Drawing: A Source book for laido Students
IWANAMI (Waves Breaking Against Rocks)
General Description
The enemy sits immediately to your left, facing in the same direction. When he turns
toward you, forestall his attack by striking his left hand. Then thrust forward, plerc-
ing his solar plexus. Bring down the enemy by slicing at his back. The form finishes
j BL wfth a downward cut at the enemy's body.
Commentary
In this form the swordsman again faces an enemy at close quarters. We have
already seen that this does not guarantee friendliness.
Iwanaml Introduces, not only footwork against a leftward opponent, but the
thrust. In addition to the cut and the slice, the sword can be thrust into the
enemy’s body, somewhat as in European fencing. Thrusts can be either one or
two-handed, vertical or horizontal. In this case, the thrust is vertical, powered by
the right hand and guided by the left.
The form also utilizes a hilt strike, as in Yamaorosht, and uses the overhead
swing and cut found in that form.
Movements
Photo I: front view, fate hlza
Sitting with the front on your left, In the
drawn-up knee position, you arc imme-
diately adjacent to your enemy, who is
on your left facing the same direction.
The Traditional Schools of laido
131
• Slide your left foot directly back while
rising to a kneeling position.
• Grip the sword with both hands and
begin drawing to the front.
• Watch the enemy intently.
The left knee does not leave the ground.
The sword is drawn edge up.
Photo 2: front view, kneeling,
draw to knee, looking to the left
• As the enemy turns to face you, pivot on the left knee, and turn 90-degrees to
the left to face him.
• Forestall the enemy’s attack by striking the back of his left hand with your hilt,
in the vicinity of the fourth finger.
Photo 3: front view, kneeling, strike to hand
Photo 4: left side view, kneeling,
strike to hand
• Draw the sword through a arc, from the left side, upward past the face,
and down to the right, gripping the blade writh the left hand at the end.
• The instant the point leaves the scabbard, pull the right foot back to the
left knee.
When the turn ends, the right fist will be along side the right hip, the left
hand will be along side or slightly in front of the right knee. The sword
will be horizontal, pointing at the enemy. The edge will be downward.
132
Japanese Sword Drawing: A Source book for Iaido Students
Photo 5: front view, kneeling,
draw passing face
Photo 6: left side view, kneeling,
draw passing face
Photo 7: front view, kneeling,
left hand on blade
Photo 8: right side view, kneeling,
left hand on blade
• Stamp the right foot down one step forward.
• Thrust horizontally into the enemy’s solar plexus.
• Immediately pull out the sword.
During the thrust, the left hand remains fixed at the right knee. The right hand
thrusts. During lhe extraction, the left hand remains at the knee. The right hand
alone pulls back.
The Traditional Schools of laido
133
Photo 9: front view, kneeling, thrust
Photo 10: right side view, kneeling, thrust
Having extracted the sword, raise it in both hands and extend it deeply along the
enemy’s right side.
The edge rotates to horizontal.
Photo 11: front view, kneeling,
deep extension
Photo 12: right side view,
kneeling, deep extension
Pivoting on the left knee 90-degrees to the right, cut the enemy by slicing from
behind his right side.
This slicing movement is the same as in Yamaoroshi. Clearly turn the right foot
90-degrees as the body moves.
134
Japanese Sword Drawing: A Source book for Iaido Students
Photo 13: front view, kneeling, slice
Photo 14: right side view, kneeling, slice
• Releasing the left hand, turn the sword over to the upper right and re-grip, mov-
ing to the high position.
• Stamp the right foot forward.
You are assumed to be stepping on the enemy’s right arm. Toe the right foot in.
Photo 15: front view, kneeling, sword
diagonal over right shoulder
Photo 16: right side view, kneeling, sword
diagonal over right shoulder
Photo 17: front view, kneeling, jodan
Photo 18: right side view, kneeling, jodan
The Traditional Schools of laido
135
• Pivoting on the ball of the right foot, turn 90-degrees to the left, facing the
enemy squarely.
• At the same time, cut downward at the enemy’s chest.
This is the same movement as in Yamaoroshi.
In this position, perform blood-cleaning.
Sheath the sword, pulling the right heel back to the left thigh.
Photo 19: front view, kneeling, downward cut Photo 20: left side view, kneeling,
downward cut
136
Japanese Sword Drawing: A Source book for laido Students
UROKOGAESHI (Repeating Pattern)
General Description
The enemy sits on your left, facing tn the same direction. You draw al his temple,
then immediately cut downward at his head.
Commentary
This form, together with Iwanami, forms a pair dealing with an enemy on the
swordsman's left. Thus we have two pairs, Ukigunio and Yamaoroshl, and
Iwanami and Urokogaeshi. that give techniques for both sides.
This technique is nearly the same as that of the Sa To form in the First
Tradition, except that in that form the draw is done from a kneeling posture, and
this technique is done from the half-kneeling, half-standing posture.
The form is called Gaeshi (repeating) because it uses techniques already
seen in the First Tradition.
Movements
Photo 1: front view, tate hiza
Sit with the front on your left, in the
drawn-up knee position.
• Pivoting on the ball of the right foot,
turn 90-dcgrees to the left into the half-
sitting, half-standing posture, facing
the enemy and pulling the left foot
to the rear.
• Draw at the enemy’s temple.
The withdrawal of the left foot produces
the necessary distance fordrawing the
sword.
Photo 2: front view, iaigoshi,
horizontal draw
The Traditional Schools of laido
137
Move the left knee to the right heel,
kneeling, and swing the sword overhead.
Photo 3: front view, iaigoshi,
sword over left shoulder
Photo 4: front view, kneeling, jodan
Photo 5: front view, kneeling, downward cut
Advance the right foot one step and cut
downward at the enemy’s forehead.
Perfonn blood-cleaning.
Sheath the sword, pulling back the
right foot.
138
Japanese Sword Drawing: A Source book for Iaido Students
NAMIGAESHI (Repeating Waves)
№
General Description
The enemy Is silting behind you, facing the same direction. You turn left 180-
degrees, to draw at his temple. Immediately, you cut downward at the enemy’s
head.
Commentary
This form continues the progression of the enemy's position. We have had him in
the front, on the left and right, and now he is in the rear.
This form is nearly the same as the Atari To in the First Tradition, except
that the draw is done from the half-kneeling, half-standing posture.
Movements
Photo 1: front view, tate hiza
Sit with the front at your rear, in the
drawn-up knee position.
• While drawing the sword, pivot on
the ball of the right foot and turn 180-
degrees left, into the half-sitting half-
standing posture, by pulling the left
leg around.
• Draw at the enemy’s temple.
Turn while drawing the sword. You
should be done when about 2/3 of
the blade is drawn.
Photo 2: front view, iaigoshl,
horizontal draw
The Traditional Schools of laido
139
Place the left knee on the floor, even
with the right heel and swing the sword
overhead.
Photo 3: front view, iaigoshi,
sword over left shoulder
Photo 4: front view, kneeling, jodan
Photo 5: front view, kneeling, downward cut
Advance the right foot one step and cut
down at the enemy’s forehead.
Perform the blood-cleaning.
Sheath the sword, as in the Returning
Pattern.
140
Japanese Sword Drawing: Л Source book for laido Students
TAKI OTOSHI (Dropping Waterfall)
dSfr
General Description
The enemy is sitting to your rear, facing the same direction. He grips the butt of your
scabbard. You shake him off and thrust at his chest. You then cut him down at the
forehead.
Commentary
This is the second form dealing with a rear attack. It is characteristic of the
Middle Tradition that forms arc given mostly in pairs.
Tliis form returns to the complicated footwork of the Eishin Ryu, using the
heron leg stance. The draw that is combined with this stance is a new technique.
The blade is edge up and drawn nearly vertical back along your left side.
A thrust is used as the initial counterattack. It is delivered edge up directly
from the drawing position.
Photo 1: front view, tale hiza
Movements
Sit with the front to your rear, in the
drawn-up knee position.
• When the enemy seizes the butt of
your scabbard with his right hand,
without immediately resisting, grip
your scabbard with your left hand,
thumb on the guard.
• Press the right hand to the right waist.
Photo 3: right side closeup, hands
Photo 2: front view, tale hiza. left hand
on scabbard, looking over left shoulder
The Trad l Попа I Schools of Iaido
141
• Pull the left foot straight back toward
the enemy and rise, looking to the left
so you can see him.
• Pull the scabbard to the right in your
belt to adjust for this turn, but offer
little resistance.
Look backward over your left shoulder.
The enemy will have to stand and lean
forward to keep his grip, but be careful
not to jerk him forward.
Photo 4: front view, standing,
looking over left shoulder
Photo 5: front view, standing
Photo 6: right side closeup, left hand
• Suddenly, turn the left fingers up, and twisting, raise the sword upward in the
direction of the left shoulder.
• The left foot swings to the right, passing over the right foot until the calf touches
the shin.
This motion twists the scabbard from the enemy's grasp. The edge faces the front.
Do not place the left foot on the floor.
142
Japanese Sword Drawing: A Source book for laido Students
Photo 7: front view, standing, freeing sword
Photo 8: right side view, standing,
freeing sword
• Grip the hilt with the right hand.
• Stamp the left foot, out of the
one-legged stance, down to the
right side of the right foot.
Toe out with the left foot.
Photo 9: right closeup, feet
Photo 10; front view, standing,
right hand on hilt
Photo 11: right side view, standing,
right hand on hilt
The Traditional Schools of Iaido
143
Photo 12: right side closeup, feet
• Immediately stamp the right foot down about 30 cm. to the right of the left foot.
• Draw the sword a little upward to the right side.
These two quick steps should make some noise. Pull back the right hand to
shoulder height to accomplish the draw. The sword will be nearly vertical,
edge up. You are now fully facing the enemy.
Photo 13: front view, standing, draw
Photo 14: right side view, standing, draw
• Pivot the right foot on its heel and point the toes in the same direction
as the left.
• Glide-step toward the enemy with the left foot.
• From the sword's position, thrust into the enemy’s chest.
This is a single-handed thrust, with the edge up.
144
Japanese Sword Drawing: A Source book for laido Students
Photo 15: front view, standing, thrust
Photo 16: right side view, standing, thrust
Swing the sword overhead in the flowing
parry.
Photo 17: front view, standing,
sword passing left shoulder
Photo 18: front view, standing, downward cut
Advance the right foot one step and cut
downward at the enemy’s forehead.
The Traditional Schools of laido
145
Immediately kneel on the left knee and perform blood-cleaning.
Sheath the sword.
Photo 19: front view, dropping to left knee,
sword moving to right
Photo 20: right diagonal view, dropping
to left knee, sword moving to right
Photo 21: front view, kneeling,
end of eishin chiburi
146
Japanese Sword Drawing: A Source book for laido Students
NUK1 UCHI (Sudden Attack)
General Description
Ji- You sit facing your enemy, in close proximity. Perceiving his malicious intention,
yOU quickly draw your sword and cut him down.
Commentary
Here, again, we find the swordsman in close proximity to his enemy. If he
thought himself safe, he is rudely surprised.
This is the only form in the Middle Tradition performed from selza. It is simi-
lar to the Nuki Uchi in the First Tradition. It is characteristic of the Muso Shinden
Ryu that each of its TYaditions ends with such a form. You will find a similar one
at the end of the Inner Tradition.
Although the movements of the knees are identical to the Nukl Uchi of the
First Tradition, the draw is different. Previously you used a horizontal draw and
then swung the sword around the elbow to the high position, making the follow-
ing cut. Now you will use a vertical draw and go immediately to the cut.
Consequently, the action is much faster. It also requires less room.
You should practice this form quickly, as in the First Tradition, so that the
movements do not break up into individual pieces.
Movements
Sit formally facing the front.
Photo 1: front view, seiza, sword settled
The Traditional Schools of laido
147
• Suddenly, grip the sword with both
hands, and draw upward along the
left side.
• Spread the knees apart.
Photo 2: front view, kneeling on both knees,
vertical draw
• In one stroke swing the sword over-
head in the flowing parry.
• Add the left hand to the hilt.
Photo 3: front view, knees in air, jodan
• Lift the knees and bring them together.
Photo 4: front closeup, knees
Photo 5: front view, kneeling on both knees,
downward cut
• Cut downward at the enemy’s fore-
head.
• The knees separate and strike the floor.
Perform the Elshln Ryu blood-cleaning.
Sheath the sword.
Close the knees at the end.
5. The Inner Tradition: The с>ки лл
(Seated Techniques)
BACKGROUND
&
The Inner TYadition of the Muso Shinden Ryu is the third set of forms, taught after
the study of the Eishin Ryu. As such, it is regarded as more difficult than the
Omori Ryu or the Eishin Ryu.
The Inner Ttadition has both seated and standing forms. The eight seated
forms will be described In this chapter. All begin from the drawn-up knee sitting
position. This position is basic to the Middle Tradition.
The forms arc designated by name. Sometimes a second name is also given.
The forms are:
Kasumi (Mist); muko barat (beating the other)
Sunegakoi (Enclosed Shin); tsuka dome (hilt stop)
Shihogiri (Four Directional Cut); sht sumt (four corners)
Tozume (Enclosing Doors); ml suml (three corners)
Towaki (Side Door); muko zume (the other enclosed)
Tanashita (Lower Shelf)
Ryo Zume (Both Enclosed)
Tora Bashiri (Rushing Tiger)
The descriptions that follow will use the same form as in the previous chap-
ter. The other usual conventions of the descriptions will still be followed. Unless
otherwise noted, the downward cut is delivered with both hands.
149
150
Japanese Sword Drawing: A Source book for Iaido Students
DISTINCTIVE FEATURES
In the First Tradition the forms used a single-step forward to define the drawing
interval: the distance needed to reach the enemy with the sword. The Middle
Tradition often defined the drawing interval with a single-step backward. In the
Inner Tradition both the forward and backward step from the drawn-up knee
position are used.
The cutting actions that follow the draw often involve more complex steps
than previously.
The forms of the Inner Tradition, like those of the two preceding traditions,
are assumed to take place indoors, but the Inner Tradition stresses this location
more than the others. Many of the forms assume that the practitioner must move
in and around a typical Japanese room.
The blood-cleaning of the Inner Tradition is the same as that of the Middle
Tradition. Care must be taken that it is conducted to demonstrate remaining
heart.
The sheathing is also the same. The back of the blade is placed at the scab-
bard mouth in the vicinity of the center of the blade, and the sword is sheathed
by pulling it to the right in a single movement, until the point slips into the scab-
bard, and then inserting at a moderate speed. When the sword is about 20 cm to
25 cm from finishing, the sheathing stops and then continues to a quiet ending,
demonstrating remaining heart.
In the seated techniques of the Inner Tradition the footsteps on rising are
quiet. This is said to demonstrate the musei no klat (soundless spirit meeting).
KASUMI (Mist); muko barai (beating the other)
General Description
Your first enemy sits facing you at lhe front about 1.5 meters away. Before he can
attack, you draw, aiming at his temple. Turning over the sword you cut at hts neck.
You then cut down the enemy from the high position, and finish the form with
blood-cleaning and sheathing.
The Traditional Schools of laido
151
Commentary
Here, again, we have a transitional form. The initial position, tate hiza, is familiar
from the Middle Tradition. The horizontal draw is also known.
The forward right step, rather than the backward left step, differentiates this
form from ones previously studied. It requires that the weight be kept on the left
knee, rather than shifted forward. As a result, the step is much faster.
Techniques in the Inner Tradition are generally more straight forward than
in the Middle TYadition, but are also more rapid and require more accuracy.
This form could be used against two opponents who attack you sequentially
from the front.
Movements
Photo 1: front view, tate hiza
Sit facing the front in the drawn-up knee
position.
Sensing the enemy’s hostile intentions,
rise on the left knee, advance the right
foot one step forward, and draw the
sword, striking the enemy’s temple.
This is essentially the same draw as
in the Shohatto form of the First
Tradition.
Photo 2: front view, tate hiza,
initiating horizontal draw
152
lapanese Sword Drawing: Л Source book for laido Students
Photo 3: front view, tale hiza,
right knee vertical
Photo 4: front view, kneeling,
large horizontal draw
Turn over the right hand, reversing the blade.
Photo 6: right side closeup, right hand
Photo 5: front view, kneeling,
sword turned over
• Slide the left knee to the right heel.
•Cut back to the left, striking the neck
of the second enemy.
The sword movements should look
as though you are cutting a trail
through mist.
Photo 7: front view, kneeling,
left horizontal cut
The Traditional Schools of Iaido
153
Again turn the right hand over, reversing the blade and immediately swing the
sword overhead.
Photo 8: front view, kneeling,
sword turned over
Photo 9: right side closeup, right hand
Photo 11: front view, kneeling, jodan
Photo 10: front view, kneeling,
sword passing left shoulder
Photo 12: front view, kneeling, downward cut
Advance the right foot one step and cut
downward at the enemy's forehead.
Perform blood-cleaning.
Sheath the sword, pulling back the
right foot.
154
Japanese Sword Drawing: A Source book for laido Students
SUNEGAKOI (Enclosed Shin); tsuka dome (hilt stop)
№
General Description
This form is nearly identical to Тога Issoku in the Middle Tradition. The enemy,
seated in front of you, attacks your right foot. You first stop the enemy’s sword.
Making use of his retreat, you cut him down from the high position.
Commentary
Here the swordsman is faced with an enemy who attacks first. He must consider
defense if he is to survive. The swordsman chooses the beat as his defensive
technique.
As noted, this form is nearly identical to Tora Issoku. It differs only in that
you must react more quickly. In Tora Issoku you moved immediately to the beat
because the enemy had drawn and was cutting at your right foot. Here, you must
respond while the enemy is drawing.
To constrain him from drawing rapidly, you draw your own sword hilt
directly at his right hand. This slows him, but doesn’t stop him. He still draws
and cuts at your right leg.
You move directly to the beat. Recall that this requires you to grip the hilt
from the top, with your thumb down the side. It also requires that you adjust this
grip later when swinging the sword overhead.
Movements
Sit facing the front in the drawn-up knee position.
• As the enemy draws to cut at your right foot, raise the right knee toward vertical
and pull the left foot one step backwards.
• Draw the sword, aiming your hilt at the enemy’s right hand.
This confines his movement.
Photo I: front view, tate hiza
Photo 2: front view, tate hiza, initiating
horizontal draw
The Traditional Schools of laido
155
Photo 3: front view, fate hiza,
right knee vertical
Photo 4: front view, standing,
draw til point emerges
Clearly preserving your right leg, ward off the enemy’s sword with your sword
blade ridge.
This is the same warding off movement that appears in the Tora Issoku form tn
the Middle Tradition.
Photo 5: front view, standing, harai Photo 6: right side view, harai
Move the left knee to the right heel, while kneeling, and swing the sword
overhead.
Advance the right foot and cut downward at the enemy.
Perform blood-cleaning.
Sheath the sword.
156
Japanese Sword Drawing: A Source book for Iaido Students
SHIHOGIRI (Four Directional Cut); shi sumi (four corners)
tZ7
General Description
There are four enemies to the front and rear, left and right. You draw and attack the
rear, right, left, and front enemy in turn. You finish the form with blood-cleaning
and sheathing.
Commentary
So far we have seen the swordsman in situations with, at most, two enemies. The
implication is that, while one or two persons might prove treacherous and attack,
there would not be a general battle.
Of course this would not always be the case. A swordsman could be set
upon by any number of people and have to fight his way out. In this form he is
surrounded and must deal with four opponents.
The order of his counterattack is rear, right, left and front. This order is cho-
sen because it removes the most dangerous enemies first.
The rear enemy is the most dangerous because he cannot be seen. The right
enemy Is next because his draw is the quickest and shortest. The left enemy is
next because he is at the rear when the swordsman turns to attack the right
enemy. The front enemy is last because he’s the only one left.
The initial counterattack is a thrust, this time delivered horizontally. The
other enemies arc dispatched with downward cuts. The footwork is straight for-
ward. involving a series of pivots on the left knee.
You cannot assume that each of your enemies will wait his turn to attack
you. Once you have killed the rear enemy they will all attack, being watchful that
they don’t get in each other’s way.
While you are counterattacking each enemy, you must be aware of what the
others are doing. Watch them out of the corners of your eyes.
The techniques of this form serve the basis of using the sword when
enclosed by a large number of enemies. The techniques can be used against
opponents at the corners as well.
The Traditional Schools of laido
157
Movements
Photo 1: front view, tate hiza
Sit facing the front in the drawn-up knee
position.
• Rising to the left knee, step forward
strongly with the right foot.
• Draw the sword slanting to the front.
Rotate the sword to horizontal. Do not
pull back the scabbard.
Photo 2: front view, tate hiza.
initiating horizontal draw
Photo 3: front view, kneeling,
draw til point emerges
Photo 4: front view, kneeling,
sword horizontal at left side
158
Japanese Sword Drawing: A Source book for laido Students
Sliding the right foot toward the left knee, pierce the left chest of the rear enemy,
thrusting horizontally past your left arm.
Rotate the upper body to the left as needed.
Photo 5: front view, kneeling, rear thrust,
looking over left shoulder
Photo 6: left side view, kneeling, rear thrust,
looking over left shoulder
Step the right foot about 90-dcgrccs to
the right and swing the sword overhead
in a flowing parry at the left side.
Add the left hand and cut downward
at the right enemy.
Photo 7: front view, kneeling,
sword passing left shoulder
Photo 8: front view, kneeling, Jodan
Photo 9: front view, kneeling, downward cut
The Traditional Schools of laido
159
Photo 10: front view, kneeling, looking back
Immediately step the right foot 180
degrees to the left and swing the
sword overhead in a flowing parry
at the right side.
Photo 11: front view, kneeling,
sword passing right shoulder
Photo 12: front view, kneeling, jodan
160
Japanese Sword Drawing: A Source book for laido Students
Photo 13: front view, kneeling, downward cut
Cut downward at the left enemy.
Again step 90-degrees to the right and
swing the sword overhead in a flowing
parry at the left side.
Photo 15: front view, kneeling. )odan
Photo 14: front view, kneeling,
sword passing left shoulder
Perform blood-cleaning.
Photo 16: front view, kneeling, downward cut
Cut downward at the forehead of the
front enemy.
Sheath the sword.
The Traditional Schools of laido
161
TOZUME (Enclosing Doors); mi sumi (three comers)
General Description
E? There are two doors in front, to the left and right. These suddenly open revealing
' two enemies at the forward diagonal directions. You draw and attack the right
- i enemy first, and then cut down the left enemy. The form finishes with blood-cleantng
and sheathing.
Commentary
The interior doors of a Japanese house, called fusuma (door), are solid panels 3
feet by 6 feet. There is a lintel at 6 feet containing the upper sliding track for the
door.
When the door is opened by the enemy, he is seriously constrained. If he Is
standing, the height of the lintel prevents him from attacking with a vertical draw
and cut. Either standing or kneeling, the narrow width of the doorway prevents
the use of a horizontal draw. To press his attack the enemy must cither drop to
one knee and cut vertically, or step through the doorway. Either of these moves
will take time.
The swordsman is already sitting. He needs only to rise to his knee and
attack with a vertical draw and cut. Hence, in spite of being out-numbered, he
has the advantage.
The enemy in the right doorway is attacked first, for the usual reason. If he
is standing, waiting to step though the doorway, you strike at his torso. If he is
kneeling, preparing to attack after opening the door, you cut at his head.
You then pivot to attack the second enemy. Instead of turning on your left
knee, you exchange knees and cut with the left knee forward. The exchange is
best done by lifting the left knee and placing the right knee down on almost the
same spot. It must be rapid and you cannot pause because of the pain.
When you attack the second enemy you can take a small glide-step forward
with the left foot to adjust the distance.
162
Japanese Sword Drawing: A Source book for laido Students
Movements
Photo 1: front view, tate htza
Sit in the drawn-up knee position with
the front diagonally to your left.
• As the first secret door opens, advance
the right foot one step obliquely to the
right front.
• Draw the sword vertically on the right
side, and continuing the motion, cut
downward single-handed at the right
enemy.
The right foot can be assumed to cross
the threshold.
Photo 2: front view, kneeling,
draw to point emerge
Photo 3: front view, kneeling,
one-hand downward cut
The Traditional Schools of laido
163
• Immediately turn the body 90-degrees
to the left, setting the right knee on the
floor and raising the left knee.
• Swing the sword overhead in a flowing
parry at the right side.
Photo 4: front view, middle of turn,
sword passing right shoulder
Photo 5: front side view, /odan
Photo 6: front view, kneeling, downward cut
Cut downward at the left enemy, emerg-
ing from the left door.
Perform blood-cleaning.
Sheath the sword.
164
Japanese Sword Drawing: A Source book for laido Students
TOWAKI (Side Door); muko zume (the other enclosed)
General Description
О There is a door to your right front, in the wall on your right side, concealing an
/ enemy who is waiting for an opportunity' to strike. A second enemy advances from
л. your left rear. Forestalling the first enemy, you draw and attack the second. Then
Fprfy you cut down the first enemy, still in his hiding place.
Commentary
The swordsman is sitting with a wall on his right. Just ahead of him is a door. An
enemy approaches from the left rear. The door opens, revealing an enemy to the
right front corner. Clearly, they hope to pin the swordsman between them.
There is a fundamental flaw in their strategy, though. Remember that the
doorway constrains the enemy’s attacks. The swordsman can keep the enemy
in the doorway long enough to dispose of the enemy at the rear, who is more
dangerous.
You use two techniques to constrain the enemy in the doorway. First, you
step over the threshold of the door with your right foot. Standing on the lower
sliding track, you prevent the enemy from shutting the door in your face. Second,
you draw your hilt directly at the enemy, forcing him backwards if he wants to
gain space.
While he is forestalled, you thrust at the second enemy’s chest. Then you
swing the sword into the high position and cut the first enemy down. Remember,
you can do this because you are kneeling and can cut under the door lintel.
Movements
Photo 1: front view, tate hiza
Sit in the drawn-up knee position with
the front diagonally to your right.
The Traditional Schools of Iaido
165
Photo 2: front view, tate hiza,
initiating horizontal draw
• When the hidden enemy, seeing the
advance of the rear enemy, begins to
open the secret door, advance your
right foot strongly one step to the right
front corner.
• Draw the sword with the blade hori-
zontal, edge to the outside, directly
at the hidden opponent.
The right foot Is assumed to obstruct
the door, preventing Its closure. The
draw forestalls the first enemy, prevent-
ing him from emerging. Do not move
the scabbard.
Photo 3: front view, kneeling,
draw til point emerges
Pierce the left chest of the rear enemy,
thrusting horizontally over your left arm.
Rotate the upper body to the left
as needed.
Photo 4: front view, kneeling, rear thrust,
looking over left shoulder
Photo 5: left side view, kneeling, rear thrust,
looking over left shoulder
166
Japanese Sword Drawing: Л Source book for laido Students
• Rotate the upper body back to the front.
• Swing the sword overhead at the left side.
Photo 6: front view, kneeling,
sword passing left shoulder
Photo 7: front view, kneeling, jodan
• Scoop the right foot to the left and return it to the floor.
• Cut downward at the enemy.
The slight scoop of the right foot is assumed to push the door open, exposing
the hidden enemy.
Photo 8: front view, kneeling, downward cut
Photo 9: front view, kneeling, downward cut
Perform blood-cleaning.
Sheath the sword.
The Traditional Schools of laido
167
TANASHITA (Lower Shelf)
General Description
The enemy is to your front, but your advance is obstructed by the edge of a low
shelf. You creep forward under this obstruction, and suddenly appear, cutting the
enemy down. The form finishes with blood-cleaning and sheathing.
Commentary
Items in Japanese houses are stored in different ways. Some things are put into
closets having the same kind of doors as are used to divide rooms. Some goods
are kept in chests or cabinets, called tansu (chest of drawers). Some items are
kept on shelves, called tana (shelf). Items are also placed on shelves for display.
The shelf in this form is one of the display type. It is in the room proper,
attached to one of the walls, perhaps at a corner. In any event, the swordsman
cannot advance without going around, over or under it. He chooses to go under,
to surprise his enemy.
The enemy is known to be dangerous. Because the shelf obstructs the path,
the enemy cannot see the swordsman. He takes him by surprise when he
emerges.
The techniques of this form could be applied to any low obstruction. They
could also be done in the dark to take the enemy by surprise.
Movements
Photo 1: front view, late hiza
Sit in the drawn-up knee facing the front.
168
Japanese Sword Drawing: A Source book for Iaido Students
Draw the sword while advancing the
right foot a large step to the front.
Draw the sword straight, without rotat-
ing the blade. Use more emphasis on
the rear pull of the left hand than on the
advance of the right foot. Lower the head
and upper body. Keep the hips low.
Photo 2: front view, tate hiza,
initiating horizontal draw
Photo 3: front view, kneeling,
draw til point emerges
Photo 4: left side view, kneeling,
draw til point emerges
Photo 5: front view, crouching,
fully extended draw
Photo 6: left side view, crouching,
fully extended draw
The Traditional Schools of laido
169
Carry the sword from the left side to the back.
Photo 7: front view, crouching,
sword on back
Photo 8: left side view, crouching,
sword on back
Slide the left knee to the right heel.
Keep the body as low as possible. You are assumed to be going under the shelf.
Place the left hand on the hilt, and let the hilt precede you.
Photo 9: front view, kneeling,
sword on back
Photo 10: left side view, kneeling,
sword on back
170
Japanese Sword Drawing: A Source book for Iaido Students
Advance the right foot and raise up.
This step Is assumed to carry'you beyond the obstruction. In practice, the preced-
ing and this step can be repeated before rising to simulate a long shelf.
Photo 11: front view, kneeling, jodan
Photo 12: left side view, kneeling, jodan
Photo 13: front view, kneeling, downward cut
Cut down at the enemy.
Do not lift the hands from in front of
your face when cutting. The sword hilt
moves in a circle, forward and down.
Perform blood-cleaning.
Sheath the sword.
The Traditional Schools of laido
171
RYOZUME (Both Enclosed)
General Description
Both Уои ап^ Уоиг enemy are enclosed in a space so narrow that it does not allow
’ * freedom to draw the sword as is usually done. You draw, adjusting for the narrow-
•» » ness, and attack the enemy with a thrust. You then cut the enemy down, finishing
x with blood-cleaning and sheathing.
Commentary
Since this is a seated form we assume it takes place in doors. The narrow space,
then, must be some part of a house, perhaps a corridor or other kind of passage.
What the swordsman is doing sitting in a corridor is not known. Perhaps he is
waiting for permission to enter a room.
In any case, he is now constrained by exactly the same circumstances that
previously hampered his enemy. The choice of counterattack technique is
severely limited. The horizontal draw is unusable, as is the standing vertical draw
and cut. The kneeling vertical draw and the thrust can still be used, so the form
focuses on these techniques.
Movements
Photo 1: front view, tate hiza
Sit facing the front in the drawn-up knee
position.
172
Japanese Sword Drawing: A Source book for laido Students
Advancing the right foot slightly, draw
the sword to the right front.
Photo 2: front view, late hiza,
initiating horizontal draw
Photo 3: front view, tate hiza,
draw til point emerges
Photo 4: left side view, tate hiza,
draw til point emerges
• Rise up on the left knee.
• Turning the sword over with the right hand, bring the hilt to rest in front of the
navel and grasp it with the waiting left hand.
Photo 5: front view, kneeling,
sword reversing
Photo 6: left side view, kneeling,
sword reversing
The Traditional Schools of Iaido
173
Photo 7: front view, kneeling,
sword at navel
Photo 8: left side view, kneeling,
sword at navel
• Advance the right foot.
• Thrust with both hands at the front enemy.
Photo 9: front view, kneeling, thrust
Photo 10: left side view, kneeling, thrust
Withdraw the sword and swing it overhead.
This is not done with a flowing parry, but with a much more direct manner.
Photo 11: front view, kneeling, jodan
Photo 12: left side view, kneeling, jodan
174
Japanese Sword Drawing: A Source book for laido Students
Cut downward at the enemy’s forehead.
Perform blood-cleaning.
Because of (he narrowness, (he blood-cleaning is done with small movements.
Photo 13: front view, kneeling, downward cut
Photo 14: front view, kneeling,
end of eishin chiburi
Sheath the sword.
Because of the narrowness, the sheathing is done to the front, with the edge up.
Photo 15: front view, kneeling, beginning note
Photo 16: left side view, kneeling,
beginning noto
The Traditional Schools of laido
175
Photo 17: front view, kneeling, point entry
Photo 18: left side view, kneeling, point entry
Photo 19: front view, kneeling, end of noto
176
Japanese Sword Drawing: A Source book for Iaido Students
TORA BASHIRI (Rushing Tiger)
General Description
An enemy, hoping to catch you by surprise, moves to attack. Your swift reaction dis-
turbs him and he flees. You follow and cut him down. A second enemy attacks as
you are finishing your sheathing. You withdraw, then counterattack, cutting him
down. A second blood-cleaning and sheathing finishes the form.
Commentary
The actions used in this form are not new. The draws are horizontal, the cuts ver-
tical. The new feature is the footwork.
In executing the small, hurrying steps called for in this form, you must
retain your balance while bending at the waist. The forward bend reduces the
amount of your torso that is a potential target while you pursue the enemy.
Should he turn and confront you, you give him less to aim at. Similarly, when
fleeing yourself, you reduce the target area by bending.
The steps are small so that the center of motion Is under control at all times.
After a sequence of these, ending with the left foot in front, you suddenly step for-
ward with a large right step and draw.
The “tiger" in the form’s title refers to the difference In quality between these
steps.
Movements
Photo I: front view, tate hiza
Sit facing the front in the drawn-up knee
position.
The Traditional Schools of laido
177
• As the enemy begins to move, slide the right foot forward and rise to a half-
kneeling, half-standing posture.
• Move the sword and scabbard to the right waist.
The upper body sloops to the front. The sword is gripped ready for drawing,
at almost 90 degrees to the front of your body.
Photo 2: front view, tate hiza,
initiating horizontal draw
Photo 3: front view, iaigoshi,
sword at right waist
As the enemy flees, follow forward with
small hurrying steps.
Photo 4: front view, iaigoshi,
sword at right, left foot forward
178
Japanese Sword Drawing: A Source book for laido Students
Photo 5: front view, standing,
horizontal draw
• When the correct drawing interval
has been gained, step suddenly
forward with a large right step.
• Raise up the upper body and draw
horizontally at the enemy.
Lower the left knee and cut down the
enemy from the high position.
Perform the blood-cleaning.
Sheath the sword.
Draw the right foot near the left.
Draw the hilt near the right waist,
while half-crouching.
Because another enemy attacks from the
front, while the sword is still 5 to 6cm
out, pull the left foot back one step, into
the half-sitting, half-standing posture.
Photo 6: front view, iaigoshi,
sword at right waist
The Traditional Schools of laido
179
Fall back before the enemy with
the same small hurrying steps.
Photo 7: front view, laigosht,
sword at right, left foot forward
When the correct drawing interval has
been gained, pull the left foot back in
a large step and draw horizontally to
the front.
Kneeling on the left knee, swing the
sword overhead, and cut down the
enemy.
Perform blood-cleaning.
Sheath the sword.
Photo 8: front view, standing,
horizontal draw
6. The Inner Tradition: the c>ku
(Standing Techniques)
BACKGROUND
&
Thirteen forms comprise the standing technique section of the Inner TYadition,
although the last form is actually done from the formal sitting position. Some
have subtitles, in addition to the more usual title. They are:
Yuki Tsure (Accompanying)
Tsuredachi (Together)
So Makuri (All Rolled Up): goho girt (five direction cut)
So Dome (All Stopped); hanashi uchi (disengaging strike)
Shinobu (Faithful Husband): yoru no tachi (long sword in the night)
Yukichigai (Crossing)
Sodesurigaeshi (Returning from Brushing the Sleeve):
ken no koto (circumstantial wisdom)
Mon Iri (Entering the Gate); kakure sute (hide and discard)
Kabe Zoi (Adjusting for the Wall); hltonaka (in public)
Ukenagashi (Flowing Parry); yorumi nuki (relaxed draw)
Oikakegiri (Pursuing Cut)
Ry oshi Hikitsure (Both Warriors Brought Together)
Itomagoi (Farewell Visit); nuki uchi (sudden attack)
181
182
Japanese Sword Drawing: Л Source book for laido Students
DISTINCTIVE FEATURES
Several of the standing forms take place outside, in a typical Japanese urban
environment. The practitioner must understand not only the structure and layout
of a Japanese house, but also the neighborhood in which it is likely to be found.
The blood-cleaning and sheathing are, unless otherwise noted, the same as
in the seated forms.
YUKI TSURE (Accompanying)
General Description
While you are walking, two enemies catch up and fall In step with you, on the left
and right sides. They intend to take you away to some unwanted destination. Before
' zfc are in contro1 °fthe situation, you attack, first the enemy on the right and then
on the left. Finish the form with blood-cleaning and sheathing.
Commentary
The swordsman finds enemies on either side. They have made no hostile move,
but he knows they are dangerous. Falling in on either side is an obvious tactic to
control an opponent. It allows control of an opponent, while avoiding an open
confrontation. It is used by police forces even today.
You do not wait to get to wherever they are taking you. Instead, you sud-
denly stop. As the enemies swing around to face you, dispatch them. Start with
the right enemy because he is the more dangerous.
Movements
Step forward with the left foot.
This simulates walking, and Is the moment the enemies fall in step with you.
Before stepping forward with the right foot, deliberately pause.
You are unexpectedly letting the enemies go one step past you. They will turn
to face you to see what is happening.
The Traditional Schools of Iaido
183
Photo 1: front view, standing, bukezukuri
Photo 3: front view, standing,
initiating vertical draw
Photo 2: front view, standing, bukezukuri,
left foot forward
• Step to the right side with the right
foot.
• With the right hand draw and cut
downward at the top of the right
enemy’s left shoulder with the
priest's stole cut.
A Buddhist priest’s stole is a rectangle of
cloth that is worn from the left shoulder
to the right armpit. The priest’s stole cut
is made from the top of the left shoulder
(or the right) slanting to the lower diago-
nal direction. A reversed priest’s stole cut
is made upward along the same path.
Photo 4: front view, standing,
vertical draw to the right diagonal
Photo 5: front view, standing,
one-hand leftward slanting cut
184
Japanese Sword Drawing: A Source book for laido Students
Quickly turn and face the left enemy.
Photo 6: front view, standing,
sword passing right shoulder
Photo 7: front view, standing, )odan
Photo 8: front view, standing, downward cut
• Slide the left foot toward the left
enemy.
• From the right side swing the sword
overhead in a flowing parry motion.
• Add the left hand to the hilt.
Cut down at the enemy’s forehead
from the high position.
Perform blood-cleaning.
Sheath the sword, pulling back the
left foot.
The Traditional Schools of laido
185
TSUREDACHI (Together)
General Description
As tn the first form, Yuki Tsure, you are again between two enemies, who fall in step
with you on the left and right sides. You seize control, attacking, first the enemy on
the left and then on the right. You finish the form with blood-cleaning and sheathing.
Commentary
Here, again, you do not wait until you get to wherever they are taking you. Rather
than lag behind, though, in this form you step ahead, pressing in on the right
enemy.
The right enemy is the more dangerous, for the usual reasons. However,
instead of attacking him directly, you choose to hamper him and attack the left
enemy.
Initially you arc all facing the same direction. When you step into the right
enemy, he will move away from you, turning to see what you are doing. Because
you stepped toward the right, the left enemy is now partly behind you, and has
taken on added importance because of this new position. You must attack him
immediately, using a rear thrust. You must then return to the first enemy before
he has a chance to attack.
Movements
Step forward with the left foot.
This simulates walking and Is the moment the enemies fall in step with you.
Photo 1: front view, standing, bukezukuri
Photo 2: front view, standing,
bukezukuri, left foot forward
186
Japanese Sword Drawing: A Source book for laido Students
• Advance the right foot a small step
to the right front.
• Draw the sword to the right side
in a single stroke.
The step places you close to the right
enemy, which Inhibits him. Keep your
eyes fixed on him. The blade is horizon-
tal, edge to the outside. Do not pull
the scabbard back.
Photo 3: front view, standing,
initiating horizontal draw to the right
Photo 4: front view, standing,
draw to right til point emerges
As the sword point separates from the
scabbard, quickly look at the left enemy
and thrust at the right side of his chest
over your left arm.
Turn to the left as needed.
Photo 5: front view, standing,
rear thrust, looking to left
The Traditional Schools of laido
187
• With the feet as they are, quickly
turn rightward to again face the
right enemy.
• Swing the sword overhead.
• Add the left hand.
Photo 6: front view, standing,
sword passing left shoulder
Photo 7: front view, standing, jodan
Photo 8: front view, standing, downward cut
• Slide the right foot to the front.
• Cut down at the enemy’s forehead
from the high position.
The enemy has pulled away from
you to gain distance.
Perform blood-cleaning.
Sheath, pulling back the right foot.
188
Japanese Sword Drawing: A Source book for laido Students
SO MAKURI (All Rolled Up); goho giri (five direction cut)
General Description
You respond to five enemies coming at you serially from the front. You finish the
form with blood-cleaning and sheathing.
Commentary
The swordsman, as noted In the commentary on Shihoglrt in the seated forms of
the Inner TYadition, could not depend on having only one opponent. He must
also be able to deal with many enemies. In Shihoglrt he had four surrounding
him. In this form he has five, coming at him serially.
A serial attack is not improbable. In-doors, enemies coming down a corri-
dor, or through a doorway, would have to attack one at a time. Out of doors, a
narrow path, the space between houses, or an opening in a crowd would produce
the same effect.
This form uses five different cuts, and a smooth method of repeatedly swing-
ing the sword overhead. It can be considered as teaching the basic techniques for
dealing with a large number of opponents.
Movements
Photo 1: front view, standing, bukezukuri
• Pull back the right foot one step
to the rear.
• Draw the sword upward and swing
it overhead in a left flowing parry.
The first enemy comes from the front,
crowding in to cut at you. The back
step and flowing parry ward off the
attack.
The Traditional Schools of Iaido
189
Photo 2: front view, standing,
initiating vertical draw
Photo 3: front view, standing,
sword passing left shoulder
• Advance the right foot.
• Add the left hand and cut at the left side of the enemy’s head.
Photo 4: front view, standing,
left hand added
Photo 5: front view, standing,
left slanting cut
• Advance the left foot.
• Swing the sword overhead
from the right side.
Photo 6: front view, standing, end of cut
190
Japanese Sword Drawing: A Source book for laido Students
Photo 8: front view, standing, jodan
Photo 7: front view, standing,
sword passing right shoulder
As the second enemy advances, cut at his right shoulder in the priest’s stole cut.
• Advance the right foot.
• Swing the sword toward the right shoulder.
This position, reminiscent of the eight-phase posture, Is called katsugi
(carry on the shoulder).
Photo 10: front view, standing, katsugi
Photo 9: front view, standing,
rightward slanting cut
The Traditional Schools of laido
191
Cut the left torso of the third enemy in a shallow, slanting cut.
Photo 11: front view, standing,
slanting do giri
Photo 12: front view, standing,
slanting do girl
Turn the sword horizontal, point to the left rear.
This will cause your wrists to cross.
Photo 14: left diagonal closeup, hands
Photo 13: front view, standing,
sword pointing to left
192
lapanese Sword Drawing: A Source book for Iaido Students
Photo 15: front view, standing, horizontal cut
• Advance the left foot.
• Cut with both hands in a sideways
single stroke at the right side of the
fourth enemy’s body.
Photo 16: front view, standing, horizontal cut
• Advance the right foot.
• Swing the sword overhead to the
high position past the right side.
Photo 17: front view, standing,
sword pointing to rear
The Traditional Schools of laido
193
Photo 18: front view, standing,
sword passing right shoulder
Photo 19: front view, standing, /odan
Photo 20: front view, standing, downward cut
Cut downward at the fifth enemy’s
forehead.
Perform blood-cleaning.
Sheath, pulling back the right foot.
194
Japanese Sword Drawing: A Source book for laido Students
SO DOME (All Stopped); hanashi uchi (disengaging strike)
General Description
Your freedom of movement is constricted on both sides. In front are several enemies,
who must attack one at a time. You respond to them, but show no hostility, being
JL willinS cease after eac^ one- Finally, when finished, you do a narrow blood-clean-
ygj Ing and sheathing.
Commentary
The swordsman Is attacked sequentially by several enemies, as in So Makuri.
Rather than respond with hostility to them all, he chooses to hold no grudges and
to be willing to stop after each. It is up to the opponents to press the attack.
The narrowness of the situation can be the result of the physical layout or
other factors. For example, the area may be a narrow bridge, an embankment, or
a narrow street. The swordsman might also be attacked in a crowd, where there is
only a narrow opening between people.
The counterattack is a single-handed vertical draw and cut. The left hand is
used to control the scabbard. The heron leg stance is used to show a willingness
to stop.
Movements
Photo 1: front view, standing, bukezukuri
• Confronting the first enemy, advance
the right foot and point the toes to
the left.
• T\vist the hips to the left, so that only
half the body is presented, and point
the left toes to the left.
• Draw upward with the right hand
and cut down the enemy.
The Traditional Schools of Iaido
195
Photo 2: front view, standing, initiating
elongated vertical draw
Photo 3: front view, standing,
elongated vertical draw
Photo 4: front view, standing, elongated
one-hand downward cut
Photo 5: left side view, elongated
downward cut
196
Japanese Sword Drawing: A Source book for laido Students
Begin to sheath the sword.
This sheathing is very elongated.
Touch the back of the blade to the
scabbard mouth at a point about 1/3
from the tip. Draw the sword slowly
to the front until the tip enters.
Photo 6: front view, standing,
sword on left hand
Photo 7: front view, standing,
sheath to point entry
Photo 8: left side view, standing,
sheath to point entry
• Move the left foot a very small step forward, just in front of the right foot, with
the toes pointing to the left.
• Continue to slowly sheath the sword.
This Is the heron leg step previously encountered. Only the toes touch. The shins
cross. The hips move twist. Use this motion to continue to sheath the sword, mov-
ing the scabbard forward. The sword will be 1/3 to 1/2 inserted. It is this motion
that shows your willingness to ‘‘disengage."
The Traditional Schools of Iaido
197
Photo 9: front view, standing,
continue sheathing
Photo 10: left side view, standing,
continue sheathing
Suddenly, confronting the second enemy, repeat the attack as before.
Repeat the sheathing as before.
In this way, deal with a sequence of enemies. Only two would be necessary'
to demonstrate the form.
Finally, perfonn blood-cleaning.
The sideways movement is restricted by the narrowness of the location.
Sheath the sword, pulling back the right foot.
This sheathing is very elongated. Touch the back of the blade to the scabbard
mouth al a point about 1/3 from the tip. Draw the sword slowly to the front
until the tip enters. Then insert the blade tn a straight line to the rear.
198
Japanese Sword Drawing: A Source book for laido Students
SHINOBU (Faithful Husband); yoru no tachi (long sword in the night)
General Description
'«A* This form takes place at night, tn a dark room. The enemy Is tn front, facing in your
& direction and advancing cautiously. You cannot see each other. You lure him into
attacking, but avoid being struck, and strike him down instead. You finish the form
with blood-cleaning and sheathing.
'X. This form's title is a word play on the adverb shinobu (stealthily).
Commentary
Illumination in a Japanese house was provided by floor lanterns, using either
candle or oil lamp. When these are extinguished for sleep, and the doors closed
to contain warmth, windowless rooms can be very' dark.
It Is reasonable that the swordsman and his opponent cannot see each other.
Instead, they strain their ears to hear the other, trying to discover his position.
Speed is not your problem, noise is. In fact, you will move much slower
than usual to prevent the enemy from hearing you.
You must draw your sword as quietly as possible. The blade must not rattle
in the scabbard. You can pinch the blade between your left thumb and index fin-
ger as you draw it to eliminate noise.
You bend slowly over and scuff the floor, trying to make the sound of some-
one walking. When your opponent betrays his position by striking, you attack
decisively.
Movements
• Faintly discerning the enemy, rotate your body to the left, carrying the left foot
backward to the right rear.
• Slowly draw the sword, as quietly as possible.
Photo I: front view, standing, bukezukuri
Photo 2: front view, standing, initiate draw
The Traditional Schools of laido
199
• Bend forward.
• Tap the sword point lightly on the floor two or three times with a circular motion.
Do not make hard taps, but rather scuff the floor. This sounds more like a moving
person.
Photo 3: front view, bending
Photo 5: front view, standing, lodan
Photo 4: front view, bending,
sword tapping floor
• Rise up.
• Swing the sword overhead to the two-
handed high position and wait.
• When the enemy attacks the location
of the sounds, advance the left foot
to the left front.
• Cut down.
Perform blood-cleaning.
Sheath the sword, pulling back the
left foot.
Photo 6: front view, standing, downward cut
200
lapanese Sword Drawing: A Source book for Iaido Students
YUKICHIGAI (Crossing)
*7
it
General Description
Two enemies advance from the front. One passes and attacks you from behind. You
respond, attacking first the enemy at the front with a disabling blow, then the enemy
to the rear, and then the front enemy again. You finish with blood-cleaning and
sheathing.
Commentary
In this form the swordsman is placed between two enemies. This time, however,
they are to the front and rear, rather than on each side. This placement, espe-
cially that of the enemy in the rear, makes the situation more dangerous and dic-
tates the need for a very fast response.
The enemy in the rear would normally be the more dangerous and you
would want to deal with him first. However, because he has to walk past you,
tum and draw, you have a little time. This allows you to strike the front enemy
with your hilt to forestall him before dealing with the rear enemy.
Movements
Photo 1: front view, standing, bukezukuri
• As one enemy passes you, deliberately
enter into the space between the two
men by stepping forward with the
right foot.
• Strike with your hilt at the face of the
front enemy.
In the hilt-strike, both hands stretch
out, carrying the sword and the scab-
bard forward. Strike the front enemy
with the butt of the hilt just below
his nose.
The Traditional Schools of laido
201
Photo 2: front view, standing, hilt strike
Photo 3: left side view, standing, hilt strike
Immediately, pull the scabbard to the rear with the left hand, leaving the hilt in
place, drawing the sword.
Photo 4: front view, standing, draw til point
emerges, looking over left shoulder
Photo 5: left side view, standing,
draw til point emerges
202
Japanese Sword Drawing: Л Source book for laido Students
• As soon as the point leaves the scabbard, rotate 180 degrees to the left, facing
the rear enemy.
• Thrust to the enemy's chest.
The blade is horizontal, edge up.
Photo 6: front view, standing, thrust
Photo 7: left side view, standing, thrust
• Rotate 180-degrees to the right.
• Swing the sword overhead to the two-handed high position, over the left shoulder.
Photo 8: front view, standing,
sword passing left shoulder
Photo 9: left side view, standing,
sword passing left shoulder
The Traditional Schools of Iaido
203
Photo 10: front view, standing, jodan
Photo 11: front view, standing, downward cut
Cut down al front enemy's forehead.
Perform blood-cleaning.
Sheath, pulling back the right foot.
204
lapanese Sword Drawing: A Source book for Iaido Students
SODESURIGAESHI (Returning from Brushing the Sleeve);
ken no koto (circumstantial wisdom)
fib
fl?
General Description
You see your enemy al the other side of a crowd. Using the form’s movements, you
pass through the crowd and cut down the enemy. You finish with blood-cleaning
and sheathing.
Commentary
One would think that a crowd, seeing an armed swordsman moving toward an
enemy, would tend to disperse, but this is not always the case. Some people might
flee, some might drop to the ground, some might run straight into his path, but
most would stand frozen. Imagine a crowd today, seeing a gunman in their midst.
The swordsman, then, must make his way through the crowd as unobtru-
sively as possible. At the same time, he must try not to injure any bystanders. Yet
he must also arrive at the other side, prepared to cut down his enemy.
Sodesurigaeshi solves this problem. As you move through the crowd, your
drawn sword is earned at your left side, edge up. Bystanders are unlikely to blun-
der into it; they are even unlikely to notice it until you’ve passed.
Upon confronting your enemy, you swing the sword in a wide circle, edge
still up. Bystanders will scatter or be pushed aside. At the very end of the arc you
suddenly swing the sword overhead, adjust the grip and cut down the enemy.
Movements
Step forward with the left foot.
Quietly draw the sword, edge up, straight forward.
Keep your eyes on lhe enemy.
Photo 1: front view, standing, bukezukuri
Photo 2: front view, standing,
draw til point emerges
The Traditional Schools of laido
205
Photo 3: front view, standing, arms crossed
• Step forward with the right foot.
• The right fist moves below the left
elbow; the left fist moves below the
right elbow.
Leave the sword as it is, edge up, point-
ing to the rear, and step forward into
position along side it. The left and right
forearms cross at your chest.
Step forward with the left foot.
• Step forward with the right foot
to confront the enemy.
Photo 4: front view, standing,
arms crossed, left foot forward
Photo 5: front view, standing, beginning sweep
• Open both arms in a large, horizontal
sweep, carrying the sword to the
right side.
The sweep of the arms pushes the
crowd aside. The blade is still edge
up, so it does not injure anyone.
206
lapanese Sword Drawing: A Source book for laido Students
Photo 6: front view, standing, sweep
Photo 7: front view, standing, end of sweep
Photo 8: front closeup, right hand
Rotate the hands and swing the sword overhead to the two-handed high position,
using a flowing parry motion on the right side.
• Step forward with the right foot to confront the enemy.
Photo 10: front closeup, standing, right hand
Photo 9: front view, standing,
arms extended, sword rotated
The Traditional Schools of laido
207
Photo 11: front view, standing,
sword passing right shoulder
Photo 12: front view, standing, /odan
Photo 13: front view, standing, downward cut
Cut down the enemy.
Perform blood-clcaning.
Sheath.
208
Japanese Sword Drawing: A Source book for laido Students
MON IRI (Entering the Gate ); kakure sute (hide and discard)
General Description
While walking you see two enemies waiting ahead. One Is inside a gate In a wall or
fence on your left, and one waits outside on your right. You attack the one Inside
first, and then the one outside. You finish with blood-cleaning and sheathing.
Commentary
Japanese houses are usually not built perpendicular to the street. Instead, they
are placed on their lots according to the principles of geomancy. The result is a
ragged street line, with houses at many angles.
Japanese builders tend to use any space left available on the lot for gardens,
and to enclose the whole property with a fence or wall. The entrance to the
grounds must be made through a gate. These gates arc often substantial, with
roofs and benches inside.
Your enemy is hiding inside one of these gates. While you are distracted by
the opponent outside, he will strike you from behind. Clearly, the hidden enemy
is the more dangerous. If you can forestall the other enemy, you can deal with the
hidden one first.
Movements
Step so that the left foot comes down opposite the center of the gate.
Toe out the left foot.
Photo I: front view, standing, bukezukuri
Photo 2: front view, standing.
bukezukuri, left foot forward
The Traditional Schools of laido
209
Draw the sword to the outside right,
pulling it horizontally across the chest.
The blade is horizontal, edge to the
outside.
Photo 3: front view, standing, initiating draw,
pulling sword to extreme right
Photo 4: front view, standing, draw across
chest til point emerges
Photo 5: front view, standing, thrust
• Pull the right foot sharply to the right,
and rotate the body 90 degrees to
the left.
• Thrust, piercing the chest of the
enemy inside the gate.
The overhead beam that forms the
lintel of the gate prevents you from
cutting down the enemy Inside.
210
lapanese Sword Drawing: A Source book for laido Students
• Rotate 180-degrees to the right.
• Swing the sword overhead to the
two-handed high position.
Photo 6: front view, standing,
sword passing left shoulder
Photo 7: front view, standing, jodan
Photo 8: front view, standing, downward cut
Cut down the outside enemy.
Perform blood-cleaning.
Sheath.
The Traditional Schools of Iaido
211
KABE ZOI (Adjusting for the Wall); hitonaka (in public)
General Description
p £ There is a wall on the left and right sides, restricting your freedom to use your sword.
The enemy comes from the front. Adjusting for the restrictions, you cut him down,
and finish with a restricted blood-cleaning and sheathing.
* Commentary
The walls mentioned above are probably ones enclosing houses on opposite
sides of a street, As noted before, Japanese houses are not placed regularly and
the resultant streets are very winding. They are also often enclosed by walls or
fences and the streets can be very narrow.
This form sets the general pattern for sword drawing in a narrow space. You
cannot stretch out to the left or right side. Accordingly, it could be used to cut
down an enemy who was in the middle of a crowd, without injuring others.
This is the third form that specifically deals with narrow areas or describes
techniques to use in a crowd.
Movements
Step forward with the left foot.
This simulates walking between lhe two walls.
Photo 1: front view, standing, bukezukuri
Photo 2: front view, standing,
bukezukuri, left foot forward
212
Japanese Sword Drawing: A Source book for laido Students
Photo 3: front view, standing, feet together
Before moving the right foot, deliberately
pause, then move the right foot to the left
foot and make the feet even.
• Stand up on your tiptoes.
• Draw the sword nearly straight up,
swinging it overhead to a two-handed
high position over the left shoulder.
Because of the restricted position, the
sword point may drop behind the back
after the left hand grasps the hilt.
Photo 4: front view, standing,
initiating vertical draw
Photo 6: front view, standing, left hand added
Photo 5: front view, standing,
extreme vertical draw
Cut downward, describing a large circle.
Remain on tiptoe. The sword point comes clearly low to the ground.
The Traditional Schools of laido
213
Perform a very narrow blood-cleaning.
The sword point stays as close to the ground as it was, and moves sharply sideways.
You cannot move the sword beyond the width of your body. Remain on tiptoe.
Photo 7: front view, standing,
large downward cut
Photo 8: front view, standing,
end of narrow eishin chtburl
Sheath.
The sheathing is very vertical. You
must control the scabbard. Cany' the
hilt above the head as you insert the
point. As the sheathing finishes, lower
the feel to the ground.
Photo 9: front view, standing,
sword on left hand
Photo 11: front view, standing, end of noto
Photo 10: front view, standing,
point insertion
214
Japanese Sword Drawing: A Source book for Iaido Students
UKENAGASHI (Flowing Parry); yorumi nuki (relaxed draw)
General Description
Moving from the front, an enemy crowds tn, cutting directly at you. You respond by
deflecting his sword and counterattacking. You finish with blood-cleaning and
''ft* sheathing.
Commentary
This forms bears a marked resemblance to the Ryu To form in the First Tradition.
However, because the enemy comes from the front the deflection is different.
In Ryu To, the standing enemy attacked from the left side. The deflection
had to cover both the head and the left shoulder. In this form the enemy attacks
directly downward from the front and the deflection must strongly resist this cut.
The resultant technique bears a strong resemblance to the deflection used
in Gyaku To in the First Tradition. You must be prepared for the shock. Receive
his blade on your sword blade ridge as close to the guard as possible. The right
elbow takes some of the force; the rest must be dissipated downward over your
left shoulder.
You carry the block immediately to the right by stepping in that direction. If
this and the previous motion arc continuous, the enemy’s sword will carry
through the deflection past your left shoulder.
You counterattack immediately, striking the opponent with the priest’s stole
cut. The target of the cut is the shoulder. In Ryu To it was the hip. Care must be
taken to avoid confusion between these two forms.
Movements
Photo 1: front view, standing, bukezukuri
• Advance the left foot a small step for-
ward, pointing the toes to the right.
• Draw the sword upward, slanting to
the right.
The left foot is nearly in front of the
right. The draw finishes in the flowing
parry, clearly protecting the head and
shoulder.
The Traditional Schools of laido
215
Photo 2: front view, standing,
initiating vertical draw
Photo 3: front view, standing,
deflection over left shoulder
• Carn,' the right foot slanting to the
right front.
• Use the sword to slide through the
flowing parr)'.
Photo 4: front view, standing,
sword passing left shoulder
Photo 5: front view, standing, left hand added
• Point the tip of the left foot toward
the enemy.
• Add the left hand to the hilt.
216
Japanese Sword Drawing: A Source book for laido Students
• Move the right foot even with the left,
fanning the toes apart.
• Cut at the top of the enemy’s left
shoulder.
Aim at the joint between the shoulder
and the neck. Bend the knees during
the strike.
Perform blood-cleaning.
Sheath.
Photo 6: front view, standing,
leftward slanting cut
Photo 7: front view, standing,
leftward slanting cut
The Traditional Schools of laido
217
OIKAKEGIRI (Pursuing Cut)
General Description
An escapee runs. You follow up with rapid steps, while drawing the sword. Catching
him, you cut him down from behind.
V* Commentary
Л7'
It
Фг
Normally, a cut from the rear is not done by a person of the swordsman class, or
with the disposition of a swordsman. However, the circumstances require that
you do so, and you must act without hesitation.
This is an older form, and is generally practiced less than the others. There
Is some evidence that, although it originally was a combat technique, it was
abandoned some time in the past, and that the form, as now done, is an abridge-
ment of the original. Only a general description of the movements is given.
Movements
• Take several small, hurrying steps in pursuit of the escaping enemy.
• During these steps draw the sword.
Begin with the left foot. These steps are similar to those tn the Tora Bashiri form,
of the Inner Tradition seated techniques. The draw Is taken when the left foot is
forward.
Catching up with the enemy, straighten up, swing the sword overhead to a two-
handed high position, and cut him down.
The targets would be the neck, arm or torso of the enemy.
218
Japanese Sword Drawing: A Source book for Iaido Students
RYOSHI HIKITSURE (Both Warriors Brought Together)
llfi)
General Description
The enemy is cornered at your left side. Because of hts proximity, you must cut him
down with a special strike, as he pulls away from you to gain distance.
Commentary
fl
This is also an older form, and is not practiced. It is included here for reference. It
may also, however, be an abridgement. Only a general description of the movements
is given.
Movements
• Advance the left foot to the front.
• Draw the sword straight ahead.
The blade is horizontal, edge facing to the left, toward the enemy. The point
pauses at the left armpit.
Photo 1: front view, standing, bukezukuri
Photo 2: front view, standing, forward draw
The Traditional Schools of laido
219
Photo 3: front view, standing, left hand on hilt
• Advance the right foot.
• Add the left hand to the hilt.
Leave the sword in place and move
up beside It. The wrists cross.
Photo 4: front view, standing, horizontal cut
Cut at the enemy’s right arm and torso.
This cut is a raking, slashing action,
rather than a clean cut. The hands
produce a pushing-pulling, scissoring
motion.
Photo 5: front view, standing,
horizontal cut cut
220
Japanese Sword Drawing: A Source book for laido Students
ITOMAGOI (Farewell Visit); nuki uchi (sudden attack)
General Description
j You are exchanging bows at the conclusion of a visit. Suddenly you perceive the per-
son has become an enemy. While at some stage tn the seated bow, you draw and
cut the enemy down. The form finishes with blood-cleaning and sheathing.
Zj
Commentary
This is the final form in the Inner Tradition and the last of the Muso Shinden
Ryu. It is the sole seated form in the standing section. Its inclusion here is proba-
bly to finish out the pattern of closing each Tradition with a seated form.
The form places the swordsman in one of his most vulnerable situations:
executing the deep seated bow. This bow is done from seiza. The swordsman first
lowers his eyes, then places both hands palm-down in a triangle on the floor in
front of him, and lowers his body toward the triangle.
Somewhere during this bow, the supposed friend suddenly turns into an enemy.
Even while bowing the swordsman finds no security.
Itomagoi should be practiced from three different beginnings. These corre-
spond to the degree of depth you have performed in the initial bow. First, begin
the counterattack just after you have lowered your eyes. Second, begin after
you’ve placed both hands on the floor. Third, begin after you’ve bowed deeply.
The draw is taken from whichever position you choose. In each case, the
sword is drawn out horizontally into the space between you and the enemy. This
is the same draw as in Nuki Uchi in the First Tradition. The sword is immedi-
ately swung overhead to a very high two-handed position. The enemy is cut
down from here.
The footwork, or more correctly the “kneework,” is also the same as in Nuki
Uchi. That is, the knees are spread apart as the sword is drawn, lifted from the
floor and clapped together as you move to the high position, and re-spread and
slammed to the floor as you strike.
Movements
Sit facing the front.
Photo 1: front view, seiza, sword settled
The Traditional Schools of laido
221
Begin the seated bow, choosing one
of the three positions for practice.
Photo 2: front view, seiza,
both hands on floor, bowing deeply
Without wasting motion by straightening
up. draw the sword to the right.
The sword is drawn out horizontally
into the space between you. This is the
same draw as in the Nuki Uchi form
in the First Tradition.
Photo 3: front view, seiza,
bowing, initiating draw
Photo 4: front view, seiza. bowing,
draw til point emerges
Photo 5: front view, kneeling
on both knees, sword drawn
222
Japanese Sword Drawing: A Source book for laido Students
• Lift both knees from the floor and clap
them together.
• Swing the sword overhead to a very
high two-handed position, using a
flowing parry motion around the left
elbow.
The sword seems almost vertical.
Photo 6: front view, knees in air.
very high /odan
Photo 7: front view, kneeling on both knees,
large downward cut
• Separate the knees and drop back
to the floor.
• Cut down at the enemy’s head in a
large circle.
The sword point comes clearly very
low to the floor. The body remains
on tiptoe.
Perform blood-cleaning.
Sheath.
At the end of sheathing, lower the
body back to the sitting position.
Part Three
^s-stoblisk^d ЬСсдКл
o! JcAp^utAOSO
T^e de r o+ i oja s
7. Kutu of Ию .АП J<_»p<-»H 1~окгзи\с| T~ede* »*t »fiok\
BACKGROUND
® у) si чё w
These Seilei Kata (Established Forms) were selected by a committee authorized
by the Zen Nihon Kendo Renmel *zcn nlpon kendo remind" (All Japan Fencing
Federation) Seven forms were selected in March loos. Three additional forms
were added in April 1980. They represent both forms from traditional systems
and forms altered or created specifically for the Federation
There arc ten forms, in three categories. These are: formal sitting forms,
drawn-up knee forms, and standing forms. The forms arc designated by title as
well as number, and have the usual subtitles
Formal Sitting Forms:
Mae (Front); snomen (center)
Ushiro (Rear): ushlro muki (facing the rear)
Ukenagashi (Flowing Parry): migr muki (facing the right)
Drawn-Up Knee Forms:
Tsuku Ate (Hilt Strike); shomen (center)
Standing Forms:
Kesagiri (Priest s Stole Cut ); shomen muki (facing the center)
Morotezuki (TXvo Handed Thrust): mac muki (facing the front)
Sanpogiri (Three Direction Cut), sammen о muki (facing three centers)
Gunmen Ate (Strike Between the Eyes)
Soetezukl (Fixing Thrust)
Shihogiri (Four Direction Cut)
225
2’0
lapanese Sword Drawing: A Source book for laido Students
DISTINCTIVE FEATURES
The blood-cleaning in lhe Established Forms, unless otherwise noted, resembles
that used in the First Tradition. The sheathing is the same as in the First
Tradition.
PRELIMINARIES
Since these forms arc standardized by the Fencing Federation throughout Its
schools, the beginning and ending formalities arc also standardized.
Beginning Formality
The sword is carried to the practice area in the right hand, with the hilt to the rear
and the edge downward.
Perform a standing bow on entry to the practice area.
Photo I: front view, sword in right hand
Photo 2: right side view, sword in right hand
Established Kata of the lapanese Federations
227
Photo 5: from view, sword in left hand
Photo 6: left side view, sword in left hand
22К
Japanese Sword Drawing: A Source book for laido Students
Bring the sword to the front with the left hand, slanting down to the left.
Grasp the sword at the guard with the right hand, palm up
Slide the left hand down the scabbard and raise it to horizontal
Photo Я; front view. sword horizontal
Arrange the cords, if any.
Use the left hand to move the sword to the vertical, edge to the left. and stand the
butt on the floor. Use the left hand to rotate the sword. edge turning toward you.
all the way to the right Use the left hand to straighten the cords to the left and
then lower them along the scabbard. Use the left hand to rotate the sword again,
edge turning away from you. all the way to the left. Then use the left hand to
again raise the sword to chest-high horizontal, right hand palm up. left hand
palm down.
This whole procedure frees the cords from the scabbard. The sword returns to
the same position you started from, with the cords now trapped against the scab-
bard with the left thumb.
Photo 10: front closeup, hands
Photo 9: front view, left hand
standing swotd vertical
L'stublished Kata of the Japanese Federations
229
Photo 12: front closeup, hands
Photo 11: front view, routed scabbard
Photo 15: front view, rotating scabbard
Photo 14 front view, left hand lowering cords
Photo 10: front closeup hands
230
lapanese Stvonf Drawing: A Source book for laido Students
Place the sword on the floor in front, edge away from you.
Bow formally.
If there are any cords, pick them up with the little finger of the right hand.
Photo 17: front view, sword on floor
Photo 18: front Иен»,
right hand picking up cords
Photo 14: front view, sword horizontal
Lift the sword with borh hands as usual,
and insert It In the belt.
Photo 21: left side view, sword inserted in ubl
Photo 20: front view, sword inserted in оЫ
EstaNfshed Kata of the lapanese Federations
231
Photo 22: front view, left hand
drawing sword to rear
Photo 23: left side view,
left hand drawing sword to rear
If there are cords straighten them
out to the right with the right hand.
Tie them at the waist.
Photo 24 left side view view, sword inserted
Photo 25: front view, drawing cords to right
Photo 26 right closeup, tying knot
232
lapanese Sword Drawing: A Source book for laido Students
Photo 27: right closeup, tying knot
Photo 2S; front view. seize. w/ sword settled
Photo 29: left side view, seiza.
w/ sword settled
Stand and move to the waiting area or
directly to the practice position.
Photo 30: front view. standing bukezukuri
Established Kata of the lapanese Federations
233
Ending Formality
With lhe sword in the belt, move to the
appropriate area.
Sit.
Photo 31: front view, seiza, w sword settled
Photo 32: front view. drawing eords to right
Untie the cords, if any. and hold the
ends with the little fingers of the right
hand.
Place the left hand over the scabbard
and withdraw the sword slowly with
the right.
Photo 33: front view, nght hand
withdrawing scabbard
234
lupwKst Sword Drawing: A Source book for laido Students
As the butt of the scabbard comes free, stand It up In the front center,
edge to the left.
Raise the left hand and rotate the scabbard, edge turning toward you.
all the way to the right.
If there are cords they will rap uraund the scabbard.
Photo 34: front view, left hand
Photo 35: front closeup, hands
standing sword vertical
Photo 37: front closeup, hands
Photo 36: front view, rotated scabbard
Established Kula of the lapanese Federations
2.15
If there arc cords, reach between
the scabbard and the loop of cords
with the left hand. Take the cords
from the right fingers with the left
hand Draw them back through the
loop and draw them down the scab-
bard. tightening them around it.
Photo 58: front closeup,
left hand taking cords
Photo 5d: front view, tying cords
around scabbard
Photo 4ft front closeup,
tying cords around scabbard
Lay the sword down from here, across
the front, with the hilt to the left, edge
toward you.
Arrange the cords, if any.
Bow formally.
Photo -11: front view, seiza.
sword on ground in front
236
lapanese Sword Drawing: A Source book for laido Students
Re-grip the sword with the right hand and stand it up in the front center, edge
away from you, letting any cords hang down.
Photo 42; front view, seira.
right hand griping sword
Photo 43: front view. setza.
nght hand standing sword vertical
Grip the end of the scabbard with the left
hand, catching any cords.
Photo 44. front view, setza.
left hand on sword bull
Slide the sword through the left hand to
assume the usual carrying position and
release the nght hand
Stand.
Move to the edge of the practice area.
Photo 45: front view, setza.
sword carried in left hand at side
EstaNished Kata o( the lapanese Federations
237
Transfer the sword across the front
to the right hand, holding it in the
original reversed way.
Bow and leave the practice area.
Photo 40: left side view. standing,
sword tn left hand
Photo 47; front view. middle of pass
Photo 49: front view, sword in right hand
Photo 50: right side view, sword in right hand
lapanese Sword Drawing: A .Source book (or laido Students
23»
MAE (Front); shorncn (center)
General Description
Z. This form is performed in the same circumstances as the Shohatto form in the first
|*| Tradition. The movements of the feet and knees an; the same, as the enemy is struck
by drawing to the front and cut down with an overhead stroke.
The blood-cleaning used Is the one prescribed for the Established Forms. The
ending movements of the feet are the same as in Shohatto.
Commentary
This form, or one wry like it. is often found as the first form In many systems Its
movements arc considered basic.
Movements
Perform the same movements as are described in the Shohatto of the First
Ttadition.
USH1RO (Rear); ushiro niuki (facing the rear)
General Description
This form is the same as the Atari To in the first Tradition.
Movements
Follow the movements of the Atari To. Такс care to maintain the proper angle in
the blood-cleaning, as described above.
EslaNbhed Kuta of the lapanese f ederations
239
UKENAGASHI (Flowing Parry); migi muki (facing the right)
General Description
Sitting customarily, you find the enemy about 1.5 meters away on the left side. fac-
ing in the same direction. Suddenly he stands and attacks with a downward cut.
Using a flowing parry', you deflect lhe enemy's sword while standing. You then cut
down the enemy in a diagonal cut from the top of the left shoulder to the right side.
Commentary
This form Is similar to the Ryu To form in the First Tradition in that both have an
enemv on the left who stands and attacks; both respond with a leftward deflec-
tion; and both cut the enemy down with a priest's stole cut. However, the forms
differ on the techniques of the footwork. the parry, and the final cut.
Most of the comments made lor Ryu To apply here as well.
Movements
Photo l: front view, seiza. sword settled
Sit with the front on your left.
Suddenly the enemy stands, draws,
steps forward and cuts at your head.
240
lapanese Sword Drawing: A Source book for laido Students
• Turn your bead toward the enemy.
• Rising up. advance the left foot a little
to the right.
• Draw the sword overhead in the upper
front direction.
• Deflect the enemy's sword diagonally
off your sword blade ridge to the left.
The blade is high, clearly protecting
your head and shoulder.
Photo 2: front view. setza. initiating
vertical draw, looking to left
Photo 3: front view. selra. vertical draw,
looking to left
Photo 4: front view, kneeling,
deflection over left shoulder
• Advance the right foot to the inside of the left foot.
• Stand up
• As the enemy’s sword continues its momentum in the flowing parrv. rotate your
sword around your back.
• face the enemy directly while placing the left hand on the hilt.
The point circles around the left shoulder.
Established Kuta of the Japanese Federations
241
Photo 5: front view, standing, deflection
*
Photo 6: front view, standing,
sword passing left shoulder
Photo 7: front view, standing, left hand added
• Pull back the left foot io the rear.
• Cut downward diagonally at the top
of the enemy's left shoulder.
The moment the downward cut к done,
the hands slop in front of the navel.
Photo 8: front view, standing,
leftward slanting cut
Photo 9: front view. standing,
leftward slanting cut
242
Japanese Sword Drawing. A Soune book for laido Students
Photo 10: front view. standing, chudan
Move the sword to the middle position.
Photo 11: front view. standing, gedan
• Drop the sword point.
• Pull both hands to the left, so that
the sword point floats above the
right knee.
Photo 12: front view. standing,
sword drawn towards left
Established Kata o( lhe lupuncsc Federations
243
Reverse the grip of the right hand on the hilt.
Photo H: front close up. right hand
Photo IS: front view standing,
reverse right hand grip
Photo 15 front view, standing,
left hand on scabbard
• Detach the left hand and grasp the
scabbard mouth.
• Rotate the sword In the right hand
from below in the direction of the
scabbard mouth
Place the back of the blade in the neigh-
borhood of the sword guard at the scab-
bard mouth
Photo 17: front closeup, sword on left hand
Photo 16: front view, standing,
sword on left hand
244
lapanese Sword Drawing: A Source boot for laido Students
• With the right hand reversed as it Is. quietly sheath the sword.
• Place the left knee on the floor
Photo 19: left closeup, point entry
Photo 18: front view, standing,
«word drawn to point entry
Photo 20: front view, kneeling, end of nolo
Stand up.
Make the feet even.
Detach the tight hand from the hilt
Established Kuta of the Japanese Federations
245
TSUKA ATI'. (Hilt Strike); shomen (center)
General Description
Ajj While sealed in the drawn-up knee posture. two enemies are at your front and rear.
* intending to attack you separately. First, you strike the enemy at the front In the
। solar plexus with your hilt. Continuing, you pierce the second enemy's chest with a
Iff» single-handed thrust. Finally, you cut down the first enemy.
Commentary
This form is the only one of the Established Fotms that begins ftom the drawn-up
knee posture tate hiza Because It uses a forward step during the initial draw, it is
more like the forms in the Inner Tradition than those in the Middle Tradition of
the Muso Shinden Ryu.
The front and rear enemies sit with you, nominally friendly. Then they show
their treachery. The rear enemy is, of course, the more dangerous. If you forestall
the front enemy long enough to dispatch the rear one. you stand a good chance
of winning.
The hilt strike is similar to ones you’ve already studied.
Movements
Photo 1; front view, tate hiza
Face the front, sitting in the drawn-up
knee posture.
246
lapanese Sword Drawing: A Source book for Iaido Students
• Place both hands on the sword.
• Advance the right foot one step
• Stand up on the left toes.
• Thrust the sword and scabbard
together to the front, striking the
enemy In the solar plexus with
the end of the hilt.
Photo 2: front view, tale hiza gripping sword
Photo 5: front view kneeling
advancing right foot
Photo 4: front view, kneeling, hilt stnke
Photo 5: left side view kneeling, hilt strike
Established Kata of the lapanese Federations
247
Pull the scabbard back with the left hand as far as you can. and free the sword
point.
The blade is horizontal, edge to the outside.
Photo 6: front dew kneeling
draw by withdrawing scabbard
Photo 7: left side view kneeling,
draw by withdrawing scabbard
Thrust across your left ami at the rear
enemy's chest.
Rotate the body on the left kneecap
to the left as needed.
Photo Я: front view, kneeling
sword horizontal along left arm
Photo *>: front view kneeling rear thrust,
looking over left shoulder
Photo I ft left side dew. kneeling, rear thrusi
24К
lapanese Sword Drawing: A Source book for laido Students
• Face the front enemy
• Extract the sword and in one motion,
swing it overhead.
• Add the left hand on the hill
Photo 11: (runt view, kneeling,
sword passing left shoulder
Photo 12: front view, kneeling, jodan
Photo i 3: front view, kneeling,
low downward cut
Cut downward at the front enemy's
forehead.
Perform blood-cleaning.
Open to the right and perform the
Elshin Ryu Nood-cleaning, as In
lhe Middle Tradition.
Sheath the sword.
Pull the right foot buck toward the
left. Settle the body into u crouching
posture. on the left knee.
Stand up.
Make the feel even.
Detach the right hand from the hilt.
Established Kata of the lapanese Federations
249
KESAGIRI (Priest's Stole Cut); shomen muki (facing the center)
General Description
While you are walking, an enemy advances from the front, crowding in to cut al
you. You draw from underneath, cutting him from his lower right side in a reversed
priest's stole cut. Then cut downward at the top of his left shoulder in a normal
5k priest's stole cut.
Commentary
This form begins the standing section of the Established Forms. It is one of only
two examples in either the Established Forms or the Muso Shinden Ryu of the
underhanded draw.
This draw is regarded as older than either the vertical or horizontal draws. It
has its origin in the manner of wearing the sword used prior to bukezukuri. The
sword was not wont thrust through the belt, but suspended from it. In this older
style, the edge was downward. When drawn from this position the sword mows
through an arc that is now simulated by the underhand draw.
This draw requires that you first turn the hilt and scabbard over so that the
edge is down. The grip is then taken from the top of the reversed hilt, with the
thumb down the side. The sword is drawn forward and upward, cutting the
enemy In the reversed priest s stole cut.
A Buddhist priest s stole is a rectangle of cloth that Is worn around the body
from the left shoulder to the right armpit. In older fencing terms the name of this
cloth became associated with a downward diagonal cut from the top of the left
shoulder (or the right) across the body.
The reversed priest's stole Is a cut from the lower side slanting upwards to
the opposite shoulder.
250
lapanese Sword Drawing: Л Source book for laido .Students
Photo I: front view. standing, bukczukurl
Movements
• Advance the left foot
• Place both hands on the sword,
and rotate It In the belt until It Is
edge downward.
Photo 2: front view. standing
initialing underhand draw
4
• Advance the nght foot
• Draw the sword from its upside down
position and cut the enemy from his
lower right side In a single handed
reversed priest's stole cut.
The point should enter his torso above
fs waist, At the ertd of the cut the right
hand should be above shoulder height.
Photo 3: front view, standing,
underhand draw and cut
Established Kata of the lapanese Federations
251
With the feet as they are. rotate your right hand to point the sword at the ceiling
and put the left hand on the hilt.
The sword swings overhead.
Photo 4: front view. Standing, sword
horizontal in front oi forehead
Cut downward from the top of the
enemy's left shoulder in a priests
stole cut.
During steps 1 through .3 the sword
mustn't stop. At the end of the last cut
the hands stop In front of the navel.
The sword point should not move
beyond the width of the body.
Photo 6: front view. standing,
leftward slanting cut
• Pull back the right foot
• Raise the sword to the eight phase
posture.
The sword guard is even with the
mouth. Demonstrate remaining heart.
Photo 7: front view, standing,
hasso no gomoe
252
Japanese Sword Drawing; A Source hook for laido Students
• Detach the left hand and grasp
the scabbard mouth.
• Step back with the left foot.
• Swing the sword down to the right in
the blood-cleaning of the Omori Ryu,
the First Tradition.
Photo K. front view, standing,
end of eishin chiburi
Sheath the sword
• Move the left foot to make the feet
even
• Detach the right hand.
Photo 9: front view, standing, end oi rroto
L'slablished Kata of the lapanese federations
253
MOROTEZUKI (Two-Handed Thrust); mac muki (facing forward)
2k
General Description
You are attacked by three enemies, two in front and one at the rear. You draw at the
first enemy in the front, and then thrust into his chest. Continuing, you cut down the
enemy at the rear. Finally. you cut down the third enemy in the front.
Commentary
This form uses a situation you have met before: more than one enemy attacking
sequentially. As before this might occur in a corridor a bridge, a street or through
an opening In a crowd, wherever it is too narrow for the enemies to attack more
than one at a time.
Normally the rear enemy would be the more dangerous of the trio. Some
attempt would be made to forestall the first enemy in the front until the rear
enemy could be dispatched.
In Morotezukl. however. this is not done, The enemy in the front is attacked
while the enemy at the rear is ignored. The reason for this is not known.
The thrust that is used in this form is a two-handed one. Such a thrust was
used in Ryozume In the Inner Tradition of the Muso Shinden Ryu.
Movements
• Step forward with the left foot.
• Put both hands on the sword
Photo I front view, standing, bultezukuri
Photo 2 front view, standing,
initialing draw
254
Japanese Sward Drawing- A Source book for laido SiudenLs
• Step forward with the right foot
♦ Turn the body slightly to the left
• Draw and cut to the right side of the first enemy's head.
Photo 4: front view, standing, downward cut
Photo S: front view, standing,
upward slanting draw
• Move the right foot even with the left foot.
• lower the sword Io the middle position and place the left hand on the hilt.
Photo 5: front view, standing,
feet together, chudan
Photo 6: left side view, standing,
feet together, ihudan
• Advance the right foot one step.
• Thrust with both hands at the first enemy's solar plexus.
Established Kata of the lapanese Federations
255
Photo 7 front view. standing,
two hand thrust
Photo 8: left side view, standing,
two-hand thrust
Photo 9: front view, standing,
sword passing right shoulder
Photo 10: left side view, standing,
sword passing nght shoulder
256
lapanese Sword Drawing: A Source book for luido Students
• Step forward with the right foot
• Cut downward at the rear enemy's forehead
Photo 13: front view standing. downward cut
Photo 14: left side view, standing,
downward cut
• Rotate 180 degrees to the left, facing the second front enemy.
• Swing the sword overhead.
Photo 15: front view standing,
sword passing nght shoulder
Photo 16: right side view; standing,
sword passing tight shoulder
Established Kata of the lapanese Federations
257
Photo 17; front view. standing, fodan
• Advance the right foot.
• Cut downward at the second
front enemy's forehead.
Photo IK: front view, standing, downward cut
Perform blood-cleaning.
The feet stay as they are. The blood-cleaning is the normal one for the
Established Forms.
Sheath the sword.
Move the rear fool to make the feet even.
Detach the right hand.
258
lapanese Sword Drawing: A Source book for laido Students
S/VNPOG1R1 (Three Direction Cut):
sammen о muki (facing three centers)
General Description
—~ You arc walking forward The enemies come from three directions, the center, left
and right, splitting their attack. You attack the right, then left, then center enemy in
_» turn. You finish with blood cleaning and sheathing.
Commentary
Here, again, you are faced with more than one enemy. Common practice says the
one on the right is the most dangerous. If you turn toward him. the one on the
left Is behind you and must be dispatched next. The one in the front can be dealt
with last.
The cuts arc the usual downward ones. The method used during the turns
to swing the sword into the high position varies with the direction of rotation.
When rotating to the left, the sword is swung past the right shoulder. When
rotating to the right, past the left shoulder.
Movements
Step forward with the left foot.
Photo I front view standing, bukezukuri
Photo 2: front view, standing,
bukezukuri. left foot forward
L'sfuWlshed Kata of (he lapanese Federations
259
Photo 3: front view, standing. initiating
vertical draw looking to nght
• Step forward with the right foot,
even with the left.
Place no weight on the right foot:
)ust touch the toes down lightly.
• Advance the right foot to the right
• Attack the right enemy with a single-
handed overhead draw and cut
Photo 5: front view, standing,
one-hand downward cul
• With the feet in this position, turn I HO degrees lo the left and face
the left enemy.
• Swing the sword overhead, using a flowing parry motion over the
right shoulder.
Put the left hand on the hilt.
2оО
lapanese Sword Drawing: A Source book for laido Students
Photo n: front view, standing,
swotd passing right shoulder
Photo 7: front view, standing, left lodan
Photo R: front view, standing, downward cut
Cut down at the left enemy's forehead.
• Move the nght foot 90 degrees to the
right and lum to face the front enemy.
• Swing the sword overhead, using a
flowing parry motion over the left
shoulder.
Photo 10: front view, standing, fmdun
Photo »: front view, standing,
sword passing left shoulder
Established Kuta of the lapanese federations
2ol
Photo 11: front view, standing, downward cut
Cut downward at the front enemy’s
forehead.
Photo 12: front view, standing, left fodon
• Pull the right foot back.
• Take the two-handed high position.
Demonstrate remaining heart.
Photo I3: front view, standing,
end of clshln ehlburi
Pull back the left foot.
• Detach the left hand and place it at
the left waist.
• Swing the sword down from the high
position to perform blood-cleaning.
Sheath lhe sword.
• Move the right foot to make
the feet even.
• Detach the right hand.
262
lapanese Sword Drawing- A Source book for laido Students
GANMEN ATE (Strike Between the Eyes)
a
£
General Description
While walking you are attacked by lira opponents, one to the front and one at the
rear. Sensing his hostile intentions, you forestall the first enemy by striking him
between the eyes with the butt of your sword. You then draw, turn and thrust into
the second enemy 's mid-section before he can draw. Continue turning and step for-
ward. cutting downward at your first opponent. Finish the form by performing
blood-cleaning and sheathing.
Commentary
Here, again, you are penned in between two opponents. The rear one is the more
dangerous. As you have done many times, you forestall the enemy at the front,
which gives you the time you need to dispatch the enemy at the rear.
Once again you use a thrust to kill the enemy at the rear. This is deliver by
one hand, with the blade horizontal.
Mechanically, this thrust most resembles the thrust used in European fencing.
Movements
Photo I: from view, standing, bukezukurl
Stand motionless facing the front.
Established Kata of the Japanese federations
’6.1
Begin walking forward with the right foot.
Step right, left, and right
Photo 2: front view, standing.
bukezukuri. right foot forward
Place both hands on the sword, in the
customary drawing positions, as you
take the left step.
Photo 3: front view, standing, initiating draw
As you take the next right step mow
the sheathed sword forward with both
hands, edge up. and strike your first
opponent smartly between the eyes
Photo 5: left side view. standing, hilt strike
Photo 4 iront view, standing, hilt strike
264
fupcrnese Sword Drawing: A Source book for Iaido Students
• Pull the left foot back a little
• Leaving the right hand as it is. immediately withdraw the scabbard with the left
hand, drawing the sword.
Photo 6: front view. standing, drawing
sword by withdrawing scabbard
Photo 7 left side view, standing,
withdrawing scabbard
• lust as the sword point leaves the scabbard mouth, pivot on the right foot
to the rear.
• As you pivot, rotate the blade edge to the right so that it is flat
• At the end of the pivot bring the sword to lhe right hip.
Photo 8: front view, standing, sword at hip Photo 9: left side view, standing, sword al hip
established Kahi of the lapanese Federations
265
• Slop forward with the right foot
• Thrust slightly upward into the second opponent s mid section.
Fully extend .vour right arm. The hilt will fie beneath your forearm
Photo Ю. front view. standing, thrust
Photo 11: kfl side view, standing, thrust
• Without hesitation pivot on your
right foot to the left, facing your first
opponent.
• Withdraw your sword from the second
opponents body and swing it overhead
to the high position using a deflecting
motion.
• lust as the sword comes overhead
add the left hand to the hilt
Photo 12: front view, standing,
sword passing right shoulder
Photo IЛ-. front view, standing. |<>dun
266
lapanese Sword Drawing: A Source book for laido Students
Photo 14: front view, standing, downward cut
• Immediately step forward with
the right foot.
• Cut downward at the enemy's
forehead.
Perform blood-cleaning.
The feet stay as they are. The blood
cleaning ts that of the Eishin Ryu
system.
Sheath the sword.
The feet stay as they are.
When the blade is fully inserted, step
forward with the left foot as far as the
right foot.
Release the right hand.
Step backward to your original position, left foot first.
Established Kata of the lapanese federations
207
SOETEZUKI (Fixing Thrust)
&
4
General Description
While walking you are attacked by one opponent Immediately to your left. Sensing
his hostile Intentions, you attack him by turning left to face him, drawing your sword
und cutting single-handed downward through his nghl shoulder. You then follow this
with и short thrust, finish the form by performing blood-cleaning and sheathing.
1‘fiZ Commentary
In this form you return to the single enemy. You see him in front of you as you are
walking He moves to pass you on the left side You interpret this as a hostile move.
The lapanese swordsman wears his weapon on his left side, the scabbard
extending to the left rear. When he passes a person walking toward him he would
attempt to pass on the right. If the two swordsmen passed each other on the left,
there would be a chance that their scabbards might touch
Striking scabbards together in this way is called sayu ate (scabbard strike). It
was considered a great insult and was immediately followed by a fight, wherever
it occurred.
Since your enemy has chosen to pass you on the left, he Is deliberately
courting the scabbard strike. You arc correct to distrust him.
As you pass each other you step backwards to the right. Since your enemy
probably intended Io strike your scabbard with his own. he will pass very close.
Y'ou need to step away to gain the necessary distance to draw and cut at him.
After cutting, you deliver a short thrust, holding the blade in your left hand.
Gripped-bladc techniques arc the specialty of some systems of sword drawing.
Such a technique is probably Included In the Established forms to give students
some access to these systems.
Stand motionless (.King the front
Begin walking forward, right-left-right
I’huto I: front view, standing. bukezukun
2Л8 lapanese Sword Drawing: A Source book for laido Students
Place both hands on the sword as you take the left step.
• As you take the tight step, turn left by pivoting backward on yout right foot,
extending you left fool to the rear.
• Rotate the scabbard slightly outward and draw the sword forward and up.
Photo 2: front view, standing.
Initiating vertical draw
Photo Л: front view, standing, vertical draw
At the end of the pivot, turn the
draw into a one-handed diagonal
downward cut through your oppo-
nent's right shoulder to his left hip.
This should be done by rotating
a wind the left shoulder. The
transition should be smooth.
Photo 4: left side view, standing,
sword passing left shoulder
Established Kata of the lapanese f ederations
20»
one hand rightward slanting cut
Photo 0: tront view, standing,
one hand nghtward slanting cut
• Twist your upper body slightly
to the right.
• With win right hand, draw the
hilt smartly back to your right
hip. edge downward.
• Toe outward with the nght loot
Photo 7: left side view, standing
sword al hip
Place the palm of your left hand atop
the back of the blade.
Hook you left thumb over the top. Pinch
the blade between your left thumb and
extended index finger. Point the blade
at your opponent's mid section.
Photo 8: front view, standing,
left hand on blade
270
lapanese Stvord Drawing: A Source book for laido Students
• Step forward with the left fool.
• Deliver a short thrust into the opponents midsection
• Draw up the right foot to reinforce the thrust
Do not change the position ofyour hand on the blade. Do not let the right hand
move to the center line.
Photo 9: front view, standing, thrust
Photo IO: front view, standing, thrust
• With your left hand fixed as II Is In space, slowly raise the hilt with your right
hand diagonally upward to the right, while stepping forward with the right foot.
• Let the blade rotate under your left thumb and over your extended fingers
Stop the right hand when it comes to chest level.
The blade slopes downward lo your left.
Demonstrate remaining heart.
Photo 11 front view, standing,
hilt lifting to right
Photo 12: left side view standing,
hilt lifting to right
Established Kata of the lapanese Federations
271
Detach your kit hand from the blade and grasp the scabbard mouth
• Take a deep step backward with your right foot.
• Perform blood-cleaning
Use the Eishin Ryu style. but perform the action more gently than usual
Photo 1 j' front view, standing, end of chlhun
Photo 14: left side view, sranding.
end of chlhun
With both feet as they are. sheath the sword
When the blade is fully inserted, step forward with the left foot as far as
the right foot.
• Release the right hand
• Turn right to face the front.
Step backward to your original position, left foot first.
272
lapanese Sword Drawing.- A Source book for laido Students
SHIHOG1R1 (four Direction Cut)
General Description
ОУ While walking. you are attacked by four opponents, who approach you from the
corners. You forestall the first opponent by striking the back of hts right hand with
your sword hilt. Y'ou then draw, turn and thrust into the second opponent's mid-sec-
lion. Continue turning and step forward. cutting downward at the first enemy. You
then continue turning and cut down the third and fourth opponents in tum. Finish
fonn fy’ performing blood-cleaning and sheathing.
Commentary
This form has a slightly different flavor because the opponents arc at the comers
instead of the usual directions. Y'ou can see more of the two that arc behind you
They are not quite as dangerous as usual.
This accounts for the order In which you face them. Y'ou first turn to the
right comer to upset that enemy's draw. This places the enemy at lhe left rear cor-
ner directly behind you. so you must attack him next.
Once you have turned to the left rear to dealt with this enemy, the first
enemy Is now behind you. Fortunately, he Is still stunned from your initial action.
Y'ou turn back to him and finish him off.
There are two enemies left: one in the left front corner and one in the right
rear corner. Because you are now facing to the right front corner, you can sec
both, one on your right and one on your left. The rightward enemy is the more
dangerous, so you attack him next.
In doing so. you have turned your back on the last enemy, so you must
immediate turn to him and finish the form.
Aside from the hilt strike to disable the first enemy, the form uses standard
thrusting and cutting techniques.
Photo I: front view, standing, bukecuitun
Movements
Stand motionless facing the front.
Begin walking forward, right-left-right.
Established Knfu of the lapanese Federations
273
Place both hands on the sword as you
take the left step.
• Take a right step by moving to the right
front corner.
• Move the sheathed sword forward and
upward with both hands, rotating the
edge to the outside horizontal position.
• As your enemy grips his sword to draw,
strike his right hand with your hilt.
Photo 4: front view, standing, hilt strike
Photo S: front view, standing,
sword lifted for strike
• Leaving your right hand as it is. Imme-
diately withdraw the scabbard with
your left hand, drawing the sword.
• Pull the left foot back a little and look
over your left shoulder.
Photo 5: front view, standing, draw sword
by withdrawing scabbard
274
lapanese Sword Drawing: Л Source book for laido Students
Photo o: front view, standing, draw to release,
looking over left shoulder
• lust as the sword point leaves the
scabbard mouth, pivot to the rear
on the right foot.
• As you pivot position the blade paral-
lel to the ground, edge to the outside.
firing the back of the blade against war
body at chest level, pointing directly
al the second opponent's midsection.
Because you Initially stepped to the
right front, all your orthogonal direc-
tions are realty diagonal ones, relative
to the practice area. This allows you to
perform standard movements against
diagonally placed opponents.
• At the end of the pivot, glide step
forward with your left foot.
• Deliver a one-handed straight thrust
to the opponent's mid-section.
As you thrust, cross your arms, the left
one under the right. Fully extend your
right arm. The blade will slant slightly
downward and the hilt will touch the
underside of your right forearm.
Photo 7 front view, standing, thrust . . . ... ... ...
• Without hesitation, pivot to the right,
facing your first opponent.
• Withdraw your sword from the second opponent s body and swing it overhead
lo the right high position using a deflecting motion.
• lust as the sword comes overhead add the left hand to the hilt.
Photo M: front view, standing, /odan
Photo h: front view, standing,
sword passing left shoulder
Established Kata of lhe lapanese Federations
275
Photo 10: front «kw. standing downward cut
• Immediately step forward with the
left foot.
• Cut downward at the first opponent
• Without hesitation, pivot <W-degrccs to
your right.
• Swing your sword overhead to a right
high position.
Photo 11: front view. standing,
sword passing left shoulder
Photo 12: front view, standing, tight jodan
• Immediately step forward with your
right fool.
• Cut downward at your third opponent
Photo 15: front view, standing,
leftward slanting cut
lapanese Sword Drawing: A Source book for laido Students
• Quickly pivot I W-degrees to the left
on your right foot.
• Swing your sword overhead to a high
left position using a deflecting motion
Photo 14: front view. standing
sword passing right shoulder
Photo 15: front view, standing, left /odan
• Without hesitation, step forward
with your right foot.
• Cut downward at your fourth
opponent.
Photo 16: front view, standing,
rightward slanting cut
Established Kaki of the lapanese federations
277
Photo 17: front view, standing. Jodan
• Step straight back with your right foot
• Raise the sword io .1 left high position
• Step directly back with your left foot.
• Release your left hand from the hilt
and press it against the scabbard at
your waist.
• Perform blood-cleaning
Swing your blade downward in lhe
First Tradition style.
Photo IK front view, standing chiburi
With both feet as they are sheath the
sword.
When the blade is fully inserted, step
forward with your left foot as far as the
right foot.
• Release the right hand
• Turn right to face the front.
Step backward to your original position,
left foot first.
Photo 19: front view, standing, end of chtburl
Й. l^cafcA of >A|I JopctlA Swopd
T?»‘eiwir\cj T-iederution
BACKGROUND
a
%
X
These Seitei Kata (Established Forms) were selected by a committee authorized
by the Zen Nihon laido Renmel (All-Japan Sword Drawing Federation) in
October 1957. They represent forms most likely to be learned in the various sys-
tems. although not necessarily the most basic techniques were selected. Neither
were they selected simply as winning techniques, but rather as most representa-
tive of the sword drawing principles of the systems.
There arc five forms. The first two begin In the formal sitting position: the
remaining three, from standing. They are designated by both title and by the sys-
tems from which they originate. They are:
Margin (Front Cut): Eishin Ryu (Excellent Faith System)
Mac Atogiri (Front-Rear Cut), Mogul Ryu (Nothing Excluded System)
«1
Klriagc I Rising Strike); Shinto Munen Ryu (Way of the Gods and
Impassive Mind System)
Shihogiri (Four Direction Cut): Mizu Kamomc Ryu (Water Gull System)
Kisakigaeshi (Returning Sword Point): Hohl Ryu (Old Official System)
DISTINCTIVE FEATURES
When you deliver the final cut of each form you must say the word ellsu (an
exclamation) This utterance Is the final klal (spirit meeting) of the form, and
immediately precedes the demonstration of remaining heart.
The forms, unless otherwise noted, use the Eishin Ryu style of blood-cleaning.
The sitting and standing forms, unless otherwise noted, use the Eishin Ryu
style of sheathing.
279
280
lapanese Stvord Drawing: A Source book for laido Students
PRELIMINARIES
In addition to standardizing the forms, the sword drawing Federation has also
standardized the beginning and ending formalities of practice.
Beginning Formality
V
I
Photo 1: front view, standing,
sword earned In right hand
Г?
Die sword is carried lo the practice area
in the right hand, with the hilt forward
and the edge upward. The cords. If any.
arc held by the little fingers of the right
hand.
Perform a standing bow upon entry to
the practice area.
Sit.
Place the scabbard butt vertically lo the
right of the right knee.
Photo 2: front view, right hand
standing sword vertical
Established Kata of the Japanese Feilerutions
281
If there are any cords, draw them away from the scabbard with the left hand.
When they are free lower them down along the scabbard.
Photo 4: front view, left hand lowering cords
Photo S: front view, left hand
drawing out cords
Lay the sword down from here, across the front, with the hilt to the left, edge
toward you.
Arrange any cords.
Bow formally.
Photo 5: front view, right hand hying sword
Photo 6: from view. seiza
wl sword on ground in front
282
lapanese Sword Drawing: A Source book for laido Students
Иск up any cords with the little fingers
of the right hand and stand the sword
vertically up in the center front.
Photo 7 front view, right Kind
picking up cords
Photo 8: front view. right hand
standing sword vertical
Grip the end of the scabbard with the left
hand.
Photo 9: front view, left hand on scabbard
Established Koto of the Japanese Federations
283
Insert the sword into the belt as usual.
Photo 10: from view, sword inserted in obi
Photo 11: front view, seiza. insetted In obi
If there arc cords, use the right hand to straighten them out to the right.
Then tie them at the waist.
Photo 1 J: front closeup, tying knot
Photo 12: front view, drawing cords to right
Photo 14: front closeup, tying knot
284
lapanese Sword Drawing: A Source book for Iaido Students
Photo 15: front view, scica. w. sword settled
Stand and шоте to the waiting area
or directly to the practice position.
Photo 16: front view, standing, bukccidtun
Ending Formality
The movements of the end of practice arc almost exactly the opposite of the
beginning. They arc identical to those of the closing formality of the All-lapan
Fencing Federation Established Forms. Follow the description of the ending for-
mality given in the previous chapter.
Established Kata of the lapanese Federations
285
MAEG1R1 (Front Cut)
General Description
This form Is performed In the same circumstances as the Shohatto form in the
4’J First hadition [he movements of the feet and knees are the same, as the e
is struck by drawing to the front and cut down with an overhead stroke.
J» 71 The blood-cleaning used is the one prescribed for the Established Forms,
that is. the Eishin Ryu style. The sheathing is also in the Eishin Ryu style.
Commentary
There is little to say about this form thut has not been said earlier. The comments on
Shohatto all obtain.
Movements
Perform the same drawing and cutting movements as are described in the
Shohatto of the First Tradition, remembering to say "efts* on the final cut
Then, perform the following blood-cleaning and sheathing
Demonstrating remaining heart, open the sword to the right and perform the
Eishin Ryu blood-cleaning
Perform the Eishin Ryu sheathing.
While sheathing, pull the right foot back toward the left fool. Lower the body
down onto the heels. Take a crouching posture.
Step forward with the right foot.
Stand up
Move the left foot forward, even with the right foot
Sit in the initial place and continue to the next form.
’86
lapanese Sword Drawing: A Source book for laido Students
МЛЕ ATOC.lRl (Front Rear Cut)
H'J
1*.
lx
General Description
You are between two enemies, to the front and rear. Before they can strike, you fore-
stall the front enemy and then attack the rear enemy. You then return and attack the
front enemy. You finish the form with blood-cleaning and sheathing.
Commentary
This form requires two pivots done while kneeling. These are not simple pivots,
but require you to exchange your knees. You have already seen this movement In
Теките. in the Inner Tradition of the Muso Shinden Ryu.
The exchange is best done by lifting the supporting knee and putting the
other knee down on almost the same spot. It must be rapid and you cannot
pause because of the pain.
.Movements
Sit formally, facing the front.
Photo 1: front view, sefzo. sword settled
• Rise up on the knees.
• Draw the sword in the upper direction
with a flowing parry motion.
Photo 2: horn view, setro
initiating vertical draw
Established Kata of lhe lapanese Federal ions
287
Photo .V front view, kneeling on both knees,
draw to retease
» J
Photo 5: front view, kneeling, left hand on hilt
Place the left hand on the hilt.
• Advance the right foot
• Cut downward at the front enemy-
H
photo 6: front view, kneeling, downward cut
28H
lapanese Sword Drawing: A Source book for laido Students
• Plv« 180-degrces to the left by raising the left knee and putting the right knee
on the floor.
• Swing the sword overhead In a flowing parry motion from the right side.
Photo 7: front view beginning turn,
sword point dropping
Photo S: front view, middle of turn,
«.word passing right shoulder
Photo 0: front view kneeling, fodon
Photo 10: left side view, kneeling. )odan
Established Kata of the lapanese Federations
28«
Cut downward at the rear enemy's
forehead.
Photo 11. front view, kneeling, downward cut
• Pivot 180 degrees to the right by rais-
ing the right knee and putting the left
knee on the floor.
• Swing the sword overhead in a flowing
parry motion from the left side.
Photo 12 front view middle of turn,
sword passing left shoulder
Photo I A: front view, kneeling, fodan
240
lapanese Sword Drawing: A Source book for laido Students
»
Photo H front view, kneeling, downward cut
Cut downward at the front enemy's fore-
head.
Say "eits."
Move the sword to the middle position.
t 1
Photo 15: front view, kneeling, end of chlbun
Perform blood-cleaning.
Use the Eishin Ryu style.
Sheath.
While sheathing, pull the right foot
back and place the right knee on the
floor, even with the left. The sheathing
finishes the moment you are standing
on both knees. Then lower the body
to the sitting position.
Stand and mow to the next form
as before.
Established Kata of the lapanese Federations
2<tl
KIR1AGE (Rising Strike)
General Description
The enemy crowds in from the front, cutting down at you. You cut upward at his
nght armpit from underneath. Immediately, you cut downward from the two-handed
high position in a left priest's stole cut. The form finishes with blood cleaning and
sheathing.
If
Commentary
This Is the second of the only two forms that use the underhand draw. The first
was Kesagin In the previous chapter. This draw requires that you first turn the hilt
and scabbard over so that the edge is down. The grip is then taken from the top
of the reversed hilt, with the thumb down the side. The sword is drawn forward
and upward.
The enemy has drawn and raised his sword to the high position to cut at
you. The target of your underhand draw and cut Is his right armpit, which Is
exposed in the high position.
Following this cut. you swing the sword around the left shoulder into the
high position and cut down with the priest's stole cut.
A Buddhist priest's stole is a rectangle of cloth worn around the body, from
the left shoulder to the right armpit. In older sword drawing terms the name of
this cloth became associated with a downward diagonal cut from the top of the
left shoulder (or the right) across the body.
Movements
• Advance the left foot.
• Turn the scabbard over in the belt, so that the edge faces down
Photo 1 Irani view, standing, bukcrukuri
Photo 2: front view, standing, initiating draw
2«2
lapanese Sword Drawing: A Source book for laido Students
• Advance the right foot
• Draw the sword upward. cutting
the enemy’s right armpit.
Photo 3: from Hew. standing
underhand cut
• Move the left foot forward
• Swing the sword around the left
shoulder to the high position and
add the left hand.
Photo 4: front view, standing,
sword passing left shoukiet
Photo 5: front view, standing, fodun
Photo 0: front view, standing,
leftward slanting cut
• Advance the right foot
• Cut downward al the top of the
enemy's left shoulder in the priest's
stole cut.
Say "cits.”
Return to the middle position.
Perform blood-cleaning.
Sheath the sword.
Remain standing.
Make the left foot even with the right
and move to the next form.
Established Kata of the Japanese Federations
24?
SH1HOG1R1 (l our Direction Cut)
General Description
CP While walking, (our enemies attack you from all sides. You respond and strike them,
right, left, front and rear. You finish with the standing blood-cleaning and sheathing.
Commentary
The footwork in this form is mote complicated than in the other Established
Forms It brings to mind techniques used in the Inner Tradition of the Muso
Shinden Ryu. In fact, this form comes from the Afiau Kamome Ryu (Water Gull
System).
There arc four opponents, but there arc five strikes. This Is because the
attack used on the enemy at the front is not considered devastating and he must
be struck a second time.
Normally, the enemy at the rear would be considered the most dangerous.
Some attempt might be made to forestall or hamper one of the others, but the
enemy in the rear would be the one dispatched first.
This Is not done in this form. Instead, the initial attack is made on the
enemy to the right. The reason for this tactic Is not known.
Four different cuts are used in the form, along with four different steps.
These form the basis for dealing with a large number of enemies.
Movements
Stand facing the front.
Advance the left foot.
Photo I: front view, standing, bukcrukun
’«4
lapanese Swoni Drawing: A Source book for laido Students
• /\dvance the right foot even with the left.
• Look at the right enemy and point the right toes in his direction.
• Draw the sword upward with the right hand.
Photo 2: front view, standing,
initiating vertical draw, looking to right
Photo J: front view, standing,
vertical draw to release, looking to right
• Slide the right foot a little toward the
right enemy.
• Cut the enemy’s right shoulder with a
single-handed priest's stole cut.
Stop the cut al the height of his solar
plexus.
Photo 4: front view, standing,
one hand rightward slanting cut
Established Kata of the lapanese Federations
295
Rotate IHO-dcgrccs to the left, looking
at the left enemy.
Leove the sword pointing at the right
enemy’s chest.
Photo 5: fnmt view view standing,
sword pointing to rear
• Swing the sword overhead and add the
left hand.
Photo 6: front view, standing,
sword passing right shoulder
Photo 7: front view, standing, jodun
• Advance the right foot one full step
toward the left enemy.
• Cut down al lhe left enemy’s forehead.
Photo 8: front view, standing, downward cut
296 lapanese Sword Drawing: A Source book for laido Students
• Look at the front enemy.
• Pull the right foot back to the left foot.
• Draw the sword upward to the left
eight-phase position.
The sword guard is even with the
mouth. The sword is over the left
shoulder.
* Advance the right foot toward the front
enemy.
Photo 9: front view, standins.
feet together, basso no gamae
• Cut the enemy's right torso in one
stroke, using both hands.
This Is a horizontal cut from left to right.
Photo 10: front view, standing. leftward do gin
Photo 11: front view, standing,
leftward do girl
• Rotate I HO-dcgrccs to the left.
• 1dm the blade upward and swing the
sword up into the two-handed high
position.
Photo 12: front view, standing,
middle of pivot
EstaMbhed Kata of the Japanese Federaffons
2Q7
Photo 13: front, standing,
sword passing right shoukier
Photo 14: left side view, standing,
sword passing right shoulder
Photo 15: front, standing, jodan
Photo 16: left side view, standing, todan
Cut at the rear enemy’s forehead.
Photo 17; front view, standing, downward cut
Photo 18: left side view, standing,
downward cut
’98
Japanese Sword Drawing: Л Source book for laido Students
• Rotate I «(.'-degrees to the right.
• Swing the sword overhead.
Photo 19: front view, standing,
sword passing left shoulder
Photo 20: front view, standing, lodan
Photo 21: front view, standing, downward cut
Cut downward at the front enemy's
forehead.
Say "efts. *
Perform blood-cleaning.
Sheath.
Established Kuta of the lapanese Federations
’W
K1SAKIGAESHI (Returning Sword Point)
tn
a
General Description
The enemy approaches and cuts at your forehead. Parry to the left with a slanting
/lowing parry. Putting the left hand on the swotd. pull back and cut the enemy's head.
Thrust and pierce his chest. Finish the form with blood-cleaning and sheathing.
Commentary
This is a very straight forward form. There Is not much footwork. The swordwork,
however, involves a gnpped-blade technique you have not seen before.
Griping the blade with the left hand is thought to be an older method of
dealing with close Infighting situations. The fact that this form Is from the Hold
Ryu (Old Official System) suggests it may predate others you have studied.
The left hand grips the blade early In the action. It adds power to a down-
ward slash, allowing the sword to be used effectively in a close situation. An over-
head cut would need more room.
The form also uses a thrust, with the left hand still gripping the blade. This
is similar to the thrust used in Soelezuki in Chapter 7.
Movements
•Advance the left foot.
Photo I: front view, standing, bukezukuri
300
lapanese Sword Drawing: A Source book for laido Students
• Advance the right foot.
• Draw the sword overhead.
The edge faces lhe rear. The point hangs
down to tire left, clearly protecting your
head and shoulder. Use the sword blade
ridge to form the flowing parry.
Photo 2: front view, standing.
Initiating vertical draw
Photo 5: front view, standing,
left hand moving to blade
• Immediately, grip the back of the blade
with the left hand.
• Lowering the body slightly, slash
downward at the enemy's head.
The left hand comes up from
underneath.
The sword moves In a circle. The
right hand comes to the right hip: the
left hand stops tn front of the waist.
Coordinate the movements of the
two hands, pushing and pulling.
to get a powerful stroke.
Established Kata of the lapanese Federations
301
Photo 6: front view, standins, downward slash
Photo 7: front view, standing. downward slash
Photo 8: front view, standing. thrust
• Advance the left foot.
• Thrust and pierce the enemy's chest.
Say "cits.' The left hand remains on the
back of the blade, coordinating with the
right to thrust.
• Pull back the left foot.
• Release rhe left hand and move it to
the left waist.
• Perform blood-cleaning.
Sheath.
Photo 9: front view, standing, end of chtburl
Appendix
L-ir\eocjeL uncl
Sysiemits Development
HEADMASTER LINEAGE and SYSTEMIC DEVELOPMENT
Muso Shlnden Ryu
Hayashi Jmsukt Shigencbu
Shtokajje ffyu 5 Sdintnaer Muso ffyu
i ......С. 15БЗ
Tainiya Hcibci Shigemasa
c. 1574
Nagano Muraku Kjnrosai (Jurozaemon)
| Muraky ftyu i
молю Gumbei Mitsushige
! Ankawa shozaenion Muretsugu
I c. 1530
Bsnnc Danuemon No Jo Nobusada
c. 1590
Hocyawa Oikardriobuke Eisrtn (Hictenobui
' Mose Hasegtwt Eishm Ryu
▼ 1610
Omer. Rckurozsemoo Masamitsu I
Arai Seitetsu Kiyonobu
Omori ffyu i
Hayashi Rokudayu Mcrimasa
16 75
1 Hayashi Yasucfayt Masanobu (Seidio?)
1 e 1 73?
Oguro Motoemon Kiyokatsu
1742
I
Hayashi Masu No Jo Masamori
1 799
Yoda Manzai Yorikatai
Hayashi Yadayu (Seiki) Masayori
C. 1809
Matsuyoshi Teisuke (Sidasuke) Hisanan
c. 1790
Yarn aka wa Kyvzo Y<jkrkatsu
c. 1808
Tanimura Kame No Jo Yofika^sy
Tanimura Ня
с/1823
GqI<j Mogotei Masasuke
с. 1B62
OeMasamchi Shike
Muso jik den bshtr Pyv
с. 1B98
Shimoniura Motets Sudamasa
Sttimomura
c. 1840
Hosckawa (Grahc) Ycshimasa
c. 1877
Nakayama Hakudo
- ► Muso ihjridten Ryu i
c. 1923
305
JAPANESE SWORD TERMS
306
1 Toshin (sword blade)
2 Nukago (lang)
3 To no nagasa (sword length)
4 He ku (blade section)
5 Nakagojiri (tang butt)
6 Mel (signature)
7 Mekugi ana (rivet hole)
8 Yasurime (file marks)
9 Munehi (back of blade section)
10 Hamon (temper pattern)
11 Ha (blade)
12 Yakiba (tempered edge)
13 Л (blade surface above temper pattern)
14 Monoda (striking area)
15 Shtnogl (sword blade ridges)
16 Shinogi/i (blade surface above ridge line)
17 Mune (back of blade)
18 Sori (measure of curvature)
19 Ybkote sufi (line dividing point from body)
20 Ото (thickness)
21 Mihaba (width)
22 Mltsukado (triangle)
23 Kisaki (point)
24 tioshi (point temper pattern)
25 Fikura (curve)
26 Koshinogi (ridge line close to point)
27 Kaeri (turning back of point temper pattern)
28 Tsuka (hilt)
29 Kashira (butt cap)
30 Same (stingray skin)
31 Tsukaito (hilt binding)
32 Menukl (hilt ornaments)
33 Mekugi (bamboo peg)
34 Fuchi (collar)
35 Seppa (washer)
36 Tsuba (sword guard)
37 Habaki (blade sleeve)
38 Kaiguchi (scabbard mouth)
39 Kurikata (chord knob)
40 Saya (scabbard)
41 Sageo (chord)
42 Kojirl (butt)
43 Kceshiiuno (catch)
307
Glossary
Atari To
The Striking Sword; the fourth
kata of the Shodert of the Muso
Shinden Ryu
Ato
The Rear; the second seitei
kata of the zen nihon kendo
lenmei
Boken; bokuto
A wooden practice sword
budo
The martial ways
bukezukuri
The warrior method of wearing
the katana, through the layers
of the obi at the left hip, edge
up
chiburt
Blood-cleaning: a largely sym-
bolic action of cleaning imagi-
nary blood from the blade of
the katana
chi nugul
Blood-wiping; a form of chiburi
Chuden
The Middle Tradition: the sec-
ond section of kata within the
Muso Shinden Ryu
Eishin Ryu
The Excellent Faith System;
the style of the kata of the
Chuden of the Muso Shinden
Ryu
Eishin Ryu no chiburi
The blood-cleaning of the
Excellent Faith System
eitsu
An exclamation: see, ktai
Ganmen Ate
Strike Between the Eyes; the
eighth seitei kata of the zen
nihon kendo renmei
goho girt
The five directional cut; see, so
makuri
Gyaku To
The Reversed Sword; the
eighth kata of the Shoden
of the Muso Shinden Ryu
gyosho
The semi-cursive style; the sec-
ond style of lapanese writing
Breaking
hakama
The wide trousers worn in
practice over the juban or
kelkogi and the obi
309
310
Japanese Sword Drawing: A Source book for laido Students
hanashiuchi
A disengaging strike; see, so
dome-, the idiom for a strike
made immediately after a parry
Hasegawa Eishin Ryu
The Deep River Valley
Excellent Faith System; the
style of kata of the Chuden
of the Muso Shinden Ryu
hidari
The left; see, sa to
hitonaka
In public; see, kabe zoi
Hokt Ryu
The Old Official System
laido
The way of Japanese sword
drawing
iai gosh!
The sword drawing waist; a
half-standing, half-kneeling
posture used in the kata
iaito
A metal practice sword, with-
out an edge
i hyoshi no uchi
The strike of one rhythm; the
idiom for the flowing motion
from the vertical draw to the
vertical cut
Inazuma
Lightning; the third kata
of the Chuden of the Muso
Shinden Ryu
Inyo Shtntai
Advancing-Re treating
Movement; the fifth Rata
of the Shoden of the Muso
Shinden Ryu
Inyo Shintai Kaewaza
The Advancing-Retreating
Movement, Alternate
Technique; the twelfth, and
alternate kata of the Shoden
of the Muso Shinden Ryu
Itomagoi
Farewell Visit; the twenty-first
kata of the Okuden of the Muso
Shinden Ryu
Iwunumi
Waves Breaking Against
Rocks; the sixth kata of the
Chuden of the Muso Shinden
Ryu
juban
A short upper undergarment
Jun To
The Obedient Sword; the sev-
enth kata of the Shoden of the
Muso Shinden Ryu
Kabe Zoi
Adjusting lor the Wail; the sev-
enteenth Rata of the Okuden
of the Muso Shinden Ryu
kaishaku
The assistant at the formal
Japanese suicide ceremony;
see, /unto
Glossary
311
kaisho
The printed style: the first style
of Japanese writing
feature sute
Hide and discard; see, mon irt
Kasumi
Mist; the first kata of the
Okuden of the Muso Shinden
Луи
kata
The forms of any Japanese
martial or cultural art
katana
A Japanese sword, of the later,
shorter length, designed to be
worn in the bufee’ufeuri fashion
katsugi
To carry on the shoulder
ketkogi
A short upper practice gar-
ment, heavier than a juban
kendo
The way of Japanese fencing
ken no koto
Circumstantial wisdom; see,
sodesurigaeshl
kesagtrl
The priest's stole cut; a down-
ward slanting cur, usually
directed at one of the shoul-
ders; also, the Priest's Stole
Cut; the fifth seitel kata of
the zen nihon kendo renmei
kiai
A spirit meeting: the idiom for
a shout given in company with
an aggressive move
Kiriage
The Rising Strike; the third
seitel kata of the zen nihon
laido renmei
kiri tsuke
Cutting with the katana
Kisakigaeshi
The Returning Sword Point;
the fifth seilei kata of the zen
nihon laido renmei
Koran To
The Tiger-Fighting Sword: the
tenth kata of the Shoden of the
Muso Shinden Ryu
Mae
The front; see, shohatto;
also, the first seitel kata of
the zen nihon kendo renmei
Mae Atogiri
The Front-Rear Cut: the sec-
ond seitel kata of the zen nihon
iaido renmei
Maegiri
The Front Cut; the first seitel
kata of the zen nihon iaido
renmei
mae muki
Facing the front; see, morote
zuki
312
Japanese Sword Drawing: A Source book for laido Students
maai Meeting space; the idiom for the proper distance for an effective attack Namigaesht Returning Waves; the eighth kata of the Chuden of the Muso
migi Shinden Ryu
The right; see, u to no to
migi muki Sheathing the katana
Facing the right; see, nuki tsuke
ukenagash? Drawing the katana in the
mi sumi horizontal manner
Three comers; see, tozume Nuki Uchi
Mtzu Kamome Ryu The Water Gull System Мол In* Entering the Gate; the six- teenth kata of the Okuden of the Muso Shinden Ryu Morale Zuki Sudden Attack; the eleventh kata of the Shoden of the Muso Shinden Ryu; the tenth kata of the Chuden of the Muso Shinden Ryu: see, kesaglri
obi
The T\vo-Handed Thrust; A wide belt used to close the
the sixth seitei kata of the juban or keikogi
zen nihon kendo renmei Oikakegiri
Mugai Ryu Pursuing Cut; the nineteenth
The Nothing Excluded System kata of the Okuden of the
muko barai Muso Shinden Ryu
Beating the other; see, kasumi oikaze
muko zume Pursuing wind; see, koran to
The other enclosed; see, towuki Okuden
The Inner Tradition; the third
The soundless spirit meeting; the idiom for the quite per- section of kata within the Muso Shinden Ryu
formance of the kata of the Omori Ryu
Okuden of the A4uso Shinden The Big Forest System; the
Ryu style of kata in the Shoden
Muso Shinden Ryu of the Muso Shinden Ryu
The Traditional Spiritual Vision Omori Ryu no chiburi
System of iaido The blood-cleaning of the Omori Ryu.
Glossary
313
renmei
A federated organization of any
Japanese martial or cultural
arts
ri
Leaving
Ryvshi Hikiisure "ryoski hikit sre"
Both Warriors Brought
Together; the twentieth kata
of the Okuden of the Muso
Shinden Ryu
Ryozume
Both Enclosed; the seventh
kata of the Okuden of the Muso
Shinden Ryu
ryu
Any system of Japanese martial
or cultural arts
Ryu To
The Flowing Sword; the sixth
kata of the Shoden of the Muso
Shinden Ryu
sag! ashi
The legs of a heron; the idiom
for a one-legged stance in
which the shins cross
sammen о muki
Facing three centers; see, san-
pogiri
Sanpogiri
Three Directional Cut; the sev-
enth seitel koto of the zen
nihon kendo renmei
Sa To
Tire Following Sword; the
second kata of the Shoden
of the Muso Shinden Ryu
Seichu Io
The Center-Strengthened
Sword; the ninth kata of
the Shoden of the Muso
Shinden Ryu
setter kata
The established kata of a
renmei
seiza
The formal seated position
seme
Attacking
seppuku
The formal Japanese suicide
ceremony
Shthogiri
The Four Directional Cut; the
third kata of the Okuden of
the Muso Shinden Ryu ; also,
The Four Directional Cut; the
fourth seite! kata of the zen
nihon iaido renmei; also, The
Four Directional Cut; the tenth
seitei kata of the zen nihon
kendo renmei
Shtngaku An
The Hermitage of Self-Study
Shinobu
The Faithful Husband; the thir-
teenth kata of the Okuden of
the Muso Shinden Ryu
314
Japanese Sword Drawing: A Source book for latdo Students
Shinto Munen Ryu
The Way of the Gods and the
Impassive Mind System
shi sum!
Four corners; see, shihogiri
Shoden
The First Tradition; the first
section of kata within the Muso
Shlnden Ryu
Shohatto
The Initial Sword: the first kata
of the Shoden of the Muso
Shlnden Ryu
shomen
lhe center; see, mae; see,
tsuka ate
shomen muki
Facing the center, see. kesagiri
shu
Keeping
Sodesurigaeshi
Returning from brushing the
Sleeve; the fifteenth kata of the
Okuden of the Muso Shlnden
Ryu
So Dome
All Stopped; the twelfth kata of
the Okuden of the Muso
Shlnden Ryu
Soetezuki
Fixing Thrust; the ninth seitei
kata of the zen nlhon kendo
renmei
So Makuri
All Rolled Up; the eleventh
kata of the Okuden of the
Muso Shlnden Ryu
sosho
The cursive style; the third
style of lapanese writing
sut hashiri
Running water: the idiom for
the slight angle of the blade at
the end of the horizontal draw
suihei osame to
The horizontally stopping
sword; the Idiom for the angle
the blade finally assumes in
the Eishln Ryu no chiburi
Sunegakoi
Enclosed Shin; the second
kata of the Okuden of the
Muso Shlnden Ryu
Taki Otosht
Dropping Waterfall: the ninth
kata of the Chuden of the
Muso Shlnden Ryu
Tanastuta
The Lower Shelf; the sixth kata
of the Okuden of the Muso
Shlnden Ryu
tate hiza
The drawn-up knee position;
a sitting position used in the
advanced kata
to о fun kamurl
Swinging the sword overhead;
the idiom for the circular pass-
ing of the blade around the left
shoulder into a two-handed,
overhead position
Tore Bashlrt
Rushing Tiger; the eighth kata
of the Okuden of the Muso
Shlnden Ryu
Glossary
315
Tora Issoku
Pair of Tigers; the second
kata of the Chuden of the
Muso Shinden Ryu
lowaki
Side Door: the fifth kata
of the Okuden of the Muso
Shinden Ryu
Tozume
Enclosing Doors; the fourth
kata of the Okuden of the
Muso Shinden Ryu
Tsuka Ate
The Hilt Strike; the fourth seitel
kata of the zen nihon kendo
renmei
tsuka dome
Hilt slop; see, sunegukoi
tsukekomi
The idiom for taking advan-
tage; see, gyaku to
tsukikage
Moonlight; see, seichu to
Tsuredachi
Together; the tenth kata
of the Okuden of the Muso
Shinden Ryu
Ukenagashl
Parrying; see, ryu to ; the idiom
for the deflection of the oppo-
nent’s blade over the left shoul-
der; also. Flowing Parry; the
eighteenth kata of the Okuden
of the Muso Shinden Ryu ;
also, The Flowing Parry; the
third seitel kata of the zen
nihon kendo renmei
Ukigumo
Floating Clouds; the fourth
kata of the Chuden of the
Muso Shinden Ryu
Urokogaeshi
Returning Pattern: the
seventh kata of the Chuden
of the Muso Shinden Ryu
ushiro
The rear; see, atari to
ushiro muki
Facing the rear; see, ato
U To
The Right Sword; the third
kata of the Shoden of the
Muso Shinden Ryu
yae gakl
Doubled fences; see, inyo shin-
tai
yakuza no osame to
The gambler’s sheathing style
Yamaoroshi
Mountain Wind; the fifth kata
of the Chuden of the Muso
Shinden Ryu
Yokogumo
Bank of Clouds; the first kata
of the Chuden of the Muso
Shinden Ryu
yorumi nuki
The relaxed draw; see, ukena-
gashl
yoru no tachi
The long sword In the night;
see, shinobu
316
japanese Sword Drawing: A Source book for laido Students
Yukichigai
Crossing; the fourteenth kata
of the Okuden of the Muso
Shinden Ryu
Yuki Tsure
Accompanying: the ninth kata
of the Okuden of the Muso
Shinden Ryu
zan shin
Remaining heart; the idiom
fot the conscious, alert state
following the conclusion of
any action
Zen Nihon laido Renmel
The All-Japan Sword Drawing
Federation
Zen Nihon Kendo Renmel
The All-Japan Fencing
Federation
PARTICIPANTS’ STATEMENTS
L to r. Rich Radcliffe. Don Zier. Tom Lang
AUTHOR: DON J. ZIER
lapanese martial arts are infused with Japanese culture; they do not exist in a
vacuum, easily transported to another society. As American students, we must be
aware of the legacy of lapanese culture that comes with the arts. However, we
have our own legacy, too, and we must also take into account the heritage of
western culture we bring to our study.
During my involvement In the martial arts I have tried to balance two
forces; the Eastern, mystical martial arts themselves, and the Western, rationalist
disciplines of study and analysis. The first bnngs us lapanese traditions and tech-
niques. We bring the second with us to class, a unique set of learning tools we
can apply to gain new perspective and mastery.
My study of the Japanese martial disciplines began in the 1950s with body
arts (Judo and Aikido) and moved to weapons systems (Jodo and iaido and, in
the 1980s, to Kyudo) My active practice was cut short in 1988 when I was struck
by an automobile. Subsequent to the writing ol this book, further complications
have forced me to retire from the martial arts altogether
I wish to thank my students, Tom Lang and Richard Radcliffe, who posed
for most of the photographs In this work to Illustrate techniques I am no longer
able to do.
317
Demonstrator; Tom Lang
I began practicing the martial arts in 1971. I hold a fourth-degree black belt in
Danzan Ryu (Kodenkan) Jujitsu from the American Judo and Jujitsu Federation
and a second-degree black belt in Muso Shinden Ryu laido from the All Japan
Kendo Federation. 1 have also trained for many years in the Filipino martial arts,
especially Kali, and in Bokendo, a martial art employing a heavy, curved, wooden
staff in the manner of a riot baton, taught within Danzan Ryu Jujitsu. I have stud-
ied laido, the four-foot staff (jo), and the spear (yari) with Don Zier since 1975
and am co-author with him of The fapanese Short Staff, a traok on the jo, also
published by Unique Publications.
Demonstrator: Rich Radcliffe
I have studied several martial arts, both Chinese and Japanese, with various
instructors. I began the study of Dan Zan Ryu jujitsu in 1970 and hold a
fourth-degree rank. I have studied laido with Don Zier since 1975, and have run
my own dojo for many years.
318
Martial Arts
$19.95
Japanese Sword Drawing is a complete guide to this
esoteric aspect of sword fighting. Written by a noted
master, this volume describes the techniques and katas
of Muso Shinden Ryu (Traditional Spiritual Vision
System), one of iaido’s best-known schools.
Muso Shinden Ryu was founded by the great mas-
ter Hayashi Jinsuke Shigenobu in the 16th century.
Since that time, a succession of masters have guided
the progress of the school, often adding katas and modi-
fying techniques as their experiences dictated.
Illustrated with more than 800 photographs, this
book records many iaido forms that thus far have only
been orally transmitted. It documents the three styles of
sword-drawing taught in the Muso Shinden Ryu system:
Shoden (First Tradition), Chuden (Middle Tradition) and
Okuden (Inner Tradition), each of which is actually a
complete art of sword-drawing in itself. In addition, the
Seitei Kata (Official Forms) of the All-Japan Fencing
Federation and the All-Japan Sword Drawing Federation
are described in detail.