/


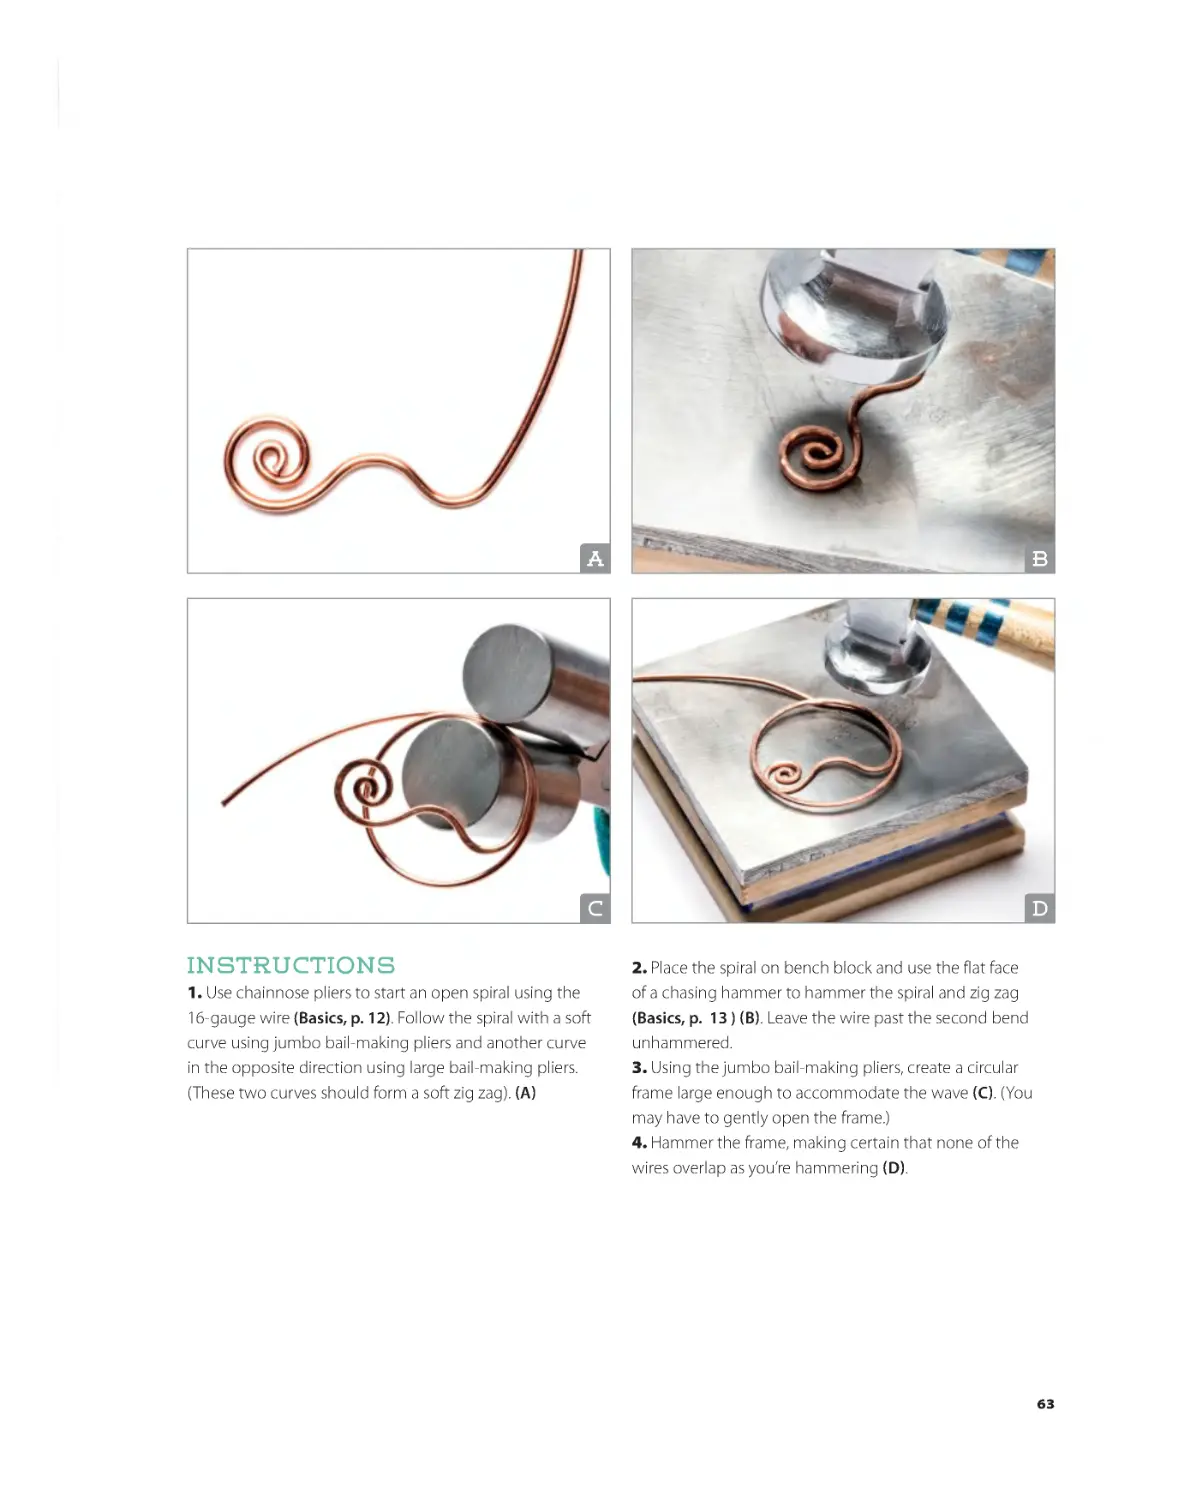

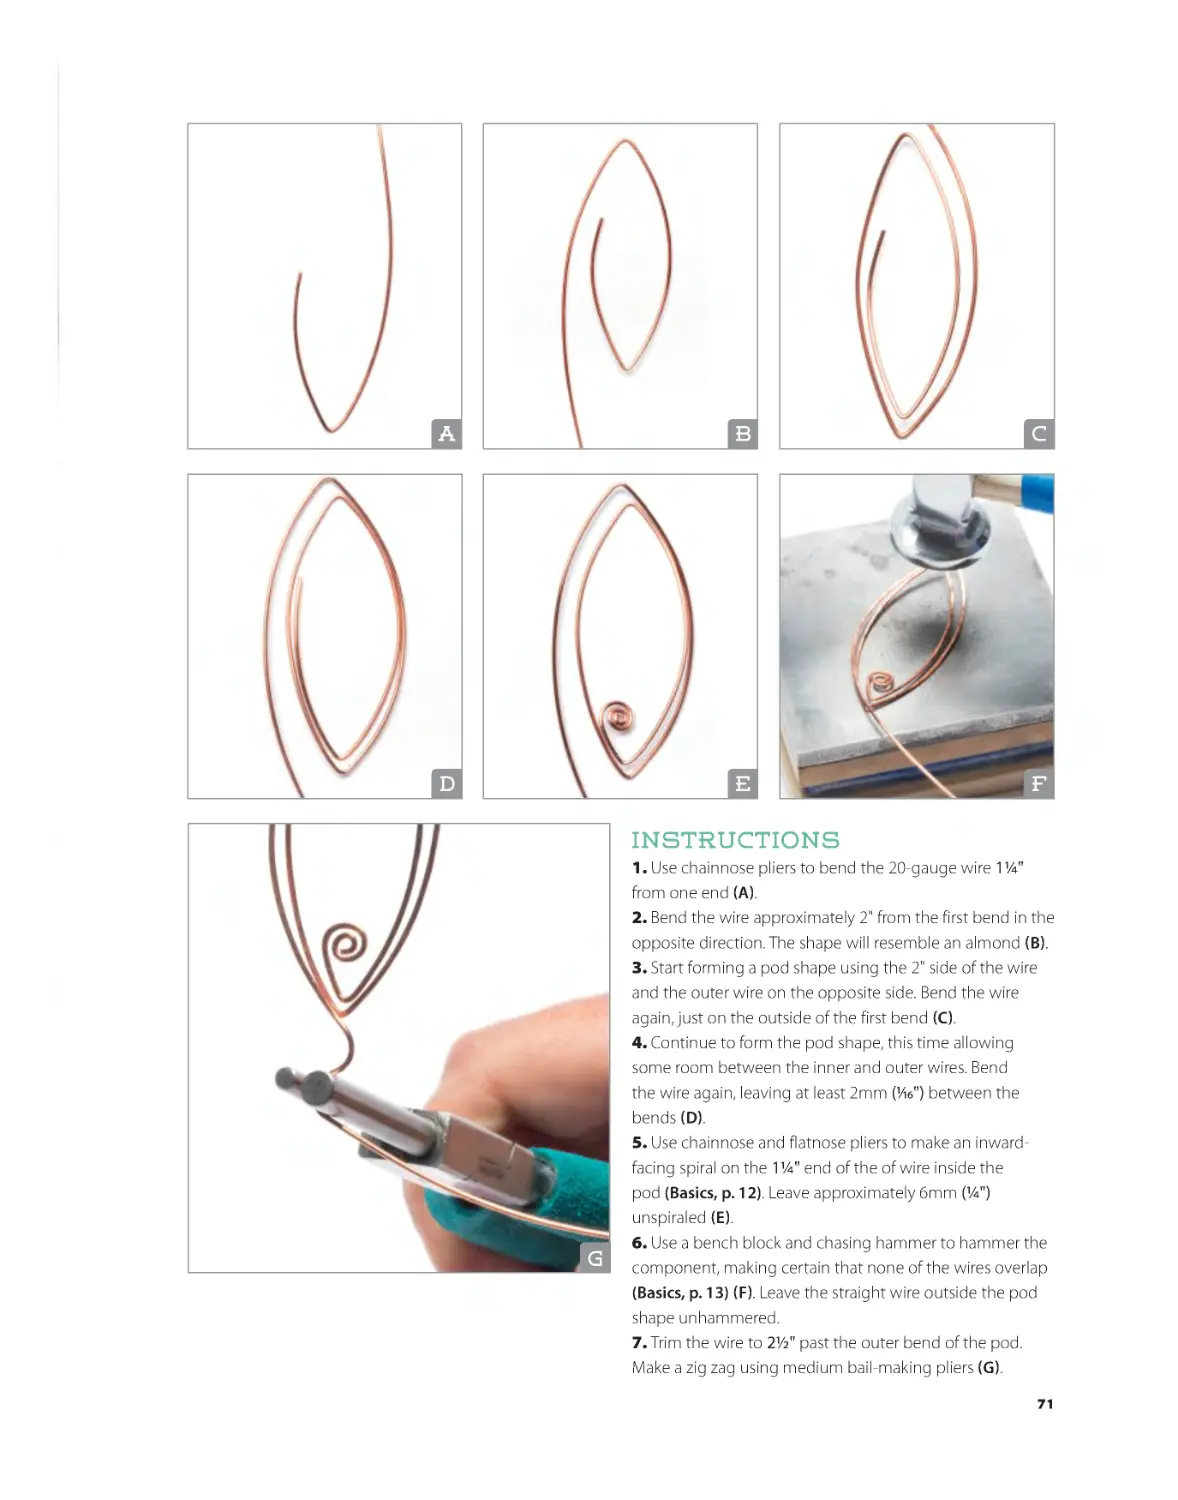
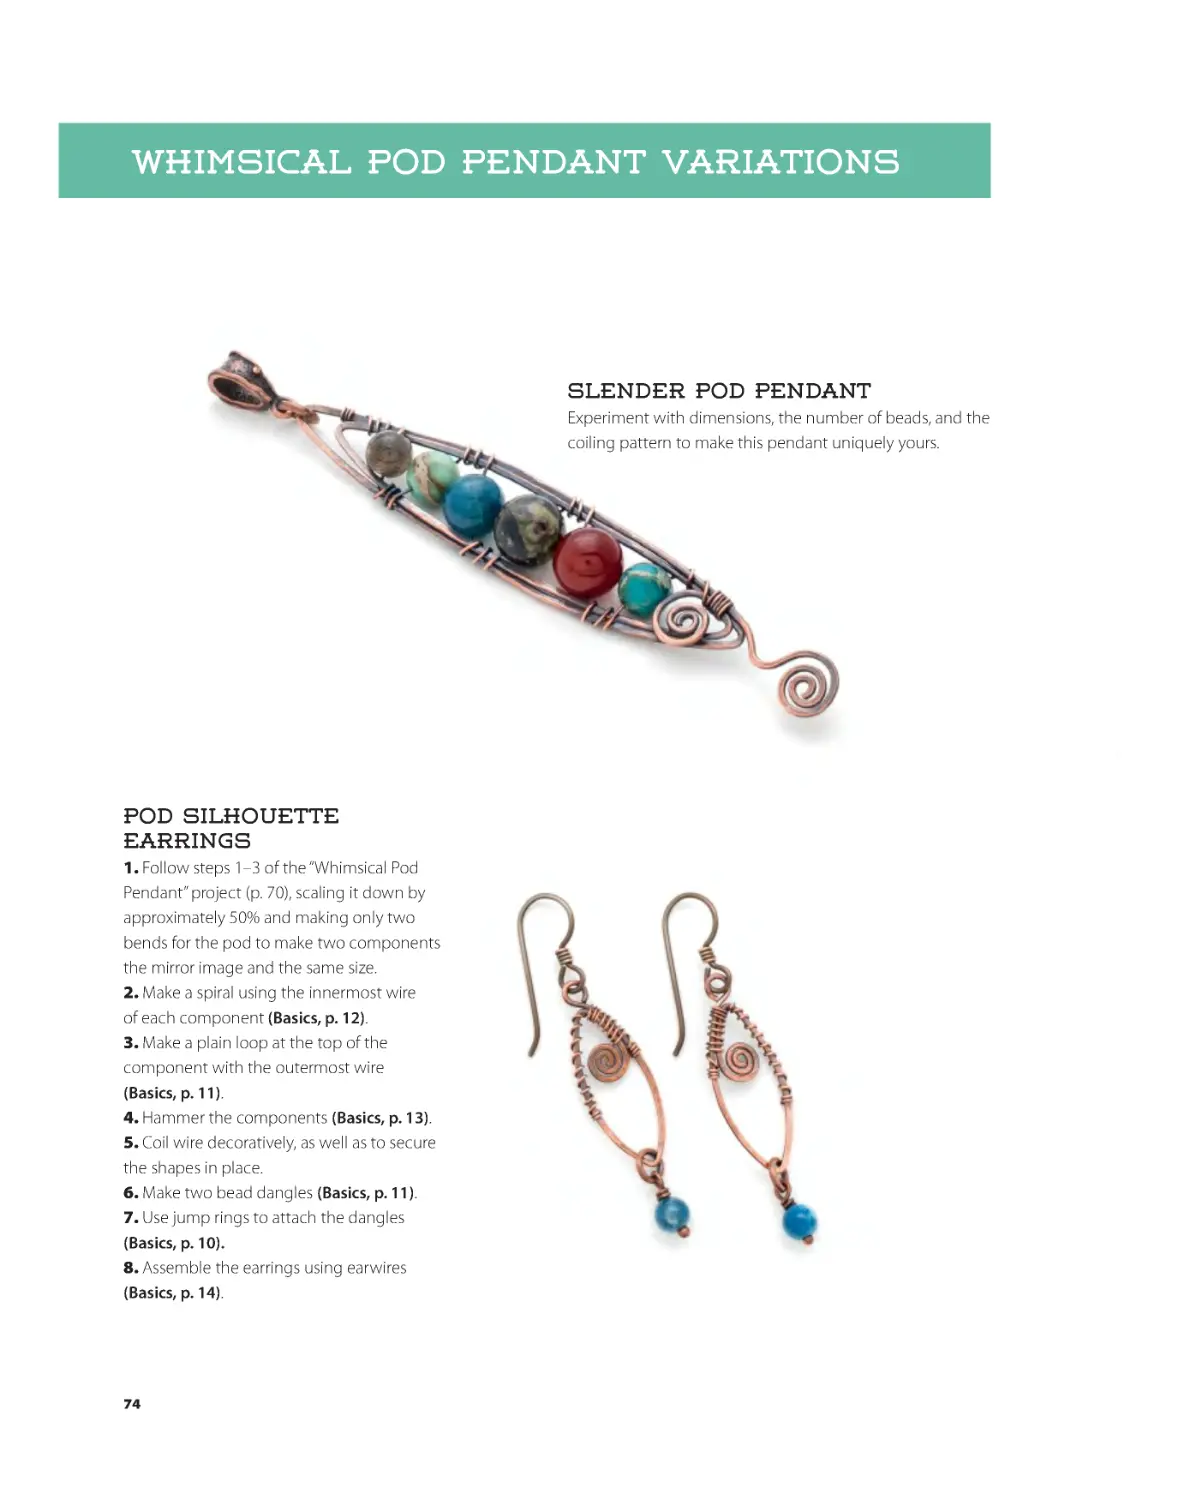


Text
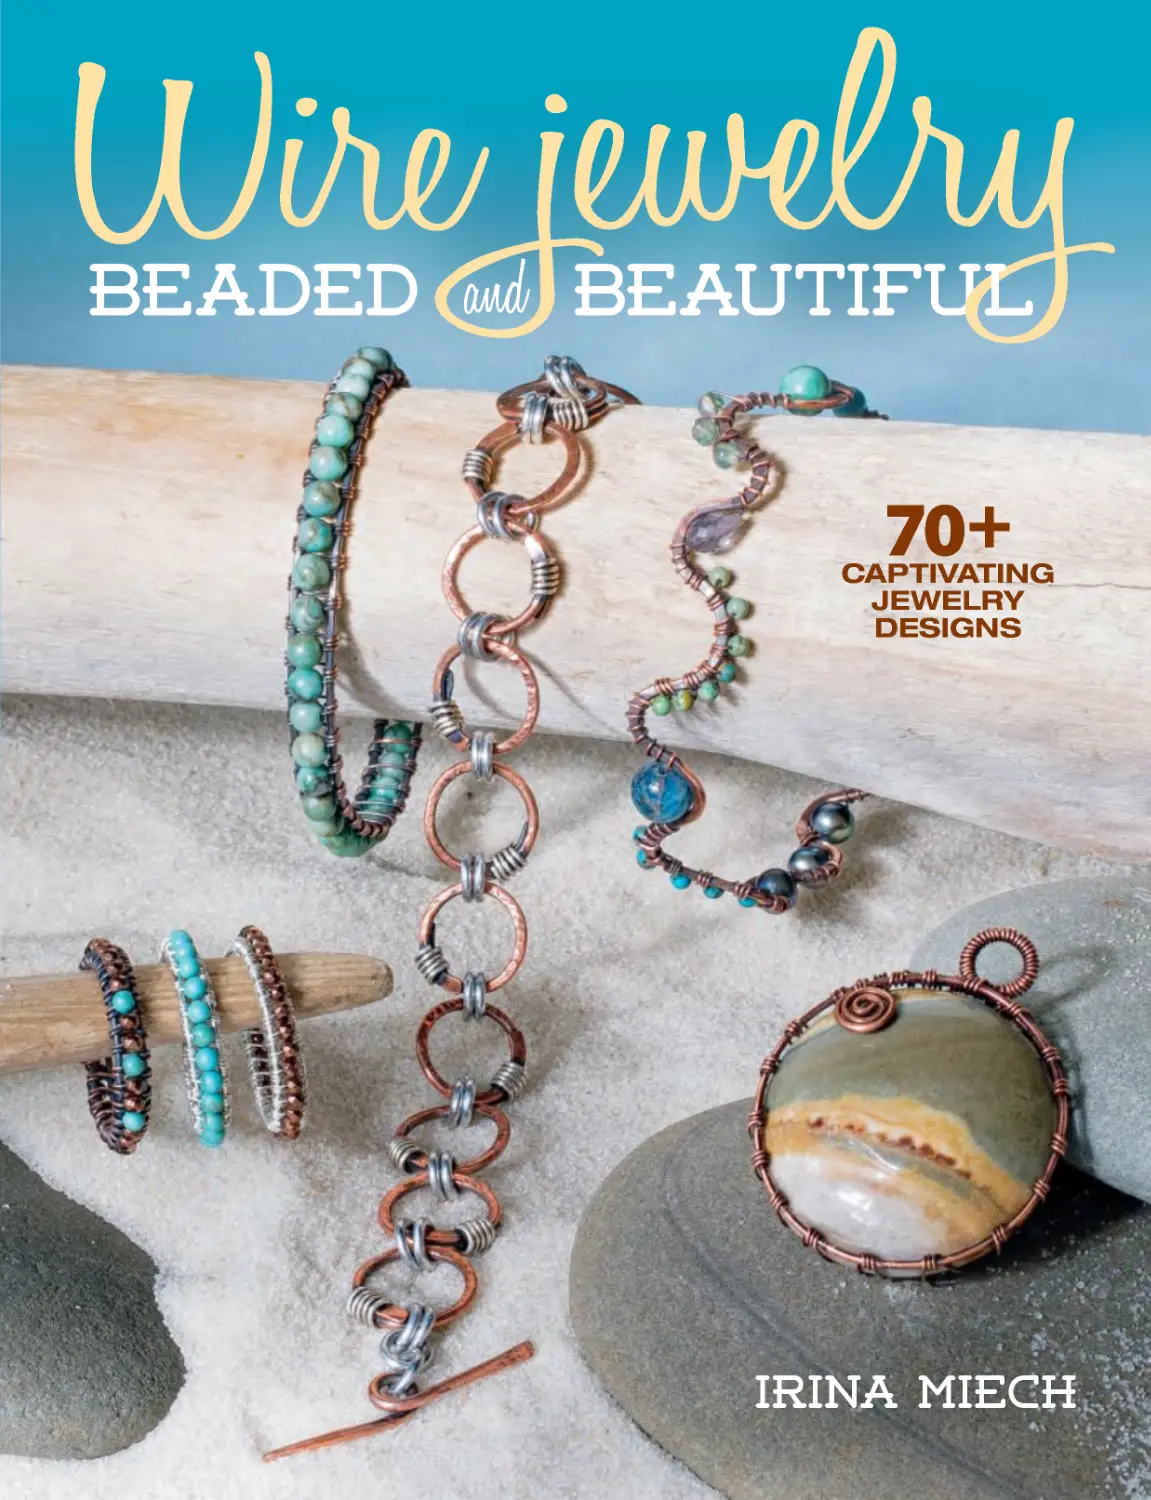
Beaded
Beautiful
70+
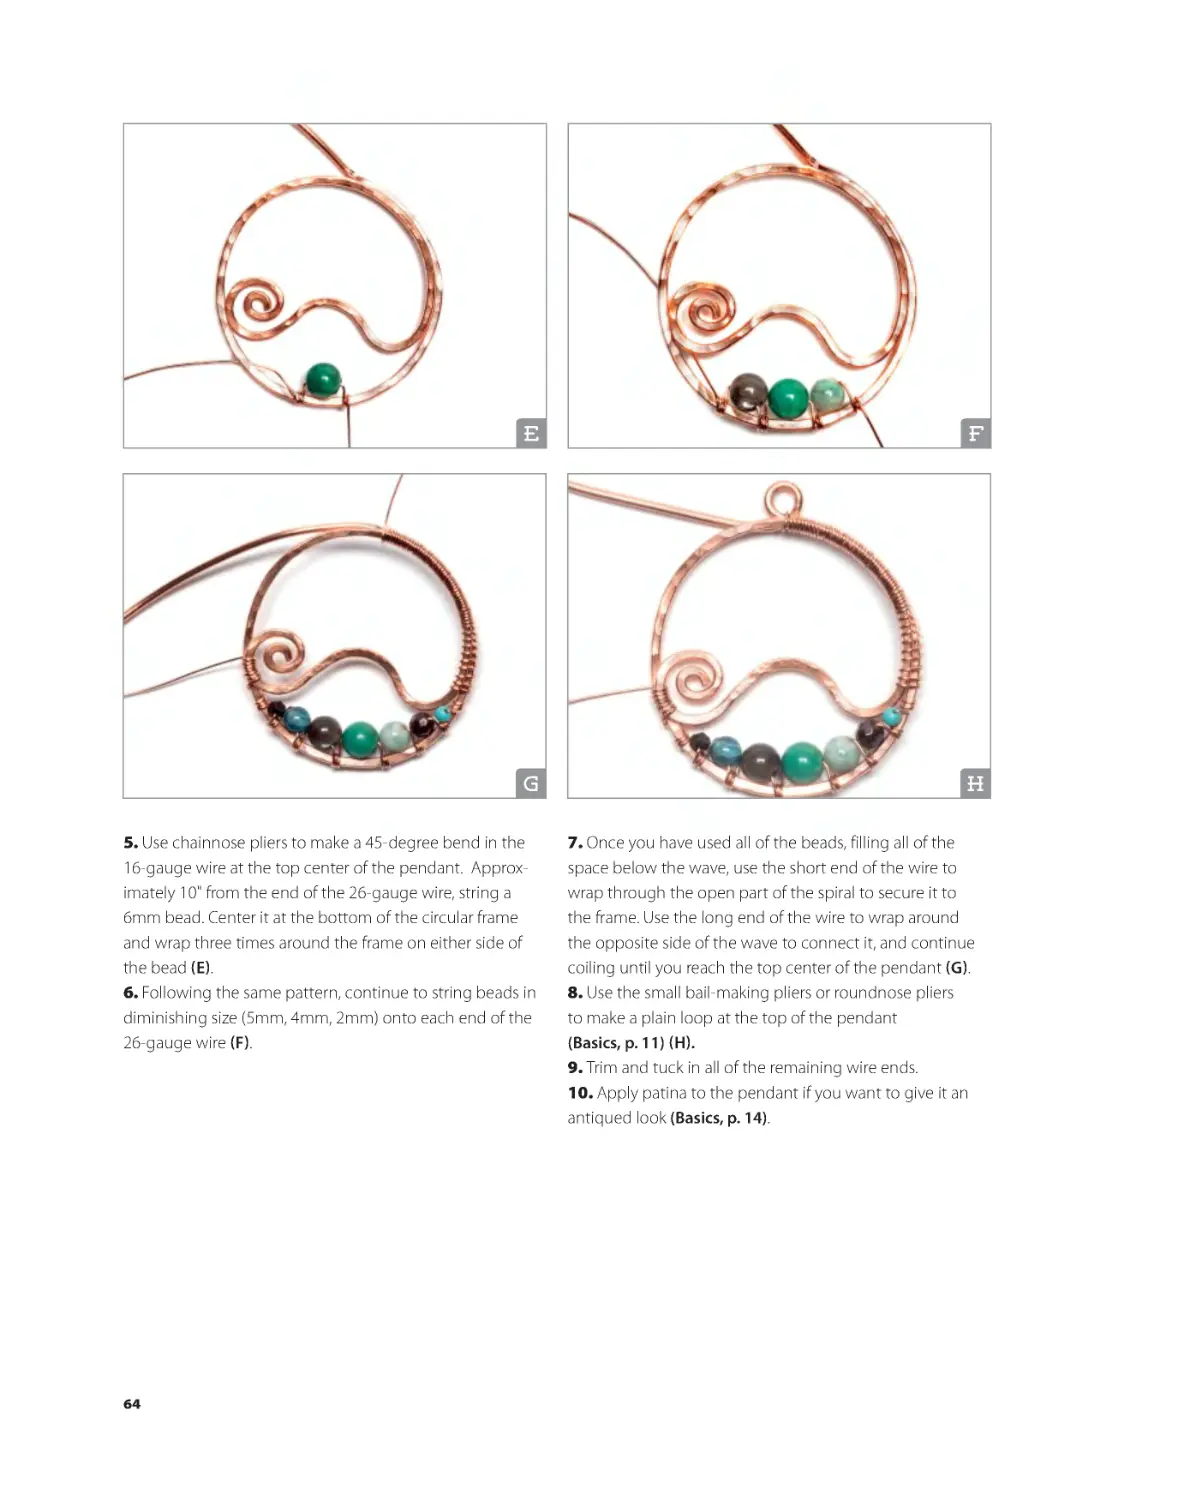
CAPTIVATING
JEWELRY
DESIGNS
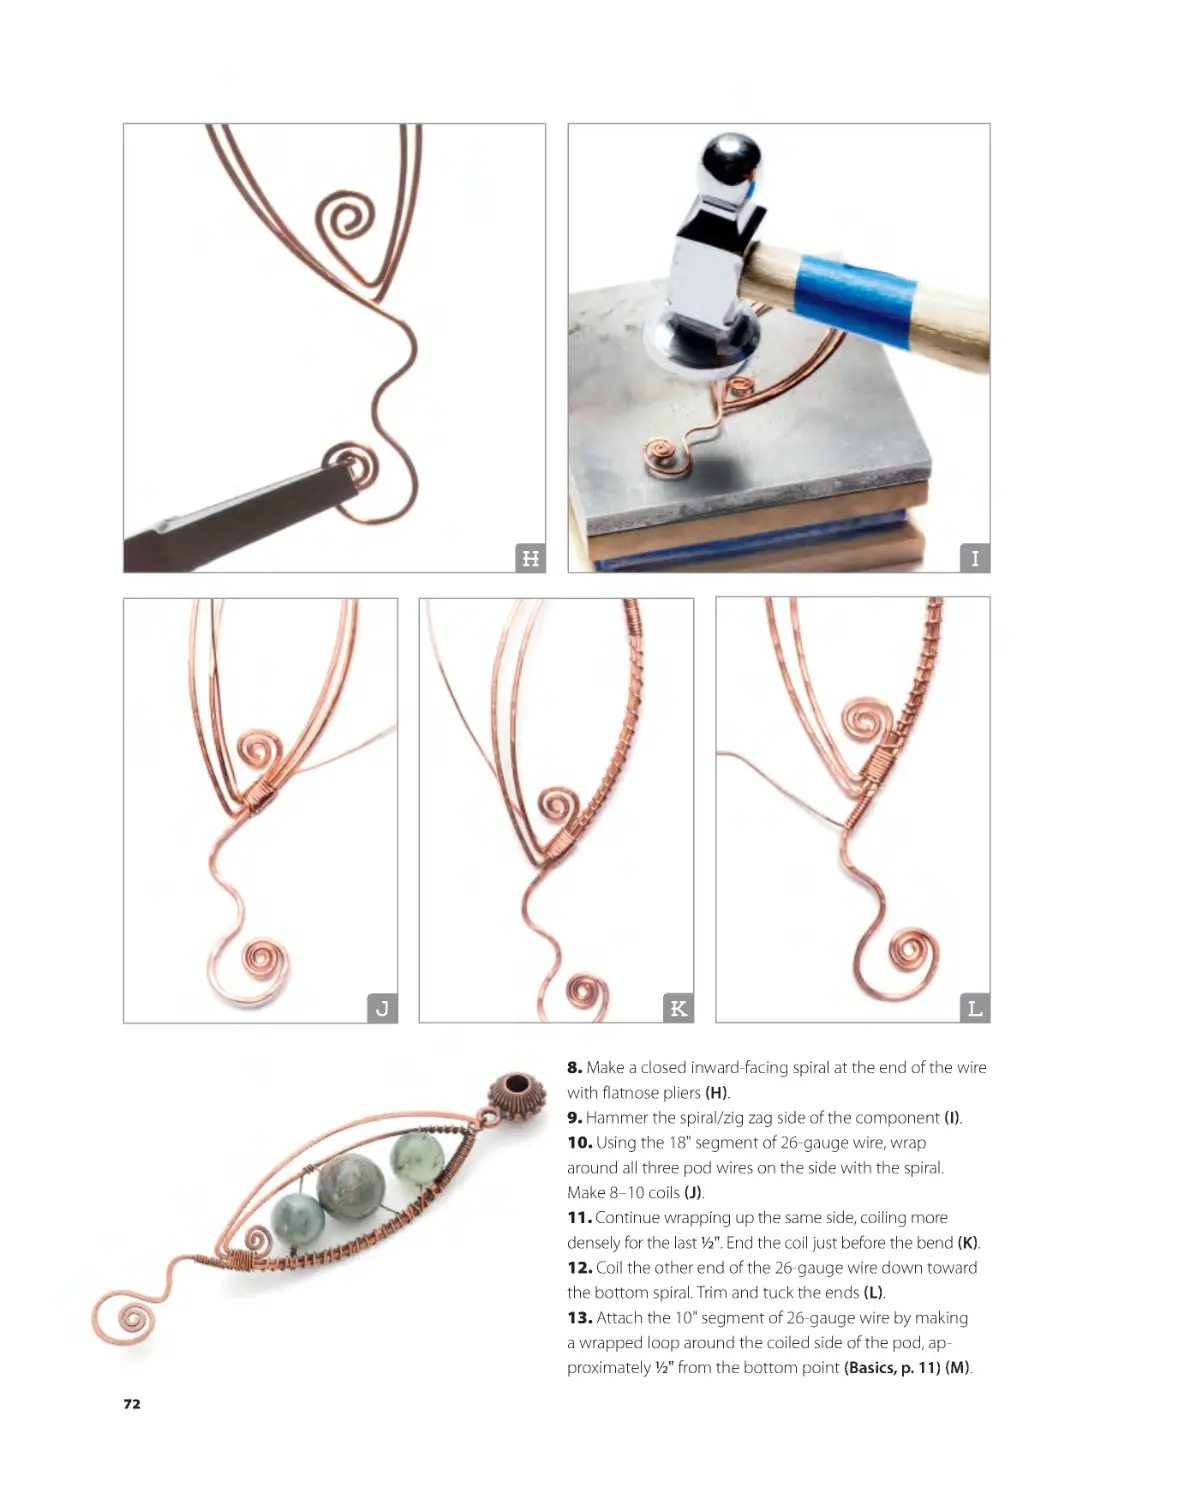
Irina Miech
Irina Miech
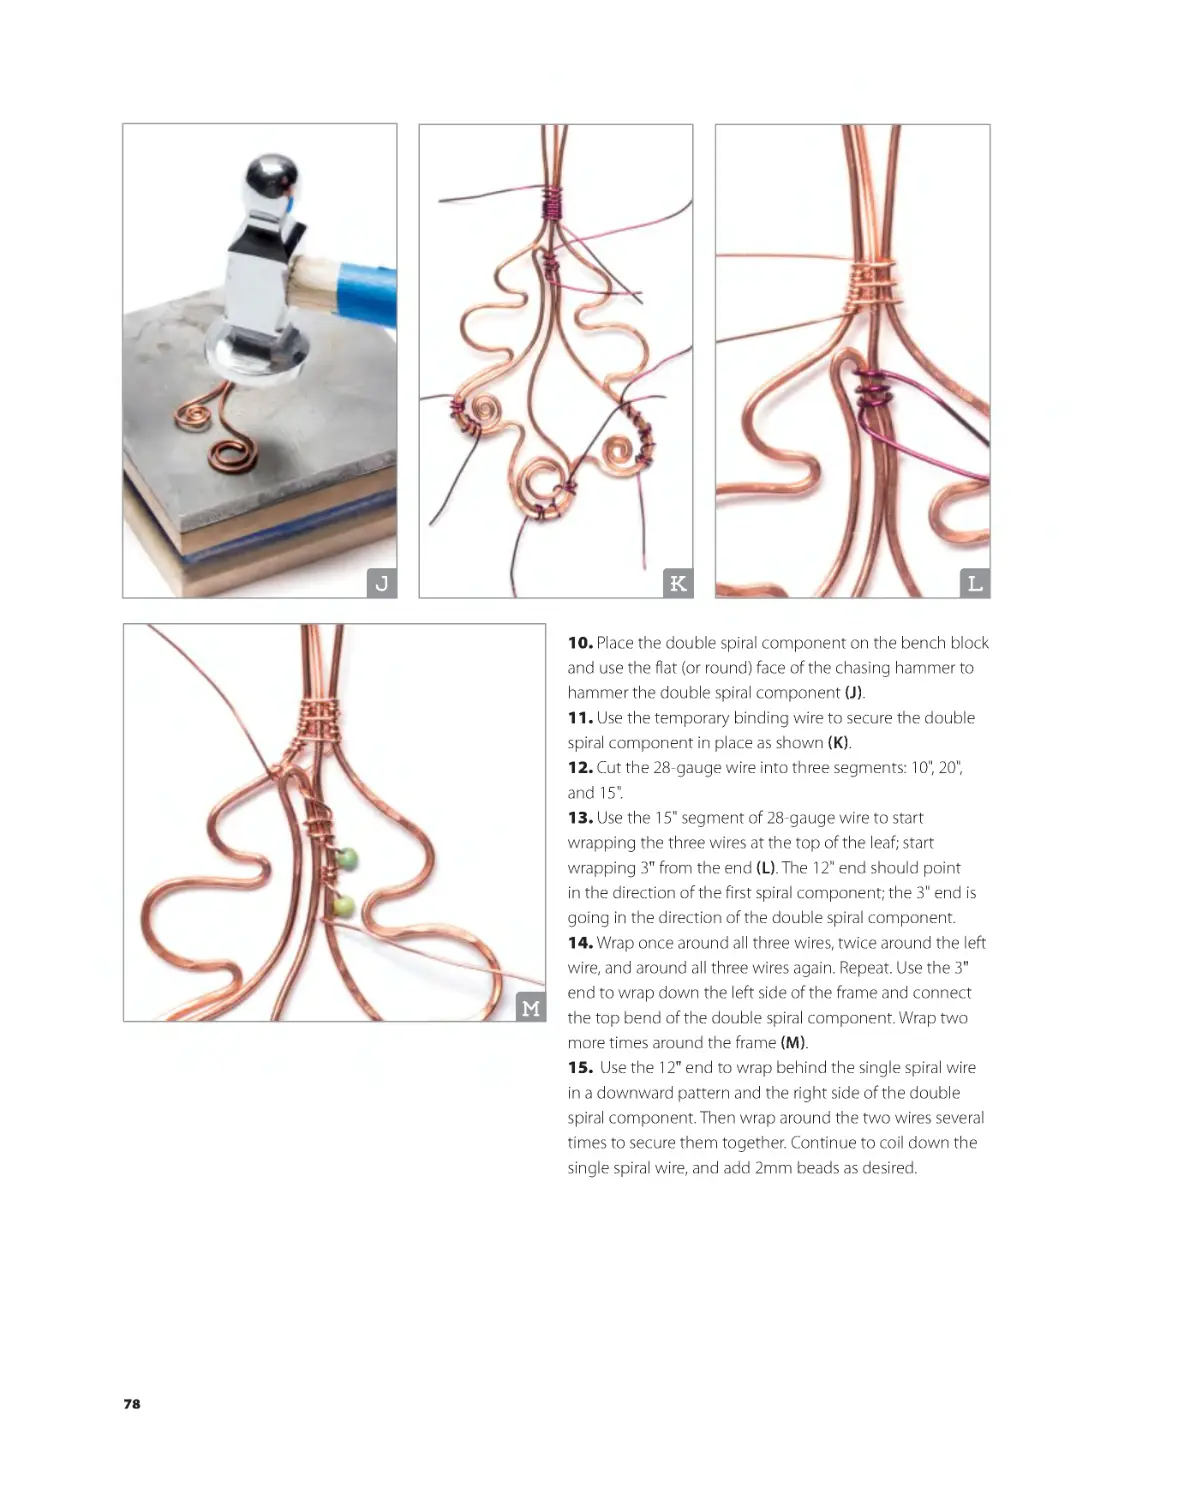
BKS-67899-00.indd 1
2/1/17 1:46 PM
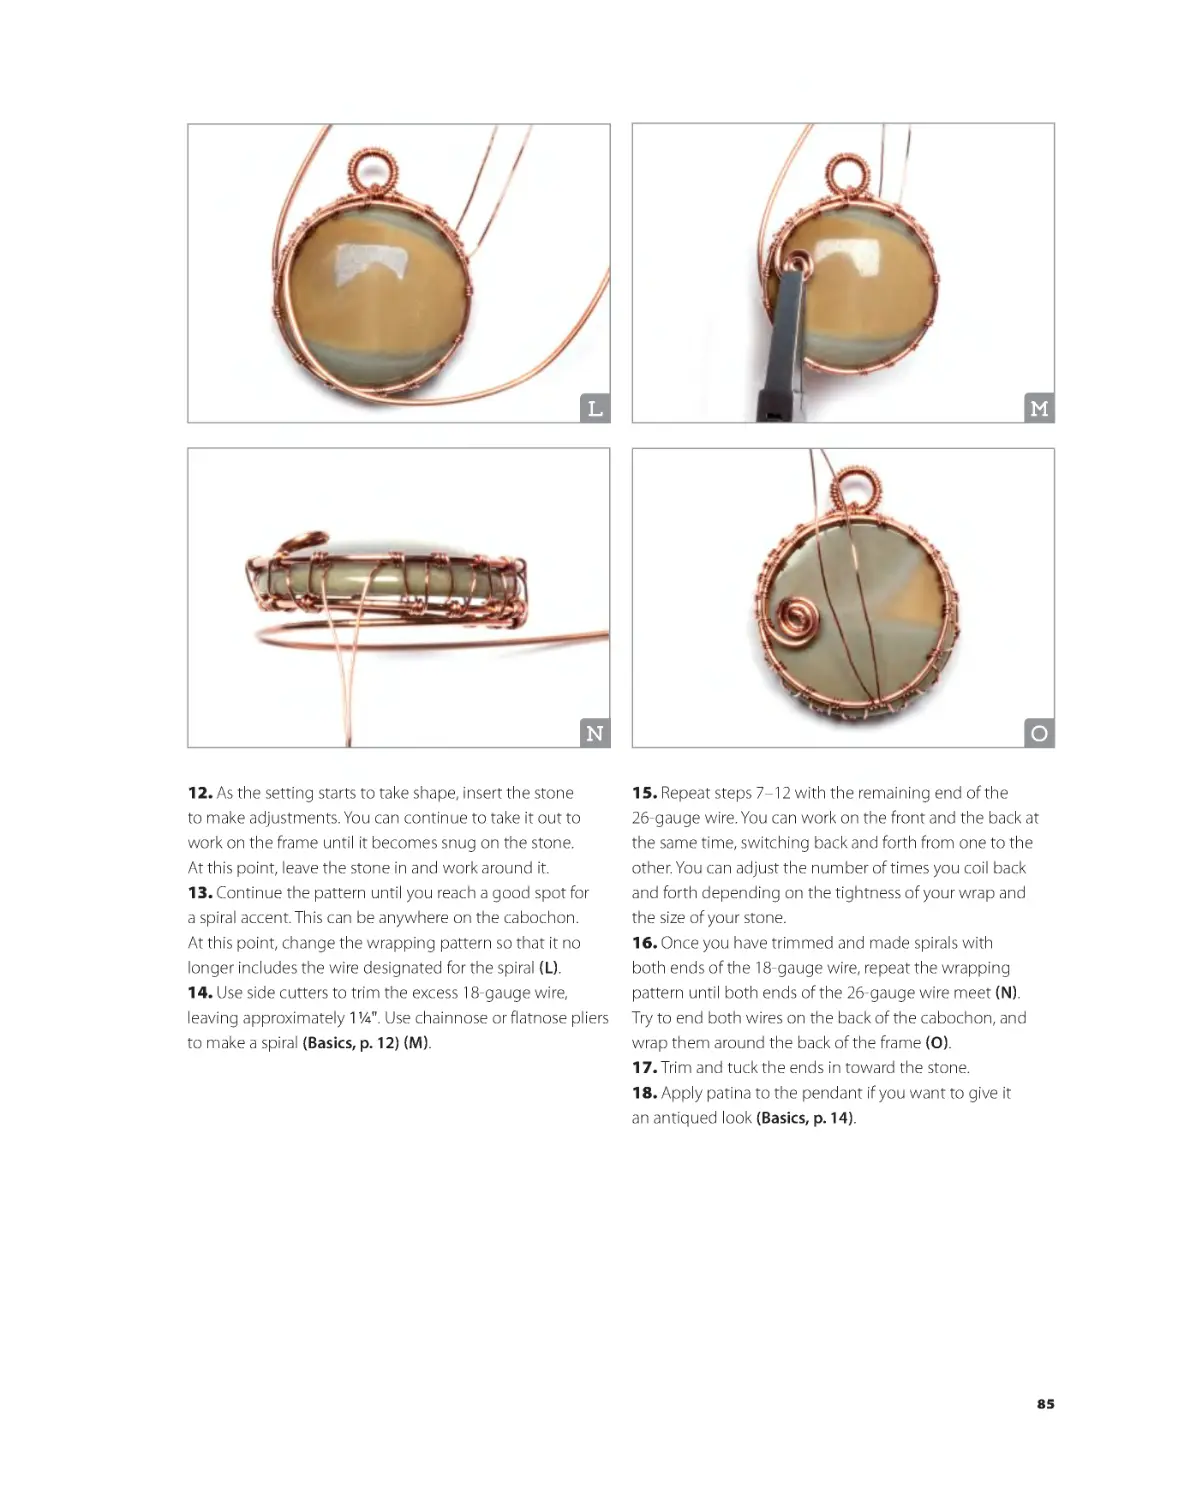
Kalmbach Books
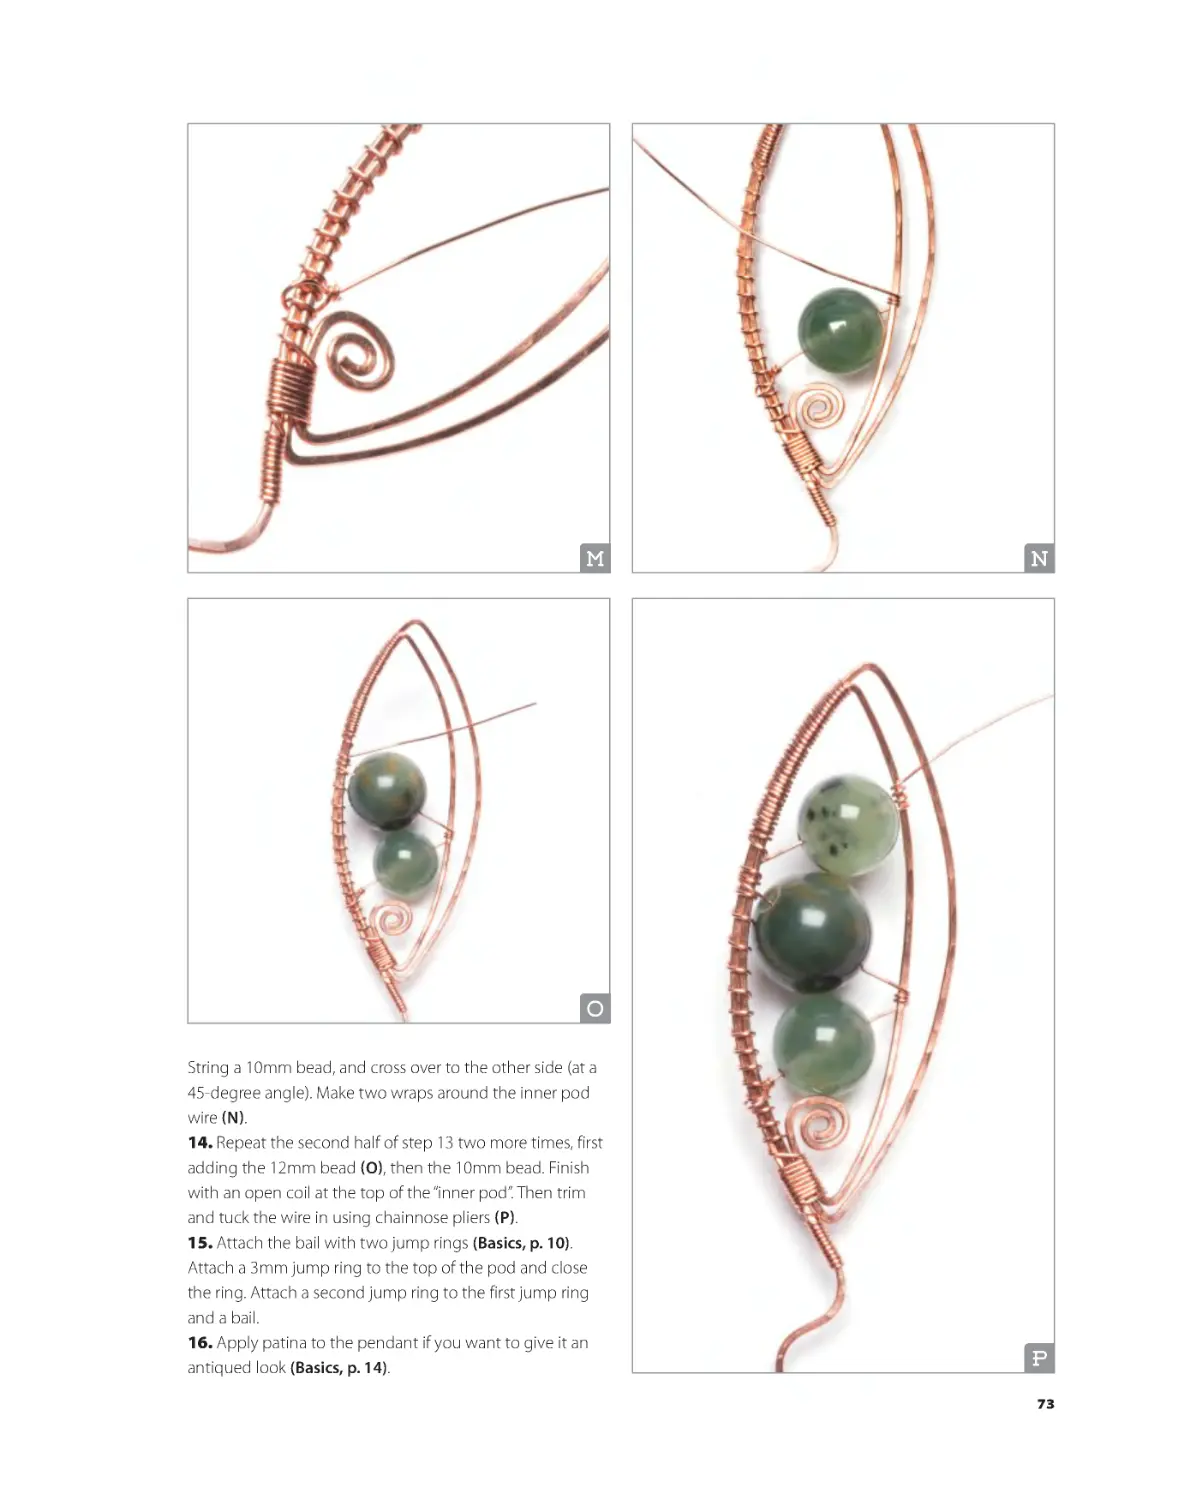
21027 Crossroads Circle
Waukesha, Wisconsin 53186
www.JewelryAndBeadingStore.com
© 2017 by Irina Miech
Table of
Contents
All rights reserved. Except for brief excerpts
for review, this book may not be reproduced
in part or in whole by electronic means or
otherwise without written permission of the
publisher.
Introduction ..............................................4
BASICS
Materials ..............................................6
Tools ...............................................................8
Techniques ..................................... 10
All photography © 2017 Kalmbach Books.
Wire Shapes
WESTON font designed by Pavel Pavlov for FONTFABRIC.
Honey Script Font Family made by Typographer
Mediengestaltung.
The jewelry designs in Wire Jewelry: Beaded and
Beautiful are the copyrighted property of the
author, and they may not be taught or sold
without permission. Please use them for your
education and personal enjoyment only.
Please follow appropriate health
and safety measures when working
with materials and equipment. Some
general guidelines are presented in
this book, but always read and follow
manufacturers’ instructions.
Zig Zag Earrings............................................................ 16
Graceful Spiral Earrings....................................................18
Pearl Simplicty Pendant ..................................................18
Spike Earrings ........................................................................18
Classic Pearl Earrings.........................................................18
Spiral Journey Pendant ..................................................... 19
Spiral Zig Zag Earrings .....................................................21
Spiral Serenity Pendant ...................................................21
Moon Rings Bracelet ............................................................ 22
Eclectic Pendant ................................................................ 25
Chain Dance Bracelet...................................................... 25
Grecian Scroll Bracelet ........................................................26
Grecian Spike Necklace .................................................. 29
Grecian Scroll Earrings ................................................... 29
Winding Road Bangle................................................ 30
Road to Haiku Bracelet ....................................................32
Road to Nepal Bracelet ....................................................32
Published in 2017
21 20 19 18 17 1 2 3 4 5
Manufactured in China.
ISBN: 978-1-62700-391-9
EISBN: 978-1-62700-392-6
Editor: Dianne Wheeler
Book Design: Lisa Schroeder
Technical Editor: Annie Pennington
Proofreader: Dana Meredith
Photographer: William Zuback
Library of Congress Control Number:
2016943702
BKS-67899-00.indd 2
2/1/17 1:46 PM
Focal Point Frames & BAILS
Gingko Leaf Pendant ........................................................... 58
Moonlit Gingko Leaf Pendant......................................61
Shades of the Ocean Gingko Leaf Pendant..........61
Ocean Wave Pendant .......................................................... 62
Ocean Wave Cascade Pendant ..................................65
Ocean Wave Bracelet .......................................................65
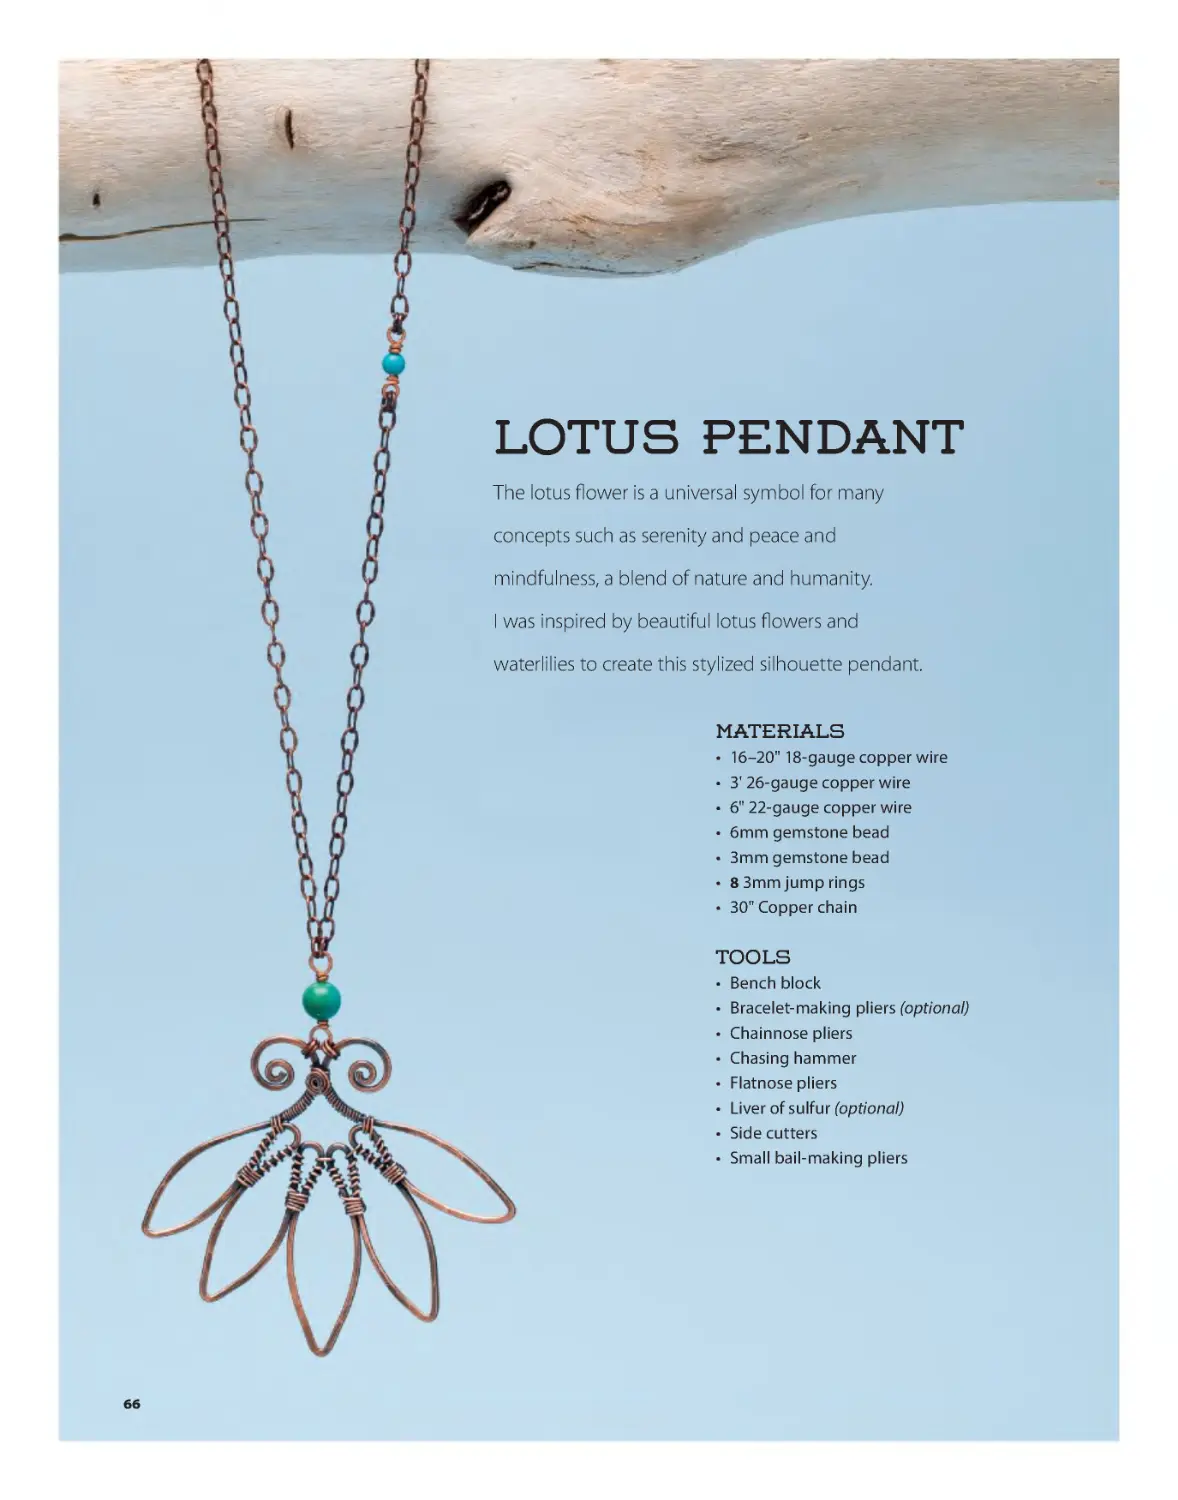
Lotus Pendant ............................................................................ 66
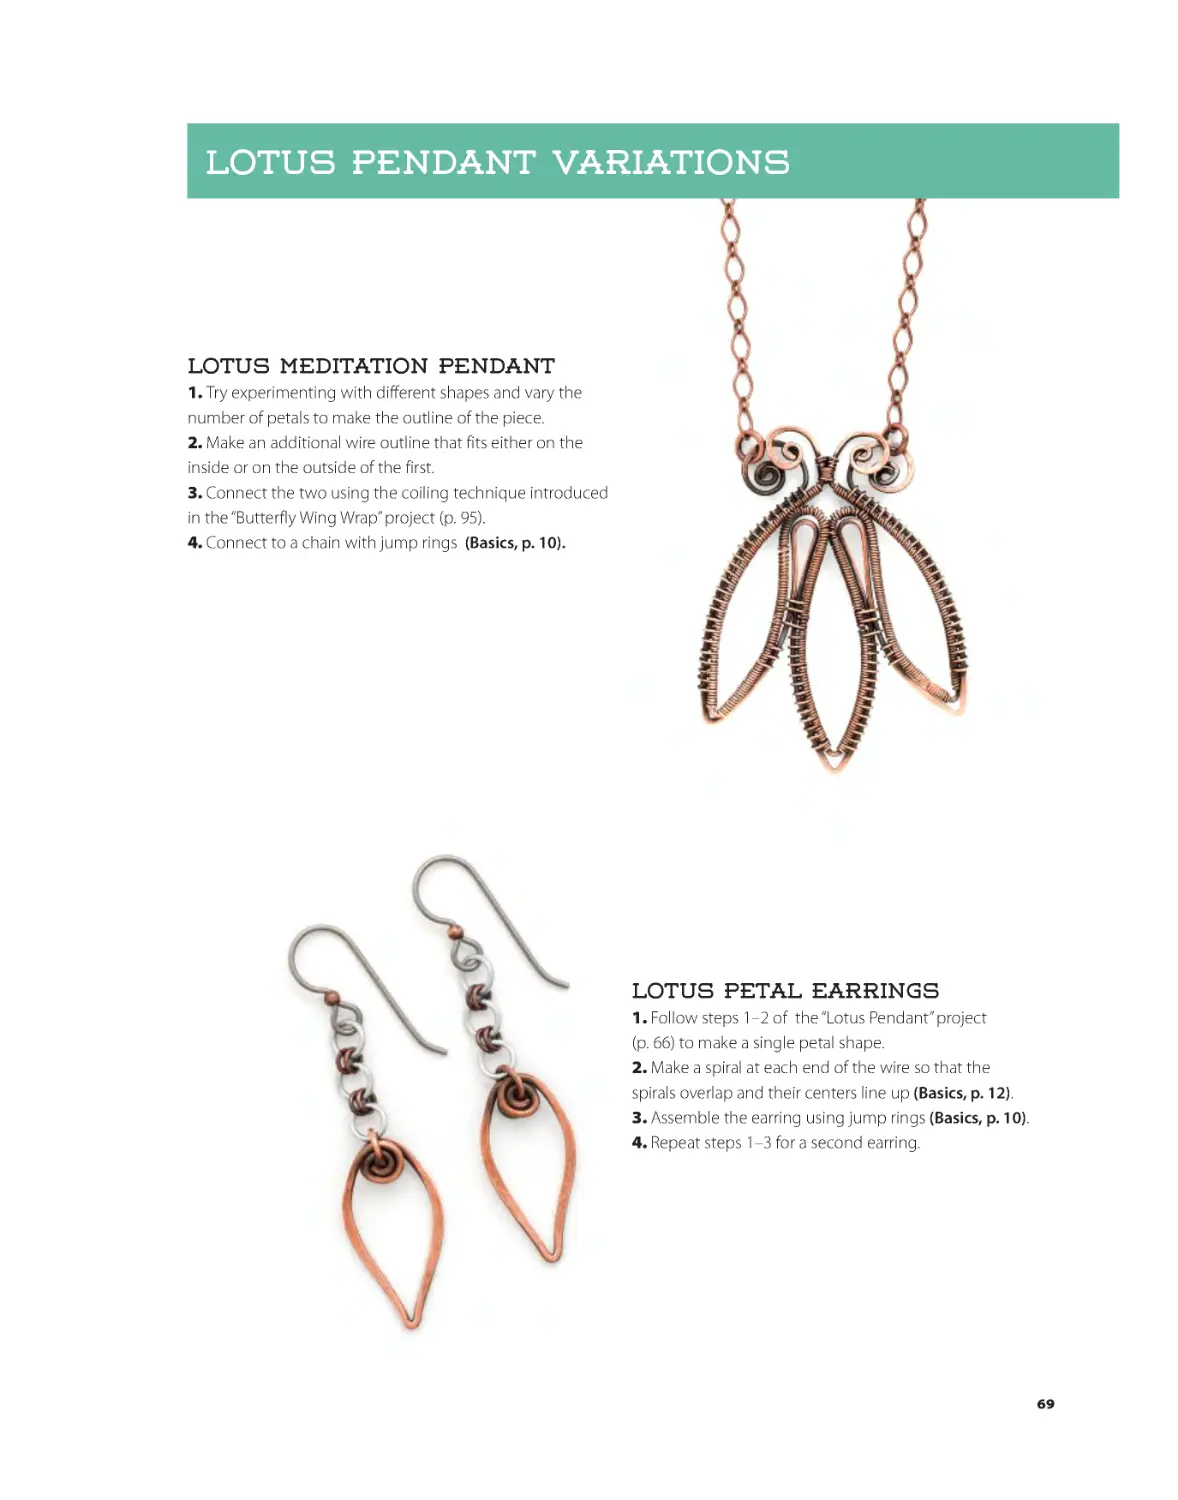
Lotus Meditation Pendant ........................................... 69
Lotus Petal Earrings............................................................69
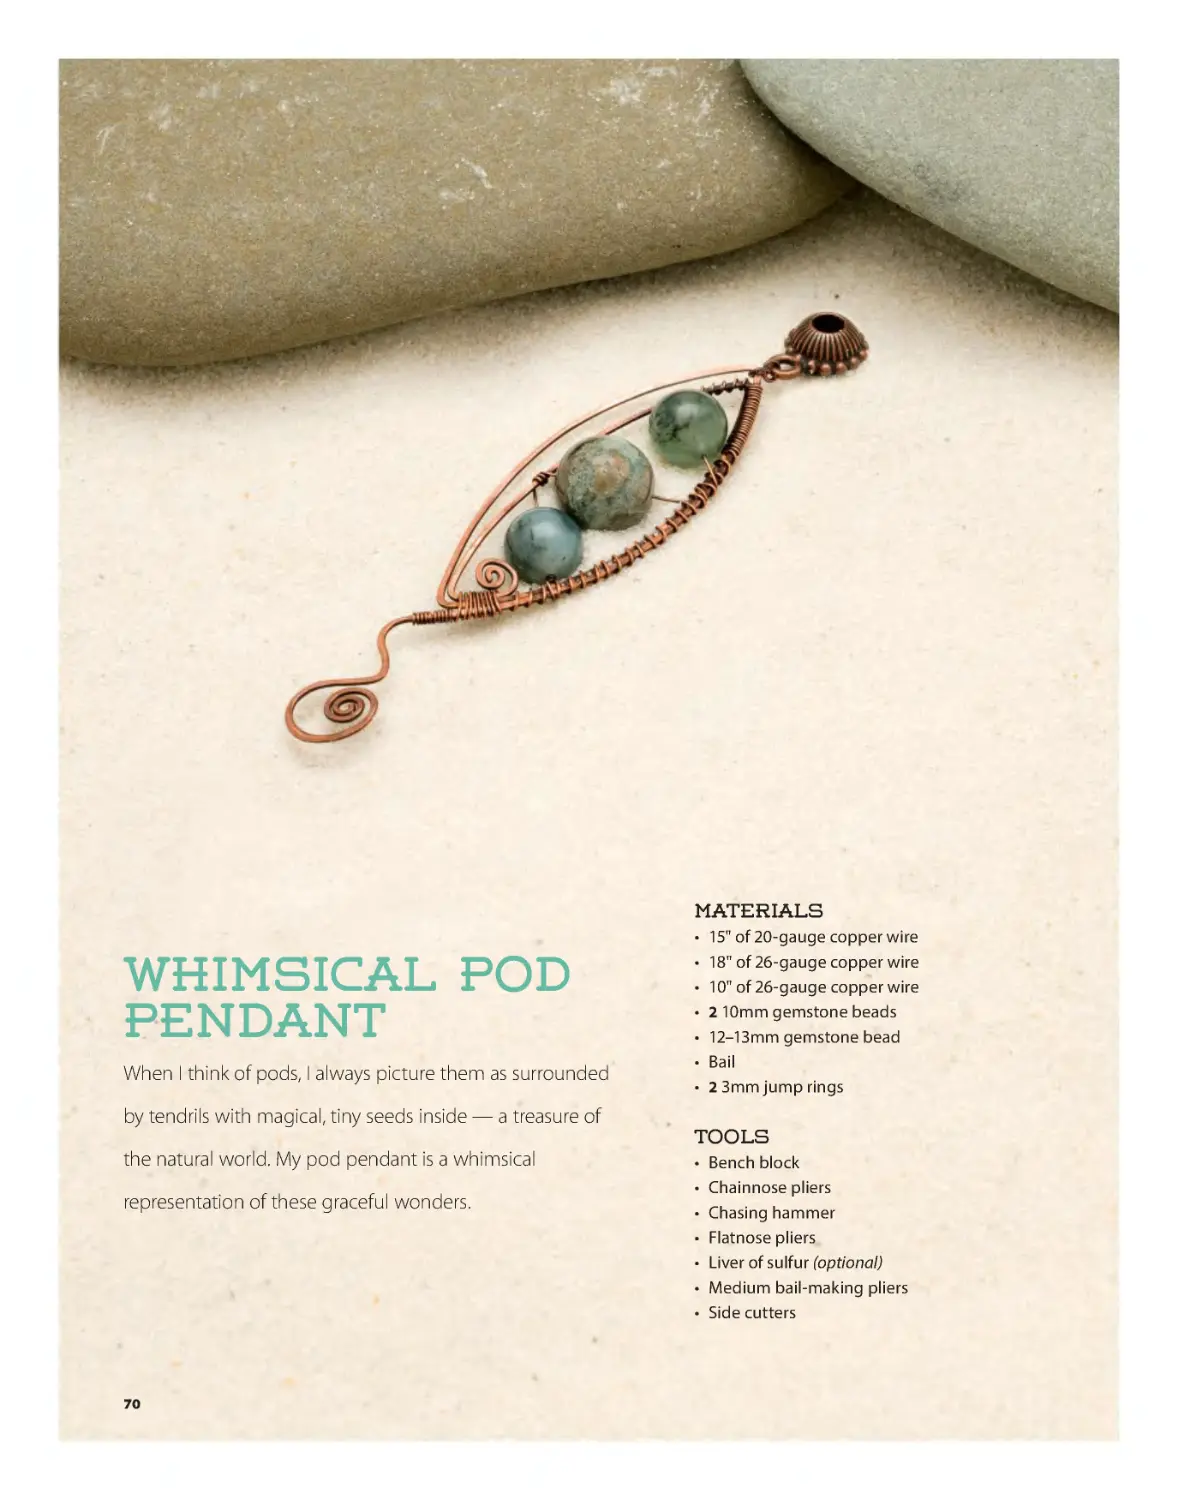
Whimsical Pod Pendant...................................................70
Slender Pod Pendant ........................................................74
Pod Silhouete Earrings .....................................................74
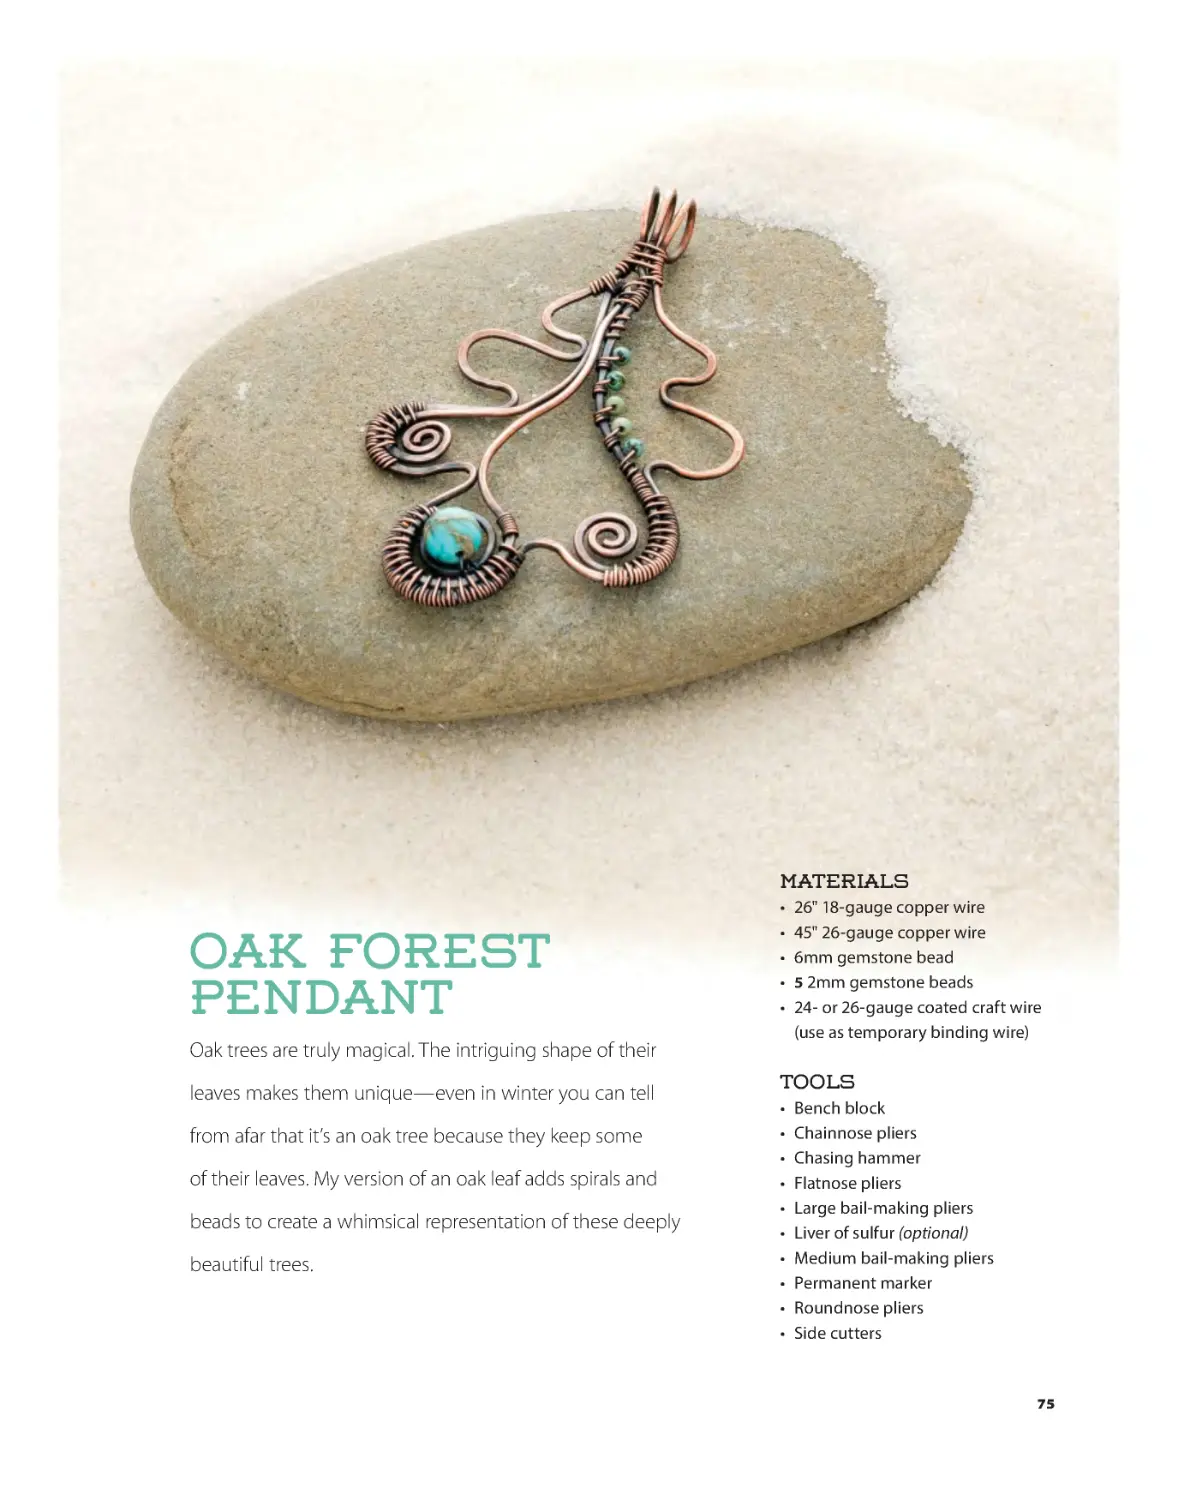
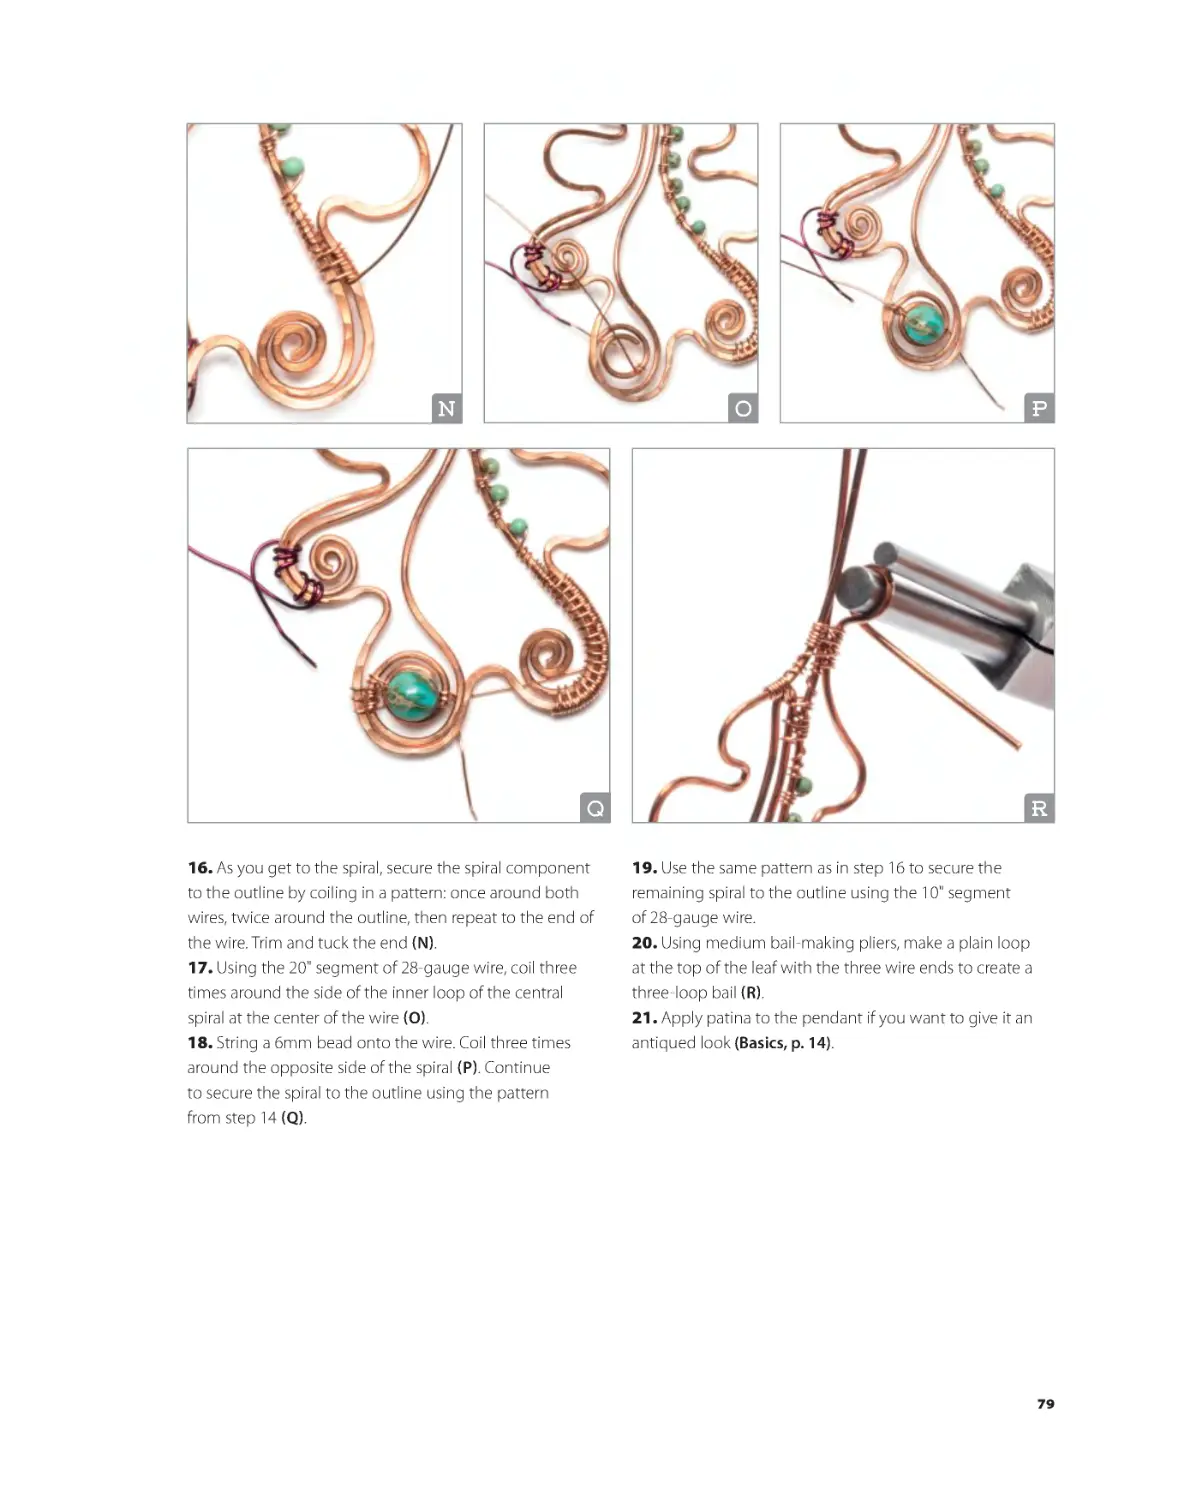
Oak Forest pendant ...............................................................75
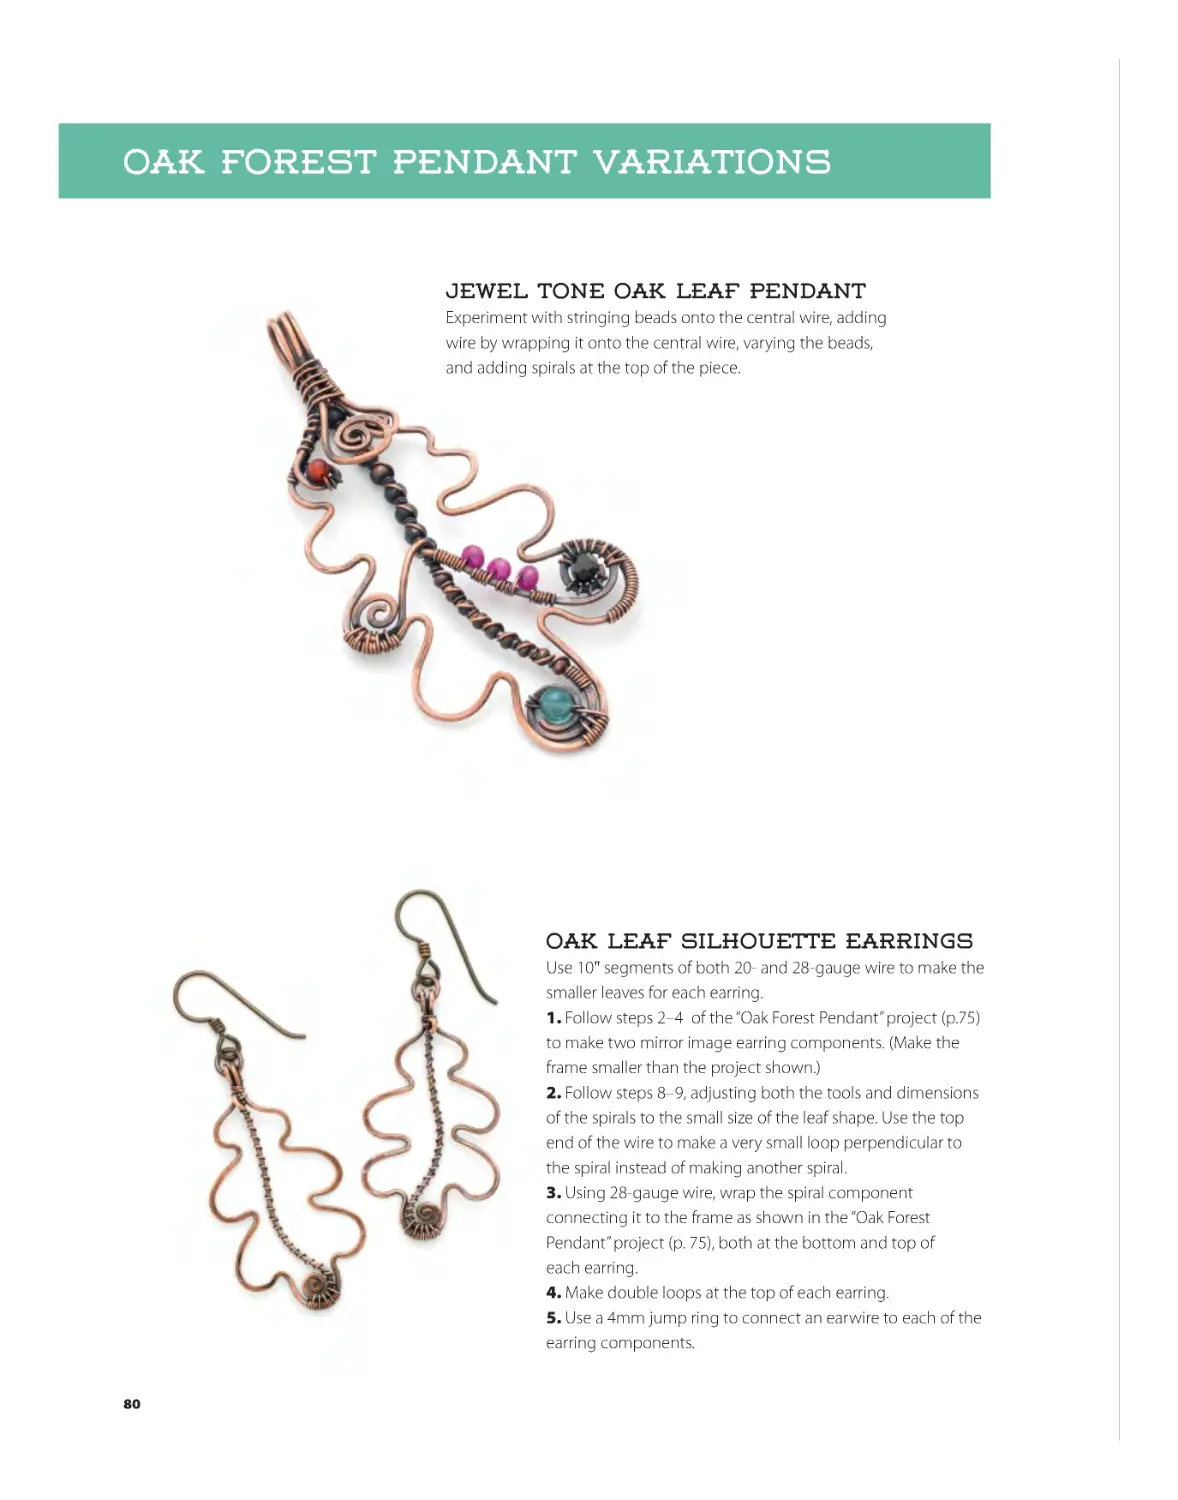
Jewel Tone Oak Leaf Pendant ..................................... 80
Oak Leaf Silhouette Earrings........................................ 80
Cabochons &
FOCAL POINT STONES
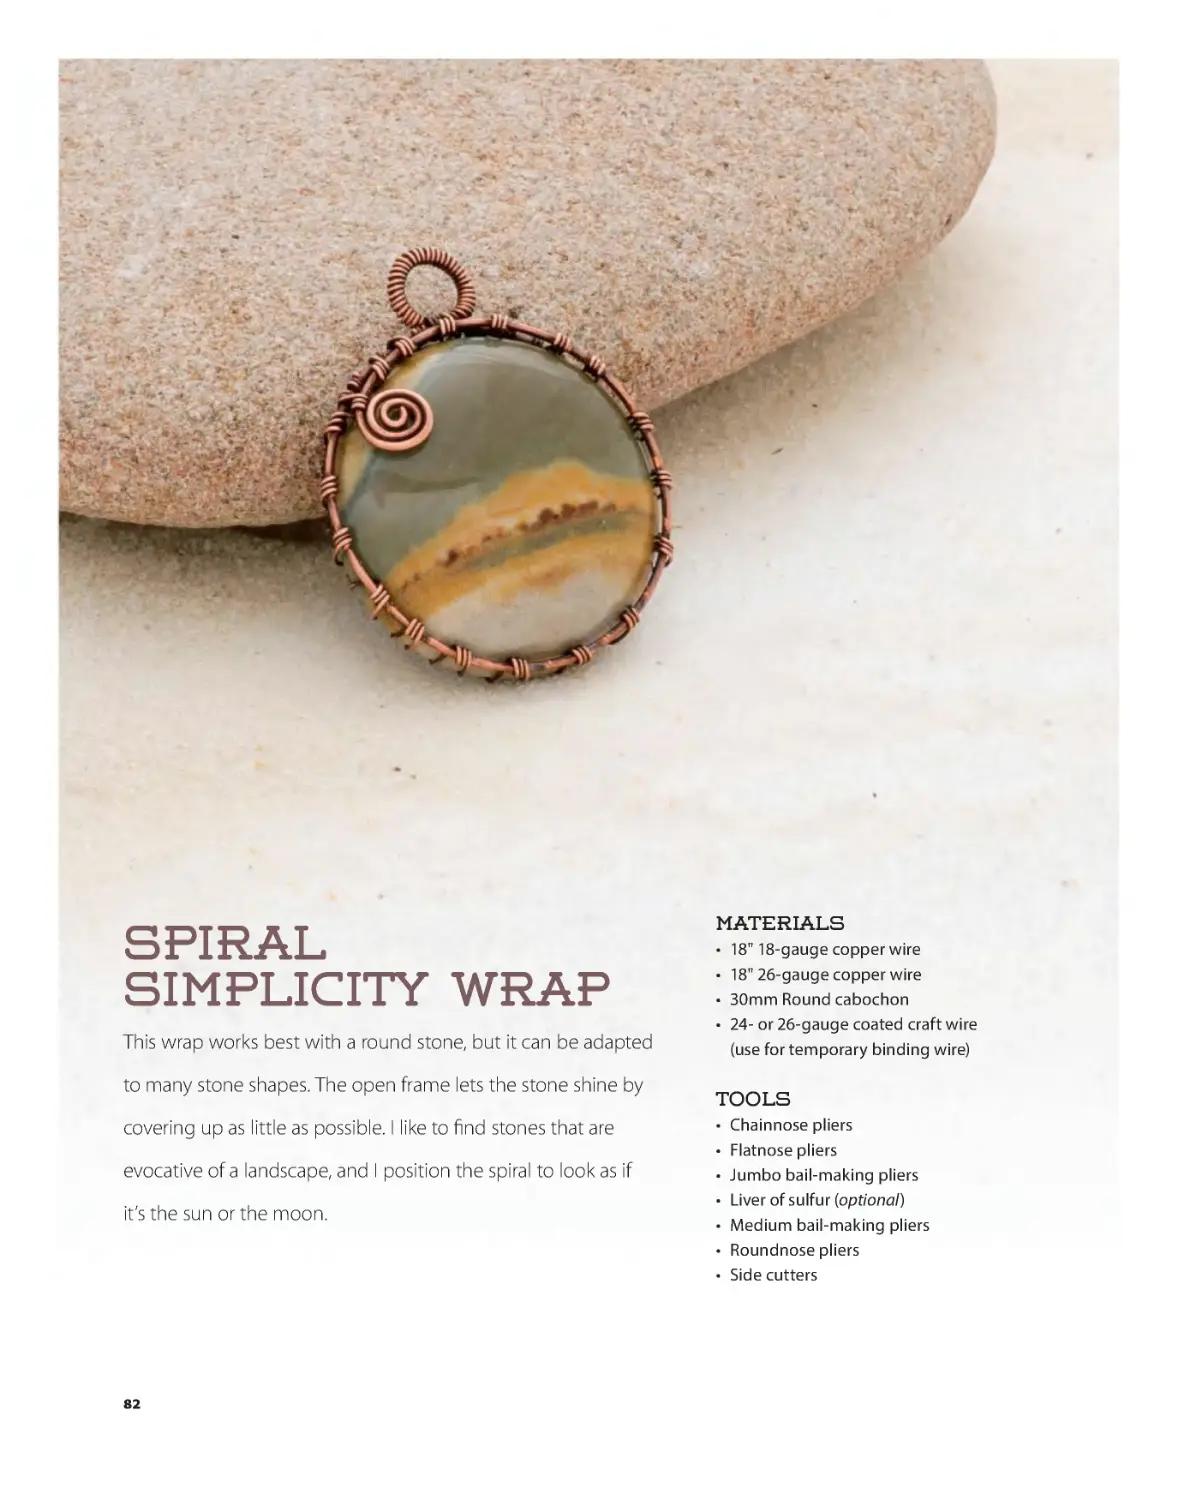
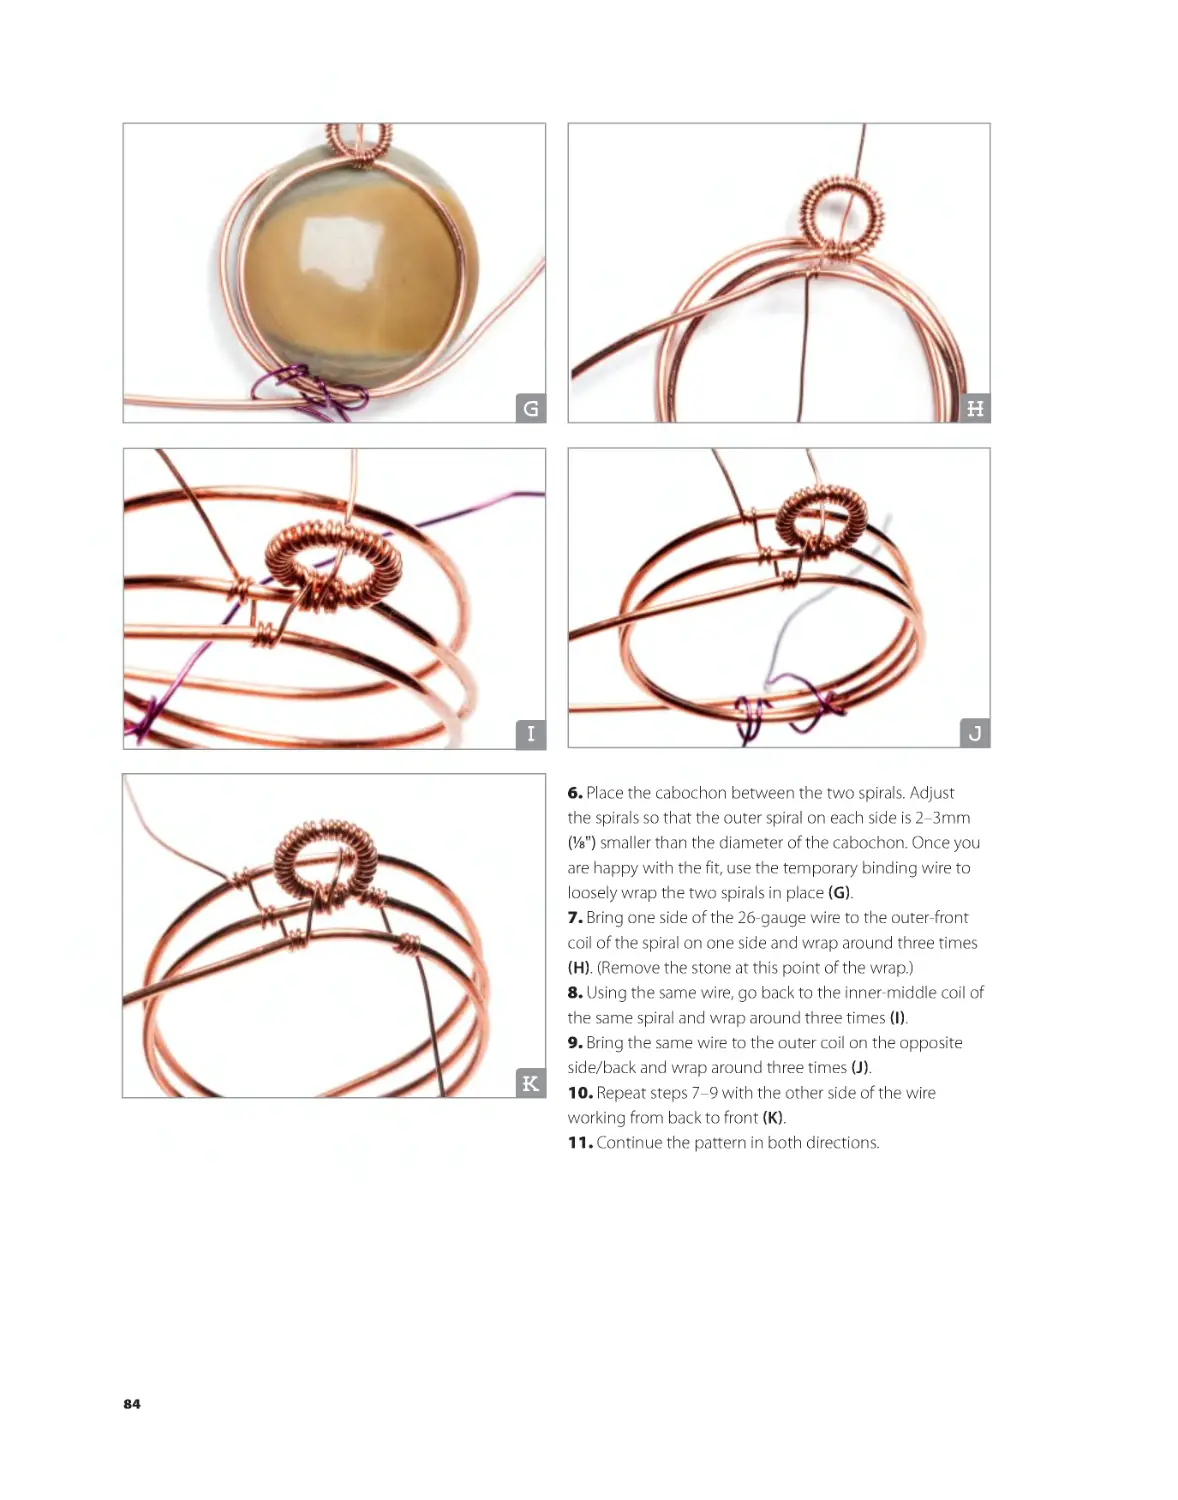
Spiral Simplicity Wrap......................................................... 82
Coiling Patterns
Spiny Spiral Pendant ............................................................ 34
Spiny Spiral Framed Pendant .......................................37
Spiny Spiral Earrings .........................................................37
Celtic Knot Bacelet ................................................................. 38
Teardrop Earrings................................................................41
Celtic Pendant .....................................................................41
Plumeria Leaf Earrings.........................................................42
Plumeria Gem Pendant ...................................................45
Birch Leaf Pendant ............................................................45
Gemstone Ladder Bracelet ............................................ 46
Sedona Bracelet...................................................................49
Tiny Gems Bracelet ............................................................49
Stacking Spiral Rings.............................................................50
Garnet and Turquoise Ring............................................53
Pearl Whimsy Ring .............................................................53
Desert Vine Earrings............................................................. 54
Desert Vine Bracelet .......................................................... 56
Copper Edge Earrings ...................................................... 56
BKS-67899-00.indd 3
Spiral Sphere Pendant .................................................... 86
Spiral Wave Pendant........................................................ 86
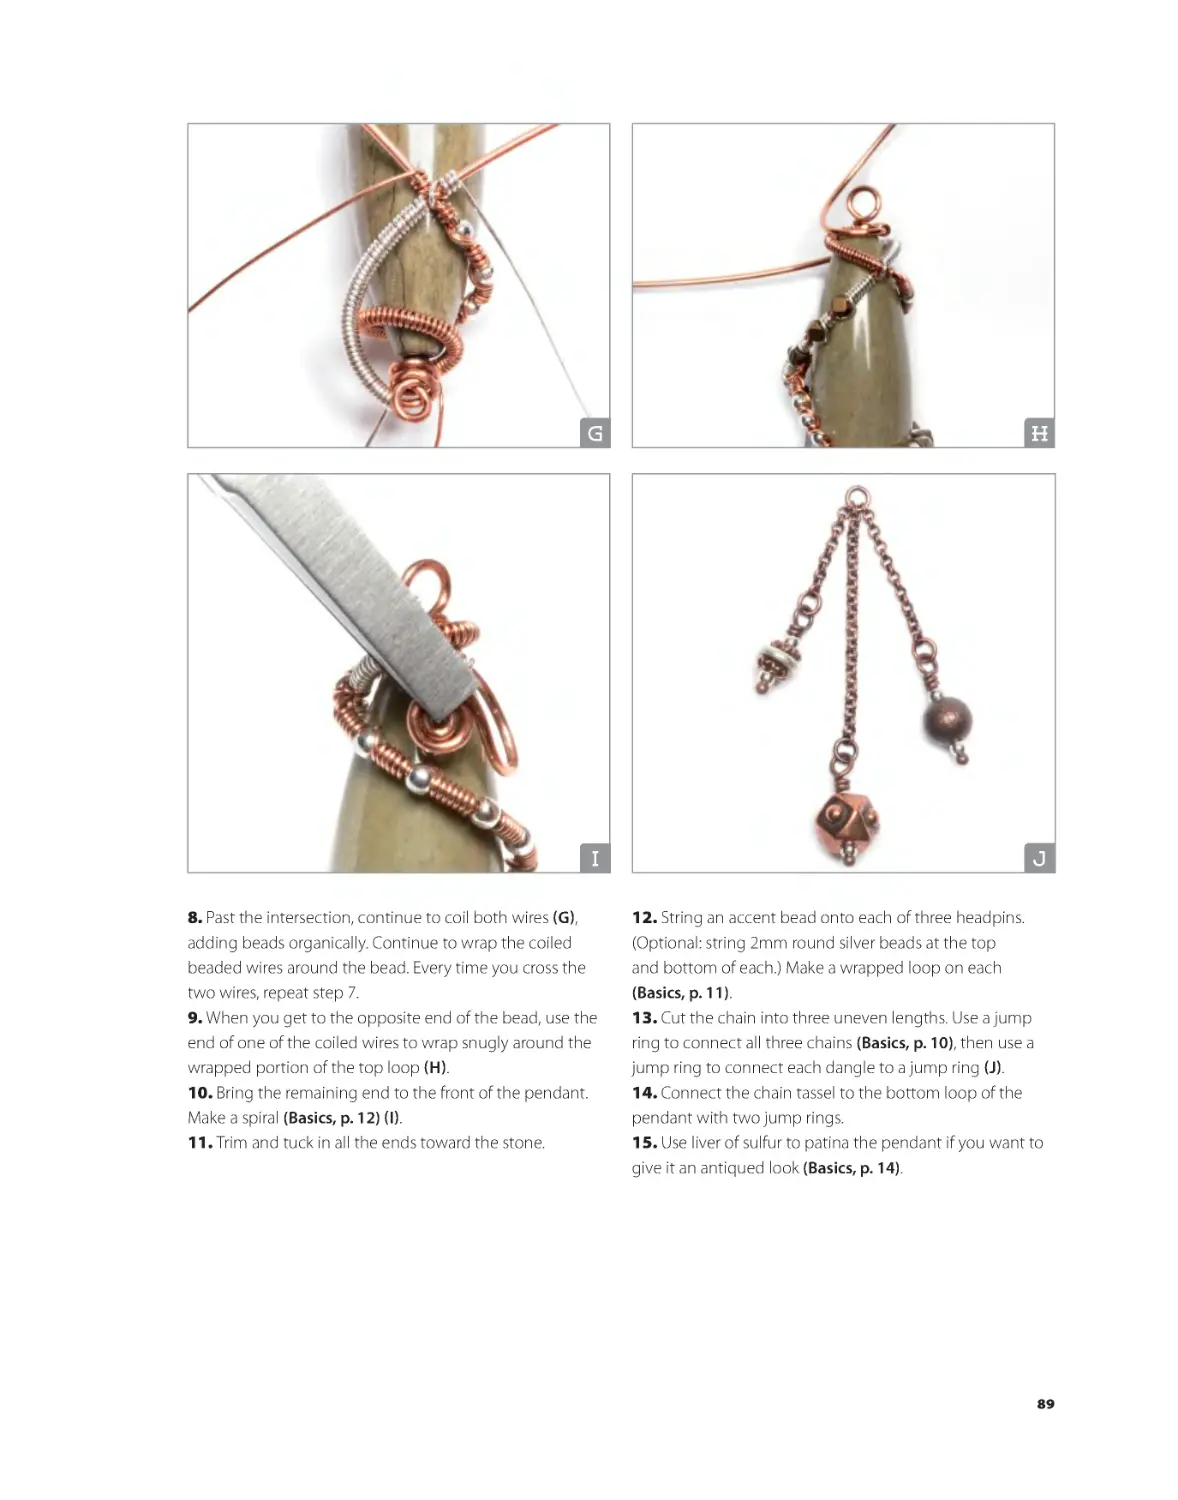
Orbiting Spiral pendant .....................................................87
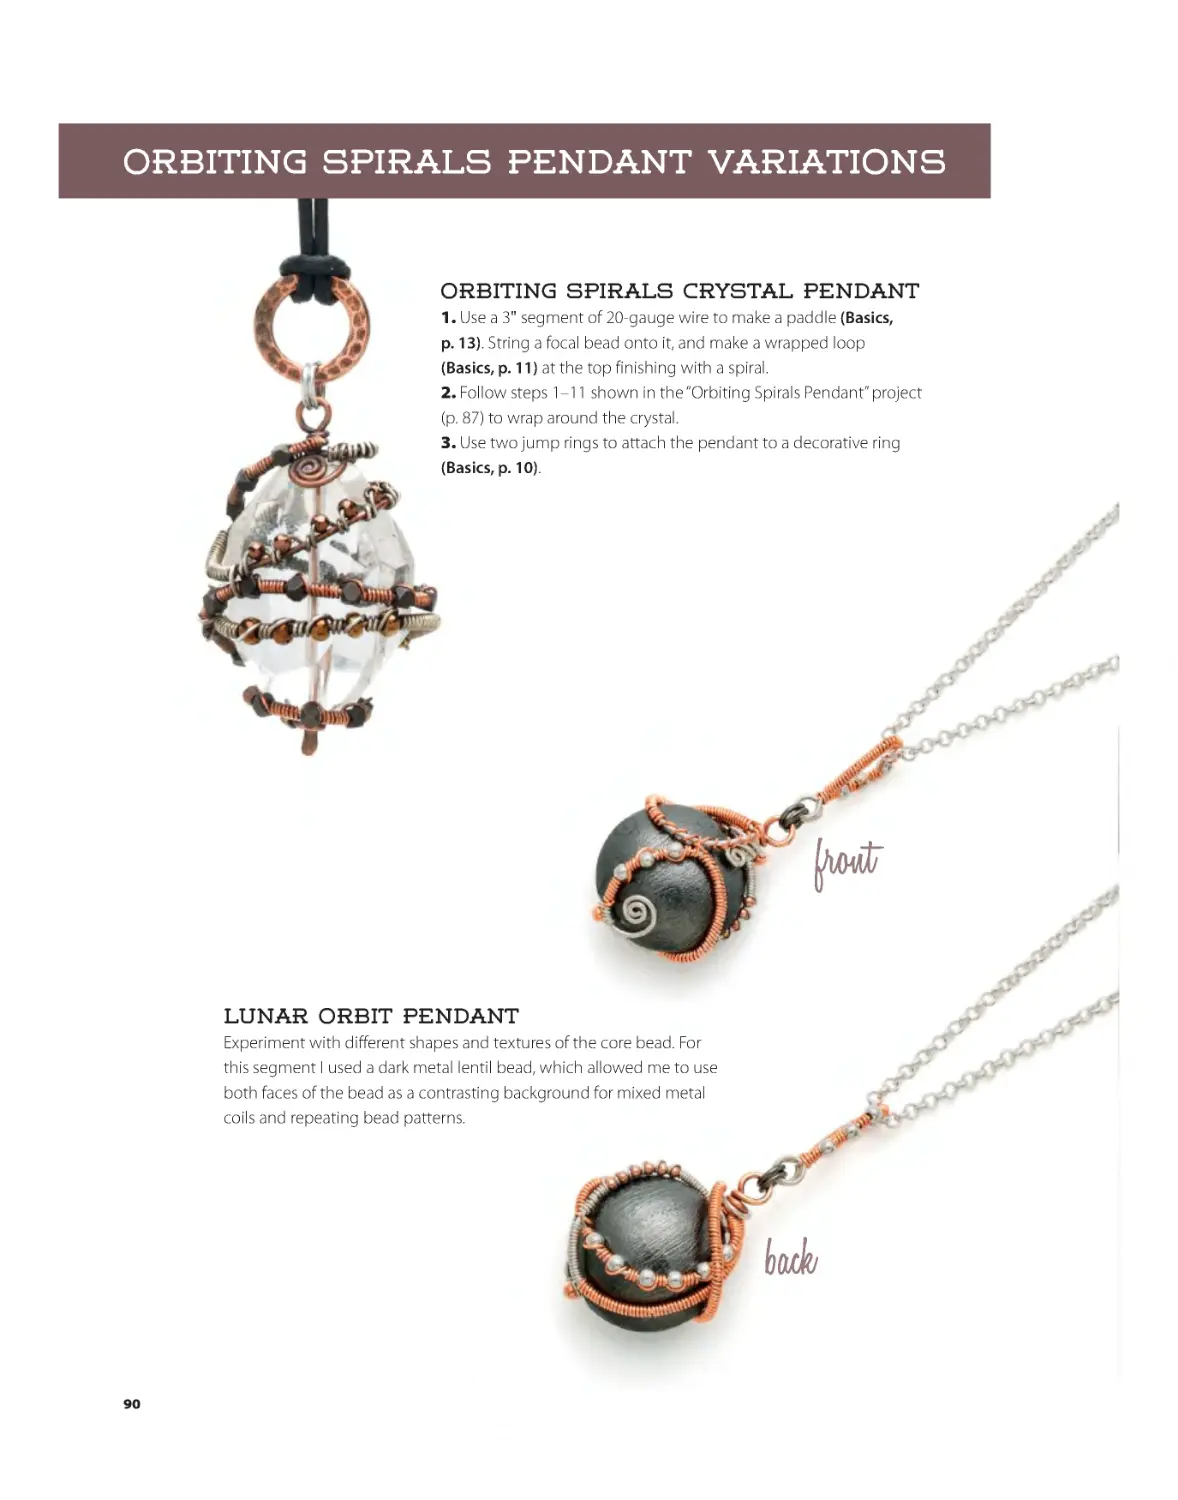
Orbiting Spirals Crystal Pendant................................ 90
Lunar Orbit Pendant ........................................................ 90
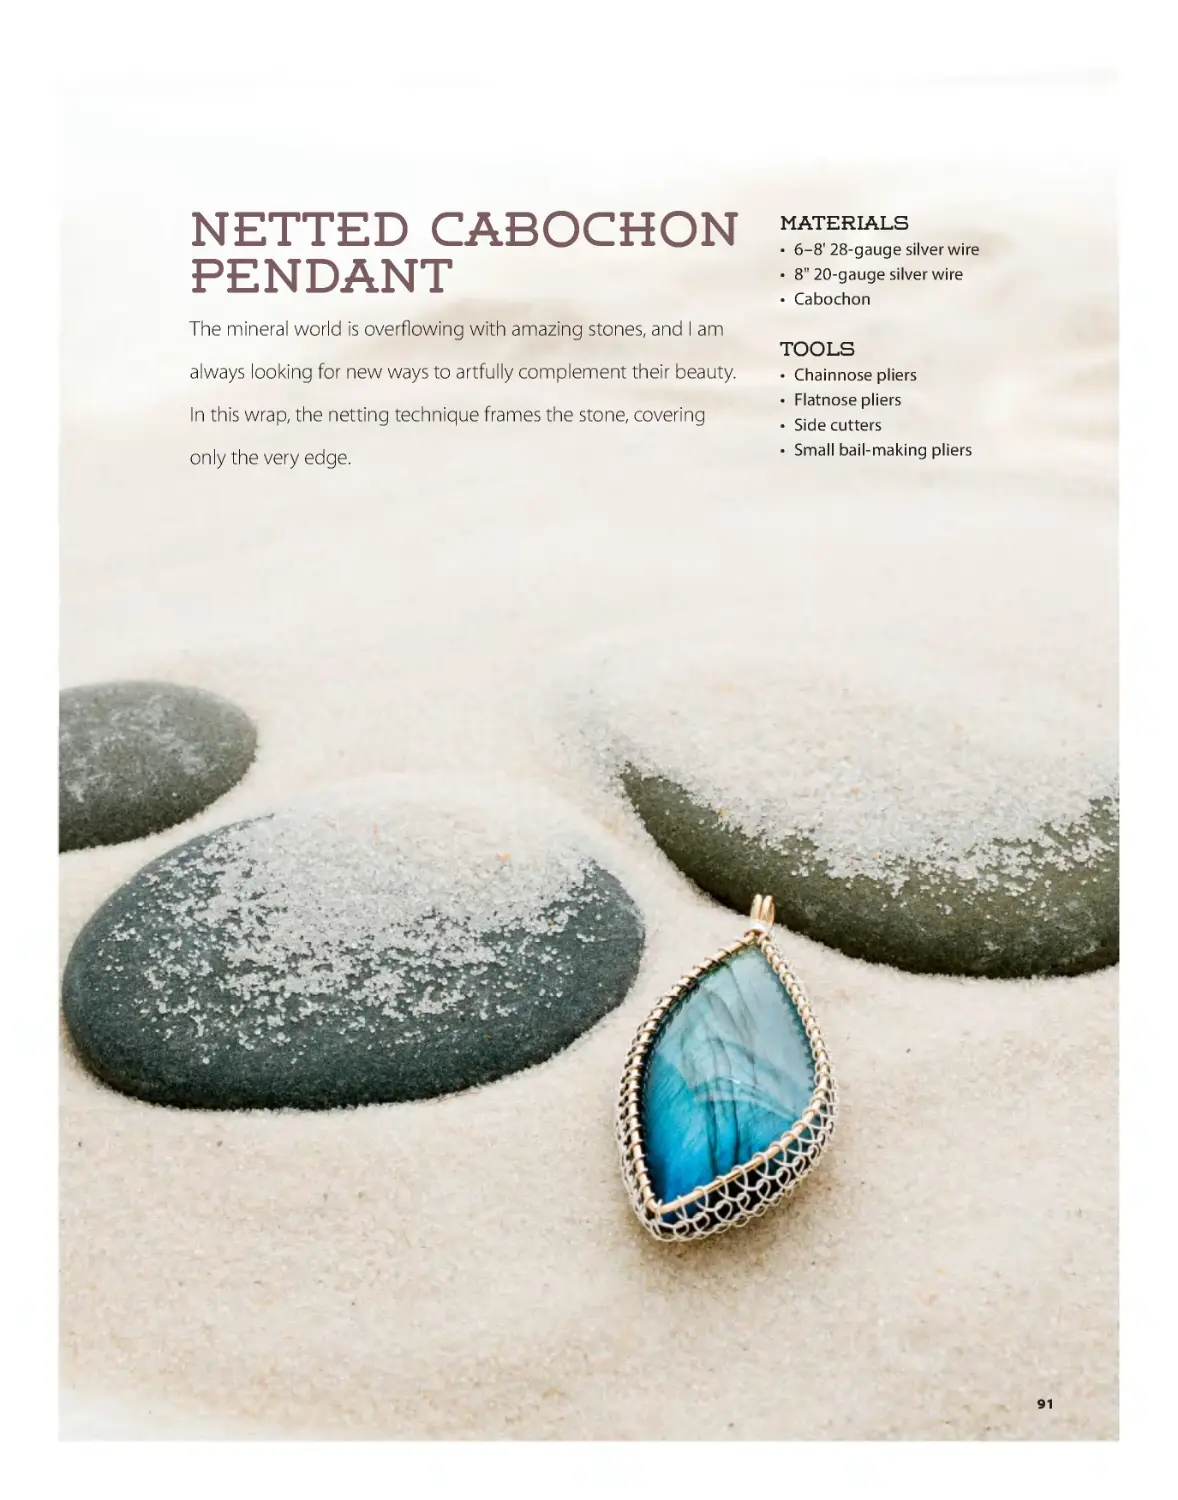
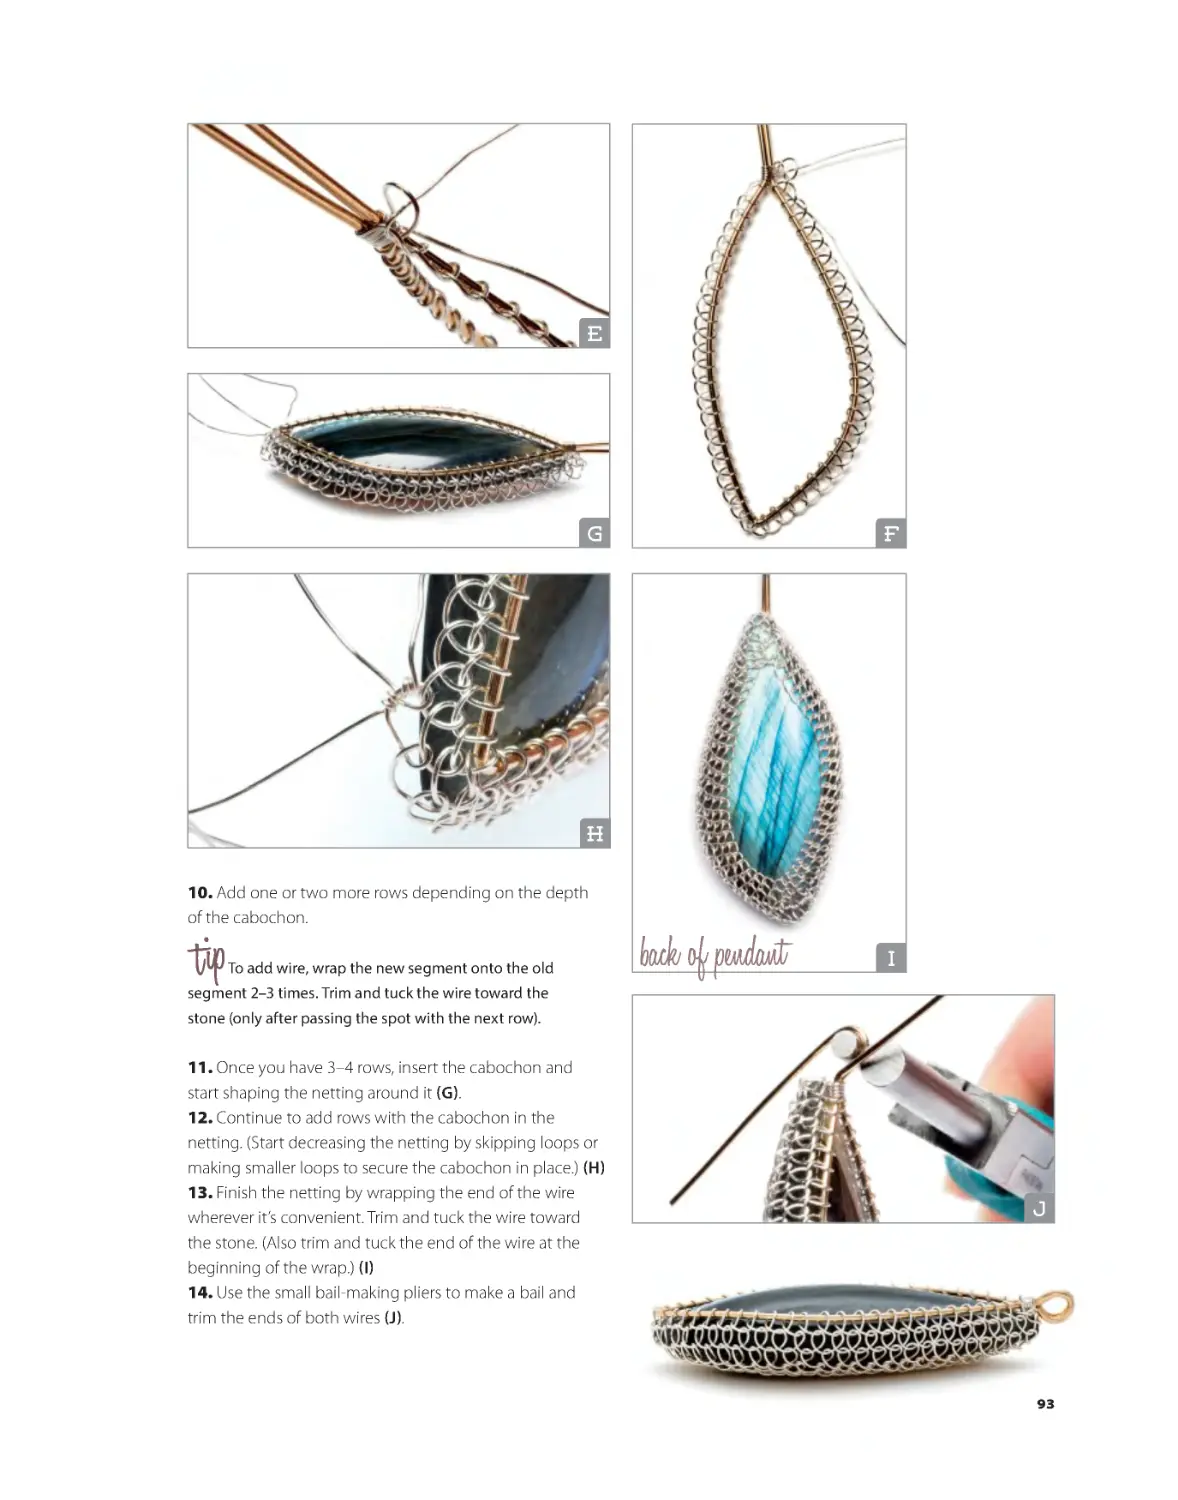
Netted Cabochon .................................................................... 91
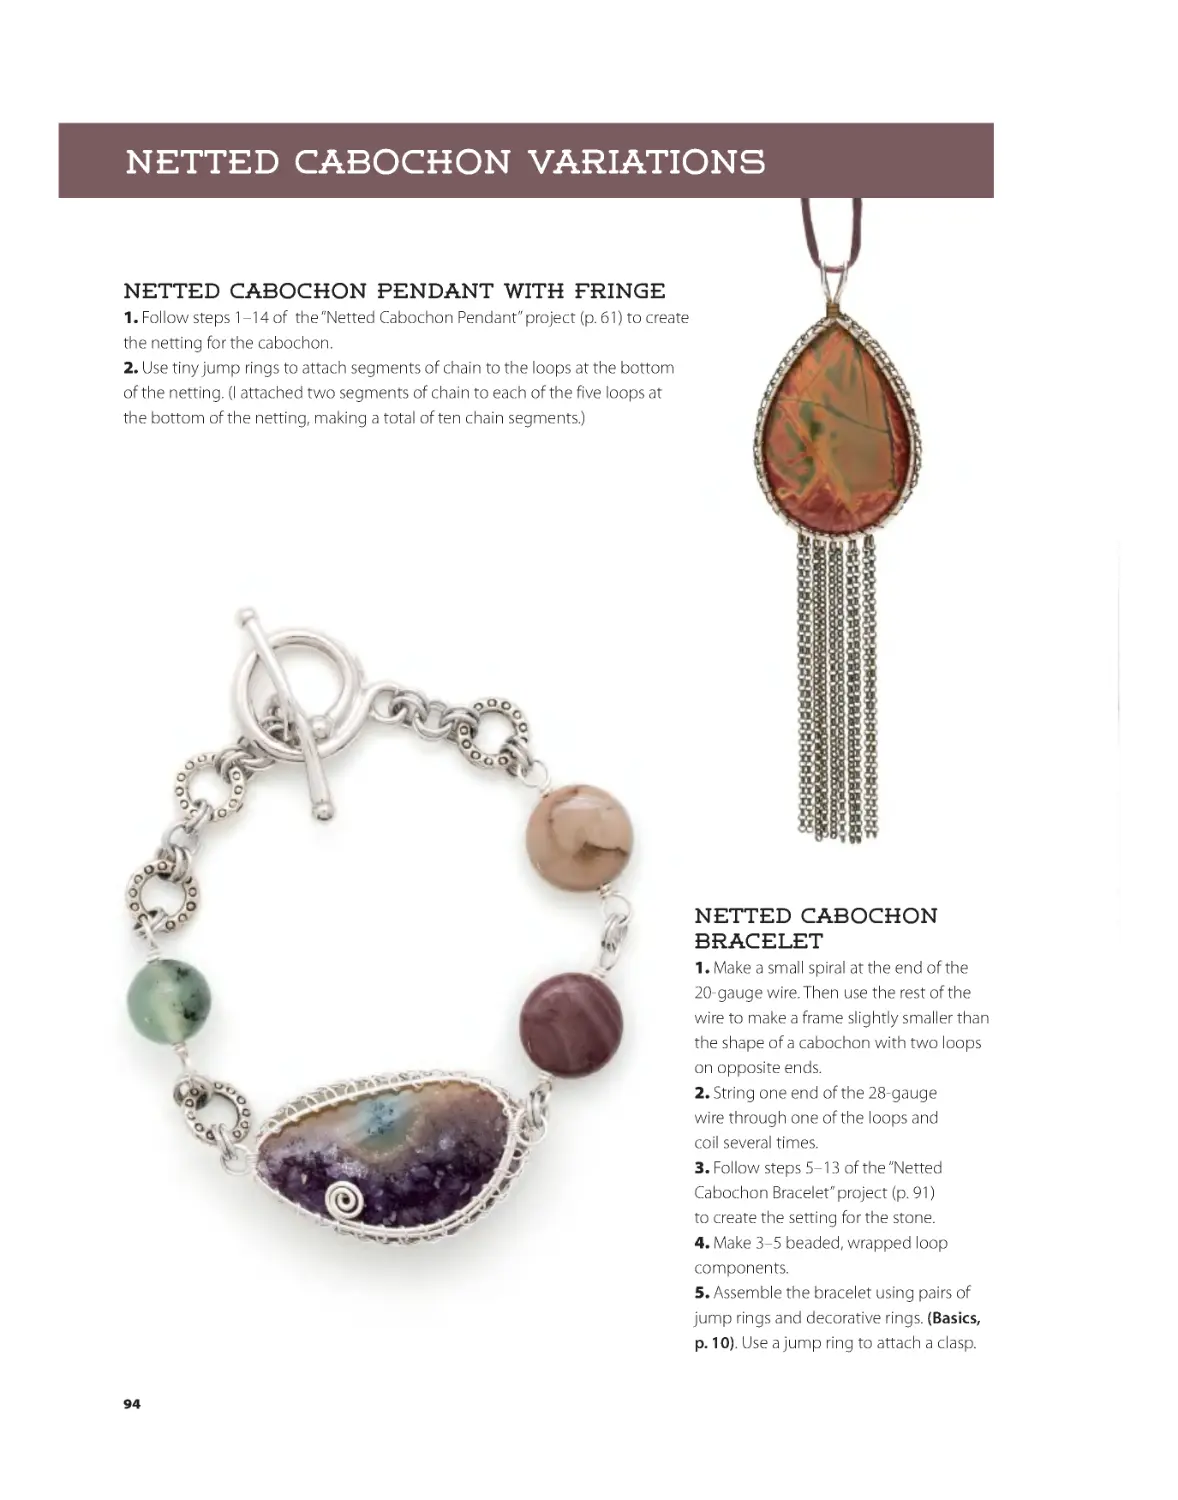
Netted Cabachon Pendant with Fringe ............... 94
Netted Cabachon Bracelet ........................................... 94
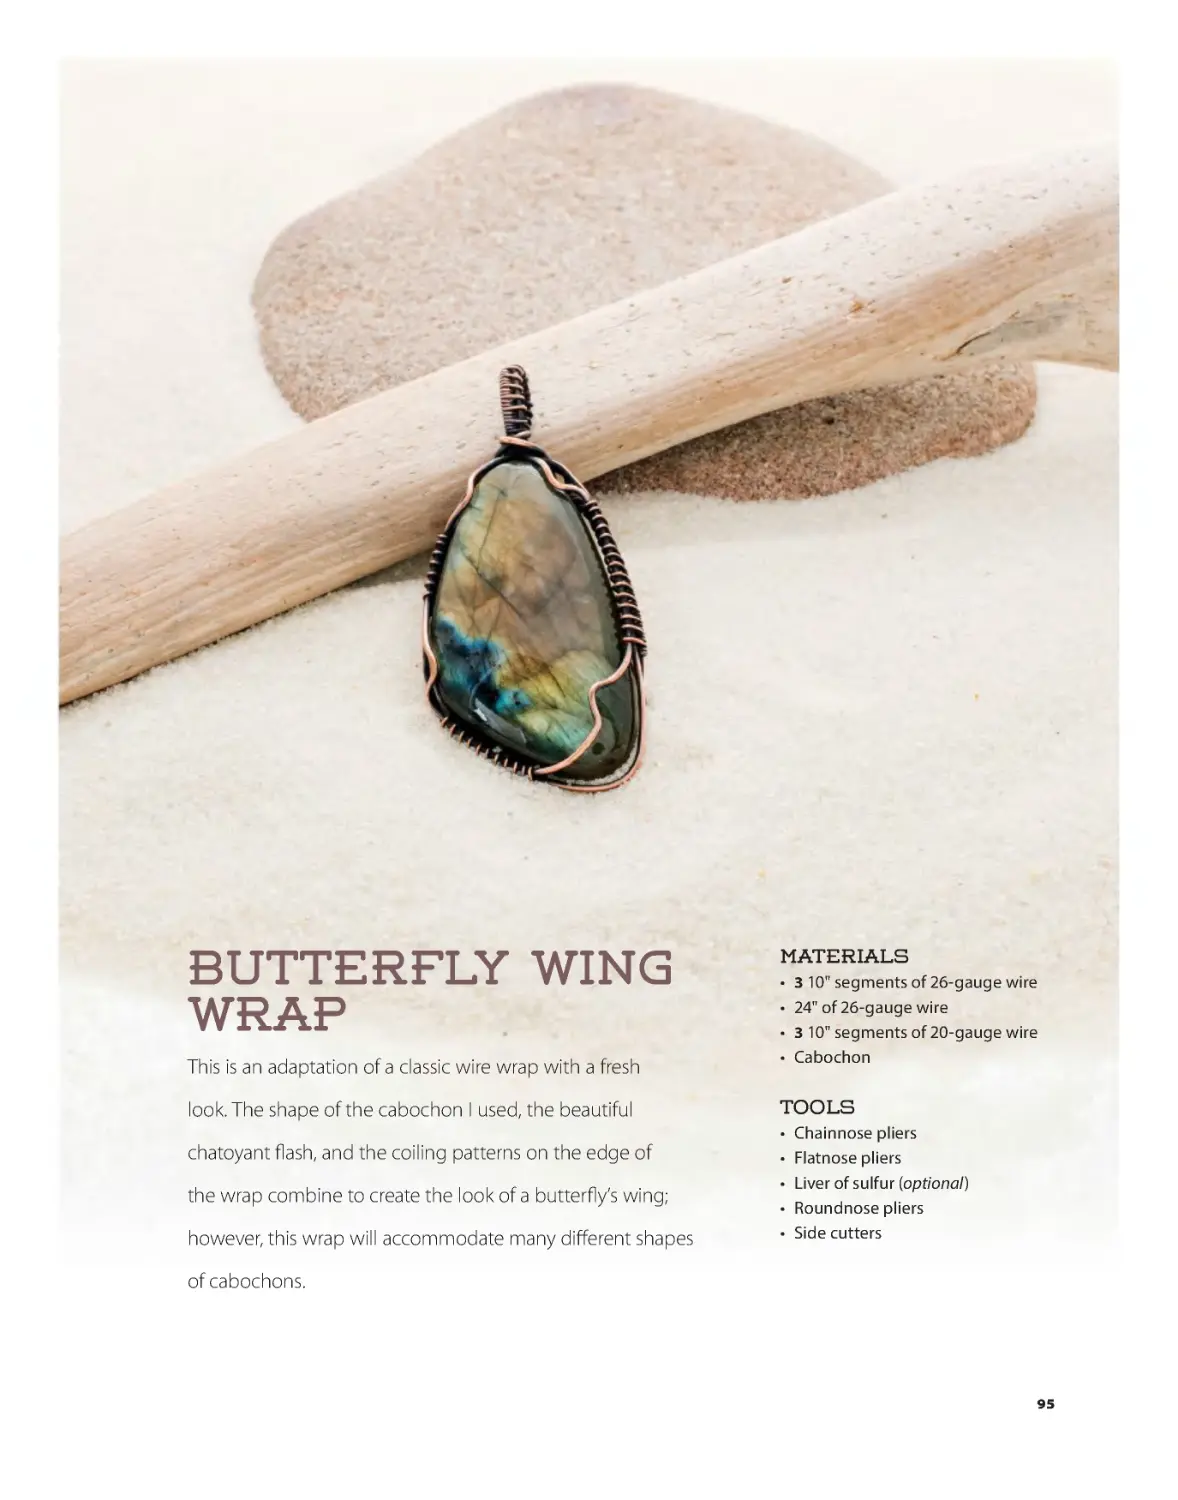
Butterfly Wing Wrap .............................................................95
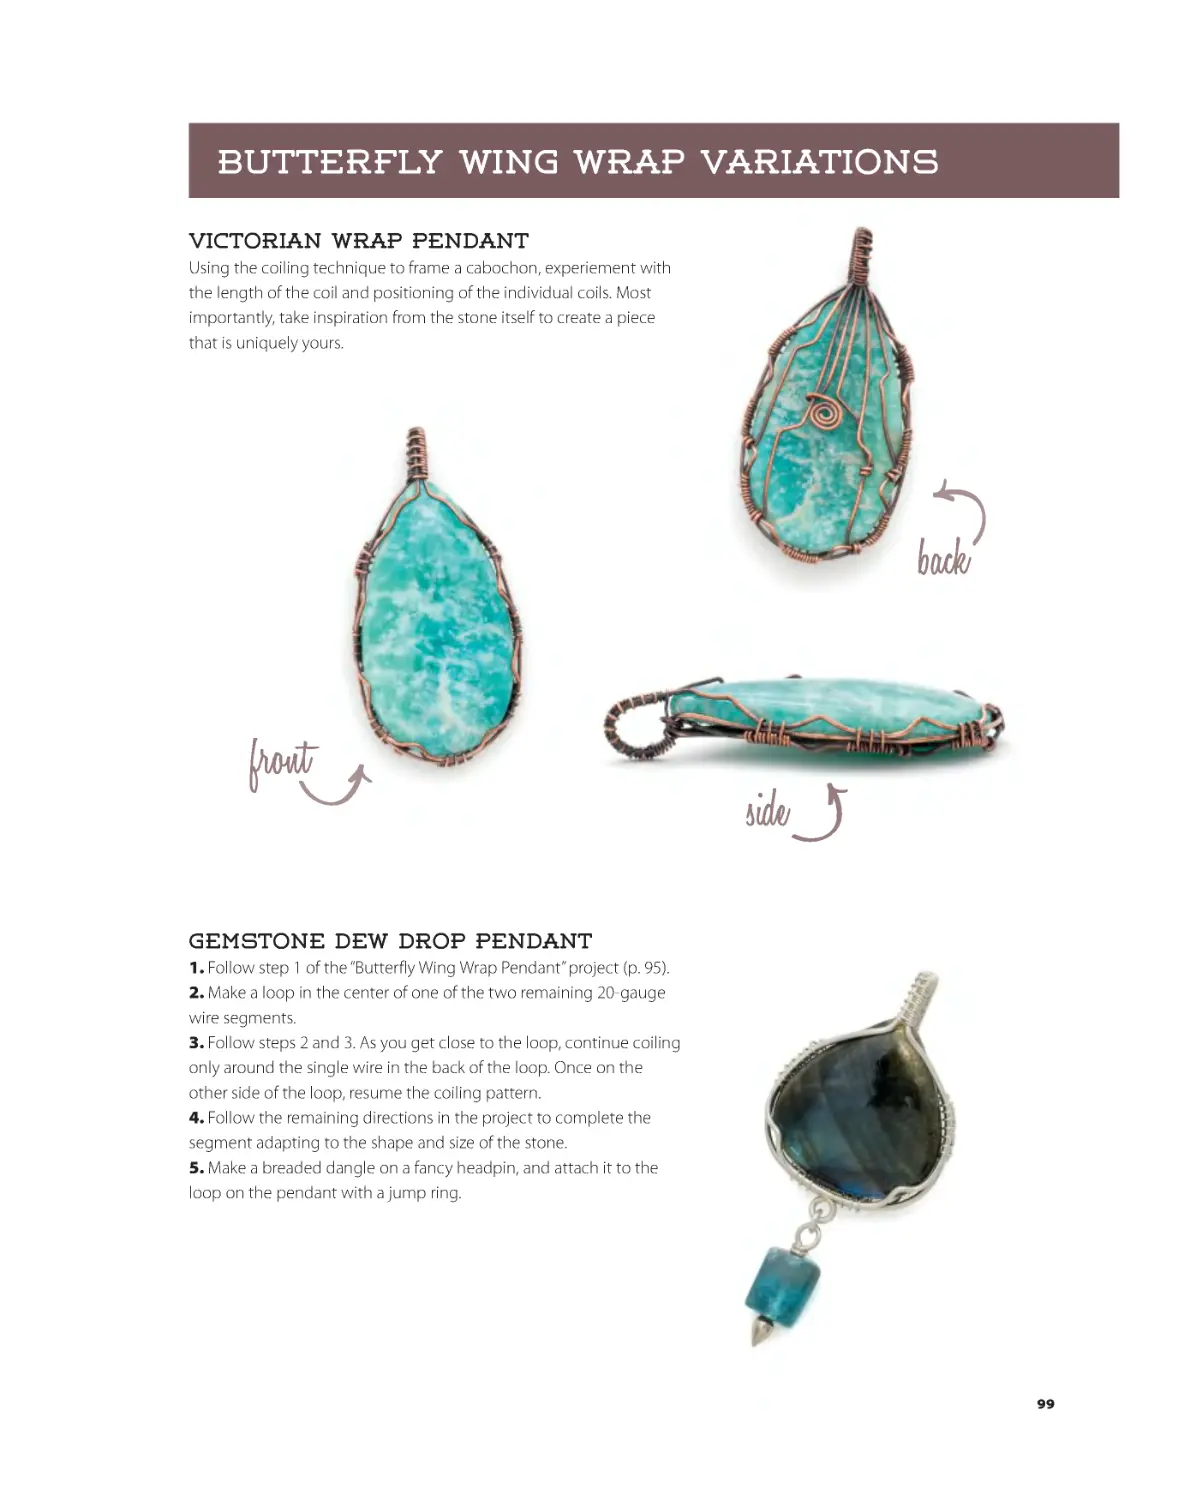
Victorian Wrap Pendant ................................................ 99
Gemstone Dew Drop Pendant..................................99
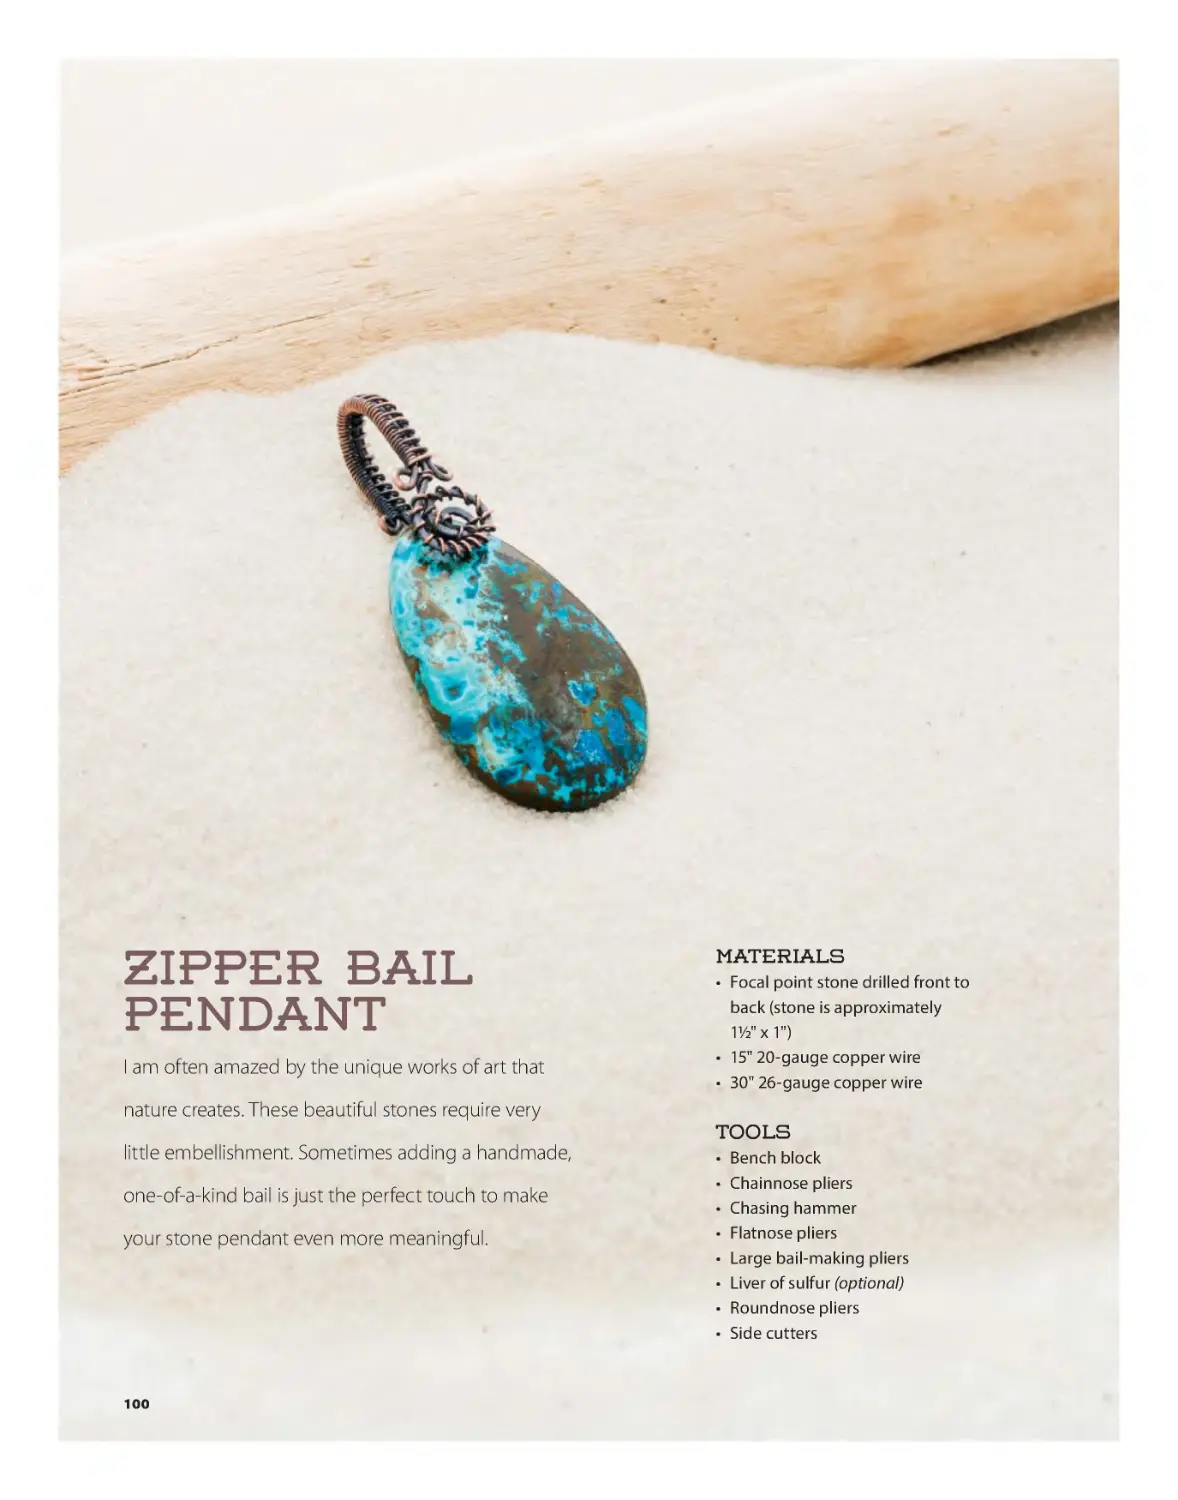
Zipper Bail Pendant ........................................................... 100
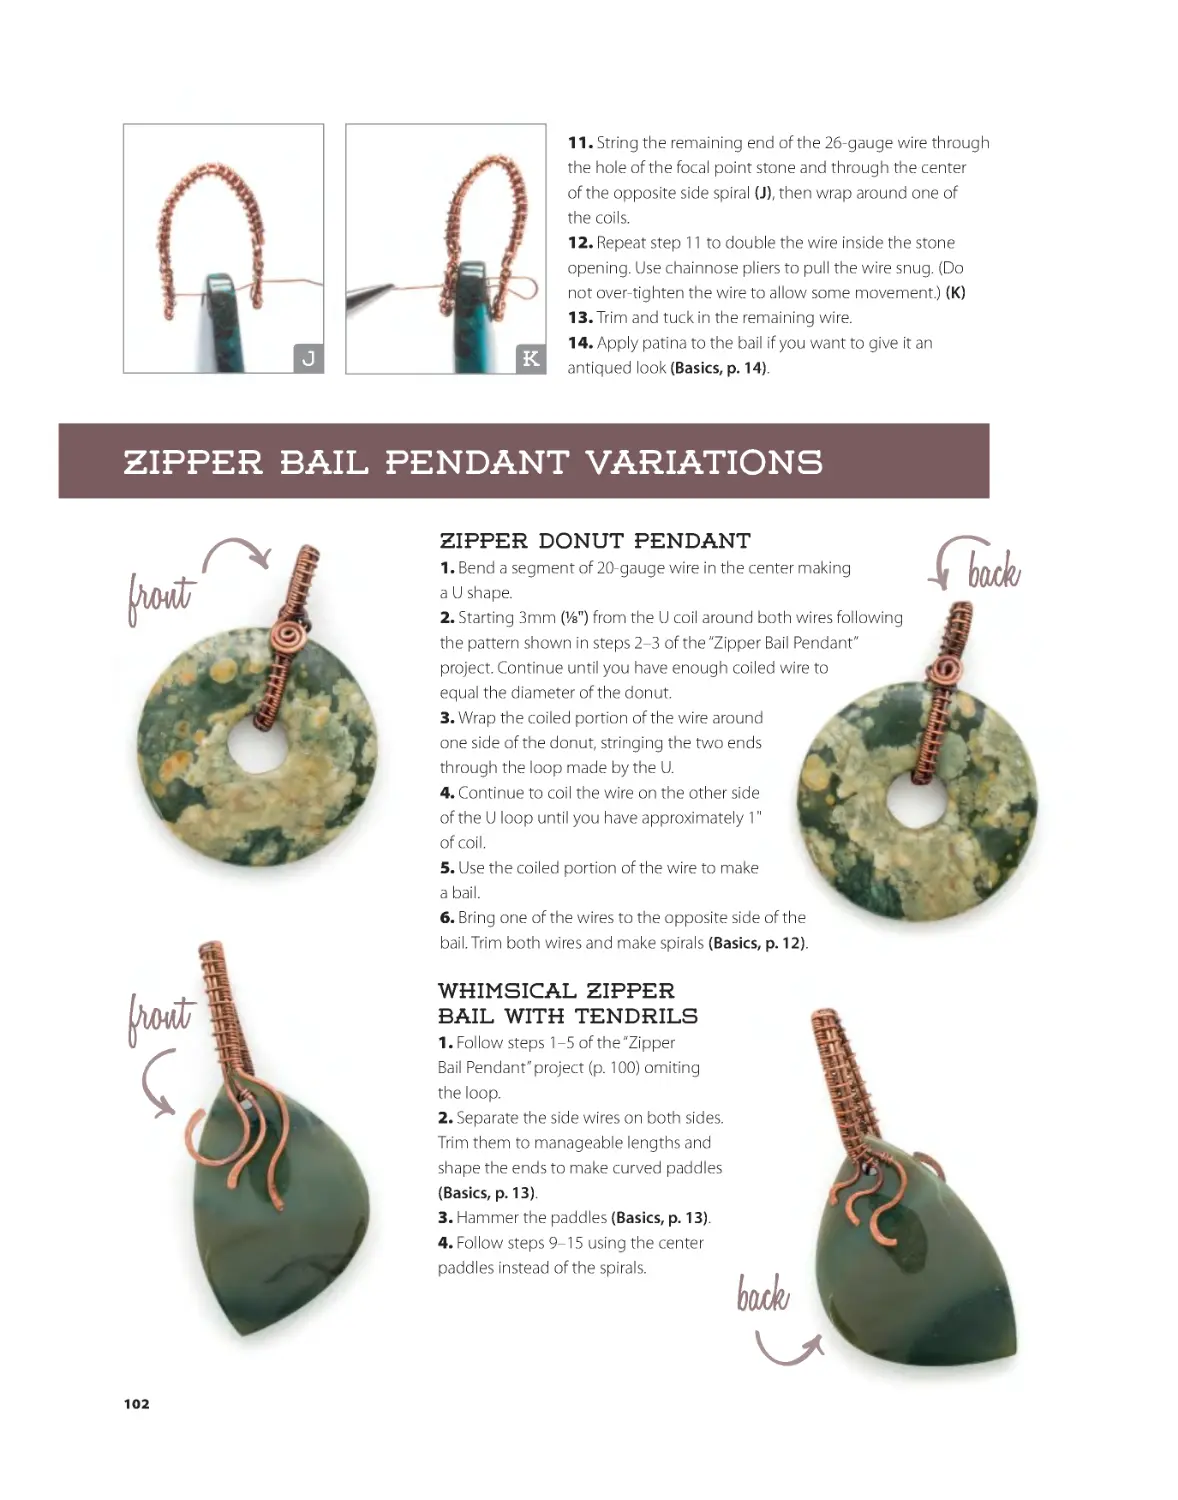
Zipper Donut Pendant.................................................. 102
Whimsical Zipper Bail with Tendrils ....................... 102
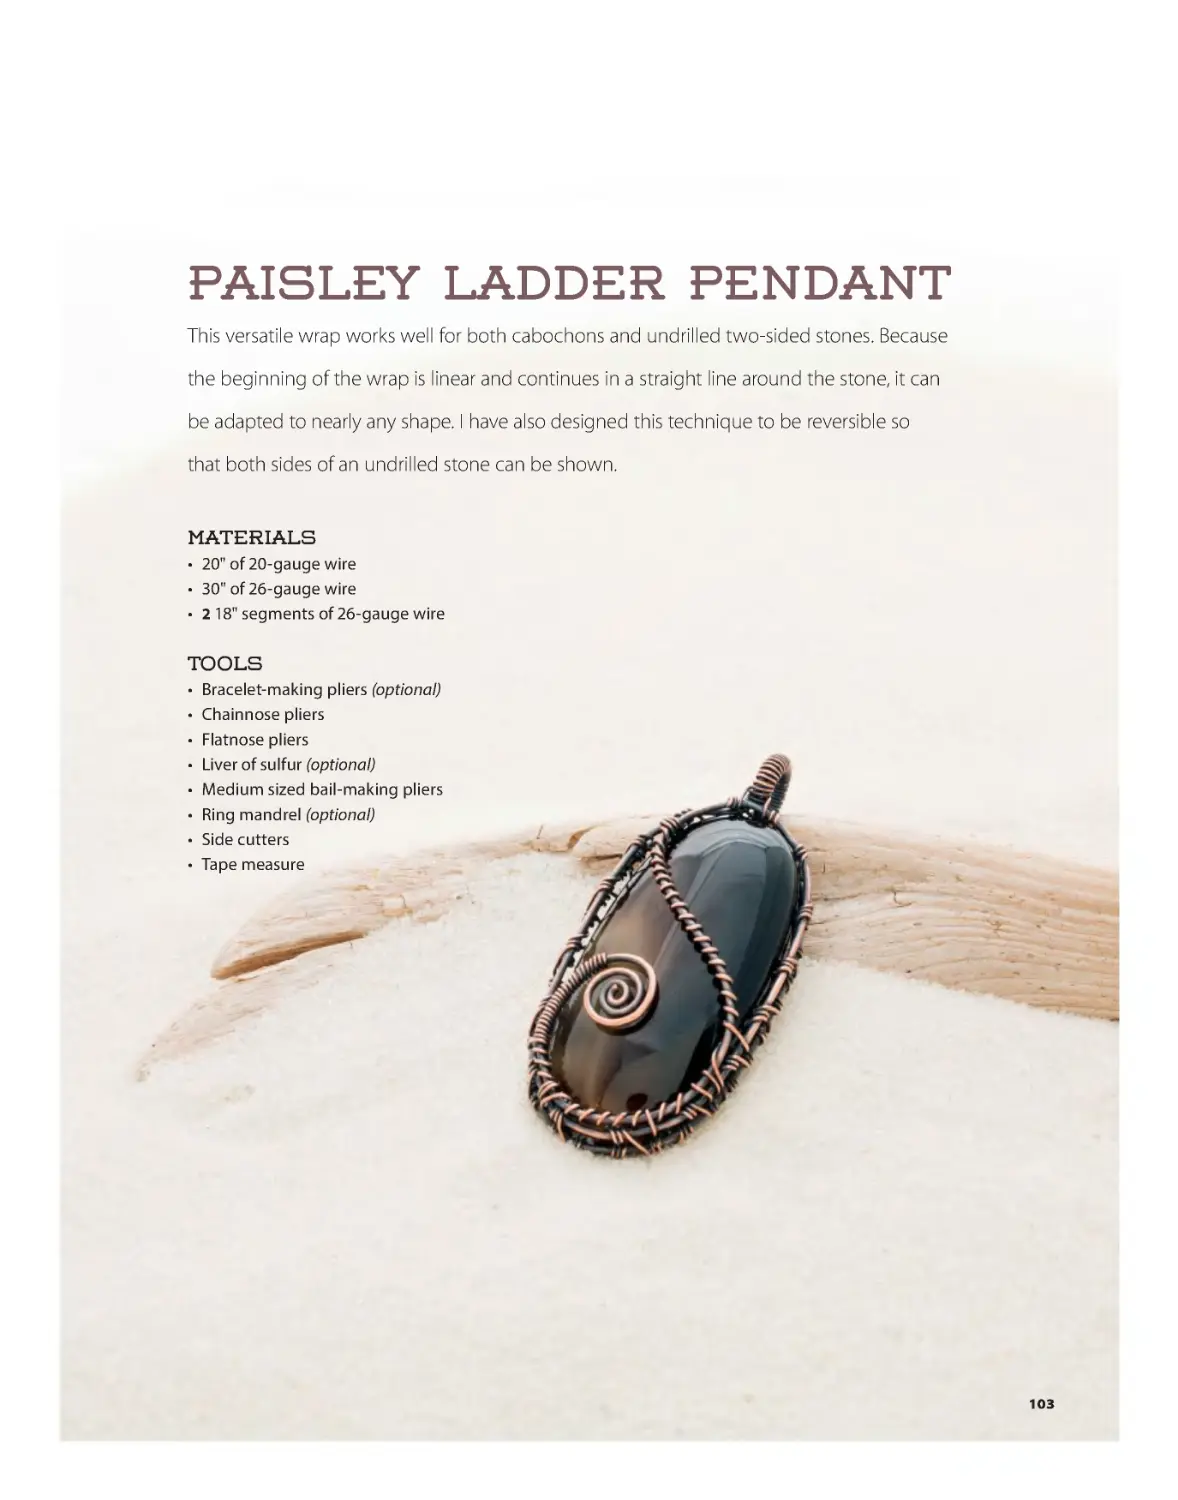
Paisley Ladder Pendant................................................... 103
Horizontal Amulet...........................................................106
Dream Jasper Ladder Pendant ................................106
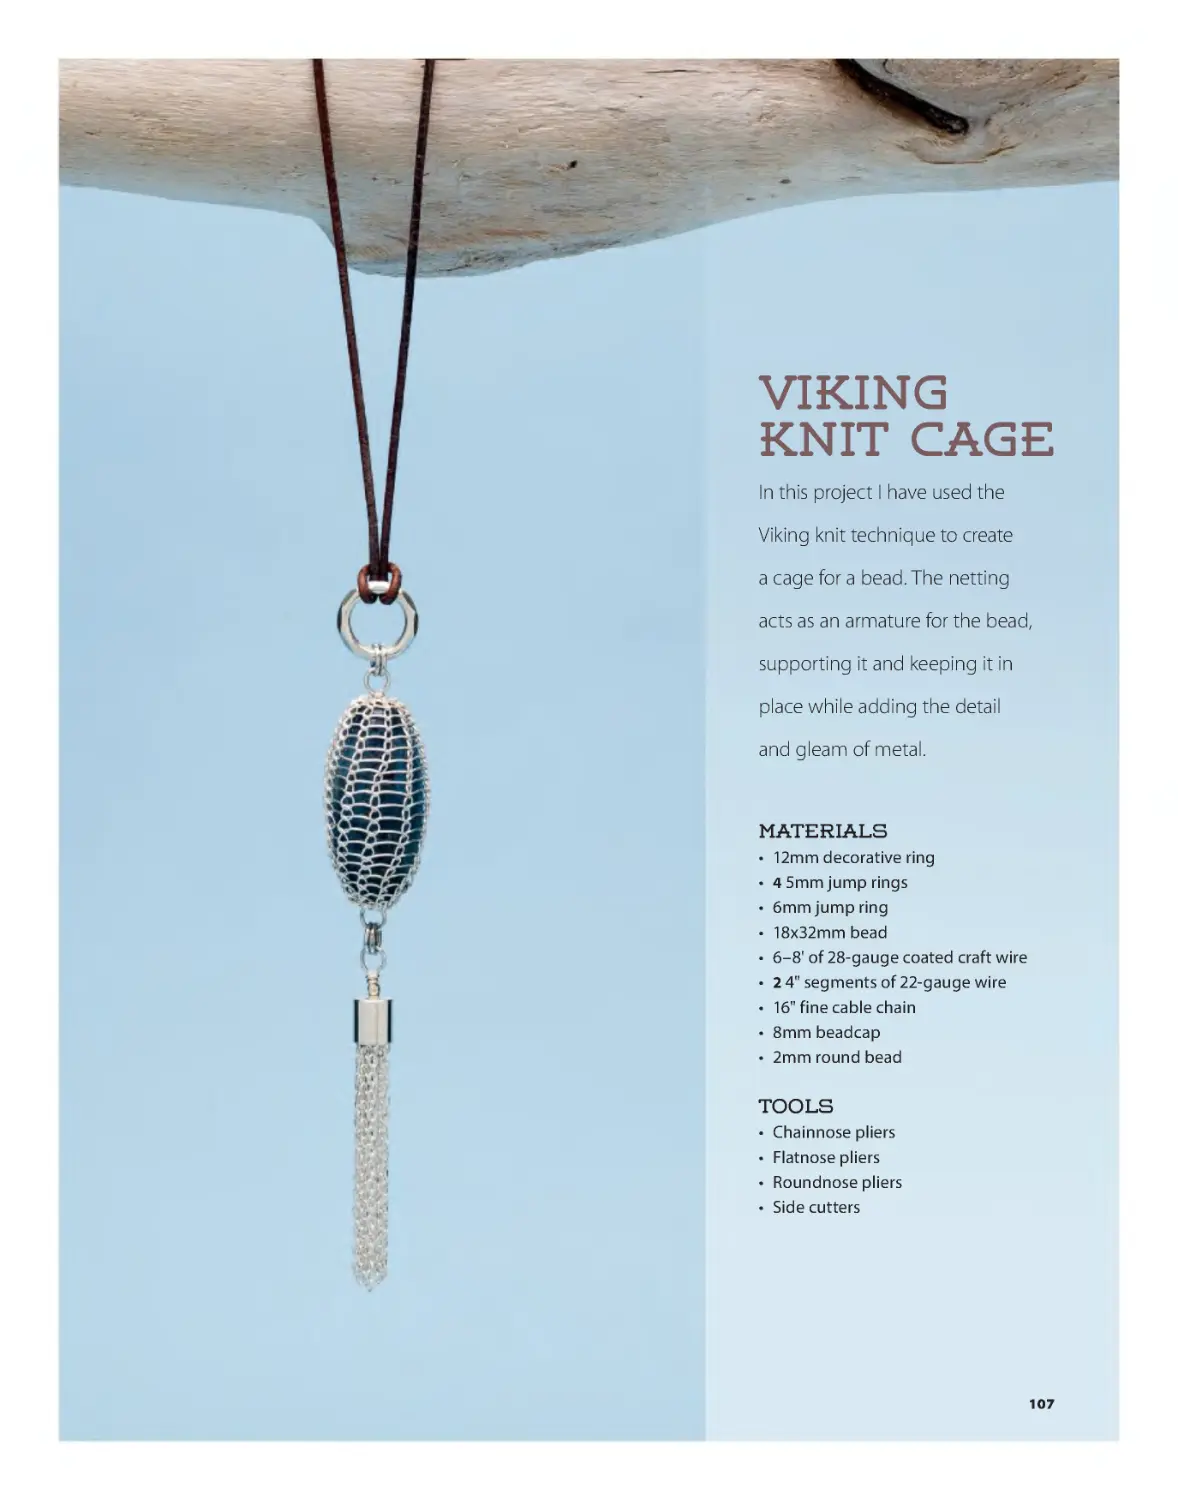
Viking Knit Cage..................................................................... 107
Mixed Metals Viking Knit Pendant ...........................110
Viking Knit Centerpiece for a Chain ........................110
Acknowledgments .......................... 111
About the Author .......................... 111
2/1/17 1:46 PM
Introduction
Wirework, at its essence, is very beginner friendly.
As long as you are able to follow directions, you can
create your first project and be proud of how beautiful
and unique it is. Very little is required beyond a few
tools and your imagination. It’s very satisfying to
learn a few basic wireworking skills and immediately
begin making pieces that are one-of-a-kind, artful,
and wearable.
One of wire’s biggest strengths is that it’s completely
open ended because it is not component based. A
piece of wire can become anything — a zig zag, a
spiral, a stone wrap, a clasp. The only limit is your
own creativity!
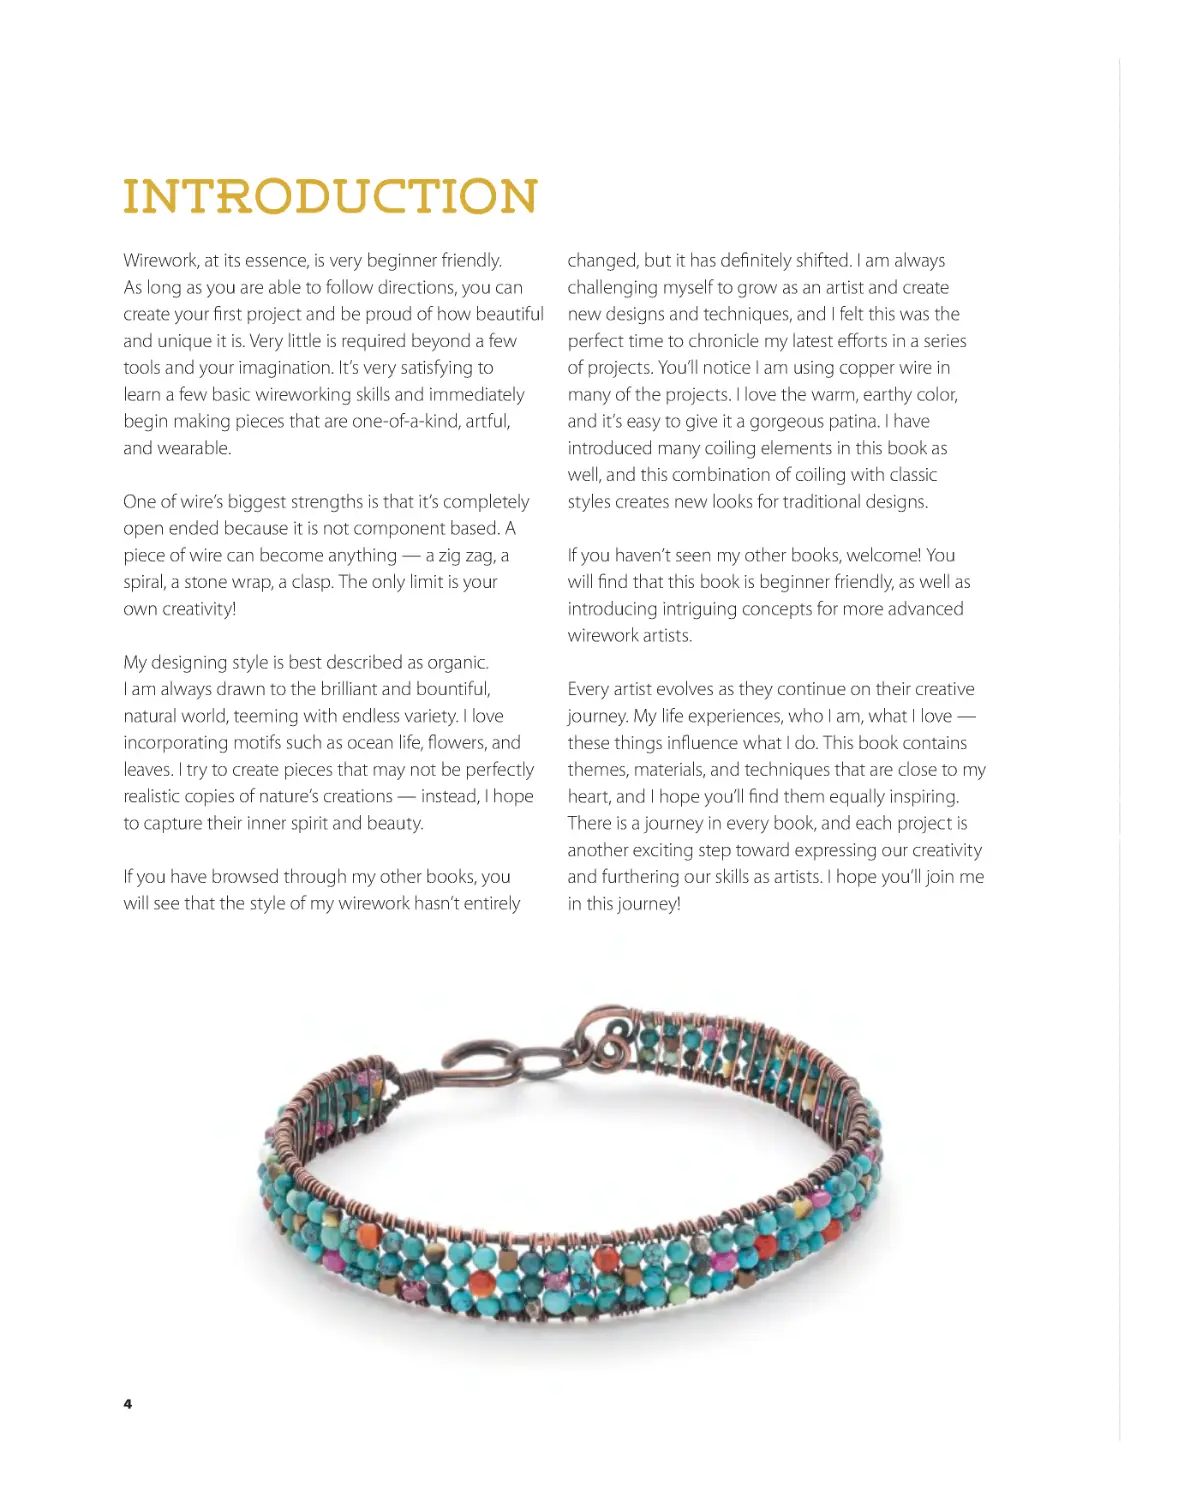
My designing style is best described as organic.
I am always drawn to the brilliant and bountiful,
natural world, teeming with endless variety. I love
incorporating motifs such as ocean life, flowers, and
leaves. I try to create pieces that may not be perfectly
realistic copies of nature’s creations — instead, I hope
to capture their inner spirit and beauty.
If you have browsed through my other books, you
will see that the style of my wirework hasn’t entirely
changed, but it has definitely shifted. I am always
challenging myself to grow as an artist and create
new designs and techniques, and I felt this was the
perfect time to chronicle my latest efforts in a series
of projects. You’ll notice I am using copper wire in
many of the projects. I love the warm, earthy color,
and it’s easy to give it a gorgeous patina. I have
introduced many coiling elements in this book as
well, and this combination of coiling with classic
styles creates new looks for traditional designs.
If you haven’t seen my other books, welcome! You
will find that this book is beginner friendly, as well as
introducing intriguing concepts for more advanced
wirework artists.
Every artist evolves as they continue on their creative
journey. My life experiences, who I am, what I love —
these things influence what I do. This book contains
themes, materials, and techniques that are close to my
heart, and I hope you’ll find them equally inspiring.
There is a journey in every book, and each project is
another exciting step toward expressing our creativity
and furthering our skills as artists. I hope you’ll join me
in this journey!
4
BKS-67899-00.indd 4
2/1/17 1:46 PM
5
BKS-67899-00.indd 5
2/1/17 1:46 PM
materials
COPPER AND SILVER-FILLED WIRE
JUMP RINGS
CRAFT WIRE
WIRE
HEADPINS
Coated craft wire is perfect for using as temporary binding wire. I
also like to use it for the netting techniques shown in the Cabochon &
Focal Point Stones chapter of this book.
Copper and silver-filled wire, 22-gauge or finer, is what I usually
use for making wrapped loops, and I use 20-gauge or thicker for
making basic loops.
BAILS
METAL FINDINGS
Jump rings are classic jewelry findings that allow you to easily
connect different components in your pieces of jewelry. They
are available in many diameters, gauges, and colors, and can be
opened or soldered.
BEAD CAPS
Headpins are short lengths of wire with a stopper at the bottom to
hold beads in place. Purchased headpins may have a simple stopper
that looks like a nail head, or they may have a decorative detail. A 2"
pin will give you extra length to work with; however, in many cases, a
11/2" pin will be long enough.
Bails have a large loop or tube which can be strung over a cord or
bead strand, and a small loop or ring at the bottom for attaching a
pendant or dangle.
DECORATIVE
RINGS
Bead caps are domed spacers that fit around or atop one side of
a bead. They are available in an endless array of styles and sizes.
Decorative Rings are solid, closed rings made of various types of
metals. They are often decorated with designs or stampings, and can
be linked with jump rings to create chain or dangles.
CHAIN
Chain adds movement to jewelry designs or can be used to create
a necklace extender. It is often used as a good base for necklaces
and bracelets.
6
BKS-67899-00.indd 6
2/1/17 1:47 PM
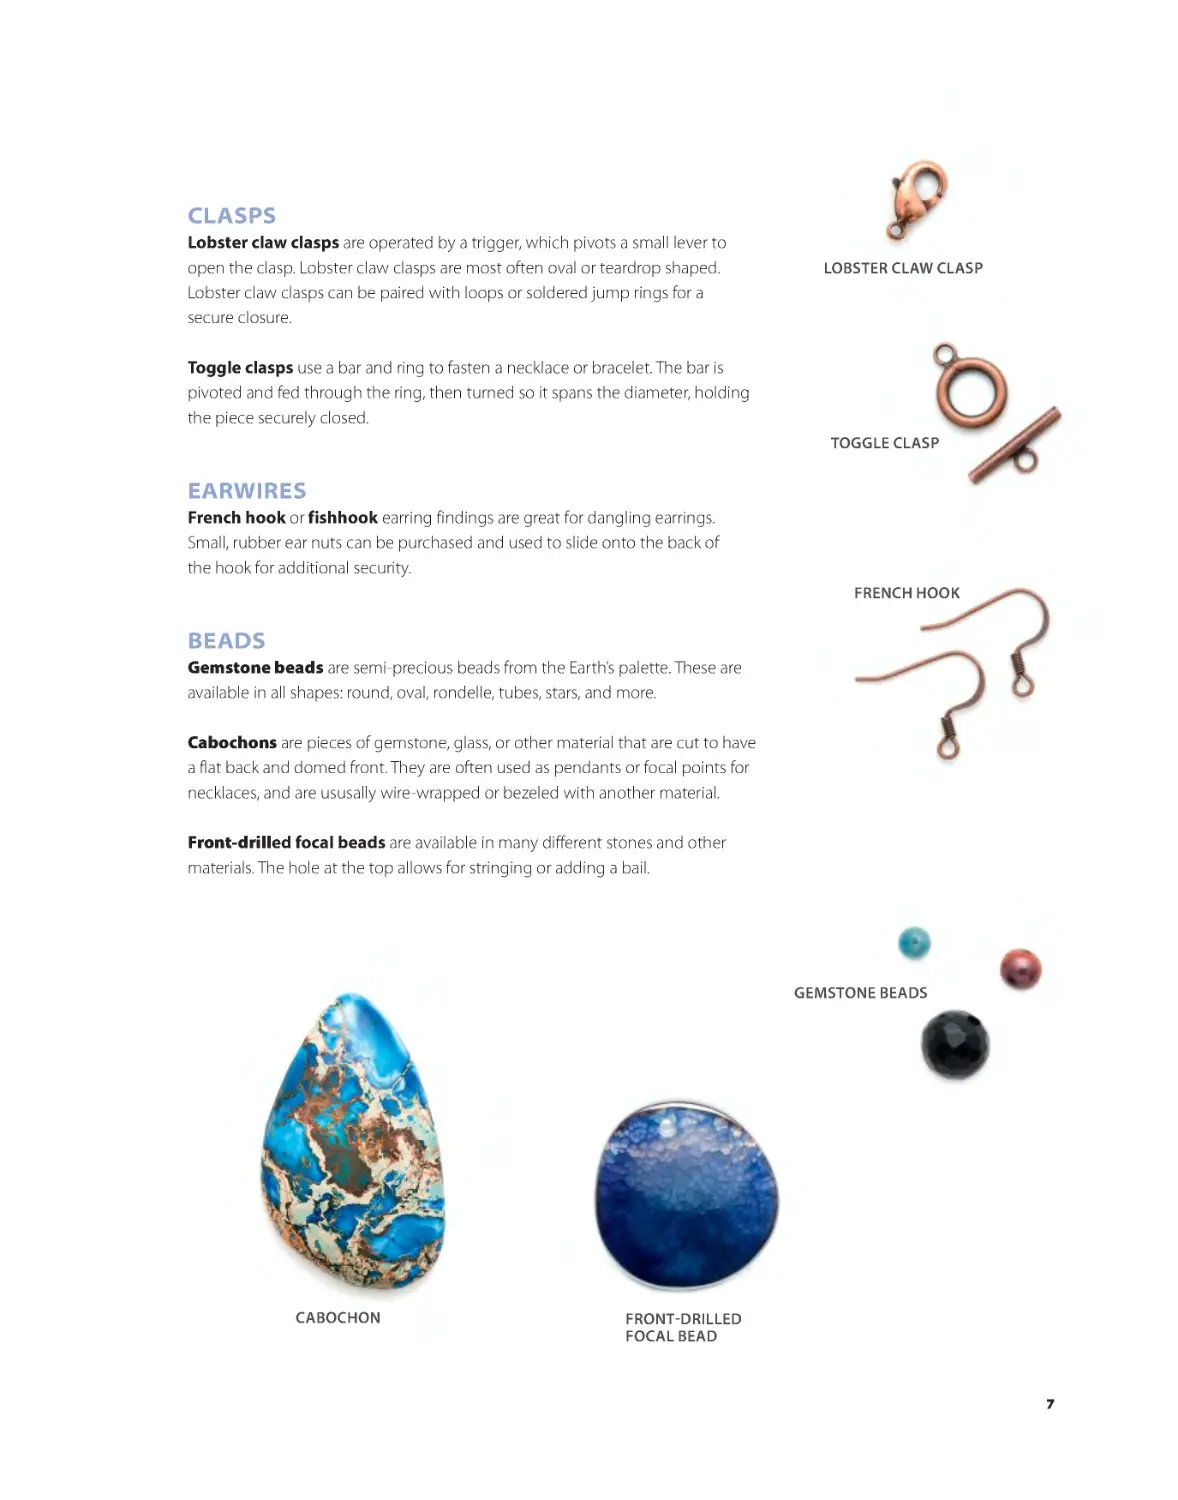
CLASPS
Lobster claw clasps are operated by a trigger, which pivots a small lever to
open the clasp. Lobster claw clasps are most often oval or teardrop shaped.
Lobster claw clasps can be paired with loops or soldered jump rings for a
secure closure.
LOBSTER CLAW CLASP
Toggle clasps use a bar and ring to fasten a necklace or bracelet. The bar is
pivoted and fed through the ring, then turned so it spans the diameter, holding
the piece securely closed.
TOGGLE CLASP
EARWIRES
French hook or fishhook earring findings are great for dangling earrings.
Small, rubber ear nuts can be purchased and used to slide onto the back of
the hook for additional security.
FRENCH HOOK
BEADS
Gemstone beads are semi-precious beads from the Earth’s palette. These are
available in all shapes: round, oval, rondelle, tubes, stars, and more.
Cabochons are pieces of gemstone, glass, or other material that are cut to have
a flat back and domed front. They are often used as pendants or focal points for
necklaces, and are ususally wire-wrapped or bezeled with another material.
Front-drilled focal beads are available in many different stones and other
materials. The hole at the top allows for stringing or adding a bail.
GEMSTONE BEADS
CABOCHON
FRONT-DRILLED
FOCAL BEAD
7
BKS-67899-00.indd 7
2/1/17 1:47 PM
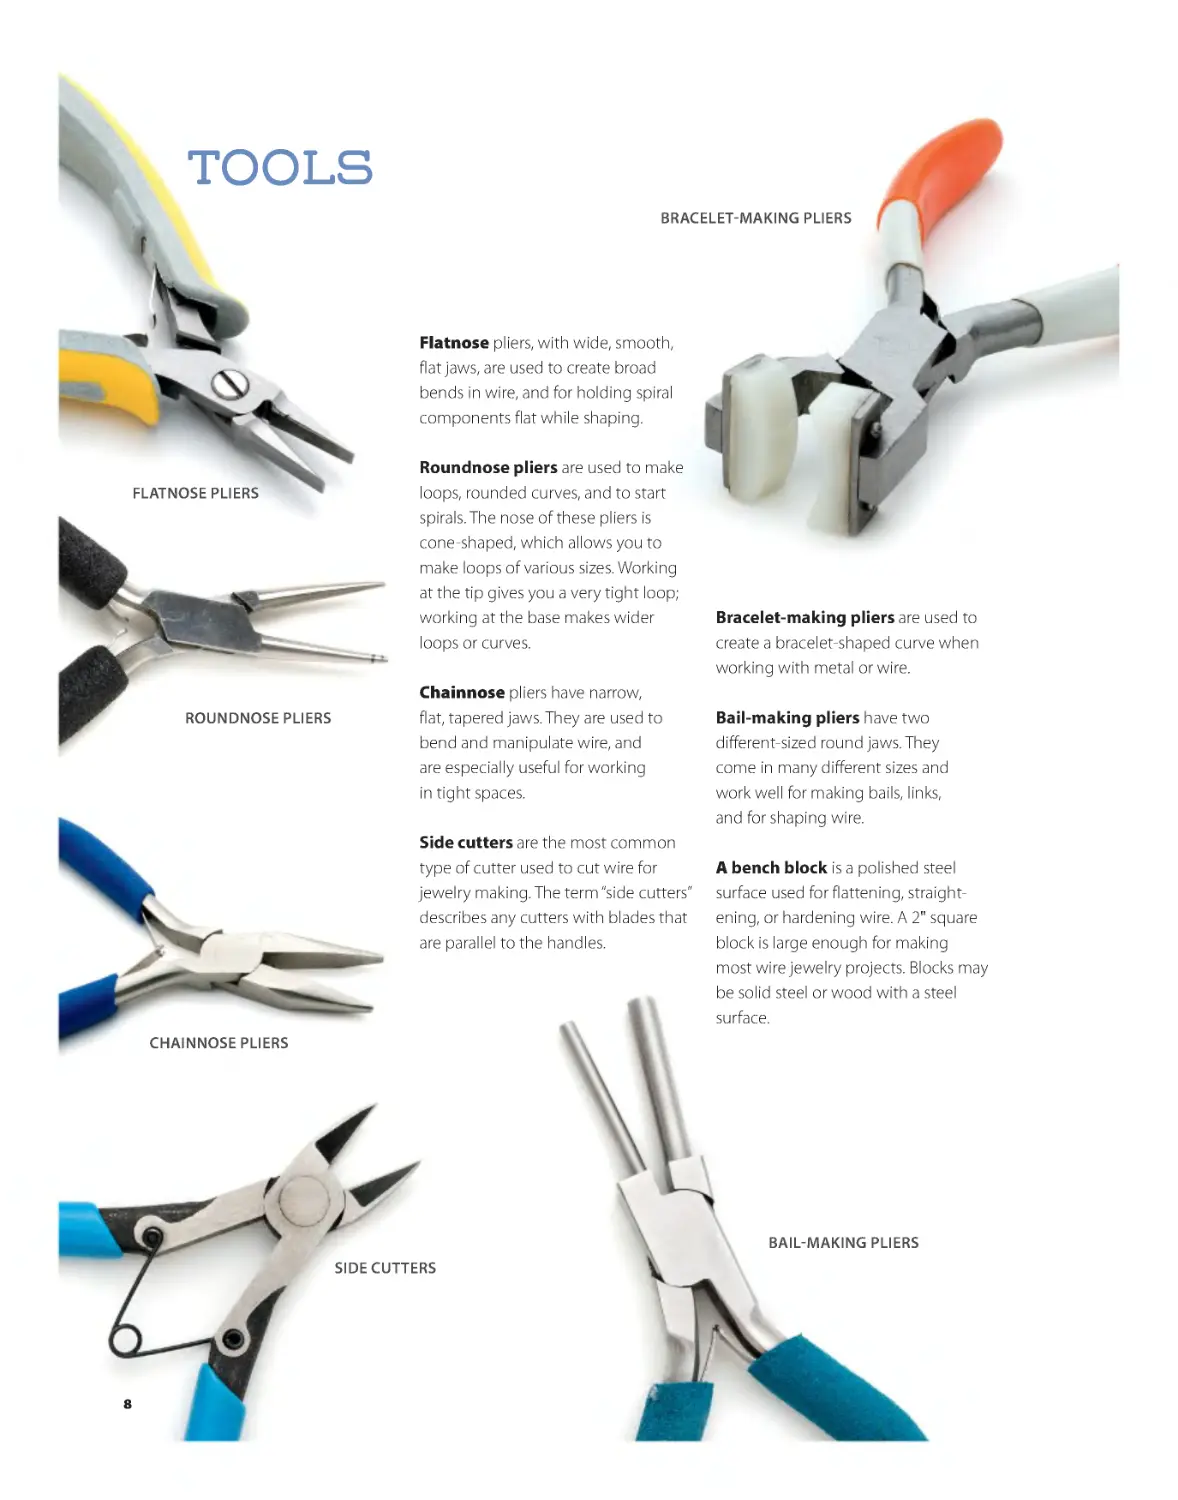
tools
BRACELET-MAKING PLIERS
Flatnose pliers, with wide, smooth,
flat jaws, are used to create broad
bends in wire, and for holding spiral
components flat while shaping.
FLATNOSE PLIERS
ROUNDNOSE PLIERS
Roundnose pliers are used to make
loops, rounded curves, and to start
spirals. The nose of these pliers is
cone-shaped, which allows you to
make loops of various sizes. Working
at the tip gives you a very tight loop;
working at the base makes wider
loops or curves.
Chainnose pliers have narrow,
flat, tapered jaws. They are used to
bend and manipulate wire, and
are especially useful for working
in tight spaces.
Side cutters are the most common
type of cutter used to cut wire for
jewelry making. The term “side cutters”
describes any cutters with blades that
are parallel to the handles.
Bracelet-making pliers are used to
create a bracelet-shaped curve when
working with metal or wire.
Bail-making pliers have two
different-sized round jaws. They
come in many different sizes and
work well for making bails, links,
and for shaping wire.
A bench block is a polished steel
surface used for flattening, straightening, or hardening wire. A 2" square
block is large enough for making
most wire jewelry projects. Blocks may
be solid steel or wood with a steel
surface.
CHAINNOSE PLIERS
BAIL-MAKING PLIERS
SIDE CUTTERS
8
BKS-67899-00.indd 8
2/1/17 1:47 PM
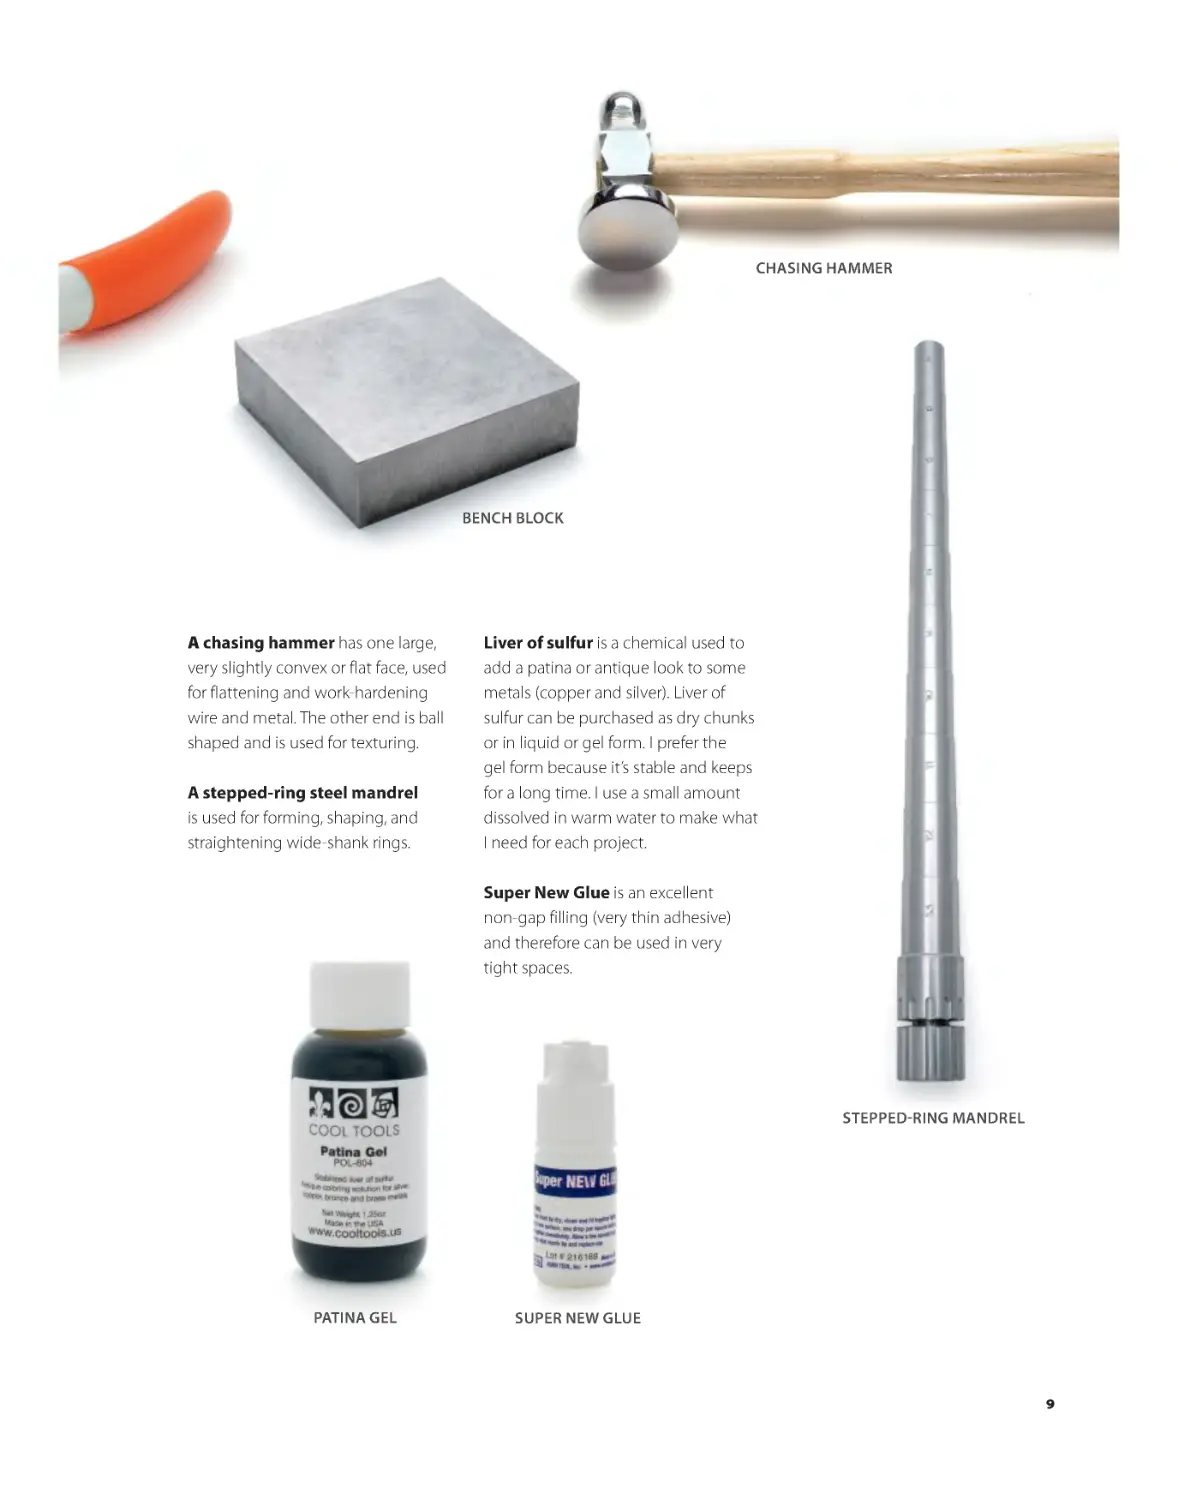
CHASING HAMMER
BENCH BLOCK
A chasing hammer has one large,
very slightly convex or flat face, used
for flattening and work-hardening
wire and metal. The other end is ball
shaped and is used for texturing.
A stepped-ring steel mandrel
is used for forming, shaping, and
straightening wide-shank rings.
Liver of sulfur is a chemical used to
add a patina or antique look to some
metals (copper and silver). Liver of
sulfur can be purchased as dry chunks
or in liquid or gel form. I prefer the
gel form because it’s stable and keeps
for a long time. I use a small amount
dissolved in warm water to make what
I need for each project.
Super New Glue is an excellent
non-gap filling (very thin adhesive)
and therefore can be used in very
tight spaces.
STEPPED-RING MANDREL
PATINA GEL
SUPER NEW GLUE
9
BKS-67899-00.indd 9
2/1/17 1:47 PM
Techniques
As you embark upon your wireworking journey
through this book, there are several basic techniques that will be used in many of the projects.
These techniques are the vital building blocks of
jewelry construction. They will be repeated in many
of the chapters, sometimes with different variations.
For example, if you learn a spiral technique, you
could be making a tiny decorative spiral, or a large
open spiral design element meant to hold a
cabochon in place. Once these skills have become
familiar, it’s easy to customize them to suit the
needs of a design by varying the wire gauge, the
type of wire, hammering and texturing, and more.
The following techniques are stepping stones to
learning the art of wireworking. Let’s explore them
together to create your own wire jewelry designs.
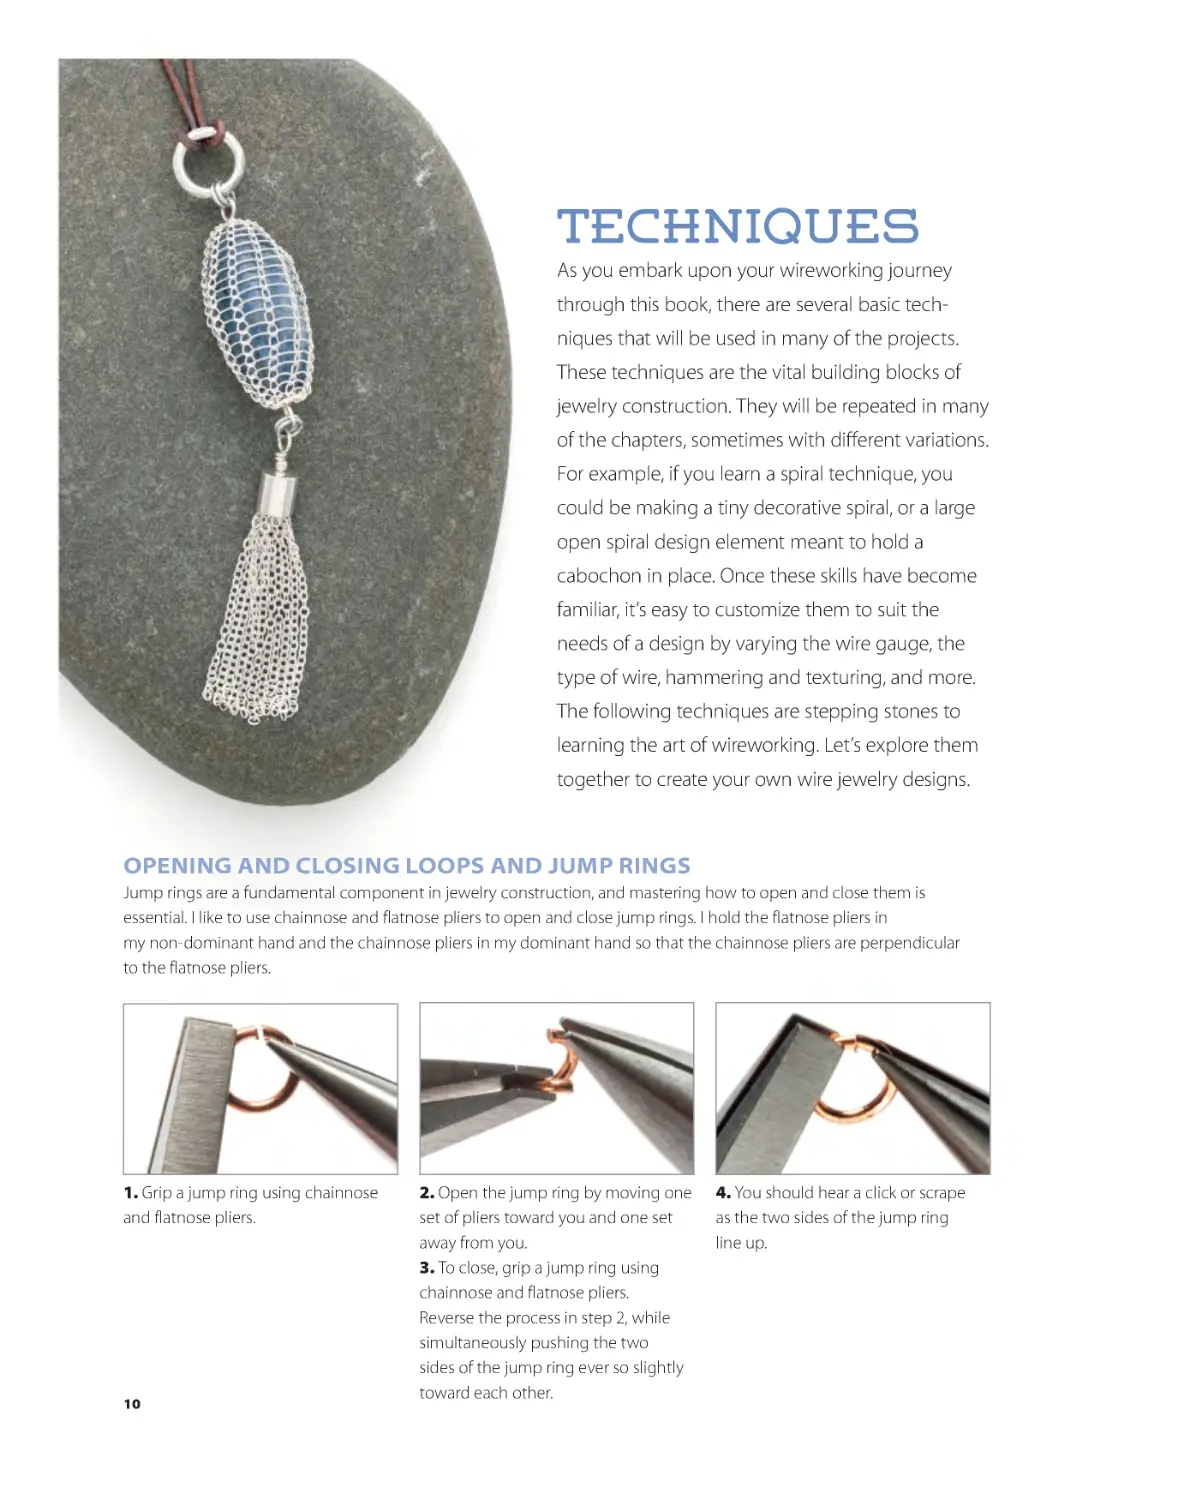
OPENING AND CLOSING LOOPS AND JUMP RINGS
Jump rings are a fundamental component in jewelry construction, and mastering how to open and close them is
essential. I like to use chainnose and flatnose pliers to open and close jump rings. I hold the flatnose pliers in
my non-dominant hand and the chainnose pliers in my dominant hand so that the chainnose pliers are perpendicular
to the flatnose pliers.
1. Grip a jump ring using chainnose
and flatnose pliers.
10
BKS-67899-00.indd 10
2. Open the jump ring by moving one
set of pliers toward you and one set
away from you.
3. To close, grip a jump ring using
chainnose and flatnose pliers.
Reverse the process in step 2, while
simultaneously pushing the two
sides of the jump ring ever so slightly
toward each other.
4. You should hear a click or scrape
as the two sides of the jump ring
line up.
2/1/17 1:47 PM
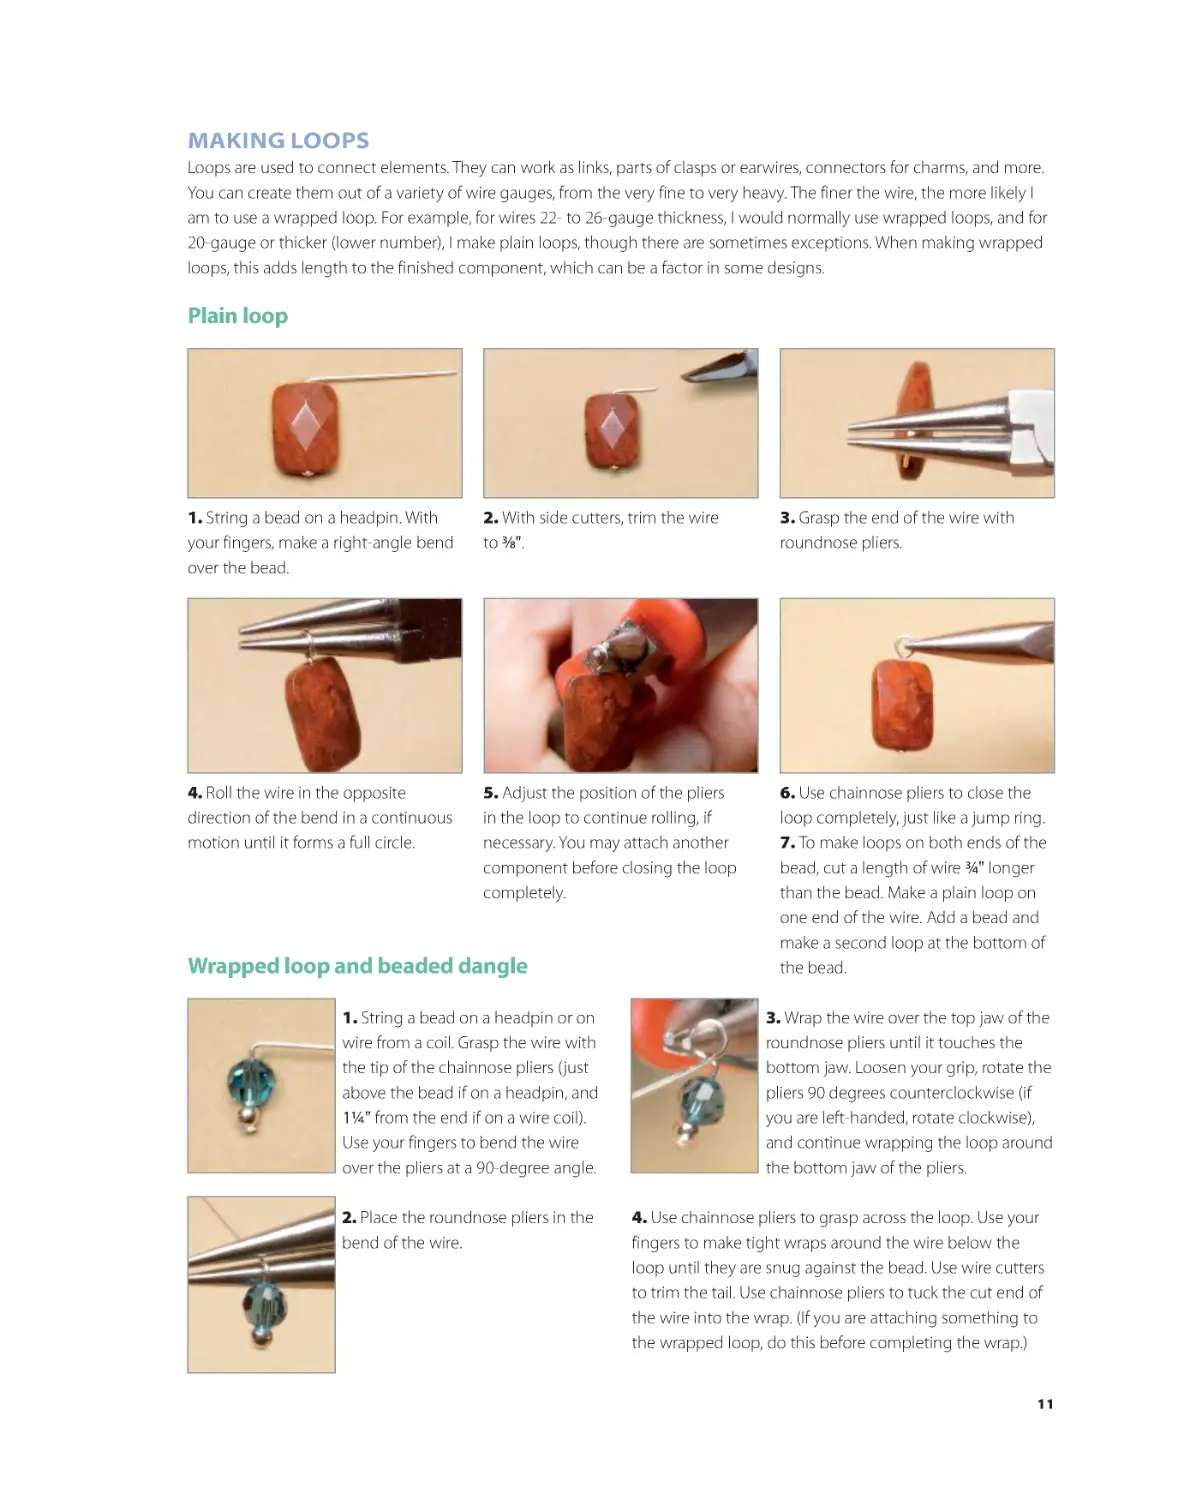
MAKING LOOPS
Loops are used to connect elements. They can work as links, parts of clasps or earwires, connectors for charms, and more.
You can create them out of a variety of wire gauges, from the very fine to very heavy. The finer the wire, the more likely I
am to use a wrapped loop. For example, for wires 22- to 26-gauge thickness, I would normally use wrapped loops, and for
20-gauge or thicker (lower number), I make plain loops, though there are sometimes exceptions. When making wrapped
loops, this adds length to the finished component, which can be a factor in some designs.
Plain loop
1. String a bead on a headpin. With
your fingers, make a right-angle bend
over the bead.
2. With side cutters, trim the wire
to 3/8".
3. Grasp the end of the wire with
roundnose pliers.
4. Roll the wire in the opposite
direction of the bend in a continuous
motion until it forms a full circle.
5. Adjust the position of the pliers
in the loop to continue rolling, if
necessary. You may attach another
component before closing the loop
completely.
6. Use chainnose pliers to close the
loop completely, just like a jump ring.
7. To make loops on both ends of the
bead, cut a length of wire 3/4" longer
than the bead. Make a plain loop on
one end of the wire. Add a bead and
make a second loop at the bottom of
the bead.
Wrapped loop and beaded dangle
1. String a bead on a headpin or on
wire from a coil. Grasp the wire with
the tip of the chainnose pliers (just
above the bead if on a headpin, and
11/4" from the end if on a wire coil).
Use your fingers to bend the wire
over the pliers at a 90-degree angle.
2. Place the roundnose pliers in the
bend of the wire.
3. Wrap the wire over the top jaw of the
roundnose pliers until it touches the
bottom jaw. Loosen your grip, rotate the
pliers 90 degrees counterclockwise (if
you are left-handed, rotate clockwise),
and continue wrapping the loop around
the bottom jaw of the pliers.
4. Use chainnose pliers to grasp across the loop. Use your
fingers to make tight wraps around the wire below the
loop until they are snug against the bead. Use wire cutters
to trim the tail. Use chainnose pliers to tuck the cut end of
the wire into the wrap. (If you are attaching something to
the wrapped loop, do this before completing the wrap.)
11
BKS-67899-00.indd 11
2/1/17 1:47 PM
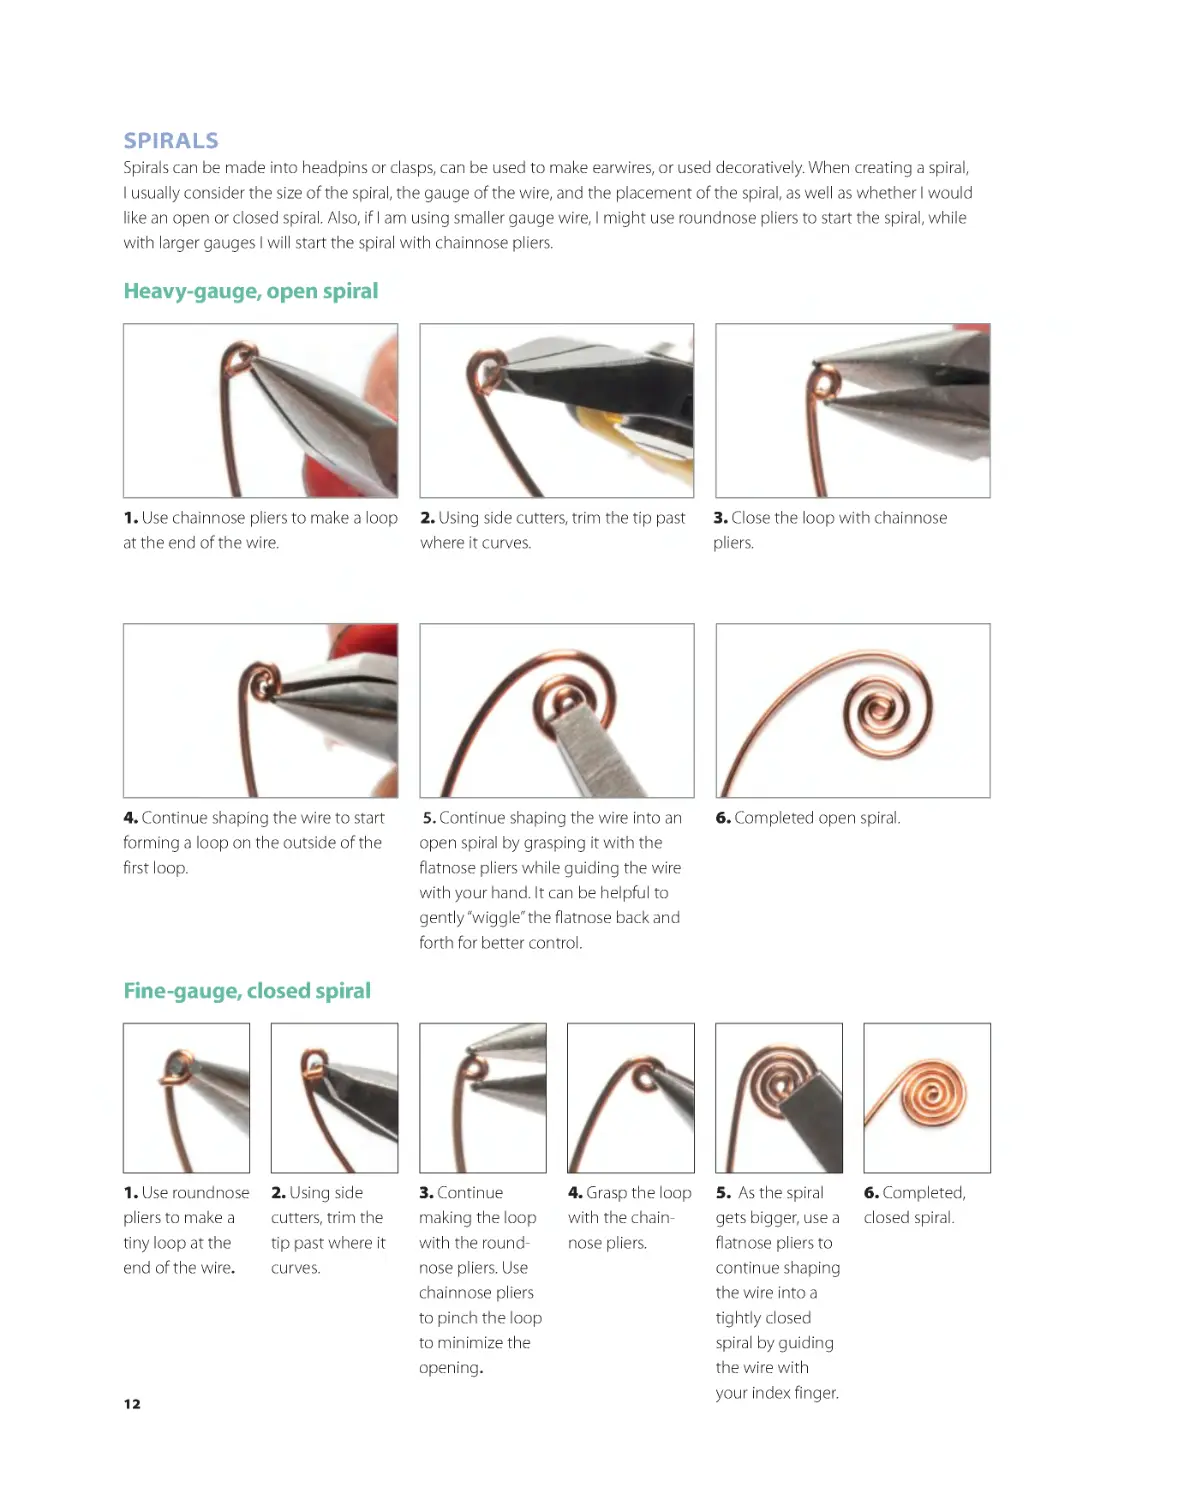
SPIRALS
Spirals can be made into headpins or clasps, can be used to make earwires, or used decoratively. When creating a spiral,
I usually consider the size of the spiral, the gauge of the wire, and the placement of the spiral, as well as whether I would
like an open or closed spiral. Also, if I am using smaller gauge wire, I might use roundnose pliers to start the spiral, while
with larger gauges I will start the spiral with chainnose pliers.
Heavy-gauge, open spiral
1. Use chainnose pliers to make a loop
at the end of the wire.
2. Using side cutters, trim the tip past
where it curves.
3. Close the loop with chainnose
pliers.
4. Continue shaping the wire to start
forming a loop on the outside of the
first loop.
5. Continue shaping the wire into an
open spiral by grasping it with the
flatnose pliers while guiding the wire
with your hand. It can be helpful to
gently “wiggle” the flatnose back and
forth for better control.
6. Completed open spiral.
3. Continue
making the loop
with the roundnose pliers. Use
chainnose pliers
to pinch the loop
to minimize the
opening.
5. As the spiral
gets bigger, use a
flatnose pliers to
continue shaping
the wire into a
tightly closed
spiral by guiding
the wire with
your index finger.
Fine-gauge, closed spiral
1. Use roundnose
pliers to make a
tiny loop at the
end of the wire.
12
BKS-67899-00.indd 12
2. Using side
cutters, trim the
tip past where it
curves.
4. Grasp the loop
with the chainnose pliers.
6. Completed,
closed spiral.
2/2/17 3:21 PM
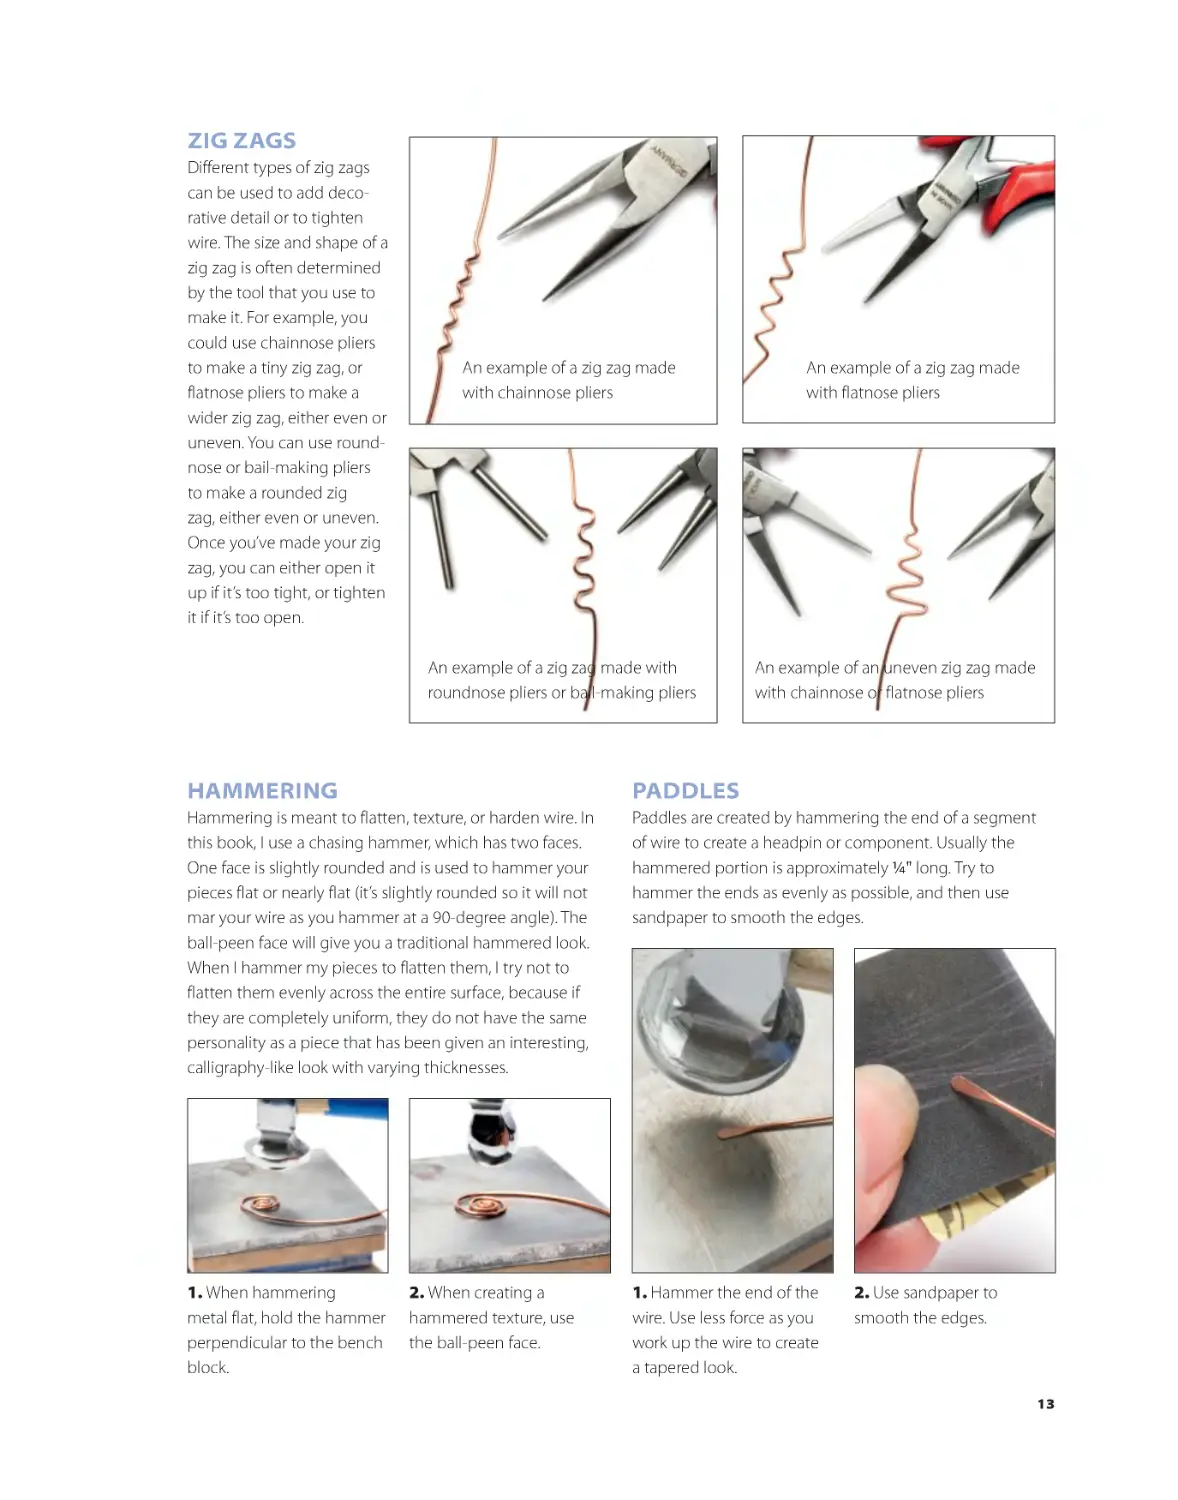
ZIG ZAGS
Different types of zig zags
can be used to add decorative detail or to tighten
wire. The size and shape of a
zig zag is often determined
by the tool that you use to
make it. For example, you
could use chainnose pliers
to make a tiny zig zag, or
flatnose pliers to make a
wider zig zag, either even or
uneven. You can use roundnose or bail-making pliers
to make a rounded zig
zag, either even or uneven.
Once you’ve made your zig
zag, you can either open it
up if it’s too tight, or tighten
it if it’s too open.
An example of a zig zag made
with chainnose pliers
An example of a zig zag made with
roundnose pliers or bail-making pliers
An example of a zig zag made
with flatnose pliers
An example of an uneven zig zag made
with chainnose or flatnose pliers
HAMMERING
PADDLES
Hammering is meant to flatten, texture, or harden wire. In
this book, I use a chasing hammer, which has two faces.
One face is slightly rounded and is used to hammer your
pieces flat or nearly flat (it’s slightly rounded so it will not
mar your wire as you hammer at a 90-degree angle). The
ball-peen face will give you a traditional hammered look.
When I hammer my pieces to flatten them, I try not to
flatten them evenly across the entire surface, because if
they are completely uniform, they do not have the same
personality as a piece that has been given an interesting,
calligraphy-like look with varying thicknesses.
Paddles are created by hammering the end of a segment
of wire to create a headpin or component. Usually the
hammered portion is approximately 1/4" long. Try to
hammer the ends as evenly as possible, and then use
sandpaper to smooth the edges.
1. When hammering
metal flat, hold the hammer
perpendicular to the bench
block.
1. Hammer the end of the
wire. Use less force as you
work up the wire to create
a tapered look.
2. When creating a
hammered texture, use
the ball-peen face.
2. Use sandpaper to
smooth the edges.
13
BKS-67899-00.indd 13
2/1/17 1:47 PM
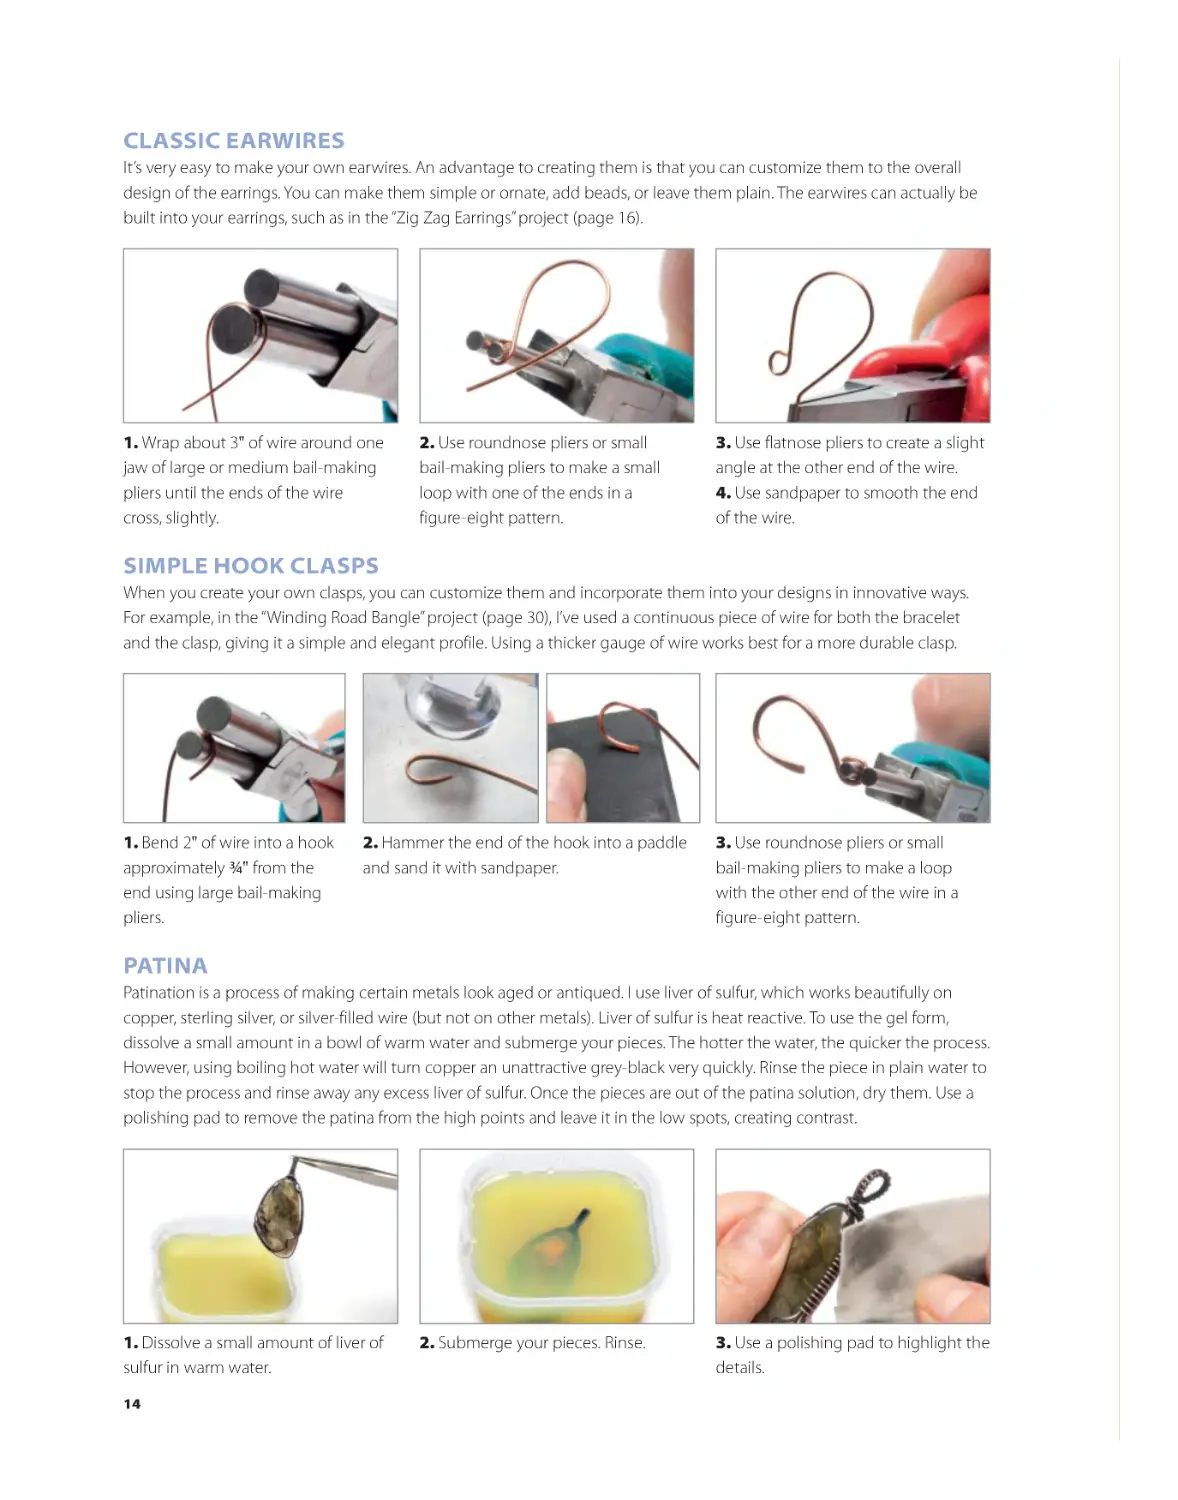
CLASSIC EARWIRES
It’s very easy to make your own earwires. An advantage to creating them is that you can customize them to the overall
design of the earrings. You can make them simple or ornate, add beads, or leave them plain. The earwires can actually be
built into your earrings, such as in the “Zig Zag Earrings” project (page 16).
1. Wrap about 3" of wire around one
jaw of large or medium bail-making
pliers until the ends of the wire
cross, slightly.
2. Use roundnose pliers or small
bail-making pliers to make a small
loop with one of the ends in a
figure-eight pattern.
3. Use flatnose pliers to create a slight
angle at the other end of the wire.
4. Use sandpaper to smooth the end
of the wire.
SIMPLE HOOK CLASPS
When you create your own clasps, you can customize them and incorporate them into your designs in innovative ways.
For example, in the “Winding Road Bangle” project (page 30), I’ve used a continuous piece of wire for both the bracelet
and the clasp, giving it a simple and elegant profile. Using a thicker gauge of wire works best for a more durable clasp.
1. Bend 2" of wire into a hook
approximately 3/4" from the
end using large bail-making
pliers.
2. Hammer the end of the hook into a paddle
and sand it with sandpaper.
3. Use roundnose pliers or small
bail-making pliers to make a loop
with the other end of the wire in a
figure-eight pattern.
PATINA
Patination is a process of making certain metals look aged or antiqued. I use liver of sulfur, which works beautifully on
copper, sterling silver, or silver-filled wire (but not on other metals). Liver of sulfur is heat reactive. To use the gel form,
dissolve a small amount in a bowl of warm water and submerge your pieces. The hotter the water, the quicker the process.
However, using boiling hot water will turn copper an unattractive grey-black very quickly. Rinse the piece in plain water to
stop the process and rinse away any excess liver of sulfur. Once the pieces are out of the patina solution, dry them. Use a
polishing pad to remove the patina from the high points and leave it in the low spots, creating contrast.
1. Dissolve a small amount of liver of
sulfur in warm water.
2. Submerge your pieces. Rinse.
3. Use a polishing pad to highlight the
details.
14
BKS-67899-00.indd 14
2/1/17 1:48 PM
15
BKS-67899-00.indd 15
2/1/17 1:48 PM
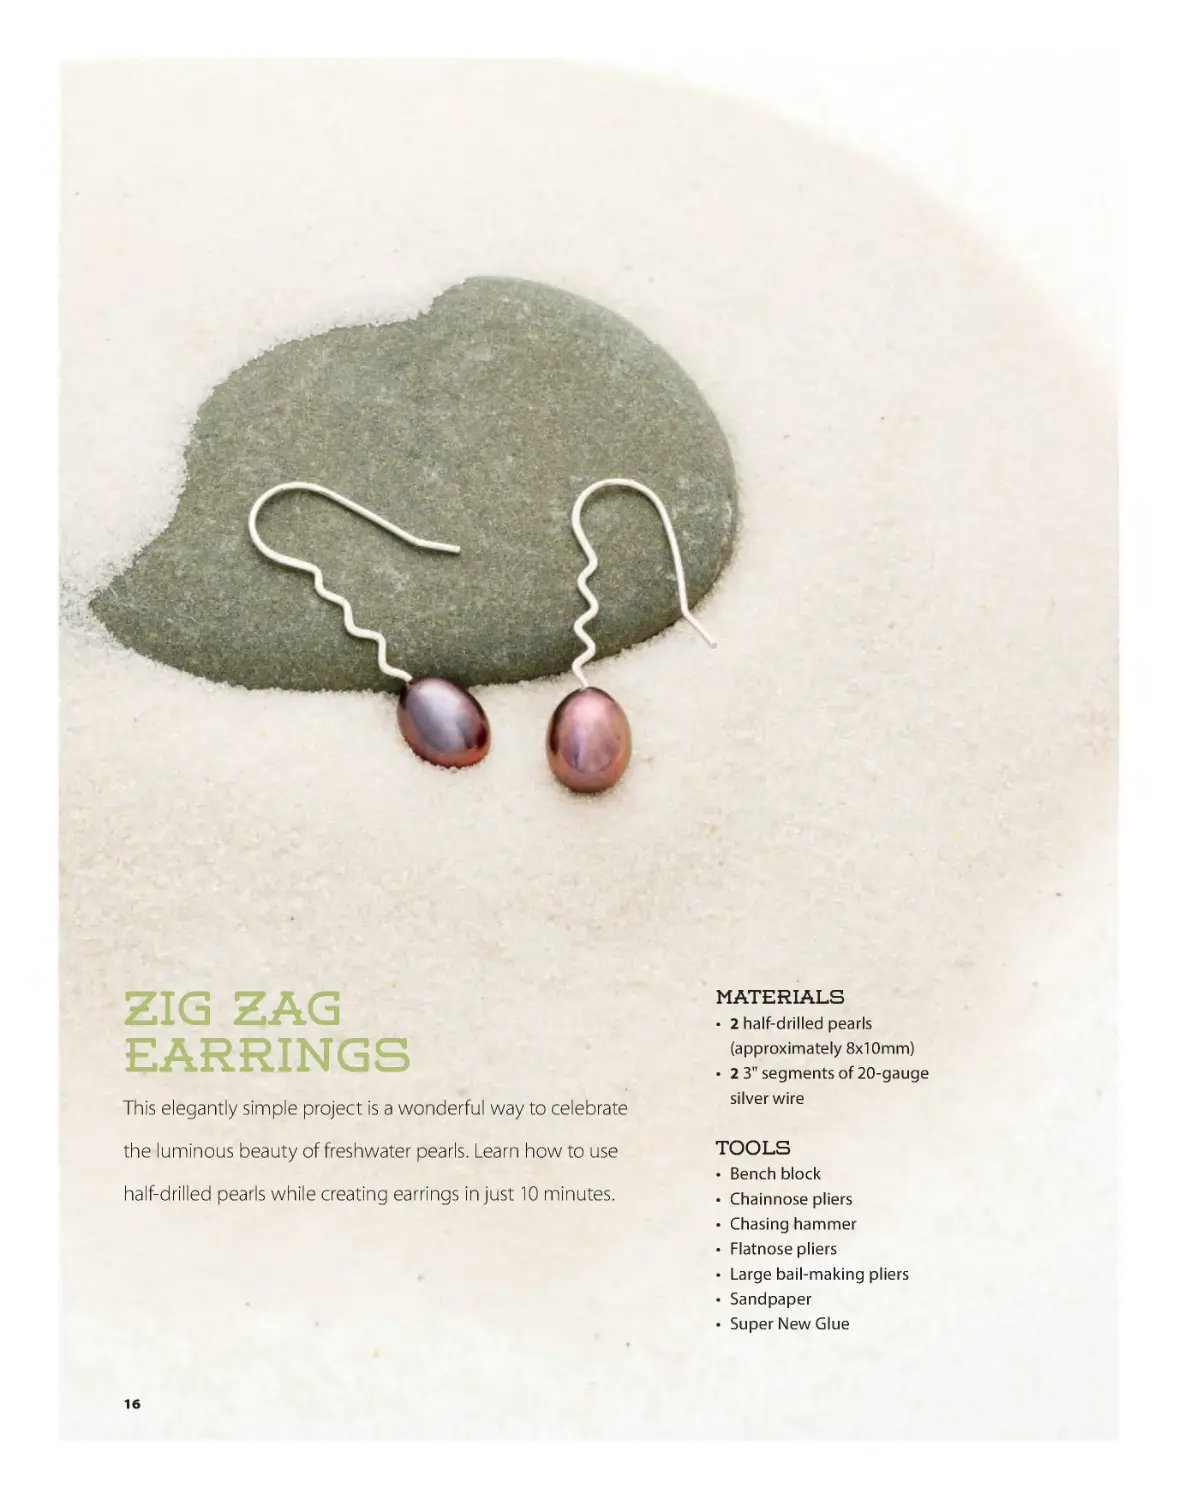
Zig Zag
Earrings
This elegantly simple project is a wonderful way to celebrate
the luminous beauty of freshwater pearls. Learn how to use
half-drilled pearls while creating earrings in just 10 minutes.
Materials
• 2 half-drilled pearls
(approximately 8x10mm)
• 2 3" segments of 20-gauge
silver wire
Tools
•
•
•
•
•
•
•
Bench block
Chainnose pliers
Chasing hammer
Flatnose pliers
Large bail-making pliers
Sandpaper
Super New Glue
16
BKS-67899-01.indd 16
2/1/17 1:50 PM
A
B
C
D
E
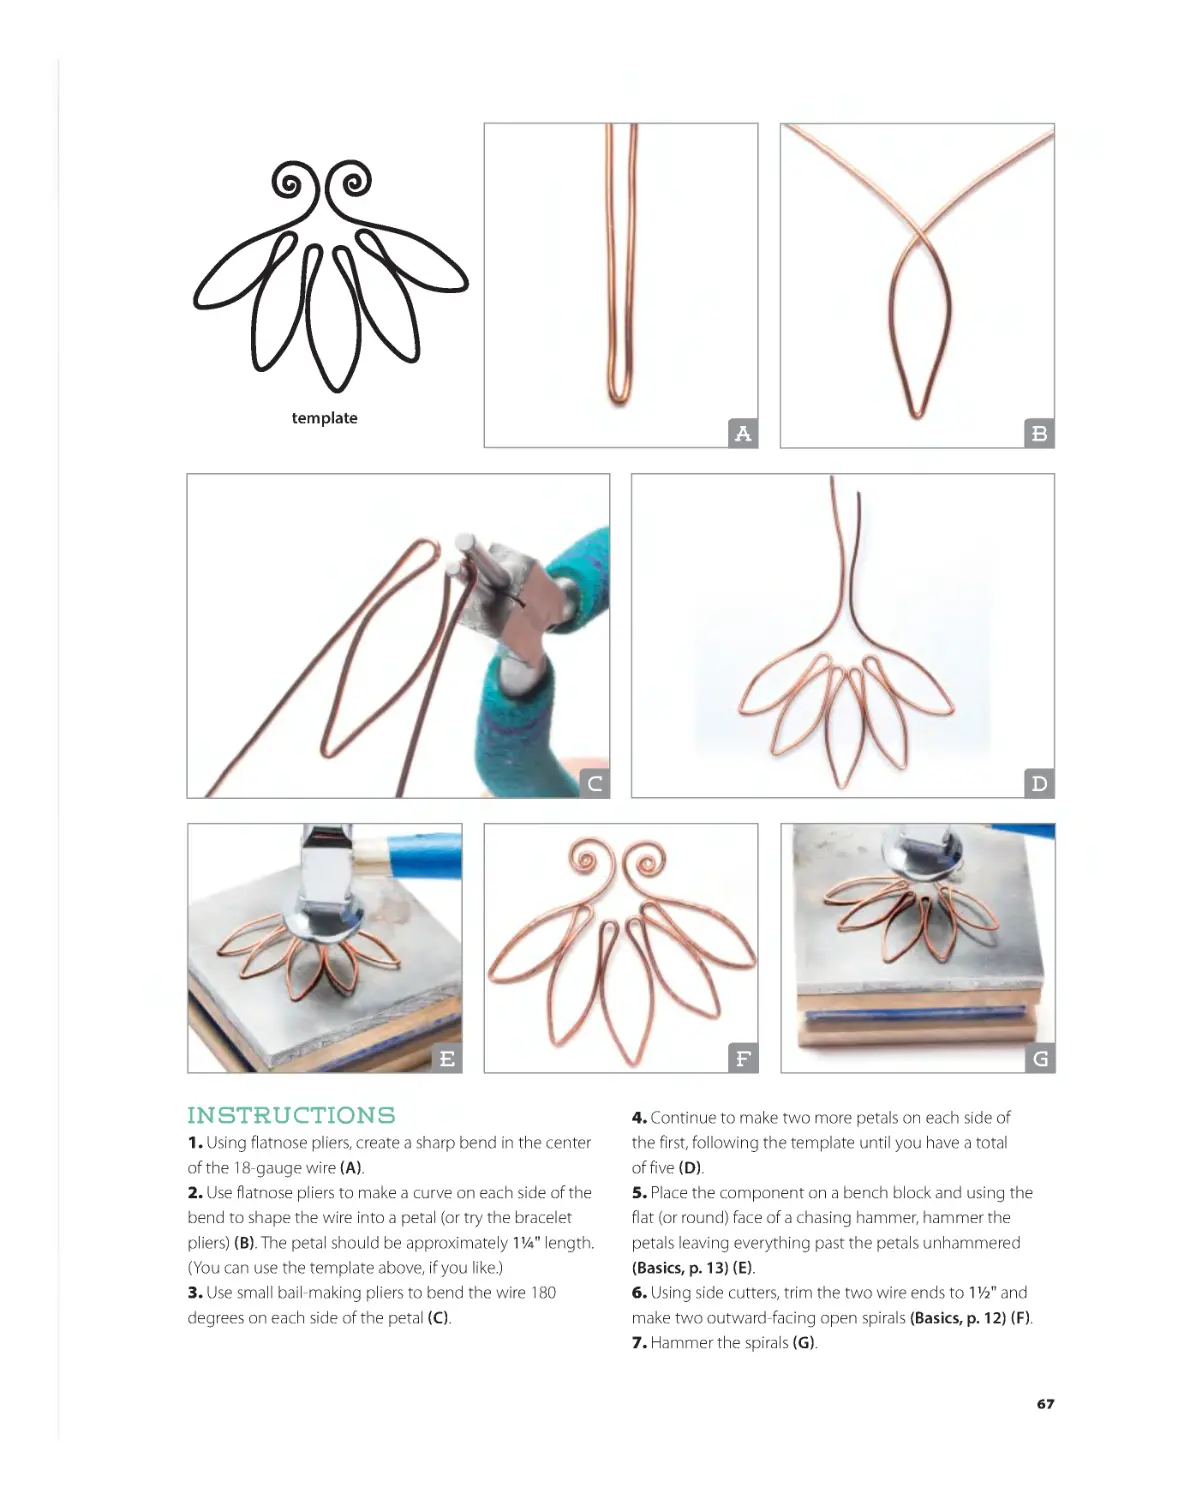
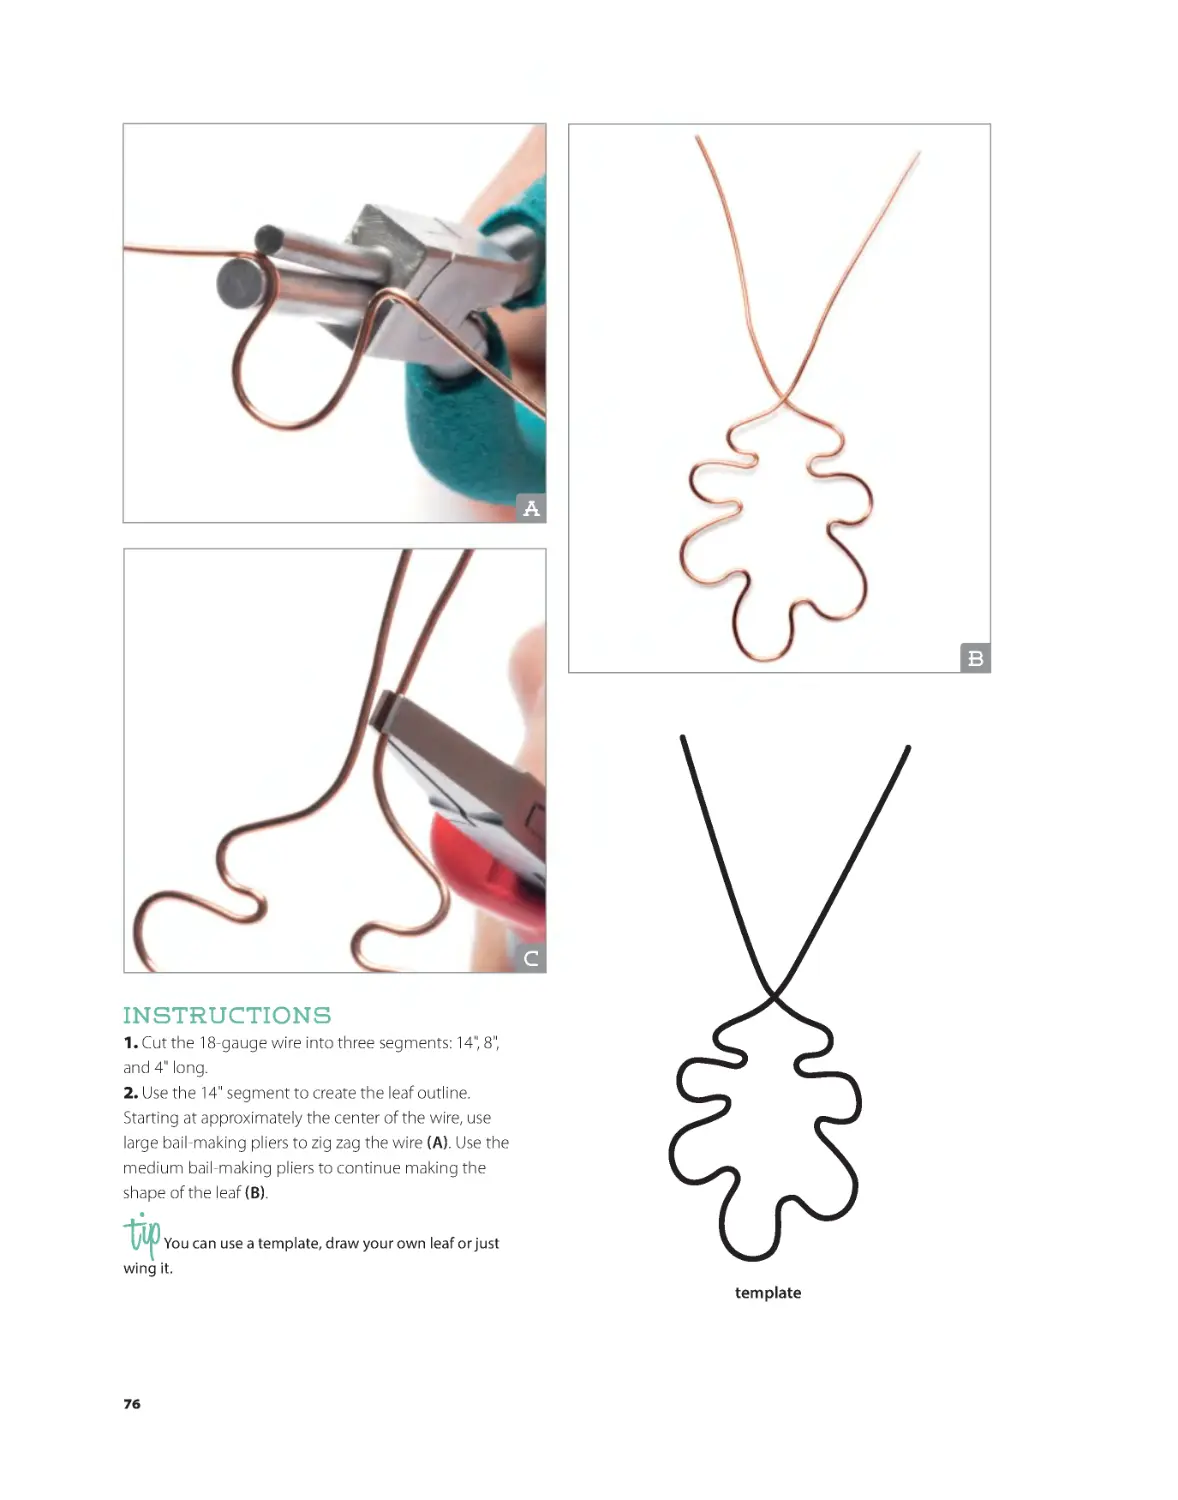
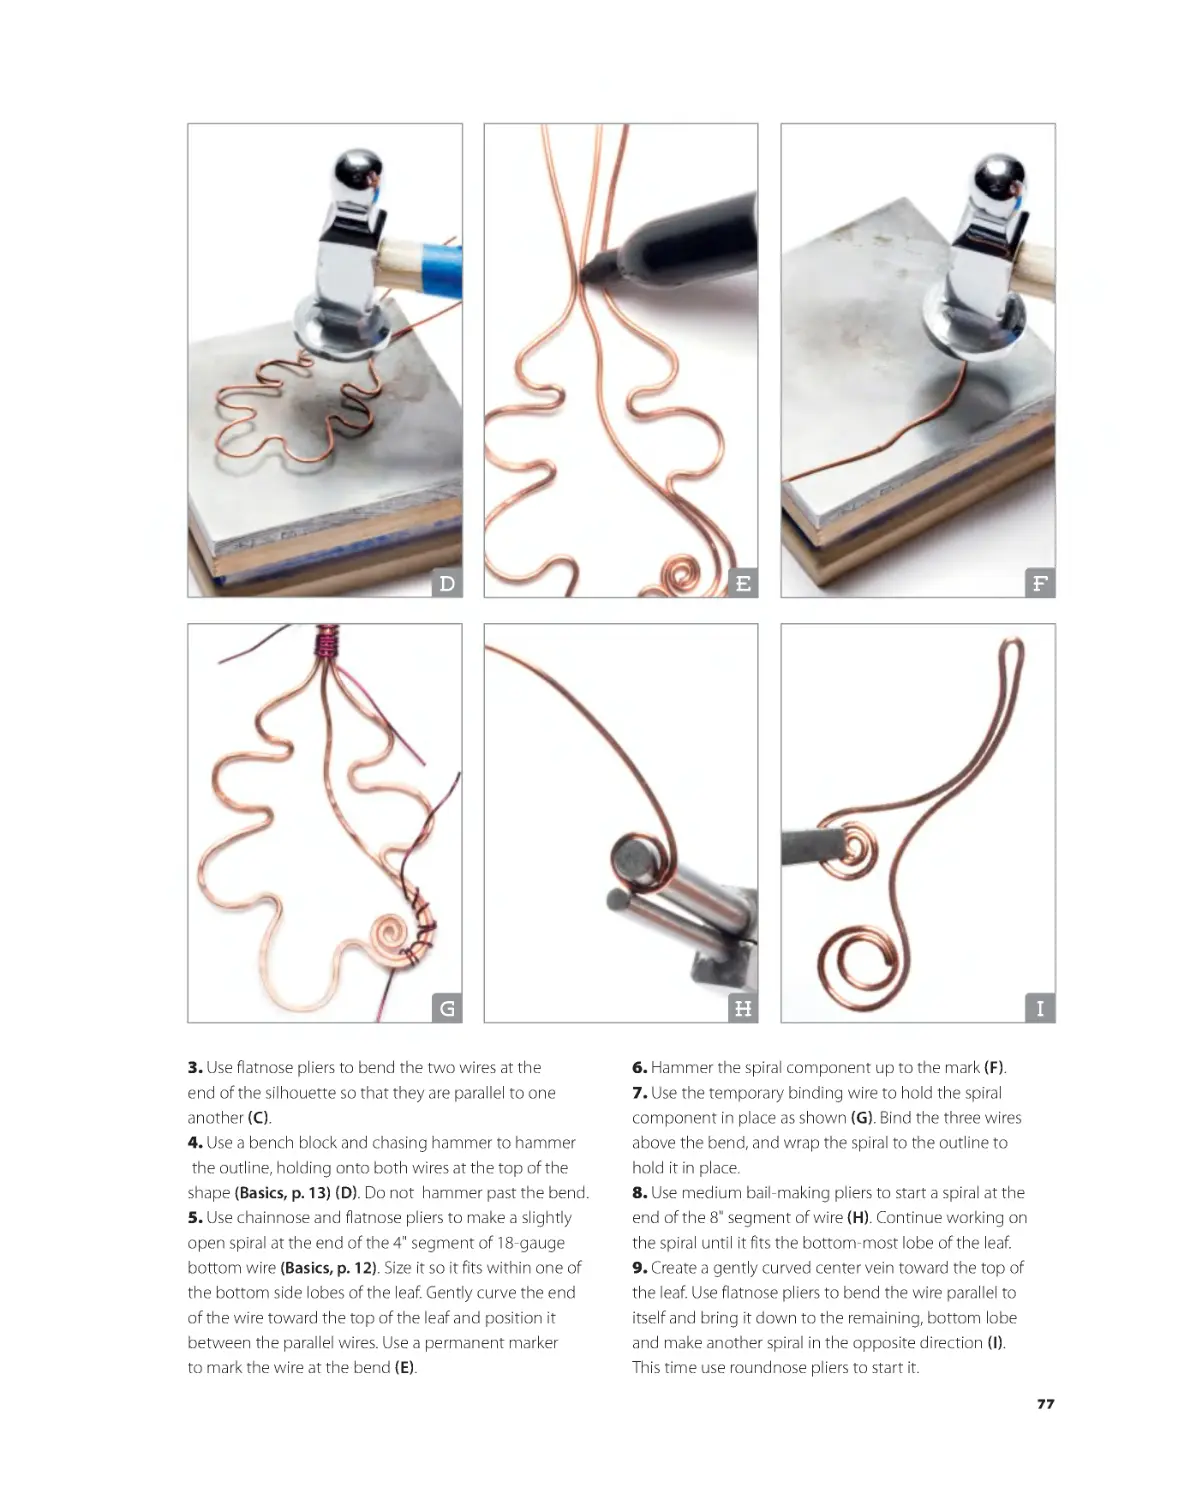
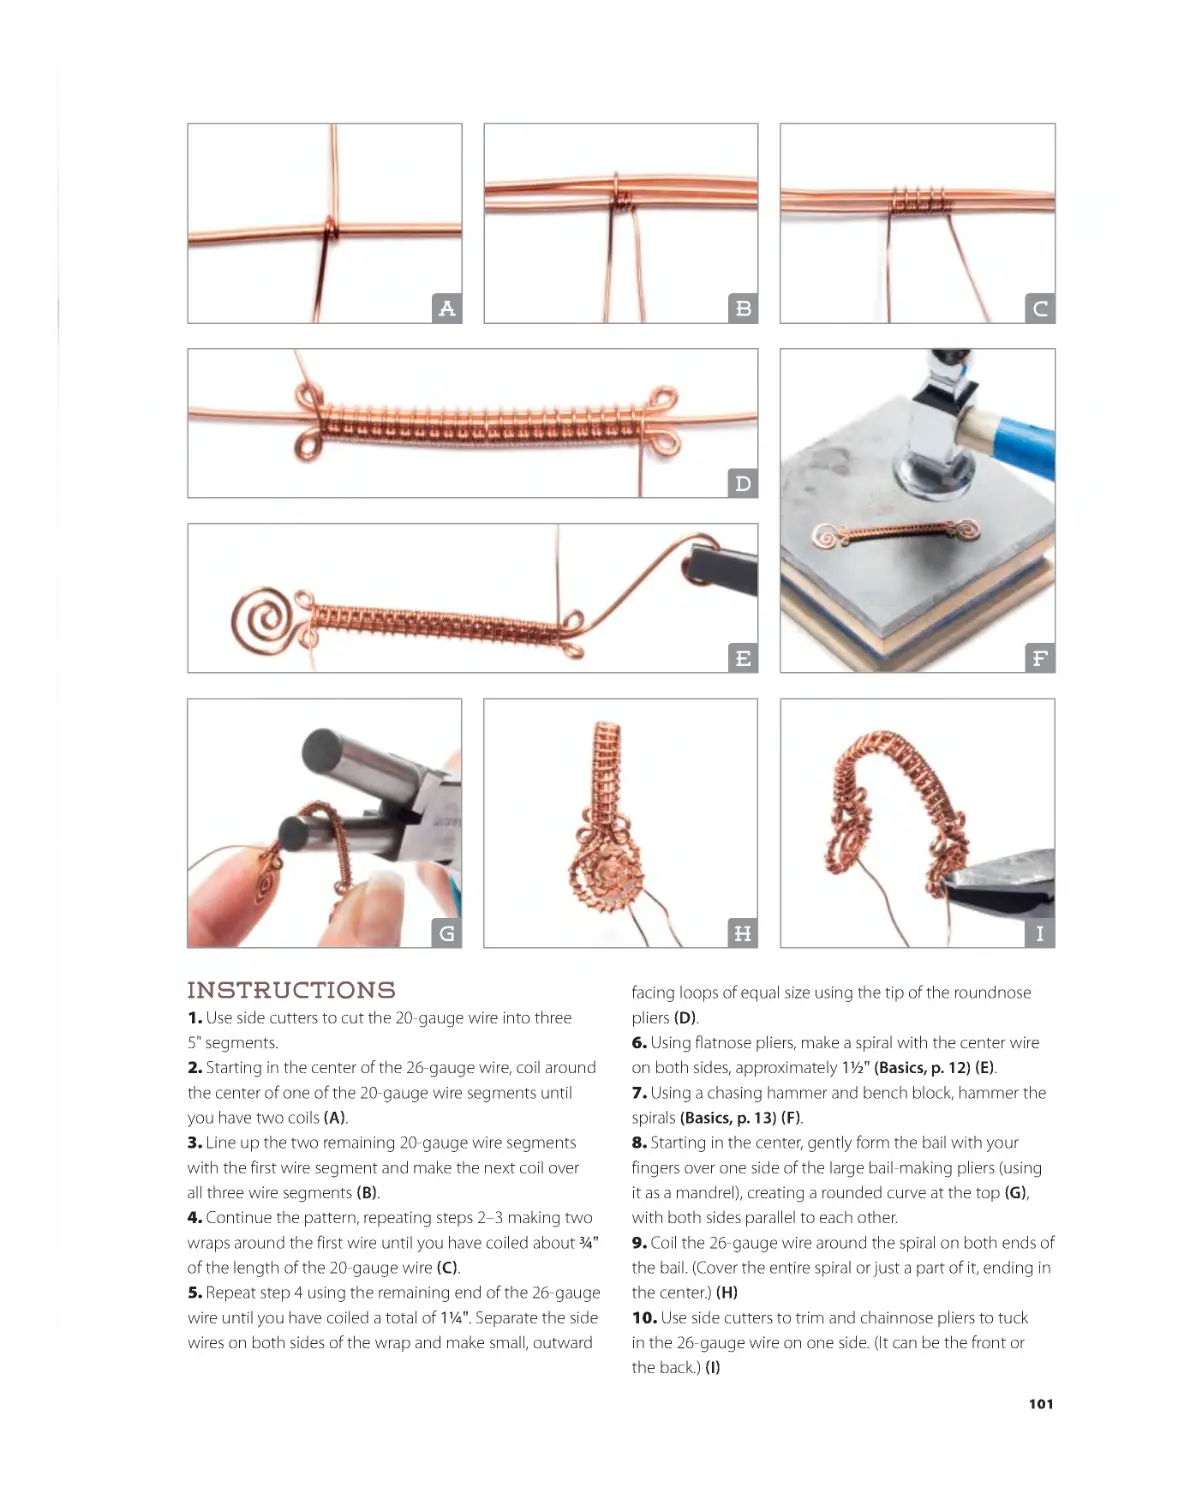
Instructions
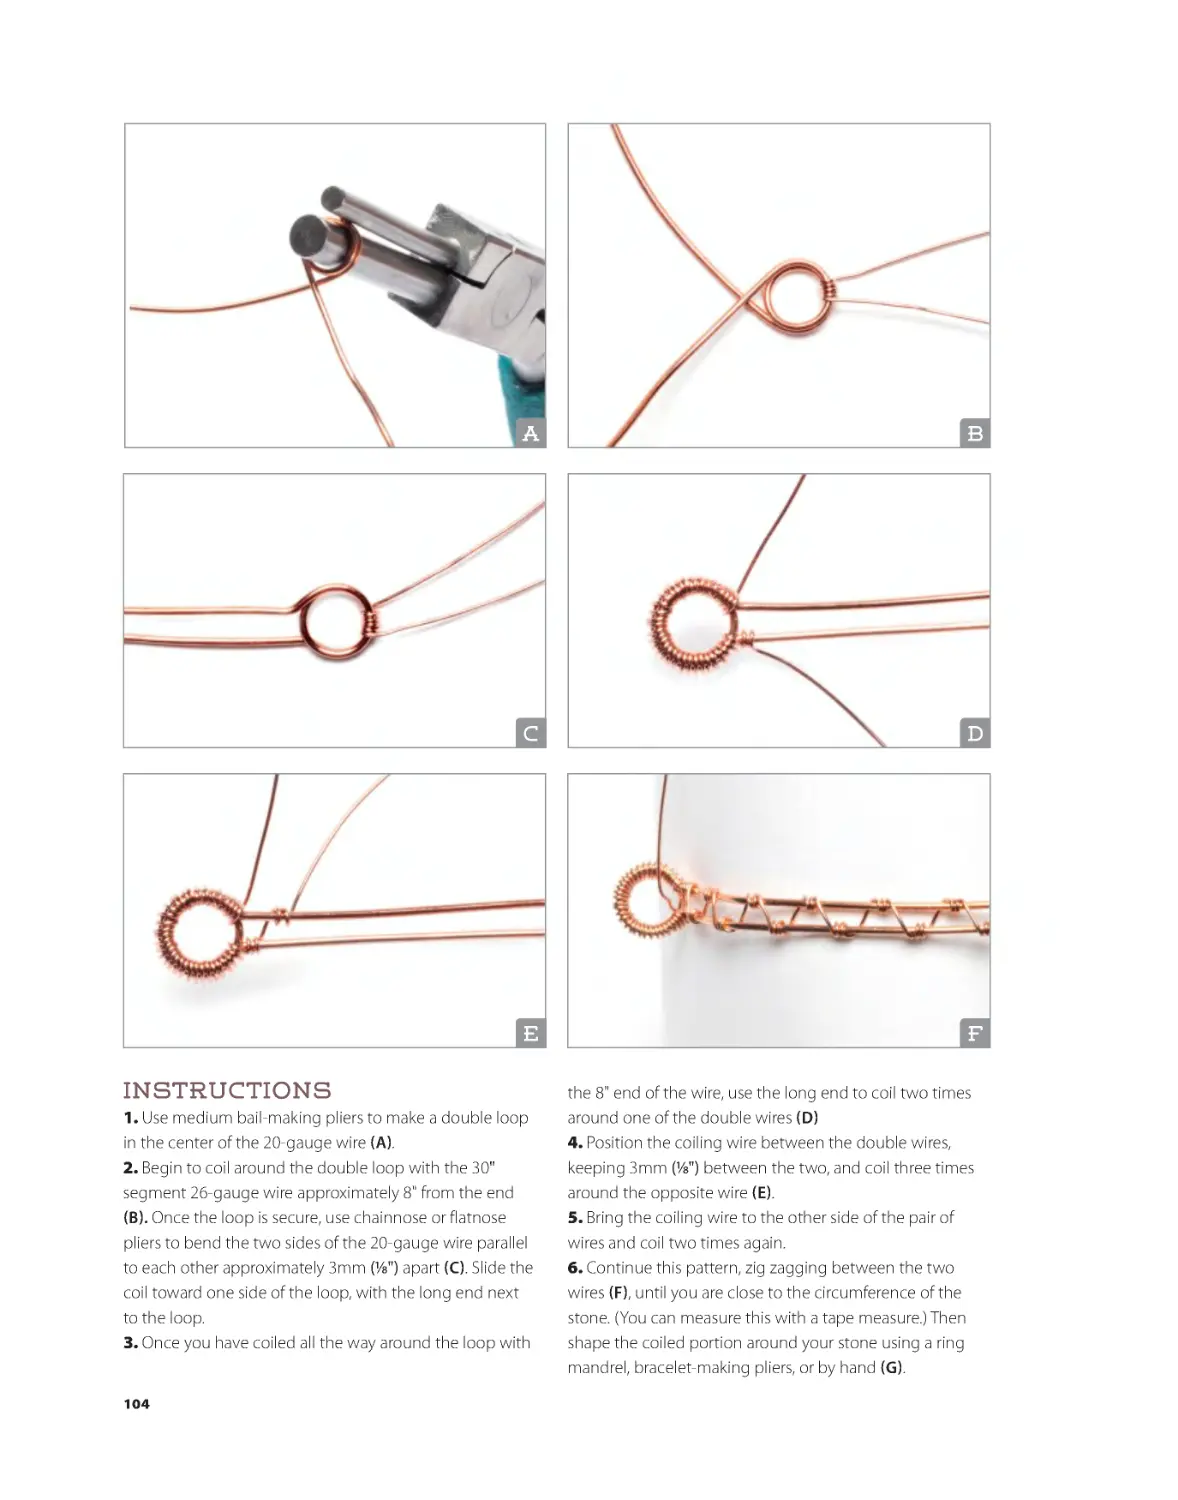
1. Using large bail-making pliers, bend the wire about 1"
from the end (A).
2. Use flatnose pliers to bend the short end of the wire out
at a slight angle (B).
3. Start to zig zag the long end of the wire with chainnose
pliers (Basics, p. 13). Make the last segment of the zig zag
point downward (C). Trim the end of the earwire approximately 6mm (1/4") below the last zig zag.
4. Place the zig zag on the bench block and use the flat (or
round) face of a chasing hammer to hammer the zig zag
portion of the earwire to flatten and work-harden it (Basics,
p. 13) (D). (Avoid hammering both the last segment of the
zig zag and everything above the zig zag.)
5. Use sandpaper to smooth the end of the earwire (E).
6. Repeat steps 1–5 to create a second earring (or consider
doing parallel steps on both earwires at the same time).
F
G
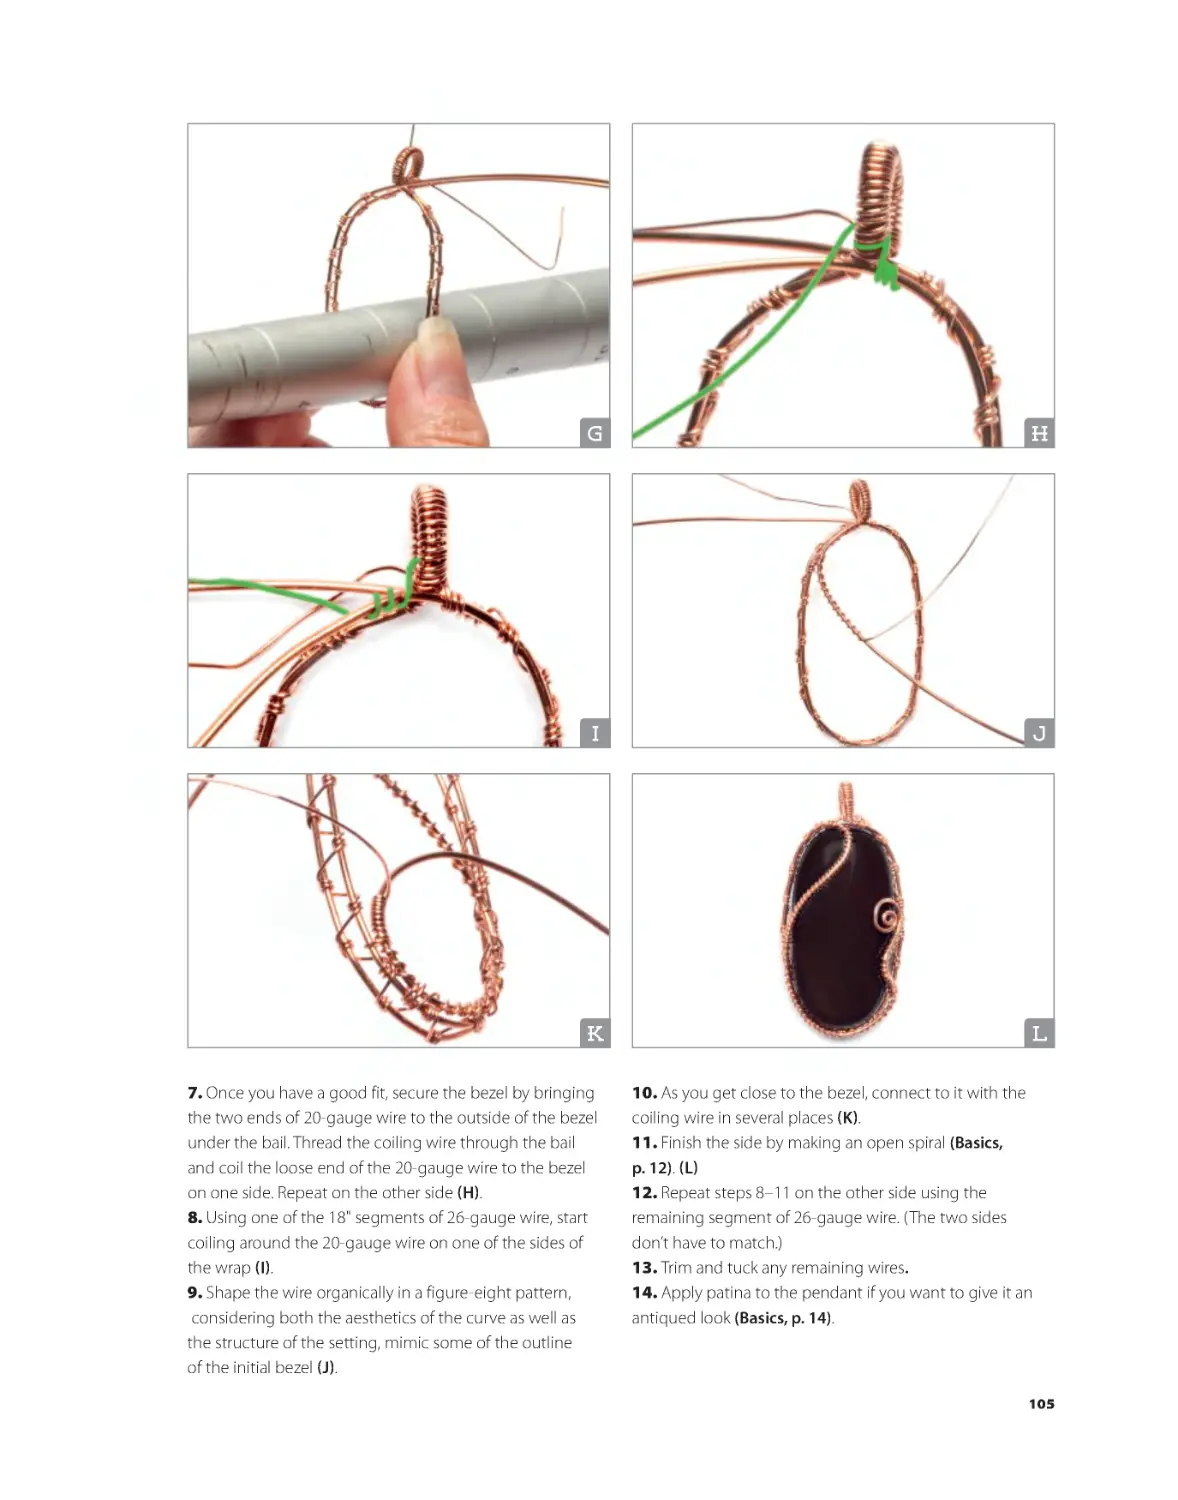
7. Check the fit of the wire in the hole in the pearl. If it is
loose, use your chainnose pliers to slightly flatten the end
of the wire by squeezing it firmly (F, G).
8. Use your preferred adhesive to glue the pearls onto
the end of each wire.
9. Repeat steps 7 and 8 to finish a second earring.
17
BKS-67899-01.indd 17
2/1/17 1:50 PM
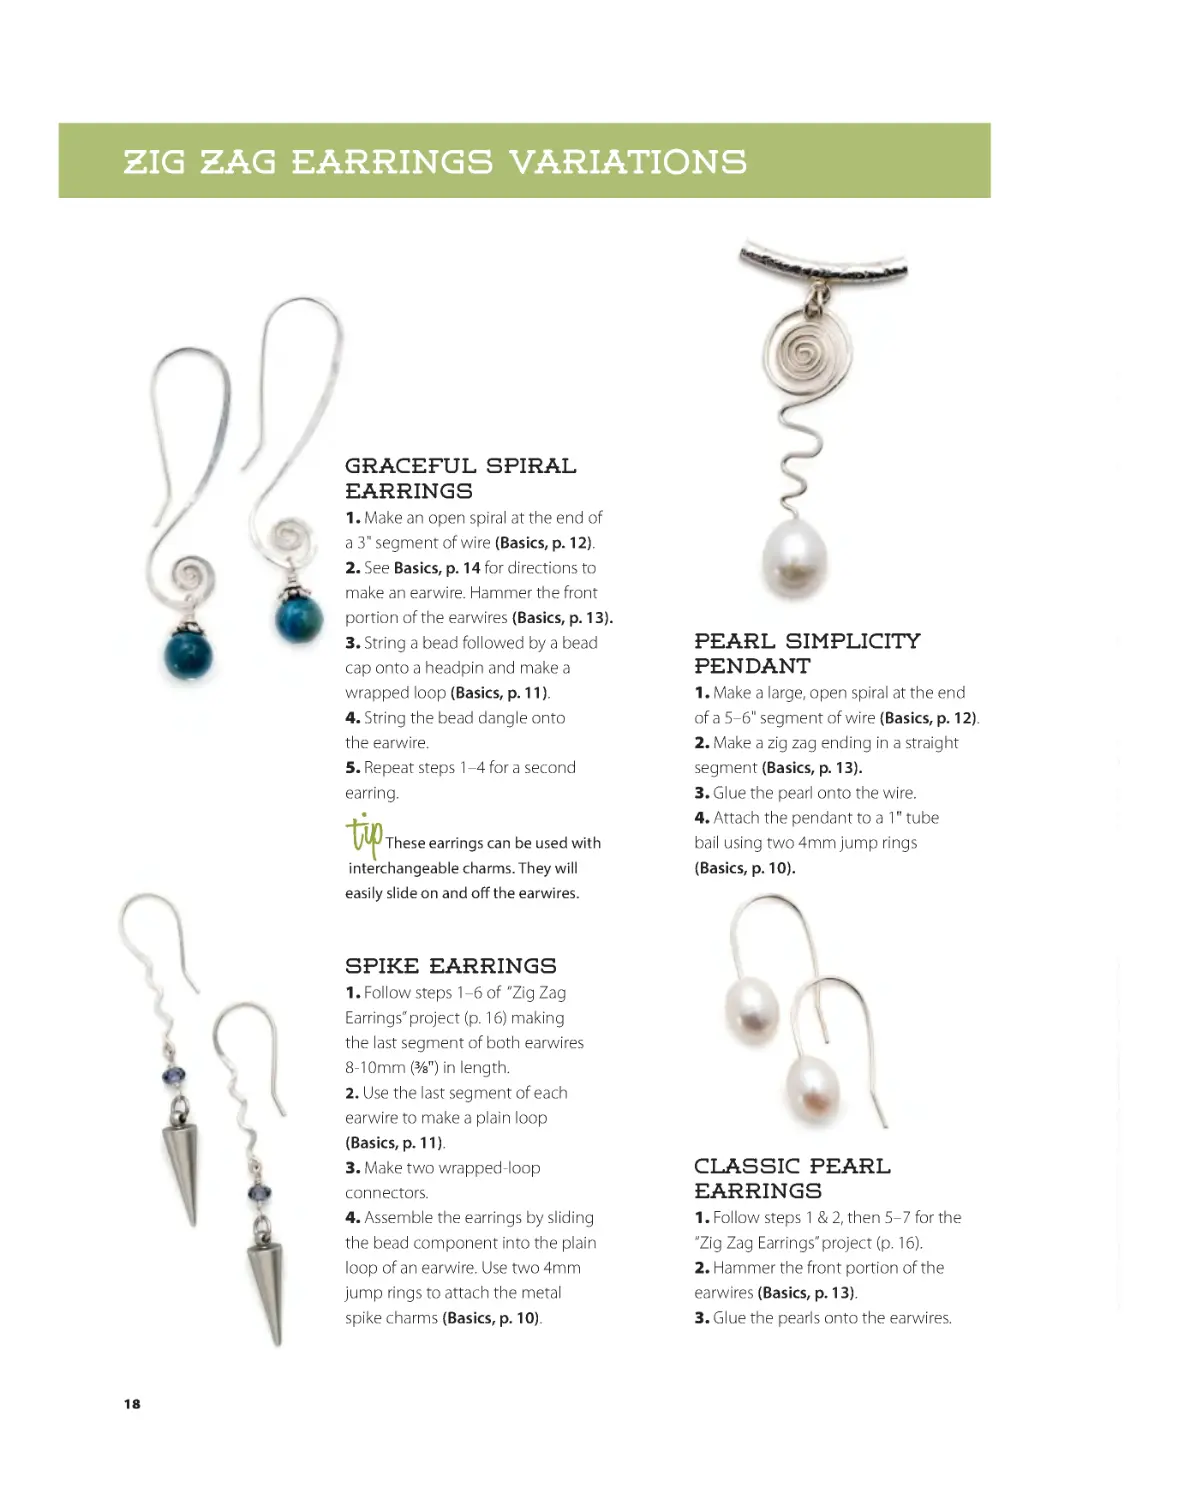
Zig Zag Earrings Variations
Graceful Spiral
Earrings
1. Make an open spiral at the end of
a 3" segment of wire (Basics, p. 12).
2. See Basics, p. 14 for directions to
make an earwire. Hammer the front
portion of the earwires (Basics, p. 13).
3. String a bead followed by a bead
cap onto a headpin and make a
wrapped loop (Basics, p. 11).
4. String the bead dangle onto
the earwire.
5. Repeat steps 1–4 for a second
earring.
These earrings can be used with
interchangeable charms. They will
Pearl Simplicity
pendant
1. Make a large, open spiral at the end
of a 5–6" segment of wire (Basics, p. 12).
2. Make a zig zag ending in a straight
segment (Basics, p. 13).
3. Glue the pearl onto the wire.
4. Attach the pendant to a 1" tube
bail using two 4mm jump rings
(Basics, p. 10).
easily slide on and off the earwires.
Spike earrings
1. Follow steps 1–6 of “Zig Zag
Earrings” project (p. 16) making
the last segment of both earwires
8-10mm (3/8") in length.
2. Use the last segment of each
earwire to make a plain loop
(Basics, p. 11).
3. Make two wrapped-loop
connectors.
4. Assemble the earrings by sliding
the bead component into the plain
loop of an earwire. Use two 4mm
jump rings to attach the metal
spike charms (Basics, p. 10).
Classic Pearl
Earrings
1. Follow steps 1 & 2, then 5–7 for the
“Zig Zag Earrings” project (p. 16).
2. Hammer the front portion of the
earwires (Basics, p. 13).
3. Glue the pearls onto the earwires.
18
BKS-67899-01.indd 18
2/1/17 1:50 PM
Spiral
Journey
PenDant
Materials
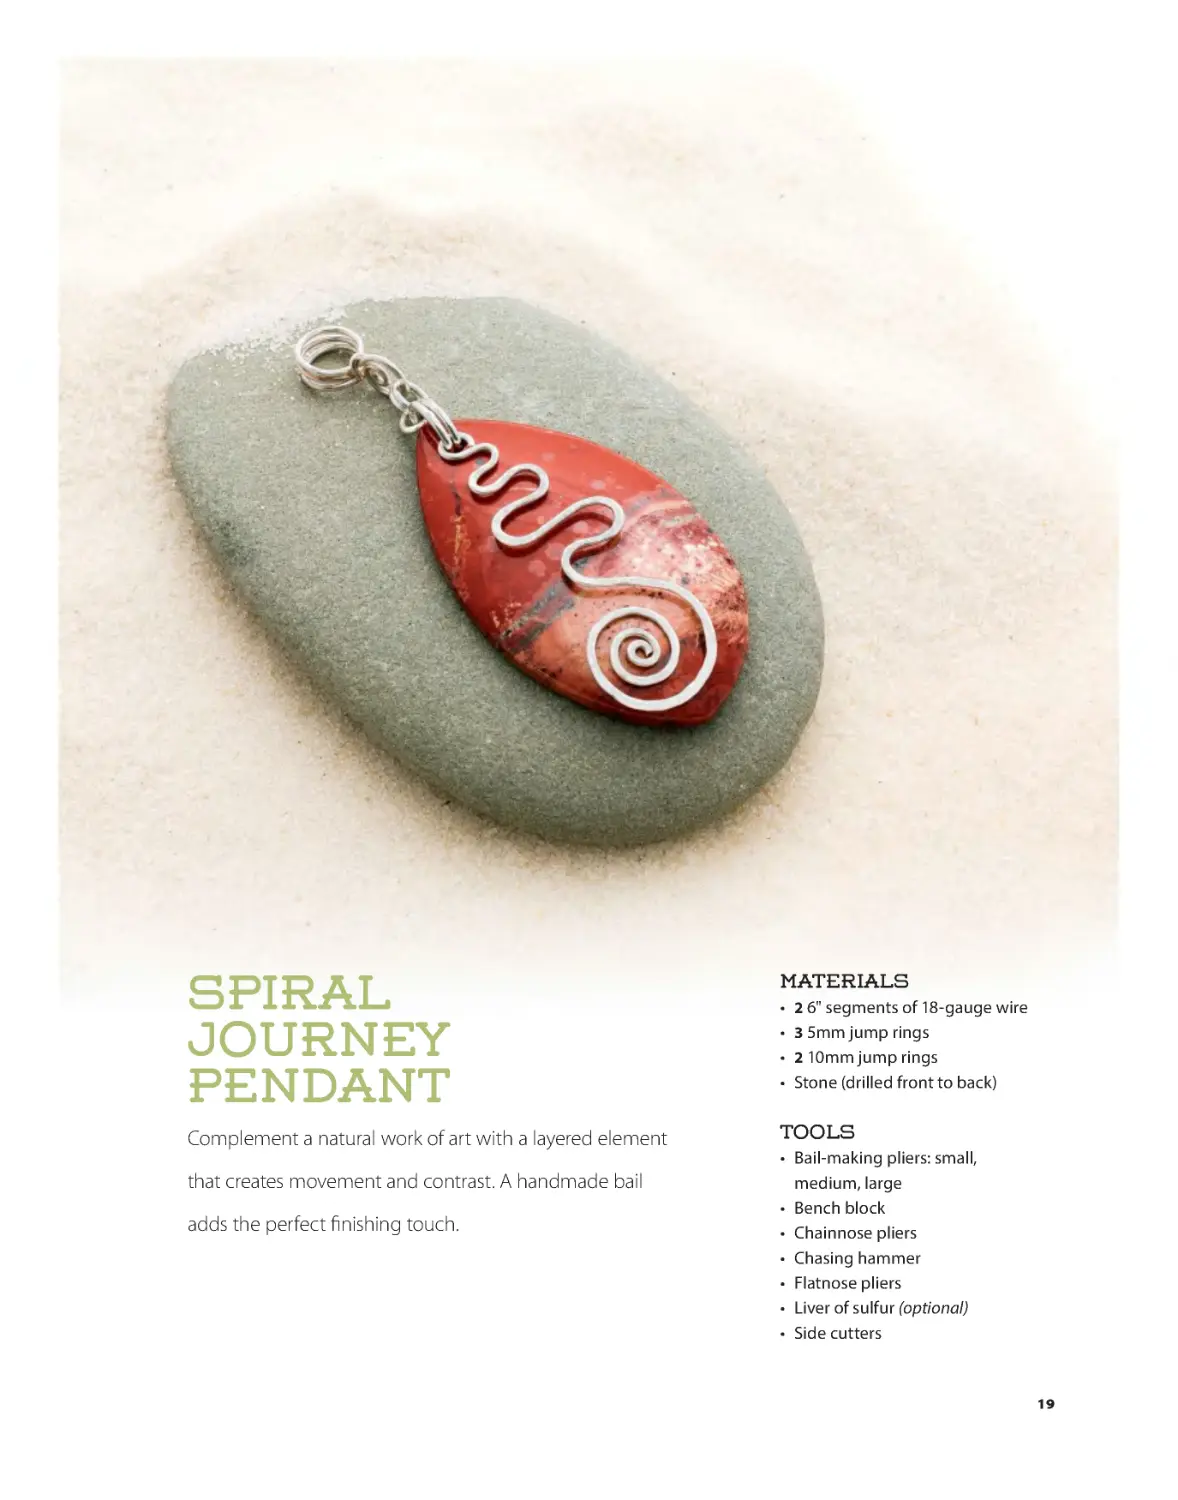
Complement a natural work of art with a layered element
Tools
that creates movement and contrast. A handmade bail
adds the perfect finishing touch.
•
•
•
•
2 6" segments of 18-gauge wire
3 5mm jump rings
2 10mm jump rings
Stone (drilled front to back)
• Bail-making pliers: small,
medium, large
• Bench block
• Chainnose pliers
• Chasing hammer
• Flatnose pliers
• Liver of sulfur (optional)
• Side cutters
19
BKS-67899-01.indd 19
2/1/17 1:50 PM
A
B
C
D
E
F
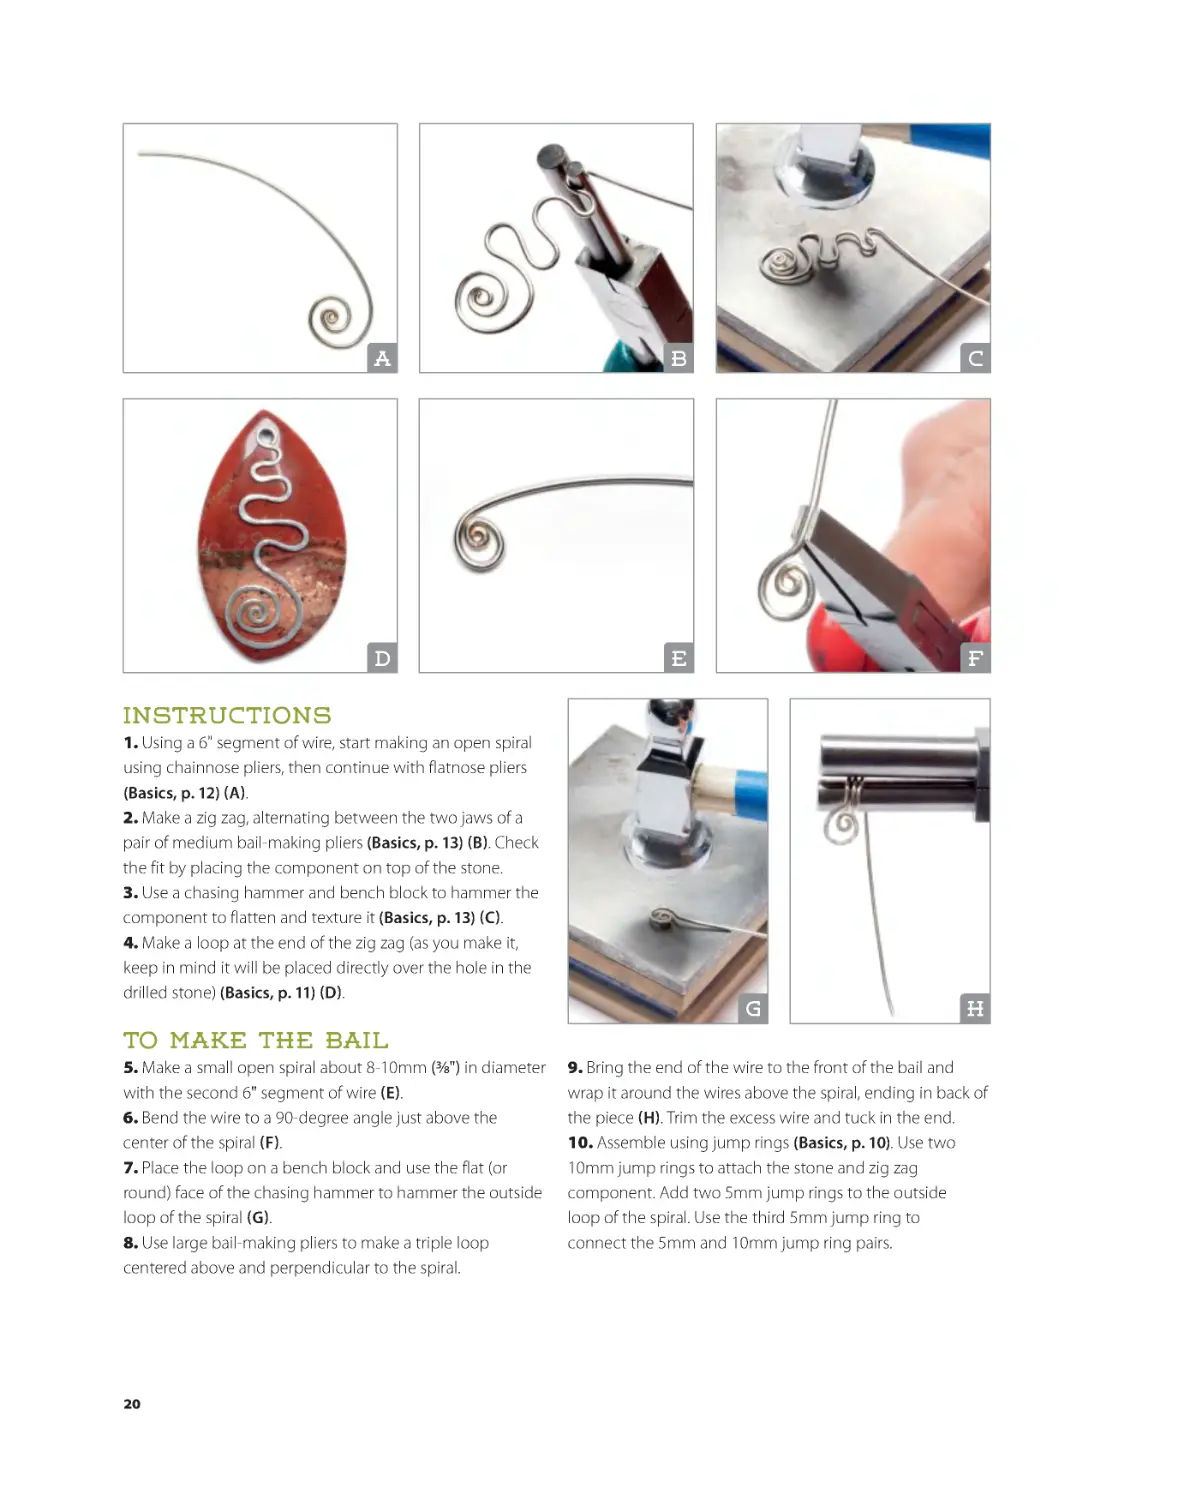
Instructions
1. Using a 6" segment of wire, start making an open spiral
using chainnose pliers, then continue with flatnose pliers
(Basics, p. 12) (A).
2. Make a zig zag, alternating between the two jaws of a
pair of medium bail-making pliers (Basics, p. 13) (B). Check
the fit by placing the component on top of the stone.
3. Use a chasing hammer and bench block to hammer the
component to flatten and texture it (Basics, p. 13) (C).
4. Make a loop at the end of the zig zag (as you make it,
keep in mind it will be placed directly over the hole in the
drilled stone) (Basics, p. 11) (D).
G
H
To make the bail
5. Make a small open spiral about 8-10mm (3/8") in diameter
with the second 6" segment of wire (E).
6. Bend the wire to a 90-degree angle just above the
center of the spiral (F).
7. Place the loop on a bench block and use the flat (or
round) face of the chasing hammer to hammer the outside
loop of the spiral (G).
8. Use large bail-making pliers to make a triple loop
centered above and perpendicular to the spiral.
9. Bring the end of the wire to the front of the bail and
wrap it around the wires above the spiral, ending in back of
the piece (H). Trim the excess wire and tuck in the end.
10. Assemble using jump rings (Basics, p. 10). Use two
10mm jump rings to attach the stone and zig zag
component. Add two 5mm jump rings to the outside
loop of the spiral. Use the third 5mm jump ring to
connect the 5mm and 10mm jump ring pairs.
20
BKS-67899-01.indd 20
2/1/17 1:50 PM
Spiral Journey Pendant Variations
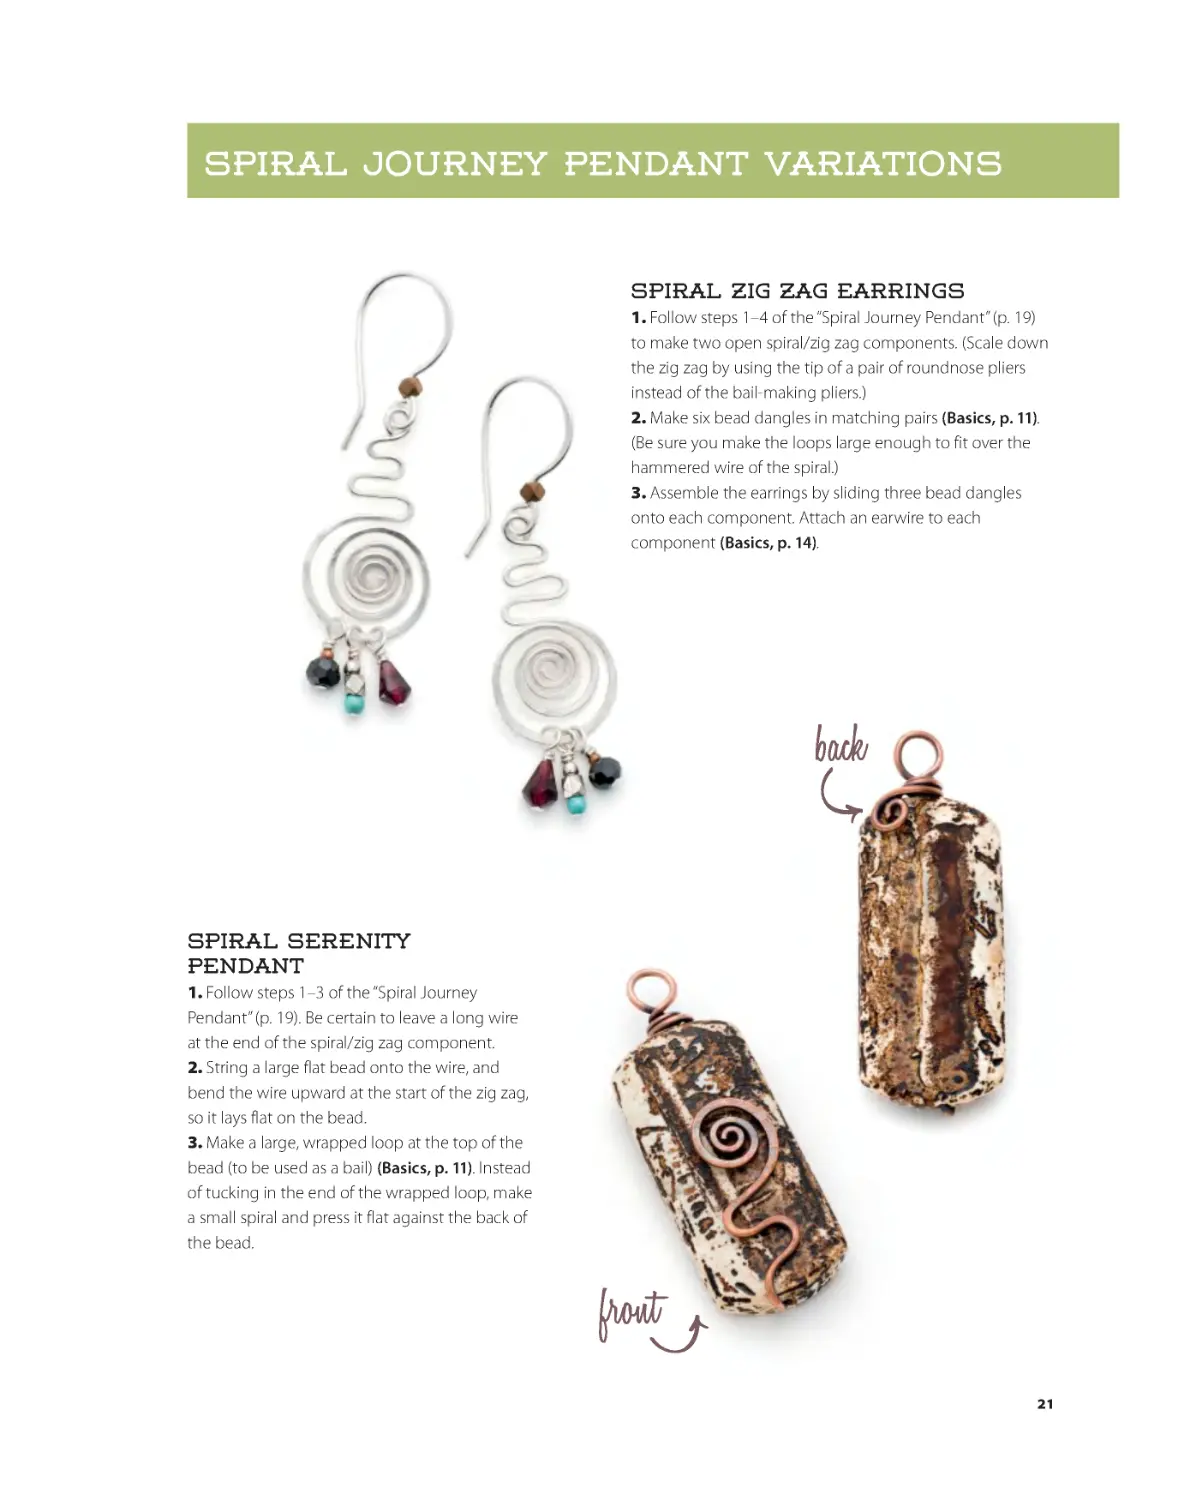
Spiral Zig Zag Earrings
1. Follow steps 1–4 of the “Spiral Journey Pendant” (p. 19)
to make two open spiral/zig zag components. (Scale down
the zig zag by using the tip of a pair of roundnose pliers
instead of the bail-making pliers.)
2. Make six bead dangles in matching pairs (Basics, p. 11).
(Be sure you make the loops large enough to fit over the
hammered wire of the spiral.)
3. Assemble the earrings by sliding three bead dangles
onto each component. Attach an earwire to each
component (Basics, p. 14).
Spiral Serenity
Pendant
1. Follow steps 1–3 of the “Spiral Journey
Pendant” (p. 19). Be certain to leave a long wire
at the end of the spiral/zig zag component.
2. String a large flat bead onto the wire, and
bend the wire upward at the start of the zig zag,
so it lays flat on the bead.
3. Make a large, wrapped loop at the top of the
bead (to be used as a bail) (Basics, p. 11). Instead
of tucking in the end of the wrapped loop, make
a small spiral and press it flat against the back of
the bead.
21
BKS-67899-01.indd 21
2/1/17 1:50 PM
Moon Rings
Bracelet
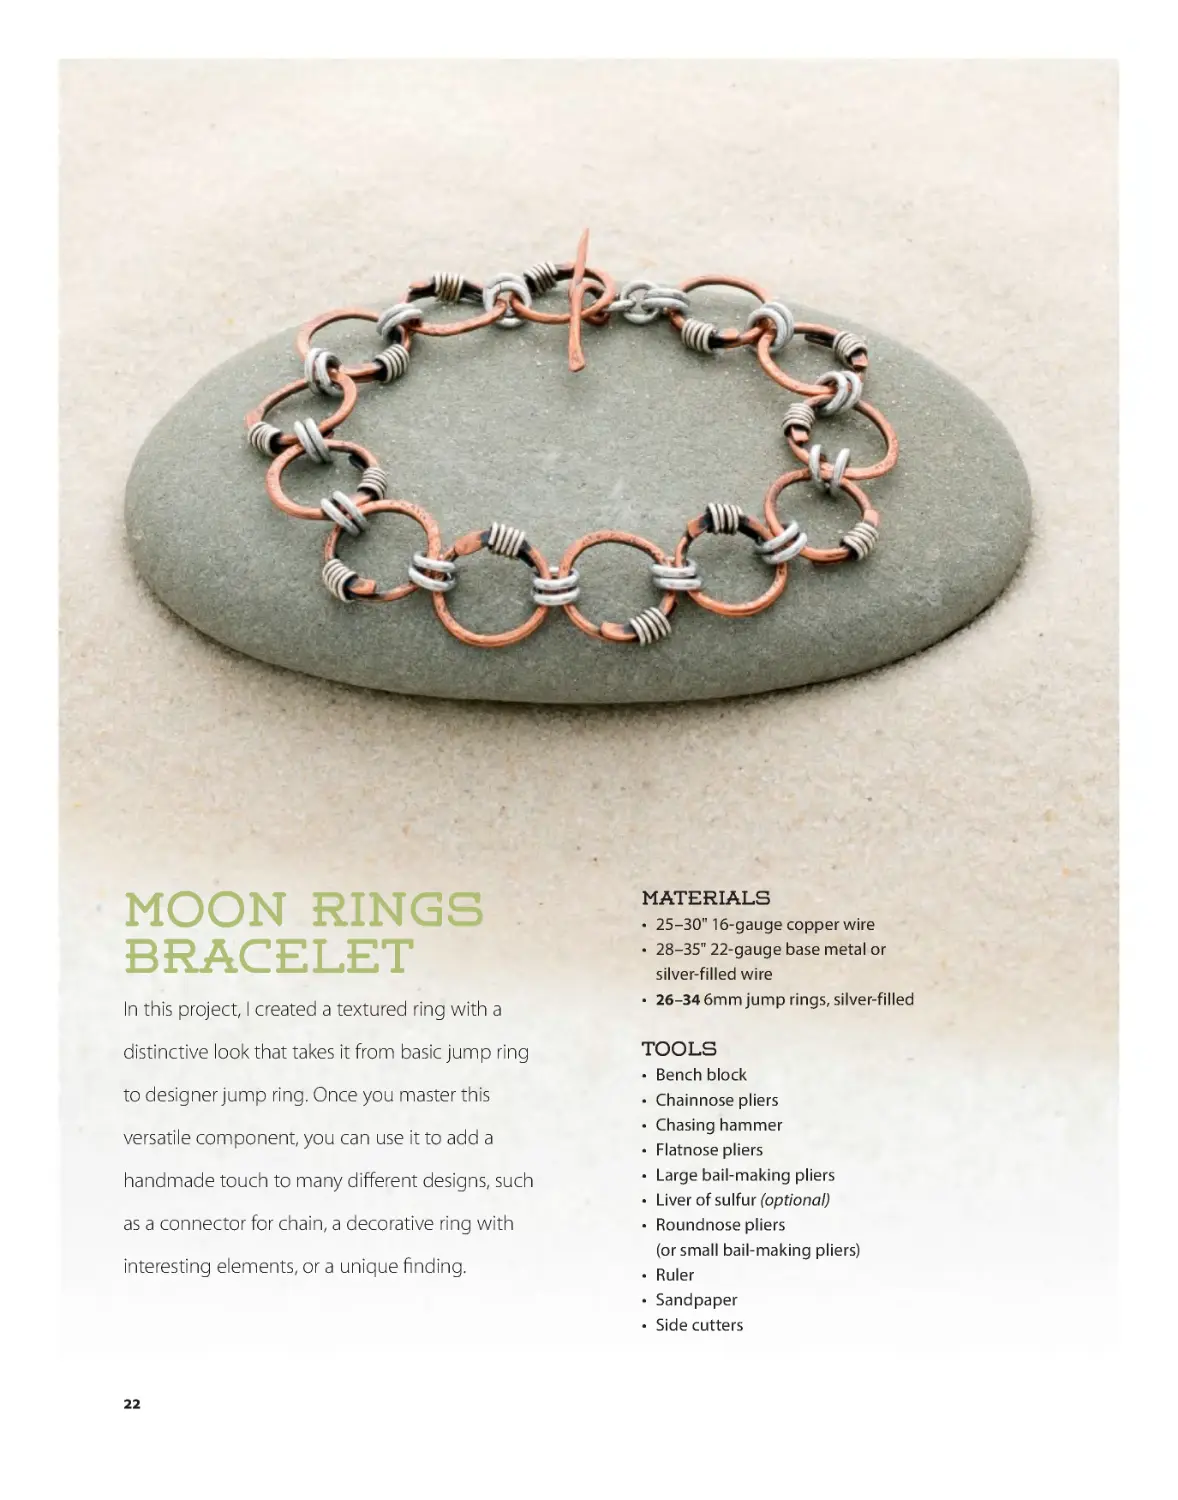
In this project, I created a textured ring with a
distinctive look that takes it from basic jump ring
to designer jump ring. Once you master this
versatile component, you can use it to add a
handmade touch to many different designs, such
as a connector for chain, a decorative ring with
interesting elements, or a unique finding.
Materials
• 25–30" 16-gauge copper wire
• 28–35" 22-gauge base metal or
silver-filled wire
• 26–34 6mm jump rings, silver-filled
Tools
•
•
•
•
•
•
•
Bench block
Chainnose pliers
Chasing hammer
Flatnose pliers
Large bail-making pliers
Liver of sulfur (optional)
Roundnose pliers
(or small bail-making pliers)
• Ruler
• Sandpaper
• Side cutters
22
BKS-67899-01.indd 22
2/1/17 1:50 PM
A
B
C
D
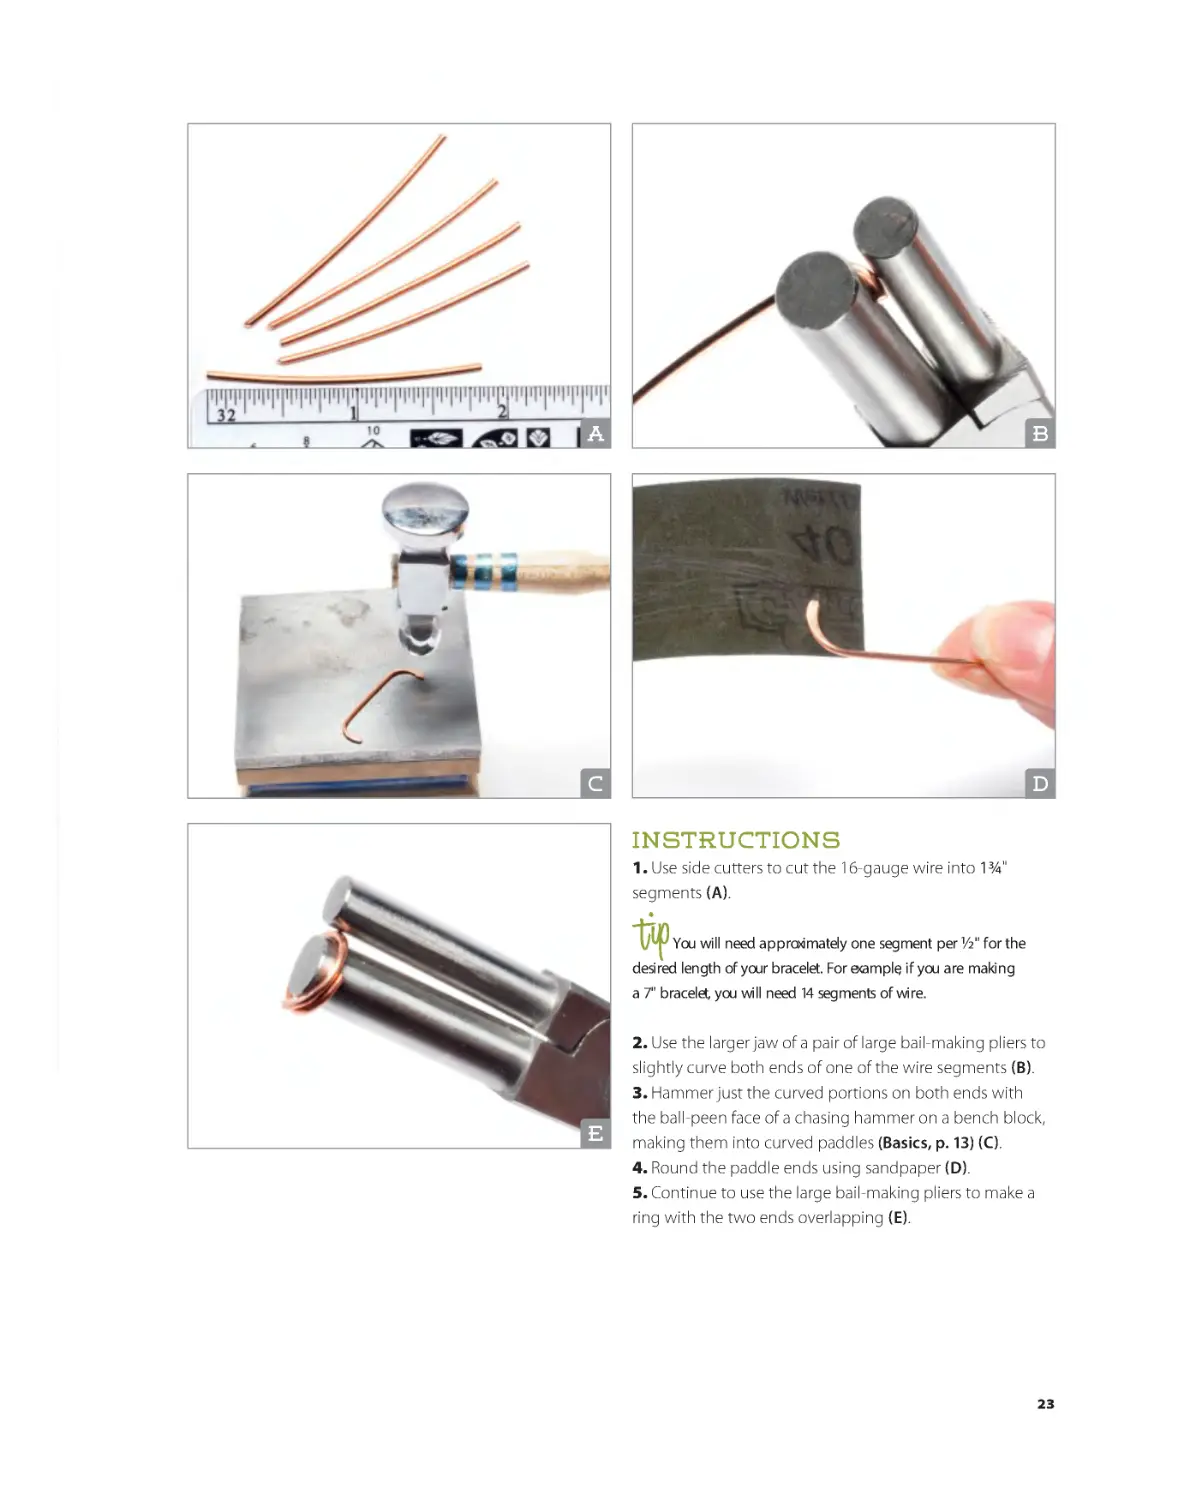
Instructions
1. Use side cutters to cut the 16-gauge wire into 1¾"
segments (A).
You will need approximately one segment per ½" for the
desired length of your bracelet. For example, if you are making
a 7" bracelet, you will need 14 segments of wire.
E
2. Use the larger jaw of a pair of large bail-making pliers to
slightly curve both ends of one of the wire segments (B).
3. Hammer just the curved portions on both ends with
the ball-peen face of a chasing hammer on a bench block,
making them into curved paddles (Basics, p. 13) (C).
4. Round the paddle ends using sandpaper (D).
5. Continue to use the large bail-making pliers to make a
ring with the two ends overlapping (E).
23
BKS-67899-01.indd 23
2/1/17 1:50 PM
F
G
H
I
J
K
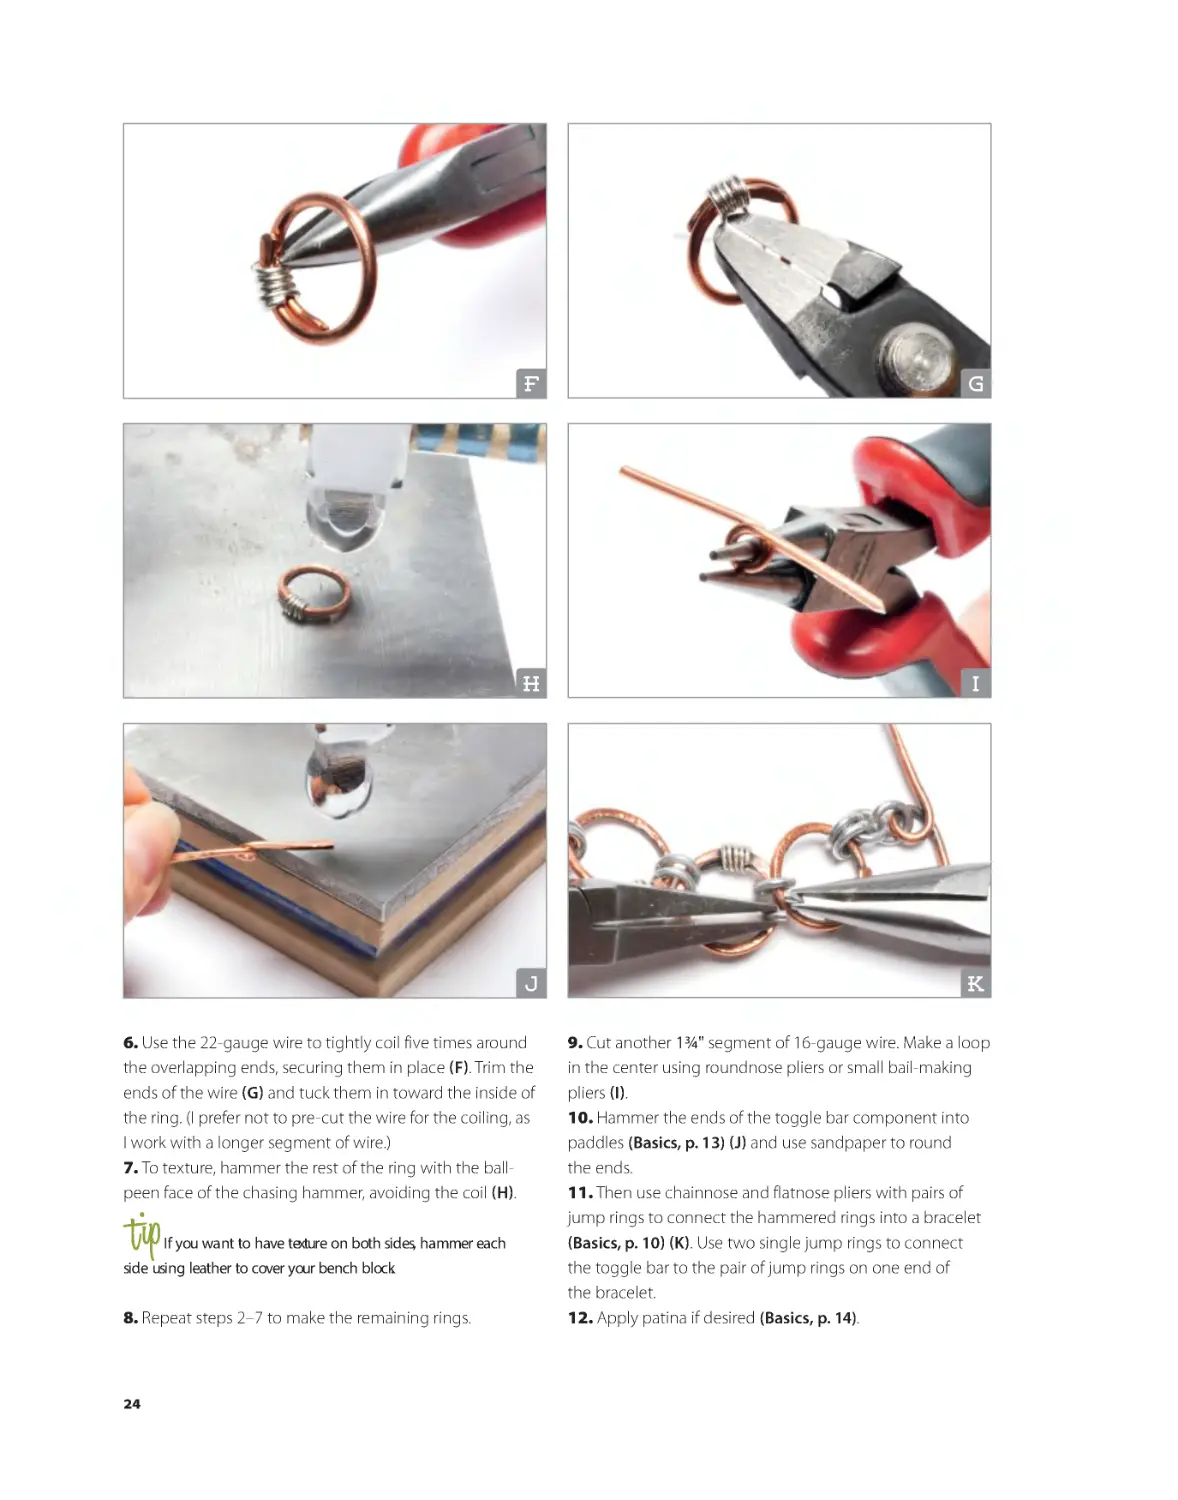
6. Use the 22-gauge wire to tightly coil five times around
the overlapping ends, securing them in place (F). Trim the
ends of the wire (G) and tuck them in toward the inside of
the ring. (I prefer not to pre-cut the wire for the coiling, as
I work with a longer segment of wire.)
7. To texture, hammer the rest of the ring with the ballpeen face of the chasing hammer, avoiding the coil (H).
If you want to have texture on both sides, hammer each
side using leather to cover your bench block.
8. Repeat steps 2–7 to make the remaining rings.
9. Cut another 13/4" segment of 16-gauge wire. Make a loop
in the center using roundnose pliers or small bail-making
pliers (I).
10. Hammer the ends of the toggle bar component into
paddles (Basics, p. 13) (J) and use sandpaper to round
the ends.
11. Then use chainnose and flatnose pliers with pairs of
jump rings to connect the hammered rings into a bracelet
(Basics, p. 10) (K). Use two single jump rings to connect
the toggle bar to the pair of jump rings on one end of
the bracelet.
12. Apply patina if desired (Basics, p. 14).
24
BKS-67899-01.indd 24
2/1/17 1:51 PM
Moon Rings Bracelet Variations
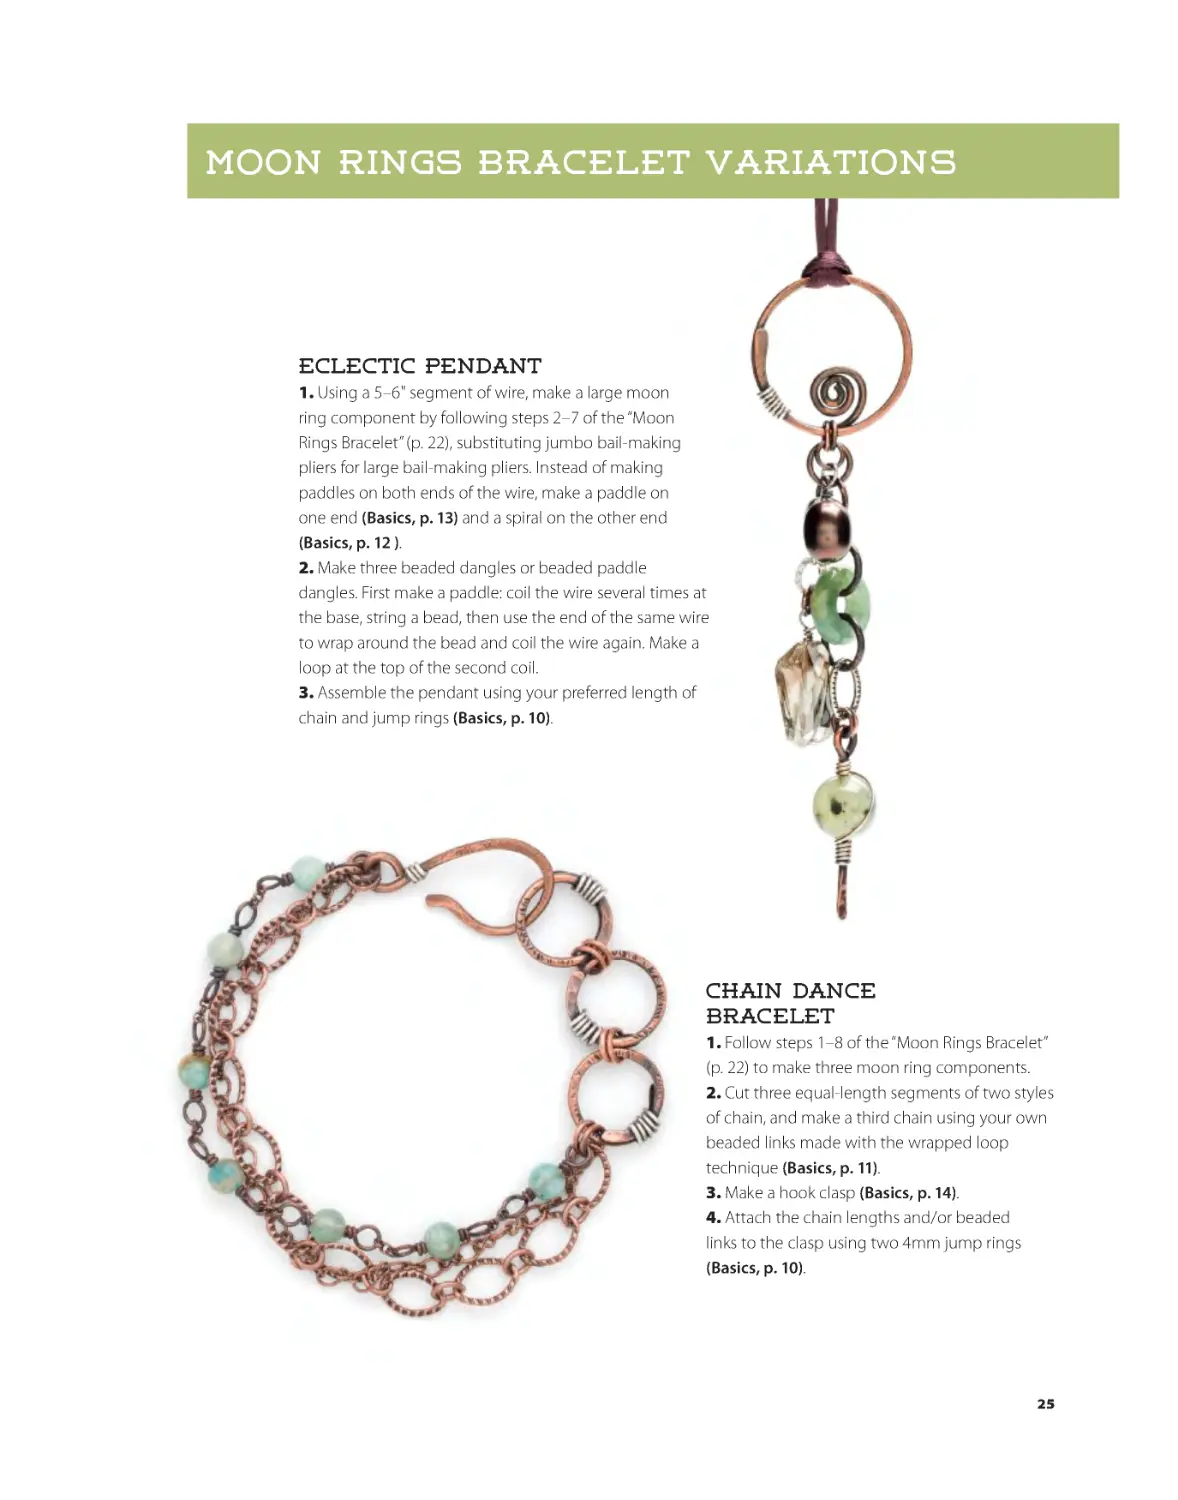
Eclectic Pendant
1. Using a 5–6" segment of wire, make a large moon
ring component by following steps 2–7 of the “Moon
Rings Bracelet” (p. 22), substituting jumbo bail-making
pliers for large bail-making pliers. Instead of making
paddles on both ends of the wire, make a paddle on
one end (Basics, p. 13) and a spiral on the other end
(Basics, p. 12 ).
2. Make three beaded dangles or beaded paddle
dangles. First make a paddle: coil the wire several times at
the base, string a bead, then use the end of the same wire
to wrap around the bead and coil the wire again. Make a
loop at the top of the second coil.
3. Assemble the pendant using your preferred length of
chain and jump rings (Basics, p. 10).
Chain Dance
Bracelet
1. Follow steps 1–8 of the “Moon Rings Bracelet”
(p. 22) to make three moon ring components.
2. Cut three equal-length segments of two styles
of chain, and make a third chain using your own
beaded links made with the wrapped loop
technique (Basics, p. 11).
3. Make a hook clasp (Basics, p. 14).
4. Attach the chain lengths and/or beaded
links to the clasp using two 4mm jump rings
(Basics, p. 10).
25
BKS-67899-01.indd 25
2/1/17 1:51 PM
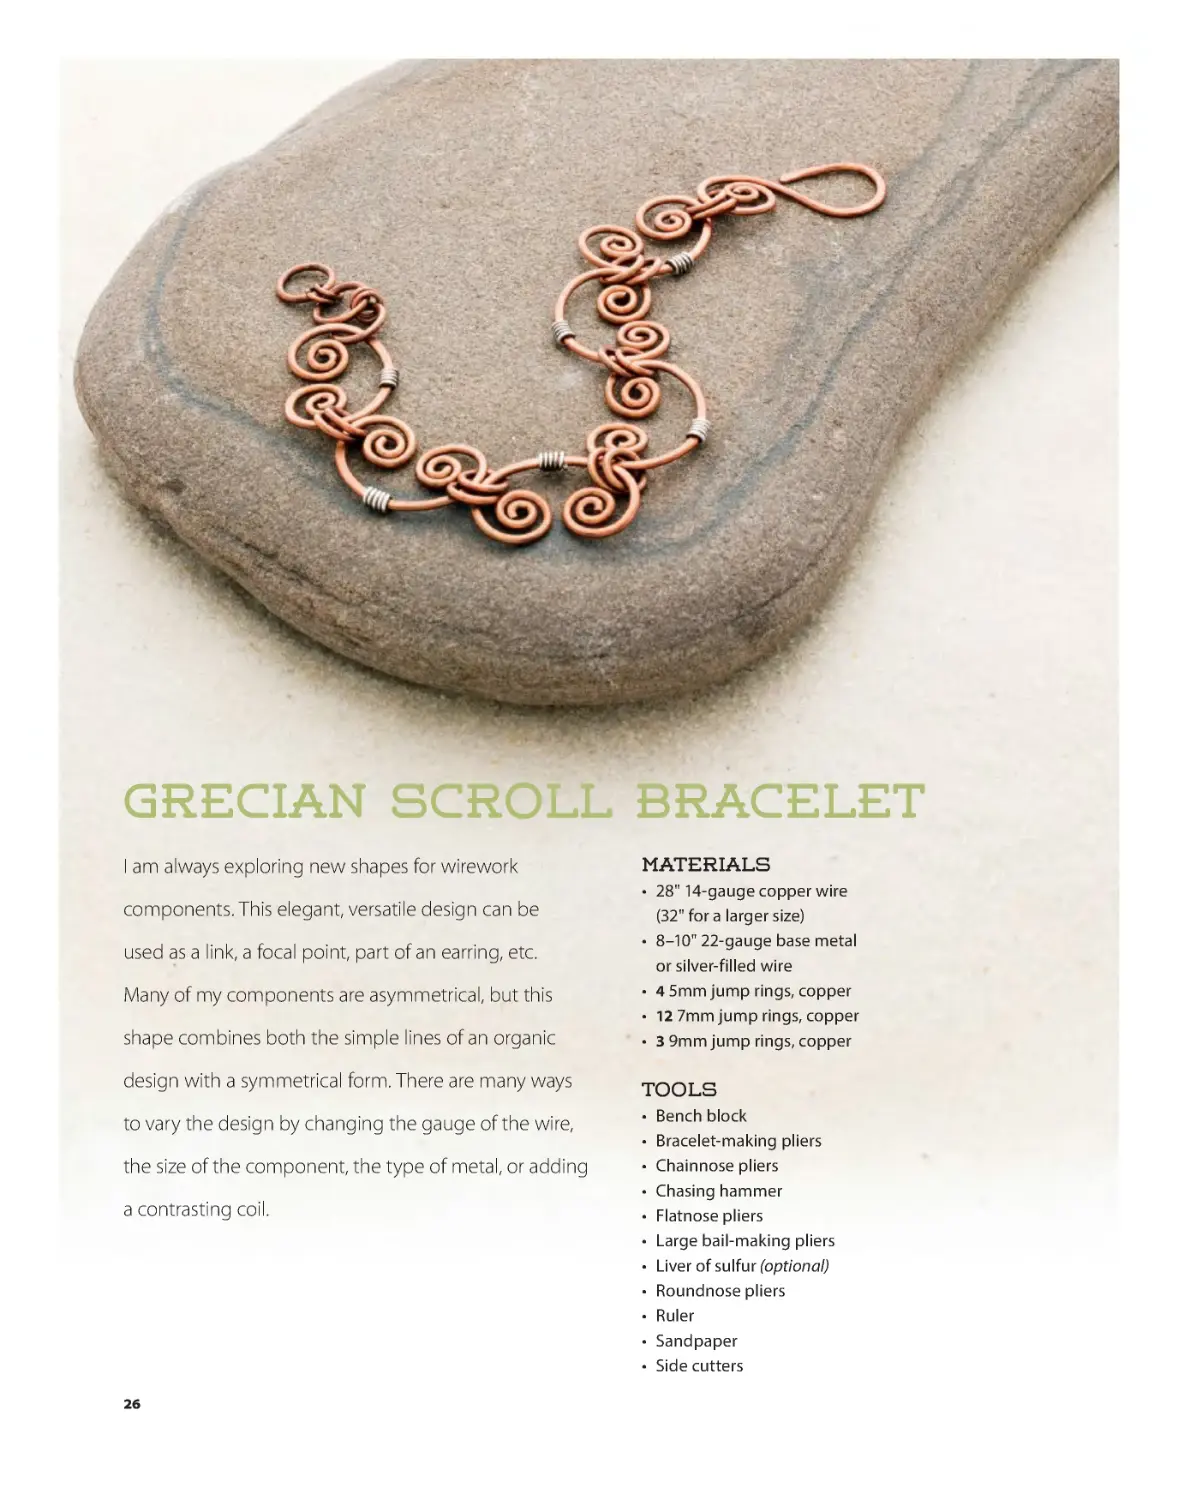
Grecian Scroll Bracelet
I am always exploring new shapes for wirework
Materials
shape combines both the simple lines of an organic
• 28" 14-gauge copper wire
(32" for a larger size)
• 8–10" 22-gauge base metal
or silver-filled wire
• 4 5mm jump rings, copper
• 12 7mm jump rings, copper
• 3 9mm jump rings, copper
design with a symmetrical form. There are many ways
Tools
components. This elegant, versatile design can be
used as a link, a focal point, part of an earring, etc.
Many of my components are asymmetrical, but this
to vary the design by changing the gauge of the wire,
the size of the component, the type of metal, or adding
a contrasting coil.
•
•
•
•
•
•
•
•
•
•
•
Bench block
Bracelet-making pliers
Chainnose pliers
Chasing hammer
Flatnose pliers
Large bail-making pliers
Liver of sulfur (optional)
Roundnose pliers
Ruler
Sandpaper
Side cutters
26
BKS-67899-01.indd 26
2/1/17 1:51 PM
A
B
C
D
E
F
G
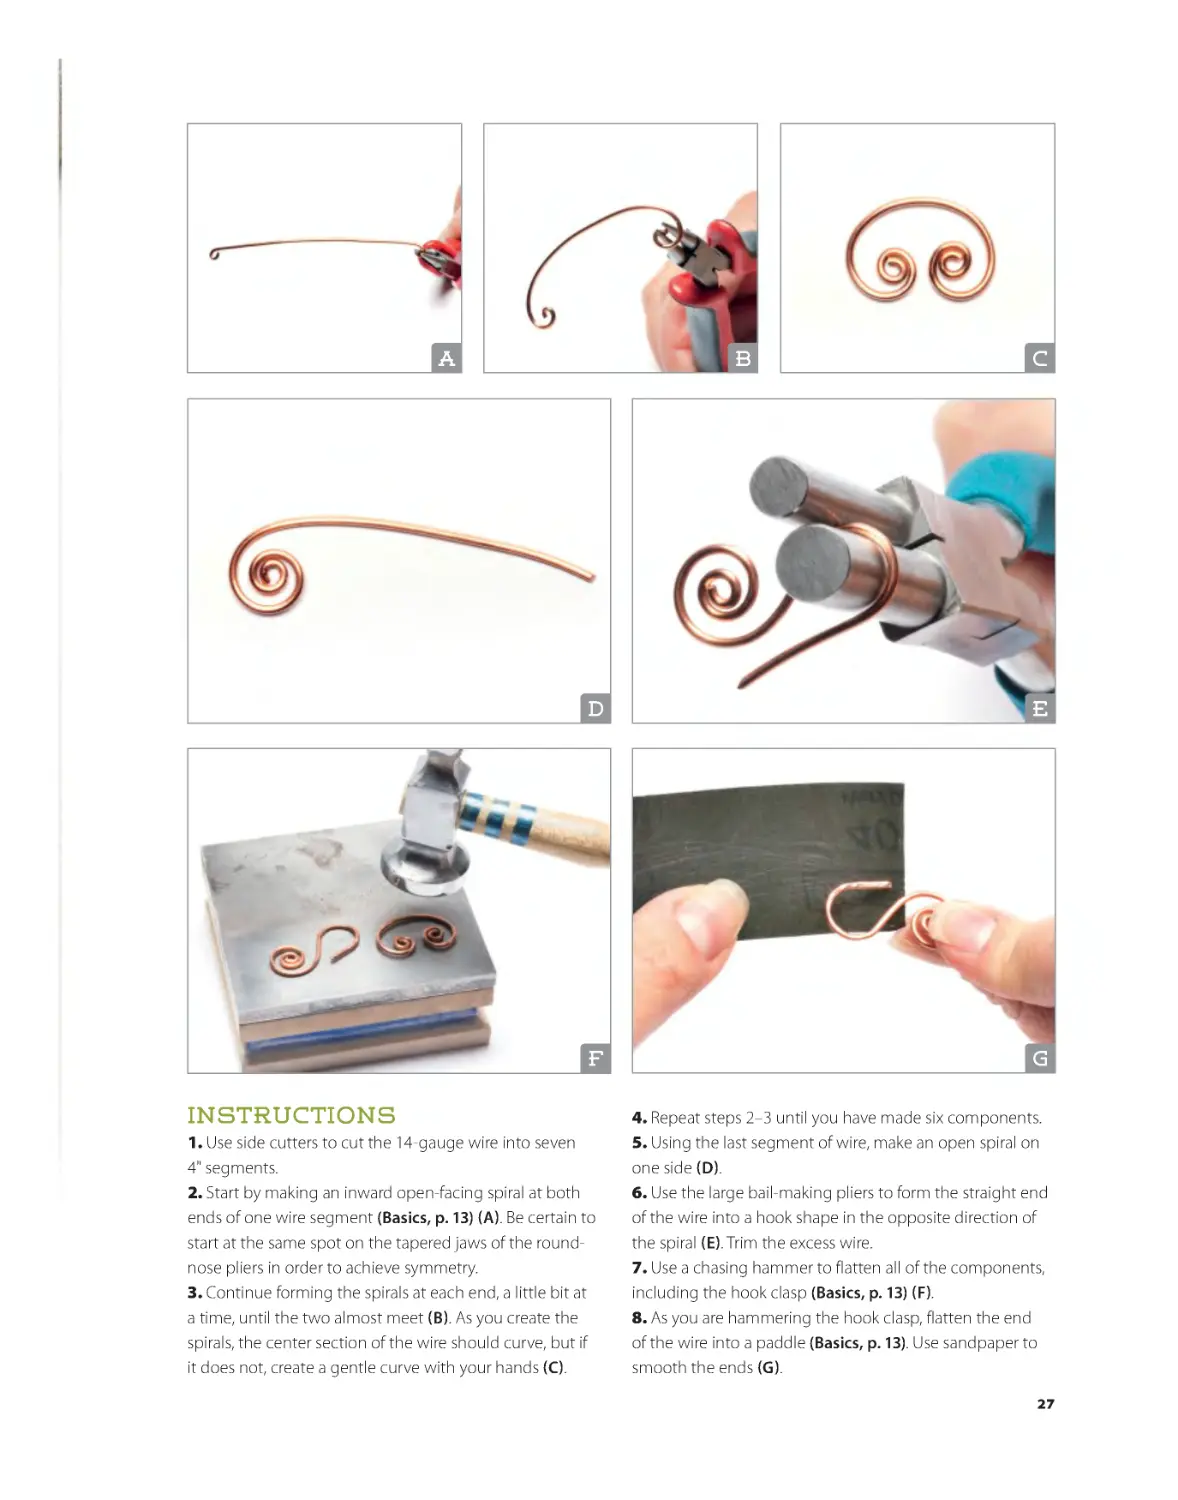
Instructions
1. Use side cutters to cut the 14-gauge wire into seven
4" segments.
2. Start by making an inward open-facing spiral at both
ends of one wire segment (Basics, p. 13) (A). Be certain to
start at the same spot on the tapered jaws of the roundnose pliers in order to achieve symmetry.
3. Continue forming the spirals at each end, a little bit at
a time, until the two almost meet (B). As you create the
spirals, the center section of the wire should curve, but if
it does not, create a gentle curve with your hands (C).
4. Repeat steps 2–3 until you have made six components.
5. Using the last segment of wire, make an open spiral on
one side (D).
6. Use the large bail-making pliers to form the straight end
of the wire into a hook shape in the opposite direction of
the spiral (E). Trim the excess wire.
7. Use a chasing hammer to flatten all of the components,
including the hook clasp (Basics, p. 13) (F).
8. As you are hammering the hook clasp, flatten the end
of the wire into a paddle (Basics, p. 13). Use sandpaper to
smooth the ends (G).
27
BKS-67899-01.indd 27
2/1/17 1:51 PM
H
I
J
K
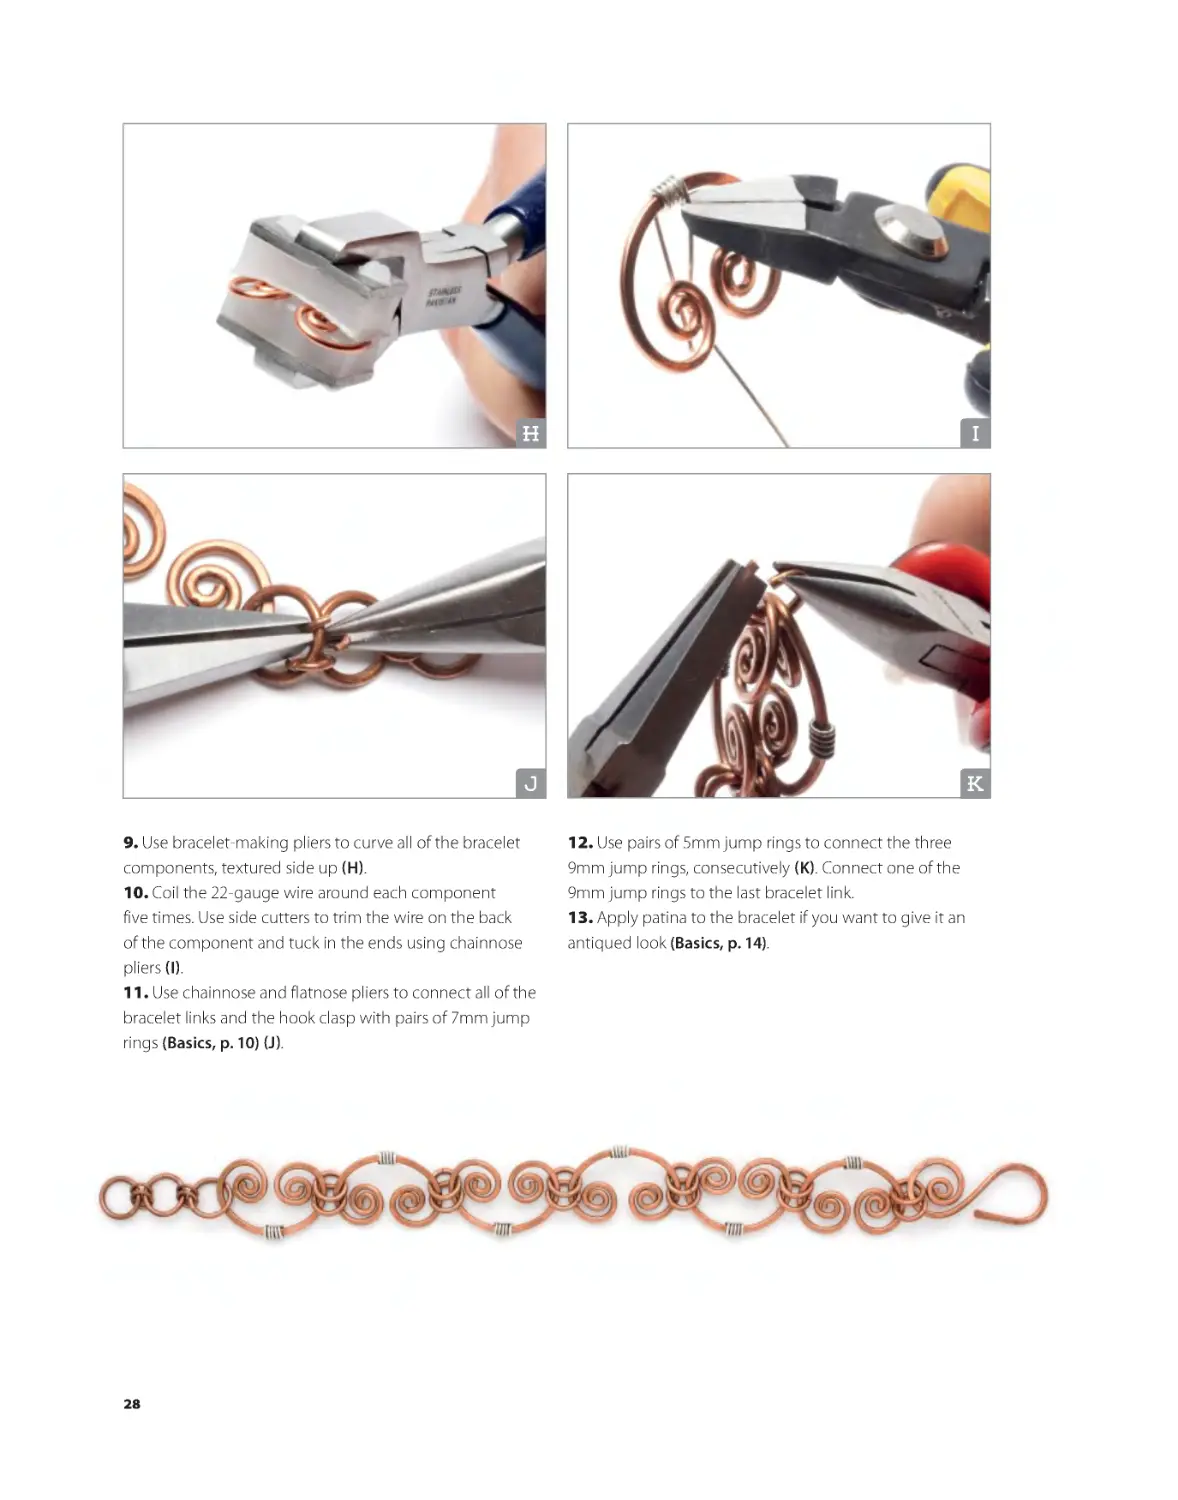
9. Use bracelet-making pliers to curve all of the bracelet
components, textured side up (H).
10. Coil the 22-gauge wire around each component
five times. Use side cutters to trim the wire on the back
of the component and tuck in the ends using chainnose
pliers (I).
11. Use chainnose and flatnose pliers to connect all of the
bracelet links and the hook clasp with pairs of 7mm jump
rings (Basics, p. 10) (J).
12. Use pairs of 5mm jump rings to connect the three
9mm jump rings, consecutively (K). Connect one of the
9mm jump rings to the last bracelet link.
13. Apply patina to the bracelet if you want to give it an
antiqued look (Basics, p. 14).
28
BKS-67899-01.indd 28
2/1/17 1:51 PM
Grecian Scroll Bracelet Variations
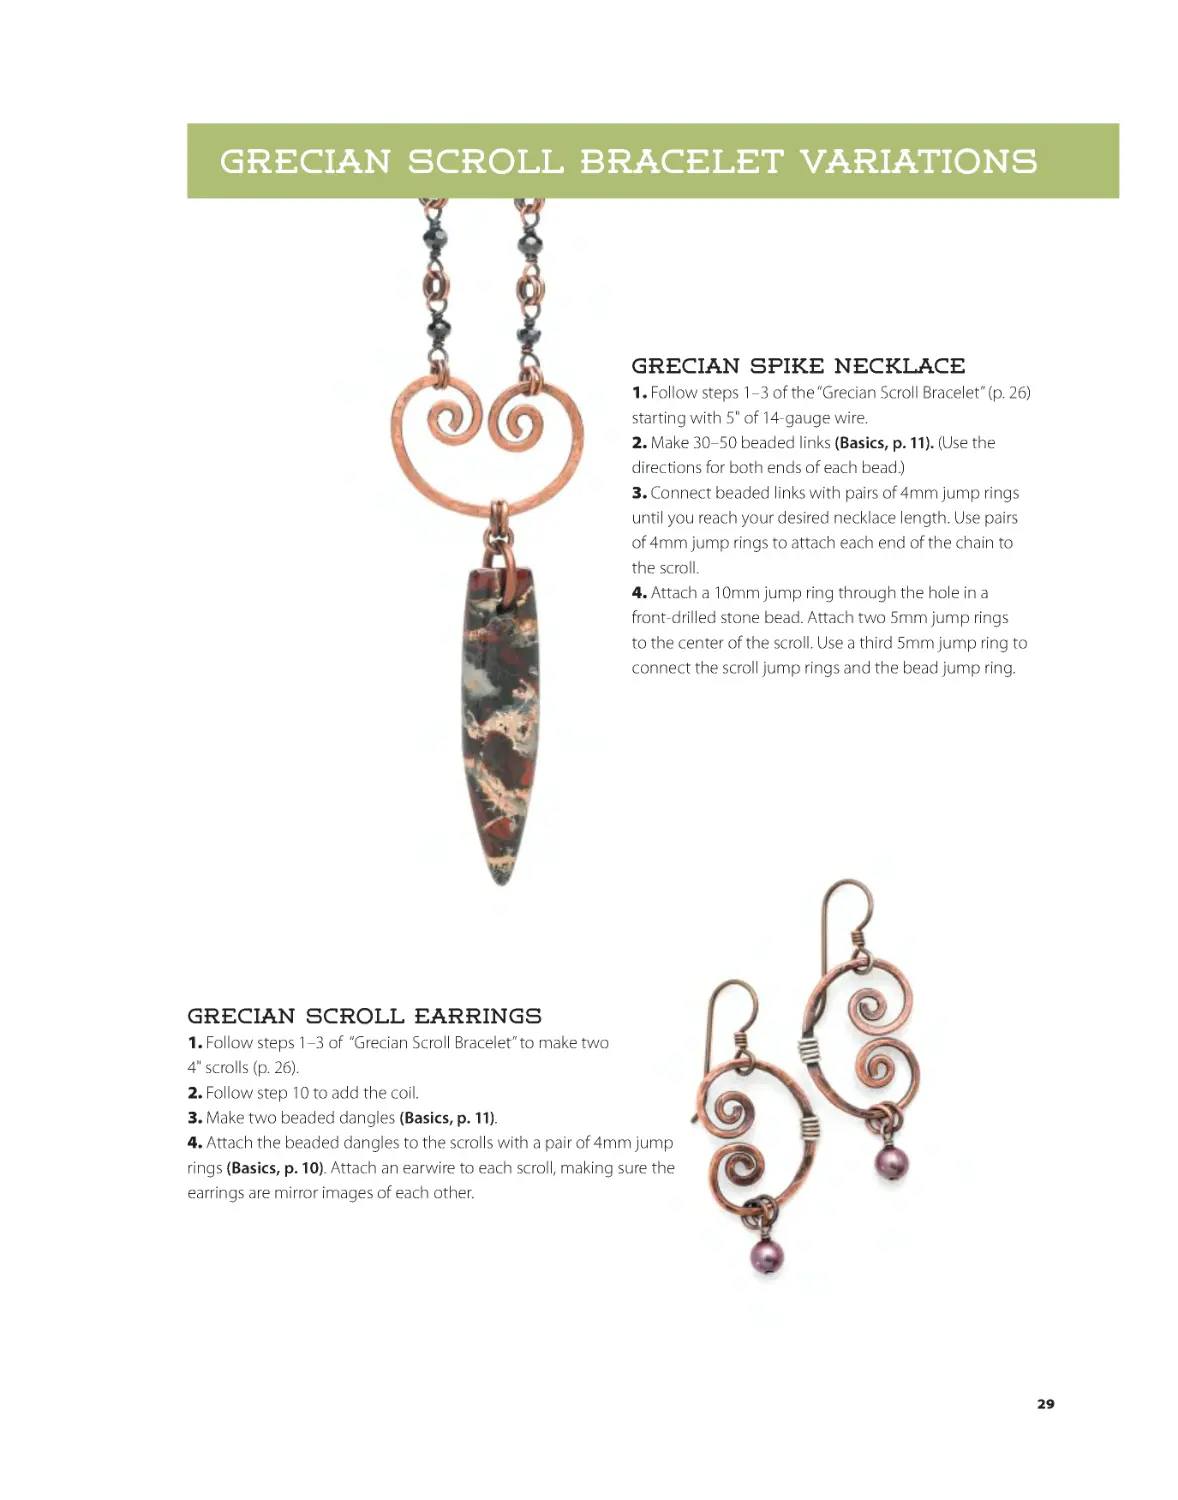
Grecian Spike Necklace
1. Follow steps 1–3 of the “Grecian Scroll Bracelet” (p. 26)
starting with 5" of 14-gauge wire.
2. Make 30–50 beaded links (Basics, p. 11). (Use the
directions for both ends of each bead.)
3. Connect beaded links with pairs of 4mm jump rings
until you reach your desired necklace length. Use pairs
of 4mm jump rings to attach each end of the chain to
the scroll.
4. Attach a 10mm jump ring through the hole in a
front-drilled stone bead. Attach two 5mm jump rings
to the center of the scroll. Use a third 5mm jump ring to
connect the scroll jump rings and the bead jump ring.
Grecian Scroll Earrings
1. Follow steps 1–3 of “Grecian Scroll Bracelet” to make two
4" scrolls (p. 26).
2. Follow step 10 to add the coil.
3. Make two beaded dangles (Basics, p. 11).
4. Attach the beaded dangles to the scrolls with a pair of 4mm jump
rings (Basics, p. 10). Attach an earwire to each scroll, making sure the
earrings are mirror images of each other.
29
BKS-67899-01.indd 29
2/1/17 1:51 PM
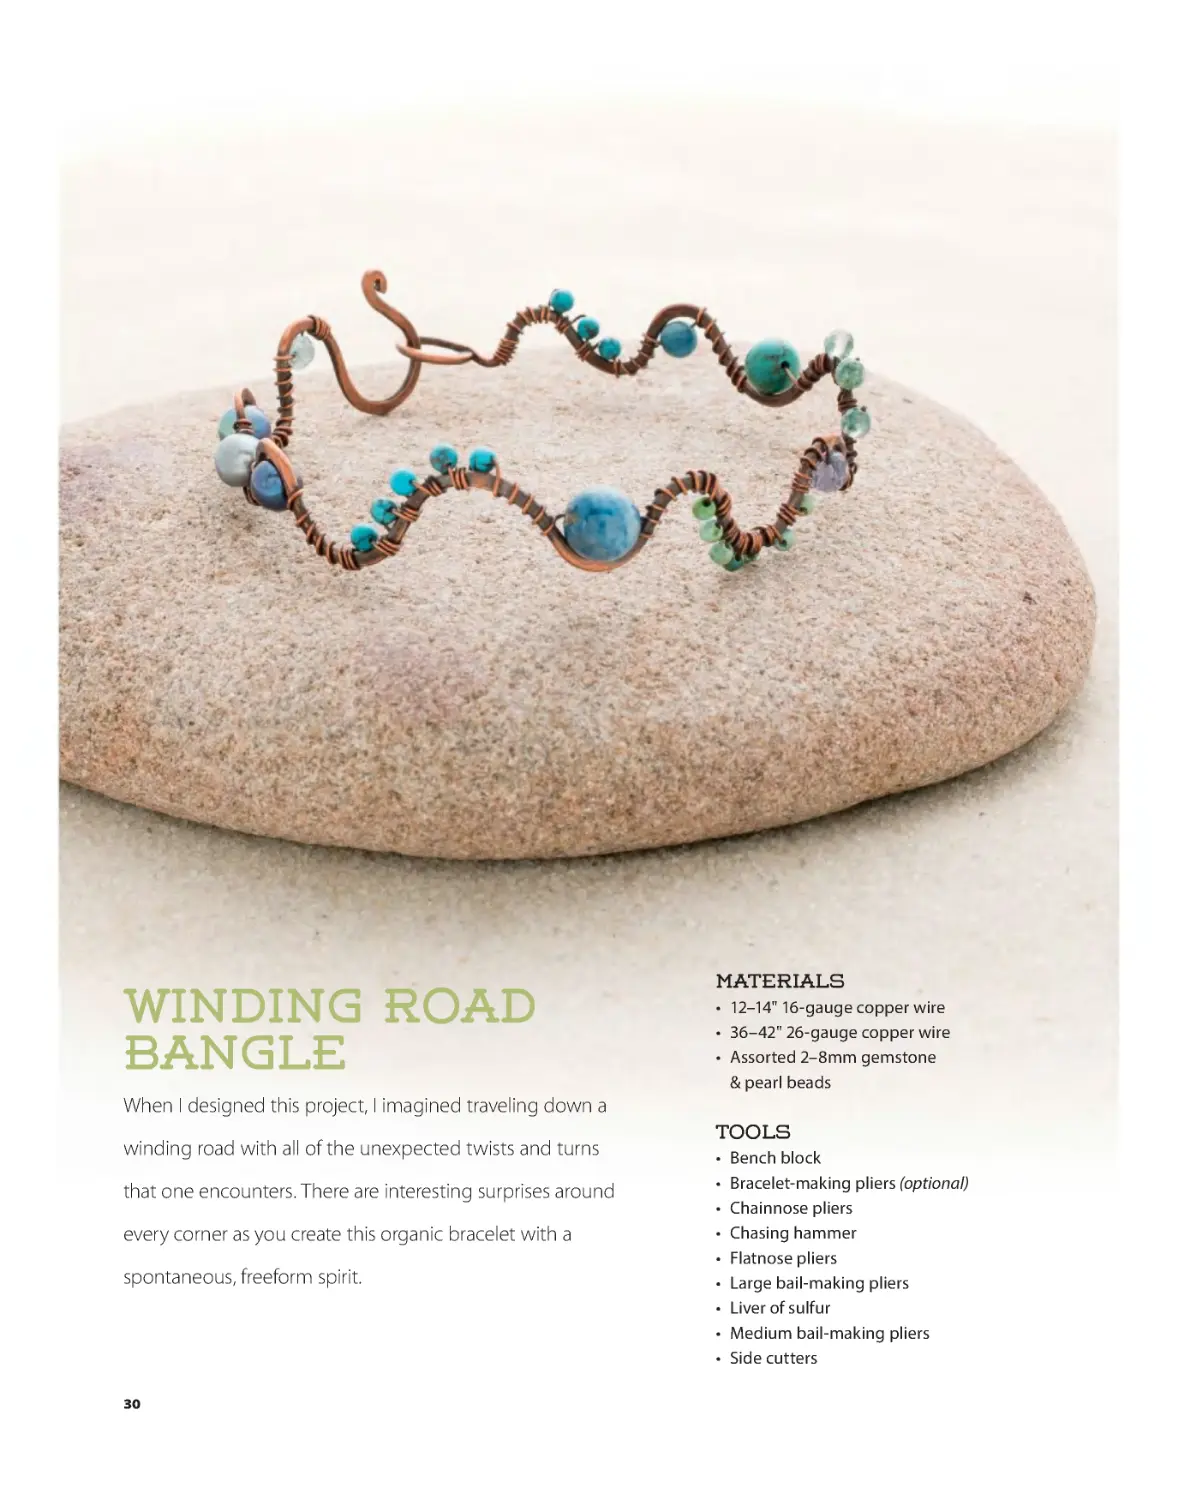
Winding Road
Bangle
Materials
• 12–14" 16-gauge copper wire
• 36–42" 26-gauge copper wire
• Assorted 2–8mm gemstone
& pearl beads
When I designed this project, I imagined traveling down a
winding road with all of the unexpected twists and turns
that one encounters. There are interesting surprises around
every corner as you create this organic bracelet with a
spontaneous, freeform spirit.
Tools
•
•
•
•
•
•
•
•
•
Bench block
Bracelet-making pliers (optional)
Chainnose pliers
Chasing hammer
Flatnose pliers
Large bail-making pliers
Liver of sulfur
Medium bail-making pliers
Side cutters
30
BKS-67899-01.indd 30
2/2/17 3:23 PM
A
B
C
D
E
F
G
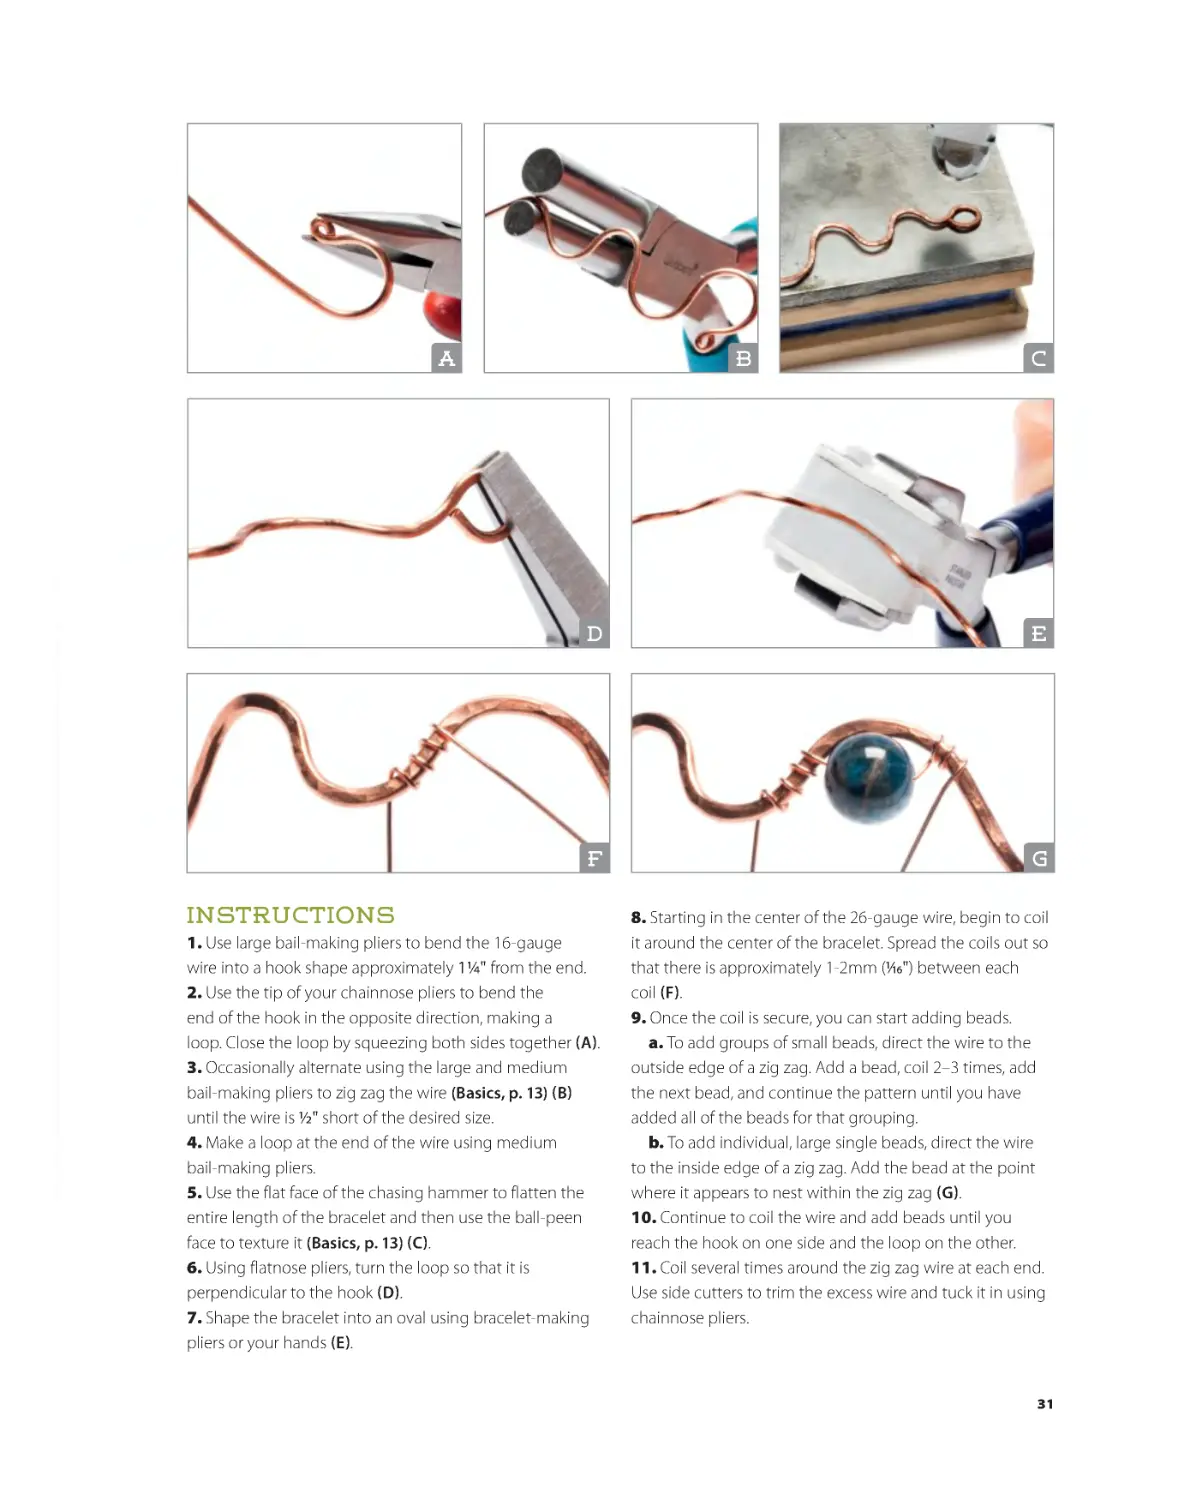
Instructions
1. Use large bail-making pliers to bend the 16-gauge
wire into a hook shape approximately 1¼" from the end.
2. Use the tip of your chainnose pliers to bend the
end of the hook in the opposite direction, making a
loop. Close the loop by squeezing both sides together (A).
3. Occasionally alternate using the large and medium
bail-making pliers to zig zag the wire (Basics, p. 13) (B)
until the wire is ½" short of the desired size.
4. Make a loop at the end of the wire using medium
bail-making pliers.
5. Use the flat face of the chasing hammer to flatten the
entire length of the bracelet and then use the ball-peen
face to texture it (Basics, p. 13) (C).
6. Using flatnose pliers, turn the loop so that it is
perpendicular to the hook (D).
7. Shape the bracelet into an oval using bracelet-making
pliers or your hands (E).
8. Starting in the center of the 26-gauge wire, begin to coil
it around the center of the bracelet. Spread the coils out so
that there is approximately 1-2mm (1⁄16") between each
coil (F).
9. Once the coil is secure, you can start adding beads.
a. To add groups of small beads, direct the wire to the
outside edge of a zig zag. Add a bead, coil 2–3 times, add
the next bead, and continue the pattern until you have
added all of the beads for that grouping.
b. To add individual, large single beads, direct the wire
to the inside edge of a zig zag. Add the bead at the point
where it appears to nest within the zig zag (G).
10. Continue to coil the wire and add beads until you
reach the hook on one side and the loop on the other.
11. Coil several times around the zig zag wire at each end.
Use side cutters to trim the excess wire and tuck it in using
chainnose pliers.
31
BKS-67899-01.indd 31
2/1/17 1:51 PM
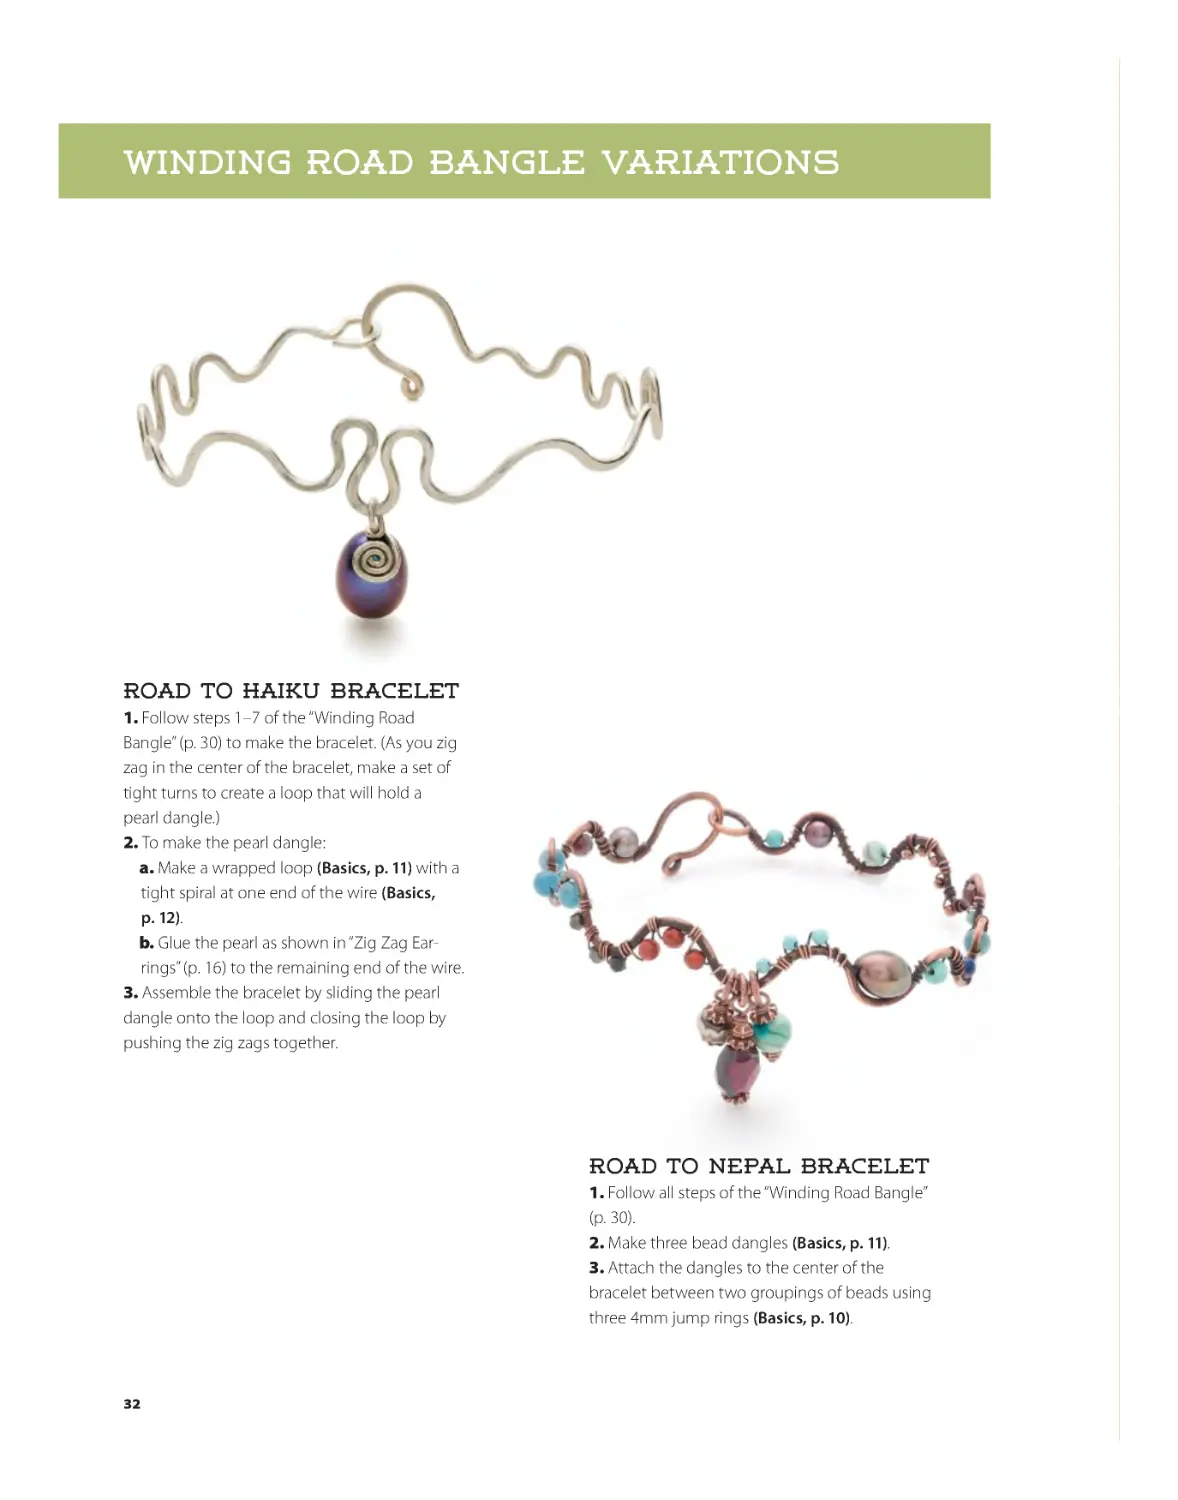
Winding Road Bangle Variations
Road to Haiku Bracelet
1. Follow steps 1–7 of the “Winding Road
Bangle” (p. 30) to make the bracelet. (As you zig
zag in the center of the bracelet, make a set of
tight turns to create a loop that will hold a
pearl dangle.)
2. To make the pearl dangle:
a. Make a wrapped loop (Basics, p. 11) with a
tight spiral at one end of the wire (Basics,
p. 12).
b. Glue the pearl as shown in “Zig Zag Earrings” (p. 16) to the remaining end of the wire.
3. Assemble the bracelet by sliding the pearl
dangle onto the loop and closing the loop by
pushing the zig zags together.
Road to Nepal Bracelet
1. Follow all steps of the “Winding Road Bangle”
(p. 30).
2. Make three bead dangles (Basics, p. 11).
3. Attach the dangles to the center of the
bracelet between two groupings of beads using
three 4mm jump rings (Basics, p. 10).
32
BKS-67899-01.indd 32
2/1/17 1:52 PM
33
BKS-67899-01.indd 33
2/1/17 1:52 PM
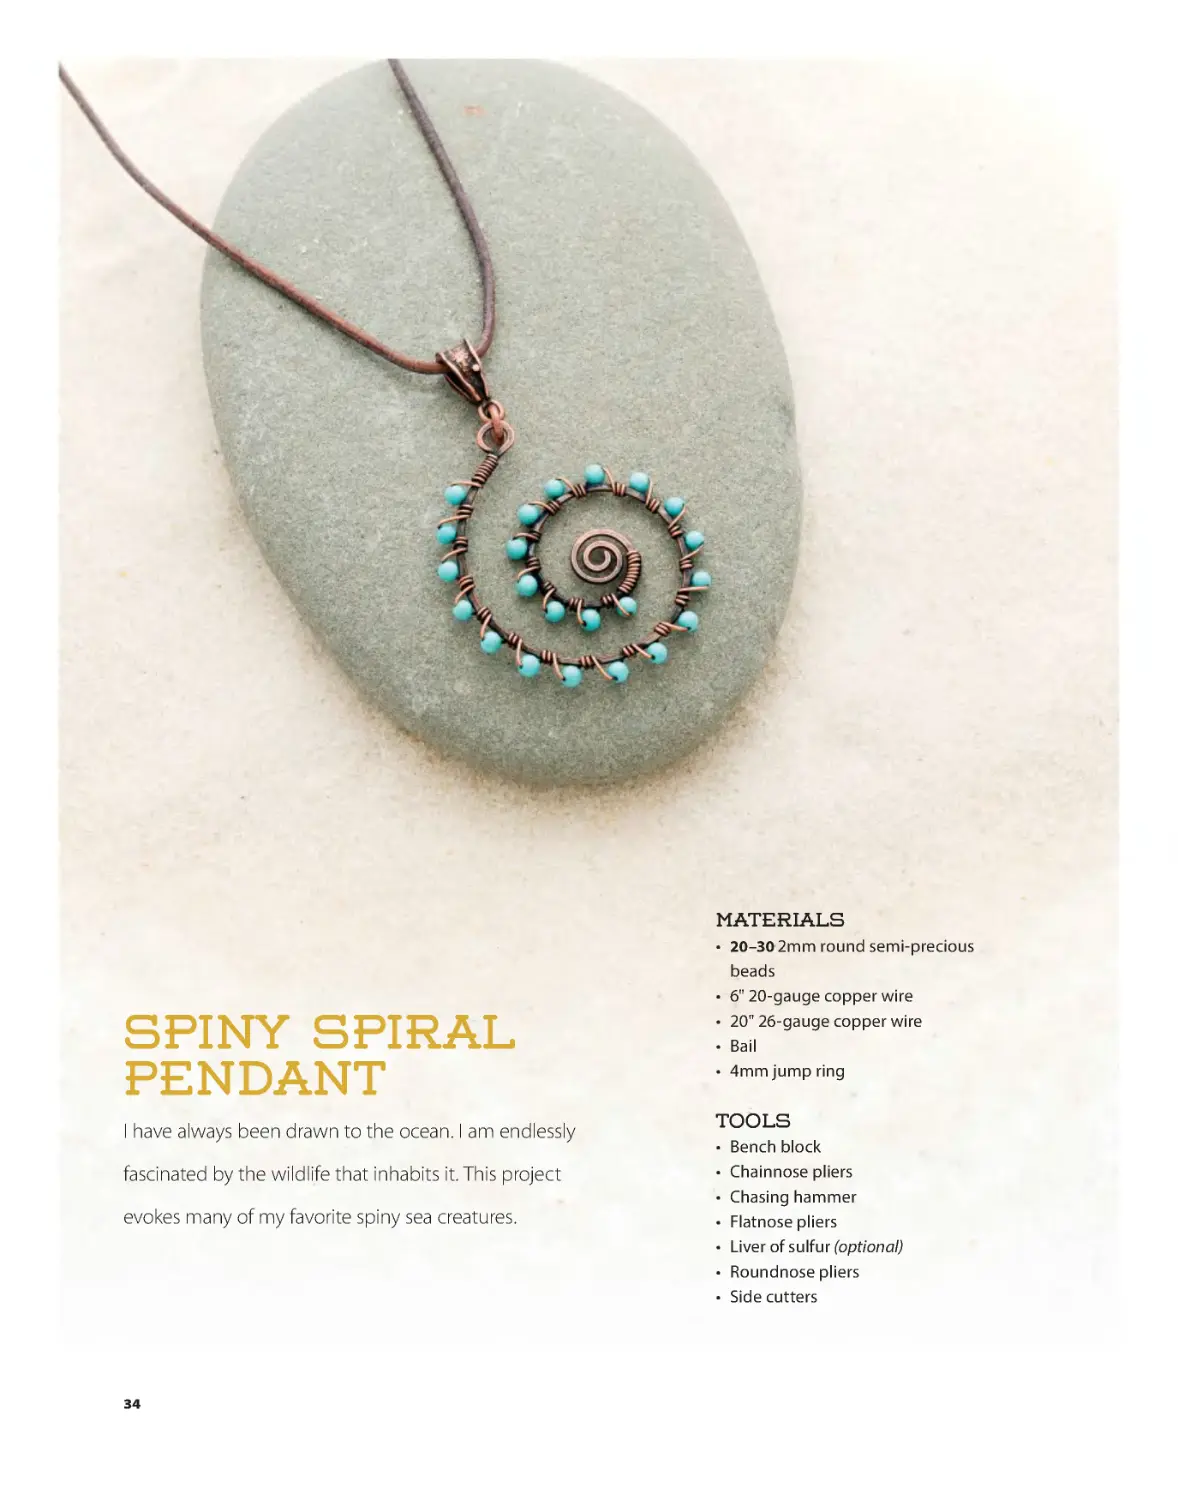
Materials
Spiny Spiral
Pendant
I have always been drawn to the ocean. I am endlessly
fascinated by the wildlife that inhabits it. This project
evokes many of my favorite spiny sea creatures.
• 20–30 2mm round semi-precious
beads
• 6" 20-gauge copper wire
• 20" 26-gauge copper wire
• Bail
• 4mm jump ring
Tools
•
•
•
•
•
•
•
Bench block
Chainnose pliers
Chasing hammer
Flatnose pliers
Liver of sulfur (optional)
Roundnose pliers
Side cutters
34
BKS-67899-01.indd 34
2/1/17 1:52 PM
A
B
C
D
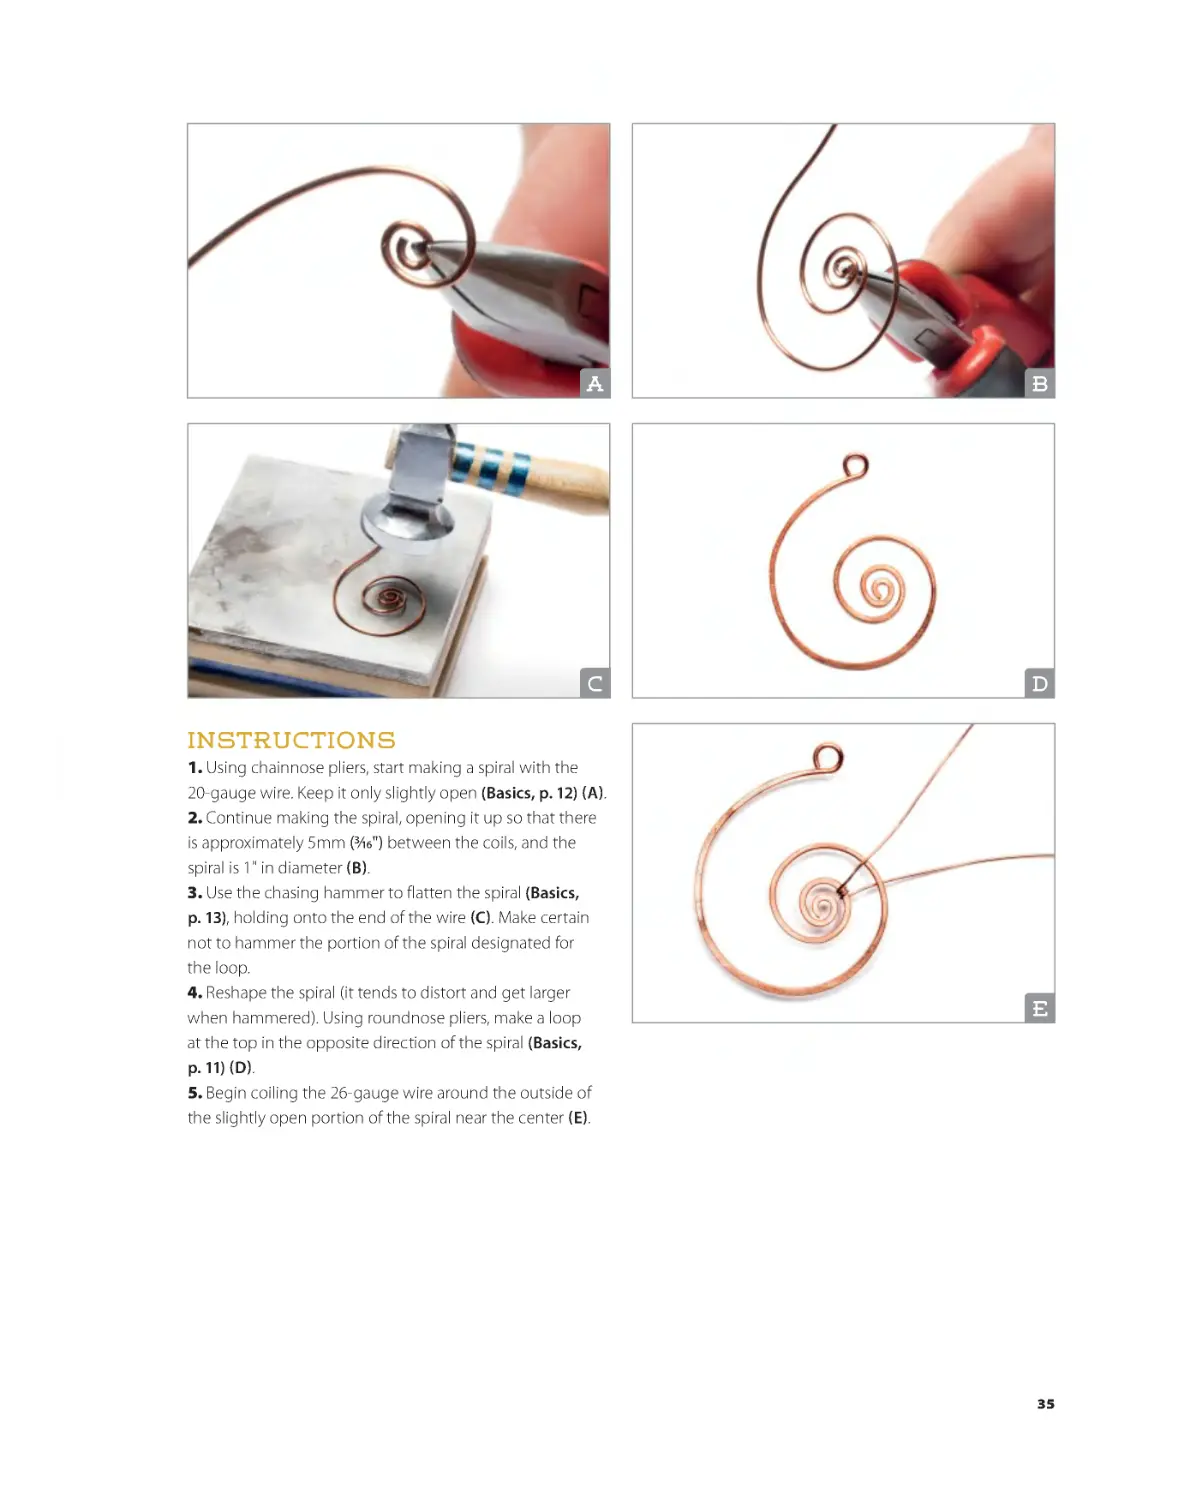
Instructions
1. Using chainnose pliers, start making a spiral with the
20-gauge wire. Keep it only slightly open (Basics, p. 12) (A).
2. Continue making the spiral, opening it up so that there
is approximately 5mm (3⁄16") between the coils, and the
spiral is 1" in diameter (B).
3. Use the chasing hammer to flatten the spiral (Basics,
p. 13), holding onto the end of the wire (C). Make certain
not to hammer the portion of the spiral designated for
the loop.
4. Reshape the spiral (it tends to distort and get larger
when hammered). Using roundnose pliers, make a loop
at the top in the opposite direction of the spiral (Basics,
p. 11) (D).
5. Begin coiling the 26-gauge wire around the outside of
the slightly open portion of the spiral near the center (E).
E
35
BKS-67899-01.indd 35
2/1/17 1:52 PM
F
G
H
I
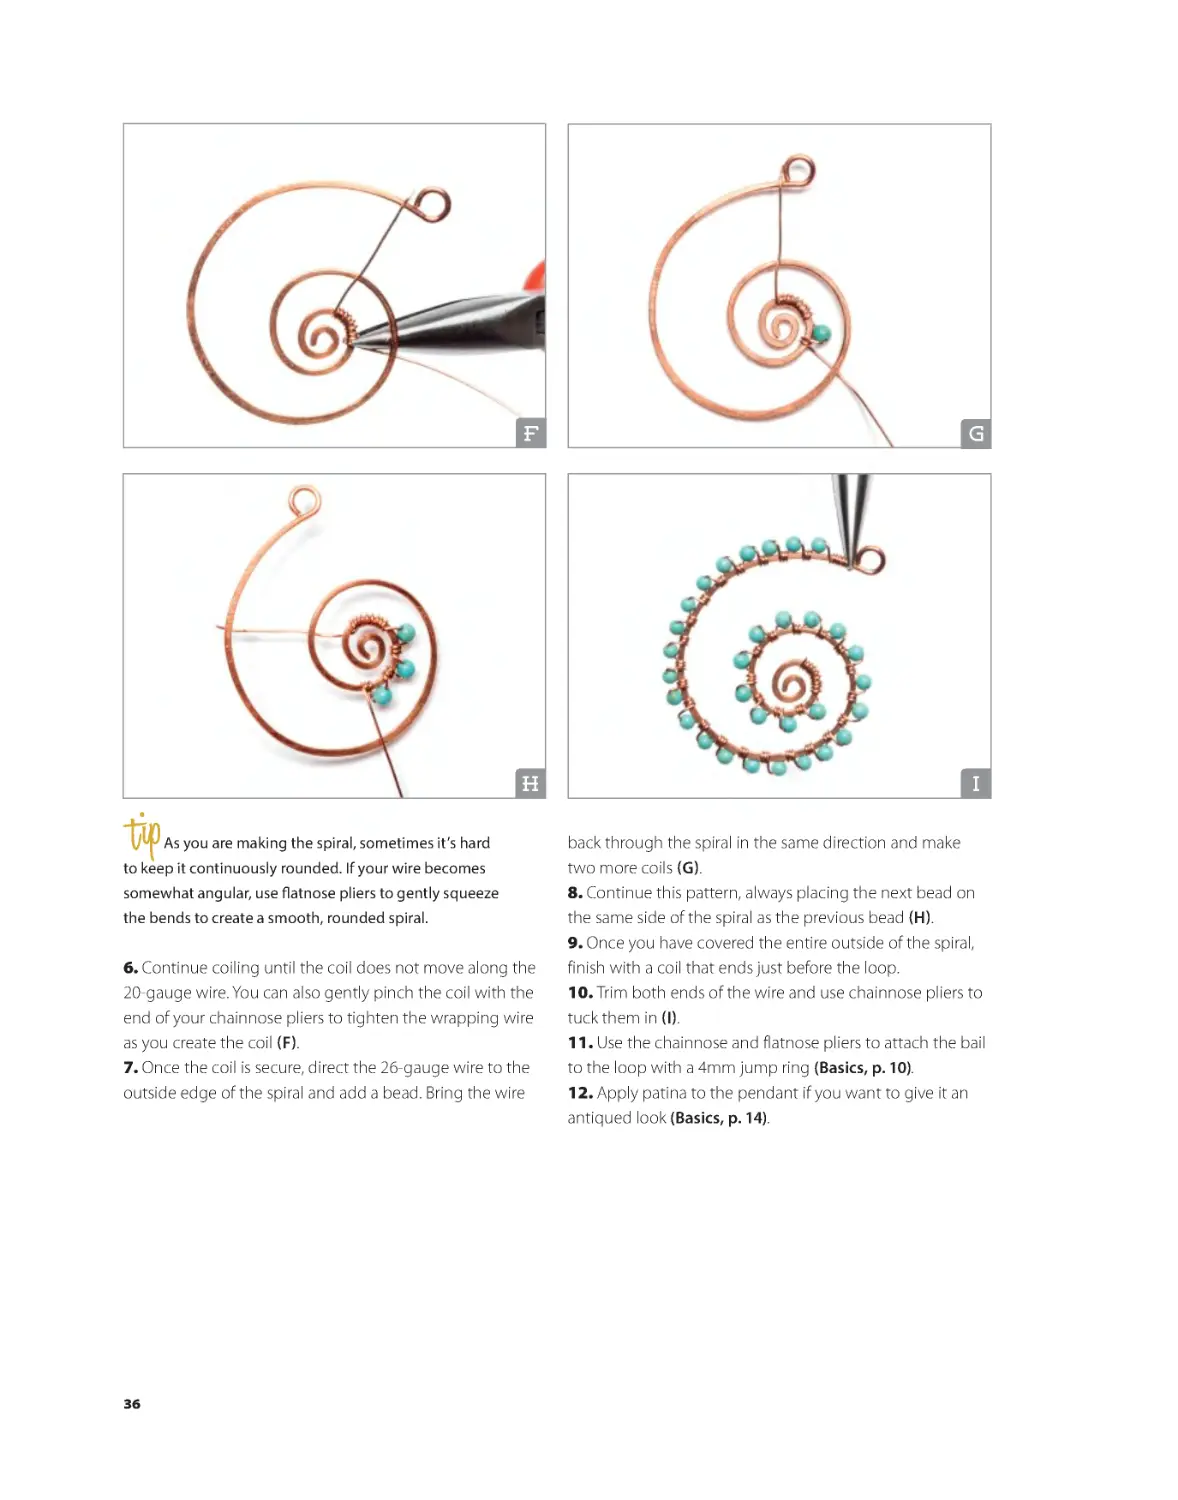
As you are making the spiral, sometimes it’s hard
to keep it continuously rounded. If your wire becomes
somewhat angular, use flatnose pliers to gently squeeze
the bends to create a smooth, rounded spiral.
6. Continue coiling until the coil does not move along the
20-gauge wire. You can also gently pinch the coil with the
end of your chainnose pliers to tighten the wrapping wire
as you create the coil (F).
7. Once the coil is secure, direct the 26-gauge wire to the
outside edge of the spiral and add a bead. Bring the wire
back through the spiral in the same direction and make
two more coils (G).
8. Continue this pattern, always placing the next bead on
the same side of the spiral as the previous bead (H).
9. Once you have covered the entire outside of the spiral,
finish with a coil that ends just before the loop.
10. Trim both ends of the wire and use chainnose pliers to
tuck them in (I).
11. Use the chainnose and flatnose pliers to attach the bail
to the loop with a 4mm jump ring (Basics, p. 10).
12. Apply patina to the pendant if you want to give it an
antiqued look (Basics, p. 14).
36
BKS-67899-01.indd 36
2/1/17 1:52 PM
Spiny Spiral Pendant Variations
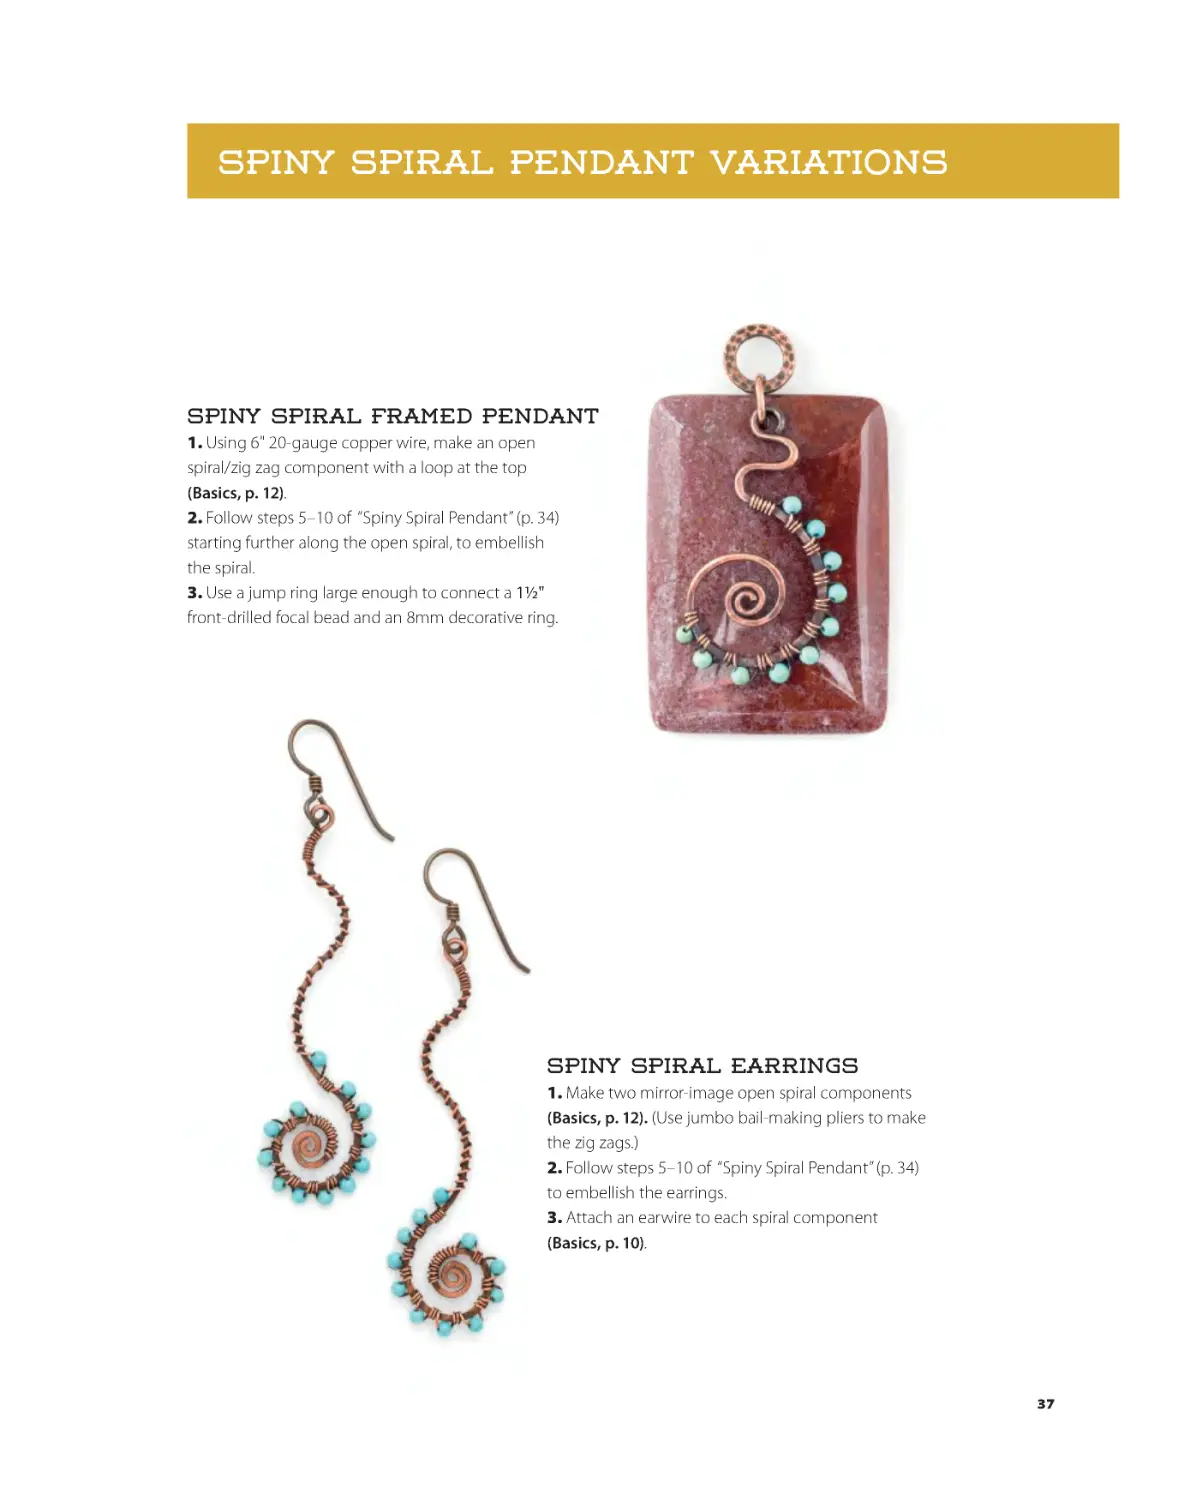
Spiny Spiral framed Pendant
1. Using 6" 20-gauge copper wire, make an open
spiral/zig zag component with a loop at the top
(Basics, p. 12).
2. Follow steps 5–10 of “Spiny Spiral Pendant” (p. 34)
starting further along the open spiral, to embellish
the spiral.
3. Use a jump ring large enough to connect a 11/2"
front-drilled focal bead and an 8mm decorative ring.
Spiny Spiral Earrings
1. Make two mirror-image open spiral components
(Basics, p. 12). (Use jumbo bail-making pliers to make
the zig zags.)
2. Follow steps 5–10 of “Spiny Spiral Pendant” (p. 34)
to embellish the earrings.
3. Attach an earwire to each spiral component
(Basics, p. 10).
37
BKS-67899-01.indd 37
2/1/17 1:52 PM
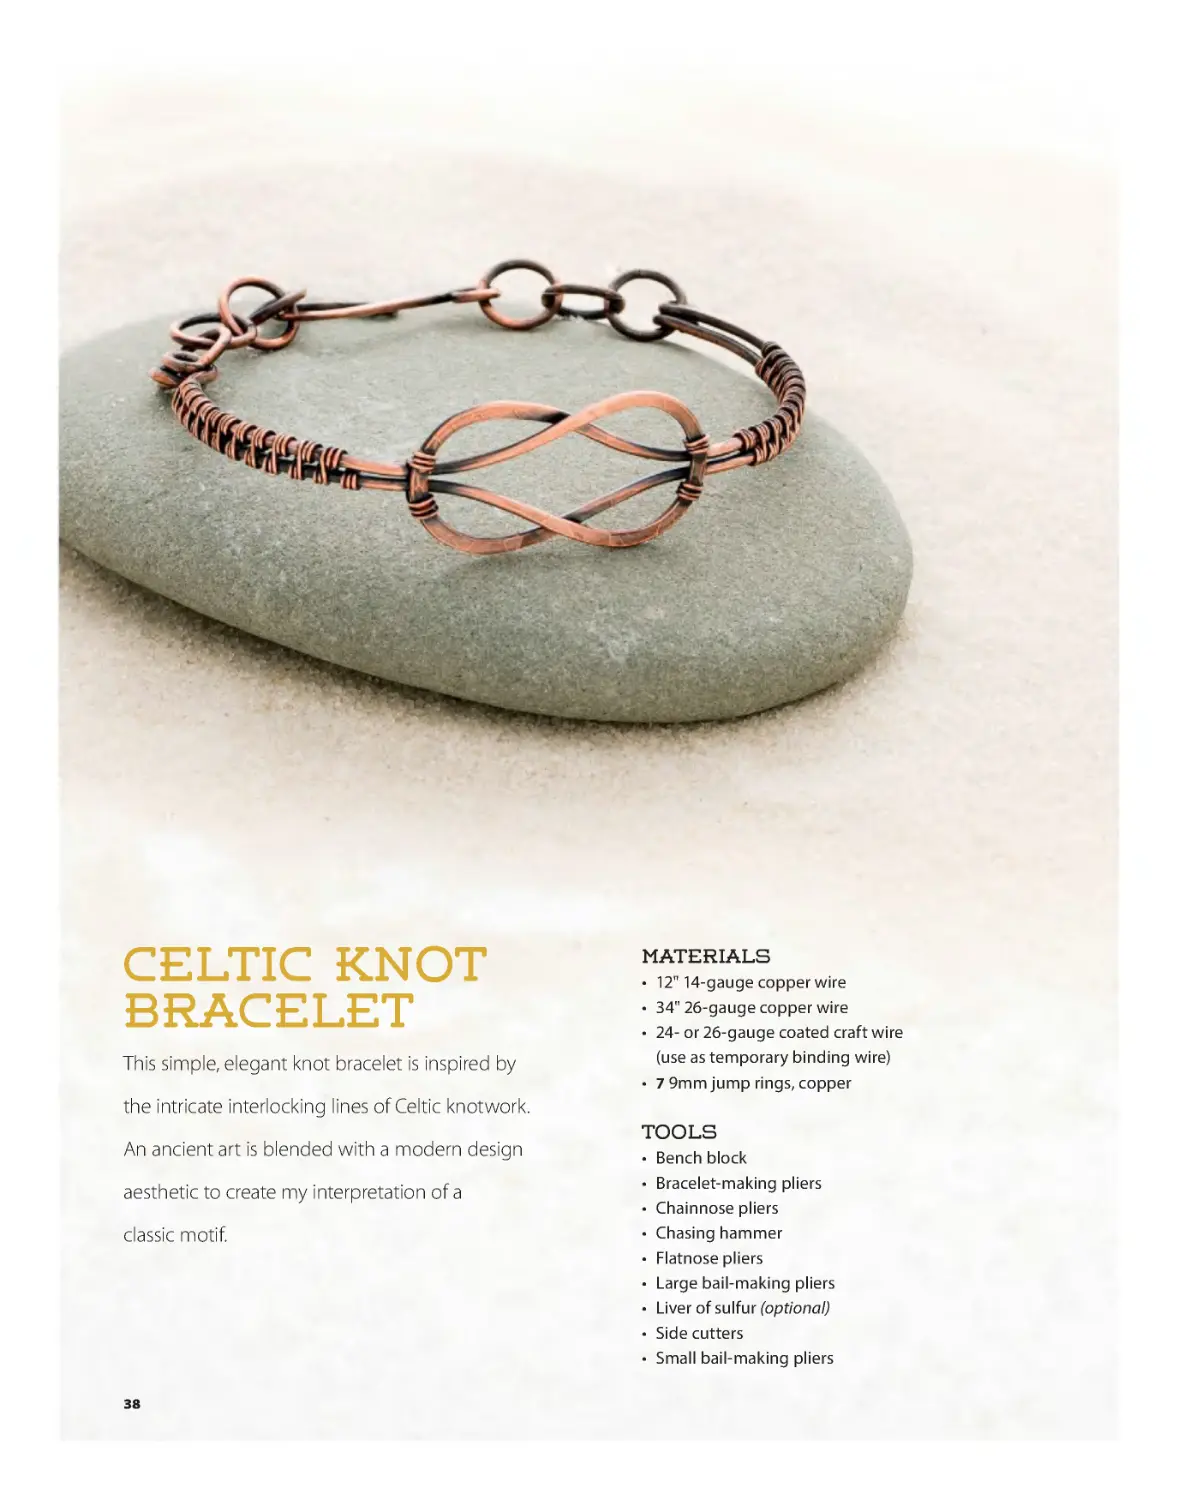
Celtic Knot
Bracelet
This simple, elegant knot bracelet is inspired by
Materials
• 12" 14-gauge copper wire
• 34" 26-gauge copper wire
• 24- or 26-gauge coated craft wire
(use as temporary binding wire)
• 7 9mm jump rings, copper
the intricate interlocking lines of Celtic knotwork.
An ancient art is blended with a modern design
aesthetic to create my interpretation of a
classic motif.
Tools
•
•
•
•
•
•
•
•
•
Bench block
Bracelet-making pliers
Chainnose pliers
Chasing hammer
Flatnose pliers
Large bail-making pliers
Liver of sulfur (optional)
Side cutters
Small bail-making pliers
38
BKS-67899-01.indd 38
2/1/17 1:52 PM
A
B
C
D
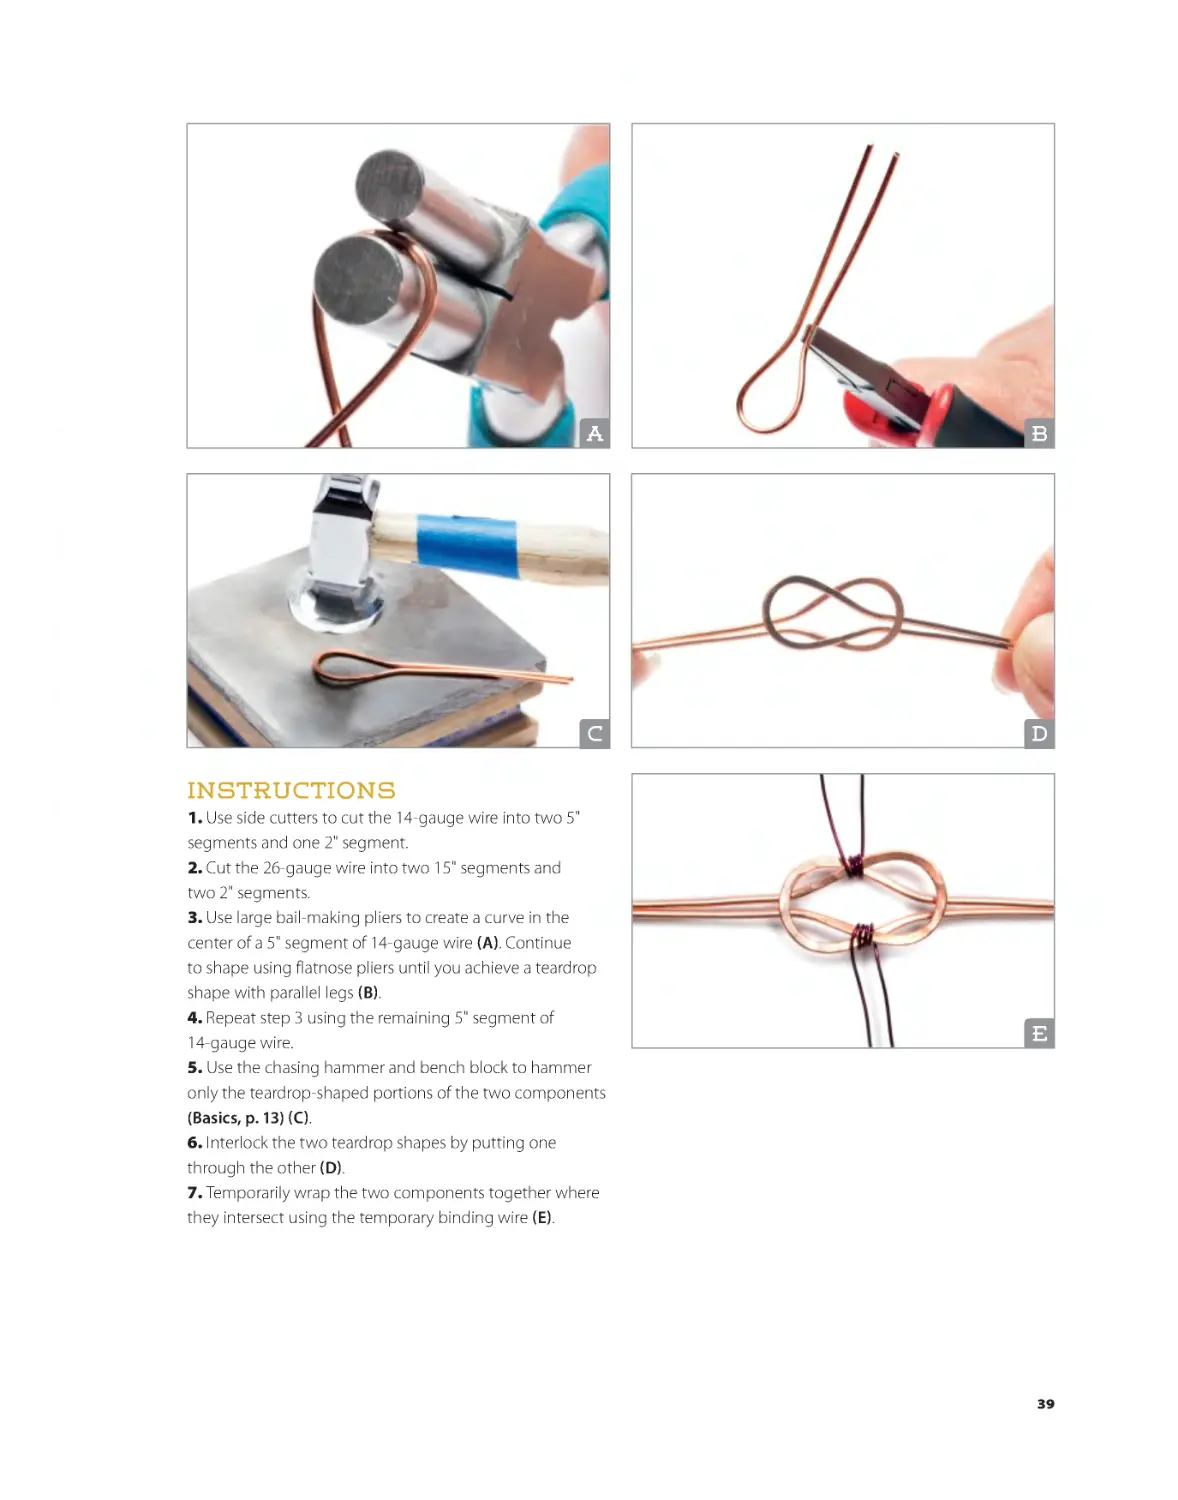
Instructions
1. Use side cutters to cut the 14-gauge wire into two 5"
segments and one 2" segment.
2. Cut the 26-gauge wire into two 15" segments and
two 2" segments.
3. Use large bail-making pliers to create a curve in the
center of a 5" segment of 14-gauge wire (A). Continue
to shape using flatnose pliers until you achieve a teardrop
shape with parallel legs (B).
4. Repeat step 3 using the remaining 5" segment of
14-gauge wire.
5. Use the chasing hammer and bench block to hammer
only the teardrop-shaped portions of the two components
(Basics, p. 13) (C).
6. Interlock the two teardrop shapes by putting one
through the other (D).
7. Temporarily wrap the two components together where
they intersect using the temporary binding wire (E).
E
39
BKS-67899-01.indd 39
2/1/17 1:52 PM
F
G
H
I
J
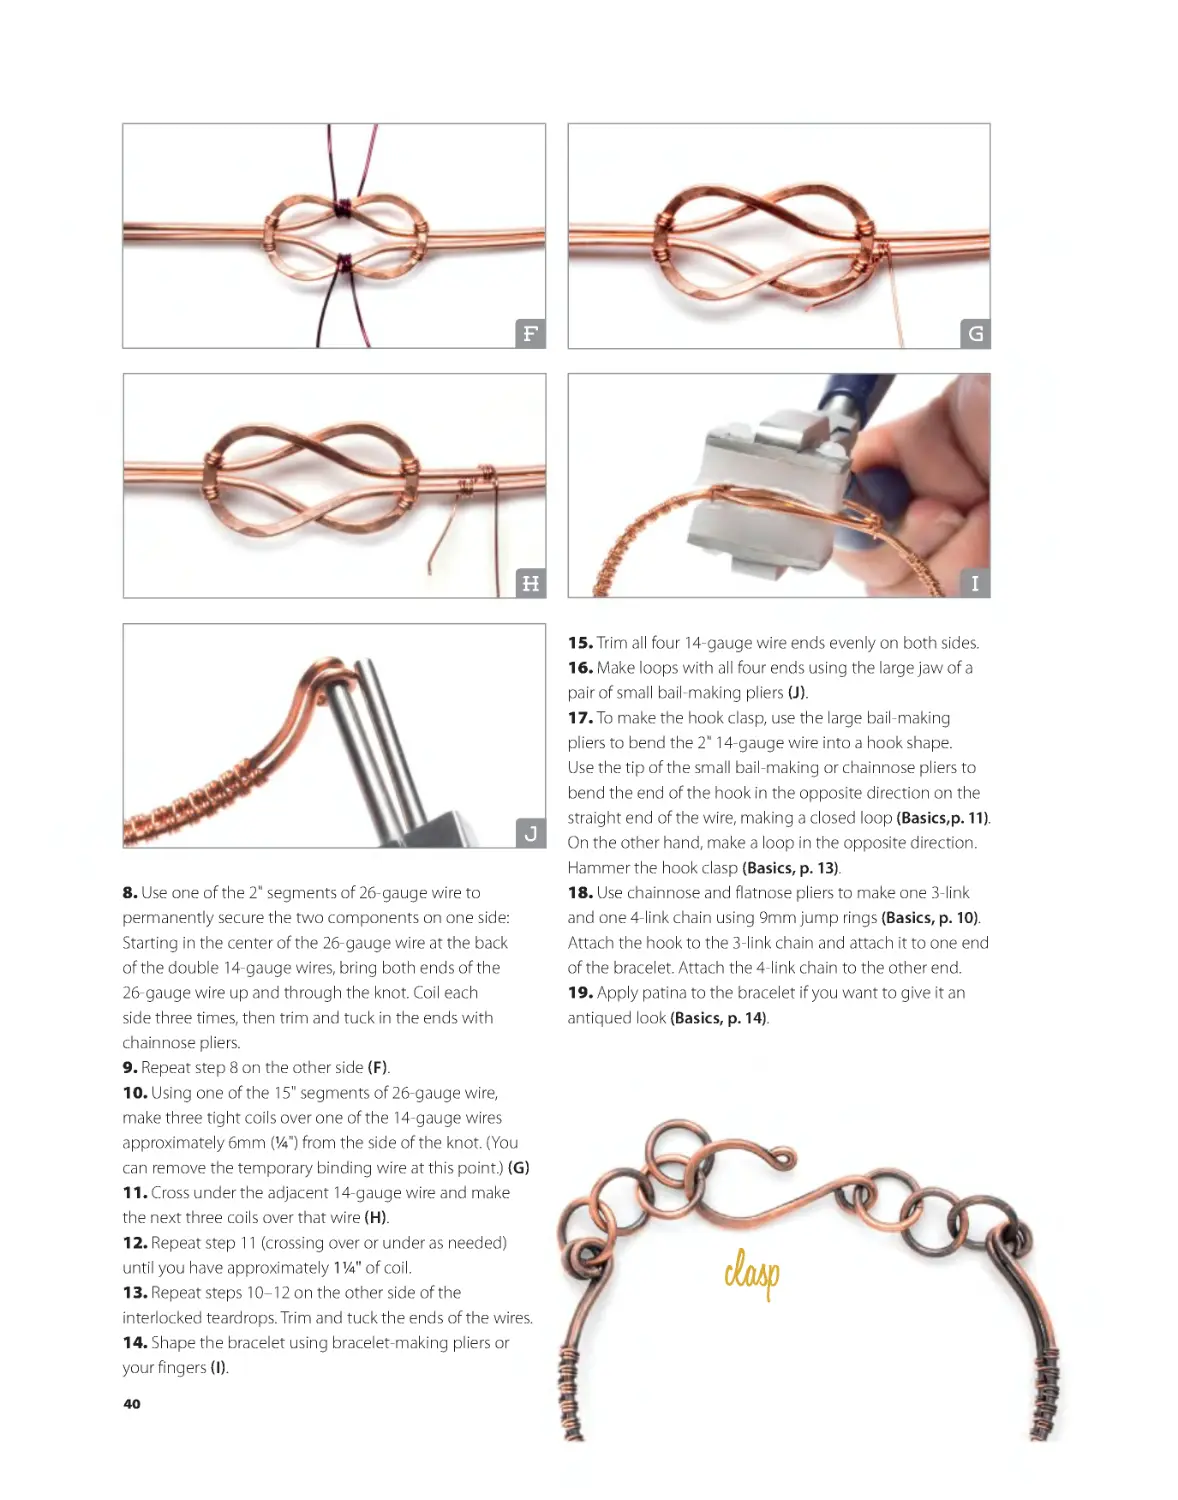
8. Use one of the 2" segments of 26-gauge wire to
permanently secure the two components on one side:
Starting in the center of the 26-gauge wire at the back
of the double 14-gauge wires, bring both ends of the
26-gauge wire up and through the knot. Coil each
side three times, then trim and tuck in the ends with
chainnose pliers.
9. Repeat step 8 on the other side (F).
10. Using one of the 15" segments of 26-gauge wire,
make three tight coils over one of the 14-gauge wires
approximately 6mm (1/4") from the side of the knot. (You
can remove the temporary binding wire at this point.) (G)
11. Cross under the adjacent 14-gauge wire and make
the next three coils over that wire (H).
12. Repeat step 11 (crossing over or under as needed)
until you have approximately 11/4" of coil.
13. Repeat steps 10–12 on the other side of the
interlocked teardrops. Trim and tuck the ends of the wires.
14. Shape the bracelet using bracelet-making pliers or
your fingers (I).
15. Trim all four 14-gauge wire ends evenly on both sides.
16. Make loops with all four ends using the large jaw of a
pair of small bail-making pliers (J).
17. To make the hook clasp, use the large bail-making
pliers to bend the 2" 14-gauge wire into a hook shape.
Use the tip of the small bail-making or chainnose pliers to
bend the end of the hook in the opposite direction on the
straight end of the wire, making a closed loop (Basics,p. 11).
On the other hand, make a loop in the opposite direction.
Hammer the hook clasp (Basics, p. 13).
18. Use chainnose and flatnose pliers to make one 3-link
and one 4-link chain using 9mm jump rings (Basics, p. 10).
Attach the hook to the 3-link chain and attach it to one end
of the bracelet. Attach the 4-link chain to the other end.
19. Apply patina to the bracelet if you want to give it an
antiqued look (Basics, p. 14).
40
BKS-67899-01.indd 40
2/1/17 1:52 PM
Celtic Knot Bracelet Variations
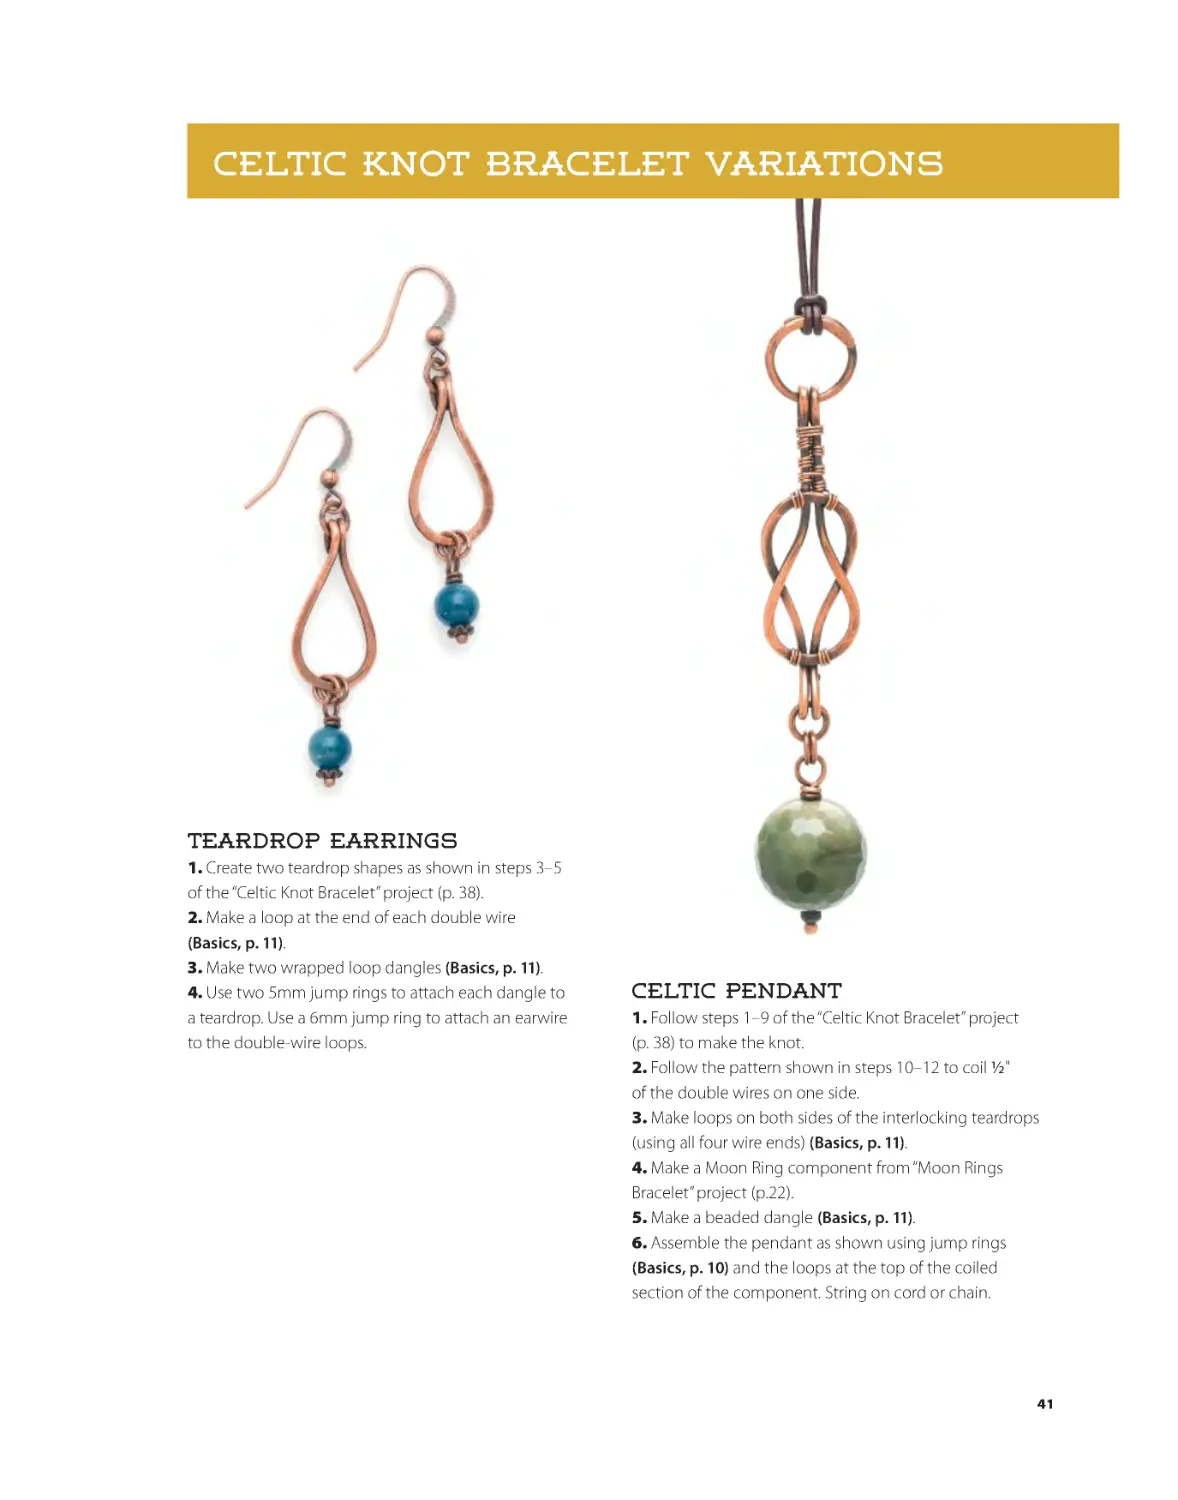
Teardrop Earrings
1. Create two teardrop shapes as shown in steps 3–5
of the “Celtic Knot Bracelet” project (p. 38).
2. Make a loop at the end of each double wire
(Basics, p. 11).
3. Make two wrapped loop dangles (Basics, p. 11).
4. Use two 5mm jump rings to attach each dangle to
a teardrop. Use a 6mm jump ring to attach an earwire
to the double-wire loops.
Celtic Pendant
1. Follow steps 1–9 of the “Celtic Knot Bracelet” project
(p. 38) to make the knot.
2. Follow the pattern shown in steps 10–12 to coil 1/2"
of the double wires on one side.
3. Make loops on both sides of the interlocking teardrops
(using all four wire ends) (Basics, p. 11).
4. Make a Moon Ring component from “Moon Rings
Bracelet” project (p.22).
5. Make a beaded dangle (Basics, p. 11).
6. Assemble the pendant as shown using jump rings
(Basics, p. 10) and the loops at the top of the coiled
section of the component. String on cord or chain.
41
BKS-67899-01.indd 41
2/1/17 1:52 PM
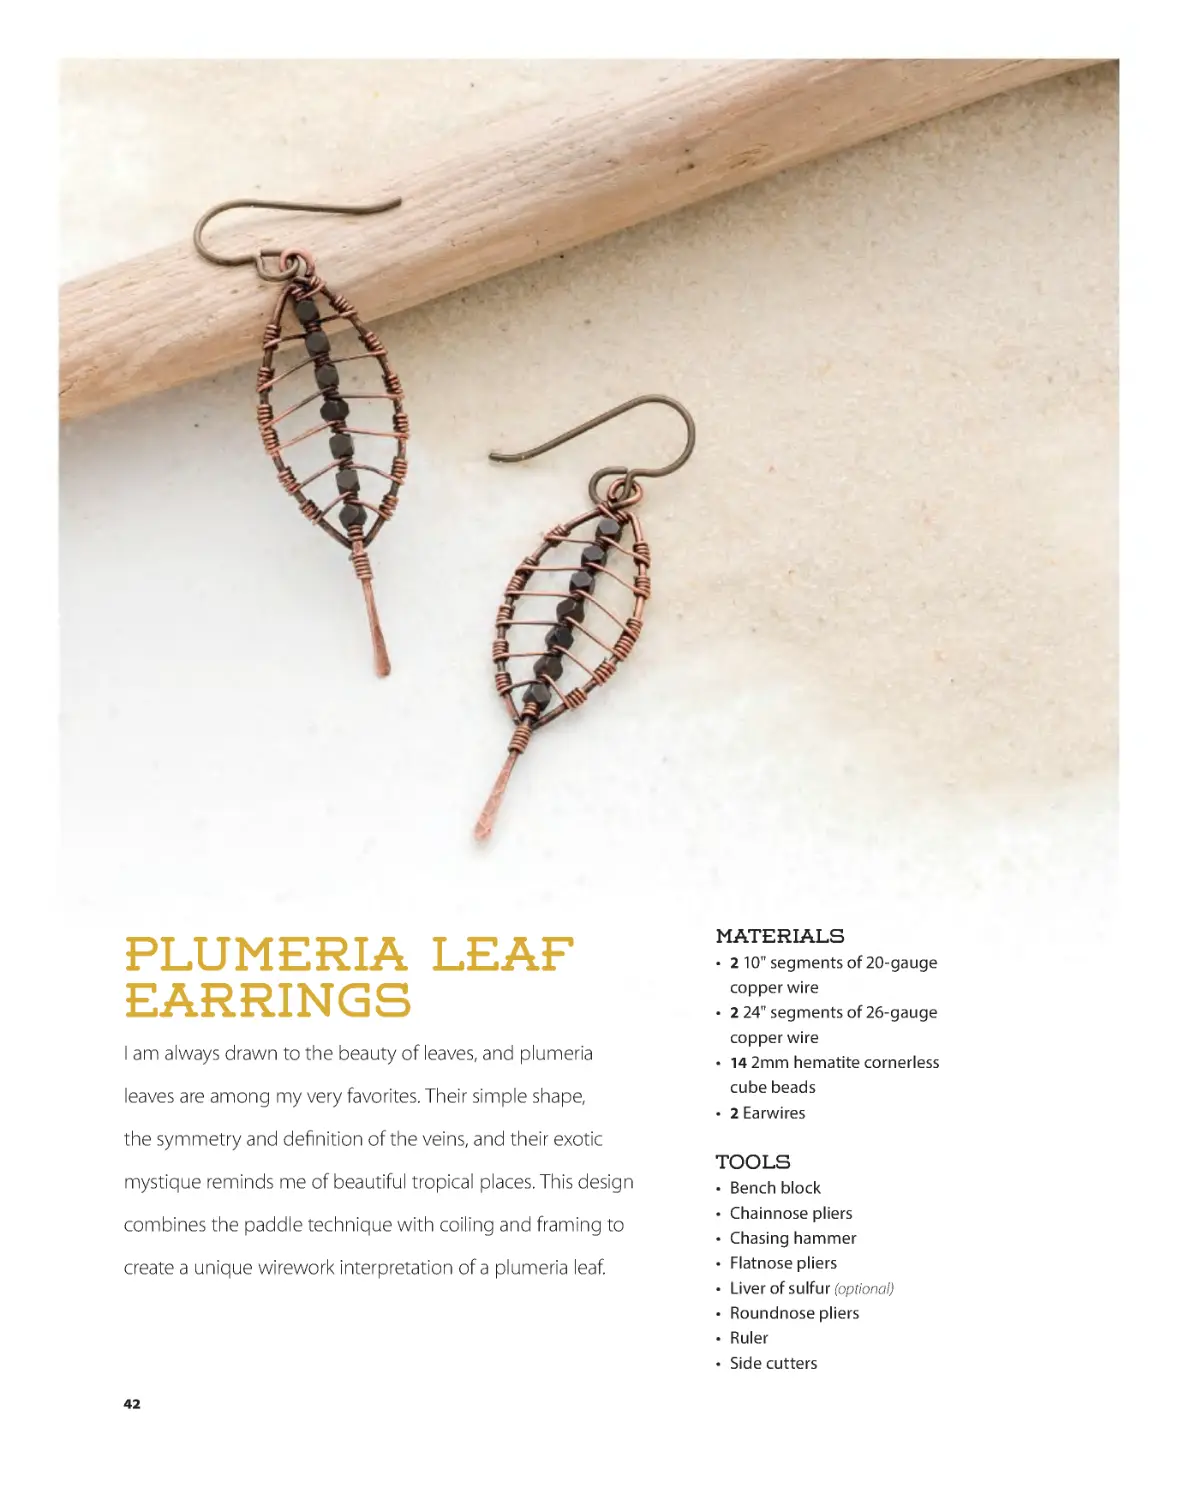
Plumeria Leaf
Earrings
I am always drawn to the beauty of leaves, and plumeria
leaves are among my very favorites. Their simple shape,
the symmetry and definition of the veins, and their exotic
mystique reminds me of beautiful tropical places. This design
combines the paddle technique with coiling and framing to
create a unique wirework interpretation of a plumeria leaf.
Materials
• 2 10" segments of 20-gauge
copper wire
• 2 24" segments of 26-gauge
copper wire
• 14 2mm hematite cornerless
cube beads
• 2 Earwires
Tools
•
•
•
•
•
•
•
•
Bench block
Chainnose pliers
Chasing hammer
Flatnose pliers
Liver of sulfur (optional)
Roundnose pliers
Ruler
Side cutters
42
BKS-67899-01.indd 42
2/1/17 1:53 PM
A
B
C
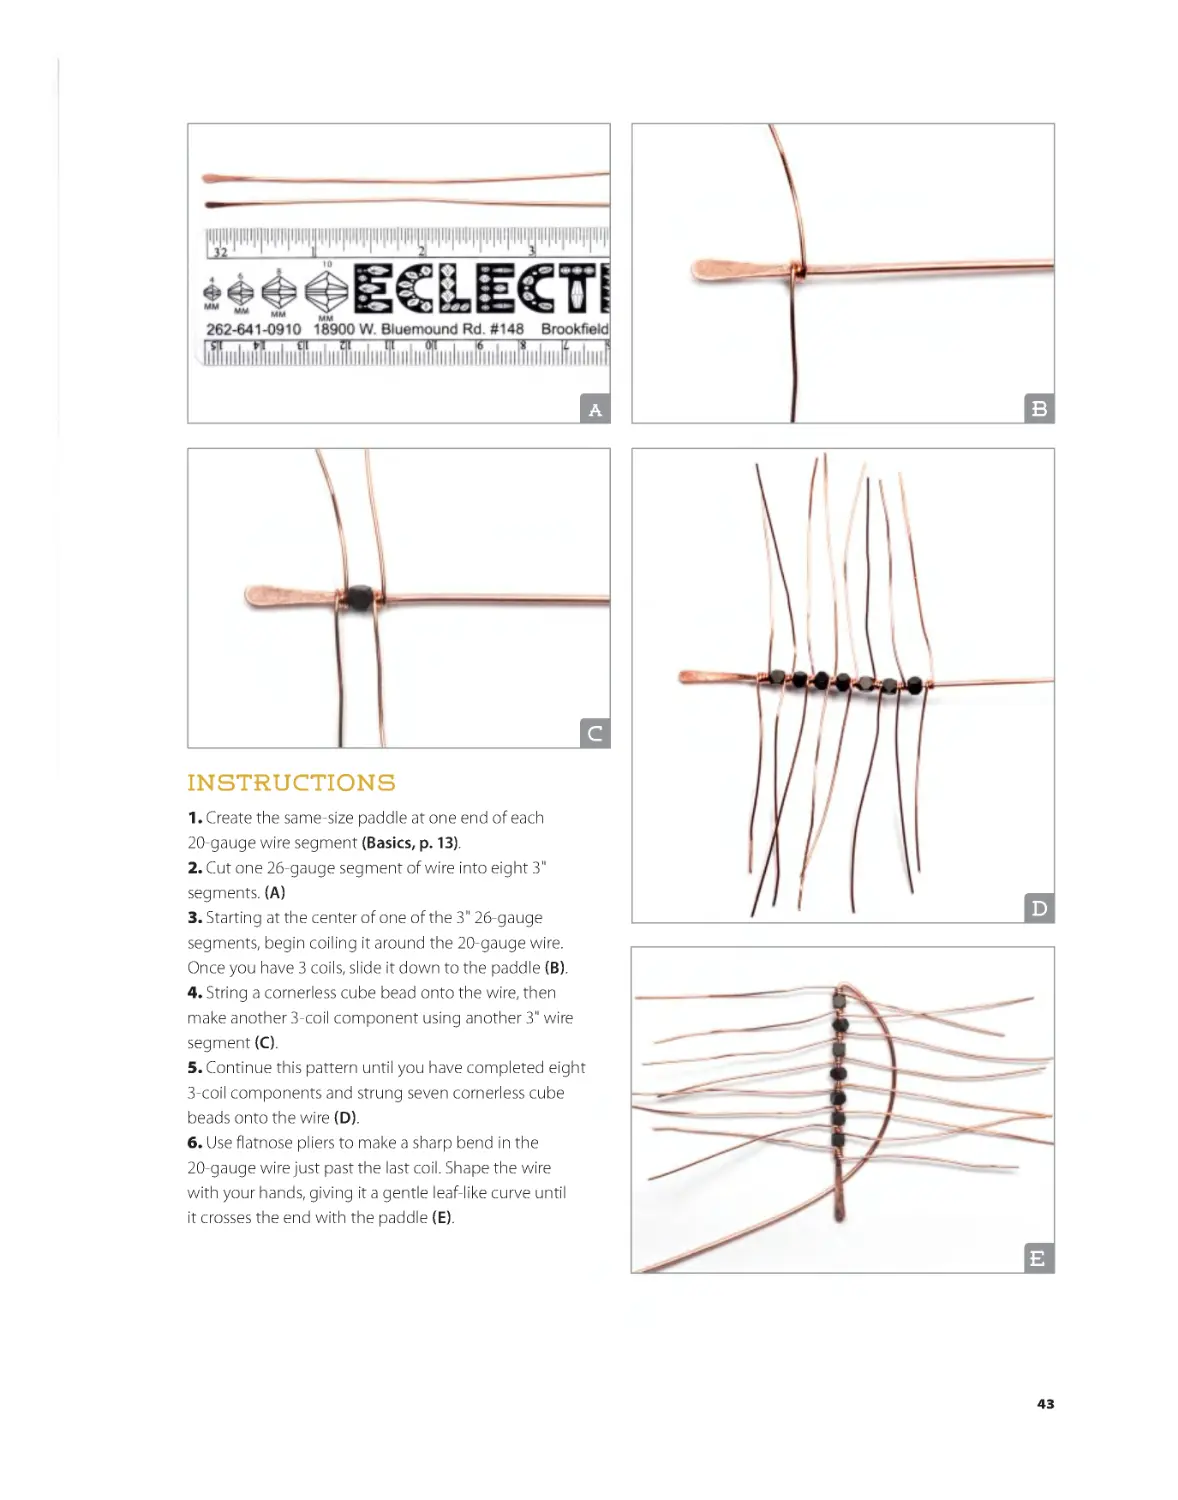
Instructions
1. Create the same-size paddle at one end of each
20-gauge wire segment (Basics, p. 13).
2. Cut one 26-gauge segment of wire into eight 3"
segments. (A)
3. Starting at the center of one of the 3" 26-gauge
segments, begin coiling it around the 20-gauge wire.
Once you have 3 coils, slide it down to the paddle (B).
4. String a cornerless cube bead onto the wire, then
make another 3-coil component using another 3" wire
segment (C).
5. Continue this pattern until you have completed eight
3-coil components and strung seven cornerless cube
beads onto the wire (D).
6. Use flatnose pliers to make a sharp bend in the
20-gauge wire just past the last coil. Shape the wire
with your hands, giving it a gentle leaf-like curve until
it crosses the end with the paddle (E).
D
E
43
BKS-67899-01.indd 43
2/1/17 1:53 PM
F
G
H
I
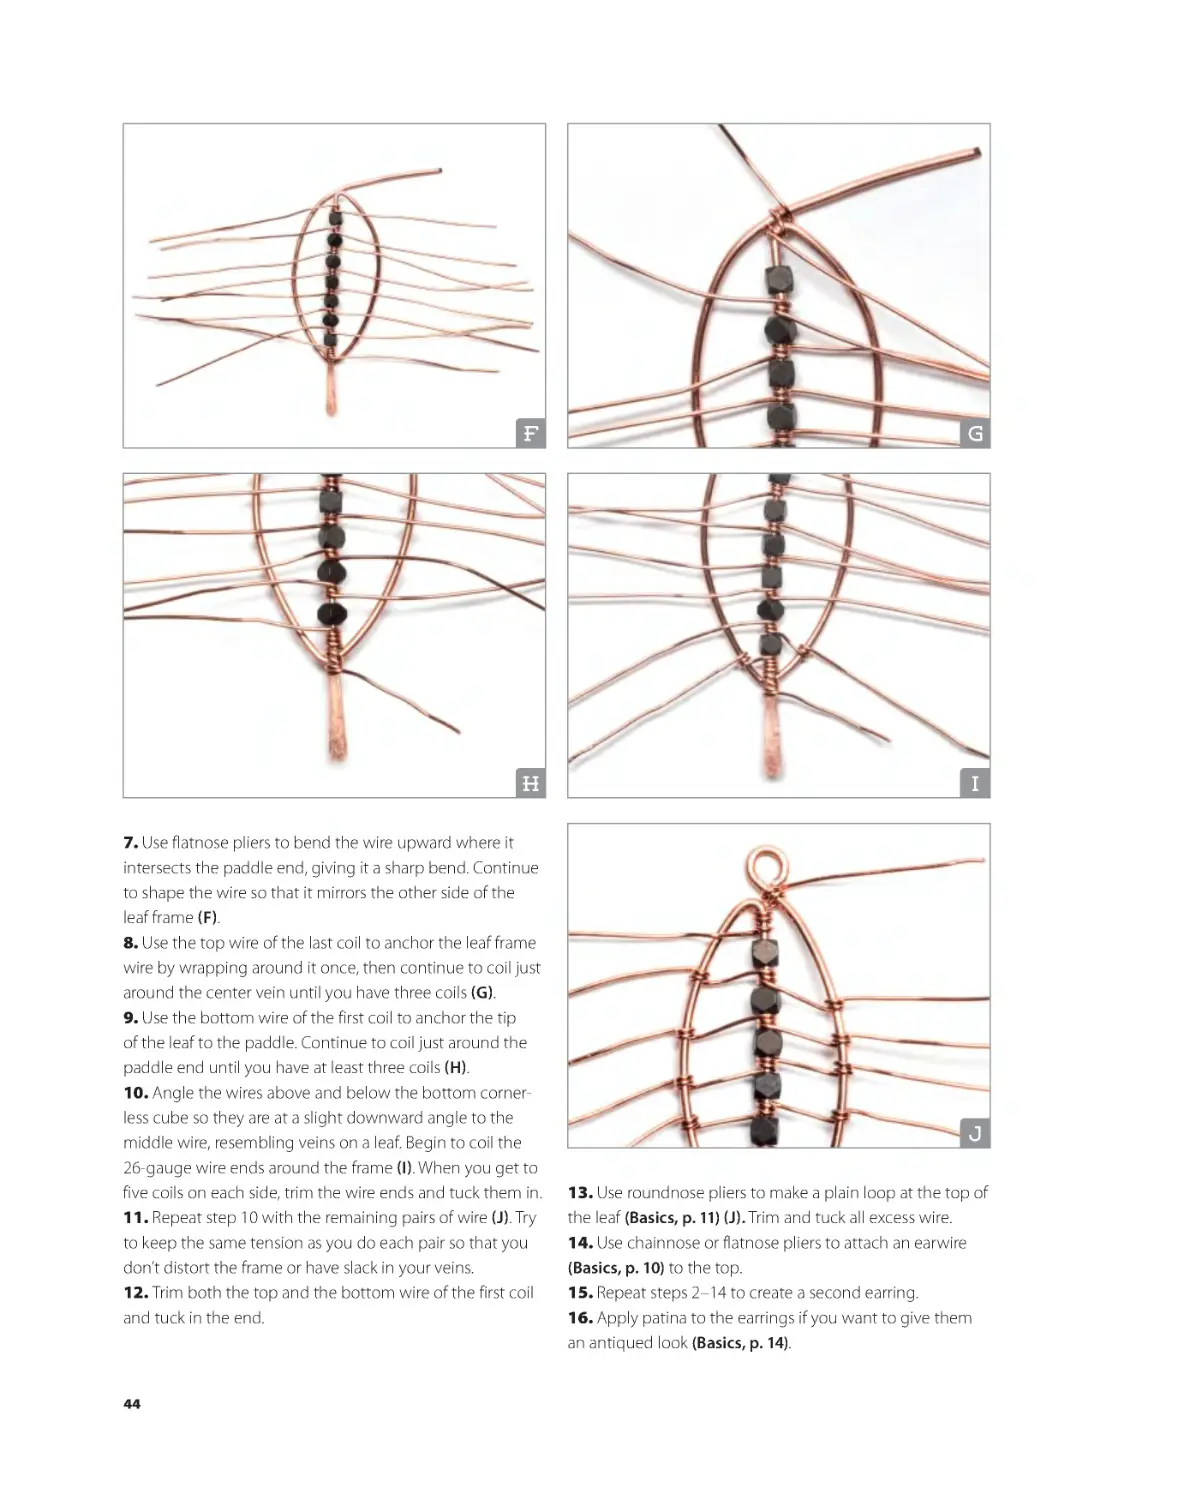
7. Use flatnose pliers to bend the wire upward where it
intersects the paddle end, giving it a sharp bend. Continue
to shape the wire so that it mirrors the other side of the
leaf frame (F).
8. Use the top wire of the last coil to anchor the leaf frame
wire by wrapping around it once, then continue to coil just
around the center vein until you have three coils (G).
9. Use the bottom wire of the first coil to anchor the tip
of the leaf to the paddle. Continue to coil just around the
paddle end until you have at least three coils (H).
10. Angle the wires above and below the bottom cornerless cube so they are at a slight downward angle to the
middle wire, resembling veins on a leaf. Begin to coil the
26-gauge wire ends around the frame (I). When you get to
five coils on each side, trim the wire ends and tuck them in.
11. Repeat step 10 with the remaining pairs of wire (J). Try
to keep the same tension as you do each pair so that you
don’t distort the frame or have slack in your veins.
12. Trim both the top and the bottom wire of the first coil
and tuck in the end.
J
13. Use roundnose pliers to make a plain loop at the top of
the leaf (Basics, p. 11) (J). Trim and tuck all excess wire.
14. Use chainnose or flatnose pliers to attach an earwire
(Basics, p. 10) to the top.
15. Repeat steps 2–14 to create a second earring.
16. Apply patina to the earrings if you want to give them
an antiqued look (Basics, p. 14).
44
BKS-67899-01.indd 44
2/1/17 1:53 PM
Plumeria Leaf Earrings Variations
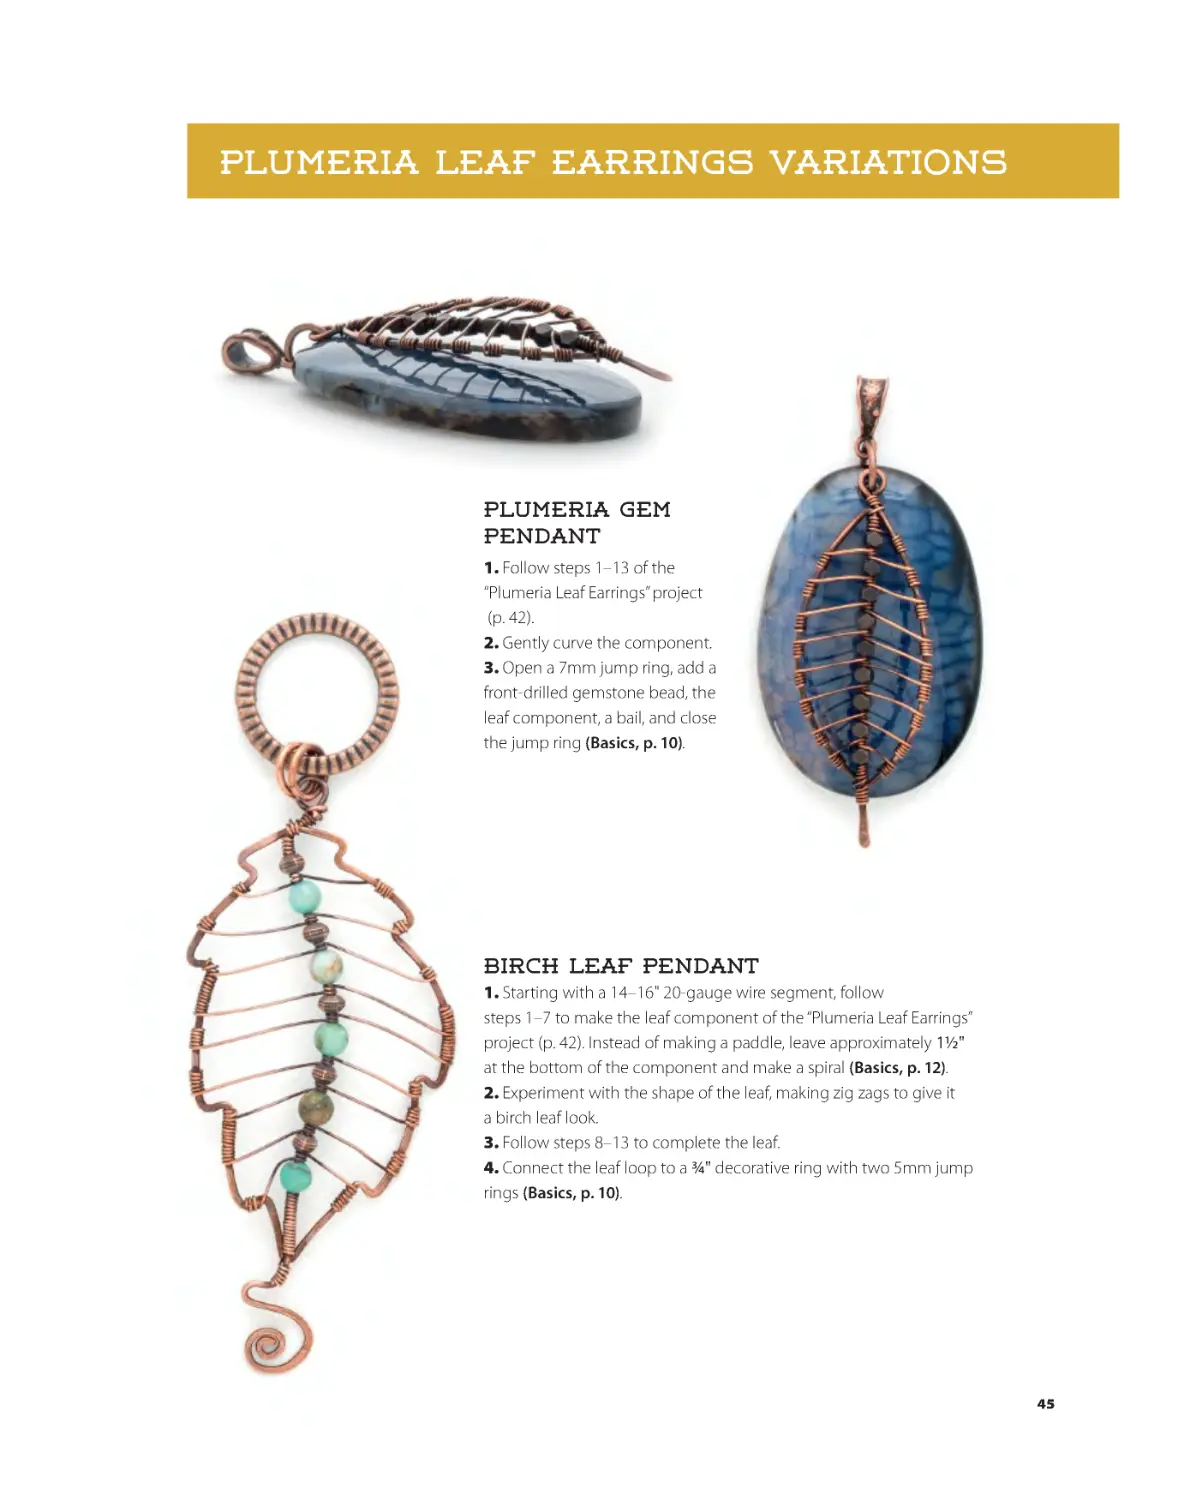
Plumeria Gem
Pendant
1. Follow steps 1–13 of the
“Plumeria Leaf Earrings” project
(p. 42).
2. Gently curve the component.
3. Open a 7mm jump ring, add a
front-drilled gemstone bead, the
leaf component, a bail, and close
the jump ring (Basics, p. 10).
Birch Leaf Pendant
1. Starting with a 14–16" 20-gauge wire segment, follow
steps 1–7 to make the leaf component of the “Plumeria Leaf Earrings”
project (p. 42). Instead of making a paddle, leave approximately 11/2"
at the bottom of the component and make a spiral (Basics, p. 12).
2. Experiment with the shape of the leaf, making zig zags to give it
a birch leaf look.
3. Follow steps 8–13 to complete the leaf.
4. Connect the leaf loop to a 3/4" decorative ring with two 5mm jump
rings (Basics, p. 10).
45
BKS-67899-01.indd 45
2/1/17 1:53 PM
Materials
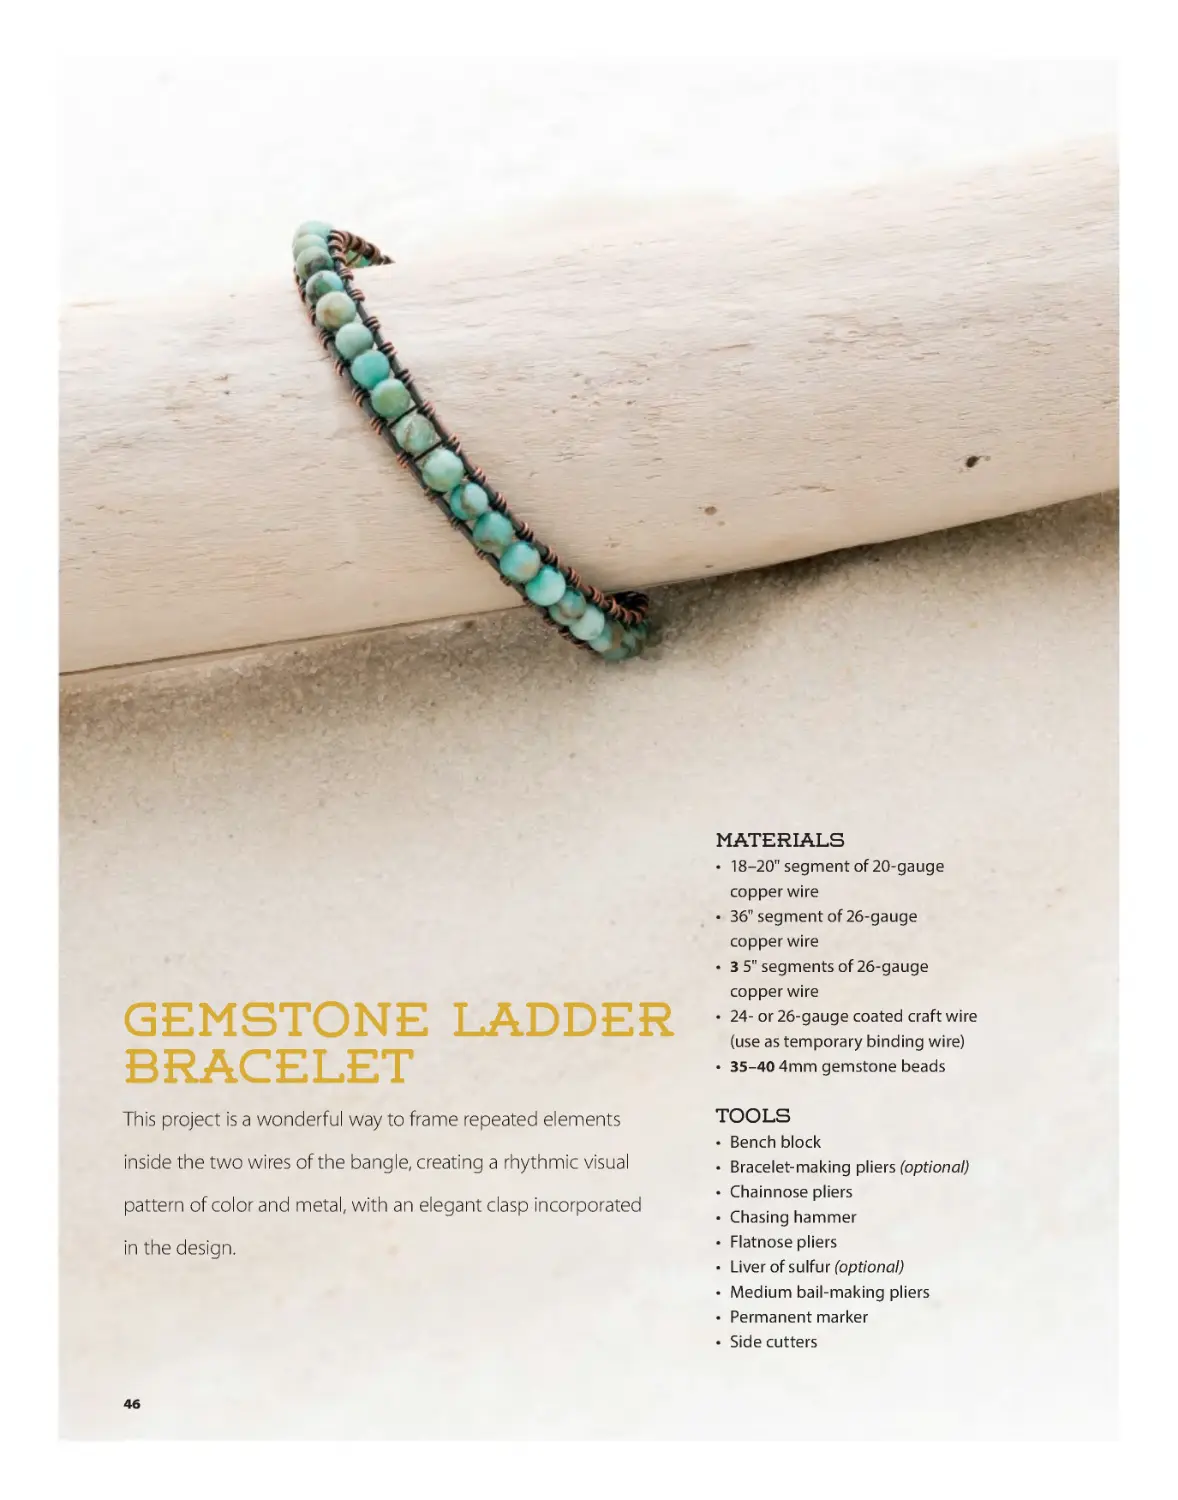
Gemstone Ladder
Bracelet
This project is a wonderful way to frame repeated elements
inside the two wires of the bangle, creating a rhythmic visual
pattern of color and metal, with an elegant clasp incorporated
in the design.
• 18–20" segment of 20-gauge
copper wire
• 36" segment of 26-gauge
copper wire
• 3 5" segments of 26-gauge
copper wire
• 24- or 26-gauge coated craft wire
(use as temporary binding wire)
• 35–40 4mm gemstone beads
Tools
•
•
•
•
•
•
•
•
•
Bench block
Bracelet-making pliers (optional)
Chainnose pliers
Chasing hammer
Flatnose pliers
Liver of sulfur (optional)
Medium bail-making pliers
Permanent marker
Side cutters
46
BKS-67899-02.indd 46
2/1/17 2:05 PM
A
B
C
D
E
Instructions
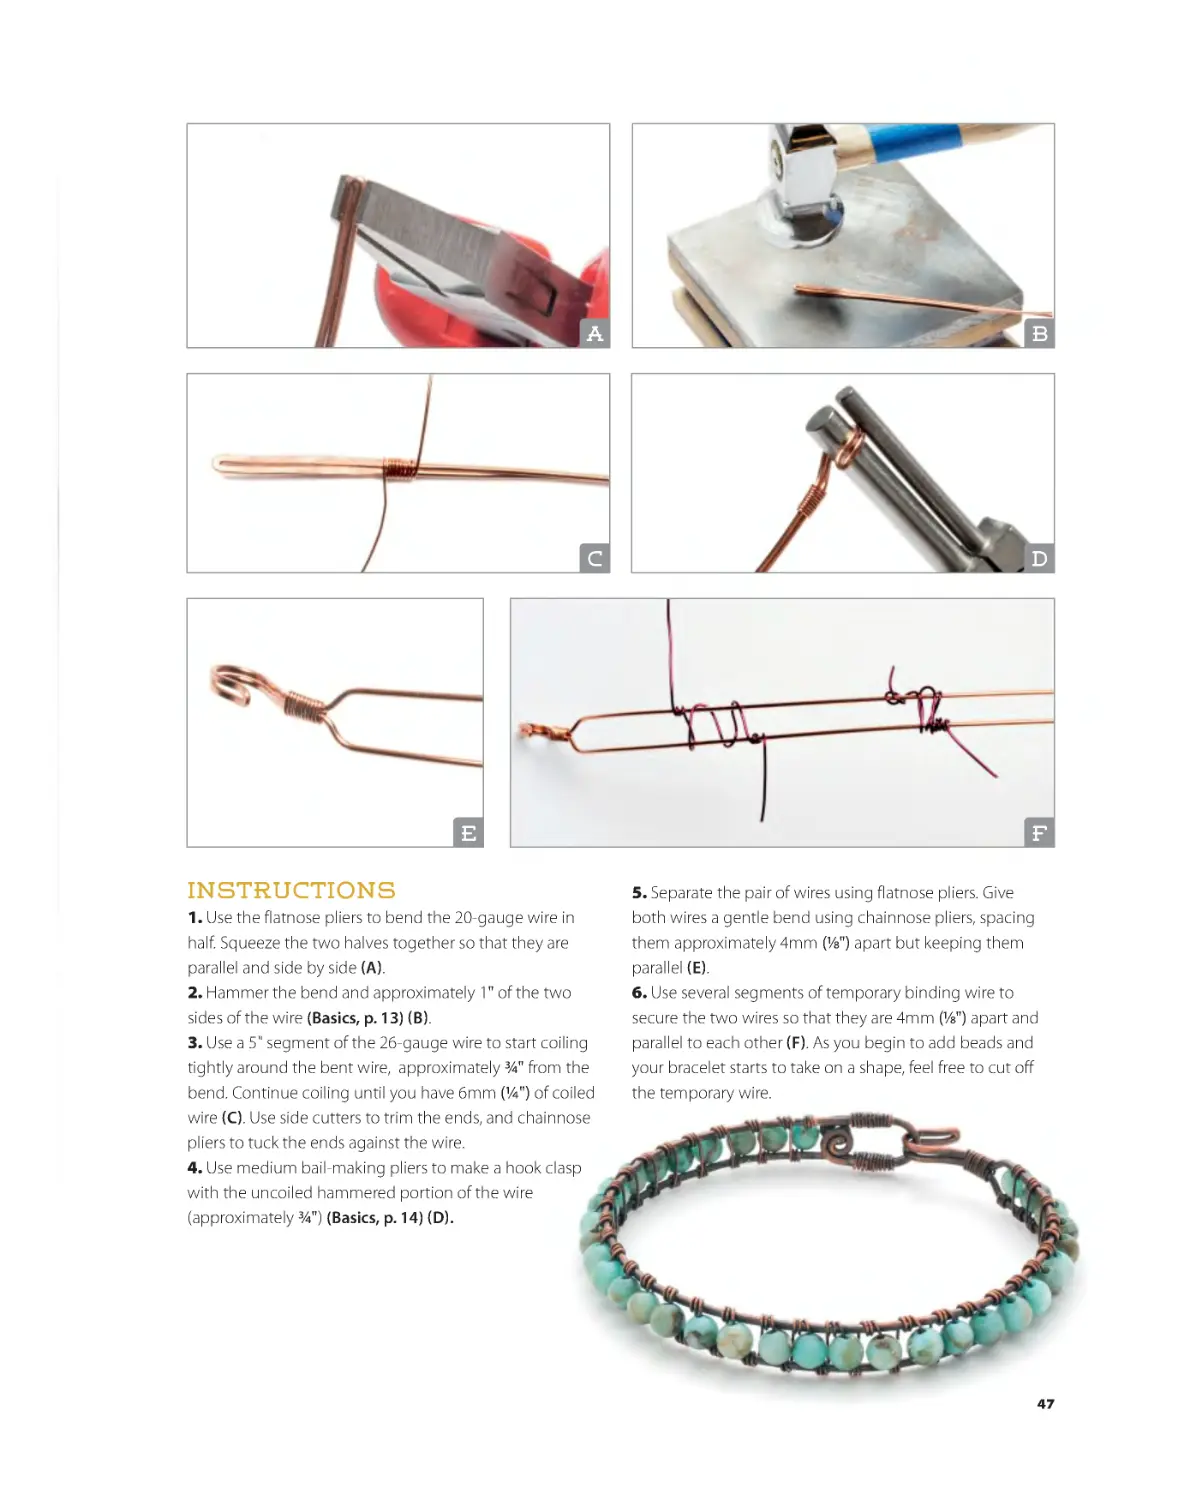
1. Use the flatnose pliers to bend the 20-gauge wire in
half. Squeeze the two halves together so that they are
parallel and side by side (A).
2. Hammer the bend and approximately 1" of the two
sides of the wire (Basics, p. 13) (B).
3. Use a 5" segment of the 26-gauge wire to start coiling
tightly around the bent wire, approximately ¾" from the
bend. Continue coiling until you have 6mm (¼") of coiled
wire (C). Use side cutters to trim the ends, and chainnose
pliers to tuck the ends against the wire.
4. Use medium bail-making pliers to make a hook clasp
with the uncoiled hammered portion of the wire
(approximately ¾") (Basics, p. 14) (D).
F
5. Separate the pair of wires using flatnose pliers. Give
both wires a gentle bend using chainnose pliers, spacing
them approximately 4mm (1⁄8") apart but keeping them
parallel (E).
6. Use several segments of temporary binding wire to
secure the two wires so that they are 4mm (1⁄8") apart and
parallel to each other (F). As you begin to add beads and
your bracelet starts to take on a shape, feel free to cut off
the temporary wire.
47
BKS-67899-02.indd 47
2/1/17 2:05 PM
G
J
M
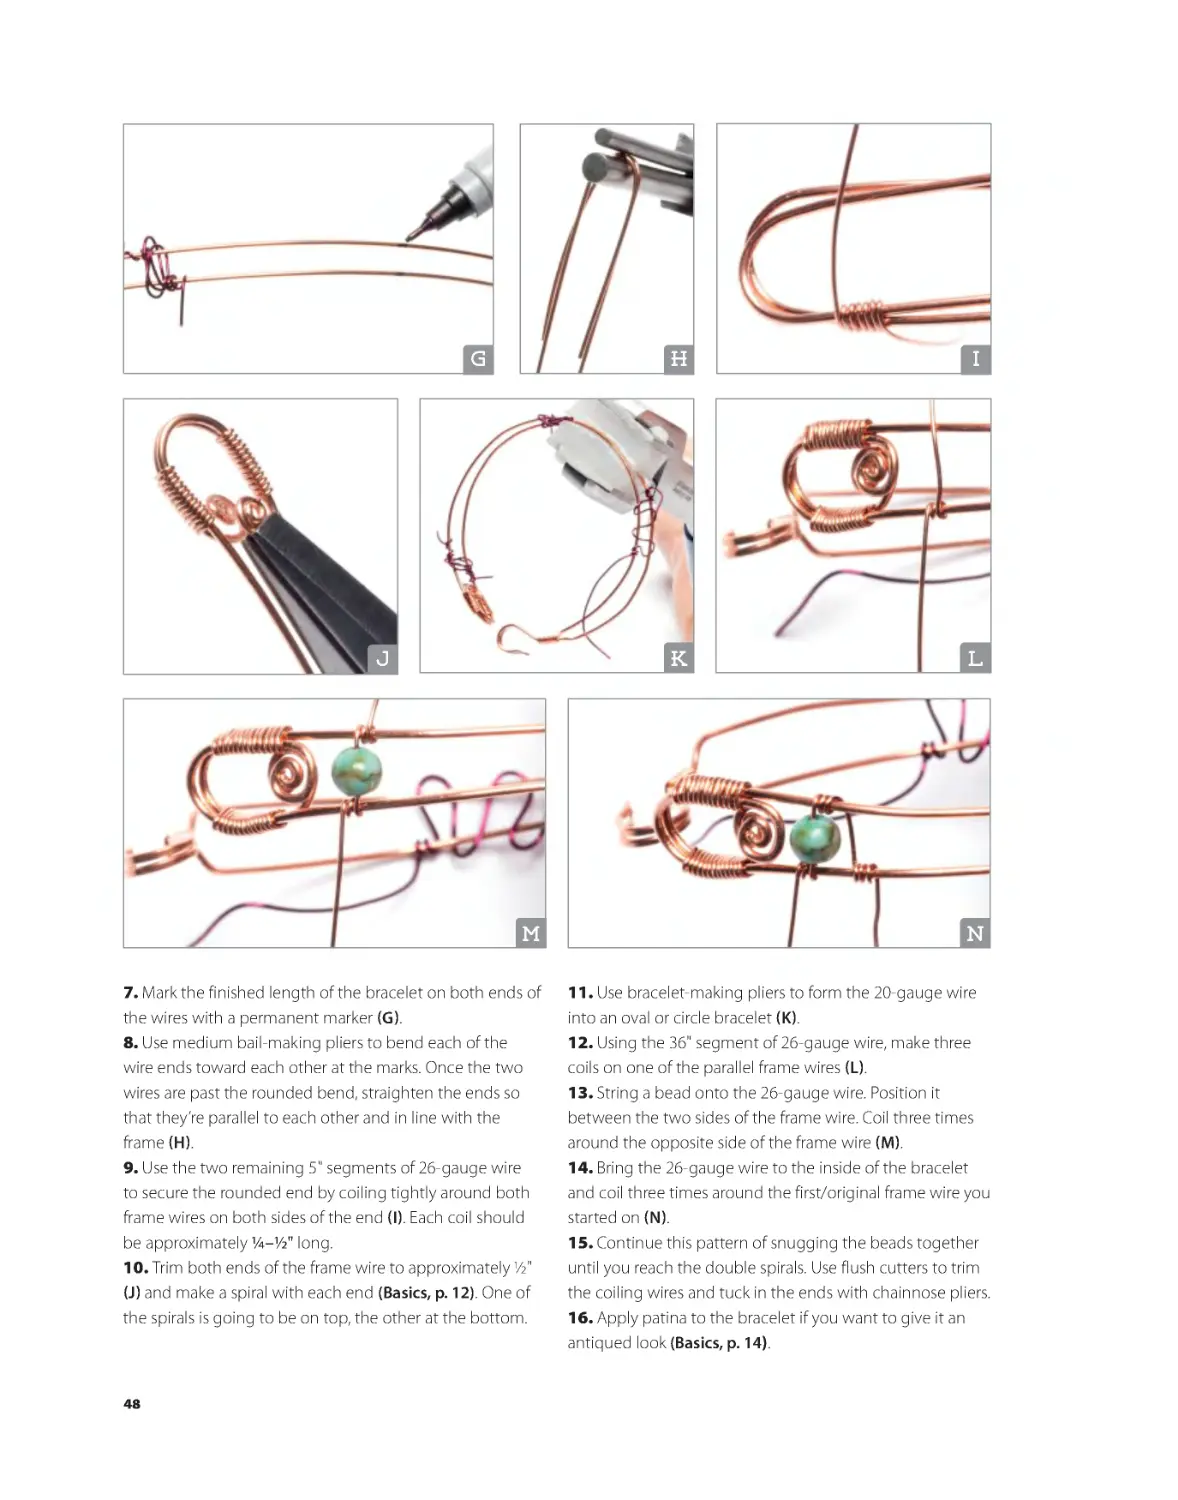
7. Mark the finished length of the bracelet on both ends of
the wires with a permanent marker (G).
8. Use medium bail-making pliers to bend each of the
wire ends toward each other at the marks. Once the two
wires are past the rounded bend, straighten the ends so
that they’re parallel to each other and in line with the
frame (H).
9. Use the two remaining 5" segments of 26-gauge wire
to secure the rounded end by coiling tightly around both
frame wires on both sides of the end (I). Each coil should
be approximately 1/4–1/2" long.
10. Trim both ends of the frame wire to approximately ½"
(J) and make a spiral with each end (Basics, p. 12). One of
the spirals is going to be on top, the other at the bottom.
H
I
K
L
N
11. Use bracelet-making pliers to form the 20-gauge wire
into an oval or circle bracelet (K).
12. Using the 36" segment of 26-gauge wire, make three
coils on one of the parallel frame wires (L).
13. String a bead onto the 26-gauge wire. Position it
between the two sides of the frame wire. Coil three times
around the opposite side of the frame wire (M).
14. Bring the 26-gauge wire to the inside of the bracelet
and coil three times around the first/original frame wire you
started on (N).
15. Continue this pattern of snugging the beads together
until you reach the double spirals. Use flush cutters to trim
the coiling wires and tuck in the ends with chainnose pliers.
16. Apply patina to the bracelet if you want to give it an
antiqued look (Basics, p. 14).
48
BKS-67899-02.indd 48
2/1/17 2:05 PM
Gemstone Ladder Bracelet Variations
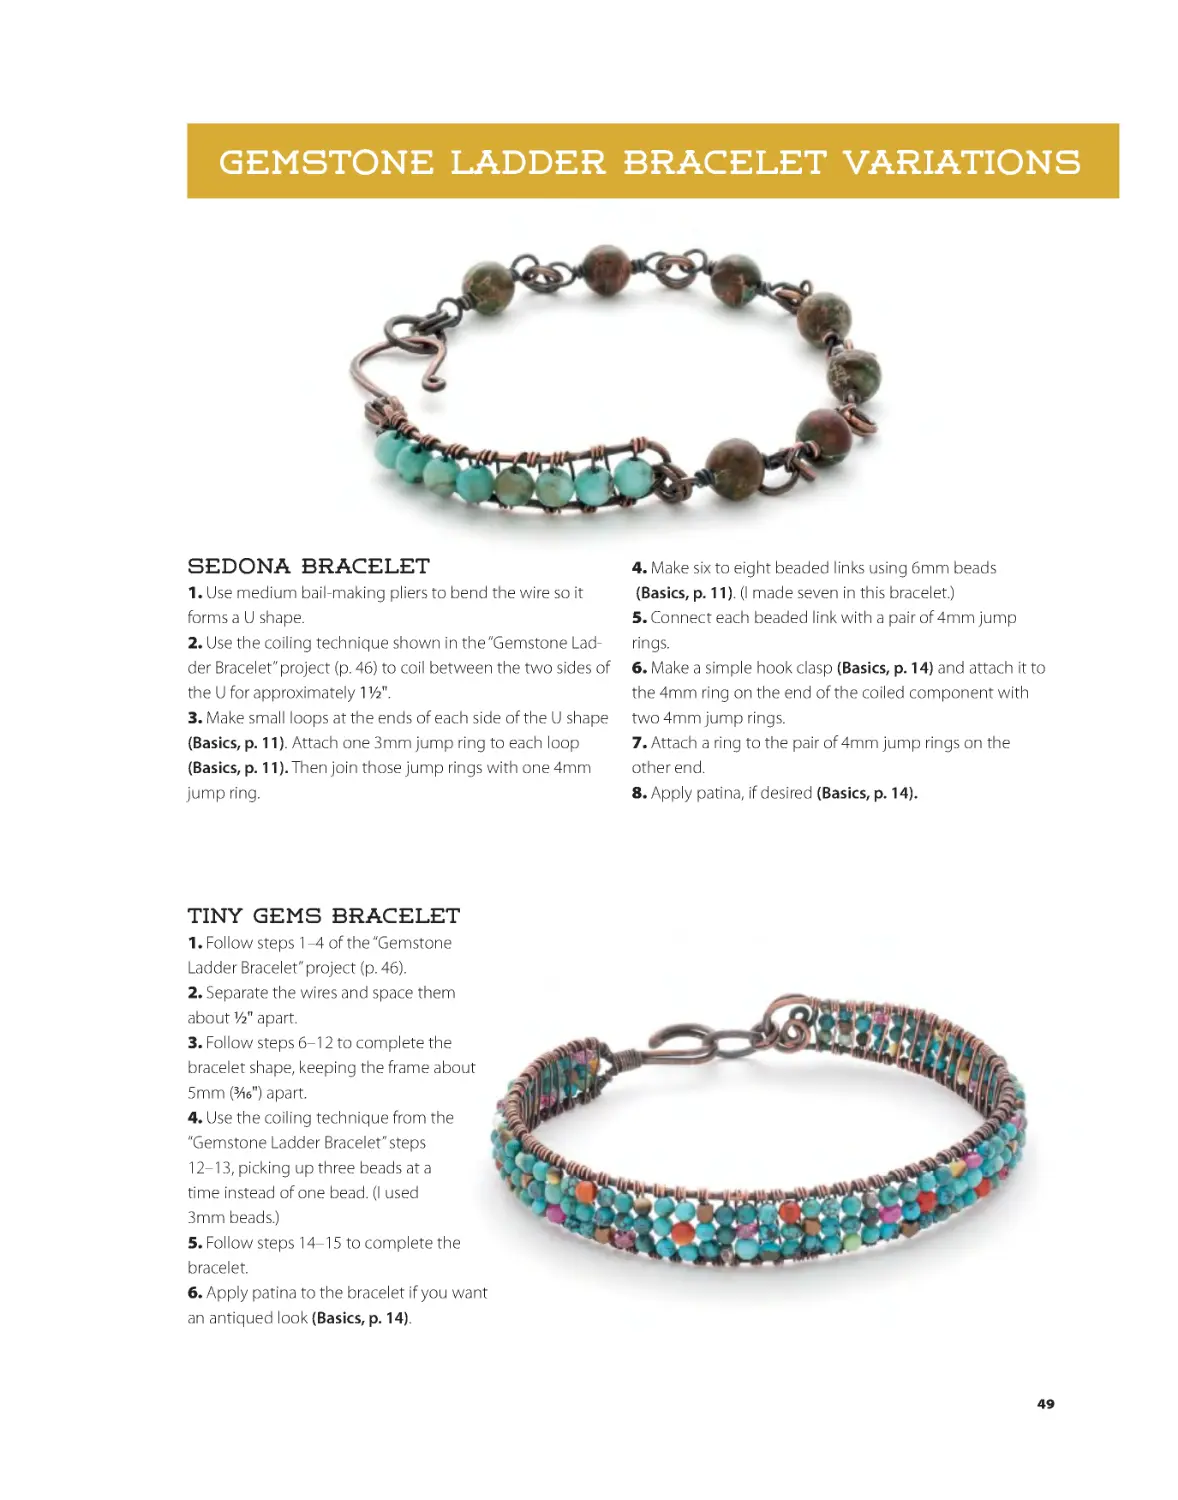
sedona Bracelet
1. Use medium bail-making pliers to bend the wire so it
forms a U shape.
2. Use the coiling technique shown in the “Gemstone Ladder Bracelet” project (p. 46) to coil between the two sides of
the U for approximately 11/2".
3. Make small loops at the ends of each side of the U shape
(Basics, p. 11). Attach one 3mm jump ring to each loop
(Basics, p. 11). Then join those jump rings with one 4mm
jump ring.
4. Make six to eight beaded links using 6mm beads
(Basics, p. 11). (I made seven in this bracelet.)
5. Connect each beaded link with a pair of 4mm jump
rings.
6. Make a simple hook clasp (Basics, p. 14) and attach it to
the 4mm ring on the end of the coiled component with
two 4mm jump rings.
7. Attach a ring to the pair of 4mm jump rings on the
other end.
8. Apply patina, if desired (Basics, p. 14).
tiny gems Bracelet
1. Follow steps 1–4 of the “Gemstone
Ladder Bracelet” project (p. 46).
2. Separate the wires and space them
about 1/2" apart.
3. Follow steps 6–12 to complete the
bracelet shape, keeping the frame about
5mm (3/16") apart.
4. Use the coiling technique from the
“Gemstone Ladder Bracelet” steps
12–13, picking up three beads at a
time instead of one bead. (I used
3mm beads.)
5. Follow steps 14–15 to complete the
bracelet.
6. Apply patina to the bracelet if you want
an antiqued look (Basics, p. 14).
49
BKS-67899-02.indd 49
2/1/17 2:05 PM
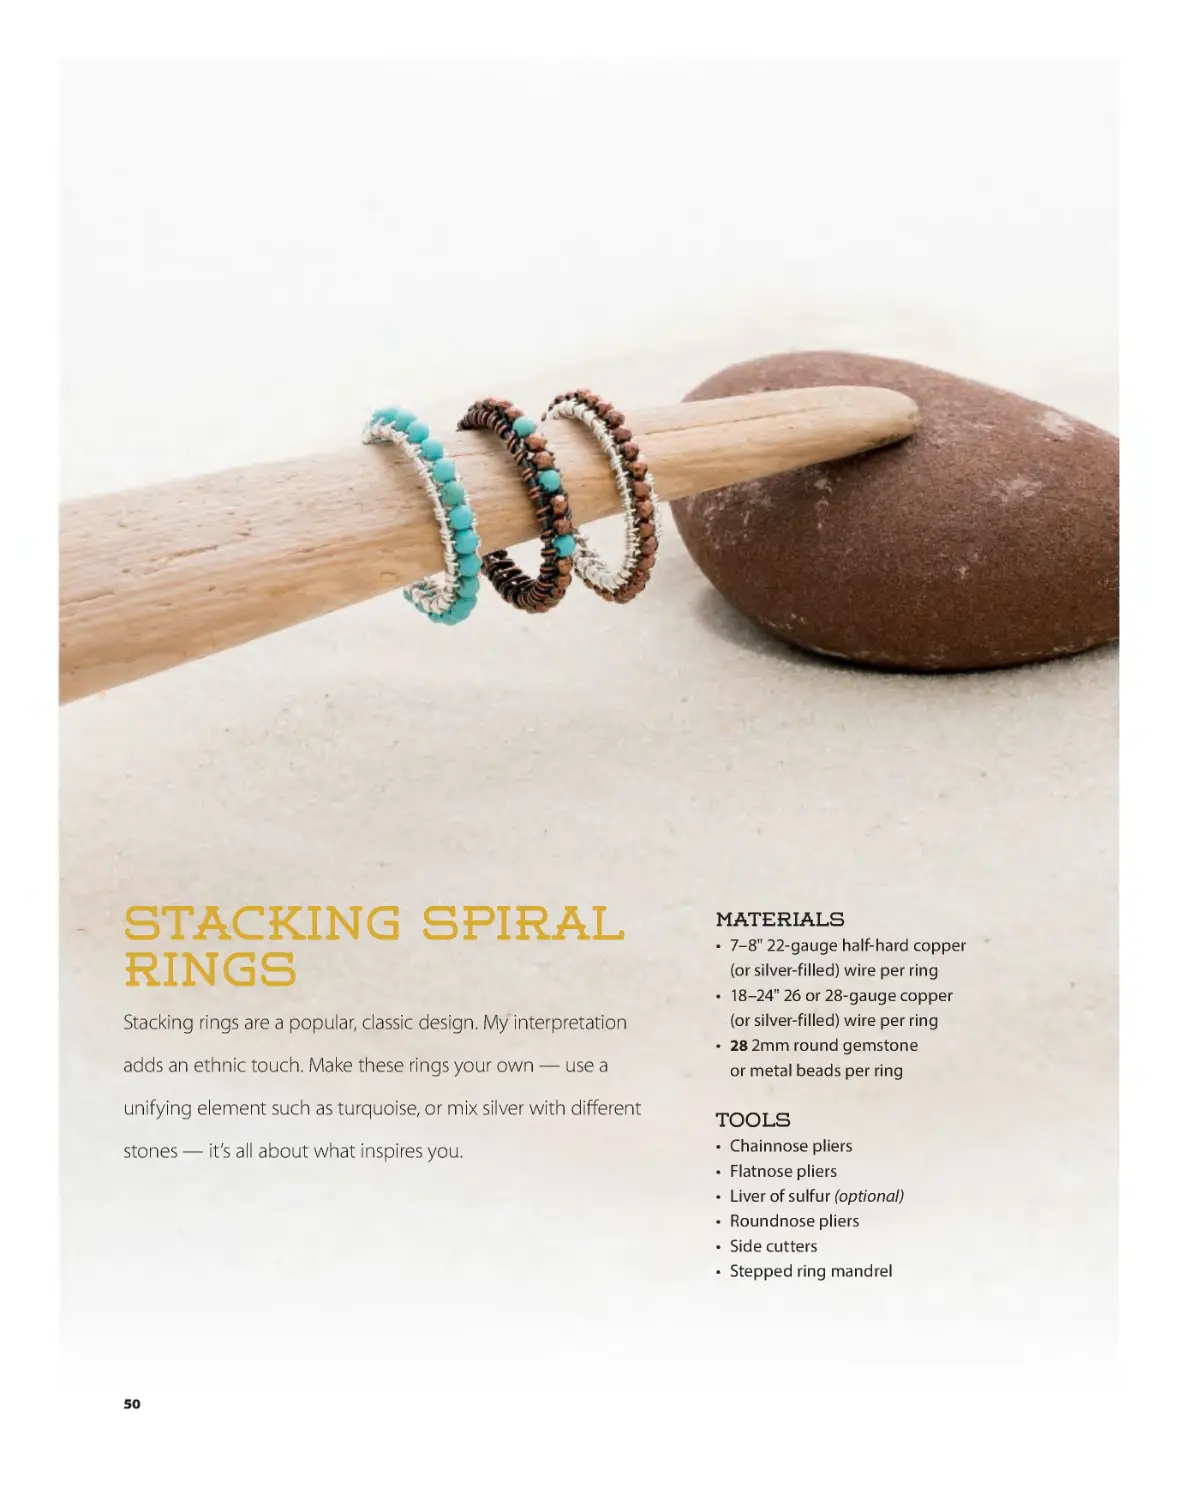
Stacking Spiral
Rings
Stacking rings are a popular, classic design. My interpretation
adds an ethnic touch. Make these rings your own — use a
unifying element such as turquoise, or mix silver with different
stones — it’s all about what inspires you.
Materials
• 7–8" 22-gauge half-hard copper
(or silver-filled) wire per ring
• 18–24" 26 or 28-gauge copper
(or silver-filled) wire per ring
• 28 2mm round gemstone
or metal beads per ring
Tools
•
•
•
•
•
•
Chainnose pliers
Flatnose pliers
Liver of sulfur (optional)
Roundnose pliers
Side cutters
Stepped ring mandrel
50
BKS-67899-02.indd 50
2/1/17 2:05 PM
A
B
C
D
Instructions
1. Starting in the center of the 22-gauge wire, wrap it two
times around the stepped ring mandrel on a step 2–4 sizes
smaller than the desired ring size (A).
Starting smaller will help when the wire springs back
or gets larger in diameter after being wrapped around the
mandrel and becoming slightly work-hardened.
2. Coil the end of the 26-gauge wire around the end of
the 22-gauge wire just where it begins to curve (B).
3. String a bead onto the 26-gauge wire. Position it
between the two sides of the ring. Coil twice around
the other side of the ring (C).
4. Bring the 26-gauge wire to the inside of the ring and
coil twice around the first side where you started (D).
5. Continue the pattern.
51
BKS-67899-02.indd 51
2/1/17 2:05 PM
E
F
G
H
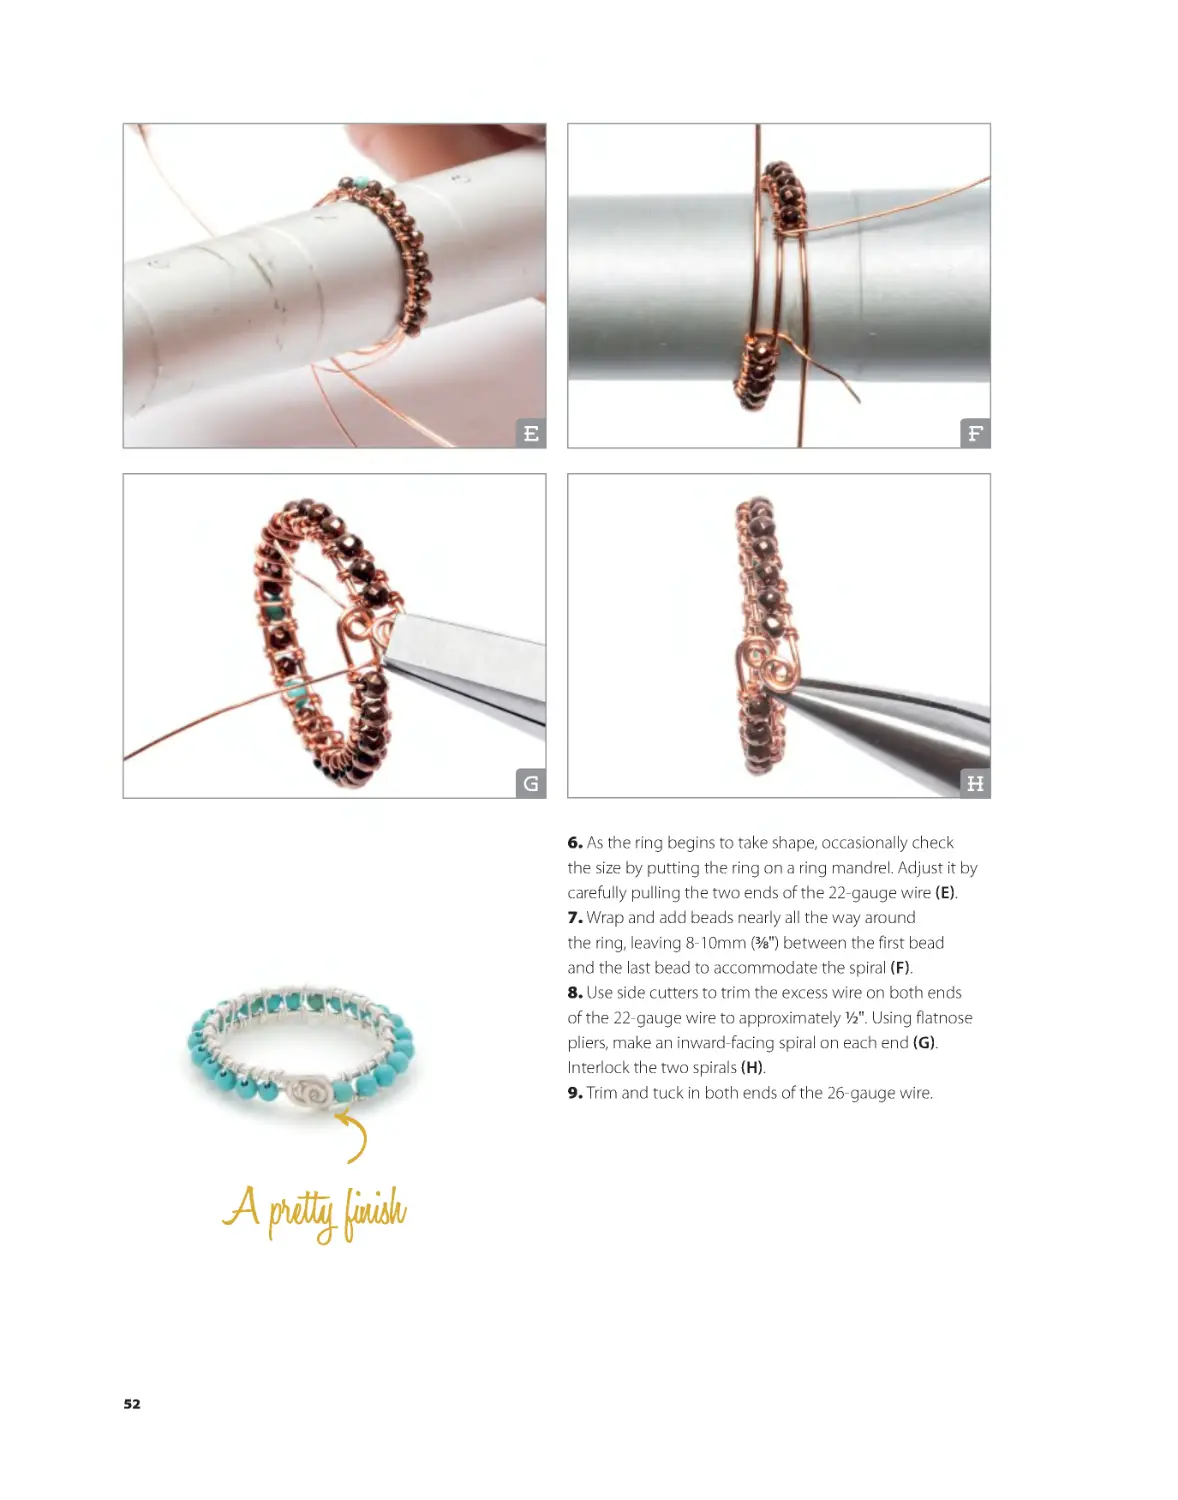
6. As the ring begins to take shape, occasionally check
the size by putting the ring on a ring mandrel. Adjust it by
carefully pulling the two ends of the 22-gauge wire (E).
7. Wrap and add beads nearly all the way around
the ring, leaving 8-10mm (3/8") between the first bead
and the last bead to accommodate the spiral (F).
8. Use side cutters to trim the excess wire on both ends
of the 22-gauge wire to approximately 1/2". Using flatnose
pliers, make an inward-facing spiral on each end (G).
Interlock the two spirals (H).
9. Trim and tuck in both ends of the 26-gauge wire.
52
BKS-67899-02.indd 52
2/1/17 2:05 PM
Stacking Spiral Rings Variations
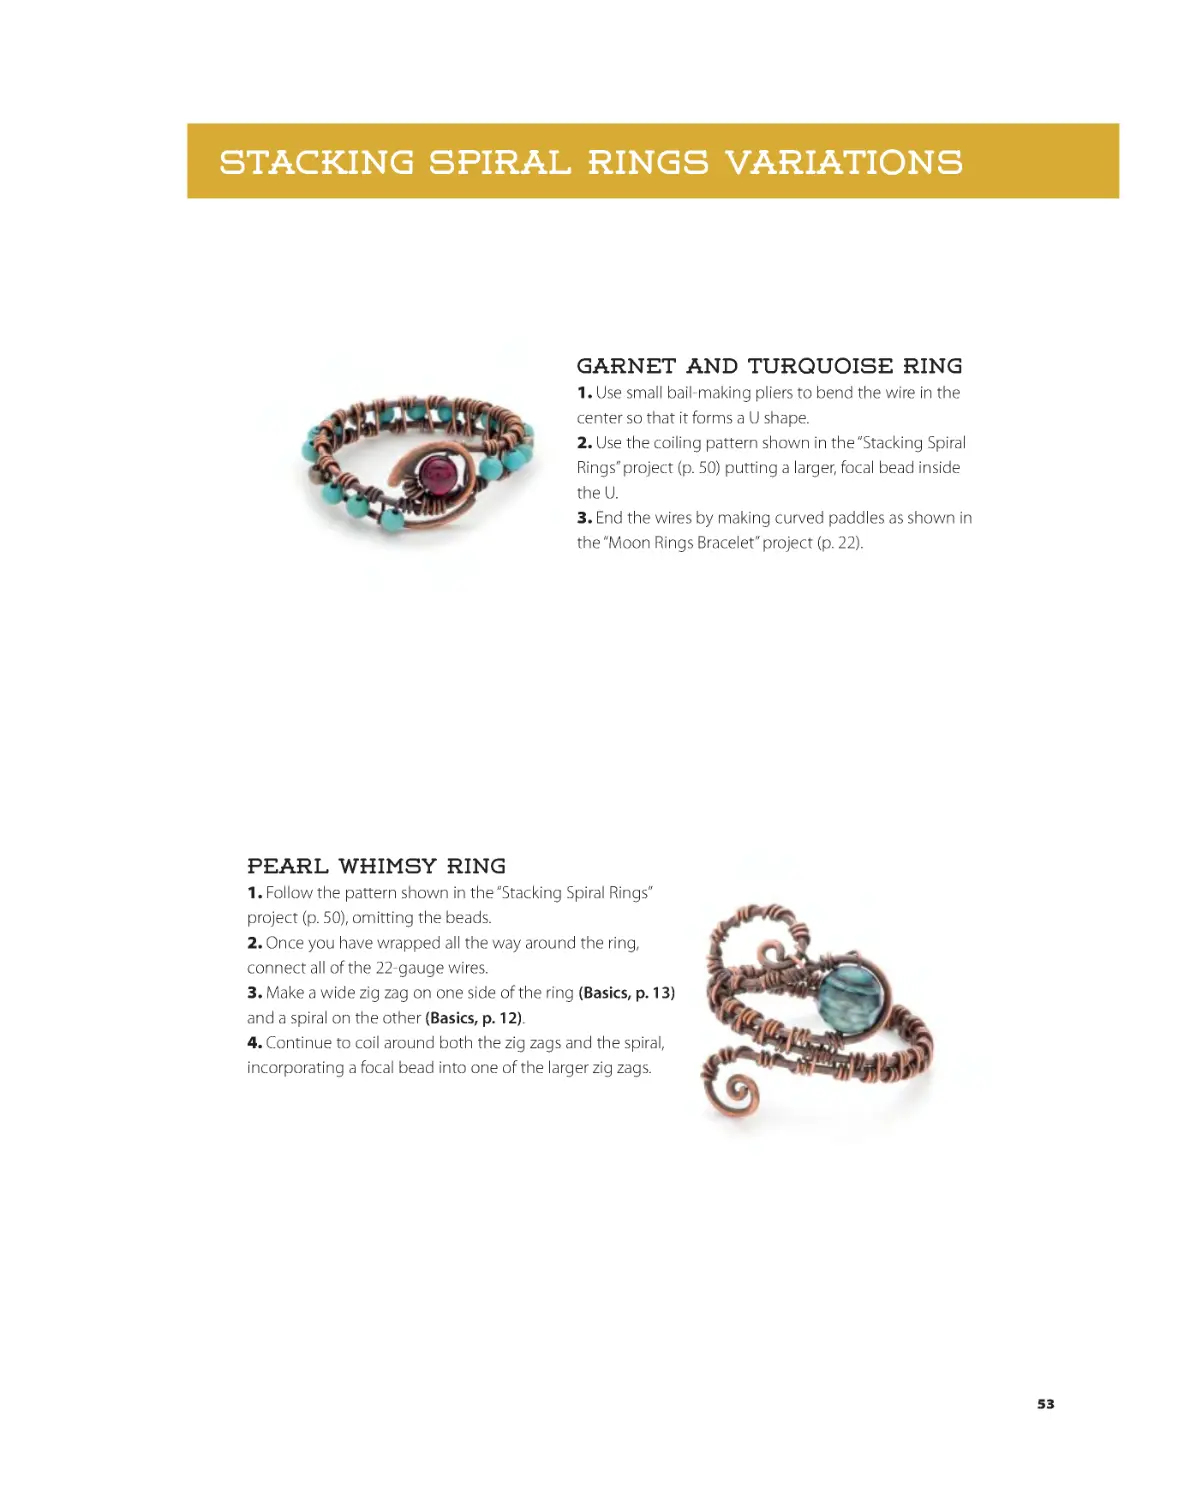
Garnet and Turquoise Ring
1. Use small bail-making pliers to bend the wire in the
center so that it forms a U shape.
2. Use the coiling pattern shown in the “Stacking Spiral
Rings” project (p. 50) putting a larger, focal bead inside
the U.
3. End the wires by making curved paddles as shown in
the “Moon Rings Bracelet” project (p. 22).
Pearl whimsy Ring
1. Follow the pattern shown in the “Stacking Spiral Rings”
project (p. 50), omitting the beads.
2. Once you have wrapped all the way around the ring,
connect all of the 22-gauge wires.
3. Make a wide zig zag on one side of the ring (Basics, p. 13)
and a spiral on the other (Basics, p. 12).
4. Continue to coil around both the zig zags and the spiral,
incorporating a focal bead into one of the larger zig zags.
53
BKS-67899-02.indd 53
2/1/17 2:05 PM
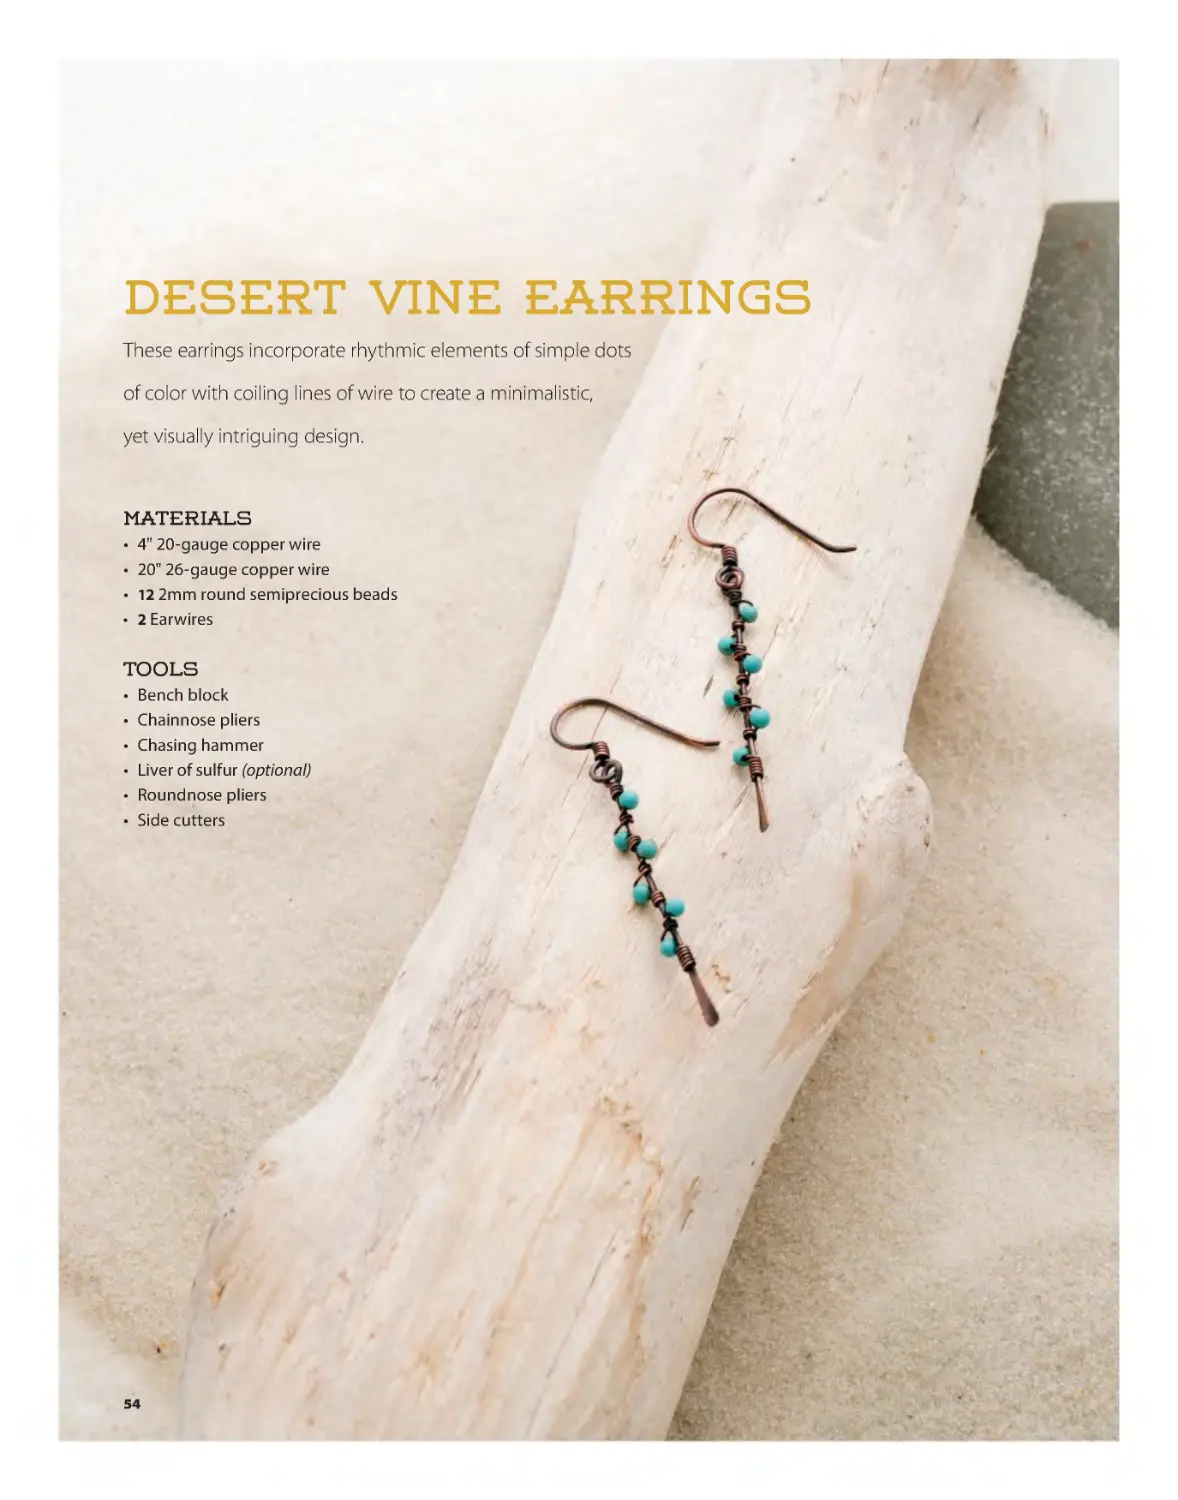
Desert Vine Earrings
These earrings incorporate rhythmic elements of simple dots
of color with coiling lines of wire to create a minimalistic,
yet visually intriguing design.
Materials
•
•
•
•
4" 20-gauge copper wire
20" 26-gauge copper wire
12 2mm round semiprecious beads
2 Earwires
Tools
•
•
•
•
•
•
Bench block
Chainnose pliers
Chasing hammer
Liver of sulfur (optional)
Roundnose pliers
Side cutters
54
BKS-67899-02.indd 54
2/1/17 2:05 PM
A
B
C
d
e
f
Instructions
1. Use side cutters to cut the 20-gauge wire into two
2" equal segments.
2. Using a bench block and the flat face of a chasing
hammer, create the same size paddle at one end of each
segment (Basics, p. 13) (A).
3. Use roundnose and chainnose pliers to make the same
size plain loop at the opposite end of each segment
(Basics, p. 11).
4. Coil the 26-gauge wire two times just below the loop of
one segment (B). Use chainnose pliers to gently pinch the
coil to tighten it. Continue coiling the wire.
5. Once you have 3–5 coils, string a bead onto the
26-gauge wire and continue to coil, keeping the bead on
one side of the paddle component (C).
6. Continue this pattern, always placing the next bead
on the opposite side of the paddle component from the
previous bead (D).
7. Once you have six beads on your paddle component,
finish with a longer coil (E).
g
8. Trim both ends of the wire (F). Use chainnose pliers to
tuck in the ends (G).
9. Repeat steps 4–8 to create a second earring drop.
10. Attach earwires to the loops of each paddle
component.
11. Apply patina to the earrings if you want to give them
an antiqued look (Basics, p. 14).
55
BKS-67899-02.indd 55
2/1/17 2:06 PM
Desert Vine Earrings Variations
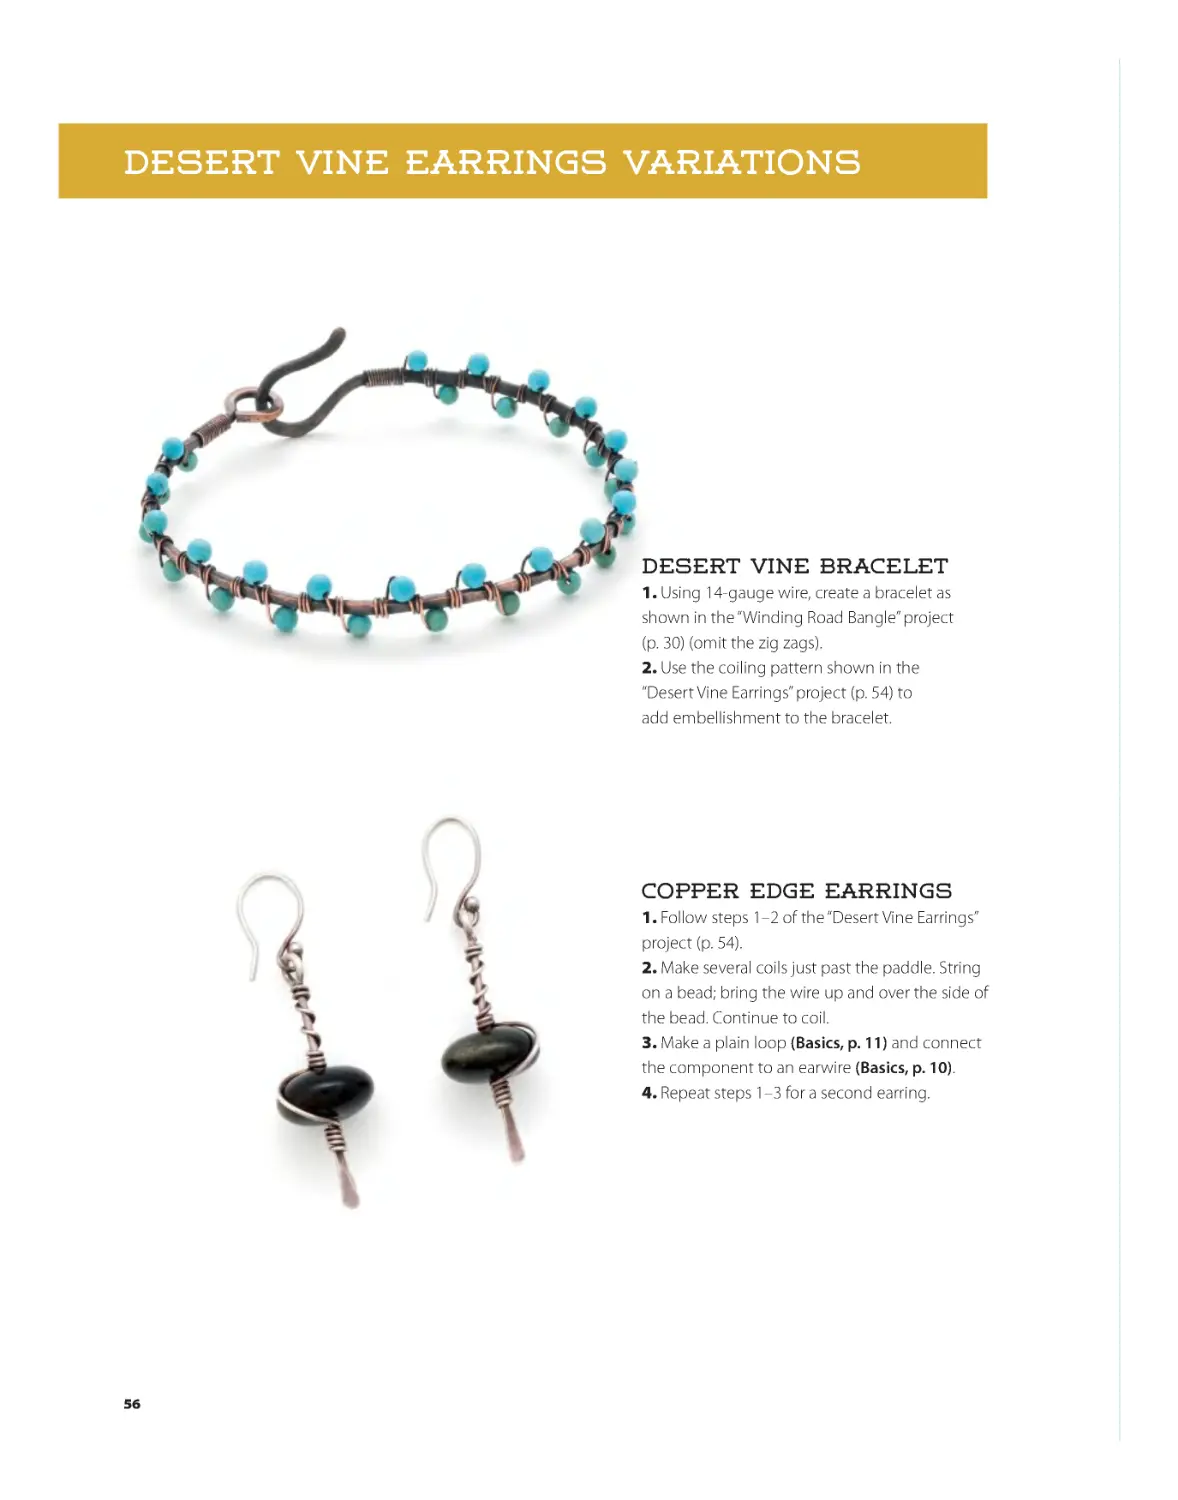
Desert Vine Bracelet
1. Using 14-gauge wire, create a bracelet as
shown in the “Winding Road Bangle” project
(p. 30) (omit the zig zags).
2. Use the coiling pattern shown in the
“Desert Vine Earrings” project (p. 54) to
add embellishment to the bracelet.
Copper Edge Earrings
1. Follow steps 1–2 of the “Desert Vine Earrings”
project (p. 54).
2. Make several coils just past the paddle. String
on a bead; bring the wire up and over the side of
the bead. Continue to coil.
3. Make a plain loop (Basics, p. 11) and connect
the component to an earwire (Basics, p. 10).
4. Repeat steps 1–3 for a second earring.
56
BKS-67899-02.indd 56
2/1/17 2:06 PM
57
BKS-67899-02.indd 57
2/1/17 2:06 PM
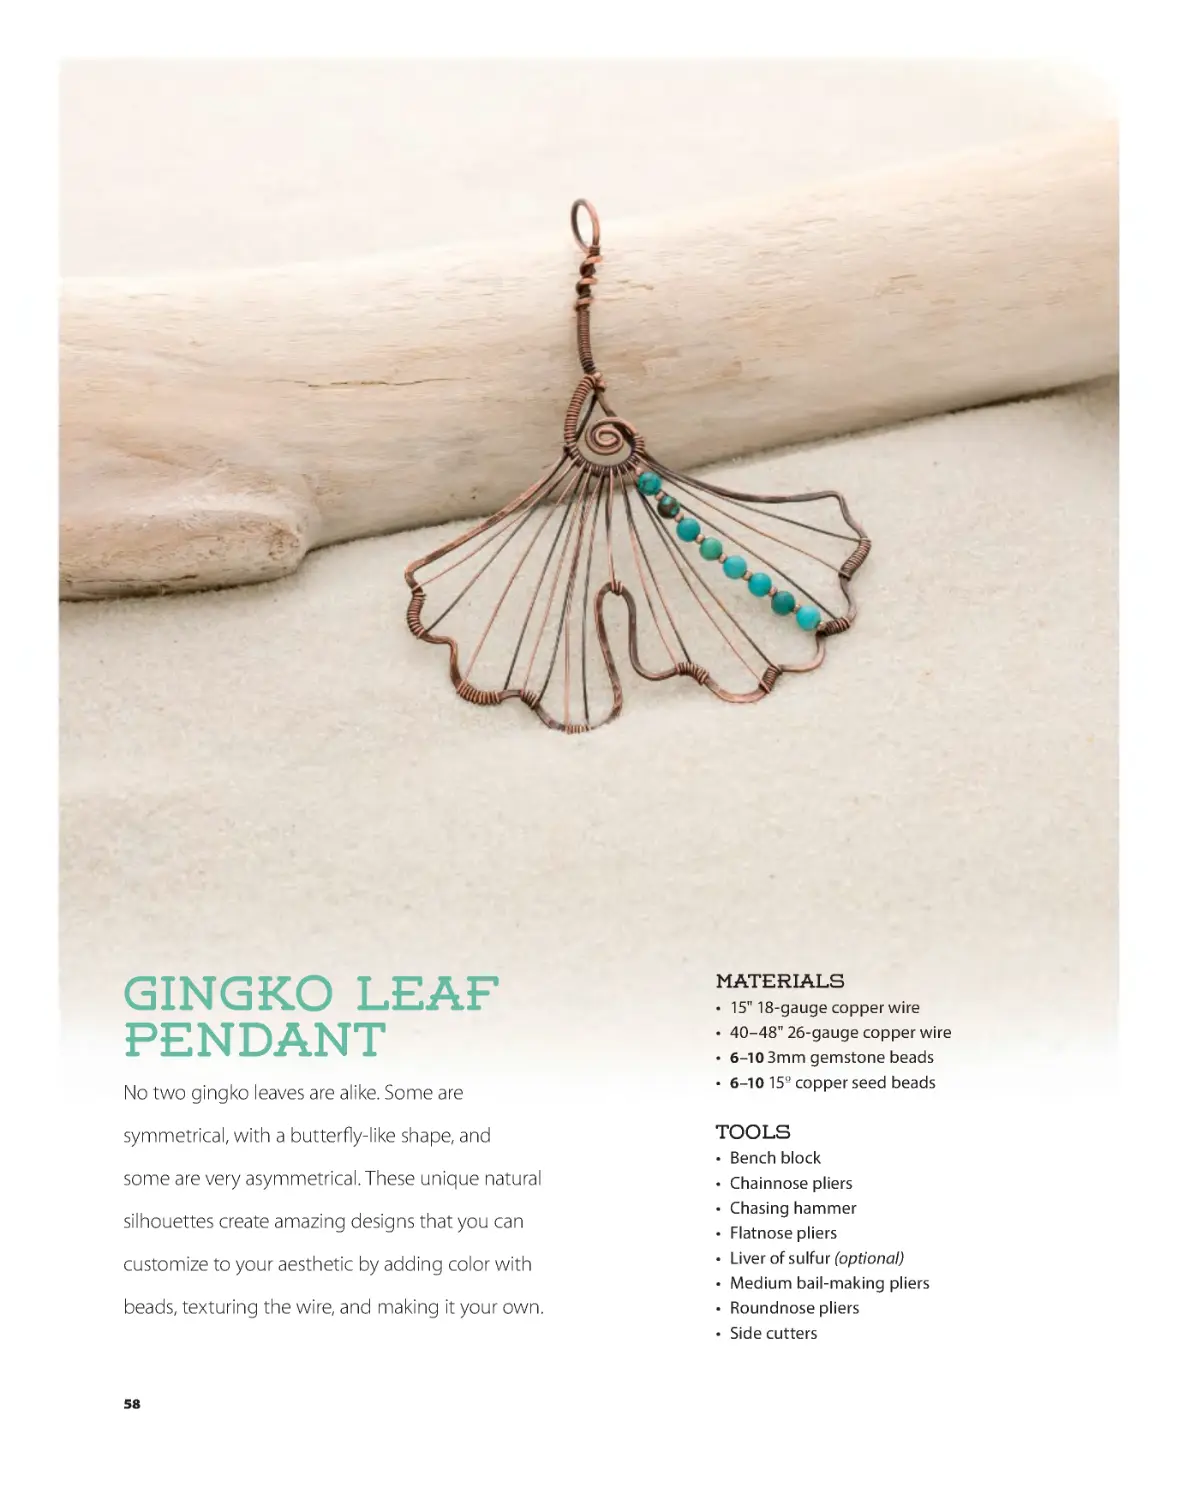
Gingko Leaf
Pendant
No two gingko leaves are alike. Some are
symmetrical, with a butterfly-like shape, and
some are very asymmetrical. These unique natural
silhouettes create amazing designs that you can
customize to your aesthetic by adding color with
beads, texturing the wire, and making it your own.
Materials
•
•
•
•
15" 18-gauge copper wire
40–48" 26-gauge copper wire
6–10 3mm gemstone beads
6–10 150 copper seed beads
Tools
•
•
•
•
•
•
•
•
Bench block
Chainnose pliers
Chasing hammer
Flatnose pliers
Liver of sulfur (optional)
Medium bail-making pliers
Roundnose pliers
Side cutters
58
BKS-67899-02.indd 58
2/1/17 2:06 PM
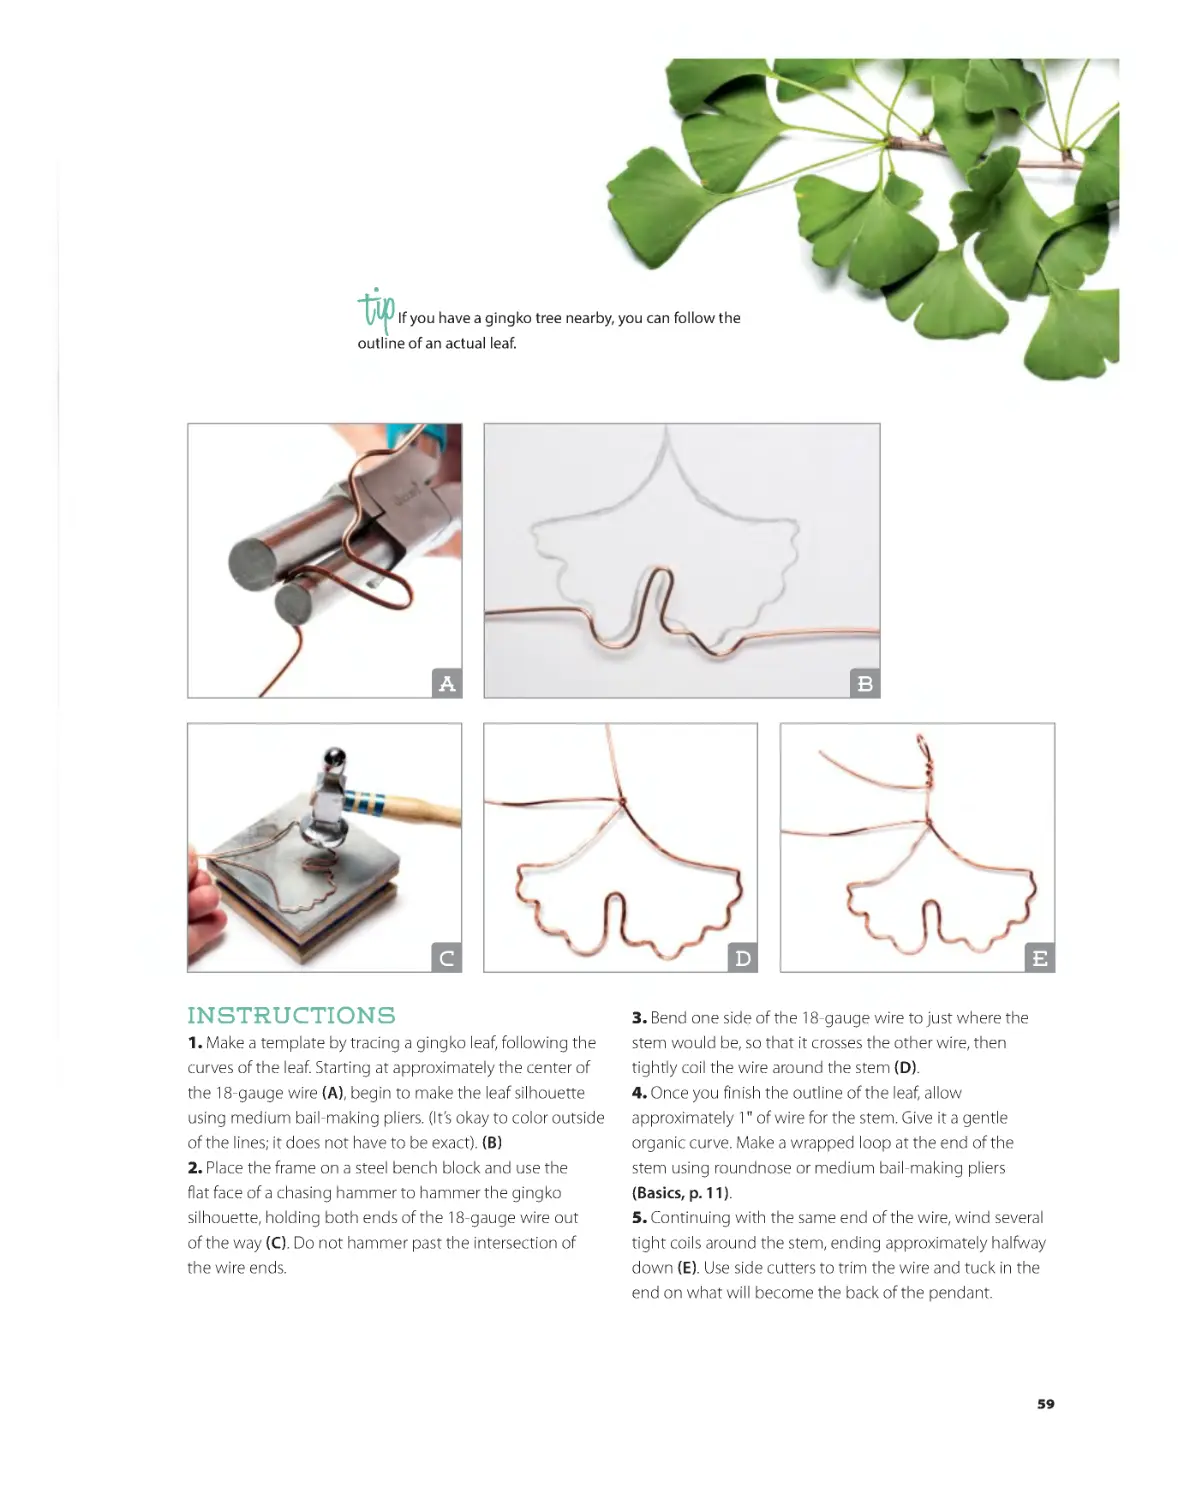
If you have a gingko tree nearby, you can follow the
outline of an actual leaf.
A
C
Instructions
1. Make a template by tracing a gingko leaf, following the
curves of the leaf. Starting at approximately the center of
the 18-gauge wire (A), begin to make the leaf silhouette
using medium bail-making pliers. (It’s okay to color outside
of the lines; it does not have to be exact). (B)
2. Place the frame on a steel bench block and use the
flat face of a chasing hammer to hammer the gingko
silhouette, holding both ends of the 18-gauge wire out
of the way (C). Do not hammer past the intersection of
the wire ends.
B
D
E
3. Bend one side of the 18-gauge wire to just where the
stem would be, so that it crosses the other wire, then
tightly coil the wire around the stem (D).
4. Once you finish the outline of the leaf, allow
approximately 1" of wire for the stem. Give it a gentle
organic curve. Make a wrapped loop at the end of the
stem using roundnose or medium bail-making pliers
(Basics, p. 11).
5. Continuing with the same end of the wire, wind several
tight coils around the stem, ending approximately halfway
down (E). Use side cutters to trim the wire and tuck in the
end on what will become the back of the pendant.
59
BKS-67899-02.indd 59
2/1/17 2:06 PM
F
G
H
I
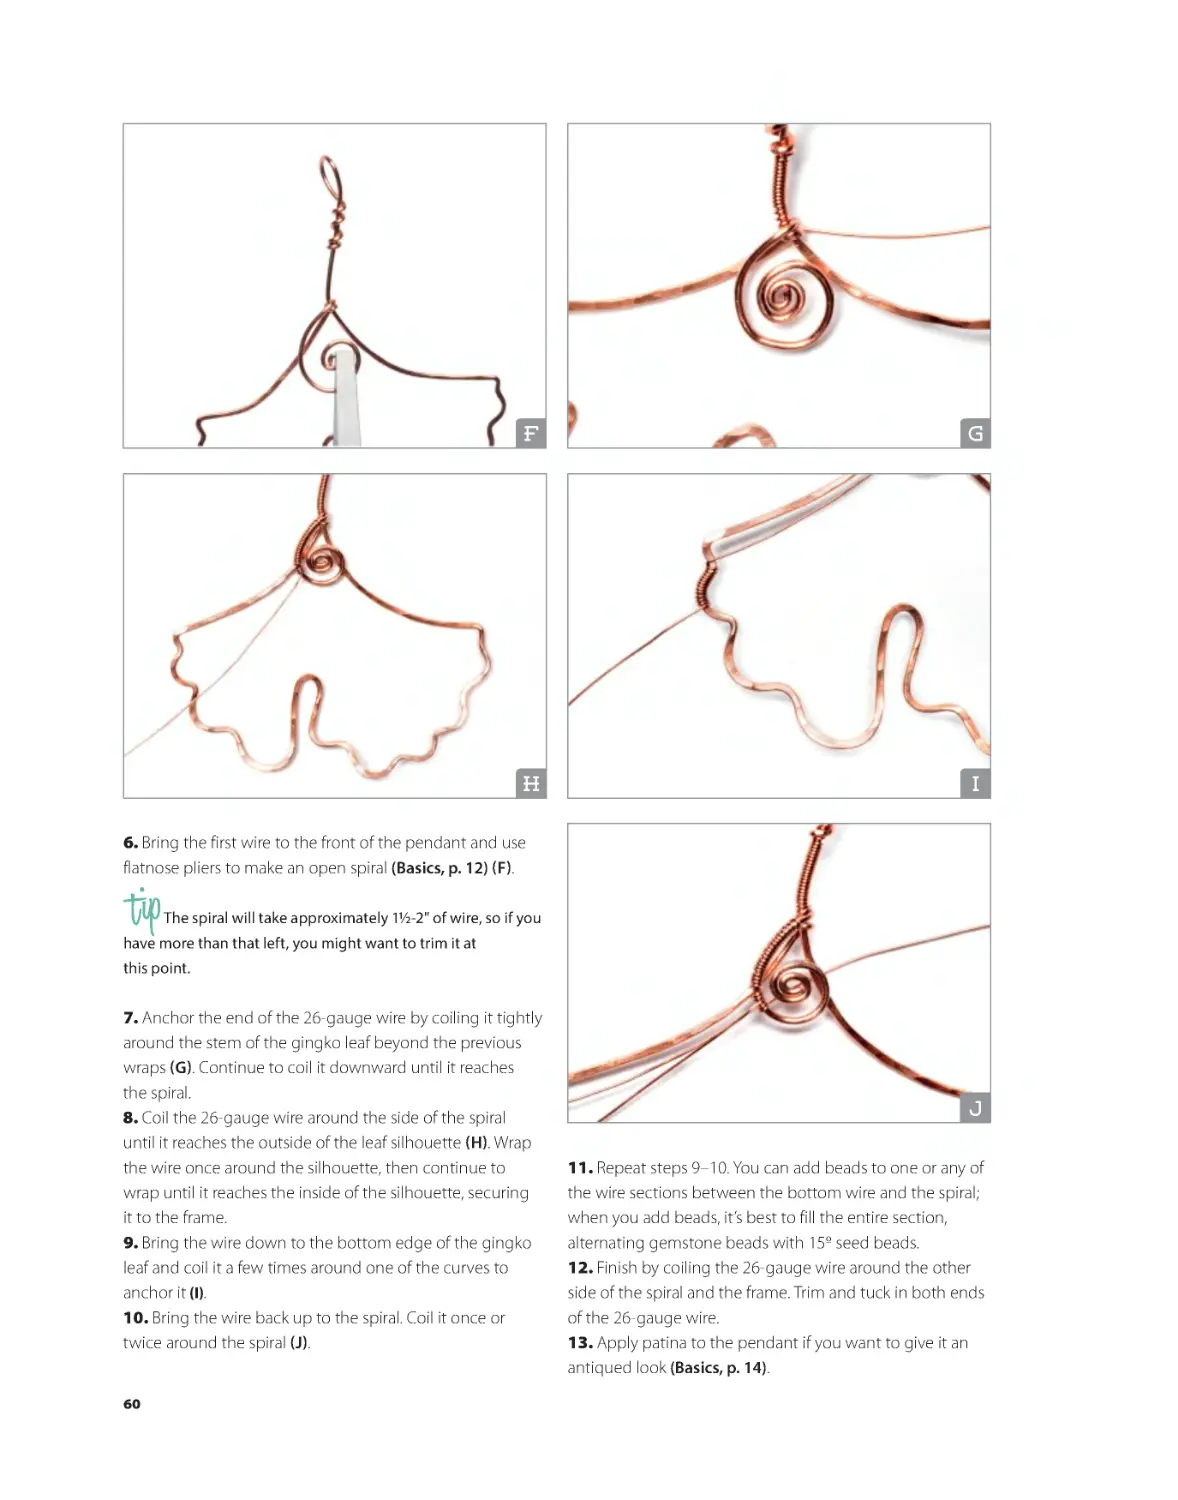
6. Bring the first wire to the front of the pendant and use
flatnose pliers to make an open spiral (Basics, p. 12) (F).
The spiral will take approximately 1½-2" of wire, so if you
have more than that left, you might want to trim it at
this point.
7. Anchor the end of the 26-gauge wire by coiling it tightly
around the stem of the gingko leaf beyond the previous
wraps (G). Continue to coil it downward until it reaches
the spiral.
8. Coil the 26-gauge wire around the side of the spiral
until it reaches the outside of the leaf silhouette (H). Wrap
the wire once around the silhouette, then continue to
wrap until it reaches the inside of the silhouette, securing
it to the frame.
9. Bring the wire down to the bottom edge of the gingko
leaf and coil it a few times around one of the curves to
anchor it (I).
10. Bring the wire back up to the spiral. Coil it once or
twice around the spiral (J).
j
11. Repeat steps 9–10. You can add beads to one or any of
the wire sections between the bottom wire and the spiral;
when you add beads, it’s best to fill the entire section,
alternating gemstone beads with 150 seed beads.
12. Finish by coiling the 26-gauge wire around the other
side of the spiral and the frame. Trim and tuck in both ends
of the 26-gauge wire.
13. Apply patina to the pendant if you want to give it an
antiqued look (Basics, p. 14).
60
BKS-67899-02.indd 60
2/1/17 2:06 PM
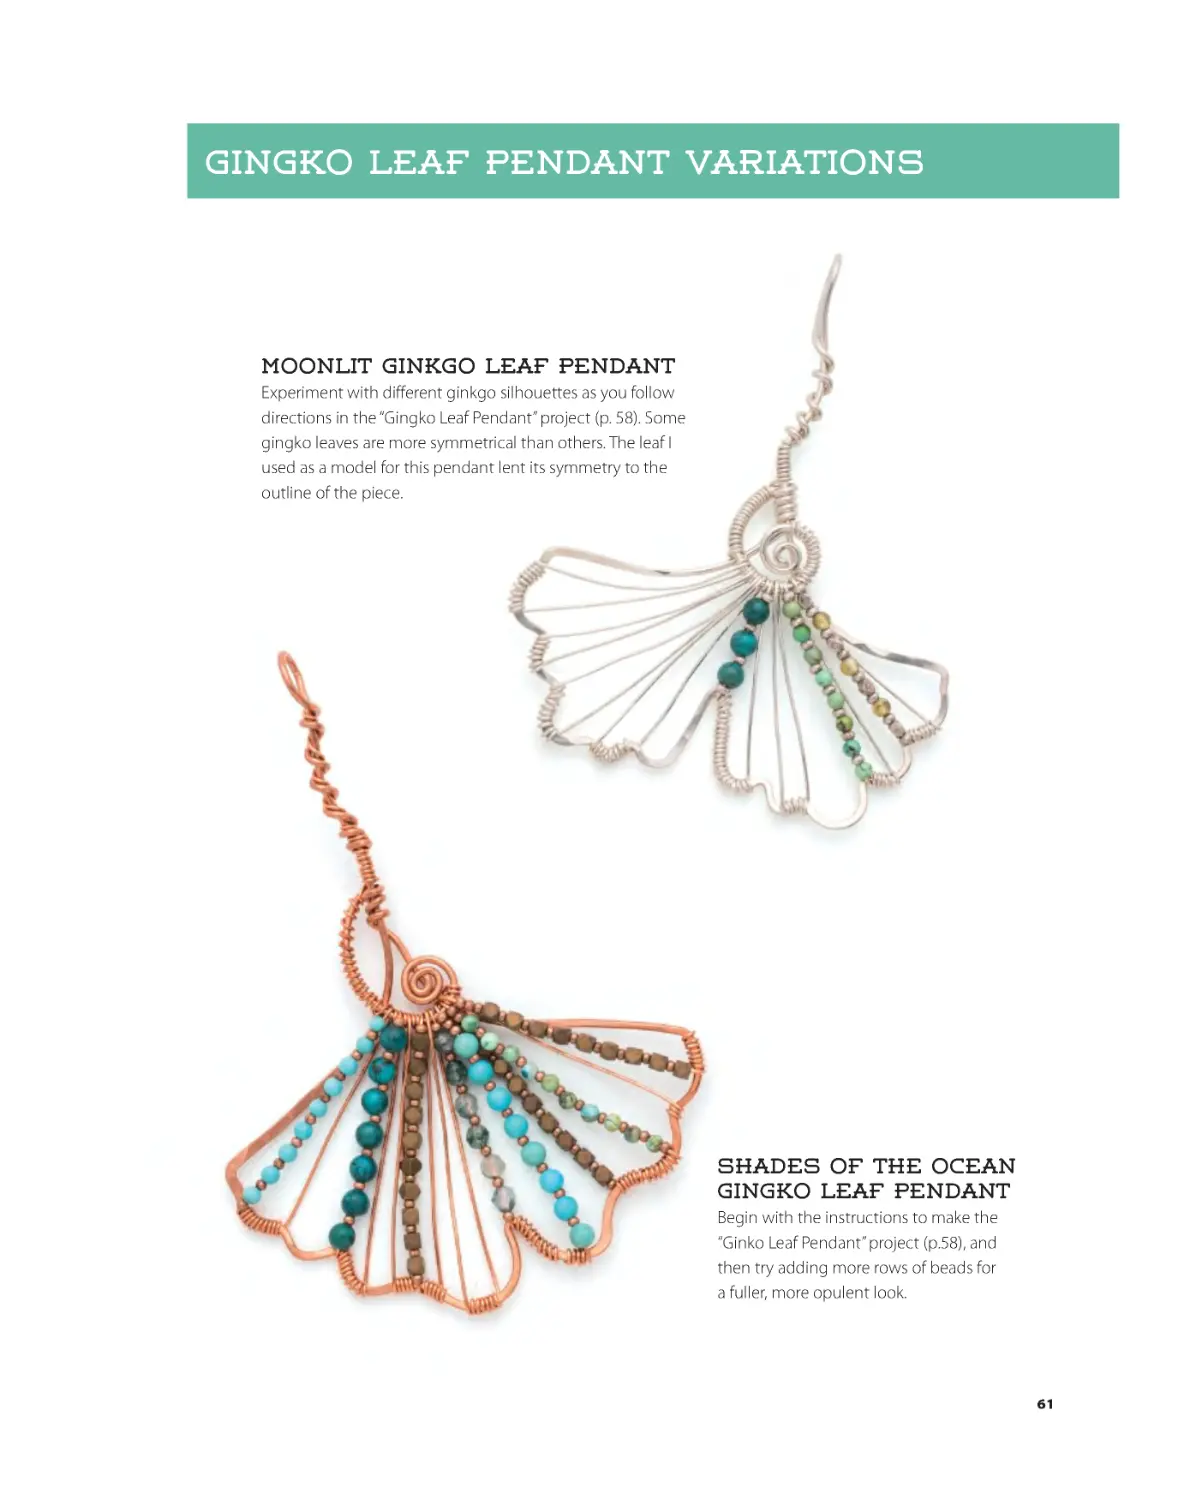
Gingko Leaf Pendant Variations
Moonlit Ginkgo Leaf Pendant
Experiment with different ginkgo silhouettes as you follow
directions in the “Gingko Leaf Pendant” project (p. 58). Some
gingko leaves are more symmetrical than others. The leaf I
used as a model for this pendant lent its symmetry to the
outline of the piece.
shades of the ocean
Gingko Leaf Pendant
Begin with the instructions to make the
“Ginko Leaf Pendant” project (p.58), and
then try adding more rows of beads for
a fuller, more opulent look.
61
BKS-67899-02.indd 61
2/1/17 2:06 PM
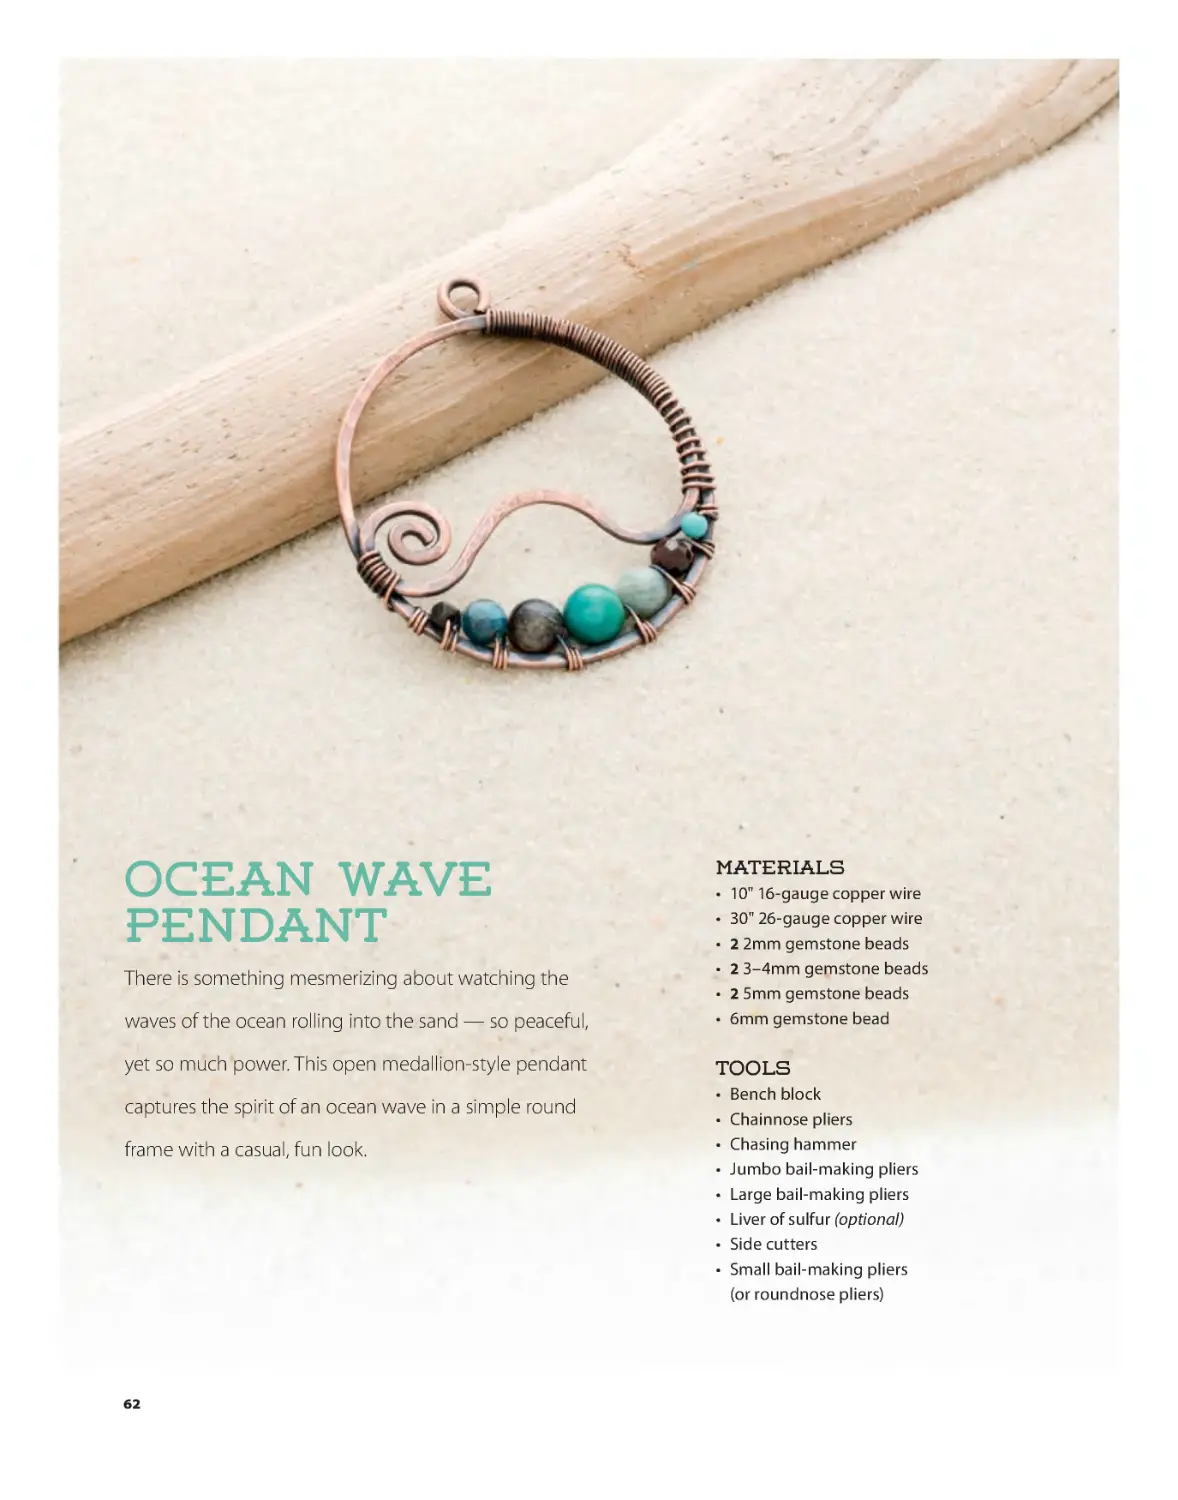
Ocean Wave
Pendant
Materials
waves of the ocean rolling into the sand — so peaceful,
•
•
•
•
•
•
yet so much power. This open medallion-style pendant
Tools
There is something mesmerizing about watching the
captures the spirit of an ocean wave in a simple round
frame with a casual, fun look.
•
•
•
•
•
•
•
•
10" 16-gauge copper wire
30" 26-gauge copper wire
2 2mm gemstone beads
2 3–4mm gemstone beads
2 5mm gemstone beads
6mm gemstone bead
Bench block
Chainnose pliers
Chasing hammer
Jumbo bail-making pliers
Large bail-making pliers
Liver of sulfur (optional)
Side cutters
Small bail-making pliers
(or roundnose pliers)
62
BKS-67899-02.indd 62
2/1/17 2:06 PM
A
B
C
D
Instructions
1. Use chainnose pliers to start an open spiral using the
16-gauge wire (Basics, p. 12). Follow the spiral with a soft
curve using jumbo bail-making pliers and another curve
in the opposite direction using large bail-making pliers.
(These two curves should form a soft zig zag). (A)
2. Place the spiral on bench block and use the flat face
of a chasing hammer to hammer the spiral and zig zag
(Basics, p. 13 ) (B). Leave the wire past the second bend
unhammered.
3. Using the jumbo bail-making pliers, create a circular
frame large enough to accommodate the wave (C). (You
may have to gently open the frame.)
4. Hammer the frame, making certain that none of the
wires overlap as you’re hammering (D).
63
BKS-67899-02.indd 63
2/1/17 2:06 PM
E
F
g
h
5. Use chainnose pliers to make a 45-degree bend in the
16-gauge wire at the top center of the pendant. Approximately 10" from the end of the 26-gauge wire, string a
6mm bead. Center it at the bottom of the circular frame
and wrap three times around the frame on either side of
the bead (E).
6. Following the same pattern, continue to string beads in
diminishing size (5mm, 4mm, 2mm) onto each end of the
26-gauge wire (F).
7. Once you have used all of the beads, filling all of the
space below the wave, use the short end of the wire to
wrap through the open part of the spiral to secure it to
the frame. Use the long end of the wire to wrap around
the opposite side of the wave to connect it, and continue
coiling until you reach the top center of the pendant (G).
8. Use the small bail-making pliers or roundnose pliers
to make a plain loop at the top of the pendant
(Basics, p. 11) (H).
9. Trim and tuck in all of the remaining wire ends.
10. Apply patina to the pendant if you want to give it an
antiqued look (Basics, p. 14).
64
BKS-67899-02.indd 64
2/1/17 2:06 PM
Ocean Wave Pendant Variations
Ocean Wave Cascade Pendant
1. Follow steps 1–3 to make the framed wave component.
To make it oval, use flatnose pliers and your hands to
gently elongate the frame.
2. Use a chasing hammer and bench block to hammer the
component (Basics, p. 13), then make a loop at the top
of the pendant (Basics, p. 11). Use 22-gauge wire to coil
around the spiral and the inside of the frame, securing it to
the outside of the frame.
3. Make three beaded dangles and attach them to lengths
of chain (Basics, p. 11).
4. Attach the beaded dangles with a 4mm jump ring and
close the ring (Basics, p. 10). Attach a jump ring to the
component with two 4mm jump rings.
5. Assemble the pendant using two 4mm jump rings to
attach a decorative, 15mm bail.
Ocean wave
bracelet
1. Starting with a 16–18" segment
of 14- or 16-gauge wire, follow steps
1–3 of the “Ocean Wave Pendant”
project (p. 62) to make the framed
portion of the component.
2. Use the chasing hammer and
bench block to hammer the entire
component, including the straight
length of the wire (Basics, p. 13).
3. Use 22-gauge wire to coil around
the spiral and the inside of the frame,
securing it to the outside of the frame.
4. Use bracelet-making pliers to
form the straight wire into a bracelet
shape, ending with a hook clasp
(Basics, p. 14) .
5. Use 22-gauge wire to create a
decorative coil the length of the
bracelet. Trim and tuck the ends.
65
BKS-67899-02.indd 65
2/1/17 2:06 PM
Lotus Pendant
The lotus flower is a universal symbol for many
concepts such as serenity and peace and
mindfulness, a blend of nature and humanity.
I was inspired by beautiful lotus flowers and
waterlilies to create this stylized silhouette pendant.
Materials
•
•
•
•
•
•
•
16–20" 18-gauge copper wire
3' 26-gauge copper wire
6" 22-gauge copper wire
6mm gemstone bead
3mm gemstone bead
8 3mm jump rings
30" Copper chain
Tools
•
•
•
•
•
•
•
•
Bench block
Bracelet-making pliers (optional)
Chainnose pliers
Chasing hammer
Flatnose pliers
Liver of sulfur (optional)
Side cutters
Small bail-making pliers
66
BKS-67899-02.indd 66
2/1/17 2:07 PM
template
A
C
e
Instructions
1. Using flatnose pliers, create a sharp bend in the center
of the 18-gauge wire (A).
2. Use flatnose pliers to make a curve on each side of the
bend to shape the wire into a petal (or try the bracelet
pliers) (B). The petal should be approximately 11/4" length.
(You can use the template above, if you like.)
3. Use small bail-making pliers to bend the wire 180
degrees on each side of the petal (C).
B
D
f
g
4. Continue to make two more petals on each side of
the first, following the template until you have a total
of five (D).
5. Place the component on a bench block and using the
flat (or round) face of a chasing hammer, hammer the
petals leaving everything past the petals unhammered
(Basics, p. 13) (E).
6. Using side cutters, trim the two wire ends to 11/2" and
make two outward-facing open spirals (Basics, p. 12) (F).
7. Hammer the spirals (G).
67
BKS-67899-02.indd 67
2/1/17 2:07 PM
h
i
j
k
8. To make the segment hold the shape, find the center
of the 26-gauge wire. Use it to wrap the two sides of the
center petal together. Then use the ends of the wire to coil
down both sides of the petal, each wire coiling around the
side it is closest to (H).
9. Use each wire end to connect the center petal to the
next petal by coiling several times around both wires (I).
10. Use each of the coiling wires to cross over the coils
connecting the petals on the back, up toward the top of
the segment (J).
11. Use each of the coiling wires to coil in an upward
direction on the side petals, matching the number of coils
on the center petal.
12. Bring the coiling wires to the front and connect the
remaining petals in the same manner. Then coil the wire
three times to attach the outside of the lotus on both sides.
13. Coil the wire up toward the spiral on each side,
stopping where the two spirals meet. Wrap several times
around both spirals (K).
14. Use side cutters to trim one end of the wire and tuck it
in. Trim the other end of the wire to approximately 1/2" and
use chainnose and flatnose pliers to make a tiny spiral (L).
l
15. Apply patina to the pendant if you want to give it an
antiqued look (Basics, p. 14).
assemble the necklace
1. Make a wrapped loop beaded link using a 6mm
gemstone bead and 22-gauge wire (Basics, p. 11).
2. Make a wrapped loop beaded link using a 3mm
gemstone bead and 22-gauge wire.
3. Use jump rings to assemble the necklace (Basics, p. 10).
68
BKS-67899-02.indd 68
2/1/17 2:07 PM
Lotus Pendant Variations
Lotus Meditation Pendant
1. Try experimenting with different shapes and vary the
number of petals to make the outline of the piece.
2. Make an additional wire outline that fits either on the
inside or on the outside of the first.
3. Connect the two using the coiling technique introduced
in the “Butterfly Wing Wrap” project (p. 95).
4. Connect to a chain with jump rings (Basics, p. 10).
Lotus Petal Earrings
1. Follow steps 1–2 of the “Lotus Pendant” project
(p. 66) to make a single petal shape.
2. Make a spiral at each end of the wire so that the
spirals overlap and their centers line up (Basics, p. 12).
3. Assemble the earring using jump rings (Basics, p. 10).
4. Repeat steps 1–3 for a second earring.
69
BKS-67899-02.indd 69
2/1/17 2:07 PM
Materials
Whimsical Pod
Pendant
When I think of pods, I always picture them as surrounded
by tendrils with magical, tiny seeds inside — a treasure of
the natural world. My pod pendant is a whimsical
representation of these graceful wonders.
•
•
•
•
•
•
•
15" of 20-gauge copper wire
18" of 26-gauge copper wire
10" of 26-gauge copper wire
2 10mm gemstone beads
12–13mm gemstone bead
Bail
2 3mm jump rings
Tools
•
•
•
•
•
•
•
Bench block
Chainnose pliers
Chasing hammer
Flatnose pliers
Liver of sulfur (optional)
Medium bail-making pliers
Side cutters
70
BKS-67899-02.indd 70
2/1/17 2:07 PM
A
B
C
D
E
F
Instructions
G
1. Use chainnose pliers to bend the 20-gauge wire 11/4"
from one end (A).
2. Bend the wire approximately 2" from the first bend in the
opposite direction. The shape will resemble an almond (B).
3. Start forming a pod shape using the 2" side of the wire
and the outer wire on the opposite side. Bend the wire
again, just on the outside of the first bend (C).
4. Continue to form the pod shape, this time allowing
some room between the inner and outer wires. Bend
the wire again, leaving at least 2mm (1/16") between the
bends (D).
5. Use chainnose and flatnose pliers to make an inwardfacing spiral on the 11/4" end of the of wire inside the
pod (Basics, p. 12). Leave approximately 6mm (1/4")
unspiraled (E).
6. Use a bench block and chasing hammer to hammer the
component, making certain that none of the wires overlap
(Basics, p. 13) (F). Leave the straight wire outside the pod
shape unhammered.
7. Trim the wire to 21/2" past the outer bend of the pod.
Make a zig zag using medium bail-making pliers (G).
71
BKS-67899-02.indd 71
2/1/17 2:07 PM
h
j
i
k
l
8. Make a closed inward-facing spiral at the end of the wire
with flatnose pliers (H).
9. Hammer the spiral/zig zag side of the component (I).
10. Using the 18" segment of 26-gauge wire, wrap
around all three pod wires on the side with the spiral.
Make 8–10 coils (J).
11. Continue wrapping up the same side, coiling more
densely for the last ½". End the coil just before the bend (K).
12. Coil the other end of the 26-gauge wire down toward
the bottom spiral. Trim and tuck the ends (L).
13. Attach the 10" segment of 26-gauge wire by making
a wrapped loop around the coiled side of the pod, approximately ½" from the bottom point (Basics, p. 11) (M).
72
BKS-67899-02.indd 72
2/1/17 2:07 PM
m
n
o
String a 10mm bead, and cross over to the other side (at a
45-degree angle). Make two wraps around the inner pod
wire (N).
14. Repeat the second half of step 13 two more times, first
adding the 12mm bead (O), then the 10mm bead. Finish
with an open coil at the top of the “inner pod”. Then trim
and tuck the wire in using chainnose pliers (P).
15. Attach the bail with two jump rings (Basics, p. 10).
Attach a 3mm jump ring to the top of the pod and close
the ring. Attach a second jump ring to the first jump ring
and a bail.
16. Apply patina to the pendant if you want to give it an
antiqued look (Basics, p. 14).
p
73
BKS-67899-02.indd 73
2/1/17 2:07 PM
Whimsical Pod Pendant Variations
Slender Pod Pendant
Experiment with dimensions, the number of beads, and the
coiling pattern to make this pendant uniquely yours.
Pod Silhouette
Earrings
1. Follow steps 1–3 of the “Whimsical Pod
Pendant” project (p. 70), scaling it down by
approximately 50% and making only two
bends for the pod to make two components
the mirror image and the same size.
2. Make a spiral using the innermost wire
of each component (Basics, p. 12).
3. Make a plain loop at the top of the
component with the outermost wire
(Basics, p. 11).
4. Hammer the components (Basics, p. 13).
5. Coil wire decoratively, as well as to secure
the shapes in place.
6. Make two bead dangles (Basics, p. 11).
7. Use jump rings to attach the dangles
(Basics, p. 10).
8. Assemble the earrings using earwires
(Basics, p. 14).
74
BKS-67899-02.indd 74
2/1/17 2:07 PM
Materials
Oak Forest
Pendant
•
•
•
•
•
Oak trees are truly magical. The intriguing shape of their
leaves makes them unique—even in winter you can tell
from afar that it’s an oak tree because they keep some
of their leaves. My version of an oak leaf adds spirals and
beads to create a whimsical representation of these deeply
beautiful trees.
26" 18-gauge copper wire
45" 26-gauge copper wire
6mm gemstone bead
5 2mm gemstone beads
24- or 26-gauge coated craft wire
(use as temporary binding wire)
Tools
•
•
•
•
•
•
•
•
•
•
Bench block
Chainnose pliers
Chasing hammer
Flatnose pliers
Large bail-making pliers
Liver of sulfur (optional)
Medium bail-making pliers
Permanent marker
Roundnose pliers
Side cutters
75
BKS-67899-02.indd 75
2/1/17 2:07 PM
A
B
C
Instructions
1. Cut the 18-gauge wire into three segments: 14", 8",
and 4" long.
2. Use the 14" segment to create the leaf outline.
Starting at approximately the center of the wire, use
large bail-making pliers to zig zag the wire (A). Use the
medium bail-making pliers to continue making the
shape of the leaf (B).
You can use a template, draw your own leaf or just
wing it.
template
76
BKS-67899-02.indd 76
2/1/17 2:08 PM
D
E
F
G
H
I
3. Use flatnose pliers to bend the two wires at the
end of the silhouette so that they are parallel to one
another (C).
4. Use a bench block and chasing hammer to hammer
the outline, holding onto both wires at the top of the
shape (Basics, p. 13) (D). Do not hammer past the bend.
5. Use chainnose and flatnose pliers to make a slightly
open spiral at the end of the 4" segment of 18-gauge
bottom wire (Basics, p. 12). Size it so it fits within one of
the bottom side lobes of the leaf. Gently curve the end
of the wire toward the top of the leaf and position it
between the parallel wires. Use a permanent marker
to mark the wire at the bend (E).
6. Hammer the spiral component up to the mark (F).
7. Use the temporary binding wire to hold the spiral
component in place as shown (G). Bind the three wires
above the bend, and wrap the spiral to the outline to
hold it in place.
8. Use medium bail-making pliers to start a spiral at the
end of the 8" segment of wire (H). Continue working on
the spiral until it fits the bottom-most lobe of the leaf.
9. Create a gently curved center vein toward the top of
the leaf. Use flatnose pliers to bend the wire parallel to
itself and bring it down to the remaining, bottom lobe
and make another spiral in the opposite direction (I).
This time use roundnose pliers to start it.
77
BKS-67899-02.indd 77
2/1/17 2:08 PM
j
k
m
l
10. Place the double spiral component on the bench block
and use the flat (or round) face of the chasing hammer to
hammer the double spiral component (J).
11. Use the temporary binding wire to secure the double
spiral component in place as shown (K).
12. Cut the 28-gauge wire into three segments: 10", 20",
and 15".
13. Use the 15" segment of 28-gauge wire to start
wrapping the three wires at the top of the leaf; start
wrapping 3" from the end (L). The 12" end should point
in the direction of the first spiral component; the 3" end is
going in the direction of the double spiral component.
14. Wrap once around all three wires, twice around the left
wire, and around all three wires again. Repeat. Use the 3"
end to wrap down the left side of the frame and connect
the top bend of the double spiral component. Wrap two
more times around the frame (M).
15. Use the 12" end to wrap behind the single spiral wire
in a downward pattern and the right side of the double
spiral component. Then wrap around the two wires several
times to secure them together. Continue to coil down the
single spiral wire, and add 2mm beads as desired.
78
BKS-67899-02.indd 78
2/1/17 2:08 PM
o
n
q
16. As you get to the spiral, secure the spiral component
to the outline by coiling in a pattern: once around both
wires, twice around the outline, then repeat to the end of
the wire. Trim and tuck the end (N).
17. Using the 20" segment of 28-gauge wire, coil three
times around the side of the inner loop of the central
spiral at the center of the wire (O).
18. String a 6mm bead onto the wire. Coil three times
around the opposite side of the spiral (P). Continue
to secure the spiral to the outline using the pattern
from step 14 (Q).
p
r
19. Use the same pattern as in step 16 to secure the
remaining spiral to the outline using the 10" segment
of 28-gauge wire.
20. Using medium bail-making pliers, make a plain loop
at the top of the leaf with the three wire ends to create a
three-loop bail (R).
21. Apply patina to the pendant if you want to give it an
antiqued look (Basics, p. 14).
79
BKS-67899-02.indd 79
2/1/17 2:08 PM
Oak Forest Pendant Variations
Jewel tone Oak Leaf Pendant
Experiment with stringing beads onto the central wire, adding
wire by wrapping it onto the central wire, varying the beads,
and adding spirals at the top of the piece.
OAK LEAF SILHOUETTE EARRINGS
Use 10" segments of both 20- and 28-gauge wire to make the
smaller leaves for each earring.
1. Follow steps 2–4 of the “Oak Forest Pendant” project (p.75)
to make two mirror image earring components. (Make the
frame smaller than the project shown.)
2. Follow steps 8–9, adjusting both the tools and dimensions
of the spirals to the small size of the leaf shape. Use the top
end of the wire to make a very small loop perpendicular to
the spiral instead of making another spiral.
3. Using 28-gauge wire, wrap the spiral component
connecting it to the frame as shown in the “Oak Forest
Pendant” project (p. 75), both at the bottom and top of
each earring.
4. Make double loops at the top of each earring.
5. Use a 4mm jump ring to connect an earwire to each of the
earring components.
80
BKS-67899-02.indd 80
2/1/17 2:08 PM
81
BKS-67899-02.indd 81
2/1/17 2:08 PM
Spiral
Simplicity Wrap
This wrap works best with a round stone, but it can be adapted
to many stone shapes. The open frame lets the stone shine by
covering up as little as possible. I like to find stones that are
evocative of a landscape, and I position the spiral to look as if
it’s the sun or the moon.
Materials
•
•
•
•
18" 18-gauge copper wire
18" 26-gauge copper wire
30mm Round cabochon
24- or 26-gauge coated craft wire
(use for temporary binding wire)
Tools
•
•
•
•
•
•
•
Chainnose pliers
Flatnose pliers
Jumbo bail-making pliers
Liver of sulfur (optional)
Medium bail-making pliers
Roundnose pliers
Side cutters
82
BKS-67899-02.indd 82
2/1/17 2:08 PM
A
B
C
D
E
F
Instructions
1. Use medium bail-making pliers to make a loop in the
center of the 18-gauge wire (A).
2. Starting in the center of the 26-gauge wire, bind both
sides of the loop, coiling around both 2–3 times (B).
3. Use one end of the 26-gauge wire to coil all the way
around the entire loop (C).
4. Once you reach the double wire portion of the loop, coil
around both sides 2–3 times again (D).
5. Use the jumbo bail-making pliers to create a large, open
spiral on either side of the bail (E, F).
83
BKS-67899-02.indd 83
2/1/17 2:08 PM
G
H
I
J
K
6. Place the cabochon between the two spirals. Adjust
the spirals so that the outer spiral on each side is 2–3mm
(1/8") smaller than the diameter of the cabochon. Once you
are happy with the fit, use the temporary binding wire to
loosely wrap the two spirals in place (G).
7. Bring one side of the 26-gauge wire to the outer-front
coil of the spiral on one side and wrap around three times
(H). (Remove the stone at this point of the wrap.)
8. Using the same wire, go back to the inner-middle coil of
the same spiral and wrap around three times (I).
9. Bring the same wire to the outer coil on the opposite
side/back and wrap around three times (J).
10. Repeat steps 7–9 with the other side of the wire
working from back to front (K).
11. Continue the pattern in both directions.
84
BKS-67899-02.indd 84
2/1/17 2:08 PM
L
M
N
O
12. As the setting starts to take shape, insert the stone
to make adjustments. You can continue to take it out to
work on the frame until it becomes snug on the stone.
At this point, leave the stone in and work around it.
13. Continue the pattern until you reach a good spot for
a spiral accent. This can be anywhere on the cabochon.
At this point, change the wrapping pattern so that it no
longer includes the wire designated for the spiral (L).
14. Use side cutters to trim the excess 18-gauge wire,
leaving approximately 1¼". Use chainnose or flatnose pliers
to make a spiral (Basics, p. 12) (M).
15. Repeat steps 7–12 with the remaining end of the
26-gauge wire. You can work on the front and the back at
the same time, switching back and forth from one to the
other. You can adjust the number of times you coil back
and forth depending on the tightness of your wrap and
the size of your stone.
16. Once you have trimmed and made spirals with
both ends of the 18-gauge wire, repeat the wrapping
pattern until both ends of the 26-gauge wire meet (N).
Try to end both wires on the back of the cabochon, and
wrap them around the back of the frame (O).
17. Trim and tuck the ends in toward the stone.
18. Apply patina to the pendant if you want to give it
an antiqued look (Basics, p. 14).
85
BKS-67899-02.indd 85
2/1/17 2:08 PM
Spiral Simplicity Wrap Variations
Spiral Sphere Pendant
1. Follow steps 1–6 of the “Spiral Simplicity Wrap” project (p. 82).
2. Before starting the coiling, string one end of the 26-gauge wire
through the bead and wrap it around the opposite end of the frame.
3. Complete the frame as shown in the project.
Spiral Wave Pendant
1. Follow steps 1–12 of the “Spiral Simplicity Wrap”
project (p. 82) to create the setting for a stone.
2. Use jumbo bail-making pliers to bend the
working wire on the front of the segment so
that it makes a U turn.
3. Make a spiral at the end of the U turn, then
secure it to the frame with a coiling wire.
86
BKS-67899-02.indd 86
2/1/17 2:08 PM
Orbiting
Spirals
Pendant
In this project, the bead acts as
the armature that supports the
coiled wire framework. The
design combines a touch of
Steampunk with a mixedmetals look. The beads in the
tassel echo the colors, themes,
and shapes I used to decorate
the bead.
Materials
•
•
•
•
•
•
•
•
•
•
•
5" 20-gauge copper wire
14" 20-gauge copper wire
24" 26-gauge copper wire
24" 26-gauge silver-filled wire
15-20 2mm silver round beads
10-12 2mm hematite cornerless
cubes
12x40mm focal bead
3 Assorted 5-10mm accent beads
3 Headpins, copper
6 4mm jump rings, copper
2-3" of copper chain
Tools
•
•
•
•
Chainnose pliers
Flatnose pliers
Liver of sulfur (optional)
Roundnose pliers (or small
bail-making pliers)
• Side cutters
87
BKS-67899-02.indd 87
2/1/17 2:09 PM
A
B
C
d
e
f
Instructions
1. String the focal bead on a 5" segment of 20-gauge wire.
Use roundnose pliers or small bail-making pliers to make a
wrapped loop at both ends (Basics, p. 11) (A). (I made the
loop intended for the bail larger than the other loop.) Use
side cutters to trim the wire, and use chainnose pliers to
tuck in the ends.
2. Starting in the center of the 14" segment of wire, coil
twice around one of the wraps on the bottom wrapped
loop (B).
3. Start coiling one of the 24" segments of 26-gauge wire
around one side of the 20-gauge wire (C).
4. Once you have 1/2–1" of coil, start winding it around
the bead (D).
5. Add beads organically in a pattern between the coils (E).
6. Repeat steps 3–4 using the remaining segment of
26-gauge wire on the other side of the 20-gauge wire
and wrapping in the opposite direction.
7. When you get to a point where the wires intersect (F),
use the coiling wire to wrap around both wires so that the
two coiling wires form an “X”. (This holds the wires together
for structural support.)
88
BKS-67899-02.indd 88
2/1/17 2:09 PM
g
h
I
J
8. Past the intersection, continue to coil both wires (G),
adding beads organically. Continue to wrap the coiled
beaded wires around the bead. Every time you cross the
two wires, repeat step 7.
9. When you get to the opposite end of the bead, use the
end of one of the coiled wires to wrap snugly around the
wrapped portion of the top loop (H).
10. Bring the remaining end to the front of the pendant.
Make a spiral (Basics, p. 12) (I).
11. Trim and tuck in all the ends toward the stone.
12. String an accent bead onto each of three headpins.
(Optional: string 2mm round silver beads at the top
and bottom of each.) Make a wrapped loop on each
(Basics, p. 11).
13. Cut the chain into three uneven lengths. Use a jump
ring to connect all three chains (Basics, p. 10), then use a
jump ring to connect each dangle to a jump ring (J).
14. Connect the chain tassel to the bottom loop of the
pendant with two jump rings.
15. Use liver of sulfur to patina the pendant if you want to
give it an antiqued look (Basics, p. 14).
89
BKS-67899-02.indd 89
2/1/17 2:09 PM
Orbiting Spirals Pendant Variations
Orbiting Spirals Crystal Pendant
1. Use a 3" segment of 20-gauge wire to make a paddle (Basics,
p. 13). String a focal bead onto it, and make a wrapped loop
(Basics, p. 11) at the top finishing with a spiral.
2. Follow steps 1–11 shown in the “Orbiting Spirals Pendant” project
(p. 87) to wrap around the crystal.
3. Use two jump rings to attach the pendant to a decorative ring
(Basics, p. 10).
Lunar Orbit Pendant
Experiment with different shapes and textures of the core bead. For
this segment I used a dark metal lentil bead, which allowed me to use
both faces of the bead as a contrasting background for mixed metal
coils and repeating bead patterns.
90
BKS-67899-02.indd 90
2/1/17 2:09 PM
Netted Cabochon
Pendant
The mineral world is overflowing with amazing stones, and I am
always looking for new ways to artfully complement their beauty.
In this wrap, the netting technique frames the stone, covering
only the very edge.
Materials
• 6–8' 28-gauge silver wire
• 8" 20-gauge silver wire
• Cabochon
Tools
•
•
•
•
Chainnose pliers
Flatnose pliers
Side cutters
Small bail-making pliers
91
BKS-67899-02.indd 91
2/1/17 2:09 PM
A
B
C
D
I found that coated craft wire such as Artistic Wire
works better for this project than uncoated wire. It’s less
likely to break.
Instructions
1. Use flatnose or chainnose pliers to shape the 20-gauge
wire to resemble the shape of the cabochon, making the
frame slightly smaller in diameter (A). (There should be
about 3mm (1⁄8") space between the frame and the
cabochon on all sides.)
2. Bend the ends of the wire 45-degrees so they are parallel
and straight at what will become the top of the pendant.
3. Cut the 28-gauge wire into manageable lengths of 2–3'.
4. Use one of the 28-gauge wire segments to wrap 2" from
the end several times around both ends of the 20-gauge
wire (just enough to hold) (B).
5. Use the long end of the 28-gauge wire to make a loop
5mm (approximately 3⁄16" long). String the wire from back to
front through the frame, and then back through the loop
from front to back (C).
6. Repeat step 5 until you have gone all the way around
the bezel and reached the double wires (D). Keep all the
loops the same size.
7. Bring the 28-gauge wire behind the double wires and
make a loop by going through the first loop (E).
8. To start the second row, step up and make an additional
loop through the first loop of the first row (F). (This loop
will sit higher than the loops in the first row.)
9. To make the second row, instead of going through the
bezel, go through each loop of the first row. (You will need
to increase the size of the loops.)
92
BKS-67899-02.indd 92
2/1/17 2:09 PM
e
G
F
h
10. Add one or two more rows depending on the depth
of the cabochon.
To add wire, wrap the new segment onto the old
i
segment 2–3 times. Trim and tuck the wire toward the
stone (only after passing the spot with the next row).
11. Once you have 3–4 rows, insert the cabochon and
start shaping the netting around it (G).
12. Continue to add rows with the cabochon in the
netting. (Start decreasing the netting by skipping loops or
making smaller loops to secure the cabochon in place.) (H)
13. Finish the netting by wrapping the end of the wire
wherever it’s convenient. Trim and tuck the wire toward
the stone. (Also trim and tuck the end of the wire at the
beginning of the wrap.) (I)
14. Use the small bail-making pliers to make a bail and
trim the ends of both wires (J).
j
93
BKS-67899-02.indd 93
2/1/17 2:09 PM
Netted Cabochon Variations
Netted Cabochon Pendant with Fringe
1. Follow steps 1–14 of the “Netted Cabochon Pendant” project (p. 61) to create
the netting for the cabochon.
2. Use tiny jump rings to attach segments of chain to the loops at the bottom
of the netting. (I attached two segments of chain to each of the five loops at
the bottom of the netting, making a total of ten chain segments.)
Netted Cabochon
Bracelet
1. Make a small spiral at the end of the
20-gauge wire. Then use the rest of the
wire to make a frame slightly smaller than
the shape of a cabochon with two loops
on opposite ends.
2. String one end of the 28-gauge
wire through one of the loops and
coil several times.
3. Follow steps 5–13 of the “Netted
Cabochon Bracelet” project (p. 91)
to create the setting for the stone.
4. Make 3–5 beaded, wrapped loop
components.
5. Assemble the bracelet using pairs of
jump rings and decorative rings. (Basics,
p. 10). Use a jump ring to attach a clasp.
94
BKS-67899-02.indd 94
2/1/17 2:09 PM
Butterfly Wing
Wrap
This is an adaptation of a classic wire wrap with a fresh
look. The shape of the cabochon I used, the beautiful
chatoyant flash, and the coiling patterns on the edge of
the wrap combine to create the look of a butterfly’s wing;
however, this wrap will accommodate many different shapes
Materials
•
•
•
•
3 10" segments of 26-gauge wire
24" of 26-gauge wire
3 10" segments of 20-gauge wire
Cabochon
Tools
•
•
•
•
•
Chainnose pliers
Flatnose pliers
Liver of sulfur (optional)
Roundnose pliers
Side cutters
of cabochons.
95
BKS-67899-02.indd 95
2/1/17 2:09 PM
A
B
C
D
E
Instructions
1. Using one of the 10" segments of 26-gauge wire, make
two coils around the center of one of the 20-gauge wire
segments (A).
2. Line up the two remaining 20-gauge wire segments
with the first wire segment and make the next coil over all
three wire segments. Make two more coils over the first
wire segment (B).
3. Continue the pattern, repeating steps 2–3 until you have
coiled approximately 1/2" of wire (C, D).
4. Use side cutters to trim & tuck both ends of the
26-gauge wire on the inside of the bezel (E).
5. Shape the 20-gauge bezel around the cabochon,
treating the three 20-gauge segments as a unit (F).
F
96
BKS-67899-02.indd 96
2/1/17 2:10 PM
g
h
i
j
k
l
6. Use the two remaining segments of 26-gauge wire to
coil along the two remaining sides of the bezel, repeating
steps 1–3 (G).
7. Shape the two sets of frame wire to closely fit at the top
(H). (It’s okay to overlap them.)
8. Use flatnose pliers to bend both sets of wire
perpendicular to the top of the cabochon, and parallel
to each other (I).
9. Use the 24" segment of 26-gauge wire to coil 3–5 times
around all six wires (J).
10. Separate the pair of wires at the front of the segment
and use the 26-gauge wire to coil in the following pattern:
once around both, twice around a single wire, and repeat (K).
11. Continue coiling until you have coiled approximately
1" in length. Then bend the four uncoiled wires toward the
back and use the coiled part to start making a bail (L).
97
BKS-67899-02.indd 97
2/1/17 2:10 PM
m
n
o
p
q
r
12. Split the second pair of wires so it straddles the front of
the bail. Use the 26-gauge wire to secure the bail, wrapping
underneath the double wires (M).
13. Use flatnose pliers to separate the three wires of the
bezel in between the coiled portions (N).
14. Use roundnose pliers to make decorative bends
("lightning bolts") on each side of all the coiled
portions (O, P).
15. Place the cabochon in the bezel and use flatnose pliers
to make the "lightning bolts" on the back (Q).
16. Bring all of the remaining loose wires to the back of
the pendant. Secure them by wrapping them around the
"lightning bolts," then either trim or use them to make
spirals (R).
17. Apply patina to the pendant if you want to give it an
antiqued look (Basics, p. 14).
98
BKS-67899-02.indd 98
2/1/17 2:10 PM
Butterfly Wing Wrap Variations
Victorian Wrap Pendant
Using the coiling technique to frame a cabochon, experiement with
the length of the coil and positioning of the individual coils. Most
importantly, take inspiration from the stone itself to create a piece
that is uniquely yours.
Gemstone Dew Drop Pendant
1. Follow step 1 of the “Butterfly Wing Wrap Pendant” project (p. 95).
2. Make a loop in the center of one of the two remaining 20-gauge
wire segments.
3. Follow steps 2 and 3. As you get close to the loop, continue coiling
only around the single wire in the back of the loop. Once on the
other side of the loop, resume the coiling pattern.
4. Follow the remaining directions in the project to complete the
segment adapting to the shape and size of the stone.
5. Make a breaded dangle on a fancy headpin, and attach it to the
loop on the pendant with a jump ring.
99
BKS-67899-02.indd 99
2/1/17 2:10 PM
Zipper Bail
Pendant
I am often amazed by the unique works of art that
nature creates. These beautiful stones require very
little embellishment. Sometimes adding a handmade,
one-of-a-kind bail is just the perfect touch to make
your stone pendant even more meaningful.
Materials
• Focal point stone drilled front to
back (stone is approximately
1½" x 1")
• 15" 20-gauge copper wire
• 30" 26-gauge copper wire
Tools
•
•
•
•
•
•
•
•
Bench block
Chainnose pliers
Chasing hammer
Flatnose pliers
Large bail-making pliers
Liver of sulfur (optional)
Roundnose pliers
Side cutters
100
BKS-67899-02.indd 100
2/1/17 2:10 PM
A
B
C
d
g
Instructions
1. Use side cutters to cut the 20-gauge wire into three
5" segments.
2. Starting in the center of the 26-gauge wire, coil around
the center of one of the 20-gauge wire segments until
you have two coils (A).
3. Line up the two remaining 20-gauge wire segments
with the first wire segment and make the next coil over
all three wire segments (B).
4. Continue the pattern, repeating steps 2–3 making two
wraps around the first wire until you have coiled about 3/4"
of the length of the 20-gauge wire (C).
5. Repeat step 4 using the remaining end of the 26-gauge
wire until you have coiled a total of 1¼". Separate the side
wires on both sides of the wrap and make small, outward
e
f
h
i
facing loops of equal size using the tip of the roundnose
pliers (D).
6. Using flatnose pliers, make a spiral with the center wire
on both sides, approximately 11/2" (Basics, p. 12) (E).
7. Using a chasing hammer and bench block, hammer the
spirals (Basics, p. 13) (F).
8. Starting in the center, gently form the bail with your
fingers over one side of the large bail-making pliers (using
it as a mandrel), creating a rounded curve at the top (G),
with both sides parallel to each other.
9. Coil the 26-gauge wire around the spiral on both ends of
the bail. (Cover the entire spiral or just a part of it, ending in
the center.) (H)
10. Use side cutters to trim and chainnose pliers to tuck
in the 26-gauge wire on one side. (It can be the front or
the back.) (I)
101
BKS-67899-02.indd 101
2/2/17 3:24 PM
j
k
11. String the remaining end of the 26-gauge wire through
the hole of the focal point stone and through the center
of the opposite side spiral (J), then wrap around one of
the coils.
12. Repeat step 11 to double the wire inside the stone
opening. Use chainnose pliers to pull the wire snug. (Do
not over-tighten the wire to allow some movement.) (K)
13. Trim and tuck in the remaining wire.
14. Apply patina to the bail if you want to give it an
antiqued look (Basics, p. 14).
Zipper Bail Pendant Variations
Zipper Donut Pendant
1. Bend a segment of 20-gauge wire in the center making
a U shape.
2. Starting 3mm (1⁄8") from the U coil around both wires following
the pattern shown in steps 2–3 of the “Zipper Bail Pendant”
project. Continue until you have enough coiled wire to
equal the diameter of the donut.
3. Wrap the coiled portion of the wire around
one side of the donut, stringing the two ends
through the loop made by the U.
4. Continue to coil the wire on the other side
of the U loop until you have approximately 1"
of coil.
5. Use the coiled portion of the wire to make
a bail.
6. Bring one of the wires to the opposite side of the
bail. Trim both wires and make spirals (Basics, p. 12).
whimsical Zipper
Bail with Tendrils
1. Follow steps 1–5 of the “Zipper
Bail Pendant” project (p. 100) omiting
the loop.
2. Separate the side wires on both sides.
Trim them to manageable lengths and
shape the ends to make curved paddles
(Basics, p. 13).
3. Hammer the paddles (Basics, p. 13).
4. Follow steps 9–15 using the center
paddles instead of the spirals.
102
BKS-67899-02.indd 102
2/1/17 2:10 PM
Paisley Ladder Pendant
This versatile wrap works well for both cabochons and undrilled two-sided stones. Because
the beginning of the wrap is linear and continues in a straight line around the stone, it can
be adapted to nearly any shape. I have also designed this technique to be reversible so
that both sides of an undrilled stone can be shown.
Materials
• 20" of 20-gauge wire
• 30" of 26-gauge wire
• 2 18" segments of 26-gauge wire
Tools
•
•
•
•
•
•
•
•
Bracelet-making pliers (optional)
Chainnose pliers
Flatnose pliers
Liver of sulfur (optional)
Medium sized bail-making pliers
Ring mandrel (optional)
Side cutters
Tape measure
103
BKS-67899-02.indd 103
2/1/17 2:10 PM
A
B
C
d
e
f
Instructions
1. Use medium bail-making pliers to make a double loop
in the center of the 20-gauge wire (A).
2. Begin to coil around the double loop with the 30"
segment 26-gauge wire approximately 8" from the end
(B). Once the loop is secure, use chainnose or flatnose
pliers to bend the two sides of the 20-gauge wire parallel
to each other approximately 3mm (1/8") apart (C). Slide the
coil toward one side of the loop, with the long end next
to the loop.
3. Once you have coiled all the way around the loop with
the 8" end of the wire, use the long end to coil two times
around one of the double wires (D)
4. Position the coiling wire between the double wires,
keeping 3mm (1/8") between the two, and coil three times
around the opposite wire (E).
5. Bring the coiling wire to the other side of the pair of
wires and coil two times again.
6. Continue this pattern, zig zagging between the two
wires (F), until you are close to the circumference of the
stone. (You can measure this with a tape measure.) Then
shape the coiled portion around your stone using a ring
mandrel, bracelet-making pliers, or by hand (G).
104
BKS-67899-02.indd 104
2/1/17 2:11 PM
g
h
i
J
K
L
7. Once you have a good fit, secure the bezel by bringing
the two ends of 20-gauge wire to the outside of the bezel
under the bail. Thread the coiling wire through the bail
and coil the loose end of the 20-gauge wire to the bezel
on one side. Repeat on the other side (H).
8. Using one of the 18" segments of 26-gauge wire, start
coiling around the 20-gauge wire on one of the sides of
the wrap (I).
9. Shape the wire organically in a figure-eight pattern,
considering both the aesthetics of the curve as well as
the structure of the setting, mimic some of the outline
of the initial bezel (J).
10. As you get close to the bezel, connect to it with the
coiling wire in several places (K).
11. Finish the side by making an open spiral (Basics,
p. 12). (L)
12. Repeat steps 8–11 on the other side using the
remaining segment of 26-gauge wire. (The two sides
don’t have to match.)
13. Trim and tuck any remaining wires.
14. Apply patina to the pendant if you want to give it an
antiqued look (Basics, p. 14).
105
BKS-67899-02.indd 105
2/1/17 2:11 PM
Paisley Ladder Pendant Variations
Horizontal Amulet
To make your center segment horizontal, make an additional loop
using the 20-gauge wire from one of the sides of the “ladder” used to
make the bezel. In order for the segment to hang without flipping
over, position both loops within the top third of the cabochon.
Dream Jasper Ladder Pendant
This wrap is adaptable to many different sizes and shapes of
stones. It lends itself to both two-sided stones as shown in the
project and cabochons (stones that are flat on the back), as well
as asymmetrical designs. I used a cabochon for this segment and
opted to create an elongated spiral on the front to compliment
the segment and a more angular spiral on the back.
106
BKS-67899-02.indd 106
2/1/17 2:11 PM
Viking
Knit Cage
In this project I have used the
Viking knit technique to create
a cage for a bead. The netting
acts as an armature for the bead,
supporting it and keeping it in
place while adding the detail
and gleam of metal.
Materials
•
•
•
•
•
•
•
•
•
12mm decorative ring
4 5mm jump rings
6mm jump ring
18x32mm bead
6–8' of 28-gauge coated craft wire
2 4" segments of 22-gauge wire
16" fine cable chain
8mm beadcap
2mm round bead
Tools
•
•
•
•
Chainnose pliers
Flatnose pliers
Roundnose pliers
Side cutters
107
BKS-67899-02.indd 107
2/1/17 2:11 PM
a
b
d
Instructions
1. Use chainnose and flatnose pliers to close a 6mm jump
ring so that it is completely flush with no gap (or use a
soldered jump ring) (Basics, p. 10). Use side cutters
to trim the 28-gauge wire into comfortable working
lengths (2–3').
2. Wrap the wire once around the 6mm jump ring with
the long end extending up from the jump ring (A).
3. Use the long wire end to make a loop approximately
3mm (1/8") long, by going through the jump ring from
back to front, and then feeding it through the new loop
from front to back (B).
4. Continue to make loops until you have gone all the way
around the jump ring. The last loop should be anchored to
the first loop instead of the jump ring (C). (You should have
8-12 loops, each loop should be approximately 1/8".)
c
E
F
5. To start the second row, go into the very first loop for
the second time and make a loop (D). Make this new loop
slightly larger than the loops in the first row.
6. From now on, instead of going through each loop to
create a new loop, go in between the loops (the small
space where the loops overlap) (E).
7. Continue to make new loops, always going through
the overlap between the loops. By the time you complete
the second row and start the third (F), you no longer have
to differentiate between the rows (where they end and
begin). The loops are going to get larger with each
subsequent row.
8. At approximately 2–3 rows, start shaping the loop cage
around the bead using your fingers (G).
108
BKS-67899-02.indd 108
2/1/17 2:11 PM
G
H
I
J
K
L
9. Continue to make loops, and shape the cage around the
bead until you go past the widest portion of the bead (H).
10. Start reducing the cage by pulling the loops just a little
tighter. At this point, leave the bead in the cage. The loops
should get smaller with each subsequent row.
11. To add wire, wrap the working segment twice (I).
Wrap the new segment twice and continue the pattern.
Do not trim either end until after you have completed the
next row.
12. Once you have passed the row, either trim and tuck in
the ends or make closed spirals (Basics, p. 12) (J).
13. Continue the pattern, shaping the cage around the rest
of the bead.
14. Be certain to leave an opening approximately the same
size as the opposite side. When you are ready to finish,
make the last loop and trim the wire (K). (By this time they
should be very small and hold on their own.)
M
N
To make the tassel
1. Use a 22-gauge wire segment and roundnose pliers to
make a double loop approximately 1" from one end (L).
2. Cut 10 segments of chain 11/2" long.
3. String chain onto the double loop, five segments per
loop, and complete the wrapped loop (Basics, p. 11) (M).
4. String the tassel wire through a beadcap and a 2mm
bead (N), and make a wrapped loop.
5. Use two 5mm jump rings to connect the bead link to
the decorative ring. Use the two remaining jump rings to
attach the tassel to the bead link.
109
BKS-67899-02.indd 109
2/1/17 2:11 PM
Viking Knit Cage Variations
Mixed Metals
Viking Knit Pendant
1. Follow steps 1–14 of the “Viking Knit
Cage” project (p. 107) to make the focal
point bead.
2. To make a paddle bead charm follow
directions in the “Copper Edge Paddle
Earrings” project (Desert Vine Earrings
variation, p. 54).
3. Use jump rings to attach a bail to a
decorative ring, the ring to the pendant,
and then the charm to the pendant
(Basics, p. 10).
Viking Knit
Center segment
for a Chain
1. Follow steps 1–14 of the “Viking Knit Cage”
project (p. 107) to make the centerpiece.
2. String the caged bead onto a wire with a small
metal bead on each side and make wrapped loops
on each end (Basics, p. 11).
3. Use jump rings to connect the center
segment to the chain on both sides (Basics, p. 10).
110
BKS-67899-02.indd 110
2/1/17 2:11 PM
acknowledgments
I would like to thank my husband, Tony Miech, for
his unwavering support of my work; Lauren Walsh
for her writing advice; and my sons, Zachary and
David, for their encouragement and love.
I thank my editor, Dianne Wheeler, and the rest of
the Kalmbach staff for their invaluable assistance.
about the
author
Thanks also to my wonderful store staff members
for all of their enthusiastic help and continual
support.
Artist, teacher, and author, Irina Miech has been
involved in the world of jewelry design for more
than 20 years. She has been designing with wire
since her childhood growing up in Kiev, Ukraine.
As teaching is a passion of Irina’s, she can often
be found instructing classes in wirework, metals,
and metal clay at her bead store, Eclectica,
located in southeastern Wisconsin. She enjoys
sharing her talent and artistic perspective
through classes, and finds this is equally balanced
with what she learns in return from her students.
Irina is a graduate of UW-Milwaukee and is the
2017 recipient of the Excellence in Jewelry
Artistry Award. This is her 11th jewelry design
book with Kalmbach books.
111
BKS-67899-02.indd 111
2/1/17 2:11 PM
Coil, wrap, weave, and shape wire into elegant, classic jewelry you can wear anywhere.
Step-by-step project books from Kalmbach Publishing show you how!
Wire Weaving
The flow and movement of woven wire jewelry is a wonderful temptation for any aspiring artist—
and it’s easier than you might think. In Weaving Freeform Wire Jewelry, author Kaska Firor guides
you, step-by-step, as you learn to create beautiful pendants, bracelets, earrings, and more.
THE
COMPLE TE
COUR S E
Wire Jewelry
Beautiful Wire Jewelry for Beaders
Timeless
Weaving Freeform Wire Jewelry
TIMELESS WIRE WEAVING
re
n a range of wire
ving techniques
ugh a variety of
cts that result
unning jewelry.
te the intricate
ls that are the hallmarks
eautifully crafted artisan
woven jewelry.
for beaders
Creative
wirework
projects
for all levels
re
nd showpiece cabochons in perfectly
frames of wire. Shape detailed bezels
al pieces.
You’ll learn how to:
wire links, clasps, and connectors to finish
oven necklaces and bracelets. Make coiled
posts to accent hand-crafted earrings.
• Work with five different wire weaves:
over-over weave, over-under weave,
coiling, circular weaving, and looping
• Complete 20 beautiful step-by-step
projects designed to showcase those
weaves, including a “design your own”
challenge pendant
key wire weaves with variations suited
ny detailed jewelry designs.
n today and create jewelry
l wear for years to come.
• Construct and finish each piece with
professional results, following the
comprehensive basics
ure, it’s only wire, but look what
’ve done with it! The transformation
mazing.” -Lisa Barth
www.KalmbachBooks.com
www.KalmbachBooks.com
U.S. $21.99
CAN $22.99
ISBN 978-0-87116-703-3
52199
9
780871 167033
0
64465 16703
6
LISA BARTH
Timeless Wire
Weaving: The
Complete Course
#67844
$19.99
P30121
Step-by-step techniques,
20 versatile designs
Miech
BARTH
67033
Firor
From the publisher of Bead&Button,
Bead Style, and Art Jewelry magazines
Irina Miech
Weaving Freeform
Wire Jewelry
#67033
$21.99
Beautiful Wire Jewelry
for Beaders
#62649 • #21.95
Buy now from your favorite craft or bead shop!
Shop at JewelryandBeadingStore.com
Sales tax where applicable.
P30121.indd 1
1/24/17 8:19 AM