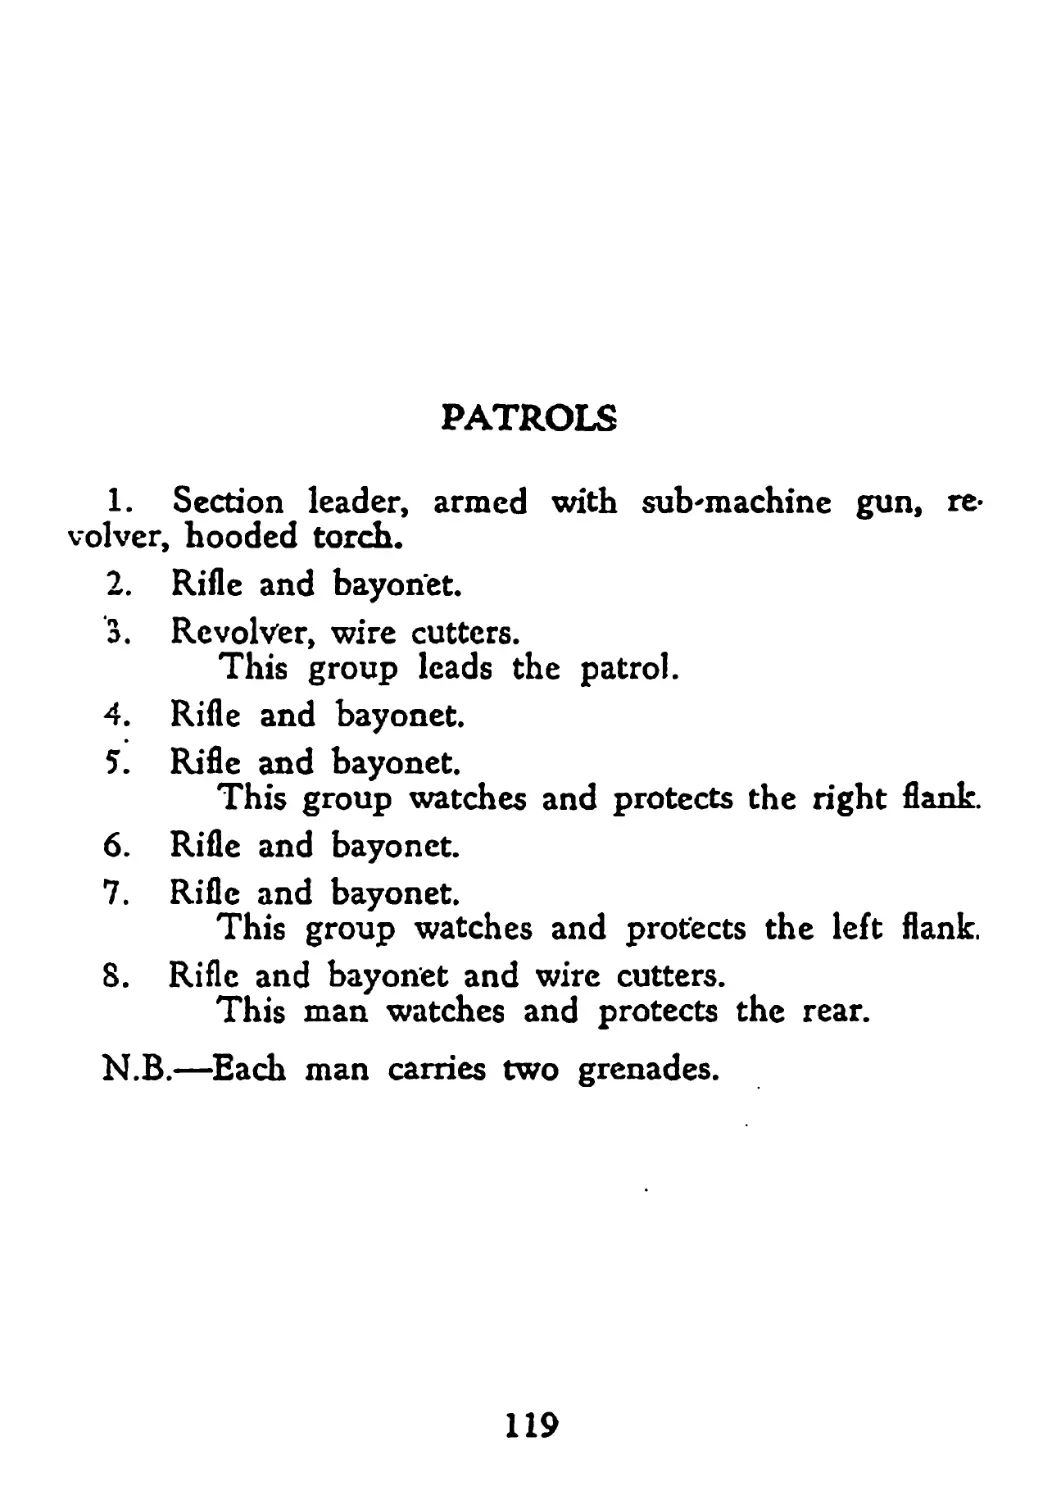
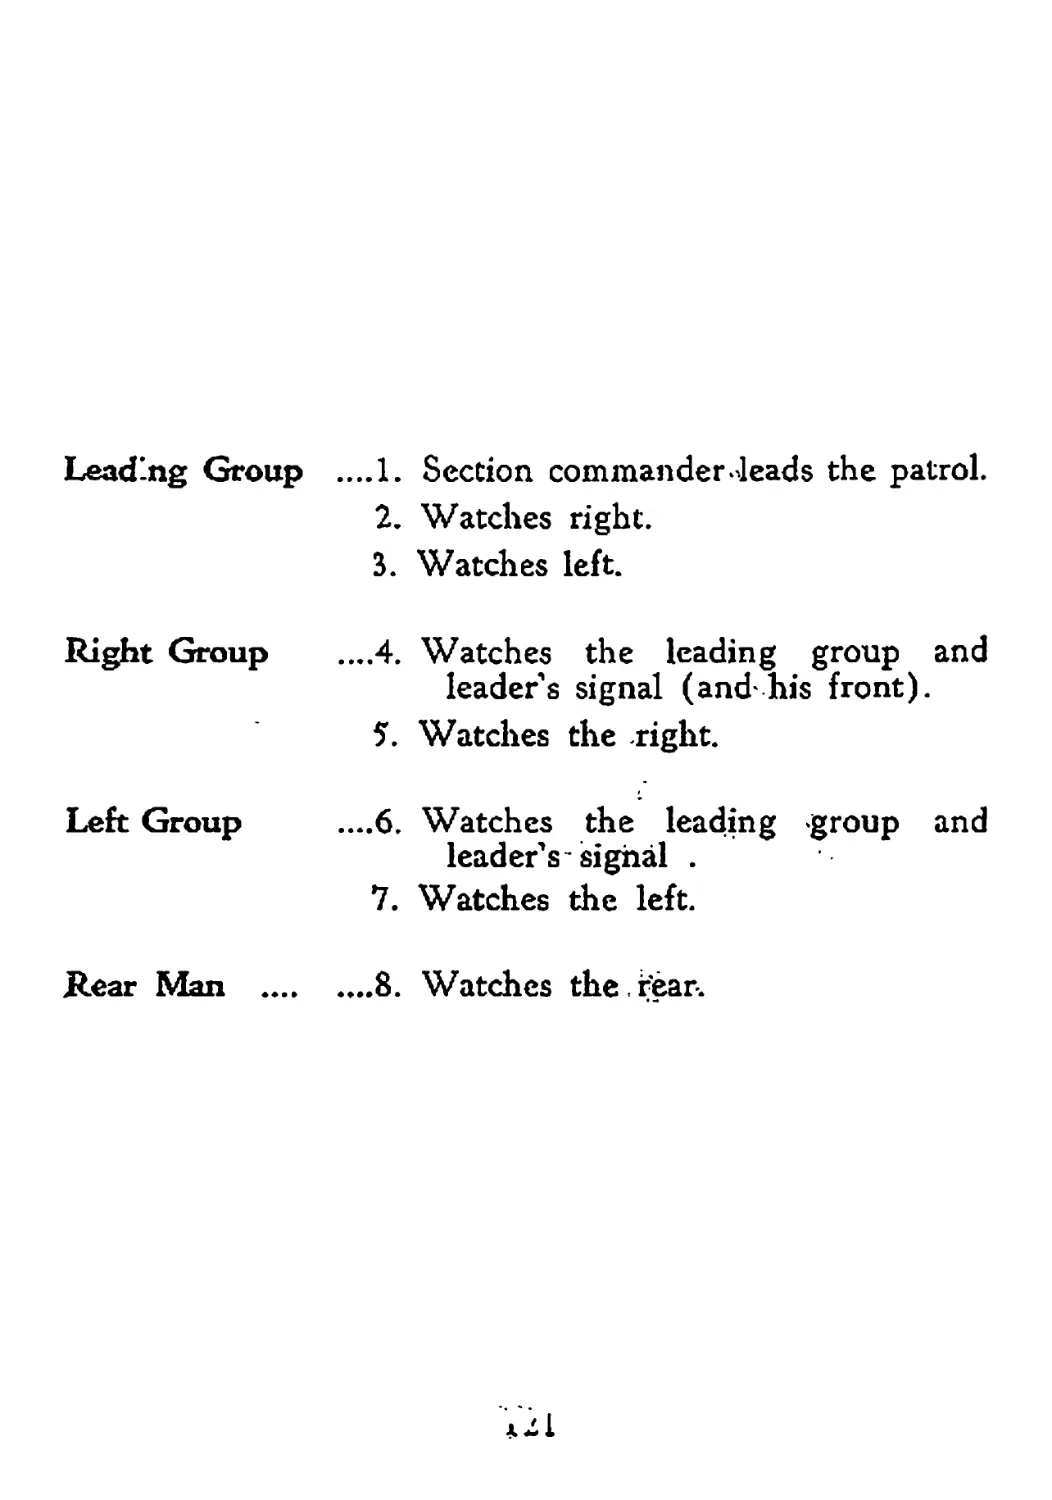
/


Tags: firearms military science combat tactics
Year: 1941
Text
il
VOLUNTEER DEFENCE CORPS
(HOME GUARD)
i _ .,
*
•• i1
i •" • ’
Preliminary Training
1 к л- i ;
Manual
Issued by the authority of the V\D+C. Corps Commander
>•*-' л
HEADQUARTERS
81 St. George's Terrace, Perth,
Western Australia
z Telephone В 8622
।
June, 1941
PRELIMINARY TRAINING
MANUAL
PUBLISHED.'BY'
IMPERIAL PRINTING CO.. LTD
397 HAY ST.. PERTH
L
Page
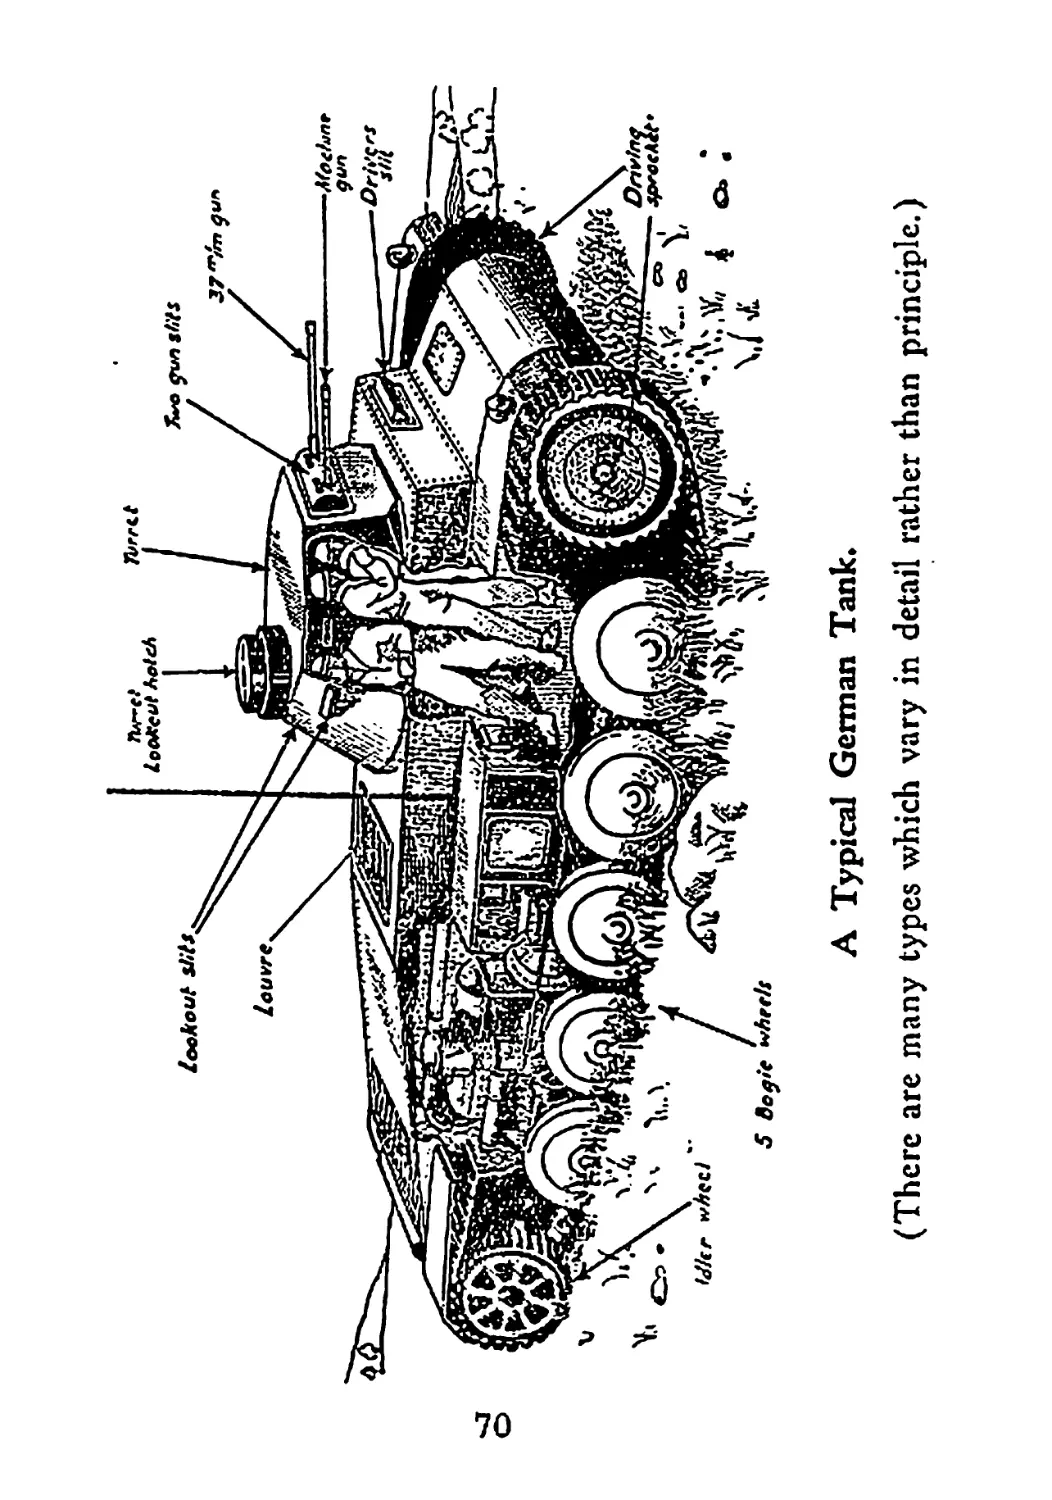
PART IV—TANK HUNTING AND DESTRUCTION .. .. 69
Hunting and Destruction .. .. .. ... .. 69
Characteristics .. .. .. .. .. .. 71
Tactical Action .. .. .. .. .. .. 74
. Road Blocks, Ambushes and Obstacles .. . ♦ 83
PART V—-TACTICAL NOTES................................. 94
Attack .. .. .. .. .. ,. - .. 94
A Forward Platoon Advancing .. «. .. 96
A Section in the Attack .. .. .. •. 98
A Section in the Assault........................100
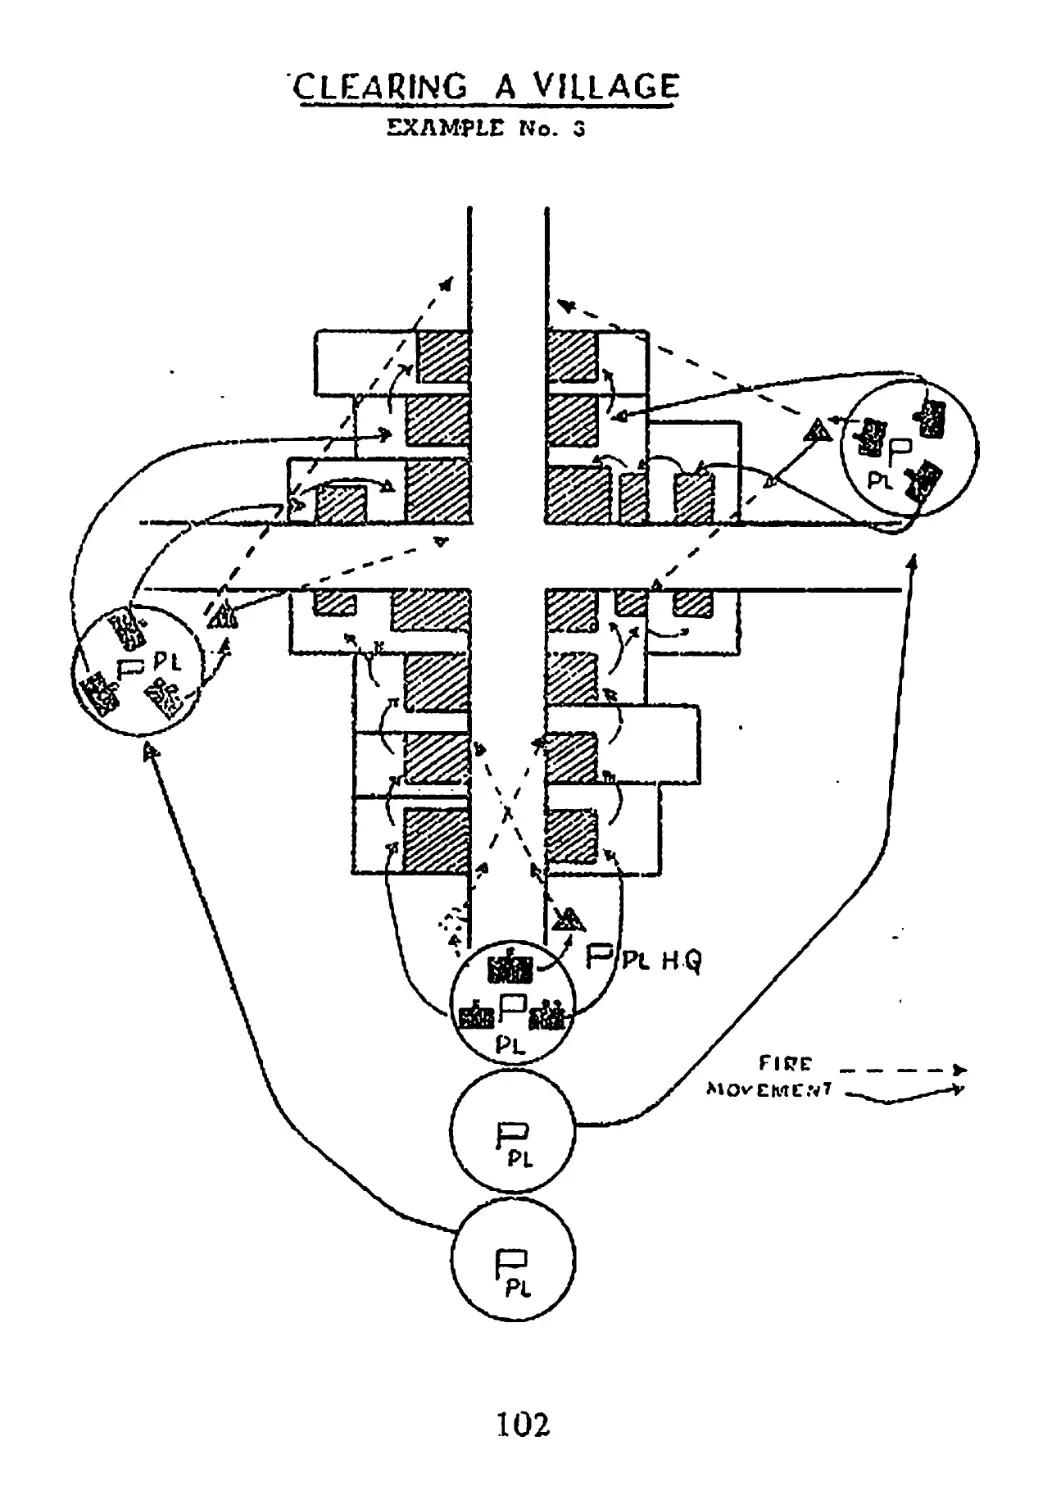
Clearing a Village............... .. .. 102
Clearing a Wood .. .. .. .. .. 104
Defence ...........................................106
A Platoon Defensive Locality in Mobile Warfare 106
A Post in Concrete .. 108
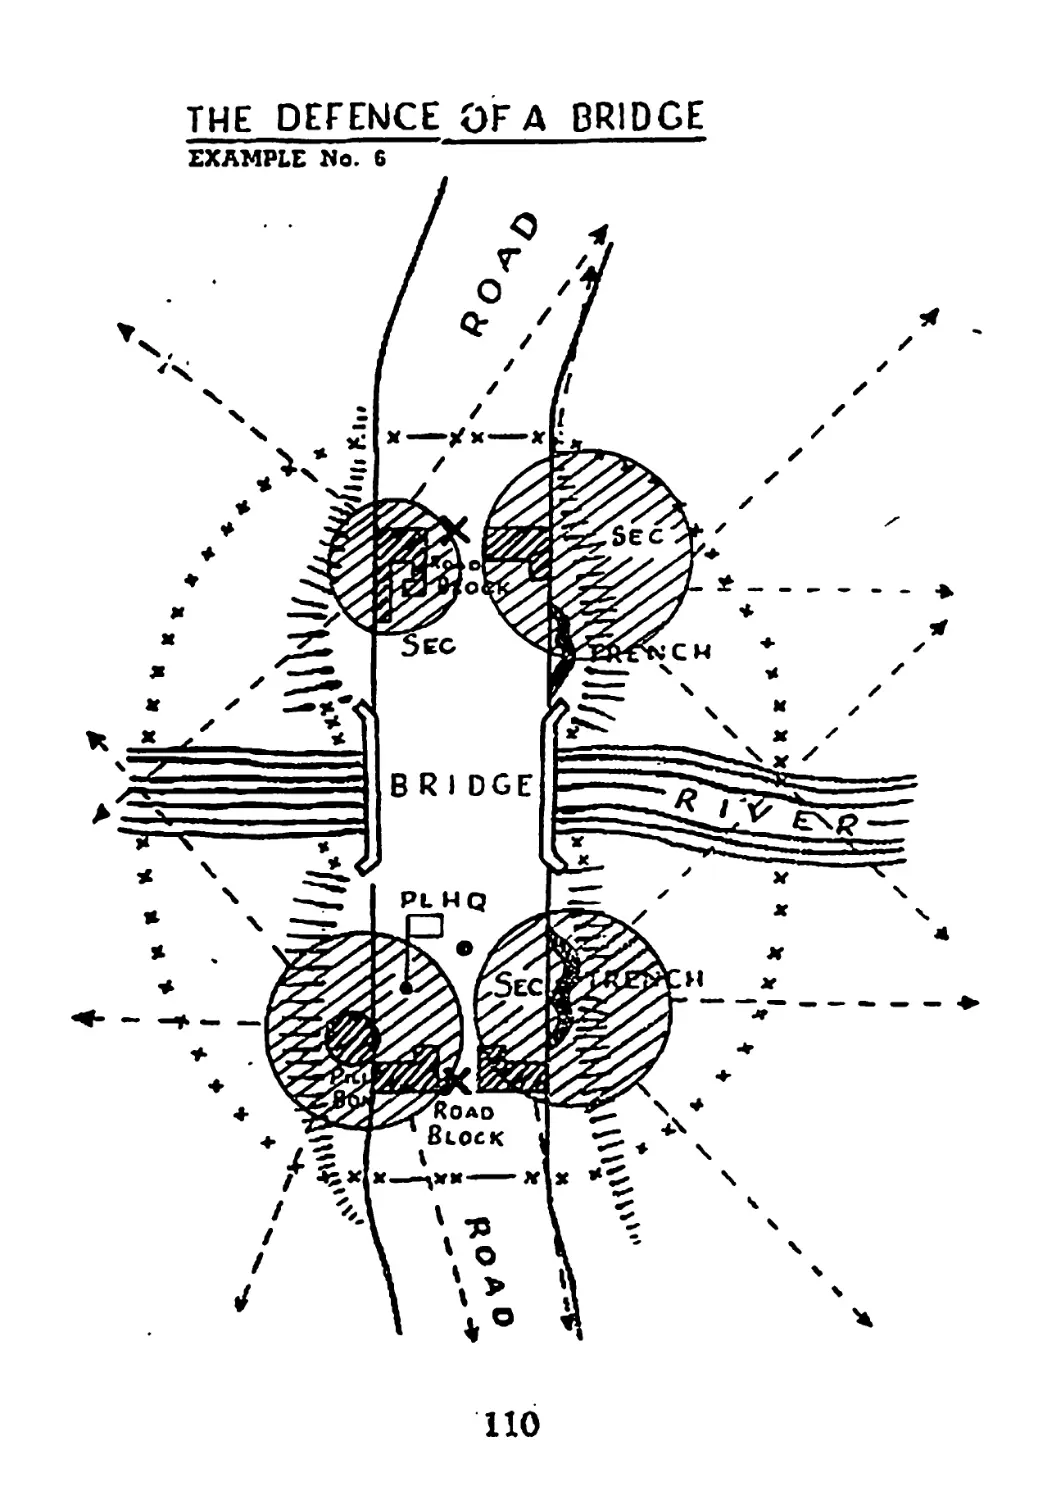
Defence of a Bridge.............................110
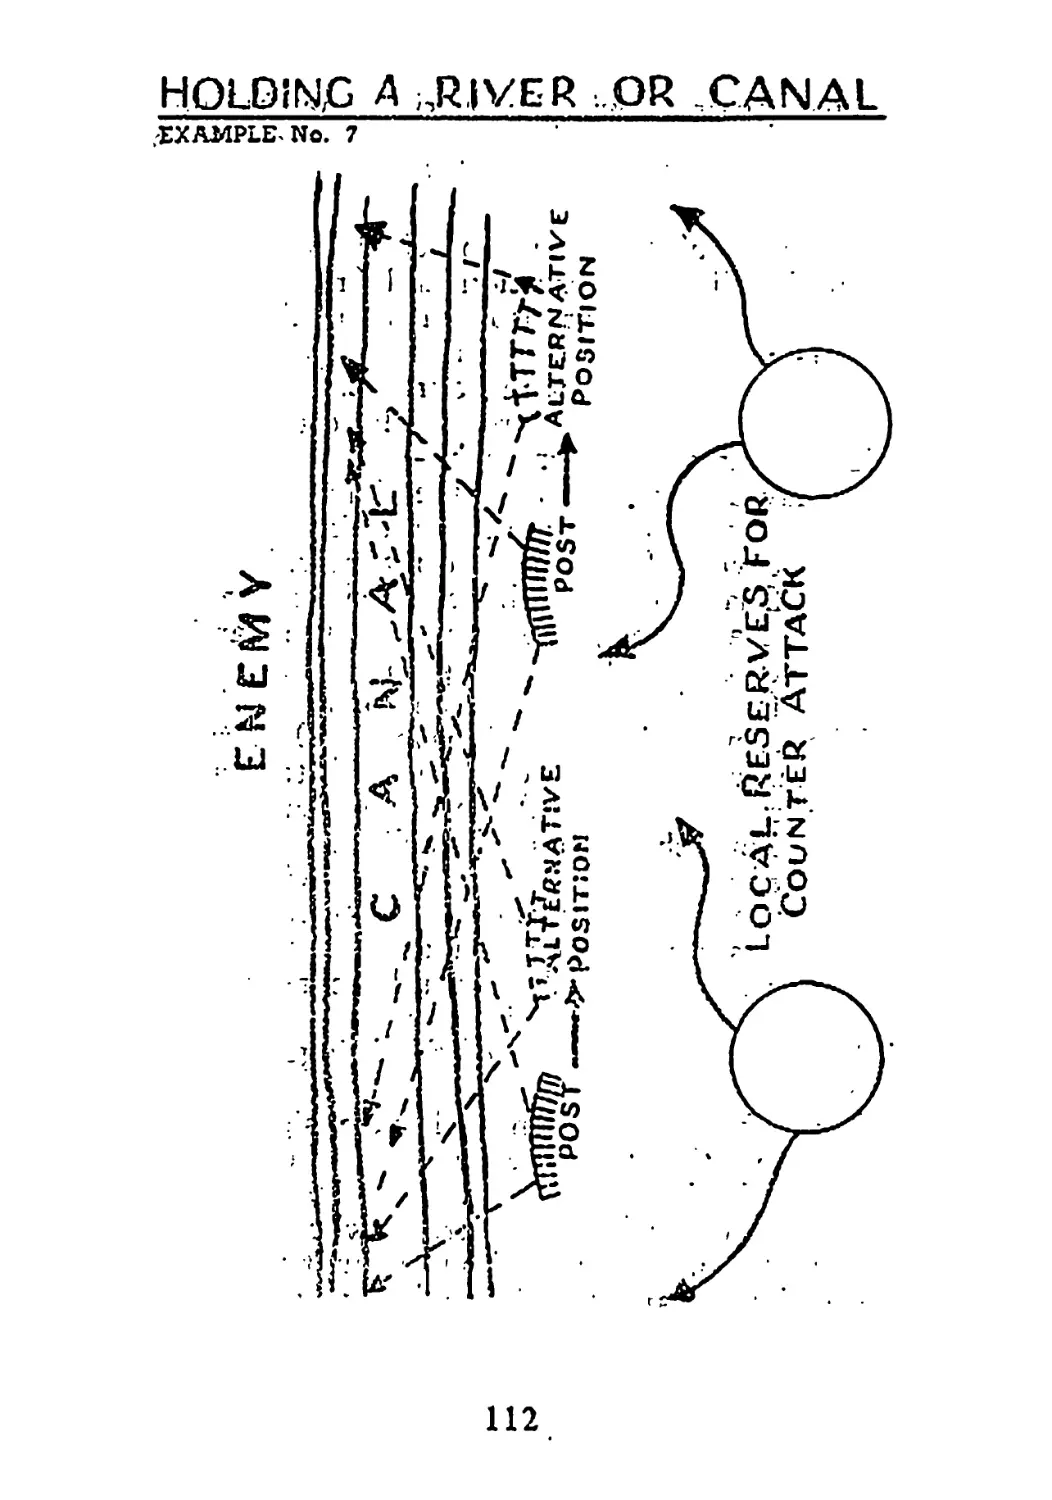
Holding, a River oi Canal .. .. .. .. 112
Road Blocks and Tank Traps .. .. .. 114
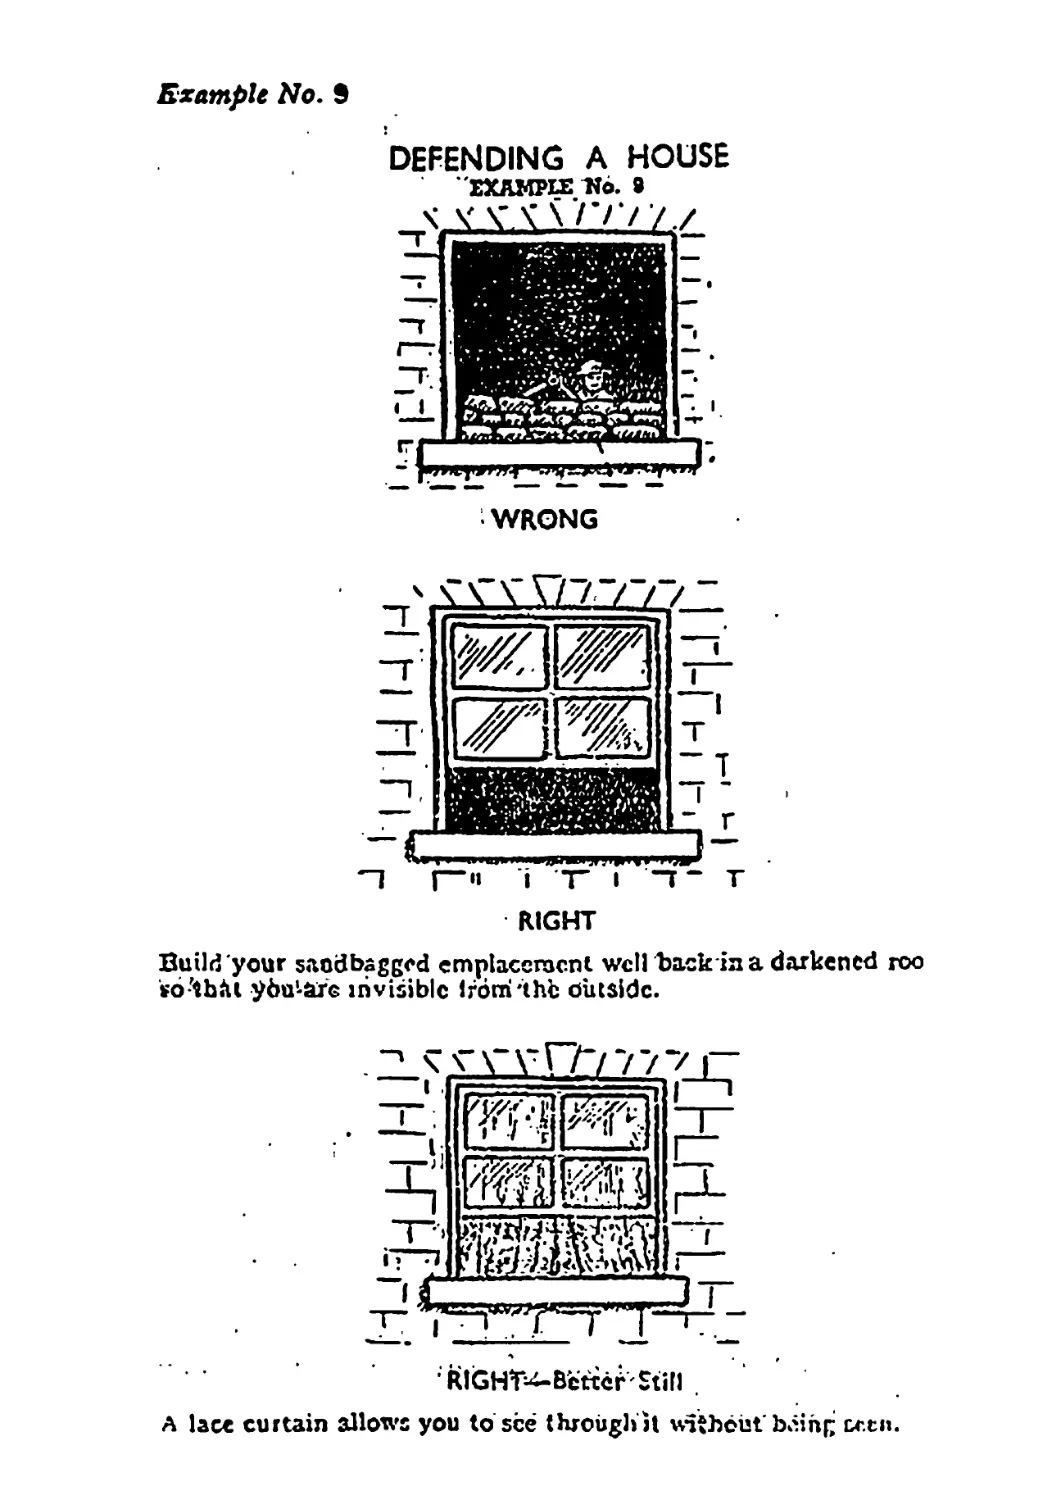
Defending a House .. .. .. .. .. 116
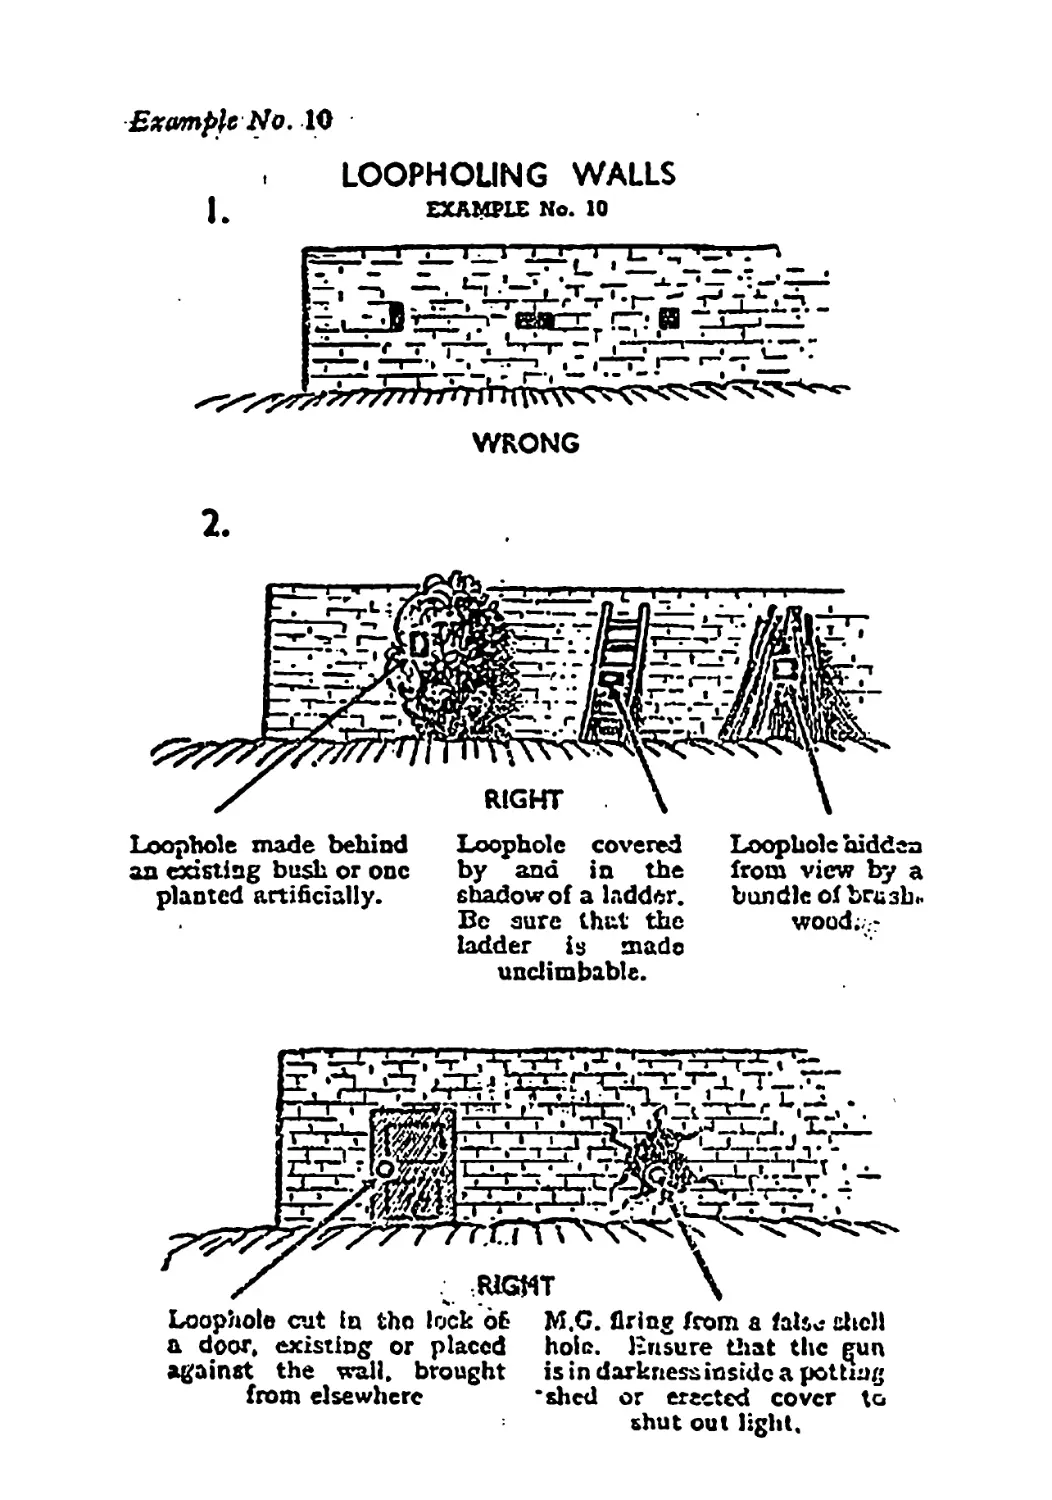
Loop-holing Walls ..............................117
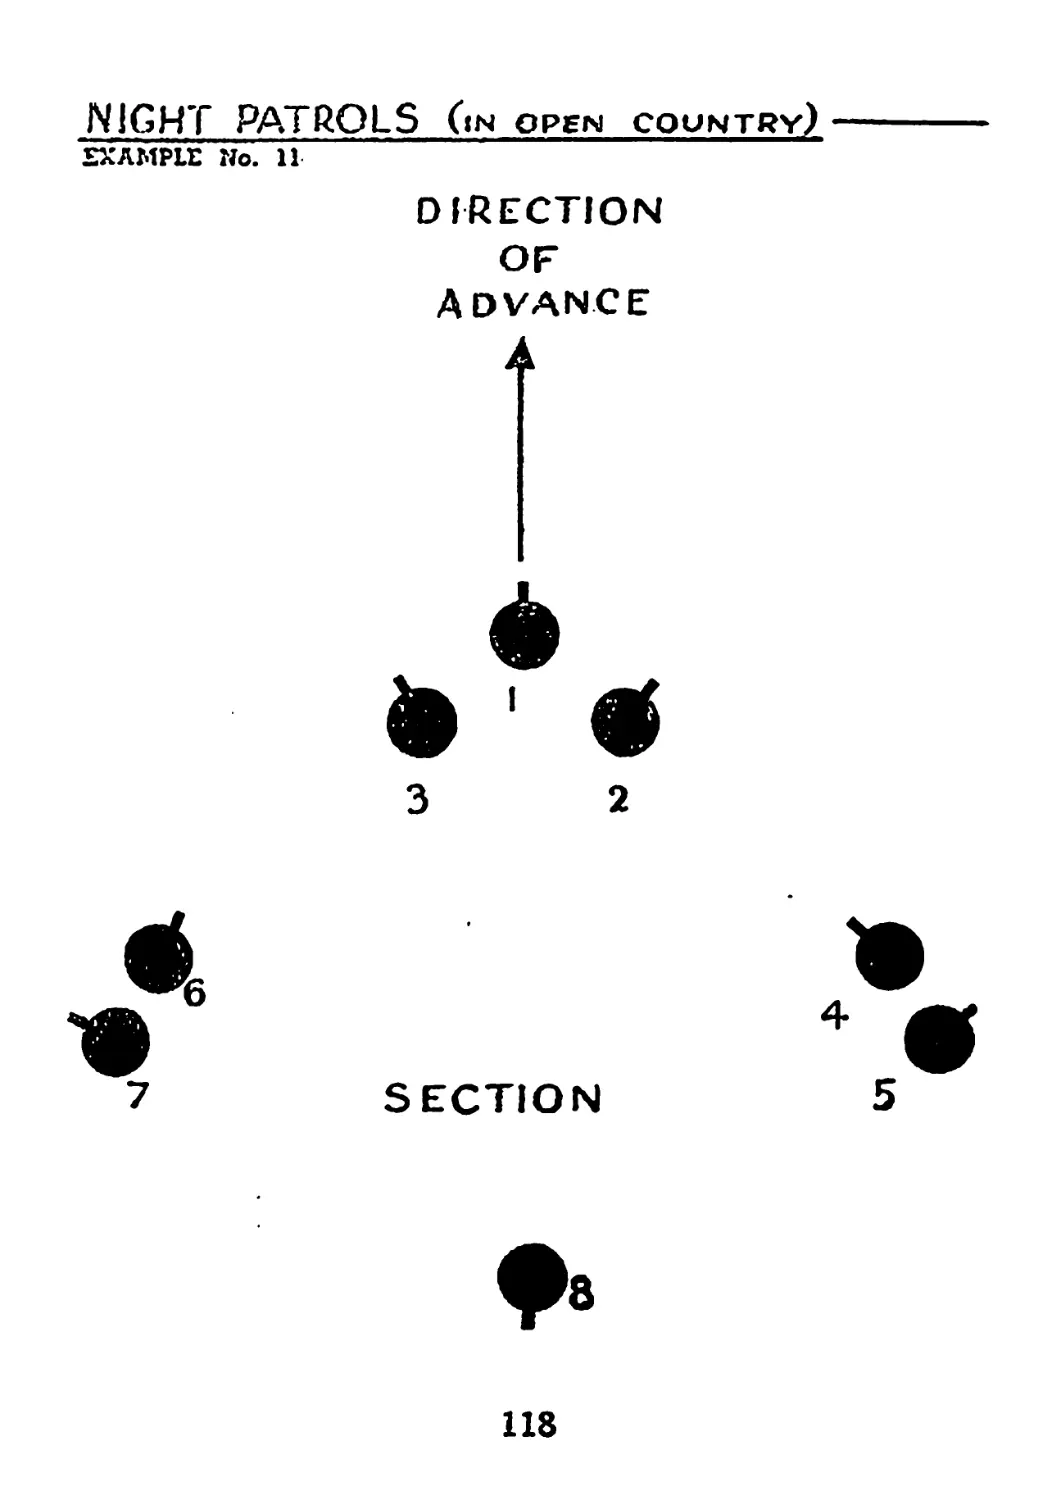
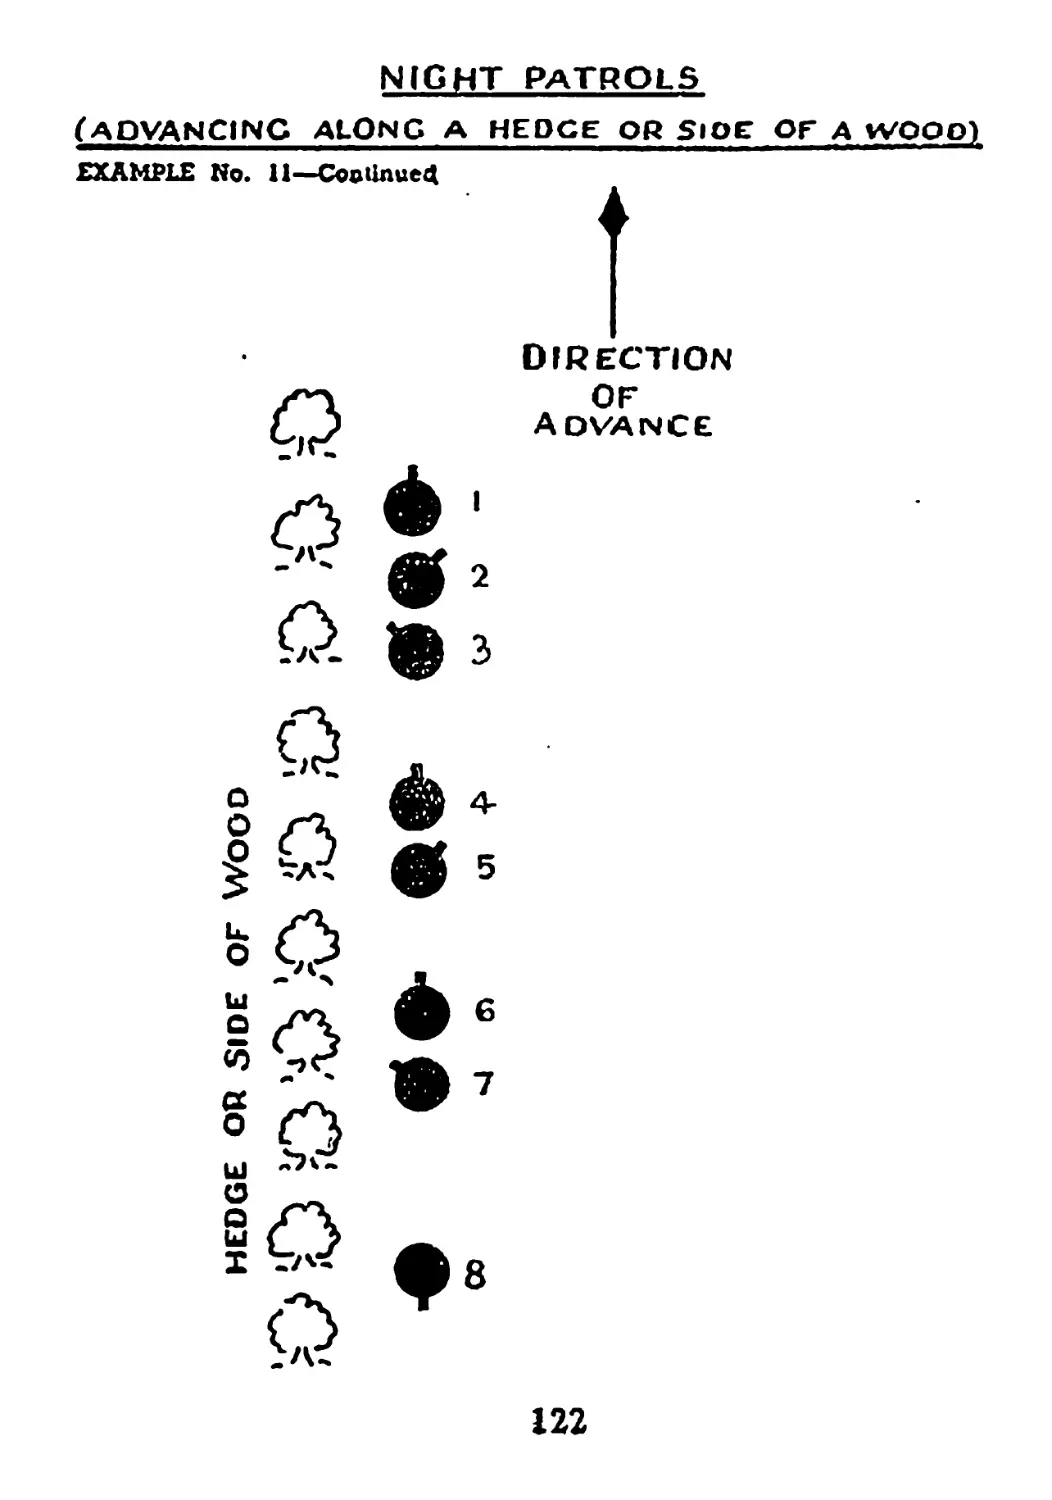
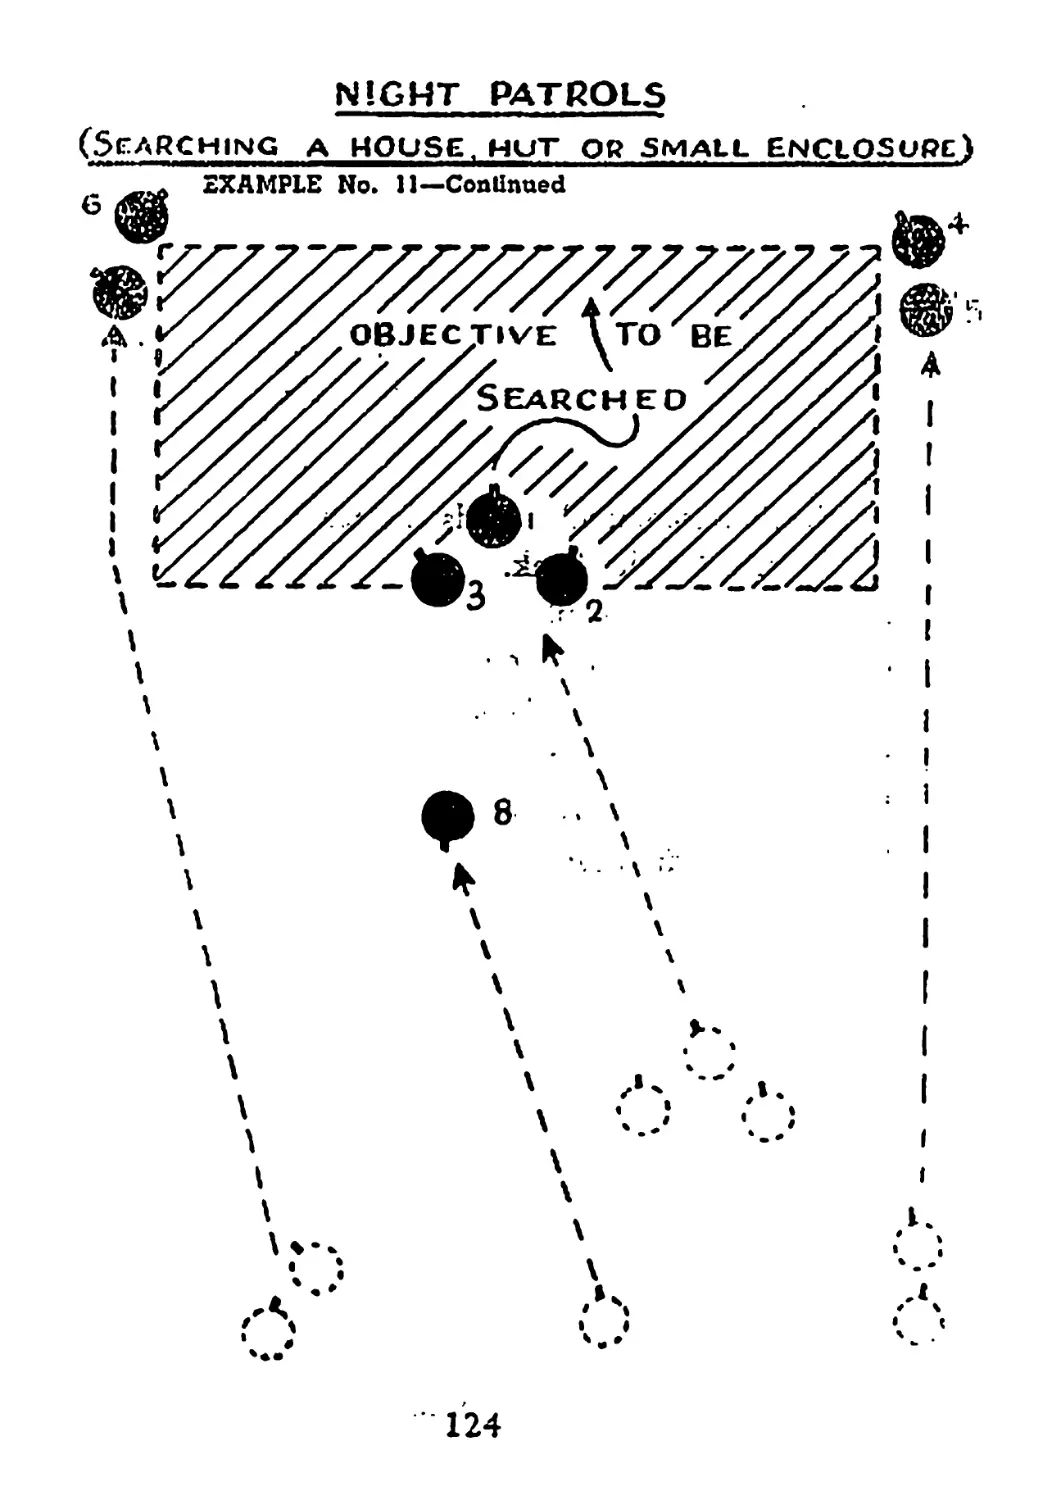
Night Patrols......................................118
In Open Country .. .. .. .. ♦. 118
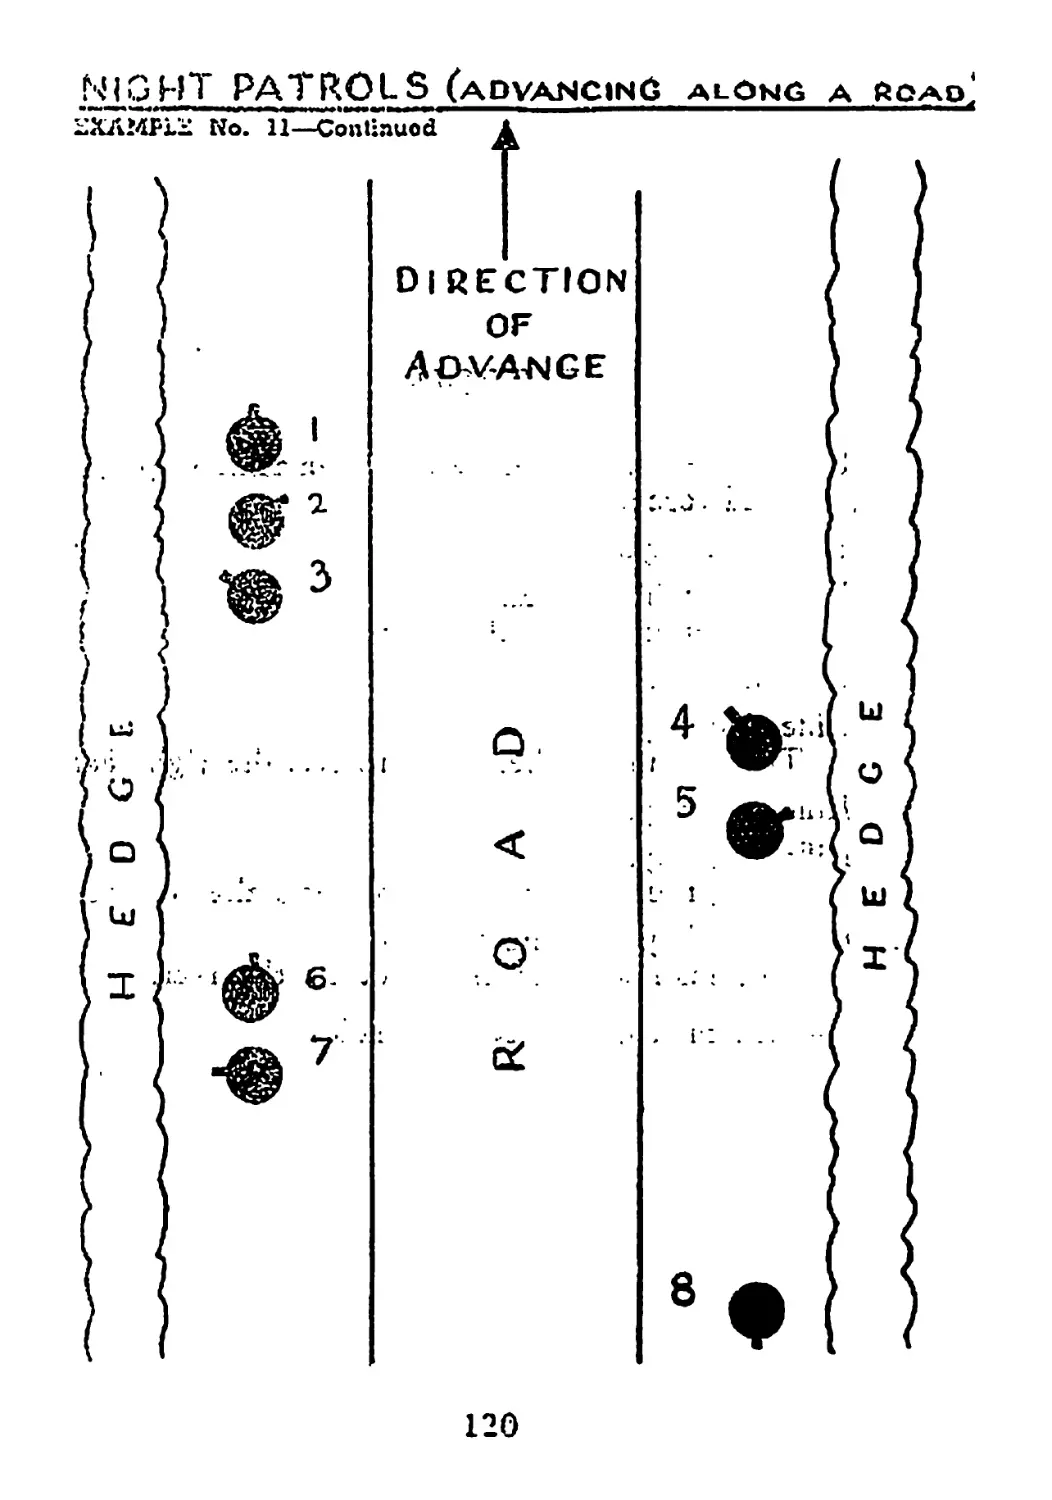
Advancing Along, a Road .. .. .. .. 120
Advancing Along a Hedge or Side of a Wood 122
Searching a House, Hut or Small Enclosure .. 124
4
VOLUNTEER DEFENCE CORPS
(HOME GUARD)
TRAINING MANUAL
BADGES OF RANK
The colours of rank, worn around the top edge of
the armband, are as follows:—r
Commander: Red.
Group Commander: Grey.
Battalion Commander: Orange.
Company Commander: Green.
Platoon Leader: White.
Administrative Staff: Light Blue.
PART I
SQUAD DRILL
Three Ranks.—Squad drill will in future be carried out
in three ranks, unless numbers are insufficient, when two
ranks will be formed. Troops will be “stood easy” when*
ever possible.
Handing over a parade, etc., will always be done at
“stand at ease.”
Platoons in Threes.
Each rank is a section at single arm interval, with the
Section Leader as No. 1, e.g., Front rank, No. 1 Section;
centre rank, No. 2 Section; rear rank, No. 3 Section.
Distance between ranks: one pace (30 inches).
5
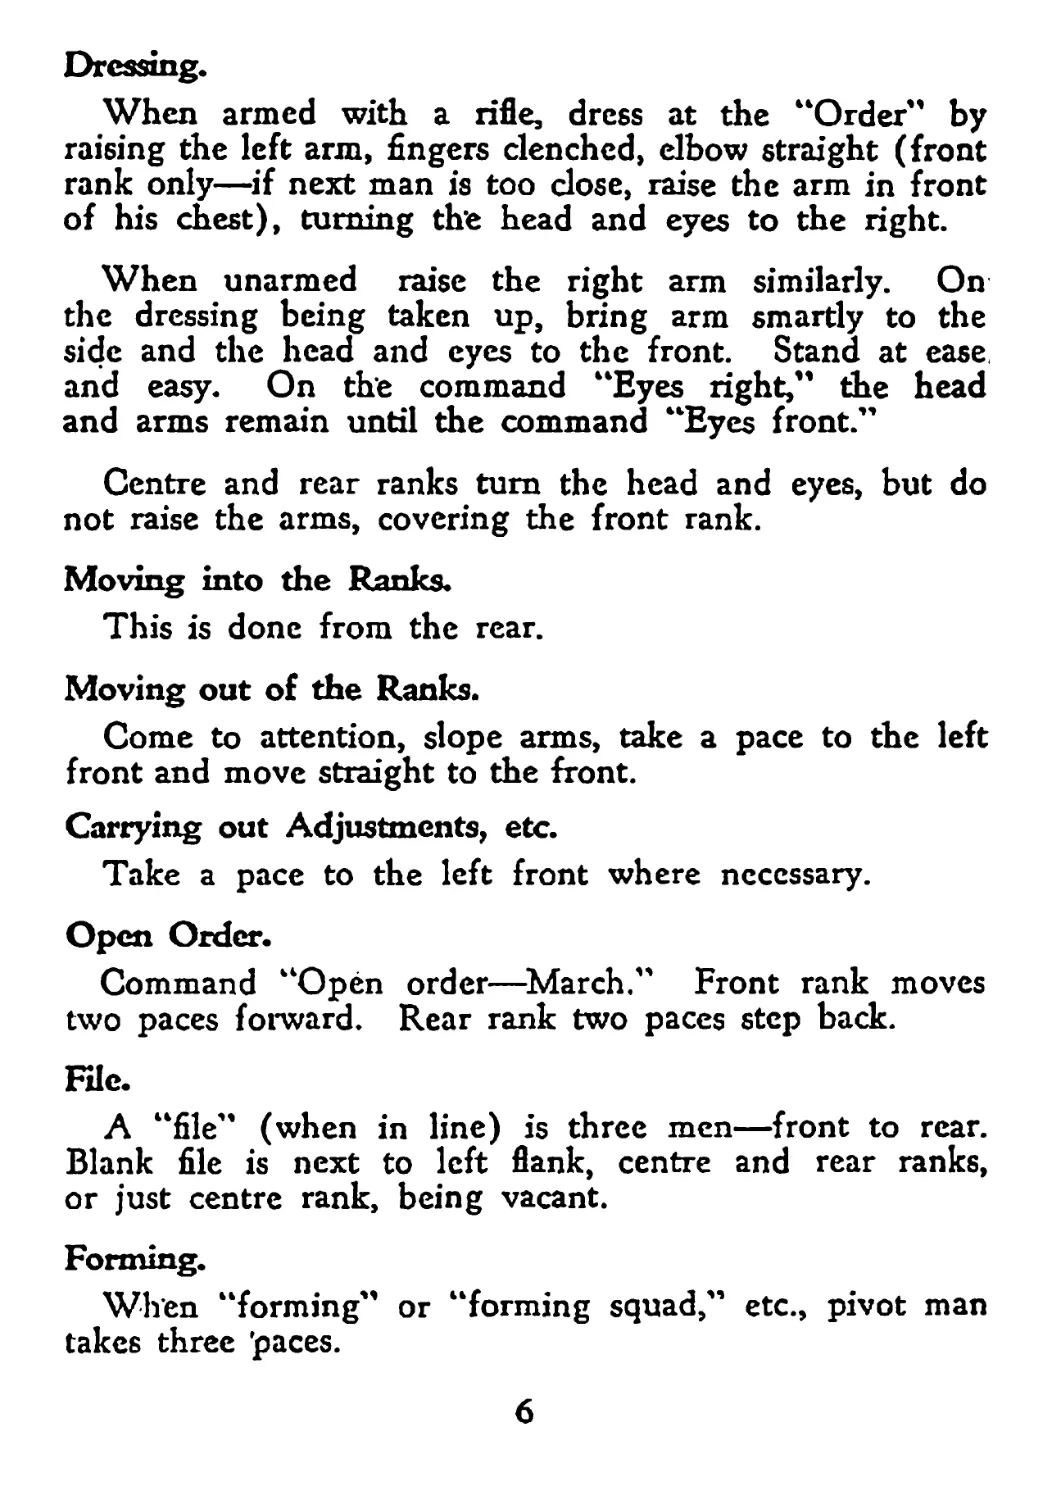
Dressing.
When armed with a rifle, dress at the “Order” by
raising the left arm, fingers clenched, elbow straight (front
rank only—if next man is too close, raise the arm in front
of his chest), turning the head and eyes to the right.
When unarmed raise the right arm similarly. On
the dressing being taken up, bring arm smartly to the
side and the head and eyes to the front. Stand at ease
and easy. On the command “Eyes right,” the head
and arms remain until the command “Eyes front.”
Centre and rear ranks turn the head and eyes, but do
not raise the arms, covering the front rank.
Moving into the Ranks.
This is done from the rear.
Moving out of the Ranks.
Come to attention, slope arms, take a pace to the left
front and move straight to the front.
Carrying out Adjustments, etc.
Take a pace to the left front where necessary.
Open Order.
Command “Open order—March.” Front rank moves
two paces forward. Rear rank two paces step back.
File.
A “file” (when in line) is three men—front to rear.
Blank file is next to left flank, centre and rear ranks,
or just centre rank, being vacant.
Forming.
When “forming” or “forming squad,” etc., pivot man
takes three ’paces.
6
SEQUENCE OF INSTRUCTION
1. Explanation.
2. Demonstration.
3. Execution.
4. Repetition.
Teach by eye wherever possible, and break up move*
ments into separate parts.
Check Faults.
Unless correct execution by squad is insisted upon, by
the checking of all faults as they occur, the wrong way
will have been taught, e.g., the instructor teaches the
right way, by explanation and demonstration.
A member of the squad makes a mistake without realise
ing it. If the instructor does not see and correct the
mistake, the member has learned the wrong way.
WORDS OF COMMAND
Two parts—
Cautionary Executive
Stand at — Ease.
Slope — Arms.
Both cautionary and executive must be distinct. A
good word of command gets results. A bad word of
command does not! Additional cautionaries are used
wherever possible. “Move to the right in threes/' etc.,
“Squad will retire/’ etc.
7
ON THE MOVE
Cautionary and executive
foot
on successive beats of same
Halt
Mark—Time
Right—Turn
Right—Form
Right In—cline
Rifle Exercises
About—Turn
Left—Turn
Left—-Form
Left In—cline
As right
foot is
passing left.
As left
foot passes
right
POSITIONS
1 .—Attention.
.Alteration—Feet at angle of about 30 degrees.
Points to stress.—Body erect, shoulders down and back,
hands lightly clenched, thumbs to the front behind seam
of trousers. Do not restrict breathing.
2 .—At Ease.
Alteration.—Heels about a foot apart.
Points to stress.—Body rests evenly on both feet. Hands
behind back; back of right hand in palm of left; thumbs
crossed; arms hanging full extent.
3.—Easy.
Points to stress.—Body may be moved, but not feet;
do not slouch, relax.
MOVEMENTS
Turning (when halted)»
(Right.) Points to stress.—Turn on right heel and
left toe; do not swing arms.
(Left.) Reverse ‘process.
(About.) Right about.—Right heel, left toe» arms
close at side.
8
Inclining.
Move to the right (or left) by the * Diagonal March.”
Right (or left)—Incline. This is similar, except that the
body is turned half right (or left).
Marching.
Length of paces—
Quick and slow time: 30 inches.
Double time: 40 inches.
Stepping out: 33 inches.
Stepping short: 21 inches.
Side or closing pace: 12 inches.
Points to stress.—Step off with left foot, swing arms
from shoulder, front to rear; hands swung level with
waist; do not bend elbows or swing arms across body.
(Note.—In slow march, arms are kept steady at sides.)
Turning (right or left).—Right or left foot is brought
a short pace in front of left (or right) foot; body is
turned smartly in new direction. Using right (or left)
foot as a pivot and full pace taken in new direction.
Turning (about turn).—Complete pace with right foot,
commence turn with left foot, complete turn three beats.
The fourth pace is full ‘pace forward with right foot. Do
not swing arms whilst turning.
Marking Time.
Points to stress.—Raise foot about six inches of ground
(slow time, 12 inches). Do not move arms.
Change Step.
On march.—Complete pace with advancing foot; ball
of rear foot brought up to heel of forward foot, which
takes an other pace forward.
Marking time.—Make two successive beats with the
same foot.
9
Wheeling»
“Change direction right (or left). Right (or left)—
Wheel." The inner flank man moves round in a quarter
of a circle with a 4ft. radius, stepping short. When
quarter circle completed, the other flank man should be
in new alignment, and full pace forward taken by each
man.
Forming Squad.
“On the left (or right)—Form squad.” Flank man
(left or right) leading file takes three paces forward and
marks time; remainder make right (or left) incline and
move up into a new alignment by the shortest route.
Rear ranks follow front rank. AH dress and mark time.
Forming (squad in line).
“Change direction left (or right). Left (or right)—
Form.”—Flank man (left or right) takes a full turn to. the
left (or right) and takes three paces forward; the re*
mainder of front rank take left (or right) iodine and
move up too new alignment by shortest route. Dress
and mark time. Rear ranks conform to movements of
front rank, except that they do not incline.
Dismissing.
Squad turns right, pauses, salutes if officer present and
breaks off quietly. If with rifles, arms arc sloped before
command “dismiss' is given.
PLATOON DRILL
A Platoon in Line Forming Column of Route.
“Move to the right (or left) in column of route.
Right (or left)—Turn. Quick—March.”
On right turn being given, platoon commander and
platoon sergeant will march into their positions in the
column, commander in centre front, sergeant in centre
rear.
10
When moving to the left section commanders will move
to the head of the section as soon as they have turned
to the left, outer section commanders moving by the
outer flanks, the middle section commander moving by
the same flank as the higher numbered section com*
mander.
A Platoon in Column of Route Forming Line.
“Platoon will advance. Left—Turn.”
Platoon commander and platoon sergeant will regain
their positions in quick time.
When retiring the platoon commander and platoon
sergeant do not change their positions.
FALL IN A COMPANY
Immediately prior to time for “fall in,” company will
assemble near parade ground. They will stand easy.
C.S.M. calls “Markers,” and the leading section com*
mandcrs of each platoon move straight into close column
distance facing C.S.M. and cover off, stand at ease and
easy. (Close column distance is 14 paces between
platoons, measured from front rank to front rank.)
Where a permanent parade ground is used, permanent
marks such as bricks should be used, and the unit fallen
in without markers.
C.S.M. gives “Company. Fall—In.” The company
springs to attention, slopes arms (if with rifles) and moves
smartly to their position, takes up a rough dressing, orders
arms, dress, stands at ease, and easy. Platoon sergeant in
front of platoons, and if necessary corrects dressing.
C.S.M. calls “Call the roll?’ Platoon sergeant brings
platoon to “at; ease” and calls names from platoon roll
book (if used), and stands at case in front. Normally,
cajling the roll is unnecessary, as the platoon sergeant
should know all his men and a glance over them, count*
ing them or having their number, is all that is required.
11
*<C.S.M. brings company to attention, calls for platoon
reports (No. 1 Platoon, No. 2 Platoon, etc.). Stands
Company at ease and makes his report to O.C. company,
giving verbal report as to absentees, etc.
O.C. orders “Officers—Take post!” Officers may then
inspect their platoons and their arms.
COMPANY DRILL
A Close Column when Halted forming Column of Route.
O.C. gives “Advance (or retire) in column of route
from the right (or the leftt). Right (or left)—Turn."
Leading or rear platoon commander will move to the
head of his platoon and give “No.-Platoon. Left (or
right)—Wheel. By the left (or right)—Quick march.”
The procedure is similar to above when command is
“Move to the right (or left) in column of route. Right
(or left)—turn.”
No. 1 platoon commander will give “No. 1 Platoon.
By the right (or left—Quick march.”
No. 2 platoon commander will give “No. 2 Platoon.
Left wheel by the left (or right)—Quick march” in rime
to take up nis place in the column.
A Close Column when Halted moving to a Flank in
Threes.
“Move to the right (or left) in threes. Right (or left)
—Turn. Quick—March” (dressing by right or left
platoons).
A Column of Route Forming Close Column of Platoons
at the Halt Facing a Flank.
“At the halt facing left form, close column of platoons.”
No. 1 platoon commander gives “No. 1 Platoon, Halt.
Left—Turn.” The other platoons will be led into position
by flank guide and then will be given similar commands.
12
A Company in Close Column Advancing (or retiring)
in Column.
(a) “Advance in column."
Commander of leading platoon will give “No. -----
Platoon will advance. By the right—Quick march?’
Other platoons will, be given same command when at
column distance.
(b) “Retire in Column. “The company will retire—
About turn.
Platoon commanders will march their platoons in sue*
cession at column distance. “No. -- Platoon. By the
left. Quick—March."
A Company in Column Changing Direction*.
“Change direction—Right."
Leading platoon commander will give “Nd.---------
Platoon. Right—Form. Forward."
Remaining platoons on reaching same spot will do like*
wise. (Direction may be changed by wheeling.)
A Line when Halted Forming Column Facing a Hank.
“At the halt. Into column. Platoons right-—form.
Quick—march."
RIFLE EXERCISES
Falling Tn.
At the slope, order ^arms and stand at ease.
Stand at Ease.
Same position as in squad drill; rifle is, pushed straight
in front of body with right hand, rifle held between thumb
and fingers at the band; fingers not curled around the
rifle but pointing forwards and downwards. Toe of butt
in line with toe of boot.
Stand Easy.
Slide right hand up to, piling, swivel, (same, procedure
with bayonet fixed).
13
Attention.
Heels together; rifle pulled close to right side and
resting on heel of butt; toe of butt level with right toe;
right elbow back.
Slope from Order.
Slope Arms: One.—Throw the rifle upwards with the
right hand, catching it with both hands at the same time;
left hand at about back sight; right hand at the small
of the butt; thumb to the left; elbow to the rear; right
arm nearly straight; rifle kept perpendicular close to the
right side; shoulders square.
Two.—Carry rifle across the body and place it flat on
the left shoulder; magazine outwards from the body.
Seize the butt with the left hand, the first two joints of
the fingers grasping the upper side of the butt; the
thumb about one inch above the toe; left elbow close to
the side; forearm horizontal and the heel of the butt in
line with the centre of the left thigh.
Three.—Cut away the right hand to the position of
"attention."
Order from Slope.
Order Arms: One.—Bring the rifle down to the full
extent of the left arm, meeting it with the right hand
at about the band; arm close to the body; do not draw
butt to rear.
Two-—Bring the rifle to the right side, steadying it at
the same time with the left hand at the nose cap; fingers
together and extended; butt just dear of the ground.
Three.—Place the butt quietly on the ground, cutting
the left hand away to the side.
Trailing Arms.
(a) To trail arms from order: fciTrail arms." Cant
rifle forward, seizing it at the point of balance; bring it
to a horizontal position at the side, muzzle to the front.
14
(b) To order arms from trail: ‘‘Order arms." Raise
the muzzle; catch the rifle at the band and come to
order.
(c) To trail arms from slope: "Trail arms." One.—
Keeping the rifle in the 'position of the slope seize it at
the point of balance with the right hand.
Two.—With the right hand bring the rifle to a horv
zontal position at the right side and cut the left hand to
the side.
(d) To slope arms from trail: ‘‘Slope arms." One.—
With the right hand place the rifle on the left shoulder
in the position of the slopej seize the butt with the left
hand as in the second motion of the slope from the order.
Two.—Cut away the right hand to the side.
(c) The short trail. No word of command except
"Short trail. Quick—march." Raise the rifle from the
ground about three inches, keeping otherwise the position
of the order.
Changing Arms.
(a) To change arms when at slope: ‘‘Change arms."
One.—Seize the butt plate with the right hand, back of
hand up, slip left hand to the small.
Two.—Carry rifle, magazine outward to the right shoul*
der, well in front to clear the head?
Three.—Cut left hand to the side.
(b) To change arms from trail: "Change arms." One.
—Raise the rifle to a perpendicular position in front of
the right shoulder, magazine outwards, hand in line with
waist, forearm horizontal, elbow close to the body.
Two.—Pass rifle across body, catching it with left hand
at point of balance, cut right hand smartly to the side.
Three.—Lower rifle to full extent of left arm at trail. •
/
Ground Arms.
(Before grounding arms, ranks will be given: "Open
order—March?’)
15
(a) “Ground arms”: One.—Place the rifle on the ground
at the right side, magazine to the right; muzzle pointing
straight to the front; the band in line with the toe.
Two.-—Return smartly to the position, of attention.
(b) “Take up arms”: One.-r-rSeize. the rifle with the
right hand in line with the toe.
Two.—Pick up the rifle and return smartly,. At the
order.
Inspection of Anns.
“For inspection, port arms;” Throw the rifle, muzzle
leading, with the right hand smartly across the body;
magazine to the left and downwards; barrel crossing oppo*
site the ‘point of the left shoulder; meet it at the same’
time with the left hand close behind the backsight;
thumb pointing to muzzle and fingers around the rifle;
left wrist opposite left breast; both elbows dose to body.
Turn safety catch completely over to the front with
thumb of right hand. Pull out cut-off with thumb and
forefinger; seize the knob of bolt with the forefinger and
thumb of the right hand; taking the time from the right*
hand man, turn it sharply upwards and draw back the
bolt to its fullest extent; seize the butt with the right
hand immediately behind the bolt; thumb inside butt and
pointing to the muzzle.
“Ease Springs.”—From the position of “inspection”
work the bolt rapidly backwards and forwards until all
cartridges are removed from the magazine and chamber,
allowing them to fall to the ground; dose the cufroff
with the right hand with a rolling and downward motion;
close the bolt; press the trigger; turn the safety catch
over the rear with the first finger of the right hand, at
the same time drawing the remaining fingers over the
bolt lever, to force it down, and return the hand to
the small.
Note.—Before pressing trigger take up correct holding
with right hand.
16
To order arms from port: “Order arms." One.—Change
the grip of the right hand from the butt to the hand.
Two.—As in the second motion of the order from
the slope.
Three.—As in the third motion of order from the
slope.
Note.—When arms are inspected at the port only, the
inspecting officer will see that:—
(I) The exterior of the rifle is clean and free from
rust;
(2) the magazine and action are clean and in good
order;
(3) the sights are at zero (200).
(4) no parts loose or damaged.
Each man, when the inspecting officer has passed the
file next to him, will independently ease springs, order
arms and stand at ease.
To Examine Arms.
“Examine arms."—Both ranks, being at the port, will
come to the position for loading (see standing load) with
the muzzle pointing high enough for the inspecting
officer to look down the barrel. The thumb nail of the
right hand is placed in front of the bridge chargerguide
so as to reflect light up the bore.
When the inspecting officer has passed the next file
to him, each man will independently ease springs, order
arms and stand at ease.
Note.—If the arms are to be examined, the caution
"Ordering arms from the examine." One.—Seize the
rifle with the right hand at about the band, at the same
time withdrawing the left foot to the right.
Two.—Carry the rifle to the right side, steadying it with
the fingers of the left hand at the nosccap, as in the
second ^motion of the order from the slope.
Three.—Lower rifle to the ground, cut left hand to
the side. Stand at ease, stand easy.
17
Present from Slope.
“Presenting arms by numbers." One.—Grasp the rifle
with the right hand at the small, elbow dose to the body.
Two.—Raise the rifle with the right hand, barrel per*
pcndicular in front of the body, magazine to the left;
place left hand smartly on the stock, wrist ‘on thfe maga*
zine; fingers together, pointing upwards; thumb close to
the forefinger and point indine with the mouth; left
elbow close to the butt; right elbow close to the body.
Three.—Release the grip of the rifle with the left hand
and with the right bring it perpendicular in front of the
centre of the body about three inches away; magazine
to the front, right arm fully extended, fingers together
slanting downwards; left hand about the backsight, outside
the sling, thumbs pointing towards muzzle. At the same
time place hollow of right foot against left heel. Both
legs straight.
Slope from Present
“Slope arms." One.—Bring right foot into line with
the left; place rifle on left shoulder, taking the correct
holding with the left hand.
Two.—Cut hand away to side.
Fixing and Unfixing Bayonets.
The following procedure will be adopted:—
(1) “The squad will fix bayonets—Fix bayonets."
On the command "fix," push the rifle forward with the
right hand as in the position of "stand at ease" with the
rifle, at the same time seizing the handle of the bayonet
with the left hand, back of the hand to the front and
thumb and fingers to the rear; withdraw the bayonet
downwards sufficiently to allow the left arm to become
straight. On the command "bayonets," draw the bayonet,
turning the point upwards and keeping the elbow down;
place the handle on the bayonet standard with the ring
over the stud of the nose cap, pressing it home to the
catch; at the same time turn the head and eyes down
18,
Io the right to ensure the bayonet is properly fixed, the
head and eyes remaining in this position on completion.
Hingers will be clasped around handle of bayonet. On
the command “attention," the position of attention will
be resumed.
(2) “The squad will unfix bayonets—Unfix bayonets."
On the command “unfix," keeping the heels closed,
place the rifle between and grip it with the knees, guard
to the front. At the same time seize the rifle with the
left hand, knuckles to the front, thumb on the bayonet
bolt spring, pressing the spring with left thumb, and with
the right hand seize the bayonet handle. Disengage the
bayonet clear of the rifle. On the command “Bayonets,"
drop the point of the bayonet to thfe left side, ring to
I he rear, at the same time seizing the scabbard with the
left hand, thumb underneath the frog and turning the
head and eyes towards the to’p of the scabbard, force the
bayonet home. On the command “attention," seize the
rifle with the right hand at the band, raise the head and
«•yes and resume the position of attention.
Note.—Cautionary words of command will not be used.
19
PART П
THE RIFLE
The service rifle is known as the No. 1 Mark III. It
fires a .303 Mark VII> which has a muzzle velocity of
2,440 feet per second. The barrel of the rifle is rifled
with spiral grooves, left to right, making one complete
turn in ten inches. This applies to both rifle and Vickers
medium machine-gun. In the Lewis, the rifling is right-
handed, and there are four grooves instead of five.
The rifle can be identified by the colour or marking
of the stock, and the number stamped on the right of butt,
form, cc., which must agree with the number stamped
on the bolt lever.
MECHANISM OF RIFLE
To Remove Bolt»
Push forward safety catch with thumb, raise knob, draw
back bolthead to resisting shoulder and disengage retaining
spring by raising bolthead. Remove bolt by drawing it
backwards.
To Replace»
See that the bolt number coincides with the rifle num-
ber. See that resisting lug and cocking-piece are aligned
and the bolthead screwed home. Place bolt in the body
and press it forward until the head is dear of the resisting
shoulder. Press the bolthead down until it is caught by
the retaining spring. Close bolt, press trigger, pull back
safety catch with forefinger and with the remaining fingers
press bolt lever down.
To Remove Magazine.
Press the magazine catch inside trigger guard and with-
draw magazine.
20
To Remove Magazine Platform.
With the magazine removed from the rifle, depress the
irar end of the platform as far as possible, holding up
(he front end. Pull the front end towards the rear end
of the case until it passes underneath the front lips.
Till the rear end of the platform sideways, left side
uppermost, and draw it forward out of the case.
To Replace Magazine Platform.
Insert rear end of platform in front of rear lips of
case, tilting sideways so that the right enters first. Depress
tear end until the front is below the level of the front
hpn. Push forward, guiding the front end through the
internal ribs in the magazine case.
I Inlfcock and How to Recock.
If the action is half*cocked, the rifle is locked. To
trinedy, puli cocking piece back to full cock, open and
close bolt, press trigger and apply safety catch.
CARE AND CLEANING OF THE RIFLE
Cure.
Before a service rifle becomes unserviceable it should,
with proper care, fire from 5,000 to 6,000 rounds. When
not in use the leaf and slide of the backsight should be
lowered. The rifle should never be left cocked unless
loaded. The magazine should be removed only for clean*
ing purposes and unloading by the alternative method, and
cartridges should not be left in it unnecessarily, as this
tends to weaken the spring. Each rifle has its own partic*
ular bolt and the numbers must correspond.
Before cleaning, bolt, magazine and sling will be re*
moved. The pulbthrough is kept in the butt'trap and
has three loops. The loop nearest the weight is for the
wire £auze. The centre loop is for the flannelette and
third loop is for removing the pulbthrough should it
break or get jammed in the bofe (armourer only).
21
To avoid cord wear, the cord must not be allowed to
rub against the muzzle. The weight on the pull-through
should be inserted from breech to muzzle and pulled
through in one continuous motion.
Oil.
Service oil is carried in the oil bottle in the butt-trap.
No other oil must be used.
Flannelette.
For cleaning or drying the boce a piece of flannelette
4in by 2in. will be used. Place in the second loop and
wrap around the cord. For oiling the bore use a slightly
smaller piece of flannelette, which should have oil well
rubbed in with the fingers.
Wire Gauze.
Is issued in pieces 2£in. by Tjin. and is used on active
service or by permission of an officer or warrant officer
to remove hard fouling or rust. It must be oiled thor-
oughly before use, and is ’placed in the first loop of the
pull-through. Fold the gauze so that the longer side
takes the form of an and coil each half tightly
around the cord until the two rolls thus formed meet.
Do not polish the metal of the rifle. The browning
on the metal is a preventative against rust.
Boiling water should be used to remove fouling. The
boiling water dissolves the harmful deposit of the com-
bustion. Flannelette on the pull-through takes away the
thus softened deposit. When the barrel is warm, super-
ficial fouling can also be removed by the flannelette. If
it is allowed to remain in the bore, it will harden and
turn to red rust. This may necessitate the us*e of a wire
gauze.
Immediately after firing, pull the bore through. To
prevent moisture and air reaching the steel of the barrel,
it should be covered with a film of oil. The barrel
should be dry only when rifles are being inspected on
parade or immediately before firing.
22
Daily Cleaning.
Ги11 the bore through with a piece of dry flannelette.
Repeat until clean; oil.
Clean the exterior of the rifle and the bayonet with
an oily rag. Oil working parts lightly.
Cleaning before Firing.
Remove all traces of oil from the bore. Wipe the
action with an oily rag, but ‘prevent the face of the bolt
liom being oiled. See that the gas escapes are clear. In
handy or dusty country keep the bolt dry.
Cleaning after Firing.
I. Pull through with dry flannelette.
2. Using a funnel, pour five or six pints of boiling
waler dirough the bore, breech to muzzle. Thoroughly
di у the bore, oil, and allow it to cool.
Wipe over the rest of the rifle as in daily cleaning.
Then dry the bore and examine it. If clean, oil it. After
firing, daily cleaning should be carried out very carefully
for several days.
After blank or ballistite, clean before firing ball. Where
no boiling water is available, pull the bore through with
dry flannelette, then oil it. On service, wire gauze has
of necessity to take the place of boiling water. In brief:
Pry, boil; dry, oil; dry, oil. Clean remainder of rifle.
LOADING AND UNLOADING
Loading.
Push safety catch forward with thumb, pull out cut-off,
seize knob of bolt between thumb and forefinger and
open bolt. Take charger of cartridges from pouch,
between thumb and forefinger of right hand, and place
charger in bridge chargerguide.
Pia$c ball of thumb on base of cartridges and remainder
of fingers underneath cut'off. With a firm and continuous
pressure, force the cartridges into the magazine. Seize
23
the knob of bolt between thumb and forefinger and dose
bolt. Pull back safety catch with forefinger of right hand,
the remaining fingers pressing on lever of bolt. Button
up pouch.
Unloading.
Push forward safety catch with thumb of the right hand,
seise knob of bolt between thumb and forefinger of right
hand and work bolt rapidly backwards and forwards until
all cartridges are removed from the rifle. Do not turn
the knob of the bolt down after each movement. The
sequence when closing the action of the rifle is: cutoff,
bolt, trigger, safety catch. Always assume correct holding
with right hand before 'pressing the trigger.
CHARGING MAGAZINE
The magazine will hold ten rounds. During aircraft
precautions, when magazines are charged (without allow-
ing a round to enter the chamber), the order is “charge
magazines.” This is done by loading with two chargers,
but when closing the bolt, pressing down the top round,
to prevent it from entering the chamber and closing the
cut-off. The sequence is as before: cut-off, bolt, trigger,
safety catch and button pouch. If there is no cut-off,
hold down top cartridge with thumb of right hand and
draw bolt head over top cartridge with little finger.
To load the rifle after the magazine has been charged,
push forward safety catch, pull out cut-off, open and close
bolt and apply safety catch.
TRIGGER PRESSING
Bad shooting is often a direct result of faulty trigger
pressing. The rifle has two pressures, whereas the Lewis
gun has one only. The first pressure is taken as the
butt comes to the shoulder, the second when the aim is
correct.
24
Method.
With ri(lc cocked, grip small of the butt, right hand
hiirlinger outside the trigger guard. Raise the butt to
I he shoulder, place first joint of the forefinger on the
ihkkci; squeeze thumb and forefinger towards each other
until first pressure is taken. Hold breath and continue
pirwiii’c until rifle is discharged. Pause for a second or
mi lifter a shot is fired. Open and close bolt, which ejects
г in pl у cartridge case and places another round in chamber
11it (he next shot.
SIGHT SETTING
The sights are placed on the rifle to give both elevation
and direction. To adjust the back sight, hold rifle in a
convenient position. With thumb of left hand press in
r.lud on backsight slide. Move slide until line on it is
even with mark on leaf giving elevation for distance
mimed. Ensure that slide is fixed firmly. Alterations will
be made in hundred (100) and/or fifty (50) yards.
Го Adjust Slide.
If, when sights are set at 200 yards, it is found that
line on slide does not agree exactly with mark on leaf,
adjust it by the following method: Press stud on slide
with thumb of left hand until worm wheel can be re-
volved easily. Turn worm wheel with thumb nail of right
hand until lines agrees. Stud must not be pressed to
Mich an extent that worm wheel is disengaged entirely
from rack.
RULES OF AIMING
1. Backsight upright.
2. Close the left eye (left-handed shooting will be
discouraged unless the firer is naturally left handed, when
the right eye will be closed).
3. Look at the target. Direct the sights at the centre
of it by aligning the top of foresight in the middle of
(he “LT’ and in line with the shoulders of the backsight.
25
(In using a target provided with an aiming mark, aim
will be directed at the lowest central portion of such
mark.)
THE CORRECT AIM
1. Demonstrate a correct aim.
2. Let each man view it.
3. Bring out the rules of aiming.
4. Each man lays aim, and has them checked.
5. Assist by means of diagrams of various aims, and
their results.
6. Bring out faults as they occur and demonstrate
their effect.
To convince a man that his aim is wrong: Hold a piece
of paper in front ’of his muwl’e. The man is then told
to align his sights correctly.
The white paper is removed for a moment or two and
then replaced, when the man will tell you where his aim
was directed on the target.
Demonstrating Elevation.
1. Two rifles, with bolts removed, mounted on two
aiming rests.
2. One rifle with sight at 200 yards on to aiming mark.
3. The other rifle with an aim laid on the same aiming
mark but with sights elevated to 1,000 yards.
Let each man view the aims and then look through
the bores. By looking through the bore of the rifle
with sights at 200, the aiming mark should be visible.
By looking through the bore of the rifle sighted at 1,000
yards, the aiming mark will not be visible because of the
elevation, the rifle pointing over the target on account
of the increased range.
The illustration is that the further an object is to be
thrown the higher the elevation required. Point out that
the rifle has been given elevation to overcome the effect
of the bullet dropping, and that the target is still visible
through the sights.
26.
Aiming off for Wind.
To counter the effect of wind on the bullet, it is
necessary to fire into the wind. The following rules are
laid down, but they must be applied with commonsense
according to the target and strength of the wind. At
ranges up to 200 yards, it is not necessary to aim off
for any wind, from 200 to 400 yards, if you can feel
a fresh wind, aim off the target’s width from the centre
of your target. At distances over 400 yards, aim off
two targets’ width. No allowance need be made for
head or rear winds.
The above rules refer to direct or oblique right or
left winds.
Aiming off for Movement.
If a target is moving across the front, it is necessary
to aim off to allow for movement. The rules are: A man
walking, aim ‘off one width; running, two widths. VehP
clcs and horsemen, one width. Swing the rifle with the
target and continue to swing whilst ‘pressing the trigger.
Hiflc fire will seldom be effective against a single man
or horseman in movement beyond 300 yards, or against
single figures beyond 500 yards. .303 ammunition will
not penetrate armour, but firing against armoured vehicles
causes the visors or turrets to be closed, thus hindering
the crew. The bullet, hitting armour, breaks up into
small molten fragments, which might chance to enter slots
and crevices and so injure the crew.
RIFLE FIRING POSITIONS
Slings will be loosened, but not used to steady the rifle
when firing. Rifles have long, medium and short butts
and are issued to men according to their build.
/
Except in rapid fife, the exact aim at the moment the
second pressure is taken should be declared.
27
Lying Position (Command: “Load.”)
Used lor firing in the open or from low continuous
cover such as a bank or fold in the ground, or from
isolated cover such as rocks or trees. This is the service
position and is adopted on the command “load?’
To Lie Down.
Take a long pace forward with left foot to right front.
Change rifle to left hand at the point of balance. Place
right hand on the ground in line with left foot and lie
down. Push rifle forward towards target and lower it
co the ground, gripping it at the small with the right
hand.
Points to Watch.
Legs apart and heels on the ground. Body oblique to
line of fire. Elbows on ground, left arm extended. Right
forefinger along trigger guard. Eyes on target.
To Get Up.
Right hand on ground below right shoulder. Draw
left knee forward without unduly raising body and draw
back rifle with left hand. Stand up quickly, bring right
foot up to left, return to order and stand at ease.
Kneeling Position.
Used when firing from low wall, bank or long grass,
crops or scrub.
To Kneel (Command: “Kneeling—Load”).
Take walking pace forward, with left foot to right
front. Change rifle to left hand at point of balance. Rifle
on right side of body, muzzle up. Kneel on right knee
pointed out towards right. Sit back on right heel and
grasp small of butt with right hand, finger along trigger
guard. Left forearm resting behind left knee. Butt of
the rifle resting on right thigh.
28
Points to Note.
Eyes on target. Left forearm resting behind left knee.
Right forefinger along trigger guard. Butt on inside of
light thigh. Left foot to right front and slightly behind
left knee.
‘Го Aim and Fire.
Watch target. Push forward safety catch, without rais*
ing left arm. Slide left elbow forward until it rests either
'u’hind or in front of left knee. Raise right elbow. Bring
I mit into shoulder and take the first pressure, with the
tight check on butt. When aim is correct, restrain the
breathing, take second pressure, declare point of aim,
irload in the shoulder and lower rifle.
‘Го Get Up.
Unload, zero sights and rise, grasping rifle near band
with right hand, and bring left foot back to right. Return
In order and stand at. ease.
Standing Position.
Used to fire over high cover; to take snapshots during
advance; to fire at aircraft; or to charge magazines.
Standing Load.
Turn half right. Carry left foot to left so that body is
equally balanced. Cant rifle forward and catch with left
hand at point of balance. Muzzle pointing upwards.
Small of butt in front of hip.
To Ahn and Fire.
Raise butt and press into right shoulder. Right elbow
lightly below right shoulder. Left elbow under rifle.
Body well balanced and leaning forward. Eyes on target.
Right cheek on butt, first ’pressure and aim. Fire, reload
and return to standing position.
To Return to Order.
Unload, zero sights, seize rifle with right hand near
hand and bring left foot back to right. Return to
order and stand at ease.
29
INFANTRY WEAPONS COMPARED
Weapon Rounds Magazine Holds Ammunition Used Rounds per Minute Normal Effective Range (ya^ds) Effective Beaten Zone (in yards)
Rifle 10 .303in. Mark VII About 15 Rapid; 5 Normal 600 500—330 yds. x 7 ft. 1000—180 yds. x 14 ft.
о Lewis Gun .. 47 do. About 120 Rapid; 25 Normal in bursts 1,000 500—135 yds. x 4 ft. 1000—70 yds. x 9 ft.
Bren Gun .. 30 do. 120 (in bursts), 30 (single) rap- id, 25 (nor- mal) in bursts, or 5 single 1,000 500—200 yds. x 7»/2 it. 1000—130 yds. x 15 ft.
Vickers Gun 250 (Belt) do. 250 rapid 125 normal 2,000 1000—300 yds. x 5 yds. 1500—160 yds. x 10 yds.
Pistol . . . . 6 455in. Mark ! VI ?
No, 36 H.E. Grenade H.E., H/2lbs.; Smoke, U/4 lbs. Ballistite from Rifle
3-Jnch Mortar ы 1 Bomb, 10 lbs., H.E. or Smoke Ballistite and Nitro- Cellulose
Anti-Tank Rifle 5 .55 A.P.
2-Inch Mortar 1 Bomb, 2 lbs., H.E. or Smoke 1
Bayonet . .. Hand-to-hand Fighting only 1
- - - 25 । •
7-second fuse Hand, 35 (H.E. only); Rifle 200 20yd. Radius burst
40 rapid, 20 seconds flight 275 to 1,600 100yd. Radius burst
8 to 9 per ' minute 500 Flat Trajec- tory
40 rapid To 500 50yd. Radius burst
—
NOTES CN FIRING
Watch your target.
On number of rounds being given, push forward the
safety catch.
On command “fire,” bring rifle to shoulder, take first
pressure, aim, check breathing whilst taking the second
pressure and declare aim at moment of discharge, i.c.,
“correct,” “high,” “low.” Keeping head still and right
elbow down, reload with rifle at shoulder, then lower
rifle to position of loading.
Keep firm grip with both hands.
Normal rate of fire is five rounds per minute.
Magazine should be kept filed with at least three rounds
until “unload” is ordered.
When reloading, tilt rifle slightly to the right.
Count number of rounds.
Rapid fire is used for short but critical periods.
Do not sacrifice accuracy for speed.
Rapid fire is maximum effort of the soldier.
Keep rifle at shoulder except when reloading with fresh
charger.
Apply safety catch on command “stop” or on firing
number of rounds ordered.
32’
PART Ш
FIELD CRAFT.
Field craft is a most important part of a soldier's
I raining. It is intended to develop in him initiative and
Io enable him to employ with cunning and intelligence
I hose instincts, which in the face of difficulties and
danger will enable him to act with calmness, shrewdness
lind decision. It is essential under service conditions when
I roups might be dispersed over large areas and away
Iroin the personal supervision of their leaders.
Section Command.
The section leader is the smallest unit commander in
the army, but that does not imply that he is the least
important. When leading his section in battle, he re*
quiries to note:—
Points of observation, fire effect, cover from view
and fire, and obstacles.
It is important that he fully realise the effect of his
movements in the different types of country. The effect
of the weather conditions, keeping direction, and how to
work in darkness, fog and smoke. When deciding on a
route to follow, he should bear in mind the point he is
making for, how he is going to get there, and the speed
ul which to move. He might find it necessary, for in*
Mance, to fix intermediate points and make for his ob*
jcctive in stages. The ideal route provides both cover
from fire and view and at the same time offers good
fire positions and observation ‘points. Low ground gives
both concealment and protection, but high positions give
good observation and fire position.
In advancing, fire should be withheld as long as pos*
bible, so that the route giving the most concealment
would Ие the line of approach. Intermediate points of
observation should be used to observe the progress of
supporting troops.
33
The speed of advance is decided by the urgency ol
the task. He should however, ensure that his men arc
in a fit condition to use their weapons and wits on
arrival at the objective.
Cover from Fire and View.
Dead ground is that which the firer cannot see from
his position. Recognition of such cover should be quickly
made by the section leader. Undulating ground is not
easy to detect from a distance from an enemy’s point
of view, but it may be skilfully used in an advance, as
it is difficult for the firer to range it.
On the other hand hedges and bushes whilst giving
cover from view are not ideal ’protection as they can
be ranged by the firer.
Possibly the best cover is that of dry beds of streams
and ditches. They give excellent cover approach, but on
that account, care should be taken that an ambush is not
laid. The winding nature of a dry creek bed gives good
facilities for ambush.
Standing crops afford cover but they are not ideal
protection as they restrict the field of fire, and move*
ment is easily detected.
Using Cover.
Except over very small distances crawling should bt
avoided. It is both slow and tiring and speed is nearly
always the main essential to success.
Gaps offer a good target to the enemy. If the gap is
small, the whole section should take it at a bound. If
the gap is large, it should be crossed by one or two
men at a time at irregular intervals.
Natural Cover.
Artificial aids to concealment should be used against
ground or air observation. The following points should
be observed:—
Avoid straight lines. Irregular lines are more diffi'
cult to detect.
34
Shiny surfaces must be avoided.
Small bushes could be used with great effect, intelli*
gence however, must be used. For instance, a
large bush walking over a paddock would draw
enemy ’fire.
Keeping Direction.
When advancing to an objective detours are often
necessary for protection. Care must be taken, therefore,
to watch carefully the direction and the correct line of
advance. This is not easy in undulating or dose country,
or in darkness or fog.
Aids for keeping direction are land marks, compass,
or map. Land marks are the most likely from a section
leader’s ‘point of view. Advances should be made by
bounds and the direction checked during pauses.
Night Movements.
In the darkness sound disdoses movement more than by
sight. Silence, therefore, is one of the main essentials.
Ratling equipment will carry long distances on still
nights. Men should break step. Orders given in a low
voice or a whisper. Where possible the ground over
which the advance is to be made should have been re*
connoitred during the day.
Skyline movements should be avoided in both day and
night movement.
Wire.
If no wire cutters are available, the easiest meth’od
is to move underneath on the back, holding the strands
from the body. With cutters cut the lowest strands and
crawl through. Men should work in pairs, one holding
the others cutting. This prevents noise from the loose
ends of the cut wire. If working alone, hold the wire
near a/post and cut it between the hand and post.
In mist or smoke, the same conditions should be ob*
served.
35
In night movements, particularly on very dark nights,
men should keep touch by holding the bayonet frog.
When crawling, place a hand on the forward man’s heel.
Observation.
The principle is to see without being seen and to
know for what to look. Avoid skylines, keep in the
shadow. Select suitable backgrounds. Select a spot
ahead with a covered approach. Avoid obvious lookouts.
Look round the object, rather than over it. Remain
perfectly still. Do not expose your face, use a twig or
bunch of grass. Do not smoke, even at night time. A
lighted cigarette on a dark night is visible for nearly 300
yards. Do not stand with legs apart or hands on hips.
What to Look for.
Endeavour to discover likely observation points of the
enemy, his fire positions and his covered approaches.
Look out for horsemen and armoured cars. Watch roads
and tracks for movement. Do not stare at an object
too long, because after a while it will appear to move, it
being an optical illusion. Be careful in distance judging. In
darkness there is a tendency to under estimate distance,
and over estimate numbers. Scouts should work in pairs,
therefore, check your observations. At night time, the
cars should be used as much as the eyes.
26
FIELD SIGNALS, SECTION
FORMATIONS AND
DEPLOYMENT
FIELD SIGNALS.
When troops arc deployed, control by verbal orders
is difficult. Recourse is therefore made to signals. Sig*
nals are made by hand, by flags (for tanks), by the
rifle, and by whistle blast. Preparatory to giving the
signals, a short blast of the whistle is made to attract
the attention of the troops.
Signals with the Hand.
The following control signals are used:—
1. Deploy.—The arm extended to the full extent over
the head and waved slowly from side to side, the hand
to be open and to come down as low as the hips on both
sides of the body.
If it is required to deploy to a flank, the commander
will point to the required flank finishing the signal.
2. Advance.—The arm swung from rear to front
below the shoulder.
3. Halt.—The arm raised to the full extent above the
head.
4. Retire.—The arm circled above the head.
5. Change Direction, Right (or Left).—The arm is
first extended in line with the shoulder. A circular move*
ment is then made, on completion of which the arm and
body should point in the required direction.
When troops are halted the above signal means change
position, right (or left).
6. Blight (or Left) Incline or Turn.—The body or
car turned in the required direction and the arm extended
in line with the shoulder, and pointing in the required
direction.
37
7. Close.—The hand placed on top of the head, the
elbow to be square to the right or left according to which
hand is used.
The above signal denotes close on the centre. If it
is required to close on a flank, the leader will point to
the required flank before dropping his hand.
If, when on the march, it is required to halt as well
as dose, the leader will give the halt signal before
dropping his hand.
8. Quick Time.—The hand raised in line with the
shoulder, the elbow bent and dose to the side.
9. Double or Increase Speed (M.T.*).—The clenched
hand moved up and down between the thigh and
shoulder.
10. Follow Me.—The arm swung from rear to front
above the shoulder.
11. Start Up (M.T.).—Circular movement of the
hand as if starting an engine.
12. Mount (M.T.).—Two or three slight upward
movements with the hand (palm uppermost).
13. Lie Down or Dismount (M.T.).—Two or three
slight movements with the open hand towards the ground
(‘palm downwards).
14. As You Were or Switch Off (M.T.).—The arm
extended downwards with the hand open, and waved
across the body, parallel to the ground.
15. Slow Down or Resume Normal Speed (M.T.).—
The arm extended to the side level with the shoulder,
palm downwards, and moved slowly up and down with
the wrist loose.
16. Form Line (M.T.).—The arm waved horizontally
from right to left and back again as though cutting with
a sword, finishing with the delivery of a point to the front.
* M.T.—Motor Transport. Signals for Infantry and
Mounted units adopted where applicable to Motor Trans*
port, as per 9 to 17 herein.
38
17. Form Close Column (M.T.).—The hand raised
perpendicularly above the head and lowered and raised
several times.
18. Last Order Completed.—The salute, followed by
the hand raised vertically above the head, hand open and
fingers together.
19. Right (or Left) Take Ground.—Hand brought
to the shoulder with the fist clenched, and the arm
extended sharply in the required direction two or three
times. Of use to get M.T. vehicles off the road, when
practicable, to avoid enemy aircraft attacks.
Rag Signals for Tanks.
Tanks communicate with infantry by means of the
following flag signals:—
Red, white and blue means friendly tank coming
out of action to rally.
Green and white means opposition neutralised; in*
fantry come on.
Red and gold mteans out of action. Do not wait for
me.
Signals with Rifle.
The following communicating signals are made with
the rifle: —
1. Enemy in Sight in Small Numbers.—The rifle held
above the head at the full extent of the arm and parallel
with the ground, muzzle ‘pointing to the front.
2. Enemy in Sight in Large Numbers.—The rifle held
as in the previous signal, but raised and lowered fre*
quendy.
3. No Enemy in Sight.—The rifle held up to the full
extent of the arm, muzzle uppermost.
These signals may be used by scouts, etc., sent on
ahead о/ their sections. Care should be taken that the
signal cannot be seen by the enemy.
39
Signals by Whistle Blast.
The following whistle blasts are used:—
1. The Customary Blast (a Short Blast).—To draw
attention to a signal or order about to be given.
2. The Alarm Blast (a Succession of Alternate Long
and Short Blasts).—To turn out troops from camp or
bivouac to fall in, or to occupy previously arranged
positions.
3. Enemy Aircraft in Sight (a Succession of Short
Blasts).—Since this signal will often be inaudible, a visual
signal will also be used to attract atention, viz., both
arms held above the head and hands waved. On this
signal, troops either get ready to fire, open out or take
cover, according to the order in force.
4. Enemy Aircraft Attack Ended (Two Long Blasts
Repeated at Intervals of Five Seconds).—Oh receipt of
this signal all troops resume previous formations. Troops
which have been firing will recharge their magazines
before moving off.
У. Start up and Mount or Switch Off (one long
bhst).
6. Dismount (two short blasts).
SECTION FORMATIONS.
Troops should be practiced in becoming flexible in
their movements so that when enemy fire is encountered,
they should be able to deploy immediately on the signal
being given by the leader. The formations to be adopted
on deployment depends. on the conditions under which
the defence is being made, the nature of the ground and
the enemy’s fire.
The formations most commonly used are:—
1. File.—The close formation of troops in file per-
mits of rapid movement and control by the leader. On
the other hand, file offers a good target to enemy fire,
and is not good for fire production.
4U
2. Single File.—Is useful for certain types of cover,
such as hedges, but does not give good Ere production.
3. Extended Line.—A good formation when crossing
open ground under fire, but is more difficult to control.
4. Arrowhead.—Permits of quick deployment to
either flank.
These formations are at the > discretion of the section
leader, who should adjust his formation to the require-
ments of the situation. When verbal orders are being
given under these circumstances they should be brief and
not given as drill movements. For instance, "‘Behind me
in file." "On my right and left—paces." "Arrowhead."
"Across that bridge and line the bank."
DEPLOYMENT.
Deployments are carried out at the double. The de-
ploying intervals and distances may be varied to suit the
ground or other circumstances. The object of deploy-
ment is to avoid casualties which may be achieved by
skilful use of ground and cover.
Platoon Deploying from Column or Column of Route.
Commander orders "Deploy." On this command the—
Centre section moves straight forward about 50 yards.
Right section doubles out to the right about 50
yards.
Left section doubles out to the left about 50 yards.
Platoon H.Q. forms and moves forward in rear of
centre section in line with the flank sections.
The final formation is a triangle, of which the centre
section is the apex.
It is the responsibility of a section commander to main-
tain his section in its relative position and to decide on the
formatidb to be adopted by the section, i.e., single file, or
extended line, or arrowhead. He will convey his decision
to the men either by brief instructions or by signal.
41
Platoon Closing to Column or Column of Route from
Deployment.
Commander gives order either by voice or signal»
‘‘Close on—Section?’
Sections then wheel into their correct relative positions
in column and» if necessary, proceed in column of route.
Company Deploying from Column of Platoon.
Company commander gives the order by voice or sig*
nal “Deploy.” On this command, platoons act as fob
lows: —
Centre ‘platoon moves forward for approximately 200
yards.
Right platoon moves out to the right for about 100
yards.
Left platoon moves out to the left for about* 100
yards.
Company headquarters moves in rear of the centre
section and approximately in line with the flank
platoons.
The final formation is a triangle.
Company Deploying from Column of Route.
Company Commander gives the order by voice or sig*
nal “Deploy.” On this command, platoons move out to
form a triangle, the sides of which are approximately
200 yards. Company headquarters will take up a position
in the centre. The leading ‘platoon moves forward, the
second platoon moves out to the right and the third
platoon to the left.
Once a company is deployed platoon commanders be*
come responsible for the formation of their platoons.
Company Deployed Closing to Column of Platoons or
Column of Route.
On the “Close” signal being given, platoons will re*
sum'e the formation in which they were moving before
receiving the order to deploy.
42
SCOUTS: PATROLS (RECON-
NOITRING, FIGHTING AND
STANDING)
SCOUTS.
Their Use.
Scouts are the eyes and cars of the body of troops
they protect; their function is to prevent surprise attack,
to reconnoitre ground, and to collect information.
The commander of the deployed unit is responsible for
its protection. He adopts the formation suitable to the
ground. If the enemy has not been located, and the
ground over which the advance is to be made cannot
be seen, scouts are sent forward. Similarly with exposed
flank. Forward scouts should not mask the fire of the
troops in rear.
How They Operate.
Scouts work in pairs. They advance from one objec*
tive to another in bounds. An objective is selected to
which one moves forward whilst the other remains to
observe. The observer is then signalled forward to the
new position. Thus the first scout is covered by the
second and can help him with fire to withdraw if surprised
by the enemy. The second scout can also take back a
report should anything happen to the forward scout.
Bounds selected should give a good view forward and
should be suitable for signalling back. The scout should
be able to see more than the section commander, but he
should keep contact and avoid all risk of becoming lost.
Scouts should see without being seen and for this
reason they should use their rifles only in defence.
Com/nanders who wish to givfc fresh orders to their
scouts, signal them to stop and move u*p to them.
Scouts can also be used as links between forward and
reserve sections.
43
PATROLS.
1. Reconnoitring Patrols.
(a) Their use may be employed for the purpose of
protection or to secure information about the enemy or
the ground. If for protection, then their movements
depend on the plans of the force they are protecting. If
for information, they act independently of the unit from
which they are sent out. An instance of the work of a
protective patrol is when it is sent out from an outpost
before dawn to discover if the enemy has approached
closer under cover of darkness.
Special reconnaissance patrols keep contact with the
enemy after a successful attack. They also keep contact
with units on the flank or with rear reserve units.
(b) How Conducted.—Patrol leader must clearly un*
derstand his task and let his commander have the infer'
mation required in time for action.
The patrol leader is told:—
1. Information regarding the enemy.
2. The position of our forward detachments and
other patrols.
3. The object of the patrol and the information that
is required.
4. Times of departure and return.
5. The route going and coming and how patrol is
to be recognised by our own troops.
6. If other detachments of our troops know the patrol
is out.
(c) Preparation for Patrol:—
Reconnaissance.—Leader to study the ground with
another member of the patrol, noting likely obser*
vation points, covered routes, bounds, landmarks,
obstacles and ambushes.
Orders.—Every man of the patrol should know the
plan and the objective.
44
Equipment.—The patrol should be as lightly
equipped as possible, often with rifle only; maga*
zine charged and a few rounds in the tunic
pockets.
Silence.—No rattling equipment. Put it on under
tunic if necessary. Men liable to cough or sneeze
be left behind. Use the bayonet in preference to
the rifle.
Secrecy.—No letters, papers or war maps to be
carried.
(d) The route.—Officer in charge decides. The return
should be by a different route. The same route or pro-
cedure should not be made twice running.
(c) The approach.—Approach objectives from rear or
flank.
Do not do as the enemy expects. Avoid obvious places,
such as isolated cover.
Avoid contact with enemy 'posts or patrols.
Advance under direction of scouts and by selected
bounds.
(f) Strength.—Patrols seldom exceed a section (nine
men and N.C.O.). Two or three competent scouts may
be sufficient depending on protection needed and length
of time patrol is to be out.
(g) Formation.—Depends on cover, control, protection
and the ground. Keep compact to keep control, but guard
against surprise. Hank as well as frontal observation is
essential. When a bound is made one or two men will
follow in rear or on a flank to protect against surprise
attack and getting away in event of main patrol falling
into ambush. They must keep patrol in view and be able
to get away if necessary.
(h) Withdrawal of Patrol.—By bounds as in advance.
A fire position in rear will be selected, and manned by a
portion of the patrol which will cover the withdrawal of
the others.
45
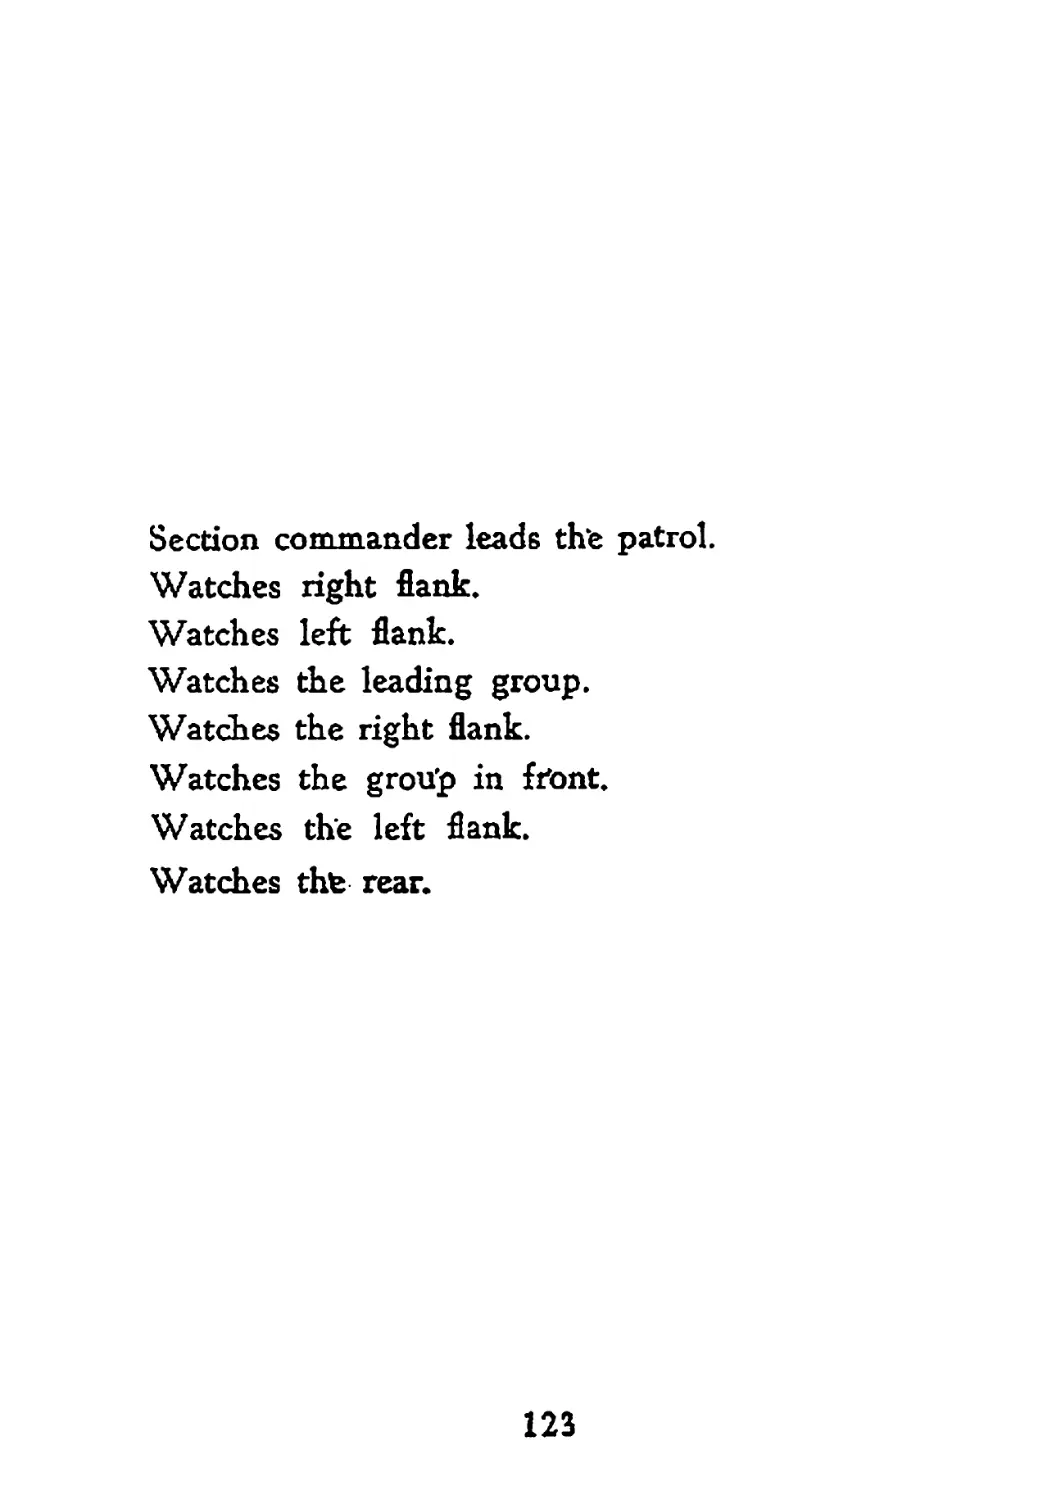
(i) Night Patrols.—Not necessary to proceed by bounds,
but at a steady pace, halting frequently to check up on
route. File is a suitable formation with two riflemen and
patrol leader a little way ahead and one man a short
distance in rear. Silence is essential. If the enemy is sud*
denly met use the butt and the bayonet before he has
time to recover.
When moving in darkness on roads, keep to the side
where the ground is softer. Keep to the low ground
and in the shadow; avoid the skyline.
2. Fighting Patrols.
Must be prepared to act offensively. They are com*
manded by an oflicer or W.O. IL and consist of two
or more sections. They are to deal with enemy patrols,
capture prisoners and bring back wounded. The task of a
fighting patrol may be protective or for some special
purpose. In protective patrolling their task is to delay
the enemy during a withdrawal, or to protect troops form*
ing up for a night attack. Special tasks might be to
cover a demolition party, secure identifications, or harass
the enemy.
3. Standing Patrols.
Standing Patrols are sent out to watch approaches
which the enemy is expected to use, such as fords,
bridges, road junctions, or likely enemy assembly posi*
tions, which are hidden from the main body. They may
also occupy prominent points which an ‘enemy must cap*
ture as a premilinary to an attack. The difference be*
tween a standing ’patrol and a defensive post is that the
latter must fight in its position to the last. A standing
parol however, may change its position or withdraw if
forced to do so by the en’emy.
4. Conduct of Standing Patrol.
The commander must know:—
1. His task.
2. His route out and back.
46
3. What to do when the enemy advances, i.e., whe*
ther to try to delay them or withdraw.
4. How often to report and by what means.
5. Signals to be used on approach or withdrawal
of enemy.
6. How he is to be recognised on approaching his
own lines.
5. Selecting Position.
A covered line of withdrawal should be available. It
should be possible to open fire on enemy at long range.
There should be no covered flank approach so that
enemy could advance unseen.
Fire positions should be selected for defence.
Sentries should be posted in concealed positions and
the remainder of the patrol should lie down under cover
ready for immediate action.
Sentries should also be hidden and close enough to be
able to give the alarm.
Sentries will be instructed whether to challenge or o’p'en
fire without awaiting orders.
6. Conclusion.
In scouting and patrolling, as in all other branches of
field craft, whilst certain basic principles are laid down
as a general guide, it is intended that each soldier should
be encouraged to develop initiative, cunning and intellr
gence in the use of those rules.
It should also be borne in mind that a problem may
have many solutions, but there is only one correct solu*
tion, that is the one which is successful.
47
CROSSING WATER OBSTACLES,
VILLAGE AND BUSH FIGHTING
Infantry will often be faced with operations involving
the passage of a water obstacle, or fighting in woods and
villages.
These types of operation possess certain characteris-
tics of their own and it is necessary to consider briefly
the action of infantry when engaged in them, though
the principles of section leading given in previous lec-
tures still stand.
THE PASSAGE OF WATER OBSTACLES.
Action of Leading Troops.
On encountering a water obstacle commanders of the
leading platoons and sections will make every effort to
obtain a footing on the far bank. Energetic action by the
leading troops may ‘prevent the enemy completing his
demolition programme.
If the obstacle is shallow, the leading troops should
wade across. If wading is impossible existing resources
must be utilised to the fullest extent. The whole line
of the river must be searched by patrols to see whether a
bridge has been incompletely demolished, a footbridge
left intact by the enemy, or boats left on the near side of
the river.
Even if patrols cannot find any means of crossing they
should supply valuable information and so assist the com-
mander in making the detailed arrangements necessary for
the subsequent crossing.
The Points on Which Information is Required are:—
(i.) Enemy positions.
(ii.) Nature and slope of banks and bottom, height
or bank above the water.
48
(iii.) Information about the river, width, depth, cur*
rent.
(iv.) The existence of islands, weirs or sandbanks.
(v.) Whether there are subsidiary obstacles such as
wide ditches.
(vi.) Approaches to the river bank for men and
wheeled transport, and whether these arc concealed from
enemy observation on the far bank.
(vii.) View ‘points, and the stretch of water that can
be seen from each point.
Service Equipment Employed in Crossing.
(i.) Reconnaissance Boat made of rubber provided
with foot pumps and two paddles. Can be inflated in five
minutes. Carries two fully equipped men and light
machine gun. Carried in kit bag one foot diameter and
two foot six inches long.
(ii.) Folding Assault Boat made of wood with canvas
side 12 feet long and four feet nine inches wide . Sides
fold flat down to bottom of boat . Carries nine men
fully equipped plus two additional men for return jour*
ney. Can be carried by three men.
(iii.) Kapok Assault Bridging comprising a series of
floats filled with kapok which are joined together to carry
a pontoon. Their chief disadvantage is that they arc
a bottleneck, thus preventing an advance on a wide front.
N.C.Os. in Charge of Sections of the Assault Troops
Detailed to Cross by Folding Assault Boats.
(i.) Supervise the erection of the boat at the forming
up position.
(ii.) Detail the men who arc to paddle the boat across
—four men to six will be required. (Two of these men
will ha$c been attached to the section and will act as the
permanent crew of the boat; when the section has landed
they will paddle the boat back to the near bank.)
49
(iii.) Indicate to each man his position in the boat
and the order in which he will enter it. This should
be practised on dry land prior to the crossing. Two men
without paddles should be detailed to crouch in the bow
ready to leap ashore as soon as the boat approaches the
far bank.
(iv.) Detail the equipment that is to be carried. As a
rule the section will be fully equipped for movement.
(v.) The N.C.O. must be certain that he knows the
route from the forming up position to the point on the
river bank where the boat is to be launched, and that
there are no obstacles in the way. The route must be
cleared and if necessary, marked.
(vi.) The complete plan must be explained to the
whole section. This will include a description of the
forming up position on the far bank; the signal for the
advance to the objective; the location of the covering
troops who cross in advance; a description of the objec-
tive and the action to be taken when if is reached.
(vii.) If compasses are available, compass bearings
should always be taken.
N.C.Os. must insist that all arrangements ’prior to the
crossing are carried out in complete silence; no lights or
smoking should be allowed.
POINTS TO BE OBSERVED WHEN FIGHTING IN
WOODS
1. General.
The progress of an attack through woods will be slow
and laborious. Consequently they should be avoided by
attacking troops. But even though the main attack may
have been so directed to avoid passing through wooded
country, this must be eventually cleared by troops de-
tailed for the purpose. Owing to the reduced visibility
and enclosed nature of woods, the support given by other
arms such as artillery and armoured fighting vehicles will
50
bo small. Fighting will therefore, be mainly between
the opposing infantry. Success will depend on resolute
leading and a high standard of training both in field
craft and skill ’at arms.
2 Method of Advance.
Objectives should be lines (roads, trucks, streams,
clearings, etc.) which can be easily recognised on the
ground, and along which touch can, as necessary be re-
established. The distance between them should not be
too great and the progress of troops operating on neigh-
bouring routes should be co-ordinated step by step,
liaison being achieved by patrols meeting at pre-selected
places. Fronts should be relatively small and reserves
kept closer to hand than in open country. Touch with
platoon headquarters must be maintained, and every op-
portunity taken to re-organise both for the purposes of
control and for checking the direction of the advance.
The rate of advance will be slower than in the o'pen,
as the attack will consist of a methodical advance from
objective to objective.
No definite rules can be laid down, applicable to all
cases, but section commanders should bear the following
points in mind:—
(i.) Owing to reduced visibility, there is always the
danger of ambush, so that special vigilance is essential.
On the other hand, the enemy may also be ambushed
axid surprised. Section commanders must remember that
because of the reduced visibility commanders in rear
will have little idea of what is going on except from
information sent back by those in front.
(ii.) It is difficult to keep direction when moving.
(iii.) It is difficult to keep touch with neighbouring
sections
(iv.) "Sounds are magnified in woods and bush though
it is difficult to detect their direction; it is therefore im-
portant to move carefully and silentiy.
Я
3» Formations.
(i.) Extensions, intervals and distances will depend on
visibility. The leading companies will as a rule be pro*
tected by sections extended in line followed by section
or platoon columns. In very thick woods connecting
files will be necessary.
(ii.) Sections should be disposed so as to reduce the
risk of being surprised by an ambush. If the under*
growth is not too thick, it is better to move off a path
and dose to it; in any case, scouts should move ahead
of the section, the distance varying with the visibility.
When moving away from paths, extended line is the
most suitable formation if the undergrowth is not too
thick. In heavy undergrowth, file or single file may be
necessary, though in these formations the section is not
well placed to avoid ambush. Close control by the sec*
tion commander is necessary and the men of the section
should always be in sight of each other.
(iii.) When crossing a clearing or path which may be
under view of the enemy, it is best to do so in one rush,
the clearing should first be reconnoitred.
(iv.) Special care must always be given to the flanks
and rear.
(v.) The maintenance of direction and touch require
constant attention. Men experienced in wood and bush
craft develop an instinct for keeping direction.
(vi.) If a section is surprised at close quarters, the
most effective and safest dan is to rush the enemy; this
applies especially to uncivilised enemies.
(vii.) When debouching from a wood, sections should
not halt on the edge, which will often be subjected to
heavy fire by the enemy. They should be reorganised
before the extreme edge of the wood is reached, so that
they can debouch into the open rapidly.
52.
4. Fire Discipline.
Fire discipline and fire control are particularly import-
ant in woods; otherwise there is a danger that sections
may fire into each other, owing to loss of direction or
poor visibility.
POINTS TO BE OBSERVED WHEN FIGHTING IN
VILLAGES
1. General.
Infantry will often be detailed to mop-up the enemy
remaining in a village after the main attack has passed.
Street and house-to-house fighting is always difficult for
the attacker, and success will depend largely on the
initiative of section commanders.
The following paragraphs may be of assistance to
junior leaders engaged in operations of this nature.
2. When Advancing Through a Village.
(i) The right of the road is usually the safest side on
which to move, as it is difficult for riflemen in houses
to bring fife to bear on this side without exposing them-
selves to view.
(ii.) Whenever possible get a light machine gun into
a window or on to a roof top to give covering fire while
the remainder of the section advances along the road.
(iii.) Formations will depend on circumstances, but as
a general rule two scouts should precede the section, their
duty being to watch the windows and roofs on the op-
posite side of the street and to o’pen fire as soon as any
enemy appear. Similarly two men should follow the
section ready to deal with anybody opening fire after the
section has passed.
(iv.) Remember, that streets arc not always the best line
of advance, casualties will often be saved by moving
through backyards and gardens.
(v.) The two-inch mortar and hand grenade will be
found most useful in effecting an entry into a house or
dealing with barricades.
53
(vi.) Houses must be cleared systematically. Do not
forget the cellars. Before entering a house each man
in the section should know his particular task. It is
dangerous to delay in the doorway.
3. When Defending a House»
(i.) Always occupy the roof.
(ii.) Doors must be barricades, but means of rapid
exit should be provided.
(iii.) Examine the cellars to see whether an opening
is available from which fire may be opened on the enemy
from an unexpected direction.
(iv.) All entrances should if possible be covered by
fire from other houses (mutual support).
(v.) If time is available, buildings should be loop*
holed and windows sandbagged; communications should be
improved by knocking holes in walls between houses
and gardens, so that movement is possible without enter*
ing the street.
94
PROTECTION AGAINST
AIRCRAFT, ARMOURED
FIGHTING VEHICLES, AND
DURING WITHDRAWALS
GENERAL
Commanders are at all times responsible for the pro-
tection of their units; no body of troops can be regarded
as secure unless protection is furnished in all directions
from which attack is possible, whether from the front,
the flanks, the rear or the air. Under modem condi-
tions, even when at a considerable distance from the
enemy and when other troops are in front or to the
flanks, units are liable to. attack, and should therefore
always be ready to fight and protect themselves at short
notice.
ANTI-AIRCRAFT DEFENCE
1. Speed is the essence of all attacks from the air.
A few seconds only will elapse between the first appear-
ance of the aircraft and the end of the attack.
The efficiency of the defence will therefore depend:—
(i.) On the speed at which warning of the attack can
be conveyed to subordinate commanders.
(ii.) On the quickness with which the warning can
be followed by the executive orders for movement or fire.
(iii.) On the skill, steadiness and fife discipline train-
ing of the troops.
2. Means of Protection*
Infantry protects itself against enemy aircraft by:—
(i.) i Concealment.
(ii.) The adoption of suitable formations (dispersions).
(iii.) Small arms fife.
55
3. Concealment and Formations.
On the line of inarch concealment is almost impossible,
but when at rest or deployed the following points should
be considered:—•
(i.) The adoption of irregular formations in such small
groups that the target, if observed from the air, does
not appear worth attacking.
(ii.)Troops should keep in the shade and not look up.
(iii:) If in the open, they should lie down and remain
still.
(iv.) Engines of mechanical vehicles will be stopped so
as to prevent smoke (from the exhaust.
(v.) Efforts should be made to conceal the smoke of
cooking.
4. Air Observation.
Air observers find the position of bivouacs by the
study of air photographs, which clearly show new tracks
and turned soil. Their object may be defeated by:—
(i.) Good track discipline.—This is of the utmost im-
portance. Sentries must be posted to ensure that troops
only use covered approaches (under hedges, etc.) and
avoid making obvious tracks in the open.
(ii.) All earth turned for latrines etc., should be
located under cover.
5. Warning.
Air sentries should always be posted to give warning
of the approach of hostile aircraft. The signal is a suc-
cession of short blasts on a whistle, but since this may
often be inaudible, sentries should also make a visual
signal by holding both arms above the head and waving
their hands. Sentries must be continually watching the
sky, especially in the direction of the sun or towards
low hills, woods, etc. They must also listen for the a’p*
proach of aircraft. Their duties arc exhausting and entail
great strain on the eyes. They should be therefore re*
licved frequently.
56.
6. Small Arms Fire.
(i.) At rest or when deployed.—Orders will be issued
by battalion commanders as to whether hostile planes are
to be engaged by small arms fire or not. In certain
circumstances when trodps arc well concealed it may be
inadvisable to open fire so as to avoid disclosing their
presence. Section commanders must be quite clear on
this point and instruct their sections accordingly.
(ii.) When halted.—The fire of the light machine gun
is the most economical form of protection.
(iii.) On the move.—The fire of all available rifles
must be used to protect the column. Light machine guns
should be brought into action if time permits, but this
will rarely be possible except for the four light machine
guns carried in the anti-aircraft platoon.
Before starting out, all rifle magazines will be charged
with 10 rounds and sights set at 500 yards.
On receipt of the order “Aircraft action" the following
action will be taken:—
(a) Troops will immediately dash for cover.
(b) The section will be the fire unit. Fire orders
will be issued both verbally and visually by section
commanders.
(c) Section commanders will not fire, but will con-
trol the fire of their sections.
(d) The aeroplane will be engaged with continuous
rapid fire.
(e) Fire unit commanders will ensure that as much
fire as possible is concentrated on the aeroplane
when it is climbing away after the attack, as it
will then present the most favourable target.
(f) When the attack is finished, magazines will be re-
charged with ten rounds and the advance con-
tinued with as little delay as possible.
57
ROAD BLOCKS AGAINST ARMOURED FIGHTING
VEHICLES
General.
The radius of A.F.Vs. raises special problems of pro*
tection which particularly affect a force on the move.
Even when no immediate threat against a flank exists,
encounters with small numbers of hostile A.F.Vs. or
troops in mechanical vehicles are possible. In such a
situation the most economical form of protection may
be to establish road blocks covering approaches on the
threatened flank or flanks.
(This subject is covered in this manual in section
“Tank Hunting and Destruction.”)
PROTECTION WHEN WITHDRAWING—REAR
GUARDS
1. General»
A force retiring covers itself against enemy pursuit by
a rear guard, whose duty is to secure for the main body
an unmolested withdrawal. Platoons forming part of a
rear guard will often be protected by cavalry or the car-
rier platoon. A rtar guard usually withdraws from one
position to another or through a position held by other
troops.
2. Rear Guard Position.
Rear guard and defensive positions are similar, and the
section commander will have the same tasks in both.
The main differences are that, in a rear guard position
depth is sacrificed and positions are selected so as to
obtain the maximum field of fire from the outset and a
covered line of withdrawal. A large ‘proportion of light
machine guns will, therefore, be given arcs of fire straight
to the front.
58
3» Withdrawal.
Withdrawal from a rear guard position will usually be
carried out at night. By day it is a very difficult operation.
Before withdrawal, the section commander in an ad'
vanced platoon will require to know:—
(i.) Time up to which the forward localities are to be
denied to the enemy.
(ii.) Who is holding any position which may have
been organised in rear, where it is, and what time his
section is to pass through this position.
(iii.) Route back to platoon and company rendezvous.
This route must be chosen so as not to mask the fire of
any troops holding a position in rear.
(iv.) Who will give order to begin withdrawal (if he
has not got a watch).
(v.) What covering fire is available.
(vi.) Where the platoon truck will be located and what
spare equipment can be loaded on trucks ‘prior to the
actual hour of leaving the position.
(vii.) Locations of platoon and company headquarters.
Routes and rendezvous will in all cases be selected by
the next higher commander, i.e., section route and render
vous selected by platoon commander and so on. This is
to avoid j commanders of two sections or platoons both
selecting the same route or rendezvous thereby causing
congestion.
59
ANTI-GAS
General.
Gas may be used by the enemy in many different ways.
It may be sent over in shells. mortar*bombs, projector
bombs, air*bombs, or sprayed from aircraft. It may also
be emitted from gas cylinders and carried over by the
wind in the form of a doud. Ground may also be con*
taminated by enemy in withdrawal by means of ground
contamination bombs or gas mines.
Gas may be used by the enemy in order to:—
(i.) Produce casualties.
(ii.) Harrass our troops by forcing them to wear their
protective equipment for long periods.
(iii.) Contaminate ground, thus causing delay and
casualties.
It is important that protective arrangements should
be taken immediately. To do this, it is essenial that gas
should be recognised at once, and all 'personnel in the
gassed area immediately warned.
Characteristics of the Different Gases.
Generally speaking, gases can be divided into two dif*
fcrent types—persistent or non*persistent:—
(i.) Non*persistent gas is like smoke from a chimney
which is rapidly dispersed by the wind. It will therefore
only be dangerous in any one spot for a short period.
(ii.) Persistent gas is a liquid giving off a vapour until
the liquid dries up, when it becomes harmless. This
vapour may continue for hours, days or even weeks.
Non*persistent types are divided into two different
groups:—
60
1 .—Choking Group.
TYPE. HOW TO 1 RECOGNISE. j EFFECT. j PROTECTION.
Phosgene Smell of musty hay. Choking and cough- ing which may become intense. Respirator gives complete protec- tion.
Chlorine A greenish coloured gas, smells like chloride of lime. Choking and cough- ing. Respirator gives complete protec- tion.
2 .—Nose Group.
TYPE. HOW TO RECOGNISE. EFFECT. PROTECTION.
Poison smoke .. .. The resultant tend- ency to remove the facepiece when it aggra- vates the effects of poison smokes must be guarded against. Visible at point of emission but soon becomes invis- ible. Can only be recognised by ef- fect it produces after approxi- mately 3-5 min- utes. Burning pain in nose followed by sneezing. Casual- ties recover in a few hours. Respirator gives complete protec- tion but when the respirator is put on after exposure to this gas the symptoms tend temporally to get worse instead of better.
Persistent types are divided into two different grou’ps:—
________________________________1.—Tear Group.________________
TYPE. HOW TO 1 RECOGNISE. EFFECT. PROTECTION.
Some of these gases may be non-persistent but usually they are persistent. Can be recognised at once by the Immediate effect on the eyes. Copious flow of tears and spasm of eyelids. These symptoms pass after a short period. Respirator gives complete protec- tion.
2.—Blister Group.
MUSTARD
This is the most likely type of gas to be used. It remains dangerous in some
cases for long periods. It will penetrate the skin in five minutes and ordinary
clothing in about ten minutes. Both the liquid and vapour given off by the
liquid are dangerous.
How to Recognise.
The liquid may be light straw or dark brown colour, but on grassland, etc.,
it will often be invisible. It can be recognised by the smell of garlic or onions
given off by the vapour.
The Effect
N.B.—The following times can only be taken as a simple guide.
Liquid Form.
Eyes.—Immediate irritation, closure of the eye in about one hour; permanent
blindness.
Skin.—Nothing will be felt at first. Redness appears
approximately eight to 12 hours; then intense irritation
followed by blisters in from 12 to 24 hours. Swallowing
contaminated food or water causes severe injuries to the
stomach.
Vapour.
To be affected by vapour an individual must remain in
a strong concentration for a period of from half hour to
one hour or even longer.
Eyes.—No immediate effect. After a few hours, irrita*
tion followed by temporary‘blindness within about 24
hours.
Throat.—Loss of voice and cough. Severe cases prove
fatal.
Skin.—No immediate effect. Irritation after a few
hours, then blisters may develop.
Protection.
Protection is provided by anti*gas clothing.
LEWISITE
Smells of geraniums. Has the same general charac-
teristics as mustard gas.
Lewisite acts much more rapidly than mustard.
Personal Anti-gas Clothing.
The following are issued for anti'gas protection.
(i) Respirator.—Affords 100 per cent, protection to the
eyes, nose, throat and lungs against all known war gases,
provided it is in working order and has been fitted cor*
rectly
(ii.) Eyes shields.—Expandable. Six will be issued to
each man, and will be carried in the pocket of the respira-
tor haversack. They should be always worn when there
is danger of being sprayed with gas from the air. They
provide complete protection to the eyes from liquid blister
gas.
63
(iii.) Capes.—Will be issued on a basis of three for
each man. One will be carried on the man or in the
platoon truck, one in unit transport and a third in rear
echelon. Each cape will provide protection for approxP
mately 1£ hours against liquid blister gases. They do not
provide protection to the face, hands, ankles and feet.
(iv.) Ointment.—Two tins each holding eight small
lead tubes will be carried by each man; one in the
respirator haversack and the other in the pocket of the
cape.
Ointment, anti'gas No. 2, must be applied within one
minute of Lewisite contamination to give complete pror
tection.
If ap’plied within five minutes after contamination the
ointment gives complete protection from mustard gases.
If applied within five and 15 minutes the effect of the
gas will be considerably reduced.
Gas Warning.
A good system of alarm signals to warn troops that
gas is being used by the enemy is essential. All sentries
are automatically gas sentries; they may detect the presence
of gas by:—
(i.) Smell.
(ii.) Gas spray detector—which develop red spots when
sprayed with blister gas. They are used to indicate the
fall of gas spray. In addition to sentries, mechanical
transport will be provided with these detectors. An indivr
dual detector will be carried by all personnel.
Sentries will give warning of the ’presence of gas on
their own initiative whenever gas is detected by sounding
the local alarm.
64
Protection.
On the gas signal being sounded all personnel will at
once adjust their respirators.
Action on Encountering a Gassed Area.
When an area contaminated with blister gas is cn*
countered by the leading troops, the main principles
are:—
(i.) To make every effort to find a way round the
obstacles and then continue to advance, unless actually
attacking in which case the contaminated area must be
ignored and casualties accepted.
ii. Warn those in rear of position of the contaminated
area.
Duties of Leading Section Commander.
In accordance with these principles, the leading section
commander will:—
(i.) Order the section to put on respirators.
(ii.) Send back a verbal report to the platoon com*
mander.
(iii.) Find a way round and continue advance.
65
PHYSICAL FITNESS
If an invader set foot on our shores, every conceivable
device and every ounce of physical energy would be
needed to repel him.
Every man must see to it that he is “fighting fit” to
stand up to fatigue and hardships. All the knowledge
possible of drill, musketry, tactics, etc., would be of little
use if the soldier were not physically fit. Part of this
preparation is a thorough drilling in physical training.
To do this efficiently it will be necessary for every man
in the V.D.C. to rise ten minutes earlier every morning
and work through the prepared syllabus. It is important
to follow the table of exercises fully, as it is prepared, to
harmonise mind and body to attain the best results. It
will be easy to find an excuse to stay in bed: such as the
weather being too cold or too wet. Show a determined
spirit and overcome these minor tribulations. If it is
raining, then do the exercises indoors.
Here are four points that must be understood before
commencing individual training:—
(1) Physical training must never be attempted within
half an hour of completion of a meal.
(2) Exercises requiring movement both right and left
are always commenced to the left first. An equal distribu*
tion must be strictly adhered to at all times.
(3) To obtain maximum benefit, starting positions such
as “hips firm” and “arms bend” must be correct.
(4) Work in shorts and sandshoes if possible, but as
soon as the table as set out is concluded, put on a dressing*
gown or something warm.
Physical training should not cause undue fatigue, and
in a unit such as the V.D.C., consisting of men of such
varying ages, it is obvious that the same effort cannot be
exerted by all, but some portion of each exercise should
be completed in order to reach the highest possible physi*
cal condition. For instance, strenuous jumping or jerking
exercises should not be undertaken ,by the older men.
66
Every individual should assess his own capacity and exer-
cise accordingly. Where a younger man might repeat each
exercise, say, 12 times, an older many may find half this
number sufficient, but the number should be progressively
increased with fitness. It is emphasised that where a weak*
ness in constitution is known, any exercise having the
effect of aggravating it must be omitted.
Here is a brief explanation of the sequence adopted in
physical training:—
MARCHING AND RUNNING GROUP.—Commence
by doing some simple and easy exercises requiring little
effort, which helps to tone up the body.
INTRODUCTORY GROUP (leg, neck, arm co-ordina-
tion).—It has a general effect on the whole body, stimu-
lates circulation and prepares the system for the more
strenuous exercises to follow.
GENERAL GROUP (heaving, lateral, balance abdom*
inal (stomach muscles) and dorsal (back muscles)).—
These exercises are of a more strenuous nature, so designed
to develop harmoniously every part of the body.
AGILITY GROUP (jumping and vaulting).—Very
vigorous exercises requiring strong, muscular perwer.
FINAL GROUP (leg, neck and arm).—Quiet and easy
exercises to enable the body to return to its normal
temperature.
CORRECTIVE EXERCISE (deep breathing).—To
develop the chest and to assist bringing the action of the
heart and lungs back to normal.
The following comprehensive exercises are submitted
to cover the complete physical body:—
MARCHING AND RUNNING.—(a) A hundred
skips with a skipping rope or one or two minutes of
doubling pn the spot. Start slowly and gradually increase
the speed, (b) Deep breathing.
LEG.—Heels raising and knees bending. Starting posi*
tion: Hips firms (four times.)
67
NECK.—Head circling. Three to the left and three
to the right. Make the head pivot the largest circle
possible without moving the shoulders. Take care with
the neck muscles, as they are the tcndcrest in the body
and are more liable to stifl’ness. Starting position: Atten-
tion.
APJvL—Arms stretching forward, sideways and upwards
(change the sequence). Starting position: Arms bend
(five times).
CO-ORDINATION.—Astride jumping with arms rais-
ing sideways (later with a rebound). The idea of the
co-ordination movement is to have control of mind over
muscle, i.c., doing two movements in one and working in
harmony (ten times).
HEAVING.—Double arm punching upwards slowly
with a slow return. Make a deliberate effort of this a 5
though you had a heavy weight to be lifted to the full*
arm extent. Starting position: Arms bend (three times).
LATERAL.—Trunk bending sideways. Then trunk
turning. Starting position: Feet astride, hips firm (four
times each).
BALANCE.—Leg raising forward, sideways and back-
wards, with toe pointing to the ground. Starting position:
Hips firms (four times each foot).
ABDOMINAL.—Trunk rolling. Small to large circle
Starting position: Feet astride, hands above the head
clasp (three clockwise and three anticlockwise).
DORSAL.—Touching the toes. Do this exercise
rythymically, counting to yourself: "‘Knees, toes, knees,
up/' Straighten up and square the shoulders after each
movement. Starting position: Hips firm (ten times). If
you cannot reach your toes, do not strain yourself. Go
down as far as you can.
FINAL.—Finish off with 50 slow skips.
CORRECTIVE.—Arms forward raise. Deep breathing
with arms parting.
68
PART IV
TANK HUNTING AND
DESTRUCTION
This is drafted as a guide and help to troops who
have the determination and nerve to destroy tanks at close
quarters.
INTRODUCTION
Tanks well served and bodly directed have established
a superiority on the battlefield which is out of all pro*
portion to their true value; the problem is now to reduce
this menace to its true perspective even when elaborate
equipment is not available.
It has been proved that tanks, for all their hard skin,
mobility and armament, achieve that more spectatcular
results from their moral effect on halfhearted or ilMed
troops, Consequently, troops which attempt to withstand
tanks by adopting a purely passive role will fail in their
task, or at the best only half complete it.
Tank hunting must be regarded as a sport—big game
hunting at its best. A thrilling, albeit a dangerous sport,
which, if skilfully played, is about as hazardous as shooting
tiger on foot, and in which the same principles of stalk
and ambush are followed.
TANK HUNTING AND DESTRUCTION
German Methods»
The German method of attack is generally to tap along
the front with his reconnaissance troops until a weak spot-
is discovered. As soon as such a spot is located, the
crossing of the obstacle is effected, and a small bridgehead
is made. ^This bridgehead is subsequently widened and
arrangements made for the passage of tanks, and more
troops.
69
Tbrrlt
О
A Typical German Tank»
(There are many types which vary in detail rather than principle.)
Subsequently, by using methods of infiltration and with
a complete disregard for open flanks, the Germans attempt
to push through their mobile troops, if necessary on a
narrow;front. These mobile troops*’consist of groups of
from three to ’ five tanks, often with anti-tank guns in
support, preceded by motor cyclists as scouts and followed
by a small party of lorried infantry. These mobile groups
are sometimes assisted by their own reconnaissance and
close support aircraft. The axis of advance of these
parties will sooner or later be that of a well-defined road.
They make ho attempt to clear or occupy the area in
which they operate, but concentrate on quick and deep
penetration to destroy communications and stores, dis-
organise headquarters and generally to spread alarm
through rumour. The number of enemy tanks operating
in an area behind our own troops is nearly always exag-
gerated by rumour.
On meeting a block, in a defile the Germans attempt
to outflank the party defending. the road block by using
the . motor cyclists, or by dismounting their lorry<carried
infantry or the crews of the rear tanks.
By night these mobile columns cease their activities and
go into "‘harbours,” which are selected with a view to
concealment from the air; such places. as farms, woods
and hamlets being chosen.
The possibility of tanks being landed from aircraft after
a suitable aerodrome or landing ground has been captured
by parachutists must also be considered.
TANKS AND THEIR CHARACTERISTICS
Types»
German tanks are of many different types which vary
in detail rather than principle.
71
Weaknesses.
The following remarks apply generally to tanks of all
types, which in spite of their hard skin, mobility and
armament have serious weaknesses. Amongst these are:—
(a) Blindness.—The only view available is through
the driver’s slit, the gunners’ slits and the commander’s
slit, all of which are small and the first at least fixed to
the front. Their radius of vision is consequently limited.
When the tank is closed down the crew have no observa*
cion at all immediately above the tank, or on the ground
within a radius of approximately 15 feet of the tank itself.
If a tank is travelling with the lid open, small arms fire
will soon make it close down. There is always the danger,
however, that these blind spots will be covered by the
fire of other tanks.
•(b) Field of Fire.—The guns are incapable of depres*
sion to fire on anything at ground level within approxi*
mate radius of 20 feet of the vehicle or at an elevation
about 25 degrees. The tank cannot, therefore, engage
targets in its immediate vicinity which are on the tops
of high banks or in first floor windows of houses. The
gun turrets revolve slowly and their weapons defend
the vehicle from attack only along their immediate line
of site. A simultaneous attack, therefore, from several
directions finds serious gaps in its defence. A tank is
incapable of firing into deep slit trenches at any range,
except in enfilade.
(c) Tracks.—The vehicle is mobile only as long as its
tracks hold out. If it is forced on to rough or stony
ground by blocks or demolitions, wear increases rapidly;
and the tracks of the heaviest tanks have been broken
by direct hits from our antitank rifles. Percussion grenades
containing approximately 31b. of explosive will break a
track. Moreover, tracks may be removed by crowbars
72
or wooden spars rammed in between the driving sprocket
and the track whilst the vehicle is moving at a very
slow pace. The British anti-tank mine will completely
remove a track from any tank.
(d) Crews.—The exhaustion of mpving long distances
and work for several hours in a closed tank is very corp
siderable. The crews of tanks who have been in action
require frequent rests for sleep and food, for which purpose
they halt in concealment in harbours and lie about out-
side their vehicles.
(e) Petrol.—The menace of a tank ceases when it runs
nut of petrol. Few tanks have a mileage of more than
100 miles without refilling. It is dependent for its sup-
ply on local petrol resources or on its own petrol lorries
—which are unarmoured and easily set on fire by tracer
ammunition or petrol bombs—or supply by air.
(f) Night.—Darkness is the greatest ally of the tank
hunter. This is the opportunity for stalking, sniping
and atacking with grenades and incendiary bombs. On no
account must they be allowed to rest undisturbed. Move-
ment by night is almost impossible unless the tank com-
mander directs proceedings by sticking his head out
through the open roof. If he does so he is vulnerable
to any form of attack however primitive.
Vulnerable Points.
The following are as a rule the most vulnerable points
in a tank:—
(a) Driver's, gunners' and commanders slits.—At these
points the tank is vulnerable to small arms fire and
attack by flame-throwers. In most tanks the openings are
variable and fire directed at them will cause the gap to
be closed to a minimum, thus reducing visibility and
ventilation.
73
These slits afe often given some overhead protection
to give additional cover against the usual trajectory of a
bullet. For. this reason small .arms fire is most effective
when directed from ground level at short range "‘under
the eyebrows."
The slits are often protected with glasses which, though
bullet-proof, must be replaced when hit. Reserve glasses
carried are limited. Vision through the glasses is limited,
and if they are used the slits are useless as a means of
ventilation.
(b) The belly and top of the tank.—The front and
sides of a tank are, as a rule, the most heavily armoured
parts; the armour on the top is less heavy, and that be<
neath the tank is thinnest of all. Opportunities may be
presented for a shot by anti-tank rifle from ground level
against this vulnerable part when a tank rears up to
cross a bank or to climb from a ditch. Owing to the
shape of the belly, fire must be at short range to ensure
penetration.
(c) The tracks.—See paragraph (c) above.
(d) The louvres or air vents.—These allow for the
necessary intake of air for the engine and ventilation for
the crew. If incendiary bombs are burst over these
louvres, the provision of the necessary air is upset and
the tank may be set on fire.
(e) The turret.—Whenever possible the tank will drive
with its turret open and the commander looking out. In
this state it is very vulnerable to a surprise attack from
above by incendiary bombs or ordinary grenades and
other weapons, when passing through streets or under
trees.
TACTICAL ACTION AGAINST TANKS
General.
Before tanks can effect penetration of our defences it i*.
likely that they will have to overcome a tank obstacle and
that they will have been subjected to the fire of anii
74
tank guns and field artillery. In addition, they may
have suffered casualties from our anti-tank minefields.
They may have been subjected to counterattack by our
own tanks, which is the most effective answer to a tank
attack.
Crews of enemy tanks which do subsequently succeed
in breaking through must be harried, hunted, sniped and
ambushed from the moment they are located until they
are destroyed. They must be compelled to move with
turrets closed and slits reduced to the minimum, which in
itself will make it impossible for them to determine their
position except in country which they know well.
Tank-hunting platoons will, however, as a rule be
working on an area basis. They must exploit the advan-
tages this gives them, and every platoon must have a
thorough knowledge of the area in which it works. All
tracks and by-paths must be known, suitable positions for
ambushes and road blocks must be selected, and methods
of attack on all likely tank harbours must be considered.
Although this task is primarily one for the specially
equipped tank-hunting platoons, the responsibility is not
theirs alone. Every soldier and every member of The
Home Guard should be trained in the methods of tank
hunting and in the use of special anti-tank weapons. The
lessons of Spain and Finland confirm that tanks can be
destroyed by men who have the bravery, resource and
determination to do so.
Tank-hunting platoons must retain their mobility and
make use of it to act offensively against enemy tanks.
They should not be used for the defence of road blocks
with a prepared tank obstacle if other troops can be made
available for the purpose.
Anti-Tank Weapons,
Apart from anti-tank guns and artillery there are many
other weapons for use against tanks: and in connection
with tank hunting which should be understood by all .
75
(a) AntPtank rifle (see S.A.T. Vol. 1, Pamphlet No.
7).—The anti-tank rifle penetrates the armour of the light
tank, and that of some heavier models when fired at short
range. It is effective against the tracks of the heaviest
tanks yet encountered.
(b) Small arms fire.—Small arms fire is effective against
the commander’s, driver’s and gunners’ slits. It is most
effective when fired from ground level at short range
"‘under the eyebrows.”
(c) “Molotov Cocktails.”—These are hand*made bombs
consisting of a bottle containing various inflammable mix*
tures of petrol, tar and other substances and a means for
igniting the mixture when the bottle is smashed. These
bombs should be directed above the louvres or vents so
that the burning liquid may be sucked into the tank to
make it uninhabitable or possibly to set the vehicle on
fire. It is important to aim high at the tank so that the
liquid can flow downwards. The first inclination to throw
the bomb hard at the tank must be avoided; an underarm
lob will often be the best method of throwing unless the
bomb can be dropped from the windows of a house or
some other position above the tank. After the first
bomb has hit the target and ignited, successive bombs
can be thrown without themselves being ignited.
In its simplest form the inflammable substance consists
of petrol and tar in approximately equal proportions, but
this may be varied by the addition of naptha, paraffin,
diesel oil, etc., which will make the substance cling more
to the surface of the tank. The essentials are that it
should be sufficiently volatile to ignite eas;ly while having
sufficient body so that the duration of burning will be
adequate. Duration of burning may be increased by the
inclusion of a small proportion of sawdust, cotton waste,
etc.
76
Any bottle which will break easily of approximately
one pint size will do (e.g., whisky, sherry, lime juice
bottles); the beer bottle, being more difficult to break,
is less suitable. Large bottles such as quart beer bottles
and champagne bottles arc difficult both to throw and to
break. Bottles should be given two or three scratches
with a diamond down their length to make them break
more easily. Circular scratches should not be made.
There are various methods of ignition: the materials
used to be satisfactory must satisfy the conditions that
they can be ignited in a wind, will not go out when
the bottle is thrown or broken, and will not be affected
by damp, etc. The following are examples which have
proved satisfactory:—
(1) Lifeboat matches.—Two lifeboat matches bound to
the bottle with adhesive tape. Matches liable to be
affected by damp may be covered by cellophane paper
held in position by rubber bands. The fuses are lighted
with an ordinary matchbox and must be burning well
rather than fuzing before the bomb is thrown.
(2) Cinema film.—A length of about 18 inches of
cinema film allowed to curl around the bottle and fixed
at one end with adhesive tape may be used. Ignition
can be by match or cigarette end, but again it must be
burning well before the bomb is thrown.
(3) Cotton waste or rag.—Cotton waste or rag tied to
the bottle may be used. This should be soaked previously
in paraffin and immediately before use dipped in petrol
or the inflammable mixture from the bomb.
(d) The phosphorous grenade (“The A.W. Grenade”).
—This is an improved type of “Molotov bomb,” which
ignites spontaneously as, soon as the glass is shattered,
producing an incendiary, mixture and a dense cloud of
smoke. yThe grenade may be used as follows:—
i. It may be thrown at tanks, vehicles, buildings, pill*
boxes, etc., in order to blind the occupants with
smoke and possibly expel them. . The. grenade
77:
should be thrown at the front of the tank, the
mixture remaining on the tank continues to burn
and give off smoke from which the tank cannot
escape by movement.
ii. In favourable wind conditions a controlled smoke
screen can be put up near a road block or pillbox
by placing the grenades in suitable positions and
exploding them by small arms fire.
iii. The grenade has considerable incendiary effect owing
to its phosphorus content, which can only be com*
pletely destroyed by allowing it to burn itself out.
It can be temporarily extinguished with water, but
will start burning again after it has dried, on being
disturbed.
(c) The sticky (S.T.) grenade.—This is a high ex-
plosive grenade with a five-second time fuse. It is de*
signed to stick on impact and to shatter the armour or
track by explosion. The safest and easiest way of using
these grenades is by dropping them from an upstairs
window; they may also be used from an ambush or
trench within ten to fifteen yards of a tank. A position
on a bank controlling a road has obvious advantages.
When it is possible to close with the tank under cover of
smoke or darkness the grenade may be placed by hand.
(f) The anti-tank percussion grenade.—The hand per-
cussion grenade is a simple H.E. grenade with an instan-
taneous percussion fuse. It consists of about 31b. of
explosive and, being in a light casing only, there is no
shrapnel effect, the danger to the thrower being mainly
from the blast. The grenades should be thrown whenever
possible into the tracks of the tank, alternative targets
being the wheels at either end of the track, the plating,
over the engine or any of the observation slits.
Grenades should be thrown into the tracks as far for-
ward as possible, as in the case of a forward break the
tank will quickly run off its track and must be jacked up
before the track can be replaced.
78:<
(g) Harvey flame-thrower.—This flame-thrower con-
sists of a vertical cylinder of 22 gallons capacity mounted
on wheels in die same manner as a porter's barrow. To
the cylinder is connected 25 feet of flexible hose termin-
ating in a nozzle; a rest is provided on which the pipe
carrying the nozzle can be traversed and elevated. When
in operation, a jet of inflammable liquid, which is ig-
nited on leaving the nozzle, is thrown to a range of
approximately 50 yards; the maximum range gradually
decreases as the cylinder is expended. These flame-throwers
will be of value mainly as part of the defensive equipment
of fixed road blocks and will generally be best sited
when placed on the flank on the enemy side of the road
block. They will be of particular value in dealing with
tanks beyond the range of the A.D. grenade and Molotov
bombs.
It may be possible on occasion to mount the equipment
in a car or truck for mobile use.
(h) The Northover (bottle) mortar.—This is a simple
mortar designed to throw th’e A.W. grenade to ranges
of between 50 and 150 yards. It will be of use for
attacking tanks, when it is impossible to get to close
quarters. It should not be used prematurely to give
away an ambush or to disclose the position of a road
b-ock.
(i) Anti-tank mines.—All mtn should understand the
mechanism and use of the various anti-tank mines which
may be available (see Military Training1 Pamphlet No.
40). Anti-tank mines (Mk. II or IV) may be joined
together by means of wire or rope and nets to form a
string of mines which can be drawn across a road at
short notice.
Getting to Close Quarters.
The destruction and immobilisation of tanks by gren-
ades and bombs demands ability by the attacker to get
at dose’ quarters to'the tank. He Jcan do; this in various
ways:-—
79
(a) From trenches.—During an enemy tank attack over
trenches, the enemy tanks will often be within a few yards
of men who can immobilise them.
(b) From ambushes.—Tanks passing through towns
and other defiles will often place themselves within range.
(c) By use of smoke.—Smoke may be used to blind
tanks and under its cover a determined man may get
at close quarters across the open.
(d) By fieldcraft.—A tank cannot fire in all directions
at the same time. (A tank with turret guns only is
limited to firing in one direction. If, in addition, it has
a fixed gun beside the driver, it is also capable of fire
direct to its front.) If men work together approaching
the tank from different angles, moving only when the
guns are not directed at them and at other times making
use of cover, they should always be able to close with
a single tank which is stationary or moving slowly. To
do so they must watch carefully the movements of the
tank's guns and carefully select beforehand their bounds
from cover to cover,
t
Destruction of Tanks at Close Quarters.
Having got close to the tank it may be attacked with
incendiary and H.E. bombs—or a steel rail may be pushed
in between the track and the driving sprocket with the
object of stripping the track. The tank being now ini'
mobilised, the crew must be killed or captured. Incend'
iary bombs burst over the louvres may force them into
the open, as also may antitank percussion grenades. If
this does not hurry out the crew, an “S.T." grenade
may be exploded on the roof of the tank, and a No. 36
or other grenade dropped through the hole made. Failing
this, rifles may be fired into the slits at point blank range.
Attacks on Tanks in Harbours.
As night approaches the small enemy columns will seek
suitable harbours for the night. These will be selected
with a view to concealment from both ground and air
80v
and for economy of men in protective duties. The defence
of harbours will vary according to the men and tanks avail*
able, the ground, fatigue of the crews and other factors.
The tanks may be protected by a thin outpost line of
dismounted troops, although even then the tanks will be
sited tactically and their guns manned; in other cases the
tanks may be used to provide the outposts, being sited
to cover all approaches. At other times, when very
fatigued, they may rely almost entirely on concealment,
with little protection except one or two sentries close to
the tanks.
Tank hunters should attempt to get into positions from
which they can note in detail the enemy's dispositions and
plan their night attack. This reconnaissance is of the great*
est importance. In carrying out this attack their primary
objective will be the men, as the tanks arc unlikely to be
fully manned, and even if manned will be of little fighting
value in the darkness. Once the men arc killed or cap*
tured, the destruction of the tanks should be easy. The
method of attack will be similar to that carried out by
other fighting patrols, except that weapons for tank des*
truction will be carried. This should not be regarded as
a specialist task to be carried out only by tank*hunting
platoons, but as one which may be carried out by any
troops. Should enemy columns try to harbour and rest
by day and be too strong for a direct attack, they must
be harassed remorselessly by snipers, mortars, bombing
from the air and all other means available so that rest
is impossible for them. In the meantime, plans to am*
bush them when they do move should be made.
Rendering a Captured Tank Unserviceable.
A tank crew may be put out of action or captured,
leaving ^the tank itself intact. When possible, captured
tanks should be salvaged for examination by experts,
but if there is any possibility of the tank -again falling
into enemy hands it should be rendered unserviceable.
81
This may be done in a number of ways, including the
following:—
(a) By fire—flame-producing bombs being dropped in-
side the tank—will often be the quickest method, but
not always the most desirable.
(b) Breaking or removing the tracks is effective for a
short period and until spare parts are available.
(c) . To put the tank out of action for a prolonged
period the following methods are recommended:—
i. breaking water jacket of engine with sledge ham-
mer;
ii. smashing the driver’s controls, including the gear
lever;
iii. smashing the carburettor or fuel pum’p;
iv. throwing H.E. bombs inside the tank;
v. if it is impossible to open the tank one of the
sprockets may be blown off with gelignite.
Keeping Touch.
It will not always be possible for tank hunters to attack
an enemy column. If they cannot do so, the enemy must
be shadowed and stalked and information must be passed
to other troops in the area with regard to the enemy
strength (which must not be exaggerated), the direction in
which he is moving, his method of advance and other
points which will aid others to destroy them. Early
information with regard to the movements of enemy col-
umns is important to enable tank hunters to prepare
their ambushes. Tank-hunting platoon commanders must
work in the closest co-operation with the battalion intelli-
gence section, not only to get the information they require
but also to pass on information gained by them to others.
A system of light signals may also be developed for
passing information and arrangements made for inter-
communication between tank hunters and aircraft.
82
ROAD BLOCKS, AMBUSHES AND OBSTACLES
Road Blocks—General.
Roads can be blocked against wheeled vehicles in vari-
ous ways:—
(a) By cratering.
(b) By a barricade of local materials such as farm
carts, harrows, etc., or by debris from demolished
buildings.
(c) By felling trees. Trees felled to form road blocks
should be left with the trunks attached to the
stumps, if possible. To effect this, no cut should
be made on the side to which the tree is to fall,
and, unless the tree will fall naturally in the
required direction, it must be strained with guys.
(d) By coils of concertina wire opened out and bent
into “U” shape to fill the breadth of the road.
(e) By trenches across the road.
To stop tanks, a more formidable obstacle will be neces-
sary. Eighty pound of explosive at a depth of 6ft. in
•average ground makes a crater 7ft. deep and at least 20ft.
wide. This size of crater is likely to be an effective
obstacle. No normal tree or series of trees felled across
a road can be relied on to stop a tank, nor can any
rapidly erected wireblock. Light road blocks may, how^
ever, be made effective against tanks by the inclusion of
anti-tank mines.
The effectiveness of all blocks depends on their being
located in defiles and kept under constant observation
and fire. They should also, whenever possible, be sited
to achieve surprise.
Siting.
Sites should be selected in which it is difficult for crews
of approaching vehicles to see the obstacle until they are
close to /t, or to turn round or move off the road once
they have seen it. For example, defiles where the road
passes between woods, deep ditches, thick hedges, high
83
banks or buildings arc suitable, particularly if there is a
bend in the road close to the enemy side of the obstacle.
It is an advantage if the points at which tanks are
likely to stop arc overlooked at close range so that the
tanks can be bombed from above, or if there are gaps
between buildings or other cover at these points from
which bombs can be thrown or rails pushed into the
•.racks.
The’ sides of the defile should be closed by natural
obstacles or barbed wire to keep enemy dismounted per*
sonncl in full view of the defenders and to prevent them
from breaking out at the side and stalking the garrison.
Occasionally, if the road passes through long defiles,
4 may be possible to set traps by placing the obstacle well
inside the defile and preparing a block at its entrance
which can be rapidly put into position after the enemy
vehicle has passed.
Pilbboxes and ground floor windows straight behind
an obstacle should be avoided, though they may be used
as bait in the form of dummy positions. These arc likely
о be in full view of the crew with the weapons of the
A.F.V. pointing at them. The best positions to occupy
will usually be in upper windows, or on roofs or behind
banks on the flanks of the obstacle. Pillboxes should
be well camouflaged and sited to cover the obstacle.
The ’position chosen will depend on the ground and may
be to the flank of the obstacle; behind it if well con-
cealed or even on the enemy side. The upper windows
of houses and the bank on the flanks of the obstacle
should also be occupied.
Defence of the Block.
Like all obstacles, road blocks must be covered with
fire. One section, with, if possible, an anti-tank rifle, will
often be sufficient garrison. Anti-tank rifles, L.M.G.'s
and Tommy guns should be sited away from the block
and on the flanks covering the road on the enemy side;
tank bombers should be in position on the flanks of the
<84
defile on the enemy side of the block. Snipers should
be disposed to attack any enemy leaving his A.F.V.;
remaining personnel should be distributed to prevent any
outflanking movement by the enemy. Consideration must
•e given to the possibility of smoke being used by the
enemy tanks to conceal their movements, and weapons
j’tcd accordingly.
Although hostile A.F.V.'s may be expected from a
certain direction, it is always possible they may appear
where least expected. Consideration should therefore be
given to alternative ’positions to meet possible situations.
Where no natural cover from fire exists, garrisons of
road blocks should dig weapon*pits for their own pro*
.ection.
Ambushes.
In every area, suitable sites for ambushes both for the
A.F.V.'s and their accompanying personnel should be re*
connoitrcd, planned in detail and, where desirable, the
necessary material placed ready at the site. Suitable
points for ambushes will generally be found in defiles
such as villages, towns, cuttings and woods.
The essence of a good ambush is surprise; it cannot
therefore be made a subject for rules. If ambushes are
prepared by fixed drill methods they will cease to be
ambushes. They must therefore be devised by the in*
genuity of individual leaders who must pit their wits
against those of the enemy. The object must always be
to mystify and mislead—obvious places should be avoided.
Time for preparation will often be short, and tank*
hunting platoons must therefore be able to prepare an
ambush with the minimum of equipment, and often with
their weapons alone.
The variation of an ambush are almost unlimited. For
example/ sometimes it will be advisable to attack recon*
noitring motor cyclists: at other times the ambushers mav
hide until the enemy motor cyclists have passed through
and then attack the tanks, while at other times the
85
whole column may be allowed to pass and may then be
attacked from the rear. Sometimes it may be possible to
draw the enemy from his line of advance into a trap.
An ambush in its simplest form may consist of a few
men concealed at intervals along the side of the road.
At a given signal they throw their A.W. bombs to blind
ihe tanks and then attack with hand percussion bombs.
Somebody should be ready to deal with the enemy motor
cyclists as they come racing back to see what has hap*
pened.
The basis of the plan will often be:—
(a) To surprise and overcome the reconnoitring cyclists
before they are able to warn the leading tank. A wire
stretched taut across the road, three feet from the ground
will often be sufficient. If possible, these motor cyclists
should be disposed of silently, and devices for puncturing
their tyres will sometimes be useful (e.g., board with up*
turned nails, broken glass, etc.).
(b) To attack tanks individually and to prevent them
supporting each other. Bends in the road may make
this possible; if not, one alternative is to make use of
smoke bombs to isolate individual tanks. Having isolated
a tank it may be attacked with incendiary bombs and
high explosive grenades until it is destroyed. In village
streets, woods and other narfow defiles speed of action,
surprise and a simultaneous attack on supporting tanks
may render the isolation of individual tanks unnecessary.
(c) The provision of “look-outs" to protect the am-
bushing detachments from lorried infantry following the
tanks. The action of the enemy infantry when the lead'
ing tanks have met an ambush is likely to be to deploy
with the intention of taking the ambushers in flank or
rear.
(d) Arrangements for the withdrawal of the party and
getting them once more under control so that they may
prepare fresh ambushes and continue the fight. These
86
arrangements will include the selection of a rendezvous
(which should be known to every man), the parking of
vehicles, bicycles, etc., with a view to the "get*away” and
signals for withdrawal.
Petrol Ambushes.
Petrol and oil poured on to a road and ignited will,
in suitable conditions, form an effective ambush, the in*
tense heat and flame resulting in the destruction or im*
mobilisation of enemy vehicles.
The use of this means is restricted to defiles which
the enemy are likely to use (e.g., to debouch from the
coast or landing grounds). Consideration must be given
to the effect of fires which may be started in the vicinity.
The method of employment is by gravity or trailer
pump from a reservoir hidden and protected at a dis*
tance from but within view of the defile. Surprise is
important, and the reservoir should be camouflaged. The
oil is led by tworinch pipes to the defile, discharged from
jets or sprays and ignited electrically or by some other
simple means. The composition recommended is 25 per
cent, petrol and 75 ’per cent, gas oil, which being of no
value for the propulsion of motor vehicles is of little
use to the enemy.
The reservoirs may be static or mobile, preferably the
latter—any tank with the necessary capacity may be used
either mounted on a lorry or built into a previously pre*
pared position. Fuel is required on a scale of two gallons
per square foot per hour. Thus to cover an area of road
50 feet long by 20 wide requires 200 gallons for every
six minutes burning. To sustain a fire of great intensity
a head of oil of only a few feet is necessary, and a
pump is not an essential.
Thfe form of ambush should be prepared only where
approved by general officers commanding*in*chief or such
officers to whom they may delegate the authority.
87
Bluffs and Booby Traps.
Every possible device must be used to slow up the
movement of enemy mobile columns and to stop tanks and
make them disembark part of their crews, who can
then be shot. Motor cyclists, though often a difficult
target to hit when on the move, are very vulnerable
when halted. The defence has achieved much if it can
make the task of reconnoitring motor cyclist so dangerous
that the tanks themselves must lead the column. The
intention should be to instil into the enemy such a fear
of ambushes that he will approach every defile and bend
in a road with caution, and that he will make a dis-
mounted reconnaissance before attempting to pass such
points. Once this moral ascendancy has been achieved
the danger of tank infiltration is over.
The following arc examples of bluffs and booby traps
which must, of course, be combined with road ambushes:—
(a) Dummy anti-tank mines—the surface of a road
broken up as though the road has been mined or even
a row of upturned soup plates will demand dismounted
reconnaissance. The enemy making the reconnaissance
may be sniped.
(b) A number of blankets slung across a narrow street,
which might be concealing a road block or ambush, will
probably stop a tank at least once.
(c) Dummy pill-boxes will be of value to draw both
the enemy’s attention and his fire, and so to give the
tank hunters an opportunity to get to close quarters with
their bombs.
(d) Strips of canvas may be laid across a road to
conceal a trench, or to explode bombs when moved.
They may prove equally effective if they are no more
than harmless strips of canvas. Hay or straw spread over
a stretch of road may be used in a similar way.
(e) Booby traps consisting of road mines, charges
for felling trees or bombs designed to burst in the foliage
88
of trees above tanks and exploded by a trip wire across
the road are described in Field Engineering Pamphlet
No. 6.
Whenever booby traps are prepared, the danger to
< ur own troops must always be considered, and adequate
precautions must be taken to prevent them falling into
the traps set for the enemy.
Tank Obstacles.
(a) Anti-tank mines.—Anti-tank mines play the same
part against A.F.V.’s as wire does the* infantry. The
principles of its employment are similar. Unless covc;<c
by the fire of the defenders, anti-tank mines are in most
cases useless. In road blocks in particular the efficiency
of the obstacle will depend largely on the skill with
which the covering weapons are sited.
Tanks on discovering a mined road block will usually
try to work round it, drive off the defending troops and
then remove the mines. To counter this, the mines
should be placed so that they are encountered unex*
pectcdly and where deviation is awkward. Close sparing
should be used.
(b) Other tank obstacles.—The size of the obstacles
required to stop a tank depends on the design and dimen-
sions of the tank concerned. The following are the guid-
ing rules:—
i. A tank cannot cross a gap which is appreciably
wider than half the overall length of the tank; unless
it can approach at a speed, when it may be able
to jump an appreciable distance.
ii. A tank cannot climb a solid vertical face which
is higher than the top of the tank’s track where
it passes over the leading sprocket or idler wheel;
in the case of trenches and earth banks the height
of the vertical face should be not less than five
feet.
iii. A tank is unlikely to surmount an obstacle which
causes the ground line of the tank to be tilted, from
89
the forward end, to an angle of 4 5 degrees, with
the horizontal. This rule governs the ability of
a tank to- surmount an obstacle placed on a slope.
Trees»
Single rows of trees to withstand the thrust of a medium
tank should consist of trees of not less than 18 inches
in diameter. In the case of a copse where a series of
trees in depth exists the effective diameter of trees can
be reduced to eight inches. Modern tanks can manoeuvre
in a very restricted space and can pass through gaps
from six feet to eight feet.
Trees of the diameter required, whether in single row*
or copses, will seldom be found growing at close enough
intervals to prevent tanks manoeuvring between them.
Artificial obstacles will, therefore, usually be necessary to
reduce the gaps, to close rides, etc. The anti-tank mine
is the simplest weapon for this purpose.
Stumps*
Tree stumps will sto’p tanks when they are sturdy enough
to raise the tracks of the ground by fouling the belly
of the tank between the tracks. For this purpose, stumps
should be not less than 12 inches in diameter and should
be 2ft. 3in. in height. To prevent tanks manoeuvring
between stumps, the gaps must be reduced as in the case
of trees. Belts of stumps must possess some depth; a
single line will not stop tanks.
Natural Obstacles»
These include rivers, banks, woods and the cuttings and
embankments of railways and roads, which if not in them<
selves of adequate dimensions may often be made so with
a little labour.
Artificial Obstacles.
Details of the construction of artificial obstacles will be
found in Military Training Pamphlet No. 43.
90
Training.
Training must aim at producing quick-witted, bold,
confident and. swift-moving teams of high morale. The
following should be included in the syllabus:—
(a) Physical training.—Physical fitness of the highest
order is essential. Every man must be “fighting fit."
(b) Fieldcraft.—Success will depend largely on field-
craft. The training described in Military Training Pam-
phlet No. 33 should be carried out and applied to the
special task in view. For example, all men should be
practised in stalking a tank, individually and working in
pairs. A “mock up" turret should be made which can
be carried on a car or carrier. The men should then
be taught to watch the tank's guns and to run forward
from cover to cover whenever the guns are aiming in
another direction. Similar exercises should be carried out
against a pair of tanks, making use of smoke.
(c) Night work.—During darkness the A.F.V. loses
almost all the advantages it may have by day over the
man on his feet. Tank-hunting platoons should specialise
in night work (see Military Training Pamphlet No. 33).
Exercises should include attacks on tanks, whether halted,
on the move or in harbour, and sections should be pitted
against each other, acting as enemy in turns.
(d) Map reading.—A high standard is essential.
(e) Ambush training.—The art of siting, preparing and
manning ambushes in towns, woods and other types of
country should be practised. There must, however, be no
stereotyped plan. The success of an ambush depends on
surprise and depends on wits rather than rules.
(f) Field engineering.—Men should be trained in the
field engineering required in the construction of road
blocks, e.g., use of concertina wire, the felling of trees,
tank traps, etc. A general knowledge of the use of ex-
plosives should be included.
(g) Recognition of AT.V.'s.—It is essential that men
should be able to recognise allied and enemy A.F.V.'s and
91
their types. (See Pamphlet notified in A.C.I.'s for week
ending February 21, 1940.) They should know the weak
spots in enemy tanks.
(h) Weapon training.—All members of tank-hunting
detachments should be trained in the use of the special
anti-tank weapons with which they are armed, in addition
to the L.M.G., rifle, bayonet, grenade, 2in. mortar and
anti-tank rifle. A good proportion of expert snipers
should be included, and the use of smoke should be
practised. Dummy bombs of approximately the correct
weight should be made up locally of sand, etc., sacking
containers, and men practised in throwing them at the
tracks of carriers.
(i) Anti-tank mines.—(See Military Training Pamphlet
No. 40.)
92
NOTES
93
PART V
TACTICAL NOTES
The object of these notes is to develop a technique
of how to deal quickly with minor tactical situations. It
is better to know instincively some orthodox line of con-
duct than to be paralysed by uncertainty of what to do.
Master the technique—and then use it as a master.
The examples given cannot cover all possible situations.
ATTACK
Speed in the Attack
1. The following remarks are applicable to all offen-
sive operations whether they be undertaken against hos-
tile invading forces or against an enemy overseas.
2. If hostile forces land in this country, success of
retaliatory action will depend on the speed with which
counter-attacks can be developed. A few minutes’ delay
allows an enemy to consolidate his position. The need for
speed of execution in all offensive operations calls for
swiftness of decision and action in all exercises.
In the past we have been used to much slower moving
operations than wc see today. In consequence our train'
ing has been based on detailed and methodically pre-
pared plans, depending largely for success on heavy and
accurate covering fire of all descriptions.
To-day, against an exceedingly quick and bold oppoonent
who relies for success on surprise in the form of rapid
infiltration, we shall find ourselves at a grave disadvantage
if we cannot be as quick, bold, and enterprising as he is.
The modem German army have never yet met an op-
ponent who can play them at their own game—and wc
may be sure that if we too develop the technique of
speed in offensive operations, they in turn will be sur-
prised, and fall an easier prey than we imagine.
Let us, therefore, keep before our eyes this guiding
principle—SPEED. Speed in making up our minds,
94
speed in delivering our orders, speed in reconnaissance,
and, finally, speed in Execution.
3. Here are some methods by which we can realise
these aims:— ?
(i.) Anticipation.—A highly developed sense of an*
ticipation is characteristic of all great games*
players. They start to take action before the
necessity arises. As a result, they are always
at the right place at the right time. All
leaders must strive after this ideal. It is not
enough co start making a ‘plan when a new
situation has arisen. Plans to meet every pos*
sible development must be thought out before*
hand, and preparations made to put them into
effect. Instant action can thus be taken and
priceless hours and not less priceless minutes
gained. Napoleon said: “I may have lost
battles, but I never lost a minute.” How
do we stand this test in our Field Training?
(ii.) Speed in reconnaissance.—“Time spent on re*
connaissance is seldom wasted.” Most of the
time spent during reconnaissance is wasted.
Reconnaissance must be confined to essentials,
and, preferably, made from the nearest point
available.
(iii.) Plans must be simple.
(iv.) Verbal orders must be cut down to the abso*
lute essentials.
i
(v.) Commanders must be well forward so that they
can deal at once with the situation.
95
A FORWARD PLATOON ADVANCING
Movement
Fir-
96;
1. As soon as the leading platoon meets opposition, it
will prepare immediately, for offensive: action.
2. The section first fired on will at once get its light
machine gun into position and engage the enemy with
fire.
3. The remaining sections of the platoon will take
advantage of this covering fife to surround the opposition
by an encircling movement if possible.
4. This movement must be automatic and made with*
out checking the forward advance of the platoon.
5. In .these circumstances the platoon commander's
duty is to ensure the momentum of the advance, which
he can best do by immediately bringing into effect what
reserve fire power he has-^uch as ms mortars.
6. If the opposition is more than the platoon can
overcome by its own resources, if is for the company com-
mander to continue the attack on the same system.
7. Advantage will be taken of the least sign of weaken-
ing on the part of the defence, and the sections of the
leading platoon will seize every opportunity to press for-
ward to their immediate objective without awaiting orders
from the rear.
8. The' diagram given opposite shows how the enemy
might be suitounded, but the ground will often be un-
suitable for envelopment of both flanks. The action to.
be takeij to. get behind the enemy must depend bn the
most suitable lines of approach. TKe main object is tq
surround’ the enemy quickly.
Д7
98
1. The section is a complete unit under a leader, but
it can be split into two groups for tactical manoeuvre.
2. The attack is carried out on the principle of fire
and movement, each move being made as far forward as
possible.
3. The first stage (see diagram) of the attack shows
the forward infiltration of the rifle group covered by the
fire of the L.M.G. group.
4. The second stage (see diagram) shows the for
ward infiltration of the L.M.G. group covered by the fire
of the rifle group.
?. Thus the attack progresses without a check. When
the rifle group advances, its movement is covered by the
fire from the L.M.G. group; when the L.M.G. group ad*
vances, it is covered by the rifle group.
Either group can lead the attack, according to cir*
cumstances.
6. Use covered approaches (if possible) or short
rushes from fire position to fire position until withiv.
.assaulting distance of the objective. Now look at Example
No. 2, which shows the final stage—the assault.
7. There is no fixed number of men for the L.M.G.
group. It may consist of three men or even one man,
according to its task, S.A.A. to be carried, distance to be
covered, etc.
i
99
A SECTION IN THE ASSAULT
(Final Stage)
WiMPLS No. 2
5. Sec Comd
W WIRE CUTTER
G GRENADE THROWER
•100
1. N.B.—The left encircling section of the platoon
has been taken as an example.
1. The L.M.G. will first open fire from the outer
flank, remaining in that position, if possible, till the ob'
jcctive has been overcome. Jt will then rejoin the section
and be responsible for the protection of the outer flank.
2. On the inner flank the grenade throwers, each
with a rifleman, and working in pairs, will throw their
grenades.
3. The section commander carrying the sub'M.G. will
lead the assault, the bombers on the flank conforming.
4. The section commander must personally time the
assault so that its arrival on the objective docs not coin'
cide with the bursting of the grenades. This timing is
important and requires practice.
5. The whole section must arrive on the objective
together. They must therefore start in line.
ICJ
CLEARING A VILLAGE
EXAMPLE No. 3
102
1. The same principles ap'ply in this example as in a
“Forward Platoon Advancing/4 Example 1.
2. Each platoon covers the main exits with fire in
order to protect its sections and to catch any enemy trying
to break out
3. Sections work through the back gardens and enter
from the rear. At each stage during the process of clear
ing the houses the riflemen are covered by their section
L.M.Gs.
103
CLEARING A WOOD OF PARACHUTISTS OP
SMALL BODIES OF THE ENEMY-----------
EXAMPLE No. 4
Supporting Groups
zflSdoeiLE
RC3CBVC
MOBILE RESCRVC
•04
1. The wood or similar cover must be completely
ringed round by posts of light* machine guns or riflemen
so that no one can escape without being seen.
2. The moppers'up will form a line * preparatory to
searching the ground in the same way as beaters 'in a
game drive. They will move steadily forward^ keeping
line and searching all likely hiding places so that no
concealed enemy can be passed over.
3. Behind the line of moppers'Up ’ small groups of re'
serves will follow, armed with rifles, bayonets,- sub'
machine guns, and grenades, to deal with any pockets of
hostile resistance.
4. The ring4 of stops or posts placed outside the wood
will have one or more grounds kept mobile to chase any
enemy who breaks cover and succeed in escaping.
5. The commander will place himself where he can
best control operations. This point will normally be
where the majority of his troops are employed.
/
107
A PLATOON DEFENSIVE LOCALITY
IN MOBILE WARFARE
EXAMPLE No. S
♦
106
DEFENCE.
1. The platoon will be sited for albround defence, pre*
ferably in the shape of a triangle, if the ground permits.
2. To avoid casualties from* shell fire and dive bomb*
ing, sections will not be doser to each other than 30
yards.
3. To ensure voice control by the platoon com*
mander, sections will not be farther from each other than
60 yards.
4. To keep enemy out of hand grenade range, wire
will be sited not less than 3f yards from trenches.
5, To prevent wire being cut under cover of darkness,
mist, or artificial fog, wire will not be more than 40 yards
out from trenches.
6. The better the concealment of wire and trenches
from ground and air observation by the use of natural
or artificial cover, the greater the degree of security for
the garrison, and the more likelihood of surprising the
enemy.
Note.—The defence of beaches and certain localities
in concrete are special cases requiring special treatment
and must not be confused with the normal layout in
mobile warfare, as shown here.
3 07
A POST IN CONCRETE
1. The concrete pill*box is a great aid to defence if
intelligently use; if not, it may become a death-trap.
2. Concrete is a protection only against bullets, shell
splinters, and weather. If properly camouflaged, it is
also a .protection from ground and air observation.
3. It is not complete protection against a direct hit
from a shell or from an aerial bomb; it has the advantage
tagc of limiting the field of view and field of fire; be-
cause of its few loopholes, it does not allow all the garri-
son the use of their rifles; and, finally, it hinders the
garrison in the employment of the hand grenade and
bayonet,
4. Therefore the garrison of a pill box locality will
ict as follows:—
(a) The sentry or sentries ‘on duty will be stationed
outside the pill box, where they can see and
hear all round them.
(b) Temporary coyer, from view, shell fire, and
aerial bombing may. be sought inside the pill
box; but beware that the enemy are not
creeping towards you under covering fire,
whilst you are hiding inside.
(c) When the attack comes, the light machine gun
or machine gun will fire from the pill box,
if it can carry out its task. If not, it must come
oUt to a prepared ‘position.
(d) Those men who cannot'use their weapons inside
must man the trenches outside—where they
can do their duty.
(e) If the pill box is surrounded—except for those
who can fire from the loopholes, the garrison
will fight outside, where they can employ all
their weapons to the best advantage.
IOS
NOTES
1р9
THE DEFENCE OF A BRIDGE
EXAMPLE No. 6
110
1. The garrison will be astride the bridge. Posts
should embrace the road blocks and be sited to cover all
immediate approaches to the bridge as shown on dia-
gram opposite'
2. The wire obstacle must be sited so that every yard
of it is under direct observation and fire.
3. The aim of the garrison must be that no unauth*
orised person can penetrate into the perimeter of the
bridge defence, i.e., the wire round it.
4. The garrison, therefore, is disposed to safeguard
the bridge against an enemy who—
(a) may attack from any direction;
(b) may approach within assaulting distance under
cover of darkness, early morning mist, arti*
fidal smoke, or by covered approaches;
(c) or may attempt to overcome the garrison by a
ruse, i.e., by arriving in a motor car, or on
foot, dressed as civilians or as British soldiers.
5. The command post will have an O.P. from which
the maximum amount of ground immediately surrounding
the bridge can be seen. At last one sentry will be on
duty throughout the hours of daylight.
6. All defensive posts and positions will be concealed
from ground and air observation by camouflage. Alter*
native positions, i.e., other positions from where the same
task can be performed, will always be constructed.
7. Wherever possible, visual communication will be
established from the garrison of the bridge to the nearest
neighbouring unit.
8. Every bridge garrison will have signal rockets as
an alarm signal that they are being attacked.
9. Every bridge garrison will include at least one
bicycle and one or more orderlies who will know the
best way to the nearest neighbouring unit which can give
assistance if the garrison of the bridge is in difficulties.
10. If the garrison is larger than required for the close
defence of the bridge, a ring of outposts may bte em-
ployed.
Ill
HOLDINC A RIVER OR CANAL
-EXAMPLE-No. 7
A W 3 N 3
i, J . •:
112
1. The forward garrisonwill be so disposed that they
can cover the water by direct observation and fire. In
no circumstances will any stretch of water be left un*
guarded. The enemy will .certainly cross bv anV. such
unguarded stretch.
2. Every ‘post so sited ' to guard the water will be
hidden and camouflaged from\grourid observation and, as
far as possible, air observation as well.
3. ‘Alternative sites will be prepared, that is, sites from
which the same task can be performed but in a different
locality. The garrison, if spotted and shelled, can then
move to a safer place and avoid casualties. ' <
4. Local reserves will be so placed- that they can im*
mediately counterattack any<ehemy who .have succeeded
in gaining a footing on. our bank. This is their duty.
5. At night, or during mist or fog, moving patrols
must guard the\ gaps between posts to ensure that the
water is kept under constant observation.
6. When time permits, dummy trenches of conspicuous
nature will be made to draw the enemy's fire on to places
where it will not harm our troops.
113
Road Blocks and Tank Traps
EXAMPLE No. 8
114
RULES FOR THE GARRISON
There are four distinct functions which devolve on the
garrison:—
(1) To’locate and watch the enemy, in order to ensure
adequate warning of his advance. This is done by estab'
lishing a good O.P. and direct communication from the
sentry at the O.P. to the garrison.
(2) To put the block or trap into position when
warned of the enemy’s approach. This is done by the
infantry or sapper party, acccording to the nature of the
block or trap. Time must be allowed for our own delay*
ing troops to pass through. If the block is a trap, the
operation must be timed accordingly.
(3) To destroy the enemy who are stopped by the block
or who run into the trap. Personnel can be destroyed by
L.M.G. and rifle fire; hostile vehicles by anti-tank gun or
anti'tank rifle fire, or bombs.
(4) To ensure the protection of the garrison.—By siting
albround defence so that the garrison cannot be surprised
and taken by attack from the flanks and rear, and by
ensuring that the garrison is not only hidden from view
but protected from hostile fire.
NOTES
1. The O.P. must be in visual communication with
the O.C. garrison. By a prearranged signal, early warn*
ing of hostile approach is given, on which the main block
is closed. The O.P. must remain invisible to the enemy;
otherwise it will arouse suspicions of a trap.
2. If or when an enemy vehicle enters the trap, the
movable block is pulled into position, thereby preventing
the enemy from withdrawing.
3. Enemy vehicles within the trap are destroyed by
the bomb throwers, supported by the L.M.G. and rifles
of the garrison.
4. y The garrison commander must, by his initial dis*
position and the posting of sentries, ensure against an
attack from the flank or rear.
115
Example No. 9
DEFENDING A HOUSE
EXAMPtE No. 9
KIGHT
Build your sandbagged emplacement well back in a darkened roo
bo 'tbftl ydu'-arc invisible from'the outside.
A lace curtain allows you to see through* h without b^ihg cr.tn.
Example No. 10
LOOPHOLING WALLS
|. EXAMPLE No. 10
WRONG
2.
Loopbole made behind
an existing bush or one
planted artificially.
Loophole covered
by and in the
shadow of a ladder.
Be sure that the
ladder is made
unclimbable.
Loophole hidden
from view by a
bundle of brush»
wood;;;?
ч RIGHT
Loophole cut in the lock of* M.G. firing from a false shell
a door, existing or placed hole. Ensure that the gun
against the wall, brought is in darkness inside a potting
from elsewhere ‘shed or erected cover to
shut out light.
NIGHT PATROLS Gn open country)
EXAMPLE No. 11
DIRECTION
OF
Advance
4
3 2
SECTION
118
PATROLS
1. Section leader, armed with sub-machine gun, re-
volver, hooded torch.
2. Rifle and bayonet.
3. Revolver, wire cutters.
This group leads the patrol.
4. Rifle and bayonet.
5. Rifle and bayonet.
This group watches and protects the right flank.
6. Rifle and bayonet.
7. Rifle and bayonet.
This group watches and protects the left flank.
8. Rifle and bayonet and wire cutters.
This man watches and protects the rear.
N.B.—Each man carries two grenades.
119
night patrols (advancing along A ftOAo'
120
Leading Group ....1. Section commander4eads the patrol.
2. Watches right. 3. Watches left.
Right Group ....4. Watches the leading group and leaders signal (and*his front). 5. Watches the right.
Left Group ....6. Watches the leading group and leader's-signal . 7. Watches the left.
Rear Man .... ....8. Watches the tear.
NIGHT PATROLS
(ADVANCING ALONG A HEDGE OR SlOE OF A WOOD)
122
Section commander leads the patrol.
Watches right flank.
Watches left flank.
Watches the leading group.
Watches the right flank.
Watches the group in front.
Watches the left flank.
Watches thte rear.
123
NIGHT PATROLS
124
2 I Section commander with his two men enter co
j* । search, protected by:—
4 7
j Watch the front and right flank.
7* c Watch the front and left flank.
8. Watches the rear.
Nos. 4, У, 6, and 7 will get into position first. When
they signal 4‘All clear," Nos. 1, 2, and 3 will come for
ward and enter the area to be searched. No. 8 will re*
main watching the rear.
;25.
NOTES
126
NOTES
127
NOTES'.
1.2S
IMPERIAL PRINT, PERTH