/


Text
Teaching English as a
Foreign Language
FOR
DUMmIES
‰
Teaching English as a
Foreign Language
FOR
DUMmIES
‰
by Michelle Maxom
A John Wiley and Sons, Ltd, Publication
Teaching English as a Foreign Language For Dummies®
Published by
John Wiley & Sons, Ltd
The Atrium
Southern Gate
Chichester
West Sussex
PO19 8SQ
England
E-mail (for orders and customer service enquires): cs-books@wiley.co.uk
Visit our Home Page on www.wiley.com
Copyright © 2009 John Wiley & Sons, Ltd, Chichester, West Sussex, England
Published by John Wiley & Sons, Ltd, Chichester, West Sussex
All Rights Reserved. No part of this publication may be reproduced, stored in a retrieval system or
transmitted in any form or by any means, electronic, mechanical, photocopying, recording, scanning or
otherwise, except under the terms of the Copyright, Designs and Patents Act 1988 or under the terms of
a licence issued by the Copyright Licensing Agency Ltd, Saffron House, 6-10 Kirby Street, London EC1N
8TS, UK, without the permission in writing of the Publisher. Requests to the Publisher for permission
should be addressed to the Permissions Department, John Wiley & Sons, Ltd, The Atrium, Southern Gate,
Chichester, West Sussex, PO19 8SQ, England, or emailed to permreq@wiley.co.uk, or faxed to (44) 1243
770620.
Trademarks: Wiley, the Wiley Publishing logo, For Dummies, the Dummies Man logo, A Reference for the
Rest of Us!, The Dummies Way, Dummies Daily, The Fun and Easy Way, Dummies.com and related trade
dress are trademarks or registered trademarks of John Wiley & Sons, Inc. and/or its affiliates in the United
States and other countries, and may not be used without written permission. All other trademarks are the
property of their respective owners. Wiley Publishing, Inc., is not associated with any product or vendor
mentioned in this book.
LIMIT OF LIABILITY/DISCLAIMER OF WARRANTY: THE PUBLISHER, THE AUTHOR, AND ANYONE
ELSE INVOLVED IN PREPARING THIS WORK MAKE NO REPRESENTATIONS OR WARRANTIES WITH
RESPECT TO THE ACCURACY OR COMPLETENESS OF THE CONTENTS OF THIS WORK AND SPECIFICALLY DISCLAIM ALL WARRANTIES, INCLUDING WITHOUT LIMITATION WARRANTIES OF FITNESS
FOR A PARTICULAR PURPOSE. NO WARRANTY MAY BE CREATED OR EXTENDED BY SALES OR PROMOTIONAL MATERIALS. THE ADVICE AND STRATEGIES CONTAINED HEREIN MAY NOT BE SUITABLE
FOR EVERY SITUATION. THIS WORK IS SOLD WITH THE UNDERSTANDING THAT THE PUBLISHER IS
NOT ENGAGED IN RENDERING LEGAL, ACCOUNTING, OR OTHER PROFESSIONAL SERVICES. IF PROFESSIONAL ASSISTANCE IS REQUIRED, THE SERVICES OF A COMPETENT PROFESSIONAL PERSON
SHOULD BE SOUGHT. NEITHER THE PUBLISHER NOR THE AUTHOR SHALL BE LIABLE FOR DAMAGES
ARISING HEREFROM. THE FACT THAT AN ORGANIZATION OR WEBSITE IS REFERRED TO IN THIS
WORK AS A CITATION AND/OR A POTENTIAL SOURCE OF FURTHER INFORMATION DOES NOT MEAN
THAT THE AUTHOR OR THE PUBLISHER ENDORSES THE INFORMATION THE ORGANIZATION OR
WEBSITE MAY PROVIDE OR RECOMMENDATIONS IT MAY MAKE. FURTHER, READERS SHOULD BE
AWARE THAT INTERNET WEBSITES LISTED IN THIS WORK MAY HAVE CHANGED OR DISAPPEARED
BETWEEN WHEN THIS WORK WAS WRITTEN AND WHEN IT IS READ.
For general information on our other products and services, please contact our Customer Care
Department within the U.S. at 877-762-2974, outside the U.S. at 317-572-3993, or fax 317-572-4002.
For technical support, please visit www.wiley.com/techsupport.
Wiley also publishes its books in a variety of electronic formats. Some content that appears in print may
not be available in electronic books.
British Library Cataloguing in Publication Data: A catalogue record for this book is available from the
British Library
ISBN: 978-0-470-74576-2
Printed and bound in Great Britain by Bell & Bain Ltd, Glasgow
10 9 8 7 6 5 4 3 2 1
About the Author
Michelle Maxom began teaching part-time in 1997 after doing an intensive
Trinity TESOL certificate. She later moved to Italy where she furthered her
studies in EFL and honed her skills working with students of all ages and
from a wide variety of backgrounds. She toured secondary schools and gave
seminars in Caribbean literature and Britain’s multi-ethnic culture showing
how the English language can open doors and minds. On returning to the UK
she took on the post of Director of Studies at a central London EFL school,
bringing it to accreditation by the British Council for the first time and
learning how to work behind the scenes in the industry. She has made an
instructional film for Thomson ELT and become a specialist in one-to-one
courses. Since becoming a freelance teacher/trainer Michelle has delivered
work experience programmes for trainee TEFL teachers, taught on intensive
TEFL courses in person and tutored those taking distance learning courses.
She is a member of the College of Teachers.
Michelle loves voluntary work, finding out about other languages and
working at home by the river Thames.
Dedication
This book is dedicated to Mrs Keturah Samuels, her children past and
present and all my family members who approach life with such faith,
courage and grace.
Author’s Acknowledgements
I would like to thank my colleagues and students who responded to this
project with such enthusiasm. You truly inspired me.
During my career there have been certain TEFL people who have given me
special support. These are the folks at Salisbury School of English, Oxford
School Mantova, Avalon School of English and TEFL Training. Thank you for
giving me one stepping stone after another while allowing me to be myself
inside and outside the classroom.
The input from Wejdan Ismail, Simon Bell and Kathleen Dobie at John Wiley
has been invaluable. I certainly could not have written this book without you.
Last but not least, thanks to Mum, Monique and all my dear brothers and
sisters for constantly egging me on and for putting up with me.
Publisher’s Acknowledgements
We’re proud of this book; please send us your comments through our Dummies online registration
form located at www.dummies.com/register/.
Some of the people who helped bring this book to market include the following:
Acquisitions, Editorial, and Media
Development
Project Editor: Simon Bell
Cartoons: Rich Tennant
(www.the5thwave.com)
Composition Services
Content Editor: Jo Theedom
Project Coordinator: Lynsey Stanford
Acquisitions Editor: Wejdan Ismail
Publishing Assistant: Jennifer Prytherch
Layout and Graphics: Reuben W. Davis,
Christin Swinford
Copy Editor: Sally Lansdell
Proofreader: Susan Moritz
Technical Editor: Chris Groves
Indexer: Cheryl Duksta
Production Manager: Daniel Mersey
Cover Photos: © avatra images / Alamy
Contents at a Glance
Introduction ................................................................ 1
Part I: Getting Started in TEFL ..................................... 7
Chapter 1: Discovering the Wonderful World of TEFL.................................................. 9
Chapter 2: Looking at What TEFL Teachers Actually Do ............................................ 19
Chapter 3: Examining Courses, Qualifications and Jobs ............................................ 31
Part II: Putting Your Lesson Together .......................... 47
Chapter 4: Starting from the Beginning: Planning the Lesson ................................... 49
Chapter 5: Standing in the Spotlight: Presenting to the Class ................................... 67
Chapter 6: Holding the Reins and Letting Them Loose –
Giving Students Practice .............................................................................................. 85
Chapter 7: Giving Correction and Feedback .............................................................. 101
Chapter 8: Being Materialistic! Using Course Books and Other Materials ............. 115
Chapter 9: Who’s The Boss around Here? Managing Your Classroom ................... 125
Part III: Teaching Skills Classes................................ 137
Chapter 10: Taken as Read: Teaching Reading Lessons ........................................... 139
Chapter 11: Write or Wrong? Teaching Writing Lessons.......................................... 157
Chapter 12: What Accent? Teaching Pronunciation.................................................. 171
Chapter 13: Setting Their Tongues Wagging: Speaking and Discussion ................. 183
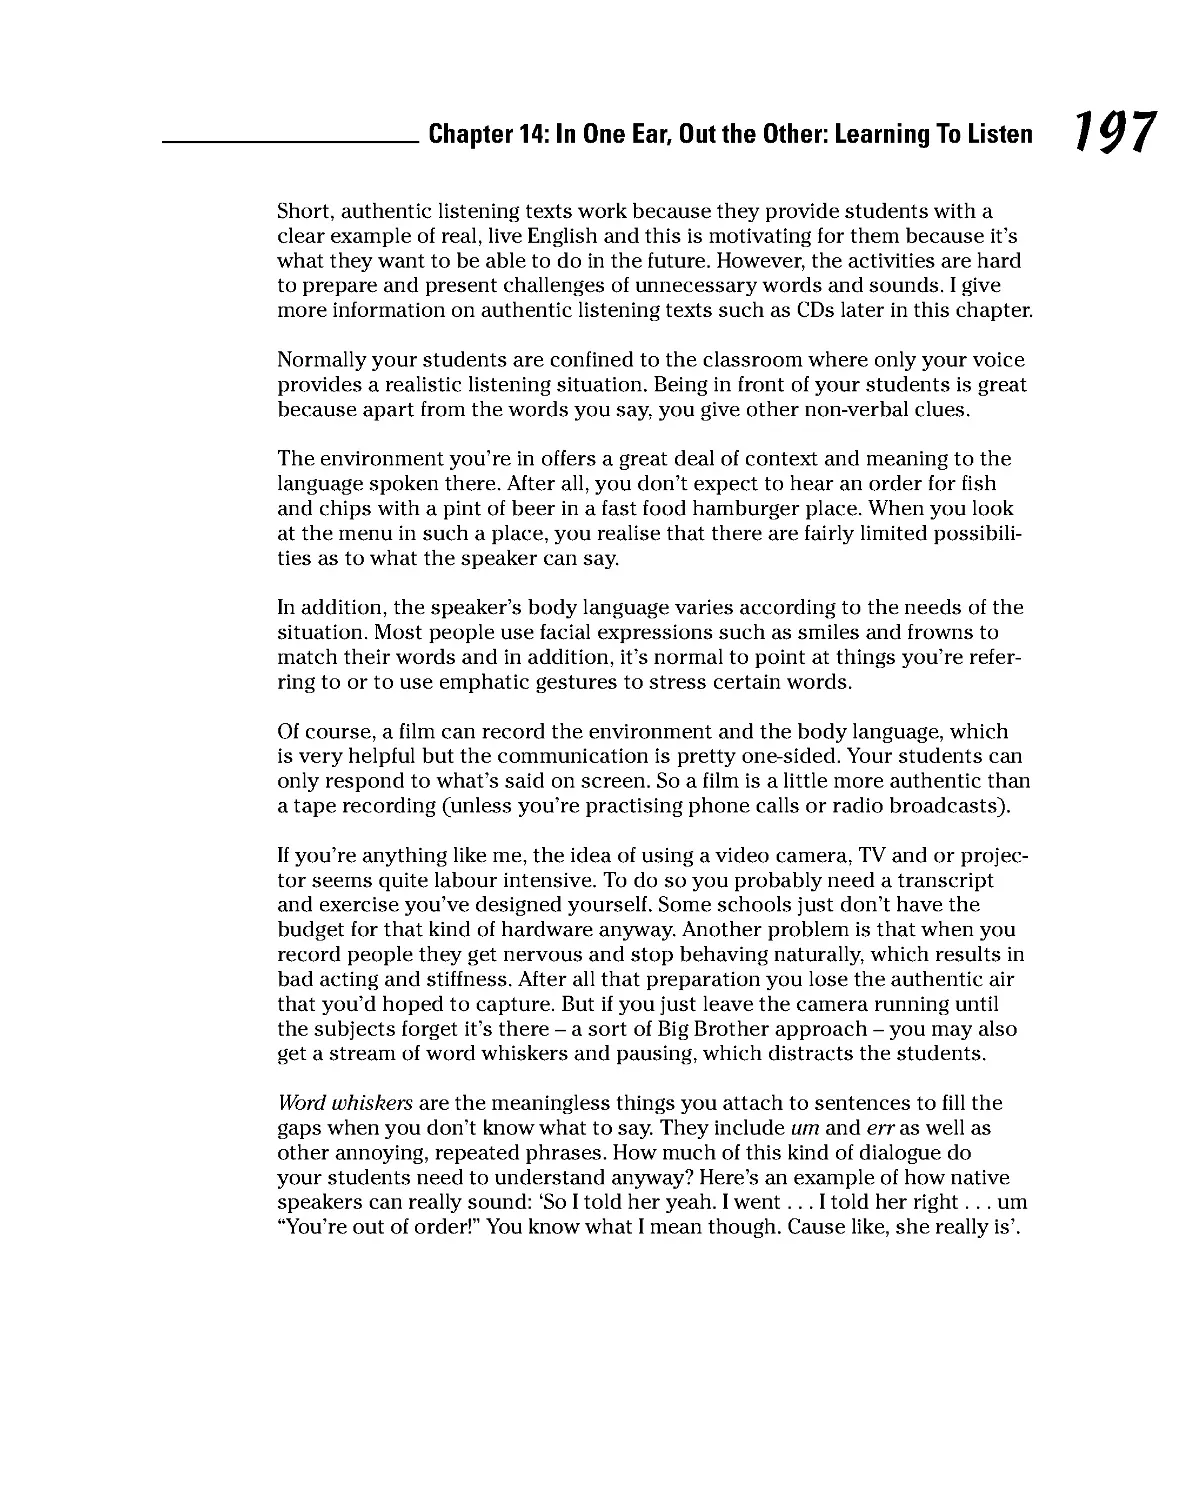
Chapter 14: In One Ear, Out the Other: Learning To Listen ..................................... 195
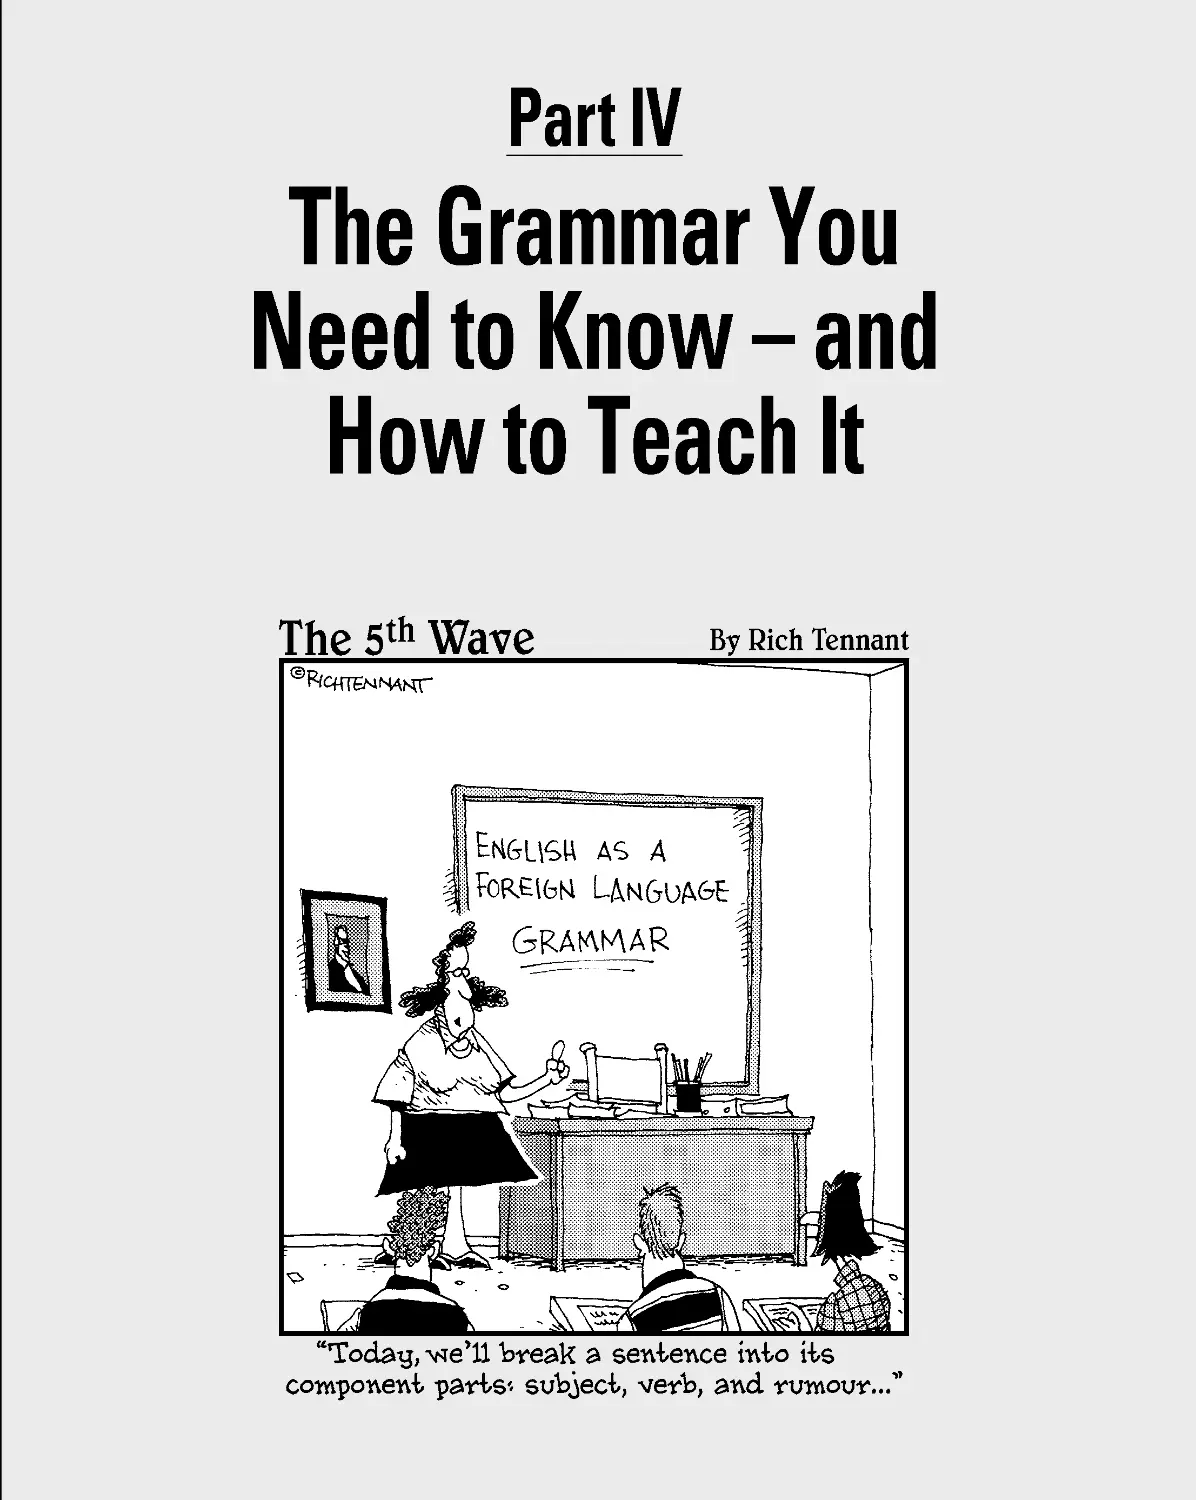
Part IV: The Grammar You Need to Know –
and How to Teach It ................................................. 209
Chapter 15: Stop Press! Student to Deliver Sentence ................................................ 211
Chapter 16: Feeling Tense? Sorting Out Verb Tenses ............................................... 227
Chapter 17: Exploring More Important Verb Structures .......................................... 247
Part V: What Kind of Class Will I Have?.................... 263
Chapter 18: Putting Students to the Test.................................................................... 265
Chapter 19: Getting Specific: Teaching Just One Student and Business English ... 275
Chapter 20: Getting Youth on Your Side: Coping with Younger Learners ............. 283
Chapter 21: Making the Grade: Handling Exam Classes ........................................... 299
Chapter 22: Distinguishing Monolingual and Multi-lingual Classes ........................ 317
Part VI: The Part of Tens .......................................... 333
Chapter 23: Ten Ways to Liven Up an English Lesson .............................................. 335
Chapter 24: Ten Great Resources for TEFL Teachers ............................................... 341
Appendix A: Lesson Plan Templates ........................... 349
Appendix B: TEFL Locations around the World............ 355
Index ...................................................................... 363
Table of Contents
Introduction ................................................................. 1
About This Book .............................................................................................. 1
Conventions Used in This Book ..................................................................... 2
Foolish Assumptions ....................................................................................... 2
How This Book Is Organised ......................................................................... 3
Part I: Getting Started In TEFL .............................................................. 3
Part II: Putting Your Lesson Together ................................................. 3
Part III: How to Teach Skills Classes .................................................... 4
Part IV: The Grammar You Need to Know – and How to Teach It ... 4
Part V: What Kind of Class Will I Have?............................................... 4
Part VI: The Part of Tens ....................................................................... 4
Icons Used in This Book ................................................................................. 5
Where to Go from Here ................................................................................... 5
Part I: Getting Started in TEFL ...................................... 7
Chapter 1: Discovering the Wonderful World of TEFL. . . . . . . . . . . . . . .9
Understanding Why English ........................................................................... 9
Looking at the TEFL Marketplace ................................................................ 10
Considering countries – both home and abroad ............................. 10
Changing with the seasons ................................................................. 12
Teaching trends ................................................................................... 13
Getting Out There .......................................................................................... 13
Preparing to leave town ...................................................................... 13
Setting up elsewhere ........................................................................... 14
Thinking About a Stint or a Life in TEFL ..................................................... 15
Filling gap years and career breaks ................................................... 15
Planning a new life ............................................................................... 16
Addressing some qualms .................................................................... 17
Chapter 2: Looking at What TEFL Teachers Actually Do. . . . . . . . . . . .19
Answering Common Questions ................................................................... 19
Can I teach English without knowing the students’ language? ...... 19
Do I have to translate?......................................................................... 20
Will the students be children? ........................................................... 20
Do I have to know all the grammar in the English language? ......... 20
Can I teach without a degree and formal qualifications?................ 21
I hated language lessons at school. Will the job be like that?........ 21
Are there lots of books and exercises for
students to work through?.............................................................. 21
xii
Teaching English as a Foreign Language For Dummies
What kind of person makes an ideal TEFL teacher?........................ 22
Does it matter that I’m not a native speaker? .................................. 22
How many students will I have? ......................................................... 22
Is it okay if I don’t ‘talk posh’? ............................................................ 23
Will the students like me? ................................................................... 23
How will I know what to do? ............................................................... 23
Talking to Students and So Much More – Teaching Basics...................... 23
Teaching the easier words first ......................................................... 24
Focusing on the most useful words ................................................... 26
Giving students room to talk .............................................................. 26
Keeping things relevant ...................................................................... 27
Recognising What Your Students Want from You..................................... 27
Chapter 3: Examining Courses, Qualifications and Jobs . . . . . . . . . . .31
Teaching the Teacher ................................................................................... 31
Finding your level ................................................................................ 32
Being an unqualified teacher ............................................................. 32
Getting initiated ................................................................................... 34
Becoming a qualified teacher ............................................................. 35
Getting on Course .......................................................................................... 35
Entering introductory courses ........................................................... 35
Signing up for a certificate course ..................................................... 37
Keeping your distance......................................................................... 40
Going for a diploma course ................................................................ 41
Staying in for in-house training .......................................................... 43
Banking on Salaries ....................................................................................... 44
Finding Work ................................................................................................. 45
Part II: Putting Your Lesson Together ........................... 47
Chapter 4: Starting from the Beginning: Planning the Lesson . . . . . . .49
Deciding What to Teach ............................................................................... 49
Beginner ................................................................................................ 50
Elementary ............................................................................................ 51
Pre-intermediate .................................................................................. 52
Intermediate ......................................................................................... 52
Upper-intermediate ............................................................................. 53
Advanced .............................................................................................. 54
Proficiency ............................................................................................ 55
Keeping Things Relevant .............................................................................. 55
Getting into Grading ...................................................................................... 56
Setting Aims and Objectives ........................................................................ 58
Getting Your Timing Down and Planning for Interaction ........................ 59
Assembling Presentation, Practice and Production ................................. 61
Introducing the point .......................................................................... 61
Analysing the point .............................................................................. 61
Table of Contents
Trialling the language .......................................................................... 62
Giving your students free practice .................................................... 63
Stepping Out of the Spotlight to Let Your Students Shine ....................... 64
Chapter 5: Standing in the Spotlight: Presenting to the Class . . . . . . .67
Eliciting Answers – Ask, Don’t Tell! ............................................................. 67
Creating Interest with Visual Aids ............................................................... 69
Showing and telling – pictures and objects ...................................... 69
Travelling along timelines and tenses ............................................... 70
Using the board effectively ................................................................. 72
Doing Concept Checks .................................................................................. 74
Introducing Vocabulary ................................................................................ 76
Sharing function and connotation ..................................................... 78
Fish and . . . ? Teaching vocabulary in chunks................................. 79
All right mate! Teaching posh words and slang ............................... 80
Talking about words that mean the same and opposites –
synonyms and antonyms ................................................................ 81
Presenting Grammar ..................................................................................... 82
Chapter 6: Holding the Reins and Letting Them Loose –
Giving Students Practice . . . . . . . . . . . . . . . . . . . . . . . . . . . . . . . . . . . . . .85
Practising New Words ................................................................................... 85
Practising with the whole class first ................................................. 87
Practising alone.................................................................................... 88
Practising in pairs ................................................................................ 90
Practising in groups............................................................................. 93
Moving to the Production Stage .................................................................. 93
Writing and speaking ........................................................................... 93
Role-playing in pairs ............................................................................ 94
Getting dramatic in groups ................................................................. 95
Giving Instructions ........................................................................................ 96
Putting Students into Pairs and Groups ..................................................... 97
Trying Out Practice and Production Activities ......................................... 97
Writing a blurb ..................................................................................... 98
Doing class surveys and reports........................................................ 98
Playing Mastermind ............................................................................. 99
Producing predictions....................................................................... 100
Chapter 7: Giving Correction and Feedback . . . . . . . . . . . . . . . . . . . . .101
Knowing What to Correct and When ........................................................ 101
Judging accuracy, timing and value ................................................ 102
Exploring the nature of the error..................................................... 103
Letting Your Fingers Do the Talking ......................................................... 104
Using your hands ............................................................................... 104
Teaching with body language .......................................................... 105
Leading to Self Correction .......................................................................... 106
Progressing by prompting ................................................................ 106
Examining echoing ............................................................................. 107
xiii
xiv
Teaching English as a Foreign Language For Dummies
Encouraging Peer Correction ..................................................................... 107
Scheduling Class Feedback ........................................................................ 108
Wielding Your Red Pen ............................................................................... 109
Marking with correction codes ........................................................ 109
Choosing written errors to work with ............................................. 110
Marking criteria .................................................................................. 112
Praising the good bits ....................................................................... 112
Exposing Progress ....................................................................................... 113
Chapter 8: Being Materialistic! Using Course
Books and Other Materials . . . . . . . . . . . . . . . . . . . . . . . . . . . . . . . . . . .115
Wasting No Time Reinventing the Wheel ................................................. 115
Listing Popular Course Books and Published Resources ...................... 116
Going for general English books ...................................................... 117
Imparting business English............................................................... 118
Starting off younger learners ............................................................ 118
Adapting Your Course Book....................................................................... 119
Catering to a class of mixed ability ................................................. 119
Dealing with mixed age groups ........................................................ 120
Setting tasks........................................................................................ 120
Making Use of Authentic Materials ........................................................... 121
Designing Your Own Materials .................................................................. 122
Using What’s at Hand .................................................................................. 123
Chapter 9: Who’s The Boss around Here?
Managing Your Classroom . . . . . . . . . . . . . . . . . . . . . . . . . . . . . . . . . . . .125
Running Your Classes Effectively .............................................................. 125
Organising Your Classroom ....................................................................... 127
Considering basic equipment........................................................... 127
Arranging the room ........................................................................... 128
Establishing Classroom Rules .................................................................... 130
Keeping Order .............................................................................................. 131
Troubleshooting .......................................................................................... 132
Dealing with disruptive students ..................................................... 133
Handling a lack of participation ....................................................... 134
Attending to poor attendance .......................................................... 135
Part III: Teaching Skills Classes ................................ 137
Chapter 10: Taken as Read: Teaching Reading Lessons. . . . . . . . . . .139
Choosing a Text ........................................................................................... 139
Starting with the ABCs ...................................................................... 140
Reading whole words ........................................................................ 141
Graduating from words to sentences with
the help of punctuation ................................................................. 142
Table of Contents
Looking at length ............................................................................... 144
Judging interest and relevance ........................................................ 144
Working with the Text ................................................................................ 145
Getting ready to read: Pre-reading tasks ........................................ 145
Finding your way around .................................................................. 146
Getting the gist ................................................................................... 146
Getting down to the nitty-gritty ....................................................... 146
Predicting ............................................................................................ 147
Summarising ....................................................................................... 147
Handling Vocabulary ................................................................................... 148
Before you set off ............................................................................... 149
Along the way ..................................................................................... 149
Try another route .............................................................................. 149
Working on Skills Associated with Reading ............................................. 150
Including reading-related skills ........................................................ 150
Doing more than reading .................................................................. 150
Reading Case Study ..................................................................................... 152
Chapter 11: Write or Wrong? Teaching Writing Lessons . . . . . . . . . .157
Putting Pen to Paper ................................................................................... 157
Paying attention to basic writing skills ........................................... 158
Completing sentences ....................................................................... 158
Moving on to paragraphs .................................................................. 159
Structuring a Writing Lesson ..................................................................... 161
Energising the class with pre-writing tasks .................................... 161
Setting the writing task and explaining the stages ........................ 165
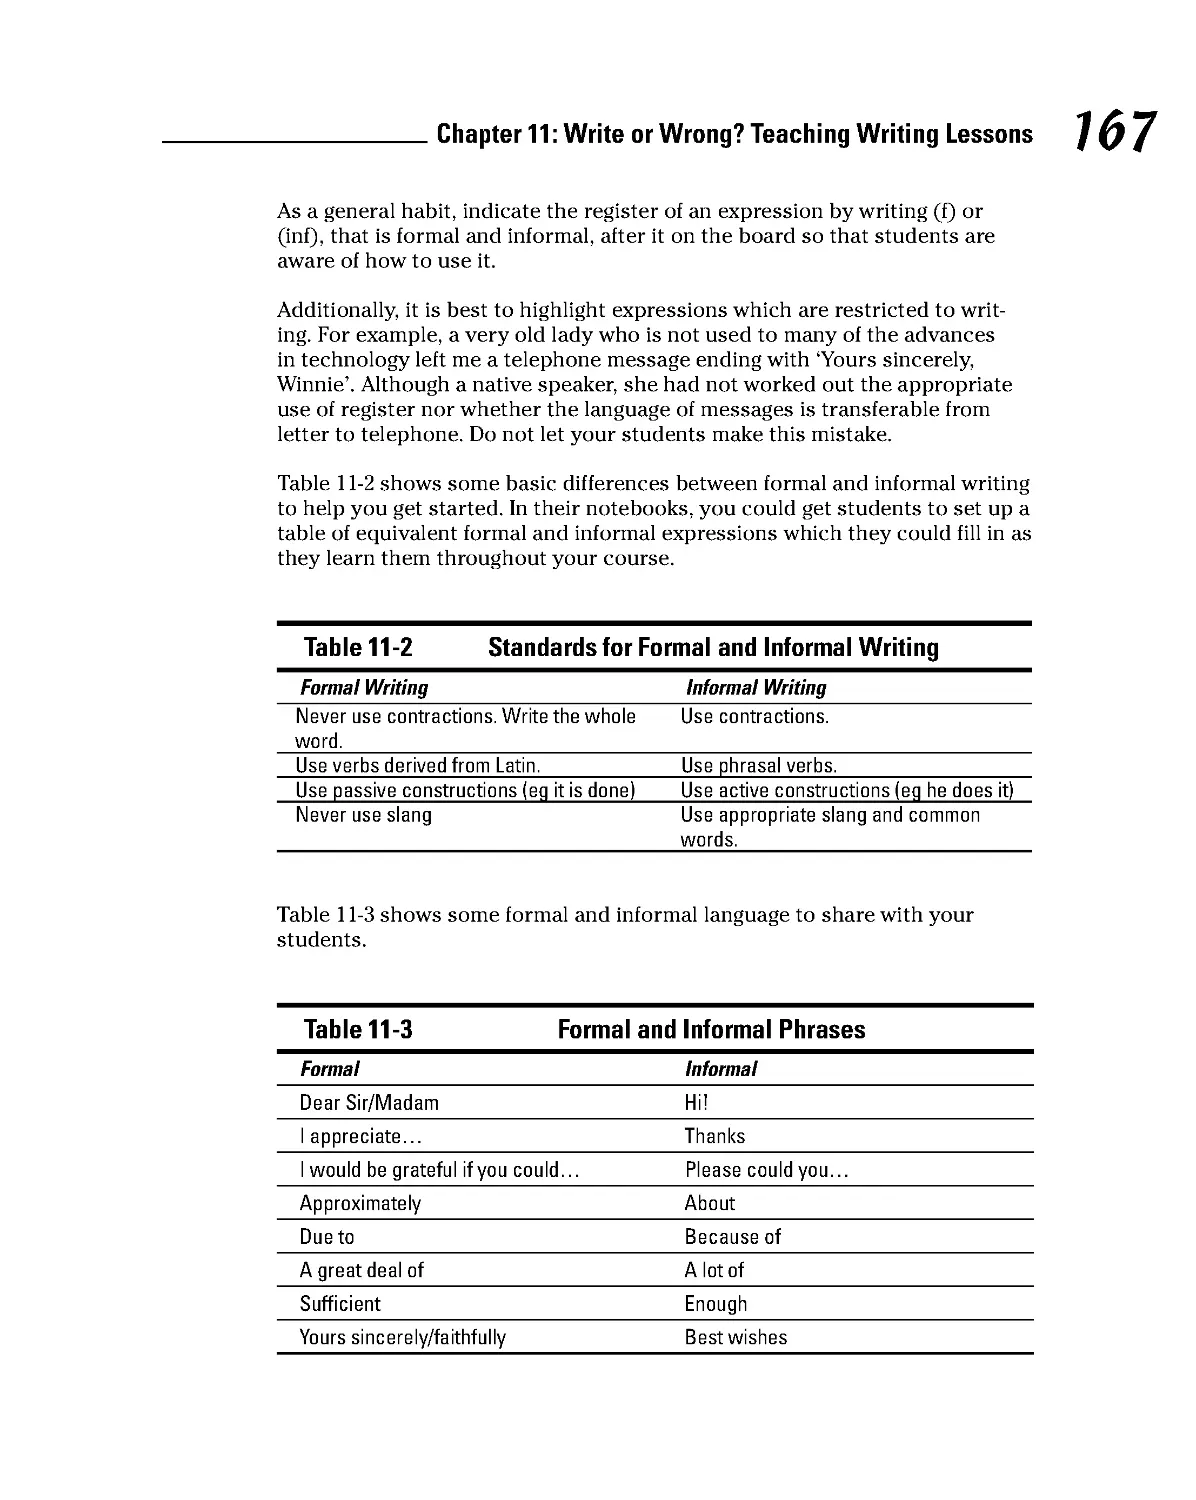
Registering the Right Degree of Formality ............................................... 166
Writing Case Study ...................................................................................... 168
Chapter 12: What Accent? Teaching Pronunciation . . . . . . . . . . . . . .171
Repeat after Me ............................................................................................ 171
Repeating first .................................................................................... 171
Repeating as a class and individually ............................................. 172
Using Phonology: Sound and Spelling....................................................... 173
Getting to know the 44 key sounds of English ............................... 174
Using phonemes in class................................................................... 177
Adding Emphasis to Words and Syllables ................................................ 177
Impotent or important? Placing emphasis on syllables................ 178
Emphasising words............................................................................ 178
Improving Fluency through Pronunciation .............................................. 179
Watch Your Tone! – Intonation .................................................................. 180
Chapter 13: Setting Their Tongues Wagging:
Speaking and Discussion . . . . . . . . . . . . . . . . . . . . . . . . . . . . . . . . . . . . .183
Getting Students Talking ............................................................................ 183
Warming up ........................................................................................ 184
Talking about communicative activities ......................................... 185
xv
xvi
Teaching English as a Foreign Language For Dummies
How About You? Extending Conversations ............................................. 187
Helping students depart from the script ........................................ 187
Following up ....................................................................................... 189
In My Opinion – Agreeing, Disagreeing and Negotiating ........................ 190
Expressing an opinion ....................................................................... 190
Interjecting, rephrasing and summing up....................................... 191
Planning a Discussion Lesson .................................................................... 193
Choosing the right topic ................................................................... 193
Creating structure in the discussion ............................................... 194
Paying attention without taking over .............................................. 194
Chapter 14: In One Ear, Out the Other: Learning To Listen . . . . . . . . .195
Structuring Your Lesson ............................................................................. 195
Choosing a Listening Activity .................................................................... 196
Finding material from the real world .............................................. 196
Choosing the material from course books ..................................... 198
Using CDs and DVDs for authentic listening .................................. 198
Whetting Students’ Appetites .................................................................... 201
Motivating students to listen ........................................................... 201
Running through some pre-listening tasks ..................................... 202
Come Again? Repeating the Text ............................................................... 204
Listening for the basic idea .............................................................. 204
Listening for detail ............................................................................. 205
Planning Follow-Up Activities .................................................................... 207
Part IV: The Grammar You Need to Know –
and How to Teach It ................................................. 209
Chapter 15: Stop Press! Student to Deliver Sentence . . . . . . . . . . . . .211
Starting with the Basics: Subjects, Verbs and Objects ........................... 211
Thinking about subjects ................................................................... 212
Activating verbs ................................................................................. 213
Acting on the object .......................................................................... 216
Proposing Prepositions .............................................................................. 217
Introducing Articles .................................................................................... 218
Using the indefinite a/an ................................................................... 219
Getting specific with ‘the’ ................................................................. 219
Foregoing the article altogether ...................................................... 220
Describing Adjectives and Adverbs .......................................................... 220
Sprucing up a noun with an adjective ............................................. 220
Expanding on verbs with adverbs ................................................... 222
Table of Contents
Connecting with Conjunctions................................................................... 224
Differentiating conjunctions ............................................................. 224
Weaving conjunctions into writing and speaking .......................... 225
Chapter 16: Feeling Tense? Sorting Out Verb Tenses . . . . . . . . . . . . .227
I Speak, I Spoke, I’ve Spoken: Identifying the Tenses .............................. 227
Beginning with the Present Simple ........................................................... 229
Staying Continuously in the Present ........................................................ 231
Going Back to the Past, Simply .................................................................. 231
Remembering a Moment in the Past ........................................................ 232
Presenting the Present Perfect Simple ..................................................... 233
Sharing experiences .......................................................................... 233
Continuing from the past until the present .................................... 234
Anticipating expectations ................................................................. 234
Noting recent changes ...................................................................... 234
Acting in the Present Perfect Continuous ................................................ 235
Moving from the past until the present .......................................... 235
Showing recent changes ................................................................... 235
Getting to the Past Perfect Simple............................................................. 236
Seeing the structure .......................................................................... 236
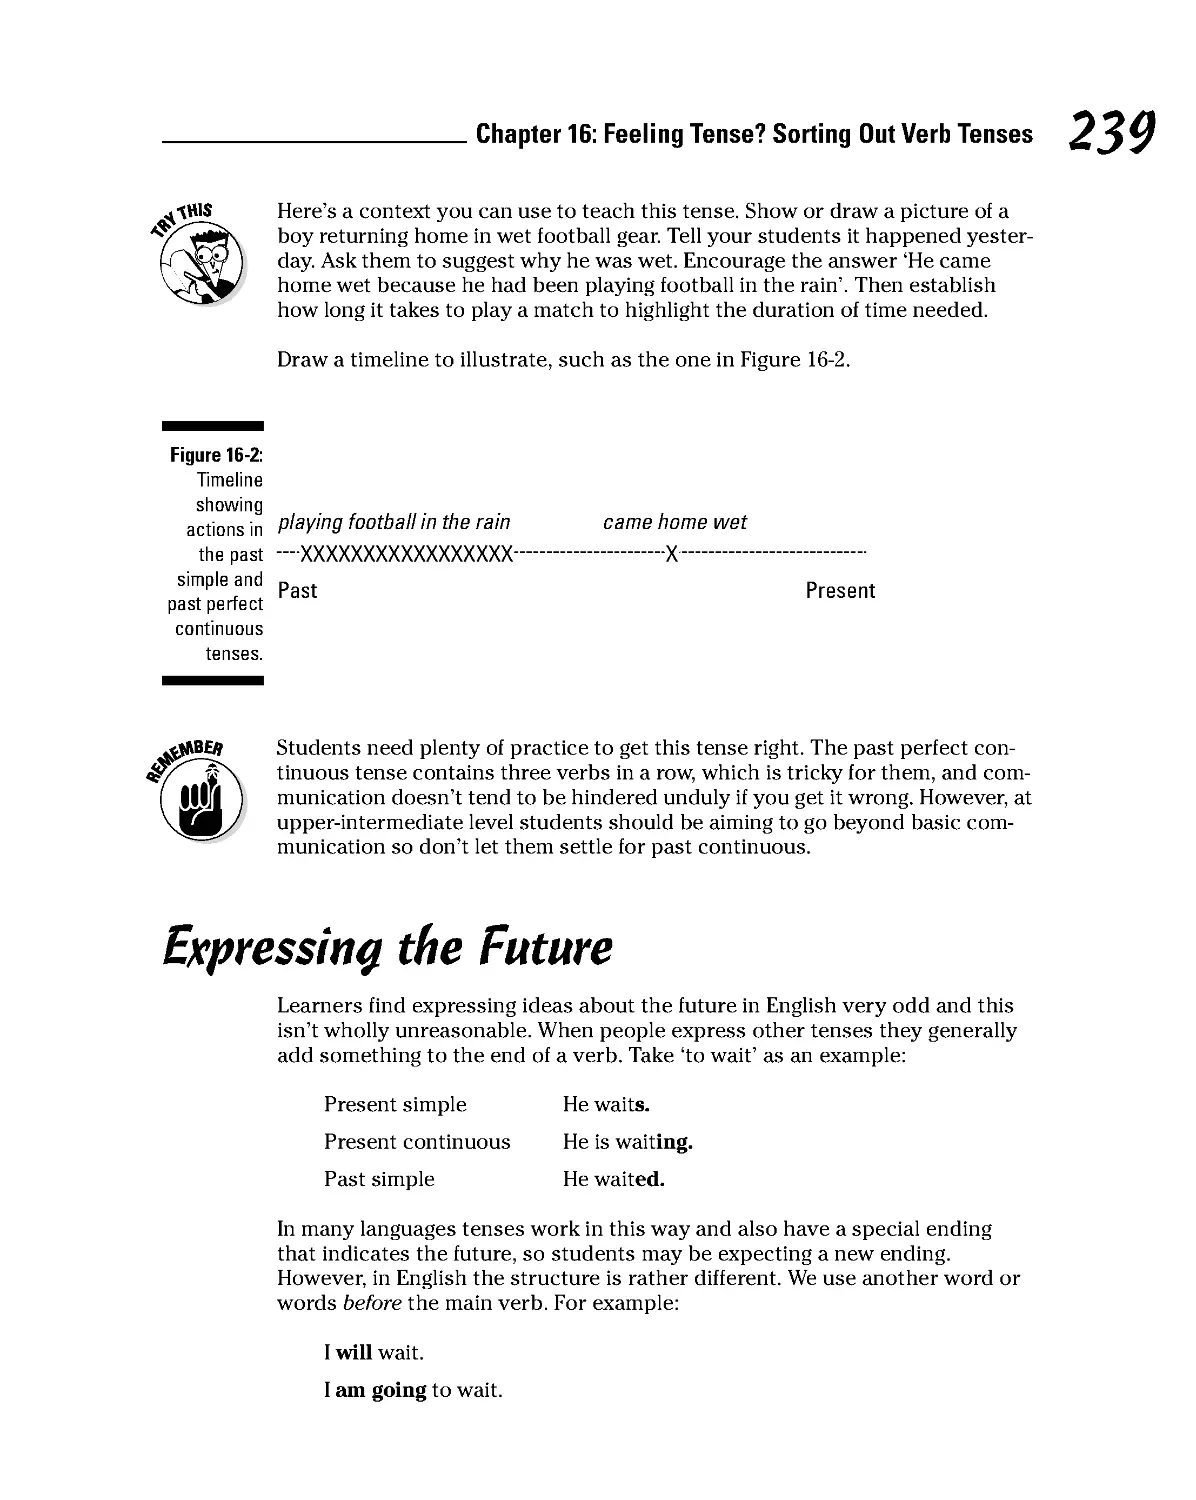
Plotting a timeline .............................................................................. 237
Focusing on the Past Perfect Continuous ................................................ 238
Expressing the Future ................................................................................. 239
Doing the future simple..................................................................... 240
Going into the future continuous..................................................... 241
Getting to the future perfect............................................................. 242
Looking forward to the future perfect continuous ........................ 244
Talking about ‘To be going to’.......................................................... 245
Chapter 17: Exploring More Important Verb Structures . . . . . . . . . . .247
Knowing Your Modals ................................................................................ 247
Identifying modal verbs .................................................................... 247
Comparing the modal verbs and what they do.............................. 249
Sorting Out Phrasal Verbs ......................................................................... 251
Following the rules about separable and inseparable phrasals .... 252
Teaching phrasal verbs .................................................................... 254
If I Were You . . . Conditional Structures .................................................. 255
Being general: The zero conditional ................................................ 255
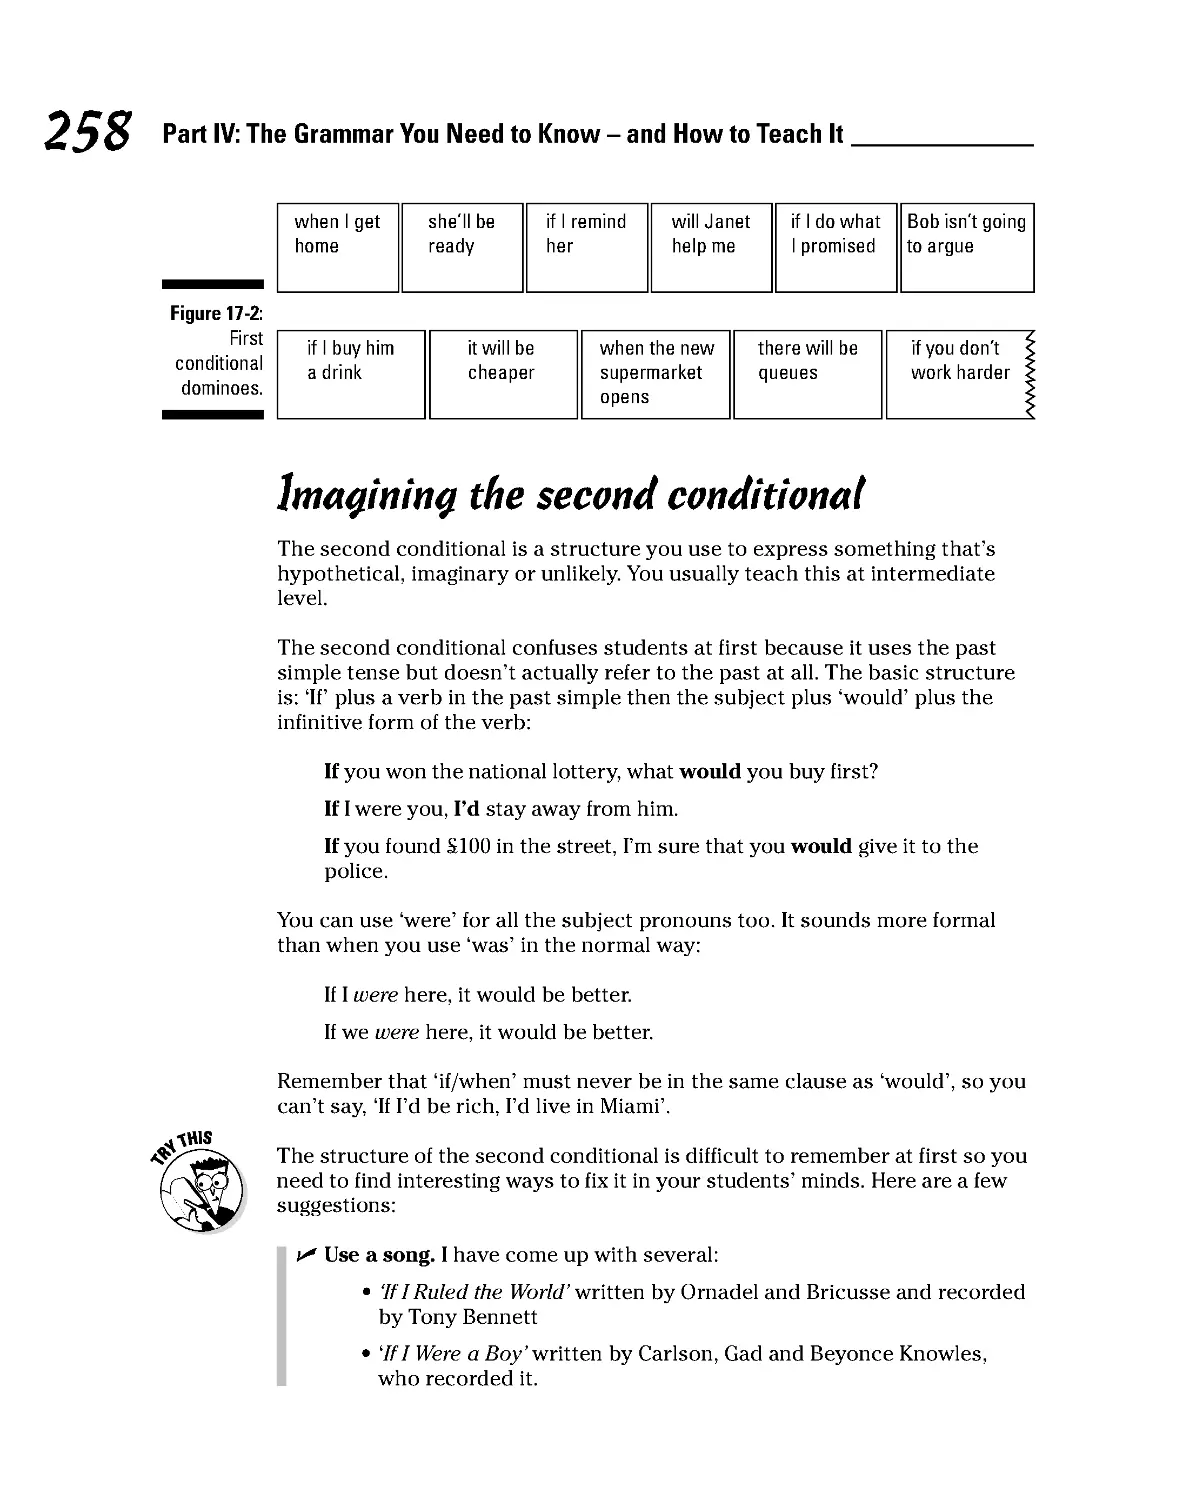
Depending on the possible: The first conditional ......................... 256
Imagining the second conditional.................................................... 258
Reviewing the past with the third conditional ............................... 260
xvii
xviii
Teaching English as a Foreign Language For Dummies
Part V: What Kind of Class Will I Have? .................... 263
Chapter 18: Putting Students to the Test . . . . . . . . . . . . . . . . . . . . . . . .265
Testing Early to Discover Your Students’ Needs .................................... 265
Having them test themselves ........................................................... 265
Assigning levels through placement tests ...................................... 267
Testing for proficiency ...................................................................... 268
Testing to Establish the Best Course ........................................................ 268
Testing progress ................................................................................ 269
Testing achievement ......................................................................... 269
Marking Tests............................................................................................... 272
Looking at Alternatives to Testing ............................................................ 273
Chapter 19: Getting Specific: Teaching Just One
Student and Business English . . . . . . . . . . . . . . . . . . . . . . . . . . . . . . . . .275
Evaluating One-to-Ones .............................................................................. 275
Listing pros and cons for the student ............................................. 276
Talking pros and cons for the teacher ............................................ 277
Planning and teaching a one-to-one lesson .................................... 279
Working at Teaching Business English ..................................................... 280
Chapter 20: Getting Youth on Your Side:
Coping with Younger Learners . . . . . . . . . . . . . . . . . . . . . . . . . . . . . . . .283
Teaching Kids’ Classes – Dream or Nightmare? ...................................... 283
Looking at how little ones learn ....................................................... 284
Sorting out what young learners need ............................................ 284
Imagining Once Upon a Time ..................................................................... 285
Getting the grammar ......................................................................... 286
Expanding vocabulary ....................................................................... 287
TEFL Tiddlywinks: Using Games to Teach ............................................... 288
Adapting real games .......................................................................... 289
Using games from course books ...................................................... 290
Tuning-In to Songs and Nursery Rhymes ................................................. 292
Choosing the right song .................................................................... 292
Teaching your class to sing .............................................................. 292
Keeping Teenagers Interested ................................................................... 294
Intriguing students with international English............................... 295
Spelling out abbreviations ................................................................ 296
Playing Kim’s game ............................................................................ 297
Offering advice with problem pages ............................................... 297
Chapter 21: Making the Grade: Handling Exam Classes. . . . . . . . . . .299
Exploring University Entrance Exams....................................................... 299
IELTS (International English Language Testing System) ............. 300
TOEFL (Test of English as a Foreign Language) ............................ 302
Table of Contents
Going for More General English Exams .................................................... 304
Cambridge ESOL (English for Speakers
of Other Languages) exams .......................................................... 304
Other exams ...................................................................................... 305
Sharpening Study Skills and Exam Techniques ..................................... 307
Writing especially for exams ............................................................ 308
Reading for exams ............................................................................. 310
Speaking in exams ............................................................................. 311
Listening in exams ............................................................................ 312
Teaching Exam Classes ............................................................................... 313
Organising your course ..................................................................... 313
Using English exam papers: Teaching what sounds ‘English’...... 314
Chapter 22: Distinguishing Monolingual and
Multi-lingual Classes . . . . . . . . . . . . . . . . . . . . . . . . . . . . . . . . . . . . . . . .317
Speaking the Same: Monolingual Classes ................................................. 317
Predicting errors ................................................................................ 317
Using the students’ language .......................................................... 319
Pointing out the pitfalls of monolingual classes ........................... 320
Creating an ‘English’ environment .................................................. 320
Diversifying with Multi-lingual Classes ..................................................... 322
Building rapport ................................................................................. 322
Managing learning.............................................................................. 324
Going beyond language: Teaching culture ..................................... 326
Applying Case Studies................................................................................. 327
The English class in Italy .................................................................. 329
The English class in London ............................................................. 330
Part VI: The Part of Tens ........................................... 333
Chapter 23: Ten Ways to Liven Up an English Lesson . . . . . . . . . . . . .335
Bring in Real-World Objects ....................................................................... 335
Step Outside the Classroom ....................................................................... 336
Browse the Net............................................................................................. 336
Start a Project .............................................................................................. 337
Let the Students Teach ............................................................................... 337
Starting Out with ‘Once Upon a Time’ ...................................................... 338
Open Up Your Life ....................................................................................... 338
Move Around................................................................................................ 339
Play a Game .................................................................................................. 339
Get Musical ................................................................................................... 340
xix
xx
Teaching English as a Foreign Language For Dummies
Chapter 24: Ten Great Resources for TEFL Teachers. . . . . . . . . . . . . .341
Making the Most of EFL Reference Books ................................................ 341
A grammar reference to fall back on ............................................... 341
A book with grammar lessons to save the day .............................. 342
Looking It Up! Making Use of the Dictionary ............................................ 342
Browsing Websites ...................................................................................... 343
Finding work ...................................................................................... 343
Planning lessons ................................................................................ 344
Reading the English Language Gazette ..................................................... 344
Attending Professional Seminars............................................................... 345
Getting Your Hands on Real Stuff- ............................................................. 345
Maps .................................................................................................... 345
Newspapers and magazines ............................................................. 346
Personal memorabilia ....................................................................... 346
Playing Board Games .................................................................................. 346
Roping in Friends and Family..................................................................... 347
Pointing to Charts and Posters .................................................................. 348
Appendix A: Lesson Plan Templates ........................... 349
PPP Lessons ................................................................................................. 349
Skills Lessons ............................................................................................... 351
Needs Analysis ............................................................................................. 352
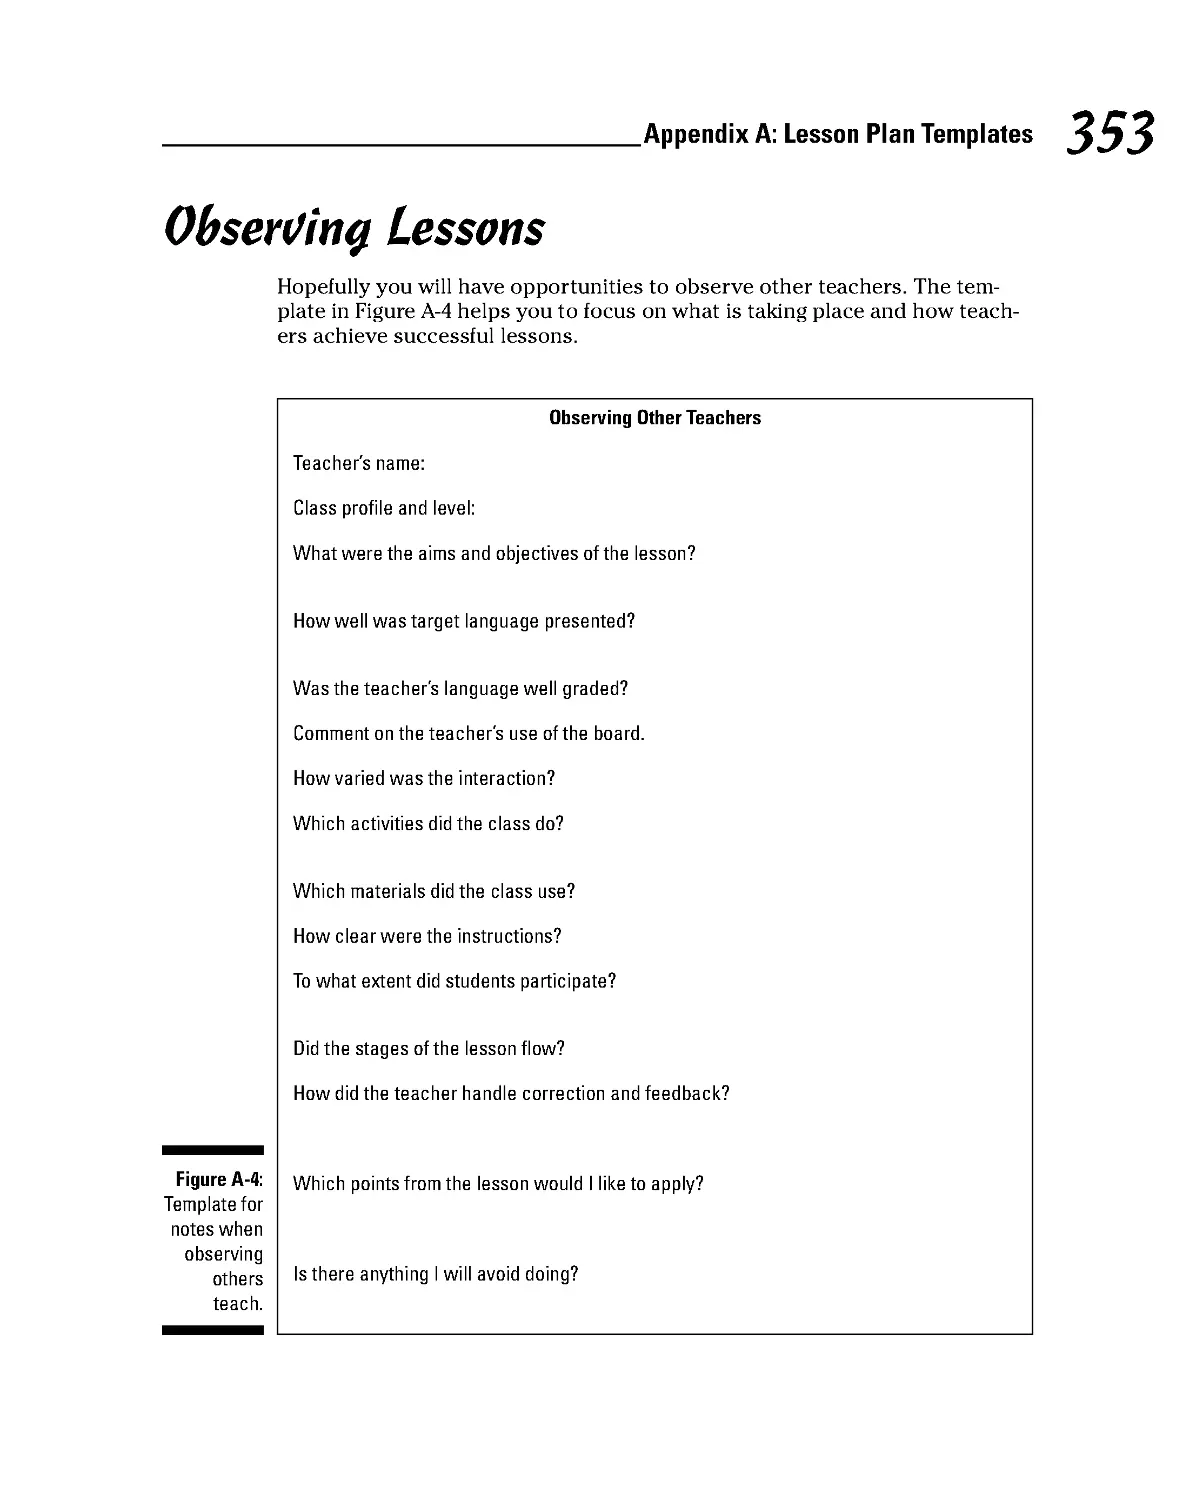
Observing Lessons ...................................................................................... 353
Appendix B: TEFL Locations around the World ............ 355
Brazil ............................................................................................................. 355
China ............................................................................................................. 356
Italy ................................................................................................................ 356
Japan ............................................................................................................. 357
Poland ........................................................................................................... 358
Russia ............................................................................................................ 358
Saudi Arabia ................................................................................................. 359
South Korea .................................................................................................. 360
Spain .............................................................................................................. 360
Turkey ........................................................................................................... 361
Vietnam ......................................................................................................... 362
Index ....................................................................... 363
Introduction
T
he English language is officially big business. There could be as many
as a billion students learning English around the world at this time and
that is reason enough to consider moving into Teaching English as a Foreign
Language (TEFL). However, when you combine this with the freedom the job
gives you to move around the world and earn your keep, the case for TEFL
gets even stronger. While English speakers move out to different lands, students of English migrate to other parts of the globe in search of a better life
and new horizons.
Teaching English is something people do when they are ready to change their
lives and this book gives you some of the basic tools you need to make that
happen.
Most people who speak the language well can teach others to some degree.
We do it all the time with children and with foreign friends. We explain words
and concepts to each other on a daily basis. TEFL is an extension of what
we do naturally and this book helps you zoom in on your language skills and
structure them. People often surprise themselves by discovering that even
without attending months and years of language study, they can teach. You
are probably no different.
About This Book
I have been teaching English for many years now and I have found it an
entirely rewarding experience. I have met the most fascinating people and
had a hand in helping others reach their goals. My goal in this book is to help
you enjoy TEFL too by giving you the confidence and know-how to get a job
and deliver effective, engaging lessons.
You could read the book from cover to cover before deciding whether TEFL
is for you. If you do, you will have a solid overview of the skills involved in
teaching English well. On the other hand, you could use it as a resource that
you dip into whenever you need some input because your lessons are falling
a bit flat or you are short of ideas. The table of contents will point you to specific areas of concern or maybe even areas you have never thought about but
should have.
A book of this size can’t cover all the different ways of planning and delivering a lesson. There are probably as many teaching techniques as there are
2
Teaching English as a Foreign Language For Dummies
TEFL teachers, so I have chosen to present the tried and tested path to solid
courses. If you do come across other effective ways to help students don’t
discard them because they are not included here. Use TEFL for Dummies as a
starting point. Hopefully it will inspire some great ideas of your own.
I should also mention that this is not a photocopiable resource book with
ready made lesson plans. The aim is to show the kinds of activities and techniques you can use with your classes, adapting them to your own situation.
This book is not strictly applicable to teaching in language schools which
have their own trademark methodology and materials. In such cases the
schools will expect you to teach in very defined ways with little room for
other techniques.
Conventions Used in This Book
Throughout this book I use a few conventions which you need to know about
up front:
✓ I use the words student and learner interchangeably.
✓ Presentation, Practice and Production written with capital Ps refer to
specific stages of a lesson, not general concepts.
✓ English refers to whatever is normal in most English speaking countries
not just England. There are so many countries where English is an official language that I have chosen to keep it simple in this way.
✓ Web addresses appear in the book in monofont type, so they stand out.
✓ Sidebars – boxed text on a grey background – are chunks of material
which you might find useful as background knowledge, or as enhancements to the techniques you read about in the main text. Fun and helpful, but not essential reading: skip them if you want.
Foolish Assumptions
I wrote this book with the intention of helping people who want to teach
English for the first time, or who are inexperienced at the job and need some
tips to improve their teaching.
I assume these things about you:
✓ You are a native speaker or proficient in speaking English.
✓ You are not a fully qualified TEFL teacher although you may have an initial qualification.
Introduction
✓ You want to do a responsible job in the classroom and give students
value for money.
✓ You are more interested in the mechanics of teaching than the methodology behind language learning.
✓ You are not enrolled on a full TEFL course leading to a diploma or MA.
Please note that this book is not for you if you just want to improve your
own English. The focus is on how to explain language points to students not
simply to you, the reader.
How This Book Is Organised
This book is organised into six main parts, and two Appendixes. The parts
cover the TEFL industry, putting together lessons and their content, and then
to the courses as a whole.
Part I: Getting Started In TEFL
In this first section of the book I cover the information you need to know
about the kind of people who go into TEFL and what the job can do for them.
I help you to decide whether to only teach for a couple of summers or as a
career, by explaining what the job entails. I tell you what the students expect
from you too. You find out about the qualifications and training you need, if
any, as there are different kinds of courses you can enrol on. As well as this,
I include the points you need to keep in mind if you are moving abroad to
teach. This is an introduction to the industry as a whole.
Part II: Putting Your Lesson Together
For most people who are new to teaching or have never done it before, the
task of finding a point to teach and then working out how to package the
information into an effective lesson is rather overwhelming. In these chapters
I break the lesson down into different stages, known as Presentation, Practice
and Production so that there is a clear structure for learning. There is also
advice on how long the stages should last and who should be doing the
talking. I include lots of examples and suggestions for classroom activities,
whether you use a course book or design your own materials. You find out
when and how to correct the students’ errors and keep them in check during
the lesson through good classroom management.
3
4
Teaching English as a Foreign Language For Dummies
Part III: How to Teach Skills Classes
In language courses there are four main skills which need to be included to make
students truly proficient. These are listening, speaking, reading and writing. In this
part of the book I take a look at each skill in isolation, showing you how to put a
lesson together which is dedicated to one skill. These lessons have a slightly different structure from grammar and vocabulary ones. There is also a chapter on
pronunciation which is so vital to good communication that there are phonetic
symbols and particular techniques for assisting students to speak clearly.
Part IV: The Grammar You Need
to Know – and How to Teach It
Grammar for foreign students is the topic of this section. It is the area which so
many native speakers dread teaching, not having done much of this at school
themselves. Although this book is not an exhaustive reference on the English
grammar, here I cover most of the questions you need answered in order to
hold your own in the classroom. You can you use this part of TEFL for Dummies
along with your dictionary and reference works if you want to go deeper. So,
you review the way sentences are put together with subjects, verbs and objects.
Then you find out how to improve your students’ sentences with adjectives,
adverbs and conjunctions. I present each tense explaining what it does and what
it looks like. Finally there is a chapter covering modal verbs, phrasal verbs and
conditional structures. There are lots of suggestions on practising grammar too.
Part V: What Kind of Class Will I Have?
First in this section I provide advice on using tests to get students in the right
class and how to use testing progressively during the course. Following this
there are sections on different kinds of courses and advice on handling them.
You learn about one to ones classes, business English, teaching young people
from small children to adolescents and exam classes. Finally, I compare two
kinds of classroom situations. The first is the class with students who all
speak the same language and the second is the class with students from all
around the world. I take a look at one nationalities of students in detail. As a
TEFL teacher you need to be ready for anything!
Part VI: The Part of Tens
Part VI is the part of tens which gives you ten tips each on a couple of TEFL
issues. The first offers suggestions on making your lessons more lively and the
second one looks at resources you can use to improve your teaching skills.
Introduction
There are two appendixes offering you extra information. Appendix A gives
you templates which help you plan, observe and assess lessons. Appendix
B takes a brief look at popular locations around the world for TEFL teachers
and gives you an idea of what to expect from the country and the job.
Icons Used in This Book
When you see this icon, you know you’ll be getting a real-world illustration of
a language teaching idea or situation to help you grasp what’s going on.
This icon draws attention to points you should try to lodge in your memory.
This icon highlights helpful ideas for making your lessons run more smoothly.
If you want practical suggestions for how to go about teaching a particular
point, look out for this icon.
This icon alerts you to common mistakes among newer teachers and suggests
pointers to help you avoid problems.
Where to Go from Here
If you have never taught English before but are considering it as a source of
income, the best place to start is probably Part I. That way you’ll know what
the job is before you start digging deeper. For example Chapter 3 tells you
about who is eligible to teach.
If you are living abroad and have already examined the local demand for
English lessons you probably know who your prospective students will be.
In that case, take a look at Part VI as you can start finding out about specific
teaching situations. You could browse Chapter 19 on business English, for
example.
5
6
Teaching English as a Foreign Language For Dummies
Existing teachers should already know something about their shortcomings,
be it explaining grammar (Part IV) or correcting students (Chapter 7), so you
can find individual chapters which deal with your weak points. Perhaps your
boss has just given you a new kind of course which is making you nervous
and you want to know the best approach: Try Part VI.
Be confident as you proceed. There are many things in your favour:
✓ You already know English. You have probably been learning it since
infancy.
✓ You have probably taught someone something before and seen them
apply what they have learned.
✓ Most people who start out in TEFL are not academics. They just enjoy
travelling and like people but they manage to pull off great courses. You
can too.
✓ If you gradually go through this book you will have all the information
you need to get started.
Part I
Getting Started
in TEFL
T
In this part . . .
his part covers the TEFL basics. Here’s where I tell
you all you need to know about why TEFL is a great
idea and what the job can do for you, whether you want to
teach whilst travelling round the world, or as a full-time
career.
This part tells you what to expect in the TEFL environment
and what the students expect from you, too. You should
also dip in here to find out about the qualifications and
training you need to meet your requirements and those of
prospective employers. I also include the points you need
to bear in mind if you’re planning to move abroad to
teach.
Chapter 1
Discovering the Wonderful
World of TEFL
In This Chapter
▶ Realising the need for English teachers
▶ Finding out where you can teach
▶ Travelling to foreign lands
▶ Considering how far TEFL can take you
S
o you want to teach English as a foreign language. In this chapter you get
an overview of the industry and an idea of what the lifestyle of a person
in this rewarding career is really like.
Understanding Why English
Many factors contribute to the market for Teaching English as a Foreign
Language The historical factor offers the legacy of the old British Empire that
took the language around the world. The political factor gives the current
dominance of the USA. Science and technology have developed with English
at the forefront. In addition, there’s a need for a global language to make
international communications smoother, and tools such as the worldwide
web truly accessible around the planet.
These days English is viewed as a language which gives you access to the
world. Some want to study at prestigious English-speaking universities; some
want a high flying career with international connections. Others just want a
better chance in life and move to wherever the money seems to be, and then
again, some just love Hollywood, international rock stars or their English girlfriend. Even the free-spirited backpackers need English to get by in far-flung
lands.
10
Part I: Getting Started in TEFL
Looking at the TEFL Marketplace
For most would-be TEFL teachers, the draw of the job is the ability to travel
and work. Even if your responsibilities don’t allow you to leave your own
shores, at least working in TEFL brings other travellers to you.
Considering countries – both
home and abroad
Before entering TEFL, give some consideration to where you want to teach
and who your ideal students would be. Subtle differences exist between the
criteria for teachers in English speaking countries and elsewhere. The training you need for particular student groups also varies. In addition, unlike a
career change at home, teaching abroad presents challenges you may not
have considered.
Staying in the home market
Finding work in TEFL in an English-speaking country can be more difficult
than doing so abroad. The problem is that, unlike being a foreigner overseas,
you have no novelty value when you’re at home. As many English-speaking
nations are economic powerhouses, they tend to have various regulatory
bodies governing the employment of teachers and trying to ensure high standards in education. In other words you need to jump through more hoops to
get a decent job.
Very often TEFL jobs are advertised as ESOL (English for Speakers of Other
Languages) or ESL (English as a Second Language).Teaching English as a
Foreign Language, English as a Second Language and English for Speakers of
Other Languages are all the same kind of work depending on which country
you’re in and who your students are. There’s a slight difference between learning a language to survive in the English-speaking country you now live in and
learning English while you’re in a non-English speaking country.
ESOL students may be refugees or economic migrants who need help with
day-to-day situations such as seeing the doctor or understanding letters from
their child’s school.
Many students are entitled to attend government funded courses or free classes
run by charitable organisations. In addition, private language schools offer
courses from two weeks up to two years. In the latter case, students pay for
their lessons and often have other activities to make the experience more fun,
including a social programme that teachers generally get involved with too.
Chapter 1: Discovering the Wonderful World of TEFL
Although the basic skills of the job are the same in each sector, you may not
be eligible to apply for all of these jobs. The first thing you need is to be able
to speak English well (whether you’re a native speaker or not). Most employers require teachers to have a first degree and a TEFL qualification (certificate, diploma or Master of Arts) although in the public sector you usually
need a qualification specifically for teaching adults in further education. Nongraduates can often get onto a training course but fewer job opportunities
are available to them.
Amongst countries in the European Union things have been changing.
Citizens of the EU have rights in the UK, including the right to enrol on
courses offered by the state. This means that instead of learning English in
their home country and then moving to the UK to look for work or higher
education opportunities, it’s quite feasible to move over and then learn the
language through the state system and full immersion. There have been
quite a few changes in the number of jobs offered in countries like Poland for
these reasons. Unfortunately the British economy is not what it was, and as
the world struggles with the recent banking crises, people are thinking twice
about their prospects abroad anyway.
Working abroad
You can find far more opportunities for TEFL abroad than on home soil. The
world is a big place, after all! However, despite the thrill of setting off on a
new adventure overseas, you need to approach a TEFL work with a balanced
outlook that considers both the advantages and the disadvantages.
The advantages are that:
✓ You get to experience another culture and broaden your horizons.
✓ You’re involved in a rewarding occupation through which you can help
others to change their lives.
✓ You get paid as you slowly travel around the world.
✓ If you already live abroad, you can find a job before you have mastered
the local language.
✓ You work with a skill you already have, speaking English.
But the disadvantages are that:
✓ It’s difficult to know what kind of employer you’re getting involved with
until you arrive in the country.
✓ Once you’ve given up your home and job it isn’t quite as easy to turn
back.
11
12
Part I: Getting Started in TEFL
✓ You may feel thrown in at the deep end. Even if you get extensive training first, when you actually have your own class, most of the time it’s
just them and you.
✓ You’re unlikely to get rich. The best most EFL teachers abroad can hope
for is a decent standard of living by local standards (which may be different from what you’re used to) and enough money saved to get back
home again.
✓ You’re out of the loop as far as your home country is concerned, both
socially and professionally (if you already have another line of work).
So many TEFL operators in the world – almost anyone who speaks the language well can find work somewhere but, as with jobs on home soil, the best
opportunities go to graduates with a recognised TEFL qualification.
Ask a school abroad if you can contact one of the current foreign teachers
to get some insight into local living. Even if the school declines, you can still
put out some feelers among friends and Internet forums such as on www.
eslcafe.com. You can ask just about anything and you’ll find someone out
there who can help you find the answer.
Changing with the seasons
More often than not, TEFL jobs abroad follow the academic calendar. So in
most countries jobs start in September or October and run for nine months
to a year. Start looking for a good contract in the summer if you want to fly off
in the autumn. Some positions begin in January, so December isn’t a bad time
to look for a position either.
Considering China
These days many TEFL teachers are heading to
China. It has become one of the biggest economies in the world and is a huge market for the
TEFL industry. It’s estimated that less than 1 per
cent of Chinese people in China currently speak
English and with a population of over a billion,
the potential is huge.
That being said, there isn’t as much regulation
of language schools as you find in other countries, so you need to be very cautious about
visas, work permits and contracts and make
sure that they’re genuine.
With such a large country, you should also
give some thought to where you want to teach.
Some like to be around other Westerners so
they don’t feel lonely, whereas others want to
immerse themselves entirely in the new culture. Apparently the weather varies greatly too,
inside and outside the classroom, so check that
you’re going to be working in a climate you can
manage and that the school has appropriate
facilities – like air-conditioning.
Chapter 1: Discovering the Wonderful World of TEFL
When the academic year finishes, students visit English speaking countries so
they can practise their language skills. That’s why TEFL job opportunities in the
UK and other similar places mushroom for the summer. You can often find short
contracts from two to twelve weeks long at summer schools. Advertisements for
these jobs start appearing in spring, typically in March and April.
So if you want to work all year round, check whether your school closes for
long periods and if so, make sure that you can save enough to tide you over
or find a temporary position for the ‘holidays’.
Teaching trends
English language teaching has become more tailored to the varying needs of
students. ESP (English for Specific Purposes) is big news, so instead of studying general English for years, more students are opting for business English,
EAP (English for Academic Purposes) or similar courses that address their
needs more directly.
Another trend is towards online learning and training for students and teachers. Many resources are available on the Internet so students feel less inclined
to ask a teacher for help in person these days. And with fewer students around,
employers are looking for a higher standard from their teachers.
Getting Out There
There’s a lot to think about when you shut up shop and re-establish yourself
in a new location. You need to prepare your mind in advance, not just your
suitcase.
Preparing to leave town
If you already know where in the world you want to teach, find out as much as
you can about what you’re likely to meet in terms of bureaucracy and daily life.
Find the answers to these questions:
✓ Do I need a working visa?
✓ Do I need any jabs?
✓ Will I be eligible for medical treatment and if not what kind of insurance
covers me in case of emergencies?
✓ Which home comforts may I need to take with me?
13
14
Part I: Getting Started in TEFL
✓ What are the implications for my tax and pension contributions back home?
✓ Have I set up a forwarding address for my post?
✓ What do I know about the currency and economy? How much money do
I need to take and in what form?
Don’t close your home bank account if you can help it. It’s really tricky to
start all over again when you return because you often have to provide proof
of address and accounts for three months just to rent a flat. Have your paperwork sent abroad or to a safe place back home.
Setting up elsewhere
Arriving in another country is a very exciting and frightening experience.
When everything is new, you can find yourself feeling a bit isolated and homesick at first, especially if you don’t speak the language, but if you’re open
minded things usually get better.
Use these tips to help start feeling at home:
✓ Learn the language to a reasonable extent.
✓ Be curious. Find out all you can about your new environment.
✓ Listen to advice. Local people try to advise you about all kinds of things.
You don’t have to follow it all but if you pay attention you’ll probably
avoid some pitfalls.
✓ Accept invitations. If your students are going for a drink, go along from
time to time (as long as your employer approves).
The lifestyle of an EFL teacher is usually a pleasant one. Jobs are most often
three to five hours a day plus the time you spend preparing. So you can usually find time to explore your surroundings. Take some of your lesson planning out and about with you as you try out local cafés and beauty spots. You
may find that if you look different from local people, they start conversations
with you out of curiosity or on the other hand they may just stare. Either
way, be friendly. When people get used to seeing you around, they’re more
likely to accept you being there.
A small piece of advice is to judge accommodation by local standards. If you
must complain, save it for your friends back home. It does annoy people
when they hear ‘In my country . . . ’ too often.
Chapter 1: Discovering the Wonderful World of TEFL
Use the Internet to keep in touch with your friends and family. Even though
you may be too excited to keep in touch when you first arrive, you’ll miss your
mates a bit when things settle down, so don’t lose touch.
Thinking About a Stint or a Life in TEFL
Some spend a few months in TEFL, others a couple of years and still others
a lifetime. Believe it or not, TEFL work can meet all of those needs if you’re
brave enough to set your reservations aside and go for it.
Taking someone from the basics of the language to independence is continually rewarding. There’s something very special about hearing or seeing the
penny drop in a lesson.
Filling gap years and career breaks
TEFL is the perfect antidote to a life chained to a desk. You may be one of
those professionals who find that you just can’t bear the rat race unless you
take some time out. Sales targets can really lose their appeal when you can’t
see what’s really being accomplished by your work. For students, gap years
in TEFL can give you the kind of life skills and experience that lectures just
can’t match.
Real benefits can be gained from taking a year out; they include:
✓ Refocusing: You may have thought you had it all worked out but suddenly you wonder whether your chosen path is really what you want.
Giving yourself time to think and look at other possibilities should set
you straight.
✓ Recharging your batteries: Perhaps you’ve made the right career
choices but you’re a little burnt out. A short diversion into TEFL can
energise you again.
✓ Appreciating what you have: Seeing how others live can really help you
see the good in your own lifestyle when you return home.
✓ Giving something back: You can use TEFL to help people who don’t
have the same advantages as you.
15
16
Part I: Getting Started in TEFL
✓ Broadening your skill base: You can gain by:
• Finding out how to be independent
• Leading a team
• Taking responsibility for yourself and others too
• Building rapport and communicating with others
• Solving problems
• Improving your planning and organisation skills
Planning a new life
On a personal level, TEFL can take you around the world, which is a goal in
itself for many people. But even if you don’t cover the whole globe, it’s fascinating finding out new things about yourself or rediscovering them. Being in
a new environment helps you to sort out the things you want to do from the
things you previously just went along with and being exposed to other cultures truly inspires the imagination.
If you do happen to take to the job like a duck to water, you can work up the
career ladder too. Once you’ve been teaching for a couple of years and you
have a TEFL certificate (representing at least 100 hours of tuition) you can
then become a senior teacher, which introduces you to teacher training roles
and added responsibilities such as controlling learning resources. There may
be extra money in that but by this time you’ll be ready to take your skills outside the classroom sometimes anyway. The next steps are ADoS (assistant
director of studies) and DoS (director of studies), which are positions offering
a higher salary but which generally require additional qualifications – namely
a diploma or master’s degree. The problem with managerial roles though, is
that they tend to take you away from teaching and into the office. So you may
want to embark on more of a sideways move:
✓ As an official examiner for the exams students of English as a Foreign
Language sit.
✓ As a teacher trainer.
✓ As a materials writer.
✓ As a home-stay course provider, who accommodates and teaches students in their own home.
✓ As a marker for distance learning courses.
✓ As an agent connecting students with schools and colleges in different
countries.
Chapter 1: Discovering the Wonderful World of TEFL
Addressing some qualms
Do you still need a final push to get out there? When you speak to people
who have taught EFL, you usually find that there’s no need to hold back if this
is what you want.
Some common fears include:
✓ Money: You don’t need to have huge amounts of money put by. Save
enough to pay for some TEFL training, a return flight, and enough to set
you up in the local currency (which may be comparatively little).
✓ Commitments at home: Although you have commitments, if you think
positively you may be able to get nine months abroad without changing
your whole life. Have you asked your boss about taking an unpaid sabbatical? You never know, he may be keen on the idea. You can also speak
to an estate agent about letting your home for a year and even your
loved ones may be happy for you to take a break (in my experience, they
love to have a place to visit for a free holiday).
✓ Age: Don’t start thinking that only youngsters get TEFL jobs. Students
love to a see a mature face in the classroom. Most employers expect
older teachers to be more dedicated and have a better work ethic, so
there’s no need to write yourself off.
You may just have the time of your life working in TEFL, so go ahead and take
the plunge.
17
18
Part I: Getting Started in TEFL
Chapter 2
Looking at What TEFL
Teachers Actually Do
In This Chapter
▶ Addressing common concerns
▶ Looking at basic teaching methods
▶ Meeting your students’ needs
I
n this chapter you get an insight into the world of teaching English as
a foreign language. You find out what the job entails from the teacher’s
point of view and the student’s too.
Answering Common Questions
Many would-be teachers are plagued with fears and insecurities about what
TEFL is really like and whether they’re up to the challenge. In this section I
give you some of the most common – and commonly troubling – questions
and their answers.
Can I teach English without knowing the
students’ language?
In a word, yes! The only language you really need to know well is English.
Some schools use the students’ language in the classroom but this is by no
means typical of the TEFL industry as a whole, and it’s positively discouraged
in most cases.
With so many different kinds of teaching situations and places to teach in,
you’d have to know the language of everyone you may meet in the classroom
at any point in your career, so neither you nor any other teacher would ever
get started.
20
Part I: Getting Started in TEFL
Do I have to translate?
Even though your students inevitably speak to you in their mother tongue
from time to time, you can respond in simple English, with gestures or pictures. Of course, you may not understand what they’re saying anyway and
this just gives them real motivation for learning your language. In a way, it
makes the whole situation more authentic.
If you do translate in the classroom, you have to be absolutely certain that
what you’re saying corresponds exactly to the students’ language. Students
sometimes expect one language to translate word for word into another, but it
just doesn’t work like that. For example, you can’t translate ‘bon voyage’ into
‘good journey’ if you want to get the sense of the expression.
Will the students be children?
Youngsters in many countries need English lessons, but the state takes care
of this by using primary and secondary school teachers. TEFL teachers sometimes give support to the state education system but do most of their work
in the private sector. Parents often pay for extra English lessons, especially
during the summer months.
However, many adults and teenagers preparing for work abroad or in an international environment have a great desire to learn English. These students are
highly motivated and usually well behaved.
Do I have to know all the grammar
in the English language?
You don’t need to know every last bit of English grammar, but you should
aim to have a good working knowledge of all the tenses and be able to identify and explain all the parts of speech (nouns, verbs, adjectives and so on).
Check the chapters in Part 4 for some help with grammar issues.
The aim of TEFL is to produce students who can speak the language almost
as well as you can, at the most. In reality, very few students have the time
and resources to stay in the classroom setting beyond upper-intermediate
or advanced level (proficiency is the highest level). As soon as students feel
confident that they can use English for whatever purposes they need, they
often get on with their lives. This is why you don’t need to know every last
predicate and gerund.
Chapter 2: Looking at What TEFL Teachers Actually Do
Can I teach without a degree
and formal qualifications?
Yes you can, but finding work is easier if you have them. Most schools advertise vacancies for graduates in any discipline who have a TEFL certificate
comprising about 100 hours of training.
However, if you actually live overseas and are prepared to trawl around the
local language schools, you may find that these schools welcome native
speakers with open arms, without or without the typical entry requirements.
Get some training if you can as this gives you better opportunities.
I hated language lessons at school.
Will the job be like that?
I remember some of the phrases I learnt in my O-level French lessons. Most
of them are pretty irrelevant to my life now and even to my life back then.
Fortunately, language teaching has moved on rather a lot in the last thirty
years. So these days there’s less emphasis on grammar drills and more emphasis on practical role-playing and creating a relaxed learning environment.
Even if education in general in your chosen destination is still rather dry, you
can expect to teach according to the livelier techniques of the modern TEFL
industry.
Are there lots of books and exercises
for students to work through?
You can make use of the stacks of course books, work books and resource
books on the market but most schools encourage teachers to use their own
ideas too. Depending on the country and the employer, you probably have a
book and syllabus but a fair amount of latitude as well.
Most large bookshops have a section on English as a foreign language, so have a
browse through some popular course books to get an idea of the kind of material
teachers use. Some examples of course books that are popular in many countries
are titles such as Innovations, Cutting Edge and English File, which are available for
each level of English students and cover elementary, pre-intermediate and so on.
21
22
Part I: Getting Started in TEFL
What kind of person makes
an ideal TEFL teacher?
A good EFL teacher enjoys meeting people and is interested in other languages and cultures. The most successful teachers are often the ones who
can put the students at ease and who have a sense of humour.
On the other hand, it’s not all about personality. You have greater insight into
the students’ learning issues if you speak another language yourself, but this
is not a must.
You definitely need to have a methodical approach, which usually includes
taking the time to do your research and preparation before you enter the
classroom. So, in a way, good teachers of English are also good students of
their subject.
Does it matter that I’m
not a native speaker?
The answer to this depends on your level of English, who you’re teaching
and in what situation. Most employers expect you to be proficient in English
and have excellent, native pronunciation. You may get away with fewer skills
if you’re teaching young children or if you’re teaching in your own country
where native English speakers are in short supply.
You’re far less likely to find work in the private sector in an English-speaking
country because students who pay to travel to and study in the UK, for
example, quite reasonably expect their teachers to represent the vocabulary,
grammar and pronunciation of that land fully. However, in the public and voluntary sectors this may be different, as the students are usually immigrants
who may relate well to a fellow immigrant who has found her feet in the
English-speaking community.
How many students will I have?
Most classes have 10 to 20 students in them, but I have heard of ‘classes’
with more than 40 students, which are actually more like lectures. It depends
on the country, the economy and the integrity of your employer.
Chapter 2: Looking at What TEFL Teachers Actually Do
Is it okay if I don’t ‘talk posh’?
Yes, but you need to have good grammar and a clear speaking voice, with
or without a regional accent. If native speakers have trouble following you,
you need to make some changes. However, there’s no point trying to sound
aristocratic because the vast majority of students are unlikely to mix with the
upper-class set in real life anyway.
Will the students like me?
Although you should aim to put your students at ease so that they’re more
receptive to learning, you’re not there to be their best mate. Students should
like your lessons and respect you as their teacher. If they happen to like you
personally, it’s a bonus, not a prerequisite for a good course. In general, you can
be a likeable teacher by being fair, considerate, responsible and well prepared.
How will I know what to do?
If at all possible, get yourself some training and observe some lessons before
you start teaching. Once you’ve done that, speak to your colleagues for tips
and guidance.
Use up-to-date course books to help you. Most course books have a teachers’
book too that gives you a complete lesson plan and some even include online
training so you can see model lessons.
Talking to Students and So Much
More – Teaching Basics
The human brain is a marvellous instrument with the built-in capacity to
decipher language. If you hear the same words in the same context enough,
you start to work out what they mean – it’s like cracking a code. You discovered this as a baby. Mum said the word ‘teddy’ every time she waved that
cuddly little chap in front of your face and pretty soon you made the connection. Perhaps your Indian neighbour says ‘Namaste!’ every time he sees you.
Pretty soon you understand that this means ‘Hello!’
23
24
Part I: Getting Started in TEFL
Picking up language this way is almost effortless. However, busy people wanting to learn a new language can’t go back to the restful days of babyhood, or
take a couple of weeks to pick up a simple greeting. So, when students attend
language classes, they need a system or methodology so that they can measure their progress and balance this against the money they pay. The next
sections give the basics on teaching methods.
In the classroom, students learn actively through direct instruction from
the teacher and pick up the language incidentally at the same time. It’s surprising how many of your favourite phrases your students imitate just because
you drop them into your lessons. A couple of mine are ‘Okie dokie’ and ‘Here
we go’.
Teaching the easier words first
When you pick up a language by hearing it spoken, everything is thrown at
you at the same time and you have to wade through a lot of ‘noise’ before you
hear something you recognise. However, when you teach systematically you
generally start with easy words and phrases and then add a bit more each
time. You save the most difficult words for the end.
In TEFL you grade whatever you say so that your speech matches the students’ level of English. When you start a beginners’ course, for example, you
use a lot of pictures, gestures and repetition to put across the meaning of
basic words like ‘car’ and ‘bus’.
Figure 2-1 uses an imaginary language – we can call it Dummese – to illustrate
a dialogue typical of a Dummese beginner-level lesson.
The teacher in Figure 2-1 uses only four words to teach ‘car’ and ‘bus’ –
‘deeba’ and ‘dooba’ respectively. How about ‘Dum dim’? They must be equivalent to ‘this is a . . .’ in English. With only four words to decipher, the visual
aid of the pictures, along with the reassuring smiles of the teacher, it’s quite
easy for students to crack the code.
The lesson would logically continue with another few words connected with
vehicles and transport as you use easy words in a clear context and build up
from there. If you had to pick out words like these by listening to a complicated traffic report in Dummese, you would have a much more difficult, if not
impossible, task.
Chapter 2: Looking at What TEFL Teachers Actually Do
Dum dim ‘deeba’.
Deeba! Deeba!
Deeba!
Dum dim deeba
Dum dim ‘dooba’
Dooba!
Dum dim deeba
Figure 2-1:
Starting off
simply with Dum dim dooba
props.
25
26
Part I: Getting Started in TEFL
Focusing on the most useful words
In theory you can spend your whole life learning a new language, especially a
global language such as English to which new words are added or borrowed
from other languages all the time.
Most people, however, make do with a few thousand words and leave the rest
to those who particularly need them. So the question is, if English has around
half a million words in its vocabulary, which ones do you teach? Obviously,
you can’t teach them all.
The idea is to focus on teaching the words that allow the students to function
competently in the language.
You only have 90 minutes or so per lesson, and perhaps 60 hours or so to
complete a course, whether it’s a beginner, elementary or intermediate
course. With that in mind, you can’t afford to be sidetracked by talking about
words that particularly interest you but are seldom used.
Your students need to know all the words typically associated with a given
level of English so that they can measure their progress and move on. The
best way to become familiar with what students need to learn within each
level is to refer to the syllabus at the beginning of an EFL course book.
Usually the syllabus sets out the vocabulary areas and grammar chapter by
chapter. In most cases the language school has approved a course book or
set of materials, which you should use as your guide.
Giving students room to talk
Learning a new language is a great deal harder if you feel stressed. You’re
likely to feel embarrassed about pronouncing the words and discouraged
by grammar rules and differences from your mother tongue. This is why an
important aspect of TEFL work is to present lessons in an enjoyable and
engaging way.
In the TEFL industry, you challenge the stereotype of teachers as boring,
sour-faced characters who spend most of their time writing on the board
with their backs to the students. Neither do you lecture the students, forcing
them to simply listen and take notes.
Actually, the students should be doing the talking for most of the lesson.
They need to try out what they’ve learned, get to know their classmates
better so they work as a team, and feel relaxed enough to laugh at their own
Chapter 2: Looking at What TEFL Teachers Actually Do
mistakes. Speaking to a classmate in small groups or pairs and role playing
is one of the more effective ways to learn. In TEFL the aim is to give your students practice and a nice safe environment to try out everything they learn.
People really need to be able to speak a language to master it, so remember
that in your lessons.
Keeping things relevant
Whatever you teach the students should be realistic and have some relevance to their lives. Depending on the situation, students sometimes come to
you with their own goals. If the class is a general English course, the onus is
on you to select the words and phrases most used in the situations your particular students are likely to meet. For example, youngsters often compare
their ages as soon as they meet, but adults rarely do (it’s actually quite rude
to ask someone’s age in many cultures) so teaching the ‘How old are you?’
question is far more relevant to a class of children than to a class of adults.
Likewise, students who are living in an English-speaking country need some
colloquial expressions to survive. For example, in London you teach students
that the underground transport system is called ‘the tube’ within the first
week, whereas a class of students in Costa Rica may never need to know that.
Some students have very specific goals such as passing exams or getting a
job. Once you know what these are you can more easily tailor your classes to
fit their needs. This is especially true if all the students are working towards
the same goal.
TEFL does comprise some very focused areas, such as business English, EAP
(English for academic purposes), and even courses adapted for particular
jobs like football coaching and hairdressing.
Recognising What Your Students
Want from You
You may wonder what students expect from an EFL teacher when they enrol
on a course and gingerly enter the classroom. To be honest, students don’t
always have their list of wants and needs crystallised from the outset, but as
they go along they certainly pick up when things aren’t right. Then, they start
complaining or stop attending.
27
28
Part I: Getting Started in TEFL
From the moment a student turns up at the reception area of your school or
makes contact with you directly, she expects you to understand that she has
a lack in her ability and that communicating in English is beyond her level
and presents a problem. Students want help. They don’t want to feel embarrassed or stupid.
You first need to determine your students’ level of English by some form of
testing. In a country where English is not the first language, students tend
to make contact with a school or teacher in their own language. However, a
form of speaking test happens quite quickly when (in the case of a language
school) a student is introduced to a teacher or teaching manager who begins
a conversation in English. You can buy written placement tests from EFL
publishers such as Oxford University Press or you can put one together using
questions that move progressively through the grammar and vocabulary
typical of each class level. It depends on the school and a student’s needs
whether to test speaking, grammar writing skills or all three. At the appropriate level, students stretch themselves but won’t struggle too much.
Students need to make measurable progress from their starting level. Proof
of this may be completing a syllabus, gaining confidence or passing a test.
However, by the end of your course your students want to feel that it was all
worthwhile because they’ve bettered themselves.
Encouragement goes hand in hand with improving English skills. Your class
wants to know that you’re on its side by the praise you give the students when
they do well.
From the students’ perspective, it’s reassuring when the teacher seems to
know her stuff. You don’t have to be a professor of the language but you do
need to inspire confidence overall. Students want to know that you as the
teacher are an expert (and as a native or proficient speaker of English you
are) and that you know the process involved in making their English better.
Nobody wants to have a boring experience, so students rely on you to make
their lessons as lively and memorable as possible. They don’t want a standup comedian or anything too eccentric, but there should be smiling, laughing
and interesting contexts. In this way your students won’t just remember that
they had a lesson about words for sports, for example, but they’ll remember
the story of a great athlete that you gave as the backdrop to the vocabulary.
Remembering is also a big deal for people learning a language, because they
need enough repetition to drive the point home but not so much that it
becomes tedious.
In most cases you use books and handouts to help you present your lessons.
Students want nicely presented, informative documents that they can still
understand when they look back at them a year later. Conscientious students
Chapter 2: Looking at What TEFL Teachers Actually Do
always turn up with a pen and notebook because they want to make their
own notes on the course, but they expect any materials you provide to be
concise and effective.
Unless you’re teaching a dedicated speaking class or writing class, most students want some kind of coverage of the four main skills in language – reading, writing, speaking and listening – so that they can function fully in English.
They don’t usually want to cover all four to the same degree but they expect
to work in each area.
Because TEFL doesn’t require the same degree of training as some other educational roles, teachers sometimes forget the importance of professionalism.
Even though your students may be of the same age group as you, and some
may encourage you to socialise with them at the local pizzeria or wine bar, as
a class they expect you to work professionally and conduct yourself in a dignified way. This includes the overall management of your classroom – what
it looks like, what time your lessons start and finish and your supervision of
the students.
Some people enrol on language courses because they want to make new
friends but you can still help them to focus on the course aims so that they
take learning seriously.
Students want you to be both fair and flexible. They become irritated if you
seem to favour one student over another. Equally, they expect you to understand the real world involves many pressures so it’s not always possible to
do homework to perfection or arrive early every single time. When something
of particular interest happens in the world, they want you to depart from
your lesson plan so that they can talk to you about it (hopefully in English).
The USA and UK are major players in world politics so some students want to
discuss current affairs with their new tool, the language of those nations.
Culture is very important in a language lesson; it’s almost impossible to teach
one thing without the other. So students want a role model who can give
them a window into the English-speaking culture while showing due respect
to their own. They definitely don’t want a hint of superiority from their
teacher but instead they want to know about any pitfalls in terms of appropriate behaviour and expressions.
Students want you to point out the customs of English speakers in certain situations but they don’t want to be forced to accept these as good or right.
Believe it or not, students love it when their teachers correct them. I mention
this because new teachers are sometimes too polite about this as they think
that students may be offended. In my experience, students want to know
where their errors lie and what to do about them.
29
30
Part I: Getting Started in TEFL
Chapter 3
Examining Courses, Qualifications
and Jobs
In This Chapter
▶ Deciding on your level of teaching
▶ Signing up to the right courses and training
▶ Gearing your work to the salaries available
▶ Finding work
G
one are the days when a native English speaker could set off with a
rucksack, arrive anywhere in the world and expect to be greeted with
open arms by eager language school owners. Such scenarios are still possible, but the TEFL (Teaching English as a Foreign Language) industry has
moved on, so you need to put a little more thought into it before you start
packing. In this chapter I show you how to take your first steps in TEFL by
deciding whether you need training, what kind to choose and how to go
about finding a job.
Teaching the Teacher
From intensive weekends to master’s degrees, so many TEFL courses exist
out there that it’s a job in itself trying to decide which one is right for you.
Before you set out to teach, get a decent dictionary and the best grammar
book you can fit in your case (see Chapter 24 for some suggestions).
32
Part I: Getting Started in TEFL
Finding your level
In the world of TEFL there are four or five levels of ‘teacher’. Deciding
whether you want to earn enough to keep you in beer money whilst on your
travels or whether you’re looking for a long-term career helps you decide
what kind of training is appropriate.
The various types of native and proficient speakers of English working fit into
these categories:
✓ The opportunist who has no training in EFL or any other teaching qualifications but needs to find work.
✓ The teacher who has a basic level of training amounting to 20 hours or
fewer. He’s been introduced to the overall principles of TEFL.
✓ The TEFL initiated teacher who has completed a certificate level TEFL
course of about 100 hours.
✓ The teacher qualified in another subject who needs to learn the principles of teaching EFL. At this same level are people who have studied
the English language extensively, perhaps having a degree in English literature or linguistics, but who have no experience of teaching.
✓ The TEFL qualified teacher who has a diploma or master’s-level qualification in EFL.
Don’t underestimate the responsibility teachers have. Once you’re facing 20
eager students who’ve parted with their hard-earned cash hoping that you
can change their lives, it’s a little late for regrets.
Get some training or do your own research but never walk into a classroom
completely unprepared. A little training is better than none at all.
Being an unqualified teacher
Most language schools belong to professional bodies, which set criteria for
teaching staff so that there’s a level of quality control. This means that usually you can’t find paid work in an English-speaking country without a wellrecognised teaching qualification. However, there are exceptions to this if the
school runs its own training programmes for would-be teachers. Charitable
and state-run organisations with volunteer programmes sometimes welcome
people willing to share their knowledge with others and you get some teaching experience in return.
Chapter 3: Examining Courses, Qualifications and Jobs
If a school trains staff to use its own teaching methods, you’ve a better chance
of finding work with them without a teaching qualification. Big chains like
Callan and Berlitz employ staff in this way, depending on the location.
On the other hand, if you’re travelling to a part of the world where there are
few native English speakers in residence, but the locals have some disposable income, you’re more likely to be viewed as a great catch by schools and
individual students looking for a tutor, despite your lack of qualifications and
experience. Being a native speaker can be your USP (unique selling point),
but try not to be complacent.
Many EFL teachers have no training whatsoever but still manage to find work
and develop their skills while in the job. If you won’t be relying on an income
from teaching and are unlikely to spend more than a few months in one place,
a short taster course is probably all you need. Various organisations offer
weekend and short courses in TEFL that give you a taste of what is involved in
the job and help you decide whether teaching is for you on a long-term basis.
In the UK, for example, Berlitz (www.berlitz.com) won’t employ a teacher
who doesn’t have a degree and teaching certificate. However, if you apply to
one of their schools abroad, you may have the chance to prove yourself on
their unpaid training course which lasts one to two weeks.
Unfortunately, employers don’t view all native speakers as equal. UK, Australian
and other accents from economically strong nations are viewed as high status
and are more sought after. Students tend to mimic the pronunciation of their
teachers and many have distinct preferences about the accent they want to
acquire. Countries that use English as just one of their national languages
often bring influences from the other language (or languages) into the pronunciation, grammar and vocabulary of their particular variety of English. Some
students find Asian and African varieties of English, for example, less desirable than those of the single-language nations. Whatever your accent, practise
speaking clearly and accurately.
When you start approaching schools, project a professional attitude, a sense
of humour and an interest in meeting and helping people.
Once you find work, you need more than a great accent to get through the
lessons. If a choice of work comes your way, teaching conversation lessons
is your best bet for easing yourself into TEFL. Teaching conversation is a
little easier because you can concentrate on teaching less technical areas
like fluency, vocabulary and pronunciation and avoid tricky grammar questions until you build up your experience. It’s inadvisable to advertise yourself
as merely a teacher of conversation lessons though, as this can limit your
33
34
Part I: Getting Started in TEFL
chances of finding work and you may find yourself feeling pigeonholed even
after you’ve expanded your skills. It pays to brush up on your own grammar anyway and take an interest in how the English language works. (Look
at Chapter 15 for info on grammar.) Think about when and why you say the
things you do.
Getting initiated
If you intend to teach for more than a few months, make a reasonable living
at TEFL, and give your students value for money, you really should invest in
a TEFL certificate course of 100 hours or more. Teachers at this level are officially called TEFL initiated. Most EFL teachers remain at this level as this is
what the majority of employers require from job applicants.
Before enrolling on a certificate course, consider who you want to teach and
where. Each country has its own standards and preferences, so failing to
meet the criteria for visa applications and the standards set by local employers hampers your chances of finding work.
The UK TEFL market is a prime example. The two strands of English course
providers are the private sector and the public sector:
✓ Private sector: The more established private language schools tend
to be accredited by the British Council who expect EFL teachers to be
graduates (in any field) and to hold the CELTA (Certificate in English
Language Teaching to Adults) or Trinity CertTESOL (Certificate in
Teaching English to Speakers of Other Languages) qualifications. Other
qualifications are technically acceptable but school managers have
to jump through hoops to convince inspectors that their teachers are
worthy if they don’t meet the British Council’s standard for EFL teaching
qualifications or if their qualifications are not so well known. As a result
they usually avoid hiring anyone who doesn’t fit the profile or may cause
them extra work.
✓ Public sector: On the other hand, in the public sector, schools and
colleges have to meet ever changing government standards. So these
days, all new teachers have to take a ‘Preparing to Teach in the Lifelong
Learning Sector’ qualification.
Unfortunately, one certificate alone won’t easily grant you entry into both
sectors. The point being that, if you know where, who and how you want to
teach, you can do your research and select the right course.
Look at TEFL job ads specific to the country you intend to work in and even
call or email a few employers to find what exactly they are looking for. If you
need a work permit before you can work as a teacher in your chosen destination, check whether you qualify for one. If not, you may have to put in a bit
Chapter 3: Examining Courses, Qualifications and Jobs
more planning, otherwise you’ll find yourself dependent on dodgy operators
who run courses with poor facilities and ridiculously low pay. Find out too if
the schools there have a strong preference for one qualification over another.
Becoming a qualified teacher
A fully qualified EFL teacher is someone who has a diploma in TEFL and has at
least two years’ full-time experience in teaching EFL.
The best-known diplomas are the Cambridge DELTA (Diploma in English
Language Teaching to Adults) and Trinity DipTESOL (Diploma in Teaching
English to Speakers of Other Languages). You may also have a master’s
degree in ELT or a similar field (such as Applied Linguistics) in addition to
teaching experience.
These qualifications are for people who want to make progress in their career
and apply for managerial positions such as Director of Studies. You need a
qualification like this if you’re interested in training roles too. The good news
is that all these positions attract higher pay and even if you’re teaching the
same courses as your less qualified colleagues, you’re likely to have a better
hourly rate than them.
Diploma and master’s-level courses are not for the faint hearted. You need to get
thorough experience in TEFL before considering a qualification at this level.
Getting on Course
After you decide that some form of training is in order, you need to find the
right course.
Doing a training course abroad may be cheaper than doing one at home.
Entering introductory courses
Various organisations offer weekend courses of about 20 hours that introduce
you to TEFL. Courses aren’t accredited by any of the best-known bodies, so
word of mouth is an important indicator of quality.
Even though the certificate may have an accreditation stamp, it may be from
an organisation most employers haven’t heard of. So it’s worth finding out
about the tutors’ qualifications and experience and of what the course consists before parting with your cash.
35
36
Part I: Getting Started in TEFL
In most cases, courses have a minimum age requirement of 17 or 18. To be
honest, you need to have an A-level standard education or similar to get your
head around it all, but more importantly, you should have the confidence to
manage people, which is something teenagers may struggle with unless they
restrict themselves to teaching small children.
There’s no upper age limit, but once again, the pace is rather hectic on these
courses. Be honest with yourself as you need to be the kind of person who
can absorb knowledge quickly and put it into practice to get the most benefit
out of these TEFL weekend programmes. Trainees sometimes underestimate
what is required of them and end up a little discouraged. So be warned.
Weekend courses are fast and furious!
If you’re not a native speaker, you usually need to show that you’ve achieved
an advanced level of English by passing an exam such as IELTS (International
English Language Testing System) with a minimum band score of 7. However,
even if you’re a native speaker, your grammar should be of a reasonably high
standard or else you can find yourself doubting your English and losing the
confidence of your students. You should know that your English is correct
even if you cannot explain why yet.
What you can do with this certificate
A certificate from a weekend course tells employers that you’re responsible
enough to undergo basic training before applying for a job. It doesn’t mean that
you’re now a qualified EFL teacher, regardless of what the advertisement says.
In fact, after a training weekend, you’re likely to feel a lot more enthusiastic
and aware of what the job entails. You won’t feel ready to go anywhere and
teach anyone but at least you know a bit more about how to put a lesson
together and the kind of the information students need. View the course as a
taster and tell employers that you’re keen to develop your skills on the job.
What the course covers
A weekend TEFL course follows similar lines as a full TEFL certificate because
it touches on most of the same course components but in a very brief way.
A weekend course should include:
✓ Basic grammar: There’s far too much grammar in the English language
to teach everything in such a short time, but the course should make
you aware of different tenses (you may think that there’s a past, present
and future tense and that’s it, but believe me, the truth is a little more
complicated). You usually touch on the different kinds of words you use
in a sentence too – nouns, verbs, adverbs and adjectives.
Chapter 3: Examining Courses, Qualifications and Jobs
✓ Classroom techniques and activities: Very often the tutor treats you as
though you’re a foreign student and shows you how to handle warm-up
activities and pair or group work in the classroom.
✓ Lesson planning: You should learn one of the different formats for planning a lesson so that you know in which order to do things and how to
make your lessons fun and effective.
✓ An opportunity to practise teaching: You teach a mini lesson or part of
a lesson to volunteer students or to your fellow trainees.
The maximum class size should be about 20; a tutor can’t effectively teach
more than that.
How much it costs
A weekend course should be a lot cheaper (about 25 per cent of the cost) of
a full certificate in a school, but don’t forget to factor in the cost of accommodation and travel too. In the UK courses cost approximately £200 for 20 hours
training.
i- to- i (www.i-to-i.com) has been offering weekend TEFL courses in the UK,
USA, Ireland, Canada and Australia for several years.
Signing up for a certificate course
TEFL certificate courses come in a variety of packages these days. You can do
intensive or part-time courses or complete a distance course online or by post.
You have to be at least 18 years old to do a TEFL certificate in most cases,
which is practical as you’ll be managing people in your classroom. There’s no
upper age limit.
Course providers generally prefer to take students with degrees or a good
standard of education (good enough to go to university). Don’t despair if you
don’t have any formal qualifications though. It’s worth speaking to the school
or college in person. If it’s satisfied that you have a good head on your shoulders and a respectable level of English, it may well accept you.
Applicants with teaching experience are also favoured. Most schools ask you
to take a test to prove how good your English is, so inform the school beforehand if you have a learning difficulty that affects your writing. If you’re a nonnative speaker, schools expect you to have an exam pass at advanced level in
English as well.
37
38
Part I: Getting Started in TEFL
Intensive TEFL courses last four or five weeks. Don’t try to keep up your parttime job or even your favourite TV show because every waking moment is
filled with lesson plans and projects. However, this type of course is a great
way to jump in and get started.
If that sounds a bit too much for you, plenty of courses are spread over three
months or even a year, enabling you to attend sessions in the evenings and at
weekends, so you can fit it in around your job.
In any case, you need over 100 hours of tuition, plus feedback and homework
time to gain your certificate.
What you can do with this certificate
With a bachelor or master’s degree in any field and an EFL teaching certificate you’re eligible to apply for the majority of vacancies.
To be honest, many university graduates have no idea what to do in a classroom so some employers bypass your level of education if you’ve managed
to prove yourself and passed a certificate course.
What the course covers
The overall aim of certificate courses is to provide initial training for people
who want to teach English to speakers of other languages and to make sure
that they meet the criteria for teaching by demonstrating English usage accurately, by giving well balanced lessons and by evaluating their lessons.
Objectives for the course usually include familiarising trainees with all those
areas that go into English language teaching – methodology, classroom procedures, techniques and aids, language awareness and testing. You have the
opportunity to teach and to find out how to prepare and evaluate lessons too.
Other objectives for taught certificate courses are:
✓ To help trainees learn about the main pronunciation, vocabulary and
structural features of current English.
✓ To raise awareness of the learning needs of individuals or groups of
learners and of the motivation they have in a variety of circumstances
and environments.
✓ To make sure that trainees can work cooperatively as members of a
teaching team or group.
✓ To help trainees develop the ability to create and maintain the learners’
interest and establish rapport.
Chapter 3: Examining Courses, Qualifications and Jobs
✓ To make sure that trainees can plan lessons with clear and achievable
aims using methods appropriate to the learners’ levels of achievement
and age.
✓ To give trainees basic classroom management skills and the ability to
provide relevant activities.
✓ To make sure that trainees are able to use and adapt published teaching
material and create their own basic teaching material.
✓ To highlight the main advantages and disadvantages of various language
teaching approaches.
✓ To ensure that trainees can continue their development in TEFL after
completing the course.
Before you start, the course provider sends you an EFL reading list and often
asks you to complete a work book that provides an introduction to three
important areas of the course. One is the unknown language section, the
second is a grammar section and the third section is about how to teach.
Some courses include lessons in a foreign language so that you understand
how the students in your class feel. Through these lessons you can gain the
dual perspective of both a teacher and a student and experience various
teaching techniques. You produce a project based on these lessons near the
end of the course.
Teaching practice is an essential part of the course so expect real live students to volunteer to take part in your lesson. You also have the opportunity
to see various other experienced teachers at work and your tutor gives you
continual advice, feedback and support.
Courses with a learner profile project give you the opportunity to get to know
one EFL student a bit better and analyse their language skills in depth. For
the project, you usually conduct an interview with the student and record
it. In addition you set them a written task so that you can write about their
strengths and weaknesses and discuss ways in which you would help them
through EFL lessons. You may teach one lesson with the student in which you
address one of that student’s weak points.
A materials project is designed to help you use and adapt basic materials,
such as a photograph, in the classroom. You’re asked to show how to use the
same set of materials with students of different levels and abilities.
At the end of the course there’s often a test on grammar and phonology
(pronunciation).
39
40
Part I: Getting Started in TEFL
Speak to local schools and colleges about their teacher training programmes.
CELTA and Trinity CertTESOL are the most widely accepted certificates for the
private sector and employers worldwide recognise them. If you’re currently
studying for a degree, check whether your university runs TEFL courses in the
summer.
How much it costs
The average cost of the CELTA and the Trinity CertTESOL is £1,000. You may
need to consider accommodation and travel costs too if no course provider
exists where you live.
Keeping your distance
Distance learning courses never share the same high profile as taught
courses because they don’t let you experience teaching practice, but they
have their own advantages.
Many people find it easier to fit the course into their normal lives by studying in this way. You can go at your own pace – and distance courses are a lot
cheaper. On the other hand, you may never meet a student until you’re teaching a class yourself and your tutor can only offer feedback on your written
work not your actual performance. So distance learning has a few disadvantages too.
Many people who already have a suitable teaching qualification, such as a
PGCE (Postgraduate Certificate in Education), but have no experience in EFL
choose to take a distance course because the certificate itself is not as important for them. The skills to do with presentation, classroom management and
lesson planning are transferable, so with this kind of course it’s easier for the
teacher to choose which areas to spend more time on.
What you can do with this certificate
Overseas employers appreciate the fact that you’ve taken the trouble to study
and get yourself a certificate, and this tends to carry more weight than the actual
certificate itself. This is because the organisations offering distance courses
aren’t as well known as CELTA or Trinity, which provide taught courses.
This area of the market has far less quality control than taught courses.
However, the College of Teachers is one body which accredits distance TESOL
(Teaching English to Speakers of Other Languages) courses as does ACTDEC,
which is specifically for distance courses in TESOL. Courses accredited by
these bodies offer a reasonable standard of professionalism and someone to
talk to if the course or course provider falls seriously below your expectations.
Chapter 3: Examining Courses, Qualifications and Jobs
What the course covers
Most distance certificate courses run along the same lines as taught courses
(see information in the preceding ‘Signing up for a certificate course’). You
usually have assignments or work books to complete and get feedback from a
designated tutor.
Some course providers work in collaboration with a school so that trainees
can get practical experience in the classroom, at least through observing
others if not through teaching lessons themselves.
How much it costs
Prices vary widely depending on what the course has to offer. However, you
can expect to pay up to £400 for a course with about 100 hours tuition.
Contact TEFL Training (www.tefltraining.co.uk) for introductory weekends in the UK and mainland Europe and distance courses. This is a wellestablished organisation with very professional tutors.
Going for a diploma course
After you’ve been teaching English for a couple of years and have decided
to make TEFL your career for some time to come, you can consider doing a
diploma course. This means demonstrating deeper theoretical knowledge
and more practical ability than holders of a TEFL certificate.
If you’re going to invest your time and money in a diploma course, stick to the
most well-known courses for the country you live in. In the UK these are the
Cambridge DELTA and Trinity DipTESOL.
What you can do with this certificate
With a diploma, you can now call yourself a fully qualified EFL teacher. You’re
in a position to apply for most DoS jobs (Director of Studies) and ADoS
(Assistant to the DoS) roles too. Employers usually require officially recognised teacher trainers to have this qualification and schools accredited by
more prestigious bodies such as the British Council need to have a certain
ratio of diploma qualified teachers on staff, so this makes you more desirable
to employers. You can legitimately ask for a pay rise once you have your ‘dip’
so that you’re set apart from the initiated teachers.
You can study a diploma intensively over about three months or by distance
learning over a year or two. However, with both the Trinity diploma and the
DELTA you need to sit an exam and have your teaching assessed internally by
your course provider and externally by the awarding body.
41
42
Part I: Getting Started in TEFL
Although you’re expected to have a degree before applying, if you speak
to the course provider and demonstrate how competent you are, there’s a
chance that the provider may accept you on the course without one. You
can’t get away with a lack of experience though. So, make sure that you’ve
been teaching for two years, and mostly to adult classes.
Some universities give you credit points towards a degree if you have a recognised diploma, which means that you may not have to study as many modules, and this is particularly helpful for mature students returning to full-time
education.
What the course covers
This course goes into far more depth than the TEFL certificate.
You teach and you’re sometimes observed while you teach. You also observe
other experienced teachers and submit coursework.
The DELTA is a modular course, which sometimes offers you more flexibility
about what you study and when. The three modules you need to study are:
✓ Understanding language, methodology and resources leading to a threehour written exam.
✓ Developing professional practice leading to course work, written assignments and a lesson that is observed by a moderator.
✓ Extending practice and an ELT specialism (such as teaching business
English, younger learners or one to one lessons) leading to a research
project.
On a Trinity diploma course, even distance learning trainees have to undertake a practical block where you teach lessons in preparation for the classroom teaching part of the exam. You’re regularly observed by a tutor who
gives you detailed feedback and helps you analyse your own lessons. The
exam is actually a lesson in which you teach while being observed by the
Trinity moderator, so you need to prepare meticulously.
You also sit for a 30-minute interview with the moderator during which you
show your understanding of pronunciation (phonology) and the theory
behind what you do in the classroom.
Most course providers give you work books that follow the Trinity stipulated
syllabus along with extensive reading tasks.
How much it costs
A diploma course usually costs about £1,500 for the course and exam fees.
Don’t forget to factor in accommodation and travel costs if your course
Chapter 3: Examining Courses, Qualifications and Jobs
provider is another city and you need to commute or stay over for a week of
teaching practice. In addition, the reading list includes some essential books,
so get yourself a library card or be ready to cough up. You can probably
recoup your money within 18 months as your salary increases.
Schools often need diploma qualified teachers to meet their quotas and raise
their prestige. So, before you get out your cheque book, speak to your director of studies about funding for your diploma course. You may have to sign
a special contract agreeing to stay at the school for a specific period of time
after you pass, but you can save yourself hundreds of pounds if your employer
pays some or all the costs.
Another point to keep in mind is that the reading lists for diploma courses
are rather long and expensive. Who really wants to keep all those books after
the course is finished anyway? So ask the school to buy them and then they
can keep them in the teachers’ room for the next diploma candidate who
comes along.
Staying in for in-house training
Schools that have their own unique methodology often offer in-house training
in their method. These programmes offer several advantages:
✓ You know that the training course exists because there’s a need for
teachers. So, providing that you impress the trainers, you usually have a
job waiting for you.
✓ The school probably has its own materials and course books so you
don’t have to use too much imagination to come up with lesson plans.
It’s all done for you.
✓ Schools like these are also more likely to take a chance on someone who
has no formal qualifications; ‘the proof of the pudding is in the eating’ as
they say.
✓ Some of these schools are also part of an international chain so you can
transfer from one place to another using internally advertised vacancies
and contacts.
It’s not all good news though. Some people find schools with a strict methodology a bit stifling to their creativity. Teachers sometimes get bored and want
to move away from the prescribed material, which may not be allowed.
Professional development programmes are one of the hallmarks of responsible, caring TEFL employers. So there should be opportunities to improve
while on the job. Hopefully the director of studies has a budget for seminars
and conferences for teachers and even if money is tight, it’s usually possible
43
44
Part I: Getting Started in TEFL
to set up peer observations where teachers watch each other teach and offer
constructive feedback.
Ask about ongoing professional development at the initial interview if you’re
applying to a larger school.
Banking on Salaries
So the question is: can you get rich in TEFL? To be honest, it’s unlikely.
However, it’s not all bad news. What TEFL jobs lack in riches, they certainly
make up for in charm and interest. So this job is for people who like people,
who like travelling, or at least meeting travellers, and like sharing knowledge.
Due to nature of the job, it’s pretty difficult to give you an hourly rate that
translates to all the places in the world where TEFL teachers work. Let me
put it like this: the average full-time job should pay enough for you to share a
decent flat, eat out once a week and take the odd day trip. Now, by a full-time
job I mean 25 to 35 hours a week depending on the teaching method.
Consider the amount of time you spend preparing when you’re deciding
whether an hourly rate is appropriate. Some teaching methods require no
preparation at all whereas others require about 20 minutes preparation per
hour of teaching for an experienced teacher. Your timetable may also include
teaching the same lesson to more than one class and this reduces preparation
time as well.
As a measure of comparison, in central London where language schools are
plentiful and range from shady visa factories to prestigious colleges, the
hourly rate for teachers ranges from an appalling £8 per hour right up to
around £25 per hour, depending on the job. The average is £10 to £15 per
hour. Business English and one-to-one-tuition organisations often pay more
but fewer teaching hours are available.
Teaching is a very full on job, so don’t be tempted to adopt the same hours as
an office worker. You’re better teaching one or two private lessons a week on
the side than having an extended timetable every day.
Before accepting a job, find out whether you have to pay your own local taxes
and whether the salary advertised is gross or net. Ask about the location of
your classes too. If you have to travel around town to teach your clients, you
need to agree on travel expenses. You can also expect an employer to pay for
your flight if you’re applying for a job abroad from your home country.
Chapter 3: Examining Courses, Qualifications and Jobs
By the way, you should ask about holidays and seasonal closures because in
some countries the schools close for three months a year during the summer
in which case you’ll need to save up or find another form of income.
Finding Work
The most common way to find a TEFL job in any country is by using www.
tefl.com. This excellent website has various search options and a facility for entering an online CV so that you can respond to jobs adverts in an
instant.
TEFL.com advertises dozens of summer school jobs from March onwards.
This is a good way to get your first teaching job in EFL. Summer schools
employ teachers with a range of experience and qualifications for a few weeks
or even three months at a time. You may have to move away for a while but
most offer subsidised accommodation.
Even if you haven’t got your teaching qualification yet, you can apply for a
job as an activity leader or a similar non-teaching role. This gives you experience in being around groups of foreign language students and puts you in
contact with people in the industry.
Another option is to use the contacts of your TEFL course provider.
Employers very often have close links with schools and colleges in the UK or
other English speaking countries. Ask your tutor about job vacancies early on
in your course and you may just get a head start on your classmates.
Two newspapers in the UK advertise TEFL positions regularly: one is The
Times Educational Supplement which comes out on Fridays and the other is
The Guardian, which publishes an extensive Education section on Tuesdays.
Some larger chains of language schools have job opportunities worldwide.
Keep in mind that the academic year starts in September, so start sending
these organisations your CV in the summer. Apply in March and April for
summer jobs. In most cases you write to the director of studies and include a
brief covering letter.
I have seen too many CVs wind up in the bin because of poor grammar and
spelling. So check and double check before you send yours off because if your
English is poor, you don’t stand a chance of getting a job teaching English. And
try to make your CV as relevant as possible by emphasising experiences where
you travelled, learned a foreign language, taught someone or managed people.
45
46
Part I: Getting Started in TEFL
Potential employers you can try include:
✓ English First, known as EF advertises scores of vacancies worldwide.
Take a look at their website www.ef.com.
✓ Language Link has vacancies in Europe and Asia. Its website is
www.languagelink.co.uk.
✓ Wall Street Institute International employs graduate teachers without a
TEFL certificate in their schools around the world. See www.wsi.com for
worldwide vacancies.
✓ Avalon School have a network of affiliated schools throughout Europe,
Brazil, Poland, China and France, and its main branch in central London.
Email dos@avalonschool.co.uk with your CV. You must have a
degree and TEFL certificate to apply.
✓ VSO – short for Voluntary Service Overseas – offers placements in Africa
and Asia, preferably to graduates. Salaries are modest but VSO provides
accommodation and you can apply for various grants. See www.vso.
org.uk. You need to be under 68 years of age to apply.
✓ International House has an excellent reputation for teaching worldwide
and operates in about 30 countries. Contact hr@ihlondon.co.uk for
vacancies if you have a recognised TEFL certificate.
✓ Bell International operates in 18 countries. It advertises vacancies on its
website at www.bell-worldwide.com.
Part II
Putting Your
Lesson Together
B
In this part . . .
eing able to structure and deliver a lesson effectively
and engagingly is what TEFL is all about. This part
gives you the inside track on how to do just that.
In the chapters in this part, I break the lesson down into
different stages (Presentation, Practice and Production),
so that you can see how to deliver a clear structure for
learning. I also provide advice on how long the stages
should last and who should be doing the talking, and how
to engage your students in learning.
This part teems with examples and suggestions for
classroom activities, whether you use a course book or
design your own materials. You can find out when and
how to correct the students’ mistakes and keep them in
check – and interested – during the lesson.
Chapter 4
Starting from the Beginning:
Planning the Lesson
In This Chapter
▶ Looking at student levels
▶ Teaching in the every day
▶ Suiting the lesson to the students
▶ Knowing where your lesson is going
▶ Planning your time and students’ time in a lesson
▶ Introducing new language and encouraging students to use it
▶ Drawing up your lesson plan
S
o you get the job and the students enrol on your course, ready to get
started. But what on earth are you going to teach them and how are you
going to put it together into a lesson? In this chapter, I tell you about the content and structure of an EFL (English as a Foreign Language) lesson.
Deciding What to Teach
When you select information to teach in your lessons, you need to think
about what level the students are at and how well your lesson fits into what
they already know and what they need to know.
Most courses have a basic syllabus that acts as a road map. An EFL syllabus
lists the major areas of grammar, vocabulary and functions (what you can do
with particular expressions) a course covers. Most EFL course books have a
list within the first few pages. Even if you’re working from your own materials, it makes sense to set specific course goals including which words and
grammar you definitely want to cover.
50
Part II: Putting Your Lesson Together
However, when you begin teaching it can be quite difficult to know what students are likely to comprehend at each level and few EFL teachers follow the
same students from beginner to advanced level.
So to give you a guide, the next sections offer a basic run down of what you
may expect to teach students at the different levels. I include a list of grammar and vocabulary students should cover during the course, along with
examples.
Unlike many other courses people enrol on, EFL courses can be for adults
or children and include students with an incredibly wide range of interests
and goals. However, their basic needs in learning are similar. For example,
all students want to learn how to speak about the past, present and future in
English.
Beginner
Beginner-level students aren’t necessarily children. Many people discover a
need or desire to study English later in life. Students at beginner level can’t
speak or write accurately in the present simple and present continuous
tenses. Those who know some words in English but aren’t ready to join elementary level are called False Beginners. When there’s no distinct beginner’s
class, beginner level is absorbed within the first 15–20 hours of an elementary course. This is a difficult level to teach as you have so few words to work
with when explaining things but it’s also very rewarding because every new
word marks significant progress for the class.
Grammar to cover includes:
✓ The subject pronouns: I, you, he, she and so on.
✓ Demonstrative pronouns: this, that, these, those.
✓ Question words: what, who, where and how.
✓ Possessive adjectives: my, your, his and hers.
✓ Singular and plural nouns.
✓ Expletives (not the naughty ones): there is, there are.
✓ The verb to be in positive, negative and question form: I am, I am not, am I?
Vocabulary to cover includes:
✓ The alphabet.
✓ Numbers 1 to 100.
✓ Jobs: doctor, teacher, taxi driver.
Chapter 4: Starting from the Beginning: Planning the Lesson
✓ Countries and nationalities: ‘He is from the UK. He’s British.’
✓ Basic food: fruit, vegetables, meat.
✓ Days of the week.
✓ Everyday objects: bag, pen, telephone.
✓ Immediate family: mother, son, husband.
✓ Rooms in the house: living room, bathroom, kitchen.
Elementary
At elementary level, students learn to use many more verbs instead of only to
be (I am, you are, it is). This is because with other verbs you have to use ‘to
do’ as an auxiliary verb, which is rather strange for them and quite different
from other languages (Do you like apples? No, I don’t). At this level students
learn to talk and ask about matters related to daily routines. They also begin
to refer to past and future time.
Grammar to cover includes:
✓ Basic verbs in the present simple positive, negative and question forms:
I live, I don’t live, do I live?
✓ Simple adverbs of frequency: usually, sometimes.
✓ Quantities: How much, how many? Some, any.
✓ Showing ability: using can/can’t.
✓ The past simple tense with to be: was/were.
✓ Future simple tense: I will go.
✓ Past simple tense with regular verbs: I looked, I listened.
Vocabulary to cover includes:
✓ Simple adjectives: opposites, colours.
✓ Language for telling the time: hat time is it? It’s half past three.
✓ Language for shopping: types of shops, asking for what you want.
✓ Asking for directions: straight ahead, turn left/right.
✓ Months and years.
✓ Weather: What’s the weather like? It’s raining.
✓ Comparative adjectives: bigger, nicer, and so on (superlatives wait until
the next level).
51
52
Part II: Putting Your Lesson Together
Pre-intermediate
At pre-intermediate level students learn to discuss their experiences and
future plans. They learn vocabulary related to travelling. In addition they’re
able to discuss leisure activities and explain their preferences.
Grammar to cover includes:
✓ Modal verbs: These give more meaning to the main verb in a sentence.
Two examples are: can/can’t and must/mustn’t. I can’t wait any more
because I must get to the shops.
✓ Possessive pronouns: mine, yours and so on.
✓ To be going to: This isn’t a tense but you use this structure to talk about
plans. I am going to study medicine at university.
✓ Present perfect tense: I’ve eaten.
✓ Past simple tense with irregular verbs: I ate, I thought.
✓ Past continuous tense: I was eating.
✓ Adverbs: slowly, well.
Vocabulary to cover includes:
✓ Types of films: comedy, western, thriller.
✓ Clothes: trousers, shirt, coat.
✓ Hobbies and interests: jogging, eating out, reading.
✓ Language for booking hotels and restaurants: Can I book a single room
please?
✓ Landscape words: mountain, river, field.
✓ Parts of the body: shoulder, knee.
✓ Superlatives: the best, the most wonderful.
Intermediate
At this level students tend to lose their initial enthusiasm for learning
English. They already know how to make sentences that refer to the past,
present and future and they have a basic vocabulary for everyday situations.
However, at this level the language you teach adds sophistication and fluency, instead of basic communication. It becomes harder for students to measure their progress so you need to work hard at maintaining interest by using
topics they really enjoy.
Chapter 4: Starting from the Beginning: Planning the Lesson
Grammar to cover includes:
✓ More modal verbs: (should, may, might). Too many modal verbs exist to
teach at once so you teach a few at a time.
✓ Zero conditional: If it rains, I use my umbrella.
✓ First conditional: If it rains, I’ll use my umbrella.
✓ Second conditional: If it rained, I’d use my umbrella.
✓ Non-defining relative clauses: The man, who I thought looked great, was
at the office.
✓ Gerunds and infinitives: going and to go.
✓ The verb will for spontaneous decisions: I’ll pay!
✓ Present perfect continuous tense: I have been singing, he has been dancing.
✓ Past perfect tense: They had seen it, you had not watched it.
Vocabulary to cover includes:
✓ Comparing and contrasting: both, neither, whereas.
✓ Polite forms: Would you mind? I’m afraid I can’t.
✓ Expressions for generalising: On the whole, in general.
✓ Stages of life: infancy, childhood.
✓ Reviewing films, books and so on: describing the plot, characters,
strengths and weaknesses.
Upper-intermediate
At this level students can speak and write with reasonable fluency using a
range of tenses and expressions for linking ideas. They can use appropriate
language in a variety of situations demonstrating an understanding of formal
and informal language.
Grammar to cover includes:
✓ To have something done: students are used to speaking about actions
they do themselves. With this grammatical structure they can express
the idea of paying or instructing other people to do things. For example,
I had my house painted.
✓ Third conditional: If I had known, I wouldn’t have done it.
✓ Reported speech: She said that she . . .
✓ Defining relative clauses: The man who is standing over there is nervous.
53
54
Part II: Putting Your Lesson Together
✓ Modal verbs in the past: I could have come.
✓ Passive verb forms: The room was cleaned.
✓ The verb to wish: I wish I could go, you wish you were me (after wish you
use a verb in one of the past tenses, so students have to learn this verb
separately)
✓ To be used to/ to get used to: I’m used to London now but I’m still getting
used to my new job. Students easily confuse these two grammatical structures for familiar activities and activities that are becoming familiar .
✓ Past perfect continuous tense: I had been working.
✓ Future perfect: I will have written it.
Vocabulary to cover includes:
✓ Adjectives of personality: generous, manipulative.
✓ Medical problems: ache, bruise, sprain.
✓ Crime words: to arrest, fraud, mugging.
✓ Feelings: hurt, fascinated, relieved.
✓ Science and technology words: software, appliance.
✓ Media and communications words: broadcasting, the press.
Advanced
Students at this level are able to communicate with native speakers without
much difficulty. They get the gist of most texts and conversations and have
sufficient vocabulary to express themselves on a wide variety of topics. The
grammar and vocabulary they use is similar to that of native speakers even
when it’s not strictly necessary to be understood. Question tags, which I
show in the following grammar list, provide a good example of this.
Grammar to cover includes:
✓ Prefixes and suffixes: unlike, likeable.
✓ Compound nouns: tooth + paste = toothpaste.
✓ Ellipsis and substitutions (words you can leave out or replace with
something else): This one is bigger. One represents another noun so it’s
a substitution. Sometimes you leave words out completely because the
meaning is clear. For example: This one is bigger (than the other thing).
When I leave out the words in brackets it’s an example of ellipsis.
✓ Question tags: You like that, don’t you?
Chapter 4: Starting from the Beginning: Planning the Lesson
✓ Active and stative verbs (actions and conditions): She bought (active) a
motorbike and also owns (stative) a car.
✓ Future perfect continuous tense: I will have been working.
✓ Detailed rules on phrasal verbs: Phrasal verbs consist of a verb and a
preposition or two that together make a new meaning. For example: to
get on with someone, to put up with something.
Vocabulary to cover includes:
✓ General idioms. An idiom is a phrase that has a meaning quite different
from the individual words within it. For example, students may understand all the words: it + is + a + pain + in + the + neck. However they won’t
get the point unless you explain what the whole expression means.
✓ Newspaper headlines. There are a number of words that are favourites
for newspapers but hardly used elsewhere, for example, Minister Rapped
After Expenses Probe. Journalists also like to be very playful with the
language. They use nicknames, rhymes, and slang and students want to
be in on the joke so that they can understand the press for themselves.
However, it sometimes takes a great deal of explaining and a detailed
analysis of the language for students to get the point.
✓ Words with different connotations. Old and elderly have basically the
same meaning. However, elderly is more polite than old when referring to
people, so the connotation (attitude behind the word) is different. When
students understand that words have similar meanings they also need to
know the subtle but important differences between them.
✓ Metaphors and similes. You use metaphors when you say that one thing
is another because they’re somehow similar. There was a storm of protest. Storm is a word that describes violent weather conditions but here
it means a violent outburst.
Proficiency
It’s pretty difficult to come up with a syllabus for proficiency level as many
of the questions are more like A-level English for native speakers. Proficiency
has more exercises based on inference (reading between the lines).
Keeping Things Relevant
Not only do you teach according to the students’ level – a concept called
grading – you also teach what is relevant and useful to them.
55
56
Part II: Putting Your Lesson Together
So if the syllabus for beginners doesn’t include detailed descriptions of furniture but your student works in the sofa shop, you can adapt the syllabus
to fit in relevant vocabulary. On the other hand, if your class is made up of
children, they may not recognise half of the professions on your list of job
titles, in which case you can drop the professions list and substitute names of
games or sports equipment.
A good syllabus covers not what people can say in English but what they actually need to say or usually say.
For example, it’s grammatically correct to say, ‘I shall depart forthwith’, but
when was the last time you heard someone come out with that?
TEFL is not about language as beauty; it’s about language as communication.
So, select the practical bits and keep anything else to a minimum.
For example, the occasional poem is a great demonstration of culture and
rhythm in English, but don’t handle poetry as though you’re teaching a literature course, going into all the artistic features. Just find aspects related to the
syllabus and everyday life.
Getting into Grading
In TEFL you grade what you say so that things become progressively more
difficult step by step. It’s a bit like climbing a hill with a gradual incline. If
the hill is too steep, your students get exhausted before they near the top;
too flat and they become bored with the familiar and inattentive. Figure 4-1
shows a good learning slope.
Figure 4-1:
A good
grading
system
gets more
difficult
gradually.
more difficult
challenging
easier
You start by teaching your students the word bathroom. It’s not a difficult
word, and it’s one used every day, more or less. But a student at a low level
doesn’t know the word, and you explain it this way:
It’s the room where you have a sink, and a mirror and a bath.
It’s the place where you brush your teeth.
Chapter 4: Starting from the Beginning: Planning the Lesson
This explanation is an example of poor grading. Logically, if your student
knew both the words ‘bath’ and ‘room’ they would understand ‘bathroom’
without too much trouble, so using these in the explanation doesn’t help
them. The other words like ‘sink’ and ‘mirror’ are even more difficult.
A better approach at the right level for your student is to approach bathroom
by starting with ‘house’. Make sure that everyone knows the word by drawing or showing a picture and saying ‘What is it?’ Then divide the picture into
separate areas and teach ‘rooms’. Show a picture of a bathroom or do a mime
of someone taking a shower to teach ‘bathroom’.
Good grading influences many things you do in the classroom. You need to
keep grading in mind on a couple of levels:
✓ Grading a lesson. To grade a lesson well you need to select new language that builds on what students already know. Students should have
sufficient knowledge to grasp the concept. During the lesson too, you
grade by explaining to students how to complete a task using rules,
reminders and examples before actually setting the task. Each task in
the lesson should also be more challenging than the one before it.
✓ Grading the course. You want a logical order within the course syllabus too. This means that the grammar and vocabulary should get more
difficult as you go along and the skills tasks (reading, writing, listening and speaking) should only include language that has already been
taught or is under consideration in that lesson. So you can’t really teach
the names of ailments before you’ve done the parts of the body. Or, it
doesn’t make sense to teach the past continuous tense before you’ve
done the past simple.
A well-graded lesson starts simply and builds.
Within a lesson, it helps to have particular activities for your students to
work on.
Say you want your students to write a letter telling their friends back home
about tourist sights in the UK. List what your students need to know in order
to complete the task:
✓ Present simple tense
✓ There is/there are
✓ The layout of a letter in English
✓ Expressions such as ‘Dear . . . ’ and ‘Best wishes’
✓ How to spell the names of the sights
✓ Adjectives for describing places
57
58
Part II: Putting Your Lesson Together
If your students don’t know any of these things, you may want to reconsider
whether they’re ready for the task. It’s really discouraging for your students
when you set the activity and then start back pedalling because the class
can’t cope.
A letter writing session with students who know the grammar can have a running order like this:
1. Students read a letter from one friend to another and analyse the layout
and typical expressions.
2. You explain that the class is going to write letters about the UK and have
them brainstorm their favourite sights.
3. Find out why students like the sights and put the adjectives they use on
the board.
4. Put a plan of the letter on the board showing how many paragraphs to
write and what kind of information should go in each one.
5. Have them write.
Setting Aims and Objectives
At the planning stage of your lesson, you need to think about your aims and
objectives:
✓ Aims are the overall points you want students to understand as a result
of the lesson.
Sample aims may be:
• To provide revision and practice of the present perfect.
• To increase rapport amongst the students.
• To teach vocabulary for hobbies and interests.
• To teach students to express likes and dislikes using the structure I
(don’t) like + a gerund (a verb with ‘ing’ added).
✓ Objectives are the skills you want students to be able to demonstrate
by the end of the lesson or their accomplishments during the lesson.
Objectives relate to specific activities.
Sample objectives may include specific goals, for instance that students
should:
Chapter 4: Starting from the Beginning: Planning the Lesson
• Be able to compare their travel experiences with other people by
saying ‘Have you ever . . . ?’
• Write a questionnaire using verbs associated with travel in the
present perfect, and try it out on at least three other students.
• Learn the vocabulary for their hobbies and interests, including
pronunciation.
• Know when to use the gerund and when to use the noun.
• Know how to write sentences requiring the gerund.
• Discuss their likes and interests together in groups
Even in a conversation class you ought to have a clear idea of what you
intend the lesson to accomplish.
Both you and your students benefit when you write down your aims and
objectives:
✓ You consider the lesson from the students’ perspective as well as your own.
✓ There’s less likelihood that you’ll go off on a tangent during the lesson.
✓ You can assess the relevance and effectiveness of activities you intend
to use more easily by seeing whether they’re closely linked to the aims
and objectives of the lesson.
Getting Your Timing Down and
Planning for Interaction
A very important factor to consider when putting your lesson together is
the amount of time available to you and how you want to spend it. English
lessons can vary from 45 minutes to 3 hours but there is a basic format
for dividing the time: an initial stage in which you teach new information;
another in which you practise what you’ve just presented in a controlled way
and a final stage that involves students expressing themselves with less guidance from you. These stages are called Presentation, Practice and Production
respectively. Each stage is longer than the one before it so that the students
end up doing most of the talking.
So if the triangle in Figure 4-2 represents a one-hour lesson, P1 (Presentation)
would be about 15 minutes, then P2 (Practice) about 20 minutes and finally
P3 (Production) about 25 minutes.
59
60
Part II: Putting Your Lesson Together
P1
Figure 4-2:
A Presentation,
Practice
and
Production
pyramid.
P2
P3
Within each stage and throughout the lesson, think about who should be talking
to whom – the interaction patterns. You want to plan it so that you don’t ending
up speaking for too long and the students keep busy. The traditional way of
doing this is by using abbreviations like these in the margin of your lesson plan:
✓ T-ST: The teacher talks to the students
✓ ST-T: The students give feedback to the teacher
✓ ST-ST: The students talk to each other
✓ Pr: Students work in pairs
✓ Gr: Students work in groups
Figure 4-3 shows an example from a lesson plan.
Figure 4-3:
A sample
lesson plan
sets out
time and
interaction
patterns.
Presentation
Tell ST an anecdote about last weekend using
watched
listened
enjoyed
Ask ST to tell me what I did while I write it up on the board
Underline the regular past simple verbs and point out ...ed ending
2mins
2mins
2mins
T-ST
T-ST
T-ST
Chapter 4: Starting from the Beginning: Planning the Lesson
Assembling Presentation,
Practice and Production
After you decide what you want to teach, you need to have a explain matters
to the class thoroughly and efficiently.
Introducing the point
If you chose language at the right level for your students, there’s a good
chance that they’ve heard it before. Or it may be that some students recognise it, although you can’t rely on that fact. So first of all you need to find an
interesting way to bring this new language to their attention.
Usually EFL teachers prefer to make their students curious rather than to
simply state: ‘Today’s lesson is all about . . . ’ In the real world, people learn
language in context rather than through direct statements or recited rules. As
a child, your family probably never mentioned grammar, they just spoke. By
the same token, introducing language within a story of some kind, a conversation or with the aid of a picture or object is very effective.
Analysing the point
After introducing the new language, perhaps by means of a story or picture
that creates a realistic context in an interesting way, you analyse it. You
explain whatever rules, patterns or information the students need to make
the language their own in this stage. For example, for a vocabulary lesson
teaching several fruits you begin with a picture of a market stall and move on
to highlight and name the pears, grapes and so on.
Make a connection between what students already know and the new
language – add a new building block to their language tower.
Use the board to set things out clearly so that the class can take notes.
Provide examples so that they have a guide as they complete the tasks later
in the lesson.
61
62
Part II: Putting Your Lesson Together
If there are several ways to use the new word or grammar point, don’t overload the students by trying to cover everything all at once. You can have a
‘Part 2’ lesson later on.
Use this analysis stage to explain and check your students’ understanding
before you move on to practising. Don’t take anything for granted. Ask lots of
questions so that the students can demonstrate that they get it (rather than
just saying they do). As this is the stage where you get to do more of the talking, make the time count.
Trialling the language
Following the presentation stage in which you introduce new language, you
need to set up an activity or task that requires the students to focus on it.
A good practice activity is one which:
✓ The students can do together without the teacher. You can step back
and make notes on any errors or teaching points that come up during
the activity.
✓ Makes the new language point vital to completing the task. This
ensures that the students concentrate on using it.
✓ Is communicative in whole or in part. This means that the students
should not work individually throughout the lesson. They need to interact with each other. So, for example, even if the students are working
on a written exercise, they should be able to compare and discuss the
answers with other students in pairs or groups. This may happen while
they complete it, or afterwards.
✓ Is structured so that students must actually understand the new point
in order to use it properly. If the students are simply following a pattern
they may not put much thought into it and end up not being able to use
it later. Take a look at two examples in Figure 4-4.
The bad exercise is poor because the students only needs to work out that
they need to add ‘s’ to the verb. The next example requires more thought
because the learner has to work out which pronoun to use as well as how to
change the form of the verb.
Chapter 4: Starting from the Beginning: Planning the Lesson
Bad exercise
Example: He/like/cats – He likes cats
1) She/drink/coffee – She .....................................................
2) It/eat/fish – It .....................................................
Good exercise
Example: What is Peter’s favourite animal? (like)
He likes cats
1) What does Mrs Smith do in the morning? (drink/coffee)
............................................................................................
Figure 4-4:
Bad and
good
exercises.
2) What does the cat have for dinner? (eat/fish)
............................................................................................
Giving your students free practice
By the time you reach the production stage of the lesson, the students should
be fairly comfortable with the new language point. After all, they’ve heard
what you had to say about it and practised it for themselves. Now, in this
stage they get to practise in a freer way. In the production stage the aim is for
the students to be fluent and use the language in a natural way rather than
just an accurate way.
When students engage in free production activities, they have a chance to
express themselves and show off all they know that’s relevant to the topic.
They have the opportunity to use the new language point but they can decide
when to use it and when to opt for something else.
Storytelling is a typical activity for production exercises. There’s a theme but
not a sentence by sentence structure. Other activities include debates and
63
64
Part II: Putting Your Lesson Together
report writing. In Chapter 6 I talk about ideas for practice and production
activities and how to use them.
Stepping Out of the Spotlight
to Let Your Students Shine
In the TEFL industry, TTT, or Teacher Talking Time, is seen as something
to be minimised. Unlike the traditional image most people have of what a
teacher does, in TEFL, it isn’t a good thing to be standing at the board talking
for the majority of the lesson for several reasons:
✓ Students need time to practise speaking in the lesson and if the
teacher hogs the limelight this becomes difficult. Bearing in mind that
the lesson is sometimes the only opportunity the student has to speak
English, it would be tragic if the only person speaking is the one who
already knows the language perfectly.
✓ Students get bored when they have to sit listening. Much better to
have them actively involved in a task or interaction.
✓ Lectures leave no room for progress checks. Students need to demonstrate understanding throughout the lesson, which means they need
to speak and write. Even if they smile and nod while you’re speaking, it
doesn’t guarantee understanding.
You can employ a variety of techniques to avoid talking too much to the detriment of your students:
✓ Encourage students to solve problems. Whenever possible, get students to work things out for themselves. Eliciting means asking students
questions that lead them where you want them to be. So ask focused
questions instead of making statements.
✓ Promote learner independence. Encourage your students to develop
strategies that allow them to cope without you. For example, show them
how to organise information in their notebooks in a logical fashion so
that they end up with a sound reference book, instead of asking you all
the time.
✓ Make dictionaries available. If there’s a class set of English-English dictionaries (with the key word and the definition both in English instead of
translated from language into another) in the classroom, you won’t have
to define every difficult word.
Chapter 4: Starting from the Beginning: Planning the Lesson
Lesson planning checklist
Use this checklist to make sure that you’re prepared for each lesson.
❑ I know what level my students are at.
❑ I know who my students are – their nationality, language, background and so on.
❑ I know how long the lesson is.
❑ I set aims and objectives.
❑ I anticipated problems and have thought of
ways to prevent them from occurring.
❑ I have a planned activity or exercise for
providing controlled practice.
❑ I have a planned activity for providing free
practice.
❑ I have any materials I need.
❑ What I want to teach fits in with the course
syllabus.
❑ My activities are communicative, which
means the students spend some time interacting with each other to complete a task.
❑ I know what my students need to know
about this piece of language – its rules,
patterns and so on.
❑ My teacher talking time is 30 per cent or
under.
❑ I have an appropriate context for this language point.
You can find lesson planning templates in
Appendix A.
✓ Write your interaction patterns into your plans. On your lesson plan,
indicate who is speaking to whom and for how long. Plan TTT (teacher
talking time) for no more than 30 per cent of the lesson time. This helps
maintain a good balance.
✓ Simplify your classroom language. Avoid rambling and overly polite
language. I’m not suggesting that you be rude but it’s far easier for students to cope with ‘Open your books to exercise F on page 10 please’,
than ‘If you’re all finished then, we’ll just take a little look at an exercise;
the one on page 10. Yes that’s right, it’s exercise F I think’.
✓ Write up instructions. When you write up instructions on the board
(perhaps while the students are busy doing something else) you don’t
have to repeat yourself later on.
✓ Drawing and miming. Use these techniques to get students describing what you’re doing so that you don’t have to engage in long
explanations.
✓ Wait patiently for the student to answer. Try not to jump in too soon.
Your students may just get there if you allow them a little more time to
answer the question.
65
66
Part II: Putting Your Lesson Together
✓ Avoid echoing. Over enthusiasm may make you repeat everything the
student says as though you’re egging them on, but this is unproductive
and increases TTT.
✓ Ask open questions. Open questions start with words like ‘why’ and
‘how’ so the student can’t just say ‘yes’ and ‘no’ in response.
✓ Monitor quietly. Once you get the students working in pairs and groups,
try not to butt in. Just listen and make notes.
Chapter 5
Standing in the Spotlight:
Presenting to the Class
In This Chapter
▶ Asking for answers
▶ Using visual aids
▶ Making sure that your students understand
▶ Expanding vocabulary
▶ Using proper grammar
Y
ou generally divide a lesson into three distinct parts – Presentation,
Practice and Production. This chapter concentrates on the Presentation
stage of the lesson and I show you what to include.
The Presentation stage of the lesson is the shortest stage, and happens right
at the beginning. The teacher explains the new words or grammar as thoroughly as possible using examples, definitions, pictures, tables and so on.
During this stage the students should get all the information they need to
use the new piece of language well and complete the tasks that follow in the
Practice and Production stages.
Eliciting Answers – Ask, Don’t Tell!
Eliciting means getting your students to tell you what they know by using
questions instead of simply giving them the information.
In your mind you need to be several steps ahead of the students throughout
the lesson. So the questions you ask should keep them mentally active and
move them along to the next step. Elicitation questions are generally short
and snappy. For example, ask the class how to spell words, for the meaning,
for examples, for similar words and opposites, what they remember about
a previously taught point, and so on. You can use props and pictures if they
help to clarify the meaning or add interest.
68
Part II: Putting Your Lesson Together
The pros and cons of using this technique are set out in the following list, but
most teachers find it very useful.
The pros first:
✓ Eliciting keeps your class on their toes. They’re interested and involved
because they have constant opportunities for interaction. Passively listening for extended periods is dull, so in EFL you rarely give lecture-style
presentations.
✓ Eliciting gets the students guessing. When you ask them questions they
try to work things out spontaneously. This is a great skill because in
the real world your students often have to take a stab at the meaning of
words or sentences and may not have anyone there to explain. So, being
prepared to have a go and guess is a good habit.
✓ Students really understand what’s going on. When you elicit, you’re
getting regular feedback from the students so you can gauge whether or
not they’re with you, so to speak.
✓ You reduce Teacher Talking Time (TTT). As the students should do
most of the talking in a lesson, eliciting allows you to reduce TTT and
instead, keep students interacting with you.
Eliciting has a few drawbacks, though:
✓ It can drag on. If your students don’t get the point quickly (possibly
because you’re asking the wrong questions) this stage of the lesson can
be rather long and drawn out. It’s definitely quicker to just tell the students what’s what.
✓ It encourages dominant students. Far be it from me to suggest that you
may have a teacher’s pet in your class but it has been known to happen.
Sometimes you have one student who has their hand up permanently, or
who you know is pretty smart, so that one student ends up answering all
the elicitation questions. This is obviously annoying for everyone else.
✓ Poor or excessive eliciting may put students’ backs up. If your questions are too easy the class may feel that you’re somewhat condescending and refuse to answer. The class may also wonder whether you’re
capable of uttering a simple statement if you seem to turn everything
into a question.
With these points in mind, follow a few suggestions when eliciting to make it a
positive experience for your students:
✓ Make sure that your questions have a definite answer that the class has
a good chance of guessing or knowing – no vague questions.
Chapter 5: Standing in the Spotlight: Presenting to the Class
✓ Deal with learners according to their level; don’t try to elicit an intermediate level answer from an elementary level student.
✓ Once students are speaking, don’t cut them off mid-sentence. Remember
that one of the aims of eliciting is to increase student talking time.
Creating Interest with Visual Aids
Visual images and aids add interest and often add meaning in a way that
words can’t. This is especially true of EFL students who don’t have sufficient
words to understand detailed spoken explanations.
Showing and telling – pictures and objects
People learn in different ways. For example, some people learn well by listening (auditory learning), some by movement and touch (kinaesthetic learning)
and many people respond well to seeing things (visual learning). These are
some of the different learning styles. So having variety in your presentations
gives attention to these different styles and helps everyone succeed.
Bringing something of interest into the classroom gets students quite excited –
there’s a certain novelty value involved in pictures and objects you personally
have chosen.
Things visual learners love to see in a presentation include:
✓ Flash cards: Not just for primary school, flashcards are good fun for
adults and children alike. The traditional flashcard has a picture on
the front and the equivalent word in writing on the back or below. By
holding up one side of the card you can elicit the information on the
other side.
You can use flash cards for vocabulary groups such as jobs, food, animals, weather and hobbies. Or how about having the infinitive verb
form on the front, and the past simple and past participle on the back?
Likewise, try having opposites front and back.
✓ Drawings: A simple stick figure drawing is enough to make students
smile and give them something to talk about. If you’re a bit nervous
about your art work, do it before the lesson and then just stick your picture to the board. Use a clipart website if you really can’t draw anything
recognisable.
69
70
Part II: Putting Your Lesson Together
✓ Photos: Celebrity photos seem to work particularly well in EFL lessons,
perhaps because of the glamorous international flavour they give your
lesson. Save old magazines, or even catalogues, as photographs are
great for explaining the meaning of a word, or setting a context.
✓ Videos: Short video clips really grab your students’ attention and lend
themselves to further activities in the practice and production stages,
which I cover in Chapter 6.
✓ Realia: The term for real objects you use to help you teach. Students
feel involved when they get to touch something or move it around.
Realia works to reinforce learning for visual and kinaesthetic learners
alike.
In a lesson aimed at teaching ‘used to’ and ‘any more’ to contrast the
past and present, you can bring in an old childhood photograph. I usually bring in a photograph of myself aged ten, dressed in school uniform
and complete with dodgy 70s hairdo. First you find out if the students
recognise you. Let them have a giggle and guess how old you are in
the picture. Then tell them that you had hobbies at that age and ask
students to make suggestions about what they were. Show the clues
like stamps or a skipping rope. With each suggestion say ‘Yes, I used
to . . . ’ or ‘No, I didn’t used to . . . ’. When they’ve guessed one or two
hobbies correctly you can switch to the present and ask whether they
think that you still do that activity. This leads to the statement, ‘I don’t
do it any more’.
You can sometimes find cheap children’s games and activities that you can
adapt for the classroom. For example, children’s playing cards are often pictorial, showing animals or a variety of jobs. Model cars and trains are useful
when you explain transport words or describe directions (left, right, forwards
and so on).
Travelling along timelines and tenses
In TEFL and in Western cultures in general, you represent time as a straight
horizontal line showing the past on the left and the future to the right. With
a timeline, you can show how tenses refer to an aspect of time and compare
them. So timelines are most common in a presentation of a new tense.
By using timelines you help students to understand the function of a tense –
what it does basically. However, you need to highlight the form of a tense or
piece of grammar too. In other words, show exactly what it looks like.
Chapter 5: Standing in the Spotlight: Presenting to the Class
Showing simple tenses
When you want to show that an action is in a simple tense (present simple,
past simple, or future simple) you put an individual point on the timeline with
an X or a spot and label it, as in Figure 5-1.
Figure 5-1:
cinema
The spot
marks when
I went to the
PAST
cinema.
PRESENT
FUTURE
With a simple label you can elicit a statement in the past simple tense: ‘I went
to the cinema’.
Likewise, you can demonstrate the simple future tense, as Figure 5-2 does for
the statement, ‘I will go on holiday’.
Figure 5-2:
Showing the
simple, but
hopefully
PAST
fun, future.
holiday X
PRESENT
FUTURE
Carrying through with continuous tenses
An action in a continuous tense (present continuous, past continuous and so
on) should occupy more space on the timeline. You can emphasise the duration of time by using continuous X’s or a wavy line as in Figure 5-3.
Figure 5-3:
Continuous
tenses take
more room. PAST
XXXX I am speaking English now
PRESENT
FUTURE
71
72
Part II: Putting Your Lesson Together
You can use a similar method to show an action in the present perfect that
started in the past but continues into the present.
From the timeline in Figure 5-4, you can elicit ‘I have lived/ have been living in
London for a while’.
Figure 5-4:
The present
perfect on a
timeline. PAST
XXXXXXXXXXXXXXXX in London
PRESENT
FUTURE
Adapting the timeline
When you use a timeline you can use specific times, days, months or years
instead of past, present and future. In addition to that, you don’t need to
include both ends of the line if one isn’t relevant.
In Figure 5-5, the timeline shows two actions in the past so the students can
see what happened first and what happened later. For example, ‘I was hungry
this morning because I hadn’t eaten’, which illustrates the past simple and
past perfect tenses respectively.
Not eat
Figure 5-5:
Showing the
past simple
and perfect. THIS MORNING
hungry
PRESENT
Using the board effectively
Whenever you use the board, the first thing you should check is whether you
have markers that work – pens or chalk – and then make sure that all the students can see the board. You may need to alter the seating.
Keep your board clutter-free at all costs. Nothing frustrates a student more
than looking down at his notebook for a second, then looking up again to see a
board so disorganised and busy that he can’t find the thing he wanted to copy
down. Rub off information you no longer need. Clean the board before and
after each lesson.
Chapter 5: Standing in the Spotlight: Presenting to the Class
Whatever you have on the board should be legible and logical. Some good
practices for board work are:
✓ Writing in a straight line.
✓ Using different colours.
✓ Dividing the board into sections if you have slightly different fields to
consider.
✓ Stepping back to check spelling and punctuation.
If you’re a bit poor at spelling, have dictionaries in the classroom and encourage students to check words for you as you write.
You can use the board quite a few ways to make meaning clearer through diagrams in the Presentation stage. For example, use diagrams like the one in Figure
5-6 to show clearly the relationship between items of vocabulary, including subordinate groups or categories. You can have students add words to each group to
demonstrate that they understand. It’s a fairly simple diagram to copy down too.
Fruit
pear
Fish
salmon
Vegetables
carrot
FOOD
GROUPS
Figure 5-6:
Showing
relationships on the
board.
Meat
chicken
Carbohydrates
pasta
73
74
Part II: Putting Your Lesson Together
In Figure 5-7, I show some words for weather and how they’re related. You
could elicit from the students a temperature for each box, for example.
Figure 5-7:
Diagram
demonstrating how
weather
words relate.
boiling
hot
warm
cool
cold
freezing
mild
So, the way you organise words on the board can show a hierarchy or a scale
from most to least, best to worst and so on.
Depending on the topic, you can draw a chart or label a diagram to give visual
input. For grammar presentations, charts and equations are very common.
In a lesson about asking questions, you can lay out the structure on the board
this way:
Question word +
Auxiliary verb +
Subject word +
Infinitive verb
How
does
he
travel?
Why
can
Roger
eat?
Where
will
the girls
stay?
Try to keep talking as you write on the board. Otherwise the atmosphere in
class goes flat because of the silence and the fact that your back is turned. The
students may also get up to mischief if you don’t keep them busy so it’s a good
idea to elicit as you write.
Doing Concept Checks
It’s never useful to ask students if they understand. After all, how do they
know whether they’ve misunderstood until they end up getting it wrong? So
instead, you need to find out by getting the students to demonstrate understanding, usually through concept check questions. Concept check questions
are questions that test understanding. For example, a concept check question
for the word ‘breakfast’ is ‘What time do people usually eat breakfast?’ The
student is only likely to get the answer right if he understands that breakfast
is a morning meal.
Chapter 5: Standing in the Spotlight: Presenting to the Class
Translation isn’t used in most EFL classrooms, but it’s an easy way to check
that students understand certain words. Sometimes you can do a straight, likefor-like substitution from one language to another. In this case the students
translate in their heads by simply changing the label. However, checking a
concept can be a challenging exercise when different cultural or religious perceptions are involved. For example, a bed may involve a mattress, headboard
and base for some, a mat on the floor for others or a hammock for yet another
culture. Is a bed a piece of furniture or just a place where you sleep?
If you don’t make clear what the concept behind the English word is, lines can
become blurred.
Boundaries also exist between one word and another, and you need to define
them. So for example what’s the difference between a bench and a sofa in practical and design terms? Clearly you can’t just describe them as long chairs.
Concept check questions come in various forms:
✓ Yes/no: It’s quick and easy to ask closed questions. So for example, if
you’re teaching vocabulary for vehicles you can ask:
• Is a van bigger than a car?
• Is a car bigger than a lorry?
Of course to make these questions work, the answer shouldn’t always be yes
or always no. If it is, the students can work at your pattern and just bluff.
✓ Multiple choice: Offering students a range of possibilities is another
good way to concept check. Multiple choice questions don’t require
students to come up with the vocabulary for the answer themselves
but they do require a little more thought than closed questions if the
options are similar. For example, in a lesson on the present perfect, ask
students to tell you whether the action in the statement ‘I have seen the
pyramids’. is in the past, the present or both past and present.
✓ Open questions: When you ask students questions that start with words
like ‘who’, ‘how’ and ‘why’, their answers needs to go beyond ‘yes’ or ‘no’.
They really have to think about it and use their own words to explain.
✓ Physical response: Another approach is to ask the students to actually do something to show they understand. A phrasal verb is a verb
together with a preposition that has a new meaning, often different from
the meaning of the verb by itself. ‘To pick’ means to select whereas the
phrasal verb ‘to pick up’ means to raise it from a surface. You can read
more about phrasal verbs in Chapter 17. So for example, during a lesson
on phrasal verbs including ‘pick up’ and ‘hold on’ you can give commands
such as: ‘Pick up your purple pen now but hold on until I say “Write this
down”’. If they do what you say you can tell that they understand.
75
76
Part II: Putting Your Lesson Together
Don’t spend time on inessentials. A basic object like a bath plug doesn’t really
warrant having much time spent on it as most people rarely say the word, and
a verbal explanation is more complex than the object itself.
Introducing Vocabulary
When it comes to teaching vocabulary, the Presentation stage can include a
combination of any of these things:
✓ Meaning: Sometimes a straightforward definition
✓ Synonyms: Similar words
✓ Antonyms: Opposites
✓ Connotation: The emotion a word conveys
✓ Spelling: Self, explanatory, hopefully
✓ Collocation: Words that fit together
✓ Syntax: An explanation of how a word fits into a sentence grammatically
‘To like’ is followed by a noun, an infinitive or a gerund: to like something, to like to do something and to like doing something.
✓ Register: How (in)formal it is.
✓ Pronunciation: This can include transcription into phonemes, marking
the stressed syllable and drilling (repeating).
✓ Word families: You can introduce other words that come from the same
root. For example:
• to inherit (verb)
• inheritance (noun, thing)
• hereditary (adjective)
• heir (noun, person)
• heiress (noun, woman only)
✓ Visuals: Pictures, mimes, realia, board work and so on.
✓ Part of speech: A noun, a verb and so on. (I talk about the parts of
speech in Chapter 15.)
Aim to teach only about seven new words or phrases per lesson. Students find
it extremely difficult to absorb any more than that.
Chapter 5: Standing in the Spotlight: Presenting to the Class
Presentations for vocabulary lesson on bodies of water to meet certain standards:
✓ Class profile: Mixed nationality class of six students studying English for
higher education.
✓ Level: Pre-intermediate.
✓ Materials: Photos of bodies of water.
✓ Problems: Difficulty remembering which word is which.
✓ Lesson aims: To teach ‘puddle’, ‘pond’, and ‘lake’ as bodies of water; to
continue the theme of the week,‘Water’; to aid project work.
A Presentation procedure that takes 12 minutes follows these steps:
1. Hold up a bottle of water. Ask students to take out their notebooks
and brainstorm adjectives that can describe water, for one minute.
2. Give out pens and ask students to write their adjectives in the designated section on the board.
Allow students to ask each other about any words they’re unfamiliar with.
3. Draw a puddle shape on the board. Elicit from the students any ideas
about what to call water in this shape.
Make a tiny puddle of water on the desk to illustrate if possible.
4. Now indicate the size of the body of water by drawing a child jumping
in it, complete with splashes.
5. Elicit ‘puddle’ if possible and drill the word chorally and individually.
Write the word, its part of speech and phonetic spelling on the board.
6. Highlight syntax.
Have students fill in the blank: A puddle of . . .
7. Draw the same puddle shape again but this time draw a couple of fish
in it and a house nearby. Elicit and drill the word ‘pond’. Write the
word, its part of speech and phonetic spelling on the board.
8. Highlight collocates and compound nouns.
You can go through fish pond, freshwater pond, muddy pond (make the
picture on the board brown if you can).
Follow the same pattern for ‘lake’ but with a large boat in the water. Include
drilling and board work. Show how the name of the lake usually comes
second – Lake Erie, for example.
77
78
Part II: Putting Your Lesson Together
You can use concept check questions such as:
✓ Do fish live in puddles? Why not?
✓ Give me an example of a famous lake? (For example, Garda, Michigan,
Windermere.) Is there one in your country? How big is it?
✓ Why are ponds, lakes and puddles similar?
✓ If you break a big bottle of wine what do see on the kitchen floor?
Show pertinent pictures and get descriptions from individual students.
Encourage them to use the adjectives already on the board.
Sharing function and connotation
When you explain vocabulary or grammar, you generally need to show how
people use it. It’s easy with some words. For example, tall is a word for things
or people of great height. However, some phrases and grammar are more
open to interpretation. Take the word cheers. It has several uses – you say it
while clinking glasses before you drink, you use it informally to express gratitude and it’s associated with happiness too (cheer, cheerful).
Filling in students on functions
When you teach language according to the situation you need it for, this is
called a functional approach. If you take a functional approach to teaching,
you usually introduce the setting before you introduce the new piece of language. I talk about using a functional/notional syllabus in Chapter 19.
So, if you’re teaching cheers, you can design a lesson about going to the pub,
and teach:
✓ What are you having?
✓ I’ll have a pint/glass of . . .
✓ Whose round is it?
✓ It’s my round
✓ Bottoms up!
You focus not on the grammatical structures but simply on what you say in
this particular context.
Even if you take a structural approach to the lesson, meaning that you teach
particular grammar, you still need to show very clearly how a word or phrase
is actually used in realistic situations.
Chapter 5: Standing in the Spotlight: Presenting to the Class
Conveying connotations
Certain words imply emotions or attitudes – they have connotations.
Think of one of those famous supermodels. Which of these words would you
associate with her?
thin
trim
slim
wiry
skinny
bony
svelte
twig-like
The word(s) you choose reveal whether you view her as truly attractive or
not and this is what you teach with connotation.
You need to point out whether a word is positive, negative or neutral, a
compliment or an insult. Failure to do this can leave students embarrassed
because they may come across as rude or over familiar.
Fish and . . . ? Teaching
vocabulary in chunks
In English some words are often grouped together and seem to have an especially close relationship. These are called collocations. For instance, even
though the words ‘constructive’ and ‘criticism’ can be used perfectly well
apart from each other, together they form a common phrase. ‘Positive criticism’ renders the same idea but just doesn’t sit right. It doesn’t collocate.
Equally, it’s fine to say ‘very serious’ but ‘deadly serious’ is so much better
and mirrors what a native speaker is likely to say. It’s collocation.
Going for more than one
Look for opportunities to teach chunks of language. Instead of teaching just
one word, try teaching two or three all at once. One way of doing this is by
highlighting collocations in reading texts. For example, ask students to underline all the occurrences of a particular word in a text and see which other
words come before or after it each time.
You can also reinforce collocations through multiple choice whereby you
offer the students several logical possibilities to partner a word, but show
that only one is the true match.
79
80
Part II: Putting Your Lesson Together
Give readers choices to finish a sentence:
I’m going to a pop . . .
a) concert; b) recital; c) performance
The most common collocations are in the form of:
✓ Subject and verb: The music blared, the engine roared.
✓ Verb and object: Brush your teeth, scrub the floor.
✓ Adverb and past participle: Ideally situated, highly strung.
✓ Adjective and noun: Black tea, heavy make-up.
Teaching certain words together
When you teach a particular word, you need to give students all the tools
they need to actually use it. With that in mind, take note of:
✓ Words that can’t be used without other words: Some words are so
uncommon that they become almost meaningless without their collocates. Take for example ‘beady’. Is anything else ‘beady’ except eyes?
✓ Expressions set in stone: Even though it may be true literally you can’t
say ‘black and green’ to mean bruised. It’s definitely ‘black and blue’.
✓ Compound nouns: These are nouns made up of two words together. So you
can teach similar compounds as one vocabulary group. For example, you
can teach coffee table, dining table and kitchen table in the same lesson.
✓ Clichés: Some expressions are tired but common phrases such as ‘no
stone will be left unturned’. It’s worth teaching clichés as one chunk.
✓ English verbs that don’t translate: Some verbs in English have particular collocations which students find tricky because when translated they
don’t seem to follow a pattern. Foremost are:
• Do: a deal, harm, the shopping, business
• Get: the sack, home, lost, ready
• Make: the bed, a mistake, trouble, amends
• Take: a look, the lead, advantage, a bite
All right mate! Teaching posh
words and slang
Because people face such a wide range of situations in life, it makes sense
to teach a wide range of language to meet them. So there’s good reason to
Chapter 5: Standing in the Spotlight: Presenting to the Class
teach formal and informal language as well different styles of communicating
according to the students’ requirements.
Tabloid and broadsheet newspapers provide great examples of how style
can differ even when the subject matter is the same, as the following sample
headlines about the same story show:
✓ Desperate Danielle Beats Jail Rap!
✓ Tragic Mother Acquitted
✓ Sad Mum Escapes Prison Sentence
Presentations using such comparisons demonstrate cultural awareness, connotation and synonyms too. (I talk about connotation a few sections earlier
and synonyms in the next section.)
Choose the words frequently used in situations the students may encounter,
whether slang or posh. It’s realistic to expect students to expand their knowledge into new areas sooner or later, so the occasional exposure to new styles
helps motivate them. In any case, everyone needs formal and informal language in order to reflect the different relationships in their lives.
In your presentation, you can indicate this kind of information in brackets
after the word:
toilet (n)
loo (n) (UK slang)
clothes (n)
gear(n) (informal)
Make students aware of varieties of English from various parts of the globe,
but focus on the ones to which students are most likely to be exposed.
Talking about words that mean the same
and opposites – synonyms and antonyms
Using the antonym, or opposite, of a word is a very useful way to explain its
meaning. It’s as though half the job is already done for you. So you can teach
that the opposite of ‘cheap’ is ‘expensive’ or that ‘increase’ and ‘decrease’ go
hand in hand.
Synonyms, words that have exactly the same or similar meaning, are especially
useful as students learn to expand their vocabulary. Some examples are:
✓ huge/enormous
✓ messy/untidy
✓ happy/glad
81
82
Part II: Putting Your Lesson Together
Use a little caution when using synonyms and antonyms because they sometimes fit only in particular circumstances. For example, synonyms of ‘buy’ are
‘get’, ‘acquire’ and ‘purchase’. However you can’t really ‘purchase’ time. Only
‘buy’ fits in that expression.
Presenting Grammar
When you present grammar, usually one of the tenses in English, you include
points such as:
✓ Form: Show what the grammar actually looks like even when you manipulate it in different ways. For instance:
• Positive: He had written it.
• Negative: He had not written it.
• Question: Had he written it?
• Contraction: He’d written it.
✓ Pronunciation: Consider any features that you need to highlight and
drill.
✓ Function: Demonstrate exactly when you use the grammar by putting it
in context. Timelines help to represent this visually.
✓ Examples: Use realia or pictures as well as sentences to explain.
✓ Concept check questions.
✓ Comparison with other grammar if necessary.
A Presentation for a grammar lesson on bodies of water to meet certain criteria might consist of:
✓ Class profile: Mixed nationality class of six students studying English for
higher education.
✓ Level: Pre-intermediate.
✓ Materials: Diagrams showing simple processes.
✓ Problems: Remembering the difference between active and passive
forms.
✓ Lesson aims: To teach the present simple passive for describing a process; to continue the theme of the week ‘Water’; to aid project work.
Chapter 5: Standing in the Spotlight: Presenting to the Class
To teach this lesson, follow these steps:
1. Have a soft drink on the desk but complain that it’s too warm. Ask students what to do. Then find out who likes ice in their drinks.
2. Have the students tell you the procedure for making ice and write the
stages on the board:
1) Put water into container.
2) Place container into freezer.
3) Leave for 2 hours.
3. Lead the students to get to the past participle of each of the verbs –
put, placed and left. I talk about past participles in Chapter 16. It’s one
form of a verb that you sometimes use when you speak about the past.
4. Ask students to identify the object of the sentence in step one – water.
5. Ask them to identify the verb – put – and highlight that there’s no
person doing the action.
6. Set out the equation for the present simple passive form (the equation
shows the necessary parts of the sentence in the right order): Object +
the verb to be in the present simple tense (am, is or are) + past participle
(+ by someone if you want to say who did it). I talk about the present
simple tense in Chapter 16.
7. Complete the examples for each stage by eliciting the words and writing them on the board:
Object
+ to be in present simple + past participle + where/how long
The water
is
put
into a container
It
is
placed
into the freezer
It
is
left
for two hours
8. Demonstrate how to transform one sentence into a negative and one
into a question on the board:
• Is the container placed in the fridge?
• It isn’t left for two minutes.
Check that your students understand the concept by asking:
✓ Who puts the water into the freezer. Is it important?
✓ Are the sentences in the past or present simple?
✓ What’s the difference between the present simple active and passive?
83
84
Part II: Putting Your Lesson Together
Chapter 6
Holding the Reins and
Letting Them Loose –
Giving Students Practice
In This Chapter
▶ Practising new vocabulary
▶ Introducing production activities
▶ Mastering the art of giving instructions
▶ Grouping students
▶ Organising practice and production activities
M
ost teachers plan EFL lessons in three stages – Presentation, Practice
and Production. How to handle the first stage is the focus of Chapter
5. In this chapter, I tell you about the differences between the Practice and
Presentation stages and offer suggestions for activities.
Experts generally agree that people learn languages by listening before speaking. In a similar way, the class hears what you have to say and they begin to
own the piece of language themselves.
Practising New Words
The second stage of the lesson, called Practice, or more specifically, Controlled
Practice, is an important period of transition for the students. During the
Presentation stage, students are fairly passive as you explain the form and
function of the new piece of language. During the third Production stage students have freer expression. During the practice stage, they repeat what they
learned in a controlled situation before moving into the more active Production
stage. This means that you set the students an exercise with entirely predictable
answers and these answers are rather repetitious because they’re designed
to practise the new piece of language several times over. So in this part of the
86
Part II: Putting Your Lesson Together
lesson you aim to get the students concentrating on the new words or grammar
without them showing off everything else they know. The students take their first
tentative steps at using the words to test whether they can get it right.
Some of the many benefits of the Practice activities include:
✓ They help the students to focus on accuracy. This doesn’t mean that
the activities should be dry, meaningless exercises like the old days of
Latin lessons. It’s very important that you challenge students with an
activity that can only be completed if they really understand how the
piece of language works. You should be able to predict the the students’
responses, though. In these exercises the answers are predictable
because there’s only one correct way to complete the sentences. In the
following examples the only possible answers are have, has and/or the
past participle form of the verb given.
An example of a bad practice activity first:
Complete these sentences in the Present Perfect
Example: I . . . (have) seen that movie.
They . . . visited the zoo.
You . . . read that book.
We . . . eaten there.
Students can simply take a guess and write ‘have’ in every gap. Here’s an
improvement:
Complete these sentences in the Present Perfect, using the verb in
parentheses.
Example: I . . . have seen . . . that movie. (to see)
They . . . the zoo. (to visit)
She . . . that book. (to read)
We . . . there. (to eat)
Notice that students have to apply the grammar rule more vigorously to
come up with ‘has’ for the third person she.
✓ These exercises force attention on the new piece of language through
frequent repetition. Students can fix their attention on the new point
without being distracted by too many other rules they’ve learned.
At the same time, by repeating the new language, students form new
habits in the brain.
✓ This type of exercise allows students to come to a gradual recognition
of the new language in a safe way. That is to say, the students feel very
supported.
Chapter 6: Holding the Reins and Letting Them Loose – Giving Students Practice
One thing to avoid is letting students make a habit of an error. Once engrained,
bad habits are really difficult to root out. For example, students say things like
‘Is good!’ and ‘I gonna do it’, even though they know the correct grammar, just
because no one forced them to break the habit initially. So while the students
are practising, monitor closely.
This practice is called controlled because of the limited range of what the
students have to do, not because you stand over them commenting on every
word. That would be counter-productive. You need to step back and let them
get on with it, but make notes.
Use the feedback session immediately after the activity to root out any problems you’ve picked up on and tackle additional questions from the students.
Keep the target language as priority though. After all, if you spend too much
time going through errors in other areas, students may forget what the primary aim of the lesson is. You can cover any significant error that’s off the
point right at the end of the lesson.
Make your Practice activities long enough to allow you to go round and listen
to everyone in the class. You’re bound to miss some errors, but that’s life! And
by the way, arrange the room so you can walk around as easily as possible.
Practising with the whole class first
During Presentation you had the attention of the entire class (hopefully).
So the transition from Presentation to Practice is seamless if you continue
to work with the entire group. This also allows you to offer correction that
benefits everyone; after all, the students are likely to make similar errors. You
can egg them on, offer reassurance that they’re doing well and quickly spot
anything you’d forgotten to include, before the students work in small groups
out of earshot. Doing practice activities with the whole class gives students
tools for doing the activity that follows, because the practice activities serve
as examples.
Pairing up with a student
Open pairs is one way of practising while you remain in control. In an open
pairs exercise, you ask a student questions or role play in full view and hearing of everyone else in the room. The class sees an example of how to use
the new piece of language, but because you’re one of the partners in the
exchange, the level of accuracy is very high. Students also know that you’ll
point out immediately any mistake made by your partner.
You can continue open pairs with two students as partners, but still in front
of everyone else. You have slightly less control but still plenty of opportunity
for correction – by you or the classmates.
87
88
Part II: Putting Your Lesson Together
If you’re practising the future perfect tense, you can proceed this way:
Teacher: Mary Jo, what do you think you’ll have done by the time
you’re 30?
Mary Jo: I think that I’ll having a baby by the time I’m 30.
Teacher: Could you repeat your sentence using the correct from
of ‘have’?
Mary Jo (refers back to the board): Oh yes! I’ll have had a baby.
Teacher: Well done! Ask Olivia a question in the future perfect please.
Mary Jo: Olivia what will you have done by the time you’re 60?
Olivia: I’ll have travelled the world.
Using the board
You can involve the whole class by putting gapped sentences or questions on
the board. You can then ask for a volunteer to fill in the correct answer.
Alternatively, if you plan to give the students written exercises you can
include a set of questions on the worksheet that the whole class can discuss
before individual study.
Practising alone
Controlled Practice activities that students do alone are based on listening,
reading or writing.
Even when students work alone, they can still compare their answers in pairs
afterwards to add a communicative element to the activity.
Recognising the structure
Activities that help students recognise the new structure or vocabulary may
be in the form of a text (listening or reading). Students can assess it and note
examples of the new structure.
Read the story and underline all the verbs in the Present Continuous.
Monique is an accountant. She works at home. This morning she’s using her
computer in the kitchen. She’s looking at a lot of information but she doesn’t
think it’s difficult. She’s very clever with numbers. Monique is wearing her
tennis clothes because she wants to play tennis with her friends when she
stops working. She isn’t thirsty, because she’s drinking a cup of coffee too.
Chapter 6: Holding the Reins and Letting Them Loose – Giving Students Practice
Remember that students need a challenge. In this exercise I include another
gerund (stops working) to see whether the students can distinguish between
this structure and the Present Continuous, which always includes the verb ‘to
be’ plus a gerund.
Finding specific words in a text
You can use other ways to use a text without underlining tenses. When you’re
doing a vocabulary based lesson, try using identifying and categorising tasks.
This exercise from a more advanced lesson is about descriptions of personality.
Decide whether the underlined words are positive, negative or neutral
and write each under one of the headings after the passage. Cheerful is
already slotted for you.
There are five people in my department. Sometimes we get on well but
there’s also friction when we’re under pressure. Bill is the most ambitious. He’s pretty frank but on the whole a cheerful chap. Then there’s
Rick who has more experience than the rest of us so he’s a shrewd character. Being more mature he likes to be selective about the projects we
take on. Sarah and Beverley are both very cooperative but Sarah is far
more assertive.
Positive
Negative
Neutral
cheerful
Mixing up anagrams
You’re probably familiar with anagrams, which are basically words with the
letters jumbled up. By putting the letters in order, the students not only have
to remember the words but also make sure of the spelling of the new words.
Put the letters in order to find three sports
lolyallevb: volleyball
skoorne:
scattehil:
The last two are snooker and athletics in case you’re wondering!
Scrambling sentences
To practise the word order of a particular structure you can design an exercise in which words in a sentence are jumbled.
89
90
Part II: Putting Your Lesson Together
Put the words in order to make a third conditional sentence.
If Joanne was her boyfriend have known that 60 old years she never
would gone had out with him.
If Joanne had . . .
Transforming tenses
This traditional exercise in language courses works best when there’s a clear
context instead of arbitrary sentences. The idea is to set out one tense (or
structure) and have the students accurately exchange it for another.
Make one sentence using the Past Continuous.
She typed the letter from 7.30 to 7.45. At 7.40 the telephone rang.
While she . . .
You can use timelines and pictures to generate sentences too.
Matching exercises
Activities in which students have to match opposites, or words and pictures
or make other similar connections are very controlled and also useful for getting students accustomed to new words.
In a lesson on classroom language, you can have students match verbs and
activities together:
raise
to your partner
ask
the gaps
compare
your hand
talk
your answers
fill in
a question
Practising in pairs
When students work in pairs they can practise their speaking and get to
know each other better. Lessons are livelier than with solo activities and
classmates can spur each other on and offer correction.
Chapter 6: Holding the Reins and Letting Them Loose – Giving Students Practice
To encourage communication in pairs, get students to share some materials
by handing out one worksheet or text for two students to share. If it’s something they each want to keep, you can give out another copy later.
You need to have your wits about you for pair work activities. It isn’t quite
as easy to control students when they’re all speaking at once and the noise
level can be pretty high. However the students are generally happier because
they’re actively involved.
I talk about pair exercise in the next sections.
Ranking
With a list of vocabulary you can have pairs discuss the appropriate rank
from best to worst, or most to least useful perhaps. You can have students
practise the target vocabulary and the expressions for justifying opinions as
well. You need to have taught them expressions of opinion well beforehand,
though, and you can use examples by first of all asking a few students, in
front of the whole class, for their opinions about the vocabulary.
With your partner, decide on the most important electrical items from the list
to have in a kitchen with 1 the most important item and 8 the least important.
freezer
microwave
dishwasher
kettle
cooker
toaster
fridge
food processor
Filling an information gap
Use activities in which students talk to each other in order to access information. The idea is to give them different information about the same topic.
Instead of just looking at the other person’s worksheet, they have to ask for
what they need to know.
91
92
Part II: Putting Your Lesson Together
Have students living in the UK practise saying ‘What’s the weather like in . . . ?’
along with weather words and place names, and having given each pair the following worksheets. (The pronunciation of place names is tricky so I regularly
find an excuse to slip the ones they know into a lesson.)
Complete your weather report by asking your partner, ‘What’s the
weather like in . . .?’
Weather Report A
Aberdeen: warm and cloudy
Carlisle:
Dundee: hot all day
Edinburgh: rain in the morning
Glasgow:
Ipswich:
Kidderminster: cold and windy
Liverpool: foggy in the morning
Manchester:
Norwich:
Weather Report B
Aberdeen:
Carlisle: warm and sunny
Dundee:
Edinburgh:
Glasgow: mild and grey
Ipswich: rain in the afternoon
Kidderminster :
Liverpool:
Manchester: hot and dry
Norwich: foggy then bright
You can get some more ideas for speaking activities in Chapter 13.
Role playing from a script
If you use a course book in class, it probably has the tape script for recorded
dialogues at the back. The way students use intonation when reading out a
dialogue is a strong indicator of their comprehension.
Chapter 6: Holding the Reins and Letting Them Loose – Giving Students Practice
Practising in groups
You can use larger groups of students or the whole class again for the
Practice stage. Sometimes it’s fun to have a competitive element or just the
camaraderie of working side by side.
Here are a couple of ideas:
✓ Using a blindfold: One student in a group covers her eyes and then has
to listen to the directions of her classmates in order to find a particular
location of an object.
✓ Running dictations: Organise two teams and two copies of a written text
full of the target language for the lesson. You place the texts at one end
of the room while the students remain at the other end. Each team has a
blank sheet of paper and a pen. One by one, students come up and look
at the text. They each memorise a chunk of the text, as much as they can
manage, and reproduce it on the blank sheet. By the end of the activity
the teams should have their own handwritten versions of the text. They
practise accuracy and remembering chunks of language.
Moving to the Production Stage
In this third stage of the lesson, called Production or Freer Practice, the focus
is on fluency. Students have a chance to experiment a bit and add the new
language to everything else they know by, for example, having extended discussions, describing things in detail and telling stories. The aim is to set the
students a task that gets them speaking, or writing, in their own words but
that’s a suitable context for including the target language. Having concentrated on being accurate in the Practice stage, students can now try to sound
natural when they incorporate the new language.
The Production stage tests the students subtly. They should be able to show
off what they can do without you holding their hands or guiding them.
A Production activity involves speaking or writing primarily and encourages
creativity.
Writing and speaking
Writing activities are usually solitary affairs. It’s pretty straight forward to set
students an essay task, for example, and ask them to include particular words
or phrases. If you do this, you should have some involvement in planning the
written piece with the students so that they have sufficient structure. Use the
93
94
Part II: Putting Your Lesson Together
board to show what kind of information or expressions can be used to go in
each paragraph before they start writing by themselves. See Chapter 11 for
tips on organising writing lessons.
In the next section I talk about ways to engage students in writing and
presenting.
Miming a story
A fun way to set a writing activity is by miming it. Students love to watch you
doing all the actions while they make notes and later write the entire story
in the tense(s) you set for them. Of course, you need to make it an amusing
story full of actions and without too many characters.
Making speeches and presentations
An example of an individual freer practice activity for speaking is to have
students do a speech or presentation. This is particularly applicable for
business English students who may need to do similar activities at work.
However, if there’s an election running, students can try delivering a manifesto speech.
Students need to do this kind of activity from time to time because it allows
stronger ones to show off without compromising for the sake of their classmates.
It also reveals students’ true speaking levels without the support of a group.
Role-playing in pairs
Role-playing is an effective way of speaking freely in pairs. In the Practice
stage the students can just act out a role-play from a script. However, in
Production you can get them writing the script themselves and then perhaps
performing for the rest of the class.
What’s the question?
An exercise in using creative language is to give students just the answers to
an interview and asking them to come up with the most interesting questions
they can think of to match.
Write a question in the Past Simple to match each answer.
Answer: Vanilla ice cream.
Question: What did you want for breakfast when you were a child?
Chapter 6: Holding the Reins and Letting Them Loose – Giving Students Practice
Interviews
Very often students interview each other on particular topics. So in a lesson
on vocabulary for clothing try setting tasks like this:
Ask your partner about the newest item in her wardrobe. Find out why,
where and when she bought it. Ask her whether it matches anything else.
Getting dramatic in groups
You can have great fun with freer group activities.
Doing drama and improvisation
I’ve met many a trained actor working in TEFL as a day job so it’s no wonder
that drama has established itself as a Production activity. Drama has real
advantages in the language classroom:
✓ You repeat the same dialogue many times. This is very reassuring for
students as they get better each time and this helps them build up their
confidence.
✓ The context for the language is very strong because a story is involved.
✓ You can record and play back the piece for analysis and self correction if
you have the equipment.
✓ Drama tends to teach language and culture together.
A short extract lasting five or six minutes is sufficient and it’s interesting for
the students if you can show a film clip of the same scene afterwards.
In real life, language is generally spontaneous so you can mimic this by using
improvisation.
Give students a card with a secret role on it. Perhaps it’s a hospital situation
and each person has a complaint that influences what they say. Or maybe it’s
a quirky dinner party with a string of guests who need to get their own secret
words into the conversation. The students can all work out what the others
are up to.
Retelling the story
Paraphrasing, summarising and even embellishing are everyday skills, so
asking students to tell each other about something they’ve read, watched or
experienced is a valuable activity. For example, have partners read separate
95
96
Part II: Putting Your Lesson Together
texts, then tell each other about what they read and add any other information they know about the topic.
Integrating different skills into one activity allows for the students’ different
learning styles and adds variety.
Fostering discussions and debates
Sometimes debates kick off spontaneously and that’s great. It’s exactly what
you want to use language for and you shouldn’t feel that your lesson plan is
compromised if you occasionally go off the beaten track.
If you want to orchestrate a discussion or debate yourself, you need to teach
all the appropriate vocabulary (or at least give students access to a glossary if
there’s too much or some is less relevant) and occasionally add fuel to the fire.
Giving Instructions
One of the keys to a successful activity in the classroom is the way you give
instructions to set up the task. It may seem simple to say ‘Talk about X in
pairs!’ but there’s a little more to it than that.
Consider these presentation tips:
✓ Speak well: Talk slowly even if the students are at a higher level. It
encourages them to pay attention. Be clear! Don’t mutter or ramble. Use
short sentences and imperatives (commands). Grade what you say so
it’s at the right level.
✓ Use visuals: Use pictures and diagrams to show what you want the students to do. Give examples of what you want. Use lots of gestures.
✓ Plan your instructions: Write the instructions for the exercises into
your lesson plan. This helps you present them clearly and succinctly.
Don’t start giving instructions until everyone’s listening and be sure to
allot enough time for the instructions – give them out step by step and
not all at once. Very often students get confused when you tell them too
much. Be sure to repeat the instructions and write them on the board,
giving students time to write them down if necessary.
Ask open questions to see if the students understand the instructions. You can
even get them to repeat the instructions back to you.
Chapter 6: Holding the Reins and Letting Them Loose – Giving Students Practice
Putting Students into Pairs and Groups
When it comes to organising your students for pair and group work, avoid
simply telling them to pair up themselves. It’s your responsibility to say who
works with whom and you ought to have a strategy for doing so.
Why? First, you’re likely to have mixed abilities in the class and you definitely don’t want two weak students working together. On the other hand, if
you have two very strong students it may be motivating for them to be put
together sometimes so that they can express themselves to their full potential. Unfortunately you sometimes have an annoying class member too (the
joker perhaps) and it would be unfair for the same student to be stuck with
that person in every activity. Share the load.
If you can, change the seating order in your classroom regularly. Ask the class to
sit in alphabetical order, in order of their front door numbers in their addresses
or according to their dates of birth. Use anything that moves them around.
For pairs, use your left hand to point to the first student (an open hand is
friendlier than a single finger) and then the right hand for the second student.
Show that they’re now a pair by bringing your palms together.
Of course, you can just say ‘you’re A and you’re B’ if the students understand
but you can also inject a bit of fun by using other vocabulary. You’ll get a
smile with: ‘You’re an apple and you’re a banana!
When you’re working with groups, it‘s great to switch them around after a
time so they can pool ideas. First you label each student A, B, C, or D and put
them together in a group of four. After they’ve had time to generate ideas you
can now group all the As, all the Bs and so on.
Encourage students to move their chairs so that they face each other if possible. Communication involves body language too.
Trying Out Practice and
Production Activities
Practice and Production activities come in many different forms but they
should be interesting, varied and challenging according to the level of the
97
98
Part II: Putting Your Lesson Together
students. Here are some examples of activities that carry the same theme
throughout each of the three stages of the lesson.
Writing a blurb
The blurb is the text at the back of a book or film that tells you why you should
buy it. It usually contains a synopsis of the plot and some information about
the cast or author. Over the years I’ve noticed that very often the language
used is quite sophisticated even when the entertainment is aimed at children.
So rewriting an existing blurb and creating new ones are great ways of exercising language skills with students who are intermediate level and above.
After an initial Presentation stage focusing on vocabulary for describing
films, for example, students can tell each other specific details about a recent
film they’ve seen – plot, stars, genre, format and so on.
Next introduce the film(s) using the title and pictures from the cover. You can
use different films for different groups or just one for the whole class. The
students can use this initial information to make predictions about the film.
For this you may decide to use a less well-known movie so that the students
really have to discover the information.
Now you can distribute the blurb(s) for students to examine.
Pair students and ask them to skim the blurb for particular details about the
new film(s).
Next the students should analyse the language content of the blurb and,
using dictionaries and/or a glossary, ask students, in pairs, to simplify the
blurb using synonyms for the tricky words.
Form the students into new groups based on a film they’ve all seen.
Together they must now pool their knowledge to come up with a blurb for
that film.
Spin off activities from this include listening to, acting out or narrating clips
of the film.
Doing class surveys and reports
Find out from the class about topics they’re all interested in. From this starting point you can determine a good topic for a survey and have the students
prepare survey questions based on the topic.
Chapter 6: Holding the Reins and Letting Them Loose – Giving Students Practice
The answers to questionnaires like these are usually limited, so they provide
excellent controlled practice of the tenses.
A survey on musical tastes may incorporate questions in various tenses:
✓ Past tenses: What was the first CD you bought? Had you heard all the
tracks before you bought it?
✓ Present tenses: What are you listening to these days? Do you use CDs,
MP3 or a different format?
✓ Future tenses: Will you be going to any concerts this year? In your opinion which artist will be ‘the next big thing’?
Students can distribute the questions and mingle to conduct short interviews
with each other.
Mingling (as though at a dinner party) is a great way to incorporate group
work and create a buzz.
After that they can collate the information and prepare graphs and charts
to demonstrate the results. As a freer writing activity the students can now
prepare reports on their findings. They could also have a final discussion
analysing the reasons for any surprising results.
Playing Mastermind
You’ve probably seen this game on television. It‘s the one where a contestant
prepares to answer questions on a specialist subject. Well, in the classroom
you can organise a similar game that allows groups of students to research a
particular topic (maybe an area of vocabulary) and answer questions about
it. They can ask each other questions you’ve prepared and later write questions themselves.
Apart from the revision of particular topics, a sub-aim is to get students using
questions with and without auxiliary verbs, as in the following examples:
When did this happen?
What happened?
Which film did Brando make in 1978?
Who directed Jurassic Park?
So that you can reduce TTT (teacher talking time), hand the questions over
to another group. For example, if Team A prepared Hobbies as their specialist
subject and Team B prepared Occupations, each team can have a quizmaster
99
100
Part II: Putting Your Lesson Together
who asks the other team questions. They can have a spokesperson each to
answer. A question and answer session may run something like this:
Quizmaster A: What is the name of the person who has the job of
organising funerals?
Spokesperson B: Undertaker.
Quizmaster A: Correct.
Quizmaster B: Which pub sport has small metal arrows and a target?
Spokesperson A: Darts.
After the specialist knowledge round, which is practice, do another short presentation to remind students of the grammar of questions. Then students can
come up with questions for the general knowledge round themselves.
If a piece of language is needed later in the lesson, instead of expecting the
students to learn it at the beginning and remember it throughout, you can do
another mini presentation when it’s needed.
Producing predictions
Several ways can be used to render the future in English so here’s a suggestion for using the various future constructions:
In 1979 Margaret Thatcher famously predicted that there would never be
a woman Prime Minister in her lifetime and in 1916 Charlie Chaplin said
that cinema was little more than a fad.
1. In the Presentation stage, analyse the different expressions and tenses
used.
2. Have students respond to a set of predictions for the year 2050, saying
whether they’re likely to come true or not and comparing their ideas
with a partner.
3. Come up with your own or find out what the scientists say.
4. Ask the students to make their own predictions on various areas of life.
Chapter 7
Giving Correction and Feedback
In This Chapter
▶ Sorting out which errors matter
▶ Using gestures to correct
▶ Having students correct themselves
▶ Using students to correct other students
▶ Giving your class feedback
▶ Correcting written work
▶ Giving tests
A
ll language learners make mistakes. It’s part of the learning process.
But what should you do about them? In this chapter I tell you about the
different kinds of error students make and various techniques for handling
them.
Knowing What to Correct and When
There seems to be little disagreement that students ought to receive correction in the classroom. They expect it, and teachers rightly feel the need to
take action when students get it wrong.
Of course, in the real world outside the classroom, people make errors all the
time and still communicate effectively. And even though you teach English,
you generally don’t interrupt them, especially as this may come across as
rude and actually put them off speaking. Taking the person to one side afterwards and pointing out an error, is more polite but maybe a little picky. After
all, the moment has passed. And in any case, it does no harm to let some
things slide – you don’t need to be a staunch defender of the Queen’s English
on all occasions.
But the classroom isn’t the real world. It’s a safe environment where your students can try language out. And as the teacher, you’re no ordinary listener;
you’re paid to point students in the right direction.
102
Part II: Putting Your Lesson Together
That being said, the issues for TEFL teachers when it comes to correction,
boil down to these:
✓ Striking the right balance between accuracy and fluency.
✓ When to correct: immediately or later?
✓ The particular errors to correct.
✓ The techniques you use for giving correction.
The guidelines for dealing with the first three points all boil down to a set of
definitive rules:
✓ Accuracy and fluency: These should combine to make for good communication. If lack of accuracy hinders communication, the speaker doesn’t
achieve anything by carrying on.
✓ Good communication: When this takes place, correction can usually
wait. When communication is poor or non-existent, step in more quickly.
✓ Correcting errors: Errors related to the topic of the lesson and which
stop communication should receive the most attention.
I talk about correction techniques later in the chapter.
Judging accuracy, timing and value
On the subject of accuracy, most students want to get it right. This is one
of the key differences between people who just pick up a language as they
go along and those who actually study it. The fact that the student is in the
classroom at all means that accuracy is important to him to some degree. It
should therefore be important to you too.
Even though students may not achieve total accuracy, try for it at least in the
language area you’re practising in that particular lesson. This gives the student
something to aim for. It’s a bit like target practice. You need to identify the
target and actually aim for it. You hit it sometimes and miss at other times but
it’s clear to you when you miss and that you need to practise. When the arrow
misses the target you can still applaud the effort. Likewise, you need to encourage effort but make sure that the student knows when he has to work harder.
So, suppose that the lesson is about the present simple tense and your student, John, says, ‘I am go to the shopping.’ You may want to interrupt him to
make the error, ‘ I am go’, the focus of attention because it indicates that the
he may not have grasped the information you just presented on the present
simple tense. However the meaning is fairly clear, especially if it occurs within
a more extended dialogue. So if you don’t stop him, John continues, ‘. . . and
there I buy vegetables because I don’t want meat.’ The benefit of allowing
Chapter 7: Giving Correction and Feedback
him to continue, or to be fluent, is that you discover the extent to which he
understands the tense. He may have just slipped up initially because of nerves
or distraction. His next two attempts at the present simple, ‘I buy’ and ‘I don’t
want’ are very good. So, by allowing John to continue the conversation, it also
becomes clear that he really wants to say the present simple ‘I go’ – not ‘I am
going’, which was the other likely option. Also, if John continues to use the
present simple very well, you can handle his first error very quickly, leaving
time for a mention of the second error ‘to the shopping’.
To encourage fluency then, you should allow students to keep talking. You
can make a note of the errors and deal with them later.
Try not to put words in your student’s mouths when you offer correction. Find
out what they actually want to say before wading in.
In a lesson about health, Paola makes a different kind of error:
Tano: Do you have a cough?
Paola: Yes I have one cup in the morning and one with lunch.
Tano: Not cup, cough!
Paola: Yes, every day.
This time communication is actually breaking down and very soon the two
students are likely to become exasperated. Knowing her Brazilian Portuguese
background, I detect that Paola is talking about coffee, not a cough. This is an
occasion when it would be wise to step in immediately as fluency has no benefit without true communication. By the way, inaccurate pronunciation is the
usual culprit when this happens.
Exploring the nature of the error
Students get things wrong for different reasons. Sometimes they just slip up
although they really know it. Even native speakers do that. At other times
they make mistakes because they really are confused or they’ve missed the
point.
If a student just slips up, you can tell because he gets it right most of the
time. In that case he only needs a reminder instead of a full explanation. As
long as the student is aware that he’s got something wrong, he stands a good
chance of putting it right. Having said that, students find it most useful if you
point out what kind of slip up it is.
If the atmosphere in your classroom is generally relaxed and friendly, students
won’t feel too self conscious about making mistakes. You can even laugh along
with them when the result of a mistake is rather amusing.
103
104
Part II: Putting Your Lesson Together
If the problem is more than a minor slip, the student needs an explanation
that shows that he’s made an error and exactly why it’s wrong.
Letting Your Fingers Do the Talking
Students have their eyes glued on their teacher quite a lot of the time, so
they get to know your gestures and mannerisms quite well. For that reason
alone, it makes sense to use your body language effectively instead of just
waving your arms around for emphasis.
Don’t worry about whether or not the students understand your gestures. Just
go ahead and they very quickly get used to them.
Using your hands
You can use your hands to indicate where a student has made errors in a
spoken sentence. These ideas may come in handy, if you’ll excuse the pun.
✓ Using fingers as words or syllables: One way to indicate where the
error is in a sentence is by using your fingers to represent words.
A student has come up with this sentence: She have been to France.
You can highlight the problem by holding out your left hand (right if
you’re left handed) and pointing to a finger as you say each word:
• she = the thumb
• have= the index finger
• been = the middle finger
• to = the ring finger
• France = the little finger
When you say ‘have’ waggle the index finger and use a questioning tone,
then carry on to the next finger/word.
✓ Pointing for time reference: To remind a student that he should refer to
the past, the present or the future, you can point back over your shoulder for the past, to the floor in front of you for the present and straight
ahead for the future.
✓ Extending: If the student has used only the base of a word (‘go’ instead
of ‘going’ or ‘inform’ instead of ‘information’), say the word using your
thumb and index finger: Start with them pressed together and separate
them as you say the word. Draw out the word as you say it too.
Chapter 7: Giving Correction and Feedback
If the student needs to extend the whole sentence, you can use both
hands, pulling them apart from a ‘praying’ position. At the same time,
draw out the last word of the student’s sentence as you say it.
✓ Reducing a word: Sometimes students attach endings to words unnecessarily. They say, for example: I might watching a film.
You may not need to speak at all if you can quickly make a gesture like a
pair of scissors cutting while the student is saying the word. If you miss
your chance, say the word again yourself along with the gesture.
✓ Re-ordering: When students get their words in the wrong order, try to
get them to do a reshuffle without interrupting by using a quick mime of
shuffling little boxes around in a straight line on a table in front of you.
Teaching with body language
You can give a lot away with your body language, but it isn’t necessarily just
an unconscious form of communication. In the classroom you can use it like
this:
✓ Smiling and frowning: Your face is a strong indicator of approval, or
not, as the case may be. When you smile a lot, students feel encouraged
and comfortable. On the other hand, you can use a frown to show that
something is not quite right. Hopefully the student then starts to tread
more carefully and possibly self-correct.
✓ Nodding: When you do this, people want to continue speaking to you.
They know that you’re listening and interested. In this case of students,
they know that they’re doing well and that real communication is taking
place because you understand. When they make an error, a confused or
quizzical expression is less off-putting than shaking your head.
✓ Hums: In English hmmm can mean yes, no, I’m not sure or score of other
things. It’s a good way to show your opinion unobtrusively.
You can take it a step further by humming a whole sentence to demonstrate the right intonation.
✓ Pointing to clues: If you have charts and instructional posters up in
your classroom, you can point to the one that indicates the nature of the
student’s problem. For example, if you have a verb table up, point to the
past participle column when your student says ‘He had often sang’.
Gestures aren’t universal so students learn the body language of English
speakers by watching you.
105
106
Part II: Putting Your Lesson Together
Leading to Self Correction
Give a man a fish and you feed him for a day. Teach a man to fish and you feed
him for a lifetime.
— Chinese proverb
According to the proverb, there’s wisdom in allowing people to fend for themselves once you explain how. This works in TEFL too. Students remember
the answers they work out for themselves better than the ones you tell them
explicitly. So if you always say ‘not x but y’ your students may lack the skills
to correct themselves when you aren’t there.
After trying to help students correct themselves, and if they still don’t get
it, tell them the answer and make sure that they understand any principal
involved. It becomes exasperating if the correction process is drawn out for
too long a time.
Progressing by prompting
Of course you can’t always wait for students to fathom things all by themselves, so instead you give them clues and prompts to help them get there. In
addition to the largely non-verbal techniques in the previous section, you can
also help students in these ways:
✓ Tell the student which part of speech or tense they need. For example:
• I came in the bus: Preposition.
• I am here since 2008: Change the tense with ‘since’.
• I am eating many bread: Uncountable or countable.
✓ Elicit the correct language by asking leading questions.
• Student: I told the host that I didn’t like tomatoes because they’re
disgusting.
• Teacher: People have different likes and dislikes, don’t they? Lots
of people love tomatoes. Can you tell me an expression that’s quite
polite but means you don’t like something?
• Student: Is it not nice?
• Teacher: That’s not quite right. I’m thinking of an expression that
means it’s OK but not good for me.
• Student: Is it not my cup of tea?
• Teacher: Well done! Could you repeat your sentence now please?
Chapter 7: Giving Correction and Feedback
Examining echoing
A tendency for some teachers is to just say the correct version of what the
student wanted to say, but this isn’t usually an effective correction technique.
Giulia has pronunciation difficulties:
Giulia: I leave in Hackney.
Teacher: You live in Hackney.
Giulia: Yes, I leave in Hackney.
Clearly Giulia doesn’t even realise that a correction has taken place. She can’t
actually hear the difference between ‘live’ and ‘leave’ because the distinction
between long and short vowel sounds doesn’t exist in her language. Unless
the teacher makes her focus on the error, Giulia’s oblivious to it. She hears
it as an echo with no particular connection to an error and she’ll probably
repeat the mistake next time. The teacher needs to recognise that Giulia
needs more help to sort out the different sounds by using the phonology of
the words and writing the two sounds on the board. In this case /i/ and /i/.
Now she can both see and hear the difference. At the very least it’s better to
say, ‘Not leave but live’ and ask her to repeat.
Encouraging Peer Correction
Peer correction is asking students in the class to correct each other’s errors.
This very practical technique has several benefits:
✓ It reduces the pressure on the student who made the mistake, especially
if the teacher’s attempts to prompt self-correction are unsuccessful.
✓ The other students are involved in what’s happening rather than just
observing.
✓ The teacher can tell how widespread the problem is.
You can make use of various techniques in employing peer correction:
✓ Put the error on the board. Monitor silent work, pair or group activities
and make a note of the errors. Then, during the feedback session, you
can put the error up on the board.
It’s considerate to conceal the identity of the student who got it wrong,
so tweak the sentence a bit in order not to give it away. Then consult the
class and ask what’s wrong with the sentence on the board.
Some students have visual memories and may recall the error rather
than the correct version. It’s important to cross the wrong version out
and put the correct word on the board.
107
108
Part II: Putting Your Lesson Together
✓ Go round the class asking each student to say a word that some students are pronouncing incorrectly. If one student gets it wrong, ask
another student who did well to say it again, and then ask the student
who got it wrong to have another go.
Watch the faces of the other students when one student is speaking. If
you see a frown or grimace on a classmate’s face when a student makes
an error, this is the ideal person to choose for peer correction. At a convenient moment you can ask: Hideki, you were listening carefully. Do you
agree with Noako’s answer?
Make sure that students offer correction in English. Sometimes they think that
their friend understands better if they just translate. At least you can train the
students to say something like: ‘How do you say . . . in our language please?’
Scheduling Class Feedback
The class feedback session is when teachers usually address errors and give
praise, so it’s really important to schedule time for this in your lesson plan. (I
talk about lesson plans in Chapter 4.) During this part of the lesson you can
highlight areas where students got things wrong and deal with the problems
by briefly re-teaching a pertinent point or by prompting self and peer correction. Feedback involves the whole class offering suggestions or listening.
A lack of feedback leaves students wondering whether or not they were successful or actually overconfident.
You can carry out class feedback at various times:
✓ At the end of an activity: Immediately after the students finish an activity, you can round things up with a review, praise and correction session. Use this as an opportunity to weed out any emerging problems in
using the target language before you begin the next activity.
✓ At the end of the lesson: Students may be making significant errors not
related to the topic of the day that still require attention. Handling this
at the end of the lesson prevents going off on a tangent to the detriment
of your lesson plan.
✓ After written homework: When you’ve completed the delightful task of
marking all your students’ written work, make a note of recurring errors
and have a dedicated feedback session about them. If several students
have the same problems, it may indicate that something got left out
when you taught that point.
✓ At the end of the week: Repetition is a great way to remember things,
so make a note of the errors that came up during the week and have
a Friday review. This should help you to assess whether the students
really got the point.
Chapter 7: Giving Correction and Feedback
Wielding Your Red Pen
Before I say anything about correcting written work, let me address the red
pen debate. There are those who believe that the colour red is far too aggressive and confrontational to be used for marking. Others say it is the only
colour that really stands out and that other ‘friendlier’ colours such as green
and purple should represent opinions not correction. You have to make up
your own mind about the colour of ink you choose, keeping in mind what is
appropriate in the local culture.
Chinese students take offence if you write their names in red. They consider it
rude, unlucky or both.
Marking with correction codes
Most teachers use a correction code when they mark written work so that
the student can do some self-correction. You can devise your own symbols
but Table 7-1 shows some possibilities.
Table 7-1
Correction Codes
Mark
Error Indicated
/\
A word is missing
/
Start a new sentence
//
Start a new paragraph
Gr
Grammar error
Sp
Spelling error
P
Punctuation error
Art
Error with articles (a, an, the)
c/unc
Countable/uncountable error (you can use a/an before countable
nouns but never before uncountable noun)
Wo
Wrong word order
Ww
Wrong word
Wt
Wrong tense
Wf
Wrong form
Irreg
Irregular verb
?
Unclear
109
110
Part II: Putting Your Lesson Together
You may not want to highlight every error, as this may leave a piece of writing
that reads well overall covered in disconcerting marks.
Many teachers gradually wean their students off the code in stages:
✓ Put a symbol next to the error
✓ Put symbols in the margin only for each line
✓ Give an overall assessment without symbols
The advantage of doing this is that the students gradually become more independent and aware of the need to edit their own work. During this process
the teacher presents several compositions by other students so that the
whole class can practise editing together.
If your students are comfortable with it, you can encourage peer correction of
written work too.
Choosing written errors to work with
As it isn’t usually motivating to correct everything in an extended piece of
writing, you need to give some thought to which points are worth dealing
with and which aren’t.
Written work includes several areas that may need correction. These include:
✓ Style. This covers the right degree of formality and the presentation of
the work.
✓ Grammar.
✓ Vocabulary.
✓ Cohesion. There needs to be a linking of ideas with appropriate words
such as because, therefore and after that.
✓ Task completion. Consider whether the piece of writing has really fulfilled the task that you set.At the top of the list of mistakes to correct,
many teachers put style. Whenever students write they should have a
reader in mind and reflect this in the degree of formality and the presentation. Take the two pieces of writing in Figure 7-1 for example.
Chapter 7: Giving Correction and Feedback
Dear Caroline,
Thank you for your invitation to the party, However, I regret to inform you that I will be unable
to attend due to unforeseen circumstances.
Yours sincerely
Ivanete
Allo Caroline,
Figure 7-1:
Which
note would
you like to
receive if
you were
Caroline?
Tank you for the invitation to your house for party. Sorry but is not good this day for me
because I working. I Coming next time promis.
Kisses
Ivanete
The first note doesn’t contain any particular errors, but it’s inappropriate for
the situation. However, the second version has several inaccuracies but it
also displays real warmth because of the style. I suspect that Caroline would
prefer to receive the second version.
So, when your students write, train them to use appropriate layout, style and
register (degree of formality). I talk about appropriate style and register in
Chapter 11.
When you correct grammar, try not to get too distracted from the purpose
of the text. It’s best to focus on expressions that students are likely to use
repeatedly.
So, for example, if your class is preparing for higher education, the students
probably need to grasp the use of passive sentences in general because these
are common to academic writing. If a student wrote: ‘First you connect the
tube to the cylinder and then you fill it up with liquid.’ you may note that he
should use passive constructions for describing a process.
111
112
Part II: Putting Your Lesson Together
After you add your corrections, make it clear whether you expect the student
to do the writing over again. Redoing the work helps to fix the corrections
in the student’s mind, but sometimes he’s sick of the sight of it by then and
may prefer to transfer the information to a new piece of writing. I encourage
students to keep a copy of the original anyway so that they can compare that
one, the teacher-edited version and the new improved one.
Marking criteria
A useful tool for students when they attempt longer compositions is marking criteria that inform students what you’re looking at and whether they’ll
receive a grade, percentage or a score. After all students may resent spending
all their time checking their spelling if it isn’t what you’re really looking for.
Areas you may want to focus on include:
✓ Structure: The composition should include an introduction, body and
conclusion.
✓ Content: Each paragraph should contain a topic sentence and a clearly
explained point with examples when necessary.
✓ Verb tenses: A variety of tenses are used accurately and appropriately.
Marking criteria help students keep their focus.
Praising the good bits
Your red (or other coloured) pen can have a positive function too. If the
students’ work contains some good aspects, tell them so. It’s rewarding for
students to see positive remarks and some personal interaction from the
teacher. So they’ll usually welcome comments such as the following:
✓ Good point!
✓ Well written!
✓ That’s better!
And suppose that your students express their thoughts on a matter, you can
tell them what you think as well.
Chapter 7: Giving Correction and Feedback
✓ I agree!
✓ You surprise me!
When you continue your rapport with a student in writing, the teaching environment becomes friendlier and more encouraging.
Exposing Progress
Quite a number of course books in TEFL have progress tests built in after
every three units or so. Such evaluations can be useful for you and the students to see how well you’re covering the syllabus. Also the way that you
handle the students’ errors can lead to more learner independence.
I recommend the kind of procedure listed below for good teamwork and turning the negatives (errors) into positives (reviewing):
1. Prepare the students to expect the test and encourage them to revise.
2. Give them the test.
3. Allow the students to compare their answers in small groups and
enter into discussion about who’s right and why.
• Give each group a copy of the answer key so they can mark their
answers.
• Allow the groups a further 5–10 minutes for comparison and discussion.
4. Encourage the students to consult their course books and clear up any
doubts.
5. Have a class feedback session where students ask the class for help
with any outstanding problems.
6. Make sure that everyone in the class understands their errors.
Apart from tests, another way to measure progress is by continual assessment. This means that you regularly evaluate how each student is performing
in class and keeping up with the course. It’s very useful to note errors regularly and compare them every few weeks or so to see whether you’ve remembered to deal with the error and whether the student is improving. In Table
7-2 I show a system you can use for making notes on an individual student’s
errors. Categorising errors in this way helps you identify particular areas of
difficulty for the student, as one column may have more xs than others.
113
Lack of
cultural
insight
Register –
too informal
X
Other
Unit from Ship or
Sheep
Action taken
15/04/09
Handwriting – many
words illegible
05/04/09
17/04/09
Spoke to student.
Asked him to be
careful
07/04/09 as homework
Grammar exercises
from Murphy
X
Pronunciation
Missing articles
Vocabulary
A form for dealing with common errors
05/04/09
X
Grammar
Error
02/04/09
Can’t pronounce words
spelt with th, says t or d
Description
Table 7-2
‘A/an’ okay but needs
to work on ‘the’
Partially, can now hear
the difference
Resolved?
114
Part II: Putting Your Lesson Together
Chapter 8
Being Materialistic! Using Course
Books and Other Materials
In This Chapter
▶ Making use of published materials
▶ Identifying popular course books and resources
▶ Adjusting your course book to suit your students
▶ Bringing in real objects
▶ Creating your own materials
▶ Using what’s available
D
epending on the teaching situation you find yourself in, you may have
a full library of resources at your disposal or just a piece of chalk and
a blackboard. In this chapter, I show you how to make use of whatever tools
you have to make a lively lesson.
Wasting No Time Reinventing the Wheel
Some newly initiated teachers resolve to prepare every lesson from scratch,
like an organic meal. They believe that their dedication and attention is
enough to produce efficient, engaging materials that are going to amaze students in the modern world. Well, even if this is true in rare cases, how long
does it take? If you include the time you spend with your scissors and glue
when you calculate your hourly rate, you may find that you’re working for
peanuts by choice.
Face it: The wheel has already been invented, in this case by large publishing
houses who’ve been producing TEFL materials for decades and who have a
wide range of research and technology available to them.
116
Part II: Putting Your Lesson Together
Most course books include the four skills – reading, writing, speaking, listening – as well as pronunciation. A good book caters for different learning styles
through varied activities, whereas your lesson plans probably tend to play
to your own strengths and learning style – it’s only natural. So for example, if
you like learning visually, you teach most of your lessons that way too. Using
a book helps you include activities that suit all types of learners. I mention
different learning styles and accommodating them in your presentations in
Chapter 5.
Published course books definitely have their place in TEFL and although you
may not choose to use one in every lesson, having them around provides
some read advantages:
✓ The course syllabus is clearly set out for you and the students.
✓ If each student has a book it reduces your preparation time including
photocopying.
✓ It’s easy for students to see their progress as they work their way
through the book.
✓ Authors and publishers have experience in the field so you feel supported and guided.
✓ Course books often come as part of a set that includes extra resources,
so they offer room for expansion and variety.
When you’re choosing a book for your students, keep a few points in mind:
✓ Books aren’t cheap, so find one that suits your students’ pockets.
✓ Consider the cultural suitability of the book. Will the class be able to
identify with the images and written content? Is there anything which
may seriously offend or upset your students such as constant references
to the pub if you’re dealing with a teetotal community?
Listing Popular Course Books and
Published Resources
When it comes to course books, the majority are written in a series to cover
all the levels from elementary to advanced. (I explain the levels of EFL in
Chapter 4.) In most cases a school buys five books per level but an individual
teacher can make do with less.
Cambridge International Book Centre (www.eflbooks.co.uk) lists more
than 12,000 titles in English language teaching.
Chapter 8: Being Materialistic! Using Course Books and Other Materials
Common teaching materials can include:
✓ Student’s book: The book the students use in class.
✓ Teacher’s book: This book usually contains the answers to exercises
in the student’s book and fleshes out the lesson plan for each unit with
background information and tips.
✓ CDs: Sometimes included with the student’s book but not always. They
can be fairly costly, so check this out before you commit your students
to the cost.
✓ Work book: To save photocopying, you can often get work books that
students use as homework.
✓ Resource book: This book for teachers contains extra, photocopiable
activities.
Many books tell you how many hours of study they provide. Compare this
with the length of your course before you decide how much material you
actually need. Try not to get carried away!
Certain publishers crop up often in the lists of recommended books in the
next sections. Representatives from these companies are happy to visit
schools to keep you informed of the latest resources. Some even do presentations with students where they explain how best to use their books for effective study. As an individual teacher you can contact these publishers and ask
to join their mailing lists. From time to time you can receive sample copies of
the latest books and information on any new releases.
Going for general English books
Some of the most well-known and successful general English books for adults
from the UK are, in no particular order:
✓ New English File by Oxenden, Latham Koening and Seligson, published
by Oxford University Press
✓ New Headway by Liz and John Soars, published by Oxford University
Press
✓ Landmark by Simon Haines, published by Oxford University Press
✓ New Inside Out by Sue Kay and Vaughan Jones, published by MacMillan
✓ Cutting Edge by Cunningham, Moor and Comyns Carr, published by
Longman
117
118
Part II: Putting Your Lesson Together
✓ Innovations by Dellar and Walkley, published by Thomson/Heinle ELT
✓ Language In Use by Doff and Jones, published by Cambridge University
Press
✓ face2face by Redston, Cunningham and Bell, published by Cambridge
University Press
Just for back-up in those emergency situations, take a look at More Grammar
Games: Cognitive, Affective and Movement Activities for EFL Students by Davis
and Rinvolucri, published by Cambridge University Press.
Imparting business English
Titles for business English include:
✓ English for International Tourism by Dubicka and O’Keefe, published by
Pearson Longman. Includes material for testing students and a video.
✓ Business Basics New Edition by Grant and McLarty, published by Oxford
University Press for lower-level students.
✓ The Business English Handbook by Emmerson, published by Macmillan
for advanced learners.
Starting off younger learners
Even youngsters learning English can benefit from a book. You can find multimedia resources to work with and all kinds of games and quizzes. Some popular courses for children and teenagers are:
✓ Playway to English by Gerngross and Puchta, a series published by
Cambridge University Press for very young children.
✓ Join In by Gerngross and Puchta, a series published by Cambridge
University Press for very young children.
✓ Backpack by Herrera and Pinkley, a series published by Longman for primary school children.
✓ English World by Hocking and Bowen, a new series published by
Macmillan for primary school children.
✓ Top Score by Falla and Davies, a series published by Oxford University
Press for teenagers.
Chapter 8: Being Materialistic! Using Course Books and Other Materials
Adapting Your Course Book
Apart from the fact that most teachers like to put their own stamp on a
lesson, other reasons may make it necessary for you to tinker with the material the course book presents. One is that course books adhere quite closely
to a particular level, so if you have some outstanding students and other
extremely weak ones and no hope of moving them up or down, you need to
adapt to all your students. Similarly, if all your students are at an intermediate level but a couple are teenagers, a few are housewives, there’s a middleaged businessman and a great-grandfather you need to tailor your lessons to
meet everyone’s interests – or try to!
Catering to a class of mixed ability
If one student is much better than the rest of the class, she may get bored
with lessons using material she already knows. You need to think of ways to
extend the exercises in the book to provide a greater challenge.
For the more advanced students, try these options:
✓ Provide a learners’ dictionary so that students can look up words in the
course book and prepare to explain them to the rest of the class. This is
an alternative to pre-teaching (teaching the meaning of new vocabulary
just before students encounter it in the lesson materials) vocabulary
yourself.
✓ While other students are still reading, set an extra activity for the
quicker students:
• Have them transform all the verbs into a different tense.
• Have them retell the story without using particular ‘taboo’ words.
These exercises stretch their grammar and vocabulary respectively.
For weaker students, you can:
✓ Supplement the book by offering extra information. Plan additional presentations on points that the students find difficult and prepare glossaries of the vocabulary in a particular lesson for easy reference.
✓ Make the activities easier than the ones in the book. For example, where
the book has a fill-in-the-gap exercise, you can give the students a multiple choice option.
✓ Make greater use of the images as these are less threatening to the student than words. Ask easier questions about what is in a picture and get
students to label it.
✓ Split up a unit to make the content more manageable and less stressful.
119
120
Part II: Putting Your Lesson Together
For both weak and strong students, include more competitions and games
with the same language aims as the syllabus in the book. When the students
work together in mixed ability groups they support each other and the group
can establish its own pace, whereas exercises in a course book are less fluid.
Dealing with mixed age groups
In a class with different age groups, think about what the task or exercise in
the book is aiming to achieve and keep this focus while changing the setting.
In a personal example, in a lesson about expressing figures, the course book
presented a graph about profit and loss in a construction company. The teenage students were ready to switch off before they even read the instructions.
So, I encouraged them to change the setting to one based on music. Instead
of a construction company, their graph was now about a rock star’s record
sales. The students could come up with reasons for the sales performance,
whether based on the serious economic factors or on music trends and concert performances. Once they’d analysed the graph in their own way, I mixed
the students up again to summarise their findings because the basic language
remained the same – increase, decrease, peak, slump and so on.
There isn’t that much difference in the language you teach students of different ages, especially at lower levels. It’s the setting in which you put the language that really makes the difference.
Setting tasks
Sometimes students don’t engage with the material or feel that it’s not relevant to them. In this case, set students tasks based on the book. Get students
role-playing characters in the book, and having debates about points made
in the text. They can also read a passage aloud in the manner of a particular
adverb (quickly, snobbishly and so on) or dictate short sections to each
other to practise pronunciation.
When you plan your lesson, include a warm-up activity and maybe a cooldown one too, which have nothing to do with the book. And don’t open
the book until it’s absolutely necessary. Insist that students close the book
during the stages of the lesson when it’s not needed so that they focus on
what you’re saying, or so that they try hard to use their own words instead of
reading.
Chapter 8: Being Materialistic! Using Course Books and Other Materials
Making Use of Authentic Materials
If you’re not using a course book for a particular lesson, or at all for that
matter, you can make use of realia, real objects you take into the classroom
to help you teach – anything from a banana to an old shoe. Apart from
objects, realia can also be some form of text that wasn’t designed for TEFL,
such as an article from The Guardian or a recording of a sitcom.
When you use realia, often the object sparks the idea for the lesson rather
than the other way round. If you have an item that’s quintessentially British
(or from your culture) that your students may find intriguing, you may
wonder how you can use it in the classroom. So, a Dr Martens boot and a
Clarks sandal are great props for a lesson on comparisons (This boot looks
much stronger than that shoe, for example) and since, more than likely, everyone in the classroom has their own shoes you’ll find great opportunities to
expand the theme.
When it comes to the banana, the obvious lesson to bring it in for is one on
fruit and veg, but you can also start a more general discussion on healthy
eating, recipes, or idioms (‘Don’t be such a banana!’, a banana republic and
so on).
Although the realia won’t give you a lesson, it can give you an air of mystery
and amusing eccentricity as your students anticipate what you’ll turn up with
next.
Don’t let the desire to show off the realia be the main point of your lesson. If
anyone should run into one of your students on the way home and ask what
they learnt today, the answer should never be, ‘I don’t know, but she was carrying a boot the whole time!’
With the advent of the Internet, you can harness an endless supply of material in English for your lessons. Hurrah! English speakers also have the advantage of being able to call upon Hollywood movies, decades of famous tunes
from the Beatles to the Scissor Sisters and all the science and technology
papers conveniently written in English. So it makes sense to use authentic
materials like these in the classroom.
Using text other than course books has a few drawbacks though, such as
these:
✓ It’s hard to find materials just the right length for your lesson.
✓ Material designed for native speakers is often too difficult for learners in
terms of grammar and vocabulary.
✓ The text may contain too much slang or irrelevant vocabulary.
✓ Students may become overwhelmed by the variety of accents and
vocabulary in the English-speaking world.
121
122
Part II: Putting Your Lesson Together
✓ Authentic materials are so ‘of the moment’ that you need some knowledge of current affairs and culture to really appreciate them and they
soon become out of date.
✓ It takes time to select, adapt and/or prepare them.
However, using authentic materials really motivates students because it gives
them a glimpse of what they’ll be able to access in English when their language skills improve.
In my case, I learned a foreign language with the help of children’s programmes. They were authentic shows at the right level for me and they actually gave me an insight into the culture. I gradually moved on to daytime TV
and finally the news. I found that, unlike the lessons in my student’s books,
the language I learned from TV shows was exactly what ‘real people’ said. My
expressions and pronunciation were not as dry and stilted as friends who’d
only studied in the classroom. I’m not suggesting that you take recordings of
children’s TV shows into your classroom but the principle remains that if your
students want to learn to speak like natives, expose them to authentic speech
and texts.
Designing Your Own Materials
If you happen to be in a situation where there are few, if any, published materials, or if you’re just a creative soul, you can have a stab at designing your
own materials to keep and re-use. I say re-use, because it’s easy to spend
hours preparing the perfect lesson and then forget to file a copy away for
another class, effectively loosing the benefit of your work.
To combat this I offer a few tips to help you:
✓ Use cards and laminating so that you won’t have to cut things up again
next time.
✓ You don’t have to make one for each student. Group and pair work
encourages speaking so just make enough to share.
✓ To get full use of your materials, build your whole lesson around the
theme.
I’ve seen some beautifully designed materials used for just three minutes
in a lesson and then forgotten because the teacher didn’t consider how
to exploit their design. So, if you’ve recorded a conversation that you
want to use as a listening activity, ask the students to predict what the
conversation is going to be about, compare their ideas, analyse the tapescript, imagine the characters who are speaking, describe them, extend
the conversation themselves, role play it and so on.
Chapter 8: Being Materialistic! Using Course Books and Other Materials
✓ Separate visuals from exercises so that you can use the same visual
image in many different ways.
✓ Keep your worksheets and re-use them but make little changes each
time so that the examples are more personalised.
✓ Make sure that you present and lay out your material well. Even if
your ideas are great, students are put off by anything dull, cluttered or
unclear.
✓ Use famous names and brands in your examples as students are likely to
use them in real life anyway.
✓ Make sure that your worksheet instructions unfold step by step. So,
don’t give out all the instructions at once. Give the students what they
need to complete one stage at a time.
✓ If you design materials for a school you work in, you should agree
beforehand on the future use of this work even after you leave the
company.
Using What’s at Hand
In training sessions with aspiring teachers, I very often reject published materials in order to demonstrate that you can grab students’ attention with just
the basic classroom equipment.
Even an atrocious artist can manage the occasional stick figure – witness the
one in Figure 8-1. Poor drawings are actually rather good for raising a smile
among your students. You may occasionally create confusion when your stick
figure horse looks more like a giraffe but your students still have fun guessing
what it’s supposed to be. It makes a change for them to be laughing at your
failings for a change.
Figure 8-1:
A stick figure can be a
helpful and
amusing
visual.
123
124
Part II: Putting Your Lesson Together
From a simple stick figure you can create an entire back story in collaboration with your students. For example, a class can practice the past simple
using a stick man on the board:
Teacher: What’s his name?
Student A: His name is David.
Student B: His name is Abdul.
Student C: No, it’s Ramon.
Teacher: Okay, it’s Ramon. Where’s he from, class?
Students: Colombia!
Teacher: How’s he feeling today?
Students: He’s happy.
Teacher: I think he’s happy because something good happened yesterday.
What happened?
Student A: I think he’s happy because he met a girl!
The lesson can continue with students drawing their own additions to the
story on the board, while their classmates guess what happened. The pictures, along with some key vocabulary that you write up, can serve as the
basis for a writing or speaking activity with students telling each other the
story.
When you’re teaching grammar, a nice clear layout on the board is the best
substitute for a worksheet. Use columns and boxes so that everything is
clear. Lists and mind maps are also easy to copy down. Mind maps are diagrams which look a bit like spiders because you put the main idea in the
centre and then have ‘legs’ coming out from the middle that point to related
ideas and information.
Beyond the use of the board, your most effective tool is your own body. Use
your voice well by varying pace and power as much as possible. Use good
volume and gestures (Chapter 7 has a section on body language). Acting and
mime are great fun and keep the lesson lively.
Chapter 9
Who’s The Boss around Here?
Managing Your Classroom
In This Chapter
▶ Managing your students
▶ Getting your classroom organised
▶ Setting rules of behaviour
▶ Maintaining control in your class
▶ Taking care of problems
W
hen you’re in the classroom, you do more than just teach. You’re the
manager and your students look to you for professional handling of
their course and the people on it.
In this chapter, I explain how you can deal with problems relating to students
and your teaching environment. I also offer suggestions and advice for running your classes and handling difficulties too.
Running Your Classes Effectively
As the teacher, it’s your responsibility to maintain order during the course.
First, you need to be aware of the time and location of the classes. It may be
up to the school to decide this but you should think ahead about your availability to complete the job and be on time. The premises should be suitable
for teaching but you may need to make some adjustments. Find out who the
students are and how to record their attendance and progress. You need
a course syllabus and individual lessons plans but while the lesson is in
progress you have to manage your students too. Everyone in the classroom,
including you, should behave appropriately, which means being friendly,
maintaining a sense of fun but being disciplined at the same time. If students
are out of line you need a strategy for dealing with this too.
126
Part II: Putting Your Lesson Together
Some general points of good practice I find very helpful in almost all teaching
situations include:
✓ Plan ahead. As far as possible, think about where your course is heading and what possible pitfalls you may encounter along the way. This
means knowing where you’re teaching, what equipment and resources
are available, as much about your students as possible and any personal
considerations that may affect your teaching (planned absences, for
example). In other words, try to prevent problems before they happen.
✓ Ask for and welcome feedback. The students have their own opinions
about how well you teach, but many teachers are too proud or scared
to hear them. One of the dangers for teachers is that they can become
over-confident because the students appear happy in your class but, to
be honest, students don’t always have a measure of comparison. You
can encourage constructive criticism though by designing feedback
forms that ask for specific information. The results of the feedback guide
you on changes necessary to make your teaching of the course, the
course materials, or any other area under your control more effective. If
you invite a colleague to watch you occasionally, his advice can help you
to stay on track professionally and avoid getting stuck in a rut.
✓ Start off quite strict and ease up later if you can. Set the right tone
from the word ‘go’. Students expect you to be in control, so they won’t
find you unfriendly just because you impose rules. In fact, once they
know the rules you won’t have to keep reminding them because they
remind each other. In this way you’re not cast in the role of the bad guy
and can get on with making the lessons enjoyable.
✓ Start and finish on time. If you don’t respect your students’ time, they
won’t respect yours either. Stick to the scheduled time and apologise if,
for some reason, things don’t go to plan.
✓ Respect your students. Treat your students as clients and remember
that just because they don’t know English doesn’t mean that they’re
incompetent or unintelligent.
Hold your students’ cultures in high regard too. There’s more than one
way to skin a cat and the way you’re accustomed to in your own land is
not necessarily the best.
✓ Maintain a sense of humour. This is one of the single, most important
factors in running a memorable course. Laugh at yourself, laugh with
your students when they laugh at themselves, and laugh just to have a
good time.
Chapter 9: Who’s The Boss around Here? Managing Your Classroom
Organising Your Classroom
The layout of your TEFL classroom depends to some extent on the resources
available to you. What you do with them is largely up to you. Even if the
chairs are fixed to the floor, you can introduce less regimentation with creative wall decorations.
Considering basic equipment
The basic equipment is, of course, a place for your students to sit and a
board for you to write on. However, you need to think about a few other considerations such as:
✓ The size and shape of the room.
✓ The number of students.
✓ Equipment such as electrical items that need to be connected to a
power socket.
✓ Special and individual needs your students may have. A partially sighted
student needs to be close to the board, and left-handers may need extra
elbow room – just two examples.
✓ The surrounding environment including noise from traffic or other
rooms. Check whether you can have the windows or door open.
✓ Lighting. Make sure that there are no dark corners or a glare on the
white board.
✓ The versatility of the furniture. Some schools nail their furniture to the
floor, whereas in others cases you may have a choice of the items to use.
✓ Where students put their bags and coats. Get a few hooks put up, especially if you want your students to have the freedom to move around.
✓ Heating and cooling. There should be adequate ventilation and temperature control to enable your students to concentrate.
Most teachers like to personalise their classrooms when it’s appropriate by
putting up posters, reminders, notices and examples of students’ work.
Hopefully your school has a self-access centre for students to do extra work
in but if not, make an area of your classroom a mini self-access centre where
students can pick up a novel or magazine and use a computer to research
their work. If the budget is tight, try using free literature such as holiday brochures for English-speaking countries there, along with some extra grammar
and vocabulary exercises.
127
128
Part II: Putting Your Lesson Together
Arranging the room
When it comes to tables and chairs, each style has its own advantages. I
show you the various types of arrangements and talk about their good and
bad points in the next sections.
Circling the horseshoe
The most popular layout is a horseshoe formation, shown in Figure 9-1.
Figure 9-1:
The horseshoe puts
you at the
centre of
attention.
Key
Board
Individual chair (or desk and chair)
Teacher
The advantage of this layout is that everyone in the room can easily see
everyone else and the board. In addition, students usually have room to
stand in the middle for more energetic activities.
This layout gives an informal atmosphere to the class but is not for very
large groups (much more than 20). It functions well when students work only
from their chairs (without a desk) or with tablet chairs (where a mini-desk is
attached to the chair).
Grouping students together
Another style, shown in Figure 9-2, is particularly suited to group work. In
this case students work at a desk in pairs or fours.
Chapter 9: Who’s The Boss around Here? Managing Your Classroom
Key
Figure 9-2:
Gathering
students
into groups
aids
interaction.
Board
Teacher
Desk for
4 students
Make sure that you’re able to walk around the desks (large desks or groups of
desks) so you can interact freely with students and monitor their work.
In order for students to see the board and you, they can sit sideways on.
Going for traditional rows
The most traditional classroom layout, shown in Figure 9-3, is mainly suitable
for exams and tests.
Students in this kind of layout are less likely to feel relaxed and part of a team.
You’re likely to find classrooms set up like this unless you ask for something
different, but don’t accept the room as you find it. Arrive early to set things up
in the best way for you and your students.
129
130
Part II: Putting Your Lesson Together
Figure 9-3:
Traditional
rows don’t
generally
promote
active
engagement.
Key
Board
Desk
Teacher
Establishing Classroom Rules
Many language schools have rules for students set out in their terms and
conditions, which takes some of the pressure off you because students read
and agree to them before entering the classroom. However, as teachers and
classmates vary it’s a good idea to establish rules at the beginning of the
course that reflect the situation of the class. The students can get involved in
agreeing some of the rules.
Some common classroom rules are:
✓ Latecomers must not disrupt the class. In some cases you can set a time
limit after which the student may not enter the room. In any case, students should display good manners instead of barging in.
✓ Students should bring their own materials (books, pens, paper to
write on).
✓ Students should avoid behaviour that’s offensive to their classmates
and to their teacher. This includes swearing (in English or their mother
tongue), styles of dress (highly inappropriate compared with the local
culture) and body odour.
Chapter 9: Who’s The Boss around Here? Managing Your Classroom
✓ No smoking in the classroom.
✓ No eating during the lesson.
✓ Mobile phones must be switched off or on silent. If a student leaves the
room to answer a call, he’s only allowed to re-enter at the teacher’s discretion.
✓ Students shouldn’t speak to each other while you’re addressing the
class and only one student can speak to the class at a time.
Keeping Order
Once you’ve set up the course and the classroom you need to think about
managing the people. Your aim is to build confidence in your students so that
they respect your guidance and instructions. At the same time, you should
encourage a learning environment that sees all the students treated fairly
by you and their classmates. When a student is disruptive you need to deal
with the matter efficiently so that there’s minimal distraction from the lesson.
Learning English is the priority so other matters that students choose to
raise shouldn’t use up valuable lesson time.
These tips can help you set the right tone and expectations for your students:
✓ Teach classroom language. Tell students the words they need to communicate their learning problems to you. It’s easy to lose control of a
class when they stop speaking English in favour of their mother tongue,
but if they know how to say things like, ‘I’m sorry, I don’t understand.
Could you repeat please?’ they can let you know when things are going
wrong. You can put phrases like this up on the wall or ask students to
write them at the back of their course books.
I teach words such as stationery, classroom furniture and several
polite requests too. One example is Would you excuse me for a moment?
because when students lack this kind of vocabulary they fall back on
their own language again.
✓ Don’t start until everyone is listening. There’s nothing worse than
shouting over boisterous students in an attempt to teach the other quieter ones. It’s best to ask for silence and wait for it. Those who want to
learn actually help you to maintain order.
Some cultures find speaking over one another acceptable so you may
want to point out what you consider to be good classroom etiquette at
the start of the course.
131
132
Part II: Putting Your Lesson Together
✓ Establish the rules clearly. If you need to get the rules translated or
represented in pictures, go ahead. It’s only fair that your students know
when and why they’re out of line before you pull them up. (The preceding section offers suggestions for rules to set.)
✓ Don’t let problems escalate. Nip problems in the bud because this helps
to maintain a pleasant environment. (I offer troubleshooting advice in
the next section.)
✓ Give ample warning of the consequences of continued rule breaking. In other words, don’t throw a student out for a first misdemeanour.
Remind him of what will happen if he does it again. Agree how many
warnings you’re prepared to give before taking action, a bit like the
yellow and red cards in football.
✓ Be consistent. There’s no point making idle threats. Just do what you
say you intend to do. This is one way of gaining respect.
✓ Be fair and don’t hold a grudge. It isn’t right to let one student off and
not another. Try to treat your students equally and avoid giving the
brightest ones all your attention.
✓ Don’t let other students get involved. Resolve problems privately in the
corridor or after the lesson when others have left. People always react
better when they’re allowed to save face and when they’ve no mates
around to egg them on.
✓ Lean on the school for support. The director of studies should advise
you of disciplinary procedures for students and the rules they’re
expected to abide by. Actually you should only be handling minor misdemeanours yourself. In most cases adult students have a copy of the
terms and conditions and as a last resort they can face expulsion.
Troubleshooting
If your course doesn’t seem to be flowing, there may be various reasons for
this. Teachers find that, typically, a number of difficulties recur.
Some common problems include:
✓ Students don’t bring their books. Don’t keep photocopying everything.
If students are slightly inconvenienced by having to share resources
they’re more likely to bring their own copies.
✓ A student fancies you or vice versa. Wait until the course finishes to
make your move because things can get very heated if you end up with a
spurned lover in your classes. If you don’t want to accept the advances
of a student at all, allow him to feel that you’ve rejected him for professional reasons. It’s less embarrassing.
Chapter 9: Who’s The Boss around Here? Managing Your Classroom
✓ The class is too big. This comes down to school policy but if you
happen to have a class of 30 or 40, identify the more capable students
and make them group leaders. Ask them to help you by organising the
other students. They may enjoy being used as assistant teachers too.
✓ Your school says that you have to use a particular course book but it’s
as dull as ditchwater. Follow the syllabus but supplement the book with
your own ideas whenever you can.
Dealing with disruptive students
Students are disruptive for various reasons. The most common problem is
that they’re bored because they don’t understand or because they don’t have
enough to do. Students who really are too smart for the level, or not competent enough for it, should move to another class. Ask the school for help
arranging this.
Keep a few extra activities on hand to keep the faster workers busy.
Disruptive students come in some familiar forms:
✓ The ‘clever-clogs’ who asks questions to show off or just to catch you
out. One solution is to ask them to do their research at home and report
their findings to you after the next lesson. They won’t be playing to a full
house after the lesson so may not bother but if they do and their findings are correct, you can try involving them in presenting the information to the class at an appropriate time.
✓ The student who wants to have a personal consultation in the middle
of the lesson. These characters ask questions that no one else in the
class is interested in or that have no connection to the lesson (or even
the course for that matter).
I recommend that when a student says, ‘Can I ask a question?’ you find
out whether it’s directly relevant to the situation. You can reply by
asking whether the student’s question is about the lesson because if not
he can ask you later (when he’ll probably have forgotten it anyway). If
you make it a habit to open up questions to the class, this lessens the
focus on you and reinforces the community setting, reminding everyone
to do what is best for the group.
If one student is unhappy about the lesson, arrange to talk to him about
it afterwards and before he convinces everyone else in the class that he’s
right and you’re wrong. Some students just want to be heard or at least
to be satisfied that you’re doing your best under the circumstances.
133
134
Part II: Putting Your Lesson Together
✓ Students who bully, shun or mock other students in the class. Employ
a zero tolerance attitude in this case. The thing is, these students may
not be aware of how strangers see them and are used to getting away
with anti-social behaviour. When you show that you just won’t accept it,
they’re forced to analyse what they’re doing. Even if they feel that their
behaviour is normal in their society, they need to know that in the society they hope to access, the English-speaking countries by and large, it
won’t wash.
Racial prejudices, sexism and age discrimination may not be law-breaking
offences in every land but the way you handle these issues gives students
valuable knowledge about how to curb their tongues abroad.
Handling a lack of participation
If your classroom is worryingly quiet, you have a problem on your hands, but
fear not, you have ways to increase student participation.
Firstly, it’s easier to change yourself than anyone else, so look at your own
level of enthusiasm. Keep your energy levels high throughout your lesson (I
often have a soft drink on hand, which I can craftily sip to prevent getting dull
and dehydrated) and act as though you have full confidence in the success
of every activity you present. Cheerfulness is infectious so make sure that
you’re not a misery guts in class.
Another thing you can do is to ensure that you put your questions simply and
create tasks at the appropriate level. Your students are likely to clam up if
they don’t understand what they have to do.
A nice trick is to drop the level of an activity you present in class so that the
students can just concentrate on speaking without grappling with new words
and grammar. This may boost their confidence a bit for next time.
Have a look at the pairings and groups you use in class as well. Some combinations amongst the students may not work well. Perhaps two very shy
people together don’t participate because neither wants to go first. So, rearrange the students frequently by asking them to sit in alphabetical order
sometimes, and in order of their birthdays at other times. Just sorting that
out requires communication from the students.
You can do speaking activities in concentric circles: in a class of ten students,
you have five standing in a circle in the middle, all facing outwards and then
five in a circle all around them facing inwards. The inner circle remain still, but
the outer circle rotate every few minutes so that they all speak to a different
person at regular intervals. It’s very helpful for students to do an activity more
than once because they improve each time but it doesn’t seem boring when
they have a different partner for each attempt.
Chapter 9: Who’s The Boss around Here? Managing Your Classroom
Attending to poor attendance
Poor attendance is a real pain because it affects the progress the class can
make. On the other hand, progress also depends on who is turning up to lessons and if you have a hard core of good attenders, You don’t need to worry
so much about the persistent no show. However, if different people come
each time, the only thing you can do is to review previously taught information at the beginning of each lesson.
A course book is a great back-up for students who missed last week or last
night as they can at least read through the material by themselves, which
allows them to take responsibility for their own learning (if they don’t turn up
or do their reading, it’s their problem not yours).
Of course there may be good reasons why students don’t come along, including something you can perhaps change. So try to keep the lines of communication open by asking your students how they’re getting on and whether
they’d like to suggest any improvements to the course. Of course, you do
need to be thick skinned enough to accept constructive criticism.
135
136
Part II: Putting Your Lesson Together
Part III
Teaching Skills
Classes
L
In this part . . .
istening, speaking, reading and writing: the four
cornerstone skills of English. Welcome to Part III,
which shows you how to master delivering skills skilfully.
I dedicate a chapter to each of these main skills, with a
special bonus chapter on pronunciation, since it’s such a
key component of accurate spoken communication.
Along the way I sprinkle tips on how to keep your lessons
lively and how to involve all your students, at whatever
level they might be.
Chapter 10
Taken as Read: Teaching
Reading Lessons
In This Chapter
▶ Finding reading material
▶ Revealing reading skills
▶ Working with words
▶ Developing associated skills
▶ Presenting a reading lesson plan
R
eading is one of the key skills in language learning. It reinforces the
skills students acquire in speaking, listening and writing. On the other
hand, it really isn’t enough just to put a book or short text in front of students
and ask them to read, whether silently or out loud.
You can help students develop a host of sub-skills through activities around
reading. And, you can make life easier by selecting reading material that’s
both at the right level and somewhat interesting.
Many students insist that they prefer to focus on speaking, but before long
they want to browse through an English newspaper or read the notices on
the Underground. Reading skills help round out your students’ English, so in
this chapter I focus on this key skill.
Choosing a Text
You can choose from an immense variety of things to read in English –
novels, blogs, poems, ads, newspapers, magazines or just flashcards – the
list is endless.
140
Part III: Teaching Skills Classes
Choose a piece of writing that your students are likely to be interested in and
is at the right level for them, even if it’s just a couple of words long and written on the board. They should be able to understand most of the words on
a printed page except for a handful of new words, which you have a strategy
for dealing with.
Starting with the ABCs
The alphabet is the most basic reading text you can choose. For EFL (English
as a Foreign Language) teachers, using the English alphabet is second nature,
but this isn’t the case for all EFL students. It may surprise you to know that
few students, even those at intermediate level, are comfortable with all 26 letters in their various shapes and sizes – capitals, lower case, handwriting and
print.
It never hurts to run through the alphabet at the outset of a course. Make sure
that everyone in the class can recognise and say the letters out loud.
Actually you can organise the letters of the alphabet in a memorable way
to help students pronounce them accurately. If you’re already familiar with
phonemes (the symbols used to represent all the different sounds in the language), you can use them to group the letters. If not, refer to Chapter 12 for
more information.
Even if you don’t use the phonemic symbols, rhyming the letters makes
things clearer for your students. A good place to start is to analyse the
groups and say the letters in Table 10-1 out loud. You can hear that with the
exception of the last group the others are similar in the way they’re pronounced. This form of analysis based on sound pushes students out of any
complacency, as they may believe that they know all the letters based on
visual recognition.
Pay particular attention to the vowels. Even higher-level students get them
wrong.
Table 10-1
Letters, Sounds and Phonemic Symbols
Letters
Sound
Phonemic Symbol
A, J, K, H
ei as in day or weigh
/ei/
F, L, M, N, S, X, Z
e as in egg or let
/e/
B, C, D, E, G, P, T, V
ee as in tree or wheat
/i/
I, Y
ai as in my or lie
/ai/
Q, U, W
oo as in you or blue
/u/
O, R
Chapter 10: Taken as Read: Teaching Reading Lessons
Make sure that your students have a copy of the alphabet in the correct order
as well. They need it when using the dictionary.
Practise the alphabet in a fun way by using popular acronyms or abbreviations and see if the students know what they mean. Try these for example:
✓ ATM: Automated teller machine
✓ BBC: British Broadcasting Corporation
✓ BMX: Bicycle motorcross
✓ DVD: Digital versatile disc
✓ SMS: Short message service
✓ UNICEF: United Nations International Children’s Emergency Fund
Reading whole words
Remember how you were taught to recognise individual words back in primary school? The teacher would hold up flashcards and the kids shouted the
words out. Well in EFL, lower-level students learn word by word too.
Write new words on the board as soon as the class has repeated the pronunciation. At the same time, help your students to read well by pointing out
spelling patterns. After all, English is notoriously difficult to spell and pronounce even for native speakers, so reading aloud can be very daunting for
EFL students.
These simple examples of English spelling rules make a world of difference to
people learning to read in English:
✓ The letter e after a vowel and consonant together softens/lengthens the
vowel sound. Compare rid and ride, mad and made, or cut and cute.
✓ When the letter ‘s’ is between two vowels, it’s pronounced like a z – rise
/raiz/, present /prezənt/ and pose /pəυz/.
✓ At the beginning of a word gn, kn, and pn are pronounced /n/.
✓ Wh is pronounced /w/. There’s no need to pronounce the ’h’.
✓ Wr is pronounced /r/. The ‘w’ is always silent.
You probably know all these rules instinctively but your students need you
to spell them out. If you think of any other rules, make a note of them as your
students will be eternally grateful.
141
142
Part III: Teaching Skills Classes
Graduating from words to sentences with
the help of punctuation
In order for students to understand complete sentences on paper, they need
an idea of sentence structure and punctuation.
From beginner stage, point out what apostrophes, commas and other marks
do. Using a slow deliberate change in your intonation as you read often
makes this clear.
Make sure that you know the function of all these punctuation marks and
how they affect a sentence:
✓ . Full stop: This mark shows the end of a complete sentence.
✓ : Colon: You use a colon before you introduce a list, example or the
second part of a sentence that gives more detail about the first part.
✓ ; Semi-colon: When two sentences are very closely related the writer can
make them into one sentence separated by this mark.
I love the Caribbean; I’ve lived there for years.
✓ ‘’ Quotation/speech marks: You use these to show the beginning and end
of what someone actually said, in that person’s words.
He said, ‘See you tonight’.
✓ , Comma: This mark indicates a pause, as if you were saying the words
aloud. You sometimes use a comma instead of brackets when giving
extra information and also to separate items on list. So a comma can
replace the words and and or to avoid repeating them.
My favourite dishes, or foreign ones anyway, are curry, lasagne and paella.
✓ ‘Apostrophe: Use an apostrophe to show that some letters are left out or
that something belongs to someone.
She can’t (cannot) drive Paul’s car.
✓ ( ) Brackets/parentheses: Brackets show an interruption in the sentence
for the writer to add additional information.
The house (an ugly place) is still for sale.
✓ - Hyphen: This is used to join two words or parts of words together.
There was a break-in at the home of his ex-wife.
✓ ? Question mark: This mark shows the end of a question.
Is that statement true?
Chapter 10: Taken as Read: Teaching Reading Lessons
✓ ! Exclamation mark: You use this mark to show that there’s stronger
emotion than usual, or surprise, in the statement.
I just don’t believe it!
✓ @ : I know this at sign isn’t punctuation, but I included it here because
it’s become so ubiquitous, meaning that it’s everywhere!
Don’t be lazy about using question marks and capital letters when you write
on the board. Many teachers take these things for granted only to wonder why
their students read and write so poorly. Students quickly pick up your bad
habits.
From the first lessons you’re likely to teach whole phrases such as, ‘How are
you?’ and ‘I’m from England’. Get your students to repeat whole sentences as
they read from the board and you point out the words one by one. That’s not
to say that students should only read the words one by one. Aim for fluent,
connected speech. They then learn to recognise the words and also how to
use the appropriate intonation for a statement or question.
You certainly don’t want your students to read like robots. So don’t slow
down too much when you read aloud. You find that you start to sound unnatural if you do and you won’t be using the typical rhythm of the language.
Encourage students to chunk words together too. In this way they’re less
likely to translate word for word, which often leads to them losing the sense
of the sentence.
Higher-level students can also work with individual sentences. For example,
they can analyse a list of newspaper headlines or short advertisements. The
puns (jokes based on words that look or sound the same but have different meanings) and other forms of word play in these short texts are a real
challenge for learners. On the other hand, when they get the sense of them,
students feel a real sense of accomplishment. Collect any good examples you
come across for use in your lessons.
Scores of words sound or look the same in English. If students aren’t paying
attention to the context, they may get completely the wrong end of the stick.
Pay attention when teaching:
✓ Homophones: Words that sound the same but are spelled differently and
have different meanings. For example, both here/ hear are pronounced /
hiə/ and sight/site are both pronounced /sait/.
✓ Homographs: Words that look the same but sound different and have
different meanings. For example, bow /baυ/(to bend from the waist as a
sign of respect) and bow /bəυ/ (a decorative way of tying a ribbon).
143
144
Part III: Teaching Skills Classes
Looking at length
Once students are comfortable with sentences, give some consideration to
the length of the text you want to use in your lessons.
You can use readers, especially designed for language students, containing
short stories and novels. These slim, pocket-sized books are written to match
the various levels of EFL courses. They’re best used at home but can provide
short extracts that you can use in the classroom, safe in the knowledge that
the level of English is just right.
The majority of texts EFL teachers use in a lesson are between three and six
paragraphs long.
The EFL classroom is generally a fun and lively place in which to learn. So
think carefully before introducing a long text that requires extended periods
of silence while students read. Shorter texts, or texts you can deal with in
stages with periods of discussion in between, tend to be more appealing.
Judging interest and relevance
Now we’re all proud of Will Shakespeare, but pause for a moment before you
reach for a volume of Hamlet. Is the effort of translating ‘To thine own self be
true’ actually worth it for a student who simply wants to serve British holidaymakers in his café?
Ask yourself, ‘What’s the aim of this lesson?’ If the text practises vocabulary
or grammar the class has recently covered, and if it seems pretty interesting
or relates to something the students need to know in the future, you’re on the
right lines.
So if you have a nifty recipe for shepherd’s pie that you fancy using in class,
don’t be put off just because your students are unlikely to make the dish.
Think about what kind of language your students are practising. Verbs like
chop, slice and mix are useful for anyone who cooks. On the other hand, you
may be using your recipe to demonstrate how to describe the process of
doing something (first . . . , and after that . . . , and finally . . .). Or perhaps you
feel your students need a little more cultural awareness. It’s perfectly valid to
have as an aim something that’s not based on grammar and vocabulary, providing that the level of English in the text is appropriate.
Other texts suitable for beginners are timetables – where students need to
say what time something happens – shopping lists and menus where the
vocabulary is limited but the class can practise saying prices and calling out
individual items. You may be surprised how useful authentic English texts
can be for practising in class.
Chapter 10: Taken as Read: Teaching Reading Lessons
Put together a selection of these text types:
✓ Diary entries
✓ Emails
✓ Cartoon strips
✓ Food labels and ingredients
✓ TV guide listings
Working with the Text
Students should be ready for the text and have a purpose for reading in
the form of a task or question. You need to have a strategy for dealing with
vocabulary and to design a follow-up activity to expand on the same theme.
If you follow these steps, your reading lessons can really open the door to a
world of English texts and literature to your students.
Getting ready to read: Pre-reading tasks
Everyone needs a reason for reading, even if it’s just to pass the time of day.
Don’t just hand out a text and expect students to get stuck in. Have them do a
bit of preparation first.
A pre-reading task whets the appetite and prepares the mind for the text that
follows. As the name suggests, the task doesn’t involve reading the text but is
connected to the main topic of the lesson.
So what kinds of pre-reading task can you use? You can have a discussion
about the author. Find out what the class knows about him or her. On the
other hand, if the text represents an aspect of English speaking culture that’s
unusual for the students, have a pop quiz about it or bring in some pictures.
Before reading an article from The Sun newspaper, have a class discussion
about what tabloid newspapers are, and how they differ from broadsheets like
The Times. Identify the new vocabulary in the text and put six or seven of the
new words on a worksheet with their definitions. If you mix things up, you can
ask students, in pairs or small groups, to match the words to their definitions.
You can also ask what the words may have in common too.
List all the numbers or locations in the text. Students can make up their own
story with them and then read the text afterwards to see whether their ideas
were similar to the text.
145
146
Part III: Teaching Skills Classes
Finding your way around
Helping your students to identify the structure of a reading text is a useful
way of focusing the mind, so be aware of how the text is put together. This
means looking first at the title and pictures that introduce the topic. Next,
read any subheadings or just the first line of each paragraph, which should
each contain a slightly different idea to the previous one. Is there an introduction and conclusion? Point these out too.
Now that you’re aware of how it all fits together, you can make the text less
intimidating for your students by showing them these signposts. Reading in
another language can seem really daunting but once students know how to
find their way around the text they should be more positive about this skill,
especially if they’re likely to enter higher education in English.
Getting the gist
You get the gist of a text by skimming it, or reading through it fairly quickly
to form an impression of what it’s about. After the pre-reading task, students
should glance through the whole text quickly.
An analysis of the structure, which I talk about in the preceding section,
involves skimming.
Try giving your students a multiple choice of answers and ask which places,
numbers or characters are mentioned in the text. They can find the answer
by glancing through without reading each line.
Set a time limit of just a few minutes for all skimming activities.
Getting down to the nitty-gritty
After the students take a good overview of the text it’s time for a closer look
at the details. This is called scanning. Students can’t spend as much time as
they want analysing every word in the text but they do have more time than
the skimming stage. They now read to find specific, not general, information.
A typical comprehension exercise involves scanning, whether it involves true
or false questions, multiple choice or filling in missing words.
It’s more fun if students read different texts in groups and write their own comprehension questions to test their classmates.
Chapter 10: Taken as Read: Teaching Reading Lessons
Another more detailed scanning activity is called multiple matching. This is
where you match a variety of paragraphs and specifications together. Say the
class is reading film reviews, the students can then match an appropriate film
with the profile of a person you’ve given them. For example:
John is a horror fan but he doesn’t mind science fiction. His girlfriend
Penny likes American films but prefers unknown actors. Read the six film
reviews and decide which film they could see together.
With three or four questions like this the students match information
together and test their comprehension.
Predicting
Another skill worth making use of in reading lessons is prediction. If you can
make a fair stab at what’s coming next, it shows you’ve understood what’s
happened so far and builds up excitement. Any self- respecting novel does
this at the end of each chapter. So why not choose a text with a decent
storyline? Instead of having long periods of silence in the classroom, the
students can read smaller sections and then debate how the plot is going to
develop.
For example, here’s the introduction to a short story with a prediction
question:
Ravi was awake. He opened his eyes slowly and pushed his arms straight.
It was already too hot, at least 30 degrees, and the city streets were full of
men and children rushing along to catch the crowded buses. Ravi’s stomach was rather noisy this morning, so he decided to . . .
Prediction questions:
What did Ravi decide to do? Compare your ideas.
What did your classmates predict?
Now read the next paragraph to find out what Ravi decided.
Use an overhead projector so that you can uncover one paragraph at a time,
or alternatively, fold the text handout so that each fold contains one key section for consideration.
Summarising
Summarising is a valuable skill for students. A summary explains or shows
what the whole text is about but in a brief way. You can have them do it verbally, in the form of a diagram or in writing. Even children can summarise by
drawing a picture based on what they’ve read.
147
148
Part III: Teaching Skills Classes
Some ideas for summarising are to have students read separate related texts,
which they then explain to each other. Give your students a table to fill in
with key points or ask them to give a one-minute presentation in front of the
class.
Bring in a handful of film reviews. Divide students into groups, with a member
for each review and have each student read a different review. Hand out a
table such as the one in Table 10-2. As each student tells the group about her
review, the others can listen and complete the table with all the films.
Table 10-2
Reviewing Films
Name of film
Genre
Plot
Star
Rating
Vampire Attack
Horror
Vampires invade
London looking for
more victims.
Brad Cruise
*****
Love In London
Romance
Two tourists from
different worlds meet
and fall in love in
Trafalgar Square.
Denzel Snipes and
Jennifer Streep
***
Handling Vocabulary
You can handle new words in a reading exercise in a few ways:
✓ Get the vocabulary out of the way from the outset by teaching it in the
pre-reading stage.
✓ Let the students read first and work on the meaning of individual words
afterwards.
✓ Don’t deal with vocabulary at all so that students learn to find their own
coping strategies.
In the first two cases beware of wasting time on words that can just as well
be ignored. Even native speakers encounter words they’re unfamiliar with
and may not look up them up if they’re still able to understand what they’re
reading.
The next sections explore each option in turn.
Chapter 10: Taken as Read: Teaching Reading Lessons
Before you set off
You can make new words a pre-reading task (see ‘Getting ready to read: Prereading’ earlier in the chapter). This works well if students aren’t used to
reading in English and need a little reassurance that they can do it. This technique makes sense especially when a new word occurs so frequently in the
reading that the meaning is necessary to make any sense of the thing.
Along the way
Get your students to underline new words as they read but without necessarily stopping to check the meaning. They need to read with relative fluency
and get an overview of the text. Apart from providing definitions yourself, see
if students can help each other. Pooling knowledge is great for keeping everyone involved and interested.
Don’t encourage explanations in the students’ mother tongue (unless you’re
totally fluent). They may be barking up the wrong tree.
If possible, make dictionaries available after the initial reading so that students can manage their own learning. Most schools have class sets of learners’ dictionaries (English to English ones, which have the key word and
definition in English so that students don’t use their mother tongue during
the lesson) but you can get the students to bring their own.
If students use a dictionary to translate, it’s still important that you check
their understanding. Ask open questions using what, why, how, when so that
they can express their opinions and prove that they understand.
Try another route
Context is the biggest indicator of meaning. You can start the investigation by
asking students which part of speech the unknown word is – for example, is it
a noun, a verb or an adjective?
Then again, perhaps the new word looks familiar somehow. Maybe it’s part of
a family of words (love, lovable, unloving, lover, for example). Or is it similar
to a word in the students’ own language?
English words are mainly derived from Latin and German so a large number of
students whose native tongues derive from those languages are prepared to
take a stab at the meaning.
149
150
Part III: Teaching Skills Classes
And of course, loads of foreign words have been pasted into English and vice
versa, so it never hurts for the students to have a go.
Working on Skills Associated with
Reading
Reading is rather a broad area. Does the fact that students are reading automatically mean that they’re improving? Not always. You can adopt various
sub-skills as aims of reading lessons to focus the minds of your students and
yourself more keenly and mark the difference between efficient and inefficient readers.
Including reading-related skills
Those students who haven’t mastered the following sub-skills from reading in
their mother tongue benefit a great deal by developing in these areas:
✓ Working out the meaning of new words from the context.
✓ Recognising high frequency words.
✓ Working out what the purpose of the text is (to entertain, inform and
so on).
✓ Skimming (see ‘Getting the gist’ earlier in the chapter).
✓ Scanning (see ‘Getting down to the nitty-gritty’ earlier in the chapter).
✓ Summarising and taking notes.
✓ Learning how texts are organised.
✓ Identifying grammar in context.
✓ Reading between the lines.
✓ Identifying key and minor points.
Doing more than reading
Reading aloud is just one way to use a text. Other ways are for students to
answer comprehension questions, extend the dialogue themselves or fill in
deliberately placed gaps, even at beginner level.
Chapter 10: Taken as Read: Teaching Reading Lessons
Ideas for reading lessons
Some authentic pieces of writing you can use in
the classroom include:
✓ Classified ads: Students can discuss things
they’d like to sell or buy – a bike or a piece of
furniture, for example. First, talk about ways
of buying and selling unwanted items. Then,
use a page full of classified ads to practise
scanning for particular purchases. Give the
students a budget and certain specifications to match the ads with. Finally, as a
follow on, students can write their ads and
make a notice board in class. Lonely hearts
columns are great fun.
✓ Problem pages: Tell students about a problem you have and ask for some advice. Find
out if they know what an agony aunt is and
if they’re common in their own country.
Following that, read letters from a problem
page and predict what the advice will be.
Read the professional advice on the page
and get students’ opinions on it. Role-play
talking about various problems and giving
advice.
✓ Tourist information: Collect or download
leaflets on various tourist attractions in an
English-speaking country. Find out what
students already know about these places
or whether they’ve visited them. Ask students to write questions they’d like to ask
a tour guide and then have them read the
leaflets to see whether their questions
have been answered. They can read different leaflets and pool their answers. They
can write their own tourist information to
follow up.
✓ Film blurbs: Examine the blurb (the information on the back cover) of a DVD. Skim by
looking at the length of the film, the actors
and director but scan by reading about the
plot. Find out whether students would be
likely to watch the film and ask why. A follow-up listening lesson can involve watching a clip or two.
Notice that in each reading source, you can do
a follow-up activity that involves a different skill
(not reading).
Before long, students can start performing short dialogues from a script using
the phrases from a recent lesson. The following is an extract from a beginners’
text. Ask the class to tell you what people say when they meet and put their
ideas on the board. Students can then compare their suggestions with the text.
En: Hello! I’m a new student and my name’s En. What’s your name?
Alejandro: I’m Alejandro and I’m from Venezuela. Pleased to meet you En!
Are you from Malaysia?
En: No, I’m not from Malaysia. I’m Chinese.
Alejandro: Oh, you’re Chinese! Sorry!
Fabio:
En:
Alejandro:
151
152
Part III: Teaching Skills Classes
The text is incomplete so that the students can extend the dialogue themselves.
Comprehension questions for this text may include:
✓ Where does Alejandro think En is from? Is he right?
✓ Do En and Alejandro speak the same language?
✓ Is En a teacher?
Notice that good comprehension questions prove that students have got the
sense of the text.
Students can now work in pairs to extend the dialogue by completing Fabio’s
words and the response given by the En and Alejandro. The class then compares its results.
If you intend the students to read aloud and role-play, it’s best if you and a
strong student perform the dialogue in front of the class first so that everyone
can hear it. Lower-level students will enjoy practising short dialogues in pairs
or small groups, swapping roles each time.
Reading Case Study
I prepared this lesson to help a class with their reading skills. It’s very easy to
update and personalise, so do try it.
✓ Class Profile: 10 adult Italian students in Italy. 90-minute evening class.
✓ Level: Intermediate.
✓ Materials: TV schedule for one evening in English. Extra board pens.
✓ Problems: Pronunciation errors (pronouncing each letter). Drilling
needed as students are daunted by the idea of reading long texts in
English; focus on scanning.
✓ Lesson aims: To practise scanning in a reading text; to revise and
increase vocabulary connected with TV programmes.
The sections of the lesson proceed as follows:
1. Warm-up (6 minutes): Show pictures of characters from famous TV
shows, made in English-speaking countries, shown around the world
(The Simpsons, Friends, and so on). When students recognise one or
two, divide the class into teams and hold a quiz to find out how many
characters they can identify.
Chapter 10: Taken as Read: Teaching Reading Lessons
2. Pre-reading task (15 minutes): Ask each student to find ten words associated with TV shows from their notes or general knowledge and then
ask them to write the vocabulary on the board, trying not to duplicate
any of the words.
Have extra board markers ready for this.
Have the whole class examine the board and identify any words they’re
unfamiliar with. As the words came from the students themselves, if any
problems arise they can ask each other for explanations.
Get suggestions from the class on how to organise the words into categories. Make sure that the students are able to pronounce the words
by drilling them thoroughly. You can also indicate which part of speech
(noun, verb, preposition and so on) each word is.
Add any necessary words that haven’t come up but that you want to
pre-teach.
Figure 10-1 shows one category on the board.
TV Vocabulary
TV People
actor/ækt /, (n)
e
cast/ka:st/, (collective noun for actors) ‘a star-studded cast of actors’
e
e
presenter/pr ‘zent /(n), ‘John smith is the presenter of that political programme
and he is good at explaining the election’
contestant/k n'test nt/(n), a person who takes part in a quiz/game show and
Figure 10-1: tries to win
Sample
vocabulary host/h st/(male) (n+v), hostess/h 'stes/(female) (n) a person who presents
words. a show where other people are guests. ‘Jonathan Ross is the host of the chat
show and his guest is Clint Eastwood’.
e
a
e
e
When the students have built up the vocabulary and copied it into their
notebooks, give each one a copy of the TV schedule.
3. Skim (8 minutes): Ask the students to look at the text quickly on their
own and answer three questions. Make sure that the students are aware of
the time limit though (2 minutes perhaps), so they don’t get sidetracked.
• How many TV channels are there?
• Does each channel broadcast 24 hours a day? If not, when are they
off air?
• Does each channel broadcast the news? How often?
153
154
Part III: Teaching Skills Classes
Put the students in pairs to compare their answers and then have a
short feedback session with the class.
4. Scan (30 minutes): Now have the class to look at the text in more detail.
Have them find programmes that match the interests and routines
of particular classmates: ‘Is there any football on TV after 9 p.m. for
Giovanna?’ This is a nice way to personalise the activity and it also
encourages the class to make up their own questions.
If the students attach no comment to a particular programme, small
groups can discuss what kind of show it may be, based on the title and
time of broadcast: ‘Property ladder is on once a week at 7 p.m. and lasts
for 50 minutes. The name of the presenter is Sarah Beeny. What kind of
programme do you think it is? Why?’
Other scan questions you can use may be:
• When can I watch a modern film that’s suitable for children?
• Which channel is best for music lovers?
• Are the soap operas shown at the same? Which ones do you think
are the most popular? Explain.
• Name someone who is:
A chat show host
A newsreader
A cartoon character
ATV chef
Comparing answers in pairs or small groups is useful for students.
Have a class feedback session afterwards to check the answers and correct any vocabulary and grammar errors you’ve noted.
5. Follow-up (15 minutes): Some of the programmes on the TV schedule
are also shown in Italy. Have a class discussion on how culture affects
the way programmes are made and presented in Italy.
Ask whether there should be more or fewer foreign programmes on local
television. Have students form two lines, each person facing a partner.
The purpose is to role-play one side of an argument. So, in this case the
students in line A argue the case for more foreign TV shows, and the students in line B argue for fewer.
After two or three minutes the students in line B can all move along to
form new partnerships in the line. Then they can argue again with new
points to consider.
Chapter 10: Taken as Read: Teaching Reading Lessons
6. Homework (5 minutes): Students can write an essay in four paragraphs
on the same argument. Show students how to organise the text – introduction, the argument for more foreign shows, the argument for fewer
and a conclusion.
7. Cooler (6 minutes more or less): Have the students play hangman using
the names of international celebrities. Make sure that they pronounce all
the letters correctly or they lose points.
155
156
Part III: Teaching Skills Classes
Chapter 11
Write or Wrong? Teaching
Writing Lessons
In This Chapter
▶ Getting started
▶ Presenting a lesson
▶ Going formal or informal
▶ Offering a writing lesson
I
t is rather daunting to produce written work in a foreign language, but
with some guidance your students can go from good sentences, to paragraphs, to texts with due attention to style and formality.
You never know just when your students may have to fall back on written
communication so try to incorporate writing into your course, even if it’s just
a little.In this chapter, I show you how to focus a lesson on writing skills.
Putting Pen to Paper
By the time you start getting into writing, your students should have had a
chance to listen, speak and read the language to some degree. They have also
copied information down, but actually writing in their own words is more of
a challenge. After all, proof of progress (or not) remains there in black and
white for the world to see. So, teach your students what it takes to make a
decent sentence. This will be the foundation for future written texts.
158
Part III: Teaching Skills Classes
Paying attention to basic writing skills
Most EFL teachers are fortunate enough to have students who can already
wield a pen and form all the letters of the alphabet in English. You may take
this ability for granted. However, if you encounter students who either have a
different writing system in their home country and have had no opportunity
to learn the English one, or are illiterate in their first language, you need to
start teaching writing skills with the alphabet itself.
It could be embarrassing for students to admit that they are having difficulties starting out, so be vigilant. Students who make no effort to write anything down at beginner level may need special attention.
Right from the first lesson, give your students opportunities to copy from the
board. This allows you to start snooping from the outset. Whether you talk to
the students directly about their notes or discreetly lean over their shoulders
as they write, make sure that they are all able to copy what you have written
legibly and accurately.
Point out the errors or else they may become engrained (especially poor
spelling) and if a student’s handwriting may cause a problem for native
English speakers, let the student know. I mention this because national styles
vary and the formation of particular letters could be interpreted differently
with a foreigner’s eye.
Completing sentences
The problem for many students is that they don’t understand what a sentence actually is. Without a basic grammar rule they tend to come up with
‘sentences’ like these:
✓ The blue bag there.
✓ Chicken, fish and pork, for example.
✓ Is very nice here.
With the exception of short imperatives, the little action based phrases you
tend to yell at people – ‘Shut up!’ ‘Look!’ or ‘Sit!’ – a good sentence needs a
noun and a verb at least. You may have learned this rule as ‘subject + predicate’ at school, but basically the idea is that there is a person/thing doing
something or being something. Applying this principle, I made complete sentences from the phrases in the first list:
Chapter 11: Write or Wrong? Teaching Writing Lessons
✓ The blue bag is there.
✓ I like chicken, fish and pork, for example.
✓ It is very nice here.
After they know to join a noun and a verb, you need to check that students
understand the rules of punctuation. For example, have a lesson or two on
using capital letters, not just at the beginning of a sentence but for days of
the week, months, place names, people’s names and all other proper nouns.
(I talk about punctuation marks in Chapter 10.)
When students have the hang of basic sentence construction, they can start
working on the content by using a wider range of grammar and vocabulary.
They can incorporate more adjectives and adverbs to create interest. In addition, you can practise various expressions of opinion such as ‘I think’ and ‘in
my opinion’ to make their expressions sound more natural.
Higher level students have a problem identifying what a sentence is as well
as lower level ones and many make the mistake of having one ginormous sentence where two or three shorter ones would be far better.
Moving on to paragraphs
Your next task after your students can write a good sentence is to show the
class how to build sentences into a paragraph and convey the basic rules and
tips for doing so.
Each paragraph should contain a separate idea. One sentence sums up what
the whole paragraph is about and is generally called the topic sentence. It’s
easiest to teach students to put the topic sentence at the beginning of the
paragraph although in other texts they read they might find it in the middle
or at the end. The following sentences should support the idea in the topic
sentence and/or give examples.
Once you have several sentences for the paragraph, they need to fit together
well. For this students need to know linking words like the ones listed in Table
11-1 and what kind of punctuation goes with them (some follow a comma,
some a full stop and others need nothing at all):
159
160
Part III: Teaching Skills Classes
Table 11-1
How to use linking words
Some lower-level linking words
so
and
but
because
when
before
You generally use a comma before these words
when they join two sentences together. Some people
leave out the comma when the two sentences are
very short.
Patrick had two bags but he gave one to Nasreen.
When these words are first in the sentence use a
comma before the second clause (part of sentence
which is itself like a sentence with a subject and
verb ).
Because I like him, I bought him a gift.
You don’t need a comma when these words are
between the clauses.
I greeted him when I saw him at the party.
Examples of linking words for intermediate level and above
however
Use a comma after this word when it links sentences
and clauses.
I had a nice day. However, the weather was poor.
in addition
You use in addition or in addition to this with a
comma then a clause.
There are several styles of dress on display. In addition to this, there are many nationalities costumes.
consequently
You begin a new sentence with these words and a
comma to link the sentence with an idea you have
already mentioned.
I liked the cuisine. Furthermore, the museums were
very good
When your students know how to master a sentence and build sentences
into a paragraph, they are ready to tackle a more substantial task where they
write a complete text.
Chapter 11: Write or Wrong? Teaching Writing Lessons
Structuring a Writing Lesson
For a writing lesson to be successful, you need to set the writing task up so
that students are clear about what they have to do and how best to tackle it.
A wide variety of tasks cover various sub-skills too, for example using register, which means the right formal or informal style, and adapting to different
kinds of texts.
When deciding on a writing task to set, ask yourself some questions as an
initial checklist.
✓ Is it appropriate for the class in terms of level, relevance and interest?
✓ Is it clear what the purpose of the task is?
✓ Is it clear who the imagined reader is?
✓ Do the students have sufficient information to complete the task (vocabulary, layout, background, examples)?
If you have a task which seems to fit the bill, you now need to build a lesson
around it.
Energising the class with pre-writing tasks
As writing is often a quiet, solitary activity, a pre-writing task is usually necessary because such tasks energise and prepare the students. They allow
for collaboration and help students put together ideas which will make the
actual writing task more successful.
Fostering discussion
A class discussion is a good way to generate ideas on the writing topic.
To begin the discussion provide an example of the topic. Tell a story, use a
visual image or provide a text which gets students thinking along the right
lines. You could also put some keys words on the board and ask students
what they have in common. Then, ask students to add some more relevant
words to the ones you have presented.
If the task you intend to set is a composition about an interesting experience
while on holiday, for example, you can begin the lesson with a personal anecdote about one of your holidays and then open the topic up to the students
to tell each other similar stories, which should get the creative juices flowing.
Alternatively, a short reading about a trip, an exotic piece of music or stimulating photograph from a far away land can stimulate conversation which
leads in the direction of the writing topic.
161
162
Part III: Teaching Skills Classes
Save vocabulary or key points which come from the discussion and are relevant to the task by writing the words on the board. This gives you something
to do and prevents you from hogging the discussion.
Brainstorming tends to raise energy levels as well. Once students are used to
the idea of calling out all their ideas on a topic and benefiting from other people’s contributions, they can easily do it in small groups with no help from
you at all. The class may offer vocabulary or perhaps questions that they
think a reader would like the final written piece to answer. Once the groups
have something down on paper they can compare with each other for more
input.
Some possible topics to brainstorm are:
✓ How many words can you think of which are connected with the topic?
✓ If you read an article on this topic, what information would you expect it
to include?
✓ Are there different characters or locations in this piece of writing? What
vocabulary do I need to describe them?
✓ Does this topic include pros and cons? What are they?
Building structure
Another approach is to focus on the structure of the written work, helping
the students conform to the layout needed and remember the expressions
that link ideas together. In each case students ought to think through the text
beforehand by writing a plan. There should be an outline of each paragraph
and the ideas associated with each one. In Appendix A I show examples of
formal and informal letters, a review, a report and an essay. I show a template
and an example.
Letter writing
All letters need an address, date, opening greeting, paragraphs which each
have a main point, a closing greeting and signature. Letters divide into formal
and informal, as follows:
✓ Formal letters: At the top of a formal letter you usually write two
addresses. The first is your own address and the second is the address
of the person you intend to read the letter. You can’t use contractions
(shortened forms of words) in formal letters. That means you need to
write do not instead of don’t, for example. The purpose of writing the
letter must be clear from the first paragraph and you have to stick to
formal language with no slang. At the end, you write Yours sincerely (if
you mentioned the reader by name) or Yours faithfully (if you started
with Dear Sir/Madam) and under your signature you print your name
and job title (if relevant).
Chapter 11: Write or Wrong? Teaching Writing Lessons
✓ Informal letters: The difference between formal and informal letters is
that you only need your address at the top. You can use contractions
and informal language. You still need to write in paragraphs, but at the
end of the letter you use friendlier closing expressions like See you and
Take care. Finally you sign your name, perhaps just your first name, and
you don’t need to print it clearly below.
Essays
When students give their opinions in writing there are different ways to set
out the essay. You can state your opinion in the introduction and proceed to
explain your view. You could also have a general introduction, explain both
sides of the argument and give your opinion in the conclusion. However,
there should always be an and introduction, paragraphs highlighting main
points in each, along with examples and ideas which support the point and
finally a concluding paragraph which sums up the essay. The language should
be formal.
Stories
A story requires creative language in the form of descriptive adjectives and
adverbs, and direct speech quoting what the characters say. It is not so
important for the students to have great plots in their stories, as time is limited in EFL lessons. Rather, they should be able to describe events, people
and places well. Usually, students need to be accurate in using the past
simple, continuous and perfect tenses (according to their level) and they also
need linking words which show the sequence of events such as and then, after
that and finally.
Reports
A report is a formal presentation of information so it requires formal language. There should be clear headings and subheadings including the division of Introduction (followed by the purpose of the report), Findings and
Conclusion/Recommendation. Students should avoid writing their opinions
throughout report and restrict their own ideas to the Recommendations section.
Reviews
Depending on how many words the review includes, the text might include
several paragraphs or just one. However the text should say what the is
being reviewed, the good and bad points and a recommendation for readers.
The degree of formality that the students use depends on the kind of publication or the reader the student is writing for.
You can provide the students with a kind of template of how the work should
look. Ask the students questions about how the piece of writing should look
and set out the format on the board. Figure 11-1 shows the template for an
essay on having a holiday in your own country. Figure 11-2, meanwhile, is an
example of how a student might structure an informal email.
163
164
Part III: Teaching Skills Classes
Template 1 – Essay highlighting advantages and disadvantages.
Paragraph 1:
Introduction
Topic sentence (general theme of the text)
Overview of what will follow
Paragraph 2:
The advantages
Topic sentence
Advantage A
Supporting points/ examples
Advantage B
Supporting points/ examples
Paragraph 3:
The disadvantages
Topic sentence
Disadvantage A
Supporting points/ examples
Disadvantage B
Supporting points/ examples
Paragraph 4:
Figure 11-1:
A template
for a standard essay
Conclusion
Summary of the essay in different words.
Say which view I take
You can make a practice activity worksheet out of the template by asking the
class to put each heading in the right order until they achieve the appropriate layout.
If you combine this kind of template with some key vocabulary, the students
will be in a great position to complete the task effectively.
Chapter 11: Write or Wrong? Teaching Writing Lessons
Subject: .............................................................................................................
Greeting:
Paragraph 1:
How are things?
Topic sentence
Details and examples
Paragraph 2:
The holiday
Topic sentence
Details and examples
Figure 11-2:
Structuring
an informal
email.
Paragraph 3:
Plans to meet
Topic sentence
Details and examples
Paragraph 4:
Closing comments
I look forward to ....................
Closing Salutation:
Name:
Setting the writing task and explaining
the stages
After preparing the students’ minds for the task, you need to tell them what
it is, whether they will be working alone or collaborating with someone else,
and how long they have to complete it.
Student follow three stages when writing: The first is drafting or planning, the
second is actually writing and the third is reviewing. I cover each in the following sections.
Thinking through the drafting stage
For the first stage, drafting, students have already considered how to use a
template to good effect (see ‘Building structure’ a bit earlier in the chapter),
but still need time to gather their ideas. At this stage the student should also
make sure that each aspect of the task will be covered in the text.
165
166
Part III: Teaching Skills Classes
Far too many students pick up a pen, start writing the main text cold and
either run out of time or end up with an unsatisfactory piece of work. So
although you may meet some resistance when you try to make students take
this preparatory stage, it is better than the loss of morale that comes along
with continually poor writing.
Set a specific time period for planning so that the students can then pause and
compare their ideas. They are likely to notice points their peers have included
which they have forgotten about. It also gives you the chance to step in and
avert disaster.
Getting stuck in
If you set the task up well, there should be little for you to do at this stage
except monitoring – without interrupting too much. Have an occasional look
over your students’ shoulders but don’t say a word unless the student is
hopelessly lost or asks for advice.
Have dictionaries available to increase the students’ independence. They
should not have to depend on you for everything!
Keep the students abreast of the time so that they keep pushing ahead to the
end. Students do get stuck on one point or another and end up wasting time,
so remind them of where they should be in the task – ‘10 minutes to go! You
should be on your conclusion now, ready to review your work.’
Doing final checks
Before handing in their work, students should be reminded to check it
through thoroughly. Provide a checklist with points like these if it helps:
✓ Have I answered the question fully?
✓ Have I used the right layout?
✓ Is my spelling correct?
✓ Have I divided my work into appropriate paragraphs?
✓ Have I included an introduction and conclusion?
✓ Is my work clear (that includes good handwriting) and interesting?
Registering the Right Degree of
Formality
The formal word for showing the write degree of formality in English is register. It is an aspect of language teaching that you should not overlook. Any
errors in this area are particularly noticeable when it comes to writing.
Chapter 11: Write or Wrong? Teaching Writing Lessons
As a general habit, indicate the register of an expression by writing (f) or
(inf), that is formal and informal, after it on the board so that students are
aware of how to use it.
Additionally, it is best to highlight expressions which are restricted to writing. For example, a very old lady who is not used to many of the advances
in technology left me a telephone message ending with ‘Yours sincerely,
Winnie’. Although a native speaker, she had not worked out the appropriate
use of register nor whether the language of messages is transferable from
letter to telephone. Do not let your students make this mistake.
Table 11-2 shows some basic differences between formal and informal writing
to help you get started. In their notebooks, you could get students to set up a
table of equivalent formal and informal expressions which they could fill in as
they learn them throughout your course.
Table 11-2
Standards for Formal and Informal Writing
Formal Writing
Never use contractions. Write the whole
word.
Use verbs derived from Latin.
Use passive constructions (eg it is done)
Never use slang
Informal Writing
Use contractions.
Use phrasal verbs.
Use active constructions (eg he does it)
Use appropriate slang and common
words.
Table 11-3 shows some formal and informal language to share with your
students.
Table 11-3
Formal and Informal Phrases
Formal
Informal
Dear Sir/Madam
Hi!
I appreciate…
Thanks
I would be grateful if you could…
Please could you…
Approximately
About
Due to
Because of
A great deal of
A lot of
Sufficient
Enough
Yours sincerely/faithfully
Best wishes
167
168
Part III: Teaching Skills Classes
Sample writing activities
Writing activities can begin with a single letter
of the alphabet and later develop into formal,
lengthy texts. Try this list of activity types with
your classes. They can all be done individually
but those marked with an asterisk are also well
suited to pair and group work.
✓ Advertisements*
✓ Application forms
✓ Articles
✓ Biographies
✓ Book/film reviews
✓ Composition (setting out an opinion or argument)
✓ CV
✓ Descriptions of a process or diagram
✓ Dictation. The students write down what
the teacher reads aloud to practise their
spelling and punctuation.
✓ Emails
✓ Formal and informal letters
✓ Instruction sheets*
✓ Memos
✓ Notices*. Students can prepare notices
giving information for use in the classroom,
for example about upcoming events.
✓ Poetry: Get students to write a short poem
or limerick. You can provide a list of rhyming
words to help them.
✓ Projects*: Students can do more extensive
work over a period of weeks on one topic.
They can use English to explore and explain
something which interests them.
✓ Reports: After finding out information on a
particular topic students can present this in
a concise and formal way as though they
were giving feedback to an employer.
✓ Stories
Choose the activities which your students are
most likely to need in the future.
Students who speak Latin-based languages like French and Portuguese tend
to favour words of Latin origin instead of more common words and phrases –
‘establish’ rather than’ set up’, for example. This makes them sound too
formal at times, so you can work on that with them to sound more casual.
Writing Case Study
Many teachers work in UK during the summer months when youngsters from
all over the world descend on language schools expecting to learn English
in six weeks and be thoroughly entertained in the process. Here is a lesson I
used successfully in one such class.
Chapter 11: Write or Wrong? Teaching Writing Lessons
✓ Class Profile: 12 teenage students from Taiwan, Spain, Brazil and Turkey.
60 minute lesson
✓ Level: Upper-Intermediate
✓ Materials: Two copies of the school rules, tape, a prize, poster-size
paper, dictionaries and extra marker pens.
✓ Problems: Several pupils have illegible handwriting, mostly due to
laziness. Most feel that writing is too passive and prefer to do lively
activities.
✓ Lesson aims: To undertake a collaborative writing activity which
requires attention to handwriting and general accuracy. To have fun
writing.
Get a copy of the school rules. Make sure they are written in words the students can understand or rewrite them to match your pupils’ level. Take the
opportunity to embed some key vocabulary or grammar that you want students to notice.
Use normal A4 sized paper so that they cannot read what the document contains unless they are very close up. Prepare two identical copies and stick
them to the wall in the classroom.
Then, follow these steps for a successful lesson:
1. Pre-reading task (5 minutes): Ask the students to brainstorm ideas
about what they love/hate about their school back home individually in
their notebooks.
Put the pupils in pairs of mixed nationalities to compare ideas.
Use their answers to spark a short class discussion. Find out how many
mention rules as something they hate.
2. Writing activity 1-Dictation (30 minutes): Divide the class into two
teams of equal size. Arrange the room so that there is a clear space for
them to dash to the wall and then back to prepared desks.
Have the two teams come up with team names and appoint a captain for
each to keep order. Give each team a blank sheet of paper.
Explain that, one at a time, a member of each team will run to their copy
of the rules, memorise a section without making any notes. They must
then dash back to their team’s blank sheet and write down the section
they memorised.
Do the title or the first line yourself as an example. Check that everyone
understands the process and set a time limit for completing the dictation.
169
170
Part III: How To Teach Skills Class
The exercise continues until the entire document is reproduced accurately.
Whilst the activity is taking place, give encouragement and make sure
that the work is legible.
When the teams have finished, award points for speed and accuracy.
Decide on a winner and award a prize.
As a class, discuss what they agree/disagree with from the rules and
review the language of rules (do/don’t, must/mustn’t, should/shouldn’t
and so on).
3. Writing activity 2 (25 minutes): Divide the class into four smaller
groups. Within these groups students must agree on five things pupils
should do and five they should not do when learning English (allow for
creative license). Make dictionaries available.
Give each group a large sheet of paper and a couple of markers. Ask
them to write up a poster explaining their rules.
When the posters are complete, one representative from each group
should give a short presentation explaining it.
Display the posters in class.
Chapter 12
What Accent? Teaching
Pronunciation
In This Chapter
▶ Asking students to ‘repeat after me’
▶ Displaying phonemes
▶ Adding stress
▶ Boosting pronunciation
▶ Getting the tone right
T
here’s nothing worse than studying a language for years only to find that
nobody can understand a word you say. You write with ease but when
you open your mouth, you’re met with blank stares. This is the experience of
many a student whose teachers underestimated pronunciation skills. So in
this chapter, I tell you how to teach good pronunciation.
Repeat after Me
Probably the simplest way of making students pronunciation conscious is by
getting them to repeat all the new words they learn as well as the words they
find tricky. Before you cringe, erase that picture of students sitting in rows
reciting dull and meaningless sentences. Repetition can be incorporated into
the normal flow of the lesson and can be used to raise energy levels at any
level.
Repeating first
The natural order for learning language skills is listening first, then speaking,
followed by reading and finally writing. With this in mind, when you introduce
a new word students should repeat it after you several times before focusing
on the spelling.
172
Part III: Teaching Skills Classes
Spelling in English is so irregular that if students don’t sort out the right pronunciation first they’re likely to come up with a letter-by-letter version of how
the word sounds. So get them speaking before they read and write.
Whenever students are speaking, pay attention to their pronunciation. You
don’t have to stop them every time they say something incorrectly, but you
can make notes and include repetition of problem words in your feedback
sessions. You can also collect data for a whole lesson on pronunciation in
which you can address recurring errors.
For example, you may notice that words with ‘th’ are routinely pronounced
with ‘d’ instead and this may lead to a lesson on analysing the sound, how it’s
made and a collection of tongue twisters to practise it.
Repeating as a class and individually
The easiest way to get repetition is to ask for it. Just say ‘Repeat!’ and use
gestures to add emphasis. Use your arms like a conductor in front of an
orchestra or use your hand to cup behind your ear, indicating that you’re listening to them. Students soon get the hang of it and come to expect it.
All together now
When the whole class repeats together this is called choral drilling. Students
feel more at ease when they work as a team because embarrassment is
reduced. However, just as in a musical ensemble, you need to listen very
carefully for anyone who’s ‘out of tune’.
If you hear one poor speaker on the left of the room, ask the students on
the right to take a break for a few seconds. Those on the left now work a bit
harder because they think that you’re starting to home in on them.
Going solo
Individual drilling is another option. This means that one student repeats
alone. You can run through the students one after the other and diplomatically
ask better speakers to correct the errors of weaker ones by modelling the
right pronunciation.
Teacher gestures: Weak! Repeat please, weak!
Whole class: Weak!
Teacher: Rashid, weak!
Rashid: Weak!
Teacher (gestures to the next student): Weak!
Chapter 12: What Accent? Teaching Pronunciation
Soraya: Wik!
Teacher: Rashid weak!
Rashid: Weak!
Teacher: Soraya?
Soraya: Weak!
Teacher: Good! Sanjay weak . . .
For a sentence, or a word with many syllables, you can use backchaining.
This means that students repeat the last bit first and then go backwards until
they’ve done the whole thing. Take the question ‘What would you like to
drink?’
Teacher: Drink!
Class: Drink!
Teacher: Like to drink!
Class: Like to drink!
Teacher: You like to drink!
Class: You like to drink!
Teacher: What would you like to drink?
Using Phonology: Sound and Spelling
The problem with English is that the spelling is rather misleading. Words
such as recipe and receipt, tough and though and place names such as
Leicester and Southwark are hopelessly illogical for students to pronounce. So, to combat this problem, you use a whole range of symbols,
or phonemes(pronounced ‘foe-neemz’, which in the symbols I mention is /
fəυnimz/), to represent every individual sound in this language. They provide a great tool in teaching pronunciation and even in reading the dictionary
as most include a phonological transcription. As with many tools, you can
get the job done without phonemes and you may find them difficult to use
at first, but they do help in the long run. After all, you won’t be around your
students forever to correct their pronunciation and if they devise their own
system of writing pronunciation you can’t check it for them.
You teach individual phonemes by drawing the symbol on the board, saying
the sound many times and asking the students to repeat it. It helps to tell the
students which parts of the mouth, neck or other speech organs (perhaps the
nasal cavity, which is the space inside and beyond your nostrils) you use to
173
174
Part III: Teaching Skills Classes
make the sound and what you do with them. For example, you can tell students to put the tip of their tongue just behind the top of the upper teeth to
say /l/. Actually, you can point to the both parts of mouth to make the point.
Getting to know the 44
key sounds of English
Forty-four individual, recognised sounds make up the English language. These
are broken down into single vowels, double vowels and consonants. The
vowels allow the air to come straight out unobstructed by speech organs –
lips and teeth.
All the phonemes that include two marks like this are long sounds. For example, compare ‘it’ /it/ and ‘eat’/it/. There’s a long sound in the second word.
The next sections cover the complete list of phonemes with examples.
Focusing on single vowel sounds
A vowel is a sound that comes out of the mouth without any of the speech
organs blocking the way. In other words you say them with an open mouth.
Single vowel sounds aren’t joined to any other vowel. In the next section I
focus on double vowel sounds.
Phoneme
Examples
/i/
tree, easy, please
/i/
trip, is, synchronise
/u/
food, suit, moody
/υ/
put, wood, cook, look
/e/
extra, wedding, said
//
early, word, furtive
/ə/
after, important, around
/ɔ/
more, war, awful, floor
/ɑ/
mask, car, afterwards and
//
mat, plait, animal, wax
/ /
under, cup, son, thud
/ɒ/
what, not, octopus, along
Chapter 12: What Accent? Teaching Pronunciation
The phoneme /ə/ is called the schwa. It represents the sound that causes
the most confusion as it can be represented by so many vowels. However,
it only occurs in a syllable that carries no stress, or strong emphasis. Some
words may include the schwa when the word is not stressed but change the
pronunciation when it is stressed. Consider ‘can’ in these two statements, for
example:
Can we talk?
Yes we can.
You probably stressed ‘talk’ in the first statement, if you said it at normal
speed, and said ‘can’ very quickly using the schwa. In the second statement
‘can’ is stressed a lot more so the schwa changes to /æ/.
Doing double vowel sounds
Double vowel sounds are literally two vowels combined to make one sound.
You have to move your jaw bone to say them and students find them strange
so they often exchange a double vowel for a single one. They may pronounce
train /tren/ instead of /trein/ However, good use of double vowels really helps
in creating a more native sounding accent.
Phoneme
Examples
/iə/
ear, beer, merely, career
/ei/
mate, weight, daytime, ace
/υə/
pure, sewer, cruel, fuel
/ɔi/
destroy, ointment, boiling, buoy
/əi/
oh, photo, motor, loan
/eə/
rare, bear, malaria, heir
/ai/
my, wider, style, pile
/aυ/
loud, cow, plough, ouch
Saying consonants
Many of the consonant phonemes look exactly like the alphabet but you need
to check, as a significant number may be new to you or misleading. So look at
the example words to make sure that the sound matches your expectations.
Take /j/ for example. It’s pronounced like y in yacht not j in jump.
Different versions of the phonemic chart exist. They always show the same
phonemes but in different orders. Say the phonemes out loud in the order I
show them here and you notice that they’re grouped according to the speech
organs you use to make them. For example /p/ and /b/ both use the upper
and lower lips.
175
176
Part III: Teaching Skills Classes
Phoneme
Examples
/p/
politics, happy, up
/b/
bubble, burn, cab
/t/
doubt, theatre, tight
/d/
did, wooden, mud
/tʃ/
cheese, rich, cheap
/d/
judge, page, general
/k/
cook, chemistry, bike
/ /
good, wiggle, big
/v/
visit, stove, voice
/f/
photo, off, wife
/θ/
thumb, thirst, bath
/ð/
this, either, father
/s/
psychology, nice, scent
/z/
wise, jazz, phase
/ʃ/
sugar, shoot, machine
//
measure, visual, decision
Many of the consonant phonemes are paired – voiced and unvoiced. If you
were lip reading you’d probably have trouble distinguishing /p/ and /b/, for
example, because they both involve the same speech organs (upper and lower
lips). However when you put your hand on your larynx (where the adam’s
apple is on a man’s neck) and say them aloud, you can feel that voiced /b/
makes it vibrate a lot, whereas unvoiced /p/ does not. So a voiced consonant
is a sound that makes the vocal chords vibrate when you say it, whereas
there’s no vibration of the vocal chords when you say an unvoiced consonant.
Phoneme
Examples
/m/
numb, mystery, mime, autumn
/n/
now, vain, gnome, knees
/ŋ/
think, language, singer, wrinkle
/h/
hospital, hairstyle, hello, hamster
/l/
lessons, wheel, leaf, subtle
/r/
romance, bearer, robin, wrong
/w/
watch, fewer, weed, wasp
/j/
yellow, layer, yesterday, yam
Chapter 12: What Accent? Teaching Pronunciation
Using phonemes in class
If you have a nice, big phonemic chart up in your classroom and you write
the phonemic transcription on the board whenever you write a word with
potentially problematic pronunciation, your students can pick up sounds as
they go along. So you write the word, the part of speech (noun, adjective and
so on) and the phonemic transcription:
bomb (n) /bɒm/
to search (v) /stʃ/
You can simply point to phonemes and get the class to repeat the sound after
you. This is particularly useful when you use minimal pairs. This term refers to
the comparison of two words with almost the same pronunciation, except for
one sound. Students may not hear the difference unless you demonstrate that
there is one, perhaps because that sound isn’t used in their own language.
sank /sæŋk/ and thank /θæŋk/
hat /hæt/ and hut /h t/
When you compare words, isolate the phonemes and repeat them carefully
to raise student awareness so that they make more of an effort to pronounce
words as a native speaker would.
If you can include whole sessions on pronunciation in your course, it’s worth
supplying the students with mirrors so that they can study the shapes they
make with their lips, tongues and mouths when pronouncing the phonemes –
modelling their pronunciation on yours, of course. It’s easier for them to
copy you this way.
A cross section of the speech organs is also useful so that you can point to
areas at the back or the mouth, for example when you teach /k/.
Adding Emphasis to Words and Syllables
In some languages every syllable you say is equal in emphasis (also called
stress) and volume so that no one syllable stands out. In other languages the
stress always falls in the same place, perhaps on the first or last syllable in a
word. This isn’t the case in English. In TEFL you teach which words stand out
and which syllables stand out too.
177
178
Part III: Teaching Skills Classes
Impotent or important? Placing emphasis
on syllables
In addition to the individual sounds or phonemes that make up a word, you
also need to know how many syllables there are because if there’s more than
one syllable, you need to add stress or emphasis. Incorrect placement of the
stress can at times change the meaning and definitely hinders communication.
Take the word ‘export’. It’s a two syllable word (ex + port) and can be used as
a verb or a noun. Interestingly when it’s a noun, you stress ex, but when it is a
verb we stress port. Figure 12-1 shows the several ways you can show emphasis on the board.
Figure 12-1: 'export (n) and ex'port (v)
Showing
stressed export (n) and export (v)
syllables. export (n) and export (v)
✓ The accent mark is the style often used in dictionaries.
✓ You can write the stressed syllable bigger and bolder than the
unstressed one(s).
✓ If you draw a line above the stressed syllable, put it above the vowel, not
a consonant.
Make it a habit to mark the stress on new words and use one of these visual
methods as a means of correction too. It’s also fun to illustrate the stressed
syllable in an audible way while still allowing the students to work it out. For
example, you can show the difference between impotent and important by
singing DAdada and daDAda.
Emphasising words
In English, you stress particular words in a sentence more than others, saying
them a little louder and with more force. The stressed words are usually
those that carry more meaning. Examine the following statements.
Where were you at six o’clock?
I was at home. I went to the club at seven o’clock.
Chapter 12: What Accent? Teaching Pronunciation
The stress adds meaning but it also makes the speaker sound more interesting than if that person were to use a flat tone throughout.
Stressing words contributes to the distinct rhythm of the English language.
You can teach it by means of poetry recital or rapping.
Take the well-known rhyme ‘This is the house that Jack built’. If you say it out
loud you find it necessary to stress certain words and cram the others in, in
order to keep the beat going. Students find this challenging and enjoyable.
This is the house that Jack built!
This is the malt that lay in the house that Jack built.
This is the rat that ate the malt
That lay in the house that Jack built.
Notice how quickly you need to say some of the unstressed words. As you
stress the words that carry the most meaning and force the other words to fit
in, the pronunciation of the unstressed words becomes very contracted.
Students complain that native speakers eat their words but there’s actually a
reason for this, which they would do well to imitate.
Improving Fluency through
Pronunciation
Practice makes perfect and this almost true of pronunciation. I say ‘almost’
because the aim in teaching this skill should be clear speech instead of a
native-like accent. Very few students lose their accents but most can produce
the phonemes reasonably well, except for the odd sticky one.
Reading aloud to the whole class isn’t something you encourage EFL students
to do often. It can be rather dull. However, reading aloud in pairs is less
embarrassing and keeps everyone busy reading, correcting or encouraging.
Students who’ve learnt the phonemes can correct themselves using the dictionary and they should always put on an English (or other native speaker)
voice. By doing so they can move beyond individual words and emphasis and
start analysing how we connect words.
Once students start focusing on pronunciation they may overdo it by being
precise about every single word. In fact, native speakers often allow words to
elide.
179
180
Part III: Teaching Skills Classes
Typically, native speakers pronounce consonants and vowels as though they
were joined together. So if a word ends with a consonant and the next begins
with a vowel, you pronounce them together. Try this for example:
teacher and student
vets and animals
Whereas the /r/ at the end of teacher is usually silent, you can pronounce it
before ‘and’ as it begins with a vowel. Similarly, in the second example you
allow the ‘s’ of ‘vets’ to connect with ‘and’. Then you connect ‘d’ of ‘and’ with
‘animals’.
Sometimes sounds disappear or change.
✓ Good game: At the end of ‘good’ we can’t pronounce the ‘d’ unless we
speak extremely slowly and carefully. At the most we say ‘goog’ because
of the influence of the following ‘g’ in ‘game’.
✓ What do you do?: Many native speakers would pronounce /wɒʔdiə/
instead of ‘what do you’. The /ʔ/ represents the glottal stop which is the
rather unattractive sound most people make when they stop the air at
the back of the throat instead of pronouncing ‘t’ at the end of a word.
These examples highlight the value of sometimes repeating whole sentences
at normal speed. Realistic features of the language become evident as long
you speak normally and clearly. Use your natural accent to do this and point
out alternatives if any obvious ones come up.
Watch Your Tone! – Intonation
Intonation is the method for indicating whether you’re uttering a sentence or
question, or whether you’re in a good mood or bad mood without relying on
grammar and vocabulary. When you ask a question your tone tends to rise at
the end but when you say a sentence your tone falls at the end to show that
you’ve finished it. In addition, far more rises and falls occur when emotions
are running high. Happy intonation sounds a little closer to singing. It’s very
varied and animated, whereas depressive intonation is very flat. Indeed you
can tell a lot about someone’s mood and intention from a single word.
Take a fairly versatile word such as ‘nice’. Different intonation can change the
meaning according to the situation.
Take an innocuous question and response:
How about cream tea with the neighbours today?
Nice!
Chapter 12: What Accent? Teaching Pronunciation
Activities to try
Activities to help your students understand pronunciation, stress and intonation may include
the following:
✓ Use a map of local train stations and streets
to practise saying place names. You can
swap the names for phonemes and see if
students recognise them.
✓ Play a homophones games. Homophones
are words which sound exactly the same
but have different meanings, such as here
and hear. Say the word and see if students
can come up with both spellings and meanings. You’ll be surprised to find that students
often don’t know that certain words are
supposed to sound the same.
✓ Have your students put on a mini-play.
Drama is fun and encourages students to
use good intonation.
✓ Play ‘I spy’ using phonemes instead of letters of the alphabet.
Imagine how this dialogue sounds in the following cases, especially the
response ‘nice’:
✓ A mum is talking to her 14 year-old son who is a computer geek and
heavy metal fan.
✓ An elderly man is talking to his wife who’s too ill to travel far.
✓ A woman is talking to a man who’s attracted to her. He had hoped to go
for a romantic stroll.
Other words that tend to need intonation to indicate the intention are okay,
oh and fine.
When students do listening exercises from a CD or other media they can then
use the tape script to role-play the dialogue themselves, copying the intonation. They may need to go through it line by line, repeating after you or the
CD, before trying it out. They can also play games where they each have a
versatile word and a meaning or mood to convey. They can take it in turns
saying their word while the class guesses the meaning or mood from a choice
of options.
When you write utterances on the board, you can indicate the intonation pattern by using arrows, such as those in Figure 12-2.
181
182
Part III: Teaching Skills Classes
Figure 12-2:
Showing rising or falling
intonation.
You are waiting for me, aren’t you?
You are waiting for me, aren’t you?
In this case, the question tag ‘aren’t you’ with falling intonation can indicate
that you know what’s going on. It may be rhetorical. Then again, with rising
intonation, it sounds as though you really aren’t sure and need an answer.
Chapter 13
Setting Their Tongues Wagging:
Speaking and Discussion
In This Chapter
▶ Starting the ball rolling
▶ Making the conversation last
▶ Sparking civil discussions
▶ Creating a discussion lesson
S
peaking is the most important skill in English language teaching. It’s
almost impossible to have true mastery of a language without actually
speaking it. So in this chapter, I show you how to get your students chatting,
arguing and generally wagging those tongues in English.
Getting Students Talking
In general, to encourage speaking in the early stages of a course and with
students who are a little timid, give plenty of guidance on what the conversations should be about. You can give students a list of questions to ask each
other or specific topics and lots of language input first. So before the activity gets under way make sure that the class knows the necessary grammar
and vocabulary with appropriate examples. In this way students don’t have
to think about what to say, only how to say things. Set speaking tasks for
pair group work as often as possible. The tasks should have clear aims and
involve taking turns, so say ‘Find out what your partner thinks about X and
make some notes’, rather than just telling them to discuss X. The advantage
is that the students are more aware of the need to get the other person’s view
instead of talking about themselves the whole time.
184
Part III: Teaching Skills Classes
Warming up
Anyone who speaks a foreign language knows that if you don’t use it, you lose
it. It’s easy to get rusty. And if your mind is full of other matters such as your
job, the bills or your love life, it’s even harder to get your brain in gear.
This is no less true of your students. In between lessons they may forget
what they’ve learnt or they may just be distracted by life. This is where the
warmer comes in. The warmer is a very short activity that gets the students
acclimatised after the previous lesson. Most warmers are for speaking.
Some of my favourite warm-up activities are:
✓ Last letter, first letter: This simple game also tests spelling. It works
best if the students are in a circle. Basically, one person starts the game
by saying a word and the next person has to come up with another word
beginning with the last letter of the previous one.
A chain of words my students recently came up with is: apple, elephant,
taxi, interesting, girl, little, eggs, sugar, robot, train.
As the students get better at the game and improve in their vocabulary,
they develop strategies for catching their classmates out by including
lots of words that end with the same letter or with a difficult letter like ‘x’.
✓ The supermarket game: This very well-known game involves building
up a list of items bought at the supermarket. When it’s your turn you
have to remember all the items on the list in the right order and then
add one more.
To make it more challenging, you can ask students to attach an adjective
to their item, usually starting with the same letter. For example:
I went to the supermarket and I bought a crazy camera.
I went to the supermarket and I bought a crazy camera and a
meaty meal.
I went to the supermarket and I bought a crazy camera, a meaty
meal and a lovely loaf.
✓ Assemble a sentence: Sometimes I write a sentence, perhaps with a connection to the lesson for that day, using a different card for each word.
I shuffle the cards and give one or two to each student. Then I ask the
students to get together and negotiate the correct word order for the
sentence.
Chapter 13: Setting Their Tongues Wagging: Speaking and Discussion
This warmer is good for getting a team spirit going right from the beginning of the lesson.
✓ Current affairs: Noting what’s going on in the world often leads to
some interesting discussions in the classroom. You can just write a
headline on the board, or stick up an image from a newspaper and ask
the students what they know about it. Then get their opinions on the
story. It works best when you find a humorous story or one with a hint
of controversy (but nothing that may offend or hit or a raw nerve).
Talking about communicative activities
This kind of activity has been popular for many years now in TEFL.
Communicative activities generally involve pairs of students sharing information with each other to complete a task.
Communicative activities come in many different forms but usually involve
a Partner A and a Partner B. Each partner needs to ask each other fact or
opinion-based questions after receiving initial prompts from you. Sometimes
you give them a worksheet which has gaps in it but the gaps are different for
each partner. The pair must then hide their own sheet and come up with a
question to ask their partner who, as a result, gives them information that
they use to fill in a gap. On the other hand the activity may perhaps involve
a list of topics or situations to ask a partner about so that the students talk
about their own lives.
Communicative activities are practical because they often don’t require any
imagination or opinions from the participants. They just provide a context
for some solid practice of a particular grammatical structure or some new
words.
This type of exercise also accustoms students to working with each other
and gets them moving about a bit. As in most cases the students aren’t
allowed to see each others’ information, you can get them to sit or stand
back to back, for example.
Table 13-1 is an example of a communicative activity designed to practise the
phrase ‘How much is/how much are the . . . ?’
185
186
Part III: Teaching Skills Classes
Table 13-1
Practising ‘how much is/how much are’
Partner A
Partner B
Menu
Menu
Starter
Starter
Spring rolls £2.00
Spring rolls £ . . .
Sesame toast £ . . .
Sesame toast £2.20
Chicken soup £2.50
Chicken soup £ . . .
Main Course
Main Course
Prawn curry £ . . .
Prawn curry £4.50
Roast beef £4.70
Roast beef £ . . .
Vegetarian lasagne £ . . .
Vegetarian lasagne £4.00
Dessert
Dessert
Chocolate cake £3.00
Chocolate cake £ . . .
Summer fruits £ . . .
Summer fruits £3.15
Apple pie £2.95
Apple pie £ . . .
To make use of this activity in which each partner gets prices for half the
items on a menu, use these steps:
1. Go through the vocabulary to make sure that students understand the
food items.
If you don’t do this first thing, your students are likely to get distracted
from the main aim.
2. Do an example on the board.
Get students to suggest what question needs to be asked and make sure
that everyone knows how to ask ‘How much is?’ and ‘How much are?’
3. Divide the class into pairs and give each partner one half of the sheet –
Partner A has the left half and Partner B the right.
You can tell each partner that his menu is top secret so he can’t show
his partner.
4. Ask the students to look at the prices and check which ones are missing, then explain that each partner has to ask the other partner for the
prices of these dishes.
Check that they all know what to do.
Chapter 13: Setting Their Tongues Wagging: Speaking and Discussion
5. Set a time limit of about three minutes, get them started and monitor
quietly.
Try not to step in unless a pair is hopelessly lost or silent. Just make a
note of any errors to discuss afterwards.
6. Stop the activity when the time is up and have a feedback session.
You can use this very simple activity in various ways. For example, if you
delete the names of the dishes instead, you can practise ‘What costs . . .?’.
You can also omit some of the words (such as apple, curry, chicken) and practise ‘What kind of . . . is it?’.
Lots of opportunities for communicative activities present themselves in the
classroom. Even when students are doing a written exercise by themselves,
they can compare their answers and opinions in pairs afterwards and explain
their reasons for anything that differs from their partner’s work. By the time
you engage in whole class feedback, the students have had an opportunity to
speak and an idea of which answers are likely to present a problem.
How About You? Extending Conversations
Once your students are talking to each other in English, there’s no reason to
cut them off. In fact, if you can get them to extend their conversations in a
more natural way, so much the better.
Communicative activities are rather controlled and often involve repeating
the same grammar over and over again, so you need to work your students
into more conversational dialogues.
Helping students depart from the script
One of the easiest ways to extend conversations is by teaching students to
use phrases that encourage speaking. Try these:
✓ How about you?
✓ Tell me more.
✓ What was it like?
✓ Can you describe it?
187
188
Part III: Teaching Skills Classes
✓ Why is that?
✓ What do you mean?
✓ What do you think?
✓ What else?
Once the conversation has opened up it’s important to show your interest
in what the speaker is saying. You can do this by good body language and
expressions that demonstrate interest.
Expressing through body language
Some cultural groups use body language more naturally than others, and
individual personalities play a large part too, but students need to be
reminded that language is about real communication and that it sometimes
goes beyond words. Ask your students to do these things while speaking in
pairs or groups:
✓ Turn towards the speaker.
✓ Look him in the eye.
✓ Uncover his face. Don’t have hands, hair and hats obscuring the eyes
and mouth.
✓ Smile and nod at intervals.
✓ Avoid putting physical barriers – your bag on the desk or crossed arms
and legs – between you and the speaker.
Showing interest
Another great way to encourage extended conversations in a natural way is
to do what native speakers do all the time – you say something to show that
you’re really listening. It’s not always a word, sometimes just ‘mmm’ with
suitable intonation, but you can teach your students to say:
✓ Really!
✓ Wow!
✓ That’s interesting!
✓ Oh no!
✓ No way!
✓ Cool!
✓ What a shame!
Chapter 13: Setting Their Tongues Wagging: Speaking and Discussion
Following up
In addition to extending conversations generated from communicative
activities, you need to write extended discussions into your lesson plan.
Discussions are also communicative, but they don’t usually involve filling in
worksheets or facts supplied by the teacher. The idea is to get students talking about personal experience and opinions in a natural way. These conversations mimic what someone may tell a friend about in their own language
and this is the way most students eventually aim to use English as bilingual
speakers. Conversations allow time to explain or ask how?, where?, why? and
when?
Usually this kind of activity follows more controlled practice, so by this time
the students have had a chance to try out new vocabulary and grammar and
they’re ready to add this knowledge to all the other English they know in a
freer way.
After completing the communicative activity on menu prices (see ‘Talking
about communicative activities’ earlier in the chapter), the follow-up activity
may be:
Discuss in pairs: What is your favourite place to eat for
a) a snack?; b) lunch with friends?; c) a special evening?
Because of the different situations, prices are likely to come into the discussion but they aren’t the sole focus of the conversation.
Follow-up activities like these don’t only follow speaking practice. You can use
them to liven up a reading, writing or listening lesson too. The idea is to take
the overall theme of the lesson and develop another area of it in an interesting
way, which involves sharing opinions.
Another example is follow-up to a reading lesson in which you read a current
news story and analysed it for content and detailed vocabulary. Towards the
end of the lesson, you may want to move away from that particular text and
widen the topic in the following ways:
Tell your classmates about a story in the news that you find interesting.
Who or what is the story about? Is it a local, national or international
story?
Do people have different opinions about it? Explain.
189
190
Part III: Teaching Skills Classes
I find that if you prompt students with some secondary questions, and give
them a minute to think about it and make notes, you hear far fewer ‘ums’ and
‘errs’.
Other possibilities for follow-up activities are:
✓ Role-plays: Students can create an imaginary dialogue between characters in the previous or related activity and act it out.
✓ Interview questions: In pairs or groups students can agree a set of ten
questions they’d use to interview a key character.
✓ Compare and contrast: Students discuss the similarities and differences
between their culture and that of their partner, or that of an Englishspeaking country in relation to the theme of the lesson.
✓ Debates: Assign different groups to represent each side of the argument.
In My Opinion – Agreeing, Disagreeing
and Negotiating
The problem with extended speaking activities is that everyone has their
own opinion and at times disagreements arise. No problem! Learning to
express your opinions in a foreign language is a pretty important skill. In fact
if you don’t teach the students how to do this, they may just clam up, resort
to their mother tongue or, worse still, shout everyone else down using bad
grammar.
Expressing an opinion
The way we differentiate between a fact and an opinion is by tacking on little
expressions that alert the hearer to what’s coming. You say things like:
✓ I (don’t) think.
✓ I (don’t) believe.
✓ In my opinion.
✓ How about this.
These expressions are quite straightforward to teach because they go neatly
on the front of a sentence and don’t often change tense.
Chapter 13: Setting Their Tongues Wagging: Speaking and Discussion
One of several ways of showing that your expressions are not fact though, is
to teach your students some words that show uncertainty such as:
✓ Maybe
✓ Perhaps
✓ Possibly
In the case of possibly you need to show the right word order. So you generally say It may possibly be this (that’s subject + auxiliary verb + possibly +
main verb) instead of Perhaps it’s this, which is easy because you’re simply
adding a word to the beginning of a normal sentence.
The beauty of these words and phrases is that students immediately sound
more fluent without having to do too much work. Sometimes it isn’t what you
say, but how you say it that counts. That’s why, for higher-level students I also
teach them how to stall: ‘That’s an interesting question. I’ve never thought
about that but . . .’.
You’d be surprised how many students have passed their speaking exams by
saying very little but saying it elegantly.
Further to this, you can use a number of modal verbs to show that there’s a
greater or lesser degree of certainty. Modal verbs are auxiliary verbs such as:
might, may, could, must and can’t.
You need to teach these words as a grammar lesson though because the students need to know how the modal verb fits into a sentence:
✓ Subject + modal verb (+ not ) + infinitive verb without to:
It
might
not
be a good idea
✓ The past form is as follows:
Subject + modal verb (+ not )+ have + past participle:
It
might
not
have been a good idea.
Interjecting, rephrasing and summing up
In a conversation you do more than give an opinion then keep quiet.
Sometimes you interrupt to add something important, explain in other words
to make the point clearer, bring things to a close and so on. These are skills
that effective English speakers possess and which you need to teach your
students. Let them know how to do these things in accordance with Englishspeaking culture and in a polite way.
191
192
Part III: Teaching Skills Classes
Interjecting
It may seem rude to butt in, but in real life sometimes you need to leave
before someone has said their piece or just get them to be quiet! Good
classroom management involves giving your students the skills to stop the
class show-off hogging the limelight. And if the teacher is rambling on and
not making much sense, it’s only fair that the students have the language to
politely protest, by using phrases such as:
✓ Could I stop you there?
✓ May I interrupt?
✓ Excuse me!
✓ Sorry but . . .
✓ I understand what you’re saying but . . .
Some students of English sound a bit rude because they don’t know what to
say. When they use these expressions instead of putting their hand in front of
your face to stop you, the politeness factor improves immediately. Sadly, a few
people just are rude in whatever language they use, and giving them expressions like these just brings their personality to the fore.
Rephrasing
Instead of asking for repetition, you can teach your students to check
whether they’ve understood and prove that they’re listening by saying something like to following before putting what they heard into their own words:
✓ So what you’re saying is . . .
✓ Do you mean . . .
Summing up
When it’s time to signal the end of a conversation or highlight the main points
covered in a discussion, some useful little phrases, which students appreciate (especially in business English) come in handy:
✓ To sum up then . . ., or, in summary . . .
✓ In conclusion . . .
✓ So the point is . . .
Chapter 13: Setting Their Tongues Wagging: Speaking and Discussion
Planning a Discussion Lesson
In Chapter 6 I talk about production activities that encourage students to
communicate freely without you putting words into their mouths. Discussion
can form just one stage of a lesson that focuses on something else (using a
grammatical structure or some new vocabulary) or you make discussion the
main aim in itself. When you plan a discussion lesson you still need to have
presentation and practice stages, which I discuss in Chapters 5 and 6, and
then the discussion at the end. Even if the lesson is about discussion skills
such as introducing your opinion, there should still be interesting subject
matter for the class to talk about.
Choosing the right topic
An error many new teachers make is to expect students to put their heart
and soul into discussing something that they’d never even mention in their
own language. If you ask your students to have a five-minute discussion on
the difference between their own pencil and their partner’s, your lesson is
unlikely to be a roaring success.
Although it’s true that you need to find simple things for your students to talk
about, you can’t milk a topic beyond its natural length. So my best advice for
choosing the topic is to ask yourself a few questions:
✓ If you had to discuss this topic yourself, how keen would you be?
✓ For how long would you be willing to discuss it?
Personally, I’d be prepared to talk about pencils for two minutes and no
longer. So, be realistic. Your students’ enthusiasm and goodwill only go so far.
Give some thought to the age and backgrounds of you students too. For
example, with children ask them to talk about and role-play things that are
relevant to them such as cartoon characters and pop stars.
In general, topics with international appeal are great to get everyone talking.
A few famous people are so well known that you can bring them into discussions almost anywhere in the world: Michael Jackson, Jackie Chan, Queen
Elizabeth, the Beatles, Mickey Mouse and so on. Issues related to the environment, crime, family life, finding and keeping a job and love transfer very well
across ages and nationalities.
If you ask students to discuss their local issues, find out beforehand whether
it’s possible to translate the words they need into English. If the situation has
no real comparison in the English-speaking world, your students feel frustrated trying to express it.
193
194
Part III: Teaching Skills Classes
Creating structure in the discussion
A 20-minute discussion doesn’t just happen by itself in most cases. Unless
you happen to strike on a golden topic, you’re likely to find that the conversation dries up within ten minutes.
The best way to avoid this is by using a slow reveal method. By this I mean
that you can feed in the details one by one, adding another piece of information every so often. It’s like putting in another piece of the jigsaw puzzle.
For example, the class begins by discussing how the government should use
a piece of land. The options may include a shopping centre, a housing estate,
or a nature reserve. After the students give their initial reaction you can give
them information about the local population and problems that are prevalent
in the area. This may change their minds somewhat. Before they make a final
decision you can tell the students about the surrounding towns and other
building developments taking place nearby. By adding the information gradually students explore different perspectives and extend the dialogue.
You can also move people around. So, one group can think of all the pros
of an argument and another group all the cons. Then you can regroup the
class so that each group contains students with both pros and cons. Assign
a spokesperson for each group who has the responsibility of reporting to
the class the final decision of the group. You’ll find this more effective than
simply saying, ‘Talk about . . . ’.
Paying attention without taking over
While the students are having a good old chat, don’t just go off to the teachers’ room for a cup of tea. You need to monitor the dialogue so that you know
when to add a point to fuel the discussion.
Of course, this doesn’t give you licence to talk about all your opinions. It’s
time for the students to speak, remember.
However, as you monitor, you may notice that one student is rather too quiet
and needs a prompt from you to get involved. Apart from this, you also need
to have your pen and paper ready so that you can note errors and teaching
points for your feedback session or for a future lesson.
Chapter 14
In One Ear, Out the Other:
Learning To Listen
In This Chapter
▶ Listening twice for good measure
▶ Finding a format
▶ Getting students ready to listen
▶ Playing it again, Sam
▶ Assigning follow-up activities
W
hen students are able to listen to texts in English and get the sense
of them, they feel a real sense of achievement. But how can you train
your students to listen without them feeling overwhelmed? In this chapter
you find out what to have students listen for and which activities make for an
engaging listening lesson.
Structuring Your Lesson
When you teach listening skills, it pays to remember that it takes most people
a little time to tune in before they listen well. Students need to pay full attention and have had some practice time before they can cope with detailed
information in a foreign language. So, to help your students feel relaxed
and prepared you can begin with a warmer activity lasting a few minutes. It
doesn’t have to be related to the listening activities but is a short game or
puzzle that focuses the mind.
Then you need two activities based on the same listening text but the first
should be easier than the second. With the first activity you set the task and
let students, read, discuss or work on it. Then you play the recording for
them to listen to. After that there’s a feedback session in which the students
196
Part III: Teaching Skills Classes
compare their answers and discuss them with you. You follow the same order
for the second, more difficult activity. In each case the students should be
prepared for what they have to do before they listen. It’s up to you how long
the recording lasts but the second, trickier task should take longer and be
more detailed than the first.
Finally, have a follow-up activity that doesn’t involve listening to the recording again but is loosely related to it. If the follow-up activity lasts longer than
the two listening activities combined, it’s too long for a true listening skills
lesson.
Choosing a Listening Activity
The first question you may confront is the problem of what your students
should be listening to. If you use a course book, quite likely it’s accompanied by a cassette or CD with a simple cheesy dialogue. Great! But hold on.
Perhaps it’s better to give them real recorded conversations to set them up
for life outside the classroom. There are pros and cons on both sides, which I
lay out in the next sections.
Finding material from the real world
If you happen to be teaching in an English-speaking country or area, you
could, in theory, have your students engage in entirely authentic listening
by taking them out onto the streets. Realistically though, this isn’t your best
option, as you’ve no control over what your students hear in terms of grammar, vocabulary, slang or even good manners.
Having said that, a few real, predictable situations exist, which students can
manage with a little preparation. For example, guided tours around cities
and museums provide opportunities for quite extended listening. Tours are
reliable in that they tend to follow the same pattern each time despite being
a little longwinded. Another advantage of a fairly controlled situation like
that is that listeners can predict more or less what’s coming and this is a key
point. In the real world you usually know more or less what kind of information you’re about to hear. So it’s useful for you to use spontaneous, authentic
listening exercises, but they’re quite hard to find.
You rarely listen to anything without an expectation of what’s coming next. So
students also need a bit of preparation before they get stuck into a listening
task and they need a reason to listen. (The upcoming ‘Motivating students to
listen’ helps with expectations.)
Chapter 14: In One Ear, Out the Other: Learning To Listen
Short, authentic listening texts work because they provide students with a
clear example of real, live English and this is motivating for them because it’s
what they want to be able to do in the future. However, the activities are hard
to prepare and present challenges of unnecessary words and sounds. I give
more information on authentic listening texts such as CDs later in this chapter.
Normally your students are confined to the classroom where only your voice
provides a realistic listening situation. Being in front of your students is great
because apart from the words you say, you give other non-verbal clues.
The environment you’re in offers a great deal of context and meaning to the
language spoken there. After all, you don’t expect to hear an order for fish
and chips with a pint of beer in a fast food hamburger place. When you look
at the menu in such a place, you realise that there are fairly limited possibilities as to what the speaker can say.
In addition, the speaker’s body language varies according to the needs of the
situation. Most people use facial expressions such as smiles and frowns to
match their words and in addition, it’s normal to point at things you’re referring to or to use emphatic gestures to stress certain words.
Of course, a film can record the environment and the body language, which
is very helpful but the communication is pretty one-sided. Your students can
only respond to what’s said on screen. So a film is a little more authentic than
a tape recording (unless you’re practising phone calls or radio broadcasts).
If you’re anything like me, the idea of using a video camera, TV and or projector seems quite labour intensive. To do so you probably need a transcript
and exercise you’ve designed yourself. Some schools just don’t have the
budget for that kind of hardware anyway. Another problem is that when you
record people they get nervous and stop behaving naturally, which results in
bad acting and stiffness. After all that preparation you lose the authentic air
that you’d hoped to capture. But if you just leave the camera running until
the subjects forget it’s there – a sort of Big Brother approach – you may also
get a stream of word whiskers and pausing, which distracts the students.
Word whiskers are the meaningless things you attach to sentences to fill the
gaps when you don’t know what to say. They include um and err as well as
other annoying, repeated phrases. How much of this kind of dialogue do
your students need to understand anyway? Here’s an example of how native
speakers can really sound: ‘So I told her yeah. I went . . . I told her right . . . um
“You’re out of order!” You know what I mean though. Cause like, she really is’.
197
198
Part III: Teaching Skills Classes
Choosing the material from course books
Pre-recorded listening texts that accompany the course book are usually
designed to have students practise exactly the language or concept the
lesson plan teaches. These texts tend to appear in every one or two units of a
course book to balance out the four skills (reading, writing and speaking are
the other skills). Listening texts made especially for EFL are:
✓ Easily accessible.
✓ Appropriate to the level.
✓ Focused on the target grammar and structures.
✓ Free of slang, distractions and interruptions.
✓ Labour saving.
✓ The right length for the lesson.
✓ Usually accompanied by a tape-script.
Unfortunately they have some drawbacks too. Some of these pre-prepared
texts may be unusable because:
✓ The initial expense for the CD/DVD/cassette is often quite steep.
✓ The dialogues are often so carefully staged that they sound fake or
patronising.
✓ They give a false impression – in real life people aren’t so clear and
concise.
✓ They may not cover the situations that students actually need.
Ultimately the teacher needs to look at the circumstances of each class and
consider the time and resources available before deciding which kind of text
to choose.
Using CDs and DVDs for
authentic listening
Music, films, podcasts (a video or audio file you can download from the
Internet and listen to on your computer, MP3 or other similar device) and
broadcasts are very popular with students, except the odd few who prefer
grammar tables and ‘serious’ work. Some broadcasting companies have websites that you can access to look through their archives of programmes and
download free of charge.
Chapter 14: In One Ear, Out the Other: Learning To Listen
Try www.bbc.co.uk/iplayer for fairly current BBC shows first broadcast
on TV and radio. I also use Channel 4 programme archives, which are free.
Access www.channel4.com and register for their 4oD service, which offers
a wide variety of shows to download. Another favourite is www.lbc.co.uk
offering podcasts from their London radio station. It’s a talk station that
invites ordinary people to call in and discuss current affairs. You can scarcely
find a more cosmopolitan bunch than the residents of London so there’s still
an international feel to the programmes.
In a lesson you can only usually deal with a few minutes of listening text at a
time, so select clips from longer recordings that are appropriate to the level
and interesting to analyse. If your students have Internet access you can set
longer listening tasks as homework. They can listen to extracts of 20 minutes
or so in preparation for a class discussion the following lesson. Although
students do sometimes become anxious when they hear the unfamiliar, texts
downloaded from the Internet are easy for the students to access by themselves for personal study at another time.
Accommodating accents
Hearing authentic listening material designed for native speakers is very
motivating for your students, but you face a serious problem where there are
many accents to deal with.
When you teach pronunciation, you generally use whatever is considered
to be Standard English in your country and your own accent as models.
Suddenly you realise that in the TV clip you want to use there’s a heavy
Newcastle accent, some Liverpool dialect and a New Zealand speaker too.
Well, there’s a difference between recognition and imitation.
A good way to deal with unusual accents is by adapting a tape-script for your
students. This means turning it into a ‘fill in the gaps’ type exercise where
students can read along and just fill in certain words pronounced in a fairly
regular way. Or, they have to put complete lines of the dialogue into the correct order. So even if they don’t catch every word just by listening they can
still complete the task with the support of their reading skills. The accents
then become incidental. In both cases you’re connecting listening and reading so that students learn to match the sound and spelling of the language.
When you model pronunciation you actually want them to speak like you
or as similarly to you as possible. When you expose your students to other
accents, however, you help them to get used to the reality of English as a
diverse and global language.
Accents are different from dialects, which feature entirely different vocabulary
and grammatical structures.
199
200
Part III: Teaching Skills Classes
Correctness in pronunciation is all to do with whether or not people understand you easily. By demonstrating a range of accents students become more
accepting of this.
Coping with colloquial language
The extent to which you expose students to informal, colloquial speech may
well depend on what they eventually intend to do with their English. For
example, if you’re teaching business English to students who need to work
on an international scale and not necessarily with native speakers of English,
they probably won’t encounter too many colloquialisms. Compare that situation with Korean students preparing to attend a course at university in
Scotland. In the second case, the students are likely to face a constant stream
of colloquialisms so it’s worth them doing listening activities that get them
familiar with everyday speech.
Clichés, expressions that people use far too much so have no originality and
little meaning, may be one of the first things to deal with. Footballers are
great for this and here are a few classics.
✓ To be perfectly honest.
✓ At the end of the day.
✓ For the record.
✓ With all due respect.
✓ Lessons will be learned.
None of these expressions is likely to carry the main message in the sentence
or dialogue. Pointing this out, and having students learn to listen out for key
words and particular information, makes them feel better about knowing
what they can safely ignore.
Slang words are a little different because sometimes they’re essential to
understanding the message. For example, in the phrase,‘Give 20 quid to the
bloke in red’, both bloke and quid are slang words essential to the meaning.
So you may want to provide a glossary:
Quid: British English meaning one pound sterling (£1).
Bloke: British, Australian and New Zealand English meaning a man.
If students are likely to need the slang words in future, teach them how to use
these appropriately. If, on the other hand, the students only need the slang
words to understand this text, just provide a glossary for them and leave it at
that.
Chapter 14: In One Ear, Out the Other: Learning To Listen
Authentic listening texts give students a chance to hear how normal, natural
intonation really sounds. Sometimes students make so much effort that they
sound rather over the top. Or alternatively they make no effort and sound
dead pan.
Films with robots such as the ‘Terminator’ series help students to hear the
effect of flat intonation.
Whetting Students’ Appetites
In the real world listeners usually have a sense of purpose for listening. So
before you play your text, you need to prepare your students.
Motivating students to listen
Occasionally teachers bring in a much loved reading or song and proceed with
great enthusiasm, only to find that the students have no idea what all the fuss
is about. This is why some initial talking up of the activity is ideal – because it
raises anticipation. You may have to add some cultural background as well to
aid comprehension.
Before you turn on the machine, provide some information on:
✓ Context and background: Talk to the class about the speakers, the situations referred to, the time period, location and so on. Not only does
this generate interest but it reduces the amount of work the students
have to do. With some basic questions about the text already answered,
they focus more on the specific task you set.
If, for example, your listening text is a Beatles number, you can begin
with pictures of the Fab Four and you can find out what the students
know about them. You can ask which Beatle is which? What’s so special
about them? Are they still alive and if so what are they doing now?
✓ Type of listening text: As there’s a vast array of text type to choose
from, try giving the students a multiple choice task by asking them, for
example, to identify whether they’re listening to a poem, story or play.
You can also talk about general features of the genre you’re dealing
with so that students can pay particular attention to word play such as
rhyme and alliteration. They can also listen out for the way the structure
identifies the genre. For instance, Once upon a time followed by the past
simple tense is almost certainly a fairy tale.
201
202
Part III: Teaching Skills Classes
✓ The language in the text:
You may want to remind them of what a particular tense sounds like
with its contractions – for example, I had done it = I’d done it – or what
form an irregular verb takes. Then there’s vocabulary. If the text contains tricky words, get them out of the way beforehand by giving the students a list of the words and a dictionary.
Another way to keep students’ motivation high is to remove the problem
of trying to listen while grappling with an unclear task at the same time.
So before the listening text is played make sure that students understand
exactly what they have to do and that they’ve read the relevant questions
thoroughly. Allow the students to familiarise themselves with the worksheet,
if there is one, and ask questions beforehand.
Of course, during the listening stage the students are fairly passive so the
pre-listening stage can give them the opportunity to discuss and compare
opinions with their classmates. An extended period of listening quietly is just
too much for some of the more active students. Fidgety students only disrupt
things if you don’t allow them to be more active for a time.
After you’ve done a few of these activities the class should be ready to tune
in and listen.
Running through some pre-listening tasks
In this section, I give you some examples of what you can do in the pre-listening stage.
Predicting
When students predict the answers to specific questions or overall content it
really raises their curiosity.
If students have an exercise where they need to fill in the gaps, they should
first of all try to predict what kind of word is missing. For example, is the word
a noun or a verb? Is it a place, a number or a name? This helps them to listen
for a few words.
You have an extract from a BBC interview with Madonna. After a short class
discussion about favourite pop stars you introduce the activity by saying
‘You’re going to listen to an interview with the international superstar
Madonna. Predict which three of these topics the journalist asks her about:
✓ Her divorce
✓ Adoption
✓ Writing children’s books
Chapter 14: In One Ear, Out the Other: Learning To Listen
✓ Women in the music industry
✓ Living in London
Have them compare choices with a partner and say why they chose these
topics.
Making predictions about the text they’re going to listen to gives students a
reason to listen because they want to know if they were right.
Brainstorming
You can give students a time limit, say two minutes, and then get them to jot
down all the words they know on a particular topic. Actually, they can write
them straight up on the board for you.
So, for example, before a radio weather report, ask students about weather
words: ‘How many words can you think of for this kind of weather?’
You can then fill in any gaps in their knowledge by pre-teaching some extra
words. You’re then at least able to see if they remember the trickier words
that are to come in the text.
Discussing
Class, group or pair discussions introduce the topic and feed the imagination.
(I talk more about promoting discussion in Chapter 13.)
For instance, before listening to a phone conversation about restaurant bookings students can talk about their own experiences in small groups, responding to questions like:
When was the last time you ate out?
Did you book a reservation?
Did you have a good time? Why/why not?
Questioning
Students can also decide what they hope to gain from the text. I find this
useful for students of academic English who may have to listen to longer lectures in the future.
You can ask students to make a personal connection to the topic. For example, if they’re going to hear a short lecture on dinosaurs, you can ask, ‘What
would you personally like to know about these amazing creatures?’
If the lecture doesn’t answer what students want to know, they have a readymade homework project to write about or give a presentation about.
203
204
Part III: Teaching Skills Classes
Come Again? Repeating the Text
In most cases you play listening texts twice within the lesson. The first time
students get the idea of what the text is about and on the second occasion
they listen for more detail.
Listening for the basic idea
A task or activity aimed at getting the gist should be relatively easy but not
obvious. So if you’re presenting a Madonna interview, there’s no point asking
‘Who is Madonna?’ It’s not even necessary to listen to the text to get the
answer. However, if the students had previously predicted which questions
the interview would cover, the task may be to listen to the interview and
check whether they were right.
Listening and responding to a visual image is a useful way of exercising listening skills because students don’t get tangled up with reading and writing,
which may create anxiety or distraction.
Listening activities should practise just that, listening. Avoid trying to test
reading or writing skills at the same time by using complicated grammatical
structures or unnecessarily difficult vocabulary in the questions.
Figure 14-1 is an example of a business English activity I devised along with
part of the tape-script. The organisation charts in the figure accompany a
listening text about the structure of a company. Students listen for gist and
decide which chart best fits the description they hear.
The tape-script is here:
Mrs Smith: Have you prepared the letters?
Paul: Yes Mrs Smith, but I gave one to Mike.
Mrs Smith: Well, you’re a manager too, Paul. You should be doing your
own paperwork.
Paul: I know but the client wanted a 35 per cent discount and I’m only
allowed to offer 25 per cent. Only you and Mike can agree to bigger discounts so I passed it on to him.
Mrs Smith: I see. Well I’ll speak to Mike later. Don’t forget that he and I are
coming to see you and John tomorrow to discuss the sales figures.
Allow students to get the point through what the speakers infer rather than
what they say explicitly, as long as it’s not too subtle.
Chapter 14: In One Ear, Out the Other: Learning To Listen
Owner Mrs Smith
Manager Richard Taylor
Manager Paul Jones
Manager Mike Smith
Owner Mrs Smith
Figure 14-1:
A business
English
activity.
Area Manager Mike Smith
Manager Paul Jones
Manager Richard Taylor
Manager John Jones
Other simple forms of questions to get at the main idea of a dialogue may be:
✓ Do the speakers in the dialogue agree with each other or not?
✓ How many speakers are there?
✓ Where do you think they are?
Get students to tick off the things they hear, using words or pictures.
I had a class of children listen to the story of Red Riding Hood. They knew the
story but didn’t realise what it was because they weren’t able to translate the
title. They were very keen to find out if the English language characters did the
same things as the characters in their version. I gave them a worksheet with
the words grandfather, wolf, big ears, big teeth and big feet on it and told them
to tick the things they heard in the story.
Listening for detail
After the students have a chance to listen to the text once and get the gist of
it, you can prepare to go a bit deeper by setting a more detailed listening task
for the students to tackle while listening to the recording a second time. This
time the students can listen for more specific information based on particular
expressions the speaker uses.
205
206
Part III: Teaching Skills Classes
Listening activities to try
Here a few suggestions for you to try in your
listening skills lessons:
✓ Working with a picture. Students can
examine a picture to see if it matches up
to the listening text. Does the picture show
the correct number of people in the right
place? Is each person in the picture wearing the clothes the listening text described?
In a picture story students can choose the
picture that doesn’t fit. They may have four
pictures that show scenes from a story but
one picture shows the same characters
doing something that doesn’t happen in the
story. By listening carefully the students
can weed out it out.
✓ Labelling: Students put labels on various
parts of a diagram based on what they
hear. Suppose the listening text describes a
machine with four of five distinct parts and
only one part is labelled on the diagram. As
the students listen to the text they hear that
Part A is rectangular not round, or that Part
D is the only one connected to Part C on the
right. By listening to the text the class can
identify and eliminate the various parts.
✓ Following a map: After a description or
directions, X can mark the spot.
✓ Short teacher monologue: Tell a story about
an episode in your life while students take
notes. They can ask you questions about it
afterwards or retell the story to each other.
✓ Traditional stories: Folk tales and fairy stories
are great because there are often similar
ones in other cultures so the students may
want to tell their own afterwards. If you
can’t find a professional recording, get a
friend to read and record it for you.
✓ Songs: Music is great for fixing words in
your mind. It’s a painless way to practice
grammar. I recently used Beyonce’s ‘If I
Were a Boy’ to practise the second conditional tense.
✓ Physical response: Get students to follow
instructions through movement. They can
practice words like prepositions and parts
of the body. They can also manipulate
objects in accordance with the listening
text.
✓ Dictation: This traditional activity can be livened up by dictating a diagram for students
to draw.
✓ True or false: Have a series of true or false
comprehension questions after listening for
detail.
✓ Gap fill: Leave gaps in the tape-script or in
the summary you prepare.
✓ Putting information in order. The listening
text may describe a process such as baking
a special cake. On the students’ worksheet
you list all the stages in the wrong order.
As they listen, the students can number the
stages of the process from first to last.
✓ Complete information on a timetable or
schedule.
Students don’t need to understand every word. After all, in real life we often
just let phrases go over our heads. You may understand a particular expression only after hearing it many times – this is a natural way to acquire language. So instead of analysing the text to death, just choose specific things
you want to highlight.
Chapter 14: In One Ear, Out the Other: Learning To Listen
Keep in mind that you always set the task before playing the text for the
second time. Then the students listen, and have a little time to reflect on
their answers. After that, have a feedback session. You can carry out reflection and feedback in a variety of ways but it should happen immediately after
the listening. It’s quite tricky for the students to recall the nuances of what
they’ve heard on the following day, for example.
Your task may be comprehension questions based on the grammar and
vocabulary in the text. It doesn’t have to be so traditional though. From time
to time you can use a text to focus on pronunciation and intonation too. The
objective can be for the students to listen carefully and then read a section
aloud themselves.
Look for the nearby sidebar, ‘Listening activities to try’ for examples of activities to use.
Planning Follow-Up Activities
Round off your lesson with a follow-up activity. This helps to conclude the
lesson in a balanced way because not everyone is good at learning through
listening and some may not appreciate your chosen listening text as much as
other classmates. After all, students have different styles of learning.
When you finish with an activity that focuses on a different skill, more students have a chance to shine. You can personalise a theme from the listening
text by having students do a quick writing exercise based on the topic the
listening text explored.
After having the class listen to an interview with Madonna, you can say something like, ‘Now that you’ve listened to an interview with an American artist, I
would like you to think about a very popular musician in your country. Make
notes about this musician for two minutes including the reason why she is so
popular in your opinion and say whether you have any music by her at home.
Then give a 90-second presentation to your group.
This kind of activity is also appropriate for written homework and your followup activity may include a plan that leads to composition writing.
Other ideas for follow ups are:
✓ Making predictions: Ask students to speculate about what happened
after the clip finished. This kind of question lends itself to role-plays, students preparing quiz questions, and story writing.
207
208
Part III: Teaching Skills Classes
✓ Reading a book related to the listening text: Listening texts that
involve a popular personality or event are useful because you can often
find other material based on the same topic, such as biographies or conspiracy theories. Books and articles maintain the students’ interest after
a relatively short listening text. They provide more cultural input and an
opportunity to put to good use the vocabulary they encountered during
the listening tasks.
Films are often based on books and if you use a movie clip for the listening activity, you can check whether the book exists as a graded reader (a
short book written especially for EFL students at a particular level) and
get students to compare the film and book version of a particular scene.
Ask whether the director did a satisfactory job. They can try directing
another scene to be acted out by classmates.
Part IV
The Grammar You
Need to Know – and
How to Teach It
T
In this part . . .
eaching grammar needn’t be a slog, even if you’re not
much used to it yourself. While this book doesn’t
claim to be a definitive grammar textbook, Part IV gives
you the knowledge you need to be able to teach grammar
effectively and suggests ways to make grammar teaching
interesting.
Basic sentence structure, the use of adjectives and
adverbs, and the many and various verb tenses which
help to make learning and teaching English such a joy –
they’re all here. And of course I show you how to deliver
the seemingly driest factual info with a dash of humour
and fun.
Chapter 15
Stop Press! Student to Deliver
Sentence
In This Chapter
▶ Looking at the building blocks of sentences
▶ Understanding prepositions and articles
▶ Describing adjectives and adverbs
▶ Joining up with conjunctions
A
round the world there are thousands of languages, each with its own
grammatical system. This means that students can easily get it wrong
when they try to put words together to make a sentence in English. So in this
chapter you find out about the structure of sentences. Although entire grammar books devote themselves to the subject, this section introduces a few
points that students can use to improve spoken and written fluency.
English is basically an SVO language – in a simple sentence it’s subject first,
then verb, then object.
Starting with the Basics: Subjects, Verbs
and Objects
‘Things’ and ‘doing words’ are the explanations for nouns and verbs you may
remember from your school days but you have to be a lot more detailed than
that to help your students. Actually, nouns are words that tell you the names
of people, places and things such as, office and desk. A verb is word that
describes an action such as to laugh and to watch. Verbs can describe a state
of being too, such as I am happy. Then there are pronouns, which are words
you use to replace nouns in a sentence such as it and they. I go into these in
detail in the following sections.
212
Part IV: The Grammar You Need to Know – and How to Teach It
Thinking about subjects
A subject is basically a word telling you what or who is doing something, or
what thing, or who, the sentence is about. For example:
Peter loves ice cream.
The word ‘Peter’ is the subject word because he is the one who ‘loves’.
You use the subject pronoun when you don’t say the name of the person or
thing. For example:
He loves ice cream.
Instead of saying ‘Peter’, the subject word is he, which is a subject pronoun.
By the way, subject pronouns are sometimes called personal pronouns and
here they all are: I, you, he, she, it, we and they. You should point out that ‘I’
is always a capital letter.
Students may think that one or two subject pronouns are missing when you
first write them out like this. That’s because in lots of languages there are different versions of ‘you’ depending on whether you’re talking about one person
or more than one, or whether you’re speaking to a respected person or a pal.
In addition to this, in some dialects and varieties of English, people say ‘you
all’, ‘you guys’ or ‘youse’, but you don’t teach these as standard English.
Some native speakers use the subject pronoun ‘one’. For example they may
say, ‘One drinks white wine with chicken’. Although the sentence is correct, it
doesn’t sound very modern and if students say it they can sound rather pretentious. So you’re better off not teaching ‘one’ as a subject pronoun unless
your students come across it and ask you for an explanation. Encourage them
to use ‘people’ or ‘you’ instead.
Students get mixed up for various reasons when they use subject words. For
example:
✓ In some languages you can make a sentence without using a subject
word at all. So, you can effectively say: Peter loves ice cream. Prefers
vanilla.
Of course, this second sentence is incorrect in English because in
English you must have a subject word, but it may well look fine to a
student.
✓ Sometimes the subject word is not in first place in a sentence. Of course,
that’s where students expect it to be so they panic when it’s not there.
Chapter 15: Stop Press! Student to Deliver Sentence
In the sentence, ‘Yesterday afternoon Rex went to the supermarket’, the
subject is Rex not yesterday afternoon, which appears first in the line up.
In this case it’s important to show the connection between Rex and the
verb – Rex is the person who went.
✓ Students repeat the subject word instead of using a subject pronoun. So
for a student, Rex’s story may continue: ‘After Rex finished in the supermarket Rex walked in the park. Rex got a sandwich in the café and Rex
ate it on the grass.’
It’s therefore important for students to practise replacing the name of
the subject word with a pronoun once they’re clear about who or what
that is. As students progress, you also need to point out that later in the
sentence it’s possible to leave the subject word or pronoun out, as long
as it’s there in the first part and the meaning is obvious. So they can say,
‘Rex got a sandwich in the café and ate it on the grass’ instead of ‘Rex
got a sandwich in the café, and Rex ate it on the grass’.
Activating verbs
A verb is a word that describes an action. It can be manipulated into different
tenses to show when something happened. When you talk about a verb in its
original, infinitive form, you put ‘to’ in front of it.
Finding verb forms
A main verb can be manipulated into different forms to show which tense it’s
in or what purpose it serves in a particular sentence. (I talk about auxiliary
verbs in the next section.)
Verb forms are:
✓ Infinitive: The infinitive form of the verb is the original form before it
changes to make a tense. It’s the form with ‘to’ in front of it, for example
‘to play’. You usually need to know this form to look up the meaning in
the dictionary, although you cut the ‘to’ off.
✓ Gerund or present participle: This is the verb with ‘ing’ on the end. So
the gerund of ‘to play’ is ‘playing’.
✓ Past simple: The past simple is a particular tense that describes completed actions in the past. Some verbs have regular endings in the past
simple. You add ‘ed’ to the end (or just ‘d’ to a verb ending with ‘e’
already). For example, the past simple of ‘play’ is ‘played’.
Many verbs are irregular though, so they change a lot in this tense. For
example: say /said.
213
214
Part IV: The Grammar You Need to Know – and How to Teach It
✓ Past participle: When you use a passive sentence (‘the book was written’ instead of ‘someone wrote the book’) you use another form of the
verb called the past participle. You also need this form when you make
perfect tenses. For example: I have seen it (present perfect), Bob will
have done it (future perfect), Kenny had drunk the beer (past perfect) .
✓ Third person singular of the present simple: When you write a sentence using he, she or it in the present simple tense, you need to put ‘s’
(or ‘es’) at the end of the main verb – He plays guitar.
A verb table is a necessary but hated part of kit for EFL students. It consists
of a long list of irregular verbs (verbs that don’t conform to usual patterns in
English) and you usually find verb tables at the back of course books and in
dictionaries for students to memorise or refer to. Verb tables are usually written in three columns:
infinitive
past simple
past participle
(to) sing
sang
sung
Helping out with auxiliary verbs
Some verbs don’t have much meaning all by themselves but when you put
them with another verb, a main verb, the sentence has a new shade of meaning. Or even if the verb can be used alone, when you put it in a sentence next
to the main verb you can construct a tense.
In the sentence, ‘I am drinking coffee’, drinking is the main verb and am has no
real meaning; it’s just there to make the present continuous tense so you know
that the action is happening now.
The auxiliary verbs we use in the English language are:
✓ to be
✓ to do
✓ to have
✓ may*
✓ might*
✓ must*
✓ ought*
✓ shall*
✓ should*
✓ will*
✓ would*
Chapter 15: Stop Press! Student to Deliver Sentence
The verbs marked with * never change form or tense. By this I mean you
can’t add anything to the end of them. You don’t say, ‘He shoulds go’, for
example.
Others can change because they’re sometimes used as main verbs, such as to
have (has, had).
In the following sentences I’ve italicised the auxiliary verbs. They help the
main verb in bold.
✓ I have finished.
✓ They are working.
✓ Can you speak French?
Recognising regular and irregular verbs
Lots of verbs in English are irregular. They don’t follow the same patterns as
most verbs, especially in the past simple. I discuss the past simple in Chapter
16 – it’s the tense we use to say what happened yesterday, for example. Most
verbs add ‘ed’ in the past simple, such as ‘looked’ and ‘washed’. The irregular
verbs don’t change in this way, for example, ‘wore’ and ‘swam’.
Probably the most important verb and the trickiest one to explain is ‘to be’.
Fortunately, most other languages have an equivalent verb so you don’t really
have to explain its meaning but rather demonstrate how it operates in English.
It’s the verb with the most changes and exceptions – am, is, are for example.
Subject Pronoun
Present Simple
Past Simple
I
am
was
You
are
were
He/she/it
is
was
We
are
were
They
are
were
I talk about the present simple and past simple tenses in Chapter 16.
The gerund or present participle of to be is being. The past participle of to be
is been. I explain the meaning of these gerund, present and past participles in
the following section.
215
216
Part IV: The Grammar You Need to Know – and How to Teach It
Shortening verbs with contractions
In English, sometimes you can make verbs shorter by omitting letters and
using an apostrophe instead. This is very common in conversation and
informal writing. You can’t use contractions in academic and formal writing
though.
am= ’m
I’m tall
is/ has= ’s
He’s here. He’s got a car
will= ’ll
We’ll help you.
have= ’ve
You’ve been there.
had/ would= I’d better go.
I’d like milk please.
are= ’re
They’re at work.
Not= n’t He didn’t come. Notice that when not becomes n’t it’s attached to
the verb and written as one word. Cannot becomes can’t.
Acting on the object
In the sentence: Peter loves ice cream,‘Peter’ is the subject word and ‘loves’ is
the verb. But what does Peter love? He loves ice cream. So ice cream is the
object word. It’s involved in the action. Peter may love other things too:
Peter loves her.
Peter loves eating.
Peter loves the fact that the town was lively.
All these endings are the object of the sentence.
In English you don’t always need an object word: ‘Peter loves’ is actually a
complete sentence in itself.
The main reason why students get confused with object words is because
they’re not sure where to put them in the sentence. In a simple sentence students can just follow the SVO (subject, verb, object) pattern. So even very
low-level students can usually manage sentences like
S (subject)
V (verb)
O (object)
The dog
brings
the newspaper.
However, what if the student wants to mention the owner of the dog? There
are now two objects.
Chapter 15: Stop Press! Student to Deliver Sentence
When you mention the person who receives the action, you’re talking about
an indirect object. An indirect object goes after the verb and before the direct
object: The dog brings its owner the newspaper.
The indirect object may be a thing not a person but it still receives the action,
as in: John made the book a new cover.
Placing an object with a transitive verb
However some verbs, called transitive verbs need an object. For example
the verb ’to drop’ is transitive. In the sentence, ‘I dropped the cup’, ‘I’ is the
subject, ‘dropped’ is the verb and ‘the cup’ is the object. If you’re not sure
whether or not a verb is transitive, use a dictionary to check. Transitive verbs
are listed with a T or tr in brackets next to the verb and the definition often
includes something or somebody to emphasise that you need a direct object.
Standing in with object pronouns
You use ‘her’ not ‘she’ as the object. So these are the object pronouns that
replace nouns and phrases:
Subject pronoun
Object pronoun
I
me
you
you
he
him
she
her
it
it
we
us
they
them
Proposing Prepositions
Prepositions are words that come before nouns and pronouns and show how
words in a sentence relate to each other in terms of amount, direction, time,
place, cause, or manner. Here are a few examples:
✓ Prepositions of manner: by, via
✓ Prepositions of amount: about, over
✓ Prepositions of time: before, after
✓ Prepositions of direction: into, towards
✓ Prepositions of place: next to, in front of
✓ Prepositions of cause: because, due to
217
218
Part IV: The Grammar You Need to Know – and How to Teach It
Unfortunately, prepositions don’t translate very well into other languages.
Some have fewer; some have ‘postpositions’ that go after the noun and some
just use different expressions entirely. Be prepared for a lot of groans from
students whenever they have to get the right preposition because in many
cases they simply have to learn the whole phrase by heart .
When an expression needs a particular preposition in a sentence, you should
highlight that to students. For example:
to marry: to be married to someone.
to agree: to agree with someone or something.
Introducing Articles
Articles appear before nouns in a sentence. Fortunately for students there are
only a three:
✓ A: The indefinite article.
✓ An: The indefinite article before a vowel sound only.
✓ The: The definite article.
You can’t teach the students that ‘an’ comes before a vowel. You need to say a
vowel sound or phoneme because they to need to rely on pronunciation, not
spelling. For example:
a fire
an aeroplane
But:
a university /junivsitii/
an honest man /ɒnist/
Although there are only three articles, quite a number of rules surround
them.
Teach the rules for articles whenever you teach the vocabulary associated
with them. It’s really difficult for students to remember lists of rules but they
get a feel for what sounds right if they learn whole phrases. For example, you
teach ‘to have dinner’ instead of just ‘dinner’, and if the students tend to make
errors by inserting an article, you can write it this way on the board: ‘to have a
dinner’ and cross out the ‘a’.
Chapter 15: Stop Press! Student to Deliver Sentence
Using the indefinite a/an
You use the indefinite articles for non-specific singular nouns, in cases where
you’re referring to any of the items within a group. For example: A pet is for
life.
Use ‘a’ or ‘an’ for these situations:
✓ Jobs: I’m a teacher.
✓ Religions and nationalities in the form of a noun: I’m a Hindu. I’m a
Briton.
✓ Something you’re talking about for the first time: I met a doctor at the
party.
✓ With what a/such a and a singular noun: What a shame!
✓ Only one: There’s a Briton and two Brazilians in the office.
Getting specific with ‘the’
By using the definite article, you make clear which particular thing you’re
referring to. For example: This food is for the pets.
Use ‘the’ for these situations:
✓ Specific things or things mentioned before: In the following example a
refers to any book but the refers to a particular one: I wanted a book so I
chose the one on the middle shelf.
✓ In geography for the names of rivers, oceans, seas, and also unique
places: The Thames is beautiful today. That country is near the equator.
✓ Superlatives: This one is the best. This is the most expensive.
✓ Ordinal numbers: This is the first time.
✓ The activity of playing an instrument: She plays the saxophone.
✓ An entire group of people or animals: The Chinese seem industrious.
✓ Decades: I was born in the seventies.
✓ When there’s only one of something: The sun was shining when the
Prime Minister met the Queen.
✓ Republics and kingdoms: the United Kingdom.
✓ Countries made up of separate states, islands and so on: the Caribbean,
the USA.
219
220
Part IV: The Grammar You Need to Know – and How to Teach It
Foregoing the article altogether
Sometimes you don’t need any article at all in English, whereas in other languages you do. Here are some examples of nouns without articles that may
surprise your students.
✓ Very general ideas: People love humour.
✓ Countries: I’m off to France.
✓ Languages: I speak Gujarati.
✓ Meals in general: I have dinner quite early.
✓ People’s names: Queen Elizabeth arrived.
✓ Single mountains and lakes: Mount Fuji is huge.
Describing Adjectives and Adverbs
Once your students have learnt the basic building blocks of sentences in
English they need to work on making them a little more interesting, which is
where modifiers come in.
Sprucing up a noun with an adjective
An adjective is a word you use to give more information about a noun or pronoun in a sentence. You can use an adjective to describe, identify or say how
much or many in relation to a noun.
When you use a noun in a sentence, it’s more interesting to describe that
noun and give an idea of what it’s like.
The simple sentence, She sits on the sofa is grammatically accurate but rather
dull. Although the student who wrote it may feel content, you can get him to
identify the noun and imagine the details about it, by asking questions about
it: What colour is the sofa? What is it made of? How does it feel? and so on.
An improvement would be: She sits on the cheap, black sofa. The sentence is
already more descriptive because there are two adjectives, cheap and black.
In English, words made from nouns and verbs but with ‘able’ at the end are
generally adjectives. For example, ‘peace’ is a noun but ‘peaceable’ is the
adjective and ‘adore’ is a verb but ‘adorable’ is the adjective.
Chapter 15: Stop Press! Student to Deliver Sentence
Running through the types of adjectives
Adjectives come in three main flavours: describing, identifying and quantifying. The following sections take you through the uses of each variety.
Describing
Many adjectives tell you what the noun is like. For example, instead of just
talking about a bag, you can say that it’s a large, leather bag. The descriptive
adjectives tell you that the bag is large and leather.
Some examples of descriptive adjectives are:
✓ Colours: Blue, turquoise, pale.
✓ Materials: Woollen, metallic, granite.
✓ Shapes: Oval, rectangular, round.
✓ Opinion: Nasty, tremendous, absurd.
✓ Tastes: Bitter, tasty, sweet.
✓ Comparatives and superlatives: Better, best, most exciting.
✓ Nationalities: British, Jamaican, Irish.
Identifying
At times the adjective tells you who a noun belongs to. These words are
called possessive adjectives. So rather than saying the jacket of my brother,
you can use ’s after the name of the person who owns something (my brother’s jacket) or use a possessive adjective, his jacket.
The possessive adjectives are:
✓ My
✓ Your
✓ His/her/its
✓ Our
✓ Their
Or you can point out which noun you’re referring to by using these adjectives, which are a little more specific than using an article:
✓ This
✓ These
✓ That
✓ Those
221
222
Part IV: The Grammar You Need to Know – and How to Teach It
Quantifying
Another use of adjectives is to say how many of an item there are.
Adjectives related to quantity can range from a simple number (one, a thousand, a million) to words like these: each, every, either, neither, both, any,
some, none, more, many, all, few and enough.
Using adjectives in order
Once students get the hang of what an adjective is, they put them in all over
the place. Unfortunately, that creates another problem because sentences
can sound somewhat odd if you don’t put the adjectives in the right order.
The sentence ‘There’s a German, old, ugly car in the street’. is very easy to
understand but just doesn’t sound right. Surely it should be: ‘There’s an ugly,
old, German car in the street’.
You need to teach your students a rule for lining up their adjectives. In reality, you can’t cover every line up of adjectives possible, but Table 15-1 offers
a guide which works most of the time.
Table 15-1
Whose/
Which
a
his
these
How
Many
few
ninety
two
Example of Adjective Order
Opinion
great
awful
rude
Size/
Shape
oval
narrow
tall
Age
Colour
Origin
old
new
young
golden
white
bright
Japanese
American
Tribal
What It’s
Made Of
acrylic
straw
ice
What
It’s For
coffee
driving
bath
For example you can describe items this way: those twenty fantastic, beige,
ceramic flower pots and my funny, blue, Aboriginal wall hanging.
Expanding on verbs with adverbs
Adverbs are words that describe verbs. They say how the verb is carried out
and, like adjectives, they make sentences more interesting. The same accurate
but dull sentence used in the section on adjectives – She sits on the sofa – offers
no evidence of how she sits. You can ask the student for more information, and
may be presented with: She sits elegantly on the sofa.
Now you can imagine how she sits because of the word ‘elegantly’, which is
an adverb. She may also sit lazily, well or sleepily as these are all adverbs too.
Chapter 15: Stop Press! Student to Deliver Sentence
You can point out to students that most adverbs in English end with ‘ly’. But
note that many adverbs don’t. ‘Fast’ and ‘hard’ don’t change whether they’re
adverbs or adjectives and the adverb form of ‘good’ is ‘well’.
Sometimes adverbs describe an adjective or even another adverb. In the
next examples the italicised adverb describes the bold adjective and adverb,
respectively:
The statue was really huge.
She does that particularly well.
Looking at types of adverbs
The first adverbs students learn are often adverbs of frequency that tell you
how often something takes place. They’re words such as:
✓ Always
✓ Generally
✓ Often
✓ Sometimes
✓ Occasionally
✓ Hardly ever
✓ Never
Other kinds of adverbs describe:
✓ Time: nowadays, today.
✓ Degree: quite, rather.
✓ Place: somewhere, here.
Truly, madly, deeply: The rules of using adverbs
What often confuses students is the position of adverbs in a sentence.
Most adverbs go after the verb in a sentence if the adverb is describing the
verb. For example:
They play professionally.
On the other hand, adverbs that describe transitive verbs go after the object
of the verb. I discuss transitive verbs earlier in this chapter. For example, to
raise is transitive because you always speak about raising something in particular. In the following sentence the object is the cup:
The winner raised the cup triumphantly.
223
224
Part IV: The Grammar You Need to Know – and How to Teach It
When the adverb shows how strong or weak an idea is (these are called
adverbs of degree or intensifiers), you put the adverb before the word it
refers to. For example:
How warm is it? It’s fairly warm.
However, enough goes after the word it refers to:
It’s warm enough.
Adverbs of time can be used in different positions in a sentence. It’s easier for
students to go by the rule of thumb that you should put them at the beginning or end of a clause (part of a sentence with its own subject and verb):
This afternoon I’m free/ I’m free this afternoon.
Adverbs of frequency go between the subject and the verb as a general rule: I
always speak to her.
When the main verb is ‘to be’, in one form or another, the word order is different because the adverb goes after the verb: I am usually busy.
In some tenses there’s a main verb and auxiliary verb. You fit the adverb
between the main verb and auxiliary verb, even if the main verb is a form of
‘to be’: They were always talking. I have often been here.
Although you can use adverbs in other positions within a sentence, you
should aim to give your students a model that allows them to get it right most
of the time. They’ll notice other possibilities in time.
Connecting with Conjunctions
You use a conjunction to join two sentences or even two words together.
Some of the more common conjunctions are: but, and, or/nor, for, yet, so,
because, while, since.
Conjunctions can be just one word, but sometimes they’re two words. For
example: ‘so that’ – and even three, such as ‘in order that’.
Differentiating conjunctions
The family of conjunctions is composed of three members:
Chapter 15: Stop Press! Student to Deliver Sentence
✓ Coordinating conjunctions join two sentences together when each sentence is as important as the other. So you can teach students to change
from writing two short sentences to one longer one:
She sits on the sofa. She reads her book.
She sits on the sofa and reads her book.
Michael plays well. He can’t jump high.
Michael plays well but he can’t jump high.
✓ Subordinating conjunctions work in sentences with two distinct parts
where the understanding of one part depends on understanding the
other:
We must go now. We might be late.
We will be late unless we go now.
✓ Correlative conjunctions work together in pairs, so you can’t usually
use one without the other:
I don’t want milk. I want sugar.
I want neither milk nor sugar.
Weaving conjunctions into
writing and speaking
You teach each individual conjunction one by one. For example, ‘and’, ‘but’
and ‘because’ usually appear in elementary level course books, then when
students get used to longer sentences and varied tenses they learn more
sophisticated conjunctions such as ‘whereas’ and ‘however’.
Rules surround each conjunction too, which is all the more reason to work
through them slowly and progressively, but once you’ve presented a few, the
best way to get students using them frequently is by using practice exercises.
Giver your students sentences with lists and have them write them using ‘and’
before the last item:
I like tea/coffee/hot/chocolate. Answer: I like tea, coffee and hot chocolate.
He went /bank/ park/ friend’s house. Answer: He went to the bank, the
park and a friend’s house.
She is /big/bold/beautiful. Answer: She is big, bold and beautiful.
225
226
Part IV: The Grammar You Need to Know – and How to Teach It
You can have students fill in the gaps with an appropriate conjunction:
I love going to the cinema . . . I don’t think I can go tonight . . . I have
no money. . . . my dad lends me a few pounds, I will have to stay home.
Money is going to be a problem . . . I start my new job.
In addition to written exercises like these you can put individual conjunctions
on cards and get students to come up with a sentence about their own lives
including the word you give them.
Chapter 16
Feeling Tense? Sorting Out
Verb Tenses
In This Chapter
▶ Naming the tenses
▶ Getting comfortable in the past and present
▶ Being perfectly content with continuous and perfect tenses
▶ Focusing on the future
F
or most new teachers knowing the grammar is one of the most fear
inspiring parts of the job. In this chapter you find out how to break down
each tense, one by one, and you get ideas for teaching them in context.
With all tenses, you have to know what it looks like. It is never enough to
say past tense, present tense or future tense. Actually the tenses are always
labelled past/present/future and then simple/continuous/perfect/perfect
continuous. In this chapter, we also find out what these terms mean and how
we use verbs to put each tense together. Then we discover why and when we
use each tense.
I Speak, I Spoke, I’ve Spoken:
Identifying the Tenses
Whereas the terms past, present and future are quite logical in meaning,
tenses can be simple, continuous and perfect in the past, present and future
as well. So you don’t refer to a sentence as just present tense but you say that
it’s present simple, present continuous, or present perfect.
These tense forms aren’t so obvious to decipher, but these pointers can
help you:
228
Part IV: The Grammar You Need to Know – and How to Teach It
✓ The simple tenses don’t use the auxiliary verbs ‘to be’ or ‘to have’ with
the main verb. The continuous and perfect tenses use these auxiliary (or
helping) verbs in their structure. For example, ‘I drink tea’ is in the present simple. ‘I drank tea’ is in the past simple tense and ‘I will drink’ is the
future simple tense.
✓ The continuous tenses always include ‘to be’ in one form or another (is,
are was, were and so on – I go through ‘to be’ in Chapter 15) and another
verb ending with ‘ing’ (called a gerund). So the sentence ‘I am eating
now’ is in the present continuous tense. ‘I was eating’ is in the past continuous tense and ‘I will be eating’ is in the future continuous tense. In
each case ‘to be’ and a gerund form part of the structure of the tense.
✓ The perfect tenses always include ‘to have’ in some way (has, have,
had) and another verb that’s a past participle. So the sentence ‘I have
eaten’ is the present perfect tense. ‘I had eaten’ is in the past perfect
tense and ‘I will have eaten’ is the future perfect tense. In each case the
structure of the tense contains ‘to have’ and a past participle.
There may seem to be an endless number of tenses to remember, but actually
there are only twelve and you only need to teach them one at a time.
In Table 16-1 all the tense labels are set out using the first person ‘I’ and the
verb ‘to eat’, which is an irregular verb, to make model sentences.
Table 16-1
Tense Names
Past
Present
Future
Simple
I ate
I eat
I will eat
Continuous
I was eating
I am eating
I will be eating
Perfect
I had eaten
I have eaten
I will have eaten
Perfect
continuous
I had been eating
I have been eating
I will have been eating
Although the table includes all the tenses, I cover other grammatical structures such as ‘conditionals’ in Chapter 17.
In Table 16-1, I use the subject pronoun I in each sentence. Fortunately, in
English the grammar changes very little when you use the other subject pronouns. This is much easier than in other languages so don’t be surprised if
students seem to be overcomplicating the matter. They’re usually translating.
Chapter 16: Feeling Tense? Sorting Out Verb Tenses
1st person singular
1
2nd person singular and plural
you
3rd person singular
he/she/it
1st person plural
we
3rd person plural
they
The verb ‘to be’ changes the most according to the subject pronoun used
and I list these different forms of the verb in Chapter 15. With other verbs,
point out to your students that sentences referring to he/she/it in the present
tenses change form. After he/she/it you add an ‘s’ or ‘es’ .
Present Simple
He/she/it
likes/goes/wants
Present continuous
I
am
looking/driving
You/we/they
are
looking/driving
He/she/it
is
looking/driving
The verb ‘to have’ is irregular. The third person singular form in the present
simple tense is has. You use has for he/she/it in the present perfect simple and
continuous too.
Present Perfect
He /she/it
has gone/has sold
Present Perfect continuous
He/she/it
has been going/has been selling
Beginning with the Present Simple
You use the present simple tense to describe an action that happens generally
or is generally true.
So it’s typical to teach the present simple in the context of hobbies, preferences and routines, along with adverbs of frequency such as: always, usually,
often, sometimes, occasionally, rarely and never.
Students can pair up and ask each other questions about their daily lives:
What do you usually do in the evening?
I often watch TV but I never go to the pub.
229
230
Part IV: The Grammar You Need to Know – and How to Teach It
The present simple really is as easy as it sounds. Unlike many languages, in
English regular verbs don’t have to change much for each subject pronoun (I,
you, he, she, it, we or they).
✓ 1st person singular: I like
✓ 2nd person singular/plural: You like
✓ 3rd person singular: He/she/it likes
✓ 1st person plural: We like
✓ 3rd person plural: They like
As soon as the students have learnt the verb ‘to like’ or any other regular
verb, they’re ready to get started with the present simple, as long as they
remember to use ‘s’ or ‘es’ at the end of the verb in the third person.
I list first, second and third person singular and plural so that you can identify
which is which. However, the only one you commonly need to correct in TEFL
is third person singular because students often forget to use ‘s’ at the end of a
verb in the present simple.
It’s unwise to bombard students with grammar jargon. Just use what’s necessary to explain the point. So referring to he/she/it is clearer than saying third
person singular.
The tricky part for students is the negative and question forms where you
use ‘do’, ‘does’ and ‘don’t’. In the negative, you put ‘do not’ and ‘does not’
before the main verb.
I, you, we, they don’t/do not like: What do I/you/we/they like?
He, she, it doesn’t/does not like: When does he/she like to drink beer?
We teach the verb ‘to be’ separately as it behaves in a different way in the
positive, negative and question forms:
I am/’m (not) here.
You/we/they are/’re (not) here.
He/she/it is/’s (not) here.
Am I here?
Are you/we/they here?
Is she here?
Chapter 16: Feeling Tense? Sorting Out Verb Tenses
Staying Continuously in the Present
Whereas the present simple describes a general habit, the present continuous
tense describes an action that’s happening now, at this moment or around
this time.
So, you can use the current scene in the classroom to practise. For example,
you can have students list everything they’re wearing, do ‘spot the difference’ exercises – because pictures capture a moment in time – or compare
first and second languages – ‘I speak German but I’m speaking English at the
moment’.
In comparison with the present simple, the present continuous is structured
with the verb ‘to be’ and a gerund, a fact that students tend to forget:
I am singing.
He/she/it is singing.
You/we/they are singing.
I didn’t use ‘to like’ as I did in the examples for the section on the present
simple because some verbs don’t really describe an action but more of a state,
and so can’t be expressed in a continuous tense. So we say ‘I understand that’
instead of ‘I’m understanding that’.
As you use ‘to be’ to make this tense, students should already know how to
make questions and negatives based on the way we use this verb in the present simple. For example: Are you staying here? No, I’m not staying.
Even though this isn’t technically a future tense, you can use the present
continuous for appointments in the future. This use of the present continuous suggests that a particular time has been decided on, rather than a vague
intention: I’m seeing the dentist at 3 p.m. However, you usually teach this at
pre-intermediate level, not to beginners.
We can also express annoying habits in the present continuous: He’s always
leaving his key behind. However, this lesson is generally for upper-intermediate
students and above.
Going Back to the Past, Simply
The past simple tense is the tense you use with actions that are finished in
the past. You often add words like ‘ago’ or ‘last’ (night, week, month, year) to
show when the action happened.
231
232
Part IV: The Grammar You Need to Know – and How to Teach It
A typical context for this tense is a story about last weekend or your last holiday: Last summer, I went to Florida with my family. It was really hot and I got a
good tan.
The past simple tense is quite easy with regular verbs. Students can easily
remember to add ‘ed’ or ‘d’ to the end of a verb.
Don’t get too comfortable though! The ‘ed’ ending can be pronounced in different ways. Just compare these three verbs – looked, played and waited – and
notice that you pronounce the ‘ed’ as t/, /d/ and /id/respectively, although the
spelling is the same.
There’s also an array of irregular verbs that students just have to learn by
heart. Course books or learners’ dictionaries usually include a table of verbs
at the back of the book and these tables list the past simple in the second
column. Verbs such as ‘to drink’ and ‘to understand’ are irregular because
they change drastically. Instead of adding ‘. . . ed’, you change them to drank
and understood respectively.
Remembering a Moment in the Past
With the past continuous tense you can speak about a particular moment in
the past.
All continuous tenses include the verb ‘to be’ and a gerund (a verb that ends
with ing). In this case the verb ‘to be’ is in the past (was or were).
I/he/she/it was singing.
You/we/they were singing.
In the negative form you add not or n’t (wasn’t and weren’t) and for question
forms you put was and were before the subject pronoun (words like I, you,
and they). For example: Were they singing? No they weren’t singing.
If a detective wanted to interview someone about a theft that happened the
night before, she may ask, ‘What were you doing at 8.30 p.m. last night?’
Whodunnit games are a great way to practise this tense as students can come
up with alibis in the past continuous.
Or perhaps two actions happened in the past but one action interrupted the
other one. For example: ‘At 8.30 p.m. I started making dinner. At 8.35 p.m.
my neighbour came round’. The typical way to express that is by combining
past continuous, often with ‘while’ and ‘when’, and past simple: While I was
making dinner, my neighbour came round.
Chapter 16: Feeling Tense? Sorting Out Verb Tenses
There may be two actions happening simultaneously too, with each lasting for a reasonable period of time. In this context, use the past continuous
twice: While I was making dinner, my husband was watching TV.
Use pictures with a lot of people and actions to present and practise sentences like these.
Presenting the Present Perfect Simple
The present perfect tense is the tense you use to make a connection between
the past and present.
Every perfect tense contains part of the verb ‘to have’ and a past participle
(the third column of most verb tables).
So for this tense we use ‘have’ or ‘has’ as follows:
I/you/we/they have begun (or ’ve begun)
He/she/it has begun (or ’s begun)
In the negative form we include not (or n’t) and in the question form we put
have/has before the subject pronoun (words like I, you and they).
Why have you begun the game? Actually, we haven’t begun yet.
The present perfect is without doubt the most difficult tense for students to
grasp because it doesn’t translate well into other languages and is used for
many different things.
This tense is used in many ways, as I explain in the next sections, but it isn’t
wise to teach the various uses at once.
Sharing experiences
Use the present perfect simple to talk about experiences and accomplishments in the past without saying when they happened. If you want to speak
about times and dates specifically with experiences, switch to the past
simple:
Have you been to Ireland?
Yes I have been to Dublin. Actually I visited Margaret there last week.
233
234
Part IV: The Grammar You Need to Know – and How to Teach It
Quite often we use ‘ever’ with present perfect questions of this kind and
‘never’ in an answer.
Have you ever studied French? No, I’ve never studied it.
Continuing from the past until the present
Sometimes an action started in the past but is still true now. In these situations we can express the duration of time using the word for followed by a
period of time or the word since plus a date or a point in time:
I have lived here for three and a half years now, since July 2005.
This tense can also describe something that is gradual:
Joshua has grown as tall as his dad.
Typical words associated with this gradual use of the tense include: today,
tonight, this week/month/year, so far, in the last minutes/days/week and so on.
Anticipating expectations
When we ask about things we’re expecting, we use the present perfect simple
with ‘yet’. The answer may include ‘already’, ‘recently’ or perhaps ‘still’,
although you use ‘yet’ in negative sentences(those which include not).
Is he here yet?
Yes, he has already arrived, or No, he still hasn’t arrived.
Noting recent changes
Very often we can see the result of a recent action because of a visible
change. We often use ‘just’ and ‘recently’ in these sentences but it’s important to point out when to put these words in a sentence:
Have you had a fall recently? Your arm is all bruised.
I’m blushing again. Jason has just walked in.
Chapter 16: Feeling Tense? Sorting Out Verb Tenses
Acting in the Present Perfect Continuous
People use the present perfect simple tense for actions that run from the past
to the present and for recent changes. The present perfect continuous tense is
used for the same two purposes when you want to stress the duration of time
a bit more than usual.
Very similar to the present perfect simple, the present perfect continuous
includes ‘have’ or ‘has’ and a past participle. However, with this tense the
past participle is always ‘been’ and a gerund follows:
He/she/ it has been singing.
You/we/they have been waiting.
The negative construction adds not (or n’t) after has or have and in the
question form, has or have comes before the subject pronoun (I, you, we
and so on):
Has he been dancing again? No he hasn’t been dancing today.
Moving from the past until the present
Use this tense with the word for plus a period of time or the word since and a
date or a point in time.
I have been waiting for the bus for ages!
What have you been doing since this morning?
Showing recent changes
When you can see the result of a recent action that was repeated or took a
while to complete, use the present perfect continuous:
I think that it has been raining in the last half hour. The pavement’s wet.
Have you been dieting recently? You look great.
Use pictures as contexts for showing the results of recent actions for both
the present perfect simple and present perfect continuous and have students
guess the cause. For example, a picture of a man who’s out of breath can generate sentences such as:
235
236
Part IV: The Grammar You Need to Know – and How to Teach It
He has been running.
He has just missed the bus.
He has been playing with his dog.
Getting to the Past Perfect Simple
You use the past perfect simple tense for an action that happened in the past
before something else that happened in the past.
Imagine that yesterday I saw you looking rather downhearted. A short conversation follows:
What was up with you yesterday? You looked really miserable.
When you saw me I had just lost my lucky pen.
Notice the two sets of actions mentioned about yesterday (this works with
any time in the past). The first is ‘saw’ and the second is ‘lost’. However, you
need to show which action happened first. So, you put the action that happened first in the past perfect (you had lost your lucky pen) and the thing
that happened later in the past simple (I saw you).
Students tend to find the past simple easier and sufficient to convey the idea
that an action happened in the past. Sentences using ‘had had’ may even look
strange to native speakers (I had had a bad night, for example) so students
avoid using it. However, if you don’t push students to use more sophisticated
language they remain at a low level, limit themselves and get marked down in
exams.
Seeing the structure
All perfect tenses include have, has, or had and a past participle (the third
column of most verb tables).
So, in the present perfect simple you use have and has to say:
I/you/we/they have done something.
He/she/it has seen me.
However, in the past perfect you use had. So you say:
I/you/we/they had done something.
He/she/it had seen me.
Chapter 16: Feeling Tense? Sorting Out Verb Tenses
You can also use the contraction of had, which is ’d. The negative form uses
not (or n’t) and in a question had comes before the subject (I, we, they and
so on):
Had you met him before you went to that party? He reckons he’d seen
me before but I hadn’t actually met him.
In a sentence you’re more likely to stress or emphasise the past participle
than ‘had’. Help students to practise emphasising the right word by repeating
after you. The contracted form is also difficult for students to recognise when
they hear it. So, ask them to repeat words like I’d, you’d, he’d and so on.
To teach the past perfect, think of a scenario or story set in the past. Make the
sequence of events obvious but don’t relate the story in consecutive order. (A
story told entirely in consecutive order is best related in the past simple.)
John was really hungry last night. He had already searched all the cupboards in the kitchen without success and had had no food for hours.
Why? Well, the day before he had run out of money and there was not a
penny left. Poor John!
Reveal your story bit by bit. Draw John on the board, use a photograph or
just tell the story with lots of exaggerated acting.
Your students can use phrases that summarise the story to construct a whole
sentence or two:
Last night /John hungry/no food that day/run out of money.
Last night John was really hungry because he had run out of money and
he had not eaten any food that day.
It’s a good idea to work backwards by asking the students questions like
Why do you think he was so hungry? Because he had . . .
Why hadn’t John bought some food? Because he had . . .
Plotting a timeline
A timeline is a great way to illustrate tenses by showing their relationship to
the past, present or future. A timeline is a straight line showing time as a continuum. You can plot different actions along the line so that it’s clear when
the action took place and label it to show the most appropriate tense. It is
particularly useful when there’s more than one action.
The timeline in Figure 16-1 illustrates the sentence about John:
237
238
Part IV: The Grammar You Need to Know – and How to Teach It
Figure 16-1:
Timeline
showing three
actions in
run out of money
the past to
X
demonstrate
the past Past
simple and
past perfect
tenses.
no food
X
hungry
X
Last night
Last night
Today
You can highlight words that are typically used with this tense – just, already,
before, ago, by then and never – but remember to teach students where in the
sentence each one goes. For example, you say I had just/already/never seen
that. So, you use just, already and never between had and the past participle.
However, you say I had seen that before/weeks ago/by then. So you use before,
ago and by then after the object word(s). I talk about object words in Chapter
15. You can also use already after the object.
Focusing on the Past Perfect Continuous
Like the past perfect simple, you use the past perfect continuous tense when
two actions are in the past and one happened before the other. However, this
time you want to emphasise the duration of the action that happened first.
I had been shopping for hours when I decided to stop for lunch. In this example, the two actions are ‘had been shopping’ and ‘decided’. The action that
happened first and seemed to take a long time is in the past perfect continuous and the action that followed is in the past simple.
The past perfect continuous is similar to the past perfect simple but slightly
easier to construct because it always uses had plus been and a gerund:
I had been listening.
In the negative you add not (or n’t) after had. However, in a question you put
the subject word (I, you, we and so on) after had.
Where had you been living before that?
I had not been living in that area.
Chapter 16: Feeling Tense? Sorting Out Verb Tenses
Here’s a context you can use to teach this tense. Show or draw a picture of a
boy returning home in wet football gear. Tell your students it happened yesterday. Ask them to suggest why he was wet. Encourage the answer ‘He came
home wet because he had been playing football in the rain’. Then establish
how long it takes to play a match to highlight the duration of time needed.
Draw a timeline to illustrate, such as the one in Figure 16-2.
Figure 16-2:
Timeline
showing
actions in playing football in the rain
the past
XXXXXXXXXXXXXXXXX
XXXXXXXXXXXXXXXX
simple and
Past
past perfect
continuous
tenses.
came home wet
X
Present
Students need plenty of practice to get this tense right. The past perfect continuous tense contains three verbs in a row, which is tricky for them, and communication doesn’t tend to be hindered unduly if you get it wrong. However, at
upper-intermediate level students should be aiming to go beyond basic communication so don’t let them settle for past continuous.
Expressing the Future
Learners find expressing ideas about the future in English very odd and this
isn’t wholly unreasonable. When people express other tenses they generally
add something to the end of a verb. Take ‘to wait’ as an example:
Present simple
He waits.
Present continuous
He is waiting.
Past simple
He waited.
In many languages tenses work in this way and also have a special ending
that indicates the future, so students may be expecting a new ending.
However, in English the structure is rather different. We use another word or
words before the main verb. For example:
I will wait.
I am going to wait.
239
240
Part IV: The Grammar You Need to Know – and How to Teach It
Doing the future simple
Although there’s more to the story, when students are at a low level it’s
enough to start by teaching them to use the future simple to describe an
action in the future. Teach separately the other ways of expressing the future,
such as in the present continuous, or using ‘going to’.
The future simple always includes will and then an infinitive without to, which
is the original form of a verb before any other endings or irregular forms have
been added. The infinitive is usually the first column in a verb table.
Use the future simple with words like tomorrow, next (week, month, year) and
later.
To make the future simple of ‘to go’ you use will plus go – will takes the place
of to. Likewise the future simple of ‘to buy’ is will buy .
Teach students that will doesn’t change in the 3rd person singular (that is:
‘he’, ‘she’ and ‘it’). We never say wills’. In addition, you can use the contraction
(’ll) in positive sentences.
I will/I’ll buy that jacket tomorrow.
You will/you’ll buy that jacket tomorrow.
He/she/it will buy that jacket tomorrow.
We will buy that jacket tomorrow.
They will buy that jacket tomorrow.
To make the negative form of this tense you use not after will.
Give some attention to the contraction of ‘will not’ – won’t. It looks different
from how students may expect it and shouldn’t be mistaken for ‘want’ in terms
of pronunciation. The phonemes for want and won’t are written like this, so
you can highlight the different vowel sounds:
/wɒnt/= want
/wəυnt/= won’t
And the negatives forms look like this: I will not do it. I won’t.
You can make a question by putting will before the subject word.
Will you help me later?
How will I know?
Chapter 16: Feeling Tense? Sorting Out Verb Tenses
For a negative question, it’s best to teach the contraction form, which is far
more common.
Won’t you help me? (Will you not help me?)
A fun way for teaching this tense is to use predictions. Everybody likes guessing what’ll happen to their favourite football or celebrity. Give students the
event and ask them to predict in which year it will take place.
When students have progressed to intermediate level they’re likely to
become more interested in the difference between the future simple and
other expressions for the future. Interestingly, other uses for the future
simple tense are far more subtle than the reference to when an action takes
place.
In reality we don’t just use the future simple to stress that an action takes
place in the future. We can use this tense to show that we have only just
decided to do something rather than having carefully considered it beforehand. Suppose that you go to a restaurant and examine the menu. You’re
quite likely to say something like: ‘I’ll have the steak, I think.’ Or perhaps the
phone rings, and you want to do the honours. You may say, ‘Don’t worry, I’ll
get it!
On the other hand, we often use the future simple to express a promise and
emphasise our determination to carry out an action, as in: I’ll get it right
somehow.
We can also make a request in the future simple: Will you help me lift this box
please?
Going into the future continuous
Use the future continuous tense for an action that’s in progress at a particular
moment in the future. So when you think of a particular time in the future and
imagine that scene, whatever actions are taking place can be expressed with
this tense.
The future continuous always includes will, along with be and a gerund. So
for example:
I will be listening.
You will be listening.
He/she/it will be listening.
We will be listening.
They will be listening.
241
242
Part IV: The Grammar You Need to Know – and How to Teach It
‘At 7.45 this evening I will be watching my favourite soap opera.’ In fact the
soap begins at 7.30 p.m. but it’ll still be on TV at 7.45 p.m., so the action will be
in progress. A timeline, such as the one in Figure 16-3, can illustrate this.
Figure 16-3:
In a question, will
comes
before the Past
subject
word.
Watch soap opera
XXXXXXXXXXXXXXXX
XXXXXXXXXXXXXXXXX
7.30
8.00
Present
Will you be listening?
What will she be listening to?
It is noteworthy that when a negative question is necessary, the contraction
is far more common: ‘Won’t they be listening?’ instead of ‘Will they not be
listening?’
When you make a negative statement in this tense you add not after will or
you use the contraction won’t:
I will not be listening.
They won’t be coming.
A good way to teach and practise this tense is with the use of a page of diary
entries set in the future. Students can then role-play turning down invitations
by saying what they’ll be doing instead.
You may also combine this tense with ‘at this time’ and a future time reference. So for example: ‘At this time tomorrow I will be doing my shopping’.
Getting to the future perfect
You use the future perfect tense when you refer to an action that’ll be finished
by a particular time in the future, or before another action in the future. For
example, if you imagine your retirement and the goals you hope to achieve
before that time, you can use sentences on the lines of the following to
express yourself:
By the time I retire, I will have completely paid off my mortgage. I will
have lived here for 20 years by then.
Chapter 16: Feeling Tense? Sorting Out Verb Tenses
Most sentences in the future perfect include by and a future time reference
(next week, December and so on).
The future perfect tense always includes will have and a past participle. This
is the same for all subject pronouns (I, you, we and so on):
I will have begun.
You will have begun.
He/she/it will have begun.
We will have begun.
They will have begun.
In the negative you use not after will or won’t instead.
I will not have begun.
I won’t have begun.
The question is made by putting will before the subject pronoun.
Will you have begun by tonight?
Why will it have worked?
The pronunciation of ‘will have’ at normal speed poses problems for students.
The sound we often use for this is represented in phonemes like this /wiləv/.
It’s important for students to recognise what these words realistically sound
like, otherwise they won’t hear this tense in real life situations.
A timeline, like the one in Figure 16-4, can help illustrate the future perfect.
Figure 16-4:
Timeline move in
X
illustrating
the future
2009
perfect.
pay off mortgage
X
retire
X
2029
The idea of goals and ambitions is an ideal context for teaching this tense.
Students can set up there own time frames to explain when they hope to
achieve these ambitions. They can also make predictions about the world in
general.
243
244
Part IV: The Grammar You Need to Know – and How to Teach It
Looking forward to the future
perfect continuous
You use the future perfect continuous tense for an action that continues up to
a particular point in the future. In the section on the future perfect I used the
example of retirement. However, this isn’t a suitable example for the future perfect continuous as you only use it to express an action that’s completed over a
period of time – and the act of retirement happens just once. People arrive at
retirement age and just stop. In comparison, ‘working’ is something we do over
an extended period of time and is therefore more suited to this tense.
The future perfect continuous tense always includes four important parts:
After the subject comes will plus have plus been plus a gerund:
I will have been typing.
You will have been typing.
He/she/it will have been typing.
We will have been typing.
They will have been typing.
In a negative sentence you use not after will or won’t instead.
I will not have been typing.
I won’t have been typing.
You change the word order in a question. So, put will before the subject pronoun:
Will you have been typing for hours by then?
With so many verbs in a row the pronunciation naturally becomes very contracted. ‘Will have been’ is reduced and connected to sound almost like one
word. This is represented in phonemes like this: /wiləvbin/.
The main verb that follows, carries much more stress (emphasis) when you
speak.
There’s often little difference in meaning between the future perfect and
future perfect continuous except for the emphasis on the duration of time in
the continuous form. Both of these sentences are grammatically correct but
the second is more likely because 20 years is a long time and would naturally
be emphasised.
I will have lived here for 20 years.
I will have been living here for 20 years.
Chapter 16: Feeling Tense? Sorting Out Verb Tenses
Expressions typically combined with this tense include: for ages, for over (a
week, two days and so on) and when plus a verb in the present simple tense.
Talking about ‘To be going to’
‘To be going to’ is not a tense as such but is an expression that shows you
intend or plan to do something in the future. It sounds far less spontaneous
than the future simple. Compare these sentences:
I’ll watch TV tonight.
I’m going to watch TV tonight.
The first sentence is used more often when it involves a new choice or decision:
The party has been cancelled. I think I’ll watch TV tonight.
The second sentence gives the impression that you’d thought about the
matter previously:
I’m going to watch TV tonight. I always watch the soaps on Mondays.
You can also use was or were going to to show that something was intended
or planned in the past.
Getting the form right is easy! It’s the verb ‘to be’ in the present simple, then
going to and then a verb in its infinitive form without the to.
I am going to do something.
You are going to do something.
He/she/it is going to do something.
We are going to do something.
They are going to do something.
‘Gonna’ is a common informal way of saying ‘going to’. It’s good for students
to recognise well-known slang words but don’t encourage your learners to use
them.
In negative sentences you put not after ‘to be’:
They are not going to help.
245
246
Part IV: The Grammar You Need to Know – and How to Teach It
In a question the word order changes so that ‘to be’ is before the subject pronoun:
Are we going to like it?
In normal speech we don’t tend to stress, or emphasise ‘to be going to’ but
rather the verb that follows. It’s therefore helpful to get students repeating
sentences with the appropriate stress – I’m going to wait here.
In addition, you use ‘to be going to’ when you can see that something is likely
to happen based on evidence you have now. For example, when you see black
clouds you probably say, ‘It’s going to rain’.
However, it’s best to leave this second usage until at least intermediate level.
Go through the structure making sure that your students recognise all the
various parts needed.
Students who are a bit lazy latch on to ‘will’ and use it whenever they’re referring to the future. Others attempt to be cool and informal but end up saying, ‘I
gonna’.
Here’s an idea for using this tense in context. Show or list some ingredients
for a popular local dish. Ask students to suggest why you have these items.
Now refer to a group of friends, who can be guests, and any other dinner party
arrangements. This provides the context for sentences such as:
You’re going to have a party.
You’re going to invite your friends to dinner.
Students can then organise their own imaginary events and compare ideas
using ‘to be going to’.
Chapter 17
Exploring More Important
Verb Structures
In This Chapter
▶ Helping out the main verb with a modal
▶ Adding prepositions for phrasal verbs
▶ Using ‘if’ and ‘when’ with conditionals
I
n Chapter 16 I talk about the various tenses in English, which is really the
bulk of the grammar you teach students. However, a few other grammar
areas tend to give learners the shivers but with a little insight you can make
them manageable and maybe even fun. So in this chapter I tell you about
modal and phrasal verbs as well as the conditionals.
Knowing Your Modals
A modal verb is a kind of auxiliary verb because its purpose is to help the
main verb. You can’t just use a modal verb by itself because it doesn’t have a
great deal of meaning on its own.
Modal verbs don’t change like other verbs do either. So you don’t add ‘s’ at
the end when you say he/she/it in the present simple tense, you can’t add
‘ed’ in the past simple tense and there’s no gerund form of the verb with ‘ing’
at the end either.
Identifying modal verbs
Perhaps the easiest way I can help you identify the English modal verbs is to
write them all down. So here’s the complete list:
248
Part IV: The Grammar You Need to Know – and How to Teach It
✓ can
✓ could
✓ may
✓ might
✓ must
✓ shall
✓ should
✓ ought to
✓ will
✓ would
Even though you can create a short sentence with just a modal verb and no
main verb, the main verb is understood because of the rest of the interchange:
A: Yes, I can.
B: You can what?
A: Go to the office, of course.
When you put all these modal verbs into a sentence you find that they go
between the subject, words such as ‘you’ and ‘we’, and the main verb, as
shown in Table 17-1.
Table 17-1
Sentence Structure with Modal Verbs
Subject
Modal Verb
Main Verb
Object
The tourists
should
go
home
They
might
follow
us
She
will not
like
that
In questions, the word order is different though, so the subject word goes
between the modal verb and the main verb. Table 17-2 offers some examples.
Table 17-2
Sentence Structure with Modal Verbs and Objects
Question word
Modal Verb
Subject
Main Verb
Object
When
should
the tourists
go
home?
How
might
they
follow
us?
Why
won’t
she
like
that?
Chapter 17: Exploring More Important Verb Structures
When you add have to a modal verb and then use a past participle (the last
column in verb tables) it shows that the action refers to the past:
They must have loved it.
She couldn’t have watched the movie.
So the order is: subject plus modal verb plus have plus past participle.
Comparing the modal verbs
and what they do
So how do you explain the way to use modal verbs? Well you can divide them
up into specific functions.
Showing degrees of probability
At times you aren’t certain about something happening, but you want to
make a stab at saying what is the probability or likelihood of it coming to
pass. Some of the modal verbs come in really handy in this case.
You can represent each of these modals of probability in the form of a
percentage:
✓ Must: He must be happy. It’s about 95 per cent certain he is.
✓ Might: He might be happy. It’s about 60 per cent certain he is.
✓ May: He may be happy. It’s about 60 per cent certain he is.
✓ Could: He could be happy. It’s about 40 per cent certain he is.
✓ Can’t: He can’t be happy. It’s about 95 per cent certain he isn’t.
Notice that must and can’t function as opposites here. You use can to show
ability or permission but not probability.
Expressing the future with ‘will’
When you refer to future time you can use will, although to be going to and
tenses such as the present simple and continuous are also possible. (I cover
these tenses in Chapter 16.)
In a language course, you usually start with will, often called the future
simple, to teach students how to express the future because it’s pretty easy
to use. You just put will before the infinitive (original or unchanged form of
the verb) and that’s it. For example: I will start tomorrow.
Although some people still use ‘shall’ in the future simple, it sounds a little
old fashioned so you really don’t need to teach it for this purpose.
249
250
Part IV: The Grammar You Need to Know – and How to Teach It
Of course there are other ways to use will, which aren’t really focused on the
future. You can use will for decisions you make at the moment of speaking.
Take this sentence for example: You relax and I’ll answer the door this time.
The action of answering the door is really present, not future, but it’s a spontaneous decision, not something planned in advance. By comparison, saying
‘I’m going to’ sounds a bit more planned.
On the other hand, the same sentence without the contraction (‘I will answer’
instead of ‘I’ll answer’) can indicate that the speaker is really determined or
is making a promise.
Giving and gaining permission
Sometimes you need to say whether it’s okay to do something or not. In this
case you quite likely use can or may and could if you’re asking a question.
‘May’ sounds a little more formal than the other two.
Could/may I use your bathroom?
Of course you can.
Offering
In English there are various ways of offering something; using would is one of
them, as in: Would you like a cup of tea?
Or if you’re using ‘I’ or ‘we’ you can use shall instead: Shall I/we make you a
cup of tea?
Talking about ability
When you want to say whether or not you’re able to do something, you use
can or could. The difference between the two is that could also refers to
things you were able to do in the past. In this sentence for example could
and cannot reflect ability at different stages of life, childhood and the present
day respectively: I could speak my father’s language at the age of four but I
cannot really remember it now.
Expressing degrees of obligation
Various modal verbs indicate whether you really must do something or
whether you have a choice of doing it or not. For a very strong obligation you
use must: You mustn’t smoke here. It’s forbidden.
Have to is synonymous with must in positive sentences except that you tend
to use have to when someone else’s authority is involved: ‘The boss says you
have to stop that now.’
Chapter 17: Exploring More Important Verb Structures
The problem is that in the negative they no longer mean the same things:
The boss says you mustn’t stop (meaning don’t stop).
The boss says you don’t have to stop (meaning stop if you want to).
From time to time though, there’s a choice or a weak obligation. In that case
you can use should or ought to: You should go on a diet. In fact you ought to
cut out sugar completely.
You use the same words for giving advice.
Using ‘would’
Would is generally used to show that a situation is imaginary or hypothetical
rather than a present fact: ‘I would sit down but there are no more seats’.
And would is used as the past of will too. So when you report what someone
else said about the future, you can use would:
Bob: I’ll go to the post office for you.
John: What did Bob say?
Gary: Bob said that he would go to the post office for you. He’s gone now.
You can even use would for reminiscing about past habits: ‘As teenagers we
would regularly skip school’.
Sorting Out Phrasal Verbs
Phrasal verbs are quite informal expressions that include a verb and at least
one preposition.
The meaning isn’t always obvious, which is one reason students struggle with
them. For example ‘pick up’ is not too obscure if you understand the individual verb ‘pick’ and the preposition ‘up’ but ‘keep up’ is much harder to guess.
Here are a few more examples of phrasal verbs:
✓ ask someone out*
✓ back someone up*
✓ call something off*
✓ drop out
✓ end up
✓ fall out
251
252
Part IV: The Grammar You Need to Know – and How to Teach It
✓ grow out of *
✓ hold on
✓ keep something up*
✓ pass away
✓ run out of*
✓ show off
✓ turn up
✓ wear off
The phrasal verbs in the list marked with * are also transitive, which means
that they need a direct object. So basically, you can’t just say ‘I’ve grown out
of’. You have to add what you’ve grown out of. Likewise, you can’t say ‘I asked
out’ because you need to say who you asked out.
For most phrasal verbs synonyms exist that are little more formal. For example, ‘to back someone up’ means to support them and ‘to keep something up’
means to maintain it. Students tend to latch onto the formal words because
they translate better into their own languages (especially Latin languages) but
then they don’t sound conversational enough when they speak. So remember
that, given a choice, most native speakers opt for a phrasal verb in everyday
life.
Note that some phrasal verbs are separated by ‘someone’ or ‘something’. This
conveniently brings us to another difficulty; phrasal verbs can be separable
or inseparable. I deal with this in the following section. The other phrasal
verbs in the list are all intransitive so you can’t put an object in the middle.
Following the rules about separable and
inseparable phrasals
Basically, if you can put ‘someone’ or ‘something’ between the verb and the
preposition in a phrasal verb, it’s separable and transitive, which means it
requires a direct object. (I talk about objects in Chapter 15.) This doesn’t
necessarily mean you have to separate it, it just means that you can. For
example:
I have to call the party off.
I have to call off the party.
If you can’t put ’something’ or ‘someone’ in the middle of a phrasal verb, it’s
both intransitive and inseparable, which means that you can’t separate the
verb and the preposition: intransitive verbs have no direct object. You don’t
need ‘someone’ or ‘something’ for it to make sense. For example:
Chapter 17: Exploring More Important Verb Structures
The van broke down.
She got up.
So every time you teach a phrasal verb you need to tell the students whether
or not it’s separable. The most common way to do this is by writing s/o
(someone) or s/t (something) into the phrasal verb on the board:
To call s/t off (pv) (I also include pv here to show that it is a phrasal
verb.)
In the examples of separable phrasal verbs, I put the object in the middle
between the verb and preposition. However, at times you can use an object
pronoun instead of a noun.
If the sentence contains an object pronoun instead of a noun, put the pronoun between the phrasal verb and preposition, nowhere else:
I have to call it off, not I have to call off it.
I need to back him up, not I have to back up him.
In some cases, a separable phrasal verb must have the object in the middle
whether it’s a pronoun or not. The phrasal verb ‘to tell apart’ works in this way:
Can you tell the twins apart? Not, Can you tell apart the twins?
Some transitive phrasal verbs (the ones that need an object) aren’t separable. So for example ‘to put up with’ needs an object but you can put the
object only after ‘with’:
Why do you put up with John’s behaviour?
Finally, some phrasal verbs need not one object but two. ‘To do out of’ needs
‘someone’ and ‘something’ to make sense. For example:
That crooked boss did me out of my wages!
So here, one object goes after the verb and the other after the preposition.
If you have to use a phrasal verb in a passive sentence, just keep the verb and
preposition together, regardless:
He complained that he had been done out of his wages by the boss.
253
254
Part IV: The Grammar You Need to Know – and How to Teach It
Teaching phrasal verbs
With all these rules about phrasal verbs, it may sound a bit daunting teaching
them. So here are a couple of tips.
Avoid teaching phrasal verbs as a big topic in itself. Lessons about all the
phrasal verb rules tend to be boring and confusing anyway because students
don’t learn in this way.
Print copies of the rules so that students can use it as a reference, perhaps on
a sheet they can keep at the back of their books. However, it’s best to teach
just a few phrasal verbs at a time, in context and with lots of examples.
One way to teach ‘to put up with’ and ‘to fall out’ is by following these steps:
1. Start with spoken content.
‘Twins Paul and Paula live together. She is very untidy and likes to
have her friends round every day. Paul likes his home to be quiet and
organised. He loves his sister but maybe it’s time to move out. When he
complains, they fall out, but after two years he can’t put up with the situation anymore’.
2. Have students discuss the situation.
Ask, ‘How do they feel about the situation?’
3. Display board work.
For example:
• To put up with s/t (pv, inseparable)= to tolerate something
• To fall out (with s/o) (pv inseparable)= to argue then stop being
friendly
• Paul can’t put up with Paula’s friends. They annoy him too much.
• Paula and Paul fall out whenever they talk about the problem
because he shouts at her.
4. Have students do some practice exercises.
Write a sentence about each of the following situations using ‘to put up
with’ or ‘to fall out with’ in the correct tense. For example: The man gets
doesn’t complain when the neighbours play very loud music. The man
puts up with his neighbours’ loud music.
Last week Evelyn and Debbie argued about where to go for the
evening. They got angry and have not spoken since then.
Mrs Singh will not allow her son to continue smoking in the house.
The reason why the sisters were nervous about seeing each other
was because they had had a big disagreement.
Chapter 17: Exploring More Important Verb Structures
5. Have students discuss similar situations in pairs.
Ask each other about other situations that result in people falling out
and refusing to put up with things. When was the last time you fell out
with someone and why?
If I Were You . . . Conditional Structures
Sentences beginning with ‘if’ are conditional. They’re always in two clauses,
showing that one situation is dependent on another. Even though native
speakers mix conditionals up a lot in real life, you need to teach the students
gradually the four basic conditional structures I cover in the next sections.
A clause always contains a subject word and a verb.
With all these structures, teach the positive, negative and question forms and
don’t forget the contractions too. For example, this is a positive sentence; If
I’m unhappy, I eat more. By comparison a negative version of the question contains not or its contraction (short form) n’t. So the negative version is; If I’m
unhappy, I don’t eat more. Notice that don’t (do not) is the negative part. The
question form is, If you’re unhappy, do you eat more?
Being general: The zero conditional
You use zero conditional sentences to say that something is generally true.
The situation is not just about a particular instance but is more a rule of
thumb. In fact, you quite often use this structure to state a fact, principle or
truth. For example:
If you cool water below 0 degrees, it freezes.
When you visit a place of worship, you dress appropriately.
Pairing ‘if’ and ‘when’
The zero conditional is the easy one to remember. It comprises two distinct
clauses, both in the present simple, but one clause starts with ‘if’ or ‘when’. It
doesn’t matter which clause goes first.
When I feel tired, I take a nap.
If it’s sunny, I sit on the balcony.
When you really want something, you have to work hard.
People usually visit the Louvre, when they go to France.
255
256
Part IV: The Grammar You Need to Know – and How to Teach It
So the structure is: If plus present simple tense and a present simple verb in
the other clause.
Formulating it for students
You teach the zero conditional at about pre-intermediate level. Generally, students have no difficulty understanding this structure but you break it down
into a formula to prepare students for the other conditionals to come.
Try teaching conditionals with a chain story or dialogue. By that I mean that
you build up the interaction clause by clause. For example:
Teacher: What do you do when you feel ill?
Student A: When I feel ill, I stay home instead of going to work.
Teacher: When you stay home, do you take medicine?
Student B: Yes, when I stay home, I take aspirin.
Teacher: Ask Alex about aspirin.
Student B: Do you feel better, when you take aspirin?
Student C: Yes, whenever I take aspirin, I feel better. En Feng, what do
you do when you feel a bit better?
Matching exercises are a useful form of practice for conditional sentences.
So, you can divide the clauses and mix them up in two columns, like the one
in Figure 17-1.
Match one half of the sentence 1) 2) 3) or 4) with the second half in a) b) c)
or d). Write the sentences below.
Figure 17-1:
Matching
exercise
for the zero
conditional.
1) If I meet elderly people
a) it wants to go out
2) When Mark sees Elizabeth
b) I show respect
3) If life is boring
c) he smiles
4) If the dog starts looking at the door
d) people take a trip
Depending on the possible:
The first conditional
You use the first conditional for a situation that’s quite possible and realistic
but still dependent on something else.
Chapter 17: Exploring More Important Verb Structures
Whereas the zero conditional uses the same tense in both clauses, the first
conditional doesn’t. This time the structure is basically: ‘If’ or ‘when’ plus
a verb in the present simple with a verb in the future simple in the other
clause.
The structure still contains two clauses and one includes’ if’ or ‘when’, but it
looks like this:
If you aren’t nice to me, I’ll leave.
Will you help me fix my car, if I bring it to your house?
When we finish this job, we will not stop.
You can swap ‘will’ for a modal verb or ‘to be going to’ as well:
If you aren’t too busy, can you come to my office?
He might come, when it stops raining.
I’m going to take away your toys, if you don’t stop spitting.
You can swap ‘if’ or ‘when’ for a couple of other expressions too, namely
‘whether or not’ and ‘unless’. In this case, you use a verb in the future simple
tense first, then ‘whether or not’ or ‘unless’ followed by a verb in present
simple (positive, meaning without not or n’t ).
You will have to work late, whether or not you want to.
I won’t talk to you, unless you give me back my money.
Unless something extraordinary happens, she’ll probably come.
But you can’t put ‘if’ or ‘when’ in the same clause as ‘will’, so you can’t say
something like, ‘If I will see him, I will tell him’.
Following the chain activity and matching exercises in the section on the zero
conditional, take this a step further by designing some 1st conditional dominoes, like those in Figure 17-2.
They’re a little time consuming to prepare initially, but if you use some sturdy
card or a laminator, you can keep them for ages. The aim is for students to
match sentence clauses together so that they make sense, and the first student to use all his cards is the winner. You may have to act as referee though!
Another way to give students practice in a freer way is to talk about threats,
which are generally in the first conditional anyway. Tell the class an anecdote
about a time when you were threatened and what happened and then say:
Write about a time when you were threatened or made a threat yourself.
Explain why the situation happened and if the threat was carried out.
257
258
Part IV: The Grammar You Need to Know – and How to Teach It
when I get
home
Figure 17-2:
First
conditional
dominoes.
if I buy him
a drink
she’ll be
ready
it will be
cheaper
if I remind
her
will Janet
help me
when the new
supermarket
opens
if I do what
I promised
there will be
queues
Bob isn’t going
to argue
if you don’t
work harder
Imagining the second conditional
The second conditional is a structure you use to express something that’s
hypothetical, imaginary or unlikely. You usually teach this at intermediate
level.
The second conditional confuses students at first because it uses the past
simple tense but doesn’t actually refer to the past at all. The basic structure
is: ‘If’ plus a verb in the past simple then the subject plus ‘would’ plus the
infinitive form of the verb:
If you won the national lottery, what would you buy first?
If I were you, I’d stay away from him.
If you found £100 in the street, I’m sure that you would give it to the
police.
You can use ‘were’ for all the subject pronouns too. It sounds more formal
than when you use ‘was’ in the normal way:
If I were here, it would be better.
If we were here, it would be better.
Remember that ‘if/when’ must never be in the same clause as ‘would’, so you
can’t say, ‘If I’d be rich, I’d live in Miami’.
The structure of the second conditional is difficult to remember at first so you
need to find interesting ways to fix it in your students’ minds. Here are a few
suggestions:
✓ Use a song. I have come up with several:
• ‘If I Ruled the World’ written by Ornadel and Bricusse and recorded
by Tony Bennett
• ‘If I Were a Boy’ written by Carlson, Gad and Beyonce Knowles,
who recorded it.
Chapter 17: Exploring More Important Verb Structures
• ‘If I Were a Sailboat’ written and performed by Katie Melua
• ‘If I Were a Rich Man’ written by Zero Mostel and sung in the musical ‘Fiddler on the Roof’.
Blank out some words and get students to fill them in while listening to
the song. However, the most important thing is to have a good old sing
along. That’s what they’ll find most memorable.
✓ Lead a jazz chant. You may not have access to music, so how about a
jazz chant, which is just words or phrases repeated in a rhythm? You’ve
probably seen footage of army drill sergeants getting the chant in time
with the soldiers’ marching, often through repetition. Jazz chants are
similar. You simply get students to repeat sentences after you in whole
or in part and to a beat (everyone should clap their hands). In this way
they can more easily remember the structure, and pick up the rhythm
of the language while they’re at it. Here’s an example of an easy second
conditional chant:
Teacher: If
Students: If
Teacher: If I
Students: If I
Teacher: If I were you
Students: If I were you
Teacher: And you were me
Students: And you were me
Teacher: If I were you and you were me
Students: If I were you and you were me
Teacher: We’d be different
Students: We’d be different
Teacher: But still happy
Students: But still happy
✓ Play a game of moral dilemmas. You can prepare cards with the dilemmas – some are shown in Figure 17-3 – in one pile and cards for the
names of each student individually in another pile. For each round of the
game you pick up a card from each pile and ask everyone in the class to
write a sentence in the second conditional suggesting what the named
student would do about the problem. After everyone has a minute to
write something down, have a feedback session when you encourage the
named student to confirm or deny what was said.
259
260
Part IV: The Grammar You Need to Know – and How to Teach It
If your classmate saw
the 13 year old child
of a colleague drinking
alcohol, what would
he/ she do?
Figure 17-3:
Examples
of moral
dilemma
cards using
the second
conditional.
If his/her good friend
looked awlful in her
expensive new dress,
would your classmate
tell the truth?
NATASHA
....................................
JALE
....................................
Reviewing the past with the
third conditional
This tense is used exclusively to talk about the past. You use it to express
regrets and imagine how things would be if something different had happened.
The third conditional is probably the most difficult structure your students
have to learn. You only teach it to upper-intermediate and advanced learners.
The basic structure is: ‘If’ plus a verb in past perfect tense, the subject followed by ‘would have’ plus a past participle verb:
If I had known the shop was closed, I would not have come.
If you hadn’t studied languages, what would you have done instead?
If I had been born poor, I think my life would still have been happy.
You can also use past perfect continuous tense in the ‘if’ clause and the present perfect continuous form after ‘would’ in the other clause:
If I had been wearing a seatbelt at the time of the accident, I wouldn’t
have been so badly injured.
If you had known I was coming, you would have been wearing your suit.
One way to practise this structure is by making excuses.
Chapter 17: Exploring More Important Verb Structures
Put students in pairs and have one student accuse the other of doing something and the other can apologise with an excuse. You just need to provide
the students with the situations. For example, students discussing a football
match may have a dialogue like this:
Pierre: You arrived late for the game! I’m so annoyed.
Valerie: I’m sorry but if you had given me the right directions, I would
have been on time.
Pierre: But you didn’t bring my boots.
Valerie: I’m afraid if you had left your boots in the usual place, I would
have been able to find them.
Pierre: You don’t understand! I couldn’t play!
Valerie: Don’t worry! Even if you’d played, the team would have lost. The
score was 12-0.
261
262
Part IV: The Grammar You Need to Know – and How to Teach It
Part V
What Kind of Class
Will I Have?
W
In this part . . .
ondering what the experience of dealing with
students is like? Wondering how to assess their
aptitude and the difference you’re making to them along
the way? Wonder no more. This part gives you an in-depth
guide to assessment, the many types of courses you may
become involved with and, most importantly, the sorts of
students you’ll find yourself face-to-face with. I cover the
differences between classes where every student speaks
the same language and those where you have as many
different mother tongues as speakers.
I also lead you through the intricacies of one-to-one
teaching, working with younger students and how to
teach specific types of English – English for business, for
example – with ease and efficiency.
Chapter 18
Putting Students to the Test
In This Chapter
▶ Finding out what your students need
▶ Discovering the best course for students
▶ Grading tests
▶ Considering alternatives to testing
T
he word ‘test’ tends to evoke fear in most students, but as a teacher,
tests help you gather loads of information that enable you to keep your
students happy and progressing.
Testing is useful before students get started so you know what kind of course
to enrol them on, but you can also use tests along the way to check progress
and find out if the course was successful in meeting objectives.
Testing Early to Discover
Your Students’ Needs
When a student makes an inquiry about a course, schools and individual
teachers see pound signs flash before their eyes. In reality though, the
pounds only materialise if you can you deliver the course the student needs.
So you start off by checking what she knows and what she needs. I cover the
various ways of doing this in the next sections.
Having them test themselves
One kind of test that’s really useful for giving you a head start before you
even meet the student, is a self-assessment test in which you get the student to
analyse how good she is at various aspects of the language, usually by rating
herself from 1-5 or by completing sentences.
266
Part V: What Kind of Class Will I Have?
Now, I know what you’re thinking, ‘If the student can’t speak English, how
can she complete the test?’ Well, if all your students come from the same
language base, you can fairly easily organise a test in their mother tongue.
You can make the test visual by using pictures of different situations in which
they may use English (listening to lectures, using the phone and so on) and
ask students how comfortable they are in those situations. Rating systems
with smiley faces and frowning faces help to convey the point. Set the test
out so that it goes from really easy to gradually more difficult and the students
can stop when the questions get too tough.
You can engineer your test to cover areas such as:
✓ Grammar by offering a ‘complete the sentence’ exercise such as: ‘If I
improved my English, I . . .’.
With this question, you can test whether the student knows how to
make a sentence in the second conditional and you can find out a bit
about that person’s motivation for taking a course at the same time.
If the test contains very direct questions the student is likely to copy
from a grammar reference book. It works better when you sneak in the
tenses by asking about things you want to know about the student and
stating that she should reply with a complete sentence. For example, to
test the past simple tense ask:
When was the last time you studied English? Describe your lessons.
✓ Vocabulary knowledge centres around the dictionary, so ask something
like:
When you talk about the following topics, how often do you use your
dictionary?
• Family and friends: a little quite a lot often
• My job: a little quite a lot often
• My hobbies and interests: a little quite a lot often
• Shopping: a little quite a lot often
✓ Reading skills depend on comprehension, so ask questions such as:
What do you usually read in English? Say how easy or difficult it is to
understand.
✓ Writing includes spelling and formats, so present a scale from 1 to 5
where 1 is bad and 5 is excellent, and have students rate their abilities
on questions such as:
• How good is your spelling in English?
1 2 3 4 5
• Can you write formal letters?
1 2 3 4 5
• Can you write informal letters?
1 2 3 4 5
Chapter 18: Putting Students to the Test
✓ Speaking is a matter of being understood, so ask something along the
lines of:
My customers usually understand me. Yes No
✓ Listening is another test of comprehension. Give students the 1 to 5
scale again and ask how well they understand the person speaking in
various situations:
• Telephone calls:
1 2 3 4 5
• Presentations:
1 2 3 4 5
• Colleagues chatting in the office:
1 2 3 4 5
You can also find out why students are taking the class by having them fill in
a sentence like: I need to study English because . . . Ask them also whether
they prefer to study in a class of students or alone and to explain why. The
answers that students give help the school or teacher to put students in the
right kind of course or to design and sell the courses better.
Assigning levels through placement tests
Rather than designing a course for a student’s specific purposes, schools and
colleges usually have placements tests so that they can match a student to a
course already on offer or planned. In terms of general English, most offer six
levels ranging from beginner to advanced and which I talk about in Chapter 4.
Proficiency level is absolutely the highest level, but courses at this level are
quite rare. Even beginner and advanced level courses are sometimes tricky to
fill. So, before the term begins, or if your school offers continuous enrolment,
before you place a student in an existing course, the school has to establish
the student’s overall level.
Speaking and listening testing
Some establishments offer each student an interview with a teacher, which is
basically a test. It’s really time consuming to do this but at least you can get
a real view of the student’s speaking ability, which is the key language skill
for most people. Of course, listening is involved too as you interact with the
student. You can also take the opportunity to plug the school’s facilities and
put the student at her ease because the test happens more informally. For
example, to try a past simple check question, you casually ask: ‘How did you
get here today? Did it take long?’
For an interview to be really effective, let everyone in the room introduce
themselves. You may have a second teacher who doesn’t speak and just
assesses, although this makes students more nervous. Explain what’s going
to happen, personalise the questions if possible and give each student some
feedback at the end.
267
268
Part V: What Kind of Class Will I Have?
Assessing through the written words
Written placement tests are very common too. They allow a school to test
a whole coach load of new students all at the same time, providing there’s
space. At the end you also have a written record to keep in students’ files.
One of the disadvantages of written tests compared with oral ones is that
students complain about the results of written tests far more and often ask for
another go.
In written tests, students tend to cheat a lot and have warped results because
of the pressure of the situation. It’s fairly rare that someone in the school can
find time to watch a student take the test so the student is likely to sneak
a look at the dictionary or ask a friend for help. Sometimes students don’t
understand the instructions but this only becomes evident later when the
marker notices how badly they messed things up.
On the other hand, you can buy published tests or select a section from the
course books for each level to form the test. It’s possible to include reading
passages but it’s best not to make the test appear too long and intimidating.
Tests like these should have an easy marking system, usually an answer key,
to cut down on administration.
If the school offers exam classes, use questions from past papers to give the
students a realistic example of what the exam is like and an idea of how the
students measure up to specific exam skills.
Testing for proficiency
Proficiency tests aren’t the same as the proficiency level in English, which
follows advanced level. A proficiency test assesses a student’s ability to
perform a particular task or tasks that she’ll have to accomplish in the future.
So if your student tells you that she’s been offered a great job in a restaurant
on the condition that her English is up to scratch, you can design a test
that covers taking orders and handing complaints. It doesn’t really matter
whether the student has taken a course before or whether she knows their
grammar. You simply need to know how well she may be able to handle
that job.
Testing to Establish the Best Course
Once your students are actually enrolled on a course you can continue to use
tests to map their progress and measure what you’ve all achieved.
Chapter 18: Putting Students to the Test
Testing progress
If a course is of a specific length you can build in one or two progress tests at
various stages. Progress tests serve a few purposes:
✓ Providing motivation for the students to study. Targets and deadlines
help some people to get themselves in gear, but for others they can be
stressful and de-motivating. You need to decide how to present your test
so that you strike the right balance.
✓ Providing a standard level for the class so that students can be
changed to a different course that better matches their proficiency
level if necessary. Students sometimes ask to be moved up to a higher
level and if you, as the teacher, aren’t too keen, the results of the progress
test may be the basis on which you decide. Likewise if you have to move
a student down, you can use the test as evidence for your decision.
✓ Highlighting gaps in your teaching – or the course materials – that
you need to fill. This can be for your own purposes or for the school to
monitor its teachers. The danger of this is that you may end up training
your class to pass the test rather than teaching them English.
The way you handle the test depends on the importance you attach to it and
your main objective. For example, you may tell the students the topic of the
test and ask them to revise particular points that you feel are essential to
their progress in the rest of the course. On the other hand, you may decide
that the class should have a thorough review, so you don’t give the students
specific details. This makes them revise everything so far.
A fun and effective way to organise a progress test is to allow the students
to design it themselves. Break them into different groups, have each group
construct a few questions, or ask each student to submit two or three questions each. As they review the topic and construct the questions, the topic
becomes indelibly printed on their minds. There’s also an exciting level of
competition and anticipation as they wait to see who gets their question right.
Testing achievement
Achievement tests are typically given at the end of the course. You can hold
these up against the course syllabus and objectives to see how successful the
lessons have been.
The success of a course may not be measured solely in language skills. A
student may want to become more outgoing, creative or confident and her
success or failure in this is dependent on her own feelings. Formal testing is
incidental to her. It’s helpful to have class discussions about what each
student hopes to achieve and how they expect to do so.
269
270
Part V: What Kind of Class Will I Have?
Some of the different ways of testing achievement follow:
✓ True or false questions: These can be less stressful for students
because they test knowledge without necessarily involving writing skills.
✓ Gap-fill exercises: In this kind of exercise you strategically omit certain
words from a text in order to test particular areas of language.
Suppose you want to test your students’ knowledge of English prepositions.
You can cut the prepositions out of a text and provide the missing words
in the wrong order below the passage, or you can leave out the missing
words and make students come up with the prepositions on their own.
The words are provided in the following example:
Goldilocks went . . . the little house and saw a dining table . . . the left.
There were three bowls of porridge . . . the table and . . . each bowl there
was a chair.
on into in front of of
The missing words can be listed in the wrong order below the test as I
show here, as a multiple choice or just left out completely.
✓ Cloze: This is a kind of gap-fill but the omitted words are more random,
say every eighth word, so you get more of a feel for the students’ overall
knowledge of the language. Try this one:
Teachers select texts from published materials or . . . exercises themselves.
The advantage of writing your . . . tests is that you can make them . . .
relevant to your students’ interests.
write own more
✓ Matching: At lower levels especially, you can test vocabulary by matching
words to pictures or single items to the appropriate categories. You can
put a grammar slant on matching exercises by connecting sentences
to the right tense label, or perhaps the beginning of a sentence to the
appropriate ending. Figure 18-1 shows a matching vocabulary question.
✓ Dictation: Dictations tend to conjure up bad memories for some but
they needn’t consist of long dry passages. I find dictations very handy
for practising listening, pronunciation and spelling all at once.
Here is one of my dictation lists: cap, cup, cop, cope, cape, cob.
✓ Transforming and rewriting: In exams like Cambridge First Certificate
in English, students have to show their ability to change a word from a
noun into an adjective and rewrite a whole sentence incorporating a
particular word. That’s why teachers like to get students used to this
kind of exercise from early on. Take a look at these examples:
• Complete the sentence by transforming the word in brackets into
the right form:
Chapter 18: Putting Students to the Test
I am not sure if I should wear my coat because the weather is so . . .
(change).
• Rewrite the sentence so that the meaning is the same but include
the word in bold.
Although it was raining, John still went to play tennis. Despite . . .
✓ Translation: This isn’t very common in TEFL but it may be an appropriate test for more advanced students. The text for translation should
include idiomatic expressions that reveal a student’s ability to understand the more subtle nuances of the language.
✓ Essays: Essays test writing skills, as well as spelling, vocabulary and
grammar. It’s quite important that an essay doesn’t become a test of
imagination or creativity. During the marking stage, focus on specific
language skills rather than level of interest. You can establish the criteria
for awarding points beforehand so that you judge fairly.
✓ Presentation: Students can prepare a short presentation on a chosen
topic. This is an effective way of exercising speaking ability and can balance out the nerves that poor writers have when they take written tests.
A combination of tests should give everybody a chance to shine.
✓ Pair work tests: When the course is primarily based on speaking, it may
be unfair to test achievement through writing, so pairing students to
demonstrate communication skills is a good alternative. Students can
talk to teach each other to achieve the task while the teacher monitors
and supervises. For example:
✓ Discuss which present is best for a new student at university:
money (£50) two course books a strong rucksack
Write the number of a shape/shapes next to an adjective it describes
For example: triangular –2
1)
Figure 18-1:
A typical
matching
vocabulary
exercise.
2)
– 3 dimensional
– curved
– symmetrical
3)
4)
271
272
Part V: What Kind of Class Will I Have?
Marking Tests
One reason teachers are sometimes reluctant to administer a test to their
class is because of their dread of marking and collating results. It can be a
tedious and time-consuming task. Now the way you mark has much to do
with the kind of test you set but the following are some general points that
you can keep in mind.
If your time is severely limited, set a test that has just one or two possible
answers for each question and write, or obtain, the answer key. In this way,
anyone can help you mark, even a student.
The way you mark a student’s sheet itself is something to consider too. These
days the red pen is considered a little bit threatening, so teachers often go
for friendly green and purple pens instead. In any case, make your marking
absolutely clear. Of course, this presupposes that the students are actually
going to get their test papers back, or at least see them. Some schools keep
test papers so that students can’t sell them on and help others to cheat, but
they should at least have a chance to see their errors. For the sake of time
you can just tick or cross questions.
Ticks and crosses aren’t common to every culture so let students know what
each symbol means.
Use a marking code for longer answers, if your students are used to one.
Highlight a grammar error by writing ‘gr’ or ‘sp’ for spelling. This helps them
to see what kind of errors they typically make and gives them an opportunity
to try correcting the problem themselves. Chapter 7 has more on marking
corrections.
For straightforward questions you can allow students to mark each other’s
work. You need to be careful about cheating though, so you should insist that
everyone puts their own pens away and then give everyone a pen in a special
colour.
Having their work reviewed by another student can be embarrassing for some
students so you need to be quite careful about sharing out this task. Get to
know your students’ work and their personalities before trying this method.
It’s good to have a class feedback session about the test if possible. When
you do that, you tackle the tricky questions that everyone got wrong. After
all, it may be your fault because you didn’t teach that topic thoroughly, or
because the test question wasn’t clear. You now have the chance to make up
for it by re-teaching the point. For students’ individual errors you can employ
peer correction, which means the students correct each other.
Chapter 18: Putting Students to the Test
Looking at Alternatives to Testing
Testing carries various disadvantages so you may want to try alternatives
such as project work and continuous assessment. These tend to be less
pressurised for most students and remove the problem of having a bad
day at the time of the test, which results in an uncharacteristically poor
performance.
A project in English is a great way for students to express their language
skills and creativity at the same time. It is especially appealing to younger
learners on short summer courses. By the end of the project they have something to show for their efforts and the opportunity to use the English they’ve
learnt, or picked up, on their own terms.
Instead of filling in the gaps in a test the teacher has written, they choose
their own topic and usually they find out what they need to know to achieve
the task they set for themselves.
The problem is how to teach project work. Well, you can agree on certain
things your students have to include, for example, the history or background,
the current situation and future plans of the chosen celebrity, sport or
whatever subject they’ve chosen. This at least pushes the students to use a
variety of tenses.
You can also use continuous assessment so that every week or so you record
the students’ progress, performances and achievements. To make the best
use of time, the school should organise sheets that you can just tick or
grade on each aspect assessed. Writing reports increases the teachers’
administration work considerably. However, when you assess students in this
way, it’s easier to produce a final report at the end of the course rather than
just a test score.
273
274
Part V: What Kind of Class Will I Have?
Chapter 19
Getting Specific: Teaching Just
One Student and Business English
In This Chapter
▶ The pros and cons of one-to-one teaching
▶ Planning and handling a one-to–one session
▶ Who can teach business English?
▶ Planning and handling business English lessons
A
lthough most teachers obtain some training in teaching general English
in classes, there’s woefully little available in advice and support for
teachers making the transition into one-to-ones and business English. So in
this chapter I provide advice and tips about these two areas.
Evaluating One-to-Ones
From the outset I can tell you that teaching one-to-ones can be pretty lucrative. As they’re often two or three times the cost of class lessons in a school,
it naturally follows that people who pay for a private teacher are well off or
well motivated.
The typical students fall into several categories:
✓ The student who’s reached a reasonably high level of English, at least
intermediate level, but who has no desire to commit to another formal
course. These students want to maintain their English, probably by
studying an hour or so each week, and prefer to have a conversationbased lesson without too much structure.
276
Part V: What Kind of Class Will I Have?
✓ The student with a specific goal in mind. These individuals have an
exam looming or business trip coming up and want to prepare for a
specific period of time. They need to develop skills in particular areas
and require a needs analysis from you (I give information on needs
analysis in ‘Working at Teaching Business English’ later in this chapter)
as well as a syllabus.
✓ The student struggling to keep up with mainstream courses who needs
extra support in order to stay level with his classmates. In this case the
student often brings you the material that he’s struggling with, so part
of your lesson is devoted to immediate homework issues and revision of
topics covered in class that week.
Some schools set up self-access centres for their students. These take the
form of libraries and computers loaded with EFL resources. If you work in a
school with this kind of facility, you may find that teachers are asked to
man the centre and be on hand to help students with particular problems,
effectively giving short one-to-ones and tutorial support.
Listing pros and cons for the student
It’s good to think about the various advantages one-to-ones offer a student so
that you can promote yourself if you decide to pursue this line of income:
✓ The teacher addresses the individual learning needs of the student.
✓ Shy students feel able to cope with just one other person.
✓ Students can voice their preferences about activities and topics, which
they can’t do in a class setting.
✓ The lesson is never too fast or too slow. The student can go at his own
pace.
✓ The student can have much more input at every stage of the course.
✓ There’s usually a great deal more flexibility in terms of time, location,
content and so on.
✓ The teacher and student tend to develop a better rapport and
understanding of each other.
✓ It’s a good way to keep the student’s English topped up.
On the other hand, the disadvantages for the student are that:
✓ Students often hope to make friends through the language school. With
no classmates they can feel rather isolated.
✓ The student and teacher may not get on too well. Even with the best will
in the world, lessons are hard going if you just don’t hit it off.
Chapter 19: Getting Specific: Teaching Just One Student and Business English
✓ Many students miss the dynamics of classroom debates, swapping
speaking partners frequently and working in a team. Whereas the
teacher generally takes the role of the classmate during practice
sessions, it isn’t possible to engage in the same range of activities as
you can in a class.
✓ Lessons are much more expensive compared to group classes.
✓ Whereas in a school, the student may have more than one teacher; with
one-to-one lessons there’s less opportunity for exposure to another
accent or style.
Talking pros and cons for the teacher
One-to-ones offer a lot to consider from the student’s point of view and
this is no less true for the teacher. Your own experience, personality and
circumstances affect your decision regarding this kind of work. I look at the
advantages and disadvantages in the next sections.
On the whole, one-to-one lessons can be very rewarding as long as you and
the student monitor progress regularly, but you need to find out exactly what
the course entails for you before agreeing to do it.
Your students are your best advertisements. Give them a few of your business
cards to distribute and ask them to mention your services to friends and colleagues. Let local people know what you do too, and try to get some ads up in
universities and on other notice boards.
Appreciating the financial rewards
Firstly, the obvious plus is that you can make more money per hour, whether
you work for a school or for yourself.
Most students pay at least 30 per cent more due to the increased amount
of preparation and the more intense nature of the work, but don’t use this
rate as the basis for charging your own private students. Remember that the
school incurs overheads. So find out what the local schools charge individual
students on average and then undercut them (by a considerable amount if
you’re inexperienced).
Never allow a school to give you one-to-one work without establishing a
higher rate of pay than class teaching.
While we’re on the subject of money, think about funds you may have to put
aside for taxes, factor in the time it takes to prepare your own accounts and
don’t rely on your one- to-one students always being around. It’s hard to
predict exactly how much money you’ll make from month to month as students
tend to stop and start according to their circumstances and finances.
277
278
Part V: What Kind of Class Will I Have?
Agree a cancellation policy with your students beforehand so that you don’t
waste your time. Some teachers ask for payment in advance and others are
more relaxed, as long as the students gives them reasonable notice of
cancellation, but it’s unwise to put up with customers who have no respect
for your time.
Finding a place
You need to sort out a place to teach. If you’re teaching private lessons in
addition to working for a school, and have checked that there’s no conflict
of interest between you and your employer, ask to use an empty classroom
out of hours. If you do this, at least you’ll have access to loads of resources
nearby. Unless you’ve built up a good supply of books at home, lack of
resources may limit your lesson preparation when you go it alone.
Other locations you may choose to use are your own home or a local library
or café. Whilst being very convenient, using your place poses obvious risks,
especially if you’ll be alone with the student. Because of this, you should
think very carefully before taking this option. The same principles apply if
you go to the student’s home. On the other hand, if you use a public place
like a library, you’re bound by their opening hours and rules. For example,
you may not be able to speak at full volume or play recordings.
One of the nice things about this kind of lesson though, is that you can more
easily take the student to different locations. If you’re working in an Englishspeaking country, why not take a few trips to markets, auctions, courthouses
or anywhere your student may find stimulating.
Forging a relationship
Your relationship with your student also presents challenges and rewards.
Luckily, the majority of students are happy, motivated souls, but if you do get
a boring or obnoxious one it can be very hard work.
Private lessons sometimes resemble counselling sessions as students
inevitably let off steam and talk about their day-to-day lives.
Now, if you know that you’re not the type to put on a smile and feign interest
when you’re bored witless, be a bit wary of this line of work.
The most successful one-to-one teachers like making other people feel good
about themselves. A nice thing about the job is that one-to-one teachers often
learn something too. People often pass on information about their specialisms
and particular interests, not to mention their culture and traditions.
Chapter 19: Getting Specific: Teaching Just One Student and Business English
Enjoying the pace
In the actual lesson, you find that the student who just wants to chat saves
you quite a lot of preparatory work. Of course, you should never go to a
lesson unarmed but your lesson may be spread over several sessions if the
student has other matters to get off his chest. Unlike in classes, students can
use their time to talk if they prefer, as long as they don’t have deadlines to
meet, such as looming exams (in which case try to steer them back to more
structured study).
On the point of preparation though, bring along more material than usual for a
one-to-one because the student needs a great deal of variety.
Planning and teaching a one-to-one lesson
Planning a one-to-one lesson is largely similar to planning a lesson with a
group of students but in order to be effective, you need to keep certain points
in mind.
Have clear aims for the short- and long-term. Have a detailed interview with
the student before you start the course and review the aims often. This
should prevent the lesson turning into a chit-chat every time (unless that’s
what the client wants of course). A course book that you can dip into may
help with this, if you can get your student to buy it, that is. A course book
allows you to set homework and have extra material on hand without too
much photocopying. Course books also show students how to develop study
skills, which may be necessary for those who’ve been out of education for
many years.
Although you need to make your lessons varied and bouncy, remember that
your student can only absorb so much in one session. So revise previous
topics a lot, after the student has had a day or two to absorb them. Even
during the lesson it’s not a bad idea to leave the room for a few minutes to
give the student a bit of space to think and reflect.
If you do happen to get an intensive course, 15 hours a week for example, you
have to pull out all the stops to keep it interesting. I’ve found that having a
running saga is good fun.
What I do is to base a series of lessons (listening, reviewing, narrating and so
on) around a film that plays out over the course of the week. The student is
keen to know what happens next and is therefore more motivated.
279
280
Part V: What Kind of Class Will I Have?
Read a few news headlines each morning and include activities that get your
student moving – sorting through cards and objects, doing library research
or going on field trips.
By the way, it’s easy to stop monitoring the student’s errors while you’re
playing the part of the other speaker in a role play or similar activity. I
therefore suggest that you keep your pen and paper to hand all the time,
so that you can have some thorough feedback and correction sessions
afterwards.
Working at Teaching Business English
The answer to the question about who should teach business English, and
how, revolves around needs analysis, in other words, finding out in detail
what the client needs to do in English and where his wants and lacks are.
The following are some examples of questions for a needs analysis
questionnaire, which can help you to assess the needs and lacks of the
potential student and determine your own suitability for meeting those
needs.
✓ What do you need to do in English?
✓ Which skills need to be involved (reading, writing, speaking, listening)
and through which kind of communication – letters, emails, Skype
computer software (which allows you to make free calls using the
Internet) or face to face?
✓ What do you need to talk about? Tell me about the subject areas.
✓ Who are you likely to be speaking to and where are they from?
✓ Describe the settings you’ll use English in (conferences, lunches and
so on)?
✓ Do you have any particular time frames? Do you need English now or for
a future event?
✓ Why did you decide to study English?
✓ Is your course being sponsored by your company? What kind of budget
is there?
✓ What is your educational background?
Chapter 19: Getting Specific: Teaching Just One Student and Business English
✓ Tell me about your background, culture and interests.
✓ Do you have a particular location in mind for the lessons?
✓ How often and how long do you want your lessons be?
✓ Can you provide a sample of your writing – a recent email for example?
When teaching business English, you do more than check the student’s
overall grammar and vocabulary, you also get him ready for the particular
situations he’s to face.
As the spectrum of occupations requiring a certain level of English is so wide,
there may be cases where very little specialist knowledge of that industry is
required.
If you can get a foothold in teaching people your own specialism in English,
so much the better. In addition, for some the most difficult words in the job
are similar to English ones anyway. For example, when teaching Italian
surgeons I found that their lack was in everyday language for communicating
with immigrant patients and for socialising, not the Greek- and Latin- based
terminology of medical journals. After all, English is the international
language of science and technology now but the words we use often originate
elsewhere.
Fortunately, a business English class is sometimes pretty straightforward. If
you’re teaching a whole class that’s enrolled at your school, you’ll probably
be given a course book or a syllabus to teach from. Some classes are geared
towards exams such as Cambridge BEC or LCCI qualifications which a
teacher with experience of general English exams can handle with a little
extra preparation. (I talk about English proficiency exams in Chapter 21.)
The main difference between general and business English is register (formal
and informal styles), and the organisation of a functional-notional syllabus,
which means that instead of learning one piece of grammar or vocabulary
after another, getting progressively more difficult, the syllabus focuses on
situations and tasks. For example, the first chapter may be about making
phone calls and teach whole phrases like, ‘Hold the line please. I’ll put you
through’. The next chapter may cover welcoming visitors to the office and
so on. So it’s still the English you’re used to, but organised in a different way.
For this reason, you need to teach chunks of language that students can
memorise even if they don’t understand the grammar involved.
Use real communications like business letters, faxes and emails you’ve
received and look regularly at the business pages in national newspapers.
281
282
Part V: What Kind of Class Will I Have?
Look for business English resources at these websites:
✓ E. L. Easton at www.eleaston.com/biz/home.html
✓ Macmillan Business English at www.businessenglishonline.net
✓ Oxford University Press English Language Teaching at www.oup.com/
eltnew/teachersclub/business_english
Chapter 20
Getting Youth on Your Side: Coping
with Younger Learners
In This Chapter
▶ Focusing on young learners
▶ Telling stories
▶ Playing games
▶ Singing songs
▶ Connecting with teenagers
T
eaching young learners – from toddlers to adolescents – is a somewhat
different experience from the highly motivated and self-disciplined adult
students of most lessons. So, in this chapter you get advice on how to make
children’s lessons fun and stimulating.
Teaching Kids’ Classes –
Dream or Nightmare?
When you’re offered the opportunity to teach children you may delight at the
idea of singing songs with cute little pupils or you may envisage screaming,
unruly terrors paying you no heed whatsoever. To be honest, you’re probably
going to encounter both situations and sometimes in the same lesson. It’s up
to you to decide, but if you take the job it’s good to start off by thinking about
the way youngsters learn.
284
Part V: What Kind of Class Will I Have?
Looking at how little ones learn
Most people think that children are superb language learners and that they
outstrip adult students. However, more recent research shows that this
isn’t exactly true. Children have much more time to devote to learning than
adults and they can often see a clear need for doing so. So, for example, most
bilingual children have a parent or caregiver who speaks to them entirely in
another language. Say, a family in the UK are made up of a Twi-speaking mum
and a dad who’s bilingual, the child eventually speaks Twi to communicate
with her mother and English to speak to everyone else. However, when the
mother learns English, the child may stop speaking Twi because she doesn’t
have to. Understanding Twi is sufficient for survival and so English becomes
dominant.
Two good points about youngsters learning a language:
✓ Their pronunciation is sometimes better than that of adult students.
✓ They’re often less self-conscious about speaking than older learners.
If you work as an au pair to small children, you can just speak your language
and the children begin to acquire it because they need to communicate.
However, as an EFL teacher you’re only likely to have your pupils for an hour
or two a week, so acquisition is less likely to happen this way. You need a
strategy for helping them learn.
Sorting out what young learners need
Children’s and adult’s lessons obviously differ in some respects. You really
can’t just turn up and play a game so here are some things you ought to
include in your lesson preparation:
✓ Shorter activities to match the shorter concentration span: Even games
or role-plays need to be brief and punchy so that the kids don’t get
bored.
✓ Extra activities just in case: Sometimes the children aren’t in the mood
for a particular activity so instead of forcing them, have an alternative
on hand.
✓ Eccentric behaviour: Kids love it when you do something out of the
ordinary. It gives them a reason to communicate because they want to
tell you about it.
✓ Rewards: Parents don’t always like it if you give their children sweets,
except occasionally, but you can have stickers with smiley faces and
positive messages. Pre-teens really beam when they get praise and
commendation that they can show to Mum and Dad.
Chapter 20: Getting Youth on Your Side: Coping with Young Learners
✓ Interest and motivation: Try to make your activities lively and based on
the children’s interests so that they really want to get involved.
✓ Sensory and kinaesthetic activities: Use all the senses (maybe not so
much of taste). If you can’t bring in real objects, tap into their imaginations.
Ask about how things smell, and what they look or sound like. And get
them moving! You can encourage mime and acting out stories. Do
activities standing up. Ask them to come up and write or draw something
on the board.
✓ A balance of activities: Try to alternate between sit-down activities and
ones involving movement so that the kids don’t end up over excited or
bored. It disturbs other classrooms if there’s constant noise but short
bursts are more acceptable.
✓ Thorough preparation: If you’re unsure of yourself, youngsters take
advantage and start messing about. Know exactly what you want to do.
✓ Have a starting and finishing routine: Repeat the same little songs at
the beginning and end of the lesson for several weeks. Kids feel secure
when they know what’s going to happen and when they’ve picked up the
words.
✓ Revision and repetition: Repeat information from previous lessons to
reinforce the ideas and give the kids a chance to show off what they
know.
✓ Visual stimulation: Make your classroom and materials bright and
colourful with lots of pictures.
✓ Discipline: This is an area of concern for a number of teachers. It’s best
to let children know what will happen if they’re naughty. Unfortunately,
you may not speak the children’s language when you begin but you can
always ask for the assistance of the school or a parent to set out the
ground rules.
I find it helps when the children know that parents are likely to get
involved if problems arise. For minor cases of disruptive behaviour
you try getting that pupil more involved by giving them a special
responsibility. This can improve confidence and prevent restlessness.
Imagining Once Upon a Time
You should always practise language within a context, and in the case of
children, fairy tales and kids’ stories in general are ideal. Another benefit of
stories is that they encourage the use of the four skills – reading, writing,
listening and speaking. Stories improve general linguistic ability because
children begin to paraphrase and summarise. In addition, they actually get
some cultural awareness through this gentle introduction to world literature.
285
286
Part V: What Kind of Class Will I Have?
No doubt you’ll read stories aloud in the classroom and this takes a little
practice if you aren’t used it. Be sure to vary the intonation of your voice as
much as possible so that key words stand out and so that the children are
gripped by the music of the language. Invent funny voices for different
characters and don’t insist on silence if the children want to interact with
the tale. You can teach booing, hissing and ‘He’s behind you!’ if you like.
Getting the grammar
Grammar is an off-putting word for most students, so when it comes to the
little ones, it needs to be sugar coated a little.
Take for example a lesson on adjectives. From beginner level, children learn
their colours so they know the basic ‘adjective plus noun’ structure – a
blue ball.
Adjectives of personality are motivating for kids because they enjoy telling
you what they think of the various characters in their stories. Fortunately,
fairy-tale characters often come with their own adjectives, so you can use
them as examples. For instance: evil stepmother, ugly sisters, magic wand,
handsome prince, big bad wolf, little pigs.
Students enjoy matching the adjectives to the characters and to their flashcard
pictures. And don’t forget the dwarfs from Snow White! Six of the seven
dwarfs have adjectives for names – Bashful, Dopey, Grumpy, Happy, Sleepy
and Sneezy – so you can easily have students practise using a subject, a form
of the verb ‘to be’ and an adjective.
For example they can identify the characters from pictures and show
understanding of what the names mean like this:
I know he is Sleepy because he’s in bed.
I know he is . . . because he . . .
Most fairy tales are in the past simple tense and can easily become gap-fill
exercises where the children choose the missing words from a list under the
passage, like this one:
Once upon a time, there . . . a woman who . . . very sad because she . . . a
child but . . . not have one.
wanted was did was
Chapter 20: Getting Youth on Your Side: Coping with Young Learners
Some famous lines from stories provide a context for introducing other
tenses:
✓ Future simple: ‘I’ll huff and I’ll puff and I’ll blow your house down’, from
The Three Little Pigs.
✓ Present perfect continuous: ‘Someone’s been sleeping in my bed’, from
Goldilocks.
✓ 1st conditional: ‘I’ll give you the child if you guess my name’, from
Rumpelstiltskin.
You can use stories to teach modal verbs too. Summarising the moral of the
story from fables and fairy tales lends itself to this topic. You may start a
discussion like the following:
Teacher: What do you learn from ‘The Tortoise and The Hare’?
Student 1: We shouldn’t rush.
Student 2: We mustn’t boast.
Student 3: We can’t judge by looks.
Expanding vocabulary
Many story books for children are designed so that you can just point at the
picture and introduce the vocabulary. However, there should be a structure
for learning, so it’s good to introduce vocabulary within topic areas. Once
you decide on the topic you can find a story that lends itself to it.
Some modern TV characters are also shown abroad, not to mention
Hollywood movies, which have international appeal. Use any story that’s
appropriate for the age group. So for example:
✓ Food: Hansel and Gretel
✓ Buildings: The Three Little Pigs
✓ Family: Cinderella
✓ Animals: The Jungle Book
✓ Jobs: Fireman Sam/ Bob the Builder
✓ Environment: The Ice Age
287
288
Part V: What Kind of Class Will I Have?
EFL teachers sometimes refer to inductive and deductive learning. Inductive
learning means that students learn through examples and discovering things
themselves so that they understand the meaning in context. Deductive
learning means that you teach the rules of a subject first so that students
refer back to the rules as a point of reference. Using a story to teach
vocabulary is a deductive approach when you teach the children the words
very directly. But the children also infer the meaning of certain words
because of the context, so they learn inductively as well. So in the Hansel
and Gretel story the children learn the words for ‘woodcutter’ and ‘witch’
inductively; they just pick them up. On the other hand, the food vocabulary
is deductive because you tackle it head on. This means that you don’t need
to worry about students understanding every word before you can use the
story. They can work out some of it for themselves.
Of course children have their own imaginations and they enjoy coming up
with their own stories too. When they create their own tales and pictures,
they’re more likely to remember the vocabulary they’ve used, and they feel
a greater sense of achievement if these efforts become posters for the
classroom.
Children Only ESL-EFL at www.childrenonlyesl-efl.com offers free
downloadable flashcards for children’s stories.
TEFL Tiddlywinks: Using Games to Teach
Games that have a clear language focus are a real asset to lessons and here I
show you list of games you can adapt for TEFL.
Whichever game you play, I find it helpful to teach realistic game-playing
vocabulary such as:
It’s my turn.
You’re cheating.
Pass.
Can I have a clue?
I win.
You lose.
Chapter 20: Getting Youth on Your Side: Coping with Young Learners
Adapting real games
Very often you can take a game you already know and tweak it for the TEFL
market. For example, I use these:
✓ Battleships: In this game, you have a grid onto which you secretly mark
off certain squares as the location of your battleships; your partner does
the same on another grid. For the purposes of language practice, the
grid references can be made up of numbers that sound similar and tricky
letters of the alphabet, such as those in Figure 20-1. When the students
try to guess the location of each other’s battleships they’re forced to
pronounce their numbers and letters very precisely. For example:
Student A: Is there a battleship at Q13?
Student B: Is that Q or K?
A
Figure 20-1:
Using
‘Battleships’
to teach
letters and
numbers.
13
30
14
40
15
50
16
60
100
E
I
K
Q
G
J
H
W
X
X
X
X
X
✓ Bingo: You can play bingo in lots of different ways. The traditional
approach of course, is to have numbers on your card and then to mark
them off as soon as they’re called out.
However, you can create your own bingo-style cards with pictures on
instead. So if you’re teaching children about animals, have pictures of
animals on the cards. It works well with food, clothing and furniture too.
This game gives very good practice in listening skills. Be really crafty
and instead of calling out the word, just hold it up in writing. This kind of
variation pushes the students to recognise English words in writing.
289
290
Part V: What Kind of Class Will I Have?
✓ Tiddlywinks: Games like this, which don’t actually require speaking, can
be used in a slightly different way. If students just enjoy having a go at
the skill of the game, tell them that they need to answer a grammar or
vocabulary question correctly before they have a turn. You can ask the
students to revise a particular topic by going through their notes and
making sure that they remember it, and let them play in return for their
correct answers.
✓ Colour by numbers: This kind of activity really reinforces the names of
all the colours (and numbers too), especially if you can get the children
to talk about the picture while they work. Ask them whether a particular
item is to be blue or green, for example. This works well in very small
classes.
✓ Simon says: This is a fun game using instructions in command form, for
example, ‘Simon says, touch your toes’. It practises saying the parts of
the body and some useful verbs like ‘put’ and ‘touch’. The advantage of
a game like this is that the shy child doesn’t have to speak but can still
participate.
✓ Uno: This is a card game that practises numbers, colours and a series
of verbs and phrasal verbs such as ‘pick up’, ‘put down’ and ‘reverse’.
It takes some time to play a whole game, so you may have to reduce the
number of cards dealt to each player.
✓ Snakes and ladders: Create your own board with various revision
questions on it. If the children answer correctly they don’t have to go
the ladder despite landing on that square.
✓ Crosswords and word searches: You can buy some children’s puzzle
books but it’s much more fun if the children create their own to challenge
each other, based on different vocabulary areas.
Using games from course books
You can find a number of dedicated course books for young learners. I list
some titles in Chapter 8. Most of these include ideas for games and activities
within the syllabus but here are two books on the market that are more
focused:
✓ Children’s Games Photocopiable Resource Pack’ written by Maria Toth
and published by Macmillan is crammed full of activities for young
learners at different levels.
✓ Five-Minute Activities: A Resource Book of Short Activities’ written by
Ur and Wright and published by Cambridge Handbooks for Language
Teachers is not actually aimed at young learners but many of the games
are great for kids because of their short attention span.
Chapter 20: Getting Youth on Your Side: Coping with Young Learners
Most series of course books are accompanied by teachers’ and resource
books that contain games and activities. Even those designed for adult learners give you great ideas which you can transfer to children’s topics.
When you adapt activities from books, use colourful cards that kids can move
around and attach amusing pictures, perhaps something they can colour in
afterwards.
Trying other activities
Depending on the resources available to you,
you can invent your own activities to practise
language.
chosen newspaper words directly onto the card
and write the rest in with their own handwriting.
Award a prize for the most original.
Here are a couple I use; the first activity is
fun if you have English newspapers or magazines around. The second requires no special
resources at all. What they have in common is
that the children don’t need too much involvement from you so they can be more in control of
their own learning.
By the end of the lesson, they’ll have learnt
several new words and practised sentence
structure in English.
Making a newspaper collage
For this you need a newspaper or two (comics
for lower-level students), scissors, card, five
or six boxes or envelopes and glue. Make sure
that everyone has access to a page or two of
the newspaper.
You simply chose a particular part of speech
(verbs, nouns, adverbs and so on) and give
students a time limit of a couple of minutes to
find examples of this kind of word on the page.
They can underline the words and you then
need to do some feedback to make sure that
they’ve got it right.
Next you get them to cut out all the examples
they’ve found and put them in the designated
box or envelope. After a few rounds you end up
with collections of nouns and verbs and so on.
Finally, have groups of students pick three
words from each collection without looking.
They have to think up a short story using all
their words, no matter how bizarre, and write
it out on a large piece of card. They stick their
That’s a good question!
It’s always best to let students generate
language themselves so here’s a game that
does just that.
On strips of paper ask students to write down
questions they’d like to ask their classmates.
They may be about their favourite things or more
along the lines of ‘What would you do if . . .?’
When they’ve finished, go through and weed
out any that are just too cheeky or inappropriate
for other reasons. If you have a good question in
poor grammar, put it on the board so that other
members of the class can help correct it. Try to
include about twice as many questions as there
are students so that you retain the element of
suspense. And now put the questions in a hat
or something similar.
Finally you go from student to student and ask
each person to choose a question without looking. On the flip of a coin, decide whether the
student has to answer the question or nominate
someone else to do so.
By the end of this lesson, the students should
have practised asking questions in English and
they should also know quite a bit more about
each other.
291
292
Part V: What Kind of Class Will I Have?
Tuning-In to Songs and Nursery Rhymes
Nursery rhymes are great fun because they contain the kind of vocabulary
that’s appropriate for children, for example names of animals and parts of the
body. They also contain simple actions in nursery rhymes, which kids can do
the actions to. However, when children repeat and act out rhymes, they don’t
see it as learning; it’s more of a game.
Choosing the right song
When it comes to choosing a nursery rhyme or song for teaching English,
resist the temptation to simply choose your favourites so you can indulge in
a bit of nostalgia from your childhood. Think about it! Some rhymes make no
real sense at all and certainly won’t do well under scrutiny. Take this line for
example:
Ring a ring o’ roses, a pocket full of posies . . .
Songs that contain words you think are useful are actually a better bet.
You may not analyse all the words at this stage but as students progress
in English they should be able to recall the rhyme and have some common
English words at their disposal. Choose nursery rhymes with an easy,
memorable tune and beat so everyone can clap and sing along (or at least
hum at first). Rhymes of more than eight lines are hard to memorise unless
they’re very repetitive. In addition, go for rhymes that are easy enough to
pronounce and easy to act out.
Kids also like to perform actions to the rhyme because it helps them
remember and adds to the meaning. I’m a big fan of good old Incey Wincey
Spider myself, because the hands are moving all the way through.
Teaching your class to sing
So how do you actually teach foreign children an English rhyme? You don’t
need to break the song down in all its parts. Only certain words deserve a bit
of focus. Words that are accompanied by a mime or action are an easy target
because the movement helps explain the meaning. You can also highlight
words that are part of your course syllabus such as numbers and colours.
You should decide what the rhyme is basically about and teach the vocabulary
that describes the theme. So for Incey Wincey Spider, focus on ‘spider’,
‘climb’ and ‘spout’. For Ten Green Bottles teach the number and the colour
along with ‘bottle’ and ‘wall’.
Chapter 20: Getting Youth on Your Side: Coping with Young Learners
The basic steps to teaching your class a song are:
1. Teach the vocabulary for parts of the body with pictures for the
children to label – and lots of repetition.
2. Arrange the children in a circle and begin singing the song slowly,
doing the actions as well.
If you sing much more slowly than usual, they can associate the words and
actions easily. They can also hear the sounds of the words distinctly so you
don’t end up with vague, muffled approximations of the words. You may have
to repeat a song three or four times when you first introduce it. The kids may
not join in with the words but they probably pick up the actions. However,
regularity is the key. So if you sing it again the next lesson you should find
that they start to sing along with a few of the words they recognise.
‘One finger one thumb’ is a great nursery rhyme which has actions too. It
teaches the parts of the body – finger, thumb, arm, leg, head – and some
imperatives (commands): stand up, sit down, turn around.
The idea is to waggle your finger and thumb. Then to push out your arm and
leg, nod and follow all the commands in time with the song.
Here’s the whole rhyme in case you don’t know it. You’ll have to ask around
for the tune unless you have a recording of it!
One finger, one thumb, keep moving.
One finger, one thumb, keep moving.
One finger, one thumb, keep moving.
We’ll all be merry and bright.
One finger, one thumb, one arm, keep moving (repeat twice).
We’ll all be merry and bright.
One finger, one thumb, one arm, one leg, keep moving (repeat twice).
We’ll all be merry and bright.
One finger, one thumb, one arm, one leg, one nod of the head, keep
moving (repeat twice).
We’ll all be merry and bright.
One finger, one thumb, one arm, one leg, one nod of the head, stand up,
sit down, keep moving (repeat twice).
We’ll all be merry and bright.
One finger, one thumb, one arm, one leg, one nod of the head, stand up,
sit down and turn around, keep moving (repeat twice).
We’ll all be merry and bright
293
294
Part V: What Kind of Class Will I Have?
Singing the Happy song
Another great song for young learners is the
Happy Song. It goes like this:
If you’re happy and you know it, clap your
hands (clap twice and repeat).
If you’re happy and you know it, and you
really want to show it.
If you’re happy and you know it, clap your
hands. (clap clap).
The next three verses are the same except
that you replace ‘clap your hands’ with these
commands in turn: stamp your feet, shout ’We
are!’. Do all three.
This song has simple lyrics and the commands
mirror the actions exactly, so you don’t need
to pre-teach them. The only word you need to
teach beforehand is ‘happy’, which is very easy
to do with smiley faces. The procedure is the
same, a slow version first then normal speed.
Repeat it several times the first day and then
regularly after that.
After the song you can then focus on the verbs
‘clap’, ‘stamp’ and ‘shout’. Whenever someone
does well you can ask the class to clap.
I suggest you save shouting exercises for
outdoors as you may be unpopular with your
colleagues otherwise. You can use ‘stamp your
feet’ when you talk about cold weather too.
If you have a recorded version of the song it’s great for you and the children
to have some musical accompaniment. If not, go ahead and sing your heart
out at normal speed. Be cheery and exaggerate the actions, encouraging the
children to join in.
Don’t worry about the other phrases in the song unless the children
particularly want to know the meaning.
Keeping Teenagers Interested
When you have a class of teenagers, you can have some great discussions
providing that you find the topics that really interest them. Whether it’s the
latest signings by Manchester United, or finding the perfect date, teenagers
make the effort to communicate when they feel strongly enough about the
subject matter.
Some other points that teenagers look for in a good lesson are:
✓ Evidence that the teacher is prepared for the lesson and interested in
their students’ development: At this age kids are smart enough to know
if you habitually throw lessons together at the last minute and they
behave accordingly.
Chapter 20: Getting Youth on Your Side: Coping with Young Learners
✓ Good classroom management: There’s no point trying to get in with
the kids. You aren’t one of them! What they like to see is that you’re in
control of the class and that you’re a figure of authority without being
too uptight.
✓ Showing them respect: Teenagers are moving towards adulthood and
they like you to acknowledge this by asking their opinion about various
topics and encouraging them to be independent in their learning when
this is appropriate.
✓ Fun activities they can actually learn from: You can play games at any
level and with any age group but with teenagers you need to make your
aims and objectives clear so they know why the activities you do are
relevant to them.
✓ Challenging activities: Take the level up half a notch from time to time
so that students feel stretched. Easy activities can lead to boredom.
✓ An invitation to comment on the course or lesson: Hand out
questionnaires so that students can tell you what they want. You
can ask them to suggest topics they’d like to talk or write about.
Have competitive team activities on a regular basis but be sure to mix up the
teams regularly.
Intriguing students with
international English
If you’re teaching in a non-English-speaking country, set your students a
challenge. Ask them to find as many examples of English words and slogans
as possible over a week. Get them to cut out examples from magazines and
newspapers, or take pictures of advertising hoardings (lots of teens have
camera phones). This can become a short project resulting in a class poster.
As a result of their findings, students discuss with you with the pros and cons
of adopting English words into their language. Discuss questions like:
✓ Are English words used correctly when they’re borrowed?
✓ How are they pronounced?
✓ What about the grammar? For example, in many languages words have
to be designated masculine or feminine. Who should decide whether a
foreign word adopted into your language is masculine or feminine?
✓ Do older people use English words or just the younger people?
✓ What kind of image do companies who use English in their advertising
want to have?
295
296
Part V: What Kind of Class Will I Have?
Following this, begin another similar task. This time ask students to find
out which words from their language have been adopted into English. Make
another poster with these international words and discuss:
✓ Have the words kept their meaning or have they changed?
✓ Does the use of these words abroad create a good image of your country?
✓ How do foreigners pronounce them?
Finally have an international word quiz. Get the students to guess the origin
of international words used in English. For example:
✓ Alcohol (Arabic)
✓ Amateur (French)
✓ Boomerang (Aboriginal)
✓ Bungalow (Bengali)
✓ Hamburger (German)
✓ Ketchup (Chinese)
✓ Taboo (Hawaiian)
Spelling out abbreviations
In this age of text messaging, youngsters are very adept at finding short
ways of writing down what they want to say. Why not use some well-known
abbreviations to get them thinking? They may already know the gist of some,
but not letter for letter and others they may have to investigate.
For instance, these abbreviations from broadcasting, texting and the world at
large would make a great quiz activity:
✓ AKA:
Also known as
✓ ASAP:
As soon as possible
✓ BBC:
British Broadcasting Corporation
✓ CD:
Compact disk
Chapter 20: Getting Youth on Your Side: Coping with Young Learners
✓ Cul8r:
See you later
✓ GMT:
Greenwich Mean Time
✓ IOU:
I owe you
✓ Lol:
Laugh out loud and lots of love
✓ MC:
Master of ceremonies
✓ MTV:
Music television
✓ PTO:
Please turn over
✓ R&B:
Rhythm and blues
✓ VIP:
Very important person
Even if students recognise the abbreviation, make sure that they can say it
correctly. For example, they shouldn’t make VIP rhyme with ‘skip’ but say
each letter.
Playing Kim’s game
This well-known game tests observation and memory. In the classroom you
can use it to teach or reinforce vocabulary.
To play, you gather together 20 objects that teenagers use and lay them out
on the desk but cover them with a cloth. Uncover them for two minutes or
so to let students look at them, cover them up again, then get the students
to write a list of what they were from memory. I like to choose things that
students use every day but don’t know the name for in English, such as an
eraser or ear-phones.
Offering advice with problem pages
Scores of magazines and websites offer advice to troubled teens. I use
readers’ letters as a basis for reading and writing activities. Students can
each become the agony aunt or even submit their own problem for another
classmate to answer.
297
298
Part V: What Kind of Class Will I Have?
Chapter 21
Making the Grade:
Handling Exam Classes
In This Chapter
▶ Examining the range of exams
▶ Helping students with exam skills
▶ Composing an exam course
S
ome students have very fixed goals for their English which often involve
passing exams. Exam classes take a bit of getting used to so in this
chapter you find out about the most popular exams. I include a section on
how to teach the necessary skills; you can consult the chapters in Part III for
more tips.
Exploring University Entrance Exams
For a large number of students higher education is the motivation for
learning English. They want to take degree courses in an economically strong
English-speaking country because this adds prestige to the qualification and
opens up more opportunities for their future careers. However, in order to
enrol on such courses, students have to prove to universities that they
have sufficient language skills and this is why entrance exams in English are
necessary.
300
Part V: What Kind of Class Will I Have?
IELTS (International English
Language Testing System)
This exam started in the 1980s and is becoming increasingly well known. As
the name suggests, there is a very international feel to this exam. There are a
variety of accents and styles of writing in most of the papers.
IELTS is for people who:
✓ Want to emigrate to Canada, Australia, the UK or New Zealand.
✓ Professional people, especially those in the medical field, who want to
practise in the UK, USA or Australia.
✓ Want to attend university or higher education courses in New Zealand,
USA, Australia, Canada, UK, and South Africa.
✓ Want to undertake work experience programmes in an English-speaking
country.
Once students have taken the exam, the result is usually valid for two years
depending on who needs it. Language skills can fluctuate a great deal over
this period of time, so in a situation where competition is intense a university
is entitled to set more stringent entrance criteria. However, this is fairly rare.
The exam results are given in bands of 0 through to 9. So, 0 means that the
candidate didn’t do the test and a 9 means that the candidate is an expert
English user.
It isn’t usually worth taking the exam unless you can achieve a band 5.5 score
at least. However UK universities sometimes ask for a score as high as 7.5, and
in the USA some academic institutions ask for 8.5.
Students tend to improve by 0.5 to 1.0 on average in three months of study
if they are in an English speaking country and need six months of study
otherwise. For example, students who begin an IELTS course with a score of
6.0 (based on pre-course testing) typically achieve 6.5 or 7.0 by the end of the
course.
Fortunately you can take IELTS more frequently than most other exams, so
students can repeat the exam within weeks if they have a bad day and mess it
up. It costs approximately £100 to take the exam each time.
Although IELTS is generally considered to be for higher education, the exam
has two versions. One is the Academic exam and the other is the General
English version. Most students need the Academic version but emigrants and
work experience candidates who are applying for internships take General
English.
Chapter 21: Making the Grade: Handling Exam Classes
The listening and speaking elements of the exam are the same in both versions.
However, the reading and writing elements are somewhat more difficult in
the Academic version which reflects the nature of work and study the exam
candidates are in line for. A CB (computer based) Academic version is also
offered in some places but this doesn’t include the speaking exam.
There is always a recording device in the room but you should advise students
not to worry about this because this just supports the examiner’s work.
So the four exam papers are:
✓ Listening: This is a 30 minute test in four sections. There is a conversation
between two speakers, followed by a monologue. The third section
involves a group conversation and finally there is a lecture or talk. The
listening texts are only played once each. The questions take the form
of multiple choice, short answers in three words or similar, completing
sentences, notes, diagrams and flow charts.
✓ Reading: This test lasts 1 hour and the question types are similar to
those done in the Listening text. However, they also include choosing
from a list of headings to identify paragraphs, stating whether a sentence
is true, false or has an answer not given in the text, classifying information,
and matching lists or phrases.
✓ Writing: This test lasts 1 hour during which you have to complete two
different tasks. You lose marks if you don’t finish them.
• Task 1 consists of a chart, graph or table and the candidate has to
write about the information presented. Alternatively you have to
describe a process from a diagram, showing how something works.
The minimum word limit is 150 words.
• Task 2 carries more marks and requires you to consider and discuss
aspects of a particular topic in a formal way. The minimum word
limit is 250 words and the question features international themes.
In IELTS writing, if you restate the question in the same words, those
words are deducted from your word count. Hyphenated words and
numbers are counted as one word and you shouldn’t use contractions.
✓ Speaking: This test lasts no more than 15 minutes and takes the form of
an interview with one examiner. First there is a general discussion about
everyday topics. After that the examiner gives the student a topic, a
pencil and some paper. The candidate has a minute to make notes about
the topic and then gives a two minute presentation.
The Speaking test does not happen on the same day as the other exam papers.
It should take place within 7 days of the others though. Candidates have to
do Listening, Reading and Writing papers one after the other, on the same day
with no break.
301
302
Part V: What Kind of Class Will I Have?
Even if a student is proficient in English they might do badly without training
because the questions are a little unusual. For example, in the Reading paper
candidates have to choose whether information is true, false or not given
in the text. Unlike in other exams, you have to read between the lines for
the meaning. In the Listening test you have to listen all the way through too
because there might be a question which doesn’t follow sequentially.
TOEFL (Test of English as
a Foreign Language)
TOEFL is designed to show how well a non- native speaker can cope with
English in higher education. If the student has already followed a recent
course of study in English for two or more years in an English speaking
country, they may be exempt from the test. It is not enough to live in an
English-speaking country. Many universities in the USA require a TOEFL score
to measure proficiency and the exam itself features the American variety
of English. Exams fees vary according to which version of the test you take
and at which centre but the payment is may be quoted in US currency and is
approximately $150.
TOEFL scores are only valid for two years, after that your official report is
deleted.
In this exam you need overall skills like:
✓ Note-taking: Students need to be able to write down key points even
if they don’t understand the content completely and then rephrase or
reconstruct it in writing or speech.
✓ Mind mapping: This technique of using a diagram to organise ideas
around a central point helps students to organise a writing task in just a
few minutes.
✓ Synthesising: This means drawing together information on one topic
from different sources to form a new piece of work.
Three versions of the exam exist: the IBT version is internet based, the PBT is
paper based and the CBT is the computer-based test, so the version you take
depends on where you sit the exam. You only need to take one version.
The IBT lasts 4 hours and has four sections which you do on the same day, as
follows:
Chapter 21: Making the Grade: Handling Exam Classes
✓ Reading: You have to read three to five passages on academic themes
and then answer comprehension questions. It lasts 60 to100 minutes.
✓ Listening: You listen to two conversations involving at least two speakers
and four classroom based lectures. Then you have to answer multiple
choice comprehension questions. It lasts 60-90 minutes.
✓ Speaking: Candidates speak about 6 questions based on what they have
heard or read for about 20 minutes in total. The information for the six
questions is presented during the Speaking test.
✓ Writing: There are two writing tasks in this section, one of which
involves reading and listening. So after reading or listening to a lecture
you write about it. The second is an essay of about 300 words reflecting
your opinion on a given topic. The duration of the test is 50 minutes.
Each part attracts a score of 0-30, so the total score is 0-120.
The PBT is a little different from the IBT and involves:
✓ Reading: This test lasts 55 minutes and has 50 questions based on
general English.
✓ Listening: The duration of the test is 30-40 minutes.
✓ Structure and Written Expression: This test lasts 25 minutes and is
based on using the appropriate language for standard written English.
✓ Writing: There is only one topic and candidates have 30 minutes to
complete it.
Candidates can take the Test of Spoken English separately.
In TOEFL PBT each paper can attract a score of 31-68 so the total is up to 677.
The CBT papers are:
✓ Listening: You get 40 -60 minutes to answer a maximum of 49 questions.
✓ Structure and Written Expression: There is an allocation of 20 minutes
for this.
✓ Vocabulary and Reading Comprehension: This is a 90 minute test.
✓ Essay Writing: You get 30 minutes to write one essay.
The score is averaged out so the total is a maximum of 300.
303
304
Part V: What Kind of Class Will I Have?
Going for More General English Exams
Some students have goals other than higher education and need a more
general qualification which they can show to employers or use as a landmark
for their progress in learning English. In this case they are likely to take a
general English exam or work through several of these over a period of time.
Such exams give students something to focus on and provide motivation.
They may also enhance their career prospects.
Cambridge ESOL (English for Speakers
of Other Languages) exams
Cambridge ESOL offer a a range of exams in general English which are
internationally recognised (see www.cambridgeesol.org). Students in
well over a hundred countries take these exams so there is a wide acceptance
from employers, educators and other bodies of these qualifications as a
measure of students’ abilities in English.
The results of Cambridge ESOL exams are valid for life, unlike IELTS and
TOEFL results. The exams are:
✓ KET (Key English Test): This is an elementary level exam which follows
the same pattern as PET. The registration fee is about £40.
✓ PET (Preliminary English Test): This is for pre-intermediate and
intermediate level students building up to higher level English exams
in the future. The three parts are Reading and Writing (one paper),
Listening and Speaking. The registration fee is about £45.
✓ FCE (First Certificate in English): This one is for intermediate and
upper-intermediate level students. It is a very well-known exam and
popular with employers and educators. The registration fee is about £80.
There are five papers this time:
• Reading: This is a one hour paper based on general fiction and
non-fictions texts.
• Writing: This part lasts 80 minutes and comprises two different
tasks. You need to train students in letter-writing/emails, stories,
essays, articles, reports and reviews. Each style is different and
examiners expect candidates’ writing to fit the task in style and
register.
Chapter 21: Making the Grade: Handling Exam Classes
• Listening: This lasts 40 minutes and aims to present realistic
contexts such as public announcements and news broadcasts.
You listen to the texts twice.
• Speaking: Students have to talk about general topics, compare
and contrast two pictures by themselves, and discuss a task with
another student. This part takes about 14 minutes.
• Use of English: This paper is a tricky one which tests overall
knowledge of English grammar and vocabulary. It takes 45 minutes.
✓ CAE (Certificate in Advanced English): This advanced level exam is
almost the same in its format as FCE but of course at a higher level. The
registration fee is about £85.
✓ CPE (Certificate of Proficiency in English): This level is close to that of
a native speaker and the exam consists of the same five papers as FCE.
However each one is longer. The registration fee is about £90.
✓ Certificates in ESOL Skills for Life: Speakers of English as a second
language in England, Wales and Northern Ireland take these state-run
exams. Depending on the level the cost of these exams is approximately
£10 for the Reading test, £15 to £20 for the Writing test and £20 to £25 for
the Speaking and Listening test.
Cambridge offer KET and PET exams ‘for Schools’, which means they’re
designed specifically for the interests and experiences of students.
Consult the Cambridge ESOL website at www.cambridgeesol.org for
more information about these exams. The British Council website at
www.britishcouncil.org gives information about most English exams.
Other exams
Students take other exams, although these are a little less prominent than the
ones mentioned in earlier sections. Some of these are specific to the student’s
(prospective) career or age group. Others are alternatives to the academic and
general English exams mentioned above and are also recognised by employers
and educators, but are especially favoured by particular EFL colleges.
EDI (Education Development International) offer general English exams and
professional English exams through LCCI (www.lcci.org.uk).
305
306
Part V: What Kind of Class Will I Have?
✓ English Language Skills Assessment (ELSA): This is a quick, businessoriented English test including Reading, Writing, Speaking and Listening.
Students don’t need to prepare for the test and they get a score of 1-500
on completion.
✓ Foundation English Language Skills Assessment (FELSA): This is a
general English test which is suitable for students at low levels, including
elementary, and for different age groups. The format includes a lot of
pictures and large text and the student’s result is presented as a list of
things they can do.
✓ JETSET Certificates in English Language Skills: These are a range of
certificates designed specifically for young learners. They cover the four
skills of reading, writing, speaking and listening as well as encouraging
knowledge of life skills. Because there are several levels, the certificates
can provide evidence of continuous progress.
The London Chamber of Commerce and Industry (see www.lccieb.com
under LCCI International Qualifications) operate several exams for English in
the working environment. They are:
✓ English for Business (EFB): All students take reading and writing tests
which are related to business English but the speaking and listening
components are optional. The exam is offered at different levels.
✓ English for Commerce (EFC): This exam is taken by non-native speakers
who have a reasonable knowledge of commercial concepts.
✓ English for Tourism (EFT): This exam is designed specifically for staff
who deal with customers and who manage others in the tourism industry
and is offered at two levels.
✓ Practical Business English (PBE): This is an elementary level business
English certificate.
✓ Spoken English for Industry and Commerce (SEFIC): This is an oral
exam involving an interview and optional tests in specific areas of work.
City and Guilds run a range of ESOL exams. City and Guilds is an organisation
which is largely focused on vocational qualifications helping people to
further their careers and their qualifications cater for, among others, migrant
workers and non-native speakers settling in the UK
(see www.cityandguilds.com).
✓ ESOL for Young Learners: Children from 8-13 can take one paper for
Listening, Reading and Writing skills and take another optional test
which is an interview to assess speaking skills.
✓ English for Business Communications: These tests at different levels
cover areas such as business letters, faxes and emails.
✓ International Spoken ESOL (ISESOL): This is a recorded interview in
general English which can be taken at different levels.
Chapter 21: Making the Grade: Handling Exam Classes
✓ International ESOL (IESOL): This is a series of general English
qualifications at different levels.
✓ Spoken English Test for Business: The test is a recorded interview at
the appropriate level which demonstrates confidence and fluency in
business English.
✓ English for Office Skills: This test is especially for office workers who
need to show that they can be highly accurate when they write or speak
in English.
I mentioned Cambridge ESOL exams earlier in the chapter. Cambridge ESOL
is a highly respected examining body who also offer Professional English
exams.
✓ BEC (Business English Certificates): These are certificates for people
who wish to use English in their careers.
✓ BULATS (Business Language Testing Service): Employers use this
service to assess the language skills of (prospective) employees.
✓ Cambridge ILEC (International Legal English Certificate): Workers in
the legal profession who need to make contact with English speakers
or speakers of other languages through English benefit from this
qualification.
✓ ICFE (International Certificate in Financial English): This qualification is
for accountants and workers in the financial sector who want to follow
international career opportunities.
✓ ESOL for Work ):This exam is only for non-native speakers who want to
live and work in England, Wales and Northern Ireland.
✓ TOEIC (Test of English for International Communications): This test is
similar in format to TOEFL which I mentioned earlier in the chapter.
However, it is designed to demonstrate students’ readiness for life in the
corporate or business world.
Sharpening Study Skills
and Exam Techniques
Before anything else, make sure your students are at the right level to attempt
the exam within a few months, otherwise they may become demoralised by
the amount of work they have to plough through. A general English course is
sometimes a better option than an exam class to start off with.
307
308
Part V: What Kind of Class Will I Have?
Some general tips to offer students taking exams include:
✓ During the exam, the student has to transfer answers accurately to the
official answer sheet. It would be a shame for them to know the correct
answer, but lose marks because of failing to do this properly. Towards
the end of your course, introduce the answer sheet and get students to
practice using it. They should include this in their timing too.
✓ Check whether students need to write in pencil or pen on the mark
sheet. It sounds basic but examining boards have different requirements
and students need to make sure they have all the right equipment.
Correction fluid is usually banned too.
✓ Remind them not to offer alternatives answers in questions where a
short answer is required, unless the question invites them to do so. If
they’re offered two options and choose a third, that answer is automatically
wrong, whereas if they guess at the right answer, they have a 50 per cent
chance of its being correct. So if a question calls for one word, don’t
choose two and if it asks for two words, don’t choose three.
Tell them to take note of the grammar in the question as it often
indicates singular or plural and other clues. Here is an example:
Which person is responsible for the situation?
Answer: Person A or Person B
The question asks about one person but the student has suggested two
people. Therefore the answer is automatically marked wrong.
✓ Tell them to pay attention to the word count in short answers too. In
some exercises, the student has to write just three or four words per
question. If the answer is in good English but contains five words, it’s
wrong.
✓ Spelling is notoriously difficult in English but there is no excuse for
messing up on words which are actually in the exam paper, so advise
your students to pay attention to the text. Sloppiness loses marks.
✓ Recommend that they think of their own answer before using multiple
choice options. This is an excellent measure of accuracy.
✓ Warn them not to leave blank spaces. Always guess.
Writing especially for exams
The two main things that examiners want to see are good structure and a
composition that answers the question in its entirety.
Chapter 21: Making the Grade: Handling Exam Classes
When it comes to structure, the introduction, body and conclusion should
stand out at a glance. So, for example, even if the body of the composition is
excellent, students are likely to lose marks if they don’t have a conclusion.
Train your students to include at least one final sentence which sums up or
restates the ideas raised in the introduction.
Examiners have very limited time for marking each paper so they won’t waste
time trying to decipher poor handwriting. When students do homework they
should avoid using a computer unless they will be using one in the exam. You
need to check that their handwriting is legible and that the punctuation and
spelling is accurate.
An additional reason to practise handwriting is to do with word counts.
There is no time to count every word in the exam so students need to be able
to see what the appropriate number of words looks like for them. Is it half a
page or a page and a half, for example? The quickest way to count is to see
how many words you write in one line and then count the lines. And never go
beyond the word count by much. It’s a waste of time which would be better
spent checking accuracy. The reality is that the more you write, the more
mistakes you make.
English exams don’t require complex arguments. Students just need to present
a few appropriate points in logical order. The points need to be linked together
with expressions such as ‘however’, ‘in addition’, ‘alternatively’ etc.
Many students are repetitious in their writing so flag this when you mark
homework. Repetition of ideas reveals poor planning and repetition of words
and phrases reveals poor vocabulary.
One overused word is ‘say’. Devote a lesson to using alternatives such as
state, utter, complain, suggest and so on.
Writing lessons ought to include information on:
✓ Opening and closing salutations for letters/emails
✓ Saying what the communication is about
✓ Apologising
✓ Requesting
✓ Thanking
✓ Giving details
✓ Arguing for and against
309
310
Part V: What Kind of Class Will I Have?
✓ Contrasting through tenses
✓ Stating opinions
✓ Giving background information
✓ Concluding
Reading for exams
The biggest problem for students when it comes to reading tends to be
speed. Very often they run out of time because they attempt to read each
text carefully from start to finish. So you need to train your students in speed
reading.
After getting an overview from the headings or opening sentences of each
paragraph, the students need to know what they are looking for. They can get
this information by reading the questions, so tell them to read the questions
before reading the text. Teach students to skim through a text until they find
an appropriate section and then read that part more carefully. They should
practice timed readings in silence (you would be surprised how many people
only study to music).
Get students in the habit of reading with a pen or pencil in their hand for two
reasons:
✓ Dragging the pen across the page helps to keep up forward momentum
and instead of constantly rereading sentences
✓ They can use the pen to underline key words.
Usually answers are in order in the text so it shouldn’t be necessary to keep
going back to the beginning.
When you tackle reading tasks in class, help students by highlighting new
vocabulary but encourage them to guess the meaning instead of always
resorting to the dictionary. You should also look at the structure of the text in
terms of grammar, layout and expressions which link ideas together.
The questions for Reading exams usually involve:
✓ Choosing headings for paragraphs or parts of a text
✓ Classifying: This involves putting information into appropriate groups or
under the right headings.
✓ Completing a table or flow-chart
✓ Completing notes: Students fill in the gaps on an incomplete set of notes
based on a reading or listening text.
Chapter 21: Making the Grade: Handling Exam Classes
✓ Completing sentences
✓ Identifying the views or claims of the writer
✓ Locating information
✓ Matching: These questions usually involve matching a heading to a
paragraph or a character in a text to activities/attitudes associated with
them.
✓ Summarising: Students need to be able to get the gist of and rephrase
information in just a few words.
Speaking in exams
In most speaking exams the examiner is looking for intelligible pronunciation,
a range of grammar, and vocabulary appropriate for the level and task.
Some students try to memorise a speech or at least set answers. However
this doesn’t work because they end up sounding robotic and sometimes fail
to answer the actual question.
Communication between the candidate(s) and the examiner should be as
relaxed and natural as possible. Some tips your students can follow to achieve
this are:
✓ Take your time. It’s no problem to pause for breath before answering. In
fact you’re more likely to mix up your grammar if you rush.
✓ Practise speaking on the day of the exam. If you can have a practise
session with your teacher on before the exam, this helps, but you can at
least use English before entering the exam room to get ‘tuned in’.
✓ Relax yourself by smiling and using the names of the people with
you. Sometimes two or three candidates take an exam at once. Use their
names if they are easy to remember and listen out for the examiner’s
name too.
✓ Learn what to say if you don’t understand or you need to hear something
again. There are very polite and realistic expressions such as, ‘I‘m
terribly sorry but I didn’t catch that’ or ‘Could you possibly rephrase
that for me?’(this isn’t always possible but when the request is made in
good English you are unlikely to be marked down for asking).
✓ Realise that the examiner can’t give anything away. The examiner
can’t let students know how well they have done or put words into their
mouths. So, if students know what to expect, they won’t be put off by
the lack of commendation from the examiner.
✓ Know how to waffle a bit. Make sure that you know how to buy thinking
time with expressions like, ‘That’s a good question. Let’s see…’
311
312
Part V: What Kind of Class Will I Have?
Listening in exams
While listening in exams students have to:
✓ Circle or tick correct information.
✓ Complete multiple choice questions.
✓ Complete multiple matching questions where there are several answers
and several categories.
✓ Complete sentences and other information using no more than three
words or numbers.
✓ Fill in a table.
✓ Get the gist by stating what the overall purpose of a text is even though
it may not be stated explicitly.
✓ Label a diagram.
✓ Pinpoint details.
✓ Write short answers.
Some suggestions for preparing are:
✓ Tune your ears by practicing English on the same day before the exam.
✓ Get used to hearing different accents because you never know what kind
of voices might be used on the recording. You can do this by practising
with authentic materials such as radio broadcasts.
✓ Read all the questions first so you know what you are listening out
for and predict the kind of information required – a name, a place or a
number, for example.
✓ Try to relax but stay focussed. Even if something happens around you,
don’t lose your concentration.
✓ Don’t get bogged down. If you don’t know the answer to one question,
just move on. It isn’t worth missing the next answer and you can always
go back and guess the answer later.
✓ If you can’t hear properly, speak to the examiner immediately. If you have
a choice of exam location, choose the one where they use headphones.
Chapter 21: Making the Grade: Handling Exam Classes
Teaching Exam Classes
Most exam classes involve practising actual exam questions from past
papers and analysing what went well or badly. There is also a need for general
training in grammar, vocabulary, text structure and overall exam techniques.
The first thing to do is get hold of up-to-date information from the examining
board on what the exam consists of. Then sit down and take the exam
yourself. Don’t just answer the questions, make notes on how you found
the answer or structured your argument. There is always a reason why one
answer is better than another and it’s your job to explain it. Did you find
synonyms or use a process of elimination, for example?
Find examples of good written texts by students and analyse what makes
them successful. Do the same for poor attempts.
Organising your course
After you know what the exam is like, find some course materials. You need a
book of past papers or typical exam questions and another book which helps
students build up their skills. Ideally students should have their own copies
of the book(s) to save you doing photocopies every day and to encourage
self-study. Don’t worry too much about students looking ahead and cheating,
after all they are only cheating themselves. You can also draw on authentic
materials from the real world to liven things up and help students to find
their own learning resources. So, instead of a text from the course book, use
a newspaper article or extract from a popular novel.
Work out how much preparation time is available before the exam and
organise the course syllabus accordingly. Students should have a full mock
exam during the course, about three quarters of the way through so there is
time to put a few things right. Some teachers set a full mock at the beginning
of the course so students know what they are aiming for but this can be
intimidating. You should definitely go through all parts of the exam though.
For the Speaking test, see if you can get a colleague to pose as an examiner as
this feels more realistic than when you do it.
313
314
Part V: What Kind of Class Will I Have?
Your students must be prepared to do homework. If you plan your lessons
carefully you can usually incorporate some of the marking into the lesson
time without short changing the class. So for example, if the exam includes
a listening or reading component, you can set students a timed exercise and
mark work while they do it. Use a marking correction code and get your class
to redo their work. (Chapter 7 lists suggested marking codes.)
Remain upbeat and optimistic even if the students are not quite there yet. Let
them know if there doesn’t seem to be much point enrolling for the exam this
time and focus on more appropriate timing. If enrolment isn’t optional you
can focus on the skills the students will gain by taking it. And beware of the
over confident students who rely on being clever rather than practising their
techniques. They sometimes fail.
Using English exam papers: Teaching
what sounds ‘English’
The Use of English paper in Cambridge exams is probably the most difficult
to teach. Even if an exam doesn’t contain a paper with this name, there is
bound to a number of questions based on the same principles. The idea is for
students to demonstrate whether they have good overall knowledge of the
language and the familiarity to know what sounds correct.
The best way to test this kind of knowledge initially is by using a cloze test.
This means that you delete words from an appropriate reading text at regular
intervals, perhaps every eighth word, and ask students to complete it. By
doing this you take in all parts of speech and get an immediate impression of
your students’ abilities. From this kind of assessment you may discover that
your students have a particular area where they need more study – idioms
and prepositions often fall into this category – but on the other hand you
could opt for a more comprehensive training regime. This can include:
✓ Synonyms: Highlight synonyms (words that mean the same as other
words) all the time. You can do this during reading lessons if you decide
to dissect the text, and in addition, do a synonym brainstorming activity
before a writing task so that the students are less likely to repeat
themselves. As a stand alone activity you can set matching tasks for
synonymous pairs or ask the class to find the odd one out which is not a
synonym.
✓ Rephrasing: This is related to the use of synonyms and also syntax, or
how words in a sentence fit together. As a teacher, your own definitions
should include examples of rephrasing so that students become aware
of alternative ways of expressing things. A typical rephrasing task is like
this one:
Chapter 21: Making the Grade: Handling Exam Classes
Complete the second sentence so that it has the same meaning as
the first one. You must use the words in parentheses.
I won’t come to the barbecue if it rains. (unless)
I…….…………………………...it rains.
Teach grammar rules so that students can more easily work things out
for themselves.
✓ Preposition agreement: Choosing the right preposition is pretty difficult
because there aren’t always rules to follow, so highlight which preposition goes with which verb or other part of speech.
✓ Collocations and chunks of vocabulary: Sometimes there is no particular rule about which words go together, so you just have to teach
a whole phrase at once and highlight to students that those words fit
together in a particular way.
✓ Identify part of speech: In a cloze test, one where you have to fill in the
gaps, you can decide whether a preposition or adjective or other part of
speech is missing to help guess the answer.
Read the sentence and think of the word which best fits the space.
He would often……visit……….the forest.
✓ Prefixes and suffixes: Once students know which part of speech they
need, it’s easier to manipulate a base word by adding to it. Here’s an
example.
Use the word given in capitals to make a new word which fits in the
space.At the computer company, all the ……programmers……….. take
their break at 1pm.
PROGRAMME
✓ Dictionary usage: Train students to use dictionaries efficiently. They
are a tremendous source of information so if students read more of the
entry for a particular word, they will learn about all the associated parts
of speech and synonyms too.
✓ Editing: Students should be used to editing their own work from your
correction code. However, they often have to apply grammar rules to
eliminate words from a text in exams. For this reason, always try to
explain why a sentence is incorrect.
If a line has a word in it which is incorrect, write that word in the space
provided.
1) Even though my car it was driving smoothly, I took it to the mechanic.
315
316
Part V: What Kind of Class Will I Have?
Chapter 22
Distinguishing Monolingual and
Multi-lingual Classes
In This Chapter
▶ Handling classes in which everyone speaks the same language
▶ Teaching multi-lingual classes
▶ Comparing two teaching situations – at home and abroad
E
nglish is English wherever you go but the nature of classes varies
tremendously. In this chapter I tell you about learning environments at
home and abroad and give you some tips on handling similar and diverse
students.
Speaking the Same: Monolingual Classes
In the majority of EFL courses, all the students speak the same native
language. These usually run in the students’ home land. These classes tend
to be larger in size than multi-lingual groups and the students are quite often
from the same background and age group as well.
Predicting errors
The advantage of teaching monolingual classes is you can fairly easily predict
problem areas, or L1 interference. L1 means first language – mother tongue, in
other words. L2 is a second or foreign language.
Most people who speak another language have an accent which reveals
where they’re from and usually make mistakes typical of anyone from the
same language group. Their mother tongue influences pronunciation, structure
and vocabulary. The good news is that because all the students have the
same problems it’s easier to predict what could go wrong.
318
Part V: What Kind of Class Will I Have?
Pronunciation errors
If you imagine speaking English with your students’ accent you can begin to
estimate which phonemes (pronunciation segments) they find problematic.
Take a copy of all the phonemes in English and highlight the ones your
students struggle with. Then, whenever you introduce words which contain
these sounds, make a point of drilling the pronunciation thoroughly.
English has several sounds which don’t correspond to Hindi ones. English
/t/ seems to fall between a number of similar Hindi sounds but these are said
with the tongue between the upper and lower teeth or much further back in
the mouth. So students need to see where exactly in the mouth they can make
this sound. You could have a diagram up so that you can point out the correct
tongue position every time a word with /t/ crops up.
Adopt a similar approach for word stress and intonation patterns. Anything
which is markedly different from English should attract special attention
from you.
Grammatical errors
You don’t have to speak your students’ L1 to predict their grammar problems.
Just listen to the errors speakers of that language make and then do some
research by asking colleagues and checking reference books. In particular,
books which teach the students’ language to English speakers point out the
differences in grammar. It might seem illogical to an English speaker when a
student consistently refers to an inanimate object as he or she. For instance,
students may say, ‘She is a beautiful chair’.
However, knowledge of how gender works for objects in their L1 would cause
you to stress that in English objects are neutral. So in Italian a chair is ‘sedia’
and feminine because it ends with the vowel ‘a’. It probably wouldn’t occur
to you to point out that a chair is not ‘she’ without this kind of background
information.
Vocabulary errors
False friends are words which look or sound similar in two different languages
but have entirely different meanings.
For example, ‘byte’ in Swedish means prey or victim; in English it’s a group of
binary digits
Find out as much as you can about false friends and note them down whenever
you come across them so you can help your students avoid pitfalls.
Or how about words which function differently when you translate them? For
example compare English and French: ‘langue’ in French means language or
Chapter 22: Distinguishing Monolingual and Multi-lingual Classes
tongue, so you can say ‘I speak a language’ and ‘I speak a tongue’, but you
can’t say ‘I taste with my language’ so you have to pay attention.
Literal translation from L1 to L2 is risky so point out any traps you are aware of.
Apart from the practicality of the thing, when you are living abroad it is to
your advantage as a teacher to start learning the local language.
Using the students’ language
Although most EFL professionals are against the use of the students’ L1 in the
classroom, there are those who point out the advantages of its use in small
measure.
For one thing, weaker students who have no option but to attend the class
at that level (there is no lower level to move to for instance) do not feel as
lost as when only English is in use. For true beginners L1 use might build
confidence especially if the teaching methods are just as new to them as the
language. In both cases there is a reasonable argument in favour of using the
L1 just to give instructions.
Suppose you are struggling to convey the ins and outs of an activity in
English. Is it a wise use of time to persevere or should you allow another
student to whisper the explanation in L1 to someone who doesn’t get it so
that everyone can proceed?
A more extended use of L1 is for grammar explanations. A bilingual teacher
might be able to switch to L1 for detailed comparisons of structure. There is
also the option of team teaching with one partner the native English speaker
and the other a native L1 speaker. In this way the native English speaker can
concentrate more on conversation and cover the grammar only lightly.
Ultimately the aim of TEFL is not to erase the L1 but to help learners become
bilingual. In reality bilinguals switch from one language to another all the time
so you could reason that it should be allowable in class.
The problem is, of course, that use of L1 reduces the use of English and that
as the teacher you may not understand what the students are saying. How do
you know if their translations are even correct? And anyway, it isn’t possible
to accurately translate every English phrase into L1. Sometimes students
have to just adopt an English speaking mindset to really get the point when
they learn the language.
So it’s up to you to decide whether to allow L1 in the classroom. Perhaps you
need to take each situation as it comes.
319
320
Part V: What Kind of Class Will I Have?
Pointing out the pitfalls
of monolingual classes
The trouble with monolingual classes is that when students know that
everyone speaks the same language (except perhaps the teacher) there just
isn’t a great need to communicate in another tongue. There is no urgency to
learn English or at least to speak it. Especially for younger learners, there is
not as much natural curiosity as when their classmate comes from a far flung,
exotic land.
Another problem is that there isn’t so much to ask classmates about when
they all come from the same area and have similar backgrounds. Even worse,
perhaps the students have taken the course just to get out of the house and
make some new friends. This is hardly ideal for linguistically focused lessons.
Your class might just as well be a coffee morning.
If your students are school age or perhaps taking English as a compulsory
course in university, they may be lacking in motivation and at times downright
resistant to learning because they have no choice in the matter.
Creating an ‘English’ environment
You can employ various strategies to get students using English together.
The physical environment can encourage use of the language if it promotes
the culture typical of English speaking countries. So students should see and
hear lots of interesting things in English. You should also use the English
language so consistently and efficiently in the classroom that students view
it as inappropriate to speak any other language in this environment. The idea
is for the classroom to become a place where students can suspend disbelief
and forget that there is any other language which offers a viable means of
communication. During the lesson they are in an outpost of an English
speaking country and must behave accordingly.
Use these tips to create the kind of atmosphere in class that makes students
want to speak English.
✓ Make activities interesting, but not too fun. Believe it not, if an activity
is too fun, students may simply forget to speak English in the heat of the
moment, and the activity becomes more important than the language
point you’re practising.
Chapter 22: Distinguishing Monolingual and Multi-lingual Classes
Now, I’m not suggesting the elimination of fun from your lessons but
perhaps you could highlight the aim of the activity, teach additional
phrases we use when we are having fun such as ‘That’s great!’ and offer
subtle reminders to use expressions in English throughout.
✓ Explain the benefits of pair and group work. As teaching methodology
varies from country to country, it could be that students don’t understand
that this kind of work has a serious purpose.
✓ Forestall use of L1. If you don’t want students to resort to L1, teach
them everything they need to say in English. This includes classroom
language like asking for clarification and even asking for the translation
of a word, but in English: ‘Does anyone know how to say that in English?’
✓ Give clear instructions. Communication in English will definitely break
down if students don’t know what they are supposed to do. So make
sure everyone knows what they’re doing before you start and check with
the weaker students directly because they are the ones most likely to
resort to L1.
✓ Give your students some quiet time to prepare. Before actually speaking
in English, give the class a chance to switch languages. This should help
to focus everyone on the task and it gives them time to ask you a question
if they’re unsure about the lesson, which builds confidence.
✓ Encourage teamwork and cross-communication. Make all the activities
you do communication activities. So encourage discussion and set tasks
which students cannot complete unless they speak to someone else who
has the information they need and vice versa – information gap exercises,
which I talk about in Chapter 6 are excellent for this.
✓ Sit the students back to back for some activities. You tend to concentrate
on verbal communication more when you can’t see your partner’s face or
body language. There is less chance of the students just copying down the
information they need from each other and then chatting in L1.
✓ Collect money for a local charity (or a class visit to the pub) from
anyone who speaks in L1. If money isn’t appropriate, collect names and
make frequent offenders do a forfeit of some kind.
✓ Decorate the room with English. Fill the classroom with posters,
magazines and brochures from English speaking countries.
✓ Play English music. Have some English language music playing when
students enter and exit the room.
✓ Have students use English names. If students are in agreement, tell
them the English equivalents of their names and use them. Some students
like choosing an English name or descriptive title for themselves.
‘Hunter’ was one of my favourite Chinese students.
321
322
Part V: What Kind of Class Will I Have?
Diversifying with Multi-lingual Classes
Classes made up of students with different languages tend to be in English
speaking countries. There are several advantages to this situation:
✓ Motivation among students is high. Either they have paid a considerable
sum of money to attend a language course abroad or they have moved
to that country lock and stock and barrel so they need English to get on
with lives.
✓ English is the only way to communicate with everyone else. Even if
you speak the language(s) of some of the students, you’re unlikely to do
so in that setting or else the others will feel alienated.
✓ An English speaking country offers lots of opportunities for learning
outside the classroom.
✓ Students have a natural curiosity about their classmates’ lives and
have much to discover about them.
Unfortunately multi-lingual classes have their downsides too. If you had 12
students who each spoke totally unrelated languages, all things would be
equal. However, this is not often the case. Certain schools are popular with
particular nationalities because of strong word of mouth and very active
agent promotion. As a result, there tends to be large groups of students from
just a few nationalities, perhaps 4 or 5 nationalities amongst 12 students.
Some of these nationalities might speak the same language, or at least share
similar cultures. The upshot of all this is that students may form cliques to
the exclusion of others in the class.
For younger learners particularly, cliques can result in negative peer pressure.
Say, there are four students who can speak Russian in one class. One diligent
student might want to speak English throughout the class whereas the
Russian speaking friends insist on using their mother tongue most of the
time. They might make fun of the ‘goodie two shoes’ who insists on doing
what the teacher says.
Something similar happens when one friend in the language group is weaker
than the others in English. This person often feels too embarrassed to get
help from the teacher and instead relies on friends to translate. Consequently
they all end up speaking their mother tongue.
Building rapport
Students are usually quite apprehensive when they begin a new course and
this is magnified when the only thing they appear to have in common is their
poor English.
Chapter 22: Distinguishing Monolingual and Multi-lingual Classes
With a class of students from different language groups and backgrounds,
breaking the ice is key to getting the course off to a good start. By using these
activities, you can help students make friends, feel comfortable and avoid
them gravitating towards speakers of the same language.
Chuck a monkey (or whatever toy you have)
A useful tool in an EFL classroom is a stupid looking cuddly toy (I use a
monkey myself), or if you just can’t bring yourself to have one of those with
you, try a bean bag. I have tried doing the following activity with a pen but
found that one student complained on the grounds of health and safety. She
said I could have someone’s eye out!
The icebreaker goes like this:
1. Arrange the chairs into a circle if possible.
Students can sit or stand for this.
2. Introduce yourself according to the class level.
For example, with absolute beginners you might just say your name and
point to yourself or at advanced level you can explain your background
in teaching and any interests you have.
3. Now throw the toy to someone else and ask them to introduce
themselves.
Sometimes a raised eyebrow and expectant look does the trick.
4. After the student speaks, indicate that they should throw the toy to
someone else.
5. Keep going until everyone has introduced themselves, then retrieve
the toy.
6. This time you throw the toy to someone else and you introduce that
person.
So, you say their name and whatever you remember about them.
7. Indicate to the student to throw the toy to someone else whose name
they remember and keep going until you’ve covered everyone.
Encourage the rest of the class to help if someone gets stuck.
8. The activity ends when someone finally introduces you again.
Make a map
Get students working in pairs or threes for the first time.
Draw or point to a map on the board to illustrate your background – where
you’re from, places you’ve lived in and/or countries you’ve visited. Explain
the story with drawings, mimes and dates as necessary. Now get each student
to draw a map too.
323
324
Part V: What Kind of Class Will I Have?
Pair or group the students up and get them to explain their own stories. Even
if they have to mime to each other they will still enjoy breaking the ice.
Ask the students to reorganise themselves in order of their birthdays (not
age). Now they get a chance to meet someone else.
Guess the numbers
This one is not suitable for beginners because it involves asking questions.
Write some numbers or facts on the board which relate to your life and get
the students to guess what they mean. I sometimes write the number of siblings
in my family or the year I began teaching. You can only answer yes or no to
the students’ questions. Now they can play the same game in pairs/groups.
Names and actions
Try this memory game with a twist with the students in a circle.
Have everyone think of a unique action or gesture – maybe stamping your
left foot. So first of all you say your name and perform your action. The next
person has to say your name, stamp their foot, say their name and perform
their own action. This continues around the circle until the last person has a
nightmare of names and funny moves to recall. It really gets people laughing.
Managing learning
After breaking the ice you need to get on with the day to day business of
teaching your class English.
Speakers of European languages have a distinct advantage over other
students because of the similarities in structure, vocabulary and culture
between their tongue and English. Even amongst European languages there is
the potential for some students to grasp a concept almost immediately while
others take a little longer.
Take the word ‘television’. Although the concept is not at all difficult for the
German speaker, the other nationalities barely have to translate.
✓ Czech: televize
✓ Dutch: televisie
✓ German: Fernsehen
✓ Italian: televisione
Chapter 22: Distinguishing Monolingual and Multi-lingual Classes
✓ Portuguese: televisão
✓ Spanish: televisión
This example highlights three problem areas in multi-lingual situations:
✓ You need to be prepared for the different speeds at which learners are
likely to grasp language, given their different backgrounds.
✓ If only one person is lagging behind, this individual may feel too shy to
speak up.
✓ You may overlook the one student who doesn’t get it because the others
so enthusiastically express that they do.
The solution to all three problems is that you never take for granted that
the whole class understands. If you draw or show a picture before using the
word, everyone gets the idea at once. Additionally, you can ask questions to
make sure that students understand (I discuss concept check questions in
Chapter 5). Even if the student understands already, they have an opportunity
to express themselves and help their fellow students understand.
Concept check questions for ‘television’ are:
What shape is a television?
Do you have a television in the garden?
Where is the television in your house?
What do you watch on television?
Use students who are faster on the uptake to help model the language. Good
speakers can show classmates how to pronounce a word in small groups.
They become your assistant teachers which is motivating for them and
helpful for the classmates.
If one student has a linguistic problem which is more complex and not relevant
to the other students, give them more personal attention. For example, a student
from Libya could be slower at doing his work just because it is more difficult
for him to use the English alphabet and script. Instead of partnering him with
a classmate who reads and writes well, be his partner yourself so that you can
assist with some of the more difficult words and give encouragement.
In the long run, you may have to accept that some students will have to
change class in order to move ahead more rapidly or to repeat the course
again. This isn’t desirable but there is no point ignoring the needs of one or
two students just so that you can keep the group together. Your class should
proceed at a pace which is comfortable for the majority of learners.
325
326
Part V: What Kind of Class Will I Have?
Going beyond language: Teaching culture
Some of us are fortunate enough to have been brought up in a multicultural
society so that it’s nothing new or strange to have a mixture of races, cultures
and languages around us.
There is a knack to showing interest without appearing ignorant or
acknowledging differences without alienating anyone. In a class with many
different nationalities you sometimes find that students from mono-cultural
societies lack these skills and are in danger of making gaffes.
Unfortunately, students sometimes bring their prejudices with them to the
learning environment. Some problems I have encountered so far are:
✓ Students from neighbouring countries can display animosity towards
each other based on historical or political factors.
✓ Some males feel that they are superior to female students (and female
teachers).
✓ One student’s religious beliefs may be undermined by others, for example
the observance or non-observance of particular festivals or the need to
pray at particular times.
✓ Differing opinions on sexuality might be offensive to some.
✓ Stereotyping might result in a failure to accept as a native speaker, a
teacher who doesn’t fit the student’s perception of Britishness (a black
teacher for example) or a student whose physical characteristics are not
typical of his nationality.
✓ Students may use inappropriate gestures or expressions to refer to
someone of another race.
✓ A dodgy sense of humour with inappropriate jokes which the student
feels the strange compulsion to translate into English.
By all means, deal with problems as they arise but there are also some
preventative measures which might help: Promote an atmosphere of mutual
respect by asking students to share information about their backgrounds at a
class level and showing real interest in what they say.
Occasionally you encounter students who resent the dominance of the English
language and the political histories of English speaking nations. When you
enquire about the student’s culture and demonstrate that you view it as equal
to your own it helps to break down these barriers.
Chapter 22: Distinguishing Monolingual and Multi-lingual Classes
Teach students the right words for describing other people in the community
(Oriental, mixed race etc) and let them know what is acceptable behaviour. If
necessary you can discuss how the law of the land reflects on these issues so
students are clear that this is not just your opinion.
Have clear guidelines for classroom conduct and explain the consequences
of breaking these rules if you have offensive individuals in your class.
Fortunately, most objectionable attitudes come from a position of ignorance
so when you teach students another way, they tend to adapt.
Applying Case Studies
In this section I take one 90-minute lesson for 12 students and comment on
how it differs for two different classes. It appears to be short in length but
this allows time to incorporate the needs of each class.
✓ Level: Upper-intermediate
✓ Materials: IELTS speaking test practice material (IELTS Masterclass,
Haines and May, OUP pages 171, 172 which includes a speaking test on
theme of reading). A video of students taking the exam.
✓ Lesson aims: To practise the three stages of the IELTS speaking exam. To
teach a strategy and expressions useful for Part 3, which is a discussion
between the examiner and exam candidate.
The structure of the lesson for each group is as follows:
1. Elicit from students the stages of the IELTS speaking test and length of
each. (5 minutes)
Put the following information on the board. These are the parts of the
test:
• Part 1: General chat about home, work, study, and general life
(4 minutes)
• Part 2: Presentation (1 minute for preparation and notes;
1-2 minutes describing given topic)
• Part 3: Expansion on Part 2 (3 or 4 minutes)
2. Brainstorm what the examiner is looking for and put ideas on the
board. (5 minutes)
327
328
Part V: What Kind of Class Will I Have?
Make sure they cover these necessary points:
• Fluency and coherence
• Range of vocabulary
• Range of grammar
• Accuracy
• Clear pronunciation
3. Have each student think of four questions suitable for Part 1 of the
exam. Then have a brief class feedback session in which they tell you
the questions they have thought of. (5 minutes)
4. Pairs ask each other their questions and give answers on these general
topics. (5 minutes)
5. Reorganise the pairs and assign partner A as examiner and partner B
as exam candidate. Ask students to prepare their note books with the
marking criteria set out so they can assess each other more formally, as
the examiner would. (5 minutes)
6. Students practise and role play, alternating the roles of examiner and
student. (6 minutes)
7. Students give each other feedback on Part 1.(4 minutes)
8. Students each practice Part 2, which is the presentation. They switch
roles after giving feedback to their partner based on the marking criteria.
(10 minutes)
9. Class feedback. Students say what they find easy or difficult in Parts 1
and 2 (5 minutes)
10. Focus on Part 3, which is the topic expansion discussion related to
Part 2. Brainstorm ways to comment on a question and think of sample
phrases to use during the test. (15 minutes)
Some suggestions may be:
• Say something about the question
• Make a connection to your life
• Answer in two parts
Possible phrases to use in this part may include:
• That’s an interesting/a difficult/ an important question.
• I have (never) thought about that.
• That’s quite relevant because I . . .
• It’s funny you ask because recently . . .
• There are two sides to this.
• I’ll mention the pros first and then the cons.
Chapter 22: Distinguishing Monolingual and Multi-lingual Classes
11. Students watch a video of other students taking the exam, assess these
other students and give feedback. (15 minutes)
12. Students practise asking and answering a few questions each for Part
3. on the topic of reading. (5 mins)
13. Give students an envelope full of questions typical of Part 3 but on
various topics, one for each pair. Together they practice asking and
answering the questions using the phrases on the board. (5 minutes)
The English class in Italy
The students in this class are all Italian and vary in age from late teens to
mid- twenties. They are generally quite communicative and tend to focus
more on getting their message across than accuracy. As I speak their language
to upper-intermediate level, I can anticipate some particular difficulties.
General skills
Ask students to pay particular attention to accuracy when they speak and
also in the examiner role. Make sure that they don’t interrupt when someone
else is speaking. It’s more acceptable for speakers to do this in Italian culture
but it would be a disaster to do so in the exam. Use a ‘wait’ gesture to remind
students about this throughout the lesson.
Vocabulary problems
The course book discusses different kinds of reading material but there are
two words which might be false friends:
✓ The Italian romanzo is very similar to ‘romance’ but means novel.
✓ Magazzino means warehouse, not magazine, which is actually scomparto
in Italian.
Pronunciation problems
In Italian, most words carry stress (emphasis) on the penultimate (the
second-to-last) syllable. Students tend to use the same stress patterns when
speaking English, which makes it more difficult to understand the accent. On
the list of reading material, get the students to mark the stress for each word.
There is usually some confusion with the correct stress on compound nouns
such as different kinds of books. Drill several examples with students making,
sure they stress the first noun –sports books.
Science books are on the list of reading material. The letters sci are pronounced
/ʃi/ as in ‘ship’ in Italian so students are very likely to mispronounce science.
Be sure to drill it.
329
330
Part V: What Kind of Class Will I Have?
Many words in Italian end in a vowel so the students often add an extra vowel
sound to the ends of words. They pronounce the words ‘read’ and ‘reader’
almost identically, for example. Use the cutting gesture during the lesson to
remind them to cut the ending.
Grammar and syntax problems
There is a recurring error caused by students confusing the infinitive form of
a verb (such as to go) when it should be the gerund (going). Remind students
how to use ‘enjoy’ as it comes up in the lesson: ‘I enjoy reading’; not ‘I enjoy
to read’.
The English class in London
In this class there are four nationalities among the students in equal numbers.
They are Brazilian, Japanese, Colombian and South Korean. I don’t speak the
languages of any of these students so I can only use my observations of them
and fellow countrymen to predict errors. In addition to linguistic problems
faced by the students due to L1 interference, there are other cultural
characteristics which I need to take into account to get the best out of
everyone.
Most of the students need to broaden the range of tenses they use and
include more modal verbs, so while monitoring I will make an effort to check
their progress in these areas. I can also encourage them to modify the examples
they give me to include these points.
As the students all have different problems they should be able to assist each
other. It’s important to mix them up so that each pair is made up of different
nationalities, ideally one South American and one Asian. Before the role play,
students can inform their partners of particular problems they have so that
the acting examiner can be on the look out for these points. The peers can
correct each other during feedback sessions too.
Problems for Korean students
Most of the Korean students make mistakes with /p/ and /f/, getting the two
sounds confused. They need to practise drilling these words but I can use
the Colombian and Brazilian students to help model words such as favourite /
pevrit/ and fiction /pikʃən/.
This group of students have a tendency to focus more on grammar than
fluency. Remind them to be coherent and use linking words. Ask the
examiner in the role play stage to listen out for this.
Chapter 22: Distinguishing Monolingual and Multi-lingual Classes
Problems for Japanese students
The Japanese students pronounce every syllable with equal length and
stress, so they can sound a little like robots. Monitor and drill intonation and
get students to mark the stress on all the vocabulary listed in the course
book. They can also underline key words in their notes so they give them
more emphasis when speaking.
Read /lid/ is a key word in this lesson but these students have difficulty with
the letter ‘r’, so show and exaggerate the mouth position for this word.
Being overly polite is a hindrance for some of the students. Encourage them
to be bold and not to apologise too frequently. Explain that formal and
traditional gestures like bowing and receiving things with both hands are
unnecessary but not objectionable.
When they’re unsure, some of the Japanese students say ‘Huh!’ in what looks
like a startled manner from an English speaking perspective. This response
needs to be softened. Memorising some of the expressions from this lesson
will give the students something to say in response to any question.
Problems for Colombian students
My Colombian students are all university undergraduates from the same
college. They stick together a lot and break into Spanish whenever they can
get away with it.
Students put an initial /e/ before words which begin with ‘s’, such as sports /
espɔrt/ and science /esaiens/. Apart from the initial vowel, I predict that
students will pronounce science in a Spanish way because of the Latin
connection /ʃiens/.
Problems for Brazilian students
Collectively the Brazilians are the most outgoing and vocal. They sometimes
intimidate the other groups, especially the Asian students, simply because
they speak up more readily. If others wait for a convenient moment to speak
they find it difficult to get a word in sometimes. This manner brings a lively
atmosphere to the classroom though.
They have some ingrained bad habits that will lose them marks such as:
✓ Omitting the auxiliary verb: What you think? instead of What do you
think?
✓ Making adjectives plural to match nouns: bigs books instead of big books
331
332
Part V: What Kind of Class Will I Have?
Part VI
The Part of Tens
I
In this part . . .
t’s a For Dummies book, so it’s bound to have a Part
of Tens. This part consists of a couple of chapters
containing ten bite-sized chunks of valuable info you can
dip into as and when you feel the need. Here I touch on
how to liven up your lessons with games and activities
and how to make the best use of the multitude of TEFL
resources out there.
Chapter 23
Ten Ways to Liven Up
an English Lesson
In This Chapter
▶ Varying your resources
▶ Giving students a chance to show off
▶ Adapting your teaching style
T
his chapter contains suggestions for injecting something different into
your lessons when you feel things have become a bit a flat. It happens to
the best of teachers sometimes, but with a little thought you can get things
back on track.
Bring in Real-World Objects
In TEFL, sometimes you want to bring real items – called realia in the biz –
into the classroom to help teach a particular point. These items may include
clothing, food, household items or even a musical instrument.
Lugging these things into class isn’t as easy as showing a picture or offering a
definition, but the advantage is that students are more likely to remember the
day the teacher came to school with a potato in her handbag than the day
she pointed to one in a book. Students will want to pick the item up, play with
it and generally make a connection with something three dimensional.
As well as using realia for teaching new vocabulary, you can also use it to
practise what the students already know. Take prepositions: A toy car moving
through a Lego town is very engaging for young learners, and as one child
plays with the car, the others can describe what’s happening or give instructions
inevitably using prepositions. Even adults prefer using real maps from places
they dream of visiting than pretend ones mocked up for the classroom.
336
Part VI: The Part of Tens
If you are working for a language school, find out if there a stock of realia and
keep it topped up by bringing in things you don’t need anymore.
Step Outside the Classroom
Whether you can leave the classroom behind for a while and get out into the
real world depends on the context you find yourself teaching in. However, in
most cases you can at least escape to the garden or local town.
The fact is that when the language you are learning is associated with a new
situation it can suddenly feel fresh again. So, it may never have occurred to
a student to ask the word for sky, traffic light or market stall before because
there had never been anyone to speak English to around these things. By
getting outside, the students associate English with a wider range of
situations, not just a classroom.
If you are teaching in an English speaking country, you do a lesson or two
building up to a visit to the local courthouse, a place of historical interest or
even a café offering typical dishes. Even something as mundane as an English
breakfast is fascinating to someone from overseas. The opportunity to speak
English to a ‘real’ person under the watchful eye of their teacher is enough
capture the students’ attention. The motivation to learn comes much more
easily when the grammar or vocabulary you are teaching concerns a real
event.
In a non-English speaking country, you can still find examples of English
words on hoardings and notices. Or perhaps the students can take you for
a traditional drink or snack. They are likely to be very proud of their culture
and make every attempt to explain and translate to initiate you. As long as
you create a structure by noting the vocabulary/grammar appropriate to the
situation and going over it beforehand or afterwards, the students will see
the lesson as purposeful.
Take your students out on the street in their town. Have them find as many
English words as they can in ten minutes, then see whether they understand
what the words they mean.
Browse the Net
The worldwide web is an absolute gift to teachers and a large proportion of
it is in English! As with the two previous points, the internet is a way to bring
the real world into your lessons.
Chapter 23: Ten Ways to Liven Up an English Lesson
Students can do their research online instead of using a dictionary or
depending on you. In addition, they can interact with other people in selected
chat rooms and discussion forums. It gives students a thrill to know that
outsiders understand their English too and that they can post information in
their new found second language for all the world to see.
If you have internet access in the classroom, or if you have taken your class
to the Information Technology room as part of your lesson, it is your
responsibility to make sure that students are not looking at offensive websites.
Start a Project
There comes a time when students want to take more control of their learning. Perhaps your students have their own interests which they would like to
explore in English – anything from football, movies, music, fashion and more.
Whatever their interest, it is liberating for students to do a presentation or
wall display around it then share their efforts with their classmates.
You can also have student tackle projects in small groups with each student
adopting a different role. Teenagers, for example, often enjoy putting together a
class magazine with a wide variety of articles, interviews, surveys and artwork.
Establish a regular time for sharing or preparing project work. Make it part of
the class routine.
Let the Students Teach
English lessons tend to follow the same pattern: teachers teach and students
practise. But for a change, how about giving the students the board pens and
seeing how well they rise to the challenge?
There are always restless individuals who struggle to sit still and listen. And
what about those know-alls who interrupt you at every turn? Well, these
students are ideal candidates for a bit of role reversal. Or, you could give all
the students a chance to have a go by giving everyone a 10 minute teaching
slot over several lessons.
Students don’t need to teach the whole class; more timid students can teach
their partner or a small group.
To be fair, you need to back up whatever they teach by thorough checks and
feedback sessions.
337
338
Part VI: The Part of Tens
Starting Out with ‘Once Upon a Time’
Story-telling is part of every culture in the world and is something you do
frequently in day to day life. It combines human interest and clear settings
for language practice. So, help your students develop this skill by giving them
lots of opportunities to tell their favourite anecdotes and tales.
To be honest, because most people struggle to make a story interesting in a
foreign language, the first attempt at storytelling might be rather subdued.
Interestingly though, things start to change if the same story is repeated two
or three times. Students increase in confidence and fluency, and in between
each telling they tend to check or note points which they have realised they
need. Whereas most people don’t mind repeating their favourite tales, it is
rather boring to hear the same story over and over. So, the best way to get
around this is to change the pairings of students each time the story is told.
You will find that with each re-telling they get livelier and more accurate to
boot.
Use traditional fairy stories, urban legends, jokes or your autobiography as
resources.
When you think about it, native speakers learn to appreciate stories right
from when they are toddlers and long before they are able to tell stories
themselves. What does this imply? Basically that if you tell your students
stories, even ones which contain some new words or grammar, they will
enjoy it because the overall meaning is clear and interesting.
Open Up Your Life
As you’re from a different background (race, nationality, religion, and so on)
to your students, they are bound to be more than a little curious about what
goes on in your life. Feed them a few simple titbits about your life and you’ll
find that students can’t wait to learn more.
You might wonder what kind of information is safe to reveal. Your hobbies
and interests are a good place to start. Bring in some realia or photographs
for the class to examine. Even if the class don’t share your passion for, say,
hiking, they will have something to talk to you about. It is surprising how a
lack of cultural knowledge can really stifle conversation. So your students
may need to know which topics are safe to discuss with you.
Then again, a bit of junk mail which you would otherwise throw away could
fascinate the students. If you are sure there is no classified information in it
(the ‘Dear Homeowner’ kind is useful), you can even let them open it (from
a new envelope if you want to conceal your address), have a go at filling in
forms or planning a reply.
Chapter 23: Ten Ways to Liven Up an English Lesson
Move Around
A kinaesthetic learner is someone who learns by actions and movement.
Although some people just seemed to be wired that way (you know, the
fidgeters who are always asking when the next break is), almost everyone
benefits by getting out of the chair and shaking off the cobwebs from time
to time.
Try to adapt your activities so that they become more physical.
Whenever possible, get students to:
✓ Change seats
✓ Stand up
✓ Do pair work (even back to back)
✓ Act things out
Play a Game
Most students, even serious business types are up for a challenge in the form
of a game, puzzle or quiz. It makes sense to have an armoury of these at your
disposal to use as warmers at the beginning of a lesson, coolers at the end or
just to break things up when the atmosphere has become rather flat. Another
approach is to see how you can turn your existing lesson material into
something more competitive or entertaining by pitting teams against each
other, setting time limits and awarding points.
The games and puzzles we native speakers play are often easy to adapt for
classroom use. All the children’s games below require speaking in simple
statements and no props at all.
✓ Simon says: In this game one person gives orders such as ‘Simon says
touch your toes’. However, you don’t follow the order unless the speaker
first says ‘Simon says’. If you forget and follow the order anyway, you are
out of the game.
✓ I spy: This popular game in one in which players take it in turns to
secretly identify something in the room and the letter that the object
begins with, for example ‘L’ for lamp. You then say, ‘I spy with my little
eye something beginning with . . . L!’ Then all the other players have to
guess what the thing beginning with L is.
339
340
Part VI: The Part of Tens
✓ I went to the supermarket: This is a memory game based on shopping
lists. The first person says, ’I went to the supermarket and I bought . . . ’.
This person chooses an item and says the word. It might be a pen for
example. The second person must now say the introduction, the word
pen and then add another item of their own. ‘I went to the supermarket
and I bought a pen and some cheese’. Move from student to student as
they repeat the ever increasing list and add an item.
✓ Chinese whispers: Stand all the students in a line or a circle. Whisper
a short message in the first student’s ear. That student whispers the
message, as they have understood it, to the next student and so on. The
challenge is to see whether the message remains the same by the time it
reaches the last student
Then there are other games which, with a little adjusting can fit snugly into a
lesson. Chapter 20 has more on games and don’t be put off because the chapter
is directed at teaching children – the games can be adapted for any age.
Get Musical
Music generally puts a smile on people’s faces and reduces stress too, so if
you can find a song to illustrate the piece of language you want to practise
you will find your lesson much livelier than when you use a simple worksheet.
Songs are generally seen as a listening activity and older, professional students
may not want to sing along too often. There is an alternative though if you
want to get musical and this means using jazz chants. A jazz chant is a cross
between speaking and singing (a little like rapping) which involves repetition
and rhythm. While chanting sentences you want to practise, you can snap
your figures or clap your hands which really helps learners to hear how
English pronunciation and intonation works.
If you are still not sure what chanting sounds like, take a look at www.
onestopenglish.com under Listening skills: jazz chants. You can download
and listen to some jazz chants on MP3.
Chapter 24
Ten Great Resources for
TEFL Teachers
In This Chapter
▶ Making use of books and other reading materials
▶ Visiting helpful websites
▶ Calling on real people
▶ Getting your hands on real stuff
J
ust in case you find yourself lacking in time or inspiration, in this chapter
I list resources to help your lessons and your career along. With these at
hand you should be able to deal with many a tricky situation.
Making the Most of EFL Reference Books
A high proportion of EFL teachers are nomads who try not accumulate too
many weighty objects in their backpacks. However, if you decide to invest in
any EFL reference books apart from this one, the two here are real classics. They
both deal with grammar, as this is the area where you tend to get caught out
in either understanding it or teaching it.
A grammar reference to fall back on
Few EFL teachers have not been caught off guard by a grammar question they
just could not answer. There you are with your perfect lesson plan, or so you
think, when some clever clogs student raises their hand and suddenly reveals
your Achilles heel. The best way out of this is, of course, to look confident
and promise to go through the answer in the next lesson, giving you a chance
to do your research and save face.
342
Part VI: The Part of Tens
One of the most popular grammar reference books for EFL is Practical English
Usage written by Michael Swan and published by Oxford University Press. All
of the trickier grammar areas are there from intermediate to advanced level.
The book contains examples of what you can say and of what you cannot say
as well. This very well laid out publication is well worth the investment. As
a matter of fact, this is a book which you can even recommend to your more
advanced students.
A book with grammar lessons
to save the day
Ok, so you know what that tense is called, the form and the function, but you
are still a little clueless about what to actually do with it in the classroom.
Teaching Tenses: Ideas for Presenting and Practising Tenses in English written
by Rosemary Aitken and published by ELB Publishing/ ABAX Ltd is a great
book with ideas, explanations, timelines and photocopiable illustrations
which you can use time and again. You basically get entire lessons which
present and practise the tenses in a practical, thorough and enjoyable way. In
addition to this, you get superb examples of what a good lesson consists of.
If you have more room, try these other books too:
✓ For pronunciation practice drills and comparisons, pick up Ship or Sheep
written by Ann Baker and published by Cambridge University Press,
along with English Pronunciation Illustrated written by John Trim and
published by Cambridge University Press. This second book also offers
thorough practice but has particularly amusing cartoons to make your
students smile.
✓ The photocopiable ELT Games and Activities series published by
Longman are spiral bound teachers’ books for practising language skills
in a fun and engaging way. Included in the series are the Communication
Games books for different levels. Written by Jill Hadfield, they’re a staple
for EFL schools around the world.
Looking It Up! Making
Use of the Dictionary
Some great learners’ dictionaries out there offer more than just definitions.
Chapter 24: Ten Great Resources for TEFL Teachers
The Macmillan English Dictionary for Advanced Learners, for example,
includes colour sections with clear diagrams showing various vocabulary
groups. It indicates how frequently used a word is, the pronunciation in the
form of phonemic transcription (symbols that show how to pronounce an
English word), what kind of word it is (noun, verb and so on), what collocates
or typically goes next to that word(for example pitch and black are collocations
because the usually go together as one phrase) and the different meanings.
It offers whole sections on different varieties of English, metaphors, phrasal
verbs (verbs which include a preposition or two and have a special meaning
such as to set off and to get on with) and other useful areas.
If you either recommend one particular dictionary to all your students, or
have a class set of dictionaries, you can plan lessons and whole activities
based on dictionary skills. In most cases, accompanying websites offer
exercises for the students to do with you or as self-study for homework. You
can also write to the publisher and ask for resource packs.
Another two popular dictionaries for EFL students are:
✓ Oxford Advanced Learners’ Dictionary comes along with a range of online
resources from the Oxford University Press (OUP) website www.oup.
co.uk
✓ Various editions of the Longman Dictionary of Contemporary English
come in paperback or hardback format and also with CD roms.
Browsing Websites
Just as in many other industries, the internet has revolutionised the world
of EFL. From job-hunting to lesson planning, you can find loads of help and
encouragement from colleagues on a variety of websites.
Finding work
Before ever you find yourself in the classroom, you need to get a job. So, if
you are currently in Warsaw but hoping to find yourself a position in Beijing,
for example, you need to get on the internet, CV at the ready.
For many years www.tefl.com has been an essential website for job seekers
in EFL. It lists vacancies from all over the world and allows you to save a
CV online which can be forwarded to potential employers at the click of a
mouse. It also offers advice on training courses, franchise opportunities and
living costs in particular cities.
343
344
Part VI: The Part of Tens
Planning lessons
Take a look at www.onestopenglish.com, an excellent site for teachers
maintained by MacMillan, the largest publisher of educational books.
Countless pages cover many different kinds of lessons including business
English, ESOL (English for Speakers of Other Languages) and exam classes. In
addition, the site has articles on methodology and new developments in the
industry. Downloading a worksheet or lesson plan is quick and easy too.
The British Council is a well established organisation which, among other
things, runs English language training programmes around the world. It also
tries to promote understanding among different cultures and promotes the
UK to other nations.
As well as job vacancies, the British Council website at www.british
council.org has a section on teaching English with ready made lesson
plans and links to other useful sites offering resources. This site is also ideal
for students interested in travelling to Britain to study or need some extra
guidance on funding or exams.
Your first exam class is always a daunting experience. However, if you
happen to be teaching one of the Cambridge suite of exams you can get a
head-start by looking at the tips and sample exercises on their website
www.cambridgeesol.org. Each exam is broken down paper by paper and
there are classroom activities to help you teach all the skills and sub-skills
your students will need.
Reading the English Language Gazette
The English Language Gazette is the most well-known industry journal and
has been running for over 20 years. You can subscribe to the newspaper with
an online edition at affordable rates and visit the website www.elgazette.
com. All of these will tell you about vacancies, upcoming events and the latest
EFL books to hit the market. You can make use of lesson plans too and get
information about colleges and universities offering further development
courses such as masters programmes.
The EL Gazette presents articles from all over the world and reports on the
global EFL market, which is useful if you are considering teaching abroad but
need some up-to-date inside information about your chosen destination.
Chapter 24: Ten Great Resources for TEFL Teachers
Attending Professional Seminars
In countries where EFL is popular, publishing houses, larger teaching
institutions and examining boards organise yearly lectures and sessions for
teachers to update themselves on methodology and resources. They can
be very refreshing, not least because you get to discuss your problems with
other teachers who may have found solutions. Some offer free sessions as
long as you register and for others you need to pay (or ask your employer
to – it’s worth a try, anyway).
Regular seminars are held by:
✓ Cambridge ESOL to make sure teachers are fully acquainted with their
exams and know how to prepare candidates to take them. You can find
a country by country list at www.cambridgeesol.org/resources/
teacher/seminars.html
✓ IATEFL ( International Association of Teachers of English as a Foreign
Language) also have a yearly conference and special interest groups
online for teachers who want to develop in particular areas. Take a look
at their homepage www.iatefl.org for further information.
Getting Your Hands on Real Stuff
Realia refers to real objects you take into the classroom to help you teach.
By this I do not mean things like dictionaries or board pens. Realia might be
a tomato, a remote control or a piece of clothing which generates interest in
the topic you are discussing.
Maps
Real maps are fascinating for students abroad and in native English speaking
countries alike. Take the iconic London Underground tube map. You can tell a
story about a day in London while students follow the locations on the map,
use it to practise directions, pronunciation of place names, colours or just
create an atmosphere of full immersion in your classroom.
Maps of entire countries and cities are great too and even neighbourhood
layouts give students a bit of insight into how English-speaking communities
work. A map of the world is a must-have when people of different nationalities
meet.
345
346
Part VI: The Part of Tens
Newspapers and magazines
If you can, keep your old magazines and a small supply of newspapers in the
teachers’ room for back up. Even though you can find images of just about
everything on the net these days, students tend to feel a greater sense of
accomplishment when they are leafing through an original glossy magazine
in full colour. It’s what native speakers do and it allows students to get better
acquainted with the culture.
Printed materials offer opportunities to select reading activities from among
the articles and advertisements, pictures to describe and stimulate the
imagination, and interesting comparisons regarding the students’ cultures
whatever the publication is about. Do not forget those interesting pages
like the TV guide and the problem page which reveal a nation’s lifestyle and
values from an unusual angle.
Personal memorabilia
Things like theatre tickets, tacky souvenirs and photographs are wonderful
aids for storytelling. Learners are often curious about the secret life of the
teacher and prefer having it slowly unravelled. So, get your class to guess the
relevance of an object to you. Make it a game of twenty questions and only
answer yes or no. This helps to get the students talking without focussing on
grammar and later in the lesson they can tell their own stories and anecdotes
based on similar experiences.
Playing Board Games
Specific board games are language based but even games that aren’t often
provide practise of other useful vocabulary such as numbers and colours and
phrases such as ‘It’s your turn!’ or ‘I have no idea!’.
It is always worth having a dice and some counters stashed in your bag
anyway as many printable and downloadable resources involve this kind of
turn taking. Of course you can design your own snakes and ladders or trivia
games as well.
Some particularly effective games include:
✓ Scrabble: For great spelling and vocabulary practice for all levels, this
is a board game which you play by distributing letters of the alphabet
on small tiles. The players have to make words and place them on the
board in a crossword type formation. You get extra points for using
trickier letters like Q and Z.
Chapter 24: Ten Great Resources for TEFL Teachers
✓ Scategories: For upper-intermediate level students and above. It is fun
and effective for building groups of similar vocabulary. Players have a
time limit and they have to think of words which are suitable for
particular categories. You get extra points for originality.
✓ Taboo: This gets students defining words without giving away what it
actually is. A player gets a card with a main word to define and describe
to their partner or partners, but there are other words on the card
which that player is not allowed to use and this makes the game quite
challenging.
If you do not have the funds to buy board games (and they can be quite
costly), arrange a class project in which students design their own.
Roping in Friends and Family
Language is all about communication and the people you communicate with
most are your friends and family. Some have unusual accents, others have
fascinating stories to tell and still others have jobs which raise eyebrows.
Why not take someone you know into the classroom to provide your students
with a little variety?
One of the disadvantages of always being around your students is that they
become dependent on their familiarity with you. They may convince themselves
that all English speakers have the same pronunciation, gestures and expressions
as you. And of course you can only milk your personal anecdotes so much.
After that they become old hat. So bribe one of your mates to come in for 30
minutes and see how your class cope with the situation. If they are particularly
nervous, you can always get them to prepare interview questions to ask your
pal beforehand.
People who are not used to dealing with non-native speakers have a tendency
to shout or speak too slowly. Encourage your friend to be natural at all times.
Students can ask for repetition if they need it.
If you cannot get anyone to come in, get yourself a tape recorder and see
whether your friends and family mind you recording ten minutes of a normal
dialogue. These authentic listening texts tend to be very tricky for students
to understand, but short clips are usually manageable. You can use these to
show students that, just like them, native speakers use poor grammar and
incomplete sentences too, sometimes, but it is the overall communication
which really counts.
347
348
Part VI: The Part of Tens
Pointing to Charts and Posters
By charts and posters I mean both those designed for teaching English and
ordinary ones from your own culture.
Everyday posters advertising films, pop groups or whatever else are useful in
two ways. Firstly, they set the scene in the classroom. Students will definitely
get the feeling of full immersion into an ‘English’ world if the images around
them represent the language and culture. The vocabulary will seep in
subconsciously or consciously, if you make a poster the basis of your lesson.
There is a constant reminder of that teaching point on the wall which
reinforces the idea.
You can ask shopkeepers for out of date posters which would otherwise end
up in the rubbish, or write off to larger organisations you are interested in for
freebies. Most big companies and charities love the publicity.
Posters and charts designed for EFL can be useful and can save time in class.
For example, if you have a phonemic chart (a display of all the symbols
which represent the 44 sounds in the English language) and a verb table on
the wall, you can quickly point to the right sound or verb when a student
slips up. The class can refer to these displays by themselves, too, so they can
increase their independence.
Of course the question is, ‘How do I get hold of them?’ Well if you have not
yet attended any EFL seminars, conferences and events where these things
are freely available in conjunction with new book releases, write to publishers
of EFL books and ask them. Oxford University press at www.oup.co.uk,
Cambridge University Press at www.cambridge.org/elt , Longman at
www.pearsonlongman.com and Thomson ELT at www.elt.thomson.com
are very cooperative with requests like these.
Keep your posters fresh by putting up new ones every few months. Old ones
don’t generate interest after a while. If you are overseas, see if your friends
back home can send you a few and if they are in really short supply, rotate
them so you swap the posters with a teacher in another classroom.
Appendix A
Lesson Plan Templates
T
his appendix offer templates you can use in planning and observing
lessons. These should help know what to look for in a good lesson, at a
glance.
PPP Lessons
The first template, Figure A-1, sets out the Presentation, Practice and
Production model for lesson planning. (I cover these concepts in Chapters 5
and 6.) I also include a section on any ‘warmer’ activity you might want to do
to relax and engage the class before getting into the meat of the lesson. You
can include details of interaction, so you can say who is speaking to whom,
and the table also has a time column so you can say for how long the stage
lasts.
350
Teaching English as a Foreign Language For Dummies
PPP Lesson
Class:
Level:
Aim and Objectives:
Materials:
Anticipated problems:
Time
Warmer
Presentation
Practice
Production
Figure A-1:
Template
for a
lesson with
Presentation,
Practice
and
Production
stages.
How successful was the lesson? Explain.
Appendix A: Lesson Plan Templates
Skills Lessons
The template in Figure A-2 is for a reading and listening skills lesson. These
are receptive skills so they need to include gist and detail stages. So, for
example, in a reading lesson there is usually an easier task to get students
skimming through the text (for the gist) and then another which requires
more time and careful analysis of it.
Listening/ Reading Lesson
Class:
Level:
Aim and Objectives:
Materials:
Anticipated problems:
Time
Warmer
Preparation task
Gist task
Detail task
Figure A-2:
Template
for Listening
or Reading
skills lesson
How successful was the lesson? Explain
351
352
Teaching English as a Foreign Language For Dummies
Needs Analysis
Before taking on a one to one course you need to find out as much as you can
about the student. The template in Figure A-3 provides a basis and record for
student assessment.
Needs Analysis for One to One Lessons
Student’s name:
Language:
Background:
Level and form assessment:
Reading
Writing
Listening
Speaking
Pronunciation
Long term aims:
Short term aims:
What does the student need to do in English?
Interests:
Learning Preferences:
Course Length:
Course Location:
Figure A-3:
Template for
recording
individual
needs of
one to one
students.
Proposed timetable:
Suggested Materials
Appendix A: Lesson Plan Templates
Observing Lessons
Hopefully you will have opportunities to observe other teachers. The template in Figure A-4 helps you to focus on what is taking place and how teachers achieve successful lessons.
Observing Other Teachers
Teacher’s name:
Class profile and level:
What were the aims and objectives of the lesson?
How well was target language presented?
Was the teacher’s language well graded?
Comment on the teacher’s use of the board.
How varied was the interaction?
Which activities did the class do?
Which materials did the class use?
How clear were the instructions?
To what extent did students participate?
Did the stages of the lesson flow?
How did the teacher handle correction and feedback?
Figure A-4:
Template for
notes when
observing
others
teach.
Which points from the lesson would I like to apply?
Is there anything I will avoid doing?
353
354
Teaching English as a Foreign Language For Dummies
Appendix B
TEFL Locations around the World
I
n this appendix, I offer information about some popular locations
for TEFL jobs.
In many places employers ask potential teachers to have a TEFL certificate.
While courses vary, evidence of 100 hours of training or more is desirable.
Whether this needs to include teaching practice with students or not
depends on the employer.
Brazil
Brazilians are ethnically diverse but most people speak Portuguese. Football
is a national obsession and most people are Christian. They are exceptionally
friendly. Networking is important in Brazil. Use your contacts to get ahead (if
you have any).
✓ Accommodation: Quite expensive in the larger cities.
✓ Classes: Lots of business people and other adult learners.
✓ Contracts: Generally for 10 months, though it’s often easier to find work
once you’re there. Hours are often unsociable.
✓ Cost of living: Expenses are low. You can live well but not save much.
✓ Qualifications: You can find work without any qualifications. Schools
offer training.
✓ Salary: £375 a month. The local currency is the Real.
✓ Travelling: TAM Linhas Aeras, British Airways
✓ Visa: For an official work permit you need two years of compatible
experience (in TEFL or a similar educational field) and a degree.
✓ Where to teach: Sao Paolo, Brasilia and Rio de Janeiro
356
Teaching English as a Foreign Language For Dummies
China
China is one of the most historic civilisations in the world. The main
languages are Mandarin and Cantonese. The people respect foreigners and
are generally friendly. It helps if you ride a bike.
Standards vary so much in China that you should get as much information as
you possibly can before accepting a job.
✓ Accommodation: About £140 per month
✓ Classes: Ages vary from young children to older business executives
but there could be up to 100 students in a class! You may find yourself
submerged in homework to mark.
✓ Contracts: Jobs are available year round. Be prepared to negotiate.
You can expect to get help with accommodation, and have medical
insurance and airfares provided and to get ten days paid holiday plus
public holidays. You work an average of 15 hours per week.
✓ Cost of living: For the average Foreign Teacher it’s usually necessary
to take on private lessons to allow for the standard of living you are
used to.
✓ Qualifications: Degree, but TEFL certificate not always necessary.
Foreign Teachers are classified differently from Foreign Experts who
must have an MA in a related field and teaching experience in higher
education. This distinction applies mainly to university work.
✓ Salary: Foreign Experts have half their salaries paid in a hard currency,
approximately £1,000 per month and the rest in the local currency.
✓ Travelling: China Eastern Airlines, China Airlines
✓ Visa: You need a Z-visa before arriving, and this takes two months or
more to obtain.
✓ Where to teach: Shanghai, Beijing, Guangzho, Shenzhen. These cities are
better paid but very crowded.
Italy
The north and south vary greatly in terms of pace of life. Life in the south
follows a more leisurely Mediterranean pace but the north is faster and more
efficient. People are very image conscious but hospitable. This is a beautiful
country and a good place to start a career.
Appendix B: TEFL Locations around the World
✓ Accommodation: £400 per month.
✓ Classes: Many private schools run courses for adults but state schools
ask for native speaker conversation classes. Students tend to be a bit
rowdy but good natured.
✓ Contracts: Contracts run from autumn to spring.
✓ Cost of living: Slightly cheaper than the UK but eating out costs less.
✓ Qualifications: Native speakers can find work without qualifications but
not at the best schools.
✓ Salaries: £900 per month or more
✓ Travelling: Cheap airlines like Ryanair fly here.
✓ Visa: EU citizens don’t need one.
✓ Where to teach: Rome, Milan and tourist cities
Japan
The Japanese are still interested in old traditions. Japanese people follow
rules so expect to conform. They are hospitable people but live a very
high-speed lifestyle. They give more importance to body language than most
English speakers and tend to be ambitious.
✓ Accommodation: About 20 per cent of net salary.
✓ Classes: Classes are varied and can include local primary schools or
business people. The students’ focus is often on correctness, but most
lessons are conversation based.
✓ Contracts: Contracts run April to March with long teaching hours.
But you get a bonus on completion of contract and seven weeks paid
holiday. Apply for the best jobs in your home country.
✓ Cost of living: It’s possible to save if you don’t splurge on bars and
entertainment.
✓ Qualifications: A degree is needed for an instructor visa but you can
find work without one while in Japan.
✓ Salaries: £1,700 per month.
✓ Travelling: Japan Airlines, All Nippon Airways, United Airlines.
✓ Visa: You need a working visa and you can obtain a teaching licence
through accredited schools.
✓ Where to teach: Tokyo
357
358
Teaching English as a Foreign Language For Dummies
Poland
The people are very keen to learn as English is important to get a good job.
The people can appear serious but they aren’t particularly.
✓ Accommodation: Around £300 depending on the location.
✓ Classes: Some schools use team teaching with a Polish teacher. Students
are of all ages and the focus is on conversation.
✓ Contracts: Contracts from September to June include 20 days paid
holiday (some schools offer a free ski pass). You teach 23 hours a week
on average. You get help with accommodation, Polish lessons and
medical insurance.
✓ Cost of living: The cost of living is low, about a quarter of UK costs.
✓ Qualifications: Degree and TEFL certificate but no experience necessary.
✓ Salaries: About £600 per month.
✓ Travelling: British Airways, American Airlines, Polskie Linie Lotnicze
(national carrier).
✓ Visa: EU nationals preferred as no visa is required.
✓ Where to teach: Warsaw, Krakow, Wroclaw, Gdansk and Poznan.
Russia
Russia is relatively safe but violent crime is on the increase. Winters are very
harsh. There are still a high number of unscrupulous schools who pay late or
not at all. The people are very open and there are scores of places of historical
interest.
✓ Accommodation: Affordable, but power cuts are frequent.
✓ Classes: Business English is particularly in demand.
✓ Contracts: You work 25 hours a week starting in September for 9 months
to a year with 3 weeks paid holiday.
✓ Cost of living: Reasonably cheap. Transport and accommodation are
affordable but more so in the smaller towns.
Appendix B: TEFL Locations around the World
✓ Qualifications: A degree and certificate are required in most cases.
✓ Salaries: £300 per month and free accommodation or about £25 an hour
for private lessons.
✓ Travelling: Aeroflot, KLM and Russian Sibir Airines.
✓ Visa: Employers should arrange a work permit before you arrive but
most foreigners work illegally and may end up paying bribes.
✓ Where to teach: Moscow and St Petersburgh.
Saudi Arabia
Male and female students and staff are segregated at universities. It is a
Muslim country under Sharia law. Alcohol is banned, most jobs are for men
and everything stops for prayers.The daytime temperature is very high,
often, above 50 degrees.
✓ Accommodation: This is quite expensive if you are independent from a
company but the standard is high.
✓ Classes: Classes have up to 30 students and classroom discipline can be
quite hard. You have to follow a strict curriculum and use set materials.
✓ Contracts: You work 5 to 6 days a week, 33 contact hours plus
administrative time on a one or two year contract that includes help
with accommodation, airfare and medical cover. You get 4 weeks paid
holidays plus national holidays and an end-of-contract bonus
✓ Cost of living: The general costs are the same as most European
countries but imported food is quite expensive.
✓ Qualifications: A degree plus a diploma or MA and two years experience.
✓ Salaries: £1,500 a month tax free plus £550 housing allowance or free
accommodation plus help with transport costs.
✓ Travelling: Saudi Airlines
✓ Visa: It isn’t possible to get a working visa without a job offer. Individuals
from certain religious faiths are not eligible and you need to be over 22.
✓ Where to teach: Jeddah and Riyadh.
359
360
Teaching English as a Foreign Language For Dummies
South Korea
South Korea has a reputation for being quite safe. It’s a good place to save
money and still enjoy a high standard of living. There is basically one
race and one language. Many people are religious. Buddhism, Christianity,
Confucianism and Shamanism are the most common religions. Lots of
students are interested in technology and pop music.
✓ Accommodation: It is usually arranged for you but deposits are very
high.
✓ Classes: Most students are primary and secondary school age. On
average there are ten students per class. The focus is on conversation.
✓ Contracts: On average, you work 30 hours a week on a one-year
contract. You get a bonus for completing the contract, along with help
with airfare and medical cover. You get two weeks paid holiday per year
plus public holidays.
✓ Cost of living: Outgoings only amount to about 30 per centof your
salary.
✓ Qualifications: It’s best to have a degree. Some jobs are available to
those without a TEFL certificate and inexperienced teachers too.
✓ Salary: Approximately £1300 per month. Local currency is South Korean
Won (KRW).
✓ Travelling: Korean Air, Jeju Air.
✓ Visa: A working visa is necessary.
✓ Where to teach: Seoul and Busan.
Spain
The Spanish enjoy socialising, eating out and their old traditions.
✓ Accommodation: You need to see the property before you rent as you
may not be able to pull out if you change your mind.
✓ Classes: All ages and an average of 12 per class.
✓ Contracts: Thry run September through June, about 25 hours per week
and 4 weeks paid holidays plus national holidays. Help offered with
accommodation and an end-of-contract bonus.
Appendix B: TEFL Locations around the World
✓ Cost of living: Not as good value as it used to be but living is cheaper in
the south.
✓ Qualifications: Degree plus certificate. Experienced teachers and
Spanish speakers are favoured.
✓ Salaries: £1,150 per month.
✓ Travelling: There are low cost airlines like Easyjet and Ryanair.
✓ Visa: Not necessary for EU nationals.
✓ Where to teach: Big cities – Madrid and Barcelona – have the best
opportunities.
Turkey
Turkey offers fascinating places to visit and a warm climate. Although a
Muslim country there is a buzzing nightlife and people dress in Western
clothes in the cities.
In the large cities TEFL teachers are seen as expendable because they often
come and go.
✓ Accommodation: It can be expensive unless you share (for about £400
per month in Istanbul).
✓ Classes: Most students are adult professionals but children’s classes are
common too. Ten students per class in private schools but as many as
thirty in state schools. There is demand for private lessons.
✓ Contracts: A one year includes two weeks paid holiday, help with
accommodation, utility bills and medical insurance for about 25 hours
per week.
✓ Cost of living: Quite low but you can’t save much.
✓ Qualifications: Some jobs available for unqualified native speakers but
graduate, certificate holders preferred.
✓ Salary: £11 per hour.
✓ Travelling: Turkish Airlines, Easyjet, British Airways
✓ Visa: Schools should pay for a work permit but some teachers work on a
three month tourist visa.
✓ Where to teach: Ankara, Istanbul, Bursa
361
362
Teaching English as a Foreign Language For Dummies
Vietnam
Vietnam is influenced by China, France, Russia and USA so it had a fascinating
culture. It is a beautiful country and over half of the population is under
35 years old. The food is good and there are many foreign restaurants.
Apparently the cities are very noisy and polluted but exciting.
✓ Accommodation: Only people in certain areas are allowed to rent to
foreigners.
✓ Classes: School and university age students. They are motivated and
respectful.
✓ Contracts: Most positions are part-time in private schools (many
teachers work for two schools). You work 20 hours per week during a
12-month contract with 20 days paid holidays plus national holidays
off. You get a bonus on completion of your contract and help with heath
insurance, flights and accommodation.
✓ Cost of living: Food is cheap and there are options to suit every budget.
✓ Qualifications: Degree and certificate.
✓ Salary: $15 per hour.
✓ Travelling: British Airways, Air France, KLM.
✓ Visa: Convert a tourist visa to a working visa.
✓ Where to teach: Ho Chi Minh City (formerly Saigon), Hanoi.
Index
•A•
•B•
abbreviation, 296–297
ability, 250
abroad, working. See also job
described, 11
job search, 45–46, 343
locations, 12, 355–362
seasonal work, 11–12
academic calendar, 12–13
accent, 33, 199–200, 312
accredited course, 35, 40
accurate language, 86, 102–103
achievement test, 269–271
address, 162, 163
adjective
achievement tests, 270–271
fairy tales, 286
sentence structure, 220–222
advanced student, 54–55, 119
adverb, 222–224
advertising, 10, 348
age
students, 20, 120, 134
teacher, 17, 37
aim, of lesson, 58, 59, 279
alphabet, 140–141
anagram, 89
annoying habit, 231
answer key, 272
answer sheet, 308
antonym, 76, 81–82
anxiety, test, 311, 312
apostrophe, 142
article, 218–220
assistant director of studies, 16
attendance, 135
au pair, 284
audio file, 198–201
auditory learning, 69
auxiliary verb
modal verbs, 247–251
sentence structure, 214–215, 224
verb tenses, 228
Avalon School, 46
backchaining, 173
Baker, Anne (Ship or Sheep), 342
bank account, 14
battleships game, 289
BBC show, 199
BEC (Business English Certificates), 307
beginner-level student, 50–51, 119
Bell International (language school), 46
Berlitz (language school), 33
bilingual children, 284
bingo, 289
blindfold activity, 93
blurb, 98, 151
board
correction techniques, 107
furniture arrangement, 128–130
practice activities, 88
presentation of concepts, 72–74
simple classroom materials, 123–124
board game, 346–347
body language, 104–105, 197
book. See course book
boring lesson, 28, 64
brackets/parentheses, 142
brainstorming, 162, 203
Brazil, work in, 355
Brazilian student, 331
British Council, 34, 344
bully, 134
business English, 280–282, 307
Business English Certificates (BEC), 307
Business Language Testing Service
(BULATS), 307
•C•
CAE (Certificate in Advanced English), 305
Cambridge DELTA (Diploma in English
Language Teaching to Adults), 35, 41, 42
Cambridge ESOL (English for Speakers of
Other Languages) exam, 304–305
Cambridge ILEC (International Legal English
Certificate), 307
364
Teaching English as a Foreign Language For Dummies
Cambridge International Book Centre, 116
Cambridge University Press, 348
cancellation policy, 278
capital letter, 143
career ladder, 16
CD, 117, 198–201
Certificate in Advanced English (CAE), 305
Certificate in English Language Teaching to
Adults (CELTA), 34, 40
Certificate in ESOL Skills for Life, 305
Certificate in Teaching English to Speakers of
Other Languages (CertTESOL, Trinity),
34, 40, 41, 42
Certificate of Proficiency in English (CPE), 305
certification, 16, 34–44, 305
chair, 128–130
change, recent, 234, 235
chart, 348
cheating, 268
children. See young learner
Children Only ESL-EFL (website), 288
Children’s Games Photocopiable Resource
Pack (Toth), 290
children’s programme, 122
China, work in, 12, 356
Chinese whispers game, 340
choral drilling, 172
City and Guilds (vocational organisation), 306
class
correction techniques, 107–108
mixed abilities, 119–120
one-to-one lessons, 276–277, 278
profile, 77
real-world locations, 336
size, 22, 133
surveys, 98–99
classified ad, 151
classifying, 310
classroom management
basic equipment, 127
class rules, 130–131, 132, 327
common problems, 132–135
described, 125
furniture arrangement, 128–130
general principles, 126
monolingual classes, 320–321
multi-lingual classes, 324–325, 326–327
teacher’s expectations and tone, 131–132
young learners, 295
clause, 255
cliché, 80, 200
clique, 322
cloze exercise, 270, 315
clues, giving, 105, 106
coat hook, 127
cohesive writing, 110
college degree, 16, 21, 35
College of Teachers, 40
collocation, 76, 79–80, 315
colloquial speech, 200–201
Colombian student, 331
colon, 142
colour, 290
comma, 142
community, class in, 336
competition, 295
compound noun, 54, 80
comprehension
listening, 206
reading, 146–148, 152
concentration span, 284
concept check, 74–76, 325
conditional sentence structure, 255–261
conjunction, 224–226
connotation, 55, 76, 79
consequence, rule-breaking, 132
consistency, 132
consonant, 175–176, 180
context, 149–150
continuous assessment, 273
continuous tense, 71–72, 228, 232. See also
specific tenses
contract job, 13
contraction
described, 216
grammar presentation, 82
irregular, 240
letter writing, 162, 163
punctuation, 142
controlled practice, 85, 87, 88
conversation
extended, 187–188
language practice, 59
teacher qualifications, 33–34
coordinating conjunction, 225
correcting students
class feedback, 108
correction form, 114
guidelines, 102–104
nonverbal corrections, 104–105
Index
peer corrections, 107–108
self-correction, 106–107
teachers’ common concerns, 101–102
written work, 109–113
correlative conjunction, 225
course book
benefits of, 115, 116
classroom management, 132, 133
closed-book lesson, 120
follow-up activities, 208
games, 290–291
listening materials, 198
reading selection, 139–145
references, 341–343
selection of, 116
students’ expectations, 28–29
teachers’ adaptations, 119–120
teachers’ common concerns, 21, 23
types of, 117
young learners, 287
CPE (Certificate of Proficiency in English), 305
cross-communication, 321
crossword puzzle, 290
culture, 326–327
custom, of English speakers, 29
CV, 45
•D•
debate, 96
deductive learning, 288
definite article, 219
definition, 76
degree, college, 16, 21, 35
DELTA (Diploma in English Language
Teaching to Adults, Cambridge),
35, 41, 42
description, 220–224
descriptive adjective, 221
designing materials, 122–123
desk, 128–130
diagram, 73
dialect, 212
diary, 242
dictation activity
achievement tests, 270
listening activities, 206
Production phase of lesson, 93
writing activities, 168, 169–170
dictionary
exam courses, 315
lesson phases, 64
presentation of concepts, 73
reading vocabulary, 149
symbols, 173
teacher resources, 342–343
diploma, 35, 41–43
Diploma in Teaching English to Speakers of
Other Languages (DipTESOL, Trinity),
35, 41, 42
directions
giving, 93, 96
listening to, 206
director of studies, 16, 35, 132
discussion
extended, 189–190
monitoring by teacher, 194
phrasal verbs, 254, 255
planning for, 193
pre-listening tasks, 203
pre-writing tasks, 161–162
Production phase activities, 96, 193–195
structure, 194
disruption, class, 130–134, 284, 285
distance learning, 13, 40–41
double vowel sound, 175
drafting, 165–166
drama, 95, 181
drawing, 65, 69, 123–124
DVD, 70, 198–201
•E•
E. L. Easton (business English resource), 282
echoing speech, 66, 107
editing, 315
Education Development International
(EDI), 305
EFB (English for Business) exam, 306
EFC (English for Commerce) exam, 306
EFT (English for Tourism) exam, 306
elementary level student, 51
eliciting answers, 67–69, 106
ellipsis, 54
ELSA (English Language Skills
Assessment), 306
ELT Games and Activities series
(Hadfield), 342
email, 165
365
366
Teaching English as a Foreign Language For Dummies
encouraging students
engaging lessons, 64
exam courses, 314
students’ expectations, 28
written work, 112–113
English First (website), 46
English for Business Communications
exam, 306
English for Business (EFB) exam, 306
English for Commerce (EFC) exam, 306
English for Office Skills exam, 307
English for Speakers of Other Languages
(ESOL, Cambridge) exam, 304–305
English for Tourism (EFT) exam, 306
English language
book list, 117–118
global influence, 9
English Language Gazette (journal), 344
English language proficiency
placement tests, 267–268
progress tests, 269
student learning levels, 55
teacher qualifications, 11, 22
teacher training, 36, 37
tests, 268
English Language Skills Assessment
(ELSA), 306
English Pronunciation Illustrated (Trim), 342
English-speaking country, 10–11
entrance exam, 299–303
equipment, classroom, 127, 321
error, language. See correcting students
ESOL for Work exam, 307
ESOL for Young Learners test, 306
essay, 163, 164, 271
exam class, 268, 313–315
examiner, 311
exclamation mark, 143
excuse, making, 260–261
extending words, 104–105
•F•
fairness, 29, 132
fairy tale, 285–288
false friend, 318
family, 347
FCE (First Certificate in English), 304–305
fears, common, 17
feedback session
classroom management, 126
function of, 87
listening activities, 207
teenagers, 295
tests, 272
whole class, 108
FELSA (Foundation English Language Skills
Assessment), 306
film
blurbs, 98, 151
follow-up activities, 208
intonations, 201
listening materials, 197
one-to-one lessons, 279
reviews, 148
First Certificate in English (FCE), 304–305
first conditional, 256–258
Five-Minute Activities: A Resource Book of
Short Activities (Ur and Wright), 290
flashcard, 69, 122, 288
flexibility, 29
fluency, 102, 149, 179–180
follow-up activity, 207–208
foreign language, 149–150, 168
formal letter, 162
format, for writing, 163–165
Foundation English Language Skills
Assessment (FELSA), 306
friend, 347
frowning, 105
full stop, 142
fully qualified EFL teacher, 35, 41
functional approach, 78
functional-notional syllabus, 281
furniture, 128–130
future continuous tense, 71–72, 241–242
future perfect continuous tense, 244–245
future perfect tense, 54, 88, 242–243
future simple tense, 71, 240–241, 249
future tense, 238
•G•
game
conditional structure, 259
learning styles, 70
mixed-ability class, 120
multi-lingual classes, 323–324
Practice phase of lesson, 99–100
Index
pronunciation, 181
rapport building, 323–324
student motivation, 339–340
teacher resources, 346–347
verb tense, 232
young learners, 288–291, 295
gap year, 15–16
gap-fill activity, 206, 270
gender, 318, 326
general English exam, 304–307
gerund
defined, 228
described, 213, 231
future continuous tense, 241–242
irregular verbs, 215
Practice phase of lesson, 89
student learning levels, 53
gesture, 104–105
global language, 9
graded reader, 208
grading, 50–58
grammar. See also sentence structure; verb
tense
bad habits, 87
benefits of practice, 86–87
corrections and feedback, 111
exam techniques, 308, 315
fairy tales, 286–287
grading process, 57
listening texts, 202
monolingual classes, 318, 330
practice activities, 87–93
presentation of concept, 82–83
quality of CV, 45
reference books, 341–342
self-assessment test, 266
student learning levels, 50–55
teachers’ common concerns, 20, 23
training courses, 36
graph, 120
group work
benefits of, 26–27
discussion structure, 194
furniture layout, 128–129
lack of student participation, 134
monolingual classes, 321
Practice phase of lesson, 62, 87–88, 93
Production phase of lesson, 97
pronunciation tasks, 172
guided tour, 196
•H•
habit, annoying, 231
Hadfield, Jill (ELT Games and Activities
series), 342
hand gesture, 104–105
handwriting, 158
Happy Song, 294
heading, text, 310
heating/cooling system, 127
highlighting vocabulary, 310
holiday, 45
homesickness, 14–15
homework, 199, 207, 314
homograph, 143
homophone, 143, 181
hourly rate, 44
humming, 105
humour, sense of, 22, 126
hyphen, 142
hypothetical situation, 251
•I•
‘I spy’ game, 181, 339
IATEFL (International Association of
Teachers of English as a Foreign
Language), 345
icebreaker, 323
ICFE (International Certificate in Financial
English), 307
identifying adjective, 221
idiom, 55
IELTS (International English Language
Testing System), 300–302
IESOL (International ESOL) exam, 307
ILEC (International Legal English Certificate,
Cambridge), 307
imaginary situation, 251
imperative sentence, 158
improvisation, 95
income, teacher
career ladder, 16
described, 44–45
one-to-one lessons, 277–278
qualified teachers, 35
teachers’ common fears, 17
work abroad, 12
indefinite article, 219
367
368
Teaching English as a Foreign Language For Dummies
indirect object, 217
individual drilling, 172–173
inductive learning, 288
infinitive, 53, 213, 240
informal letter, 163
informative speaking, 91–92
in-house training, 43–44
inseparable phrasal verb, 252–253
instructions
listening activities, 206
monolingual classes, 321
Production phase of lesson, 65
speaking activities, 96
teacher-created materials, 123
intensifier, 224
intensive course, 38, 279
intention, expressing, 245–246
interaction pattern, 60, 65
intermediate level student, 52–53
International Association of Teachers of
English as a Foreign Language
(IATEFL), 345
International Certificate in Financial English
(ICFE), 307
international English, 295–296
International English Language Testing
System (IELTS), 300–302
International House (language school), 46
International Legal English Certificate
(Cambridge ILEC), 307
International Spoken ESOL (ISESOL)
exam, 306
interview, 42, 94–95, 267
intonation, 143, 180–182, 201
intransitive verb, 252–253
irregular verb, 214, 215, 232
ISESOL (International Spoken ESOL)
exam, 306
Italian student, 329–330
Italy, work in, 356–357
i-to-i course, 37
•J•
Japan, work in, 357
Japanese student, 331
jazz chant, 259, 340
JETSET Certificates in English Language
Skills, 306
job. See also abroad, working
advertisements, 10
basic required skills, 11
break from, 15–16
business English, 280–282
career ladder, 16
gap years, 15–16
home country versus countries
abroad, 10–12
preparations, 13–15
search for, 45–46, 343
seasonal work, 12–13
teachers’ common fears, 17
unqualified teachers, 33
work permit, 34–35
journal, 344
•K•
Key English Test (KET), 304
Kim’s game, 297
kinaesthetic learning, 69, 285, 339
Korean student, 330
•L•
labelling activity, 206
language knowledge, 19, 314–315
language lesson. See also specific skills
aims and objectives, 49, 58–59
checklist, 65
feedback sessions, 108
general teaching methods, 23–27
grading process, 56–58
length of, 26, 59–60, 126
one-to-one lessons, 279–280
phases of, 61–64
reading case study, 152–155
relevant information, 55–56
student involvement, 64–66
student learning levels, 50–55
students’ expectations, 28–29
teacher resources, 115–116, 344
teachers’ common concerns, 21
templates, 349–354
training courses, 37
Language Link (website), 46
Latin-based language, 168
Index
LCCI (London Chamber of Commerce and
Industry), 305, 306
learner profile project, 39
learning level, student
basic writing skills, 158
described, 50–55
one-to-one lessons, 275–276
paragraph writing, 160
placement tests, 267–268
reading skills, 119–120
sentence structure, 159
learning style, 69–70, 285
lecture, 64–66
lesson. See language lesson
letter writing, 57–58, 162–163
lighting, 127
linking word, 159–160
listening
activity selection, 196–201
children’s games, 289, 290
classroom management, 131
details in text, 205–207
discussion activities, 194
exam techniques, 312
follow-up activities, 207–208
lesson structure, 195–196
lesson template, 351
main idea of text, 204–205
placement tests, 267
pre-listening activity, 201, 202–203
pronunciation, 172
repetition, 204–207
sample activities, 206
self-assessment test, 267
students’ motivation, 201–203
university entrance exams, 301, 303
listing items, 225–226
London Chamber of Commerce and Industry
(LCCI), 305, 306
L1 interference, 317, 319
Longman Dictionary of Contemporary
English, 343
•M•
Macmillan Business English (resource), 282
Macmillan English Dictionary for Advanced
Learners, 343
managing students. See classroom
management
map, 206, 323–324, 345
marker, 72
marking criteria, 112
Mastermind game, 99–100
matching exercise, 90, 270, 311
materials, classroom. See specific materials
materials project, 39
memorabilia, 346
memory, 297, 324, 340
metaphor, 55
miming, 65, 94
mind mapping, 302
mingling, 99
minimal pair, 177
mixed-ability class, 119–120
modal verb, 53, 54, 247–251
monitoring students
discussions, 194
one-to-one lessons, 280
phases of lesson, 66
writing tasks, 166
monolingual class, 317–321
monologue, 206
moral dilemma, 259–260
motivation, student
listening tasks, 201–203
monolingual classes, 320
multi-lingual classes, 322
strategies to improve, 335–340
tests, 269
young learners, 285
multi-lingual class, 322–327
multiple choice question, 75
multiple matching activity, 147
music
listening activities, 206
monolingual classes, 321
sentence structure, 258–259
student motivation, 340
young learners, 292–294
•N•
name, of students, 321
negative form
practice activities, 89
presentation of concept, 82
verb tenses, 230, 233, 235, 237, 238
neutral form, 89
369
370
Teaching English as a Foreign Language For Dummies
newspaper
children’s activities, 291
job ads, 45
one-to-one lessons, 280
posh language, 81
pre-reading tasks, 145
reading texts, 151
student learning levels, 55
usefulness, 346
nodding, 105
noise, 127
nonverbal communication, 104–105, 197
note-taking, 302
notice, written, 168
noun, 211, 220–222, 270–271
number game, 290, 324
nursery rhyme, 292–294
•O•
object, of verbs
basic sentence structure, 216–217
modal verbs, 248–249
monolingual errors, 318
phrasal verbs, 252–253
object pronoun, 217
objective, of lesson, 58–59, 279
obligation, 250–251
observation skill, 297
observing lessons, 353
offering items, 250
one-to-one lesson, 275–280
online learning, 13, 40–41
online research, 336–337
online teacher resource, 343–344
open pairs exercise, 87–88
open question, 66, 75
opinion, expressing, 190–191
optimism, 314
oral presentation, 96, 271
ordering information, 206
Oxford Advanced Learners’ Dictionary, 343
Oxford University Press, 282, 348
•P•
pair activity
lack of student participation, 134
monolingual classes, 321
multi-lingual classes, 325
Practice phase of lesson, 87–88
Production phase of lesson, 97
pair work test, 271
paragraph, 144, 159–165
parentheses/brackets, 142
participation, lack of, 134
parts of speech, 51–55, 291, 315. See also
specific parts of speech
passive verb, 54
past continuous tense
described, 232–233
presentation of concept, 71–72
past participle, 214, 235, 236
past perfect continuous tense, 238–239
past perfect simple tense, 236–238
past perfect tense, 53, 54
past simple tense
described, 213, 231–232
presentation of concept, 71
PBE (Practical Business English) exam, 306
peer correction, 107–108
pen, 109, 272, 310
perfect tense, 228. See also specific tenses
permission, 250
personal memorabilia, 346
PET (Preliminary English Test), 304
PGCE (Postgraduate Certificate in
Education), 40
phoneme, 140, 173–177, 318
phonology, 140, 173–177
photo, 70
phrasal verb, 251–255
physical response question, 75
place name, 181
placement test, 267–268
planning
classroom management, 126
exam courses, 313–314
one-to-one lessons, 279–280
teacher resources, 344
writing tasks, 166
young learners, 285, 294
podcast, 198–201
poetry, 56, 168
Poland, work in, 358
posh language, 80–81
positive form, 82, 89, 230
poster, 348
Postgraduate Certificate in Education
(PGCE), 40
Practical Business English (PBE) exam, 306
Practical English Usage (Swan), 342
Practice phase, of lesson
described, 59–60, 62–64, 85
length of, 87
Index
lesson template, 349–350
sample activities, 87–93, 98–100
practice teaching, 39
practicing language
benefits of, 64, 86–87
speaking exams, 311
verb tenses, 239
praising students, 112–113
prediction
listening activities, 202–203, 207
reading strategies, 147
verb tenses, 241
prefix, 54, 315
pre-intermediate level student, 52
prejudice, 134, 326
Preliminary English Test (PET), 304
preposition
achievement tests, 270
exam courses, 315
sentence structure, 217–218
pre-reading task, 145, 149
present continuous tense
described, 231
practice activities, 88–89
presentation of concept, 71–72
present participle, 213
present perfect continuous tense, 235–236
present perfect tense
described, 233–234
presentation of concept, 72
student learning levels, 52, 53
present simple tense
described, 214, 229–230
presentation of concept, 71
presentation, by student, 96, 271
Presentation phase, of lesson
answers, eliciting, 67–69
concept checks, 74–76
described, 59–63
grammar instruction, 82–83
lesson template, 349–350
visual aids, 69–74
vocabulary introduction, 76–82
pre-teaching, 119
pre-writing task, 161–165, 169
private language school, 34, 45
probability, 249
problem page, 151, 297
problem solving, 64, 132
Production phase, of lesson
described, 59–60, 93
lesson template, 349–350
sample activities, 63–64
professional development, 43–44, 345
professionalism, 29, 132
proficiency. See English language proficiency
progress, student, 113–114, 269
project, 168, 273, 337
promise, making a, 241, 250
prompting students, 105, 106
pronoun, 211–217, 228–229
pronunciation
alphabet, 140–141
children’s songs, 293
correction techniques, 108
defined, 76
emphasising words and syllables, 177–179
fluency, 179–180
grammar presentation, 82
intonation, 180–182
listening activities, 199
monolingual classes, 318, 329–330
multi-lingual classes, 330–331
phonology, 140, 173–177
reading texts, 140–141
reference books, 342
repetition, 171–173
sample activities, 181
spelling rules, 141
verb tenses, 244
whole words, 141
prop, 121
public language school, 34, 45
publisher, book, 117
pun, 143
punctuation, 54, 142–143
puzzle, 290
•Q•
quantifying adjective, 222
question
form, 230, 233, 234, 235, 240
games, 94–95
intonation, 180, 182
listening activities, 206
mark, 54, 142
student’s, 133, 203, 291
vocabulary, 8274
371
372
Teaching English as a Foreign Language For Dummies
questioning students
achievement tests, 269–271
correction techniques, 106
lack of participation, 134
needs analysis, 280–281
open-ended questions, 66
Presentation phase of lesson, 74–76
reading strategies, 147, 152
wait time for answer, 65
questionnaire, 98–99
quiet time, 321
quiz game, 99–100
quotation/speech mark, 142
•R•
radio broadcast, 199
ranking words, 91
rapport, 322–324
reading
aloud, 179
exam techniques, 310
follow-up activities, 208
importance of, 139
lesson template, 351–352
predictions, 147
pre-reading tasks, 145, 149
sample lesson, 152–155
self-assessment tests, 266
skimming/scanning strategy, 146
sub-skills, 150–152
summarising strategy, 147–148
text selection, 139–145, 151
text structure, 146
university entrance exams, 301, 303
vocabulary strategies, 148–150
realia
benefits and drawbacks, 121–122
defined, 121
function of, 335
learning styles, 70
listening activities, 196–197
teacher resources, 345–346
recipe, 144
red ink, 109, 272
reducing words, 105
register
business English, 281
defined, 76, 161, 166
language standards, 167
relative clause, 53
relaxing, 311, 312
relevant language
discussion topics, 193
posh and slang, 81
reading texts, 144–145
student learning levels, 55–56
teaching methods, 27
religion, 326
reminiscing, 251
repetition, language
benefits of, 86
feedback sessions, 108
fluency, 180
listening activities, 204–207
pronunciation, 171–173
young learners, 285
rephrasing, 314–315
report, written, 163, 168
reported speech, 53
resource book, 117
respect
classroom management, 126
multi-lingual classes, 326–327
teenagers, 295
review, 148, 163
rewarding students, 284
rewriting, 112, 270–271
rhyme, 140, 179, 292–294
role playing
benefits of, 26–27
practice activities, 92
production activities, 94–95
reading strategies, 151–152
routine, 285
row, of desks, 129–130
rule, classroom, 130–131, 132, 327
Russia, work in, 358–359
•S•
Saudi Arabia, work in, 359
scanning text, 146
Scattergories game, 347
Scrabble game, 346
script
listening activities, 199
Practice phase of lesson, 92
pronunciation, 181
reading strategies, 151
Index
seasonal work, 12–13, 45
second conditional, 258–260
SEFIC (Spoken English for Industry and
Commerce) exam, 306
self-access centre, 127, 276
self-assessment, 265–267
semi-colon, 142
seminar, 345
sensory activity, 285
sentence structure. See also grammar
adjectives and adverbs, 220–224
articles, 218–220
conditional structure, 255–261
conjunctions, 224–226
minimum components, 159, 211–217
modal verbs, 248–249
objects, 216–217
practice activities, 89–90
prepositions, 217–218
reading lessons, 142–143
separable phrasal verb, 252–253
sexism, 134
Ship or Sheep (Baker), 342
shouting, 131
shwa, 175
simile, 55
Simon says game, 290, 339
simple tense, 71, 228. See also specific tenses
singing, 292–294
single vowel sound, 174–175
skill, of teachers, 15, 16, 29, 43
skimming text, 146, 310
slang
versus colloquialisms, 200
letter writing, 162
presentation of concept, 80–81
verb tenses, 245
slow reveal method, 194
smiling, 105, 311
snakes and ladders game, 290
sound, of language. See pronunciation
South Korea, work in, 360
Spain, work in, 360–361
speaking. See also specific skills/activities
check for understanding, 192
communicative activities, 185–187
conjunctions, 225–226
exam techniques, 311
group and individual repetition, 172–173
importance of repetition, 171
initial activities, 183
interjections, 191–192
interruptions, 191–192
lack of student participation, 134
listening to, 172
opinions, expressing, 190–191
phonology, 173–177
placement tests, 267
Practice phase of lesson, 91–92
Production phase of lesson, 94, 95–96
sample activities, 193–195
self-assessment test, 267
university entrance exams, 301, 303
warmers, 184–185
special needs, student with, 127
speech, by student, 94
speech mark, 142
spelling
confusing words, 143
exam techniques, 308
irregularities, 172, 173
practice activities, 89
pronunciation, 141
rules, 141
Spoken English for Industry and Commerce
(SEFIC) exam, 306
Spoken English Test for Business exam, 307
stereotyping, 326
story, written, 163, 285–288
storytelling
described, 63
listening activities, 206
Production phase of lesson, 95–96
student motivation, 338
young learners, 285–288
stress, word/syllable, 175, 177–179, 237
structural approach, 78
student. See also young learner
age ranges, 20
class attendance, 135
class size, 22, 133
disruptive, 130–131
education funding, 10
educational choices, 11
expectations of teacher, 27–29
gap years, 15–16
group work tips, 97
lack of participation, 134
lesson phases, 59–66
motivation for listening, 201–203
373
374
Teaching English as a Foreign Language For Dummies
student (continued)
names, 321
one-to-one lessons, 275–280
respect for teacher, 23
special needs of, 127
as teacher, 337
test construction, 269
types of, 10
study skills, 307–312
style, writing, 110
subject, of sentence, 158–159, 212–213
subject pronoun
sentence structure, 212, 215
verb tense, 228–229, 233
subordinating conjunction, 225
suffix, 54, 315
summarising, 147–148, 192, 311
supermarket game, 340
survey, 98–99
Swan, Michael (Practical English Usage), 342
syllable, 104, 173, 178, 281
syllabus, 26, 56, 57
symbol, pronunciation, 173–177
synonym
defined, 76
exam courses, 314
phrasal verbs, 252
presentation of concept, 81–82
syntax, 76, 314, 330
synthesising, 302
•T•
tabloid, 81
Taboo game, 347
tax, 277
teacher
basic skills, 11
characteristics of, 22, 28, 29, 36
common fears and concerns, 17, 19–29
gap-year training, 15, 16
in-house training, 43
language knowledge, 19
one-to-one lessons, 277–279
open pairs activity, 87–88
personal information, 338
personality, 22, 23, 126, 278
published resources, 115–116, 342–347
relationship with students, 278, 322–324, 338
student as, 337
students’ expectations of, 27–29
students’ fancy for, 132
students’ respect for, 23
training courses, 34–44
training levels, 32
teacher qualifications
career ladder, 16
job market, 11, 12
teachers’ common concerns, 21
unqualified teachers, 32–34
Teacher Talking Time (TTT), 64–66
teacher’s book, 117, 291
Teaching English as a Foreign Language
(TEFL)
benefits of, 1, 10
need for, 9
trends in, 13
teaching method
grading process, 56–58
importance of, 23–24
increasing difficulty, 24–25
relevant language, 27
role playing, 26–27
small groups, 26–27
student involvement, 64–66
training courses, 37
vocabulary, 26
teamwork, 321
teenager, 294
TEFL initiated teacher, 34
TEFL Training (teacher training provider), 41
TEFL.com (website), 45
temperature, room, 127
template, 163–165, 349
tense. See verb tense
Test of English as a Foreign Language
(TOEFL), 302–303
Test of English for International
Communications (TOEIC), 307
testing students
achievement tests, 269–271
alternatives to testing, 273
correction procedure, 113–114
exam classes, 268, 313–315
feedback sessions, 272
general English exams, 304–307
importance of, 265
marking process, 272
needs assessments, 265–267, 280–281, 352
proficiency tests, 267–269
Index
progress tests, 269
students’ expectations, 28
study skills and testing techniques, 307–312
university entrance exams, 299–303
testing teachers, 36, 37, 344
text structure, 146, 162–165
theme, lesson, 122
third conditional, 260–261
third person singular, 230
Thomson ELT (publisher), 348
threat, making a, 257
tiddlywinks game, 290
time, 223–224, 234, 310
timeline, 70–72, 237–238
TOEFL (Test of English as a Foreign
Language), 302–303
TOEIC (Test of English for International
Communications), 307
topic
discussion, 193
writing, 159, 162
Toth (Children’s Games Photocopiable
Resource Pack), 290
tour, 196
tourist information, 151
training, teacher
costs of, 37, 40, 41, 42–43
courses, 34–44
job search, 45
lack of, 32–34
levels, 32
transforming words, 270–271
transitive verb, 217, 223, 252–253
translating
achievement tests, 271
concept checks, 75
discussion topics, 193
monolingual classes, 319
prepositions, 218
teachers’ common concerns, 20
travel, 12–16, 355–362
Trim, John (English Pronunciation
Illustrated), 342
Trinity CertTESOL (Certificate in Teaching
English to Speakers of Other Languages),
34, 40, 41, 42
Trinity DipTESOL (Diploma in Teaching
English to Speakers of Other Languages),
35, 41, 42
true or false question, 206, 270
TTT (Teacher Talking Time), 64–66
Turkey, work in, 361
TV viewing
benefits of, 122
listening materials, 197, 199
sample reading lesson, 152–155
•U•
university entrance exam, 299–303
Uno game, 290
unvoiced consonant, 176
upper-intermediate level student, 53–54
Ur, Penny (Five-Minute Activities: A Resource
Book of Short Activities), 290
•V•
verb
adverbs, 222–224
collocations, 80
complete sentences, 158–159, 211–217
defined, 211, 213
forms of, 213–214
modal, 53, 54, 247–251
phrasal, 251–255
practice activities, 90
verb tense. See also grammar; specific tenses
conditional sentence structures, 255–261
correction techniques, 104
fairy tales, 286–287
games, 232
intentions, expressing, 245–246
irregular verbs, 215
Practice phase of lesson, 87–89, 90, 99
Presentation phase of lesson, 70–72
pronouns, 215, 228–229
student learning levels, 51, 52, 53, 54, 55
types of, 227–229
visual aids, 70–72, 233, 235–236
video, 70, 198–201
Vietnam, work in, 362
visual aid. See also specific types
class surveys, 99
defined, 76
instructions, giving, 96
learning styles, 69–70
listening activities, 206
materials design, 123
375
376
Teaching English as a Foreign Language For Dummies
visual aid (continued)
teacher resources, 348
teacher-created materials, 123–124
verb tenses, 70–72, 233, 235–236
vocabulary, 73–74
young learners, 285
visual learner, 69–70, 285
vocabulary
articles, 218
children’s songs, 293
classroom language, 131
exam techniques, 310, 315
fairy tales, 287–288
game-playing, 288
grading process, 57
listening texts, 202
mixed-ability class, 119
monolingual classes, 318, 329
Practice phase of lesson, 87–93
Presentation phase of lesson, 76–82
pre-writing tasks, 162
reading lessons, 148–150
sample activities, 98–100
student learning levels, 50–55
self-assessment tests, 266
teaching methods, 26
visual aids, 73–74
vocal chord, 176
voiced consonant, 176
Voluntary Service Overseas (VSO), 46
vowel, 174–175, 180
•W•
Wall Street Institute International, 46
warm-up activity, 120
whisper game, 340
word
families, 76
puzzles, 290
whiskers, 197
work book, 117
Wright, Andrew (Five-Minute Activities: A
Resource Book of Short Activities), 290
writing
basic skills, 158
case study, 168–170
checklists, 166
class time, 166
complete sentences, 158–159
conjunctions, 225–226
corrections and feedback, 108, 109–113
described, 93–94
exam techniques, 308–310
formal versus informal, 166–168
importance of, 157
lesson structure, 161–166
placement tests, 268
Practice phase of lesson, 98–100
Production phase of lesson, 93–94
sample activities, 98–100, 168
self-assessment test, 266
student learning levels, 158
university entrance exams, 301, 303
•Y•
yes/no question, 75
young learner. See also student
books, 118
characteristics of, 284–285
games, 288–291
multi-lingual classes, 322
sample activities, 291
songs and nursery rhymes, 292–294
stories, 285–288
teenagers, 294–297
•Z•
zero conditional sentence, 255–256
er!
Making Everything Easi
TM
UK editions
BUSINESS
Body Language For Dummies
978-0-470-51291-3
British Sign Language
For Dummies
978-0-470-69477-0
Business NLP For Dummies
978-0-470-69757-3
978-0-470-51806-9
978-0-470-77930-9
978-0-470-71382-2
FINANCE
Cricket For Dummies
978-0-470-03454-5
Digital Marketing For Dummies
978-0-470-05793-3
Divorce For Dummies, 2nd Edition
978-0-470-74128-3
eBay.co.uk Business All-in-One
For Dummies
978-0-470-72125-4
English Grammar For Dummies
978-0-470-05752-0
Fertility & Infertility For Dummies
978-0-470-05750-6
978-0-470-99280-7
978-0-470-74324-9
978-0-470-69515-9
Flirting For Dummies
978-0-470-74259-4
Golf For Dummies
978-0-470-01811-8
HOBBIES
Green Living For Dummies
978-0-470-06038-4
Hypnotherapy For Dummies
978-0-470-01930-6
Inventing For Dummies
978-0-470-51996-7
Lean Six Sigma For Dummies
978-0-470-75626-3
978-0-470-77085-6
978-0-470-75857-1
Available wherever books are sold. For more information or to order direct go to www.wiley.com
or call +44 (0) 1243 843291
05380_p1
978-0-470-69960-7
A world of resources to
help you grow
UK editions
SELF-HELP
Motivation For Dummies
978-0-470-76035-2
Personal Development All-In-One
For Dummies
978-0-470-51501-3
PRINCE2 For Dummies
978-0-470-51919-6
978-0-470-01838-5
978-0-7645-7028-5
978-0-470-75876-2
HEALTH
Psychometric Tests For Dummies
978-0-470-75366-8
Raising Happy Children
For Dummies
978-0-470-05978-4
Reading the Financial Pages
For Dummies
978-0-470-71432-4
Sage 50 Accounts For Dummies
978-0-470-71558-1
Study Skills For Dummies
978-0-470-74047-7
Succeeding at Assessment Centres
For Dummies
978-0-470-72101-8
978-0-470-69430-5
978-0-470-51737-6
978-0-470-71401-0
Sudoku For Dummies
978-0-470-01892-7
Teaching Skills For Dummies
978-0-470-74084-2
HISTORY
Time Management For Dummies
978-0-470-77765-7
Understanding and Paying Less
Property Tax For Dummies
978-0-470-75872-4
Work-Life Balance For Dummies
978-0-470-71380-8
978-0-470-51015-5
978-0-470-98787-2
Available wherever books are sold. For more information or to order direct go to www.wiley.com
or call +44 (0) 1243 843291
05380_p2
978-0-470-99468-9
e done
The easy way to get mor
and have more fun
LANGUAGES
Art For Dummies
978-0-7645-5104-8
Baby & Toddler Sleep Solutions
For Dummies
978-0-470-11794-1
Bass Guitar For Dummies
978-0-7645-2487-5
Brain Games For Dummies
978-0-470-37378-1
978-0-7645-5194-9
978-0-7645-5193-2
978-0-471-77270-5
Christianity For Dummies
978-0-7645-4482-8
Filmmaking For Dummies,
2nd Edition
978-0-470-38694-1
MUSIC
Forensics For Dummies
978-0-7645-5580-0
German For Dummies
978-0-7645-5195-6
Hobby Farming For Dummies
978-0-470-28172-7
Index Investing For Dummies
978-0-470-29406-2
978-0-7645-9904-0
978-0-470-03275-6
UK Edition
978-0-7645-5105-5
Jewelry Making & Beading
For Dummies
978-0-7645-2571-1
Knitting For Dummies, 2nd Edition
978-0-470-28747-7
Music Composition For Dummies
978-0-470-22421-2
SCIENCE & MATHS
Physics For Dummies
978-0-7645-5433-9
Schizophrenia For Dummies
978-0-470-25927-6
Sex For Dummies, 3rd Edition
978-0-470-04523-7
Solar Power Your Home For Dummies
978-0-470-17569-9
Tennis For Dummies
978-0-7645-5087-4
978-0-7645-5430-8
978-0-7645-5325-7
The Koran For Dummies
978-0-7645-5581-7
Available wherever books are sold. For more information or to order direct go to www.wiley.com
or call +44 (0) 1243 843291
03580_p3
978-0-7645-5326-4
ur horizons and ac
Helping you expand yo
hieve your potential
COMPUTER BASICS
978-0-470-13728-4
978-0-471-75421-3
978-0-470-39062-7
978-0-470-42342-4
978-0-470-32725-8
978-0-470-34502-3
DIGITAL LIFESTYLE
978-0-470-25074-7
WEB & DESIGN
978-0-470-39700-8
Available wherever books are sold. For more information or to order direct go to www.wiley.com
or call +44 (0) 1243 843291
05380_p4
978-0-470-27759-1
Access 2007 For Dummies
978-0-470-04612-8
Adobe Creative Suite 3 Design
Premium All-in-One Desk Reference
For Dummies
978-0-470-11724-8
AutoCAD 2009 For Dummies
978-0-470-22977-4
C++ For Dummies, 5th Edition
978-0-7645-6852-7
Computers For Seniors For Dummies
978-0-470-24055-7
Excel 2007 All-In-One Desk Reference
For Dummies
978-0-470-03738-6
Flash CS3 For Dummies
978-0-470-12100-9
Green IT For Dummies
978-0-470-38688-0
Mac OS X Leopard For Dummies
978-0-470-05433-8
Macs For Dummies, 10th Edition
978-0-470-27817-8
Networking All-in-One Desk Reference
For Dummies, 3rd Edition
978-0-470-17915-4
Office 2007 All-in-One Desk Reference
For Dummies
978-0-471-78279-7
Search Engine Optimization
For Dummies, 3rd Edition
978-0-470-26270-2
The Internet For Dummies,
11th Edition
978-0-470-12174-0
Visual Studio 2008 All-In-One Desk
Reference For Dummies
978-0-470-19108-8
Web Analytics For Dummies
978-0-470-09824-0
Windows XP For Dummies, 2nd Edition
978-0-7645-7326-2