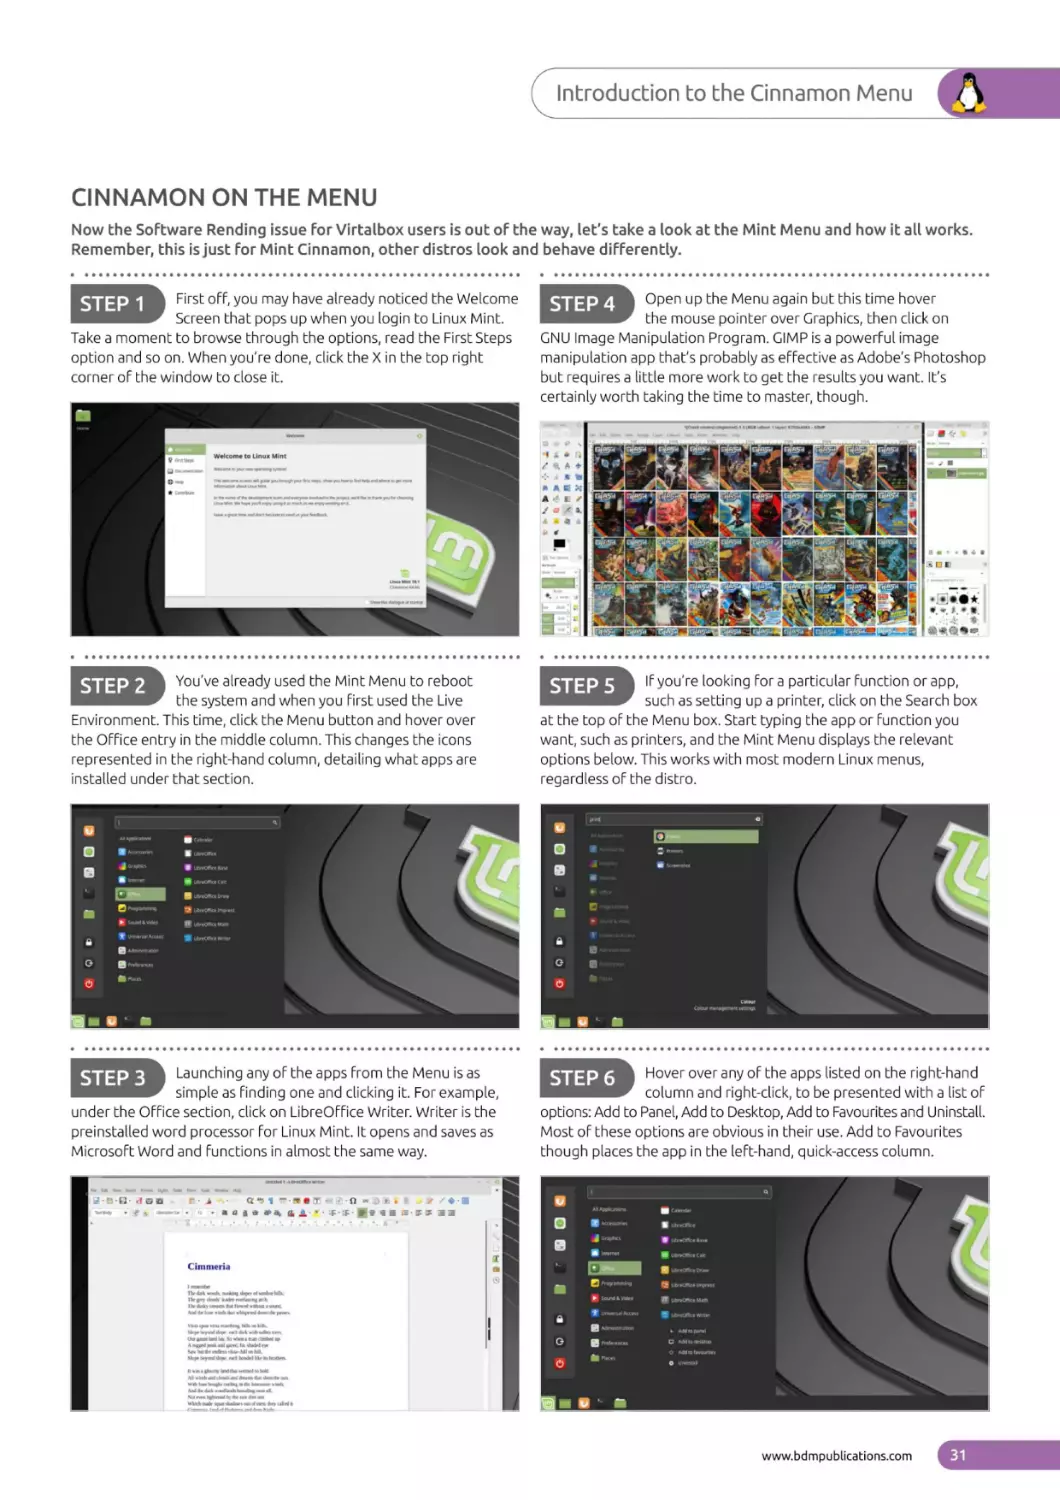
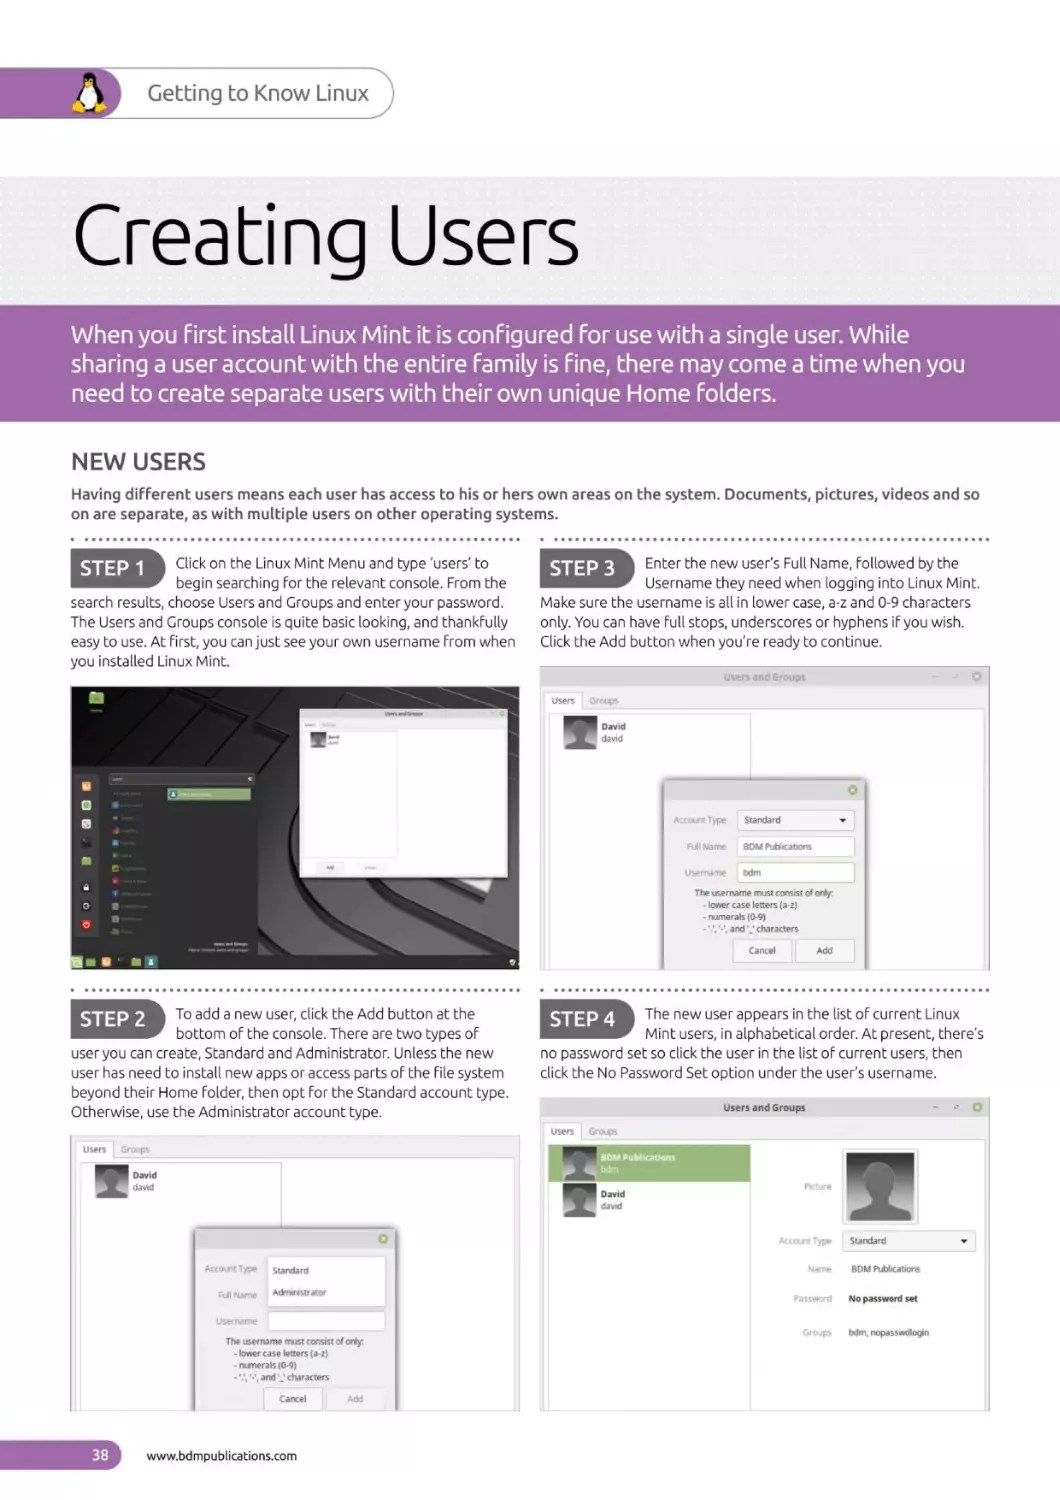
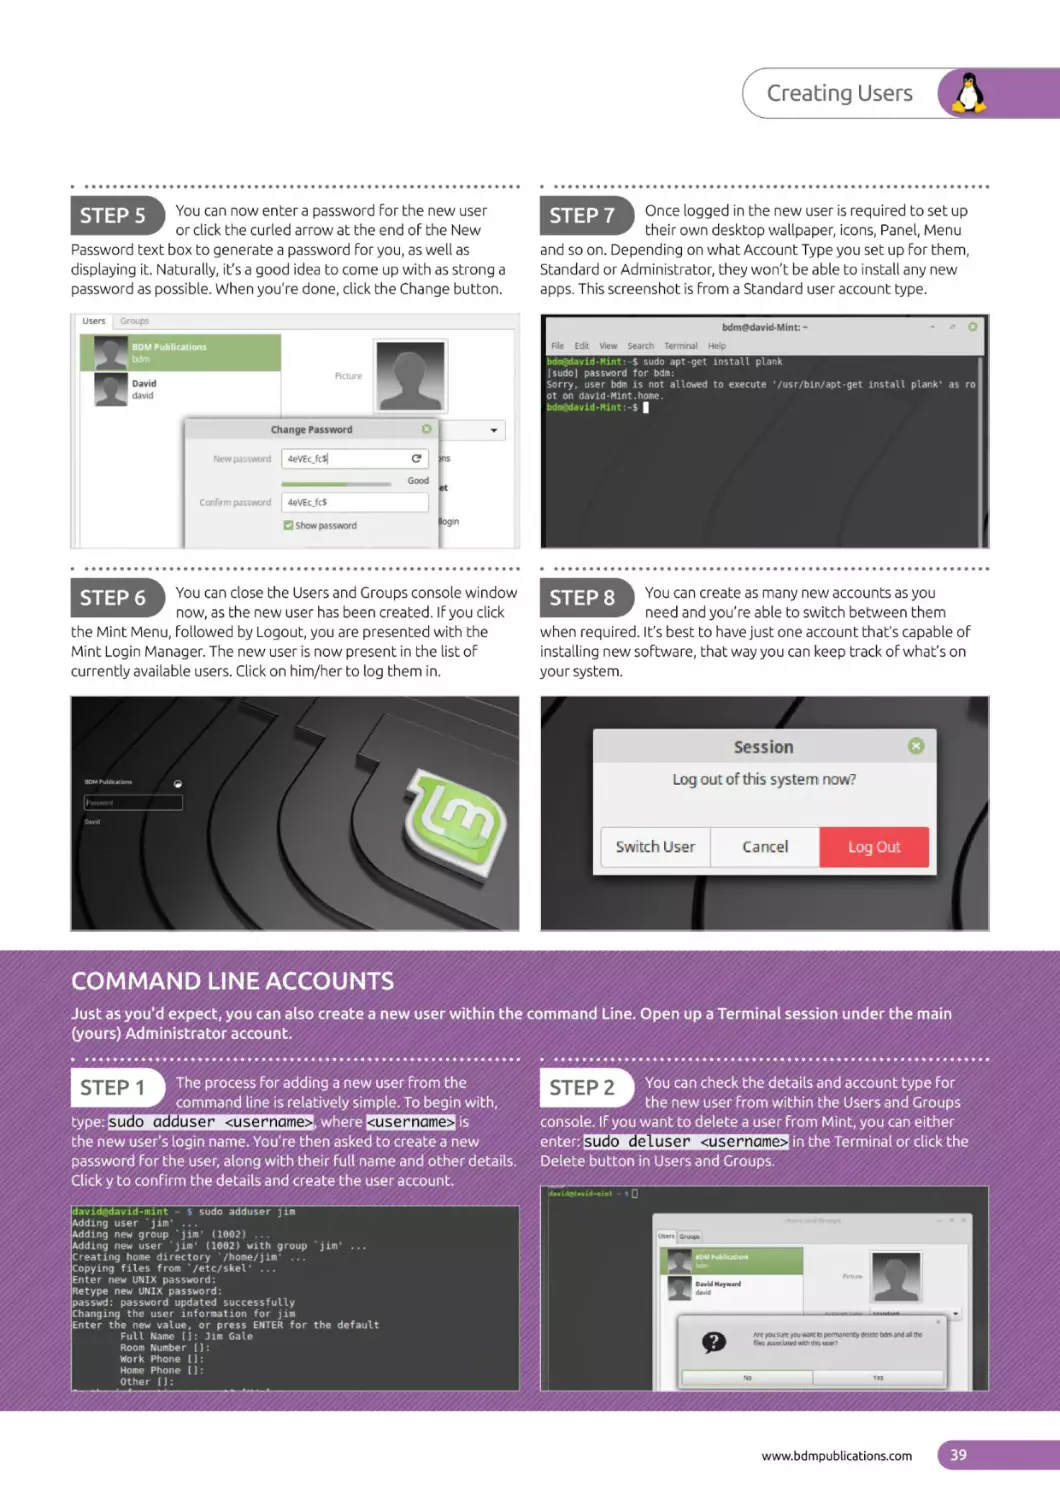
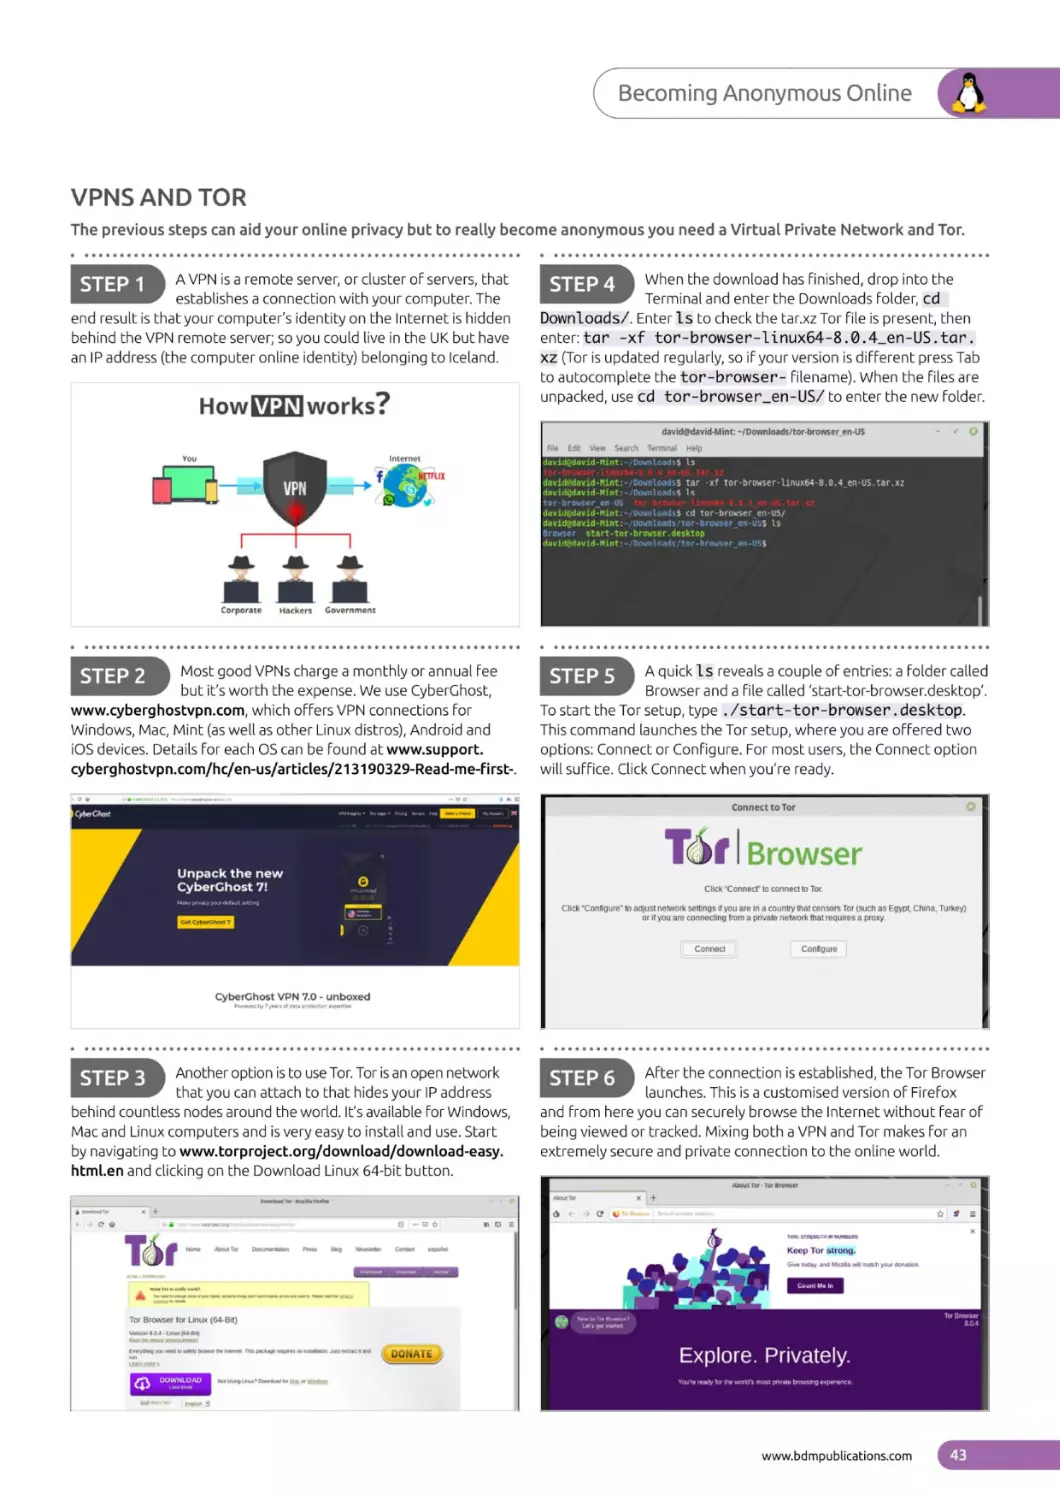
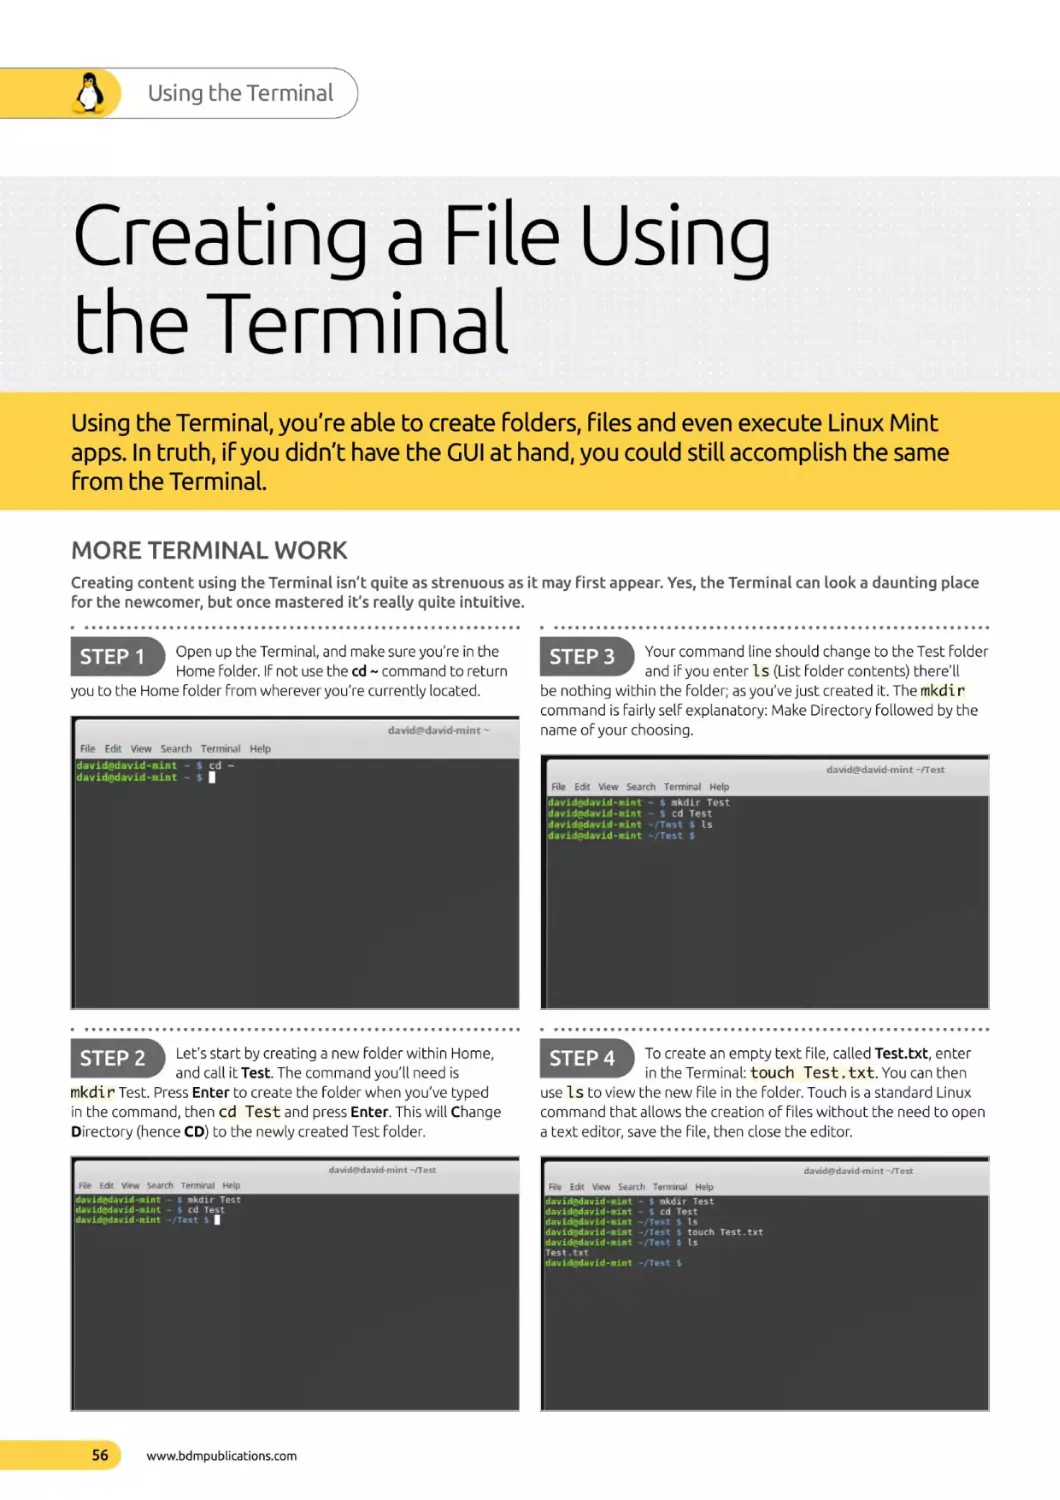
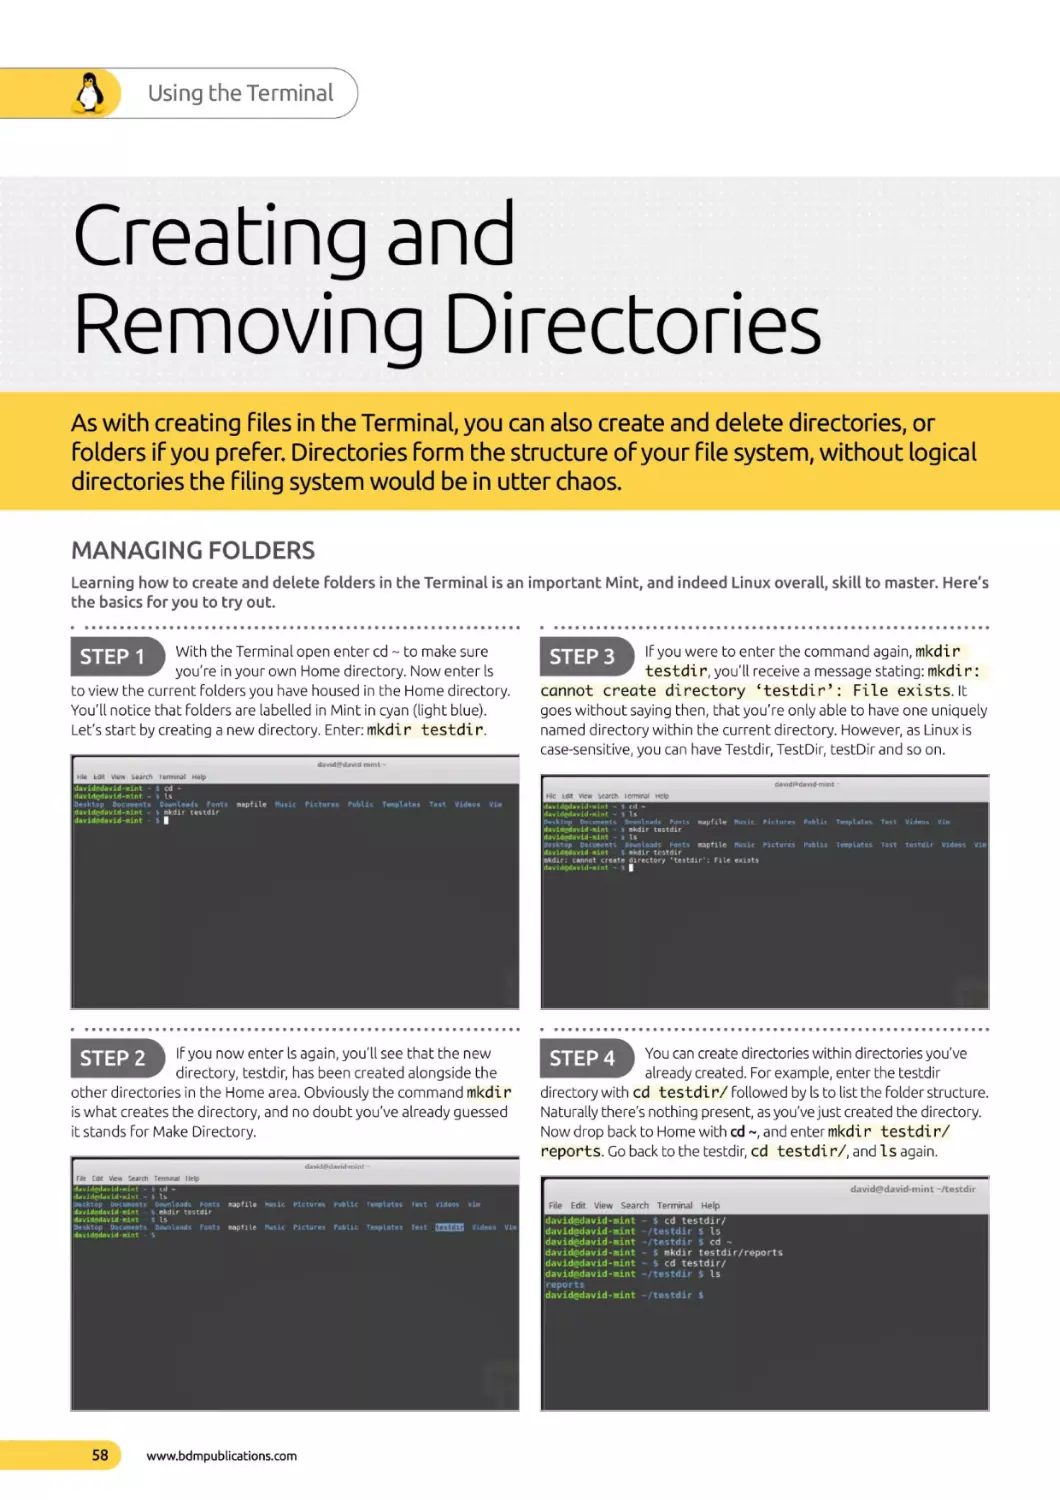
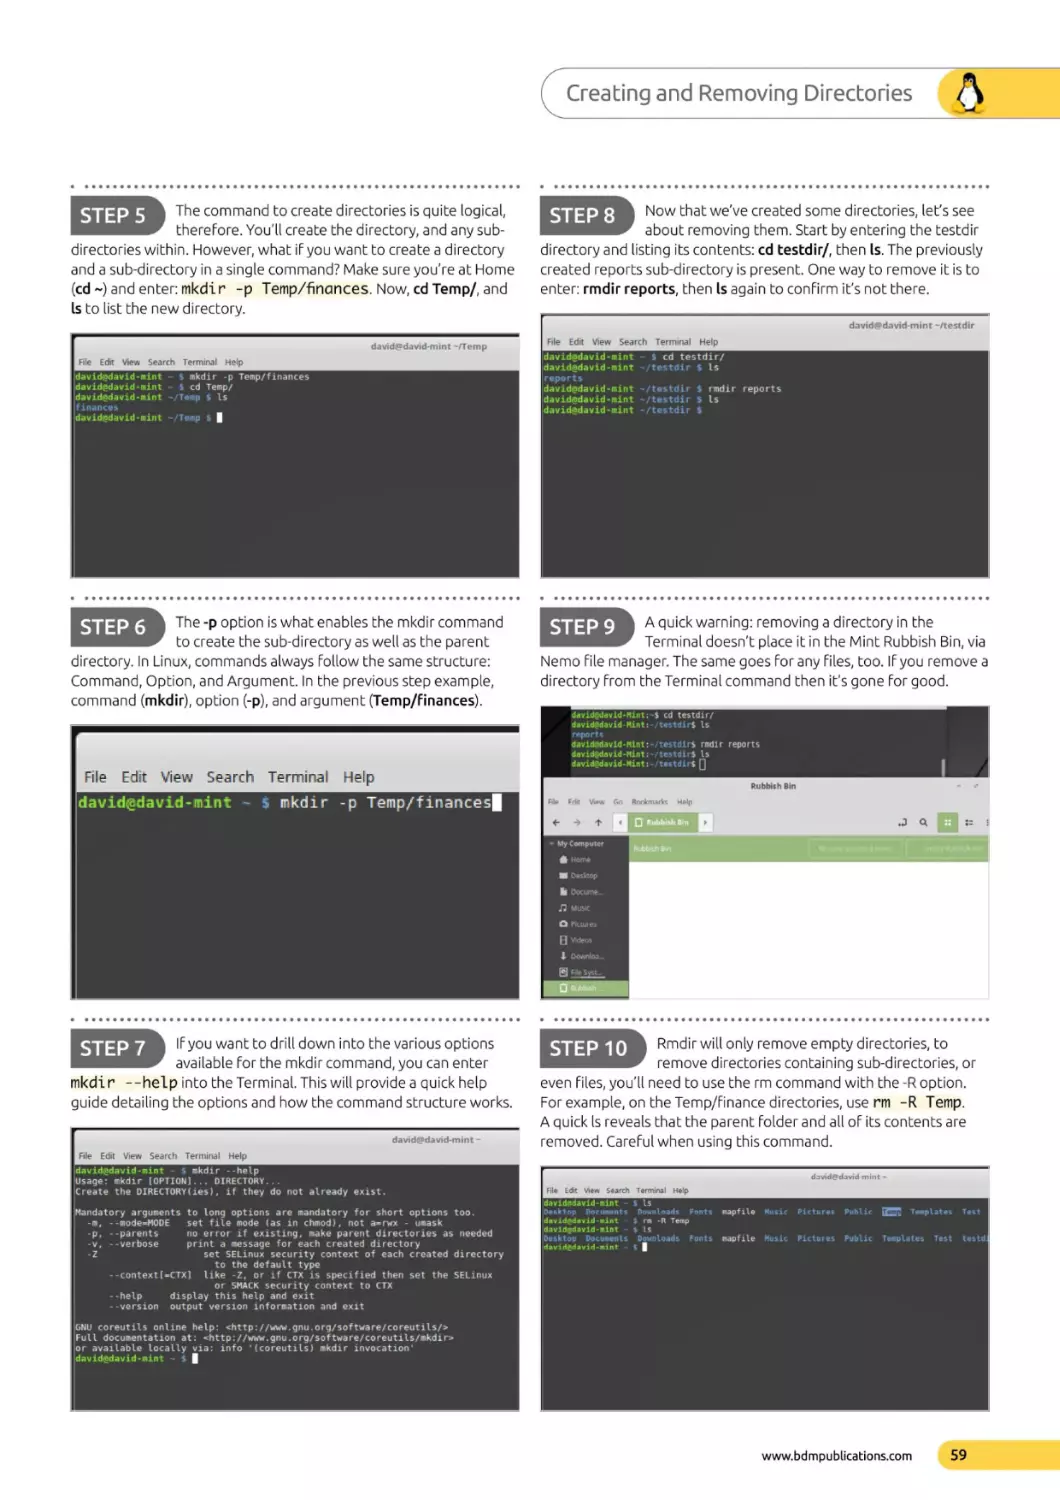
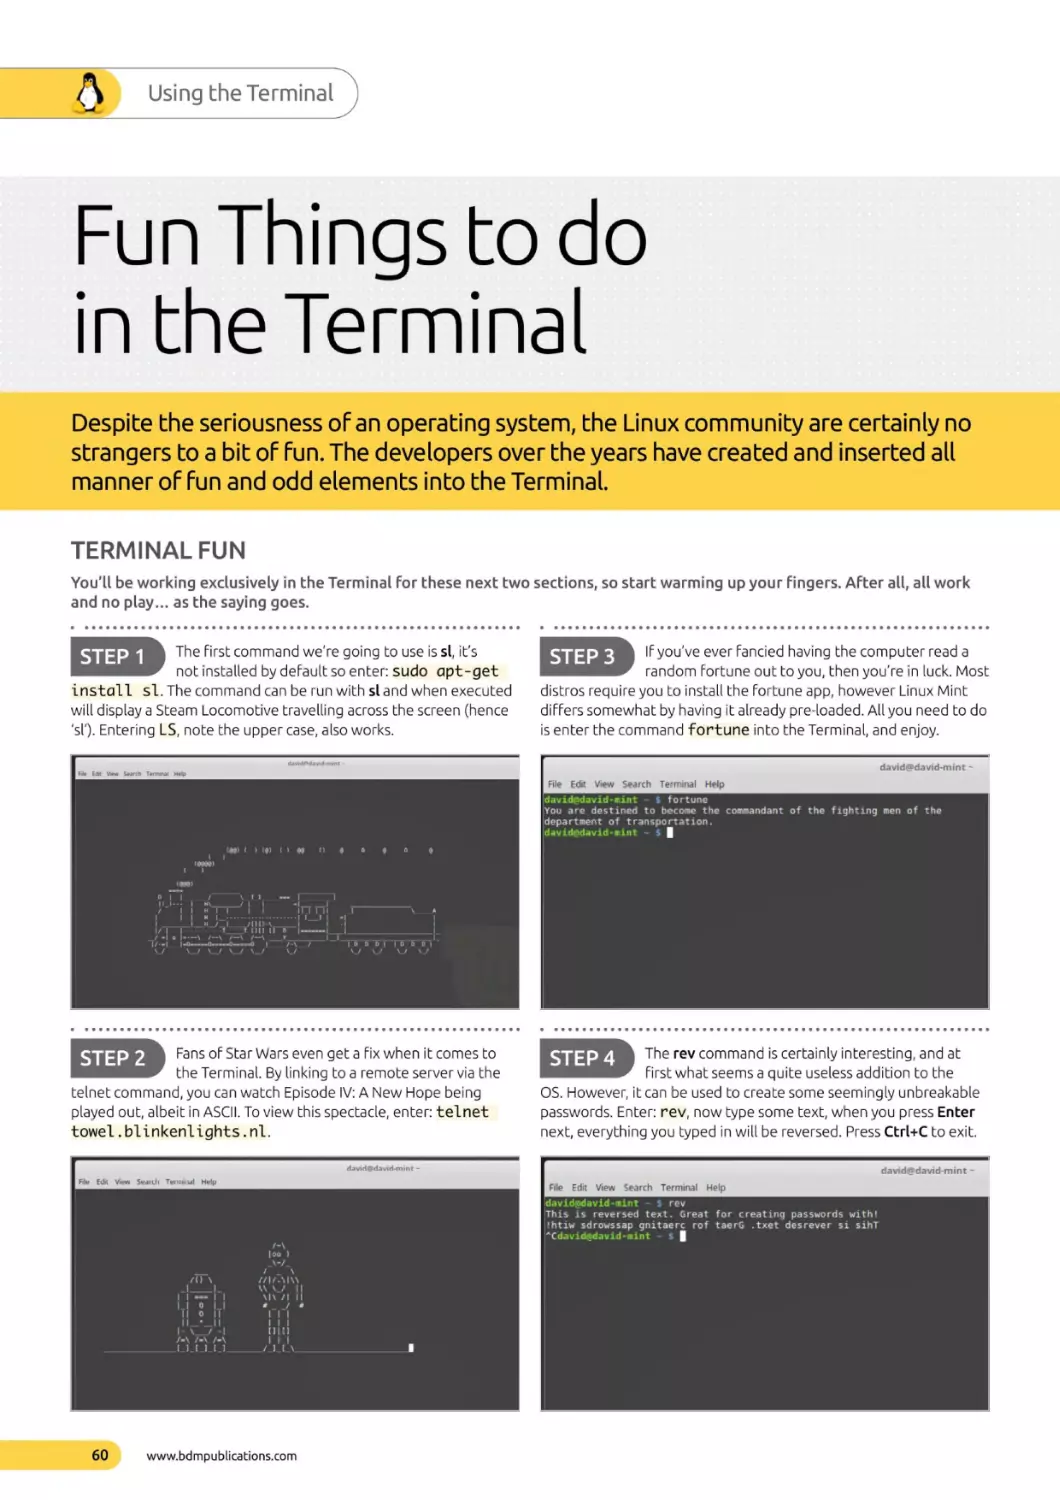
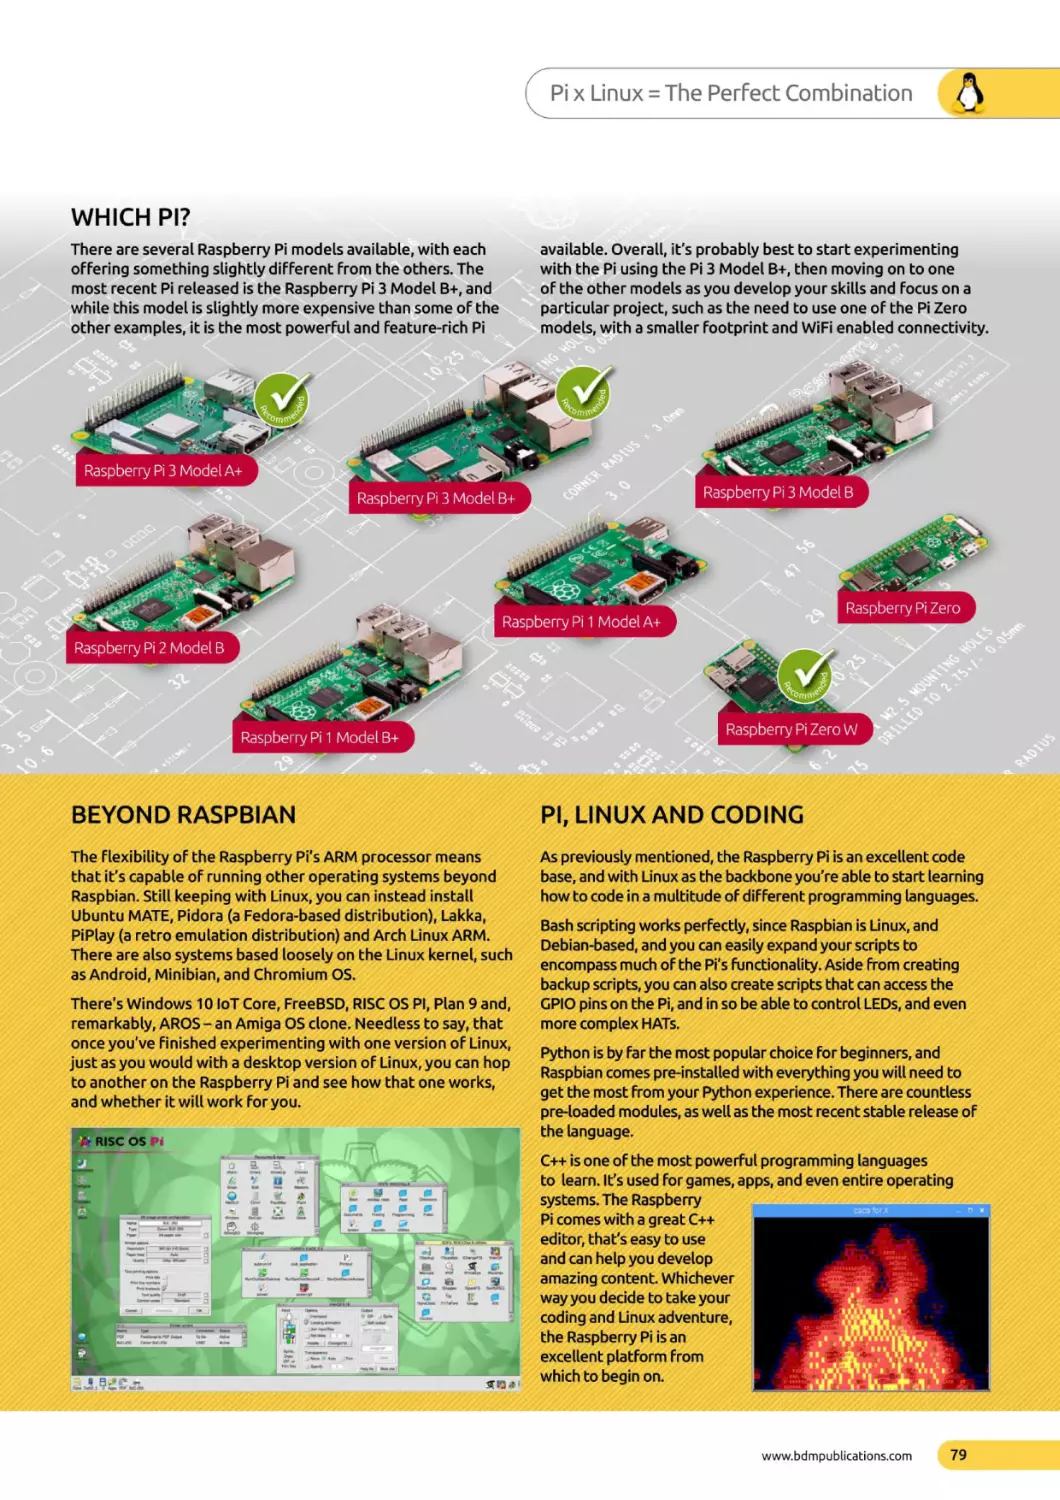
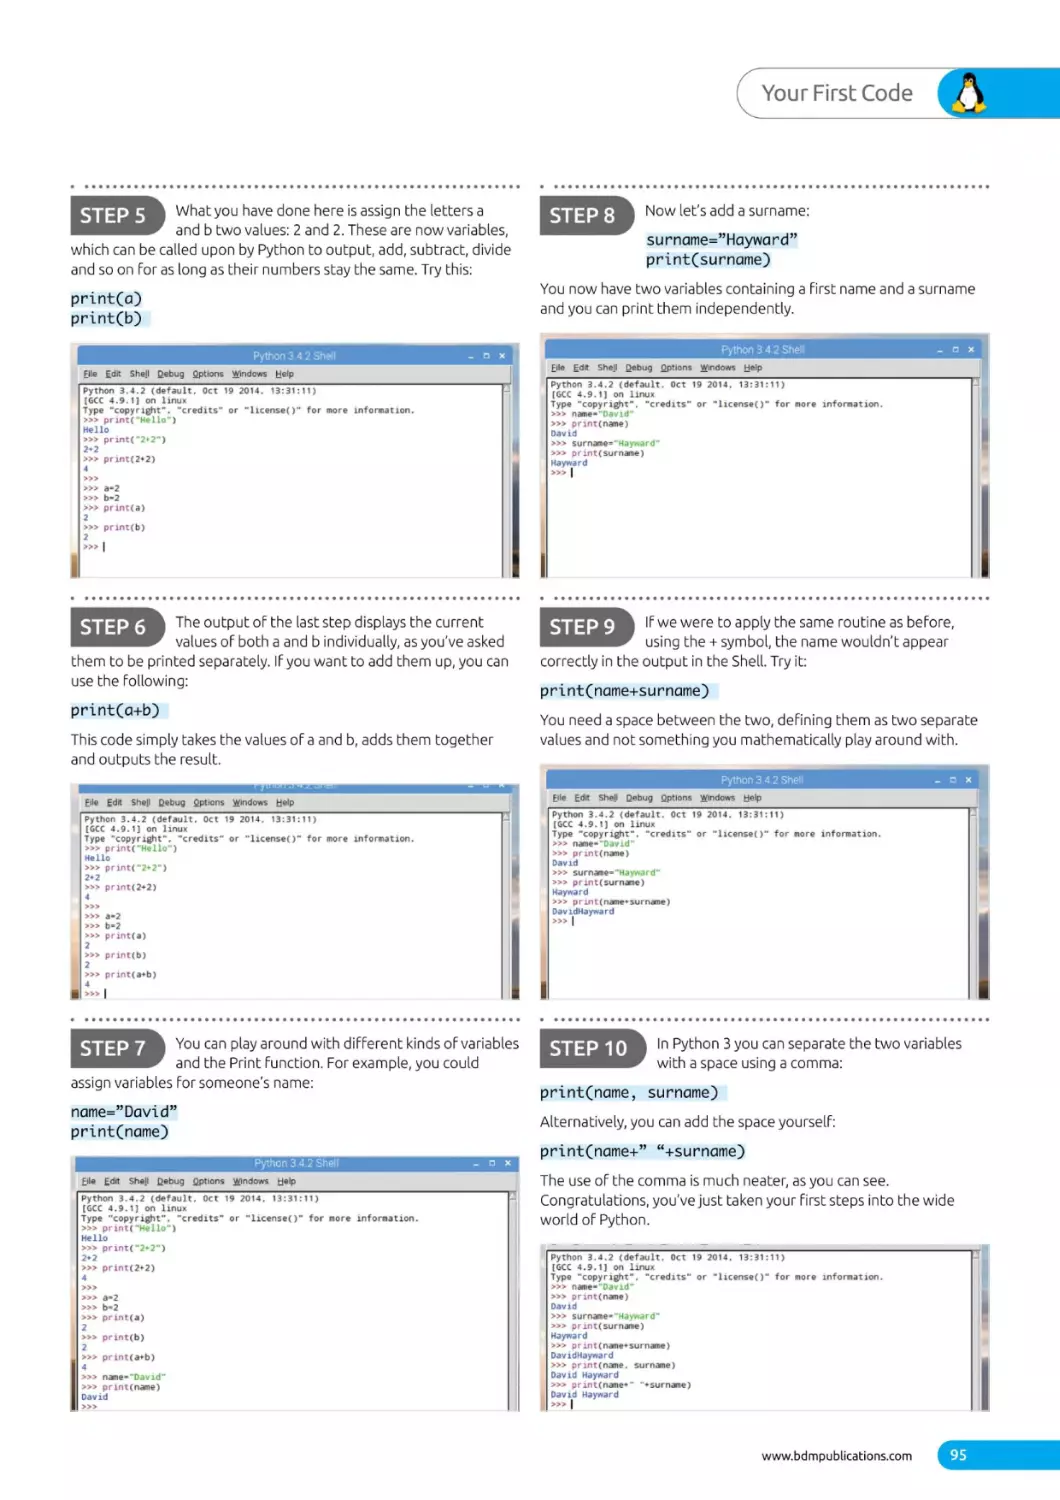
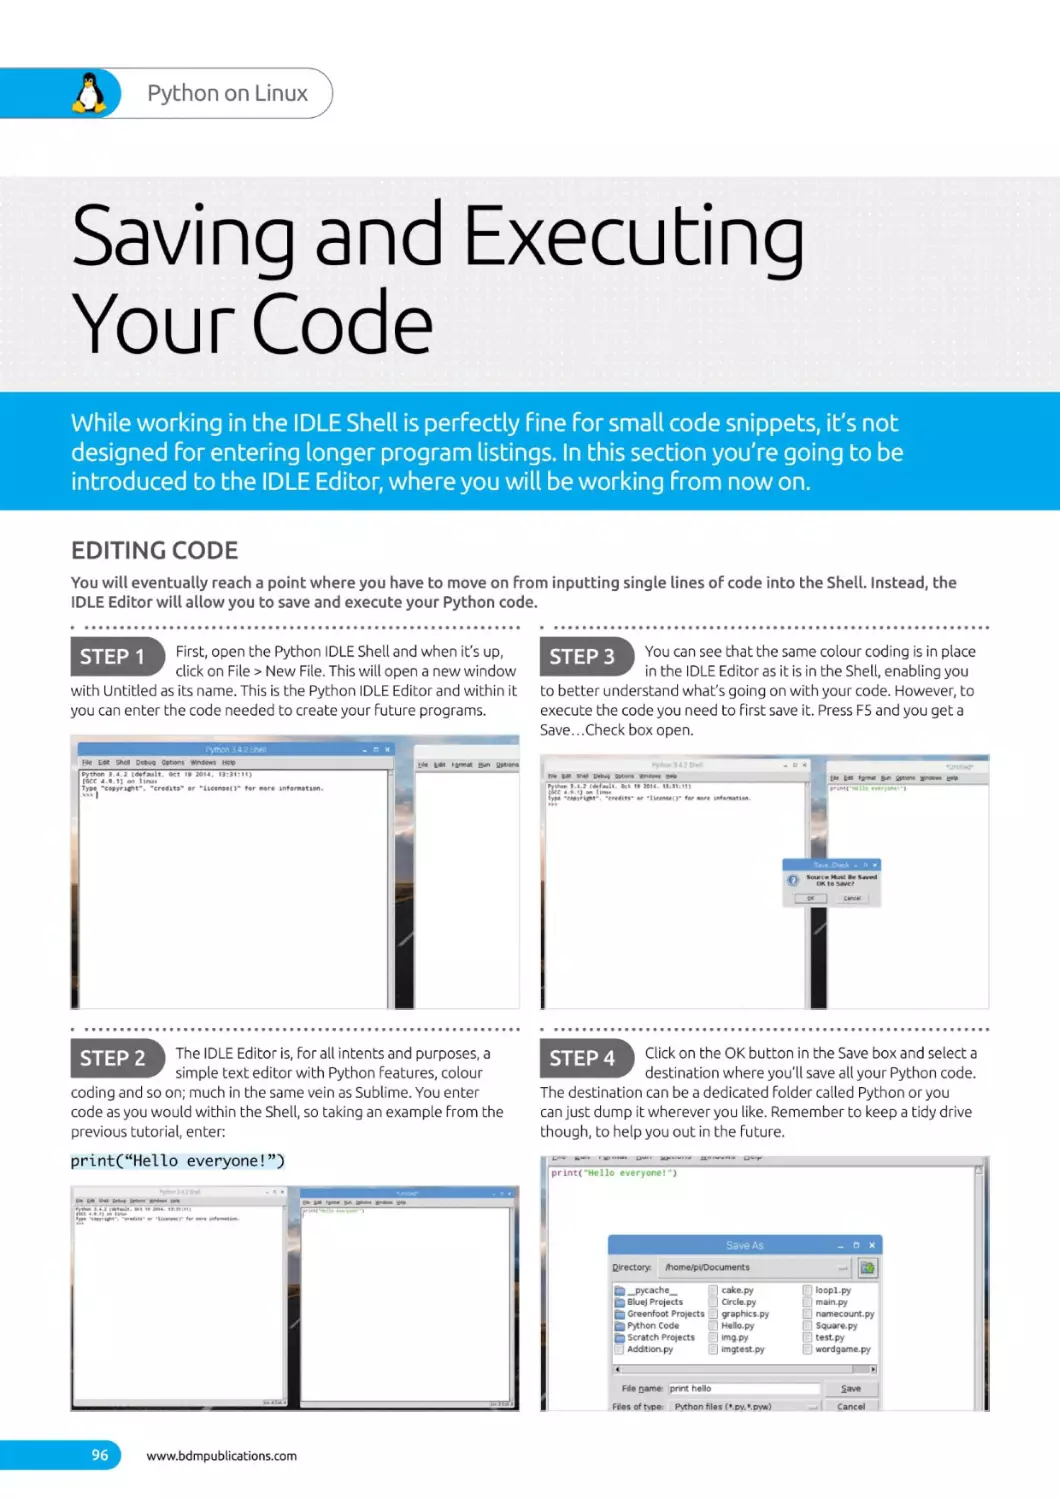
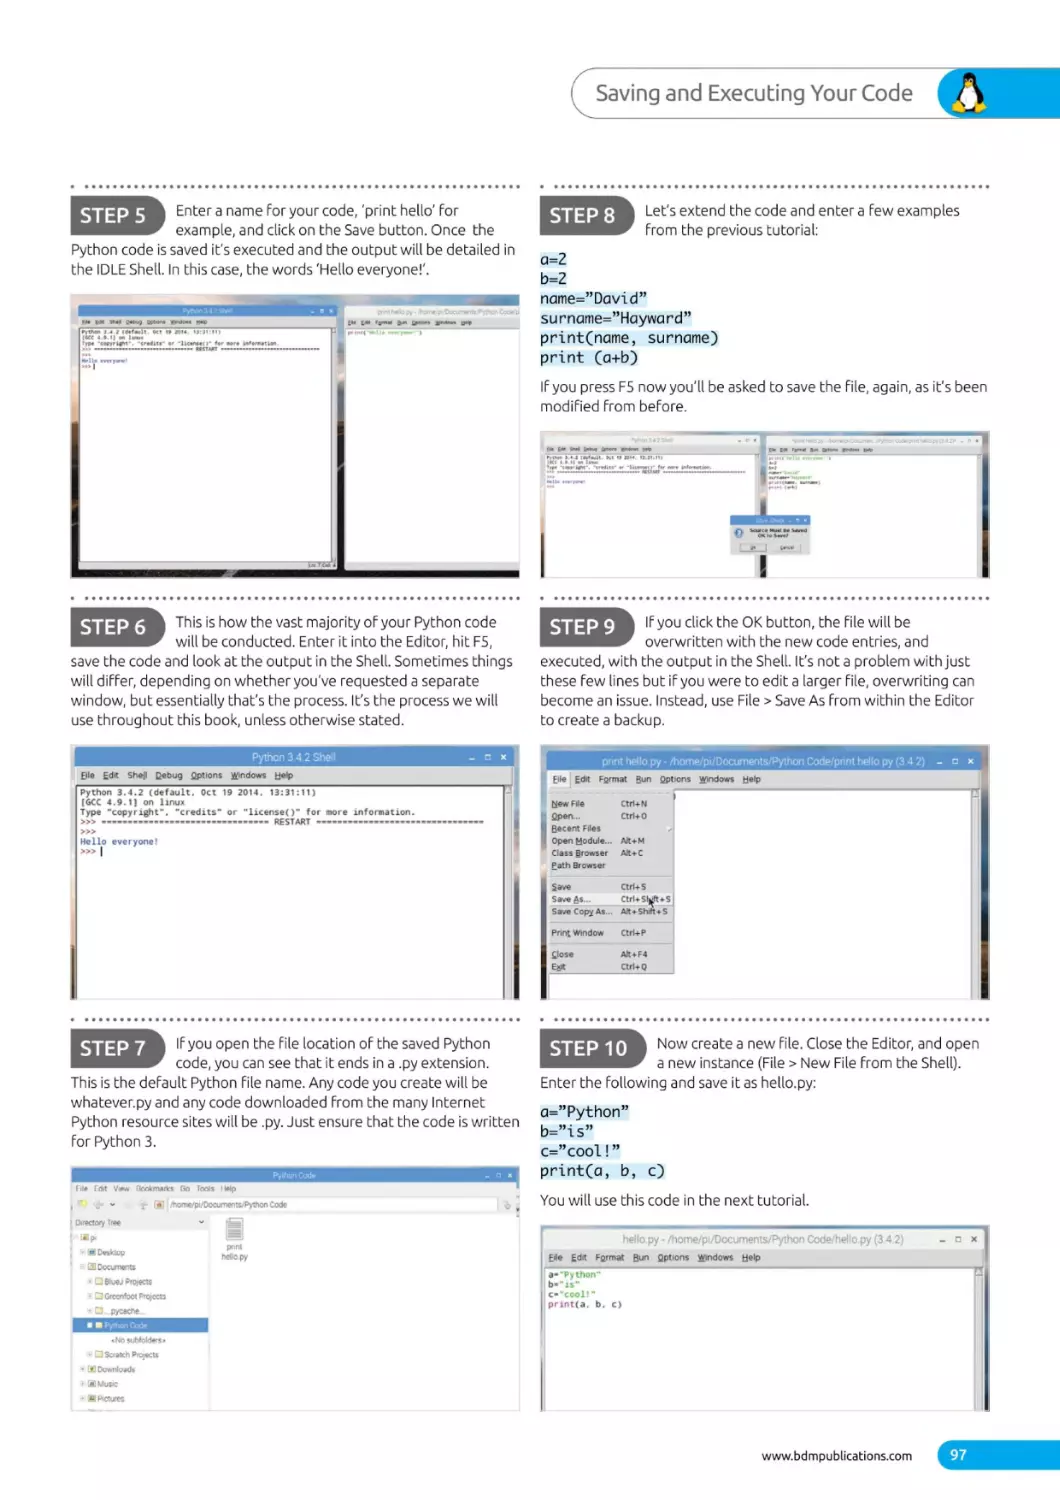
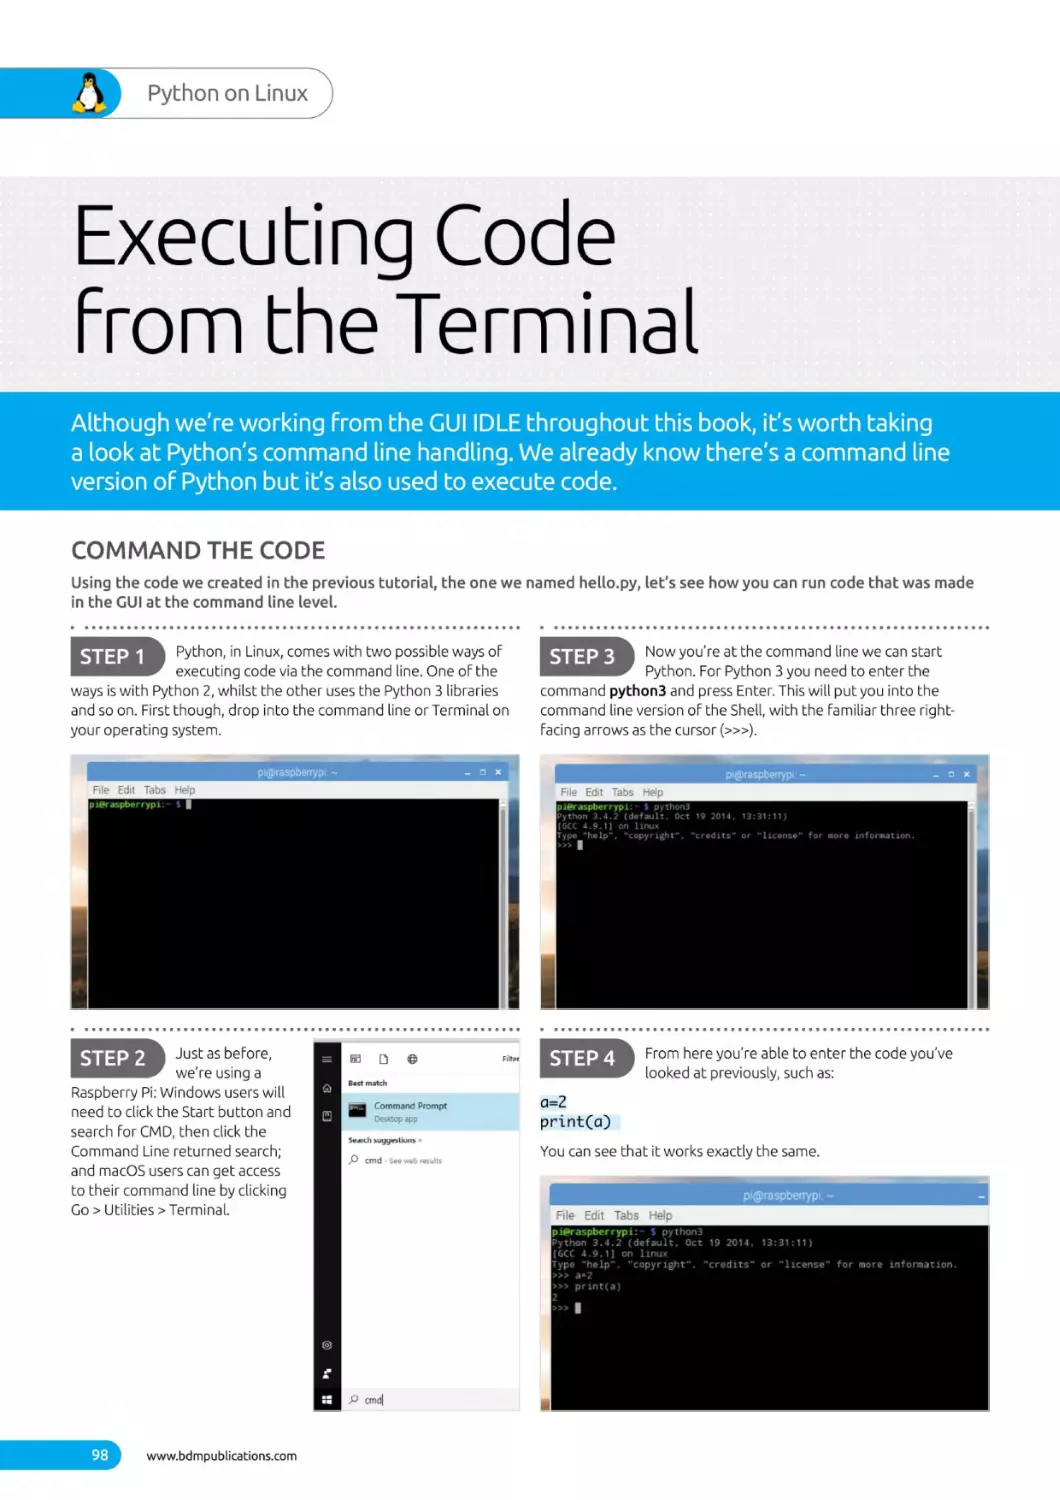
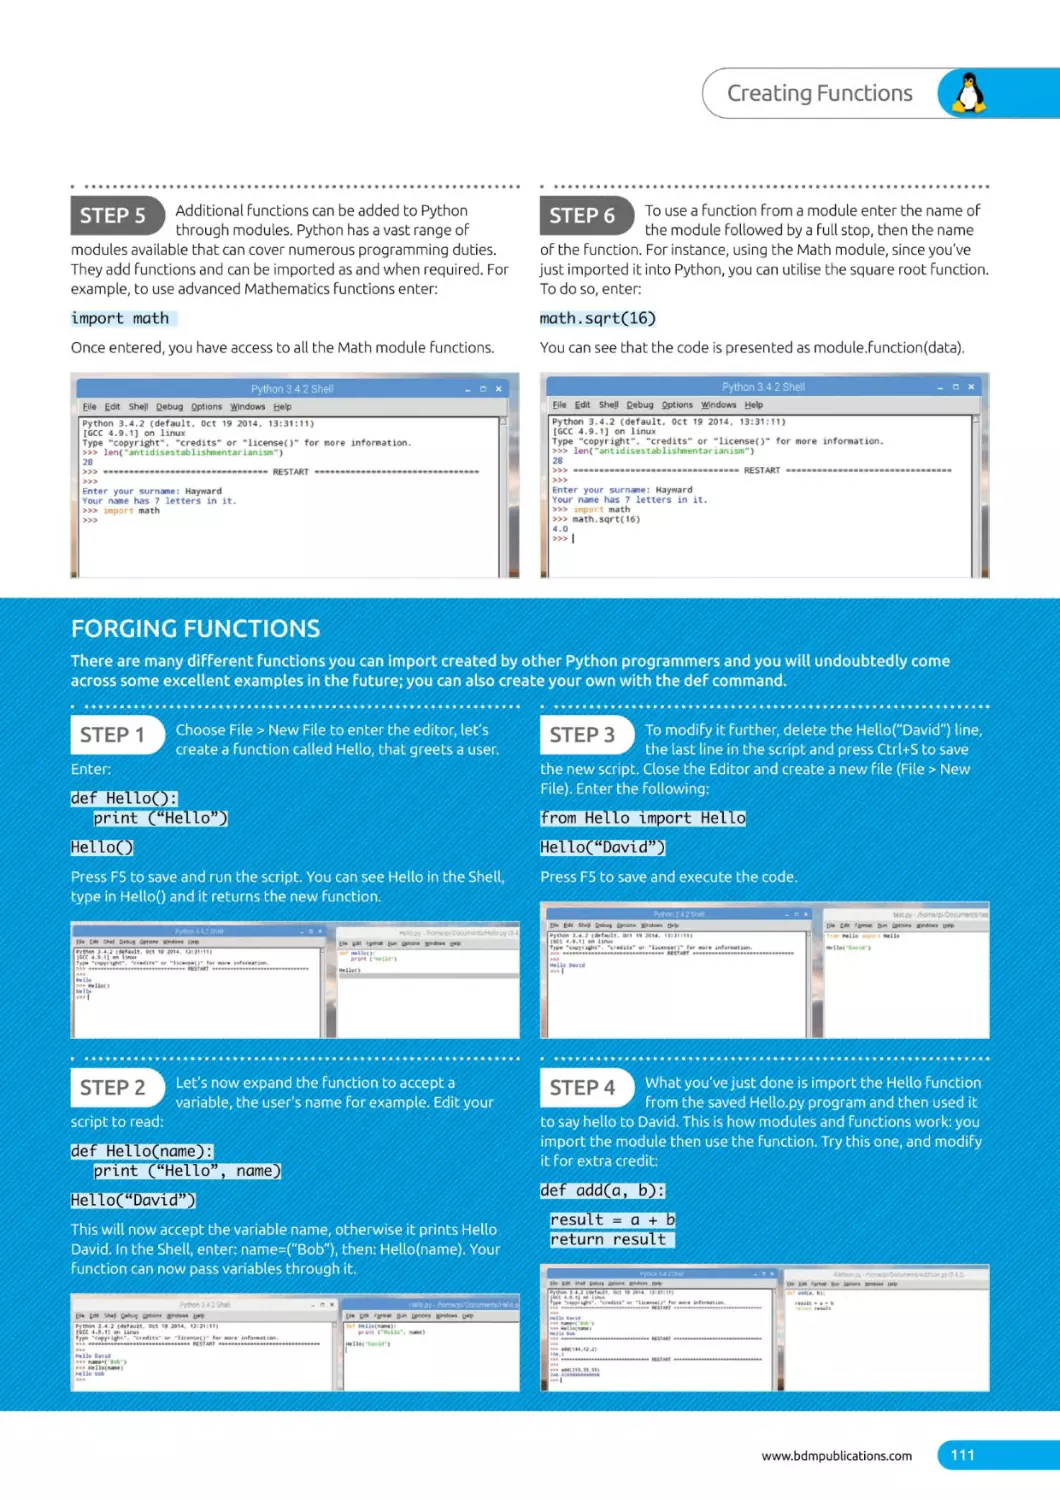
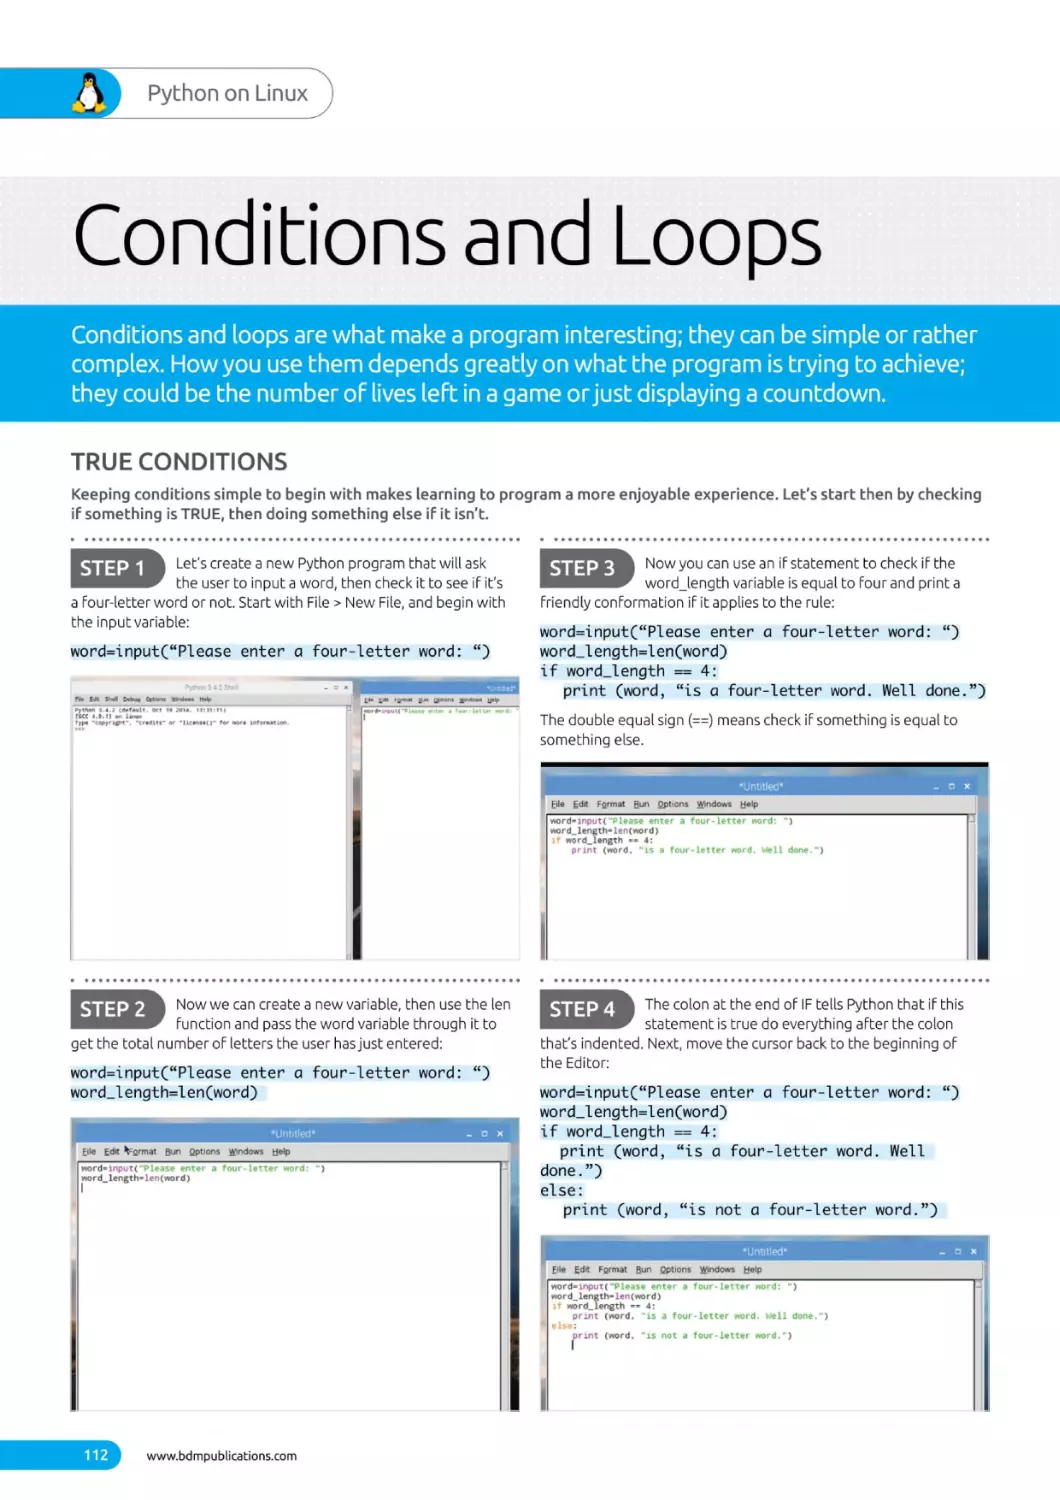
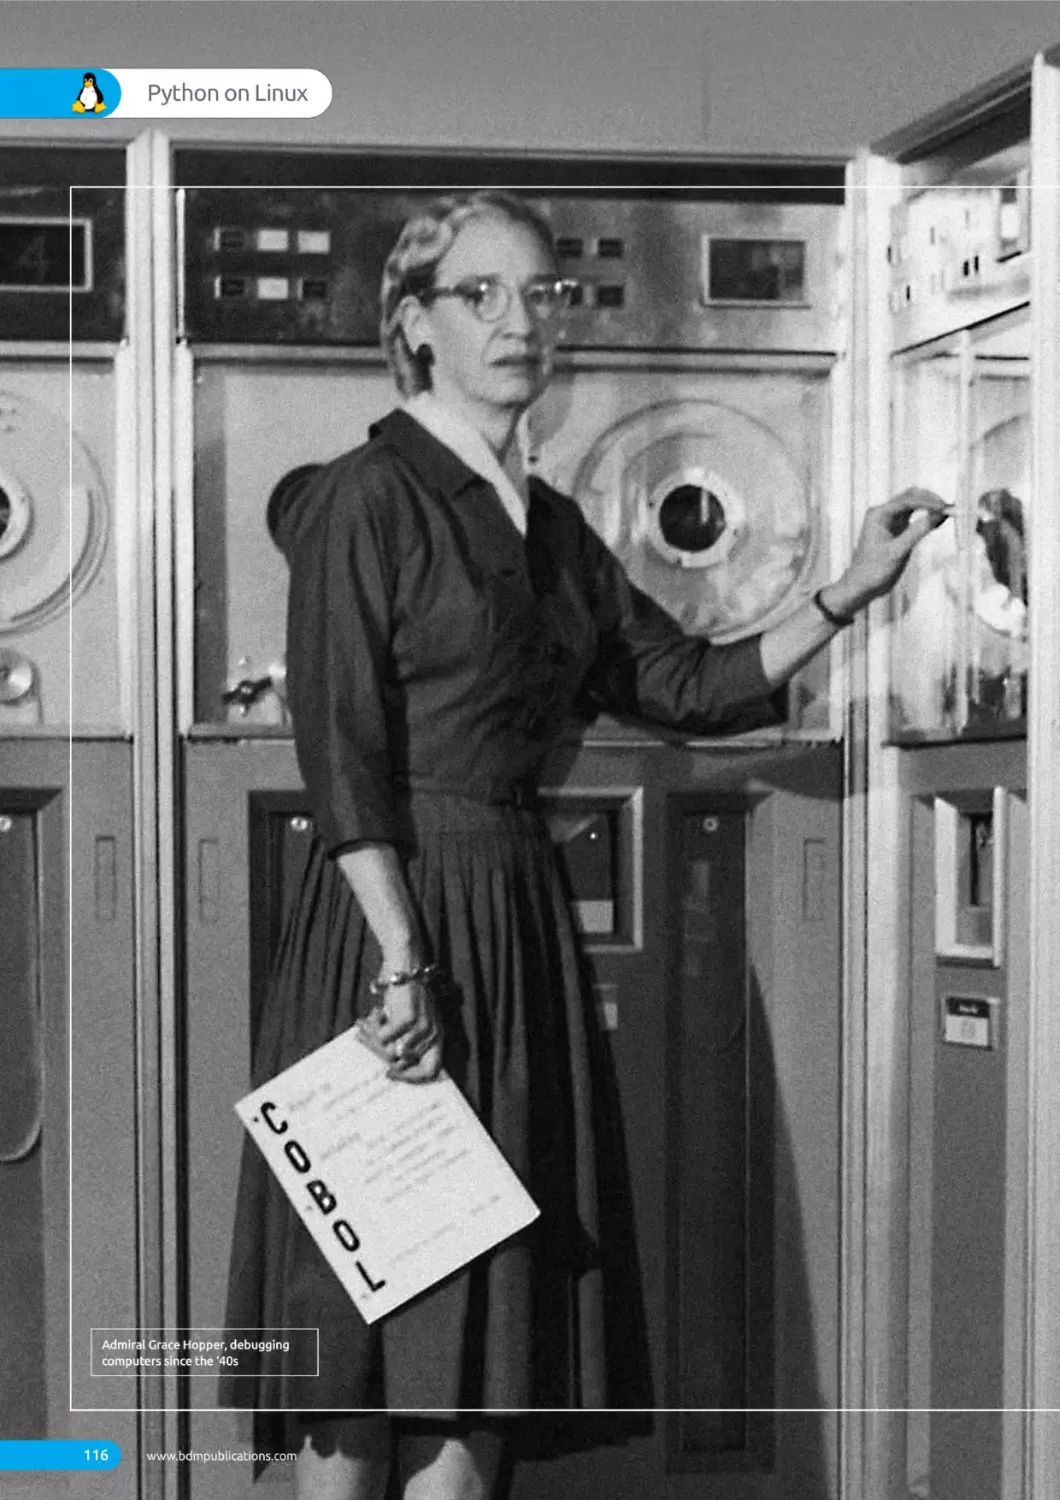
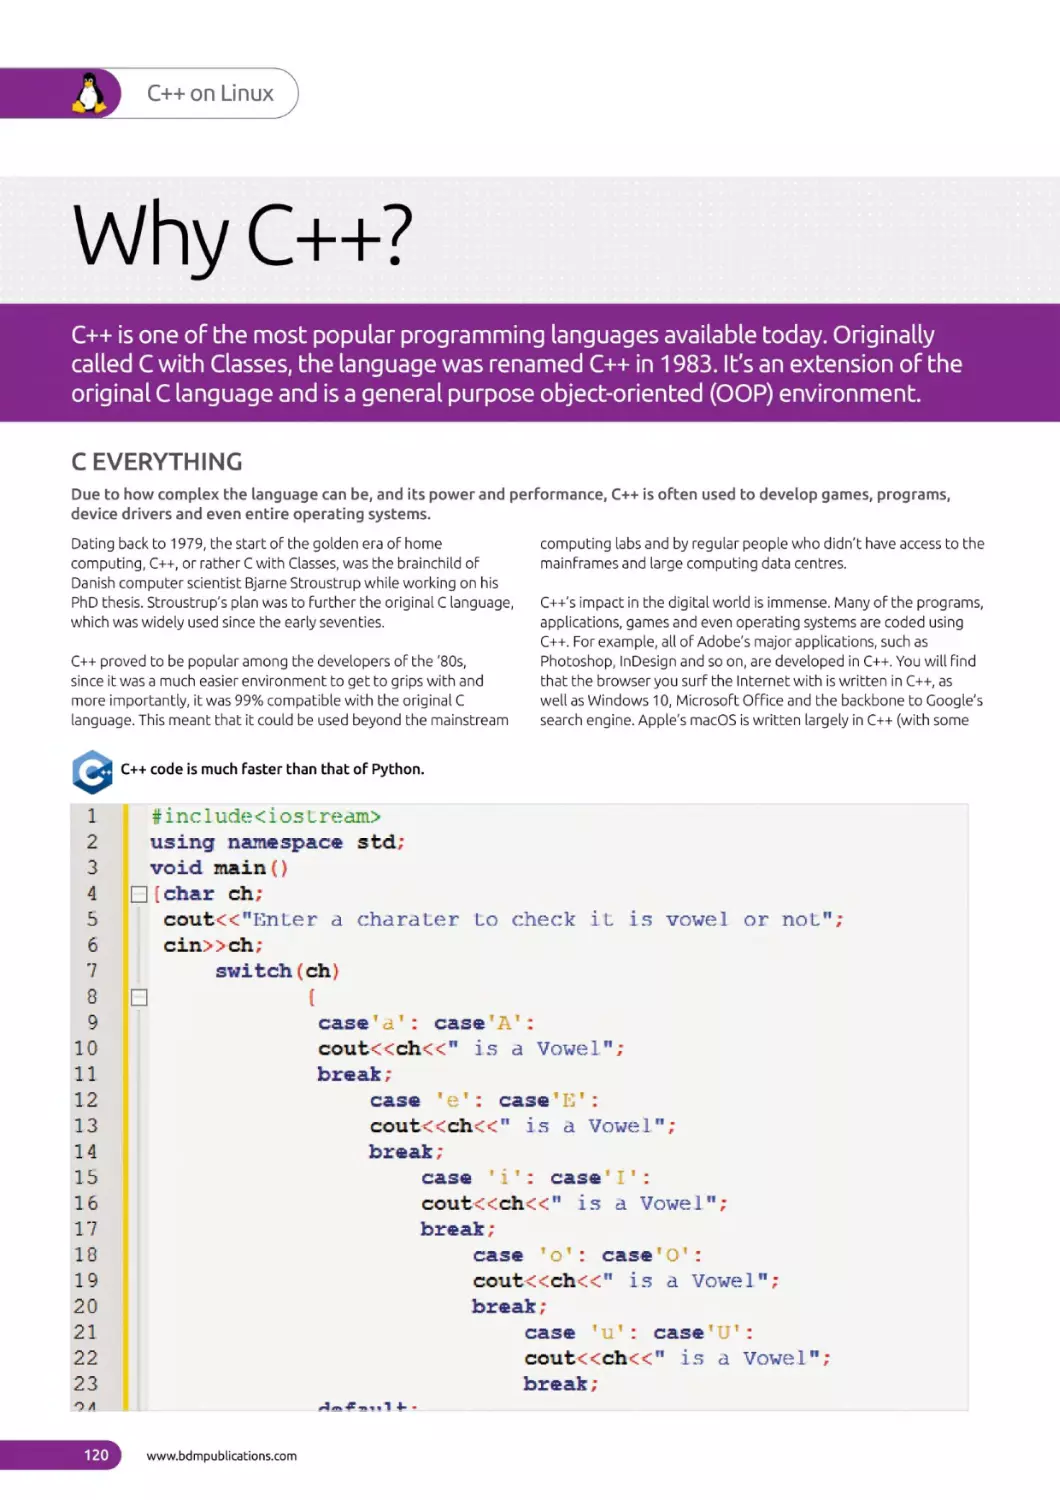
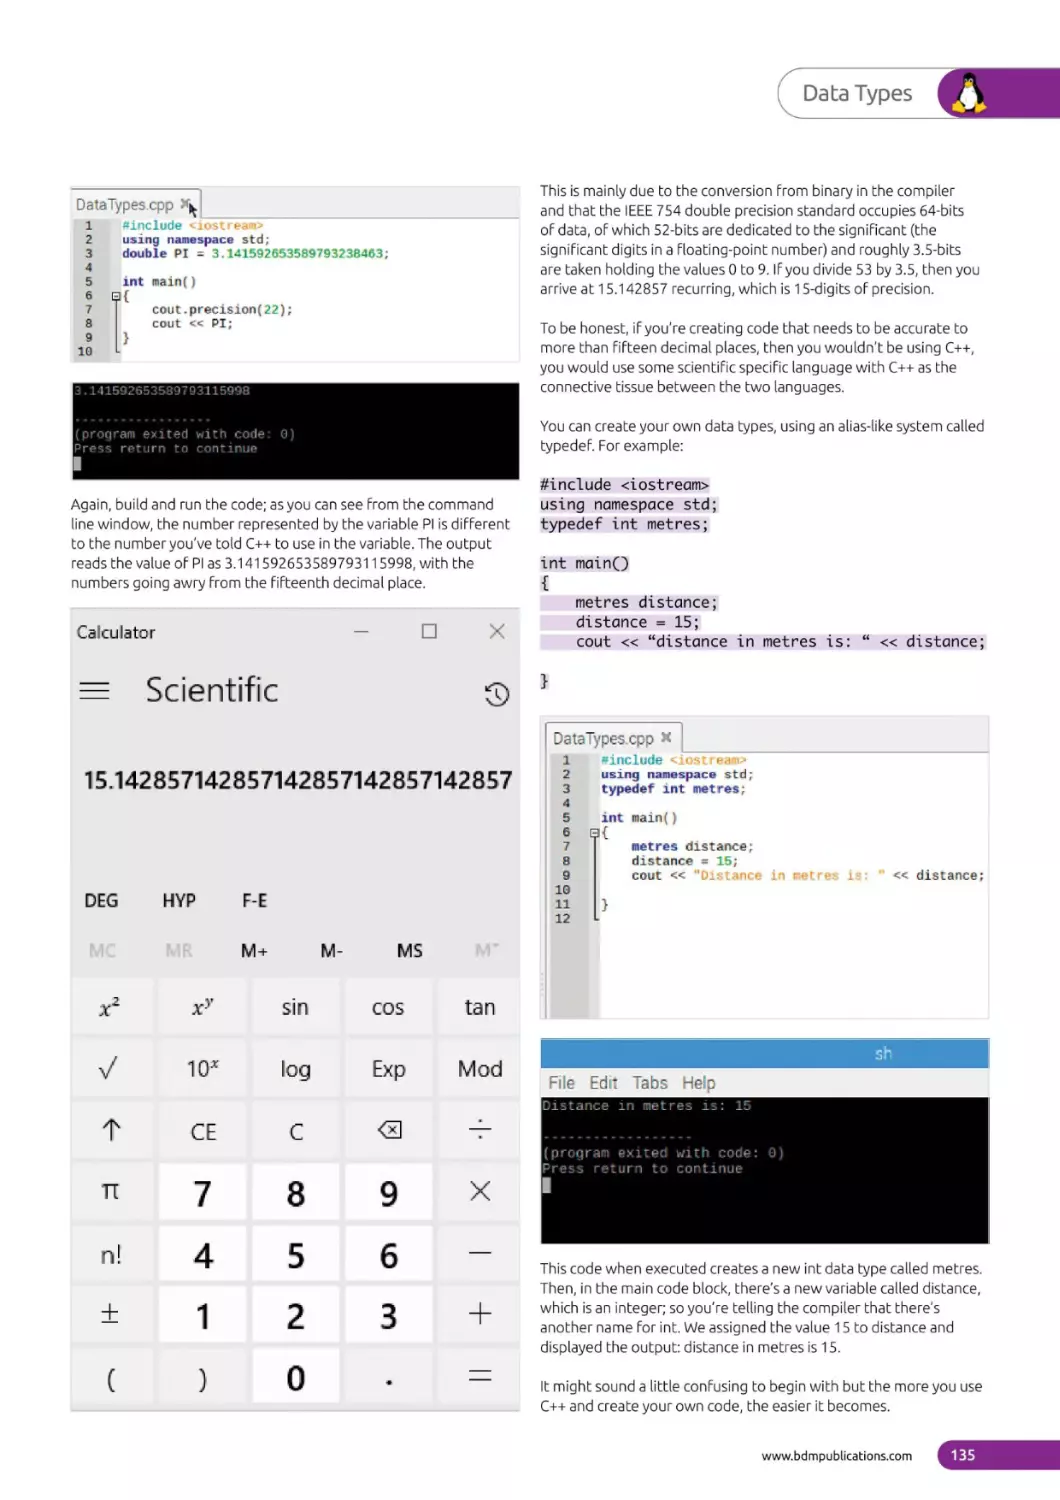
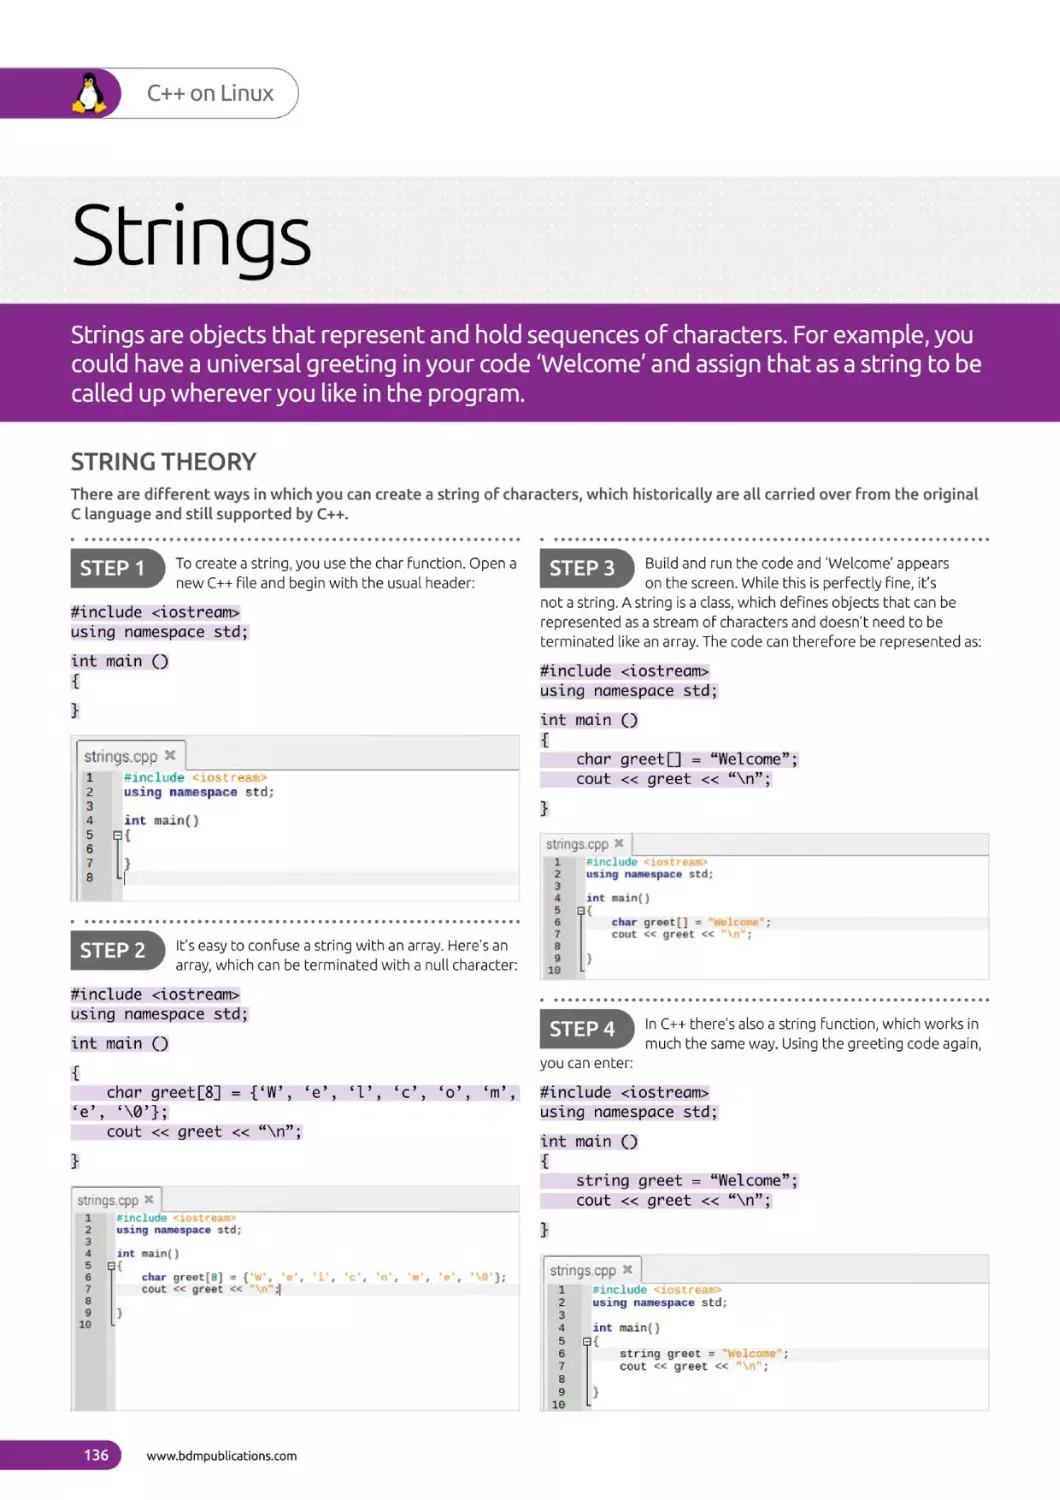
/


Tags: programming languages programming computer science instruction manual linux operation system gnu linux
ISBN: 2044-4060


Text
Linux
|~
Manual
Expert Tutorials to Improve Your Skills
100% INDEPENDENT
~|
The Complete
The Complete
Android
Manual
Black & White
Photography
—
The Complete
The Complete
Build Your
Own PC
Canon
The Complete
The Complete
FRITZ'Box
Google
Expert Tutorials to Improve Your Skills
100% INDEPENDENT
ay
The Complete
The Complete
Cloud
Computing
Manual
Manual
Coding
Expert Tutorials to Improve Your Skills
Expert Tutorials to lmprove Your Skills
Expert Tutorials to Improve Your Skills
Expert Tutorials to Improve Your Skills
The Complete
The Complete
The Complete
The Complete
Instagram
WhatsApp
GoPro
Manual
i
Manual
|
Manual
Internet
Manual
Security
Manual
,
Expert Tutorials to Improve Your Skills
,
Expert Tutorials to
=
Improve
Your Skills
:
Expert Tutorials to Improve Your Skills
aaa: Expert Tutorials to Improve Your Skills
:
11S
1rd
o
The Complete
iPad OS
The Complete
iPhone
Landscape
Manual
Photography
|
fo
Expert Tutorials to tmprove Your Skills
The Complete
ete
The Complete
Linux
Manual
Expert Tuterials te Impreve Your Skills
100% INDEPENDENT
Manual
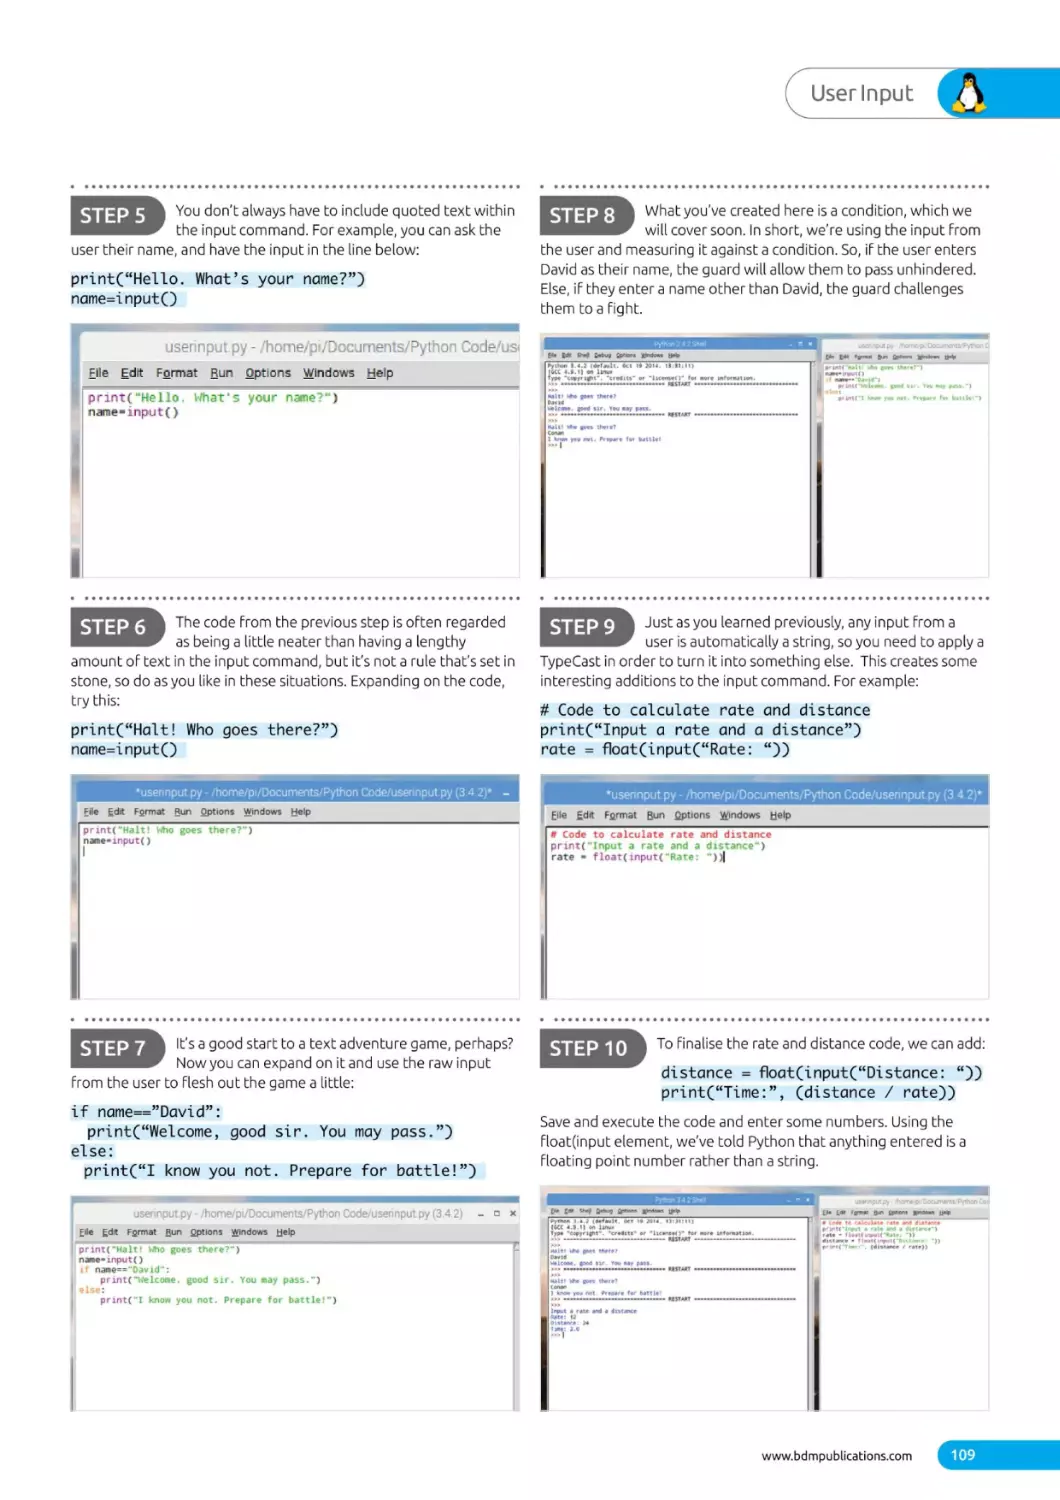
‘That’s what makes Linux so good: you put in
something and that effort multiplies. It’s a positive
Feedback cycle.”
- Linus Torvalds (developer of the Linux kernel
Linux is everywhere. It powers the Internet as the main operating
system behind the Web's servers, it powers spacecraft, it’s the
operating system for the Fastest supercomputers in the world
and it’s used in smart TVs and mobile devices. Why? Because it’
ultra stable, lightning fast and completely Free of charge.
However, there’s more to Linux than simply being a free to use
operating system. Its unique configuration allows the user to
customise and personalise the OS into any Form they wish. A
Linux user can change their OS look and feel from one day to
the next, install thousands of Freely available apps and program
and take back control of their computer.
Linux is about freedom. Freedom from the walled-garden
approach of other restrictive operating systems, Freedom to
choose what you want on your computer, freedom to alter it
and use it how you please. It’s worldwide community of like
minded users, all striving to get the best development From thi
incredible OS.
a
With this book, you too can become a part of the open communit
of Linux users. The tutorials within these pages will help you get
to grips with Linux, show you how it works, what you can do with
it and how you can code with it to take your Linux experience to
even greater heights.
Discover Linux. Discover freedom.
BIN Mase) el recs ola
s
B
www.bdmpublications.com
c
Acres
ey
ee
€
Using the Terminal
8
Why Linux?
46
Basics of the Terminal
10
The Best Linux Distributions
48
12.
Equipment You Will Need
50
Update Mint via the Terminal
Install Apps via the Terminal — Part
14
Desktop Environments
52
Install Apps via the Terminal — Part 2
Which Distro?
54
Did you Know...Linux Kernel 0.01
56
Creating
58
Creating and Removing Directories
~~
|
16
20
Linux
a
Installer
on Windows
22
Installing Linux on
24
Installing a Virtual Environment
26
Installing Linux in a Virtual Environment
30
PC
Introduction to the Cinnamon Menu
32
Navigating the Cinnamon Desktop
34
36
a
10 Things
~—
todo After Installing Linux Mint
Did you Know...Apollo 11
38
Creating Users
40
Customising the Desktop
42
Becoming Anonymous Online
|
a)
jie
Hee
MS
ce€E
Spm
ce
Je
“33,
RS
a
Cle
O1
e
|
2
85333 =a
il
ii
al
www.bdmpublications.com
60
~—
a File
1
Using the Terminal
Fun Things to do in the Terminal
62
More Fun Things to do in the Terminal
64
Linux Tips and Tricks
66
—_
Did you Know...Linux and the Big Bang
68
Creating Bash Scripts— Part
70
Creating Bash Scripts — Part
2
72
Creating Bash Scripts — Part
3
74
76
78
1
Creating Bash Scripts
—
Part 4
~~
Creating Bash Scripts
—
Part
~~
Pix
5
Linux = The Perfect Combination
80
Command Line Quick Reference
82.
A-Z of Linux Commands
84
Did you Know...Good enough For NASA
88
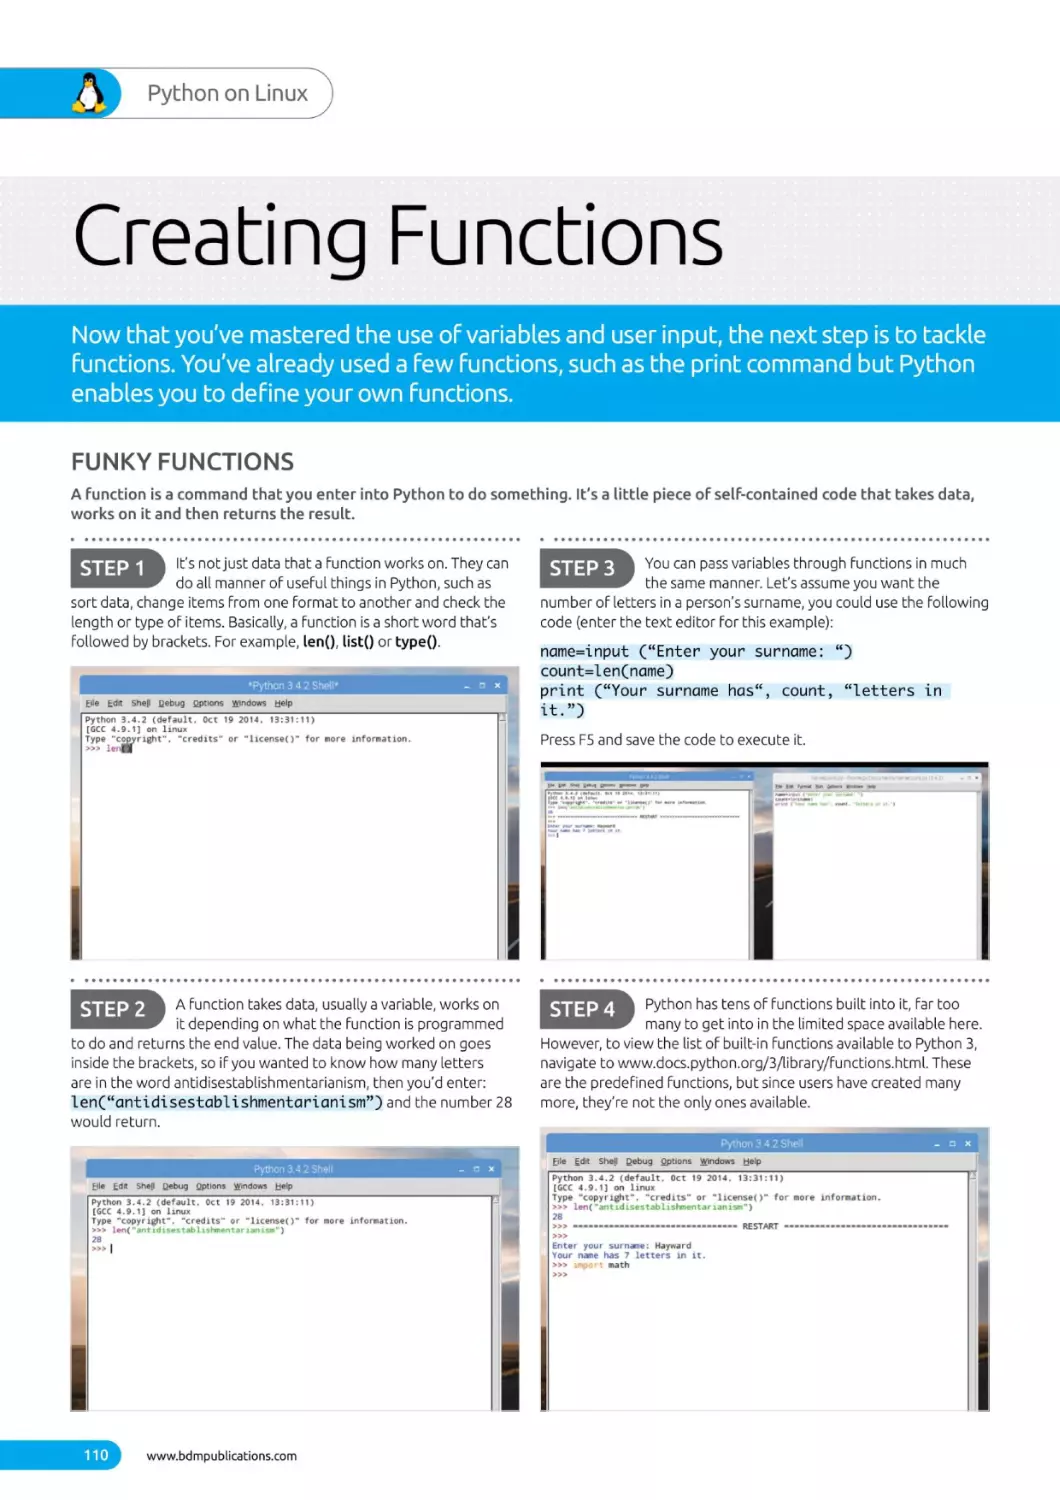
Why Python?
90
Howto Set Up Python
92
Starting Python for the First Time
94
Your First Code
96
Saving and Executing Your Code
98
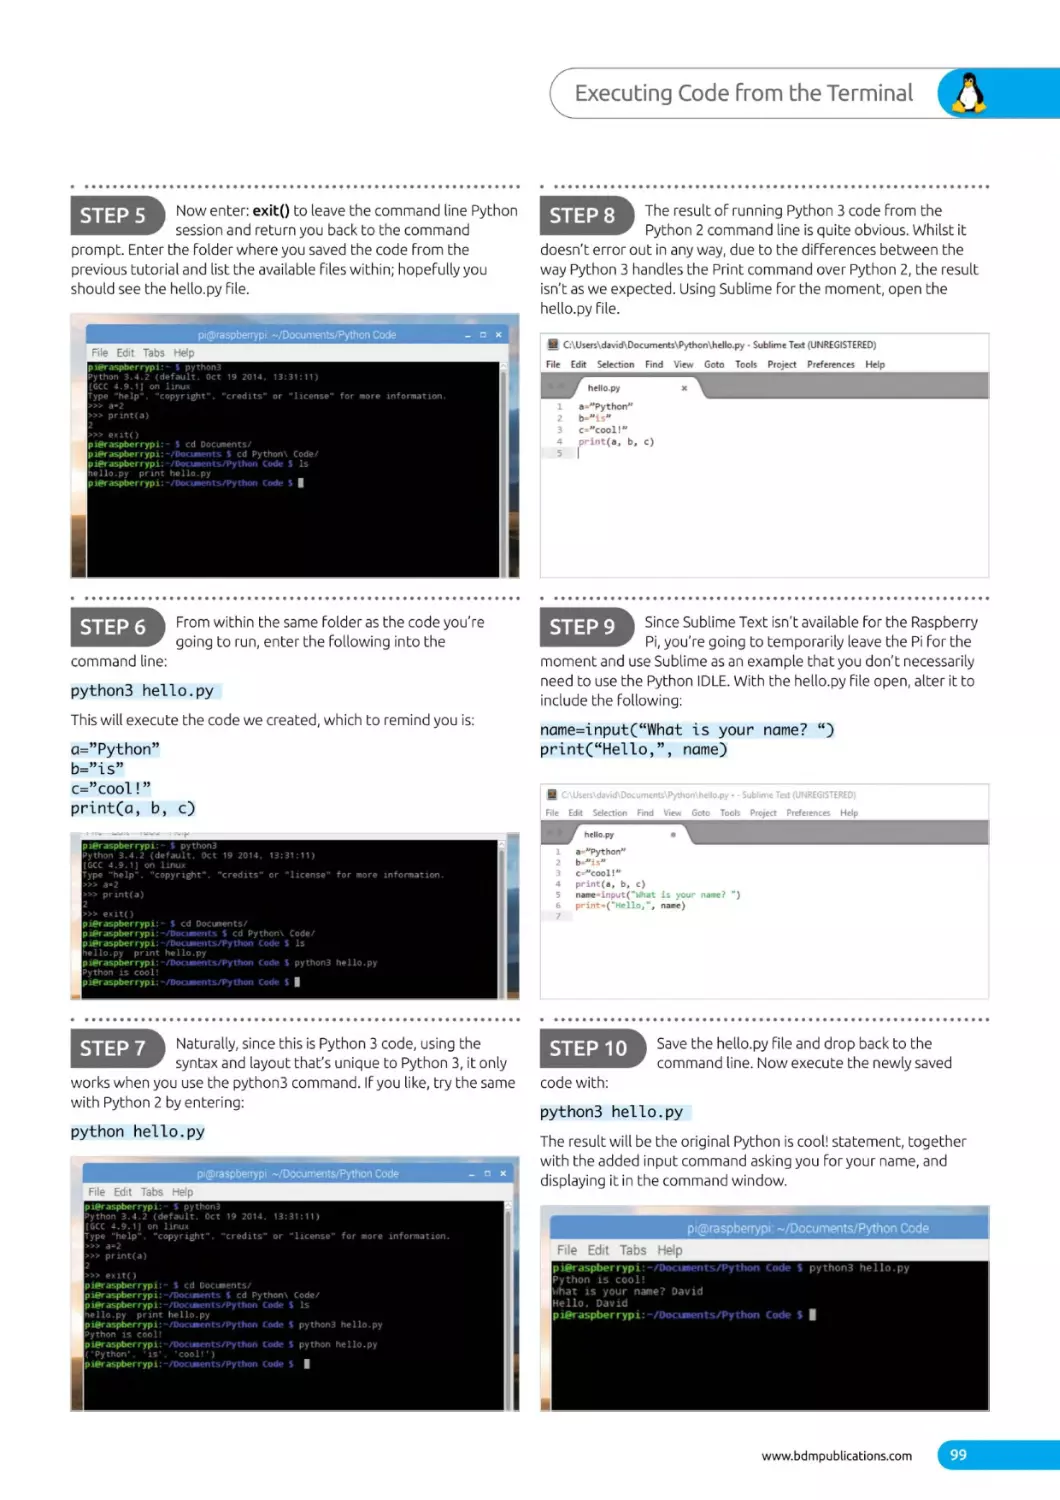
Executing Code from the Terminal
100
Did you Know...Space Invaders
in
Linux
102
Numbers and Expressions
122
Your First C++ Program
104
Using Comments
124
Structure of a C++ Program
06
Working with Variables
126
Compile and Execute
108
User Input
128
Did you Know. ..Virus!
110
Creating Functions
130
Using Comments
112
Conditions and Loops
132
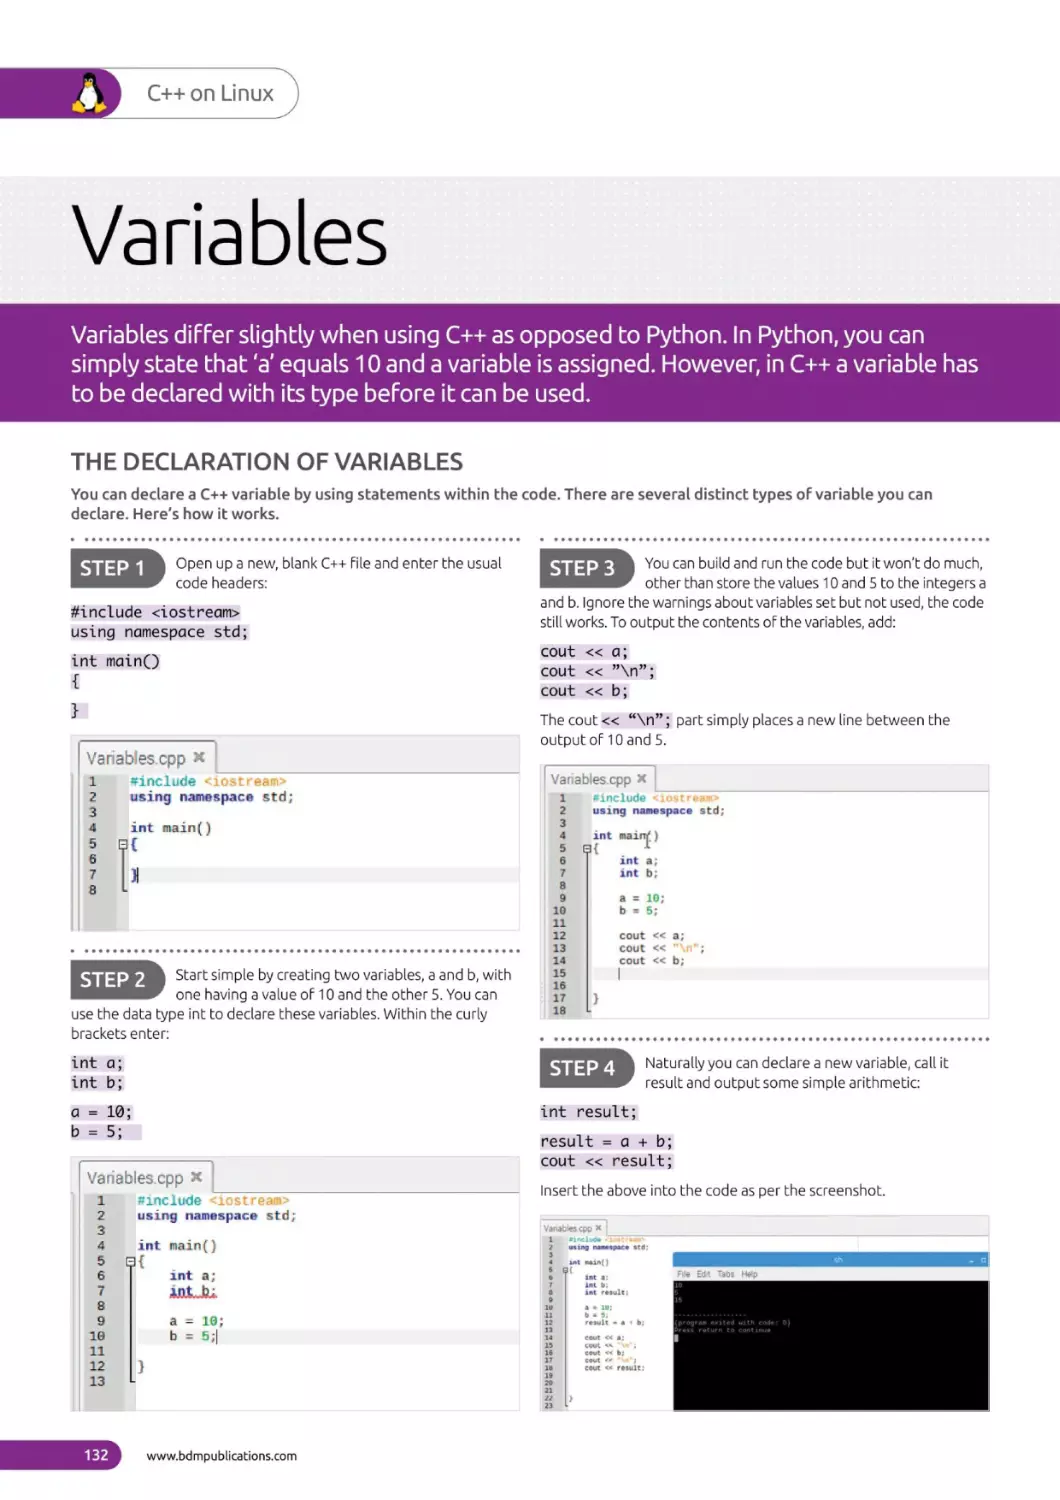
Variables
114
Python Modules
134
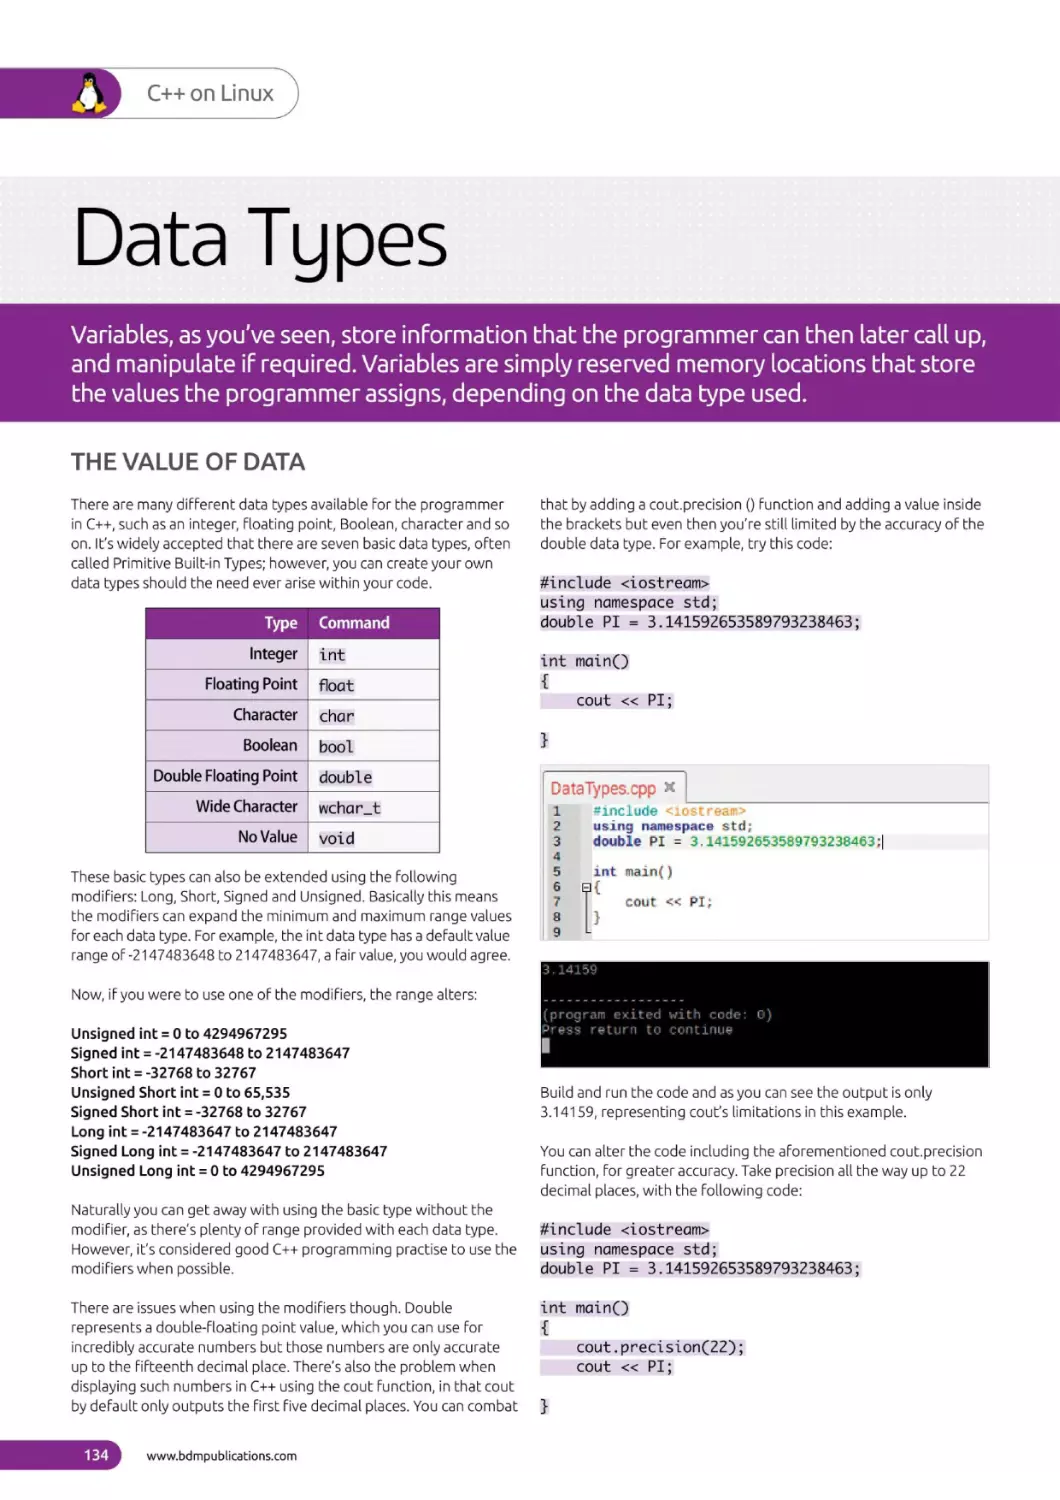
Data Types
116
Did you Know...Debugging
136
Strings
138
C++ Maths
140
User Interaction
142
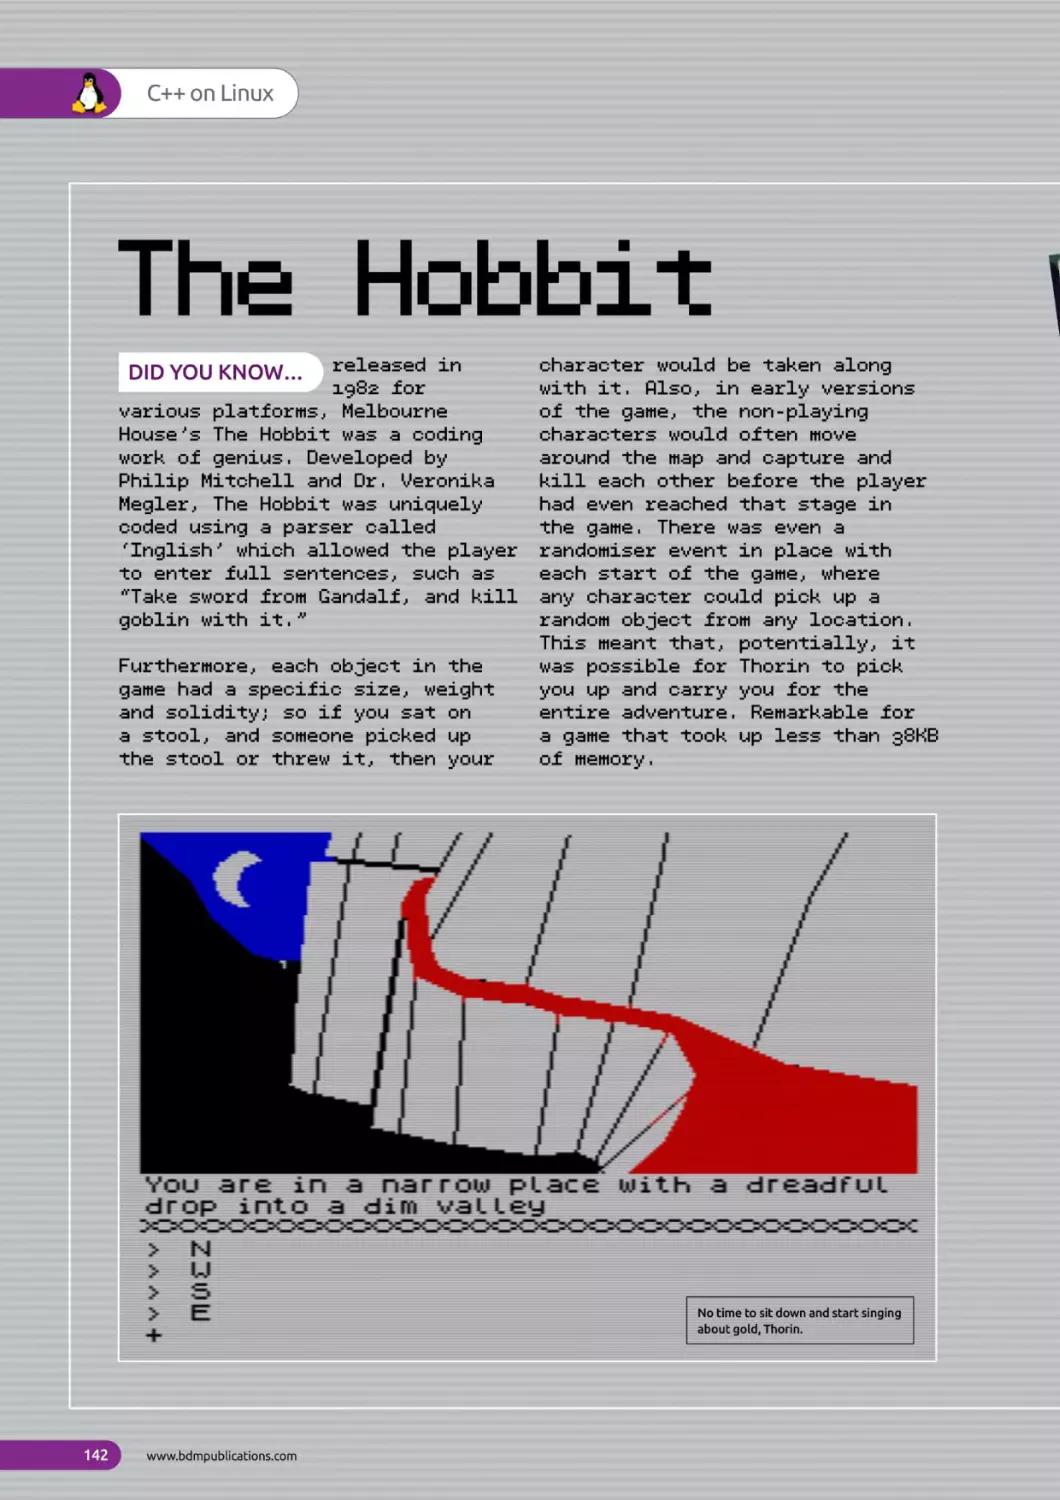
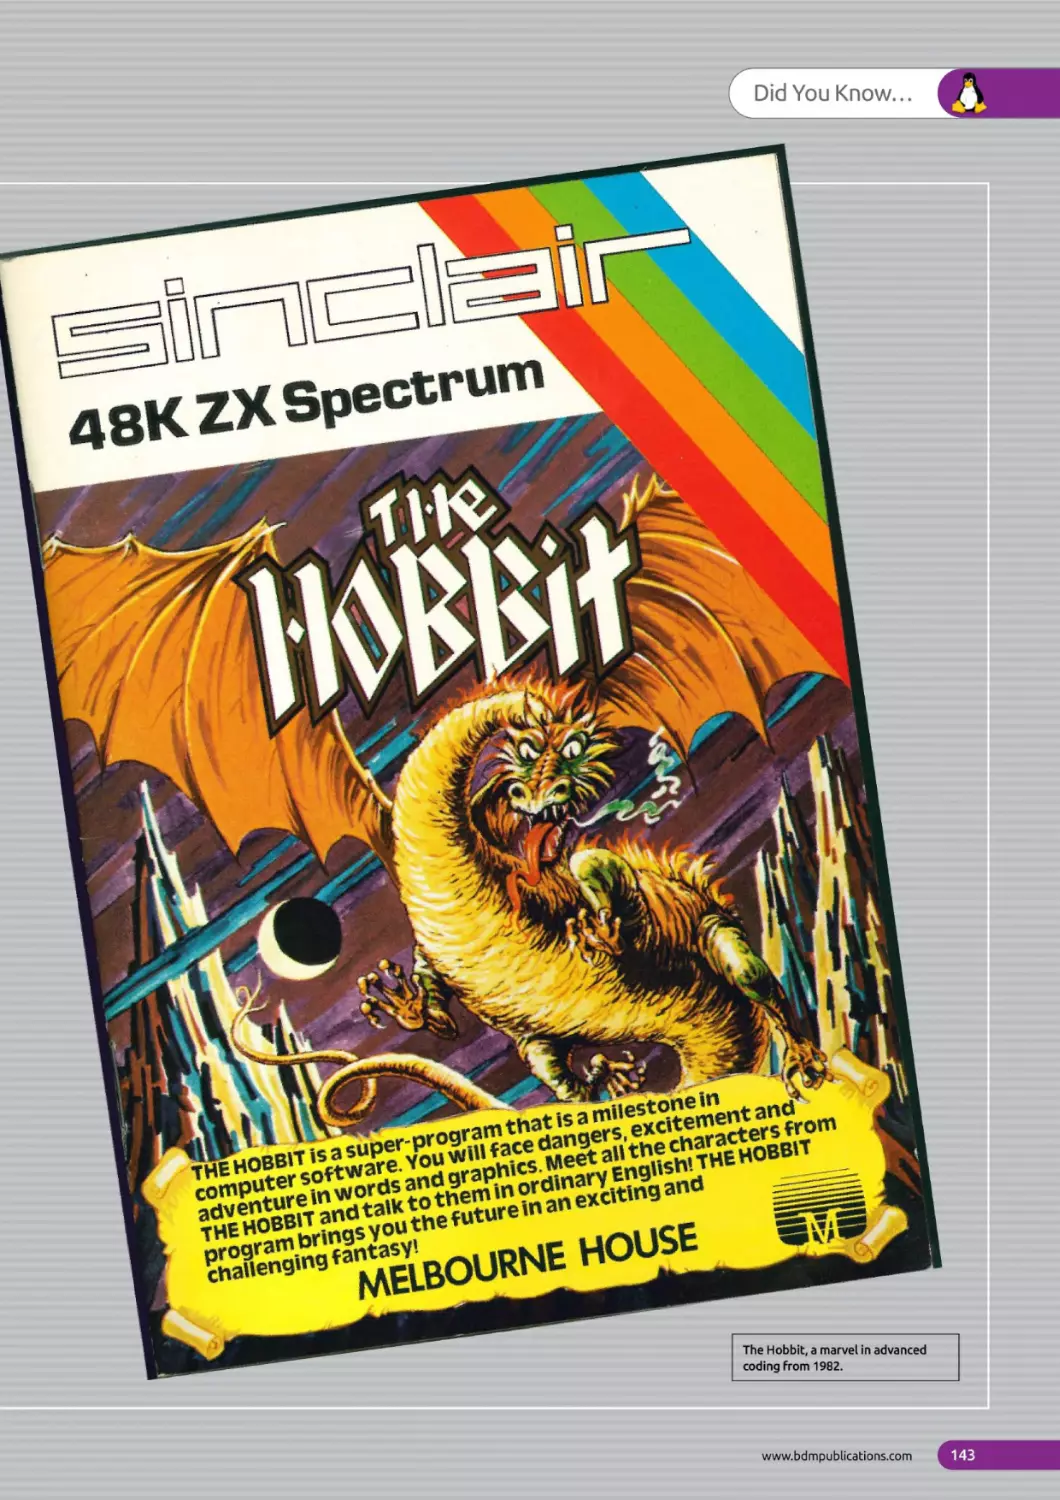
Did you Know...The Hobbit
144
Common Coding Mistakes
120
Why C++?
Black Dog i-Tech Series ~ 7th Edition ISSN 2044-4060
Published by:
Editor:
Black Dog Media Limited (BDM)
................
Art Director& Productioi
James Gale
«Mark Ayshford
-Karl Linstead
-Robin Drew, Lena Whitaker
David Hayward
Paul Beard
Printed and bound in Great Britain by: Acorn Web Offset Ltd
Newsstand distribution by: Seymour Distribution Limited
2, East Poultry Avenue, London EC1A 9PT
International distribution by: Pineappie Media Limited
www.pineappte-media.com
Digital distribution by: Readly AB, Pocketmags, Zinio, Cafeyn, Magzter
For all advertising and promotional opportunities contact:
enquiries@bdmpublications.com
Copyright
2020 Black Dog Media. All rights reserved.
INTERNATIONAL LICENSING Black Dog Media has many great publications
and ail are available for licensing worldwide. For more information go to:
www.brucesawfordlicensing.com; email: bruce@brucesawfordlicensing.com;
telephone: 0044 7831 567372
—
Editorial
Papercut Limited and
and design are the copyright of
reproduced under licence to Black Dog Media. No part of this publication
may be reproduced in any form, stored in a retrieval system or integrated
into any other publication, database or commercial programs without
the express written permission of the publisher. Under no circumstances
should this publication and its contents be resold, loaned out or used
in any form by way of trade without the publisher's written permission.
While we pride ourselves on the quality of the information we provide,
Black Dog Media Limited reserves the right not to be held responsible
for any mistakes or inaccuracies Found within the text of this publication.
Due to the nature of the software industry, the publisher cannot
guarantee that all tutorials will work on every version of Raspbian OS. It
remains the purchaser's sole responsibility to determine the suitability
of this book and its content for whatever purpose. Images reproduced
‘on the front and back cover are solely for design purpases and are not
representative of content. We advise all potential buyers to check listing
prior to purchase for confirmation of actual content. All editorial opinion
herein is that of the reviewer as an individual and is not representative
of the publisher or any of its affiliates. Therefore the publisher halds no
responsibility in regard to editorial opinion and content.
Black Dog i-Tech Series is an independent publication and as such does
not necessarily reflect the views or opinions of the producers contained
within. This publication is not endorsed or associated in any way with The
Linux Foundation, Linux Mint, The Raspberry Pi Foundation, ARM Holding,
Python, Debian Project, Lenovo, Dell, Microsoft, Hewlett-Packard, Apple
or any associate or affiliate company. All copyrights, trademarks and
registered trademarks for the respective companies are acknowledged.
Relevant graphic imagery reproduced with courtesy of Lenovo, Raspberry
Pi, Hewlett- Packard, Dell, Python, Microsoft, Samsung and Apple.
Additional images contained within this publication are reproduced under
licence from Shutterstock.com.
Prices, international avaitability, ratings, titles and content are subject to
change. All information was correct at time of print. Some content may
have been previously published in other volumes or BDM titles. We advise
potential buyers to check the suitability of contents prior to purchase.
ea
Black Dog Media Limited (BDM)
Registered in England & Wales No: 5311511
www.bdmpublications.com
>
“How did you know so much
about computers?”
“| didn’t, it was the First one.”
www.bdmpublications.com
SayHellotoLinux
@}
Why Linux? What is it? Where do get it?
Why are there so many different versions
of it? Most beginners ask these, and many
more, questions when starting out. It’s
true that Linux is an incredibly versatile
and powerful operating system but
where do you start? Thankfully, you can
Find the answers in this section.
|
There is so much you can do with Linux
but you need to know where to start;
we're here to help you out. In this section
you can learn what Linux is, what a distro
is and what a desktop environment is.
You can also begin to explore how Linux
works and how it can work for you.
8
Why Linux?
10
The Best Linux Distributions
12
Equipment
You Will Need
14
Desktop Environments
Which Distro?
www.bdmpublications.com
_
Fo
inal
e
Say Hello to Linux
Wm
Why Linux?
For many of its users, Linux means freedom. Freedom from the walled garden
approach of other operating systems, Freedom to change and use the OS as you please
and freedom from any form of licensing or payment. There’s a lot more to Linux than
you may think though.
FREE AND OPEN
Linux is a Fantastic Fit for those who want something different. The efficiency of the system, the availability of applications and
stability are just a Few good reasons.
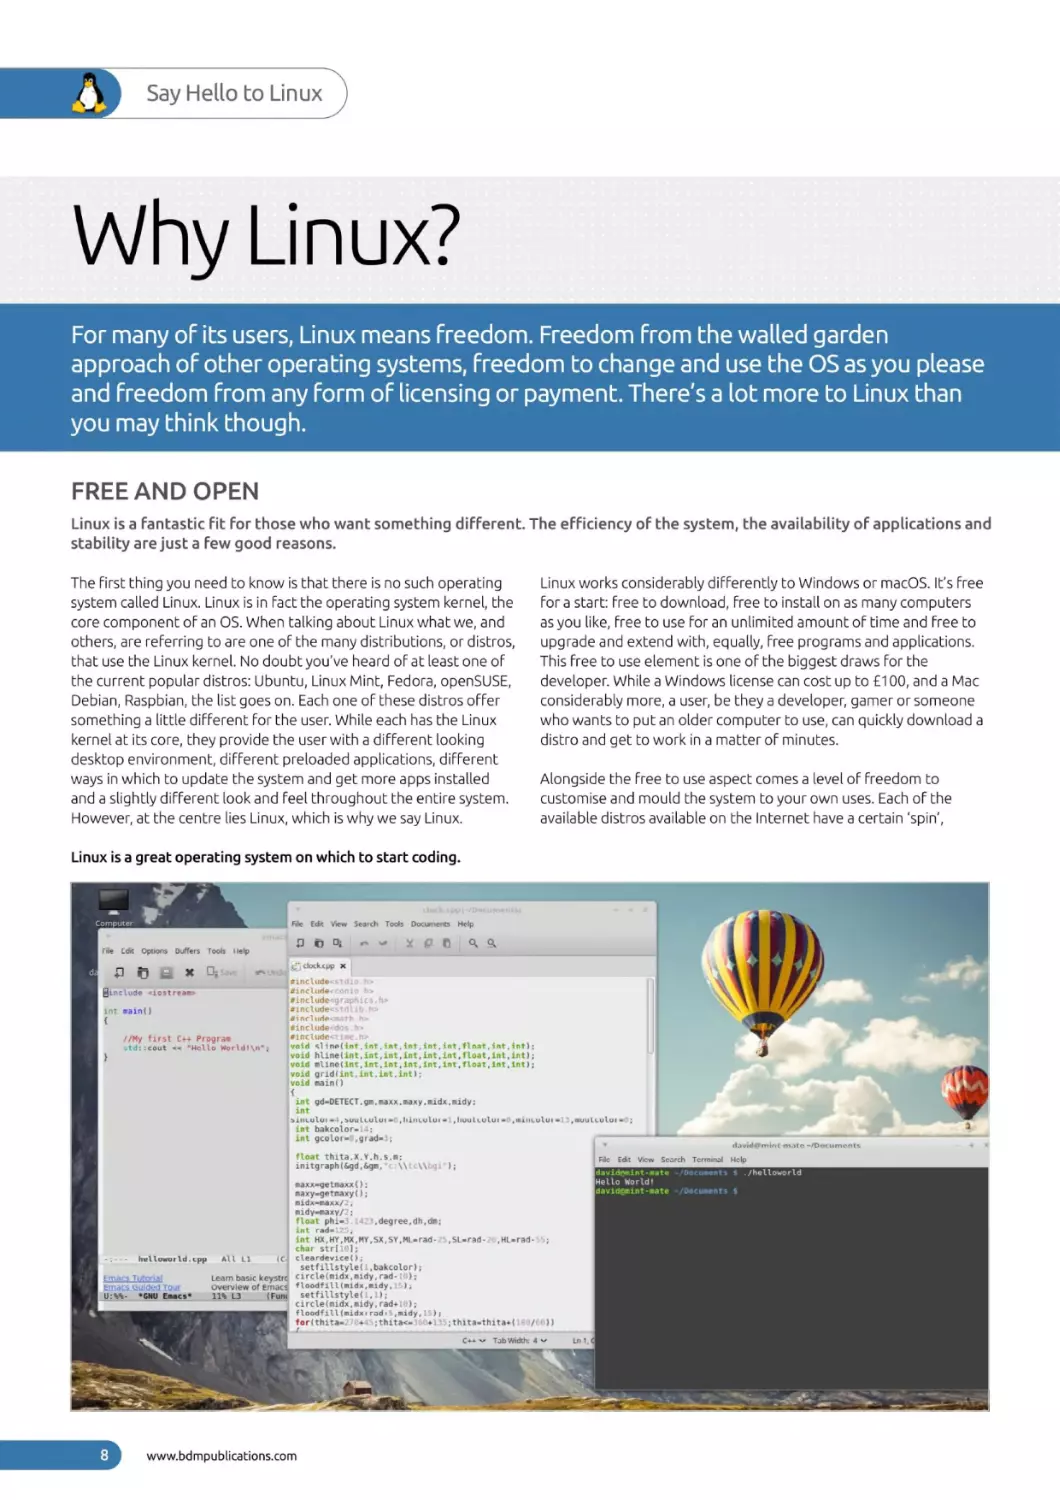
The First thing you need to know is that there is no such operating
system called Linux. Linux is in fact the operating system kernel, the
core component of an OS. When talking about Linux what we, and
others, are referring to are one of the many distributions, or distros,
that use the Linux kernel. No doubt you've heard of at least one of
the current popular distros: Ubuntu, Linux Mint, Fedora, openSUSE,
Debian, Raspbian, the list goes on. Each one of these distros offer
something a little different For the user. While each has the Linux
kernel at its core, they provide the user with a different looking
desktop environment, different preloaded applications, different
ways in which to update the system and get more apps installed
and a slightly different look and Feel throughout the entire system.
However, at the centre lies Linux, which is why we say Linux.
Linux works considerably differently to Windows or macOS. It’s Free
for a start: Free to download, Free to install on as many computers
as you like, free to use for an unlimited amount of time and Free to
upgrade and extend with, equally, Free programs and applications.
This free to use element is one of the biggest draws For the
developer. While Windows license can cost up to 100, and a Mac
considerably more, a user, be they a developer, gamer or someone
who wants to put an older computer to use, can quickly download a
distro and get to work in a matter of minutes.
a
Alongside the Free to use aspect comes a level of Freedom to
customise and mould the system to your own uses. Each of the
available distros available on the Internet have a certain ‘spin’,
Linux is a great operating system on which to start coding.
|
1
Tile
[dit Options
Duffers
Tools
File
Edit
Search Tools
View
Documents
yop
ielp
Help
QQ
|
Ci tlockcpp *
"
Hinclude <iostream>
int maint)
t
siMy
first
std::cout
}
C++ Program
<<
“Hello World!\n"s
kinclude
#include
aincluce
erne
litte
sinclude
ainclude
void sline(int, int, int. int, int, int, flaat, int. int);
void hline(int, int, int, int, int, int, float, int, int);
void
int. int.int):
void
void main()
{
int
int
\
int, float,int,int);
gd=DETECT.
gm, maxx, maxy.midx,midy;
sanculor= ,svulcolvr= ,hincylur= ,houlculur= ,minculur=
int bakcolor=
int gcolor= ,grad= ;
float thita.x.¥.h.s.m:
WOW
initgraph(&qd, &qm,
;
Dae
,
;
float phi=
.degree,dh,dm;
int rad=.;
int HX,HY,MX,MY,SX,SY,ML=rad- ,Sl=radchar strf 1;
ALL LI
(c- Cleardevice();
helloworld.cpp
setfillstyle( ,bakcolor);
);
Leam basic keystre Circle(midx,midy,radOverviewof Emacs floodfall(mida,mady, ),
11% L3
(Funt
,HL=rad-
;
setfillstyle(.,.);
circle(midx,midy,rad+: );
floodfill (midxirad: ,midy,
for(thitas,
f
+
;thita<=
jthitasthitas(.
C++
www.bdmpublications.com
Tab
Width:
/
))
|
david@mint mate ~/Documents
File
7
maxx=getmaxx():
maxy=getmaxy();
midx=maxx/
midy=maxy/
,mouleolor=
Edit
View
Search
Terminal
Help
Why Linux?
3
Software Manager
Hal
«es
Featured
ponerrng
‘Sound and
All Packages
8687 vac hove:
*
Games
Accessorie:
LTE pawknges
Science and
Education
Wier paeeng
A
System tools
openSUSE”
ubuntu.
Graphics
video
De rah see
Oe Mandriva
@debi
Fonts
CentOS
ramming
St paceages
BAS packages
slackware
@-
Ba ackages
There are thousands of Free packages available
For programmers under Linux.
Each distro offers something unique to the user
but all have Linux at the core.
that some offer increased security, a fancy looking desktop,
gaming specific spin, or something directed toward students.
This extensibility makes Linux a more desirable platform to use,
as you can quickly mould the system into a development base,
including many different kinds of IDEs for the likes of Python, web
development, C++, Java and so on; or create a base for online
anonymity, perhaps as a Minecraft server, media centre and
much more.
refuse to run the latest versions of Windows or macOS; so rather than
throwing away an old computer, it can be reused with a Linux distro.
in
a
It’s not all about C++, Python or any of the other more popular
programming languages though. Using the command line of
Linux, also called the Terminal, you're able to create Shell scripts,
which are programs that are designed to run from the command
line and made up ofscripting languages. They are used mainly to
automate tasks or offer the user some form of input and output for
a certain operation.
Another remarkable advantage For those looking to learn how
to code, is that Linux comes with most of the popular coding
environments built in. Both Python and C++ are preinstalled ina
high percentage of Linux distros available, which means you can
start to program almost as soon as you install the system and boot it
Finally, although there are many more advantages we can list, there
are thousands and thousands of free programs and apps available
that cover nearly every aspect of computing. Known as packages,
there are (at the time of writing) over 8,700 specific programming
applications
just on Linux Mint alone and an incredible 62,000+
overall packages catering for everything from Amateur Radio to
WWW tools.
up For the First time.
Generally speaking, Linux doesn’t take up as many system resources
as Windows or macOS; by system resources we mean memory, hard
drive space and CPU load. The Linux code has been streamlined
and is free From third-party ‘bloatware’ which hogs those systems
resources. A more efficient system of course means more available
resources for the coding and testing environment and the programs
you eventually create. Less use of resources also means you can
use Linux on older hardware that would normally struggle or even
great resource and environment For programming
perfectly suited for developers and is continually improving
and evolving. IF you’re serious about getting into coding, or you just
want to try something new, give Linux a try and see how it works
Linux then, is
a
in. It's
for you.
A Linux programming environment can be as simple or as complex as you need it to be.
BeanchFolding.cp
{-/development/projects/llvmulibyCodeGen) - YAVIDE
+
eet
:
So
{
"gtpensemrentm
agenabletaitmerge)
Peet
Parl
¥
Agarassieer Tm
ersten
evribeparen
ana
create
rar
cme Piccers
Ares
Sebati
nae
pets
kari
NOMI
Oe
bomenDR erste Uanciironeyts
ee
Hone
me
tN
cs
RE
Ma
CH
Gee
or
7
mol)
Rector
qetuase
pe
gsc
cop
Dae
saa
Peers
eel
Hbscc
irrarsetay
hee
oc
WLect
ans
4 CPB
Specter
Pee
cet
etrePR
Paria
Herre
.
lett Serre
we
rman Ee
Enea
ater
peicreerreia
irate
cas
ECR
erCcin
U
on eseregtr
Pata in
conor)
10
me
read
tborpah
eieleatiaae
it
ary
nes
eee
ee
op
Poe
MP
ercon
Reheat
ber ae
Pairvendvelion
iy
ates
cree
Paiienittrs
BSA
ey
ected
S
}
aranchtelding.c
re
ene rere
oCe otTEs
%
Poot
frees Saran
ad
co te ai
RtetA
Tcc
tera
Bare
sneer
treec
eatin const
fara
ee
oa
SetBlochFreql
t
a
nates
ed
Pores
errs
[funetion:
eeits
ae
any
Fa
af
SOL
NS Sere
Oey
Ragas
ertabentreuer stats eit
Benoit
Peete
MRN
I
Ca)
Peabo
Brereton
ese
Fetiibabieilaada
zr
Berra)
ee
on
copa(const
Paerte
Poritescee Temaa
aarempatted
freer ert
arerarettt
mourn comre
Renter
aac
Tet
ores
ola
Farr
Seti
tr
Bel
a
ele SH Coenen
egy
Pallet
Peary
crete
inawachinel unction{Machinet
www.bdmpublications.com
une
tion]
Wm
Say Hello to Linux
The Best Linux
Distributions
There are lots of versions of Linux available, known as Distributions. Each has a
different ethos and approach. Here are Five great distributions to try and where you
can get them.
GOING LINUX
The installation process for most distributions is similar. You download a disk image from the website and burn it to an optical disk or
create a USB Flash Drive installer. Just be careful to get the right distribution for your hardware and read the instructions carefully.
Activities
By Far the most popular Linux distro (distribution) is Linux Mint.
Mint began life back in 2006, as an alternative to the then most
popular distro, Ubuntu. Although based on Ubuntu’s Long Term
Support build, Linux Mint took a different direction and offered
the user a better overall experience.
HES
aE)
@ Files >
OH
EY
Throughout this title we'll be using the Cinnamon version;
however, you can try out any of the other desktop environments
as you wish. In Fact, it’s recommended that you do spend some
time trying different environments, and even different distros,
to see which suits you and your computer best.
www.linuxmint.com
OO
Cinnamon is a graphically rich desktop environment, MATE uses
less Fancy graphics, and is more stable on a wider variety of
desktop systems, and Xfce is an extremely streamlined desktop
environment that’s built For speed and ultimate stability.
OE
Linux Mint has three main desktop versions available with
each new version of the core OS it releases. This may sound
confusing at First but it’s quite simple. Currently, Linux Mint
uses the Cinnamon Desktop Environment as its flagship model;
there’s MATE and Xfce models available too.
The second most popular distro available is Ubuntu, which
is an ancient African word meaning ‘humanity to others’.
Ubuntu’s popularity has Fluctuated over its fourteen year life.
At one time, it was easily the most used Linux-based operating
system in the world but some wrong choices along the way
with regards to its presentation, and some unfavourable,
controversial elements involving privacy, sadly saw it topple
from the number one spot.
That said, Ubuntu has since made amends and is slowing
crawling its way back up the Linux leader board. The latest
versions of the OS use the GNOME 3 desktop environment, an
impressive environment, although it can be a little confusing
for Former Windows users and is a little heavy on system
resources, especially if you’re planning on installing it on an
older computer.
Ubuntu, For all its Faults, is good Linux distro to start
experimenting with. It’s a clean interface, easy to use and install
and offers the user a complete Linux experience.
OH
EOC
a
www.ubuntu.com
www.bdmpublications.com
( The Best Linux Distributions
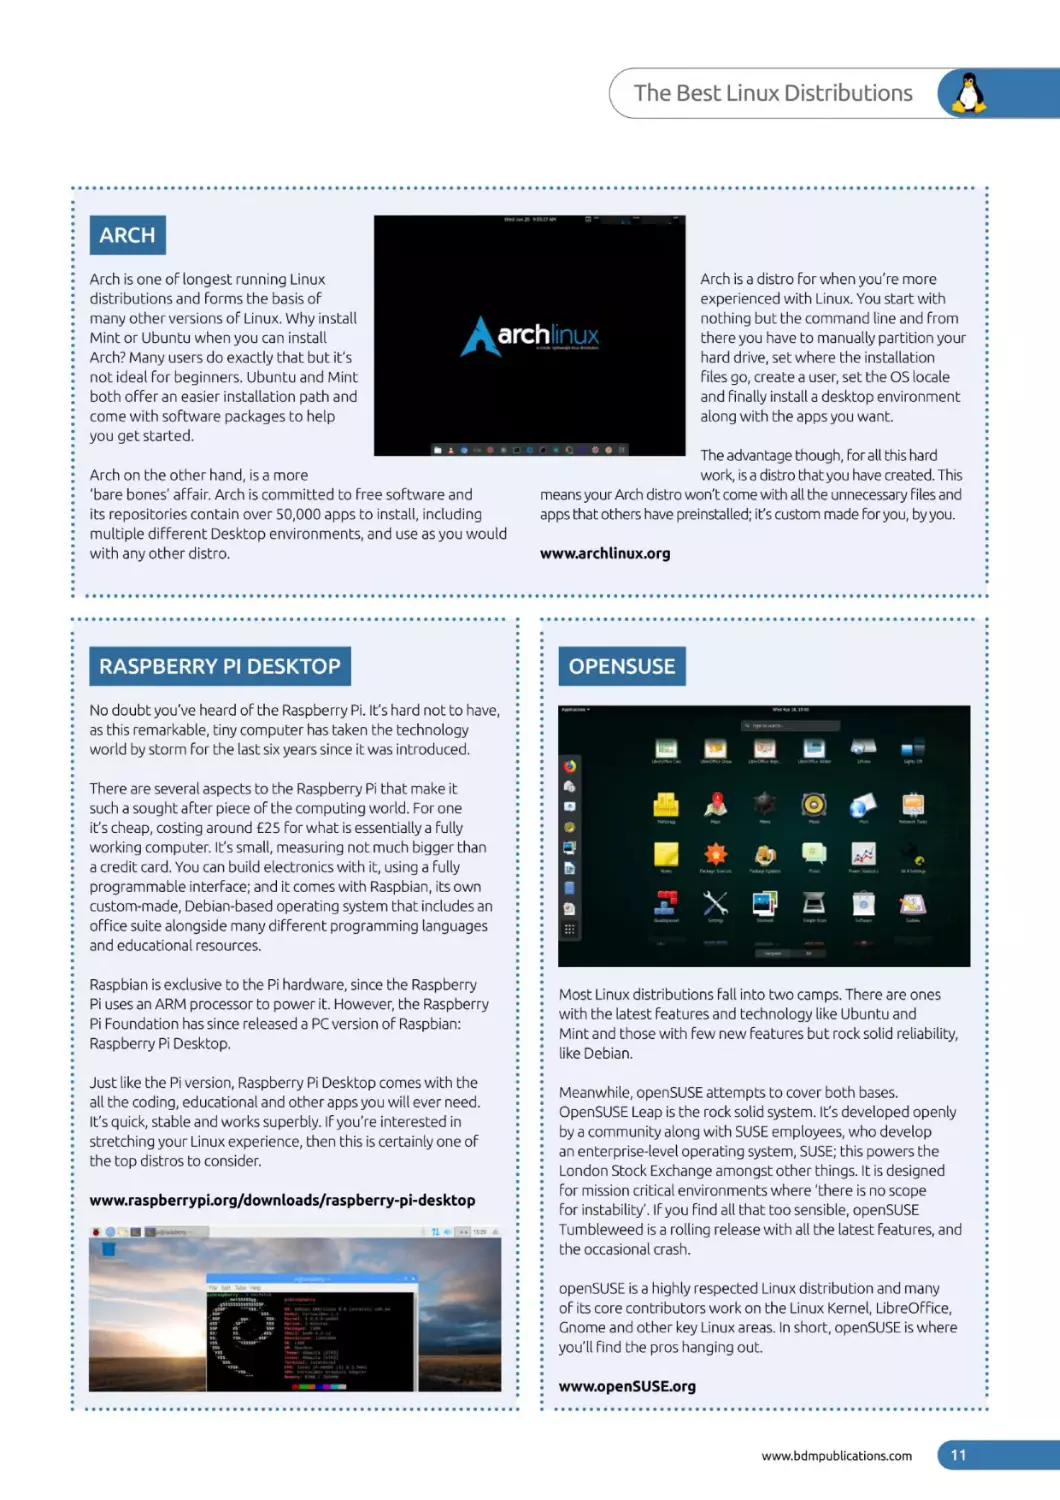
ARCH
Arch is one of longest running Linux
distributions and Forms the basis of
many other versions of Linux. Why install
Mint or Ubuntu when you can install
Arch? Many users do exactly that but it’s
not ideal for beginners. Ubuntu and Mint
both offer an easier installation path and
come with software packages to help
you get started.
Arch is a distro for when you're more
experienced with Linux. You start with
nothing but the command line and from
there you have to manually partition your
hard drive, set where the installation
files go, create a user, set the OS locale
and Finally install desktop environment
along with the apps you want.
a
The advantage though, for all this hard
work, is a distro that you have created. This
means your Arch distro won't come with all the unnecessary files and
apps that others have preinstalled; it’s custom made for you, by you.
Arch on the other hand, is more
‘pare bones’ affair. Arch is committed to Free software and
its repositories contain over 50,000 apps to install, including
multiple different Desktop environments, and use as you would
with any other distro.
a
www.archlinux.org
OR
RASPBERRY PI DESKTOP
No doubt you've heard of the Raspberry Pi. It’s hard not to have,
OU
as this remarkable, tiny computer has taken the technology
world by storm for the last six years since it was introduced.
HERES
Most Linux distributions Fall into two camps. There are ones
with the latest Features and technology like Ubuntu and
Mint and those with Few new features but rock solid reliability,
like Debian.
Raspberry Pi Desktop.
Pi version,
Raspberry Pi Desktop comes with the
all the coding, educational and other apps you will ever need.
It's quick, stable and works superbly. IF you're interested in
stretching your Linux experience, then this
the top distros to consider.
is
certainly one of
www.raspberrypi.org/downloads/raspberry-pi-desktop
o
ca Es
:
:
OO
Just like the
:
+
:
°
:
+
:
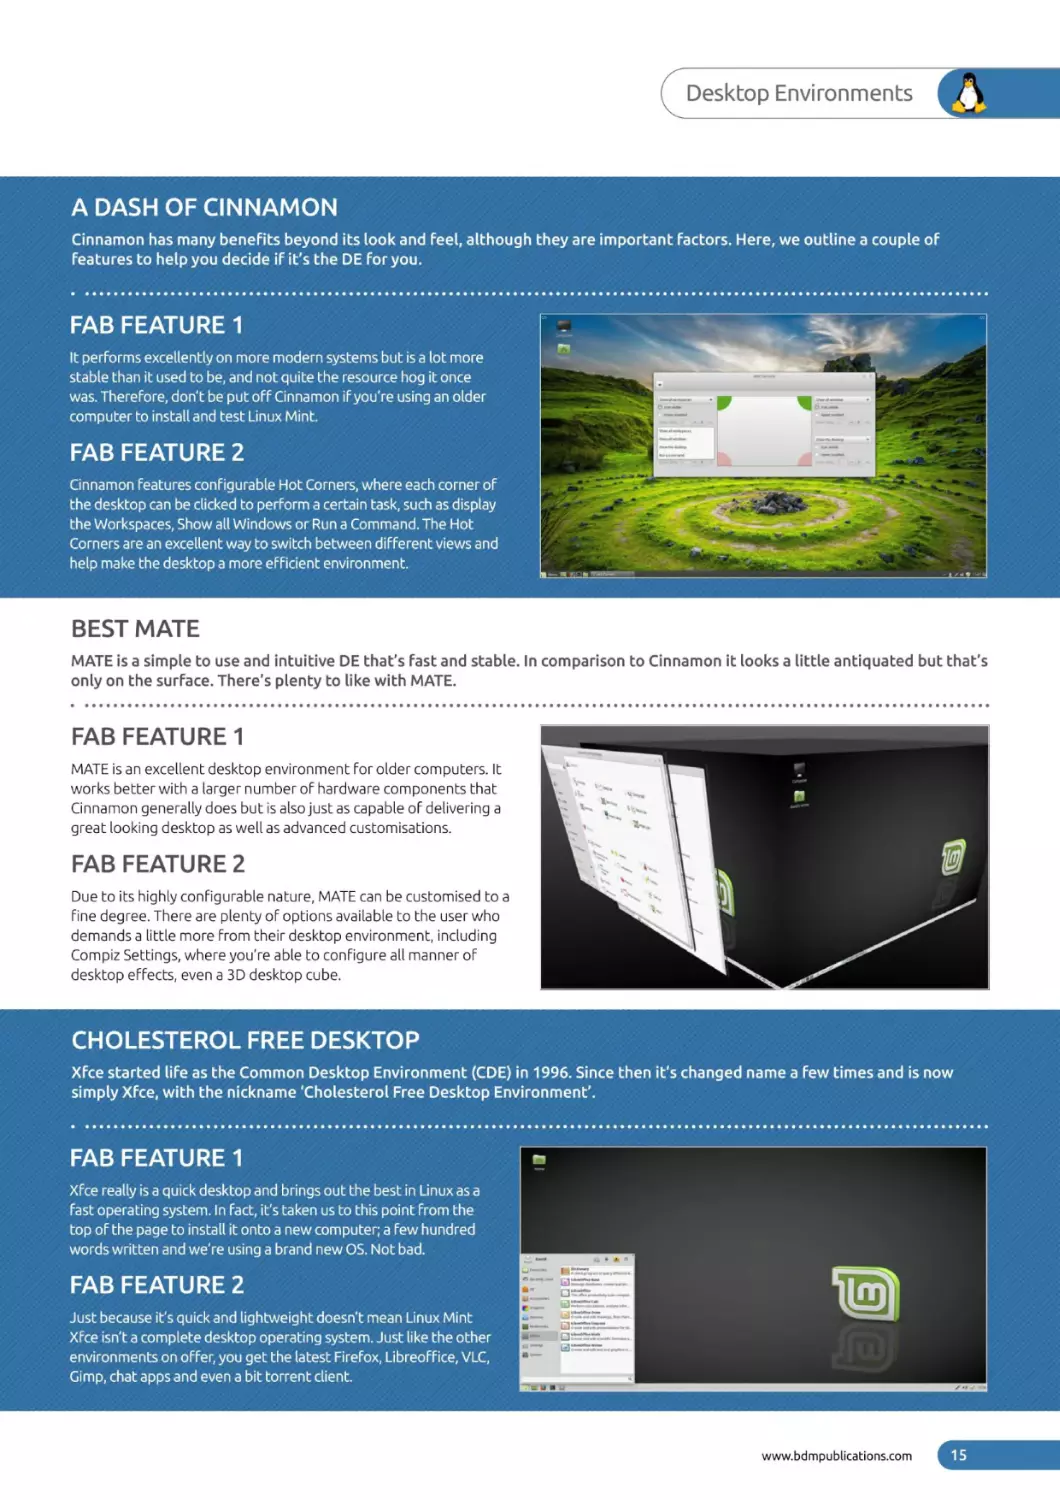
Meanwhile, openSUSE attempts to cover both bases.
OpenSUSE Leap is the rock solid system. It’s developed openly
bya community along with SUSE employees, who develop
anenterprise-level operating system, SUSE; this powers the
London Stock Exchange amongst other things. It is designed
for mission critical environments where ‘there is no scope
for instability’. IF you find all that too sensible, openSUSE
Tumbleweedis a rolling release with all the latest Features, and
the occasional crash.
openSUSE is a highly respected Linux distribution and many
of its core contributors work on the Linux Kernel, LibreOffice,
Gnome and other key Linux areas. In short, openSUSE is where
you'll find the pros hanging out.
www.openSUSE.org
www.bdmpublications.com
OM
OO
Raspbian is exclusive to the Pi hardware, since the Raspberry
Pi uses an ARM processor to power it. However, the Raspberry
Pi Foundation has since released a PC version of Raspbian:
OR
There are several aspects to the Raspberry Pi that make it
such a sought after piece of the computing world. For one
it’s cheap, costing around 25 for what is essentially a Fully
working computer. It’s small, measuring not much bigger than
a credit card. You can build electronics with it, using a fully
programmable interface; and it comes with Raspbian, its own
custom-made, Debian-based operating system that includes an
office suite alongside many different programming languages
and educational resources.
Wm
Say Hello to Linux
Equipmen
You
Will Need
The system requirements For successfully installing Linux Mint on to a PC are
surprisingly low, so even a computer that’s several years old will happily run this distro.
However, it’s worth checking you have everything in place before proceeding.
MINTY INGREDIENTS
Before we start working our way through this book, here’s what you need to install and run Linux Mint. You have several
choices available, so take your time and see which works best for you.
:
:
:
:
?
The minimum system requirements For Linux Mint are
as follows:
fae
rererrrery
SYSTEM REQUIREMENTS
:
=
:
:
CPU-700MHz
rere rr
Ha
RAM/Memory -512MB
USB INSTALLATION
You can install Linux Mint onto your computer via USBor DVD.
We look into each a little later on but if you're already familiar
with the process, or thinking of USB and just gathering the
har IWdle you He ey,
yOU Te youly Lo
nee da minimum 4GB USB flash drive
tos ‘ore the Linux Mint ISO.
Hard Drive space — 9GB (20GB recommended)
Display — 1024 x 768 resolution
Poe EPEC OCU
.
.
Obviously the better the system you have, the better the
experience will be and quicker too.
?
errr reer
:
:
www.bdmpublications.com
DDORNS
ATEN TON
DVD installation of
Linux Mint simply
requires a blank
DVD-R disc. OF
course, you also
need an optical
drive (a DVD writer
drive) before you're
able to transfer or
burn the ISO image
to the disc.
:
:
(Equipment
You Will Need
VIRTUAL ENVIRONMENT
VirtualBox
ee eee reer errr
INTERNET CONNECTION
goes without saying really, that an Internet connection is vital For
making sure that Linux Mint is up to date with the latest updates and
patches, as well as the installation of Further software. Aithough you
don’t need an Internet connection to use Linux Mint, you'll miss out on
a world of free software available For the distro.
It
»
—
eee
|
MAC HARDWARE
ad
Although Linux Mint can be installed
onto a Mac, there’s a school of
thought that recommends Mac
owners use a virtual environment,
such as Virtualbox or Parallels;
and why not, macOS is already a
splendid operating system. IF you're
wanting to breathe new life into an
older Mac, make sure it’s an Intel
CPU model and not the Power PC
models. Beware though, it’s not as
pain Free as installing on to a PC.
—
www.bdmpublications.com
+
Installation to a virtual environment is a Favourite method of testing and using Linux distros. Linux Mint works exceedingly well
when used ina virtual environment but more on that later. There are many different virtual environment apps available; however,
VirtualBox, from Oracle, is one of the easiest to into. You can Find the latest version at www.virtualbox.org.
Wm
Say Hello to Linux
Desktop Environments
Linux Mint comes in several different versions, or Flavours: Cinnamon, MATE and Xfce;
there are 32-bit and 64-bit versions of these too. What does it all mean though and
which version should you choose for your installation?
WHICH MINT?
A Desktop Environment is the graphical interface which you use to interact with the core Linux system. Just as the graphical
desktop for Windows 10 is also called Fluent Design.
Linux Mint offers the user a choice of versions of the distro:
Cinnamon, MATE and Xfce. While that may sound a little confusing
for the newcomer, essentially each of the versions available contains
the same core Linux structure and kernel, the kernel is the core of
the operating system, that handles all the instructions between the
software and hardware.
Each version is simply a different desktop environment, the
Graphical User InterFace (GUI) that you use to interact with the
operating system. Each of the desktop environments uses different
apps to access or use the system, such as the File manager to browse
the operating system’s file structure or the way it launches other
apps. Again though, the core available productivity, video and
graphic suites are the same, and Function in the same way.
www.bdmpublications.com
Why bother then with a different desktop environment? Simply put, it’s
down to personal taste. Some users prefer MATE, as MATE is a fork of
the classic GNOME 2 environment and is a little more menu-centric
and performs well on older computers. Others prefer Cinnamon, which
is more modern environment that works better on recent hardware
and features some cutting edge desktop code. Xfce, on the other
hand, is a lightweight desktop environment that works well on older
hardware due to its extremely low use of the available system resources.
a
In short, Cinnamon is the Flagship desktop environment for Linux
Mint. MATE is more compatible with a wider variety of hardware.
Where Windows, for example, only offers one desktop environment
to work in, Linux offers many. Linux Mint has therefore opted to
bring the user a wealth of choice.
( Desktop Environments
BEST MATE
MATE is a simple to use and intuitive DE that’s fast and stable.
only on the surface. There’s plenty to like with MATE.
FAB FEATURE
In
comparison to Cinnamon it looks a little antiquated but that’s
1
MATE is an excellent desktop environment for older computers. It
works better with a larger number of hardware components that
Cinnamon generally does but is also just as capable of delivering a
great looking desktop as well as advanced customisations.
FAB FEATURE 2
Due to its highly configurable nature, MATE can be customised to a
Fine degree. There are plenty of options available to the user who
demands a little more From their desktop environment, including
Compiz Settings, where you're able to configure all manner of
desktop effects, even
a
3D desktop cube.
Mo
www.bdmpublications.com
Say Hello to Linux
Wm
Which Distro?
Up to now we've looked mainly at Linux Mint but there are other Linux distributions
out there to try. In truth there are thousands of Linux distros available to download
and install, so which one should you decide on to use?
DISTRO HOPPING
Distro hopping is a term used by the community for people who never
stick to a single distribution. Instead, they hop from one to the other
and back again, testing each, using them, then moving on to another
or a newly released distro.
For example, Linux Mint is an ideal starting place. It’s an easy to install
and use distro, has all the software you would normally use ona
day-to-day basis already installed out-of-the-box and gently eases you
into the unique world of Linux and how it works and performs.
There’s nothing wrong with distro hopping, as it’s good way to get to
grips with what's out there and discover the elements of one distro
over another that may or may not appeal to your tastes. The problem
of course is which one do you use overall?
Ubuntu offers much the same experience but it does this in a slightly
different way. There’s generally less preinstalled with Ubuntu than
with Linux Mint, so you would need to manually install it yourself.
Another point worth considering is the sheer volume of content and
help pages dedicated to Ubuntu users when using Linux. IF you get
stuck, you're never too far From a solution to the problem.
a
A|C|Bloly
ren
Petinxos ff
.sls
|
LES
redhat
Moving on, as you begin to grow more confident with Linux, you may
test out the likes of openSUSE, Fedora or Debian. These are all
excellent distros and each offers the user a slightly different
perspective on how the system runs. Some are more demanding, in
terms of Linux skills, than others, but essentially they each have some
valuable lessons to learn For the user.
While distro hopping is a good thing, it’s not exactly a stable way to
enjoy Linux and get the most from it. We're not saying you should stick
to one distro and never look elsewhere, as you would be missing a lot
of great content out there, but instead we recommend you find a
handful and slowly progress through them based on your increasing
Linux skills.
You may Find yourself moving to a particular distro because it offers
something radically different From the norm. Tails Linux, for example,
is a distro that’s designed purely for online anonymity. It contains
complex and military grade encryption tools as well as tools and
browsers designed to help you browse the web without ever being
detected, traced or monitored. Kali Linux is designed for security
professionals and contains many different kinds of ethical hacking
Loree
rat) Rees
proses)
Plate
ORE
Td Setlsestststukat
wee
ered
PET
PEELEEE
HEEEEEEEEEEL:
Breast
aw
oe
ier ork
a
catface
bay
so cera
As le
te eed sie Lid
rire
MAN
rt
ee
As
eso
te ald
eAT
eh
maT
ase
tird
/libd/tiretox/firetox
duse
las
le
rie @At
toes sa tid
cir gat
mee
arr
coe
corveh:
: ladle
sms
Lg
rarbo2
Klaatu
Peg
Loe
Dy
displo
ore
AR
OMG
Ase
cr
ge
eral
tt
tetd
Ei
daeaimaliaabal
ag
—
aoa
aT
Se
fee uae a
perianal
can explain
how
pone
Sy
me
ita
Eades oot
so
dae
ToT
Heetees
smn
CRI
PM
ePPUEpNUEpeeenerevnppemmmmmmmmmmmmmen
abaat see
lal seas
ee
tr PR SEE x)
iad
eee)
www.bdmpublications.com
Here
po
nea
CULe
EE
|
ord
iret)
bs gd
ta
eM
a
rot
i can wite
a malware?
eels CO
Which Distro?
nnn
rae
Meron)
ccc)
a)
pater
tools preinstalled, that a user can run for penetration testing against
their network. There was once even a Hannah Montana Linux
distribution but the less we talk about that the better. The point being,
there’s a distro out there for you.
Needless to say, once you've mastered Linux to a relatively high degree,
probably a power user ability, then you will want to expand your skills
and begin to build your own Linux distro based on Arch, Debian or one
of the many other distros available. Doing so involves a lot of command
line knowledge, as well as knowledge on how the Linux system works
and interacts with the hardware in the computer. You will need to
partition your own hard drive, install desktop environment and
eventually install the apps and programs you want. Doing so takes
time and again there are a lot of skills you're going to need to learn.
a
Eventually you can consider yourself a technical Linux user but never
consider yourself an expert, after all we're always learning something
new. You can build your own distro From scratch, help other Linux
users out with problems, maybe even contribute to the improvement
ofa distro during its testing phase or build. Where next then?
a
—
cha
tirarer
@
G
my
nts:
Oddly enough, most higher-end technical users Find themselves
back at square one, using a distro like Linux Mint. The main reason is
usually because it’s an easy option, and it’s a stable environment.
Just because you know the system inside and out, doesn’t mean
you always want to be Fixing potential issues. Most of us would
prefer the easy life, especially where technology is concerned, so
the logical choice would be to choose a distro that’s simple, yet
still powerful enough to do everything you want it to do, hence
Linux Mint.
However, in the end, it’s purely down to choice, your own personal
choice. You may find that after going through the tutorials in this title
you don't like Linux Mint or the Cinnamon desktop. Fine, you may
prefer Ubuntu, Debian or openSUSE: that’s the beauty of Linux. The
freedom to change what you want, to distro hop from one to another
without being penalised by cost or lack of access.
The answer to the question, which distro
is:
any which one you like! It
can be as complex or easy as you need it to be, as long as it does what
you want it to do, then it’s perfect.
www.bdmpublications.com
BRS
wr
a
\
.
AN
&
ER
MS“
x
.
, “In real-gpen source, y@eshaye. the
|
18)
www.bdmpublications.com
ri
(
Getting
Started with Linux
It’s all Fine and well talking about how
good Linux is but how do you get it on
your computer? Installing Linux is
remarkably simple but there are several
options available to you. This section
looks into how you can download the
Linux ISO, install it on a PC as your main
operating system and even how to install
a virtual environment.
With a virtual environment you can run
Linux while still using your main operating
system, be that Windows or macOS.
Intrigued? Read on and Find out more.
Linux Installer on Windows
20
Creating
22
Installing Linux on
24
Installing
a
a
a
PC
Virtual Environment
Installing Linux in
a
Virtual Environment
www.bdmpublications.com
Getting Started with Linux
)
Creating a Linux
Installer on Windows
You need to transfer the downloaded Linux ISO to either DVD or a USB key before
being able to install it onto a computer. This will be a live environment, which allows
you to test the OS prior to installation, but First you need to create the bootable media.
a
DVD BOOTABLE MEDIA
We're using Windows 10 PC here to transfer the ISO to a DVD.
process is extremely easy.
a
First locate the ISO image of Linux you've already
downloaded. You can usually Find it in the
Downloads Folder in Windows 7, 8.1 and 10 computers, unless you
specified a different location when saving it.
STEP
1
~
Name
IF you're
using a version of Windows from 7 onward the
Right-click the Linux ISO and From the menu select
Burn Disc Image. Depending on the speed of the PC,
it may take a Few seconds before anything happens. Don’t worry too
much, unless it takes more than a minute, in which case it might be
worth restarting your PC and trying again. With luck, the Windows
Disc Image Burner should launch.
STEP 3
gw Quick access
Tinuaemint-19.1-cinnarmon-64 bit
YY
-cinnarmon-64
bit
Dropbox (Team BDM)
Mount
;
OneDrive
This PC
@
CD Drive (&) Hisuite
a
Network
Burn disc image
& KG
WM
Scan with Windows Defender...
Share
Open with
Open with WinRAR
Add to archive...
Next insert a recordable DVD disc into your
computer's optical drive. After a Few seconds, while
the disc is read, Windows displays a pop-up message asking you
what to do with the newly inserted disc. Ignore this, as we're going
to use the builtin image burning Function.
Cons
With the Windows Disc Image Burner dialogue box
open, click on the ‘Verify disc after burning’ tick
box, then the Burn button. The process should take a Few minutes,
depending on the speed ofyour PC’s optical drive. Once it’s
complete it runs through the verification stage and when done the
optical drive should auto-eject the disc for you.
e°
Windows Disc Image Burner
Discimage file
Dise Burner
DVD RW Drive (E:)
Tap to choose what happens with blank
BDH
linuxmint-19.1-cinnamon-64bit.iso
BD-ROM Drive (D:)
Status
Burning disc image to recordable disc...
ne
www.bdmpublications.com
ae
|
(Creating
a
Linux Installer on Windows
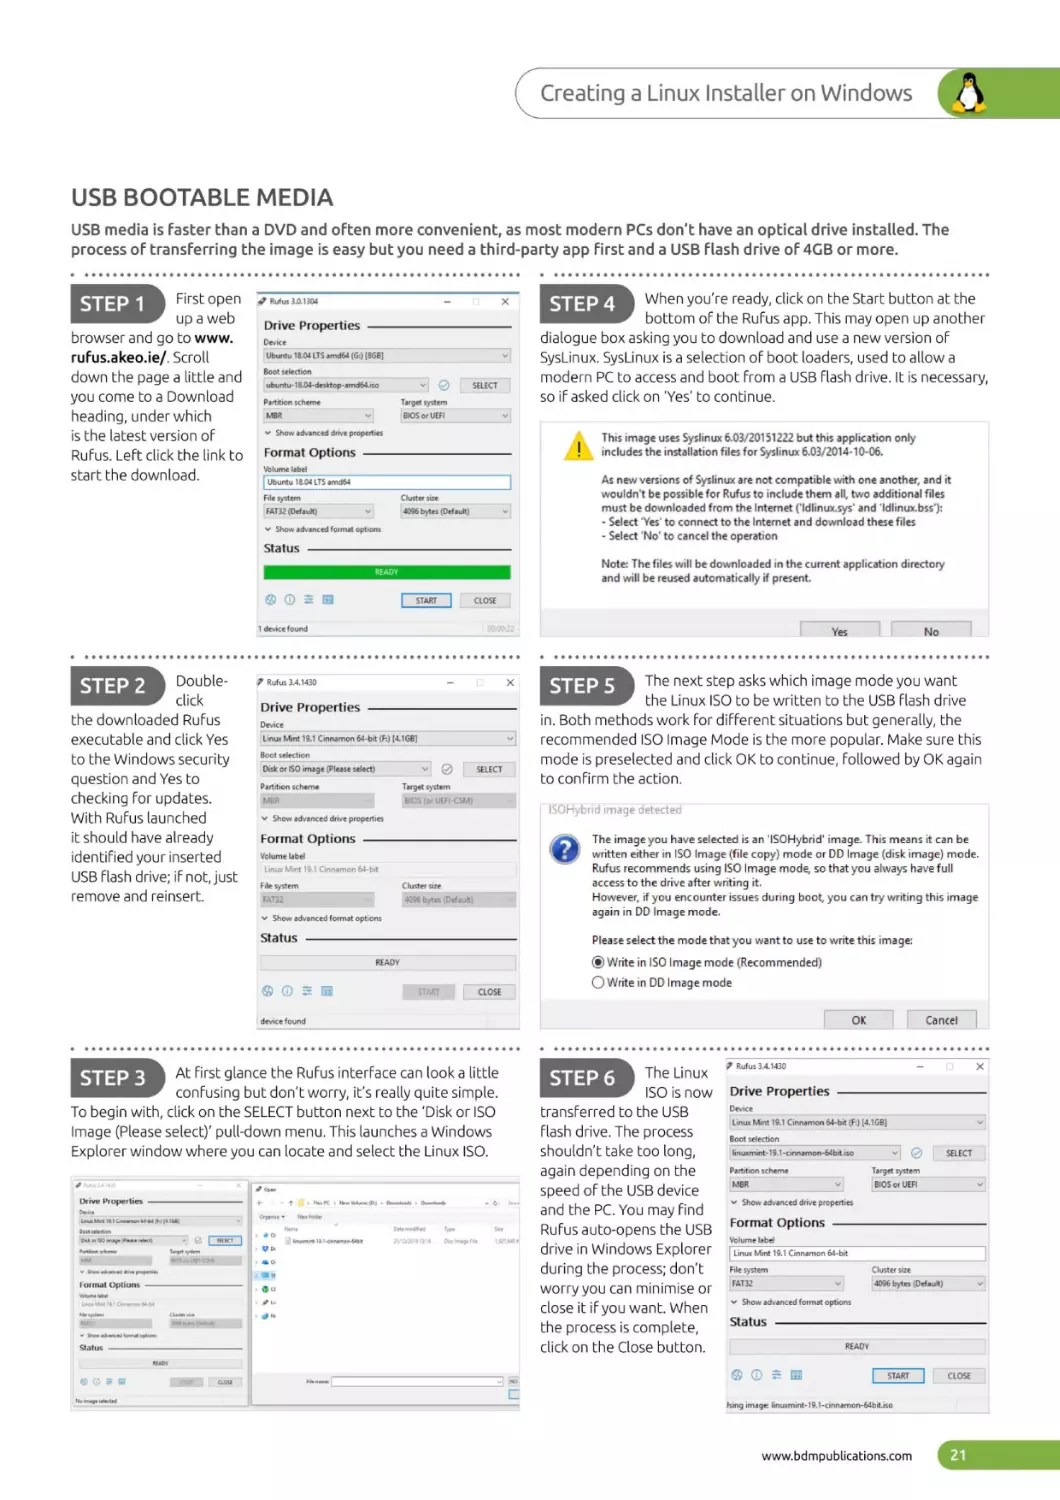
USB BOOTABLE MEDIA
USB media is Faster than a DVD and often more convenient, as most modern PCs don’t have an optical drive installed. The
process of transferring the image is easy but you need a third-party app First and a USB Flash drive of 4GB or more.
STEP
First OPEN
1
up
_
—@ Rufus 3.0.1304
aweb
x
Drive Properties
browser and go to www.
rufus.akeo.ie/. Scroll
down the page 4 little and
you come toa Download
heading, under which
is the latest version of
Rufus. Left click the link to
start the download.
Device
Ubu
LTS amd6s
~
(6: [868]
a
18.04
Boot selection
.
~-
ubuntu-18.04-desktop-amd6d.iso
—_pyriion
scheme
¥
MAR
SELECT
.
Target system
BIOS or UEFI
When you're ready, click on the Start button at the
bottom of the Rufus app. This may open up another
dialogue box asking you to download and use a new version of
SysLinux. SysLinux is selection of boot loaders, used to allow a
modern PC to access and boot from a USB Flash drive. It is necessary,
so if asked click on ‘Yes’ to continue.
|
This image uses Syslinux 6.03/20151222 but this application only
includes the installation files for Syslinux 6.03/2014- 10-06.
Show advanced drive properties
Format Options
Volume label
[Couens
TS
As new versions of Syslinux are not compatible with one another, and it
wouldn't be possible for Rufus to include them all, two additional files
must be downloaded from the Internet (‘Idlinux.sys' and ‘Idlinux.bss'):
- Select ‘Yes' to connect to the Internet and download these files
~ Select ‘No’ to cancel the
operation
amatt
File systern
Cluster size
v
FAT32 (Defaustt)
v
4096 bytes (Default)
Show advanced format options
Status
Note: The files will be downloaded in the current application directory
and will be reused automatically if present.
@Oz
CLOSE
device found
STEP 2
Doubleclick
the downloaded Rufus
executable and click Yes
to the Windows security
question and Yes to
®
-
Rufus 34.1430
x
Drive Properties
Device
Linux Mint 19.1 Cinnamon 64-bit (F:) [4.168]
|
Boot selection
~
Disk or [SO image (Please select)
Target system
MBR
~
setect |
|
eattion scheme
checking For updates.
With Rufus launched
it should have already
identified your inserted
BIOS (or UEFI-CSM)
Format Options
@
Linux Mint 19.1 Cinnamon 64-bit
File
;
Cluster size
system
FAT32
v
|
Status
Please select the mode that you want to use to write this image
Le
@ Write in Sa Image mode (Recommended)
READY
The Linux
ISO is now
transferred to the USB
flash drive. The process
shouldn't take too long,
again depending on the
speed ofthe USBdevice
.
and the PC. You may find
Rufus auto-opens the USB.
.
drive in Windows Explorer
during the process; don’t
worry you can minimise or
close it if you want. When
the process is complete,
click on the Close button.
@ Open
+
Ongenive~
Show
advancesdeve prupestes
tare
+
+
New Moker Oh}
Dmwmieah
Crwninsdh
Newfolder
Onte
medics
Type
.
vO
“aeget oetem
wen
+
+
bbe
ao
OS
Format Options
Votornaiabat
abet
Lane
Kher
Fae optoen
ed
Show
advancedtown
6
wie
es Detaul)
options
GO =
erage selactad
id
‘STARE
CL0se
.
Cancel
x
Rufus 3.4.1430
Drive Properties
Device
v
19.1 Cinnamon 64-bit (F:) [4.168]
|Linuxx
Mint
Boot selection
|linuxmint-19.1-cinnamon-64bit.so
Partition
scheme
~
'™™*
v
Sh
dri
dive
eese
d
cee
x] @
Target system
BOS oruER
i
Prope
|
suet
|
—
eee
Format Options
Volume label
Cinemon Sibi
[cinxMint
191
—_Fitesystem
[2
v
Cluster size
a
Show advanced format options
Status
READY
_]
{Gost|
nisi
Status
No
DD Image mode
OK
a
Mint FRE
in
device found
At First glance the Rufus interface can look a little
confusing but don’t worry, it’s really quite simple.
To begin with, click on the SELECT button next to the ‘Disk or ISO
Image (Please select)’ pull-down menu. This launches Windows
Explorer window where you can locate and select the Linux ISO.
Device
O Write
[CLOSE
starr
STEP 3
Drive Properties
The image you have selected is an ‘ISOHybrid' image. This means it can be
written either in [SO Image (file copy) mode or OD Image (disk image] mode.
Rufus recommends using ISO Image mode, so that you always have full
access to the drive after writing it.
However, if you encounter issues during boot, you can try writing this image
again in DD Image mode.
Show advanced format options
®@Oz
a
The next step asks which image mode you want
the Linux ISO to be written to the USB flash drive
in. Both methods work For different situations but generally, the
recommended ISO Image Mode is the more popular. Make sure this
mode is preselected and click OK to continue, Followed by OK again
to confirm the action.
STEP5
IsCHybrid image detected
Show advanced drive properties
Volume label
USB Flash drive; if not, just
remove and reinsert.
No
Yes
Jsing image: linuxmint-19.1-cinnamon-64bit.iso
www.bdmpublications.com
Getting Started with Linux
)
Installing Linux on a PC
Most Linux distros come as a Live Environment. This means you can boot into an actual,
Fully-working distro straight from the DVD or USB that you just created. Let's see how
that works and how you go about installing Linux from there.
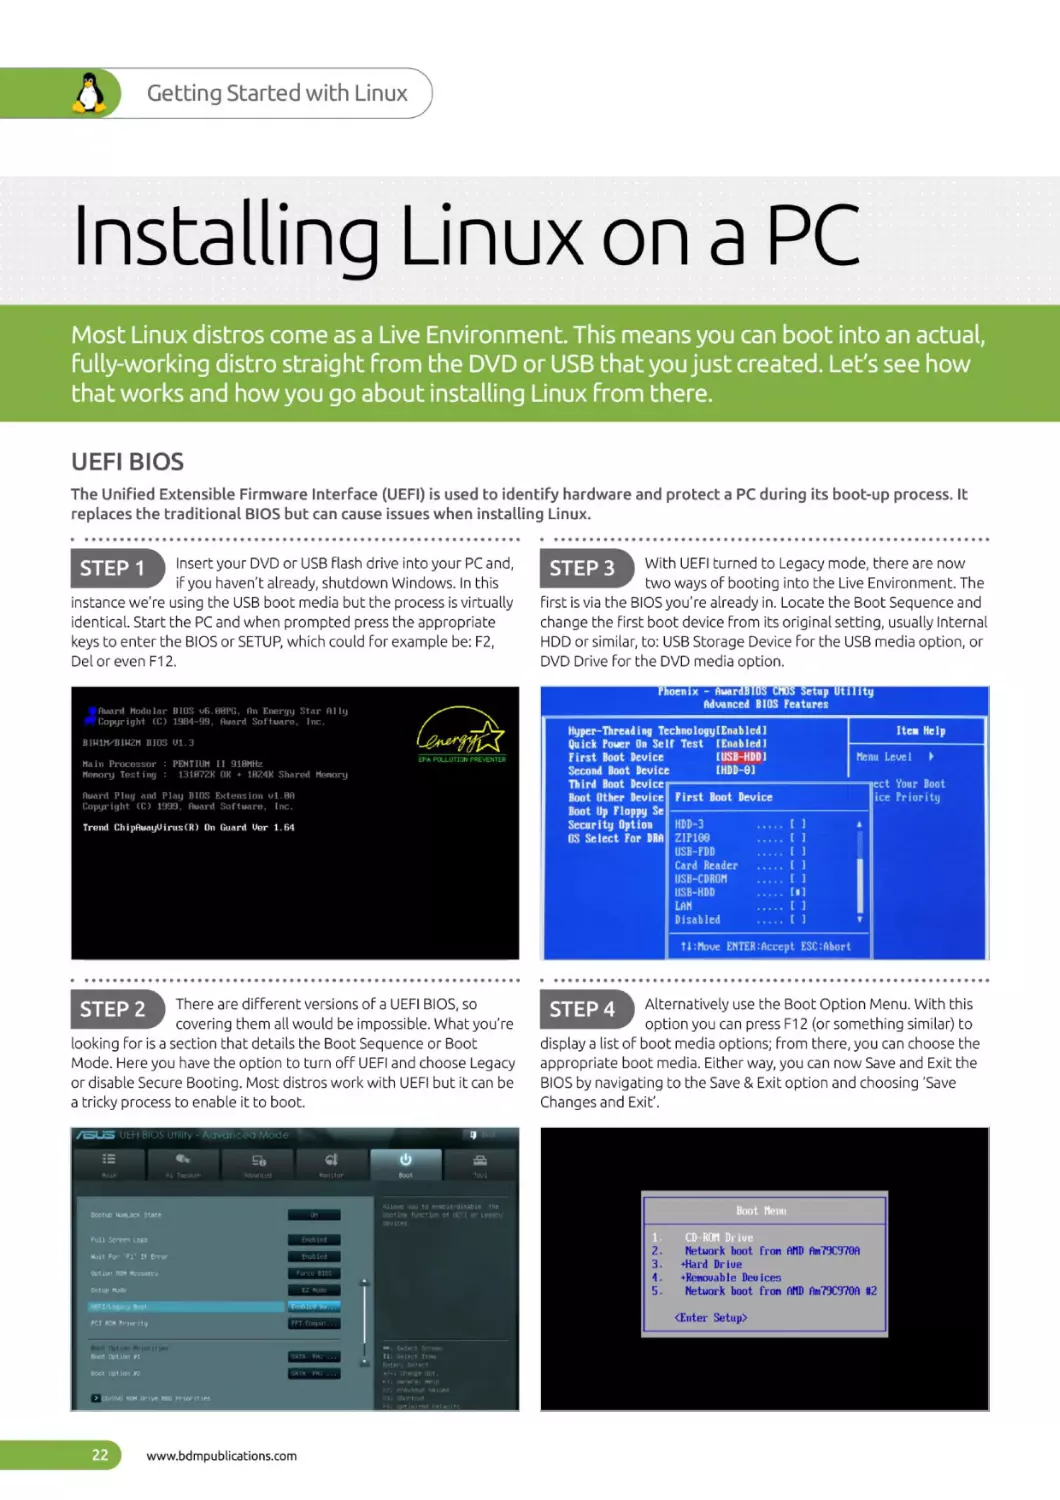
UEFI BIOS
The Unified Extensible Firmware Interface (UEFI) is used to identify hardware and protect a PC during its boot-up process. It
replaces the traditional BIOS but can cause issues when installing Linux.
sy =o
Insert your DVD or USB Flash drive into your PC and,
you haven't already, shutdown Windows. In this
instance we're using the USB boot media but the process is virtually
identical. Start the PC and when prompted press the appropriate
keys to enter the BIOS or SETUP, which could For example be: F2,
Del or even F12.
iF
COE
Auard Modular BICS v6.GQPG, An Energy Star Ally.
Copyright (C) 1984-99, fward Software, Inc.
Hyper-Threading TechnologyfEnabled)
Quick Power On Self Test [Enabled]
PAU
Nain Processor : PENTIUM
Me
Award
I]
ete
S18NHz
Mal]
Gro
pee MH
ae
Be)
Menu
Level
>
ect Your Boot
Toe
Cees
Boot Up Floppy Sef
Security Option
te
SUE
UNS
Third Boot Device;
Plug and Play BIOS Extension ¥1.0A
a
With UEFI turned to Legacy mode, there are now
two ways of booting into the Live Environment. The
first is via the BIOS you're already in. Locate the Boot Sequence and
change the First boot device From its original setting, usually Internal
HDD or similar, to: USB Storage Device For the USB media option, or
DVD Drive For the DVD media option.
STEP 3
|
|
etre
USB-CDROM
Sy Shy
LAN
EDIE)
au ==
There are different versions of a UEFI BIOS, so
covering them all would be impossible. What you're
looking for is section that details the Boot Sequence or Boot
Mode. Here you have the option to turn off UEFI and choose Legacy
or disable Secure Booting. Most distros work with UEFI but it can be
a tricky process to enable it to boot.
a
JRBUSS UE
BIOS
ay ao
Alternatively use the Boot Option Menu. With this
option you can press F12 (or something similar) to
display a list of boot media options; from there, you can choose the
appropriate boot media. Either way, you can now Save and Exit the
BIOS by navigating to the Save & Exit option and choosing ‘Save
Changes and Exit’.
tility - Advanced Mode
&.
=)
3
Ro
boot ing
URRY
function of UEFI or Legacy
Network boot from
AMD
Am?9C970A
AMD
Am?9C970A 12
Hard Drive
+Removable Devices
Network boot from
<Enter Setup>
Bout Apt ton
Priora ties
www.bdmpublications.com
(installing
Linux on aPC
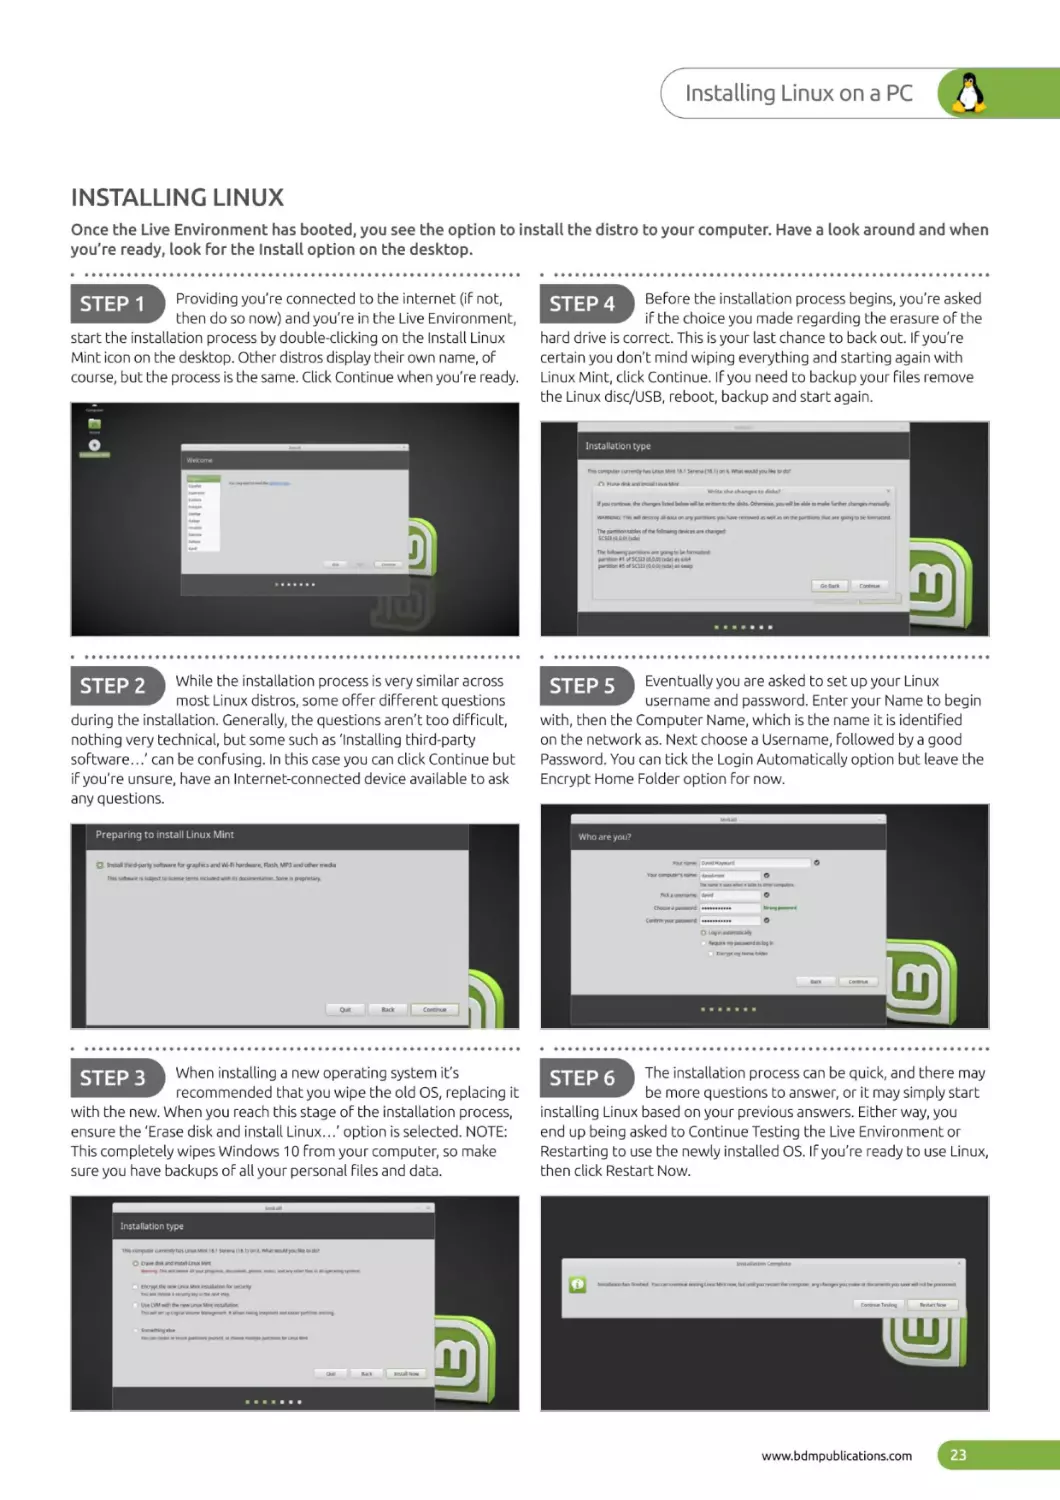
INSTALLING LINUX
Once the Live Environment has booted, you see the option to install the distro to your computer. Have a look around and when
you're ready, look for the Install option on the desktop.
Providing you're connected to the internet (iF not,
then do so now) and you're in the Live Environment,
start the installation process by double-clicking on the Install Linux
Mint icon on the desktop. Other distros display their own name, of
course, but the process is the same. Click Continue when you're ready.
ae
Before the installation process begins, you're asked
if the choice you made regarding the erasure of the
hard drive is correct. This is your last chance to back out. IF you're
certain you don’t mind wiping everything and starting again with
Linux Mint, click Continue. IF you need to backup your Files remove
the Linux disc/USB, reboot, backup and start again.
STEP 4
Installation type
While the installation process is very similar across
most Linux distros, some offer different questions
during the installation. Generally, the questions aren't too difficult,
nothing very technical, but some such as ‘Installing third-party
software...’ can be confusing. In this case you can click Continue but
if you're unsure, have an Internet-connected device available to ask
STEP 2
9
Eventually you are asked to set up your Linux
username and password. Enter your Name to begin
with, then the Computer Name, which is the name it is identified
on the network as. Next choose a Username, followed by a good
Password. You can tick the Login Automatically option but leave the
Encrypt Home Folder option For now.
any questions.
Preparing to install Linux Mint
E
testall
party software
1
for graphics
cere
OD
tere
nei
and
We-Fi
wIER
Who are you?
hardware, Flush, MP3 and
Ty
Oc
AM
Some
other
media
BIB Lary
Gut
Baws
Cones
|
When installing a new operating system it’s
recommended that you wipe the old OS, replacing it
with the new. When you reach this stage of the installation process,
ensure the ‘Erase disk and install Linux...’ option is selected. NOTE:
This completely wipes Windows 10 From your computer, so make
sure you have backups of all your personal Files and data.
STEP 3
The installation process can be quick, and there may
be more questions to answer, or it may simply start
installing Linux based on your previous answers. Either way, you
end up being asked to Continue Testing the Live Environment or
Restarting to use the newly installed OS. IF you're ready to use Linux,
then click Restart Now.
STEP 6
LUCE Tolanazar
www.bdmpublications.com
Glin
Getting Started with Linux
)
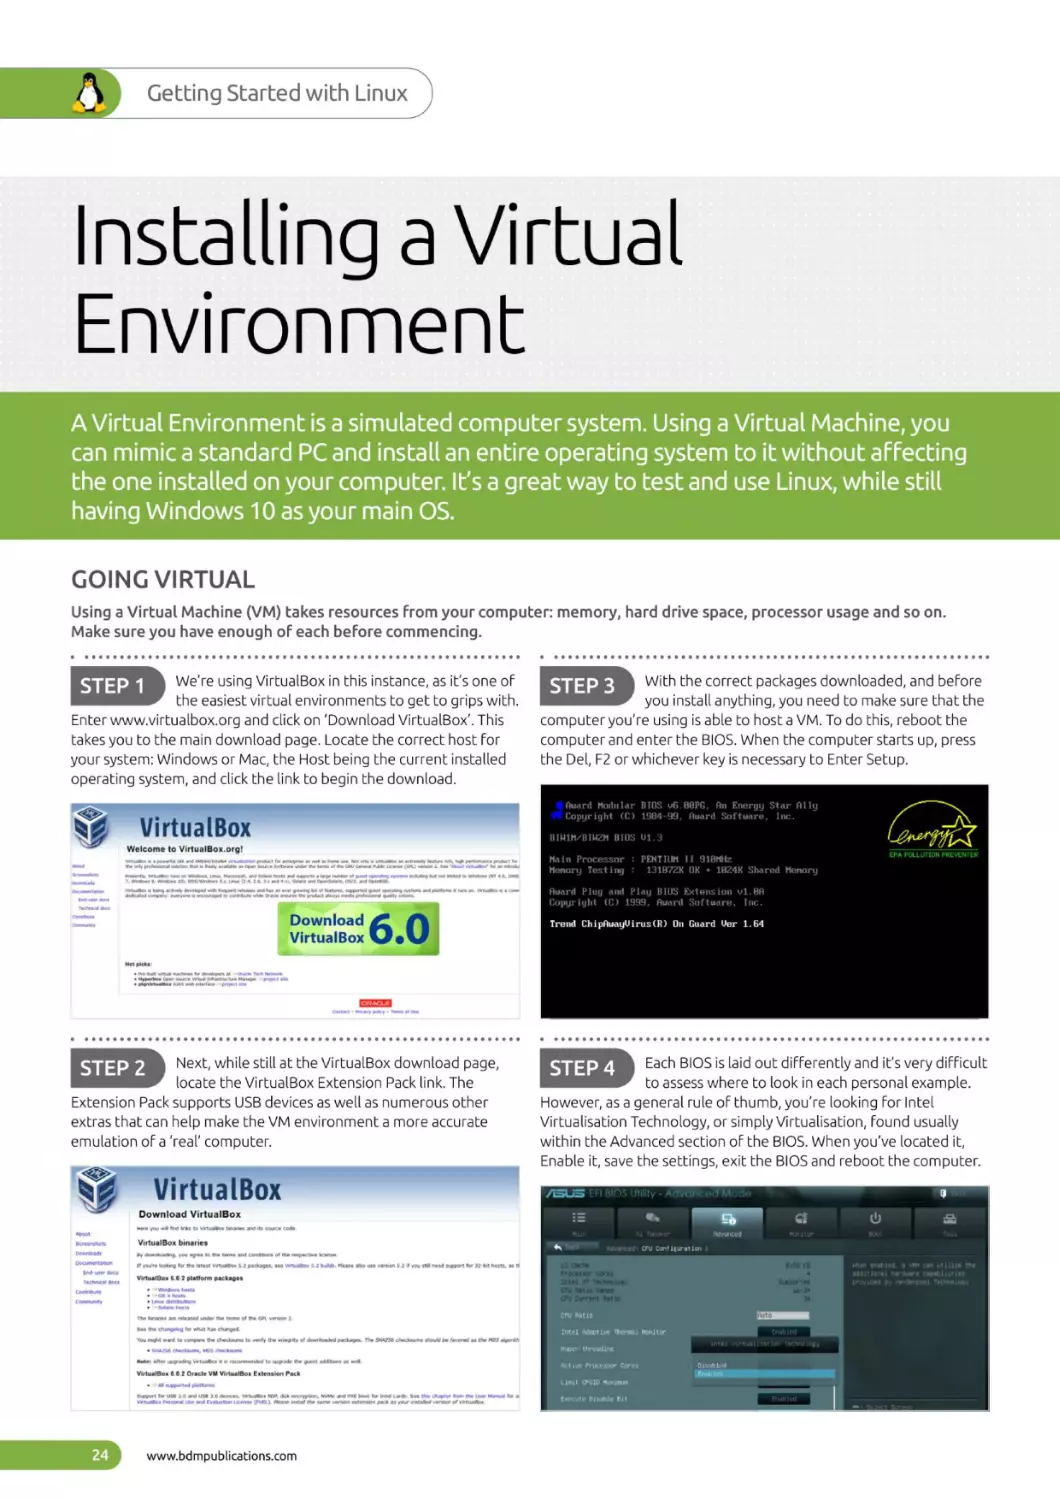
Installing a Virtual
Environment
Virtual Environment is a simulated computer system. Using a Virtual Machine, you
can mimic a standard PC and install an entire operating system to it without affecting
the one installed on your computer. It’s a great way to test and use Linux, while still
having Windows 10 as your main OS.
A
GOING VIRTUAL
Using a Virtual Machine (VM) takes resources from your computer: memory, hard drive space, processor usage and so on.
Make sure you have enough of each before commencing.
We're using VirtualBox in this instance, as it’s one of
the easiest virtual environments to get to grips with.
Enter www.virtualbox.org and click on ‘Download VirtualBox’. This
takes you to the main download page. Locate the correct host For
your system: Windows or Mac, the Host being the current installed
operating system, and click the link to begin the download.
=f
With the correct packages downloaded, and before
you install anything, you need to make sure that the
computer you're using is able to host a VM. To do this, reboot the
computer and enter the BIOS. When the computer starts up, press
the Del, F2 or whichever key is necessary to Enter Setup.
STEP 3
Copyright (C) 1964-99, Award Software, Inc.
_MirtualBox
Ua
DU
SMe
ee
abot
setearn
Menory
rs
Testing
Teerncal oct
6. 0
VirtualBox
ee
Download
Commarvty
1
bre
butt
weal
{ tperios
machews Sovthopers
at
for
Opereeuce
nena
vets
<
oracle
Tach featwork
ote
Mang
Contact
+
the
*
Prvacy pokey
oP
Next, while still at the VirtualBox download page,
locate the VirtualBox Extension Pack link. The
Extension Pack supports USB devices as well as numerous other
extras that can help make the VM environment a more accurate
emulation of a ‘real’ computer.
Each BIOS is laid out differently and it’s very difficult
to assess where to look in each personal example.
However, as a general rule of thumb, you're looking For Intel
Virtualisation Technology, or simply Virtualisation, Found usually
within the Advanced section of the BIOS. When you've located it,
Enable it, save the settings, exit the BIOS and reboot the computer.
STEP 2
7
STEP 4
VirtualBox
FRUS
FFI BIOS Utility
eco you wil
fee inks
About
Sy downlaacing,
Documentapen
Tecnencal doce
to vartualfion branes
and
its cource code,
binaries
Virtu
to
yous
tht
terms and congnons
5.2
2f you're loolong for the latest virtualbox
packages,
VirtualBox
6.0.2 ptatform packages
of
the
buds. Pleats
aise
use version
5.2
if
you
sti
need support for 32-biE
Rorts.
3
92
Cache
Processor Cores
Intel HT Technolony
Ratio Range
Cru Current Ratio
CPU
Contrtute
Conrounsty
‘The binarigg are solensed under the terms. of the GPL vernon
See tne changelog for whist has changed,
2.
‘You maght want to compare Un checkwume to vardy the mtegnty of domricaded packegus, The SYA256
| SIHAZSS
‘Note: ator
checksums should
be
favored
av
the MDS
wget?
charkeume, MOS checksums
upgrading VirtualBox it
necommened to upgrade the guest additians
a6
wal.
VirtusiBor 0.0.2 Oracte VM VirtualBox Extension Pack
+
-
‘Support
Al supported platforms,
USB 1.0
for USM
2.0Une
andand
\Vattnibon
Peronal
devices,
extension
VirtualBox
ROP, dick encryption, MvMe and PXE toot for Intel cards. See thes chaptor from
the Uuer Marist for
VirtuaiBox.
(PUPL).
Pvaksatien Ucenan
Alraae iastal the same version
pack ax your inataded vernon of
www.bdmpublications.com
Advanced Mode
gt
respectve scenes,
sou Virtuskion 5.2
-
=
2
eee
a
End-veer abet
Shareil Memory
esi: |
Meerme
Copyright (C) 1999, fward Software, Inc.
erd-umer doce
downloads
1-4
1391872K OK + 1824K
mee Um
Conese
Screontors,
:
a
core
10
Leg
8192 KB
ee
erect ak
4
Supported
Ty
(installing
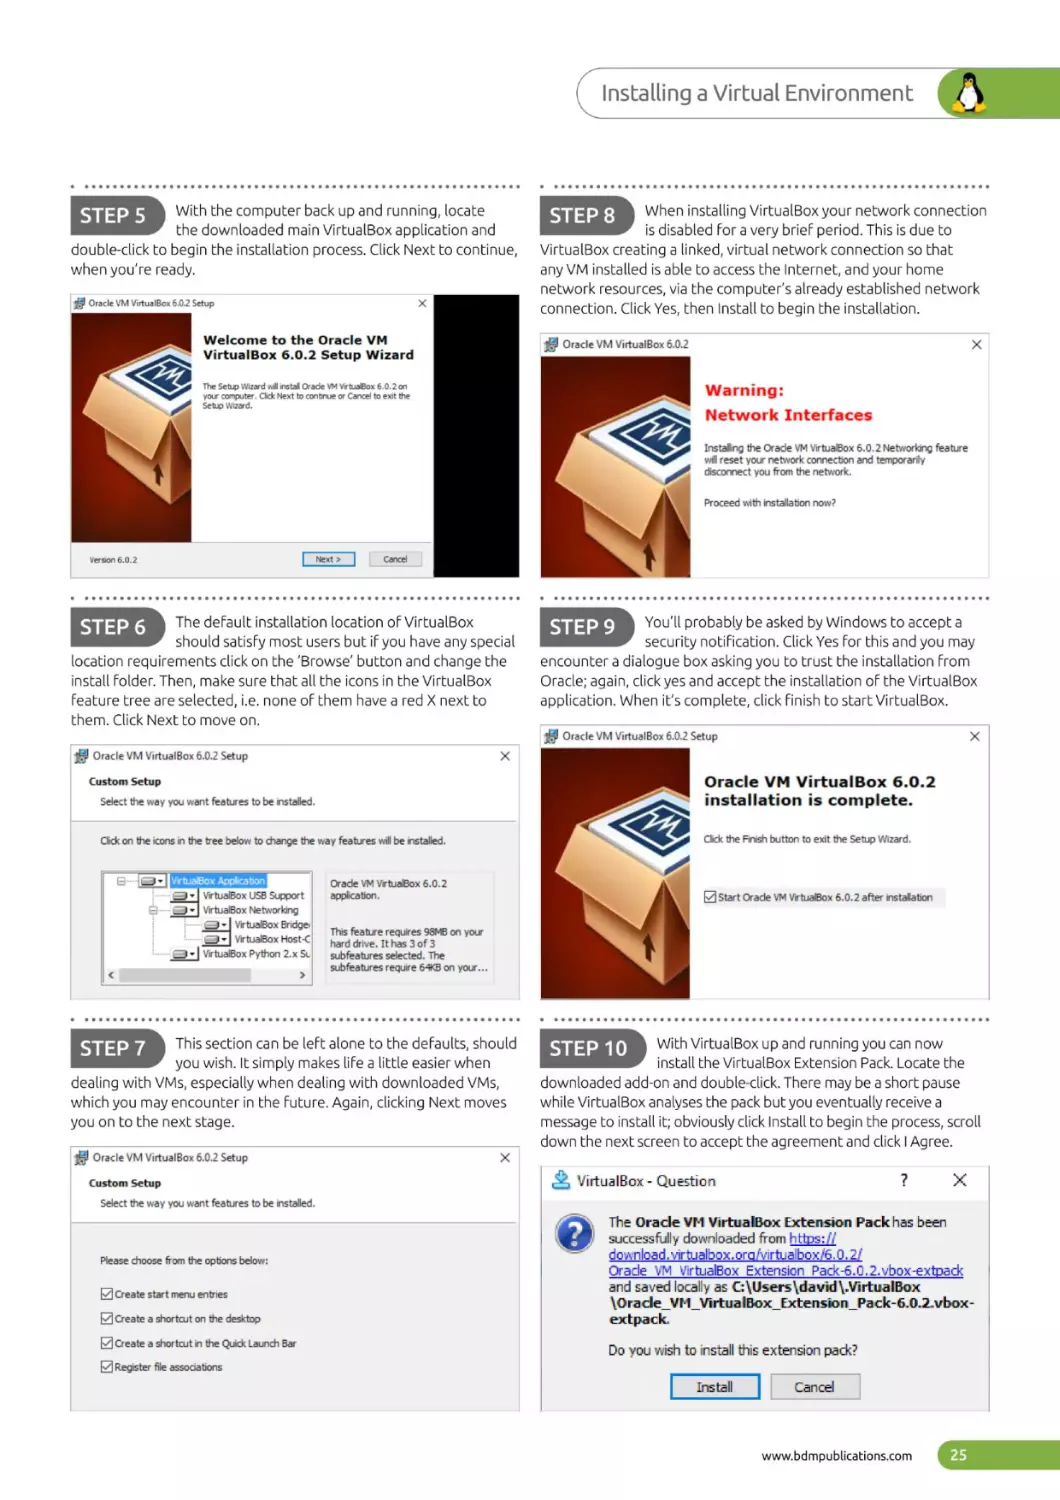
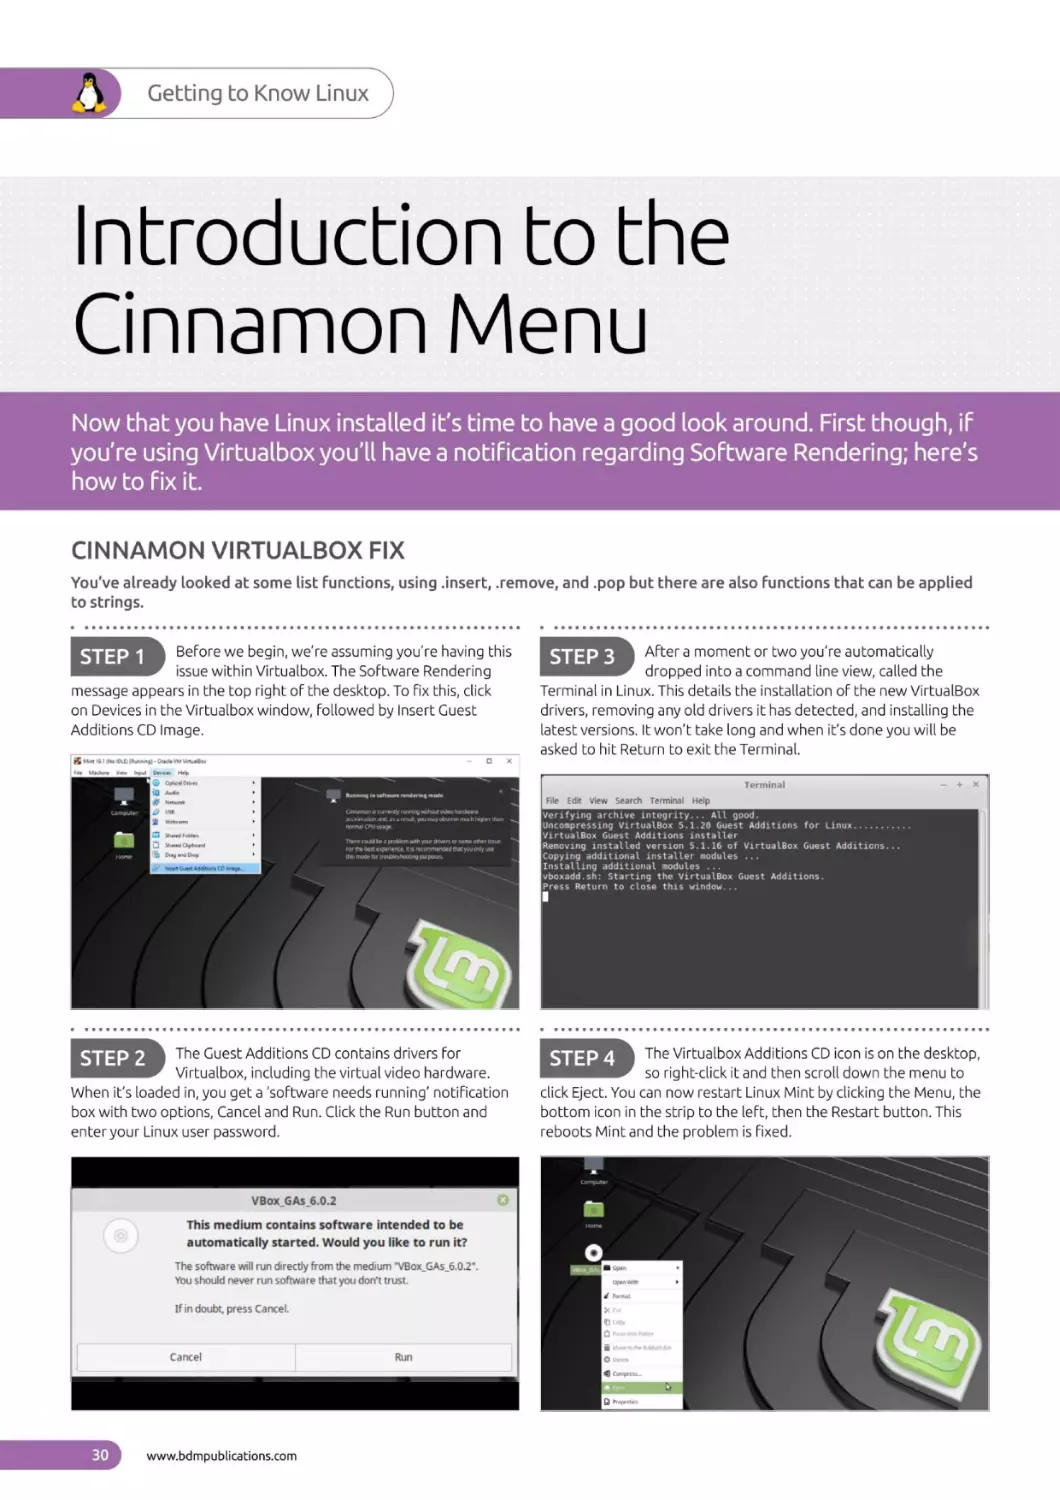
With the computer back up and running, locate
the downloaded main VirtualBox application and
double-click to begin the installation process. Click Next to continue,
when you're ready.
STEP
5
#F Oracle VM VirtualBox
6.0.2 Setup
~
Welcome to the Oracle VM
VirtualBox 6.0.2 Setup Wizard
a
Virtual Environment
When installing VirtualBox your network connection
is disabled for a very brief period. This is due to
VirtualBox creating a linked, virtual network connection so that
any VM installed is able to access the Internet, and your home
network resources, via the computer's already established network
connection. Click Yes, then Install to begin the installation.
STEP8
al Oracle
x
VirtualBox 6.0.2
VM
The Setup Wizard will install CQrade YM VirtualBox 6,0, on
2
your computer. Click Next to continue er Cancel to exit the
Setup Wizard.
Warning:
Network Interfaces
Installing the Orade VM VirtualBox 6.0.2 Networking feature
will reset your network connection and temporarily
disconnect you from the network,
Proceed with installation now?
Version 6.0.2
cares
The default installation location ofVirtualBox
should satisfy most users but if you have any special
location requirements click on the ‘Browse’ button and change the
install folder. Then, make sure that all the icons in the VirtualBox
feature tree are selected, i.e. none of them have a red X next to
them. Click Next to move on.
STEP 6
You'll probably be asked by Windows to accept a
security notification. Click Yes For this and you may
encounter a dialogue box asking you to trust the installation from
Oracle; again, click yes and accept the installation of the VirtualBox
application. When it’s complete, click Finish to start VirtualBox.
STEP 9
38) Oracle VM VirtualBox 6.0.2 Setup
1#P Oracle VM VirtualBox 6.0.2 Setup
Custom Setup
oe
Select the way you want features to be installed,
Ciick on the icons in the tree below to change the
way
features will be installed.
<K<
Oracle VM VirtualBox 6.0.2
installation is complete.
Click the Finish button to exit the Setup Wizard.
Orade VM VirtualBox 6.0.2
VirtualBox USB Support
VirtualBox Networking
9+]
2}
B-|
VirtualBox Bridge:
VirtualBox Host<!
VirtualBox Python 2.x St}
<
>
Mstart Orade VM VirtualBox 6.0.2 after installation
application.
This feature requires 98MB on your
hard drive. Ithas 3 of 3
subfeatures selected. The
subfeatures require 64KB on your...
This section can be left alone to the defaults, should
you wish. It simply makes life a little easier when
with
VMs,
dealing
especially when dealing with downloaded VMs,
which you may encounter in the Future. Again, clicking Next moves
you on to the next stage.
With VirtualBox up and running you can now
install the VirtualBox Extension Pack. Locate the
downloaded add-on and double-click. There may be a short pause
while VirtualBox analyses the pack but you eventually receive a
message to install it; obviously click Install to begin the process, scroll
down the next screen to accept the agreement and click Agree.
STEP 10
|
8p
Oracle VM VirtualBox 6.0.2 Setup
Custom Setup
&, VirtualBox
- Question
?
x
|
Select the way you want features to be installed.
Please choose from the options below:
MY Create start menu entries
Mi Create a shortaut on the desktop
M Create a shortcut
in the Quick Launch Bar
The Grade ¥M VirtualBox Extension Pack has been
successfully downloaded frem https:f/
download, virtualbox
orgfvirtualbowis.O.
2f
Oracde VM VirtualBox Extension Pack-6.0.2.vbox-extpack
and saved locally as Users david). VirtualBox
\Oracdle_VM_VirtualBox_Extension_Pack-6.0.2.vboxextpack,
De you wish te install this extension pack?
M)Register file associations
Install
Cancel
www.bdmpublications.com
|
|
Getting Started with Linux
)
Installing Linux ina
Virtual Environment
With Oracle's VirtualBox now up and running, the next task is to create the Virtual
Machine (VM) environment into which you install Linux. This process won't affect your
currently installed operating system, which is why a VM is a great choice.
CREATING THE VM
There are plenty of options to choose from when creating a VM. For now though, let’s set up a VM adequate to run Mint
Cinnamon and perform well.
STEP
With VirtualBox open, click on the New icon in the
top right of the app. This opens the new VM Wizard.
1
~
8) Oracle YM VirtualBox Manager
Machine
File
v4,
lat
few
:
‘
ga
mw
Seltings
u
x
Help
vera
Slot
Omad
7
GD
sraoshots
The next section defines the amount of system
memory, or RAM, the VM has allocated. Remember
this amount is taken From the available memory installed on your
computer, so don’t give the VM too much. For example, we have
8GB of memory installed and we're giving 2GB to the VM. When
you're ready, click Next to continue.
STEP 3
Welcome
VirtualBox!
to
of
a
of
this window Is ist all virtual machines
because you haven't created ony virtual machines yet.
‘The left part
on
your computer, The
kt is empty now
@
In
order to create
new virtual machine, press the Mew button in the
at
‘main tool bar tocated
the top of the window.
poet 2 Snqedants (7)
"G
‘You can press the Fil key to get instant
help, or visit
infrrmatinn
www. vetialbo.org for the latest
and
By Preview
Create Virtual Machine
:
Metnury size
Select
the amount
te the
In
megabytes
to
be
T-afAN, Nested Pag, KYM
is
Paravirumimaton
L.
81028
i
emo
ary:
D
Seaver;
Mere
ig ce
Masur
(64d)
er pam
Hoppy, Optcal, Hard Usk
te
memory soc a 1024 MB,
498
In the box next to Name, type Linux Mint and
VirtualBox should automatically choose Linux as
the Type and Ubuntu (64-bit) as the Version; if not then use the
drop-down boxes to select the correct settings (remember Mint
mainstream is based on Ubuntu). Click Next when you're ready
to proceed.
Mt Cenornon,
Ubunty
fo
of
memory (RAM)
virtual machine.
‘The
Liew
Disabled
Weabied
[pteal ve]
Empty
This section is where you start to create the virtual
hard disk that the VM uses to install Mint on to.
The default option, ‘Create a virtual hard disk now’, is the one we're
using. Click Create to move on.
STEP 4
Fee
Pachena
Or
th,
w
Create Virtual
Sagadants (2)
Mat hine
Dascord
Ber
|
Hard disk
It-you
Virtual
Mas
rah you ean add
a
virtual harddok to the new
machine,
‘You can ether create anew hard ese fle or select one from
the lst or from another location using the foider icon.
hire
If you need more complex storage set vou can sp thes
step and make the changes to the machine settings once the
machine
created,
Jer?
kenny,
fon:
Cpin
cl, Hers
ik
VT
X/AMD ¥, Nested Poca, KYM
Paarnaaton
a
Name and operating system
apa
3
Hiease choose
desonptve name for the newtater!
virtual
lhe ype
la machine
yysteen yous
cat eke
of oper alngg
sii be used
throughout YirkuolBox
tn
sae
Hepey, Upocal, Hard ok
/AM-¥, Need Papen, KYM
vr
ation
Pox:
is
‘The recommended
.
(2)
Do not add
Create
Une
a
a
size of the herd dak is
or tiad bert
dk
"
60,
bee
ences
erual nar isk row
avesising
10.00
frory:
virtual hard disk
»wae
Cater
Ble
»
Sever; Deabied
Daabled
Master:
ry
:
[Oppca
Linge
aster:
[Opecal
www.bdmpublications.com
Drive] Empty
We] Empty
nant
Cnnamon.
15.3468)
vel Gearaal,
(installing
3 oo
After clicking Create the initial setup of the VM
is complete; you should now be looking at the
newly created VM within the VirtualBox application. Before you
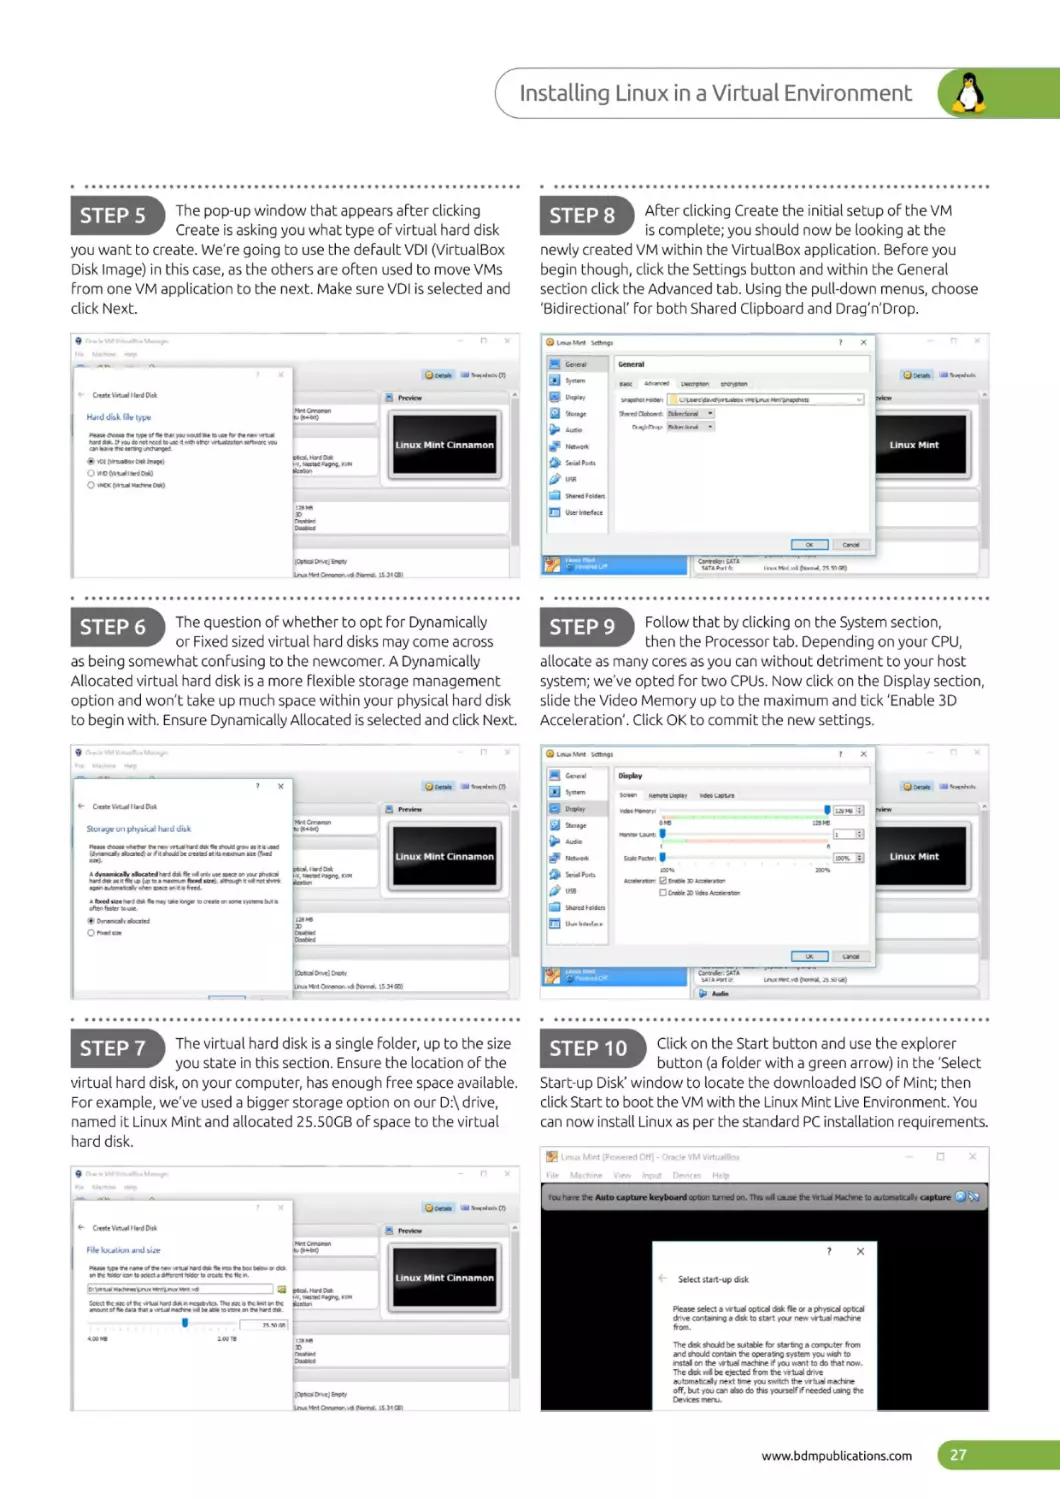
The pop-up window that appears after clicking
Create is asking you what type of virtual hard disk
you want to create. We're going to use the default VDI (VirtualBox
Disk Image) in this case, as the others are often used to move VMs
from one VM application to the next. Make sure VDI is selected and
STEP
5
begin though, click the Settings button and within the General
section click the Advanced tab. Using the pull-down menus, choose
‘Bidirectional’ For both Shared Clipboard and Drag’n’Drop.
click Next.
Fie
te
VA
-
ve tstnlBine Mattayre
Machine
File
x
@ imu Mint
.
settings
EM
Gesu
Pr
Audio
ie?
Nework
s
Be
Mint Qanamen
fa coeon
[
Please choose the type of fhe that you wovie Man to ute for the new virtual
It
de natineed
virtualization
hard dak.
yeu
to use it with other
softens™
Gan leave fe sening unchanged.
Linux Mint Cinnamon
7
rag)
(virtual
Herd Dak)
rex coat acne
OH Svqhiats (7)
GP etate
———_
Create Virtual Hard Disk
Hard disk file type
cx
WD
mx
Help
?
‘
Linux in a Virtual Environment
Prcwered
piston
Pog,
D scialrons
aa
BS
usa
Desk)
Shared Folders,
[CE] User interface
=D
[rmcaet
[Cesabted
(a
Contrer SATA
Cos) Lona]
‘SATA Pret 0:
Hiram Mint
Crriaman.vii (Hormel,
.
15.34 G5)
The question of whether to opt for Dynamically
or Fixed sized virtual hard disks may come across
as being somewhat confusing to the newcomer. A Dynamically
Allocated virtual hard disk is more flexible storage management
option and won't take up much space within your physical hard disk
to begin with. Ensure Dynamically Allocated is selected and click Next.
STEP 6
a
Follow that by clicking on the System section,
then the Processor tab. Depending on your CPU,
allocate as many cores as you can without detriment to your host
system; we've opted for two CPUs. Now click on the Display section,
slide the Video Memory up to the maximum and tick ‘Enable 3D
Acceleration’. Click OK to commit the new settings.
STEP 9
@
Machine
File
i
Mint settings
?
x
Halp
General
{GP Detats
GU Sevqetasts (7)
-
& preview
Create Virtual lard Disk
Storage on physical hard disk,
ie
fe
new virusal hard dick
should grow an
used
‘{Ghmamically allocated) or if it shoud! be created at ita meodmum size {ford
Piaace chooes whether the
we).
a
9
hard de
a8
‘agin
2
ty
Rs up {up to
macdnum feoed size), athough
when apace onit 6 freed.
‘A foced suzehard dak
often faster to wae,
@
sk fle
we not
Ohaw:
GB]
Sorage
PR
Audio
SP
Network
D> scisrow
your prysical
tc
sysem
shrink.
oS
fhe may take longer to create on seme cystems but
vss
Stared Folders
Dyneenicaly docated
Pred ave
(a7)
ial
Linu
Fr
Mint
Crnnamon.vd (Normal,
15,349)
he virtual hard disk is a single folder, up to the size
aus>wvame
you state in this section. Ensure the location of the
virtual hard disk, on your computer, has enough free space available.
For example, we've used a bigger storage option on our D:\ drive,
named it Linux Mint and allocated 25.50GB ofspace to the virtual
hard disk.
File
Machine
Click on the Start button and use the explorer
button (a folder with a green arrow) in the ‘Select
Disk’
window
to locate the downloaded ISO of Mint; then
Start-up
click Start to boot the VM with the Linux Mint Live Environment. You
can now install Linux as per the standard PC installation requirements.
STEP 10
Help
You have the Auto
GQ vetals
&
Create Virtual Hard Oisk
fas
Please type the name of thea new irks hard dak fle Into the box
on the folder icon to select dtterent folder to create the fein,
Machen
anu
Mint i(tra.ne Mart. vcd
2
below
or
(oor)
cick
a
of
megebytcs.
the virtual
hard dak in:
This
ig the init on the:
2
of fle data thet: virtual machine wf be able to store on the hard disk.
Scloct
the aize
anourn
Preview
Mint Clanaman
File location and size
|: Wirtusal
capture keyboard option turned on. This will cause the Virtual Machine to automatically capture (_)
OS Seqednats (7}
a8
PEO
Pca,
Select start-up disk
Dike
Hard
“¥, Nested Paging,
ection
KYM
Please select virtual optical disk fle or
drive containing a disk to start your nev
4
a
physical opbcal
‘artuac machine
from
2.0078
“He
disk should be suitotle tor -tarting a .ompe tes ‘Tor
anc shoud ‘ontain the operaana ~,stem ;2u ie te
instell on the irtual machine t cu
ant to de tet ne.
The dich ill be erated from the irtual dr &
avton otlall) neat ttre Cus. Ith the ital t aching
off, but you can also de tis yourself if needed using the
Devices menu,
[Optical Drive] Empty
2M
vel (Normal,
15.3465}
www.bdmpublications.com
Xx
.
S
~
SY
ON
8]
iY,
se
_
4
4
“Anyone can build a fast
processor. The trick is to
build a Fast system.”
Seymour Cray (Electrical Engineer, and
designer/founder of Cray Supercomputers)
‘\
—
www.bdmpublications.com
q
(
Getting
to Know Linux
We've used Linux Mint as a guideline
here, as it’s an easy to use distro and
perfect for former Windows users.
It's also one of the most developed
and well documented Linux distros
as well as having some Fantastic
configuration options.
this section, we introduce the Linux
Mint Cinnamon Menu and Desktop
Environment, how it works and what
you can do to customise it. Want to
create another user or even discover
how to become anonymous online?
Then read on.
In
—
30
~——
2
Introduction to the Cinnamon Menu
32
Navigating the Cinnamon Desktop
34
10 Things to do After Installing Linux Mint
36
Did You Know...Apollo 11
38
Creating Users
40
Customising the Desktop
42
Becoming Anonymous Online
a—
ee
www.bdmpublications.com
/
Getting to Know
Linux)
Introduction to the
Cinnamon Menu
Now that you have Linux installed it’s time to have a good look around. First though, if
you're using Virtualbox you'll have a notification regarding Software Rendering; here’s
how to Fix it.
CINNAMON VIRTUALBOX FIX
You've already looked at some list functions, using .insert, .cemove, and .pop but there are also Functions that can be applied
to strings.
Before we begin, we're assuming you're having this
issue within Virtualbox. The Software Rendering
message appears in the top right of the desktop. To fix this, click
on Devices in the Virtualbox window, Followed by Insert Guest
Additions CD Image.
STEP
1
After moment or two you're automatically
STEP 3
a
dropped into a command line view, called the
Terminal in Linux. This details the installation of the new VirtualBox
drivers, removing any old drivers it has detected, and installing the
latest versions. It won't take long and when it’s done you will be
asked to hit Return to exit the Terminal.
Terminal
File
7
Edit
View
Search
Terminal
Help
ea seem
te
(ees Pee Vee [oele
Uncompressing VirtualBox 5.1.26 Guest Additions for Linux
VirtualBox Guest Additions installer
Removing installed version 5.1.16 of VirtualBox Guest Additions...
Copying additional installer modules
Installing additional modules
Ietert Gueet Additions CO image
...
MC
acl
Press Return to close this window...
Pi Sehe
The Guest Additions CD contains drivers for
Virtualbox, including the virtual video hardware.
When it’s loaded in, you get a ‘software needs running’ notification
box with two options, Cancel and Run. Click the Run button and
enter your Linux user password.
VBox_GAS 6.0.2
This medium contains software intended to be
automatically started. Would you like to run it?
The software will run directly from the medium "VBox_GAs_6.0.2".
You should never run software that you don’t trust.
If in doubt, press Cancel.
Cancel
www.bdmpublications.com
Caso
The Virtualbox Additions CD icon is on the desktop,
so right-click it and then scroll down the menu to
click Eject. You can now restart Linux Mint by clicking the Menu, the
bottom icon in the strip to the left, then the Restart button. This
reboots Mint and the problem is fixed.
(Introduction
to the Cinnamon Menu
CINNAMON ON THE MENU
Now the Software Rending issue for Virtalbox users is out of the way, let’s take a look at the Mint Menu and how it all works.
Remember, this is just for Mint Cinnamon, other distros look and behave differently.
su =o
First off, you may have already noticed the Welcome
Screen that pops up when you login to Linux Mint.
Take a moment to browse through the options, read the First Steps
option and so on. When you're done, click the X in the top right
corner of the window to close it.
Open up the Menu again but this time hover
the mouse pointer over Graphics, then click on
GNU Image Manipulation Program. GIMP is a powerful image
manipulation app that’s probably as effective as Adobe's Photoshop
but requires a little more work to get the results you want. It’s
certainly worth taking the time to master, though.
STEP 4
Wetcome to Linux Mint
i
ote aretgnernohrh
“ne nae
Una
#
We
ARF
Pope FO
ae everyone
2 Macha
Kat MAE
Wm ATH
He
akan teen
hal
promt
ON
mat
te Rare
ont
4.
6,
MOG
yor MeL
qi.
*
You've already used the Mint Menu to reboot
the system and when you First used the Live
Environment. This time, click the Menu button and hover over
the Office entry in the middle column. This changes the icons
represented in the right-hand column, detailing what apps are
installed under that section.
IF you're looking For
a particular Function or app,
such as setting up a printer, click on the Search box
at the top of the Menu box. Start typing the app or Function you
want, such as printers, and the Mint Menu displays the relevant
options below. This works with most modern Linux menus,
regardless of the distro.
Launching any of the apps from the Menu is as
simple as Finding one and clicking it. For example,
under the Office section, click on LibreOffice Writer. Writer is the
preinstalled word processor for Linux Mint. It opens and saves as
Microsoft Word and Functions in almost the same way.
Hover over any of the apps listed on the right-hand
column and right-click, to be presented with a list of
options: Add to Panel, Add to Desktop, Add to Favourites and Uninstall.
Most of these options are obvious in their use. Add to Favourites
though places the app in the left-hand, quick-access column.
STEP 2
STEP 3
(le
Lot
em Ines
fort
4dea
fen Tate
Form
Ao lp
Tou
me Re
G8R
+
Bete
STEP5
we /O-R
Cimmeria
member
|
“The dak dee
woods, sunking sepe of wabre bis;
“Tie pry
str
[ae deskKee
Arne
‘Sata
AB
rote
tat howe
ds da
mb
ath
Sai
ch:
wou wna,
stiri
spor veut oarhing
aes
atc drain
dere the
poe,
hth,
at
sea
br
98,
www.bdmpublications.com
Getting to Know Linux
)
Navigating the
Cinnamon Desktop
Each desktop environment behaves differently to that of the next. Some DEs offer
widgets that can be customised and placed on the desktop, others instead opt For a
clean, sharp look to keep everything running as Fast as possible. Let’s see what the
Cinnamon desktop has to offer.
A TOUCH OF SPICE
The Cinnamon desktop environment is a great blend of style and performance. There’s lots to like about it, which is why it's
such a popular DE.
auf
Begin exploring the Cinnamon desktop by doubleclicking the Computer icon. This brings up Nemo,
the File manager used in Cinnamon. The Computer icon opens up
the root level File system, with access and views to the optical drive
(if you have one installed), hard drive and core Linux file system.
ode
Nemo has many different Features, views and
ways so that you can view and manipulate Files and
folders. For example, if you have any images in the Pictures Folder,
you can select the icon zoom level For the images by using the slider
located in the bottom right of Nemo, labelled Adjust Zoom Level.
STEP 3
og
wh
2
ae
i
Gay
es
0
GE
Eon
fa fa
The Linux File system can appear confusing to
a Former Windows user, so until you're a little
more knowledgeable on how it all works, we’d recommend you
concentrate on the Home icon on the desktop instead. In here is
everything relating to your user account: where you store Pictures,
Videos, Music, Documents, Downloaded items etc.
STEP 2
Just like any good file manager,
Di
nm
open
Pye
sere
con
erwin
Wi
htowe
20
to
BD comoress
Ba Propertion
space
www.bdmpublications.com
18.1
G8,
ott stdpmn
,
Open
&
free
iF you
right-click
any of the files or Folders within you get a wealth of
options. In the case of Cinnamon, the defaults allow you to play or
view a File depending on what type of file it is and copy, cut, delete,
compress, rename, send via email and view its properties.
matic
ber
(Navigating
At the bottom of the desktop there’s the Panel.
We've already looked at one section of the Panel,
the Menu. IF you right-click anywhere on the Panel, other than ona
Panel app, you see a menu allowing you to edit, add and set up the
Panel in a different way.
the Cinnamon Desktop
anos
From that desktop right-click, context menu, select
Customise, Followed by the Desktop Settings link at
the bottom of the newly opened window. This opens a new window
where you're able to edit which desktop icons are present. IF you're
using a setup with multiple monitors attached, you can also choose
which monitor displays which icons.
‘Show desitop icora
on prenaxy morwnr
.
ony
«a
a
Moe
a
Mounted Dene,
|
‘options
@ Temes
3.
Sytem
Cieste New Folder
‘show
New Document
Seis
1cone
from eras sung
x
montors
»
t
Current Monitor
Layout
tay
Monitor
skies
46405
Desttap Hackground
a
tioemat
"
rewiauncher here
Ouran
For example, if you click the option Modify Panel,
you can remove, move, remove the Panel, add a
new one and clear it of any Applets that are currently present. An
Applet, by the way, is an app that's designed to work and Fit into the
Cinnamon Panel.
STEP 6
Yeruat
ov
Click on the Menu and type system settings and
open the resulting icon. This takes you to the
System Settings options. From here you're able to control and edit
the way Linux Mint Cinnamon looks and works as well add new
users, manage the Firewall and enable accessibility options.
STEP 9
@ Appearance
eo
Barigroures
+
@
iter
@
By
Fore Sriecoon
Themes
7
Preferences
a,
0
Acvernbabty
eo
Mt
Comey
scivermmt
2
Account deals
Ages
*
8
«
Inga
Method
7
Languages
sua
Dake
k
time
oS
8@
oO
Deshets
rsttop
brtersons
O
Aoutnator
vere
ting
Onde
Aecounts,
S
Panel
=
a
Preterred
&
eneral
@
Prwacy,
Worse
@ Hardware
|
Ss
O
Ertan
If you right-click anywhere on the Cinnamon
:
desktop you see a set of options that allows you to
further add to, edit or view the desktop content differently. It’s very
similar to that of Windows, which is why Mint is a good choice For
ex-Windows users.
STEP 7
avlry
celour
&
Grapes Taber
eters
a
G
MBEAN
SOE
short, Linux Mint Cinnamon can be configured
to look quite extraordinary. There are many
examples available of how good it can get and what can be
achieved. You can go as complex or as simple as you want, adding
different component and animations or just keeping it plain and
easy to read.
STEP 10
In
@| Create New Folder
create New Document
[
Add Desklets
fe] Change Desktop Background
+
Create a new launcher here...
@
open in Terminal
@» Open as Root
Customise
www.bdmpublications.com
Getting to Know Linux
)
10 Things to do After
Installing Linux Mint
Linux Mint is a polished distro out of the box but, as with most Linux distros, there are
some tweaks that can be applied to improve the way it works. Although these are Mintspecific tweaks, most can be applied to other distros.
LINUX TWEAKS
Some of these post-installation actions are highly recommended, while others are just handy additions and simply tweak the
system or add a customisation.
The First, and most important, post-installation
action is to update the system. Click on the shield
icon in the Panel, Found at the bottom right of the desktop next to
the time and date. This launches the Update Manager.
STEP
1
Update Manager
Click the OK button and you can see a couple of
updates ready for installation. Before you update
click
on
the blue bar OK button to switch to a Local Mirror.
though,
This opens the Software Sources option. In the Mirrors section, click
on the Main and Base drop-down menus and select a server closest
to your current location.
STEP 3
Welcome co the Update Manager
“Tr
tek
ets yOu
pt
pet
a4 yarn WA
a
Mirrors
ese
@ PPAs
Main (tessa)
RE
hetp:weww mirrneservice. argysitesmparkages Jinuncmint comuparkages
@
Additional Repositories
Base (bionic)
«SER
hitpy/archive.ubuntu.corvubunty
»
Authentication Keys.
_
Optional Sources
2 Moimerumee
Source code reposituies
x
Debug symbak
x
Unstable packages (romeo)
x
Restore the default settings
Linux Mint offers the user a three level policy
approach to updates: Don’t Break My Computer,
Optimise Stability and Security and Always Update Everything.
The recommended option is the Optimise Stability and Security,
which only updates safe, essential patches that won’t impact critical
elements of the core OS. Read through the descriptions but choose
the middle, and recommended option.
Click the Update the Cache button and close the
Software Sources window. Back in the Update
Manager, click on the Install Updates icon and enter your password.
The updates automatically apply themselves and relaunch Update
Manager, this time with a lot more updates. Again, click Install
Updates, OK any messages and wait for them to finish.
Welcome to the Update Manager
t
break my computest
Optnise
bo
stability
update
and seeutity
eventing
e
sos
www.bdmpublications.com
(1 0 Things to do After Installing Linux Mint
The updates are graded by level, being alow
level update, level 5 being a dangerous one. Stick
to level 3 updates, is our advice; and click Replace For any messages
regarding overwriting a configuration file. With regards to the
Software Rendering issue and lack of drivers For non-VirtualBox
users, click the Menu and type ‘driver’ into the search box.
STEP
5
1
When asked to accept the changes, enter
Y and also
when asked to configure libdvd. Make sure OK is
highlighted and press Enter, then Yes to any Further questions. Next
up, still in the Terminal, enter: cat /proc/sys/vm/swappiness;
the result should be 60. IF your computer has less than 4GB of RAM/
memory, then enter: gksudo xed /etc/sysctl.conf.
STEP 8
david duvid
Fle
Edt View Search
Terminal
mine
Help
tc)
Configuring (ibdyd-pka
This package autonates the process of Launching dowloads of the source
files tor Libdvdess2 froa videatan.org, compiling thea. and installing
the binary packages {libdvdess2 (ibdvdcss-dev?
Please cun “sudo dpkg-reconfigure Libdvd
the first tine.
Click the Driver Manager app that appears as a
result of the search and enter your password. Mint
takes moment to analyse what's available and presents you with
a selection of potential drivers based on your detected hardware.
Those with graphical problems, such as Software Rendering, should
opt to use the latest, recommended Graphics driver.
STEP 9
os
a
NVIDIA Corporation: GMIO7M {GeForce GTX
O
you
to Launch this process for
This tweak helps speed up systems with less than
4GB RAM/memory. Scroll down to the bottom of
just opened and add the following new lines:
Decrease swap usage to a more reasonable Level
vin, swappiness=10
#
Click File > Save, then File > Quit. Reboot Linux Mint and you should
notice a slight hike in performance.
Driver Manager
Ge
the File
pkg™
ECM}
xserver-xorg.video-nouveau
Vt
nvidia-340
renter
JAD IE Qubuetsg “6
O814
Bran drives etesise
S80
NADA
B
unknown
el PL
Donotuse the device
{propriety drverm
use
At this point you'll probably need to restart Linux
Mint, so do that now. After a reboot click the Menu
button again, Followed by the Terminal. The Terminal iconisfoundin
the left-hand column, above the Files icon. With the Terminal open,
enter: sudo apt-get install 1ibdvd-pkg, press Enter and
type in your password. This enables encrypted DVD playback.
david@david-mint
File
cp
Edit View
Search Terminal
mint
-§
sudo
[sudo] password for david:
Security is always a concern in this modern digital
age. While Linux Mint is a secure system, it’s
advisable to always try and improve it. Click the Menu button and
search for Firewall; click the Firewall Configuration icon and enter
your password. In the Firewall window, click the Status slider to On.
STEP 10
~
Help
apt-get install libdvd-pke
Getting started
www.bdmpublications.com
ae
'
point in human hista
First
mankind
stepped on the
vasa turning
h
ute DM Tehcde melas,
cratch. Using a new meth:
Peirce
ue
russ
bores
Boater
uh
FLOWSDLE.
cok
Cr
carats
RETURN
GoRACK
2
VES, CECE
FOR AUTO-THRCTILE
HOE
CxTCRD,
LLeuTS
an
ecrew
cue
ect
coeat
tm
PH
CAF
ae
caus
eure
Ter
geT0%e0n
ree
pana
Fe
an
senior
Paes
4uTO THROTTLE MODE
DTSDLANS vS0NIS
fe
Oat
Cus
RETURN
Ri-Z0S PLEASE PERELE?
1ST 308 TURN AU BONES FIC
fysee
.
sae
.
nate
-
%
cour
gee
af
oa
+
$$:ra8
CONSTANTS FOR THE IGNITION ROUTINE
"sp
PERTABLE +7
.
PALADRES
ADRES
PAQTABLE
ADRES
PAITABLE
-*
eo
5
Programmers
aren’t without a
sense a humour.
See what else is
in there.
$
One giant leap for
mankind, and coding.
Getting to Know
Linux.)
Creating Users
When you First install Linux Mint it is configured For use with a single user. While
sharing a user account with the entire Family is Fine, there may come a time when you
need to create separate users with their own unique Home folders.
NEW USERS
Having different users means each user has access to his or hers own areas on the system. Documents, pictures, videos and so
on are separate, as with multiple users on other operating systems.
Click on the Linux Mint Menu and type ‘users’ to
begin searching For the relevant console. From the
search results, choose Users and Groups and enter your password.
The Users and Groups console is quite basic looking, and thankfully
easy to use. At First, you can just see your own username From when
you installed Linux Mint.
an
Enter the new user’s Full Name, followed by the
Username they need when logging into Linux Mint.
Make sure the username is all in lower case, a-z and 0-9 characters
only. You can have full stops, underscores or hyphens if you wish.
Click the Add button when you're ready to continue.
STEP 3
Users and Groups
Users
Groups
David
david
Account Type
Standard
FullName
BDM Publications
Username
bdm
The username must consist of only:
- lower case letters
(a-2)
> numerals
(0-9)
and"! characters
Add
Cancel
To add a new user, click the Add button at the
bottom of the console. There are two types of
user you can create, Standard and Administrator. Unless the new
user has need to install new apps or access parts of the File system
beyond their Home folder, then opt For the Standard account type.
Otherwise, use the Administrator account type.
STEP 2
The new user appears in the list of current Linux
Mint users, in alphabetical order. At present, there’s
no password set so click the user in the list oF current users, then
click the No Password Set option under the user's username.
ay
Users
Users
-
Users and Groups
-
Groups
Groups
ai
David
david
bal
David
Picture
david
Account Type
Account Type
Standard
Administrator
FuliName
Username
Standard
Name
BDM Publications
Password
Nopassword set
l
The username must consist of only:
~ lower case letters
(a-z)
- numerals (0-9)
-*,'*, and ‘' characters
'
Cancel
|
www.bdmpublications.com
Add
Groups
—_ bdm,
nopasswdlogin
v
Creating Users
You can now enter a password for the new user
or click the curled arrow at the end of the New
Password text box to generate a password for you, as well as
displaying it. Naturally, it’s good idea to come up with as strong a
password as possible. When you're done, click the Change button.
a
Users
Once logged in the new user is required to set up
their own desktop wallpaper, icons, Panel, Menu
and so on. Depending on what
Type you set up for them,
Standard or Administrator, they won't be able to install any new
apps. This screenshot is From a Standard user account type.
STEP 7
Account
Greuine
bdm@david-Mint:
File
Edit
Search
vie
a
Sorry, user
Chee bee
bditdavid-F
david
Terminal
bdm
is
~
Help
$ sudo apt-get
bdm:
[sudo] passwerd fer
David
@
install
plank
not allowed to execute
‘/usr/bin/apt-get install plank’
as ro
earn
A
1
Change Password
New password
|
iS
4eVEc_fc3|
|
—
Confirm password
v
eo
Good
4eVEc_fc$
Show password
jin
You can close the Users and Groups console window
now, as the new user has been created. IF you click
the Mint Menu, Followed by Logout, you are presented with the
Mint Login Manager. The new user is now present in the list of
currently available users. Click on him/her to log them in.
tos
sudo)
You can create as many new accounts as you
need and you're able to switch between them
when required. It’s best to have just one account that’s capable of
installing new software, that way you can keep track of what's on
your system.
Session
Log out of this system now?
®
Switch User
Cancel
COMMAND LINE ACCOUNTS
Just as you'd expect, you can also create a new user within the command Line. Open up a Terminal session under the main
(yours) Administrator account,
STEP
1
The process for adding a new user from the
command line is relatively simple. To begin with,
PtASUdO_adduse_<username>ItiG
ts
the new user's login name. You're then asked to create a new
password For the user, along with their full name and other details.
Click y to confirm the details and create the user account.
sudo adduser jim
Adding user
jim’...
Adding new group ‘jim’ (1002)
Adding new user
jim’ (1002) with group jim’
Creating home directory “/home/jim’
Copying files from /etc/skel’
Enter new UNIX password:
Retype new UNIX password:
passwd: password updated successfully
Changing the user information for jim
Enter the new value, or press ENTER for the default
Full Name [J]: Jim Gale
...
You can check the details and account type for
the new user From within the Users and Groups
console. IF you want to delete a user from Mint, you can either
do delu
Delete button in Users and Groups.
STEP 2
Users Groups
...
...
[]:
Room Number
Work Phone
[
Test a aheltaa
1:
|:
David Hayward
david
@
‘Are you sure you want
files
to
with this
permanently delete
bdm
and all the
user?
(ola at-tame
www.bdmpublications.com
Getting to Know Linux
)
Customising the Desktop
Customising the operating system desktop is one way to make it your own: a
personalised workspace that is there to help you work, inspire you or Feature the
company logo. Whatever your reasons For having your own desktop, here’s how it’s done.
YOUR DESKTOP
Linux is probably one of the customisable operating systems there is. With just a Few tweaks, one or two extras installed and
some imagination, you can create something incredible.
The First aspect of desktop customisation is to
change the wallpaper. Right-click the desktop and
choose Change Desktop Background. This opens the Backgrounds
app in Linux Mint; remember, other distros may present their
background, wallpaper selection tools differently.
1
[a
sjsmewee
You just need to click the available images, from any
of the locations provided to have them install as the
desktop wallpaper. Incidentally, ifyou have images stored in another
location on your system or network, you can add them by clicking on
the Plus symbol at the bottom of the Backgrounds console, using
the File manager to locate them.
EGU
ee aT
STEP
More recent versions of Linux Mint display available
backgrounds depending on the version the user is
running. You normally get three categories followed by a fourth,
Pictures, which is separated from the others. The Pictures option
is different because it reads the image content From the Pictures
Folder in your Home area.
STEP 2
STEP 4
By clicking on the Settings tab you can, instead,
play numerous images as a slideshow or change the
aspect of the wallpapers to
a
variety of choices.
Backgrounds
No piceure
Mosaic
Centred
Background settings
Backgrounds
Scaled
Settings
Play
backgrounds as
Picture aspect
4 Linux Mint
Summit
Pitsunda
Are
BL
Autumn in Japan
a
Small Leaves
1
4
Surreal Sunset
r
www.bdmpublications.com
Lake
te
a
slideshow
Stretched
Joon
(_customising
none of the available wallpapers take your
fancy, open a browser and search for the type of
background image you prefer. When you've found the image you
want as the desktop wallpaper, right-click it and choose Set As
Desktop Background from the list of options. When the Set Desktop
Background console open, click the Set Desktop Background button.
IF
the Desktop
Themes allows you to change the way certain
aspects of the Mint desktop look: Window
Borders, Icons, Controls, Mouse Pointer and Desktop. In the
Settings tab you can extend the options with a Few on/off slider
buttons, too.
Themes
i
[6
toranywatpepe Seog
x
+
€
Window borders
Icons
Mincy
Controls
Mouse Pointer
Click the Menu button and search For ‘desktop’
and click the Desktop Settings result. The Desktop
console allows you to pick the layout, desktop icons and options
for multi-monitor support you want. You can experiment with the
options for the best setup, according to your personal tastes.
STEP 6
IF you click on the Add/remove button in the centre
of the three available options, you can choose the
default view From a number of preinstalled themes. Click the theme
you want, then click the Install (downward-pointing arrow) button
STEP 9
to enable it.
—_
Desktop
Settings
Themes,
Desktop Layeut
‘Show desktop om.
on
pewriiry
|
movutor only
Sutthy
Powulatity
*
Q
Desktop icons:
Available themes
~
Home
Br
ios-x
Muurted Denes
:
cc
Racer
tine
Mins
Nework
Options
Stew cons
there!
ws
+
ws
v
we
+
Vivaldi-ZonnOS
sreluged
from massing mandors
Silk
Eple
In addition to changing the desktop wallpaper,
and how the icons are displayed, you can also alter
the overall theme for Linux Mint. From the Mint Menu, search For
‘themes’ and click the Themes app as it appears in the search results.
Ast theme
Click back on Themes, then Desktop and you can
locate the newly installed theme and apply to your
installed
Themes can also be uninstalled via the Add/
desktop. Any
Remove button. It’s worth spending some time personalising your
desktop how you want it and there are some incredible themes
available too.
STEP 10
aon
www.bdmpublications.com
oo
Getting to Know Linux
)
Becoming
Anonymous Online
The digital age has led to many great advances in communications; however, it has
also brought on a new age of spying and snooping. Most of us are no strangers to the
Frequent news stories of governments, secret organisations and underground hackers
breaking our privacy but how can you combat this?
ANONYMITY WITH MINT
While it’s virtually impossible to become totally anonymous online, you can take measures to ensure our privacy is at its best.
Starting with the basics, use HTTPS instead of the
standard HTTP when browsing. This means that
anything that’s transmitted over HTTPS is secure (hence the S$ part
at the end) and encrypted.
|
Although using Google may seem like the obvious
choice For a modern Internet search, the company
does track all searches made by an individual. Instead, consider an
alternative search engine, such as DuckDuckGo, a search engine that
doesn’t store personal data or track you.
STEP 3
aie
‘Switch to DuckDuckGe and
Google
Googie Search
‘ake back your privacy!
Pet Featng Lucy
DuckDuckGo
Q
+
When you're browsing, consider using the Incognito
or Private browsing modes available in a browser.
This disables your web history and web cache, allowing you to
browse without the details being stored for later scrutiny by
someone else. However, it doesn’t stop any data or search tracking.
Caso
IF you're regularly on the Internet then consider
installing some of the browser plug-ins that
enhance your privacy. For example, for Firefox, use Ghostery,
NoScript and Adblock Plus to block trackers, adverts and other data
mining techniques.
¥
Add-ons
Welcome te Firefox Add-ons. Choose trom tousangs of extra features ang styles
Google
Featured Extensions
www.bdmpublications.com
Laser Mote
Lo
make Rretos your oan,
:
(Becoming Anonymous
Online
VPNS AND TOR
The previous steps can aid your online privacy but to really become anonymous you need a Virtual Private Network and Tor.
auto
AVPN
is a remote server, or cluster of servers, that
establishes a connection with your computer. The
end result is that your computer's identity on the Internet is hidden
behind the VPN remote server; so you could live in the UK but have
an IP address (the computer online identity) belonging to Iceland.
works?
How
a
When the download has finished, drop into the
Terminal and enter the Downloads Folder, cd
DownLoads/. Enter 1s to check the tar.xz Tor file is present, then
enter:tar
-xf tor-browser-1linux64-8.@.4_en-US.tar.
xz (Tor is updated regularly, so if your version is different press Tab
to autocomplete the tor-browser
- Filename). When the files are
unpacked, use cd tor-browser_en-US/ to enter the new Folder.
david@david-Mint: ~/Downloads/tor-browser_en-US
You
——
—- §
a
Corporate
oa.
$
tar -xf
aes
tor-browser-tinux64-8.0.4
en-US. tar. xz
a
Government
Hackers
a
sy a2
Most good VPNs charge a monthly or annual Fee
but it’s worth the expense. We use CyberGhost,
www.cyberghostvpn.com, which offers VPN connections For
Windows, Mac, Mint (as well as other Linux distros), Android and
iOS devices. Details For each OS can be Found at www.support.
cyberghostvpn.com/hc/en-us/articles/213190329-Read-me-first-.
A quick Ls reveals a couple of entries: a Folder called
Browser and a file called ‘start-tor-browser.desktop’.
To start the Tor setup, type ./start-tor-browser .desktop.
This command launches the Tor setup, where you are offered two
options: Connect or Configure. For most users, the Connect option
will suffice. Click Connect when you're ready.
Q
Connect to Tor
Te
Unpack the new
CyberGhost 7!
Browser
Click “Connect” to connect to Tor.
Click “Configure” to adjust network settings if you are
in a county that censors Tor (such as Egypt, China, Turkey}
or it you are connecting from a private network that requires a proxy.
Configure
Connect
CyberGhost VPN 7.0 - unboxed
After the connection
is established, the Tor Browser
launches. This is customised version of Firefox
and from here you can securely browse the Internet without Fear of
being viewed or tracked. Mixing both a VPN and Tor makes for an
extremely secure and private connection to the online world.
Another option is to use Tor. Tor is an open network
that you can attach to that hides your IP address
behind countless nodes around the world. It's available for Windows,
Mac and Linux computers and is very easy to install and use. Start
by navigating to www.torproject.org/download/download-easy.
html.en and clicking on the Download Linux 64-bit button.
STEP 6
STEP 3
a
About Tor -Tor Browser
+
x
& Dowrtoed
Tor
‘Download ter-MoriRa
»ece
-é
Of
Oo
ene
retcneg
~
epee
=
@
mo
=
Firion
g
TOR,
About Tot
Pres
Documennanon
ing
sNewslemar
Conlacr—aspanot
FAN
Keep Tor strong.
Give today and Moz.
ete
cae
nga
ten
cat em
onnte
hene
ne
a
vel match your doraton
aL
Tor Browser for Linux (64-Bit)
Version
804 -Linux (64-810
ssa aroun enens
fevesyting
Caw
ote
rs)
&
you need to nalely bowse the
hiernet. Ths packege tenures
no
mniafabon
«
De
ROOM
Not
User Lees? Download fer Max
of
Just extract
and
Explore. Privately.
Weniow
Engi
www.bdmpublications.com
titi
Index
%,
itiihitbfin
et
de.
Wa,
fg
44
www.bdmpublications.com
( using the Terminal e
|
ki}
a
ware,
HS “
oF!
—
this section you will explore the
intricacies of the Terminal, and how it
works with Linux. You will learn how to
manipulate the Linux File system From
the Terminal, and you will discover
some odd, but fun things you can do in
the Terminal.
In
-
als)
The Linux command line, the Terminal,
is an incredibly powerful environment.
From it, you can bring the OS to its
knees, or update it to something
spectacular. You can hack into remote
computers, look at an animated
ASCII camp fire, install new apps and
programs, watch Star Wars played out
from a server in the Netherlands, and
code intricate automated scripts.
*
Anonymous (Postedoncomp.
|
software.testing)
The Terminal rules supreme in the world
of Linux. Learn how it works, and you
can access all that power.
.
~
'
46
Basics of the Terminal
48
Update Mint via the Terminal
50
Install Apps via the
—
52
Install
—
54
Did You Know...Linux Kernel 0.01
56
Creating
58
Creating and Removing Directories
60
Fun Things to do in the Terminal
62
More Fun Things to do in the Terminal
64
Linux Tips and Tricks
66
Did You Know...Linux and the Big Bang
68
Creating Bash Scripts— Parts
78
Pix
80
Command Line Quick Reference
82
A-Z of Linux Commands
Terminal
Part 1
Apps via the Terminal
Part 2
a File
Using the Terminal
1-5
Linux = The Perfect Combination
Did You Know...Good enough for NASA
www.bdmpublications.com
45
\
.
Using the Terminal
Basics of the Terminal
Most operating systems use two kinds of interface, the GUI, which is the desktop
that Windows, macOS and Linux Mint boot into and the command line. While modern
operating systems shy away from the command line, Mint uses the Terminal to give the
user greater control of the system.
TAKING COMMAND
The command line, or Terminal, is an extremely powerful interface. Everything you can do on the desktop can be done within
the Terminal. Let’s start by seeing how it works.
The Terminal can be accessed by either clicking on
the Terminal icon on the Panel, located between
the Firefox and files icons or launched by opening the Menu and
selecting it From the left-hand quick launch strip.
STEP
STEP 3
1
What you currently see in the Terminal is your login
name Followed by the name of the computer; as you
named it during setup when you first installed Mint. The line then
ends with the current folder name; at First this is just a tilde ~, which
means your Home Folder.
mR Pees ellie
@ castes)
account details
|
a
|
|
Graphics
Haas
|
|
B
F
ld
| |
BSW
eR
ie
Backgrounds
LORra
26)
davidedavid-mint ~ $ Jj
Pere [tKy
carl
Ua lessees)
LJ Peyote
Pease sce
ae ecicas
te
The Flashing cursor at the very end of the line is
where your text-based commands are entered. You
can begin to experiment
with a simple command, Print Working
Directory (pwd), which outputs the current Folder you're in to the
screen. Type pwd and press Enter.
The Terminal gives you access to the Linux Mint
Shell, called Bash, which gives you access to the
underlying operating system. Everything in Mint, including the
desktop and GUI, is module running from the command line.
STEP 2
ay
a
davidédavid-mint
File
Edit
View
Search Termina!
~
david@david-mint
Help
File
46
www.bdmpublications.com
Edit
View
Search
Terminal
Help
~
(Basics
All the commands you enter work in the same
manner: you enter the commana, include any
parameters to extend the use of the command and press Enter to
execute the command line you've entered. Type into the Terminal:
uname -a and press Enter. This displays some system information
regarding Mint.
STEP
He
bear
View
5
earch
Lerrmanal
of the Terminal
View and Search options let you alter the sizing of
the Terminal window and of course search within
STEP 8
the Terminal For any particular key words.
david@david-mint
File
Edit
Terminal
View
Before we get into entering commands, let's take
moment to see what menus the Terminal has to
offer. The File menu option allows you to open a new Terminal,
create a new profile, where you can alter the size, colours and
behaviour of the Terminal, add a new tab, and close all current
active Terminal sessions.
Help
The Terminal entry extends the profile editing and
sizing and allows you to alter the character encoding.
Interestingly, you can also set it to Read Only mode, which stops you
from entering any commands into the Terminal; this is good for when
you need to permanently display the Terminal contents.
STEP 9
a
david@david-mint
david@david-mint
FJ
Edit
Search Terminal
View
~
Help
a
dal
ry
~
File
Edit
View
Search§
hadi
~
**!
Help
Open Terminal
g@ Open
Tab
Reset
New Profile
Reset and Clear
% Close Terminal
1,
% Close All Terminals
80x24
2. 80x43
3. 132«24
4,132%43
The Edit option lets you copy and paste commands
to and From the Terminal and other sources; handy
for when you want to copy a very long and complex command From a
web page. It also allows you to edit the current profile preferences.
david@david-mint
View
Select
Search
Terminal
Finally, the Help option displays the help contents
and version number of the Terminal, or to be
more precise, GNOME Terminal; we'll simply refer to it as Terminal in
future. The Contents are worth having a quick read through, to help
familiarise yourself with how the Terminal works.
STEP 10
~
Help
All
Preferences
Profile Preferences
cig
Started
bing With Text
www.bdmpublications.com
47
Using the Terminal
}
Update Mint via
the Terminal
Up to now you've been using the shield icon to launch Mint Update Manager in order
to update the system and upgrade the currently installed apps, tools and other
elements. However, you can also accomplish a complete system update and upgrade
From the Terminal.
USING APT-GET
To update and upgrade via the Terminal
you use the APT (Advanced Packaging Tool) command. It’s a powerful command and
combines different elements depending on its use.
ani
Start by opening a new Terminal or if you already
have one opened clear its contents with the clear
command. This starts you off with a clean slate on which to work.
david@david-mint
View
Edit
File
Search Terminaj
saint
Ret
~
$
Apt-get is used to update and upgrade the
software in Mint, as well as Ubuntu and other
Debian-based distros. Using the Update element retrieves
new package lists and updates the list of source files. Upgrade
downloads and performs an upgrade to the latest versions of those
files. To start the entire Upgrade and Update process, enter: sudo
apt-get update, Followed by your password.
STEP 3
oo
~
Help
clearff
david
Edit
File
View
Search
Terminal
caret
:
ere
CUPL
Enter: apt-get into the Terminal. This brings up a
list of the most used apt-get commands, along with
a brief description of what the command does. It’s worth having a
look at, even if it doesn’t make a huge amount of sense at this time.
STEP 2
dived
File
View
Edit
Search
Terminal
Oe
Co
SC
teCie
for installation,
upgrade
update
-
install
-
Retrieve
new
Install
new
Omr
OC
RL
-
ccm
ae
Ede
er
packages (pkg is
Search
eet
together
mint
Pr
lists...
Calculating upgrade...
Done
Done
automatically installed and are no longer required:
Libgkeyfitet.e-cil Libgnome-keyring1.@-cit Libmono-accessibility4.e-cil Libmono-data-tds4.odap4.@-cil libmono-sqlited,@-cil Libmono-system-componentmodel -dataannotations4.@-|
were
SCL
LT)
em design4.@ cil libmono system enterpriseservices4
.@|
yotem-idapd.6-cil Livmono-system-numerics4.@-cil
system-runtime-serialization-tormatters-soap4.6-cil
-system-runtime-serialization4.6-cil Libmono-system-servicemodel-internals6.6-cil
-system-transactions4.0-cil Libmono-system-web-applicationservices4.0-cil
-system-web-services4.6-cil Libmono-system-web4.0-cil Libmona-system-windows- forms4.6|
-system-xml-Ling4.6-cil Libmono-webbrowserd.@-cil libnotifyé.4-cil lLibsd12-2.6-6 Libs|
libef nat libef.deb)
apt autoremove' to remove them.
The following packages will be upgraded:
ees
www.bdmpublications.com
david
Help
ein Cnt
state information...
The following packages
Ted
Follow dselect selections
Terminal
meaner
COPaR
Reading
on
and removal of packages
View
Reading package
kd
clean - Frase downloaded archive files
autoclean
Erase old downloaded archive files
check
verify that there are no broken dependencies
source - Download source archives
download
Download the binary package into the current directory
48
es
ee
Notice now the addition of the sudo command. The
sudo command once meant Super User Do; these
days it’s more acceptable as Substitute User Do. It means that the
administrative user (Super User) uses APT (Advanced Packaging
Tool) to Get any Updates. Now try this: sudo apt-get upgrade.
lists of packages
eM
ae
we
ae
david mint
purge - Remove packages and config files
autoremove - Remove all unused packages automatically
dist-upgrade - Distribution upgrade, see apt-get (8)
dselect-upgrade
PCL
david
apt-get [options] install|remove pkgl
Cie
E
:4/security.ubuntu.com/ubuntu xenial security Inftclease [162 kB}
Ue
ee
LS
Lan GoM
serena InRelease
ee
Cee
rec
CROC
ubuntu.
TnRelease
ee
[17 kA
:/farchive
cam/ubuntu xenial-updates
://wew mirrorservice.org/sites/packages. Linuxmint.com/packages serena Release
i/fatchive.ubuntu.com/ubunlu xenial-backporis InRelease [182 kB
|
File
Pr ser
ae
Help
Usage: apt-get [options] command
david mint
Help
are
ce
en
meaty)
Ro
eee
MCE
OTL
Le
After this operation, 36.9
kB
Me
SCC
MEL REECE
See
ht Se
MCRL
UT
of additional disk space will be used.
sa)
ae
Crt
UME
ek
( Update Mint
Depending on the state of your updates, iF you
have any waiting to be installed, you might be
asked if you want to apply the results of the sudo apt-get
upgrade command. You can press y to accept and continue. What's
happening here is that apt-get has some updated software to apply
to Mint, and you're okaying the action.
STEP
5
davis:
File
Eds
view
Search
Teerinal
Essentially, that’s it, your system is now up to date
according to the available list of packages from the
apt-get update command. You can run through the process one
more time, just to check if everything went okay. To recap, enter:
sudo apt-get update, press Enter, then type: sudo apt-get
upgrade and press Enter.
davidesdavidanine
Edit
File
yu
Eh
Leet
View
Lae
eee
Search Terminal
aver
(4.4.0-67.98)
buntud_amdbd
deh
-75.96)
ee
ee
We
Ey
RET
Mn
ariesacueean
le
WA _TIMFOUT
SUT
value
to a
ne
ee CUP
eM
tte
Cee)
ill ee
Mere
Shere
Building dependency tree
Reading state information...
ees
Setting up grub-pe (2.6
pCreyectr mr iaeer otra Berses
eS
Done
Reading package lists...
ddavidsdavid-mint - $ sudo apt-get upgrade
ean
es
he
Ie
ne
een
LOLS
OCR
eno
na
Paes Tle
PaOuraeae ee
GP
eel
://archive.ubuntu.com/ubuntu xenial-updates InRelease [162 kB]
eer
Praca
Help
-mint - $ sudo apt-get update
/farchive.canonical.com/ubuntu xenial InRelease
://security.ubuntu.com/ubuntu xenial-security InRelease [102 kB}
ems
Sore
ry
STEP 7
ating
Help
tear
re mel
ee
via the Terminal
set
when GRUR_HEDOFN TEMFOUT is
is
no
following packages
[The
longer supperted
Dats Serer
a
Found initrd image:
SaaeLoaa
PR aEERRS
fbool/initid. img-d
Found memies 186+ imaye: /bool/memtes
tT
(86+
aeeU
Ce
ene
OB
gO
were
eRe.
Done
automatically installed
hte
UCT
and are
no
longer required:
tee ekeae
Scam
a
emeel
mono-system-design4.6-cil Libmono-system-enterprisese|
ees
eet eae Rael)
Tae
eee
Libmono-system-runtime-serialization-formatters-soap4.0-cil
libmono-system-runtime-serialization4.@-cil libmono-system-servicemodel-internalsé.
ee
er eee
Stee
ee
eee
PT
L
Libmono- system putea
epaailel Sisalasa pabeaoaad aon Libmono-
co
eee
Oe
Oe
alae
a
There’s likely to be a long list of what seems
gibberish now filling your Terminal window
but don’t worry. The files necessary for the upgrade have been
downloaded, prepared, unpacked, processed, installed and set up
correctly. There’s a lot going on when you perform an upgrade, even
with the smallest package.
oo)
Unpacking
7
ry)
Ca
ee
freee abt ine
Linux-libc- rate
amd64 (4.4 -75.96) over (4.4.8-67.88)
Preparing to
a
Preparing to unpack .../thermald_1.5-2ubuntu4_amd64.deb
(1.5-2ubuntu3)
Unpacking thermald (1.5-2ubuntu4) o
Processing triggers for man-db (2.7.5-1)
Processing triggers for dbus (1.18.
Processing triggers for ureadahead (8.166.6-19)
Processing triggers for systemd (229-dubuntul6)
...
...
File
..
apt-utils
lupdate-rc.d: warning: start and stop actions are
up grub2-common (2.62~beta2-36ubuntu3.9)
up grub-pc-bin (2.82~beta2-36ubuntu3.9)
up grub-pc (2.62~beta2-36ubuntu3.9) .
Installing for i386-pc platform.
wMe-
Des
longer supported;
.
falling
ba
ae
...
eae
Red
Found memtest86+ image: /boot/memtest&6+.bin
eelTo
Setting
Setting
Setting
up
up
up
libgail-3-8:amd64 (3.18.9-lubuntu3.3)
apt-transport-https (1.2.26)
cifs-utils (2:6.4-lubuntul. 1) 1
Terminal
Help
6
ma
http://www.mirrorservice.org/sites/packages.linuxmint
.com/packages
serena
http: //archive.ubuntu.com/ubuntu xenial-backports InRelease [162 kB}
CUS Lee Lac
eee cal ene ee ee
ae
Rele:
TED]
.
Generating grub configuration file
jarning: Setting GRUB TIMEOUT to a non-zero value when GRUB_HIDDEN_TIMEOUT is se
Found Linux image: /boot/vmlinu2-4.4.6-53-generic
ee lee UP Ra PPO br er EE Bere Ulan
Ge
5
...
no
Search
r
...
Setting
Setting
Setting
View
-
...
(1.2.28)
up
up grub-common (2.82~beta2-36ubuntu3.9)
Edit
s sudo apt-get update && sudo apt-get upgrade
jdavidadavid-mint
eae eee ee
eee AN
Td
seaes
http: //archive.ubuntu.com/ubuntu xenial InRelease
3 http: //ww.mirrorservice .org/sites/packages .linuxmint .com/packages serena InRe
:4 http://archive.ubuntu.com/ubuntu xenial-updates InRelease [102 kB]
...
Setting
Setting
Interestingly, Linux Mint, among other distros,
offers you the ability to chain several commands
together. In this example, therefore, we can use Sudo apt-get
update && sudo apt-get upgrade. The double ampersand is
what combines the commands and works perfectly, providing the
preceding command went without a hitch. It’s recommended to
start any session with the update and upgrade combo.
...
Done
Reading package lists...
Done
IReading package lists...
Building dependency tree
he
Pets
Lterte Rite eae
CES Kel
(aerateRae
jThe
el:
Lal: eee
Le)
following packages were automatically installed
and are no
longer required
libgkeyfilel.@-cil libgnome-keyringl.6-cil libmono-accessibility4.6-cil
lLibmene-da
Libmono-ldap4.@-cil libmono-sqlite4.@-cil Libmono-system-componentmodel-dataannota
libmono-system-data4.@-cil lLibmono-system-design4.@-cil Libmono-system-enterprises
Libmono-system-ldap4.0-cil Libmono-system-numerics4.@-cil
Libmono-system-runtime-serialization-formatters-soap4.0-cil
Libmono- system-runtime-serialization4.6-cil libmono-system-servicemodel-internals®
Libmono-system-transactions4.6-cil Libmono-system-web-applicationservices4.@-cil
Libmono-system-web-services4
§-cil Libmono-system-web4 @-cil Libmono-system-window!
TERMINAL VS UPDATE MANAGER?
Why use the Terminal to update and upgrade over the Update
Manager, regardless of the distro you're using? Some users
greatly prefer using the Terminal to update their Linux systems
and accompanying apps, in the belief that it’s better. However,
that’s not often the case.
Using the Terminal, apt-get upgrade, doesn’t handle changing
dependencies between versions of packages, so if a package
has its dependent files changed from one version to another,
then the upgrade is held back.
The Update Manager, or Software Manager (depending on the
distro), often phases its updates and marks those packages
with changed dependencies for updating. However, and this is
where Linux can often get confusing, sometimes it doesn’t.
It all boils down to the developer of the package being
updated and the way the package is held in the distro’s
repositories and whether the update is classified as stable
or not. In essence, from the point of view of the user, if you
update and upgrade using both the Terminal and the Update
Manager regularly, then you will be as up to date as possible,
and get the essential and necessary stable versions of the
packages and core software. IF you're looking For cutting edge
package updates, then it’s best to opt for a rolling release
distro instead.
www.bdmpublications.com
49
|
Using the Terminal
}
Install Apps via the
Terminal—Part
1
There are different ways to install apps and programs on Linux. You can opt for the
graphical route, using a Software Manager, or you can use the Terminal. Often, the
Terminal provides better control over the software being installed and sometimes, you
have no choice in the matter.
COMMAND LINE INSTALLS
Installing an app with the Terminal may require some nifty keyboard work but you get a better sense of what’s being installed
and where.
Installing apps Form the Terminal is often relatively
simple. First though, you need to make sure that
the system is up to date. To do this open up the Terminal and enter:
sudo apt-get update && sudo apt-get upgrade. Enter
your password and accept any necessary updates.
STEP
1
david®
Edit
File
View
Search
‘davidudavid-mint
~
Terminal
$
sudo
You need to enter y to confirm the installation,
which takes up around 5.5MB of storage in the
Once
Stella
is installed, you can see again that Mint has
system.
automatically created the Games category in the Menu as well as
the app shortcut.
STEP 3
david-mint~
Help
apt-get update
&&
sudo
apt-get upgrade
http://archive.canonical.com/ubuntu xenial InRelease
rea2http://www.mirrorservice.org/sites/packages.linuxmint.com/packages
Ign:2
serena
IHit:3 http://archive.ubuntu.com/ubuntu xenial InRelease
Peer are
Uae
heel eee CS
ee
LS
te
Get:5 http: //archive.ubuntu.com/ubuntu xenial-updates InRelease [102 kB]
Get:6 http://archive.ubuntu.com/ubuntu xenial-backports InRetease [162 kB]
Get:8 http: //security.ubuntu.com/ubuntu xenial-security InRelease [162 kB]
InRelease
LST
em
(582
me en ak
Done
Reading package lists...
ame
for
‘Reading state information... Done
calcutating upgrade...
Done
to upgrade, @ to newly
davidadavid-mint
install,
6
to remove and
6
not to upgrade.
hs
STEP 2
Just as you've seen, sudo apt-get update/upgrade
and so on are designed to upgrade the software
that’s already installed on the system. How do you install more apps
though? It just so happens that it’s extraordinarily simple. First you
need an app to install, so let’s use Stella again. Enter: sudo apt-
get
install stella.
Sometimes, when installing software, you need to
add the app’s Repository. The repository, or repo,
is simply the remote server location where the software is held,
along with all its dependencies (the vital libraries and such it needs
to function). Start by typing in this: sudo add-apt-repository
ppa: peterlevi/ppa. Press Enter when asked to and add the PPA
(Personal Package Archive).
davidSdavid-mint
File
ieee
Edit
View Search Terminal
hie hbase
sudo
~
Help
apt-get install stella
davide
View
File
Search
Edit
Terminal
§
sudo
errr
add-apt-repository ppa:peterlevi/ppa
Steer
en
Contains packages for the Variety wallpaper changer
More
info:
eae ld
Nttps://launchpad.net/~peterlevi/+archivesubuntu/ppa
ee
50
www.bdmpublications.com
david-mint
Help
ee
a
(
This adds the repo For the app Variety Wallpaper
Changer, an Ubuntu-based app that works in Mint
and changes the wallpaper automatically. Now that the repoisadded,
enter: sudo apt-get update, to update the newinformationand
add the contents of the repo to the package database.
eT
DS
Press Enter to contanue
AS
UAC
eC
eres
ILM
See
electing previously
J
1
Dera
Ure
LMC
Ee
...
Py
girl.2-gexiv:
MUL
amd64
(6.16.8-1)
ct
...
el
Pc se OM
Och
Ree ed rT
ene
-1_all .deb
Unpacking variety (@.7.0~git201809151662.8eff236~ppa768~ubuntul8.64.1)
Processing triggers for mime-support (3.68ubuntul)
Processing triggers for desktop-file-utils (@.23+linuxmint4)
ran
aeeC
TMC
rts
amported:
apt-get
the installation, and to continue with the install. Once installed, you
can type variety into the Terminal to run the app.
Unpacking
ee
niet
ae iote
NM
a
Ctrl+e to cancel
crue
Now to install Variety, enter: sudo
ry
1
install variety. Press y to confirm and accept
Preparing to unpack .../libgexiv2-2_6.10.8-1 amd64.deb
Unpacking libgexiv2-2:amd64 (6.18.8-1)
Selecting previously unselected package girl.2-gexiv2-6.10:amd64.
Preparing to unpack
6.16.8-1 amd64.deb
et aagCR ral
or
Apps via the Terminal — Part
install
Ld
...
...
Eee
...
(RSA: 1)
1
e rim
a
ee
as
libgexiv2-2:amd64 (@.10.8-1)
Processing triggers for libc-bin (2.27-3ubuntul)
Processing triggers for man-db (2.8.3-2ubuntu@.1)
Processing triggers for gnome-menus (3.13.3-llubuntul.1)
Processing triggers for hicolor-icon-theme (@.17-2)
(9.16.8-1)
Setting up girl.2-gexiv2-.16:amd64
Setti
aero YL Ce
see sCl
Setting
aC}
up
...
...
cores
...
...
...
...
me
int:~$
ORERERUET
7{
URES
Red
SO
esc aL
ee
Ca)
david@david-Mint:~$ variety
REMOVING APPS
addition to installing apps, the apt command can also be used to remove any apps and helps keep the system tidy and free
In
up resources.
To uninstall, or remove, the Variety app enter the
Following: sudo apt-get remove variety.
Entery to continue with the uninstall of the app; notice also that
you're informed of how much space you're Freeing up on the hard
drive as a result of removing the app.
=i
oo
Edit
View
davidedavid-mint
File
pete
Search Terminal
Te
eT
Sire
>
Help
davidé@david-mint
OM)
Done
Reading package lists...
Building dependency tree
state
information...
Done
Reading
The following packages were automatically installed and are
Libboost-python1.58.8 python-pyexiv2 variety-slideshow
File
SEs taa 7
no
longer
requ.
to newly install, 1 to remove and @ not to upgrade.
After this operation, 2,442 kB disk space will be freed.
to upgrade,
rem)
6
SaOA
ane
While the ‘apt-get remove’ command uninstalls an
app, it doesn’t get rid of the extra clutter that comes
with an app, such as configuration and library Files. To completely
remove the clutter, enter:sudo apt-get purge variety.
STEP 2
davidi@david-mint
File
€dit
a
View
Search
id-riint
‘Reading package
-
Terminal
$
sudo
lists...
Building dependency tree
‘Reading state information
Package
‘variety’ is
not
‘@
®@
sil
§ sudo apt-get autoremove
davidedavid-mint
Done
Reading package lists...
Building dependency tree
state
information...
Done
Reading
(The following packages will be REMOVED
~
Libboost-python1.58.0 python-pyexiv2 variety-slideshow
to upgrade, 6 to newly install, 3 to remove and @ not to upgrade.
1,16@ kB disk space will be freed.
After this operation,
ane
PLM
OZ]
ane
Finally, to tidy up all the non-used packages in
the system, and to remove elements that the
autoremove command didn’t, you can enter: sudo apt-get
autocLean. These last few steps are vital For keeping your Linux
Mint setup in good working order and to trim off the unnecessary
excess caused by installations and upgrades.
apt-get purge variety
david@david-mint
Done
File
reli}
installed,
@
net te
View
Edit
Search Terminal
davidedavid-mint
so not removed
Use ‘sudo apt autoremove' to remove them.
to upgrade,
te newly install,
te remeve and
ce
-
Help
Help
following packages were automatically installed and are
Libboost-python1.58.8 pythen-pyexiv2 variety-slideshow
‘The
Search Terminal
View
Edit
-
Use ‘sude apt auteremeve’ te remeve them.
The following packages will be REMOVED
6
When you remove apps from the system you're
be informed that some packages that were
automatically installed are no longer required. You already saw in
the previous tutorial, that you can tidy things up with the Following
command: sudo apt-get autoremove, followed by pressing y
to accept the process.
STEP 3
no
longer require
upgrade.
-
$
sudo
Reading package lists...
~
Help
apt-get autoclean
Done
Building dependency tree
Reading state information...
davi
tee a
Done
CPs
www.bdmpublications.com
51
Using the
Terminal.)
Install Apps via the
Terminal—Part 2
Most of the time you'll get to install apps from the Terminal using the standard aptget command. However, sometimes an app demandsa little more work. This means
installing an app From its source code, which isn’t as scary as it First sounds.
FROM THE SOURCE
The commands you'll need to become familiar with here are Configure, Make and Install. You'll find a lot of apps use installing
From source, so it’s certainly a skill worth investing time in.
Source code files for Linux usually come in the form
of .TAR.GZ or .TAR.BZ2. Both are compressed files
all
the
core
files needed to ‘make’ the app. Start off this
holding
tutorial by creating a new folder in Home: mkdir Vim.
|
The wget command retrieves content From the
internet, in this case the .BZ2 File For Vim. To check
the File was downloaded successfully, enter: ls. According to Mint’s
file system colour key, the compressed file should be displayed in red.
STEP 3
david@ davidEdit
File
Search
View
Terminal
Help
Cee
y
probe
perermersererere
Sey
ier
art
RPS
Ee)
SU
SeeaCr
iv
a
UC
eT)
es
Pear
ea
te
ers
CR
part
Vim, by the way, is an advanced text editor which
we'll use as an example to install. Enter the new
folder, cd Vim, then From within the new Vim folder, enter the
following command into the Terminal: wget ftp://ftp.vim.
org/pub/vim/unix/vim-7 .4.tar.bz2.
We need to uncompress the contents of the file
now, soenter:tar -xf
the Terminal. Note: you cantypeintar
key to auto-Fill the remaining File name.
vim-7.4.tar.bz2 into
-xf
david-@
File
Edit
View
Search Terminal
Help
ete
rary
a
I
SET
ft
"9
Cone
Ragen
wa>
babrrrer cancer
iia at es
ae
CLaLRaE
Troe Tat
TadCER
Cone
140[:21...
int
connected,
aeneTe
RETR vim
[=
CR
52
nint
-q/pub/vim/unix/vim-7.4.tar.o22
ae
Met
Connecting to
onTEARS
nnnnnnees
a
www.bdmpublications.com
IE
-;Vim
$
Vin
tac -xf vim-7.4.tar.bz2
s
ff
vand press the Tab
david-mint -Vim
(
a0 oy
IF you enter Ls again, you'll notice that
new
folder has been created: vim74; in light blue text
representing a Folder in Mint. It’s always handy to create root folders
for the main app, then as you upgrade apps through this method
the individual versions will each have their own folder.
a
david@david-mir
3 oo
You may need to keep installing new dependencies,
depending on the app. After each new dependency
is installed, re-run . /configure and when it doesn’t report back
with an error you can continue to the next stage of the installation.
Note: you may need to search online For some error messages.
Tie
Cait
View
Search
Terminal
Help
ry
Help
mouse
argument...
no
ae}
Veale
id-rint
r
Apps via the Terminal — Part 2
er
Search Terminal
Edit View
File
install
-.vim
s
ye
for sysctl... nul usable
rs
eenTTS
Jf
aro!
ery
kK
for _xpg4_setrunelocale
ST
rec
Ta
Cae)eee
mS
aes
re
orrrag
sts
for dlopenQ) aein -lub...
for dlsym(}... yes
Type in cd vim?74 to enter the Folder, and 1s again
to view its contents. There will likely be a Fair number
of files present; most are the app’s core files, while others will be
labelled README or INSTALL. It’s always wise to read these files First
as they provide valuable information regarding the installation.
ao
es
tance
os
Seen?
-lxpg4...
in
ee
yas
With a successful /configure, the system will
create a Makefile. This needs to be ‘made’ by
entering: make into the Terminal. This may take a while, depending
on the size of the app.
STEP 9
.
david
File
Fda
Seach Tectniual
View
ry
mcLCMOm
It there
problems, cd to the src
are
cd src && make
davidanine
Help
first
MCL
ear
i Cesc) Poe
Sure
me)
pe
Bia Se
I.
Et
CONFIG
le
ee
H
directory
Ce
and run make
there
CACC
Setivatie
igac lc
COLT
aa
mT
-I/usr/local/include
a)
I/usr/locat/inctude
ee
SL
emer mn
ORM)
Ce
-g -02 -U_FORTIFY_ SOURCE -D_FOATIFY_SOURCE-1
eee
acc
The First part of the installation requires you to enter
./configure. The ./configure command will check
For
your system
any missing dependencies associated with the app. IF
you received an error regarding a C Compiler, then enter: sudo aptget install build-essential. The third-party app Ncurses
was recorded as missing. We need to install that with: sudo apt-
c
Iproto
q
02
U
FORTIFY SOURCE
D
FORTIFY SOURCE-1
install
Finally, you need to enter: sudo make
into the Terminal. This will install the app, and
make it ready For use in the system. When complete you can execute
the app, in this case by entering vim into the Terminal or searching
for it via the Dash.
STEP 10
install Libncurses5-dev libncursesw5-dev.
get
eros
File
Lat View earch
lermina:
checking for tgetent in
Cae
david? david
lncurs
Mint,
~/Doemloads/vim74
cry
a
no
ROMO
Le
eae
mit
ae
te
Ca Socy
Building dependency tree
Ur
cist
The fullowing addational
pircsitc eng
Se
ltelp
RSL
Serie OMe
Sher
eT)
mec
freely distrobutable
pared
aCe
Urea tse
Sp
tor information
CCE
to
res
Need to
eer
Cte
em
of archives
get 458 kB
ext
ca
Cd
Cements
CMC
a
Sree
ei
Mar
mst rer
IL
Selectang
UES
Lae
Uatoe
L
O72)
learum
Mn
PLSD
RTIG
elected package tibtinto-dev:amd64
a
eee
ee
meee
aero
www.bdmpublications.com
53
Ly
Kernel
i
Lj
old
command
line: block2mtd. block 2mtd=/dev/hda2,
131072, rootfs root=/dev/mtdbl
ockO rootfstype=jffs2 init=/etc/preinit noinitrd console=ttyO
00n8 reboot=bios
Found and enabled local APIC!
Enabling fast FPU save and restore... done.
Enabling unmasked SIMD FPU exception support... done,
Initializing
console=ttyS0,
384
CPU#0
PID hash table
entries:
(order: 5, 128 bytes)
processor.
32
Detected 1991.657 MHz
Console: colour ¥GA+ 80x25
console [tty0] enabled
console [ttyS0] enabled
Dentry cache hash table entries: 1024 (order: 0, 4096 bytes)
Inode-cache hash table entries: 1024 (order: 0, 4096 bytes)
Memory: 5112k/8128k available (1497k kernel code, 2624k reserved, 597k data, 196
k
init,
Ok highmem)
virtual kernel
fixmap
vmalloc
lowmem
-init
.data
:
:
»
:
:
etext:
Checking
memory
layout:
0xc1000000
Oxfffb9000
-
OxcO000000
0xc 0313000
0x027653c
-
-
oxffff fo00
Oxt ffb7000
0xc07f 0000
0xc 0344000
processor
honours the
Calibrating delay using timer specific
www.bdmpublications.com
kB
(100
IB
IB
19
59
OxcO30bc
fc
Oxc 0100000 0x027653
if this
28
kB
kB
(1497 kB)
bit even 1n supervisor mode... Ok.
routine. 4047.64 BogoMIPS (1p}=20238210)
WP
#include <linux/sched.h>
#include <linux/tty.h>
#include <asm/io.h>
f#include <asm/system.h>
#define
#define
#define
#define
#define
SCREEN START 0xb8000
SCREEN END
Oxcd000
LINES 25
COLUMNS 80
NPAR 16
extern
void keyboard interrupt (void)
static
unsigned
unsigned
unsigned
unsigned
unsigned
unsigned
unsigned
unsigned
unsigned
unsigned
static
static
static
static
static
static
static
static
static
long
long
long
long
long
long
long
long
long
;
origin=SCREEN_START;
scr_end=SCREEN_START+LINES*
COLUMNS * 2;
pos;
x,y:
top=",bottom=LINES;
lines=LINES,
state=0;
columns=COLUMNS:;
npar, par[NPAR};
ques=";
char attr=!x17;
that the First Linux kernel, as
programmed by Linus Torvalds,
only occupied 65KB of memory? And that since version 0.01,
the Linux kernel now boasts over 18 million lines of code, Not
bad for a university project that now runs the New York Stock
Exchange, and powers the US Department of Defence’s Fleet of
nuclear submarines.
DID YOU
KNow.,,
Using the
Terminal.)
Creating a File Using
the Terminal
Using the Terminal, you're able to create Folders, Files and even execute Linux Mint
apps. In truth, if you didn’t have the GUI at hand, you could still accomplish the same
From the Terminal.
MORE TERMINAL WORK
Creating content using the Terminal isn’t quite as strenuous as it may First appear. Yes, the Terminal can look a daunting place
For the newcomer, but once mastered it's really quite intuitive.
Open up the Terminal, and make sure you're in the
Home folder. IF not use the ed ~ command to return
to
the
Home
folder from wherever you're currently located.
you
oo
david@david-mint
File
Edit
View
Search Terminal
~
Your command line should change to the Test folder
and if you enter Ls (List folder contents) there'll
be nothing within the folder; as you've just created it. The mkdir
command is Fairly self explanatory: Make Directory Followed by the
name of your choosing.
STEP 3
Help
david@david-mint ~/Test
File
Edit
View
Search Terminal
Help
s mkdir Test
s cd Test
Test
Let's start by creating a new folder within Home,
and call it Test. The command you'll need is
mkdir Test. Press Enter to create the folder when you've typed
in the command, then cd Test and press Enter. This will Change
Directory (hence CD) to the newly created Test folder.
ls
$
To create an empty text file, called Test.txt, enter
in the Terminal: touch Test. txt. You can then
use Ls to view the new file in the Folder. Touch is a standard Linux
command that allows the creation of Files without the need to open
a text editor, save the file, then close the editor.
davidiedavid-mine ~Test
File
Edit
View
Search
Terminal
Sa
Help
LS
d-mint
eb tias
davidiedavid-mint -/Test
File
Edit
View
Search Terminal
5
s
Help
mkdir Test
cd Test
Test
s
touch Test.txt
eee
56
www.bdmpublications.com
(
Let's say you now wanted to create a text file, we'll
call it Test2.txt, complete with some content. To do
so, enter: cat > Test2.txt. This will create the File Test2.txt and
put the Terminal into an editing mode.
File Using the Terminal
a
Creating
Xed is a GUI app, and you can enter text and save
the File, or any File, accordingly by using the app’s
main window, and the File > Save, or File > Save As Functions From
its top menu bar options.
Edit
View
Edit View
Search Terminal
8
Help
0
mkdir Test
§ cd
-
Test2.txt (~/Test)
david@davi
File
ry
Search Tools
Documents
chy
New
oO
Help
B
Ag
Open...
Test
Crit
Oj Save
st
§
touch Test.txt
D3 save As...
fTest
$
cat
WR
Shite Ctrl
ng
the Cat
command from
the Terminal. Cool, isn't
.
|
it.
.
Revert
>
Test2.txt
PrintPreview
shirt+Ctrl+P
Curler
Print...
You'll notice that the cursor is Flashing below the
cat > Test2.txt command, without the usual
prompt. This editing mode will allow you enter the text that the file
will contain. Enter some text, then press Ctrl+D to exit and write the
contents to the file.
STEP 6
Fie
I
Edt View Search Terminal
PE
* Close
Cire yy
Bk Quit
ctrl
If, however, you prefer to remain working in the
.
'
Terminal to edit/save/create files, you can use
Nano. Nano is a simple Terminal-based text editor. To try it with
the example, enter:nano Test2.txt. There’s menu along the
bottom of the screen. To exit and save any content in Nano, press
Ctrl+X and Follow the on-screen instructions.
STEP 9
a
Help
david davidunait Test
Crtamr ys
cd
tile
GA
iene
Edit
view search
pana
lerminal
Help
tie:
lasts
tet
sg
1s
text entered using the Cat
ChesCer
eat
Det
ees
command from
eon
the Terminal. Cool, isn't
STEP7
it,
Pressing Ctrl+D
now...
Of course you don’t always have to use the Terminal
to enter text into a File. Mint comes with a text
editor called Xed, which is similar to Windows’ Notepad. To view the
previously created File in Xed, type into the Terminal: xed Test2.
txt, and press Enter.
We've used the Terminal to launch a Mint app,
Xed, but any app can be launched From within the
Terminal. For example, try: firefox, and press Enter. Close Firefox
to return to the Terminal. Providing you know the name of the app,
it can run From the Terminal. Additionally, entering firefox& opens
Firefox, AND lets you still use the Terminal.
H
f
a
i
i
This as text entered using
(a
Fle
Gait
wew
Sear rch
Oacments
Toals
s
PO
Help
AAR
bras
'
s
“ediaxy “Beats
from BDM Publications
‘Phone
“eer
www.bdmpublications.com
57
Using the Terminal
}
Creating and
Removing Directories
As with creating Files in the Terminal, you can also create and delete directories, or
Folders if you prefer. Directories form the structure of your File system, without logical
in utter chaos.
directories the Filing system would
b
MANAGING FOLDERS
Learning how to create and delete folders in the Terminal is an important Mint, and indeed Linux overall, skill to master. Here's
the basics For you to try out.
With the Terminal open enter cd ~ to make sure
you're in your own Home directory. Now enter ls
to view the current Folders you have housed in the Home directory.
You'll notice that Folders are labelled in Mint in cyan (light blue).
Let’s start by creating a new directory. Enter:mkdir testdir.
oo
STEP 3
you were to enter the command again, mkdir
IF
testdir, you'll receive a message stating: mkdir:
cannot create directory ‘testdir’: File exists. It
goes without saying then, that you're only able to have one uniquely
named directory within the current directory. However, as Linux is
case-sensitive, you can have Testdir, TestDir, testDir and so on.
david
Hie
CeCe
ACL
Sc-Fig
Edit
view
search
Ferminah
IF you now enter ls again, you'll see that the new
directory, testdir, has been created alongside the
other directories in the Home area. Obviously the command mkdir
is what creates the directory, and no doubt you've already guessed
it stands for Make Directory.
view
Search Terminal
oe
anseas
Pa
Cot
mint
ee
Cigna
Tie
“david
Help
ed =
lies
er
Cay
Sp
eg
Oe
Teele)
You can create directories within directories you've
already created. For example, enter the testdir
directory with cd testdir/ followed by Is to list the folder structure.
Naturally there’s nothing present, as you've just created the directory.
Now drop back to Home with cd ~, and entermkdir testdir/
reports. Go back to the testdir, cd testdir/, and 1s again.
ltetp
david@david-mint ~/testdir
Pee
ig
So
0
MOC
Ce
File
Edit
View
Search Terminal
Help
Paes Basso ashe
testdir
~
$
Is
Bd
-
mkdir testdir/reports
Para maa aa baa
$
a
58
www.bdmpublications.com
See)
(
The command to create directories is quite logical,
therefore. You'll create the directory, and any subdirectories within. However, what if you want to create a directory
and a sub-directory in a single command? Make sure you're at Home
(cd ~) and enter:mkdir -p Temp/finances. Now, cd Temp/, and
ls to list the new directory.
STEP
5
Creating
and Removing Directories
6
Now that we've created some directories, let’s see
about removing them. Start by entering the testdir
directory and listing its contents: ed testdir/, then ls. The previously
created reports sub-directory is present. One way to remove it is to
enter: rmdir reports, then ls again to confirm it’s not there.
STEP 8
david@david-mint ~/testdir
david-mint -/Temp
File
S$
--Tenp
Help
-.Tenp
§
Ls
s
fj
View
Search Terminal
avid-oint -
$
Search
Terminal
$
cd
testdir/
S
STEP 9
rmdir reports
re
A quick warning: removing a directory in the
Terminal doesn’t place it in the Mint Rubbish Bin, via
Nemo file manager. The same goes for any Files, too. IF you remove
directory From the Terminal command then it’s gone For good.
Help
Rubbish Bin
davidedavid-mint
View
Edit
-
Help
mkdir -p Temp/finances]f
If you want to drill down into the various options
available For the mkdir command, you can enter
mkdir --help into the Terminal. This will provide a quick help
guide detailing the options and how the command structure works.
File
>
Terminal
d-mint
MMP
The -p option is what enables the mkdir command
to create the sub-directory as well as the parent
directory. In Linux, commands always Follow the same structure:
Command, Option, and Argument. In the previous step example,
command (mkdir), option (-p), and argument (Temp/finances).
Edit
Search
d-miat
aoe)
File
View
mkdir -p Temp/finances
See
d-niat
Edit
i
Search Terminal
Edit View
File
~
Rmdir will only remove empty directories, to
remove directories containing sub-directories, or
even Files, you'll need to use the rm command with the -R option.
For example, on the Temp/finance directories, userm -R Temp.
A quick ts reveals that the parent Folder and all of its contents are
removed. Careful when using this command.
STEP 10
Help
d-mint
$ mkdir --hetp
mkdir [OPTION]... DIRECTORY...
Create the DIRECTORY{ies), if they do not already exist.
~
david
File
Edit
View
Search Terminal
Mandatory arguments to long options are mandatory far short options too.
set file mode (as in chmod), not a=rwx - umask
-m, --mode=MODE
erie ey
--verbose
if existing,
parent directories as needed
print a message for each created directory
set SELinux security context of each created directery
no error
make
david
mint
~
Help
Fonts
mapfile
Music
Pictures
Public
(QE
mapfile
Misic
Pictures
Public
Terplates
Tewy
Cram aod
~-context[=CTX] like -Z, or if CTX is specified then set the SELinux
or SMACK security context to CTX
Bian]
Cree Van emer
--version output version information and exit
atom
jor
ee
uleSee hae Reed
ees Le eae
Me
ete ees
eee Saeed
eee
ee
available locally via: info ‘(coreutils) mkdir invocation’
y
od
Pathe
www.bdmpublications.com
59
a
Using the
Terminal.)
Fun Things to do
in the Terminal
Despite the seriousness of an operating system, the Linux community are certainly no
strangers to a bit of Fun. The developers over the years have created and inserted all
manner of Fun and odd elements into the Terminal.
TERMINAL FUN
You'll be working exclusively in the Terminal for these next two sections, so start warming up your fingers. After all, all work
and no play... as the saying goes.
The First command we're going to use is sl, it’s
not installed by default so enter: sudo apt-get
install sl. The command can be run with sland whenexecuted
will display Steam Locomotive travelling across the screen (hence
‘sl’). Entering LS, note the upper case, also works.
oa
a
File
Edt View
Search
Termeal
you've ever fancied having the computer read a
random fortune out to you, then you're in luck. Most
distros require you to install the fortune app, however Linux Mint
differs somewhat by having it already pre-loaded. All you need to do
is enter the command fortune into the Terminal, and enjoy.
STEP 3
IF
david@david-mint
Help
File
Edit
View
Search Terminal
~
Help
davidudavid-“int - fortune
destined to become the
eee
ae
ee Roles
$
davidtdavid-sint
$s
You are
commandant
of the fighting
men
of the
-
Sar
Fans of Star Wars even get a Fix when it comes to
the Terminal. By linking to a remote server via the
telnet command, you can watch Episode IV: New Hope being
played out, albeit in ASCII. To view this spectacle, enter: teLnet
A
towel. blinkenlights.nl1.
The rev command is certainly interesting, and at
First what seems a quite useless addition to the
OS. However, it can be used to create some seemingly unbreakable
passwords. Enter: rev, now type some text, when you press Enter
next, everything you typed in will be reversed. Press Ctrl+C to exit.
davide david-mint
File
Edit
View Search
Terrunal
Help
david@david-mint
File
ny
This
Edit View
Search Terminal
udavid-riot
-
$
rev
Help
Great for creating passwords with!
'‘htiw sdrowssap gnitaerc rof taerG .txet desrever si sihT
“Cdavid
60
www.bdmpublications.com
is
reversed text.
~
(Fun Things
you're stuck trying to work out all the possible
factors For any particular number, simply enter
factor Followed by the number. For example, factor 7 doesn’t
offer much output, whereas factor 6@ displays more.
STEP
IF
5
david@david-mint
File
Edit View
Search
Terminal
e
to do in the Terminal
you really want to expand the whole cow thing,
for whatever reason, then pipe the Fortune
command through it, with: fortune
cowsay; and for the
graphical cow equivalent: fortune
xcowsay. Plus, there’s
always cowthink. Try: cowthink ...This book is awesome.
STEP 8
IF
|
|
~
Help
You shall judge of a man by his foes as well as by his friends.
++
There’s a fine line between the rather cool and
really-quite-weird. Having an ASCII cow repeat text
to you could potentially Fall in the latter. Enter cowsay Followed
by any text you want, such as: cowsay Linux Mint is ace!.
In fact, you can even output the ls command through the cow, by
entering: Ls
cowsay.
STEP 6
|
Joseph Conrad
The command toi Let doesn’t inspire much
confidence, we'll admit. However, it’s not as bad as
it First sounds. Start by installing it with: sudo apt-get install
toiLet. Then when installed, type something along the lines of:
toilet David. Or perhaps list the contents of the current folder
STEP 9
through
it, with:Ls
|
toilet.
daviderdavid-mint
File
Edit
View
errr
GC
Search Terminal
Help
Vasea
RnEeins
eanits
s
1s
]
david@david-mint
File
Edit
View
Search
Terminal
Help
Ta)
cowsay
Bernier
|
Pictures Public Templates Test Videos
aes
|
/
To further the cow element, there’s even a graphical,
i.e. non-Terminal, cow available. Install it with:
sudo apt-get
xcowsay, then when it’s installed enter
something similar to cowsay, such as: xcowsay BDM Publications.
lmd
install
Expanding the toilet command, you can actually
generate some decent looking graphics through
it. For example, try this: toilet -f mono12 -F metal David.
You can enter toilet --helLp, For
list of the command line
a
STEP 10
arguments to expand Further.
davidi@david-mint
File
Edit
View
ChBaee
ek
Search
Pale
Terminal
s
toilet
-f
monol2 -F metal David
ey
CRO
ae
+8
~
Help
=_
J
www.bdmpublications.com
61
~
Using the
Terminal.)
More Fun Things to
do in the Terminal
the previous list of Fun, and quite bizarre, things to do in the Terminal has you
wanting more, you're in luck. We've put together another batch of some useful, and
some not so useful, commands for you to try out.
IF
MORE FUN, YAY
Since the Terminal session is already open, and your keyboard digits are nicely warmed up, here are another two pages of
Terminal nonsense.
Remember the old ZX Spectrum days of computing,
when you could type in 10 print “Hello”, 20 goto 10
and Hello would list down the screen? Well, in Linux Mint you can do
the same. Simply enter yes followed by some text, i.e. yes Linux
1s ace. It'll keep going until you press Ctrl+C.
oo
Having a little white cat chase your mouse pointer
around the desktop may sound like a terrible waste
of time. Oddly though, it isn’t. Enter: sudo apt-get install
oneko, then type oneko to have the cat appear. Move your ‘mouse’
cursor around the screen and the cat will chase it. Use Ctr 1+C to
exit the action.
STEP 3
david@devid-Mint:
yes Linux is ace!
iether
eae
Linux is
Linux 1s
Linux is
Linux 15
POUT ae
Linux is
BUr
PPL
PPC
<
Feit
File
Wew
Search
Terminal
3
2)
ace!
ace!
acet
ace!
Help
Ee
OL
coon
Building dependency Lee
The
following
errs
@
ace!
tec
NEW
packages will
be
installed
to upgrade, 1 to newly install, ¥ to remove and ¥ not to upgrade.
eae Ure ars Wie Tea
Nitra
CarrrIpreC
MBC
aC
arnt
MiseT
Se
ere
Tere
Ce
len
eerie
ees
a
eee
ap
a
aut
were
a
eS
Prac
ae
Ue
ap
POC e
Perr
mre
eee
Linux 15 ace!
Linux is acet
PRU
epee
eUlLee
The Matrix was one of the most graphically copied
films ever released; there’s even a version of the
Matrix code available for Linux Mint. Install it with: sudo apt-get
install cmatrix. When it’s done enter: cmatrix and follow
the white rabbit, Neo. Unlike the real Matrix though, you can press
Ctrl+C to exit.
Caso
This entry is a little more serious than the previous.
It's called the Fork Bomb and what it does, basically,
is continually replicate itself until it has used up all the available
system resources, thus causing your computer to crash. You don’t
have to try it but it’s interesting nonetheless. Simply enter
:1:& }: and be prepared to reboot.
:(){
Te
Mn
File
View
Search Terminal
es
rer
|
62
Edit
www.bdmpublications.com
Help
ee ee
(More
Stringing several commands and piping them
through other commands is what makes scripting
such a powerful element to an OS. Using the while command, for
example, together with toilet, can yield some impressive results.
Enter:while true; do echo “$Cdate ‘+%D %T’
toilet
-f term -F border --metal)”; sleep 1; done.
|
Fun Things to do in the Terminal
ry
Used as a music demo From the old Amiga and
DOS days, the bb command reminds us of getting
hold of three and a half inch floppies crammed with all manner of
demoscene goodies. We've already installed bb From the previous
step, so just enter bb. Follow the on-screen instructions, and turn up
your volume.
davidesdavid-mint
kdit
View
Search
lerminal
Help
rT Ty
pee)
Talking computers were the raze of the 80s, enter:
espeak “Hello,
this is Linx Mint”
to have the computer repeat the text inside the quotes to you.
Make sure your volume is turned up, and try the following: ls >
folders.txt && espeak -f folders.txt. This will have Mint
read back the contents of the ls command.
david@.
Edit
View
Search
(ene
Terminal
§
ls
>
STEP 9 This entry is in two parts. First you need to get
hold of the necessary packages: sudo aptget install Libcurses-perl. when that’s done enter: cd
Downloads/ && wget http://search.cpan.org/CPAN/
authors/id/K/KB/KBAUCOM/Term-Animation-2.4.tar.gz
tar -xf Term-Animation-2.4.tar.gz && cd TermAnimation-2.4/. Then: perl Makefile.PL && make && make
&&
test
install.
&& sudo make
Help
folders.txt
&&
espeak -f folders.txt
ational disk space wall
be used
ae
core
rh
MCMC
Unpacking
Lives
MERIC
eal
ee Neotrrrerea|
Ley
Tiree
TASES
Re
Se
ee
on wane
Poe
fttp://search.cpan.org/CPAN/authors/14/K/KD/KBALCOM/Term Animation-2.4.tar.gz
4
Cer
org
a
AC
tar
-xf
steed
ey
icwr)
cs
Length: 18785 (18k)
Lapplacatzon/xTeer
en
Pee
“Term-Aniwation-2.4.
A roaring ASCII fire isn’t the most useful command
to have at your disposal, but it’s Fun. Install it with:
sudo apt-get install Libaa-bin, then when installed use:
aafire. It's not exactly warming but you get the idea. To expand
the above, enter: sudo apt-get install bb caca-utils,
STEP 7
then,
cacafire.
STEP 10
tar.gz’
saved [18785/167@51
With that little lot done, onto the next. Enter: cd
..
&&
wget http://www. robobunny.com/
projects/asciiquarium/asciiquarium.tar.gz && tar
-xf asciiquarium.tar.gz && cd asciiquarium_1.1/
asciiquarium. Providing all went well, enter ./
asciiquarium and enjoy your very own ASCIl-based aquarium.
&& chmod +x
Ay
+
aS?y
AST
ees
www.bdmpublications.com
63
Using the Terminal
Linux Tips and Tricks
As you've seen, the Linux Terminal is quite an exceptional environment. With a Few
extra apps installed, and a smidgen of command knowledge, incredible, and often
quite strange, things can be accomplished.
TAKING COMMAND
There are countless Linux tips, secrets, hacks and tricks out there. Some are very old, originating from Linux's Unix heritage,
while others are recent additions to Linux lore. Here’s our Favourite ten tips and tricks.
Emacs, the text editor, is great piece of
software, however, did you know it also
contains a hidden Easter Egg? With Emacs installed (sudo apt-get
install emacs25), drop to a Terminal session and enter:
EASTER EGGS
a
-batch -1 dunnet
emacs
david@david-mint:
Eat
Termiral
Searce
View
i-$
emacs
-l
apt-get install elinks
elinks
Enter the website you want to visit.
File
Edt
Search
dunnet
View
Search
Terminal
3
-
david@david-Mint:
~
Help
-batch
the Terminal? While not particularly useful, it is quite a fascinating
thing to behold. To do so, enter:
sudo
Dunnet is a text adventure written by Ron Schnell in 1982, and
hidden in Emacs since 1994.
Fie
Ever Fancied being able to
browse the Internet From
TERMINAL BROWSING
Help
Gangte
'ERQI
Hops
Play YouTube
News
Gmail
Grive
More
=
Web
History
|
Settings
|
Sign
in
Loading @6debian-vars...
eB
A eed
eee Sad ee ae Leer ence celle
Loading debian-ispell...
Loading /var/cache/dictionaries-common/emacsen-ispell-default.el (source)...
Loading /var/cache/dictionaries-common/emacsen-ispetl-dicts.el (source)...
Advanced searchlanguage
a
[aol
(Google Search
|
[
I'm Feeling Lucky
told
]
Advertising Progranmestusiness Solutions+Goagleabaut Gangtenoogle.com
Peavacy
Terns
Mice
at a dead end of a dirt road. The road goes to the east.
In the distance you can see that it will eventually fork off. The
trees here are very tall royal palms, and they are spaced equidistant
You are
Bagel
BU
te-me
eee
ae
Ey
arcu
Based on the classic 1982 arcade game,
Moon Patrol, Moon Buggy appeared on
the home computers of 1985 amid much praise. It’s a cracking Atari
game, and it’s available in the Linux Terminal by entering:
MOON BUGGY
sudo
apt-get install moon-buggy
wget
https://gist.githubusercontent com/sontek/
chmod +x
snowjob.sh
./snowjob.sh
moon-buggy
Enjoy.
david@david-Mint: ~/Oownloads
ee
This is free software,
UC
and you are welcome to
Sc a
redistribute it
www.bdmpublications.com
IF
1505483/raw/7d024716ea57e69fb52632feeG9F42
753361c4a2/snowjob.
sh
Then:
64
Snowing in the Terminal console isn’t
something you come across every day.
you're interested, however, enter:
LET IT SNOW
(
Linux, simply enter:
ps aux
sort -rnk 4
|
This sorts the output by system memory use.
telnet battlestarbbs.dyndns.org
davidedavid-Mint: ~/Downloads
cree)
ae
ee
ee
ast
Pal
ed
ese
LY
RcorcUMe
eS
ALU
CeCe
NPAC
ag
MAR
coer
Pe
Cm
aad
CREO
ge)
t
ae)
eea
Sti
Le
eae
ert
Mn
teents
eee
care
en BUC er
mer
Senter
ne
ee
is
ed
a exok
4 Mresege
6 Seuservers,
Tate
Lheatheted
ee
saod
Pie
rie urs
Lune
a
5
eae
Be
Re
ears
J
CeCe
INSU
Unt
cr
=o—
eeqadeat)
oibeam uc
beset
ae
CAs
eg
a
ce
SLY,
eee
auth
en
ure
ee
ae
CeCe
seat seat@
a
screensaver
Che mun) )tsd
CRC
eh
cia
:@
cr)
Cow cinnamon-
mire
core
@:2k fusr/Libsxorg/xXorg
@:08
Wear
There are countless operational BBSes available, check out https://
www.telnetbbsquide.com/bbs/list/detail/, for more.
Me Aad
Pi
e
Back in the days of dial-up connections, the online world
was made up of Bulletin Board Systems. These remote
servers provided hang-outs For users to chat, swap code, play games
and more. Using telnet in Linux, we can still connect to some active
BBSes:
IF you need to see what apps are
consuming the most memory on
MEMORY HOGS
Linux Tips and Tricks
Ea
ed
errr
ee
pReGn
PSCC
9:60 /usr/lib/x86 64-Linux-gnu/cinnamon-settings-d
dae
a
eyes
ee
Lun
aes UCL)
When you delete a File, there’s a chance of
someone with the right software being able
to retrieve it. However, to securely and permanently delete a file,
use Shred:
SHREDDE
NAMEOFFILE.
txt
shred -zvu
dehinaeltl
Replace NAMEOFFILE with the name of the file to delete.
IF you want to create an entire
directory (or Folder) tree with a
DIRECTORY TREES
single command, you can use:
mkdir -p New-Dir/
{subfolder1
subfolder2, subfolder3, subfolder4}
This creates a New-Dir with Four sub Folders within.
david@david-Mint: ~/Downloads
File
Edit
View
Search
Terminal
eee
Help
vin74
Hint:-.Downloadss shred -zvu
Eo
ilg-lsPa
TopSecretFile.txt:
Ae)
MC PRO
Edt
View
Search
aed
TopSecretFile.txt
shred:
david@david-Mint: ~/New-Dir
File
removing
Terminal
:-$ mkdir
bee
TopSecretFile.
txt
subfalder2
New-Dir/{subfolderl1
subfolder2, subfolder3, subfolder:
-p
5
COMME
Help
ae
ey
subfalder3
subfolder4
shred: TopSecretFile.txt: removed
Ceo
vid-Mint:- Doonloadss ff
ASCII ART
ASCII art can be quite striking when applied to
some images. However, it’s often difficult to
You
can
create some great ASCII art From the images
get just right.
you have by using img2txt:
It’s not easy trying
to remember all the
available Linux commands. Thankfully, we can use apropos to help
us. Simply use it, along with a description of the command:
img2txt NAMEOFIMAGEFILE
.png
apropos “copy files”
apropos “rename files”
Replace NAMEOFIMAGEFILE
with the actual name of the
image File on your system. IF
img2txt install installed, use:
sudo
apt-get install
caca-utils.
FORGOTTEN COMMANDS
david@david-Mint:
Hoo
View
Search
ieee
Ee)
Terminal
'262)
-
copy
files
copy
files
Pace ae
-
Bre
rename
-
~
Help
a
and
directories
and
set attributes
files
write the
comments
in
zipfile
oe
to stdout, edit comments and rename
www.bdmpublications.com
65
www.bdmpublications.com
aan
=
a)
=)
Oo
ad)
x<
=
_
a)
66)
DID YOU KNOW...
that Linux is at the heart of the
science behind the Large Hadron
Collider? Using a combination
of Red Hat Linux and CentOS
(an ultra-stable distro built from
the Red Hat core) as the base
distributions of choice, scientists,
developers and engineers have
created
Scientific Linux.
Using SL as the base, the clever
people at CERN have developed
several different versions of their
own custom Linux distro to help
with all aspects of the LHC. Most
notable is SLC, or Scientific Linux
CERN, also known as CERN6.
According to reports, there are
over 36,000 systems running SL,
and over 15,000 running SLC.
www.bdmpublications.com
Using the
Terminal.)
Creating Bash Scripts
—
Part1
Eventually, as you advance with Linux Mint, you'll want to start creating your own
automated tasks and programs. These are essentially scripts, Bash Shell scripts
to be exact, and they work in the same way as a DOS Batch File does, or any other
programming language.
GET SCRIPTING
A Bash script is simply a series of commands that Mint will run through to complete a certain task. They can be simple or
remarkably complex, it all depends on the situation.
You'll be working within the Terminal and witha
text editor throughout the coming pages. There
are alternatives to the text editor, which we'll look at ina moment
but For the sake of ease, we'll be doing our examples in Xed. Before
you begin, however, run through the customary update check: sudo
STEP
1
apt-get update
&&
sudo
To begin with, and before you start to write any
scripts, you need to create a folder where you can
put all our scripts into. Start with mkdir scripts, and enter the
foldercd scripts/. This will be our working folder and from here
you can create sub-folders if you want of each script you create.
STEP 3
apt-get upgrade.
davil
davi
Edit
File
View
Search
Terminal
File
Edit
View
Search
Terminal
Help
mkdir
scripts
s cd scripts/
scripts s §f
Help
S$
- § sudo
apt-get update && sudo apt-get upg
for
david:
password
{sudo]
1 http://ppa. launchpad. net/openshet .develepers/ppa/ubuntu
http://ppa. launchpad.net/peterlevi/ppa/ubuntu xenial In
asa
:3 http://archive.canonical.com/ubuntu xenial InRelease
http: //ppa. launchpad.net/thomas-schiex/blender/ubuntu
http://archive.ubuntu.com/ubuntu xenial InRelease
http: //www.mirrorservice.org/sites/packages.linuxmint.c
:7 http://archive.ubuntu.com/ubuntu xenial-updates InRelea
eo) http://ppa.launchpad.net/wine/wine-builds/ubuntu xenial
oe) http: //wew.mirrorservice.org/sites/packages.linuxmint.
Bes @ http://repository.spotify.com stable InRelease
14
pe)
16
spscwaee
[here are several text editors we can use to create
script: Xed, Vi, Nano, Vim, GNU Emacs and
so on. In the end it all comes down to personal preference. Our
use of Xed is purely due to making it easier to read the script in the
screenshots you see below.
a Bash
Windows users will be aware that in order For a
batch File to work, as in be executed and Follow the
programming within it, it needs to have a .BAT file extension. Linux
is an extension-less operating system but the convention is to give
scripts a .sh extension.
davi
be Lot
File
Edit
View
Search Terminal
~-scripts
Help
$
ls
scriptl.sh script2.sh script3.sh script4.sh
he
Fea
tan Cuuses
Ballers
foul Hell
Efdlets
68
www.bdmpublications.com
wey
(Creating
Let’s start with a simple script to output something
to the Terminal. Enter xed helLoworld. sh.
This will launch Xed and create a File called helloworld.sh. In Xed,
enter the Following: #! /bin/bash, then on a new line: echo
STEP
5
Hello World!.
File
Edit
Search Terminal
View
aha)
scripts
xed
Edit
View
Search
Terminal
helloworld.sh
xed
he
hellewerld.sh
ake
§
scripts
--seripts
Edit
6
When you enter Ls again, you can see that the
helloworld.sh script has now turned From being
white to green, meaning that it’s now an executable file. To run
the script, in other words make it do the things you've typed into it,
enter: ./heLLoworl1d.sh.
-
File
1
STEP 8
File
Help
kf
Bash Scripts — Part
Search Tools
View
Documents
Help
*helloworldsh
9
-
helloworld.sh
./helloworld.sh
scripts
OH
AoaG
chmod +x
scripts s
§f
x
#!/bin/bash
echo Hello World!
The #!/bin/bash line tells the system what Shell
you're going to be using, in this case Bash. The hash
(#) denotes a comment line, one that is ignored by the system, the
exclamation mark (!) means that the comment is bypassed and will
force the script to execute the line as commana. This is also known
a
Although it’s not terribly exciting, the words ‘Hello
World!’ should now be displayed in the Terminal.
The echo command is responsible for outputting the words after
it in the Terminal, as we move on you can make the echo command
output to other sources.
STEP 9
as a Hash-Bang.
*helioworld.s
Edit
File
View
Search
Tools
Documents
*helloworldsh
Edit
Help
OB
9oG
*hi
File
E@
x
a-
*helloworldsh
Documents
¥Y¥
Help
OB
AA
x
echo Hello World! This
You can save this File, clicking File > Save, and exit
back to the Terminal. Entering Ls, will reveal the
in
the
folder.
To make any script executable, and able to
script
run, you need to modify its permissions. Do this with chmod +x
helLoworl1d. sh. You need to do this with every script you create.
STEP 7
View
Search Tools
#!/bin/bash
echo Hello World!
Edit
View
AoG
QQ
#!/bin/bash
File
Edit
File
Search Terminal
scripts
xed
first script in Linux
hellos
{dit View
File
Search
Tools
Documents
OB
am
$
$
Mi
Think of echo as the old BASIC Print command. It
displays either text, numbers or any variables that
are stored in the system, such as the current system date. Try this
example: echo Hello World! Today is $Cdate +%A). The
$(date +%A) is calling the system variable that stores the current day
of the week.
helloworld.sh
File
helloworld.sh
he
esa)
my
STEP 10
Help
s
is
nee
+x
helloworld.sh
Edit
View
Search
Hello World! Today
Terminal
is
1ielp
AA
Help
Monday
EM
a1
rellowcridsh
x
/binybash
echo
Hello World! Today
15
s(date
+%4)
www.bdmpublications.com
69
Using the Terminal
}
Creating Bash Scripts
—Part 2
Previously we looked at creating your First Bash script, Hello World, and adding a
system variable. Now you can expand these and see what you can do when you start to
play around with creating your own unique variables.
VARIABLES
Just as in every other programming language a Bash script can store and call certain variables From the system, either generic
or user created.
Let’s start by creating a new script called hello.sh;
hello. sh. Init enter: #! /bin/bash, then,
echoHello $1. Save the file and exit Xed. Back in the Terminal
make the script executable with: chmod +x hello.sh.
oo
Edit
File
xed
View
Search Terminal
scripts
scripts
The output now will be Hello David. This is because
Bash automatically assigns variables for the user,
which are then held and passed to the script. So the variable
‘$1’ now holds ‘David’. You can change the variable by entering
something different: ./heLlo.sh Mint.
STEP 3
Help
hello.sh
hello.sh
§
xed
$
chmod +x
File
Edit
View
Search Terminal
ees
File
View Search Tools
Edit
Documents
OB
E@heliosh
Help
s
.fhello.sh
s
.fhello.sh David
Help
AA
eed
x
#!/bin/bash
echo Hello $1
4s the script is now executable, run it with JS
auciowvame
heLLo.sh. Now, as you probably expected a simple
‘Hello’ is displayed in the Terminal. However, if you then issue the
command with a variable, it begins to get interesting. For example,
try
./hello.sh David.
davida@'davi
File
Edit
View
Search Terminal
scripts
Hello
Hello David
Oke)
Help
./hello.sh
.f/hello.sh David
asim
You can even rename variables. Modify the hello.
sh script with the Following: firstname=$1,
surname=$2, echo Hello $firstname $surname. Putting
each statement on a new line. Save the script and exit back into
the Terminal.
File
Search Tools
Edit View
Documents
Ho&aje~|xyool/ag
BA *hellosh
x
|
j#!/bin/bash
‘firstname=$1
surname=$2
echo Hello $firstname $surname|
70
www.bdmpublications.com
Help
(
When you run the script now you can use wo
custom variables: ./hello.sh David Hayward.
Naturally change the two variables with your own name; unless
you're also called David Hayward. At the moment we're just printing
the contents, so let’s expand the two-variable usea little.
Creating
Bash Scripts — Part 2
6
Let's expand things Further. Create a new script
called greetings. sh. Enter the scripting as below
in the screenshot, save it and make it executable with the chmod
command. You can see that there are a Few new additions to the
script now.
STEP 8
greetings.sh
File
View
Edit
Search Terminal
ne
~fseripts
Hello David Hayward
Helle Linux Mint
Help
.fhello.sh David
=
Edit View Search Tools
File
Hayward
~fseripts
Documents
Heip
n+-/y¥o8,aQ
Hog
EM greetings.sh
x
|
1
#!/bin/bash
$
echo -no fein,
read firstname
echo -n
read surname
1
a
=):
clear
echo Hello $firstname Ssurname, how are you today?
Create a new script called addition. sh, using
the same format as the hello.sh script, but
changing the variable names. Here we've added firstnumber and
secondnumber, and used the echo command to output some
simple arithmetic by placing an integer expression, echo The sum
is $CC$firstnumber+$secondnumber)). Save the script, and
make it executable (chmod +x addition. sh).
os
We've added a —n to the echo command here
which will leave the cursor on the same line as the
question, instead of a new line. The read command stores the
users’ input as the variables Firstname and surname, to then read
back later in the last echo line. And the cLear command clears
the screen.
STEP 9
day
addition.sh
Edit View
File
Search Tools
AoaGDG
additionsh
a~
Documents
¥
Edit
File
View
Search Terminal
Hello David Hayward,
Help
Help
how are
you today?
OB
x
#!/bin/bash
firstnumber=s1
secondnumber=$2
echo The sum is $(($firstnumber+ssecondnumber))
When you now run the addition.sh script we can
enter two numbers: ./addition.sh 1 2. The
result will hopefully be 3, with the Terminal displaying ‘The sum
is 3’. Try it with a Few different numbers and see what happens.
See also if you can alter the script and rename it do multiplication,
and subtraction.
STEP 7
As a final addition, let's include the date variable
we used in the last section. Amend the last line
of the script toread: echo Hello $firstname $surname, how
are you on this fine $Cdate +%A)?. The output should
display the current day of the week, calling it From a system variable.
STEP 10
greetings.sh
davic
File
Edit
sum
View
is
Search Terminal
is
79
sum
is
67212
ripts
Documents
Help
Ip
.faddition.sh
1
.faddition.sh
34 45
.faddition.sh
65756 1456
2
3
sum
Edit View Search Tools
File
.fmultiplication.sh
BM
greetingssh
x
|
#!/bin/bash
2 8
echo
read
echo
read
clear
-n
Helle,
your
firstname
-a (Unank
surname
vou,
and woat
vane?
is
vo
echo Hello $firstname $surname, how are you on
this fine $(dat
www.bdmpublications.com
71
Using the Terminal
}
Creating Bash Scripts
—Part 3
the previous pages we looked at some very basic Bash scripting, which involved
outputting text to the screen, getting a user’s input, storing it and outputting that to
the screen; as well as including a system variable using the Date command. Now let's
combine what you've achieved so Far and introduce Loops.
In
IF,
THEN, ELSE
With most programming structures there will come a time where you need to loop through the commands you've entered to
create better Functionality, and ultimately a better program.
auf
Let's look at the IF, Then and Else statements now,
which when executed correctly, compare a set of
instructions and simply work out that IF something is present, THEN
do something, ELSE do something different. Create a new script
called greeting2.sh and enter the text in the screenshot below
into it.
ode
The next line, ELSE, is what happens if the variable
doesn’t equal ‘David’. In this case it simply outputs
the
to
screen
the
now Familiar ‘Hello...’. The last line, the FI
—_
statement, is the command that will end the loop. IF you have an IF
command without a Fi command, then you get an error.
STEP 3
david@david
*greetings.sl
Edit View Search Tools
File
Documents
File
Edit
View
Search
Hello Pink Floyd,
Help
how are
~-
ER *ogreetingssh
Terminal
scripts
Help
you on
this fine
Wednesday?
§
x
#!/bin/bash
echo
read
echo
read
H-'°
-n
firstname
-n
clear
(
if
eh
A
surname
$Sfirstname
fovic
==
J
Greeting2.sh is a copy of greeting.sh but with a
slight difference. Here we've added a loop starting
at the if statement. This means, IF the variable entered is equal to
David the next line, THEN, is the reaction to what happens, in this
case it will output to the screen ‘Awesome name,’ Followed by the
variable (which is David).
STEP 2
david@davi
File
Edit
View
Awesome name,
Search
Terminal
Help
You can obviously play around with the script a
little, changing the name variable that triggers a
response; or maybe even issuing a response where the first name
and surname variables match a specific variable.
greetings2.s
Edit
File
View
s
ff
Oocuments
Help
AA
Ppognmnws.
David
~-scripts
Search Tools
greetings2.sh
*
#!/bin/bash
echo -n
tread
firstname
echo -n
read surname
clear
if [ Sfirstname
==
]
&& [
Ssurname
==
]
then echo
Sfirstname Ssurname
else echo Hello sfirstname Ssurname, how are you on this fine
72
www.bdmpublications.com
(Creating
Bash Scripts — Part 3
ry
MORE LOOPING
You can loop over data using the FOR, WHILE and UNTIL statements. These can be handy if you’re batch naming, copying or
running a script where a counter is needed.
Create a new script called count. sh. Enter the
text in the screenshot below, save it and make it
executable. This creates the variable ‘count’ which at the beginning
of the script equals zero. Then start the WHILE loop, which WHILE
count is less than (the LT part) 100 will print the current value of
count in the echo command.
The UNTIL loop works much the same way as the
WHILE loop only, more often than not, in reverse.
STEP 4
su soo
So our counting to a hundred, using UNTIL, would be: until
do. The difference being, UNTIL count is
[ $count -gt 10@
than
one
(the
hundred, keep on looping.
greater
gt part)
];
*count.sh
count.sh
Edit View Search Tools
File
Documents
(-
Edit View Search Tools
File
Documents
(
Help
Help
ER *countsh x
EM countsh
x
#!/bin/bash
#!/bin/bash
until [ $count
echo Scount
-gt
count=@
let count=count+1
Scount -1t 160 ];do
echo $count
let count=count+1
done
while
[
166
1];
de
dann:
Executing the count.sh script will result in the
numbers 0 to 99 listing down the Terminal screen;
when it reaches 100 the script will end. Modifying the script with the
FOR statement, makes it work in much the same way. To use it in our
script, enter the text From the screenshot into the count.sh script.
You're not limited to numbers zero to one hundred.
You can, within the loop, have whatever set of
commands you like and execute them as many times as you want
the loop to run for. Renaming a million Files, creating fifty Folders
etc. For example, this script will create ten Folders named folder
through to folder10 using the FOR loop.
STEP 5
*count.sh
Edit View
File
Search Tools
Documents
ag
Hoge.»
*countsh
*count.sh(
Help
Edit View Search Tools
File
Documents
Help
x
#!/bin/bash
Em
*countsh
x
#!/bin/bash
for count in {@..106}; do
echo Scount
for count in {6|..18};do
mkdir Folder$count
let count=count+1
let count=count+1
done
done
The addition we have here is: for count in
@.
.10@}; do. Which means: FOR the variable
‘count’ IN the numbers From zero to one hundred, then start the
loop. The rest of the script is the same. Run this script, and the same
output should appear in the Terminal.
STEP 3
|= *countsh
Using the FOR statement once more, we can
execute the counting sequence by manipulating the
{0..100} part. This section of the code actually means {START..END..
INCREMENT}, if there’s no increment thenit’s just a single digit up to
the END. For example, we could get the loops to count up to 1000 in
two's with: for count in {@..10@@..2}; do.
x
*count.sh
|
#!/bin/bash
‘for count in {8..188};
echo Scount
(Let count=count+1
yore
aga:
Edit View
File
Search Tools
do
Documents
Y¥
*countsh
Help
OB
xX
#!/bin/bash
for count in
echo $count
{0..1009..2};do
let count=count+1
done
www.bdmpublications.com
73
Using the Terminal
Creating Bash Scripts
—Part4
You've encountered user interaction with your scripts, asking what the user’s name
is and so on. You've also looked at creating loops within the script to either count or
simply do something several times. Let’s combine and expand some more.
CHOICES AND LOOPS
Let’s bring in another command, CHOICE, along with some nested IF and ELSE statements. Start by creating a new script called
mychoice. sh.
STEP
mycho
1
file
View Search Tools Documents
Cdit
a~/x
aoa
The mychoice.sh script
is beginning to look a
lot more complex. What
we have here is a list
of Four choices, with
three possible options.
The options: Mint, Is,
and Awesome will be
displayed if the user
presses the correct
option key. IF not, then
the menu will reappear,
the Fourth choice.
Help
ag
BM mychoicesh
#'s/binsbash
choice-4
echo
echo
echo
echo -n
*
_.
while
.
wibin/bash
=
J;
Schoice -eq 4
|
cho
do
ES ae56 Se
$e
PUTO
read choice
if
[
else
Schoice -eq
echo
af
-
11;
echo
if
[
else
fi
;
”
BARK(D{ Se
then
schoice -eq
echo
choice=4
3]
;
}
i}
"\e[ 7075}
sstty sonesse “Vec\e[37;44n\e[I"3}s
for each in S{seq
SET
then
WRITEZMARK;
TPUT
URN SELECT
im
ARROW
&
Le
Lot
DL
neve
read
# tf
t
os “ENTERhey
M4(){ TPUT
8 20; Se
IPUL
9 eB; se
MOQ){ TPUT 16 285 Sc
6
scripts
Please choose
an
2.
far each
(
UL
Saeq
Scur
==
Scur
or
3)
1
./mychoice.
15
2
or 3)
2
./mychoice.
$
sae
2. Is
Please choose
74
an
option (1,
REFRESH( ){
“ABOU!
“EMIT
up
am
or
SLA
he
;UNMARKS
»42
echo upstt
echo
doz
tz}
Bo
“G)
St¥)sdo
domes}
J); thea (CLMS{earh)
-D)5
jTaenen
ten
J)5t
at )ut)
(C+ mH
rt
Sin
: betores
ar
atreras((tt
af ff §
a
sare
af ff ss -Ut st
Virthen
UNMARKIASafter
unmaaninsbetoresetee
Af [[ Satter -eq @ 1] df f Sbefore
-eq SLM )ithen
MobeTore:
MLO
Ter
UHMARK;
j=St
before sMSafters}
INIT OT RSHEAD: FOOT ZAENU;
a
ft
./mychoice.
$
Please choose an option (1,
You have chosen: Is
scripts
“LUNKARK3}
Help
$s
option (1, 2
scripts
2>fdev/null
“Timeé
ASO{
IF you Follow the script through you soon get the
hang of what's going on, based on what we've
already covered. WHILE, IF, and ELSE, with the FI closing loop
statement will run through the options and bring you back to the
start iF you pick the wrong option.
Search Terminal
x
min
Shey = Sesc(A []sthen
= stscfe 1}
n
o>
View
13):do
5
shew
AF
Edit
1
Se,
\s0: CLEAR: CIVIS:NULL=/dev/oult
Ow
TOOT(){ MARK; TPUT 17 5
SELECT EY
=
MEMULL
File
1
on
ne
donc
STEP 2
?
“NeLSf1F:SC2
RCD CLEAR
HEADO)L DRAW
7
:
echo
echo
echo
echo
echo -n
Fi
then
:
5
-e‘jen’echo -en';trap "Rjexit’
“\e")
CLEARCHTSe 7“\ec™r}
CIVISOL Se
schoice -eq 2]
[
else
ti
You can, of course, increase the number of choices
but you need to make sure that you match the
number of choices to the number of IF statements. The script can
quickly become a very busy screen to look at. This lengthy script
is another way of displaying a menu, this time with a fancy colour
scheme too.
STEP 3
2
or
3)
3
www.bdmpublications.com
STEP 4
\aekeumccu
arrow keys and Enter
in the menu setup in the script. Each
choice is an external command that
feeds back various information. Play
around with the commands and
choices, and see what you can come
up with. It’s a bit beyond what we've
looked at but it gives a good idea of
what can be achieved.
"
®
SEIECT
a
NEXE
(Creating
Bash Scripts — Part 4
6
CREATING A BACKUP TASK SCRIPT
One of the most well used examples of Bash scripting is the creation of a backup routine, one that automates the task as well
as adding some customisations along the way.
Avery basic backup script would look something
su soo
along the lines of:
#!/bin/bash, then,
tar cvfz ~/backups/my-backup.tgz ~/Documents/. This
will create a compressed File backup of the ~/Documents Folder,
with everything in it, and put it in a folder called /backups with the
name my-backup.tqz.
Once the ~/backups Folder is created, we can now
create a new subfolder within it based on the
Time Stamp variables you set up at the beginning. Add mkdir -p
$dest/”’$day $month $year”. It’s in here that you put the
backup file relevant to that day/month/year.
STEP 4
backupish
Em
x
|
backup1.sh (~/scripts)
Edit View Search Tools
File
Documents
clear
Help
# Time stamp
day=$(date +%A)
month=${date +%B)
yoo,
€@ backupt.sh
#!/bin/bash
year=$(date
x
+%Y)}
Folders
dest=~/backups
#
#!/bin/bash
sauce=~/Documents
tar cvfz ~/backups/my-backup.tgz ~/Documents/|
if [ -d $dest J]; then
echo “Backup folder exists"
else
echo “Backup folder does not exist!
echo
I’m
fi
read -p “Press any key to continue...”
mkdir -p $dest/"$day $month $year”
While perfectly Fine, we can make the simple script
a lot more interactive. Let’s begin with defining
some variables. Enter the text in the screenshot into a new backup.
sh script. Notice that we've misspelt ‘source’ as ‘sauce’, this is
because there's already a built-in command called ‘source’ hence the
different spelling on our part.
STEP 2
now
(mkdir -p $dest)
creating
-nl -s
With everything in place, you can now enter the
actual backup routine, based on the Tar command
From Step 5. Combined with the variables, you have: tar cvfz
$dest/"$day $month $year”/DocumentsBackup.
tgz
$sauce. In the screenshot, we added a handy “Now backing up...”
echo command.
a0
x
Fem boctupt.sh
|
#!/bin/bash
x
backupi.sh
clear
Time stamp
#!/bin/bash
#
clear
fyeare$idate
1
# Time stamp
rolders
}#
dest~~/backups
ee /Macuments
day=$(date +54)
if
month=${(date +%B)
-d Sdest
[
year=$(date +%Y}
Clue
Bake
echo
Folders
dest=-/backups
then
J;
dues
mkdir
eraelo
lk
#
Inkdir -p Sdest/ $day Smonth Syear
sauce=-/Documents|
The previous script entries allowed you to create
a Time Stamp, so you know when the backup was
taken. You also created a ‘dest’ variable, which is the folder where
the backup File will be created (~/backups). You can now add a
section of code to First check if the ~/backups Folder exits, if not,
then it creates one.
STEP 3
evi
sdest/ day smonth syear /OocumentsBackup.taz $sauce
ners
Finally, you can add a Friendly message: echo
“Backup complete. AL1 done...”.The
completed script isn’t too over-complex and it can be easily
customised to include any Folder within your Home area, as well as
the entire Home area itself,
(Ew
j=
$dest)
clear
eet
backupt.sh
sp
-Al -s
Cd
bockuptsh
x
#1 /binsbash
x
clear
|
#!/bin/bash
# Time
}clear
wonthes {date
stan
dayes(date +SA)
yeare$(date
l# Time stamp
}day=$(date +%A)
month=$(date +%B)
#
+48}
+7)
Folders
/backups
desteee~/Poruments
year=$(date +%Y}
#
if [ -d Sdest 1; then
acho ‘Backup ‘older exists
sauce=~/Documents
acho
acho
Folders
dest=~/backups
if
[
echo
else
-d Sdest
“Sachin
echo “tHackuc
echo
fi
fF
else
];
read -p
then
lniet
“Rarkup falrier
fans not
Tor now
“Press any bey to contanue..”
akdir -p sdest/"Sday Sacnth $year”
aeast
clear
.°y (mkdir -p sdest)
echa
“Now
nackiny
up
tar cvtz Sdest/*Sday
clear
Please
$month
m2
creating
it.
og
(mkdde -p
$dest)
<6
wat
Sycar"/DocumentsBackup.tgz Ssauce
ache
www.bdmpublications.com
75
Using the Terminal
Creating Bash Scripts
—Part5
The backup script we looked at previously can be Further amended to incorporate
choices, user-interaction with regards to where the backup File will be copied to and so
on. Automating tasks is one of the main benefits of Bash scripting, a simple script can
help you out in many ways.
EASY AUTOMATION AND HANDY SCRIPTS
Entering line after line of commands to retrieve system information, Find
better answer.
Let's start by creating a script to help display the
Mint system information; always a handy thing
to have. Create a new script called sysinfo. sh and enter the
following into Xed, or the text editor of your choice.
STEP
1
Bi sysinfosh x
a File or rename a batch
of files? A script is a
Each of the sections runs a different Terminal
command, outputting the results under the
appropriate heading. You can include a lot more, such as the current
aliases being used in the system, the current time and date and so
on. Plus, you could also pipe all that information into a handy HTML
file, ready to be viewed in a browser.
STEP 3
#1 /bin/bash
# Hostname information:
acho -@ “\e[31;43m=**+* HOSTNAME INFORMATION ++++*\e[am"
david@david-mint ~/scripts
hostnamectl
View
Edit
File
ecl
Search Terminal
-File system disk space usage
echo -@ “\el31;43m*7*** FILE SYSTEM DISK SPACE USE *****\el Om"
at -h
scripts
|j#
# -Free and used memory:
FREE
echo -e “\ef21:43m"*+*
Help
s
./sysinfo.sh
>
sysinfo.html
emns
***+*\e[@m"
AND USED MEMORY
# -system uptime and performance load:
SYSTEM UPTIME AND LOAD
echo -e “\e 512430
fou”
ime
jacho
# -Users currently logged in:
echo -e "\e[21;43m*"*"* CURRENT USERS **<>"\e[Om™
jecho
i! -Top
acho
Ips
-eo
echo
echo
-@
five processes being used
“\c[21;43m=*~** TOP
Smem,Scpu,comm
5
by the system:
MEMORY CONSUMING
--sort=-Saem
“\e[1;32mDone.\el
|
head -n 6
Although there are simple Terminal commands to
help you look for a particular File or folder, it’s often
more fun to create a script to help you. Plus, you can use that script
for other non-technical users. Create a new script called Llook4. sh,
entering the content From the screenshot below.
STEP 4
hi 0
PROCESSES *--**\c[om"
6m”
look4.sh (~
STEP 2 We've included a couple of extra commands in
this script. The first is the -e extension for echo,
this means it'll enable echo interpretation of additional instances
ofa new line, as well as other special characters. The proceeding
‘31;43m’ element enables colour For foreground and background.
mint
~/scripts
HOSTNAME INFORMATION
$
./sysinfo.sh
Chassis:
Po
ee
th
oracle
Operating System: Linux Mint 18.1
Kernel: Linux 4.4.6-53-generic
ges
x86-64
PN
FILE SYSTEM DISK SPACE USE
76
www.bdmpublications.com
Search Tools
Documents
E@
look4.sh
Help
ag
Hho&G
x
#!/bin/bash
target=~/
output=$( find
Machine ID: Sab3c275b7304ed3b8aeef9F
fcc37eb4
Boot ID: 61celbaadf934f649c fSac8e9abe7e18
ere
View
read name
Static hostname: david-mint
ae
Edit
File
*****
if [{
else
fil
-n
echo
echo
sStarget
Soutput
soutput
]];
-iname
then
Sname
2>
/dev/null
)
(Creating
When executed the script waits For input From the
user, in this case the File extension, such asjpg,
mp4 and so on. It’s not very Friendly though. Let’s make it a little
friendlier. Add an echo, with:echo -n “Please enter the
extension of the file you’re Looking for: “, just
before the read command.
x
BB *looktsh
e
The output From colours.sh can, of course, be
mixed together, bringing different effects
depending on what you want to the output to say. For example,
white text in a red background Flashing (or blinking). Sadly the
blinking effect doesn’t work on all Terminals, so you may need to
change to a different Terminal.
Normal Text
|
#1
Bash Scripts — Part 5
/bin/bash
es
target=~/
1
output=${ find "$target" -iname "*.$name" 2> /dev/null }
af {[
else
fi
-n
"$output"
echo “$output”
]];
then
haere
echo “No match found"
rare
eeeaae)
ome
Light blue
Light magenta
STEP 6 Here's an interesting, fun kind of script using the
app espeak. Install espeak with sudo apt-get
install espeak, then enter the text below into a new script called
speak. sh. As you can see it’s a rehash of the First greeting script
we ran. Only this time, it uses the variables in the espeak output.
EM speaksh
echo
read
echo
read
-n "Hello, what
firstname
clear
is
your
first
name?
~
-n “Thank you, and what as your surname?
surname
espeak "Hello $firstname $surname,
how are
"
you on this
fine $(date =%A)?"
~/scripts
We briefly looked at putting some colours in the
output For our scripts. Whilst it’s too long to dig a
little deeper into the colour options, here’s a script that outputs
what's available. Create a new script called colours.sh and enter
the text (see below) into it.
PR colours.sh
x
MA mmenush %
|
clear
#1
"Normai
echo
“Normal
echo -e “Normal
lecho -e “Normal
acho -e “Normal
lecho -e “Normal
j@cho -e
«oc
echo
jacho -e
echo
\ellmBotd”
\c{[2mDim"
\e[4mUnderlined*
jecho -e
echo
acho
echo
acho
echo
acho
echo
\el@mHidden"
zenity --info --titlee’Hel
\el7minverted”
“Default \el30mBlack”
“Default \e[37mbight gray”
“Default
-e “Default
-e “Detauit
oc
“Default
lacho -e “Default
\e{93mLight yellow"
\el94mLight blue”
\el9Smiignt magenta”
\c(96mLight cyan”
echo -e “Default \eldomDe fault”
acho
“Nefault \el4amRtark”
echo -e “Default \e[4imRed”
echo -e “Default \el42mGreen”
acho
echo
echo
echo
echo
acho
lecho
echo
lecho
lecho
echo
jacho
oc
ls!
tua:
--texte
Nave
Kare
to
Linve
Sint
Have
fin, $firstname
$surname
While gaming in a Bash script isn’t something
that’s often touched upon, it is entirely possible,
little basic. If you Fancy playing a game, enter wget
STEP 10
albeit, a
http: //bruxy. regnet .cz/Linux/housenka/housenka. sh,
make the script executable and run it. It’s in Polish, written by
Martin Bruchanov but we're sure you can modify it. Hint: the title
screen is in Base6é4.
\e[97mWhite”
jacho
lecho
--Litles
~\e[OmNormal lext”
-e “Default \el98mDark gray"
-e “Default \e[9imtight red”
-e “Default \e(gzmLight green~
-@
tirstname-$(zenity --entry --titles"/ou"
surnamess(zendty --entry
-e "Default \e{3imRed”
-e “Default \el32mGreen"
-e “Default \el33mvellow™
-o “Default \e[24mBlue"
-e “Default \el3Smitagenta"
-e “Default \e{26mCyan"
-e
/bin/bash
\el5rBlink”
acho -e “Default \e[39mDefault"
leacho
Whilst we're on making Fancy scripts, how about
using Zenity to output a graphical interface?
Enter what you see below into a new script, mmenu. sh. Make it
executable and then run it. You should have a couple of dialogue
boxes appear, Followed by a Final message.
STEP 9
|
\#! /bin/bash
echo
echo
echo
acho
echo
acho
$
eee oe
OOP
be
"Defoult \c[42mYellow"
-e “Default \e{44mBlue”
-e
“Default \el45mtagenta”
“Default \el46mCyan”
-e “Default \el47mLight gray”
-e “Default \e[1e0mDark gray”
-e “vefauit \e[luimiignt red”
“Default \e{102mLight green”
-e “Default \e[103mLight yellow"
-e “Default \e{104mLight blue"
-e "Default \el105mLight magenta”
-e “Default \e[106mLight cyan"
-e “Default \e[1l07mWhite”
-e
www.bdmpublications.com
77
Using the
Terminal.)
Pi x Linux =
The Perfect Combination
The Raspberry Pi is remarkable piece of hardware, and to help drive its potential
it needs a remarkable operating system. Thankfully, Linux is the default and
recommended OS of choice For the Pi, and together they make a winning team.
a
When the Raspberry Pi was in its developmental stages its designers needed to ensure that they were creating a piece of
hardware that could offer much more than simply being a cheap, but small, computer.
The Pi needed to be Flexible with what it could do, it needed to have
room to grow into more ambitious project concepts ind ideas, and
it needed to do so in as easy to use Fashion as possibl 2, The goal was
to create a universal learning platform, that students of any age
could expand on and tinker with, while learning new concepts such
as programming, electronics, and computing. Natural ly, once
the hardware was developed, the only real choice of
operating system was of course, Linux.
_—
{
The versatility oF Linux is legendary. This incredible
core OS is so malleable that it can be steered
toward near any aspect of computing, From
supercomputing to robotics, the space industry to
more terrestrial engineering; education and
science, manufacturing and the Internet.
Think of an industry, and you will likely
find a Linux installation somewhere in the
background keeping it all together.
Raspbian is the recommended operating system For the Raspberry
Pi, customised Debian-based distribution that comes packed with
a collection of useful tools that cater For coding, electronics, and
general desktop computing duties. Alongside the apps are preloaded modules to help get the most from each of the programming
languages you decide to learn and use, as well as software to
hardware modules that will enable you to power and use the
hardware specific items unique to the Pi. For example, there are
Python modules that interact with the Raspberry Pi’s 40-pin GPIO,
allowing you to create content For any of the Hardware Attached on
Top devices.
a
This combination is what makes the Raspberry Pi an excellent base
of operations to learn not only coding on, but also Linux in general.
Raspbian, being Debian-based, will be able to run any of the
Terminal commands listed in this book, as Linux Mint and even
Jbuntu are also Debian-based. And since the Raspberry is so
nall, and costs very little setup, you're able to have both your
regular, Windows or macOS computers, and have a Raspberry Pi as
a headless (a powered device that doesn’t need a keyboard, mouse or
monitor attached, as you connect to it remotely) computer from which
you can connect to and learn how to use Linux and how to code.
78
www.bdmpublications.com
(Fi x Linux
= The Perfect Combination
WHICH PI?
There are several Raspberry Pi models available, with each
offering something slightly different from the others, The
most recent Pi released is the Raspberry Pi Model B+, and
while this model is slightly more expensive than some of the
other examples, it is the most powerful and feature-rich Pi
3
cee)
8
NN] Pi
oPon Ww
i Model sa
A
BEYOND RASPBIAN
PI, LINUX AND CODING
The Flexibility of the Raspberry Pi’s ARM processor means
that it’s capable of running other operating systems beyond
Raspbian. Still keeping with Linux, you can instead install
Ubuntu MATE, Pidora (a Fedora-based distribution), Lakka,
PiPlay (a retro emulation distribution) and Arch Linux ARM.
There are also systems based loosely on the Linux kernel, such
as Android, Minibian, and Chromium OS.
As previously mentioned, the Raspberry Pi is an excellent code
base, and with Linux as the backbone you're able to start learning
how to code ina multitude of different programming languages.
There's Windows 10 loT Core, FreeBSD, RISC OS PI, Plan 9 and,
remarkably, AROS — an Amiga OS clone. Needless to say, that
once you've Finished experimenting with one version of Linux,
just as you would with a desktop version of Linux, you can hop
to another on the Raspberry Pi and see how that one works,
and whether it will work For you.
jj
available. Overall, it's probably best to start experimenting
with the Pi using the Pi 3 Model B+, then moving on to one
of the other models as you develop your skills and focus on a
particular project, such as the need to use one of the Pi Zero
models, with a smaller footprint and WiFi enabled connectivity.
Bash scripting works perfectly, since Raspbian is Linux, and
Debian-based, and you can easily expand your scripts to
encompass much of the Pi’s functionality. Aside from creating
backup scripts, you can also create scripts that can access the
GPIO pins on the Pi, and in so be able to control LEDs, and even
more complex HATs.
Python is by far the most popular choice for beginners, and
Raspbian comes pre-installed with everything you will need to
get the most from your Python experience. There are countless
pre-loaded modules, as well as the most recent stable release of
the language.
C++ is one of the most powerful programming languages
to learn. It's used for games, apps, and even entire operating
systems. The Raspberry
Pi comes with a great C++
editor, that’s easy to use
and can help you develop
amazing content. Whichever
way you decide to take your
coding and Linux adventure,
the Raspberry Pi is an
excellent platform from
which to begin on.
betninnilillern..
ES
www.bdmpublications.com
ws
Using the
Terminal.)
Command Line
Quick Reference
When you start using Linux Full time, you will quickly realise that the graphical
interfaces of Ubuntu, Mint, etc. are great for many tasks but not great for all tasks.
Understanding how to use the command line not only builds your understanding of
Linux but also improves your knowledge of coding and programming in general. Our
command line quick reference guide is designed to help you master Linux quicker.
TOP 10 COMMANDS
These may not be the most common commands used by everyone but they will certainly feature frequently for many users of
Linux and the command line.
The cd command is one of the commands you
will use the most at the command line in Linux. It
allows you to change your working directory. You
use it to move around within the hierarchy of your
The mv command moves a File to a different
location or renames a file. For example mv file
sub renames the original Fileto sub. mv sub
~/Desktop moves the file ‘sub’ to your desktop
directory but does not rename it. You must specify
a new Filename to rename a file.
file system. You can also use chdir.
The Ls command shows you the files in your
current directory. Used with certain options, it lets
you see file sizes, when Files where created and file
permissions. For example, Ls ~ shows you the files
that are in your home directory.
The cp command is used to make copies of Files
and directories. For example, cp file sub makes
an exact copy of the File whose name you entered
and names the copy sub but the first File will still
exist with its original name.
cmod
The chmod command changes the permissions on
the files listed. Permissions are based on a fairly
simple model. You can set permissions for user,
group and world and you can set whether each can
read, write and or execute the File.
The pwd command prints the Full pathname of
the current working directory (pwd stands For
“print working directory”). Note that the GNOME
terminal also displays this information in the title
bar of its window.
pwd
The
clear
The rm command removes (deletes) Files or
directories. The removal process unlinks a Filename
in a filesystem from data on the storage device
and marks that space as usable by Future writes. In
other words, removing Files increases the amount
of available space on your disk.
clear command clears your screen if this
is possible. It looks in the environment for the
terminal type and then in the terminfo database
to Figure out how to clear the screen. This is
equivalent to typing Control-L when using the
bash shell.
80
chown
The chown command changes the user and/
or group ownership of each given File. If only an
owner (a user name or numeric user ID) is given,
that user is made the owner of each given file, and
the files’ group is not changed.
www.bdmpublications.com
mkdir
Short For “make directory”, mkdir is used to
create directories ona file system, if the specified
directory does not already exist. For example,
mkdir work creates a work directory. More than
one directory may be specified when calling mkdir.
(command
Line Quick Reference
C:\Commonly
Used. Commands
~
fe
SAMSUNG
USEFUL HELP/INFO COMMANDS
The following commands are useful for when
you are trying to learn more about the system or
program you are working with in Linux. You might
not need them every day, but when you do, they
will be invaluable.
~
The free command displays the total amount
Qf free and used physical and swap memory in
the system. For example, free -mgives the
information using megabytes.
The sed command opens a stream editor.
Astream editor is used to perform text
transformations on an input stream: a file or input
From a pipeline.
The df command displays Filesystem disk space
‘usage for all partitions. The command df-h
-Unmame-a:
‘.
%
Yu,
<
Ya
0
Molle.
“
del
ClUSer
-
deluser command removes a user from
the system. To remove the user's files and
home directory, you need to add the -remove-
The top program provides a dynamic real-time
om
system summary information, as well as a list
of processes.
me
The uname command with the -a option prints
all system information, including machine name,
kernel name, version and a Few other details.
“. The delgroup command removes a group from
_delgroup the system. You cannot remove a group that is the
primary group of any users.
7
“view of a running system. It can display
LPL,
adduser
Is probably the most useful (the -h means
human-readable).
..
The adduser command adds a new user to the
system. Similarly, the addgroup command adds a
=. New group to the system.
=
YM.
“
‘The
home option.
;
:
ae
i
“The ps command allows you to view all the
ma
7
processes running on the machine. Every
operating system's version of ps is slightly
different but all do the same thing.
_
*
grep
:
The grep command allows you to search inside a
number of files for a particular search pattern and
then print matching lines. An example would be:
grep blah file.
S The man
_
man
man
~
man intro.
man command brings up the manual
entry For the man command, which is a great place
bo.start when using it.
The man intro command is especially useful.
it displays the Introduction to User Commands,
which is a well written, Fairly brief introduction to
the Linux command line.
www.bdmpublications.com
&ei
Using the Terminal
A-Z of Linux Commands
There are literally thousands of Linux commands, so while this is not a complete A-Z, it
does contain many of the commands you will most likely need. You will probably Find
that you end up using a smaller set of commands over and over again but having an
overall knowledge is still very useful.
A
adduser
Add
arch
Print machine architecture
awk
Find and replace text
within file(s)
B
bc
Ccat
a
new user
Concatenate files and print
on the standard output
Change working directory
chgrp
Change the group
ownership of files
chroot
Change root directory
cksum
Print CRC checksum and
byte counts
cmp
Compare two files
comm
Compare two sorted files
line by line
crontab
cspLlit
cut
D
date
dc
82
Display the differences
between two files
grep
Search file(s) For lines that
match a given pattern
Convert a full path name
groups
Print group names a user
isin
gzip
Compress or decompress
named File(s)
head
Output the first part
of File(s)
hostname
Print or set system name
id
info
Print user and group ids
install
Copy Files and
set attributes
diff
dirname
du
chdir
cp
Find and Replace text
within file(s)
Data Dump, convert and
copya file
to
An arbitrary precision
calculator language
Copy one or more files to
another location
F
justa path
Estimate File space usage
echo
Display message on screen
ed
A line oriented text editor
(edlin)
egrep
Search file(s) For lines
that match an
extended expression
env
Display, set or remove
environment variables
expand
Convert tabs to spaces
expr
Evaluate expressions
Ffactor
Print prime Factors
fdisk
Schedule a command to
run ata later time
Partition table
manipulator for Linux
fgrep
Split a file into contextdetermined pieces
Search File(s) For lines that
match a fixed string
find
Divide a file into
several parts
Search for files that meet
a desired criteria
fmt
Reformat paragraph text
fold
Wrap text to fit a
specified width
Display or change the
date & time
Desk calculator
www.bdmpublications.com
G
gawk
dd
format
Format disks or tapes
fsck
Filesystem consistency
check and repair
J
join
Help info
Join lines ona
common field
Kkill
LLess
Stop a process
from running
Display output one screen
ata time
“In
Locate
Make links between Files
Find files
(az of Linux Commands
Logname
Print current login name
rcp
lpc
Line printer
control program
Copy Files between
two machines
rm
Remove files
Lpr
OFF line print
rmdir
Remove folder(s)
Lprm
Remove jobs from the
rpm
Remote Package Manager
rsync
Remote file copy
print queue
U
umount
Unmounta device
unexpand
Convert spaces to tabs
unig
Uniquify files
units
Convert units From one
scale to another
unshar
Unpack shell archive scripts
useradd
Create new user account
usermod
Modify user account
(synchronise File trees)
M
man
See Help manual
mkdir
Create new folder(s)
mkfifo
S
.
.
screen
Terminal window manager
Make FIFOs (named pipes)
sdiff
Merge two files interactively
mknod
Make block or character
special files
select
Accept keyboard input
seq
Print numeric sequences
more
Display output one screen
at a time
shutdown
Shutdown or restart linux
sleep
Delay For a specified time
sort
Sort text files
split
Split a file into
fixed-size pieces
su
Substitute user identity
sum
mount
nice
Mounta
file system
Set the priority of a
command or job
nL
nohup
p
Number lines and
write files
Run a command immune
to hangups
passwd
Modify a user password
paste
Merge lines of Files
pathchk
Check file name portability
pr
Convert text Files
for printing
printcap
Printer capability database
printenv
Print environment variables
printf
Format and print data
quota
Display disk usage
and limits
quotacheck
Scan a File system for
disk usage
quotactlL
Set disk quotas
R
ram
symLink
users
V
:
vdir
T
in
Verbosely list directory
contents (‘ls - -b’)
W
watch
Execute or display a
program periodically
Print a checksum For a file
we
Make a new name for
file
Print byte, word, and
line counts
whereis
Report all known
instances of command
a
sync
List users currently
logged
a
Synchronise data on disk
with memory
tac
Concatenate and write
files in reverse
tail
Output the last part
of files
tar
Tape Archiver
tee
Redirect output to
which
Locate a program file in
the user's path
who
Print all usernames
currently logged in
.
.
whoami
X
xargs
multiple Files
test
Evaluate a
conditional expression
time
Measure Program
Resource Use
touch
Change File timestamps
top
List processes running on
the system
traceroute
Trace Route to Host
tr
Translate, squeeze and or
delete characters
tsort
Topological sort
Y
yes
Print the current user id
and name
Execute utility, passing
constructed argument list(s)
Printa string
until interrupted
Ram disk device
www.bdmpublications.com
83
Using the Termina.
%.
that NASA's
state-of-theart supercomputing cluster, Pleiades, is
powered by Linux? Pleiades consists of
160 racks (11,440 nodes), 245,536 CPU
cores, a total memory count of 935TB,
184,320 NVIDIA CUDA cores, and over
six miles of Fibre optic cabling.
DID YOU
KNow..,
At the heart of it lies complex setup
of SUSE Linux Enterprise Server, along
with many custom development
packages and other software unique
a
to NASA‘s projects. The projects
NASA's Advanced Supercomputing
Division uses Pleiades For are: The
Kepler Mission — searching for
extra-solar Earth-like planets; CFD
(Computational Fluid Dynamics)
modelling to help create more
efficient space launch systems; Dark
Matter research and simulation; and
visualisation of Earth's ocean currents,
building data For the ECCO (Estimating
the Circulation and Climate of the
Ocean) Project.
i]
~~
rd
=
=
San
an
~
+
aswitaera
‘
wth
tastes
é ‘a,
-
tw
a
LS
cc
Good enough
for NASA
wae
Uy
/ Y;
Wy L;
ee
eee
Ys
zy
7)
]
he Python
programming language)
Python on Linux
Python is a Fantastic programming
language, combining ease of use with
a generous helping of power to allow
the user to create both minor utilities or
performance-heavy computational tasks.
However, there’s more to Python than
simply being another programming
language. It has a vibrant and lively
community behind it that shares
knowledge, code and project ideas, as
well as bug Fixes for Future releases.
We've used a Raspberry Pi for this section
of the book, as it’s Linux based and one of
the best coding platforms available. The
Pi’s features and Functions make it the
perfect Python programming partner, so
let's get started.
88
~~
Why Python?
90
Howto Set Up Python
92
Starting Python for the First Time
94
Your First Code
96
Saving and Executing Your Code
98
Executing Code From the Terminal
100
Did You Know...Space Invaders
102
Numbers and Expressions
104
Using Comments
106
Working with Variables
108
User Input
110
Creating Functions
112
Conditions and Loops
114
Python Modules
116
Did You Know...Debugging
in Linux
www.bdmpublications.com
rs
Python on Linux
é
Why Python?
There are many different programming languages available For the modern computer,
and some still available for older 8 and 16-bit computers too. Some of these languages
are designed For scientific work, others for mobile platforms and such. So why choose
Python out of all the rest?
PYTHON POWER
Ever since the earliest home computers were available, enthusiasts, users and professionals have toiled away until the wee
hours, slaving over an overheating heap of circuitry to create something akin to magic.
These pioneers of programming carved their way into a new
Frontier, Forging small routines that enabled the letter ‘A’ to scroll
across the screen. It may not sound terribly exciting to a generation
that’s used to ultra high-definition graphics and open world, multiplayer online gaming. However, forty-something years ago it was
blindingly brilliant.
Regardless of whether you use an Android device, iOS device, PC,
Mac, Linux, Smart TV, games console, MP3 player, GPS device built-in
to a car, set-top box or a thousand other connected and ‘smart’
appliances, behind them all is programming.
All those aforementioned digital devices need instructions to tell
them what to do, and allow them to be interacted with. These
instructions form the programming core of the device and that core
can be built using a variety of programming languages.
Naturally these bedroom coders helped Form the foundations For
every piece of digital technology we use today. Some went on to
become chief developers for top software companies, whereas
others pushed the available hardware to its limits and Founded the
billion pound gaming empire that continually amazes us.
Bombs - GUI - ThelDE -
+
File
Edit
Macro
Project
[d:\uppsrc\CtrlLibrrayCtrl.cpp windows-1 252] { examples }
Bombs
BP
carb
|
BE
|
|
gm
$F Editctrl.h
EditField.cpp
Textedit.h
#F
G
@
@ Text.cpp
4
$
LineEdit.cop
DocEdit.cpp
4
#
ScroliBar.h
ScrollBar.cpp
HeaderCtrl.b
GrrayCtrl.b
arrayctrl.cpp
Dropchoice.h
@
DropPusher.
cpp
Dropchoice.
cpp
StaticCtrl.h
Splitter.h
Spltter.cpp
#
@
$
+
#
Promot.cpp
StatusBar.h
Treectrl.h
FrameSplitter.cpp
Sliderctri.4
(& DigColor
SliderCtrt.cpp
Column_ist.h
& DigColor.cpp
Progress.h
Progress.cpp
#
DigColor.h
€ ColorPopup.cpp
€ ColorPusher.cpp
(# FileSel
FileSel.b
Akeys.h
€ Filetist.cpp
key header.h
€
|
Col 45
By
.
ArrayCtrl: :ChildLostFocus()
if(cursor >= 0)
Ref reshRow(cursor);
Ctrl: :ChildLostFocus();
void
ArrayCtrl::Paint(Draw&
LTIMING("Paint");
Size size = GetSize();
Rect 1;
FileSel.cop
www.bdmpublications.com
w) {
=_
r.bottom = 0;
bool hasfocus = HasFocusDeep();
int i = GetLineAt(sb);
int xs = -header.GetScroll();
int js;
for(js = 0; =js < column.GetCount(); jst+) {
int cw header.GetTabwidth(js);
if ( ( xs + cw - vertgrid + (js
column.GetCount()
==
-
1))
>=
break;
xs += cw!
StatusBar.cpp
Treectrl.cpp
Columntist.cpp
##
RichTextview.cpp
& Tabctrl
# Tabctrl.h
S TabCtrl.cpp
& Treectri
HF
Ge
L639,
oliOo@
|
€ DateTimectrl.cpp
Bar
# Bar.h
€ Bar.cpp
€ MenuBar.cpp
€ ToolBar.cpp
€ ToolTip.cpp
#
€ Static.cpp
##
youd
@ Help.cpp
DateTimectri.h
Dropbox. cpp
Droplist.cpp
}
.
<ide-aux>
#
@ HeaderCtrl.cop
$#
plugintz
akeys.cpp
RichText.h
Ge)
Setcursor(p.y);
Ctrl: :ChildGotFocus();
stemp-aux>
zm
S
msc7icdb Debuc v]
‘mB <prj-aux>
rRichtext
~
Setup
& plugin\png
@Brdioraw
#
Assist
® pluginjbmp
& CtriCore
BW
Bebug
Build
cu
&®
The languages in use today differ depending on the situation, the
platform, the device’s use and how the device will interact with its
}
Color fc
=
Blend(SColorDisabled, SColorPaper);
if (!}IsNull(i))
while(i
< GetCount()) {
= GetLineY{i)
r.top
if(r.top
r.bottom
>
=
-
sb;
size.cy) break;
r.top + GetLinecy(i);
int x = xs;
for(int
j = js; j < column.GetCount(); j++) {
i
int cw header .GetTabWidth(j);
int cm column[j].margin;
if(cm < 0)
cm = header .Tab(j).GetMargin();
if(x > size.cx) break;
= x;
r.left
r.riaht = x
+ cw
-
vertorid
+
(i
==
column.GetCount()
0)
Why Python?
environment or users. Operating systems, such as Windows, macOS
and such are usually a combination of C++, C#, assembly and some
form of visual-based language. Games generally use C++ whilst web
pages can use a plethora of available languages such as HTML, Java,
Python and so on.
More general-purpose programming is used to create programs,
apps, software or whatever else you want to call them. They’re
widely used across all hardware platforms and suit virtually every
conceivable application. Some operate faster than others and some
are easier to learn and use than others. Python is one such generalpurpose language.
Python is what's known as a High-Level Language, in that it ‘talks’
to the hardware and operating system using a variety of arrays,
variables, objects, arithmetic, subroutines, loops and countless
more interactions. Whilst it’s not as streamlined as a Low-Level
Language, which can deal directly with memory addresses, call
stacks and registers, its benefit is that it’s universally accessible
and easy to learn.
Python was created over twenty six years ago and has evolved to
become an ideal beginner's language for learning how to program a
computer. It’s perfect For the hobbyist, enthusiast, student, teacher
and those who simply need to create their own unique interaction
between either themselves or a piece of external hardware and the
computer itself.
Python is Free to download, install and use and is available For Linux,
Windows, macOS, MS-DOS, OS/2, BeOS, IBM i-series machines, and
even RISC OS. It has been voted one of the top five programming
languages in the world and is continually evolving ahead of the
hardware and Internet development curve.
So to answer the question: why python? Simply put, it’s free, easy to
learn, exceptionally powerful, universally accepted, effective and a
superb learning and educational tool.
40
7@
71
7S
8@
9@
10@
116
/7/File: Invoke .java
import java. lang.reflect.*;
a
a
S
class Invoke {
.
public static void main( String [] args ) {
try {
Class c = Class.forName( args[0] );
= c.getmethod( args[1], new Class
fethod a
Object ret = m.invoke( null, null
printIn
System.out.
“Invoked static method: “ +
"
+ " of class:
+ args[0]
+
with no args\nResults:
“
(
method
135
140
4SQ0
180
1865
19@
200
21@
220
300
);
+ ret );
} catch ( ClassNotFoundeException e)f{
// Class.forname( ) can't find the class
3 catch
NosuchMethodexception e2) {
}
13°
args[1]
"
// that method doesn't exist
catch ( T]
have permission to
// we don'tlegalaccessException
y+120
invoke that
} catch ( InvocationTargetException e4 ) {
// an exception ocurred while invoking that
@
nm
OK,
==
LET py=15
FOR
=1 TO 16
CLS
LET
bYy=INT (RND#28)
LET
bx=0
FOR d=1 TO 2g
PRINT
AT PxX,P¥;"
U "
PRINT
AT bx,by; "a"
IF INKEY §="p" THEN LET py=p
IF TNKEY
THEN LET py=p
$5"
FOR n=1 TO 10@: NEXT
IF py<2 THEN LET py=sea
IF py>+2? THEN LET py=2?7
LET
bx=bx4+1
"
PRINT
AT bx-1,by;"
NEXT d
IF
(by-1) =py THEN LET s=s+1
PRINT
AT 10,10;
FOR v=1 TO 100@: "score="3;5
NEXT v
NEXT w
@:1
BASIC was once the starter language that early
8-bit home computer users learned.
method
system.out.printin(
‘Method threw an: " + e4.
getTargetException( ) );
powerful
@
language that’s used
= Java
is
print
(HANGMAN[@)}
attempts = len(HANGMAN) - 1
while (attempts le @ and
in word_guessed):
print(("\nYou have {} attempts remaining”).format(attempts))
=
joined_word
"".join(word_guessed)
print(joined_word)
try:
a
player_guess = str(input("\nPlease select a letter between A-Z" + "\n>
except: # check valid input
print("That is not valid input. Please try again.")
continue
in
web pages, set-top boxes,
TVs and even cars.
Vey
")).
else:
if not player_guess.isalpha(}: # check the input is a letter. Also checks
print("That is not a letter. Please try again.”)
a
continue
elif len(player_guess) > 1: # check the input is only cne letter
print("That is more than one letter. Please try again.”)
continue
elif player_guess in guessed_letters:
# check it letter hasn't been guessed
print("You have already guessed that letter. Please try again.”)
continue
else:
pass
guessed_letters.append(player_guess)
for letter in range(len(chosen_word)):
if player_guess
chosen_word[letter]:
==
word_guessed[letter]
=
player_guess
#
replace all letters in the chosen
if player_guess not in chosen_word:
)
Python is a more modern take on BASIC, it’s easy to learn
and makes for an ideal beginner's programming language.
www.bdmpublications.com
Python on Linux
é
How to Set Up
Python in Linux
While the Raspberry Pi’s operating system contains the latest, stable version of Python,
other Linux distros don’t come with Python 3 preinstalled. IF you’re not going down the
Pi route, then here’s how to check and install Python For Linux.
PYTHON PENGUIN
Linux is such a versatile operating system that it’s often difficult to nail down just one way of doing something. Different
distributions go about installing software in different ways, so we're sticking with Linux Mint for this particular tutorial.
First you need to ascertain which version of Python
currently installed in your Linux system. To begin
into
a
Terminal
session From your distro’s menu or hitthe
with, drop
Ctrl+Alt+T keys.
STEP
1
is
david@david-Mint:
File
Edit
View
Search
Terminal
In our case we have both Python 2 and 3 installed;
as long as Python 3.x.x is installed, then the code in
our tutorials will work. It's always worth checking to see if the distro
has been updated with the latest versions, so enter: sudo apt-get
update && sudo apt-get upgrade to update the system.
STEP 3
~
david@david-Mint:
Help
File
Edit
View
Search
nt:-$
Terminal
sudo
Help
apt-get update
sudo
&&
{sudo] password for david:
Next enter python --version into the Terminal
screen. You should have the output relating to
version 2.x of Python in the display. By default, most Linux distros
come with both Python 2 and 3, as there’s plenty of code out there
still available for Python 2. Now enter: python3 --version.
david@david-Mint:
File
Edit
view
Search
Terminal
ee S281)
Help
C31
~
apt-get upgrade
esr.)
Once the update and upgrade completes, enter:
python3 --version again to see if Python 3.x
is updated or even installed; as long as you have Python 3.x, you're
running the most recent major version. The numbers after the 3.
indicate patches and further updates. Often they're unnecessary
but can contain vital new elements.
~
/f/archive.ubuntu.com/ubuntu bionic-updates/main amd64 libasound2-data
Subuntué.2 [36.5 kB]
/farchive.ubuntu.com/ubuntu bionic-updates/main amd64 linux-Libce-dev
amd64 4.15.0-44.47 [1,613 kB]
Fetched 1,409 kB in Os (3,823 kB/s)
290768 files and directories currently installed.)
(Reading database
Preparing to unpack .../libasound2_1.1.3-Subuntu@.2_amd64.deb
Unpacking Libasound2:amd64 (1.1.3-Subuntu@.2) over (1.1.3-5ubuntu@.1)
Preparing to unpack .../libasound2-data_1.1.3-Subuntu@.2
all.deb
Unpacking Libasound2-data (1.1.3-Subuntu6.2) over (1.1.3-Subuntu@.1)
Preparing to unpack .../Linux-libc-dev_4.15.6-44.47_amd64.deb
Unpacking linux-lLibc-dev:amd64 (4.15.6-44.47) over (4.15.6-43.46)
...
AUC
ee
ed
...
ae
...
|
...
...
...
...
Pi
Setting
Setting
iP eee Le
ne
eee
oe
up Linux-libc-dev:amd64 (4.15.0-44.47)
up Libaseund2:amde4 (1.1.3-Subuntud.2)
...
...
Processing triggers for libe-bin {2.27-3ubuntul)
david@david-Nint:-$ python3 --version
david@david-Mint:~$ ff
www.bdmpublications.com
...
(
How to Set Up Python in Linux
a0 oy
However, if you want the latest, cutting edge
version, you need to build Python From source. Start
by entering these commands into the Terminal:
apt-get install build-essential checkinstal1
apt-get install Libreadline-gplv2-dev
Libncursesw5-dev libssl-dev libsqlite3-dev tk-dev
libgdbm-dev libc6-dev libbz2-dev
sudo
sudo
david@david-Mint:
File
Search
Edit
~
lists...
ee
Done
ee
Building dependency tree
Reading state information... Done
build-essential is already the newest version (12.4ubuntul).
Mh
MaceO
Ce PR
fay
ee- Tae
to upgrade, 1 to newly install, 9 to remove and 3 not to upgrade.
to get 97.1 kB of archives.
After this operation, 438 k® ef additienal disk space will be used.
Do you want to continue? [Y/n] y
6
./configure
sudo make
altinstall
This could take a while depending on the speed of your computer.
Once finished, enter: python3.7 --version to check the
installed latest version. You now have Python 3.7 installed, alongside
older Python 3.x.x and Python 2.
checking whether compiling and linking against OpenSSL works... no
checking for --with-ssl-default-suites... pythan
Help
ieee]
eee
Reading package
Terminal
Within the Python folder, enter:
Need
configure: creating ./config.status
config.status: creating Makefile.pre
Cee
LC LU Seeee
ee eee yee
creating Misc/python-config.sh
:
LTS
COL st
YA
TMLee
config.status: creating pyconfig.h
aera
Moe CER
bal
fade
fags temas acd
aa
ome
mee’
re
Rae RM
IC ek
UR
Ce
please run ./confiqure --enable-optimizations
Ca
davidédavid-Nint:~/Downloads/Python-3.7.2$ sudo
Open up your Linux web browser and go to
the Python download page: www.python.org/
downloads. Click on Downloads followed by the button under
the Python Source window. This opens a download dialogue box;
choose a location and start the download process.
ee)
e ) ern
STEP9
eC
Le
hee
ae
aCe ace
altinstall
make
For the GUI IDLE, you need to enter the Following
command into the Terminal:
apt-get install idle3
sudo
The IDLE can then be started with the command idle3. Note that
IDLE runs a different version From the one you installed From source.
;
david@david-Mint: ~/Downtoads/Python-3.7.2
ey
Opening Python-3.7.2.tar.xz
VoL nave
chosen
to open:
Python-3.7.2.tarxz
PaaS)
ad 0)
print{"Hellc,
cae
Eat
File
whichis: XZ archive (16.3 MB)
from: heeps/Awaw.python.org
What should Firefox do with this fite?
Open with
Archive Manager (default)
View
Search
Termural
lists...
Reading package
install idle3
Done
Building dependency tree
Reading state information... Done
The fellewing additienal packages will be installed:
blt idle idle-python3.6 python3-tk tk8.6-blt2.5
Suggested packages:
blt-demo tix python3-tk-dbg
The fellewing NEW packages will be installed
blt idle idle-python3.6 idle3 python3-tk tk8.6-blt2.5
0 to upgrade, 6 to newly install,
to remove and 3 not to upgrade.
ome
same)
tM
me
help
avid-Mint:-,Downloads. Python-3.7.2$ sudo apt-get
ee
a
ae
PD
MOR
BD)
Vee
Cel
of
aed
Python
STEP7
In the Terminal, go the Downloads folder by
entering cd Downloads/. Then unzip the contents
of the downloaded Python source code with: tar -xvf Python3.Y.Y.tar.xz replacing the Y’s with the version numbers
you've downloaded. Now enter the newly unzipped folder with cd
Python-3.Y.Y/.
STEP 10
Enter:sudo
When PIP
apt-get install python3-pip
installed, check For the latest update with:
install --upgrade
pip3
pip
When complete, close the Terminal and Python 3.x will be available
via the Programming section in your distro’s menu.
a)
Python-3.7.2/0bjects/clinic/funcobject.c
Python-3
/Objects/clinic/longobject
ened /Objects/clinic/dictobject
AC ees /Objects/clinic/structseq
Python-3
/Objects/clinic/tupleobject.
/Objects/clinic/moduleobject
/Objects/clinic/odictobject.c.
/Objects/bytearrayobject.c
david@david-Mint: ~/Downloads/Python-3.7.2
File
Search
Edit
7
Tarmiral
Help
ee melt
Done
Reading package lists...
(ce
Meo tal
Reading state information... Done
The fellewing additional packages
nae)
Mee
/Objects/lnotab_notes.
txt
/Objects/methodobject.
AOS
SP aan
will
be
installed:
python-pip-whl python3-distutils python3-lib2to3
packages:
python3-dev python3-setuptools python3-wheel
-2/0bjects/obmalloc.c
.2/Objects/object.c
Recommended
Pei
The
a
ne
ae ye
-2/Objects/listobject.c
-2/Objects/bytes_methods.c
.7,2/0bjects/dictnotes
.txt
P7R
ARYA
eee
a
OD UCL
is
You also need PIP (Pip Installs Packages) which is a
tool to help you install more modules and extras.
fellewing NEW packages will be installed
She ee a Ue
Pee cM
ee bi
to upgrade, 4 to newly install, @ to remove and 3 not to upgrade.
Need to get 1,984 kB of archives.
After this operation, 4,569 kB of additional disk space will be used.
Oo you want to continue? [Y/n] I
@
ee
1~/DownLoads/Python-3.7.2$
ees
www.bdmpublications.com
Python on Linux
é
Starting Python for
the First Time
We're going to be using the Raspberry Pi as our Python 3 hardware platform. The
latest version of Raspbian comes preinstalled with Python 3, version 3.4.2 to be exact,
so as long as you have a version 3 Shell, all our code will work.
STARTING PYTHON
We're not going to go into the details of getting the Raspberry Pi up and running, there’s plenty of material already available
on that subject. However, once you're ready, fire up your Pi and get ready For coding.
With the Raspbian desktop loaded, click on the
Menu button followed by Programming > Python
3 (IDLE). This opens the Python 3 Shell. Windows and Mac users can
Find the Python 3 IDLE Sheil From within the Windows Start button
menu and via Finder.
STEP 3
oo
For example, in the Shell enter: 2+2
After pressing Enter, the next line displays the
answer: 4. Basically, Python has taken the ‘code’ and produced the
relevant output.
Python 3.4.2 Shell
SO
|
> Lepemenesnet
Eile Edit
|
She? Debug Options Windows Help
|
Python 3.4.2
(default, Oct #9 2014, 13:31:11)
4.9.1] on linux
Type “copyright”, “credits” or “license()” for
(6CC
>>>
4
>>>
more
information.
242
|
|
is where you can enter code and see the
responses and output of code you've programmed
into Python. This is a kind of sandbox, where you're able to try out
some simple code and processes.
The Shell
The Python Shell acts very much like a calculator,
since code is basically a series of mathematical
interactions with the system. Integers, which are the infinite
sequence of whole numbers can easily be added, subtracted,
multiplied and so on.
Python 3.4.2 Shell
Python 3.4.2 Shell
File Edit Shell Debug Options Windows Help
|
{6CC
4.9.1]
(default, Oct
on
linux
Type "copyright",
>>>
“credits”
19
or
=
2014, 13:31:11)
“license(}" for
more
information.
File Edit Shell Debug Options Windows Help
ae. 2
Python 3.4.2
|
Python 3.4.2
(default, Oct 19 2014, 13:31:11)
4.9.1] on linux
Type "copyright", “credits” or “license()" for
>>> 242
>>> 23453+64545522
64568975
>>> 98778642342- 12343
98778629999
>>> 1287437*43534
56047282358
>>>
www.bdmpublications.com
al
[GCC
|
more
information.
i
(
yoo}
While that’s very interesting, it’s not particularly
exciting. Instead, try this:
The Python IDLE is a configurable environment. IF
you don’t like the way the colours are represented,
then you can always change them via Options > Configure IDLE and
clicking on the Highlighting tab. However, we don’t recommend
that, as you won't be seeing the same as our screenshots.
printC“Hello everyone!
”)
Just enter it into the IDLE as you've done in the previous steps.
=
Python for the First Time
Starting
python 3.4.2
4.9.1]
[6CC
Python 3.4.2 Shell
(default, Oct
19 2014, 13:31:11)
linux
"eredits” of “license()}" for
on
wee
Type,
Tsopyr ight”.
more
information.
De:
Fae Edit Shell Debug Options Windows Help
4
[Python 3.4.2 (default, Oct 19 2014, 13:31:11)
[6CC 4.9.1] on linux
Type “copyright”. “credits” or “license()" for
A
Suntan reyrnyrcary
P
64568975
>>> 98778642342-12343
98778629999
1287437*43334
56047282358
>>> print("Hello everyone!
information.
more
—
—-
—
races
b
——
>
Highlighting Theme
Select
«
Choose Colour for:
‘+
a
Built-in Thame
-
")
Hella everyone!
pa
64568975
>>> 98778642342- 12343
98778629999
>>> 1287437*43534
56047282358
airs
Fonts/Tabs{ Highaghting| Keys| Generai|
>>> 23453+64545522
>>> 242
4
>>> 8+6
14
>>> 23453+64545522
>>>
eyes
86
“
|
@
«
Foreground
Background
IDLE Classic
'
~
fryou can click here
leto choose items
def func(param):
“"'strang”
varg
print("Hello everyone!
“)
vari
Hello everyone!
'
Leste
‘striny
=
var2
var3 = list(tione)
>>>
cursor
|
shell stdout stderr
Custom
Thame
‘Save ac New
a Ss
This is a little more like it, since you've just produced
your first bit of code. The Print command is fairly
self-explanatory, it prints things. Python 3 requires the brackets as
well as quote marks in order to output content to the screen, in this
case the ‘Hello everyone!’ bit.
Just like most programs available, regardless of the
STEP 9
operating system, there are numerous shortcut
keys available. We don’t have room for them all here but within the
Options > Configure IDLE and under the Keys tab, you can see a list
of the current bindings.
print("Helio everyone!)
>>>
Hello everyone!
ForesTans
p>|
Hghighting
General
Keys
Key Set
+
Use Buittin
Key Set
a
IDLE Classic windows
Gove 05 New Custom key Set
Custom key find:ngs
Action - Keys)
begracg
re
dR
bang
bekrowe
loverd
te
dos
oe
Shee
bos
ttetare
ba
thtus
ow
rete
ede
rep a
+
CK
You may have noticed the colour coding within
the Python IDLE. The colours represent different
elements of Python code. They are:
Black Data and Variables
Green — Strings
Purple Functions
Orange — Commands
Blue — User Functions
Dark Red Comments
Light Red — Error Messages
—
-
(OLE
«
Le
23.6
Data & variables
Strings
Purple
Functions
Orange
Commands
Blue
User functions
Dark red
Comments
Error messages
area
“Hello World"
len()
if
for
print()
else
get_area()
#Remember VAT
Berroco
OnDURpeY
wh parreapel Demons, sleppng,
mid
duiogt
Browsers andetie
aA
of
ga
ond
local nemenpeceS.
25.5.1, Menus
CLE
mn
nar aan
‘curreny have te
25.5.1.1.
File
Sad enon
annem pos, he
es
serve lop meus
Lior eendows
menu (Shes and
ane
bu
16
ERE
a
tower
1
wndow
cate
poset
and
coed
Fen,
ra
Editor)
Fe
Mon
(Crome
0
new tm
cee
(Chan
an
song meow
ectang Maer an Open
stag
Recent Faas
9
(Open
SyntaxError:
Davelogunert and Leeming
toe
TORE nes ae
=
doit
Priors inapioned
=
Light red
a
25.5. IDLE
IDLE Colour Coding
Green
Carel
The Python IDLE is power interface and one
that’s actually been written in Python using one
of the available GUI toolkits. IF you want to know the many ins and
outs of the Shell, we recommend you take a few moments to view
www.docs.python.org/3/library/idle.html, which details many of
the IDLE’s Features.
STEP 10
emrce cod,
Black
ApRy
2c of
nano
‘Open
Can
an
scat es
excatng
CX
one
A
93
Coe
‘Shem
open
mocilefmerchen
Line, cle
coum
pet)
i
cnet Ear Mem es euerh
Mahe
ek one ame
ht
www.bdmpublications.com
Python on Linux
rs
Your First Code
Essentially, you've already written your First piece of code with the ‘print(“Hello
everyone!”)’ Function From the previous tutorial. However, let’s expand that and look at
entering your code and playing around with some other Python examples.
PLAYING WITH PYTHON
With most languages, computer or human, it’s all about remembering and applying the right words to the right situation.
You're not born knowing these words, so you need to learn them.
IF you've closed Python 3 IDLE, reopen it in
whichever operating system version you prefer.
the Shell, enter the familiar Following:
STEP
You can see that instead of the number 4, the
output is the 2+2 you asked to be printed to the
screen. The quotation marks are defining what's being outputted
to the IDLE Shell; to print the total of 2+2 you need to remove
the quotes:
STEP 3
1
In
printC“Hello”)
print(2+2)
Edt Shell Debug Qptions Windows Help
Python 3.4.2 (default, Oct 19 2014, 13:31:11)
(6cc 4.9.1] on linux
Type “copyright”, “credits” or “license{)" for more information.
Eile
>>>
&
Python 3 4.2 Sheil
Fle Edit Shell Debug Options
print("Hello”)
Hello
Python 3.4.2
>>>|
4.9.1]
(GCC
(default,
on
linux
Type “copyright”.
print("Helle")
>>>
Windows Help
13:31:11)|
“license()” for more information.
Oct 19 2014,
“credits”
or
Hello
>>> print(72*27)
+
2+2
>>>
print(2+2)
4
>>>
>>>
Just as predicted, the word Hello appears in the
Shell as blue text, indicating output from a string.
It’s Fairly straightforward and doesn’t require too much explanation.
Now try:
You can continue as such, printing 2+2, 464+2343
and so on to the Shell. An easier way is to use a
variable, which is something we will cover in more depth later. For
now, enter:
printc*2+2”)
a=2
STEP 2
STEP 4
b=2
File Edit Shell Debug Options Windows Heip
Python 3.4.2
(default, Oct 19 2014, 13:31:11)
4.9.1] on Linux
Type “copyright”. “credits” or “license()” for
>>> print("Kello")
[GCC
Hello
>>>
242
print( 72427)
Python 3.4.2 Shell
&
Fite
more
information.
Edit Shell Debug Options Windows Help
Python 3.4.2 (default, Oct 19 2014, 13:31:11)
(6Cc 4.9.4} on linux
Type “copyright”, “credits” or “license()" for more information.
>>>
print("Hello”)
Hello
>>>|
>>>
2+2
>>>
4
print("2#27)
print(2+2)
>>>
>>> a=2
>>> be2
>>>|
www.bdmpublications.com
Your FirstCode
apo)
What you have done here is assign the letters a
and b two values: 2 and 2. These are now variables,
Now let's add a surname:
surname=”Hayward”
which can be called upon by Python to output, add, subtract, divide
and so on for as long as their numbers stay the same. Try this:
printCsurname)
You now have two variables containing a First name and a surname
and you can print them independently.
print(a)
print(b)
ELC
File Edit
ICR
Python 3 4.2 Shell
aca
Elle Edit
Shell Debug Options Windows Help
(default, Oct 19 2014, 13:31:11)
4.9.1] on linux
Type “copyright”, “credits” or “license()" for
>>> print(“Hello")
(6CC
2+2
4
(default, Oct
(ece 4.9.1] on linux
more
information.
HI
Type “copyright",
>>> name="David"
“credits”
19
2014, 13:31:11)
or
“license()” for
more
infonnation.
>>>
print{name)
David
Hello
>>>
Shell Debug Qptions Windows Help
Python 3.4.2
|
Python 3.4.2
>>>
@}
print("2+2")
>>> surname="Hayward”
>>> print{surname)
print(2+2)
Hayward
>>>
PP>
|
>>> an2
>>> ba2
>>>
>>>
2
i
>>>
print(a)
print(b)
|
I
The output of the last step displays the current
values of both a and b individually, as you've asked
them to be printed separately. IF you want to add them up, you can
IF we were to apply the same routine as before,
using the + symbol, the name wouldn't appear
correctly in the output in the Shell. Try it:
STEP 9
os
use the Following:
printCname+surname)
printCa+b)
You need a space between the two, defining them as two separate
values and not something you mathematically play around with.
This code simply takes the values of a and b, adds them together
and outputs the result.
paler walt
Ble Edit Shell Debug Qptions Windows Help
_
Python 3.4.2
(default, Oct
[6cc 4.9.1} on linux
Type “copyright”,
>>>
print(“Hello”)
“credits”
19
or
Python 3.4.2
2014, 13:31:11)
“license()" for
>>>
2
more
information.
>>>
2
>>>
2
>>>
4
|
>>>
print("2+2")
or
name="David”™
“license()}” for
more information.
Hayward
=
>>> print(name+surname)
Dav idHayward
Davi
print(a)
print(b)
print(atb)
|
|
David”
printCname)
4.9.1]
(6CC
on
linux
print("Hello”)
printCname, surname)
printCname+” “+surname)
a=
Ble Edit She! Qebug Options windows Help
Python 3.4.2 (default, Oct 19 2014, 13:31:11)
Type “copyright”,
In Python 3 you can separate the two variables
with a space using a comma:
STEP 10
Alternatively, you can add the space yourself:
Python 3.4 eS
|
Oct 19 2014, 13:31:11)
“credits”
>>> surname="Hayward™
>>> print(surname)
print (2+2)
name=”
|
linux
print(name)
David
You can play around with different kinds ofvariables
and the Print Function. For example, you could
variables
for someone's name:
assign
>>>
(default,
on
>>>
>>> ae2
>>> b=2
>>>
4.9.1]
[GCC
Type “copyright”.
Helio
>>>
Edit Shell Debug Options Windows Halp
Fila
“credits”
or
“license()” for
|
more
information.
The use of the comma
is much neater, as you can see.
Congratulations, you've just taken your First steps into the wide
world of Python.
Hello
>>>
print("2+2")
>>>
4
print(2+2)
>>>
>>> a=2
>>> b=2
>>> print(a)
2
>>>
2
>>>
print(b)
print(atb)
4
>>>
"David"
namee
>>> print(name)
David
>>>
Python 3.4.2
(6cc 4.9.1]
(default, Oct
on
linux
Type “copyright”,
>>> name="David”
"credits"
19 2014.
or
13:31:11)
“license()" for
more information.
>>> print(name)
David
>>> surname="Hayward”
>>>
print{surname)
Hayward
>>>
print(name+surname)
DavidHayward
>>> print(name, surname)
David Hayward
>>> print(namet” “#surname)
David Hayward
>>>
|
www.bdmpublications.com
Python on Linux
é
Saving and Executing
Your Code
While working in the IDLE Shell is perfectly Fine For small code snippets, it’s not
designed for entering longer program listings. In this section you're going to be
introduced to the IDLE Editor, where you will be working from now on.
EDITING CODE
You will eventually reach a point where you have to move on from inputting single lines of code into the Shell. Instead, the
IDLE Editor will allow you to save and execute your Python code.
First, open the Python IDLE Shell and when it’s up,
click on File > New File. This will open a new window
with Untitled as its name. This is the Python IDLE Editor and within it
you can enter the code needed to create your future programs.
STEP
1
Bie Edt Sheol Debug Options Windows Help
(default, Oct 19
Bython 2.4.2
Lece
"credits"
or
“license(}"
You can see that the same colour coding is in place
in the IDLE Editor as it is in the Shell, enabling you
to better understand what's going on with your code. However, to
execute the code you need to first save it. Press F5 and you geta
Save...Check box open.
STEP 3
Byline
34.7
——————————
Shell
+?)
for
more
information.
Python $14.9
(default, Oct
4.9.1} on fina
Type “copyright”, “er edits”
1
Tact
or
Ble
Een Fagmat fain Options Yondows
Prent( nelle everyone’)
2014. 1B
“licanse()" for
mare information.
ile
a
i
Source
Must Be Saved
OK to Save?
fencet|
i
The IDLE Editor is, For all intents and purposes, a
simple text editor with Python Features, colour
coding and so on; much in the same vein as Sublime. You enter
code as you would within the Shell, so taking an example from the
previous tutorial, enter:
printC“Hello everyone!
”)
Click on the OK button in the Save box and select a
destination where you'll save all your Python code.
The destination can be a dedicated Folder called Python or you
can just dump it wherever you like. Remember to keep a tidy drive
though, to help you out in the future.
STEP 4
print(”Hello everyone!”)
Directory.
Ga _pycache_
G Blue) Projects
[_]
(1
Greenfoot Projects |_|
Python Code
Scratch Projects
[/]
Addition.py
cake.
py
{| loopi.py
Circte.py
(Cl main.py
graphics.py
L| namecount.py
U Square.py
img.py
(U]
imgtest.py
(1 wordgame.py
C Hello.py
Gm
(J
aj
File name: {print hello
Files of tvoe:
www.bdmpublications.com
—
shome/pi/Documents
Python files (+.0v.*.0vw)
test.py
( Saving
Let's extend the code and enter a few examples
from the previous tutorial:
Enter a name for your code, ‘print hello’ For
example, and click on the Save button. Once the
Python code is saved it’s executed and the output will be detailed in
the IDLE Shell. In this case, the words ‘Hello everyone!’.
-
"Bie dk
chon
Steak
Rebuy Options
3.4.2 (deteult, Get
04.9.1)
on
Type “copyrsgnt”,
print hello py
irdows belt
18
20M,
“credits” or “Licenset) fer
RESTART
a=2
b=2
mome/pi/Documents/Pythen Code/p
Edt Famet Bun Lptins
PrInt( “Hello wweryone'")
‘Bio
and Executing Your Code
iaions taly
more intemnecion.
name=”David”
surname=”Hayward”
printCname, surname)
print
felis
>a»
Ca+tb)
press FS now you'll be asked to save the file, again, as it’s been
modified From before.
IF you
IF you click the OK button, the File will be
overwritten with the new code entries, and
executed, with the output in the Shell. It’s not a problem with just
these few lines but if you were to edit a larger File, overwriting can
become an issue. Instead, use File > Save As From within the Editor
to create a backup.
This is how the vast majority of your Python code
will be conducted. Enter it into the Editor, hit F5,
save the code and look at the output in the Shell. Sometimes things
will differ, depending on whether you've requested a separate
window, but essentially that’s the process. It’s the process we will
use throughout this book, unless otherwise stated.
STEP 9
Python 3.4.2 Shell
Ee Edt
Shell
pnnt hello.py /home/pi/Documents/Python Code/print helio.py (3.4.2)
=
9
x
Debug Options Windows Help
|
Python 3.4.2 (default, Oct 19 2014, 13:31:11)
(6cc 4.9.1) on Linux
Type “copyright”, “credits” or "license()" for more information.
>>>
>>>
Hello everyone!
>>> [
IF you open the file location of the saved Python
code, you can see that it ends in a .py extension.
This is the default Python file name. Any code you create will be
whatever.py and any code downloaded from the many Internet
Python resource sites will be .py. Just ensure that the code is written
For Python 3.
File Edit View Bookmarks Go Toots Iielp
FO ae
'
Directory Tree
+
Save
Ctri+s:
cute
Save As...
Save Copy As...
Alt+:!
Print Window
Ctri+P.
Glose
ARLr4
Exc
Ctri+Q
(| momeypyDocuments/Python
Code
=
fill besktop
EB
Documents
¥
OBlued Projects.
+
DiGreenfoot Projects
+
C_pycache_
+S
Nhs
Now create a new file. Close the Editor, and open
new instance (File > New File From the Shell).
Enter the Following and save it as hello.py:
a
a="Python”
b=” 1 ”
Ss
"
|
k
le,
You will use this code in the next tutorial.
hello.py /home/pi/Dacuments/Python Code/hello.py (3.4.2)
pi
+
1
”
——&
Alt+M
AR+C
c="cool!”
print(a, b, c)
‘
i
Open Module...
Class Browser
Path Srowser
paint
hello.py
Ble Edk Format Bun Qptions Windows Help
a="Python”
b="is”
c="cool!”
print(a, b.
c}
«No subfolders>
+
+
+
+
DScratch Projects
Downloads
Music
fil Pictures
www.bdmpublications.com
>
Python on Linux
é
Executing Code
From the Terminal
Although we're working from the GUI IDLE throughout this book, it’s worth taking
a look at Python’s command line handling. We already know there's a command line
version of Python but it’s also used to execute code.
COMMAND THE CODE
Using the code we created in the previous tutorial, the one we named hello.py, let’s see how you can run code that was made
in the GUI at the command line level.
Python, in Linux, comes with two possible ways of
executing code via the command line. One of the
ways is with Python 2, whilst the other uses the Python 3 libraries
and so on. First though, drop into the command line or Terminal on
STEP
1
your operating system.
pisraspberrypi:-
5
Of
Just
as before,
we're using a
Raspberry Pi: Windows users will
need to click the Start button and
search for CMD, then click the
Command Line returned search;
and macOS users can get access
to their command line by clicking
Go > Utilities > Terminal.
a
Now you're at the command line we can start
Python. For Python 3 you need to enter the
command python3 and press Enter. This will put you into the
command line version of the Shell, with the Familiar three rightfacing arrows as the cursor (>>>).
STEP 3
a
oct
®
sitter
STEP 4
match
a
feo]
fom
Gescp
ind
eps
Search suggestions
emd
Prompt
From here
able to enter the code you've
you're
looked at previously, such as:
a=2
.
print(Ca)
You can see that it works exactly the same.
e
2
www.bdmpublications.com
emd|
information.
Code From the Terminal
(Executing
Now enter: exit() to leave the command line Python
session and return you back to the command
prompt. Enter the Folder where you saved the code from the
previous tutorial and list the available Files within; hopefully you
should see the hello.
py File.
3 oo
The result of running Python 3 code from the
Python 2 command line is quite obvious. Whilst it
doesn’t error out in any way, due to the differences between the
way Python 3 handles the Print command over Python 2, the result
isn’t as we expected. Using Sublime for the moment, open the
hello.py file.
BB CAUsers\david\Documents\Python\hello.py
File
Selection
Edit
View
Find
Preferences
Project
Help
x
hella.py
ane
- Sublime Text (UNREGISTERED)
Tools
Goto
a="Python”
b=*is”
c="cool!”
prns@.
eCard
fn
From within the same folder as the code you're
going to run, enter the following into the
command line:
python3
b, c)
hello.py
This will execute the code we created, which to remind you is:
Since Sublime Text isn’t available for the Raspberry
Pi, you're going to temporarily leave the Pi for the
moment and use Sublime as an example that you don’t necessarily
need to use the Python IDLE. With the hello.py file open, alter it to
include the Following:
STEP 9
b="i1 s”
c="cool!”
printda, b, c)
“)
name=inputC“What 1s your name?
printC“Hello,”,
a=”Python”
@
File
.
Geers
Edit
name)
ae.id Becument: Pethenvneilep.
Selection
Find
View
Goto
++
Tools
Surliee
Test
Project
UPIPESISTERED!
Preferences
Help
°
helto.py
a="Python”
b="is”
c="cool!”
print(a, b,
)
name=input("What
print=("Hello,”,
3B
eereen
is your
name?
")
name)
hello
nT
Naturally, since this is Python 3 code, using the
syntax and layout that’s unique to Python 3, it only
works when you use the python3 command. If you like, try the same
with Python 2 by entering:
python
hello.
py
Save the hello.py File and drop back to the
command line. Now execute the newly saved
code with:
python3 hello.py
The result will be the original Python is cool! statement, together
with the added input command asking you for your name, and
displaying it in the command window.
ke tra
PaO
IsIany
Ce
ATerey
code
$
fl
pee
www.bdmpublications.com
~~
a
ted
~)
“4
es tes es es Es Es
as
as
oes
as as
as
was ees >
ba
a?
ad
Lee’,
sgyoss
Python on Linux
rs
Numbers and Expressions
We've seen some basic mathematical expressions with Python, simple addition and the
like. Let's expand on that now and see just how powerful Python is as a calculator. You
can work within the IDLE Shell or in the Editor, whichever you like.
IT’S ALL MATHS, MAN
You can get some really impressive results with the mathematical powers of Python; as with most, if not all, programming
languages, maths is the driving Force behind the code.
sy =o
Open up the GUI version of Python 3, as mentioned
you can use either the Shell or the Editor. For the
time being, you're going to use the Shell just to warm our maths
muscle, which we believe is a small gland located at the back of the
brain (or not).
(GCC
4.9.1]
on
linux
Type “copyright”,
“credits”
or
“license()" for
|
Af
more
CRE
information.
asia
File Edt Shell Debug Options Windows Help
ms
>>>
1/2
6/2
(14+2)+(3*4)
Ble Edt She Qebug Options windows Leip
Python 3.4.2 (default, Oct 19 2014, 13:31:11)
HP
few, for example:
2+2*3
eau
|
YOu can use all the usual mathematical operations:
divide, multiply, brackets and so on. Practise with a
esjecwee
Python 3.4.2
4.9.1]
Gcc
(default, Oct
on
linux
Type "copyright".
>>> 242
"credits"
19
or
2014, 13:31:11)
“license()” for
more
information.
ii
4
>>> 54956+34553245
34607601
>>> 99867344*27344484221
2730821012201179024
ia
0.5
Lay
I,
>>> 1/2
33>
3.0
>>>
8
>>>
15
>>
STEP 2
In
You've no doubt noticed, division produces a
decimal number. In Python these are called Floats,
or Floating point arithmetic. However, iF you need an integer as
opposed to a decimal answer, then you can use a double slash:
the Shell enter the following:
2+2
54356+34553245
99867344*2 7344484221
1//2
6//2
You can see that Python can handle some quite large numbers.
And so on.
Python 3.4 2 Shel!
Fila Edit
Shell Debug Options Windows Help
[Python 3.4.2 (default, Oct 19 2014, 13:31:11)
[6c 4.9.1] on Linux
Type “copyright”, “credits” or “License()” for more information.
-
>>> 242
4
>>> 54356+34553245,
|
(102)4(3*4)
|
34607601
>>> 99867344*27344484221
2730821012201179024
>>>
a
"Bile Edk Shell Debug Options Windows Help
Python 3.4.2 (default, Oct 19 2014, 13:31:11)
[6CC 4.9.1] on linux
Type “copyright". “credits” or "License()" for
>>>
4
more
information.
2+
>>> 54356+34553245
;
34607601
\@
>>> 99867344*27344484221
‘|
he
2730821042201179024
>>> 1/2
0.5
3.0
>>>
8
24283
p>>
(1#2)4( 384)
15
>>>
0
14/2
>>>
64/2
3
www.bdmpublications.com
ie
q
>>>|
102
io
6/2
(Numbers
yi
You can also use an operation to see the remainder
left over from division. For example:
10/3
Will display 3.333333333, which is of course 3.3-recurring.
now enter:
IF
you
10%3
This will display 1, which is the remainder left over From dividing 10
into 3.
2730821012201179024
P>>> 142
0.5
>>>
3.0
6/2
>>> 26203
3
>>> (142)+(3"4)
5
>>> 14/2
oO
2>>
6//2
3
>>>
,
3. 3999359233309035
a
his will be displayed as ‘0b11’, converting the
s2esee
Front.
IF
and Expressions
integer into binary and adding the prefix Ob to the
you want to remove the 0b prefix, then you can use:
‘b’)
format(3,
The Format command converts a value, the number 3, toa
formatted representation as controlled by the Format specification,
the ‘b’ part.
Ml
>>> 2+2*3
8
>>> (142)+(3%4)
1S
>>> 14/2
0
>>>
6/42
3
>>>
3.
>>>339999330888835
1
>>>
8
>>>
2eeg
10**10
10000000000
>>>
bin(3)
"Ob11
>>> format(3,°b‘}
“4a
>>>
Next up we have the power operator, or
exponentiation if you want to be technical. To work
out the power of something you can use a double multiplication
symbol or double-star on the keyboard:
A Boolean Expression is a logical statement that will
either be true or false. We can use these to compare
data and test to see if it’s equal to, less than or greater than. Try this
2**3
10**10
a=6
b=7
soars
Essentially, it’s 2x2x2 but we're sure you already know the basics
behind maths operators. This is how you would work it out in Python.
>>> 6/2
3.0
por 20243
>>>
(142)4+(3*4)
>>> 44/2
>>>
6//2
3
>>> 10/3
3. 3333333333333335
STEP 9
in a New File:
Boolcantest py /home/pi/Dk
print(1,
print(2,
print(3,
print(4,
print(S,
print(6,
print(7,
print(8,
print(9,
a
a
a
a
==
==
6)
7)
==
6 and b
==
==
7 and b
==
not a
a
a
7 and b
==
==
7
==
7
not (a
not a ==
7)
7)
or
or
==
b
==
b
==
b=
7)
6)
7 and b
7 and b
7
an
7)
==
6))
==
==
6)
>>> 10%3
1
>>> 2**3
>>> 108810
10000000000
Numbers and expressions don’t stop there. Python
has numerous built-in Functions to work out sets
of numbers, absolute values, complex numbers and a host of
mathematical expressions and Pythagorean tongue-twisters. For
example, to convert a number to binary, use:
STEP 7
bin(3)
>>>
3.0
eatal|
Edit Shell Debug Options Windows Help
(Gece
6/2
>>> 26283
8
>>> (192)+( 384)
15
por 14/2
Qo
>>>
Pea
Bile
Python 3.4,2
>>
0.5
Execute the code from Step 9, and you can see a
series of True or False statements, depending on
the result of the two defining values: 6 and 7. It's an extension of
what you've looked at, and an important part of programming.
STEP 10
64/2
3
>>> 10/3
3.3333333333333335
>>> 10%3
Type
(default, Oct 19 2014, 13:31:11)
4.9.4] on linux
“copyright”, "credits" or “license()" for
>>>
1
2
3
more
information.
RESTART
True
.
.
False
|
True
4 False
3 True
6 True
7 False
8 True
9 False
>re|
1
pep Qeeg
8
>>> 10**10
10000000000
bin(3)
‘Obit’
>>>
www.bdmpublications.com
attK)
*
Python on Linux
rs
Using Comments
When writing your code, the Flow, what each variable does, how the overall program
will operate and so on is all inside your head. Another programmer could Follow the
code line by line but over time, it can become difficult to read.
#COMMENTS!
Programmers use a method of keeping their code readable by commenting on certain sections. If a variable is used, the
programmer comments on what it’s supposed to do, for example. It's just good practise.
Start by creating a new instance of the IDLE Editor
(File > New File) and create a simple variable and
print command:
a=10
printC“The value of
Save the File
f
File
a=10
is,”,
a)
an execute the code.
Comments py
fl
A
Resave the code and execute it. You can see that the
output in the IDLE Shell is still the same as before,
despite the extra lines being added. Simply put, the hash symbol (#)
denotes a line of text the programmer can insert to inform them,
and others, of what’s going on without the user being aware.
STEP 3
-
Python 3.4.2 Sheil
/nome/pi/Documen ../Python Code/Comments py
Edit Format fiun Options windows Help
print("The value of A is,",
(342)
-
Eile Edit
0
Shell
Python 3.4.2 (default, Oct 19 2014, 13:31:11)
[GCC 4.9.14] on Linux
Type "copyright", “credits” or “license()” for more information.
*
-
RESTART
>>>
>>>
a)
The value of A is.
>>>
Running the code will return the line: The value of A
into the IDLE Shell window, which is what we
expected. Now, add some of the types of comments you'd normally
see within code:
is, 10
Set the start value of
#
A
to
Print the current value of
printC“The value of
A
is,”,
Fie Edit Format Aun Qptions windows Help
# Set the start value of A to 10
-|
a=10
Print the current value of A
print("The value of A is.", a}
#
www.bdmpublications.com
10
Let's assume that the variable A that we've created
is the number of lives in a game. Every time the
player dies, the value is decreased by 1. The programmer could
insert a routine along the lines of:
ae
printC“You’ve just lost a life!”)
printC“You now have”, a, “lives Left!”)
A
a)
*Comments.py
- /home/pi/Docume..Python Code/Comments py (3.4.2)*
"
is,
a=a-1
10
a=10
#
Sais
10
RESTART
>>>
>>>
The value of A
|
STEP 2
Debug Qptions Windows telp
x
File Edit Format Run Options Windows Help
#
Set the start value of
A to 10
a=10
Print the current value of A
print("The value of A is.”, a)
#
aza-1
print("You've just lost a life!”)
print("You now have", a, “lives left!"}
aye
UsingComments
Inline coments are comments that follow a section
of code. Take our examples from above, instead of
Whilst we know that the variable A is lives, and
that the player has just lost one, a casual viewer or
someone checking the code may not know. Imagine for moment
that the code is twenty thousand lines long, instead ofjust our
seven. You can see how handy comments are.
inserting the code ona separate line,
a
Ele Edit Sheil Debug Options Windows Help
Python 3.4.2 (default, Oct 19 2014, 13:31:11)
(6CC 4.9.1] on linux
Type “copyright”. “credits” or "license()” for
|
rs
more
The value of A
information.
>>>
The value of A
>>>
|
is,
10
is,
10
use:
Set the start value of A to 10
printC“The value of A is,”, a) # Print the current
value of A
a=a-1 # Player lost a life!
RESTART
>>>
we could
a=1@ #
ca
tC
@®}
printC“You’ve just lost a life!”)
printC“You now have”, a, “Lives Lleft!”) # Inform
player, and display current value of A (lives)
Comments py - /home/pi/Documents/Python Cade/Comments py (3 4 2)
fe
Edk Format Bun Qptions Windows fHelp
a=10 # Set the start value of A to 10
print("The value of A 2s,", a) # Print the current value of A
RESTART
is, 10
You've just lost a life!
You now have 9 lives left!
The value of A
aea-t
#
Player lost
a
4
life!
print(“You've just lost a life!™)
brint("You now have", a, "lives left!")
#
Inform player, and display current value of A
(lives
>>>
Essentially, the new code together with comments
could look
like:
Set the start value of
#
A
to 10
a=10
Print the current value of A
printC“The value of A is,”, a)
# Player lost a life!
a=a-1
# Inform player, and display current value of
#
The comment, the hash symbol, can also be used to
comment out sections of code you don’t want to be
executed in your program. For instance, if you wanted to remove
the First print statement, you would use:
STEP 9
printC“The value of
#
Eile Edit
A
# Set
printC“You’ve just lost a life!”)
printC“You now have”, a, “lives Left!”)
#
#
#
Print the current value of A
print("The value of A is,*, a)
# Player lost a life!
Inform player. and display current value of
print(“You've just lost a life!)
print("You now have", a, “lives left!”)
#
A
You can use comments in different ways. For
variables you're planning
on
using:
This is the best game ever, and has been
developed by a crack squad of Python experts
# who haven’t slept or washed in weeks. Despite
being very smelly, the code at Least
#
works
#
J]
really well.
really well.
Windows
Help
to 10
Print the current value af A
printc’The value of A is,", a}
Player lost a life!
STEP 10
|
Set the start value of A to 10
an10
# Print the current value of A
print("the value of A is,~, a)
comments. Place them before and after the areas you want to
commen
For
them
to work:
eo9
This is the best game ever, and has been developed
by a crack squad of Python experts who haven’t
slept or washed in weeks. Despite being very
smelly, the code at least works really well.
Ee
Eat Former gun gpoons
yondows Help
This
15 the best gane ever, and has been developed by a crack squad of Python experts
havenOt slept or washed in weeks. Despite being very smelly, the code at least
works really well]
who
| #
Ml
Player lost
aza-1
#
a
life!
player, and display current value of
print(“You've just lost a life!~)
“Lives left!7)
Print(“You now have~,
# Inform
A
(lives)
(lives)
You also use three single quotes to comment
out a Block Comment or multi-line section of
a>93
Ele Edk Format Run Options Windows Help
# This 1s the best game ever, and has been developed by a crack squad of Python experts
# who haven't slept or washed in weeks. Despite being very smelly. the code at least
# works
A
(lives)
example, Block Comments are a large section of
text that details what's going on in the code, such as telling the code
what
Options
value of
print("You've just lost a life!™)
Print("You now have". a, "Lives left!™)
a=10
#
reader
Format Run
the start
ae
SL
ad
a=a-1
# Inform player. and display current value of A
Edt Format Bun Qptions Windows Help
Set the start value of A to 10
STEP 7
a)
a=10
J fe
"/
_
is,”,
re anal
Clives)
i|#
A
value of A to
#
Sct the start
#
#
#
Print the current value of A
print("The value of A is.". 9)
Player lost a life!
10
Inform player, and display current value of A (lives)
print("You've just lost a lifer")
print("You now have’, 2, “Lives leftt-)
#
www.bdmpublications.com
Python on Linux
é
Working with Variables
We've seen some examples ofvariables in our Python code already but it’s always
worth going through the way they operate and how Python creates and assigns certain
values to a variable.
VARIOUS VARIABLES
You'll be working with the Python 3 IDLE Shell in this tutorial.
IDLE Shell to clear up any old code.
In some programming languages you're required
to use a dollar sign to denote a string, whichis a
variable made up of multiple characters, such as a name of a person.
In Python this isn’t necessary. For example, in the Shell enter:
name=”David Hayward” (or use your own name, unless you're
also called David Hayward).
IF
you haven't already, open Python 3 or close down the previous
You've seen previously that variables can be
concatenated using the plus symbol between the
variable names. In our example we can use: print Cname + “:
*
+
The middle part between the quotations allows us to
add a colon and a space, as variables are connected without spaces,
so we need to add them manually.
STEP 3
title).
-_—_
Tet
File Edit
Shell
aac}
File Edit
Debug Options Windows Help
(default, Oct 19 2014, 13:31:11)
4.9.1] on linux
Type "copyright". “credits” or “License()” for
Shell Qebug Qptions Windows Help
Python 3.4.2
Python 3.4.2
[GCC
more
name="David Hayward"
print (name)
David Hayward
|
Paiute
information.
>>>
>>>
(default, Oct
4.9.1] on Linux
Type “copyright”, “credits”
(GCC
19
or
mame="David Hayward”
print (name)
David Hayward
>>> type (name)
>>>
"
2014, 13:31:11)
“license()” for
more
information.
>>>
>>>
<class 'str'>
>>> title="Descended from Vikings"
>>> print (name + ": “ + title)
Hayward: Descended from Vikings
|
ea
>>>
You can check the type of variable in use by
issuing the type () command, placing the name of
the variable inside the brackets. In our example, this would be:
type Cname). Add a new string variable: titLe=”Descended
STEP 2
from
Vikings”.
Python 3.4.2 Shell
File Edit
character=name +
title
Shell Debug Options Windows Help
Python 3.4.2
(default, Oct 19 2014, 13:31:11)
4.9.1] on linux
Type “copyright”, “credits” or “license()” for
[GCC
>>>
>>>
name="David Hayward”
print (name)
David Hayward
>>> type (name)
<class ‘str'>
title="Descended from Vikings”
>>>
>>>
You can also
combine variables
within another variable. For
example, to combine both name
and title variables into a new
variable we use:
STEP 4
more
information.
eo.
&
+
Then output the content of the
new variable as:
print Ccharacter)
|
Numbers are stored as different
variables:
age=44
Type Cage)
Which, as we know, are integers.
www.bdmpublications.com
eae Ras
Elle
Edit
Shell
Python 3.4.2
1G6CC
4.9.1]
Debug Options Windows Help
(default,
on
linux
Oct 19 2014, 13:31:1
Type “copyright”, “credits” or
>>> name=“David Hayward"
>>>
“license()"
print (name)
David Hayward
>>> type (name)
<class ‘str’>
>>> title="Descended
>>> print (name +
from
Vikings”
title)
David Hayward: Descended from Vikings
>>> character=name + ": “ + title
>>>
print (character)
David Hayward: Descended from Vikings
>>>
apee4dd
>>> type
(age)
<class ‘int‘’>
>>>
!
( Working with Variables
However, you can’t combine both strings and
integer type variables in the same command, as you
would a set of similar variables. You need to either turn one into the
other or vice versa. When you do try to combine both, you get an
error message:
print
Cname +
Python 3.4.2
4.9.1]
(6CC
age)
(default, Oct
on
linux
Type “copyright", "credits" or
>>> name="David Hayward"
>>> print (name)
David Hayward
>>> type (name)
“license()” for
This presents a bit of problem when you want to
work with a number that’s been inputted by the
user, as age + 10 won't work due to being a string variable and an
integer. Instead, you need to enter:
intCage)
more
Python 3.4.2 Shell
File Edit Shell Debug Options Windows Help
Python 3.4.2
(default, Oct 19 2014, 13:31:11)
4.9.1] on linux
Type “copyright”, “credits” or “license()“ for
(GCC
>>>
How
>>>
Traceback (most recent call
age + 10
<module>
TypeError: Can’t convert ‘int’
Can't convert ‘int’ object to str implicitly
>>>
This is process known as TypeCasting. The Python
code is:
a
+
“ is “ +
“
strCage) + years
or you Can Use:
“is“,
age, “years
old.”)
Notice again that in the last example, you don’t need the spaces
between the words in quotes as the commas treat each argument
to print separately.
print
int(age)
s4
>>>
print Ccharacter,
information.
Traceback (most recent call last):
File "<pyshell#2>", line 1, in <module>
last):
File “<pyshell#9>", line 1, in
print (name+age)
old.”)
more
™)
>>> age + 10
<class ‘int'>
>>> print (nametage)
print Ccharacter
age» input (“How old are you?
old are you? 44
type(age)
<class "str'>
>>> ageed4
>>> type (Cage)
>>>
+ 10
information.
<class ‘str'>
>>> titlee"Descended from Vikings“
>>> print (name + “:
title)
David Hayward: Descended from Vikings
>>> character=name + ":
title
>>> print (character)
David Hayward: Descended from Vikings
errr:
a
This will TypeCast the age string into an integer that can be
worked with.
2014, 13:31:11)
19
yoo}
(meme +
age)
Traceback {most recent call last):
File “<pysheli#1e>", line 1, in <module>
print (name + age)
TypeError: Can*t convert ‘int’ object to str" implicitly
"+ str(age) +
o>> print (character + "is
years old.)
David Hayward: Descended from Vikings is 44 years old.
>>> print (character, "is", age. “years old.")
David Hayward: Descended from Vikings is 44 years old.
+ 10
object to str implicitly
|
The use of TypeCasting is also important when
dealing with floating point arithmetic; remember:
numbers that have a decimal point in them. For example, enter:
STEP 9
shirt=19.99
Now enter typeCshirt) and you'll see that Python has allocated
the number as a ‘float’, because the value contains a decimal point.
A
Python 3.4.2 Shell
'
Elle Edit Shell Debug Qptions Windows Help
Python 3.4.2
(default, Oct 19 2014, 13:31:11)
4.9.1] on linux
Type “copyright”, “credits” or “license()" for
>>> shirt=19.99
>>> type(shirt)
<class ‘float'>
(GCC
>>>
more
information.
|
phe
oe?
|
Another example of TypeCasting is when you ask for
input From the user, such as a name. for example,
enter:
age= input C“How old are you?
“)
All data stored From the Input command is stored as a string variable.
a
{
oo
ee
File Edit
type(age)
<class ‘str'>
>>>
|
eee
waC
Shell Debug Options Windows Help
Python 3.4.2 (default, Oct 19 2014, 13:31:11)
(GCC 4.9.14] on linux
Type “copyright”. “credits” or “license()" for more information.
>>> age= input ("How old are you? ”)
How old are you? 44
>>>
When combining integers and floats Python
usually converts the integer to a float, but should
the reverse ever be applied it’s worth remembering that Python
doesn’t return the exact value. When converting a Float to an
integer, Python will always round down to the nearest integer,
called truncating; in our case instead of 19.99 it becomes 19.
STEP 10
Eile Edit
Shell Debug Qptions Windows Help
Python 3.4.2
(default, Oct 19 2094, 13:31:11)
4.9.1] on linux
Type “copyright”. “credits” or “license()” for
>>> shirt=19.99
>>> type(shirt)
<class ‘float'>
[GCC
>>>
19
more
information.
int(shirt)
>>>|
www.bdmpublications.com
sty)
Python on Linux
rs
User Input
We've seen some basic user interaction with the code From a few of the examples
earlier, so now would be a good time to Focus solely on how you would get information
From the user then store and present it.
USER FRIENDLY
The type of input you want from the user will depend greatly on the type of program you're coding. For example, a game may
ask For a character's name, whereas a database can ask for personal details.
STEP
IF it’s not already, open the Python 3 IDLE Shell,
and start a New File in the Editor. Let’s begin with
1
STEP 3
we want:
something really simple, enter:
printC“Hello”)
is
firstname=inputC“What
printC“Thanks.”)
surname=inputC“And what
Now that we have the user’s name stored ina
couple of variables we can call them up whenever
your first name?
is
your surname?
printC“Welcome”, firstname, surname,
“)
you’re well today.”)
“. I
hope
“)
File Edit
Format
Run Options Windows Help
erant"Hello”)
firstname=input("What 1s your first name? ”)
prant“Thanks.")
surnames input("And what is your surname? ”)}
I print( "welcome", firstname. surname.~. I hope you're well today.*)
ay
File Edit Format Run Options Windows Help
Hf
pr
intc“hel to")
firstnamesinput(
"What
print("Thanks.”)
And
1s your
what
first
4|
A
name?
")
is your surname? ~)
purmanensnpur
Save and execute the code, and as you already no
doubt suspected, in the IDLE Shell the program will
ask for your first name, storing it as the variable firstname, followed
by your surname; also stored in its own variable (surname).
ol
2
print(“Welcome”, firstname, surname+“. I
you’re well today.”)
Python 3.4.2 Shell
File Edit
Shell
Debug Options Windows Help
Python 3.4.2
(default, Oct 19 2014, 13:31:14)
4.9.1] on linux
Type “copyright", “credits” or “license()” for
[GCC
RESTART
>>>
>>>
Hello
What is
Thanks.
your
first
name? David
And what is your surname? Hayward
>>>
|
www.bdmpublications.com
Run the code and you can see a slight issue, the
full stop after the surname Follows a blank space.
To eliminate that we can add a plus sign instead of the comma in
the code:
STEP 4
RB"
more
hope
*userinput
py - /heme/pi/Becuments/Python Code/userinput py (3.4.2)*
information.
File Edit
G
x
Format Run Options Windows Help
print"Hello")
firstname=input(
"What
print“Thanks.”)
is
your
first
A
name?
“)
surname=input("And what is your surname? “)
print{ "Welcome". firstname. surname+“. I hope you're well today.“)
(useriput_
You don't always have to include quoted text within
the input command. For example, you can ask the
user their name, and have the input in the line below:
printC“Hello. What’s your name?”)
userinput.py /horne/pi/Decuments/Python Code/usi
Edit
Format Run Options windows Halp
print(“Hello. What's
names input(
will cover soon.
In
a
name=inputC)
Aila
we
short, we're using the input from
the user and measuring it against a condition. So, if the user enters
David as their name, the guard will allow them to pass unhindered.
Else, if they enter name other than David, the guard challenges
them to a fight.
What you've created here is a condition, which
Stmy Rebuy Options windows biel
a004, tSIETTD
Bython 3.4.2 (default, Oct
[ace 4.9.1) on janux
Teeedats” oF * ucence()” for
Bie GR
Bis Est
1
+
useanout
py: shome/puDocuments/Python
Ci
‘iedown tile
Fiyeent Bein Gpllons
wore information.
RESTART
your name?")
Welcome. good sir.
>
els
He goes there?
ales
Brant("t kaw
you not. Prepare
fur
battle!">
You may pass.
eaSTART
Hale!
gore there?
Whe
conan
Thor
you not. Prepare for
batttet
i
The code From the previous step is often regarded
as being a little neater than having a lengthy
amount of text in the input command, but it’s not a rule that’s set in
stone, so do as you like in these situations. Expanding on he code,
try this:
os
printC“Halt!
Who
goes
there?”)
name=inputC)
print("Halt!
name=input()
Who
to calculate rate and distance
print(“Input a rate and a distance”)
rate = float(input( "Rate: "y
# Code
good start to a text adventure game, perhaps?
Now you can expand on it and use the raw input
from the user to Flesh out the gamea little:
if
a
name=="David”:
printC“Welcome, good
else:
printC“I
know you
Code/userinput py (3 4 2)"
Edit Format Bun Qptions Windows Heip
Fite
goes there?")
It's
Code to calculate rate and distance
printC“Input a rate and a distance”)
rate = floatCinputC“Rate: “))
#
*userinput
py - /home/pi/Documents/Python
File Edit Format Run Options Windows Help
[|
user is automatically a string, so you need to apply a
TypeCast in order to turn it into something else. This creates some
interesting additions to the input command. For example:
-
*userinput.py /home/pi/Documents/Python Code/userinput py (3 42)"
Just as you learned previously, any input From a
STEP 9
sir.
You may
not. Prepare for
File Edit Format Run Qptions Windows Help
To finalise the rate and distance code, we can add:
distance = floatCinputC“Distance: *"))
printC“Time:”, Cdistance / rate))
Save and execute the code and enter some numbers. Using the
float(input element, we've told Python that anything entered is a
floating point number rather than a string.
pass.”)
battle!”)
userinput.p
- /nome/pi/Documents/Python Code/usennputpy
(3.4.2) -
STEP 10
Oo
x
ie
Galt She Qabuy gpeiana yindews Leip
Bye
ae
9
CORERGTE,
cred
%
Gee TE DOLE, VaEITTTTD
.-
usennput py- shomerp.‘Documents/Python
print("Halt! Who goes there?")
name=input()
if name=="David":
Print("Welcome, good sir. You may pass.")
else:
print(*t know you not. Prepare for battle!")
Rate:
ot
12
2
www.bdmpublications.com
Python on Linux
é
Creating Functions
Now that you've mastered the use of variables and user input, the next step is to tackle
Functions. You've already used a few functions, such as the print command but Python
enables you to define your own Functions.
FUNKY FUNCTIONS
A Function
is command that you enter into Python to do something. It’s a little piece of self-contained code that takes data,
works on it and then returns the result.
a
It’s not just data that a Function works on. They can
do all manner of useful things in Python, such as
sort data, change items from one format to another and check the
length or type of items. Basically, Function is short word that’s
followed by brackets. For example, len(), list() or type().
STEP
1
a
a
*Python 3.4.2 Shell*
File Edit
Shell Debug Options Windows Help
Python 3.4.2 (default, Oct 19 2014, 13:31:11)
[Gcc 4.9.1] on linux
Type “copyright”. “credits” or “license{)" for more information,
>>>
lel
You can pass variables through Functions in much
the same manner. Let's assume you want the
number of letters in a person’s surname, you could use the following
code (enter the text editor For this example):
STEP 3
name=input C“Enter your surname: “)
count=LenCname)
print C“Your surname has“, count, “letters in
it.”)
Press FS and save the code to execute it.
sLiceetedy* for wore
A function takes data, usually a variable, works on
it depending on what the Function is programmed
to do and returns the end value. The data being worked on goes
inside the brackets, so if you wanted to know how many letters
are in the word antidisestablishmentarianism, then you'd enter:
LenC“antidisestablishmentarianism”) and the number 28
would return.
ies
Python has tens of Functions built into it, far too
many to get into in the limited space available here.
However, to view the list of built-in Functions available to Python 3,
navigate to www.docs.python.org/3/library/functions.html. These
are the predefined Functions, but since users have created many
more, they're not the only ones available.
STEP 4
Python
eeTue
File Edit
File
eS) 012
19 2014, 13:34:11)
linux
Type "copyright". “credits” or “license()" for
>>> len(“antidisestab] ishmentarianism”)
4.9.1]
[@cc
Type
>>>
on
28
more
information.
28
>>>
(default,
4.9.1] on linux
“copyright”, “credits"
or
>>>
www.bdmpublications.com
“license()" for
len(“antidisestablishmentar
ianism")}
RESTART
>>>
>>>
import mat
B
Oct 19 2014, 13:31:15)
Enter your surname: Hayward
Your name has ? letters in it.
>>>|
|
|
Python 3.4.2
Shell Debug Options Windows Help
Python 3.4.2 (default. Oct
(GCC
3.4.2 Shell
Edit Shell Debug Options Windows Help
more
information.
di
CreatingFunctions
@}
Additional Functions can be added to Python
through modules. Python has a vast range of
modules available that can cover numerous programming duties.
They add Functions and can be imported as and when required. For
example, to use advanced Mathematics functions enter:
To use a function from a module enter the name of
the module followed by a full stop, then the name
of the Function. For instance, using the Math module, since you've
just imported it into Python, you can utilise the square root Function.
To do so, enter:
import math
math. sqrt(16)
Once entered, you have access to all the Math module functions.
You can see that the
STEP
5
codeis presented
Python 3.4.2 Shell
Python 3.4.2 Shell
file Edit Shell Debug Options Windows Help
Ble Edit Shell Debug Qptions Windows Help
Python 3.4.2 (default, Oct 19 2014, 13:31:19)
[6CC 4.9.1] on linux
Type “copyright”, “credits” or “License()" for mare information.
Python 3.4.2
[@cce
Type
>>>
28
(default, Oct 19 2014, 13:31:11)
4.9.1] on linux
“copyright”, “credits” or “license()” for
len(“antidisestablaishmentar
ianism")
more
information.
>>>
Enter your
surname:
name has 7
>>> import math
P>>
RESTART
>>>
>>>
Your
Llen("antidisestablishmentar
ianism")
>>>
28
RESTART
Enter your
as module.function(data).
Hayward
letters in it.
fl
surnane:
Hayward
Your name has 7 letters in
>>> import math
>>> math. sqrt( 16)
it.
4.0
>>>
|
FORGING FUNCTIONS
There are many different Functions you can import created by other Python programmers and you will undoubtedly come
across some excellent examples in the Future; you can also create your own with the def command.
STEP
1
Choose File > New File to enter the editor, let’s
create a function called Hello, that greets a user.
Enter:
print
To modify it Further, delete the Hello(“David”) line,
the last line in the script and press Ctrl+S to save
the new script. Close the Editor and create a new file (File New
File). Enter the following:
STEP 3
>
rom HeLlLo
C“HeLLlo
Hel Loc
Press F5 to save and run the script. You can see Hello
type in Hello() and it returns the new function.
in
the Shell,
import Hello}
“David
Press F5 to save and execute the code.
Gie Eat
DythOn
Sef
3.4.2
nt}
Debug Gptons wndom
(default,
en
19
ings
208,
or
WERT
Ble
IT)
“Licengec)” for
Ede Format Hun Options tatndows
Welle
Hello
sisi
>
more
in
"
MelleDaved
)
RESTART
STEP 2
Let’s now expand the Function to accept a
variable, the user's name for example. Edit your
script to read:
def HeLLoCname):
What you've just done is import the Hello function
from the saved Hello.py program and then used it
to say hello to David. This is how modules and Functions work: you
import the module then use the function. Try this one, and modify
it For extra credit:
STEP 4
def
This will now accept the variable name, otherwise it prints Hello
David. In the Shell, enter: name=(“Bob”), then: Hello(name). Your
Function can now pass variables through it.
JUG
te"
I[
1
|
Gon
Fgrmet Bun greens windows
add(a,
result
b
=
return result
sip
Hellotnaney:
prant
(Helio,
mame)
wetio-paven'y
www.bdmpublications.com
Python on Linux
é
Conditions and Loops
Conditions and loops are what make a program interesting; they can be simple or rather
complex. How you use them depends greatly on what the program is trying to achieve;
they could be the number of lives left ina game or just displaying countdown.
a
TRUE CONDITIONS
Keeping conditions simple to begin with makes learning to program a more enjoyable experience. Let's start then by checking
is TRUE, then doing something else if it isn’t.
if something
sy =o
Let's create a new Python program that will ask
the user to input a word, then check it to see if it’s
a Four-letter word or not. Start with File > New File, and begin with
the input variable:
word=inputC“Please enter a four-Letter word:
Bython
Bie ER
Holy
21a, VaraTTttT
Shed Cebus Options Yindowe
CGatault, Oct 19
Soymnon
18CE 4.9.1] on Linux
Type “copyright”, “credits
IRB
TS?
or “License()~ for more information.
ete car Farm pun potions yrdiows
Tout dwt
rordeinput(-Plvave wwe
if statement to
Now you can use an
check
if the
word_lengt
variable is equal to Four and print a
Friendly conformation if it applies to the rule:
word=input(“Please enter
“)
a
four-letter
word:
“)
word_lLength=LenCword)
if
-
Sho
74.2
STEP 3
word_length
print (word,
sip
word.”
|
==
“is
4:
a
four-letter
word. Well done.”)
The double equal sign (==) means check if something is equal to
something else.
Pood
Edit Format Run Options Windows Help
i File
word=input("Please enter a four-letter word: ")
word_length=len(word)
if word_length
print (word, "is a four-letter word. well done.")
==
STEP 2
Now we can create a new variable, then use the len
Function and pass the word
get the total number of letters the user
has
variable through it to
just entered:
word=inputC“Please enter a four-letter word:
“)
a
four-letter
word: ")
The colon at the end of IF tells Python that if this
statement is true do everything after the colon
that's indented. Next, move the cursor back to the beginning of
the Editor:
if word_length
*Untitled*
Options Windows Help
word=input("Please enter
word_length=len(word)
ay ao
word=inputC“PLlease enter a
word_lLength=LenCword
word_Length=LenCword)
File Edit Rormat Run
4:
a
==
done.”)
else:
a
four-letter
print Cword, “is not
File Edit
Format Run
Options windows
a
a
www.bdmpublications.com
(word, “is not a
word. Well
Help
four-letter
word: ")
==
pone
“)
four-letter word.”)
word_length= len(word
it word_length
4:
print (word, “is a four-letter word. Well
els
word:
4:
print Cword, “is
word=input("Please enter
four-letter
four-letter word,”)
done.)
+
(
Press F5 and save the code to execute it. Enter
a Four-letter word in the Shell to begin with, you
should have the returned message that it’s the word is Four letters.
Now press F5 again and rerun the program but this time enter a
STEP
5
five-letter word. The Shell will display that it’s not
a
Four-letter word.
the code to include another conditions.
Eventually, it could become quite complex. We've
added a condition For three-letter words:
“
=]
enter
word=input(“Please
an
4:
==
print Cword, “is
_
four-letter
elif
word_length
print
Cword,
==
“is
four-letter
a
done.”)
wore information.
a
word:-
6
“)
word_Length=LenCword)
seindows Help
9-42 (dgtavit. Oct 1 2OV, TeaTeIt
fete 4.9.1] on time
Type “copyrignt™. “credits” or “license()" for
Bychon
and Loops
Now expand
word_length
Bie Ede Shab Qebog Cietions
conditions
word. Well
3:
a
three-letter
else:
print (word, “is not
a
word. Try
again.”)
four-Letter word.”)
LOOPS
A loop looks quite similar to a condition but they are somewhat different in their operation. A loop will run through the same
block of code a number of times, usually with the support of a condition.
B11]
eRTM
Lom
) CAT
LComi ect Eason
this will check to see if something is TRUE, then run
the indented code:
The For loop is another example. For is used to
loop over a range of data, usually a list stored as
variables inside square brackets. For example:
x = 1
ords=[“Cat”, “Dog”,
for word in words:
print Cword
STEP
1
Oto
1g
ai
Elle Edit
Format Bun Options Windows
ee
STEP 3
“Unicorn
Ola
Help
xe
while x<10:
print (x)
x=x+1
|
STEP 2
Binet
ale -nle cm ol-1 WTA
ATR LNA LAL
EM
a
gets to the end of the indented code, it goes back
and checks the statement is still true. In our example x is less than
10. With each loop it prints the current value of x, then adds one to
that value. When x does eventually equal 10 it stops.
fe
Eox Shell Debug Options windows Help
Python 3.4.2
(60 4.9.1)
(default,
on Linux
Ele Edt
“license()” for
ant
The For loop can also be used in the countdown
example by using the range function:
The x=x+1 part isn’t needed here because the range function
creates a list between the First and last numbers used.
Format Bun Giptions Windows He!
wet
Oct 19 2014, 13:81:11)
Type
“copyright”. “credats™ or
:
STEP 4
wetO:
—
print (x)
ware anformation.
qd
OUR
Ee
Et Shef
2
Debug gptions wandews telp
(oefault, Oct 1 2014, Wa:at
1] on Lio
copyright”. “credits”
I
AN)
or “Lacense()™ for more anformation.
RESTART
ny
Bie EOt Farm
Tange
print On
py.
mtren
Bun Options windows Help
(1)
WGy?
Og
unicorn
www.bdmpublications.com
(ibe)
"|
Python on Linux
é
Python Modules
We've mentioned modules previously, (the Math module) but as modules are sucha
large part of getting the most from Python, it’s worth dedicating a little more time to
them. In this instance we're using the Windows version of Python 3.
MASTERING MODULES
Think of modules as an extension that’s imported into your Python code to enhance and extend its capabilities. There are
countless modules available and as we’ve seen, you can even make your own.
Although good, the built-in Functions within Python
are limited. The use of modules, however, allows us
to make more sophisticated programs. As you are aware, modules
are Python scripts that are imported, such as import math.
STEP
Lo
Fite
1
Edit
-
Shell
Pethen 2.22
Shell
Debug
Options
Window
Python 3.6.2 (v3.6.2:5d33bS,
on win32
Type "copyright", "credits"
>>> import math
Jul
or
Help
8 2017,
04:14:34)
"license()" for
more
[MSC v.1900
32 bit
a
x
(Intel)]
The result is an error in the IDLE Shell, as the
Pygame module isn’t recognised or installed in
Python. To install module we can use PIP (Pip Installs Packages).
Close down the IDLE Shell and drop into command prompt or
Terminal session. At an elevated admin command prompt, enter:
STEP 3
a
a
pip
install
pygame
information.
bec he- DO Mmep ree)
Some modules, especially on the Raspberry Pi,
are included by default, the Math module being a
prime example. Sadly, other modules aren’t always available. A good
example on non-Pi platforms is the Pygame module, which contains
many Functions to help create games. Try: import pygame.
STEP 2
-
U& Pithen 3.4.2 Shell
Fite
Edit
Shell
Debug
Options
Window
oO
Help
8 2017, 04:14:34) (MSC v.1900 32 bit
Python 3.6.2 (v3.6.2:5fd33b5, Jul
on win32
Type “copyright”, "credits" or "license()" for more information.
The PIP installation requires an elevated status
due it installing components at different locations.
Windows users can search for CMD via the Start button and rightclick the result then click Run as Administrator. Linux and Mac users
can use the Sudo command, with sudo pip install package.
(Intel)]
icrosoft
(c)
2617
Windows [Version 16.@.15863]
Microsoft Carporation. All rights reserved.
math
>>> import
=
pygame
Traceback (most recent call last):
File "<pyshell#i>", line 1, in <module>
import pygame
ModuleNotFoundError: No module named 'pygame'
>>>
Collecting
system32>pip install
Installing collected packages: pygame
Successfully instalied pygame-1.9.3
SER
www.bdmpublications.com
pygame
pygame
Using cached pygame-1.9.3-cp36-cp36m-win32.Whl
Pas
Python Modules
Multiple modules can be imported within your code.
To extend our example, use:
Close the command prompt or Terminal and
relaunch the IDLE Shell. When you now enter:
import pygame, the module will be imported into the code
without any problems. You'll Find that most code downloaded or
copied from the Internet will contain a module, mainstream of
unique, these are usually the source of errors in execution due to
them being missing.
[&
File
-
Python 3.6.2 Shell
Edit
Shell
Debug
Options
Window
Python 3.6.2 (v3.6.2:5d33bS,
on win32
Type "copyright", "credits"
>>> import pygame
Jul
or
a
import random
import math
for I in range(5):
printCrandom.randintc1, 25))
print(math.
pi)
x
Help
8 2027,
[MSC v.1900
04:14:34)
"License()" for
more
32 bit
@@}
(Intel)]} *,
[&
File
information.
Rnd Number.py
Edit
-
Format
C:/Users/david/Documents/Python/Rnd Number.py (3.6.2)
Run
Options
Window
-
x
a
Help
4
import random
import math
>>>
for
i in range(5):
print(random.randint(1, 25)}
‘print (math.pi}
The result is a string of random numbers Followed
by the value of Pi as pulled From the Math module
using the print(math.pi) Function. You can also pull in certain
functions from a module by using the From and import commands,
The modules contain the extra code needed to
achieve a certain result within your own code, as
we've previously experimented with. For example:
STEP 9
STEP 6
import random
such as:
Brings in the code From the Random Number Generator module.
You can then use this module to create something like:
from random import randint
for 1 in range(5):
printCrandintc1, 25))
for i in range(1@):
printCrandom.randint(i, 25))
{@ Rnd Number.py - C:'Users‘david’Documents/Python/Rnd Number
py (3.6.2)
(> "Untitled"
,
File
Edit
Format
Run
Options
Window
for
in range(10):
print {random.randint(1,
25)})
This code, when saved and executed, will display ten
random numbers from 1 to 25. You can play around
with the code to display more or less, and From a great or lesser
range. For example:
import random
Fue
|za
iF
in
i
Run
Options
Window
_
a
i in range(5}:
print (randint (1, 25))
This helps create a more streamlined approach to
programming. You can also use Import module*,
which will import everything defined within the named module.
However, it’s often regarded as a waste of resources but it works
nonetheless. Finally, modules can be imported as aliases:
STEP 10
m
Gat
Fermat
Pn
Opteos
Window
OF course, adding comments helps to tell others what's going on.
Hale
xendom
wumber.py
fie
a in
renoe(h:
aaom.zandiwe
(1, 100))
(ae *Rnd Number.py
‘File Edit Format
import math as
- C:/Users/david/Documents/Python/Rad Number.py (3.6.2)*
Run
Options
Window
Help
m
ln
is
a
jae
x
Help
print(m. pi)
A]
!
Format
import math as
for i in range(25):
printCrandom.randint(1, 100)
aa
Edit
from random import randint
Help
import random
for
File
print (m.pi)
vo»
www.bdmpublications.com
ES}
Python onL INUX
niin
cate
aaa
RTI
sig
Men
imi
mre
4
mn an
a
ER
SUMING en
SNE
Tae
tres
.
meus
ARO
we
oot
eM,
tee
ABBR
tee
meteMP otal
Cc
CPt
.
FO
Rr
2
caren
tee
setae
2
Toei
RRA
RRMA
EIT,
kM
Se
mR
rato
Me
Aran
teumatentang
YIdebit LE
itn
OR
a stad:
DID YOU KNOW.
(+45 Jo Jopas
pityadojanaq) an.Asno.ys auwDlg —
LU
Ped
pole
-avey, WLUW
Wee
+
J@3}2 9q 07 SI JUBWdoO)]aAap
ht) LL0b
MUTE [ohm(ok
wy
Te
queywodwijsow
ay,
-
ao
Pox
ai
fi
j
ey
WN
\
\
(renn
C++ is an excellent, high-level
programming language that’s used ina
multitude of technologies. Everything
from your favourite mobile app,
console and PC game to entire
operating systems are developed with
C++ at the core, together witha
collection of software development
kits and custom libraries.
C++ is the driving force behind most of
what you use on a daily basis, which
makes it complex and extraordinarily
powerful language to get to grips with.
It’s the code behind Linux itself, as well
as most of the behind the scenes drivers,
library Files and control elements of
most, if not all, operating systems.
a
This section shows you how to start
coding in C++ on Linux using a
Raspberry Pi. From there, you can begin
to create great things.
120
Why C++?
122
Your First C++ Program
124
Structure of a C++ Program
126
Compile and Execute
Did You Know...Virus!
Variables
Strings
C++ Maths
User Interaction
Did You Know...The Hobbit
Common Coding Mistakes
ae
www.bdmpublications.com
ula
@
ED
Why C++?
C++ is one of the most popular programming languages available today. Originally
called C with Classes, the language was renamed C++ in 1983. It’s an extension of the
original C language and is a general purpose object-oriented (OOP) environment.
C EVERYTHING
Due to how complex the language can be, and its power and performance, C++ is often used to develop games, programs,
device drivers and even entire operating systems.
Dating back to 1979, the start of the golden era of home
computing, C++, or rather C with Classes, was the brainchild of
Danish computer scientist Bjarne Stroustrup while working on his
PhD thesis. Stroustrup’s plan was to further the original C language,
which was widely used since the early seventies.
C++ proved to be popular among the developers of the ‘80s,
since it was a much easier environment to get to grips with and
more importantly, it was 99% compatible with the original C
language. This meant that it could be used beyond the mainstream
CG
4
5
#include<iostream>
using namespace std;
void main {}
[Li{char ch;
cout<e<"Enler
a
charater
to check
it is vowel
ar
not";
ecin>>ch;
6
7
8
C++'s impact in the digital world is immense. Many of the programs,
applications, games and even operating systems are coded using
C++. For example, all of Adobe's major applications, such as
Photoshop, InDesign and so on, are developed in C++. You will Find
that the browser you surf the Internet with is written in C++, as
well as Windows 10, Microsoft Office and the backbone to Google's
search engine. Apple’s macOS is written largely in C++ (with some
C++ code is much faster than that of Python.
1
2
3
computing labs and by regular people who didn’t have access to the
mainframes and large computing data centres.
1
switch (ch}
9
i
case'a':
case'A':
ecout<cch<<" is a Vowel";
10
ll
break;
case'h':
cout<<ch<<" 15 a Vowel";
12
13
14
15
16
case
break;
'1': case'I':
cout<<ch<<" is a Vowel";
case
break;
1?
'o': case'd':
cout<<ch<<" is a Vowel";
18
case
19
break;
20
21
22
23
'u': case'U':
coutecch<<" 15 a Vowel";
case
break;
vA
www.bdmpublications.com
Why C++?
Installing
- Visual Studio
Community 2017 (15.0.26223.1)
Workloads
Individual components
Language packs
Windows (3)
Universal Windows Platform development
Create applications for the Universal Windows Platform with C#,
VB, JavaScript, or optionally C++.
_]
O
-NET desktop development
Build WPF, Windows Forms and console applications using the
-NET Framework,
Summary
¥ Desktop development with C...
Included
v
Desktop development with C++
Build classic Windows-based applications using the power of the
Visual C++ toolset, ATL, and optional features like MFC and...
*4—
Visual C++ core desktop features
Optional
VC++ 2017 v141 toolset (x86,x64)
C++ profiling tools
Windows 10 SDK (10.0.14393.0)
Visual C++ tools for CMake
Visual C++ ATL support
Web & Cloud (4)
ASP.NET and web development
Build web applications using ASP.NET, ASP.NET Core, HTML,
JavaScript, and CSS.
|
Windows 8.1 SDK and UCRT SDK
@&
Cl
Azure development
Azure SDK, tools, and projects for developing cloud apps and
creating resources,
Windows XP support for C++
MFC and ATL support (x86 and x64)
C++/CLI support
Clang/C2 (experimental)
Standard Library Modules
Node.js development
Build scalable network applications using Nodejs, an asynchronous
event-driven JavaScript runtime.
Data storage and processing
Connect, develop and test data solutions using SQL Server, Azure
Data Lake, Hadoop or Azure ML
@
By continuing, you agree to the license for the
Visual Studio edition you selected. We also offer the
ability to downioad other software with Visual
Studio, This software is licensed separately, a5 set
‘out in the 3rd Party Notices or in its accompanying
license. By continuing, you also agree to those
Microsoft's Visual Studio is a great,
Free environment to learn C++ in.
other languages mixed in depending on the Function) and the likes
of NASA, SpaceX and even CERN use C++ for various applications,
ta ks
programs, controls and umpteen other comput
begin with Python and spend some time getting to grips with
programming structure and the many ways and means in which
da lu ion to a problem through programming. Once
yo
i
h. ppily power up your computer and whip
outé Python program with one hand tied behind
your back, then move on to C++. Of course,
there’s nothing stopping you From jumping
straight into C++; iF you Feel up to the task,
you can
C++ is also extremely efficient and performs
well across the board as well as being an
easier addition to the core C language.
This higher level of performance over
other languages, such as Python, BASIC
and such, makes it an ideal development
environment for modern computing,
hence the aforementioned companies
using it so widely.
While Python is a great programming
language to learn, C++ puts the developer
in a much wider world of coding. By
mastering C++, you can find yourself
developing code for the likes of Microsoft, Ap ple
and so on. Generally, C++ developers enjoy ah gh
salary than programmers of some other languages an
due to its versatility, the C++ programmer can move between
jobs and companies without the need to relearn anything specific.
However, Python is an easier language to begin with. IF you're
completely new to programming then we would recommend you
CG
go For it.
Getting to use C++ is as easy as Python, all
you need is the right set of tools in which
to communicate with the computer in
C++ and you can start your journey. A C++
IDE is Free of charge, even the immensely
powerful Visual Studio from Microsoft
is Freely available to download and use.
You can get into C++ from any operating
ys tem, be it macOS, Linux, Windows or even
bile platforms.
Just like Python, to answer the question of Why C++ is the
answer is because it’s Fast, efficient and developed by most of the
applications you regularly use. It’s cutting edge and a fantastic
language to master.
Indeed, the operating system you're
using is written in C++.
x
__
Mac
debian
ubuntu
bd
bl
ED
Your First C++ Program
The Raspberry Pi makes for a great coding base on which to learn C++. You won't need
any complicated, third-party IDEs or to install any extra components. Everything you
need to get started is already built into the Pi.
HELLO, WORLD!
It's traditional in programming for the first code to be entered to output the words ‘Hello, World!’ to the screen. Interestingly,
this dates back to 1968 using a language called BCPL.
You can use the included Geany Programmer's
Editor to write, compile and execute your C++ code
on the Raspberry Pi. You can find Geany as the First entry in the
Programming section from the main Raspberry Pi menu. Click the
Geany icon to open and start coding.
moo
s
i
@
It doesn’t look like much at the moment but you can
get into what the C++ header commands mean in
STEP 3
due course. Geany uses syntax highlighting, meaning it colour-codes
the code depending on the language. To activate this, save the code
by clicking on File > Save As. Now name the code helloworld.cpp and
click the Save button.
.
a
Pp
seis
Fe
'
(Renata
Ip
‘srveeistund
.
2
a
}
1
Samemfogs
2 Seerth
Recent
Wn
Croate Folder
Cade
ured
ape
Imi
Desatop
File Sym
WserrNss
Canc
The Geany editor is quite powerful while still being
easy to use. All the code you enter shows in the
main window and is numbered to help you keep track of your code.
For now, in line 1, enter:
STEP 2
#include <lostream>
STEP 4
The colour coding helps a lot when your coding.
Now press Enter and start new command on line
a
3. Enter the Following:
int
maind)
Note: there’s no space between the brackets.
tuntitled - Geany
File Edit Search View Document
By
|
Symbots
<[
No
symbots
found
Project
Build
so wk
I> Vunwdea
Tools Hetp
.%*
*
|
|
2
#9
B
File Edit Search
<|
Symbols
No symbols found
Ves
View
Glowtresns
www.bdmpublications.com
Document Project Build
> helloworld.cpp *
1
2
3
4
#
include <iostream>
int main()
Tools
Help
( Your First C++ Program
Now you need to close off the code, by inserting the
opposite, closing, curly bracket. On line 7 enter:
On the next line, below int main(, enter a curly bracket:
{
This can be done by pressing Shift and the key to the right of
English UK keyboard layout.
P
}
onan
Note that you won’t need to backspace to the start of the line,
removing the indent, just by entering the curly bracket Geany autojumps to the correct part of the line, thus ending the code block.
File Edit Search View Document Project Build Tools Help
lex
@
1
g@
\SQ@-
Functions
1
#include <1ostream>
2
a
@
main (31
File Edit Search View Document Project Build Tools Help
*
Symbols
helloworld.cpp
S-~G- So
Symbols
main(}
= @ Functions
@
man
[3]
le
z
int main()
3
*
L
Notice that Geany has automatically created a slight
indent. This is due to the structure of C++ and it’s
where the meat of the code is entered. Now enter:
//My first C++ program
File Edit Search View Document Project Build Tools Help
=
@@
Functions
@ man
(3)
a:
diay
tr
first C+
first
std::cout
C++ program
<< "Hello,
world! \n";
File Edit Search View Document Project Build Tools Help
X
helloworld.cpp *
1
#include <1ostream>
2
int main()
3
Symbols
<]
ow
//My
Essentially, these are your first steps into the world
of coding in C++. We will look at the structure of the
code in more detail on the next couple of pages; for now though,
click on the Save button as represented by a Filing cabinet witha
green downward pointing arrow.
STEP 6
2
Sevzgigal
x
helloword.cpp *
#include <iostream>
a
Symbols
=
program
#include <iostream>
Functions
@@
@
int main()
{
//My first
std::cout
main (3)
C++ program
<<
qv
STEP7
std::cout
Note again the colour coding change. Press Return
at the end of the previous step’s line and then enter:
<<
“Hello, world!\n”;
"Hello, world! \n";
you haven't done so already, it’s always advisable
to create a blank Folder where you can save all
your code. You can have one each for Python and C++ or simply a
single Folder called Code, whichever you prefer. It’s not a necessity,
IF
just good housekeeping.
File
Edit Search View
Document
Project Build Tools
.
%
helloworld.cpp
=!
Functions
@
@ main
[3}
~
Help
®
oO
C)
x
finclude <1ostream>
int main()
//¥y first
[
[Momnes
a
w) (¥) O
Documents Downloads
Oj (a (@]
Pubic
C++ program
<<
MagPi
Music
tH
python.gam Templates
es
¥ideos
"Hello, world!\n";
pratreout
+
+
+
+
+
+
]ode
Wdesktop
dt] Documents
w]Downloads
7] MagPi
Music
+* Joldcontiles
+
+
(Pictures
CR] Publec
www.bdmpublications.com
ED
tructure of a
C4 Program
++
C++ has a very defined structure and way of doing things. Miss something out, even
as small as a semicolon, and your entire program will Fail to be compiled and executed.
Many a professional programmer has Fallen Foul of sloppy structure.
#INCLUD<C++
STRUCTURE>
Learning the basics of programming, you begin to understand the structure of a program. The commands may be different
From one language to the next but you can start to see how the code works.
int
INT MAIN()
C++
C++ was invented by Danish
student Bjarne Stroustrup
in 1979, as a part of his
a Oo
Amen
main(Q)
initiates the declaration of a
Function, which is group of code statements
under the name ‘main’. All C++ code begins at the main function,
regardless of where it actually lies within the code.
a
helloworld.cop
was called C with Classes,
which added features
to the already popular C
|
Finclude <iostream>
1
2
3
4
5
programming language,
while making it more
user-friendly environment
through a new structure.
a
int main{}
SIE
e
nell cient)
inventor of C++.
The structure of a C++ program is quite
precise. Every C++ code begins with a directive:
#include <>. The directive instructs the pre-processor to include a
section of the standard C++ code. For example: #include <iostream>
includes the iostream header to support input/output operations.
#INCLUDE
helloworld.cop
The open brace (curly brackets) is something that
you may not have come across before, especially if
you're used to Python. The open brace indicates the beginning of the
main function and contains all the code that belongs to that Function.
BRACES
hellowarld.cop
*
|
Finclude <iostream>
i
2
3
4
5
6
7
A
aPz.
www.bdmpublications.com
*
Finclude <iostream>
int main{)
{
|
|}
(structure
Lines that begin with a double slash are
comments. This means they won't be
executed in the code and are ignored by the compiler. Comments
are designed to help you, or another programmer looking at your
code, and explain what's going on. There are two types of comment:
a single line.
7* covers multiple line comments and
ia Naas
//
ol & Wh Be
:
hellawond.cpp x
#include <iostream>
int main{}
f/My first
€++ program
a
The two chevrons used here are insertion operators.
This means that whatever Follows the chevrons is to be
inserted into the std::cout statement. In this case they're the words
‘Hello, world’ which are to be displayed on the screen when you
compile and execute the code.
helloworld.cop
i
#Hinclude <iostream>
using namespace std;
2
3
#
5
int main{}
i
#/My
cout
7
8
9
While std stands For something quite different, in C++ it
means Standard. It’s part of the Standard Namespace in
C++, which covers a number of different statements and commands.
You can leave the std: : part out of the code but it must be
declared at the start with: using namespace std; not both. For
of C++ Program
first C++ program
<<|
Leading on, the “Hello, world!” part is what you
want to appear on the screen when the code is
executed. You can enter whatever you like, as long as it’s inside the
quotation marks. Sometimes brackets are needed, depending on
the compiler. The \n part indicates a new line is to be inserted.
OUTPUTS
example:
#include <1ostream>
using namespace std;
helloword.cpp *
Hinclude <iostream>
//My
aL
std::cout
C++ program
<< "Hello, worid!\n";
this example we're using cout, which is a part of
the Standard Namespace, hence why it’s there, as
you're asking C++ to use it from that particular namespace. Cout
means Character OUTput, which displays, or prints, something to
the screen. IF you leave std:: out you have to declare it at the start of
the code, as mentioned previously.
COUT
In
*
i
int main{}
f/My First
cout|
helloworld.cop *
#include <iostream>
using Mmamespace atd;
oo
Ue We
helloword.cop
#include <iostream>
Using magespace std;
Finally you can see that lines within a Function code
block (except comments) end with a semicolon. This
marks the end of the statement; all statements in C++ must have
one at the end or the compiler Fails to build the code. The very last
line has the closing brace to indicate the end of the main function.
—_
ANN
1D) }
WN
int main{)
‘My first
first C++ program
“Hello, worid!\n"|
cout <<
C++ program
-
int main(}
/fMy first C++ program
cout << "Helle, world!\n";
www.bdmpublications.com
ED
Compile and Execute
You've created your First C++ program and you now understand the basics behind the
structure of one. Let’s get things moving and compile and execute, or run if you prefer,
the program and see how it looks.
GREETINGS FROM C++
Compiling and executing code from within Geany is remarkably simple and just a matter of clicking a couple of icons and
seeing the result. Here’s how it’s done.
Open Geany, iF you haven't already, and load up
the previously saved Hello World code you created.
Ensure that there are no visible errors, such as a missing semicolon
at the end of the std::cout line.
STEP
1
When you click the Build icon, the pane at the
bottom of the Geany interface displays some
results. IF all is well, you will see a successful compilation, if not then
Geany issues an error along with the line the error was Found on.
STEP 3
helloworld.cpp fhome/pi/Documents Ceany
File Edit Search
om oh
helloworld.cpp %
#include <iostream>
first
grt -wall
IF your code is ready, look to the menu bar along
the top of the Geany window. Notice that midway
along the line of icons there's a red brick icon. This is Build, which
when clicked runs through the code, checking it against the C++
standards to see if there are any errors that stop it From running.
View
§» By
Symbols
ig? Functions
@& main [3]
Tools
2
3
4
7
a
std::cout
|}
www.bdmpublications.com
(in directory:
mt Project
Build
|
‘My
first
td: :eout
G++ program
<<
"Hello, world!\n",|
/home/pi/Documents)
;
|
Tools
8
Help
“|
ainf}
Finclude <iostream>
int main{)
f/My first
“Hello, worid'\n";
With the code successfully built, it's now time to
execute it. Next to the Build icon there's a paper
aeroplane icon, this is the Run icon. You can’t run code that hasn't
been previously built or has an error in place. Click the Run icon.
pp %
ide <1ostream>
helloworld.cpp
L
C1) program
<<
finished successfully.
Help
le *
5
6
126
Project
Build
first
“helloworld* “helloworld.cpp*
-o
| compilation
p[.
—
main{)
9 Se)
x
Document
Tools Help
Bl
std::cout
2
Search
aint
/MMy
aw
Build
x
sancluue
C++ program
«< "Hello, world! \n";
Status
Edit
Project
helloworld
cpp %
@ main [3]
|
le
°
Functions
int main{}
std::cout
sl
Document
»
[>
Symbols
<}
‘/My
View
C++ program
««
"Hello, world! \n":
|
Run or view the current file
or view the curent
te
(compile
When you click Run, the C++ code executes and
a simple Terminal window appears displaying the
results of the code. In the case of this simple code, you can see the
words: Hello, world! in the window; as you've already learned, the
code is cout{ing) (outputting) the contents between the quotes in
the std::cout line.
x
helloworld.cpp
&@~@if|
--
4h!
int main()
firse
cout << “Hello, world!\n”
1
)>
#include <iostream>
dmmy
to have std::cout if you've already declared the
standard namespace at the start of the code. Now, let's create a
deliberate mistake, to see what happens. Remove the semicolon
from the cout line, so it reads:
4)2/1B
*
std::cout
C++ program
<< "Mello,
world! \n";
helloworld.cpp
*
#include <iostream>
Using namespace std;
int main{)
to continue
am
return
Just as mentioned previously, you don’t need
STEP 8
hb
g
5
O&O
STEP
and Execute
4/My
first
C++ program
cout << “Hella, worid!\n"
Pressing Return/Enter in the command line box
closes it, returning you to Geany. Let's alter the code
slightly. Under the #include line, enter:
STEP 6
using namespace std;
Now try and build the code once more. This time,
notice that the bottom panel is displaying an error,
regarding the missing semicolon. Notice that error reads as being
on line 8, the first character, the closed curly bracket. This is because
there’s an expected semicolon missing before the closed bracket.
STEP 9
Then, delete the std:: part of the Cout line; like so:
cout
<<
“Hello, world\n”;
ymbols
helloworld.cpp
”
we
3
actions
elloworld.cop
a
#include <iostream>
using namespace std;
Z
Int main{}
ffMy first
lcout <<
}
cout
‘/My first
std [2]
C++ program
cout << “Hello, worid!\n®
C++ program
helloword.cpp *
#include <iostream>
using namespace std;
<<
int main{}
tam Variables
“Hello, wordd!\n";
In order to apply the new changes you need to save
the File, build it and execute it again. Go through the
process as before, you don’t need to change the name of the file
unless you want to, of course, followed by clicking the Brick icon,
then the Aeroplane icon.
int main()
//My first
main [4]
*
#include <iostream>
Using namespace std;
Replace the semicolon and under the cout line,
enter a new line to your code:
cout
<<
“And
greetings from C++!\n?;
The \n simply adds a new line under the last line of outputted text.
Build and Run the code, to display your handiwork.
helloworld.cpp
*
#include <iostream>
using namespace std;
int main()
C++ program
//¥y first
“Hello, warldtvn";
C++ program
cout << “Hello, world!\n";
cout << “And greetings from C++!\n";
Sena
exited with code: 0)
eturn to continue
m
rjram
exited with code: 6)
UL
Silt)
www.bdmpublications.com
0001100001011101000111010000
ROOM Rte ROME
000001100011011011110110010000
01000011001010010000001110111111
11010001101000011001010010000000
10111000100000011011010110000101
SOR ROM
COR
10000001100010011110010010000000
10000101110010011001010010000000
110000001000000111001101100011111
01110011001000010000001110011111
0000001100001011101000111010000
1010101110010011010001110100000
00000110001
110010000
000011001
11011111
0001101
10000000
000100
10000101
01101
111010101
1100
011000
0010000000
10010000000
Oh
01101111
000100000
011000010
0110010000100000011
01110010001
011000010111010001
01100011011101
011110010010000001100011011011110
011101000110100001100101001000000
0010000001110100011010000110010100 000000
0110111000100000011011010110000101
001100010011110010010000000
11001001
Um
ml
000011
01 1
000010000001110011111
0001011
TREY
te)
111001001101 00
0001100011011011110110010000
SEMEL Reem
01000000111010001101000011001010010000000
1100001011011100010000 11011010110000101
TOM
ee
0101001000000
10010000000
111011000
ete
10001
ee)
Te)
te)
10
00
im
eh
te
0001101
en
00 00
01 00
0011011
01
te)
Om
Ee
Oe
11101
10
100001
11010001
1001010110
40-0-0-04044400
1000110110101
00000011000110
100000011010110
110010011001000
1001010110111001
1001010010000001
1001010110010000
10000101101110011
11010001110100011
10010101100101011
1000010111001001
1000110110101100
000000110001101
0000011010110
001100100
0110111
00100
10110
101101
oo
1001
0001110
00101
10101100
111000
10000101110
1010001
1000110110
010000001
0000001100 101101111011)
100000011010110110010101
110010011001000010000001010111
10010101101110011101000179"%1%
100101001000000110
100101011001000
10000101101
11010001
10010
EET
00
1000
1000110
000000110
1000000110101
11001001100100001 0000
100101011011100111010001
1
010010000001100110011
11001000010000001
111001101110
0001100001
10110111
0111010
010000
01000
011010
1
01
01
11001
1
11001
00
10
10
00
011001
Developed as a prank back in ‘82,
first record
Cloner was one of the
viruses in the wild,
ED
Using Comments
While comments may seem like a minor element to the many lines of code that
combine to make a game, application or even an entire operating system, in actual Fact
they're probably one of the most important Factors.
THE IMPORTANCE OF COMMENTING
Comments inside code are basically human readable descriptions
that detail what the code is doing at that particular point. They don’t
sound especially important but code without comments is one of
the many Frustrating areas of programming, regardless of whether
you're a professional orjust starting out.
In short, all code should be commented in such a manner as to
effectively describe the purpose of a line, section or individual
elements. You should get in to the habit of commenting as much as
possible, by imagining that someone who doesn’t know anything
about programming can pick up your code and understand what it’s
going to do simply by reading your comments.
In a professional environment, comments are vital to the success of
the code and ultimately, the company or project. In an organisation,
many programmers work in teams alongside engineers, other
developers, hardware analysts and so on. IF you're a part of the team
that’s writing a bespoke piece of software For the company, then
your comments help save a lot of time should something go wrong
and another team member has to pick up
and follow the trail to pinpoint the issue.
qa
lie
Place yourself in the shoes of
someone who's job it is to Find out
what's wrong with a program. The
program has in excess of 800,000
lines of code, spread across several
different modules. You can soon
appreciate the need For a little help
from the original programmers in the
form of a good comment.
The best comments are always concise and link the code logically,
detailing what happens when the program hits a line or section. You
don’t need to comment on every line. Something along the lines of:
if x==0 doesn’t require you to comment that if x equals zero then do
something; that's going to be obvious to the reader. However, if x
equalling zero is something that drastically changes the program for
the user, such as, they've run out of lives, then it certainly needs to
be commented on.
Even if the code is your own, you should write comments as if you
were going to share it with others publicly. This way you can return
to that code and always understand what it was you did or where it
was you went wrong, or what worked brilliantly.
Comments are good practise and once you understand how to adda
comment where needed, you soon do it as if it’s second nature.
DEFB
DEFB
DEFB
DEFB
DEFB
DEFB
Tassc:
DEFB
DERB
DEFB
DEFB
DEFB
Game restart
START:
XOR
LD
LD
LD
LD
LD
LD
LD
LD
SET
LD
LD
LD
LD
LDIR
LD
ub
LD
LDIR
LD
LD
LD
CALL
LD
LD
LD
LDIR
30h, 32h, 26h, 30h, 32h, 0, 0, 32h, 72h, 73h, 32h, 72h, 73h, 32h
60h, 61h, 32h, 4Ch, 4Dh, 32h, 4Ch, 99h, 32h, 4Ch, 4Dh, 32h, 4Ch, 4Dh
32h, 4Ch, 99h, 32h, 5Bh, 5Ch, 32h, 56h, 57h, 32h, 33h, OCDh, 32h, 33h
34h, 32h, 33h, 34h, 32h, 33h, OCDh, 32h, 40h, 41h, 32h, 66h, 67h, 64h
66h, 67h, 32h, 72h, 73h, 64h, 4Ch, 4Dh, 32h, 56h, 57h, 32h, 80h, OCBh
19h, 80h, 0,19h, 80h, 81h, 32h, 80h, OCBh, OFFh
=. 26h,
80h, 72h, 66h, 60h, 56h, 66h, 56h, 56h, 51h, 60h, 51h, $1h, 56h, 66h
56h, 80h, 72h, 66h, 60h, 56h, 66h, 56h, 56h, 51h, 60h, 51h, 5ib
-456h, 56h, 56h, 56h, 80h, 72h, 66h, 60h, 56h, 66h, 56h, 56h, 51h, 60h
51h, Sih, 56h, 66h, 56h, 56h, 80h, 72h, 66h, 60h, 56h, 66h, 56h, 40h
56h, 66h, 80h, 66h, 56h, 56h, 56h, 56h
—-45 6h,
point
A
{SHEET),A
(KEMP)
,A
{DEMO)
,A
{B845B),A
{B8458),A
A,2
{NOMEN)
,A
HL,
HL, OAOOOh
DE, SCREEN
BC, 4096
DRWFIX
OFCOOh
DE, ATIR
BC, 256
BC, 31
130
www.bdmpublications.com
image
?Titie
screen
bitmap
O9EQ0h
BC,512
A
IN
E, (C)
E
R&621
3$-03
20h
NZ,R862F ;$+07
A,L
sAttributes for the last
7
R8621:
LD
screen
c,0
HL,
XOR
JR
7Clear
DE, MANDAT+64
BL,
AND
count
HL, SCREEN + 800h + 1*32 + 29
LDIR
LD
DI
OR
lives
SCREEN
DE, SCREEN+1
BC, 17FFh
{HL) ,0
LD
LD
DINZ
sInitial
HL, T845C
0, (HEL)
room
(top third)
sAttributes for title
3 (bottom two-thirds}
screen
UsingComments
@}
C++ COMMENTS
Commenting in C++ involves using a double forward slash ‘//’ or a forward slash and an asterisk ‘/*’. You've already seen some
brief examples but this is how they work.
Be careful when commenting, especially with block
comments. It’s very easy to forget to add the closing
asterisk and forward slash and thus negate any code that falls inside
the comment block.
Using the Hello World code as an example, you can
easily comment on different sections of the code
using the double forward slash:
STEP 4
su soo
//My first C++ program cout
%
“Hello, world!\n”;
—
SeowsnawNE
namespace
std;
Int main()
int main()
//My first
C++ program
cout << “Hello, worid'\n"; //This
line ouputs the
words
‘Hello,
/* This comment can
several lines
*
cover
*
without the need to add more slashes
cout
9
However, you can also add comments to the end of
of code, to describe in a better way what's
<< “And
greetings from C++!\n";
ot)
Obviously if you try and build and execute the
code it errors out, complaining of a missing curly
bracket ‘¥ to finish off the block of code. IF you’ve made the error
a few times, then it can be time consuming to go back and rectify.
Thankfully, the colour coding in Geany helps identify comments
from code.
a line
going on:
cout
#include <iostream>
using namespace std;
Ros
f/My first C++ program
cout << “Helio, world!\n";
cout << "And greetings from C++!\n";
“Hello, world!\n”; //This Line outputs the
‘Hello, world!’. The \n denotes a new Line.
<<
words
*
helloworld.cpp
|
#include <iostream>
usig
a
BEGosveasiunw
helloworld.cpp
<<
Note, you don’t have to put a semicolon at the end of comment.
This is because it's a line in the code that’s ignored by the compiler.
a
bellaword cpp
1"
B{
|
Symbois
= @ Functions
<|
*
|
manelude <iaatreaa>
SEinG namespace std;
=
@
[>
@ main [4]
stern Variables
helloworld.cpp
a
*
#include <iostream>
using namespace std;
int main()
1
«int
et
a”
maint)
@
tirat Co* progr.
cram
Gout << “Hello, world!\n"; //This Line ouputs the words
cout << “And gratings from Ceet\nm:
‘Hello, world.
The \n denotes a new
std [2]
//My
first"
C++ program
line,
several lines
*
cover
*
without the need to add more slashes
cout << "And greetings from C++!\n";
|
You can comment out several lines by using the
forward slash and asterisk:
/* This
comment can
several lines
without the need to
With block comments, it’s good practise in C++ to
add an asterisk to each new line of the comment
block. This also helps you to remember to close the comment block
off before continuing with the code:
cover
add more
slashes */
Just remember to Finish the block comment with the opposite
asterisk and Forward slash.
I
|
|
/* This comment can
*
hellowrld.cop *
#include <iostream>
a]
using namespace std;
2
a
s
g7
B
2
18
a3
int main()
//My first
C++ program
cout << “Hello, world!\n"; //This line ouputs the words ‘Hello, world. The
/*
*
*
*
‘
cover several Lines
without the need to add
more
slashes */
Thankfully, Geany does this automatically but be aware of it when
using other IDEs.
This coment can
cover several lines
without the need to add more slashes */
cout << “And greetings from C++!\n";
several lines
*
cover
*
without the need to add more slashes */
www.bdmpublications.com
eri!
w
DD
Variables
Variables differ slightly when using C++ as opposed to Python. In Python, you can
simply state that ‘a’ equals 10 and a variable is assigned. However, in C++ a variable has
to be declared with its type before it can be used.
THE DECLARATION OF VARIABLES
You can declare a C++ variable by using statements within the code. There are several distinct types of variable you can
declare. Here’s how it works.
auf
Open up a new, blank C++ file and enter the usual
code headers:
ode
#include <iostream>
using namespace std;
int mainQ
{
}
UN Be
dor
Re
Vanables.cpp *
#include <i osctream>
ESing mame: pace std;
int main(}
You can build and run the code but it won't do much,
other than store the values 10 and 5 to the integers a
and b. Ignore the warnings about variables set but not used, the code
still works. To output the contents of the variables, add:
STEP 3
cout << a;
cout << ”\n”;
cout << b;
The cout<< “\n”; part simply places a new line between the
output of 10 and 5.
Variables.cpp *
#include <1ostream>
1
2
using namespace std;
3
4
[
t
int main)
{
int a;
int b;
5
6
7
8
9
a = 16;
b= 5;
10
11
12
13
cout << a;
cout << "\n";
cout << b;
Start simple by creating two variables, a and b, with
one having a value of 10 and the other 5. You can
use the data type int to declare these variables. Within the curly
brackets enter:
15
16
17
int a;
int b;
3 stor
STEP 2
b=5;
result
Vanables.cpp *
1
Finclude <iostream>
2
Using nanepace std;
|
3
int main(}
4
At
13
ncy4
int a;
ANE Re.
|
a=
18;
b = 53
19
11
lz
Naturally you can declare a new variable, call it
result and output some simple arithmetic:
int result;
a = 10;
5
6
7
e
5
}
}
www.bdmpublications.com
cout
<<
+b;
result;
Insert the above into the code as per the screenshot.
1
2
3
using namespace sta
€
You can assign a value to a variable as soon as you
declare it. The code you've typed in could look like
this, instead:
int a = 10;
int b = 5;
int result =
cout
b;
Variables.cpp *
#include <iostream>
using namespace std;
result;
<<
The previous step creates the variable StartLives,
which is a global variable. In a game, For example,
a player's lives go up or down depending on how well or how bad
they're doing. When the player restarts the game, the StartLives
returns to its default state: 3. Here we've assigned 3 lives, then
subtracted 1, leaving 2 lives left.
STEP 8
int Startlives
1
= 3;
using namespace std
2
3
4
:
aint
il
au
result -
cout
ss
4%
a
-
b;
-
1;
}
=
int a ant b=
StartLives = StartLives
cout << StartLives;
rPODOBND
int
5
6
7
.
iin
P<
te MEU Raa
SO
mRenea
bere
Leena
et
L
cesult:
The modern C++ compiler is Far more intelligent
than most programmers give it credit. While there
are numerous data types you can declare for variables, you can in
Fact use the auto Feature:
STEP 9
Specific to C++, you can also use the Following to
assign values to a variable as soon as you declare them:
STEP 6
int
int
a
b
#include <iostream>
using namespace std;
auto pi = 3.141593;
(10);
(5);
Then, From the C++ 2011 standard, using curly brackets:
int result {a+b};
int maind
{
double area, radius = 1.5;
cout
int main()
int a (10);
int b (5);
int result {a+b};
<<
#
Vanables.
cpp
Doda
4
ram
cout << result;
2
3
4
5
6
7
8
exited with code: 6)
Cd
#include <1ostream>
using namespace std;
int StartLives = 3;
main
{
18
11
i2
13
radius;
|
int main(}
double area, radius = 1.5;
area = pi “ radius * radius;
cout << area;
}
Although we said to ignore the warnings in Step
3, there’s a difference between a warning and
an error. In this case, it’s just simple warning. The new data type,
double, means double-precision floating point value, which makes
the code more accurate. The result should be 7.06858. Essentially,
you can often work with a warning but not an error.
STEP 10
)
a
startLives = StartLives
cout << StartLives;
-
1;
finclude <iostream>
using namespace std;
int StartLives = 3;
int main(}
StartLives = StartLives - 1;
cout << Startlivas;|
Vanables.cpp *
hk
Finclude <iostream>
z
2
using namespace std;
auto pi = 3.141593;
3
4
5
6
7
8
9
10
nn
Be
*
using namespace std;
auto pi = 3.141593;
g
You can create global variables, which are variables
that are declared outside any Function and used in
Function
within
the entire code. What you've used so far are
any
local variables: variables used inside the function. For example:
STEP 7
int
*
radius
area;
area = pi
Variables.cpp *
#include <iostream>
using namespace std;
|
int main()
double area, radius = 1.5;
area = pi * radius
cout << area;
*
radius;
exited with code:
j
fata
eno
mt Seed
a2
www.bdmpublications.com
Gers)
ED
Data Types
Variables, as you've seen, store information that the programmer can then later call up,
and manipulate if required. Variables are simply reserved memory locations that store
the values the programmer assigns, depending on the data type used.
THE VALUE OF DATA
There are many different data types available For the programmer
in C++, such as an integer, Floating point, Boolean, character and so
on. It's widely accepted that there are seven basic data types, often
called Primitive Built-in Types; however, you can create your own
data types should the need ever arise within your code.
Type
Integer |
Floating Point
|
that by adding a cout.precision () Function and adding a value inside
the brackets but even then you're still limited by the accuracy of the
double data type. For example, try this code:
#include <Lostream>
using namespace std;
Command
double PI = 3.141592653589793238463;
int
int
float
{
mainQ)
cout << PI;
Character | char
Boolean | bool
Double Floating Point | double
Data Types.cpp
Wide Character | wchar_t
No Value |
*
stream>
1
ace
void
std;
double PI = 3, 141592653589793236463;
int main(}
These basic types can also be extended using the Following
modifiers: Long, Short, Signed and Unsigned. Basically this means
the modifiers can expand the minimum and maximum range values
for each data type. For example, the int data type has a default value
range of -2147483648 to 2147483647, a fair value, you would agree.
{
I
cout << PI;
Now, if you were to use one of the modifiers, the range alters:
Unsigned int = 0 to 4294967295
Signed int = -2147483648 to 2147483647
Short int = -32768 to 32767
Unsigned Short int = 0 to 65,535
Signed Short int = -32768 to 32767
Long int = -2147483647 to 2147483647
Signed Long int = -2147483647 to 2147483647
Unsigned Long int = 0 to 4294967295
Naturally you can get away with using the basic type without the
modifier, as there’s plenty of range provided with each data type.
However, it’s considered good C++ programming practise to use the
modifiers when possible.
There are issues when using the modifiers though. Double
represents a double-floating point value, which you can use for
incredibly accurate numbers but those numbers are only accurate
up to the fifteenth decimal place. There’s also the problem when
displaying such numbers in C++ using the cout function, in that cout
by default only outputs the first Five decimal places. You can combat
134
www.bdmpublications.com
Cee
ee
hs
Press return
Ie
continue
to.
Build and run the code and as you can see the output is only
3.14159, representing cout’s limitations in this example.
You can alter the code including the aforementioned cout.precision
function, for greater accuracy. Take precision all the way up to 22
decimal places, with the following code:
#include <iostream>
using namespace std;
double PI = 3.141592653589793238463;
int maind
{
cout.precision(22);
cout << PI;
}
DataTypes
This
is mainly due to the conversion from binary in the compiler
and that the IEEE 754 double precision standard occupies 64-bits
of data, of which 52-bits are dedicated to the significant (the
significant digits in a floating-point number) and roughly 3.5-bits
are taken holding the values 0 to 9. If you divide 53 by 3.5, then you
arrive at 15.142857 recurring, which is 15-digits of precision.
*
DataTypes.cpp
einclude <iostream>
2
using nespace std;
3
double PI = 3.1415927653569793238463;
i
4
int main{)
5
6
7
8
5
cout. precision( 22);
cout << PI;
To be honest, if you're creating code that needs to be accurate to
more than fifteen decimal places, then you wouldn’t be using C++,
you would use some scientific specific language with C++ as the
connective tissue between the two languages.
1G
RWS She
Pace be
ee
me
|
You can create your own data types, using an alias-like system called
typedef. For example:
{program exited with code: 6)
ieee
sma
@¥
Mere
Again, build and run the code; as you can see from the command
line window, the number represented by the variable Pl is different
to the number you've told C++ to use in the variable. The output
reads the value of Pl as 3.141592653589793115998, with the
numbers going awry From the fifteenth decimal place.
O
Calculator
Scientific
#include <iostream>
using namespace std;
typedef int metres;
int
mainQ)
{
metres distance;
distance = 15;
cout << “distance in metres
~*~
is: “
<<
distance;
aD
15.14285 714285714285 7142857142857
DataTypes.cpp *
Finclude <iostream>
using namespace std;
typedef int metres;
int main{}
metres distance;
distance = 15;
cout <= "Gistance ia metres is:
H¥P
F-E
Wi+
sin
COs
tan
v
10°
log
Exp
Mad
tT
CE
C
=]
&
o
Mm
Wm
x
anh,
distance;
WS
4
Mi-
x
I+
<<
ee
DEG
"
18
=
This code when executed creates a new int data type called metres.
Then, in the main code block, there's a new variable called distance,
which is an integer; so you're telling the compiler that there’s
another name for int. We assigned the value 15 to distance and
displayed the output: distance in metres is 15.
It might sound a little confusing to begin with but the more you use
C++ and create your own code, the easier it becomes.
ei
www.bdmpublications.com
1]
ED
Strings
Strings are objects that represent and hold sequences of characters. For example, you
could have a universal greeting in your code ‘Welcome’ and assign that as a string to be
called up wherever you like in the program.
STRING THEORY
There are different ways in which you can create a string of characters, which historically are all carried over From the original
C
language
STEP
1
still
and
supported by C++.
To create a string, you use the char function. Open a
new C++ file and begin with the usual header:
#include <iostream>
using namespace std;
int
Build and run the code and ‘Welcome’ appears
STEP 3
onthe screen. While this is perfectly Fine, it’s
not a string. A string is a class, which defines objects that can be
represented as a stream of characters and doesn’t need to be
terminated like an array. The code can therefore be represented as:
main
{
#include <1ostream>
using namespace std;
}
int
{
strings.cpp *
#include <iostream>
Esing namespace std;
i
strings.cpp *
#include <1ostream>
1
2
using namespace std;
|
Slo
It's easy to confuse a string with an array. Here’s an
array, which can be terminated with a null character:
3
4
5
6
7
8
9
10
#include <lostream>
using namespace std;
int
char greet{] = “Welcome”;
cout << greet << “\n”;
}
int main()
a
main
int main()
char greet[] = "welcome";
cout << greet << "\n";
|}
STEP 4
main
In C++ there’s also a string function, which works
much
you can enter:
{
char greet[8]
Se’, ‘\Q’3;
=
cout << greet <<
{‘W’, ‘e’, ‘Ll’, ‘ce’, fo’, ‘m’,
“\n”;
#include <1ostream>
using namespace std;
int
main
)
{
}
string greet
strings.cpp *
a
Rinclude <1ostream>
2
using namespace std;
3
4
5
int main()
char greet[8] = {'w', ‘e',
cout << greet << "\n"jJ
6
7
8
9
cout
‘1’, 'c’, ‘o',
‘m',
‘e’, '\O'};
strings.cpp
<<
= “Welcome”;
greet
*
finclude <iostream>
using namespace std;
int main{}
string greet
cout
136
“\n”;
<<
|}
18
www.bdmpublications.com
<<
in
the same way. Using the greeting code again,
=
"welcome";
greet << "\n";
(stis€
There are also many different operations that you can
apply with the string Function. For instance, to get the
length of a string you can use:
#include <lostream>
using namespace std;
main
string greet
= “Welcome”;
cout << “The length of the string
cout << greet.sizeQ) << “\n”;
is: “
int
f
“;
wows wi
stings.cpp *
Rinclude <iostream>
using namespace std;
main
int Length;
string greetl
string greet2
string greet3
length
int main{}
string greet = "Welcome";
eout << "The length of the string is:
eout << greet.siza(} << "\n";
Eee
a
can mix in an integer
and store something to do with the string. In this
example, we created int length, which stores the result of string.
size() and outputs it to the user:
#include <iostream>
using namespace std;
int
{
Just as you might expect, you
les)
is:
";
=
=
=
=
“Hello”;
“, world!”;
greeti + greet2;
greet3.sizeQ);
cout << “The Length of the combined strings
<<
length
<<
“\n”;
}
Using the available operations that come with the
string function, you can manipulate the contents of a
string. For example, to remove characters from a string you could use:
STEP 9
You can see that we used greet.size(} to output the
length, the number of characters there are, of the
contents of the string. Naturally, iF you call your string something
other than greet, then you need to change the command to reflect
this. It’s always stringname.operation. Build and run the code to see
Sos)
theresults.
ene gersee
Press return te continue
int
{
main
string strg C“Here is
string.”);
it
[Suet
#include <Lostream>
using namespace std;
cout << strg <<
rary
a
long sentence in
a
‘\n’;
strg.erase (10,5);
cout << strg << ‘\n’;
|
strg.erase Cstrg.begin(Q)+8);
cout << strg << ‘\n’;
You can of course add strings together, or rather
combine them to form longer strings:
#include <1ostream>
using namespace std;
int
cout <<
=
=
=
“Hello”;
“, world!”;
greeti + greet2;
greet3 << “\n”;
string greet1
string greet2
string greet3
}
It’s worth spending some time playing around with
the numbers, which are the character positions
in the string. Occasionally, it can be hit and miss whether you get it
right, so practice makes perfect. Take a look at the screenshot to see
STEP 10
main
{
strg.erase Cstrg.begin(Q)+9, strg.endQ-9);
cout << strg << ‘\n’;
the result of the code.
}
stings.cpp X
#include <iostream>
Z
using namespace std;
3
&
5
int main{}
string greeti
string greet?
string greet3
&
7
8
‘3
= "Hello";
= ", world'";
= greet] + graet2;
cout << greet? << "\n"4|
|)
www.bdmpublications.com
Q@ERé4
ED
C++ Maths
Programming is mathematical in nature and as you might expect, there’s plenty of
built-in scope For some quite intense maths. C++ has a lot to offer someone who's
implementing mathematical models into their code. It can be extremely complex or
relatively simple.
C++ =MC2
The basic mathematical symbols apply in C++ as they do in most other programming languages. However, by using the C++
Math Library, you can also calculate square roots, powers, trig and more.
auto
C++’s mathematical operations Follow the same
and division take precedence over addition and subtraction. You can alter
that though. For now, create a new File and enter:
#incLlude <Lostream>
using namespace std;
int
{
numbers = numbers + 10;
initial 100
<< numbers <<
int
main
QC)
float numbers = 100;
*
numbers = numbers
by 10
float numbers = 100;
cout
#include <iostream>
using namespace std;
{
main
Multiplication and division can be applied as such:
STEP 3
patterns as those taught in school, in that multiplication
// This
“\n”;
<< numbers <<
/
numbers = numbers
// This multiplies
10;
//
And
this divides
10@0 by 10
“\n”;
numbers = numbers - 10;
from the new 110
cout
adds 10 to the
10;
// This subtracts
cout
10
<< numbers <<
“\n”;
cout << numbers << “\n”;
1
2
3
4
5
6
7
8
9
29
po
}
maths.cpp
*
Finclude <iostream>
using namespace std;
int main()
float numbers
=
100;
numbers = numbers + 16;
a
cout
<< numbers <<
//This
adds 10 to the
initial
166
"\n";
numhers = numbers - 18:
//This subtracts 10 from the
new 116
While simple, it does get the old maths muscle
warmed up. Note that we used a float for the
numbers variable. While you can happily use an integer, if you
suddenly started to use decimals, you would need to change toa
float or double, depending on the accuracy needed. Run the code
and see the results.
STEP 2
a
Rk
13
u
A
138
www.bdmpublications.com
int main{)
float numbers
=
106;
numbers = numbers
*
numbers = numbers
cout
<< numbers <<
16;
//This multiplies
166 by 10
“\n";
cout << numbers <<
/
10; //And
this divides
1600 by 16
"\n";
15
26
17
Again, execute the simple code and see the
results. While not particularly interesting, it’s an
introduction to C++ maths. We used a float here, so you can play
around with the code and multiply by decimal places, as well as
divide, add and subtract.
STEP 4
Fos
(program exited with code: 6)
#include <iostream>
using namespace std;
Ell
Tsui
100
C++ Maths
The interesting maths content comes when you call
upon the C++ Math Library. Within this header are
dozens of mathematical Functions along with Further operations.
Everything From computing cosine to arc tangent with two
STEP
parameters, to the value of Pl. You can call the header with:
int
{
#include <1ostream>
#include <cmath>
using namespace std;
int
#include <iostream>
#include <cmath>
using namespace std;
Calculating powers of numbers can be done with:
STEP8
5
{
main
float number = 12;
cout << number << “ to the power of
main
powCnumber, 2) << “\n”;
cout << number << “
I
3)
powCnumber,
#include <iostream>
#include <cmath>
using namespace std;
2
3
4
5
6
Da
a
main
is “
<<
to the power of 0.8 is “
“\n”;
using namespace std;
int main(}
float number
scoe
||}
Start by getting the square root of
a
= 12;
"
cout << number <<
to the power of
sumhee
2
is
" <<
pow(number, 2} <<
“\n";
So
ances
Here we created a float called number with the
value of 12 and the pow(variable, power) is where
STEP 9
number:
the calculation happens. Of course, you can calculate powers and
square roots without using variables. For example, pow (12, 2)
outputs the same value as the First cout line in the code.
#include <1ostream>
#include <cmath>
using namespace std;
{
3
|
EA
int
<<
maths.cpp x
“|
#include <iostream>
#include <cmath>
8
STEP 6
is “
}
int main(}
ae
a1
“\n”;“
cout << number <<
<< powCnumber, @.8) <<
mths.cpp *
a
<<
to the power of
2
)
float number = 134;
is:
}
“The square root of “
<< sqrtCnumber) << “\n”;
cout
“
maths.cpp
<<
<< number <<
“
(program oxited with. code: 0)
Press return to continue
a
The value of Pi is also stored in the cmath header
library. It can be called up with the M_PI function.
Enter cout << M_PI; into the code and you get 3.14159; or you can
use it to calculate:
*
#include <iostream>
#include <cmath>
using namespace std;
#include <iostream>
#include <cmath>
using namespace std;
int maint}
float
number = 134:
cout << "The square root of
tLe)
" <<
number << "
is:
"
int
iz
main
)
double area, radius = 1.5;
area = M_PI
*
radius
cout << area <<
Here we created a new float called number and
7
used the sqrt(number) Function to display the
square root of 134, the value of the variable, number. Build and run
the code and your answer reads 11.5758
STEP
square root
of
234
(program exited with code:
Press return to continue
11.5758
)
*
radius;
“\n”;
I
maths.cpp
|
1
2
3
4
S
6
7
8
9
1
x
|
include <iostream>
#include <cmath>
using namespace std;
int main()
Bt
double area, radius = 1.5;
area =
MPI
*
radius
*
radius:
cout << area << "\n";
www.bdmpublications.com
139
DD
User Interaction
There’s nothing quite as satisfying as creating a program that responds to you. This
basic user interaction is one of the most taught aspects of any language and with it
you're able to do much more than simply greet the user by name.
HELLO, DAVE
You have already used cout, the standard output stream, throughout our code. Now you're going to be using cin, the standard
input stream, to prompt a user response.
anf
Anything that you want the user to input into the
program needs to be stored somewhere in the
system memory, so it can be retrieved and used. Therefore, any
input must first be declared as a variable, so it’s ready to be used by
the user. Start by creating a blank C++ file with headers.
ode
userinteraction.cpp #&
Finclude «lost
The cin command works in the opposite way from
the cout command. With the First cout line you're
outputting ‘What is your age’ to the screen, as indicated with the
chevrons. Cin uses opposite Facing chevrons, indicating an input. The
input is put into the integer age and called up in the second cout
command. Build and run the code.
STEP 3
eam>
std;
using namespac
int main{}
1
The data type of the variable must also match the
type of input you want From the user. For example,
user their age, you would use an integer like this:
STEP 2
to ask a
#include <iostream>
using namespace std;
int
{
main
cout
cin
would use:
#include <1ostream>
using namespace std;
)
int
int age;
<<
>>
main
)
{
is your age: “;
“what
age;
If you're asking a question, you need to store the
input as a string; to ask the user their name, you
STEP 4
string
cout <<”\nYou are “ << age << “ years
cout
cin
old.\n”;
<<
name;
“what
is
your name:
cout << “\nHello, ““ <<
}
“;
>> name;
name <<
well today?\n”;
4
5
finclude <icst
140
int age;
cout <<
cin
cout
14
11
12
13
userinteraction.cpp *
include <1ostream>
1
2
using namespace std;
int main{}
Bt
>>
<<
you’re
eam>
using namespac: std;
5
7
8
5
hope
¥
useninteraction.cpp
1
2
3
“, I
at is your age: ";
"Ww
age
|
ie
You are
"
<<
"
age <<
years old. \n";
3
4
5
6
7
8
9
16
11
32
13
}
4
www.bdmpublications.com
ant main()
af
string
cout
cin
cout
}
name;
<< "What is
>> name;
<<
"\nHello,
your name:
";
" <<
name <<
". I
hope
you're well today>\n";
User Interaction
The principal works the same as the previous code.
The user’s input, their name, is stored in a string,
because it contains multiple characters, and retrieved in the second
cout line. As long as the variable ‘name’ doesn’t change, then you
can recall it wherever you like in your code.
STEP
5
While cin works well for most input tasks, it does
have a limitation. Cin always considers spaces as a
terminator, so it’s designed For just single words not multiple words.
However, getline takes cin as the First argument and the variable as
the second:
STEP 8
#include <iostream>
using namespace std;
ee
SRE
ed
int
program exited with coda:
rs
6)
main
QC
{
string mystr;
a
cout << “Enter a sentence: \n”;
You can chain input requests to the user but just
make sure you have a valid variable to store the
input to begin with. Let’s assume you want the user to enter two
whole numbers:
getlineCcin, mystr);
ks
cout
#include <lostream>
using namespace std;
int
{
is: “
<<
mystr.size()
<< "
“Your sentence
<<
mystr.sizeQ
characters Long.\n”;
oe
<<
#include <iostream>
using namespace std;
int main()
main
string mystr;
cout << “Enter a sentence: \n";
int
getline(cin, mystr);
num1, num2;
cout
cin
numl1 >>
“ and “
num1 <<
<<
“\n”;
I
|
Build and execute the code, then enter a sentence
with spaces. When you're done the code reads the
number of characters. If you remove the getline line and replace it
with cin >> mystr and try again, the result displays the number of
STEP 9
ence:
using namespace std;
Eee
eC
sentence
four
main()}
int
charcters long. \n"5|
character
up to the First space.
userinteraction.cpp *
include <iostream>
int
“ <<
num2;
cout << “you entered “ <<
num2 <<
is:
“Enter two whole numbers: “;
<<
>>
cout << "Your sentence
eRe
ix:
Le
53 charcters long.
mg
Og
numi, num2;
cout << "Enter two whole numbers:
cin >> nuni >> num2;
(program exited with code: 8)
°;
cout << "You entered “ << numl << “ and “ <<
sn ald
num2 <<
"\n";
Likewise, inputted data can be manipulated once
you have it stored in a variable. For instance, ask the
a
tLe)
Getline is usually
a
command that new C++
programmer
forget to include. The terminating
user For two numbers and do some maths on them:
white space is annoying when you can’t Figure out why your code
isn’t working. In short, it’s best to use getline(cin, variable) in Future:
#include <iostream>
using namespace std;
#include <iostream>
using namespace std;
int
{
int
t
main
float num1, num2;
cout
cin
<<
>>
cout
numl + num2 <<
“
is: “
<<
“\n”;
num2;
num@l
<<
“.\n”;
<< num2
<<" ig:
ant main()
string
name;
getline(cin,
>> numl >> num2;
cout <<
<< name <<
\n”;
*
cout << "Enter your
cout << "Enter two whole numbers: ";
cin
name:
ws
|
int main()
int num,
“Enter your full
(Wa Rinclude <iostream>
using namespace std;
r2
os
4
name;
userinteraction.cpp
#include <iostream>
using namespace std;
3
<<
getlineCcin, name);
cout << “\nHello, “
num1 >> num2;
num2 <<
)
string
“Enter two numbers: \n”;
cout << numl << “ ++ “ <<
main
" << numl + num2 <<
“\n";/
full
name:
name);
cout << "\nHello, " << name <<
\n";
".\n";]
www.bdmpublications.com
TD
The Hobbit
released in
1982 for
DID YOU KNOW...
Various platforms, Melbourne
House’s The Hobbit was a coding
work of genius, Developed by
Philip Mitchell and Or, Veronika
Megler, The Hobbit was uniquely
coded using a parser called
‘Inglish’ which allowed the player
to enter full sentences, such as
“Take sword from Gandalf, and kill
goblin with it.”
Furthermore, each object in the
gare had 4 specific size, weight
or
You safe
threw
drop into
AAAA
142
ain
it,
random object from any location.
This Weant that, potentially, it
possible for Thorin to pick
you up and carry you for the
entire adventure, Rewarkable for
& gate that took up less than 38KB
of wWenory.
then your
3 narrow
the game, There was even 4
randoniser event in place with
each start of the game, where
any character could pick up a
was
and solidity; so if you sat on
a stool, and someone picked up
the stool
character would be taken along
with it. Also, in early versions
of the gate, the non-playing
characters would often move
around the tiap and capture and
kill each other before the player
had even reached that stage in
place with
a dim valley
4 dreadful
MN
LJ
S
Ee
www.bdmpublications.com
No time to sit down and start singing
about gold, Thorin.
4
’
m
u
r
t
c
8K ZX Spe
‘,
d
ment arns from
e
it
c
x
e
h
t
rs, e characte IT
gralm
r-pruow
ce dangee
e
a
B
f
p
il
u
s
all th
is
a
t
T
I
e
THE HOB
BB
Yo
THE HO r software. and graphics. M ary English!
d
compnuttuere in wordlsk to them in ordain
ing an
it
c
x
n
e
e
in
a
t
adv
e future
BIT and
THE HOB brings you th
SE
U
O
progranmging fantasy!
H
E
chalte
LBOURN
=s
ME
pubticari
m
www.bd
a
Common Coding Mistakes
When you start something new you're inevitably going to make mistakes, this is purely
down to inexperience and those mistakes are great teachers in themselves. However,
even experts make the occasional mishap. Thing is, to learn From them as best you can.
X=MISTAKE, PRINT Y
There are many pitfalls For the programmer to be aware of, Far too many to be listed here. Being
able to recognise a mistake and Fix it is when you start to move into more advanced territory, and
become a better coder. Everyone makes mistakes, even coders with over thirty years’ experience.
Learning From these basic, common mistakes help build a better coding Foundation.
EASY VARIABLES
Meaningful naming For variables is must to eliminate
common coding mistakes. Having letters of the alphabet
is Fine but what happens when the code states there's
a problem with x variable. It’s not too difficult to name
variables lives, money, player1 and so on.
a
,
;
=
1023;
points
var lives = 3;
var totalTime = 45;
write("Points: "+points);
write("Lives: "“+tlives);
write("Total Time: "+totalTime+" secs");
var
KHU
It would be wonderful to be able to
work like Neo from The Matrix movies.
Simply ask, your operator loads it into
your memory and you instantly know
everything about the subject. Sadly
though, we can’t do that. The first
major pitfall is someone trying to learn
too much, too q quickly.y- So take coding 9 in
ot
.
small pieces and take your time.
write("
totalScore = 0;
write("Your total Score is:
")3
var
Use comments. It’s a simple concept but commenting on
your code saves so many problems when you next come to
look over it. Inserting comment lines helps you quickly sift
through the sections of code that are causing problems;
also useful if you need to review an older piece of code.
orig
+=
target
PLAN AHEAD
While it’s great to wake up one morning and decide to code
a classic text adventure, it’s not always practical without a
good plan. Small snippets of code can be written without
too much thought and planning but longer and more indepth code requires a good working plan to stick to and
help iron out the bugs.
2:
2:
--n;
}
=o
a
|
:
=—
:
#fendit
if (nm — 0}
return;
ff
//
ff
Loop
“te
Cina)
unroliing.
Openng Cuncene
ff
(nm
#f
Imp
(*3)) 43 the greatest multiple of 4
the while Loop ahead, orig will move on
ff increments (4 elements of 2 bytes).
f/f end marks our barrier for not falling cuts
char const * canst end = orig + 2 * (mn & (+3)
or
&@
ff See af we're aligned far wreatting
MCE SIZECK LONG
2 sé \
amiéa
defined
#if
an
€4 as
==
ji
x?é€
64
"+totalScore);
USER ERROR
N,
User input is often a paralysing mistake in code. For
example, when the user is supposed to enter a number for
their age and instead they enter it in letters. Often a user
can enter so much into an input that it overflows some
internal buffer, thus sending the code crashing. Watch those
user inputs and clearly state what’s needed From them.
om
‘ f\
ammon Coding Mistakes
BACKUPS
Always make
a
backup of your work, with
a
secondary
backup For any changes you've made. Mistakes can be
Ce ela
Lelie a)
SCT
7
You have entered wrong
Liat
ae
0
rectified if there’s a good backup in place to revert to for
those times when something goes wrong. It’s much easier
to start where you left off, rather than starting from the
LU
input
beginning again.
emda
sdfsdf213213123
You have entered wrong input
123234234234234234
You have entered wrong
4
the number
is:
input
12
execution time
CD
ala te
Press any key to continue.
alee
SM
MC
OCD
:
21.495
RE-INVENTING WHEELS
You can easily spend days trying to fathom outa section
of code to achieve a given result and it’s Frustrating and
often time-wasting. While it’s equally rewarding to solve the
problem yourself, often the same code is out there on the
Internet somewhere. Don’t try and re-invent the wheel, look
to see if some else has done it first.
IF you're writing code
to deal with usernames
and passwords, or other
such sensitive data,
then ensure that the
data isn’t in cleartext.
Learn how to create
a function to encrypt
sensitive data, prior to
feeding into a routine
that can transmit or
store it where someone
may be able to get to
view it.
AU
Asking for help is something most of us has struggled
with in the past. Will the people we're asking laugh at us?
Am wasting everyone's time? It’s common mistake For
someone to suffer in silence. However, as long as you ask
the in the correct manner, obey any Forum rules and be
polite, then your question isn’t silly.
a
|
ats
IF your code makes multiple calculations then you need
to ensure that the maths behind it is sound. There are
thousands of instances where programs have offered
incorrect data based on poor Mathematical coding, which
can have disastrous effects depending on what the code is
set to do. In short, double check your code equations.
set Cerminal x11
set output
Tagged Questions
915,002,
a sey
rere
then
wn
oe
oye 3
3
picts
Dud
2
Senge
yu
Pa
toeand
une
arcana
x
rn
walt
Spec
Tp
ere ety
Fem
story
9
“2O1E
stg bee tht one teh
cera
bc
01
0
2 PPA
OF 46
woe
on net
fe
max > 5
nnax = 108
Comune
PyAbon
tage
FReebore dats pod teen
bony
ae
lng
entre
ge
Ya
ati
2
complex (x, y} =
{1, 6} + y # 48, 1}
mandel (x, y, z, a) = (abs (z)> rmax || r=
set
set
set
set
set
set
set
108)?
xcange (~6.
yrange (-0.5:8.
logscale
z
samples 208
isosample 200
paid map
size square
a= #AP
b= #88
splot
-b/10@, complex(x,y} ,@)
notitle
nz mandel
(x, y,
z + complex
(x,
y¥), n+
1)
Black Dog Media
Master Your Tech
To continue learning more about your
tch
visit us at:
www.bdmpublications.com
FREE Tech Guides
Mac, MacBook & Watch
EXCLUSIVE
eee
iPhioneOffers on G
our Tech Guidebooks
Print & digital editions
Featuring the very latest updates
Step-by-step tutorials and guides
2 j
_
|
Themacog
Codin 3 Catal
fuses
He
f
@Manual_
,
vAtalina
anual
iano
Windows10
Created by BDM experts
Check out our latest titles today!
SPECIAL DEALS
and Bonus Content
bdmpublications.com/ultimate-photoshop
Buy our Photoshop guides and download tutorial
images for free! Simply sign up and get creative.
Sign up to our monthly newsletter
and get the latest updates, offers
and news from BDM. We are here
to help you Master Your Tech!
The Complete
The Complte
The Complete
Mac
The Complete
Outdoor
N i kon
Python
Photography
Manual
Manual
Manual
|
Expert Tutorials to Improve Your Skills
/
The Complete
MacBook
Manual
ry
fa
The Complete
Photography
Manual
The Complete
The Complete
Raspberry Pi
Photoshop
i
|
Manual
5
SS
fT
4
Expert Tutorials to Improve Your Skills
Expert Tutorials to Improve Your Skills
. The Complete
The Complete
The Complete
Expert Tutorials to Improve Your Skills
The Complete
Windows 10
Manual
Samsung
Galaxy
Manual
|
Elements
Manual
Expert Tutorials to Improve Your Skills
The Complete
Photoshop
C++
Catalina
|
oe
The Complete
Python &
macOS
Lightroom
Manual
Expert Tutorials to Improve Your Skills
Py
gt,
OL
Expert Tutorials tolmprove Your Skills
The Complete
macOS
S
ar
Big
He va
iPad OS 14
fae