/


Text
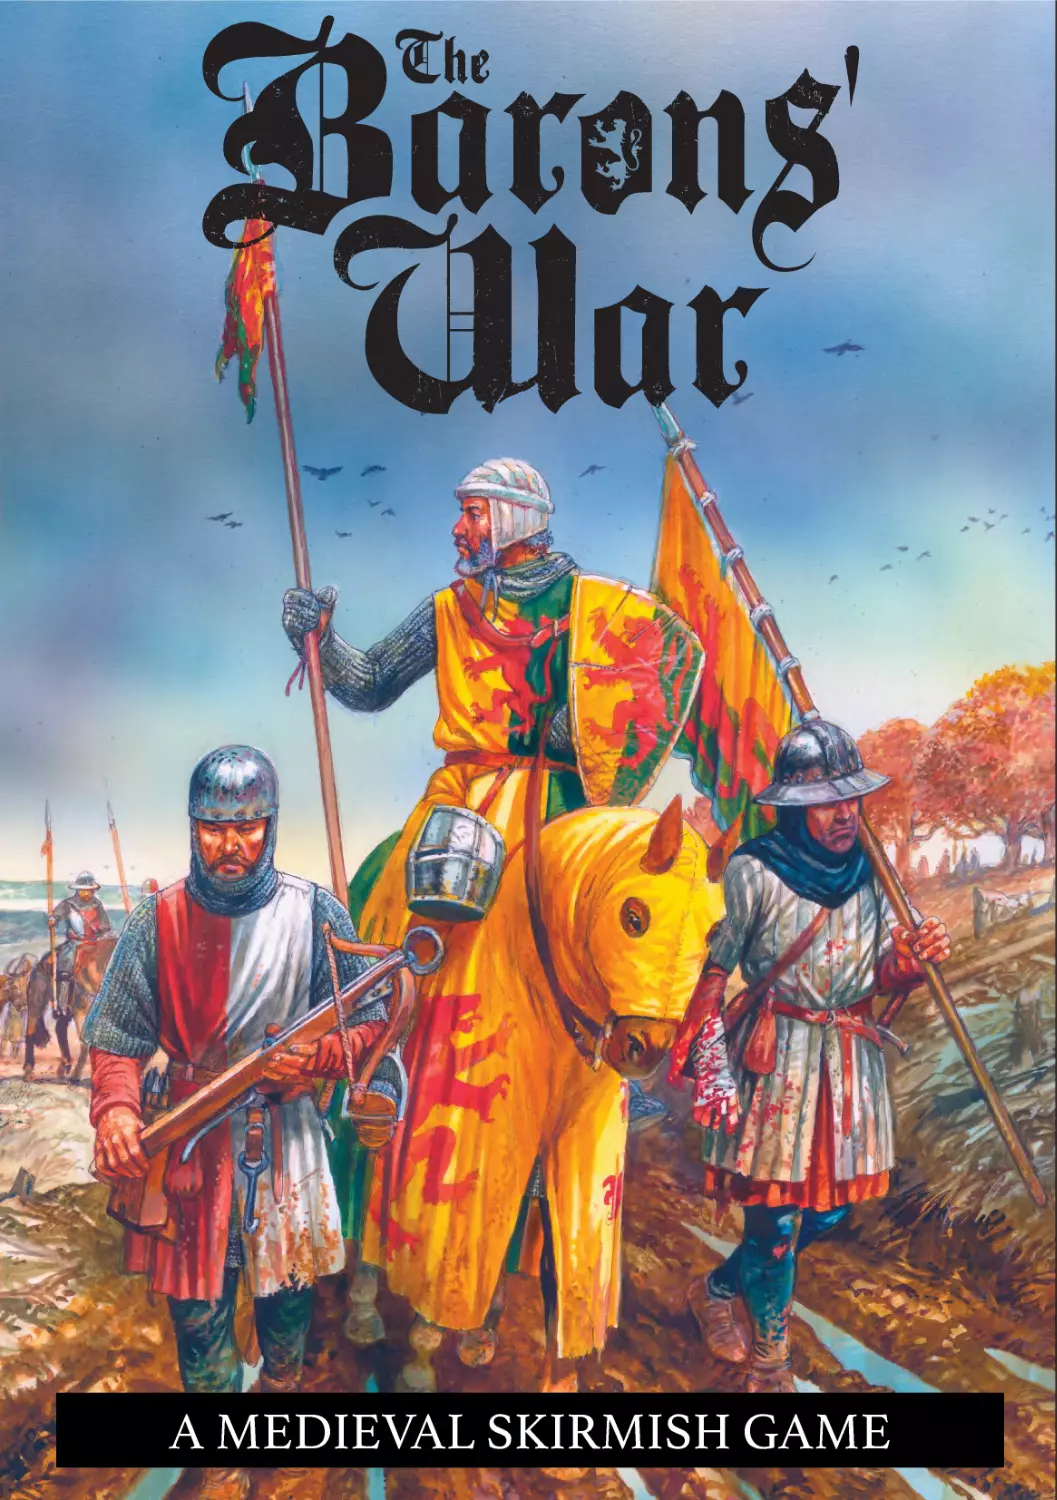
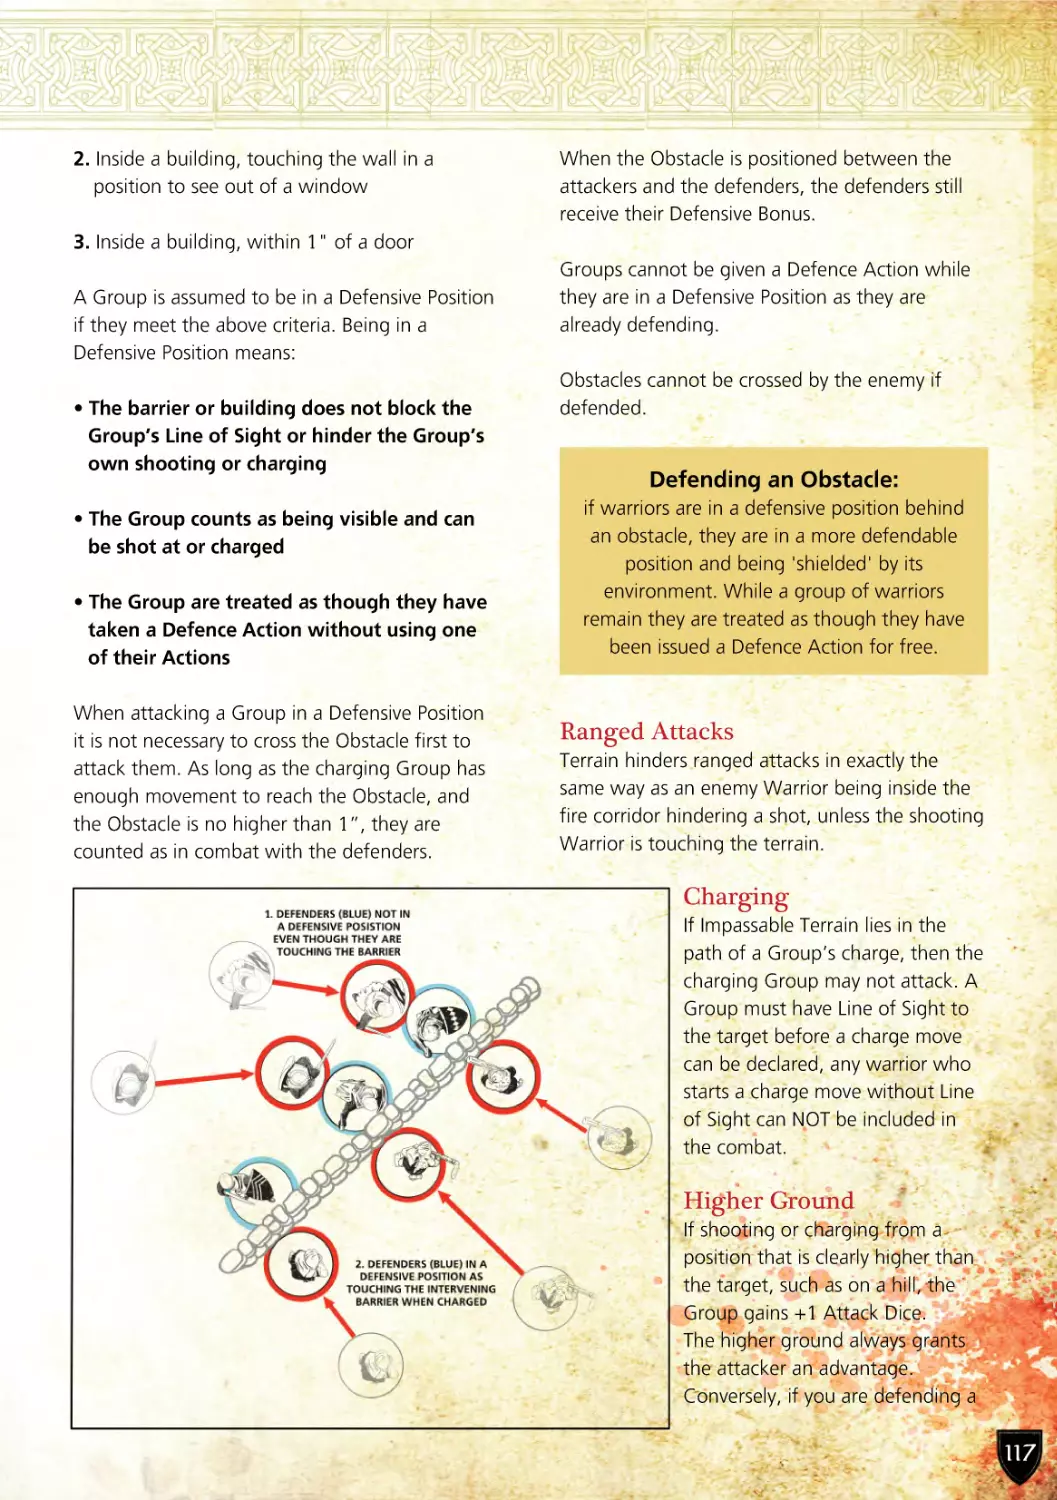
A MEDIEVAL SKIRMISH GAME
Written by Andy Hobday
Developed by Andy Hobday with George Asling & Mark Farr
Artwork: Peter Dennis & Steve Beckett
Book design & production: Steve Beckett
Photography: Daniel Wegmann (HVM workbench) & Andy Hobday
Editing: Dom Sore & Mark Farr
Miniature design: Paul Hicks
Painting: Daniel Wegmann (HVM workbench), Darren Linington, Jez Allum
& Ben MacIntyre (Brush Demon)
Terrain: From Mark Farr's collection – 1st Corps, Lost Valley, Perry Miniatures,
Tabletop Workshop, Iron Gate, Tablescape, and by George Asling
A huge thank you to Peter Dennis, Paul Hicks, Mark Farr & George Asling
and a special thank you to Leila, Ginny & Amélie.
Finally, a heartfelt thank you to everyone who supported the Barons’ War Kickstarter
and the playtesters without whom there would be no rulebook.
Copyright © Andy Hobday 2021
All rights reserved. No part of this publication may be reproduced, distributed, or transmitted in any form or by any means,
including photocopying, recording, or other electronic or mechanical methods, without the prior written permission of the
publisher, except in the case of brief quotations in reviews permitted by copyright law.
Second Printing 2021, First Printing 2020
ISBN 978-1-9999514-1-2
www.warhost.online WARHOST is a trademark of Andy Hobday .
Footsore Miniatures & Games is a trademark of Andy Hobday & Mark Farr
1
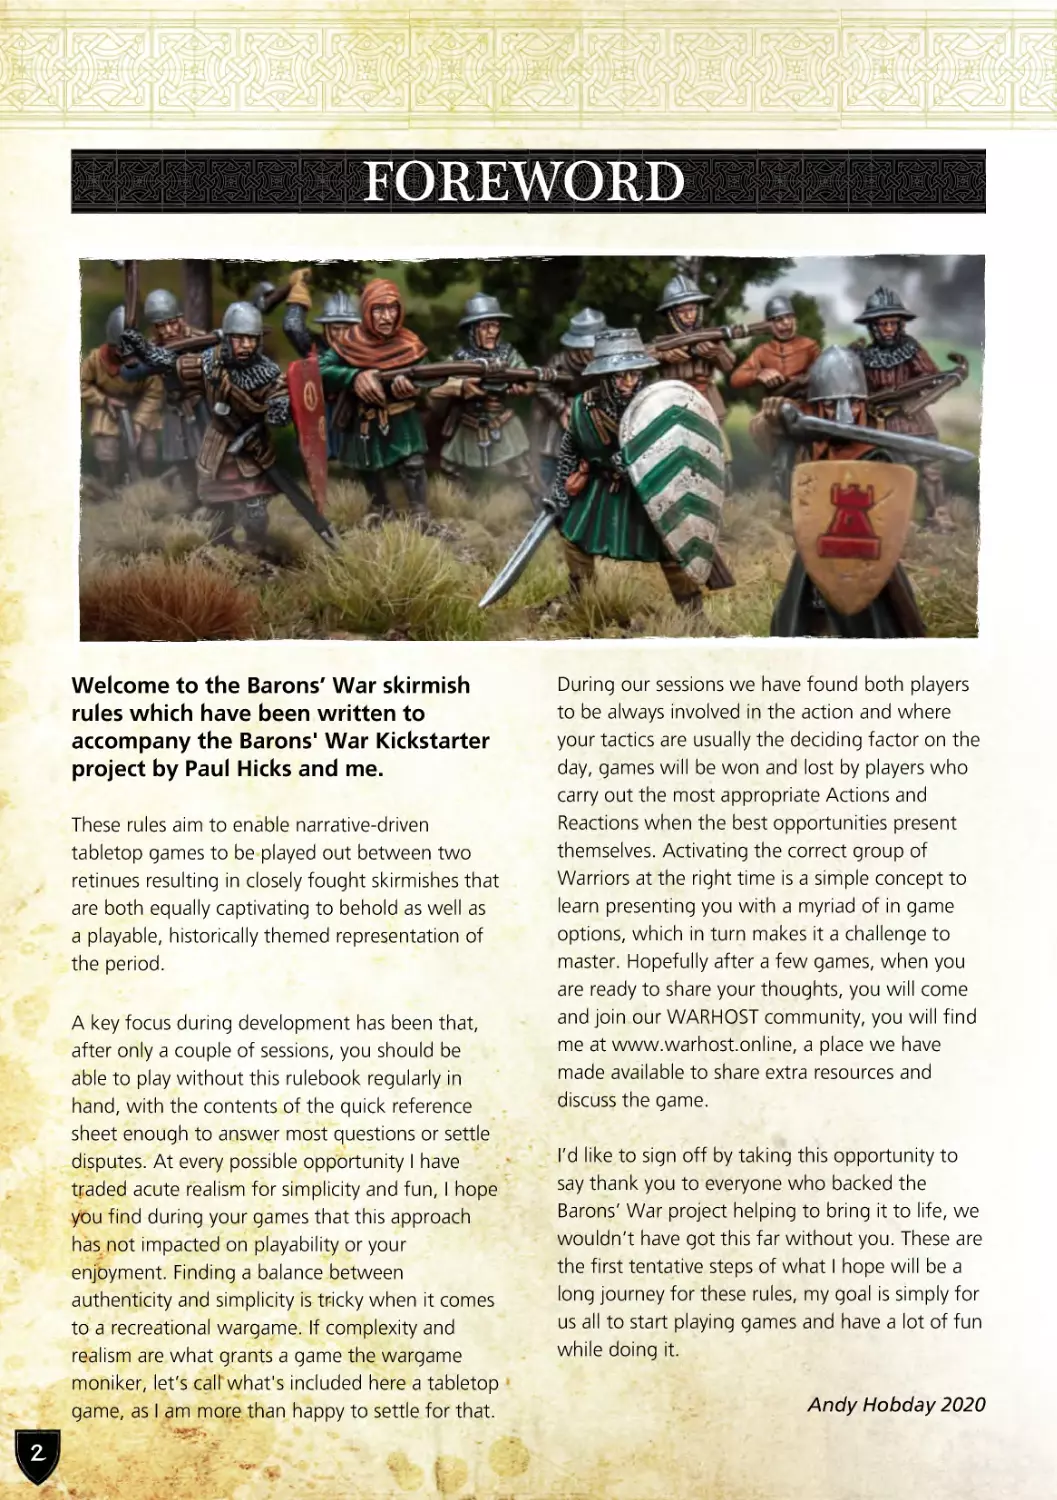
FOREWORD
Welcome to the Barons’ War skirmish
rules which have been written to
accompany the Barons' War Kickstarter
project by Paul Hicks and me.
These rules aim to enable narrative-driven
tabletop games to be played out between two
retinues resulting in closely fought skirmishes that
are both equally captivating to behold as well as
a playable, historically themed representation of
the period.
2
A key focus during development has been that,
after only a couple of sessions, you should be
able to play without this rulebook regularly in
hand, with the contents of the quick reference
sheet enough to answer most questions or settle
disputes. At every possible opportunity I have
traded acute realism for simplicity and fun, I hope
you find during your games that this approach
has not impacted on playability or your
enjoyment. Finding a balance between
authenticity and simplicity is tricky when it comes
to a recreational wargame. If complexity and
realism are what grants a game the wargame
moniker, let’s call what's included here a tabletop
game, as I am more than happy to settle for that.
During our sessions we have found both players
to be always involved in the action and where
your tactics are usually the deciding factor on the
day, games will be won and lost by players who
carry out the most appropriate Actions and
Reactions when the best opportunities present
themselves. Activating the correct group of
Warriors at the right time is a simple concept to
learn presenting you with a myriad of in game
options, which in turn makes it a challenge to
master. Hopefully after a few games, when you
are ready to share your thoughts, you will come
and join our WARHOST community, you will find
me at www.warhost.online, a place we have
made available to share extra resources and
discuss the game.
I’d like to sign off by taking this opportunity to
say thank you to everyone who backed the
Barons’ War project helping to bring it to life, we
wouldn’t have got this far without you. These are
the first tentative steps of what I hope will be a
long journey for these rules, my goal is simply for
us all to start playing games and have a lot of fun
while doing it.
Andy Hobday 2020
3
CONTENTS
5. Introduction
6. The Barons’ War
8. What You Need To Play
11. General Principles & Rule Conventions
16. Miniature Warriors & Their Groups
22. The Game Round
28. Movement
34. Combat
44. Morale
48. Building You Retinue
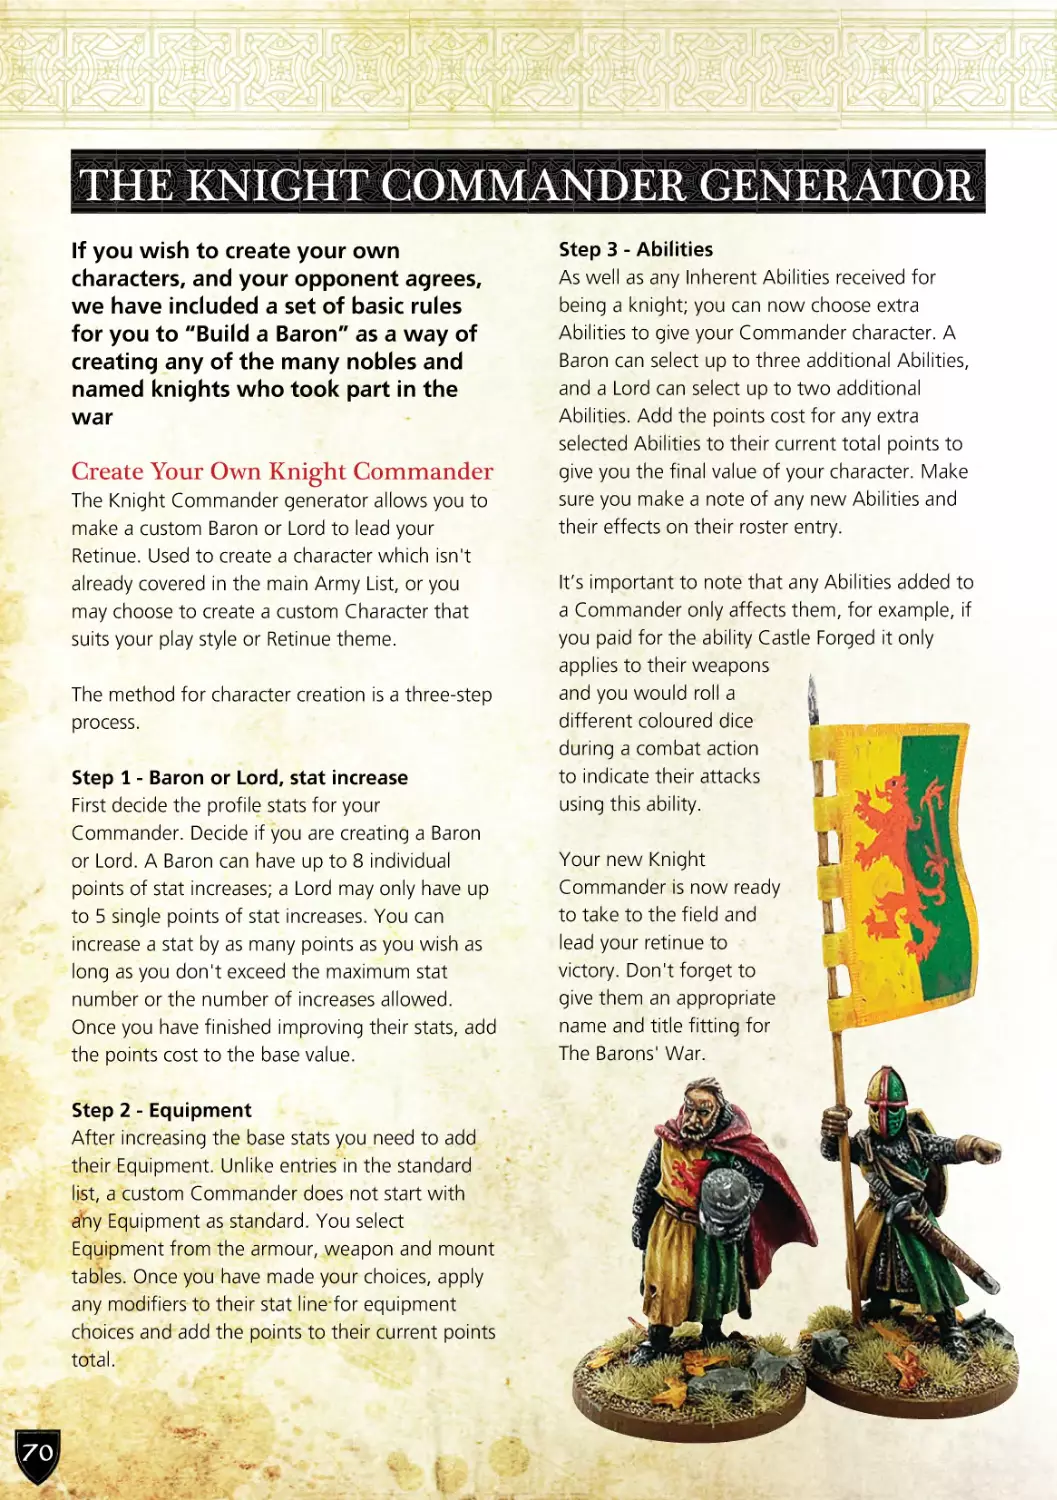
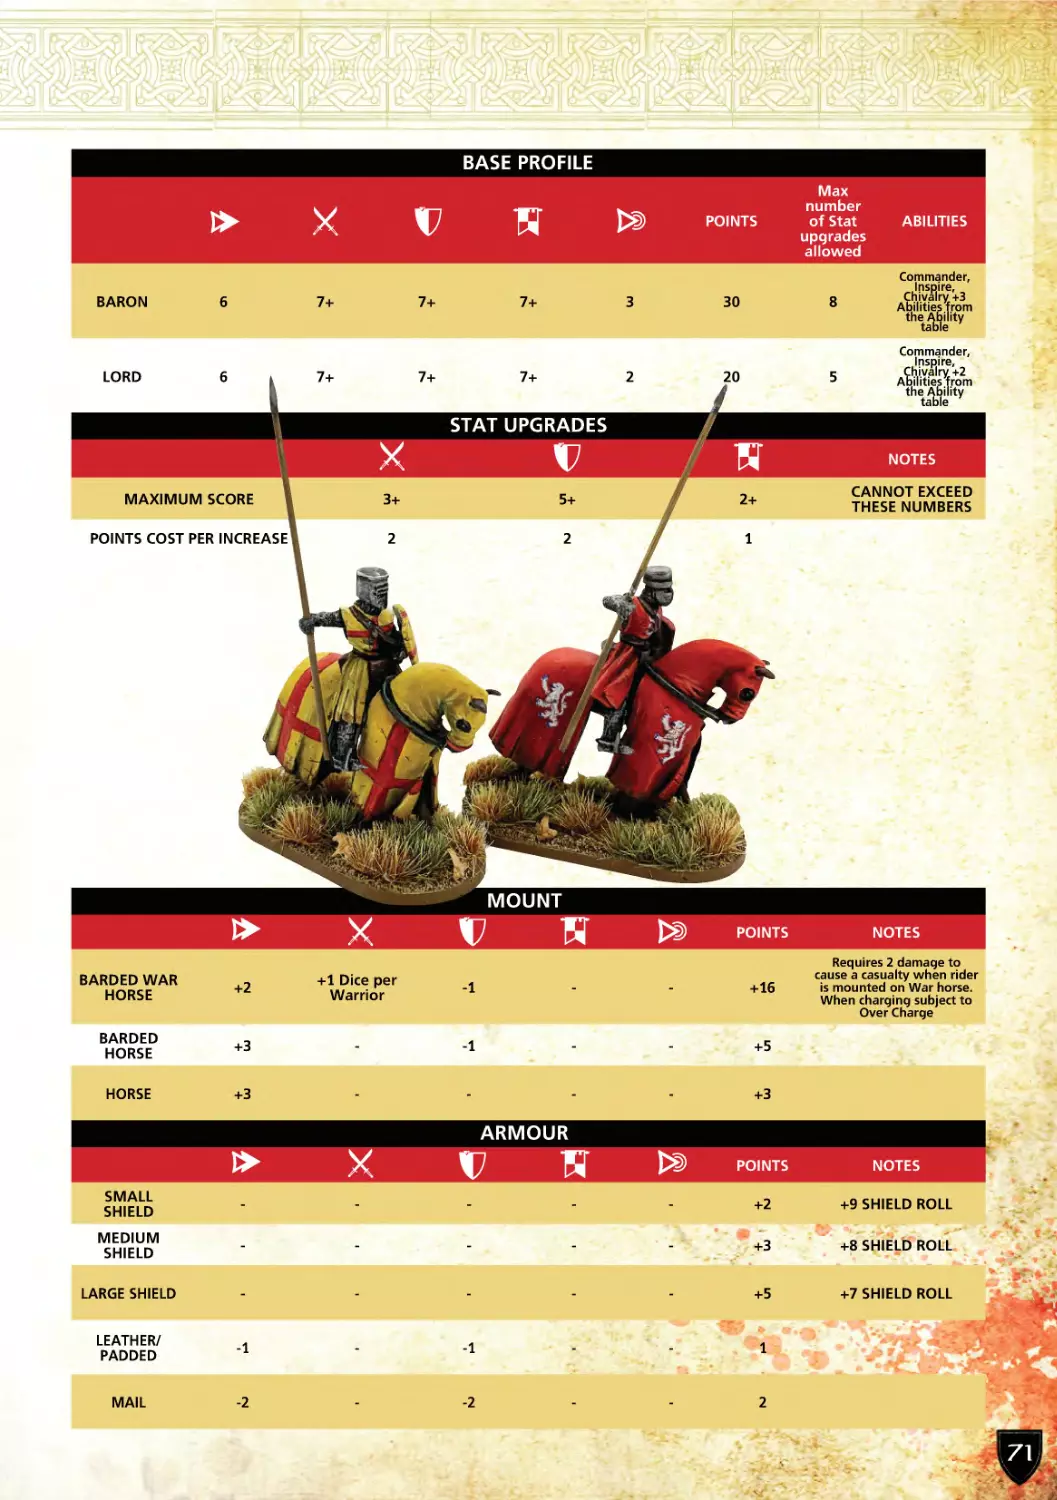
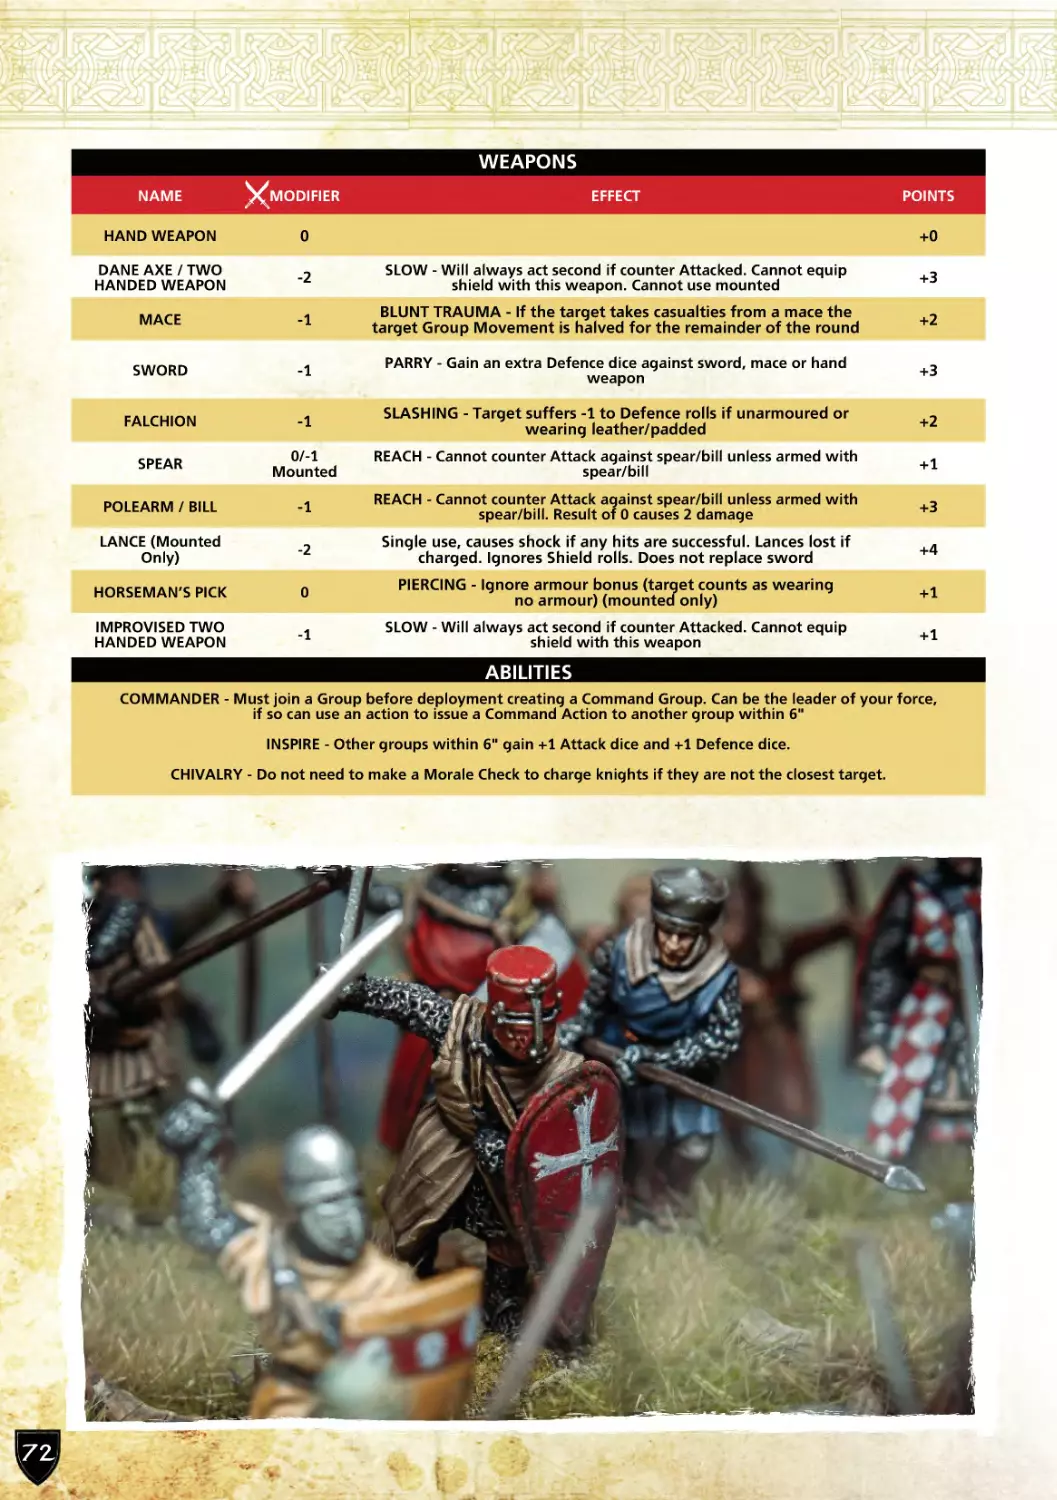
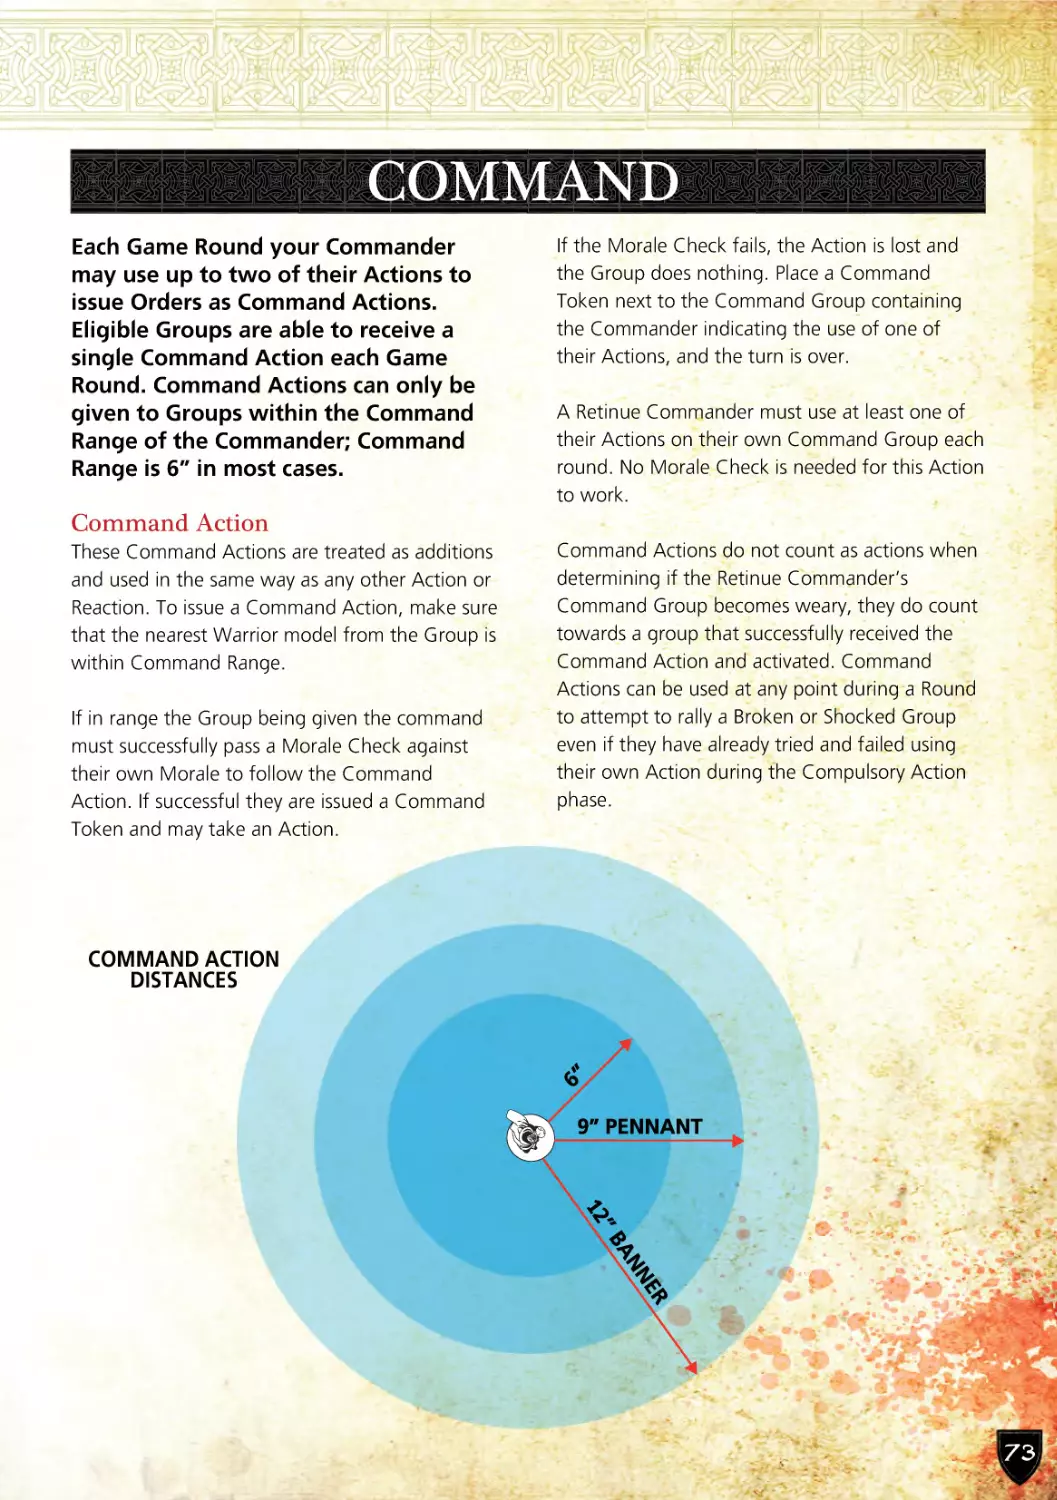
70. The Knight Commander Generator
73. Command
74. Equipment
78. Abilities
88. Historic Characters
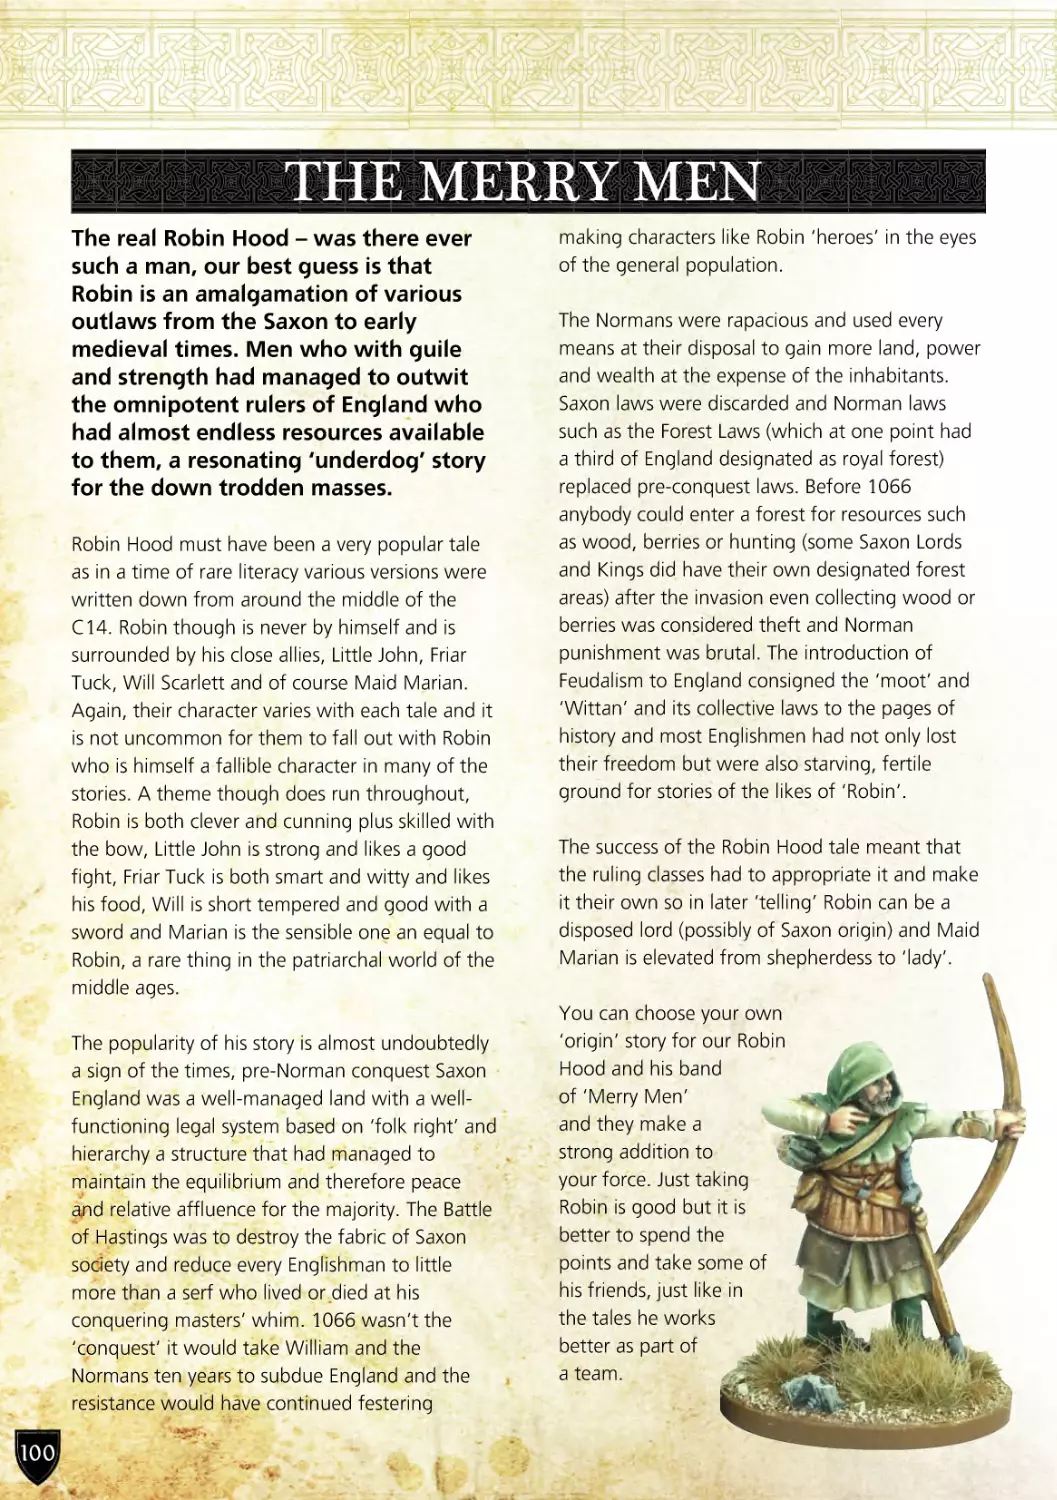
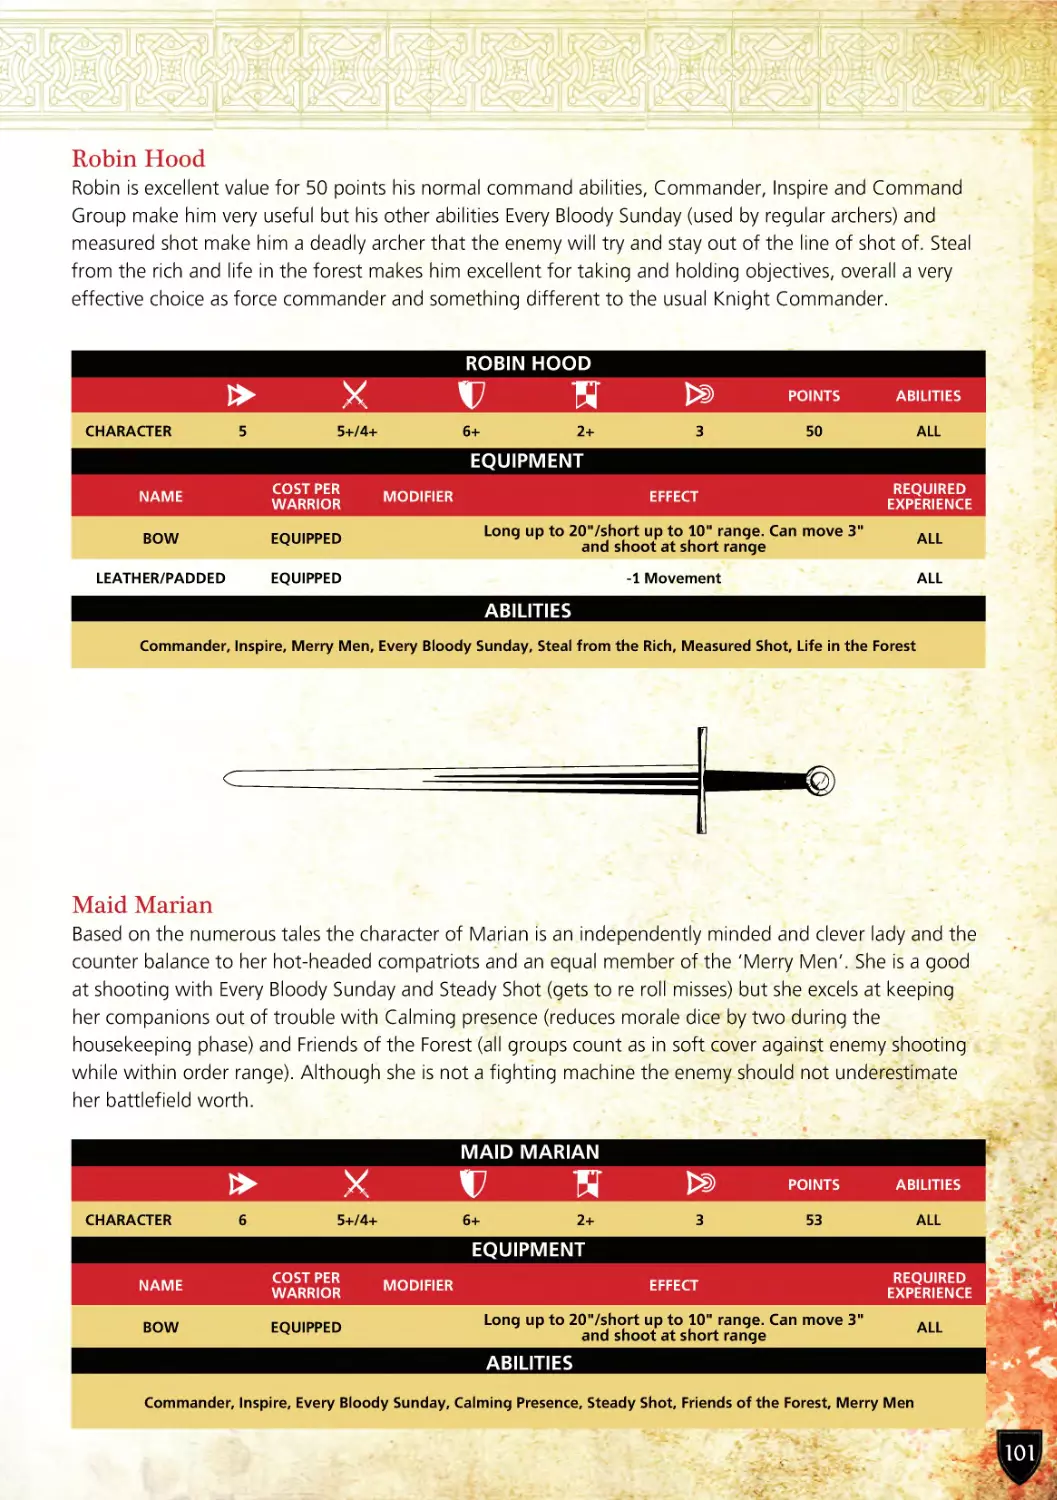
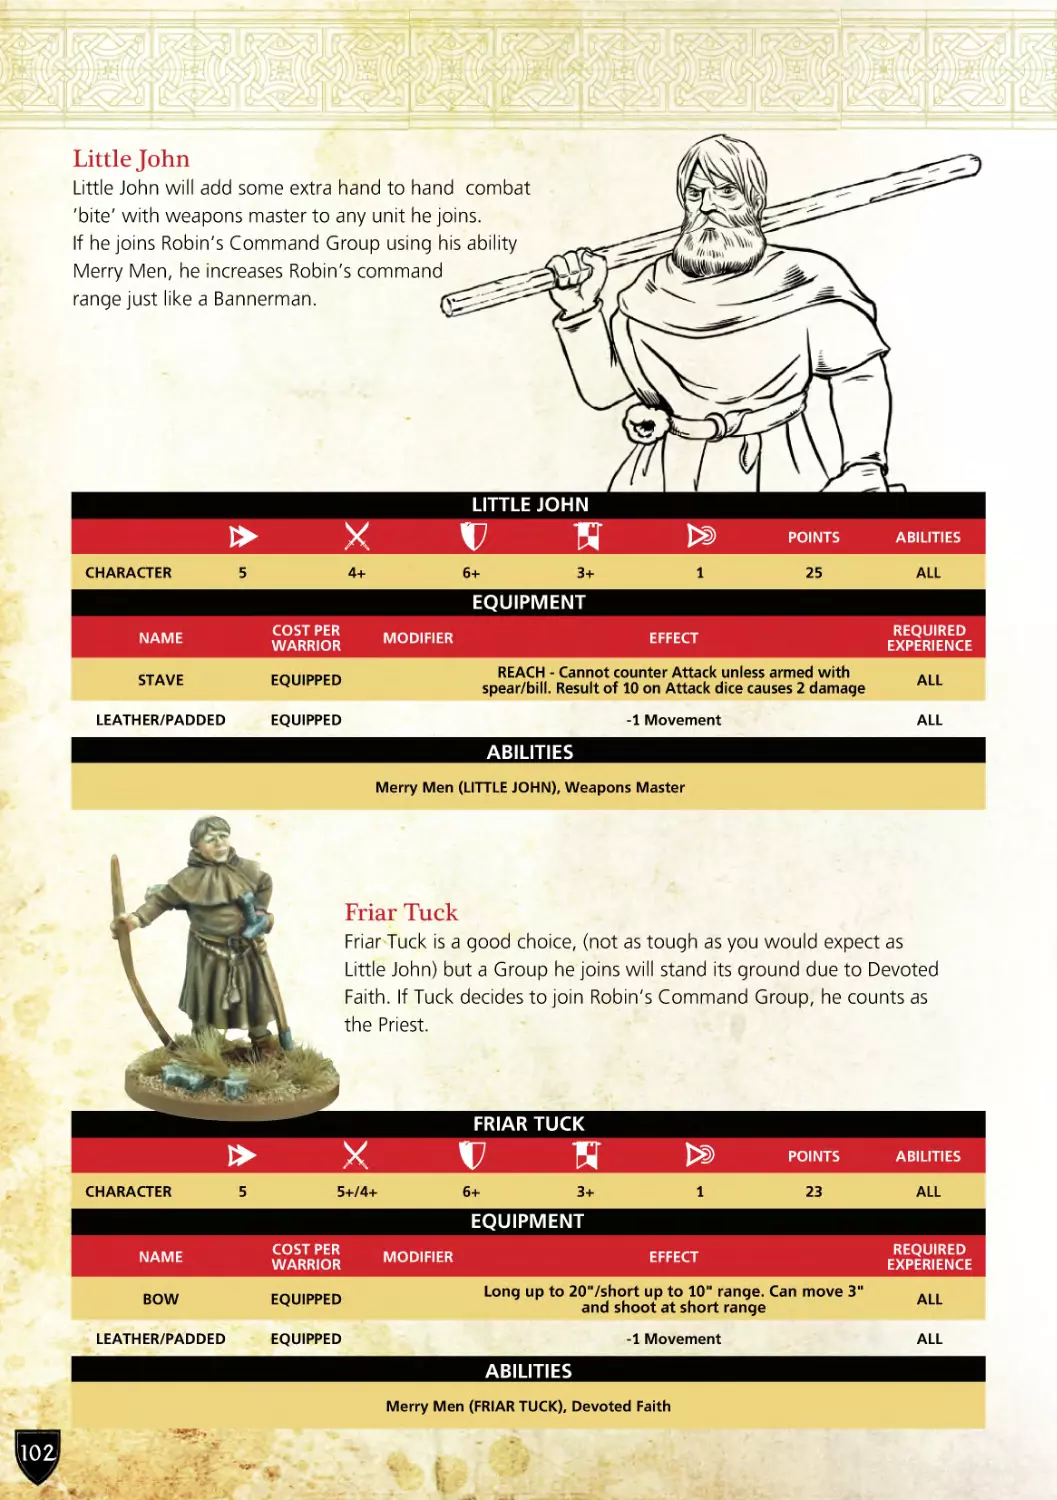
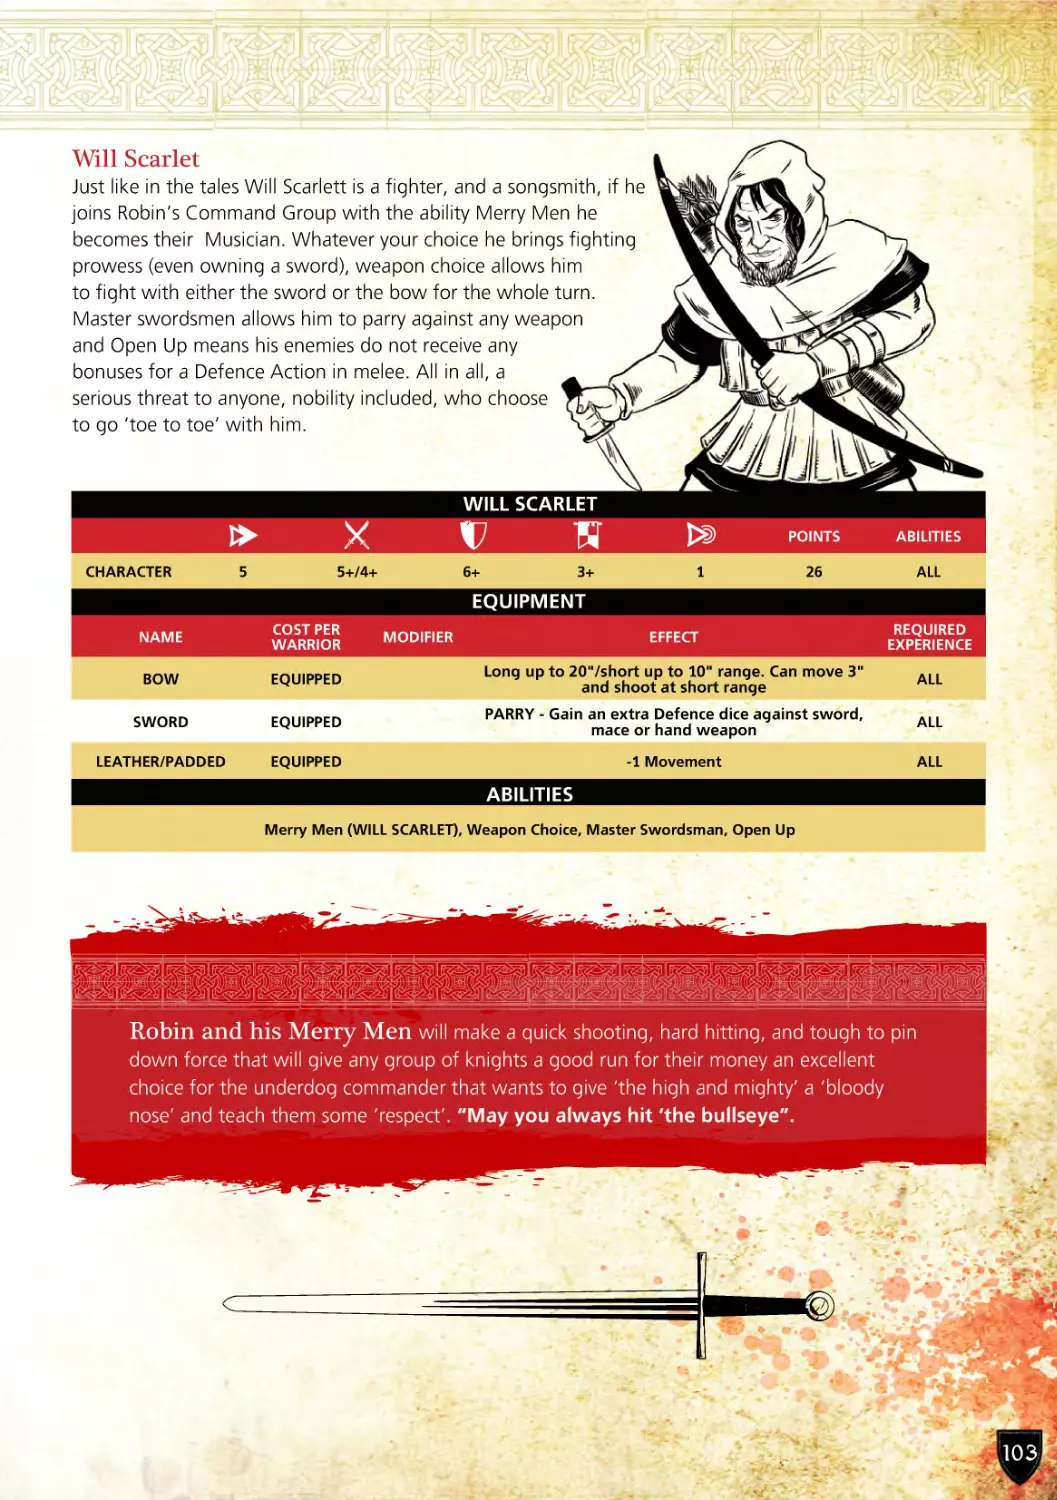
100. The Merry Men
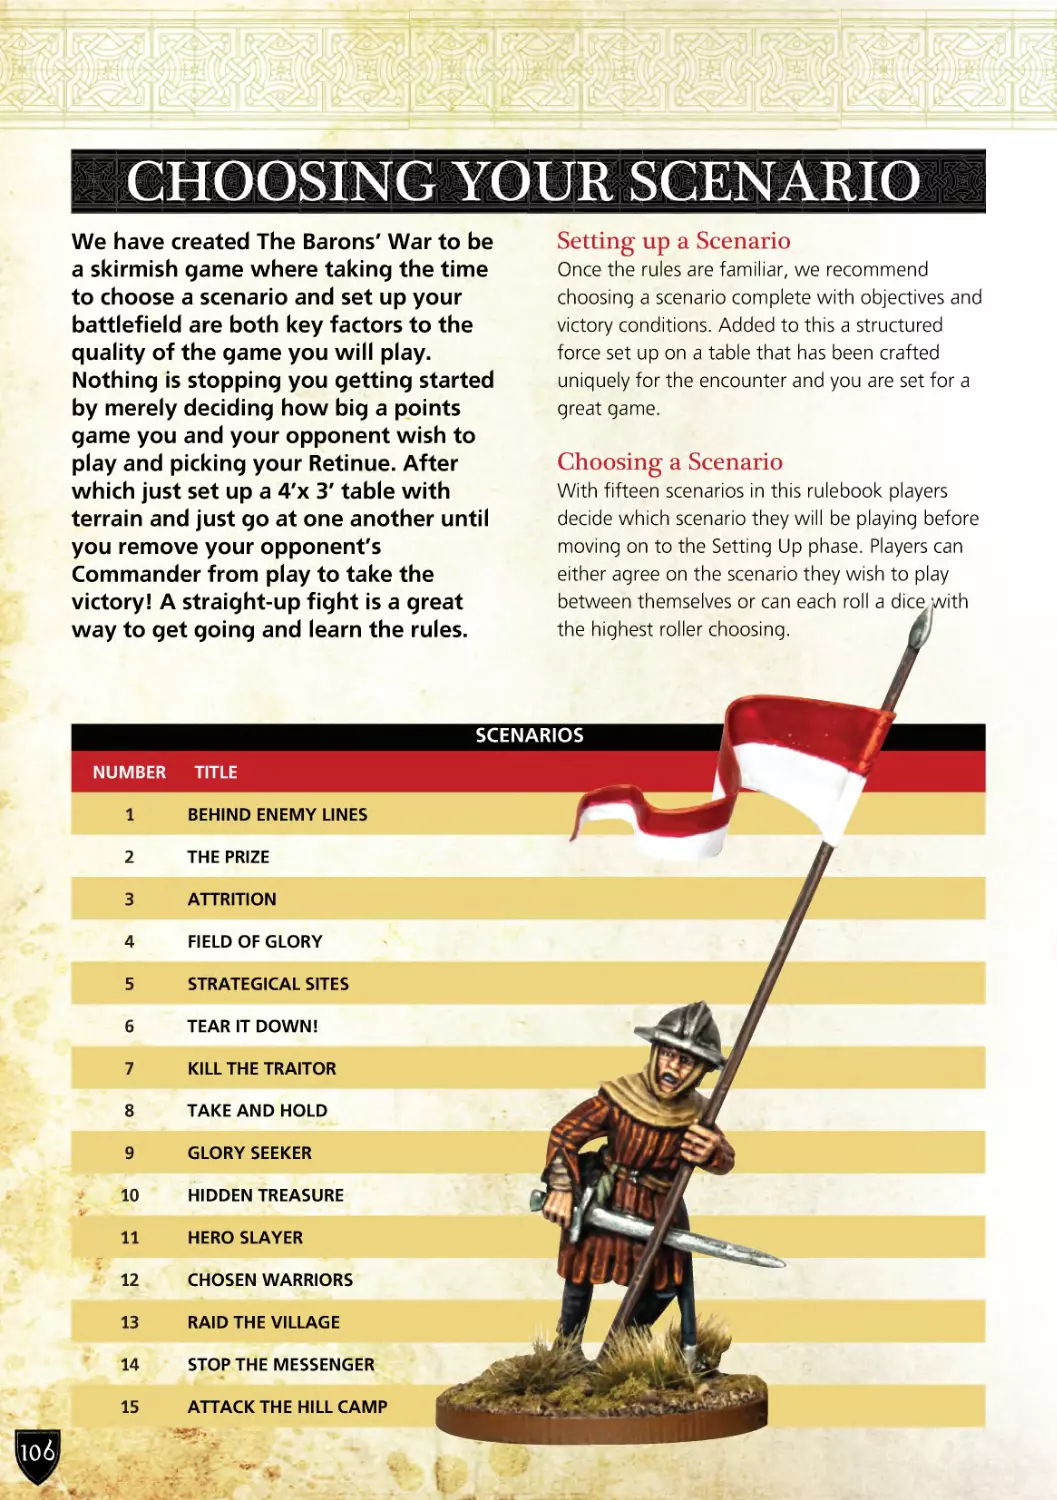
106. Choosing Your Scenario
114. Terrain & The Battlefield
122. Glossary
4
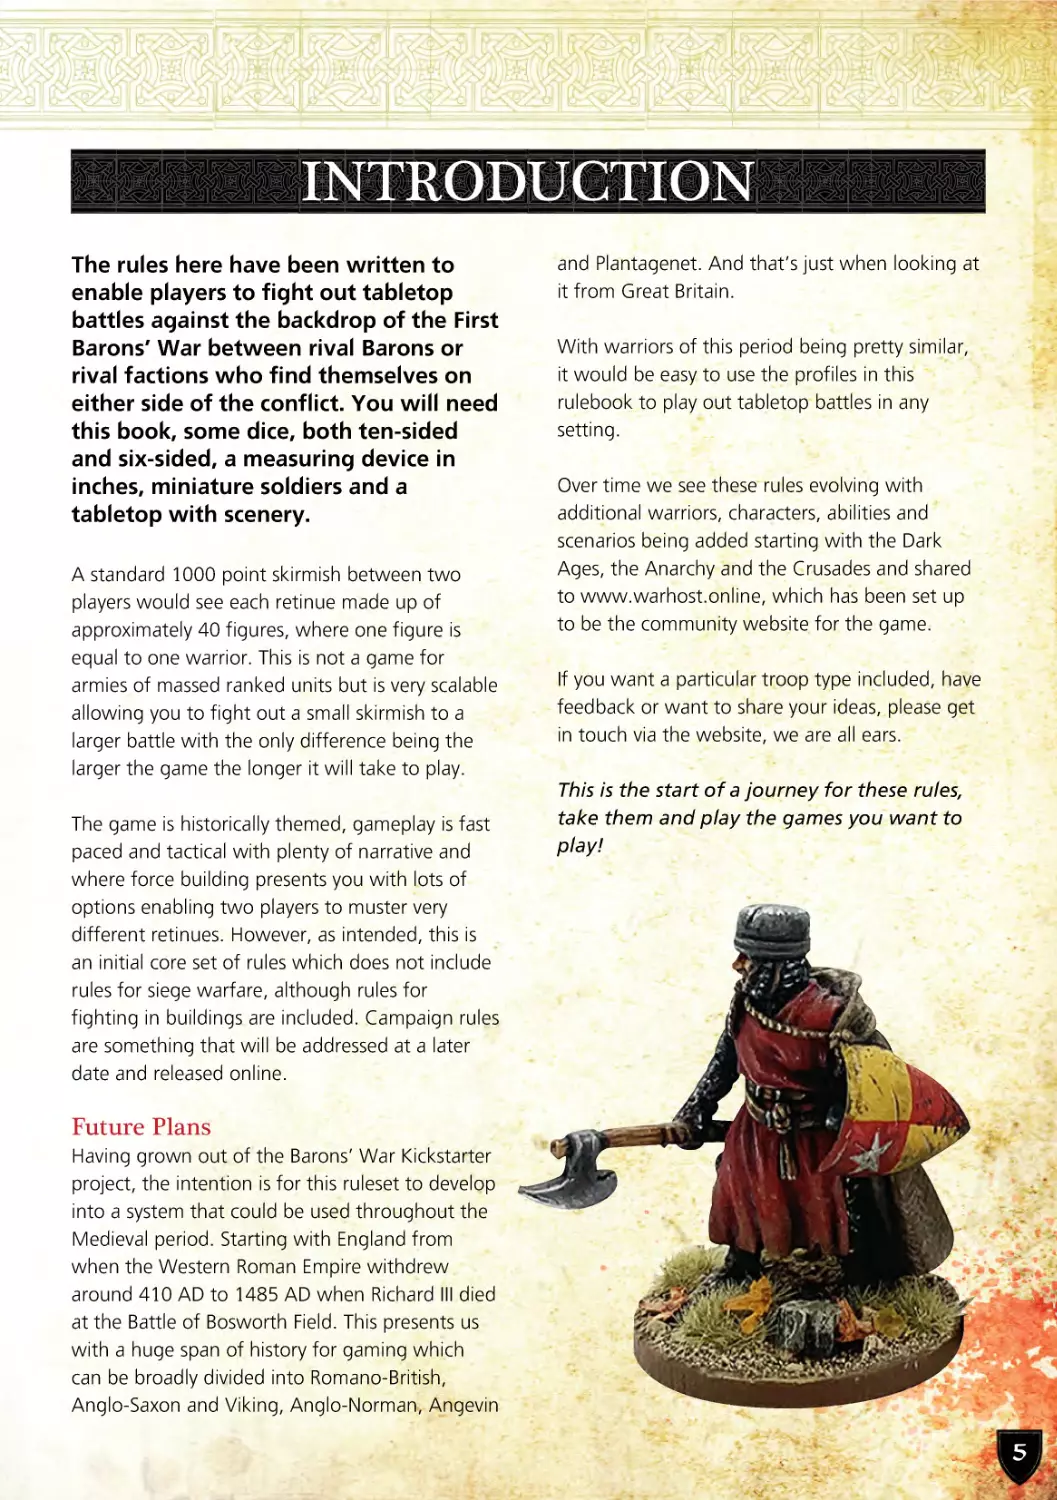
INTRODUCTION
The rules here have been written to
enable players to fight out tabletop
battles against the backdrop of the First
Barons’ War between rival Barons or
rival factions who find themselves on
either side of the conflict. You will need
this book, some dice, both ten-sided
and six-sided, a measuring device in
inches, miniature soldiers and a
tabletop with scenery.
A standard 1000 point skirmish between two
players would see each retinue made up of
approximately 40 figures, where one figure is
equal to one warrior. This is not a game for
armies of massed ranked units but is very scalable
allowing you to fight out a small skirmish to a
larger battle with the only difference being the
larger the game the longer it will take to play.
The game is historically themed, gameplay is fast
paced and tactical with plenty of narrative and
where force building presents you with lots of
options enabling two players to muster very
different retinues. However, as intended, this is
an initial core set of rules which does not include
rules for siege warfare, although rules for
fighting in buildings are included. Campaign rules
are something that will be addressed at a later
date and released online.
and Plantagenet. And that’s just when looking at
it from Great Britain.
With warriors of this period being pretty similar,
it would be easy to use the profiles in this
rulebook to play out tabletop battles in any
setting.
Over time we see these rules evolving with
additional warriors, characters, abilities and
scenarios being added starting with the Dark
Ages, the Anarchy and the Crusades and shared
to www.warhost.online, which has been set up
to be the community website for the game.
If you want a particular troop type included, have
feedback or want to share your ideas, please get
in touch via the website, we are all ears.
This is the start of a journey for these rules,
take them and play the games you want to
play!
Future Plans
Having grown out of the Barons’ War Kickstarter
project, the intention is for this ruleset to develop
into a system that could be used throughout the
Medieval period. Starting with England from
when the Western Roman Empire withdrew
around 410 AD to 1485 AD when Richard III died
at the Battle of Bosworth Field. This presents us
with a huge span of history for gaming which
can be broadly divided into Romano-British,
Anglo-Saxon and Viking, Anglo-Norman, Angevin
5
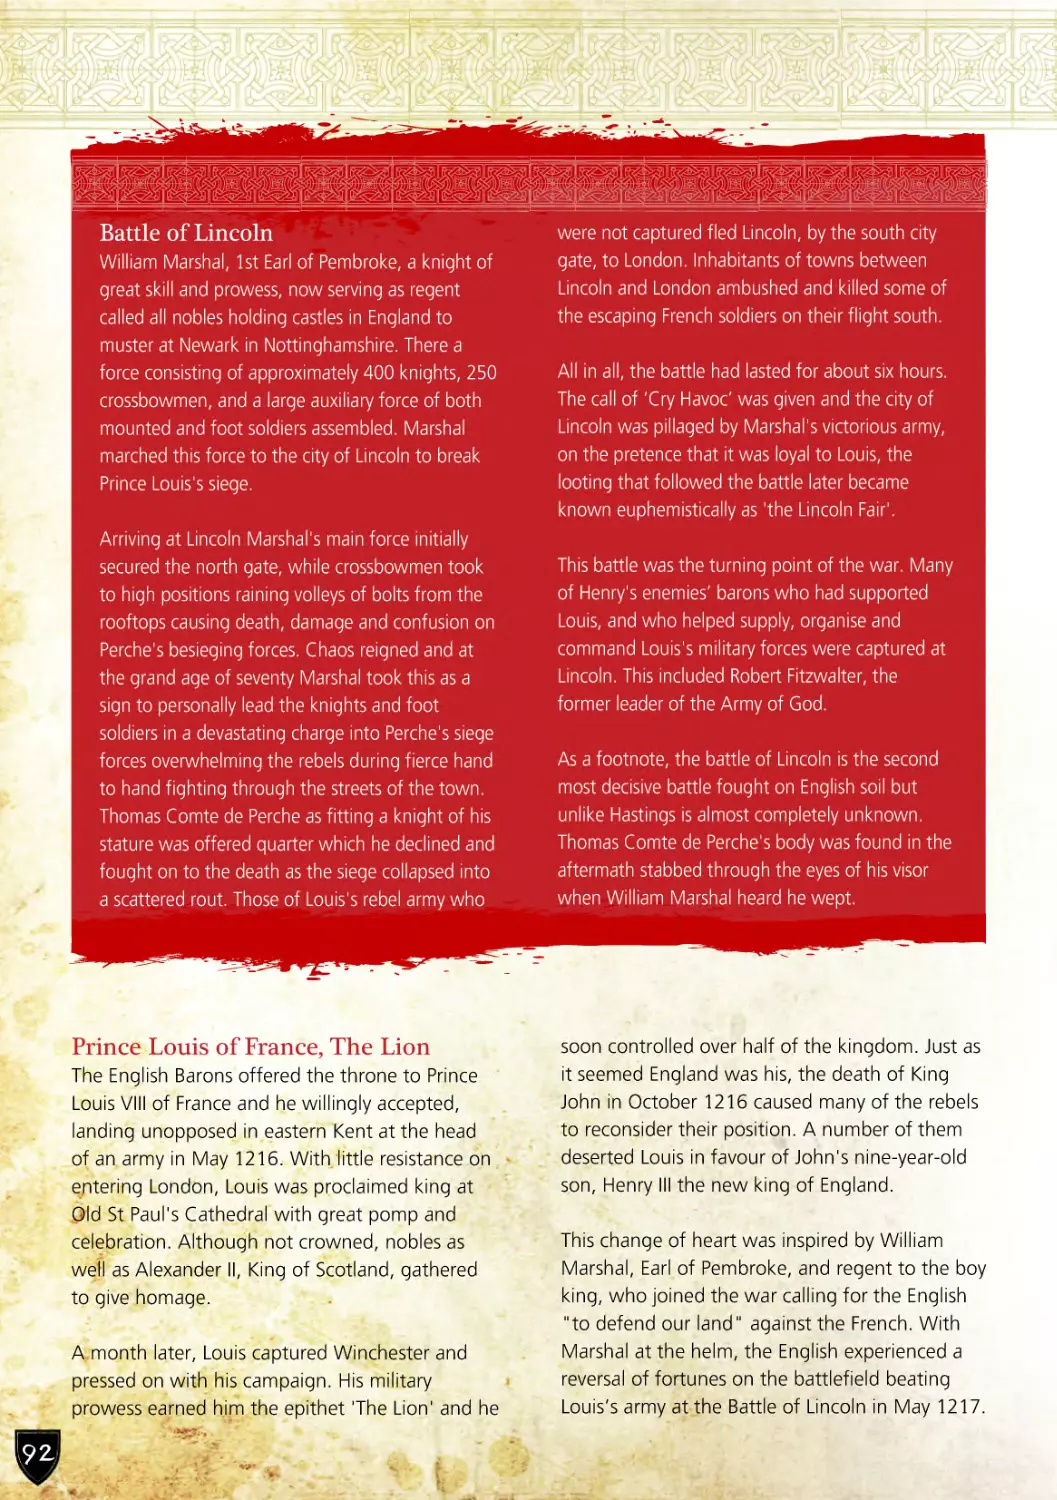
THE BARONS’ WAR
The First Barons' War provides the
background and inspiration for our
games. Civil wars mean the collapse of
law and order and provide the nobility
with the confidence to break the rules
without fear of reprisal. Not that they
were ever that conscientious about any
rules governing their behaviour. Each
noble was continuously on 'the make'
and paid 'lip service' to the higher
authorities, when it was advantageous
for them to do so.
A civil war was the perfect opportunity to grab
land and power while settling some old scores
along the way. This vying for land and power
hadn't stopped since the invasion of 1066 with
only the strongest of kings being able to keep
their nobles in check.
Our narrative focuses on small groups of warriors
brought together under a lord or baron to raid
and steal or defend land and property. With the
strong, wise, cunning and lucky aiming to rise
out of this civil strife in a better position than
when it started.
The First Barons’ War
The rules in this book are set against a backdrop
of a Civil War that lasted for two years, 1215-17,
as a result of the issuing of Magna Carta. The
Magna Carta was signed by King John under
duress as he used the time it bought him to try
and get the Barons under control. This did not
work which encouraged Prince Louis of France to
take his opportunity to place a claim to the
English throne through his marriage.
6
In the Kingdom of England by 1215, a group of
powerful barons of the North had reached
breaking point due to King John's despotic rule,
high taxes and failed leadership. These major
landowners decided to rebel and, initially led by
the Baron Robert Fitzwalter, they marched on
London calling themselves the 'Army of God'.
After the rebels successfully established London
as their base, King John wisely agreed to
negotiations and on June 15, 1215 at
Runnymede, a neutral site just outside of the city,
the Barons forced John to sign the Magna Carta.
This Great Charter was a document stating the
king was no longer above the law and not above
protecting the rights of the people. King John's
refusal to accept and abide by this agreement,
even though he had reluctantly put his seal to it
resulted in a civil war which escalated when the
rebels were later joined by a French army led by
Prince Louis of France.
After John's death in 1216 the war continued.
The ongoing ambitions of the French Crown
Prince to the English throne saw the war
dragging on. With John out of the way, many of
the rebels switching sides to join his son Henry.
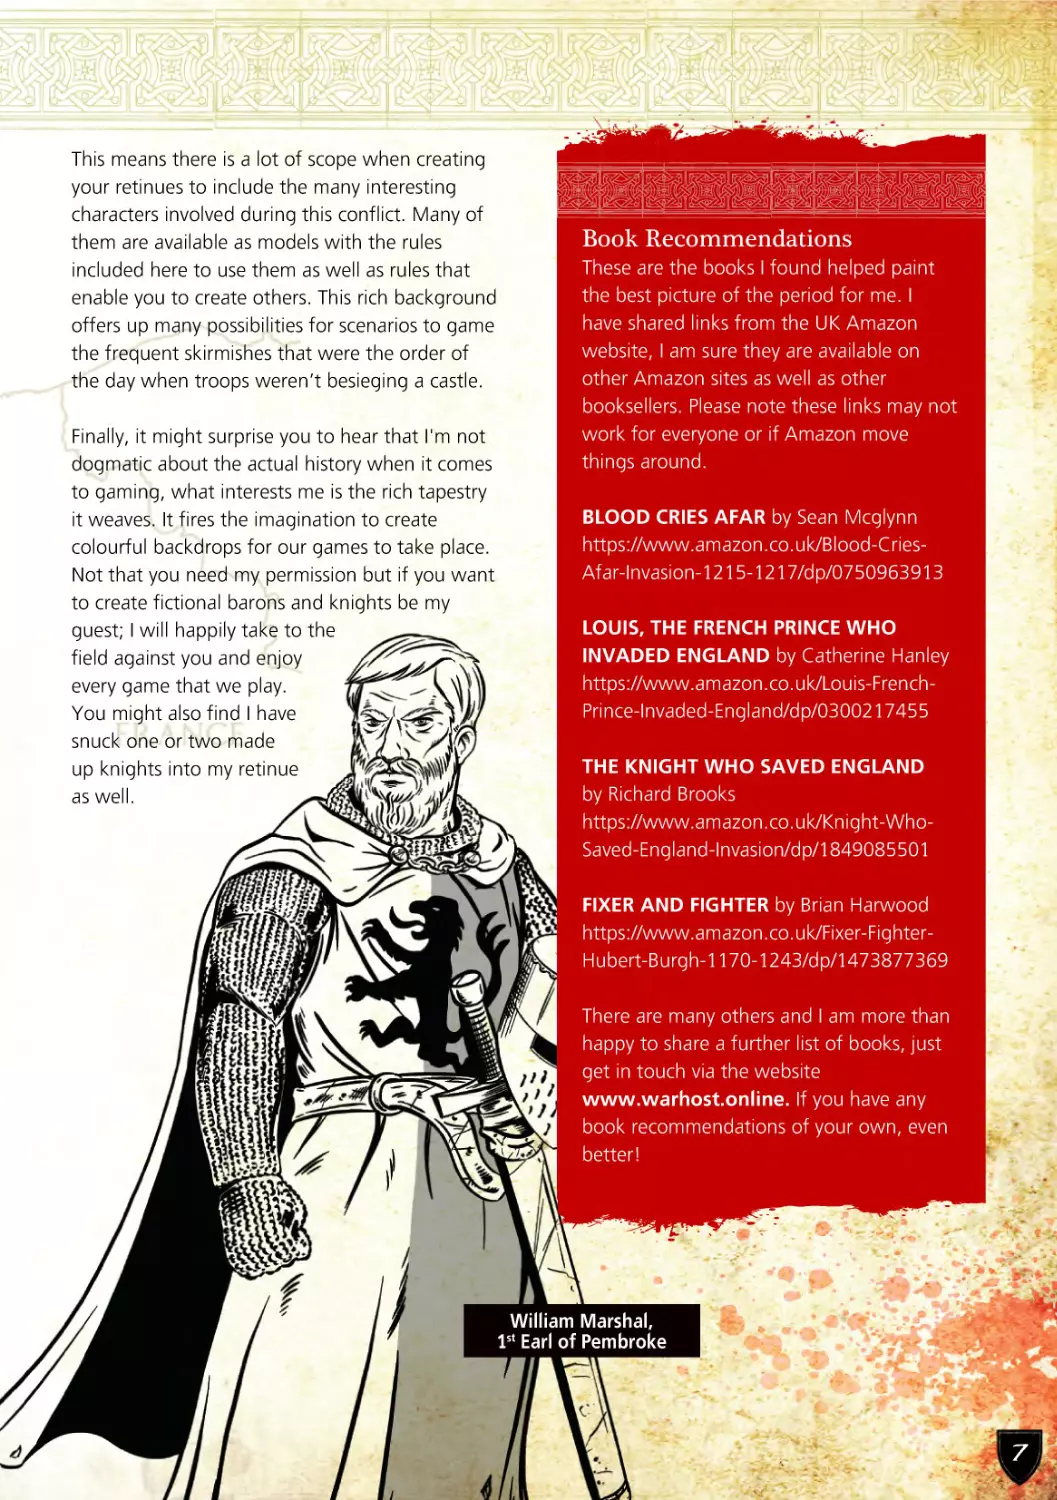
These loyalist forces were now led by his regent
and The Greatest Knight, William Marshal. The
war ended after French defeats at Lincoln, a
battle of equal importance to England’s history as
Hastings, and a final battle at Sandwich both
taking place during 1217. These crushing defeats
forced Louis, under William Marshal’s direction,
to sign the Treaty of Lambeth which formalised
the end of the civil war. The Prince agreed to
withdraw his claim to the English throne and the
departure of the French from English soil.
History tells us that by late 1216 a large majority
of the barons were in revolt with only the holders
of one quarter of the baronies and just under one
third of the greatest barons remaining loyal to
the King.
This means there is a lot of scope when creating
your retinues to include the many interesting
characters involved during this conflict. Many of
them are available as models with the rules
included here to use them as well as rules that
enable you to create others. This rich background
offers up many possibilities for scenarios to game
the frequent skirmishes that were the order of
the day when troops weren’t besieging a castle.
Finally, it might surprise you to hear that I'm not
dogmatic about the actual history when it comes
to gaming, what interests me is the rich tapestry
it weaves. It fires the imagination to create
colourful backdrops for our games to take place.
Not that you need my permission but if you want
to create fictional barons and knights be my
guest; I will happily take to the
field against you and enjoy
every game that we play.
You might also find I have
snuck one or two made
up knights into my retinue
as well.
Book Recommendations
These are the books I found helped paint
the best picture of the period for me. I
have shared links from the UK Amazon
website, I am sure they are available on
other Amazon sites as well as other
booksellers. Please note these links may not
work for everyone or if Amazon move
things around.
BLOOD CRIES AFAR by Sean Mcglynn
https://www.amazon.co.uk/Blood-CriesAfar-Invasion-1215-1217/dp/0750963913
LOUIS, THE FRENCH PRINCE WHO
INVADED ENGLAND by Catherine Hanley
https://www.amazon.co.uk/Louis-FrenchPrince-Invaded-England/dp/0300217455
THE KNIGHT WHO SAVED ENGLAND
by Richard Brooks
https://www.amazon.co.uk/Knight-WhoSaved-England-Invasion/dp/1849085501
FIXER AND FIGHTER by Brian Harwood
https://www.amazon.co.uk/Fixer-FighterHubert-Burgh-1170-1243/dp/1473877369
There are many others and I am more than
happy to share a further list of books, just
get in touch via the website
www.warhost.online. If you have any
book recommendations of your own, even
better!
William Marshal,
1st Earl of Pembroke
7
WHAT YOU NEED TO PLAY
Before we get started there are a few
things needed to play a game. This
section explains what you need and
why you will need them.
Miniatures
The Barons' War is a skirmish game designed to
be played using 28mm miniatures. You can play
with as few as 15 Warriors on each side to get
you started. As the rules are very flexible this
number can be increased to 40 or more Warriors
a side. The main difference being games with
more figures take longer than games with fewer.
Warriors are mounted on 25mm round bases for
infantry, or foot troops, and 25mm x 50mm pillshaped bases for cavalry, or mounted troops.
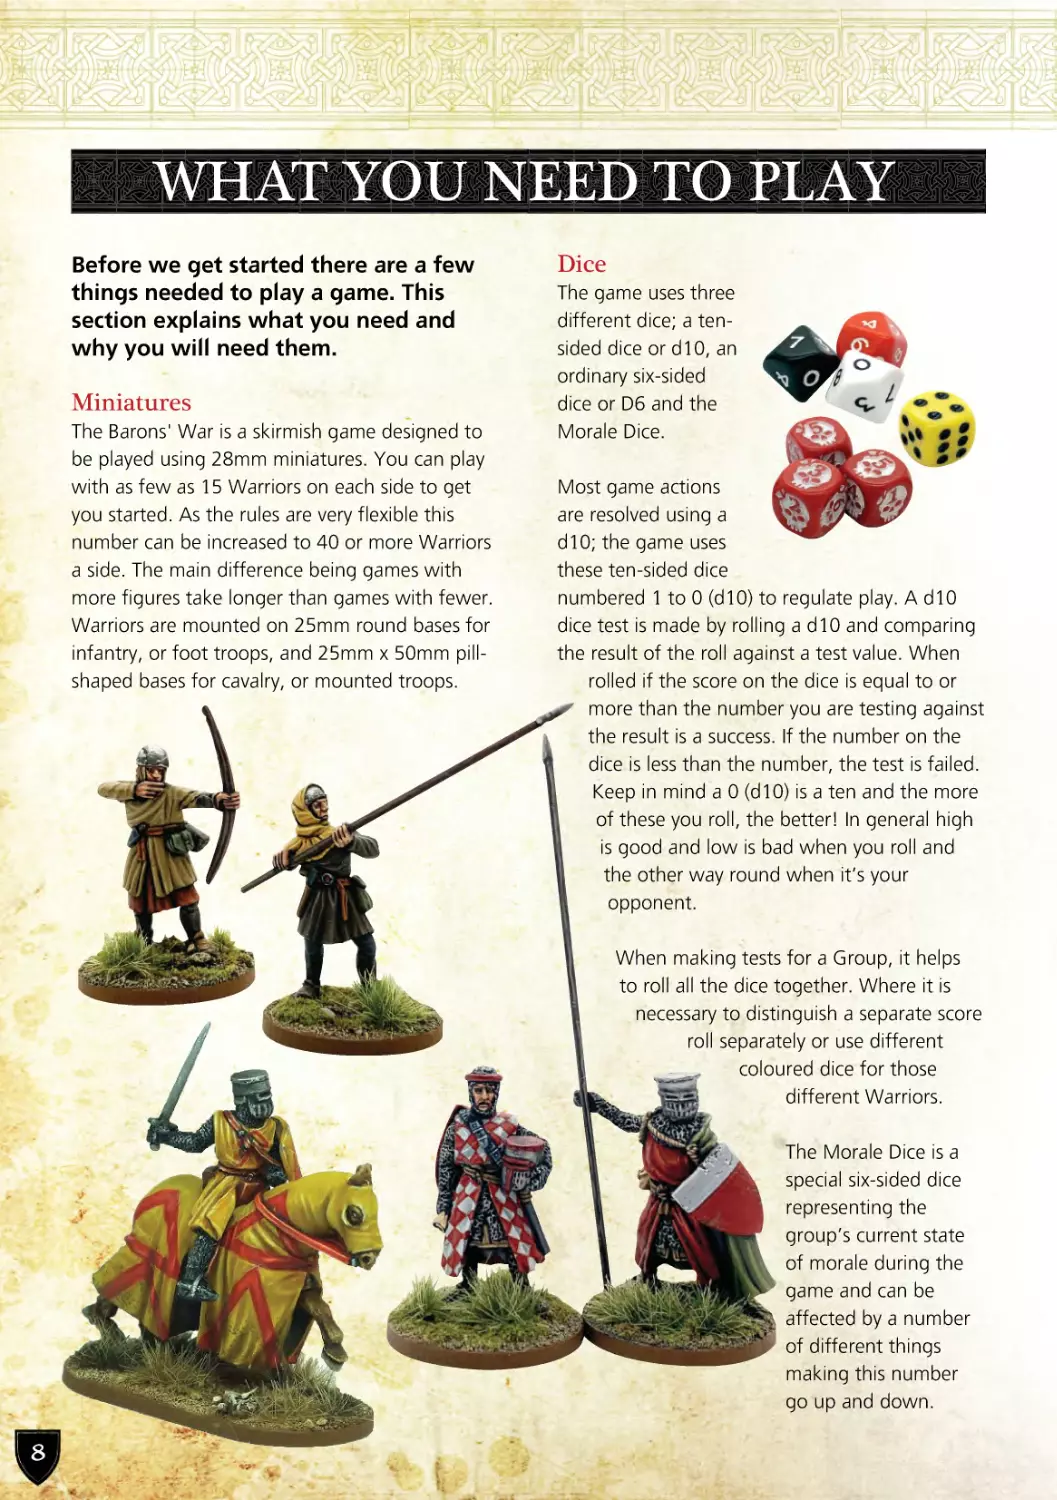
Dice
The game uses three
different dice; a tensided dice or d10, an
ordinary six-sided
dice or D6 and the
Morale Dice.
Most game actions
are resolved using a
d10; the game uses
these ten-sided dice
numbered 1 to 0 (d10) to regulate play. A d10
dice test is made by rolling a d10 and comparing
the result of the roll against a test value. When
rolled if the score on the dice is equal to or
more than the number you are testing against
the result is a success. If the number on the
dice is less than the number, the test is failed.
Keep in mind a 0 (d10) is a ten and the more
of these you roll, the better! In general high
is good and low is bad when you roll and
the other way round when it’s your
opponent.
When making tests for a Group, it helps
to roll all the dice together. Where it is
necessary to distinguish a separate score
roll separately or use different
coloured dice for those
different Warriors.
The Morale Dice is a
special six-sided dice
representing the
group’s current state
of morale during the
game and can be
affected by a number
of different things
making this number
go up and down.
8
The value can never be greater than 6 and if it
goes below 1 the dice is removed. The faces are
numbered from one to six and placed by your
Warriors on the tabletop so both players can view
it easily during play. However, if you both agree
they can be placed on the Group’s entry in your
Retinue List.
Measuring Device
The game is played out using inches, and both
players will need a measuring device such as a
tape measure to measure distances. These
measurements are for movement and shooting,
as well as measuring ranges for giving
Commands and other such Actions when
prompted.
The d6 is used primarily for Combat Move
Actions where you charge an opponent. Uses for
both the Morale Dice and the six-sided dice is
described in more detail in the relevant sections
of this book.
Players may measure distances on the tabletop at
any time during an action. Pre-measuring, in this
way, reflects your Warriors' experience and ability
to judge distances.
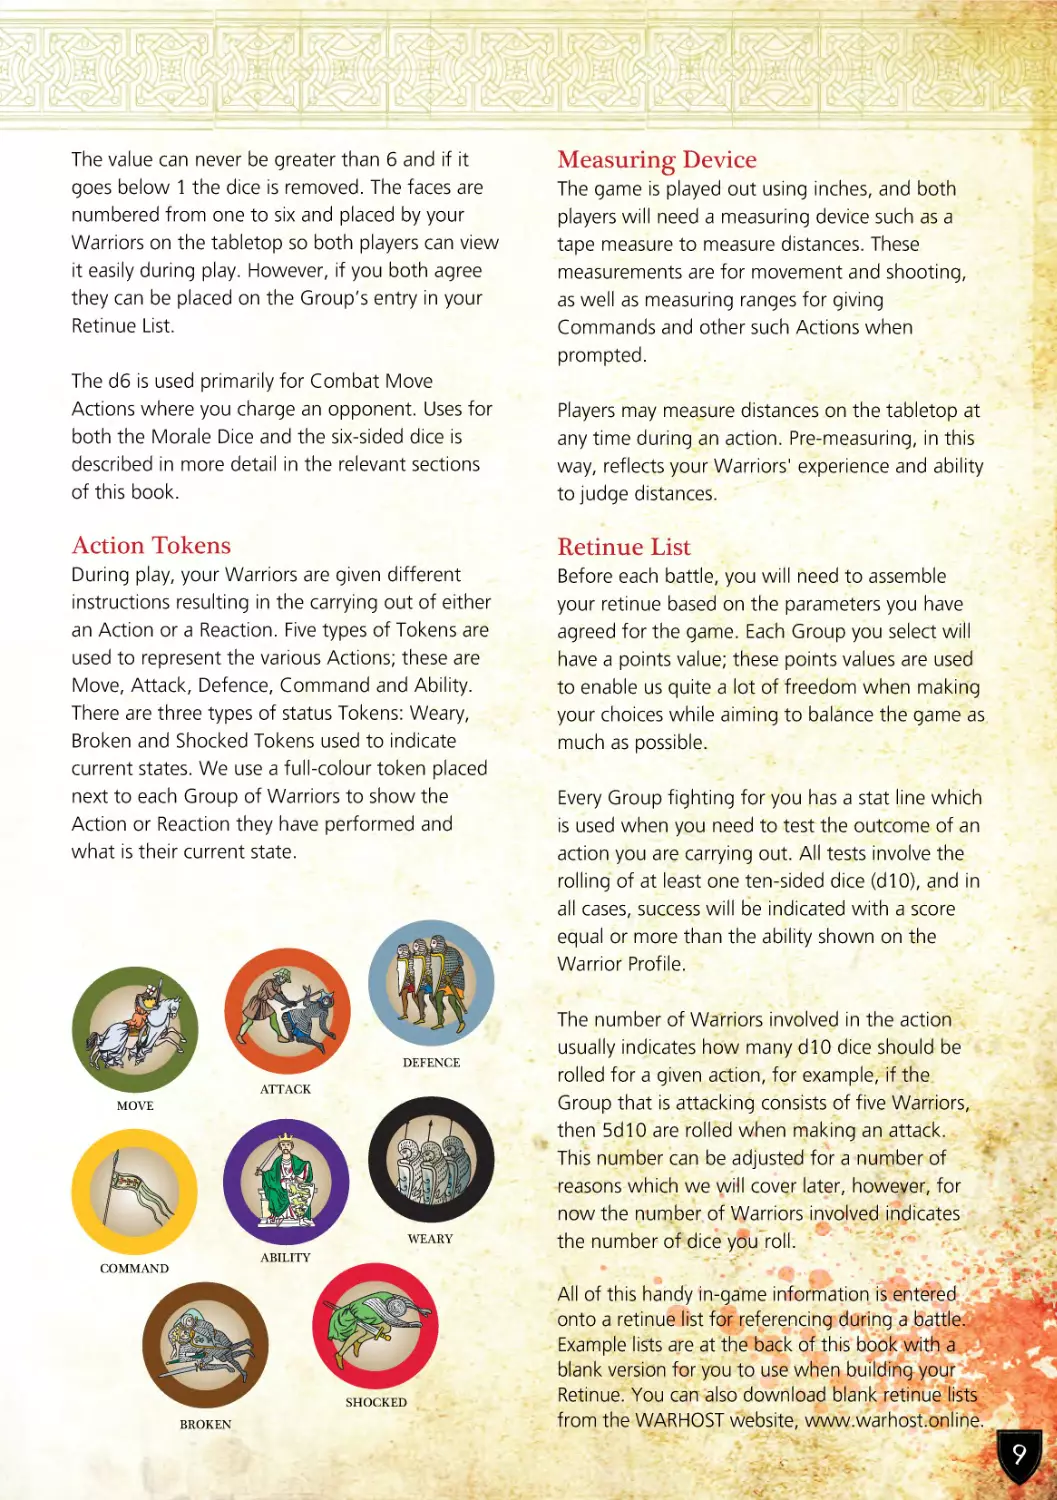
Action Tokens
Retinue List
During play, your Warriors are given different
instructions resulting in the carrying out of either
an Action or a Reaction. Five types of Tokens are
used to represent the various Actions; these are
Move, Attack, Defence, Command and Ability.
There are three types of status Tokens: Weary,
Broken and Shocked Tokens used to indicate
current states. We use a full-colour token placed
next to each Group of Warriors to show the
Action or Reaction they have performed and
what is their current state.
Before each battle, you will need to assemble
your retinue based on the parameters you have
agreed for the game. Each Group you select will
have a points value; these points values are used
to enable us quite a lot of freedom when making
your choices while aiming to balance the game as
much as possible.
DEFENCE
ATTACK
MOVE
WEARY
Every Group fighting for you has a stat line which
is used when you need to test the outcome of an
action you are carrying out. All tests involve the
rolling of at least one ten-sided dice (d10), and in
all cases, success will be indicated with a score
equal or more than the ability shown on the
Warrior Profile.
The number of Warriors involved in the action
usually indicates how many d10 dice should be
rolled for a given action, for example, if the
Group that is attacking consists of five Warriors,
then 5d10 are rolled when making an attack.
This number can be adjusted for a number of
reasons which we will cover later, however, for
now the number of Warriors involved indicates
the number of dice you roll.
ABILITY
COMMAND
SHOCKED
BROKEN
All of this handy in-game information is entered
onto a retinue list for referencing during a battle.
Example lists are at the back of this book with a
blank version for you to use when building your
Retinue. You can also download blank retinue lists
from the WARHOST website, www.warhost.online.
9
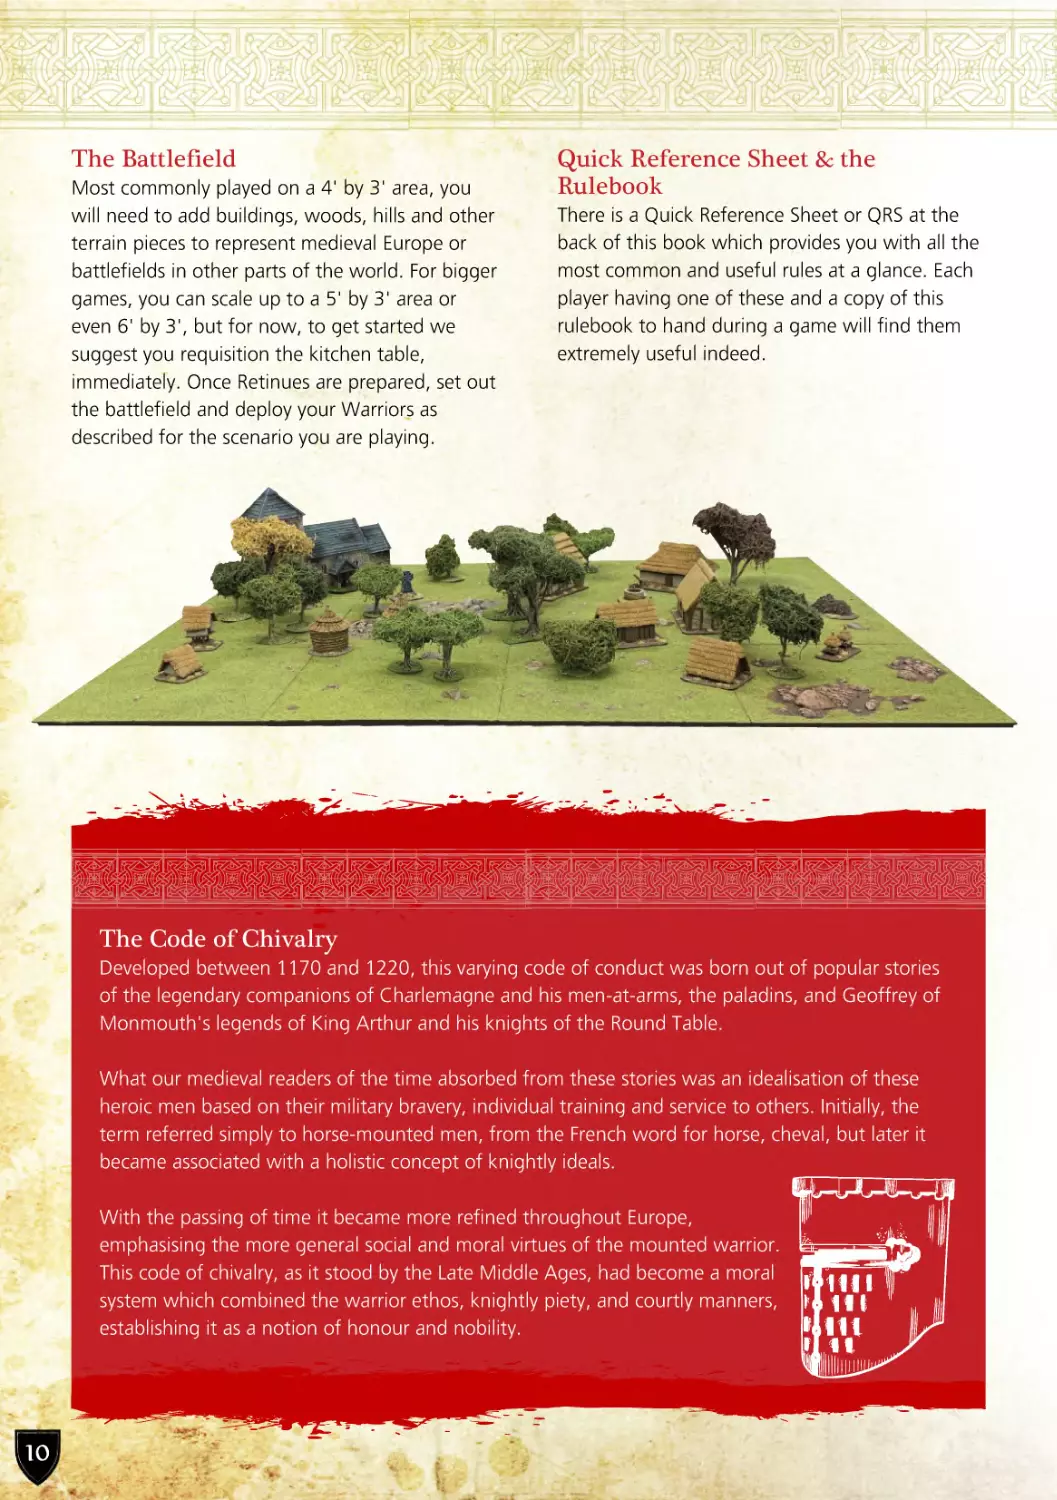
The Battlefield
Most commonly played on a 4' by 3' area, you
will need to add buildings, woods, hills and other
terrain pieces to represent medieval Europe or
battlefields in other parts of the world. For bigger
games, you can scale up to a 5' by 3' area or
even 6' by 3', but for now, to get started we
suggest you requisition the kitchen table,
immediately. Once Retinues are prepared, set out
the battlefield and deploy your Warriors as
described for the scenario you are playing.
Quick Reference Sheet & the
Rulebook
There is a Quick Reference Sheet or QRS at the
back of this book which provides you with all the
most common and useful rules at a glance. Each
player having one of these and a copy of this
rulebook to hand during a game will find them
extremely useful indeed.
The Code of Chivalry
Developed between 1170 and 1220, this varying code of conduct was born out of popular stories
of the legendary companions of Charlemagne and his men-at-arms, the paladins, and Geoffrey of
Monmouth's legends of King Arthur and his knights of the Round Table.
What our medieval readers of the time absorbed from these stories was an idealisation of these
heroic men based on their military bravery, individual training and service to others. Initially, the
term referred simply to horse-mounted men, from the French word for horse, cheval, but later it
became associated with a holistic concept of knightly ideals.
With the passing of time it became more refined throughout Europe,
emphasising the more general social and moral virtues of the mounted warrior.
This code of chivalry, as it stood by the Late Middle Ages, had become a moral
system which combined the warrior ethos, knightly piety, and courtly manners,
establishing it as a notion of honour and nobility.
10
GENERAL PRINCIPLES & RULE CONVENTIONS
There are ten key principles that drive
The Barons’ War. The principles drive
the main mechanics and philosophy of
the game. Establishing them up front
will provide a good basis for the rules
and for gameplay. They are important.
10 Key Principles
1
2
3
4
5
6
7
8
9
10
All measurements are in inches and
distances can be checked at any time.
Each figure represents one warrior
representing one dice.
There is no group facing.
Distances measured between groups
of warriors are measured from your
closest warrior with line of sight to the
closest visible enemy warrior.
Line of Sight is always drawn from the
centre of a warrior’s base to the centre
of another warrior’s base
When attacking you must target the
nearest visible Group. Passing a Morale
Check, or an ability, allows you to
choose another target.
Separate Groups must always be 1”
apart unless engaged in melee,
including the initial charge. This
applies to friends and foes.
When rolling dice high numbers are
good, low numbers are bad. Natural
dice rolls of ‘1’ always fail and a ‘0’
always succeeds.
Round all fractions up.
Use good sense if you cannot agree
during a game, roll a dice with the
player who rolls the highest deciding
the outcome for now and consult the
rules once the game has finished.
The rest of this section covers other general
principles, some of which will touch on the list
above as well as introducing and clarifying
others. These general principles can be affected
by specific rules, abilities, and situations; where
this happens, it will be clearly indicated.
Basing
Infantry should be based on 25mm round bases
and Cavalry should be based on 50mm x 25mm
pill bases. This is not to say other base sizes are
not allowed but they will impact the game and
the interactions between Groups.
Measuring Distances
All distances are measured in inches from a
Warrior’s base edge. Pre-measuring is allowed,
and you may pre-measure as many times as you
wish during your turn. After measuring for an
Action, you may change your mind and choose
another Action. However, once you start an
Action you may not stop and change for another.
All measurements between Warriors are
performed from the closest base edge to closest
base edge in all instances. This covers shooting,
charging, Group Coherency as well as measuring
for the effectiveness of abilities such as issuing a
Command.
Dice
During a game, outcomes are determined by the
roll of a dice, or lots of dice! The majority of your
dice rolls will use ten-sided dice or d10 as they
are known. When multiple dice are needed they
will be referred to using shorthand; three tensided dice is 3d10, five dice would be 5d10.
There are a number of things you need to know
for dice rolling in The Barons’ War.
Rolling Dice
You should always roll your dice where your
opponent can see them. Not only does this
promote openness it adds a little drama into the
game; whether that is the look of horror on your
11
opponent’s face as you roll well or the look of
glee on their face as you roll badly! Dice don’t
always land flat, known as a cocked dice, so
where there is any doubt of the score shown the
dice must be re-rolled. Both players should agree
to the re-roll; be fair and honest. Any dice that
escape the table and end up on the floor does
not count and must be re-rolled. Feel free to
curse the dice gods as the 0 you needed is shown
on the floor.
Modifying Dice Rolls
During a game dice rolls have modifiers applied
due to situations that unfold during the battle.
The most common cause of this is attacking a
Group of Warriors in terrain; these Warriors
receive a defence bonus. Or they are using a
particular weapon that grants an attack bonus. In
these instances, the modifier is applied to each
affected dice roll.
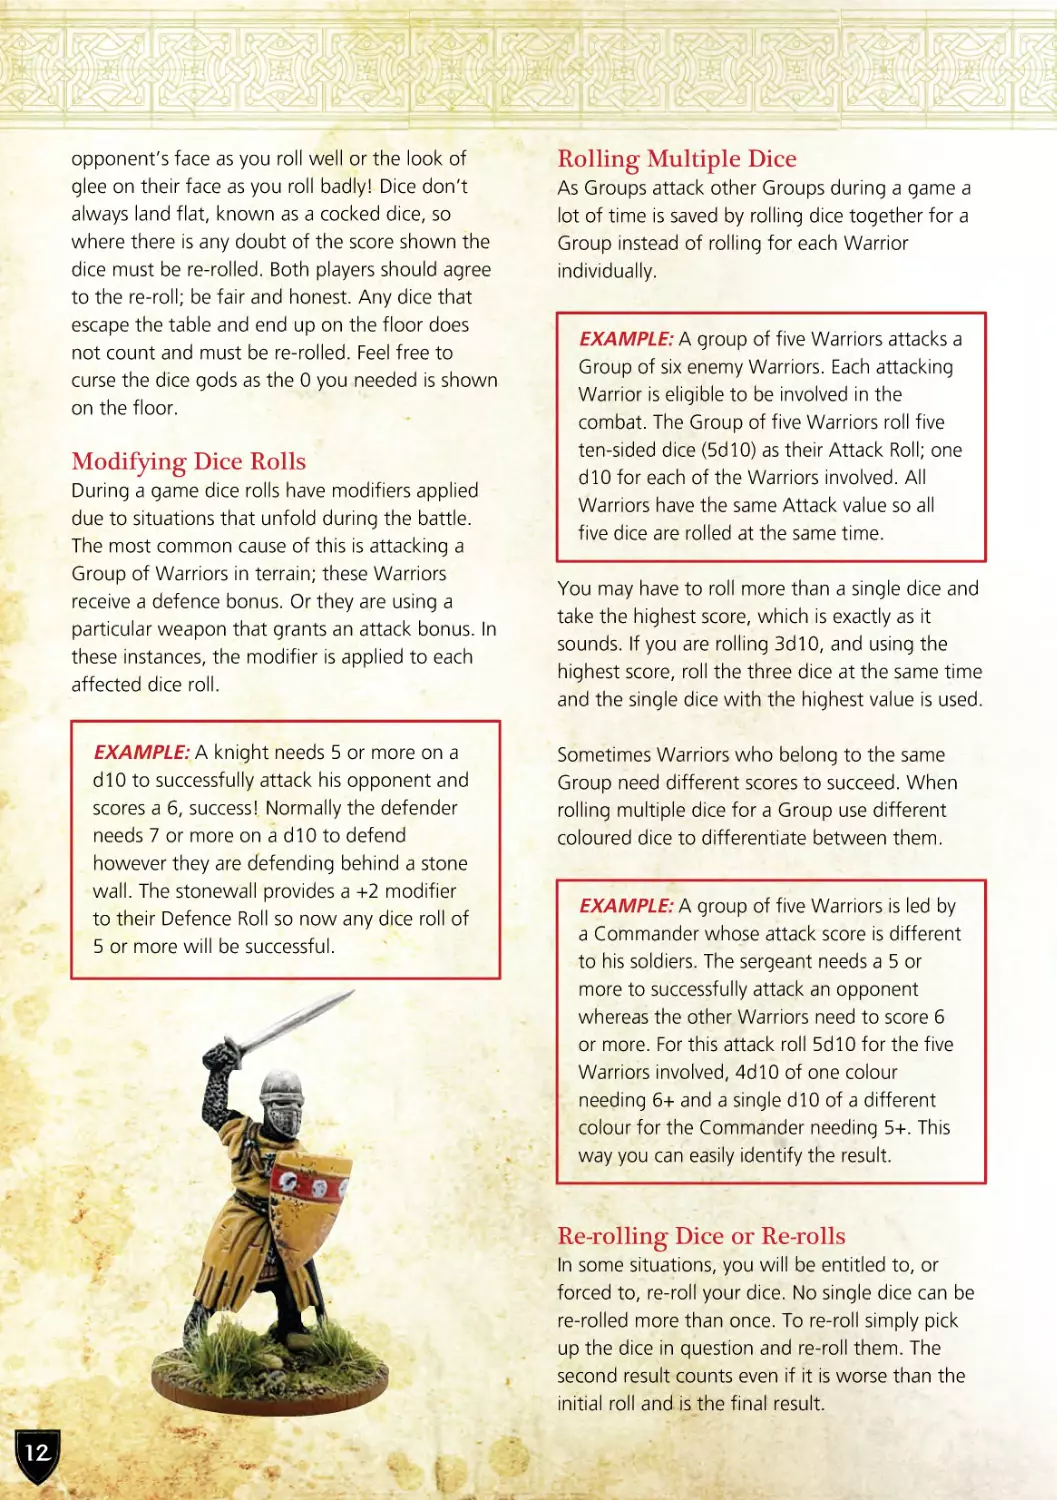
EXAMPLE: A knight needs 5 or more on a
d10 to successfully attack his opponent and
scores a 6, success! Normally the defender
needs 7 or more on a d10 to defend
however they are defending behind a stone
wall. The stonewall provides a +2 modifier
to their Defence Roll so now any dice roll of
5 or more will be successful.
Rolling Multiple Dice
As Groups attack other Groups during a game a
lot of time is saved by rolling dice together for a
Group instead of rolling for each Warrior
individually.
EXAMPLE: A group of five Warriors attacks a
Group of six enemy Warriors. Each attacking
Warrior is eligible to be involved in the
combat. The Group of five Warriors roll five
ten-sided dice (5d10) as their Attack Roll; one
d10 for each of the Warriors involved. All
Warriors have the same Attack value so all
five dice are rolled at the same time.
You may have to roll more than a single dice and
take the highest score, which is exactly as it
sounds. If you are rolling 3d10, and using the
highest score, roll the three dice at the same time
and the single dice with the highest value is used.
Sometimes Warriors who belong to the same
Group need different scores to succeed. When
rolling multiple dice for a Group use different
coloured dice to differentiate between them.
EXAMPLE: A group of five Warriors is led by
a Commander whose attack score is different
to his soldiers. The sergeant needs a 5 or
more to successfully attack an opponent
whereas the other Warriors need to score 6
or more. For this attack roll 5d10 for the five
Warriors involved, 4d10 of one colour
needing 6+ and a single d10 of a different
colour for the Commander needing 5+. This
way you can easily identify the result.
Re-rolling Dice or Re-rolls
In some situations, you will be entitled to, or
forced to, re-roll your dice. No single dice can be
re-rolled more than once. To re-roll simply pick
up the dice in question and re-roll them. The
second result counts even if it is worse than the
initial roll and is the final result.
12
Roll Off
Players will be required to roll off against each
other, such as for who has initiative each round.
Each player rolls a d10 the player who rolls the
highest value wins. In the event of a tie, the roll is
carried out again until one player wins. Any
modifiers apply to all rolls.
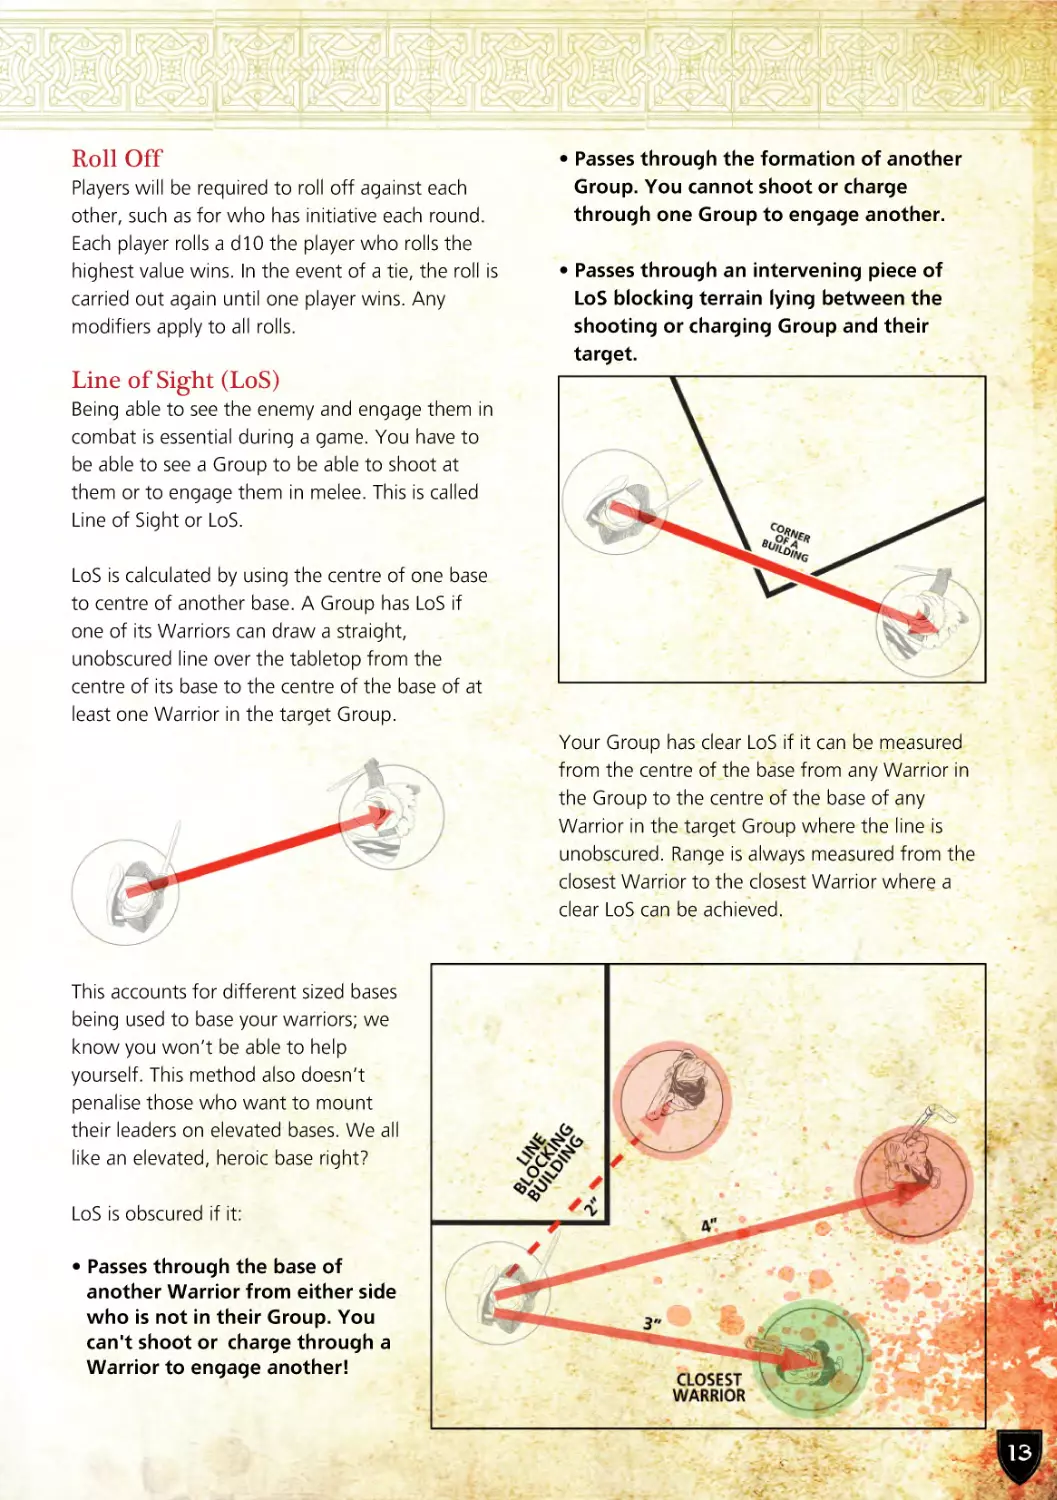
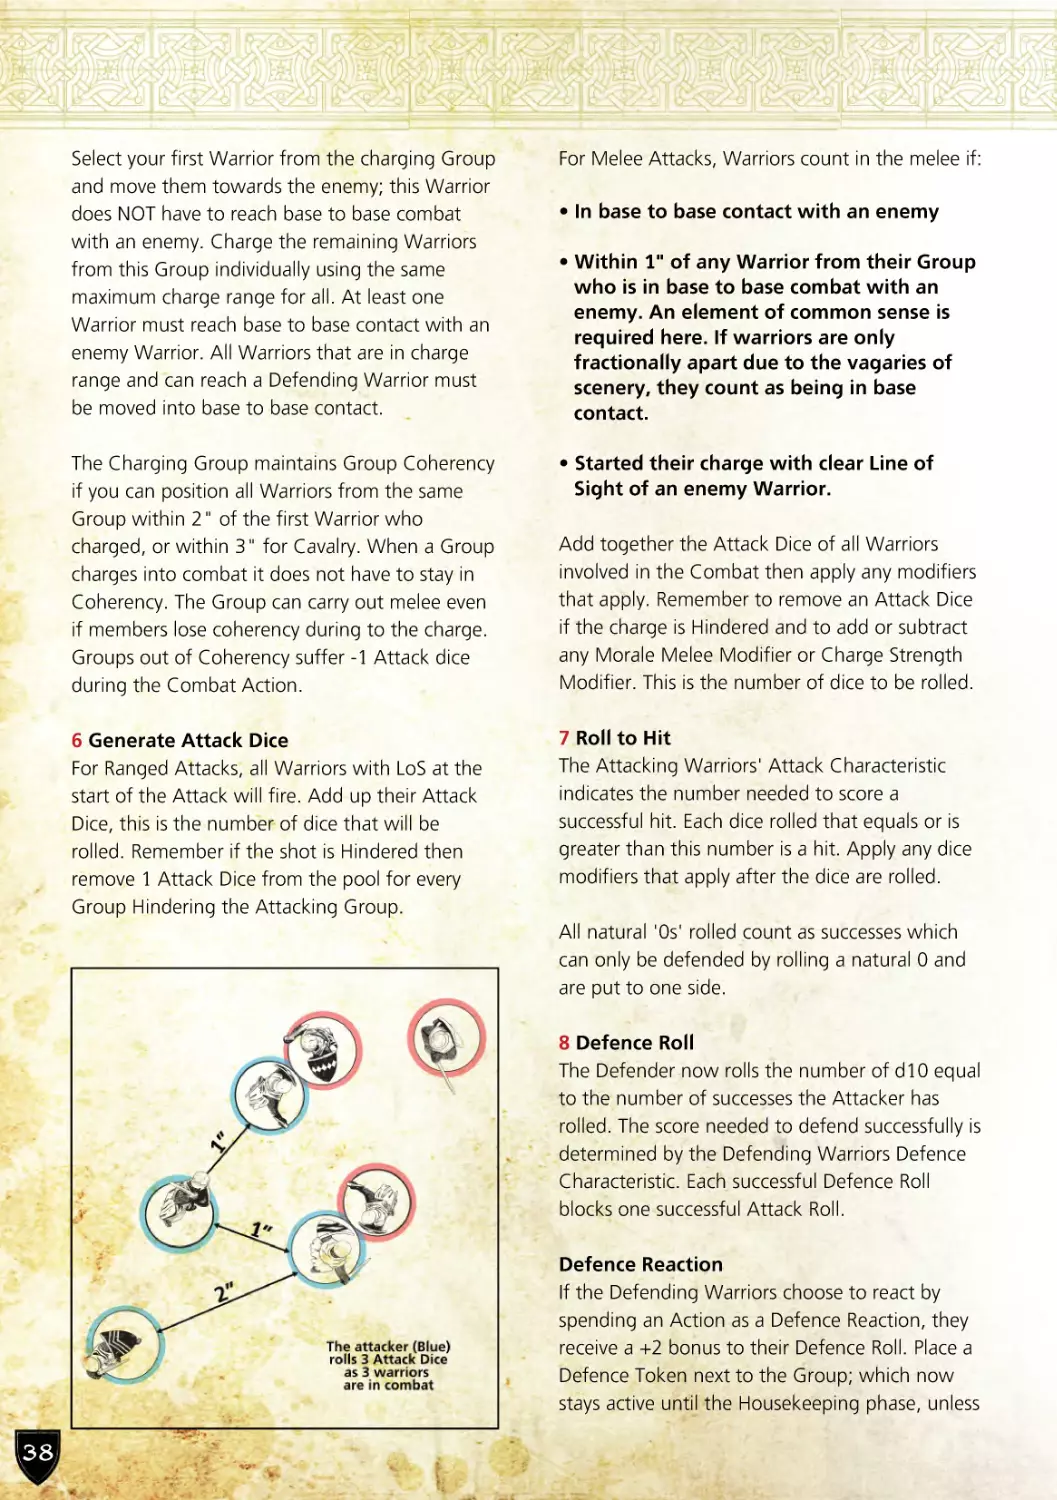
• Passes through the formation of another
Group. You cannot shoot or charge
through one Group to engage another.
• Passes through an intervening piece of
LoS blocking terrain lying between the
shooting or charging Group and their
target.
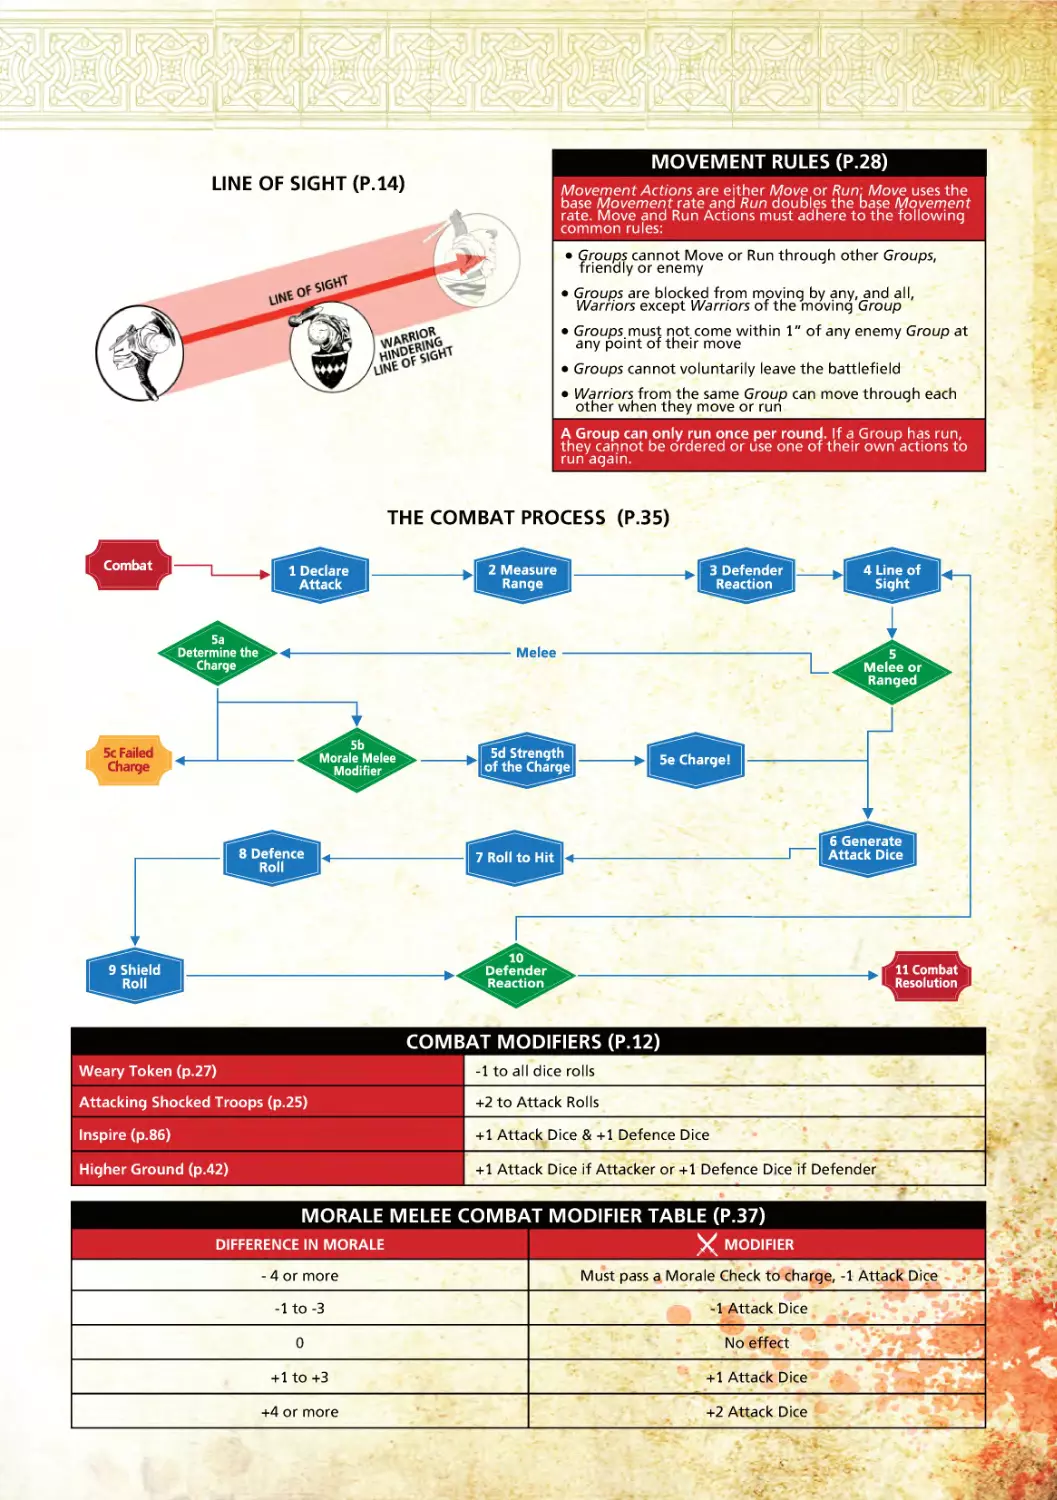
Line of Sight (LoS)
Being able to see the enemy and engage them in
combat is essential during a game. You have to
be able to see a Group to be able to shoot at
them or to engage them in melee. This is called
Line of Sight or LoS.
LoS is calculated by using the centre of one base
to centre of another base. A Group has LoS if
one of its Warriors can draw a straight,
unobscured line over the tabletop from the
centre of its base to the centre of the base of at
least one Warrior in the target Group.
Your Group has clear LoS if it can be measured
from the centre of the base from any Warrior in
the Group to the centre of the base of any
Warrior in the target Group where the line is
unobscured. Range is always measured from the
closest Warrior to the closest Warrior where a
clear LoS can be achieved.
This accounts for different sized bases
being used to base your warriors; we
know you won’t be able to help
yourself. This method also doesn’t
penalise those who want to mount
their leaders on elevated bases. We all
like an elevated, heroic base right?
LoS is obscured if it:
• Passes through the base of
another Warrior from either side
who is not in their Group. You
can't shoot or charge through a
Warrior to engage another!
13
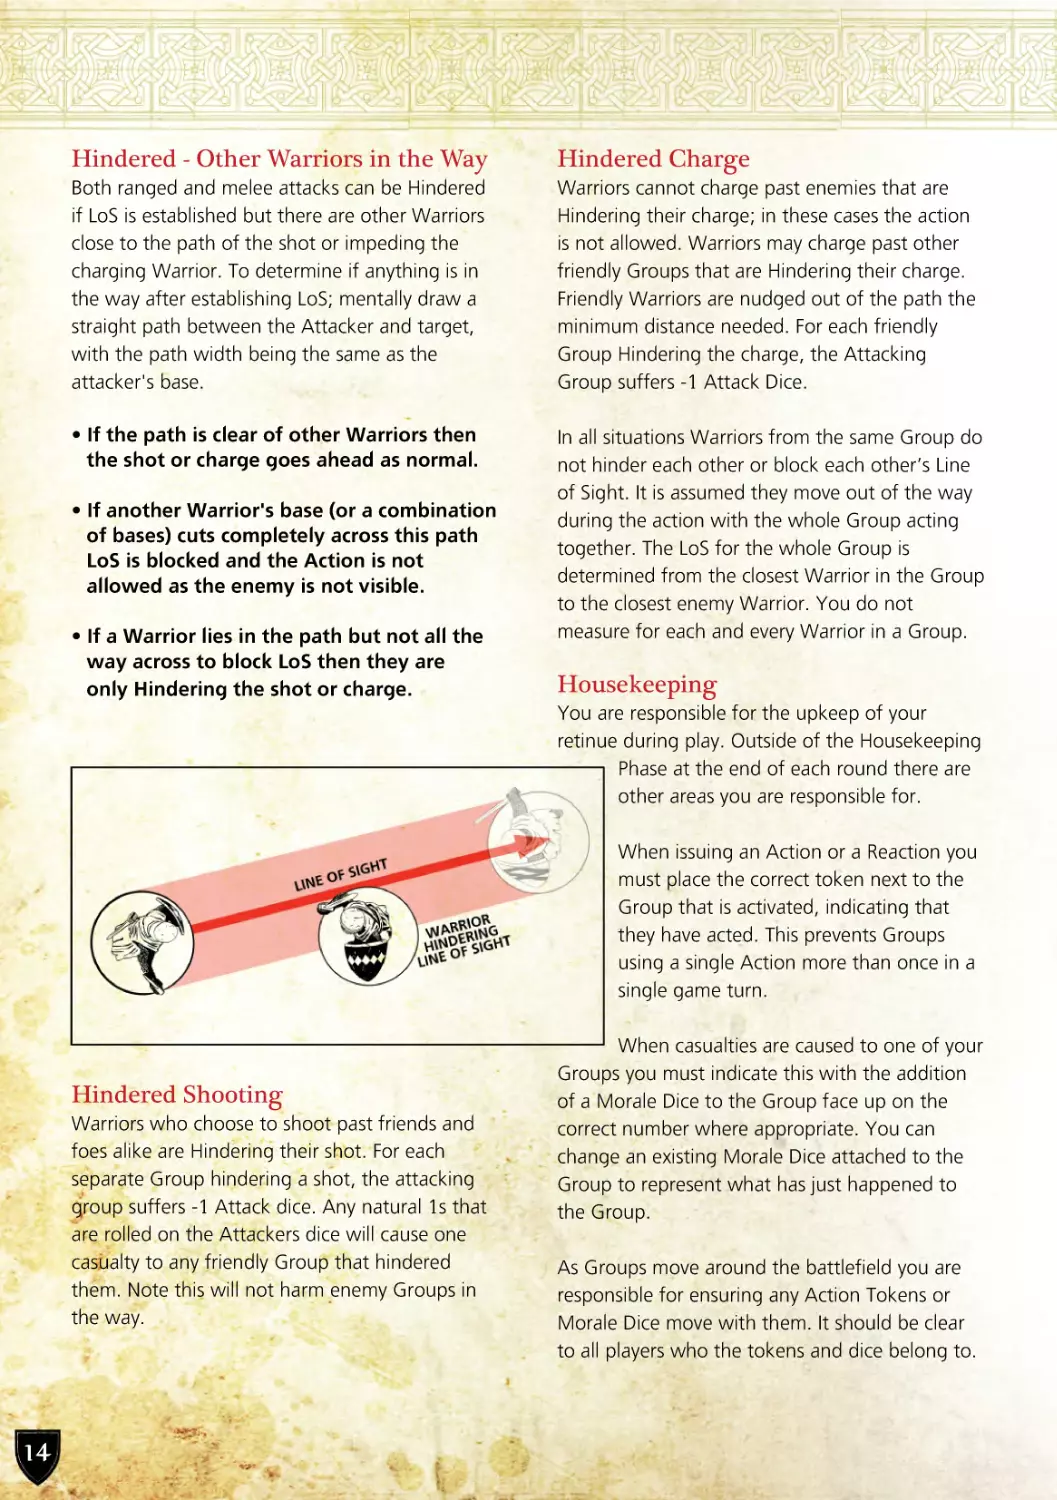
Hindered - Other Warriors in the Way
Hindered Charge
Both ranged and melee attacks can be Hindered
if LoS is established but there are other Warriors
close to the path of the shot or impeding the
charging Warrior. To determine if anything is in
the way after establishing LoS; mentally draw a
straight path between the Attacker and target,
with the path width being the same as the
attacker's base.
Warriors cannot charge past enemies that are
Hindering their charge; in these cases the action
is not allowed. Warriors may charge past other
friendly Groups that are Hindering their charge.
Friendly Warriors are nudged out of the path the
minimum distance needed. For each friendly
Group Hindering the charge, the Attacking
Group suffers -1 Attack Dice.
• If the path is clear of other Warriors then
the shot or charge goes ahead as normal.
In all situations Warriors from the same Group do
not hinder each other or block each other’s Line
of Sight. It is assumed they move out of the way
during the action with the whole Group acting
together. The LoS for the whole Group is
determined from the closest Warrior in the Group
to the closest enemy Warrior. You do not
measure for each and every Warrior in a Group.
• If another Warrior's base (or a combination
of bases) cuts completely across this path
LoS is blocked and the Action is not
allowed as the enemy is not visible.
• If a Warrior lies in the path but not all the
way across to block LoS then they are
only Hindering the shot or charge.
Housekeeping
You are responsible for the upkeep of your
retinue during play. Outside of the Housekeeping
Phase at the end of each round there are
other areas you are responsible for.
When issuing an Action or a Reaction you
must place the correct token next to the
Group that is activated, indicating that
they have acted. This prevents Groups
using a single Action more than once in a
single game turn.
Hindered Shooting
Warriors who choose to shoot past friends and
foes alike are Hindering their shot. For each
separate Group hindering a shot, the attacking
group suffers -1 Attack dice. Any natural 1s that
are rolled on the Attackers dice will cause one
casualty to any friendly Group that hindered
them. Note this will not harm enemy Groups in
the way.
14
When casualties are caused to one of your
Groups you must indicate this with the addition
of a Morale Dice to the Group face up on the
correct number where appropriate. You can
change an existing Morale Dice attached to the
Group to represent what has just happened to
the Group.
As Groups move around the battlefield you are
responsible for ensuring any Action Tokens or
Morale Dice move with them. It should be clear
to all players who the tokens and dice belong to.
You are responsible for making sure that each
individual Group stays at least 1” apart from all
other Groups, friend or foe. The only exception to
this rule are Groups involved in Melee.
All Action Tokens are removed at the end of a
round where applicable and returned to each
player.
All Morale Dice remain in play and adjusted if
applicable before the next round begins. If an
Action Token is missed and not removed during
Housekeeping the group is counted as already
activated in the following round due to 'fog of
war'.
Each player is responsible for their own tokens
and dice!
15
MINIATURE WARRIORS & THEIR GROUPS
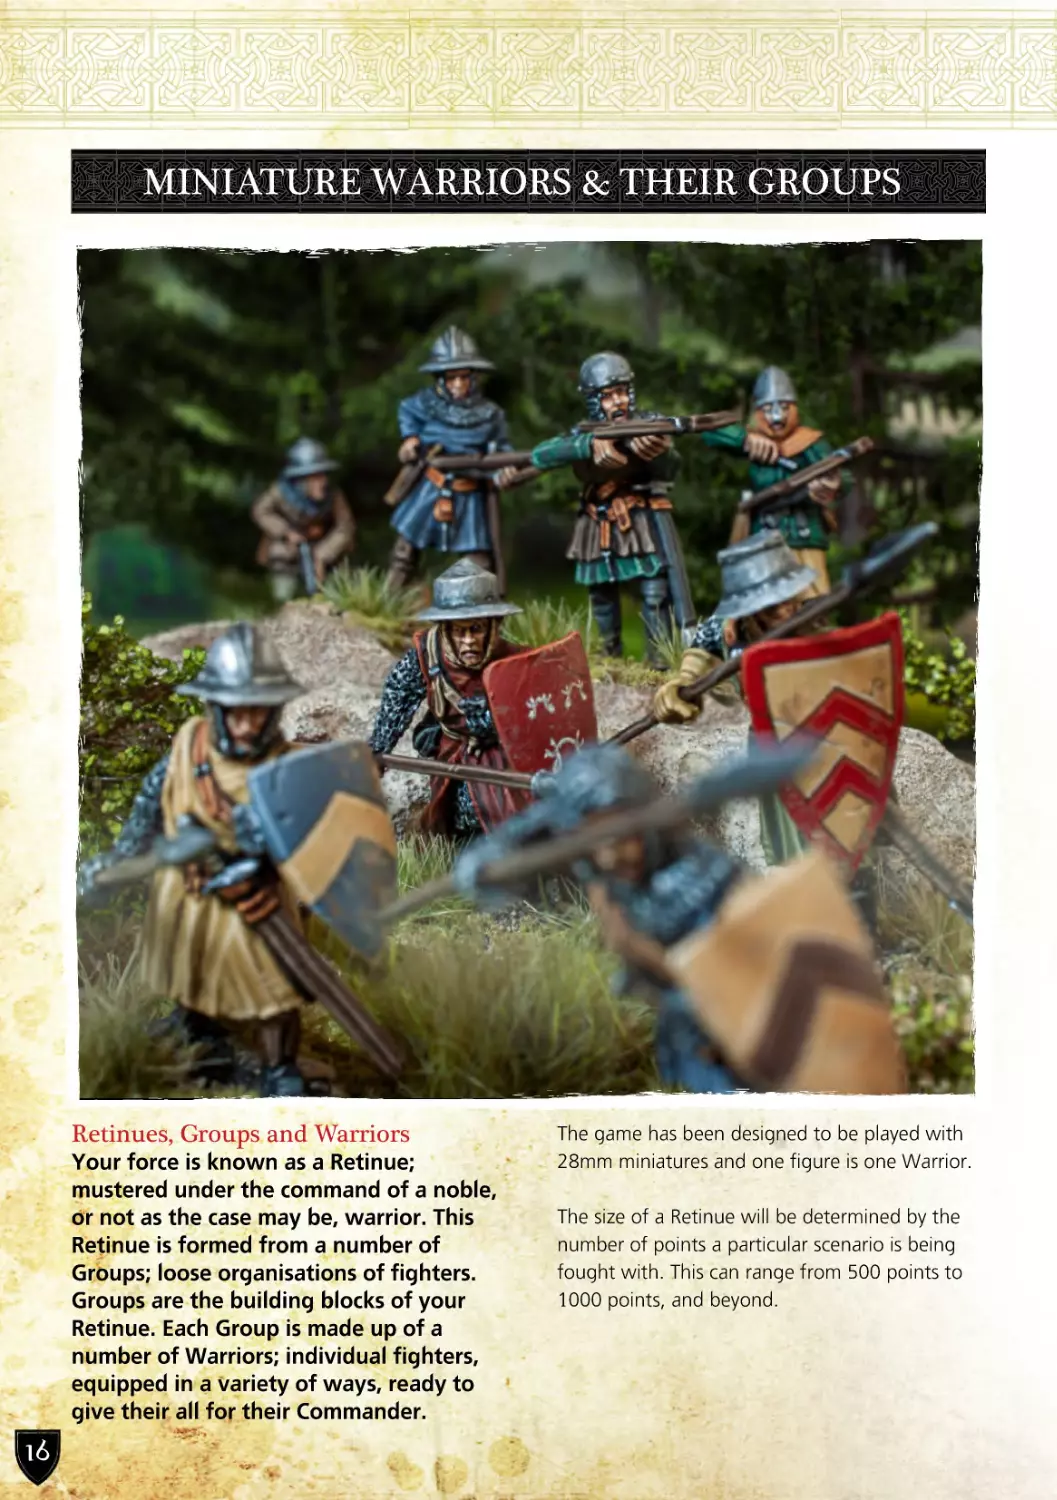
Retinues, Groups and Warriors
16
Your force is known as a Retinue;
mustered under the command of a noble,
or not as the case may be, warrior. This
Retinue is formed from a number of
Groups; loose organisations of fighters.
Groups are the building blocks of your
Retinue. Each Group is made up of a
number of Warriors; individual fighters,
equipped in a variety of ways, ready to
give their all for their Commander.
The game has been designed to be played with
28mm miniatures and one figure is one Warrior.
The size of a Retinue will be determined by the
number of points a particular scenario is being
fought with. This can range from 500 points to
1000 points, and beyond.
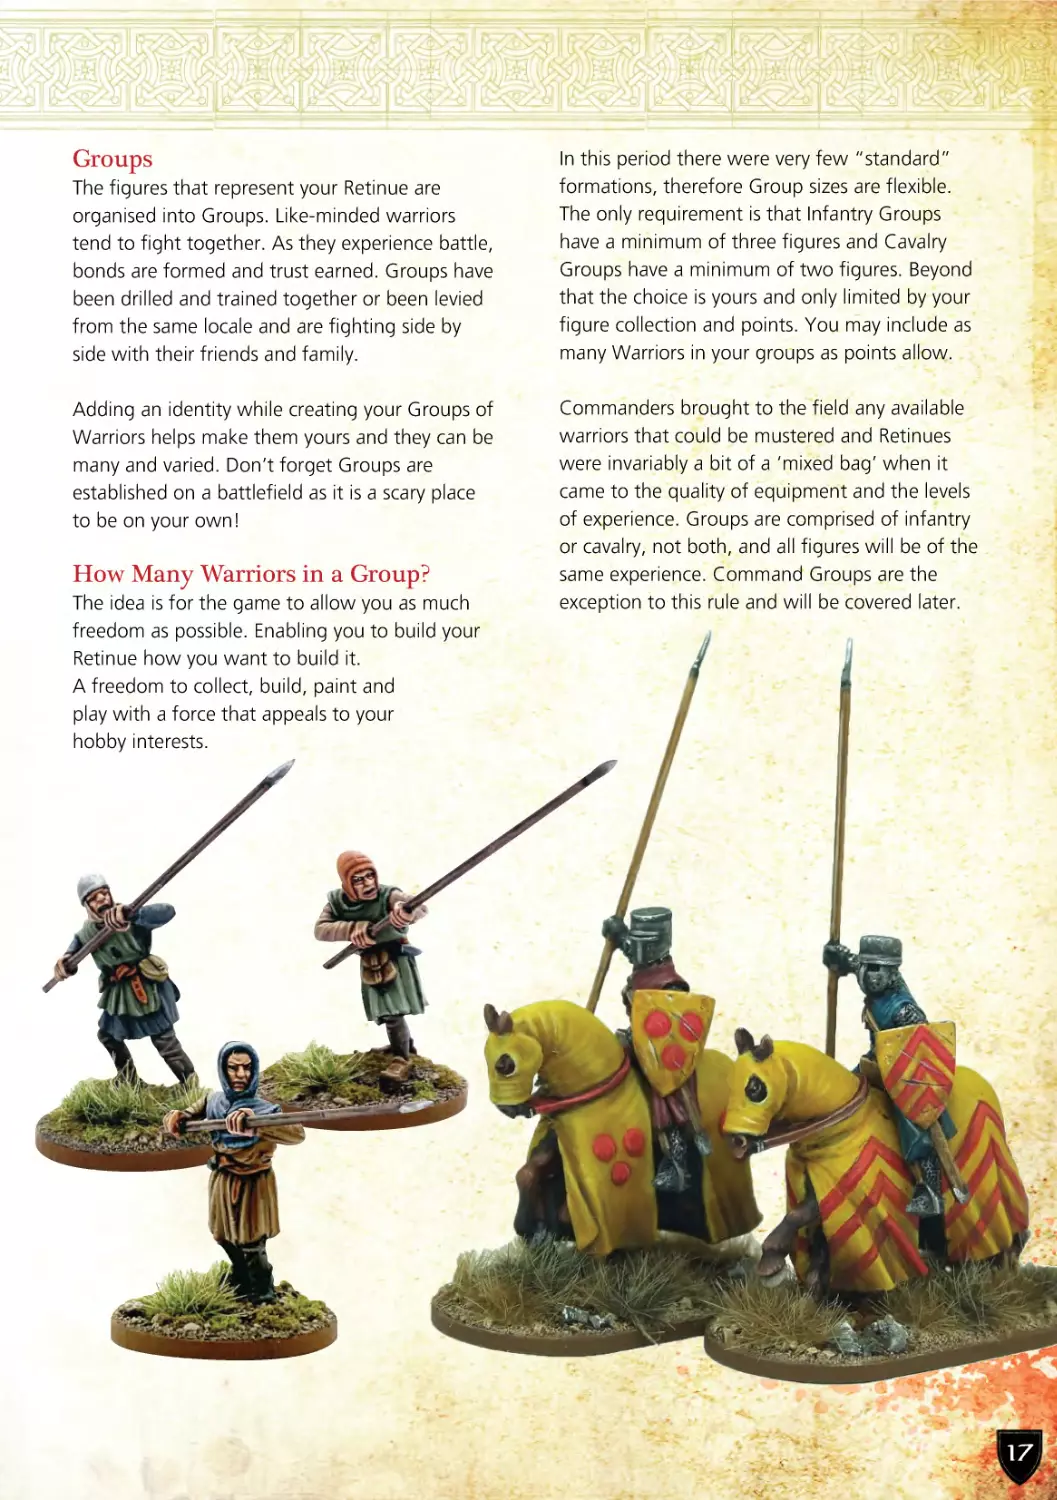
Groups
The figures that represent your Retinue are
organised into Groups. Like-minded warriors
tend to fight together. As they experience battle,
bonds are formed and trust earned. Groups have
been drilled and trained together or been levied
from the same locale and are fighting side by
side with their friends and family.
Adding an identity while creating your Groups of
Warriors helps make them yours and they can be
many and varied. Don’t forget Groups are
established on a battlefield as it is a scary place
to be on your own!
How Many Warriors in a Group?
The idea is for the game to allow you as much
freedom as possible. Enabling you to build your
Retinue how you want to build it.
A freedom to collect, build, paint and
play with a force that appeals to your
hobby interests.
In this period there were very few “standard”
formations, therefore Group sizes are flexible.
The only requirement is that Infantry Groups
have a minimum of three figures and Cavalry
Groups have a minimum of two figures. Beyond
that the choice is yours and only limited by your
figure collection and points. You may include as
many Warriors in your groups as points allow.
Commanders brought to the field any available
warriors that could be mustered and Retinues
were invariably a bit of a ‘mixed bag’ when it
came to the quality of equipment and the levels
of experience. Groups are comprised of infantry
or cavalry, not both, and all figures will be of the
same experience. Command Groups are the
exception to this rule and will be covered later.
17
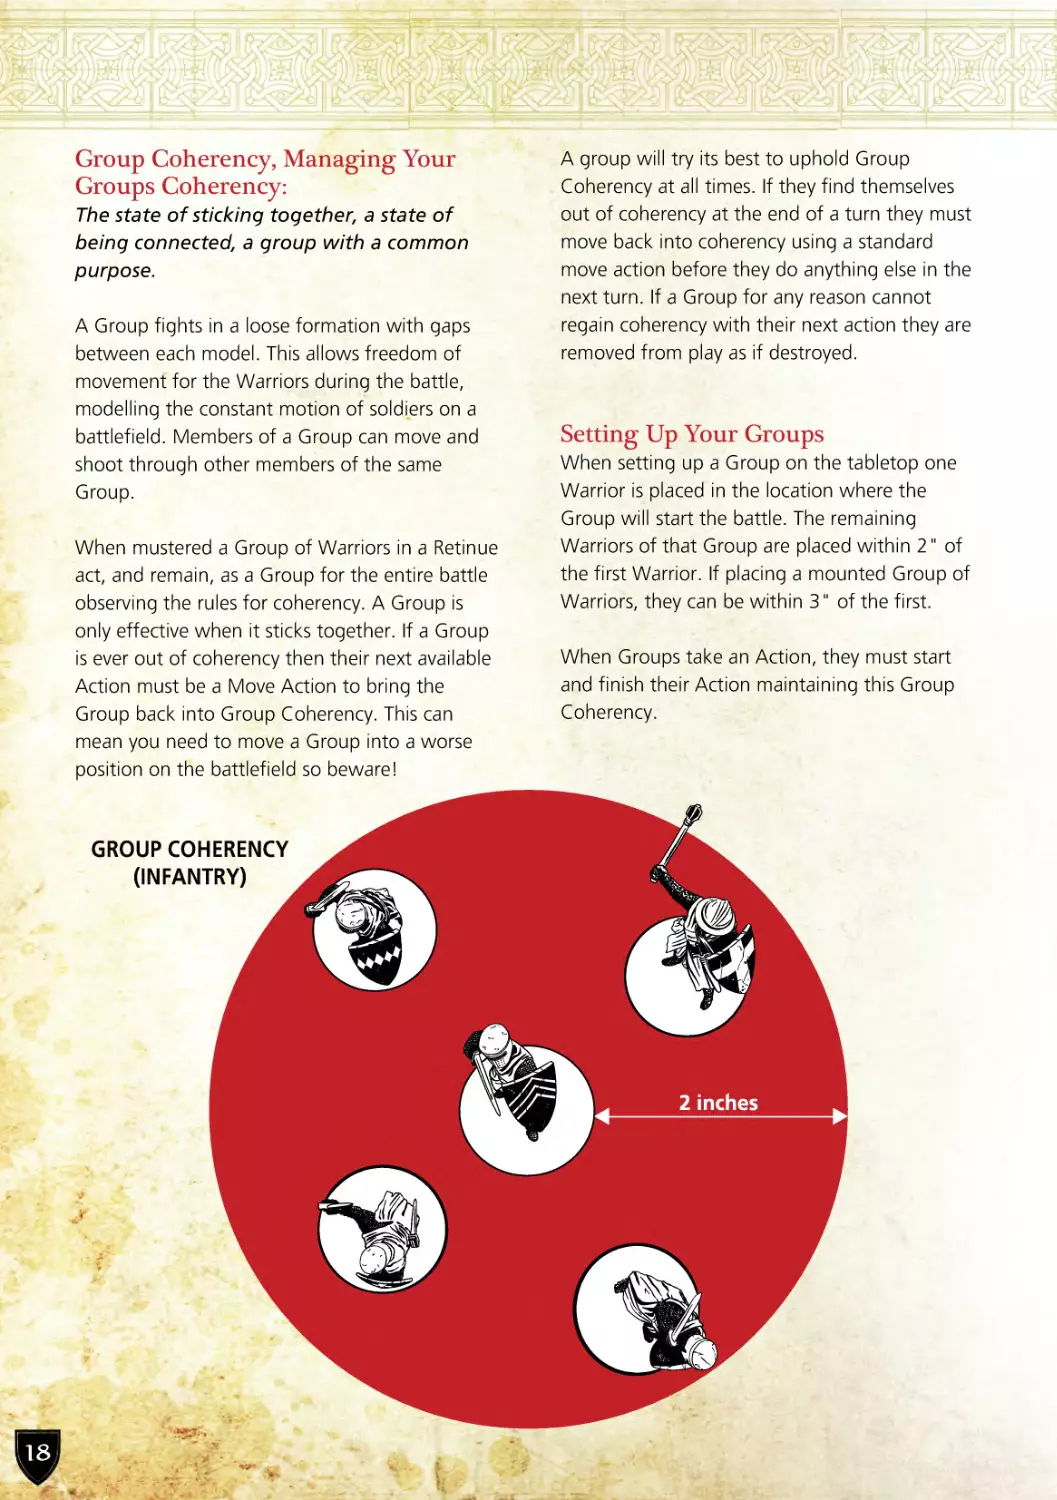
Group Coherency, Managing Your
Groups Coherency:
The state of sticking together, a state of
being connected, a group with a common
purpose.
A Group fights in a loose formation with gaps
between each model. This allows freedom of
movement for the Warriors during the battle,
modelling the constant motion of soldiers on a
battlefield. Members of a Group can move and
shoot through other members of the same
Group.
When mustered a Group of Warriors in a Retinue
act, and remain, as a Group for the entire battle
observing the rules for coherency. A Group is
only effective when it sticks together. If a Group
is ever out of coherency then their next available
Action must be a Move Action to bring the
Group back into Group Coherency. This can
mean you need to move a Group into a worse
position on the battlefield so beware!
GROUP COHERENCY
(INFANTRY)
18
A group will try its best to uphold Group
Coherency at all times. If they find themselves
out of coherency at the end of a turn they must
move back into coherency using a standard
move action before they do anything else in the
next turn. If a Group for any reason cannot
regain coherency with their next action they are
removed from play as if destroyed.
Setting Up Your Groups
When setting up a Group on the tabletop one
Warrior is placed in the location where the
Group will start the battle. The remaining
Warriors of that Group are placed within 2" of
the first Warrior. If placing a mounted Group of
Warriors, they can be within 3" of the first.
When Groups take an Action, they must start
and finish their Action maintaining this Group
Coherency.
enemy attacks. This base score is
affected by armour, tactics, abilities
and terrain.
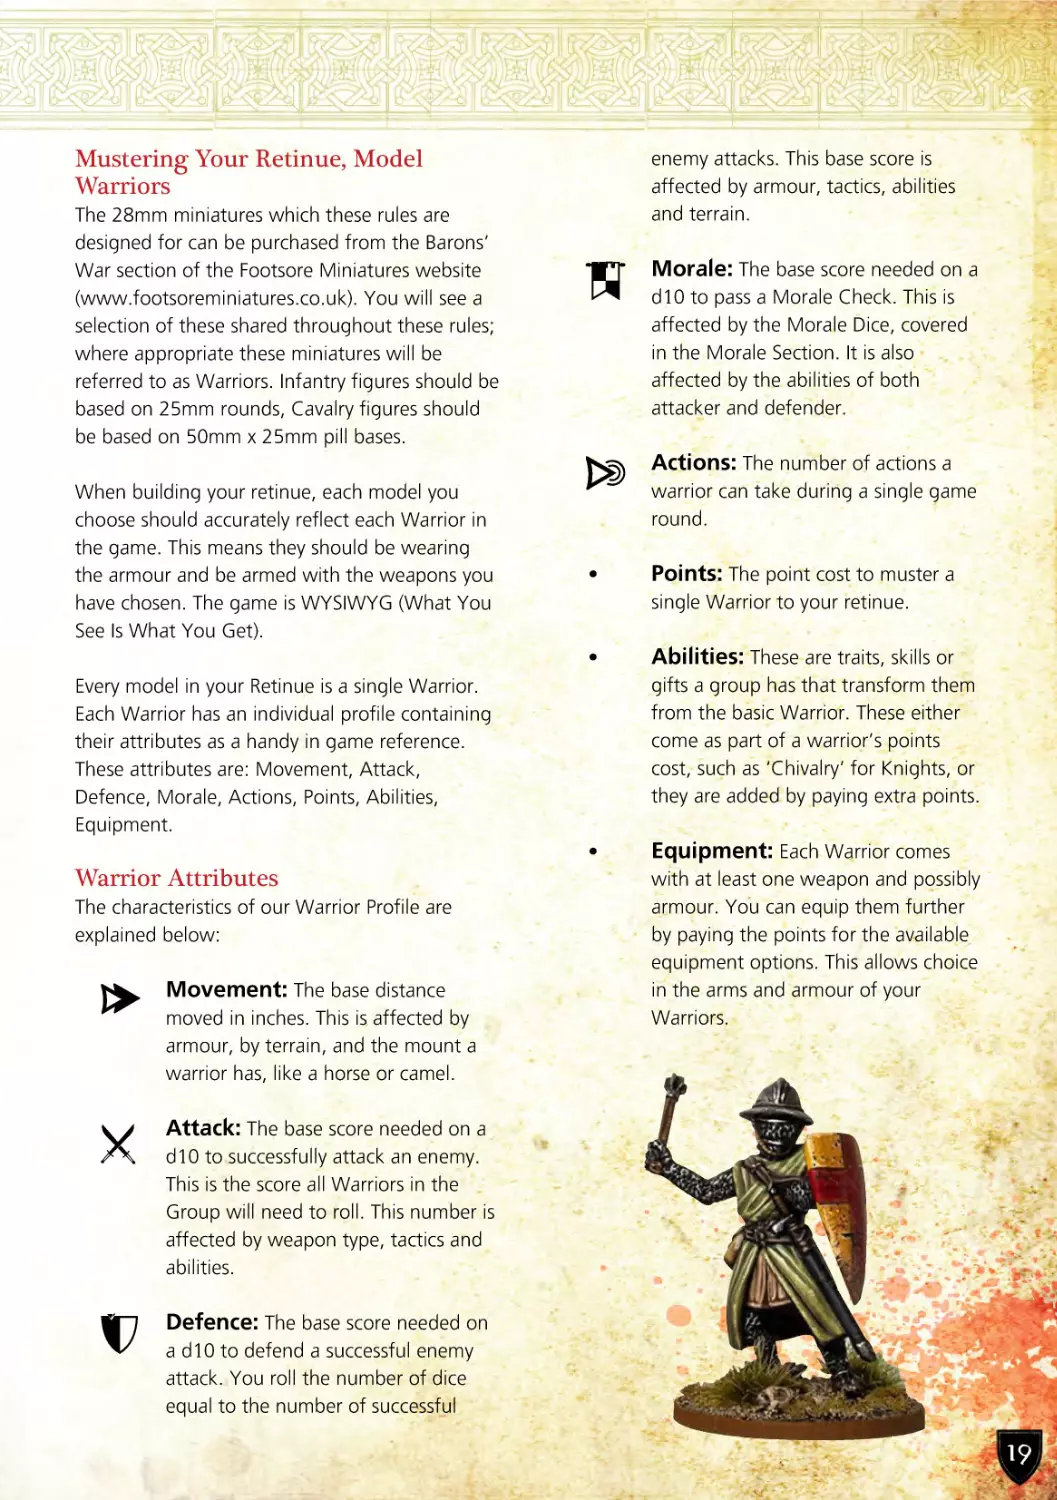
Mustering Your Retinue, Model
Warriors
The 28mm miniatures which these rules are
designed for can be purchased from the Barons’
War section of the Footsore Miniatures website
(www.footsoreminiatures.co.uk). You will see a
selection of these shared throughout these rules;
where appropriate these miniatures will be
referred to as Warriors. Infantry figures should be
based on 25mm rounds, Cavalry figures should
be based on 50mm x 25mm pill bases.
Morale: The base score needed on a
d10 to pass a Morale Check. This is
affected by the Morale Dice, covered
in the Morale Section. It is also
affected by the abilities of both
attacker and defender.
Actions: The number of actions a
When building your retinue, each model you
choose should accurately reflect each Warrior in
the game. This means they should be wearing
the armour and be armed with the weapons you
have chosen. The game is WYSIWYG (What You
See Is What You Get).
warrior can take during a single game
round.
•
single Warrior to your retinue.
•
•
The characteristics of our Warrior Profile are
explained below:
Movement: The base distance
moved in inches. This is affected by
armour, by terrain, and the mount a
warrior has, like a horse or camel.
Abilities: These are traits, skills or
gifts a group has that transform them
from the basic Warrior. These either
come as part of a warrior’s points
cost, such as ‘Chivalry’ for Knights, or
they are added by paying extra points.
Every model in your Retinue is a single Warrior.
Each Warrior has an individual profile containing
their attributes as a handy in game reference.
These attributes are: Movement, Attack,
Defence, Morale, Actions, Points, Abilities,
Equipment.
Warrior Attributes
Points: The point cost to muster a
Equipment: Each Warrior comes
with at least one weapon and possibly
armour. You can equip them further
by paying the points for the available
equipment options. This allows choice
in the arms and armour of your
Warriors.
Attack: The base score needed on a
d10 to successfully attack an enemy.
This is the score all Warriors in the
Group will need to roll. This number is
affected by weapon type, tactics and
abilities.
Defence: The base score needed on
a d10 to defend a successful enemy
attack. You roll the number of dice
equal to the number of successful
19
Warrior Profiles
A Warrior’s profile shows the information that describe a Warrior’s abilities, the equipment they
have and any special rules. Below is an example of a basic Spearman:
Movement
Attack
Defence
Morale
Actions
Points
6
6+
7+
3+
1
17
This Warrior Profile tells us the
spearman:
can move 6” as a basic move action
successfully attacks if the score
rolled is 6 or more
successfully defends if the score is
7 or more
will pass a morale check on a 3 or
more
can make 1 action per round
•
costs 17 points to muster.
At this point we haven’t included any abilities or
equipment.
A Warrior Profile applies to every Warrior in the
same Group. The points value is for a single
Warrior; each additional Warrior added to a
Group costs the same points as a single Warrior.
EXAMPLE: Our spearman above is in a
Group of four, this will be 68 points (17
points for each of the four spearmen),
each of these four spearmen use the same
profile.
Warrior Types
20
There is a comprehensive selection of warriors
available for muster, however, you can also take
any of the warrior profiles provided tailoring
them to a specific class of soldier you wish to
include, possibly adding an ability or two.
Over time we will be adding more and more
options at www.warhost.online, but for now
there are plenty to choose from for the Barons’
War in the ‘Choosing Your Retinue’ section of
this rulebook.
Warriors are classed either as Cavalry by being
mounted on a horse or Infantry on foot, and
their level of training can be identified at one of
four levels, Green, Irregular, Regular and Veteran.
A Retinue also needs a Commander, and history
shows their ability to be varied. We can’t all be
William Marshal. There are three levels of
Commander to choose from; Baron, Lord, and
Veteran Sergeant. If you decide to take a
particular named character, you use them warts
and all.
Removing Casualties and Coherency
When casualties are caused figures are removed
from the tabletop and placed to one side.
Position casualties from the same Group together
to make totalling victory conditions easier.
A player removes their own casualties and, in
most cases, can choose which are removed.
Most figures can only sustain one undefended
hit; therefore, each undefended hit will cause
one casualty. However, sometimes it will take
more than one undefended hit to remove a
Warrior. This will be because of equipment or a
special rule and will be clearly indicated. It is
important to note that no excess wounds caused
are carried over; if you do not deal enough hits
to cause a casualty they are spent.
EXAMPLE: Five Men at Arms attack five
mounted knights on war horses. Being
mounted on the best of horses each knight
has two wounds. The round of combat ends
with the five Warriors scoring three wounds.
This results in the knights suffering one
casualty for two undefended hits resulting
in one casualty to the mounted knights. The
remaining undefended hit is discarded as it
is not sufficient to cause a casualty.
Which Warrior Do You Remove?
When a Group suffers casualties the owning
player chooses which Warrior to remove. The
Warrior selected must be in base to base contact,
for melee casualties, or the nearest visible target,
for ranged attacks. Group Coherency must be
maintained if possible. For ranged attacks once
all visible casualties are removed then remaining
casualties are taken from the non-visible figures.
When all models are removed from a Group it is
destroyed and your opponent can claim the
victory points. This also causes your Retinue
Commander to increase their Morale Dice by +1.
If a Group of Warriors leaves the tabletop due to
being broken, they are removed as if destroyed
and your opponent claims the victory points.
However, fleeing troops do not cause an increase
to their Commander’s Morale Dice in the same
way as a group removed through combat while
they are still in the board.
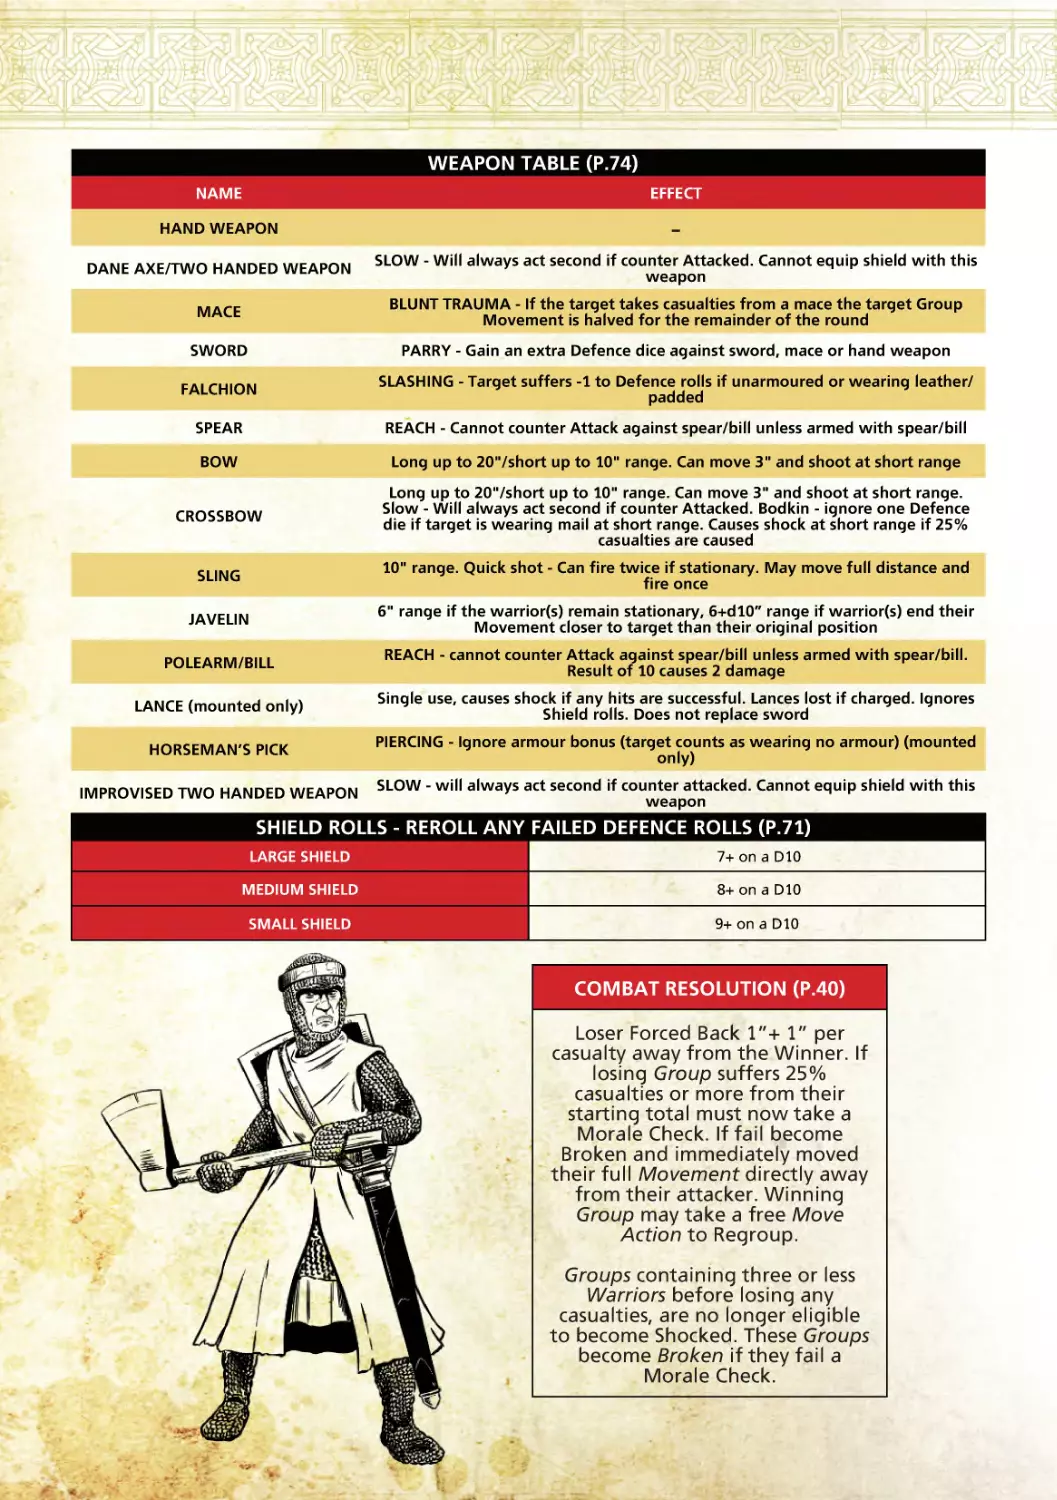
When Pushed Back
Warriors are always pushed back into coherency
whenever possible. Where this is not possible,
the Group’s next action must be a Move to bring
them back into coherency.
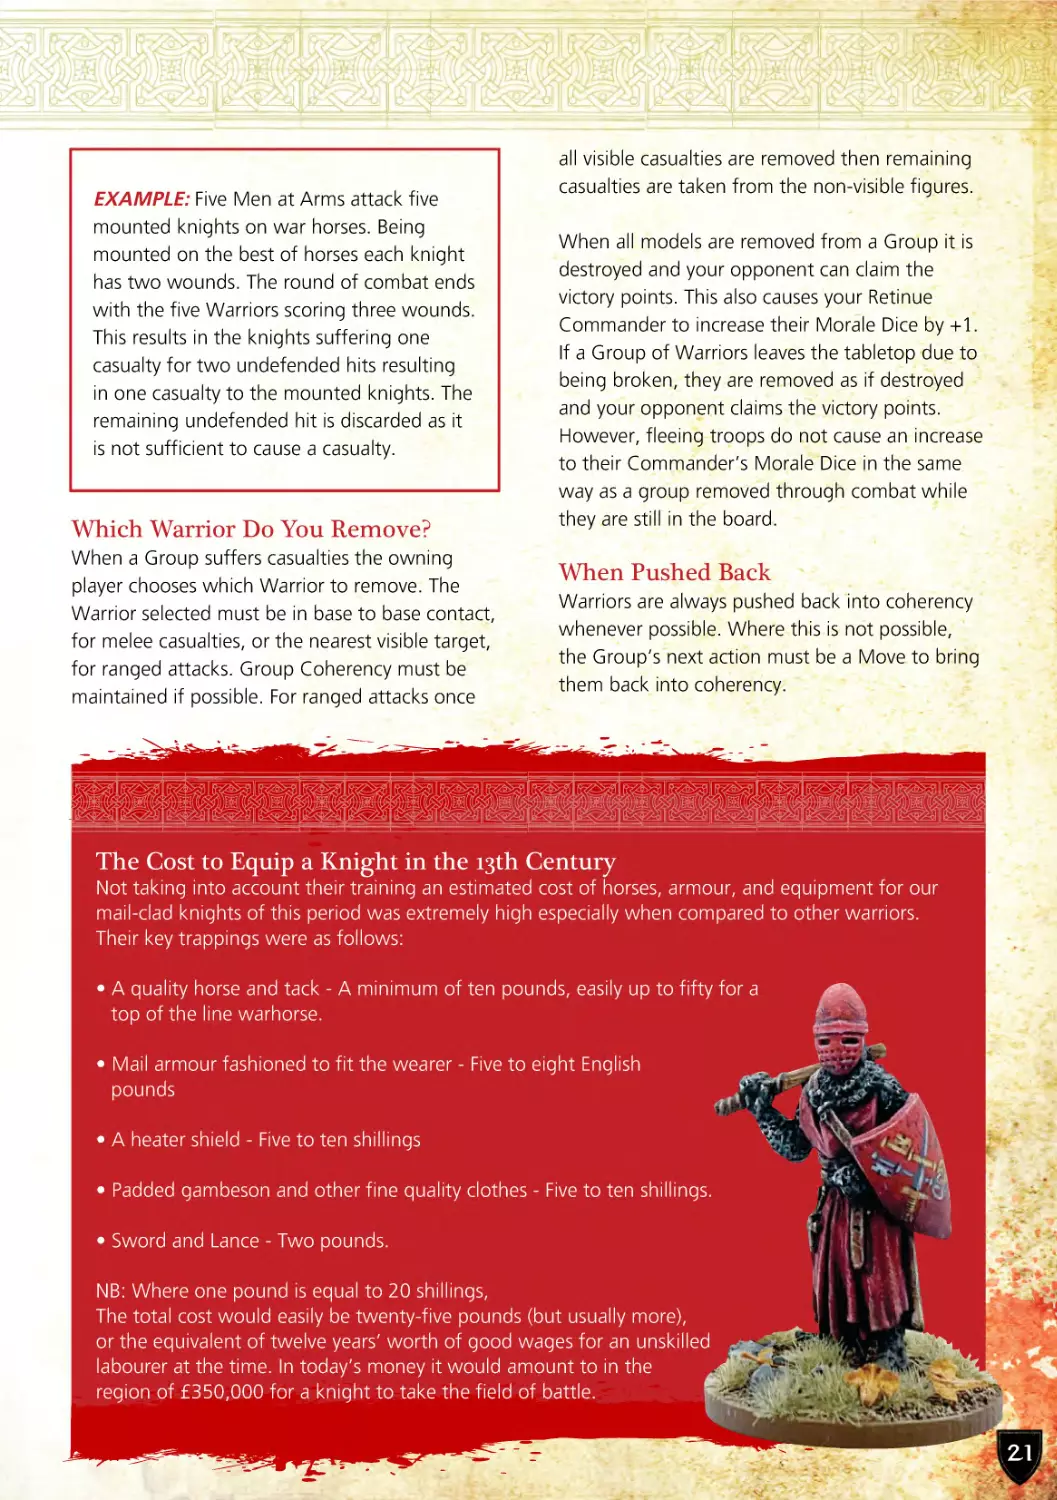
The Cost to Equip a Knight in the 13th Century
Not taking into account their training an estimated cost of horses, armour, and equipment for our
mail-clad knights of this period was extremely high especially when compared to other warriors.
Their key trappings were as follows:
• A quality horse and tack - A minimum of ten pounds, easily up to fifty for a
top of the line warhorse.
• Mail armour fashioned to fit the wearer - Five to eight English
pounds
• A heater shield - Five to ten shillings
• Padded gambeson and other fine quality clothes - Five to ten shillings.
• Sword and Lance - Two pounds.
NB: Where one pound is equal to 20 shillings,
The total cost would easily be twenty-five pounds (but usually more),
or the equivalent of twelve years’ worth of good wages for an unskilled
labourer at the time. In today’s money it would amount to in the
region of £350,000 for a knight to take the field of battle.
21
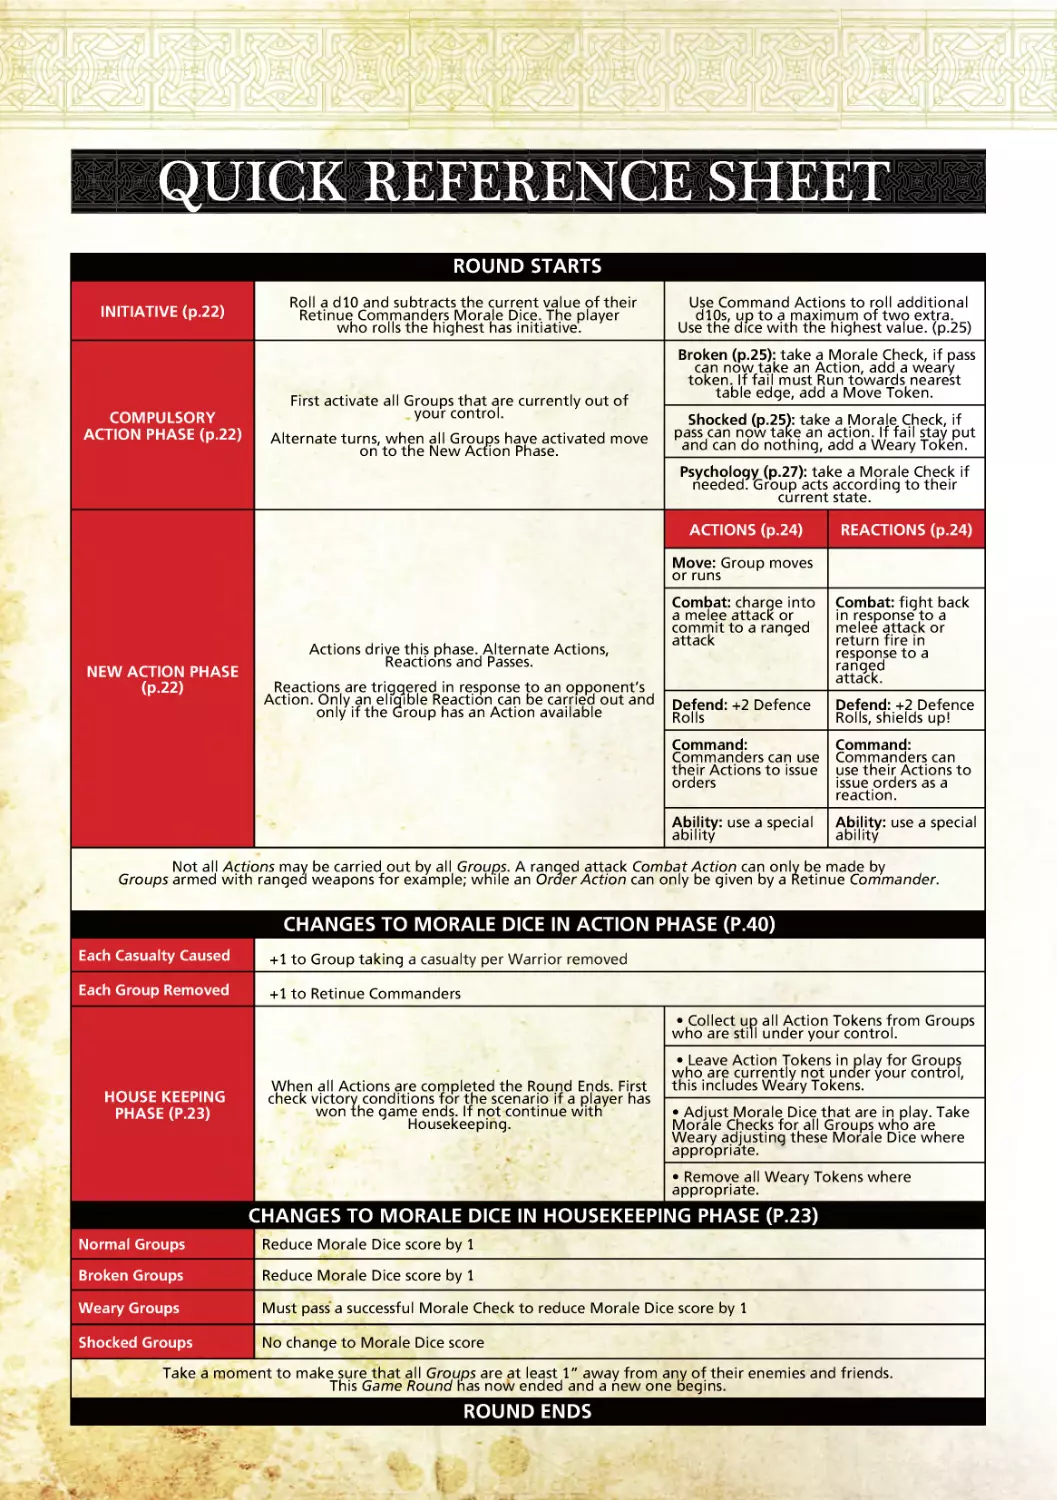
THE GAME ROUND
Games are won by carrying out the
most appropriate Actions and Reactions
when the opportunity presents itself. A
simple concept at the heart of this
game with plenty of options available.
These Actions are performed as turns
within each Round with each game
lasting a predetermined number of
Rounds.
EXAMPLE: In the Initiative Phase the player
chooses to spend one of their Commander’s
Action Tokens to give an extra dice, enabling
them to roll 2d10. They place a Command
Token next to their Commander’s Group to
show they have used an Action already. They
roll a '5' and an '8'; their initiative score for
this round is '8'.
The Game Round
During each Game Round, players alternate turns
assigning Action Tokens to Groups. Players
choose the Action they wish their Groups to
make; be it Movement, Combat, etc. until each
Group has used all of their Actions.
Each Game Round consists of a number of
phases
•
Initiative Phase
•
Compulsory Action Phase
•
New Actions Phase
•
Housekeeping Phase
Within the various phases, players will alternate
taking an Action and each Action is completed
before moving onto the next.
Initiative Phase
At the beginning of each and every new Game
Round initiative is determined by a Roll Off (see
page 13). Each player rolls a d10 and the person
who rolls the highest number can choose to go
first or force their opponent to go first.
Players can use Command Actions from their
Commander to roll extra dice for initiative. A
maximum of 2 Actions can be used this way;
place these Actions Tokens on the Commander’s
Group to indicate they are spent. For each Token
used in this way add a d10 to your initiative roll
and choose the highest dice rolled.
22
Leader’s Morale Dice
Both players deduct the current score of their
retinue Commander’s Morale Dice from their
initiative roll when testing for who has initiative.
Compulsory Action Phase
Both players must make all Compulsory Actions
first. This means all Groups a player does not
currently have control over must be activated
before any others. These Groups will start the
Game Round with a token indicating their
uncontrolled state. There are likely to be Groups
who are currently Shocked or Broken. However,
they can also be Groups who have been
triggered due to an Ability, Berserk for example.
When all Compulsory Actions have been carried
out the Game Round moves on to the next
phase; New Actions. It is possible for one player
to still be in the Compulsory Actions Phase while
the other player has moved into the New Actions
Phase.
New Actions Phase
In this phase players alternate Actions, Reactions
and Passes. Actions drive this phase with
Reactions played as a response to an opponent’s
Action.
At any time during the New Actions Phase of a
Game Round a player may choose to Pass their
turn and not make an Action. This hands
initiative back to their opponent. A single player
can only Pass their turn three times in a row
before having to take an Action.
When one player has Actions remaining they
continue to take their turns until all their Actions
are spent. Once all Actions have been taken the
New Action Phase is complete and players move
to the Housekeeping Phase. At any time if there
are three alternating consecutive Passes the New
Action Phase ends and the Game Round moves
to the Housekeeping Phase.
Shocked there is no change to their Morale Dice
during a Housekeeping phase. Groups who are
Weary must take a Morale Check, if successful,
their Morale Dice score is reduced by one. Any
time a Morale Dice is reduced to 0 it is removed.
Changes to Morale Dice in
Housekeeping Phase
Normal Groups
Reduce Morale Dice
score by 1
Broken Groups
Reduce Morale Dice
score by 1
Weary Groups
Must pass a successful
Morale Check to reduce
Morale Dice score by 1
Shocked Groups
No change to Morale Dice
score
Housekeeping Phase
When all Actions are completed it is the end of
the Game Round. First check victory conditions
for the scenario you are playing and if either
player has won the game ends. If neither player
has won the game continues with Housekeeping.
Once current Morale Dice have been addressed;
all Weary Tokens are removed ending the
Housekeeping Phase and the current round.
Housekeeping
Activating Your Retinue
• Collect up all Action Tokens from Groups
who are still under your control.
Your Retinue during a game activates via the use
of Actions and Reactions. These activations are
either standard Actions and Reactions, Command
Actions, Compulsory Actions or Abilities.
• Leave Action Tokens in play for Groups
who are currently not under your
control,this includes Weary Tokens.
Actions
• Adjust Morale Dice that are in play.
Take Morale Checks for all Groups who are
Weary adjusting these Morale Dice where
appropriate.
• Remove all Weary Tokens where
appropriate.
Take a moment to make sure that all Groups are
at least 1” away from any of their enemies and
friends. This Game Round has now ended and a
new one begins.
Your retinue comprises of Groups who have
opportunities to either take an Action or perform
a Reaction to an opponent’s Action each Game
Round. All Groups have an Action characteristic
on their Warrior Profile which denotes the
number of Actions they have each Game Round.
Most Groups have one Action, however,
Commanders and the Group they are part of
may make two or three Actions per Game
Round. You can continue to assign Actions up to
the limit indicated on their profile. Being able to
act more than once a round is what makes them
truly heroic!
Morale Dice
During the Housekeeping phase of each round,
all Groups who currently have a Morale Dice
reduce its score by one. Where a Group is
Actions and Reactions
To activate a Group a player decides the Action to
be taken and assigns the appropriate Action Token.
23
The Action Token is placed next to Group,
indicating both the Action they will perform, and
that they have taken their Action. Before this
Action is carried out, your opponent has the
opportunity to React, by using an available Action
of their own. Only the targeted Group can React
and only if they have an available Action; either
their own or from a Command Action. If they do
React, they place the appropriate Action Token
next to their Group. Starting with the player
whose turn it is they carry out their Action,
moving figures and rolling dice as necessary.
Once completed their opponent carries out their
Reaction.
Once your Action, and any opponent Reaction, is
completed initiative is passed to your opponent
and they decide on their next Action. Play passes
back and forth between players until all Actions
are complete.
Standard Actions/Reactions
This list is an overview of the standard Actions
and Reactions your Groups can perform. We will
dive into more detail when we cover each
individually in their respective sections.
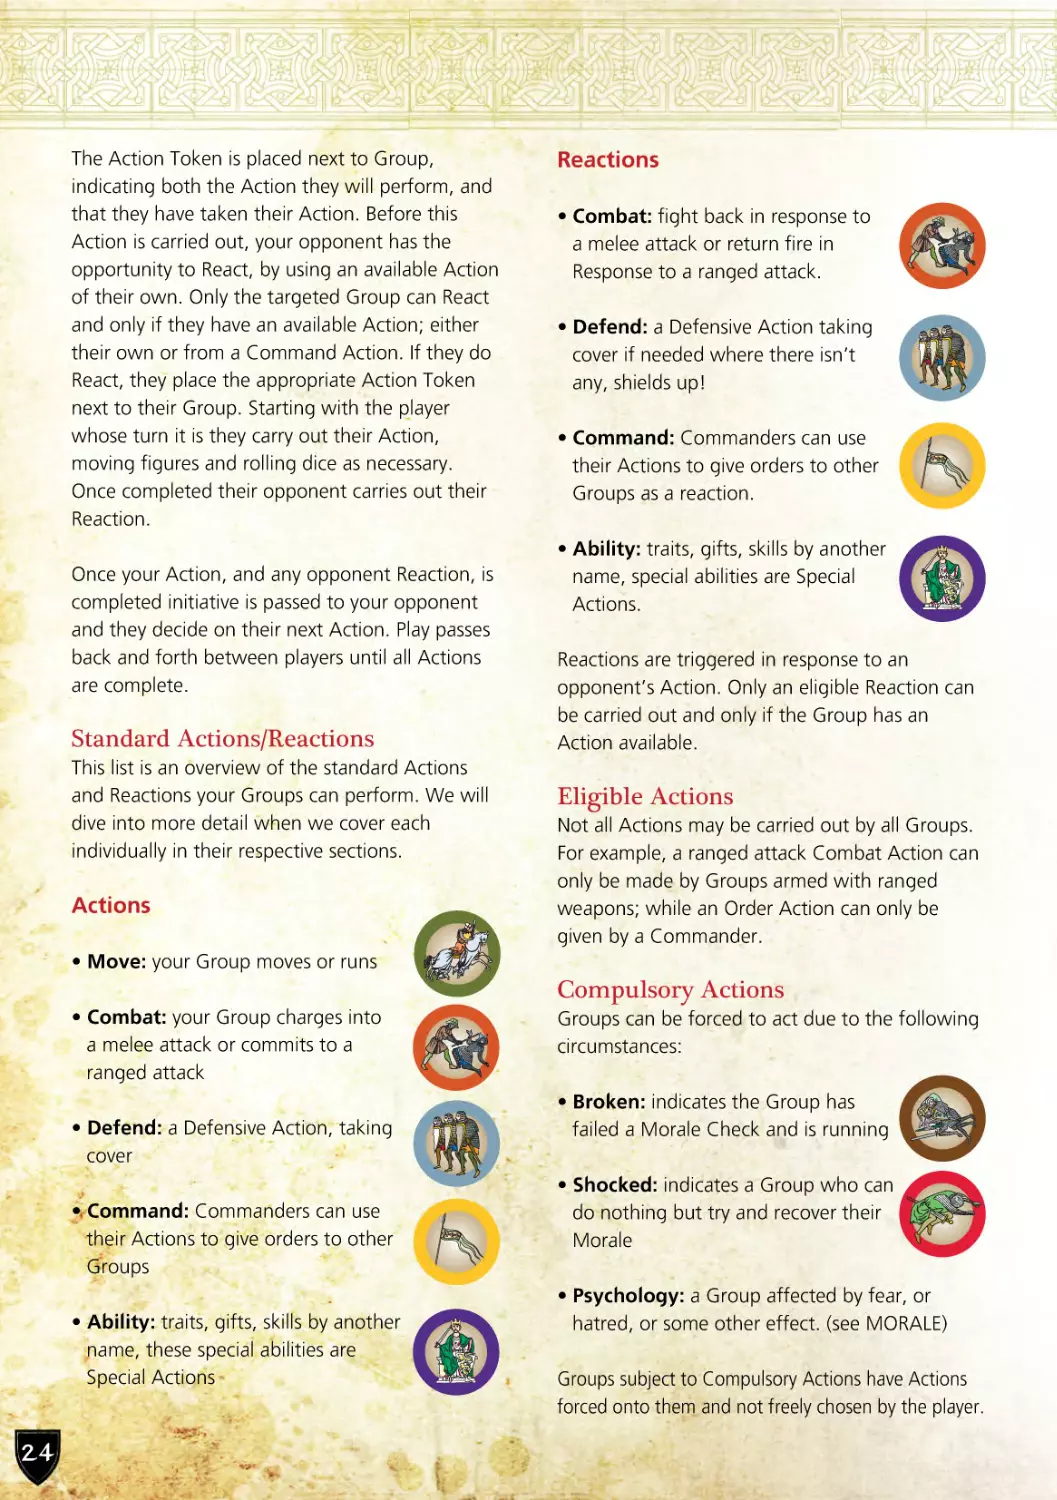
Actions
Reactions
• Combat: fight back in response to
a melee attack or return fire in
Response to a ranged attack.
• Defend: a Defensive Action taking
cover if needed where there isn’t
any, shields up!
• Command: Commanders can use
their Actions to give orders to other
Groups as a reaction.
• Ability: traits, gifts, skills by another
name, special abilities are Special
Actions.
Reactions are triggered in response to an
opponent’s Action. Only an eligible Reaction can
be carried out and only if the Group has an
Action available.
Eligible Actions
Not all Actions may be carried out by all Groups.
For example, a ranged attack Combat Action can
only be made by Groups armed with ranged
weapons; while an Order Action can only be
given by a Commander.
• Move: your Group moves or runs
Compulsory Actions
• Combat: your Group charges into
a melee attack or commits to a
ranged attack
• Defend: a Defensive Action, taking
cover
• Command: Commanders can use
their Actions to give orders to other
Groups
• Ability: traits, gifts, skills by another
name, these special abilities are
Special Actions
24
Groups can be forced to act due to the following
circumstances:
• Broken: indicates the Group has
failed a Morale Check and is running
• Shocked: indicates a Group who can
do nothing but try and recover their
Morale
• Psychology: a Group affected by fear, or
hatred, or some other effect. (see MORALE)
Groups subject to Compulsory Actions have Actions
forced onto them and not freely chosen by the player.
When it is your turn select a Group that must
make a Compulsory Action and take a Morale
Check, if the Group passes they have rallied and
come back under the players control. This is
indicated by the removal of the current Action
Token. As they have rallied you now assign the
Group a new Action of your choosing. These
Groups are either activated using their own
Action or can be activated using a Command
Action if they are in range of your Commander.
Phase of the Game Round and while Shocked
can do nothing else. Shocked Groups do not take
Morale Checks when in Combat. When a Group
contains three or less Warriors before losing any
casualties, they are no longer eligible to become
Shocked. These Groups become Broken if they
fail a Morale Check.
Broken
If a Group fails a Morale Check the current
Action Token remains and they carry out their
Compulsory Action. Once completed initiative
passes to your opponent.
Warriors will reach a point where they have had
enough; whether that is through casualties or
overwhelming fear. This is known as Broken.
While Groups are Broken they are forced to Run
towards the owning players table edge as a
Compulsory Action.
Shocked
Groups become Broken when:
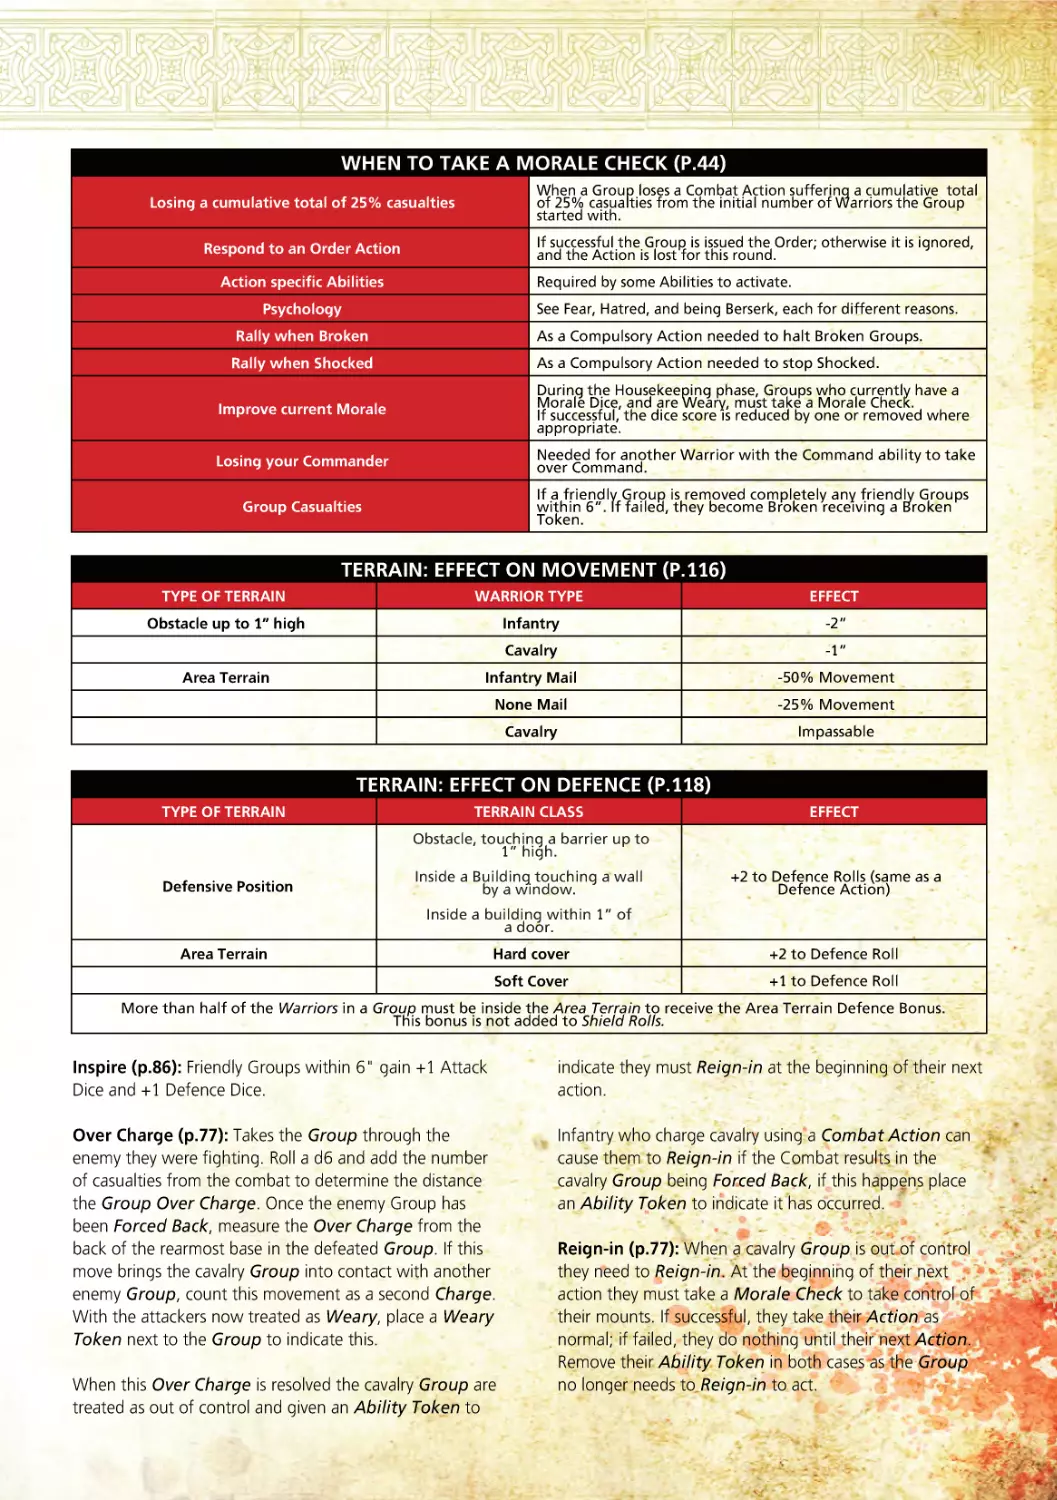
Groups must take a Morale Check when:
• They take at least 25% casualties from a
particular type of weapon, as noted in the
weapon's abilities
• Or they lose a total of 50% or more of
their current Warriors as casualties during
a single Combat Action
In either case, if the Morale Check is failed the
Group becomes Shocked. Place a Shocked Token
next to the Group, the Group loses any unused
Actions for this round. While Shocked:
• A Group cannot Move
• Attackers gain a +2 modifier to their
Attack Dice (this affects both Ranged
and Melee Combat)
• Shocked Warriors defend without any
Shield Rolls
• Shocked Groups can only be given Rally
Actions
Shocked Groups also suffer fatigue and become
Weary when they become Shocked. To remove
their Shocked Token the Group must Rally as a
Compulsory Action in the Compulsory Action
• They lose a Combat Action and suffer a
cumulative total of 25% casualties from
the total number they started the game
with
• And fail a Morale Check
Place a Broken Token next to the Group who are
then immediately moved their full Movement
directly away from their attacker. In subsequent
rounds if the Broken Group does not rally, they
Run directly towards their own nearest table
edge. This is the only allowed Action they can
make each Game Round unless a successful Rally
Action is made.
A Broken Group must attempt to rally as a
Compulsory Action at the beginning of each
round and remain Broken unless they pass a
successful Morale Check or leave the player's
table edge, whichever happens first.
Broken Groups that are charged by an enemy
are automatically hit by their attackers; Ranged
Attacks must still roll to hit as normal.
The Broken Group do have the chance to defend
each of these successful attacks, but do not
receive a Shield Roll. Broken Groups do not take
Morale Checks when in Combat.
25
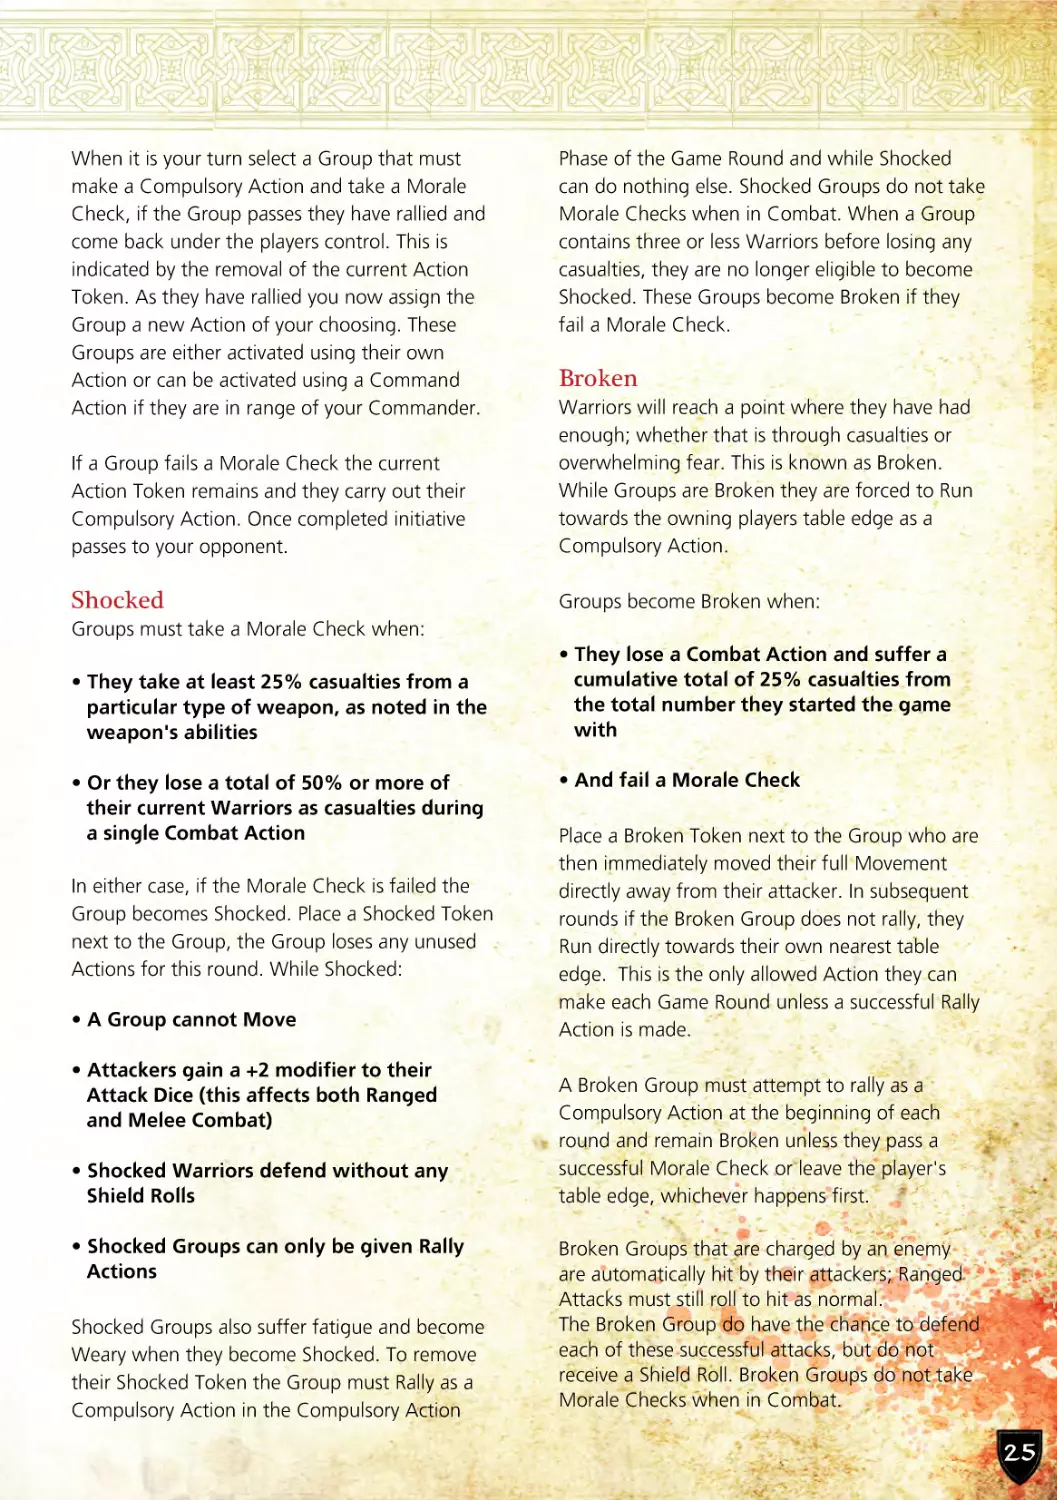
Rally
The Rally Action presents you with the
opportunity to stop your Groups in their tracks,
turn them around, and get them back into the
battle. All Rally Actions must adhere to the
following rules, unless otherwise stated:
Even if a Group has more than one Action they
can only attempt one Rally Action per Game
Round to recover from being Broken or Shocked.
However, the Retinue Commander can use a
Command Action to order them to test again
during any phase.
Groups must use their Action to attempt to Rally
or they may be ordered to Rally by your leader
using a Command Action if the Commander is
within range during the Compulsory Action
Phase.
These warriors have movement 6” so while
broken they run 12” towards the players
table edge.
Using an Order action your Warriors are
halted in their tracks.
To Rally the Group makes a Morale Check. If
successful, remove the Broken or Shocked Token
replacing it with a Weary Token if the group does
not already have one, you can now carry out any
Action available to the Group e.g. Move, Charge,
Shoot etc.
If a Morale Check is failed during the Compulsory
Phase, the Group remains Broken or Shocked. A
Broken Group is now given a Run Action and
must move towards your table edge. Any Broken
Group that reaches the players table edge is
immediately removed from the table. They are
counted toward the opponent’s Victory Points for
determining the Scenario winner.
26
These warriors while broken run 12” as
they are only 8” from the table edge
they are removed.
Weary
Troops cannot go on forever, at
some point they will become
tired; either mentally or
physically. This affects their ability
to act and react on a battlefield. During a game
when Warriors reach that point we say they are
Weary.
Weary Effects
In all these cases when a Group becomes Weary
they receive a Weary Token. Any Weary Group
now receives -1 to all dice rolls while it remains in
play. Weary Tokens are the last thing to be
removed during the Housekeeping phase. Weary
Tokens do not stack; a Group can only have a
single Weary Token at any one time.
Warriors become Weary for four reasons:
Psychology
• They perform a Run Action
(see MOVEMENT)
• When they perform more than one Action
during a single Game Round
• They have been Shocked (see MORALE)
• They successfully Rally after being Broken
More Than One Action
When a Group is given a second Action they will
become Weary. Place the Weary Token before
the Group performs their second Action as it
comes into effect straight away. Command
Groups do not become Weary when using
multiple Command Actions, they are far
too heroic to get tired just from giving
orders, but they still get Weary from
Run Actions or performing two or
more other Actions
themselves.
A sense of self-preservation, outright fear and
pure hatred can all affect a Warriors’ actions.
These different states of mind are represented by
the psychology of morale where different Groups
react in different ways based on the
circumstances they find themselves in on the
battlefield. Warriors who can find themselves
controlled by different aspects of their
psychology may act differently to how a
Commander wants them to which will be
detailed in their Warrior Profile.
The Rules for Psychology can be found in the
Morale section on page 44.
Rally
Warriors also
become Weary in
stressful
circumstances from a
sudden rush of
adrenaline, rallying
after being
Broken or
when Shocked.
27
MOVEMENT
Moving your Groups around the
tabletop is a vitally important part of
the game, and the game would be
boring if they didn’t move at all!
Having the right Groups in the right
place at the right time is instrumental
for victory.
Movement
Attack
Defence
Morale
Actions
6
6+
7+
3+
1
Terrain will affect your Group’s Movement
this is covered in the Terrain and Battlefield
section on page 117.
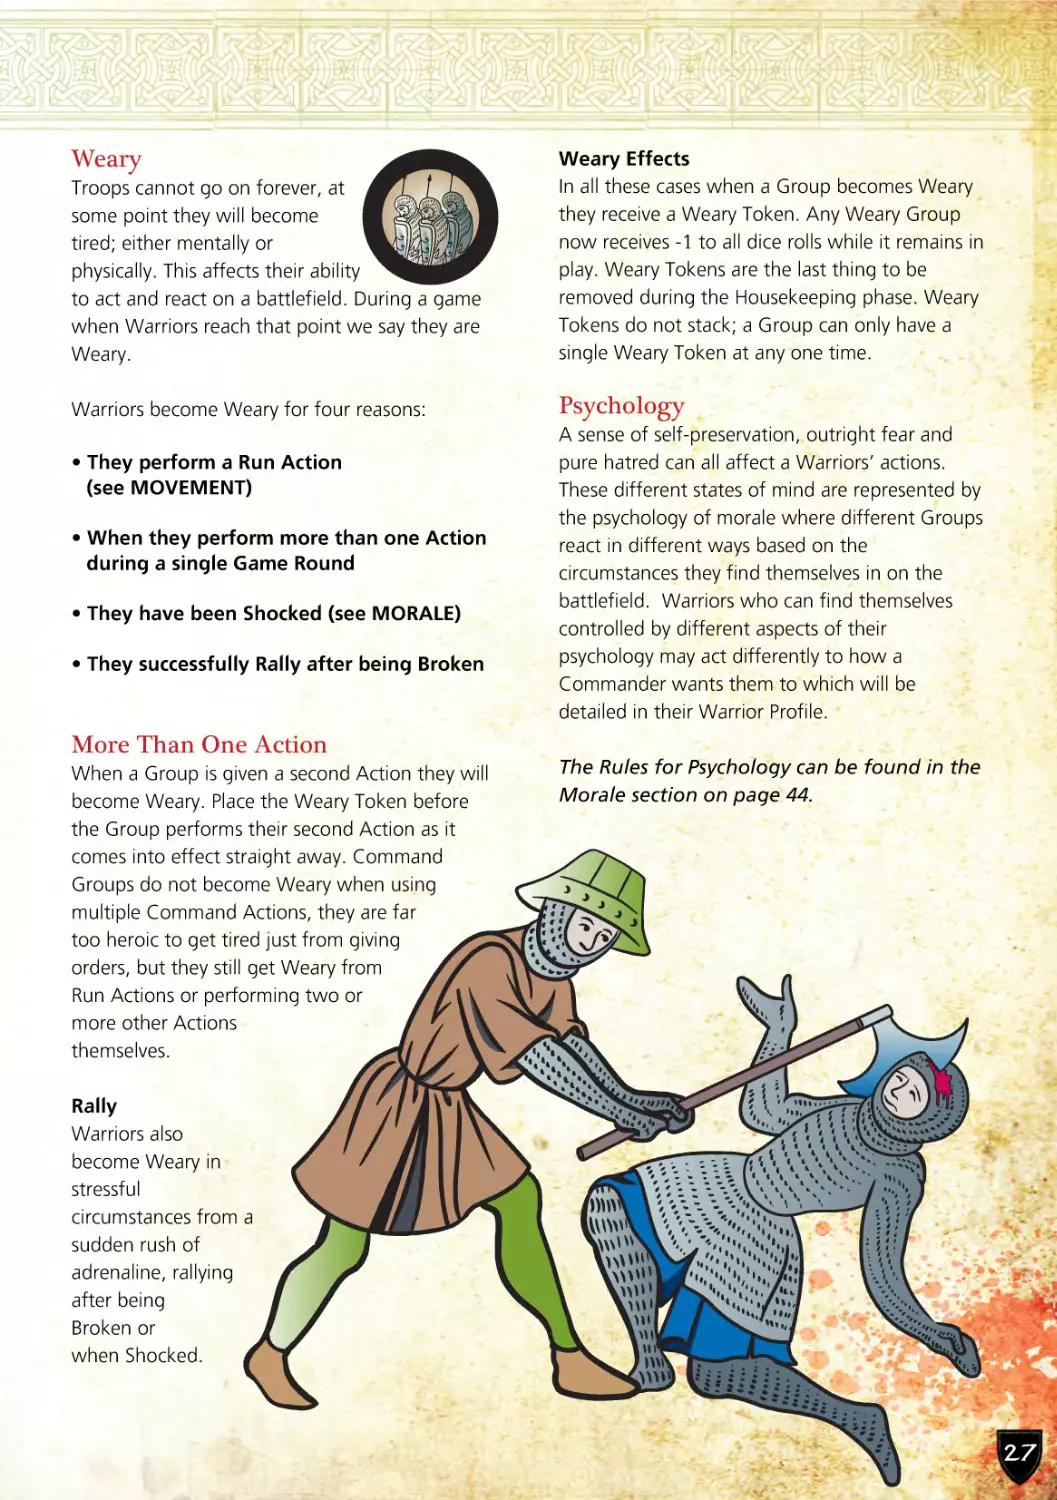
Coherency is determined once a Group has
finished moving, not during a Move Action. The
player determines which Warrior to move first,
and once moved, the rest of the Group use their
Movement allowance to end their movement in
Group Coherency.
2”
The Movement column on the Warrior Profile
indicates the basic distance in inches a Group can
move. A Group’s Movement is calculated on the
armour they are wearing plus any mount they
may have. There are three classes of Group based
on their armour: Heavy, Medium and Light.
Group Coherency When Moving or
Running
Move or Run the first Warrior in the Group;
all other Warriors must end their move
within 2" of this initial Warrior moved.
Movement Actions are either Move or Run; Move
uses the base Movement rate and Run doubles
the base Movement rate.
3”
Move and Run Actions must adhere to the
following common rules:
• Groups cannot Move or Run through other
Groups, friendly or enemy
• Groups are blocked from moving by any,
and all, Warriors except Warriors of the
moving Group
• Groups must not come within 1” of any
enemy Group at any point of their move
• Groups cannot voluntarily leave the
battlefield
• Warriors from the same Group can move
through each other when they move or run.
28
Cavalry can finish within 3", to maintain
coherency.
If a Group ends a Move Action out of Coherency and
they are unable to regroup, their next Action must be
a Move Action bringing them back into Coherency.
This only happens when moving into Combat all other
movement must end in Coherency. A Group cannot
be in Coherency unless its entire Group is in
Coherency.
Move Action
A Move Action is the standard way to move your
Groups around the tabletop without incurring a
penalty. A moving Group may travel in any
direction, regardless of facing, with any number
of turns up to their maximum Movement
characteristic.
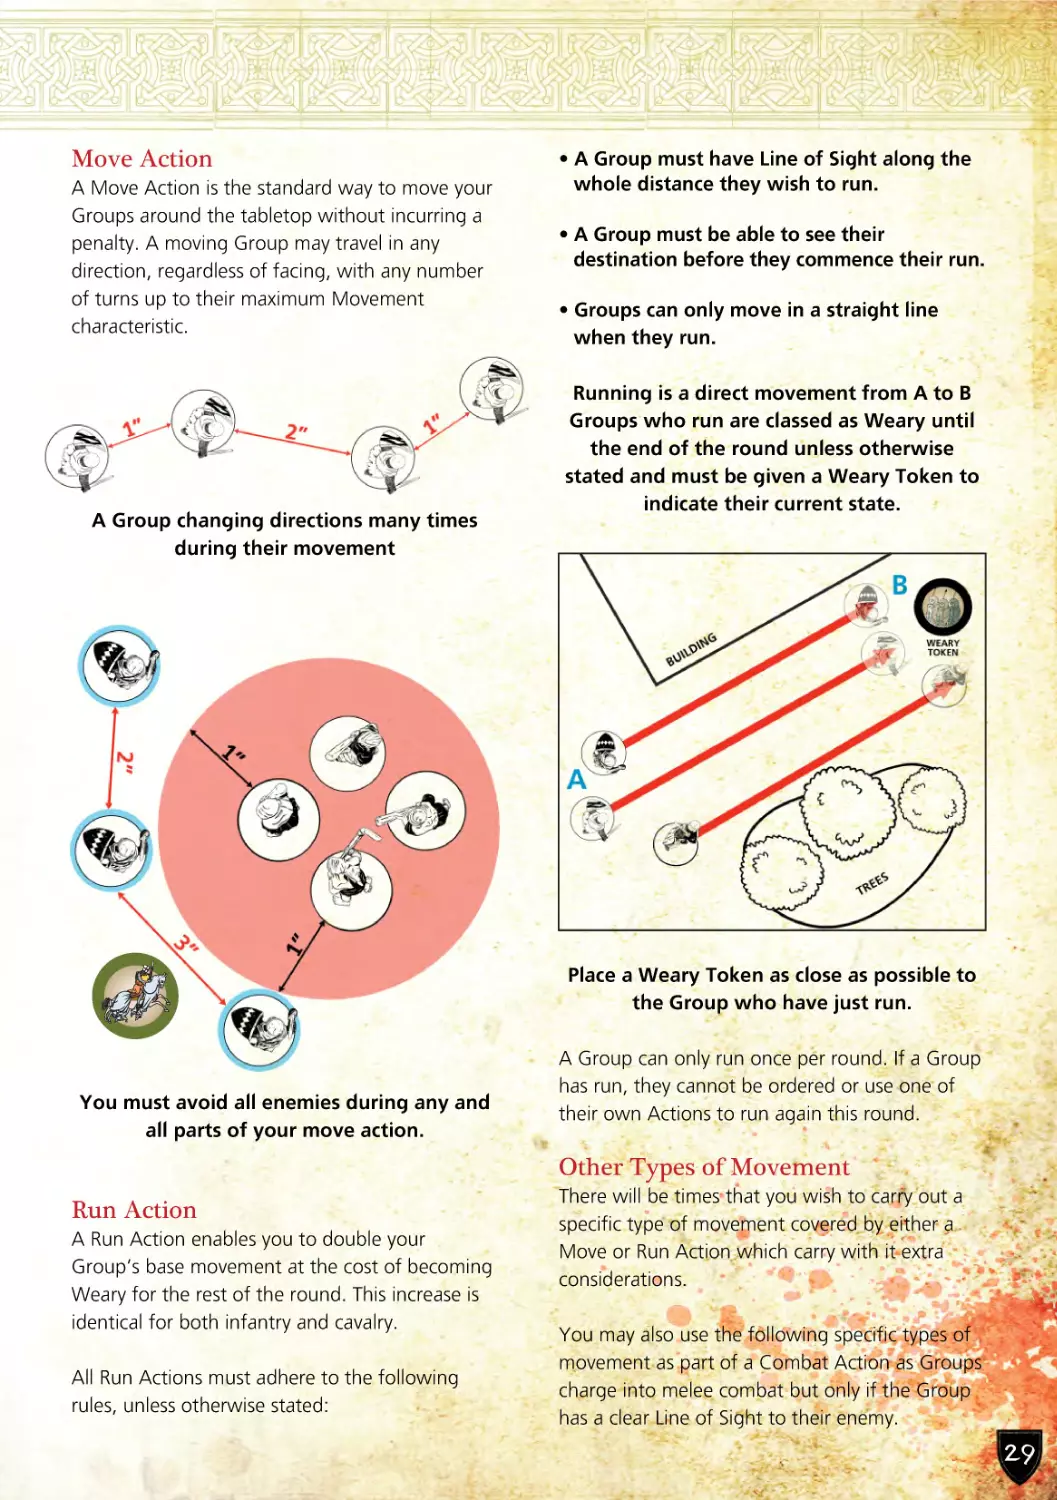
A Group changing directions many times
during their movement
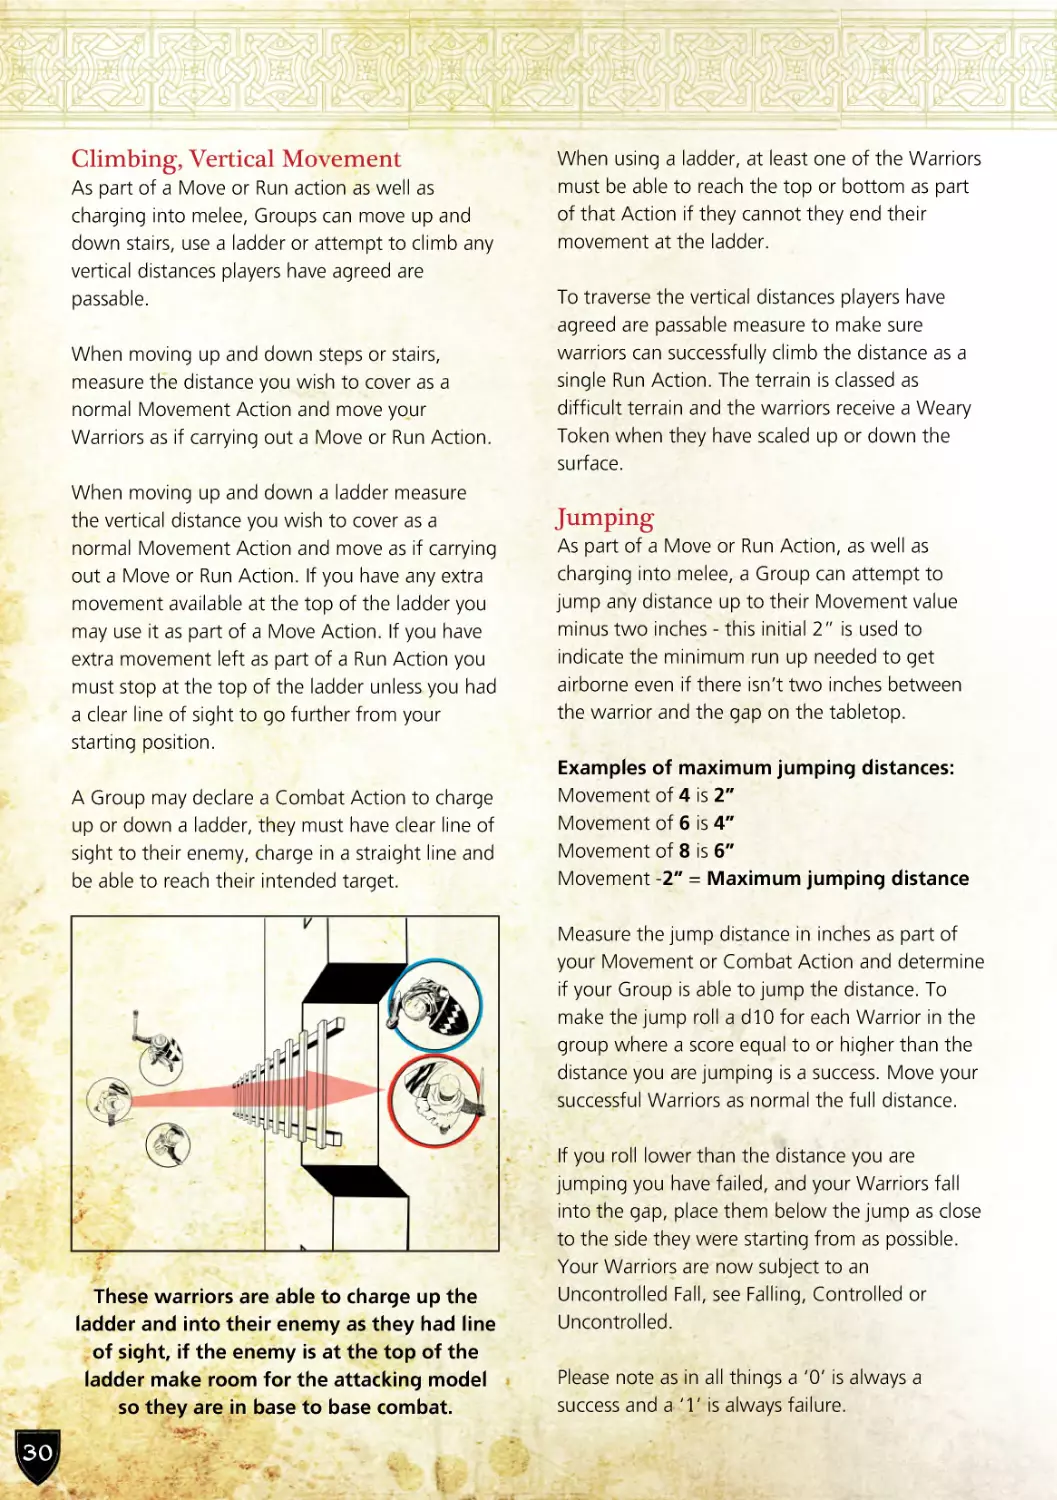
• A Group must have Line of Sight along the
whole distance they wish to run.
• A Group must be able to see their
destination before they commence their run.
• Groups can only move in a straight line
when they run.
Running is a direct movement from A to B
Groups who run are classed as Weary until
the end of the round unless otherwise
stated and must be given a Weary Token to
indicate their current state.
Place a Weary Token as close as possible to
the Group who have just run.
You must avoid all enemies during any and
all parts of your move action.
A Group can only run once per round. If a Group
has run, they cannot be ordered or use one of
their own Actions to run again this round.
Other Types of Movement
Run Action
A Run Action enables you to double your
Group’s base movement at the cost of becoming
Weary for the rest of the round. This increase is
identical for both infantry and cavalry.
All Run Actions must adhere to the following
rules, unless otherwise stated:
There will be times that you wish to carry out a
specific type of movement covered by either a
Move or Run Action which carry with it extra
considerations.
You may also use the following specific types of
movement as part of a Combat Action as Groups
charge into melee combat but only if the Group
has a clear Line of Sight to their enemy.
29
Climbing, Vertical Movement
As part of a Move or Run action as well as
charging into melee, Groups can move up and
down stairs, use a ladder or attempt to climb any
vertical distances players have agreed are
passable.
When moving up and down steps or stairs,
measure the distance you wish to cover as a
normal Movement Action and move your
Warriors as if carrying out a Move or Run Action.
When moving up and down a ladder measure
the vertical distance you wish to cover as a
normal Movement Action and move as if carrying
out a Move or Run Action. If you have any extra
movement available at the top of the ladder you
may use it as part of a Move Action. If you have
extra movement left as part of a Run Action you
must stop at the top of the ladder unless you had
a clear line of sight to go further from your
starting position.
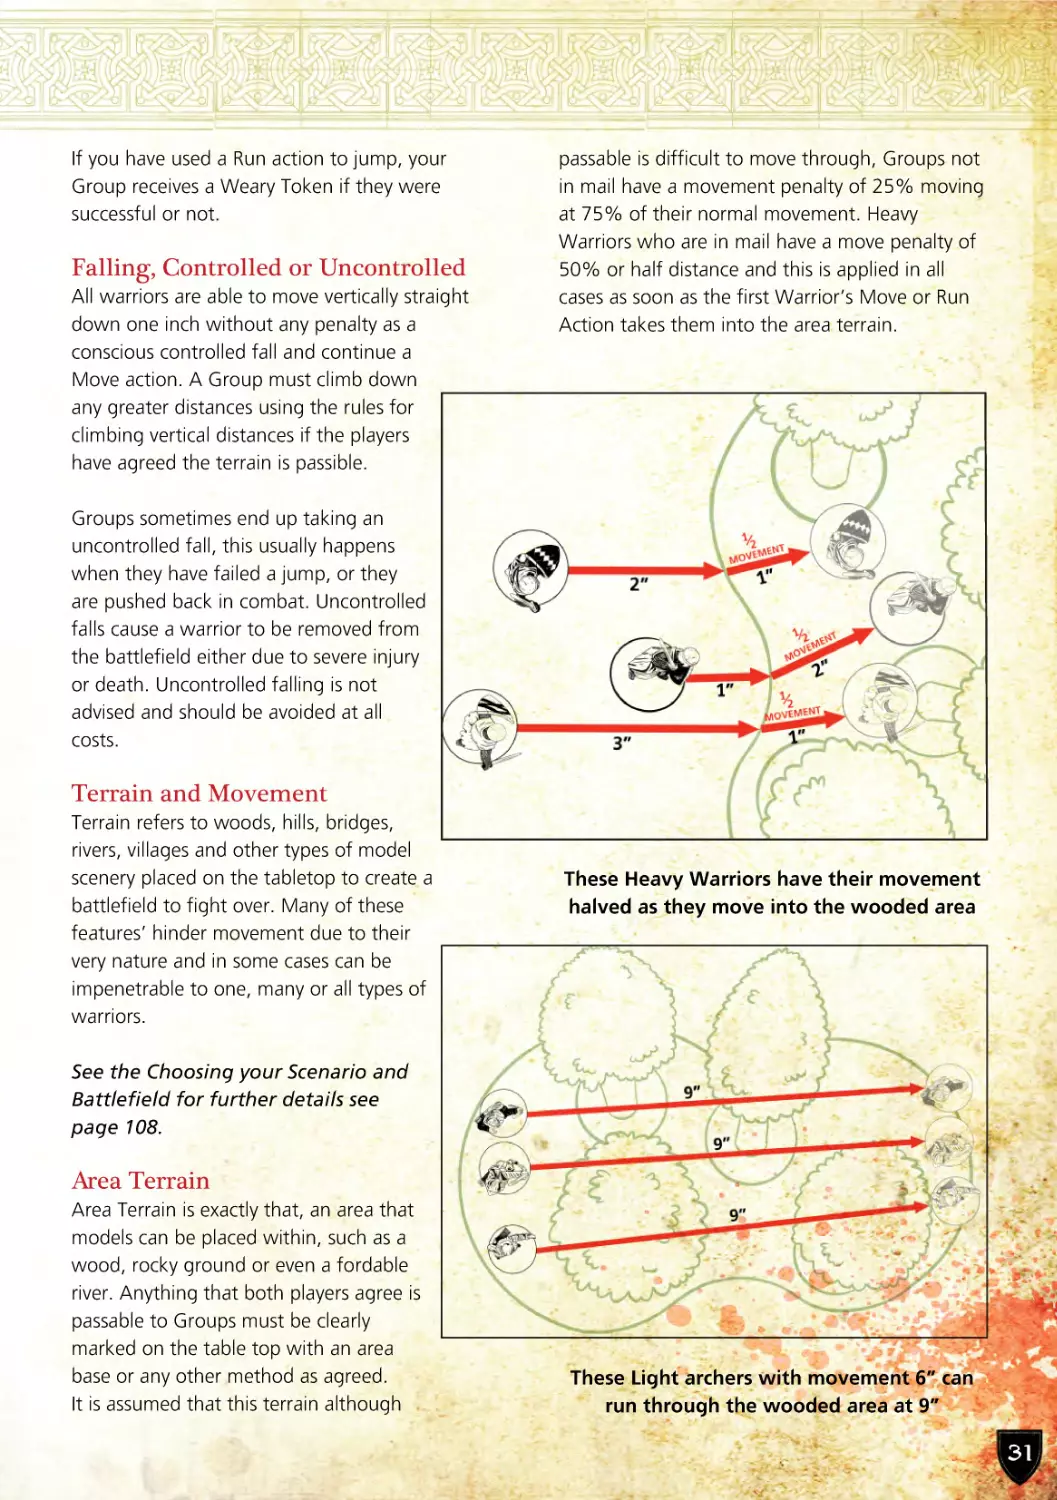
A Group may declare a Combat Action to charge
up or down a ladder, they must have clear line of
sight to their enemy, charge in a straight line and
be able to reach their intended target.
When using a ladder, at least one of the Warriors
must be able to reach the top or bottom as part
of that Action if they cannot they end their
movement at the ladder.
To traverse the vertical distances players have
agreed are passable measure to make sure
warriors can successfully climb the distance as a
single Run Action. The terrain is classed as
difficult terrain and the warriors receive a Weary
Token when they have scaled up or down the
surface.
Jumping
As part of a Move or Run Action, as well as
charging into melee, a Group can attempt to
jump any distance up to their Movement value
minus two inches - this initial 2” is used to
indicate the minimum run up needed to get
airborne even if there isn’t two inches between
the warrior and the gap on the tabletop.
Examples of maximum jumping distances:
Movement of 4 is 2”
Movement of 6 is 4”
Movement of 8 is 6”
Movement -2” = Maximum jumping distance
Measure the jump distance in inches as part of
your Movement or Combat Action and determine
if your Group is able to jump the distance. To
make the jump roll a d10 for each Warrior in the
group where a score equal to or higher than the
distance you are jumping is a success. Move your
successful Warriors as normal the full distance.
These warriors are able to charge up the
ladder and into their enemy as they had line
of sight, if the enemy is at the top of the
ladder make room for the attacking model
so they are in base to base combat.
30
If you roll lower than the distance you are
jumping you have failed, and your Warriors fall
into the gap, place them below the jump as close
to the side they were starting from as possible.
Your Warriors are now subject to an
Uncontrolled Fall, see Falling, Controlled or
Uncontrolled.
Please note as in all things a ‘0’ is always a
success and a ‘1’ is always failure.
If you have used a Run action to jump, your
Group receives a Weary Token if they were
successful or not.
Falling, Controlled or Uncontrolled
All warriors are able to move vertically straight
down one inch without any penalty as a
conscious controlled fall and continue a
Move action. A Group must climb down
any greater distances using the rules for
climbing vertical distances if the players
have agreed the terrain is passible.
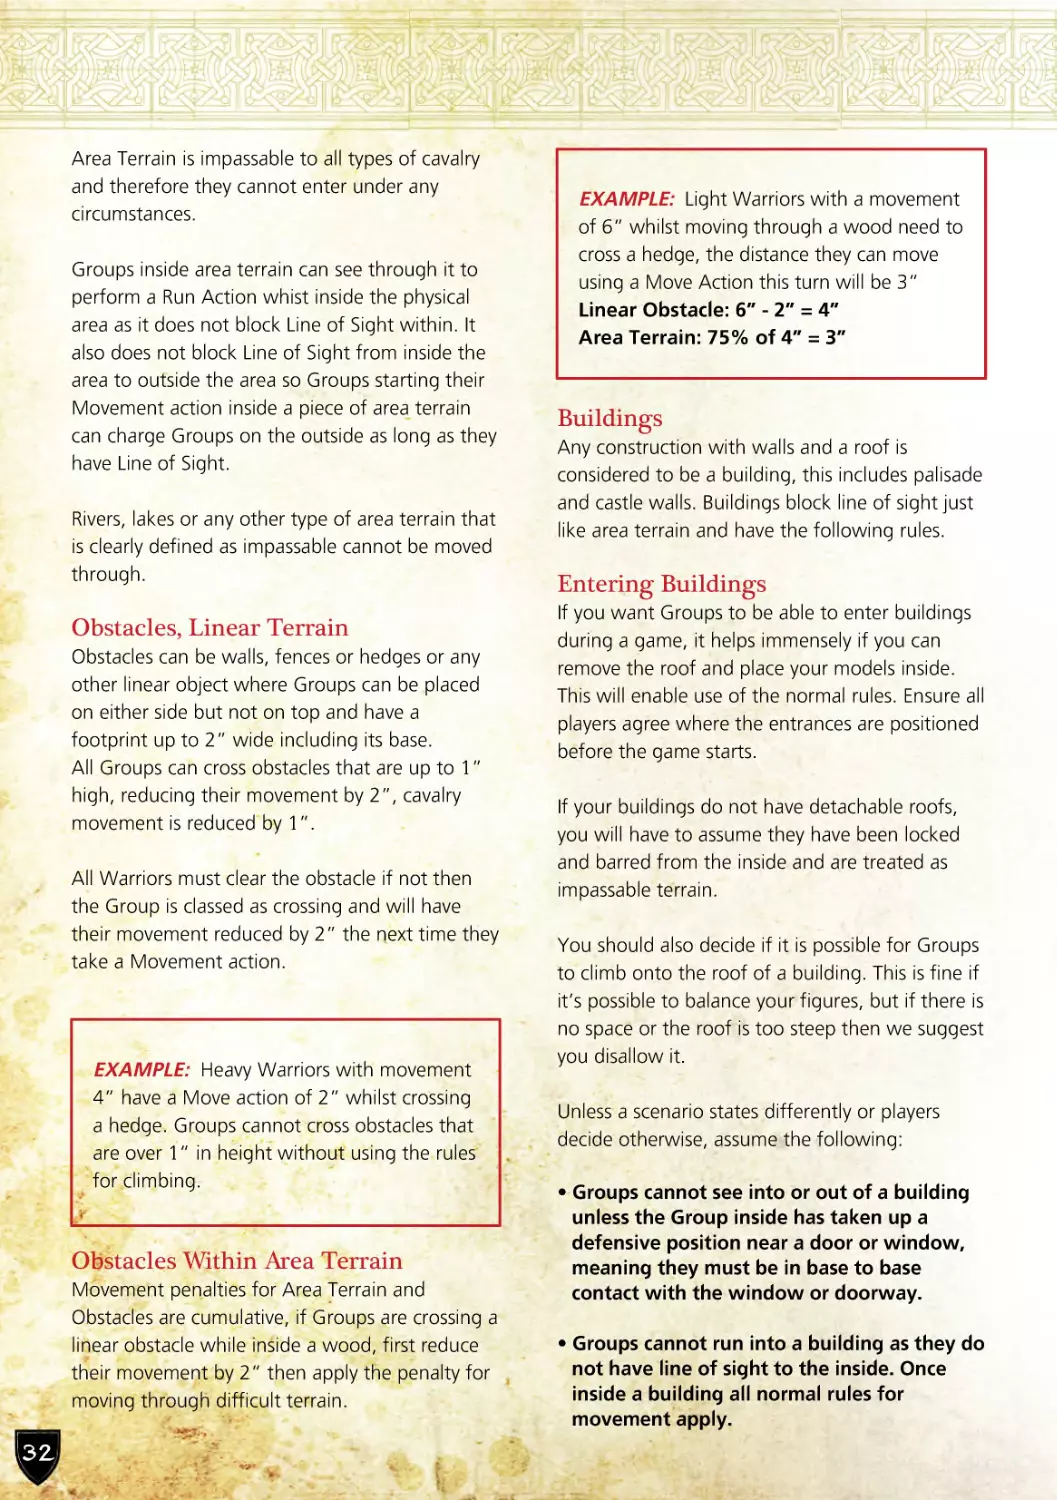
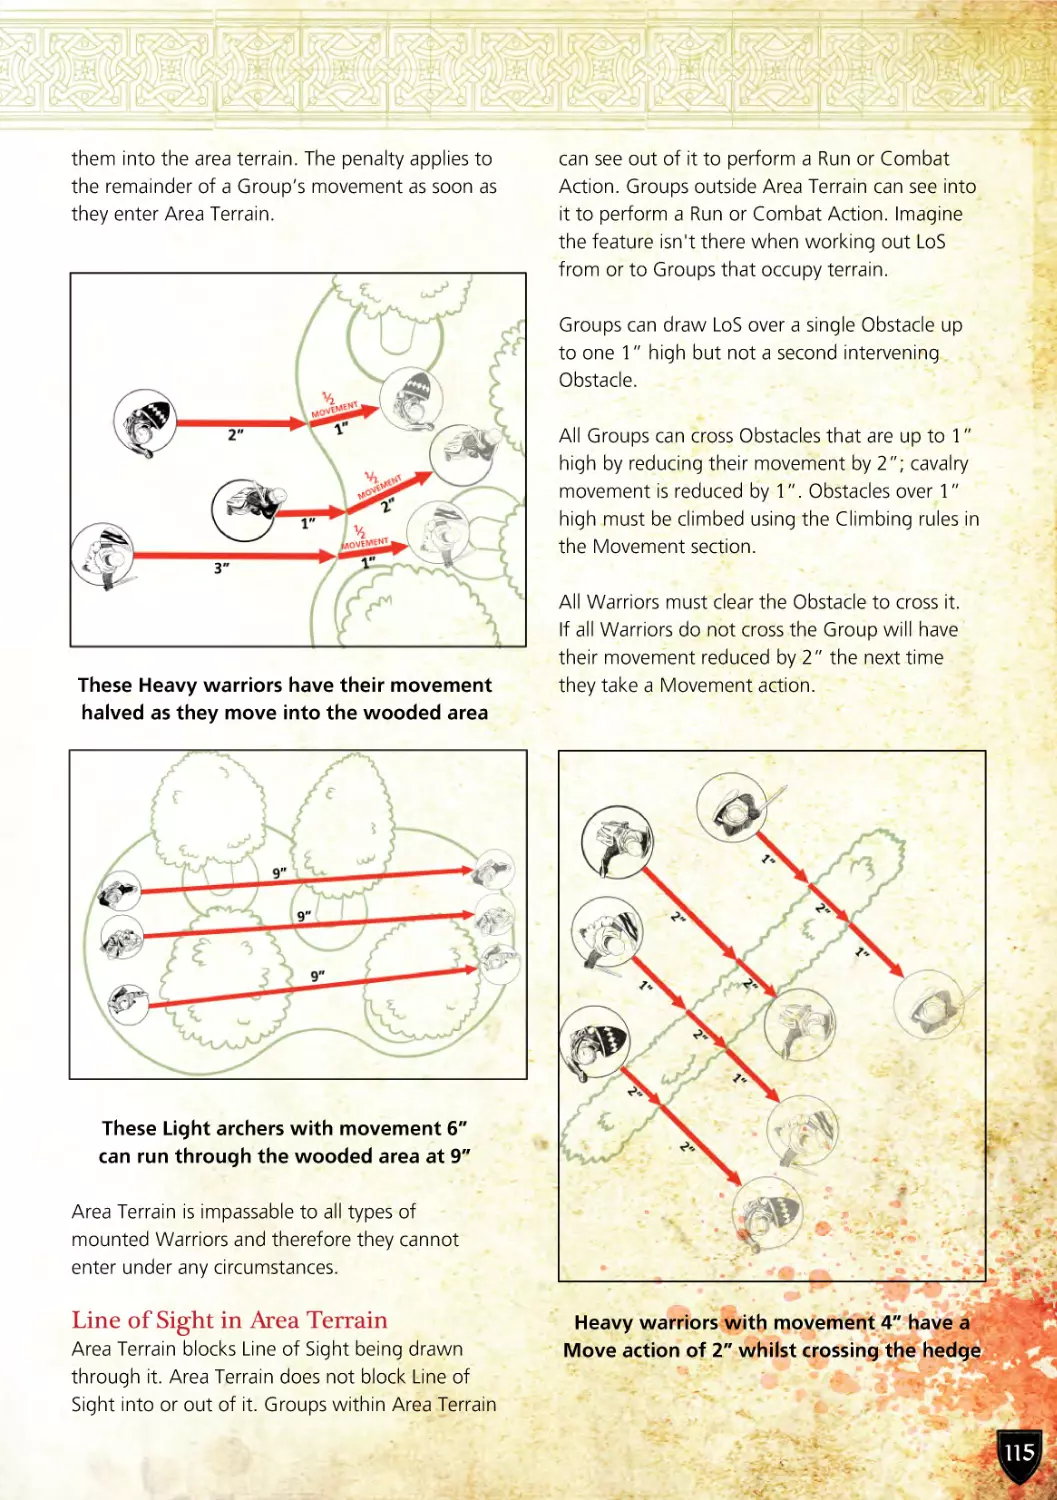
passable is difficult to move through, Groups not
in mail have a movement penalty of 25% moving
at 75% of their normal movement. Heavy
Warriors who are in mail have a move penalty of
50% or half distance and this is applied in all
cases as soon as the first Warrior’s Move or Run
Action takes them into the area terrain.
Groups sometimes end up taking an
uncontrolled fall, this usually happens
when they have failed a jump, or they
are pushed back in combat. Uncontrolled
falls cause a warrior to be removed from
the battlefield either due to severe injury
or death. Uncontrolled falling is not
advised and should be avoided at all
costs.
Terrain and Movement
Terrain refers to woods, hills, bridges,
rivers, villages and other types of model
scenery placed on the tabletop to create a
battlefield to fight over. Many of these
features’ hinder movement due to their
very nature and in some cases can be
impenetrable to one, many or all types of
warriors.
These Heavy Warriors have their movement
halved as they move into the wooded area
See the Choosing your Scenario and
Battlefield for further details see
page 108.
Area Terrain
Area Terrain is exactly that, an area that
models can be placed within, such as a
wood, rocky ground or even a fordable
river. Anything that both players agree is
passable to Groups must be clearly
marked on the table top with an area
base or any other method as agreed.
It is assumed that this terrain although
These Light archers with movement 6” can
run through the wooded area at 9”
31
Area Terrain is impassable to all types of cavalry
and therefore they cannot enter under any
circumstances.
Groups inside area terrain can see through it to
perform a Run Action whist inside the physical
area as it does not block Line of Sight within. It
also does not block Line of Sight from inside the
area to outside the area so Groups starting their
Movement action inside a piece of area terrain
can charge Groups on the outside as long as they
have Line of Sight.
Rivers, lakes or any other type of area terrain that
is clearly defined as impassable cannot be moved
through.
Obstacles, Linear Terrain
Obstacles can be walls, fences or hedges or any
other linear object where Groups can be placed
on either side but not on top and have a
footprint up to 2” wide including its base.
All Groups can cross obstacles that are up to 1”
high, reducing their movement by 2”, cavalry
movement is reduced by 1”.
All Warriors must clear the obstacle if not then
the Group is classed as crossing and will have
their movement reduced by 2” the next time they
take a Movement action.
EXAMPLE: Heavy Warriors with movement
4” have a Move action of 2” whilst crossing
a hedge. Groups cannot cross obstacles that
are over 1” in height without using the rules
for climbing.
Obstacles Within Area Terrain
Movement penalties for Area Terrain and
Obstacles are cumulative, if Groups are crossing a
linear obstacle while inside a wood, first reduce
their movement by 2” then apply the penalty for
moving through difficult terrain.
32
EXAMPLE: Light Warriors with a movement
of 6” whilst moving through a wood need to
cross a hedge, the distance they can move
using a Move Action this turn will be 3”
Linear Obstacle: 6” - 2” = 4”
Area Terrain: 75% of 4” = 3”
Buildings
Any construction with walls and a roof is
considered to be a building, this includes palisade
and castle walls. Buildings block line of sight just
like area terrain and have the following rules.
Entering Buildings
If you want Groups to be able to enter buildings
during a game, it helps immensely if you can
remove the roof and place your models inside.
This will enable use of the normal rules. Ensure all
players agree where the entrances are positioned
before the game starts.
If your buildings do not have detachable roofs,
you will have to assume they have been locked
and barred from the inside and are treated as
impassable terrain.
You should also decide if it is possible for Groups
to climb onto the roof of a building. This is fine if
it’s possible to balance your figures, but if there is
no space or the roof is too steep then we suggest
you disallow it.
Unless a scenario states differently or players
decide otherwise, assume the following:
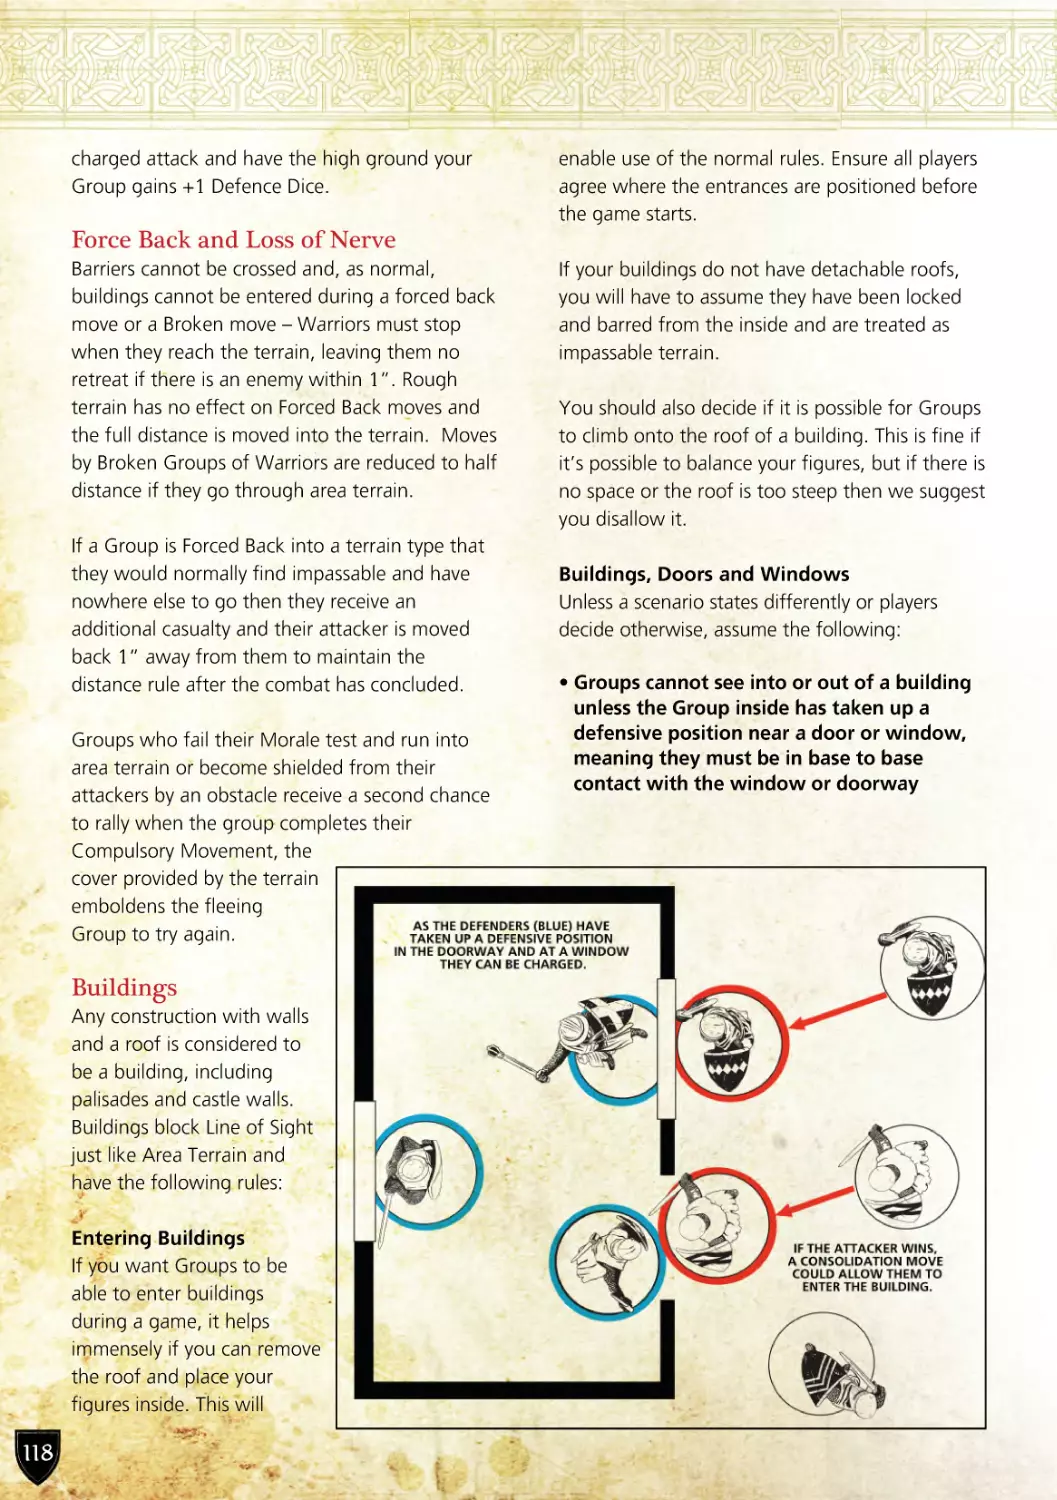
• Groups cannot see into or out of a building
unless the Group inside has taken up a
defensive position near a door or window,
meaning they must be in base to base
contact with the window or doorway.
• Groups cannot run into a building as they do
not have line of sight to the inside. Once
inside a building all normal rules for
movement apply.
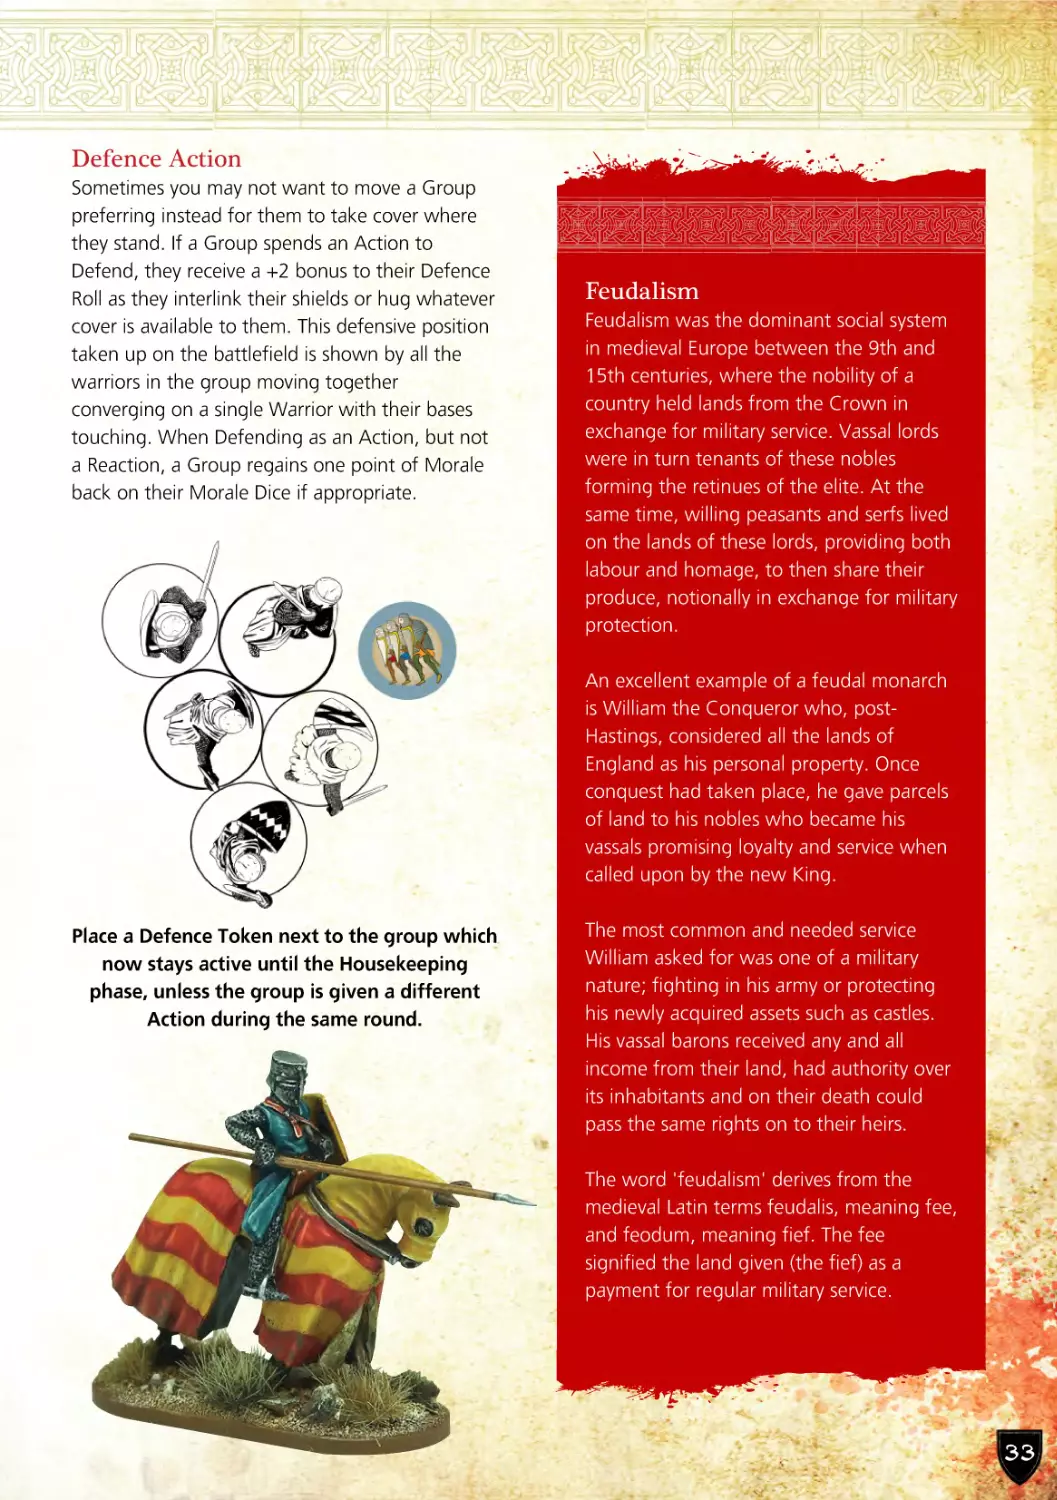
Defence Action
Sometimes you may not want to move a Group
preferring instead for them to take cover where
they stand. If a Group spends an Action to
Defend, they receive a +2 bonus to their Defence
Roll as they interlink their shields or hug whatever
cover is available to them. This defensive position
taken up on the battlefield is shown by all the
warriors in the group moving together
converging on a single Warrior with their bases
touching. When Defending as an Action, but not
a Reaction, a Group regains one point of Morale
back on their Morale Dice if appropriate.
Feudalism
Feudalism was the dominant social system
in medieval Europe between the 9th and
15th centuries, where the nobility of a
country held lands from the Crown in
exchange for military service. Vassal lords
were in turn tenants of these nobles
forming the retinues of the elite. At the
same time, willing peasants and serfs lived
on the lands of these lords, providing both
labour and homage, to then share their
produce, notionally in exchange for military
protection.
An excellent example of a feudal monarch
is William the Conqueror who, postHastings, considered all the lands of
England as his personal property. Once
conquest had taken place, he gave parcels
of land to his nobles who became his
vassals promising loyalty and service when
called upon by the new King.
Place a Defence Token next to the group which
now stays active until the Housekeeping
phase, unless the group is given a different
Action during the same round.
The most common and needed service
William asked for was one of a military
nature; fighting in his army or protecting
his newly acquired assets such as castles.
His vassal barons received any and all
income from their land, had authority over
its inhabitants and on their death could
pass the same rights on to their heirs.
The word 'feudalism' derives from the
medieval Latin terms feudalis, meaning fee,
and feodum, meaning fief. The fee
signified the land given (the fief) as a
payment for regular military service.
33
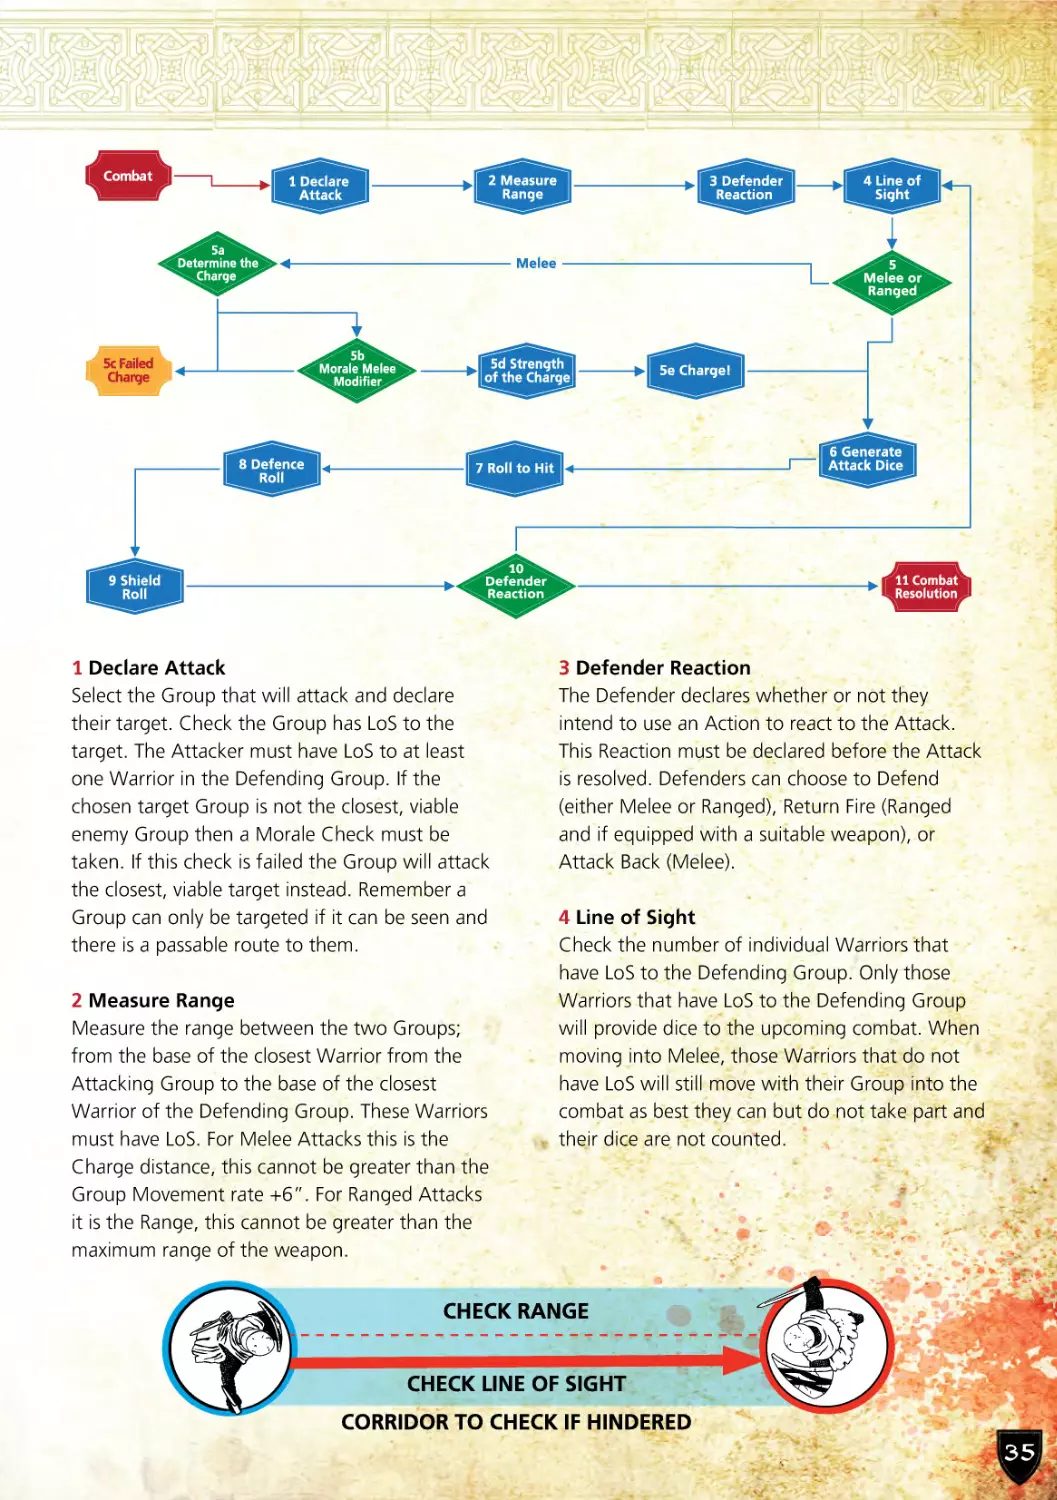
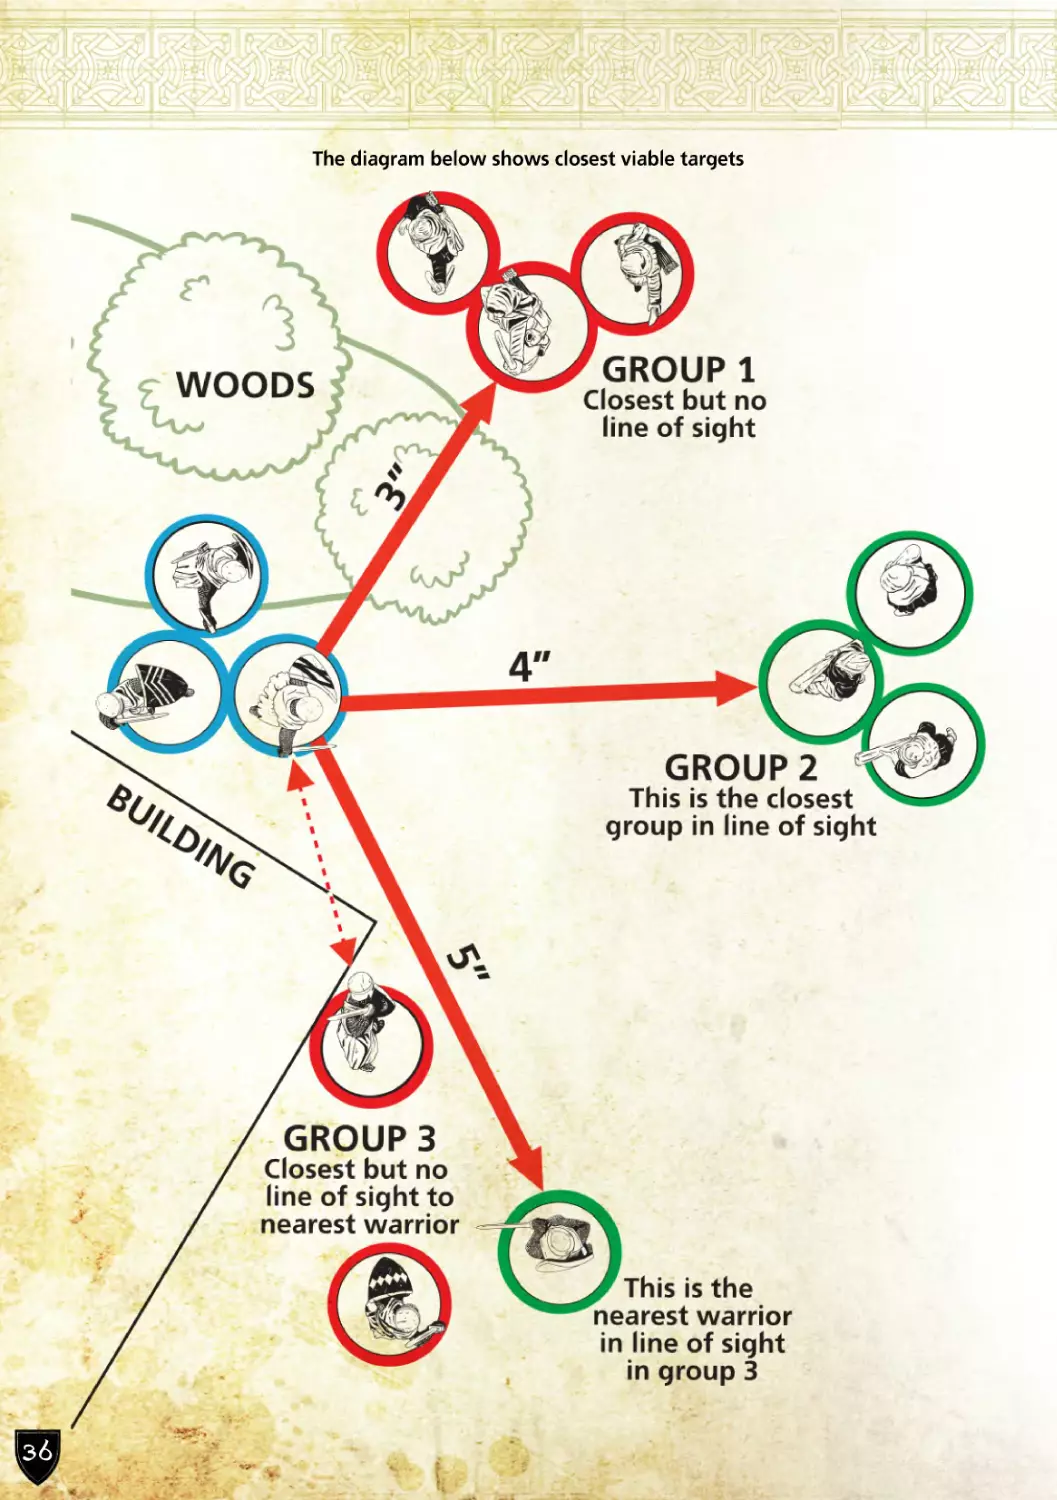
COMBAT
All warriors face the uncertainty of
combat with many factors deciding if
they will survive each encounter.
Warriors more capable than their
companions, through feats of bravery
and skill, may rise, to be called heroes
among their peers.
The Rules of Combat
There are two types of Combat Actions, Ranged
Attacks and Melee Attacks. The target of a
Combat Action can React using an Action of their
own. The Combat Action initiated by the
Attacker and Reaction initiated by the Defender
are the two sides of combat. The Combat Action
Token is used for both Ranged and Melee
Attacks.
Combat is between individual Groups only; a
Group cannot attack, and cannot be attacked by,
more than one Group during a single Combat
Action. No contact with more than one Group at
a time is allowed.
Line of Sight (LoS) and Combat
You must be able to see what you want to
attack. This is Line of Sight (LoS) which is covered
in General Principles and Rule Conventions on
page 11.
Attacker and Defender
The Group that declares a Combat Action is the
Attacker. The target of that Combat Action is the
Defender.
Attack Dice
Attack Value
The Attack Value from the Warrior Profile differs
depending on experience, skill, and weapon
characteristics and is used by the Group when
Attacking. Commanders, Veterans and Named
Characters will often have a lower Attack Value
and are capable of great feats on the battlefield.
Movement
Attack
Defence
Morale
Actions
6
6+
7+
3+
1
Defence Value
The Defence value from the Warrior Profile is
calculated based on the Armour they are wearing
and their experience level. Warriors can be
equipped with only one type of Armour, but may
also have a shield. All Warriors in a Group must
be equipped with the same Armour. This gives all
Warriors the same Defence value.
34
Movement
Attack
Defence
Morale
Actions
6
6+
7+
3+
1
This is the number of dice rolled corresponding to
the number of Attackers involved in the Combat
Action. Where a Group gains or loses Attack Dice,
the player who owns the Group chooses which
dice this affects. This is important where you have
Groups with mixed Attack scores such as
Command Groups. You will probably want
to subtract from the weaker
Warrior’s dice and add to your
Commanders dice!
The Combat Process
Combats follow the same
steps; with some differences
between Melee and
Ranged Actions. When a
Combat involves the
throwing of an object at
an enemy, like a javelin,
or firing a weapon, like a
bow, then that is a Ranged
Combat. A Combat that
involves standing toe to toe
with your enemy and
smashing them with
a weapon, or a fist,
is a Melee Combat.
1 Declare Attack
Select the Group that will attack and declare
their target. Check the Group has LoS to the
target. The Attacker must have LoS to at least
one Warrior in the Defending Group. If the
chosen target Group is not the closest, viable
enemy Group then a Morale Check must be
taken. If this check is failed the Group will attack
the closest, viable target instead. Remember a
Group can only be targeted if it can be seen and
there is a passable route to them.
2 Measure Range
Measure the range between the two Groups;
from the base of the closest Warrior from the
Attacking Group to the base of the closest
Warrior of the Defending Group. These Warriors
must have LoS. For Melee Attacks this is the
Charge distance, this cannot be greater than the
Group Movement rate +6”. For Ranged Attacks
it is the Range, this cannot be greater than the
maximum range of the weapon.
3 Defender Reaction
The Defender declares whether or not they
intend to use an Action to react to the Attack.
This Reaction must be declared before the Attack
is resolved. Defenders can choose to Defend
(either Melee or Ranged), Return Fire (Ranged
and if equipped with a suitable weapon), or
Attack Back (Melee).
4 Line of Sight
Check the number of individual Warriors that
have LoS to the Defending Group. Only those
Warriors that have LoS to the Defending Group
will provide dice to the upcoming combat. When
moving into Melee, those Warriors that do not
have LoS will still move with their Group into the
combat as best they can but do not take part and
their dice are not counted.
35
The diagram below shows closest viable targets
36
5a Determining the Charge! (Melee only)
If the distance between the two groups is less
than the attacking Group's Movement
characteristic, as shown on their Warrior Profile,
then the Charge is successful, and melee
commences.
When the distance is greater than the Group’s
Movement characteristic then the Attacker rolls a
d6 and adds this to the base Movement rate.
Where this number is greater than or equal to
the Charge distance the Charge can proceed.
Where this number is less than the Charge
distance the Charge fails. You cannot declare a
charge you cannot make.
5b Morale Melee Modifier (Melee only)
As well as affecting Morale Checks, Morale Dice
also affect Melee Combat. Warriors whose
Morale is high will often perform better in melee
combat than Warriors whose Morale has taken a
dent. Attacks are either augmented or depleted
based on current values shown on the
combatant's Morale Dice.
Before any Attack Dice are rolled in anger,
subtract the current score shown on the
Attacker’s Morale Dice from the score on the
Defender's Morale Dice. Cross-reference this
difference in Morale and apply the Attack
Modifier from the table below.
Morale Melee Combat Modifier Table
Difference in
Morale Attack Modifier
-4 or more
Must pass a Morale Check
to charge, -1 Attack Dice
-1 to -3
-1 Attack Dice
0
No effect
+1 to +3
+1 Attack Dice
+4 or more
+2 Attack Dice
EXAMPLE: The Defending Group’s Morale
Dice currently has a value of 5 and the
attacking group’s Morale dice currently has a
value of 1, 5 – 1 = +4 which means for this
Combat Action the Attacking Group receive
+2 Attack Dice to reflect their vastly superior
Morale.
In a different Combat melee, the Defenders
Morale Dice currently has a score of 2 and
the Attackers Morale Dice has a score of 6
2 – 6 = -4 which means our Attacking
Group must first pass a Morale Check to
even initiate a charge, and if successful they
receive -1 Attack Dice, this was probably not
the best Action to take.
5c Failed Charge (Melee only)
When a Charge fails due to a failed Morale
Check then the Charge stalls and the Group
stubbornly refuses to move. When a Group does
not get enough distance on their Charge (see 5a)
they will stumble forward towards their initial
target. Roll a d6 and move the Group directly
towards the Defender that number of inches.
5d Strength of the Charge! (Melee only)
Not all charges are equal. When rolling for the
Charge distance a 1 is bad and a 6 good.
A 6 gives the Attacker an extra Attack Dice;
conversely a 1 causes the Attacker to lose an
Attack Dice. You must still roll a d6 even if all
that is needed is one extra inch to reach the
enemy for this reason.
5e Charge! (Melee only)
On a successful Charge the Attacker is now
allowed to shout “CHARGE!” and move their
Group into base to base contact with their
intended target. As part of this Move at least one
of the Attacking Warriors must be able to reach a
Defending Warrior. This Charge is similar to the
Run Move from the MOVEMENT section and
follows the same rules (other than distance
travelled and they do not cause a Group to become
Weary); and yes, you can jump into Combat!
37
Select your first Warrior from the charging Group
and move them towards the enemy; this Warrior
does NOT have to reach base to base combat
with an enemy. Charge the remaining Warriors
from this Group individually using the same
maximum charge range for all. At least one
Warrior must reach base to base contact with an
enemy Warrior. All Warriors that are in charge
range and can reach a Defending Warrior must
be moved into base to base contact.
For Melee Attacks, Warriors count in the melee if:
The Charging Group maintains Group Coherency
if you can position all Warriors from the same
Group within 2" of the first Warrior who
charged, or within 3" for Cavalry. When a Group
charges into combat it does not have to stay in
Coherency. The Group can carry out melee even
if members lose coherency during to the charge.
Groups out of Coherency suffer -1 Attack dice
during the Combat Action.
• Started their charge with clear Line of
Sight of an enemy Warrior.
6 Generate Attack Dice
For Ranged Attacks, all Warriors with LoS at the
start of the Attack will fire. Add up their Attack
Dice, this is the number of dice that will be
rolled. Remember if the shot is Hindered then
remove 1 Attack Dice from the pool for every
Group Hindering the Attacking Group.
7 Roll to Hit
The Attacking Warriors' Attack Characteristic
indicates the number needed to score a
successful hit. Each dice rolled that equals or is
greater than this number is a hit. Apply any dice
modifiers that apply after the dice are rolled.
• In base to base contact with an enemy
• Within 1" of any Warrior from their Group
who is in base to base combat with an
enemy. An element of common sense is
required here. If warriors are only
fractionally apart due to the vagaries of
scenery, they count as being in base
contact.
Add together the Attack Dice of all Warriors
involved in the Combat then apply any modifiers
that apply. Remember to remove an Attack Dice
if the charge is Hindered and to add or subtract
any Morale Melee Modifier or Charge Strength
Modifier. This is the number of dice to be rolled.
All natural '0s' rolled count as successes which
can only be defended by rolling a natural 0 and
are put to one side.
8 Defence Roll
The Defender now rolls the number of d10 equal
to the number of successes the Attacker has
rolled. The score needed to defend successfully is
determined by the Defending Warriors Defence
Characteristic. Each successful Defence Roll
blocks one successful Attack Roll.
Defence Reaction
If the Defending Warriors choose to react by
spending an Action as a Defence Reaction, they
receive a +2 bonus to their Defence Roll. Place a
Defence Token next to the Group; which now
stays active until the Housekeeping phase, unless
38
the Group is given a different Action during the
same Game Round. At the conclusion of the
Combat Action, unless Broken or Shocked, the
Defending Group takes up a defensive position
on the battlefield shown by all Warriors in the
Group moving together with their bases
touching. This is carried out during Combat
Resolution after any Forced Back moves or
Morale Checks have taken place but before
Regrouping.
IMPORTANT: Attack Rolls of 0 verses
Successful Damage Rolls
Natural 0 attacks are only nullified if the
defender also scores 0s in defence. When
defending against any attack, successful
Defence Rolls are first attributed to any 0s
scored by the attacking player even though
they fail to defend the attack.
If Defending Warriors have been equipped
with shields any failed Defence Rolls can
now be re-rolled as Shield Rolls.
9 Shield Roll
If a Warrior is armed with a shield they may
re-roll any failed Defence Rolls. The size of the
shield, small (9+), medium (8+) or large (7+)
determines the score needed for success with the
'Shield Roll'. A '0' is always a successful roll.
Note: Shield Rolls cannot block a natural 0 hit
and Defence Action bonus’ do not affect the
Shield Roll.
A Defence roll of a natural 1
It is important to note that you may not use a
Shield Roll for any natural 1s rolled on a Defence
Dice and you cannot re-roll successful Defence
Rolls; only Shield Rolls for unsuccessful defence
scores are allowed.
EXAMPLE: The Attacking player rolls five
d10 in attack needing a 5+ and scores 0, 0,
8, 6 and 3. Four of these dice are successful.
The Defender now rolls four d10 to defend;
needing a 6+ scoring 0, 9, 6 and 1.
The Defender only managed to block one of
the Attackers 0s with their own 0, the 9 is
used against the other 0 but does not block
it, and the 6 successfully blocks one of the
other hits. The 1 fails to defend and leaves
two successful hits. If the Defender had
shields, they would now be able to make a
Shield Roll. However, in this example as the
only failed defence roll was a 1 it cannot be
rerolled as a Shield Roll so is ignored.
10 Defender Reaction
If the Defender has chosen an active Reaction,
Return Fire or Attack Back, then this takes place
now. If they have chosen not to React, or were
unable to do so, then it's time for Combat
Resolution.
Return Fire
Defending Groups who are shot at, and armed
with ranged weapons, can spend an Action to
Return Fire if the Attacker is within short range.
Once this initial Ranged Attack has been
concluded any surviving Defending Warriors now
Return Fire at their Attacker. Return to the Line of
Sight Combat Phase and shoot back carry out a
Ranged Attack as above.
Attack Back
Defending Groups who are attacked in melee can
spend an action to Attack Back. The Attacker
carries out their Attack first and all casualties are
removed. Once the initial Attack has been
concluded any surviving Defending Warriors who
are counted as in melee can attack back. Return
to the Line of Sight Combat phase (see 4) and
carry out a Melee Attack. Defensive Attacks will
gain no dice from the Charge, or lose any, but are
affected by the Morale Melee Modifier so that
does need to be accounted for. They do not need
to check to Charge as they are already involved in
Combat!
11 Combat Resolution
If there are no successful hits then a Ranged
Attack ends now. No Groups are moved.
39
Once all Attacks are resolved total up the number
of casualties each side has suffered. The Group
that has caused the most casualties wins the
Combat and Forces Back the opposing Group. If
casualties are equal then this is a draw and both
Groups are Forced Back.
Morale Effects
Whenever a casualty is caused, it has an impact
on Morale as represented by a Morale Dice. Each
time a Group takes a casualty increase the score
on the Morale Dice by 1, multiple casualties are
counted separately. If a Group does not have a
Morale Dice, due to having taken no casualties,
take one and place it next to the group.
Indicating the number of casualties.
Forced Back
When Forced Back a Group moves 1” plus 1” for
every casualty they have taken in that Combat.
i.e. a Group that takes 2 casualties and is Forced
Back will move back 3” (1” +2”). A Group that is
forced back must move away from their attacker.
If there is a friendly Group in the way of a Forced
Back move, move those friendly Warriors the
minimum distance needed to allow the
compulsory move to take place and make sure
both friendly Groups finish at least 1" apart.
position after being Forced Back), the Warriors
are Trapped. If there is nowhere else to go they
gain a further casualty. The new casualty must be
recorded on a Morale Dice, increasing the score
by one.
Forced Off The Table
A Forced Back move can send Warriors partially
or entirely off the edge of the battlefield. If this
happens, the Warrior is removed from play as
they are considered to have fled. Please note
that 'partially' means exactly that; if any part of a
base from a Warrior leaves the table, they flee.
At this point check to see if the Group needs to
take a Morale Check. See the Morale section on
page 44 for more details.
Morale Check
Once Groups have finished their Forced Back
moves check for Morale. A Morale Check is
needed if a Group has lost a cumulative 25% of
the number of starting Warriors in the Group.
Once a Group has lost 25% they will check
Morale after every subsequent casualty. If no
Morale Check is needed the Combat Action is
completed and players move onto the next
Action. If a Morale Check is failed the Group is
Broken, place a Broken Token next to the Group
who are then immediately moved their full
Movement directly away from their
attacker.
Regrouping
Trapped!
40
Enemy figures, on the other hand, do not move
out of the way and prevent the full compulsory
move taking place. If enemy Warriors lie in the
path (or would be within 1" of the Warriors' final
Winners of Melee Combat are allowed
a free Move Action to regroup as the
final part of their Combat Action. The
intention behind this extra movement
is to enable winning Groups to take
objectives, grab cover and more
importantly regroup to maintain
coherency after a frenetic melee. In all
cases the Group must finish this consolidation
move 1" away from any enemy Groups.
After the losing Group is Forced Back, select a
Warrior from the winning Group to move up to
their maximum basic movement in inches then
move the remaining Warriors establishing Group
Coherency.
Terrain and Combat
Terrain refers to woods, hills, bridges, rivers,
villages and other types of model scenery placed
on the tabletop to create a battlefield to fight
over. Many of these features' hinder combat due
to their very nature and in some cases can be
impenetrable to one, many or all types of
combatants. The least exciting type of terrain, for
us, is open ground which is represented by the
flat table surface and is usually the predominant
terrain type on the tabletop; it does not impede
combat at all.
Why is terrain important when it comes to
combat? Simply put, it provides your warriors
with much-needed cover and defendable
positions, increasing their chances of survival in
the face of ranged attacks and also in vicious
hand-to-hand melee. It also gives bonuses when
warriors attack from a height, allowing them a
chance of victory in a situation they might
otherwise be unable to win.
See the CHOOSING YOUR SCENARIO AND
BATTLEFIELD section on page 109 for more
details.
Ranged Attacks
Terrain hinders Ranged Attacks in precisely the
same way as if enemy Groups were blocking LoS
unless the shooting Group is touching the terrain.
Every individual piece of terrain that is
partially inside the base width
path causes an attacking
Group -1 Attack Dice.
See Hindered Attacks on
page 14 in the GENERAL
PRINCIPLES AND RULE
CONVENTIONS section.
Melee Attacks
If impassable terrain lies in the path of a Group’s
charge, then the charging Group may not attack.
Some terrain will block LoS; any Warrior that
charges through LoS blocking terrain can NOT be
included in the combat.
Forced Back and Broken
Barriers cannot be crossed, and buildings cannot
be entered during a compulsory Forced Back or
Broken move. Groups must stop when they reach
this type of terrain, leaving them no retreat if
there is an enemy within 1", causing an extra
casualty. Difficult terrain does not affect Force
Back moves. Broken moves are reduced to half
distance if they go through area terrain and this
adjustment is made as soon as a Group enters
the area.
Defence Bonuses for Occupying Terrain
Groups would be wise to make good use of
terrain to protect themselves. Taking up
defended positions behind an obstacle, in a
wood or a doorway grants them a defence bonus
and increases survivability.
Area Cover
Warriors are within cover if the centre of their
base lies within a terrain area that offers a Cover
Bonus to their Defence Roll. More than half of
the Group must be inside the area terrain to
receive the Defence Bonus. While a Group
remains in cover they will receive a bonus to their
Defence Dice. When a Group is Forced Back they
will continue to receive the cover bonus if the
cover rule still applies.
Defensive Positions
When a Group is placed behind an obstacle, with
their bases touching it, that Group is in cover
from any enemy drawing LoS over the obstacle.
Groups in a defensive position remain so as long
as they keep the obstacle between them and
their enemy! As soon as a Group makes a Move
Action, or are Forced Back, away from the
obstacle, so that less than half the Warriors in the
41
Group have bases touching it, they
are no longer in a defensive
position.
This is covered in more detail
in the Choosing
your Scenario and
Battlefield section on
page 118.
Higher Ground
Higher ground always grants
the Attacker an advantage; if
shooting or charging from a position
that is clearly higher than the target, such as on a
hill, a Group adds +1 to the result of their Attack
Dice. A Group defending a melee attack while on
higher ground adds +1 to their Defence Dice. In
both cases common sense is needed here.
Hills block Line of Sight only if the two
Warriors are on opposite sides and at
ground level with the hill between
them. Warriors on hills can see
and be seen over barriers
negating a Defensive
Position if the obstacle is
below the Attacker.
42
43
MORALE
You have spent your time carefully
mustering your retinue, you’ve
formulated a cunning plan to ensure
victory against your opponent, and
then morale rides onto the battlefield
messing everything up for you.
When to Test
Warfare is an unpredictable business, and it is a
very lucky Commander whose Warriors perform
as expected in every single battle. Surrounded by
the general din and clamour of melee, where
friends and foe alike become casualties; Warriors
can quickly become demoralised. Frightened,
fatigued, and disorientated Warriors decide that
self-preservation is far more appealing than being
a hero.
• Losing a cumulative total of 25%casualties:
When a Group loses a Combat Action and
suffer a cumulative total of 25% casualties
from the total number of Warriors the Group
started with. After the casualties have been
removed and the Morale Dice is changed to
represent the outcome of the combat
The good news is for every Warrior who runs one
will stand in the face of all the horror unleashed
upon them; these are the Warriors that bring
victory.
What Do Morale Checks Represent
Morale Checks represent how your Groups react
when called upon. Morale Checks are the
response to a particular battlefield situation, such
as acting on an order issued by their
Commander, to Action one of their Abilities or to
losing in combat.
When needing to take a Morale Check roll a d10
and compare the result to the Morale
characteristic on the Warrior Profile for the Group
taking the test.
• If the score is equal or higher than the
Warriors’ Morale, they have passed.
• If the score is less than the Warriors’
Morale, they have failed.
The outcome determines how the group may
now act.
44
During a battle, your Groups will be called upon
to take Morale Checks. These instances are
covered in the relevant rules sections; however,
they are also included here in the Morale section
for ease of reference.
• Respond to an Order Action: When a
Commander issues an Order Action the Group
receiving it must take a Morale Check using
their Morale. When successful the Group is
issued the Order; otherwise it is ignored, and
the Action is lost for this round
• Action specific Abilities: Some Abilities
require a Morale Check to activate
• Psychology: Fear, Hatred, and being Berserk
all cause warriors to take a Morale Check, each
for different reasons
• Rally when Broken: As a Compulsory Action a
Morale Check is needed to halt Broken Groups
running towards your table edge.
• Rally when Shocked: As a Compulsory Action
a Morale Check is needed to stop Shocked
Warriors from huddling down and re-join the
battle.
• Improve current Morale: During the
Housekeeping phase, Groups who currently
have a Morale Dice, and are Weary, must take
a Morale Check. If successful, the dice score is
reduced by one or removed where appropriate.
• Losing your Commander: When your
designated Commander is removed from the
battlefield, a Morale Check is needed for
another Warrior with the Command ability to
take over and stop the Retinue from running
• Group Casualties: If a friendly Group is
removed completely any friendly Groups within
6” must take a Morale Check. If their Morale
Check is failed they become Broken receiving a
Broken Token.
Using the Commanders Morale
Groups can make a Morale Check using any
Commander’s Morale characteristic when they
are within a 6” range of a Retinue Command
Group. This demonstrates their desire to perform
well in front of these Warriors of renown (no one
wants to look bad in view of the boss). If a
Command Group contains a Banner Bearer this
range is increased to 12”; it is easier to identify
these heroes at greater distances on the
battlefield.
If a Command Group is Broken or Shocked,
Groups cannot use that Commander’s Morale for
Morale Checks, this includes your Retinue
Commander. When the Command Group rallies
their Morale characteristic can be used as normal.
Groups do not use a Commander’s Morale when
testing to carry out an Order Action. Morale
Checks in this instance are carried out against a
Group’s own Morale characteristic as you are
testing to see if their Morale allows them to
follow the Order or not.
Modifiers
Certain situations make it harder or easier for a
group of warriors to pass a Morale Check. This is
represented by applying modifiers to the Morale
characteristic before the Morale Check is made.
In most cases, modifiers will be indicated by the
Morale Dice, although other modifiers may also
apply. Regardless of these modifiers, a roll of a 1
will always fail, and a 0 always passes.
Morale Dice
All battles ebb and flow, favouring first one
Commander and then the other. A large part of
this is down to the morale of their Warriors.
When things are going well, their blood is up
fighting on against all the odds; if not so well the
next situation can easily be the one that causes
fighting men to turn tail and run! Unless a
catastrophic encounter happens, the loss of
morale will usually occur over the course of a
battle. As easily as a Warriors’ morale
degenerates, it may equally improve as the fight
goes in their favour.
To indicate this, we use a Morale Dice, this
Morale Dice indicates the current modifier to a
Group’s Morale. Casualties caused through a
Combat Action are the most common reason for
a Morale Dice to be added, although not the only
45
reason. Every casualty a Group suffers increases
the value of their Morale Dice by one. The
maximum value on a Morale Dice is six, any
further additions are ignored. Where a Group
currently doesn’t have a Morale Dice their value
is 0.
cause fear but also the terrible stories around
particular warriors whose heraldry is amongst the
enemy troops. Fear applies to the Group that is
affected, not the Group that causes the fear.
When opposing a fear causing Group a Morale
Check must be taken when:
When a Morale Check is taken, the player applies
the current value shown on a Group’s Morale
Dice as a modifier to their Morale score before
testing.
• Groups wish to shoot at a Group that it
fears, and that unit is in charge range
EXAMPLE: My unit of spearmen must take
a Morale Check, their Warrior Profile shows
a Morale characteristic of 4, they currently
have a Morale Dice showing a 2. The Morale
Dice (2) is added to the Morale characteristic
(4) which means to pass this Morale Check
they need to roll a 6 or more on a d10.
The Morale Dice impacts Groups in other ways,
and while in play, these modifiers are applied to
any Group that has one.
Losing a Group
When a Group is totally destroyed, during a
Combat Action, the Command Group containing
the Retinue’s Commander adds +1 to their
Morale Dice as losing Warriors has a negative
effect on a leader’s Morale.
The Psychology of Morale
A sense of self-preservation, outright fear and
pure hatred can all affect a warriors’ actions.
These different states of mind are represented by
the psychology of morale where different groups
react in different ways based on the
circumstances they find themselves in on the
battlefield.
46
Fear
The expectation or anticipation of an unpleasant
or disastrous grisly end usually causes trembling,
heart-pounding, short of breath, vision blurring
fear. Not only the first battles for the uninitiated
• Groups want to charge a Group that it fears,
if failed they may do nothing for the rest of
that Game Round
• Groups are charged by a Group that it fears.
If failed, they are Broken and make an
immediate Run Action directly towards the
player’s table edge
• When a Group takes any casualties during
combat from a Group it fears
Hatred
Backstabbing, feuds and territorial disputes are
the sorts of things which cause Hatred to grow.
Where there is Hatred, there is usually hotheadedness and grudges plenty, so when the
opportunity to attack presents itself; it is difficult
to resist the urge to charge!
• Groups must always charge a Group that it
hates and do so as soon as they come into
range. This can only be stopped if the
Group successfully passes a Morale Check.
• When not in charge range of a visible,
hated Group, a Group armed with missile
weapons, must use their Action to shoot, if
possible, unless they successfully pass a
Morale Check.
• A Group in Melee Combat with a hated foe
can re-roll all missed Attacks. They do not
take a Morale Check if they lose a Combat
Action and are Forced Back as they will
never run from a hated foe.
Berserk
Working themselves up into an absolute frenzy
of bloodlust and carnage, the sole intent of these
warriors is to destroy everything around them
with little care, if any, to their own personal
wellbeing.
• Berserk Groups never take Morale Checks
as they can never be Shocked and are
never Broken. They continue fighting on
against all the odds
• Groups who are Berserk add +2 to their
Attack rolls to represent their combined
fighting prowess. However, they also
suffer -1 to their Defence rolls as they
make no attempt to defend being purely
focused on attack
• Berserk Groups MUST move towards the
enemy and charge the nearest Group at
every opportunity
47
BUILDING YOUR RETINUE
During this period force sizes were not
fixed, Commanders brought to the field
any available warriors that could be
mustered. These were raised from their
own estates or paid for mercenaries,
and often a mix of both. This ‘mixed
bag’ was invariably reflected in the
quality of equipment and the levels of
experience these warriors brought with
them.
With this in mind force selection allows a lot of
freedom, enabling you to build your Retinue; a
freedom to collect, build, paint and play with a
force that appeals to your hobby interests.
All players need a Retinue with which to fight
their way through their upcoming skirmishes.
Before the game starts, players agree on the
number of points available for the game you are
about to play. This is the amount each can spend
on Warriors. By giving everything a Points Value,
we have tried to ensure balance; basic Warriors
are a cheap option with more seasoned, battlehardened Warriors being expensive.
The Retinue
A Retinue is a body of Warriors ‘retained’ in their
service making them ‘retainers’; we are using the
term to indicate the armed Warriors who follow a
Commander of note. These Warriors have an
affinity with their Commanders and are usually
those whom a lord has surrounded themselves
with. Having a retinue was considered a
fundamental aspect of feudalism and acted as a
means of tying Barons to the lower nobility and
the people who work their land.
Each player fights their skirmishes and battles
using their Retinue. In game terms, Retinues are
created from the groups of figures chosen by a
player from the options available to them. All the
48
figures that take to the tabletop making up a
Retinue are classed as Warriors, from Barons to
lowly peasants this term is used to describe them
all. These Warriors are organised in Groups; loose
organisations of Warriors with similar skills and
equipment.
Besides Warriors the only other class is
Commanders. These are Warriors that have the
'Commander' Ability as part of their profile. You
may include any number of Warriors with the
'Commander' Ability; however, only a single
Commander can lead your Retinue at one time.
Commanders are attached to Groups to form
Command Groups.
Retinue Composition
When it comes to creating your Retinue, there
are a few simple rules to adhere to:
• Infantry Groups are a minimum of 3
Warriors, excluding a Commander
• Cavalry groups are a minimum of 2
Warriors, excluding a Commander
• You must include at least one Command
Group
• You can spend up to 50% of your total
points for your Retinue on Command
Groups
• You must spend a minimum of 10% of your
Retinue points on Green Warriors
• There can only be one of each Named
Character on the tabletop at once. Not one
for each Retinue, just one in total!
Where a Retinue has more than one Command
Group; one of the Commanders has to be
nominated as the leader before a game begins.
It must be clear to your opponent which figure is
the overall Retinue Commander and which
Group they are part of.
Building Your Groups (Warrior
Selection)
A Group is a collection of individual Warriors,
assembled together. There is a lot of freedom
when it comes to putting your Groups together
and creating them is quite a satisfying
experience. This is especially true if you provide
each with its own story as you then have the
building blocks for the narrative of your Retinue.
The options available have been included to
reflect the period. These choices fill a variety of
battlefield roles and enable you to customise
your Groups to suit your style of play, a planned
scenario, or just simply the figures you currently
own (or want an excuse to own).
Spend points to equip each Warrior; choosing
from their options listed. The cost of each item is
added to the starting points cost and the Warrior
Profile changed as indicated by the modifier
column.
Each Warrior in a Group must purchase their
Equipment at the points costs per Warrior.
The game treats each Warrior when costing your
Groups as an individual, one figure is one
Warrior. Warriors can have starting equipment
included in their basic points, when you change
their equipment, using the options available; pay
any extra points and replace the starting options
with these new choices.
When you start building your Groups, a Warrior
Profile indicates the starting points cost for a
single Warrior of that type. This profile gives you
their raw ability which can be modifed by adding
Equipment. Each Warrior type has a variety
of different options available in
keeping with their social
standing and battlefield role.
EXAMPLE: Knights have
access to the finest mail
armour and swords,
whereas the levy does
the best it can with
crude hand weapons,
farming implements
and if they are lucky
a spear.
49
SPEARMAN WARRIOR PROFILE
POINTS
ABILITIES
VETERAN
6
5+
7+
3+
1
19
BRACE!
REGULAR
6
6+
7+
4+
1
16
BRACE!
IRREGULAR
6
7+
7+
5+
1
12
-
GREEN
6
8+
7+
6+
1
9
-
EQUIPMENT
NAME
COST PER
WARRIOR
SPEAR
EQUIPPED
EFFECT
REQUIRED
EXPERIENCE
REACH - cannot counter attack against spears unless
armed with a spear
ALL
MODIFIER
OPTIONS
NAME
COST PER
WARRIOR
EFFECT
REQUIRED
EXPERIENCE
BILL
+2
REACH - cannot counter Attack against spear/bill
unless armed with spear/bill. Result of 10 causes 2
damage
ALL
LEATHER/PADDED
+1
MAIL
+2
-1 Defence
-1 Movement
Irregular +
-2 Defence
-2 Movement
Regular +
SMALL SHIELD
+2
9+ Shield roll
ALL
MEDIUM SHIELD
+3
8+ Shield roll
Irregular +
MODIFIER
ABILITIES
Brace!
Forming Groups
Group Size Limits
Warriors feel encouraged when they belong to
Groups; fighting with comrades increases
survivability and enables them to pack a bigger
punch when attacking. Groups are made up of
Warriors of the same type. For example, you
could choose to put five Knights together in one
group and seven Crossbowmen in another
group.
There is no set maximum limit to the number of
Warriors you can include in a Group; but do
consider the rules for group coherency plus bear
in mind in most cases each group only gets one
Action. Therefore a few, large Groups will have
fewer Actions than a Retinue composed of a lot
of smaller Groups.
Groups are decided when building your retinue
and before deployment. Once deployment begins
you cannot dissolve or form new Groups.
Once formed into a Group, each Warrior does
not activate separately and follows the Group
rules. See section ‘Miniature Warriors and
their Groups’ on page 16.
50
There is a minimum limit to the number of
Warriors in a Group:
• Infantry Groups are a minimum of 3 Warriors
excluding a Commander
• Cavalry groups are a minimum of 2 warriors,
excluding a Commander
Both large and small Groups have their merits, and
different Warrior types will perform differently in
different sized Groups. The choice is yours!
Experience
Not all warriors are created equal. Any training
they have received or battles they have
participated in combine to determine their
prowess on the tabletop. We have used quite
generic terms to determine the different
experience levels which are choices on the
individual Warrior Profiles.
Veteran: Warriors who have direct experience of
numerous battles and campaigns.
Regular: Warriors who are full-time soldiers who
have some military skill.
These different levels of experience are reflected
in the stat lines and abilities of the different
Warriors, and reflected by their different points
value.
Choosing Your Warriors, Building
Your Retinue
Before a game each player must choose from the
Warrior profiles to build their Retinue. The size of
the Retinue is dependent on the points limit
agreed by both players, in some cases it can be
stipulated by the scenario you have decided to
play.
Irregular: Warriors that are unpredictable,
variable or even erratic.
Green: Warriors who are inexperienced,
untrained or new to combat.
51
KNIGHTS
Sons of noble birth, who after an apprenticeship as a page and squire were raised to the rank of knight. They
were bound by military tenure measured through military service. A knight was a vassal who served as an elite
fighter, a bodyguard or a mercenary for a lord. Payment came in the form of land holdings, with those with
greater military experience being much sought after. Trained in the use of all knightly weapons, sword, axe,
mace and lance, to fight in heavy mail armour and the use of shield and to expertly ride a horse these warriors
were rightly feared. The distinguishing mark of the knightly class was the flying of coloured banners, to identify
themselves in battle. Knights began displaying a coat of arms, as enclosed helms were developed and the need
for marks of identification arose. With the adoption of unique coloured shields and surcoats, heraldry was born.
FOOT KNIGHT
POINTS
ABILITIES
VETERAN
4
4+
5+
3+
1
24
Chivalry, Live
by the Sword
REGULAR
4
5+
5+
4+
1
21
Chivalry, Live
by the Sword
IRREGULAR
4
6+
5+
5+
1
17
Chivalry
EQUIPMENT
NAME
COST PER
WARRIOR
SWORD
EQUIPPED
MAIL
EQUIPPED
EFFECT
REQUIRED
EXPERIENCE
PARRY - Gain an extra defence dice against sword,
mace or hand weapon
ALL
-2 Movement (applied)
ALL
EFFECT
REQUIRED
EXPERIENCE
MODIFIER
OPTIONS
NAME
COST PER
WARRIOR
MACE
-1
BLUNT TRAUMA - If the target takes casualties
from a mace the target Group Movement is halved
for the remainder of the round
ALL
FALCHION
-1
SLASHING - Target suffers -1 to Defence rolls if
unarmoured or wearing leather/padded
ALL
TWO HANDED
WEAPON
0
SLOW - Will always act second if counter Attacked.
Cannot equip shield with this weapon
ALL
MEDIUM SHIELD
+3
LARGE SHIELD
+5
MODIFIER
-1 Attack
8+ Shield roll
7+ Shield roll
ABILITIES
Chivalry, Live by the Sword
52
ALL
MOUNTED KNIGHT
POINTS
ABILITIES
VETERAN
7
4+
4+
3+
1
27
Chivalry, Live
by the Sword
REGULAR
7
5+
4+
4+
1
24
Chivalry, Live
by the Sword
IRREGULAR
7
6+
4+
5+
1
20
Chivalry
EQUIPMENT
NAME
COST PER
WARRIOR
EFFECT
REQUIRED
EXPERIENCE
SWORD
EQUIPPED
PARRY - Gain an extra defence dice against sword,
mace or hand weapon
ALL
MAIL
EQUIPPED
-2 Movement (applied)
ALL
BARDED HORSE
EQUIPPED
+3 Movement (applied)
ALL
EFFECT
REQUIRED
EXPERIENCE
MODIFIER
OPTIONS
NAME
COST PER
WARRIOR
MACE
-1
BLUNT TRAUMA - If the target takes casualties
from a mace the target Group Movement is halved
for the remainder of the round
ALL
FALCHION
-1
SLASHING - Target suffers -1 to Defence rolls if
unarmoured or wearing leather/padded
ALL
LANCE
+4
Single use, causes shock if any hits are successful.
lances lost if charged. Ignores Shield rolls. Does not
replace sword
ALL
HORSEMAN’S PICK
-1
PIERCING - Ignore armour bonus (target counts as
wearing no armour) (mounted only)
ALL
-1 Movement, requires 2 damage to cause a casualty
when rider is mounted on a War horse. When
charging subject to Over Charge
Regular +
MODIFIER
-1 Attack
BARDED WAR HORSE
+13
+1 Attack
dice per
warrior,
-1 Defence
HORSE
-2
+1 Defence
MEDIUM SHIELD
+3
8+ Shield roll
LARGE SHIELD
+5
7+ Shield roll
ALL
ALL
ABILITIES
Chivalry, Live by the Sword
53
SERGEANTS
If the knight was the nobleman, the sergeant would be thought of as
belonging to a middle class. They fulfilled a role junior to the
knight in the medieval hierarchy. Sergeants fought either as heavy
to light cavalry, or as well-trained professional infantry, either
spearmen or crossbowmen.
Medieval mercenaries were part of this sergeant class, most
notably the high-quality Flemish spearmen and crossbowmen,
who were universally regarded as extremely reliable troops.
FOOT SERGEANT
POINTS
ABILITIES
VETERAN
5
4+
6+
3+
1
22
Martial
Respect
REGULAR
5
5+
6+
4+
1
19
Martial
Respect
IRREGULAR
5
6+
6+
5+
1
16
Martial
Respect
EQUIPMENT
NAME
COST PER
WARRIOR
FALCHION
EQUIPPED
LEATHER/PADDED
EQUIPPED
EFFECT
REQUIRED
EXPERIENCE
SLASHING - Target suffers -1 to Defence rolls if
unarmoured or wearing leather/padded
ALL
-1 Movement (applied)
ALL
EFFECT
REQUIRED
EXPERIENCE
MODIFIER
OPTIONS
NAME
COST PER
WARRIOR
MACE
-1
BLUNT TRAUMA - If the target takes casualties
from a mace the target Group Movement is halved
for the remainder of the round
ALL
SWORD
0
PARRY - Gain an extra Defence dice against sword,
mace or hand weapon
Regular +
POLEARM/BILL
0
REACH - cannot counter Attack against spear/bill
unless armed with spear/bill. Result of 10 causes 2
damage
ALL
Long up to 20"/short up to 10" range. Can move 3"
and shoot at short range. Slow - Will always act
second if counter Attacked. Bodkin - ignore one
Defence die if target is wearing mail at short
range. Causes shock at short range if 25%
casualties are caused.
ALL
MODIFIER
CROSSBOW
0
+1 Attack at
long range
SPEAR
-2
+1 Attack
REACH - Cannot counter Attack against spear/bill
unless armed with spear/bill
ALL
ALL
TWO HANDED
WEAPON
0
-1 Attack
SLOW - Will always act second if counter Attacked.
Cannot equip shield with this weapon
MAIL
+1
-1 Defence
-1 Movement
Regular +
MEDIUM SHIELD
+3
8+ Shield roll
ALL
LARGE SHIELD
+5
7+ Shield roll
Regular +
ABILITIES
Martial Respect
54
MOUNTED SERGEANT
POINTS
ABILITIES
VETERAN
8
4+
6+
3+
1
25
Martial
Respect
REGULAR
8
5+
6+
4+
1
22
Martial
Respect
IRREGULAR
8
6+
6+
5+
1
19
Martial
Respect
EQUIPMENT
NAME
COST PER
WARRIOR
EFFECT
REQUIRED
EXPERIENCE
FALCHION
EQUIPPED
SLASHING - Target suffers -1 to Defence rolls if
unarmoured or wearing leather/padded
ALL
LEATHER/PADDED
EQUIPPED
-1 Movement (applied)
ALL
HORSE
EQUIPPED
+3 Movement (applied)
ALL
EFFECT
REQUIRED
EXPERIENCE
MODIFIER
OPTIONS
NAME
COST PER
WARRIOR
MACE
-1
BLUNT TRAUMA - If the target takes casualties
from a mace the target Group Movement is halved
for the remainder of the round
ALL
SWORD
0
PARRY - Gain an extra Defence dice against sword,
mace or hand weapon
Regular +
Long up to 20"/short up to 10" range. Can move 3"
and shoot at short range. Slow - Will always act
second if counter Attacked. Bodkin - ignore one
Defence die if target is wearing mail at short
range. Causes shock at short range if 25%
casualties are caused.
ALL
Long up to 20"/short up to 10" range. Can move 3"
and shoot at short range
ALL
REACH - Cannot counter Attack against spear/bill
unless armed with spear/bill
ALL
MODIFIER
CROSSBOW
0
+1 Attack at
long range
BOW
-1
+1 Attack at
long range
SPEAR
-2
MAIL
+1
-1 Movement
Regular +
MEDIUM SHIELD
+3
-1 Defence
8+ Shield roll
ALL
LARGE SHIELD
+5
7+ Shield roll
Regular +
BARDED HORSE
+2
-1 Defence
Regular +
ABILITIES
Martial Respect
55
CROSSBOWMEN
The crossbow was the first ranged weapon to be simple and cheap as well as physically undemanding
enough to be operated by large numbers of untrained conscript soldiers. This enabled Barons to field an
extremely potent ranged force with little expense beyond the cost of the weapon. The downside was the
time it took to reload, as even in the hands of a skilled arbalester it could still only manage a rate of fire of
two bolts per minute.
CROSSBOWMEN
POINTS
ABILITIES
REGULAR
6
6+/5+
7+
4+
1
17
-
IRREGULAR
6
7+/6+
7+
5+
1
14
-
GREEN
6
8+/7+
7+
6+
1
11
-
EQUIPMENT
NAME
COST PER
WARRIOR
EFFECT
REQUIRED
EXPERIENCE
Long up to 20"/short up to 10" range. Can move 3"
and shoot at short range. Slow - Will always act
second if counter Attacked. Bodkin - ignore one
Defence die if target is wearing mail at short
range. Causes shock at short range if 25%
casualties are caused
ALL
MODIFIER
CROSSBOW
EQUIPPED
NAME
COST PER
WARRIOR
MODIFIER
EFFECT
REQUIRED
EXPERIENCE
LEATHER/PADDED
+1
-1 Defence
-1 Movement
Irregular +
MAIL
+2
-2 Defence
-2 Movement
Regular
OPTIONS
ABILITIES
-
56
BOWMEN
A medieval archer often described as a bowman, one skilled in the use of the bow, were a necessary part
of every medieval army and special attention was paid to their training by their Lords. This training was
extremely time consuming as it was necessary for the archer to become an expert marksman and because
of this these lower-class men were required to practice archery by law.
BOWMEN
POINTS
ABILITIES
VETERAN
6
6+/5+
7+
3+
1
19
Every Bloody
Sunday
REGULAR
6
7+/6+
7+
4+
1
16
Every Bloody
Sunday
GREEN
6
9+/8+
7+
6+
1
9
-
EQUIPMENT
NAME
COST PER
WARRIOR
EFFECT
REQUIRED
EXPERIENCE
BOW
EQUIPPED
Long up to 20"/short up to 10" range. Can move 3"
and shoot at short range
ALL
NAME
COST PER
WARRIOR
MODIFIER
EFFECT
REQUIRED
EXPERIENCE
LEATHER/PADDED
+1
-1 Defence
-1 Movement
Regular +
MAIL
+2
-2 Defence
-2 Movement
Veteran
MODIFIER
OPTIONS
ABILITIES
Every Bloody Sunday
57
SPEARMEN
A Spearman is any warrior that fights with a spear and more often than not wearing a helmet, carrying a shield
and a secondary weapon in the form of an axe, long knife or sword This type of infantryman was much cheaper
to outfit and maintain than the noble knight and the Crusade era saw a rise in the importance of infantry when
large numbers of men were required for distant battlefields. Clever Commanders with drilled warriors can use a
group of spearmen wisely, having them kneel on the ground with braced spears planted in front, forming an
effectual 'hedge of steel' against the charging enemy horsemen stopping them in their tracks.
SPEARMAN
POINTS
ABILITIES
VETERAN
6
5+
7+
3+
1
19
BRACE!
REGULAR
6
6+
7+
4+
1
16
BRACE!
IRREGULAR
6
7+
7+
5+
1
12
-
GREEN
6
8+
7+
6+
1
9
-
EQUIPMENT
NAME
COST PER
WARRIOR
SPEAR
EQUIPPED
NAME
COST PER
WARRIOR
BILL
+2
LEATHER/PADDED
+1
EFFECT
REQUIRED
EXPERIENCE
REACH - cannot counter attack against spears unless
armed with a spear
ALL
MODIFIER
OPTIONS
MAIL
+2
SMALL SHIELD
+2
MEDIUM SHIELD
+3
EFFECT
REQUIRED
EXPERIENCE
REACH - cannot counter Attack against spear/bill
unless armed with spear/bill. Result of 10 causes 2
damage
ALL
-1 Defence
-1 Movement
Irregular +
-2 Defence
-2 Movement
Regular +
9+ Shield roll
ALL
8+ Shield roll
Irregular +
MODIFIER
ABILITIES
Brace!
58
MILITANT MONKS
We have included Monks as an opportunity for you to use your imagination to field those brothers who
took up arms to defend their faith. Or simply their abbey or church such as the Abbey of Evesham who,
led by Abbot William de Andeville, “possessed the military spirit” living as feudal lords. Although monks
such as these felt capable of defending themselves, with the addition of knights to their cloisters, do not
confuse them with the trained members of the Holy Orders as rules for using these Warriors will be added
at a later date.
MILITANT MONKS
POINTS
ABILITIES
REGULAR
6
6+
7+
4+
1
15
Faith
IRREGULAR
6
7+
7+
5+
1
12
Faith
GREEN
6
8+
7+
6+
1
9
Faith
EQUIPMENT
NAME
COST PER
WARRIOR
HAND WEAPON
EQUIPPED
MODIFIER
EFFECT
REQUIRED
EXPERIENCE
ALL
OPTIONS
NAME
COST PER
WARRIOR
MODIFIER
EFFECT
REQUIRED
EXPERIENCE
SWORD
+3
-1
PARRY - Gain an extra Defence dice against sword,
mace or hand weapon
Regular
REACH - Cannot counter Attack against spear/bill
unless armed with spear/bill
ALL
SLOW - Will always act second if counter Attacked.
Cannot equip shield with this weapon
Regular
9+ Shield roll
ALL
8+ Shield roll
Regular
SPEAR
+1
TWO HANDED
WEAPON
+3
SMALL SHIELD
+2
MEDIUM SHIELD
+3
-2 Attack
ABILITIES
Faith
59
LEVY
The infantry was raised in one of three ways, as members of a lord's household, mercenaries or levied
from a town or the countryside. Levies were not unarmed serfs expected to leave the fields; the harvest
was too important to the landowner. The warriors we are levying were armed, had some training, and
came from the upper peasantry; the tenant farmers who would have at one time had prior experience of
a battle.
LEVY
POINTS
ABILITIES
IRREGULAR
6
7+
7+
5+
1
12
Sorry m’lord
GREEN
6
8+
7+
6+
1
9
Sorry m’lord
EQUIPMENT
NAME
COST PER
WARRIOR
HAND WEAPON
EQUIPPED
MODIFIER
EFFECT
REQUIRED
EXPERIENCE
ALL
OPTIONS
NAME
COST PER
WARRIOR
EFFECT
REQUIRED
EXPERIENCE
SLING
+1
10" range. Quick shot - Can fire twice if stationary.
May move full distance and fire once
ALL
SPEAR
+1
REACH - Cannot counter Attack against spear/bill
unless armed with spear/bill
ALL
IMPROVISED TWO
HANDED WEAPON
+3
SLOW - Will always act second if counter Attacked.
Cannot equip shield with this weapon
ALL
SMALL SHIELD
+2
9+ Shield roll
ALL
MODIFIER
-1 Attack
ABILITIES
Sorry m’lord
60
COMMAND GROUPS
After Groups are chosen, a Warrior
with the 'Commander' Ability can be
added to any Group turning that Group
into a Command Group. Once a
Command Group has been established,
you have the option of purchasing
various upgrades adding bonuses to
the Commander’s abilities.
As a general rule, you can only include one
Warrior with the 'Commander' Ability to any one
Group. You cannot form a Group of four Barons,
not for now anyway!
As with Groups, each Warrior in a Command
Group does not activate individually. Instead, the
whole Group activates using the Action
characteristic of the attached Commander. In
most cases your Commander will have a separate
entry included as part of the Warrior Profile to
indicate their improved stat line. Whenever this is
the case, and Warriors within a Group have
differing stat lines, roll different coloured d10 for
each value or make separate dice rolls where a
different number is needed for success.
You can only spend up to the maximum of half
of your total points on Command Groups which
includes Warriors and any additional Abilities or
upgrade choices such as a Banner Bearer,
Musician, or Priest.
Choosing Your Commanders
A Commander is someone who is lauded for
their actions, a warrior of distinguished courage
and ability, admired for their outstanding deeds
and noble qualities. Bravery, martial prowess and
military skill are the most significant traits of
these heroes, unless you are King John of course.
To be classed as a Commander, a Warrior must
have the ‘Commander’ Ability. There are two
Commander options: Knight Commander, which
can be a Baron or Lord, and Veteran Sergeants.
A Knight can join to command any Group except
Levy, a Veteran Sergeant can join to command
any Group except Knights. You can include as
many of each as your points total allows and one
of the Commanders that you select must be
nominated as the Commander of your Retinue.
61
KNIGHT COMMANDER
Knights had many different titles Lords, Earls, Barons, Knight Bannerets,
Knight Batchelors being good examples, but for the purpose of our
Knight Commanders we have only two options Barons or Lords.
Once you have selected you can title your Commander in any way
you choose to fit your narrative.
BARON
POINTS
ABILITIES
VETERAN
4
3+
5+
2+
3
47
Commander,
Inspire, Chivalry,
Live by the
Sword
REGULAR
4
4+
5+
3+
3
44
Commander,
Inspire, Chivalry,
Live by the
Sword
IRREGULAR
4
5+
5+
4+
3
40
Commander,
Inspire, Chivalry
EQUIPMENT
NAME
COST PER
WARRIOR
SWORD
EQUIPPED
MAIL
EQUIPPED
EFFECT
REQUIRED
EXPERIENCE
PARRY - Gain an extra defence dice against sword,
mace or hand weapon
ALL
-2 Movement (applied)
ALL
EFFECT
REQUIRED
EXPERIENCE
MODIFIER
OPTIONS
NAME
COST PER
WARRIOR
MACE
-1
BLUNT TRAUMA - If the target takes casualties
from a mace the target Group Movement is halved
for the remainder of the round
ALL
FALCHION
-1
SLASHING - Target suffers -1 to Defence rolls if
unarmoured or wearing leather/padded
ALL
TWO HANDED
WEAPON
0
-1 Attack
SLOW - Will always act second if counter Attacked.
Cannot equip shield with this weapon
ALL
LEATHER/PADDED
-1
+1 Defence
-1 Movement
ALL
SMALL SHIELD
+2
9+ Shield roll
ALL
MEDIUM SHIELD
+3
8+ Shield roll
ALL
LARGE SHIELD
+5
7+ Shield roll
ALL
MODIFIER
COMMAND GROUP UPGRADES
NAME
POINTS
EFFECT
BANNERMAN UPGRADE
+9
Increase order and inspire range to 12”
MUSICIAN UPGRADE
+4
Any warrior(s) within order range of Command Group roll two dice for
the Morale Check to follow out orders and choose highest
PRIEST UPGRADE
+5
Any warrior(s) within order range of Command Group ignore Morale
Dice for Morale Checks
ABILITIES
Commander, Inspire, Chivalry, Live by the Sword
62
MOUNTED BARON
POINTS
ABILITIES
VETERAN
7
3+
4+
2+
3
50
Commander,
Inspire, Chivalry,
Live by the
Sword
REGULAR
7
4+
4+
3+
3
47
Commander,
Inspire, Chivalry,
Live by the
Sword
IRREGULAR
7
5+
4+
4+
3
43
Commander,
Inspire, Chivalry
EQUIPMENT
NAME
COST PER
WARRIOR
EFFECT
REQUIRED
EXPERIENCE
SWORD
EQUIPPED
PARRY - Gain an extra defence dice against sword,
mace or hand weapon
ALL
MAIL
EQUIPPED
-2 Movement (applied)
ALL
BARDED HORSE
EQUIPPED
+3 Movement (applied)
ALL
EFFECT
REQUIRED
EXPERIENCE
MODIFIER
OPTIONS
NAME
COST PER
WARRIOR
MACE
-1
BLUNT TRAUMA - If the target takes casualties
from a mace the target Group Movement is halved
for the remainder of the round
ALL
FALCHION
-1
SLASHING - Target suffers -1 to Defence rolls if
unarmoured or wearing leather/padded
ALL
LANCE
+4
Single use, causes shock if any hits are successful.
Lances lost if charged. Ignores Shield rolls.
Does not replace sword
ALL
HORSEMAN’S PICK
-1
LEATHER/PADDED
-1
SMALL SHIELD
MODIFIER
-1 Attack
PIERCING - Ignore armour bonus (target counts as
wearing no armour) (mounted only)
+1 Defence
-1 Movement
ALL
+2
9+ Shield roll
ALL
MEDIUM SHIELD
+3
8+ Shield roll
ALL
LARGE SHIELD
+5
7+ Shield roll
ALL
BARDED WAR HORSE
+13
+1 Attack
dice per
warrior, -1
Defence
HORSE
-2
+1 Defence
-1 Movement, requires 2 damage to cause a casualty
when rider is mounted on War horse. When charging
subject to Over Charge
ALL
COMMAND GROUP UPGRADES
NAME
POINTS
EFFECT
BANNERMAN UPGRADE
+9
Increase order and inspire range to 12”
MUSICIAN UPGRADE
+4
Any warrior(s) within order range of Command Group roll two dice for
the Morale Check to follow out orders and choose highest
PRIEST UPGRADE
+5
Any warrior(s) within order range of Command Group ignore Morale
Dice for Morale Checks
ABILITIES
Commander, Inspire, Chivalry, Live by the Sword
63
LORD
POINTS
ABILITIES
VETERAN
4
3+
5+
3+
2
37
Commander,
Inspire, Chivalry,
Live by the
Sword
REGULAR
4
4+
5+
4+
2
34
Commander,
Inspire, Chivalry,
Live by the
Sword
IRREGULAR
4
5+
5+
5+
2
30
Commander,
Inspire, Chivalry
EQUIPMENT
NAME
COST PER
WARRIOR
SWORD
EQUIPPED
MAIL
EQUIPPED
EFFECT
REQUIRED
EXPERIENCE
PARRY - Gain an extra defence dice against sword,
mace or hand weapon
ALL
-2 Movement (applied)
ALL
EFFECT
REQUIRED
EXPERIENCE
MODIFIER
OPTIONS
NAME
COST PER
WARRIOR
MACE
-1
BLUNT TRAUMA - If the target takes casualties
from a mace the target Group Movement is halved
for the remainder of the round
ALL
FALCHION
-1
SLASHING - Target suffers -1 to Defence rolls if
unarmoured or wearing leather/padded
ALL
TWO HANDED
WEAPON
0
-1 Attack
SLOW - Will always act second if counter Attacked.
Cannot equip shield with this weapon
ALL
LEATHER/PADDED
-1
+1 Defence
-1 Movement
ALL
SMALL SHIELD
+2
9+ Shield roll
ALL
MEDIUM SHIELD
+3
8+ Shield roll
ALL
LARGE SHIELD
+5
7+ Shield roll
ALL
MODIFIER
COMMAND GROUP UPGRADES
NAME
POINTS
EFFECT
PENNANT
+7
Increase order and inspire range to 9”
MUSICIAN UPGRADE
+4
Any warrior(s) within order range of Command Group roll two dice for
the Morale Check to follow out orders and choose highest
PRIEST UPGRADE
+5
Any warrior(s) within order range of Command Group ignore Morale
Dice for Morale Checks
ABILITIES
Commander, Inspire, Chivalry, Live by the Sword
64
MOUNTED LORD
POINTS
ABILITIES
VETERAN
7
3+
4+
3+
2
40
Commander,
Inspire, Chivalry,
Live by the
Sword
REGULAR
7
4+
4+
4+
2
37
Commander,
Inspire, Chivalry,
Live by the
Sword
IRREGULAR
7
5+
4+
5+
2
33
Commander,
Inspire, Chivalry
EQUIPMENT
NAME
COST PER
WARRIOR
EFFECT
REQUIRED
EXPERIENCE
SWORD
EQUIPPED
PARRY - Gain an extra defence dice against sword,
mace or hand weapon
ALL
MAIL
EQUIPPED
-2 Movement (applied)
ALL
BARDED HORSE
EQUIPPED
+3 Movement (applied)
ALL
EFFECT
REQUIRED
EXPERIENCE
MODIFIER
OPTIONS
NAME
COST PER
WARRIOR
MACE
-1
BLUNT TRAUMA - If the target takes casualties
from a mace the target Group Movement is halved
for the remainder of the round
ALL
FALCHION
-1
SLASHING - Target suffers -1 to Defence rolls if
unarmoured or wearing leather/padded
ALL
LANCE
+4
Single use, causes shock if any hits are successful.
Lances lost if charged. Ignores Shield rolls. Does
not replace sword
ALL
HORSEMAN’S PICK
-1
LEATHER/PADDED
-1
SMALL SHIELD
MODIFIER
-1 Attack
PIERCING - Ignore armour bonus (target counts as
wearing no armour) (mounted only)
+1 Defence
-1 Movement
ALL
+2
9+ Shield roll
ALL
MEDIUM SHIELD
+3
8+ Shield roll
ALL
LARGE SHIELD
+5
7+ Shield roll
ALL
BARDED WAR HORSE
+13
+1 Attack
dice per
warrior,
-1 Defence
HORSE
-2
+1 Defence
-1 Movement, requires 2 damage to cause a casualty
when rider is mounted on War horse. When charging
subject to Over Charge
ALL
COMMAND GROUP UPGRADES
NAME
POINTS
EFFECT
PENNANT
+7
Increase order and inspire range to 9”
MUSICIAN UPGRADE
+4
Any warrior(s) within order range of Command Group roll two dice for
the Morale Check to follow out orders and choose highest
PRIEST UPGRADE
+5
Any warrior(s) within order range of Command Group ignore Morale
Dice for Morale Checks
ABILITIES
Commander, Inspire, Chivalry, Live by the Sword
65
VETERAN SERGEANTS
In medieval European usage, a sergeant was simply any attendant or officer with a protective duty. Over time this
evolved into "soldier-sergeants" becoming landowners, fulfilling a more junior role to the knight in the medieval
hierarchy. Sergeants would fight either as heavy cavalry riding alongside the knights, light cavalry as scouts harrying the
flanks or as trained professional infantry. Over time these sergeants who were Veterans of many battles would be trusted
to lead warriors, men whose respect they would have earned purely by their deeds and actions.
VETERAN SERGEANT
POINTS
ABILITIES
VETERAN
5
3+
6+
3+
2
35
Martial Respect,
Inspire,
Commander
REGULAR
5
4+
6+
4+
2
32
Martial Respect,
Inspire,
Commander
IRREGULAR
5
5+
6+
5+
2
29
Martial Respect,
Inspire,
Commander
EQUIPMENT
NAME
COST PER
WARRIOR
FALCHION
EQUIPPED
LEATHER/PADDED
EQUIPPED
EFFECT
REQUIRED
EXPERIENCE
SLASHING - Target suffers -1 to Defence rolls if
unarmoured or wearing leather/padded
ALL
-1 Movement (applied)
ALL
EFFECT
REQUIRED
EXPERIENCE
MODIFIER
OPTIONS
NAME
COST PER
WARRIOR
MACE
-1
BLUNT TRAUMA - If the target takes casualties
from a mace the target Group Movement is halved
for the remainder of the round
ALL
SWORD
0
PARRY - Gain an extra Defence dice against sword,
mace or hand weapon
Regular +
0
REACH - cannot counter Attack against spear/bill unless
armed with spear/bill. Result of 10 causes 2 damage
ALL
CROSSBOW
0
+1 Attack at
long range
Long up to 20"/short up to 10" range. Can move 3" and
shoot at short range. Slow - Will always act second if
counter Attacked. Bodkin - ignore one Defence die if
target is wearing mail at short range. Causes shock at
short range if 25% casualties are caused
ALL
SPEAR
-2
+1 Attack
REACH - Cannot counter Attack against spear/bill
unless armed with spear/bill
ALL
TWO HANDED
WEAPON
0
-1 Attack
SLOW - Will always act second if counter Attacked.
Cannot equip shield with this weapon
ALL
MAIL
+1
-1 Defence
-1 Movement
Regular +
MEDIUM SHIELD
+3
8+ Shield roll
ALL
LARGE SHIELD
+5
7+ Shield roll
Regular +
BILL
MODIFIER
COMMAND GROUP UPGRADES
NAME
POINTS
EFFECT
PENNANT
+7
Increase order and inspire range to 9”
PRIEST UPGRADE
+5
Any warrior(s) within order range of Command Group ignore Morale Dice
for Morale Checks
ABILITIES
Martial Respect, Inspire, Commander
66
MOUNTED VETERAN SERGEANT
POINTS
ABILITIES
VETERAN
8
3+
6+
3+
2
38
Martial Respect,
Inspire,
Commander
REGULAR
8
4+
6+
4+
2
35
Martial Respect,
Inspire,
Commander
IRREGULAR
8
5+
6+
5+
2
32
Martial Respect,
Inspire,
Commander
EQUIPMENT
NAME
COST PER
WARRIOR
EFFECT
REQUIRED
EXPERIENCE
FALCHION
EQUIPPED
SLASHING - Target suffers -1 to Defence rolls if
unarmoured or wearing leather/padded
ALL
LEATHER/PADDED
EQUIPPED
-1 Movement (applied)
ALL
HORSE
EQUIPPED
+3 Movement (applied)
ALL
EFFECT
REQUIRED
EXPERIENCE
MODIFIER
OPTIONS
NAME
COST PER
WARRIOR
MACE
-1
BLUNT TRAUMA - If the target takes casualties
from a mace the target Group Movement is halved
for the remainder of the round
ALL
SWORD
0
PARRY - Gain an extra Defence dice against sword,
mace or hand weapon
Regular +
Long up to 20"/short up to 10" range. Can move 3"
and shoot at short range. Slow - Will always act
second if counter Attacked. Bodkin - ignore one
Defence die if target is wearing mail at short
range. Causes shock at short range if 25%
casualties are caused
ALL
Long up to 20"/short up to 10" range. Can move 3"
and shoot at short range
ALL
REACH - Cannot counter Attack against spear/bill
unless armed with spear/bill
ALL
-1 Movement
Regular +
MODIFIER
CROSSBOW
0
+1 Attack at
long range
BOW
-1
+1 Attack at
long range
SPEAR
-2
MAIL
+1
MEDIUM SHIELD
+3
8+ Shield roll
ALL
LARGE SHIELD
+5
7+ Shield roll
Regular +
BARDED HORSE
+2
-1 Defence
-1 Defence
Regular +
COMMAND GROUP UPGRADES
NAME
POINTS
PENNANT
+7
Increase order and inspire range to 9”
+5
Any warrior(s) within order range of Command Group ignore Morale Dice
for Morale Checks
PRIEST UPGRADE
EFFECT
ABILITIES
Martial Respect, Inspire, Commander
67
68
The Barons
Previously, in the Anglo-Saxon kingdom of England,
the king's companions held the title of earl and in
Scotland, the title of thane. After 1066 William the
Conqueror introduced the rank of baron* in England
to distinguish those men who had pledged their
loyalty to him under his feudal system. This act
established his favoured followers as barons by
enfeoffing them as tenants-in-chief with great
fiefdoms to be held under this title.
All who held this feudal barony "in-chief of the
king", that is with the king as his immediate overlord,
became equal barones regis ("barons of the king"),
bound to perform a stipulated annual military service,
and obliged to attend his council.
Such barons were not necessarily always from the
greater Norman nobles but were selected often on
account of their personal abilities and usefulness. For
instance, Turstin FitzRolf, the relatively humble and
obscure knight who had stepped in at the last minute
to accept the position of Duke William's standardbearer at the Battle of Hastings, was granted a
barony comprising well over twenty manors (fees).
In feudal Anglo-Norman England and Ireland, a
knight's manor or fee was a unit measure of land
deemed sufficient to support a knight. Out of
necessity, it would not only provide sustenance for
himself, his family, esquires and servants, but also the
means to furnish himself and his entourage with the
horses and armour needed to fight for his lord in
battle. It was effectively the size of a fee (or "fief"
which is synonymous with "fee") sufficient to support
one knight in the ongoing performance of his feudal
duties, his knightly service.
A knight's fee created by the king himself or by one
of his Barons was produced by separating off an area
of land from his own. This action would establish
therein a new manor for the use of a knight who
would by the process of feudal freehold becoming his
tenant by paying homage and fealty to his new lord.
This homage and fealty were a vow of loyalty, with a
corresponding vow of protection received, and an
undertaking to provide a specified form of service
commonly due under feudal land tenure in England.
Broadly speaking such service was a military service
generally to a maximum of 40 days per year,
signifying that he would have to fight for his lord in
battle.
No cash rent was payable, although military service
was later transformable into scutage, you could pay
not to fight. A knight was required to maintain the
dignity of knighthood, living in suitable style and be
well-turned out in battle, with the required number
of esquires to serve him and with horses, arms and
armour for all.
The size of a force a Baron could muster depended
on how many manors or fees he presided over or
how many mercenaries he paid to join him in the
field.
*The word baron comes from the Old French baron,
from a Late Latin barō "man; servant, soldier,
mercenary" (so used in Salic law; Alemannic law has
barus in the same sense). The word is presumably of
Old Frankish origin, cognate with Old English beorn
meaning "warrior, nobleman". In the kingdom of
England, a feudal barony or barony by tenure was the
highest degree of feudal land tenure, namely per
baroniam (Latin for "by barony"), under which the
land-holder owed the service of being one of the
king's barons. Those who held land directly from the
king by military service, from earls downwards, all
bore alike the title of baron, which was thus the
factor uniting all members of the ancient baronage as
peers of one of another. The title of baron was
mostly, though not always, hereditary and passed
from one generation to the next.
69
THE KNIGHT COMMANDER GENERATOR
If you wish to create your own
characters, and your opponent agrees,
we have included a set of basic rules
for you to “Build a Baron” as a way of
creating any of the many nobles and
named knights who took part in the
war
Create Your Own Knight Commander
The Knight Commander generator allows you to
make a custom Baron or Lord to lead your
Retinue. Used to create a character which isn't
already covered in the main Army List, or you
may choose to create a custom Character that
suits your play style or Retinue theme.
The method for character creation is a three-step
process.
Step 1 - Baron or Lord, stat increase
First decide the profile stats for your
Commander. Decide if you are creating a Baron
or Lord. A Baron can have up to 8 individual
points of stat increases; a Lord may only have up
to 5 single points of stat increases. You can
increase a stat by as many points as you wish as
long as you don't exceed the maximum stat
number or the number of increases allowed.
Once you have finished improving their stats, add
the points cost to the base value.
Step 2 - Equipment
After increasing the base stats you need to add
their Equipment. Unlike entries in the standard
list, a custom Commander does not start with
any Equipment as standard. You select
Equipment from the armour, weapon and mount
tables. Once you have made your choices, apply
any modifiers to their stat line for equipment
choices and add the points to their current points
total.
70
Step 3 - Abilities
As well as any Inherent Abilities received for
being a knight; you can now choose extra
Abilities to give your Commander character. A
Baron can select up to three additional Abilities,
and a Lord can select up to two additional
Abilities. Add the points cost for any extra
selected Abilities to their current total points to
give you the final value of your character. Make
sure you make a note of any new Abilities and
their effects on their roster entry.
It’s important to note that any Abilities added to
a Commander only affects them, for example, if
you paid for the ability Castle Forged it only
applies to their weapons
and you would roll a
different coloured dice
during a combat action
to indicate their attacks
using this ability.
Your new Knight
Commander is now ready
to take to the field and
lead your retinue to
victory. Don't forget to
give them an appropriate
name and title fitting for
The Barons' War.
BASE PROFILE
POINTS
Max
number
of Stat
upgrades
allowed
ABILITIES
BARON
6
7+
7+
7+
3
30
8
Commander,
Inspire,
Chivalry +3
Abilities from
the Ability
table
LORD
6
7+
7+
7+
2
20
5
Commander,
Inspire,
Chivalry +2
Abilities from
the Ability
table
STAT UPGRADES
NOTES
MAXIMUM SCORE
3+
5+
2+
POINTS COST PER INCREASE
2
2
1
CANNOT EXCEED
THESE NUMBERS
MOUNT
POINTS
NOTES
Requires 2 damage to
cause a casualty when rider
is mounted on War horse.
When charging subject to
Over Charge
BARDED WAR
HORSE
+2
+1 Dice per
Warrior
-1
-
-
+16
BARDED
HORSE
+3
-
-1
-
-
+5
HORSE
+3
-
-
-
-
+3
ARMOUR
POINTS
NOTES
SMALL
SHIELD
-
-
-
-
-
+2
+9 SHIELD ROLL
MEDIUM
SHIELD
-
-
-
-
-
+3
+8 SHIELD ROLL
LARGE SHIELD
-
-
-
-
-
+5
+7 SHIELD ROLL
LEATHER/
PADDED
-1
-
-1
-
-
1
MAIL
-2
-
-2
-
-
2
71
WEAPONS
NAME
MODIFIER
HAND WEAPON
0
DANE AXE / TWO
HANDED WEAPON
-2
SLOW - Will always act second if counter Attacked. Cannot equip
shield with this weapon. Cannot use mounted
+3
MACE
-1
BLUNT TRAUMA - If the target takes casualties from a mace the
target Group Movement is halved for the remainder of the round
+2
SWORD
-1
PARRY - Gain an extra Defence dice against sword, mace or hand
weapon
+3
FALCHION
-1
SLASHING - Target suffers -1 to Defence rolls if unarmoured or
wearing leather/padded
+2
SPEAR
0/-1
Mounted
REACH - Cannot counter Attack against spear/bill unless armed with
spear/bill
+1
POLEARM / BILL
-1
REACH - Cannot counter Attack against spear/bill unless armed with
spear/bill. Result of 0 causes 2 damage
+3
LANCE (Mounted
Only)
-2
Single use, causes shock if any hits are successful. Lances lost if
charged. Ignores Shield rolls. Does not replace sword
+4
0
PIERCING - Ignore armour bonus (target counts as wearing
no armour) (mounted only)
+1
-1
SLOW - Will always act second if counter Attacked. Cannot equip
shield with this weapon
+1
HORSEMAN’S PICK
IMPROVISED TWO
HANDED WEAPON
EFFECT
POINTS
+0
ABILITIES
COMMANDER - Must join a Group before deployment creating a Command Group. Can be the leader of your force,
if so can use an action to issue a Command Action to another group within 6"
INSPIRE - Other groups within 6" gain +1 Attack dice and +1 Defence dice.
CHIVALRY - Do not need to make a Morale Check to charge knights if they are not the closest target.
72
COMMAND
Each Game Round your Commander
may use up to two of their Actions to
issue Orders as Command Actions.
Eligible Groups are able to receive a
single Command Action each Game
Round. Command Actions can only be
given to Groups within the Command
Range of the Commander; Command
Range is 6” in most cases.
If the Morale Check fails, the Action is lost and
the Group does nothing. Place a Command
Token next to the Command Group containing
the Commander indicating the use of one of
their Actions, and the turn is over.
A Retinue Commander must use at least one of
their Actions on their own Command Group each
round. No Morale Check is needed for this Action
to work.
Command Action
These Command Actions are treated as additions
and used in the same way as any other Action or
Reaction. To issue a Command Action, make sure
that the nearest Warrior model from the Group is
within Command Range.
If in range the Group being given the command
must successfully pass a Morale Check against
their own Morale to follow the Command
Action. If successful they are issued a Command
Token and may take an Action.
Command Actions do not count as actions when
determining if the Retinue Commander’s
Command Group becomes weary, they do count
towards a group that successfully received the
Command Action and activated. Command
Actions can be used at any point during a Round
to attempt to rally a Broken or Shocked Group
even if they have already tried and failed using
their own Action during the Compulsory Action
phase.
COMMAND ACTION
DISTANCES
73
EQUIPMENT
A Warrior without equipment is
someone without a weapon or armour.
Giving your Warriors arms and armour
and possibly a mount will make them
more effective on the battlefield.
Weapons
All the weapons included here have been chosen
to be fitting for the period. Rules for each have
been based on historical knowledge with the idea
being to be able to represent how they would be
used during a skirmish on the tabletop. All
Warriors will be armed with at least one weapon
type. You may choose to add, swap out
weapons, or in some cases add extra weapons
such as a lance for mounted knights, this is done
by paying the extra points for each Warrior in the
Group.
EQUIPMENT
NAME
74
MODIFIER
EFFECT
HAND WEAPON
0
DANE AXE/TWO HANDED
WEAPON
-2
SLOW - Will always act second if counter Attacked. Cannot
equip shield with this weapon
MACE
-1
BLUNT TRAUMA - If the target takes casualties from a mace the
target Group Movement is halved for the remainder of the
round
SWORD
-1
PARRY - Gain an extra Defence dice against sword, mace or
hand weapon
FALCHION
-1
SLASHING - Target suffers -1 to Defence rolls if unarmoured or
wearing leather/padded
SPEAR
0/-1 MOUNTED
REACH - Cannot counter Attack against spear/bill unless armed
with spear/bill
BOW
+1/0
Long up to 20"/short up to 10" range. Can move 3" and shoot at
short range
CROSSBOW
0/-1
Long up to 20"/short up to 10" range. Can move 3" and shoot at
short range. Slow - Will always act second if counter Attacked.
Bodkin - ignore one Defence die if target is wearing mail at
short range. Causes shock at short range if 25% casualties are
caused
SLING
0
10" range. Quick shot - Can fire twice if stationary. May move
full distance and fire once
JAVELIN
0
6" range if the warrior(s) remain stationary, 6+d10” range if
warrior(s) end their Movement closer to target than their
original position
POLEARM/BILL
-1
REACH - cannot counter Attack against spear/bill unless armed
with spear/bill. Result of 10 causes 2 damage
LANCE (mounted only)
-2
Single use, causes shock if any hits are successful. Lances lost if
charged. Ignores Shield rolls. Does not replace sword
HORSEMAN’S PICK
0
PIERCING - Ignore armour bonus (target counts as wearing no
armour) (mounted only)
IMPROVISED TWO HANDED
WEAPON
-1
SLOW - will always act second if counter attacked. Cannot equip
shield with this weapon
SMALL SHIELD
0
9+ Shield roll
MEDIUM SHIELD
0
8+ Shield roll
LARGE SHIELD
0
7+ Shield roll
The Crossbow
When the crossbow first began to be used, it
was hated by a number of influential people.
The Pope declared that if a person used a
crossbow they could be excommunicated and
demanded the weapon to be banned. As a
weapon the use of the crossbowmen was
viewed as having no honour making warriors
hesitant to use the weapon and as a result,
crossbowmen were paid almost double the
pay of others.
Armour & Shields
Personal armour was a protective covering used
to prevent damage from being inflicted by
weapons during combat, the manufacture of
metal armour was a skilled art and drove the
development of better weapons designed to
pierce it. In this period mail armour was the
pinnacle of protection and remained so until the
gradual addition of small plates or discs of iron
being added to protect vulnerable areas,
ultimately developing into full plate armour.
Hardened leather and padded coats were also
worn as well as full coats of plates which was an
armour made of larger metal plates sewn over
leather coat.
As well as being fully armoured knights carried
the more traditionally shaped heater shield, both
the longer and standard shaped being common.
Kite shields and the smooth teardrop shaped
shields along with large and small round shields
would also be carried on to the field by the many
different class of warriors.
Helmets
Helmets ranged from conical pots made from
boiled leather, traditional nasal helms to the
introduction of full helms for the knights. Kettle
helms were prolific as they afforded a great field
of view, allowed air to circulate and were
relatively simple to make in large numbers, it was
The crossbow was a lot easier to aim, did not
take a lot of skill to use and did not require
the years of training that a person needed to
use the bow. It could even be used by children
or injured soldiers. This was the real moral
problem as it could be used by an untrained
soldier to injure a heavily armoured warrior. In
truth, the nobility felt that commoners should
not have a weapon that could so easily injure
a knight.
said Prince Louis favoured a helmet of this design
while on campaign for these very reasons.
Mail
Mail is a type of armour consisting of small metal
rings joined together using an interlinking
pattern to form a mesh. Worn as an armoured
coat it was referred to as a hauberk. Knights and
more affluent Sergeants of this period would
wear a suit of mail where their entire body would
be covered with this metal mesh, including mail
mittens and stockinged feet, with only sections
of their face being visible.
Padded / Cured Leather
A padded defensive jacket which was worn by
knights under their mail was often worn
separately as armour by the lower classes. The
Gambeson, as it was known, was a quilted jacket
constructed of linen or wool stuffed tightly for
protection with various things from horse hair to
scrap cloth.
Shields
For the period the large and small heater shaped
shields were preferred by knights, developed
from the earlier kite shield. Smaller in design than
the kite shield this made it more manageable in
combat making them usable both on foot and
mounted.
75
The heater was used by other warriors too as
well as large and small round shields, kite shields
and the older teardrop shaped shields. Shields
give their users a Shield Roll allowing them to
reroll any failed Defence Rolls, the size of the
shield depends on the number needed for
success.
Shield Rolls
Medium Shield
Heater and Large round shields are classed as
Medium Shields. Medium shields perform a
successful Shield Roll on 8+ on a d10.
Small Shield
Bucklers and small round shields are classed as
Small Shields. Small shields perform a successful
Shield Roll on 9+ on a d10.
Large Shield
Large Heater, Kite and large Teardrop shaped
shields are classed as Large Shields. Large shields
perform a successful Shield Roll on 7+ on a d10.
ARMOUR
NAME
COST PER
WARRIOR
LEATHER/PADDED
+1
-1 DEFENCE
-2 DEFENCE
MODIFIER
-1 MOVEMENT
MAIL
+2
SMALL SHIELD
+2
9+ SHIELD ROLL
MEDIUM SHIELD
+3
8+ SHIELD ROLL
LARGE SHIELD
The Destrier
The destrier is the best-known war horse of
the medieval era, although highly prized by
knights and men-at-arms, the destrier was not
very common and this rarity further made the
sighting of one in battle a remarkable
occurrence. The word destrier does not refer
to a breed, but to a type of horse: the finest
and strongest warhorse.
Like a knight the destrier was trained from the
earliest days of its life making them preferred
in combat. Being typically quite intelligent it
could easily sprint, stop, turn around and make
other movements as required by the rider with
perfect ease and speed, understand the rider’s
commands and responding to them
accordingly.
76
EFFECT
-2 MOVEMENT
7+ SHIELD ROLL
A Destrier was trained
to inflict damage and
injury on the enemy it
could bite or kick on
the command
making use of
its very
powerful
hindquarters
to strike
out.
Horses
A Medieval knight would own several horses which were bred and used for his
different duties. Ranging in a variety of sizes the biggest and strongest were
required as war horses, called destrier, and were owned by only the wealthiest
knights. The more common horses to be found in battle were the Coursers, a swift
and strong horse, ridden both barded and un-barded by sergeants and knights.
HORSE PROFILE
NOTES
BARDED WAR
HORSE
+2
+1 DICE PER
WARRIOR
-1
-
-
Requires 2 damage to cause
a casualty when rider is
mounted on War horse.
When charging subject to
Over Charge
BARDED HORSE
+3
-
-1
-
-
-
HORSE
+3
-
-
-
-
-
For these rules we have only covered
horses, but there is no reason why your
warriors cannot be mounted on other
animals such as camels which will be
included for Outremer retinues in the
future. For now, use the standard horse
profile if you wish to include them.
War Horse Abilities
Riding a destrier into combat has its advantages,
these great war horses enable knights to press
forward any advantages they gain in the heart of
a battle. Although rider and mount are one, after
many hours of training together, there are
certain situations knights may need extra focus to
take control of their steeds before they can act
again.
If a Group mounted on war horses win a Combat
Action, and they initiated the melee by charging,
they are subject to Over Charge brought on in
the enthusiasm of battle.
rearmost base in the defeated Group. If this
move brings the cavalry Group into contact with
another enemy Group, count this movement as a
second Charge. With the attackers now treated
as Weary, place a Weary Token next to the
Group to indicate this.
If the defenders are destroyed Over Charge
occurs from where the Combat Action took
place.
When this Over Charge is resolved the cavalry
Group are treated as out of control and given an
Ability Token to indicate they must Reign-in at
the beginning of their next action.
Infantry who charge cavalry using a Combat
Action can cause them to Reign-in if the Combat
results in the cavalry Group being Forced Back, if
this happens place an Ability Token to indicate it
has occurred.
Reign-in
Over Charge
The Over Charge takes the Group through the
enemy Group they were fighting. Roll a d6 and
add the number of casualties from the combat to
determine the distance the Group Over Charge.
Once the enemy Group has been Forced Back,
measure the Over Charge from the back of the
When a cavalry Group is out of control they need
to Reign-in. At the beginning of their next action
they must take a Morale Check to take control of
their mounts. If successful, they take their Action
as normal; if failed, they do nothing until their
next Action. Remove their Ability Token in both
cases as the Group no longer needs to Reign-in
to act.
77
ABILITIES
Ability Action
Some Warriors have the means or the skill to do
something that distinguishes them from other
Warriors. They could have a real talent for
archery, a real aptitude for defending against
cavalry or be proficient with all two-handed
weapons. They may also be negative; the
Commander who is always ready to retreat, the
Warriors that fear a particular enemy, or the
overly cautious veteran scarred by one too many
battles. Having these Abilities indicate
competence in an activity due to skill, training, or
some other qualification, and can be best
described as traits, skills and gifts.
Traits
A distinguishing characteristic or quality, of a
personal nature used to indicate a passive skill or
ability. Traits are usually passive abilities that are
always in effect. Traits can have a positive or
negative effect.
Token next to the Group indicating that an
Ability is being used. The player activates the
Group as described by the Ability.
The duration of an Ability Action lasts for the
length of the Game Round in which it is activated
unless explained otherwise in its description. A
passive Ability is always activated.
Adding Abilities To Your Groups
Any Group can have Abilities as long as you pay
the correct points and follow these rules:
• You can give Abilities to as many Groups
as you have Commanders in your Retinue
plus three. If you have two commanders,
for example, you can include up to five
abilities.
• You can purchase as many extra Abilities
for a Group as the Group has Actions, so if
a Group has one Action it can have one
ability.
Skills
The ability to do something well coming from
knowledge, practice or aptitude usually triggered
by using an Action or Reaction.
Gifts
An item bestowed or acquired by the recipient.
Often a physical piece of equipment that gives
Warriors a bonus. Gifts are usually activated by
using an Action or Reaction.
A good example are knights who are Warriors of
exceptional ability as they possess more than one
Skill, are likely to have received a martial Gift of
some description, and evidence of Traits that
make them knights.
Using an Ability as an Action
Unless classed as passive, Abilities are activated
by a player using an Action. Place an Ability
78
• When an Ability is added to a Group all
Warriors in the Group must be given the
same Ability. The cost of an Ability is per
Warrior so you will need to multiply the
cost of the Ability by the number of
Warriors in the Group. If the Ability costs 5
points and there are 10 Warriors in the
Group, the total points cost to include the
Ability is 50 points.
• When an Ability is added to a Commander,
they are the only Warrior who has the
Ability and the cost is for them only unless
stated otherwise.
• Where applicable Abilities stack and can be
used together.
ABILITIES
NAME
DESCRIPTION
ABILITY
TYPE
POINTS
AGILE
Never tiring always ready to move at speed
towards their enemy.
May use a Movement Action to run and not
become Weary.
ACTION
GROUP
1
ATTACK BACK
These warriors believe the best form of
defence is attack.
If this Group is charged and wins the Combat
Action by using a Reaction, after everything
is resolved will immediately charge the
defeated enemy Group and fight another
Combat Action as a free Action. This Ability
causes the Group to become Weary before
the second Combat Action takes place.
ACTION
GROUP
2
BLESSED
Believe they have been gifted with divine
protection.
A single Defence Roll can be rerolled once per
game the result of the second roll stands.
This takes place before any Shield Roll.
PASSIVE
GROUP
2
BORN FOR WAR
Natural fighters who enjoy the thrill of melee.
Choose a Defence or Attack Reaction when
charged as a free Action but only if they have
no Actions left. If they have an unused
Action, it must be used first.
ACTION
GROUP
2
BRAVE
The many battles witnessed have instilled
them with nerves of steel.
+1 to all Morale Checks.
PASSIVE
GROUP
2
BULWARK
Feet firmly planted and shields raised these
warriors know they can stop anything.
Gain +1 to Defence Rolls this round but
cannot make an Attack Action next round.
PASSIVE
GROUP
1
CALTROPS
Scatter caltrops on the ground to hinder a
cavalry charge.
Litter an area 3” in front of them with
caltrops with a diameter equal to 1” x the
number of warriors in the Group to a
maximum size of 6”, once per game. Place an
appropriate marker to delineate this area
which is now counts as impassable. The
caltrops remain in play for the rest of the
game, if a Group is forced back into the area,
they suffer an extra casualty.
ACTION
GROUP
3
CASTLE FORGED
These melee weapons are forged by a master
smith.
Results of 9 and 0 count as 0 results on the
Attack Roll. The points cost is in addition to
standard cost of the weapon.
ACTION
GROUP
3
CHOSEN
It seems they are protected by their faith.
When attacked during a Combat Action
choose to re-roll all Defence dice. Must accept
the result of the second roll.
PASSIVE
GROUP
3
CLOSE RANKS
A formidable wall of horse and mail charge
their foe.
Mounted knights can close their ranks,
moving base to base. This causes fear in any
infantry groups they charge. These Groups
must take and pass a Morale Check to stand
and fight or become Broken once contact is
made.
ACTION
GROUP
1
79
80
NAME
DESCRIPTION
ABILITY
TYPE
POINTS
COUNTER CHARGE
Quick reactions allow the bearer to meet the
enemies charge.
Cavalry are trained to respond to an Attack, if
they have an Action left this round, they can
use it to react by counter-charging an enemy
cavalry group who have charged them. Move
both equally into base to base contact with
both Groups resolving combat at the same
time. The Group that loses the most
casualties loses the combat and are pushed
back taking a Morale Check. A Group carrying
our an 'over charge’ cannot be counter
charged.
ACTION
GROUP
2
COURAGEOUS
Mighty in adversity, they live for war!
Automatically passes Morale Checks when
testing for being Broken or Shocked.
PASSIVE
GROUP
2
CRUELTY
The battlefield is a fickle place every
opportunity must be taken to win, this
Commander is a master of inflicting pain.
Targets must reroll one successful Defence
Dice.
PASSIVE
COMMANDER
1
CRY HAVOC
This is the tipping point, victory at all costs!
Once per game the Commander calls ‘Cry
Havoc’ all friendly units gain the ‘Glory
Seekers’ ability for that turn (any Groups
with Glory Seeker gains ‘Reputation’).
ACTION
COMMANDER
3
DAMASCUS STEEL
The finest weapons Christendom has to aid its
valiant warriors.
Opponents do not receive Shield Rolls.
PASSIVE
GROUP
2
DRILLED
‘Train hard, fight easy’ has been hammered
into this unit.
May perform a Defence Action for free but
not as a Reaction during a Combat Action.
This does not count as an Action.
PASSIVE
GROUP
2
EVADE
Quick wits or skill allow these warriors to
dodge an incoming charge.
May use an unused action to move their
movement value away from an Attacker after
they have been charged.
ACTION
GROUP
2
EXPERIENCED
TACTICIAN
Years of experience allows this commander to
choose the ground.
When determining initiative your
Commander adds an extra d10 without
spending a Command Action while their
Group does not have a Morale Dice.
PASSIVE
COMMANDER
3
FAST
These warriors have trained for speed and
endurance.
Gain +2" to Movement when not running.
ACTION
GROUP
2
FAITHFUL
The good book is all that’s needed.
Treated as if they have a Shield Roll of 9 or 0
without having shields. If equipped with
shields this ability does not work.
PASSIVE
GROUP
2
FEALTY
Loyalty brings its own reward.
Ignore the first failed Morale Check of the
game when testing to follow a Command
Action treating it as passed.
Available to Knights and Sergeants only.
PASSIVE
GROUP
1
FEAR
Imposing warriors strike fear into the hearts
of their foes.
Opponents must pass a Morale Check to
charge you.
PASSIVE
GROUP
1
FEARLESS
These warriors fear nothing on the field of
battle.
Not affected by Fear or Horror.
PASSIVE
GROUP
1
NAME
DESCRIPTION
ABILITY
TYPE
POINTS
FINISHING BLOW
A relentless torrent of challenging blows
rained down upon them.
All 0s scored during an Attack Roll cannot be
defended.
ACTION
GROUP
3
FOLLOW ME
Experienced in the art of war, friendly units
will follow the bearers lead.
A single Group of warriors may be moved at
the same time as a Group using this Action
for free if within 6". Can be used once per
round.
ACTION
GROUP
2
FORMIDABLE
Able to shrug off wounds that would kill a
normal Warrior.
Ignore the first successful casualty caused
against this Commander’s Command Group.
PASSIVE
COMMANDER
3
FRIGHTENING
Their reputation proceeds them.
Opponents must re roll all 0s scored on both
Attack Dice and Defence Dice.
PASSIVE
GROUP
2
GLORY SEEKERS
Gaining a ‘reputation’ is everything.
Ignore negative effects of Morale Dice in
Melee Combat.
PASSIVE
GROUP
2
GUTTER THUG
Raised by the streets, natural brawlers.
Each successfully defended Attack is rolled as
an Attack back at the end of the Combat
Action as extra Reactions.
ACTION
GROUP
2
HARDENED
Experience tells them running away is not an
option.
Does not run when Broken becomes Shocked
instead.
PASSIVE
GROUP
1
HEARTH GUARD
Chosen Men a Lords own bodyguard.
The Group can add +1 to either an Attack Roll
of Defence Roll but not both, once per round.
PASSIVE
GROUP
3
HEROIC
A dynamic leader, a true Warlord whose
battlefield prowess are inspiring.
Every time this Commander wins Melee
Combat, all friendly Groups within 6” remove
1 pip from their Morale Dice.
ACTION
COMMANDER
3
HOLD GROUND
This is the most important spot on the
battlefield, they will not yield one foot to the
enemy.
Gain +3 to Defence Roll while performing a
Defence Action.
ACTION
GROUP
2
HOLY RELIC
A token of faith carried by the warrior.
Automatically remove 1 extra pip from
Morale Dice in the Housekeeping Phase.
PASSIVE
GROUP
1
HORSEMAN
A master of horse, man and beast are as one.
Gain +2 to the dice roll when taking a Morale
Check to Reign-in.
PASSIVE
GROUP
2
HUNTERS
Natural understanding of the battlefield
means these warriors wield the terrain as well
as the sword.
Deploy in a piece of area terrain big enough
to fully contain all Warriors in the Group.
Remaining hidden until activated.
ACTION
GROUP
2
ICE HARDENED
MAIL
The master armourers’ years of knowledge
allow him to make an exceptional mail shirt.
Ignore piercing effects of weapons. Must
purchase mail for all Warriors given this
Ability if they are not already equipped with it.
PASSIVE
GROUP
2
81
NAME
DESCRIPTION
ABILITY
TYPE
POINTS
IMMOVABLE
It’s a ‘tactical withdrawal’.
When Forced Back in combat can choose to
only be moved half the distance away from
the enemy rounded up.
PASSIVE
GROUP
1
ACTION
GROUP
1
INFILTRATE
82
Adept at stealth the bearer can sneak up on
their foe.
Always deployed last, may deploy anywhere
on the board at least 8” away from an
opponent.
INSPIRED LEADER
Armour gleaming, banner fluttering, the way
they carry themselves all add to their aura.
All Warriors with Line of Sight to this
Commander gain +1 to Morale Checks. This
does stack with other bonuses.
PASSIVE
COMMANDER
2
LAST STAND
Believing this is the end, they are not going
down without a fight!
If annihilated, make a free Attack Action for
all models who started the Combat Action
even though they have been removed as
casualties.
ACTION
GROUP
2
LOYAL RETAINER
Loyal to the last, these warriors will not fail
their lord.
If your Retinue Commander would be killed
within 3" remove a warrior from this Group
as a casualty instead.
PASSIVE
GROUP
2
MARTIAL
TRAINING
Can always be found on the training ground.
Automatically pass any orders given via a
Command Action by the Retinue Commander.
PASSIVE
GROUP
1
MASTER FLETCHER
Skilled fletchers make all the difference.
Bows and crossbows used by these Warriors
gain an extra 5" range at long range.
PASSIVE
GROUP
2
MASTER
SWORDSMAN
Trained since birth to wield the sword,
considered exceptional swordsmen by their
peers.
Parry counts against all weapon types, must
be armed with a sword.
PASSIVE
GROUP
1
MEASURED SHOT
Taking extra time to aim can make all the
difference.
By choosing not to Move, gain +1 Attack Dice
to a Ranged Attack for that Action.
ACTION
GROUP
2
MOMENTUM
‘Success brings success’.
If successful in Melee Combat must activate
again straight away if they have an unused
Action. Will become Weary at the beginning
of their second Action.
ACTION
GROUP
3
NIMBLE
Used to hunting or poaching in the wild, no
terrain is too difficult.
Can move across difficult terrain as if it is
open ground.
ACTION
GROUP
1
OLD SOLDIERS
Wily, gritty and battle worn these warriors are
the survivors of many conflicts.
Entitled to a free Attack Reaction whenever
they are charged and engaged in a Melee
Combat Action.
PASSIVE
GROUP
2
OPEN UP!
A feint and the foe’s shield is misplaced, a
flick of the wrist and it becomes a useless
piece of wood.
Opponents do not receive any bonuses for a
Defence Action in Melee Combat and their
Defence Token is removed.
ACTION
GROUP
1
NAME
DESCRIPTION
ABILITY
TYPE
POINTS
OUTFLANK
Attack from the sides to achieve an
advantages position over the enemy.
Can be given to a Cavalry Group who are
deployed off the tabletop. During round one
when activated, must enter from either short
table edge at a position of the player’s
choosing.
ACTION
GROUP
2
POWERFUL
CHARGE
The momentum of a charge is carried
forwards into the attack.
Gain +1 Attack Dice on a roll of 5 or 6 on a d6
when Charging into Melee Combat.
ACTION
GROUP
1
PROTECTOR
Honour bound to protect the levy brought
from their estate.
Enables a Knight Commander to create a
Command Group with Levy. Cannot be the
Retinue Commander. Can only be taken once
per Retinue.
PASSIVE
COMMANDER
1
PUSHED BACK
Skilled at forcing the enemy backwards in
combat to exactly where they want them.
Success in Melee Combat allows you to Force
Back the enemy in any direction you chose.
PASSIVE
GROUP
1
RAGE
Adrenaline flows and blocks the pain.
When counter attacking, do not subtract
casualties from your Attack Roll.
ACTION
GROUP
3
RAISE SHIELDS
As skilled with the shield as they are with the
sword and spear.
When using a Defence Action gain +2 to
Shield Rolls as well as Defence Rolls.
ACTION
GROUP
2
REASSURING
Nothing seems to perturb this commander,
seeing him or his banner has a calming
influence.
Remove the Morale Dice of any Group
suffering from Shock within 6” during the
Housekeeping Phase.
PASSIVE
COMMANDER
2
RELENTLESS
Experience tells them success should always be
re-enforced!
After winning Melee Combat choose to
immediately charge the same enemy Group
again fighting a second Melee Combat Action
for free. Gain a Weary Token before the
second Combat Action commences.
ACTION
GROUP
2
REPUTATION
Fearsome warriors known to their enemies.
Always count their Morale Dice as 1 better
than any Group they are fighting.
PASSIVE
GROUP
1
RESILIENT
Never affected by the horrors of war and will
fight on regardless.
Cannot be Broken or Shocked therefore not
subjected to Morale Checks as a result of
casualties.
PASSIVE
GROUP
3
ROBUST
A stronger constitution or just chunkier than
the average Commander?
It takes one extra successful hit to remove
this commander from the battle. Ignore this
ability if riding a War Horse.
PASSIVE
COMMANDER
2
SAVAGERY
Only blood can satisfy this warrior.
If there are more enemy warriors than
friendly warriors within 6” fight with added
savagery and gain +1 Attack Dice.
ACTION
GROUP
1
SIDESTEP
Nimble on their feet, they are happy to step
aside to let others ‘grab the glory’.
Friendly Warriors do not Hinder this Group
when they charge the enemy.
ACTION
GROUP
1
83
NAME
DESCRIPTION
ABILITY
TYPE
POINTS
SKIRMISHER
Harrying the enemy is their job.
+1 to Defence Rolls against ranged weapons.
PASSIVE
GROUP
2
SPITE
No time for mercy, the enemy must be killed.
If an enemy inflicts a casualty, whenever you
charge them you charge as if you had a
higher morale score.
ACTION
GROUP
1
STEADFAST
These warriors only reluctantly relinquish
ground to their enemies.
Can choose to move half distance (rounded
up) when Forced Back during a Combat
Action.
PASSIVE
GROUP
2
STEALTH
Cunning can be effective as courage on the
battlefield.
After deployment can make a single free
Movement Action before the game starts,
this can be a Run Action.
ACTION
GROUP
1
STRONG
A mighty Warlord whose physical strength is
almost legendary.
May use two handed weapons and a shield
together enabling Shield Rolls.
PASSIVE
COMMANDER
2
SUPERIOR SHOT
This unit has an uncanny ability to hit
whatever it has aimed at.
Reroll any 1s scored when shooting (result of
the second roll counts regardless of score)
ACTION
GROUP
2
SUREFOOTED
Fleet of foot these warriors will catch out the
unwary.
May reroll failed charge dice.
ACTION
GROUP
1
VETERAN
CRUSADER
Back from over the sea, few men will ever see
what he has seen.
Ignore Morale Dice when making Morale
Checks.
PASSIVE
COMMANDER
3
WAR CRY
An inspirational shout to rally the men.
Once per game the Commander shouts their
‘War Cry’ all friendly Groups within 12”
reduce their Morale Dice by 1.
ACTION
COMMANDER
3
WARRIORS OF
GOD
Ordained by God to fight his holy wars,
victory is inevitable.
During Melee Combat Actions gain +1 to
Attack Rolls with the enemy receiving -1 to
Defence Rolls (1s and 0s are treated as
normal).
ACTION
GROUP
3
WAR WISE
I thought you were a goner!
Once per game may choose to ignore a single
casualty.
PASSIVE
GROUP
2
WEAPON CHOICE
Skilled in multiple weapons.
May fight with ranged or melee, must use the
chosen of weapon for the remainder of the
round. Pay the cost for both weapons.
ACTION
GROUP
0
ACTION
GROUP
1
WOLFHOUND
84
Never miss the chance to drive the enemy
from the field.
The Warriors must charge a broken group if
they are within charge range, roll 2d6 for
charge distance and choose the highest result
when chasing down Broken Groups.
Inherent Abilities
Listed below are Abilities that are already
included in some Warrior Profiles, usually this is
for Named Characters, Commanders and
particular types of Warriors. These Abilities are
fundamental to who or what these Warriors are.
You may not select from the list of Inherent
Abilities unless you are using the Knight
Commander Creator to build your own
Commander and only if your opponent agrees.
INHERENT ABILITIES
NAME
DESCRIPTION
ABILITY
TYPE
POINTS
BLOODLUST
The thirst for blood is never sated.
Roll 2d6 for charge range and use the highest
result for this Commander and their
Command Group.
ACTION
COMMANDER
1
BRACE!
Prepare for the impact of the cavalry charge.
If armed with spears or bills, when being
charged by cavalry you may spend an unused
action as a reaction to brace. The cavalry
Group does not make a follow up move and
you Attack back, as a Reaction, as if no
casualties were caused.
ACTION
GROUP
1
CHARISMATIC
LEADER
A Man among men, held in high esteem by
his retinue.
May reroll a single failed Order Check once
per round.
PASSIVE
COMMANDER
2
CHIVALRY
The glory of defeating other knights is all that
matters.
Do not need to make Morale Check to charge
knights if they are not the closest target.
PASSIVE
GROUP
1
CALMING
PRESENCE
A calming beacon in the storm of war.
During the Housekeeping Phase anyone
within 6” automatically reduces their Morale
Dice by 2 if eligible.
PASSIVE
COMMANDER
2
COMMANDER
Heroic characters, experienced warriors or just
born into the right family. Can be chosen to
lead your Retinue.
Must join a Group before deployment
creating a Command Group. Can be chosen to
lead your Retinue, if so, can use their Actions
to issue a Command Action to other Groups
within 6".
PASSIVE
COMMANDER
2
CRUEL KING
Will stoop to the lowest depths to achieve
their selfish goals.
If a group fails a Morale Check when
receiving an order, they take a casualty, if the
order is successful, they may reroll two
Attack Dice.
ACTION
COMMANDER
3
CUNNING
TACTICIAN
The rules of war are there to be broken and
bound to your will.
May give one additional Order Action for free
to another Group, this is not taken from the
Commander’s Action allowance.
ACTION
COMMANDER
3
DIVINE
INTERVENTION
Believes the hand of God helps his most
devoted followers.
Any Broken or fleeing groups within order
range do not have to try and rally as a
compulsory action but may choose when to
try and rally. As soon as they become outside
of Order Action range, they become subject
to a Compulsory Action and must activate
next.
PASSIVE
COMMANDER
3
DEVOTED FAITH
Believes that God is on the side of the
righteous.
Any Group this character joins gains ''God
protects - ignore the total on your Moral Dice
when making Morale Checks.''
PASSIVE
COMMANDER
2
85
86
NAME
DESCRIPTION
ABILITY
TYPE
POINTS
DISHONOURABLE
No tactic is too barbarous for this
Commander.
Do not need to make a Morale Check to
charge non-knights if they are not the closest
target.
PASSIVE
COMMANDER
1
EVERY BLOODY
SUNDAY
By law of the King of England we are drilled
and drilled again, until archery is second
nature.
Can move and fire even if at long range.
ACTION
GROUP
1
FOR THE LION
To honour their leader and Prince.
If a group successfully charges as a result of
an Order Action from this character, they gain
+1 to their Attack Roll.
ACTION
GROUP
2
FOR THE REALM
Unending devotion to the realm.
This Commander and his Command Group do
not gain Weary Tokens.
PASSIVE
COMMANDER
2
FRIENDS OF THE
FOREST
Living in the woods these warriors gain a
natural ability to find cover anywhere.
All groups within 6” gain the bonus to their
Defence Roll as though they are in Soft Cover
against Ranged Attacks.
PASSIVE
COMMANDER
3
FAITH
Belief overcomes their current Morale.
Ignore the score on the Morale Dice when
making Morale Checks.
PASSIVE
GROUP
1
REVERED
HEIRLOOM SWORD
Passed through the generation of the same
family this sword has become almost mythical
to the bearers.
Scores of 9 and 0 count as 0 results for all
Attack Rolls.
PASSIVE
COMMANDER
2
HOLY ORDER
God protects us and strengthens our sword
arm.
The Group may reroll all Attack Dice from any
Attack Roll once per game.
ACTION
GROUP
2
HORROR
Abomination!, all will to fight is sapped.
Attackers suffer a -2 penalty to all Attack
Rolls.
PASSIVE
GROUP
2
INSPIRE
Looked upon with great regard and awe,
friendly warriors will fight with extra vigour
in their presence.
Friendly Groups within 6" gain +1 Attack Dice
and +1 Defence Dice.
PASSIVE
COMMANDER
2
INSPIRING
PRESENCE
Truly a sight to behold on the field of battle.
If this Commander and his Command Group
win a Combat Action, all Groups within 6”
can reduce their Morale Dice by 1 at the end
of that Combat Action.
PASSIVE
COMMANDER
2
KINGS JUSTICE
Not all justice is ‘fair’, when this is the case
this is the man for the job.
Any '0' scored for Attack Rolls cause two
successes regardless of weapon.
PASSIVE
COMMANDER
2
LIFE IN THE FOREST
The paths and shortcuts of the forest are
known like the back of their hand.
The Commander’s Group and all groups
within 6” are not affected by difficult terrain.
PASSIVE
COMMANDER
2
LIVE BY THE
SWORD
There are few equals to knights in combat.
Reroll one Attack Dice against Groups who
are not knights.
ACTION
COMMANDER
1
MAN OF THE
CLOTH
A man of god.
Also counts as a priest Command Group
upgrade.
PASSIVE
COMMANDER
5
NAME
DESCRIPTION
ABILITY
TYPE
POINTS
MARTIAL RESPECT
Veterans of war and well respected.
When taking a Morale Check within 6" of a
sergeant, roll 2d10 and use the highest result.
PASSIVE
GROUP
1
MERRY MEN
Member of the Merry Men.
Can form a Command Group which has Robin
Hood or Maid Marian as the Commander and
any other Warriors with the ‘Merry Men’ ability.
Little John counts as Bannerman
Will Scarlet counts as a Musician
Friar Tuck counts as a Priest.
PASSIVE
SPECIAL
0
REGENT
A regent of the realm, their word is law.
May give an order to the same Group twice
during the same round using Command
Actions. The Group will receive a Weary
Token as normal.
ACTION
COMMANDER
1
RESOLUTE
DEFENDER
A master in defence no attack is
undefendable.
The Commander’s Group or one other Group
within 6” may make a Defend Action as a free
Action once per round. This cannot be
stacked with other Reactions.
ACTION
GROUP
1
SORRY M'LORD
Fear of their lord’s retribution is worse than
death.
If Broken and testing to rally, ignore Morale
Dice if within 6" of a friendly Command Group.
PASSIVE
COMMANDER
3
STEADY SHOT
Steady, aim, loose!
Reroll any missed Attack Dice for attacks
made with a bow.
ACTION
GROUP
2
STEAL FROM THE
RICH
Always helping those that need it.
If contesting an objective with an enemy
knight, lord or baron, it always counts as
being held by this Commander.
PASSIVE
COMMANDER
1
THE GREATEST
KNIGHT
The paragon of chivalry.
Groups within 6” do not need to roll a Moral Check
to pass a Command Action and follow orders.
PASSIVE
COMMANDER
1
THE LION
Ferocious on the field.
Roll 2d6 charge dice for your Command
Group and choose the highest result.
ACTION
COMMANDER
1
TO THE KING
Protect the king!
The Command Group gains +1 to its Defence
Rolls as long as this Commander is still alive.
PASSIVE
COMMANDER
3
WEAPONS MASTER
Skilled with their chosen weapon.
Roll an extra Attack Dice when initiating a
Combat Action, but not when Reacting.
ACTION
COMMANDER
2
WITHIN REACH
Trained to slip inside the range of a long
weapon to make a devastating strike.
May use a Reaction to counterattack against
Groups armed with reach weapons, spears &
bills for example.
ACTION
COMMANDER
1
Ranged Effects for Abilities
If the Ability has a Ranged Effect the Range is
determined from the figure which is activating the
Ability. This is the Area of Influence.
EXAMPLE: A Commander can affect Warriors
who are within 6” so we say the Area of
Influence is 6” measured from the edge the
Commander’s base.
87
HISTORIC CHARACTERS
The First Barons’ War is full of colourful
characters whom are thought of as
both heroes and villains depending on
which side of the argument you sat on,
however, disagreements were never
just black and white and in almost all
cases deadly powerplays by nobles
involving themselves as a way to
increase both influence at court and
personal riches.
This section provides you with a list of Character
Profiles and the opportunity of including some of
King John of England
After unsuccessfully attempting to rebel against
his brother's royal administrators whilst Richard
was participating in the Third Crusade, John was
proclaimed King of England in 1199 after
Richard's death.
War broke out with France (again) in 1202,
where John achieved early victories, but
shortages of military resources and his treatment
of Norman, Breton, and Anjou nobles resulted in
the loss of his empire in northern France by
1204. Much of the next decade was spent
attempting to regain these lands,
resulting in the raising of
huge revenues via taxes
and rebuilding of
continental alliances.
John's attempt to defeat Philip in
1214 failed at the battle of
Bouvines due to a French victory
88
the giants from the period in your Retinue, if
both players agree. They must be fielded as their
profile indicates, warts and all and you may not
give them any extra abilities. To be included they
must join a group of your choosing creating a
Command Group and they do not have to be
your Retinue Commander unless they are King
John of England or Prince Louis of France.
Please only ever have one of each on the tabletop
at a time, not one for each retinue, just one. This
character list is by no way exhaustive and the aim
is for more to be added over time.
over John's allies. Returning to England, John
faced a rebellion by many of his barons, unhappy
with his taxes and his treatment of many of
England's most
powerful nobles
during the
campaign on
the continent.
Although both John and the barons agreed to a
peace treaty in 1215 (the Magna Carta), neither
side had any intention of complying with its
conditions. Civil war broke out with the northern
barons who, aided by Prince Louis of France,
causing John's initial successes, most notably the
Siege of Rochester Castle, to descend into a
stalemate.
By the time of his death in 1216, John was
regarded as the worst King ever to have sat on
England's throne due to his treacherous,
tyrannical and cruel nature.
It is recorded that John took part in numerous
battles and engagements which goes against his
cowardly portrayal, finding success with siege
warfare in particular.
King John had substantial dealings with the
Knights Templar. At the time of Magna Carta,
not only did Aymeric de St Maur the Master of
the Temple accompany him at the signing, but
King John was also residing with the templars
when the Barons first presented their demands.
KING JOHN OF ENGLAND
CHARACTER
4
4+
5+
4+
POINTS
ABILITIES
51
ALL
3
EQUIPMENT
NAME
COST PER
WARRIOR
SWORD
EQUIPPED
MAIL
EQUIPPED
EFFECT
REQUIRED
EXPERIENCE
PARRY - Gain an extra defence dice against sword,
mace or hand weapon
ALL
-2 Movement
ALL
EFFECT
REQUIRED
EXPERIENCE
MODIFIER
OPTIONS
NAME
COST PER
WARRIOR
MODIFIER
HORSE
+3
+3 Movement
n/a
BARDED HORSE
+5
-1 Defence
+3 Movement
n/a
BARDED WAR HORSE
+16
+1 Attack
dice per
warrior,
-1 Defence
+2 Movement, requires 2 damage to cause a casualty
when rider is mounted on War horse. When charging
subject to Over Charge
n/a
SMALL SHIELD
+2
9+ Shield roll
n/a
MEDIUM SHIELD
+3
8+ Shield roll
n/a
LARGE SHIELD
+5
7+ Shield roll
n/a
COMMAND GROUP UPGRADES
NAME
POINTS
EFFECT
BANNERMAN UPGRADE
+9
Increase order and inspire range to 12”
MUSICIAN UPGRADE
+4
Any warrior(s) within order range of Command Group roll two dice for
the Morale Check to follow out orders and choose highest
PRIEST UPGRADE
+5
Any warrior(s) within order range of Command Group ignore Morale
Dice for Morale Checks
ABILITIES
Commander, Inspire, Chivalry, Cruel King, To the King!, Cunning Tactician
89
William Marshal, 1st Earl of Pembroke
William the Marshal was an Anglo-Norman
soldier and statesman who in total served five
English kings. Knighted in 1166, he spent his
younger years as a knight errant and a successful
tournament competitor and was eulogised by
Stephen Langton as the "best knight that ever
lived".
Before him, his father's family held a hereditary
title of Marshal to the king which involved
management over the other Marshals and
functionaries of the crown. William, however,
became known as 'the Marshal' and because he
was an Earl, the term 'Earl Marshal' was
commonly used where this later became an
established hereditary title in the English Peerage.
All Monarchs of England, Great Britain and the
United Kingdom since James VI have been
descendants of William Marshal through his
great-great-grandson Robert the Bruce.
True to form William supported King John when
he became king in 1199 and became heavily
engaged with the defence of Normandy against
the growing pressure of the Capetian armies
between 1200 and 1203. He and the king had a
falling out in the aftermath of this failed
campaign when he was sent with the Earl of
Leicester as ambassadors to negotiate a truce
with King Philip II of France in 1204. The Marshal
took the opportunity to negotiate the continued
possession of his Norman lands.
Causing offence to King John for having paid
homage to King Philip of France, this became
outright hostility in 1207 when John moved
against several major Irish magnates. William
stayed in Ireland defending his lands in a war
with the Braose and Lacy families until being
taken back into favour in 1212. He was
summoned in 1213 to return to the English court
and despite their differences, William remained
loyal throughout the hostilities between John and
his barons which culminated on 15 June 1215 at
Runnymede with the sealing of Magna Carta.
90
William was one of the few English earls to
remain loyal to the king through the First Barons'
War. It was William whom King John trusted on
his deathbed to make sure John's nine-year-old
son Henry would get the throne. It was also
William who took responsibility for the king's
funeral and burial at Worcester Cathedral.
On 11 November 1216 at Gloucester, upon the
death of King John, William Marshal was named
by the king's council (the chief barons who had
remained loyal in the First Barons' War) to serve
as protector of the nine-year-old King Henry III,
and regent of the kingdom. In spite of his
advanced age (around 70) he prosecuted the war
against Prince Louis and the rebel barons with
remarkable energy. In the battle of Lincoln, he
charged and fought at the head of the young
King's army, leading them to victory. He was
preparing to besiege Prince Louis in London
when the war was ended by the naval victory of
Hubert de Burgh in the straits of Dover.
At the end of the war William was criticised for
the generosity of the terms he accorded to Louis
and the rebels in September 1217, but his desire
for an expedient settlement was dictated by
sound statesmanship. Self-restraint and
compromise were the keynotes of Marshal's
policy, hoping to secure peace and stability for
his young liege. Both before and after the peace
of 1217 he reissued Magna Carta, in which he is
a signatory as one of the witnessing barons.
Marshal's health finally failed him only a couple
of years after the end of the conflict early in
1219. By fulfilling the vow, he had made while
on crusade, he was invested into the order of the
Knights Templar on his deathbed. He died on
14 May 1219 at Caversham and was buried in
the Temple Church in London, where his tomb
can still be seen.
WILLIAM MARSHALL
CHARACTER
4
3+
5+
2+
3
POINTS
ABILITIES
51
ALL
EQUIPMENT
NAME
COST PER
WARRIOR
SWORD
EQUIPPED
MAIL
EQUIPPED
EFFECT
REQUIRED
EXPERIENCE
PARRY - Gain an extra defence dice against sword,
mace or hand weapon
ALL
-2 Movement
ALL
EFFECT
REQUIRED
EXPERIENCE
+3 Movement
n/a
MODIFIER
OPTIONS
NAME
COST PER
WARRIOR
HORSE
+3
BARDED HORSE
+5
-1 Defence
+3 Movement
n/a
BARDED WAR HORSE
+16
+1 Attack
dice per
warrior, -1
Defence
+2 Movement, requires 2 damage to cause a casualty
when rider is mounted on War horse. When charging
subject to Over Charge
n/a
SMALL SHIELD
+2
9+ Shield roll
n/a
MEDIUM SHIELD
+3
8+ Shield roll
n/a
LARGE SHIELD
+5
7+ Shield roll
n/a
MODIFIER
COMMAND GROUP UPGRADES
NAME
POINTS
EFFECT
BANNERMAN UPGRADE
+9
Increase order and inspire range to 12”
MUSICIAN UPGRADE
+4
Any warrior(s) within order range of Command Group roll two dice for
the Morale Check to follow out orders and choose highest
PRIEST UPGRADE
+5
Any warrior(s) within order range of Command Group ignore Morale
Dice for Morale Checks
ABILITIES
Commander, Inspire, Chivalry, The Greatest Knight, Regent, For the Realm!
91
Battle of Lincoln
William Marshal, 1st Earl of Pembroke, a knight of
great skill and prowess, now serving as regent
called all nobles holding castles in England to
muster at Newark in Nottinghamshire. There a
force consisting of approximately 400 knights, 250
crossbowmen, and a large auxiliary force of both
mounted and foot soldiers assembled. Marshal
marched this force to the city of Lincoln to break
Prince Louis's siege.
Arriving at Lincoln Marshal's main force initially
secured the north gate, while crossbowmen took
to high positions raining volleys of bolts from the
rooftops causing death, damage and confusion on
Perche's besieging forces. Chaos reigned and at
the grand age of seventy Marshal took this as a
sign to personally lead the knights and foot
soldiers in a devastating charge into Perche's siege
forces overwhelming the rebels during fierce hand
to hand fighting through the streets of the town.
Thomas Comte de Perche as fitting a knight of his
stature was offered quarter which he declined and
fought on to the death as the siege collapsed into
a scattered rout. Those of Louis's rebel army who
Prince Louis of France, The Lion
The English Barons offered the throne to Prince
Louis VIII of France and he willingly accepted,
landing unopposed in eastern Kent at the head
of an army in May 1216. With little resistance on
entering London, Louis was proclaimed king at
Old St Paul's Cathedral with great pomp and
celebration. Although not crowned, nobles as
well as Alexander II, King of Scotland, gathered
to give homage.
A month later, Louis captured Winchester and
pressed on with his campaign. His military
prowess earned him the epithet 'The Lion' and he
92
were not captured fled Lincoln, by the south city
gate, to London. Inhabitants of towns between
Lincoln and London ambushed and killed some of
the escaping French soldiers on their flight south.
All in all, the battle had lasted for about six hours.
The call of ‘Cry Havoc’ was given and the city of
Lincoln was pillaged by Marshal's victorious army,
on the pretence that it was loyal to Louis, the
looting that followed the battle later became
known euphemistically as 'the Lincoln Fair'.
This battle was the turning point of the war. Many
of Henry's enemies’ barons who had supported
Louis, and who helped supply, organise and
command Louis's military forces were captured at
Lincoln. This included Robert Fitzwalter, the
former leader of the Army of God.
As a footnote, the battle of Lincoln is the second
most decisive battle fought on English soil but
unlike Hastings is almost completely unknown.
Thomas Comte de Perche's body was found in the
aftermath stabbed through the eyes of his visor
when William Marshal heard he wept.
soon controlled over half of the kingdom. Just as
it seemed England was his, the death of King
John in October 1216 caused many of the rebels
to reconsider their position. A number of them
deserted Louis in favour of John's nine-year-old
son, Henry III the new king of England.
This change of heart was inspired by William
Marshal, Earl of Pembroke, and regent to the boy
king, who joined the war calling for the English
"to defend our land" against the French. With
Marshal at the helm, the English experienced a
reversal of fortunes on the battlefield beating
Louis’s army at the Battle of Lincoln in May 1217.
This combined with the defeat of the French
naval forces at the Battle of Sandwich, forced
peace on the French under English terms.
under the dominion of the
kings of England by
marriage since the 12th
century. It is believed that
revenge was
the motive
behind his
attempt to
rid England of
any claim to
French land once
and for all.
The War ended with the signing of the Treaty of
Lambeth which granted amnesty for the English
rebels, a pledge from Louis never to attack
England again, and 10,000 silver marks to be
given to Louis. In return for this payment, Louis
agreed he had never been the legitimate king of
England.
Returning to France in 1217 with his tail between
his legs, Louis embarked on the conquest of the
duchy of Aquitaine; a region that had passed
PRINCE LOUIS
CHARACTER
4
2+
5+
2+
3
POINTS
ABILITIES
54
ALL
EQUIPMENT
NAME
COST PER
WARRIOR
SWORD
EQUIPPED
MAIL
EQUIPPED
EFFECT
REQUIRED
EXPERIENCE
PARRY - Gain an extra defence dice against sword,
mace or hand weapon
ALL
-2 Movement
ALL
EFFECT
REQUIRED
EXPERIENCE
+3 Movement
n/a
MODIFIER
OPTIONS
NAME
COST PER
WARRIOR
HORSE
+3
BARDED HORSE
+5
-1 Defence
+3 Movement
n/a
BARDED WAR HORSE
+16
+1 Attack
dice per
warrior, -1
Defence
+2 Movement, requires 2 damage to cause a casualty
when rider is mounted on War horse. When charging
subject to Over Charge
n/a
SMALL SHIELD
+2
9+ Shield roll
n/a
MEDIUM SHIELD
+3
8+ Shield roll
n/a
LARGE SHIELD
+5
7+ Shield roll
n/a
MODIFIER
COMMAND GROUP UPGRADES
NAME
POINTS
EFFECT
BANNERMAN UPGRADE
+9
Increase order and inspire range to 12”
MUSICIAN UPGRADE
+4
Any warrior(s) within order range of Command Group roll two dice for
the Morale Check to follow out orders and choose highest
PRIEST UPGRADE
+5
Any warrior(s) within order range of Command Group ignore Morale
Dice for Morale Checks
ABILITIES
Commander, Inspire, Chivalry, The Lion, Inspiring Presence, For the Lion!
93
Stephen Langton, Archbishop of
Canterbury
In 1207 Stephen Langton was chosen by Rome to
be the Archbishop of Canterbury which upset King
John greatly. There followed a hard political
struggle between John of England and Pope
Innocent III with the King proclaiming anyone who
recognised Stephen as Archbishop as a public
enemy which included expelling the Canterbury
monks, who were now unanimously in support of
Stephen, to France.
In May 1213 John yielded and Stephen and his
fellow exiles were allowed to return to England.
Stephen now became a leader in the struggle
against the King and with his energetic leadership
and the Barons’ military strength by 1215, John
was forced to grant his seal to Magna Carta, the
great charter the Arch Bishop had produced.
As the kingdom of England was a fief of Holy
Rome and under its jurisdiction, the Pope
supported King John and excommunicated the
barons. For refusing to publish the
excommunication Stephen was suspended from all
ecclesiastical functions a sentence confirmed by
the Pope. Highly respected by the Roman Church
he was released from his suspension the following
spring on condition that he keep out of England
until peace was restored.
STEPHEN LANGTON
CHARACTER
4
4+
5+
2+
3
POINTS
ABILITIES
53
ALL
EQUIPMENT
NAME
COST PER
WARRIOR
EFFECT
REQUIRED
EXPERIENCE
MACE
EQUIPPED
BLUNT TRAUMA - If the target takes casualties from
a mace the target Group Movement is halved for
the remainder of the round
ALL
MAIL
EQUIPPED
-2 Movement
ALL
NAME
COST PER
WARRIOR
EFFECT
REQUIRED
EXPERIENCE
MODIFIER
OPTIONS
MODIFIER
HORSE
+3
+3 Movement
n/a
BARDED HORSE
+5
-1 Defence
+3 Movement
n/a
BARDED WAR HORSE
+16
+1 Attack
dice per
warrior,
-1 Defence
+2 Movement, requires 2 damage to cause a casualty
when rider is mounted on War horse. When charging
subject to Over Charge
n/a
SMALL SHIELD
+2
9+ Shield roll
n/a
MEDIUM SHIELD
+3
8+ Shield roll
n/a
LARGE SHIELD
+5
7+ Shield roll
n/a
COMMAND GROUP UPGRADES
NAME
POINTS
BANNERMAN UPGRADE
+9
Increase order and inspire range to 12”
+4
Any warrior(s) within order range of Command Group roll two dice for
the Morale Check to follow out orders and choose highest
MUSICIAN UPGRADE
EFFECT
ABILITIES
94
Commander, Inspire, Man of the Cloth, Devoted Faith, Divine Intervention
Priest - Any warrior(s) within order range of Command Group and including the Command Group ignore Morale dice
for Morale Checks
Robert Fitzwalter,
Marshal of the
Army of God
The leader of the
baronial
opposition
against King
John was
Robert
Fitzwalter
or to give
him his full
titles, Marshal
of the Army
of God and
Holy Church, Baron of Little Dunmow, Constable
of Baynard's Castle, Castellain and Chief
Banneret of the City of London and member of
the Security Council of the Barons as enshrined in
Magna Carta.
According to Robert, the reason for his revolt had
been the king's attempt to seduce his eldest
daughter Matilda, however, his account of his
grievances varied. It is believed these stories of
Matilda recorded by monastic chroniclers and
added to by several other barons making similar
accusations developed into the legend of Robin
Hood with Matilda morphing into the Maid
Marian.
ROBERT FITZWALTER
CHARACTER
4
3+
5+
2+
3
POINTS
ABILITIES
52
ALL
EQUIPMENT
NAME
COST PER
WARRIOR
SWORD
EQUIPPED
MAIL
EQUIPPED
EFFECT
REQUIRED
EXPERIENCE
PARRY - Gain an extra defence dice against sword,
mace or hand weapon
ALL
-2 Movement
ALL
EFFECT
REQUIRED
EXPERIENCE
+3 Movement
n/a
MODIFIER
OPTIONS
NAME
COST PER
WARRIOR
HORSE
+3
BARDED HORSE
+5
-1 Defence
+3 Movement
n/a
BARDED WAR HORSE
+16
+1 Attack
dice per
warrior,
-1 Defence
+2 Movement, requires 2 damage to cause a casualty
when rider is mounted on War horse. When charging
subject to Over Charge
n/a
SMALL SHIELD
+2
9+ Shield roll
n/a
MEDIUM SHIELD
+3
8+ Shield roll
n/a
LARGE SHIELD
+5
7+ Shield roll
n/a
MODIFIER
COMMAND GROUP UPGRADES
NAME
POINTS
EFFECT
BANNERMAN UPGRADE
+9
Increase order and inspire range to 12”
MUSICIAN UPGRADE
+4
Any warrior(s) within order range of Command Group roll two dice for
the Morale Check to follow out orders and choose highest
PRIEST UPGRADE
+5
Any warrior(s) within order range of Command Group ignore Morale
Dice for Morale Checks
ABILITIES
Commander, Inspire, Chivalry, Heirloom Sword, Charismatic Leader
95
Hubert de Burgh
Hubert de Burgh the Earl of Kent also held the
titles Chief Justiciar of England (prime
minister) and Lord Warden of the Cinque
Ports both important titles indeed.
Cinque Ports is Norman French, meaning the
“five ports" of Hastings, New Romney, Hythe,
Hubert de Burgh, 1st Earl of Kent
Hubert de Burgh was one of the most influential
men in England during the reign of King John
due to his loyalty to the crown, his might at arms
and his political prowess. De Burgh remained
loyal to King John during the barons' rebellion
and in the early stages was sent to London with
the Bishop of Coventry in an attempt to
command the people of London to resist the
Barons' military advance. De Burgh along with
Philip d'Aubigny brought together the king's
troops ready to face the rebels, but John chose to
make peace by signing Magna Carta. De Burgh is
listed as one of those who advised the king to
sign that charter as well as being listed to act on
John’s behalf in the King's absence due to
holding title Chief Justiciar of
England.
During the ensuing war of
1215-1217, de Burgh served
John as sheriff of Kent and
Surrey, as well as castellan
of Canterbury and Dover.
De Burgh defended Dover
Castle during the siege that
lasted until 1217 where the
English defenders tunnelled
outwards and attacked
the French. Following
on from his success on
land Hubert almost
96
Dover and Sandwich all with origins that can
be traced back to Anglo-Saxon times. This
historic series of coastal towns were originally
formed for military and trade purposes due to
geographically lying at the eastern end of the
English Channel where the crossing to France
is at its narrowest.
immediately set sail to intercept the French fleet
which had arrived off the coast of Sandwich in
Kent, in order to provide Prince Louis with
soldiers, siege engines and fresh supplies.
During the resulting Battle of Sandwich, he
succeeded to scatter the French and captured
their flagship The Great Ship of Bayonne,
commanded by Eustace the Monk, who he
promptly executed. De Burgh’s victory
made it nearly impossible for Louis to
continue fighting the war resulting in the
French Prince asking William Marshal to
negotiate terms
for peace.
HUBERT DE BURGH
CHARACTER
4
3+
4+
2+
3
POINTS
ABILITIES
52
ALL
EQUIPMENT
NAME
COST PER
WARRIOR
SWORD
EQUIPPED
MAIL
EQUIPPED
EFFECT
REQUIRED
EXPERIENCE
PARRY - Gain an extra defence dice against sword,
mace or hand weapon
ALL
-2 Movement
ALL
EFFECT
REQUIRED
EXPERIENCE
+3 Movement
n/a
MODIFIER
OPTIONS
NAME
COST PER
WARRIOR
HORSE
+3
BARDED HORSE
+5
-1 Defence
+3 Movement
n/a
BARDED WAR HORSE
+16
+1 Attack
dice per
warrior,
-1 Defence
+2 Movement, requires 2 damage to cause a casualty
when rider is mounted on War horse. When charging
subject to Over Charge
n/a
MODIFIER
SMALL SHIELD
+2
9+ Shield roll
n/a
MEDIUM SHIELD
+3
8+ Shield roll
n/a
LARGE SHIELD
+5
7+ Shield roll
n/a
COMMAND GROUP UPGRADES
NAME
POINTS
EFFECT
BANNERMAN UPGRADE
+9
Increase order and inspire range to 12”
MUSICIAN UPGRADE
+4
Any warrior(s) within order range of Command Group roll two dice for
the Morale Check to follow out orders and choose highest
PRIEST UPGRADE
+5
Any warrior(s) within order range of Command Group ignore Morale
Dice for Morale Checks
ABILITIES
Commander, Inspire, Chivalry, Resolute Defender, Within Reach
97
Falkes de Breauté
An Anglo-Norman soldier, possibly a mercenary,
of dubious parentage with no particular
aristocratic standing. Described mostly as the
illegitimate child of a Norman knight and a
concubine, possibly a knightly family from the
village of Bréauté. Most chroniclers describe him
as from common stock often referring to him by
his first name which was derived from the scythe
he once used to murder someone as a sign of
contempt.
During the First Barons' War as an
unquestioning subject of King John, he
earned both the title of the king's steward
and the hate of baronial and monastic
leaders alike. In November 1215,
under orders of the king, de Breauté
captured Hanslope,
Buckinghamshire, a castle of
William Mauduit, and soon
afterwards he captured
Bedford Castle belonging to
William de Beauchamp.
In reward John allowed him
to keep it. As one of John's
four captains of the loyalist
army when Prince Louis of France
invaded de Breauté was tasked with
holding Oxford against the baronial
forces.
98
In reward for exemplary service, King John gave
de Breauté the hand in marriage of Margaret the
daughter of Warin Fitzgerald, the royal
chamberlain. This took place after the fact that
Falkes had already kidnapped her to improve his
standing. Falkes received not only Margaret's
dowry from her father, but also as the widow of
Baldwin de Revières, former heir to the Earl of
Devon he inherited as her son’s regent the
estates connected to the title when his
grandfather William de Revières died in 1217,
making him a powerful man indeed.
Under Henry III, de Breauté continued to
fight with the same loyalty he had
shown John. That Christmas he was
holding in total seven High Sheriffdoms
including Cambridgeshire, Oxfordshire,
Buckinghamshire, Northamptonshire and
Bedfordshire and was proving to be a major
obstacle to Louis and the rebel
barons, although he lost
Hertford and Cambridge in
1217.
Falkes seemed to be
everywhere, at the end of
February he led a royalist
force in an unsuccessful
attempt to relieve the
port of Rye and after this, he captured the Isle of
Ely. He joined the Earl of Chester to besiege
Mountsorrel, and in response, the rebel Barons
were forced to divide their forces, with Prince
Louis and half the force remaining at the siege of
Dover while the rest marched north to relieve
Mountsorrel. This proved to play a critical role in
the whole campaign leading up to the Battle of
Lincoln.
After successfully relieving the siege at
Mountsorrel the rebels marched to Lincoln to
assist their besieging force at Lincoln Castle;
while the town had fallen to the rebels, the castle
garrison had remained loyal to the King. When
the rebel relief force finally got there they found
William Marshal, the leader of the royalist forces
had already arrived forcing a battle in the streets
of the town itself.
Before the battle began de Breauté had led his
own force into the castle itself, where his
crossbowmen shot down at the rebels from the
walls causing panic and chaos. During the battle,
Falkes sallied out with such force that he drove
deep into the enemy lines ending up first being
captured before being rescued by his men. He
fought on until the rebels fled with even the
loyalist leaders acknowledging his role in a critical
victory against superior forces.
FALKES DE BREAUTÉ
CHARACTER
4
3+
5+
2+
3
POINTS
ABILITIES
51
ALL
EQUIPMENT
NAME
COST PER
WARRIOR
FALCHION
EQUIPPED
MAIL
EQUIPPED
EFFECT
REQUIRED
EXPERIENCE
SLASHING - Target suffers -1 to Defence rolls if
unarmoured or wearing leather/padded
ALL
-2 Movement
ALL
EFFECT
REQUIRED
EXPERIENCE
+3 Movement
n/a
MODIFIER
OPTIONS
NAME
COST PER
WARRIOR
HORSE
+3
BARDED HORSE
+5
-1 Defence
+3 Movement
n/a
BARDED WAR HORSE
+16
+1 Attack
dice per
warrior,
-1 Defence
+2 Movement, requires 2 damage to cause a casualty
when rider is mounted on War horse. When charging
subject to Over Charge
n/a
SMALL SHIELD
+2
9+ Shield roll
n/a
MEDIUM SHIELD
+3
8+ Shield roll
n/a
LARGE SHIELD
+5
7+ Shield roll
n/a
MODIFIER
COMMAND GROUP UPGRADES
NAME
POINTS
BANNERMAN UPGRADE
+9
Increase order and inspire range to 12”
+4
Any warrior(s) within order range of Command Group roll two dice for
the Morale Check to follow out orders and choose highest
MUSICIAN UPGRADE
EFFECT
ABILITIES
Commander, Inspire, Dishonourable, Fear, King’s Justice, Blood Lust
99
THE MERRY MEN
The real Robin Hood – was there ever
such a man, our best guess is that
Robin is an amalgamation of various
outlaws from the Saxon to early
medieval times. Men who with guile
and strength had managed to outwit
the omnipotent rulers of England who
had almost endless resources available
to them, a resonating ‘underdog’ story
for the down trodden masses.
Robin Hood must have been a very popular tale
as in a time of rare literacy various versions were
written down from around the middle of the
C14. Robin though is never by himself and is
surrounded by his close allies, Little John, Friar
Tuck, Will Scarlett and of course Maid Marian.
Again, their character varies with each tale and it
is not uncommon for them to fall out with Robin
who is himself a fallible character in many of the
stories. A theme though does run throughout,
Robin is both clever and cunning plus skilled with
the bow, Little John is strong and likes a good
fight, Friar Tuck is both smart and witty and likes
his food, Will is short tempered and good with a
sword and Marian is the sensible one an equal to
Robin, a rare thing in the patriarchal world of the
middle ages.
The popularity of his story is almost undoubtedly
a sign of the times, pre-Norman conquest Saxon
England was a well-managed land with a wellfunctioning legal system based on ‘folk right’ and
hierarchy a structure that had managed to
maintain the equilibrium and therefore peace
and relative affluence for the majority. The Battle
of Hastings was to destroy the fabric of Saxon
society and reduce every Englishman to little
more than a serf who lived or died at his
conquering masters’ whim. 1066 wasn’t the
‘conquest’ it would take William and the
Normans ten years to subdue England and the
resistance would have continued festering
100
making characters like Robin ‘heroes’ in the eyes
of the general population.
The Normans were rapacious and used every
means at their disposal to gain more land, power
and wealth at the expense of the inhabitants.
Saxon laws were discarded and Norman laws
such as the Forest Laws (which at one point had
a third of England designated as royal forest)
replaced pre-conquest laws. Before 1066
anybody could enter a forest for resources such
as wood, berries or hunting (some Saxon Lords
and Kings did have their own designated forest
areas) after the invasion even collecting wood or
berries was considered theft and Norman
punishment was brutal. The introduction of
Feudalism to England consigned the ‘moot’ and
‘Wittan’ and its collective laws to the pages of
history and most Englishmen had not only lost
their freedom but were also starving, fertile
ground for stories of the likes of ‘Robin’.
The success of the Robin Hood tale meant that
the ruling classes had to appropriate it and make
it their own so in later ‘telling’ Robin can be a
disposed lord (possibly of Saxon origin) and Maid
Marian is elevated from shepherdess to ‘lady’.
You can choose your own
‘origin’ story for our Robin
Hood and his band
of ‘Merry Men’
and they make a
strong addition to
your force. Just taking
Robin is good but it is
better to spend the
points and take some of
his friends, just like in
the tales he works
better as part of
a team.
Robin Hood
Robin is excellent value for 50 points his normal command abilities, Commander, Inspire and Command
Group make him very useful but his other abilities Every Bloody Sunday (used by regular archers) and
measured shot make him a deadly archer that the enemy will try and stay out of the line of shot of. Steal
from the rich and life in the forest makes him excellent for taking and holding objectives, overall a very
effective choice as force commander and something different to the usual Knight Commander.
ROBIN HOOD
CHARACTER
5
5+/4+
6+
2+
3
POINTS
ABILITIES
50
ALL
EQUIPMENT
NAME
COST PER
WARRIOR
EFFECT
REQUIRED
EXPERIENCE
BOW
EQUIPPED
Long up to 20"/short up to 10" range. Can move 3"
and shoot at short range
ALL
LEATHER/PADDED
EQUIPPED
-1 Movement
ALL
MODIFIER
ABILITIES
Commander, Inspire, Merry Men, Every Bloody Sunday, Steal from the Rich, Measured Shot, Life in the Forest
Maid Marian
Based on the numerous tales the character of Marian is an independently minded and clever lady and the
counter balance to her hot-headed compatriots and an equal member of the ‘Merry Men’. She is a good
at shooting with Every Bloody Sunday and Steady Shot (gets to re roll misses) but she excels at keeping
her companions out of trouble with Calming presence (reduces morale dice by two during the
housekeeping phase) and Friends of the Forest (all groups count as in soft cover against enemy shooting
while within order range). Although she is not a fighting machine the enemy should not underestimate
her battlefield worth.
MAID MARIAN
CHARACTER
6
5+/4+
6+
2+
3
POINTS
ABILITIES
53
ALL
EQUIPMENT
NAME
COST PER
WARRIOR
BOW
EQUIPPED
EFFECT
REQUIRED
EXPERIENCE
Long up to 20"/short up to 10" range. Can move 3"
and shoot at short range
ALL
MODIFIER
ABILITIES
Commander, Inspire, Every Bloody Sunday, Calming Presence, Steady Shot, Friends of the Forest, Merry Men
101
Little John
Little John will add some extra hand to hand combat
’bite’ with weapons master to any unit he joins.
If he joins Robin’s Command Group using his ability
Merry Men, he increases Robin’s command
range just like a Bannerman.
LITTLE JOHN
CHARACTER
5
4+
6+
3+
1
POINTS
ABILITIES
25
ALL
EQUIPMENT
NAME
COST PER
WARRIOR
EFFECT
REQUIRED
EXPERIENCE
STAVE
EQUIPPED
REACH - Cannot counter Attack unless armed with
spear/bill. Result of 10 on Attack dice causes 2 damage
ALL
LEATHER/PADDED
EQUIPPED
-1 Movement
ALL
MODIFIER
ABILITIES
Merry Men (LITTLE JOHN), Weapons Master
Friar Tuck
Friar Tuck is a good choice, (not as tough as you would expect as
Little John) but a Group he joins will stand its ground due to Devoted
Faith. If Tuck decides to join Robin’s Command Group, he counts as
the Priest.
FRIAR TUCK
CHARACTER
5
5+/4+
6+
3+
1
POINTS
ABILITIES
23
ALL
EQUIPMENT
NAME
COST PER
WARRIOR
BOW
EQUIPPED
LEATHER/PADDED
EQUIPPED
EFFECT
REQUIRED
EXPERIENCE
Long up to 20"/short up to 10" range. Can move 3"
and shoot at short range
ALL
-1 Movement
ALL
MODIFIER
ABILITIES
Merry Men (FRIAR TUCK), Devoted Faith
102
Will Scarlet
Just like in the tales Will Scarlett is a fighter, and a songsmith, if he
joins Robin’s Command Group with the ability Merry Men he
becomes their Musician. Whatever your choice he brings fighting
prowess (even owning a sword), weapon choice allows him
to fight with either the sword or the bow for the whole turn.
Master swordsmen allows him to parry against any weapon
and Open Up means his enemies do not receive any
bonuses for a Defence Action in melee. All in all, a
serious threat to anyone, nobility included, who choose
to go ‘toe to toe’ with him.
WILL SCARLET
CHARACTER
5
5+/4+
6+
3+
POINTS
ABILITIES
26
ALL
1
EQUIPMENT
NAME
COST PER
WARRIOR
EFFECT
REQUIRED
EXPERIENCE
BOW
EQUIPPED
Long up to 20"/short up to 10" range. Can move 3"
and shoot at short range
ALL
SWORD
EQUIPPED
PARRY - Gain an extra Defence dice against sword,
mace or hand weapon
ALL
LEATHER/PADDED
EQUIPPED
-1 Movement
ALL
MODIFIER
ABILITIES
Merry Men (WILL SCARLET), Weapon Choice, Master Swordsman, Open Up
Robin and his Merry Men will make a quick shooting, hard hitting, and tough to pin
down force that will give any group of knights a good run for their money an excellent
choice for the underdog commander that wants to give ‘the high and mighty’ a ‘bloody
nose’ and teach them some ‘respect’. “May you always hit ‘the bullseye”.
103
William Marshal
A brief history of William Marshal, prior to 1215
William's father, John Marshal, started as a
supporter of King Stephen when he took the
throne in 1135, but in about 1139 he changed
sides to support Empress Matilda in the civil war
of succession between them which led to the
collapse of England into "the Anarchy". On
besieging Newbury Castle in 1152, King Stephen
used the young William as a hostage to ensure
that his father John kept his promise to surrender
the castle. His father, however, used the time
given him to reinforce the castle and to alert
Matilda's forces. When ordered to surrender
immediately or William would be hanged, John
replied, "Go ahead, I still have the hammer and
the anvil with which to forge still more and better
sons!". This outraged the attackers, who created
a pretence to launch William from a type of
trebuchet towards the castle however Stephen
could not bring himself to harm young William
and kept him as a hostage.
104
skirmish he received a nasty wound to his thigh
luckily someone in his captor's household took
pity on the young knight. He received a loaf of
bread in which were concealed several lengths of
clean linen bandages with which to dress his
wounds. This act of kindness by an unknown
person perhaps saved Marshal's life as an
infection setting into a wound in this period
would have killed him. After a period of time as a
hostage, he was ransomed by Eleanor of
Aquitaine, who was impressed by tales of his
bravery. He would remain a member of Queen
Eleanor's household for the next two years,
taking the opportunity to attend as many
tournaments as he could.
William was knighted on campaign in Upper
Normandy, at a time when it was being invaded
from Flanders. His first experience in battle
received mixed reviews. Everyone who witnessed
the young knight in combat agreed that he had
acquitted himself well. However, "War in the
twelfth century was not fought wholly for
honour. Profit was there to be made..." In this
regard Marshal was not so successful, as he was
unable to parlay his combat victories into profit
from either ransom or seized booty.
In 1170, Marshal was appointed as Young King
Henry's tutor-in-arms by the Young King's father,
Henry II. During the Young King-led Revolt of
1173-1174, little is known of Marshal's specific
activities besides his loyalty. After the failed
rebellion, Young King Henry with Marshal,
travelled with Henry II for eighteen months,
before asking for, and receiving, permission to
travel to Europe to participate in knightly
tournaments. Both Marshal and Young King
Henry gained much prestige from many victories.
These tournaments were dangerous, often
deadly, staged battles in which money and
valuable prizes were to be won by capturing and
ransoming opponents, their horses and armour.
Marshal became a legendary tournament
champion, and, on his deathbed, he recalled
besting 500 knights during his career.
In 1167 he was taken by William de Tancarville to
his first tournament, where he found his true
calling. Quitting the Tancarville household he
switched to the household of his mother's
brother, Patrick, Earl of Salisbury. Unfortunately,
in 1168, his uncle was killed in an ambush by Guy
de Lusignan. Injured and captured in the same
In January 1183 Young King Henry declared war
against his brother, Richard the Lionheart,
however, the Young King became sick and died
on 11 June 1183. On his deathbed, he asked
Marshal to fulfil the vow he had made in 1182 to
take up the cross and undertake a crusade to the
Holy Land, and after receiving Henry II's blessing
Marshal left for Jerusalem in late 1183. Nothing
is known of his activities during the two years he
was gone, except that he fulfilled the Young
King's vow, and secretly committed to joining the
Knights Templar on his deathbed.
During Henry II’s last days, he had promised the
Marshal the hand and estates of Isabel de Clare
but had not completed the arrangements. King
Richard however, confirmed the offer and with
this unison, William became the Earl of Pembroke
acquiring large estates and claims in England,
Wales, Normandy and Ireland. The marriage
transformed the landless knight from a minor
family into one of the richest men in the
kingdom, with power and prestige at court. They
had five sons and five daughters and have many
descendants. William made numerous
improvements to his wife's lands, including
extensive additions to Pembroke Castle and
Chepstow Castle.
William was included in the council of regency
which King Richard appointed on his departure
for the Third Crusade in 1190. He took the side
of John, the king's brother when the latter
expelled the justiciar, William Longchamp, from
the kingdom, but he soon discovered that the
interests of John were different from those of
Richard therefore in 1193, he joined with the
loyalists in making war upon him. In spring 1194,
during the course of the hostilities in England
and before King Richard's return, William
Marshal's elder brother John Marshal (who was
serving as seneschal) was killed while defending
Marlborough for the king's brother John. Richard
allowed Marshal to succeed his brother in the
hereditary marshalship. The Marshal served the
king in his wars in Normandy against Philip II and
on Richard's death-bed, the king designated
Marshal as custodian of Rouen.
True to form William
supported King John
when he became king in
1199 and became heavily
engaged with the defence of
Normandy against the
growing pressure of the
Capetian armies between 1200
and 1203. He and the king had a falling out in
the aftermath of this failed campaign when he
was sent with the earl of Leicester as
ambassadors to negotiate a truce with King Philip
II of France in 1204. The Marshal took the
opportunity to negotiate the continued
possession of his Norman lands. Before
commencing negotiations with King Philip,
William had been generously permitted to do
homage to the King of France by King John so he
might keep his possessions in Normandy; land
which must have been of sentimental value due
to the time spent there in his adolescence.
However, once official negotiations began, Philip
demanded that such homage be paid exclusively
to him, which King John had not consented too.
When homage was paid, John took offence
causing a major row at court which led to cool
relations between the two men. This became
outright hostility in 1207 when John began to
move against several major Irish magnates,
including William. Though he left for Leinster in
1207 William was recalled to court and
humiliated in the autumn of 1208, while John's
justiciar in Ireland Meilyr fitz Henry invaded the
Marshal’s lands, burning the town of New Ross.
Meilyr's defeat however by Countess Isabel led to
her husband's return to Leinster. He was once
again in conflict with King John in his war with
the Braose and Lacy families in 1210, but once
again managed to survive. He stayed in Ireland
until 1213 when he was summoned back to
court by the King and taken back into Royal
favour.
105
CHOOSING YOUR SCENARIO
We have created The Barons’ War to be
a skirmish game where taking the time
to choose a scenario and set up your
battlefield are both key factors to the
quality of the game you will play.
Nothing is stopping you getting started
by merely deciding how big a points
game you and your opponent wish to
play and picking your Retinue. After
which just set up a 4’x 3’ table with
terrain and just go at one another until
you remove your opponent’s
Commander from play to take the
victory! A straight-up fight is a great
way to get going and learn the rules.
Setting up a Scenario
Once the rules are familiar, we recommend
choosing a scenario complete with objectives and
victory conditions. Added to this a structured
force set up on a table that has been crafted
uniquely for the encounter and you are set for a
great game.
Choosing a Scenario
With fifteen scenarios in this rulebook players
decide which scenario they will be playing before
moving on to the Setting Up phase. Players can
either agree on the scenario they wish to play
between themselves or can each roll a dice with
the highest roller choosing.
SCENARIOS
NUMBER
106
TITLE
1
BEHIND ENEMY LINES
2
THE PRIZE
3
ATTRITION
4
FIELD OF GLORY
5
STRATEGICAL SITES
6
TEAR IT DOWN!
7
KILL THE TRAITOR
8
TAKE AND HOLD
9
GLORY SEEKER
10
HIDDEN TREASURE
11
HERO SLAYER
12
CHOSEN WARRIORS
13
RAID THE VILLAGE
14
STOP THE MESSENGER
15
ATTACK THE HILL CAMP
Alternatively, you can play a scenario from
elsewhere or play one you have written yourself.
Keep in mind the number one priority when
choosing a scenario is for it to add a narrative to
your encounter, to have clear victory conditions,
and for both players to have fun. We will be
making more scenarios available on the
WARHOST website (www.warhost.online) to
provide you with more choice.
Placing Terrain and Scenery
It is a skirmish game, after all, so as far as we are
concerned, more terrain the better; much more
terrain is better still!
Normally games take place on a 4’ x 3’ table and
we divide this into 1’ x 1’ square board sections. We
advise one piece of area terrain or line of sight
blocking terrain per board section. A 4’x 3’ table
comprises of twelve board sections and would have
twelve pieces of terrain.
Players take turns in placing the terrain, being
mindful that the scenario you are playing may
require specific terrain pieces placed in particular
places. Once all pieces of terrain are placed both
players should discuss and agree the table set-up.
At this stage extra pieces may be added, pieces
moved, turned, or even removed. Whatever the
players feel would make for a better battle.
107
Deployment Maps
Below we have twelve diagrams showing deployment maps from which you can select your battlefield.
They represent a gaming area of 4’x 3’ made up of twelve 1’x 1’ squares, each giving two different areas:
Area 1 (Red) and Area 2 (Blue). Both players deploy their Retinue in their chosen area, remembering to
follow the Setting Up rules above.
108
1
2
3
4
5
6
7
8
9
10
11
12
Setting Up Your Retinue
Both players roll a ten-sided dice, rolling again in
the event of a tie. The player who rolls the
highest number may choose from this rulebook
which deployment map option to use for this
encounter.
Both players then roll for a second time, rolling
again in the event of a tie. The player who rolls
the highest number chooses on which of the
areas shown on the deployment map they wish
to set up in. In essence, they are choosing red or
blue. Their opponent deploys in the remaining
area.
The deployment map assumes you are playing on
a 4’x 3' table; if this is not the case, adjust
measurements and set up areas to fit your
playing area. The players then alternate
deploying Groups, by choosing one at a time,
starting with the player who won the first dice
roll. Players must deploy their Groups in their
deployment area and more than 3" away from
any enemy Groups. If a player's area has several
separate areas, Groups may start in some, none
or all of those areas.
Objectives
Some scenarios require one or more objectives to
be set up. They are placed on the table top
before any Groups are deployed. Each objective
should be represented by an appropriate piece of
terrain mounted on a 40mm round base. When
measuring distances involving objectives, always
measure from the centre of the objects base. If
both players are required to set up objectives,
take turns placing them, one objective at a time,
with the player that won the second dice roll
going first.
All Groups must be deployed a minimum of 3"
away from any objective when setting up their
retinue at the start of a game.
First Turn: Starting The Game
When all Groups are placed, and both players are
ready to start each rolls a d10 for initiative and
the one who rolls the highest can choose to take
the first action or defer to their opponent to start
the game.
Who Has Won?
The player who achieves the victory conditions as
described in the chosen scenario secures a major
victory. If neither player completes the scenario’s
victory conditions then players work out their
losses. The player who lost the smallest
percentage of their Retinue, based on the points
value of removed warriors, wins a minor victory.
Any other result is deemed to be a draw.
Killing Your Opponents Commander
Unless stated in the scenario, an objective is
controlled by the player who has the most
individual figures within 3" of a particular objective
at the end of a round. Once a player gains control
of an objective, it remains under that player’s
control until their opponent can take control.
If at any time you remove your opponent’s
Commander from the game the remaining
Retinue must take an immediate Morale Check.
This check is taken using the Morale stat of all
surviving Warriors who have the Commander
ability in your Retinue. Work your way through
109
these Commanders until one of them takes
command by successfully passing a Morale
Check. The first one who is successful becomes
the new leader of your Retinue and the game
continues; if the player fails all their Morale
Checks and none of their Commanders rise to
the challenge the remaining Warriors in their
Retinue make the decision, enough is enough.
At this point they run from the field of battle to
fight another day. The game is over, and your
opponent claims the victory.
3 Attrition
Amidst the horror and carnage of battle,
victory is sometimes a question of simple
butchery where survival comes second to the
slaughter of the foe.
Scenarios
4 Field of Glory
You range across the chosen field, a territory
of such value that to merely hold it is to seize
victory from the foe.
1 Behind Enemy Lines
You must advance into the enemy’s territory
and capture their heartlands. But beware!
The enemy means to do the same to you!
Both players roll a ten-sided dice; starting with
the player who threw the highest number, both
players take it turns to set up one objective each
anywhere in their territory. All objectives must be
more than 6" away from the edge of the table
top.
A player secures immediate victory if they control
both objectives at the end of any round.
2 The Prize
No matter how much blood is shed, how
many lives are lost and what hardships must
be endured, nothing else matters but to
seize the prize.
Place an objective at the centre of the table top.
A Warrior ending its movement in base-to-base
contact with the objective may pick it up. The
objective moves with the warrior’s Group from
that point onward. The Warrior can drop the
objective at any time. The objective is dropped if
the Warrior carrying it is dispatched or removed
from a Group. If dropped the opponent places
the objective within 1" of the fallen Warrior. The
player whose Warrior is carrying the objective at
the end of the fifth round wins the encounter.
110
Each player calculates the total points value of all
enemy Warriors their Retinue slays. At the end of
the fifth round, the player with the highest total
wins the battle (even if their own Retinue has
been wiped out!).
Place one objective at the centre of the tabletop.
Both players then roll a ten-sided dice; starting
with the player who threw the highest number,
take it in turns to set up one objective each,
anywhere in their area but more than 6" from
the edge of the tabletop. The player who
controls the most objectives at the end of the
fifth round wins the battle. A player wins
immediately if they control all three objectives at
the end of any round.
5 Strategical Sites
You face a battle on several fronts, for in this
region strategical sacred sites must all be
seized to secure victory.
Both players roll a ten-sided dice. Starting with
the player who threw the highest number, both
players take it in turns to set up two objectives
each anywhere more than 12" from the centre
of the table top, more than 6" from the edge of
the table top and more than 18" from another
objective. Each player scores one victory point at
the end of each round for every objective they
control. The player with the most victory points
at the end of the fifth round is the winner.
6 Tear it Down!
Spread ruin through the enemy’s territory
leaving nothing but heaped corpses and
fallen rubble in your wake.
Both players roll a ten-sided dice. Starting with
the player who threw the highest number, both
players then take it in turns to set up three
objectives each. The objectives may be placed
anywhere in their area that is no more than 6"
from any other objective and the edge of the
tabletop. A player can burn and pillage any
enemy objectives that they control at the end of
a round; remove those objectives once burnt and
pillaged. The first player to burn and pillage all
three enemy objectives wins the encounter.
7 Kill the Traitor
Whether they carry significant orders or
maps, the traitor must be slain, and their
voice choked into silence.
At the start of the first round and before
determining who will take the first turn, each
player lets their opponent know which Warrior
their traitor is. The Warrior chosen cannot be the
Retinue Commander and must already be set up
on the table top. The first player to slay their
opponent’s traitor wins the encounter.
8 Take and Hold
Whether a command post or warning
beacons, a holy place or abandoned
armouries, these assets must be seized at any
cost, for with them comes victory.
Place one objective at the centre of the table top.
Each player then places one objective in their
area, more than 10” from the edge of the
battlefield. At the end of each round, they score
one victory point for each objective they control.
If an objective is controlled by a player at the
start of the last round, that player scores three
victory points. The player with the most victory
points at the end of the fifth round is declared
the winner.
9 Glory Seeker
It is not enough to defeat your foe; they
must be humbled, their leaders slain, and
their greatest heroes butchered to
demonstrate your might.
Each player calculates the points values of all the
enemy Warriors their Retinue slays during the
battle, doubling the amount of any enemy
Warriors that are Commanders. The player with
the highest total wins the encounter at the end
of the fifth round (even if their army has been
wiped out!)
10 Hidden Treasures
Somewhere upon this mist-shrouded field lie
precious treasures hidden by the local
populace to avoid paying their taxes! Find
and claim these riches for yourself!
The players take turns to place six objectives.
Each objective must be set more than 6" from
any other objective and the edge of the table
top. At the start of each player’s turn, they must
roll a six-sided dice for each
objective they control, in any
order they wish. If they
roll 6, they have found
the hidden treasure;
remove the other
objectives. The player
that controls the
hidden treasure
at the end of
the fifth
round wins
the battle.
111
Both players receive an extra 100pts to spend on
a Group of 'Chosen Warriors' who they believe
will win them the favour of their Lords; this can
include abilities and gifts for them. This Group
must be declared as they are the target of your
opponent’s wrath for this battle.
The objective for both players is to remove the
opposing 'Chosen Warriors' from the game, if a
player succeeds and still has at least one of their
'Chosen Warriors' on the tabletop they win a
Minor Victory. If they still have all their starting
'Chosen Warriors' they win a Major Victory.
Special Note: 'Chosen Warriors' can be any
Group of Warriors from the lists.
13 Raid the Village
Short on supplies you have decided to raid a
local village. When you arrive, you discover
you weren't the only Commander to have
this idea.
11 Hero Slayer
Draw your blades and cut a path through
your foes, for no matter what the cost their
leader must fall!
Each player calculates the points value of all
enemy Warriors their Retinue slays, doubling their
total score at the end of the battle if one of the
Warriors they have killed is the enemy Retinue
Commander. The player with the highest total at
the end of the fifth round wins the encounter
(even if their army has been wiped out!)
12 Chosen Warriors
In battle chosen warriors make their names
becoming heroes and leaders by their very
actions alone.
112
Place one objective at the centre of the tabletop
in the village. Both players then roll a d10;
starting with the player who threw the highest
number, take it in turns to set up one objective
each, anywhere in the village but more than 6”
from the edge of the tabletop, until six objectives
have been placed. These objectives can be placed
in buildings if warriors are capable of entering.
The player who controls the most objectives at
the end of the fifth round wins the encounter.
A player wins immediately if they control four or
more objectives at the end of any round.
Special Scenario Rules: While setting up the
tabletop you will need to create a village which
contains at least three buildings, at least one of
these building must be in the central square of
the table and the others cannot be placed closer
than 8" of another building. You may want to
add walls, animal pens, trees, and so forth, to
the village as well as colourful scatter to give it
character.
14 Stop the Messenger
You have a vital message that needs to get
through to your army’s leader but beware
that your opponent is trying to stop you.
Each player rolls a d10. The winner can choose
whether they want to play as the messenger.
Whichever player is the messenger takes three
Message tokens; one will be the actual message
while the other two are blanks. Assign the three
messages to three groups of soldiers by placing
the Message tokens under their bases.
The messenger player secures victory if the
message leaves their opponents table edge. Their
opponent gains the victory if they stop the
messenger by removing them from the game.
The game lasts five turns, with a sixth turn played
if the messenger has a chance of exiting the table
with the message.
(rather than points cost) in the camp with their
Commander. The remaining half of the retinue
must be set up within 6" of the base of the hill.
The attacker then sets up their Groups up to 6"
in from any table edge. The winner is the player
who has the most warriors on the hill by the end
of turn five.
Special Scenario Rules:
A hill must be included in
the middle of the table,
it must fill the entire 1’x 1’
central square of the
board.
Special Scenario Rules: The messengers
must set up within 12" of your table edge
and must be at least 6" away from another
messenger. Besides this exception, all other
set up rules apply.
15 Attack the Hill Camp
Scouts inform you that your archnemesis has set up camp on top
of a hill in your territory, how
dare they! Now is your chance
to surprise them and claim the
day by holding them for
ransom.
Each player rolls a d10. The
winner can choose if they
want to set up as the
defender in the hill camp or
as the attacker. The
defender must set up at
least half their retinue,
calculated by totalling
actual number of
miniatures
113
TERRAIN & THE BATTLEFIELD
Your games will look great with 3D
model terrain to represent the woods
and hills, villages and chapels of the
medieval era.
Why is terrain important? Simply put it provides
members of your retinue with much needed
cover and defendable positions increasing their
survivability from ranged attacks and vicious hand
to hand melee. It gives your warriors bonuses
when attacking from height potentially enabling
them to win a fight that they would normally not
be able to win.
When it comes to terrain the easiest to define is
open ground. This is the meadow, village green,
flat desert, scrubland, that neither impedes
movement or provides cover. For large
movements of troops it is ideal but for our games
we want to add some variety. This is where
terrain comes into it. It will be Open, Area or
Obstacle and will provide Hard, Soft or No Cover.
Open Terrain
Often the majority of the tabletop will be Open
Terrain. This neither helps nor hinders movement
and in game terms has zero effect.
Area Terrain
Area Terrain is exactly that, an area that figures
can be placed within, such as a wood, rocky
ground or even a fordable river. Anything that
both players agree is passable to Groups must be
clearly marked on the table top with an area base
or any other method as agreed.
Impassable Terrain
Rivers, lakes or any other type of Area Terrain
that is clearly defined as impassable cannot be
moved through. As long as it does not physically
block Line of Sight it can be shot over or into
without any penalty.
114
Obstacles, Linear Terrain
Obstacles can be walls, fences or hedges or any
other linear object where Groups can be placed
on either side but not on top. They have a
footprint up to 2” wide including its base.
No Cover
Like Open Terrain, No Cover has no particular
effect in the game, it neither hinders nor
improves the Defence of Groups in it.
Hard Cover
This is substantial hinderance to either troops or
projectiles. Things like stone walls, ruined
buildings, and rocky outcrops. This provides the
best Defence Bonus.
Soft Cover
Often the most common cover type on the
battlefield, this accounts for wooden fences,
hedges, crop fields.
The players agree the terrain and cover types on
the battlefield before the game starts. For
example, a wood would be Soft Cover, Area
Terrain and a stone wall would be a Hard Cover,
Obstacle. A ploughed field would be No Cover,
Area Terrain whereas a swamp with lots of scrub
might be Soft Cover, Area Terrain.
Buildings are a special kind of Hard Cover, Area
Terrain and have some of their own rules covered
later.
Terrain Effect on Movement
It is assumed that terrain although passable is
difficult to move through. Groups not in mail
have a movement penalty of 25% and will move
at 75% of their movement. Heavy warriors who
are in mail have a move penalty of 50% or half
distance and this is applied in all cases as soon as
the first Warrior’s Move or Run Action takes
them into the area terrain. The penalty applies to
the remainder of a Group’s movement as soon as
they enter Area Terrain.
can see out of it to perform a Run or Combat
Action. Groups outside Area Terrain can see into
it to perform a Run or Combat Action. Imagine
the feature isn't there when working out LoS
from or to Groups that occupy terrain.
Groups can draw LoS over a single Obstacle up
to one 1” high but not a second intervening
Obstacle.
All Groups can cross Obstacles that are up to 1”
high by reducing their movement by 2”; cavalry
movement is reduced by 1”. Obstacles over 1”
high must be climbed using the Climbing rules in
the Movement section.
These Heavy warriors have their movement
halved as they move into the wooded area
All Warriors must clear the Obstacle to cross it.
If all Warriors do not cross the Group will have
their movement reduced by 2” the next time
they take a Movement action.
These Light archers with movement 6”
can run through the wooded area at 9”
Area Terrain is impassable to all types of
mounted Warriors and therefore they cannot
enter under any circumstances.
Line of Sight in Area Terrain
Area Terrain blocks Line of Sight being drawn
through it. Area Terrain does not block Line of
Sight into or out of it. Groups within Area Terrain
Heavy warriors with movement 4” have a
Move action of 2” whilst crossing the hedge
115
Obstacles Within Area Terrain
Movement penalties for Area Terrain and
Obstacles are cumulative. If Groups are crossing a
linear obstacle while inside a wood, first reduce
their movement stat by 2” then apply the penalty
for moving through difficult terrain.
EXAMPLE Light warriors with a movement
of 6” whilst moving through a wood need
to cross a hedge, the distance they can
move using a Move action this turn will be
3”, Linear Obstacle: 6” - 2” = 4”
Area Terrain: 75% of 4” = 3”
Battlefield Effects of Terrain
Area Terrain
Groups that position themselves within Area
Terrain, are said to be occupying that terrain
feature and can see and be seen while in there.
Groups that occupy terrain will benefit from
cover, making them harder to kill.
Occupying Area Terrain
Warriors are within cover if the centre of their
base lies within Area Terrain that offers a cover
bonus to their Defence Roll. More than half of
the Warriors in a Group must be inside the Area
Terrain to receive the defence bonus. While
remaining in cover they will receive a bonus to
their Defence Dice. Even if a Group is Forced
Back they will continue to receive the cover
bonus if the cover rule still applies. Warriors
receive this cover bonus for both Ranged and
Melee attacks. If both you and your opponent’s
Warriors occupy the same piece of Area Cover,
and qualify as in cover, both of you receive the
cover bonus!
Defence Bonus for Area Terrain
Only terrain that has some substance to it
provides a Defence Bonus; there must be
something in the way or to hide behind. Any and
all terrain that is identified as Soft Cover give the
Defender a +1 bonus to their Defence Roll. Any
and all terrain that is identified as
Hard Cover give the defender a +2
bonus to their Defence Roll. This
bonus is not added to Shield Rolls.
Defensive Positions
When a Group is placed behind an
obstacle with their bases touching it,
that Group is in cover from any
enemy drawing LoS over the
Obstacle. These Groups are in a
Defensive Position and remain so as
long as they stay put with the
obstacle between them and the
enemy! As soon as a Group makes
either a Move Action or are Forced
Back away from the Obstacle, so less
than half the members of their
Group have bases touching it, they
are no longer in a Defensive Position.
Groups can take up a Defensive
Position in the following places:
1. Touching a barrier up to 1" high
116
2. Inside a building, touching the wall in a
position to see out of a window
When the Obstacle is positioned between the
attackers and the defenders, the defenders still
receive their Defensive Bonus.
3. Inside a building, within 1" of a door
A Group is assumed to be in a Defensive Position
if they meet the above criteria. Being in a
Defensive Position means:
• The barrier or building does not block the
Group’s Line of Sight or hinder the Group’s
own shooting or charging
• The Group counts as being visible and can
be shot at or charged
• The Group are treated as though they have
taken a Defence Action without using one
of their Actions
When attacking a Group in a Defensive Position
it is not necessary to cross the Obstacle first to
attack them. As long as the charging Group has
enough movement to reach the Obstacle, and
the Obstacle is no higher than 1”, they are
counted as in combat with the defenders.
Groups cannot be given a Defence Action while
they are in a Defensive Position as they are
already defending.
Obstacles cannot be crossed by the enemy if
defended.
Defending an Obstacle:
if warriors are in a defensive position behind
an obstacle, they are in a more defendable
position and being 'shielded' by its
environment. While a group of warriors
remain they are treated as though they have
been issued a Defence Action for free.
Ranged Attacks
Terrain hinders ranged attacks in exactly the
same way as an enemy Warrior being inside the
fire corridor hindering a shot, unless the shooting
Warrior is touching the terrain.
Charging
If Impassable Terrain lies in the
path of a Group’s charge, then the
charging Group may not attack. A
Group must have Line of Sight to
the target before a charge move
can be declared, any warrior who
starts a charge move without Line
of Sight can NOT be included in
the combat.
Higher Ground
If shooting or charging from a
position that is clearly higher than
the target, such as on a hill, the
Group gains +1 Attack Dice.
The higher ground always grants
the attacker an advantage.
Conversely, if you are defending a
117
charged attack and have the high ground your
Group gains +1 Defence Dice.
enable use of the normal rules. Ensure all players
agree where the entrances are positioned before
the game starts.
Force Back and Loss of Nerve
Barriers cannot be crossed and, as normal,
buildings cannot be entered during a forced back
move or a Broken move – Warriors must stop
when they reach the terrain, leaving them no
retreat if there is an enemy within 1”. Rough
terrain has no effect on Forced Back moves and
the full distance is moved into the terrain. Moves
by Broken Groups of Warriors are reduced to half
distance if they go through area terrain.
If a Group is Forced Back into a terrain type that
they would normally find impassable and have
nowhere else to go then they receive an
additional casualty and their attacker is moved
back 1” away from them to maintain the
distance rule after the combat has concluded.
Groups who fail their Morale test and run into
area terrain or become shielded from their
attackers by an obstacle receive a second chance
to rally when the group completes their
Compulsory Movement, the
cover provided by the terrain
emboldens the fleeing
Group to try again.
Buildings
Any construction with walls
and a roof is considered to
be a building, including
palisades and castle walls.
Buildings block Line of Sight
just like Area Terrain and
have the following rules:
Entering Buildings
If you want Groups to be
able to enter buildings
during a game, it helps
immensely if you can remove
the roof and place your
figures inside. This will
118
If your buildings do not have detachable roofs,
you will have to assume they have been locked
and barred from the inside and are treated as
impassable terrain.
You should also decide if it is possible for Groups
to climb onto the roof of a building. This is fine if
it’s possible to balance your figures, but if there is
no space or the roof is too steep then we suggest
you disallow it.
Buildings, Doors and Windows
Unless a scenario states differently or players
decide otherwise, assume the following:
• Groups cannot see into or out of a building
unless the Group inside has taken up a
defensive position near a door or window,
meaning they must be in base to base
contact with the window or doorway
Open Ground – No Cover
The open areas of the tabletop battlefield are
called open ground and represented by any flat
surfaces which do not contain an obstacle, a
piece of area terrain or a building. Roads, tracks,
bridges and fords are also classed as open
ground being designed by their very nature to
help movement. Warriors can travel through
open ground with no penalty and offers no
attack or Defence Bonuses.
• Groups cannot run into a building as they
do not have Line of Sight to the inside
unless they have taken up a defensive
position
If Groups are inside the building, and can see
each other, they can attack each other following
the normal rules. A consolidation move can be
used to enter a building if the occupants have
been Forced Back enough to allow entry.
Terrain Examples
We use the term Terrain to mean, woods, hills,
buildings, rivers and other gaming scenery that
make up our tabletop battlefield. Besides setting
the scene for the upcoming encounter these
features have their part to play and can have
both a positive and negative outcome on each
battle depending on how both players use them
to their advantage. This is after all a skirmish
game, where one man equals one man with each
having a lot of freedom of movement with the
idea being, they will be ducking, diving, hiding
and defending areas as needed.
The following is intended to introduce a variety
of different types of terrain that you may choose
to use. It is no way near exhaustive, and if you
have a piece of terrain that you would like to use
which isn't covered then the idea is the players
agree between themselves any special rules it
may have or the impact it will have on the game.
Hills – Area Terrain, No Cover
Hills impose no penalty to movement and block
Line of Sight only if the two Warriors are on
opposite sides at ground level with the hill in the
middle. Warriors on hills can see and be seen
over obstacles and other terrain pieces, players
decide which before the battle begins.
Hills are classed as Higher Ground when
determining Combat bonuses.
Marshy and Rough Ground – Area Terrain,
No Cover or Soft Cover
All types of difficult ground are included here
muddy fields, bogs, rubble, dangerous ruins,
thick crops, shifting sand and marshy soft ground
are good examples. All of these are Area Terrain
and classed as flat so do not interfere with Line
of Sight and should be thought of as a handicap
to movement for Groups, both infantry and
cavalry. Any warriors moving through this type of
terrain move at half distance from the moment
they enter to the moment they leave and offers
no Attack or Defence bonuses unless they also
contain substantial shrubs.
Woods and Tall Shrubs – Area Terrain, Soft
Cover
A dense area of trees or thick tall shrubs, woods
count as area terrain and are impassable to cavalry.
Infantry entering the area move at half distance
from the moment they enter to the moment they
leave. Warriors inside woods receive a Defence
bonus if targeted from the Warriors from outside of
the terrain piece. Some woods can be classed as
Harder Area Terrain giving a +2 to Defence bonus if
both players agree.
119
Forests - Impassable
Are thick wooded areas and impassable to all
types and if desired perfect for creating areas on
the tabletop that no Groups can enter.
Walls, Fences and Hedges – Obstacle, Hard
or Soft Cover
All linear obstacles are included here and are the
type that are constructed to form property
boundaries, dividing fields and also for confining
animals. Infantry can cross these obstacles where
they are up to 1” high by reducing their
movement by 2” and cavalry have their
movement reduced by 1”. Neither can cross
obstacles that are over 1” in height. These
obstacles make perfect defensive positions
offering Groups a free Defence Action.
Streams and Shallow Rivers – Open Ground
or Area Terrain, No Cover
Like hills and open ground these types impose no
penalties on movement and warriors can move
through without any hindrance. If you include
rocky sections these areas could offer a Defence
bonus to infantry, but not cavalry.
120
Rivers and Deep Water – Area Terrain for
Skirmishers Impassable Otherwise, No Cover
Only infantry classed as skirmishers can move
through rivers and deep water, however, if they
end their movement in this type of terrain they
will become overpowered by the current and
swept away. Movement is not halved through
these water features, but warriors are unable to
use a run action to pass through.
Ravines and Deep Pits – Impassable, No
Cover
If either is included on the tabletop both are
classed as impassable Area Terrain and if any
warriors are Forced Back into them, they are lost
and removed from the game.
121
GLOSSARY
The Barons’ War rules uses terms that
are specific to the mechanics of the
game which can sometimes be
confusing and overwhelming when you
start. This glossary is intended to
define and explain some of the most
common terms used in this book in
order to facilitate a better
understanding and appreciation of the
rules, although it will be far from
exhaustive.
Attack Dice
Determined by the number of individual Warriors
involved in the Combat Action. For Ranged
Attacks it’s the number that have LoS to the
Defending Group. For Melee Attacks it is the
number of Warriors in base to base combat plus
any within 1” of another Warrior from their
Group who is in base to base. Total these
Warriors, this is the number of Attack Dice that
are rolled.
Attack Roll
The aim of listing these frequently used terms
here is to help in the articulation of the rules
between players and the bringing to an
agreement of what is meant by their use.
Used to attack. The Attacking Warriors' Attack
stat indicates the value needed on each individual
Attack Dice when rolled. A score equal or greater
than this number resulting in a successful hit.
Apply any dice modifiers after the dice are rolled.
Abilities
The means or skill to do something distinguishing
one Warrior from another. Positive examples
could be a real talent for archery, a real aptitude
for defending against cavalry or a proficiency
with all two-handed weapons. Negative
examples; the Commander who is always ready
to retreat, the Warriors that fear a particular
enemy, or the overly cautious Veteran scarred by
one too many battles. Abilities indicate
competence in an activity due to skill, training, or
some other qualification.
Attacker
Actions
Casualties
All Groups have an Action characteristic on their
Warrior Profile denoting the number of Actions
they have each Game Round. Used as a turn to
either perform an Action or a Reaction to an
opponent’s Action, an Action Token is used to
indicate the Action taken.
Occurs when successful attacks are not
successfully defended resulting in the removal of
Warriors from the tabletop. Unless otherwise
stated, a single undefended attack is enough to
cause one casualty, resulting in a single figure,
representing one warrior, being removed from a
Group.
A Group that declares a Combat Action is called
the Attacker.
Broken
When Warriors reach a point where they have
had enough; whether that is through casualties
or overwhelming fear. While in this state,
Warriors must Run towards the nearest friendly
table edge. Indicated during a game by using a
Broken Token.
Action Tokens
Used during a game to indicate the Actions taken
by individual Groups. Standard tokens are
Command, Move, Combat, Defence and Ability.
122
Charge
Decision to attack another group in Melee
Combat (automatically achieved if within the
attackers move range and there are no other
tests required) or achieved on the result of the
movement range plus the score on a six-sided
dice (d6) equals or exceeds the distance between
the attacker and the target.
Combat Action
An action where a player attacks an opponent’s
Warriors either via a Ranged Attack or a Melee
Attack. The target can react using an Action of
their own, called a Reaction. A Combat Action
Token is used for both Ranged and Melee
Attacks.
Command Action
Each Game Round a Retinue Commander may
use up to two of their Actions to issue Orders as
Command Actions. Eligible Groups can receive a
single Command Action each Game Round. Can
only be given to Groups within the Command
Range of the Commander. Indicated by using a
Command Token, a Group must pass a Morale
Check to use this extra Action.
Commander
The heroes and leaders of Warriors with the
'Commander' Ability as part of their profile. Any
number of Warriors with the 'Commander'
Ability may be included in your retinue; however,
only a single Commander can lead at one time.
Commanders are attached to Groups to form
Command Groups.
Command Group
Groups that contain a Commander. A Warrior
with the 'Commander' Ability can be added to
any Group turning that Group into a Command
Group. Once a Command Group has been
established, you have the option of purchasing
various upgrades adding bonuses to the
Commander’s abilities.
Compulsory Action
Carried out by Groups a player does not currently
have control over which are activated before any
others and start the Game Round with a token
indicating their uncontrolled state, likely to be
Shocked or Broken. This can also refer to Groups
who are triggered due to an Ability.
Defence Action
Taking up a defensive position on the battlefield
improves a Defence Roll indicated by placing a
Defence Token next to the group who have been
moved so their basses touch. This represents the
troops doing the best to defend themselves at all
cost.
Defence Dice
A number of ten-sided dice (d10) equal to the
number of successes the Attacker has rolled as
Attack Dice.
Defence Roll
The value determined by the Defending Warriors
Defence Characteristic needed to defend
successfully on the roll of each dice. A score
equal or greater than this number resulting in a
successful defence. Apply any dice modifiers after
the dice are rolled. Each successful Defence Roll
blocks one successful Attack Roll.
Defender
The target of a Combat Action is called the
Defender.
Failed Charge
The result of a declared Melee Combat Action
where an Attacker either fails a Morale Check
refusing to charge or when the Attacking Group
does not roll high enough when needed to reach
the group they are attacking.
Fog of War
When an Action Token is left by mistake on the
tabletop at the end of the Housekeeping Phase
resulting in the Group being treated as though
they have already taken their Action for the
coming Round.
Forced Back
The movement that occurs to the loosing group
at the end of a Combat Action indicating the loss
123
of ground. When Forced Back a Group moves 1”
plus 1” for every casualty they have taken during
that Combat Action away from the enemy.
Game Round
A passage of the game where players have the
opportunity to use all their Warrior’s activations.
During each game round, players alternate turns
assigning Action Tokens to warriors where
possible choosing the action they wish their
warriors to make. A game lasts for a
predetermined number of rounds, five is
standard.
Gift
A type of ability, usually an item bestowed or
acquired by the recipient. Often a physical piece
of equipment that gives Warriors a bonus.
Groups
An unregimented unit of Warriors, the figures
that represent your Retinue are organised into
individual Groups. There are two types or
Warriors, infantry who are on foot which must
have a minimum of three figures and cavalry who
are mounted which must have a minimum of two
figures.
Hindered
Occurs where other Warriors or obstacles are
close to the path of a shot or impeding the
charging Group who have established Line of
Sight. Determined by mentally drawing a straight
path between the Attacker and target, with the
path width being the same width as each
individual Attacker's base.
Housekeeping
The responsibility for the upkeep of your retinue
during play outside of the Housekeeping Phase.
Covers tasks such as placing the correct tokens
when Actions take place, removing casualties and
adjusting Morale Dice and moving any Action
Tokens and Morale Dice when Groups are moved.
124
Group Coherency
The loose formation with gaps between each
model that allows freedom of movement for
warriors during the battle, modelling the
constant motion of soldiers on a battlefield.
When mustered a Group acts, and remains, as a
Group for the entire battle observing the rules for
coherency.
Line of Sight (LoS)
Being able to see something most often an
opponent’s Warriors. A Warrior achieves Line of
Sight when you can draw a straight unobscured
line over the tabletop from the centre of its base
to the centre of the base of at least one Warrior
in the target Group.
Melee Attack
A Combat Action that involves standing toe to
toe with your enemy and smashing them with a
weapon, or a fist. A Combat Token is used to
indicate it has taken place.
Morale Checks
A d10 dice roll to represent a Groups response to
a particular battlefield situation, such as acting on
an order issued by their Commander, to
actioning one of their Abilities or to losing in
combat. The outcome of this check determines
how the Group acts.
Morale Dice
Indicates, if any, the current modifier to add to a
Group’s Morale. Casualties caused through a
Combat Action are the most common reason for
a Morale Dice to be added, although not the only
reason. Every casualty a Group suffers increases
the value of their Morale Dice by one. The
maximum value on a Morale Dice is six, any
further additions are ignored.
Move Action
The standard way to move your Groups around
the tabletop without incurring a penalty. The
maximum distance moved is the value of the
Movement stat indicated on a Warriors Profile in
inches. A Move Action uses a Move Token to
indicate it has taken place.
New Actions Phase
Part of a Game Turn where players alternate
Actions, Reactions and Passes.
Actions drive this phase with Reactions played
only as a response to an opponent’s Action. This
phase of the Game Turn continues until no
Warriors on either side have Actions left.
Over Charge
After a successful Combat Action Groups
mounted on war horses move through the
enemy Group they were fighting and out the
other side. If this move brings them into contact
with another enemy Group, it is counted as a
second Charge. When this Over Charge is
resolved they are now treated as out of control
and given an Ability Token to indicate they must
Reign-in at the beginning of their next action.
Points Value
Everything in a Retinue has a Points Value, by
using these values we have tried to ensure
fairness; basic Warriors are a cheap option with
more seasoned, battle-hardened Warriors being
expensive. Players agree on the number of points
available for the game they are about to play, an
amount each can spend on Warriors to build
their Retinue. A Points Value enables players to
have varied forces while maintaining balance.
Reaction
Actions triggered in response to an opponent’s
Action. Only an eligible Reaction can be carried
out and only if the Group have an Action
available.
Regrouping
A free Move Action where the winners of a
Melee Combat are allowed to regroup as the
final part of their Combat Action. The intention
behind this extra movement is to enable winning
Groups to take objectives, grab cover and more
importantly maintain coherency after a frenetic
melee.
Reign-in
When a cavalry Group is out of control after an
Over Charge they need to Reign-in. At the
beginning of their next Action a successful
Morale Check is needed to take control of their
mounts. Success means they take their Action as
normal; if failed, they do nothing until their next
Action. In both cases the Group have managed
to Reign-in and the Ability Token is removed.
Retinue
A body of Warriors "retained" in their service
making them "retainers", the term is used to
indicate a skirmish force of armed warriors who
follow a commander of note. A Retinue is
created from the groups of figures selected by
players from the options made available to them
based on a Points Value.
Ranged Attack
An attack which is carried out from distance
where a Group targets and fires upon a
defending Group with ranged weapons, like a
javelin, or firing a weapon, like a bow. A Ranged
Attack is a Combat Action using a Combat Token
to indicate it has taken place.
Rally
The opportunity to take charge of a Group which is
out of control, a successful Morale Check stops them
in their tracks from running away, turns them around
from being scared, and gets them back into the battle.
Run Action
A double Move Action, the Movement stat
indicated on a Warriors Profile in inches at the
cost of becoming Weary for the rest of the
round. The Group must Run in a straight line and
have Line of Sight along the whole path. This
increase is identical for both infantry and cavalry.
A Run Action uses a Move Token to indicate it
has taken place.
125
Shield Roll
An additional unmodified Defence Roll for any
Warriors who are equipped with a shield. The
score needed is based on the type of shield.
Shield Rolls cannot block a natural ‘0’ on an
Attack Dice and are not affected by any defence
modifiers. You may not use a Shield Roll to reroll
any natural ‘1s’ rolled on a Defence Dice.
Shocked
The result when a Morale Check is failed after a
particularly brutal Combat Action causes the
losers to huddle down, stunned into doing
nothing else until they recover. Indicated during
a game by a Shocked Token.
Warriors
All the figures that take to the tabletop making
up a Retinue are classed as Warriors, from barons
to lowly peasants this term is used to describe
them all. These Warriors are organised into
Groups; loose organisations of Warriors with
similar skills and equipment.
Warrior Profile
A type of ability, being able to do something well
coming from knowledge, practice or aptitude.
The core information for a single Warrior of a
particular type which is modified by adding
Equipment and Abilities. Each Warrior type has a
variety of different options available in keeping
with their social standing and battlefield role. A
Group share the same Warrior Profile.
Tabletop
Weary
The area a game is played over, the standard size
for The Barons’ War is 4’ by 3’, but this can be
modified as needed.
Running, performing more than one Action in a
single Round or being affected by psychology can
all cause a Group to become fatigued; either
mentally or physically. During a game when
Warriors reach this point it is indicated by a
Weary Token, being Weary effects all dice rolls.
Skill
Terrain
The three-dimensional scenery placed upon the
tabletop representing the woods and hills,
villages and chapels of the medieval era providing
members of a Retinue with much needed cover
and defendable positions increasing survivability
from Ranged Attacks and vicious hand to hand
melee. An all-important element of the game.
Trait
A type of ability, a distinguishing characteristic or
quality, of a personal nature used to indicate a
passive skill.
War Horse
An exceptionally well bred and trained horse for
a knight in battle. This mount is way beyond the
realms of ordinary folk and can only be used by
knights. They so enhance the Warrior’s skills he
gains an extra Attack Dice and enhances their
survivability resulting in the need to cause a
126
minimum of two Casualties to remove each
knight with odd numbers discounted at the end
of a Combat Action.
Copy and cut out tokens for personal use only. Full colour MDF Tokens available to purchase from Footsoreminiatures.co.uk
ARMY ROSTER
COMMANDER
WARRIOR
TYPE
EXPERIENCE
POINTS
EQUIPMENT
NAME
COST PER
WARRIOR
MODIFIER
EFFECT
COMMAND GROUP UPGRADES
NAME
POINTS
EFFECT
ABILITIES
WARRIORS
WARRIOR
TYPE &
QUANTITY
EXPERIENCE
POINTS
EQUIPMENT
COST PER
WARRIOR
NAME
MODIFIER
EFFECT
ABILITIES
WARRIORS
WARRIOR
TYPE &
QUANTITY
EXPERIENCE
POINTS
EQUIPMENT
NAME
COST PER
WARRIOR
MODIFIER
ABILITIES
EFFECT
QUICK REFERENCE SHEET
ROUND STARTS
INITIATIVE (p.22)
COMPULSORY
ACTION PHASE (p.22)
Roll a d10 and subtracts the current value of their
Retinue Commanders Morale Dice. The player
who rolls the highest has initiative.
First activate all Groups that are currently out of
your control.
Alternate turns, when all Groups have activated move
on to the New Action Phase.
Use Command Actions to roll additional
d10s, up to a maximum of two extra.
Use the dice with the highest value. (p.25)
Broken (p.25): take a Morale Check, if pass
can now take an Action, add a weary
token. If fail must Run towards nearest
table edge, add a Move Token.
Shocked (p.25): take a Morale Check, if
pass can now take an action. If fail stay put
and can do nothing, add a Weary Token.
Psychology (p.27): take a Morale Check if
needed. Group acts according to their
current state.
ACTIONS (p.24)
REACTIONS (p.24)
Move: Group moves
or runs
NEW ACTION PHASE
(p.22)
Actions drive this phase. Alternate Actions,
Reactions and Passes.
Reactions are triggered in response to an opponent’s
Action. Only an eligible Reaction can be carried out and
only if the Group has an Action available
Combat: charge into
a melee attack or
commit to a ranged
attack
Combat: fight back
in response to a
melee attack or
return fire in
response to a
ranged
attack.
Defend: +2 Defence
Rolls
Defend: +2 Defence
Rolls, shields up!
Command:
Commanders can use
their Actions to issue
orders
Command:
Commanders can
use their Actions to
issue orders as a
reaction.
Ability: use a special
ability
Ability: use a special
ability
Not all Actions may be carried out by all Groups. A ranged attack Combat Action can only be made by
Groups armed with ranged weapons for example; while an Order Action can only be given by a Retinue Commander.
CHANGES TO MORALE DICE IN ACTION PHASE (P.40)
Each Casualty Caused
+1 to Group taking a casualty per Warrior removed
Each Group Removed
+1 to Retinue Commanders
• Collect up all Action Tokens from Groups
who are still under your control.
HOUSE KEEPING
PHASE (P.23)
When all Actions are completed the Round Ends. First
check victory conditions for the scenario if a player has
won the game ends. If not continue with
Housekeeping.
• Leave Action Tokens in play for Groups
who are currently not under your control,
this includes Weary Tokens.
• Adjust Morale Dice that are in play. Take
Morale Checks for all Groups who are
Weary adjusting these Morale Dice where
appropriate.
• Remove all Weary Tokens where
appropriate.
CHANGES TO MORALE DICE IN HOUSEKEEPING PHASE (P.23)
Normal Groups
Reduce Morale Dice score by 1
Broken Groups
Reduce Morale Dice score by 1
Weary Groups
Must pass a successful Morale Check to reduce Morale Dice score by 1
Shocked Groups
No change to Morale Dice score
Take a moment to make sure that all Groups are at least 1” away from any of their enemies and friends.
This Game Round has now ended and a new one begins.
ROUND ENDS
MOVEMENT RULES (P.28)
LINE OF SIGHT (P.14)
Movement Actions are either Move or Run; Move uses the
base Movement rate and Run doubles the base Movement
rate. Move and Run Actions must adhere to the following
common rules:
● Groups cannot Move or Run through other Groups,
friendly or enemy
● Groups are blocked from moving by any, and all,
Warriors except Warriors of the moving Group
● Groups must not come within 1” of any enemy Group at
any point of their move
● Groups cannot voluntarily leave the battlefield
● Warriors from the same Group can move through each
other when they move or run
A Group can only run once per round. If a Group has run,
they cannot be ordered or use one of their own actions to
run again.
THE COMBAT PROCESS (P.35)
COMBAT MODIFIERS (P.12)
Weary Token (p.27)
-1 to all dice rolls
Attacking Shocked Troops (p.25)
+2 to Attack Rolls
Inspire (p.86)
+1 Attack Dice & +1 Defence Dice
Higher Ground (p.42)
+1 Attack Dice if Attacker or +1 Defence Dice if Defender
MORALE MELEE COMBAT MODIFIER TABLE (P.37)
DIFFERENCE IN MORALE
MODIFIER
- 4 or more
Must pass a Morale Check to charge, -1 Attack Dice
-1 to -3
-1 Attack Dice
0
No effect
+1 to +3
+1 Attack Dice
+4 or more
+2 Attack Dice
WEAPON TABLE (P.74)
NAME
EFFECT
HAND WEAPON
-
DANE AXE/TWO HANDED WEAPON
SLOW - Will always act second if counter Attacked. Cannot equip shield with this
weapon
MACE
BLUNT TRAUMA - If the target takes casualties from a mace the target Group
Movement is halved for the remainder of the round
SWORD
PARRY - Gain an extra Defence dice against sword, mace or hand weapon
FALCHION
SLASHING - Target suffers -1 to Defence rolls if unarmoured or wearing leather/
padded
SPEAR
REACH - Cannot counter Attack against spear/bill unless armed with spear/bill
BOW
Long up to 20"/short up to 10" range. Can move 3" and shoot at short range
CROSSBOW
Long up to 20"/short up to 10" range. Can move 3" and shoot at short range.
Slow - Will always act second if counter Attacked. Bodkin - ignore one Defence
die if target is wearing mail at short range. Causes shock at short range if 25%
casualties are caused
SLING
10" range. Quick shot - Can fire twice if stationary. May move full distance and
fire once
JAVELIN
6" range if the warrior(s) remain stationary, 6+d10” range if warrior(s) end their
Movement closer to target than their original position
POLEARM/BILL
REACH - cannot counter Attack against spear/bill unless armed with spear/bill.
Result of 10 causes 2 damage
LANCE (mounted only)
Single use, causes shock if any hits are successful. Lances lost if charged. Ignores
Shield rolls. Does not replace sword
HORSEMAN’S PICK
PIERCING - Ignore armour bonus (target counts as wearing no armour) (mounted
only)
IMPROVISED TWO HANDED WEAPON
SLOW - will always act second if counter attacked. Cannot equip shield with this
weapon
SHIELD ROLLS - REROLL ANY FAILED DEFENCE ROLLS (P.71)
LARGE SHIELD
7+ on a D10
MEDIUM SHIELD
8+ on a D10
SMALL SHIELD
9+ on a D10
COMBAT RESOLUTION (P.40)
Loser Forced Back 1”+ 1” per
casualty away from the Winner. If
losing Group suffers 25%
casualties or more from their
starting total must now take a
Morale Check. If fail become
Broken and immediately moved
their full Movement directly away
from their attacker. Winning
Group may take a free Move
Action to Regroup.
Groups containing three or less
Warriors before losing any
casualties, are no longer eligible
to become Shocked. These Groups
become Broken if they fail a
Morale Check.
WHEN TO TAKE A MORALE CHECK (P.44)
Losing a cumulative total of 25% casualties
When a Group loses a Combat Action suffering a cumulative total
of 25% casualties from the initial number of Warriors the Group
started with.
Respond to an Order Action
If successful the Group is issued the Order; otherwise it is ignored,
and the Action is lost for this round.
Required by some Abilities to activate.
Action specific Abilities
See Fear, Hatred, and being Berserk, each for different reasons.
Psychology
As a Compulsory Action needed to halt Broken Groups.
Rally when Broken
As a Compulsory Action needed to stop Shocked.
Rally when Shocked
Improve current Morale
During the Housekeeping phase, Groups who currently have a
Morale Dice, and are Weary, must take a Morale Check.
If successful, the dice score is reduced by one or removed where
appropriate.
Losing your Commander
Needed for another Warrior with the Command ability to take
over Command.
Group Casualties
If a friendly Group is removed completely any friendly Groups
within 6”. If failed, they become Broken receiving a Broken
Token.
TERRAIN: EFFECT ON MOVEMENT (P.116)
TYPE OF TERRAIN
WARRIOR TYPE
EFFECT
Obstacle up to 1” high
Infantry
-2”
Area Terrain
Cavalry
-1”
Infantry Mail
-50% Movement
None Mail
-25% Movement
Cavalry
Impassable
TERRAIN: EFFECT ON DEFENCE (P.118)
TYPE OF TERRAIN
TERRAIN CLASS
EFFECT
Obstacle, touching a barrier up to
1” high.
Defensive Position
Inside a Building touching a wall
by a window.
+2 to Defence Rolls (same as a
Defence Action)
Inside a building within 1” of
a door.
Area Terrain
Hard cover
+2 to Defence Roll
Soft Cover
+1 to Defence Roll
More than half of the Warriors in a Group must be inside the Area Terrain to receive the Area Terrain Defence Bonus.
This bonus is not added to Shield Rolls.
Inspire (p.86): Friendly Groups within 6" gain +1 Attack
Dice and +1 Defence Dice.
indicate they must Reign-in at the beginning of their next
action.
Over Charge (p.77): Takes the Group through the
enemy they were fighting. Roll a d6 and add the number
of casualties from the combat to determine the distance
the Group Over Charge. Once the enemy Group has
been Forced Back, measure the Over Charge from the
back of the rearmost base in the defeated Group. If this
move brings the cavalry Group into contact with another
enemy Group, count this movement as a second Charge.
With the attackers now treated as Weary, place a Weary
Token next to the Group to indicate this.
Infantry who charge cavalry using a Combat Action can
cause them to Reign-in if the Combat results in the
cavalry Group being Forced Back, if this happens place
an Ability Token to indicate it has occurred.
When this Over Charge is resolved the cavalry Group are
treated as out of control and given an Ability Token to
Reign-in (p.77): When a cavalry Group is out of control
they need to Reign-in. At the beginning of their next
action they must take a Morale Check to take control of
their mounts. If successful, they take their Action as
normal; if failed, they do nothing until their next Action.
Remove their Ability Token in both cases as the Group
no longer needs to Reign-in to act.
INDEX
10 Key Principles 11
Broken
9, 21–24, 26, 27, 39–41, 44–47, 73, 79–81, 8
3–85, 118, 122, 123
Ability
9, 11, 20, 24, 45, 48, 61, 70, 77–87, 102, 10
3, 109, 122, 124–126
Broken Token 25, 40, 45, 122
Action Tokens 9, 14, 15, 22, 23, 122, 124
Buildings 5, 10, 32, 41, 112, 114, 118, 119
A
Actions
2, 8, 9, 19, 22–29, 34, 46, 50, 61, 66, 73, 7
8, 112, 117, 122–125
Activating Your Retinue 23
Area Cover 41
Area Terrain 31, 32, 41, 81, 107, 114–120
Building Your Groups 49
C
Casualties
14, 20, 21, 25, 39, 40, 44–46, 77, 80, 82, 83
, 85, 122, 124, 126
Cavalry
8, 11, 17, 19, 20, 28, 29, 32, 38, 48, 50, 54,
66, 77–80, 83, 85, 115, 119, 120, 122, 124,
125, 133
Armour
19, 21, 28, 34, 49, 52, 69, 70, 74–76, 82, 10
4, 132
Characters 5, 7, 34, 70, 85, 88, 100, 103
Attack Back 35, 39, 79, 81, 85
Charge
9, 11, 13, 14, 26, 29, 30, 32, 35, 37–39, 41,
46, 77, 79, 80, 83–87, 117, 122, 123, 125
Attack dice
14, 34, 37, 38, 41, 42, 72, 81–83, 85–87, 11
7, 122, 126
Climbing 30–32, 115
Attack Roll
12, 38, 39, 79, 81, 83, 84, 86, 122, 123
Attacker
14, 19, 25, 34, 35, 37, 38, 40, 42, 80, 113,
118, 122–124
B
Barrier 41, 42, 116–118
Basing 11
Berserk 22, 44, 47
Bowmen 57
Coherency
11, 18, 20, 21, 28, 38, 40, 41, 50, 124, 125
Combat
9, 12, 13, 21, 22, 24, 25, 28–31, 34, 35, 37–
41, 44–46, 51, 70, 75–77, 79–84, 86, 87, 102
, 104, 115, 117–119, 122–126
Combat Action
24, 25, 29, 30, 34, 37–40, 44–46, 70, 77, 79
–84, 86, 87, 115, 122–126
Combat Process 34
Combat Resolution 39
Command Action
22–27, 73, 80, 82, 85, 87, 123
Command Group
17, 27, 34, 45, 46, 48, 61, 73, 81, 83, 85–88
, 101–103, 123
Entering Buildings 118
Equipment
17, 19–21, 48, 49, 70, 74, 78, 124, 126
Command Token 22, 73, 123
Commander
12, 16, 20–22, 24–27, 34, 44–46, 48–50, 58,
61, 62, 70, 73, 78, 80–88, 101–103, 106, 109
–113, 122–125
Experience
9, 17, 34, 48, 49, 51, 52, 60, 80, 81, 83, 85,
92, 104
Commanders Morale 45
Experienced 80, 81, 85, 92
Compulsory Action 22–26, 44, 73, 85, 123
F
Compulsory Action Phase 22, 25, 26, 73
Failed Charge 37, 84, 123
Crossbowmen 50, 54, 56, 75, 92, 99
Falkes de Breauté 98
D
Falling 30, 31, 90, 105
Damage 39, 75, 76, 92
Fear 6, 24, 25, 27, 44, 46, 78–80, 87, 122
Defence Action
33, 39, 80–83, 103, 117, 120, 123
Fog of War 123
Defence Dice
39, 41, 42, 79–81, 86, 116, 118, 123, 126
Forced Back
39–41, 46, 77, 79, 82, 84, 116, 118–120, 123
, 124
Defence Roll
12, 33, 38, 39, 41, 47, 76, 79, 81, 83, 84, 8
6, 87, 116, 123, 126
Forced Off The Table 40
Free Action 79, 87
Defender
12, 19, 34, 37–39, 77, 87, 96, 113, 116, 117,
123
Friar Tuck 87, 100, 102
G
Defending Group 35, 37, 39, 122, 125
E
Defensive Positions 41, 116, 120
Game Round
19, 22, 23, 25–27, 39, 46, 73, 78, 122–124
Deployment Maps 108
Glossary 122
Dice
5, 8, 9, 11, 12, 14, 15, 19, 21–25, 27, 33–35
, 37–42, 44–46, 61, 70, 79–87, 101, 106, 109
–111, 116–118, 122–124, 126
Green 20, 48, 51, 114
Group Coherency
11, 18, 21, 28, 38, 41, 50, 124
Group Size Limits 50
Groups
6, 11, 12, 14–18, 22–30, 32, 34, 35, 37–41,
44–50, 61, 73, 78–81, 84–87, 101, 109, 113–
120, 122–126
K
Killing Your Opponents Commander 109
King John 6, 61, 88–90, 92, 94–96, 98, 105
H
Hard Cover 114, 116
Higher Ground 42, 117, 119
Knight
6, 7, 12, 21, 49, 52, 54, 58, 59, 61, 62, 66,
69, 70, 74, 76–80, 83, 85–87, 89, 90, 92, 98,
101, 103–105, 126
Hills 10, 31, 41, 42, 114, 119, 120, 126
Knight Commander 61, 62, 70, 83, 85, 101
Hatred 24, 27, 44, 46
Hindered 14, 38, 41, 124
L
Hindered Charge 14
Levy 49, 61, 83
Hindered Shooting 14
Line of Sight (LoS) 13, 34, 124
Horses 21, 69, 77, 104, 125
Little John 87, 100, 102
Housekeeping
14, 15, 22, 23, 27, 33, 39, 81, 83, 85, 101,
123, 124
Losing a Group 46
Housekeeping Phase
14, 22, 23, 27, 33, 39, 81, 83, 85, 101, 123,
124
Hubert de Burgh 90, 96, 97
I
Impassable Terrain 32, 41, 114, 117, 118
Infantry
8, 11, 17–20, 29, 48, 50, 54, 58, 60, 66, 77,
79, 119, 120, 124, 125
Inherent Abilities 70, 85
Initiative 13, 22–25, 80, 109
Irregular 20, 51
Losing your Commander 45
M
Maid Marian 87, 95, 101
Measuring 5, 9, 11, 109
Melee Attack
14, 24, 34, 35, 38, 39, 41, 116, 122–124
Melee Combat
29, 34, 37, 40, 46, 81–84, 122, 123, 125
Merry Men 87, 100–103
Militant Monks 59
Modifiers
12, 13, 38, 45, 46, 70, 122, 123, 126
Modifying Dice Rolls 12
J
Jumping 30
Morale
8, 9, 11, 14, 15, 19–27, 33, 35, 37–40, 44–4
7, 73, 77, 79–87, 101, 109, 110, 118, 123–12
6
Morale Check
11, 19, 20, 23–26, 35, 37, 39, 40, 44–47, 73,
77, 79–87, 109, 110, 123–126
Morale Dice
8, 9, 14, 15, 19, 21–23, 33, 37, 40, 44–46, 8
0, 81, 83–87, 101, 124
More Than One Action 26, 27, 126
Move Action
9, 18, 20, 28–32, 40, 41, 115, 116, 124, 125
Movement
9, 18, 19, 22, 25–32, 35, 37, 40, 41, 76, 77,
79, 80, 84, 110, 114–120, 123–125
Moving
22, 24, 28, 30–33, 35, 39, 79, 106, 116, 119,
124
Musician 61, 87, 103
N
Prince Louis 6, 75, 88–90, 92, 93, 96, 98, 99
R
Rally 25–27, 44, 73, 84, 85, 87, 118, 125
Ranged Attack
21, 24, 34, 39, 41, 82, 86, 114, 117, 122, 12
3, 126
Re-rolls 12
Reaction
2, 9, 14, 22–24, 33–35, 38, 39, 73, 78, 79, 8
1, 82, 85, 87, 122, 123, 125
Regrouping 39, 40, 125
Regular 20, 51, 101
Reign-in 77, 81, 125
Retinue
2, 5, 7, 9, 10, 14, 16–23, 26, 33, 44–46, 48–
51, 61, 70, 73, 77, 78, 82, 83, 85, 88, 106,
108–114, 123–126
New Actions Phase 22, 125
Retinue Commander
21, 22, 26, 45, 49, 73, 82, 83, 88, 111, 112,
123
No Cover 114, 119, 120
Retinue List 9
O
Return Fire 24, 35, 39
Objectives 40, 101, 106, 109–112, 125
Robert Fitzwalter 6, 92, 95
Obstacles 32, 114–117, 119, 120, 124
Robin Hood 87, 95, 100, 101
Occupying Terrain 41
Roll Off 13, 22
Open Terrain 114
Rolling Dice 11, 12, 24
Over Charge 77, 80, 125
Round
8, 10, 11, 13–15, 19–23, 25–27, 29, 33, 39,
44, 73, 75, 76, 78–81, 83–85, 87, 109–112, 1
22–126
P
Points Value 9, 20, 48, 51, 109–112, 125
Run Action 26–32, 46, 84, 114, 120, 125
Priest 61, 86, 87, 102
10 Key Principles 11
Broken Token 25, 40, 45, 122
A
Building Your Groups 49
Ability
9, 11, 20, 24, 45, 48, 61, 70, 77–87, 102, 10
3, 109, 122, 124–126
Action Tokens 9, 14, 15, 22, 23, 122, 124
Actions
2, 8, 9, 19, 22–29, 34, 46, 50, 61, 66, 73, 7
8, 112, 117, 122–125
Activating Your Retinue 23
Buildings 5, 10, 32, 41, 112, 114, 118, 119
C
Casualties
14, 20, 21, 25, 39, 40, 44–46, 77, 80, 82, 83
, 85, 122, 124, 126
Cavalry
8, 11, 17, 19, 20, 28, 29, 32, 38, 48, 50, 54,
66, 77–80, 83, 85, 115, 119, 120, 122, 124,
125, 133
Area Cover 41
Characters 5, 7, 34, 70, 85, 88, 100, 103
Area Terrain 31, 32, 41, 81, 107, 114–120
Armour
19, 21, 28, 34, 49, 52, 69, 70, 74–76, 82, 10
4, 132
Charge
9, 11, 13, 14, 26, 29, 30, 32, 35, 37–39, 41,
46, 77, 79, 80, 83–87, 117, 122, 123, 125
Climbing 30–32, 115
Attack Back 35, 39, 79, 81, 85
Attack dice
14, 34, 37, 38, 41, 42, 72, 81–83, 85–87, 11
7, 122, 126
Coherency
11, 18, 20, 21, 28, 38, 40, 41, 50, 124, 125
Attack Roll
12, 38, 39, 79, 81, 83, 84, 86, 122, 123
Combat
9, 12, 13, 21, 22, 24, 25, 28–31, 34, 35, 37–
41, 44–46, 51, 70, 75–77, 79–84, 86, 87, 102
, 104, 115, 117–119, 122–126
Attacker
14, 19, 25, 34, 35, 37, 38, 40, 42, 80, 113,
118, 122–124
Combat Action
24, 25, 29, 30, 34, 37–40, 44–46, 70, 77, 79
–84, 86, 87, 115, 122–126
Combat Process 34
B
Barrier 41, 42, 116–118
Combat Resolution 39
Basing 11
Command Action
22–27, 73, 80, 82, 85, 87, 123
Berserk 22, 44, 47
Bowmen 57
Broken
9, 21–24, 26, 27, 39–41, 44–47, 73, 79–81, 8
3–85, 118, 122, 123
Command Group
17, 27, 34, 45, 46, 48, 61, 73, 81, 83, 85–88
, 101–103, 123
Command Token 22, 73, 123
Commander
In the Kingdom of England by 1215, a group of powerful barons had
reached breaking point due to King John’s despotic rule, high taxes and
failed leadership. It was time to rebel!
Written by Andy Hobday, these rules enable narrative-driven tabletop
games set in an England gripped by civil war played out against the
backdrop of the Magna Carta and the invasion by
the Crown Prince of France.
The historically themed gameplay is fast-paced and tactical.
With warriors of this period being pretty similar, it is easy to base your
medieval skirmish games using these rules in any setting.
Footsoreminiatures.co.uk
Warhost.online