/


Tags: chess


Text
Contents
J Strategic ideas
✓ Options for VC-^hice
J Options for Black
J Study of games by experts
8
7
6
5
4
3
?
4b.
I
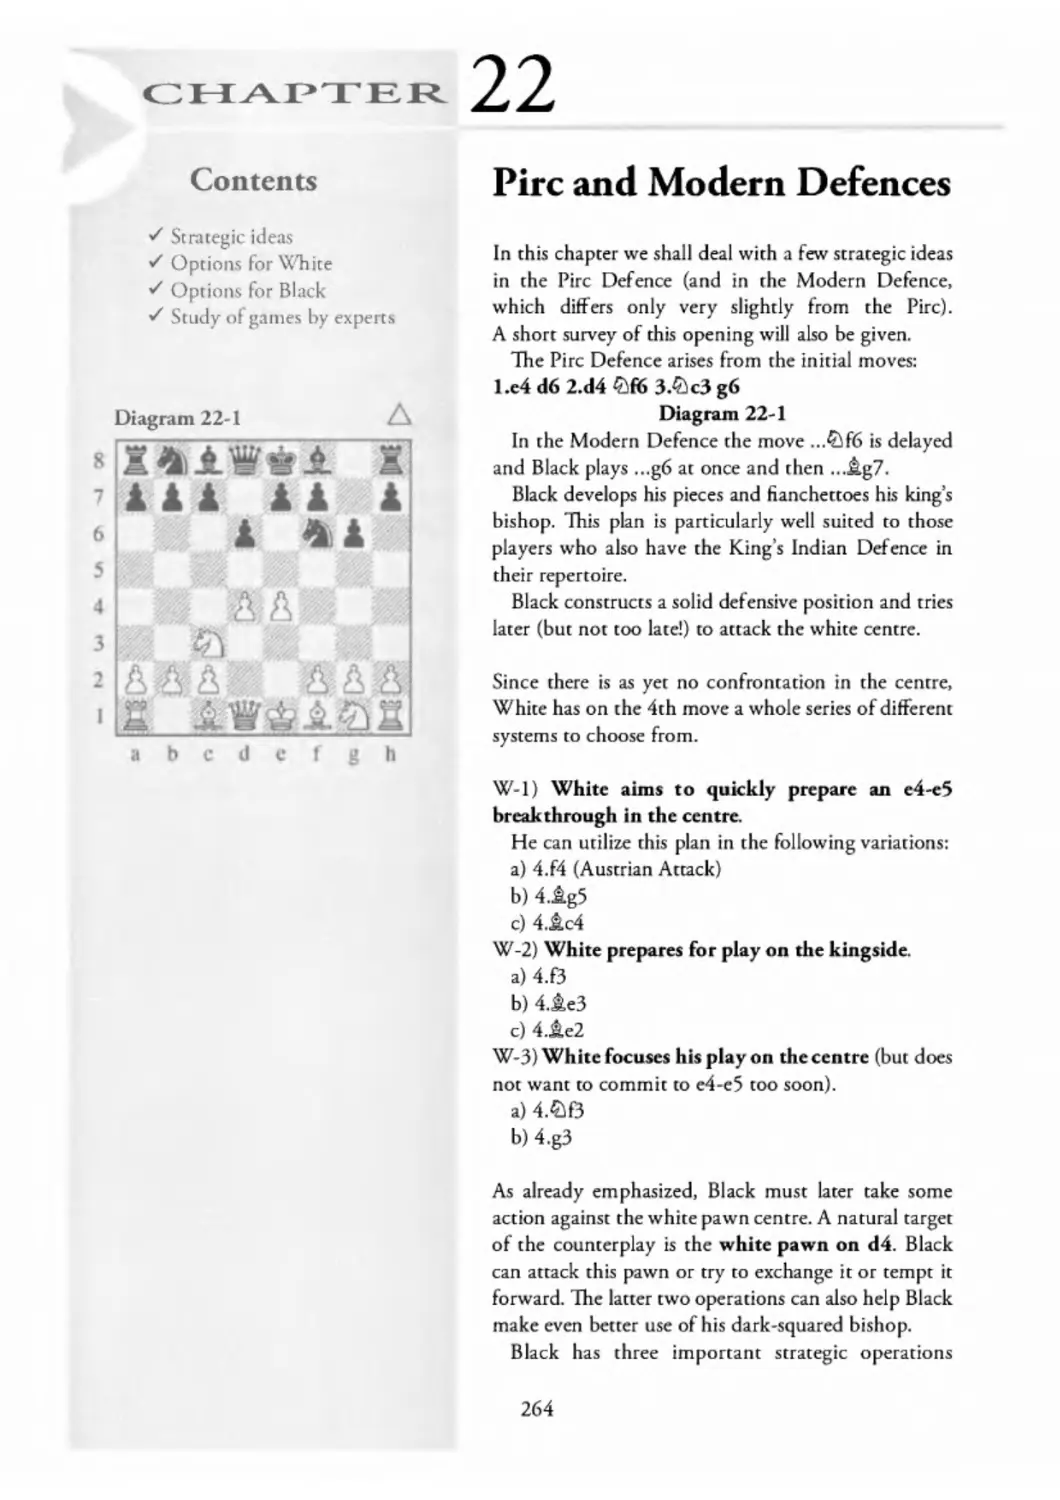
Diagram 22-1
abcdefgh
Pirc and Modern Defences
In this chapter we shall deal with a few strategic ideas
in the Pirc Defence (and in the Modern Defence,
which differs only very slightly from the Pirc).
A short survey of this opening will also be given.
The Pirc Defence arises from the initial moves:
l.e4 d6 2.d4 £jftj З.ФсЗ g6
Diagram 22-1
In rhe Modern Defence the move ...5)f6 is delayed
and Black plays ...g6 at once and rhen ..Jlg7.
Black develops his pieces and fianchettoes his king’s
bishop. This plan is particularly well suited to those
players who also have the King’s Indian Defence in
their repertoire.
Black constructs a solid defensive position and tries
later (but not too late!) to attack the white centre.
Since there is as yet no confrontation in the centre,
White has on the 4th move a whole series of different
systems to choose from.
W-l) White aims to quickly prepare ал e4-e5
breakthrough in the centre.
He can utilize this plan in the following variations:
a) 4.f4 (Austrian Attack)
b) 4.£.g5
c) 4.&c4
W-2) White prepares for play on the kingside.
a) 4.f3
b) 4.i.e3
c) 4.jU2
W-3) White focuses his play on the centre (but does
not want to commit to e4-e5 too soon).
а) 4.4Ю
b) 4.g3
As already emphasized, Black must later take some
action against the white pawn centre. A natural target
of the counterplay is the white pawn on d4. Black
can attack this pawn or try to exchange it or tempt it
forward. The latter two operations can also help Black
make even better use of his dark-squared bishop.
Black has three important strategic operations
264
Pirc and Modern Defences
which he can employ, taking into account the
system chosen by his opponent. We shall look at an
example of each.
B-l) Black prepares ...e5.
Budapest 1987
l.e4 d6 2.d4 4)f6 3.4k3 g6 4.&B £g7 5.&e2 0-0
6.0-0
Diagram 22-2
6...&g4!?
Black is prepared to exchange the f3-knight so as to
be able to exert more pressure on d4.
Note that 6...£lbd7?! is inadvisable on account
of7.e5!±.
7Jle3
7.h3 &xf3 8.1xf'3 ®c6=
7... &c6 8.£M2
8.d5 JLxf3 (8...£lb8!? followed by ...c6 is another
idea) 9JsLxf3 £)e5 10.^e2 c6 ll.a4 a5! 12.2c! ®c7
13.1d4 &ed7! 14.£fl Sac8 15.1&d2 &e8=
8...§e8I?
Black is seeking a complicated struggle. This move
is not only useful for preparing ...e5. If White ever
plays Jth6, the important dark-squared can be saved
from exchange.
Another good move here is the immediate 8...e5:
Diagram 22-3
a) 9.dxe5 dxe5=
b) 9.Sadl? Дх!3 10.^,xf3 exd4 11 JLxd4 £)xe4!
12 Jlxe4 £xd4+
c) 9.d5 £le7 is the main line, and is reckoned to
offer equal chances.
9.Sfel
After 9.d5 ФЬ8 Black will attack the centre
with ...c6.
9...a6
Black would also like to expand on the queenside.
White can prevent ...b5, but even so, control over the
b5-square is useful for Black.
10.a4
lO.gadl b5±
10...e5
Diagram 22-2
8
7
6
5
4
3
2
1
abcdef gh
Diagram 22-3 (analysis) /\
abcdefgh
265
Opening 4
abcdefgh
Diagram 22-4
11.<15
ll .dxe5 dxe5 12.Sadi leads roequality.
11... &XB
Black makes use of the peculiarities of the position
which allow him to go with his knight to d4.
1 l...£)e7 is an alternative. Black gets a position like
those in the King's Indian Defence. He should aim to
prepare ...f5 and to play on the kingside.
12^xf3
12 .dxc6 would be followed by: 12...^xe4! 13.^d3
£lxc3 (13...&xe2? 14.ofxe4±) 14^.xf3 e4 15.cxb7
Sb8 16.1&xa6 exf3 with advantage for Black.
12... ^d4! 13.Axd4
13 .JLdl is met by 13...c6!#.
13... exd4 14.^a2
14 .№xd4 £lxe4 is somewhat better for Black.
14... &d7 15.c3
White does not have enough time to attack the
black d4-pawn: 15-^icl ^fh4 (or 15...c5!?) 16.£ib3
Фс5 17.ftxd4 ftxe4+
15...Ck5! 16.Ш1
16.cxd4 £>b3+
16...dxc3 17.ФхсЗ
Diagram 22-5
17...&xc3!l
A strong positional idea. White is left with a bad
bishop on f3. The black knight on c5 is on a secure
outpost and is attacking the white pawns. White is
not in any position to exploit the weakness of the
dark squares since a lot of minor pieces have already
exchanged.
18.bxc3 a5!
Fixing the weakness on a4.
19.3Ы?
19.g3 followed by J^g2 would be better.
19...Se5
This prepares an attack on the e4-pawn.
2O.g3 ®e8 21.^g2
For the moment White can hold the position by
tactical means, since if Black takes either pawn then
the b7-pawn is hanging. But after Black’s next obvious
move, the two white pawns will be hanging again.
21...b6 22.f4 ge7 23>d4 Bxa4 24.e5
Diagram 22-6
266
Pirc and Modern Defences
24...^e8?
24...®xd4t 25.cxd4 ®d3 followed by ...ftb4 also
leads to an advantage for Black.
25.Se3 a4 26.e6
White’s only chance is to attack in the centre,
but the a-pawn can divert the white forces from
the attack. For example: 26.Sbel a3 27.exd6? 2xe3
28.Sxe3 ®xe3t 29.®xe3! a2-+
Diagram 22-7
26...©ffi?!
26...a3 is stronger: 27.§bel fxe6 (but not 27...a2
28.exf7t tSfxf? 29.Sxe7 alB 30.1fb) 28.dxe6 Sa7
29.1d5 a2 3O.gal c6-+
27.Sbel a3 28.@c4 Sa 4
28...fice6 is stronger.
29.®a2?
29.exf7f would give Black more chances to
go wrong: 29...§xf7 (29...1^xf7 30.®xa4! £ixa4
31.8xe7=) 30>b5 ^g7+
29...&g7? 30.18?! fxe6 31.dxe6 32.1c6 Ea5
ЗЗ.Д<15 &a4 34>d2?
34.§cl had to be tried.
34...^xc3! 35.8xc3 Sxd5-+ 36.1=fcl
0-1
Diagram 22-7
abcdefgh
B-2) Black prepares ...c5.
B.Ivanovic — M.Gurevich
Lucerne 1989
The following annotations are based on analysis by
Gurevich.
I.c4 d6 2.d4 3.£>c3 g6 4.f4 lg7 5.e5?!
White tries to win the struggle in the centre at once.
However, the white pawns come into contact with
the opponent too soon. White’s pieces are not yet
developed, and the required support is not available.
5.ФВ first is better.
Diagram 22-8
5...&fd7! 6.&В c5
A typical idea. Black takes the opportunity to break
up the white centre.
7.exd6 0-0 8.dxc5
If 8.dxe7 ^xe7t 9.1e2? cxd4 10.^xd4, then
10...£}b6 and the threat of ...2d8 is very strong.
Diagram 22-8
abcdefgh
267
Opening 4
The developing move 8.&еЗ looks better.
8...®a5!
A typical attacking move.
8...£ixc5 is not so good: 9Jic4 exd6 lO.O-O00
9.&e2
9.^.d2 ьГхс5 10.dxe7 2e8 llJLe2 3xe7 is good
for Black. In return for the sacrificed pawn, he has
open files and diagonals which provide sufficient
compensation.
Perhaps White could try 9 ЛеЗ!?.
Diagram 22-9
9...&xc3t!
If 9...Wxc5?! then 10.1Sfd3i.
Ю.ЬхсЗ Wxc3t 11 -&d2 ^xc5 12.dxc7 Sc8!
Black does not hurry to recover the pawn, but
prefers to prevent his opponent from castling.
13.2Ы Феб 14.§b3!
14.Sb5? would be worse: 14...^?xe7 15.ДсЗЬ6+
14...Sxe7 15.йсЗ @b6 16.SB3 @c7E
Black is playing for a win.
Diagram 22-10
17.0-0 £)c5 18.Sa3I?
Or 18.Se3 £le4 19.Hd3 and Black has an
active position.
18...&g4
18...|<Т5!?? would also be good.
19.h3 &xf3 20.&xf3 Sd8 21.Wcl 2id4
Black controls the centre and so he is better!
22.6
Threatening ^.g5.
22...$c2t
22...fte4!+ would have been a stronger way to deal
with rhe threat.
23.&xe2 8xe2 24.J&h6!“ &e4 25.@b2
25.Sd3 Sxd3 26.cxd3 Hxg2t 27.:&xg2 !Sfg3t=
25...Й
Diagram 22-11
The position is now balanced. White has his share of
the chances, but he soon makes the decisive mistake.
26.®b3t?!
26.SC3!?00 could lead to an amusing perpetual
check: 26...Sxg2f!? 27.&xg2 8d2t 28.&f3 ®g3t
29.Фхе4 ®h4+ 3O.gf4 (30.&f4 gxf5t 31.&xf5 ^h5t
32.&xf6 Wg6t ЗЗ.Фе5 lBfg7t=) 3O...gxf5t 31.&xf5
Wh5t 32.&e6№t=
268
Pirc and Modern Defences
26...&h8 27.®b5??
27.W3 1axc2 28.fxg6 hxg6 29.2e3°°
27...®xc2-+
Diagram 22-12
The white position collapses.
28.&Ы 2xg2 29.&f4D 2f2! 30.26 2x6 31.2x6
2dlt
Or 31...a6-+.
32.2ft 2>f2t
32...1=Fc6! ЗЗ.^хсб 2xflt 34j&g2 8f2t—»•
33.&g2 £?c4f 34.&g3
34.Фх6 &xf4t-+
34...2d3t
0-1
B-3) Black waits with ...e5 and carefully prepares
his counterplay on the queenside with ...c6 and
...b5, or even ...a6 and ...b5.
Diagram 22-12 Л
abcdefgh
P.Leko - M.Gurevich
Wijk aan Zee 1993
l.e4 g6 2.d4 d6 З.ФсЗ &g7 4Jlg5
A good plan against the Modern set-up.
4...c6 5.1&d2 b5
Diagram 22-13
The idea behind this expansion is to push back the
сЗ-knight with a well-timed ...b4, and thus to bring
the d5-and e4-squares under black control.
6.f4
Black naturally wants to attack the e4-pawn.
6...b4 7.£dl ЩГЬб 8.e5 f6!?<±
7.&d3
7.e5 is of course followed by 7...b4! 8.exf6 exf6.
7...&bd7 8.216 0-0
8...ofb6?! can be met with: 9.e5 b4 10.2a4 Wa5
H.exf6exf6 12.a3!?t
8...2b6!? is worth considering.
9.e5!
The thematic move, which obliges Black to hit
back.
9.0-0 is followed by: 9...2)b6 10.2ael b4 11.2e2
c5 12.c4 bxc3 13.bxc3 cxd4 14.cxd4 d5!=
Diagram 22-14
9...b4! lO.ftdl?!
Diagram 22-13
8
7
6
5
4
3
2
1
abcdefgh
Diagram 22-14
8
7
6
5
4
3
2
I
abcdefgh
269
Opening 4
Diagram 22-15 (analysis)
8
7
6
5
4
3
2
1
abcdefgh
8
7
6
5
4
3
2
I
Diagram 22-16
abcdefgh
Diagram 22-17
abcdefgh
A passive move.
If 10.exf6, then 10...bxc3 Н.оГхсЗ ftxf6!? 12.1axc6
2b8».
10.?le2!? would be better:
Diagram 22-15
10...£jd5!> (10...dxe5 ll.fxe5 £>d5 12.ih6->)
1 l.exd6 f6! 12.dxe7 ®xe7 13.^.h4i White’s idea is to
meet 13...fte3? with 14.jlf2. Black still has to show
that he has compensation.
10...&d5 1 l.exd6
11.0-0 f6!? 12.exf6 exf6 13.JLh4 JLh6 14.Jkg3
He8#
11..J& 12.M4
Without his knight blocking the e-file, White
cannot play 12.dxe7?? Wxe7t-
12...exd6
Or first 12..JLh6.
13.0-0
After 13.f5 Se8t 14.ФН Black can reply 14...g5
15.&g3 ft7b6°°, or can try the interesting 14...gxf51?
with the point that 15.Jixf5 ftc5 16.jkxc8 fte4! gives
him a strong initiative.
Diagram 22-16
13...M6!?#
Black has seriously improved his position in the
centre, and the game looks level.
14.&g3 &7b6 15.a3
If 15.c4!? then 15...bxc3 16.?Jxc3 (16.bxc3 f5)
16..Jle6=.
15...a5 16.axb4 &xb4!?
Or 16...axb4 17.Sxa8 £ixa8 18.c4 bxc3 19.bxc3
and now rather than 19...®ab6 20.c4±, Black should
prefer 19...1=Ia5!=.
17.Де2 Se8
The key to such positions lies as usual in the
centre.
Diagram 22-17
18x3 &4d5 19.£d3 c5I?
Intending 20...c4.
20.dxc5
This just improves rhe black position.
Better is 20.b3.
2O...dxc5 21.&f2 Wc7
Black attacks the f4-pawn.
21...c4 22.Дс2 ФеЗ= leads to equality.
270
Pirc and Modern Defences
22.§fel Sd8!? 23.^c2?I
White sacrifices the f-pawn, bur only gets a limited
amount of compensation.
Hie alternatives would perhaps be better:
a) 23.2adl!?=° lxf4 24.1xf4 €3xf4 25.1c4t £ifd5
26.1a2t
b) 23.&e4!? If5 24.Ш2 c4 25.1c2 lxf4
(25...1xe4!>) 26.^xft5t fixffi 27.1x5! (27.1xf4
^xf4 281xf5 ^xf5 29.^xb6=) 27...1xg3 28.1e6f
&g7 29.hxg3=
Diagram 22-18
23..^xf4 24.1W4 £xf4 25.1e4 lb7
25...§b8!?+
26.g3
26...5!?
27.1xb7 @xb7 28.®c4 ®c7!
28...^fxe4 29.£)xe4=
29.^fe6t 3O.g4?
ЗОЗеГеЗ §e8 31.£ie4 would be more resilient.
3O...Se8 31.&B3 2lf4-+
The white king is exposed; Black is controlling the
centre and the game!
32,Sxe8t Sxe8 33.Sxa5
33.Wb5!? 2e3!
33...®c6! 34.Sa7 &d7
34...c4 35.^b4t &g8-+
35.WB7
35.c4 is also followed by 35...1$xf3!-+ (Stohl).
Diagram 22-19
35...®xf3!
A nice finish, based on 363&xf3 Sei#.
0-1
In order to understand these openings and to
prepare them, I recommend you to study the games
of experts, to choose a model and to follow his
games (for example, GM Alex Chernin, who has
also written a fine and beautiful book on the Pirc,
or GM Mikhail Gurevich). The examples in the test
will help you to find reasonable lines against the
white systems described above!
The Pirc and the Modern are difficult to play,
though the same holds true for your opponents! You
must play through all the examples in the test on a
board. You will find some valuable ideas in them.
Diagram 22-18
abcdefgh
Diagram 22-19
abcdef gh
271
Exercises
8
7
6
5
4
3
2
1
abcdef gh
abcdefgh
abcdef gh
>Ex.22-5< *★
abcdefgh
abcdefgh
>Ex. 22-6< ♦*
abcdefgh
272
Exercises
abcdefgh
abcdefgh
abcdefgh
abcdefgh
abcdefgh
273