/


Tags: the art of flying flying


Text
CHAPTER
The Art of Flying
If you carefully watch a sea gull you will get a lesson in precision soaring. These sleek birds constantly adjust
their speed to play in the wafting air currents and extract every bit of lift or run from every bit of sink they
encounter. They seem to do this with an innate sixth sense.
Soaring humans can develop this extra sense as well, through understanding and practice. In this chapter we
polish the techniques that lend us the skills to achieve the performance flying we are pursuing. We’ll learn to cure
our bad habits, add new good ones and become more familiar with our glider’s capabilities. Our goal is to rival
the sea gulls soaring skills.
I - TECHNIQUE TOUCH-UP
\ / progress beyond the training hill is often achieved through a process of osmosis where
—we gradually absorb the knowledge necessary to accomplish new feats. Since this
learning is not generally programmed, we often miss something along the way. Thus we have
a review.
TAKEOFFS FOR EXPERTS__________________________________________________________
We presume you are good at taking off. If not, some time at a training hill or with an
instructor can not only save you injury but relax you on takeoff so much that you’ll enjoy
hang gliding more. Here are a few points to use as a mental checklist.
✓ Holding the Control Bar
Most of us are able to support the control bar on our shoulders and use our arms and
hands to stabilize and control the glider during launch.
- 21 -
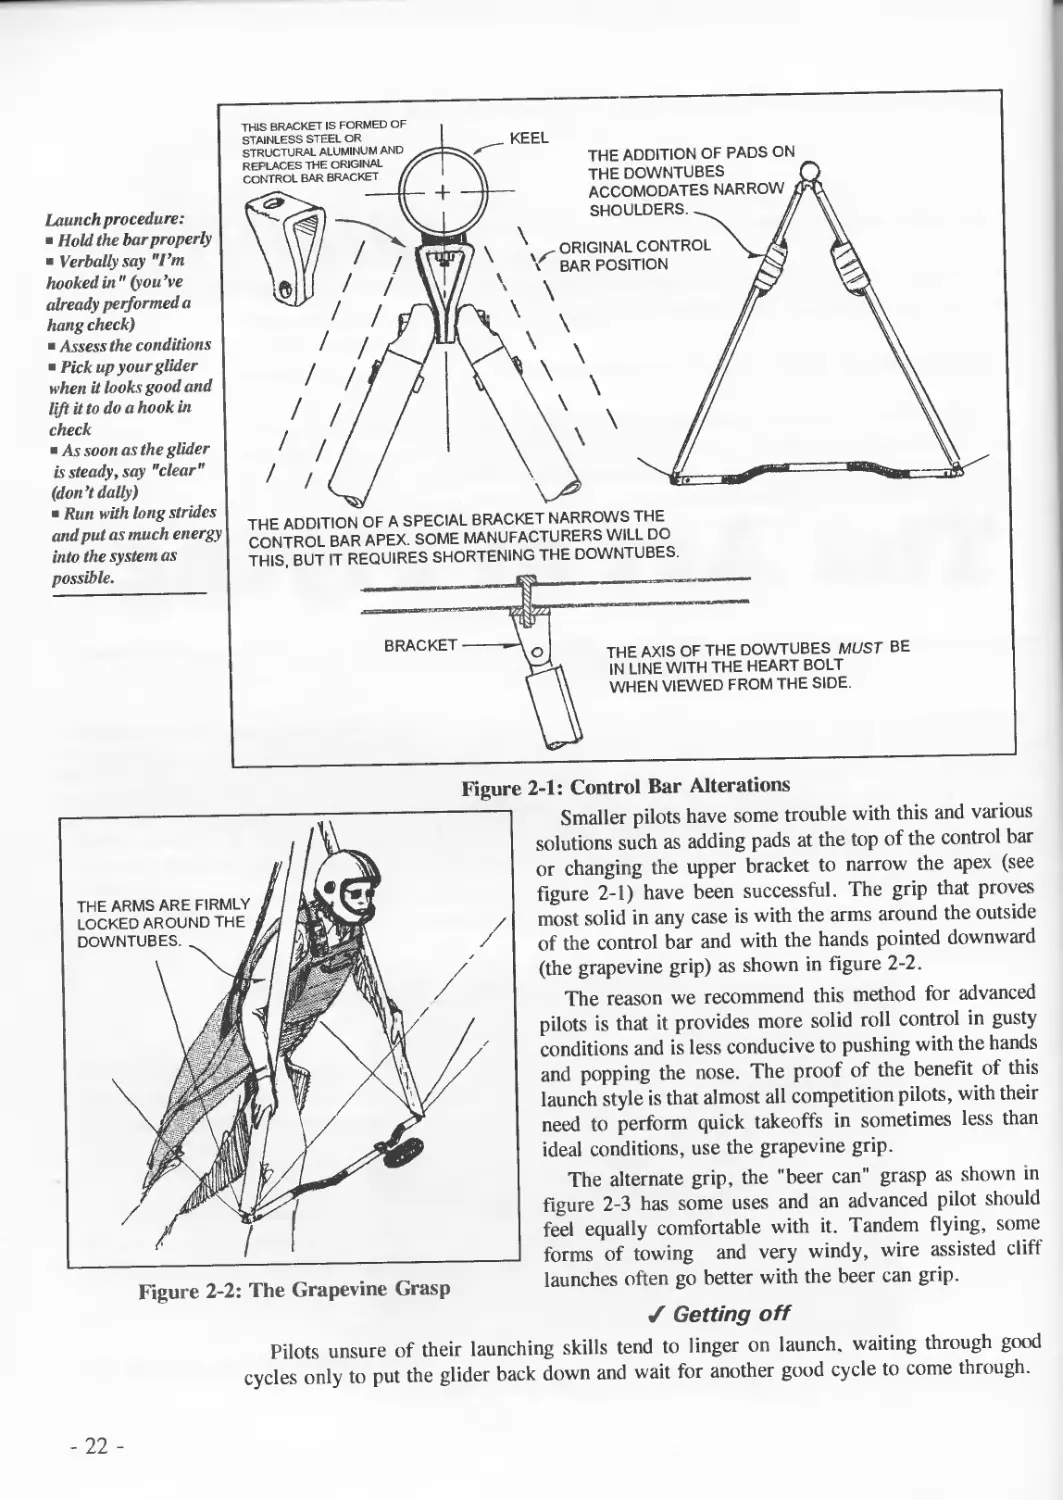
Figure 2-1: Control Bar Alterations
Launch procedure:
Hold the bar properly
Verbally say "Гт
hooked in " (you’ve
already performed a
hang check)
Assess the conditions
Pick up your glider
when it looks good and
lift it to do a hook in
check
As- soon as the glider
is steady, say "clear"
(don’t dally)
Run with long strides
and put as much energy
into the system as
possible.
Figure 2-2: The Grapevine Grasp
Smaller pilots have some trouble with this and various
solutions such as adding pads at the top of the control bar
or changing the upper bracket to narrow the apex (see
figure 2-1) have been successful. The grip that proves
most solid in any case is with the arms around the outside
of the control bar and with the hands pointed downward
(the grapevine grip) as shown in figure 2-2.
The reason we recommend this method for advanced
pilots is that it provides more solid roll control in gusty
conditions and is less conducive to pushing with the hands
and popping the nose. The proof of the benefit of this
launch style is that almost all competition pilots, with their
need to perform quick takeoffs in sometimes less than
ideal conditions, use the grapevine grip.
The alternate grip, the "beer can" grasp as shown in
figure 2-3 has some uses and an advanced pilot should
feel equally comfortable with it. Tandem flying, some
forms of towing and very windy, wire assisted cliff
launches often go better with the beer can grip.
/ Getting off
Pilots unsure of their launching skills tend to linger on launch, waiting through good
cycles only to put the glider back down and wait for another good cycle to come through.
- 22 -
Figure 2-3: The Bottle Grip
The problem is sometimes good cycles diminish in frequen-
cy or quality, excessive waiting increases anxiety and other
pilots begin to add pressure—all of which doesn’t help launch
concentration.
The first step in breaking this cycle is to only pick the
glider up if launch conditions look good. Once you do pick it
up, set the pitch, level the wings, then go. Obviously you
can’t learn to do this in tricky conditions, so start by practice
on calm or light days. Your goal should be to launch within
3 seconds of picking up your glider.
Continue this practice in gradually stronger conditions.
Remember, pick the glider up only when conditions are good,
balance, then run. If conditions deteriorate while you have the
glider up, set it down. You only get tired and more tense (you
can’t relax when you’re fighting gusts) holding your glider.
Mind that we aren’t suggesting you never wait for your glider
to settle, but we are saying more often launch problems are
compounded by a tentative approach than by hasty procedures.
'^^Pro Tip: In totally calm winds launching with VG full
tight starts the glider lifting sooner.
/ The Run
"A good aggressive
launch technique
translate to every
launch situation."
"Every pilot needs
to perfect calm
wind launches."
Tony Barton launches a windy cliff
in Tennessee
By now we shouldn’t have to mention fledgling matters, but the fact is, pilots with good
skills in the air sometimes retain poor launch habits. Bad runs and popping the nose of the
glider up are the most common mistakes—they go hand in hand. Some competitors in the
Owens Valley World Meet stuffed launches for this reason. Presumably the universally steep
launches in some countries do not develop the skills
necessary to handle the flat slope, high altitude
Gunter launch in the Owens.
We all know a gradually accelerating launch
pushing with our shoulders to top speed is desir-
able. This means long strides, a relaxed grip and
eyes ahead. If you aren’t doing this (ask any other
pilot and you’ll find out) you need to change. The
best way to effect this change is not necessarily to
go to the training hill, but to go to flat ground,
mark off a reasonable launch distance and practice
moving your glider to top speed. If you can get
your glider flying in no wind on the flat you will
have the right technique. Transfer this on every
launch every time regardless of the conditions and
you will have flawless launches.
Even in high winds your launch should be an
aggressive run attempt. It may take ten or more
runs to learn such a launch run. You’ll never climb
the training hill that many times with your heavy
glider unless you’re a Neanderthal, so practice your
launches in a landing area after a flight. If you ever
blow a launch this practice is essential to regaining
your confidence quickly.
- 23 -
SOFT LANDINGS-------------------------------------------
"Nothing can ruin
a good flight like a
bad landing."
Some of us are great entertainers and provide much hilarity to groups of watching pilots as
we whack in the landing area. But this behavior doesn’t play well when you’re on the road
away from your own arena. The point is, when we begin to fly other sites, cross-country or
high performance gliders our landings had better be darn near impeccable. Here are some
points to help make them so.
✓ The Right Approach
High performance gliders demand a downwind, base and final (aircraft type) landing
approach. We discuss why in a later section. In early training we provide a simplified version
of this approach. Here we add 360° turns for a complete setup that is useful for tight fields
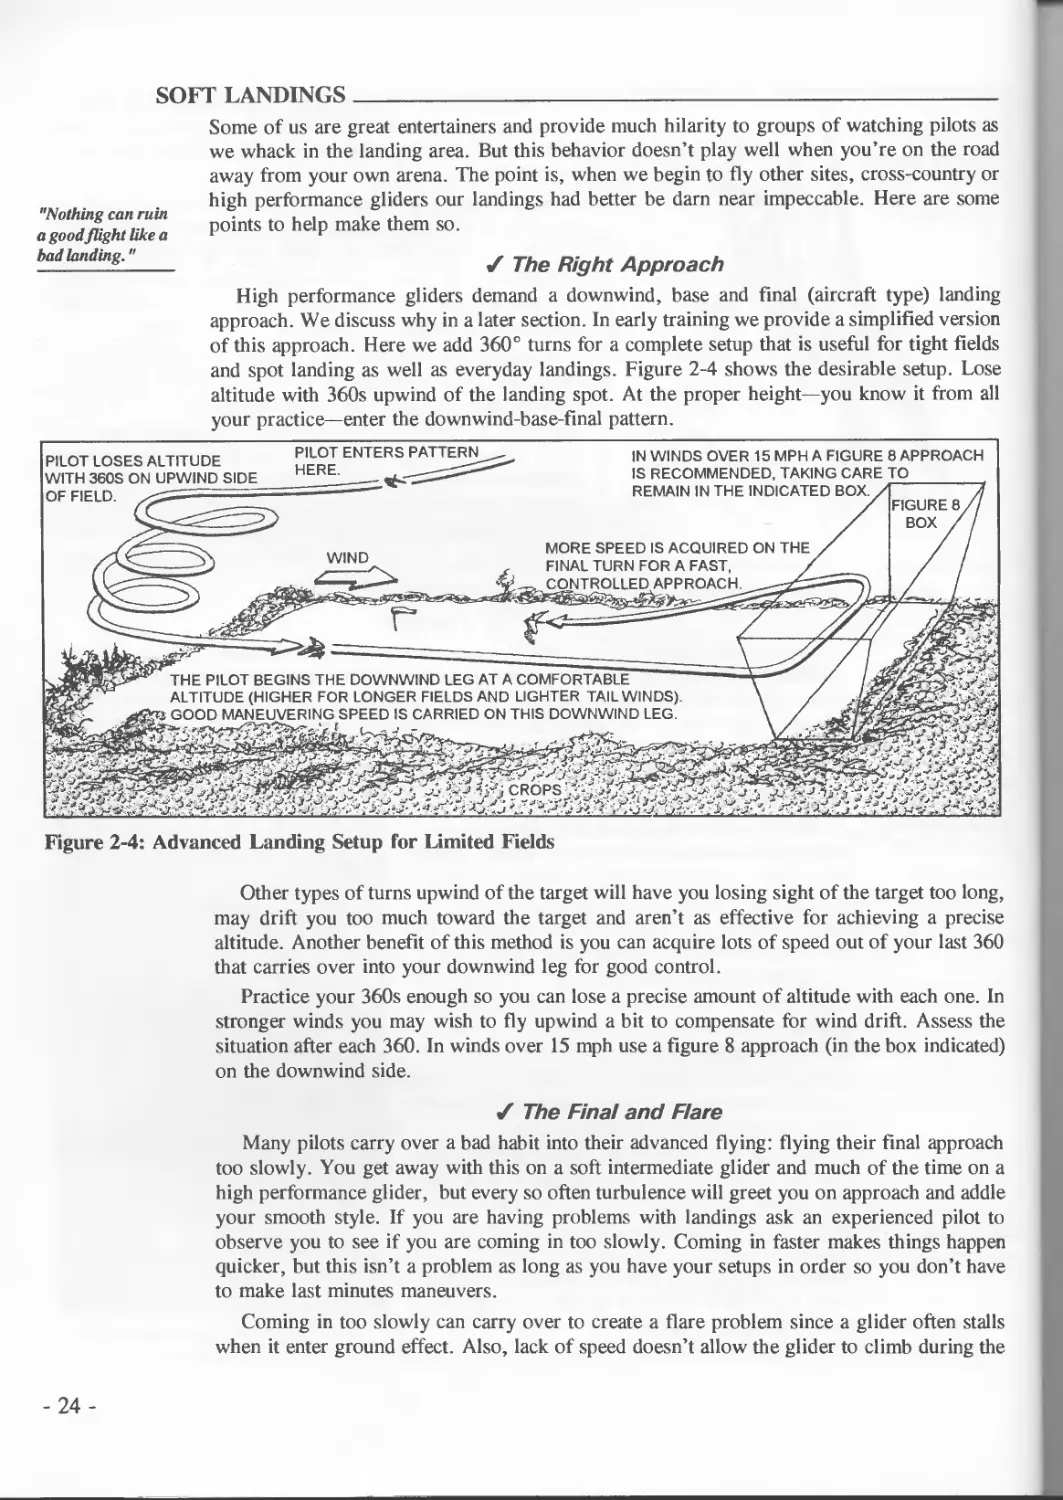
and spot landing as well as everyday landings. Figure 2-4 shows the desirable setup. Lose
altitude with 360s upwind of the landing spot. At the proper height—you know it from all
your practice—enter the downwind-base-final pattern.
FIGURE 8
BOX
PILOT LOSES ALTITUDE
WITH 360S ON UPWIND SIDE
OF FIELD.
PILOT ENTERS PATTERN
HERE.
IN WINDS OVER 15 MPH A FIGURE 8 APPROACH
IS RECOMMENDED, TAKING CARE TO
REMAIN IN THE INDICATED BOX.
ЦCROPS
WIND
MORE SPEED IS ACQUIRED ON THE
FINAL TURN FOR A FAST,
CONTROLLED APPROACH.
THE PILOT BEGINS THE DOWNWIND LEG AT A COMFORTABLE
ALTITUDE (HIGHER FOR LONGER FIELDSAND LIGHTER TAILWINDS).
GOOD MANEUVERING SPEED IS CARRIED ON THIS DOWNWIND LEG.
Figure 2-4: Advanced Landing Setup for Limited Fields
Other types of turns upwind of the target will have you losing sight of the target too long,
may drift you too much toward the target and aren’t as effective for achieving a precise
altitude. Another benefit of this method is you can acquire lots of speed out of your last 360
that carries over into your downwind leg for good control.
Practice your 360s enough so you can lose a precise amount of altitude with each one. In
stronger winds you may wish to fly upwind a bit to compensate for wind drift. Assess the
situation after each 360. In winds over 15 mph use a figure 8 approach (in the box indicated)
on the downwind side.
Z The Final and Flare
Many pilots carry over a bad habit into their advanced flying: flying their final approach
too slowly. You get away with this on a soft intermediate glider and much of the time on a
high performance glider, but every so often turbulence will greet you on approach and addle
your smooth style. If you are having problems with landings ask an experienced pilot to
observe you to see if you are coming in too slowly. Coming in faster makes things happen
quicker, but this isn’t a problem as long as you have your setups in order so you don’t have
to make last minutes maneuvers.
Coming in too slowly can carry over to create a flare problem since a glider often stalls
when it enter ground effect. Also, lack of speed doesn’t allow the glider to climb during the
-24-
Use a fast final to
combat turbulence
and wind gradient
as well as provide
reasonableflare
speed.
flare. Finally, coming in fast and gliding in ground effect gives you time to feel the glider
and judge the flare timing.
Flare timing and the amount of flare are, of course, different with different wind
conditions and are a bit more critical with advanced gliders. The key to a proper flare is to
keep your eyes directly ahead, have a sensitive, relaxed grip on the downtubes, detect a
change in the glider (a settling, sudden slowing and pitch pressure change), then push
forward and up while at the same time reaching back with your feet. If flare timing is a
personal problem, you must work it out at the raining hill with multiple flights. A couple of
landings a week will not give you the repetitive trials you need to perfect your timing. One
helpful hint is to remind yourself on final to concentrate and relax.Say it out loud until you
do so automatically.
SPOT LANDING__________________________________________
Trying to hit a spot is good practice for precision landing control, but it’s also often featured
in fly-ins, friendly contests and as a prize giveaway at goals of some cross-country contests.
It’s nice to wow the crowd and be rewarded for your good habits.
The secret to consistent spot landing is not only entering final at the right place, but also
being able to vary your glide distance. To find yourself in the right place, remember to judge
angles to your spot as you proceed on your downwind leg. If trees or other obstructions
surround your field you have to enter final higher and further from the spot, but the angle
is the same.
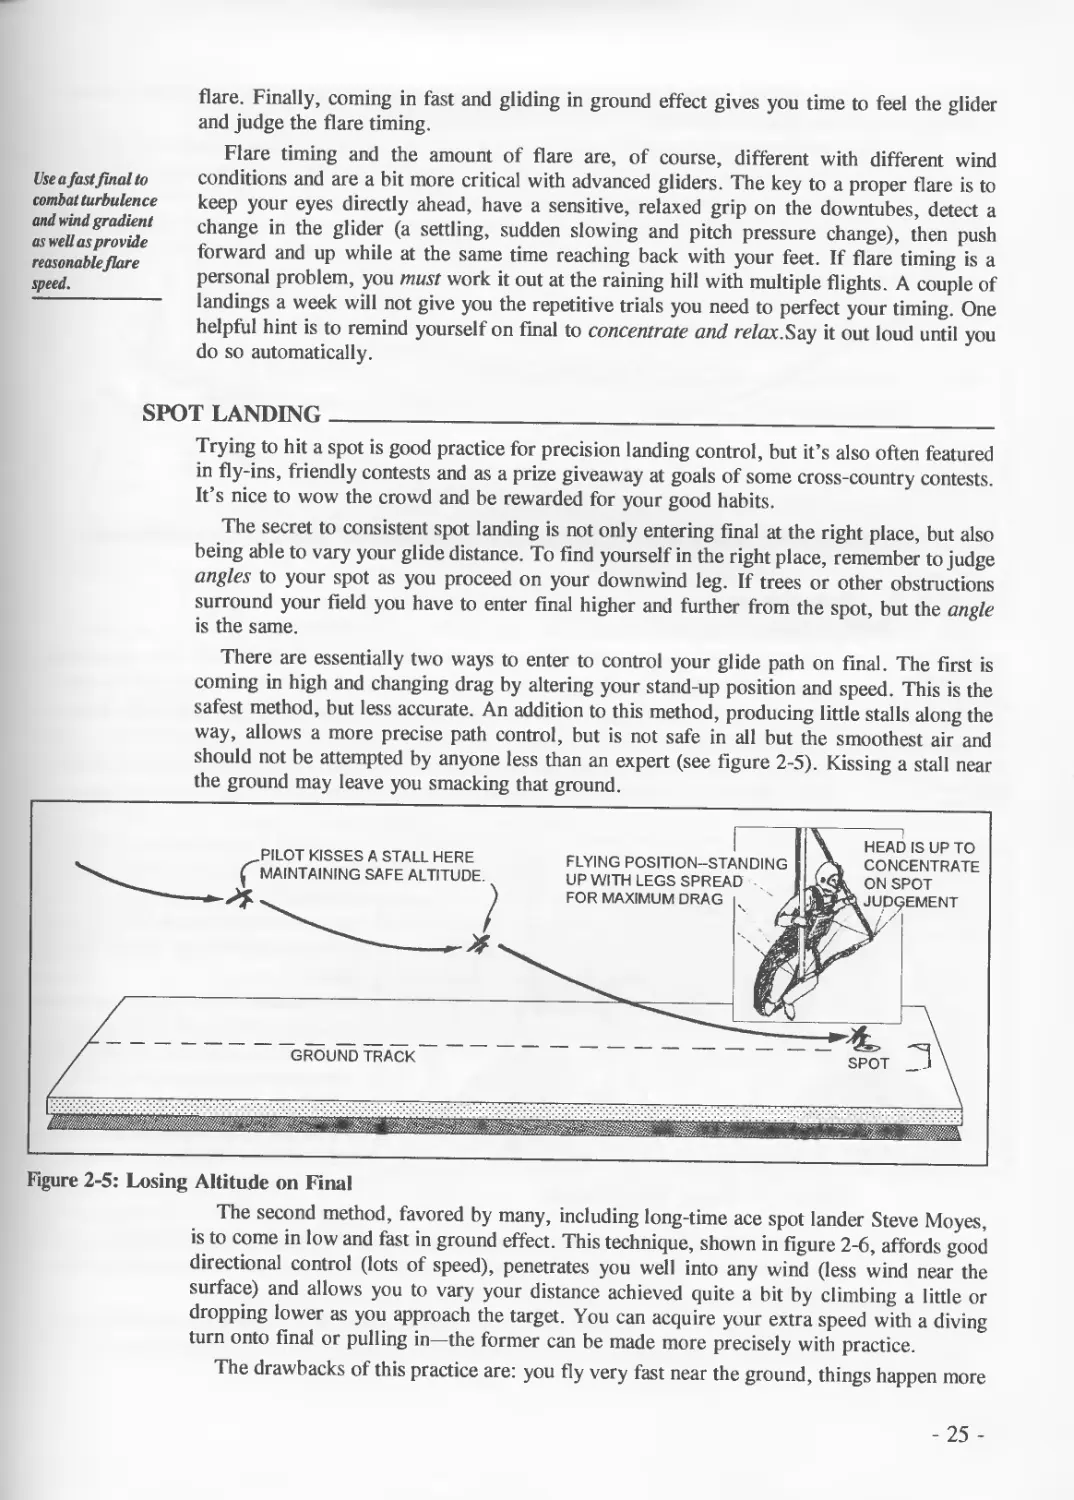
There are essentially two ways to enter to control your glide path on final. The first is
coming in high and changing drag by altering your stand-up position and speed. This is the
safest method, but less accurate. An addition to this method, producing little stalls along the
way, allows a more precise path control, but is not safe in all but the smoothest air and
should not be attempted by anyone less than an expert (see figure 2-5). Kissing a stall near
the ground may leave you smacking that ground.
Figure 2-5: Losing Altitude on Final
The second method, favored by many, including long-time ace spot lander Steve Moyes,
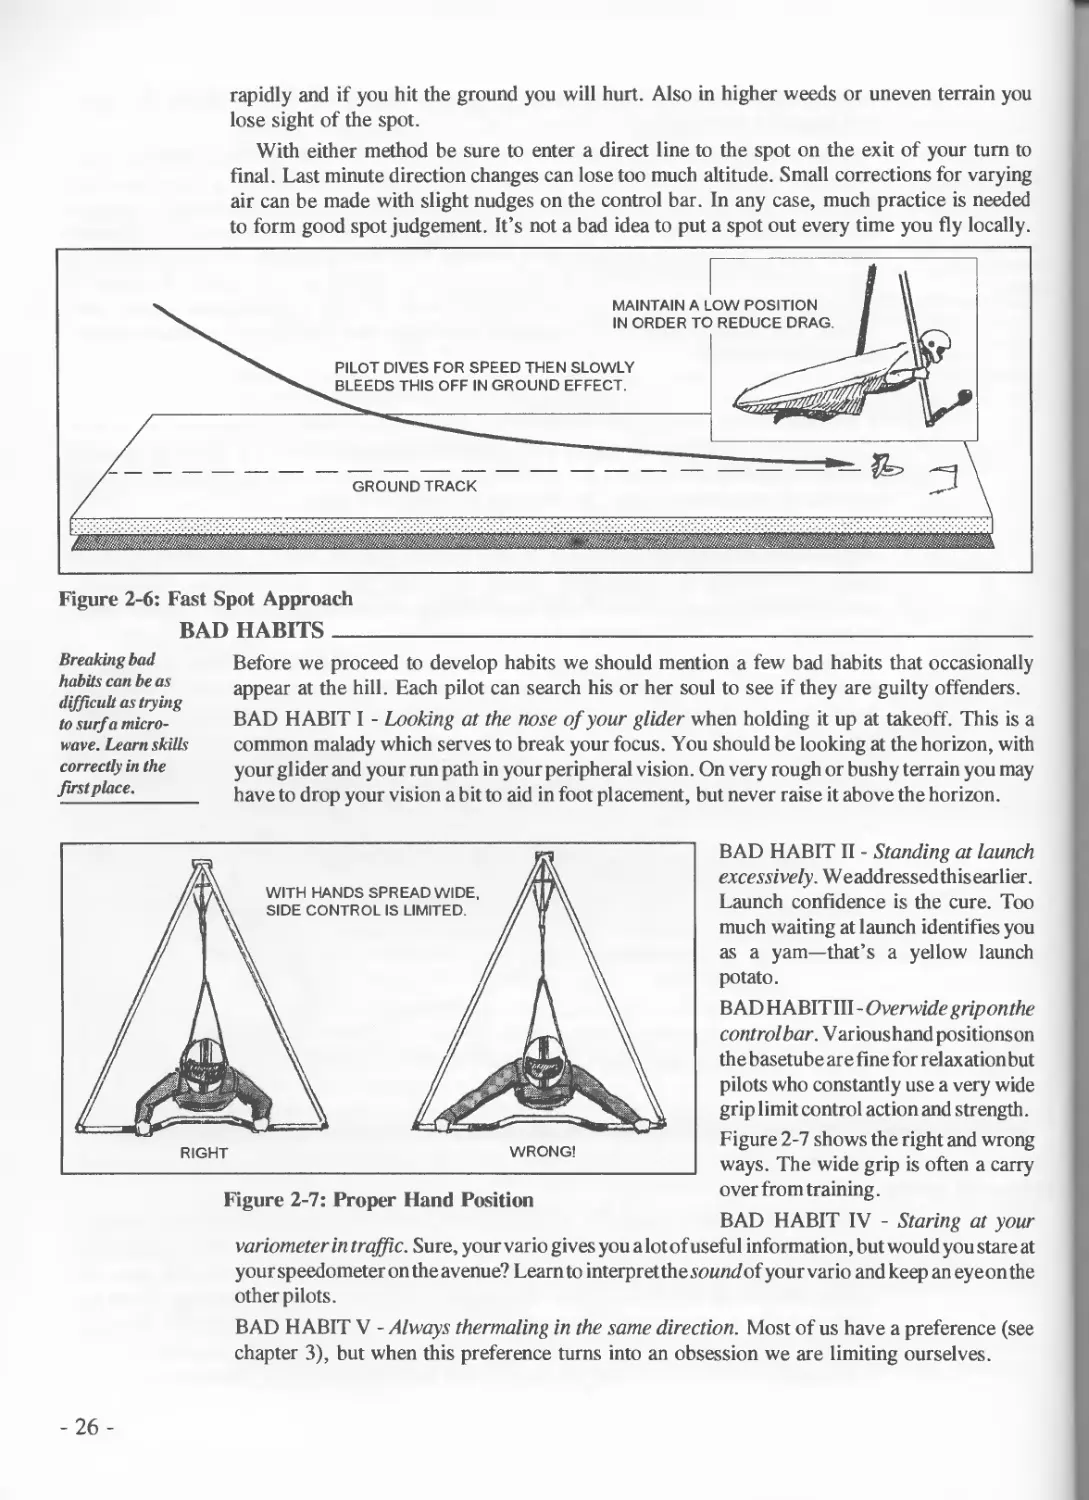
is to come in low and fast in ground effect. This technique, shown in figure 2-6, affords good
directional control (lots of speed), penetrates you well into any wind (less wind near the
surface) and allows you to vary your distance achieved quite a bit by climbing a little or
dropping lower as you approach the target. You can acquire your extra speed with a diving
turn onto final or pulling in—the former can be made more precisely with practice.
The drawbacks of this practice are: you fly very fast near the ground, things happen more
- 25 -
rapidly and if you hit the ground you will hurt. Also in higher weeds or uneven terrain you
lose sight of the spot.
With either method be sure to enter a direct line to the spot on the exit of your turn to
final. Last minute direction changes can lose too much altitude. Small corrections for varying
air can be made with slight nudges on the control bar. In any case, much practice is needed
to form good spot judgement. It’s not a bad idea to put a spot out every time you fly locally.
Figure 2-6: Fast Spot Approach
BAD HABITS _
Breaking bad
habits can be as
difficult as trying
to surf a micro-
wave. Learn skills
correctly in the
first place.
Before we proceed to develop habits we should mention a few bad habits that occasionally
appear at the hill. Each pilot can search his or her soul to see if they are guilty offenders.
BAD HABIT I - Looking at the nose of your glider when holding it up at takeoff. This is a
common malady which serves to break your focus. You should be looking at the horizon, with
your glider and your run path in your peripheral vision. On very rough or bushy terrain you may
have to drop your vision a bit to aid in foot placement, but never raise it above the horizon.
BAD HABIT II - Standing at launch
excessively. Weaddressedthisearlier.
Launch confidence is the cure. Too
much waiting at launch identifies you
as a yam—that’s a yellow launch
potato.
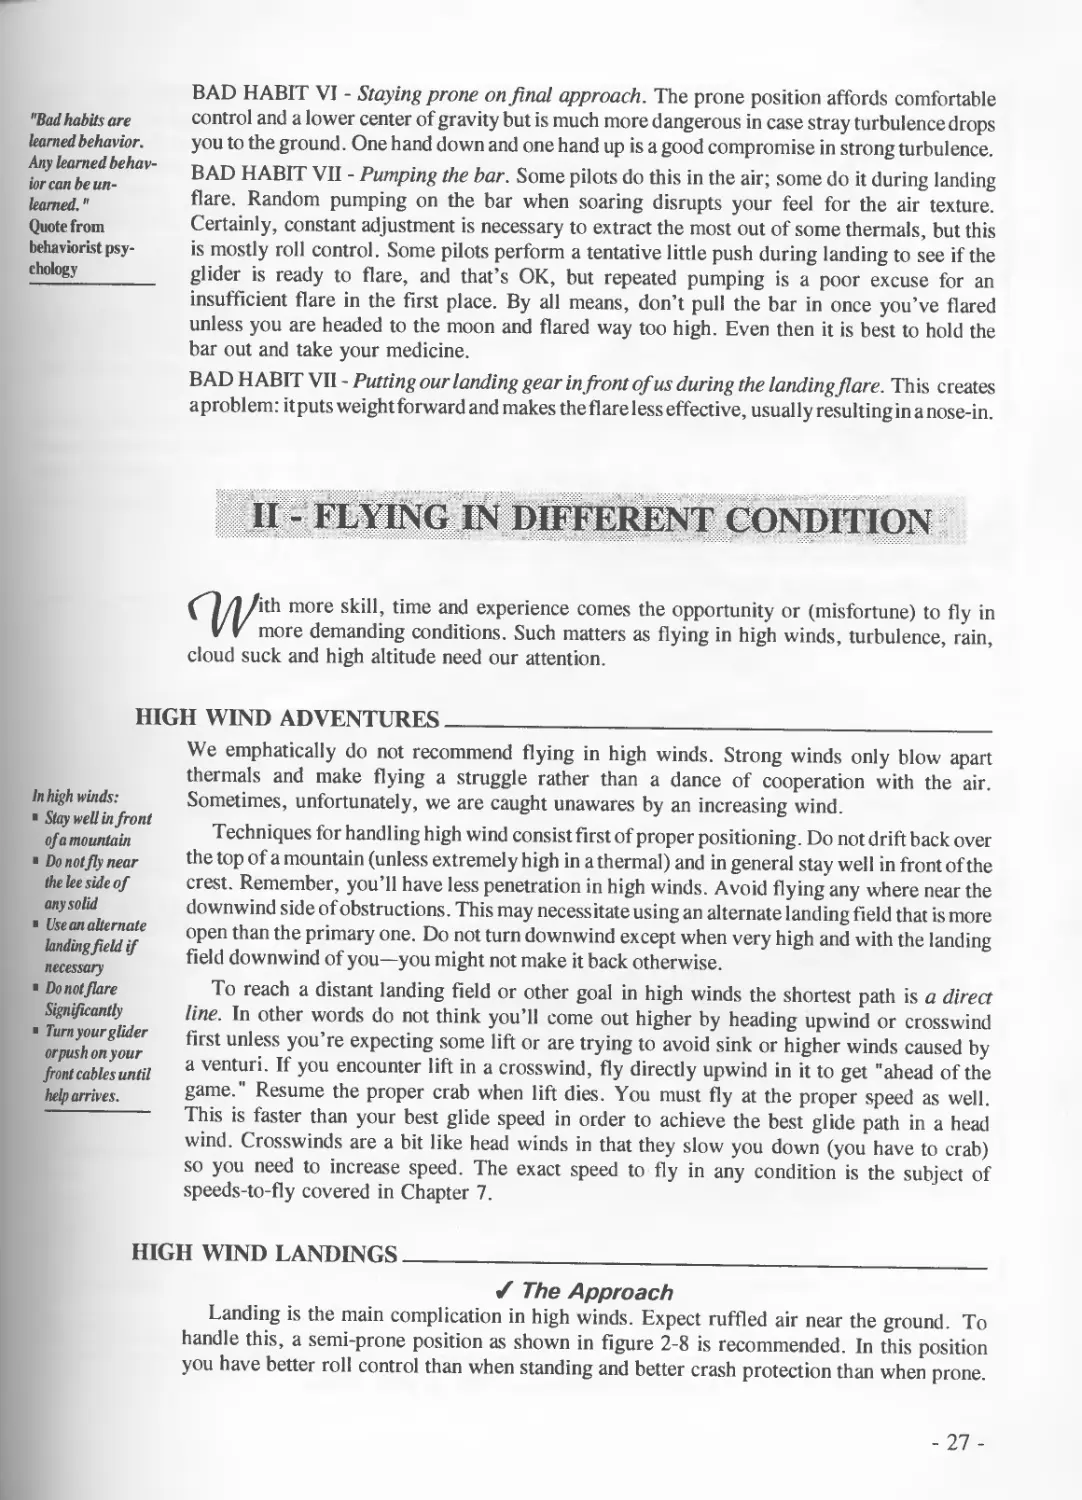
BAD HABITIII - Overwidegriponthe
controlbar. V arioushand positionson
the basetube ar e fine for relaxation but
pilots who constantly use a very wide
grip limit control action and strength.
Figure 2-7 shows the right and wrong
ways. The wide grip is often a carry
Figure 2-7: Proper Hand Posidon overfromtraining.
BAD HABIT IV - Staring at your
variometer in traffic. Sure, your var io gives you a lot of useful information, but would you stare at
your speedometer on the avenue? Learn to interpret the sound of yourvario and keep an eyeonthe
other pilots.
BAD HABIT V - Always thermaling in the same direction. Most of us have a preference (see
chapter 3), but when this preference turns into an obsession we are limiting ourselves.
-26-
"Bad habits are
learned behavior.
Any learned behav-
ior can be un-
learned. "
Quote from
behaviorist psy-
chology
BAD HABIT VI - Staying prone on final approach. The prone position affords comfortable
control and a lower center of gravity but is much more dangerous in case stray turbulence drops
you to the ground. One hand down and one hand up is a good compromise in strong turbulence.
BAD HABIT VII - Pumping the bar. Some pilots do this in the air; some do it during landing
flare. Random pumping on the bar when soaring disrupts your feel for the air texture.
Certainly, constant adjustment is necessary to extract the most out of some thermals, but this
is mostly roll control. Some pilots perform a tentative little push during landing to see if the
glider is ready to flare, and that’s OK, but repeated pumping is a poor excuse for an
insufficient flare in the first place. By all means, don’t pull the bar in once you’ve flared
unless you are headed to the moon and flared way too high. Even then it is best to hold the
bar out and take your medicine.
BAD HABIT VII - Putting our landing gear in front of us during the landing flare. This creates
aproblem: itputsweightforwardand makes the fl areless effective, usual lyresuiting in a nose-in.
II - FLYING IN DIFFERENT CONDITION
(^Э/l/ith more skill, time and experience comes the opportunity or (misfortune) to fly in
v V more demanding conditions. Such matters as flying in high winds, turbulence, rain,
cloud suck and high altitude need our attention.
HIGH WIND ADVENTURES__________________________________
Inhigh winds:
Stay well in front
of a mountain
Donotflynear
the lee side of
any solid
• Use an alternate
landing field if
necessary
Do not flare
Significantly
Turn your glider
or push on your
front cables until
help arrives.
We emphatically do not recommend flying in high winds. Strong winds only blow apart
thermals and make flying a struggle rather than a dance of cooperation with the air.
Sometimes, unfortunately, we are caught unawares by an increasing wind.
Techniques for handling high wind consist first of proper positioning. Do not drift back over
the top of a mountain (unless extremely high in a thermal) and in general stay well in front of the
crest. Remember, you’ll have less penetration in high winds. Avoid flying any where near the
downwind side of obstructions. This may necessitate using an alternate landing field that is more
open than the primary one. Do not turn downwind except when very high and with the landing
field downwind of you—you might not make it back otherwise.
To reach a distant landing field or other goal in high winds the shortest path is a direct
line. In other words do not think you’ll come out higher by heading upwind or crosswind
first unless you’re expecting some lift or are trying to avoid sink or higher winds caused by
a venturi. If you encounter lift in a crosswind, fly directly upwind in it to get "ahead of the
game." Resume the proper crab when lift dies. You must fly at the proper speed as well.
This is faster than your best glide speed in order to achieve the best glide path in a head
wind. Crosswinds are a bit like head winds in that they slow you down (you have to crab)
so you need to increase speed. The exact speed to fly in any condition is the subject of
speeds-to-fly covered in Chapter 7.
HIGH WIND LANDINGS_____________________________________________________
✓ The Approach
Landing is the main complication in high winds. Expect ruffled air near the ground. To
handle this, a semi-prone position as shown in figure 2-8 is recommended. In this position
you have better roll control than when standing and better crash protection than when prone.
- 27 -
Figure 2-8: Turbulent Landing Position
When nearing the ground on final you may have to keep the
control bar pulled in considerably. Your normal approach should
be fast enough to handle winds up to 20 mph. In higher winds
more pull-in is required. Some pilots have found themselves
flying backwards until very near the ground, but don’t give up,
wind almost always diminishes below your maximum reasonable
speed close to the ground due to wind gradient.
✓ The Flare
In winds above 15 mph not much flare is required. Just a
slight easing out of the bar stops your vertical descent. In
winds over 20 mph no flare should be used, simply walk along
as you touch down after rounding out.
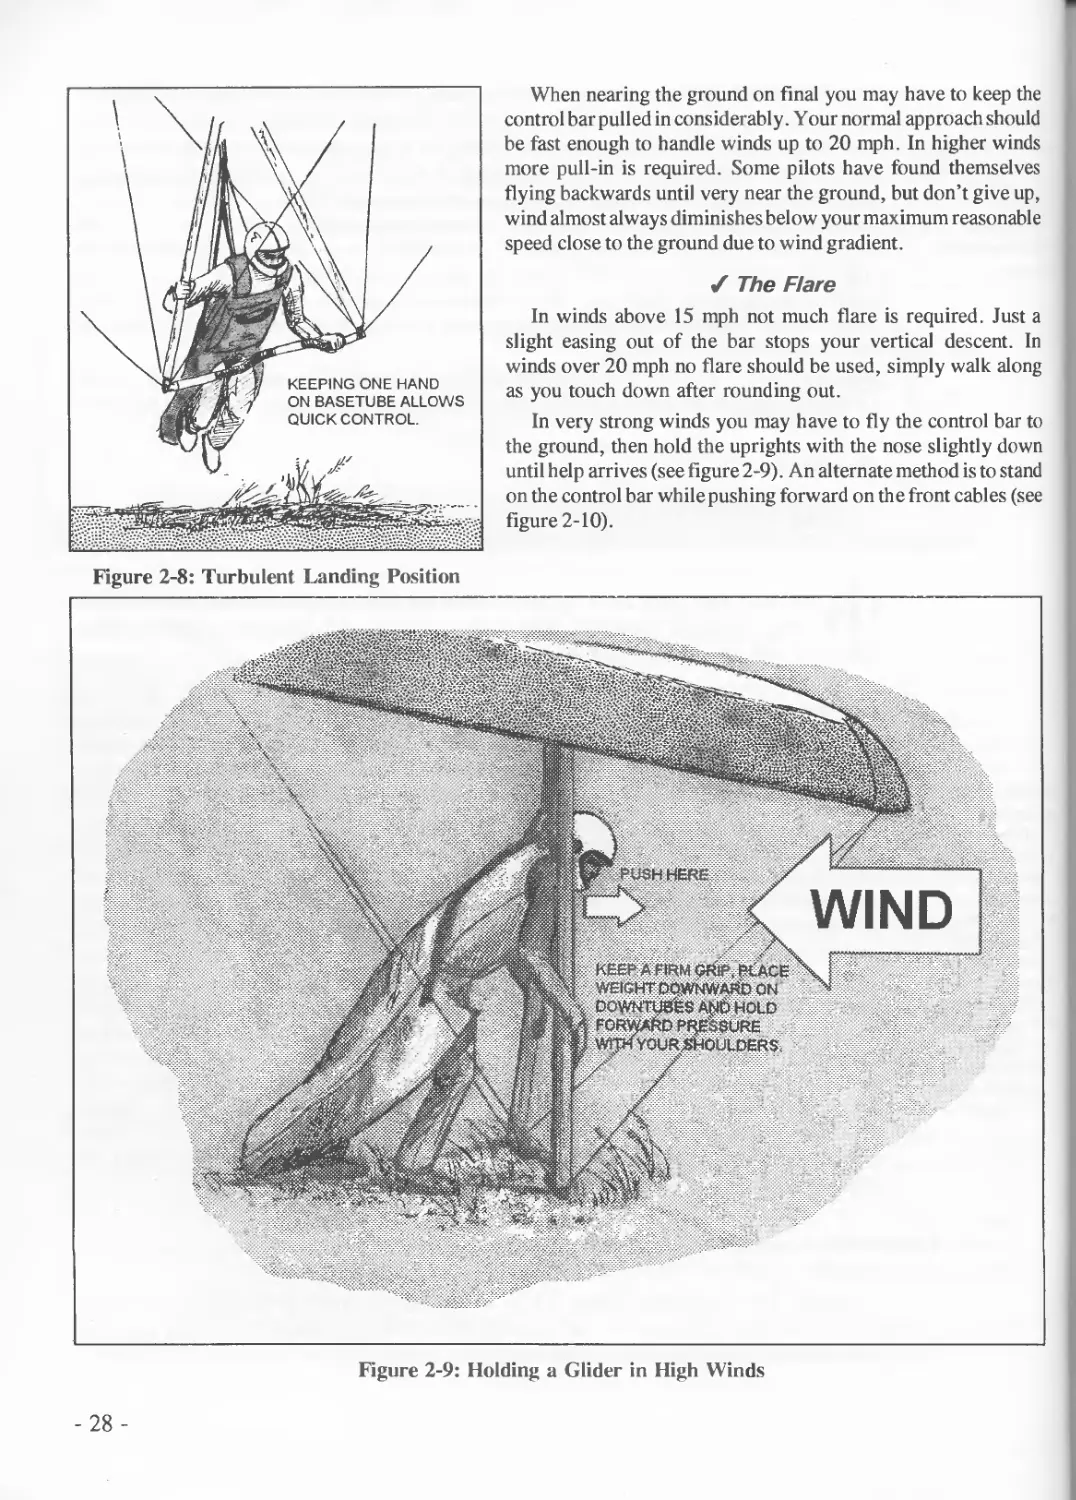
In very strong winds you may have to fly the control bar to
the ground, then hold the uprights with the nose slightly down
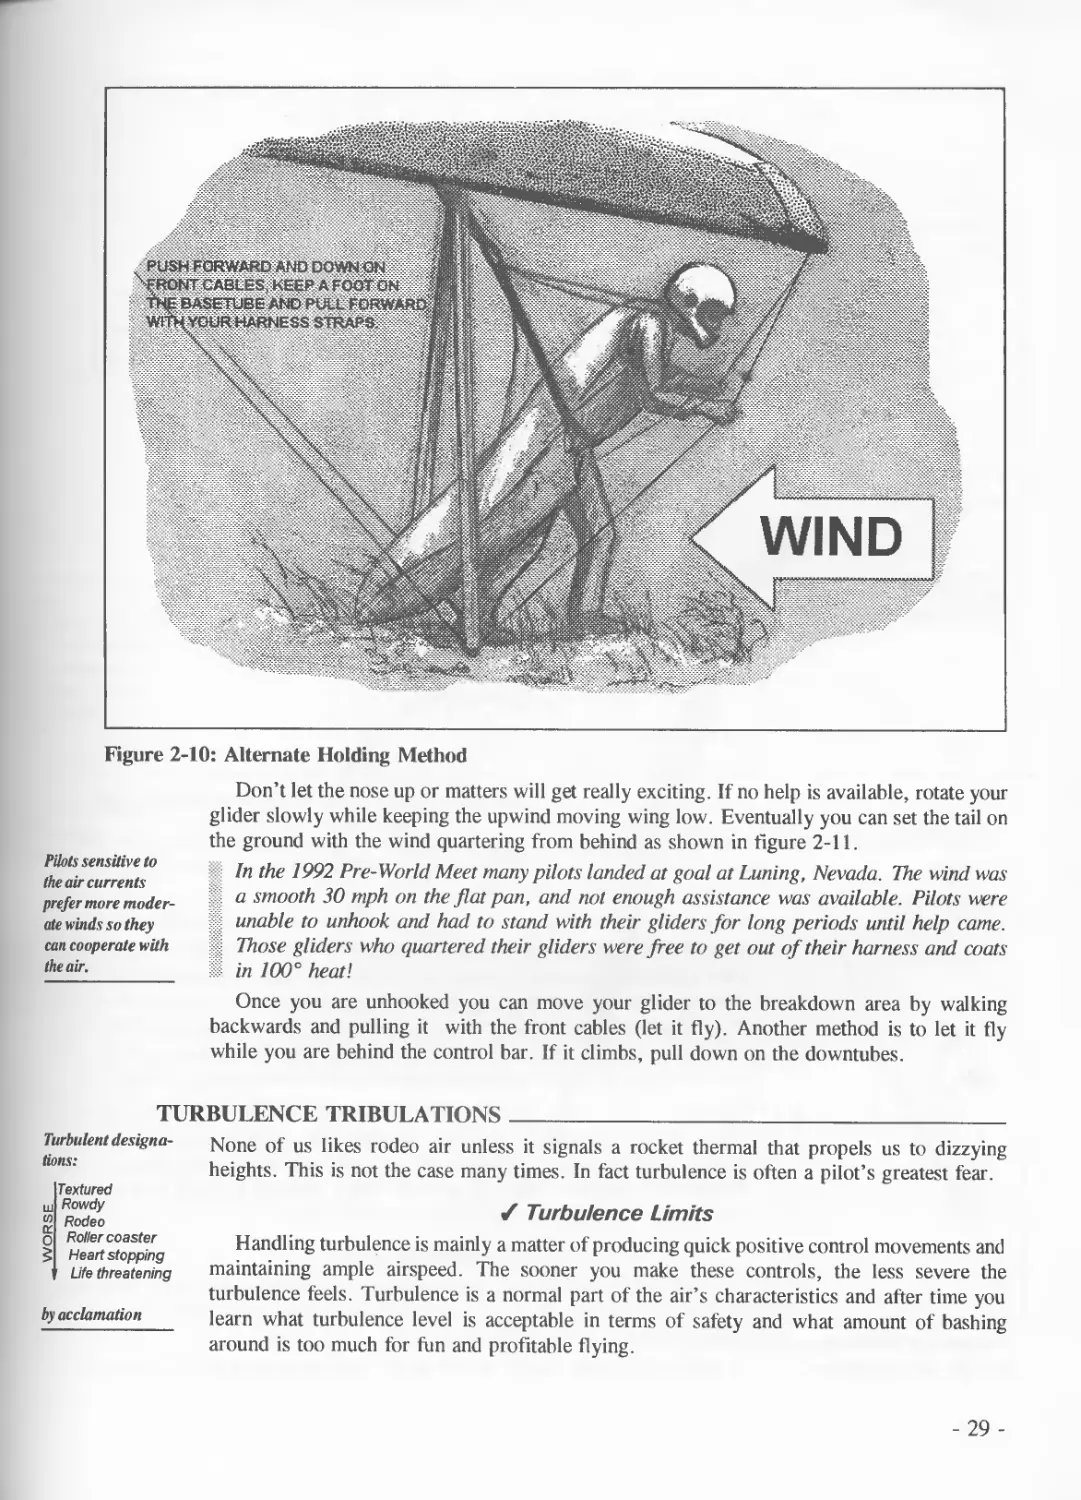
until help arrives (see figure 2-9). An alternate method is to stand
on the control bar while pushing forward on the front cables (see
figure 2-10).
Figure 2-9: Holding a Glider in High Winds
- 28 -
Figure 2-10: Alternate Holding Method
Pilots sensitive to
the air currents
prefer more moder-
ate winds so they
can cooperate with
the air.
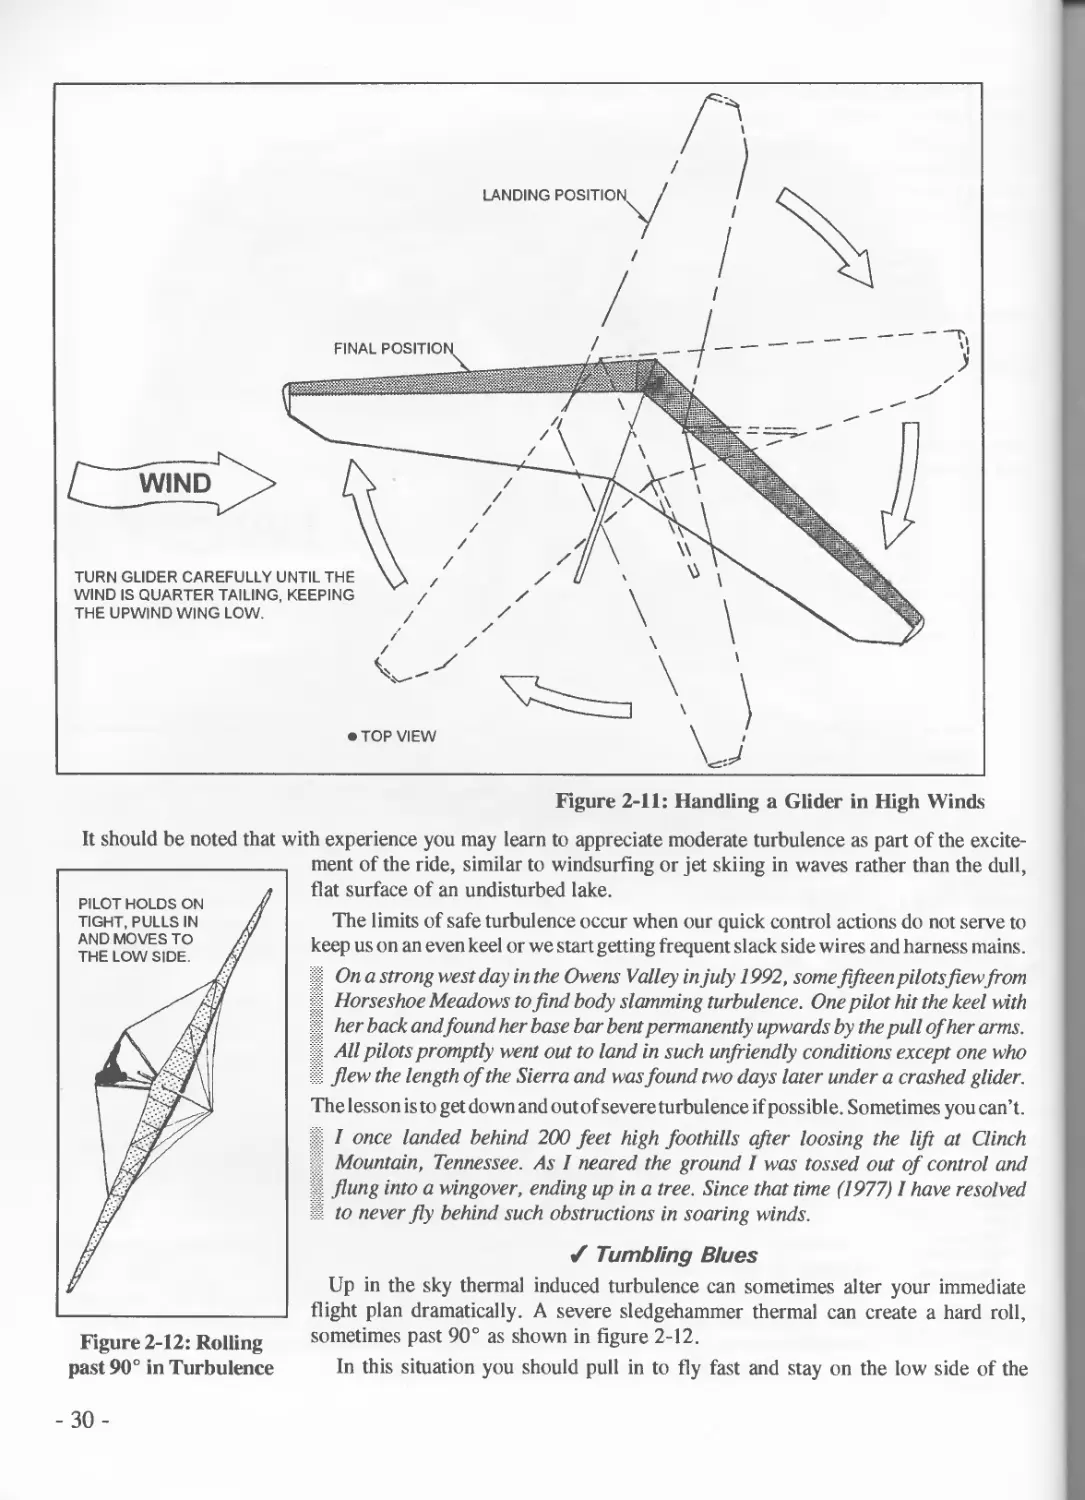
Don’t let the nose up or matters will get really exciting. If no help is available, rotate your
glider slowly while keeping the upwind moving wing low. Eventually you can set the tail on
the ground with the wind quartering from behind as shown in figure 2-11.
In the 1992 Pre-World Meet many pilots landed at goal at Luning, Nevada. The wind was
a smooth 30 mph on the flat pan, and not enough assistance was available. Pilots were
| unable to unhook and had to stand with their gliders for long periods until help came.
| Those gliders who quartered their gliders were free to get out of their harness and coats
s in 100° heat!
Once you are unhooked you can move your glider to the breakdown area by walking
backwards and pulling it with the front cables (let it fly). Another method is to let it fly
while you are behind the control bar. If it climbs, pull down on the downtubes.
TURBULENCE TRIBULATIONS___________________________________
Turbulent designa-
tions:
Textured
ш
и
tc
0
Rowdy
Rodeo
Rollercoaster
Heart stopping
Life threatening
by acclamation
None of us likes rodeo air unless it signals a rocket thermal that propels us to dizzying
heights. This is not the case many times. In fact turbulence is often a pilot’s greatest fear.
✓ Turbulence Limits
Handling turbulence is mainly a matter of producing quick positive control movements and
maintaining ample airspeed. The sooner you make these controls, the less severe the
turbulence feels. Turbulence is a normal part of the air’s characteristics and after time you
learn what turbulence level is acceptable in terms of safety and what amount of bashing
around is too much for fun and profitable flying.
- 29 -
Figure 2-11: Handling a Glider in High Winds
It should be noted that with experience you may learn to appreciate moderate turbulence as part of the excite-
ment of the ride, similar to windsurfing or jet skiing in waves rather than the dull,
flat surface of an undisturbed lake.
The limits of safe turbulence occur when our quick control actions do not serve to
keep us on an even keel or we start getting frequent slack side wires and harness mains.
If On a strong west day in the Owens Valley injuly 1992, some fifteen pilotsflew from
I Horseshoe Meadows to find body slamming turbulence. One pilot hit the keel with
if her back and found her base bar bent permanently upwards by the pull of her arms.
iii All pilots promptly went out to land in such unfriendly conditions except one who
flew the length of the Sierra and was found two days later under a crashed glider.
The lesson is to get down and out of severe turbulence if possible. Sometimes you can’t,
fl / once landed behind 200 feet high foothills after loosing the lift at Clinch
Mountain, Tennessee. As I neared the ground I was tossed out of control and
I flung into a wingover, ending up in a tree. Since that time (1977) I have resolved
1 to never fly behind such obstructions in soaring winds.
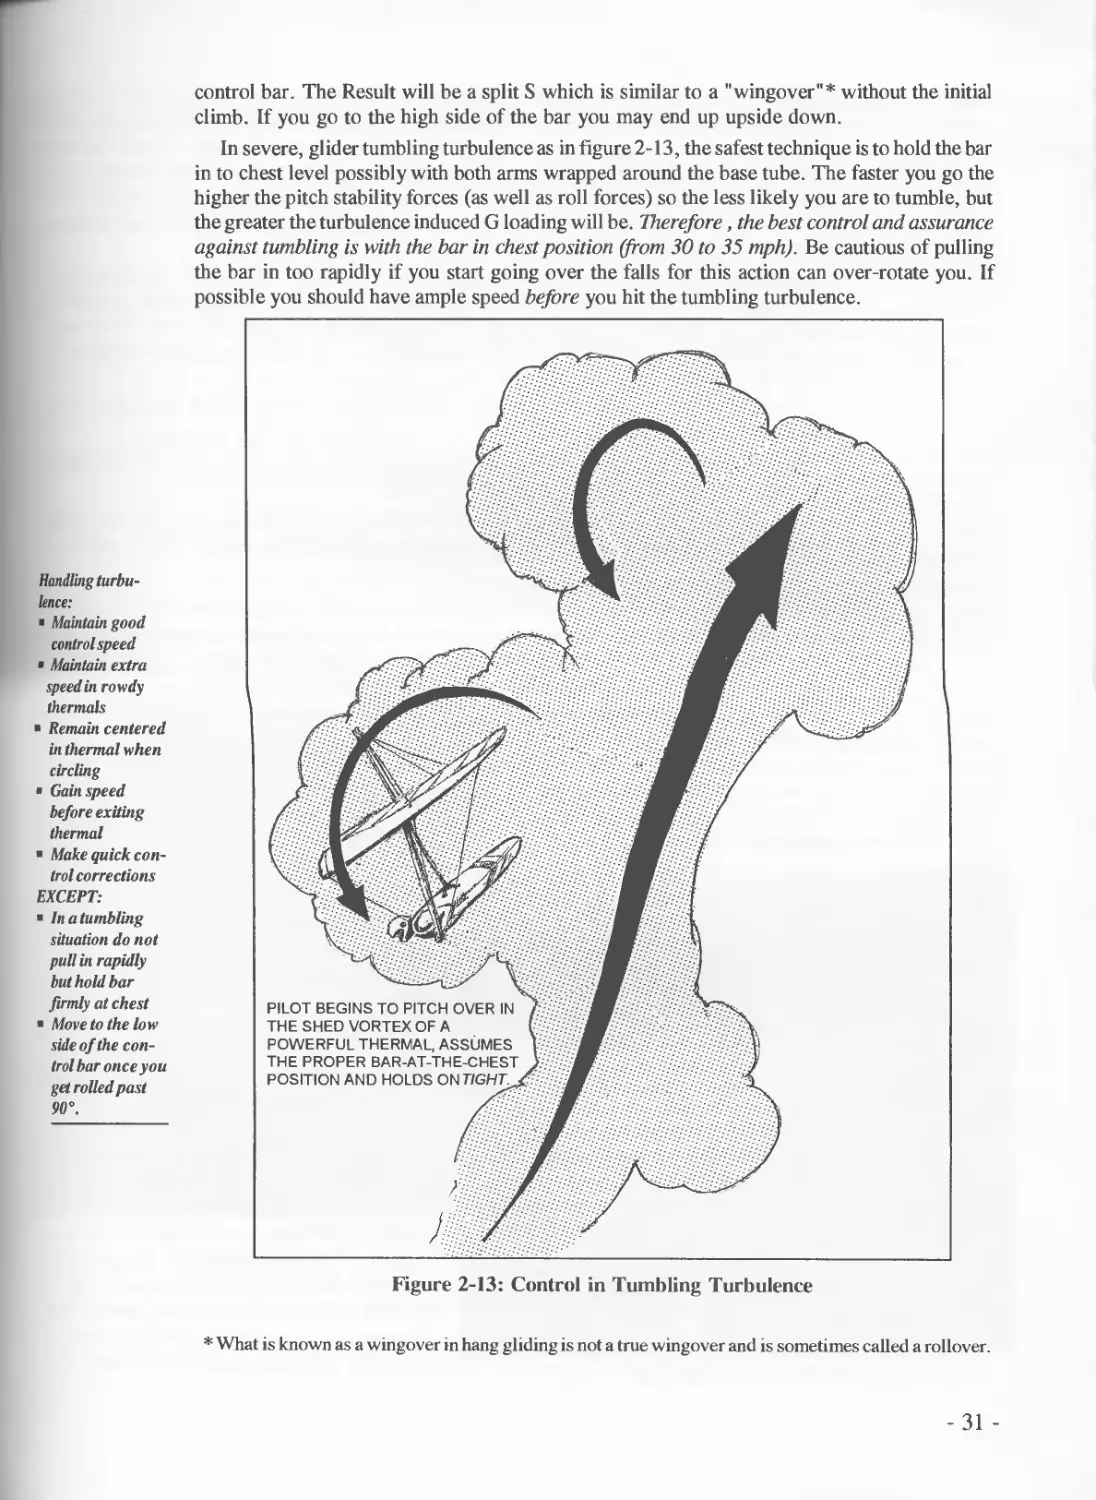
7 Tumbling Blues
Up in the sky thermal induced turbulence can sometimes alter your immediate
flight plan dramatically. A severe sledgehammer thermal can create a hard roll,
Figure 2-12: Rolling sometimes past 90° as shown in figure 2-12.
past 90° in Turbulence In this situation you should pull in to fly fast and stay on the low side of the
-30-
control bar. The Result will be a split S which is similar to a "wingover"* without the initial
climb. If you go to the high side of the bar you may end up upside down.
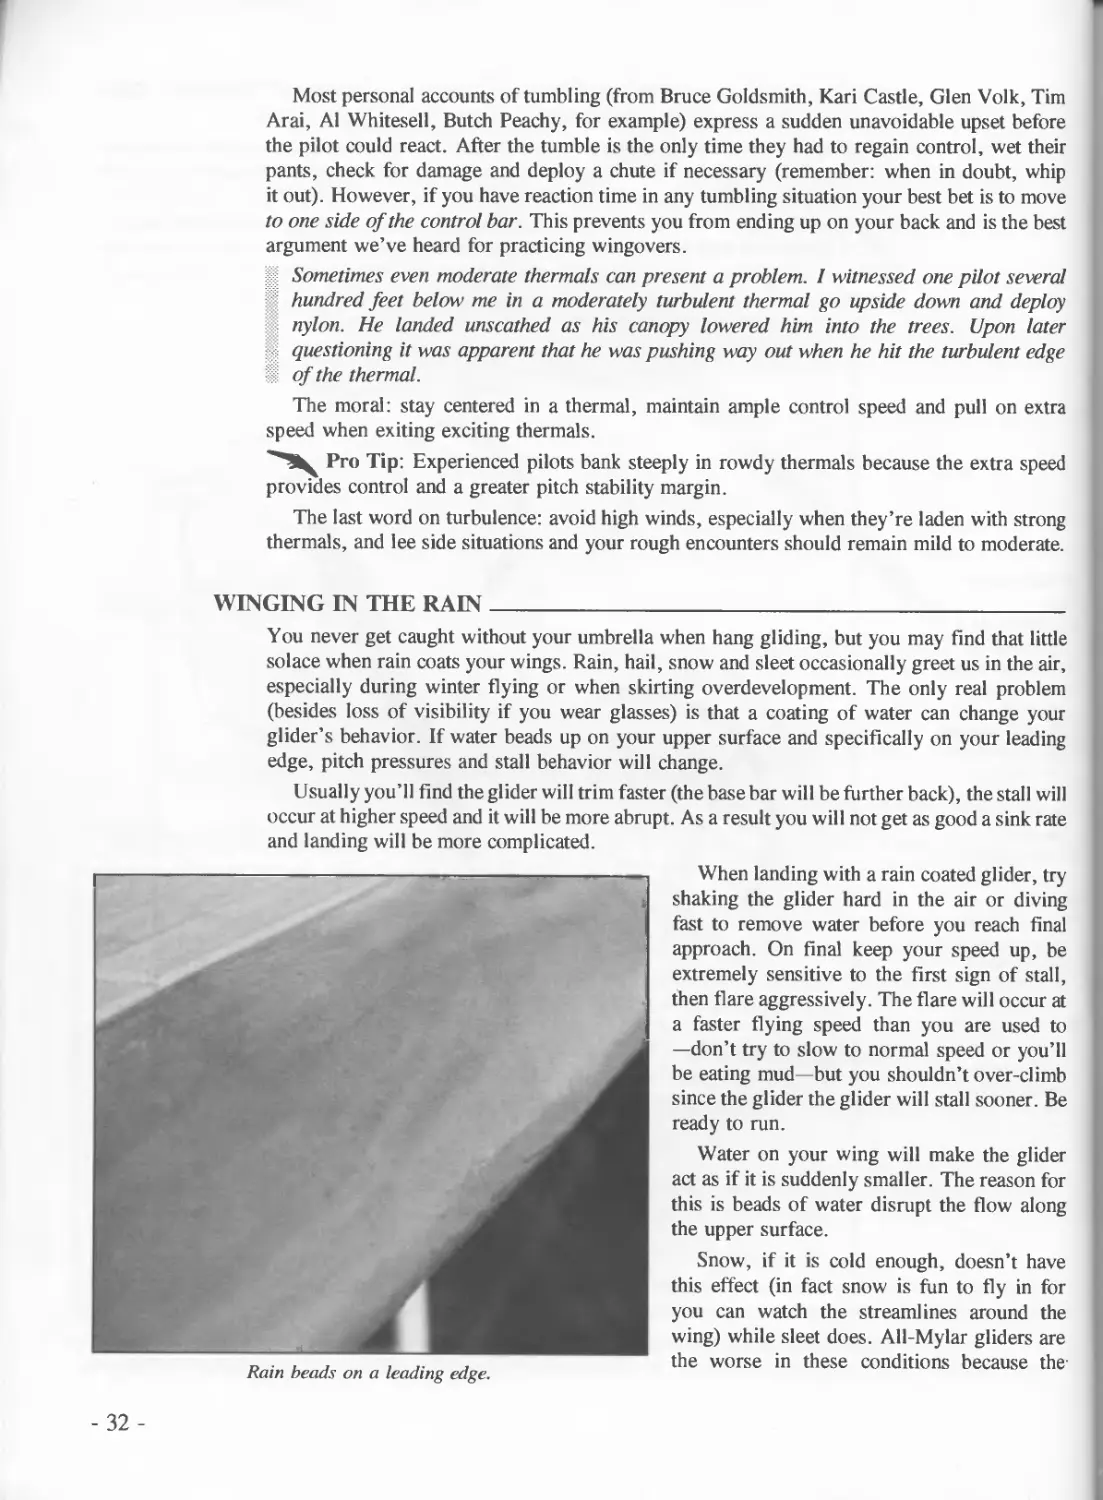
In severe, glider tumbling turbulence as in figure 2-13, the safest technique is to hold the bar
in to chest level possibly with both arms wrapped around the base tube. The faster you go the
higher the pitch stability forces (as well as roll forces) so the less likely you are to tumble, but
the greater the turbulence induced G loading will be. Therefore, the best control and assurance
against tumbling is with the bar in chest position (from 30 to 35 mph). Be cautious of pulling
the bar in too rapidly if you start going over the falls for this action can over-rotate you. If
possible you should have ample speed before you hit the tumbling turbulence.
Handling turbu-
lence:
Maintain good
control speed
Maintain extra
speed in rowdy
thermals
Remain centered
in thermal when
circling
Gain speed
before exiting
thermal
Make quick con-
trolcorrections
EXCEPT:
in a tumbling
situation do not
pull in rapidly
but hold bar
firmly at chest
Move to the low
side of the con-
trol bar once you
get rolled past
90°.
Figure 2-13: Control in Tumbling Turbulence
* What is known as a wingover in hang gliding is not a true wingover and is sometimes called a rollover.
- 31 -
Most personal accounts of tumbling (from Bruce Goldsmith, Kari Castle, Glen Volk, Tim
Arai, Al Whitesell, Butch Peachy, for example) express a sudden unavoidable upset before
the pilot could react. After the tumble is the only time they had to regain control, wet their
pants, check for damage and deploy a chute if necessary (remember: when in doubt, whip
it out). However, if you have reaction time in any tumbling situation your best bet is to move
to one side of the control bar. This prevents you from ending up on your back and is the best
argument we’ve heard for practicing wingovers.
i Sometimes even moderate thermals can present a problem. I witnessed one pilot several
hundred feet below me in a moderately turbulent thermal go upside down and deploy
nylon. He landed unscathed as his canopy lowered him into the trees. Upon later
questioning it was apparent that he was pushing way out when he hit the turbulent edge
• of the thermal.
The moral: stay centered in a thermal, maintain ample control speed and pull on extra
speed when exiting exciting thermals.
Pro Tip: Experienced pilots bank steeply in rowdy thermals because the extra speed
provides control and a greater pitch stability margin.
The last word on turbulence: avoid high winds, especially when they’re laden with strong
thermals, and lee side situations and your rough encounters should remain mild to moderate.
WINGING IN THE RAIN___________________________________
You never get caught without your umbrella when hang gliding, but you may find that little
solace when rain coats your wings. Rain, hail, snow and sleet occasionally greet us in the air,
especially during winter flying or when skirting overdevelopment. The only real problem
(besides loss of visibility if you wear glasses) is that a coating of water can change your
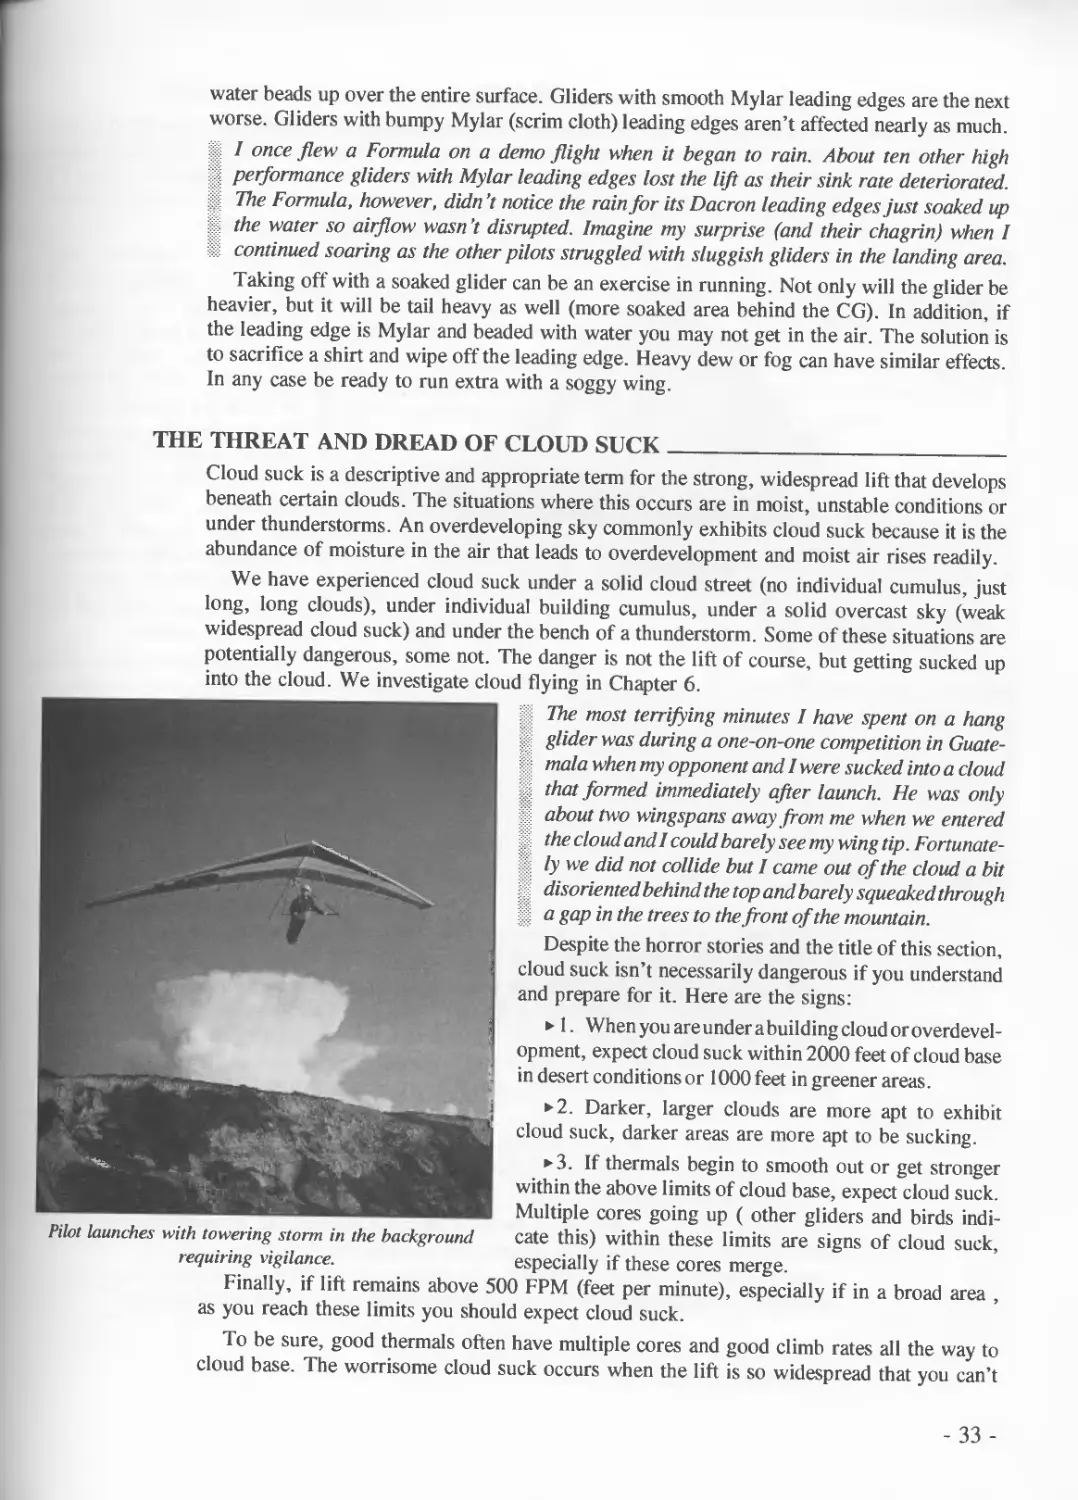
glider’s behavior. If water beads up on your upper surface and specifically on your leading
edge, pitch pressures and stall behavior will change.
Usually you’ll find the glider will trim faster (the base bar will be further back), the stall will
occur at higher speed and it will be more abrupt. As a result you will not get as good a sink rate
and landing will be more complicated.
Rain beads on a leading edge.
When landing with a rain coated glider, try
shaking the glider hard in the air or diving
fast to remove water before you reach final
approach. On final keep your speed up, be
extremely sensitive to the first sign of stall,
then flare aggressively. The flare will occur at
a faster flying speed than you are used to
—don’t try to slow to normal speed or you’ll
be eating mud—but you shouldn’t over-climb
since the glider the glider will stall sooner. Be
ready to run.
Water on your wing will make the glider
act as if it is suddenly smaller. The reason for
this is beads of water disrupt the flow along
the upper surface.
Snow, if it is cold enough, doesn’t have
this effect (in fact snow is fun to fly in for
you can watch the streamlines around the
wing) while sleet does. All-Mylar gliders are
the worse in these conditions because the
- 32 -
water beads up over the entire surface. Gliders with smooth Mylar leading edges are the next
worse. Gliders with bumpy Mylar (scrim cloth) leading edges aren’t affected nearly as much.
I once flew a Formula on a demo flight when it began to rain. About ten other high
• performance gliders with Mylar leading edges lost the lift as their sink rate deteriorated.
II The Formula, however, didn’t notice the rain for its Dacron leading edges just soaked up
||. the water so airflow wasn't disrupted. Imagine my surprise (and their chagrin) when I
i continued soaring as the other pilots struggled with sluggish gliders in the landing area.
Taking off with a soaked glider can be an exercise in running. Not only will the glider be
heavier, but it will be tail heavy as well (more soaked area behind the CG). In addition, if
the leading edge is Mylar and beaded with water you may not get in the air. The solution is
to sacrifice a shirt and wipe off the leading edge. Heavy dew or fog can have similar effects.
In any case be ready to run extra with a soggy wing.
THE THREAT AND DREAD OF CLOUD SUCK
Cloud suck is a descriptive and appropriate term for the strong, widespread lift that develops
beneath certain clouds. The situations where this occurs are in moist, unstable conditions or
under thunderstorms. An overdeveloping sky commonly exhibits cloud suck because it is the
abundance of moisture in the air that leads to overdevelopment and moist air rises readily.
We have experienced cloud suck under a solid cloud street (no individual cumulus, just
long, long clouds), under individual building cumulus, under a solid overcast sky (weak
widespread cloud suck) and under the bench of a thunderstorm. Some of these situations are
potentially dangerous, some not. The danger is not the lift of course, but getting sucked up
into the cloud. We investigate cloud flying in Chapter 6.
[ The most terrifying minutes I have spent on a hang
| glider was during a one-on-one competition in Guate-
| mala when my opponent and I were sucked into a cloud
that formed immediately after launch. He was only
- about two wingspans away from me when we entered
the cloud and I could barely see my wing tip. Fortunate-
ly we did not collide but I came out of the cloud a bit
disoriented behind the top and barely squeaked through
a gap in the trees to the front of the mountain.
Despite the horror stories and the title of this section,
cloud suck isn’t necessarily dangerous if you understand
and prepare for it. Here are the signs:
► 1. When you are under a building cloud or overdevel-
opment, expect cloud suck within 2000 feet of cloud base
in desert conditions or 1000 feet in greener areas.
► 2. Darker, larger clouds are more apt to exhibit
cloud suck, darker areas are more apt to be sucking.
► 3. If thermals begin to smooth out or get stronger
within the above limits of cloud base, expect cloud suck.
Multiple cores going up ( other gliders and birds indi-
cate this) within these limits are signs of cloud suck,
especially if these cores merge.
Pilot launches with towering storm in the background
requiring vigilance.
Finally, if lift remains above 500 FPM (feet per minute), especially if in a broad area ,
as you reach these limits you should expect cloud suck.
To be sure, good thermals often have multiple cores and good climb rates all the way to
cloud base. The worrisome cloud suck occurs when the lift is so widespread that you can’t
- 33 -
easily escape it before you enter the cloud.
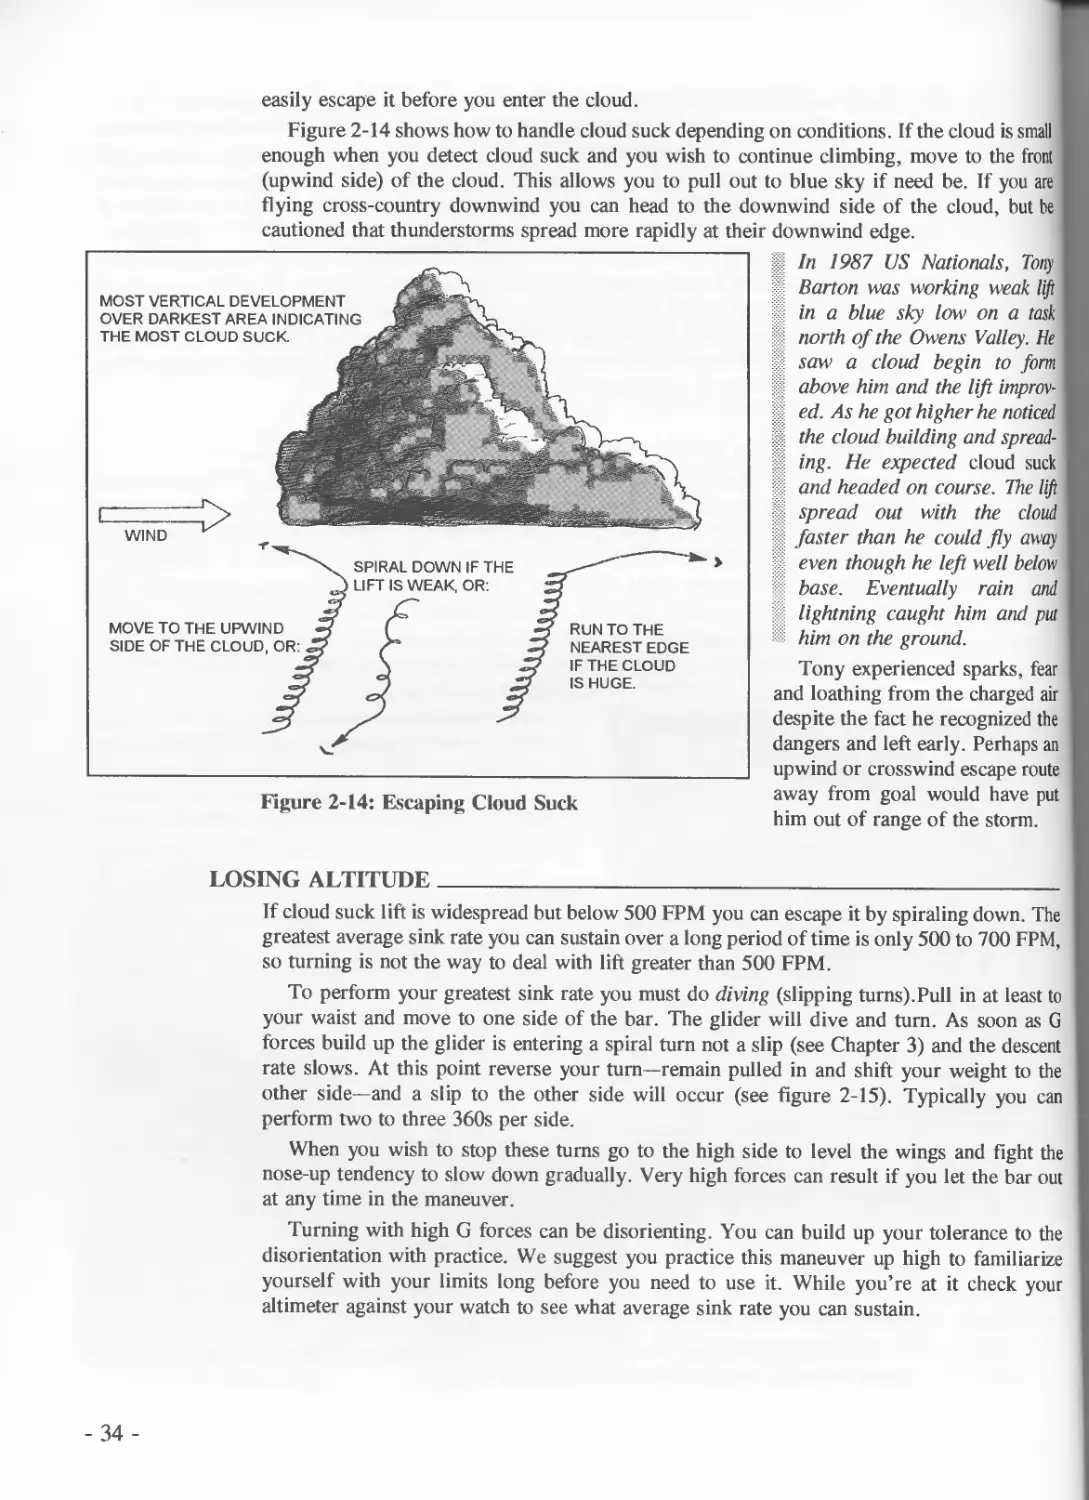
Figure 2-14 shows how to handle cloud suck depending on conditions. If the cloud is small
enough when you detect cloud suck and you wish to continue climbing, move to the front
(upwind side) of the cloud. This allows you to pull out to blue sky if need be. If you are
flying cross-country downwind you can head to the downwind side of the cloud, but be
cautioned that thunderstorms spread more rapidly at their downwind edge.
Figure 2-14: Escaping Cloud Suck
|| In 1987 US Nationals, Tony
i Barton was working weak lift
in a blue sky low on a task
north of the Owens Valley. He
saw a cloud begin to form
II above him and the lift improv-
| ed. As he got higher he noticed
the cloud building and spread-
|| ing. He expected cloud suck
and headed on course. The lift
spread out with the cloud
faster than he could fly away
even though he left well below
base. Eventually rain and
lightning caught him and put
him on the ground.
Tony experienced sparks, fear
and loathing from the charged air
despite the fact he recognized the
dangers and left early. Perhaps an
upwind or crosswind escape route
away from goal would have put
him out of range of the storm.
LOSING ALTITUDE__________________________________________
If cloud suck lift is widespread but below 500 FPM you can escape it by spiraling down. The
greatest average sink rate you can sustain over a long period of time is only 500 to 700 FPM,
so turning is not the way to deal with lift greater than 500 FPM.
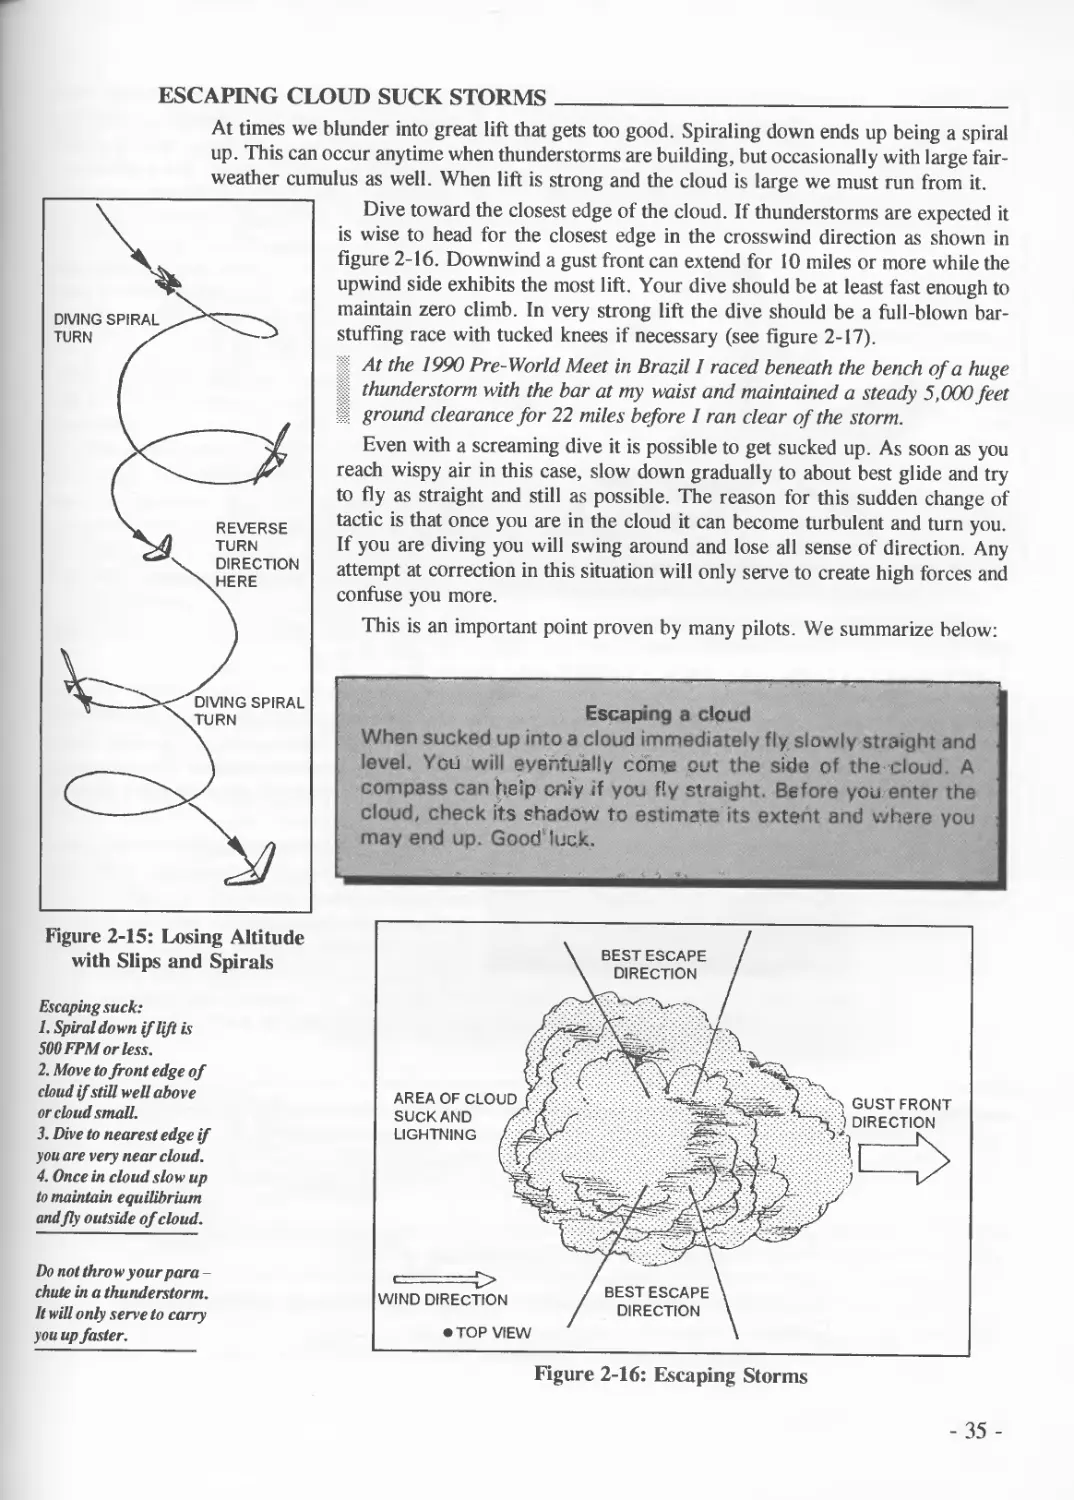
To perform your greatest sink rate you must do diving (slipping turns).Pull in at least to
your waist and move to one side of the bar. The glider will dive and turn. As soon as G
forces build up the glider is entering a spiral turn not a slip (see Chapter 3) and the descent
rate slows. At this point reverse your turn—remain pulled in and shift your weight to the
other side—and a slip to the other side will occur (see figure 2-15). Typically you can
perform two to three 360s per side.
When you wish to stop these turns go to the high side to level the wings and fight the
nose-up tendency to slow down gradually. Very high forces can result if you let the bar out
at any time in the maneuver.
Turning with high G forces can be disorienting. You can build up your tolerance to the
disorientation with practice. We suggest you practice this maneuver up high to familiarize
yourself with your limits long before you need to use it. While you’re at it check your
altimeter against your watch to see what average sink rate you can sustain.
- 34 -
ESCAPING CLOUD SUCK STORMS___________________________
At times we blunder into great lift that gets too good. Spiraling down ends up being a spiral
up. This can occur anytime when thunderstorms are building, but occasionally with large fair-
weather cumulus as well. When lift is strong and the cloud is large we must run from it.
Figure 2-15: Losing Altitude
with Slips and Spirals
Escaping suck:
1. Spiral down if lift is
500FPM or less.
2. Move to front edge of
cloud if still well above
or cloud small.
3. Dive to nearest edge if
you are very near cloud.
4. Once in cloud slow up
to maintain equilibrium
andfly outside of cloud.
Do not thro w your para -
chute in a thunderstorm.
It will only serve to carry
you up faster.
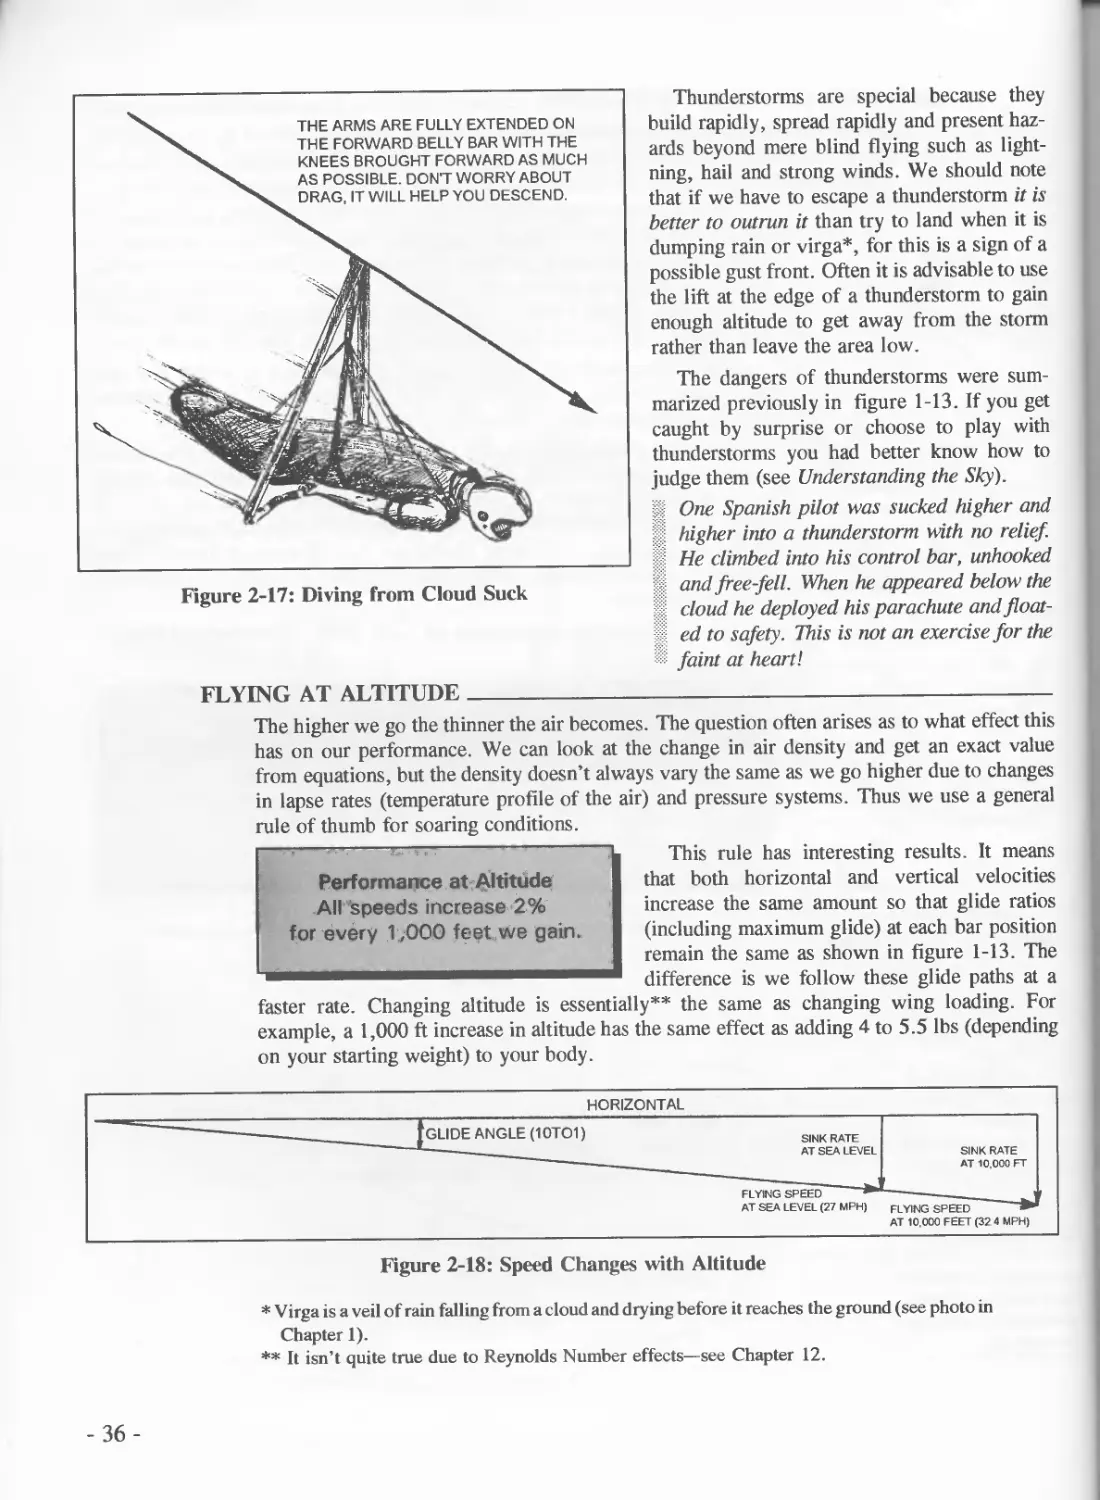
Dive toward the closest edge of the cloud. If thunderstorms are expected it
is wise to head for the closest edge in the crosswind direction as shown in
figure 2-16. Downwind a gust front can extend for 10 miles or more while the
upwind side exhibits the most lift. Your dive should be at least fast enough to
maintain zero climb. In very strong lift the dive should be a full-blown bar-
stuffing race with tucked knees if necessary (see figure 2-17).
At the 1990 Pre-World Meet in Brazil I raced beneath the bench of a huge
thunderstorm with the bar at my waist and maintained a steady 5,000feet
Ц ground clearance for 22 miles before I ran clear of the storm.
Even with a screaming dive it is possible to get sucked up. As soon as you
reach wispy air in this case, slow down gradually to about best glide and try
to fly as straight and still as possible. The reason for this sudden change of
tactic is that once you are in the cloud it can become turbulent and turn you.
If you are diving you will swing around and lose all sense of direction. Any
attempt at correction in this situation will only serve to create high forces and
confuse you more.
This is an important point proven by many pilots. We summarize below:
Escaping a cloud
When sucked up into a cloud immediately fly slowly straight and
level. You will eventually come put the side of the cloud. A
compass can help cniy if you fly straight. Before you enter the
cloud, check its shadow to estimate its extent and where you
may end up. Good luck.
Figure 2-16: Escaping Storms
- 35 -
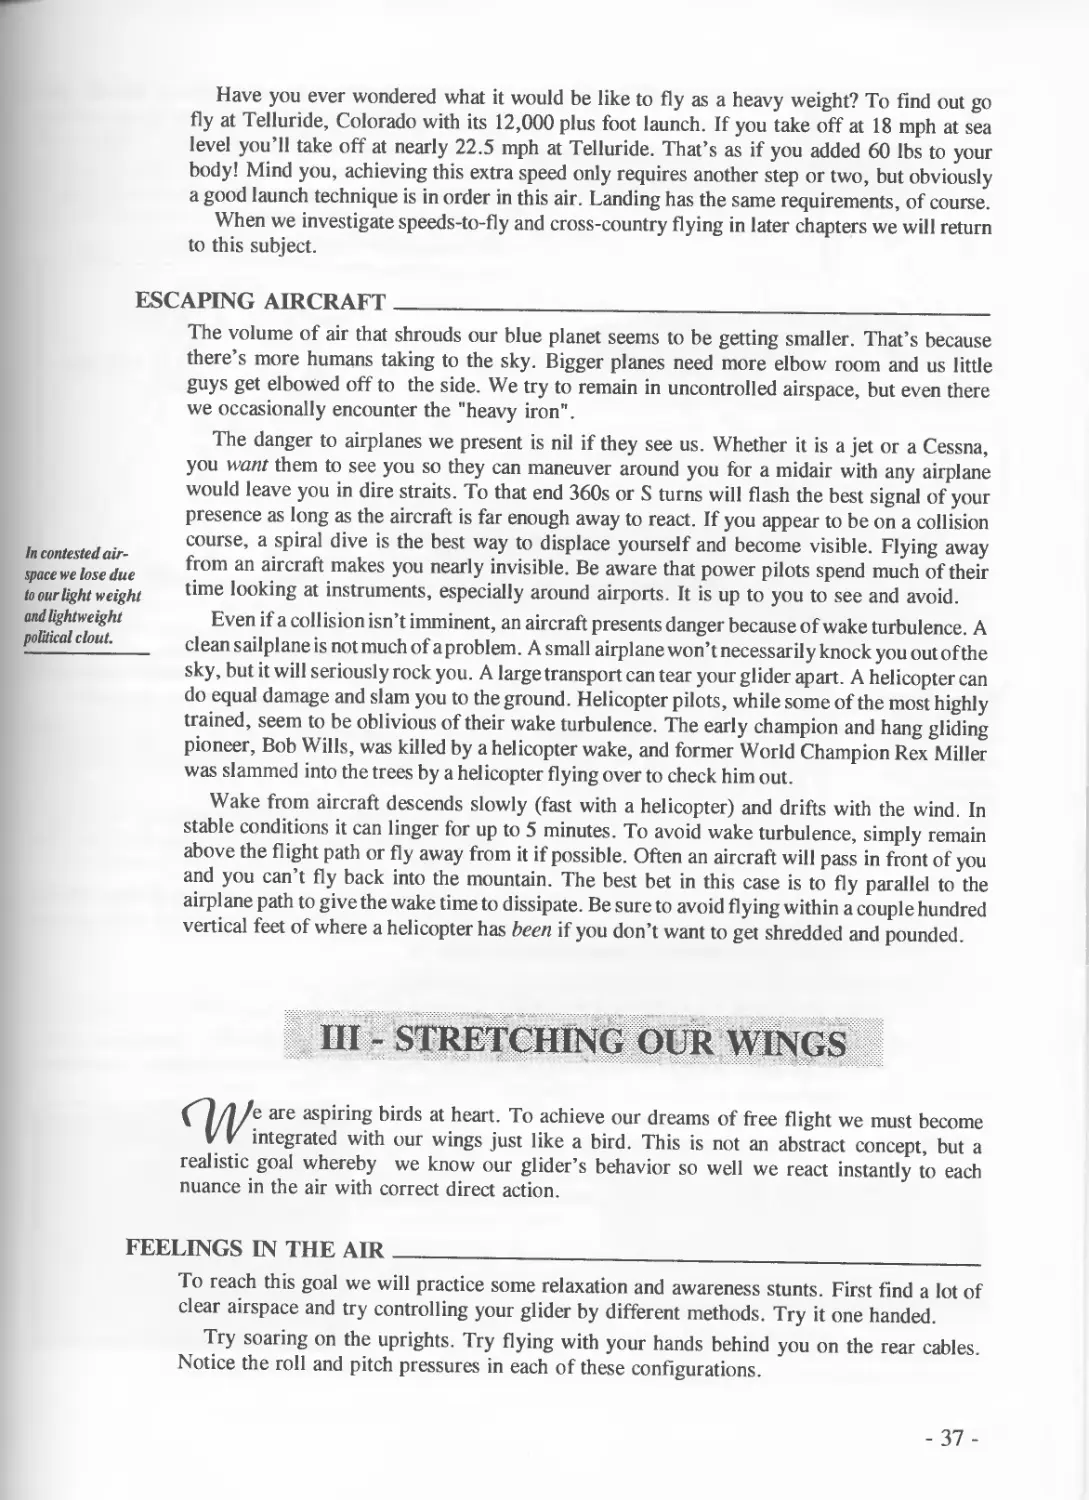
THE ARMS ARE FULLY EXTENDED ON
THE FORWARD BELLY BAR WITH THE
KNEES BROUGHT FORWARD AS MUCH
AS POSSIBLE. DON'T WORRY ABOUT
DRAG, IT WILL HELP YOU DESCEND.
Figure 2-17: Diving from Cloud Suck
Thunderstorms are special because they
build rapidly, spread rapidly and present haz-
ards beyond mere blind flying such as light-
ning, hail and strong winds. We should note
that if we have to escape a thunderstorm it is
better to outrun it than try to land when it is
dumping rain or virga*, for this is a sign of a
possible gust front. Often it is advisable to use
the lift at the edge of a thunderstorm to gain
enough altitude to get away from the storm
rather than leave the area low.
The dangers of thunderstorms were sum-
marized previously in figure 1-13. If you get
caught by surprise or choose to play with
thunderstorms you had better know how to
judge them (see Understanding the Sky).
|| One Spanish pilot was sucked higher and
higher into a thunderstorm with no relief.
I; He climbed into his control bar, unhooked
and free-fell. When he appeared below the
I cloud he deployed his parachute and float-
| ed to safety. This is not an exercise for the
faint at heart I
FLYING AT ALTITUDE
—a-,--;
Performance at Altitude
All speeds increase 2%
for every 1,000 feet we gain.
The higher we go the thinner the air becomes. The question often arises as to what effect this
has on our performance. We can look at the change in air density and get an exact value
from equations, but the density doesn’t always vary the same as we go higher due to changes
in lapse rates (temperature profile of the air) and pressure systems. Thus we use a general
rule of thumb for soaring conditions.
This rule has interesting results. It means
that both horizontal and vertical velocities
increase the same amount so that glide ratios
(including maximum glide) at each bar position
remain the same as shown in figure 1-13. The
difference is we follow these glide paths at a
faster rate. Changing altitude is essentially** the same as changing wing loading. For
example, a 1,000 ft increase in altitude has the same effect as adding 4 to 5.5 lbs (depending
on your starting weight) to your body.
* Virga is a veil of rain falling from a cloud and drying before it reaches the ground (see photo in
Chapter 1).
** It isn’t quite true due to Reynolds Number effects—see Chapter 12.
- 36-
In contested air-
space we lose due
to our light weight
and lightweight
political clout.
Have you ever wondered what it would be like to fly as a heavy weight? To find out go
fly at Telluride, Colorado with its 12,000 plus foot launch. If you take off at 18 mph at sea
level you’ll take off at nearly 22.5 mph at Telluride. That’s as if you added 60 lbs to your
body! Mind you, achieving this extra speed only requires another step or two, but obviously
a good launch technique is in order in this air. Landing has the same requirements, of course.
When we investigate speeds-to-fly and cross-country flying in later chapters we will return
to this subject.
ESCAPING AIRCRAFT___________________________________________________________________________
The volume of air that shrouds our blue planet seems to be getting smaller. That’s because
there’s more humans taking to the sky. Bigger planes need more elbow room and us little
guys get elbowed off to the side. We try to remain in uncontrolled airspace, but even there
we occasionally encounter the "heavy iron”.
The danger to airplanes we present is nil if they see us. Whether it is a jet or a Cessna,
you want them to see you so they can maneuver around you for a midair with any airplane
would leave you in dire straits. To that end 360s or S turns will flash the best signal of your
presence as long as the aircraft is far enough away to react. If you appear to be on a collision
course, a spiral dive is the best way to displace yourself and become visible. Flying away
from an aircraft makes you nearly invisible. Be aware that power pilots spend much of their
time looking at instruments, especially around airports. It is up to you to see and avoid.
Even if a collision isn’t imminent, an aircraft presents danger because of wake turbulence. A
clean sailplane is not much of a problem. A small airplane won’t necessarily knock you out of the
sky, but it will seriously rock you. A large transport can tear your glider apart. A helicopter can
do equal damage and slam you to the ground. Helicopter pilots, while some of the most highly
trained, seem to be oblivious of their wake turbulence. The early champion and hang gliding
pioneer, Bob Wills, was killed by a helicopter wake, and former World Champion Rex Miller
was slammed into the trees by a helicopter flying over to check him out.
Wake from aircraft descends slowly (fast with a helicopter) and drifts with the wind. In
stable conditions it can linger for up to 5 minutes. To avoid wake turbulence, simply remain
above the flight path or fly away from it if possible. Often an aircraft will pass in front of you
and you can’t fly back into the mountain. The best bet in this case is to fly parallel to the
airplane path to give the wake time to dissipate. Be sure to avoid flying within a couple hundred
vertical feet of where a helicopter has been if you don’t want to get shredded and pounded.
HI - STRETCHING OUR WINGS
e are aspiring birds at heart. To achieve our dreams of free flight we must become
V V integrated with our wings just like a bird. This is not an abstract concept, but a
realistic goal whereby we know our glider’s behavior so well we react instantly to each
nuance in the air with correct direct action.
FEELINGS IN THE AIR___________________________________________________________________
To reach this goal we will practice some relaxation and awareness stunts. First find a lot of
clear airspace and try controlling your glider by different methods. Try it one handed.
Try soaring on the uprights. Try flying with your hands behind you on the rear cables.
Notice the roll and pitch pressures in each of these configurations.
- 37 -
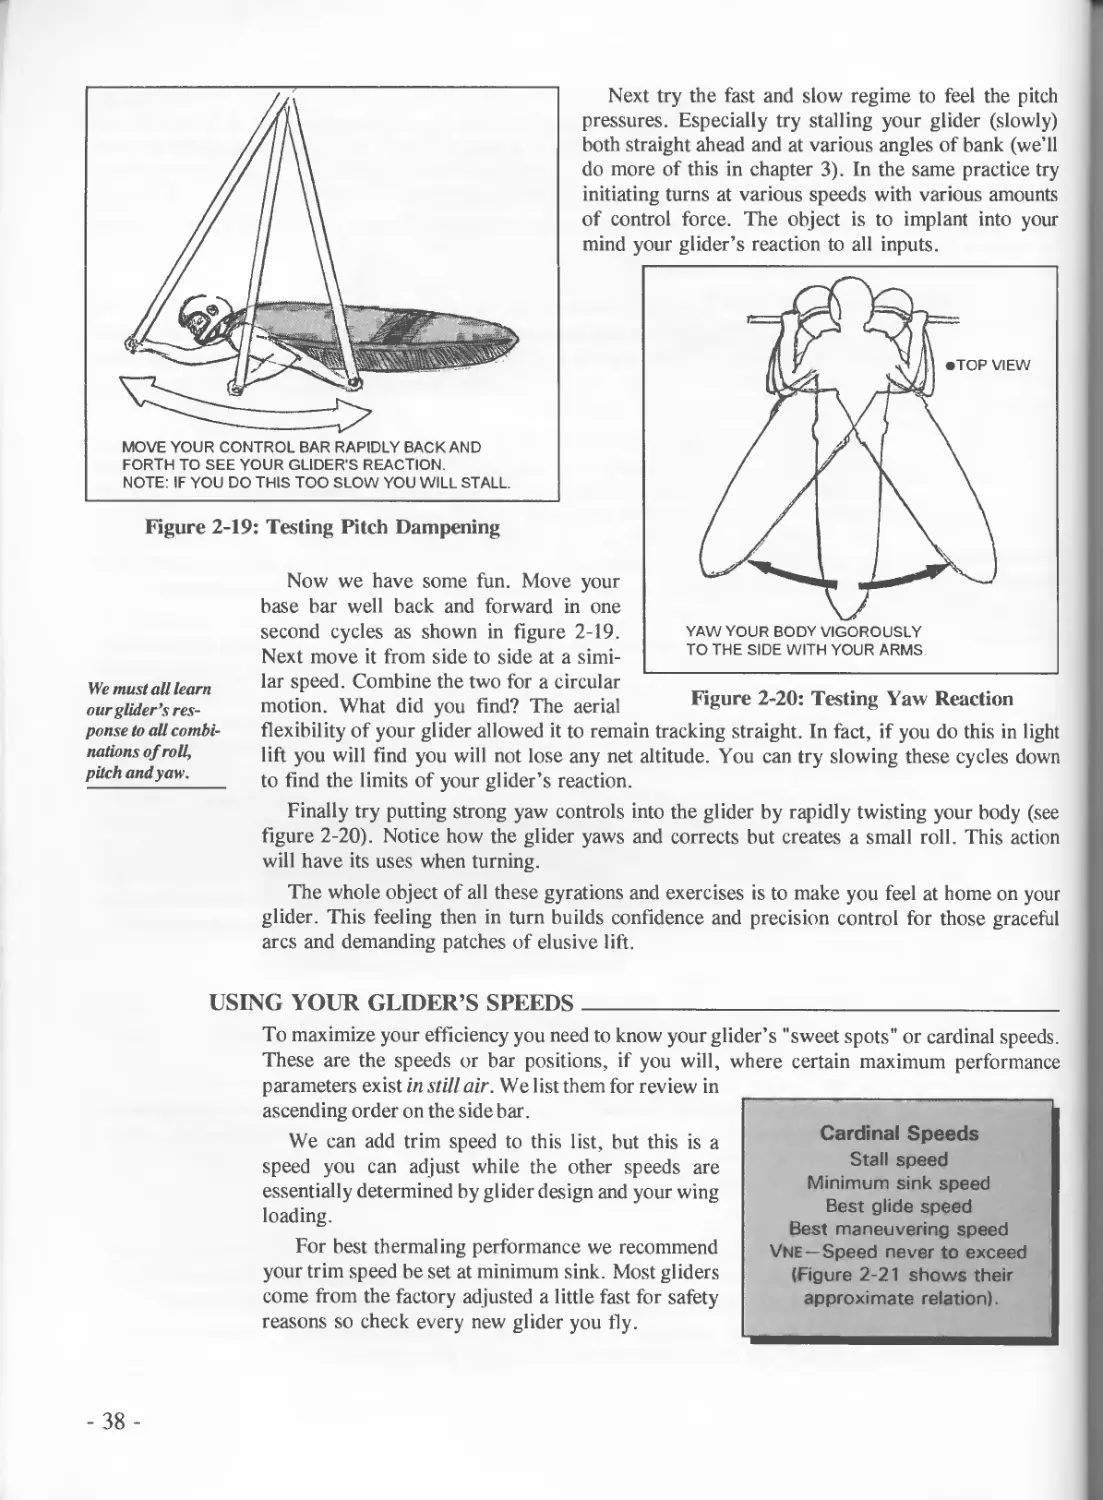
Figure 2-19: Testing Pitch Dampening
Next try the fast and slow regime to feel the pitch
pressures. Especially try stalling your glider (slowly)
both straight ahead and at various angles of bank (we’ll
do more of this in chapter 3). In the same practice try
initiating turns at various speeds with various amounts
of control force. The object is to implant into your
mind your glider’s reaction to all inputs.
your
We must all learn
our glider’s res-
ponse to all combi-
nations of roll,
pitch and у aw.
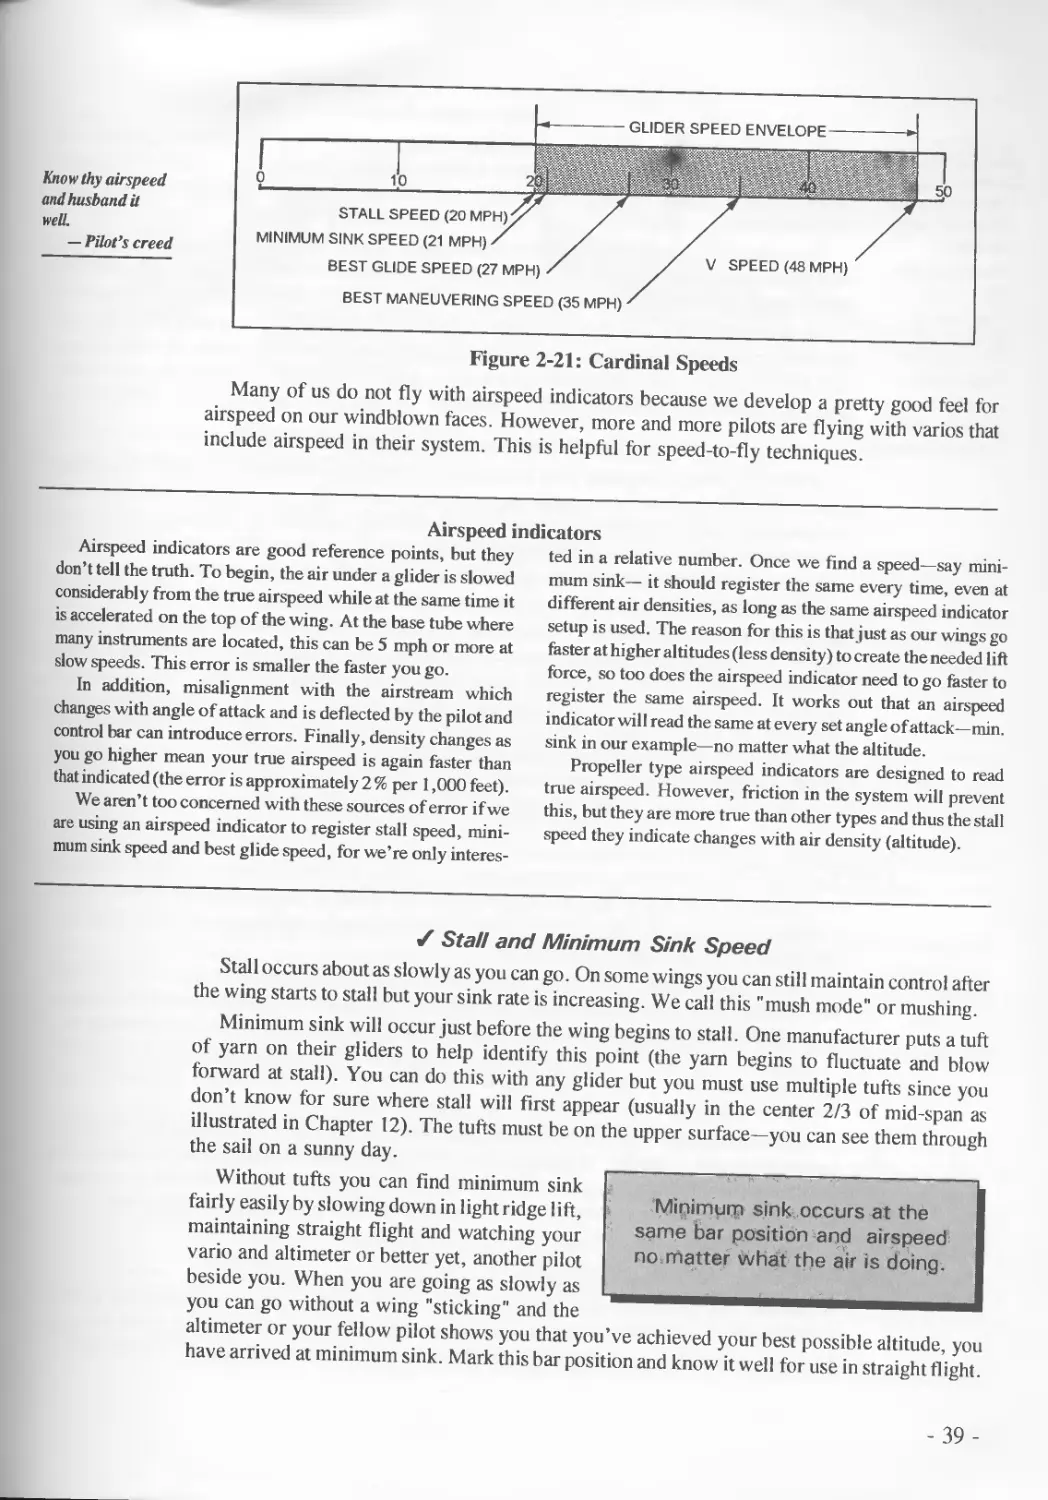
Figure 2-20: Testing Yaw Reaction
Now we have some fun. Move
base bar well back and forward in one
second cycles as shown in figure 2-19.
Next move it from side to side at a simi-
lar speed. Combine the two for a circular
motion. What did you find? The aerial
flexibility of your glider allowed it to remain tracking straight. In fact, if you do this in light
lift you will find you will not lose any net altitude. You can try slowing these cycles down
to find the limits of your glider’s reaction.
Finally try putting strong yaw controls into the glider by rapidly twisting your body (see
figure 2-20). Notice how the glider yaws and corrects but creates a small roll. This action
will have its uses when turning.
The whole object of all these gyrations and exercises is to make you feel at home on your
glider. This feeling then in turn builds confidence and precision control for those graceful
arcs and demanding patches of elusive lift.
USING YOUR GLIDER’S SPEEDS____________________________________
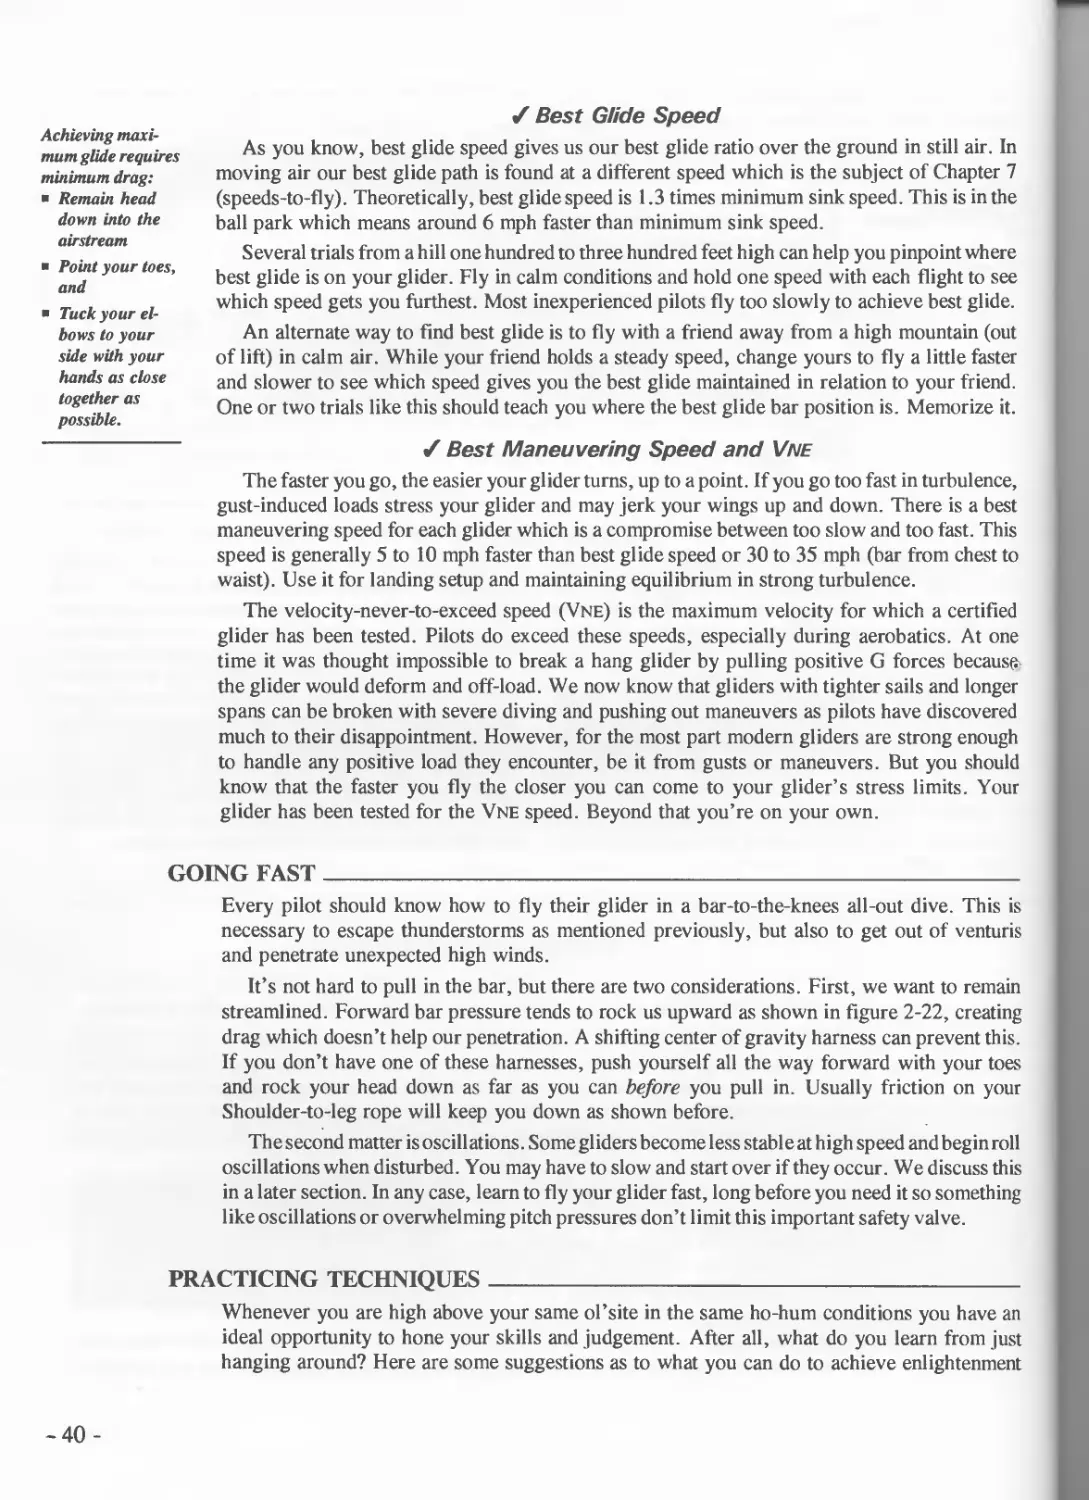
Cardinal Speeds
Stall speed
Minimum sink speed
Best glide speed
Best maneuvering speed
Vne—Speed never to exceed
(Figure 2-21 shows their
approximate relation).
To maximize your efficiency you need to know your glider’s "sweet spots" or cardinal speeds.
These are the speeds or bar positions, if you will, where certain maximum performance
parameters exist in still air. We list them for review in
ascending order on the side bar.
We can add trim speed to this list, but this is a
speed you can adjust while the other speeds are
essentially determined by glider design and your wing
loading.
For best thermaling performance we recommend
your trim speed be set at minimum sink. Most gliders
come from the factory adjusted a little fast for safety
reasons so check every new glider you fly.
- 38 -
Know thy airspeed
and husband it
well.
— Pilot’s creed
Figure 2-21: Cardinal Speeds
Many of us do not fly with airspeed indicators because we develop a pretty good feel for
airspeed on our windblown faces. However, more and more pilots are flying with varies that
include airspeed in their system. This is helpful for speed-to-fly techniques.
Airspeed indicators
Airspeed indicators are good reference points, but they
don’t tell the truth. To begin, the air under a glider is slowed
considerably from the true airspeed while at the same time it
is accelerated on the top of the wing. At the base tube where
many instruments are located, this can be 5 mph or more at
slow speeds. This error is smaller the faster you go.
In addition, misalignment with the airstream which
changes with angle of attack and is deflected by the pilot and
control bar can introduce errors. Finally, density changes as
you go higher mean your true airspeed is again faster than
that indicated (the error is approximately 2 % per 1,000 feet).
We aren’t too concerned with these sources of error if we
are using an airspeed indicator to register stall speed, mini-
mum sink speed and best glide speed, for we’re only interes-
ted in a relative number. Once we find a speed—say mini-
mum sink— it should register the same every time, even at
different air densities, as long as the same airspeed indicator
setup is used. The reason for this is that just as our wings go
faster at higher altitudes (less density) to create the needed lift
force, so too does the airspeed indicator need to go faster to
register the same airspeed. It works out that an airspeed
indicator will read the same at every set angle of attack—min.
sink in our example—no matter what the altitude.
Propeller type airspeed indicators are designed to read
true airspeed. However, friction in the system will prevent
this, but they are more true than other types and thus the stall
speed they indicate changes with air density (altitude).
/ Stall and Minimum Sink Speed
Stall occurs about as slowly as you can go. On some wings you can still maintain control after
the wing starts to stall but your sink rate is increasing. We call this "mush mode" or mushing.
Minimum sink will occur just before the wing begins to stall. One manufacturer puts a tuft
of yarn on their gliders to help identify this point (the yarn begins to fluctuate and blow
forward at stall). You can do this with any glider but you must use multiple tufts since you
don’t know for sure where stall will first appear (usually in the center 2/3 of mid-span as
illustrated in Chapter 12). The tufts must be on the upper surface—you can see them through
the sail on a sunny day.
Without tufts you can find minimum sink
fairly easily by slowing down in light ridge lift,
maintaining straight flight and watching your
vario and altimeter or better yet, another pilot
beside you. When you are going as slowly as
you can go without a wing "sticking" and the
altimeter or your fellow pilot shows you that you’ve achieved your best possible altitude, you
have arrived at minimum sink. Mark this bar position and know it well for use in straight flight.
Minimum sink occurs at the
same bar position and airspeed
no rnatter what the air is doing.
- 39 -
Achieving maxi-
mum glide requires
minimum drag:
Remain head
down into the
airstream
Point your toes,
and
Tuck your el-
bows to your
side with your
hands as close
together as
possible.
J Best Glide Speed
As you know, best glide speed gives us our best glide ratio over the ground in still air. In
moving air our best glide path is found at a different speed which is the subject of Chapter 7
(speeds-to-fly). Theoretically, best glide speed is 1.3 times minimum sink speed. This is in the
ball park which means around 6 mph faster than minimum sink speed.
Several trials from a hill one hundred to three hundred feet high can help you pinpoint where
best glide is on your glider. Fly in calm conditions and hold one speed with each flight to see
which speed gets you furthest. Most inexperienced pilots fly too slowly to achieve best glide.
An alternate way to find best glide is to fly with a friend away from a high mountain (out
of lift) in calm air. While your friend holds a steady speed, change yours to fly a little faster
and slower to see which speed gives you the best glide maintained in relation to your friend.
One or two trials like this should teach you where the best glide bar position is. Memorize it.
✓ Best Maneuvering Speed and Vne
The faster you go, the easier your glider turns, up to a point. If you go too fast in turbulence,
gust-induced loads stress your glider and may jerk your wings up and down. There is a best
maneuvering speed for each glider which is a compromise between too slow and too fast. This
speed is generally 5 to 10 mph faster than best glide speed or 30 to 35 mph (bar from chest to
waist). Use it for landing setup and maintaining equilibrium in strong turbulence.
The velocity-never-to-exceed speed (Vne) is the maximum velocity for which a certified
glider has been tested. Pilots do exceed these speeds, especially during aerobatics. At one
time it was thought impossible to break a hang glider by pulling positive G forces because
the glider would deform and off-load. We now know that gliders with tighter sails and longer
spans can be broken with severe diving and pushing out maneuvers as pilots have discovered
much to their disappointment. However, for the most part modern gliders are strong enough
to handle any positive load they encounter, be it from gusts or maneuvers. But you should
know that the faster you fly the closer you can come to your glider’s stress limits. Your
glider has been tested for the Vne speed. Beyond that you’re on your own.
GOING FAST___________________________________________
Every pilot should know how to fly their glider in a bar-to-the-knees all-out dive. This is
necessary to escape thunderstorms as mentioned previously, but also to get out of venturis
and penetrate unexpected high winds.
It’s not hard to pull in the bar, but there are two considerations. First, we want to remain
streamlined. Forward bar pressure tends to rock us upward as shown in figure 2-22, creating
drag which doesn’t help our penetration. A shifting center of gravity harness can prevent this.
If you don’t have one of these harnesses, push yourself all the way forward with your toes
and rock your head down as far as you can before you pull in. Usually friction on your
Shoulder-to-leg rope will keep you down as shown before.
The second matter is oscillations. Some gliders become less stable at high speed and begin roll
oscillations when disturbed. You may have to slow and start over if they occur. We discuss this
in a later section. In any case, learn to fly your glider fast, long before you need it so something
like oscillations or overwhelming pitch pressures don’t limit this important safety valve.
PRACTICING TECHNIQUES____________________________________________________
Whenever you are high above your same ol’site in the same ho-hum conditions you have an
ideal opportunity to hone your skills and judgement. After all, what do you learn from just
hanging around? Here are some suggestions as to what you can do to achieve enlightenment
-40-
Figure 2-22: Proper High Speed Position
"Practice makes
perfect" or at least
perfectly able.
(which in our case means get higher more often).
• Set a goal in front of the mountain which you try to reach, then return to soar. Do this
multiple times in one flight, each time setting the goal further. Trying this with other pilots
to see who can succeed first is great fun and good competition training.
• Set a goal along a ridge or mountain to reach and return as in the preceding exercise.
• Buzz down to launch level then see if you can become top pilot. Again do this more than
once and challenge your buddies to join you.
• Race your flying fellows to cloud base.
• Practice making all thermaling 360s the opposite to your preferred side. See if you can
climb with other pilots. If not, keep doing this exercise every day until you can. As a
corollary to this, practice setting your landings up with turns to your "bad" side. Is that
uncomfortable? Then you have something to practice.
• Practice figuring out the day as soon as possible by noting sizes of thermals, drift, sources,
inversion level, changes in thermal direction, cloud base, etc. You’ll be surprised at how
being aware of these factors as soon as possible will put you on top.
• Most importantly, practice flying to clouds either by meeting them out front or intercepting
them along the mountain. Learn to judge where you’ll encounter their lift and how far away
you can be and still reach it. It is amazing how this simple practice will get you to cloud base
while other gliders are floundering low elsewhere.
• Other matters to try involve familiarizing ourselves with our gliders which we discussed
earlier in the section FEELINGS IN THE AIR.
INTRODUCING HIGH PERFORMANCE GLIDERS
At some stage in your flying career you may wish to transition to what is known as a high
performance glider (in our usage this will mean a glider with close to maximum performance
available).
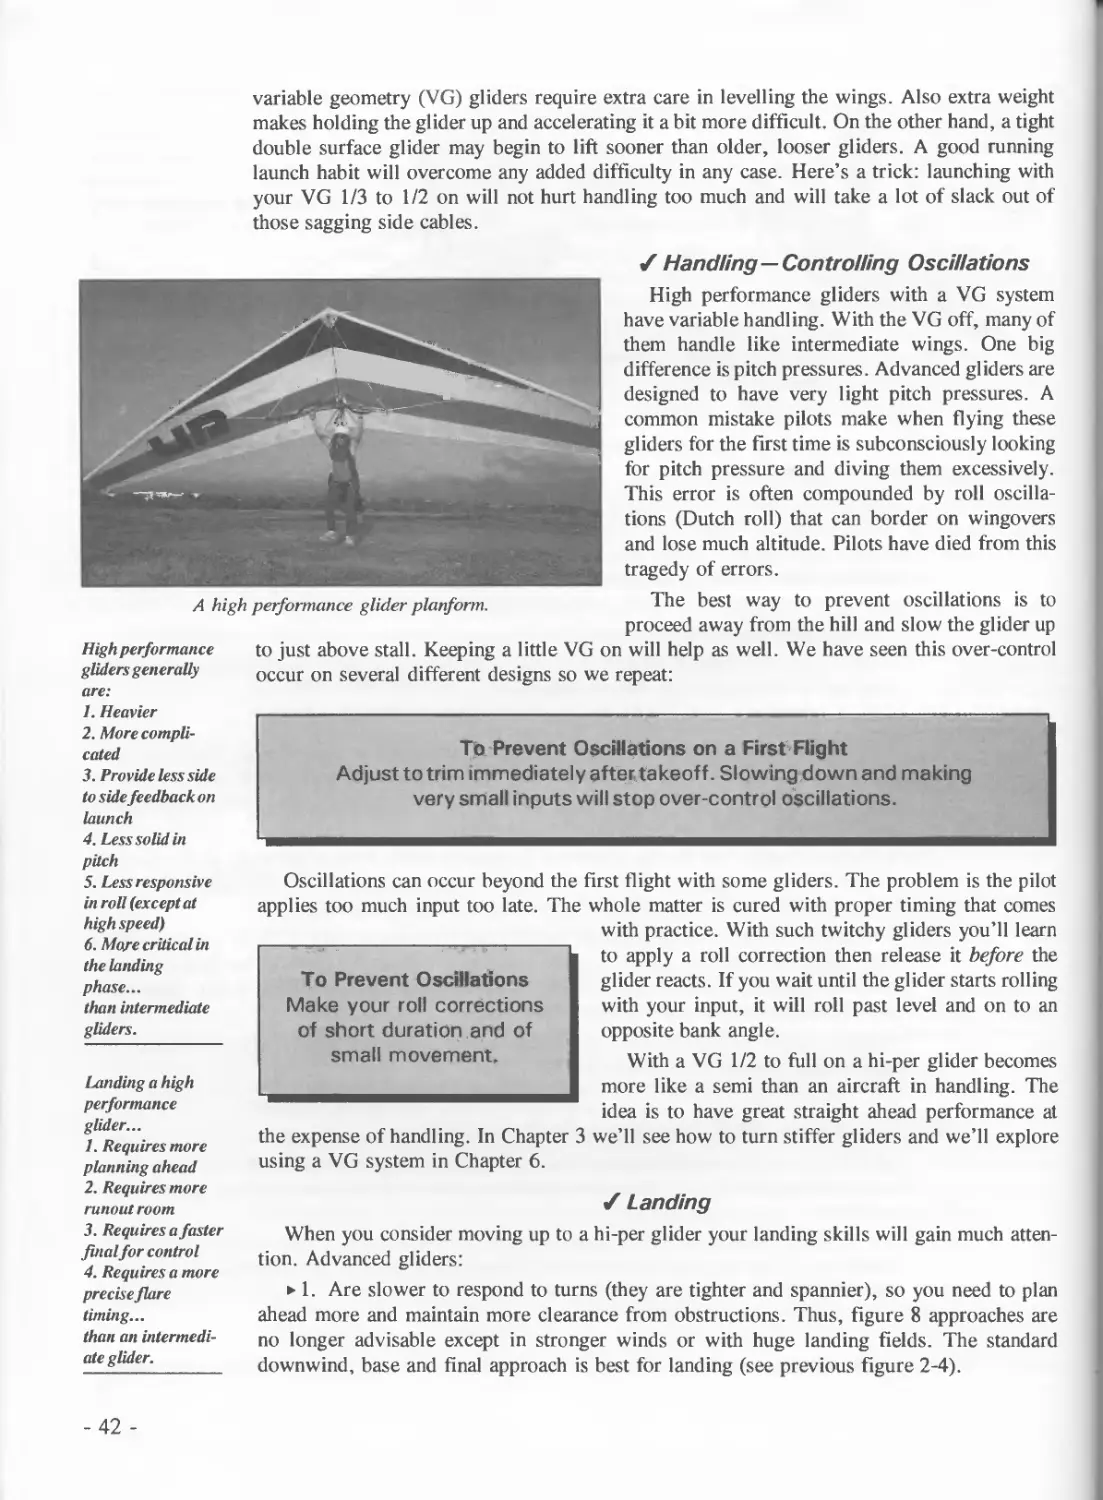
To make this step you should be aware of the differences between a "blade wing" and your old
reliable rag. We’ll categorize these as setup, takeoff, handling and landing differences. Setup is
generally obvious; you have more battens to stuff, more weight to truck and more to preflight.
/ Takeoff
Takeoff is not much more difficult in a hi-per glider except loose side cables with typical
- 41 -
variable geometry (VG) gliders require extra care in levelling the wings. Also extra weight
makes holding the glider up and accelerating it a bit more difficult. On the other hand, a tight
double surface glider may begin to lift sooner than older, looser gliders. A good running
launch habit will overcome any added difficulty in any case. Here’s a trick: launching with
your VG 1/3 to 1/2 on will not hurt handling too much and will take a lot of slack out of
those sagging side cables.
A high performance glider planform.
High performance
gliders generally
are:
✓ Handling—Controlling Oscillations
High performance gliders with a VG system
have variable handling. With the VG off, many of
them handle like intermediate wings. One big
difference is pitch pressures. Advanced gliders are
designed to have very light pitch pressures. A
common mistake pilots make when flying these
gliders for the first time is subconsciously looking
for pitch pressure and diving them excessively.
This error is often compounded by roll oscilla-
tions (Dutch roll) that can border on wingovers
and lose much altitude. Pilots have died from this
tragedy of errors.
The best way to prevent oscillations is to
proceed away from the hill and slow the glider up
to just above stall. Keeping a little VG on will help as well. We have seen this over-control
occur on several different designs so we repeat:
1. Heavier
2. More compli-
cated
3. Provide less side
to side feedback on
launch
4. Less solid in
pitch
5. Less responsive
in roll (except at
highspeed)
6. Moye critical in
the landing
phase...
than intermediate
gliders.
Landing a high
performance
glider...
1. Requires more
planning ahead
2. Requires more
runout room
3. Requires a faster
finalfor control
4. Requires a more
precise flare
timing...
than an intermedi-
ate glider.
To Prevent Oscillations on a First Flight
Adjust to trim immediately after, takeoff. Slowing down and making
very small inputs will stop over-control oscillations.
To Prevent Oscillations
Make your roll corrections
of short duration and of
small movement.
Oscillations can occur beyond the first flight with some gliders. The problem is the pilot
applies too much input too late. The whole matter is cured with proper timing that comes
with practice. With such twitchy gliders you’ll learn
to apply a roll correction then release it before the
glider reacts. If you wait until the glider starts rolling
with your input, it will roll past level and on to an
opposite bank angle.
With a VG 1/2 to full on a hi-per glider becomes
more like a semi than an aircraft in handling. The
idea is to have great straight ahead performance at
the expense of handling. In Chapter 3 we’ll see how to turn stiffer gliders and we’ll explore
using a VG system in Chapter 6.
/ Landing
When you consider moving up to a hi-per glider your landing skills will gain much atten-
tion. Advanced gliders:
► 1. Are slower to respond to turns (they are tighter and spannier), so you need to plan
ahead more and maintain more clearance from obstructions. Thus, figure 8 approaches are
no longer advisable except in stronger winds or with huge landing fields. The standard
downwind, base and final approach is best for landing (see previous figure 2-4).
- 42 -
►2. Glide further and thus require more run out room. Speeding up a hi-per glider isn’t
nearly as effective for bringing it down as with an intermediate glider.
► 3. Have a more specific flare window. A hi-per glider carries more speed retention and
will climb higher if you flare too early. Flaring too late will result in a more severe nose-in
since the stall is a bit more abrupt in a hi-per glider. Landing isn’t outrageously difficult in
an advanced glider, it just requires more attention than with more loosely strung wings.
| SUMMARY
\ l/l/e work on basics in any endeavor so that we can add to them to get to more complex
» » achievements. In this chapter we reviewed some of the situations such as taking off,
landing, challenging conditions and new gliders that can prove to be lingering problems to
advancing pilots. It is our hope that every pilot will have these matters well in hand before
moving too quickly to the more complex and demanding material that comes later. We can’t
be that sea gull’s rival until we earn our primaries.
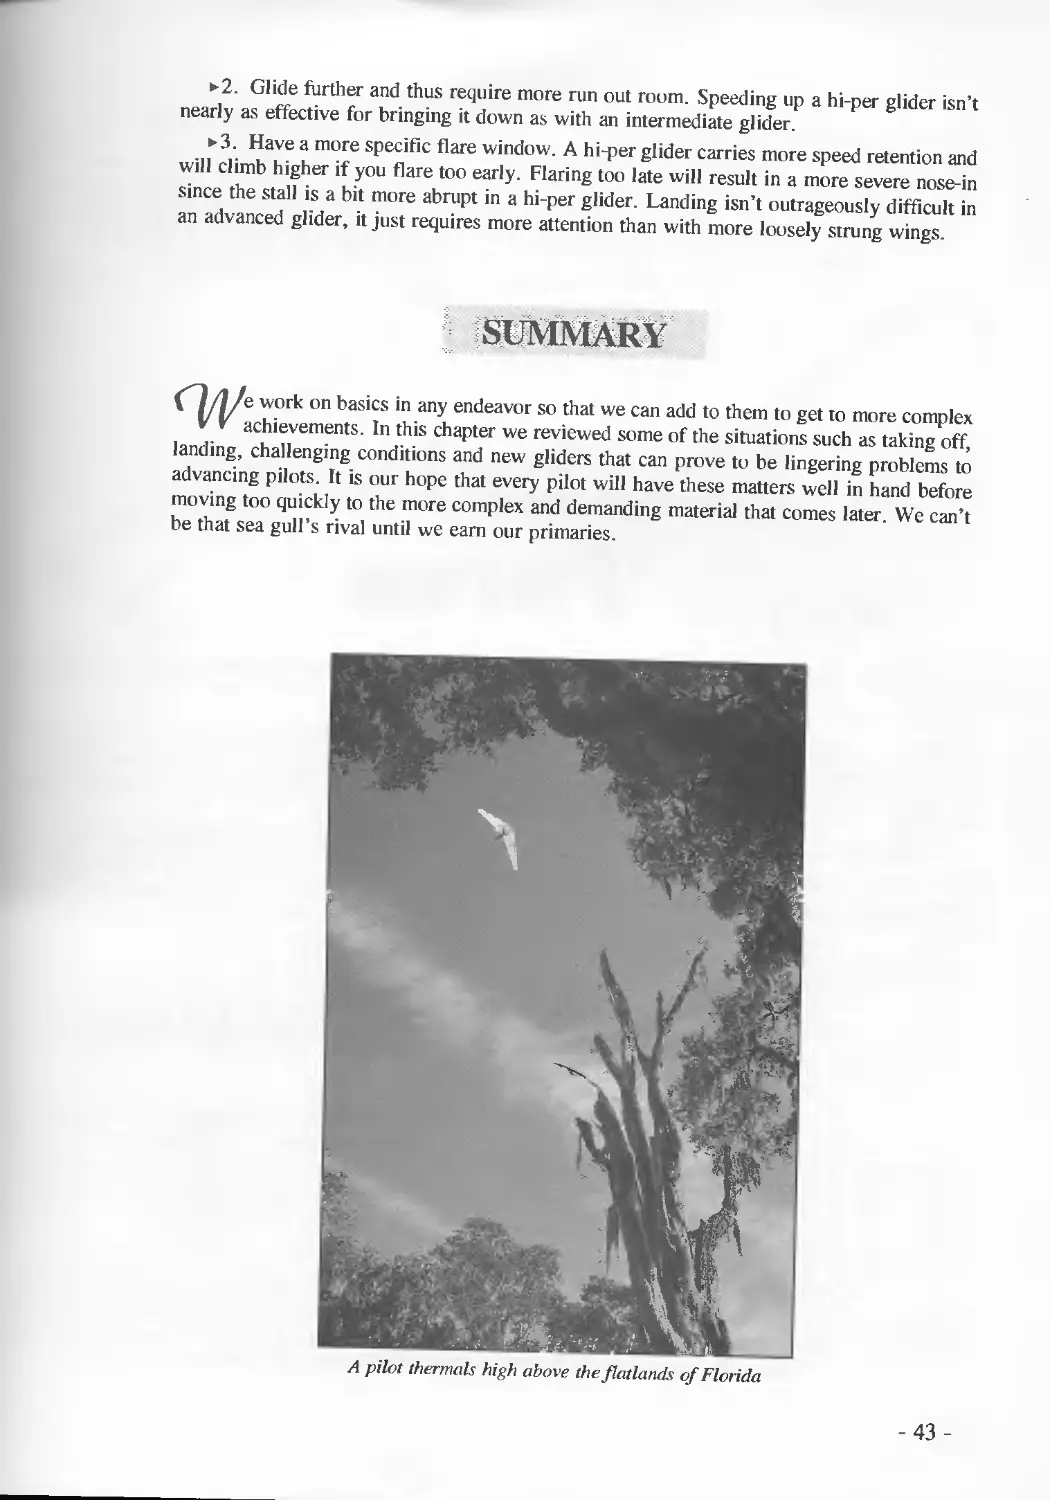
A pilot thermals high above the flatlands of Florida
-43-