/


Author: Radchuk D.
Tags: programming languages programming computer science microprocessors reverse engineering
ISBN: 978-1-78398-654-5
Year: 2016
Similar


Text
Boost.Asio C++
Network Programming
Cookbook
Over 25 hands-on recipes to create robust and
highly-efficient cross-platform distributed applications
with the Boost.Asio library
Dmytro Radchuk
BIRMINGHAM - MUMBAI
Boost.Asio C++ Network Programming
Cookbook
Copyright © 2016 Packt Publishing
All rights reserved. No part of this book may be reproduced, stored in a retrieval system, or
transmitted in any form or by any means, without the prior written permission of the publisher,
except in the case of brief quotations embedded in critical articles or reviews.
Every effort has been made in the preparation of this book to ensure the accuracy of the
information presented. However, the information contained in this book is sold without
warranty, either express or implied. Neither the author, nor Packt Publishing, and its dealers
and distributors will be held liable for any damages caused or alleged to be caused directly or
indirectly by this book.
Packt Publishing has endeavored to provide trademark information about all of the companies
and products mentioned in this book by the appropriate use of capitals. However, Packt
Publishing cannot guarantee the accuracy of this information.
First published: January 2016
Production reference: 1190116
Published by Packt Publishing Ltd.
Livery Place
35 Livery Street
Birmingham B3 2PB, UK.
ISBN 978-1-78398-654-5
www.packtpub.com
Credits
Author
Dmytro Radchuk
Reviewer
Victor Sigler
Commissioning Editor
Usha Iyer
Acquisition Editors
Shaon Basu
Project Coordinator
Kinjal Bari
Proofreader
Safis Editing
Indexer
Hemangini Bari
Production Coordinator
Shantanu N. Zagade
Manish Nainani
Cover Work
Content Development Editor
Samantha Gonsalves
Technical Editor
Madhunikita Sunil Chindarkar
Copy Editors
Trishya Hazare
Rashmi Sawant
Shantanu N. Zagade
About the Author
Dmytro Radchuk is a software engineer from Kyiv, Ukraine. His passion for science started
at a young age and led him to receive a degree in computer science from Kyiv Polytechnic
University. As of today, he has deep technical knowledge and more than 8 years of experience
in the field of software development for several industries and businesses. He strongly
believes that the whole is greater than the sum of its parts and this is one of the reasons why
the development of distributed applications has become his main specialization.
Dmytro has always supported the idea of sharing knowledge and this has resulted in Boost.
Asio C++ Network Programming Cookbook, which has become his first officially published
book. He believes that science will help us deal with the monotony of everyday life. When he is
not exploring another facet of computer engineering, he is probably learning a new aspect of
psychology, history, or the arts, which are also of great interest to him.
I would like to dedicate this book to my fiancée, Anelia, for all her love
and support.
About the Reviewer
Victor Sigler is an iOS software engineer with experience in developing consumer and
enterprise mobile applications. He loves everything that is related to Apple and is passionate
about Swift and the world of programming contests, where he has spent a long time
developing in C++. He enjoys writing about iOS development in his blog at http://www.
vsigler.com and also enjoys helping people with their queries on Stack Overflow. He can
be found on Twitter as @Vkt0r. He has worked as a technical reviewer for Swift 2 Design
Patterns, Packt Publishing.
www.PacktPub.com
Support files, eBooks, discount offers, and more
For support files and downloads related to your book, please visit www.PacktPub.com.
Did you know that Packt offers eBook versions of every book published, with PDF and ePub
files available? You can upgrade to the eBook version at www.PacktPub.com and as a print
book customer, you are entitled to a discount on the eBook copy. Get in touch with us at
service@packtpub.com for more details.
At www.PacktPub.com, you can also read a collection of free technical articles, sign up
for a range of free newsletters and receive exclusive discounts and offers on Packt books
and eBooks.
TM
https://www2.packtpub.com/books/subscription/packtlib
Do you need instant solutions to your IT questions? PacktLib is Packt's online digital book
library. Here, you can search, access, and read Packt's entire library of books.
Why subscribe?
ff
Fully searchable across every book published by Packt
ff
Copy and paste, print, and bookmark content
ff
On demand and accessible via a web browser
Free access for Packt account holders
If you have an account with Packt at www.PacktPub.com, you can use this to access
PacktLib today and view 9 entirely free books. Simply use your login credentials for
immediate access.
Table of Contents
Preface
Chapter 1: The Basics
iii
1
Introduction
Creating an endpoint
Creating an active socket
Creating a passive socket
Resolving a DNS name
Binding a socket to an endpoint
Connecting a socket
Accepting connections
1
5
12
17
19
25
29
34
Chapter 2: I/O Operations
39
Chapter 3: Implementing Client Applications
95
Introduction
Using fixed length I/O buffers
Using extensible stream-oriented I/O buffers
Writing to a TCP socket synchronously
Reading from a TCP socket synchronously
Writing to a TCP socket asynchronously
Reading from a TCP socket asynchronously
Canceling asynchronous operations
Shutting down and closing a socket
Introduction
Implementing a synchronous TCP client
Implementing a synchronous UDP client
Implementing an asynchronous TCP client
39
41
47
49
55
62
71
80
86
95
100
105
110
i
Table of Contents
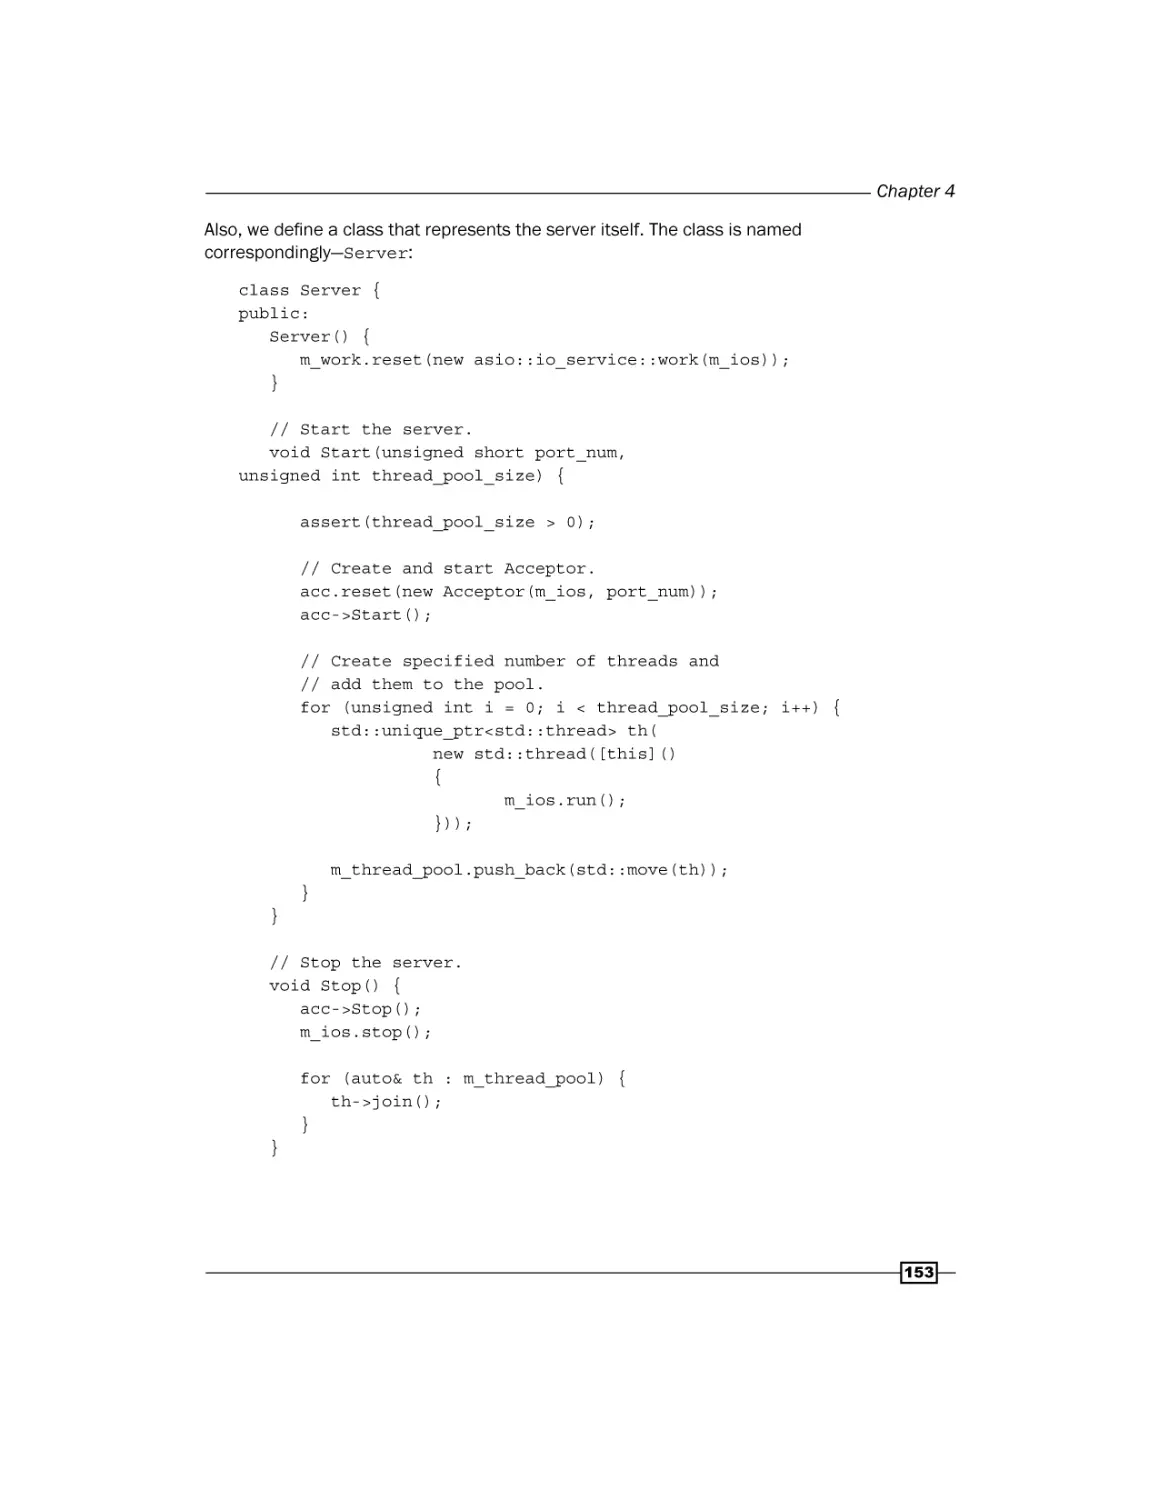
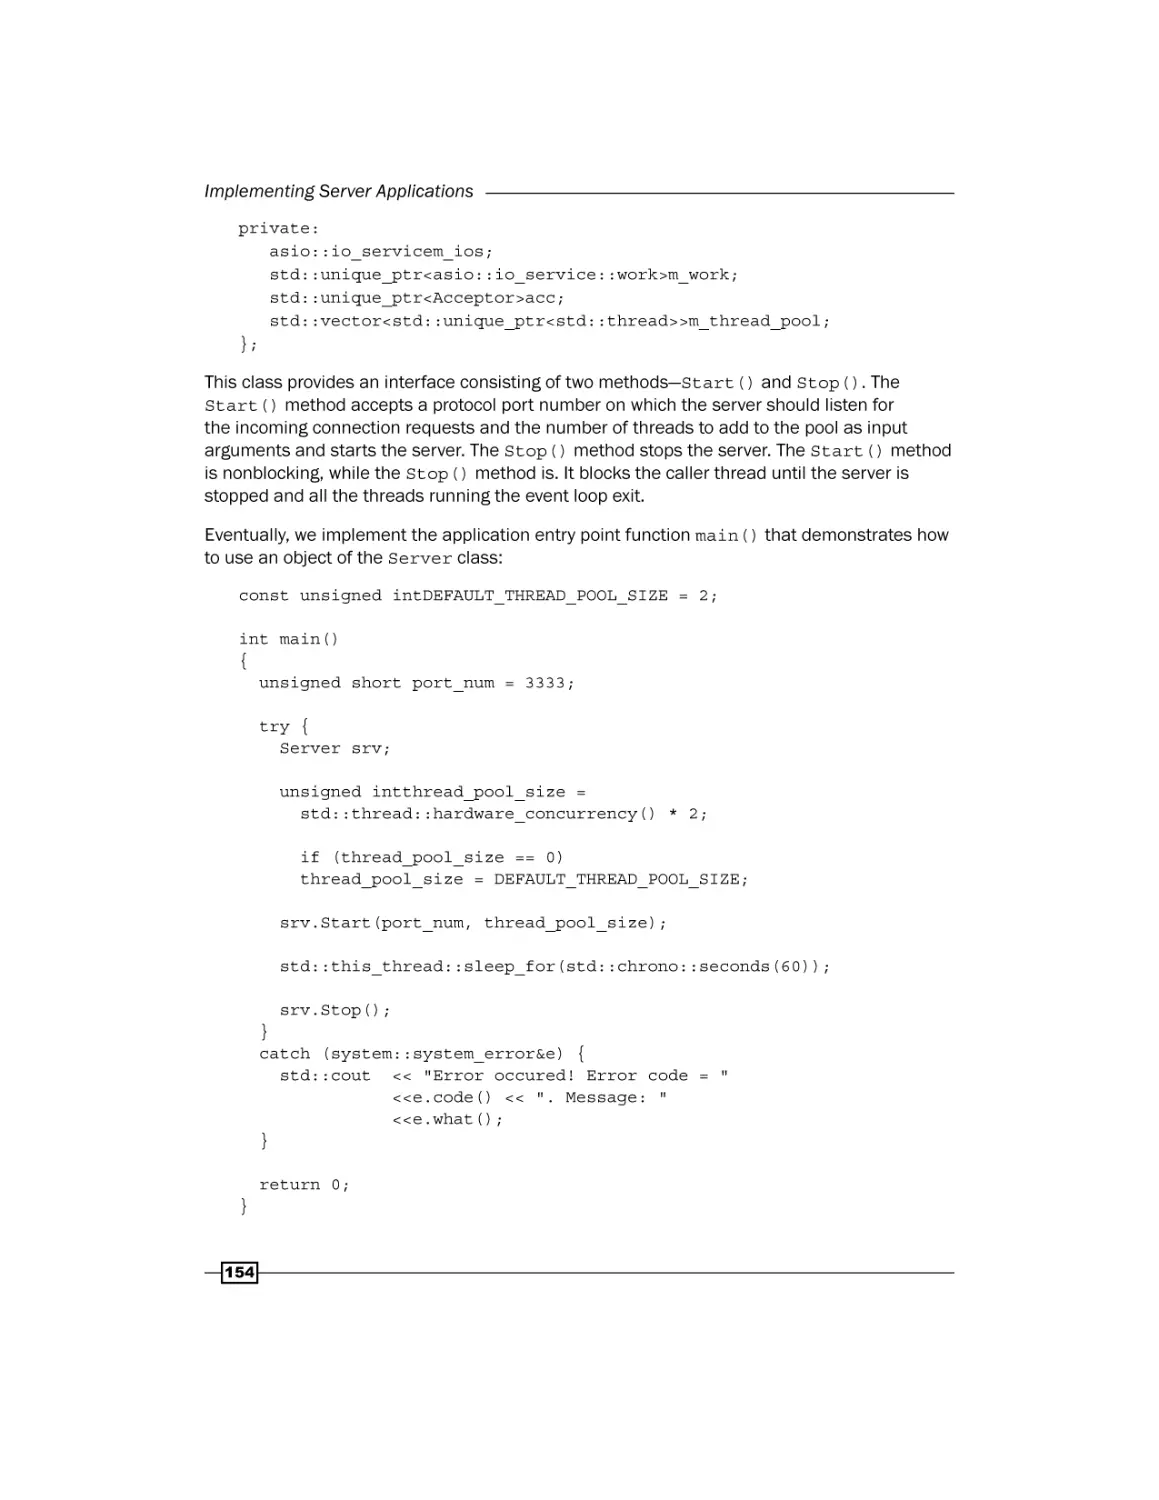
Chapter 4: Implementing Server Applications
127
Chapter 5: HTTP and SSL/TLS
159
Chapter 6: Other Topics
211
Index
227
Introduction
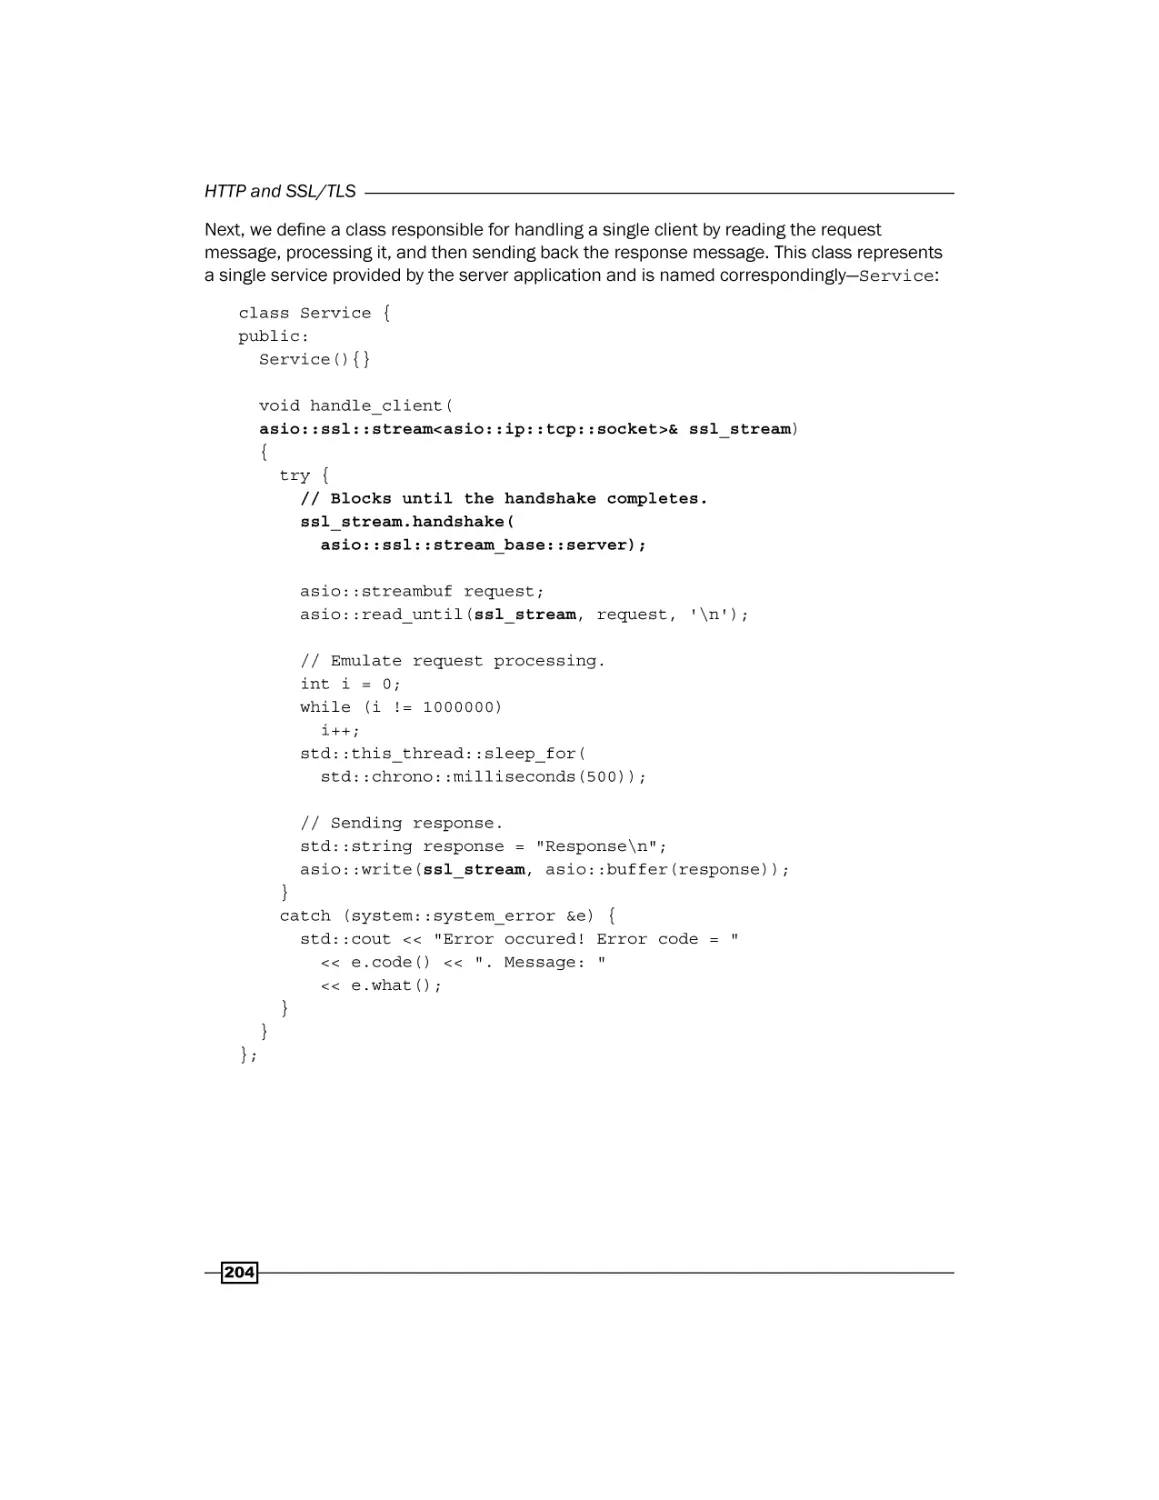
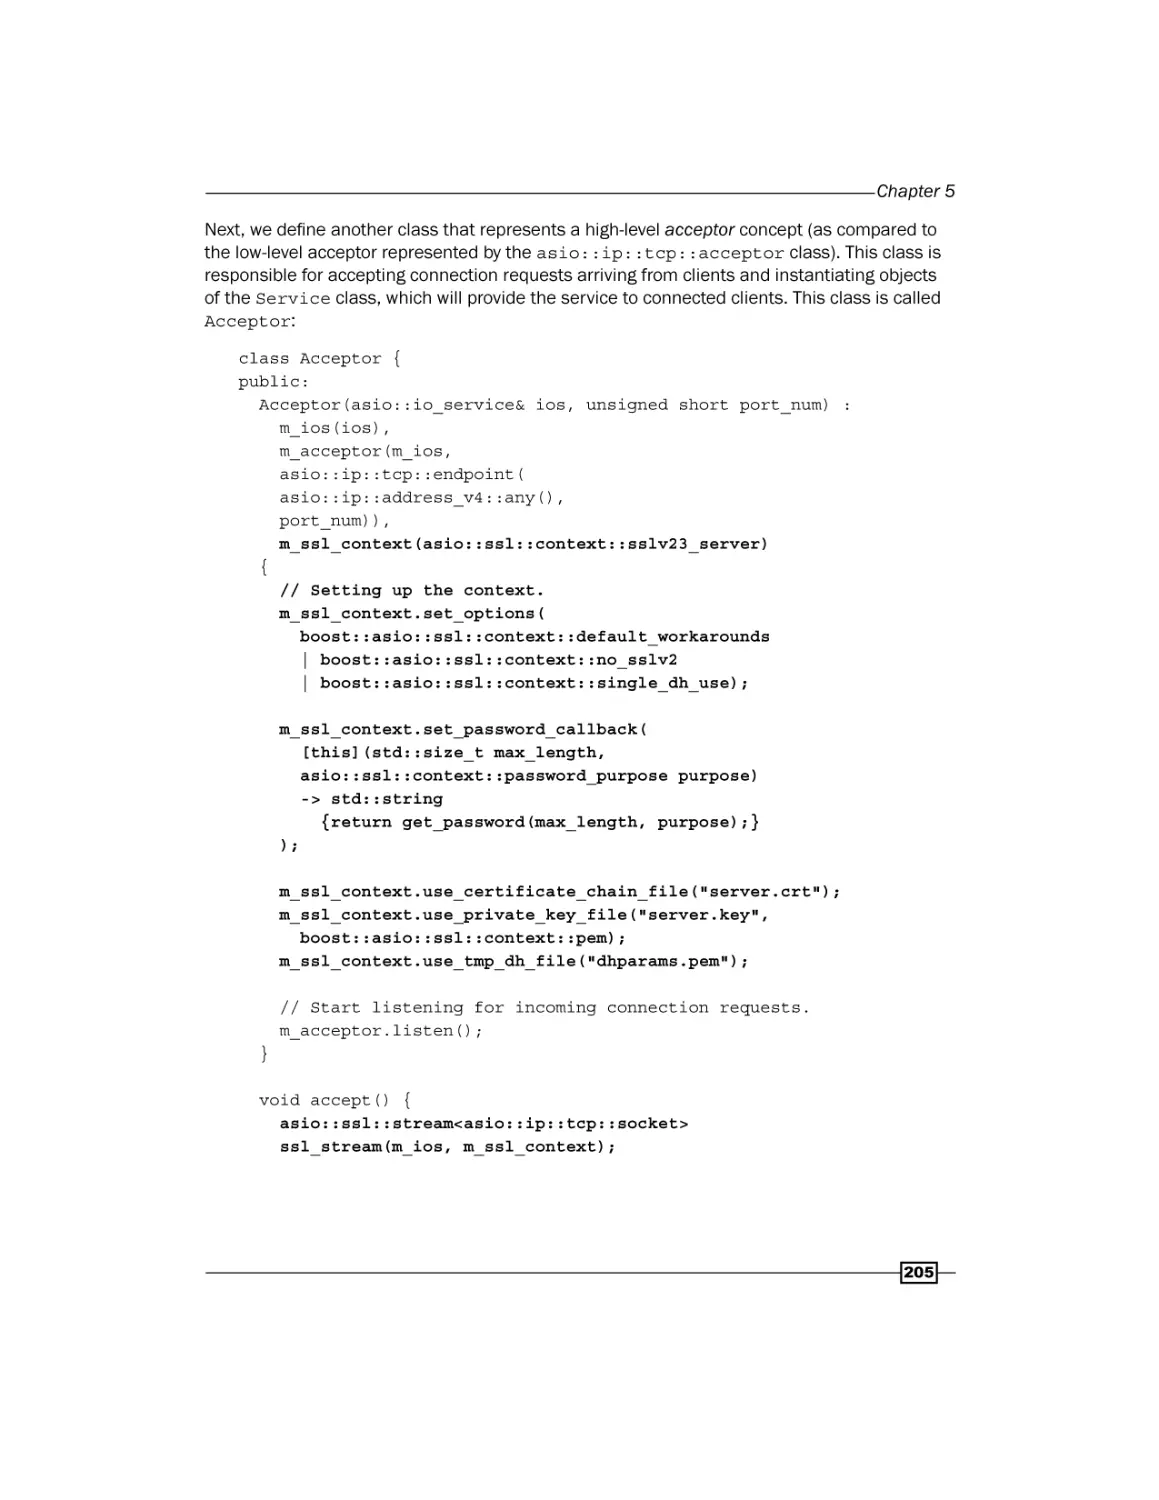
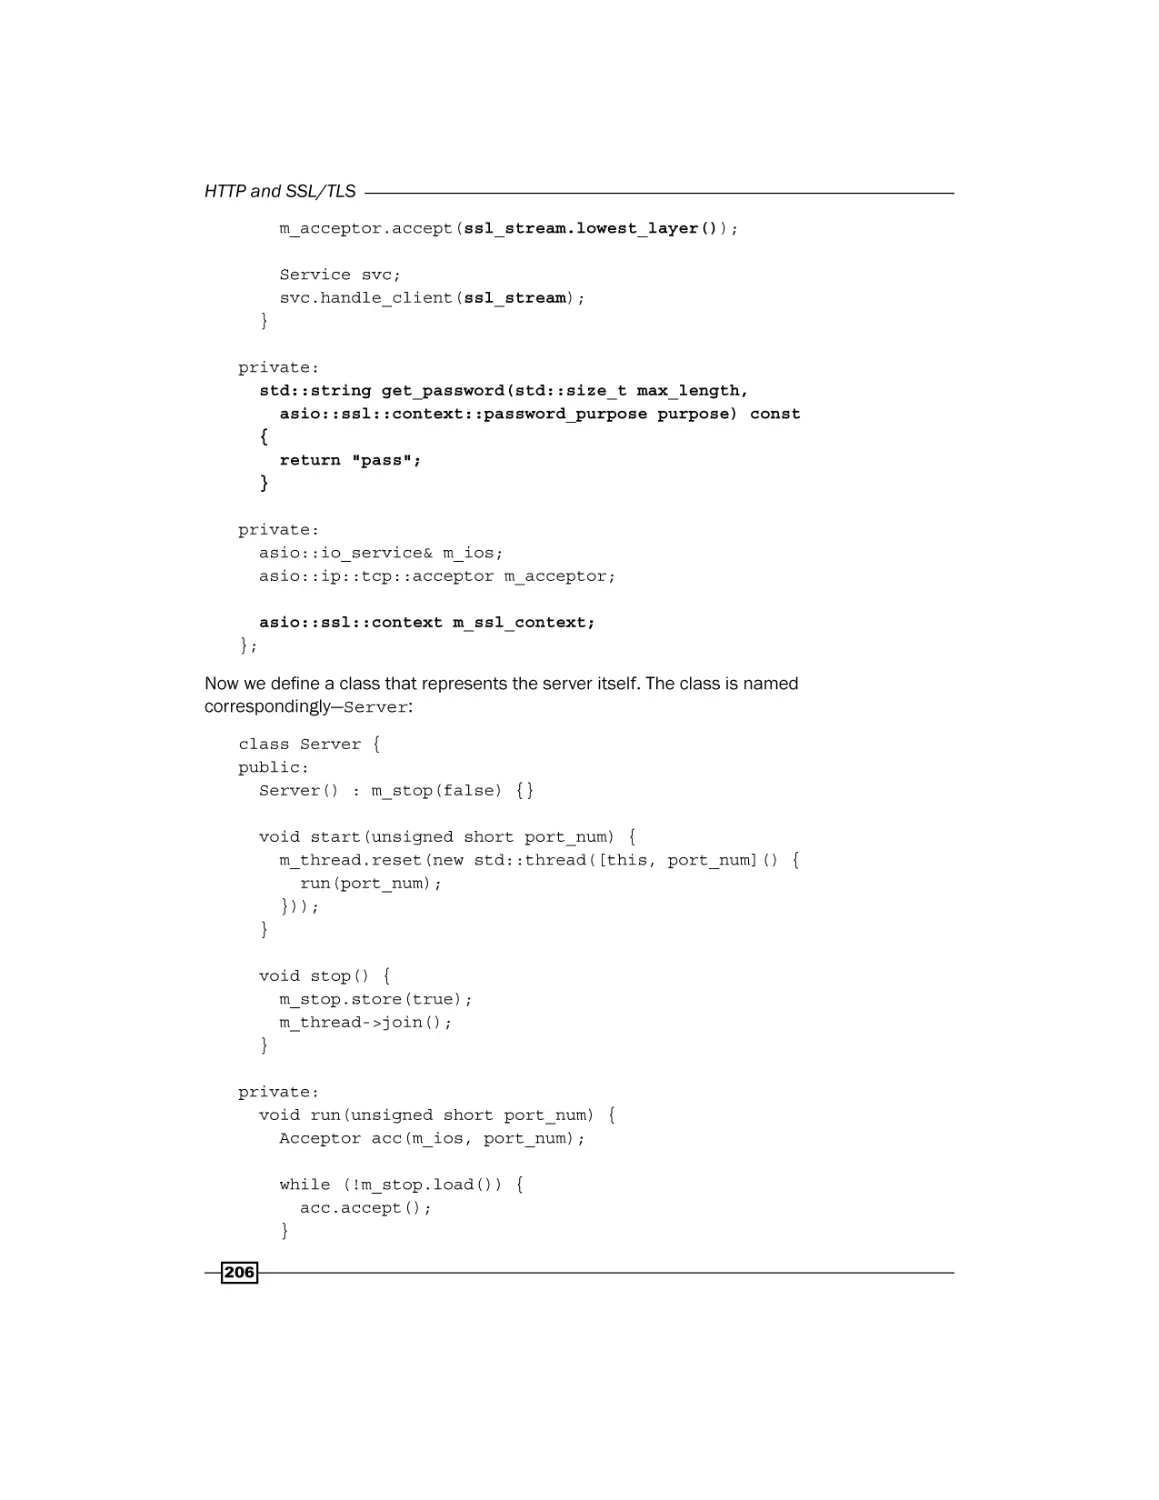
Implementing a synchronous iterative TCP server
Implementing a synchronous parallel TCP server
Implementing an asynchronous TCP server
Introduction
Implementing the HTTP client application
Implementing the HTTP server application
Adding SSL/TLS support to client applications
Adding SSL/TLS support to server applications
Introduction
Using composite buffers for scatter/gather operations
Using timers
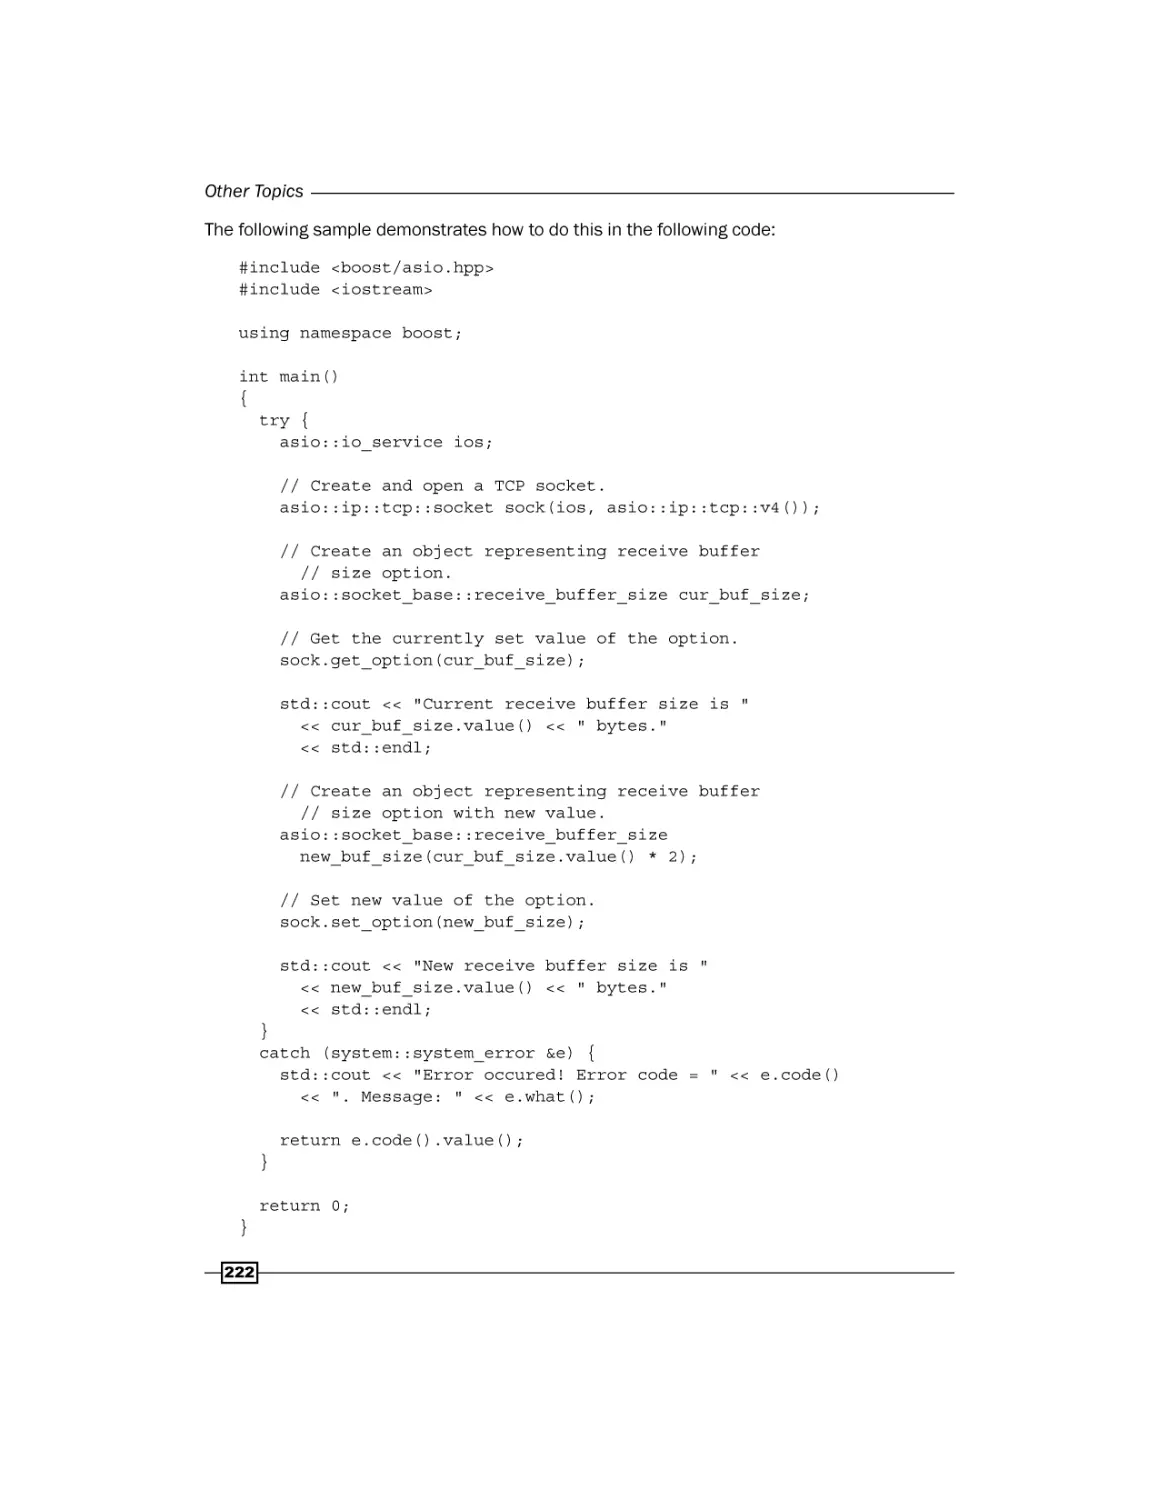
Getting and setting socket options
Performing a stream-based I/O
ii
127
131
139
147
159
161
184
196
202
211
212
216
221
223
Preface
In today's information-centric globalized world, telecommunications have become an essential
part of our lives. They penetrate and play crucial roles in almost every aspect of our day-to-day
activities, from personal to professional. Sometimes, a failure to communicate information
correctly and on time may lead to significant loss of material assets or even casualties.
Therefore, it is very important to provide the highest level of reliability when it comes to
developing telecommunication software. However, it can be a really challenging task due
to the inherent complexity of the domain and accidental complexity of the low-level tools
provided by modern operating systems.
The Boost.Asio library is aimed at reducing accidental complexity by introducing type systems
and exploiting object-oriented methods, and decreasing the development time by providing
high degrees of reusability. In addition to this, because the library is cross-platform, the
applications implemented with it can be built on multiple platforms, which enhances
software qualities even more, while decreasing its costs.
This book contains more than 30 recipes—step-by-step solutions to various tasks that often
(and not so often) arise in the area of network programming. All recipes take advantage of
facilities provided by the Boost.Asio library, demonstrating best practices of applying the
library to execute typical tasks and solve different problems.
What this book covers
Chapter 1, The Basics, introduces you to basic classes provided by the Boost.Asio library and
demonstrates how to execute basic operations, such as resolving a DNS name, connecting a
socket, accepting a connection, and so on.
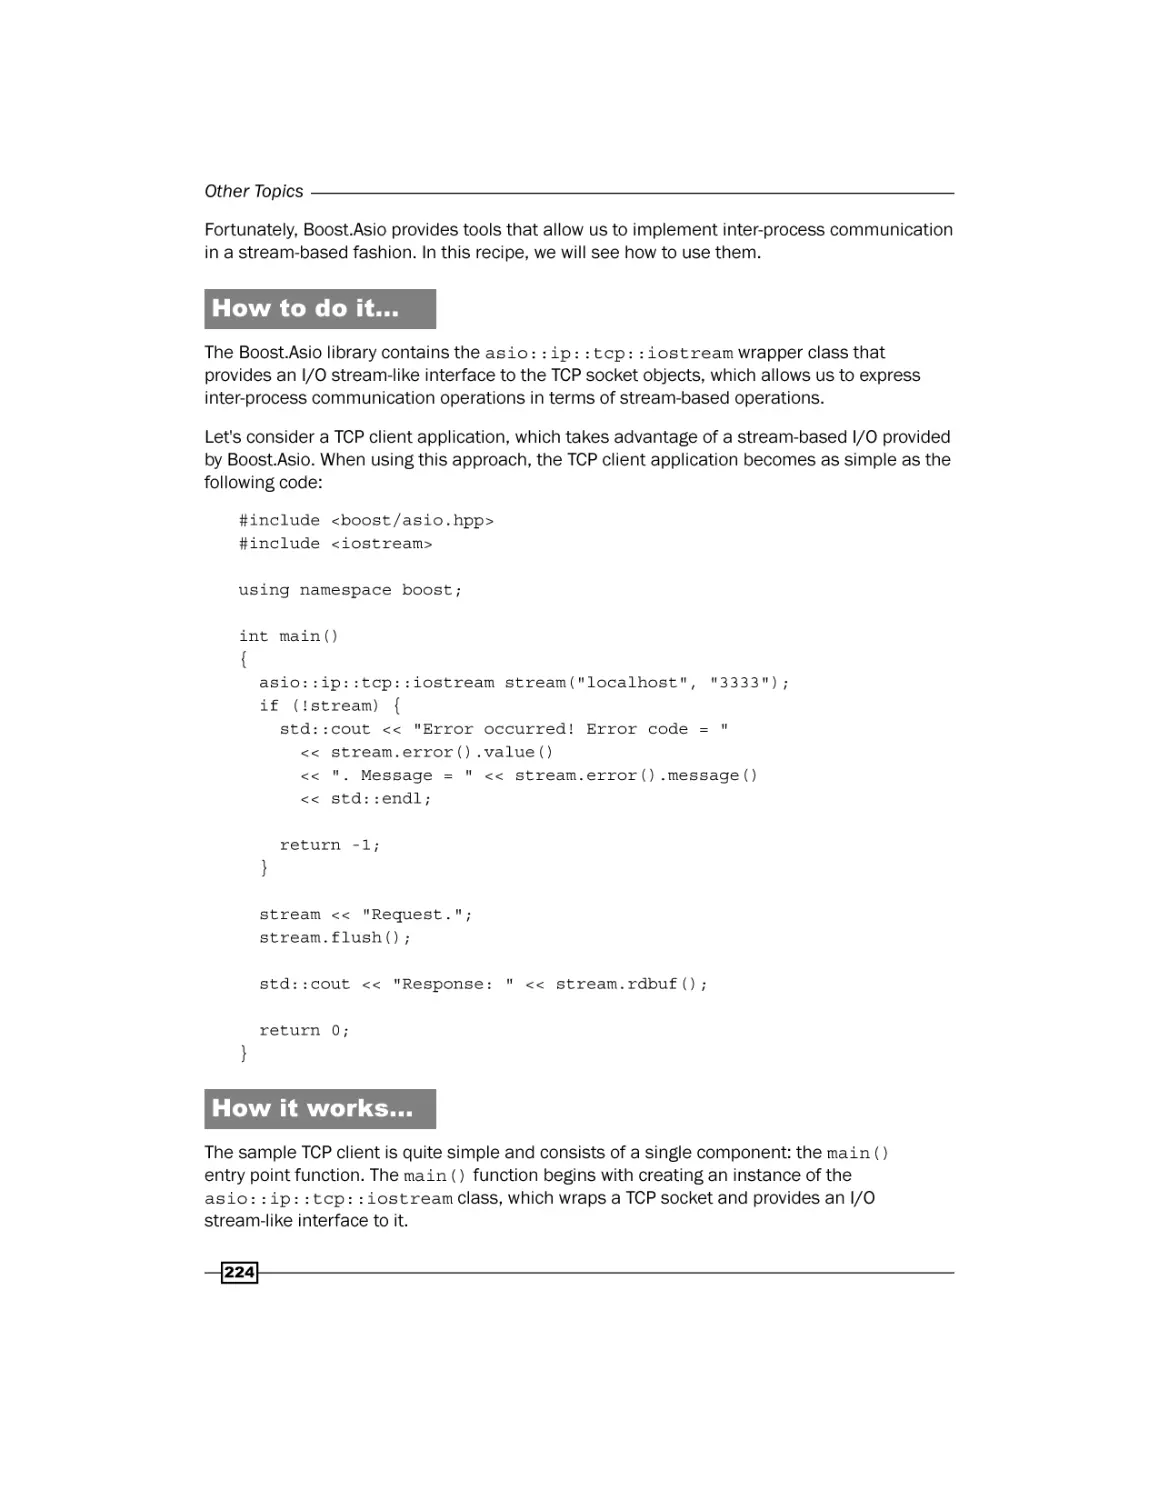
Chapter 2, I/O Operations, demonstrates how to perform individual network I/O operations,
both synchronous and asynchronous.
iii
Preface
Chapter 3, Implementing Client Applications, contains recipes that demonstrate how to
implement different types of client applications.
Chapter 4, Implementing Server Applications, contains recipes that demonstrate how to
implement different types of server applications.
Chapter 5, HTTP and SSL/TLS, covers more advanced topics on the HTTP and SSL/TLS
protocol implementation.
Chapter 6, Other Topics, includes recipes that discuss less popular but still quite important
topics, such as timers, socket options, composite buffers, and others.
What you need for this book
To compile samples presented in this book, you will need Visual Studio 2012+ on Windows or
GCC 4.7+ on Unix platforms.
Who this book is for
If you want to enhance your C++ network programming skills using the Boost.Asio library and
understand the theory behind the development of distributed applications, this book is just
what you need. The prerequisite for this book is to have a basic knowledge of C++11. To get
the most from the book and comprehend advanced topics, you will need some background
experience in multithreading.
Sections
In this book, you will find several headings that appear frequently (Getting ready, How to do it,
How it works, There's more, and See also).
To give clear instructions on how to complete a recipe, we use these sections as follows:
Getting ready
This section tells you what to expect in the recipe, and describes how to set up any software or
any preliminary settings required for the recipe.
How to do it…
This section contains the steps required to follow the recipe.
iv
Preface
How it works…
This section usually consists of a detailed explanation of what happened in the
previous section.
There's more…
This section consists of additional information about the recipe in order to make the reader
more knowledgeable about the recipe.
See also
This section provides helpful links to other useful information for the recipe.
Conventions
In this book, you will find a number of text styles that distinguish between different kinds of
information. Here are some examples of these styles and an explanation of their meaning.
Code words in text, database table names, folder names, filenames, file extensions,
pathnames, dummy URLs, user input, and Twitter handles are shown as follows: "In
Boost.Asio a passive socket is represented by the asio::ip::tcp::acceptor class."
A block of code is set as follows:
std::shared_ptr<boost::asio::ip::tcp::socket> m_sock;
boost::asio::streambuf m_request;
std::map<std::string, std::string> m_request_headers;
std::string m_requested_resource;
When we wish to draw your attention to a particular part of a code block, the relevant lines or
items are set in bold:
std::shared_ptr<boost::asio::ip::tcp::socket> m_sock;
boost::asio::streambuf m_request;
std::map<std::string, std::string> m_request_headers;
std::string m_requested_resource;
New terms and important words are shown in bold.
v
Preface
Warnings or important notes appear in a box like this.
Tips and tricks appear like this.
Reader feedback
Feedback from our readers is always welcome. Let us know what you think about this
book—what you liked or disliked. Reader feedback is important for us as it helps us
develop titles that you will really get the most out of.
To send us general feedback, simply e-mail feedback@packtpub.com, and mention the
book's title in the subject of your message.
If there is a topic that you have expertise in and you are interested in either writing or
contributing to a book, see our author guide at www.packtpub.com/authors.
Customer support
Now that you are the proud owner of a Packt book, we have a number of things to help you to
get the most from your purchase.
Downloading the example code
You can download the example code files from your account at http://www.packtpub.com
for all the Packt Publishing books you have purchased. If you purchased this book elsewhere,
you can visit http://www.packtpub.com/support and register to have the files e-mailed
directly to you.
vi
Preface
Errata
Although we have taken every care to ensure the accuracy of our content, mistakes do happen.
If you find a mistake in one of our books—maybe a mistake in the text or the code—we would be
grateful if you could report this to us. By doing so, you can save other readers from frustration
and help us improve subsequent versions of this book. If you find any errata, please report them
by visiting http://www.packtpub.com/submit-errata, selecting your book, clicking on
the Errata Submission Form link, and entering the details of your errata. Once your errata are
verified, your submission will be accepted and the errata will be uploaded to our website or
added to any list of existing errata under the Errata section of that title.
To view the previously submitted errata, go to https://www.packtpub.com/books/
content/support and enter the name of the book in the search field. The required
information will appear under the Errata section.
Piracy
Piracy of copyrighted material on the Internet is an ongoing problem across all media. At
Packt, we take the protection of our copyright and licenses very seriously. If you come across
any illegal copies of our works in any form on the Internet, please provide us with the location
address or website name immediately so that we can pursue a remedy.
Please contact us at copyright@packtpub.com with a link to the suspected
pirated material.
We appreciate your help in protecting our authors and our ability to bring you
valuable content.
Questions
If you have a problem with any aspect of this book, you can contact us at questions@
packtpub.com, and we will do our best to address the problem.
vii
1
The Basics
In this chapter, we will cover:
ff
Creating an endpoint
ff
Creating an active socket
ff
Creating a passive socket
ff
Resolving a DNS name
ff
Binding a socket to an endpoint
ff
Connecting a socket
ff
Accepting connections
Introduction
Computer networks and communication protocols significantly increase capabilities of
modern software, allowing different applications or separate parts of the same application
to communicate with each other to achieve a common goal. Some applications have
communication as their main function, for example, instant messengers, e-mail servers
and clients, file download software, and so on. Others have the network communication
layer as a fundamental component, on top of which the main functionality is built. Some
of the examples of such applications are web browsers, network file systems, distributed
database management systems, media streaming software, online games, offline games
with multiplayer over the network option support, and many others. Besides, nowadays
almost any application in addition to its main functionality provides supplementary functions,
involving network communication. The most prominent examples of such functions are
online registration and automatic software update. In the latter case, the update package
is downloaded from the application developer's remote server and installed on the user's
computer or mobile device.
1
The Basics
The application that consists of two or more parts, each of which runs on a separate
computing device, and communicates with other parts over a computer network is called
a distributed application. For example, a web server and a web browser together can be
considered as one complex distributed application. The browser running on a user's computer
communicates with the web server running on a different remote computer in order to achieve
a common goal—to transmit and display a web page requested by the user.
Distributed applications provide significant benefits as compared to traditional applications
running on a single computer. The most valuable of them are the following:
ff
Ability to transmit data between two or more remote computing devices. This is
absolutely obvious and the most valuable benefit of distributed software.
ff
Ability to connect computers in a network and install special software on them,
creating powerful computing systems that can perform tasks that can't otherwise
be performed on a single computer in an adequate amount of time.
ff
Ability to effectively store and share data in a network. In a computer network, a
single device can be used as data storage to store big amounts of data and other
devices can easily request some portions of that data when necessary without the
need to keep the copy of all data on each device. As an example, consider large
datacenters hosting hundreds of millions of websites. The end user can request the
web page they need anytime by sending the request to the server over the network
(usually, the Internet). There is no need to keep the copy of the website on the user's
device. There is a single storage of the data (a website) and millions of users can
request the data from that storage if and when this information is needed.
For two applications running on different computing devices to communicate with each other,
they need to agree on a communication protocol. Of course, the developer of the distributed
application is free to implement his or her own protocol. However, this would be rarely the
case at least for two reasons. First, developing such a protocol is an enormously complex and
time-consuming task. Secondly, such protocols are already defined, standardized, and even
implemented in all popular operating systems including Windows, Mac OS X, and majority of
the distributions of Linux.
These protocols are defined by the TCP/IP standard. Don't be fooled by the standard's
name; it defines not only TCP and IP but many more other protocols, comprising a TCP/IP
protocol stack with one or more protocols on each level of the stack. Distributed software
developers usually deal with transport level protocols such as TCP or UDP. Lower layer
protocols are usually hidden from the developer and are handled by the operating system
and network devices.
2
Chapter 1
In this book, we only touch upon TCP and UDP protocols that satisfy the needs of most
developers of distributed software. If the reader is not familiar with the TCP/IP protocol stack,
the OSI model, or TCP and UDP protocols, it's highly advised to read some theory on these
topics. Though this book provides some brief information about them, it is mostly focused on
practical aspects of using TCP and UDP protocols in distributed software development.
The TCP protocol is a transport layer protocol with the following characteristics:
ff
It's reliable, which means that this protocol guarantees delivery of the messages in
proper order or a notification that the message has not been delivered. The protocol
includes error handling mechanisms, which frees the developer from the need to
implement them in the application.
ff
It assumes logical connection establishment. Before one application can
communicate with another over the TCP protocol, it must establish a logical
connection by exchanging service messages according to the standard.
ff
It assumes the point-to-point communication model. That is, only two applications
can communicate over a single connection. No multicast messaging is supported.
ff
It is stream-oriented. This means that the data being sent by one application to
another is interpreted by the protocol as a stream of bytes. In practice, it means that
if a sender application sends a particular block of data, there is no guarantee that it
will be delivered to the receiver application as the same block of data in a single turn,
that is, the sent message may be broken into as many parts as the protocol wants
and each of them will be delivered separately, though in correct order.
The UDP protocol is a transport layer protocol having different (in some sense opposite)
characteristics from those of the TCP protocol. The following are its characteristics:
ff
It's unreliable, which means that if a sender sends a message over a UDP protocol,
there is no guarantee that the message will be delivered. The protocol won't try to
detect or fix any errors. The developer is responsible for all error handling.
ff
It's connectionless, meaning that no connection establishment is needed before the
applications can communicate.
ff
It supports both one-to-one and one-to-many communication models. Multicast
messages are supported by the protocol.
ff
It's datagram oriented. This means that the protocol interprets data as messages of a
particular size and will try to deliver them as a whole. The message (datagram) either
will be delivered as a whole, or if the protocol fails to do that won't be delivered at all.
Because the UDP protocol is unreliable, it is usually used in reliable local networks. To use
it for communication over the Internet (which is an unreliable network), the developer must
implement error handling mechanisms in its application.
3
The Basics
When there is a need to communicate over the Internet, the TCP
protocol is most often the best choice due to its reliability.
As it has already been mentioned, both TCP and UDP protocols and the underlying
protocols required by them are implemented by most popular operating systems. A
developer of a distributed application is provided an API through which it can use protocols
implementation. The TCP/IP standard does not standardize the protocol API implementation;
therefore, several API implementations exist. However, the one based on Berkeley Sockets
API is the most widely used.
Berkeley Sockets API is the name of one of the many possible implementations of TCP and
UDP protocols' API. This API was developed at the Berkeley University of California, USA
(hence the name) in the early 1980s. It is built around a concept of an abstract object called
a socket. Such a name was given to this object in order to draw the analogy with a usual
electrical socket. However, this idea seems to have somewhat failed due to the fact that
Berkeley Sockets turned out to be a significantly more complex concept.
Now Windows, Mac OS X, and Linux operating systems all have this API implemented
(though with some minor variations) and software developers can use it to consume
TCP and UDP protocols' functionality when developing distributed applications.
Though very popular and widely used, Sockets API has several flaws. First, because it was
designed as a very generic API that should support many different protocols, it is quite
complex and somewhat difficult to use. The second flaw is that this is a C-style functional
API with a poor type system, which makes it error prone and even more difficult to use. For
example, Sockets API doesn't provide a separate type representing a socket. Instead, the
built-in type int is used, which means that by mistake any value of the int type can be
passed as an argument to the function expecting a socket, and the compiler won't detect
the mistake. This may lead to run-time crashes, the root cause of which is hard to find.
4
Chapter 1
Network programming is inherently complex and doing it with a low-level C-style socket API
makes it even more complex and error prone. Boost.Asio is an O-O C++ library that is, just like
raw Sockets API, built around the concept of a socket. Roughly speaking, Boost.Asio wraps
raw Sockets API and provides the developer with O-O interface to it. It is intended to simplify
network programming in several ways as follows:
ff
It hides the raw C-style API and providing a user with an object-oriented API
ff
It provides a rich-type system, which makes code more readable and allows it to
catch many errors at compilation time
ff
As Boost.Asio is a cross-platform library, it simplifies development of cross-platform
distributed applications
ff
It provides auxiliary functionality such as scatter-gather I/O operations, stream-based
I/O, exception-based error handling, and others
ff
The library is designed so that it can be relatively easily extended to add new
custom functionality
This chapter introduces essential Boost.Asio classes and demonstrates how to perform basic
operations with them.
Creating an endpoint
A typical client application, before it can communicate with a server application to consume
its services, must obtain the IP address of the host on which the server application is running
and the protocol port number associated with it. A pair of values consisting of an IP address
and a protocol port number that uniquely identifies a particular application running on a
particular host in a computer network is called an endpoint.
The client application will usually obtain the IP address and the port number identifying the
server application either from the user directly through the application UI or as command-line
arguments or will read it from the application's configuration file.
The IP address can be represented as a string containing an address in dot-decimal notation
if it is an IPv4 address (for example, 192.168.10.112) or in hexadecimal notation if it is
an IPv6 address (for example, FE36::0404:C3FA:EF1E:3829). Besides, the server IP
address can be provided to the client application in an indirect form, as a string containing a
DNS name (for example, localhost or www.google.com). Another way to represent an IP
address is an integer value. The IPv4 address is represented as a 32-bit integer and IPv6 as a
64-bit integer. However, due to poor readability and memorability this representation is used
extremely rarely.
5
The Basics
If the client application is provided with a DNS name before it can communicate with
the server application, it must resolve the DNS name to obtain the actual IP address of the
host running the server application. Sometimes, the DNS name may map to multiple IP
addresses, in which case the client may want to try addresses one by one until it finds the
one that works. We'll consider a recipe describing how to resolve DNS names with Boost.Asio
later in this chapter.
The server application needs to deal with endpoints too. It uses the endpoint to specify to the
operating system on which the IP address and protocol port it wants to listen for incoming
messages from the clients. If the host running the server application has only one network
interface and a single IP address assigned to it, the server application has only one option
as to on which address to listen. However, sometimes the host might have more than one
network interface and correspondingly more than one IP address. In this situation, the server
application encounters a difficult problem of selecting an appropriate IP address on which to
listen for incoming messages. The problem is that the application knows nothing about details
such as underlying IP protocol settings, packet routing rules, DNS names which are mapped
to the corresponding IP addresses, and so on. Therefore, it is quite a complex task (and
sometimes even not solvable) for the server application to foresee through which IP
address the messages sent by clients will be delivered to the host.
If the server application chooses only one IP address to listen for incoming messages, it may
miss messages routed to other IP addresses of the host. Therefore, the server application
usually wants to listen on all IP addresses available on the host. This guarantees that the
server application will receive all messages arriving at any IP address and the particular
protocol port.
To sum up, the endpoints serve two goals:
ff
The client application uses an endpoint to designate a particular server application it
wants to communicate with.
ff
The server application uses an endpoint to specify a local IP address and a port
number on which it wants to receive incoming messages from clients. If there is more
than one IP address on the host, the server application will want to create a special
endpoint representing all IP addresses at once.
This recipe explains how to create endpoints in Boost.Asio both in client and
server applications.
Getting ready
Before creating the endpoint, the client application must obtain the raw IP address and the
protocol port number designating the server it will communicate with. The server application
on the other hand, as it usually listens for incoming messages on all IP addresses, only needs
to obtain a port number on which to listen.
6
Chapter 1
Here, we don't consider how the application obtains a raw IP address or a port number. In
the following recipes, we assume that the IP address and the port number have already been
obtained by the application and are available at the beginning of the corresponding algorithm.
How to do it…
The following algorithms and corresponding code samples demonstrate two common
scenarios of creating an endpoint. The first one demonstrates how the client application
can create an endpoint to specify the server it wants to communicate with. The second
one demonstrates how the server application creates an endpoint to specify on which IP
addresses and port it wants to listen for incoming messages from clients.
Creating an endpoint in the client to designate the server
The following algorithm describes steps required to perform in the client application to create
an endpoint designating a server application the client wants to communicate with. Initially,
the IP address is represented as a string in the dot-decimal notation if this is an IPv4 address
or in hexadecimal notation if this is an IPv6 address:
1. Obtain the server application's IP address and port number. The IP address should be
specified as a string in the dot-decimal (IPv4) or hexadecimal (IPv6) notation.
2. Represent the raw IP address as an object of the asio::ip::address class.
3. Instantiate the object of the asio::ip::tcp::endpoint class from the address
object created in step 2 and a port number.
4. The endpoint is ready to be used to designate the server application in Boost.Asio
communication related methods.
The following code sample demonstrates possible implementation of the algorithm:
#include <boost/asio.hpp>
#include <iostream>
using namespace boost;
int main()
{
// Step 1. Assume that the client application has already
// obtained the IP-address and the protocol port number.
std::string raw_ip_address = "127.0.0.1";
unsigned short port_num = 3333;
// Used to store information about error that happens
// while parsing the raw IP-address.
boost::system::error_code ec;
7
The Basics
// Step 2. Using IP protocol version independent address
// representation.
asio::ip::address ip_address =
asio::ip::address::from_string(raw_ip_address, ec);
if (ec.value() != 0) {
// Provided IP address is invalid. Breaking execution.
std::cout
<< "Failed to parse the IP address. Error code = "
<< ec.value() << ". Message: " << ec.message();
return ec.value();
}
// Step 3.
asio::ip::tcp::endpoint ep(ip_address, port_num);
// Step 4. The endpoint is ready and can be used to specify a
// particular server in the network the client wants to
// communicate with.
return 0;
}
Creating the server endpoint
The following algorithm describes steps required to perform in a server application to create
an endpoint specifying all IP addresses available on the host and a port number on which the
server application wants to listen for incoming messages from the clients:
1. Obtain the protocol port number on which the server will listen for incoming requests.
2. Create a special instance of the asio::ip::address object representing all IP
addresses available on the host running the server.
3. Instantiate an object of the asio::ip::tcp::endpoint class from the address
object created in step 2 and a port number.
4. The endpoint is ready to be used to specify to the operating system that the server
wants to listen for incoming messages on all IP addresses and a particular protocol
port number.
The following code sample demonstrates possible implementation of the algorithm. Note that
it is assumed that the server application is going to communicate over the IPv6 protocol:
#include <boost/asio.hpp>
#include <iostream>
8
Chapter 1
using namespace boost;
int main()
{
// Step 1. Here we assume that the server application has
//already obtained the protocol port number.
unsigned short port_num = 3333;
// Step 2. Create special object of asio::ip::address class
// that specifies all IP-addresses available on the host. Note
// that here we assume that server works over IPv6 protocol.
asio::ip::address ip_address = asio::ip::address_v6::any();
// Step 3.
asio::ip::tcp::endpoint ep(ip_address, port_num);
//
//
//
//
Step 4. The endpoint is created and can be used to
specify the IP addresses and a port number on which
the server application wants to listen for incoming
connections.
return 0;
}
How it works…
Let's consider the first code sample. The algorithm it implements is applicable in an
application playing a role of a client that is an application that actively initiates the
communication session with a server. The client application needs to be provided an IP
address and a protocol port number of the server. Here we assume that those values have
already been obtained and are available at the beginning of the algorithm, which makes step
1 details a given.
Having obtained the raw IP address, the client application must represent it in terms of the
Boost.Asio type system. Boost.Asio provides three classes used to represent an IP address:
ff
asio::ip::address_v4: This represents an IPv4 address
ff
asio::ip::address_v6: This represents an IPv6 address
ff
asio::ip::address: This IP-protocol-version-agnostic class can represent both
IPv4 and IPv6 addresses
9
The Basics
In our sample, we use the asio::ip::address class, which makes the client
application IP-protocol-version-agnostic. This means that it can transparently work with
both IPv4 and IPv6 servers.
In step 2, we use the asio::ip::address class's static method, from_string(). This
method accepts a raw IP address represented as a string, parses and validates the string,
instantiates an object of the asio::ip::address class, and returns it to the caller. This
method has four overloads. In our sample we use this one:
static asio::ip::address from_string(
const std::string & str,
boost::system::error_code & ec);
This method is very useful as it checks whether the string passed to it as an argument
contains a valid IPv4 or IPv6 address and if it does, instantiates a corresponding object. If the
address is invalid, the method will designate an error through the second argument. It means
that this function can be used to validate the raw user input.
In step 3, we instantiate an object of the boost::asio::ip::tcp::endpoint class,
passing the IP address and a protocol port number to its constructor. Now, the ep object can
be used to designate a server application in the Boost.Asio communication related functions.
The second sample has a similar idea, although it somewhat differs from the first one. The
server application is usually provided only with the protocol port number on which it should
listen for incoming messages. The IP address is not provided because the server application
usually wants to listen for the incoming messages on all IP addresses available on the host,
not only on a specific one.
To represent the concept of all IP addresses available on the host, the classes
asio::ip::address_v4 and asio::ip::address_v6 provide a static method any(),
which instantiates a special object of corresponding class representing the concept. In step
2, we use the any() method of the asio::ip::address_v6 class to instantiate such a
special object.
Note that the IP-protocol-version-agnostic class asio::ip::address does not provide the
any() method. The server application must explicitly specify whether it wants to receive
requests either on IPv4 or on IPv6 addresses by using the object returned by the any() method
of either the asio::ip::address_v4 or asio::ip::address_v6 class correspondingly. In
step 2 of our second sample, we assume that our server communicates over IPv6 protocol and
therefore called the any() method of the asio::ip::address_v6 class.
In step 3, we create an endpoint object which represents all IP addresses available on the
host and a particular protocol port number.
10
Chapter 1
There's more...
In both our previous samples we used the endpoint class declared in the scope of the
asio::ip::tcp class. If we look at the declaration of the asio::ip::tcp class,
we'll see something like this:
class tcp
{
public:
/// The type of a TCP endpoint.
typedef basic_endpoint<tcp> endpoint;
//...
}
It means that this endpoint class is a specialization of the basic_endpoint<> template
class that is intended for use in clients and servers communicating over the TCP protocol.
However, creating endpoints that can be used in clients and servers that communicate
over the UDP protocol is just as easy. To represent such an endpoint, we need to use the
endpoint class declared in the scope of the asio::ip::udp class. The following code
snippet demonstrates how this endpoint class is declared:
class udp
{
public:
/// The type of a UDP endpoint.
typedef basic_endpoint<udp> endpoint;
//...
}
For example, if we want to create an endpoint in our client application to designate a
server with which we want to communicate over the UDP protocol, we would only slightly
change the implementation of step 3 in our sample. This is how that step would look like
with changes highlighted:
// Step 3.
asio::ip::udp::endpoint ep(ip_address, port_num);
All other code would not need to be changed as it is transport protocol independent.
The same trivial change in the implementation of step 3 in our second sample is required to
switch from a server communicating over TCP to one communicating over UDP.
11
The Basics
See also
ff
The Binding a socket to an endpoint recipe explains how the endpoint object is used
in a server application
ff
The Connecting a socket recipe explains how the endpoint object is used in a
client application
Creating an active socket
The TCP/IP standard tells us nothing about sockets. Moreover, it tells us almost nothing
about how to implement the TCP or UDP protocol software API through which this software
functionality can be consumed by the application.
If we look at section 3.8, Interface, of the RFC document #793 which describes the TCP
protocol, we'll find out that it contains only functional requirements of a minimal set of
functions that the TCP protocol software API must provide. A developer of the protocol
software is given full control over all other aspects of the API, such as the structure of the
API, names of the functions comprising the API, the object model, the abstractions involved,
additional auxiliary functions, and so on. Every developer of the TCP protocol software is free
to choose the way to implement the interface to his or her protocol implementation.
The same story applies with the UDP protocol: only a small set of functional requirements of
mandatory operations are described in the RFC document #768 devoted to it. The control of
all other aspects of the UDP protocol software API is reserved for the developer of this API.
As it has already been mentioned in the introduction to this chapter, Berkeley Sockets
API is the most popular TCP and UDP protocols' API. It is designed around the concept of a
socket—an abstract object representing a communication session context. Before we can
perform any network I/O operations, we must first allocate a socket object and then
associate each I/O operation with it.
Boost.Asio borrows many concepts from Berkeley Sockets API and is so much similar to it that
we can call it "an object oriented Berkeley Sockets API". The Boost.Asio library includes a class
representing a socket concept, which provides interface methods similar to those found in
Berkeley Sockets API.
Basically, there are two types of sockets. A socket intended to be used to send and receive
data to and from a remote application or to initiate a connection establishment process with
it is called an active socket, whereas a passive socket is the one used to passively wait for
incoming connection requests from remote applications. Passive sockets don't take part in
user data transmission. We'll talk about passive sockets later in this chapter.
This recipe explains how to create and open an active socket.
12
Chapter 1
How to do it...
The following algorithm describes the steps required to perform in a client application to
create and open an active socket:
1. Create an instance of the asio::io_service class or use the one that has been
created earlier.
2. Create an object of the class that represents the transport layer protocol (TCP or UDP)
and the version of the underlying IP protocol (IPv4 or IPv6) over which the socket is
intended to communicate.
3. Create an object representing a socket corresponding to the required protocol type.
Pass the object of asio::io_service class to the socket's constructor.
4. Call the socket's open() method, passing the object representing the protocol
created in step 2 as an argument.
The following code sample demonstrates possible implementation of the algorithm. It is
assumed that the socket is intended to be used to communicate over the TCP protocol and
IPv4 as the underlying protocol:
#include <boost/asio.hpp>
#include <iostream>
using namespace boost;
int main()
{
// Step 1. An instance of 'io_service' class is required by
// socket constructor.
asio::io_service ios;
// Step 2. Creating an object of 'tcp' class representing
// a TCP protocol with IPv4 as underlying protocol.
asio::ip::tcp protocol = asio::ip::tcp::v4();
// Step 3. Instantiating an active TCP socket object.
asio::ip::tcp::socket sock(ios);
// Used to store information about error that happens
// while opening the socket.
boost::system::error_code ec;
13
The Basics
// Step 4. Opening the socket.
sock.open(protocol, ec);
if (ec.value() != 0) {
// Failed to open the socket.
std::cout
<< "Failed to open the socket! Error code = "
<< ec.value() << ". Message: " << ec.message();
return ec.value();
}
return 0;
}
How it works...
In step 1, we instantiate an object of the asio::io_service class. This class is a central
component in the Boost.Asio I/O infrastructure. It provides access to the network I/O
services of the underlying operating system. Boost.Asio sockets get access to those services
through the object of this class. Therefore, all socket class constructors require an object of
asio::io_service as an argument. We'll consider the asio::io_service class in more
detail in the following chapters.
In the next step, we create an instance of the asio::ip::tcp class. This class represents a
TCP protocol. It provides no functionality, but rather acts like a data structure that contains a
set of values that describe the protocol.
The asio::ip::tcp class doesn't have a public constructor. Instead, it provides two static
methods, asio::ip::tcp::v4() and asio::ip::tcp::v6(), that return an object of
the asio::ip::tcp class representing the TCP protocol with the underlying IPv4 or IPv6
protocol correspondingly.
Besides, the asio::ip::tcp class contains declarations of some basic types
intended to be used with the TCP protocol. Among them are asio::tcp::endpoint,
asio::tcp::socket, asio::tcp::acceptor, and others. Let's have a look at those
declarations found in the boost/asio/ip/tcp.hpp file:
namespace boost {
namespace asio {
namespace ip {
// ...
14
Chapter 1
class tcp
{
public:
/// The type of a TCP endpoint.
typedef basic_endpoint<tcp> endpoint;
// ...
/// The TCP socket type.
typedef basic_stream_socket<tcp> socket;
/// The TCP acceptor type.
typedef basic_socket_acceptor<tcp> acceptor;
// ...
In step 3, we create an instance of the asio::ip::tcp::socket class, passing the
object of the asio::io_service class to its constructor as an argument. Note that this
constructor does not allocate the underlying operating system's socket object. The real
operating system's socket is allocated in step 4 when we call the open() method and pass
an object specifying protocol to it as an argument.
In Boost.Asio, opening a socket means associating it with full set of parameters describing a
specific protocol over which the socket is intended to be communicating. When the Boost.Asio
socket object is provided with these parameters, it has enough information to allocate a real
socket object of the underlying operating system.
The asio::ip::tcp::socket class provides another constructor that accepts a protocol
object as an argument. This constructor constructs a socket object and opens it. Note that
this constructor throws an exception of the type boost::system::system_error if
it fails. Here is a sample demonstrating how we could combine steps 3 and 4 from the
previous sample:
try {
// Step 3 + 4 in single call. May throw.
asio::ip::tcp::socket sock(ios, protocol);
} catch (boost::system::system_error & e) {
std::cout << "Error occured! Error code = " << e.code()
<< ". Message: "<< e.what();
}
15
The Basics
There's more...
The previous sample demonstrates how to create an active socket intended to communicate
over the TCP protocol. The process of creating a socket intended for communication over the
UDP protocol is almost identical.
The following sample demonstrates how to create an active UDP socket. It is assumed that the
socket is going to be used to communicate over the UDP protocol with IPv6 as the underlying
protocol. No explanation is provided with the sample because it is very similar to the previous
one and therefore should not be difficult to understand:
#include <boost/asio.hpp>
#include <iostream>
using namespace boost;
int main()
{
// Step 1. An instance of 'io_service' class is required by
// socket constructor.
asio::io_service ios;
// Step 2. Creating an object of 'udp' class representing
// a UDP protocol with IPv6 as underlying protocol.
asio::ip::udp protocol = asio::ip::udp::v6();
// Step 3. Instantiating an active UDP socket object.
asio::ip::udp::socket sock(ios);
// Used to store information about error that happens
// while opening the socket.
boost::system::error_code ec;
// Step 4. Opening the socket.
sock.open(protocol, ec);
if (ec.value() != 0) {
// Failed to open the socket.
std::cout
<< "Failed to open the socket! Error code = "
<< ec.value() << ". Message: " << ec.message();
return ec.value();
}
return 0;
}
16
Chapter 1
See also
ff
The Creating a passive socket recipe, as its name suggests, provides discussion of
passive sockets and demonstrates their use
ff
The Connecting a socket recipe explains one of the uses of active sockets, namely
connecting to the remote application
Creating a passive socket
A passive socket or acceptor socket is a type of socket that is used to wait for connection
establishment requests from remote applications that communicate over the TCP protocol.
This definition has two important implications:
ff
Passive sockets are used only in server applications or hybrid applications that may
play both roles of the client and server.
ff
Passive sockets are defined only for the TCP protocol. As the UDP protocol doesn't
imply connection establishment, there is no need for a passive socket when
communication is performed over UDP.
This recipe explains how to create and open a passive socket in Boost.Asio.
How to do it…
In Boost.Asio a passive socket is represented by the asio::ip::tcp::acceptor class.
The name of the class suggests the key function of the objects of the class—to listen for and
accept or handle incoming connection requests.
The following algorithm describes the steps required to perform to create an acceptor socket:
1. Create an instance of the asio::io_service class or use the one that has been
created earlier.
2. Create an object of the asio::ip::tcp class that represents the TCP protocol and
the required version of the underlying IP protocol (IPv4 or IPv6).
3. Create an object of the asio::ip::tcp::acceptor class representing
an acceptor socket, passing the object of the asio::io_service class to
its constructor.
4. Call the acceptor socket's open() method, passing the object representing the
protocol created in step 2 as an argument.
17
The Basics
The following code sample demonstrates the possible implementation of the algorithm. It is
assumed that the acceptor socket is intended to be used over the TCP protocol and IPv6 as
the underlying protocol:
#include <boost/asio.hpp>
#include <iostream>
using namespace boost;
int main()
{
// Step 1. An instance of 'io_service' class is required by
// socket constructor.
asio::io_service ios;
// Step 2. Creating an object of 'tcp' class representing
// a TCP protocol with IPv6 as underlying protocol.
asio::ip::tcp protocol = asio::ip::tcp::v6();
// Step 3. Instantiating an acceptor socket object.
asio::ip::tcp::acceptor acceptor(ios);
// Used to store information about error that happens
// while opening the acceptor socket.
boost::system::error_code ec;
// Step 4. Opening the acceptor socket.
acceptor.open(protocol, ec);
if (ec.value() != 0) {
// Failed to open the socket.
std::cout
<< "Failed to open the acceptor socket!"
<< "Error code = "
<< ec.value() << ". Message: " << ec.message();
return ec.value();
}
return 0;
}
18
Chapter 1
How it works…
Because an acceptor socket is very similar to an active socket, the procedure of creating
them is almost identical. Therefore, here we only shortly go through the sample code. For
more details about each step and each object involved in the procedure, please refer to the
Creating an active socket recipe.
In step 1, we create an instance of the asio::io_service class. This class is needed by all
Boost.Asio components that need access to the services of the underlying operating system.
In step 2, we create an object representing a TCP protocol with IPv6 as its underlying protocol.
Then in step 3, we create an instance of the asio::ip::tcp::acceptor class, passing
an object of the asio::io_service class as an argument to its constructor. Just as
in the case of an active socket, this constructor instantiates an object of Boost.Asio the
asio::ip::tcp::acceptor class, but does not allocate the actual socket object of the
underlying operating system.
The operating system socket object is allocated in step 4, where we open the acceptor socket
object, calling its open() method and passing the protocol object to it as an argument. If
the call succeeds, the acceptor socket object is opened and can be used to start listening for
incoming connection requests. Otherwise, the ec object of the boost::system::error_
code class will contain error information.
See also
ff
The Creating an active socket recipe provides more details about the
asio::io_service and asio::ip::tcp classes
Resolving a DNS name
Raw IP addresses are very inconvenient for humans to perceive and remember, especially if
they are IPv6 addresses. Take a look at 192.168.10.123 (IPv4) or 8fee:9930:4545:a:10
5:f8ff:fe21:67cf (IPv6). Remembering those sequences of numbers and letters could be
a challenge for anyone.
To enable labeling the devices in a network with human-friendly names, the Domain Name
System (DNS) was introduced. In short, DNS is a distributed naming system that allows
associating human-friendly names with devices in a computer network. A DNS name or a
domain name is a string that represents a name of a device in the computer network.
19
The Basics
To be precise, a DNS name is an alias for one or more IP addresses but not the devices.
It doesn't name a particular physical device but an IP address that can be assigned to
a device. Thus, DNS introduces a level of indirection in addressing a particular server
application in the network.
DNS acts as a distributed database storing mappings of DNS names to corresponding IP
addresses and providing an interface, allowing querying the IP addresses to which a particular
DNS name is mapped. The process of transforming a DNS name into corresponding IP
addresses is called a DNS name resolution. Modern network operating systems contain
functionality that can query DNS to resolve DNS names and provides the interface that
can be used by applications to perform DNS name resolution.
When given a DNS name, before a client can communicate with a corresponding server
application, it must first resolve the name to obtain IP addresses associated with that name.
This recipe explains how to perform a DNS name resolution with Boost.Asio.
How to do it…
The following algorithm describes steps required to perform in a client application in order to
resolve a DNS name to obtain IP addresses (zero or more) of hosts (zero or more) running the
server application that the client application wants to communicate with:
1. Obtain the DNS name and the protocol port number designating the server
application and represent them as strings.
2. Create an instance of the asio::io_service class or use the one that has been
created earlier.
3. Create an object of the resolver::query class representing a DNS name
resolution query.
4. Create an instance of DNS name resolver class suitable for the necessary protocol.
5. Call the resolver's resolve() method, passing a query object created in step 3 to it
as an argument.
The following code sample demonstrates the possible implementation of the algorithm. It is
assumed that the client application is intended to communicate with the server application
over the TCP protocol and IPv6 as the underlying protocol. Besides, it is assumed that the
server DNS name and a port number have already been obtained and represented as strings
by the client application:
#include <boost/asio.hpp>
#include <iostream>
20
Chapter 1
using namespace boost;
int main()
{
// Step 1. Assume that the client application has already
// obtained the DNS name and protocol port number and
// represented them as strings.
std::string host = "samplehost.com";
std::string port_num = "3333";
// Step 2.
asio::io_service ios;
// Step 3. Creating a query.
asio::ip::tcp::resolver::query resolver_query(host,
port_num, asio::ip::tcp::resolver::query::numeric_service);
// Step 4. Creating a resolver.
asio::ip::tcp::resolver resolver(ios);
// Used to store information about error that happens
// during the resolution process.
boost::system::error_code ec;
// Step 5.
asio::ip::tcp::resolver::iterator it =
resolver.resolve(resolver_query, ec);
// Handling errors if any.
if (ec != 0) {
// Failed to resolve the DNS name. Breaking execution.
std::cout << "Failed to resolve a DNS name."
<< "Error code = " << ec.value()
<< ". Message = " << ec.message();
return ec.value();
}
return 0;
}
21
The Basics
How it works…
In step 1, we begin by obtaining a DNS name and a protocol port number and representing
them as strings. Usually, these parameters are supplied by a user through the client
application's UI or as command-line arguments. The process of obtaining and validating
these parameters is behind the scope of this recipe; therefore, here we assume that they
are available at the beginning of the sample.
Then, in step 2, we create an instance of the asio::io_service class that is used by the
resolver to access underlying OS's services during a DNS name resolution process.
In step 3 we create an object of the asio::ip::tcp::resolver::query class.
This object represents a query to the DNS. It contains a DNS name to resolve, a port number
that will be used to construct an endpoint object after the DNS name resolution and a set
of flags controlling some specific aspects of resolution process, represented as a bitmap.
All these values are passed to the query class's constructor. Because the service is specified
as a protocol port number (in our case, 3333) and not as a service name (for example,
HTTP, FTP, and so on), we passed the asio::ip::tcp::resolver::query::numeric_
service flag to explicitly inform the query object about that, so that it properly parses
the port number value.
In step 4, we create an instance of the asio::ip::tcp::resolver class. This class
provides the DNS name resolution functionality. To perform the resolution, it requires services
of the underlying operating system and it gets access to them through the object of the
asio::io_services class being passed to its constructor as an argument.
The DNS name resolution is performed in step 5 in the resolver object's resolve()
method. The method overload we use in our sample accepts objects of the
asio::ip::tcp::resolver::query and system::error_code classes. The latter
object will contain information describing the error if the method fails.
If successful, the method returns an object of the asio::ip::tcp::resolver::ite
rator class, which is an iterator pointing to the first element of a collection representing
resolution results. The collection contains objects of the asio::ip::basic_resolver_
entry<tcp> class. There are as many objects in the collection as the total number of
IP addresses that resolution yielded. Each collection element contains an object of the
asio::ip::tcp::endpoint class instantiated from one IP address resulting from the
resolution process and a port number provided with the corresponding query object.
The endpoint object can be accessed through the asio::ip::basic_resolver_
entry<tcp>::endopoint() getter method.
22
Chapter 1
The default-constructed object of the asio::ip::tcp::resolver::iterator class
represents an end iterator. Consider the following sample demonstrating how we can iterate
through the elements of the collection representing the DNS name resolution process results
and how to access the resulting endpoint objects:
asio::ip::tcp::resolver::iterator it =
resolver.resolve(resolver_query, ec);
asio::ip::tcp::resolver::iterator it_end;
for (; it != it_end; ++it) {
// Here we can access the endpoint like this.
asio::ip::tcp::endpoint ep = it->endpoint();
}
Usually, when a DNS name of the host running the server application is resolved to more than
one IP address and correspondingly to more than one endpoint, the client application doesn't
know which one of the multiple endpoints to prefer. The common approach in this case is to
try to communicate with each endpoint one by one, until the desired response is received.
Note that when the DNS name is mapped to more than one IP address and some of them
are IPv4 and others are IPv6 addresses, the DNS name may be resolved either to the IPv4
address or to the IPv6 address or to both. Therefore, the resulting collection may contain
endpoints representing both IPv4 and IPv6 addresses.
There's more…
To resolve a DNS name and obtain a collection of endpoints that can be used in the client
that is intended to communicate over the UDP protocol, the code is very similar. The sample
is given here with differences highlighted and without explanation:
#include <boost/asio.hpp>
#include <iostream>
using namespace boost;
int main()
{
// Step 1. Assume that the client application has already
// obtained the DNS name and protocol port number and
// represented them as strings.
23
The Basics
std::string host = "samplehost.book";
std::string port_num = "3333";
// Step 2.
asio::io_service ios;
// Step 3. Creating a query.
asio::ip::udp::resolver::query resolver_query(host,
port_num, asio::ip::udp::resolver::query::numeric_service);
// Step 4. Creating a resolver.
asio::ip::udp::resolver resolver(ios);
// Used to store information about error that happens
// during the resolution process.
boost::system::error_code ec;
// Step 5.
asio::ip::udp::resolver::iterator it =
resolver.resolve(resolver_query, ec);
// Handling errors if any.
if (ec != 0) {
// Failed to resolve the DNS name. Breaking execution.
std::cout << "Failed to resolve a DNS name."
<< "Error code = " << ec.value()
<< ". Message = " << ec.message();
return ec.value();
}
asio::ip::udp::resolver::iterator it_end;
for (; it != it_end; ++it) {
// Here we can access the endpoint like this.
asio::ip::udp::endpoint ep = it->endpoint();
}
return 0;
}
24
Chapter 1
See also
ff
The Creating an endpoint recipe provides more information on endpoints
ff
For more information on DNS and domain names, refer to the specification of the
system that can be found in the RFC #1034 and RFC #1035 documents
Binding a socket to an endpoint
Before an active socket can communicate with a remote application or a passive socket can
accept incoming connection requests, they must be associated with a particular local IP
address (or multiple addresses) and a protocol port number, that is, an endpoint. The process
of associating a socket with a particular endpoint is called binding. When a socket is bound
to an endpoint, all network packets coming into the host from the network with that endpoint
as their target address will be redirected to that particular socket by the operating system.
Likewise, all the data coming out from a socket bound to a particular endpoint will be output
from the host to the network through a network interface associated with the corresponding IP
address specified in that endpoint.
Some operations bind unbound sockets implicitly. For example, an operation that connects
an unbound active socket to a remote application, binds it implicitly to an IP address and
a protocol port number chosen by the underlying operating system. Usually, the client
application doesn't need to explicitly bind an active socket to a specific endpoint just because
it doesn't need that specific endpoint to communicate with the server; it only needs any
endpoint for that purpose. Therefore, it usually delegates the right to choose the IP address
and the port number to which the socket should be bound to the operating system. However,
in some special cases, the client application might need to use a specific IP address and a
protocol port number to communicate with the remote application and therefore will bind its
socket explicitly to that specific endpoint. We wouldn't consider these cases in our book.
When socket binding is delegated to the operating system, there is no guarantee that it will be
bound to the same endpoint each time. Even if there is a single network interface and a single
IP address on the host, the socket may be bound to a different protocol port number every
time the implicit binding is performed.
Unlike client applications that usually don't care through which IP address and protocol
port number its active socket will be communicating with the remote application, the server
application usually needs to bind its acceptor socket to a particular endpoint explicitly. This is
explained by the fact that the server's endpoint must be known to all the clients that want to
communicate with it and should stay the same after the server application is restarted.
This recipe explains how to bind a socket to particular endpoint with Boost.Asio.
25
The Basics
How to do it…
The following algorithm describes steps required to create an acceptor socket and to bind it to
an endpoint designating all IP addresses available on the host and a particular protocol port
number in the IPv4 TCP server application:
1. Obtain the protocol port number on which the server should listen for incoming
connection requests.
2. Create an endpoint that represents all IP addresses available on the host and the
protocol port number obtained in the step 1.
3. Create and open an acceptor socket.
4. Call the acceptor socket's bind() method, passing the endpoint object as an
argument to it.
The following code sample demonstrates possible implementation of the algorithm. It is
assumed that the protocol port number has already been obtained by the application:
#include <boost/asio.hpp>
#include <iostream>
using namespace boost;
int main()
{
// Step 1. Here we assume that the server application has
// already obtained the protocol port number.
unsigned short port_num = 3333;
// Step 2. Creating an endpoint.
asio::ip::tcp::endpoint ep(asio::ip::address_v4::any(),
port_num);
// Used by 'acceptor' class constructor.
asio::io_service ios;
// Step 3. Creating and opening an acceptor socket.
asio::ip::tcp::acceptor acceptor(ios, ep.protocol());
boost::system::error_code ec;
// Step 4. Binding the acceptor socket.
acceptor.bind(ep, ec);
26
Chapter 1
// Handling errors if any.
if (ec != 0) {
// Failed to bind the acceptor socket. Breaking
// execution.
std::cout << "Failed to bind the acceptor socket."
<< "Error code = " << ec.value() << ". Message: "
<< ec.message();
return ec.value();
}
return 0;
}
How it works…
We begin by obtaining a protocol port number in step 1. The process of obtaining this
parameter is beyond the scope of this recipe; therefore, here we assume that the port
number has already been obtained and is available at the beginning of the sample.
In step 2 we create an endpoint representing all IP addresses available on the host and the
specified port number.
In step 3 we instantiate and open the acceptor socket. The endpoint we created in step 2
contains information about the transport protocol and the version of the underlying IP
protocol (IPv4). Therefore, we don't need to create another object representing the
protocol to pass it to the acceptor socket's constructor. Instead, we use the endpoint's
protocol() method, which returns an object of the asio::ip::tcp class representing
the corresponding protocols.
The binding is performed in step 4. This is quite a simple operation. We call the acceptor
socket's bind() method, passing an object representing an endpoint to which the acceptor
socket should be bound as an argument of the method. If the call succeeds, the acceptor
socket is bound to the corresponding endpoint and is ready to start listening for incoming
connection requests on that endpoint.
Downloading the example code
You can download the example code files from your account at
http://www.packtpub.com for all the Packt Publishing books
you have purchased. If you purchased this book elsewhere, you can
visit http://www.packtpub.com/support and register to have
the files e-mailed directly to you.
27
The Basics
There's more…
UDP servers don't establish connections and use active sockets to wait for incoming
requests. The process of binding an active socket is very similar to binding an acceptor
socket. Here, we present a sample code demonstrating how to bind a UDP active socket
to an endpoint designating all IP addresses available on the host and a particular protocol
port number. The code is provided without explanation:
#include <boost/asio.hpp>
#include <iostream>
using namespace boost;
int main()
{
// Step 1. Here we assume that the server application has
// already obtained the protocol port number.
unsigned short port_num = 3333;
// Step 2. Creating an endpoint.
asio::ip::udp::endpoint ep(asio::ip::address_v4::any(),
port_num);
// Used by 'socket' class constructor.
asio::io_service ios;
// Step 3. Creating and opening a socket.
asio::ip::udp::socket sock(ios, ep.protocol());
boost::system::error_code ec;
// Step 4. Binding the socket to an endpoint.
sock.bind(ep, ec);
// Handling errors if any.
if (ec != 0) {
// Failed to bind the socket. Breaking execution.
std::cout << "Failed to bind the socket."
<< "Error code = " << ec.value() << ". Message: "
<< ec.message();
28
Chapter 1
return ec.value();
}
return 0;
}
See also
ff
The Creating an endpoint recipe provides more information on endpoints
ff
The Creating an active socket recipe provides more details about the asio::io_
service and asio::ip::tcp classes and demonstrates how to create and open
an active socket
ff
The Creating a passive socket recipe provides information about passive sockets and
demonstrates how to create and open them
Connecting a socket
Before a TCP socket can be used to communicate with a remote application, it must
establish a logical connection with it. According to the TCP protocol, the connection
establishment process lies in exchanging of service messages between two applications,
which, if succeeds, results in two applications being logically connected and ready for
communication with each other.
Roughly, the connection establishment process looks like this. The client application,
when it wants to communicate with the server application, creates and opens an active
socket and issues a connect() command on it, specifying a target server application with
an endpoint object. This leads to a connection establishment request message being sent
to the server application over the network. The server application receives the request and
creates an active socket on its side, marking it as connected to a specific client and replies
back to the client with the message acknowledging that connection is successfully set up on
the server side. Next, the client having received the acknowledgement from the server, marks
its socket as connected to the server, and sends one more message to it acknowledging
that the connection is successfully set up on the client side. When the server receives the
acknowledgement message from the client, the logical connection between two applications
is considered established.
The point-to-point communication model is assumed between two connected sockets.
This means that if socket A is connected to socket B, both can only communicate with
each other and cannot communicate with any other socket C. Before socket A can
communicate with socket C, it must close the connection with socket B and establish
a new connection with socket C.
This recipe explains how to synchronously connect a socket to a remote application with
Boost.Asio.
29
The Basics
How to do it…
The following algorithm descries steps required to perform in the TCP client application to
connect an active socket to the server application:
1. Obtain the target server application's IP address and a protocol port number.
2. Create an object of the asio::ip::tcp::endpoint class from the IP address and
the protocol port number obtained in step 1.
3. Create and open an active socket.
4. Call the socket's connect() method specifying the endpoint object created in step 2
as an argument.
5. If the method succeeds, the socket is considered connected and can be used to send
and receive data to and from the server.
The following code sample demonstrates a possible implementation of the algorithm:
#include <boost/asio.hpp>
#include <iostream>
using namespace boost;
int main()
{
// Step 1. Assume that the client application has already
// obtained the IP address and protocol port number of the
// target server.
std::string raw_ip_address = "127.0.0.1";
unsigned short port_num = 3333;
try {
// Step 2. Creating an endpoint designating
// a target server application.
asio::ip::tcp::endpoint
ep(asio::ip::address::from_string(raw_ip_address),
port_num);
asio::io_service ios;
// Step 3. Creating and opening a socket.
asio::ip::tcp::socket sock(ios, ep.protocol());
30
Chapter 1
// Step 4. Connecting a socket.
sock.connect(ep);
// At this point socket 'sock' is connected to
// the server application and can be used
// to send data to or receive data from it.
}
// Overloads of asio::ip::address::from_string() and
// asio::ip::tcp::socket::connect() used here throw
// exceptions in case of error condition.
catch (system::system_error &e) {
std::cout << "Error occured! Error code = " << e.code()
<< ". Message: " << e.what();
return e.code().value();
}
return 0;
}
How it works…
In step 1, we begin with obtaining the target server's IP address and a protocol port number.
The process of obtaining these parameters is beyond the scope of this recipe; therefore,
here we assume that they have already been obtained and are available at the beginning
of our sample.
In step 2, we create an object of the asio::ip::tcp::endpoint class designating the
target server application to which we are going to connect.
Then, in step 3 an active socket is instantiated and opened.
In step 4, we call the socket's connect() method, passing an endpoint object designating
the target server to it as an argument. This function connects the socket to the server. The
connection is performed synchronously, which means that the method blocks the caller
thread until either the connection operation is established or an error occurs.
Note that we didn't bind the socket to any local endpoint before connecting it. This doesn't
mean that the socket stays unbound. Before performing the connection establishment
procedure, the socket's connect() method will bind the socket to the endpoint consisting
of an IP address and a protocol port number chosen by the operating system.
31
The Basics
Another thing to note in this sample is that we use an overload of the connect() method
that throws an exception of the boost::system::system_error type if the operation fails,
and so does overload of the asio::ip::address::from_string() static method we use
in step 2. Therefore, both calls are enclosed in a try block. Both methods have overloads
that don't throw exceptions and accept an object of the boost::system::error_code
class, which is used to conduct error information to the caller in case the operation fails.
However, in this case, using exceptions to handle errors makes code better structured.
There's more…
The previous code sample showed how to connect a socket to a specific server application
designated by an endpoint when an IP address and a protocol port number are provided
to the client application explicitly. However, sometimes the client application is provided
with a DNS name that may be mapped to one or more IP addresses. In this case, we
first need to resolve the DNS name using the resolve() method provided by the
asio::ip::tcp::resolver class. This method resolves a DNS name, creates an object of
the asio::ip::tcp::endpoint class from each IP address resulted from resolution, puts
all endpoint objects in a collection, and returns an object of the asio::ip::tcp::resolve
r::iterator class, which is an iterator pointing to the first element in the collection.
When a DNS name resolves to multiple IP addresses, the client application—when deciding
to which one to connect—usually has no reasons to prefer one IP address to any other. The
common approach in this situation is to iterate through endpoints in the collection and try
to connect to each of them one by one until the connection succeeds. Boost.Asio provides
auxiliary functionality that implements this approach.
The free function asio::connect() accepts an active socket object and an object of the as
io::ip::tcp::resolver::iterator class as input arguments, iterates over a collection
of endpoints, and tries to connect the socket to each endpoint. The function stops iteration,
and returns when it either successfully connects a socket to one of the endpoints or when it
has tried all the endpoints and failed to connect the socket to all of them.
The following algorithm demonstrates steps required to connect a socket to a server
application represented by a DNS name and a protocol port number:
1. Obtain the DNS name of a host running the server application and the server's port
number and represent them as strings.
2. Resolve a DNS name using the asio::ip::tcp::resolver class.
3. Create an active socket without opening it.
4. Call the asio::connect() function passing a socket object and an iterator object
obtained in step 2 to it as arguments.
32
Chapter 1
The following code sample demonstrates possible implementation of the algorithm:
#include <boost/asio.hpp>
#include <iostream>
using namespace boost;
int main()
{
// Step1. Assume that the client application has already
// obtained the DNS name and protocol port number and
// represented them as strings.
std::string host = "samplehost.book";
std::string port_num = "3333";
// Used by a 'resolver' and a 'socket'.
asio::io_service ios;
// Creating a resolver's query.
asio::ip::tcp::resolver::query resolver_query(host, port_num,
asio::ip::tcp::resolver::query::numeric_service);
// Creating a resolver.
asio::ip::tcp::resolver resolver(ios);
try {
// Step 2. Resolving a DNS name.
asio::ip::tcp::resolver::iterator it =
resolver.resolve(resolver_query);
// Step 3. Creating a socket.
asio::ip::tcp::socket sock(ios);
// Step 4. asio::connect() method iterates over
// each endpoint until successfully connects to one
// of them. It will throw an exception if it fails
// to connect to all the endpoints or if other
// error occurs.
asio::connect(sock, it);
// At this point socket 'sock' is connected to
// the server application and can be used
// to send data to or receive data from it.
}
33
The Basics
// Overloads of asio::ip::tcp::resolver::resolve and
// asio::connect() used here throw
// exceptions in case of error condition.
catch (system::system_error &e) {
std::cout << "Error occured! Error code = " << e.code()
<< ". Message: " << e.what();
return e.code().value();
}
return 0;
}
Note that in step 3, we don't open the socket when we create it. This is because we
don't know the version of IP addresses to which the provided DNS name will resolve.
The asio::connect() function opens the socket before connecting it to each endpoint
specifying proper protocol object and closes it if the connection fails.
All other steps in the code sample should not be difficult to understand, therefore no
explanation is provided.
See also
ff
The Creating an endpoint recipe provides more information on endpoints
ff
The Creating an active socket recipe explains how to create and open a socket and
provides more details about the asio::io_service class
ff
The Resolving a DNS name recipe explains how to use a resolver class to resolve a
DNS name
ff
The Binding a socket recipe provides more information about socket binding
Accepting connections
When the client application wants to communicate to the server application over a TCP
protocol, it first needs to establish a logical connection with that server. In order to do that, the
client allocates an active socket and issues a connect command on it (for example by calling
the connect() method on the socket object), which leads to a connection establishment
request message being sent to the server.
On the server side, some arrangements must be performed before the server application
can accept and handle the connection requests arriving from the clients. Before that, all
connection requests targeted at this server application are rejected by the operating system.
34
Chapter 1
First, the server application creates and opens an acceptor socket and binds it to the
particular endpoint. At this point, the client's connection requests arriving at the acceptor
socket's endpoint are still rejected by the operating system. For the operating system to start
accepting connection requests targeted at particular endpoint associated with particular
acceptor socket, that acceptor socket must be switched into listening mode. After that, the
operating system allocates a queue for pending connection requests associated with this
acceptor socket and starts accepting connection request addressed to it.
When a new connection request arrives, it is initially received by the operating system, which
puts it to the pending connection requests queue associated with an acceptor socket being
the connection request's target. When in the queue, the connection request is available to
the server application for processing. The server application, when ready to process the next
connection request, de-queues one and processes it.
Note that the acceptor socket is only used to establish connections with client applications
and is not used in the further communication process. When processing a pending connection
request, the acceptor socket allocates a new active socket, binds it to an endpoint chosen by
the operating system, and connects it to the corresponding client application that has issued
that connection request. Then, this new active socket is ready to be used for communication
with the client. The acceptor socket becomes available to process the next pending
connection request.
This recipe describes how to switch an acceptor socket into listening mode and accept
incoming connection requests in a TCP server application using Boost.Asio.
How to do it…
The following algorithm describes how to set up an acceptor socket so that it starts listening
for incoming connections and then how to use it to synchronously process the pending
connection request. The algorithm assumes that only one incoming connection will be
processed in synchronous mode:
1. Obtain the port number on which the server will receive incoming
connection requests.
2. Create a server endpoint.
3. Instantiate and open an acceptor socket.
4. Bind the acceptor socket to the server endpoint created in step 2.
5. Call the acceptor socket's listen() method to make it start listening for incoming
connection requests on the endpoint.
6. Instantiate an active socket object.
35
The Basics
7.
When ready to process a connection request, call the acceptor socket's accept()
method passing an active socket object created in step 6 as an argument.
8. If the call succeeds, the active socket is connected to the client application and is
ready to be used for communication with it.
The following code sample demonstrates possible implementation of the server application
that follows the algorithm. Here, we assume that the server is intended to communicate over
the TCP protocol with IPv4 as the underlying protocol:
#include <boost/asio.hpp>
#include <iostream>
using namespace boost;
int main()
{
// The size of the queue containing the pending connection
// requests.
const int BACKLOG_SIZE = 30;
// Step 1. Here we assume that the server application has
// already obtained the protocol port number.
unsigned short port_num = 3333;
// Step 2. Creating a server endpoint.
asio::ip::tcp::endpoint ep(asio::ip::address_v4::any(),
port_num);
asio::io_service ios;
try {
// Step 3. Instantiating and opening an acceptor socket.
asio::ip::tcp::acceptor acceptor(ios, ep.protocol());
// Step 4. Binding the acceptor socket to the
// server endpint.
acceptor.bind(ep);
// Step 5. Starting to listen for incoming connection
// requests.
acceptor.listen(BACKLOG_SIZE);
36
Chapter 1
// Step 6. Creating an active socket.
asio::ip::tcp::socket sock(ios);
// Step 7. Processing the next connection request and
// connecting the active socket to the client.
acceptor.accept(sock);
// At this point 'sock' socket is connected to
//the client application and can be used to send data to
// or receive data from it.
}
catch (system::system_error &e) {
std::cout << "Error occured! Error code = " << e.code()
<< ". Message: " << e.what();
return e.code().value();
}
return 0;
}
How it works…
In step 1, we obtain the protocol port number to which the server application binds its
acceptor socket. Here, we assume that the port number has already been obtained and
is available at the beginning of the sample.
In step 2, we create a server endpoint that designates all IP addresses available on the host
running the server application and a specific protocol port number.
Then in step 3, we instantiate and open an acceptor socket and bind it to the server
endpoint in step 4.
In step 5, we call the acceptor's listen() method passing the BACKLOG_SIZE
constant value as an argument. This call switches the acceptor socket into the state
in which it listens for incoming connection requests. Unless we call the listen() method
on the acceptor object, all connection requests arriving at corresponding endpoint will be
rejected by the operating system network software. The application must explicitly notify the
operating system that it wants to start listening for incoming connection requests on specific
endpoint by this call.
37
The Basics
The argument that the listen() method accepts as an argument specifies the size of the
queue maintained by the operating system to which it puts connection requests arriving from
the clients. The requests stay in the queue and are waiting for the server application to dequeue and process them. When the queue becomes full, the new connection requests are
rejected by the operating system.
In step 6, we create an active socket object without opening it. We'll need it in step 7.
In step 7, we call the acceptor socket's accept() method. This method accepts an active
socket as an argument and performs several operations. First, it checks the queue associated
with the acceptor socket containing pending connection requests. If the queue is empty, the
method blocks execution until a new connection request arrives to an endpoint to which the
acceptor socket is bound and the operating system puts it in the queue.
If at least one connection request is available in the queue, the one on the top of the queue
is extracted from it and processed. The active socket that was passed to the accept()
method as an argument is connected to the corresponding client application which issued
the connection request.
If the connection establishment process succeeds, the accept() method returns and the
active socket is opened and connected to the client application and can be used to send
data to and receive data from it.
Remember that the acceptor socket doesn't connect itself to the
client application while processing a connection request. Instead, it
opens and connects another active socket, which is then used for
communication with the client application. The acceptor socket only
listens for and processes (accepts) incoming connection requests.
Note that UDP servers don't use acceptor sockets because the UDP protocol doesn't imply
connection establishment. Instead, an active socket is used that is bound to an endpoint and
listens for incoming I/O messages, and this same active socket is used for communication.
See also
ff
The Creating a passive socket recipe provides information about passive sockets and
demonstrates how to create and open them
ff
The Creating an endpoint recipe provides more information on endpoints
ff
The Creating an active socket recipe explains how to create and open a socket and
provides more details about the asio::io_service class
ff
The Binding a socket recipe provides more information about socket binding
38
2
I/O Operations
In this chapter, we will cover the following recipes:
ff
Using fixed length I/O buffers
ff
Using extensible stream-oriented I/O buffers
ff
Writing to a TCP socket synchronously
ff
Reading from a TCP socket synchronously
ff
Writing to a TCP socket asynchronously
ff
Reading from a TCP socket asynchronously
ff
Canceling asynchronous operations
ff
Shutting down and closing a socket
Introduction
I/O operations are the key operations in the networking infrastructure of any distributed
application. They are directly involved in the process of data exchange. Input operations
are used to receive data from remote applications, whereas output operations allow sending
data to them.
In this chapter, we will see several recipes that show how to perform I/O operations and other
operations related to them. In addition to this, we'll see how to use some classes provided by
Boost.Asio, which are used in conjunction with I/O operations.
The following is the short summary and introduction to the topics discussed in this chapter.
39
I/O Operations
I/O buffers
Network programming is all about organizing inter-process communication over a
computer network. Communication in this context implies exchanging data between
two or more processes. From the perspective of a process that participates in such
communication, the process performs I/O operations, sending data to and receiving
it from other participating processes.
Like any other type of I/O, the network I/O involves using memory buffers, which are
contiguous blocks of memory allocated in the process's address space used to store the data.
When doing any sort of input operation (for example, reading some data from a file, a pipe,
or a remote computer over the network), the data arrives at the process and must be stored
somewhere in its address space so that it is available for further processing. That is, when the
buffer comes in handy. Before performing an input operation, the buffer is allocated and then
used as a data destination point during the operation. When the input operation is completed,
the buffer contains input data, which can be processed by the application. Likewise, before
performing the output operation, the data must be prepared and put into an output buffer,
which is then used in the output operation, where it plays the role of the data source.
Apparently, the buffers are essential ingredients of any application that performs any
type of I/O, including the network I/O. That's why it is critical for the developer who develops
a distributed application to know how to allocate and prepare the I/O buffers to use them in
the I/O operations.
Synchronous and asynchronous I/O operations
Boost.Asio supports two types of I/O operations: synchronous and asynchronous.
Synchronous operations block the thread of execution invoking them and unblock only
when the operation is finished. Hence, the name of this type of operation: synchronous.
The second type is an asynchronous operation. When an asynchronous operation is initiated,
it is associated with a callback function or functor, which is invoked by the Boost.Asio library
when the operation is finished. These types of I/O operations provide great flexibility, but
may significantly complicate the code. The initiation of the operation is simple and doesn't
block the thread of execution, which allows us to use the thread to run other tasks, while the
asynchronous operation is being run in the background.
The Boost.Asio library is implemented as a framework, which exploits an inversion of control
approach. After one or more asynchronous operations are initiated, the application hands over
one of its threads of execution to the library, and the latter uses this thread to run the event
loop and invoke the callbacks provided by the application to notify it about the completion of
the previously initiated asynchronous operation. The results of asynchronous operations are
passed to the callback as arguments.
40
Chapter 2
Additional operations
In addition to this, we are going to consider such operations as canceling asynchronous
operations, shutting down, and closing a socket.
The ability to cancel a previously initiated asynchronous operation is very important. It allows
the application to state that the previously initiated operation is not relevant anymore, which
may save the application's resources (both CPU and memory), that otherwise (in case, the
operation would continue its execution even after it was known that nobody is interested in it
anymore) would be unavoidably wasted.
Shutting down the socket is useful if there is a need for one part of the distributed application
to inform the other part that the whole message has been sent, when the application layer
protocol does not provide us with other means to indicate the message boundary.
As with any other operating system resource, a socket should be returned back to the
operating system when it is not needed anymore by the application. A closing operation
allows us to do so.
Using fixed length I/O buffers
Fixed length I/O buffers are usually used with I/O operations and play the role of either
a data source or destination when the size of the message to be sent or received is known.
For example, this can be a constant array of chars allocated on a stack, which contain a
string that represents the request to be sent to the server. Or, this can be a writable buffer
allocated in the free memory, which is used as a data destination point, when reading data
from a socket.
In this recipe, we'll see how to represent fixed length buffers so that they can be used with
Boost.Asio I/O operations.
How to do it…
In Boost.Asio, a fixed length buffer is represented by one of the two classes:
asio::mutable_buffer or asio::const_buffer. Both these classes represent a
contiguous block of memory that is specified by the address of the first byte of the block
and its size in bytes. As the names of these classes suggest, asio::mutable_buffer
represents a writable buffer, whereas asio::const_buffer represents a read-only one.
However, neither the asio::mutable_buffer nor asio::const_buffer
classes are used in Boost.Asio I/O functions and methods directly. Instead, the
MutableBufferSequence and ConstBufferSequence concepts are introduced.
41
I/O Operations
The MutableBufferSequence concept specifies an object that represents a collection
of the asio::mutable_buffer objects. Correspondingly, the ConstBufferSequence
concept specifies an object that represents a collection of the asio::const_buffer
objects. Boost.Asio functions and methods that perform I/O operations accept
objects that satisfy the requirements of either the MutableBufferSequence or
ConstBufferSequence concept as their arguments that represent buffers.
A complete specification of the MutableBufferSequence and
ConstBufferSequence concepts are available in the Boost.Asio
documentation section, which can be found at the following links:
ff
Refer to http://www.boost.org/doc/libs/1_58_0/doc/
html/boost_asio/reference/MutableBufferSequence.
html for MutableBufferSequence
ff
Refer to http://www.boost.org/doc/libs/1_58_0/doc/
html/boost_asio/reference/ConstBufferSequence.
html for ConstBufferSequence
Although in most use cases, a single buffer is involved in a single I/O operation, in some
specific circumstances (for example, in a memory-constrained environment), a developer may
want to use a composite buffer that comprises multiple smaller simple buffers distributed
over the process's address space. Boost.Asio I/O functions and methods are designed to
work with composite buffers that are represented as a collection of buffers that fulfill the
requirements of either the MutableBufferSequence or ConstBufferSequence concept.
For instance, an object of the std::vector<asio::mutable_buffer> class satisfies the
requirements of the MutableBufferSequence concept, and therefore, it can be used to
represent a composite buffer in I/O-related functions and methods.
So, now we know that if we have a buffer that is represented as an object of the
asio::mutable_buffer or asio::const_buffer class, we still can't use it with
I/O-related functions or methods provided by Boost.Asio. The buffer must be represented
as an object, satisfying the requirements of either the MutableBufferSequence or
ConstBufferSequence concept, respectively. To do this, we for example could create
a collection of buffer objects consisting of a single buffer by instantiating an object of the
std::vector<asio::mutable_buffer> class and placing our buffer object into it.
Now that the buffer is part of the collection, satisfying the MutableBufferSequence
requirements can be used in I/O operations.
However, although this method is fine to create composite buffers consisting of two or more
simple buffers, it looks overly complex when it comes to such simple tasks as representing
a single simple buffer so that it can be used with Boost.Asio I/O functions or methods.
Fortunately, Boost.Asio provides us with a way to simplify the usage of single buffers with
I/O-related functions and methods.
42
Chapter 2
The asio::buffer() free function has 28 overloads that accept a variety of
representations of a buffer and return an object of either the asio::mutable_
buffers_1 or asio::const_buffers_1 classes. If the buffer argument passed to
the asio::buffer() function is a read-only type, the function returns an object of the
asio::const_buffers_1 class; otherwise, an object of the asio::mutable_buffers_1
class is returned.
The asio::mutable_buffers_1 and asio::const_buffers_1 classes are
adapters of the asio::mutable_buffer and asio::const_buffer classes,
respectively. They provide an interface and behavior that satisfy the requirements of the
MutableBufferSequence and ConstBufferSequence concepts, which allows us to pass
these adapters as arguments to Boost.Asio I/O functions and methods.
Let's consider two algorithms and corresponding code samples that describe how to prepare
a memory buffer that can be used with Boost.Asio I/O operations. The first algorithm deals
with buffers intended to be used for an output operation and the second one is used for an
input operation.
Preparing a buffer for an output operation
The following algorithm and corresponding code sample describes how to prepare a buffer
that can be used with the Boost.Asio socket's method that performs an output operation
such as asio::ip::tcp::socket::send() or the asio::write()free function:
1. Allocate a buffer. Note that this step does not involve any functionality or data types
from Boost.Asio.
2. Fill the buffer with the data that is to be used as the output.
3. Represent the buffer as an object that satisfies the ConstBufferSequence
concept's requirements.
4. The buffer is ready to be used with Boost.Asio output methods and functions.
Let's say we want to send a string Hello to the remote application. Before we send the
data using Boost.Asio, we need to properly represent the buffer. This is how we do this in
the following code:
#include <boost/asio.hpp>
#include <iostream>
using namespace boost;
int main()
{
std::string buf; // 'buf' is the raw buffer.
buf = "Hello";
// Step 1 and 2 in single line.
43
I/O Operations
// Step 3. Creating buffer representation that satisfies
// ConstBufferSequence concept requirements.
asio::const_buffers_1 output_buf = asio::buffer(buf);
// Step 4. 'output_buf' is the representation of the
// buffer 'buf' that can be used in Boost.Asio output
// operations.
return 0;
}
Preparing a buffer for an input operation
The following algorithm and corresponding code sample describes how to prepare the buffer
that can be used with the Boost.Asios socket's method that performs an input operation such
as asio::ip::tcp::socket::receive() or the asio::read()free function:
1. Allocate a buffer. The size of the buffer must be big enough to fit the block of data
to be received. Note that this step does not involve any functionalities or data types
from Boost.Asio.
2. Represent the buffer using an object that satisfies the MutableBufferSequence
concept's requirements.
3. The buffer is ready to be used with Boost.Asio input methods and functions.
Let's say we want to receive a block of data from the server. To do this, we first need to
prepare a buffer where the data will be stored. This is how we do this in the following code:
#include <boost/asio.hpp>
#include <iostream>
#include <memory> // For std::unique_ptr<>
using namespace boost;
int main()
{
// We expect to receive a block of data no more than 20 bytes
// long.
const size_t BUF_SIZE_BYTES = 20;
// Step 1. Allocating the buffer.
std::unique_ptr<char[]> buf(new char[BUF_SIZE_BYTES]);
44
Chapter 2
// Step 2. Creating buffer representation that satisfies
// MutableBufferSequence concept requirements.
asio::mutable_buffers_1 input_buf =
asio::buffer(static_cast<void*>(buf.get()),
BUF_SIZE_BYTES);
// Step 3. 'input_buf' is the representation of the buffer
// 'buf' that can be used in Boost.Asio input operations.
return 0;
}
How it works…
Both the samples look quite simple and straightforward; however, they contain some
subtleties, which are important to understand so that we can properly use buffers with
Boost.Asio. In this section, we'll see how each sample works in detail.
Preparing a buffer for an output operation
Let's consider the first code sample that demonstrates how to prepare a buffer that can be
used with Boost.Asio output methods and functions. The main()entry point function starts
with instantiating the object of the std::string class. Because we want to send a string of
text, std::string is a good candidate to store this kind of data. In the next line, the string
object is assigned a value of Hello. This is where the buffer is allocated and filled with data.
This line implements steps 1 and 2 of the algorithm.
Next, before the buffer can be used with Boost.Asio I/O methods and functions, it must be
properly represented. To better understand why this is needed, let's take a look at one of the
Boost.Asio output functions. Here is the declaration of the send()method of the Boost.Asio
class that represents a TCP socket:
template<typename ConstBufferSequence>
std::size_t send(const ConstBufferSequence & buffers);
As we can see, this is a template method, and it accepts an object that satisfies the
requirements of the ConstBufferSeqenece concept as its argument that represents the
buffer. A suitable object is a composite object that represents a collection of objects of the
asio::const_buffer class and provides a typical collection interface that supports an
iteration over its elements. For example, an object of the std::vector<asio::const_
buffer> class is suitable for being used as the argument of the send() method, but objects
of the std::string or asio::const_bufer class are not.
45
I/O Operations
In order to use our std::string object with the send()method of the class that represents
a TCP socket, we can do something like this:
asio::const_buffer asio_buf(buf.c_str(), buf.length());
std::vector<asio::const_buffer> buffers_sequence;
buffers_sequence.push_back(asio_buf);
The object named buffer_sequence in the preceding snippet satisfies the
ConstBufferSequence concept's requirements, and therefore, it can be used as an
argument for the send() method of the socket object. However, this approach is very
complex. Instead, we use the asio::buffer()function provided by Boost.Asio to obtain
adaptor objects, which we can directly use in I/O operations:
asio::const_buffers_1 output_buf = asio::buffer(buf);
After the adaptor object is instantiated, it can be used with Boost.Asio output operations to
represent the output buffer.
Preparing a buffer for an input operation
The second code sample is very similar to the first one. The main difference is that the buffer
is allocated but is not filled with data because its purpose is different. This time, the buffer is
intended to receive the data from a remote application during the input operation.
With an output buffer, an input buffer must be properly represented so that it can be used
with Boost.Asio I/O methods and functions. However, in this case, the buffer must be
represented as an object that meets the requirements of the MutableBufferSequence
concept. Contrary to ConstBufferSequence, this concept represents the collection
of mutable buffers, that is, those that can be written to. Here, we use the buffer()
function, which helps us create the required representation of the buffer. The object of the
mutable_buffers_1 adaptor class represents a single mutable buffer and meets the
MutableBufferSequence concept's requirements.
In the first step, the buffer is allocated. In this case, the buffer is an array of chars allocated
in the free memory. In the next step, the adaptor object is instantiated that can be used with
both the input and output operations.
Buffer ownership
It's important to note that neither the classes that represent the buffers
nor the adaptor classes provided by Boost.Asio that we've considered
(namely, asio::mutable_buffer, asio::const_buffer,
asio::mutable_buffers_1, and asio::const_buffers_1)
take ownership of the underlying raw buffer. These classes only provide
the interface to the buffer and don't control its lifetime.
46
Chapter 2
See also
ff
The Writing to a TCP socket synchronously recipe demonstrates how to write data to
the socket from a fixed-length buffer
ff
The Reading from a TCP socket synchronously recipe demonstrates how to read data
from the socket to a fixed-length buffer
ff
The Using composite buffers for scatter/gather operations recipe in Chapter 6, Other
Topics, provides more information on composite buffers and demonstrates how to
use them
Using extensible stream-oriented I/O buffers
Extensible buffers are those buffers that dynamically increase their size when new data
is written to them. They are usually used to read data from sockets when the size of the
incoming message is unknown.
Some application layer protocols do not define the exact size of the message. Instead, the
boundary of the message is represented by a specific sequence of symbols at the end of the
message itself or by a transport protocol service message end of file (EOF) issued by the
sender after it finishes sending the message.
For example, according to the HTTP protocol, the header section of the request and response
messages don't have a fixed length and its boundary is represented by a sequence of
four ASCII symbols, <CR><LF><CR><LF>, which is part of the message. In such cases,
dynamically extensible buffers and functions that can work with them, which are provided by
the Boost.Asio library, are very useful.
In this recipe, we will see how to instantiate extensible buffers and how to read and write
data to and from them. To see how these buffers can be used with I/O-related methods
and functions provided by Boost.Asio, refer to the corresponding recipes dedicated to I/O
operations listed in the See also section.
How to do it…
Extensible stream-oriented buffers are represented in Boost.Asio with the asio::streambuf
class, which is a typedef for asio::basic_streambuf:
typedef basic_streambuf<> streambuf;
The asio::basic_streambuf<> class is inherited from std::streambuf, which
means that it can be used as a stream buffer for STL stream classes. In addition to this,
several I/O functions provided by Boost.Asio deal with buffers that are represented as
objects of this class.
47
I/O Operations
We can work with an object of the asio::streambuf class just like we would work with
any stream buffer class that is inherited from the std::streambuf class. For example,
we can assign this object to a stream (for example, std::istream, std::ostream, or
std::iostream, depending on our needs), and then, use stream's operator<<() and
operator>>() operators to write and read data to and from the stream.
Let's consider a sample application in which an object of asio::streambuf is instantiated,
some data is written to it, and then the data is read back from the buffer to an object of the
std::string class:
#include <boost/asio.hpp>
#include <iostream>
using namespace boost;
int main()
{
asio::streambuf buf;
std::ostream output(&buf);
// Writing the message to the stream-based buffer.
output << "Message1\nMessage2";
// Now we want to read all data from a streambuf
// until '\n' delimiter.
// Instantiate an input stream which uses our
// stream buffer.
std::istream input(&buf);
// We'll read data into this string.
std::string message1;
std::getline(input, message1);
// Now message1 string contains 'Message1'.
return 0;
}
Note that this sample does not contain any network I/O operations because it focuses on the
asio::streambuf class itself and its operations rather than on how to use this class with
I/O operations.
48
Chapter 2
How it works…
The main() application entry point function begins with instantiating an object of the
asio::streambuf class named buf. Next, the output stream object of the std::ostream
class is instantiated. The buf object is used as a stream buffer for the output stream.
In the next line, the Message1\nMessage2 sample data string is written to the output
stream object, which in turn redirects the data to the buf stream buffer.
Usually, in a typical client or server application, the data will be written to the buf stream
buffer by the Boost.Asio input function such as asio::read(), which accepts a stream
buffer object as an argument and reads data from the socket to that buffer.
Now, we want to read the data back from the stream buffer. To do this, we allocate an input
stream and pass the buf object as a stream buffer argument to its constructor. After this, we
allocate a string object named message1, and then, use the std::getline function to read
part of the string currently stored in the buf stream buffer until the delimiter symbol, \n.
As a result, the string1 object contains the Message1 string and the buf stream buffer
contains the rest of the initial string after the delimiter symbol, that is, Message2.
See also
ff
The Reading from a TCP socket asynchronously recipe demonstrates how to read
data from the socket to an extensible stream-oriented buffer
Writing to a TCP socket synchronously
Writing to a TCP socket is an output operation that is used to send data to the remote
application connected to this socket. Synchronous writing is the simplest way to send the data
using a socket provided by Boost.Asio. The methods and functions that perform synchronous
writing to the socket block the thread of execution and do not return until the data (at least
some amount of data) is written to the socket or an error occurs.
In this recipe, we will see how to write data to a TCP socket synchronously.
How to do it…
The most basic way to write to the socket provided by the Boost.Asio library is to use the
write_some() method of the asio::ip::tcp::socket class. Here is the declaration
of one of the method's overloads:
template<
typename ConstBufferSequence>
49
I/O Operations
std::size_t write_some(
const ConstBufferSequence & buffers);
This method accepts an object that represents a composite buffer as an argument, and as
its name suggests, writes some amount of data from the buffer to the socket. If the method
succeeds, the return value indicates the number of bytes written. The point to emphasize here
is that the method may not send all the data provided to it through the buffers argument.
The method only guarantees that at least one byte will be written if an error does not occur.
This means that, in a general case, in order to write all the data from the buffer to the socket,
we may need to call this method several times.
The following algorithm describes the steps required to synchronously write data to a TCP
socket in a distributed application:
1. In a client application, allocate, open, and connect an active TCP socket. In a server
application, obtain a connected active TCP socket by accepting a connection request
using an acceptor socket.
2. Allocate the buffer and fill it with data that is to be written to the socket.
3. In a loop, call the socket's write_some() method as many times as it is needed to
send all the data available in the buffer.
The following code sample demonstrates a client application, which operates according to
the algorithm:
#include <boost/asio.hpp>
#include <iostream>
using namespace boost;
void writeToSocket(asio::ip::tcp::socket& sock) {
// Step 2. Allocating and filling the buffer.
std::string buf = "Hello";
std::size_t total_bytes_written = 0;
// Step 3. Run the loop until all data is written
// to the socket.
while (total_bytes_written != buf.length()) {
total_bytes_written += sock.write_some(
asio::buffer(buf.c_str() +
total_bytes_written,
buf.length() - total_bytes_written));
}
}
50
Chapter 2
int main()
{
std::string raw_ip_address = "127.0.0.1";
unsigned short port_num = 3333;
try {
asio::ip::tcp::endpoint
ep(asio::ip::address::from_string(raw_ip_address),
port_num);
asio::io_service ios;
// Step 1. Allocating and opening the socket.
asio::ip::tcp::socket sock(ios, ep.protocol());
sock.connect(ep);
writeToSocket(sock);
}
catch (system::system_error &e) {
std::cout << "Error occured! Error code = " << e.code()
<< ". Message: " << e.what();
return e.code().value();
}
return 0;
}
Although in the presented code sample, writing to the socket is performed in the context of
an application that acts as a client, the same approach can be used to write to the socket in a
server application.
How it works…
The main()application entry point function is quite simple. It allocates a socket, opens, and
synchronously connects it to a remote application. Then, the writeToSocket() function is
called and the socket object is passed to it as an argument. In addition to this, the main()
function contains a try-catch block intended to catch and handle exceptions that may be
thrown by Boost.Asio methods and functions.
51
I/O Operations
The interesting part in the sample is the writeToSocket()function that performs
synchronous writing to the socket. It accepts a reference to the socket object as an
argument. Its precondition is that the socket passed to it is already connected; otherwise,
the function fails.
The function begins with allocating and filling the buffer. In this sample, we use an ASCII
string as data that is to be written to the socket, and, therefore, we allocate an object of the
std::string class and assign it a value of Hello, which we will use as a dummy message
that will be written to the socket.
Then, the variable named total_bytes_written is defined and its value is set to 0. This
variable is used as a counter that stores the count of bytes already written to the socket.
Next, the loop is run in which the socket's write_some() method is called. Except for the
degenerate case when the buffer is empty (that is, the buf.length() method returns a
value of 0), at least one iteration of the loop is executed and the write_some() method is
called at least once. Let's take a closer look at the loop:
while (total_bytes_written != buf.length()) {
total_bytes_written += sock.write_some(
asio::buffer(buf.c_str() +
total_bytes_written,
buf.length() - total_bytes_written));
}
The termination condition evaluates to true when the value of the total_bytes_written
variable is equal to the size of the buffer, that is, when all the bytes available in the buffer
have been written to the socket. In each iteration of the loop, the value of the total_bytes_
written variable is increased by the value returned by the write_some() method, which is
equal to the number of bytes written during this method call.
Each time the write_some() method is called, the argument passed to it is adjusted. The
start byte of the buffer is shifted by the value of total_bytes_written as compared to
the original buffer (because the previous bytes have already been sent by preceding calls
to the write_some() method) and the size of the buffer is decreased by the same value,
correspondingly.
After the loop terminates, all the data from the buffer is written to the socket and the
writeToSocket() function returns.
It's worth noting that the amount of bytes written to the socket during a single call to the
write_some() method depends on several factors. In the general case, it is not known
to the developer; and therefore, it should not be accounted for. A demonstrated solution is
independent of this value and calls the write_some() method as many times as needed to
write all the data available in the buffer to the socket.
52
Chapter 2
Alternative – the send() method
The asio::ip::tcp::socket class contains another method to synchronously
write data to the socket named send(). There are three overloads of this method. One
of them is equivalent to the write_some() method, as described earlier. It has exactly the
same signature and provides exactly the same functionality. These methods are synonyms in
a sense.
The second overload accepts one additional argument as compared to the write_some()
method. Let's take a look at it:
template<
typename ConstBufferSequence>
std::size_t send(
const ConstBufferSequence & buffers,
socket_base::message_flags flags);
This additional argument is named flags. It can be used to specify a bit mask, representing
flags that control the operation. Because these flags are used quite rarely, we won't consider
them in this book. Refer to the Boost.Asio documentation to find out more information on
this topic.
The third overload is equivalent to the second one, but it doesn't throw exceptions in case of
a failure. Instead, the error information is returned by means of an additional method's output
argument of the boost::system::error_code type.
There's more...
Writing to a socket using the socket's write_some() method seems very complex for such a
simple operation. Even if we want to send a small message that consists of several bytes, we
must use a loop, a variable to keep track of how many bytes have already been written, and
properly construct a buffer for each iteration of the loop. This approach is error-prone
and makes the code more difficult to understand.
Fortunately, Boost.Asio provides a free function, which simplifies writing to a socket.
This function is called asio::write(). Let's take a look at one of its overloads:
template<
typename SyncWriteStream,
typename ConstBufferSequence>
std::size_t write(
SyncWriteStream & s,
const ConstBufferSequence & buffers);
53
I/O Operations
This function accepts two arguments. The first of them named s is a reference to an
object that satisfies the requirements of the SyncWriteStream concept. For a complete
list of the requirements, refer to the corresponding Boost.Asio documentation section at
http://www.boost.org/doc/libs/1_58_0/doc/html/boost_asio/reference/
SyncWriteStream.html. The object of the asio::ip::tcp::socket class that
represents a TCP socket satisfies these requirements and, therefore, can be used as the
first argument of the function. The second argument named buffers represents the buffer
(simple or composite) and contains data that is to be written to the socket.
In contrast to the socket object's write_some() method, which writes some amount of data
from the buffer to the socket, the asio::write() function writes all the data available in
the buffer. This simplifies writing to the socket and makes the code shorter and cleaner.
This is how our writeToSocket() function from a previous sample would look like if we
used the asio::write() function instead of the socket object's write_some() method
to write data to the socket:
void writeToSocketEnhanced(asio::ip::tcp::socket& sock) {
// Allocating and filling the buffer.
std::string buf = "Hello";
// Write whole buffer to the socket.
asio::write(sock, asio::buffer(buf));
}
The asio::write() function is implemented in a similar way as the original
writeToSocket() function is implemented by means of several calls to the socket
object's write_some() method in a loop.
Note that the asio::write() function has seven more
overloads on the top of the one we just considered. Some of
them may be very useful in specific cases. Refer to the Boost.Asio
documentation to find out more about this function at http://
www.boost.org/doc/libs/1_58_0/doc/html/boost_
asio/reference/write.html.
See also
ff
The Implementing a synchronous TCP client recipe in Chapter 3, Implementing
Client Applications, demonstrates how to implement a synchronous TCP client that
performs synchronous writing to send request messages to the server
ff
The Implementing a synchronous iterative TCP server recipe in Chapter 4,
Implementing Server Applications, demonstrates how to implement a synchronous TCP
server that performs synchronous writing to send response messages to the client
54
Chapter 2
Reading from a TCP socket synchronously
Reading from a TCP socket is an input operation that is used to receive data sent by the
remote application connected to this socket. Synchronous reading is the simplest way to
receive the data using a socket provided by Boost.Asio. The methods and functions that
perform synchronous reading from the socket blocks the thread of execution and doesn't
return until the data (at least some amount of data) is read from the socket or an error occurs.
In this recipe, we will see how to read data from a TCP socket synchronously.
How to do it…
The most basic way to read data from the socket provided by the Boost.Asio library is the
read_some() method of the asio::ip::tcp::socket class. Let's take a look at one of
the method's overloads:
template<
typename MutableBufferSequence>
std::size_t read_some(
const MutableBufferSequence & buffers);
This method accepts an object that represents a writable buffer (single or composite) as
an argument, and as its name suggests, reads some amount of data from the socket to
the buffer. If the method succeeds, the return value indicates the number of bytes read. It's
important to note that there is no way to control how many bytes the method will read. The
method only guarantees that at least one byte will be read if an error does not occur. This
means that, in a general case, in order to read a certain amount of data from the socket,
we may need to call the method several times.
The following algorithm describes the steps required to synchronously read data from a TCP
socket in a distributed application:
1. In a client application, allocate, open, and connect an active TCP socket. In a server
application, obtain a connected active TCP socket by accepting a connection request
using an acceptor socket.
2. Allocate the buffer of a sufficient size to fit in the expected message to be read.
3. In a loop, call the socket's read_some() method as many times as it is needed to
read the message.
55
I/O Operations
The following code sample demonstrates a client application, which operates according to
the algorithm:
#include <boost/asio.hpp>
#include <iostream>
using namespace boost;
std::string readFromSocket(asio::ip::tcp::socket& sock) {
const unsigned char MESSAGE_SIZE = 7;
char buf[MESSAGE_SIZE];
std::size_t total_bytes_read = 0;
while (total_bytes_read != MESSAGE_SIZE) {
total_bytes_read += sock.read_some(
asio::buffer(buf + total_bytes_read,
MESSAGE_SIZE - total_bytes_read));
}
return std::string(buf, total_bytes_read);
}
int main()
{
std::string raw_ip_address = "127.0.0.1";
unsigned short port_num = 3333;
try {
asio::ip::tcp::endpoint
ep(asio::ip::address::from_string(raw_ip_address),
port_num);
asio::io_service ios;
asio::ip::tcp::socket sock(ios, ep.protocol());
sock.connect(ep);
readFromSocket(sock);
}
catch (system::system_error &e) {
56
Chapter 2
std::cout << "Error occured! Error code = " << e.code()
<< ". Message: " << e.what();
return e.code().value();
}
return 0;
}
Although in the presented code sample, reading from a socket is performed in the context of
an application that acts as a client, the same approach can be used to read data from the
socket in a server application.
How it works…
The main()application entry point function is quite simple. First, it allocates a TCP socket,
opens, and synchronously connects it to a remote application. Then, the readFromSocket()
function is called and the socket object is passed to it as an argument. In addition to this, the
main() function contains a try-catch block intended to catch and handle exceptions that
may be thrown by Boost.Asio methods and functions.
The interesting part in the sample is the readFromSocket() function that performs
synchronous reading from the socket. It accepts a reference to the socket object as an input
argument. Its precondition is that the socket passed to it as an argument must be connected;
otherwise, the function fails.
The function begins with allocating a buffer named buf. The size of the buffer is chosen to be
7 bytes. This is because in our sample, we expect to receive exactly a 7 bytes long message
from a remote application.
Then, a variable named total_bytes_read is defined and its value is set to 0. This variable
is used as a counter that keeps the count of the total number of bytes read from the socket.
Next, the loop is run in which the socket's read_some() method is called. Let's take a closer
look at the loop:
while (total_bytes_read != MESSAGE_SIZE) {
total_bytes_read += sock.read_some(
asio::buffer(buf + total_bytes_read,
MESSAGE_SIZE - total_bytes_read));
}
57
I/O Operations
The termination condition evaluates to true when the value of the total_bytes_read
variable is equal to the size of the expected message, that is, when the whole message has
been read from the socket. In each iteration of the loop, the value of the total_bytes_read
variable is increased by the value returned by the read_some() method, which is equal to
the number of bytes read during this method call.
Each time the read_some() method is called, the input buffer passed to it is adjusted. The
start byte of the buffer is shifted by the value of total_bytes_read as compared to the
original buffer (because the preceding part of the buffer has already been filled with data
read from the socket during preceding calls to the read_some() method) and the size of the
buffer is decreased by the same value, correspondingly.
After the loop terminates, all the data expected to be read from the socket is now in the buffer.
The readFromSocket() function ends with instantiating an object of the std::string
class from the received buffer and returning it to the caller.
It's worth noting that the amount of bytes read from the socket during a single call to the
read_some() method depends on several factors. In a general case, it is not known to
the developer; and, therefore, it should not be accounted for. The proposed solution is
independent of this value and calls the read_some() method as many times as needed to
read all the data from the socket.
Alternative – the receive() method
The asio::ip::tcp::socket class contains another method to read data from the socket
synchronously called receive(). There are three overloads of this method. One of them is
equivalent to the read_some() method, as described earlier. It has exactly the same signature
and provides exactly the same functionality. These methods are synonyms in a sense.
The second overload accepts one additional argument as compared to the read_some()
method. Let's take a look at it:
template<
typename MutableBufferSequence>
std::size_t receive(
const MutableBufferSequence & buffers,
socket_base::message_flags flags);
This additional argument is named flags. It can be used to specify a bit mask, representing
flags that control the operation. Because these flags are rarely used, we won't consider them
in this book. Refer to the Boost.Asio documentation to find out more about this topic.
The third overload is equivalent to the second one, but it doesn't throw exceptions in case of a
failure. Instead, the error information is returned by means of an additional output argument
of the boost::system::error_code type.
58
Chapter 2
There's more...
Reading from a socket using the socket's read_some() method seems very complex for such
a simple operation. This approach requires us to use a loop, a variable to keep track
of how many bytes have already been read, and properly construct a buffer for each iteration
of the loop. This approach is error-prone and makes the code more difficult to understand
and maintain.
Fortunately, Boost.Asio provides a family of free functions that simplify synchronous reading
of data from a socket in different contexts. There are three such functions, each having
several overloads, that provide a rich functionality that facilitates reading data from a socket.
The asio::read() function
The asio::read() function is the simplest one out of the three. Let's take a look at the
declaration of one of its overloads:
template<
typename SyncReadStream,
typename MutableBufferSequence>
std::size_t read(
SyncReadStream & s,
const MutableBufferSequence & buffers);
This function accepts two arguments. The first of them named s is a reference to an object
that satisfies the requirements of the SyncReadStream concept. For a complete list of the
requirements, refer to the corresponding Boost.Asio documentation section available at
http://www.boost.org/doc/libs/1_58_0/doc/html/boost_asio/reference/
SyncReadStream.html. The object of the asio::ip::tcp::socket class that
represents a TCP socket satisfies these requirements and, therefore, can be used as the first
argument of the function. The second argument named buffers represents a buffer (simple
or composite) to which the data will be read from the socket.
In contrast to the socket's read_some() method, which reads some amount of data from the
socket to the buffer, the asio::read() function, during a single call, reads data from the
socket until the buffer passed to it as an argument is filled or an error occurs. This simplifies
reading from the socket and makes the code shorter and cleaner.
This is how our readFromSocket() function from the previous sample would look like if we
used the asio::read() function instead of the socket object's read_some() method to
read data from the socket:
std::string readFromSocketEnhanced(asio::ip::tcp::socket& sock) {
const unsigned char MESSAGE_SIZE = 7;
char buf[MESSAGE_SIZE];
59
I/O Operations
asio::read(sock, asio::buffer(buf, MESSAGE_SIZE));
return std::string(buf, MESSAGE_SIZE);
}
In the preceding sample, a call to the asio::read() function will block the thread of
execution until exactly 7 bytes are read or an error occurs. The benefits of this approach
over the socket's read_some() method are obvious.
The asio::read() function has several overloads, which provide
flexibility in specific contexts. Refer to the corresponding section of
the Boost.Asio documentation to find out more about this function
at http://www.boost.org/doc/libs/1_58_0/doc/html/
boost_asio/reference/read.html.
The asio::read_until() function
The asio::read_until() function provides a way to read data from a socket until a
specified pattern is encountered in the data. There are eight overloads of this function.
Let's consider one of them:
template<
typename SyncReadStream,
typename Allocator>
std::size_t read_until(
SyncReadStream & s,
boost::asio::basic_streambuf< Allocator > & b,
char delim);
This function accepts three arguments. The first of them named s is a reference to an
object that satisfies the requirements of the SyncReadStream concept. For a complete
list of the requirements, refer to the corresponding Boost.Asio documentation section at
http://www.boost.org/doc/libs/1_58_0/doc/html/boost_asio/reference/
SyncReadStream.html. The object of the asio::ip::tcp::socket class that
represents a TCP socket satisfies these requirements and, therefore, can be used as
the first argument of the function.
The second argument named b represents a stream-oriented extensible buffer in which the
data will be read. The last argument named delim specifies a delimiter character.
The asio::read_until() function will read data from the s socket to the buffer b until
it encounters a character specified by the delim argument in the read portion of the data.
When the specified character is encountered, the function returns.
60
Chapter 2
It's important to note that the asio::read_until() function is implemented so that it
reads the data from the socket by blocks of variable sizes (internally it uses the socket's
read_some() method to read the data). When the function returns, the buffer b may contain
some symbols after the delimiter symbol. This may happen if the remote application sends
some more data after the delimiter symbol (for example, it may send two messages in a row,
each having a delimiter symbol in the end). In other words, when the asio::read_until()
function returns successfully, it is guaranteed that the buffer b contains at least one delimiter
symbol but may contain more. It is the developer's responsibility to parse the data in the
buffer and handle the situation when it contains data after the delimiter symbol.
This is how we will implement our readFromSocket() function if we want to read all the
data from a socket until a specific symbol is encountered. Let's assume the message delimiter
to be a new line ASCII symbol, \n:
std::string readFromSocketDelim(asio::ip::tcp::socket& sock) {
asio::streambuf buf;
// Synchronously read data from the socket until
// '\n' symbol is encountered.
asio::read_until(sock, buf, '\n');
std::string message;
// Because buffer 'buf' may contain some other data
// after '\n' symbol, we have to parse the buffer and
// extract only symbols before the delimiter.
std::istream input_stream(&buf);
std::getline(input_stream, message);
return message;
}
This example is quite simple and straightforward. Because buf may contain more symbols
after the delimiter symbol, we use the std::getline() function to extract the messages
of interest before the delimiter symbol and put them into the message string object, which is
then returned to the caller.
The read_until() function has several overloads, which provide
more sophisticated ways to specify termination conditions, such as string
delimiters, regular expressions, or functors. Refer to the corresponding
Boost.Asio documentation section to find out more about this topic
at http://www.boost.org/doc/libs/1_58_0/doc/html/
boost_asio/reference/read_until.html.
61
I/O Operations
The asio::read_at() function
The asio::read_at() function provides a way to read data from a socket, starting at a
particular offset. Because this function is rarely used, it is beyond the scope of this book.
Refer to the corresponding Boost.Asio documentation section for more details about this
function and its overloads at http://www.boost.org/doc/libs/1_58_0/doc/html/
boost_asio/reference/read_at.html.
The asio::read(), asio::read_until(), and asio::read_at() functions are
implemented in a similar way to how the original readFromSocket() function in our sample
is implemented by means of several calls to the socket object's read_some() method in a
loop until the termination condition is satisfied or an error occurs.
See also
ff
The Using extensible stream-oriented I/O buffers recipe demonstrates how to write
and read data to and from the asio::streambuf buffer
ff
The Implementing a synchronous TCP client recipe in Chapter 3, Implementing Client
Applications, demonstrates how to implement a synchronous TCP client that performs
synchronous reading from a socket to receive response messages sent by the server
ff
The Implementing a synchronous iterative TCP server recipe in Chapter 4,
Implementing Server Applications, demonstrates how to implement a synchronous
TCP server that performs synchronous reading to receive request messages from
the client
Writing to a TCP socket asynchronously
Asynchronous writing is a flexible and efficient way to send data to a remote application.
In this recipe, we will see how to write data to a TCP socket asynchronously.
How to do it…
The most basic tool used to asynchronously write data to the socket provided by the Boost.
Asio library is the async_write_some() method of the asio::ip::tcp::socket class.
Let's take a look at one of the method's overloads:
template<
typename ConstBufferSequence,
typename WriteHandler>
void async_write_some(
const ConstBufferSequence & buffers,
WriteHandler handler);
62
Chapter 2
This method initiates the write operation and returns immediately. It accepts an object that
represents a buffer that contains the data to be written to the socket as its first argument.
The second argument is a callback, which will be called by Boost.Asio when an initiated
operation is completed. This argument can be a function pointer, functor, or any other object
that satisfies the requirements of the WriteHandler concept. The complete list of the
requirements can be found in the corresponding section of the Boost.Asio documentation at
http://www.boost.org/doc/libs/1_58_0/doc/html/boost_asio/reference/
WriteHandler.html.
The callback should have the following signature:
void write_handler(
const boost::system::error_code& ec,
std::size_t bytes_transferred);
Here, ec is an argument that indicates an error code if one occurs, and the
bytes_transferred argument indicates how many bytes have been written
to the socket during the corresponding asynchronous operation.
As the async_write_some() method's name suggests, it initiates an operation that
is intended to write some amount of data from the buffer to the socket. This method
guarantees that at least one byte will be written during the corresponding asynchronous
operation if an error does not occur. This means that, in a general case, in order to write all
the data available in the buffer to the socket, we may need to perform this asynchronous
operation several times.
Now that we know how the key method works, let's see how to implement an application that
performs asynchronous writing to the socket.
The following algorithm describes the steps required to perform and implement an
application, which writes data to a TCP socket asynchronously. Note that this algorithm
provides a possible way to implement such an application. Boost.Asio is quite flexible and
allows us to organize and structure the application by writing data to a socket asynchronously
in many different ways:
1. Define a data structure that contains a pointer to a socket object, a buffer, and a
variable used as a counter of bytes written.
2. Define a callback function that will be called when the asynchronous writing
operation is completed.
3. In a client application, allocate and open an active TCP socket and connect it to a
remote application. In a server application, obtain a connected active TCP socket by
accepting a connection request.
4. Allocate a buffer and fill it with data that is to be written to the socket.
63
I/O Operations
5. Initiate an asynchronous writing operation by calling the socket's async_write_
some() method. Specify a function defined in step 2 as a callback.
6. Call the run() method on an object of the asio::io_service class.
7.
In a callback, increase the counter of bytes written. If the number of bytes written is
less than the total amount of bytes to be written, initiate a new asynchronous writing
operation to write the next portion of the data.
Let's implement a sample client application that performs asynchronous writing in accordance
with the preceding algorithm.
We begin with adding the include and using directives:
#include <boost/asio.hpp>
#include <iostream>
using namespace boost;
Next, according to step 1 of the algorithm, we define a data structure that contains a pointer
to the socket object, a buffer that contains data to be written, and a counter variable that
contains the number of bytes already written:
// Keeps objects we need in a callback to
// identify whether all data has been written
// to the socket and to initiate next async
// writing operation if needed.
struct Session {
std::shared_ptr<asio::ip::tcp::socket> sock;
std::string buf;
std::size_t total_bytes_written;
};
In step 2, we define a callback function, which will be called when the asynchronous operation
is completed:
// Function used as a callback for
// asynchronous writing operation.
// Checks if all data from the buffer has
// been written to the socket and initiates
// new asynchronous writing operation if needed.
void callback(const boost::system::error_code& ec,
std::size_t bytes_transferred,
std::shared_ptr<Session> s)
{
64
Chapter 2
if (ec != 0) {
std::cout << "Error occured! Error code = "
<< ec.value()
<< ". Message: " << ec.message();
return;
}
s->total_bytes_written += bytes_transferred;
if (s->total_bytes_written == s->buf.length()) {
return;
}
s->sock->async_write_some(
asio::buffer(
s->buf.c_str() +
s->total_bytes_written,
s->buf.length() s->total_bytes_written),
std::bind(callback, std::placeholders::_1,
std::placeholders::_2, s));
}
Let's skip step 3 for now and implement steps 4 and 5 in a separate function. Let's call this
function writeToSocket():
void writeToSocket(std::shared_ptr<asio::ip::tcp::socket> sock) {
std::shared_ptr<Session> s(new Session);
// Step 4. Allocating and filling the buffer.
s->buf = std::string("Hello");
s->total_bytes_written = 0;
s->sock = sock;
// Step 5. Initiating asynchronous write operation.
s->sock->async_write_some(
asio::buffer(s->buf),
std::bind(callback,
std::placeholders::_1,
std::placeholders::_2,
s));
}
65
I/O Operations
Now, we come back to step 3 and implement it in the main()application entry point function:
int main()
{
std::string raw_ip_address = "127.0.0.1";
unsigned short port_num = 3333;
try {
asio::ip::tcp::endpoint
ep(asio::ip::address::from_string(raw_ip_address),
port_num);
asio::io_service ios;
// Step 3. Allocating, opening and connecting a socket.
std::shared_ptr<asio::ip::tcp::socket> sock(
new asio::ip::tcp::socket(ios, ep.protocol()));
sock->connect(ep);
writeToSocket(sock);
// Step 6.
ios.run();
}
catch (system::system_error &e) {
std::cout << "Error occured! Error code = " << e.code()
<< ". Message: " << e.what();
return e.code().value();
}
return 0;
}
How it works…
Now, let's track the application's execution path to better understand how it works.
The application is run by a single thread, in the context of which the application's main()
entry point function is called. Note that Boost.Asio may create additional threads for some
internal operations, but it guarantees that no application code is executed in the context of
those threads.
66
Chapter 2
The main() function allocates, opens, and synchronously connects a socket to a remote
application and then calls the writeToSocket() function by passing a pointer to the socket
object. This function initiates an asynchronous write operation and returns. We'll consider this
function in a moment. The main() function continues with calling the run() method on the
object of the asio::io_service class, where Boost.Asio captures the thread of execution
and uses it to call the callback functions associated with asynchronous operations when they
get completed.
The asio::os_service::run() method blocks, as long as, at least one pending
asynchronous operation. When the last callback of the last pending asynchronous operation
is completed, this method returns.
Now, let's come back to the writeToSocket() function and analyze its behavior. It begins
with allocating an instance of the Session data structure in the free memory. Then, it
allocates and fills the buffer with the data to be written to the socket. After this, a pointer
to the socket object and the buffer are stored in the Session object. Because the socket's
async_write_some() method may not write all the data to the socket in one go, we may
need to initiate another asynchronous write operation in a callback function. That's why we
need the Session object and we allocate it in the free memory and not on the stack; it must
live until the callback function is called.
Finally, we initiate the asynchronous operation, calling the socket object's async_write_
some() method. The invocation of this method is somewhat complex, and, therefore, let's
consider this in more detail:
s->sock->async_write_some(
asio::buffer(s->buf),
std::bind(callback,
std::placeholders::_1,
std::placeholders::_2,
s));
The first argument is a buffer that contains data to be written to the socket. Because the
operation is asynchronous, this buffer may be accessed by Boost.Asio at any moment
between operation initiation and when the callback is called. This means that the buffer must
stay intact and must be available until the callback is called. We guarantee this by storing the
buffer in a Session object, which in turn is stored in the free memory.
The second argument is a callback that is to be invoked when the asynchronous operation is
completed. Boost.Asio defines a callback as a concept, which can be a function or a functor,
that accepts two arguments. The first argument of the callback specifies an error that occurs
while the operation is being executed, if any. The second argument specifies the number of
bytes written by the operation.
67
I/O Operations
Because we want to pass an additional argument to our callback function, a pointer to
the corresponding Session object, which acts as a context for the operation, we use the
std::bind() function to construct a function object to which we attach a pointer to the
Session object as the third argument. The function object is then passed as a callback
argument to the socket object's async_write_some() method.
Because it is asynchronous, the async_write_some() method doesn't block the thread of
execution. It initiates the writing operation and returns.
The actual writing operation is executed behind the scenes by the Boost.Asio library and
underlying operating system, and when the operation is complete or an error occurs, the
callback is invoked.
When invoked, the callback function named, literally, callback in our sample application
begins with checking whether the operation succeeded or an error occurred. In the latter
case, the error information is output to the standard output stream and the function returns.
Otherwise, the counter of the total written bytes is increased by the number of bytes written
as a result of an operation. Then, we check whether the total number of bytes written to the
socket is equal to the size of the buffer. If these values are equal, this means that all the data
has been written to the socket and there is no more work to do. The callback function returns.
However, if there is still data in the buffer that is to be written, a new asynchronous write
operation is initiated:
s->sock->async_write_some(
asio::buffer(
s->buf.c_str() +
s->total_bytes_written,
s->buf.length() –
s->total_bytes_written),
std::bind(callback, std::placeholders::_1,
std::placeholders::_2, s));
Note how the beginning of the buffer is shifted by the number of bytes already written,
and how the size of the buffer is decreased by the same value, correspondingly.
As a callback, we specify the same callback() function using the std::bind() function
to attach an additional argument—the Session object, just like we did when we initiated the
first asynchronous operation.
The cycles of initiation of an asynchronous writing operation and consequent callback
invocation repeat until all the data from the buffer is written to the socket or an error occurs.
When the callback function returns without initiating a new asynchronous operation, the
asio::io_service::run() method, called in the main() function, unblocks the thread of
execution and returns. The main() function returns as well. This is when the application exits.
68
Chapter 2
There's more...
Although the async_write_some() method described in the previous sample allows
asynchronously writing data to the socket, the solution based on it is somewhat complex
and error-prone. Fortunately, Boost.Asio provides a more convenient way to asynchronously
write data to a socket using the free function asio::async_write(). Let's consider one
of its overloads:
template<
typename AsyncWriteStream,
typename ConstBufferSequence,
typename WriteHandler>
void async_write(
AsyncWriteStream & s,
const ConstBufferSequence & buffers,
WriteHandler handler);
This function is very similar to the socket's async_write_some() method. Its first argument
is an object that satisfies the requirements of the AsyncWriteStream concept. For the
complete list of the requirements, refer to the corresponding Boost.Asio documentation
section at http://www.boost.org/doc/libs/1_58_0/doc/html/boost_asio/
reference/AsyncWriteStream.html. The object of the asio::ip::tcp::socket
class satisfies these requirements and, therefore, can be used with this function.
The second and the third arguments of the asio::async_write() function are similar to
the first and second arguments of the async_write_some() method of a TCP socket object
described in the previous sample. These arguments are buffers that contain data that is to
be written and functions or objects that represent a callback, which will be called when the
operation is completed.
In contrast to the socket's async_write_some() method, which initiates the operation
that writes some amount of data from the buffer to the socket, the asio::async_write()
function initiates the operation, which writes all the data available in the buffer. In this case, the
callback is called only when all the data available in the buffer is written to the socket or when
an error occurs. This simplifies writing to the socket and makes the code shorter and cleaner.
If we change our previous sample so that it uses the asio::async_write() function
instead of the socket object's async_write_some() method to write data to the socket
asynchronously, our application becomes significantly simpler.
69
I/O Operations
Firstly, we don't need to keep track of the number of bytes written to the socket, so therefore,
the Session structure becomes smaller:
struct Session {
std::shared_ptr<asio::ip::tcp::socket> sock;
std::string buf;
};
Secondly, we know that when the callback function is invoked, it means that either all the
data from the buffer has been written to the socket or an error has occurred. This makes the
callback function much simpler:
void callback(const boost::system::error_code& ec,
std::size_t bytes_transferred,
std::shared_ptr<Session> s)
{
if (ec != 0) {
std::cout << "Error occured! Error code = "
<< ec.value()
<< ". Message: " << ec.message();
return;
}
// Here we know that all the data has
// been written to the socket.
}
The asio::async_write() function is implemented by means of zero or more
calls to the socket object's async_write_some() method. This is similar to how the
writeToSocket() function in our initial sample is implemented.
Note that the asio::async_write() function has three more
overloads, providing additional functionalities. Some of them may
be very useful in specific circumstances. Refer to the Boost.Asio
documentation to find out more about this function at http://www.
boost.org/doc/libs/1_58_0/doc/html/boost_asio/
reference/async_write.html.
70
Chapter 2
See also
ff
The Writing to a TCP socket synchronously recipe describes how to write data to
a TCP socket synchronously
ff
The Implementing an asynchronous TCP client recipe in Chapter 3, Implementing
Client Applications, demonstrates how to implement an asynchronous TCP client
that performs asynchronous writing to a TCP socket to send request messages
to the server
ff
The Implementing an asynchronous TCP server recipe in Chapter 4, Implementing
Server Applications, demonstrates how to implement an asynchronous TCP server
that performs asynchronous writing to a TCP socket to send response messages to
the client
Reading from a TCP socket asynchronously
Asynchronous reading is a flexible and efficient way to receive data from a remote application.
In this recipe, we will see how to read data from a TCP socket asynchronously.
How to do it…
The most basic tool used to asynchronously read data from a TCP socket provided by the
Boost.Asio library is the async_read_some() method of the asio::ip::tcp::socket
class. Here is one of the method's overloads:
template<
typename MutableBufferSequence,
typename ReadHandler>
void async_read_some(
const MutableBufferSequence & buffers,
ReadHandler handler);
This method initiates an asynchronous read operation and returns immediately. It accepts
an object that represents a mutable buffer as its first argument to which the data will be
read from the socket. The second argument is a callback that is called by Boost.Asio when
the operation is completed. This argument can be a function pointer, a functor, or any other
object that satisfies the requirements of the ReadHandler concept. The complete list of the
requirements can be found in the corresponding section of the Boost.Asio documentation at
http://www.boost.org/doc/libs/1_58_0/doc/html/boost_asio/reference/
ReadHandler.html.
71
I/O Operations
The callback should have the following signature:
void read_handler(
const boost::system::error_code& ec,
std::size_t bytes_transferred);
Here, ec is an argument that notifies an error code if one occurs, and the
bytes_transferred argument indicates how many bytes have been read from
the socket during the corresponding asynchronous operation.
As the async_read_some() method's name suggests, it initiates an operation that is
intended to read some amount of data from the socket to the buffer. This method guarantees
that at least one byte will be read during the corresponding asynchronous operation if an
error does not occur. This means that, in a general case, in order to read all the data from
the socket, we may need to perform this asynchronous operation several times.
Now that we know how the key method works, let's see how to implement an application that
performs asynchronous reading from the socket.
The following algorithm describes the steps required to implement an application, which
reads data from a socket asynchronously. Note that this algorithm provides a possible way
to implement such an application. Boost.Asio is quite flexible and allows us to organize and
structure the application by reading data from a socket asynchronously in different ways:
1. Define a data structure that contains a pointer to a socket object, a buffer, a variable
that defines the size of the buffer, and a variable used as a counter of bytes read.
2. Define a callback function that will be called when an asynchronous reading
operation is completed.
3. In a client application, allocate and open an active TCP socket, and then, connect it to
a remote application. In a server application, obtain a connected active TCP socket by
accepting a connection request.
4. Allocate a buffer big enough for the expected message to fit in.
5. Initiate an asynchronous reading operation by calling the socket's async_read_
some() method, specifying a function defined in step 2 as a callback.
6. Call the run() method on an object of the asio::io_service class.
7.
In a callback, increase the counter of bytes read. If the number of bytes read is less
than the total amount of bytes to be read (that is, the size of an expected message),
initiate a new asynchronous reading operation to read the next portion of data.
Let's implement a sample client application which will perform asynchronous reading in
accordance with the preceding algorithm.
72
Chapter 2
We begin with adding the include and using directives:
#include <boost/asio.hpp>
#include <iostream>
using namespace boost;
Next, according to step 1, we define a data structure that contains a pointer to the socket
object named sock, a pointer to the buffer named buf, a variable named buf_size that
contains the size of the buffer, and a total_bytes_read variable that contains the number
of bytes already read:
// Keeps objects we need in a callback to
// identify whether all data has been read
// from the socket and to initiate next async
// reading operation if needed.
struct Session {
std::shared_ptr<asio::ip::tcp::socket> sock;
std::unique_ptr<char[]> buf;
std::size_t total_bytes_read;
unsigned int buf_size;
};
In step 2, we define a callback function, which will be called when asynchronous operation
is completed:
// Function used as a callback for
// asynchronous reading operation.
// Checks if all data has been read
// from the socket and initiates
// new reading operation if needed.
void callback(const boost::system::error_code& ec,
std::size_t bytes_transferred,
std::shared_ptr<Session> s)
{
if (ec != 0) {
std::cout << "Error occured! Error code = "
<< ec.value()
<< ". Message: " << ec.message();
return;
}
73
I/O Operations
s->total_bytes_read += bytes_transferred;
if (s->total_bytes_read == s->buf_size) {
return;
}
s->sock->async_read_some(
asio::buffer(
s->buf.get() +
s->total_bytes_read,
s->buf_size s->total_bytes_read),
std::bind(callback, std::placeholders::_1,
std::placeholders::_2, s));
}
Let's skip step 3 for now and implement steps 4 and 5 in a separate function. Let's name this
function readFromSocket():
void readFromSocket(std::shared_ptr<asio::ip::tcp::socket> sock) {
std::shared_ptr<Session> s(new Session);
// Step 4. Allocating the buffer.
const unsigned int MESSAGE_SIZE = 7;
s->buf.reset(new char[MESSAGE_SIZE]);
s->total_bytes_read = 0;
s->sock = sock;
s->buf_size = MESSAGE_SIZE;
// Step 5. Initiating asynchronous reading operation.
s->sock->async_read_some(
asio::buffer(s->buf.get(), s->buf_size),
std::bind(callback,
std::placeholders::_1,
std::placeholders::_2,
s));
}
Now, we come back to step 3 and implement it in the application's main() entry
point function:
int main()
{
std::string raw_ip_address = "127.0.0.1";
74
Chapter 2
unsigned short port_num = 3333;
try {
asio::ip::tcp::endpoint
ep(asio::ip::address::from_string(raw_ip_address),
port_num);
asio::io_service ios;
// Step 3. Allocating, opening and connecting a socket.
std::shared_ptr<asio::ip::tcp::socket> sock(
new asio::ip::tcp::socket(ios, ep.protocol()));
sock->connect(ep);
readFromSocket(sock);
// Step 6.
ios.run();
}
catch (system::system_error &e) {
std::cout << "Error occured! Error code = " << e.code()
<< ". Message: " << e.what();
return e.code().value();
}
return 0;
}
How it works…
Now, let's track the application's execution path to better understand how it works.
The application is run by a single thread; in the context of which the application's main()
entry point function is called. Note that Boost.Asio may create additional threads for some
internal operations, but it guarantees that no application code is called in the context of
those threads.
75
I/O Operations
The main() function begins with allocating, opening, and connecting a socket to a remote
application. Then, it calls the readFromSocket() function and passes a pointer to the
socket object as an argument. The readFromSocket() function initiates an asynchronous
reading operation and returns. We'll consider this function in a moment. The main() function
continues with calling the run() method on the object of the asio::io_service class,
where Boost.Asio captures the thread of execution and uses it to call the callback functions
associated with asynchronous operations when they get completed.
The asio::io_service::run() method blocks as long as there is at least one pending
asynchronous operation. When the last callback of the last pending operation is completed,
this method returns.
Now, let's come back to the readFromSocket() function and analyze its behavior. It
begins with allocating an instance of the Session data structure in the free memory.
Then, it allocates a buffer and stores a pointer to it in a previously allocated instance of the
Session data structure. A pointer to the socket object and the size of the buffer are stored
in the Session data structure as well. Because the socket's async_read_some() method
may not read all the data in one go, we may need to initiate another asynchronous reading
operation in the callback function. This is why we need the Session data structure and why
we allocate it in the free memory and not on a stack. This structure and all the objects that
reside in it must live at least until the callback is invoked.
Finally, we initiate the asynchronous operation, calling the socket object's async_read_
some() method. The invocation of this method is somewhat complex; therefore, let's take
a look at it in more detail:
s->sock->async_read_some(
asio::buffer(s->buf.get(), s->buf_size),
std::bind(callback,
std::placeholders::_1,
std::placeholders::_2,
s));
The first argument is the buffer to which the data will be read. Because the operation is
asynchronous, this buffer may be accessed by Boost.Asio at any moment between the
operation initiation and when the callback is invoked. This means that the buffer must stay
intact and be available until the callback is invoked. We guarantee this by allocating the
buffer in the free memory and storing it in the Session data structure, which in turn is
allocated in the free memory as well.
The second argument is a callback that is to be invoked when the asynchronous operation is
completed. Boost.Asio defines a callback as a concept, which can be a function or a functor,
that accepts two arguments. The first argument of the callback specifies an error that occurs
while the operation is being executed, if any. The second argument specifies the number of
bytes read by the operation.
76
Chapter 2
Because we want to pass an additional argument to our callback function, a pointer to the
corresponding Session object, which serves as a context for the operation—we use the
std::bind() function to construct a function object to which we attach a pointer to the
Session object as the third argument. The function object is then passed as a callback
argument to the socket object's async_write_some() method.
Because it is asynchronous, the async_write_some() method doesn't block the thread of
execution. It initiates the reading operation and returns.
The actual reading operation is executed behind the scenes by the Boost.Asio library and
underlying operating system, and when the operation is completed or an error occurs, the
callback is invoked.
When invoked, the callback function named, literally, callback in our sample application
begins with checking whether the operation succeeded or an error occurred. In the latter
case, the error information is output to the standard output stream and the function returns.
Otherwise, the counter of the total read bytes is increased by the number of bytes read as
a result of the operation. Then, we check whether the total number of bytes read from the
socket is equal to the size of the buffer. If these values are equal, it means that the buffer
is full and there is no more work to do. The callback function returns. However, if there is
still some space in the buffer, we need to continue with reading; therefore, we initiate a new
asynchronous reading operation:
s->sock->async_read_some(
asio::buffer(s->buf.get(), s->buf_size),
std::bind(callback,
std::placeholders::_1,
std::placeholders::_2,
s));
Note that the beginning of the buffer is shifted by the number of bytes already read and the
size of the buffer is decreased by the same value, respectively.
As a callback, we specify the same callback function using the std::bind() function to
attach an additional argument—the Session object.
The cycles of initiation of an asynchronous reading operation and consequent callback
invocation repeat until the buffer is full or an error occurs.
When the callback function returns without initiating a new asynchronous operation, the
asio::io_service::run() method, called in the main() function, unblocks the thread of
execution and returns. The main() function returns as well. This is when the application exits.
77
I/O Operations
There's more...
Although the async_read_some() method, as described in the previous sample,
allows asynchronously reading data from the socket, the solution based on it is somewhat
complex and error-prone. Fortunately, Boost.Asio provides a more convenient way to
asynchronously read data from a socket: the free function asio::async_read().
Let's consider one of its overloads:
template<
typename AsyncReadStream,
typename MutableBufferSequence,
typename ReadHandler>
void async_read(
AsyncReadStream & s,
const MutableBufferSequence & buffers,
ReadHandler handler);
This function is very similar to the socket's async_read_some() method. Its first argument
is an object that satisfies the requirements of the AsyncReadStream concept. For the
complete list of the requirements, refer to the corresponding Boost.Asio documentation
section at http://www.boost.org/doc/libs/1_58_0/doc/html/boost_asio/
reference/AsyncReadStream.html. The object of the asio::ip::tcp::socket
class satisfies these requirements and, therefore, can be used with this function.
The second and third arguments of the asio::async_read() function are similar to the
first and second arguments of the async_read_some() method of a TCP socket object
described in the previous sample. These arguments are buffers used as data destination
points and functions or objects that represent a callback, which will be called when the
operation is completed.
In contrast to the socket's async_read_some() method, which initiates the operation,
that reads some amount of data from the socket to the buffer, the asio::async_read()
function initiates the operation that reads the data from the socket until the buffer passed to
it as an argument is full. In this case, the callback is called when the amount of data read is
equal to the size of the provided buffer or when an error occurs. This simplifies reading from
the socket and makes the code shorter and cleaner.
If we change our previous sample so that it uses the asio::async_read() function
instead of the socket object's async_read_some() method to read data from the socket
asynchronously, our application becomes significantly simpler.
78
Chapter 2
Firstly, we don't need to keep track of the number of bytes read from the socket; therefore,
the Session structure becomes smaller:
struct Session {
std::shared_ptr<asio::ip::tcp::socket> sock;
std::unique_ptr<char[]> buf;
unsigned int buf_size;
};
Secondly, we know that when the callback function is invoked, it means that either an
expected amount of data has been read from the socket or an error has occurred.
This makes the callback function much simpler:
void callback(const boost::system::error_code& ec,
std::size_t bytes_transferred,
std::shared_ptr<Session> s)
{
if (ec != 0) {
std::cout << "Error occured! Error code = "
<< ec.value()
<< ". Message: " << ec.message();
return;
}
// Here we know that the reading has completed
// successfully and the buffer is full with
// data read from the socket.
}
The asio::async_read() function is implemented by means of zero or more
calls to the socket object's async_read_some() method. This is similar to how the
readFromSocket() function in our initial sample is implemented.
Note that the asio::async_read() function has three more
overloads, providing additional functionalities. Some of them may be very
useful in specific circumstances. Refer to the Boost.Asio documentation to
find out about this at http://www.boost.org/doc/libs/1_58_0/
doc/html/boost_asio/reference/async_read.html.
79
I/O Operations
See also
ff
The Reading from a TCP socket synchronously recipe describes how to read data
from a TCP socket synchronously
ff
The Implementing an asynchronous TCP client recipe in Chapter 3, Implementing
Client Applications, demonstrates how to implement an asynchronous TCP client that
performs asynchronous reading from a TCP socket to receive response messages
sent by the server
ff
The Implementing an asynchronous TCP server recipe in Chapter 4, Implementing
Server Applications, demonstrates how to implement an asynchronous TCP server
that performs asynchronous reading from a TCP socket to receive request messages
from the client
Canceling asynchronous operations
Sometimes, after an asynchronous operation has been initiated and has not yet completed,
the conditions in the application may change so that the initiated operation becomes
irrelevant or outdated and nobody is interested in the completion of the operation.
In addition to this, if an initiated asynchronous operation is a reaction to a user command,
the user may change their mind while the operation is being executed. The user may want to
discard the previous issued command and may want to issue a different one or decide to exit
from the application.
Consider a situation where a user types a website address in a typical web browser's
address bar and hits the Enter key. The browser immediately initiates a DNS name resolution
operation. When the DNS name is resolved and the corresponding IP address is obtained,
it initiates the connection operation to connect to the corresponding web server. When a
connection is established, the browser initiates an asynchronous write operation to send
a request to the server. Finally, when the request is sent, the browser starts waiting for the
response message. Depending on the responsiveness of the server application, the volume
of the data transmitted over the network, the state of the network, and other factors, all
these operations may take a substantial amount of time. And the user while waiting for the
requested web page to be loaded, may change their mind, and before the page gets loaded,
the user may type another website address in the address bar and hit Enter.
Another (extreme) situation is where a client application sends a request to the server
application and starts waiting for the response message, but the server application while
processing the client's request, gets into a deadlock due to bugs in it. In this case, the user
would have to wait forever for the response message and would never get it.
80
Chapter 2
In both the cases, the user of the client application would benefit from having the ability to
cancel the operation they initiated before it completes. In general, it is a good practice to
provide the user with the ability to cancel an operation that may take a noticeable amount
of time. Because the network communication operations fall into a class of operations that
may last for unpredictably long periods of time, it is important to support the cancelation of
operations in distributed applications that communicate over the network.
One of the benefits of asynchronous operations provided by the Boost.Asio library is that they
can be canceled at any moment after the initiation. In this recipe, we'll see how to cancel
asynchronous operations.
How to do it…
The following algorithm provides the steps required to initiate and cancel asynchronous
operations with Boost.Asio:
1. If the application is intended to run on Windows XP or Windows Server 2003, define
flags that enable asynchronous operation canceling on these versions of Windows.
2. Allocate and open a TCP or UDP socket. It may be an active or passive (acceptor)
socket in the client or server application.
3. Define a callback function or functor for an asynchronous operation. If needed, in this
callback, implement a branch of code that handles the situation when the operation
has been canceled.
4. Initiate one or more asynchronous operations and specify a function or an object
defined in step 4 as a callback.
5. Spawn an additional thread and use it to run the Boost.Asio event loop.
6. Call the cancel() method on the socket object to cancel all the outstanding
asynchronous operations associated with this socket.
Let's consider the implementation of the client application designed in accordance with
the presented algorithm in which an asynchronous connection operation is first initiated
and then canceled.
According to step 1, to compile and run our code on Windows XP or Windows Server 2003,
we need to define some flags that control the behavior of the Boost.Asio library with regard to
which mechanisms of the underlying OS to exploit.
81
I/O Operations
By default, when it is compiled for Windows, Boost.Asio uses the I/O completion port
framework to run operations asynchronously. On Windows XP and Windows Server 2003, this
framework has some issues and limitations with regard to the cancelation of an operation.
Therefore, Boost.Asio requires developers to explicitly notify that they want to enable the
asynchronous operation canceling functionality despite of the known issues, when targeting
the application in versions of Windows in question. To do this, the BOOST_ASIO_ENABLE_
CANCELIO macro must be defined before Boost.Asio headers are included. Otherwise, if this
macro is not defined, while the source code of the application contains calls to asynchronous
operations, cancelation methods and functions, the compilation will always fail.
In other words, it is mandatory to define the BOOST_ASIO_ENABLE_CANCELIO macro,
when targeting Windows XP or Windows Server 2003, and the application needs to cancel
asynchronous operations.
To get rid of issues and limitations imposed by the usage of the I/O completion port
framework on Windows XP and Windows Server 2003, we can prevent Boost.Asio from
using this framework by defining another macro named BOOST_ASIO_DISABLE_IOCP
before including Boost.Asio headers. With this macro defined, Boost.Asio doesn't use the I/O
completion port framework on Windows; and therefore, problems related to asynchronous
operations canceling disappear. However, the benefits of scalability and efficiency of the I/O
completion ports framework disappear too.
Note that the mentioned issues and limitations related to asynchronous operation canceling
do not exist on Windows Vista and Windows Server 2008 and later. Therefore, when targeting
these versions of Windows, canceling works fine, and there is no need to disable the I/O
completion port framework usage unless there is another reason to do so. Refer to the
asio::ip::tcp::cancel() method's documentation section for more details on this issue
at http://www.boost.org/doc/libs/1_58_0/doc/html/boost_asio/reference/
basic_stream_socket/cancel/overload1.html.
In our sample, we will consider how to construct a cross-platform application that, when
targeted at Windows during compilation, can be run on any Windows version, starting
from Windows XP or Windows Server 2003. Therefore, we define both the BOOST_ASIO_
DISABLE_IOCP and BOOST_ASIO_ENABLE_CANCELIO macros.
To determine the target operating system at compile time, we use the Boost.Predef
library. This library provides us with macro definitions that allow us to identify parameters
of the environment in which the code is compiled as the target operating system family
and its version, processor architecture, compiler, and many others. Refer to the Boost.Asio
documentation section for more details on this library at http://www.boost.org/doc/
libs/1_58_0/libs/predef/doc/html/index.html.
To use the Boost.Predef library, we include the following header file:
#include <boost/predef.h> // Tools to identify the OS.
82
Chapter 2
Then, we check whether the code is being compiled for Windows XP or Windows Server
2003, and if it is, we define the BOOST_ASIO_DISABLE_IOCP and BOOST_ASIO_ENABLE_
CANCELIO macros:
#ifdef BOOST_OS_WINDOWS
#define _WIN32_WINNT 0x0501
#if _WIN32_WINNT <= 0x0502 // Windows Server 2003 or earlier.
#define BOOST_ASIO_DISABLE_IOCP
#define BOOST_ASIO_ENABLE_CANCELIO
#endif
#endif
Next, we include the common Boost.Asio header and standard library <thread> header. We
will need the latter because we'll spawn additional threads in our application. In addition to
this, we specify a using directive to make the names of Boost.Asio classes and functions
shorter and more convenient to use:
#include <boost/asio.hpp>
#include <iostream>
#include <thread>
using namespace boost;
Then, we define the application's main() entry point function, which contains all the
functionalities of the application:
int main()
{
std::string raw_ip_address = "127.0.0.1";
unsigned short port_num = 3333;
try {
asio::ip::tcp::endpoint
ep(asio::ip::address::from_string(raw_ip_address),
port_num);
asio::io_service ios;
std::shared_ptr<asio::ip::tcp::socket> sock(
new asio::ip::tcp::socket(ios, ep.protocol()));
sock->async_connect(ep,
[sock](const boost::system::error_code& ec)
{
83
I/O Operations
//
//
//
//
if
If asynchronous operation has been
cancelled or an error occured during
execution, ec contains corresponding
error code.
(ec != 0) {
if (ec == asio::error::operation_aborted) {
std::cout << "Operation cancelled!";
}
else {
std::cout << "Error occured!"
<< " Error code = "
<< ec.value()
<< ". Message: "
<< ec.message();
}
return;
}
// At this point the socket is connected and
// can be used for communication with
// remote application.
});
// Starting a thread, which will be used
// to call the callback when asynchronous
// operation completes.
std::thread worker_thread([&ios](){
try {
ios.run();
}
catch (system::system_error &e) {
std::cout << "Error occured!"
<< " Error code = " << e.code()
<< ". Message: " << e.what();
}
});
// Emulating delay.
std::this_thread::sleep_for(std::chrono::seconds(2));
// Cancelling the initiated operation.
sock->cancel();
84
Chapter 2
// Waiting for the worker thread to complete.
worker_thread.join();
}
catch (system::system_error &e) {
std::cout << "Error occured! Error code = " << e.code()
<< ". Message: " << e.what();
return e.code().value();
}
return 0;
}
How it works…
Now, let's analyze how the application works.
Our sample client application consists of a single function, which is the application's main()
entry point function. This function begins with allocating and opening a TCP socket according
to step 2 of the algorithm.
Next, the asynchronous connection operation is initiated on the socket. The callback provided
to the method is implemented as a lambda function. This corresponds to steps 3 and 4 of the
algorithm. Note how the fact that the operation was canceled is determined in the callback
function. When an asynchronous operation is canceled, the callback is invoked and its
argument that specifies the error code contains an OS dependent error code defined in
Boost.Asio as asio::error::operation_aborted.
Then, we spawn a thread named worker_thread, which will be used to run the Boost.Asio
event loop. In the context of this thread, the callback function will be invoked by the library.
The entry point function of the worker_thread thread is quite simple. It contains a
try-catch block and a call to the asio::io_service object's run() method. This
corresponds to step 5 of the algorithm.
After the worker thread is spawned, the main thread is put to sleep for 2 seconds. This is to
allow the connection operation to progress a bit and emulate what could be a delay between
the two commands issued by the user in the real application; for example, a web browser.
According to the last step 6 of the algorithm, we call the socket object's cancel() method to
cancel the initiated connection operation. At this point, if the operation has not yet finished,
it will be canceled and the corresponding callback will be invoked with an argument that
specifies the error code containing the asio::error::operation_aborted value to notify
that the operation was canceled. However, if the operation has already finished, calling the
cancel() method has no effect.
85
I/O Operations
When the callback function returns, the worker thread exits the event loop because there
are no more outstanding asynchronous operations to be executed. As a result, the thread
exits its entry point function. This leads to the main thread running to its completion as well.
Eventually, the application exits.
There's more...
In the previous sample, we considered the canceling of an asynchronous connection
operation associated with an active TCP socket. However, any operation associated with both
the TCP and UDP sockets can be canceled in a similar way. The cancel() method should be
called on the corresponding socket object after the operation has been initiated.
In addition to this, the async_resolve() method of the asio::ip::tcp::resolver or
asio::ip::udp::resolver class used to asynchronously resolve a DNS name can be
canceled by calling the resolver object's cancel() method.
All asynchronous operations initiated by the corresponding free functions provided by Boost.
Asio can be canceled as well by calling the cancel() method on an object that was passed
to the free function as the first argument. This object can represent either a socket (active or
passive) or a resolver.
See also
ff
The Implementing an asynchronous TCP client recipe in Chapter 3, Implementing
Client Applications, demonstrates how to construct a more complex client application
that supports the asynchronous operation cancelation functionality
ff
Chapter 1, The Basics, contains recipes that demonstrate how to synchronously
connect a socket and resolve a DNS name
Shutting down and closing a socket
In some distributed applications that communicate over the TCP protocol, there is a need
to transfer messages that do not have a fixed size and specific byte sequence, marking its
boundary. This means that the receiving side, while reading the message from the socket,
cannot determine where the message ends by analyzing the message itself with either its
size or its content.
One approach to solve this problem is to structure each message in such a way that it consists
of a logical header section and a logical body section. The header section has a fixed size and
structure and specifies the size of the body section. This allows the receiving side to first read
and parse the header, find out the size of the message body, and then properly read the rest
of the message.
86
Chapter 2
This approach is quite simple and is widely used. However, it brings some redundancy and
additional computation overhead, which may be unacceptable in some circumstances.
Another approach can be applied when an application uses a separate socket for each
message sent to its peer, which is a quite popular practice. The idea of this approach is to
shut down the send part of the socket by the message sender after the message is written
to the socket. This results in a special service message being sent to the receiver, informing
the receiver that the message is over and the sender will not send anything else using the
current connection.
The second approach provides many more benefits than the first one and, because it is part
of the TCP protocol software, it is readily available to the developer for usage.
Another operation on a socket, that is, closing may seem similar to shutting down, but it
is actually very different from it. Closing a socket assumes returning the socket and all the
other resources associated with it back to the operating system. Just like memory, a process
or a thread, a file handle or a mutex, a socket is a resource of an operating system. And like
any other resource, a socket should be returned back to the operating system after it has
been allocated, used, and is not needed by the application anymore. Otherwise, a resource
leak may occur, which may eventually lead to the exhaustion of the resource and to the
application's fault or instability of the whole operating system.
Serious issues that may occur when sockets are not closed make closing a very
important operation.
The main difference between shutting down and closing a TCP socket is that closing interrupts
the connection if one is established and, eventually, deallocates the socket and returns it
back to the operating system, while shutting down only disables writing, reading, or both the
operations on the socket and sends a service message to the peer application notifying about
this fact. Shutting down a socket never results in deallocating the socket.
In this recipe, we'll see how to shut down and close a TCP socket.
How to do it…
Here, we'll consider a distributed application that consists of two parts: a client and a server
to better understand how a socket shut down operation can be used to make an application
layer protocol more efficient and clear when the communication between parts of distributed
applications is based on binary messages of random sizes.
For simplicity, all operations in both the client and server applications are synchronous.
87
I/O Operations
The client application
The purpose of the client application is to allocate the socket and connect it to the server
application. After the connection is established, the application should prepare and send
a request message notifying its boundary by shutting down the socket after writing the
message to it.
After the request is sent, the client application should read the response. The size of the
response is unknown; therefore, the reading should be performed until the server closes
its socket to notify the response boundary.
We begin the client application by specifying the include and using directives:
#include <boost/asio.hpp>
#include <iostream>
using namespace boost;
Next, we define a function that accepts a reference to the socket object connected to the
server and performs the communication with the server using this socket. Let's name this
function communicate():
void communicate(asio::ip::tcp::socket& sock) {
// Allocating and filling the buffer with
// binary data.
const char request_buf[] = {0x48, 0x65, 0x0, 0x6c, 0x6c,
0x6f};
// Sending the request data.
asio::write(sock, asio::buffer(request_buf));
// Shutting down the socket to let the
// server know that we've sent the whole
// request.
sock.shutdown(asio::socket_base::shutdown_send);
// We use extensible buffer for response
// because we don't know the size of the
// response message.
asio::streambuf response_buf;
system::error_code ec;
asio::read(sock, response_buf, ec);
88
Chapter 2
if (ec == asio::error::eof) {
// Whole response message has been received.
// Here we can handle it.
}
else {
throw system::system_error(ec);
}
}
Finally, we define an application's main() entry point function. This function allocates
and connects the socket, and then calls the communicate() function defined in the
previous step:
int main()
{
std::string raw_ip_address = "127.0.0.1";
unsigned short port_num = 3333;
try {
asio::ip::tcp::endpoint
ep(asio::ip::address::from_string(raw_ip_address),
port_num);
asio::io_service ios;
asio::ip::tcp::socket sock(ios, ep.protocol());
sock.connect(ep);
communicate(sock);
}
catch (system::system_error &e) {
std::cout << "Error occured! Error code = " << e.code()
<< ". Message: " << e.what();
return e.code().value();
}
return 0;
}
89
I/O Operations
The server application
The server application is intended to allocate an acceptor socket and passively wait for a
connection request. When the connection request arrives, it should accept it and read the
data from the socket connected to the client until the client application shuts down the socket
on its side. Having received the request message, the server application should send the
response message notifying its boundary by shutting down the socket.
We begin the client application by specifying include and using directives:
#include <boost/asio.hpp>
#include <iostream>
using namespace boost;
Next, we define a function that accepts a reference to the socket object connected to
the client application and performs the communication with the client using this socket.
Let's name this function processRequest():
void processRequest(asio::ip::tcp::socket& sock) {
// We use extensible buffer because we don't
// know the size of the request message.
asio::streambuf request_buf;
system::error_code ec;
// Receiving the request.
asio::read(sock, request_buf, ec);
if (ec != asio::error::eof)
throw system::system_error(ec);
// Request received. Sending response.
// Allocating and filling the buffer with
// binary data.
const char response_buf[] = { 0x48, 0x69, 0x21 };
// Sending the request data.
asio::write(sock, asio::buffer(response_buf));
// Shutting down the socket to let the
// client know that we've sent the whole
// response.
sock.shutdown(asio::socket_base::shutdown_send);
}
90
Chapter 2
Finally, we define the application's main() entry point function. This function allocates
an acceptor socket and waits for the incoming connection requests. When the connection
request arrives, it obtains an active socket that is connected to the client application and calls
the processRequest() function defined in the previous step by passing a connected socket
object to it:
int main()
{
unsigned short port_num = 3333;
try {
asio::ip::tcp::endpoint ep(asio::ip::address_v4::any(),
port_num);
asio::io_service ios;
asio::ip::tcp::acceptor acceptor(ios, ep);
asio::ip::tcp::socket sock(ios);
acceptor.accept(sock);
processRequest(sock);
}
catch (system::system_error &e) {
std::cout << "Error occured! Error code = " << e.code()
<< ". Message: " << e.what();
return e.code().value();
}
return 0;
}
Closing a socket
In order to close an allocated socket, the close() method should be called on the
corresponding object of the asio::ip::tcp::socket class. However, usually, there is no
need to do it explicitly because the destructor of the socket object closes the socket if one
was not closed explicitly.
91
I/O Operations
How it works…
The server application is first started. In its main() entry point function, an acceptor socket
is allocated, opened, bound to port 3333, and starts waiting for the incoming connection
request from the client.
Then, the client application is started. In its main() entry point function, an active socket
is allocated, opened, and connected to the server. After the connection is established, the
communicate() function is called. In this function, all the interesting things take place.
The client application writes a request message to the socket and then calls the socket's
shutdown() method, passing an asio::socket_base::shutdown_send constant as an
argument. This call shuts down the send part of the socket. At this point, writing to the socket
is disabled, and there is no way to restore the socket state to make it writable again:
sock.shutdown(asio::socket_base::shutdown_send);
Shutting down the socket in the client application is seen in the server application as a
protocol service message that arrives to the server, notifying the fact that the peer application
has shut down the socket. Boost.Asio delivers this message to the application code by means
of an error code returned by the asio::read() function. The Boost.Asio library defines this
code as asio::error::eof. The server application uses this error code to find out when
the client finishes sending the request message.
When the server application receives a full request message, the server and client exchange
their roles. Now, the server writes the data, namely, the response message to the socket on
its side, and the client application reads this message on its side. When the server finishes
writing the response message to the socket, it shuts down the send part of its socket to imply
that the whole message has been sent to its peer.
Meanwhile, the client application is blocked in the asio::read() function and reads
the response sent by the server until the function returns with the error code equal to
asio::error::eof, which implies that the server has finished sending the response
message. When the asio::read() function returns with this error code, the client knows
that it has read the whole response message, and it can then start processing it:
system::error_code ec;
asio::read(sock, response_buf, ec);
if (ec == asio::error::eof) {
// Whole response message has been received.
// Here we can handle it.
}
Note that after the client has shut down its socket's send part, it can still read data from the
socket because the receive part of the socket stays open independently from the send part.
92
Chapter 2
See also
ff
The Writing to a TCP socket synchronously recipe demonstrates how to write data to a
TCP socket synchronously
ff
The Reading from a TCP socket synchronously recipe demonstrates how to read data
from a TCP socket synchronously
ff
The Implementing the HTTP client application and Implementing the HTTP server
application recipes in Chapter 5, HTTP and SSL/TLS, demonstrate how a socket shut
down is used in the implementation of the HTTP protocol
93
3
Implementing Client
Applications
In this chapter, we will cover the following topics:
ff
Implementing a synchronous TCP client
ff
Implementing a synchronous UDP client
ff
Implementing an asynchronous TCP client
Introduction
A client is a part of a distributed application that communicates with another part of this
application called a server, in order to consume services it provides. The server, on the
other hand, is a part of distributed application that passively waits for requests arriving from
clients. When a request arrives, the server performs the requested operation and sends a
response—the result of the operation—back to the client.
The key characteristic of a client is that it needs a service provided by the server and it
initiates the communication session with that server in order to consume the service.
The key characteristic of the server is that it serves the requests coming from the clients
by providing a requested service.
We'll consider servers in the next chapter. In this chapter, we are going to focus on client
applications and will consider several types of them in detail.
95
Implementing Client Applications
The classification of client applications
Client applications can be classified by the transport layer protocol they use for
communication with the server. If the client uses a UDP protocol, it is called a UDP client. If
it uses a TCP protocol, it is called a TCP client correspondingly. Of course, there are many
other transport layer protocols that client applications may use for communication. Moreover,
there are multiprotocol clients that can communicate over several protocols. However, they
are beyond the scope of this book. In this chapter, we are going to focus on pure UDP and TCP
clients as such, which are the most popular and are the most often used in general purpose
software today.
The decision as to which transport layer protocol to choose for communication between the
parts of a distributed application should be made at the early stages of the application design
based on the application specification. Because TCP and UDP protocols are conceptually
different, it may be quite difficult to switch from one of them to another at the later stages of
the application development process.
Another way to classify client applications is according to whether the client is synchronous or
asynchronous. A synchronous client application uses synchronous socket API calls that block
the thread of execution until the requested operation is completed, or an error occurs. Thus, a
typical synchronous TCP client would use the asio::ip::tcp::socket::write_some()
method or the asio::write() free function to send a request to the sever and then use the
asio::ip::tcp::socket::read_some() method or the asio::read() free function
to receive a response. These methods and functions are blocking, which makes the client
synchronous.
An asynchronous client application as opposed to a synchronous one uses
asynchronous socket API calls. For example, an asynchronous TCP client may
use the asio::ip::tcp::socket::async_write_some() method or the
asio::async_write() free function to send a request to the server and then use the
asio::ip::tcp::socket::async_read_some() method or the asio::async_read()
free function to asynchronously receive a response.
Because the structure of a synchronous client significantly differs from that of an
asynchronous one, the decision as to which approach to apply should be made early at
the application design stage, and this decision should be based on the careful analysis
of the application requirements. Besides, possible application evolution paths and new
requirements that may appear in the future should be considered and taken into account.
96
Chapter 3
Synchronous versus asynchronous
As usually, each approach has its advantages and disadvantages. When a synchronous
approach gives better results in one situation, it may be absolutely unacceptable in another.
In the latter case, an asynchronous approach should be used. Let's compare two approaches
to better understand when it is more beneficial to use each of them.
The main advantage of a synchronous approach is its simplicity. A synchronous client is
significantly easier to develop, debug, and support than a functionally equal asynchronous
one. Asynchronous clients are more complex due to the fact that asynchronous operations
that are used by them complete in other places in code (mainly in callbacks) than they are
initiated. Usually, this requires allocating additional data structures in the free memory
to keep the context of the request and callback functions, and also involves thread
synchronization and other extras that may make the application structure quite complex
and error-prone. Most of these extras are not required in synchronous clients. Besides, the
asynchronous approach brings in additional computational and memory overhead, which
makes it less efficient than a synchronous one in some conditions.
However, the synchronous approach has some functional limitations, which often
make this approach unacceptable. These limitations consist of the inability to cancel a
synchronous operation after it has started, or to assign it a timeout so that it gets interrupted
if it is running longer than a certain amount of time. As opposed to synchronous operations,
asynchronous ones can be canceled at any moment after operation initiation and before the
moment it completes.
Imagine a typical modern web browser. A request cancellation is a very important feature
of a client application of this kind. After issuing a command to load a particular website, the
user may change his or her mind and decide to cancel the command before the page gets
loaded. From the user's perspective, it would be quite strange not to be able to cancel the
command until the page gets fully loaded. Therefore, this is when a synchronous approach
is not a good option.
Besides the difference in the complexity and functionality described above, the two
approaches differ in efficiency when it comes to running several requests in parallel.
Imagine that we are developing a web crawler, an application that traverses the pages of
websites and processes them in order to extract some interesting information. Given a file
with a long list of websites (say several millions), the application should traverse all the pages
of each of the sites listed in the file and then process each page. Naturally, one of the key
requirements of the application is to perform the task as fast as possible. Provided with these
requirements, which approach should we choose, synchronous or asynchronous?
97
Implementing Client Applications
Before we answer this question, let's consider the stages of a request life cycle and their
timings from the client application's perspective. Conceptually, the request life cycle consists
of five stages as follows:
1. Preparing the request: This stage involves any operations required to prepare a
request message. The duration of this step depends on the particular problem the
application solves. In our example, this could be reading the next website address
from the input file and constructing a string representing a request in accordance
with an HTTP protocol.
2. Transmitting a request from the client to the server: This stage assumes the
transmission of the request data from the client to the server over the network.
The duration of this step does not depend on a client application. It depends on
the properties and the current state of the network.
3. Processing the request by the server: The duration of this step depends on the
server's properties and its current load. In our example, the server application is a
web server and the request processing lies in constructing a requested web page,
which may involve I/O operations such as reading files and loading data from a
database.
4. Transmitting a response from the server to the client: Like stage 2, this stage also
assumes the transmission of the data over the network; however, this time it is in the
opposite direction—from the server to the client. The duration of this stage does not
depend on the client or the server. It only depends on the properties and the state of
the network.
5. Processing the response by the client: The duration of this stage depends on a
particular task that the client application is intended to perform. In our example, this
could be scanning the web page, extracting interesting information and storing it into
a database.
Note that, for the sake of simplicity, we omitted low-level substages such as connection
establishment and connection shutdown, which are important when using TCP protocol
but don't add a substantial value in our conceptual model of a request life cycle.
As we can see, only in stages 1 and 5 does the client perform some effective job related to
the request. Having initiated the transmission of the request data at the end of stage 1, the
client has to wait during the next three stages (2, 3, and 4) of the request life cycle before it
can receive the response and process it.
Now, with the stages of the request life cycle in mind, let's see what happens when we apply
synchronous and asynchronous approaches to implement our sample web crawler.
98
Chapter 3
If we apply a synchronous approach, the thread of execution processing a single request
synchronously will be sleeping during stages 2-4 of the request life cycle, and only during
stages 1 and 5, will it perform an effective job (for simplicity, we assume that stages 1 and 5
don't include instructions that block the thread). This means that the resource of an operating
system, namely a thread, is used inefficiently, because there are number of times when it
is simply doing nothing while there is still a lot of work available—millions of other pages to
request and process. In this situation, an asynchronous approach seems to be more efficient.
With an asynchronous approach, instead of a thread being blocked during stages 2-4 of a
request life cycle, it can be effectively used to perform stages 1 or 5 of another request.
Thus, we direct a single thread to process the different stages of different requests (this is
called overlapping), which results in the more efficient usage of a thread and consequently
increases the overall performance of the application.
However, an asynchronous approach is not always more efficient than a synchronous one. As
it has been mentioned, asynchronous operations imply additional computational overheads,
which means that the overall duration of an asynchronous operation (from initiation till
completion) is somewhat bigger than the equivalent synchronous one. This means that, if the
average total duration of stages 2-4 is less than the overhead of the timing asynchronous
approach per single request, then a synchronous approach turns out to be more efficient,
and therefore may be considered to be the right way to go.
Assessing the total duration of stages 2-4 of the request life cycle and the overhead of the
asynchronous approach is usually done experimentally. The duration may significantly vary,
and it depends on the properties and the state of the network through which the requests
and responses are transmitted and also on the properties and the load level of the server
application that serves the request.
The sample protocol
In this chapter, we are going to consider three recipes, each of which demonstrates
how to implement a particular type of a client application: the synchronous UDP client,
synchronous TCP client, and asynchronous TCP client. In all the recipes, it is assumed that
the client application communicates with the server application using the following simple
application-level protocol.
The server application accepts a request represented as an ASCII string. The string has the
following format:
EMULATE_LONG_COMP_OP [s]<LF>
Where [s] is a positive integer value and <LF> is ASCII a new-line symbol.
The server interprets this string as a request to perform a dummy operation that lasts for [s]
seconds. For example, a request string may look as follows:
"EMULATE_LONG_COMP_OP 10\n"
99
Implementing Client Applications
This means that the client sending this request wants the server to perform the dummy
operation for 10 seconds and then send a response to it.
Like the request, the response returned by the server is represented by an ASCII string. It may
either be OK<LF> if the operation completes successfully or ERROR<LF> if the operation fails.
Implementing a synchronous TCP client
A synchronous TCP client is a part of a distributed application that complies with the
following statements:
ff
Acts as a client in the client-server communication model
ff
Communicates with the server application using a TCP protocol
ff
Uses I/O and control operations (at least those I/O operations that are related
to communication with a server) that block the thread of execution until the
corresponding operation completes, or an error occurs
A typical synchronous TCP client works according to the following algorithm:
1. Obtain the IP-address and the protocol port number of the server application.
2. Allocate an active socket.
3. Establish a connection with the server application.
4. Exchange messages with the server.
5. Shut down the connection.
6. Deallocate the socket.
This recipe demonstrates how to implement a synchronous TCP client application with
Boost.Asio.
How to do it…
The following code sample demonstrates a possible implementation of a synchronous TCP
client application with Boost.Asio. The client uses the application layer protocol described in
the introduction section of this chapter:
#include <boost/asio.hpp>
#include <iostream>
using namespace boost;
100
Chapter 3
class SyncTCPClient {
public:
SyncTCPClient(const std::string& raw_ip_address,
unsigned short port_num) :
m_ep(asio::ip::address::from_string(raw_ip_address),
port_num),
m_sock(m_ios) {
m_sock.open(m_ep.protocol());
}
void connect() {
m_sock.connect(m_ep);
}
void close() {
m_sock.shutdown(
boost::asio::ip::tcp::socket::shutdown_both);
m_sock.close();
}
std::string emulateLongComputationOp(
unsigned int duration_sec) {
std::string request = "EMULATE_LONG_COMP_OP "
+ std::to_string(duration_sec)
+ "\n";
sendRequest(request);
return receiveResponse();
};
private:
void sendRequest(const std::string& request) {
asio::write(m_sock, asio::buffer(request));
}
std::string receiveResponse() {
asio::streambuf buf;
asio::read_until(m_sock, buf, '\n');
101
Implementing Client Applications
std::istream input(&buf);
std::string response;
std::getline(input, response);
return response;
}
private:
asio::io_service m_ios;
asio::ip::tcp::endpoint m_ep;
asio::ip::tcp::socket m_sock;
};
int main()
{
const std::string raw_ip_address = "127.0.0.1";
const unsigned short port_num = 3333;
try {
SyncTCPClient client(raw_ip_address, port_num);
// Sync connect.
client.connect();
std::cout << "Sending request to the server... "
<< std::endl;
std::string response =
client.emulateLongComputationOp(10);
std::cout << "Response received: " << response
<< std::endl;
// Close the connection and free resources.
client.close();
}
catch (system::system_error &e) {
std::cout << "Error occured! Error code = " << e.code()
<< ". Message: " << e.what();
102
Chapter 3
return e.code().value();
}
return 0;
}
How it works…
The sample client application consists of two main components—the SyncTCPClient class
and the application entry point function main() in which the SyncTCPClient class is used
to communicate with the server application. Let's consider each component separately.
The SyncTCPClient class
The SyncTCPClient class is the key component in the sample. It implements and provides
access to the communication functionality.
The class has three private members as follows:
ff
asio::io_service m_ios: This is the object providing access to the operating
system's communication services, which are used by the socket object
ff
asio::ip::tcp::endpoint m_ep: This is an endpoint designating the
server application
ff
asio::ip::tcp::socket m_sock: This is the socket used for communication
Each object of the class is intended to communicate with a single server application;
therefore, the class's constructor accepts the server IP-address and the protocol port number
as its arguments. These values are used to instantiate the m_ep object in the constructor's
initialization list. The socket object m_sock is instantiated and opened in the constructor too.
The three public methods comprise the interface of the SyncTCPClient class. The first
method named connect() is quite simple; it performs the connection of the socket to the
server. The close() method shuts the connection down and closes the socket, which leads
to the operating system's socket and other resources associated with it to be deallocated.
The third interface method is emulateLongComputationOp(unsigned int duration_
sec). This method is where the I/O operations are performed. It begins with preparing the
request string according to the protocol. Then, the request is passed to the class's private
method sendRequest(const std::string& request), which sends it to the server.
When the request is sent and the sendRequest() method returns, the receiveResponse()
method is called to receive the response from the server. When the response is received,
the receiveResponse() method returns the string containing the response. After this,
the emulateLongComputationOp() method returns the response to its caller.
103
Implementing Client Applications
Let's look at the sendRequest() and receiveResponse() methods in more detail.
The sendRequest() method has the following prototype:
void sendRequest(const std::string& request)
Its purpose is to send a string, passed to it as an argument, to the server. In order to send
the data to the server, the asio::write() free synchronous function is used. The function
returns when the request is sent. That's it about the sendRequest() method. Basically, all it
does is, it fully delegates its job to the asio::write() free function.
Having sent the request, now we want to receive the response from the server. This is the
purpose of the receiveResponse() method of the SyncTCPClient class. To perform its
job, method uses the asio::read_until() free function. According to the application layer
protocol, the response message sent by the server may vary in length, but must end with the
\n symbol; therefore, we specify this symbol as a delimiter when calling the function:
asio::streambuf buf;
asio::read_until(m_sock, buf, '\n');
The function blocks the thread of execution until it encounters the \n symbol as a part of
the message that arrived from the server. When the function returns, the stream buffer buf
contains the response. The data is then copied from the buf buffer to the response string
and the latter is returned to the caller. The emulateLongComputationOp() method in turn
returns the response to its caller—the main() function.
One thing to note with regard to the SyncTCPClient class is that it contains no error
handling-related code. That's because the class uses only those overloads of Boost.Asio
functions and objects' methods that throw exceptions in case of failure. It is assumed that
the user of the class is responsible for catching and handling the exceptions.
The main() entry point function
This function acts as a user of the SyncTCPClient class. Having obtained the server IPaddress and the protocol port number (this part is omitted from the sample), it instantiates
and uses an object of the SyncTCPClient class to communicate with the server in order
to consume its service, mainly to emulate an operation on the server that performs dummy
calculations for 10 seconds. The code of this function is simple and self-explanatory and thus
requires no additional comments.
See also
ff
104
Chapter 2, I/O Operations, includes recipes providing detailed discussions on how to
perform synchronous I/O
Chapter 3
Implementing a synchronous UDP client
A synchronous UDP client is a part of a distributed application that complies with the
following statements:
ff
Acts as a client in the client-server communication model
ff
Communicates with the server application using UDP protocol
ff
Uses I/O and control operations (at least those I/O operations that are related
to communication with the server) that block the thread of execution until the
corresponding operation completes, or an error occurs
A typical synchronous UDP client works according to the following algorithm:
1. Obtain an IP-address and a protocol port number of each server the client application
is intended to communicate with.
2. Allocate a UDP socket.
3. Exchange messages with the servers.
4. Deallocate the socket.
This recipe demonstrates how to implement a synchronous UDP client application with
Boost.Asio.
How to do it…
The following code sample demonstrates a possible implementation of a synchronous
UDP client application with Boost.Asio. It is assumed that the client uses UDP protocol
with the underlying IPv4 protocol for communication:
#include <boost/asio.hpp>
#include <iostream>
using namespace boost;
class SyncUDPClient {
public:
SyncUDPClient() :
m_sock(m_ios) {
m_sock.open(asio::ip::udp::v4());
}
105
Implementing Client Applications
std::string emulateLongComputationOp(
unsigned int duration_sec,
const std::string& raw_ip_address,
unsigned short port_num) {
std::string request = "EMULATE_LONG_COMP_OP "
+ std::to_string(duration_sec)
+ "\n";
asio::ip::udp::endpoint ep(
asio::ip::address::from_string(raw_ip_address),
port_num);
sendRequest(ep, request);
return receiveResponse(ep);
};
private:
void sendRequest(const asio::ip::udp::endpoint& ep,
const std::string& request) {
m_sock.send_to(asio::buffer(request), ep);
}
std::string receiveResponse(asio::ip::udp::endpoint& ep) {
char response[6];
std::size_t bytes_recieved =
m_sock.receive_from(asio::buffer(response), ep);
m_sock.shutdown(asio::ip::udp::socket::shutdown_both);
return std::string(response, bytes_recieved);
}
private:
asio::io_service m_ios;
asio::ip::udp::socket m_sock;
};
int main()
{
106
Chapter 3
const std::string server1_raw_ip_address = "127.0.0.1";
const unsigned short server1_port_num = 3333;
const std::string server2_raw_ip_address = "192.168.1.10";
const unsigned short server2_port_num = 3334;
try {
SyncUDPClient client;
std::cout << "Sending request to the server #1 ... "
<< std::endl;
std::string response =
client.emulateLongComputationOp(10,
server1_raw_ip_address, server1_port_num);
std::cout << "Response from the server #1 received: "
<< response << std::endl;
std::cout << "Sending request to the server #2... "
<< std::endl;
response =
client.emulateLongComputationOp(10,
server2_raw_ip_address, server2_port_num);
std::cout << "Response from the server #2 received: "
<< response << std::endl;
}
catch (system::system_error &e) {
std::cout << "Error occured! Error code = " << e.code()
<< ". Message: " << e.what();
return e.code().value();
}
return 0;
}
107
Implementing Client Applications
How it works…
The sample consists of two main components—the SyncUDPClient class and the
application entry point function main() that uses the SyncUDPClient class to
communicate with two server applications. Let's consider each component separately.
The SyncUDPClient class
The SyncUDPClient class is the key component in the sample. It implements the server
communication functionality and provides access to it for the user.
The class has two private members as follows:
ff
asio::io_service m_ios: This is the object providing access to the operating
system's communication services, which are used by the socket object
ff
asio::ip::udp::socket m_sock: This is the UDP socket used for
communication
The socket object m_sock is instantiated and opened in the class's constructor.
Because the client is intended to use IPv4 protocol, we pass the object returned by the
asio::ip::udp::v4() static method to the socket's open() method to designate the
socket to use IPv4 protocol.
Because the SyncUDPClient class implements communication over UDP protocol,
which is a connectionless protocol, a single object of this class can be used to
communicate with multiple servers. The interface of the class consists of a single
method—emulateLongComputationOp(). This method can be used to communicate
with the server just after the object of the SyncUDPClient class is instantiated.
The following is the prototype of the method:
std::string emulateLongComputationOp(
unsigned int duration_sec,
const std::string& raw_ip_address,
unsigned short port_num)
Besides the duration_sec argument that represents a request parameter, the method
accepts the server IP-address and the protocol port number. This method may be called
multiple times to communicate with different servers.
The method begins with preparing a request string according to the application layer protocol
and creating an endpoint object designating the target server application. Then, the request
string and the endpoint object are passed to the class's private method sendRequest(),
which sends the request message to the specified server. When the request is sent and the
sendRequest() method returns, the receiveResponse() method is called to receive a
response from the server.
108
Chapter 3
When the response is received, the receiveResponse() method returns the string
containing the response. In turn, the emulateLongComputationOp() method returns
the response to its caller. The sendRequest() method uses the socket object's send_
to() method to send the request message to a particular server. Let's have a look at the
declaration of this method:
template <typename ConstBufferSequence>
std::size_t send_to(const ConstBufferSequence& buffers,
const endpoint_type& destination)
The method accepts a buffer containing the request and an endpoint designating the server
to which the content of the buffer should be sent as arguments and blocks until the whole
buffer is sent, or an error occurs. Note that, if the method returns without an error, it only
means that the request has been sent and does not mean that the request has been received
by the server. UDP protocol doesn't guarantee message delivery and it provides no means to
check whether the datagram has been successfully received on the server-side or got lost
somewhere on its way to the server.
Having sent the request, now we want to receive the response from the server. This is the
purpose of the receiveResponse() method of the SyncUDPClient class. This method
begins with allocating a buffer that will hold the response message. We choose the size of
the buffer such that it can fit the largest message that the server may send according to
the application layer protocol. This message is an ERROR\n string that consists of six ASCII
symbols, which is therefore 6 bytes long; hence is the size of our buffer - 6 bytes. Because the
buffer is small enough, we allocate it on the stack.
To read the response data arriving from the server, we use the socket object's receive_
from() method. Here is the prototype of the method:
template <typename MutableBufferSequence>
std::size_t receive_from(const MutableBufferSequence& buffers,
endpoint_type& sender_endpoint)
This method copies a datagram that came from the server designated by the
sender_endpoint object to the buffer specified by the buffers argument.
There are two things to note about socket object's receive_from() method. The first thing
is that this method is synchronous and it blocks the thread of execution until the datagram
arrives from the specified server. If the datagram never arrives (for example, gets lost
somewhere on its way to the client), the method will never unblock and the whole application
will hang. The second thing is that if the size of the datagram that arrives from the server is
larger than the size of the supplied buffer, the method will fail.
After the response is received, the std::string object is created, initialized with a response
string, and returned to the caller—the emulateLongComputationOp() method. This in turn
returns the response to its caller—the main() function.
109
Implementing Client Applications
The SyncUDPClient class does not contain error handling-related code. That's is because it
uses only those overloads of Boost.Asio functions and objects' methods that throw exceptions
in case of failure. It is assumed that the user of the class is responsible for catching and
handling the exceptions.
The main() entry point function
In this function, we use the SyncUDPClient class in order to communicate with two server
applications. Firstly, we obtain the IP-addresses and the port numbers of the target server
applications. Then, we instantiate the object of the SyncUDPClient class and call the
object's emulateLongComputationOp() method twice to synchronously consume the
same service from two different servers.
See also
ff
Chapter 2, I/O Operations, includes recipes that provide detailed discussions on how
to perform synchronous I/O
Implementing an asynchronous TCP client
As it has already been mentioned in the introduction section of this chapter, the simplest
asynchronous client is structurally more complex than equivalent synchronous one.
When we add a feature such as request canceling to the asynchronous client, it becomes
even more complex.
In this recipe, we'll consider an asynchronous TCP client application supporting the
asynchronous execution of the requests and request canceling functionality. Here is the
list of requirements the application will fulfill:
ff
Input from the user should be processed in a separate thread—the user interface
thread. This thread should never be blocked for a noticeable amount of time.
ff
The user should be able to issue multiple requests to different servers.
ff
The user should be able to issue a new request before the previously issued
requests complete.
ff
The user should be able to cancel the previously issued requests before
they complete.
110
Chapter 3
How to do it…
As our application needs to support request canceling, we begin with specifying settings that
enable request canceling on Windows:
#include <boost/predef.h> // Tools to identify the OS.
// We need this to enable cancelling of I/O operations on
// Windows XP, Windows Server 2003 and earlier.
// Refer to "http://www.boost.org/doc/libs/1_58_0/
// doc/html/boost_asio/reference/basic_stream_socket/
// cancel/overload1.html" for details.
#ifdef BOOST_OS_WINDOWS
#define _WIN32_WINNT 0x0501
#if _WIN32_WINNT <= 0x0502 // Windows Server 2003 or earlier.
#define BOOST_ASIO_DISABLE_IOCP
#define BOOST_ASIO_ENABLE_CANCELIO
#endif
#endif
Then, we include the necessary headers and specify the using directive for our convenience:
#include <boost/asio.hpp>
#include
#include
#include
#include
<thread>
<mutex>
<memory>
<iostream>
using namespace boost;
We continue with defining a data type representing a pointer to a callback function.
Because our client application is going to be asynchronous, we need a notion of callback
as a request completion notification mechanism. Later, it will become clear as to why we
need it and how it is used:
// Function pointer type that points to the callback
// function which is called when a request is complete.
typedef void(*Callback) (unsigned int request_id,
const std::string& response,
const system::error_code& ec);
111
Implementing Client Applications
Next, we define a data structure whose purpose is to keep the data related to a particular
request while it is being executed. Let's name it Session:
// Structure represents a context of a single request.
struct Session {
Session(asio::io_service& ios,
const std::string& raw_ip_address,
unsigned short port_num,
const std::string& request,
unsigned int id,
Callback callback) :
m_sock(ios),
m_ep(asio::ip::address::from_string(raw_ip_address),
port_num),
m_request(request),
m_id(id),
m_callback(callback),
m_was_cancelled(false) {}
asio::ip::tcp::socket m_sock; // Socket used for communication
asio::ip::tcp::endpoint m_ep; // Remote endpoint.
std::string m_request;
// Request string.
// streambuf where the response will be stored.
asio::streambuf m_response_buf;
std::string m_response; // Response represented as a string.
// Contains the description of an error if one occurs during
// the request life cycle.
system::error_code m_ec;
unsigned int m_id; // Unique ID assigned to the request.
// Pointer to the function to be called when the request
// completes.
Callback m_callback;
bool m_was_cancelled;
std::mutex m_cancel_guard;
};
The purpose of all the fields that the Session data structure contains will become clear later
as we go.
112
Chapter 3
Next, we define a class that provides the asynchronous communication functionality.
Let's name it AsyncTCPClient:
class AsyncTCPClient : public boost::noncopyable {
class AsyncTCPClient : public boost::noncopyable {
public:
AsyncTCPClient(){
m_work.reset(new boost::asio::io_service::work(m_ios));
m_thread.reset(new std::thread([this](){
m_ios.run();
}));
}
void emulateLongComputationOp(
unsigned int duration_sec,
const std::string& raw_ip_address,
unsigned short port_num,
Callback callback,
unsigned int request_id) {
// Preparing the request string.
std::string request = "EMULATE_LONG_CALC_OP "
+ std::to_string(duration_sec)
+ "\n";
std::shared_ptr<Session> session =
std::shared_ptr<Session>(new Session(m_ios,
raw_ip_address,
port_num,
request,
request_id,
callback));
session->m_sock.open(session->m_ep.protocol());
// Add new session to the list of active sessions so
// that we can access it if the user decides to cancel
// the corresponding request before it completes.
// Because active sessions list can be accessed from
// multiple threads, we guard it with a mutex to avoid
// data corruption.
std::unique_lock<std::mutex>
lock(m_active_sessions_guard);
113
Implementing Client Applications
m_active_sessions[request_id] = session;
lock.unlock();
session->m_sock.async_connect(session->m_ep,
[this, session](const system::error_code& ec)
{
if (ec != 0) {
session->m_ec = ec;
onRequestComplete(session);
return;
}
std::unique_lock<std::mutex>
cancel_lock(session->m_cancel_guard);
if (session->m_was_cancelled) {
onRequestComplete(session);
return;
}
asio::async_write(session->m_sock,
asio::buffer(session->m_request),
[this, session](const boost::system::error_code& ec,
std::size_t bytes_transferred)
{
if (ec != 0) {
session->m_ec = ec;
onRequestComplete(session);
return;
}
std::unique_lock<std::mutex>
cancel_lock(session->m_cancel_guard);
if (session->m_was_cancelled) {
onRequestComplete(session);
return;
}
asio::async_read_until(session->m_sock,
session->m_response_buf,
'\n',
[this, session](const boost::system::error_code& ec,
std::size_t bytes_transferred)
114
Chapter 3
{
if (ec != 0) {
session->m_ec = ec;
} else {
std::istream strm(&session->m_response_buf);
std::getline(strm, session->m_response);
}
onRequestComplete(session);
});});});
};
// Cancels the request.
void cancelRequest(unsigned int request_id) {
std::unique_lock<std::mutex>
lock(m_active_sessions_guard);
auto it = m_active_sessions.find(request_id);
if (it != m_active_sessions.end()) {
std::unique_lock<std::mutex>
cancel_lock(it->second->m_cancel_guard);
it->second->m_was_cancelled = true;
it->second->m_sock.cancel();
}
}
void close() {
// Destroy work object. This allows the I/O thread to
// exits the event loop when there are no more pending
// asynchronous operations.
m_work.reset(NULL);
// Wait for the I/O thread to exit.
m_thread->join();
}
private:
void onRequestComplete(std::shared_ptr<Session> session) {
// Shutting down the connection. This method may
// fail in case socket is not connected. We don’t care
// about the error code if this function fails.
boost::system::error_code ignored_ec;
115
Implementing Client Applications
session->m_sock.shutdown(
asio::ip::tcp::socket::shutdown_both,
ignored_ec);
// Remove session form the map of active sessions.
std::unique_lock<std::mutex>
lock(m_active_sessions_guard);
auto it = m_active_sessions.find(session->m_id);
if (it != m_active_sessions.end())
m_active_sessions.erase(it);
lock.unlock();
boost::system::error_code ec;
if (session->m_ec == 0 && session->m_was_cancelled)
ec = asio::error::operation_aborted;
else
ec = session->m_ec;
// Call the callback provided by the user.
session->m_callback(session->m_id,
session->m_response, ec);
};
private:
asio::io_service m_ios;
std::map<int, std::shared_ptr<Session>> m_active_sessions;
std::mutex m_active_sessions_guard;
std::unique_ptr<boost::asio::io_service::work> m_work;
std::unique_ptr<std::thread> m_thread;
};
116
Chapter 3
This class is the key component in our sample, providing most of the functionality of the
application. This functionality is accessible to the user of the class through its public interface
that contains three public methods:
ff
void emulateLongComputationOp(unsigned int duration_sec, const
std::string& raw_ip_address, unsigned short port_num, Callback
callback, unsigned int request_id): This method initiates a request to
the server
ff
void cancelRequest(unsigned int request_id): This method cancels the
previously initiated request designated by the request_id argument
ff
void close(): This method blocks the calling thread until all the currently running
requests complete and deinitializes the client. When this method returns, the
corresponding instance of the AsyncTCPClient class can't be used anymore.
Now, we define a function that will serve as a callback, which we'll pass to the AsyncTCPCli
ent::emulateLongComputationOp() method. In our case, this function is quite simple. It
outputs the result of the request execution and the response message to the standard output
stream if the request is completed successfully:
void handler(unsigned int request_id,
const std::string& response,
const system::error_code& ec)
{
if (ec == 0) {
std::cout << "Request #" << request_id
<< " has completed. Response: "
<< response << std::endl;
} else if (ec == asio::error::operation_aborted) {
std::cout << "Request #" << request_id
<< " has been cancelled by the user."
<< std::endl;
} else {
std::cout << "Request #" << request_id
<< " failed! Error code = " << ec.value()
<< ". Error message = " << ec.message()
<< std::endl;
}
return;
}
117
Implementing Client Applications
The handler() function's signature corresponds to the function pointer type Callback
defined earlier.
Now that we have all the ingredients, we define an entry point of the application—the
main() function—which demonstrates how to use the components defined above in order
to communicate with the server. In our sample function, main() emulates the behavior of a
human user by initiating three requests and canceling one of them:
int main()
{
try {
AsyncTCPClient client;
// Here we emulate the user's behavior.
// User initiates a request with id 1.
client.emulateLongComputationOp(10, "127.0.0.1", 3333,
handler, 1);
// Then does nothing for 5 seconds.
std::this_thread::sleep_for(std::chrono::seconds(5));
// Then initiates another request with id 2.
client.emulateLongComputationOp(11, "127.0.0.1", 3334,
handler, 2);
// Then decides to cancel the request with id 1.
client.cancelRequest(1);
// Does nothing for another 6 seconds.
std::this_thread::sleep_for(std::chrono::seconds(6));
// Initiates one more request assigning ID3 to it.
client.emulateLongComputationOp(12, "127.0.0.1", 3335,
handler, 3);
// Does nothing for another 15 seconds.
std::this_thread::sleep_for(std::chrono::seconds(15));
// Decides to exit the application.
client.close();
}
catch (system::system_error &e) {
std::cout << "Error occured! Error code = " << e.code()
<< ". Message: " << e.what();
return e.code().value();
}
return 0;
};
118
Chapter 3
How it works…
Our sample client application uses two threads of execution. The first one—UI thread—is
responsible for processing a user input and initiating requests. The responsibility of the second
thread—I/O thread—is to run the event loop and call the asynchronous operation's callback
routines. Such configuration allows us to make our application's user interface responsive.
Starting the application – the main() entry point function
The main() function is invoked in the context of the UI thread. This function emulates the
behavior of the user who initiates and cancels requests. Firstly, it creates an instance of the
AsyncTCPClient class and then calls its emulateLongComputationOp() method three
times to initiate three asynchronous requests, each time specifying a different target server.
The first request (the one assigned ID 1) is canceled by calling the cancelRequest()
method several seconds after the request has been initiated.
Request completion – the handler() callback function
For all three requests initiated in the main() function handler() is specified as a callback.
This function is called when the request is finished regardless of the reason as to why it
finished—be it a successful completion or an error. Also, this function is called when the
request is canceled by the user. The function accepts three arguments as follows:
ff
unsigned int request_id: This contains the unique identifier of the request.
This is the same identifier that was assigned to the request when it was initiated.
ff
std::string& response: This contains the response data. This value is
considered valid only if the request is completed successfully and is not canceled.
ff
system::error_code& ec: If an error occurs during a request life cycle, this
object contains the error information. If the request was canceled, it contains the
asio::error::operation_aborted value.
The handler() function is quite simple in our sample. Based on the values of the
parameters passed to it, it outputs information about the finished request.
The AsyncTCPClient class – initializing
As it has already been mentioned, all the functionality related to communication with the
server application is hidden in the AsyncTCPClient class. This class has a nonempty
constructor that accepts no arguments and does two things. Firstly, it instantiates an object
of the asio::io_service::work class passing an instance of the asio::io_service
class named m_ios to its constructor. Then, it spawns a thread that calls the run() method
of the m_ios object. The object of the asio::io_service::work class keeps threads
running event loop from exiting this loop when there are no pending asynchronous operations.
The spawned thread plays the role of I/O thread in our application; in the context of this
thread, the callbacks assigned asynchronous operations will be invoked.
119
Implementing Client Applications
The AsyncTCPClient class – initiating a request
The emulateLongComputationOp() method is intended to initiate an asynchronous
request. It accepts five arguments. The first one named duration_sec represents the
request parameter according to the application layer protocol. The raw_ip_address and
port_num specify the server to which the request should be sent. The next argument is a
pointer to a callback function, which will be called when the request is complete. We'll turn
back to the discussion of the callback later in this section. The last argument request_id is
the unique identifier of the request. This identifier is associated with the request and is used
to refer to it later, for example, when there is a need to cancel it.
The emulateLongComputationOp() method begins with preparing a request string and
allocating an instance of the Session structure that keeps the data associated with the
request including a socket object that is used to communicate with the server.
Then, the socket is opened and the pointer to the Session object is added to the
m_active_sessions map. This map contains pointers to the Session objects associated
with all active requests, that is, those requests that have been initiated but have not finished
yet. When the request completes, before the corresponding callback is called, the pointer to
the Session object associated with this request is removed from the map.
The request_id argument is used as a key of the corresponding Session object added
to the map. We need to cache the Session objects in order to have access to them in case
the user decides to cancel the previously initiated request. If we would not need to support
canceling of a request, we could avoid using the m_active_sessions map.
We synchronize the access to the m_active_sessions map with a m_active_session_
guard mutex. Synchronization is necessary because the map can be accessed from multiple
threads. Items are added to it in UI thread, and removed in an I/O thread that calls a callback
when the corresponding request is finished.
Now, when the pointer to the corresponding Session object is cached, we need to connect
the socket to the server, which we do by calling the socket's async_connect() method:
session->m_sock.async_connect(session->m_ep,
[this, session](const system::error_code& ec)
{
// ...
});
An endpoint object designating the server to which we want to connect and a callback
function to be called when the connection is complete or an error occurs, are passed
as arguments to this method. In our sample we use lambda function as a callback
function. The call to the socket's async_connect() method is the last statement in
the emulateLongComputationOp() method. When async_connect() returns,
emulateLongComputationOp() returns too, which means that the request has
been initiated.
120
Chapter 3
Let's have a closer look at the lambda function that we pass to async_connect() as a
callback. Here is its code:
[this, session](const system::error_code&ec)
{
if (ec != 0) {
session->m_ec = ec;
onRequestComplete(session);
return;
}
std::unique_lock<std::mutex>
cancel_lock(session->m_cancel_guard);
if (session->m_was_cancelled) {
onRequestComplete(session);
return;
}
asio::async_write(session->m_sock,
asio::buffer(session->m_request),
[this, session](const boost::system::error_code& ec,
std::size_t bytes_transferred)
{
//...
});
}
The callback begins with checking the error code passed to it as the ec argument, the value
of which when different from zero means that the corresponding asynchronous operation
has failed. In case of failure, we store the ec value in the corresponding Session object, call
the class's onRequestComplete() private method passing the Session object to it as an
argument, and then return.
If the ec object designates success, we lock the m_cancel_guard mutex (the member
of the request descriptor object) and check whether the request has not been canceled
yet. More details about the canceling request are provided later in this section, where the
cancelRequest() method is considered.
121
Implementing Client Applications
If we see that the request has not been canceled, we initiate the next asynchronous
operation calling the Boost.Asio free function async_write() to send the request data to
the server. Again, we pass to it a lambda function as a callback. This callback is very similar
to the one passed to the anync_connect() method when the asynchronous connection
operation was initiated. We first check the error code and then if it indicates success, we
check whether or not the request has been canceled. Also, if it has not, we initiate the next
asynchronous operation—async_read_until()—in order to receive a response from
the server:
[this, session](const boost::system::error_code& ec,
std::size_t bytes_transferred){
if (ec != 0) {
session->m_ec = ec;
onRequestComplete(session);
return;
}
std::unique_lock<std::mutex>
cancel_lock(session->m_cancel_guard);
if (session->m_was_cancelled) {
onRequestComplete(session);
return;
}
asio::async_read_until(session->m_sock,
session->m_response_buf, '\n',
[this, session](const boost::system::error_code& ec,
std::size_t b'ytes_transferred)
{
// ...
});
}
Again, we pass a lambda function as a callback argument to the async_read_until() free
function. This callback function is quite simple:
[this, session](const boost::system::error_code& ec,
std::size_t bytes_transferred)
{
if (ec != 0) {
session->m_ec = ec;
} else {
122
Chapter 3
std::istream strm(&session->m_response_buf);
std::getline(strm, session->m_response);
}
onRequestComplete(session);
}
It checks the error code and in the case of success, it stores the received response data in
the corresponding Session object. Then, the AsyncTCPClient class's private method
onRequestComplete() is called and the Session object is passed to it as an argument.
The onRequestComplete() method is called whenever the request completes with
any result. It is called when the request completes successfully, when the request fails
at any stage of its life cycle, or when it is canceled by the user. The purpose of this
method is to perform a cleanup and then to call a callback provided by the caller
of the emulateLongComputationOp() method, when initiating this request.
The onRequestComplete() method begins with shutting down the socket. Note that here we
use the overload of the socket's shutdown() method, which doesn't throw exceptions. We don't
care if the shutting down of the connection fails as this is not a critical operation in our case.
Then, we remove the corresponding entry from the m_active_sessions map as the request
is finished and hence it is not active anymore. Also, as the last step, the user supplied callback
is called. After the callback function returns, the request life cycle is finished.
The AsyncTCPClient class – canceling the request
Now, let's take a look at the cancelRequst() method of the AsyncTCPClient class. This
method accepts an identifier of the request to be canceled as an argument. It begins with
looking for the Session object corresponding to the specified request in the m_active_
sessions map. If one is found, it calls the cancel() method on the socket object stored
in this Session object. This leads to the interruption of the currently running asynchronous
operation associated with this socket object.
However, there is a chance that the cancelRequest() method will be called at the
moment when one asynchronous operation has already been completed and the next one
has not been initiated yet. For example, imagine that the I/O thread is now running the
callback of the async_connect() operation associated with a particular socket. At this
moment, no asynchronous operation associated with this socket is in progress (because
the next asynchronous operation async_write() has not been initiated yet); therefore,
calling cancel() on this socket will have no effect. That's why we use an additional flag
Session::m_was_cancelled designating, as its name suggests, whether the request has
been canceled (or to be more precise, whether the cancelRequest() method has been
called by the user). In the callback of the asynchronous operation, we look at the value of
this flag before initiating the next asynchronous operation. If we see that the flag is set (which
means that the request was canceled), we don't initiate the next asynchronous operation, but
instead we interrupt the request execution and call the onRequestComplete() method.
123
Implementing Client Applications
We use the Session::m_cancel_guard mutex in the cancelRequest() method and
in the callbacks of the asynchronous operations such as async_connect() and async_
write() to enforce the following order of operations: request can be canceled either before
the value of the Session::m_was_cancelled flag is tested in the callback, or after the
next asynchronous operation is initiated. This order guarantees the proper canceling of a
request whenever a user calls the cancelRequest() method.
The AsyncTCPClient class – closing the client
After the client has been used and is not needed anymore, it should be properly closed. The
close() method of the AsyncTCPClient class allows us to do that. Firstly, this method
destroys the m_work object that allows the I/O thread to exit the event message loop when all
the asynchronous operations are completed. Then, it joins the I/O thread to wait until it exits.
After the close() method returns, the corresponding object of the AsyncTCPClient class
cannot be used anymore.
There's more…
The AsyncTCPClient class in the presented sample implements an asynchronous singlethreaded TCP client. It uses a single thread that runs the event loop and processes the
requests. Usually, when the request rate is low, the size of the response is not large and
the request handler does not perform the complex and time-consuming processing of the
response (stage 5 of the request life cycle); one thread is enough.
However, when we want the client to make millions of requests and process them as fast as
possible, we may want to turn our client into a multithreaded one, where multiple threads
may run several requests truly simultaneously. Of course, it assumes that the computer
running the client is a multicore or a multiprocessor computer. The application running more
threads than the number of cores or processors installed in the computer may slow down the
application due to the effect of the thread switching overhead.
Implementing a multithreaded TCP client application
In order to turn our single-treaded client application into a multithreaded one, we need
to make several changes in it. Firstly, we need to replace the m_thread member of the
AnyncTCPClient class that represents a single I/O thread, with a list of pointers to the
std::thread objects, which will represent a collection of I/O threads:
std::list<std::unique_ptr<std::thread>> m_threads;
124
Chapter 3
Next, we need to change the class's constructor so that it accepts an argument representing
the number of I/O threads to be created. Besides, the constructor should spawn the specified
number of I/O threads and add them all to the pool of threads running the event loop:
AsyncTCPClient(unsigned char num_of_threads){
m_work.reset(new boost::asio::io_service::work(m_ios));
for (unsigned char i = 1; i <= num_of_threads; i++) {
std::unique_ptr<std::thread> th(
new std::thread([this](){
m_ios.run();
}));
m_threads.push_back(std::move(th));
}
}
Like in a single-threaded version of the client, each thread calls the run() method of
the m_ios object. As a result, all threads are added to the thread pool, controlled by the
m_ios object. All threads from the pool will be used to call the corresponding asynchronous
operation completion callbacks. This means that on a multicore or multiprocessor computer,
several callbacks may be running truly simultaneously in different threads, each on a separate
processor; whereas, in a single-threaded version of the client, they would be executed serially.
After each thread is created, the pointer to it is put to the m_threads list so that we have the
access to the thread objects later.
Also, the last change is in the close() method. Here, we need to join each thread in the list.
This is how the method looks after the change:
void close() {
// Destroy work object. This allows the I/O threads to
// exit the event loop when there are no more pending
// asynchronous operations.
m_work.reset(NULL);
// Waiting for the I/O threads to exit.
for (auto& thread : m_threads) {
thread->join();
}
}
125
Implementing Client Applications
Having destroyed the work object, we iterate through the list of I/O threads and join each of
them to make sure they all have exited.
The multithreaded TCP client application is ready. Now, when we create an object of
multithreaded AsyncTCPClient class, the number specifying how many threads should
be used to process the requests should be passed to the constructor of the class. All other
aspects of usage of the class are identical to those of a single-threaded one.
See also
ff
Chapter 2, I/O Operations, includes recipes that provide detailed discussions
on how to perform asynchronous I/O with TCP socket and how to cancel
asynchronous operations.
ff
The Using timers recipe from Chapter 6, Other Topics, demonstrates how to use
timers provided by Boost.Asio. Timers can be used to implement an asynchronous
operation timeout mechanism.
126
4
Implementing Server
Applications
In this chapter, we will cover the following topics:
ff
Implementing a synchronous iterative TCP server
ff
Implementing a synchronous parallel TCP server
ff
Implementing an asynchronous TCP server
Introduction
A server is a part of a distributed application that provides a service or services that are
consumed by other parts of this application—clients. Clients communicate with the server
in order to consume services provided by it.
Usually, a server application plays a passive role in the client-server communication
process. During start-up, a server application attaches to a particular well-known port
(meaning, it is known to the potential clients or at least it can be obtained by the clients at
runtime from some well-known registry) on the host machine. After this, it passively waits for
incoming requests arriving to that port from the clients. When the request arrives, the server
processes it (serves) by performing actions according to the specification of the service
it provides.
127
Implementing Server Applications
Depending on the services that particular server provides, the request processing may
mean a different thing. An HTTP server, for example, would usually read the content of a file
specified in the request message and send it back to the client. A proxy server would simply
redirect a client's request to a different server for the actual processing (or maybe for another
round of redirection). Other more specific servers may provide services that perform complex
computations on the data provided by the client in the request and return results of such
computations back to the client.
Not all servers play a passive role. Some server applications may send messages to the
clients without waiting for the clients to first send a request. Usually, such servers act as
notifiers, and they notify clients of some interesting events. In this case, clients may not need
to send any data to the server at all. Instead, they passively wait for notifications from the
server and having received one, they react accordingly. Such a communication model is called
push-style communication. This model is gaining popularity in modern web applications,
providing additional flexibility.
So, the first way to classify a server application is by the function (or functions) they perform or
a service (or services) they provide to their clients.
Another obvious classification dimension is the transport layer protocol used by the server to
communicate with the clients.
TCP protocol is very popular today and many general purpose server applications use it for
communication. Other, more specific servers may use UDP protocol. Hybrid server applications
that provide their services through both TCP and UDP protocols at the same time fall under
the third category and are called multiprotocol servers. In this chapter, we will consider
several types of TCP servers.
One more characteristic of a server is a manner in which it serves clients. An iterative
server serves clients in one-by-one fashion, meaning that it does not start serving the next
client before it completes serving the one it is currently serving. A parallel server can serve
multiple clients in parallel. On a single-processor computer, a parallel server interleaves
different stages of communication with several clients running them on a single processor.
For example, having connected to one client and while waiting for the request message from
it, the server can switch to connecting the second client, or read the request from the third
one; after this, it can switch back to the first client to continue serving it. Such parallelism is
called pseudo parallelism, as a processor is merely switching between several clients, but
does not serve them truly simultaneously, which is impossible with a single processor.
On multiprocessor computers, the true parallelism is possible, when a server serves more
than one client at the same time using different hardware threads for each client.
128
Chapter 4
Iterative servers are relatively simple to implement and can be used when the request rate
is low enough so that the server has time to finish processing one request before the next
one arrives. It is clear that iterative servers are not scalable; adding more processors to the
computer running such a server will not increase the server's throughput. Parallel servers, on
the other hand, can handle higher request rates; if properly implemented, they are scalable.
A truly parallel server running on a multiprocessor computer can handle higher request rates
than the same server running on a single processor computer.
Another way to classify server applications, from an implementation's point of view, is
according to whether the server is synchronous or asynchronous. A synchronous server uses
synchronous socket API calls that block the thread of execution until the requested operation
is completed, or else an error occurs. Thus, a typical synchronous TCP server would use
methods such as asio::ip::tcp::acceptor::accept() to accept the client connection
request, asio::ip::tcp::socket::read_some() to receive the request message from
the client, and then asio::ip::tcp::socket::write_some() to send the response
message back to the client. All three methods are blocking. They block the thread of execution
until the requested operation is completed, or an error occurs, which makes the server using
these operations synchronous.
An asynchronous server application, as opposed to the synchronous one, uses
asynchronous socket API calls. For example, an asynchronous TCP server may use the
asio::ip::tcp::acceptor::async_accept() method to asynchronously accept the
client connection request, the asio::ip::tcp::socket::async_read_some() method
or the asio::async_read() free function to asynchronously receive the request message
from the client, and then the asio::ip::tcp::socket::async_write_some() method
or the asio::async_write() free function to asynchronously send a response message
back to the client.
Because the structure of a synchronous server application significantly differs from that of an
asynchronous one, the decision as to which approach to apply should be made early at the
server application design stage, and this decision should be based on the careful analysis
of the application requirements. Besides, the possible application evolution paths and new
requirements that may appear in the future should be considered and taken into account.
As usually, each approach has its advantages and disadvantages. When a synchronous
approach yields better results in one situation, it may be absolutely unacceptable in another;
in this case, an asynchronous approach might be the right choice. Let's compare two
approaches to better understand the strengths and weaknesses of each of them.
129
Implementing Server Applications
The main advantage of a synchronous approach as compared to an asynchronous one is
its simplicity. A synchronous server is significantly easier to implement, debug, and support
than a functionally equal asynchronous one. Asynchronous servers are more complex due
to the fact that asynchronous operations used by them complete in other places in
code than they are initiated. Usually, this requires allocating additional data structures in
the free memory to keep the context of the request, implementing callback functions, thread
synchronization, and other extras that may make the application structure quite complex
and error-prone. Most of these extras are not required in synchronous servers. Besides, an
asynchronous approach brings in additional computational and memory overheads, which
may make it less efficient than a synchronous one in some situations.
However, a synchronous approach has some functional limitations, which often makes it
unacceptable. These limitations consist of the inability to cancel a synchronous operation
after it has started, or to assign it a timeout so that it gets interrupted if it is running for too
long. As opposed to synchronous operations, asynchronous ones can be canceled at any
moment after the operation has been initiated.
The fact that synchronous operations cannot be canceled significantly limits the area of
the application of synchronous servers. Publicly available servers that use synchronous
operations are vulnerable to the attacks of a culprit. If such a server is single-threaded,
a single malicious client is enough to block the server, not allowing other clients to
communicate with it. Malicious client used by a culprit connects to the server and does not
send any data to it, while the latter is blocked in one of the synchronous reading functions or
methods, which does not allow it to serve other clients.
Such servers would usually be used in safe and protected environments in private networks,
or as an internal part of an application running on a single computer using such a server for
interprocess communication. Another possible application area of synchronous servers is, of
course, the implementation of throwaway prototypes.
Besides the difference in the structural complexity and functionality described above, the two
approaches differ in the efficiency and scalability when it comes to serving large numbers
of clients sending requests at high rates. Servers using asynchronous operations are more
efficient and scalable than synchronous servers especially when they run on multiprocessor
computers with operating systems natively supporting an asynchronous network I/O.
The sample protocol
In this chapter, we are going to consider three recipes describing how to implement the
synchronous iterative TCP server, synchronous parallel TCP server, and asynchronous TCP
server. In all the recipes, it is assumed that the server communicates with clients using the
following intentionally trivialized (for the sake of clarity) application layer protocol.
130
Chapter 4
A server application accepts request messages represented as ASCII strings containing a
sequence of symbols ending with a new-line ASCII symbol. All the symbols coming after the
new-line symbol are ignored by the server.
Having received a request, the server performs some dummy operations and replies with a
constant message as follows:
"Response\n"
Such a trivial protocol allows us to concentrate on the implementation of the server and not
the service provided by it.
Implementing a synchronous iterative TCP
server
A synchronous iterative TCP server is a part of a distributed application that satisfies the
following criteria:
ff
Acts as a server in the client-server communication model
ff
Communicates with client applications over TCP protocol
ff
Uses I/O and control operations that block the thread of execution until the
corresponding operation completes, or an error occurs
ff
Handles clients in a serial, one-by-one fashion
A typical synchronous iterative TCP server works according to the following algorithm:
1. Allocate an acceptor socket and bind it to a particular TCP port.
2. Run a loop until the server is stopped:
1. Wait for the connection request from a client.
2. Accept the client's connection request when one arrives.
3. Wait for the request message from the client.
4. Read the request message.
5. Process the request.
6. Send the response message to the client.
7.
Close the connection with the client and deallocate the socket.
This recipe demonstrates how to implement a synchronous iterative TCP server application
with Boost.Asio.
131
Implementing Server Applications
How to do it…
We begin implementing our server application by defining a class responsible for handling
a single client by reading the request message, processing it, and then sending back the
response message. This class represents a single service provided by the server application
and, therefore, we will give it a name Service:
#include <boost/asio.hpp>
#include
#include
#include
#include
<thread>
<atomic>
<memory>
<iostream>
using namespace boost;
class Service {
public:
Service(){}
void HandleClient(asio::ip::tcp::socket& sock) {
try {
asio::streambuf request;
asio::read_until(sock, request, '\n');
// Emulate request processing.
inti = 0;
while (i != 1000000)
i++;
std::this_thread::sleep_for(
std::chrono::milliseconds(500));
// Sending response.
std::string response = "Response\n";
asio::write(sock, asio::buffer(response));
}
catch (system::system_error&e) {
std::cout << "Error occured! Error code = "
<<e.code() << ". Message: "
<<e.what();
}
}
};
132
Chapter 4
To keep things simple, in our sample server application, we implement a dummy service,
which only emulates the execution of certain operations. The request processing emulation
consists of performing many increment operations to emulate operations that intensively
consume CPU and then putting the thread of control to sleep for some time to emulate such
operations as reading a file or communicating with a peripheral device synchronously.
The Service class is quite simple and contains only one
method. However, classes representing services in real-world
applications would usually be more complex and richer in
functionality, though the main idea would stay the same.
Next, we define another class that represents a high-level acceptor concept (as compared to
the low-level concept represented by the asio::ip::tcp::acceptor class). This class is
responsible for accepting connection requests arriving from clients and instantiating objects
of the Service class, which will provide the service to the connected clients. Let's name this
class correspondingly—Acceptor:
class Acceptor {
public:
Acceptor(asio::io_service&ios, unsigned short port_num) :
m_ios(ios),
m_acceptor(m_ios,
asio::ip::tcp::endpoint(
asio::ip::address_v4::any(),
port_num))
{
m_acceptor.listen();
}
void Accept() {
asio::ip::tcp::socket sock(m_ios);
m_acceptor.accept(sock);
Service svc;
svc.HandleClient(sock);
}
private:
asio::io_service&m_ios;
asio::ip::tcp::acceptor m_acceptor;
};
133
Implementing Server Applications
This class owns an object of the asio::ip::tcp::acceptor class named m_acceptor,
which is used to synchronously accept incoming connection requests.
Also, we define a class that represents the server itself. The class is named
correspondingly—Server:
class Server {
public:
Server() : m_stop(false) {}
void Start(unsigned short port_num) {
m_thread.reset(new std::thread([this, port_num]() {
Run(port_num);
}));
}
void Stop() {
m_stop.store(true);
m_thread->join();
}
private:
void Run(unsigned short port_num) {
Acceptor acc(m_ios, port_num);
while (!m_stop.load()) {
acc.Accept();
}
}
std::unique_ptr<std::thread>m_thread;
std::atomic<bool>m_stop;
asio::io_servicem_ios;
};
This class provides an interface comprised by two methods—Start() and Stop() that are
used to start and stop the server correspondingly. The loop runs in a separate tread spawned
by the Start() method. The Start() method is nonblocking, while the Stop() method
blocks the caller thread until the server is stopped.
Thorough inspection of the Server class reveals one serious drawback of the implementation
of the server—the Stop() method may never return under some circumstances. The
discussion of this problem and the ways to resolve it is provided later in this recipe.
134
Chapter 4
Eventually, we implement the application entry point function main() that demonstrates how
to use the Server class:
int main()
{
unsigned short port_num = 3333;
try {
Server srv;
srv.Start(port_num);
std::this_thread::sleep_for(std::chrono::seconds(60));
srv.Stop();
}
catch (system::system_error&e) {
std::cout << "Error occured! Error code = "
<<e.code() << ". Message: "
<<e.what();
}
return 0;
}
How it works…
The sample server application consists of four components—the Server, Acceptor, and
Service classes and the application entry point function main(). Let's consider how each
of these components work.
The Service class
The Service class is the key functional component in the whole application. While other
components are infrastructural in their purpose, this class implements the actual function
(or service) provided by the server to the clients.
This class is simple and consists of a single HandleClient() method. This method accepts
an object representing a socket connected to the client as its input argument and handles
that particular client.
In our sample, such handling is trivial. Firstly, the request message is synchronously read from
the socket until a new line ASCII symbol \n is encountered. Then, the request is processed. In
our case, we emulate processing by running a dummy loop performing one million increment
operations and then putting the thread to sleep for half a second. After this, the response
message is prepared and synchronously sent back to the client.
135
Implementing Server Applications
The exceptions that may be thrown by Boost.Asio I/O functions and methods are caught and
handled in the HandleClient() method and are not propagated to the method caller so
that if the handling of one client fails, the server continues working.
Depending on the needs of a particular application, the Service class can be extended and
enriched with a functionality to provide the needed service.
The Acceptor class
The Acceptor class is a part of the server application infrastructure. When constructed, it
instantiates an acceptor socket object m_acceptor and calls its listen() method to start
listening for connection requests from clients.
This class exposes a single public method named Accept(). This method when called,
instantiates an object of the asio::ip::tcp::socket class named sock, representing
an active socket, and tries to accept a connection request. If there are pending connection
requests available, the connection request is processed and the active socket sock is
connected to the new client. Otherwise, this method blocks until a new connection
request arrives.
Then, an instance of the Service object is created and its HandleClient() method
is called. The sock object connected to the client is passed to this method. The
HandleClient() method blocks until communication with the client and request processing
completes, or an error occurs. When the HandleClient() method returns, the Accept()
method of the Acceptor class returns too. Now, the acceptor is ready to accept the next
connection request.
One execution of the class's Accept()method performs the full handling cycle of one client.
The Server class
The Server class, as its name suggests, represents a server that can be controlled through
class's interface methods Start()and Stop().
The Start() method initiates the start-up of the server. It spawns a new thread, which
starts its execution from the Server class's Run() private method and returns. The Run()
method accepts a single argument named port_num specifying the number of protocol port
on which the acceptor socket should listen for incoming connection requests. When invoked,
the method first instantiates an object of the Acceptor class and then starts a loop in which
the Accept() method of the Acceptor object is called. The loop terminates when the value
of the m_stop atomic variable becomes true, which happens when the Stop() method is
invoked on the corresponding instance of the Server class.
136
Chapter 4
The Stop() method synchronously stops the server. It does not return until the loop started
in the Run() method is interrupted and the thread spawned by the Start() method
finishes its execution. To interrupt the loop, the value of the atomic variable m_stop is set
to true. After this, the Stop() method calls the join() method on the m_thread object
representing the thread running the loop in the Run() method to wait until it exits the loop
and finishes its execution.
The presented implementation has a significant drawback consisting in the fact that the
server may not be stopped immediately. More than that, there is a possibility that the server
will not be stopped at all and the Stop() method will block its caller forever. The root cause
of the problem is that the server has a hard dependency on the behavior of the clients.
If the Stop() method is called and the value of the atomic variable m_stop is set to true
just before the loop termination condition in the Run() method is checked, the server is
stopped almost immediately and no problem appears. However, if the Stop() method is
called while the server's thread is blocked in the acc.Accept() method waiting for the next
connection request from the client, or in one of the synchronous I/O operations inside the
Service class waiting for the request message from the connected client, or for the client to
receive the response message, the server cannot be stopped until these blocking operations
are completed. Hence, for example, if at the moment, when the Stop() method is called,
there are no pending connection requests, the server will not be stopped until a new client
connects and gets handled, which in general case may never happen and will lead to the
server being blocked forever.
Later, in this section, we will consider the possible ways to tackle this drawback.
The main() entry point function
This function demonstrates the usage of the server. It creates an instance of the Server
class named srv and calls its Start() method to start the server. Because the server is
represented as an active object running in its own thread of control, the Start() method
returns immediately and the thread running method main() continues execution. To let
the server run for some time, the main thread is put to sleep for 60 seconds. After the main
thread wakes up, it calls the Stop() method on the srv object to stop the server. When the
Stop() method returns, the main() function returns too and our sample application exits.
Of course, in the real application, the server would be stopped as a reaction to a user
input or any other relevant event, rather than after dummy 60 seconds, after the server's
start-up run out.
137
Implementing Server Applications
Eliminating the drawbacks
As it has already been mentioned, the presented implementation has two drawbacks that
significantly limit its applicability. The first problem is that it may be impossible to stop the
server if the Stop() method is called while the server thread is blocked waiting for the
incoming connection request, no connection requests arrive. The second problem is that the
server can be easily hung by a single malicious (or buggy) client, making it unavailable to
other clients. To hang the server, the client application can simply connect to the server and
never send any request to it, which will make the server application hang in the blocking input
operation forever.
The root cause of both the issues is the usage of blocking operations in the server (which is
natural for synchronous servers). A reasonable and simple solution to both these issues would
be to assign a timeout to the blocking operations, which would guarantee that the server
would unblock periodically to check whether the stop command has been issued and also to
forcefully discard clients that do not send requests for a long period of time. However, Boost.
Asio does not provide a way to cancel synchronous operations, or to assign timeouts to them.
Therefore, we should try to find other ways to make our synchronous server more responsive
and stable.
Let's consider ways to tackle each of the two drawbacks.
Stopping a server in reasonable amount of time
As the only legitimate way to make the accept()synchronous method of an acceptor socket
unblock when there are no pending connection requests is to send a dummy connection
request to the port on which the acceptor is listening, we can do the following trick to solve
our problem.
In the Server class's Stop() method, after setting the value of the m_stop atomic variable
to true, we can create a dummy active socket, connect it to this same server, and send some
dummy request. This will guarantee that the server thread will leave the accept() method of
the acceptor socket and will eventually check the value of the m_stop atomic variable to find
out that its value is equal to true, which will lead to termination of the loop and completion of
the Acceptor::Accept() method.
In the described method, it is assumed that the server stops itself by sending a message to
itself (actually a message is sent from an I/O thread to the worker thread). Another approach
would be to have a special client (separate application) that would connect and send a special
service message (for example, stop\n) to the server, which will be interpreted by the server
as a signal to stop. In this case, the server would be controlled externally (from a different
application) and the Server class would not need to have the Stop() method.
138
Chapter 4
Dealing with the server's vulnerability
Unfortunately, the nature of blocking the I/O operation without the timeout assigned to it is
such that it can be used to easily hang the iterative server that uses such operations and
make it inaccessible to other clients.
Obviously, to protect the server from this vulnerability, we need to redesign it so that it never
gets blocked by I/O operations. One way to achieve this is to use nonblocking sockets (which
will turn our server into reactive) or use asynchronous I/O operations. Both the options mean
that our server stops being synchronous. We will consider some of these solutions in other
recipes of this chapter.
Analyzing the results
Vulnerabilities that are inherent in the synchronous iterative servers implemented with
Boost.Asio described above do not allow using them in public networks, where there is a
risk of misuse of the server by a culprit. Usually, synchronous servers would be used in
closed and protected environments where clients are carefully designed so that they do
not hang the server.
Another limitation of the iterative synchronous server is that they are not scalable and cannot
take advantage of a multiprocessor hardware. However, their advantage—simplicity—is the
reason why this type of a server is a good choice in many cases.
See also
ff
Chapter 2, I/O Operations, includes recipes providing detailed discussions on how to
perform synchronous I/O.
Implementing a synchronous parallel TCP
server
A synchronous parallel TCP server is a part of a distributed application that satisfies the
following criteria:
ff
Acts as a server in the client-server communication model
ff
Communicates with client applications over TCP protocol
ff
Uses I/O and control operations that block the thread of execution until the
corresponding operation completes, or an error occurs
ff
May handle more than one client simultaneously
139
Implementing Server Applications
A typical synchronous parallel TCP server works according to the following algorithm:
1. Allocate an acceptor socket and bind it to a particular TCP port.
2. Run a loop until the server is stopped:
Wait for the incoming connection request from a client
Accept the client's connection request
Spawn a thread of control and in the context of this thread:
Wait for the request message from the client
Read the request message
Process the request
Send a response message to the client
Close the connection with the client and deallocate the socket
This recipe demonstrates how to implement a synchronous parallel TCP server application
with Boost.Asio.
How to do it…
We begin implementing our server application by defining the class responsible for handling
a single client by reading the request message, processing it, and then sending back the
response message. This class represents a single service provided by the server application
and, therefore, we will name it Service:
#include <boost/asio.hpp>
#include
#include
#include
#include
<thread>
<atomic>
<memory>
<iostream>
using namespace boost;
class Service {
public:
Service(){}
void StartHandligClient(
std::shared_ptr<asio::ip::tcp::socket> sock) {
140
Chapter 4
std::thread th(([this, sock]() {
HandleClient(sock);
}));
th.detach();
}
private:
void HandleClient(std::shared_ptr<asio::ip::tcp::socket> sock) {
try {
asio::streambuf request;
asio::read_until(*sock.get(), request, '\n');
// Emulate request processing.
int i = 0;
while (i != 1000000)
i++;
std::this_thread::sleep_for(
std::chrono::milliseconds(500));
// Sending response.
std::string response = "Response\n";
asio::write(*sock.get(), asio::buffer(response));
}
catch (system::system_error &e) {
std::cout
<< "Error occured! Error code = "
<< e.code() << ". Message: "
<< e.what();
}
// Clean-up.
delete this;
}
};
To keep things simple, in our sample server application, we implement a dummy service,
which only emulates the execution of certain operations. The request processing emulation
consists of performing many increment operations to emulate operations that intensively
consume CPU and then putting the thread of control to sleep for some time to emulate I/O
operations such as reading a file or communicating with a peripheral device synchronously.
141
Implementing Server Applications
The Service class is quite simple and contains only one method.
However, classes representing services in real-world applications
would usually be more complex and richer in functionality, though
the main idea would stay the same.
Next, we define another class that represents a high-level acceptor concept (as compared to
the low-level concept represented by the asio::ip::tcp::acceptor class). This class is
responsible for accepting the connection requests arriving from clients and instantiating the
objects of the Service class, which will provide the service to connected clients. Let's name
it Acceptor:
class Acceptor {
public:
Acceptor(asio::io_service& ios, unsigned short port_num) :
m_ios(ios),
m_acceptor(m_ios,
asio::ip::tcp::endpoint(
asio::ip::address_v4::any(),
port_num))
{
m_acceptor.listen();
}
void Accept() {
std::shared_ptr<asio::ip::tcp::socket>
sock(new asio::ip::tcp::socket(m_ios));
m_acceptor.accept(*sock.get());
(new Service)->StartHandligClient(sock);
}
private:
asio::io_service& m_ios;
asio::ip::tcp::acceptor m_acceptor;
};
This class owns an object of the asio::ip::tcp::acceptor class named m_acceptor,
which is used to synchronously accept incoming connection requests.
142
Chapter 4
Also, we define a class that represents the server itself. The class is named
correspondingly—Server:
class Server {
public:
Server() : m_stop(false) {}
void Start(unsigned short port_num) {
m_thread.reset(new std::thread([this, port_num]() {
Run(port_num);
}));
}
void Stop() {
m_stop.store(true);
m_thread->join();
}
private:
void Run(unsigned short port_num) {
Acceptor acc(m_ios, port_num);
while (!m_stop.load()) {
acc.Accept();
}
}
std::unique_ptr<std::thread>m_thread;
std::atomic<bool>m_stop;
asio::io_servicem_ios;
};
This class provides an interface comprised of two methods—Start() and Stop() that
are used to start and stop the server correspondingly. The loop runs in a separate thread
spawned by the Start() method. The Start() method is nonblocking, while the Stop()
method is. It blocks the caller thread until the server is stopped.
Thorough inspection of the Server class reveals one serious drawback of the implementation
of the server—the Stop() method may block forever. The discussion of this problem and ways
to resolve it is provided below.
143
Implementing Server Applications
Eventually, we implement the application entry point function main() that demonstrates how
to use the Server class:
int main()
{
unsigned short port_num = 3333;
try {
Server srv;
srv.Start(port_num);
std::this_thread::sleep_for(std::chrono::seconds(60));
srv.Stop();
}
catch (system::system_error &e) {
std::cout
<< "Error occured! Error code = "
<< e.code() << ". Message: "
<< e.what();
}
return 0;
}
How it works…
The sample server application consists of four components—the Server, Acceptor, and
Service classes and the application entry point function main(). Let's consider how each
of these components work.
The Service class
The Service class is the key functional component in the whole application. While other
components constitute the infrastructure of the server, this class implements the actual
function (or service) provided by the server to the clients.
This class has a single method in its interface called StartHandlingClient().
This method accepts a pointer to an object representing a TCP socket connected to
the client as its input argument and starts handling that particular client.
144
Chapter 4
This method spawns a thread of control, which starts its execution from the class's
HandleClient() private method, where the actual synchronous handling is performed.
Having spawned the thread, the StartHandlingClient() method "lets it go" by
detaching the thread from the std::thread object representing it. After this, the
StartHandlingClient() method returns.
The HandleClient() private method, as its name suggests, handles the client. In our
sample, such handling is trivial. Firstly, the request message is synchronously read from the
socket until a new line ASCII symbol \n is encountered. Then, the request is processed. In
our case, we emulate processing by running a dummy loop performing one million increment
operations and then putting the thread to sleep for half a second. After this, the response
message is prepared and sent back to the client.
When the response message is sent, the object of the Service class associated with the
HandleClient() method, which is currently running, is deleted by the delete operator. Of
course, the design of the class assumes that its instances will be allocated in free memory by
a new operator rather than on the stack.
Depending on the needs of a particular application, the Service class can be extended and
enriched with the functionality to provide the needed service.
The Acceptor class
The Acceptor class is a part of the server application infrastructure. When constructed, it
instantiates an acceptor socket object m_acceptor and calls its listen() method to start
listening for connection requests from clients.
This class exposes a single Accept() public method. This method when called, instantiates
an object of the asio::ip::tcp::socket class named sock, representing an active
socket, and tries to accept a connection request. If there are pending connection requests
available, the connection request is processed and the active socket sock is connected to
the new client. Otherwise, this method blocks until a new connection request arrives.
Then, an instance of the Service object is allocated in free memory and its
StartHandlingClient() method is called. The sock object is passed to this method
as an input argument. The StartHandlingClient() method spawns a thread in
the context of which the client will be handled and returns immediately. When the
StartHandlingClient() method returns, the Accept() method of the Acceptor
class returns too. Now, the acceptor is ready to accept the next connection request.
Note that Acceptor does not take the ownership of the object of the Service class.
Instead, the object of the Service class will destroy itself when it completes its job.
145
Implementing Server Applications
The Server class
The Server class, as its name suggests, represents a server that can be controlled through
the class's interface Start()and Stop() methods.
The Start() method initiates the start-up of the server. It spawns a new thread that begins
its execution from the Server class's Run() private method and returns. The Run() method
accepts a single argument port_num specifying the number of the protocol port on which
the acceptor socket should listen for incoming connection requests. When invoked, the
method first instantiates an object of the Acceptor class and then starts a loop in which the
Accept() method of the Acceptor object is called. The loop terminates when the value
of the m_stop atomic variable becomes true, which happens when the Stop() method is
invoked on the corresponding instance of the Server class.
The Stop() method synchronously stops the server. It does not return until a loop that
started in the Run() method is interrupted and the thread that is spawned by the Start()
method finishes its execution. To interrupt the loop, the value of the atomic variable m_stop
is set to true. After this, the Stop() method calls the join() method on the m_thread
object representing the thread running the loop in the Run() method in order to wait until it
finishes its execution.
The presented implementation has a significant drawback consisting of the fact that the
server may not be stopped immediately. More than that, there is a possibility that the server
will not be stopped at all and the Stop() method will block its caller forever. The root cause
of the problem is that the server has a hard dependency on the behavior of the clients.
If the Stop() method is called and sets the value of atomic variable m_stop variable to
true just before the loop termination condition in the Run() method is checked, the server
is stopped almost immediately and no problem occurs. However, if the Stop() method is
called while the server's thread is blocked in the acc.Accept() method waiting for the
next connection request from the client—or in one of synchronous I/O operations inside
the Service class is waiting for the request message from the connected client or for the
client to receive the response message—the server cannot be stopped until these blocking
operations complete. Hence, for example, if at the moment when the Stop() method is
called, there are no pending connection requests, the server will not be stopped until a new
client connects and gets handled, which in general case may never happen and may lead to
the server being blocked forever.
Later, in this section, we will consider possible ways to tackle this drawback.
146
Chapter 4
The main() entry point function
This function demonstrates the usage of the server. It creates an instance of the Server
class named srv and calls its method Start() to start the server. Because the server is
represented as an active object running in its own thread of control, the Start() method
returns immediately and the thread running the main() method continues the execution. To
allow the server to run for some time, the main thread is put to sleep for 60 seconds. After the
main thread wakes up, it calls the Stop() method on the srv object to stop the server. When
the Stop() method returns, the main() function returns too and our sample application exits.
Of course, in the real application, the server would be stopped as a reaction to the user
input or any other relevant event, rather than after the dummy 60 seconds after the server's
start-up run out.
Eliminating the drawbacks
The drawbacks inherent in synchronous parallel server application implemented with Boost.
Asio library are similar to those of synchronous iterative server application considered in
previous recipe. Please refer to the Implementing synchronous iterative TCP server recipe
for the discussion of the drawbacks and the ways to eliminate them.
See also
ff
Recipe Implementing synchronous iterative TCP server provides more details on the
drawbacks inherent in both synchronous iterative and synchronous parallel servers
and the possible ways to eliminate them
ff
Chapter 2, I/O Operations, includes recipes providing detailed discussions on how to
perform synchronous I/O
Implementing an asynchronous TCP server
An asynchronous TCP server is a part of a distributed application that satisfies the
following criteria:
ff
Acts as a server in the client-server communication model
ff
Communicates with client applications over TCP protocol
ff
Uses the asynchronous I/O and control operations
ff
May handle multiple clients simultaneously
147
Implementing Server Applications
A typical asynchronous TCP server works according to the following algorithm:
1. Allocate an acceptor socket and bind it to a particular TCP port.
2. Initiate the asynchronous accept operation.
3. Spawn one or more threads of control and add them to the pool of threads that run
the Boost.Asio event loop.
4. When the asynchronous accept operation completes, initiate a new one to accept the
next connection request.
5. Initiate the asynchronous reading operation to read the request from the
connected client.
6. When the asynchronous reading operation completes, process the request and
prepare the response message.
7.
Initiate the asynchronous writing operation to send the response message to
the client.
8. When the asynchronous writing operation completes, close the connection and
deallocate the socket.
Note that the steps starting from the fourth step in the preceding algorithm may be
performed in arbitrary order depending on the relative timing of the concrete asynchronous
operations in a concrete application. Due to the asynchronous model of the server, sequential
order of execution of the steps may not hold even when the server is running on a singleprocessor computer.
This recipe demonstrates how to implement an asynchronous TCP server application
with Boost.Asio.
How to do it…
We begin implementing our server application by defining a class responsible for handling
a single client by reading the request message, processing it, and then sending back the
response message. This class represents a single service provided by the server application.
Let's name it Service:
#include <boost/asio.hpp>
#include
#include
#include
#include
<thread>
<atomic>
<memory>
<iostream>
using namespace boost;
148
Chapter 4
class Service {
public:
Service(std::shared_ptr<asio::ip::tcp::socket> sock) :
m_sock(sock)
{}
void StartHandling() {
asio::async_read_until(*m_sock.get(),
m_request,
'\n',
[this](
const boost::system::error_code& ec,
std::size_t bytes_transferred)
{
onRequestReceived(ec,
bytes_transferred);
});
}
private:
void onRequestReceived(const boost::system::error_code& ec,
std::size_t bytes_transferred) {
if (ec != 0) {
std::cout << "Error occured! Error code = "
<< ec.value()
<< ". Message: " << ec.message();
onFinish();
return;
}
// Process the request.
m_response = ProcessRequest(m_request);
// Initiate asynchronous write operation.
asio::async_write(*m_sock.get(),
asio::buffer(m_response),
[this](
const boost::system::error_code& ec,
std::size_t bytes_transferred)
{
onResponseSent(ec,
bytes_transferred);
149
Implementing Server Applications
});
}
void onResponseSent(const boost::system::error_code& ec,
std::size_t bytes_transferred) {
if (ec != 0) {
std::cout << "Error occured! Error code = "
<< ec.value()
<< ". Message: " << ec.message();
}
onFinish();
}
// Here we perform the cleanup.
void onFinish() {
delete this;
}
std::string ProcessRequest(asio::streambuf& request) {
// In this method we parse the request, process it
// and prepare the request.
// Emulate CPU-consuming operations.
int i = 0;
while (i != 1000000)
i++;
// Emulate operations that block the thread
// (e.g. synch I/O operations).
std::this_thread::sleep_for(
std::chrono::milliseconds(100));
// Prepare and return the response message.
std::string response = "Response\n";
return response;
}
private:
std::shared_ptr<asio::ip::tcp::socket> m_sock;
std::string m_response;
asio::streambuf m_request;
};
150
Chapter 4
To keep things simple, in our sample server application, we implement a dummy service which
only emulates the execution of certain operations. The request processing emulation consists
of performing many increment operations to emulate operations that intensively consume
CPU and then putting the thread of control to sleep for some time to emulate I/O operations
such as reading a file or communicating with a peripheral device synchronously.
Each instance of the Service class is intended to handle one connected client by reading
the request message, processing it, and then sending the response message back.
Next, we define another class, which represents a high-level acceptor concept (as compared
to the low-level concept represented by the asio::ip::tcp::acceptor class). This class
is responsible for accepting the connection requests arriving from clients and instantiating the
objects of the Service class, which will provide the service to connected clients. Let's name
it Acceptor:
class Acceptor {
public:
Acceptor(asio::io_service&ios, unsigned short port_num) :
m_ios(ios),
m_acceptor(m_ios,
asio::ip::tcp::endpoint(
asio::ip::address_v4::any(),
port_num)),
m_isStopped(false)
{}
// Start accepting incoming connection requests.
void Start() {
m_acceptor.listen();
InitAccept();
}
// Stop accepting incoming connection requests.
void Stop() {
m_isStopped.store(true);
}
private:
void InitAccept() {
std::shared_ptr<asio::ip::tcp::socket>
sock(new asio::ip::tcp::socket(m_ios));
m_acceptor.async_accept(*sock.get(),
[this, sock](
151
Implementing Server Applications
const boost::system::error_code& error)
{
onAccept(error, sock);
});
}
void onAccept(const boost::system::error_code&ec,
std::shared_ptr<asio::ip::tcp::socket> sock)
{
if (ec == 0) {
(new Service(sock))->StartHandling();
}
else {
std::cout<< "Error occured! Error code = "
<<ec.value()
<< ". Message: " <<ec.message();
}
// Init next async accept operation if
// acceptor has not been stopped yet.
if (!m_isStopped.load()) {
InitAccept();
}
else {
// Stop accepting incoming connections
// and free allocated resources.
m_acceptor.close();
}
}
private:
asio::io_service&m_ios;
asio::ip::tcp::acceptor m_acceptor;
std::atomic<bool>m_isStopped;
};
This class owns an object of the asio::ip::tcp::acceptor class named m_acceptor,
which is used to asynchronously accept the incoming connection requests.
152
Chapter 4
Also, we define a class that represents the server itself. The class is named
correspondingly—Server:
class Server {
public:
Server() {
m_work.reset(new asio::io_service::work(m_ios));
}
// Start the server.
void Start(unsigned short port_num,
unsigned int thread_pool_size) {
assert(thread_pool_size > 0);
// Create and start Acceptor.
acc.reset(new Acceptor(m_ios, port_num));
acc->Start();
// Create specified number of threads and
// add them to the pool.
for (unsigned int i = 0; i < thread_pool_size; i++) {
std::unique_ptr<std::thread> th(
new std::thread([this]()
{
m_ios.run();
}));
m_thread_pool.push_back(std::move(th));
}
}
// Stop the server.
void Stop() {
acc->Stop();
m_ios.stop();
for (auto& th : m_thread_pool) {
th->join();
}
}
153
Implementing Server Applications
private:
asio::io_servicem_ios;
std::unique_ptr<asio::io_service::work>m_work;
std::unique_ptr<Acceptor>acc;
std::vector<std::unique_ptr<std::thread>>m_thread_pool;
};
This class provides an interface consisting of two methods—Start() and Stop(). The
Start() method accepts a protocol port number on which the server should listen for
the incoming connection requests and the number of threads to add to the pool as input
arguments and starts the server. The Stop() method stops the server. The Start() method
is nonblocking, while the Stop() method is. It blocks the caller thread until the server is
stopped and all the threads running the event loop exit.
Eventually, we implement the application entry point function main() that demonstrates how
to use an object of the Server class:
const unsigned intDEFAULT_THREAD_POOL_SIZE = 2;
int main()
{
unsigned short port_num = 3333;
try {
Server srv;
unsigned intthread_pool_size =
std::thread::hardware_concurrency() * 2;
if (thread_pool_size == 0)
thread_pool_size = DEFAULT_THREAD_POOL_SIZE;
srv.Start(port_num, thread_pool_size);
std::this_thread::sleep_for(std::chrono::seconds(60));
srv.Stop();
}
catch (system::system_error&e) {
std::cout << "Error occured! Error code = "
<<e.code() << ". Message: "
<<e.what();
}
return 0;
}
154
Chapter 4
How it works…
The sample server application consists of four components—the Service, Acceptor, and
Service classes and an application entry point function main(). Let's consider how each of
these components work.
The Service class
The Service class is the key functional component in the application. While other
components constitute an infrastructure of the server, this class implements the actual
function (or service) provided by the server to the clients.
One instance of this class is intended to handle a single connected client by reading the
request, processing it, and then sending back the response message.
The class's constructor accepts a shared pointer to an object representing a socket connected
to a particular client as an argument and caches this pointer. This socket will be used later to
communicate with the client application.
The public interface of the Service class consists of a single method StartHandling().
This method starts handling the client by initiating the asynchronous reading operation to
read the request message from the client specifying the onRequestReceived() method
as a callback. Having initiated the asynchronous reading operation, the StartHandling()
method returns.
When the request reading completes, or an error occurs, the callback method
onRequestReceived() is called. This method first checks whether the reading succeeded
by testing the ec argument that contains the operation completion status code. In case the
reading finished with an error, the corresponding message is output to the standard output
stream and then the onFinish() method is called. After this, the onRequestReceieved()
method returns, which leads to client-handling process interruption.
If the request message has been read successfully, the ProcessRequest() method is
called to perform the requested operations and prepare the response message. When the
ProcessRequest() method completes and returns the string containing the response
message, the asynchronous writing operation is initiated to send this response message
back to the client. The onResponseSent() method is specified as a callback.
When the writing operation completes (or an error occurs), the onResponseSent()method
is called. This method first checks whether the operation succeeded. If the operation failed,
the corresponding message is output to the standard output stream. Next, the onFinish()
method is called to perform the cleanup. When the onFinish()method returns, the full cycle
of client handling is considered completed.
155
Implementing Server Applications
The ProcessRequest() method is the heart of the class because it implements the service.
In our server application, we have a dummy service that runs a dummy loop performing one
million increment operations and then puts the thread to sleep for 100 milliseconds. After
this, the dummy response message is generated and returned to the caller.
Depending on the needs of a particular application, the Service class and particularly its
ProcessRequest() method can be extended and enriched with a functionality to provide
the needed service.
The Service class is designed so that its objects delete themselves when their job is
completed. Deletion is performed in the class's onFinish() private method, which is
called in the end of the client handling cycle whether it is successful or erroneous:
void onFinish() {
delete this;
}
The Acceptor class
The Acceptor class is a part of the server application's infrastructure. Its constructor accepts
a port number on which it will listen for the incoming connection requests as its input argument.
The object of this class contains an instance of the asio::ip::tcp::acceptor class as its
member named m_acceptor, which is constructed in the Acceptor class's constructor.
The Acceptor class exposes two public methods—Start() and Stop(). The Start()
method is intended to instruct an object of the Acceptor class to start listening and
accepting incoming connection requests. It puts the m_acceptor acceptor socket
into listening mode and then calls the class's InitAccept() private method. The
InitAccept() method, in turn, constructs an active socket object and initiates the
asynchronous accept operation, calling the async_accept() method on the acceptor
socket object and passing the object representing an active socket to it as an argument.
The onAccept() method of the Acceptor class is specified as a callback.
When the connection request is accepted or an error occurs, the callback method
onAccept() is called. This method first checks whether any error occurred while the
asynchronous operation was executed by checking the value of its input argument ec. If
the operation completed successfully, an instance of the Service class is created and its
StartHandling() method is called, which starts handling the connected client. Otherwise,
in case of error, the corresponding message is output to the standard output stream.
Next, the value of the m_isStopped atomic variable is checked to see whether the stop
command has been issued on the Acceptor object. If it has (which means that the
Stop() method has been called on the Acceptor object), a new asynchronous accept
operation is not initiated and the low-level acceptor object is closed. At this point, Acceptor
stops listening and accepting incoming connection requests from clients. Otherwise, the
InitAccept() method is called to initiate a new asynchronous accept operation to accept
the next incoming connection request.
156
Chapter 4
As it has already been mentioned, the Stop() method instructs the Acceptor object not to
initiate the next asynchronous accept operation when the currently running one completes.
However, the currently running accept operation is not canceled by this method.
The Server class
The Server class, as its name suggests, represents a server itself. The class's public
interface consists of two methods: Start() and Stop().
The Start() method starts the server up. It accepts two arguments. The first argument
named port_num specifies the number of the protocol port on which the server should listen
for incoming connections. The second argument named thread_pool_size specifies
the number of threads to add to the pool of threads running the even loop and deliver
asynchronous operation completion events. This argument is very important and should be
chosen with care as it directly influences the performance of the server.
The Start() method begins by instantiating an object of the Acceptor class that will be
used to accept incoming connections and then starting it up by calling its Start() method.
After this, it spawns a set of worker threads, each of which is added to the pool, by calling the
run() method of the asio::io_service object. Besides, all the std::thread objects
are cached in the m_thread_pool member vector so that the corresponding threads can be
joined later when the server is stopped.
The Stop()method first stops the Acceptor object acc, calling its Stop()method. Then,
it calls the stop() method on the asio::io_service object m_ios, which makes all the
threads that previously called m_ios.run() to join the pool to exit as soon as possible,
discarding all pending asynchronous operations. After this, the Stop() method waits for all
threads in the pool to exit by iterating through all the std::thread objects cached in the
m_thread_pool vector and joining each of them.
When all threads exit, the Stop() method returns.
The main() entry point function
This function demonstrates the usage of the server. Firstly, it instantiates an object of the
Server class named srv. Because the Start() method of the Server class requires
a number of threads constituting a pool to be passed to it, before starting the server, the
optimal size of the pool is calculated. The general formula often used in parallel applications
to find the optimal number of threads is the number of processors the computer has
multiplied by 2. We use the std::thread::hardware_concurrency() static method
to obtain the number of processors. However, because this method may fail to do its job
returning 0, we fall back to default value represented by the constant DEFAULT_THREAD_
POOL_SIZE, which is equal to 2 in our case.
157
Implementing Server Applications
When the thread pool size is calculated, the Start() method is called to start the server.
The Start() method does not block. When it returns, the thread running the main()
method continues the execution. To allow the server to run for some time, the main thread is
put to sleep for 60 seconds. When the main thread wakes up, it calls the Stop() method on
the srv object to stop the server. When the Stop() method returns, the main() function
returns too and our application exits.
Of course, in the real application, the server would be stopped as a reaction to some relevant
event such as the user input, rather than when some dummy period of time elapses.
See also
ff
Chapter 2, I/O Operations, includes recipes providing detailed discussions on how to
perform synchronous I/O.
ff
The Using timers recipe from Chapter 6, Other Topics, demonstrates how to use
timers provided by Boost.Asio. Timers can be used to implement an asynchronous
operation timeout mechanism.
158
5
HTTP and SSL/TLS
In this chapter, we will cover the following topics:
ff
Implementing the HTTP client application
ff
Implementing the HTTP server application
ff
Adding SSL/TLS support to client applications
ff
Adding SSL/TLS support to server applications
Introduction
This chapter covers two major topics. The first one is HTTP protocol implementation.
The second is the usage of SSL/TLS protocol. Let's briefly examine each of them.
The HTTP protocol is an application layer protocol operating on the top of TCP protocol. It is
widely used on the Internet, allowing client applications to request particular resources from
the servers, and servers to transmit the requested resources back to the clients. Besides,
HTTP allows clients to upload data and send commands to the server.
The HTTP protocol assumes several models or methods of communication, each designed for
a specific purpose. The simplest method called GET assumes the following flow of events:
1. The HTTP client application (for example, a web browser) generates a request
message containing information about a particular resource (residing on the server)
to be requested and sends it to the HTTP server application (for example, a web
server) using TCP as a transport level protocol.
2. The HTTP server application, having received a request from the client, parses it,
extracts the requested resource from the storage (for example, from a file system or
a database), and sends it back to the client as a part of a HTTP response message.
The format of both the request and response messages is defined by HTTP protocol.
159
HTTP and SSL/TLS
Several other methods are defined by HTTP protocol, allowing client application to actively
send data or upload resources to the server, delete resources located on the server, and
perform other operations. In the recipes of this chapter, we will consider implementation of
the GET method. Because HTTP protocol methods are similar in principle, implementation of
one of them gives a good hint about how to implement others.
Another topic covered in this chapter is SSL and TLS protocols. Secure Socket Layer (SSL)
and Transport Layer Security (TLS) protocols operate on the top of TCP protocol and are
aimed at achieving two main goals as follows:
ff
Providing a way to authenticate each communication participant using
digital certificate
ff
Securing data being transmitted over the underlying TCP protocol
The SSL and TLS protocols are widespread, especially in the Web. Most web servers to which
its potential clients may send sensitive data (passwords, credit card numbers, personal data,
and so on) support SSL/TLS-enabled communication. In this case, the so called HTTPS (HTTP
over SSL) protocol is used to allow the client to authenticate the server (sometimes servers
may want to authenticate the client, though this is rarely the case) and to secure transmitted
data by encrypting it, making this data useless for the culprit even if intercepted.
Boost.Asio does not contain the implementation of SSL/TLS protocols.
Instead, it relies on the OpenSSL library, Boost.Asio provides a set of
classes, functions, and data structures that facilitate the usage of
functionality provided by OpenSSL, making the code of the application
more uniformed and object-oriented.
In this chapter, we will not consider the details of the OpenSSL library or SSL/TLS protocols.
These topics are not in the scope of this book. Instead, we will touch upon specific tools
provided by the Boost.Asio that rely on OpenSSL library and allow to implement support of
SSL/TLS protocol in a network application.
The two recipes demonstrate how to build client and server applications that secure
their communication using SSL/TLS protocols. To make SSL/TLS-related aspects of the
applications more vivid and clear, all other aspects of considered applications were made as
simple as possible. Both client and server applications are synchronous and based on recipes
found in other chapters of this book. This allows us to compare a basic TCP client or server
application with their advanced versions supporting SSL/TLS and to better understand what it
takes to add SSL/TLS support to a distributed application.
160
Chapter 5
Implementing the HTTP client application
HTTP clients constitute important class of distributed software and are represented by many
applications. Web browsers are prominent representatives of this class. They use HTTP
protocols to request web pages from web servers. However, today HTTP protocol is used not
only in the web. Many distributed applications use this protocol to exchange custom data of
any kind. Often, when designing a distributed application, choosing HTTP as a communication
protocol is a much better idea than developing custom one.
In this recipe, we will consider an implementation of HTTP client using Boost.Asio that satisfies
the following basic requirements:
ff
Supports the HTTP GET request method
ff
Executes requests asynchronously
ff
Supports request canceling
Let's move on to the implementation.
How to do it…
Because one of the requirements of our client application is to support canceling requests
that have been initiated but have not been completed yet, we need to make sure that
canceling is enabled on all target platforms. Therefore, we begin our client application by
configuring Boost.Asio library so that request canceling is enabled. More details on issues
related to asynchronous operation canceling are provided in the Cancelling asynchronous
operations recipe in Chapter 2, I/O Operations:
#include <boost/predef.h> // Tools to identify the OS.
// We need this to enable cancelling of I/O operations on
// Windows XP, Windows Server 2003 and earlier.
// Refer to "http://www.boost.org/doc/libs/1_58_0/
// doc/html/boost_asio/reference/basic_stream_socket/
// cancel/overload1.html" for details.
#ifdef BOOST_OS_WINDOWS
#define _WIN32_WINNT 0x0501
#if _WIN32_WINNT <= 0x0502 // Windows Server 2003 or earlier.
#define BOOST_ASIO_DISABLE_IOCP
#define BOOST_ASIO_ENABLE_CANCELIO
#endif
#endif
161
HTTP and SSL/TLS
Next, we include Boost.Asio library headers and also headers of some components of
standard C++ libraries that we will need to implement our application:
#include <boost/asio.hpp>
#include
#include
#include
#include
<thread>
<mutex>
<memory>
<iostream>
using namespace boost;
Now, before we can jump to implementing classes and functions constituting our client
application, we have to make one more preparation related to error representation
and handling.
When implementing the HTTP client application, we need to deal with three classes of errors.
The first class is represented by numerous errors that may occur when executing Boost.Asio
functions and classes' methods. For example, if we call the write_some() method on an
object representing a socket that has not been opened, the method will return operating
system dependent error code (either by throwing an exception or by the means of an out
argument depending on the method overload used), designating the fact that an invalid
operation has been executed on a non-opened socket.
The second class includes both erroneous and non-erroneous statuses defined by HTTP
protocol. For example, the status code 200 returned by the server as a response to particular
request made by the client, designates the fact that a client's request has been fulfilled
successfully. On the other hand, the status code 500 designates that while performing the
requested operation, an error occurred on the server that led to the request not being fulfilled.
The third class includes errors related to the HTTP protocol itself. In case a server sends a
message, as a response to correct the request made by a client and this message is not a
properly structured HTTP response, the client application should have means to represent
this fact in terms of error code.
Error code for the first class of errors are defined in the sources of Boost.Asio libraries.
Status codes of the second class are defined by HTTP protocol. The third class is not defined
anywhere and we should define corresponding error codes by ourselves in our application.
We define a single error code that represents quite a general error designating the fact that
the message received from the server is not a correct HTTP response message and therefore,
the client cannot parse it. Let's name this error code as invalid_response:
namespace http_errors {
enum http_error_codes
{
invalid_response = 1
};
162
Chapter 5
Then, we define a class representing an error category, which includes the invalid_
response error code defined above. Let's name this category as http_errors_category:
class http_errors_category
: public boost::system::error_category
{
public:
const char* name() const BOOST_SYSTEM_NOEXCEPT
{ return "http_errors"; }
std::string message(int e) const {
switch (e) {
case invalid_response:
return "Server response cannot be parsed.";
break;
default:
return "Unknown error.";
break;
}
}
};
Then, we define a static object of this class, a function returning an instance of the object,
and the overload for the make_error_code() function accepting error codes of our custom
type http_error_codes:
const boost::system::error_category&
get_http_errors_category()
{
static http_errors_category cat;
return cat;
}
boost::system::error_code
make_error_code(http_error_codes e)
{
return boost::system::error_code(
static_cast<int>(e), get_http_errors_category());
}
} // namespace http_errors
163
HTTP and SSL/TLS
The last step we need to perform before we can use our new error code in our application is
to allow Boost library to know that the members of the http_error_codes enumeration
should be treated as error codes. To do this, we include the following structure definition into
the boost::system namespace:
namespace boost {
namespace system {
template<>
struct is_error_code_enum
<http_errors::http_error_codes>
{
BOOST_STATIC_CONSTANT(bool, value = true);
};
} // namespace system
} // namespace boost
Because our HTTP client application is going to be asynchronous, the user of the client when
initiating a request, will need to provide a pointer to a callback function, which will be invoked
when the request completes. We need to define a type representing a pointer to such a
callback function.
A callback function when called, would need to be passed arguments that clearly designate
three things:
ff
Which request has completed
ff
What is the response
ff
Whether the request completed successfully and if not, the error code designating
the error that occurred
Note that, later, we will define the HTTPRequest and HTTPResponse classes representing
the HTTP request and HTTP response correspondingly, but now we use forward declarations.
Here is how the callback function pointer type declaration looks:
class HTTPClient;
class HTTPRequest;
class HTTPResponse;
typedef void(*Callback) (const HTTPRequest& request,
const HTTPResponse& response,
const system::error_code& ec);
164
Chapter 5
The HTTPResponse class
Now, we can define a class representing a HTTP response message sent to the client as a
response to the request:
class HTTPResponse {
friend class HTTPRequest;
HTTPResponse() :
m_response_stream(&m_response_buf)
{}
public:
unsigned int get_status_code() const {
return m_status_code;
}
const std::string& get_status_message() const {
return m_status_message;
}
const std::map<std::string, std::string>& get_headers() {
return m_headers;
}
const std::istream& get_response() const {
return m_response_stream;
}
private:
asio::streambuf& get_response_buf() {
return m_response_buf;
}
void set_status_code(unsigned int status_code) {
m_status_code = status_code;
}
void set_status_message(const std::string& status_message) {
m_status_message = status_message;
}
void add_header(const std::string& name,
const std::string& value)
{
m_headers[name] = value;
165
HTTP and SSL/TLS
}
private:
unsigned int m_status_code; // HTTP status code.
std::string m_status_message; // HTTP status message.
// Response headers.
std::map<std::string, std::string> m_headers;
asio::streambuf m_response_buf;
std::istream m_response_stream;
};
The HTTPResponse class is quite simple. Its private data members represent parts of HTTP
response such as the response status code and status message, and response headers
and body. Its public interface contains methods that return the values of corresponding data
members, while private methods allow setting those values.
The HTTPRequest class representing a HTTP request, which will be defined next, is declared
as a friend to HTTPResponse. We will see how the objects of the HTTPRequest class use
the private methods of the HTTPResponse class to set values of its data members when a
response message arrives.
The HTTPRequest class
Next, we define a class representing a HTTP request containing functionality that constructs
the HTTP request message based on information provided by the class user, sends it to the
server, and then receives and parses the HTTP response message.
This class is at the center of our application because it contains most of its functionalities.
Later, we will define the HTTPClient class representing an HTTP client, responsibilities
of which will be limited to maintaining a single instance of the asio::io_service class
common to all the HTTPRequest objects and acting as a factory of the HTTPRequest
objects. Therefore, we declare the HTTPClient class as a friend to the HTTPRequest
class and make the HTTPRequest class' constructor private:
class HTTPRequest {
friend class HTTPClient;
static const unsigned int DEFAULT_PORT = 80;
HTTPRequest(asio::io_service& ios, unsigned int id) :
m_port(DEFAULT_PORT),
m_id(id),
m_callback(nullptr),
m_sock(ios),
166
Chapter 5
m_resolver(ios),
m_was_cancelled(false),
m_ios(ios)
{}
The constructor accepts two arguments: a reference to an object of the asio::io_service
class and an unsigned integer named id. The latter contains a unique identifier of a request,
which is assigned by the user of the class and allows distinguishing request objects one
from another.
Then, we define methods constituting the public interface of the class:
public:
void set_host(const std::string& host) {
m_host = host;
}
void set_port(unsigned int port) {
m_port = port;
}
void set_uri(const std::string& uri) {
m_uri = uri;
}
void set_callback(Callback callback) {
m_callback = callback;
}
std::string get_host() const {
return m_host;
}
unsigned int get_port() const {
return m_port;
}
const std::string& get_uri() const {
return m_uri;
}
unsigned int get_id() const {
return m_id;
}
167
HTTP and SSL/TLS
void execute() {
// Ensure that precorditions hold.
assert(m_port > 0);
assert(m_host.length() > 0);
assert(m_uri.length() > 0);
assert(m_callback != nullptr);
// Prepare the resolving query.
asio::ip::tcp::resolver::query resolver_query(m_host,
std::to_string(m_port),
asio::ip::tcp::resolver::query::numeric_service);
std::unique_lock<std::mutex>
cancel_lock(m_cancel_mux);
if (m_was_cancelled) {
cancel_lock.unlock();
on_finish(boost::system::error_code(
asio::error::operation_aborted));
return;
}
// Resolve the host name.
m_resolver.async_resolve(resolver_query,
[this](const boost::system::error_code& ec,
asio::ip::tcp::resolver::iterator iterator)
{
on_host_name_resolved(ec, iterator);
});
}
void cancel() {
std::unique_lock<std::mutex>
cancel_lock(m_cancel_mux);
m_was_cancelled = true;
m_resolver.cancel();
if (m_sock.is_open()) {
m_sock.cancel();
}
}
168
Chapter 5
The public interface includes methods that allow the class' user to set and get HTTP request
parameters such as the DNS name of the host running the server, protocol port number, and
URI of the requested resource. Besides, there is a method that allows setting a pointer to a
callback function that will be called when the request completes.
The execute() method initiates the execution of the request. Also, the cancel() method
allows canceling the initiated request before it completes. We will consider how these
methods work in the next section of the recipe.
Now, we define a set of private methods that contain most of the implementation details.
Firstly, we define a method that is used as a callback for an asynchronous DNS name
resolution operation:
private:
void on_host_name_resolved(
const boost::system::error_code& ec,
asio::ip::tcp::resolver::iterator iterator)
{
if (ec != 0) {
on_finish(ec);
return;
}
std::unique_lock<std::mutex>
cancel_lock(m_cancel_mux);
if (m_was_cancelled) {
cancel_lock.unlock();
on_finish(boost::system::error_code(
asio::error::operation_aborted));
return;
}
// Connect to the host.
asio::async_connect(m_sock,
iterator,
[this](const boost::system::error_code& ec,
asio::ip::tcp::resolver::iterator iterator)
{
on_connection_established(ec, iterator);
});
}
169
HTTP and SSL/TLS
Then, we define a method used as a callback for an asynchronous connection operation,
which is initiated in the on_host_name_resolved() method just defined:
void on_connection_established(
const boost::system::error_code& ec,
asio::ip::tcp::resolver::iterator iterator)
{
if (ec != 0) {
on_finish(ec);
return;
}
// Compose the request message.
m_request_buf += "GET " + m_uri + " HTTP/1.1\r\n";
// Add mandatory header.
m_request_buf += "Host: " + m_host + "\r\n";
m_request_buf += "\r\n";
std::unique_lock<std::mutex>
cancel_lock(m_cancel_mux);
if (m_was_cancelled) {
cancel_lock.unlock();
on_finish(boost::system::error_code(
asio::error::operation_aborted));
return;
}
// Send the request message.
asio::async_write(m_sock,
asio::buffer(m_request_buf),
[this](const boost::system::error_code& ec,
std::size_t bytes_transferred)
{
on_request_sent(ec, bytes_transferred);
});
}
170
Chapter 5
The next method we define—on_request_sent()—is a callback, which is called after the
request message is sent to the server:
void on_request_sent(const boost::system::error_code& ec,
std::size_t bytes_transferred)
{
if (ec != 0) {
on_finish(ec);
return;
}
m_sock.shutdown(asio::ip::tcp::socket::shutdown_send);
std::unique_lock<std::mutex>
cancel_lock(m_cancel_mux);
if (m_was_cancelled) {
cancel_lock.unlock();
on_finish(boost::system::error_code(
asio::error::operation_aborted));
return;
}
// Read the status line.
asio::async_read_until(m_sock,
m_response.get_response_buf(),
"\r\n",
[this](const boost::system::error_code& ec,
std::size_t bytes_transferred)
{
on_status_line_received(ec, bytes_transferred);
});
}
Then, we need another callback method, which is called when the first portion of the response
message, namely, status line, is received from the server:
void on_status_line_received(
const boost::system::error_code& ec,
std::size_t bytes_transferred)
{
if (ec != 0) {
on_finish(ec);
171
HTTP and SSL/TLS
return;
}
// Parse the status line.
std::string http_version;
std::string str_status_code;
std::string status_message;
std::istream response_stream(
&m_response.get_response_buf());
response_stream >> http_version;
if (http_version != "HTTP/1.1"){
// Response is incorrect.
on_finish(http_errors::invalid_response);
return;
}
response_stream >> str_status_code;
// Convert status code to integer.
unsigned int status_code = 200;
try {
status_code = std::stoul(str_status_code);
}
catch (std::logic_error&) {
// Response is incorrect.
on_finish(http_errors::invalid_response);
return;
}
std::getline(response_stream, status_message, '\r');
// Remove symbol '\n' from the buffer.
response_stream.get();
m_response.set_status_code(status_code);
m_response.set_status_message(status_message);
std::unique_lock<std::mutex>
cancel_lock(m_cancel_mux);
if (m_was_cancelled) {
cancel_lock.unlock();
172
Chapter 5
on_finish(boost::system::error_code(
asio::error::operation_aborted));
return;
}
// At this point the status line is successfully
// received and parsed.
// Now read the response headers.
asio::async_read_until(m_sock,
m_response.get_response_buf(),
"\r\n\r\n",
[this](
const boost::system::error_code& ec,
std::size_t bytes_transferred)
{
on_headers_received(ec,
bytes_transferred);
});
}
Now, we define a method that serves as a callback, which is called when the next portion of
the response message—the response headers block—arrives from the server. We will name it
as on_headers_received():
void on_headers_received(const boost::system::error_code& ec,
std::size_t bytes_transferred)
{
if (ec != 0) {
on_finish(ec);
return;
}
// Parse and store headers.
std::string header, header_name, header_value;
std::istream response_stream(
&m_response.get_response_buf());
while (true) {
std::getline(response_stream, header, '\r');
// Remove \n symbol from the stream.
response_stream.get();
173
HTTP and SSL/TLS
if (header == "")
break;
size_t separator_pos = header.find(':');
if (separator_pos != std::string::npos) {
header_name = header.substr(0,
separator_pos);
if (separator_pos < header.length() - 1)
header_value =
header.substr(separator_pos + 1);
else
header_value = "";
m_response.add_header(header_name,
header_value);
}
}
std::unique_lock<std::mutex>
cancel_lock(m_cancel_mux);
if (m_was_cancelled) {
cancel_lock.unlock();
on_finish(boost::system::error_code(
asio::error::operation_aborted));
return;
}
// Now we want to read the response body.
asio::async_read(m_sock,
m_response.get_response_buf(),
[this](
const boost::system::error_code& ec,
std::size_t bytes_transferred)
{
on_response_body_received(ec,
bytes_transferred);
});
return;
}
174
Chapter 5
Besides, we need a method that will handle the last part of the response—the response body.
The following method is used as a callback, which is called after the response body arrives
from the server:
void on_response_body_received(
const boost::system::error_code& ec,
std::size_t bytes_transferred)
{
if (ec == asio::error::eof)
on_finish(boost::system::error_code());
else
on_finish(ec);
}
Finally, we define the on_finish() method that serves as a final point of all execution paths
(including erroneous) that start in the execute() method. This method is called when the
request completes (either successfully or not) and its purpose is to call the callback provided
by the HTTPRequest class' user to notify it about the completion of the request:
void on_finish(const boost::system::error_code& ec)
{
if (ec != 0) {
std::cout << "Error occured! Error code = "
<< ec.value()
<< ". Message: " << ec.message();
}
m_callback(*this, m_response, ec);
return;
}
We will need some data fields associated with each instance of the HTTPRequest class.
Here, we declare the class' corresponding data members:
private:
// Request parameters.
std::string m_host;
unsigned int m_port;
std::string m_uri;
// Object unique identifier.
unsigned int m_id;
175
HTTP and SSL/TLS
// Callback to be called when request completes.
Callback m_callback;
// Buffer containing the request line.
std::string m_request_buf;
asio::ip::tcp::socket m_sock;
asio::ip::tcp::resolver m_resolver;
HTTPResponse m_response;
bool m_was_cancelled;
std::mutex m_cancel_mux;
asio::io_service& m_ios;
The last thing to add is the closing bracket to designate the end of the HTTPRequest
class definition:
};
The HTTPClient class
The last class that we need in our application is the one that would be responsible for the
following three functions:
ff
To establish a threading policy
ff
To spawn and destroy threads in a pool of threads running the Boost.Asio event loop
and delivering asynchronous operations' completion events
ff
To act as a factory of the HTTPRequest objects
We will name this class as HTTPClient:
class HTTPClient {
public:
HTTPClient(){
m_work.reset(new boost::asio::io_service::work(m_ios));
m_thread.reset(new std::thread([this](){
m_ios.run();
}));
}
std::shared_ptr<HTTPRequest>
create_request(unsigned int id)
{
176
Chapter 5
return std::shared_ptr<HTTPRequest>(
new HTTPRequest(m_ios, id));
}
void close() {
// Destroy the work object.
m_work.reset(NULL);
// Waiting for the I/O thread to exit.
m_thread->join();
}
private:
asio::io_service m_ios;
std::unique_ptr<boost::asio::io_service::work> m_work;
std::unique_ptr<std::thread> m_thread;
};
The callback and the main() entry point function
At this point, we have the basic HTTP client that comprises three classes and several
supplementary data types. Now we will define two functions that are not parts of the client,
but demonstrate how to use it to communicate with the server using the HTTP protocol. The
first function will be used as a callback, which will be called when the request completes. Its
signature must correspond to the function pointer type Callback defined earlier. Let's name
our callback function as handler():
void handler(const HTTPRequest& request,
const HTTPResponse& response,
const system::error_code& ec)
{
if (ec == 0) {
std::cout << "Request #" << request.get_id()
<< " has completed. Response: "
<< response.get_response().rdbuf();
}
else if (ec == asio::error::operation_aborted) {
std::cout << "Request #" << request.get_id()
<< " has been cancelled by the user."
<< std::endl;
}
else {
std::cout << "Request #" << request.get_id()
<< " failed! Error code = " << ec.value()
<< ". Error message = " << ec.message()
177
HTTP and SSL/TLS
<< std::endl;
}
return;
}
The second and the last function we need to define is the main() application entry point
function that uses the HTTP client to send HTTP requests to the server:
int main()
{
try {
HTTPClient client;
std::shared_ptr<HTTPRequest> request_one =
client.create_request(1);
request_one->set_host("localhost");
request_one->set_uri("/index.html");
request_one->set_port(3333);
request_one->set_callback(handler);
request_one->execute();
std::shared_ptr<HTTPRequest> request_two =
client.create_request(1);
request_two->set_host("localhost");
request_two->set_uri("/example.html");
request_two->set_port(3333);
request_two->set_callback(handler);
request_two->execute();
request_two->cancel();
// Do nothing for 15 seconds, letting the
// request complete.
std::this_thread::sleep_for(std::chrono::seconds(15));
// Closing the client and exiting the application.
client.close();
}
178
Chapter 5
catch (system::system_error &e) {
std::cout << "Error occured! Error code = " << e.code()
<< ". Message: " << e.what();
return e.code().value();
}
return 0;
};
How it works…
Now let's consider how our HTTP client works. The application consists of five components,
among which are the three classes such as HTTPClient, HTTPRequest, and
HTTPResponse, and two functions such as the handler() callback function and
the main() application entry point function. Let's consider how each component
works separately.
The HTTPClient class
A class' constructor begins with creating an instance of the asio::io_service::work
object in order to make sure that threads running the event loop do not exit this loop when
there are no pending asynchronous operations. Then, a thread of control is spawned and
added to the pool by calling the run() method on the m_ios object. This is where the
HTTPClient class performs its first and part of the second functions, namely, establishing
threading policy and adding threads to the pool.
The third function of the HTTPClient class—to act as a factory of the object representing
HTTP requests—is performed in its create_request() public method. This method
creates an instance of the HTTPRequest class in the free memory and returns a shared
pointer object pointing to it. As its input argument, the method accepts an integer value that
represents the unique identifier to be assigned to the newly created request object. This
identifier is used to distinguish between different request objects.
The close() method from the class' public interface destroys the asio::io_
service::work object, allowing threads to exit the event loop just as soon as all
pending operations complete. The method blocks until all threads exit.
179
HTTP and SSL/TLS
The HTTPRequest class
Let's begin considering the HTTPRequest class' behavior by inspecting its data members
and their purpose. The HTTPRequest class contains 12 data members, among which are
the following:
ff
Request parameters:
std::string m_host;
unsigned int m_port;
std::string m_uri;
ff
A unique identifier of the request:
unsigned int m_id;
ff
A pointer to the callback function provided by the class' user to be called when a
request completes:
Callback m_callback;
ff
A string buffer used to store the HTTP request message:
std::string m_request_buf;
ff
A socket object used to communicate with the server:
asio::ip::tcp::socket m_sock;
ff
A resolver object used to resolve the DNS name of the server host provided by
the user:
asio::ip::tcp::resolver m_resolver;
ff
An instance of the HTTPResponse class that represents the response received from
the server:
HTTPResponse m_response;
ff
A boolean flag and a mutex object supporting the request canceling functionality
(which will be explained later):
bool m_was_cancelled;
std::mutex m_cancel_mux;
ff
Also, a reference to an instance of the asio::io_service class required by
resolver and socket objects. The single instance of the asio::io_service
class is maintained by an object of the HTTPClient class:
asio::io_service& m_ios;
180
Chapter 5
An instance of the HTTPRequest object represents a single HTTP GET request. The class
is designed so that in order to send a request, two steps need to be performed. Firstly, the
parameters of the request and the callback function to be called when the request completes
are set by calling the corresponding setter methods on the object. Then, as a second step, the
execute() method is invoked to initiate the request execution. When the request completes,
the callback function is called.
The set_host(), set_port(), set_uri(), and set_callback() setter methods allow
setting a server host DNS name and port number, URI of the requested resource, and a
callback function to be called when the request completes. Each of these methods accepts
one argument and stores its value in the corresponding HTTPRequest object's data member.
The get_host(), get_port(), and get_uri() getter methods return values set by
corresponding setter methods. The get_id() getter method returns a request object's
unique identifier, which is passed to the object's constructor on instantiation.
The execute() method begins the execution of a request by initiating a sequence of
asynchronous operations. Each asynchronous operation performs one step of request
execution procedure.
Because a server host in the request object is represented with a DNS name (rather than
with an IP address), before sending the request message to the server, the specified DNS
name must be resolved and transformed into an IP address. Therefore, the first step in the
request execution is DNS name resolution. The execute() method begins with preparing the
resolving query and then calls the resolver object's async_resolve() method, specifying
the HTTPRequest class' on_host_name_resolve() private method as an operation
completion callback.
When the server host DNS name is resolved, the on_host_name_resolved() method is
called. This method is passed two arguments: the first of which is an error code, designating
the status of the operation, and the second one is the iterator that can be used to iterate
through a list of endpoints resulting from a resolution process.
The on_host_name_resolved() method initiates the next asynchronous operation in a
sequence, namely socket connection, by calling asio::async_connect() free function
passing socket object m_sock and iterator parameter to it so that it connects the socket to
the first valid endpoint. The on_connection_established() method is specified as an
asynchronous connection operation completion callback.
When an asynchronous connection operation completes, the on_connection_
established() method is invoked. The first argument passed to it is named ec that
designates the operation completion status. If its value is equal to zero, it means that
the socket was successfully connected to one of the endpoints. The on_connection_
established() method constructs the HTTP GET request message using request
parameters stored in the corresponding data members of the HTTPRequest object. Then, the
asio::async_write() free function is called to asynchronously send a constructed HTTP
request message to the server. The class' private method on_request_sent() is specified
as a callback to be called when the asio::async_write() operation completes.
181
HTTP and SSL/TLS
After a request is sent, and if it is sent successfully, the client application has to let the server
know that the full request is sent and the client is not going to send anything else by shutting
down the send part of the socket. Then, the client has to wait for the response message from
the server. And this is what the on_request_sent() method does. Firstly, it calls the socket
object's shutdown() method, specifying that the send part should be closed by the passing
value asio::ip::tcp::socket::shutdown_send to the method as an argument. Then,
it calls the asio::async_read_until() free function to receive a response from the
server.
Because the response may be potentially very big and we do not know its size beforehand,
we do not want to read it all at once. We first want to read the HTTP response status line
only; then, having analyzed it, either continue reading the rest of the response (if we think
we need it) or discard it. Therefore, we pass the \r\n symbols sequence, designating the
end of the HTTP response status line as a delimiter argument to the asio::async_read_
until() method. The on_status_line_received() method is specified as an operation
completion callback.
When the status line is received, the on_status_line_received() method is invoked.
This method performs parsing of the status line, extracting values designating the HTTP
protocol version, response status code, and response status message from it. Each value is
analyzed for correctness. We expect the HTTP version to be 1.1, otherwise the response is
considered incorrect and the request execution is interrupted. The status code should be an
integer value. If the string-to-integer conversion fails, the response is considered incorrect
and its further processing is interrupted too. If the response status line is correct, the request
execution continues. The extracted status code and status message are stored in the
m_response member object, and the next asynchronous operation in the request execution
operation sequence is initiated. Now, we want to read the response headers block.
According to the HTTP protocol, the response headers block ends with the \r\n\r\n symbols
sequence. Therefore, in order to read it, we call the asio::async_read_until() free
function one more time, specifying the string \r\n\r\n as a delimiter. The on_headers_
received() method is specified as a callback.
When the response headers block is received, the on_headers_received() method is
invoked. In this method, the response headers block is parsed and broken into separate
name-value pairs and stored in the m_response member object as a part of the response.
Having received and parsed the headers, we want to read the last part of the response—the
response body. To do this, an asynchronous reading operation is initiated by calling the
asio::async_read() free function. The on_response_body_received() method is
specified as a callback.
182
Chapter 5
Eventually, the on_response_body_received() method is invoked notifying us of the
fact that the whole response message has been received. Because the HTTP server may
shutdown the send part of its socket just after it sends the last part of the response message,
on the client side, the last reading operation may complete with an error code equal to the
asio::error::eof value. This should not be treated as an actual error, but rather as a
normal event. Therefore, if the on_response_body_received() method is called with the
ec argument equal to asio::error::eof, we pass the default constructed object of the
boost::system::error_code class to the on_finish() method in order to designate
that the request execution is completed successfully. Otherwise, the on_finish() method is
called with an argument representing the original error code. The on_finish() method in its
turn calls the callback provided by the client of the HTTPRequest class object.
When the callback returns, request processing is considered finished.
The HTTPResponse class
The HTTPResponse class does not provide much functionality. It is more like a plain data
structure containing data members representing different parts of a response, with getter and
setter methods defined, allowing getting and setting corresponding data member values.
All setter methods are private and only the objects of the HTTPRequest class has access
to them (recall that the HTTPRequest class is declared as the HTTPResponse class'
friend). Each object of the HTTPRequest class has a data member that is an instance of
the HTTPResponse class. The object of the HTTPRequest class sets values of its member
object of HTTPResponse class as it receives and parses the response received from a
HTTP server.
Callback and the main() entry point functions
These functions demonstrate how to use the HTTPClient and HTTPRequest classes
in order to send the GET HTTP requests to the HTTP server and then how to use the
HTTPResponse class to obtain the response.
The main() function first creates an instance of the HTTPClient class and then uses it to
create two instances of the HTTPRequest class, each representing a separate GET HTTP
request. Both request objects are provided with request parameters and then executed.
However, just after the second request has been executed, the first one is canceled by
invoking its cancel() method.
The handler() function, which is used as a completion callback for both request objects
created in the main() function, is invoked when each request completes regardless of
whether it succeeded, failed, or was canceled. The handler() function analyses the
error code and the request and response objects passed to it as arguments and output
corresponding messages to the standard output stream.
183
HTTP and SSL/TLS
See also
ff
The Implementing asynchronous TCP client recipe from Chapter 3, Implementing
Client Applications, provides more information on how to implement an asynchronous
TCP client.
ff
The Using timers recipe from Chapter 6, Other Topics, demonstrates how to use
timers provided by Boost.Asio. Timers can be used to implement an asynchronous
operation timeout mechanism.
Implementing the HTTP server application
Nowadays, there are plenty of HTTP server applications available in the market. However,
sometimes there is a need to implement a custom one. This could be a small and simple
server, supporting a specific subset of HTTP protocol possibly with custom extensions, or
maybe not an HTTP server but a server supporting a communication protocol, which is
similar to HTTP or is based on it.
In this recipe, we will consider the implementation of basic HTTP server application using
Boost.Asio. Here is the set of requirements that our application must satisfy:
ff
It should support the HTTP 1.1 protocol
ff
It should support the GET method
ff
It should be able to process multiple requests in parallel, that is, it should be an
asynchronous parallel server
In fact, we have already considered the implementation of the server application that partially
fulfils specified requirements. In Chapter 4, Implementing Server Applications, the recipe
named Implementing an asynchronous TCP server demonstrates how to implement an
asynchronous parallel TCP server, which communicates with clients according to a dummy
application layer protocol. All the communication functionality and protocol details are
encapsulated in a single class named Service. All other classes and functions defined
in that recipe are infrastructural in their purpose and isolated from the protocol details.
Therefore, the current recipe will be based on the one from Chapter 4, Implementing Server
Applications, and here we will only consider the implementation of the Service class as all
other components stay the same.
Note that, in this recipe, we do not consider the security aspect of the
application. Make sure the server is protected before making it available
to the public, where though operating correctly and in accordance with
HTTP protocol, it could be compromised by the culprits due to security
breaches.
Now let's move on to the implementation of the HTTP server application.
184
Chapter 5
Getting ready…
Because the application demonstrated in this recipe is based on other applications
demonstrated in the recipe named Implementing asynchronous TCP server from Chapter 4,
Implementing Server Applications, it is necessary to get acquainted with that recipe before
proceeding with this one.
How to do it…
We begin our application by including header files containing declarations and definitions of
data types and functions that we will use:
#include <boost/asio.hpp>
#include <boost/filesystem.hpp>
#include
#include
#include
#include
<fstream>
<atomic>
<thread>
<iostream>
using namespace boost;
Next, we start defining the Service class that provides the implementation of the HTTP
protocol. Firstly, we declare a static constant table containing HTTP status codes and status
messages. The definition of the table will be given after the Service class' definition:
class Service {
static const std::map<unsigned int, std::string>
http_status_table;
The class' constructor accepts a single parameter—shared pointer pointing to an instance of a
socket connected to a client. Here's the definition of the constructor:
public:
Service(std::shared_ptr<boost::asio::ip::tcp::socket> sock) :
m_sock(sock),
m_request(4096),
m_response_status_code(200), // Assume success.
m_resource_size_bytes(0)
{};
185
HTTP and SSL/TLS
Next, we define a single method constituting the Service class' public interface. This method
initiates an asynchronous communication session with the client connected to the socket,
pointer to which was passed to the Service class' constructor:
void start_handling() {
asio::async_read_until(*m_sock.get(),
m_request,
"\r\n",
[this](
const boost::system::error_code& ec,
std::size_t bytes_transferred)
{
on_request_line_received(ec,
bytes_transferred);
});
}
Then, we define a set of private methods that perform receiving and processing of the
request sent by the client, parse and execute the request, and send the response back.
Firstly, we define a method that processes the HTTP request line:
private:
void on_request_line_received(
const boost::system::error_code& ec,
std::size_t bytes_transferred)
{
if (ec != 0) {
std::cout << "Error occured! Error code = "
<< ec.value()
<< ". Message: " << ec.message();
if (ec == asio::error::not_found) {
// No delimiter has been found in the
// request message.
m_response_status_code = 413;
send_response();
return;
}
else {
// In case of any other error –
// close the socket and clean up.
on_finish();
return;
186
Chapter 5
}
}
// Parse the request line.
std::string request_line;
std::istream request_stream(&m_request);
std::getline(request_stream, request_line, '\r');
// Remove symbol '\n' from the buffer.
request_stream.get();
// Parse the request line.
std::string request_method;
std::istringstream request_line_stream(request_line);
request_line_stream >> request_method;
// We only support GET method.
if (request_method.compare("GET") != 0) {
// Unsupported method.
m_response_status_code = 501;
send_response();
return;
}
request_line_stream >> m_requested_resource;
std::string request_http_version;
request_line_stream >> request_http_version;
if (request_http_version.compare("HTTP/1.1") != 0) {
// Unsupported HTTP version or bad request.
m_response_status_code = 505;
send_response();
return;
}
// At this point the request line is successfully
// received and parsed. Now read the request headers.
asio::async_read_until(*m_sock.get(),
m_request,
"\r\n\r\n",
[this](
const boost::system::error_code& ec,
187
HTTP and SSL/TLS
std::size_t bytes_transferred)
{
on_headers_received(ec,
bytes_transferred);
});
return;
}
Next, we define a method intended to process and store the request headers block,
containing the request headers:
void on_headers_received(const boost::system::error_code& ec,
std::size_t bytes_transferred)
{
if (ec != 0) {
std::cout << "Error occured! Error code = "
<< ec.value()
<< ". Message: " << ec.message();
if (ec == asio::error::not_found) {
// No delimiter has been fonud in the
// request message.
m_response_status_code = 413;
send_response();
return;
}
else {
// In case of any other error - close the
// socket and clean up.
on_finish();
return;
}
}
// Parse and store headers.
std::istream request_stream(&m_request);
std::string header_name, header_value;
while (!request_stream.eof()) {
std::getline(request_stream, header_name, ':');
if (!request_stream.eof()) {
std::getline(request_stream,
header_value,
188
Chapter 5
'\r');
// Remove symbol \n from the stream.
request_stream.get();
m_request_headers[header_name] =
header_value;
}
}
// Now we have all we need to process the request.
process_request();
send_response();
return;
}
Besides, we need a method that can perform the actions needed to fulfill the request sent
by the client. We define the process_request() method, whose purpose is to read the
contents of the requested resource from the file system and store it in the buffer, ready to be
sent back to the client:
void process_request() {
// Read file.
std::string resource_file_path =
std::string("D:\\http_root") +
m_requested_resource;
if (!boost::filesystem::exists(resource_file_path)) {
// Resource not found.
m_response_status_code = 404;
return;
}
std::ifstream resource_fstream(
resource_file_path,
std::ifstream::binary);
if (!resource_fstream.is_open()) {
// Could not open file.
// Something bad has happened.
m_response_status_code = 500;
189
HTTP and SSL/TLS
return;
}
// Find out file size.
resource_fstream.seekg(0, std::ifstream::end);
m_resource_size_bytes =
static_cast<std::size_t>(
resource_fstream.tellg());
m_resource_buffer.reset(
new char[m_resource_size_bytes]);
resource_fstream.seekg(std::ifstream::beg);
resource_fstream.read(m_resource_buffer.get(),
m_resource_size_bytes);
m_response_headers += std::string("content-length") +
": " +
std::to_string(m_resource_size_bytes) +
"\r\n";
}
Finally, we define a method that composes a response message and send it to the client:
void send_response() {
m_sock->shutdown(
asio::ip::tcp::socket::shutdown_receive);
auto status_line =
http_status_table.at(m_response_status_code);
m_response_status_line = std::string("HTTP/1.1 ") +
status_line +
"\r\n";
m_response_headers += "\r\n";
std::vector<asio::const_buffer> response_buffers;
response_buffers.push_back(
asio::buffer(m_response_status_line));
190
Chapter 5
if (m_response_headers.length() > 0) {
response_buffers.push_back(
asio::buffer(m_response_headers));
}
if (m_resource_size_bytes > 0) {
response_buffers.push_back(
asio::buffer(m_resource_buffer.get(),
m_resource_size_bytes));
}
// Initiate asynchronous write operation.
asio::async_write(*m_sock.get(),
response_buffers,
[this](
const boost::system::error_code& ec,
std::size_t bytes_transferred)
{
on_response_sent(ec,
bytes_transferred);
});
}
When the response sending is complete, we need to shut down the socket to let the client
know that a full response has been sent and no more data will be sent by the server.
We define the on_response_sent() method for this purpose:
void on_response_sent(const boost::system::error_code& ec,
std::size_t bytes_transferred)
{
if (ec != 0) {
std::cout << "Error occured! Error code = "
<< ec.value()
<< ". Message: " << ec.message();
}
m_sock->shutdown(asio::ip::tcp::socket::shutdown_both);
on_finish();
}
191
HTTP and SSL/TLS
The last method we need to define is the one that performs cleanup and deletes an instance
of the Service object, when the communication session is finished and the object is not
needed anymore is not needed anymore:
// Here we perform the cleanup.
void on_finish() {
delete this;
}
Of course, we will need some data members in our class. We declare the following
data members:
private:
std::shared_ptr<boost::asio::ip::tcp::socket> m_sock;
boost::asio::streambuf m_request;
std::map<std::string, std::string> m_request_headers;
std::string m_requested_resource;
std::unique_ptr<char[]> m_resource_buffer;
unsigned int m_response_status_code;
std::size_t m_resource_size_bytes;
std::string m_response_headers;
std::string m_response_status_line;
};
The last thing we need to do to complete the definition of the class representing a service is
to define the http_status_table static member declared before and fill it with data—HTTP
status code and corresponding status messages:
const std::map<unsigned int, std::string>
Service::http_status_table =
{
{ 200, "200 OK" },
{ 404, "404 Not Found" },
{ 413, "413 Request Entity Too Large" },
{ 500, "500 Server Error" },
{ 501, "501 Not Implemented" },
{ 505, "505 HTTP Version Not Supported" }
};
Our Service class is now ready.
192
Chapter 5
How it works…
Let's begin with considering the Service class' data members and then switch to its
functionality. The Service class contains the following non-static data members:
ff
std::shared_ptr<boost::asio::ip::tcp::socket> m_sock: This is a
shared pointer to a TCP socket object connected to the client
ff
boost::asio::streambuf m_request: This is a buffer into which the request
message is read
ff
std::map<std::string, std::string> m_request_headers: This is a map
where request headers are put when the HTTP request headers block is parsed
ff
std::string m_requested_resource: This is the URI of the resource requested
by the client
ff
std::unique_ptr<char[]> m_resource_buffer: This is a buffer where the
contents of a requested resource is stored before being sent to the client as a part of
the response message
ff
unsigned int m_response_status_code: This is the HTTP response
status code
ff
std::size_t m_resource_size_bytes: This is the size of the contents of the
requested resource
ff
std::string m_response_headers: This is a string containing a properly
formatted response headers block
ff
std::string m_response_status_line: This contains a response status line
Now that we know the purpose of the Service class' data members, let's trace how it
works. Here, we will only consider how the Service class works. The description of all
other components of the server application and how they work is given in the recipe named
Implementing an asynchronous TCP server in Chapter 4, Implementing Server Applications.
When a client sends a TCP connection request and this request is accepted on the server (this
happens in the Acceptor class, which is not considered in this recipe), an instance of the
Service class is created and its constructor is passed a shared pointer pointing to the TCP
socket object, connected to that client. The pointer to the socket is stored in the Service
object's data member m_sock.
Besides, during the construction of the Service object, the m_request stream buffer
member is initialized with the value of 4096, which sets the maximum size of the buffer in
bytes. Limiting the size of the request buffer is a security measure, which helps to protect
the server from malicious clients that may try to send very long dummy request messages
exhausting all memory at the disposal of the server application. For the correct request,
a buffer of 4096 bytes in size is more than enough.
193
HTTP and SSL/TLS
After an instance of the Service class has been constructed, its start_handling()
method is called by the Acceptor class. From this method, the sequence of asynchronous
method invocations begins, which performs request receiving, processing, and response
sending. The start_handling() method immediately initiates an asynchronous reading
operation calling the asio::async_read_until() function in order to receive the HTTP
request line sent by the client. The on_request_line_received() method is specified as
a callback.
When the on_request_line_received() method is invoked, we first check the error code
specifying the operation completion status. If the status code is not equal to zero, we consider
two options. The first option—when the error code is equal to the asio::error::not_
found value—means that more bytes have been received from the client than the size of the
buffer and the delimiter of the HTTP request line (the \r\n symbol sequence) has not been
encountered. This case is described by the HTTP status code 413. We set the value of the
m_response_status_code member variable to 413 and call the send_response()
method that initiates the operation that sends a response designating the error back to the
client. We will consider the send_response() method later in this section. At this point,
the request processing is finished.
If the error code neither designates success nor is equal to asio::error::not_found, it
means that some other error has occurred from which we cannot recover, therefore, we just
output the information about the error and do not reply to the client at all. The on_finish()
method is called to perform the cleanup, and the communication with the client is interrupted.
Finally, if receiving of the HTTP request line succeeds, it is parsed to extract the HTTP request
method, the URI identifying the requested resource and the HTTP protocol version. Because
our sample server only supports the GET method, if the method specified in the request line is
different from GET, further request processing is interrupted and the response containing the
error code 501 is sent to the client to inform it that the method specified in the request is not
supported by the server.
Likewise, the HTTP protocol version specified by the client in the HTTP request line is checked
to be the one supported by the server. Because our server application supports only version
1.1, if the version specified by the client is different, the response with the HTTP status code
505 is sent to the client and the request processing is interrupted.
A URI string extracted from the HTTP request line is stored in the m_requested_resource
data member and will be used later.
When the HTTP request line is received and parsed, we continue reading the request message
in order to read the request headers block. To do this, the asio::async_read_until()
function is called. Because the request headers block ends with the \r\n\r\n symbol
sequence, this symbol sequence is passed to the function as a delimiter argument. The
on_headers_received() method is specified as an operation completion callback.
194
Chapter 5
The on_headers_received() method performs error checking similar to the one that is
performed in the on_request_line_received() method. In case of an error, request
processing interrupts. In the case of success, the HTTP request headers block is parsed and
broken into separate name-value pairs, which are then stored in the m_request_headers
member map. After the headers block has been parsed, the process_request() and
send_response() methods are called consequently.
The purpose of the process_request() method is to read the file specified in the request
as the URI and put its content to the buffer, from which the contents will be sent to the client
as a part of the response message. If the specified file is not found in the server root directory,
the HTTP status code 404 (page not found) code is sent to the client as a part of the response
message and the request processing interrupts.
However, if the requested file is found, its size is first calculated and then the buffer of
the corresponding size is allocated in the free memory and the file contents are read in
that buffer.
After this, an HTTP header named content-length specifying the size of the response body is
added to the m_response_headers string data member. This data member represents the
response headers block and its value will later be used as a part of the response message.
At this point, all ingredients required to construct the HTTP response message are available
and we can move on to preparing and sending the response to the client. This is done in the
send_response() method.
The send_response() method starts with shutting down the receive side of the socket
letting the client know that the server will not read any data from it anymore. Then, it extracts
the response status message corresponding to the status code stored in the m_response_
status_code member variable from the http_status_table static table.
Next, the HTTP response status line is constructed and the headers block is appended with
the delimiting symbol sequence \r\n according to the HTTP protocol. At this point, all the
components of the response message—the response status line, response headers block,
and response body—are ready to be sent to the client. The components are combined in the
form of a vector of buffers, each represented with an instance of the asio::const_buffer
class and containing one component of the response message. A vector of buffers embodies
a composite buffer consisting of three parts. When this composite buffer is constructed, it is
passed to the asio::async_write() function to be sent to the client. The Service class'
on_response_sent() method is specified as a callback.
When the response message is sent and the on_response_sent() callback method is
invoked, it first checks the error code and outputs the log message if the operation fails; then,
it shuts down the socket and calls the on_finish() method. The on_finish() method in
its turn deletes the instance of the Service object in the context of which it is called.
At this point, client handling is finished.
195
HTTP and SSL/TLS
See also
ff
The Implementing an asynchronous TCP server recipe from Chapter 4, Implementing
Server Applications, provides more information on how to implement the
asynchronous TCP server used as a base for this recipe.
ff
The Using timers recipe from Chapter 6, Other Topics, demonstrates how to use
timers provided by Boost.Asio. Timers can be used to implement an asynchronous
operation timeout mechanism.
Adding SSL/TLS support to client
applications
Client applications usually use SSL/TLS protocol to send sensitive data such as passwords,
credit card numbers, personal data. SSL/TLS protocol allows clients to authenticate the server
and encrypt the data. The authentication of the server allows the client to make sure that the
data will be sent to the expected addressee (and not to a malicious one). Data encryption
guarantees that even if the transmitted data is intercepted somewhere on its way to the
server, the interceptor will not be able to use it.
This recipe demonstrates how to implement a synchronous TCP client application supporting
SSL/TLS protocol using the Boost.Asio and OpenSSL libraries. The TCP client application
demonstrated in the recipe named Implementing synchronous TCP client from Chapter 3,
Implementing Client Applications, is taken as a base for this recipe, and some code changes
and additions are made to it in order to add support for SSL/TLS protocol. The code that
differs from that of the base implementation of the synchronous TCP client is highlighted so
that the code directly related to SSL/TLS support is better distinguished from the rest of
the code.
Getting ready…
Before setting out to this recipe, OpenSSL library must be installed and the project must be
linked against it. Procedures related to the installation of the library or linking the project
against it are beyond the scope of this book. Refer to the OpenSSL library documentation
for more information.
Besides, because this recipe is based on another recipe named Implementing a synchronous
TCP Client from Chapter 3, Implementing Client Applications, it is highly advised to get
acquainted with it before proceeding to this one.
196
Chapter 5
How to do it…
The following code sample demonstrates the possible implementation of a synchronous TCP
client application supporting SSL/TLS protocol to authenticate the server and encrypt the
data being transmitted.
We begin our application by adding the include and using directives:
#include <boost/asio.hpp>
#include <boost/asio/ssl.hpp>
#include <iostream>
using namespace boost;
The <boost/asio/ssl.hpp> header contains types and functions providing integration
with OpenSSL library.
Next, we define a class that plays the role of the synchronous SSL/TLS-enabled TCP client:
class SyncSSLClient {
public:
SyncSSLClient(const std::string& raw_ip_address,
unsigned short port_num) :
m_ep(asio::ip::address::from_string(raw_ip_address),
port_num),
m_ssl_context(asio::ssl::context::sslv3_client),
m_ssl_stream(m_ios, m_ssl_context)
{
// Set verification mode and designate that
// we want to perform verification.
m_ssl_stream.set_verify_mode(asio::ssl::verify_peer);
// Set verification callback.
m_ssl_stream.set_verify_callback([this](
bool preverified,
asio::ssl::verify_context& context)->bool{
return on_peer_verify(preverified, context);
});
}
void connect() {
// Connect the TCP socket.
m_ssl_stream.lowest_layer().connect(m_ep);
197
HTTP and SSL/TLS
// Perform the SSL handshake.
m_ssl_stream.handshake(asio::ssl::stream_base::client);
}
void close() {
// We ignore any errors that might occur
// during shutdown as we anyway can't
// do anything about them.
boost::system::error_code ec;
m_ssl_stream.shutdown(ec); // Shutdown SSL.
// Shut down the socket.
m_ssl_stream.lowest_layer().shutdown(
boost::asio::ip::tcp::socket::shutdown_both, ec);
m_ssl_stream.lowest_layer().close(ec);
}
std::string emulate_long_computation_op(
unsigned int duration_sec) {
std::string request = "EMULATE_LONG_COMP_OP "
+ std::to_string(duration_sec)
+ "\n";
send_request(request);
return receive_response();
};
private:
bool on_peer_verify(bool preverified,
asio::ssl::verify_context& context)
{
// Here the certificate should be verified and the
// verification result should be returned.
return true;
}
void send_request(const std::string& request) {
asio::write(m_ssl_stream, asio::buffer(request));
}
198
Chapter 5
std::string receive_response() {
asio::streambuf buf;
asio::read_until(m_ssl_stream, buf, '\n');
std::string response;
std::istream input(&buf);
std::getline(input, response);
return response;
}
private:
asio::io_service m_ios;
asio::ip::tcp::endpoint m_ep;
asio::ssl::context m_ssl_context;
asio::ssl::stream<asio::ip::tcp::socket>m_ssl_stream;
};
Now we implement the main() application entry point function that uses the
SyncSSLClient class to authenticate the server and securely communicate with
it using SSL/TLS protocol:
int main()
{
const std::string raw_ip_address = "127.0.0.1";
const unsigned short port_num = 3333;
try {
SyncSSLClient client(raw_ip_address, port_num);
// Sync connect.
client.connect();
std::cout << "Sending request to the server... "
<< std::endl;
std::string response =
client.emulate_long_computation_op(10);
std::cout << "Response received: " << response
<< std::endl;
199
HTTP and SSL/TLS
// Close the connection and free resources.
client.close();
}
catch (system::system_error &e) {
std::cout << "Error occured! Error code = " << e.code()
<< ". Message: " << e.what();
return e.code().value();
}
return 0;
}
How it works…
The sample client application consists of two main components: the SyncSSLClient
class and a main() application entry point function that uses the SyncSSLClient class
to communicate with the server application over SSL/TLS protocol. Let's consider how each
component works separately.
The SyncSSLClient class
The SyncSSLClient class is the key component in our application. It implements the
communication functionality.
The class has four private data members as follows:
ff
asio::io_service m_ios: This is an object providing access to the operating
system's communication services that are used by the socket object.
ff
asio::ip::tcp::endpoint m_ep: This is an endpoint designating the
server application.
ff
asio::ssl::context m_ssl_context: This is an object representing SSL
context; basically, this is a wrapper around the SSL_CTX data structure defined
by OpenSSL library. This object contains global settings and parameters used by
other objects and functions involved in the process of communication using
SSL/TLS protocol.
ff
asio::ssl::stream<asio::ip::tcp::socket> m_ssl_stream: This
represents a stream that wraps a TCP socket object and implements all SSL/TLS
communication operations.
Each object of the class is intended to communicate with a single server. Therefore, the
class' constructor accepts an IP address and a protocol port number designating the server
application as its input arguments. These values are used to instantiate the m_ep data
member in the constructor's initialization list.
200
Chapter 5
Next, the m_ssl_context and m_ssl_stream members of the SyncSSLClient class are
instantiated. We pass the asio::ssl::context::sslv23_client value to the m_ssl_
context object's constructor to designate that the context will be used by the application
playing a role of a client only and that we want to support multiple secure protocols including
multiple versions of SSL and TLS. This value defined by Boost.Asio corresponds to a value
representing a connection method returned by the SSLv23_client_method() function
defined by OpenSSL library.
The SSL stream object m_ssl_stream is set up in the SyncSSLClient class' constructor.
Firstly, the peer verification mode is set to asio::ssl::verify_peer, which means that
we want to perform peer verification during a handshake. Then, we set a verification callback
method that will be called when certificates arrive from the server. The callback is invoked
once for each certificate in the certificates chain sent by the server.
The class' on_peer_verify() method that is set as a peer verification callback is a dummy
in our application. The certificate verification process lies beyond the scope of this book.
Therefore, the function simply always returns the true constant, meaning that the certificate
verification succeeded without performing the actual verification.
The three public methods comprise the interface of the SyncSSLClient class. The method
named connect() performs two operations. Firstly, the TCP socket is connected to the
server. The socket underlying the SSL stream is returned by the method of the SSL stream
object lowest_layer(). Then, the connect() method is called on the socket with m_ep
being passed as an argument designating the endpoint to be connected to:
// Connect the TCP socket.
m_ssl_stream.lowest_layer().connect(m_ep);
After the TCP connection is established, the handshake() method is called on the SSL
stream object, which leads to the initiation of the handshake process. This method is
synchronous and does not return until the handshake completes or an error occurs:
// Perform the SSL handshake.
m_ssl_stream.handshake(asio::ssl::stream_base::client);
After the handshake() method returns, both TCP and SSL (or TLS, depending on which
protocol was agreed upon during the handshake process) connections are established and
the effective communication can be performed.
The close() method shuts down the SSL connection by calling the shutdown() method
on the SSL stream object. The shutdown() method is synchronous and blocks until the SSL
connection is shut down or an error occurs. After this method returns, the corresponding SSL
stream object cannot be used to transmit the data anymore.
201
HTTP and SSL/TLS
The third interface method is emulate_long_computation_op(unsigned int
duration_sec). This method is where the I/O operations are performed. It begins with
preparing the request string according to the application layer protocol. Then, the request is
passed to the class' send_request(const std::string& request) private method,
which sends it to the server. When the request is sent and the send_request() method
returns, the receive_response() method is called to receive the response from the
server. When the response is received, the receive_response() method returns the
string containing the response. After this, the emulate_long_computation_op()
method returns the response message to its caller.
Note that the emulate_long_computation_op(), send_request(), and receive_
response() methods are almost identical to the corresponding methods defined in
the SyncTCPClient class, which is a part of the synchronous TCP client application
demonstrated in Chapter 3, Implementing Client Applications, which we used as a base for
SyncSSLClient class. The only difference is that in SyncSSLClient, an SSL stream object
is passed to the corresponding Boost.Asio I/O functions, while in the SyncTCPClient class,
a socket object is passed to those functions. Other aspects of the mentioned methods
are identical.
The main() entry point function
This function acts as a user of the SyncSSLClient class. Having obtained the server IP
address and protocol port number, it instantiates and uses the object of the SyncSSLClient
class to authenticate and securely communicate with the server in order to consume its
service, namely, to emulate an operation on the server by performing dummy calculations
for 10 seconds. The code of this function is simple and self-explanatory; thus, requires no
additional comments.
See also
ff
The Implementing a synchronous TCP client recipe from Chapter 3, Implementing
Client Applications, provides more information on how to implement a synchronous
TCP client used as a base for this recipe.
Adding SSL/TLS support to server
applications
SSL/TLS protocol support is usually added to the server application when the services it
provides assumes transmission of sensitive data such as passwords, credit card numbers,
personal data, and so on, by the client to the server. In this case, adding SSL/TLS protocol
support to the server allows clients to authenticate the server and establish a secure channel
to make sure that the sensitive data is protected while being transmitted.
202
Chapter 5
Sometimes, a server application may want to use SSL/TLS protocol to authenticate the
client; however, this is rarely the case and usually other methods are used to ensure the
authenticity of the client (for example, username and password are specified when logging
into a mail server).
This recipe demonstrates how to implement a synchronous iterative TCP server application
supporting SSL/TLS protocol using the Boost.Asio and OpenSSL libraries. The synchronous
iterative TCP server application demonstrated in the recipe named Implementing a
synchronous iterative TCP server from Chapter 4, Implementing Server Applications, is taken
as a base for this recipe and some code changes and additions are made to it in order to add
support for SSL/TLS protocol. The code that differs from that of the base implementation of
the synchronous iterative TCP server is highlighted so that the code directly related to SSL/
TLS support is better distinguished from the rest of the code.
Getting ready…
Before setting out to this recipe, OpenSSL library must be installed and the project must be
linked against it. Procedures related to the installation of the library or linking the project
against it are beyond the scope of this book. Refer to the official OpenSSL documentation for
more information.
Besides, because this recipe is based on another recipe named Implementing a synchronous
iterative TCP server, from Chapter 4, Implementing Server Applications, it is highly advised to
get acquainted with it before proceeding to this one.
How to do it…
The following code sample demonstrates the possible implementation of a synchronous TCP
server application supporting SSL/TLS protocol to allow client applications to authenticate the
server and protect the data being transmitted.
We begin our application by including Boost.Asio library headers and headers of some
components of standard C++ libraries that we will need to implement in our application:
#include <boost/asio.hpp>
#include <boost/asio/ssl.hpp>
#include <thread>
#include <atomic>
#include <iostream>
using namespace boost;
The <boost/asio/ssl.hpp> header contains types and functions providing integration
with OpenSSL library.
203
HTTP and SSL/TLS
Next, we define a class responsible for handling a single client by reading the request
message, processing it, and then sending back the response message. This class represents
a single service provided by the server application and is named correspondingly—Service:
class Service {
public:
Service(){}
void handle_client(
asio::ssl::stream<asio::ip::tcp::socket>& ssl_stream)
{
try {
// Blocks until the handshake completes.
ssl_stream.handshake(
asio::ssl::stream_base::server);
asio::streambuf request;
asio::read_until(ssl_stream, request, '\n');
// Emulate request processing.
int i = 0;
while (i != 1000000)
i++;
std::this_thread::sleep_for(
std::chrono::milliseconds(500));
// Sending response.
std::string response = "Response\n";
asio::write(ssl_stream, asio::buffer(response));
}
catch (system::system_error &e) {
std::cout << "Error occured! Error code = "
<< e.code() << ". Message: "
<< e.what();
}
}
};
204
Chapter 5
Next, we define another class that represents a high-level acceptor concept (as compared to
the low-level acceptor represented by the asio::ip::tcp::acceptor class). This class is
responsible for accepting connection requests arriving from clients and instantiating objects
of the Service class, which will provide the service to connected clients. This class is called
Acceptor:
class Acceptor {
public:
Acceptor(asio::io_service& ios, unsigned short port_num) :
m_ios(ios),
m_acceptor(m_ios,
asio::ip::tcp::endpoint(
asio::ip::address_v4::any(),
port_num)),
m_ssl_context(asio::ssl::context::sslv23_server)
{
// Setting up the context.
m_ssl_context.set_options(
boost::asio::ssl::context::default_workarounds
| boost::asio::ssl::context::no_sslv2
| boost::asio::ssl::context::single_dh_use);
m_ssl_context.set_password_callback(
[this](std::size_t max_length,
asio::ssl::context::password_purpose purpose)
-> std::string
{return get_password(max_length, purpose);}
);
m_ssl_context.use_certificate_chain_file("server.crt");
m_ssl_context.use_private_key_file("server.key",
boost::asio::ssl::context::pem);
m_ssl_context.use_tmp_dh_file("dhparams.pem");
// Start listening for incoming connection requests.
m_acceptor.listen();
}
void accept() {
asio::ssl::stream<asio::ip::tcp::socket>
ssl_stream(m_ios, m_ssl_context);
205
HTTP and SSL/TLS
m_acceptor.accept(ssl_stream.lowest_layer());
Service svc;
svc.handle_client(ssl_stream);
}
private:
std::string get_password(std::size_t max_length,
asio::ssl::context::password_purpose purpose) const
{
return "pass";
}
private:
asio::io_service& m_ios;
asio::ip::tcp::acceptor m_acceptor;
asio::ssl::context m_ssl_context;
};
Now we define a class that represents the server itself. The class is named
correspondingly—Server:
class Server {
public:
Server() : m_stop(false) {}
void start(unsigned short port_num) {
m_thread.reset(new std::thread([this, port_num]() {
run(port_num);
}));
}
void stop() {
m_stop.store(true);
m_thread->join();
}
private:
void run(unsigned short port_num) {
Acceptor acc(m_ios, port_num);
while (!m_stop.load()) {
acc.accept();
}
206
Chapter 5
}
std::unique_ptr<std::thread> m_thread;
std::atomic<bool> m_stop;
asio::io_service m_ios;
};
Eventually, we implement the main() application entry point function that demonstrates
how to use the Server class. This function is identical to the one defined in the recipe from
Chapter 4, Implementing Server Applications, that we took as a base for this recipe:
int main()
{
unsigned short port_num = 3333;
try {
Server srv;
srv.start(port_num);
std::this_thread::sleep_for(std::chrono::seconds(60));
srv.stop();
}
catch (system::system_error &e) {
std::cout
<< "Error occured! Error code = "
<< e.code() << ". Message: "
<< e.what();
}
return 0;
}
Note that the last two components of the server application, namely, the Server class and
the main() application entry point function are identical to the corresponding components
defined in the recipe from Chapter 4, Implementing Server Applications, that we took as a
base for this recipe.
How it works…
The sample server application consists of four components: the Service, Acceptor, and
Server classes and the main(), application entry point function, which demonstrates how
to use the Server class. Because the source code and the purpose of the Server class and
the main() entry point function are identical to those of the corresponding components
defined in the recipe from Chapter 4, Implementing Server Applications, that we took as a
base for this recipe, we will not discuss them here. We will only consider the Service and
Acceptor classes that were updated to provide support for SSL/TLS protocol.
207
HTTP and SSL/TLS
The Service class
The Service class is the key functional component in the application. While other
components are infrastructural in their purpose, this class implements the actual
function (or service) required by the clients.
The Service class is quite simple and consists of a single method handle_client().
As its input argument, this method accepts a reference to an object representing an SSL
stream that wraps a TCP socket connected to a particular client.
The method begins with performing an SSL/TLS handshake by invoking the handshake()
method on the ssl_stream object. This method is synchronous and does not return until the
handshake completes or an error occurs.
After the handshake has completed, a request message is synchronously read from the SSL
stream until a new line ASCII symbol \n is encountered. Then, the request is processed. In our
sample application, request processing is trivial and dummy and consists in running a loop
performing one million increment operations and then putting the thread to sleep for half a
second. After this, the response message is prepared and sent back to the client.
Exceptions that may be thrown by the Boost.Asio functions and methods are caught and
handled in the handle_client() method and are not propagated to the method's caller
so that, if handling of one client fails, the server continues working.
Note that the handle_client() method is very similar to the corresponding method defined
in the recipe Implementing a synchronous iterative TCP server, from Chapter 4, Implementing
Server Applications, that we took as a base for this recipe. The difference consists in the fact
that in this recipe, the handle_client() method operates on an object representing an
SSL stream as opposed to an object representing a TCP socket being operated on in the base
implementation of the method. Besides, an additional operation—an SSL/TLS handshake—is
performed in the method defined in this recipe.
The Acceptor class
The Acceptor class is a part of the server application infrastructure. Each object of this
class owns an instance of the asio::ssl::context class named m_ssl_context. This
member represents an SSL context. Basically, the asio::ssl::contex class is a wrapper
around the SSL_CTX data structure defined by OpenSSL library. Objects of this class contain
global settings and parameters used by other objects and functions involved in the process of
communication using SSL/TLS protocol.
The m_ssl_context object, when instantiated, is passed a
asio::ssl::context::sslv23_server value to its constructor to designate that the SSL
context will be used by the application playing a role of a server only and that multiple secure
protocols should be supported, including multiple versions of SSL and TLS. This value defined
by Boost.Asio corresponds to a value representing a connection method returned by the
SSLv23_server_method() function defined by OpenSSL library.
208
Chapter 5
The SSL context is configured in the Acceptor class' constructor. The context options,
password callback and files containing digital certificates, and private keys and Diffie-Hellman
protocol parameters, are specified there.
After SSL context has been configured, the listen() method is called on the acceptor object
in the Acceptor class' constructor to start listening for connection requests from the clients.
The Acceptor class exposes a single accept() public method. This method, when called,
first instantiates an object of the asio::ssl::stream<asio::ip::tcp::socket>
class named ssl_stream, representing an SSL/TLS communication channel with the
underlying TCP socket. Then, the accept() method is called on the m_acceptor acceptor
object to accept a connection. The TCP socket object owned by ssl_stream, returned by
its lowest_layer() method, is passed to the accept() method as an input argument.
When a new connection is established, an instance of the Service class is created and its
handle_client() method is called, which performs communication with the client and
request handling.
See also
ff
The Implementing synchronous iterative TCP server recipe from Chapter 4,
Implementing Server Applications, provides more information on how to
implement a synchronous TCP server used as a base for this recipe.
209
6
Other Topics
In this chapter, we will cover the following recipes:
ff
Using composite buffers for scatter/gather operations
ff
Using timers
ff
Getting and setting socket options
ff
Performing a stream-based I/O
Introduction
This final chapter includes four recipes that stand somewhat apart from those in previous
chapters that demonstrate the core Boost.Asio concepts, covering the majority of typical
use cases. However, it does not mean that recipes demonstrated in this chapter are less
important. On the contrary, they are very important and even critical to specific cases.
However, they will be required less often in typical distributed applications.
Though most applications will not require scatter/gather I/O operations and composite
buffers, for some, which keep different parts of messages in separate buffers, such facilities
may turn out to be very usable and convenient.
The Boost.Asio timer is a powerful instrument that allows measuring time intervals. Often, this
is used to set deadlines for the operations that may last unpredictably long and to interrupt
those operations if they do not complete after running for a certain period of time. For many
distributed applications, such an instrument is critical, taking into account the fact that Boost.
Asio does not provide a way to specify a timeout for potentially long-running operations. In
addition to this, timers provided by Boost.Asio can be used to solve other tasks that are not
related to network communication.
211
Other Topics
Tools that allow getting and setting socket options are quite important as well. When
developing a simple network application, the developer may be fully satisfied with the socket
equipped with default values of the options that are automatically set during instantiation of
the socket object. However, in more sophisticated cases, it may be absolutely necessary to
reconfigure the socket by customizing the values of its options.
Boost.Asio classes that wrap the socket and provide a stream-like interface to it allow us to
create simple and elegant distributed applications. And simplicity is known to be one of the
key characteristics of a good software.
Now, let's move on to a detailed consideration of the mentioned topics.
Using composite buffers for scatter/gather
operations
The Using fixed-length I/O buffers recipe in Chapter 2, I/O Operations, introduces simple I/O
buffers, but only slightly touches upon scatter/gather operations and composite buffers. In
this recipe, we are going to consider this topic in more detail.
A composite buffer is basically a complex buffer that consists of two or more simple buffers
(contiguous blocks of memory) distributed over the process' address space. Such buffers
become especially handy in two situations.
The first situation is when the application needs a buffer either to store the message before
sending it to the remote application or to receive the message sent by the remote application.
The problem is that the size of the message is so big that allocating a single contiguous buffer
that is sufficient to store it may fail due to the process' address space fragmentation. In this
case, allocating multiple smaller buffers, whose sizes when summed would be enough to
store the data, and combining them in a single composite buffer is a good solution to
the problem.
Another situation is actually the first one inverted. Due to specificity of the design of the
application, the message to be sent to the remote application is broken into several parts and
stored in different buffers, or if the message to be received from the remote application needs
to be broken into several parts, each of which should be stored in a separate buffer for further
processing. In both the cases, combining several buffers into one composite buffer and then
using scatter send or gather receive operations would be a good approach to the problem.
In this recipe, we will see how to create composite buffers and use them in scatter/gather
I/O operations.
212
Chapter 6
Getting ready…
To understand the content presented in this recipe, it is desirable to be familiar with the
content of the Using fixed-length I/O buffers recipe in Chapter 2, I/O Operations, that provides
a general overview of Boost.Asio's fixed length I/O buffers. Therefore, it is recommended to
get acquainted with the Using fixed-length I/O buffers recipe before proceeding with this one.
How to do it…
Let's consider two algorithms and corresponding code samples that describe how to create
and prepare a composite buffer that is to be used with Boost.Asio I/O operations. The first
algorithm deals with the composite buffer intended for use in gather output operations and
the second one for scatter input operations.
Preparing a composite buffer for gather output operations
The following is the algorithm and corresponding code sample that describe how to prepare
the composite buffer that is to be used with the socket's method that performs output
operations such as asio::ip::tcp::socket::send() or a free function such as
asio::write():
1. Allocate as many memory buffers as needed to perform the task at hand. Note that
this step does not involve any functionality or data types from Boost.Asio.
2. Fill the buffers with data to be output.
3. Create an instance of a class that satisfies the ConstBufferSequence
or MultipleBufferSequence concept's requirements, representing a
composite buffer.
4. Add simple buffers to the composite buffer. Each simple buffer should be represented
as an instance of the asio::const_buffer or asio::mutable_buffer classes.
5. The composite buffer is ready to be used with Boost.Asio output functions.
Let's say we want to send a string Hello my friend! to the remote application, but our
message was broken into three parts and each part was stored in a separate buffer. What
we can do is represent our three buffers as a composite buffer, and then, use it in the output
operation. This is how we will do it in the following code:
#include <boost/asio.hpp>
using namespace boost;
int main()
{
// Steps 1 and 2. Create and fill simple buffers.
const char* part1 = "Hello ";
213
Other Topics
const char* part2 = "my ";
const char* part3 = "friend!";
// Step 3. Create an object representing a composite buffer.
std::vector<asio::const_buffer> composite_buffer;
// Step 4. Add simple buffers to the composite buffer.
composite_buffer.push_back(asio::const_buffer(part1, 6));
composite_buffer.push_back(asio::const_buffer(part2, 3));
composite_buffer.push_back(asio::const_buffer(part3, 7));
// Step 5. Now composite_buffer can be used with Boost.Asio
// output operations as if it was a simple buffer represented
// by contiguous block of memory.
return 0;
}
Preparing a composite buffer for an input operation
The following is the algorithm and corresponding code sample that describe how to prepare
the composite buffer that is to be used with the socket's method that performs an input
operation such as asio::ip::tcp::socket::receive() or a free function such as
asio::read():
1. Allocate as many memory buffers as required to perform the task at hand. The sum
of the sizes of the buffers must be equal to or greater than the size of the expected
message to be received in these buffers. Note that this step does not involve any
functionalities or data types from Boost.Asio.
2. Create an instance of a class that satisfies the MutableBufferSequence concept's
requirements that represents a composite buffer.
3. Add simple buffers to the composite buffer. Each simple buffer should be represented
as an instance of the asio::mutable_buffer class.
4. The composite buffer is ready to be used with Boost.Asio input operations.
Let's imagine a hypothetical situation, where we want to receive 16 bytes long messages from
the server. However, we do not have a buffer that can fit the entire message. Instead, we have
three buffers: 6, 3, and 7 bytes long. To create a buffer in which we can receive 16 bytes of
data, we can join our three small buffers into a composite one. This is how we do it in the
following code:
#include <boost/asio.hpp>
using namespace boost;
214
Chapter 6
int main()
{
// Step 1. Allocate simple buffers.
char part1[6];
char part2[3];
char part3[7];
// Step 2. Create an object representing a composite buffer.
std::vector<asio::mutable_buffer> composite_buffer;
// Step 3. Add simple buffers to the composite buffer object.
composite_buffer.push_back(asio::mutable_buffer(part1,
sizeof(part1)));
composite_buffer.push_back(asio::mutable_buffer(part2,
sizeof(part2)));
composite_buffer.push_back(asio::mutable_buffer(part3,
sizeof(part3)));
// Now composite_buffer can be used with Boost.Asio
// input operation as if it was a simple buffer
// represented by contiguous block of memory.
return 0;
}
How it works…
Let's see how the first sample works. It starts with allocating three read-only buffers that are
filled with parts of the message string Hello my friend!.
In the next step, an instance of the std::vector<asio::const_buffer> class is created,
which is the embodiment of the composite buffer. The instance is given the corresponding
name, composite_buffer. Because the std::vector<asio::const_buffer> class
satisfies the requirements of ConstBufferSequence, its objects can be used as composite
buffers and can be passed to Boost.Asio gather output functions and methods as arguments
that represent the data source.
In step 4, each of our three buffers is represented as an instance of the asio::const_
buffer class and added to the composite buffer. Because all Boost.Asio output functions
and methods that work with fixed-sized buffers are designed to work with composite buffers
as well, our composite_buffer object can be used with them like a simple buffer.
215
Other Topics
The second sample works quite similar to the first one. The only difference is that because the
composite buffer created in this sample is intended to be used as a data destination (rather
than a data source as it is in the first sample), the three simple buffers added to it are created
as writable ones and are represented as instances of the asio::mutable_buffer class
when added to the composite buffer.
Another thing to note about the second sample is that because the composite buffer created
in this sample is composed of mutable buffers, it can be used in both gather output and
scatter input operations. In this particular sample, the initial buffers (part1, part2, and
part3) are not filled with any data and they contain garbage; and therefore, using them in
output operations is senseless unless they are filled with meaningful data.
See also
ff
The Using fixed-length I/O buffers recipe in Chapter 2, I/O Operations, provides more
information on fixed size simple buffers
ff
The Using extensible stream-oriented I/O buffers recipe in Chapter 2, I/O Operations,
demonstrates how to use classes provided by Boost.Asio, representing different types
of buffers—extensible buffers
Using timers
Timing is a very important aspect of software systems in general and distributed applications
in particular. Therefore a hardware timer—a device used to measure time intervals—is
essential component of any computer and all modern operating systems provide interface
allowing applications to use it.
There are two typical use cases related to the timer. The first one assumes that the
application wants to know the current time and asks the operating system to find it out.
The second use case is when the application asks the operating system to notify it (usually,
by means of invoking a callback) when a certain amount of time elapses.
The second use case is particularly important when it comes to developing distributed
applications with Boost.Asio because a timer is the only way to implement the timeout
mechanism for asynchronous operations.
The Boost.Asio library includes several classes that implement timers, which we will consider
in this recipe.
216
Chapter 6
How to do it…
The Boost.Asio library provides two template classes that implement timers. One of them is
asio::basic_deadline_timer<>, which was the only one available before Boost.Asio
1.49 version was released. In version 1.49, the second timer asio::basic_waitable_
timer<> class template was introduced.
The asio::basic_deadline_timer<> class template was designed to be compatible with
the Boost.Chrono library and internally relies on the functionality it provides. This template
class is somewhat outdated and provides a limited functionality. Therefore, we will not
consider it in this recipe.
On the contrary, a newer asio::basic_waitable_timer<> class template, which is
compatible with the C++11 chrono library is more flexible and provides more functionalities.
Boost.Asio includes three typedefs for classes that are generically derived from the
asio::basic_waitable_timer<> template class:
typedef basic_waitable_timer< std::chrono::system_clock >
system_timer;
typedef basic_waitable_timer< std::chrono::steady_clock >
steady_timer;
typedef basic_waitable_timer< std::chrono::high_resolution_clock >
high_resolution_timer;
The asio::system_timer class is based on the std::chrono::system_clock class,
which represents a system-wide real-time clock. This clock (and so is the timer) is influenced
by external changes of the current system time. Therefore, the asio::system_timer class
is a good choice when we need to set up a timer that will notify us when a certain absolute
time point is reached (for instance, 13h:15m:45s), taking into account the system clock shifts
made after the timer was set up. However, this timer is not good at measuring time intervals
(for instance, 35 seconds from now) because the system clock shifts may result in the timer
expiring sooner or later than the actual interval elapses.
The asio::steady_timer class is based on the std::chrono::steady_clock class,
which represents a steady clock that is not influenced by the system clock changes. It means
that asio::steady_timer is a good choice to measure intervals.
The last timer asio::high_resolution_timer class is based on the
std::chrono::high_resolution_clock class, which represents a high-resolution
system clock. It can be used in cases when high precision in time measurement is required.
In distributed applications implemented with the Boost.Asio library, timers are usually used
to implement timeout periods for asynchronous operations. Just after the asynchronous
operation starts (for example, asio::async_read()), the application will start a timer
set up to expire after a certain period of time, a timeout period. When the timer expires, the
application checks whether the asynchronous operation has completed and if it has not, the
operation is considered timed out and is canceled.
217
Other Topics
Because a steady timer is not influenced by the system clock shifts, it is the best fit to
implement the timeout mechanism.
Note that on some platforms, steady clocks are not available and the
corresponding class that represents a std::chrono::steady_clock
exhibits behavior that is identical to that of std::chrono::stystem_
clock, which means that just like the latter, it is influenced by the changes
of the system clock. It is advised to refer to the documentation of the platform
and corresponding C++ standard library implementation to find out whether
the steady clock is actually steady.
Let's consider a somewhat unrealistic but representative sample application that
demonstrates how to create, start, and cancel Boost.Asio timers. In our sample, we
will create and start two steady timers one by one. When the first timer expires, we
will cancel the second one, before it has a chance to expire.
We begin our sample application with including the necessary Boost.Asio headers and the
using directive:
#include <boost/asio/steady_timer.hpp>
#include <iostream>
using namespace boost;
Next, we define the only component in our application: the main() entry point function:
int main()
{
Like almost any nontrivial Boost.Asio application, we need an instance of the
asio::io_service class:
asio::io_service ios;
Then, we create and start the first t1 timer, which is set up to expire in 2 seconds:
asio::steady_timer t1(ios);
t1.expires_from_now(std::chrono::seconds(2));
Then, we create and start the second t2 timer, which is set up to expire in 5 seconds.
It should definitely expire later than the first timer:
asio::steady_timer t2(ios);
t2.expires_from_now(std::chrono::seconds(5));
218
Chapter 6
Now, we define and set a callback function that is to be called when the first timer expires:
t1.async_wait([&t2](boost::system::error_code ec) {
if (ec == 0) {
std::cout << "Timer #2 has expired!" << std::endl;
}
else if (ec == asio::error::operation_aborted) {
std::cout << "Timer #2 has been cancelled!"
<< std::endl;
}
else {
std::cout << "Error occured! Error code = "
<< ec.value()
<< ". Message: " << ec.message()
<< std::endl;
}
t2.cancel();
});
Then, we define and set another callback function that is to be called when the
second timer expires:
t2.async_wait([](boost::system::error_code ec) {
if (ec == 0) {
std::cout << "Timer #2 has expired!" << std::endl;
}
else if (ec == asio::error::operation_aborted) {
std::cout << "Timer #2 has been cancelled!"
<< std::endl;
}
else {
std::cout << "Error occured! Error code = "
<< ec.value()
<< ". Message: " << ec.message()
<< std::endl;
}
});
In the last step, we call the run() method on the instance of the asio::io_service class:
ios.run();
return 0;
}
Now, our sample application is ready.
219
Other Topics
How it works…
Now, let's track the application's execution path to better understand how it works.
The main() function begins with creating an instance of the asio::io_service class.
We need it because just like sockets, acceptors, resolvers, and other components defined by
the Boost.Asio library, which use operating system services, timers require an instance of the
asio::io_service class as well.
In the next step, the first timer named t1 is instantiated and then the expires_from_now()
method is called on it. This method switches the timer to a non-expired state and starts it. It
accepts an argument that represents the duration of the time interval, after which the timer
should expire. In our sample, we pass an argument that represents the duration of 2 seconds,
which means that in 2 seconds, from the moment when the timer starts, it will expire and all
those who are waiting for this timer's expiration event will be notified.
Next, the second timer named t2 is created, which is then started and set up to expire
in 5 seconds.
When both the timers are started, we asynchronously wait for the timers' expiration events. In
other words, we register callbacks on each of the two timers, which will be invoked when the
corresponding timers expire. To do this, we call the timer's async_wait() method and pass
the pointer to the callback function as an argument. The async_wait() method expects its
argument to be a pointer to the function that has the following signature:
void callback(
const boost::system::error_code& ec);
The callback function accepts a single ec argument, which designates the wait completion
status. In our sample application, we use lambda functions as expiration callbacks for
both the timers.
When both timer expiration callbacks are set, the run() method is called on the ios object.
The method blocks until both the timers expire. The thread, in the context of which the
method run() is invoked, will be used to invoke the expiration callbacks.
When the first timer expires, the corresponding callback function is invoked. It checks the wait
completion status and outputs corresponding messages to the standard output stream. And
then it cancels the second timer by calling the cancel() method on the t2 object.
The canceling of the second timer leads to the expiration callback being called with the
status code, notifying that the timer was canceled before expiration. The expiration callback
of the second timer checks the expiration status and outputs corresponding messages to the
standard output stream and returns.
220
Chapter 6
When both callbacks are completed, the run() method returns and the execution of
the main() function runs to the end. This is when the execution of the application
is completed.
Getting and setting socket options
The socket's properties and its behavior can be configured by changing the values of its
various options. When the socket object is instantiated, its options have default values.
In many cases, the socket configured by default is a perfect fit, whereas in others, it may
be needed to fine tune the socket by changing values of its options so that it meets the
requirements of the application.
In this recipe, we will see how to get and set socket options with Boost.Asio.
Getting ready…
This recipe assumes familiarity with the content provided in Chapter 1, The Basics.
How to do it…
Each socket option, whose value can be set or obtained by means of a functionality provided
by Boost.Asio, is represented by a separate class. The complete list of classes that represent
setting or getting socket options, which are supported by Boost.Asio, can be found on this
Boost.Asio documentation page at http://www.boost.org/doc/libs/1_58_0/doc/
html/boost_asio/reference/socket_base.html.
Note that there are fewer classes that represent socket options listed on this page than the
options that can be set or obtained from a native socket (an object of the underlying operating
system). This is because Boost.Asio supports only a limited amount of socket options. To set
or obtain values of other socket options, developers may need to extend the Boost.Asio library
by adding classes that represent the required options. However, the topic on the extension
of the Boost.Asio library is beyond the scope of this book. We will focus on how to work with
socket options that are supported by the library out of the box.
Let's consider a hypothetical situation where we want to make the size of the socket's receive
buffer two times bigger than whatever its size is now. To do this, we first need to get the
current size of the buffer, then multiply it by two, and finally, set the value obtained after
multiplication as the new receive buffer size.
221
Other Topics
The following sample demonstrates how to do this in the following code:
#include <boost/asio.hpp>
#include <iostream>
using namespace boost;
int main()
{
try {
asio::io_service ios;
// Create and open a TCP socket.
asio::ip::tcp::socket sock(ios, asio::ip::tcp::v4());
// Create an object representing receive buffer
// size option.
asio::socket_base::receive_buffer_size cur_buf_size;
// Get the currently set value of the option.
sock.get_option(cur_buf_size);
std::cout << "Current receive buffer size is "
<< cur_buf_size.value() << " bytes."
<< std::endl;
// Create an object representing receive buffer
// size option with new value.
asio::socket_base::receive_buffer_size
new_buf_size(cur_buf_size.value() * 2);
// Set new value of the option.
sock.set_option(new_buf_size);
std::cout << "New receive buffer size is "
<< new_buf_size.value() << " bytes."
<< std::endl;
}
catch (system::system_error &e) {
std::cout << "Error occured! Error code = " << e.code()
<< ". Message: " << e.what();
return e.code().value();
}
return 0;
}
222
Chapter 6
How it works…
Our sample consists of a single component: the main() entry point function. This function
begins with creating an instance of the asio::io_service class. This instance is then used
to create an object that represents a TCP socket.
Note the usage of the socket class constructor, which creates and opens the socket. Before
we can get or set options on a particular socket object, the corresponding socket must be
opened. This is because before the Boost.Asio socket object is opened, the underlying native
socket object of the corresponding operating system is not yet allocated, and there is nothing
to set the options on or get them from.
Next, an instance of the asio::socket_base::receive_buffer_size class is
instantiated. This class represents an option that controls the size of the socket's receive
buffer. To obtain the current value of the option, the get_option() method is called on the
socket object and the reference to the option object is passed to it as an argument.
The get_option() method deduces the option that is requested by the type of the
argument passed to it. Then, it stores the corresponding option's value in the option object
and returns. The value of the option can be obtained from the object that represents the
corresponding option by invoking the object's value() method, which returns the value of
the option.
After the current value of receive buffer size option is obtained and output to the standard
output stream, in order to set the new value of this option, the main() function proceeds with
creating one more instance of the asio::socket_base::receive_buffer_size class
named new_buf_size. This instance represents the same option as the first instance, cur_
buf_size, but this one contains the new value. The new option value is passed to the option
object as an argument of its constructor.
After the option object that contains the new receive buffer size option value is constructed,
the reference to it is passed as an argument to the socket's set_option() method. Like
get_option(), this method deduces the option to be set by the type of the argument
passed to it, and then, sets the corresponding option value, making the new value equal to
the one stored in the option object.
In the last step, the new option's value is output to the standard output stream.
Performing a stream-based I/O
The concepts of a stream and stream-based I/O are powerful in their expressiveness and
elegance when used properly. Sometimes, most of the application's source code consists
of stream-based I/O operations. The source code readability and maintainability of such an
application would be increased if network communication modules were implemented by
means of stream-based operations as well.
223
Other Topics
Fortunately, Boost.Asio provides tools that allow us to implement inter-process communication
in a stream-based fashion. In this recipe, we will see how to use them.
How to do it…
The Boost.Asio library contains the asio::ip::tcp::iostream wrapper class that
provides an I/O stream-like interface to the TCP socket objects, which allows us to express
inter-process communication operations in terms of stream-based operations.
Let's consider a TCP client application, which takes advantage of a stream-based I/O provided
by Boost.Asio. When using this approach, the TCP client application becomes as simple as the
following code:
#include <boost/asio.hpp>
#include <iostream>
using namespace boost;
int main()
{
asio::ip::tcp::iostream stream("localhost", "3333");
if (!stream) {
std::cout << "Error occurred! Error code = "
<< stream.error().value()
<< ". Message = " << stream.error().message()
<< std::endl;
return -1;
}
stream << "Request.";
stream.flush();
std::cout << "Response: " << stream.rdbuf();
return 0;
}
How it works…
The sample TCP client is quite simple and consists of a single component: the main()
entry point function. The main() function begins with creating an instance of the
asio::ip::tcp::iostream class, which wraps a TCP socket and provides an I/O
stream-like interface to it.
224
Chapter 6
The stream object is constructed with a constructor that accepts a server DNS name and
a protocol port number and automatically tries to resolve the DNS name and then tries to
connect to that server. Note that the port number is represented as a string rather than an
integer. This is because both arguments passed to this constructor are directly used to create
the resolver query, which requires the port number to be represented as a string (it should
be expressed as a service name such as http, ftp, and so on or a port number that is
represented as a string such as "80", "8081", "3333", and so on).
Alternatively, we can construct the stream object using the default constructor, which does
not perform the DNS name resolution and connection. Then, when the object is constructed,
we can call the connect() method on it by specifying the DNS name and protocol port
number in order to perform the resolution and connect the socket.
Next, the state of the stream object is tested to find out whether the connection has
succeeded. And if the stream object is in a bad or erroneous state, the appropriate message
is output to the standard output stream and the application exits. The error() method of the
asio::ip::tcp::iostream class returns an instance of the boost::system::error_
code class, which provides the information about the last error that occurred in the stream.
However, if the stream has been successfully connected to the server, the output operation
is performed on it, which sends the string Request, to the server. After this, the flush()
method is called on the stream object to make sure that all the buffered data is pushed to
the server.
In the last step, the input operation is performed on the stream to read all the data that was
received from the server as a response. The received message is output to the standard
output stream. After this, the main() function returns and the application exits.
There's more…
Not only can we implement the client-side I/O in a stream-oriented fashion using the
asio::ip::tcp::iostream class, we can also perform I/O operations on the server side
as well. In addition to this, this class allows us to specify timeouts for operations, which makes
a stream-based I/O more advantageous than a normal synchronous I/O. Let's take a look at
how this is done.
Implementing a server-side I/O
The following code snippet demonstrates how to implement a simple server that performs a
stream-based I/O using the asio::ip::tcp::iostream class:
// ...
asio::io_service io_service;
asio::ip::tcp::acceptor acceptor(io_service,
225
Other Topics
asio::ip::tcp::endpoint(asio::ip::tcp::v4(), 3333));
asio::ip::tcp::iostream stream;
acceptor.accept(*stream.rdbuf());
std::cout << "Request: " << stream.rdbuf();
stream << "Response.";
// ...
This code snippet demonstrates a piece of source code of a simple server application. It
creates instances of acceptors and the asio::ip::tcp::iostream classes. And then,
the interesting thing happens.
The accept() method is invoked on the acceptor object. As an argument, this method
is passed an object, a pointer to which is returned by the rdbuf() method called on the
stream object. The rdbuf() method of the stream object returns a pointer to the stream
buffer object. This stream buffer object is an instance of a class, which is inherited from the
asio::ip::tcp::socket class, which means that the stream buffer used by objects of
the asio::ip::tcp ::iostream class plays two roles: one of a stream buffer and another
of a socket. Therefore, this twofold stream buffer/socket object can be used as a normal
active socket to connect and communicate with the client application.
When the connection request is accepted and the connection is established, further
communication with the client is done in a stream-fashioned style just like it is done in
the client application, as demonstrated earlier in this recipe.
Setting timeout intervals
Because I/O operations are provided by the asio::ip::tcp::stream class block the
thread of execution, and they potentially may run for a substantial amount of time, the class
provides a way to set a timeout period that, when it runs out, leads to the interruption of the
operation that currently blocks the thread, if any.
The timeout interval can be set by the expires_from_now() method of the
asio::ip::tcp::stream class. This method accepts the duration of the timeout interval
as an input parameter and starts the internal timer. If at the moment, when the timer expires,
an I/O operation is still in progress, that operation is considered timed out and is, therefore,
forcefully interrupted.
226
Index
A
C
active socket
about 12
creating 13-16
asynchronous client application
about 96
versus synchronous client application 97
asynchronous operations
canceling 80-85
asynchronous server application 129
asynchronous TCP client
application, starting 119
client, closing 124
implementing 110-119
initializing 119
request, canceling 123, 124
request completion 119
request, initiating 120-123
asynchronous TCP server
about 147
Acceptor class 156
implementing 147-154
main() entry point function 157
Server class 157
Service class 155, 156
working 155
AsyncTCPClient class 119
client 95
client applications
classifying 96
communication 40
composite buffers
about 212
preparing, for gather output operations 213
preparing, for input operation 214-216
using, for scatter/gather operations 212, 213
connections
accepting 34-38
B
Berkley Sockets API 4
binding 25
Boost.Asio 12
D
distributed application
about 2
benefits 2
DNS name
about 19
resolving 19-23
DNS name resolution 20
domain name 19
Domain Name System (DNS) 19
E
endpoint
about 5
creating 5-11
creating, in client for server designation 7
goals 6
socket, binding to 25-27
227
execute() method 181
extensible buffers
about 47, 48
working 49
F
fixed length I/O buffers
preparing for input operation 44-46
preparing for output operation 43, 45
using 41-43
M
multiprotocol servers 128
multithreaded TCP client application
implementing 124-126
N
G
network programming
about 5
simplifying 5
notifiers 128
notify clients 128
get_id() getter method 181
O
H
on_connection_established() method 181
on_host_name_resolved() method 181
overlapping 99
handler() function 183
HTTP client application
callback 177, 183
HTTPClient class 176, 179
HTTPRequest class 166-182
HTTPResponse class 165, 166, 183
implementing 161-164
main() entry point function 177-179
HTTP protocol
about 159
HTTP client application 159
HTTP server application 159
HTTP request line 186
HTTP response status line 182
HTTP server application
implementing 184-195
P
parallel server 128
passive socket
about 12, 17
creating 17-19
private members, SyncTCPClient class
asio::io_service m_ios 103
asio::ip::tcp::endpoint m_ep 103
asio::ip::tcp::socket m_sock 103
private members, SyncUDPClient class
asio::io_service m_ios 108
asio::ip::udp::socket m_sock 108
push-style communication model 128
I
R
inversion of control approach 40
I/O operations
about 39
additional operations 41
asynchronous operations 40
I/O buffers 40
synchronous operations 40
iterative server 128
request headers block 188
request life cycle
stages 98
response body 175
response headers block 173
228
S
sample protocol 99
Secure Socket Layer (SSL) 160
server 95, 127
server endpoint
creating 8
simplicity 130
single-threaded TCP client 124
socket
about 4
binding, to endpoint 25-27
connecting 29-34
socket options
getting 221-223
setting 221-223
SSL context 208
SSL/TLS handshake 208
SSL/TLS support
about 202
Acceptor class 208, 209
adding, to client applications 196-200
adding, to server applications 202-207
main() entry point function 202
Service class 208
SyncSSLClient class 200-202
status line 171
stream-based I/O
performing 223-225
server-side I/O, implementing 225, 226
timeout intervals, setting 226
synchronous approach
about 130
advantage 130
sample protocol 130, 131
synchronous client application
about 96
versus asynchronous client application 97
synchronous iterative TCP server
Acceptor class 136
drawbacks, eliminating 138
implementing 131-135
main() entry point function 137
results, analyzing 139
Server class 136, 137
Service class 135
stopping, in reasonable amount of time 138
vulnerability, dealing with 139
synchronous operations 129
synchronous parallel TCP server
Acceptor class 145
implementing 139-144
main() entry point function 147
Server class 146
Service class 144, 145
Start() method 146
Stop() method 146
synchronous server 129
synchronous TCP client
about 100
implementing 100-103
main() entry point function 104
SyncTCPClient class 103, 104
synchronous UDP client
about 105
implementing 105-108
main() entry point function 110
SyncUDPClient class 108-110
SyncTCPClient class
about 103, 104
private members 103
SyncUDPClient class
about 108-110
private members 108
T
TCP client 96
TCP protocol
characteristics 3
TCP socket
asio::read_at() function 62
asio::read() function 59
asio::read_until() function 60, 61
client application 88, 89
closing 87-91
reading from, asynchronously 71-79
reading from, synchronously 55-58
229
receive() method 58
send() method 53
server application 90, 91
shutting down 86, 87
writing to, asynchronously 62-70
writing to, synchronously 49-52
timers
about 216
using 216-220
Transport Layer Security (TLS) 160
230
U
UDP client 96
UDP protocol
characteristics 3
Thank you for buying
Boost.Asio C++ Network Programming
Cookbook
About Packt Publishing
Packt, pronounced 'packed', published its first book, Mastering phpMyAdmin for Effective MySQL
Management, in April 2004, and subsequently continued to specialize in publishing highly focused
books on specific technologies and solutions.
Our books and publications share the experiences of your fellow IT professionals in adapting and
customizing today's systems, applications, and frameworks. Our solution-based books give you the
knowledge and power to customize the software and technologies you're using to get the job done.
Packt books are more specific and less general than the IT books you have seen in the past. Our
unique business model allows us to bring you more focused information, giving you more of what
you need to know, and less of what you don't.
Packt is a modern yet unique publishing company that focuses on producing quality, cutting-edge
books for communities of developers, administrators, and newbies alike. For more information,
please visit our website at www.packtpub.com.
About Packt Open Source
In 2010, Packt launched two new brands, Packt Open Source and Packt Enterprise, in order to
continue its focus on specialization. This book is part of the Packt open source brand, home
to books published on software built around open source licenses, and offering information to
anybody from advanced developers to budding web designers. The Open Source brand also runs
Packt's open source Royalty Scheme, by which Packt gives a royalty to each open source project
about whose software a book is sold.
Writing for Packt
We welcome all inquiries from people who are interested in authoring. Book proposals should
be sent to author@packtpub.com. If your book idea is still at an early stage and you would
like to discuss it first before writing a formal book proposal, then please contact us; one of our
commissioning editors will get in touch with you.
We're not just looking for published authors; if you have strong technical skills but no writing
experience, our experienced editors can help you develop a writing career, or simply get some
additional reward for your expertise.
Learning Boost C++Libraries
ISBN: 978-1-78355-121-7
Paperback: 558 pages
Solve practical programming problems using powerful,
portable, and expressive libraries from Boost
1.
Learn to apply the breadth of Boost libraries,
including containers, smart pointers, regular
expressions, threads, network I/O, and other
utilities through practical programming examples.
2.
Write clear and succinct C++ code that is efficient
and maintainable.
3.
Speed up using the Boost libraries without
any prior knowledge, using an in-depth tutorial
introduction.
Boost C++ Application
Development Cookbook
ISBN: 978-1-84951-488-0
Paperback: 348 pages
Over 80 practical, task-based recipes to create
applications using Boost libraries
1.
Explores how to write a program once and then
use it on Linux, Windows, MacOS, and Android
operating systems.
2.
Includes everyday use recipes for multithreading,
networking, metaprogramming, and generic
programming from a Boost library developer.
3.
Take advantage of the real power of Boost and
C++ to get a good grounding in using it in any
project.
Please check www.PacktPub.com for information on our titles
Learning Object-Oriented
Programming
ISBN: 978-1-78528-963-7
Paperback: 280 pages
Explore and crack the OOP code in Python, JavaScript,
and C#
1.
Write reusable code that defines and makes
objects interact with one another.
2.
Discover the differences in inheritance and
polymorphism in Python, JavaScript, and C#.
3.
Capture objects from real-world elements and
create object-oriented code that represents them.
Objective-C Memory
Management Essentials
ISBN: 978-1-84969-712-5
Paperback: 200 pages
Learn and put into practice various memory
management techniques in Objective-C to create robust
iOS applications
1.
Learn about the concepts of memory
management in Objective-C.
2.
Get introduced to Swift, an innovative new
programming language for Cocoa and Cocoa
Touch.
3.
A step-by-step approach to various memory
management techniques with lots of sample code
and Xcode projects for your reference.
Please check www.PacktPub.com for information on our titles