/


Tags: photoshop electronics photography photoplus the canon magazine guide to outdoor photography
Year: 2023


Text
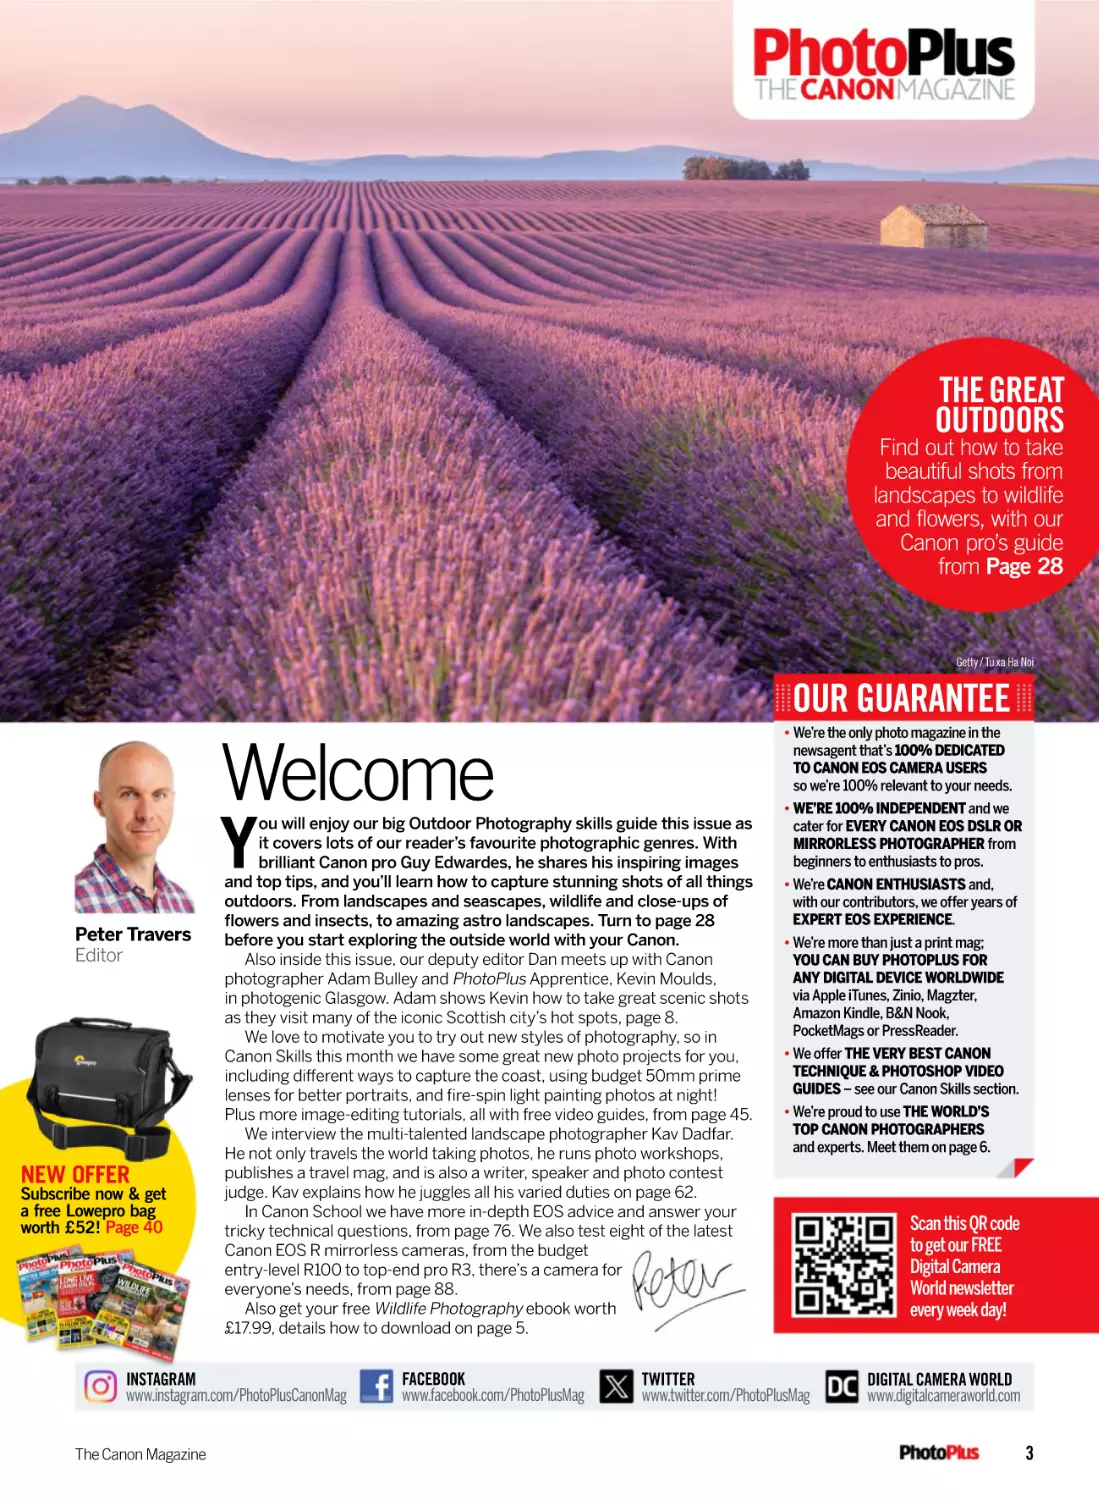
THE GREAT
OUTDOORS
Find out how to take
beautiful shots from
landscapes to wildlife
and flowers, with our
Canon pro’s guide
from Page 28
Getty / Tu xa Ha Noi
OUR GUARANTEE
• We’re the only photo magazine in the
newsagent that’s 100% DEDICATED
TO CANON EOS CAMERA USERS
so we’re 100% relevant to your needs.
Welcome
Y
Peter Travers
Editor
NEW OFFER
Subscribe now & get
a free Lowepro bag
worth £52! Page 40
ou will enjoy our big Outdoor Photography skills guide this issue as
it covers lots of our reader’s favourite photographic genres. With
brilliant Canon pro Guy Edwardes, he shares his inspiring images
and top tips, and you’ll learn how to capture stunning shots of all things
outdoors. From landscapes and seascapes, wildlife and close-ups of
flowers and insects, to amazing astro landscapes. Turn to page 28
before you start exploring the outside world with your Canon.
Also inside this issue, our deputy editor Dan meets up with Canon
photographer Adam Bulley and PhotoPlus Apprentice, Kevin Moulds,
in photogenic Glasgow. Adam shows Kevin how to take great scenic shots
as they visit many of the iconic Scottish city’s hot spots, page 8.
We love to motivate you to try out new styles of photography, so in
Canon Skills this month we have some great new photo projects for you,
including different ways to capture the coast, using budget 50mm prime
lenses for better portraits, and fire-spin light painting photos at night!
Plus more image-editing tutorials, all with free video guides, from page 45.
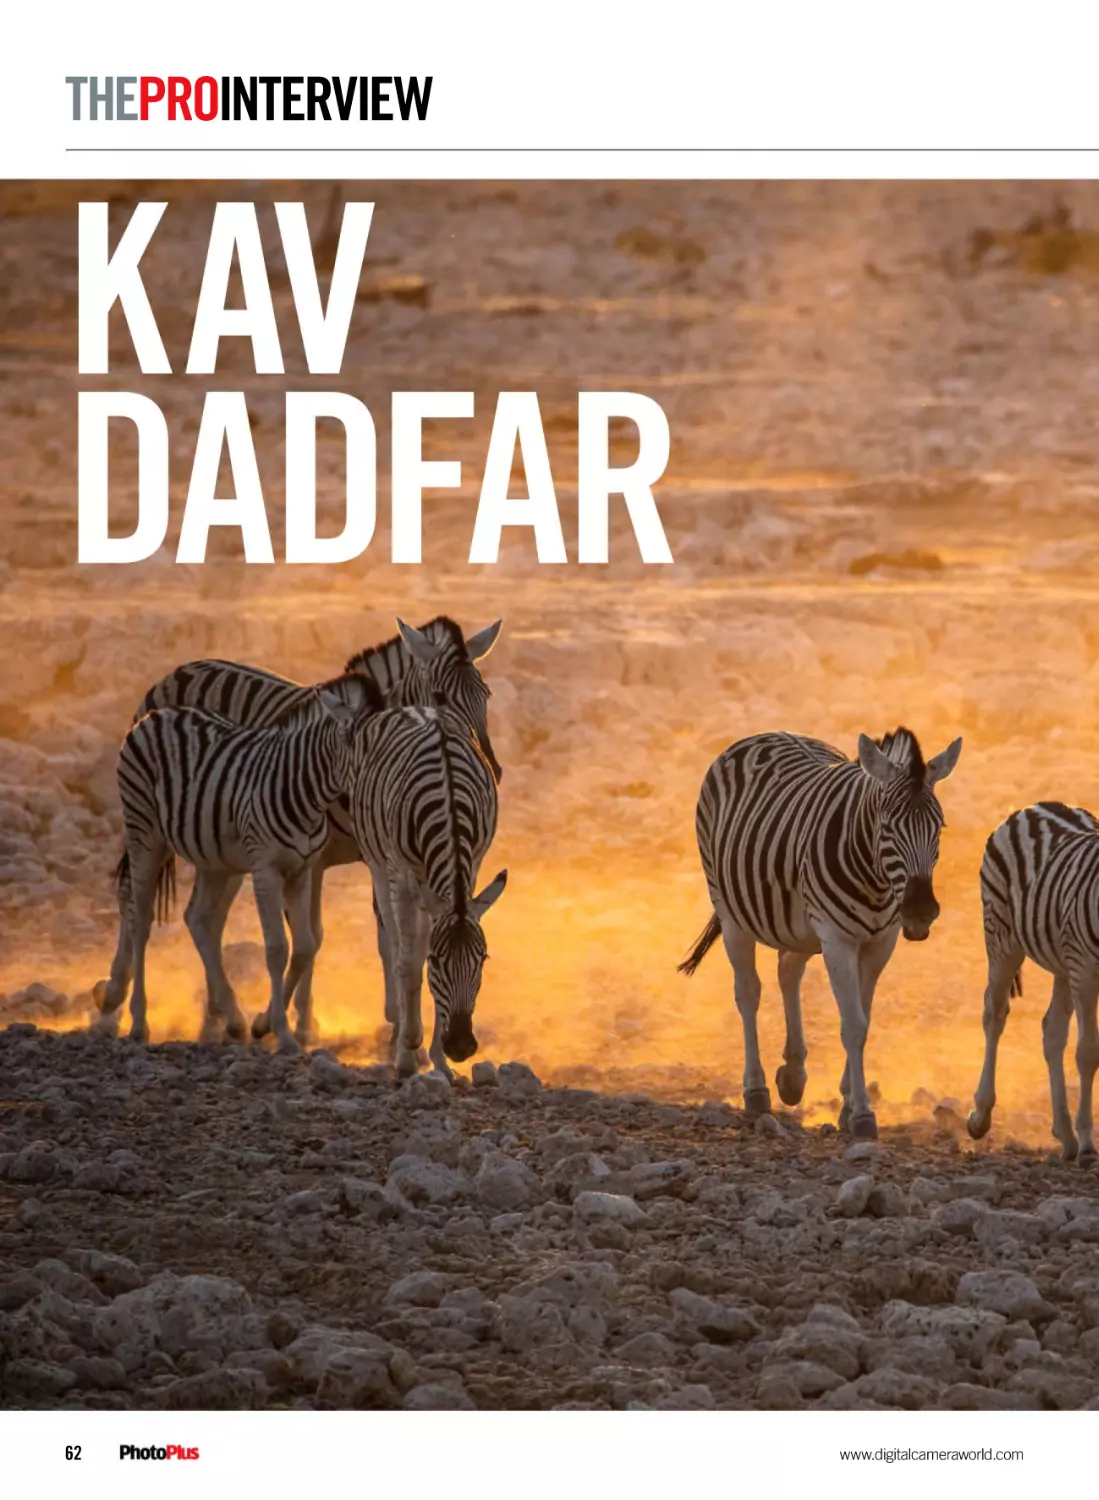
We interview the multi-talented landscape photographer Kav Dadfar.
He not only travels the world taking photos, he runs photo workshops,
publishes a travel mag, and is also a writer, speaker and photo contest
judge. Kav explains how he juggles all his varied duties on page 62.
In Canon School we have more in-depth EOS advice and answer your
tricky technical questions, from page 76. We also test eight of the latest
Canon EOS R mirrorless cameras, from the budget
entry-level R100 to top-end pro R3, there’s a camera for
everyone’s needs, from page 88.
Also get your free Wildlife Photography ebook worth
£17.99, details how to download on page 5.
INSTAGRAM
www.instagram.com/PhotoPlusCanonMag
The Canon Magazine
FACEBOOK
www.facebook.com/PhotoPlusMag
• WE’RE 100% INDEPENDENT and we
cater for EVERY CANON EOS DSLR OR
MIRRORLESS PHOTOGRAPHER from
beginners to enthusiasts to pros.
• We’re CANON ENTHUSIASTS and,
with our contributors, we offer years of
EXPERT EOS EXPERIENCE.
• We’re more than just a print mag;
YOU CAN BUY PHOTOPLUS FOR
ANY DIGITAL DEVICE WORLDWIDE
via Apple iTunes, Zinio, Magzter,
Amazon Kindle, B&N Nook,
PocketMags or PressReader.
• We offer THE VERY BEST CANON
TECHNIQUE & PHOTOSHOP VIDEO
GUIDES – see our Canon Skills section.
• We’re proud to use THE WORLD’S
TOP CANON PHOTOGRAPHERS
and experts. Meet them on page 6.
TWITTER
www.twitter.com/PhotoPlusMag
Scan this QR code
to get our FREE
Digital Camera
World newsletter
every week day!
DIGITAL CAMERA WORLD
www.digitalcameraworld.com
3
CONTENTS
46
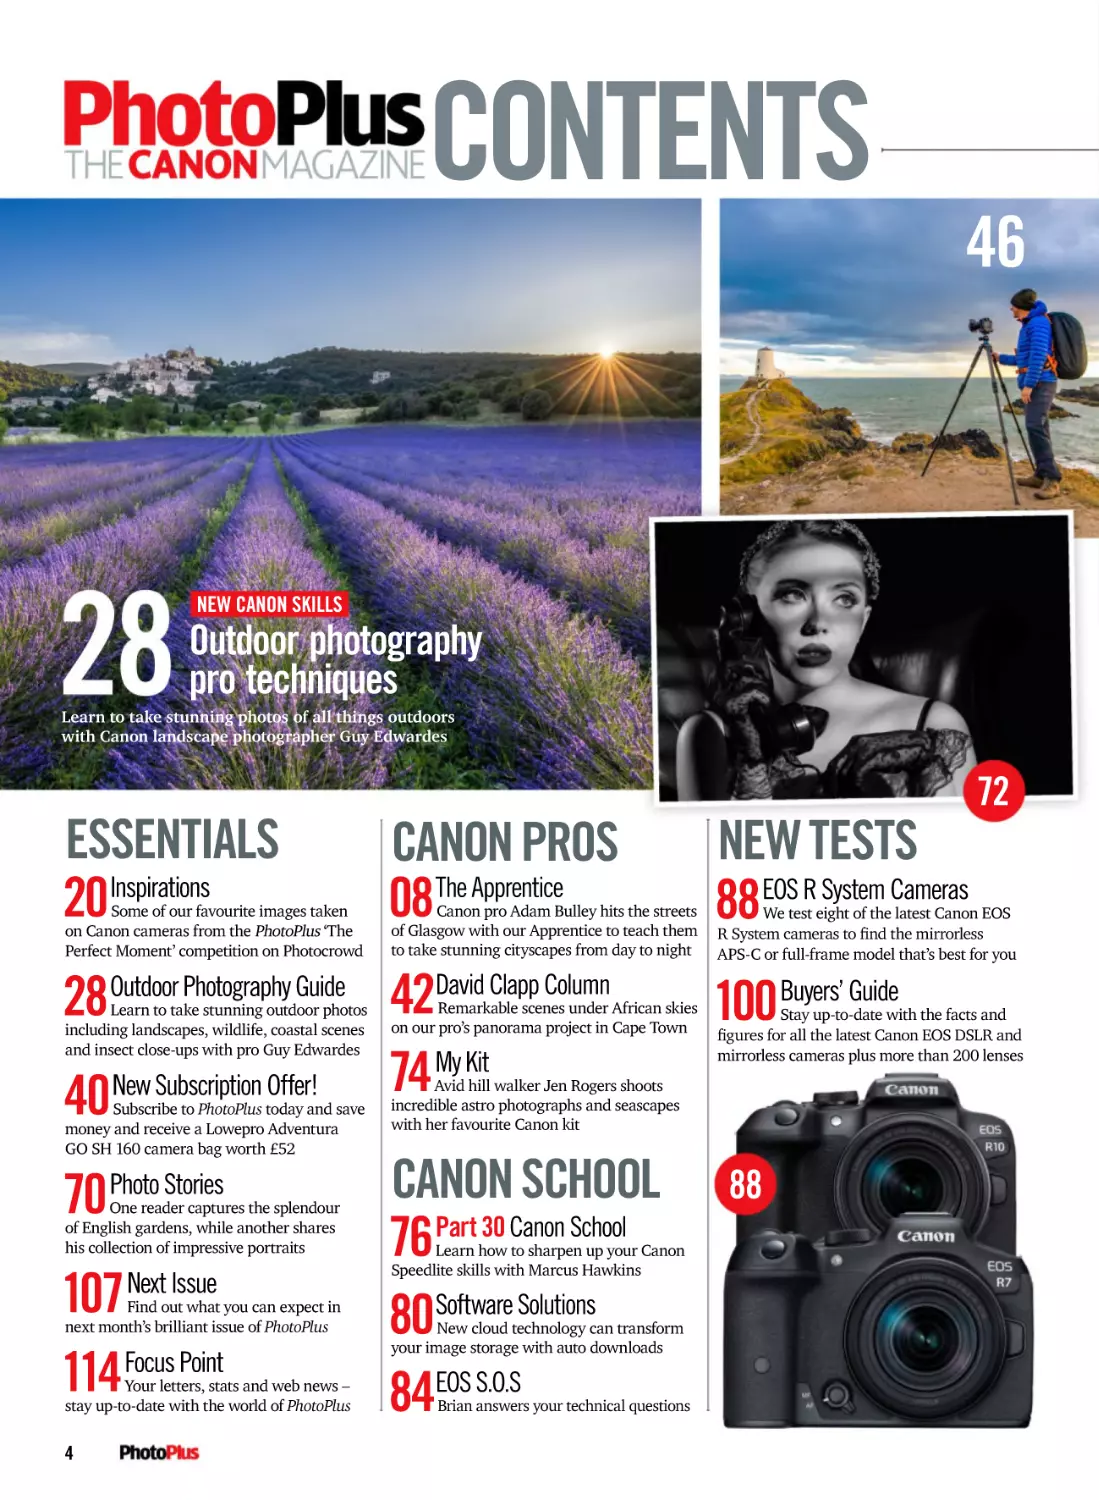
NEW CANON SKILLS
Outdoor photography
pro techniques
Learn to take stunning photos of all things outdoors
with Canon landscape photographer Guy Edwardes
72
ESSENTIALS
20Inspirations
Some of our favourite images taken
on Canon cameras from the PhotoPlus ‘The
Perfect Moment’ competition on Photocrowd
CANON PROS
08The Apprentice
Canon pro Adam Bulley hits the streets
of Glasgow with our Apprentice to teach them
to take stunning cityscapes from day to night
28Outdoor Photography Guide 42David Clapp Column
My Kit
74
40 New Subscription Offer!
Learn to take stunning outdoor photos
including landscapes, wildlife, coastal scenes
and insect close-ups with pro Guy Edwardes
Subscribe to PhotoPlus today and save
money and receive a Lowepro Adventura
GO SH 160 camera bag worth £52
70 Photo Stories
One reader captures the splendour
of English gardens, while another shares
his collection of impressive portraits
107 Next Issue
114 Focus Point
Find out what you can expect in
next month’s brilliant issue of PhotoPlus
Your letters, stats and web news –
stay up-to-date with the world of PhotoPlus
4
Remarkable scenes under African skies
on our pro’s panorama project in Cape Town
NEW TESTS
88EOS R System Cameras
We test eight of the latest Canon EOS
56\VWHPFDPHUDVWRÀQGWKHPLUURUOHVV
APS-C or full-frame model that’s best for you
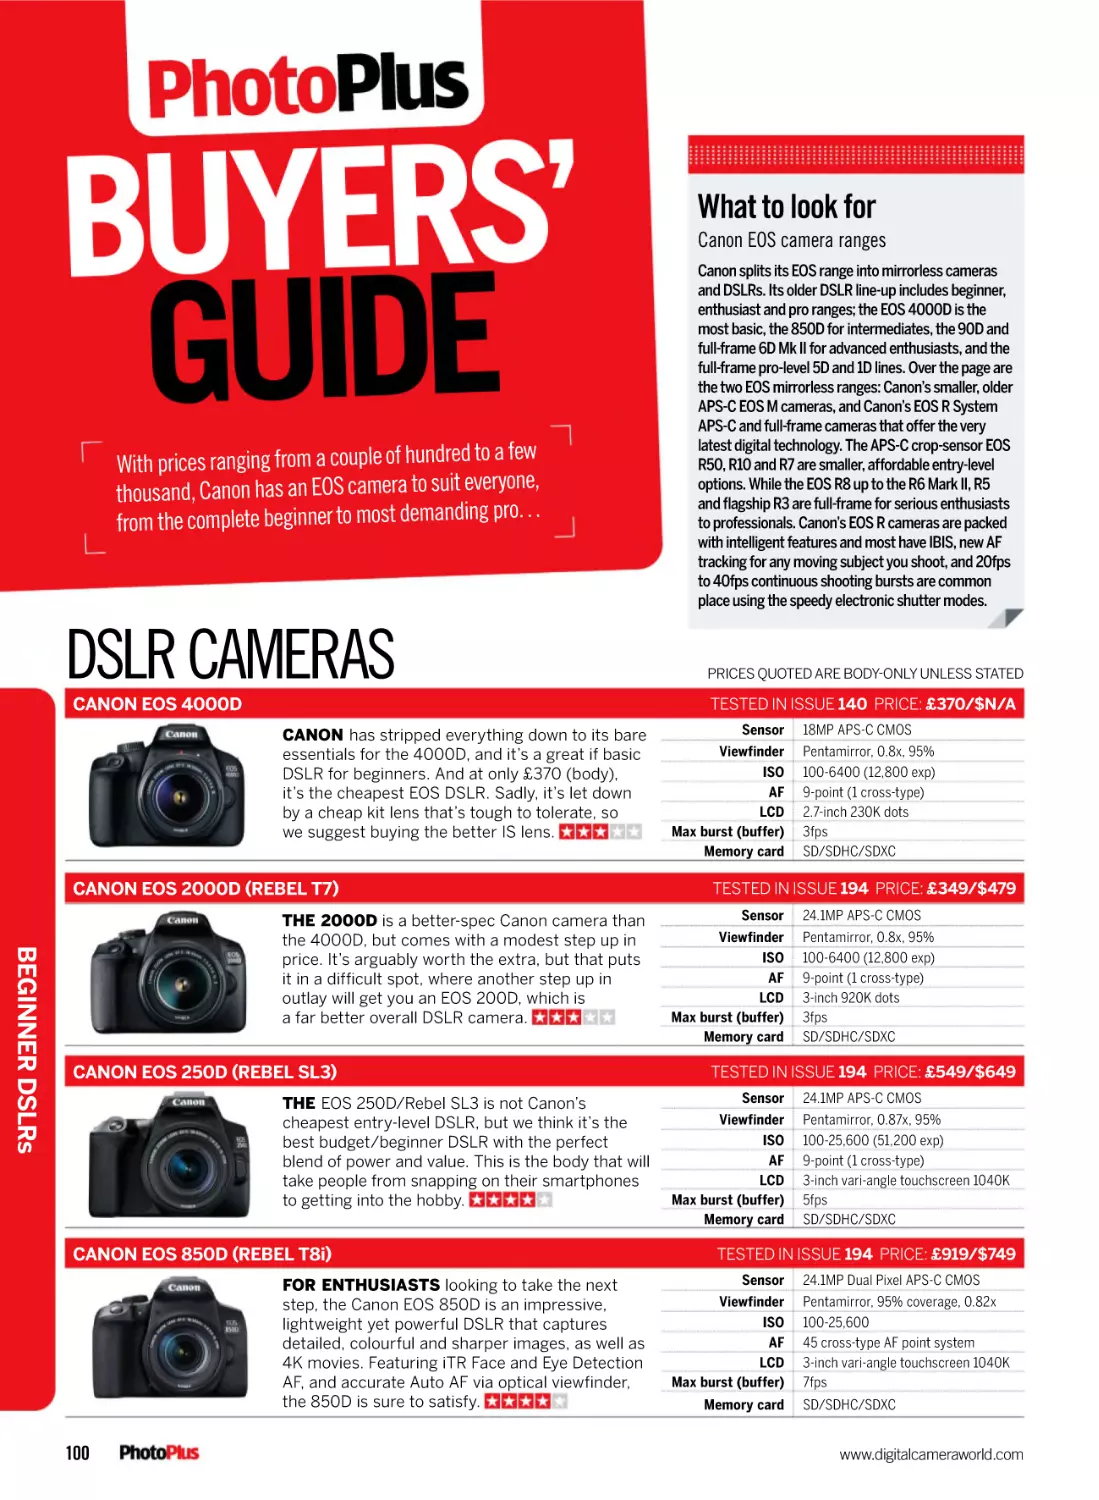
100 Buyers’ Guide
Stay up-to-date with the facts and
ÀJXUHVIRUDOOWKHODWHVW&DQRQ(26'6/5DQG
mirrorless cameras plus more than 200 lenses
Avid hill walker Jen Rogers shoots
incredible astro photographs and seascapes
with her favourite Canon kit
CANON SCHOOL
76 Part 30 Canon School
80Software Solutions
84EOS S.O.S
Learn how to sharpen up your Canon
Speedlite skills with Marcus Hawkins
New cloud technology can transform
your image storage with auto downloads
Brian answers your technical questions
88
ISSUE 208 SEPT 2023
WAT
THE VIDCEHO
S
LINKS TO
VIDEOS ONVLIEW
ON THE PAG INE
ES!
62
VIDEO GUIDES #208
6 WAYS TO IMPROVE YOUR PHOTOGRAPHY TODAY
50
Project 2 Learn how to
produce perfect portraits
with a ‘nifty fifty’ prime lens
08
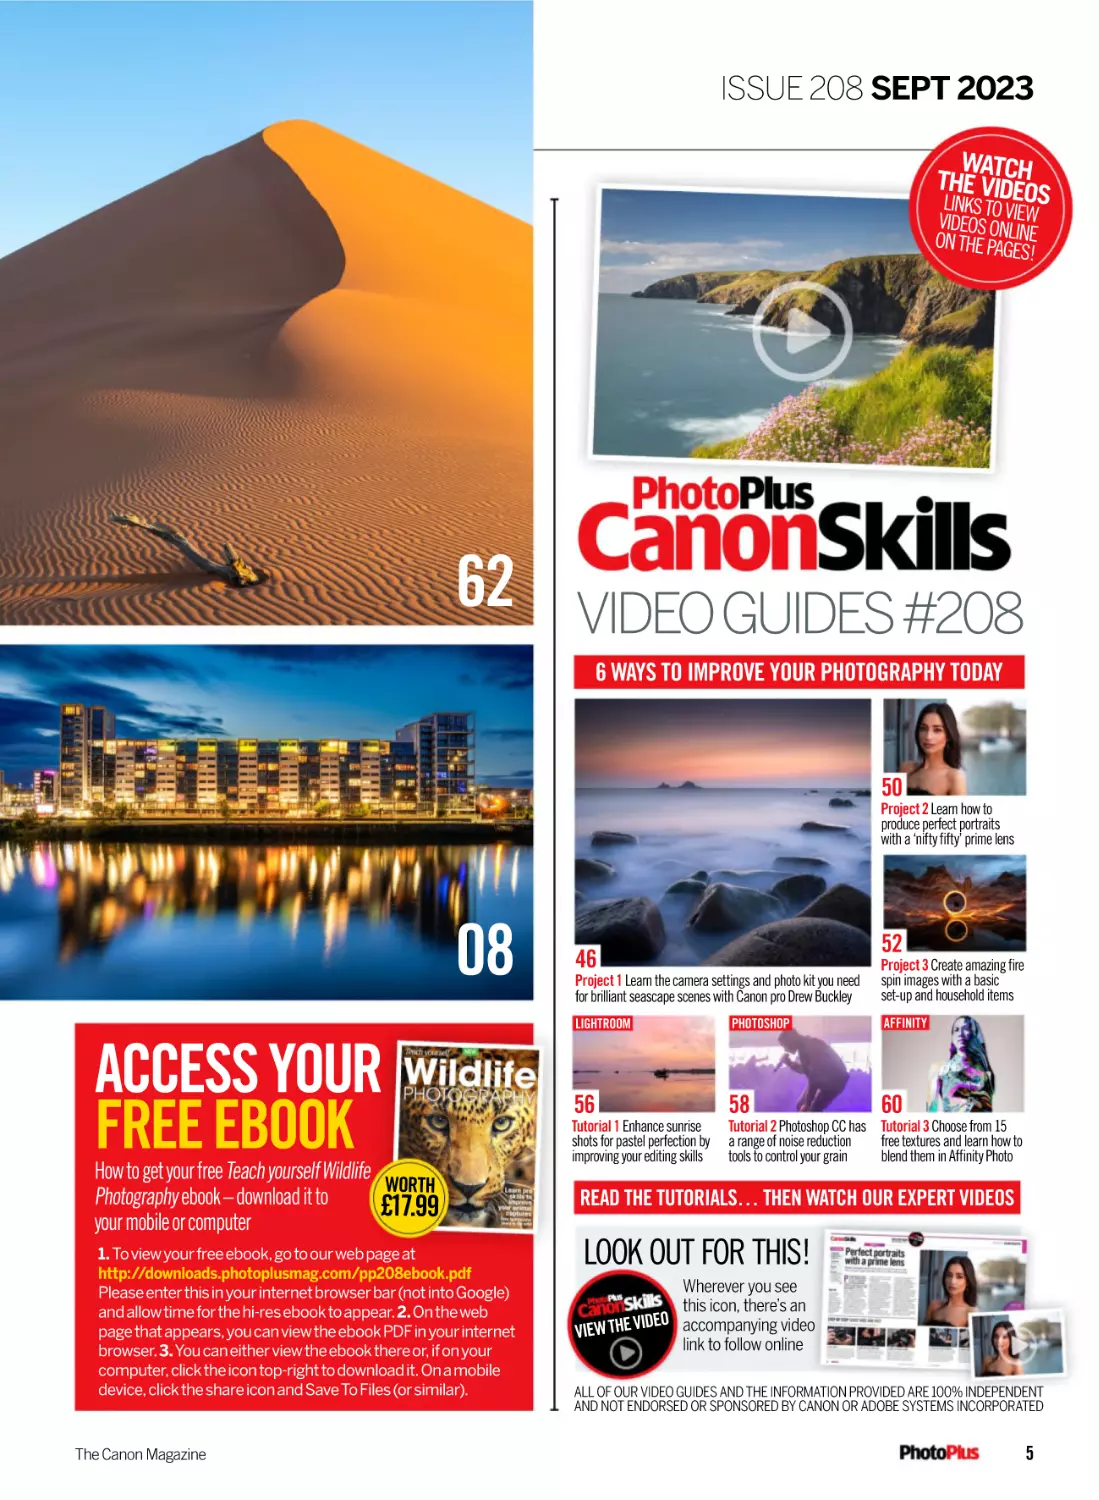
Project 1 Learn the camera settings and photo kit you need
for brilliant seascape scenes with Canon pro Drew Buckley
How to get your free Teach yourself Wildlife
WORTH
Photography ebook – download it to
£17.99
your mobile or computer
1. To view your free ebook, go to our web page at
http://downloads.photoplusmag.com/pp208ebook.pdf
Please enter this in your internet browser bar (not into Google)
and allow time for the hi-res ebook to appear. 2. On the web
page that appears, you can view the ebook PDF in your internet
browser. 3. You can either view the ebook there or, if on your
computer, click the icon top-right to download it. On a mobile
device, click the share icon and Save To Files (or similar).
The Canon Magazine
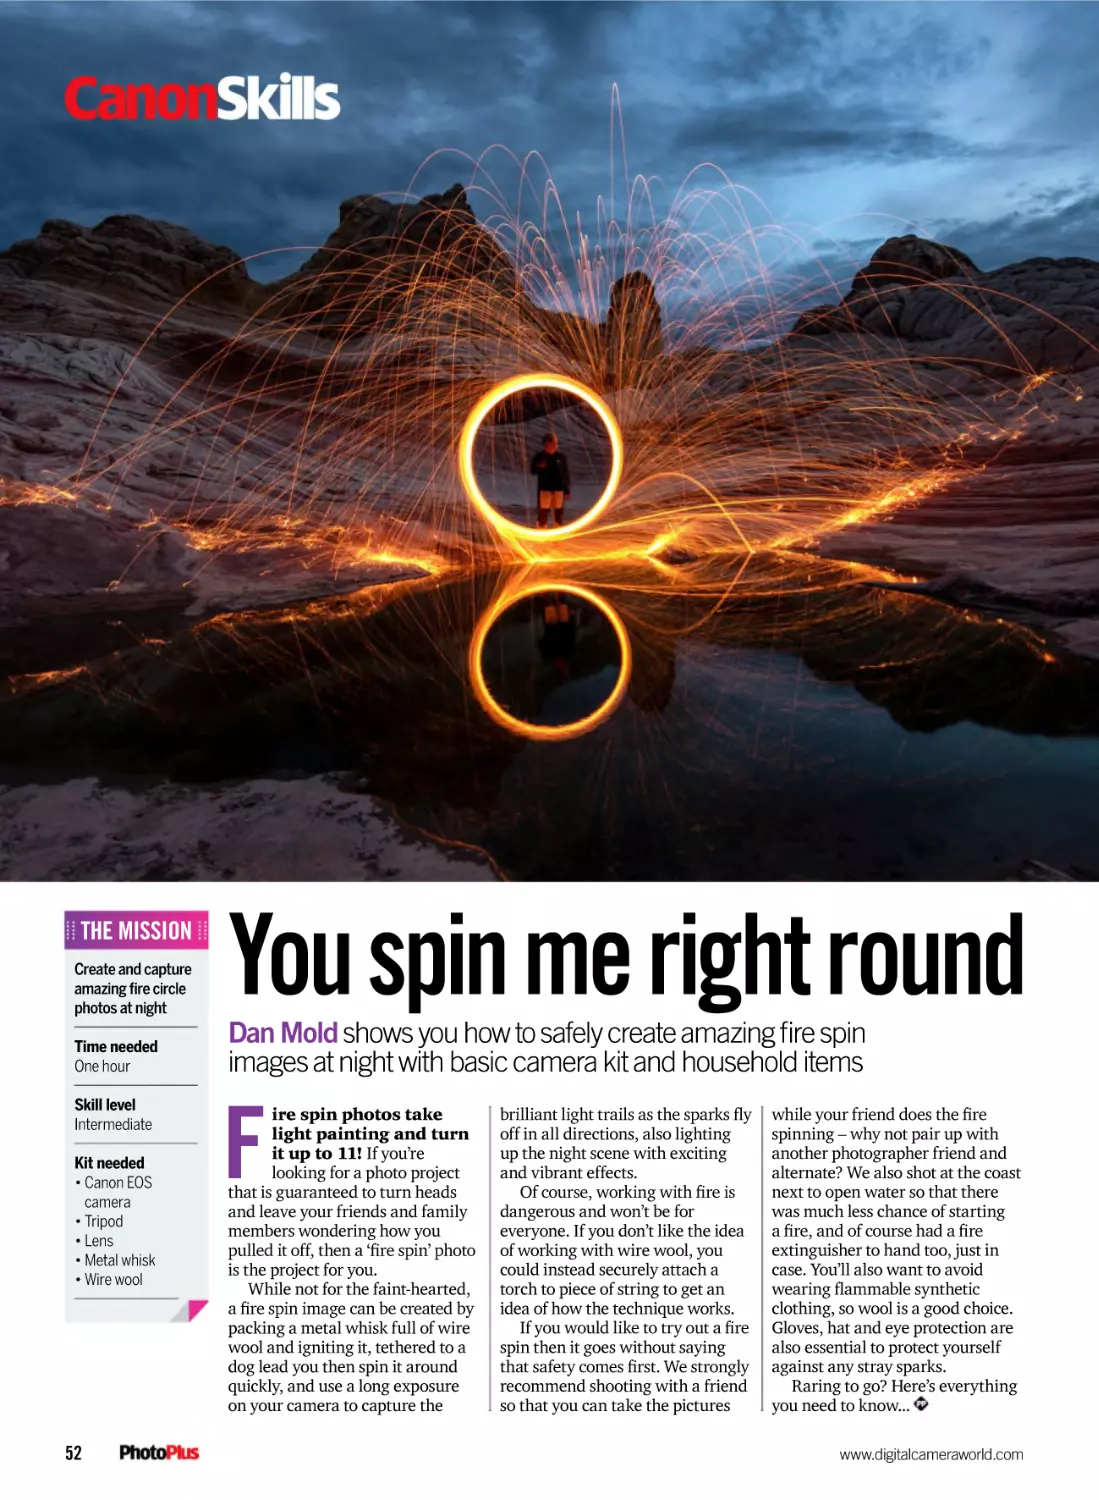
Project 3 Create amazing fire
spin images with a basic
set-up and household items
PHOTOSHOP
AFFINITY
56
58
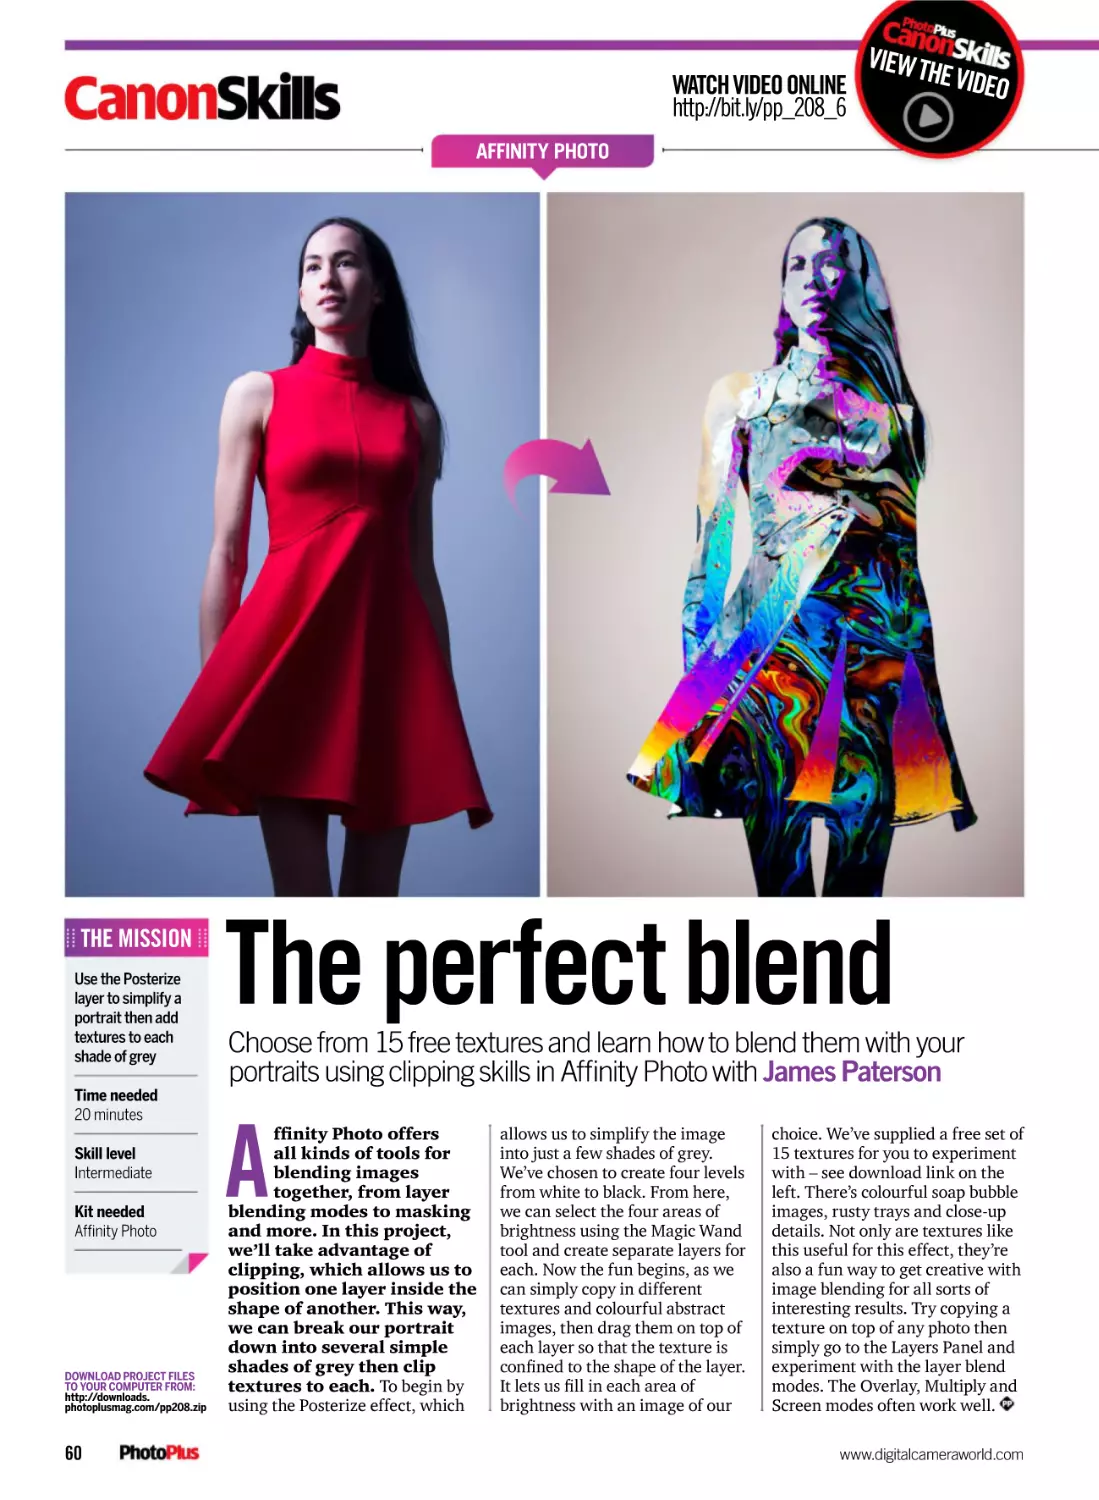
60
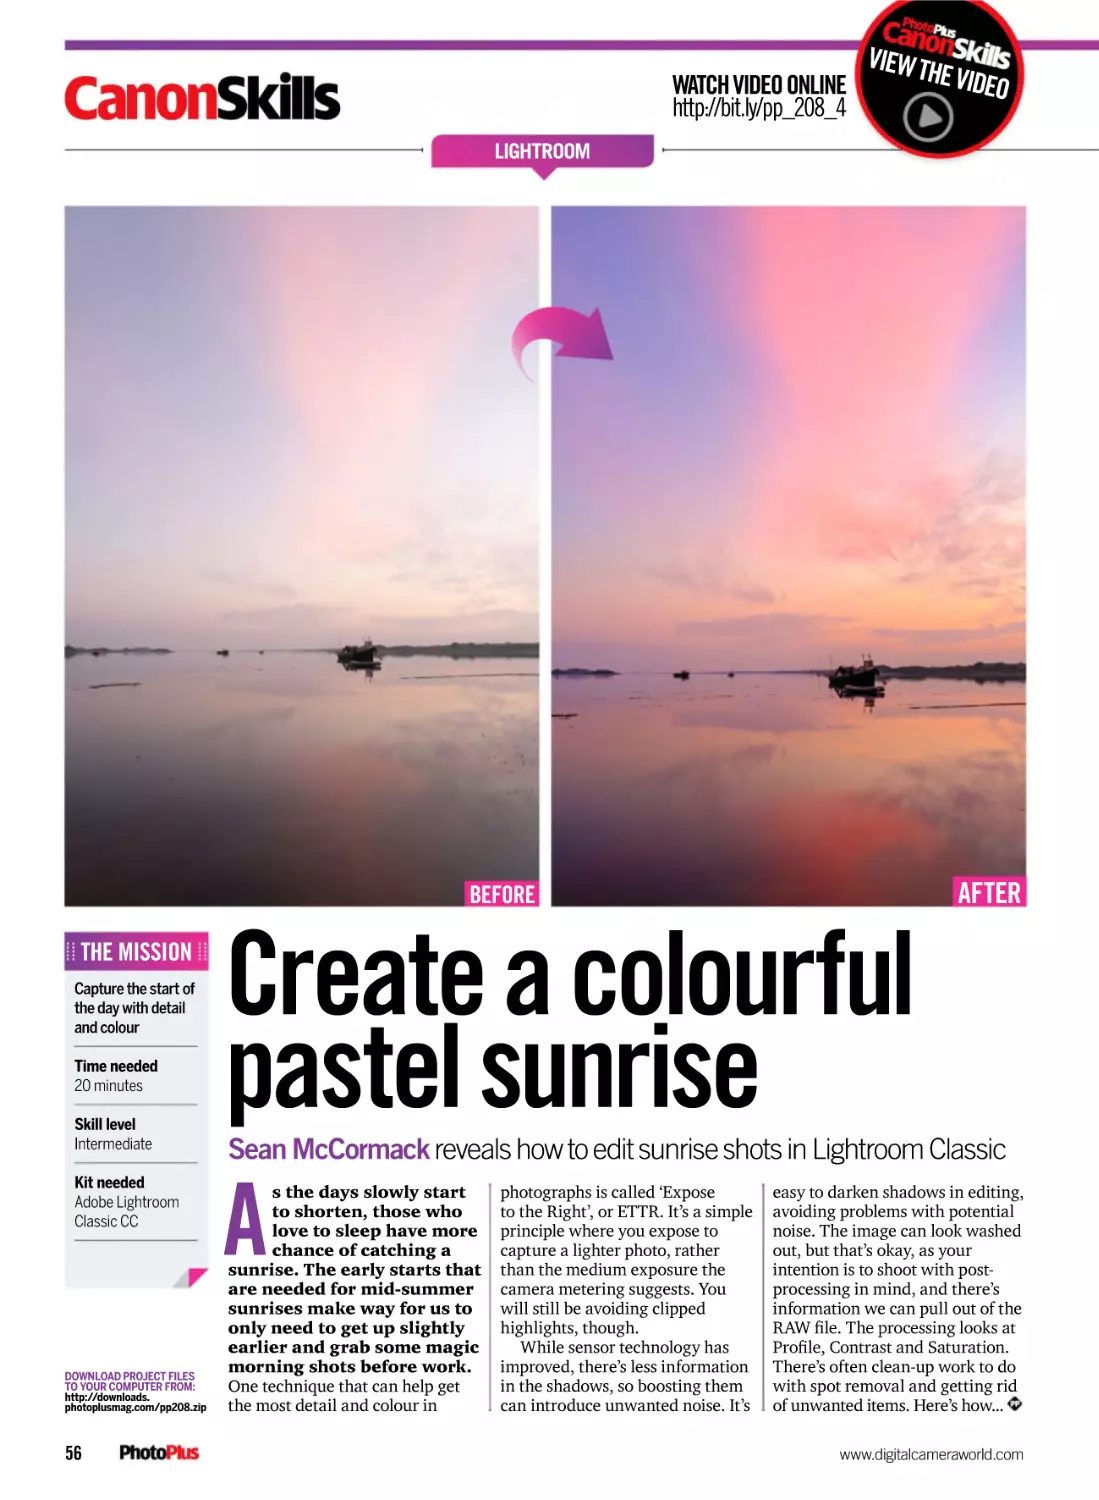
Tutorial 1 Enhance sunrise
shots for pastel perfection by
improving your editing skills
Tutorial 2 Photoshop CC has Tutorial 3 Choose from 15
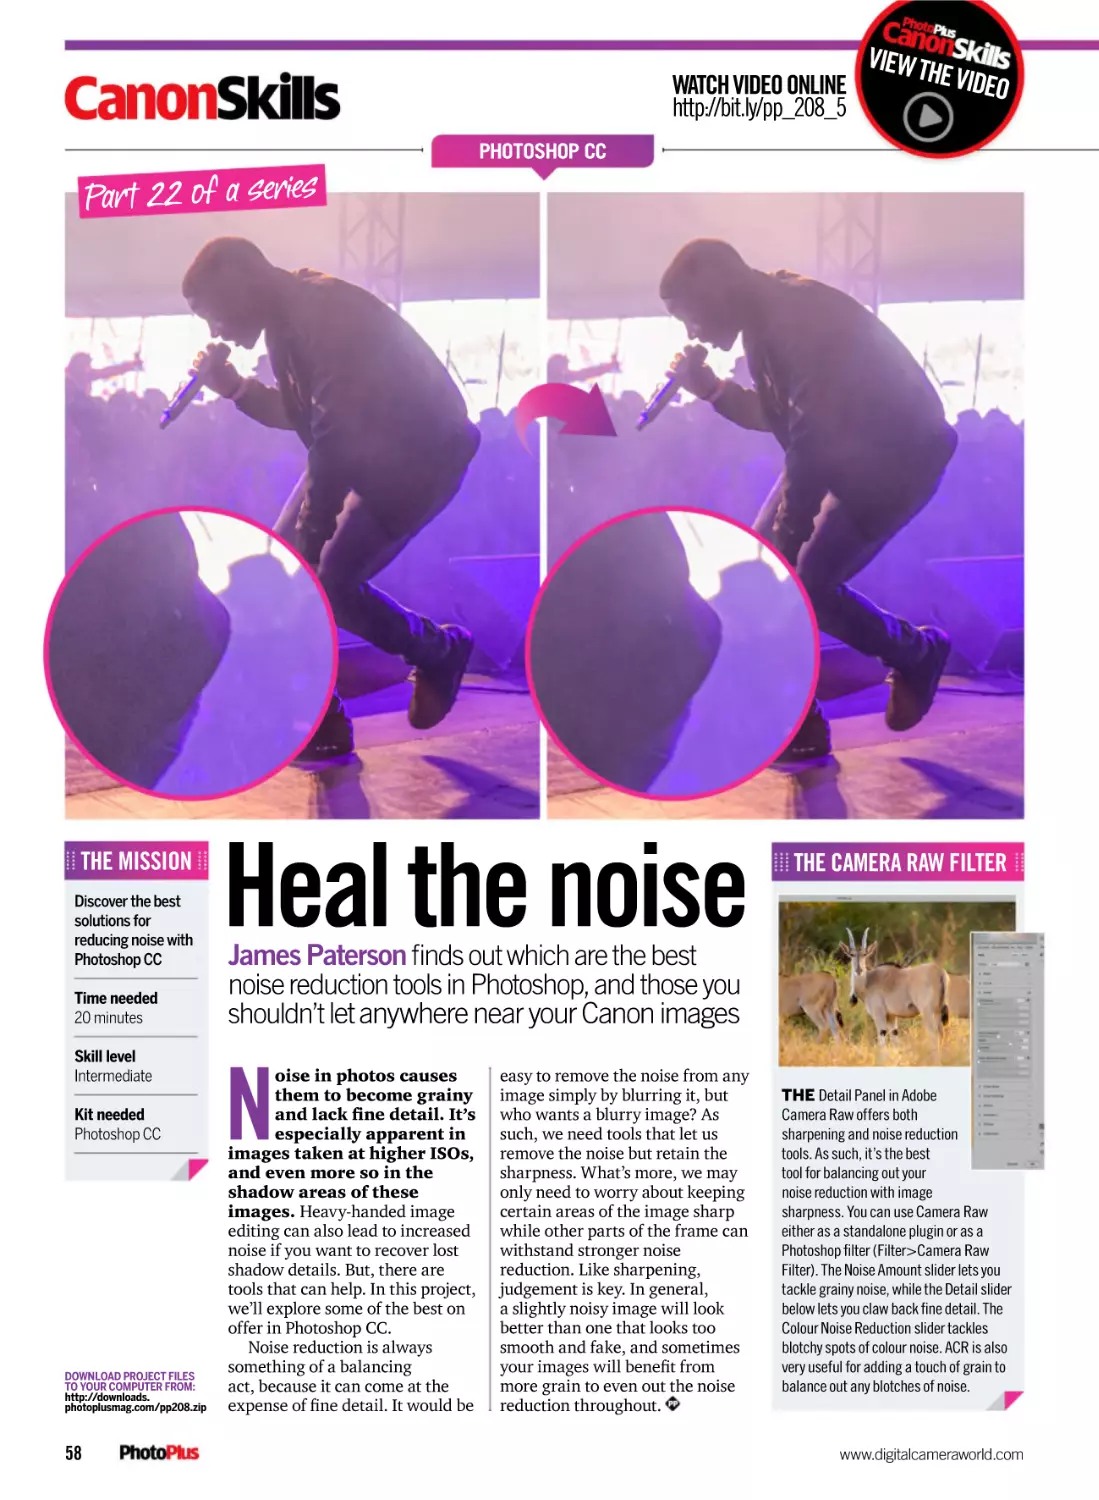
a range of noise reduction
free textures and learn how to
tools to control your grain
blend them in Affinity Photo
LIGHTROOM
ACCESS YOUR
FREE EBOOK
52
46
READ THE TUTORIALS… THEN WATCH OUR EXPERT VIDEOS
LOOK OUT FOR THIS!
Wherever you see
this icon, there’s an
O accompanying video
E
ID
V
E
H
T
VIEW
link to follow online
ALL OF OUR VIDEO GUIDES AND THE INFORMATION PROVIDED ARE 100% INDEPENDENT
AND NOT ENDORSED OR SPONSORED BY CANON OR ADOBE SYSTEMS INCORPORATED
5
Meet the team...
PhotoPlus: The Canon Magazine
Future PLC Quay House, The Ambury, Bath BA1 1UA
Who we are and our favourite Canon content in this issue…
Peter Travers
James Paterson
Editor • 5D Mk IV & R6
Technique writer • 6D Mk II
peter.travers@futurenet.com
james.paterson@futurenet.com
“Sometimes you just need to get out
with your Canon! In this issue’s
big guide, learn to take better
outdoor photos from landscapes
to wildlife and insects.” PAGE 28
“In the latest installment of my
Photoshop tools series, I show
you how to edit high ISO images
using all the varied noise reduction
settings for better results.” PAGE 58
Dan Mold
Matthew Richards
Deputy editor • R & 7D Mk II
Technical writer • R5
dan.mold@futurenet.com
photoplus@futurenet.com
“I head to my local coastline to
practise the dark arts of fire spin
photography at night! You’ll find all
of my tips and tricks to a safe fire
spin in my photo project.” PAGE 52
“In this month’s Super Test I test eight
of the latest Canon EOS R mirrorless
cameras, from the budget beginner
R100, to enthusiast R7 and R6 Mk II,
to pro spec R5 and R3.” PAGE 88
Editorial
Editor Peter Travers peter.travers@futurenet.com
Deputy Editor Dan Mold
Art Editor Martin Parfitt
Production Editor Chris McGine
Lab Manager Ben Andrews
Head of Design Dean Usher
Photography
All copyrights and trademarks are recognized and respected
Photography Studio Phil Barker
Advertising
Media packs are available on request
Group Advertising Director Matthew Johnston
matthew.johnston@futurenet.com • 07974 408083
Account Director Matt Bailey
matt.bailey@futurenet.com • +44 (0)330 390 6272
UK Commercial Sales Director Clare Dove clare.dove@futurenet.com
International licensing
PhotoPlus is available for licensing and syndication. To find out more,
contact us at licensing@futurenet.com or view our available content at
www.futurecontenthub.com. Head of Print Licensing Rachel Shaw
Subscriptions
New subscription orders or to renew email help@magazinesdirect.com
or call 0330 333 1113 or you can visit www.magazinesdirect.com
Subscription delivery disruption remains within UK and International networks.
We kindly ask that you allow up to 7 days before contacting us about a late delivery
to help@magazinesdirect.com
Customer Service 0330 333 4333 or visit www.mymagazine.co.uk
Head of Subscriptions Sharon Todd
Circulation
Newstrade & Retail Category Director Ben Oakden
Production
Head of Production US & UK Mark Constance
Senior Production Manager Matt Eglinton
Ad Production Manager Chris Gozzett
Digital Editions Controller Jason Hudson
Production Manager Vivienne Calvert
Management
Senior Vice President – Games, Entertainment, Tech & Sports Kevin Addley
Managing Director – Music, Photography & Design Stuart Williams
Content Director Chris George
Head of Art & Design Rodney Dive
Commercial Finance Director Tania Bruning
Chief Revenue Officer Zack Sullivan
This issue’s contributors…
Printed by
William Gibbons
Distributed by
Marketforce, Future, 121-141 Westbourne Terrace, London, W2 6JR
For enquiries please email mfcommunications@futurenet.com
Andy Bulley
Guy Edwardes
Drew Buckley
Kav Dadfar
Canon pro Adam teaches
PhotoPlus Apprentice Kevin
how to take sublime city
photos in Glasgow. PAGE 8
Brilliant landscape and
wildlife photographer Guy
shows you how to shoot all
things outdoors. PAGE 28
Canon photographer Drew
shares his secrets for taking
great coastal landscape
shots in Wales. PAGE 46
Busy travel and landscape
photographer Kav talks
about how he juggles all of
his multiple jobs! PAGE 62
Clive Nichols
Jen Rogers
Marcus Hawkins
Brian Worley
Pro garden photographer
Clive on his favourite spots in
England for taking wonderful
garden scenes. PAGE 70
Devon-based Jen has a
passion for the outdoors and
taking great astro photos
and seascapes. PAGE 74
Experienced Canon shooter
Marcus helps you sharpen
up your Speedlite skills for
brighter photos. PAGE 76
EOS expert Brian answers
your toughest Canon EOS
technical questions, and
rates your images. PAGE 80
Our contributors Ben Andrews, James Artaius, Adam Bulley, Drew Buckley, Alistair Campbell, David Clapp, Kav Dadfar,
Guy Edwardes, Marcus Hawkins, Clive Nichols, Sean McCormack, James Paterson, Matthew Richards, Jen Rogers,
Lauren Scott, Brian Worley
6
PhotoPlus (ISSN 1754836) is published monthly (with an extra issue in May)
by Future Publishing, Quay House, The Ambury, Bath, BA1 1UA, UK
The US annual subscription price is $181.87 Airfreight and mailing in the USA by agent
named World Container Inc., c/o BBT 150-15 183rd St, Jamaica, NY 11413, USA
Application to Mail at Periodicals Postage Prices is Pending at Brooklyn NY 11256.
POSTMASTER: Send address changes to Photo Plus, World Container Inc., c/o BBT
150-15 183rd St, Jamaica, NY 11413, USA
Subscription records are maintained at Future Publishing, c/o Air Business
Subscriptions, Rockwood House, Perrymount Road, Haywards Heath,
West Sussex, RH16 3DH, UK
We are committed to only using magazine paper which is derived from responsibly
managed, certified forestry and chlorine-free manufacture. The paper in this magazine
was sourced and produced from sustainable managed forests, conforming to strict
environmental and socioeconomic standards.
Disclaimer
All contents © 2023 Future Publishing Limited or published under licence. All rights
reserved. No part of this magazine may be used, stored, transmitted or reproduced in
any way without the prior written permission of the publisher. Future Publishing Limited
(company number 2008885) is registered in England and Wales. Registered office:
Quay House, The Ambury, Bath BA1 1UA. All information contained in this publication is
for information only and is, as far as we are aware, correct at the time of going to press.
Future cannot accept any responsibility for errors or inaccuracies in such information.
You are advised to contact manufacturers and retailers directly with regard to the price
of products/services referred to in this publication. Apps and websites mentioned in this
publication are not under our control. We are not responsible for their contents or any
other changes or updates to them. This magazine is fully independent and not affiliated in
any way with the companies mentioned herein.
If you submit material to us, you warrant that you own the material and/or have the
necessary rights/permissions to supply the material and you automatically grant Future
and its licensees a licence to publish your submission in whole or in part in any/all issues
and/or editions of publications, in any format published worldwide and on associated
websites, social media channels and associated products. Any material you submit is
sent at your own risk and, although every care is taken, neither Future nor its employees,
agents, subcontractors or licensees shall be liable for loss or damage. We assume all
unsolicited material is for publication unless otherwise stated, and reserve the right to
edit, amend, adapt all submissions.
Future plc is a public
company quoted on the
London Stock Exchange
(symbol: FUTR)
www.futureplc.com
Chief executive officer Jon Steinberg
Non-executive chairman Richard Huntingford
Chief financial and strategy officer Penny Ladkin-Brand
Tel +44 (0)1225 442 244
www.digitalcameraworld.com
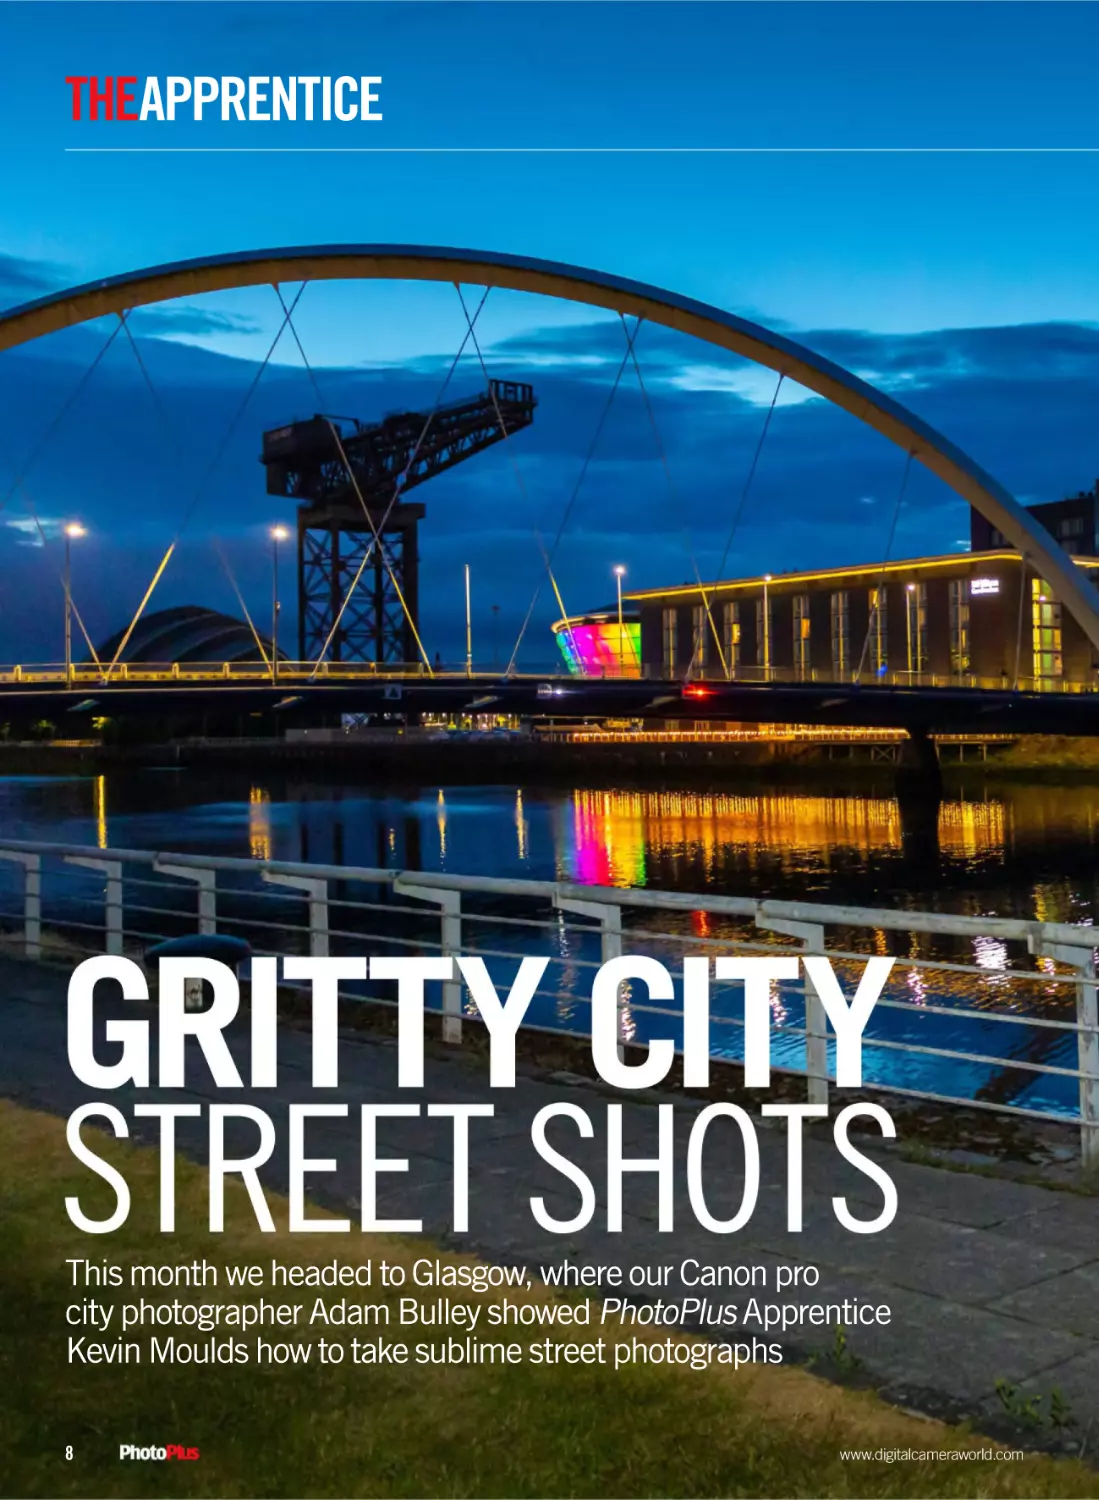
THEAPPRENTICE
This month we headed to Glasgow, where our Canon pro
city photographer Adam Bulley showed PhotoPlus Apprentice
Kevin Moulds how to take sublime street photographs
8
www.digitalcameraworld.com
SHOOT WITH A PRO
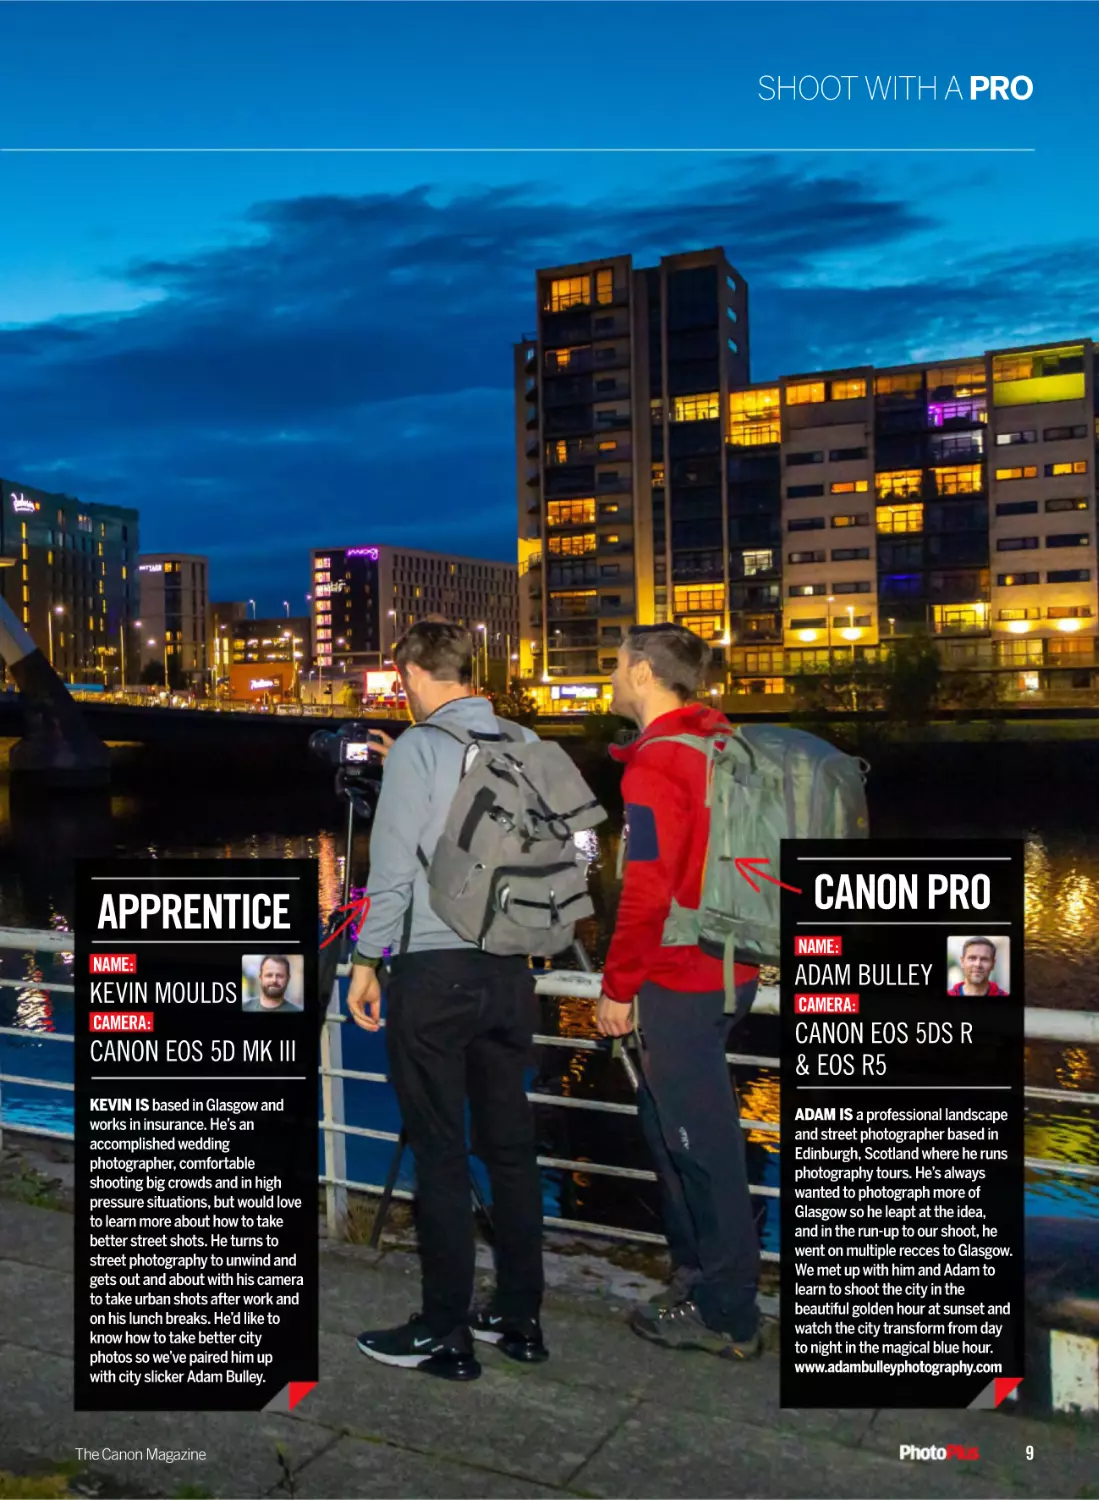
APPRENTICE
CANON PRO
NAME:
NAME:
KEVIN MOULDS
CAMERA:
ADAM BULLEY
CAMERA:
CANON EOS 5D MK III
CANON EOS 5DS R
& EOS R5
KEVIN IS based in Glasgow and
works in insurance. He’s an
accomplished wedding
photographer, comfortable
shooting big crowds and in high
pressure situations, but would love
to learn more about how to take
better street shots. He turns to
street photography to unwind and
gets out and about with his camera
to take urban shots after work and
on his lunch breaks. He’d like to
know how to take better city
photos so we’ve paired him up
with city slicker Adam Bulley.
ADAM IS a professional landscape
and street photographer based in
Edinburgh, Scotland where he runs
photography tours. He’s always
wanted to photograph more of
Glasgow so he leapt at the idea,
and in the run-up to our shoot, he
went on multiple recces to Glasgow.
We met up with him and Adam to
learn to shoot the city in the
beautiful golden hour at sunset and
watch the city transform from day
to night in the magical blue hour.
www.adambulleyphotography.com
The Canon Magazine
9
THEAPPRENTICE
TECHNIQUE
ASSESSMENT
Switch to Manual as light levels lowered
HOT
SHOT
#1
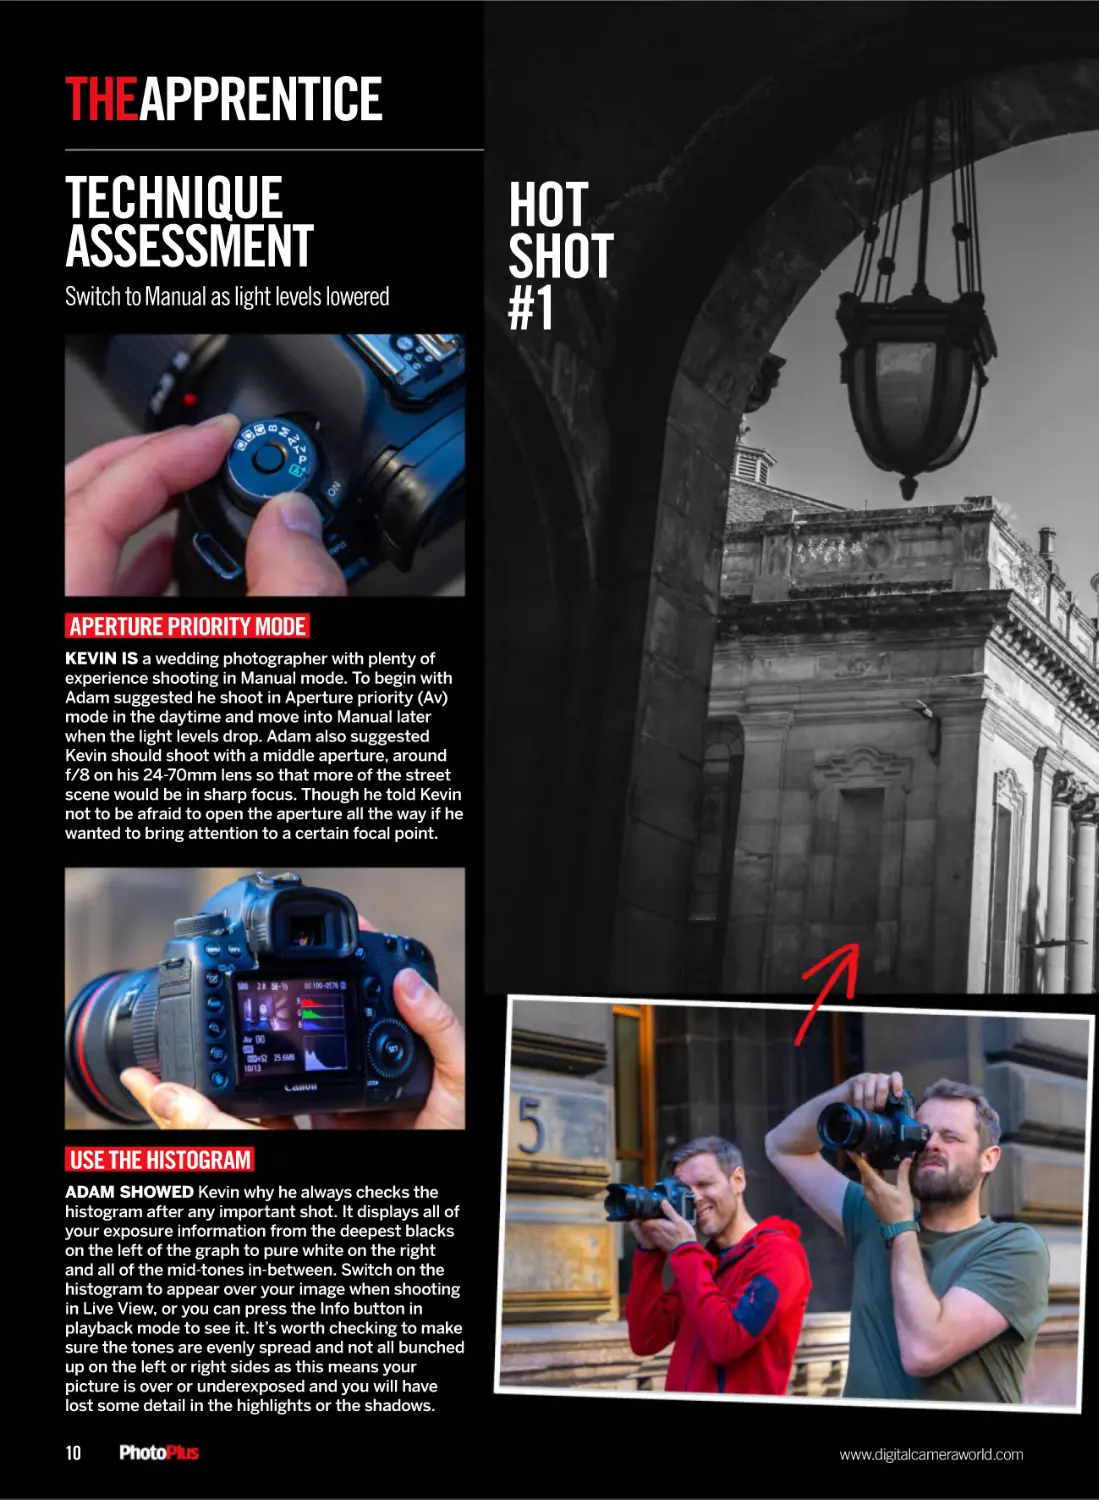
APERTURE PRIORITY MODE
KEVIN IS a wedding photographer with plenty of
experience shooting in Manual mode. To begin with
Adam suggested he shoot in Aperture priority (Av)
mode in the daytime and move into Manual later
when the light levels drop. Adam also suggested
Kevin should shoot with a middle aperture, around
f/8 on his 24-70mm lens so that more of the street
scene would be in sharp focus. Though he told Kevin
not to be afraid to open the aperture all the way if he
wanted to bring attention to a certain focal point.
USE THE HISTOGRAM
ADAM SHOWED Kevin why he always checks the
histogram after any important shot. It displays all of
your exposure information from the deepest blacks
on the left of the graph to pure white on the right
and all of the mid-tones in-between. Switch on the
histogram to appear over your image when shooting
in Live View, or you can press the Info button in
playback mode to see it. It’s worth checking to make
sure the tones are evenly spread and not all bunched
up on the left or right sides as this means your
picture is over or underexposed and you will have
lost some detail in the highlights or the shadows.
10
www.digitalcameraworld.com
SHOOT WITH A PRO
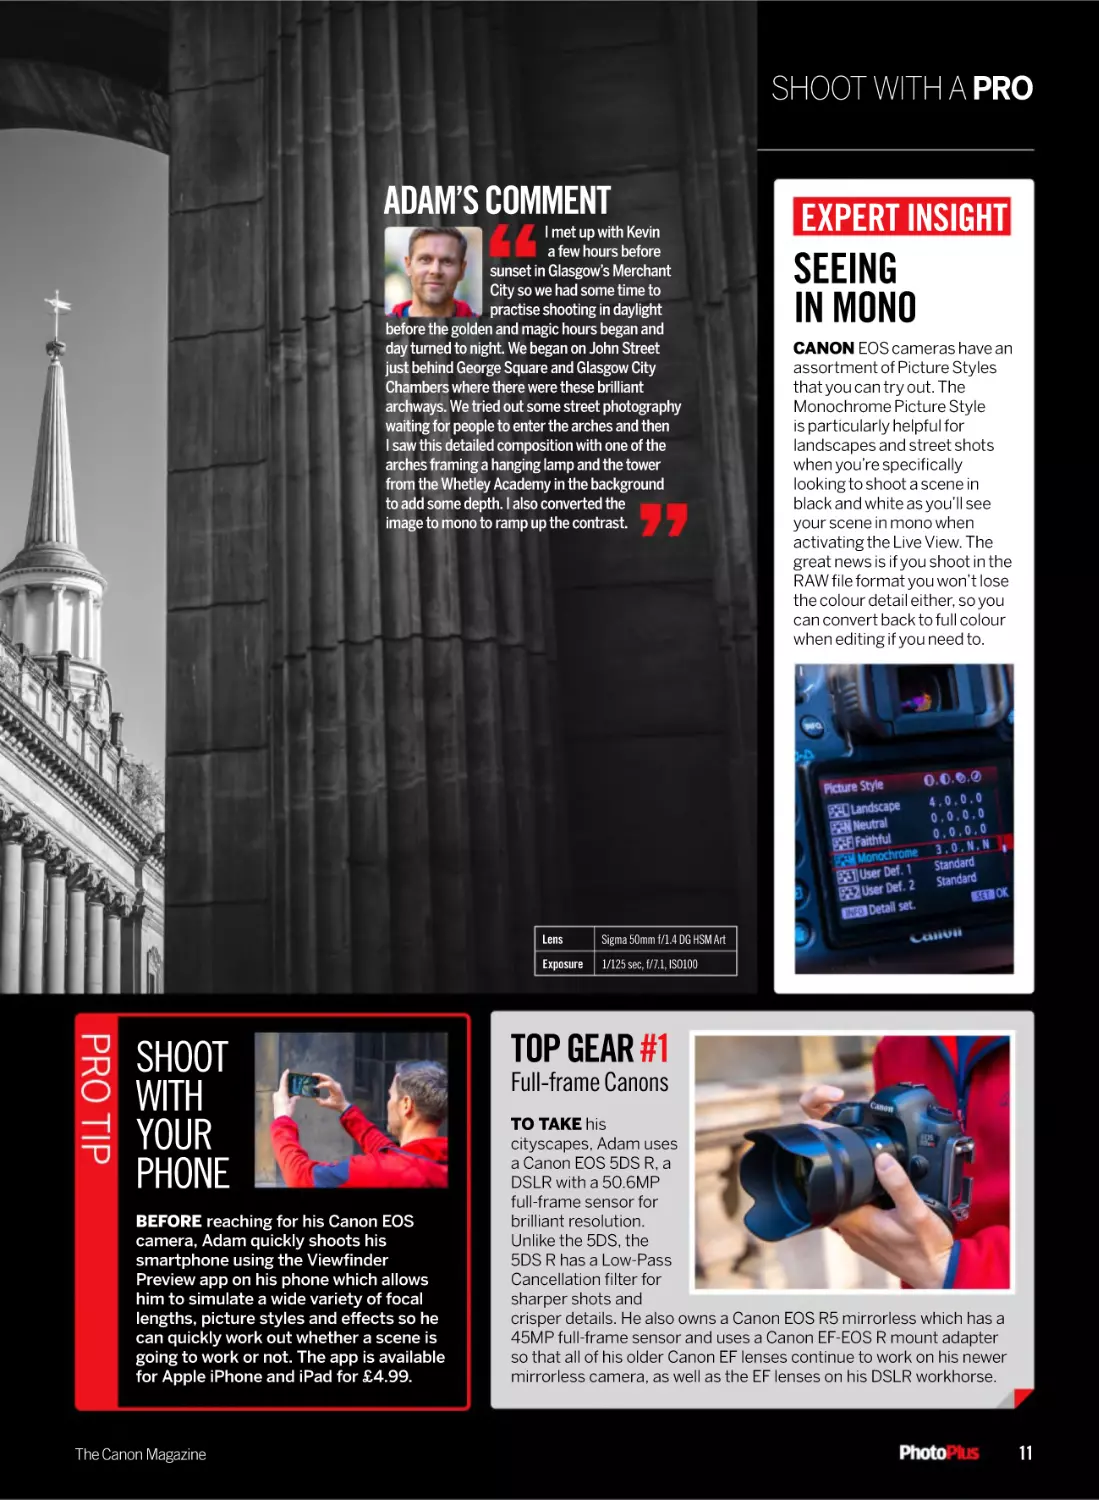
ADAM’S COMMENT
I met up with Kevin
a few hours before
sunset in Glasgow’s Merchant
City so we had some time to
practise shooting in daylight
before the golden and magic hours began and
day turned to night. We began on John Street
just behind George Square and Glasgow City
Chambers where there were these brilliant
archways. We tried out some street photography
waiting for people to enter the arches and then
I saw this detailed composition with one of the
arches framing a hanging lamp and the tower
from the Whetley Academy in the background
to add some depth. I also converted the
image to mono to ramp up the contrast.
SHOOT
WITH
YOUR
PHONE
BEFORE reaching for his Canon EOS
camera, Adam quickly shoots his
smartphone using the Viewfinder
Preview app on his phone which allows
him to simulate a wide variety of focal
lengths, picture styles and effects so he
can quickly work out whether a scene is
going to work or not. The app is available
for Apple iPhone and iPad for £4.99.
The Canon Magazine
Lens
Sigma 50mm f/1.4 DG HSM Art
Exposure
1/125 sec, f/7.1, ISO100
EXPERT INSIGHT
SEEING
IN MONO
CANON EOS cameras have an
assortment of Picture Styles
that you can try out. The
Monochrome Picture Style
is particularly helpful for
landscapes and street shots
when you’re specifically
looking to shoot a scene in
black and white as you’ll see
your scene in mono when
activating the Live View. The
great news is if you shoot in the
RAW file format you won’t lose
the colour detail either, so you
can convert back to full colour
when editing if you need to.
TOP GEAR #1
Full-frame Canons
TO TAKE his
cityscapes, Adam uses
a Canon EOS 5DS R, a
DSLR with a 50.6MP
full-frame sensor for
brilliant resolution.
Unlike the 5DS, the
5DS R has a Low-Pass
Cancellation filter for
sharper shots and
crisper details. He also owns a Canon EOS R5 mirrorless which has a
45MP full-frame sensor and uses a Canon EF-EOS R mount adapter
so that all of his older Canon EF lenses continue to work on his newer
mirrorless camera, as well as the EF lenses on his DSLR workhorse.
11
THEAPPRENTICE
HOT
SHOT
#2
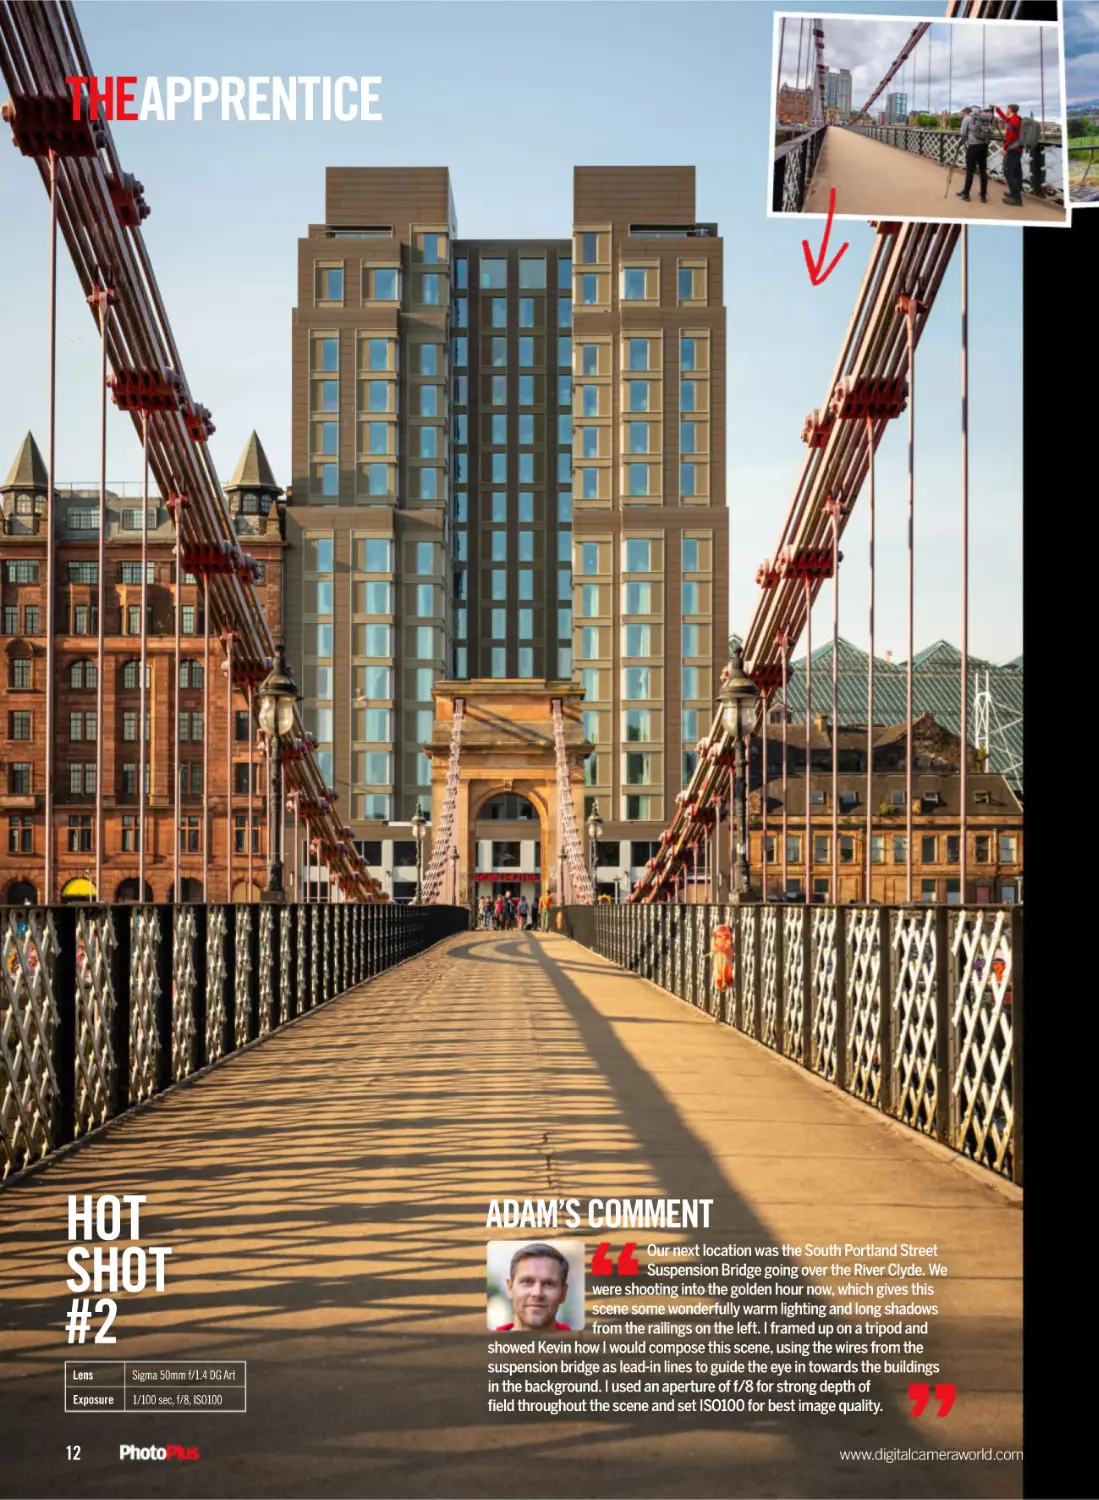
Lens
Sigma 50mm f/1.4 DG Art
Exposure
1/100 sec, f/8, ISO100
12
ADAM’S COMMENT
Our next location was the South Portland Street
Suspension Bridge going over the River Clyde. We
were shooting into the golden hour now, which gives this
scene some wonderfully warm lighting and long shadows
from the railings on the left. I framed up on a tripod and
showed Kevin how I would compose this scene, using the wires from the
suspension bridge as lead-in lines to guide the eye in towards the buildings
in the background. I used an aperture of f/8 for strong depth of
field throughout the scene and set ISO100 for best image quality.
www.digitalcameraworld.com
HOT
SHOT
#3
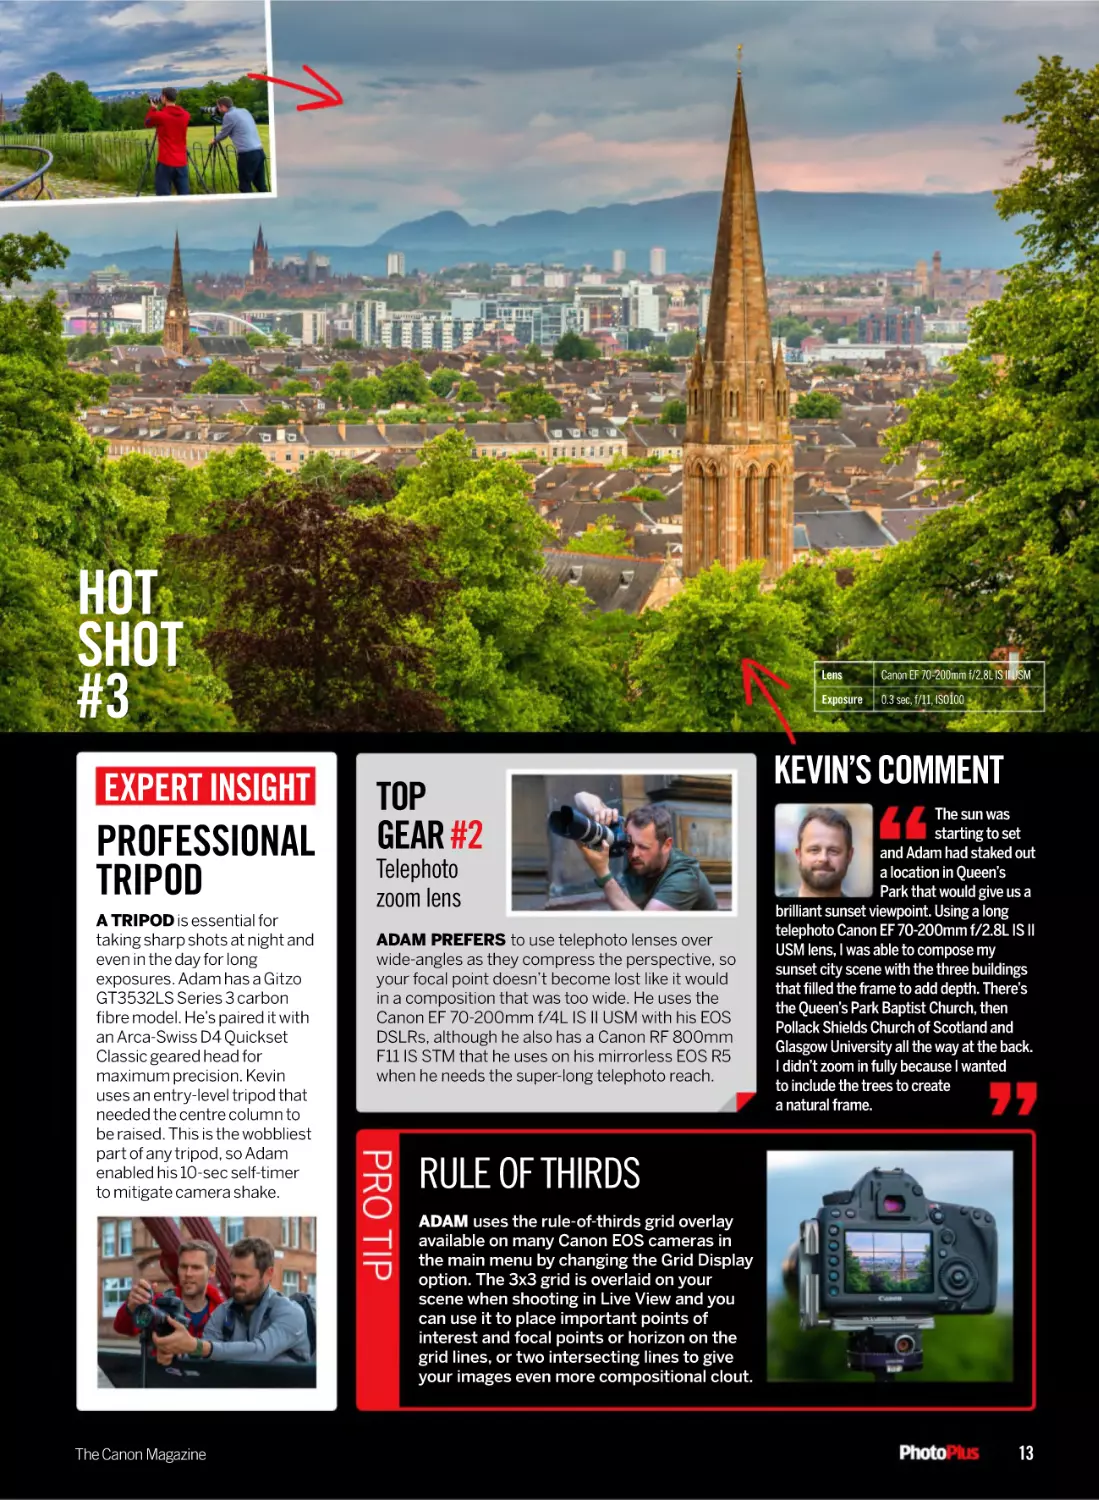
EXPERT INSIGHT
PROFESSIONAL
TRIPOD
A TRIPOD is essential for
taking sharp shots at night and
even in the day for long
exposures. Adam has a Gitzo
GT3532LS Series 3 carbon
fibre model. He’s paired it with
an Arca-Swiss D4 Quickset
Classic geared head for
maximum precision. Kevin
uses an entry-level tripod that
needed the centre column to
be raised. This is the wobbliest
part of any tripod, so Adam
enabled his 10-sec self-timer
to mitigate camera shake.
TOP
GEAR #2
Telephoto
zoom lens
ADAM PREFERS to use telephoto lenses over
wide-angles as they compress the perspective, so
your focal point doesn’t become lost like it would
in a composition that was too wide. He uses the
Canon EF 70-200mm f/4L IS II USM with his EOS
DSLRs, although he also has a Canon RF 800mm
F11 IS STM that he uses on his mirrorless EOS R5
when he needs the super-long telephoto reach.
Lens
Canon EF 70-200mm f/2.8L IS II USM
Exposure
0.3 sec, f/11, ISO100
KEVIN’S COMMENT
The sun was
starting to set
and Adam had staked out
a location in Queen’s
Park that would give us a
brilliant sunset viewpoint. Using a long
telephoto Canon EF 70-200mm f/2.8L IS II
USM lens, I was able to compose my
sunset city scene with the three buildings
that filled the frame to add depth. There’s
the Queen’s Park Baptist Church, then
Pollack Shields Church of Scotland and
Glasgow University all the way at the back.
I didn’t zoom in fully because I wanted
to include the trees to create
a natural frame.
RULE OF THIRDS
ADAM uses the rule-of-thirds grid overlay
available on many Canon EOS cameras in
the main menu by changing the Grid Display
option. The 3x3 grid is overlaid on your
scene when shooting in Live View and you
can use it to place important points of
interest and focal points or horizon on the
grid lines, or two intersecting lines to give
your images even more compositional clout.
The Canon Magazine
13
THEAPPRENTICE
ADAM’S TOP 3 SHOTS
REVEAL HIS SKILLS
Canon pro with a head for heights and eye for images
CASTLE IN THE CLOUDS
AFTER THE fog rolled into Edinburgh I decided to hike to
the top of Salisbury Crags to try to capture a shot I had
visualized for years – Edinburgh Castle floating on clouds.
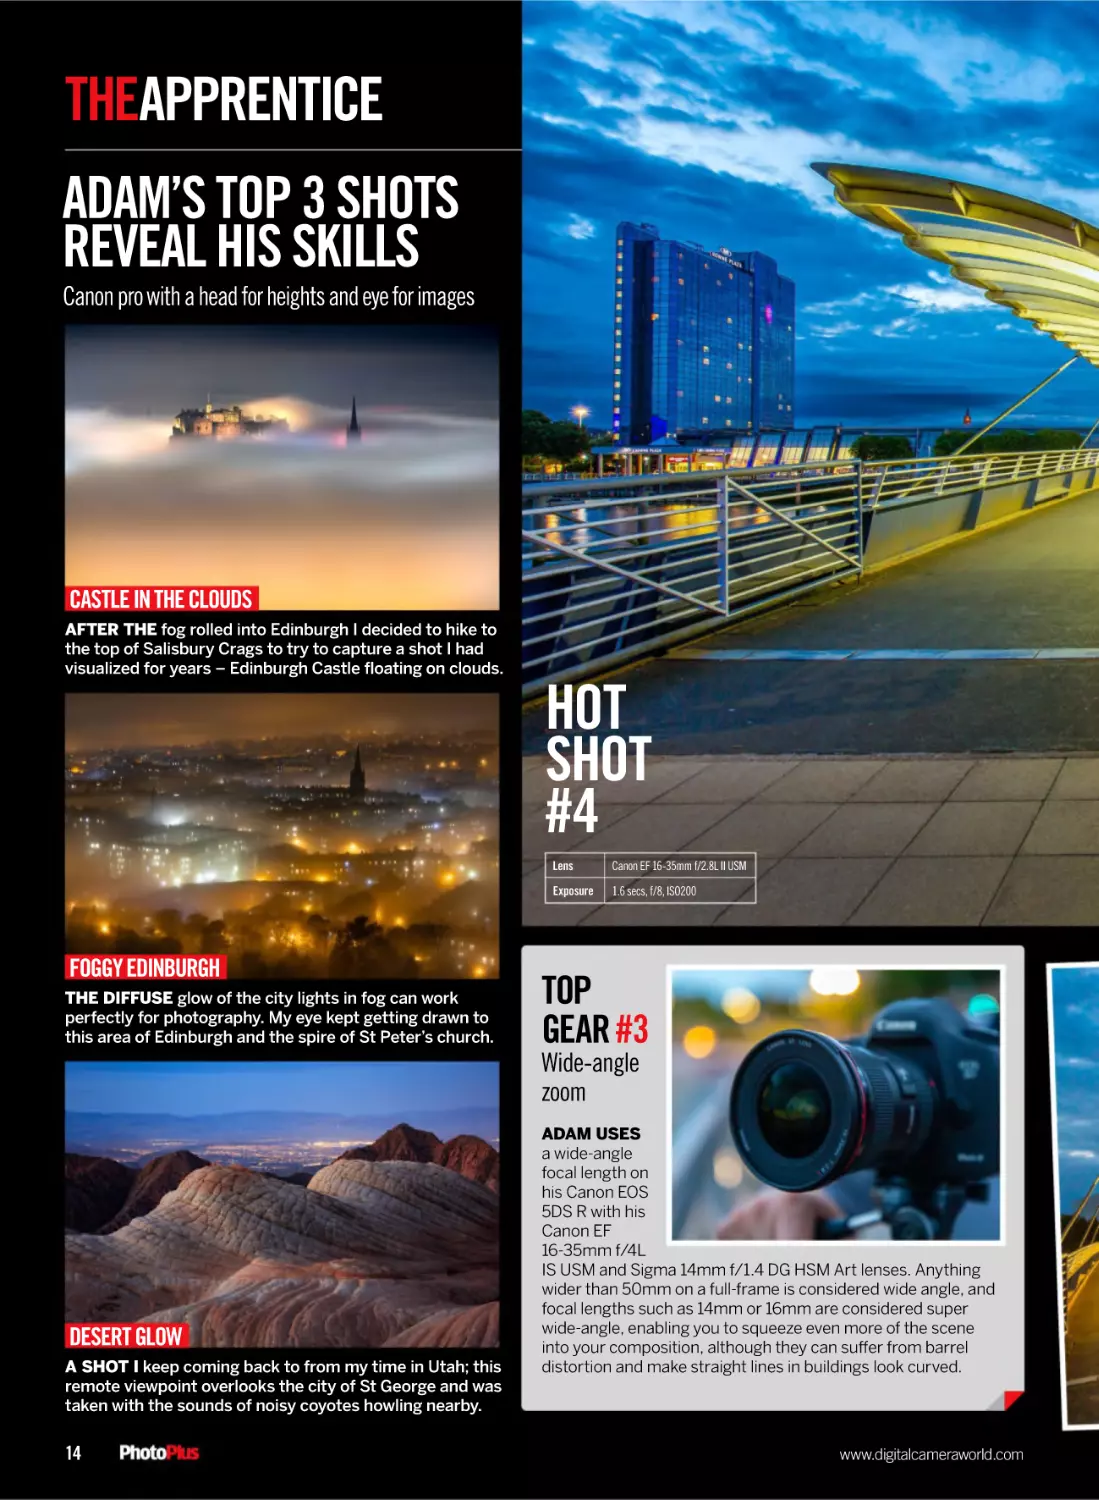
HOT
SHOT
#4
FOGGY EDINBURGH
THE DIFFUSE glow of the city lights in fog can work
perfectly for photography. My eye kept getting drawn to
this area of Edinburgh and the spire of St Peter’s church.
Lens
Canon EF 16-35mm f/2.8L II USM
Exposure
1.6 secs, f/8, ISO200
TOP
GEAR #3
Wide-angle
zoom
DESERT GLOW
A SHOT I keep coming back to from my time in Utah; this
remote viewpoint overlooks the city of St George and was
taken with the sounds of noisy coyotes howling nearby.
14
ADAM USES
a wide-angle
focal length on
his Canon EOS
5DS R with his
Canon EF
16-35mm f/4L
IS USM and Sigma 14mm f/1.4 DG HSM Art lenses. Anything
wider than 50mm on a full-frame is considered wide angle, and
focal lengths such as 14mm or 16mm are considered super
wide-angle, enabling you to squeeze even more of the scene
into your composition, although they can suffer from barrel
distortion and make straight lines in buildings look curved.
www.digitalcameraworld.com
SHOOT WITH A PRO
CUSTOM
WHITE
BALANCE
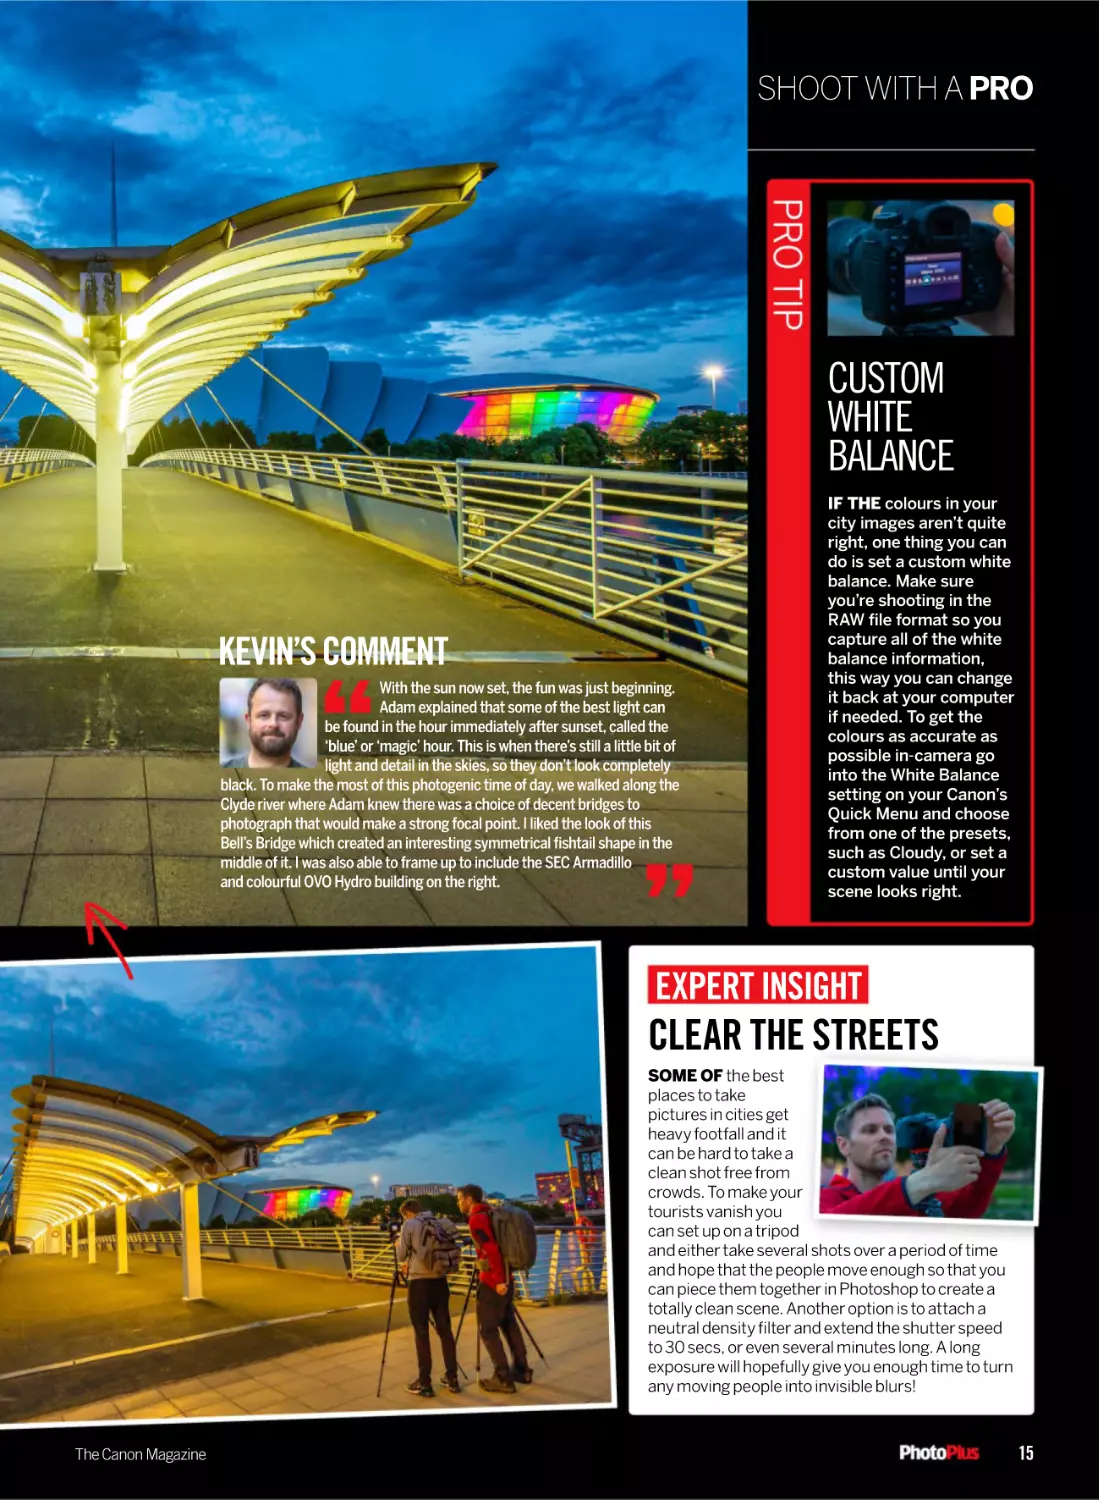
KEVIN’S COMMENT
With the sun now set, the fun was just beginning.
Adam explained that some of the best light can
be found in the hour immediately after sunset, called the
‘blue’ or ‘magic’ hour. This is when there’s still a little bit of
light and detail in the skies, so they don’t look completely
black. To make the most of this photogenic time of day, we walked along the
Clyde river where Adam knew there was a choice of decent bridges to
photograph that would make a strong focal point. I liked the look of this
Bell’s Bridge which created an interesting symmetrical fishtail shape in the
middle of it. I was also able to frame up to include the SEC Armadillo
and colourful OVO Hydro building on the right.
IF THE colours in your
city images aren’t quite
right, one thing you can
do is set a custom white
balance. Make sure
you’re shooting in the
RAW file format so you
capture all of the white
balance information,
this way you can change
it back at your computer
if needed. To get the
colours as accurate as
possible in-camera go
into the White Balance
setting on your Canon’s
Quick Menu and choose
from one of the presets,
such as Cloudy, or set a
custom value until your
scene looks right.
EXPERT INSIGHT
CLEAR THE STREETS
SOME OF the best
places to take
pictures in cities get
heavy footfall and it
can be hard to take a
clean shot free from
crowds. To make your
tourists vanish you
can set up on a tripod
and either take several shots over a period of time
and hope that the people move enough so that you
can piece them together in Photoshop to create a
totally clean scene. Another option is to attach a
neutral density filter and extend the shutter speed
to 30 secs, or even several minutes long. A long
exposure will hopefully give you enough time to turn
any moving people into invisible blurs!
The Canon Magazine
15
THEAPPRENTICE
TOP TEN CITY IMAGE
TIPS FOR STREET LIFE
1
2-sec self-timer
Pressing your camera’s shutter button can cause
camera-shake, so turn on the 2-sec self timer mode
or use a remote shutter release cable on a tripod.
2
Turn stabilization off
Image stabilization systems on a tripod can
actually introduce blur into stable cameras, so
it’s best to play it safe and disengage them.
3
Aspect ratio
One quick way you can change the look and feel of
your compositions is to play with the aspect ratio,
such as 1:1 for a square crop, or 16:9 for a superwide panorama look.
4
Focus a third of the way in for landscapes
If you’re unsure where to focus in the frame, a good
rule of thumb for landscapes is about a third of the
way into the scene and use a mid-aperture value
like f/8 or f/11 for a deep zone of focus that should
render your whole scene acceptably sharp.
5
Use the electronic level
A wonky horizon is the first thing your viewers will
spot. Luckily it’s easy to fix by either using your
Canon’s built-in electronic spirit level on screen,
or with a crop and straighten in post-production.
6
Look for lead-in lines
Keep an eye out for lines in your locations that can
be used to draw the eye towards your main focal
point, such as railings on a bridge, pathways,
fences and bollards.
7
Buddy up
Shooting in big cities, especially at night, isn’t
without its own risks. Find another photographer
or friend you can go out with for a more enjoyable
social experience and to help keep yourself safe.
8
Get the right gear
Kevin was struggling with his 11-year-old Canon
EOS 5D Mark III, so it would well be worth
upgrading to a newer camera body for better
dynamic range and low-light performance.
9
Avoid midday sun
Try to avoid shooting cities around midday – with
the sun directly overhead, shadows in scenes can
look harsh. Shoot instead around the golden and
magic hours when the sun is lower in the sky.
10
Get a circular polarizer filter
While many filter effects can be replicated in
Photoshop, the effect of a polarizing filter is still
hard to mimic. These filters cut out polarized light
to boost blues in sunny skies and help tame glare
and reflections in glass and water.
16
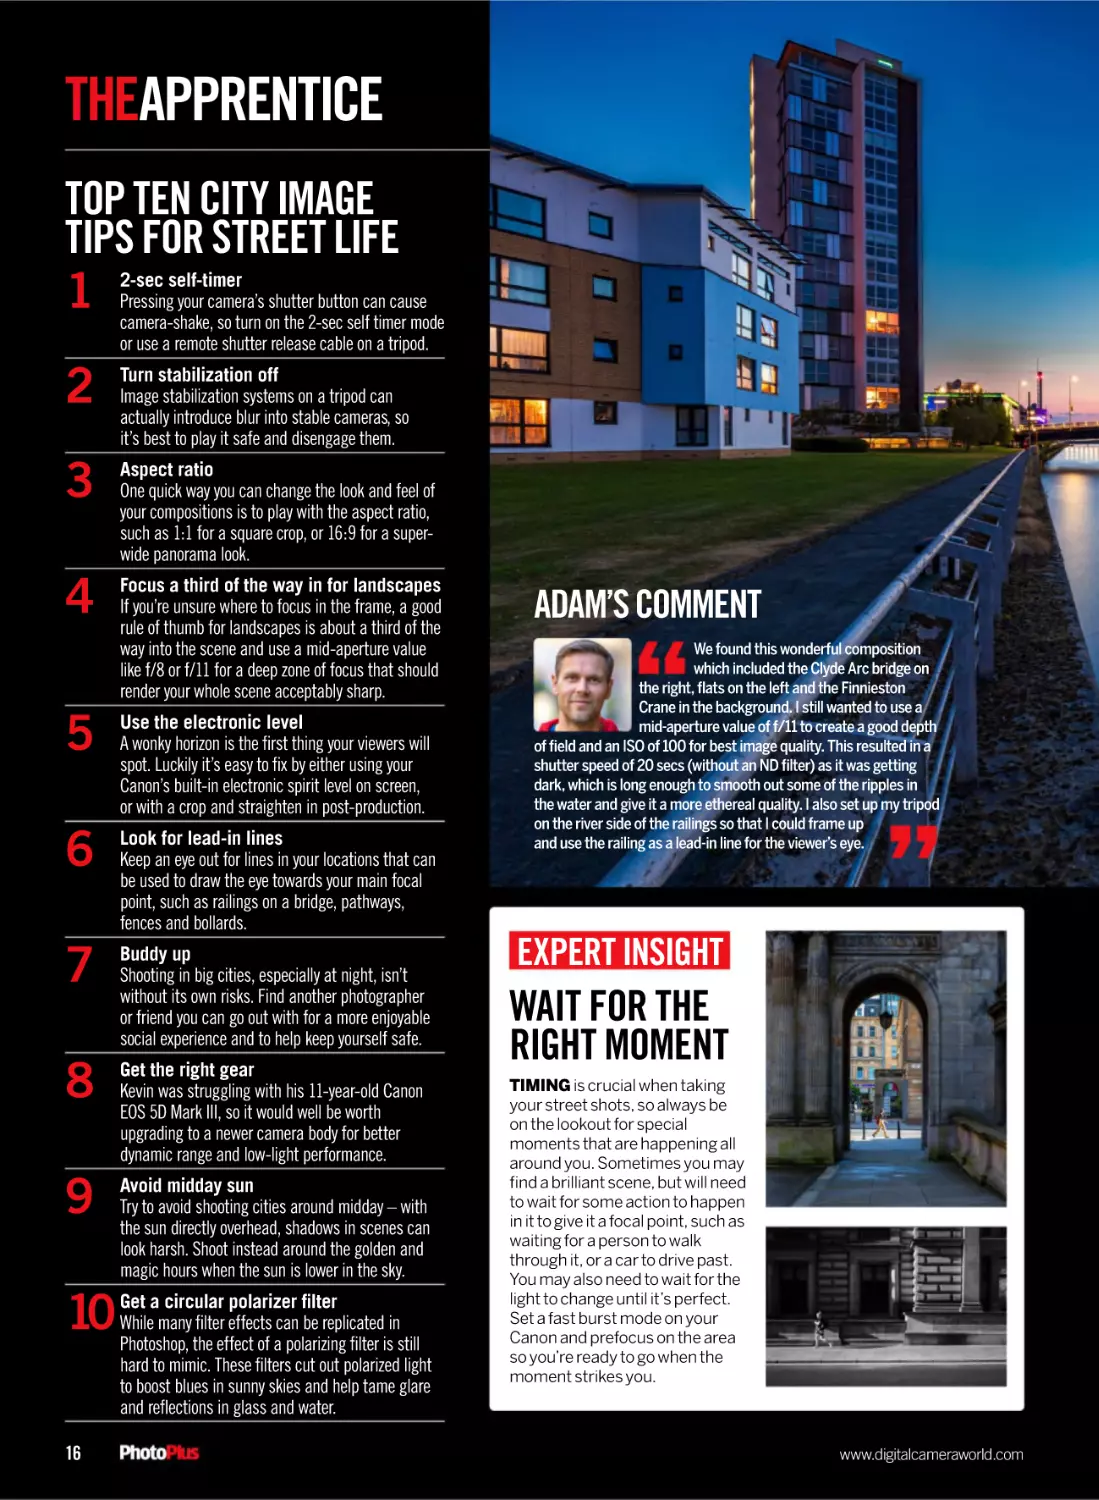
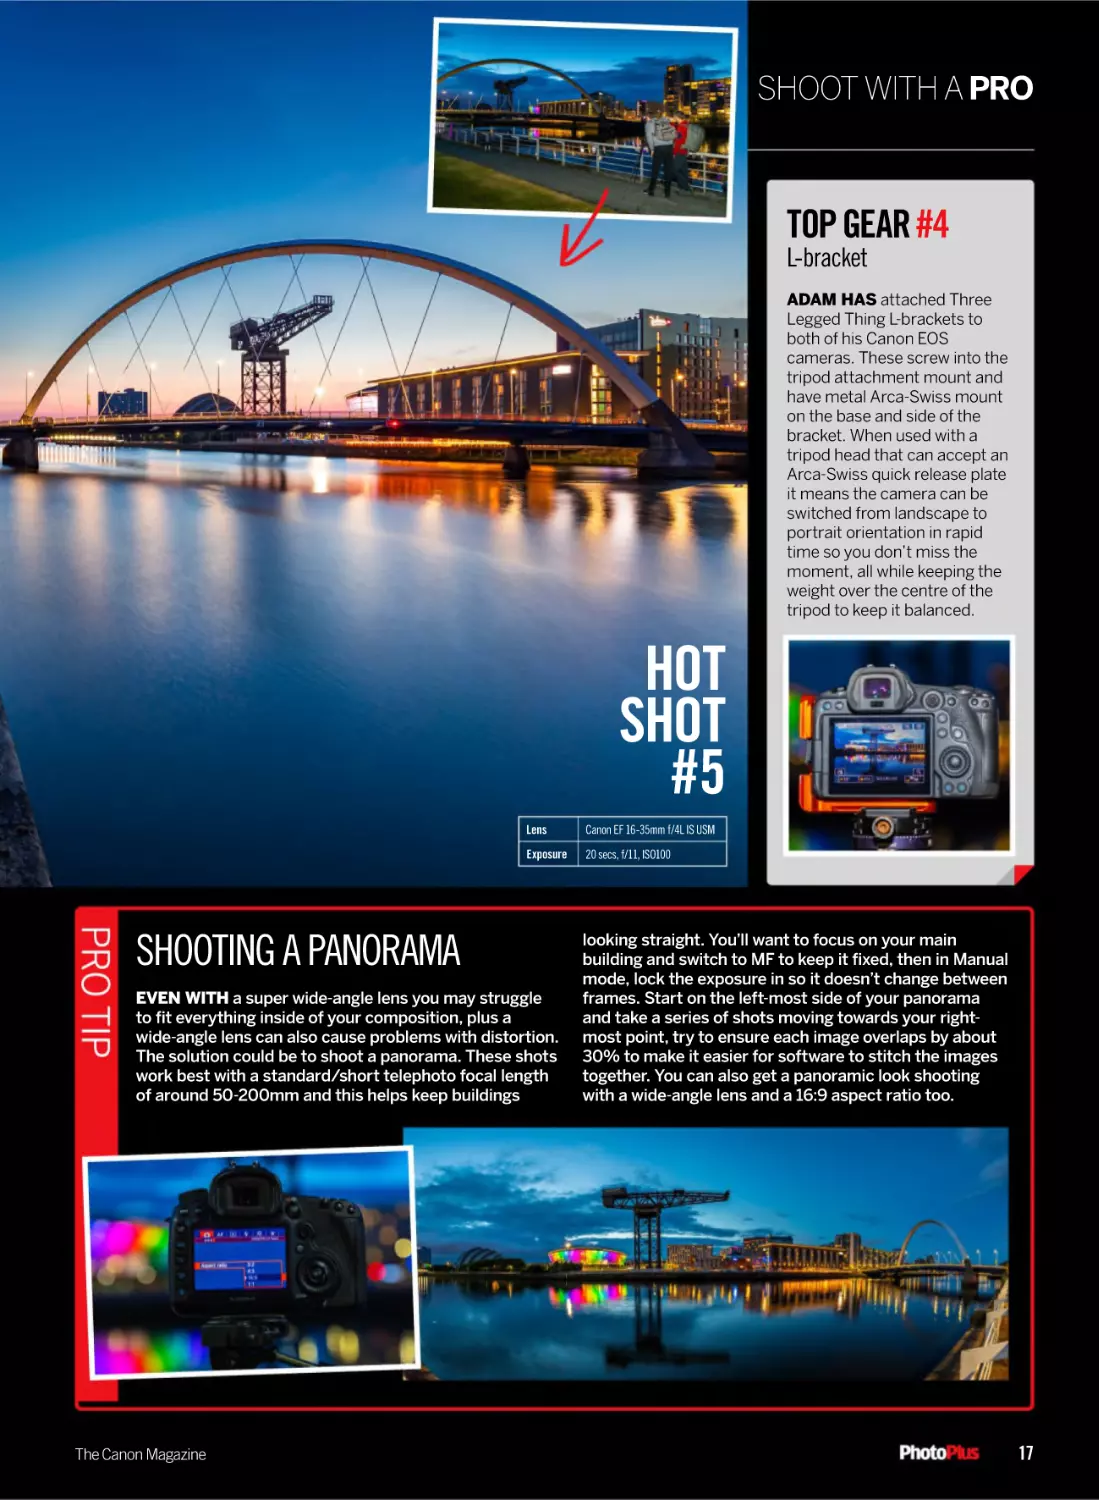
ADAM’S COMMENT
We found this wonderful composition
which included the Clyde Arc bridge on
the right, flats on the left and the Finnieston
Crane in the background. I still wanted to use a
mid-aperture value of f/11 to create a good depth
of field and an ISO of 100 for best image quality. This resulted in a
shutter speed of 20 secs (without an ND filter) as it was getting
dark, which is long enough to smooth out some of the ripples in
the water and give it a more ethereal quality. I also set up my tripod
on the river side of the railings so that I could frame up
and use the railing as a lead-in line for the viewer’s eye.
EXPERT INSIGHT
WAIT FOR THE
RIGHT MOMENT
TIMING is crucial when taking
your street shots, so always be
on the lookout for special
moments that are happening all
around you. Sometimes you may
find a brilliant scene, but will need
to wait for some action to happen
in it to give it a focal point, such as
waiting for a person to walk
through it, or a car to drive past.
You may also need to wait for the
light to change until it’s perfect.
Set a fast burst mode on your
Canon and prefocus on the area
so you’re ready to go when the
moment strikes you.
www.digitalcameraworld.com
SHOOT WITH A PRO
TOP GEAR #4
L-bracket
ADAM HAS attached Three
Legged Thing L-brackets to
both of his Canon EOS
cameras. These screw into the
tripod attachment mount and
have metal Arca-Swiss mount
on the base and side of the
bracket. When used with a
tripod head that can accept an
Arca-Swiss quick release plate
it means the camera can be
switched from landscape to
portrait orientation in rapid
time so you don’t miss the
moment, all while keeping the
weight over the centre of the
tripod to keep it balanced.
HOT
SHOT
#5
Lens
Canon EF 16-35mm f/4L IS USM
Exposure
20 secs, f/11, ISO100
SHOOTING A PANORAMA
EVEN WITH a super wide-angle lens you may struggle
to fit everything inside of your composition, plus a
wide-angle lens can also cause problems with distortion.
The solution could be to shoot a panorama. These shots
work best with a standard/short telephoto focal length
of around 50-200mm and this helps keep buildings
The Canon Magazine
looking straight. You’ll want to focus on your main
building and switch to MF to keep it fixed, then in Manual
mode, lock the exposure in so it doesn’t change between
frames. Start on the left-most side of your panorama
and take a series of shots moving towards your rightmost point, try to ensure each image overlaps by about
30% to make it easier for software to stitch the images
together. You can also get a panoramic look shooting
with a wide-angle lens and a 16:9 aspect ratio too.
17
THEAPPRENTICE
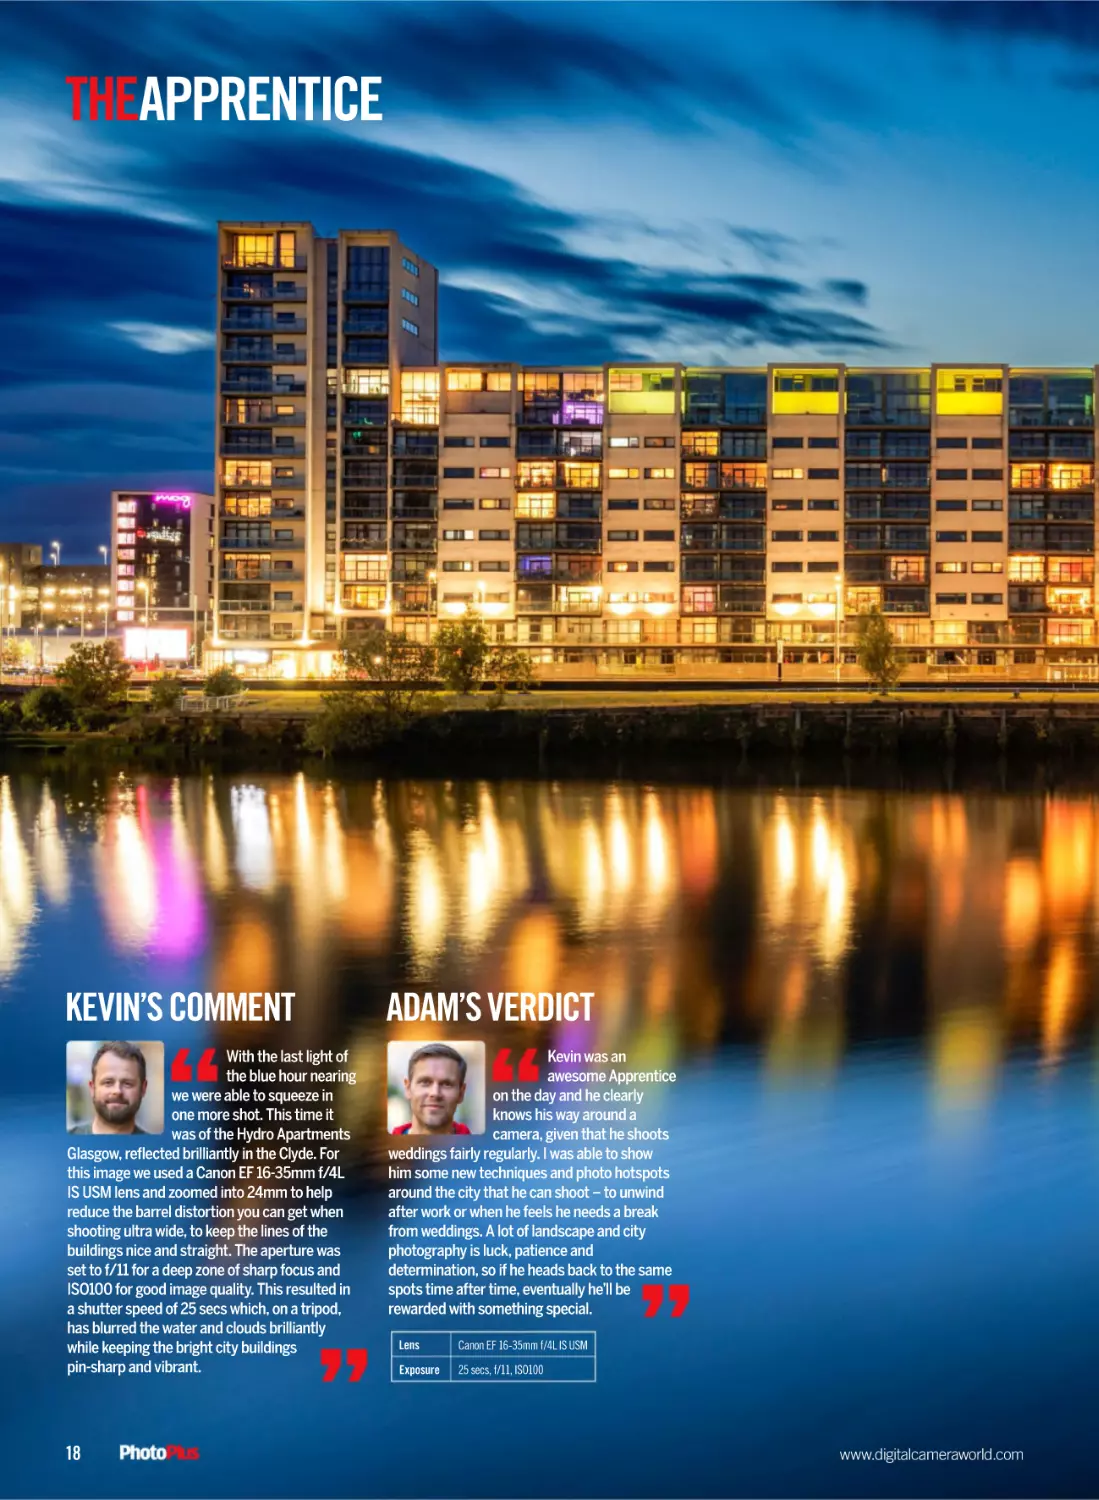
KEVIN’S COMMENT
ADAM’S VERDICT
With the last light of
the blue hour nearing
we were able to squeeze in
one more shot. This time it
was of the Hydro Apartments
Glasgow, reflected brilliantly in the Clyde. For
this image we used a Canon EF 16-35mm f/4L
IS USM lens and zoomed into 24mm to help
reduce the barrel distortion you can get when
shooting ultra wide, to keep the lines of the
buildings nice and straight. The aperture was
set to f/11 for a deep zone of sharp focus and
ISO100 for good image quality. This resulted in
a shutter speed of 25 secs which, on a tripod,
has blurred the water and clouds brilliantly
while keeping the bright city buildings
pin-sharp and vibrant.
Kevin was an
awesome Apprentice
on the day and he clearly
knows his way around a
camera, given that he shoots
weddings fairly regularly. I was able to show
him some new techniques and photo hotspots
around the city that he can shoot – to unwind
after work or when he feels he needs a break
from weddings. A lot of landscape and city
photography is luck, patience and
determination, so if he heads back to the same
spots time after time, eventually he’ll be
rewarded with something special.
18
Lens
Canon EF 16-35mm f/4L IS USM
Exposure
25 secs, f/11, ISO100
www.digitalcameraworld.com
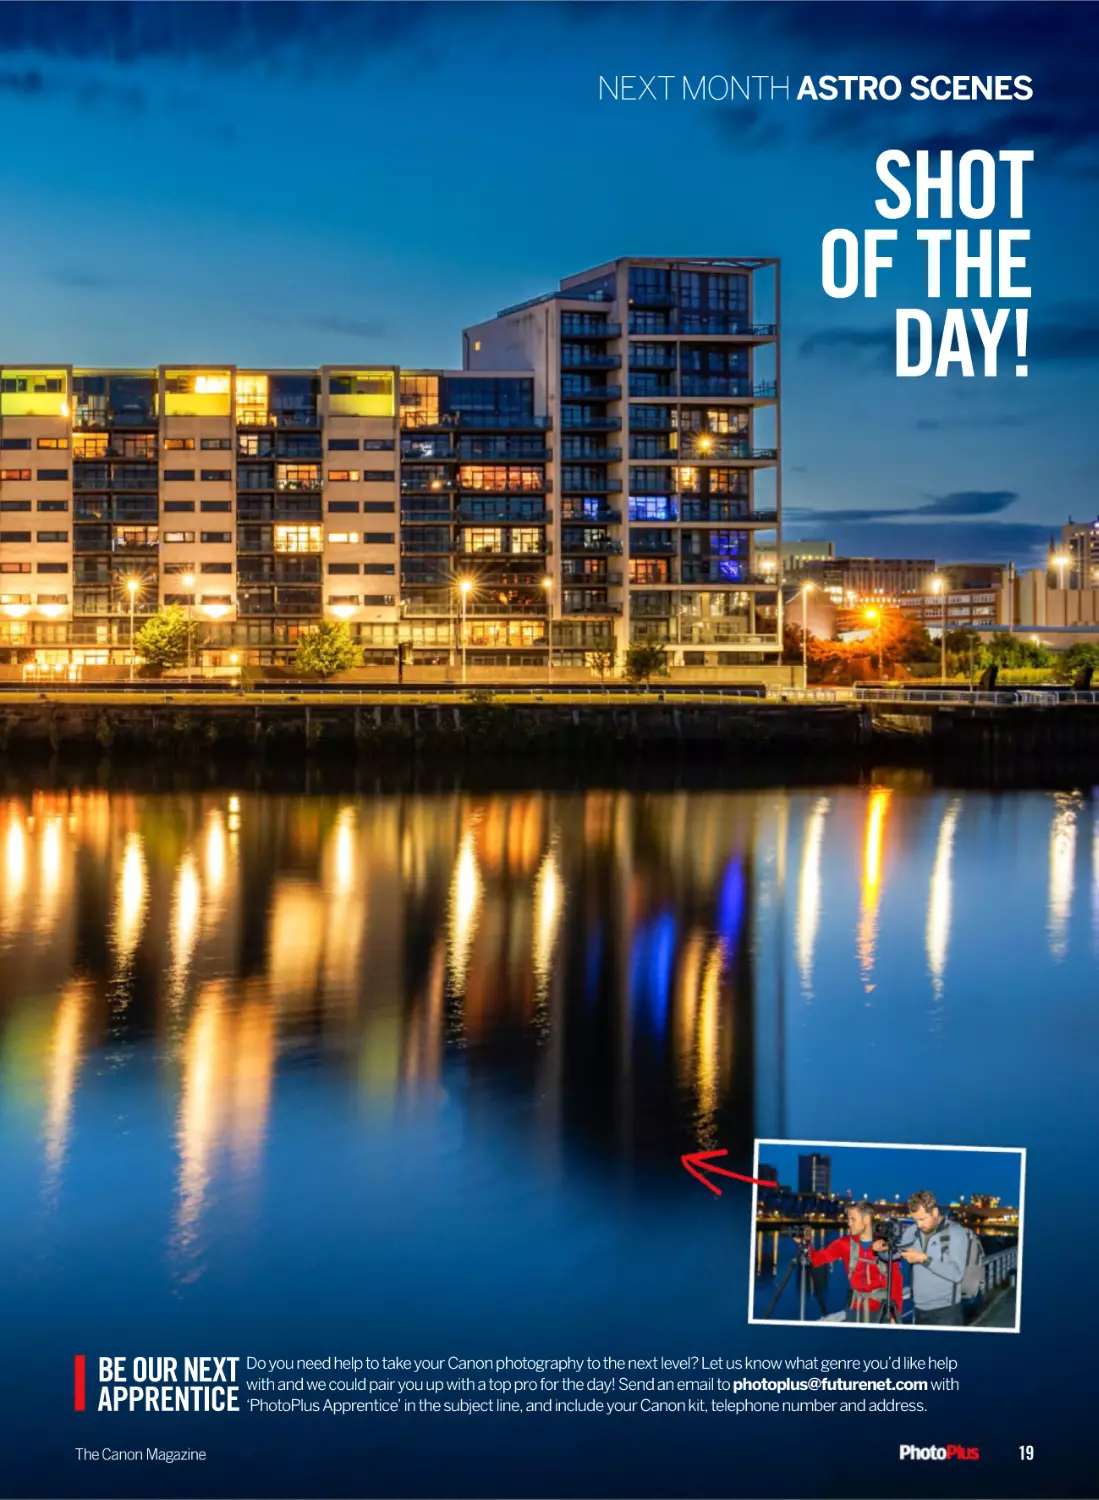
NEXT MONTH ASTRO SCENES
SHOT
OF THE
DAY!
you need help to take your Canon photography to the next level? Let us know what genre you’d like help
BE OUR NEXT Do
with and we could pair you up with a top pro for the day! Send an email to photoplus@futurenet.com with
APPRENTICE ‘PhotoPlus Apprentice’ in the subject line, and include your Canon kit, telephone number and address.
The Canon Magazine
19
STUNNING IMAGERY FROM THE WORLD OF CANON PHOTOGRAPHY
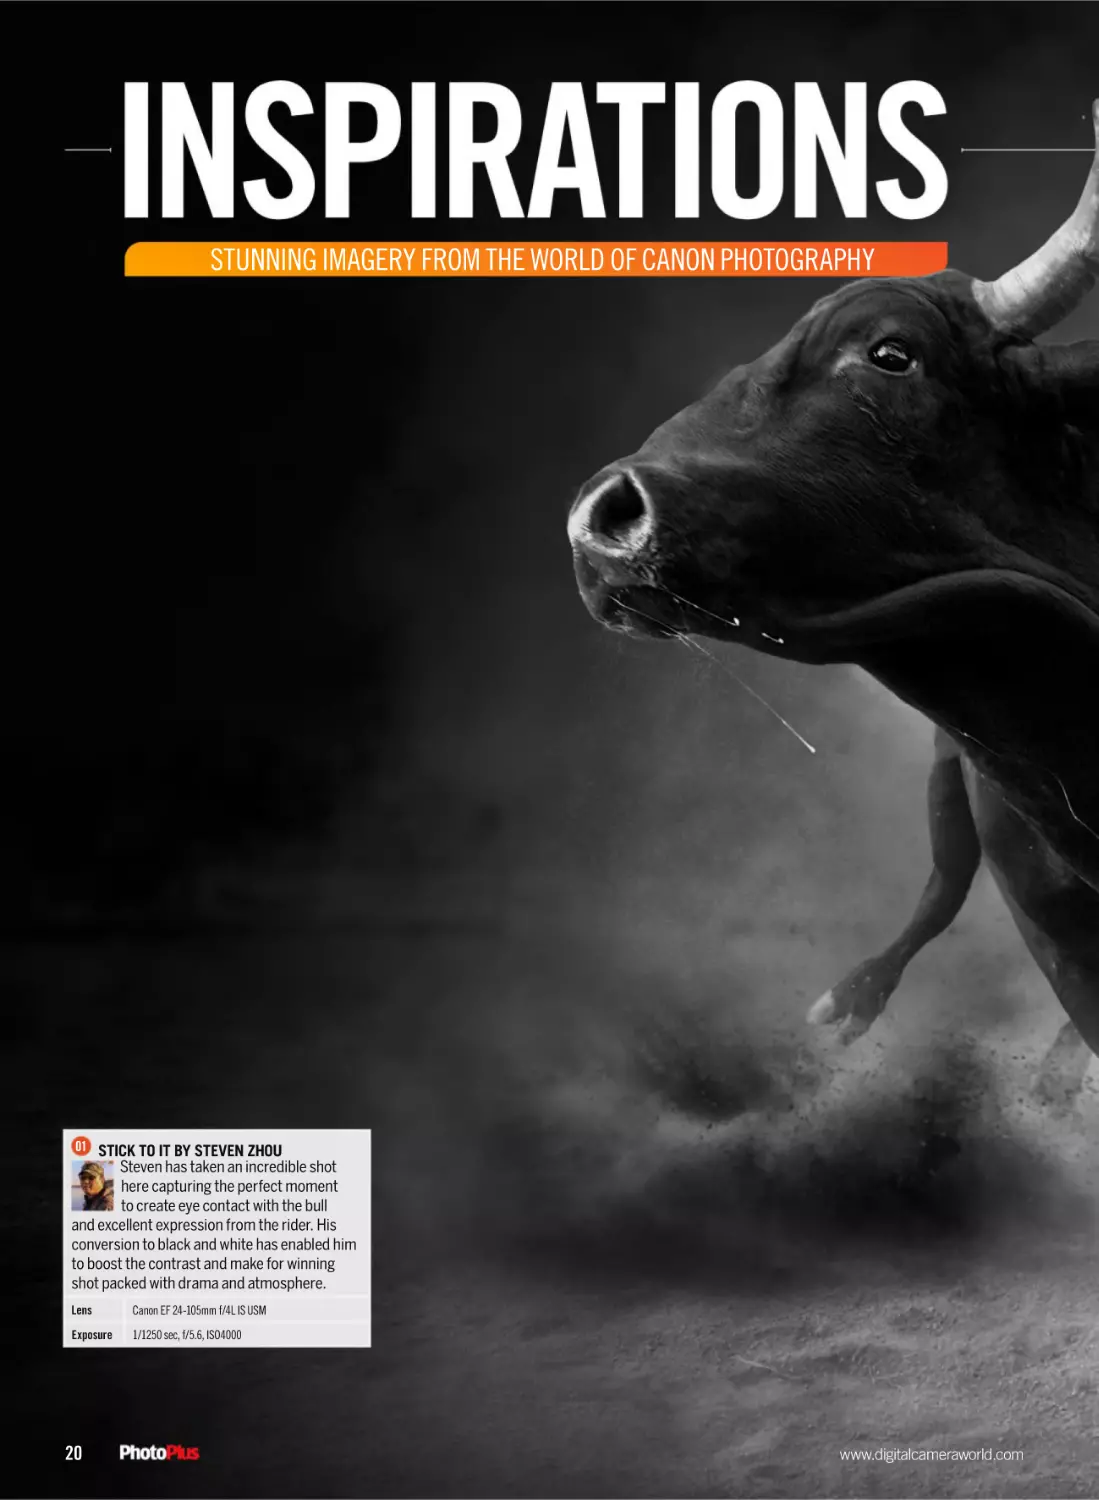
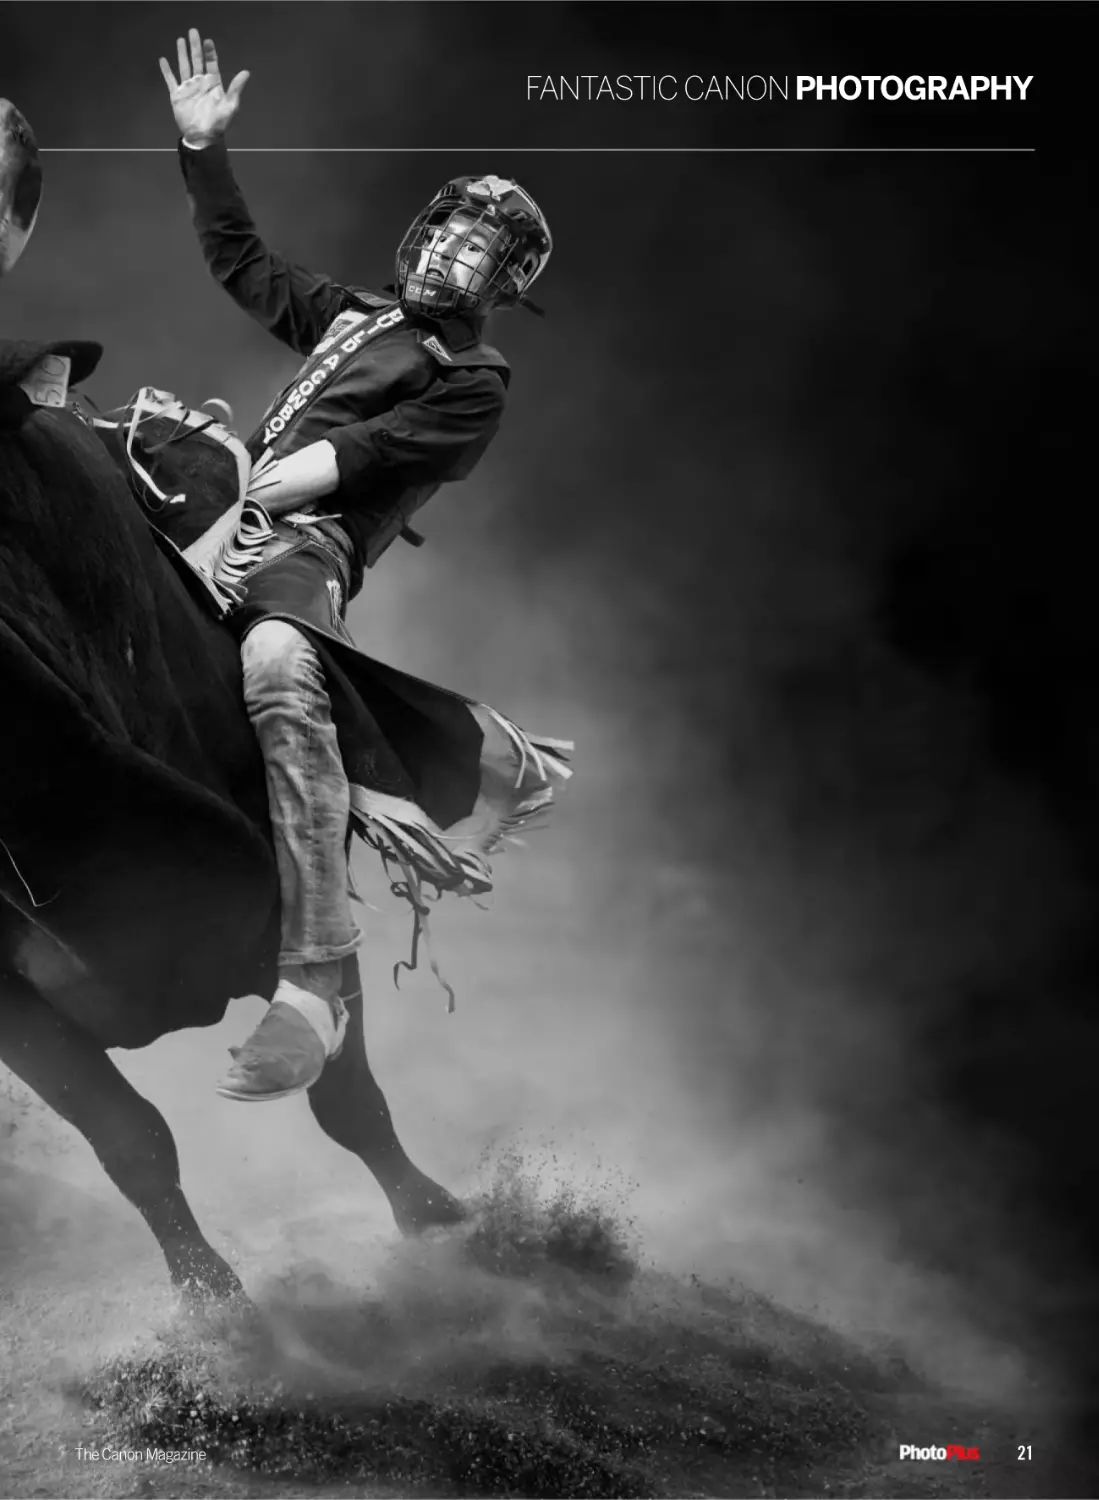
01 STICK TO IT BY STEVEN ZHOU
Steven has taken an incredible shot
here capturing the perfect moment
to create eye contact with the bull
and excellent expression from the rider. His
conversion to black and white has enabled him
to boost the contrast and make for winning
shot packed with drama and atmosphere.
Lens
Canon EF 24-105mm f/4L IS USM
Exposure
1/1250 sec, f/5.6, ISO4000
20
www.digitalcameraworld.com
FANTASTIC CANON PHOTOGRAPHY
The Canon Magazine
21
INSPIRATIONS
02
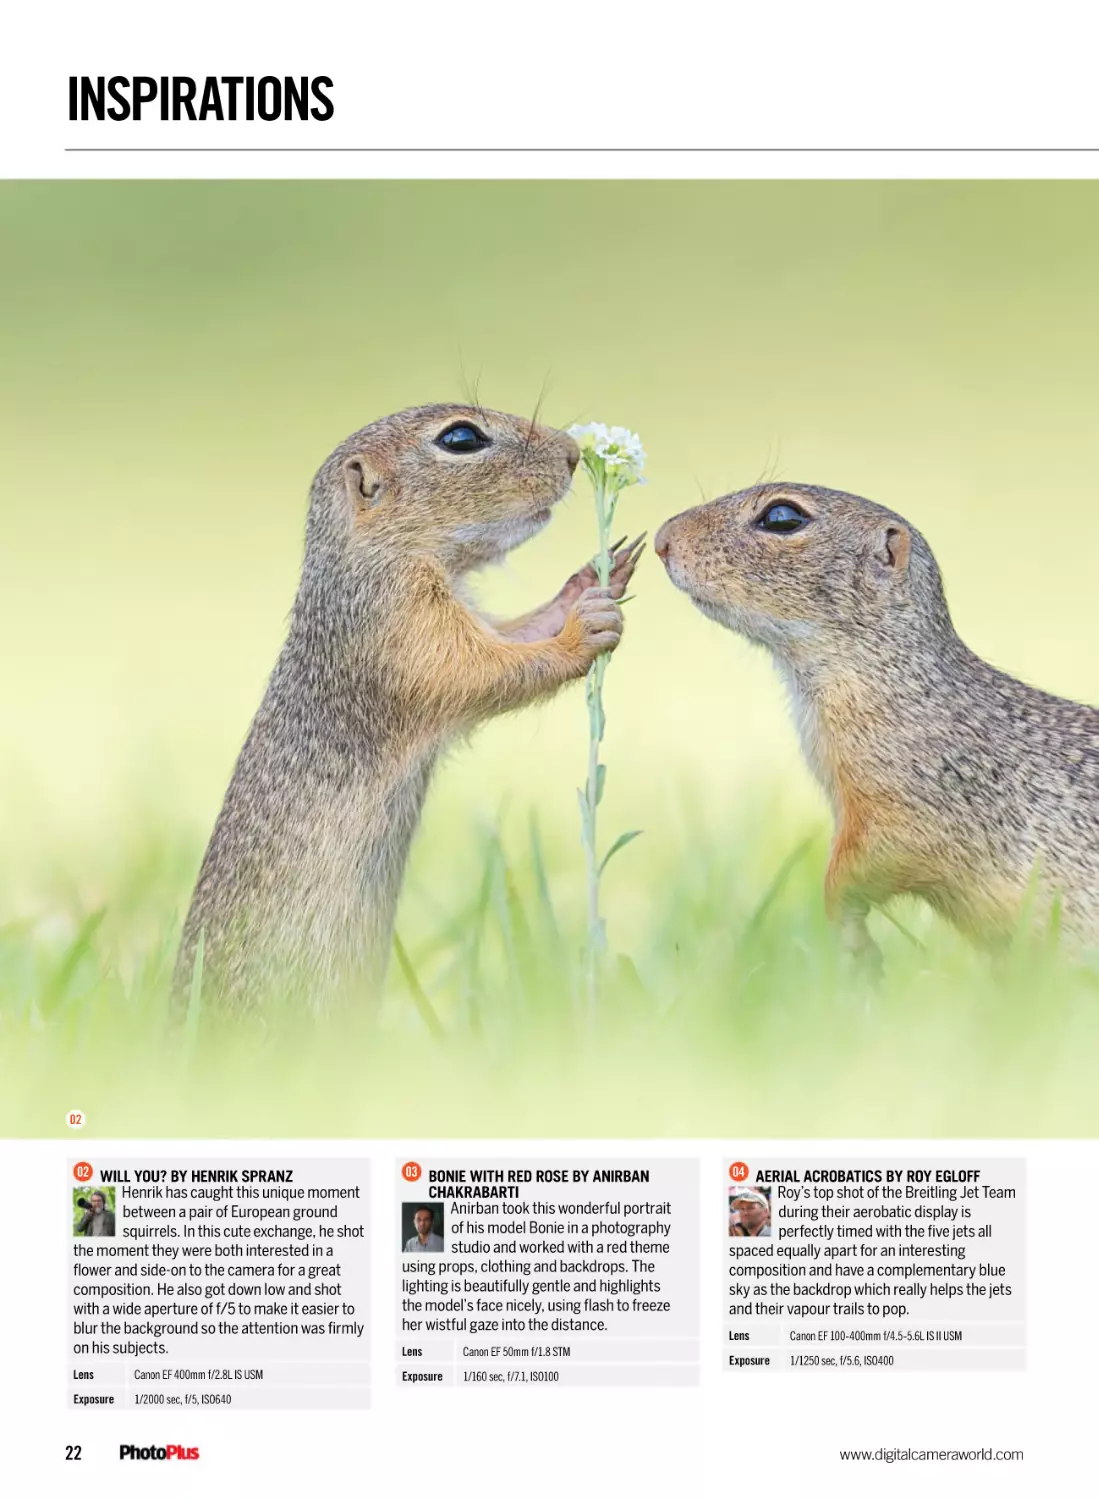
02 WILL YOU? BY HENRIK SPRANZ
03 BONIE WITH RED ROSE BY ANIRBAN
04 AERIAL ACROBATICS BY ROY EGLOFF
Henrik has caught this unique moment
between a pair of European ground
squirrels. In this cute exchange, he shot
the moment they were both interested in a
flower and side-on to the camera for a great
composition. He also got down low and shot
with a wide aperture of f/5 to make it easier to
blur the background so the attention was firmly
on his subjects.
CHAKRABARTI
Anirban took this wonderful portrait
of his model Bonie in a photography
studio and worked with a red theme
using props, clothing and backdrops. The
lighting is beautifully gentle and highlights
the model’s face nicely, using flash to freeze
her wistful gaze into the distance.
Roy’s top shot of the Breitling Jet Team
during their aerobatic display is
perfectly timed with the five jets all
spaced equally apart for an interesting
composition and have a complementary blue
sky as the backdrop which really helps the jets
and their vapour trails to pop.
Lens
Canon EF 50mm f/1.8 STM
Lens
Canon EF 400mm f/2.8L IS USM
Exposure
1/160 sec, f/7.1, ISO100
Exposure
1/2000 sec, f/5, ISO640
22
Lens
Canon EF 100-400mm f/4.5-5.6L IS II USM
Exposure
1/1250 sec, f/5.6, ISO400
www.digitalcameraworld.com
03
All the images in this gallery were
entrants to the PhotoPlus ‘The
Perfect Moment’ competition
hosted on Photocrowd – a website
where a public vote on the
best-liked images is pitted against
expert opinion. To enter our
current contest, and vote on your
favourite photos, simply visit
www.photocrowd.com
The Canon Magazine
04
23
INSPIRATIONS
05
24
www.digitalcameraworld.com
FANTASTIC CANON PHOTOGRAPHY
06
All the images in this gallery
were entrants to the
PhotoPlus ‘The Perfect
Moment’ competition hosted
on Photocrowd – a website
where a public vote on the
best-liked images is pitted
against expert opinion.
To enter our current contest,
and vote on your favourite
photos, simply visit
www.photocrowd.com
07
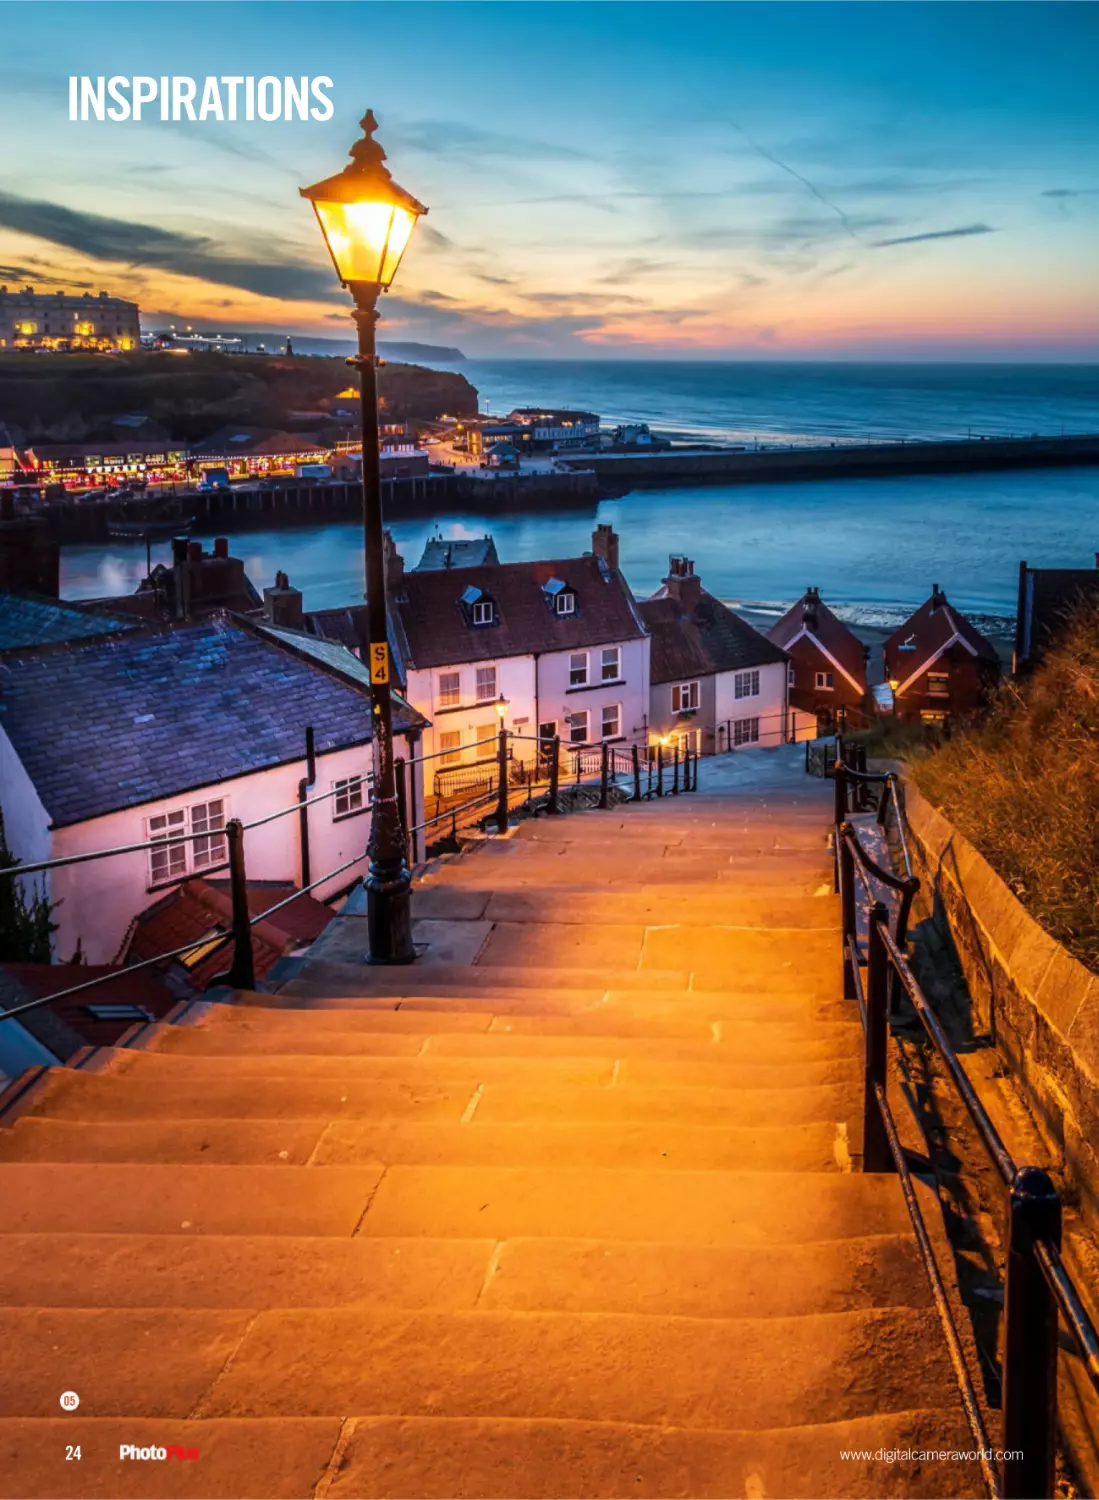
05 199 STEPS BY CHRIS SMITH
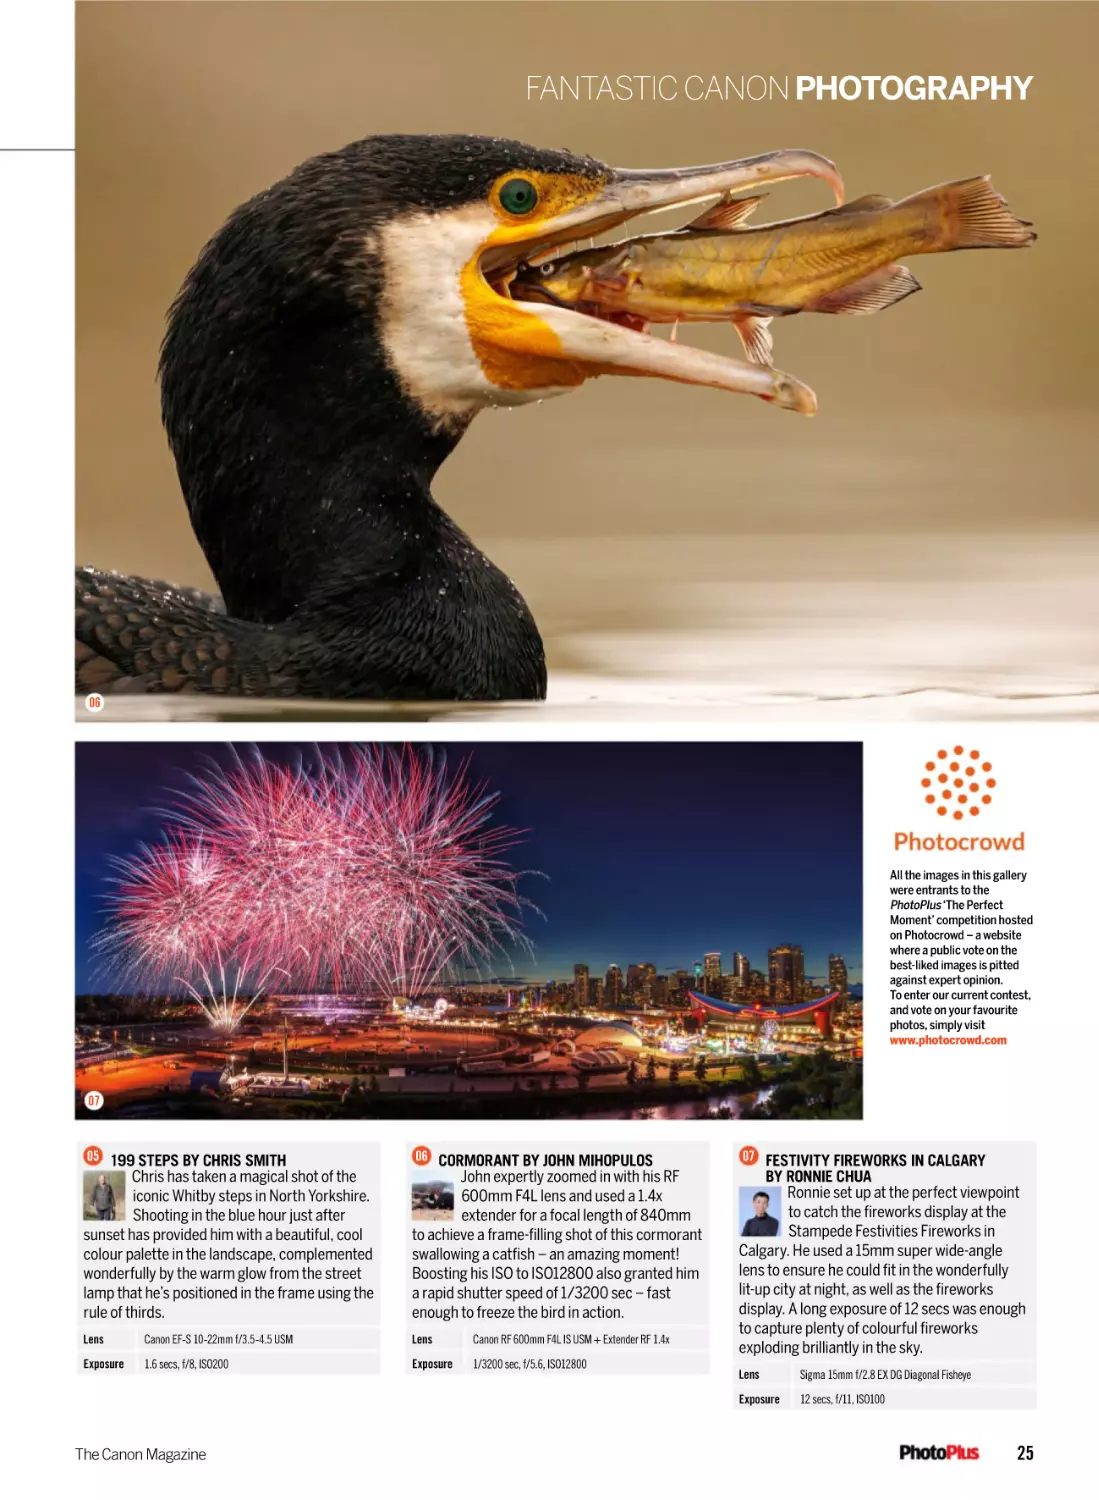
06 CORMORANT BY JOHN MIHOPULOS
07 FESTIVITY FIREWORKS IN CALGARY
Chris has taken a magical shot of the
iconic Whitby steps in North Yorkshire.
Shooting in the blue hour just after
sunset has provided him with a beautiful, cool
colour palette in the landscape, complemented
wonderfully by the warm glow from the street
lamp that he’s positioned in the frame using the
rule of thirds.
John expertly zoomed in with his RF
600mm F4L lens and used a 1.4x
extender for a focal length of 840mm
to achieve a frame-filling shot of this cormorant
swallowing a catfish – an amazing moment!
Boosting his ISO to ISO12800 also granted him
a rapid shutter speed of 1/3200 sec – fast
enough to freeze the bird in action.
Lens
Canon EF-S 10-22mm f/3.5-4.5 USM
Lens
Canon RF 600mm F4L IS USM + Extender RF 1.4x
BY RONNIE CHUA
Ronnie set up at the perfect viewpoint
to catch the fireworks display at the
Stampede Festivities Fireworks in
Calgary. He used a 15mm super wide-angle
lens to ensure he could fit in the wonderfully
lit-up city at night, as well as the fireworks
display. A long exposure of 12 secs was enough
to capture plenty of colourful fireworks
exploding brilliantly in the sky.
Exposure
1.6 secs, f/8, ISO200
Exposure
1/3200 sec, f/5.6, ISO12800
The Canon Magazine
Lens
Sigma 15mm f/2.8 EX DG Diagonal Fisheye
Exposure
12 secs, f/11, ISO100
25
INSPIRATIONS
08
All the images in this gallery
were entrants to the
PhotoPlus ‘The Perfect
Moment’ competition hosted
on Photocrowd – a website
where a public vote on the
best-liked images is pitted
against expert opinion.
To enter our current contest,
and vote on your favourite
photos, simply visit
www.photocrowd.com
09
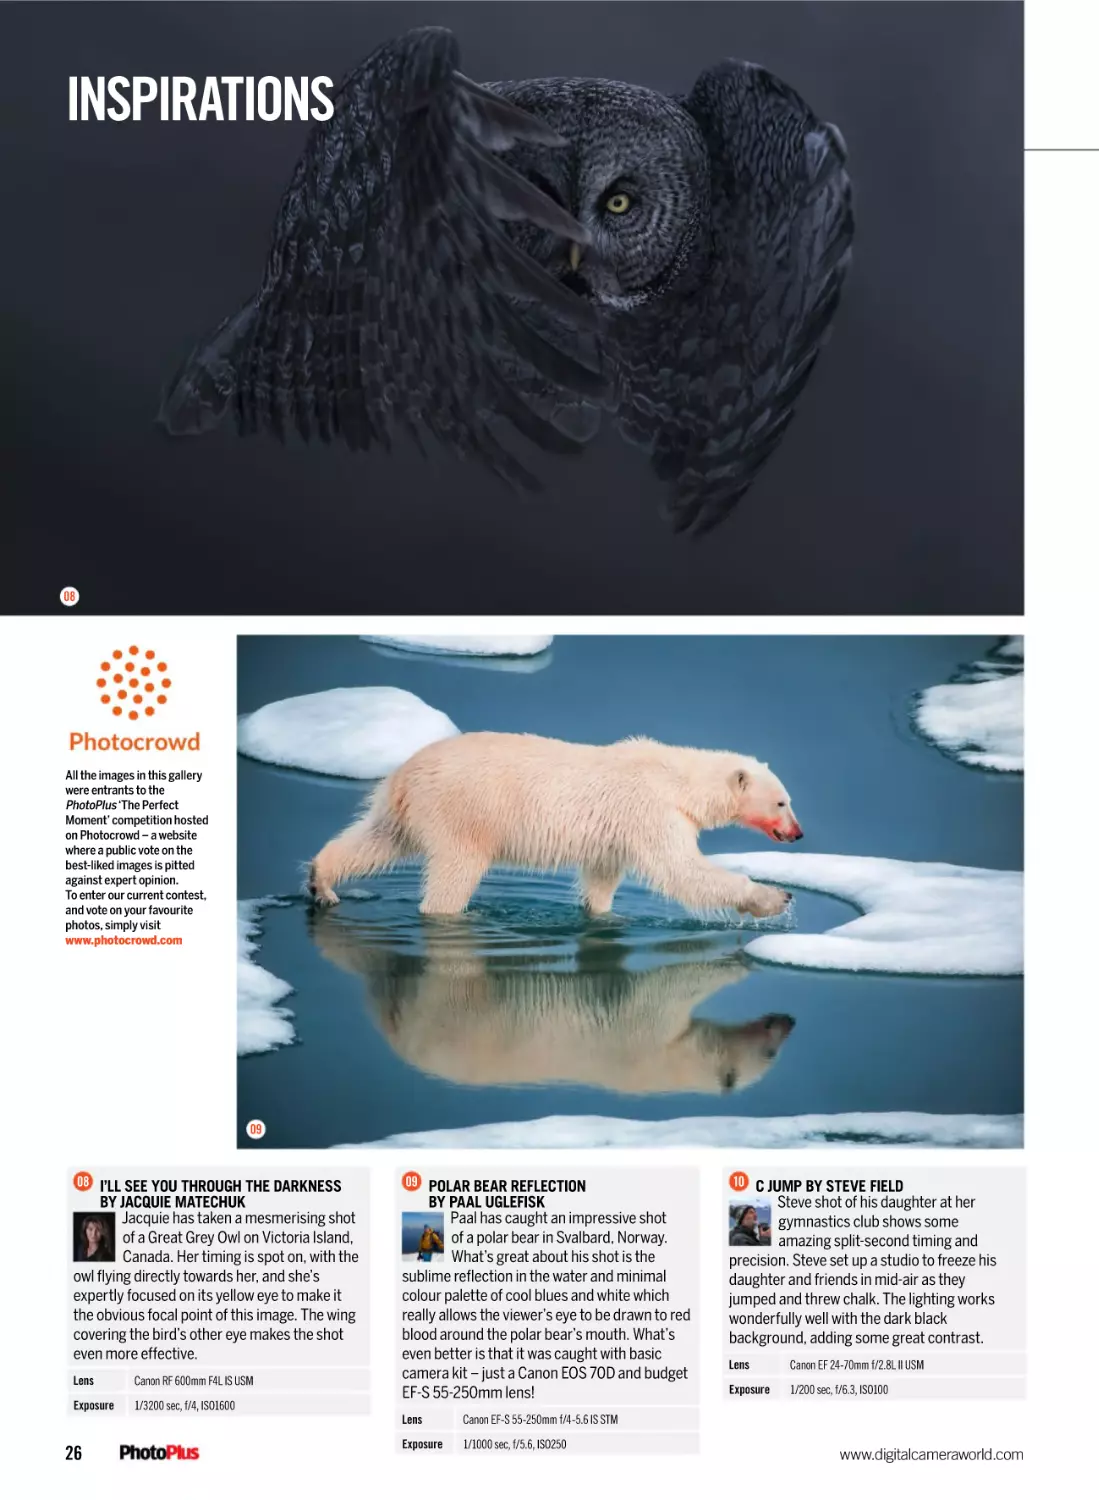
08 I’LL SEE YOU THROUGH THE DARKNESS
09 POLAR BEAR REFLECTION
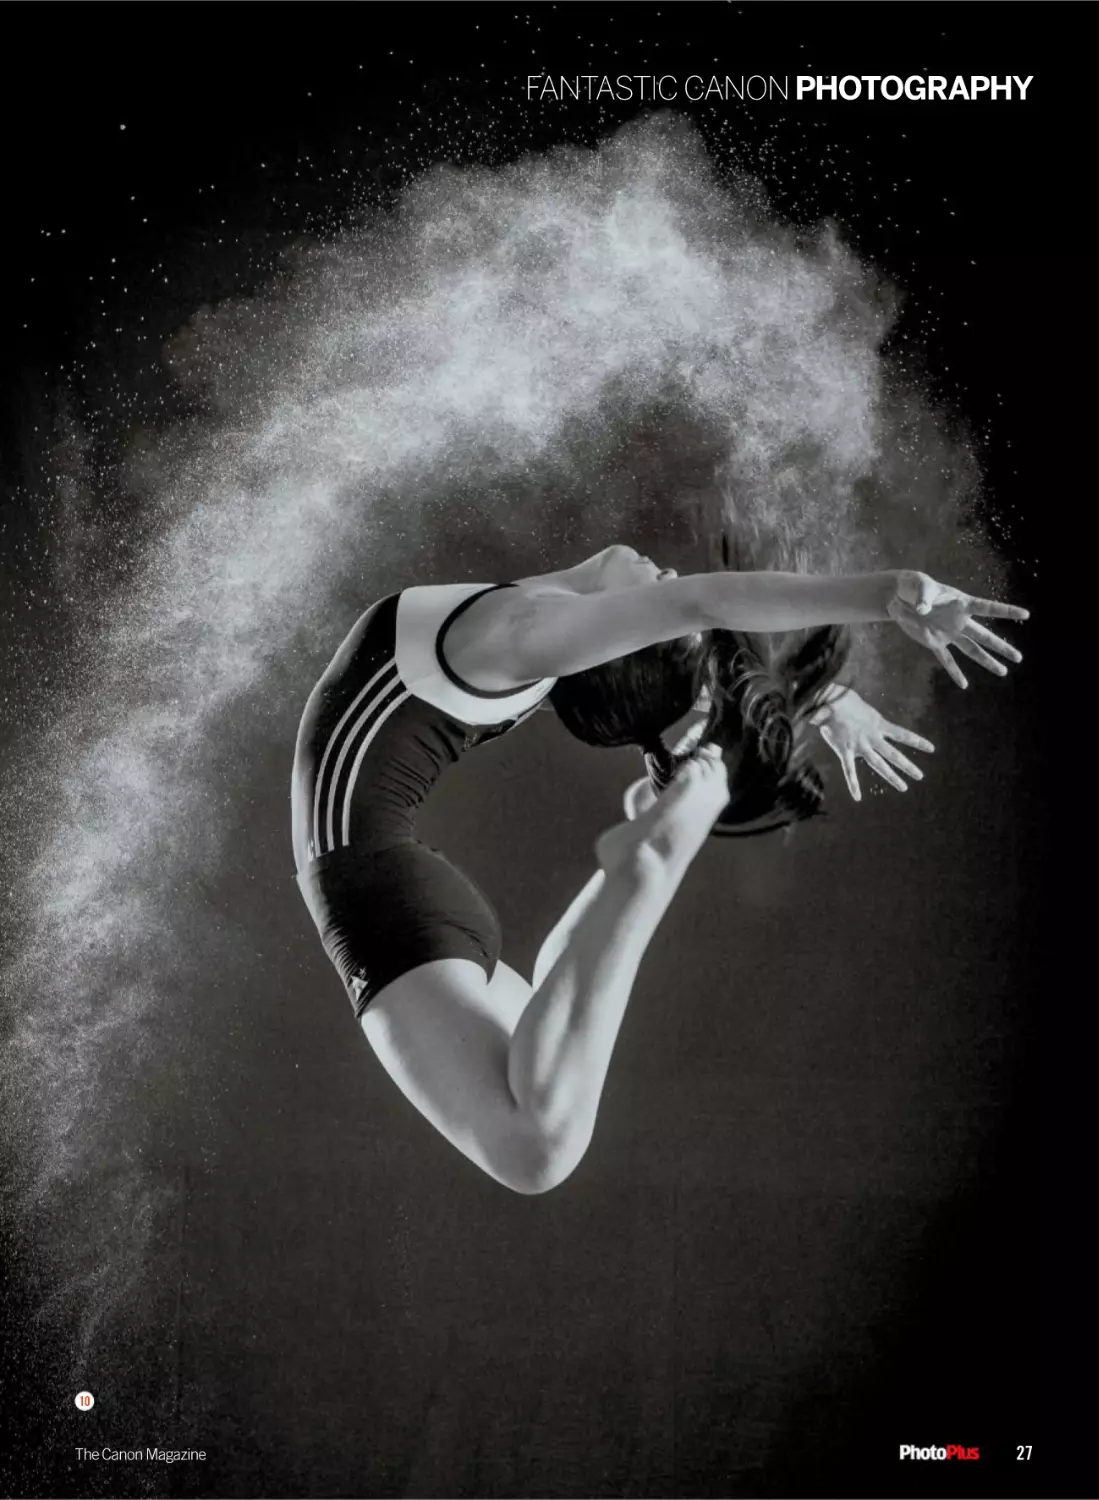
10 C JUMP BY STEVE FIELD
BY JACQUIE MATECHUK
Jacquie has taken a mesmerising shot
of a Great Grey Owl on Victoria Island,
Canada. Her timing is spot on, with the
owl flying directly towards her, and she’s
expertly focused on its yellow eye to make it
the obvious focal point of this image. The wing
covering the bird’s other eye makes the shot
even more effective.
BY PAAL UGLEFISK
Paal has caught an impressive shot
of a polar bear in Svalbard, Norway.
What’s great about his shot is the
sublime reflection in the water and minimal
colour palette of cool blues and white which
really allows the viewer’s eye to be drawn to red
blood around the polar bear’s mouth. What’s
even better is that it was caught with basic
camera kit – just a Canon EOS 70D and budget
EF-S 55-250mm lens!
Steve shot of his daughter at her
gymnastics club shows some
amazing split-second timing and
precision. Steve set up a studio to freeze his
daughter and friends in mid-air as they
jumped and threw chalk. The lighting works
wonderfully well with the dark black
background, adding some great contrast.
Lens
Canon RF 600mm F4L IS USM
Exposure
1/3200 sec, f/4, ISO1600
26
Lens
Canon EF-S 55-250mm f/4-5.6 IS STM
Exposure
1/1000 sec, f/5.6, ISO250
Lens
Canon EF 24-70mm f/2.8L II USM
Exposure
1/200 sec, f/6.3, ISO100
www.digitalcameraworld.com
FANTASTIC CANON PHOTOGRAPHY
10
The Canon Magazine
27
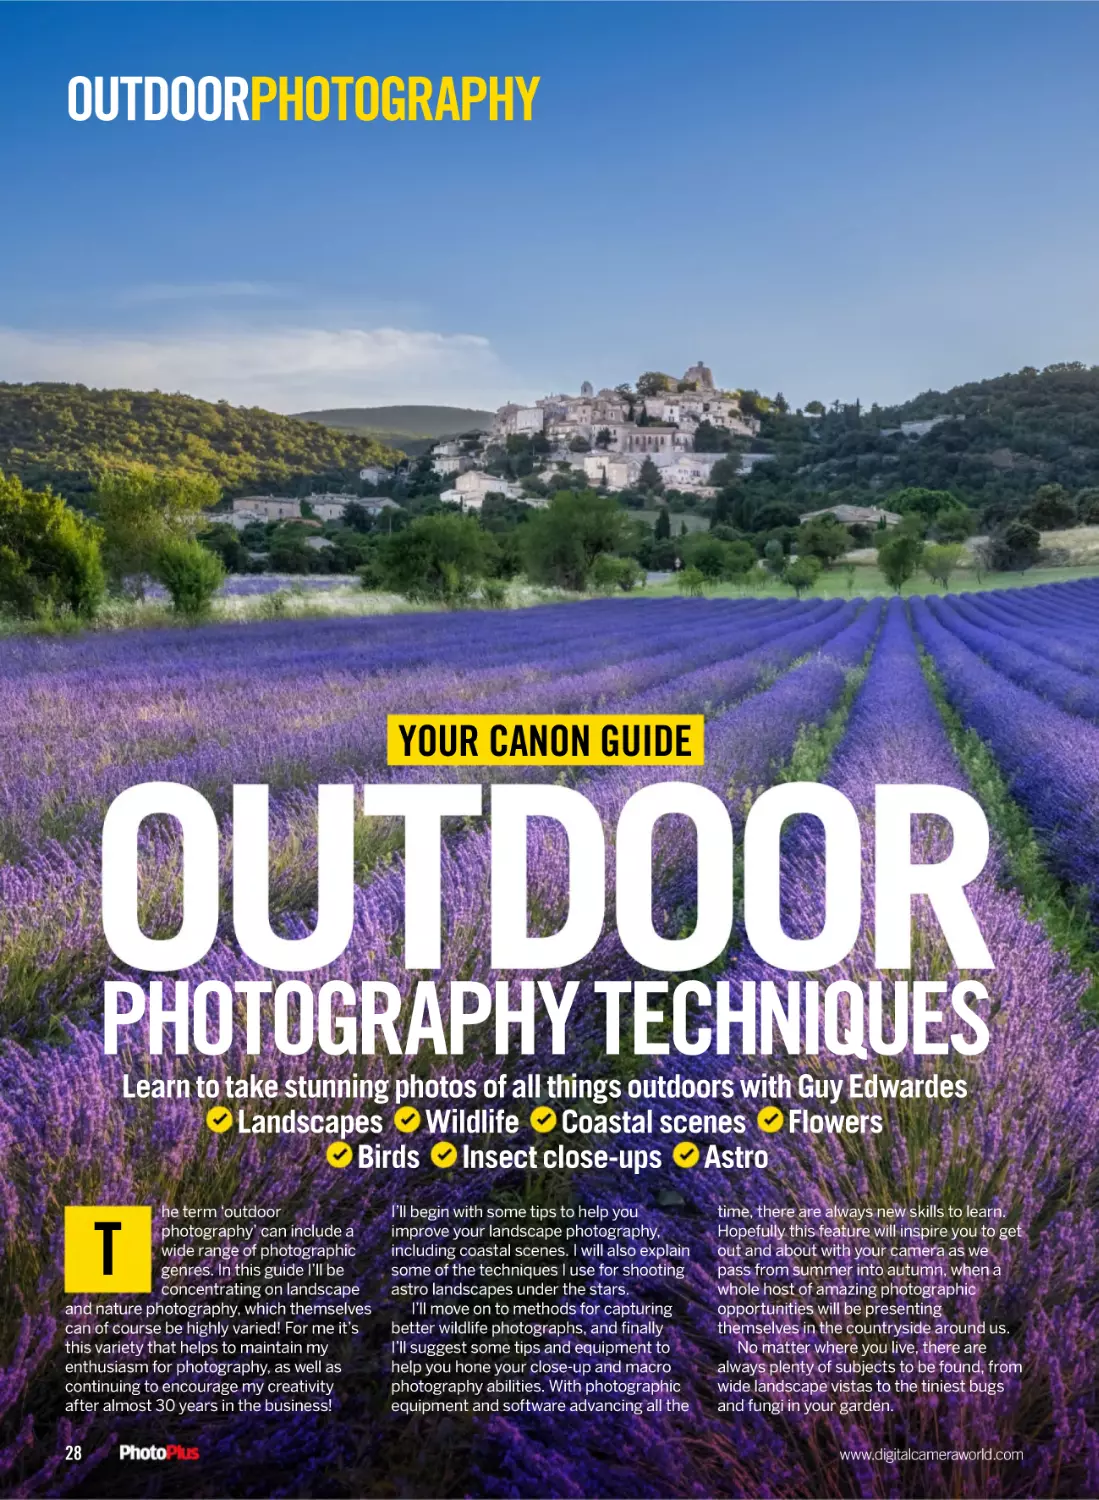
OUTDOORPHOTOGRAPHY
YOUR CANON GUIDE
PHOTOGRAPHY TECHNIQUES
Learn to take stunning photos of all things outdoors with Guy Edwardes
Landscapes Wildlife Coastal scenes Flowers
Birds Insect close-ups Astro
he term ‘outdoor
photography’ can include a
wide range of photographic
genres. In this guide I’ll be
concentrating on landscape
and nature photography, which themselves
can of course be highly varied! For me it’s
this variety that helps to maintain my
enthusiasm for photography, as well as
continuing to encourage my creativity
after almost 30 years in the business!
T
28
I’ll begin with some tips to help you
improve your landscape photography,
including coastal scenes. I will also explain
some of the techniques I use for shooting
astro landscapes under the stars.
I’ll move on to methods for capturing
better wildlife photographs, and finally
I’ll suggest some tips and equipment to
help you hone your close-up and macro
photography abilities. With photographic
equipment and software advancing all the
time, there are always new skills to learn.
Hopefully this feature will inspire you to get
out and about with your camera as we
pass from summer into autumn, when a
whole host of amazing photographic
opportunities will be presenting
themselves in the countryside around us.
No matter where you live, there are
always plenty of subjects to be found, from
wide landscape vistas to the tiniest bugs
and fungi in your garden.
www.digitalcameraworld.com
CANON GUIDE
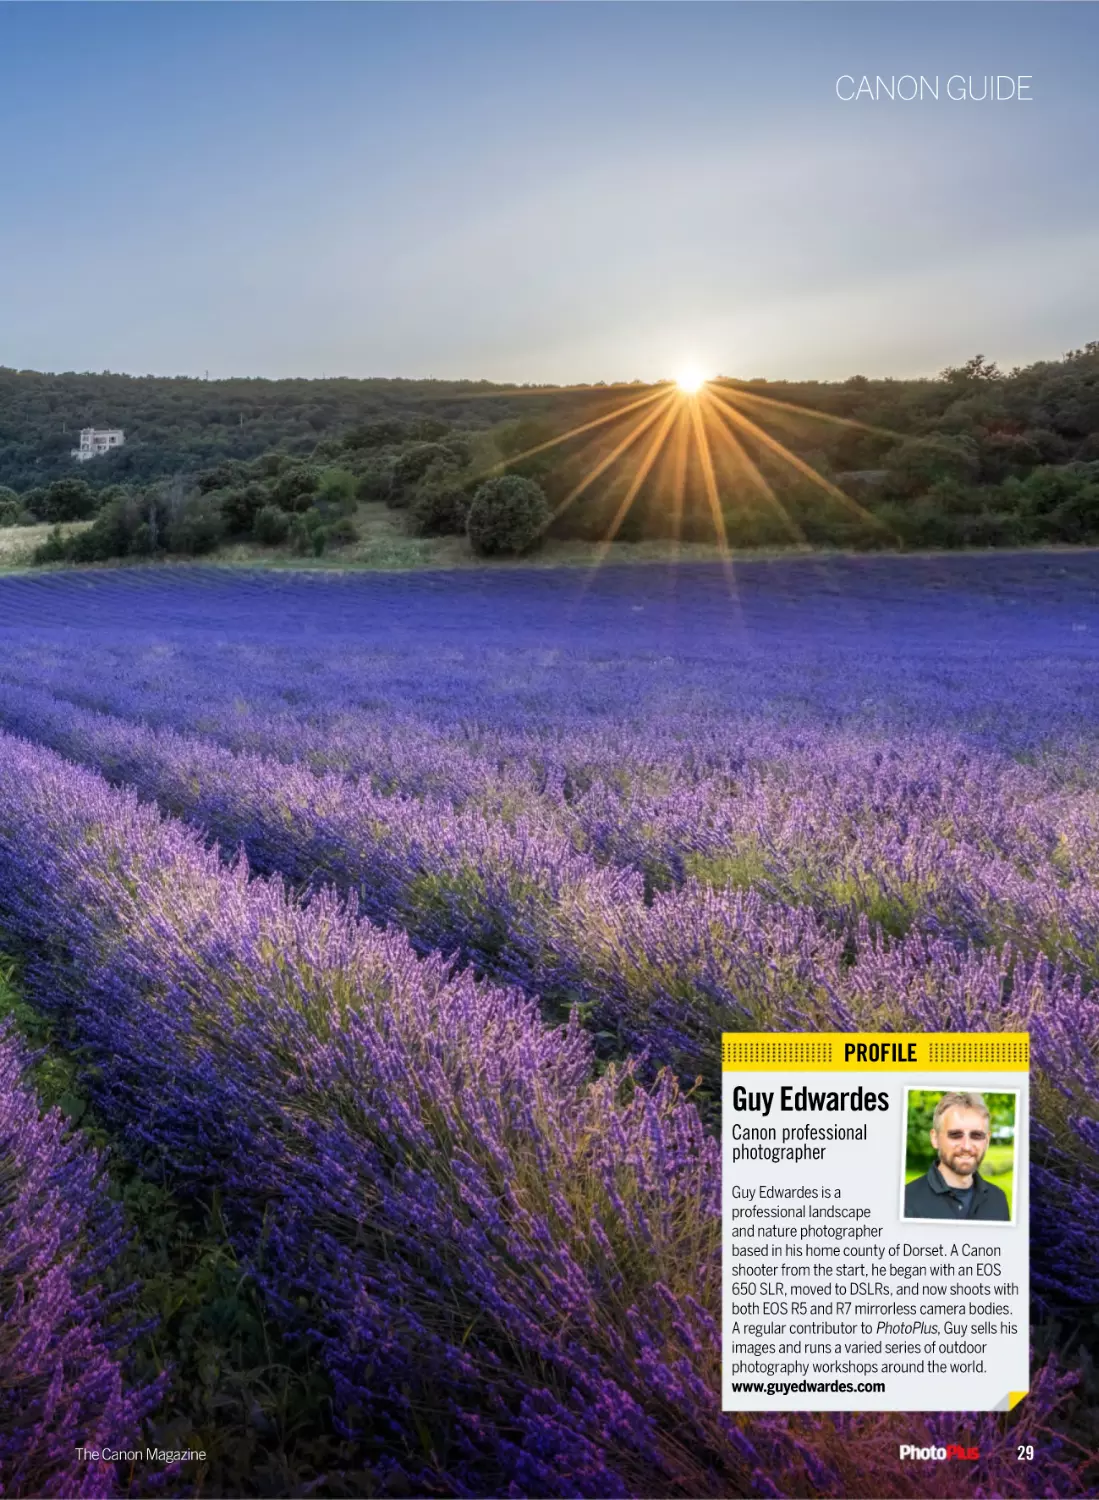
PROFILE
Guy Edwardes
Canon professional
photographer
Guy Edwardes is a
professional landscape
and nature photographer
based in his home county of Dorset. A Canon
shooter from the start, he began with an EOS
650 SLR, moved to DSLRs, and now shoots with
both EOS R5 and R7 mirrorless camera bodies.
A regular contributor to PhotoPlus, Guy sells his
images and runs a varied series of outdoor
photography workshops around the world.
www.guyedwardes.com
The Canon Magazine
29
OUTDOORPHOTOGRAPHY
01
LANDSCAPES
Experienced outdoor photographer Guy Edwardes
gets you set up for taking better landscape photos
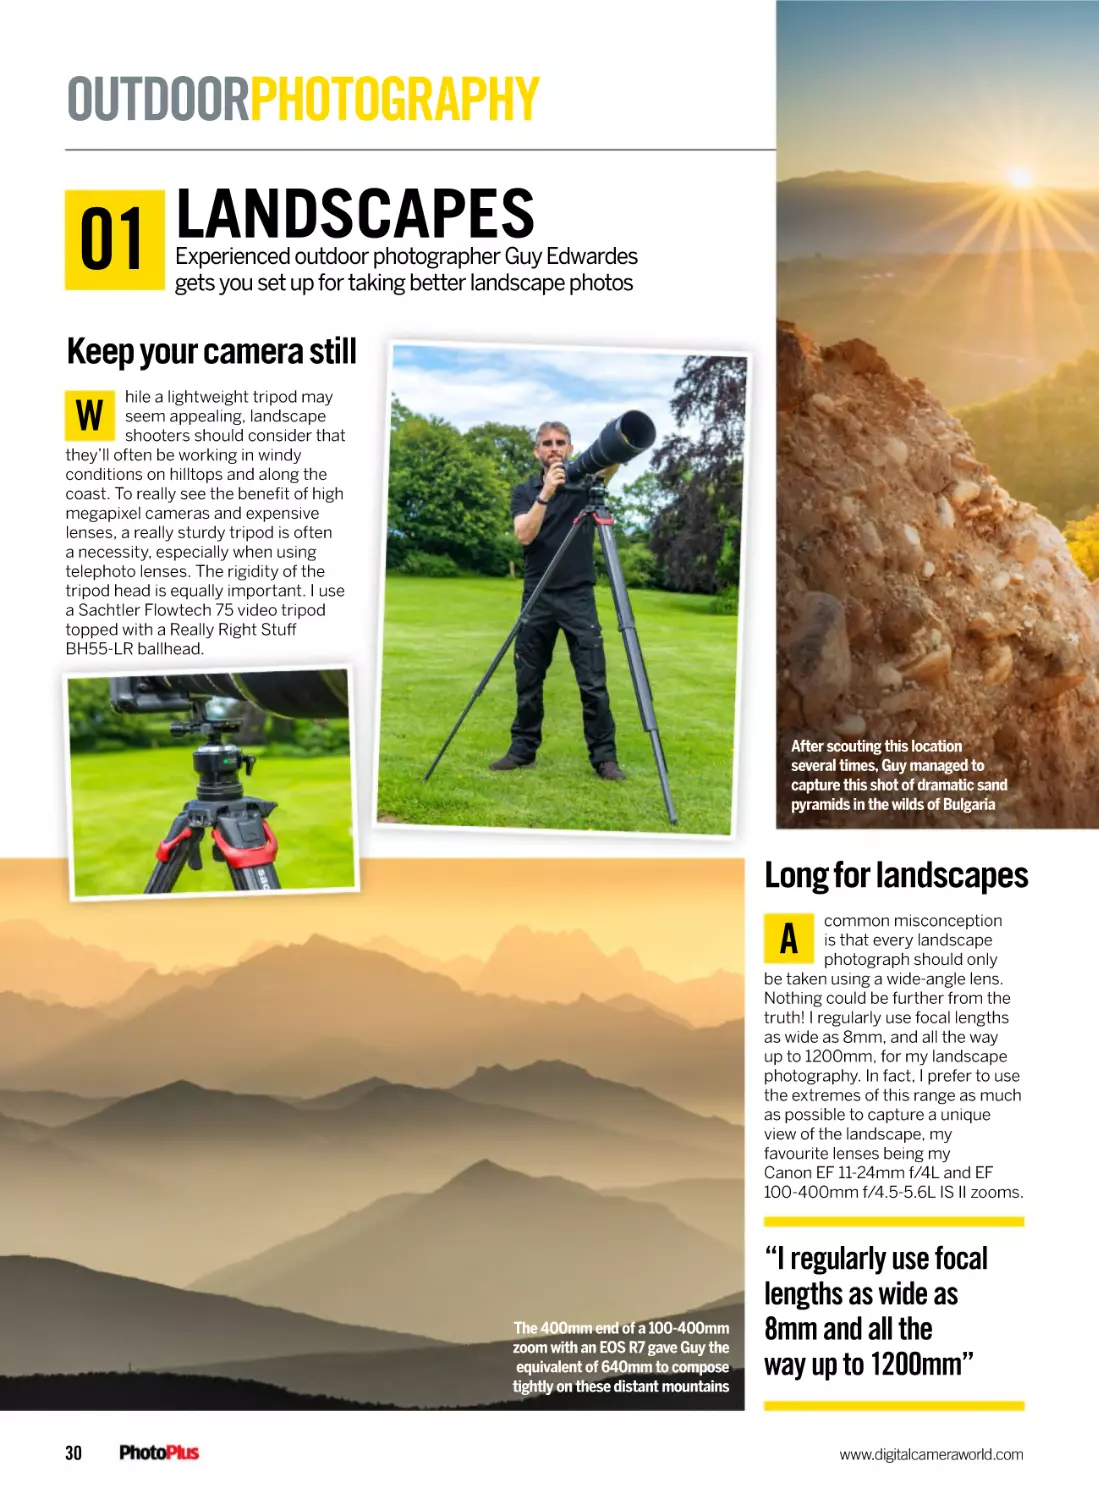
Keep your camera still
hile a lightweight tripod may
seem appealing, landscape
shooters should consider that
they’ll often be working in windy
conditions on hilltops and along the
coast. To really see the benefit of high
megapixel cameras and expensive
lenses, a really sturdy tripod is often
a necessity, especially when using
telephoto lenses. The rigidity of the
tripod head is equally important. I use
a Sachtler Flowtech 75 video tripod
topped with a Really Right Stuff
BH55-LR ballhead.
W
After scouting this location
several times, Guy managed to
capture this shot of dramatic sand
pyramids in the wilds of Bulgaria
Long for landscapes
common misconception
is that every landscape
photograph should only
be taken using a wide-angle lens.
Nothing could be further from the
truth! I regularly use focal lengths
as wide as 8mm, and all the way
up to 1200mm, for my landscape
photography. In fact, I prefer to use
the extremes of this range as much
as possible to capture a unique
view of the landscape, my
favourite lenses being my
Canon EF 11-24mm f/4L and EF
100-400mm f/4.5-5.6L IS II zooms.
A
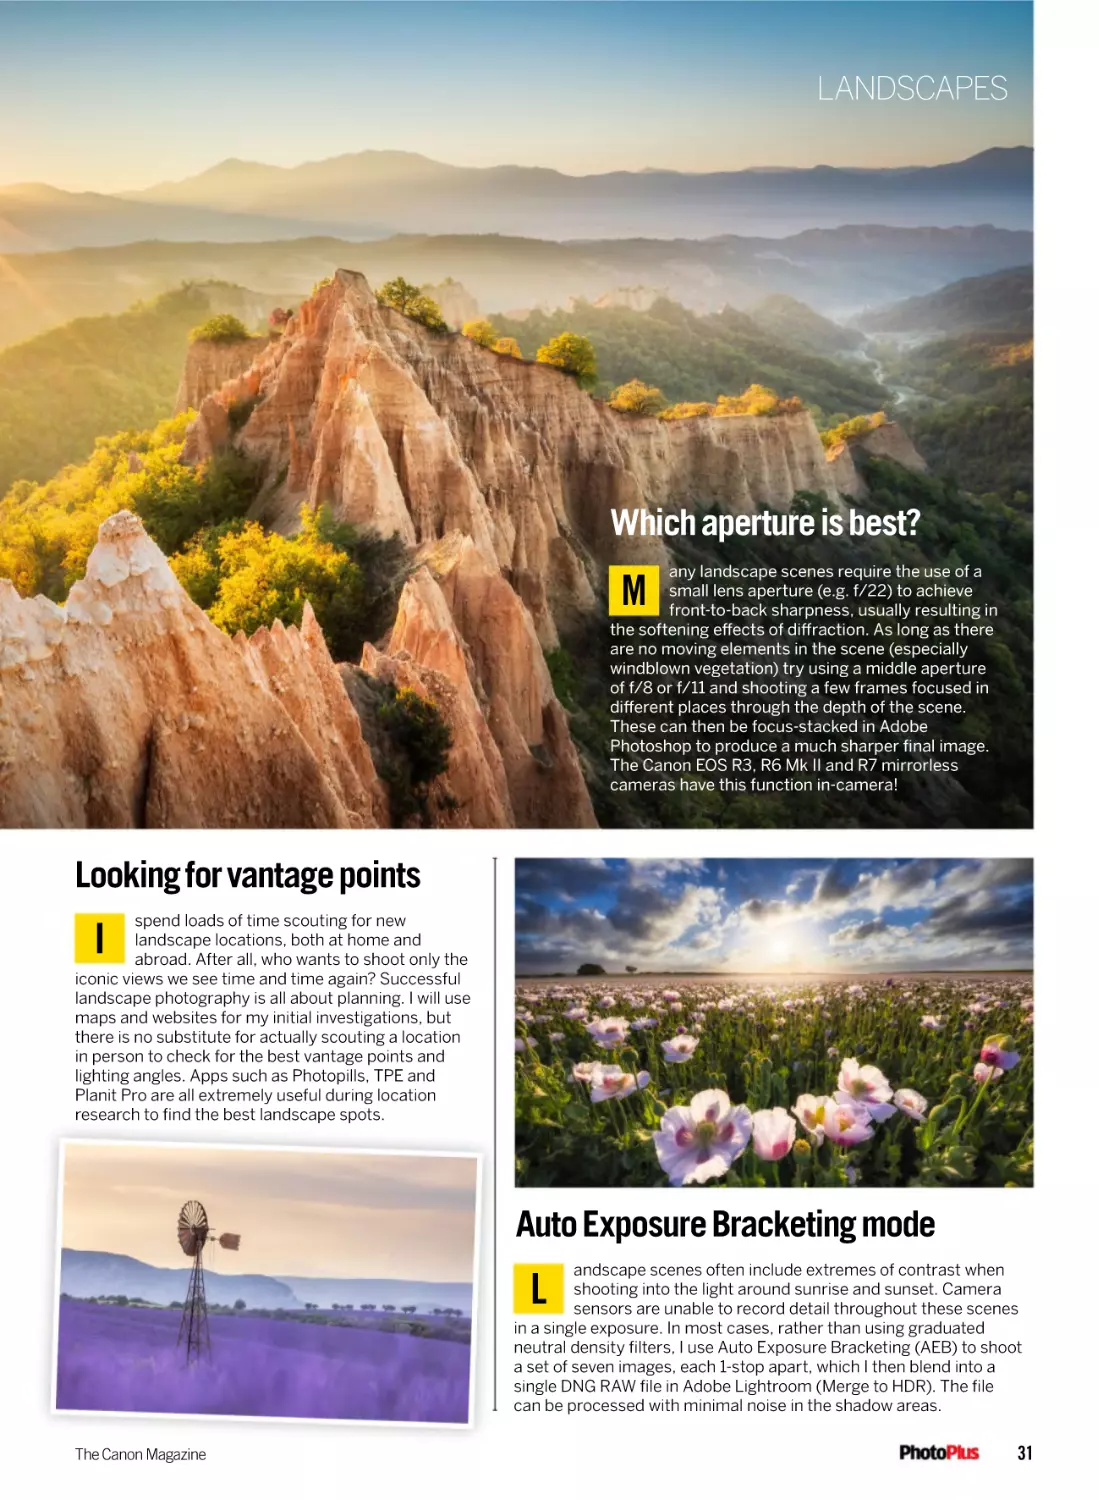
The 400mm end of a 100-400mm
zoom with an EOS R7 gave Guy the
equivalent of 640mm to compose
tightly on these distant mountains
30
“I regularly use focal
lengths as wide as
8mm and all the
way up to 1200mm”
www.digitalcameraworld.com
LANDSCAPES
Which aperture is best?
any landscape scenes require the use of a
small lens aperture (e.g. f/22) to achieve
front-to-back sharpness, usually resulting in
the softening effects of diffraction. As long as there
are no moving elements in the scene (especially
windblown vegetation) try using a middle aperture
of f/8 or f/11 and shooting a few frames focused in
different places through the depth of the scene.
These can then be focus-stacked in Adobe
Photoshop to produce a much sharper final image.
The Canon EOS R3, R6 Mk II and R7 mirrorless
cameras have this function in-camera!
M
Looking for vantage points
spend loads of time scouting for new
landscape locations, both at home and
abroad. After all, who wants to shoot only the
iconic views we see time and time again? Successful
landscape photography is all about planning. I will use
maps and websites for my initial investigations, but
there is no substitute for actually scouting a location
in person to check for the best vantage points and
lighting angles. Apps such as Photopills, TPE and
Planit Pro are all extremely useful during location
research to find the best landscape spots.
I
Auto Exposure Bracketing mode
andscape scenes often include extremes of contrast when
shooting into the light around sunrise and sunset. Camera
sensors are unable to record detail throughout these scenes
in a single exposure. In most cases, rather than using graduated
neutral density filters, I use Auto Exposure Bracketing (AEB) to shoot
a set of seven images, each 1-stop apart, which I then blend into a
single DNG RAW file in Adobe Lightroom (Merge to HDR). The file
can be processed with minimal noise in the shadow areas.
L
The Canon Magazine
31
OUTDOORPHOTOGRAPHY
02
SEASCAPES
Head to your closest picturesque coast
and put Guy’s essential skills to the test
By the seaside
hen working on sandy beaches it’s
best to visit during a falling tide so
the sand is pristine and free from
footprints. I spend time scouting the
beach for interesting foreground elements.
I take care not to put my own footprints in
W
the sand by jumping from rock to rock or
by walking along the water’s edge where
my footprints will be washed away. Where
possible, I will search the beach for the
best shooting position using a small drone
to fly ahead and check for me instead!
A 10-stop ND filter extended
Guy’s exposure time to 4 mins to
really blur the waters and help
the rock formations stand out on
the Pacific coast of Costa Rica
Variable ND filters
here is a strong argument
for using graduated neutral
density (ND) filters to control
contrast when there’s a bright sky
and darker land in your composition.
However, when conditions allow,
I prefer to use a variable ND filter.
This allows me to bracket my
exposures by simply adjusting the
density of the filter. I can therefore
maintain the same exposure time
for each bracketed shot, making it
easier to blend the sequence of
images in Adobe Lightroom or
Photoshop as the water movement
in each frame is similar.
T
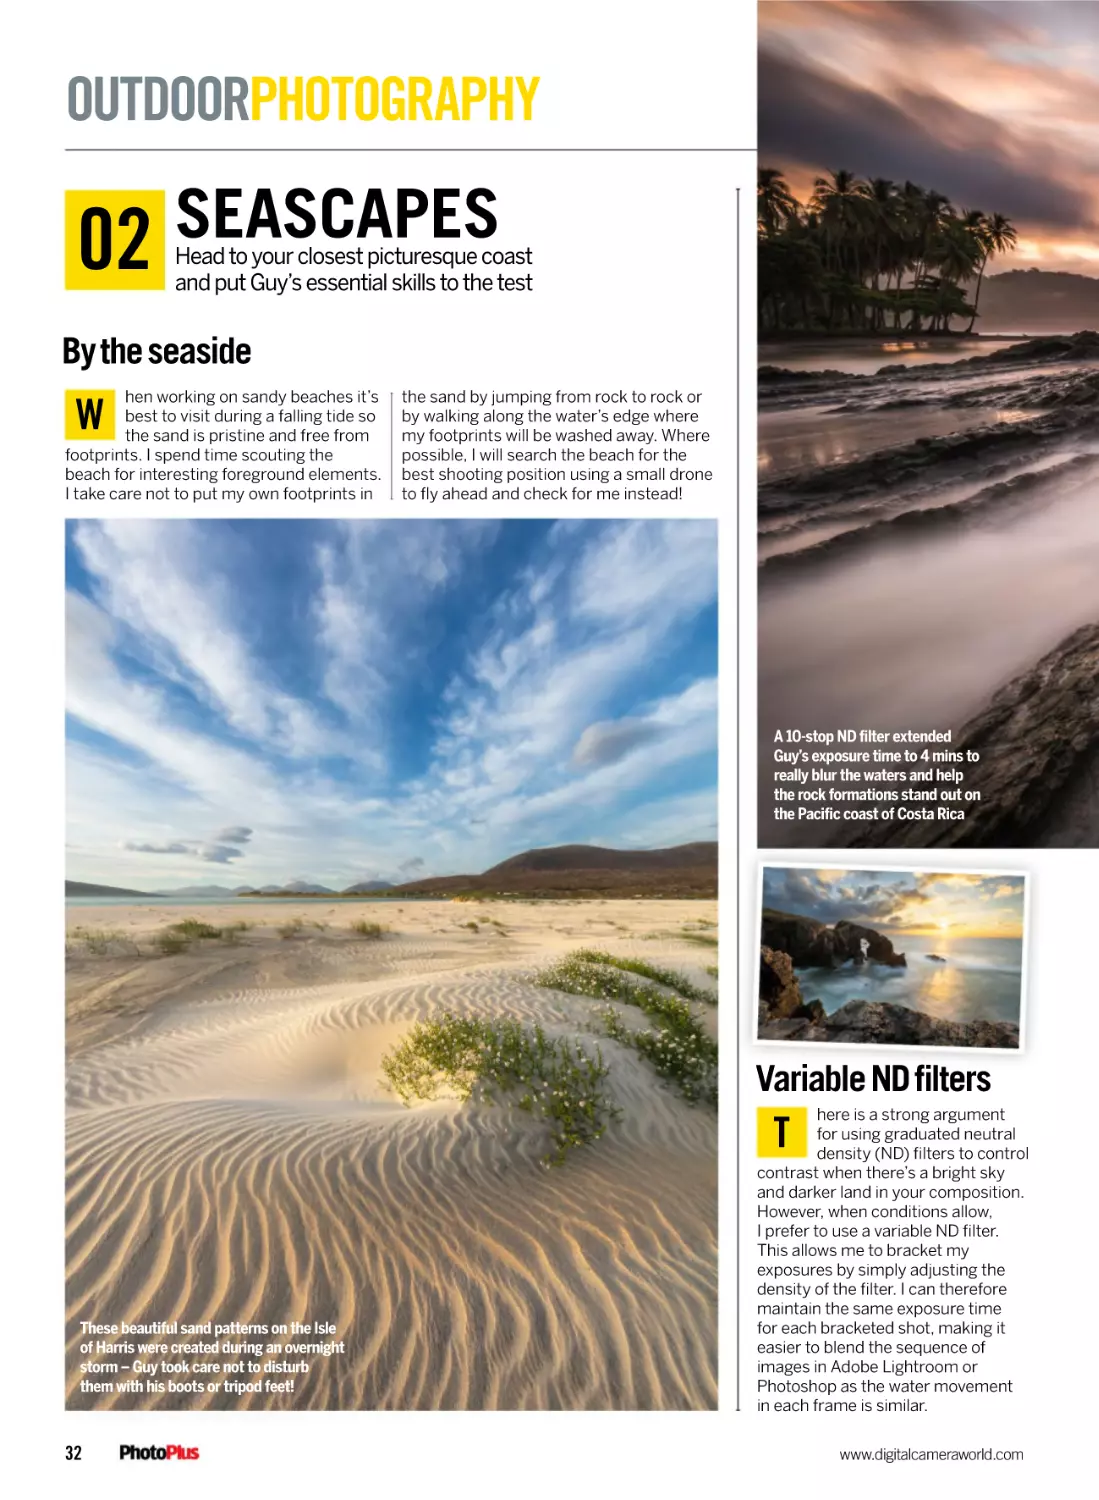
These beautiful sand patterns on the Isle
of Harris were created during an overnight
storm – Guy took care not to disturb
them with his boots or tripod feet!
32
www.digitalcameraworld.com
SEASCAPES
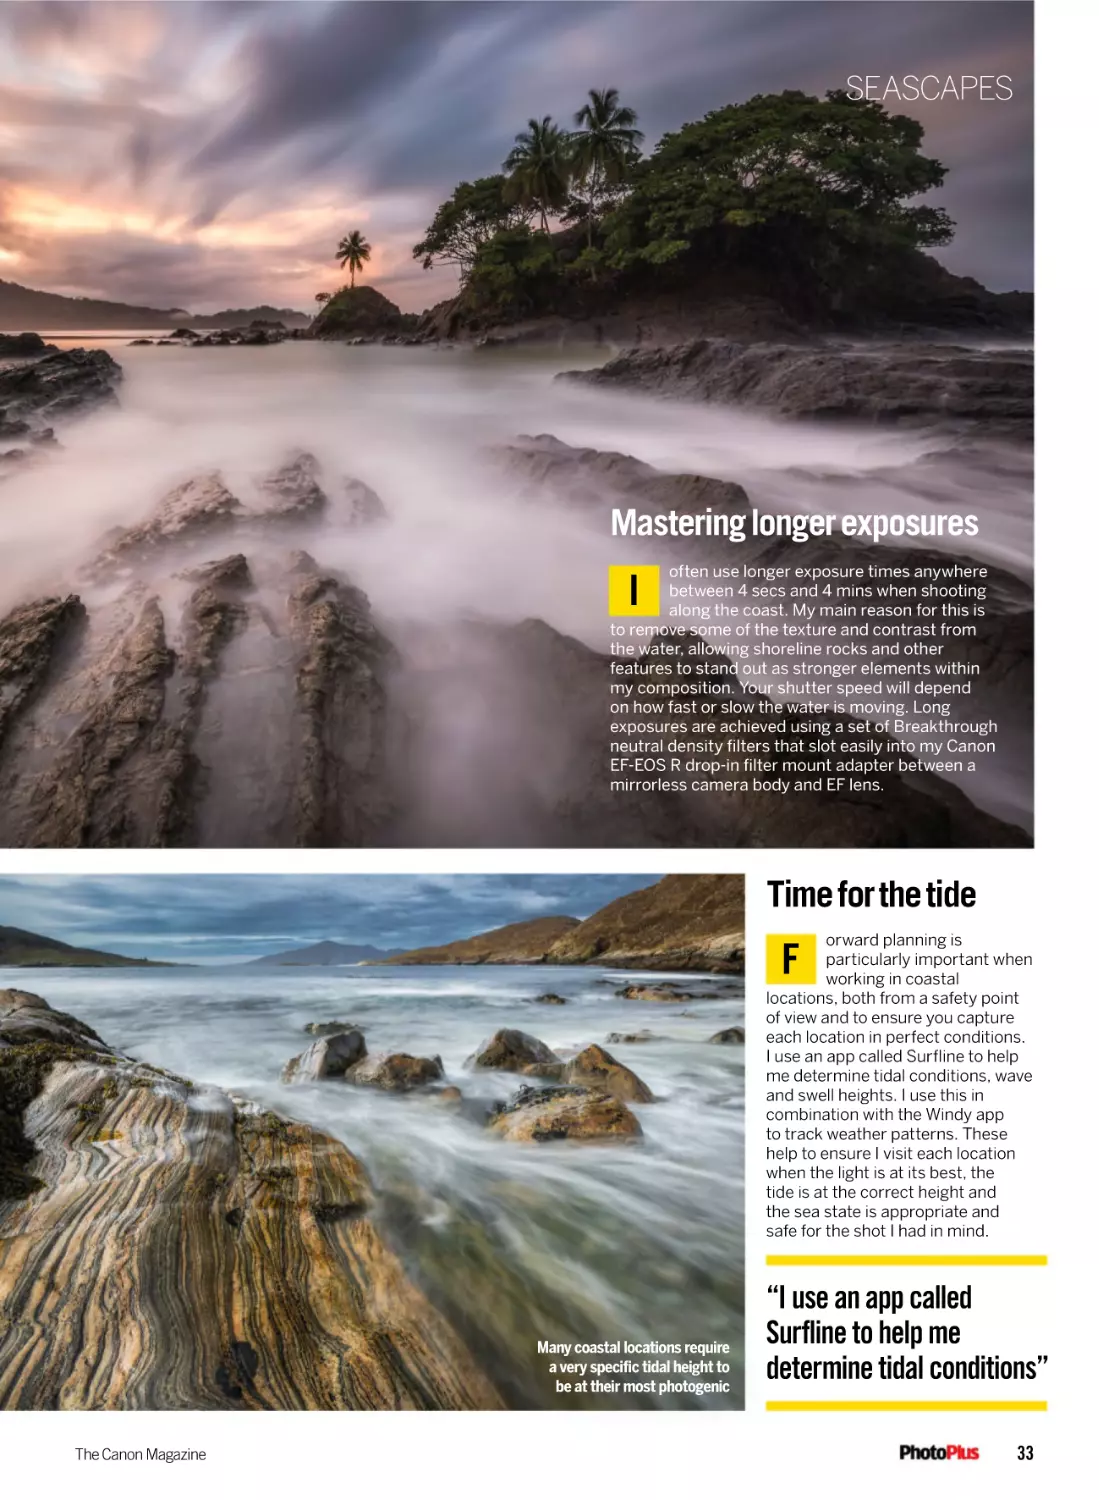
Mastering longer exposures
often use longer exposure times anywhere
between 4 secs and 4 mins when shooting
along the coast. My main reason for this is
to remove some of the texture and contrast from
the water, allowing shoreline rocks and other
features to stand out as stronger elements within
my composition. Your shutter speed will depend
on how fast or slow the water is moving. Long
exposures are achieved using a set of Breakthrough
neutral density filters that slot easily into my Canon
EF-EOS R drop-in filter mount adapter between a
mirrorless camera body and EF lens.
I
Time for the tide
orward planning is
particularly important when
working in coastal
locations, both from a safety point
of view and to ensure you capture
each location in perfect conditions.
I use an app called Surfline to help
me determine tidal conditions, wave
and swell heights. I use this in
combination with the Windy app
to track weather patterns. These
help to ensure I visit each location
when the light is at its best, the
tide is at the correct height and
the sea state is appropriate and
safe for the shot I had in mind.
F
Many coastal locations require
a very specific tidal height to
be at their most photogenic
The Canon Magazine
“I use an app called
Surfline to help me
determine tidal conditions”
33
OUTDOORPHOTOGRAPHY
03
ASTRO LANDSCAPES
After dark can offer some out-of-this-world opportunities
for atmospheric scenic shots with star-filled skies
Turn down the noise at night
hooting night sky images at high
ISO settings around ISO6400 will
inevitably result in quite noisy
images, even when using the latest EOS
bodies. Thankfully software for reducing
digital noise has been greatly improved in
the past few years. My preferred noise
S
reduction software for night sky images is
DxO Pure RAW3, but the Enhance function
in Adobe Lightroom and Photoshop also
does a good job. My standard set-up for
night-time landscapes is a Canon EOS R5
and EF 16-35mm f/2.8L III USM wide-angle
lens, using the EF-EOS R mount adapter.
Star tracking!
or the very best results try
using a Sky Tracker, such
as the iOptron Sky Tracker
Pro. This permits the use of much
lower ISO settings and smaller
apertures through longer
exposure times. It’s a good option
if you don’t own a very fast
wide-angle lens. The downside is
the need to take one exposure for
the foreground with the tracker
turned off and another for the
night sky with the tracker on, and
to combine these in Photoshop.
F
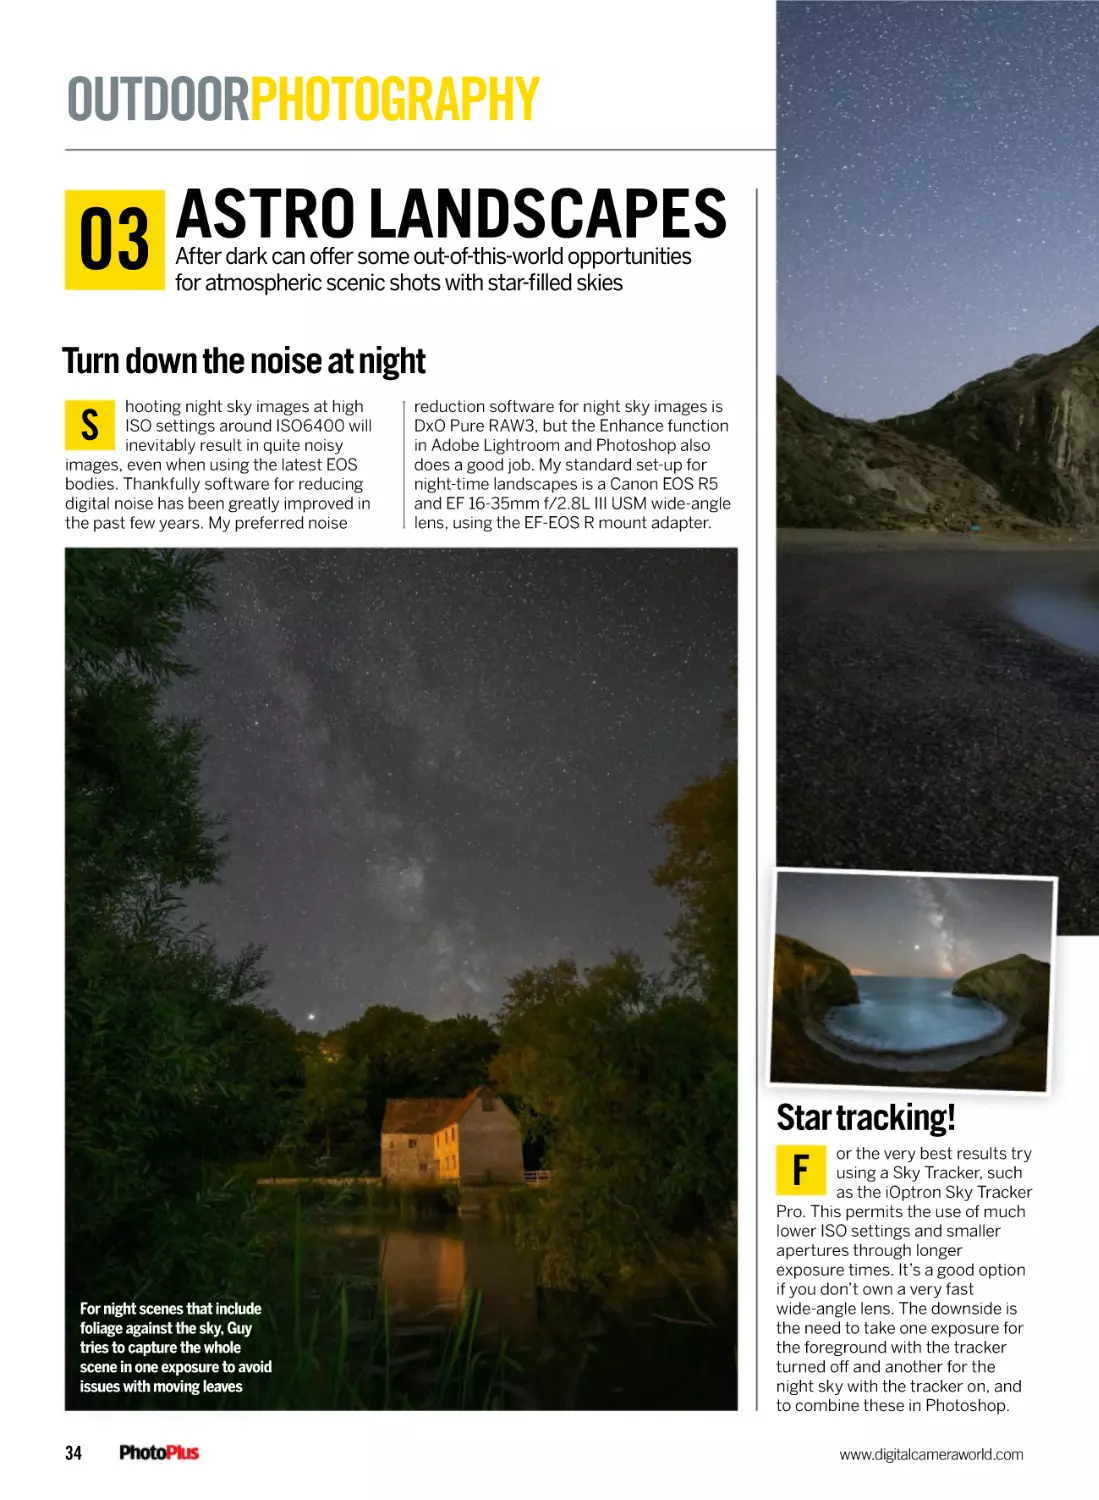
For night scenes that include
foliage against the sky, Guy
tries to capture the whole
scene in one exposure to avoid
issues with moving leaves
34
www.digitalcameraworld.com
ASTRO-LANDSCAPES
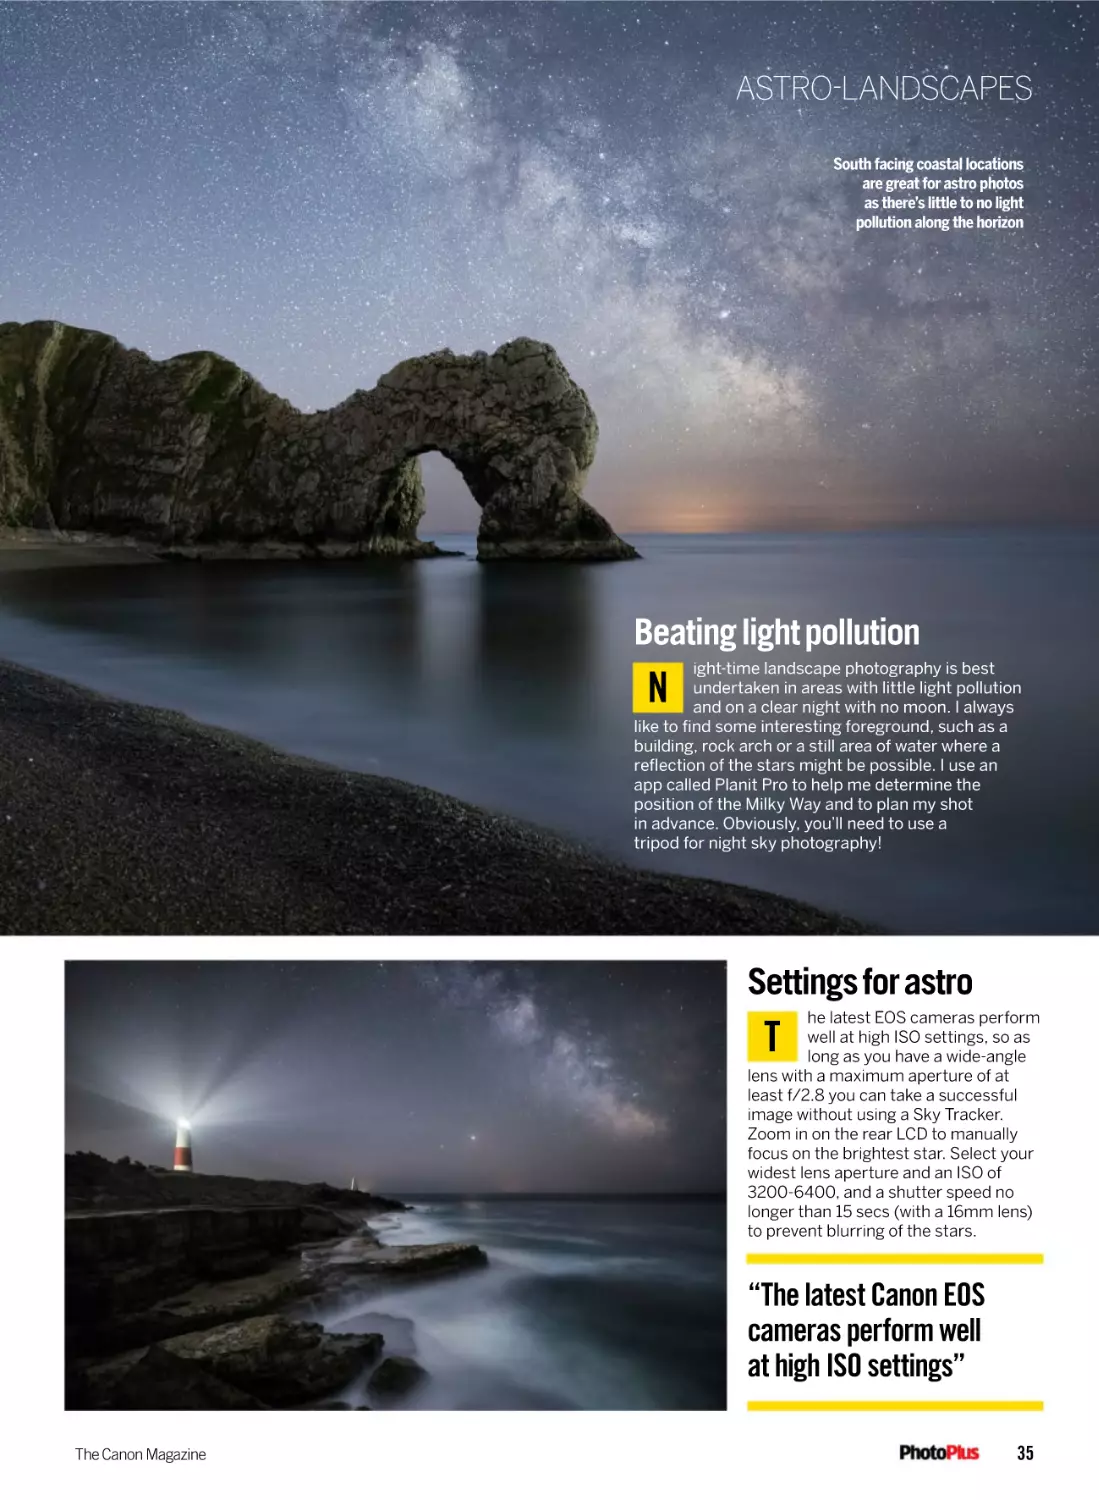
South facing coastal locations
are great for astro photos
as there’s little to no light
pollution along the horizon
Beating light pollution
ight-time landscape photography is best
undertaken in areas with little light pollution
and on a clear night with no moon. I always
like to find some interesting foreground, such as a
building, rock arch or a still area of water where a
reflection of the stars might be possible. I use an
app called Planit Pro to help me determine the
position of the Milky Way and to plan my shot
in advance. Obviously, you’ll need to use a
tripod for night sky photography!
N
Settings for astro
he latest EOS cameras perform
well at high ISO settings, so as
long as you have a wide-angle
lens with a maximum aperture of at
least f/2.8 you can take a successful
image without using a Sky Tracker.
Zoom in on the rear LCD to manually
focus on the brightest star. Select your
widest lens aperture and an ISO of
3200-6400, and a shutter speed no
longer than 15 secs (with a 16mm lens)
to prevent blurring of the stars.
T
“The latest Canon EOS
cameras perform well
at high ISO settings”
The Canon Magazine
35
OUTDOORPHOTOGRAPHY
04
WILDLIFE
Photographing wild animals and birds is very
rewarding, if you have the key skills dialled in
Hide and seek
hide will often allow you to get much closer to your
subject, without the risk of causing disturbance.
During periods of hot dry weather, providing a
source of water can attract a variety of species within range
of even a modest telephoto lens. Established hides are
preferable, but tent hides and chair hides like the Stealth
Gear One Man Chair Hide can all be very effective. I even
use a floating hide to allow a closer approach to water birds.
A
Canon AF modes
ne of the greatest recent
technological advances
when it comes to wildlife
photography is Canon’s autofocus
with Subject Tracking and Eye
Detection. My EOS R7 and R5 will
both recognise the eye of my
wildlife subjects and track it using
all available focusing points. This
has greatly increased my success
rate when photographing any
type of action, especially birds
in flight. Generally, I find the
autofocus offered by the latest
mirrorless cameras is much more
reliable than the previous
generation of EOS DSLRs.
O
A telephoto lens with a wide
aperture, and shooting low at
eye-level, will help subjects to
stand out from backgrounds
Be a specialist
et yourself a project to
focus on photographing
a single species over an
extended period. This will allow you
to research and get to know your
subject in greater detail. You’ll learn
about its behaviour and the best
way to approach it. You’ll also
capture a wider variety of images in
different lighting and weather. It will
also encourage you to be more
creative with lens choice, which
will benefit your photographic
development in the longer term.
S
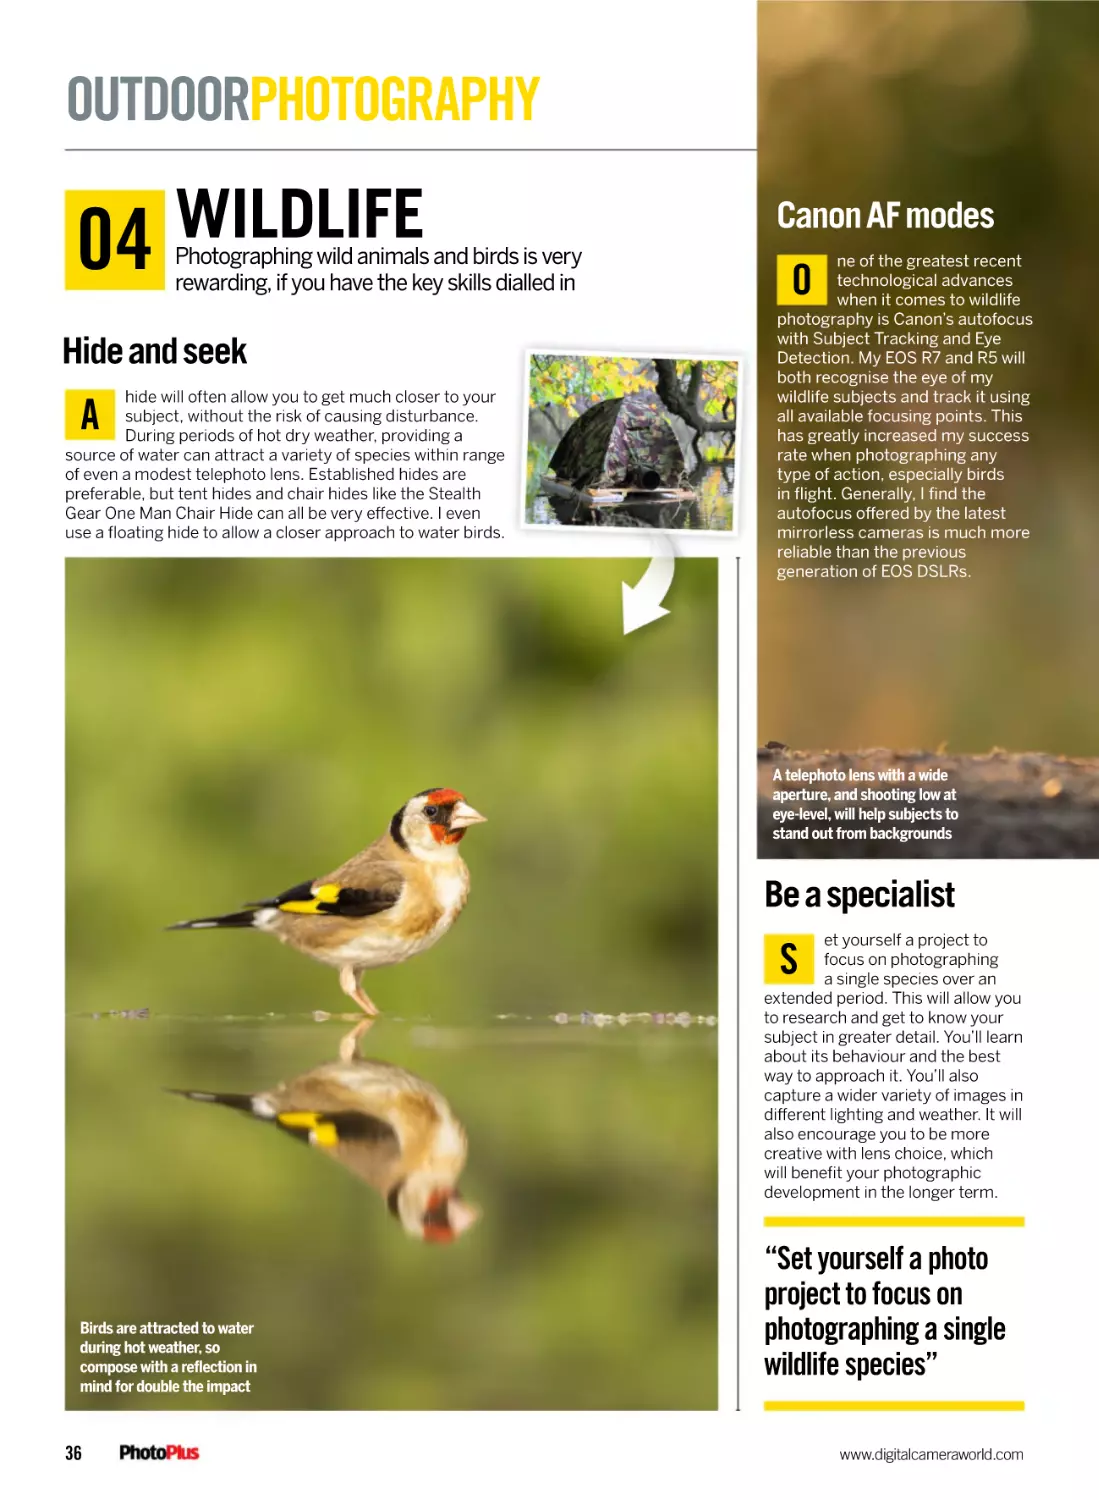
Birds are attracted to water
during hot weather, so
compose with a reflection in
mind for double the impact
36
“Set yourself a photo
project to focus on
photographing a single
wildlife species”
www.digitalcameraworld.com
WILDLIFE
Compose to include context
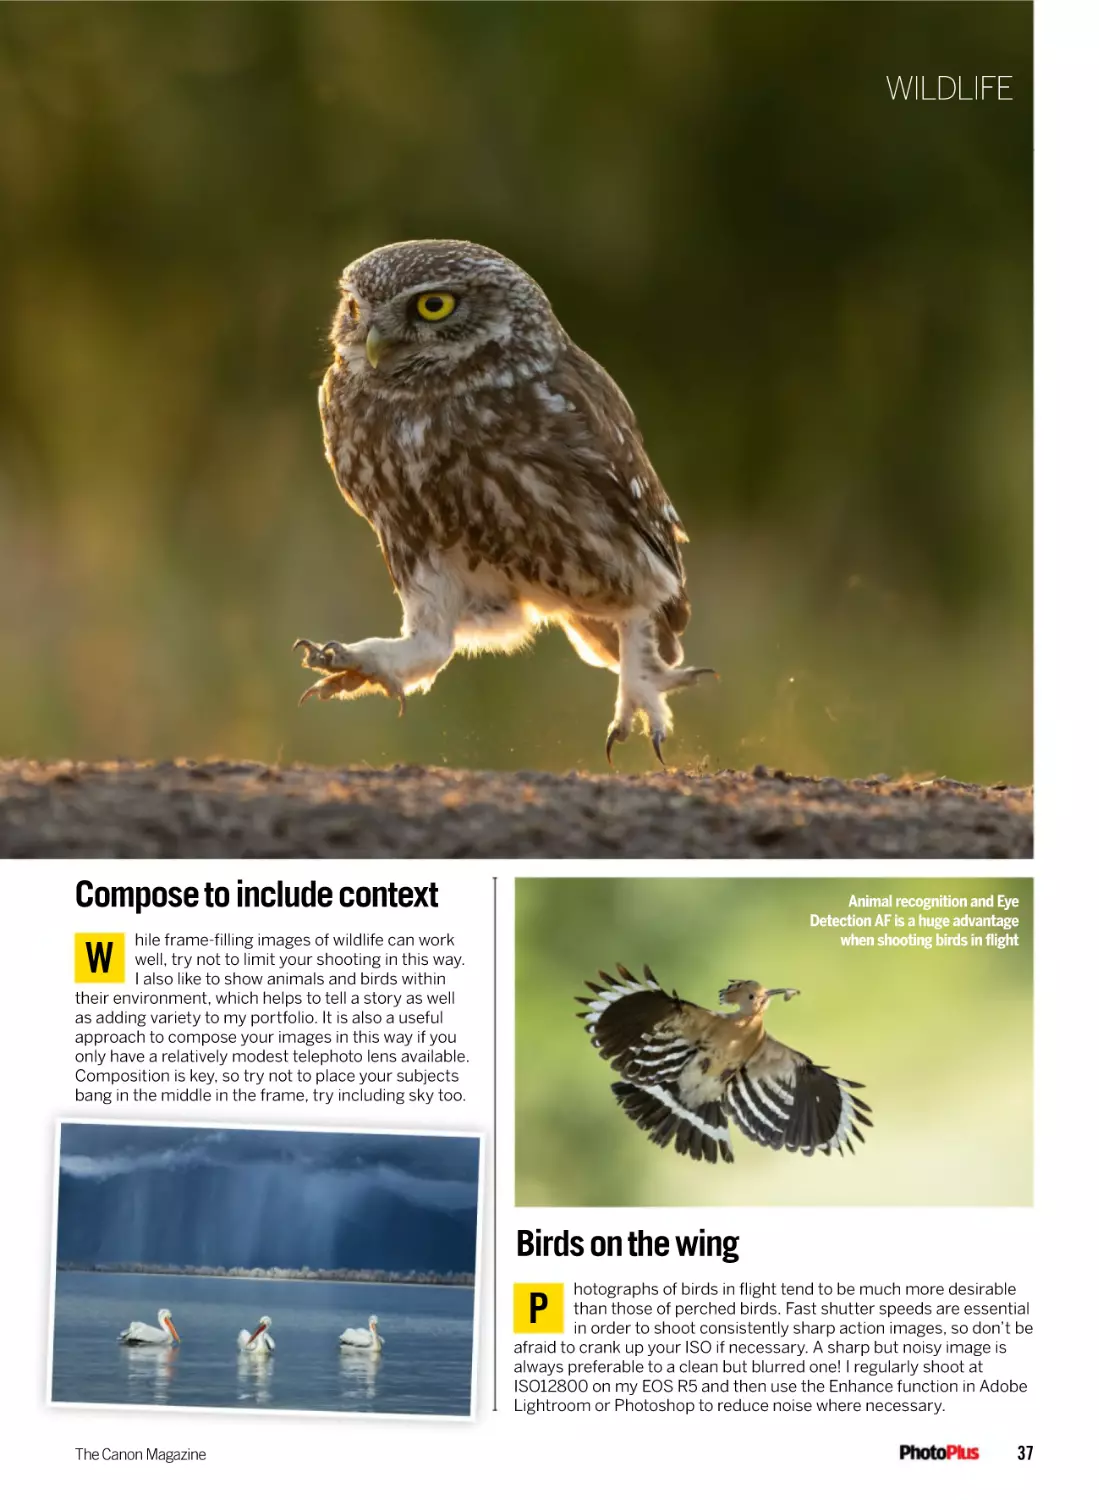
Animal recognition and Eye
Detection AF is a huge advantage
when shooting birds in flight
hile frame-filling images of wildlife can work
well, try not to limit your shooting in this way.
I also like to show animals and birds within
their environment, which helps to tell a story as well
as adding variety to my portfolio. It is also a useful
approach to compose your images in this way if you
only have a relatively modest telephoto lens available.
Composition is key, so try not to place your subjects
bang in the middle in the frame, try including sky too.
W
Birds on the wing
hotographs of birds in flight tend to be much more desirable
than those of perched birds. Fast shutter speeds are essential
in order to shoot consistently sharp action images, so don’t be
afraid to crank up your ISO if necessary. A sharp but noisy image is
always preferable to a clean but blurred one! I regularly shoot at
ISO12800 on my EOS R5 and then use the Enhance function in Adobe
Lightroom or Photoshop to reduce noise where necessary.
P
The Canon Magazine
37
OUTDOORPHOTOGRAPHY
05
MACRO
Guy teaches you the best ways to photograph
close-ups of smaller subjects in your gardens
Try a super-telephoto zoom
macro lens is normally the
go-to lens for close-ups of
flowers and insects. But a
telephoto lens can be used instead
to more easily isolate a subject
from cluttered surroundings due
to its shallow depth of field and
A
narrow field of view. I use my
Canon EF 100-400mm f/4.5-5.6L
IS II when photographing larger
insects such as butterflies and
dragonflies, as well as wildflowers.
The beauty of this lens is that it
focuses to just under one metre.
Depth of field
epth of field becomes extremely shallow
when shooting high magnification macro
shots. Focus stacking can be used to
overcome this if the subject is still enough. I
normally use a wide aperture to avoid diffraction
and maintain a diffused background. I use my EOS
R7’s Focus-bracketing and Depth-composite
function where possible. Sometimes the resulting
in-camera JPEG file works well, but with more
complex subjects I will stack the sequence of
RAWs using Helicon Focus Pro software instead.
D
Bokeh backgrounds
always consider the background of my image
to be almost as important as the subject
itself. Try to eliminate distracting highlights
or textures that might draw attention away from your
subject. Look for backgrounds that might produce a
pleasing bokeh effect. Small patches of sky between
foliage can work well for this, as well as highlights on
shiny leaves of distant trees such as holly. Shoot at a
wide aperture and these will turn into large soft
circles that can enhance your composition.
I
Shoot with a super-telephoto
to fine-tune depth of field
and isolate smaller subjects
like flowers and insects
38
www.digitalcameraworld.com
MACRO
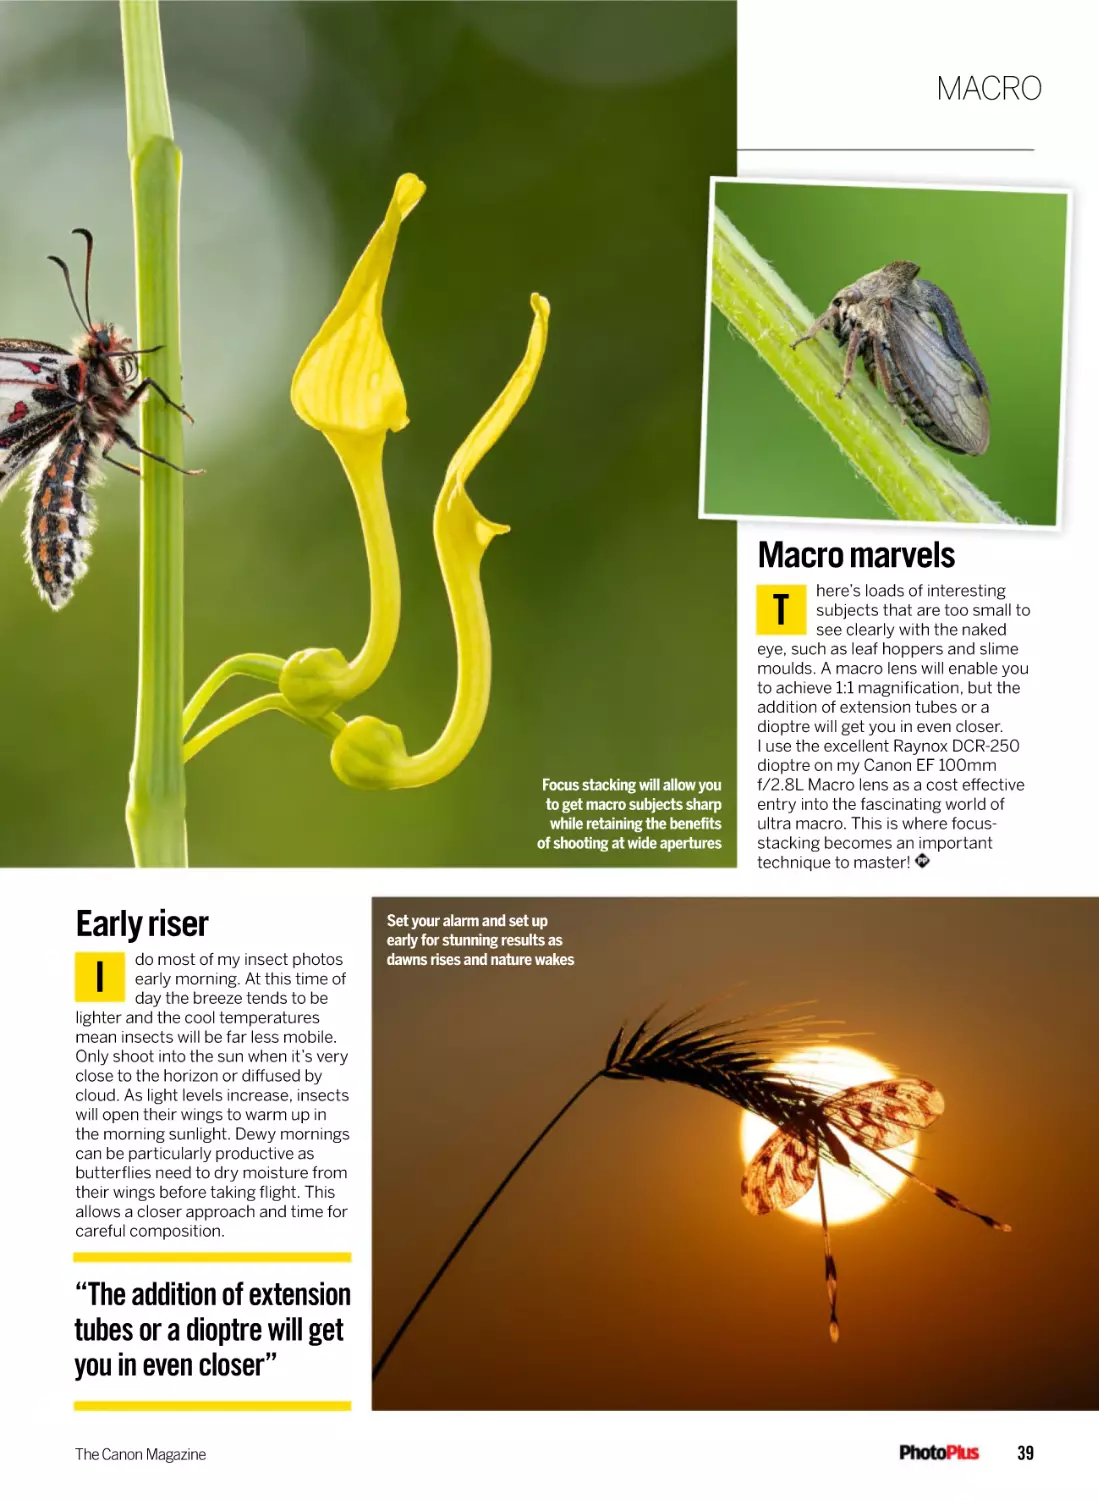
Macro marvels
here’s loads of interesting
subjects that are too small to
see clearly with the naked
eye, such as leaf hoppers and slime
moulds. A macro lens will enable you
to achieve 1:1 magnification, but the
addition of extension tubes or a
dioptre will get you in even closer.
I use the excellent Raynox DCR-250
dioptre on my Canon EF 100mm
f/2.8L Macro lens as a cost effective
entry into the fascinating world of
ultra macro. This is where focusstacking becomes an important
technique to master!
T
Focus stacking will allow you
to get macro subjects sharp
while retaining the benefits
of shooting at wide apertures
Early riser
do most of my insect photos
early morning. At this time of
day the breeze tends to be
lighter and the cool temperatures
mean insects will be far less mobile.
Only shoot into the sun when it’s very
close to the horizon or diffused by
cloud. As light levels increase, insects
will open their wings to warm up in
the morning sunlight. Dewy mornings
can be particularly productive as
butterflies need to dry moisture from
their wings before taking flight. This
allows a closer approach and time for
careful composition.
I
Set your alarm and set up
early for stunning results as
dawns rises and nature wakes
“The addition of extension
tubes or a dioptre will get
you in even closer”
The Canon Magazine
39
SUBSOFFER
FREE LOWEPRO
ADVENTURA GO
SH 160 CAMERA BAG
When you subscribe to PhotoPlus: The Canon Magazine
FREE
CAMERA BAG
WORTH
£52!
YOUR FREE LOWEPRO ADVENTURA GO SH 160 BAG
Ideal for
small Canon
EOS DSLR
or EOS R
cameras
with a lens
40
Or space for a
mid-sized Canon
EOS body,
a standard
zoom lens,
and flash
Durable fabric
and a built-in
belt loop and
shoulder strap
for comfy
carrying
www.digitalcameraworld.com
GREAT UK SUBS OFFER
Great reasons to subscribe today
FREE Lowepro Adventura GO SH 160 camera bag
SAVE Pay less than you would in the shops
NEVER MISS AN ISSUE Get PhotoPlus
delivered direct to your door or device every month
NEW TIPS & INSPIRATION Subscribe to
PhotoPlus for essential Canon techniques,
tests and photography projects every month
OPTION 1: SAVE 28%
PRINT SUBSCRIPTION
EVERY 6 MONTHS FROM £27.99*
• 13 PhotoPlus print issues a year delivered to your door
• Free Lowepro Adventura GO SH 160 bag worth £52
OPTION 2: SAVE 57%
PREMIUM SUBSCRIPTION
EVERY 6 MONTHS FROM £35.49*
• 13 PhotoPlus print issues a year delivered to your door
• 13 PhotoPlus digital issues a year for your device
• Free Lowepro Adventura GO SH 160 bag worth £52
OPTION 3: SAVE 39%
DIGITAL SUBSCRIPTION
EVERY 6 MONTHS FROM £27.50*
• 13 PhotoPlus digital editions for your device
• Instant digital access • Available on iOS or Android
• Camera bag not included with Digital Subscription
Get your free camera bag by subscribing today online at
www.magazinesdirect.com/PHPADVENTURA
or you can call 0330 333 1113 and quote C37G
TERMS AND CONDITIONS: *Offer closes 01 November 2023. Offer open to new subscribers only. Direct Debit offer is available to UK subscribers only. Your gift will be delivered separately within 60 days
after your first payment has cleared. Gifts only available to subscribers on the UK mainland with the purchase of a print or premium PhotoPlus subscription. In the unlikely event that we run out of this gift,
we promise to offer you an alternative gift of the same or greater value. Please allow up to six weeks for delivery of your first subscription issue. Payment is non-refundable after the 14-day cancellation
period. If the magazine ordered changes frequency per annum, we will honour the number of issues paid for, not the term of the subscription. Full terms and conditions at www.magazinesdirect.com/terms.
For enquiries and overseas rates please call +44 (0) 330 333 1113. Lines are open Monday-Friday 8:30am-7pm, Saturday 10am-3pm UK Time (excluding Bank Holidays). Alternatively you can email us at
help@magazinesdirect.com. Calls to 0330 numbers will be charged at no more than a national landline call, and may be included in your phone provider’s call bundle.
The Canon Magazine
41
THECLAPPCOLUMN
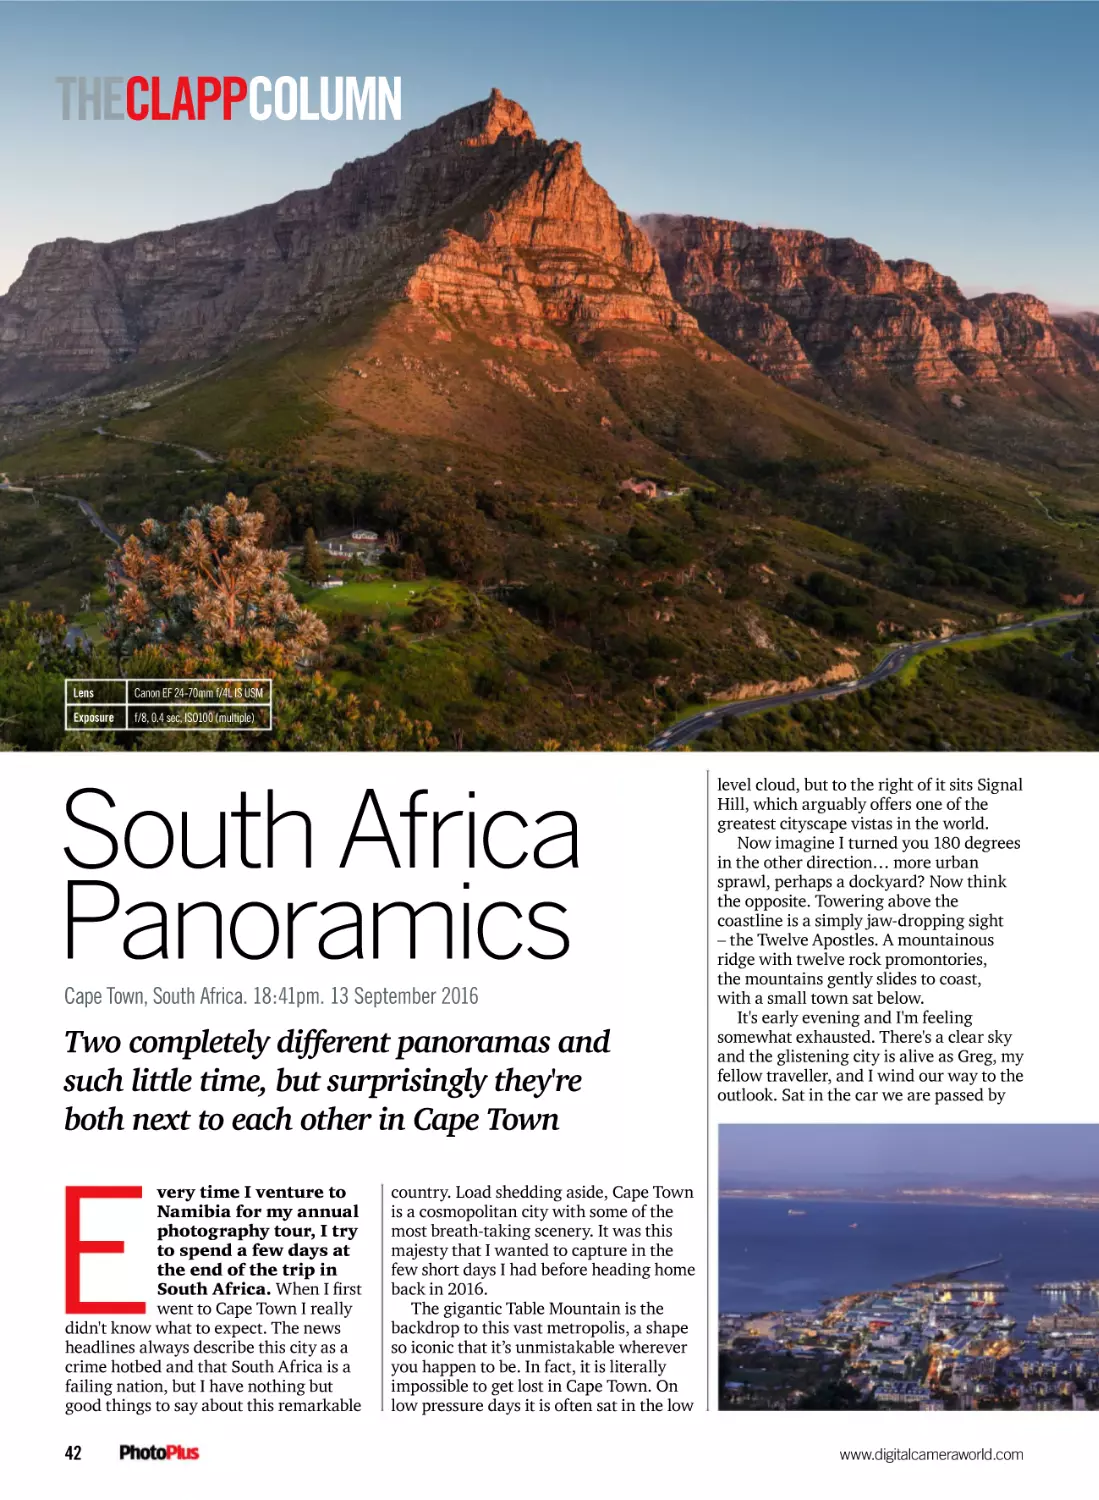
Lens
Canon EF 24-70mm f/4L IS USM
Exposure
f/8, 0.4 sec, ISO100 (multiple)
South Africa
Panoramics
Cape Town, South Africa. 18:41pm. 13 September 2016
Two completely different panoramas and
such little time, but surprisingly they're
both next to each other in Cape Town
very time I venture to
Namibia for my annual
photography tour, I try
to spend a few days at
the end of the trip in
South Africa. :KHQ,ÀUVW
went to Cape Town I really
didn't know what to expect. The news
headlines always describe this city as a
crime hotbed and that South Africa is a
failing nation, but I have nothing but
good things to say about this remarkable
42
level cloud, but to the right of it sits Signal
Hill, which arguably offers one of the
greatest cityscape vistas in the world.
Now imagine I turned you 180 degrees
in the other direction… more urban
sprawl, perhaps a dockyard? Now think
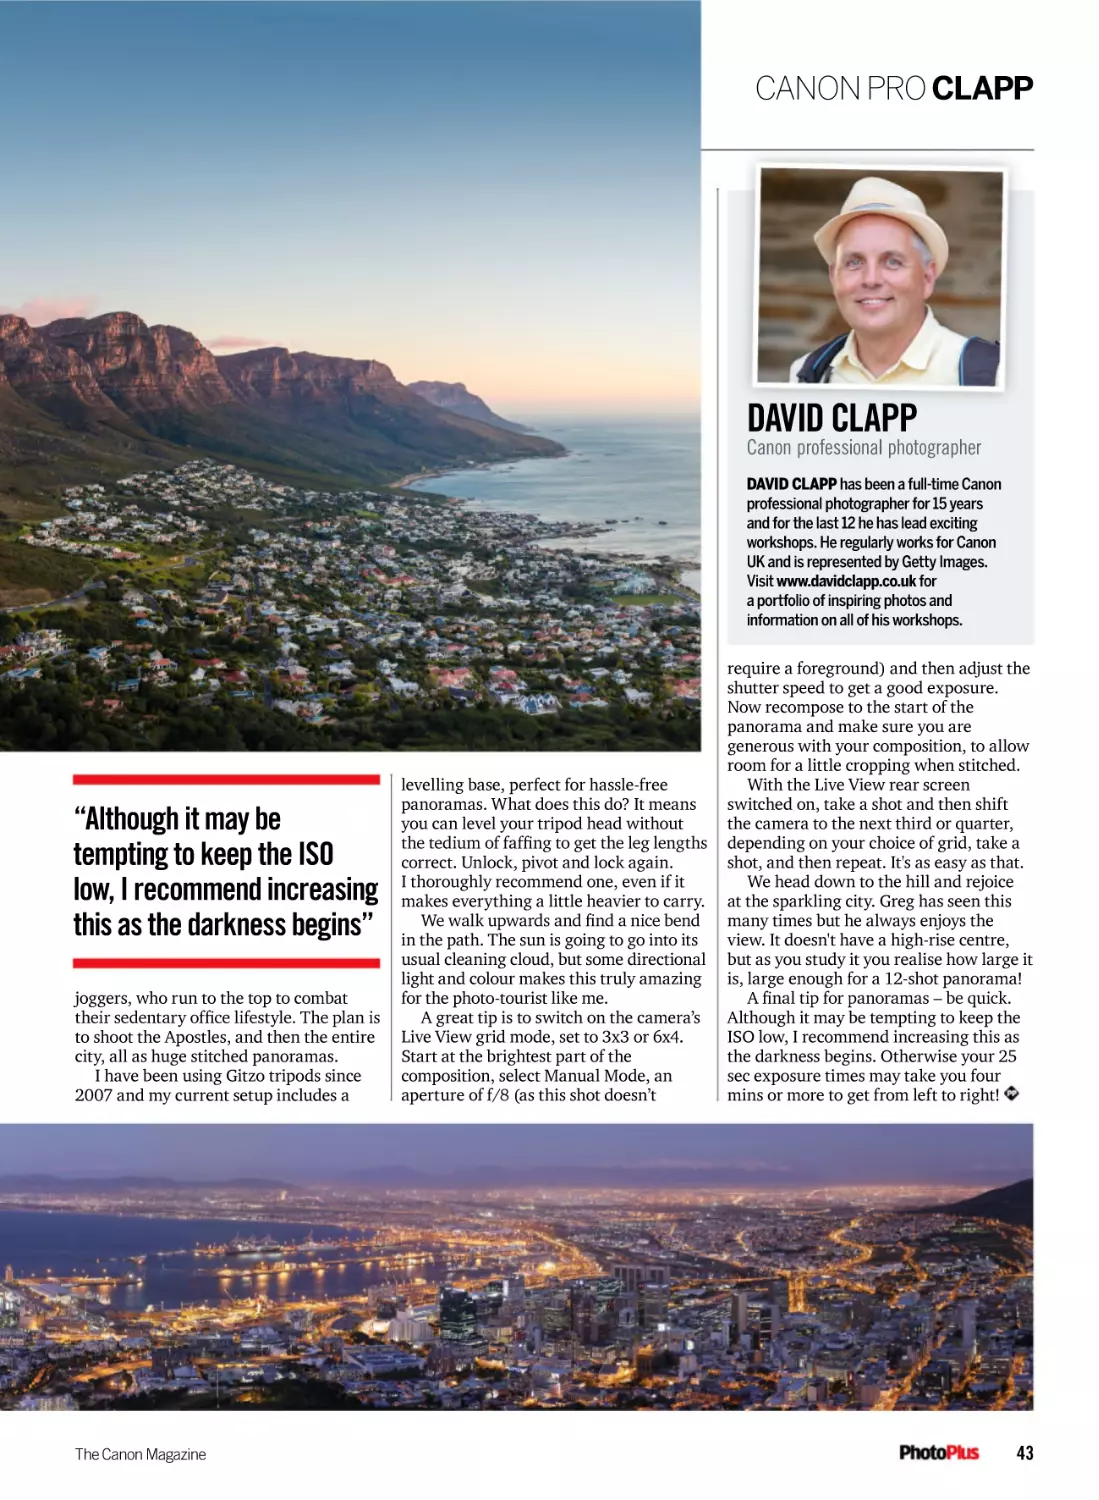
the opposite. Towering above the
coastline is a simply jaw-dropping sight
– the Twelve Apostles. A mountainous
ridge with twelve rock promontories,
the mountains gently slides to coast,
with a small town sat below.
It's early evening and I'm feeling
somewhat exhausted. There's a clear sky
and the glistening city is alive as Greg, my
fellow traveller, and I wind our way to the
outlook. Sat in the car we are passed by
country. Load shedding aside, Cape Town
is a cosmopolitan city with some of the
most breath-taking scenery. It was this
majesty that I wanted to capture in the
few short days I had before heading home
back in 2016.
The gigantic Table Mountain is the
backdrop to this vast metropolis, a shape
so iconic that it’s unmistakable wherever
you happen to be. In fact, it is literally
impossible to get lost in Cape Town. On
low pressure days it is often sat in the low
www.digitalcameraworld.com
CANON PRO CLAPP
DAVID CLAPP
Canon professional photographer
DAVID CLAPP has been a full-time Canon
professional photographer for 15 years
and for the last 12 he has lead exciting
workshops. He regularly works for Canon
UK and is represented by Getty Images.
Visit www.davidclapp.co.uk for
a portfolio of inspiring photos and
information on all of his workshops.
require a foreground) and then adjust the
shutter speed to get a good exposure.
Now recompose to the start of the
panorama and make sure you are
generous with your composition, to allow
room for a little cropping when stitched.
With the Live View rear screen
levelling base, perfect for hassle-free
switched on, take a shot and then shift
panoramas. What does this do? It means
the camera to the next third or quarter,
you can level your tripod head without
WKHWHGLXPRIIDIÀQJWRJHWWKHOHJOHQJWKV depending on your choice of grid, take a
shot, and then repeat. It's as easy as that.
correct. Unlock, pivot and lock again.
We head down to the hill and rejoice
I thoroughly recommend one, even if it
makes everything a little heavier to carry. at the sparkling city. Greg has seen this
:HZDONXSZDUGVDQGÀQGDQLFHEHQG many times but he always enjoys the
view. It doesn't have a high-rise centre,
in the path. The sun is going to go into its
usual cleaning cloud, but some directional but as you study it you realise how large it
light and colour makes this truly amazing is, large enough for a 12-shot panorama!
$ÀQDOWLSIRUSDQRUDPDV²EHTXLFN
for the photo-tourist like me.
joggers, who run to the top to combat
Although it may be tempting to keep the
A great tip is to switch on the camera’s
WKHLUVHGHQWDU\RIÀFHOLIHVW\OH7KHSODQLV
ISO low, I recommend increasing this as
Live View grid mode, set to 3x3 or 6x4.
to shoot the Apostles, and then the entire
the darkness begins. Otherwise your 25
Start at the brightest part of the
city, all as huge stitched panoramas.
sec exposure times may take you four
composition, select Manual Mode, an
I have been using Gitzo tripods since
mins or more to get from left to right!
aperture of f/8 (as this shot doesn’t
2007 and my current setup includes a
“Although it may be
tempting to keep the ISO
low, I recommend increasing
this as the darkness begins”
The Canon Magazine
43
HOW TO VIEW OUR E
LIN
VIDEO GUIDES ON
PROJECT AND
VIDEO GUIDES #208
ALL OF OUR NEW PHOTO N BE VIEWED
IMAGE-EDITING VIDEOS CALINKS ON
ONLINE VIA THE WEB
PAGES 46-61!
Sharpen up your photography skills with
our all-new photo projects and expert guides
Dan Mold
Deputy editor
dan.mold@futurenet.com
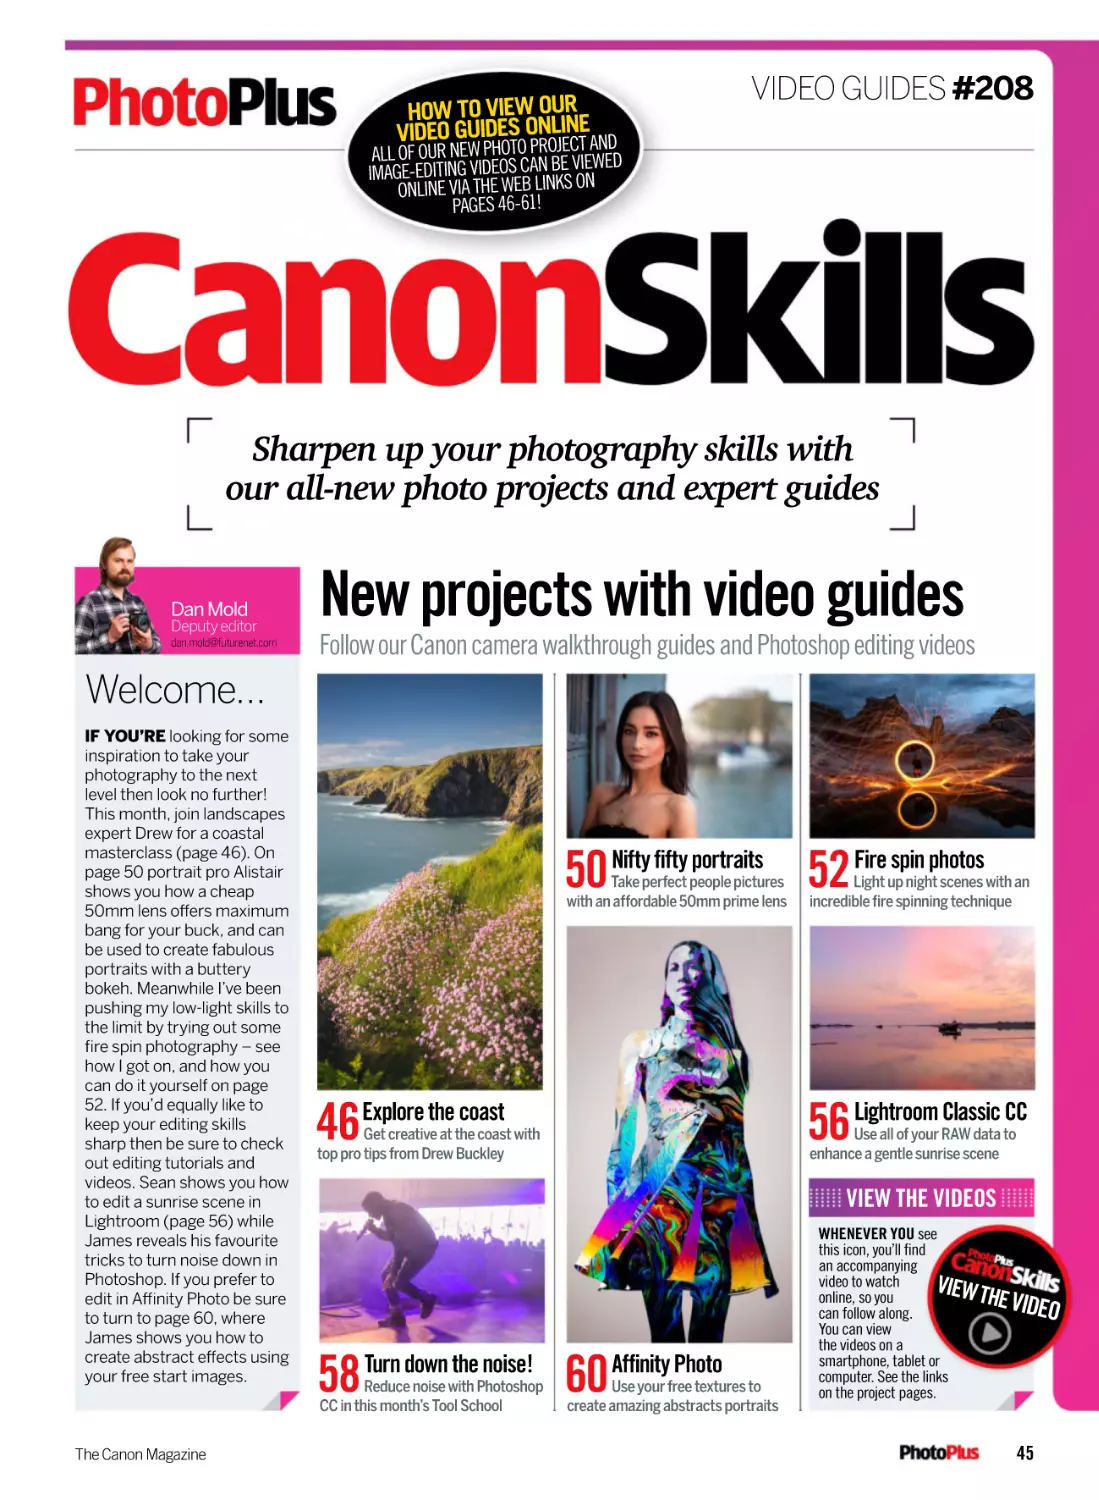
New projects with video guides
Follow our Canon camera walkthrough guides and Photoshop editing videos
Welcome…
IF YOU’RE looking for some
inspiration to take your
photography to the next
level then look no further!
This month, join landscapes
expert Drew for a coastal
masterclass (page 46). On
page 50 portrait pro Alistair
shows you how a cheap
50mm lens offers maximum
bang for your buck, and can
be used to create fabulous
portraits with a buttery
bokeh. Meanwhile I’ve been
pushing my low-light skills to
the limit by trying out some
fire spin photography – see
how I got on, and how you
can do it yourself on page
52. If you’d equally like to
keep your editing skills
sharp then be sure to check
out editing tutorials and
videos. Sean shows you how
to edit a sunrise scene in
Lightroom (page 56) while
James reveals his favourite
tricks to turn noise down in
Photoshop. If you prefer to
edit in Affinity Photo be sure
to turn to page 60, where
James shows you how to
create abstract effects using
your free start images.
The Canon Magazine
50 Nifty fifty portraits 52 Fire spin photos
Take perfect people pictures
with an affordable 50mm prime lens
46Explore the coast
Light up night scenes with an
incredible fire spinning technique
56 Lightroom Classic CC
Get creative at the coast with
top pro tips from Drew Buckley
Use all of your RAW data to
enhance a gentle sunrise scene
VIEW THE VIDEOS
58 Turn down the noise! 60 Affinity Photo
Reduce noise with Photoshop
CC in this month’s Tool School
Use your free textures to
create amazing abstracts portraits
WHENEVER YOU see
this icon, you’ll find
an accompanying
video to watch
VIEW T
online, so you
HE
can follow along.
You can view
the videos on a
smartphone, tablet or
computer. See the links
on the project pages.
VIDEO
45
VIEW T
HE VIDE
WATCH VIDEO ONLINE
O
http://bit.ly/pp_208_1
PROJECT 1
THE MISSION
Take some stunning
coastal landscape
shots in Wales
Time needed
One hour
Skill level
Intermediate
Kit needed
• Canon EOS & lens
• Tripod
• Various filters
Capture the coast
Drew Buckley shares his favourite pearls of wisdom for coastline scenes
iving in Pembrokeshire,
I’m lucky enough to
have one of the best
coastal areas in the
world on my doorstep, so
it’s fair to say I’m more of
a coastal photographer
than anything else.
The coast is an ever-changing
landscape, from winter storms
L
and crumbling cliffs, to serene
summer evenings with lapping
waves, so locations can look
different every day. Add the sun
rising and setting at varying
angles through the year and the
tides differing in height, all this
plays a massive part in your
scenes and potential compositions.
Most landscape scenes will need a
fair amount of planning and
coastal scenes are no exception,
especially throwing the tides into
mix too, it can make it tricky to
decide when and where to go. In
this article I’ll give you some of
my top tips, including Canon
FDPHUDVHWWLQJVOHQVDQGÀOWHUV
advice, that will help you to get
some top coastal shots too.
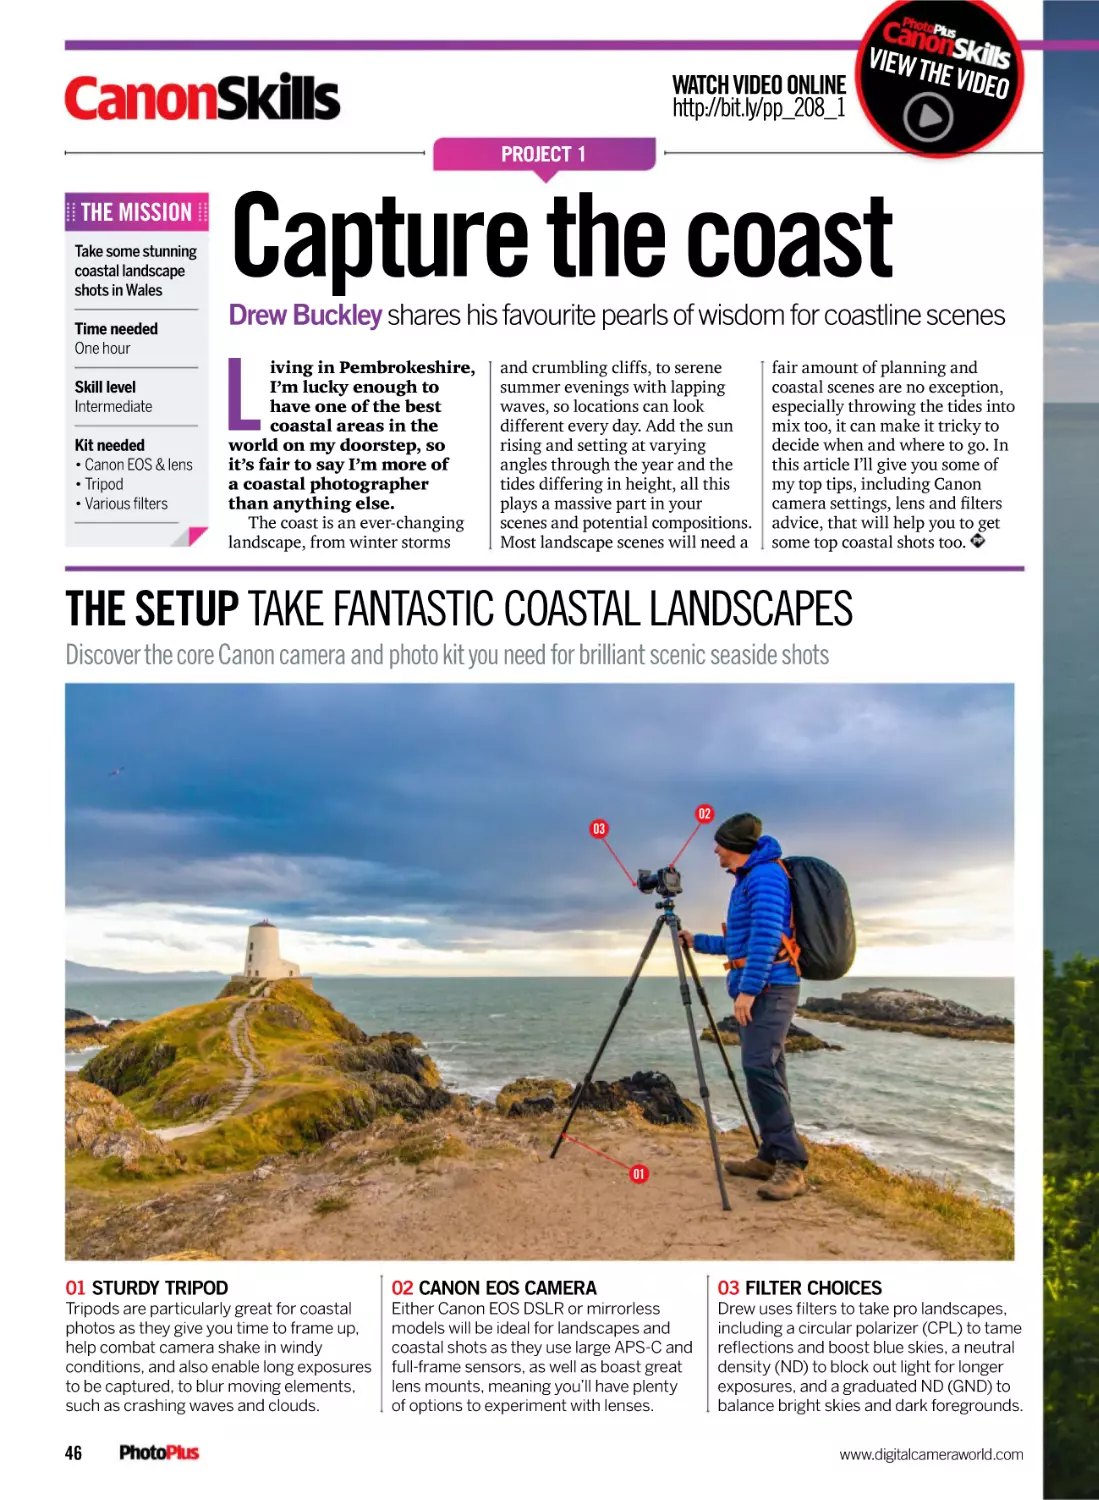
THE SETUP TAKE FANTASTIC COASTAL LANDSCAPES
Discover the core Canon camera and photo kit you need for brilliant scenic seaside shots
02
03
01
01 STURDY TRIPOD
02 CANON EOS CAMERA
03 FILTER CHOICES
Tripods are particularly great for coastal
photos as they give you time to frame up,
help combat camera shake in windy
conditions, and also enable long exposures
to be captured, to blur moving elements,
such as crashing waves and clouds.
Either Canon EOS DSLR or mirrorless
models will be ideal for landscapes and
coastal shots as they use large APS-C and
full-frame sensors, as well as boast great
lens mounts, meaning you’ll have plenty
of options to experiment with lenses.
Drew uses filters to take pro landscapes,
including a circular polarizer (CPL) to tame
reflections and boost blue skies, a neutral
density (ND) to block out light for longer
exposures, and a graduated ND (GND) to
balance bright skies and dark foregrounds.
46
www.digitalcameraworld.com
COASTAL LANDSCAPES
QUICK TIP!
WATCH
YOUR STEP!
Before we start, a safety
tip – always heed caution
on the coast. Rocks by
the sea can be slippery,
and always check tide
times thoroughly before
commencing a photoshoot.
Make sure to always have
an exit route at the beach
as tides come in, and steer
clear of large waves or cliff
edges in bad weather.
The Canon Magazine
During the summer
months, the extra
degrees of sun and
its position can
reveal a whole new
batch of scenic
locations to
try out
47
IDEO
V
E
H
T
WATCH VIDEO ONLINE VIEW
http://bit.ly/pp_208_1
PROJECT 1
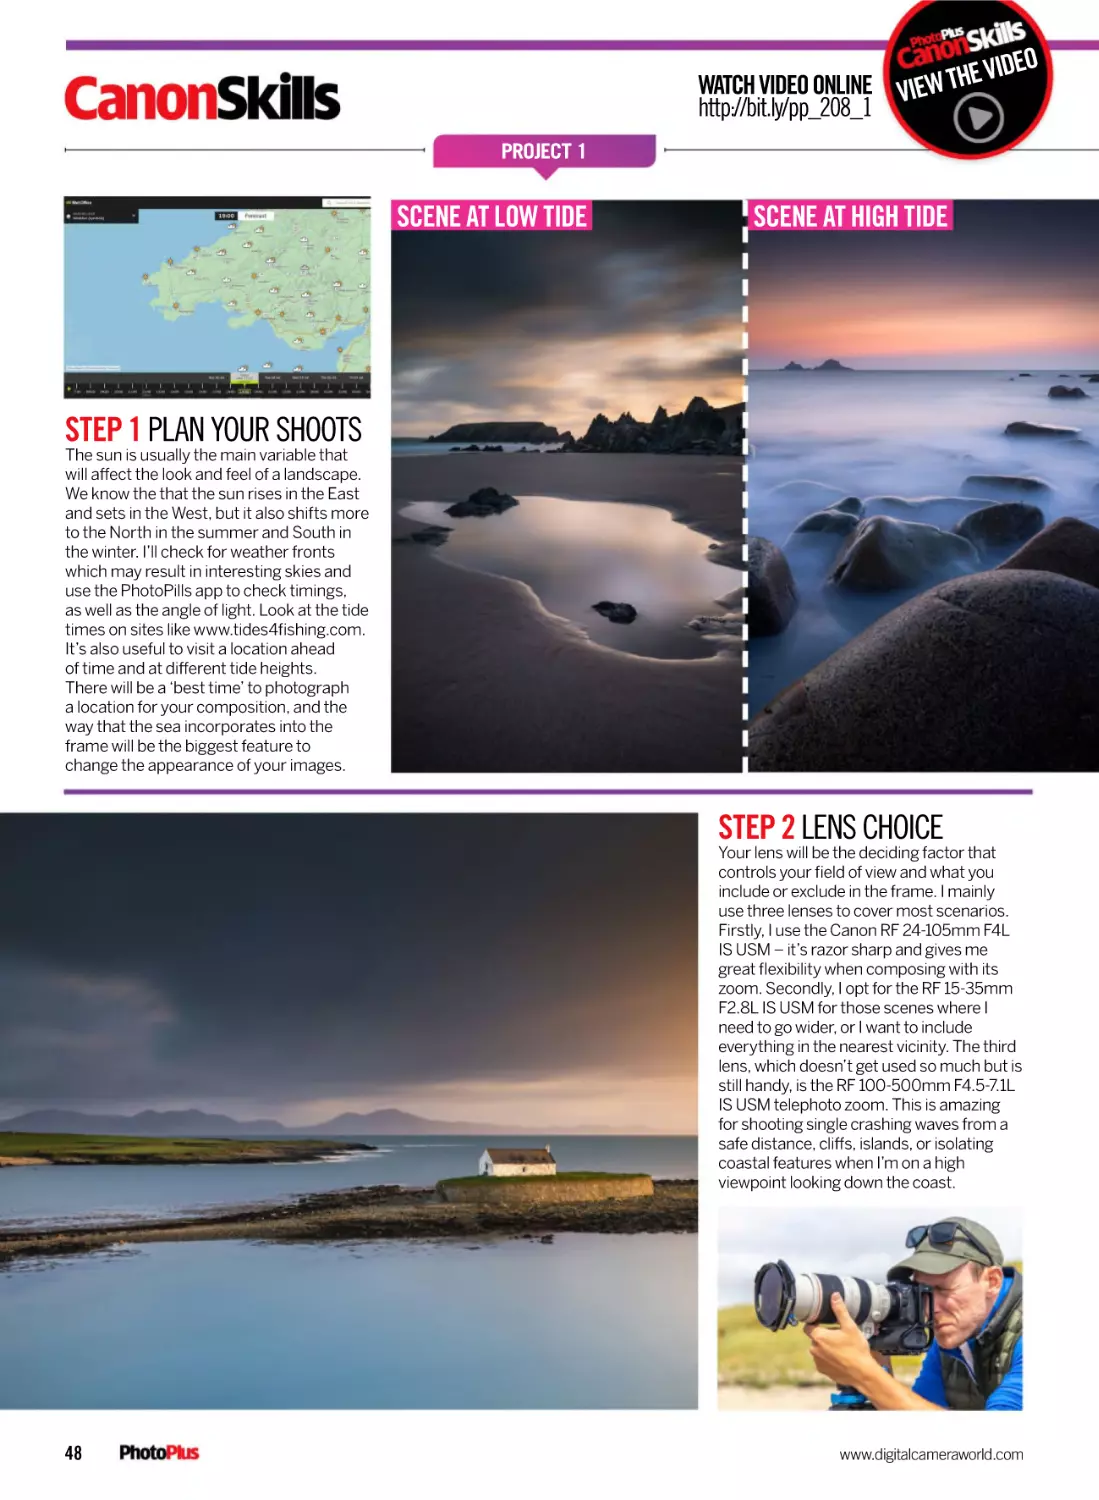
SCENE AT LOW TIDE
SCENE AT HIGH TIDE
STEP 1 PLAN YOUR SHOOTS
The sun is usually the main variable that
will affect the look and feel of a landscape.
We know the that the sun rises in the East
and sets in the West, but it also shifts more
to the North in the summer and South in
the winter. I’ll check for weather fronts
which may result in interesting skies and
use the PhotoPills app to check timings,
as well as the angle of light. Look at the tide
times on sites like www.tides4fishing.com.
It’s also useful to visit a location ahead
of time and at different tide heights.
There will be a ‘best time’ to photograph
a location for your composition, and the
way that the sea incorporates into the
frame will be the biggest feature to
change the appearance of your images.
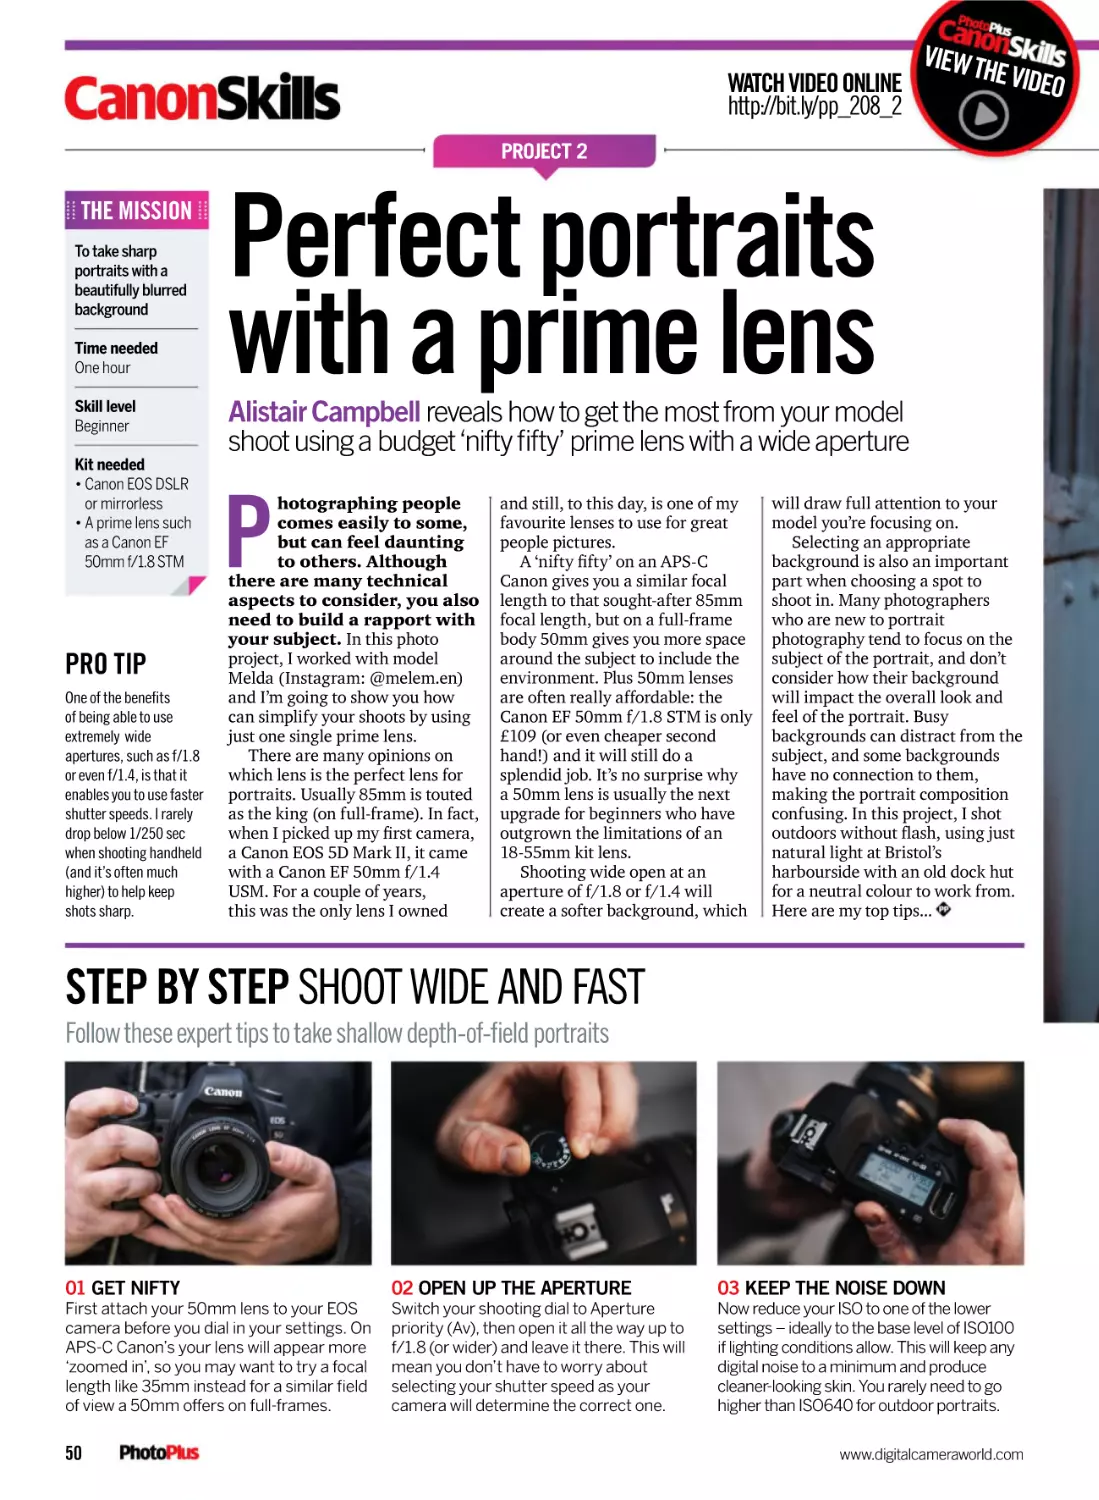
STEP 2 LENS CHOICE
Your lens will be the deciding factor that
controls your field of view and what you
include or exclude in the frame. I mainly
use three lenses to cover most scenarios.
Firstly, I use the Canon RF 24-105mm F4L
IS USM – it’s razor sharp and gives me
great flexibility when composing with its
zoom. Secondly, I opt for the RF 15-35mm
F2.8L IS USM for those scenes where I
need to go wider, or I want to include
everything in the nearest vicinity. The third
lens, which doesn’t get used so much but is
still handy, is the RF 100-500mm F4.5-7.1L
IS USM telephoto zoom. This is amazing
for shooting single crashing waves from a
safe distance, cliffs, islands, or isolating
coastal features when I’m on a high
viewpoint looking down the coast.
48
www.digitalcameraworld.com
COASTAL LANDSCAPES
STEP 3 USING FILTERS
If you need to own just one filter for coastal
photography, then a circular polarizing
filter should be it. It’ll boost blue skies,
reduce surface reflections, such as taking
the shine off any rocks, wet sand or
seaweed, and really make your sea colours
pop! There are also neutral density (ND)
filters which come in a variety of strengths
– I carry 3, 6 and 10 stop varieties to cut
out light and extend your shutter speeds
for artistic effect; in most cases, to smooth
out or blur moving clouds and water
movement. Finally, there are the graduated
ND filters, and these help to balance up the
difference in exposure between the sky
and foreground to capture a more
balanced image in terms of exposure.
SHOT AT 30 SECS
SHOT AT 2 SECS
STEP 4 COMPOSITION
I love emphasizing the uniqueness of our
coastline, be it natural arches, sea stacks
or amazing strata rock formations along
cliffs, so I think it’s important to keep an
eye out for features like this as it will
emphasize any scene. I find there needs
to be a bit of blur to give coastal scenes
some life. Water movement is the main
factor in any image that can show great
energy, especially in stormier weather
conditions where the sea is whipped up
into a white surf, so it’s good to keep
some remnants of this power in your
images. Choose a shutter speed that is
sympathetic to the conditions and
doesn’t smooth waters too much.
On the flip side, smoother water can
create a calmness in some scenes;
lakes and waterfalls, for instance.
49
VIEW T
HE VIDE
WATCH VIDEO ONLINE
O
http://bit.ly/pp_208_2
PROJECT 2
THE MISSION
To take sharp
portraits with a
beautifully blurred
background
Time needed
One hour
Skill level
Beginner
Kit needed
• Canon EOS DSLR
or mirrorless
• A prime lens such
as a Canon EF
50mm f/1.8 STM
PRO TIP
One of the benefits
of being able to use
extremely wide
apertures, such as f/1.8
or even f/1.4, is that it
enables you to use faster
shutter speeds. I rarely
drop below 1/250 sec
when shooting handheld
(and it’s often much
higher) to help keep
shots sharp.
Perfect portraits
with a prime lens
Alistair Campbell reveals how to get the most from your model
shoot using a budget ‘nifty fifty’ prime lens with a wide aperture
hotographing people
comes easily to some,
but can feel daunting
to others. Although
there are many technical
aspects to consider, you also
need to build a rapport with
your subject. In this photo
project, I worked with model
Melda (Instagram: @melem.en)
and I’m going to show you how
can simplify your shoots by using
just one single prime lens.
There are many opinions on
which lens is the perfect lens for
portraits. Usually 85mm is touted
as the king (on full-frame). In fact,
ZKHQ,SLFNHGXSP\ÀUVWFDPHUD
a Canon EOS 5D Mark II, it came
with a Canon EF 50mm f/1.4
USM. For a couple of years,
this was the only lens I owned
P
and still, to this day, is one of my
favourite lenses to use for great
people pictures.
$¶QLIW\ÀIW\·RQDQ$36&
Canon gives you a similar focal
length to that sought-after 85mm
focal length, but on a full-frame
body 50mm gives you more space
around the subject to include the
HQYLURQPHQW3OXVPPOHQVHV
are often really affordable: the
Canon EF 50mm f/1.8 STM is only
£109 (or even cheaper second
hand!) and it will still do a
splendid job. It’s no surprise why
a 50mm lens is usually the next
upgrade for beginners who have
outgrown the limitations of an
18-55mm kit lens.
Shooting wide open at an
aperture of f/1.8 or f/1.4 will
create a softer background, which
will draw full attention to your
model you’re focusing on.
Selecting an appropriate
background is also an important
part when choosing a spot to
shoot in. Many photographers
who are new to portrait
photography tend to focus on the
subject of the portrait, and don’t
consider how their background
will impact the overall look and
feel of the portrait. Busy
backgrounds can distract from the
subject, and some backgrounds
have no connection to them,
making the portrait composition
confusing. In this project, I shot
RXWGRRUVZLWKRXWÁDVKXVLQJMXVW
natural light at Bristol’s
harbourside with an old dock hut
for a neutral colour to work from.
Here are my top tips...
STEP BY STEP SHOOT WIDE AND FAST
Follow these expert tips to take shallow depth-of-field portraits
01 GET NIFTY
02 OPEN UP THE APERTURE
03 KEEP THE NOISE DOWN
First attach your 50mm lens to your EOS
camera before you dial in your settings. On
APS-C Canon’s your lens will appear more
‘zoomed in’, so you may want to try a focal
length like 35mm instead for a similar field
of view a 50mm offers on full-frames.
Switch your shooting dial to Aperture
priority (Av), then open it all the way up to
f/1.8 (or wider) and leave it there. This will
mean you don’t have to worry about
selecting your shutter speed as your
camera will determine the correct one.
Now reduce your ISO to one of the lower
settings – ideally to the base level of ISO100
if lighting conditions allow. This will keep any
digital noise to a minimum and produce
cleaner-looking skin. You rarely need to go
higher than ISO640 for outdoor portraits.
50
www.digitalcameraworld.com
PERFECT PORTRAITS
QUICK TIP!
If you’re shooting
with autofocus, use
single-point focus
and put the AF point
directly over the
model’s nearest eye
so it’s pin-sharp
04 PRACTISE MAKES PERFECT
05 BUILD A RAPPORT
06 EDIT TO PERFECTION
With everything in place, it’s time to start
shooting. I use AF (you can also use MF)
and always focus on the eyes – this is
particularly important when shooting
with a wide open aperture, because if
you aim for the bridge of the nose, the
eyes will be slightly out of focus.
Of course, you have to get the technical
settings right, but it’s just as important to
get the best out of your model too. They
can’t see the screen, so communicate with
them. Once I have some images that I’m
happy with I’ll show my model the images
on the camera screen so they can see.
Try to enhance only what’s already there in
your portraits rather than going over the
top and creating an unnatural finish. I use
Lightroom Classic CC to edit the RAW files
and tidy up minor blemishes with the Spot
Removal tool, but try to keep editing to a
minimum and looking natural.
The Canon Magazine
51
Create and capture
amazing fire circle
photos at night
You spin me right round
Time needed
One hour
Dan Mold shows you how to safely create amazing fire spin
images at night with basic camera kit and household items
THE MISSION
Skill level
Intermediate
Kit needed
• Canon EOS
camera
• Tripod
• Lens
• Metal whisk
• Wire wool
52
ire spin photos take
light painting and turn
it up to 11! If you’re
looking for a photo project
that is guaranteed to turn heads
and leave your friends and family
members wondering how you
SXOOHGLWRIIWKHQD¶ÀUHVSLQ·SKRWR
is the project for you.
While not for the faint-hearted,
DÀUHVSLQLPDJHFDQEHFUHDWHGE\
packing a metal whisk full of wire
wool and igniting it, tethered to a
dog lead you then spin it around
quickly, and use a long exposure
on your camera to capture the
F
EULOOLDQWOLJKWWUDLOVDVWKHVSDUNVÁ\
off in all directions, also lighting
up the night scene with exciting
and vibrant effects.
2IFRXUVHZRUNLQJZLWKÀUHLV
dangerous and won’t be for
everyone. If you don’t like the idea
of working with wire wool, you
could instead securely attach a
torch to piece of string to get an
idea of how the technique works.
,I\RXZRXOGOLNHWRWU\RXWDÀUH
spin then it goes without saying
WKDWVDIHW\FRPHVÀUVW:HVWURQJO\
recommend shooting with a friend
so that you can take the pictures
ZKLOH\RXUIULHQGGRHVWKHÀUH
spinning – why not pair up with
another photographer friend and
alternate? We also shot at the coast
next to open water so that there
was much less chance of starting
DÀUHDQGRIFRXUVHKDGDÀUH
extinguisher to hand too, just in
case. You’ll also want to avoid
ZHDULQJÁDPPDEOHV\QWKHWLF
clothing, so wool is a good choice.
Gloves, hat and eye protection are
also essential to protect yourself
against any stray sparks.
Raring to go? Here’s everything
you need to know...
www.digitalcameraworld.com
VIDEO
E
H
T
VIEW
FIRE SPIN PHOTOS
WATCH VIDEO ONLINE
http://bit.ly/pp_208_3
PROJECT 3
THE SETUP SHOOT AN INCREDIBLE FIRE SPIN
Get kitted out with all the gear you’ll need before you light up your fire photos
01 CANON EOS CAMERA
02 LENS CHOICE
03 STURDY TRIPOD
You can use any Canon DSLR or mirrorless
camera for this, so long as it has a Manual
mode and can shoot long exposures of
several seconds. A full-frame camera will
tend to offer better image quality in low
light scenarios, but it’s not a deal-breaker.
With bright sparks flying and flung off in all
directions, it’s usually easier to go for a
wide-angle lens to give yourself the best
chance of catching all of the bright light
trails. We used a Canon EF 16-35mm
f/2.8L and set it to the widest 16mm.
You’ll need to keep the shutter open and
the sensor exposed to light for several
seconds so that you can capture the trail
of sparks as the wire wool is spun around.
This means setting up on a tripod is vital
so that the rest of the scene is sharp.
Getty / Bon Koo / 500px
03
01
06
05
02
04
04 WHISK & DOG LEAD
05 WIRE WOOL
06 9V BATTERY
You’ll need a metal whisk with a sturdy ring
on the base of the handle that you can
attach a dog lead to so you can spin it
around. A black dog lead is a good idea
as it will show up less in your pictures.
Wire wool with a fine grading of around 00
or 0000 is ideal for fire spin photography.
You can even carefully fold one type inside
of the other to mix them together. Pack
your whisk tightly with the wire wool.
The easiest way to ignite the wire wool
when you’re all set up and ready to go it
brush a 9v battery against the wire wool to
create a spark. Once spinning, the extra
oxygen will help it burn brighter.
The Canon Magazine
53
IDEO
V
E
H
T
WATCH VIDEO ONLINE VIEW
http://bit.ly/pp_208_3
PROJECT 3
STEP 1 SET UP AT NIGHT
It’s best to shoot a long exposure of several
seconds to build up a bright and vibrant
fire spin effect. This means setting up on a
sturdy tripod so you can shoot a sharp
long exposure. For safety, we also shot at
the coast next to water to mitigate the risk
of anything catching fire from the burning
steel wool (and had a fire extinguisher to
hand too). For settings, put your Canon to
its Manual mode (M on the mode dial) and
dial in ISO100 for best image quality and a
shutter speed of 4 secs – this should give
you enough time to catch a good spin.
Then tweak the aperture value until your
exposure looks good and take a few test
shots. You can open the aperture or
extend the shutter speed as it gets darker.
STEP 2 FOCUS ON A FRIEND
One of the trickiest parts of a fire spin
photo is nailing the focus, so to make
things easier bring a friend that can do the
spinning while you stay behind the camera
taking photos. Have your friend stand in
the scene where you want the fire spin to
appear. Also make sure they’re wearing
dark clothing and shoot at night so that
they don’t appear in your images.
Compose and focus on your friend in the
blue hour, or if it’s too dark to autofocus,
have them shine a bright torch on
themselves so you can lock the focus on
them. Then you need to switch the focus
mode to manual (MF) so that it’s locked off
and won’t move between frames. Just
make sure your friend doesn’t move off
their mark during the spinning.
54
www.digitalcameraworld.com
FIRE SPIN PHOTOS
STEP 3 PREP YOUR WHISK
To create the fire spinning effect, you’ll
need to get hold of a metal balloon whisk
with a loop at the base of the handle. To
this you’ll attach a sturdy dog lead so that
you can spin it around safely at arm’s
length. Some of the cheaper whisks have a
very thin ring at the bottom of the handle
which can easily slip out of dog lead’s clip,
which is far from ideal! So make sure the
attachment point is a few millimeters thick,
or attach two dog leads so you have an
extra layer of security. Next, you’ll need to
pack the balloon whisk with your wire wool.
It’s best to use a fine wire wool, such as 00
or 0000. You can even carefully fold a
mixture of the two together and pack them
into the whisk snugly.
STEP 4 START SPINNING!
Now it’s time to attempt your first fire
spin. The easiest way to light the wire
wool is to quickly bring it into contact with
a 9v battery (above) and then have your
friend spin it around in a smooth circular
motion – as oxygen gets into the wire
wool as it spins it will glow brighter. We
had best results shooting straight on to
our friend rather than from the side (see
left). Keep continually firing your long
exposures back-to-back until the fire has
died. You can then check your shots and
work out if you need a longer or shorter
exposure time, or to open the aperture a
little wider if it’s suddenly become a lot
darker. Make sure your friend stays on
their spot so that your next shots are pin
sharp, and have another go!
The Canon Magazine
55
VIEW T
HE VIDE
WATCH VIDEO ONLINE
O
http://bit.ly/pp_208_4
LIGHTROOM
AFTER
BEFORE
THE MISSION
Capture the start of
the day with detail
and colour
Time needed
20 minutes
Skill level
Intermediate
Kit needed
Adobe Lightroom
Classic CC
DOWNLOAD PROJECT FILES
TO YOUR COMPUTER FROM:
http://downloads.
photoplusmag.com/pp208.zip
56
Create a colourful
pastel sunrise
Sean McCormack reveals how to edit sunrise shots in Lightroom Classic
s the days slowly start
to shorten, those who
love to sleep have more
chance of catching a
sunrise. The early starts that
are needed for mid-summer
sunrises make way for us to
only need to get up slightly
earlier and grab some magic
morning shots before work.
One technique that can help get
the most detail and colour in
A
photographs is called ‘Expose
to the Right’, or ETTR. It’s a simple
principle where you expose to
capture a lighter photo, rather
than the medium exposure the
camera metering suggests. You
will still be avoiding clipped
highlights, though.
While sensor technology has
improved, there’s less information
in the shadows, so boosting them
can introduce unwanted noise. It’s
easy to darken shadows in editing,
avoiding problems with potential
noise. The image can look washed
out, but that’s okay, as your
intention is to shoot with postprocessing in mind, and there’s
information we can pull out of the
5$:ÀOH7KHSURFHVVLQJORRNVDW
3URÀOH&RQWUDVWDQG6DWXUDWLRQ
There’s often clean-up work to do
with spot removal and getting rid
of unwanted items. Here’s how...
www.digitalcameraworld.com
SUPERB SUNRISES
STEP BY STEP SHOOT AND EDIT A SUNRISE
Four quick editing tips to help you give your sunrise images a subtle boost
CROPPING
YOUR SHOT
FOR BIGGER
IMPACT
02 CAMERA PROFILE
01 REMOVE SPOTS
Clean-up is important in any photo. Press Q to open
Spot Removal then press A to show a black overlay
where white reveals the edges. Spots show roughly as
circles where you shouldn’t see anything. Paint over
the affected area to remove any dust spots.
Probably the most important
change you can make is to get a
better camera profile. Unless
you have changed defaults in
Preferences, Lightroom applies
Adobe Color on Import. For
landscape photos, Adobe
Landscape or your Camera
Matching Vivid/Landscape
profile is better. Click on Profile
Browser and change it.
Cropping greatly impacts
a photo: for vertical
shots, a crop to 4:5
aspect ratio is more
pleasing; for horizontal,
a 16:9 panoramic looks
great. Crop to 4:5 and
consider the internal
balance in the photo –
this shape also works
well for social media, and
for printing eg 8x10in.
04 FINAL TOUCHES
03 START WITH PRESENCE ADJUSTMENTS
Normally, you would approach the Basic panel top
down but here you can use Presence first. Try the
‘twenties’ approach: boost each Presence slider to 20.
This will impact colour and contrast immediately, and
you can tidy up the effect in the Tone section. This is
just a starting point, but it’s a good place to begin.
The Canon Magazine
Jump back to Tone for the
final processing step.
Increase Contrast to 50
and open Shadows to 35
while reducing Highlights
to -100. It’s a ‘two steps
forward, one step back’
approach, but it does add
a lift. Finally, pull Exposure
back to -0.10 for some
subtle darkening.
57
VIEW T
HE VIDE
WATCH VIDEO ONLINE
O
http://bit.ly/pp_208_5
PHOTOSHOP CC
Part 22 of a series
THE MISSION
Discover the best
solutions for
reducing noise with
Photoshop CC
Time needed
20 minutes
Skill level
Intermediate
Kit needed
Photoshop CC
DOWNLOAD PROJECT FILES
TO YOUR COMPUTER FROM:
http://downloads.
photoplusmag.com/pp208.zip
58
Heal the noise
THE CAMERA RAW FILTER
James Paterson finds out which are the best
noise reduction tools in Photoshop, and those you
shouldn’t let anywhere near your Canon images
oise in photos causes
them to become grainy
DQGODFNÀQHGHWDLO,W·V
especially apparent in
LPDJHVWDNHQDWKLJKHU,62V
and even more so in the
shadow areas of these
LPDJHVHeavy-handed image
editing can also lead to increased
noise if you want to recover lost
shadow details. But, there are
tools that can help. In this project,
we’ll explore some of the best on
offer in Photoshop CC.
Noise reduction is always
something of a balancing
act, because it can come at the
H[SHQVHRIÀQHGHWDLO,WZRXOGEH
N
easy to remove the noise from any
image simply by blurring it, but
who wants a blurry image? As
such, we need tools that let us
remove the noise but retain the
sharpness. What’s more, we may
only need to worry about keeping
certain areas of the image sharp
while other parts of the frame can
withstand stronger noise
reduction. Like sharpening,
judgement is key. In general,
a slightly noisy image will look
better than one that looks too
smooth and fake, and sometimes
\RXULPDJHVZLOOEHQHÀWIURP
more grain to even out the noise
reduction throughout.
THE Detail Panel in Adobe
Camera Raw offers both
sharpening and noise reduction
tools. As such, it’s the best
tool for balancing out your
noise reduction with image
sharpness. You can use Camera Raw
either as a standalone plugin or as a
Photoshop filter (Filter>Camera Raw
Filter). The Noise Amount slider lets you
tackle grainy noise, while the Detail slider
below lets you claw back fine detail. The
Colour Noise Reduction slider tackles
blotchy spots of colour noise. ACR is also
very useful for adding a touch of grain to
balance out any blotches of noise.
www.digitalcameraworld.com
NOISE CONTROL
STEP BY STEP STAY SHARP & PRESERVE DETAIL
Balance noise reduction with retaining all-important image integrity when editing
01 REMOVE JPEG ARTEFACTS
02 MEDIAN
03 DUST AND SCRATCHES
Some of what you perceive as noise in
your images may actually be JPEG
artefacts. These effects occur because of
the compression that JPEG images go
through when they’re opened and closed,
which can result in marks or blocky edges.
The ‘JPEG Artefacts Removal’ filter, which
can be found in the Neural Filter dialog
(Filter>Neural Filters), employs
machine learning to fix the artefacts.
While Median is listed under the Noise
filters, it’s more of a blur filter, not the tool
you should be using for removing noise.
That said, if – like the Despeckle filter –
you use it in combination with a layer
mask, it can be used to remove noise in
out-of-focus areas of an image. It’s more
effective as a blur filter if you want to
soften areas or surfaces, although
dedicated blur filters can do this, too.
As the name suggests, this can be useful
for removing scratches, marks or dust,
making it handy for restoration work,
but less so as an actual noise-reducing
filter. In fact, it does the opposite by
removing large marks and dust spots
while retaining the underlying noise or
texture. The Radius slider controls
the strength, while the Threshold lets
you fine-tune what is affected.
01
06
02
04
03
05
04 REDUCE NOISE
05 ADVANCED NOISE REDUCTION
06 DESPECKLE
Aside from the Detail panel in Camera Raw,
the Reduce Noise filter is the best filter
Photoshop has for noise reduction. The
filter can be applied to a Smart Object layer
– right-click the layer and ‘Convert to
Smart Object’. Next, Go to Filter>Noise>
Reduce Noise, and uncheck ‘Remove
Artefacts’. Bring the sliders down to 0 and
set Preserve Details to 30% and increase
Strength until the noise is reduced.
Images can be split into different colour
channels in Photoshop: Red, Green and
Blue for a normal RGB image. Sometimes,
one channel will display more noise than
others. Reduce Noise offers an Advanced
mode that will allow you to apply noise
reduction on a per-channel basis. Here,
it lets us apply noise reduction to the blue
channel. It can be useful for reducing
noise in blue skies.
Despeckle (Filter > Noise > Despeckle)
is the simplest of Photoshop’s noise filters.
There are no controls; it applies an
automatic fix by blurring the image slightly.
As such, it’s only useful for very quick
edits. It may also be effective if you want to
reduce noise in a background, as you can
apply the filter on a duplicate layer, then
add a layer mask to brush back
the parts you want to remain sharp.
The Canon Magazine
59
VIEW T
HE VIDE
WATCH VIDEO ONLINE
O
http://bit.ly/pp_208_6
AFFINITY PHOTO
THE MISSION
Use the Posterize
layer to simplify a
portrait then add
textures to each
shade of grey
The perfect blend
Choose from 15 free textures and learn how to blend them with your
portraits using clipping skills in Affinity Photo with James Paterson
Time needed
20 minutes
Skill level
Intermediate
Kit needed
Affinity Photo
DOWNLOAD PROJECT FILES
TO YOUR COMPUTER FROM:
http://downloads.
photoplusmag.com/pp208.zip
60
A
IÀQLW\3KRWRRIIHUV
DOONLQGVRIWRROVIRU
EOHQGLQJLPDJHV
WRJHWKHUIURPOD\HU
EOHQGLQJPRGHVWRPDVNLQJ
DQGPRUH,QWKLVSURMHFW
ZH·OOWDNHDGYDQWDJHRI
FOLSSLQJZKLFKDOORZVXVWR
SRVLWLRQRQHOD\HULQVLGHWKH
VKDSHRIDQRWKHU7KLVZD\
ZHFDQEUHDNRXUSRUWUDLW
GRZQLQWRVHYHUDOVLPSOH
VKDGHVRIJUH\WKHQFOLS
WH[WXUHVWRHDFKTo begin by
using the Posterize effect, which
allows us to simplify the image
into just a few shades of grey.
We’ve chosen to create four levels
from white to black. From here,
we can select the four areas of
brightness using the Magic Wand
tool and create separate layers for
each. Now the fun begins, as we
can simply copy in different
textures and colourful abstract
images, then drag them on top of
each layer so that the texture is
FRQÀQHGWRWKHVKDSHRIWKHOD\HU
,WOHWVXVÀOOLQHDFKDUHDRI
brightness with an image of our
choice. We’ve supplied a free set of
15 textures for you to experiment
with – see download link on the
left. There’s colourful soap bubble
images, rusty trays and close-up
details. Not only are textures like
this useful for this effect, they’re
also a fun way to get creative with
image blending for all sorts of
interesting results. Try copying a
texture on top of any photo then
simply go to the Layers Panel and
experiment with the layer blend
modes. The Overlay, Multiply and
Screen modes often work well.
www.digitalcameraworld.com
BLENDING IMAGES
STEP BY STEP SURREAL PORTRAIT EFFECTS
Learn how to clip layers in Affinity Photo to create a striking portrait effect
QUICK TIP!
Pick images that are
similar in brightness,
from dark to light,
then clip them
to the matching
shades of grey in
the portrait
01 POSTERIZE THE PORTRAIT
02 SELECT THE WHITES
Open the image into Affinity Photo. Go to the Layers
Panel, click the Adjustment icon and choose Black
and White. Tweak the sliders to control the mono
conversion. Next click Adjustment again and choose
Posterize. Set the Levels to 4. This divides the image
into four levels of brightness.
Press Cmd/Ctrl+Shift+Alt+E to merge a copy of all
the layers. Grab the Magic Wand from the toolbar.
Set Tolerance to 20% and uncheck Contiguous in the
tool options. Click on the whites to select them. Click
the Refine button and increase Smooth to 5px. Hit
Apply, then hit Cmd/Ctrl+J to copy to a new layer.
MAGIC WAND
TRICKS
03 MAKE LAYERS FOR EACH
04 REMOVE THE BACKGROUND
Double-click the layer name and rename it Whites.
Hit Cmd/Ctrl+D to deselect then highlight the merged
layer below. Use the Magic Wand to select the next
brightest range of tones, then repeat the process to
make separate layers for the highlights, midtones
and shadows. Proceed to rename each.
For the next step, we need to remove the background
layers from the effect. First highlight the bottom layer,
grab the Selection Brush, click ‘Snap to Edges’ in the
options and paint over the background to select it.
Click on the top layer and hit Delete, then repeat for
the four layers below.
05 ADD A TEXTURE
06 FINISH IT OFF
Open a texture image from your free download (link on
left), hit Cmd/Ctrl+C to copy then go to the portrait
and hit Cmd/Ctrl+V to paste. Drag the layer on top of
one of the layer names – Whites, Highlights, Midtones,
Shadows. This will clip the texture to the layer so that
the shape of the layer confines the texture.
Experiment by moving the layer around with the Move
tool to find the best position, or use the bounding box
to resize it. Copy in more textures and drag onto the
other layers to build it up. You might want to lighten or
darken the textures with Curves (Cmd/Ctrl+M) to
fine-tune the tones.
The Canon Magazine
The Magic Wand tool lets
us quickly select areas by
detecting similar pixels.
Here it lets us isolate the
different shades of grey
in our portrait so that
we can create layers for
each. There are a couple
of key controls that will
help you get the most
out of the tool. Firstly
the Tolerance slider; this
determines the range of
similar pixels the tool will
seek out. A low tolerance
means it will only search
for the exact same shade
of colour, while a large
tolerance expands the
range. The other key
setting is Contiguous.
With this checked you
can confine the search
to pixels connected
to one another.
61
THEPROINTERVIEW
62
www.digitalcameraworld.com
KAV DADFAR
As a photographer,
writer, speaker,
magazine publisher,
and guide, Kav Dadfar
is a true multi-skilled
professional. Despite the
rise of Instagram and
travel photographers,
he believes there’s
always new and unique
photo opportunities…
AV DADFAR is
the epitome of
a successful,
modern, Canon
professional
photographer.
He embraces the
business side of the
profession as much
as the creative and
is never shy to diversify his skills
in other areas. During the Covid-19
pandemic, several travel
magazines sadly went under, but
Kav – and fellow photographer
Jordan Banks – saw it as the
perfect opportunity to launch
JRNY. 7KHODWHVWÀIWKLVVXHLVD
SKRWRJUDSK\VSHFLDODQGDVWKHZHEVLWH
MUQ\PDJFRPH[SODLQV´7KHUHLVQREHWWHU
ZD\WRWHOODFRPSHOOLQJWUDYHOVWRU\WKDQ
WKURXJKFDSWLYDWLQJWH[WDQGLPPHUVLYH
LPDJHVµ.DY·VSKRWRJUDSK\KDVEHHQ
WHOOLQJDVWRU\IRUHGLWRULDODQG
FRPPHUFLDOFOLHQWVVLQFHKLVFDUHHUEHJDQ
DQGHYHQLQWKHVHLPDJHVDWXUDWHGVRFLDO
PHGLDGD\VKHVWLOOÀQGVQHZZD\V
WRH[SORUHWKHZRUOGDQGFDSWXUH
FROOHFWLRQVRIXQLTXHWUDYHOSKRWRV«
01 A DAZZLE OF ZEBRAS
A pack of zebras crosses the savanna
during the golden hour, the dust back lit and
scattered by the setting sun behind them
The Canon Magazine
Lens
Sigma 150-600mm f/5-6.3 DG OS HSM | Sports 014
Exposure
1/800 sec, f/8, ISO800
63
THEPROINTERVIEW
02 TRAVEL PORTRAITS IN BOTSWANA
“As much as I love landscape photography,
nothing beats photographing people.”
Lens
Canon EF 24-70mm f/2.8L USM
Exposure
1/200 sec, f/6.3, ISO500
03 AROUND THE CANON CAMERA
Kav’s main workhorse is a Canon EOS 5D
Mark IV. Three young Buddhist monks
gather to see the images on the screen
Lens
iPhone X back dual camera 4mm f/1.8
Exposure
1/280 sec, f/1.8, ISO20
04 FRAMED THROUGH THE BRANCHES
Dead trees in dry climates often don’t
fully decompose, and can act as dynamic
contrasting subjects against brighter skies
and foregrounds
Lens
Canon EF 24-70mm f/2.8L USM
Exposure
1/125 sec, f/14, ISO800
Tell us about your photography
journey. Where did it all start for?
)RUPHSKRWRJUDSK\VWDUWHGDWXQLYHUVLW\
,ZDVVWXG\LQJDUWGLUHFWLRQDQG
LQIRUPDWLRQGHVLJQDWZKDWLVQRZWKH
/RQGRQ&ROOHJHRI$UWDQGDVSDUWRIP\
FRXUVH,DOVRKDGWRVWXG\SKRWRJUDSK\
%XWWKDWZDVLQWKHHDUO\VWDJHVRIGLJLWDO
SKRWRJUDSK\VR,KDGWROHDUQWRWDNH
SKRWRVRQÀOPDQGGHYHORSWKHP
02
03
64
How would you describe your
approach and portfolio to
someone who’d never seen it?
$IWHU,JUDGXDWHGIURPXQLYHUVLW\,
ZRUNHGDVDQDUWGLUHFWRULQWKHZRUOGRI
DGYHUWLVLQJIRUDIHZ\HDUV'XULQJWKLV
WLPH,ZDVVWLOOWDNLQJSKRWRVEXWLWZDV
IRUWKHRGGFOLHQWKHUHDQGWKHUHDQG
PDLQO\DVDKREE\IRUP\VHOI%XWWKDW
LQÁXHQFHRIEHLQJDQDUWGLUHFWRUKDV
VWXFNZLWKPHLQERWKP\DSSURDFKDQG
P\VW\OHDQGKDVFRQWLQXHGWRGRVRVLQFH
WXUQLQJSUR6R,ZRXOGVD\,DPYHU\
PHWLFXORXVLQP\FRPSRVLWLRQRIDQLPDJH
DQGKRZWKHVXEMHFWOLJKWDQGFRORXUV
ZRUNWRJHWKHU,WKLQNZKHQVRPHRQH
ORRNVDWP\SRUWIROLRWKH\ZLOOQRWLFH
EULJKWYLEUDQWLPDJHVWKDWDUHFRPSRVHG
ZHOODQGRIWHQHYHQLIWKH\DUHÁHHWLQJ
PRPHQWVWKH\ORRNDOPRVWGHOLEHUDWH
Are travel and landscape
photography two distinct genres,
or do you think they cross over?
,ZRXOGVD\WKDWWKH\DUHGLVWLQFWJHQUHV
EXWDVDWUDYHOSKRWRJUDSKHU\RXKDYHWR
EHDEOHWRGRERWK,W·VYHU\UDUHWKDW\RX
ZLOOEHVHQWRQDQDVVLJQPHQWWKDWZLOO
MXVWLQFOXGHODQGVFDSHSKRWRV(YHQLIWKH
GHVWLQDWLRQLVWKHZLOGHUQHVV\RXZLOOVWLOO
www.digitalcameraworld.com
04
EHUHTXLUHGWRFDSWXUHDYDULHW\RISKRWRV
IURPFORVHXSVWRSRUWUDLWVRIJXLGHVRU
SHRSOH\RXPHHWHQURXWH6RZKLOVW,
EHOLHYHWKH\DUHGLIIHUHQWJHQUHVWKDW
UHTXLUHGLIIHUHQWW\SHVRIVNLOOVDQG
FUHDWLYLW\DVDWUDYHOSKRWRJUDSKHU\RX
KDYHWREHDEOHWRVKRRWDZKROHYDULHW\
RIVXEMHFWVDQGVW\OHV
GHSHQGLQJRQZKDW,·PSKRWRJUDSKLQJ,Q
ODQGVFDSHSKRWRJUDSK\ZKHQP\FDPHUD
LVRQDWULSRG,ZLOOXVXDOO\EHVKRRWLQJ
LQ0DQXDOPRGH%XWLI,·PVKRRWLQJ
KDQGKHOGLQDFLW\,ZRXOGEHVKRRWLQJLQ
$SHUWXUHSULRULW\PRGH%XW,PD\VZLWFK
WR6KXWWHUSULRULW\LI,·PSKRWRJUDSKLQJ
IDVWPRYLQJDFWLRQOLNHDIHVWLYDO
Are your camera techniques the
same for travel and landscapes?
7KHELJJHVWGLIIHUHQFHIRUPHEHWZHHQ
WKHWZRLVWKDWZKHQ,·PVKRRWLQJ
ODQGVFDSHVPRUHRIWHQWKDQQRWIRU
P\EHVWSKRWRV,ZLOOEHXVLQJDWULSRG
DQGSUREDEO\DÀOWHURUWZRRIVRPHVRUW
7KLVLVEHFDXVHRIWKHORZOLJKWDQGWKH
GLVSDULW\LQOLJKWLQJEHWZHHQWKH
IRUHJURXQGDQGWKHVN\GXULQJWKRVH
KRXUV7KLVPDNHVODQGVFDSHSKRWRJUDSK\
DVORZHUSURFHVVZKHUH\RXFDQUHDOO\
WDNH\RXUWLPHWRFDSWXUHWKHSHUIHFW
FRPSRVLWLRQ:KLOHVRPHWLPHVWKLVLVDOVR
SRVVLEOHLQWUDYHOSKRWRJUDSK\XVXDOO\
\RXDUHVKRRWLQJKDQGKHOGDQGEHLQJ
PRUHUHDFWLYHWRSRVVLEOHÁHHWLQJ
PRPHQWVWKDWSUHVHQWWKHPVHOYHVVR\RX
QHHGWREHDEOHWRZRUNTXLFNHU
How important is planning when it
comes to travel photography?
3UHSDUDWLRQLVHYHQPRUHLPSRUWDQWZKHQ
LWFRPHVWRWUDYHOSKRWRJUDSK\EHFDXVH
\RXDUHVKRUWRQWLPHZKHQ\RXDUHRQ
ORFDWLRQ6RKDYLQJDFOHDUSODQDQGDOVRD
VKRWOLVWZLOOHQVXUH\RXGRQ·WZDVWHWLPH
6RPHWLPHV\RXPD\HYHQKDYHWRPDNH
VSHFLDODUUDQJHPHQWVRUJHWSHUPLVVLRQWR
EHDEOHWRSKRWRJUDSKVRPHZKHUHVRLW
SD\VWRVWDUWSODQQLQJ\RXUVKRRWZHOOLQ
DGYDQFH3DUWRIWKDWSODQQLQJDOVR
LQFOXGHVZRUNLQJRXWZKDW\RXDUHOLNHO\
WRQHHGVR\RXFDQSDFNDFFRUGLQJO\
How do you generally shoot?
Manual mode, Aperture priority?
0\VKRRWLQJPRGHVWHQGWRYDU\
The Canon Magazine
Talk us through how you prepare
for a big travel assignment…
,VWDUWE\JRLQJWKURXJKWKHEULHI
WKRURXJKO\DQGFRPSLOLQJDOLVWRI
TXHVWLRQVIRUWKHFOLHQW WKHUHZLOODOZD\V
EHTXHVWLRQV ,ZLOODOVRJLYHDQ\
IHHGEDFNDWWKLVVWDJH)RUH[DPSOHLW
PD\EHWKDWZKDWWKH\DUHDVNLQJIRULV
WRRDPELWLRXVLQWKDWWLPHIUDPH2ULW
PLJKWEHWKDWDSDUWLFXODUVKRWLVQ·W
SRVVLEOH,ZLOODOVRVWDUWWRSXOOWRJHWKHUD
VKRWOLVWRQDGD\E\GD\EDVLVWKDWZRUNV
PRVWHIÀFLHQWO\DQGPDUNLWRXWRQDPDS
)RUH[DPSOH,WU\WRJURXSVKRWVLQWRWKH
VDPHDUHDVRWKDW,PLQLPLVHKDYLQJWR
WUDYHOEHWZHHQORFDWLRQV,DOVRORRNDW
ZKDWSKRWRVDOUHDG\H[LVWIURPWKRVH
ORFDWLRQVVRWKDW,FDQWU\WRZRUNRXWQHZ
YLHZVRUDQJOHVWKDWKDYHQ·WEHHQFRYHUHG
2QFH,KDYHP\VKRWOLVW,·OOFRPSLOH
P\OLVWRIZKDW,ZLOOQHHGWRWDNHZLWKPH
DQGLIQHHGHGUHQWDQ\QHZHTXLSPHQW
What advice would you give to
aspiring travel photographers
SODQQLQJWKHLUÀUVWIHZWULSV"
,WKLQNRQHRIWKHELJJHVWPLVWDNHVQRYLFH
WUDYHOSKRWRJUDSKHUVPDNHLVWU\LQJWR
“Despite what most people
think, I actually travel much
less than I used to because
most of my time is spent
behind the desk”
65
THEPROINTERVIEW
05
06
05 SPOTTED HYENA AT A DISTANCE
In 2022, Kav travelled to the Okavango Delta
in Botswana with Desert & Delta Safaris
Lens
Sigma 150-600mm f/5-6.3 DG OS HSM | Sports 014
Exposure
1/600 sec, f/7.1, ISO1250
06 DESERTED LAND
A minimal composition echoes the empty
landscape of the desert: “There is just
something magical about the dunes.”
Lens
Canon EF 24-70mm f/2.8L USM
Exposure
1/125 sec, f/13, ISO800
07 EILEAN DONAN CASTLE, SCOTLAND
The still waters allow for stunning, crisp
reflections in the surrounding Loch Duich
Lens
Canon EF 24-70mm f/2.8L USM
Exposure
1/250 sec, f/9, ISO250
SDFNLQWRRPXFKLQWKHWLPHIUDPHWKDW
WKH\KDYH7KLVHQGVXSPDNLQJWKHP
UXVKDURXQGZLWKYHU\OLWWOHWLPHDWHDFK
ORFDWLRQ7KLVDOVRPHDQVWKDWWKH\DUH
OHVVOLNHO\WRZDLWDURXQGIRUWKHSHUIHFW
FRQGLWLRQVRUPRPHQWEHFDXVHWKH\ZDQW
WRFDSWXUHHYHU\WKLQJ
7KHUH·VDJRRGZD\WRORRNDWWKLQJV«
\RXDUHDOZD\VIDUEHWWHUUHWXUQLQJIURP
DWULSZLWKPDJQLÀFHQWVKRWVUDWKHU
WKDQPHGLRFUHVKRWV
66
You’re based outside of London…
but as a travel photographer, are
you usually on the move?
,GRQ·WDFWXDOO\WUDYHODVPXFKDVSHRSOH
PD\WKLQN,GR$ELJSDUWRIEHLQJD
WUDYHOSKRWRJUDSKHULVDOVRWKHERULQJ
VWXIIWKDW\RXQHHGWRGRDVDEXVLQHVV
RZQHU7KLQJVOLNHPDUNHWLQJ\RXUVHOI
DQGWU\LQJWRZLQQHZFOLHQWVDUHMXVWDV
LPSRUWDQWDVWUDYHOOLQJ,WHQGWREHDZD\
DURXQGIRXUWRVL[WLPHVD\HDU
Where would you like to visit that
you haven’t yet?
7KHUHDUHORWVRISODFHVWKDW,KDYHQ·WEHHQ
WKDW,ZRXOGORYHWRYLVLW,KDYHQ·WVHHQ
PXFKRI$IULFDVR,·GORYHWRYLVLWSODFHV
OLNH&KDGDQG%HQLQ,·GDOVROLNHWRYLVLW
VRPHRIWKH3DFLÀF,VODQGVOLNH6DPRD
Tell us about your most
memorable travel photography
experience so far...
,·YHEHHQYHU\OXFN\WRKDYHEHHQDEOHWR
WUDYHODORWLQP\FDUHHUDQGSHUVRQDOOLIH
ZLWKVRPHXQEHOLHYDEOHDPD]LQJDQG
VFDU\H[SHULHQFHV/LNHIRUH[DPSOHLQ
%KXWDQZKHUH,ZDVKRQRXUHGWRKDYH
EHHQLQYLWHGWRGLQQHUDWDIDPLO\ZLWK
SOXVSHRSOHIRUDFHOHEUDWLRQRIWKH
HOGHVWVRQRIWKHIDPLO\EHFRPLQJD
PRQN2UWKHUHZDVWKHWLPHZKHQ,VOHSW
RQDWUDLQSODWIRUPLQ7KDLODQG%XW,
JXHVVLI,ZDVWRFKRRVHRQHLWZRXOGEH
P\ÀUVWEDFNSDFNLQJWULSWR7KDLODQGDQG
WKHYHU\ODVWPRUQLQJWKDW,ZRNHXSLQ
P\KRWHOURRP,ORRNHGRXWRIWKH
ZLQGRZDWVXQULVHDQGMXVWUHPHPEHU
IHHOLQJOLNH,FRXOGQHYHUJREDFNWRP\
ROGFDUHHU$PRQWKDIWHUUHWXUQLQJKRPH
,TXLWP\MRELQDGYHUWLVLQJDQGVWDUWHG
SODQQLQJDURXQGWKHZRUOGWULS
Do you think the Instagram
effect has been good for travel
photography, or made it harder
to stand out from the crowd?
,WKLQNWKDWVRFLDOPHGLDLQJHQHUDOKDV
KDGERWKDSRVLWLYHDQGQHJDWLYHLPSDFW
RQWUDYHOSKRWRJUDSK\<HVLWLVPXFK
KDUGHUWRJHWRULJLQDOVKRWVRI
GHVWLQDWLRQVDVVRPXFKDOUHDG\H[LVWV
EXWLWKDVDOVRPDGHLWHDVLHUWRGLVFRYHU
QHZSKRWRJUDSKHUV,QP\UROHDVWKH
FRIRXQGHURI-51<7UDYHO0DJD]LQH, I
KDYHFRPPLVVLRQHGSHRSOHZKRVHZRUN,
KDYHFRPHDFURVVRQ,QVWDJUDP,WKLQN
WKHLPSRUWDQWWKLQJWRUHPHPEHULVWKDW
WKHUHLVDOZD\VWKHRSSRUWXQLW\WRFDSWXUH
VRPHWKLQJXQLTXH7UDYHOSKRWRJUDSK\
ZLOORIWHQEULQJWRJHWKHUDFRPELQDWLRQ
RIVXEMHFWOLJKWDQGFRPSRVLWLRQ7KHVH
YDULDEOHVDORQHFDQPHDQXQLTXHSKRWRV
DUHQHYHULPSRVVLEOHVRDOZD\VJRIRULW
www.digitalcameraworld.com
KAV DADFAR
07
And is there a misconception
about what a travel photographer
does in reality, compared to what
we might see online?
%HLQJDWUDYHOSKRWRJUDSKHULVYHU\
GLIIHUHQWWRWUDYHOOLQJDQGWDNLQJSKRWRV
<RXDUHXVXDOO\VKRUWRQWLPHRQDQ
DVVLJQPHQWFRXSOHWKDWZLWKDODFNRI
VOHHSORQJGD\VDQGWUDYHOOLQJIURPSODFH
WRSODFHDQGLW·VDYHU\GLIIHUHQWUHDOLW\WR
SHRSOHZDONLQJVORZO\RQWKHEHDFKDQG
HQMR\LQJFRFNWDLOVRQVXQORXQJHUV7KH
RWKHUSDUWLVWKDW\RXDOVRGRQ·WDOZD\V
JHWWRJRWRWKHSODFHVWKDW\RXUHDOO\
ZRXOGORYHWRDVLWWHQGVWREHWKHPRUH
SRSXODUGHVWLQDWLRQV6R\RXUDFWXDO
WUDYHOOLVWGLIIHUVDORWWR\RXUEXFNHWOLVW
When it comes to gear, have you
always used Canon cameras?
,KDYHRQO\HYHUXVHG&DQRQFDPHUDV
DOWKRXJK,GLGKDYHD)XMLÀOPFDPHUD
IRUDVKRUWWLPHLQXQLYHUVLW\%XWRWKHU
WKDQWKDWLW·VEHHQ&DQRQDOOWKHZD\
1RZDGD\V,KDYHD&DQRQ'0N,9DQG
DEDFNXS0N,,ERG\,WKLQNLW·VRQO\D
PDWWHURIWLPHEHIRUH,PRYHWRPLUURUOHVV
DWZKLFKSRLQW,ZLOOSUREDEO\UHSODFH
P\WUXVWHG0N,,,DOVRKDYHD'-,0DYLF
3URGURQHDQGD*R3URDVPRUHDQG
PRUHFOLHQWVQRZDOVRZDQWIRRWDJH
DQGYLGHRVDVZHOODVSKRWRJUDSKV
The Canon Magazine
STORY BEHIND THE SHOT
Grazing Zebras,
Botswana
Kav shares his first cover shot
for JRNY magazine, which
also went on to win the best
cover photo at the European
Publishing Awards
I was in the Makgadikgadi Pans
National Park in Botswana finishing a
story for issue three of JRNY when we
came across a herd of zebra grazing.
At first, the scene was too harsh
under the sun with dark shadows
falling across the scene. But then a
cloud covered the sun to give the
scene an even exposure. In that
instant, the herd slowly began to walk
away kicking up dust. But the only
thing missing was a point of interest
which suddenly came in the form of
one of the zebras turning and looking
at the camera before scurrying away.
I only managed to take four shots,
with only two when the zebra was
looking directly at the camera.
67
THEPROINTERVIEW
08 HABANA VIEJA RUMBA
08
A traditional Afro-Caribbean dance was in
full swing during a visit to Cuba, and Kav
found a quick pop on the vibrance levels
brings the image to life
Lens
Canon EF 24-70mm f/2.8L USM
Exposure
1/200 sec, f/5, ISO1600
09 GRAN TEATRO DE LA HABANA
Twilight provided the perfect opportunity
to contrast a fading blue sky with the
theatre’s bright lights. “Havana was built
to be photographed,” smiles Kav
Lens
Canon EF 24-70mm f/2.8L USM
Exposure
6 secs, f/8, ISO50
10 WAT PHO, BANGKOK
The Temple of the Reclining Buddha is one
of the most famous in Thailand. Kav shot
this quiet moment away from visitors,
using leading lines to the young monk
Lens
Canon EF 24-70mm f/2.8L USM
Exposure
1/200 sec, f/5, ISO800
What lenses do you use most often
and why? Are they different for
landscape and travel photos?
:LWKRXWDGRXEWWKDWWKHOHQV,XVHWKH
PRVWLVP\&DQRQ()PPI/
OHQV,W·VP\ZRUNKRUVHOHQVDQG
RI
P\VKRWVDUHWDNHQZLWKWKLVOHQV,QIDFW
,·GEHSUHWW\FRQÀGHQWRIEHLQJDEOHWRGR
PRVWDVVLJQPHQWVZLWKMXVWWKLVRQHOHQV
0\VHFRQGPRVWXVHGOHQVLVP\&DQRQ()
PPOHQVZKLFKLVDOVRVRPHWLPHV
DJUHDWRSWLRQIRUODQGVFDSHSKRWRJUDSK\
DVLWFRPSUHVVHVWKHGLVWDQFHVEHWZHHQ
REMHFWVIRUDSOHDVLQJUHVXOW
As well as being a professional
photographer, you’re a tour guide.
What’s the most challenging part
of teaching others?
,KDYHUXQSKRWRWRXUVDQGZRUNVKRSV
DOORYHUWKHZRUOG,W·VVRPHWKLQJWKDW,
WKRURXJKO\HQMR\DQGZLVK,FRXOGGR
PRUHRILIP\WLPHDOORZHG,WKLQNWKH
KDUGHVWSDUWDERXWWHDFKLQJLVSHRSOHDUH
RIWHQVHWLQWKHLUZD\VDQGJHWWLQJWKHP
WRFKDQJHEDGKDELWVXVXDOO\WDNHVORQJHU
WKDQDIHZGD\V2QRQHWRXUDJXHVWKDG
WKHPRVWXQXVXDOZD\RIKROGLQJWKH
FDPHUD7KLVZDVUHDOO\KDPSHULQJWKHP
DVWKH\NHSWJHWWLQJFDPHUDVKDNHHYHQDW
DFFHSWDEOHVKXWWHUVSHHGV$VPXFKDV,
NHSWUHPLQGLQJWKHPVXEFRQVFLRXVO\
WKH\ZRXOGVZLWFKEDFN
You’re also a competition judge
and writer. Do you think it’s
important for photographers to be
multi-skilled to have a career now?
,GRQ·WEHOLHYHWKDWDQ\RQHFDQZRUN
68
SXUHO\DVDWUDYHOSKRWRJUDSKHUWKHVH
GD\V3KRWRJUDSKHUVKDYHWREHPXOWL
VNLOOHGZKLFKLVZK\PDQ\UXQWRXUVRU
ZRUNVKRSVVHOOHERRNVDQGVKRRWRWKHU
JHQUHV6RPHOLNHPHKDYHDOVREHFRPH
ZULWHUV7KHUHLVMXVWIDUWRRPXFK
FRPSHWLWLRQWKHVHGD\VWREHDEOHWRMXVW
EHDWUDYHOSKRWRJUDSKHU7REHUHDOO\
VXFFHVVIXOÀQDQFLDOO\\RXQHHGWRH[SDQG
\RXUVNLOOVHWWRDEOHWREHDEOHWRRIIHUWKH
ZKROHSDFNDJHWRDFOLHQW
If all of that wasn’t enough, you
are also the founding editor of the
fantastic travel magazine JRNY,
ZKLFKLVQRZRQLWVÀIWKLVVXHDQG
has a spin-off podcast. What was
your vision for the magazine?
(YHUVLQFH,ZDV\RXQJ,KDYHZDQWHGWR
SXEOLVKP\RZQWUDYHOPDJD]LQH:KHQ
&RYLGVWUXFNDQGDQXPEHURIWUDYHO
PDJD]LQHVIROGHG,IHOWWKDWWKLVZDVWKH
SHUIHFWRSSRUWXQLW\WRÀOOWKHJDS7KDW·V
ZKHQ-RUGDQ%DQNVDQG,IHOWZDVWKH
ULJKWWLPH2XUJRDOZDVWRFUHDWHDWUDYHO
PDJD]LQHXQOLNHDQ\WKLQJHOVHRXWWKHUH
2QHWKDWFRPELQHGJUHDWMRXUQDOLVP
EHDXWLIXOWUDYHOSKRWRJUDSK\TXDOLW\
SURGXFWLRQDQGPLQLPDODGYHUWLVLQJ«
PRUHRIDFRIIHHWDEOHERRNWKDQWKHXVXDO
QHZVVWDQGW\SHRISXEOLFDWLRQ
:HODXQFKHG-51<7UDYHO0DJD]LQH
WKURXJKDVXFFHVVIXOFURZGIXQGLQJ
FDPSDLJQZKHUHZHKLWRXUIXQGLQJ
WDUJHWZLWKLQMXVWHLJKWGD\V,QWKHWZR
\HDUVVLQFHRXUODXQFKZHKDYHSXEOLVKHG
ÀYHLVVXHVRI-51<DQGKDYHZRQ
PXOWLSOHDZDUGVLQFOXGLQJWKH
SUHVWLJLRXVWUDYHOPDJD]LQHRIWKH
\HDUDZDUGDIWHUMXVWRQHLVVXH
www.digitalcameraworld.com
PROFILE
Kav
Dadfar
Landscaper and travel photographer
09
Kav Dadfar is a professional travel and
landscape photographer based in Surrey,
UK. He started taking photos and
developing film at university, then went on
to work as an art director in London – where
photos played a part in his everyday
workflow. Since turning professional,
Kav has worked on editorial and
commercial assignments and shot
hundreds of stock images, for clients
including National Geographic, Wanderlust
Travel Magazine, Lonely Planet, Rough
Guides, American Express, Sunday Times
Travel, The Guardian, and PhotoPlus.
Kav is also a writer, tutor, and judge. He
has written over 500 articles on travel and
landscape photography, runs group photo
tours as part of That Wild Idea with Jordan
Banks – the photographer he co-founded
JRNY Travel Magazine with – and is a judge
on the Wanderlust Travel Magazine
Photography of the Year competition.
www.dadfarphotography.com
10
Where is the magazine headed
next, what future plans are there?
,W·VDQH[FLWLQJWLPHIRUXVDW-51<ZLWK
ORWVLQWKHSLSHOLQH:HUHFHQWO\ODXQFKHG
RXUWUDYHOSKRWRJUDSK\FRPSHWLWLRQ WKH
:RUOG7UDYHO3KRWRJUDSK\$ZDUGV LQ
SDUWQHUVKLSZLWK:LOG)URQWLHUV7KHDLP
RIWKLVIUHHWRHQWHUFRPSHWLWLRQLVWRÀQG
WKHEHVWWUDYHOSKRWRJUDSK\LQWKHZRUOG
:LWKDWRSFDVKSUL]HRI LWLVD
IDQWDVWLFRSSRUWXQLW\IRUDQ\WUDYHO
SKRWRJUDSKHUQRWRQO\WRZLQWKHSUL]H
EXWDOVRSXWWKHLUEHVWVKRWVLQIURQWRIXV
at -51<DQGRXULQFUHGLEOHSDQHORI
MXGJHV&KHFNRXWWKHFRPSHWLWLRQDW
MUQ\PDJFRPSKRWRFRPS
“A big part of being
a travel photographer
is also the boring stuff
that as a business owner
you need to do”
With so many elements to your
career, what’s your favourite way
to spend your working time?
$VPXFKDV,ORYHSKRWRJUDSK\,UHDOO\GR
HQMR\ZRUNLQJRQHDFKLVVXHRI-51<
(YHU\LVVXHKDVLWVFKDOOHQJHVDQG
VOHHSOHVVQLJKWVEXWZKHQ\RXJHWWKH
ÀQDOSULQWHGPDJD]LQHLW·VDOOZRUWKLW
7KHWKLQJWKDW,ORYHPRVWDERXW
SXEOLVKLQJHDFKLVVXHLVWKDW,UHPHPEHU
The Canon Magazine
Next issue: David Lund, liquid
photography and video specialist
LWIURPWKHYHU\VWDUWZKHQZHUHFHLYH
WKHSLWFKIURPRQHRIRXUFRQWULEXWRUV
ULJKWWKHZD\WRZKHQZHGHEDWHZKLFK
SKRWRVZRUNEHVWIRUWKHIHDWXUH
)URPDSKRWRJUDSK\SRLQW,ORYH
VKRRWLQJVWRULHVIRU-51<HYHU\QRZDQG
DJDLQ'HVSLWHZKDWPRVWSHRSOHWKLQN,
DFWXDOO\WUDYHOPXFKOHVVWKDQ,XVHGWRDV
PRVWRIP\WLPHLVVSHQWEHKLQGWKHGHVN
VRUWLQJRXWWKHPDJD]LQHFRQWHQW
And lastly, where are you headed
next? What’s the destination for
your next big travel shoot?
1H[WIRUPHLVDPRQWKORQJWULSWR
&DQDGDLQ6HSWHPEHUIRU-51<:HDUH
ZRUNLQJRQDIHZELJSURMHFWVDQG,·P
OXFN\HQRXJKWREHKHDGLQJRXWWRWKH
SKRWRJHQLFDUHDVRI%ULWLVK&ROXPELD
1RYD6FRWLDDQG6DVNDWRRQ
69
Photo essays from PhotoPlus readers
and professional photographers alike
JOIN IN
THE FUN!
One of the great things
about photography is
being able to share your
view of the world. This
month, one photographer
captures the splendour of
English gardens, while
another shares some of
his favourite portraits.
We want your photos
and stories! For your
chance to show off your
images in PhotoPlus, email
three to five high-resolution
JPEGs, along with a brief
synopsis – explain why you
took the shots, the location,
whether they’re part of an
ongoing project or a one-off
shoot, and anything else
unusual or interesting. Also
include Canon EOS camera,
lens and exposure details.
Email images and info to
photoplus@futurenet.com
Catch us online at
www.facebook.com/
photoplusmag
www.instagram.com/
PhotoPlusCanonMag
www.twitter.com/
photoplusmag
01
PROJECT INFO
Green-fingered photographer Clive Nichols
heads to some of his favourite spots in
England to take wonderful garden scenes
NAME: Clive Nichols
LOCATIONS: Various gardens
across England
MISSION: To take pictures of
the best English gardens for his
book: Brilliant English Gardens
KIT: Canon EOS 5DS R, Canon EF
24-70mm f/2.8L USM, Canon EF
70-200mm f/4L USM
WEBSITE: www.clivenichols.com
70
Brilliant English
garden images
I
WWRRNPHRYHUÀYH
years to gather all of
the images to put
together my book:
Brilliant English
Gardens. I wanted to present
gardens from all over England
so I travelled far and wide in
search of the best ones, from
Devon in the west to Norfolk
in the east, and from Sussex in
the south to Northumberland
in the north. I also wanted
each of the 27 gardens to be
shown in its full glory and that
meant I could devote 12 or 14
pages to most of the garden
locations featured.
The gardens featured are
not all well known – in fact,
some have never been
photographed before. My aim
from the outset was to open
the eyes of readers to gardens
www.digitalcameraworld.com
YOUR PHOTO STORIES
03
04
01 THE OLD VICARAGE
Borders bursting with colour in May at The Old Vicarage,
Wormingford, in Essex
02
that I myself loved to
photograph. I had planned to
publish the book in Spring
2020 but then the pandemic
hit and put my plans on hold.
During the lockdowns I was
able to visit gardens that
would normally be busy with
visitors and have the whole
place to myself, which was
wonderful and one of the few
positives to come out of the
pandemic. Luckily, the
ZHDWKHUGXULQJWKHÀUVW
lockdown in the Spring of
“Most of the images
were shot at dawn or
sunset for maximum
atmosphere”
The Canon Magazine
2020 was also some of the best
we have experienced in the
past decade, with perfect skies
and little wind.
I shoot all of my images
on a Canon EOS 5DS R and
DOZD\VXVHWKH5$:ÀOH
format for best image quality.
,WKHQSURFHVVWKH5$:ÀOHV
using Adobe Camera Raw
and then some basic work in
Photoshop CC. Most of the
images were shot at dawn
or sunset for maximum
atmosphere in the golden
hour. I load up my camera bag
with a Canon EF 24-70mm
f/2.8L USM and Canon EF
70-200mm f/4L USM and this
usually covers me for most
scenarios, although I do
sometimes reach for special
tilt-shift lenses to keep the
vertical lines in buildings
absolutely straight when the
shot calls for adjustment.
Lens
Canon EF 70-200mm f/4L USM
Exposure
1/5 sec, f/11, ISO100
02 SILVER STREET FARM
Sunrise on the camomile mound and fennel, Silver Street Farm, Devon
Lens
Canon EF 24-70mm f/2.8L USM
Exposure
1/60 sec, f/11, ISO100
03 WOLLERTON OLD HALL
Misty morning at Wollerton Old Hall, Shropshire
Lens
Canon EF 70-200mm f/4L USM
Exposure
1/10 sec, f/11, ISO100
04 QUINTON OLD RECTORY
Autumn colours in November at Quinton Old Rectory,
Northamptonshire
Lens
Canon EF 24-70mm f/2.8L USM
Exposure
1/15 sec, f/11, ISO100
FEEDBACK
why it’s so
Clive’s lovely English garden photographs and show
first light,
tiful
beau
important to get up early to make use of the
sun beams,
ning
whether it’s shooting in the golden hour with stun
to fill up
like
you’d
or a gentle mist that covers the landscape. If
sure to
be
os
phot
your memory cards with some cracking garden
some
for
ens,
check out Clive’s new book, Brilliant English Gard
additional inspiration and locations.
71
PHOTOSTORIES
01
PROJECT INFO
Perfect people pictures
Tony shares some of his favourite portraits of interesting subjects
NAME: Tony James
LOCATIONS: Old Coach House Studio,
Farningham, Kent and on location
MISSION: The challenge of taking
the perfect portrait
KIT: Canon EOS R5 and Canon
EOS 5D Mark IV, Canon RF 50mm
F1.8 STM, Canon RF 24-105mm
F4L IS USM, Canon EF 85mm
f/1.4L IS USM
www.tony-james-photography.com
72
y passion for
portrait
photography
has been
inspired by my
love of ballet and the
challenge of capturing
the shape and movement
of dancers as they
practise their art. 0\ÀUVW
opportunity came about under
the mentorship of the late
Andrew Appleton and the
dancer Alexa Hilton, who took
the time to explain some of
the complexities of dance,
even getting me to attempt
some of the movements!
M
More recently, I’ve had the
opportunity to photograph
Kate Byrne and other dancers
in the rehearsal studios of the
English National Ballet.
Another reason for my interest
in portraiture is the challenge
of engaging with the person
with the aim of creating a
rapport to get the best out of
both the subject and myself.
Shooting in the studio gave
me the opportunity to hone
P\VNLOOVLQFDSWXULQJWKHÁRZ
of the dress and the point of
balance of the movement. I’ve
learnt that a photographically
good image might not be good
for the dancer if they aren’t
happy with the execution of
the movement. Therefore
communication and checking
your shots regularly is vital.
My image of Ellie was
inspired by an interest in
6FDQGLQDYLDQGUDPDVDQGÀOP
noir. The venetian blind effect
was created by attaching a
*RERVODWWHGÀOWHUWRWKHIURQW
of the studio light, taking care
to place Ellie so that her eyes
were not concealed by the
darker shadows. A second
light source was placed
behind her to create a rim
highlight on her hair.
www.digitalcameraworld.com
YOUR PHOTO STORIES
03
02
I’ve been brushing up on
my outdoors portraits too;
working with natural light is
totally different to the studio.
My image of Terri was taken
in Venice and I wanted to
include the wonderful
buildings along the canal in
the background, though I
didn’t want them to be a
distraction. I settled on an
aperture of f/4 in the end
which gave just the right
balance of blur and detail.
My photo of Romario was
taken at the Old Asylum
Chapel, Peckham in London.
It’s a crumbling Grade II
building with an incredible
atmosphere. I continued with
my theme of attempting to
create a sense of location
without it becoming a
dominant factor in the shot.
04
01 ELLIE
A studio shot inspired by Tony’s interest in Scandinavian dramas and
the film noir genre
Lens
Canon EF 85mm f/1.4L IS USM
Exposure
1/125 sec, f/8, ISO100
02 KATE
FEEDBACK
from using different
Tony has shown a broad range of camera skills
ol over the lighting,
lighting setups in the studio where he has full contr
are nice and sharp,
to working outside in natural light. His portraits
and he’s posed
with the focus expertly placed on the model’s eyes, with top
. Along
them well too, to get the best portraits of them
tion skills too
camera knowledge, he clearly has great communica
le pictures.
and this has rewarded him with some great peop
A studio shoot gave Tony the opportunity to hone his skills and
capture the flow of the dress and balancing point of the movement
Lens
Exposure
1/125 sec, f/9, ISO100
03 ROMARIO
Shooting at the Old Asylum Chapel, in Peckham, London,
Tony created a space for Romario for a wistful portrait pose
Lens
Canon EF 85mm f/1.4L IS USM
Exposure
1/100 sec, f/1.8, ISO800
04 TERRI
Tony experimented with natural light in Venice shooting with his
model on the canals
Lens
The Canon Magazine
Canon RF 50mm F1.8 STM
Canon RF 24-105mm F4L IS USM
Exposure
1/500 sec, f/4, ISO200
73
Professional photographers reveal their top six
tools of the trade they couldn’t shoot without
“As a scientist, I enjoy a technical
challenge and learning about
the position of the galactic core”
WHAT DO I DO?
Jen Rogers
Devon-based Jen has a passion for the outdoors and takes her camera kit with
her on hiking adventures to take incredible astro photographs and seascapes
was given a used
Praktica camera by
my parents for my
22nd birthday, and
I’d just moved to
Scotland to study for my
PhD, where I discovered
hill walking. The camera
became an extension of my
love of the outdoors and
remains so to this day. In
2007, I had the opportunity to
travel through South America
and realised I wouldn’t be able
WRFDUU\HQRXJKÀOPZLWKPH
so I switched to a digital
Canon EOS 450D, and have
since upgraded to better
I
74
Canons over the years. I now
shoot with a Canon EOS 5D
Mark IV and an EOS R.
In 2010, I moved to
Bideford on the north coast
of Devon. I’m attracted to wild
places and have spent many
hours exploring the area by
foot or kayak, particularly
around Hartland with its
spectacular cliffs and hidden
coves. I like moody weather
and bold colours, so I often
shoot at dawn or dusk or in
stormy weather.
Then I went to a talk by
astrophotographer Stephen
Banks in 2018, which
triggered a new passion for
astrophotography. As a
scientist, I enjoy a technical
challenge and learning about
the position of the galactic
core in the sky at different
times of the year. I also love
shooting the Aurora and have
been lucky enough to visit
Iceland and Norway. My aim
is to capture the Milky Way,
star trails or Aurora in the
context of the landscape,
particularly over the sea. I
spend a lot of time planning
how to frame the Milky Way
RYHUWKHFRDVWOLQHRUUHÁHFWLYH
pools on the beach.
Jen Rogers
jenrogersphotography.co.uk
JEN is an enthusiast astro and
seascape photographer based in
the stunning setting of north
Devon, with a love for the
outdoors, hill walking and
kayaking. She’s a consultant at
the University of Bath and her
passion is the natural world and
astrophotography. In 2020 and
2022, she was shortlisted for the
coveted Astrophotographer of
the Year award and was also the
runner-up for the Landscapes
At Night category in the
Landscape Photographer of
the Year 2022 competition.
www.digitalcameraworld.com
CANON PROS & THEIR KIT
IN JEN’S BAG
01
02
06
03
05
04
01
02
Canon EOS 5D Canon EOS R
WEB: www.canon.co.uk
Mark IV
WEB: www.canon.co.uk
MY FIRST digital
camera was a Canon
EOS 450D though I
quickly upgraded to the
EOS 5D Mark II and
eventually moved onto
the Mark III and Mark IV
models. The Mark IV is
my favourite. It’s great
in low light and I’ve
used the Canon format
for so long it’s become
intuitive, which is great
in the dark. The touch
screen and bulb timer
are also very useful.
I love it for seascapes
too, which I shoot in
Manual mode using
Live View, making it
very easy to bracket
my exposures.
The Canon Magazine
MY husband bought
this for me in 2019 as it
is significantly lighter
than my Canon EOS 5D
Mark IV but has a
similar 30.3MP
full-frame sensor. I now
largely use the EOS R at
night, as the electronic
viewfinder and the
Focus Peaking feature
in Live View make it
easier to focus on the
stars and also to focus
stack foregrounds.
I also use a Canon
EF-EOS R adapter so I
can continue to use my
old Canon EF lenses on
the newer EOS R
mirrorless body.
03
04
Canon EF
iOptron
17-40mm f/4L SkyTracker
USM
Pro
WEB: www.canon.co.uk
WEB: www.ioptron.com
THIS IS my go-to lens
which I use most often
for landscape work. It’s
perfect for emphasizing
foreground, and for
capturing seascapes,
so it’s the lens I usually
have glued to my
camera in the day.
I have two kit bags,
one for shooting
seascapes with my
Canon EF 17-40mm
f/4L USM and Canon
70-200mm lenses as
well as my LEE filters,
and another bag for
night shots with several
fast prime lenses, and
my StarTracker inside.
THIS IS my trusty
tracker which rotates at
the same speed as the
Earth in the opposite
direction. Once aligned
with Polaris, it keeps
the stars still in the sky
for long exposures to
be used without
capturing star trails. I
use this for the majority
of my Milky Way shots
to give them incredible
depth. In addition, I also
use a Pixel TW283X
intervalometer, which is
essential for shooting
star trails and tracked
Milky Way exposures in
bulb mode.
05
06
Samyang
Sigma
AF 24mm f/1.8 100-400mm
WEB: www.samyanglens.com
f/5-6.3 DG DN
THIS IS my favourite
OS | C
night lens. Very sharp,
fast, and the Milky Way
is still significantly big
in shot. The majority
of my favourite
nightscapes are shot
with this. Taking a night
landscape is always a
compromise between
getting as much detail
in the Milky Way as
possible and also
putting it into context
within the landscape. I
tend to take two shots,
one of the sky and one
of the foreground and
then stitch them
together in software for
a totally sharp scene.
WEB: www.sigmauk.com
A TELEPHOTO lens
may sound like a
strange choice for
landscapes but I
actually use two of
them – the Sigma
100-400mm f/5-6.3
DG DN OS | C and my
Canon EF 70-200mm
f/4L USM. Both are
great for compressing
the perspective, but the
Sigma, with its larger
zoom range, is also
ideal for pictures of the
moon and big wave
shots at the coast.
75
NEWSERIES
CANON
SCHOOL
In part 30 of our series: Using your Speedlite off-camera
opens up a range of lighting options for more creative photos
MARCUS HAWKINS
PHOTO EXPERT
Marcus has been passionate about
photography for more than 25
years. A former editor of our sister
publication Digital Camera, he has
written about photography and
cameras for a wide range of clients,
including Canon and Jessops, and
uses a Canon EOS 5D Mk IV.
Get up to speed on Speedlites
A flashgun (or two) lets you get creative with your lighting in ways that other lights can’t
A
EXLOWLQÁDVKFDQ
RQO\JHW\RXVRIDU
,WVÀ[HGSRVLWLRQ
DQGFRPSDUDWLYHO\
ORZSRZHUUHGXFH\RXU
FUHDWLYHÁDVKRSWLRQV
VRPHZKDW6WHSXSWRD
6SHHGOLWHDQG\RXRSHQ
XSPRUHRSSRUWXQLWLHV
Being able to take the Canon
Speedlite off-camera, use
PRGLÀHUVVXFKDVVRIWER[HV
and snoots, and add a second
RUWKLUGÁDVKJXQHQDEOHV\RX
WRFKDQJHWKHPRRGRI\RXU
pictures and give them a more
professional look.
%XWZK\FKRRVHD6SHHGOLWH
when continuous LED light
offers a number of the same
EHQHÀWV"<RX·UHDEOHWR
H[SHULPHQWZLWKWKHSRVLWLRQ
of an LED light to get a more
FUHDWLYHORRNIRUH[DPSOH<RX
FDQDOVRPRGLI\WKHRXWSXWIRU
PRUHÁDWWHULQJRUGUDPDWLF
results – although nowhere
QHDUWRWKHVDPHH[WHQWDV\RX
FDQZLWKDÁDVKJXQLWKDVWR
EHVDLG:KDW\RXVHHLVZKDW
\RXJHWZLWKDQ/('OLJKWVR
LW·VVLPSOHUWRXVHWKDQD
Speedlite, and it can also be
easier to change the colour of
the lighting to make it blend in
ZLWK RUVWDQGRXWIURP DQ\
ambient light in a scene.
Speedlites still rule for
PDQ\VLWXDWLRQVWKRXJK7KH\
offer more power than LED
76
lights, in a smaller, lighter and
PRUHPDQRHXYUDEOHIRUP<RX
FDQXVHDÁDVKIURPIXUWKHU
DZD\VRIWHQDQGVSUHDGWKH
OLJKWZLWKVRIWER[HVDQG
umbrellas, and still have bags
of power in reserve to achieve
DJRRGH[SRVXUH3HUKDSV
WKHLUELJJHVWEHQHÀW
compared with LEDs, is the
ZD\WKDW6SHHGOLWHVHQDEOH\RX
WRVHSDUDWHWKHÁDVKH[SRVXUH
and the ambient light
H[SRVXUHDQGH[SHULPHQW
ZLWKH[SUHVVLYHFRPELQDWLRQV
of sharpness and blur, such as
VORZV\QFÁDVKDQGVHFRQG
FXUWDLQV\QF
Flash head
The majority of Speedlite
s
allow you to rotate and
swivel the flash head in
order to bounce the flash
Connection
Speedlites and
transmitters that
have a Multi-Function
foot, such as the
EL-5 shown here, are
compatible with EOS
R series cameras
Display
Adaptor
conventional
To use a Speedlite with a
camera,
foot on an EOS R series
tional
you’ll need to attach the op
ter AD-E1
Multi-Function Shoe Adap
Advanced Speedlites have
onbody controls and a screen
where you can monitor
adjustments – although you
can also do this on the camera
www.digitalcameraworld.com
FLASH PHOTOGRAPHY
TAKE CONTROL
Flash exposure modes
Understand how the flash exposure can be affected
peedlites give you
the opportunity to
try different flash
modes, but ETTL and
Manual are the main
options. ETTL (Evaluative
Through-The-Lens) is an
automatic form of flash
exposure, where the camera
fires a brief pulse of flash
before the main exposure.
It uses this initial pulse to
measure the light that’s
reflected by the subject back
through the lens to set the
flash exposure. The ambient
light is also analyzed too. To
optimize the exposure, the
camera’s AF points act as a
guide to where the subject
is and, if the lens transmits
distance information, how far
away it is too. Face detection
can also be used to prioritize
the flash output for people.
ETTL doesn’t always get it
right. If there are reflective
objects in a scene, such as
glass or mirrors, the camera
might shut off the flash
exposure too soon. Bright or
dark subjects can also throw
the camera. Manual flash
offers a consistent output, but
you have to set the power of
the flash yourself. You can
typically reduce the power
S
from 1/1 (full power) down to
1/128th power, although some
Speedlites let you go lower
– such as the EL-5, which goes
to 1/1024th power. Higher
power settings gives you a
brighter flash, but you’ll have to
wait for the flash to recycle.
Lower power flash lets you
take pictures quickly, as the
flashes are shorter – but you
may need to move in closer.
To increase a flash exposure when
using ETTL mode, you can use
Flash Exposure Compensation to
brighten or darken subjects
For a brighter Manual flash
exposure, increase the power.
Alternatively, move the Speedlite
closer, or use a wider aperture
The pale setup resulted
in a flash exposure that
was too dark, but it’s
easy to override this
Experiment with flash modifiers
Softbox
Control the quality and intensity of the light with accessories
he glare of a bare
flashgun can be
harsh, but there are
huge range of modifiers
available that allow you to
soften and shape the light.
Umbrellas and softboxes are
popular choices for taking the
edge off flash. There are two
main types of umbrella: shoot
through, where you aim the
Speedlite at the subject
through the fabric, and
T
The Canon Magazine
reflective, where the umbrella
and Speedlite are reversed and
the light is bounced off the
white, silver or gold interior.
Softboxes diffuse the flash
but also give you more control
over the direction of the light.
They have solid sides, with a
panel of diffusion material at
the front. The addition of a grid
or ‘egg crate’ in front of this
material can reduce the spill of
the light, giving a more spotlit
effect – albeit a soft
one. The larger the
light source, the
softer the light is, so
moving the Speedlite
closer to the subject
will give you more
flattering results.
If the Speedlite has a
rotating head, you can try
bouncing the light off a
nearby white wall or ceiling
instead of using a diffuser.
Bare
77
CANONSCHOOL
OPTICAL AND RADIO
Taking flash off-camera
Triggering your Speedlite wirelessly gives you more freedom
he major benefit of
a Speedlite over a
built-in flash is that
you can use the Speedlite
remotely, allowing you to
illuminate the subject in
more interesting ways.
When you take a flashgun
off the camera, you’ll need a
way of operating and triggering
it remotely. While you can use
an off-shoe cord to keep the
Speedlite connected to the
camera’s hotshoe, wireless is
the most convenient way to go.
You’ll need a wireless
transmitter on the camera
– some EOS cameras have one
built in, but most will need a
transmitter attached to the
hotshoe. If you’re using Canon
Speedlites, then you also have
the option of using one of
Canon’s Speedlite transmitters
– relatively small and
lightweight devices that slot
onto the hotshoe or MultiFunction shoe of a compatible
Canon camera.
A wireless receiver is also
required on the flashgun. Many
flashguns have a wireless
receiver/transmitter function,
so you can use one flashgun on
the camera to send commands
to another remote flashgun.
There are two types of
wireless flash control: optical
T
and radio. Optical uses
infra-red light to trigger a
remote flashgun. This requires
a ‘line of sight’ between the
transmitter and the receiver.
If they cannot see each other
– or there are no walls or a
ceiling for the beam of light to
be reflected from – then the
flash won’t fire.
Radio transmission doesn’t
have this limitation, so you’re
able to hide the remote
Speedlite behind and even
inside objects in the scene that
you’re shooting. You can also
lock them away in a fully
enclosed softbox or other light
modifier, and freely change
settings and fire the flash
without having to constantly
open and close the modifier
– although you may still
need to change the batteries.
For this setup I used a
Westcott Apollo Orb
Speedlite Octabox Kit to
turn the single Speedlite into
a large overhead light source
Speedlite remote control options
There are now even more options for adjusting your Speedlite
ONE OF the advantages of using a
Canon Speedlite is that you can
control it using the camera’s
interface. It’s much easier to navigate
the familiar menu structure and
touchscreen of an EOS body than
the small screen on the back of a
Speedlite (if it indeed has one).
You’ll find the flash settings menu
under ‘External Speedlite control’ in
the shooting menu. You may be able
78
to customize one of the camera
buttons as a shortcut to this menu,
which can help to speed things up.
The Speedlite EL-5 and Speedlite
Transmitter ST-E10, both of which
are designed for the EOS R system’s
Multi-Function shoe, include a button
that automatically brings up the
flash functions menu on the
camera display. For added
convenience, the EOS R6 Mark II and
EOS R50 have a Quick
Flash Group Control
option, shown here,
which comes in handy
when you’re using more
than one Speedlite.
This feature enables
you to customize one of the buttons
as a shortcut to an overlay for
adjusting multiple Speedlites. The
Speedlite EL-5 also makes it possible
to configure flash
settings remotely on your
smartphone, via Canon’s Camera
Connect app.
www.digitalcameraworld.com
FLASH PHOTOGRAPHY
SHUTTER CHOICE
Know your camera’s flash sync speed
What happens if you set a shutter speed that’s too fast or too slow?
he flash sync speed
of an EOS camera
determines the
fastest shutter speed that
it’s possible to use flash
with for a standard
exposure. It’s typically
1/200 sec, but it does vary.
It can even change
according to the Shutter
mode you’ve set, if your
camera offers this function.
For example, the mirrorless
EOS R6 Mark II can sync with
EL/EX Speedlites at 1/200 sec
or slower when it’s set to the
mechanical shutter, but the
sync speed jumps to 1/250 sec
with the electronic first
curtain shutter.
If the subject you’re
shooting requires a shutter
speed that’s faster than the
flash sync speed in order to
expose it correctly, then the
picture may end up looking too
T
To avoid blur when using Av mode
in low light, you can ensure the
camera maintains a shutter speed
that matches the sync speed
bright. This can often happen
when you’re shooting outdoors
on a sunny day and you’re
using a large aperture to blur
the background. In this
situation, you’d normally use a
fast shutter speed to avoid the
image being overexposed, but
when the Speedite is switched
on, the camera has to use the
longer exposure time required
by the flash. If the sync speed
is 1/200 sec, for example, but
the scene requires a shutter
speed of 1/800 sec to expose
it correctly, then the image will
be overexposed by two stops.
There are a few ways to
avoid this. You can fit a Neutral
Density filter to the lens or set
a lower ISO or a smaller
aperture in order to bring the
scene’s shutter speed down to
the flash sync speed. Many
Speedlites also offer the option
to High Speed Sync, which
allows you to use a shutter
speed that’s faster than the
flash sync – although the
Speedlite may need to be
moved closer to the subject
as light power will be lower.
If you’re shooting in the
dark, you’re unlikely to have
this problem. Watch out for
motion blur though. You can
reduce this by setting the
camera’s shutter speed to the
sync speed in Manual mode.
Shooting in the dark 00 sec sync
With the camera set to the 1/2
speed in Manual mode, I manually adjusted
the flash power to control the exposure
School tip Zooming flash heads
Take advantage of this Speedlite feature for creative effect
MANY flashguns have the capability to
zoom the flash head to match the focal
length of the lens. This ensures that
flash power isn’t wasted and coverage
is matched to the field of view of the
focal length. Some Speedlites do this
automatically – which is handy if you’re
using a zoom lens – but you can also
manually adjust the zoom position.
Changing the zoom is a creative way to
The Canon Magazine
control the look of your flash pictures.
Zooming to a focal length that’s wider
than the lens, for example, can help to
spread the light for a slightly more
flattering look (although this can lead
to underexposed images if the flash
isn’t powerful enough).
Alternatively, zoom the flash in
when using a wider lens for a spotlit
effect similar to using a snoot.
PART 31
Next issue:
Controlling
colours in your
images
High-end Speedlites offer far-reaching zoom options, such as
200mm, whereas on the EL-100 you’re limited to 28-50mm
79
CANONSCHOOL
SOFTWARE
SOLUTIONS
Canon EOS expert Brian explains how to safely store your
images automatically with Canon’s cloud storage service
BRIAN WORLEY
CANON PRO
Brian is a freelance photographer
and photo tutor, based in
Oxfordshire. He has unrivalled
EOS camera knowledge as he’s
been working for Canon for over
15 years and can help you
master all EOS products.
www.p4pictures.com
Store images with image.canon
Cloud storage service takes the hassle out of saving photos from holidays and travel trips
mage.canon is a cloud
service designed to
VLPSOLI\\RXUZRUNÁRZ
Connecting your Wi-Fi
compatible Canon camera
to image.canon allows
you to seamlessly upload
your images and movies
in their original format
and quality, then access
them from the dedicated
app or a web browser and
I
automatically forward
them to your computer,
mobile devices and third
party services.
Image.canon is also an
online photo storage service
designed for long term and
short-term storage. You have
up to 10GB of free storage that
can be increased for a monthly
fee, and a 30-day short term
storage with unlimited
capacity. Many recent Canon
EOS cameras with built-in
Wi-Fi can be used with the
service. You’ll need a mobile
device, the Canon app and
an internet or mobile data
connection to complete the
setup. There you’ll need to
create a Canon ID or login to
an existing one, which will
also add the camera to your
MyCanon account. Once setup,
images can be uploaded
wherever you have an internet
connection. Many recent
cameras will upload images
you choose from the playback
screen directly to the Canon
service, others will need you
to transfer them to an app on
your phone or computer to
upload. You transfer your
images to your account’s
permanent storage.
STEP BY STEP KEEP YOUR PRECIOUS PICTURES SAFE
Learn how to transfer and share your high-res images using Canon’s cloud-based service
SET UP YOUR
CAMERA BEFORE
YOU TRAVEL
It’s best to do all the setup
for your EOS camera with
image.canon before you
embark on your travels. It’s
really simple and the mobile
app guides you through
the specific steps for your
camera. Consider how
much data you might use
if you plan uploading via
your mobile especially if you
shoot in RAW images.
80
01 SET UP YOUR CAMERA CONNECTION
02 TRANSFER YOUR PHOTOS
Firstly download and install the image.canon
mobile app from your mobile device’s app store.
Start the app, select your camera then follow the
steps to create your account and configure your
camera’s wireless settings. As part of the sign-up
process you’ll need an email and to sign up to
Canon’s online system with a Canon ID.
Check your camera to see what transfer method is
available. Options include moving images to your
phone with the Camera Connect App, then
uploading with the image.canon app, and transfer
from your camera to the image.canon app. Some
cameras can upload to image.canon as you shoot
by using your mobile as an internet hotspot.
www.digitalcameraworld.com
CLOUD STORAGE
03 SHARING TO ONLINE SERVICES
04 AUTO DOWNLOAD TO YOUR COMPUTER
Photos you send to image.canon can be
automatically transferred to other services
including Google Photos, Google Drive, Adobe
Photoshop Lightroom, YouTube, Frame.io or Flickr.
You can upload and share pictures and movies in
one step direct from your camera. Use the
connected services to simplify your workflow.
Your computer can automatically download images
from your image.canon account when your computer
is connected to the internet. So your travel pictures
could be on your home computer ready for when you
get home. You’ll need to install the image downloader
on your PC or Mac and choose where to save the
images to keep your pictures are safe.
The Canon Magazine
81
GET OUR APP
for your iPad and iPhone!
Instantly install our PhotoPlus app for your Apple devices to enjoy
your No.1 Canon magazine in digital format – all our great content
and inspirational photos look even better on screen!
Access
our amazing
discount offers on
s.
our digital edition
Scan the QR code
to get the app
today!
DIGITAL EDITIONS
It’s easy to get PhotoPlus for your iPad and iPhone
Wherever you are in the world, you can get new issues when they go on sale in the UK!
1. GET THE APP
2. USE THE APP
Scan the QR code (left) or
go to the App store on your
Apple device and search for
‘photoplus’ and then install
the app. Now you can open
the app on your iPad and/or
iPhone. Any issues you buy
will be stored in My Library.
In the app you can then
buy any single issues,
preview the current issue,
scroll to find and buy any
previous issues, as well
as buy a selection of our
great camera and photo
bookazines available.
3. START YOUR
FREE TRIAL
4. COMPLETE
COLLECTIONS
Tap Subscribe for a 30-day
FREE trial and get instant
access to the current issue
– plus your second issue
also free! After the trial, it’s
only £3.99 per month, or
save more by subscribing
for a year for only £44.99!
This is an incredible offer
– you can get 180 issues of
PhotoPlus for only £54.99!
That’s every magazine from
November 2009, and saving
of over 90%! Tap My Library,
and tap Complete Your
Collection to fill your boots.
WATCH OUR VIDEOS, VIEW GALLERIES & ZOOM IN TO READ MORE EASILY
FREE CANON SKILLS VIDEOS!
PINCH-ZOOM TO ENLARGE!
Note: This PhotoPlus app is only available via the App store for iPad and iPhone.
POP-UP GALLERIES!
CANONSCHOOL
BRIAN WORLEY
CANON PRO
Our technical guru is here to help. No Canon conundrum is too
big or small. Get in touch today at EOSSOS@futurenet.com
Brian is a freelance photographer
and photo tutor, based in
Oxfordshire. He has unrivalled
EOS camera knowledge, after
working for Canon for over
15 years, and is on hand to
answer all your EOS and
photographic queries
Why are my photos rarely in focus
when using a remote release, but always
sharp when using back button focus?
Peadar Ó Conghaile, Portadown
BRIAN SAYS… When you
configure a camera for back
button AF, you stop the
half-press of the shutter
button from initiating focus.
Most remote releases have
two stages of release like the
shutter, but internally the
camera’s hardwire the
connections of the remote
socket to the switches in the
shutter button. So when you
combine remote release
with a configuration for back
button AF, the camera never
initiates focus from the
remote, any in-focus shots
you get are pure chance or
the good fortune of the depth
of field with your aperture.
If your camera has a
custom shooting mode then
you could configure this with
different custom controls,
and no back button AF. All you
need to remember is to use
this when doing a shot with
a remote. Note, some EOS
mirrorless R-series cameras
do not support different
button configurations for
custom modes.
Lenses including the RF-S 18-45mm kit lens don’t have an IS switch on
the lens, so image stabilization operation is controlled from the menu
Why is there an IS (Image Stabilizer)
mode menu in the EOS R10, I thought it
didn’t have In-Body IS?
Peter Cox, Hereford
When using a remote release, maybe for macro shots, you need to
deactivate back button AF to enable focusing with the remote release
84
BRIAN SAYS… You are
correct that the EOS R10
doesn’t feature In-Body IS,
but the menu provides access
to two possible settings.
Firstly, it is used to set up
movie digital IS. Movie digital
IS works by slightly zooming
in to the frame, and then
dynamically reframing the
scene to mimic the effect of
image stabilization. This is
technology that has been
used on video cameras for
many years, and the results
are very effective. Even if you
use a lens with IS, activating
movie digital IS makes a
significant extra improvement
in stability while recording
with a handheld camera.
When certain RF lenses are
fitted to the camera, the IS
mode menu option appears.
Some of the RF lenses with IS
do not have an IS switch on
the lens, the RF-S 18-45mm
and RF-S 18-150mm kit lenses
are prime examples. The
menu appears and allows you
to switch the lens optical
image stabilization on and off.
You may want to disable the
lens IS if you are using a tripod
for very long exposures.
Movie digital IS crops in slightly to
the image so that the camera can
dynamically reframe the image to
achieve a stabilising effect
www.digitalcameraworld.com
EOS S.O.S
Ask Brian!
Confused with
your Canon camera?
Send your questions
to EOSSOS@
futurenet.com
Select a shutter speed of at least
1/125 sec for the sharpest
portraits and avoid subject blur,
even if the ISO has to be raised
Resolution breaks the rules
The old rules for shake-free photos are challenged by newer EOS camera’s high-resolution images
ver since reading my first book
on photography, there’s been
one rule for sharper photos,
and that’s to keep everything
stationary. When hand-holding the
camera, the traditional wisdom for
shake-free shots was to use the
reciprocal of the focal length. For a
500mm lens that means 1/500 sec, or
for a camera with a crop sensor work
with effective focal length – as 500mm
becomes 800mm then use 1/800 sec.
But with high-resolution digital sensors
and larger viewing screens means that
sharpness or lack of it is much more
readily seen. A 24-inch monitor with
1920 pixels across is commonplace and
if you zoom in to 100% on a 24MP
image it’s like looking at a 1.5 metre
print. It should be no surprise that you
see more faults looking at digital
images at full-size on a monitor.
When the first 4.1MP EOS-1D was
updated to the 8.2MP EOS-1D Mark II,
E
The Canon Magazine
professional sports photographers
found they needed to use faster shutter
speeds to achieve the same level of
sharpness they were used to. Fast
forward to the 24MP to 45MP in use
today and it becomes clear that the old
rules may have stopped being as
effective as they once were.
Image stabilization, both in-lens and
in-body, has certainly helped to reduce
the effects of camera shake. But if the
subject is moving, you will also detect
motion blur at faster shutter speeds
than in the past. For portraits it’s good
to expect to set the shutter speed to
1/125 sec or faster to freeze movement.
No amount of image stabilisation will
help correct a moving subject.
Those of you who use Program and
Aperture Priority exposure modes can
use Auto ISO to avoid camera shake.
The camera programming takes the
lens focal length into account when
choosing shutter speeds and ISO
settings, but it’s based around the
reciprocal of the focal length idea.
Many advanced cameras have the
option to change how Auto ISO works
with these modes, giving control for
faster or slower shutter speeds. Check
your ISO settings for the min shutter
speed option, and use this custom
setting to increase the shutter speed by
1-stop for a simple way to avoid camera
shake with high-resolution images.
Image stabilization reduces blurring caused by
camera shake when the subject is stationary
85
CANONSCHOOL
DON’T MISS THE SHOT
What situation would you use RAW
burst mode instead of continuous high
speed drive?
James Manning, Telford
BRIAN SAYS… RAW burst
mode captures images at
up to 30fps, but with
pre-shooting enabled it has
the ability to capture up to 15
frames before the shutter is
actually pressed. This
pre-shooting feature is ideal
for capturing the very start
of action, as this is where
most photographers miss
the shot. The downside is
that you then need to do
special processing to extract
an individual RAW file, and
only the camera or DPP can
do this currently. Continuous
high-speed drive is better
suited to situations where
this is a build-up to the
action happening and then it
happens over a short period
of time. You get to choose
RAW or JPG images and
each frame is saved
individually on the card.
When I shoot
video with my
EOS why is there
a whirring sound
recorded during
quiet moments?
Aisling Stewart, Dumfries
BRIAN SAYS… The
most likely cause is the
camera picking up the
lens Image Stabilizer or
focus motor, especially
if you are using the
built-in mic as it picks
up vibration. Automatic
audio levels raise the
recording level in quiet
sections.
Two of these three images were
captured before the shutter was
pressed using pre-shooting with
RAW burst mode
What is the point
of ISO12,800 or
more, surely the
pictures are
unusable?
In Program mode, the photographer must
choose suitable focus and image settings
Why do green square
Auto and Program modes
have similar results?
Jeffrey Craig, Dover
BRIAN SAYS… Green square Auto or
Scene Intelligent Auto puts most of the
exposure, focus and picture settings
under the camera’s control and limits
access to the more advanced features.
Program is a creative zone mode and
provides full access to all the camera’s
settings. Exposure is likely to be the
same for both modes, but Program
mode requires you to decide the
appropriate focus settings and image
settings, giving you more control.
Nick Jameson, Preston
What is HDR PQ shooting used for?
It seems to prevent other features from
working on my camera.
Jasmine Robson, Ipswich
BRIAN SAYS… Many EOS R-series cameras have the
option to shoot in the HEIF format instead of JPG, and
the HDR PQ setting is how this is selected. HEIF files are
a modern type of image with advantages over JPGs.
HEIF images support a much wider dynamic range and
10-bit colour to take advantage of HDR displays. But
the HEIF file format is not quite a universal as
JPG, so you may need to convert images to
JPG to make them more usable. If
you shoot RAW these
capture even wider
dynamic range and
allow the utmost
flexibility in post.
When the camera is set
to HDR PQ, greater
dynamic range can be
captured in the 10-bit
HEIF images, but some
functions are restricted
86
BRIAN SAYS… High
ISO settings result in
photos with more noise.
But noise may be less
important than a sharp
shot. I’ve captured low
light action pictures
where ISO12,800 has
allowed me to shoot
1/2000 sec to avoid
blurred shots.
Why does the
link light on my
Speedlite EL-1
show orange
when configured
as a sender?
James Gibson, Hull
BRIAN SAYS… The
Speedlite is working as
a secondary sender
unit but another unit
may be in radio range,
so change channels.
The EF or RF 100mm macro lenses are a great
choice for close-ups of flowers and insects
Can you suggest a
macro lens that would be
good for insects and flower
photography?
Ros Lynch, Thatcham
BRIAN SAYS… With macro lenses for
flowers and insects it often helps to
have a greater working distance from
the subject, so a 100mm lens is a very
popular choice. Most 100mm macro
lenses will capture 1:1 or life-size
images from around 30cm. For
handheld macro, both of Canon’s EF
and RF L-series macro lenses feature
a hybrid stabilizer that counters
horizontal and vertical shift movement.
www.digitalcameraworld.com
EOS S.O.S
Can you explain custom shooting
modes; it appears that they are simply
extra program modes. Is it possible
to use other exposure modes?
Paul Haynes, Bridgnorth
BRIAN SAYS… Custom
shooting modes are used for
recalling a myriad of camera
settings that you would
choose for a specific type of
photography. In that respect
they are similar to the scene
modes or program modes,
but with the complete
capabilities available when
using a creative mode like P,
Switching from close-up and
macro to action shots with AF
and drive changes is swift with
custom shooting modes
Tv, Av, or M. It’s best to
consider custom modes as
an independent copy of
another creative mode.
You might be going wrong
in the first step of setting up a
custom mode. With custom
shooting modes the initial
decision you make is
selecting the mode you want
to make a copy of. So if you
want to make a copy of
manual exposure, turn the
mode dial to M.
The second step is to copy
the current mode to your
chosen custom shooting
mode. Press menu and
navigate to the set up menus
then custom shooting mode.
Choose this and then register
settings. Now turn the mode
dial to the custom mode; you
should see that the custom
Custom shooting modes make it simple to switch between different
styles of photography that you have pre-configured
mode is now a copy of the
mode you selected. At this
point, press menu and go
back to the custom shooting
modes menu item and make
sure that auto update is set to
enable. This means that while
you are changing settings in
the custom mode; those
changes update the stored
values for that specific
custom mode.
If you started with Av
mode, and the aperture value
was set to f/8, in the custom
RATE MY PHOTO
Thoughtful Puppy
HANNAH WILKINSON, BRIGG,
SAYS… This photo is of my dog whose
name is Buck and it was a challenge to
capture as he is a very active dog, and
always running around. The main
difficulty with a young dog is trying to get
them to stay still for a photo. Plus the
lighting presented a challenge as it was
early evening and that meant finding a
good spot was difficult. I predominantly
photograph birds and landscapes,
however, I like to photograph my dogs too.
BRIAN SAYS… A nice picture of your
dog and the red collar ensures that the
viewer’s attention is kept squarely on
the dog. There’s also a non-distracting
background, that complements the
subject and gives context. Importantly
you have a nice sharp eye with a good
catchlight, the fur detail is plenty sharp
enough and the all-important wet nose
The Canon Magazine
mode you can choose f/4 and
this will be stored. Now
switching between Av and the
custom mode changes
aperture from f/4 to f/8. Any
other custom settings for AF,
drive modes, most custom
functions, ISO, Picture Style
can be different. The power of
the custom modes is that you
can quickly switch from a
setup for wildlife to portraits
to landscapes without having
to make changes to multiple
camera settings.
Lens
Sigma 55-200mm f/4-5.6 DC
Exposure
1/4000 sec, f/9, ISO1600
Get
critiqued!
Email your best
photos to EOSSOS@
futurenet.com with
the subject ‘Rate
My Photo’
sparkles in the sun. Perhaps a crop to a
square format removing the space
behind the dog’s head would further
improve the result. For photos of your
pets, it’s better to shoot lower from
their eye level. Also to get his attention,
if you (or get someone behind you) to
hold a toy or treat for some eye contact.
Since Buck is an active dog, you should
try some action shots that shows this
side of his character, though it can be
more challenging to capture!
87
SUPERTEST
THE CONTENDERS
Canon EOS R100
£669 (kit)
$479 (body)
88
Canon EOS R50
£789/$679
Canon EOS R10
£899/$979
Canon EOS R7
£1,499/$1,499
Canon EOS R8
£1,699/$1,499
Canon EOS R6
Mark II
£2,779/$2,499
Canon EOS R5
£4,299/$3,399
Canon EOS R3
£5,499/$5,499
www.digitalcameraworld.com
EOS R CAMERAS
There’s an EOS R mirrorless that’s perfect for you, but
which one will it be? We test eight of the latest cameras
he Canon EOS R system has come a
very long way since the launch of the
original EOS R back in 2018. More
revolution than evolution, this camera
took 30 years of EOS heritage and
shoehorned it into a ground-breaking
mirrorless full-frame body. The same goes for
its companion RF lenses, which set new
benchmarks in terms of image quality and
all-round performance. And while RF lenses
were thin on the ground to start with, mount
adapters ensured compatibility with Canon’s
back-catalogue of EF and EF-S lenses. Indeed,
unlike with full-frame DSLRs, you can use EF-S
lenses on full-frame EOS R system bodies in
crop mode, giving yet more options for
compact, lightweight shooting.
There are now ten EOS R camera bodies
and around 35 lenses to choose from. While
many EOS DSLRs, EF and EF-S lenses are
being phased out, new RF and RF-S lenses are
ramping up, so there’s something for
everybody. The only downside is that, with so
much choice on offer, it can be hard to choose
the EOS R system camera that’s right for you.
To some extent, the perfect fit will depend on
what kinds of photography you’re into, and
your level of expertise. ‘Hybrid’ has definitely
become a buzzword in the camera market so,
for some, video specs can be just as important
as stills performance.
Nowadays especially, budget has become
the bottom line for many, so the price tag is a
major consideration. And nobody wants to
spend more than they need to. Let’s take a
closer look at what all the EOS R system
cameras in the range have to offer, as well as
touching base with some old favourites from
the EOS DSLR and M system line-ups.
The Canon Magazine
89
SUPERTEST
APS-C
Signal-to-noise ratio (DB)
RAW* SIGNAL-TO-NOISE RATIO
01
40
The image processor
and autofocus
system are behind
other test cameras.
30
20
10
02
ISO100 200
400
800
1600
3200
6400 12800 25600
RAW* DYNAMIC RANGE
T
processor, the EOS R100 is also the
only camera in the main test group
to lack Dual Pixel CMOS II deeplearned AI autofocus. As with the
original EOS R and RP, it can
‘recognize’ humans, but not
animals and vehicles. It’s also the
only camera in the group to lack a
vari-angle touchscreen, and the
À[HG/&'LVQ·WDWRXFKVFUHHQDWDOO
On the plus side, the R100
camera is on a level footing with
most others on test for stills
resolution with a 24.1MP sensor,
and can capture 4K UHD video at
30/25/24p. That said, you can’t
HOW WE TEST
We combine real-world shooting results with rigorous
lab testing to arrive at our overall ratings
90
The fixed rear LCD
isn’t a touchscreen
and lacks vari-angle
versatility.
12
10
8
6
4
04
2
ISO100 200
400
800
1600
3200
6400 12800 25600
The R100 is good at low ISO settings,
less so towards the upper end of the
comparatively restricted sensitivity
It’s a relatively inexpensive entry-level camera
but a step or two behind other recent models
he price of this camera is cut
to the bone, aiming to entice
photographers and content
creators wanting to move up
from a smartphone. It’s an R
system replacement for the likes of
the entry-level EOS 2000D/EOS
5HEHO7'6/5,W·VYHU\FRPSDFW
with the same dimensions as the
EOS R50, and even lighter in
weight at just 356g. The body-only
price is $200 cheaper in the USA
but, in the UK, it’s currently only
available as a kit, complete with an
RF-18-45mm zoom lens. With an
older-generation DIGIC 8 image
Dynamic range (EV)
CANON EOS R100
Control dials and
buttons are basic
but user-friendly.
03
14
£669 (Kit)
$479 (Body)
FEATURES
50
shoot video in HDR mode and
there’s no support for 10-bit HEIF
stills, as you can with all other
recent EOS R system cameras.
Performance
Although the feature set lacks
ÀQHU\WKHERWWRPOLQHLVWKDWWKH
R100 is a very beginner-friendly
camera that’s capable of taking
beautiful still images, and makes a
good stab at video. It’s not exactly
sporty though, as the continuous
burst rate of 6.5fps drops to just
3.5fps in Servo (continuous)
autofocus mode.
The mode dial has
access to scene
modes and filter
effects.
05
The 2360k-dot
viewfinder matches
that of other APS-C
format R cameras.
VERDICT
FEATURES
BUILD & HANDLING
PERFORMANCE
VALUE
OVERALL
e test cameras with a selection of lenses, in wide-ranging
shooting conditions, from bright sunshine and dull
outdoor conditions, to interior lighting and night shots.
We pay particular attention to the accuracy and consistency of
autofocus and metering systems, auto white balance and all
other shooting parameters. All aspects of image quality are
checked. We also judge handling characteristics, ease of use and
how well the menu systems work, including factors such as the
intuitiveness of touchscreens and vari-angle screens.
We also run a series of lab tests on cameras, enabling us to
give quantifiable results for various attributes of image quality.
These include signal-to-noise ratio, dynamic range, and the
ability to resolve fine detail. All of these facets are measured in
Raw quality mode, at one-stop increments throughout each
camera’s sensitivity range.
W
www.digitalcameraworld.com
EOS R CAMERAS
APS-C
RAW* SIGNAL-TO-NOISE RATIO
FEATURES
Signal-to-noise ratio (DB)
50
01
40
The ISO button
enables the addition
of an AF/MF function
on multi-way pad.
30
20
10
02
ISO100 200
400
800
1600
3200
6400 12800 25600
RAW* DYNAMIC RANGE
03
Dynamic range (EV)
14
CANON EOS R50 £789/$679
The sensitivity range
is ISO 100-32,000
(51,200 expanded).
12
10
8
6
04
4
2
ISO100 200
400
800
1600
3200
6400 12800 25600
An excellent beginner’s camera that’s able to grow
with you as you learn new photography skills
Dynamic range is good for an APS-C
format camera but the R50 is typically
noisy at high ISO settings
he EOS R50 is pricier than
the R100 but has a lot more
going for it. Compared with
the more basic model, it has
a newer 24.2Mp Dual Pixel CMOS
II sensor, DIGIC X image processor
and deep-learned AI autofocus. It
has automatic recognition and
tracking for humans (eyes, face,
head, body), animals (dogs, cats
and birds) and vehicles (racing cars
and motorcycles).
Also unlike the EOS R100, the
R50 gives you the option of
shooting with a fully electronic
shutter, doubling the maximum
well as offering 10-bit frame grabs
in HEIF stills format.
The Canon Magazine
05
Formats for stills
include 14-bit Raw
and C-Raw, 8-bit
JPEG and 10-bit
HEIF.
Performance
VERDICT
For reacting to different shooting
scenarios, the R50 has an almost
identical control layout as the R100
but adds a dedicated ISO button.
The touchscreen also makes it
easier to navigate menus to adjust
important shooting parameters. At
low to medium ISO settings, image
quality is excellent for both stills
and movies, making the R50 a very
compact camera that genuinely
punches above its weight.
FEATURES
BUILD & HANDLING
PERFORMANCE
VALUE
OVERALL
36
30
28
26
26
28
26
26
26
20
10
EO
S
R3
R5
Ca
no
n
EO
S
R6
EO
S
Ca
no
n
M
k
II
R8
EO
S
Ca
no
n
EO
S
R7
Ca
no
n
Ca
no
n
EO
S
R1
0
R5
0
Ca
no
n
EO
S
R1
00
0
Ca
no
n
hen it comes to resolving ultra-fine detail and texture
within images, the 45MP image sensor of the EOS R5
pays dividends. The relatively high megapixel count
enables the camera to make the very most of the inherent
sharpness of Canon’s very best RF lenses. Most of the other
cameras on test have a very similar megapixel count of just over
24MP, but the R6 Mark II takes second place overall, matching
the 32.5MP APS-C format R7 through most of the sensitivity
range and edging ahead at the very highest ISO settings.
W
Resolution (ISO100)
It’s no surprise there’s an outright winner in
this group for resolving the finest of details
This camera has a
less than fastest
SD/HC/XC UHS-I
memory card slot.
40
EO
S
RESOLUTION
Ca
no
n
T
shutter speed from 1/4000th to
1/8000th of a second for freezing
even really rapid movement.
The maximum burst rate also
jumps up to 12fps or 15fps in
PHFKDQLFDO HOHFWURQLFÀUVW
curtain) or fully electronic
shutter modes respectively,
although the Raw buffer depth
is a mere seven shots.
There’s a higher-resolution
NGRW/'&DQGWKLVWLPHLW·V
the more usual vari-angle
touchscreen. The R50 delivers 4K
30/25/24p UHD video but with the
addition of a 10-bit HDR option, as
The R50 features
a vari-angle
touchscreen.
91
SUPERTEST
APS-C
Signal-to-noise ratio (DB)
RAW* SIGNAL-TO-NOISE RATIO
01
40
Dedicated controls
include a M-fn
button and an
AF-MF switch.
30
20
10
02
ISO100 200
400
800
1600
3200
6400 12800 25600
RAW* DYNAMIC RANGE
A
03
10
Rear-mounted
shooting controls
include an AF-On
button and joystick.
8
6
4
2
ISO100 200
400
800
1600
3200
6400 12800 25600
04
The vari-angle
touchscreen has a
1040k resolution.
05
with deep-learned AI tracking for
people, animals and vehicles. The
camera can also capture 4K movie
footage, although top-end 60p/50p
comes with a crop mode.
Not much bigger than some of
Canon’s EOS M system mirrorless
cameras, the R10 nevertheless has
a microphone socket, vari-angle
WRXFKVFUHHQDQGSRSXSÁDVK
However, as with the EOS R100
and R50, there’s no in-body image
stabilizer nor any weather-seals.
7KHYLHZÀQGHUJLYHVD
[
PDJQLÀFDWLRQIDFWRUDQGWKH
typical 100% frame coverage of
CANON EOS M50 MARK II
Unlike Canon’s
full-frame mirrorless
cameras, the R10
features a pop-up
flash.
12
The R10 edges ahead of the newer R100
and R50 for signal-to-noise, but not for
dynamic range
Small but fast and powerful, this EOS R camera
rewrote the APS-C format mirrorless rule book
lmost as small and light as
the EOS R100 and R50, the
preceding R10 is particularly
travel-friendly. It launched
with a new 24.2MP APS-C format
image sensor that really bumped
up data output speeds. The result is
super-fast drive rates of 15fps,
rising to 23fps in electronic shutter
mode. The latter also boosts the
maximum shutter speed from
1/4000 sec to 1/16,000 sec.
The budget-friendly R10
inherited the same Dual Pixel
CMOS AF II autofocus system
featured in the R3, R5 and R6,
Dynamic range (EV)
14
CANON EOS R10 £899/$979
FEATURES
50
There’s only enough
room for a slimline
LP-E17 battery.
mirrorless cameras, along with a
well-detailed 2360k dot display.
7KHUHODWLYHO\VPDOO/3(EDWWHU\
RQO\VKRRWVYLHZÀQGHUEDVHG
shots, although a more generous
430 shots is available for screenbased shooting.
FEATURES
Performance
BUILD & HANDLING
Speed and accuracy in terms of
drive rate and autofocus are simply
incredible for a camera aimed at
the beginner/intermediate market.
Image quality is excellent, not least
because the RF mount gives access
to Canon’s full range of RF lenses.
VERDICT
PERFORMANCE
VALUE
OVERALL
£589/£599
The Mark II edition of the EOS M50 is particularly good for vlogging
smart choice for vlogging as well
as for shooting stills, the EOS
M50 Mark II features a fully
articulated vari-angle touchscreen,
face/eye-tracking autofocus facility,
microphone socket and can shoot video
in 4K as well as Full HD 60p. It can capture
vertical movies as well, and supports live
YouTube streaming from any Wi-Fi
A
92
network – no computer required.
It’s nippy for stills too, with a 10fps
continuous drive rate, while the 24.1Mp
image sensor and DIGIC 8 processor
ensure great image quality. As with other
EOS M and EOS R system cameras, you
can also use EF and EF-S lenses via
EF-EOS mount adapters.
www.digitalcameraworld.com
EOS R CAMERAS
APS-C
Signal-to-noise ratio (DB)
RAW* SIGNAL-TO-NOISE RATIO
01
40
In-body stabilization
goes to 8 stops on
some lenses.
30
20
02
10
ISO100 200
400
800
1600
3200
6400 12800 25600
RAW* DYNAMIC RANGE
A mirrorless replacement for the speedy but obsolete
EOS 7D Mark II DSLR, the R7 packs extra firepower
he EOS R7 packs serious
ÀUHSRZHULQWRLWVGLPLQXWLYH
$36&IRUPDWEXLOG/LNHWKH
even smaller R10, it features
all of the latest, deep-learned AI
autofocus facilities, this time
coupled to an even faster turn of
speed, with mechanical shutter
speeds of up to 1/8000 sec and a
maximum drive rate of a blistering
30fps when using the electronic
shutter option – despite having a
32.5Mp image sensor.
Another major plus point of the
R7 over other APS-C format R
system cameras is that it features
in-body image stabilization, with
up to 8-stop effectiveness
depending on the lens, even for
lenses that don’t feature optical
VWDELOL]DWLRQ7KHHOHFWURQLF2/('
YLHZÀQGHUKDVWKHVDPHGRWFRXQW
of 2360k but this time it has a
ODUJHU[PDJQLÀFDWLRQ
FRPSDUHGZLWKWKH5·V
[7KH
3-inch rear vari-angle touchscreen
is also a more high-res affair, with
1620k dots rather than 1040k.
The slightly bigger build enables
the provision of two SD/HC/XC
UHS-II card slots and the larger
/3(1+EDWWHU\KDVHQRXJK
CANON EOS RP
£1,049/$999
T
Dynamic range (EV)
Deep-learned AI
autofocus tracks
humans, animals
and vehicles.
03
14
CANON EOS R7 £1,499/$1,499
FEATURES
50
Top-rear is a
concentric joystick
and control wheel.
12
10
8
6
04
4
2
ISO100 200
400
800
1600
3200
6400 12800 25600
Dynamic range and noise suppression
are very good at low ISO settings but
drop off towards the high end
stamina for nearly twice as many
YLHZÀQGHUEDVHGVKRWVDVZLWKWKH
R10, totalling 500 (770 shots with
the rear screen).
Performance
The 32.5Mp image sensor enables
H[FHOOHQWUHWHQWLRQRIÀQHGHWDLOLQ
images and there’s a boost in video
performance as you can shoot 4K
60p/50p footage with no additional
crop factor on top of the inherent
1.6x of the APS-C format image
sensor. All in all, the EOS R7 is
simply the best and most powerful
APS-C format camera ever.
The 1620k vari-angle
touchscreen
matches that of the
R50, R8 and R6
Mark II.
05
Unlike the EOS R10,
the R7 includes
weather-seals in its
construction.
VERDICT
FEATURES
BUILD & HANDLING
PERFORMANCE
VALUE
OVERALL
Slim and lightweight for a full-frame camera, it’s a little lacking in features
ith the same full-frame image
sensor and a similar set of core
features, the EOS RP is very
much the newer, mirrorless version of
the 6D Mk II, and is a whole 280g lighter
in weight. The electronic viewfinder is
good but not exceptional and there’s no
IBIS. The burst rate of 5fps is slower
than in the 6D Mk II and drops to
W
The Canon Magazine
4fps with continuous autofocus.
The camera’s autofocus itself is
quick and accurate, but it lacks the
advanced ‘deep-learned AI’ subject
tracking AF of almost all next-generation
R system cameras. 4K video comes
with a severe crop factor and a lack
of Dual Pixel AF.
93
SUPERTEST
FULL-FRAME
Signal-to-noise ratio (DB)
RAW* SIGNAL-TO-NOISE RATIO
01
40
The viewfinder is
relatively small for a
full-frame camera, at
0.39-inch.
30
20
10
02
ISO100 200
400
800
1600
3200
6400 12800 25600
RAW* DYNAMIC RANGE
The EOS R8 gives you a full-frame body for little more
than the price of many smaller APS-C format cameras
ust like the EOS R100 and R50
are very affordable APS-C
format mirrorless cameras, the
EOS R8 is a particularly
budget-friendly full-frame model.
Well-catalogued full-frame
advantages include a tighter depth
RIÀHOGDORQJZLWKEHWWHUG\QDPLF
range and less image noise.
With their much larger image
sensors, full-frame cameras tend to
be bigger and heavier but the
surprisingly compact and
lightweight R8 is smaller and
lighter than the APS-C format R7.
That’s partly due to the R8 running
J
RQDUHODWLYHO\VPDOO/3(EDWWHU\
and having only one memory card
VORW/LNHWKHRULJLQDO(265DQG
RP full-frame mirrorless cameras,
the R8 also lacks in-body image
stabilization, instead relying on
optically stabilized IS lenses.
You may start to think that the
R8 is pared back, much like the
R100, but there’s a lot to love here.
It has the latest 24.2Mp Dual Pixel
CMOS II sensor and DIGIC X
processor, as featured in the EOS
R6 Mark II, along with a full range
of deep-learned AI autofocus
recognition. While the maximum
Dynamic range (EV)
14
CANON EOS R8 £1,699/$1,499
FEATURES
50
The 3.0-inch, 1620k,
touchscreen is
impressive for a
full-frame camera at
this price.
12
03
10
The battery powers
220/370 shots
(VF/LCD).
8
6
4
2
04
The electronic
shutter option
The EOS R8 leaves all of the APS-C format enables a maximum
R system cameras in its wake for high-ISO of 1/16,000 sec.
dynamic range and signal-to-noise
ISO100 200
400
800
1600
3200
6400 12800 25600
05
drive rate tops out at 6fps, it’s
boosted to a super-fast 40fps in
fully electronic shutter mode,
matching the R6 Mark II, and with
a generous buffer depth.
Buffer depth gives
more than 1,000
shots in JPEG mode.
Performance
FEATURES
Although the R8 only has a single
card slot, it’s SD/HC/XC UHS-II
compatible, and its USB-C port is
similarly ‘superspeed’, at V3.2. The
USB port can also be used for
powering the camera or charging
its battery. The latest-generation
autofocus is typically breathtaking
in speed and consistent accuracy.
VERDICT
BUILD & HANDLING
PERFORMANCE
VALUE
OVERALL
CANON EOS R £1,449/$1,209
The EOS R was the ushering in of a whole new era of Canon cameras
s with current Canon DSLRs in
Live View mode, autofocus is
based on a Dual Pixel AF system
that enables phase-detection autofocus
points across most of the frame. In this
case, though, there are 5,565 of them.
Autofocus is rapid and works well even in
near-darkness. The electronic viewfinder
is a real high-quality item but, as with the
A
94
similarly first-generation EOS RP, there’s
no in-body image stabilization.
There’s no lack of drive speed for stills,
with a maximum burst rate of 8fps, but it
drops to a pedestrian 5fps when using
continuous autofocus. Image quality
combines sumptuous colour rendition
with excellent retention of fine detail.
www.digitalcameraworld.com
EOS R CAMERAS
FULL-FRAME
Signal-to-noise ratio (DB)
RAW* SIGNAL-TO-NOISE RATIO
01
40
The conventional
shooting mode dial
has three custom
settings options.
30
20
10
02
ISO100 200
400
800
1600
3200
6400 12800 25600
RAW* DYNAMIC RANGE
A fabulous hybrid full-frame all-rounder, the R6 Mark II
is a major upgrade over the original edition
he original EOS R6 was a
highly impressive camera,
although its megapixel count
of 20.1MP left a little to be
desired for stills and it was a little
prone to overheating issues in 4K
UHD video shooting. The Mark II
addresses both issues with a new
24.2MP image sensor and a raft of
other improvements. It offers
stellar autofocus performance and
a blistering stills burst rate of up to
40fps, along with no time limit for
video clips. While both of those are
VLJQLÀFDQWLPSURYHPHQWVRYHUWKH
original R6, the Mark II also
T
delivers 4K video at up to 60p/50p
with no crop factor.
Unlike the R8, the maximum
shutter speed with mechanical
VKXWWHU HOHFWURQLFÀUVWFXUWDLQ LV
1/8000th rather than 1/4000th of
a second, although both cameras
muster 1/16,000 sec in electronic
shutter mode. The R6 Mark II has
more than twice the stamina with
LWVODUJHU/3(1+EDWWHU\DQG
boasts dual UHS-II card slots. It
also has a bigger 0.5-inch
YLHZÀQGHUDQGWKHDGYDQWDJHRI
in-body image stabilization.
One handling bonus featured in
Dynamic range (EV)
The 3.0-inch
vari-angle
touchscreen isn’t
quite as big or
high-res as in the R5.
12
10
8
6
4
2
ISO100 200
There’s no
secondary info
display on top.
03
14
CANON EOS R6
MARK II £2,779/$2,499
FEATURES
50
04
400
800
1600
3200
6400 12800 25600
The EOS R6 beats the R5 for dynamic
range and signal-to-noise performance
at high ISO settings
Handling benefits
from joystick
controller and three
control dials.
05
both cameras is a stills/video
switch at the left of the top panel.
This makes switching between the
two shooting modes seamless,
without even needing to take your
H\HDZD\IURPWKHYLHZÀQGHU
The dual memory
card slots are both
SD/HC/XC UHS-II.
VERDICT
FEATURES
Performance
Despite the hike in megapixel
count, the R6 Mark II delivers
squeaky-clean image quality even
at very high ISO settings, while its
autofocus system works right down
to -6.5EV. That equates to shooting
in almost complete darkness, under
less than a half-moon.
BUILD & HANDLING
PERFORMANCE
VALUE
OVERALL
CANON EOS 90D £1,169/$1,199
Probably the best and most versatile APS-C format DSLR the world has ever seen
his camera packs a 32.5Mp
sensor and fast 10fps maximum
drive rate that matches the
speedy and now obsolete EOS 7D Mark II.
It’s a DSLR that’s tailor-made for
enthusiasts who demand resolution,
speed, and advanced handling
characteristics. Fast autofocus and face/
eye detection are enabled by a DIGIC 8
T
The Canon Magazine
processor, a huge step up from the DIGIC
6 in the previous 80D.
We’ve always been impressed by the
image quality that the 90D delivers, with
highly detailed rendition. Along with its
generous resolution, key advantages also
include high-speed 10fps shooting and
uncropped 4K video capabilities.
95
SUPERTEST
FULL-FRAME
Signal-to-noise ratio (DB)
RAW* SIGNAL-TO-NOISE RATIO
01
40
The top panel
features a large
OLED display.
30
20
02
10
ISO100 200
400
800
1600
3200
6400 12800 25600
RAW* DYNAMIC RANGE
The EOS R5 shoehorns stellar stills and video performance
into a compact build with a pro-grade feel to control layout
lthough practically identical
in size to the EOS R6 Mark
II, the R5 packs a much
higher-resolution 45Mp
image sensor, a dazzling 5760k dot
HOHFWURQLFYLHZÀQGHUDLQFK
2100k dot vari-angle touchscreen
and CFexpress as one of its dual
memory card slots. As well as
delivering feverishly highresolution stills, it also takes video
capture all the way up to 8K at
30/25/24fps, as well as turning out
4K video at up to 120fps.
Not just a phenomenal camera
for hybrid stills/video formats, you
A
can effectively shoot both formats
simultaneously. As well as
capturing stills at up to 20fps in
fully electronic shutter mode
(12fps mechanical), there’s the
option of shooting 8K video at
30fps and extracting 35.4Mp stills
from individual frames, albeit in
[
DVSHFWUDWLR
The R5 shares all of the groundbreaking autofocus and image
stabilization advantages of the R6
Mark II, but it has a more pro-grade
feel to its control layout. The
shooting mode dial is replaced by a
Mode button and rotary controller
Dynamic range (EV)
The vari-angle
touchscreen gives a
similarly detailed
display.
12
10
8
6
4
04
2
ISO100 200
The extra-highresolution OLED
viewfinder shows
incredibly fine detail.
03
14
CANON EOS R5 £4,299/$3,399
FEATURES
50
400
800
1600
3200
6400 12800 25600
The EOS R5 beats the R6 for dynamic
range at ISO 100, and high-ISO signal-tonoise is good for such a high-res camera
DQGWKHUH·VDODUJH2/('LQIR
display on the top panel, whereas
the R6 Mark II has none.
Performance
A battery grip option
gives landscape/
portrait handling
benefits.
05
The 45Mp image
sensor and DIGIC X
processor ensure
great performance.
VERDICT
Quality and performance for stills
and video is spectacular. The only
real downside of the R5 compared
with the R6 Mark II, apart from its
ssteeper price, is that high-ISO
image quality isn’t as clean. But if
you downsize and resample images
taken at maximum resolution, a lot
of the image noise disappears, or
at least shrinks to the same level
as an R6 Mark II.
FEATURES
BUILD & HANDLING
PERFORMANCE
VALUE
OVERALL
CANON EOS 6D MARK II £1,299/$1,199
Massive upgrade to the original 6D, the Mk II is unbeatable value for a full-frame DSLR
ey areas of improvement over the
original EOS 6D include a higherresolution 26.2Mp image sensor
which gains Dual Pixel AF, a newer DIGIC 7
processor, a 45-point autofocus system in
which all of the points are cross type and 27
work at f/8, and a new metering module.
The continuous drive rate also rises from
4.5fps to 6.5fps. Around the back, the basic
K
96
rear screen of the original 6D is replaced
with a vari-angle touchscreen.
The optical pentaprism viewfinder is
clear and bright but only gives 98 per cent
frame coverage. Video is limited to a
maximum of 1080p. However, image quality
and all-round performance are excellent,
along with a 1,200-shot battery life.
www.digitalcameraworld.com
EOS R CAMERAS
FULL-FRAME
Signal-to-noise ratio (DB)
RAW* SIGNAL-TO-NOISE RATIO
01
40
The vertical grip
perfectly duplicates
controls for portrait
orientation shooting.
30
20
10
02
ISO100 200
400
800
1600
3200
6400 12800 25600
RAW* DYNAMIC RANGE
Not all mirrorless cameras are compact lightweights.
The top-end R3 is built more like a juggernaut
ith the kind of integrated
vertical grip typical of
top pro cameras like the
EOS 1-DX series, the R3
replicates all the most important
buttons and dials for shooting in
both landscape and portrait
RULHQWDWLRQV$QGLWGRHVVRLQÀQH
style, with epic build quality and
DUHDOO\FODVV\ÀQLVK7KH0S
image sensor might seem a bit low
in actual megapixel count but
there’s a major upside in speed.
Thanks to its stacked, backilluminated design and groundbreaking technology, the sensor
W
has super-fast readout speeds that
enable a 30fps constant drive rate
IRUVWLOOVDQGZLWKQRYLHZÀQGHU
blackout. Another major plus point
for both stills and video is that the
readout speed virtually eliminates
the rolling shutter effect, and
shutter speeds themselves go up to
an incredible 1/64,000 sec. For
video, the hybrid R3 bridges the
gap between the 4K of the R6 Mk II
and 8K of the R5, outputting 6K
footage at up to 60p.
The R3 has the same deeplearned AI autofocus of most other
recent R system cameras, for
CANON EOS 5D MARK IV
Dynamic range (EV)
The top panel has a
mono OLED info
display with a similar
layout to the EOS R5.
12
10
8
6
4
04
2
ISO100 200
There’s a vari-angle
touchscreen around
the back.
03
14
CANON EOS R3 £5,499/$5,499
FEATURES
50
400
800
1600
3200
6400 12800 25600
High-ISO signal-to-noise is almost as
good as from the EOS R6 Mark II, and
dynamic range is highly impressive
‘intelligent’ acquisition and
tracking of people, animals and
vehicles. It also adds Eye Control
AF, in which the camera can detect
what you’re looking at through the
YLHZÀQGHUDQGVKLIWWKH$)SRLQW
Dual card slots
feature both SD/
HC/XC UHS II and
CFexpress type B.
05
The LP-E19 battery
lasts for 620 shots
with the viewfinder,
860 with the LCD.
VERDICT
FEATURES
Performance
In terms of speed, accuracy and
consistency, the range of high-end
features come together brilliantly
well. For action, sports, wildlife,
weddings and anything else that
GHPDQGVQDLOLQJWKHGHÀQLWLYH
moment, the R3 makes it almost
impossible to miss a shot.
BUILD & HANDLING
PERFORMANCE
VALUE
OVERALL
£2,609/$2,499
For pro-spec performance and handling, it’s the most attractive full-frame DSLR
lassified as a ‘professional’ grade
camera, the EOS 5D Mark IV has
a 30.4Mp image sensor. For
viewfinder-based shooting, the 61-point
autofocus system is highly competent at
tracking fast and erratically moving
objects. A control lever on the back panel
(lacking in the EOS R) is great for shifting
the active autofocus area around the
C
The Canon Magazine
frame. The 5D Mark IV also has dual
memory card slots, so you can create
instant backups as you shoot.
Dual Pixel AF enables excellent autofocus
performance but lacks an eye-detection
mode, and there’s no vari-angle or tilt facility
for the rear screen, but Dual Pixel AF is
available in 4K video capture.
97
SUPERTEST
COMPARISON TABLE
APS-C
FULL-FRAME
Canon EOS R100
Canon EOS R50
Canon EOS R10
Canon EOS R7
Canon EOS R8
Canon EOS R6 Mark II
Canon EOS R5
Canon EOS R3
May 2023
February 2023
May 2022
May 2022
February 2023
November 2022
July 2020
November 2021
APS-C
APS-C
APS-C
APS-C
Full-frame
Full-frame
Full-frame
Full-frame
24.1Mp Dual Pixel CMOS
24.2Mp Dual Pixel
CMOS II
24.2Mp Dual Pixel
CMOS II
32.5Mp Dual Pixel
CMOS II
24.2Mp Dual Pixel
CMOS II
24.2Mp Dual Pixel
CMOS II
45Mp Dual Pixel
CMOS II
24.1Mp Dual Pixel
CMOS II
DIGIC 8
DIGIC X
DIGIC X
DIGIC X
DIGIC X
DIGIC X
DIGIC X
DIGIC X
No
No
No
Yes, up to 8-stop
No
Yes, up to 8-stop
Yes, up to 8-stop
Yes, up to 8-stop
3975, dual pixel
4503, dual pixel
4503, dual pixel
5195, dual pixel
4897, dual pixel
4897, dual pixel
5940, dual pixel
4779, dual pixel
Subject AF
Humans
Humans, animals,
vehicles
Humans, animals,
vehicles
Humans, animals,
vehicles
Humans, animals,
vehicles
Humans, animals,
vehicles
Humans, animals,
vehicles
Humans, animals,
vehicles
ISO range
(expanded)
ISO 100-12,800
(25,600)
ISO 100-32,000
(51,200)
ISO 100-32,000
(51,200)
ISO 100-32,000
(51,200)
ISO 100-102,400
(50-204,800)
ISO 100-102,400
(50-204,800)
ISO 100-51,200
(50-102,400)
ISO 100-102,400
(50-204,800)
1/4000 to 30 sec, Bulb
1/4000 (1/16,000) to
30 sec, Bulb
15/23fps, 460/70 JPEG,
29/21 RAW
0.39in OLED,
2360k dots
1/8000 (1/16,000) to
30 sec, Bulb
15/30fps, 224/126 JPEG,
51/42 RAW
0.39in OLED,
2360k dots
1/8000 (1/16,000) to
30s, Bulb
6/40fps, 1000+/120 JPEG,
1000+/56 RAW
0.39in OLED,
2360k dots
1/8000 (1/16,000) to
30 sec, Bulb
12/40fps, 1000+/190
JPEG, 110/75 raw
1/8000 (1/16,000) to
30 sec, Bulb
12/20fps, 350 JPEG,
180 RAW
1/8000 (1/64,000) to
30 sec, Bulb
12/30fps, 1000+/540
JPEG, 1000/150 RAW
0.39in OLED,
2360k dots
1/4000 (1/8000) to
30 sec, Bulb
12/15fps, 42/28 JPEG, 7/7
RAW
0.39in OLED,
2360k dots
0.5in OLED, 3690k dots
0.5in OLED, 5760k dots
0.5in OLED, 5760k dots
3.0-inch, 1040k, fixed
3.0-inch, 1620k, touch,
vari-angle
3.0-inch, 1040k, touch,
vari-angle
3.0-inch, 1620k, touch,
vari-angle
3.0-inch, 1620k, touch,
vari-angle
3.0-inch, 1620k, touch,
vari-angle
3.2-inch, 2100k, touch,
vari-angle
3.2-inch, 4150k, touch,
vari-angle
RAW, C-RAW, JPEG
RAW, C-RAW, JPEG, HEIF
RAW, C-RAW, JPEG, HEIF
RAW, C-RAW, JPEG, HEIF
RAW, C-RAW, JPEG, HEIF
RAW, C-RAW, JPEG, HEIF
RAW, C-RAW, JPEG, HEIF
RAW, C-RAW, JPEG, HEIF
4K at
60/50/30/25/24fps
4K at
60/50/30/25/24fps
4K at
60/50/30/25/24fps
8K at 30/25/24fps
6K at
60/50/30/25/24fps
NAME
Announced
Camera – Format
Sensor
Image processor
Sensor-shift
stabilization
Autofocus points
Shutter speeds
(electronic)
Max burst rate,
buffer
Viewfinder
LCD screen
Stills file types
6.5fps, 97 JPEG, 6 RAW
Max video
resolution
4K at 30/25/24fps
4K at 30/25/24fps
4K at
60/50/30/25/24fps
Memory
1x SD/HC/XC UHS-I
1x SD/HC/XC UHS-I
1x SD/HC/XC UHS-II
2x SD/HC/XC UHS-II
1x SD/HC/XC UHS-II
2x SD/HC/XC UHS-II
1x CFexpress B, 1x SD/
HC/XC UHS-II
1x CFexpress B, 1x SD/
HC/XC UHS-II
Connectivity
USB 2.0, Wi-Fi, BLE
USB 2.0, Wi-Fi, BLE
USB 2.0, Wi-Fi, BLE
USB 3.2C, Wi-Fi, BLE
USB 3.2C, Wi-Fi, BLE
USB 3.1C, Wi-Fi, BLE
USB 3.1C, Wi-Fi, BLE
USB 3.2C, Wi-Fi, BLE
Battery type
LP-E17
LP-E17
LP-E17
LP-E6NH
LP-E17
LP-E6NH
LP-E6NH
LP-E19
340/430 shots (VF/
LCD)
310/440 shots (VF/
LCD)
260/430 shots (VF/
LCD)
500/770 shots (VF/
LCD)
220/370 shots (VF/
LCD)
450/760 shots (VF/
LCD)
320/490 shots (VF/
LCD)
620/860 shots (VF/
LCD)
116x86x69mm
116x86x69mm
123x88x83mm
132x90x92mm
133x86x70mm
138x98x88mm
139x98x88mm
150x143x87mm
356g
375g
429g
612g
461g
670g
738g
1015g
£669 (kit) $479 (body)
£789/$679
£899/$979
£1,499/$1,499
£1,699/$1,499
£2,779/$2,499
£4,299/$3,399
£5,499/$5,499
Battery life
Size (WxHxD body)
Weight
Price – body only
FEATURES
BUILD & HANDLING
PERFORMANCE
VALUE
OVERALL
THE WINNER IS... CANON EOS R6 MARK II
This EOS R camera is a terrific all-rounder and gives you the most bang for your buck
et’s not beat about the
bush. The Canon EOS
R3 is the best Canon
camera of all time. But is it the
best camera for you? It’s
certainly not the best camera
for your bank balance, it’s big
and weighty, and has a higher
specification than most of us
would ever need. For us, the
L
98
smart money is on the EOS R6
Mark II if you want a full-frame
camera that excels in every
area. Meanwhile, the EOS R5
wins out if you demand a really
high megapixel count for the
ultimate in quality when
creating really large format
prints. On a tight budget, the
EOS R8 is a great buy for a
full-frame camera. If you’d
rather have an APS-C format
camera that gives greater depth
of field and extends your
telephoto reach without going
extra-large on lenses, there’s
no beating the EOS R7. It’s a
high-spec camera with a really
impressive feature set and
superb handling.
www.digitalcameraworld.com
What to look for
Canon EOS camera ranges
to a few
With prices ranging from a couple of hundred
ryone,
thousand, Canon has an EOS camera to suit eve
pro…
from the complete beginner to most demanding
DSLR CAMERAS
CANON EOS 4000D
PRICES QUOTED ARE BODY-ONLY UNLESS STATED
TESTED IN ISSUE 140 PRICE: £370/$N/A
CANON has stripped everything down to its bare
essentials for the 4000D, and it’s a great if basic
DSLR for beginners. And at only £370 (body),
it’s the cheapest EOS DSLR. Sadly, it’s let down
by a cheap kit lens that’s tough to tolerate, so
we suggest buying the better IS lens.
CANON EOS 2000D (REBEL T7)
BEGINNER DSLRs
THE 2000D is a better-spec Canon camera than
the 4000D, but comes with a modest step up in
price. It’s arguably worth the extra, but that puts
it in a difficult spot, where another step up in
outlay will get you an EOS 200D, which is
a far better overall DSLR camera.
CANON EOS 250D (REBEL SL3)
THE EOS 250D/Rebel SL3 is not Canon’s
cheapest entry-level DSLR, but we think it’s the
best budget/beginner DSLR with the perfect
blend of power and value. This is the body that will
take people from snapping on their smartphones
to getting into the hobby.
CANON EOS 850D (REBEL T8i)
FOR ENTHUSIASTS looking to take the next
step, the Canon EOS 850D is an impressive,
lightweight yet powerful DSLR that captures
detailed, colourful and sharper images, as well as
4K movies. Featuring iTR Face and Eye Detection
AF, and accurate Auto AF via optical viewfinder,
the 850D is sure to satisfy.
100
Canon splits its EOS range into mirrorless cameras
and DSLRs. Its older DSLR line-up includes beginner,
enthusiast and pro ranges; the EOS 4000D is the
most basic, the 850D for intermediates, the 90D and
full-frame 6D Mk II for advanced enthusiasts, and the
full-frame pro-level 5D and 1D lines. Over the page are
the two EOS mirrorless ranges: Canon’s smaller, older
APS-C EOS M cameras, and Canon’s EOS R System
APS-C and full-frame cameras that offer the very
latest digital technology. The APS-C crop-sensor EOS
R50, R10 and R7 are smaller, affordable entry-level
options. While the EOS R8 up to the R6 Mark II, R5
and flagship R3 are full-frame for serious enthusiasts
to professionals. Canon’s EOS R cameras are packed
with intelligent features and most have IBIS, new AF
tracking for any moving subject you shoot, and 20fps
to 40fps continuous shooting bursts are common
place using the speedy electronic shutter modes.
Sensor
Viewfinder
ISO
AF
LCD
Max burst (buffer)
Memory card
18MP APS-C CMOS
Pentamirror, 0.8x, 95%
100-6400 (12,800 exp)
9-point (1 cross-type)
2.7-inch 230K dots
3fps
SD/SDHC/SDXC
TESTED IN ISSUE 194 PRICE: £349/$479
Sensor
Viewfinder
ISO
AF
LCD
Max burst (buffer)
Memory card
24.1MP APS-C CMOS
Pentamirror, 0.8x, 95%
100-6400 (12,800 exp)
9-point (1 cross-type)
3-inch 920K dots
3fps
SD/SDHC/SDXC
TESTED IN ISSUE 194 PRICE: £549/$649
Sensor
Viewfinder
ISO
AF
LCD
Max burst (buffer)
Memory card
24.1MP APS-C CMOS
Pentamirror, 0.87x, 95%
100-25,600 (51,200 exp)
9-point (1 cross-type)
3-inch vari-angle touchscreen 1040K
5fps
SD/SDHC/SDXC
TESTED IN ISSUE 194 PRICE: £919/$749
Sensor
Viewfinder
ISO
AF
LCD
Max burst (buffer)
Memory card
24.1MP Dual Pixel APS-C CMOS
Pentamirror, 95% coverage, 0.82x
100-25,600
45 cross-type AF point system
3-inch vari-angle touchscreen 1040K
7fps
SD/SDHC/SDXC
www.digitalcameraworld.com
BUYERS’ GUIDE CAMERAS
CANON EOS 77D
TESTED IN ISSUE 194 PRICE: £710/$550
THE key specs are identical to the 800D, but the
extra top-plate LCD gives at-a-glance access to
vital shooting info, while a rear control wheel
makes dialing in exposure settings much quicker,
promoting it to Canon’s enthusiast range. Super
image quality – even at high ISOs.
CANON EOS 90D
Sensor
Viewfinder
ISO
AF
LCD
Max burst (buffer)
Memory card
Pentamirror, 0.82x, 95%
100-25,600 (51,200 exp)
45-point (all cross-type)
3-inch vari-angle touchscreen 1040K
6fps (27 Raw/Unlimited JPEG)
SD/SDHC/SDXC
TESTED IN ISSUE 194 PRICE: £1299/$1199
CANON EOS 7D MARK II
Sensor
Viewfinder
ISO
AF
LCD
Max burst (buffer)
Memory card
32.5MP, APS-C (6960x4640 pixels)
Pentaprism, 0.95x, 100%
100-25,600 (51,200 exp)
45-point (all cross-type)
3-inch vari-angle touchscreen 1040K
10fps (25 Raw/58 JPEG)
SD/SDHC/SDXC
TESTED IN ISSUE 159 PRICE: £1050/$725
HERE’S the king of action-packed APS-C format
EOS cameras. A little long in the tooth now, but it
still has 65-point AF with advanced tracking,
10fps continuous drive, dual DIGIC 6 processors
and GPS, all wrapped up in a tough, weathersealed magnesium alloy shell.
CANON EOS 6D MARK II
Sensor
Viewfinder
ISO
AF
LCD
Max burst (buffer)
Memory card
20.2MP, APS-C (5472x3648 pixels)
Pentaprism, 1.0x, 100%
100-16,000 (51,200 exp)
65-point (all cross-type)
3-inch 1040K dots
10fps (31 Raw/unlimited JPEG)
CompactFlash + SD/SDHC/SDXC
ENTHUSIAST DSLRs
THE EOS 90D is still Canon’s decathlete cropcamera that comes with a better 32.5MP sensor,
super-quick 10fps continuous shooting and 4K
video, plus improved handling and decent AF.
This camera is an ideal APS-C camera upgrade
for enthusiasts and beyond.
TESTED IN ISSUE 194 PRICE: £1339/$1399
THE world’s smallest full-frame DSLR – with
a vari-angle touchscreen LCD – gets a major
upgrade over the original 6D with improved speed
and performance rather than outright image
quality. It’s a great all-rounder now thanks to an
improved AF system and burst rate.
CANON EOS 5D MARK IV
Sensor
26.2MP, full-frame (6240x4160 pixels)
Viewfinder
ISO
AF
LCD
Max burst (buffer)
Memory card
Optical pentaprism, 98%
100-40,000 (50-102,400 exp)
45-point (all cross-type)
3-inch vari-angle touchscreen 1040K
6.5fps (21 Raw/150 JPEG)
SD/SDHC/SDXC
TESTED IN ISSUE 194 PRICE: £2869/$2699
Sensor
30.4MP, full-frame (6720x4480 pixels)
Viewfinder
ISO
AF
LCD
Max burst (buffer)
Pentaprism, 0.71x, 100%
100-32,000 (50-102,400 exp)
61-point (41 cross-type, 5 dual-cross)
3.2-inch touchscreen 1620K dots
7fps (21 Raw/unlimited JPEG)
Memory card
CANON EOS 5DS (5DS R)
THE world’s first 50MP full-frame DSLR delivers
huge and amazingly detailed hi-res images. The
higher-cost 5DS R adds a low-pass cancellation
filter for marginally sharper shots. As expected
with such a high-res sensor, max ISO and drive
rate are lower than with the 5D Mk IV.
TESTED IN ISSUE 148 PRICE: £2740/$1499
Sensor
50.6MP, full-frame (8688x5792 pixels)
Viewfinder
ISO
AF
LCD
Max burst (buffer)
Pentaprism, 0.71x, 100%
100-6400 (50-12,800 exp)
61-point (41 cross-type, 5 dual-cross)
3.2-inch 1040K dots
5fps (14 Raw/510 JPEG)
Memory card
CANON EOS-1D X MARK III
THE Canon EOS-1D X Mark III is the ultimate hybrid
DSLR/mirrorless machine, with superb low-light
performance up to ISO102,400, expandable to
819,200, Deep Learning AF and 5.5K Raw video.
It can also capture up to 20fps in Live View mode,
making it a dream to shoot any action.
CompactFlash + SD/SDHC/SDXC
CompactFlash + SD/SDHC/SDXC
TESTED IN ISSUE 194 PRICE: £6999/$6499
Sensor
Viewfinder
ISO
AF
LCD
Max burst (buffer)
Memory card
20.1MP full-frame (5472x3648 pixels)
Pentaprism, 0.76x, 100% coverage
100-102,400 (exp 50-819,200)
191-point (155 cross-type)
3.2-inch touchscreen 2.1m dots
20fps (1000 Raw/unlimited JPEG)
2xCFexpress 1.0 Type B
101
PROFESSIONAL DSLRs
A SUPERB all-rounder, the pro-level weathersealed full-frame 5D Mk IV combines a stunning
hi-res 30MP sensor with a swift 7fps frame rate.
Its impressive specs list includes 4K video, a
touchscreen LCD, Wi-Fi and NFC connectivity, and
GPS to automatically geotag images.
The Canon Magazine
24.2MP, APS-C (6000x4000 pixels)
BUYERS’
GUIDE
MIRRORLESS CAMERAS
PRICES QUOTED ARE BODY-ONLY UNLESS STATED
TESTED IN ISSUE 194 PRICE with 15-45mm kit lens: £570/$549
CANON EOS M200
CANON’S EOS M200 is aimed at attracting
Instagramers and smartphone upgraders to
mirrorless
and has an appealing
to several
hundreMdrange,
from a few
gCanon’s
spec list including its 24MP sensor and plenty of
everyone, It shoots 4K
era to suit
an EOS camfeatures
for beginners.
seasy-to-use
video totoseal
deal.
anding pro…
t dem
mosthe
eginner
Sensor
Viewfinder
ISO
AF
LCD
Max burst (buffer)
Memory card
APS-C EOS M
IF YOU’RE coming to the EOS M system afresh,
the EOS M50 Mark II is a compact and capable
camera, taking great stills and 1080p video, ideal
for travel, everyday imaging, plus vlogging and
content creation. But if you need to record 4K,
this isn’t the camera for you.
CANON EOS M6 MARK II
Sensor
Viewfinder
ISO
AF
LCD
Max burst (buffer)
Memory card
Sensor
Viewfinder
ISO
AF
LCD
Max burst (buffer)
Memory card
OLED EVF, 2.36 million dots
100-25,600 (exp. to 51,200)
Dual Pixel CMOS AF, 3975 focus positions
3-inch vari-angle touchscreen 1040K dots
10fps
1x SD UHS-I
32.5MP APS-C CMOS
No
100-25,600
143/99-point
3-inch tilting touchscreen 1040K dots
14fps (23 Raws, 54 JPEGs)
SD/SDHC/SDXC and UHS-1
TESTED IN ISSUE 168 PRICE with 15-45mm kit lens: £780/N/A
AS Canon’s flagship mirrorless M camera for
enthusiasts, the EOS M5 really opens up the
DSLR vs CSC debate. It shares much of the tech
as the 80D, but swaps the optical viewfinder for
an electronic version, making this compact
system camera a pocket rocket.
Sensor
Viewfinder
ISO
AF
LCD
Max burst (buffer)
Memory card
24.2MP APS-C CMOS
OLED EVF, 2.36 million dots
100-25,600
49-point AF
3.2-inch tilting touchscreen 1620k dots
9fps
SD/SDHC/SDXC and UHS-1
TESTED IN ISSUE 208 PRICE with 18-45mm kit lens: £669/$599
THE Canon EOS R100 is effectively the mirrorless
replacement for the 250D and 2000D, aimed at
first-timers looking for better image quality than a
smartphone. It boasts a robust 24.1MP APS-C
sensor, great autofocus and wide-spanning lens
line-up, all without breaking the bank.
BEGINNER EOS R
CANON EOS R50
Sensor
Viewfinder
ISO
AF
LCD
Max burst (buffer)
Memory card
24.1MP APS-C CMOS
2.36 million dots, 60fps
100-12,800 (25,600 exp)
Dual Pixel CMOS AF II (88% coverage)
3-inch fixed (non-touch) screen 1.04m dots
6.5fps (3.5fps with AF)
1x SD/SDHC/SDXC slot
TESTED IN ISSUE 208 PRICE: £789/$679
UTILIZING the small and compact size of the
M50 yet improving upon its specs in every way,
with the sensor/processor from the R10, the R50
is one of the best pocket-friendly cameras today.
With a 24.2MP APS-C sensor, 4K video, intelligent
AF modes, and 15/12fps continuous shooting, the
R50 is a great beginner camera.
CANON EOS R10
Sensor
Viewfinder
ISO
AF
LCD
Max burst (buffer)
Memory card
24.2MP APS-C CMOS
0.39 OLED, 2.36 million dots, 120fps
100-12800 (25600 exp)
Dual Pixel CMOS AF II
3-inch vari-angle touchscreen 1.62 dots
15fps electronic, 12fps electronic 1st curtain
1x UHS-I SD
TESTED IN ISSUE 208 PRICE: £899/$979
CANON’S budget, beginner EOS R10 – with
pro-level autofocus and 15fps speed, 4K 60p
imaging and 120p slow motion at 1080p – offers
performance that punches well above its weight.
The lack of in-body image stabilization or the crop
at 4K 60p are the only drawbacks.
102
24.1MP CMOS APS-C
TESTED IN ISSUE 194 PRICE: £799/$849
THE M6 Mk II is Canon’s compact yet powerful
APS-C mirrorless, designed to deliver sharp images
for amateurs on the move. It has the same 32.5MP
APS-C sensor as the Canon 90D DSLR, but it’s
able to shoot in 14fps blasts, and 30fps Raw image
bursts, plus uncropped 4K video.
CANON EOS R100
No
100-25,600 (51,200 exp)
143-point AF
3-inch tilting touchscreen 1040K dots
6.1fps
SD/SDHC/SDXC and UHS-1
TESTED IN ISSUE 194 PRICE: £589/$599
CANON EOS M50 MARK II
CANON EOS M5
24.1MP APS-C CMOS
Sensor
Viewfinder
ISO
AF
LCD
Max burst (buffer)
Memory card
24.2MP APS-C CMOS
2.36 million dots, 120fps
100-32,000 (51,200 exp)
651 Dual Pixel CMOS AF II divisions
3-inch vari-angle touchscreen 1.04m dots
23fps electronic, 15fps mechanical
1x SD/SDHC/SDXC, UHS-II
www.digitalcameraworld.com
BUYERS’ GUIDE CAMERAS
CANON EOS RP
TESTED IN ISSUE 194 PRICE: £1049/$999
CANON’S RP is ideal for crop-sensor CSC M or
EOS DSLR users looking for a full-frame upgrade
that won’t break the bank. The EOS RP is strong
spec package that’s notably smaller, lighter and
cheaper than almost all its rivals, and ideal as
an entry-level full-frame camera.
Sensor
Viewfinder
ISO
AF
LCD
Max burst (buffer)
Memory card
CANON EOS R7
0.39-inch EVF, 2.36 million dots
100-40,000 (50-102,400 exp)
4779 Dual Pixel AF positions
3-inch vari-angle touchscreen 1040K
5fps (50 Raw/Unlimited JPEG)
SD/SDHC/SDXC and UHS-ll
TESTED IN ISSUE 208 PRICE: £1349/$1499
CANON EOS R8
Sensor
Viewfinder
ISO
AF
LCD
Max burst (buffer)
Memory card
32.5MP APS-C CMOS
2.36 million dots, 120fps
100-32,000 (51,200 exp)
651 Dual Pixel CMOS AF II divisions
3-inch vari-angle touchscreen 1.62m dots
30fps electronic, 15fps mechanical
2x SD/SDHC/SDXC, UHS-II
TESTED IN ISSUE 208 PRICE: £1699/$1499
CANON’S R8 is the lightest full-frame EOS R
camera, and can shoot it all, with the same
sensor and processor as the R6 Mk II, latest AF
subject recognition, 24.2MP images, and rapid
40fps shooting. But there’s no joystick or thumb
dial, no IBIS, and smaller batteries.
CANON EOS R
Sensor
Viewfinder
ISO
AF
LCD
Max burst (buffer)
Memory card
24.2MP full-frame CMOS
0.39 OLED, 2.36 million dots, 120fps
100-25600 (102,400 exp)
Dual Pixel CMOS AF II
3-inch vari-angle touchscreen 1.62 dots
40fps electronic, 6fps electronic 1st curtain
1x UHS-II SD
ENTHUSIAST EOS R
THE Canon EOS R7 is the first mirrorless camera
to reach for if you want the advantages of APS-C
with pro-level 15fps speed, intelligent AF, IBIS, and
big-time image resolution. It’s a fantastic addition
to the EOS R ecosystem and a worthy successor
to the 90D and 7D DSLR lines.
TESTED IN ISSUE 194 PRICE: £1449/$1799
THE first full-frame mirrorless Canon EOS R boasts
the RF mount and fully articulated vari-angle
Dual Pixel AF touchscreen with 5655 AF points.
Equivalent in many specs to the 5D Mark IV DSLR,
it’s now a cheaper EOS R option for those looking
to experience mirrorless photography.
Sensor
Electronic viewfinder
ISO
AF
LCD
Max burst (buffer)
Memory card
CANON EOS R6 MARK II
30.3MP full-frame CMOS
0.5-inch EVF, 3.69 million dots
100-40,000 (50-102,400 exp)
5655 Dual Pixel AF points
3.2-in vari-angle touchscreen 2.1m dots
Approx. 8fps (47 Raw, 100 JPEG)
1x SD/SDHC/SDXC and UHS-II
TESTED IN ISSUE 208 PRICE: £2779/$3599
CANON EOS R5
Sensor
Viewfinder
ISO
AF
LCD
Max burst (buffer)
Memory card
24.2MP full-frame CMOS
0.5-inch OLED, 3.69 million dots
100-102,400 (50-204,800 exp)
4897 Dual Pixel AF positions
3-inch vari-angle touchscreen 1.62m dots
12fps mechanical, 40fps electronic
2xUHS-II SD
TESTED IN ISSUE 208 PRICE : £4299/$3899
THE Canon EOS R5 is deserving of the hype: it’s
the perfect amalgamation of the R’s full-frame
form, the 5D’s function, the pro-grade autofocus
of the flagship EOS-1D X Mark III DSLR, plus with
near-medium format resolution, 20fps burst
speeds and mirrorless magic such as IBIS and
amazingly-intelligent Animal AF.
CANON EOS R3
Sensor
45MP full-frame CMOS
Viewfinder
ISO
AF
LCD
Max burst (buffer)
OLED EVF, 5690K dots
100-51,200 (50-102,400 exp)
5940 Dual Pixel CMOS AF II
3.15-in vari-angle touchscreen 2100K dots
12fps mechanical, 20fps electronic
Memory card
CFexpress type B, UHS-II SD/SDHC/SDXC
TESTED IN ISSUE 208 PRICE: £5879/$5999
CANON’S sporty pro mirrorless R3 has clever
AF that’s amazing at detecting vehicles as well as
people and animals, Eye Control AF, faster 30fps,
blackout-free EVF, and it can take 4K 60p video
without overheating, which means the R3
succeeds where the R5 fell short.
Sensor
Viewfinder
ISO
AF
LCD
Max burst (buffer)
Memory card
24.1MP stacked CMOS
0.5-inch EVF, 5.76 million dots
100-102,400 (50-204,800 exp)
4779 Dual Pixel AF positions
3-inch vari-angle touchscreen 4.15m dots
12fps mechanical, 30fps electronic
CFexpress type, SD/SDHC/SDXC
103
PROFESSIONAL EOS R
WHAT can’t this camera do? The R6 Mark II is a
hybrid camera that packs an obscene amount of
firepower, with up to 6K video and 24.2MP stills at
a startling 40fps. Plus updated AF detection for
tracking trains, planes and horses (with the usual
animal, people, vehicles AF detection) for sharp
shots of anything that moves.
The Canon Magazine
26.2MP full-frame CMOS
Choosing lenses
BUYERS’
GUIDE
Key factors to watch out for
The main factors to consider in a lens are
its focal length, maximum aperture, and if it’s full-frame compatible or
not. We’ve categorized lenses by focal length range from wide-angle to
telephoto. The larger a lens’s maximum aperture, the ‘faster’ it is. Zooms are
more flexible than primes, but tend not to have such fast maximum apertures.
Full-frame lenses will also work with ‘crop-sensor’ EOS DSLRs, but crop-sensor
lenses aren’t compatible with full-frame cameras. For Canon EOS R mirrorless
cameras the dedicated Canon RF lenses are best, but using Canon’s Mount
Adapter EF-EOS R enables EF-S and EF lenses to be used on EOS R cameras.
n
io
ed
at
540g
240g
385g
1180g
540
840
790g
615g
500g
555g
520g
1150g
1150g
940g
440g
1100g
1110g
560g
560g
530g
940g
600g
0.15m
0.22m
0.24m
0.28m
0.20m
0.28m
0.28m
0.28m
0.28m
0.24m
0.24m
0.24m
0.26m
0.28m
0.24m
0.28m
0.28m
0.28m
0.28m
0.25m
0.28m
0.28m
0.34x
0.15x
0.17x
0.16x
0.38x
0.21x
0.22x
0.23x
0.24x
0.13x
0.15x
0.2x
0.19x
0.23x
0.19x
0.2x
0.2x
0.12x
0.12x
0.2x
0.19x
0.21x
None
67mm
77mm
None
77mm
82mm
82mm
77mm
77mm
None
82mm
None
None
77mm
77mm
None
None
77mm
82mm
82mm
82mm
82mm
7
7
6
9
9
9
9
9
7
7
7
9
9
7
7
9
9
9
9
9
9
9
90
203
131
203
203
203
195
203
113
143
176
203
195
113
176
143
176
87
195
116
154
Canon EF-M 55-200mm f/4.5-6.3 IS STM
Canon EF-S 55-250mm f/4-5.6 IS STM
Canon EF 70-200mm f/2.8L IS III USM
Canon EF 70-200mm f/2.8L USM
Canon EF 70-200mm f/4L IS II USM
Canon EF 70-200mm f/4L IS USM
Canon EF 70-200mm f/4L USM
Canon RF 70-200mm F2.8L IS USM
Canon RF 70-200mm F4L IS USM
Canon EF 70-300mm f/4-5.6 IS USM
£299/$349
£309/$299
£2149/$2099
£1330/$1250
£1629/$1499
£360/$500 (used)
£589/$599
£2659/$2699
£1699/$1749
£400/$650
No
No
Yes
Yes
Yes
Yes
Yes
Yes
Yes
Yes
3.6x
4.5x
2.9x
2.9x
2.9x
2.9x
2.9x
2.9x
2.9x
4.3x
Yes
Yes
Yes
No
Yes
Yes
No
Yes
Yes
Yes
f/4.5-6.3
f/4-5.6
f/2.8
f/2.8
f/4
f/4
f/4
f/2.8
f/4
f/4-5.6
260g
375g
1480g
1310g
780g
760g
705g
1070g
695g
630g
1.0m
0.85m
1.2m
1.5m
1.0m
1.2m
1.2m
0.7m
0.6m
1.5m
0.21x
0.29x
0.21x
0.16x
0.27x
0.21x
0.21x
0.23x
0.28x
0.26x
52mm
58mm
77mm
77mm
72mm
72mm
67mm
77mm
77mm
58mm
7
7
8
8
9
8
8
9
9
8
196
196
175
64
196
196
163
175
196
123
Canon EF 70-300mm f/4-5.6 IS II USM
£639/$599
Yes
4.3x
Yes
f/4-5.6
710g
1.2m
0.25x
67mm
9
196
Canon EF 70-300mm f/4-5.6L IS USM
Canon EF 70-300mm f/4.5-5.6 DO IS USM
Canon EF 75-300mm f/4-5.6 III
Canon EF 75-300mm f/4-5.6 III USM
Canon EF 100-400mm f/4.5-5.6L IS II USM
£690/$800 (used)
£1380/$1400
£210/$200
£260/$190
£2529/$2199
Yes
Yes
Yes
Yes
Yes
4.3x
4.3x
4.0x
4.0x
4.0x
Yes
Yes
No
No
Yes
f/4-5.6
f/4.5-5.6
f/4-5.6
f/4-5.6
f/4.5-5.6
1050g
720g
480g
480g
1640g
1.2m
1.4m
1.5m
1.5m
0.98m
0.21x
0.19x
0.25x
0.25x
0.31x
67mm
58mm
58mm
58mm
77mm
8
6
7
7
9
196
90
15
70
206
ar
f/4
f/4.5-5.6
f/3.5-4.5
f/4
f/4
f/2.8
f/2.8
f/4
f/4
f/4.5-5.6
f/3.5
f/4
f/2.8
f/2
f/3.5-4.5
f/2.8
f/2.8
f/2.8
f/2.8
f/4
f/2.8
f/4
Aw
No
Yes
No
No
Yes
Yes
No
Yes
No
No
No
No
No
No
Yes
Yes
Yes
No
No
No
No
No
ti n
1.9x
1.8x
2.2x
2.2x
2.5x
2.3x
2.2x
2.2x
2.4x
2.0x
2.0x
2.0x
0.19x
1.5x
0.19x
2.0x
2.0x
1.8x
1.43x
2.3x
1.8x
2.1x
g
re
Yes
No
No
Yes
Yes
Yes
Yes
Yes
Yes
No
No
Yes
Yes
Yes
No
Yes
Yes
No
No
No
Yes
Yes
Ra
£1120/$1250
£249/$299
£500/$650
£3099/$2899
£1749/$1499
£2389/$1999
£2199/$2199
£1389/$1299
£720/$750
£600/$800
£319/$399
£1269/$1239
£1269/$1299
£760/$900
£449/$499
£930/$1100
£1099/$1299
£480/$500
£493/$549
£450/$400
£699/$699
£570/$450
ds
vi
es
e
Is
su
Ir
Canon EF 8-15mm f/4L Fisheye USM
Canon EF-S 10-18mm f/4.5-5.6 IS STM
Canon EF-S 10-22mm f/3.5-4.5 USM
Canon EF 11-24mm f/4L USM
Canon RF 14-35mm F4L IS USM
Canon RF 15-35mm F2.8L IS USM
Canon EF 16-35mm f/2.8L III USM
Canon EF 16-35mm f/4L IS USM
Canon EF 17-40mm f/4L USM
Sigma 8-16mm f/4.5-5.6 DC HSM
Sigma 10-20mm f/3.5 EX DC HSM
Sigma 12-24mm f/4 DG HSM A
Sigma 14-24mm f/2.8 DG HSM A
Sigma 24-35mm f/2 DG HSM A
Tamron 10-24mm f/3.5-4.5 Di II VC HLD
Tamron SP 15-30mm f/2.8 Di VC USD
Tamron SP 15-30mm f/2.8 Di VC USD G2
Tokina 11-16mm f/2.8 AT-X PRO DX II
Tokina 11-20mm f/2.8 AT-X PRO DX
Tokina 12-28mm f/4 AT-X Pro DX
Tokina 16-28mm f/2.8 FF
Tokina 17-35mm f/4 AT-X PRO FX
is
Fi
l te
r
bl
si
ad
ze
ni
ag
m
ew
fic
st
di
M
ax
M
in
fo
t
W
ei
gh
ap
cu
er
s
tu
ili
ab
M
ax
e
Im
ag
zo
M
ax
st
om
m
ra
Fu
l
WIDE-ANGLE ZOOMS
WIDE-ANGLE ZOOMS
Pr
ic
e
BEST ON TEST AWARD
l-f
BEST VALUE AWARD
e
KEY:
re
za
an
ti o
ce
n
With over 200 lenses we’ve listed for Canon EOS cameras,
picking the right one can be tough. Here’s the lowdown!
•
•
•
•
TELEPHOTO ZOOMS
TELEPHOTO ZOOMS
Canon RF 100-400mm F5.6-8 IS USM
£699/$649
Yes
4.0x
Yes
f/5.6-8
635g
0.88m
0.41x
67mm
9
206
Canon RF 100-500mm F4.5-7.1L IS USM
£2979/$2899
Yes
5x
Yes
f/4.5-7.1
1530g
0.9-1.2m
0.33x
77mm
9
206
Canon EF 200-400mm f/4L IS USM Extender 1.4x
Sigma 50-100mm f/1.8 DC HSM A
Sigma 50-500mm f/4.5-6.3 DG OS HSM
Sigma 60-600mm f/4.5-6.3 DG OS HSM Sport
£11,209/$10,999
£949/$1099
£1160/$1660
£1699/$1999
Yes
No
Yes
Yes
2.8x
2.0x
10.0x
10.0x
Yes
None
Yes
Yes
f/4
f/1.8
f/4.5-6.3
f/4.5-6.3
3620g
1490g
1970g
2700g
2.0m
0.15x
0.95m
0.15x
0.5-1.8m 0.32x
0.6-2.6m 0.3x
52mm
82mm
95mm
105mm
9
9
9
9
182
175
130
182
Sigma 70-200mm f/2.8 EX DG OS HSM
£900/$1300
Yes
2.9x
Yes
f/2.8
1430g
1.4m
0.13x
77mm
9
137
Sigma 70-200mm f/2.8 DG OS HSM S
£1179/$1499
Yes
2.9x
Yes
f/2.8
1805g
1.2m
0.21x
82mm
11
190
Sigma 70-300mm f/4-5.6 DG Macro
Sigma APO 70-300mm f/4-5.6 DG Macro
£130/$140
£180/$180
Yes
Yes
4.3x
4.3x
No
No
f/4-5.6
f/4-5.6
545g
550g
0.95m
0.95m
0.5x
0.5x
58mm
58mm
9
9
123
137
Sigma 100-400mm f/5-6.3 DG OS HSM C
£899/$799
Yes
4x
Yes
f/5-6.3
1160g
1.6m
0.26x
67mm
9
196
Sigma 120-300mm f/2.8 DG OS HSM S
Sigma 150-600mm f/5-6.3 DG OS HSM C
£2699/$3599
£849/$899
Yes
Yes
2.5x
4.0x
Yes
Yes
f/2.8
f/5-6.3
3390g
1930g
1.5-2.5m
2.8m
0.12x
0.2x
105mm
95mm
9
9
175
193
Sigma 150-600mm f/5-6.3 DG OS HSM S
£1279/$1699
Yes
4.0x
Yes
f/5-6.3
2860g
2.6m
0.2x
105mm
9
206
Tamron SP AF 70-200mm f/2.8 Di LD (IF) Macro £630/$770
Yes
2.9x
No
f/2.8
1320g
0.95m
0.32x
77mm
9
137
Tamron SP 70-200mm f/2.8 Di VC USD G2
£1249/$1299
Yes
2.9x
Yes
f/2.8
1500g
0.95m
0.16x
77mm
9
175
Tamron 70-210mm f/4 DI VC USD
Tamron AF 70-300mm f/4-5.6 Di LD Macro
£549/$599
£130/$145
Yes
Yes
2.9x
4.3x
Yes
No
f/4
f/4-5.6
860g
458g
0.95m
0.95m
0.32x
0.5x
67mm
62mm
9
9
175
137
Tamron SP AF 70-300mm f/4-5.6 Di VC USD
£230/$250 (used)
Yes
4.3x
Yes
f/4-5.6
765g
1.5m
0.25x
62mm
9
196
Tamron 100-400mm f/4.5-6.3 Di VC USD
£819/$799
Yes
4x
Yes
f/4-5.6
1135g
1.5m
0.28x
67mm
9
196
Tamron SP 150-600mm f/5-6.3 Di VC USD G2
£1299/$1399
Yes
4.0x
Yes
f/5-6.3
2010g
2.2m
0.26x
95mm
9
206
Tokina SZX Super Tele 400mm F8 Reflex MF
£250/$239
No
N/A
No
f/8
355g
1.15m
0.4x
67mm
9
206
•
•
•
•
••
•
•
•
ed
io
ew
0.35m
0.35m
0.25m
0.25m
0.35m
0.38m
0.21m
0.38m
0.39m
0.40m
0.45m
0.13m
0.40m
0.20m
0.28m
0.22m
0.28m
0.38m
0.45m
0.29m
0.38m
0.33m
0.21x
0.17x
0.34x
0.25x
0.19x
0.21x
0.30x
0.7x
0.18x
0.3x
0.24x
0.34x
0.24x
0.16x
0.2x
0.36x
0.23x
0.2x
0.22x
0.21x
0.2x
0.26x
72mm
77mm
58mm
58mm
58mm
82mm
82mm
77mm
95mm
77mm
77mm
67mm
77mm
49mm
77mm
72mm
72mm
82mm
82mm
72mm
82mm
67mm
7
7
6
7
7
9
9
9
9
7
10
7
9
7
7
7
9
9
9
7
9
7
207
207
110
207
207
162
162
162
162
127
207
162
207
127
180
90
190
207
142
142
57
Canon EF-S 18-135mm f/3.5-5.6 IS STM
Canon EF-S 18-135mm f/3.5-5.6 IS USM
Canon EF-M 18-150mm f/3.5-6.3 IS STM
Canon EF-S 18-200mm f/3.5-5.6 IS
Canon RF 24-240mm F4-6.3 IS USM
Canon RF-S 18-150mm F3.5-6.3 IS STM
Canon EF 28-300mm f/3.5-5.6L IS USM
Sigma 18-200mm f/3.5-6.3 DC Macro OS HSM C
£449/$549
£484/$599
£459/$499
£470/$700
£959/$899
£520/$500
£2479/$2449
£269/$399
No
No
No
No
Yes
No
Yes
No
7.5x
7.5x
8.3x
11.1x
10x
8.3x
10.7x
11.1x
Yes
Yes
Yes
Yes
Yes
Yes
Yes
Yes
f/3.5-5.6
f/3.5-5.6
f/3.5-6.3
f/3.5-5.6
f/4-6.3
f/3.5-6.3
f/3.5-5.6
f/3.5-6.3
480g
515g
300g
595g
750g
310g
1760g
430g
0.39m
0.39m
0.25-0.45m
0.45m
0.5m
0.17m
0.7m
0.39m
0.28x
0.28x
0.31x
0.24x
0.26x
0.31x
0.30x
0.33x
67mm
67mm
55mm
72mm
72mm
49mm
77mm
62mm
7
7
7
6
7
7
8
7
191
207
191
128
191
202
191
172
Sigma 18-250mm f/3.5-6.3 DC Macro OS HSM
g
ar
575g
645g
200g
210g
210g
805g
900g
600g
1430g
525g
795g
385g
700g
124g
565g
465g
810g
1,020g
885g
570g
905g
510g
Aw
f/3.5-5.6
f/2.8
f/3.5-5.6
f/4-5.6
f/4.5-6.3
f/2.8
f/2.8
f/4
f/2
f/3.5-5.6
f/4
f/4-7.1
f/4
f/4.5-6.3
f/2.8
f/2.8-4
f/1.8
f/2.8
f/4
f/2.8
f/2.8
f/2.8
ds
vi
Yes
Yes
Yes
Yes
Yes
No
Yes
Yes
No
Yes
Yes
Yes
Yes
Yes
Yes
Yes
No
Yes
Yes
Yes
Yes
No
ti n
Is
5.7x
3.2x
3.1x
3.1x
38.4x
2.9x
2.9x
2.9x
2.9x
4.4x
4.4x
4.4x
4.4x
2.5x
2.9x
4.1x
1.9x
2.9x
4.4x
2.9x
2.9x
2.7x
Ra
e
Ir
No
No
No
No
Yes
Yes
Yes
Yes
Yes
Yes
Yes
Yes
Yes
No
No
No
No
Yes
Yes
No
Yes
Yes
is
Fi
su
bl
r
M
l te
re
ad
ze
si
ag
m
M
£779/$699
£849/$879
£170/$200
£219/$249
£379/$299
£1740/$1599
£2329/2299
£800/$849
£2500/$3200
£579/$599
£998/$1099
£449/$399
£1119/$1099
£339/$299
£330/$370
£350/$399
£650/$800
£1149/$1299
£639/$899
£420/$650
£1250/$1200
£450/$500
in
W
ei
ax
fo
es
fic
ni
di
s
cu
t
gh
M
ax
at
an
st
re
tu
er
ap
st
e
Im
ag
n
ce
n
ti o
za
ili
ab
om
zo
M
ax
Fu
l
Canon EF-S 15-85mm f/3.5-5.6 IS USM
Canon EF-S 17-55mm f/2.8 IS USM
Canon EF-S 18-55mm f/3.5-5.6 IS II
Canon EF-S 18-55mm f/4-5.6 IS STM
Canon RF 24-50mm F4.5-6.3 IS STM
Canon EF 24-70mm f/2.8L II USM
Canon RF 24-70mm F2.8L IS USM
Canon EF 24-70mm f/4L IS USM
Canon RF 28-70mm F2L USM
Canon EF 24-105mm f/3.5-5.6 IS STM
Canon EF 24-105mm f/4L IS II USM
Canon RF 24-105mm F4-7.1 IS STM
Canon RF 24-105mm F4L IS USM
Canon RF-S 18-45mm F4.5-6.3 IS STM
Sigma 17-50mm f/2.8 EX DC OS HSM
Sigma 17-70mm f/2.8-4 DC Macro OS HSM C
Sigma 18-35mm f/1.8 DC HSM A
Sigma 24-70mm f/2.8 DG OS HSM A
Sigma 24-105mm f/4 DG OS HSM A
Tamron SP AF 17-50mm f/2.8 XR Di II VC
Tamron SP AF 24-70mm f/2.8 Di VC USD G2
Tamron SP AF 28-75mm f/2.8 XR Di
•
•
•
STANDARD ZOOMS
STANDARD ZOOMS
Pr
ic
ra
m
e
BEST ON TEST AWARD
l-f
BEST VALUE AWARD
e
KEY:
•
SUPERZOOMS
No
13.9x
Yes
f/3.5-6.3
470g
0.35m
0.34x
62mm
7
92
No
16.7x
Yes
f/3.5-6.3
585g
0.39m
0.33x
72mm
7
191
Tamron 16-300mm f/3.5-6.3 Di II VC PZD Macro
Tamron 18-200mm f/3.5-6.3 Di II VC
Tamron AF 18-270mm f/3.5-6.3 Di II VC PZD
Tamron 18-400mm f/3.5-6.3 Di II VC HLD
£499/$629
£209/$249
£300/$450
£599/$649
No
No
No
No
18.8x
11.1x
15x
22.2x
Yes
Yes
Yes
Yes
f/3.5-6.3
f/3.5-6.3
f/3.5-6.3
f/3.5-6.3
540g
400g
450g
710g
0.39m
0.49m
0.49m
0.45m
0.34x
0.25x
0.26x
0.34x
67mm
62mm
62mm
72mm
7
7
7
7
172
191
128
191
£2000/$2100
£299/$279
£2000/$2150
£450/$540
£229/$249
£1500/$1550
£529/$599
£159/$149
£1690/$1900
£420/$510
£390/$500
£1650/$1650
£499/$499
£539/$599
£609/$650
£574/$675
£250/$215
£290/$290
£240/$260
£379/$399
£360/$470
£899/$999
£330/$360
£480/$470
£680/$760
£489/$499
£700/$900
£700/$900
£600/$600
£1399/$1599
£600/$610
£449/$400
£700/$900
£650/$850
£329/$339
£699/$699
£379/$479
£649/$599
£2330/$2700
£1090/$1395
£1400/$1850
£1270/$1700
Yes
No
Yes
Yes
No
Yes
Yes
No
Yes
Yes
Yes
Yes
Yes
Yes
Yes
Yes
Yes
Yes
No
No
Yes
Yes
No
Yes
Yes
Yes
No
Yes
No
Yes
Yes
Yes
Yes
Yes
Yes
Yes
Yes
Yes
Yes
Yes
Yes
Yes
None
None
None
None
None
None
None
None
None
None
None
None
None
None
None
None
None
None
None
None
None
None
None
None
None
None
None
None
None
None
None
None
None
None
None
None
None
None
None
None
None
None
No
No
No
No
No
No
Yes
No
No
No
Yes
No
Yes
Yes
No
No
No
No
No
No
No
No
No
No
No
No
No
No
No
No
No
No
No
No
No
No
No
Yes
No
No
No
No
f/2.8
f/2.8
f/4
f/2.8
f/2
f/1.4
f/2.8
f/2.8
f/3.5
f/1.8
f/2.8
f/1.4
f/1.8
f/2
f/4
f/2.4
f/3.5
f/2.8
f/3.5
f/2.8
f/2.8
f/2.4
f/2
f/1.4
f/3.5
f/1.4
f/2.8
f/3.5
f/2.8
f/1.8
f/2.8
f/1.4
f/1.4
f/1.4
f/1.4
f/1.4
f/1.4
f/1.8
f/2.8
f/3.5
f/2.8
f/2
645g
165g
820g
405g
105g
650g
280g
125g
780g
310g
260g
760g
305g
335g
790g
685g
400g
630g
435g
590g
530g
791g
590g
680g
680g
660g
470g
400g
475g
1170g
370g
405g
950g
665g
270g
665g
280g
480g
947g
510g
851g
600g
0.2m
0.13m
0.25m
0.25m
0.15m
0.25m
0.2m
0.16m
0.21m
0.25m
0.23m
0.28m
0.17m
0.24m
0.28m
0.25m
0.22m
0.3m
0.3m
0.25m
0.2m
0.27m
0.2m
0.25m
0.2m
0.3m
0.14m
0.14m
0.14m
0.27m
0.15m
0.25m
0.28m
0.25m
0.3m
0.3m
0.5m
0.2m
0.25m
0.3m
0.22m
0.25m
0.15x
0.26x
0.14x
0.14x
0.21x
0.17x
0.23x
0.27x
0.34x
0.18x
0.2x
0.21x
0.5x
0.24x
0.13
0.11x
0.13x
N/S
N/S
N/S
N/S
0.08x
N/S
N/S
N/S
N/S
0.17x
0.22x
0.11x
0.19x
0.26x
0.1x
0.14x
0.19x
0.14x
0.19x
0.14x
0.4x
0.11x
0.08x
0.2x
0.17x
None
43mm
77mm
72mm
43mm
77mm
58mm
52mm
82mm
58mm
58mm
72mm
52mm
67mm
None
95mm
None
None
None
None
None
None
77mm
77mm
82mm
77mm
None
None
None
None
None
67mm
77mm
77mm
52mm
67mm
55mm
67mm
95mm
82mm
82mm
67mm
6
7
8
5
7
8
7
7
8
7
7
9
9
8
9
9
9
•
SUPERZOOMS
£350/$350
Sigma 18-300mm f/3.5-6.3 DC Macro OS HSM C £369/$579
•
•
WIDE-ANGLE PRIMES
6
6
7
9
8
8
8
8
6
6
7
9
7
9
9
9
9
9
9
9
9
9
9
9
Zeiss Distagon T* 28mm f/2 ZE
£980/$1285
Yes
None
No
f/2
580g
0.24m
0.21x
58mm
Zeiss Otus 28mm f/1.4 ZE
£3500/$5000
Yes
None
No
f/1.4
1350g
0.3m
0.2x
95mm
9
Zeiss Milvus 35mm f/2 ZE
£935/$1120
Yes
None
No
f/2
702g
0.3m
0.19x
58mm
9
203
90
114
180
•
180
190
67
114
141
202
180
•
167
167
167
90
180
87
87
87
203
44
161
114
114
161
180
202
180
44
141
•
•
•
WIDE-ANGLE PRIMES
Canon EF 14mm f/2.8L II USM
Canon RF 16mm F2.8 STM
Canon TS-E 17mm f/4L (tilt & shift)
Canon EF 20mm f/2.8 USM
Canon EF-M 22mm f/2 STM
Canon EF 24mm f/1.4L II USM
Canon EF 24mm f/2.8 IS USM
Canon EF-S 24mm f/2.8 STM
Canon TS-E 24mm f/3.5L II (tilt & shift)
Canon EF 28mm f/1.8 USM
Canon EF 28mm f/2.8 IS USM
Canon EF 35mm f/1.4L II USM
Canon RF 35mm F1.8 IS Macro STM
Canon EF 35mm f/2 IS USM
Irix 11mm f/4 Blackstone
Irix 15mm f/2.4 Blackstone
Peleng 8mm f/3.5 Fisheye
Peleng 17mm f/2.8 Fisheye
Samyang 8mm f/3.5 IF MC CSII DH Circular
Samyang 10mm f/2.8 ED AS NCS CS
Samyang 12mm f/2.8 ED AS NCS Diagonal
Samyang XP 14mm f/2.4
Samyang 16mm f/2 ED AS UMC CS
Samyang 24mm f/1.4 ED AS UMC
Samyang T-S 24mm f/3.5 ED AS UMC (tilt & shift)
Samyang 35mm f/1.4 AS UMC AE
Sigma 4.5mm f/2.8 EX DC HSM Circular Fisheye
Sigma 8mm f/3.5 EX DG Circular Fisheye
Sigma 10mm f/2.8 EX DC HSM Diagonal Fisheye
Sigma 14mm f/1.8 DG HSM | A
Sigma 15mm f/2.8 EX DG Diagonal Fisheye
Sigma 16mm f/1.4 DC DN I C
Sigma 20mm f/1.4 DG HSM A
Sigma 24mm f/1.4 DG HSM A
Sigma 30mm f/1.4 DC DN I C
Sigma 35mm f/1.4 DG HSM A
Sigma 56mm f/1.4 DC DN I C
Tamron SP 35mm f/1.8 Di VC USD
Zeiss Milvus 15mm f/2.8 ZE
Zeiss Distagon T* 18mm f/3.5 ZE
Zeiss Milvus 21mm f/2.8 ZE
Zeiss Distagon T* 25mm f/2 ZE
BUYERS’
GUIDE
Contacts
ed
f/1.05
f/2.8
f/2.8
f/1.2
f/1.4
f/1.8
f/1.2
f/1.8
f/1.4
f/1.4
f/1.4
f/1.8
f/1.4
f/1.4
f/1.4
f/1.4
606g
130g
645g
580g
290g
160g
950g
160g
575g
435g
815g
540g
950g
922g
380g
1030g
0.57m
0.3m
0.4m
0.45m
0.45m
0.35m
0.40m
0.30m
0.45m
0.3m
0.4m
0.29m
0.4m
0.45m
0.45m
0.5m
0.13x
0.18x
0.16x
0.15x
0.15x
0.21x
0.15x
0.25x
N/S
0.15x
0.18x
0.29x
0.18x
0.15x
0.15x
0.15x
58mm
52mm
72mm
72mm
58mm
49mm
77mm
43mm
77mm
62mm
77mm
67mm
72mm
67mm
58mm
77mm
13
7
8
8
8
7
10
7
8
9
9
9
9
9
9
9
202
141
£1999/$1999
£1489/$1599
£365/$369
£2869/$2699
£1240/$1400
£410/$500
£940/$1000
£5400/$5700
£700/$750
£5800/$6100
£1140/$1350
£9900/$10,000
£7000/$6900
£1180/$1180
£8400/$9000
£11,350/$11,500
£829/$799
£1099/$899
£11,900/$13,000
£319/$399
£599/$699
£370/$530
£125/$150
£929/$1099
£2600/$3400
£3600/$4400
£4699/$5999
£5000/$6600
£750/$750
£1380/$1800
£1900/$2200
Yes
Yes
Yes
Yes
Yes
Yes
Yes
Yes
Yes
Yes
Yes
Yes
Yes
Yes
Yes
Yes
Yes
Yes
Yes
Yes
Yes
Yes
Yes
Yes
Yes
Yes
Yes
Yes
Yes
Yes
Yes
None
None
None
None
None
None
None
None
None
None
None
None
None
None
None
None
None
None
None
None
None
None
None
None
None
None
None
None
None
None
None
No
Yes
No
No
No
No
No
Yes
No
Yes
Yes
Yes
Yes
No
Yes
Yes
Yes
Yes
Yes
No
No
No
No
No
No
No
Yes
No
Yes
No
No
f/1.2
f/1.4
f/1.8
f/1.2
f/2.8
f/2
f/2
f/2
f/2.8
f/2.8
f/4
f/2.8
f/4
f/5.6
f/4
f/4
f/11
f/11
f/5.6
f/1.4
f/1.4
f/2
f/6.3
f/1.4
f/2.8
f/4.5
f/4
f/5.6
f/1.8
f/1.4
f/2
1025g
950g
425g
1195g
565g
460g
750g
2520g
765g
2400g
1190g
3850g
2100g
1250g
3190g
3920g
930g
1260g
4500g
730g
485g
830g
705g
TBA
2400g
3150g
TBA
4.9kg
700g
1280g
1123g
0.95m
0.85m
0.85m
0.85m
0.5m
0.9m
0.9m
1.9m
1.5m
2.0m
1.5m
2.7m
3.3m
3.5m
3.7m
4.5m
4.5m
6.0m
6.0m
1.1m
0.9m
0.8m
2.0m
0.85m
2.5m
4.0m
3.5m
7.0m
0.8m
0.8m
0.8m
0.11x
0.12x
0.13x
0.12x
0.29x
0.14x
0.19x
0.12x
0.16x
0.18x
0.24x
0.17x
0.13x
0.12x
0.15x
0.15x
0.14x
0.14x
0.14x
0.09x
0.11x
N/S
N/S
0.12x
0.13x
0.13x
0.15x
0.11x
0.14x
0.14x
0.28x
72mm
77mm
58mm
82mm
58mm
58mm
72mm
52mm
72mm
52mm
77mm
52mm
52mm
77mm
52mm
52mm
82mm
95mm
52mm
72mm
77mm
77mm
95mm
86mm
46mm
46mm
46mm
46mm
67mm
77mm
77mm
8
9
8
9
8
8
8
8
8
9
8
9
9
8
9
9
N/A
N/A
8
8
9
9
0
9
9
9
9
9
9
9
9
£309/$299
£379/$349
£399/$350
£980/$1050
£499/$599
£999/$1099
£1330/$1400
£649/$549
£1239/$1199
£449/$495
£569/$499
£499/$499
£449/$569
£359/$569
£780/$1100
£1250/$1700
£350/$525
£350/$500
£649/$649
£800/$740
£464/$429
£1300/$1840
No
No
No
Yes
Yes
Yes
Yes
Yes
Yes
Yes
Yes
Yes
Yes
Yes
Yes
Yes
No
Yes
Yes
Yes
Yes
Yes
None
None
None
None
None
None
None
None
None
None
None
None
None
None
None
None
None
None
None
None
None
None
Yes
Yes
No
No
No
Yes
No
Yes
Yes
No
No
No
No
No
Yes
Yes
No
No
Yes
No
No
No
f/3.5
f/2.8
f/2.8
f/2.8
f/2.8
f/2.8
f/3.5
f/2
f/2.8
f/2.8
f/2.8
f.2.8
f/2.8
f/2.8
f/2.8
f/2.8
f/2
f/2.8
f/2.8
f/3.5
f/2.8
f/2
130g
190g
335g
710g
600g
625g
1090g
500g
730g
848g
619g
638-650g
515g
725g
1150g
1640g
350g
400g
610g
985g
540g
843g
0.097m
0.13m
0.20m
0.24m
0.31m
0.3m
0.48m
0.35m
0.3m
0.35m
0.21m
0.25m
0.26m
0.31m
0.38m
0.47m
0.23m
0.29m
0.3m
0.47m
0.3m
0.44m
1.2x
1.0x
1.0x
5.0x
1.0x
1.0x
1.0x
0.5x
1.4x
1.0x
2.0x
2.0x
1.0x
1.0x
1.0x
1.0x
1.0x
1.0x
1.0x
1.0x
1.0x
0.5x
44.8mm
56mm
52mm
58mm
58mm
67mm
72mm
67mm
67mm
77mm
67mm
67mm
49mm
62mm
72mm
86mm
55mm
55mm
62mm
72mm
55mm
67mm
7
7
7
6
8
9
8
9
9
11
13
7-13
9
9
9
9
7
9
9
7
9
9
103
185
202
185
202
166
185
185
148
185
g
ar
No
No
No
No
No
No
No
No
No
No
No
Yes
No
No
No
No
Aw
None
None
None
None
None
None
None
None
None
None
None
None
None
None
None
None
ti n
Yes
Yes
Yes
Yes
Yes
Yes
Yes
Yes
Yes
No
Yes
Yes
Yes
Yes
Yes
Yes
Ra
£450/$486
£200/$180
£1200/$1400
£1370/$1350
£389/$400
£109/$125
£2389/$2299
£199/$149
£310/$350
£349/$499
£649/$949
£415/$549
£879/$949
£1159/$1199
£560/$725
£2700/$3990
ds
vi
es
re
e
Is
7Artisans 50mm f/1.05
Canon EF 40mm f/2.8 STM
Canon TS-E 45mm f/2.8 (tilt & shift)
Canon EF 50mm f/1.2L USM
Canon EF 50mm f/1.4 USM
Canon EF 50mm f/1.8 STM
Canon RF 50mm F1.2L USM
Canon RF 50mm F1.8 STM
Samyang 50mm f/1.4 AS UMC
Sigma 30mm f/1.4 DC HSM A
Sigma 50mm f/1.4 DG HSM A
Tamron SP 45mm f/1.8 Di VC USD
Tokina Opera 50mm f/1.4 FF
Zeiss Milvus 50mm f/1.4 ZF.2
Zeiss Planar T* 50mm f/1.4 ZE
Zeiss Otus 55mm f/1.4
is
Ir
su
bl
si
Fi
l te
r
m
M
ax
ad
ze
ni
ag
s
cu
M
in
fo
t
W
ei
gh
ew
fic
st
di
re
tu
er
ap
at
an
io
n
ce
n
ti o
za
ili
ab
M
ax
e
Im
ag
zo
M
ax
st
om
m
ra
Fu
l
STANDARD PRIMES
STANDARD PRIMES
Pr
ic
e
BEST ON TEST AWARD
l-f
BEST VALUE AWARD
e
KEY:
Sigma www.sigma-imaging-uk.com
Tamron www.tamron.co.uk
Tokina www.tokinalens.com
Zeiss www.zeiss.co.uk
Canon www.canon.co.uk
Peleng www.digitaltoyshop.co.uk
Samyang www.samyang-lens.co.uk
Schneider www.linhofstudio.com
•
•
TELEPHOTO PRIMES
TELEPHOTO PRIMES
Canon EF 85mm f/1.2L II USM
Canon EF 85mm f/1.4L IS USM
Canon EF 85mm f/1.8 USM
Canon RF 85mm F1.2L USM
Canon TS-E 90mm f/2.8 (tilt & shift)
Canon EF 100mm f/2 USM
Canon EF 135mm f/2L USM
Canon EF 200mm f/2L IS USM
Canon EF 200mm f/2.8L II USM
Canon EF 300mm f/2.8L IS II USM
Canon EF 300mm f/4L IS USM
Canon EF 400mm f/2.8L IS II USM
Canon EF 400mm f/4 DO IS II USM
Canon EF 400mm f/5.6L USM
Canon EF 500mm f/4L IS II USM
Canon EF 600mm f/4L IS II USM
Canon RF 600mm F11 IS STM
Canon RF 800mm F11 IS STM
Canon EF 800mm f/5.6L IS USM
Samyang MF 85mm f/1.4 RF
Samyang AF 85mm f/1.4 EF
Samyang 135mm f/2 ED UMC
Samyang 500mm MC IF f/6.3 Mirror
Sigma 85mm f/1.4 DG HSM A
Sigma APO 300mm f/2.8 EX DG HSM
Sigma APO 500mm f/4.5 EX DG HSM
Sigma 500mm f/4 DG OS HSM S
Sigma APO 800mm f/5.6 EX DG HSM
Tamron SP 85mm f/1.8 Di VC USD
Zeiss Milvus 85mm f/1.4 ZE
Zeiss Milvus 135mm f/2 ZE
179
179
159
179
•
•
46
98
98
54
117
54
117
206
196
202
159
179
98
206
21
159
MACRO
MACRO
Canon EF-M 28mm f/3.5 Macro IS STM
Canon EF-S 35mm f/2.8 Macro IS STM
Canon EF-S 60mm f/2.8 Macro USM
Canon MP-E65mm f/2.8 1-5x Macro
Canon EF 100mm f/2.8 Macro USM
Canon EF 100mm f/2.8L Macro IS USM
Canon EF 180mm f/3.5L Macro USM
Canon RF 85mm F2 Macro IS STM
Canon RF 100mm F2.8L Macro IS USM
Irix 150mm f/2.8 Macro 1:1 Dragonfly
Laowa 90mm f/2.8 2X Ultra Macro APO
Laowa 100mm f/2.8 2:1 Ultra Macro APO
Sigma 70mm f/2.8 DG Macro Art
Sigma 105mm f/2.8 EX DG OS HSM Macro
Sigma APO Macro 150mm f/2.8 EX DG OS HSM
Sigma APO Macro 180mm f/2.8 EX DG OS HSM
Tamron SP AF 60mm f/2 Di II LD (IF) Macro
Tamron SP AF 90mm f/2.8 Di Macro
Tamron SP AF 90mm f/2.8 Di VC USD Macro
Tamron SP AF 180mm f/3.5 Di Macro
Tokina 100mm f/2.8 AT-X PRO Macro
Zeiss Milvus Makro Planar 100mm f/2 ZE
177
177
164
50
177
204
69
204
204
204
204
202
204
204
138
102
138
102
184
69
204
50
•
•
NEXT ISSUE
YOUR EXPERT GUIDE
MAKE CASH WITH
YOUR CANON
We show you easy ways how you can generate
money with your own Canon photography
THE NO
MAGAZINE .1FOR
CANON
USERS!
Getty / Peter Zelei Images
FREE VIDEOS!
In the next Canon Skills chapter…
How to capture fog and mist in landscapes
Spot metering explained
Mushroom
close-ups
New Photoshop,
Lightroom and Affinity Photo
image-editing guides
EOS
D
I
V
E
H
T
VIEW
PLUS ALL THIS...
PhotoPlus Apprentice: Canon pro
Drew Buckley shows you how to
take amazing astro shots in Wales
Profile: David Lund, the liquid
photography specialist
Super Test: The best lightweight
lenses for those big days out!
ISSUE 209 ON SALE 19 SEPT 2023
* Content subject to change
107
Catch up on what you’ve missed by buying a recent
issue either in print or via digital download BACK IS
SUES
AVAILABLE ON
YOUR TABLET,
PHONE, PC OR
IN PRINT
imited back issues of PhotoPlus: The Canon Magazine print editions
are available on our new MagazinesDirect.com secure store at
www.magazinesdirect.com/photoplus-magazine-single-issue
But if you’ve got an iPad, Android, Kindle or Nook tablet, or iPhone or
Android smartphone, you can download PhotoPlus back issues from the
following digital edition options:
• Got an Apple iPad or iPhone? Get the free PhotoPlus: The Canon
Magazine app in the App Store or at bit.ly/photoplus_app then browse
through our back issues or subscribe and save through the app.
• Kindle Fire or Nook HD? Simply search for PhotoPlus on Amazon’s
Newsstand or in B&N’s Nook store.
• Windows or Mac? Use Zinio to read PhotoPlus on your laptop or
desktop computer or via the app! Go to www.zinio.com and search
for PhotoPlus where you can buy back issues or subscribe.
• PhotoPlus is also available on Magzter, PocketMags and PressReader.
L
LAST MONTH
Issue 207
August 2023
CAPTURE CRACKING
COASTAL PHOTOS With
Canon pro landscape and travel
photographer David Clapp in
North Cornwall • Master your
Canon exposure modes for
better shots with our big EOS
camera skills guide • We speak
to brilliant beauty and fashion
portrait photographer Siân
Elizabeth • New photo projects
and new image-editing tutorials
to try, all with free video guides
• In Canon School we show you
how to create a great photo
book • We answer your tricky
technical questions in EOS SOS
• And in Super Test, we look at
eight of the most versatile
standard zoom lenses
Issue 206
July 2023
Issue 205
June 2023
TRAVEL PRO TIPS
Award-winning Canon pro
Jeremy Flint’s top 20 photo tips
• Our Apprentice masters
close-up wildlife photos • In
Canon School, make the most
of the longer summer days •
New Canon EOS R100 could be
the budget-beginner mirrorless
camera you need • In our Super
Test we put super-telephoto
zooms in the lab • New photo
projects, all with free video
guides to follow along
CANON SHOOTING
CHECKLIST 25 essential
tips for better images • Canon
pro James Abbott teaches our
Apprentice how to shoot slow
motion waterfalls • Travel
tripods on test – the best buys
that won’t break the bank or
your back • We put the new
Canon PowerShot V10 vlogging
cam through its paces • Brian
Worley answers your questions
in EOS SOS • In-depth photo
projects with video guides
READ YOUR MAGAZINE ON ANY DEVICE:
108
www.digitalcameraworld.com
BACK ISSUES
Issue 204
May 2023
Issue 203
Spring 2023
Issue 202
April 2023
Issue 201
March 2023
Issue 200!
February 2023
LEARN CANON PRO
TECHNIQUES Master your
exposures • Nature and travel
photographer Damian Waters
helps you set up your camera
depending on subject or scene
• Our Apprentice learns how to
photograph birds in the wild •
Canon’s new EOS R50 tested
• In Canon Skills, from sunburst
effects in landscape shots to
taking creative castle photos,
plus new image-editing tutorials
– all with free videos
NEW SPRING PHOTO
SKILLS Your Canon guide to
better seasonal photos • Canon
R8 budget lightest full-frame
mirrorless tested • Pro secrets
to utilize the latest technology to
improve your photos • Great
flower macro photo skills with
Canon pro Clive Nichols at RHS
Wisley gardens • Eight great
ultra-wide lenses tested • New
photo projects including how to
capture bluebell scenes in your
own local forests • Free videos
RAW IMAGES SKILLS
10 essential Raw image-editing
tips • Our Apprentice spends a
day in the studio with a Canon
pro learning to take close-ups
of reptiles • New budget Canon
EOS R8 and EOS R50 • New
photo projects, including how
to use cool coloured gels on
flashguns • Top ‘Dogtographer’
Kaylee Greer and her stunning
close-up dog photos • We also
test eight of the best budget
Canon-fit lenses • Free videos
101 GREAT CANON
TIPS We answer your
toughest technical questions
• Landscape pro photographer
Justin Minns interviewed • 12 of
the latest photo editors tested
• Canon photographer Andrew
James teaches our PhotoPlus
Apprentice how to capture
stunning seascapes on the
beautiful Norfolk coastline •
New inspiring photo projects
with free videos • Plus free
Creative Photography ebook
200 CANON TIPS We’ve
compiled 200 top tips to help
you take better photos of
everything • Canon Gear of the
Year – the best EOS cameras,
lenses and kit • Our Apprentice
learns new cityscape photo
skills in London • David Clapp
risks trench foot in torrential
rain in Vietnam • Canon EOS R6
Mark II in-depth test • In Canon
School we help you master
aperture, shutter speed and
ISO • Projects and videos
Issue 199
January 2023
Issue 198
December 2022
Issue 197
November 2022
Issue 196
October 2022
Issue 195
September 2022
10 TIPS FOR BETTER
WINTER LANDSCAPES
From depth of field to mastering
composition • New super-fast
Canon EOS R6 Mark II • We
speak to inspiring new Canon
wildlife photographer Dani
Connor • Our Apprentice gets
to spend a day with Canon pro
Emma Finch, learning how to
take stylish Hollywood B&W
portraits • Great photo projects
with free videos • Free Teach
Yourself Image Editing ebook
MASTER WILDLIFE
PHOTOGRAPHY Learn to
take amazing photos of stags
• Five great Canon gear setups
and photo skills for better shots
from landscapes to wildlife •
Learn simple Canon camera
settings and skills for capturing
better low-light shots • David
Clapp takes a photo trip to the
Dolomites • A4 to A3+ home
photo printers tested to find
the best options to produce
all prints great and small
AUTUMN PHOTO
SKILLS Ten top tips • We
ventured to photogenic Isle of
Skye to take great landscapes •
Chris Fraikin discusses his arty
shots of industrial architecture
• We test eight of the best
photo backpacks • Canon
School helps you improve your
black-and-white photography
• Your technical questions
answered in EOS SOS • New
photo projects, all with free
video guides to follow
MASTER YOUR CANON
IN 12 HOURS Use our
Canon crash course to master
your EOS camera and kit in less
than a day and create a brilliant
portfolio • Pro photographer
Rebecca Faith teaches our
Apprentice how to take outdoor
portraits in a beautiful Bath
park • We talk to macro and
landscape photographer Oliver
Wright • Affordable telephoto
zoom lenses in Super Test •
Photo projects with videos
CANON PHOTO SKILLS
How to take incredible wildlife,
scenic and portrait shots on
safari • We head to Edinburgh
to teach our Apprentice how to
take fantastic city scenes •
Roberto Valenzuela talks about
his journey from teacher to
acclaimed LA photographer •
In-depth first look at Canon’s
new RF-S 18-45mm F4.5-6.3
IS STM kit lens • Round-up of
the best lenses to help you
capture landscapes
The Canon Magazine
109
We’d love to hear your thoughts on the magazine and all
things photographic! Email us at photoplus@futurenet.com
Letter of the Month
I wanted to say thank you for giving
me inspiration and tips from your
PhotoPlus magazines. I’m deaf and
disabled and was somewhat a bit of a
UHFOXVHDQGQHHGHGWRÀQGVRPHWKLQJ
to get me out and about more. So
I bought a secondhand Canon EOS
1200D with a couple of lenses
(I mainly used my phone camera
beforehand) and I bought the July
issue of PhotoPlus, and then the
August issue. Both have been brilliant
and I learned so much (but still so
much to learn), plus I’m slowly
working through the wonderful
handbook. But it would be great to
learn how to take photos at night.
Would it be possible to feature this in
future issues? Once again, a big thank
you for giving me a new lease of life.
The month
in numbers
9V
it’s your lucky day, as we have some
great tips for shooting cities at night in
this issue’s in-depth Apprentice article
on page 8, and on page 34, learn how
to take astro landscape photos!
Wendy Ransom, Westham, East Sussex
Thanks for your email, Wendy, it’s
lovely to hear we’ve inspired you. Also
Get in touch with
your own stories,
issues & images
at photoplus@
futurenet.com
WIN NEW PRIZES!
Every winner whose letter and
photos are printed gets to choose
three of our great camera and
photo bookazines at our web
shop MagazinesDirect.com
Clever deputy editor Dan simply used
a 9-volt battery to set the wire wool
alight before spinning it around to create
amazing fire spin photos – page 52
5
246
Multi-talented
photographer Kav
Dadfar has five jobs
in total, find how he
balances his work life
on Page 62
Landscape and wildife pro
Guy Edwardes used a
10-stop ND filter to extend
his exposure to 246 secs
(over 4 minutes) for his
stunning seascape shot
on Page 33
Image: Future
Image: Canon
Hannah Rooke Via Lensa and Photo AI
DigitalCameraWorld.com The best from our brilliant website
New patent suggests Canon is working
on next-gen autofocus technology
We need to address AI’s obsession with
boobs – it isn’t healthy says Hannah Rooke
Common filter mistakes photographers
make (and how to avoid them)
Patent reveals new linear autofocus system
that could be smaller and more powerefficient than existing AF tech. Learn more
Canon news at our DigitalCameraWorld.com
via our quick link bit.ly/dcw_nextaf
Overly sexualized deep fakes are a serious
cause for concern as AI image generators
continue to output unnecessary nudity.
Read our opinions at DigitalCameraWorld.com
via our quick link bit.ly/dcw_ai
Filters for your lenses are an essential part of
landscape photography but there are some
essential do’s and don’ts. Learn more in our
step-by-step at DigitalCameraWorld.com
via quick link bit.ly/dcw_filters
INSTAGRAM
www.instagram.com/PhotoPlusCanonMag
114
FACEBOOK
www.facebook.com/PhotoPlusMag
TWITTER
www.twitter.com/PhotoPlusMag
DIGITAL CAMERA WORLD
www.digitalcameraworld.com
www.digitalcameraworld.com