/


Text
Bumper Holiday Special! BONUS DOUBLE EDITION!
NEW ______________
DIGITAL Essential phot°graPhv skills /*^4
Camerausfff
Issue Eight | December 2023 | 100% INDEPENDENT
Learn How
To Shoot
Amazing
Photos!
Master Professional Tips
and Techniques with Ease.
520S-!
Expert Tutorials & Tips
Photography!
Expert Image Processing
with Adobe Lightroom!
Perfect Your Portrait Want to Upgrade Your
Photography! Photographic Gear?
From Black & White to
Natural Light covered Inside.
We Reveal Stacks of Cool
Accessories to Inspire You.
Take Your Photographs to the
Next Level with Our Help.
< OVER>
180
<PAGES! /
Want to master Photo Editing?
Bumper Holiday Special! BONUS DOUBLE EDITION!
। nen uon t miss our NEW Photoshop
magazine on Readly now!
NEW
Professional Photo.Editing
.100% INDEPENDENT
Technique.
FEATURING
Assemble Your Images to
Make Amazing New Artworks.
Photoshop
Mega Tips
We Show You How to get the
Very Best from Photoshop!
Compositing
Walkthrough
Photoshop
Creative Zone
Improve Your Image
Compositing Skills!
From Colour Matching to Lense
Flare, We have it covered.
Essential Photoshop Delve Deep Into Our
Mega Tips & Tricks! Creative Artwork Projects!
Quickly Learn the Essentr
Skills to Create
Professional
Looking Images! Ш I * i
Master
Photo
Click our handy link to read now: https://bit.ly/3xKgzFX
шл DIGITAL
Camerazi
USER
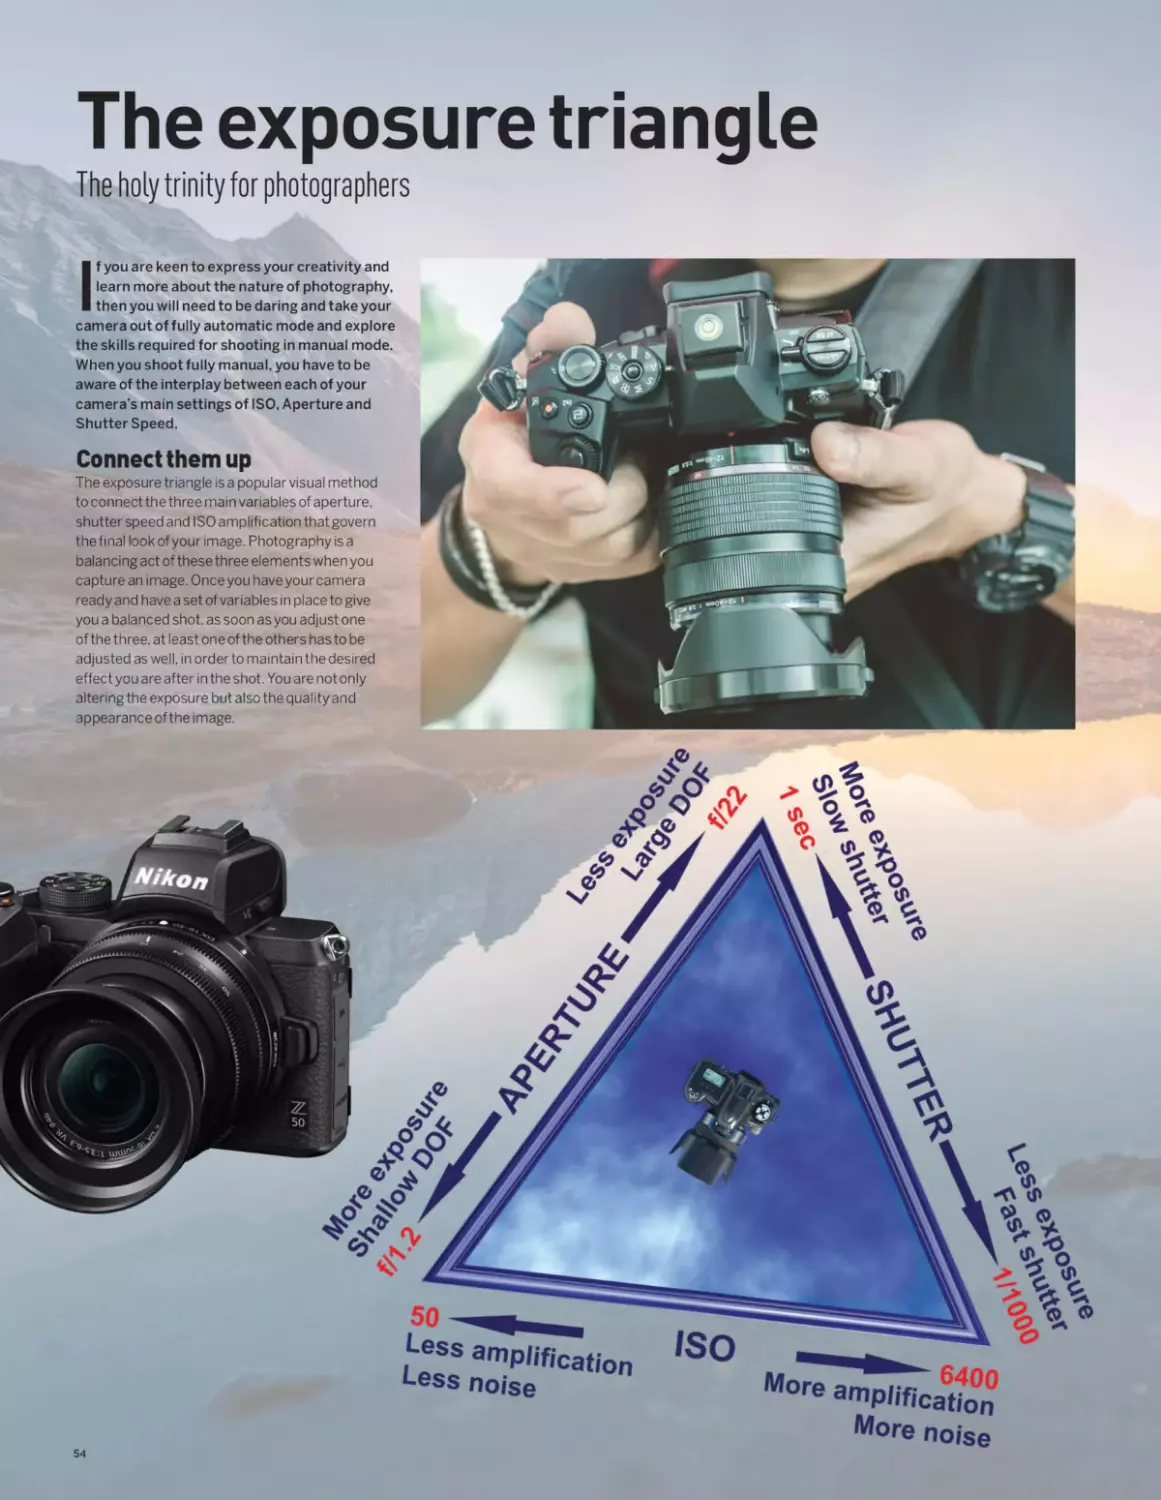
When you pick up a modern
digital camera, you hold
in your hands a small
technological marvel, the like of
which could only be dreamt of just a
few decades ago. Not only that, you
also hold the key that can unlock the
door to a hugely popular medium of
expression and creativity. So do you
want to explore that medium? Are you
thinking of getting into photography,
or are you looking to brush up on the
skills you already have and then take
them that one step further? We can
help you. Photography is a multi-
faceted and jargon filled discipline
that can sometimes put people off. It
is also a cluttered minefield of brands,
models, lenses, and accessories.
However, It doesn’t have to be that
way. Photography can be as simple,
or as advanced, as you need it to be
and we hope the information within
these pages can help you decide
what kind of cameras and lenses
are right for you and also what kind
of photographer you want to be.
Learning the skills and techniques
required need not be a chore when it
is applied to such a creative outlet as
photography and we hope to show
you that now.
Take Your Best Shot
8 A gallery of some great images to get you
inspired and eager to create your own
19 Canon Zoemini instant camera
20 Fujifilm XF10
21 Olympus Tough TG-5
22 PixaproCITI600
23 Lowepro Pro Runner X450II
24 Crowd pleasers
FUJIFILM
XF1O
The Handy GearGuide
18 Canon EOS 80D
ON/OFF
Getting Started
24 Know your camera
28 The right camera for you
32 What lenses do I need?
36 Why do I need a tripod?
Why the tripod is essential
Technical Quick-Start
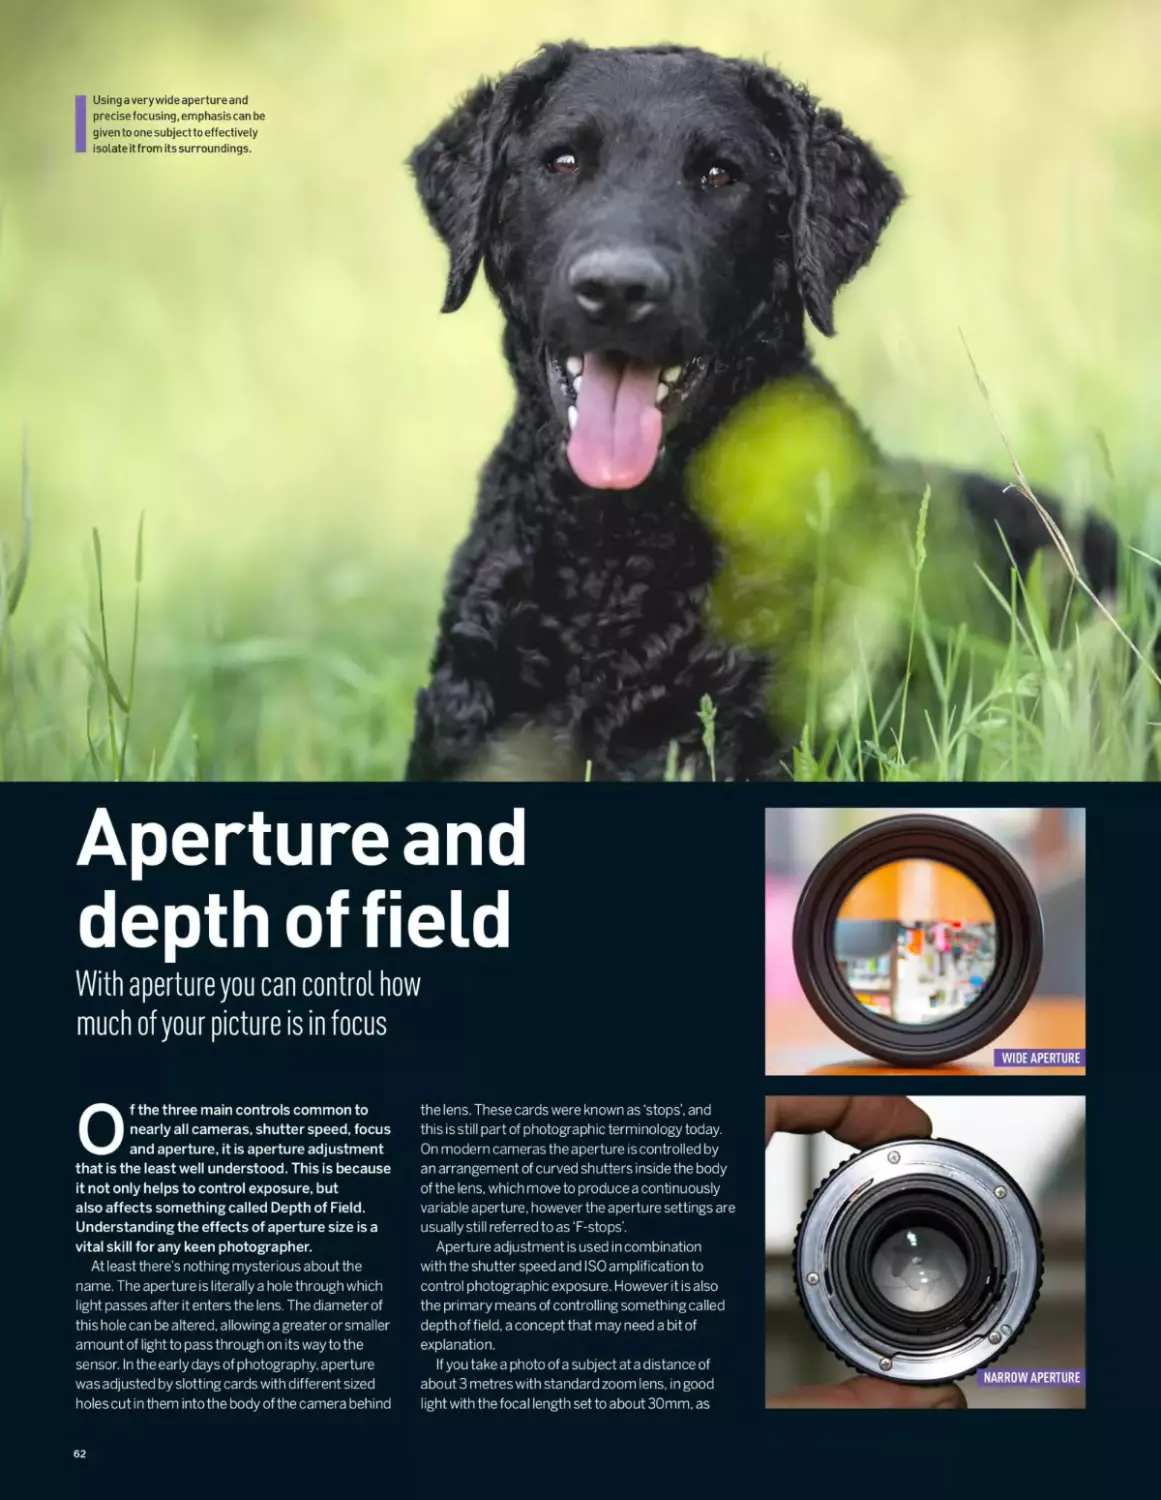
42 Aperture and depth of field explained
46
44 How does shutter speed affect photos?
46 How ISO works on a digital camera
48 Photography software
Learning New Skills
52 The exposure triangle
54 Shutter speed
58 Shutter speed: how it’s done
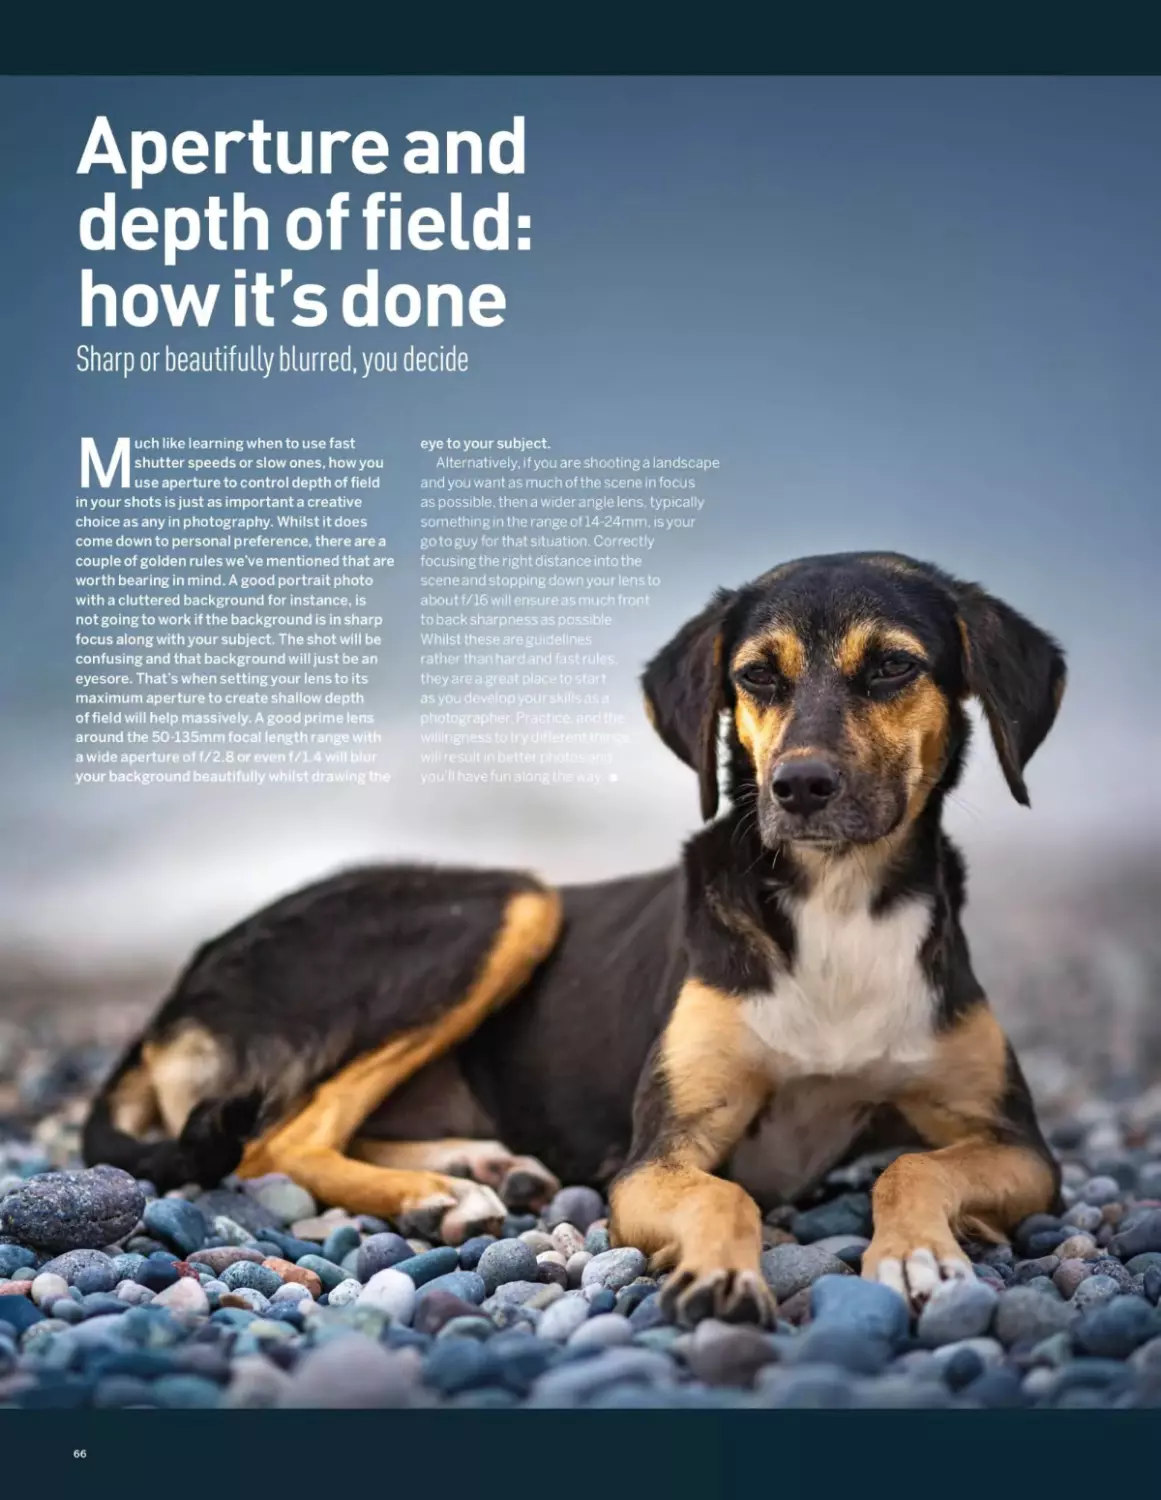
60 Aperture and depth of field
64 Aperture and depth of field: how it’s done
Control the look of your images with shutter speed RZ
Creative Projects
68 Natural light portraits
70 After it gets dark
72 Black and white portraits
78 High speed photography
New to Post-Processing?
88 Lightroom top tips
90 The history of Photoshop
92 The history of Lightroom
94 Photoshop versu s Lightroom
96 Shooting in raw mode
98 What is Photoshop Elements?
www.pclpublications.com 5
Take Your Best Shot
The Handy Gear Guide
100 Anothercollection of great imagestogetyou
fired up and eager to create your own
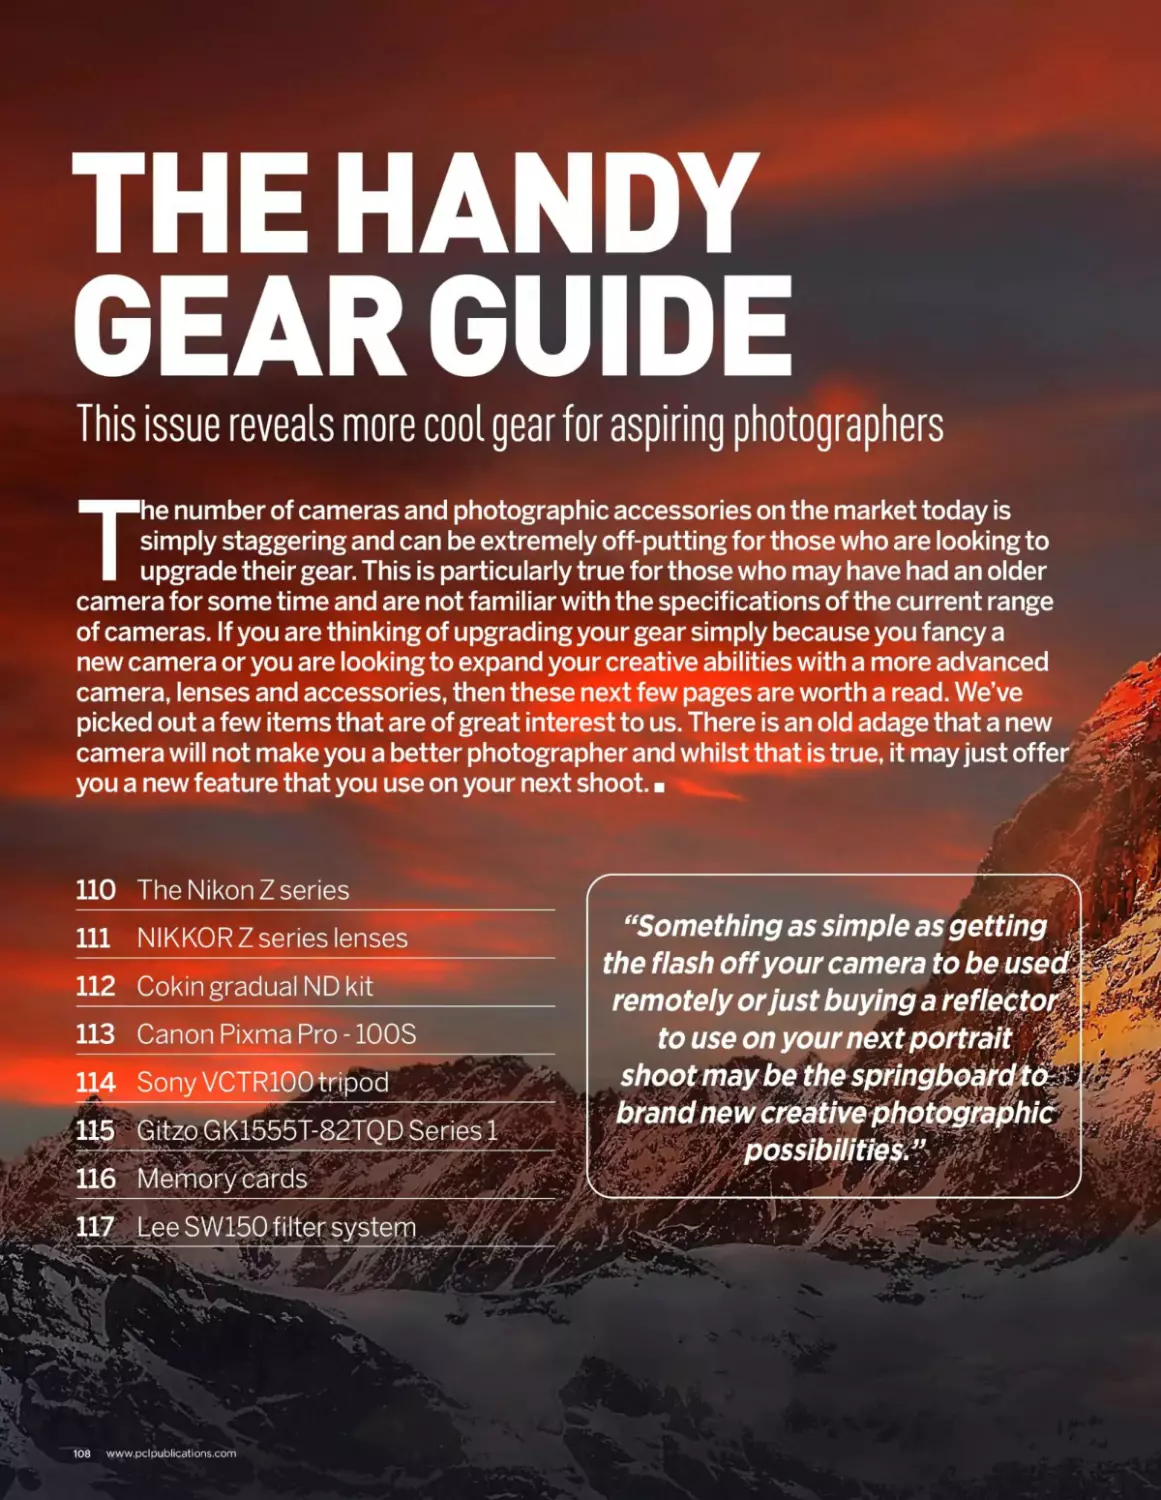
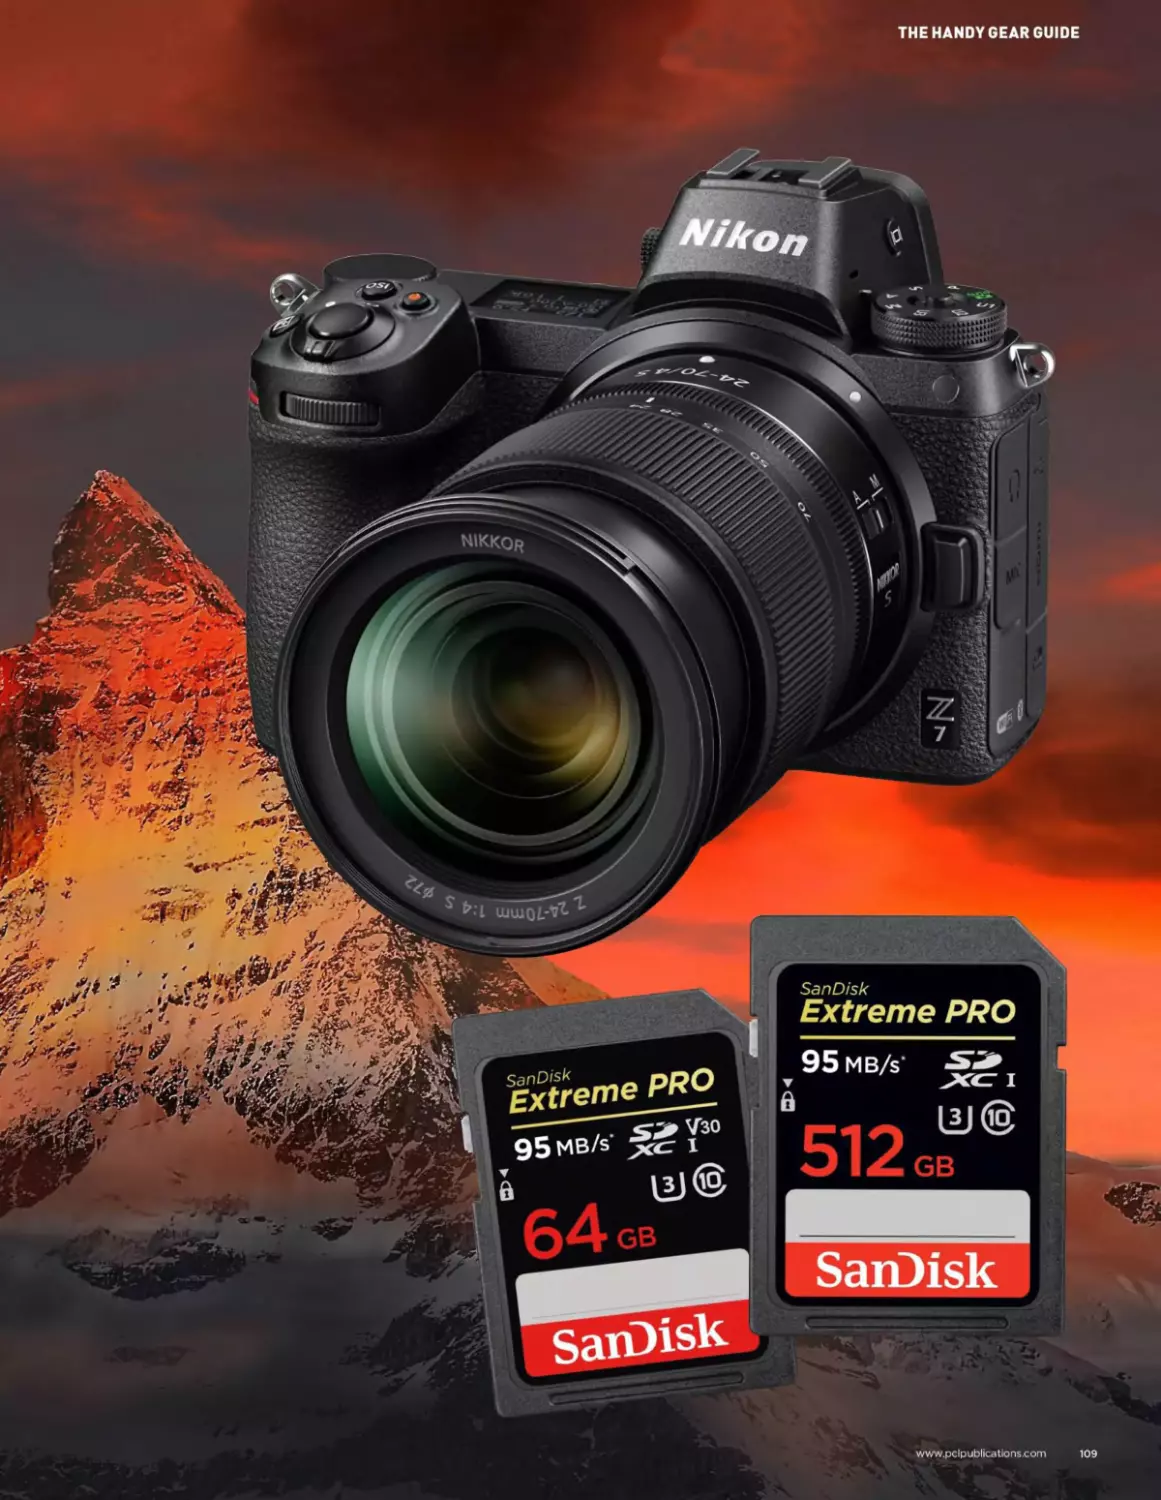
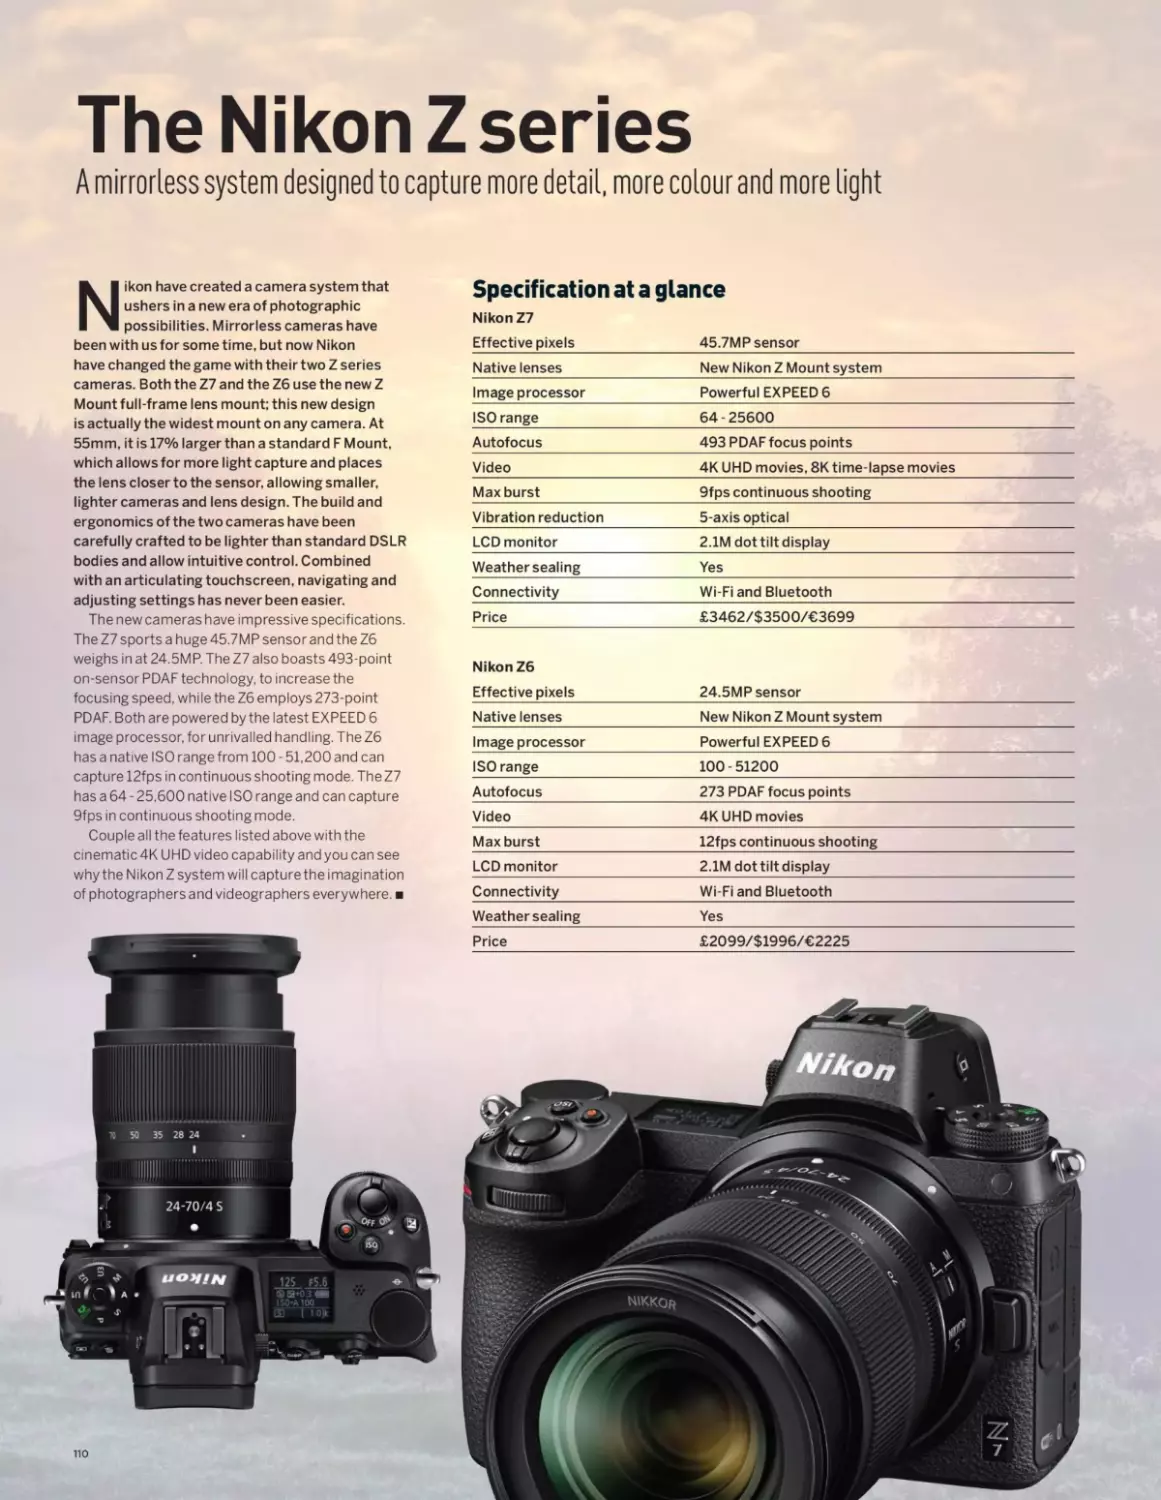
110 The Nikon Z series
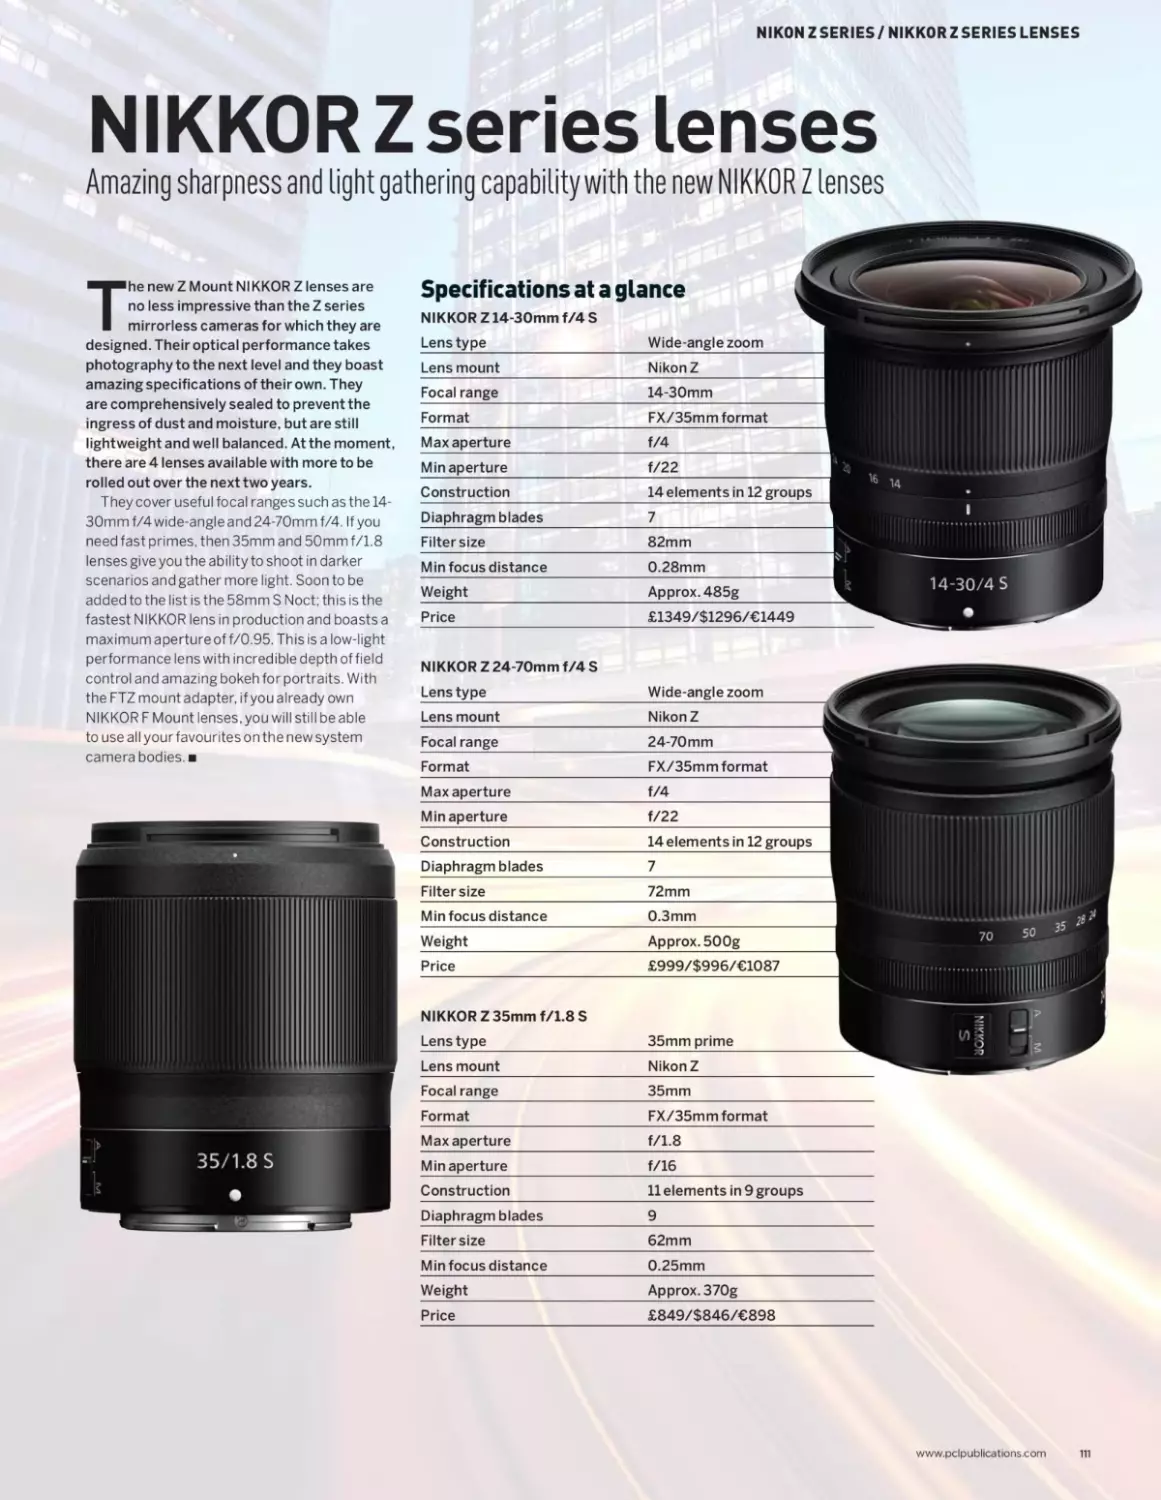
113 NIKKORZserieslenses
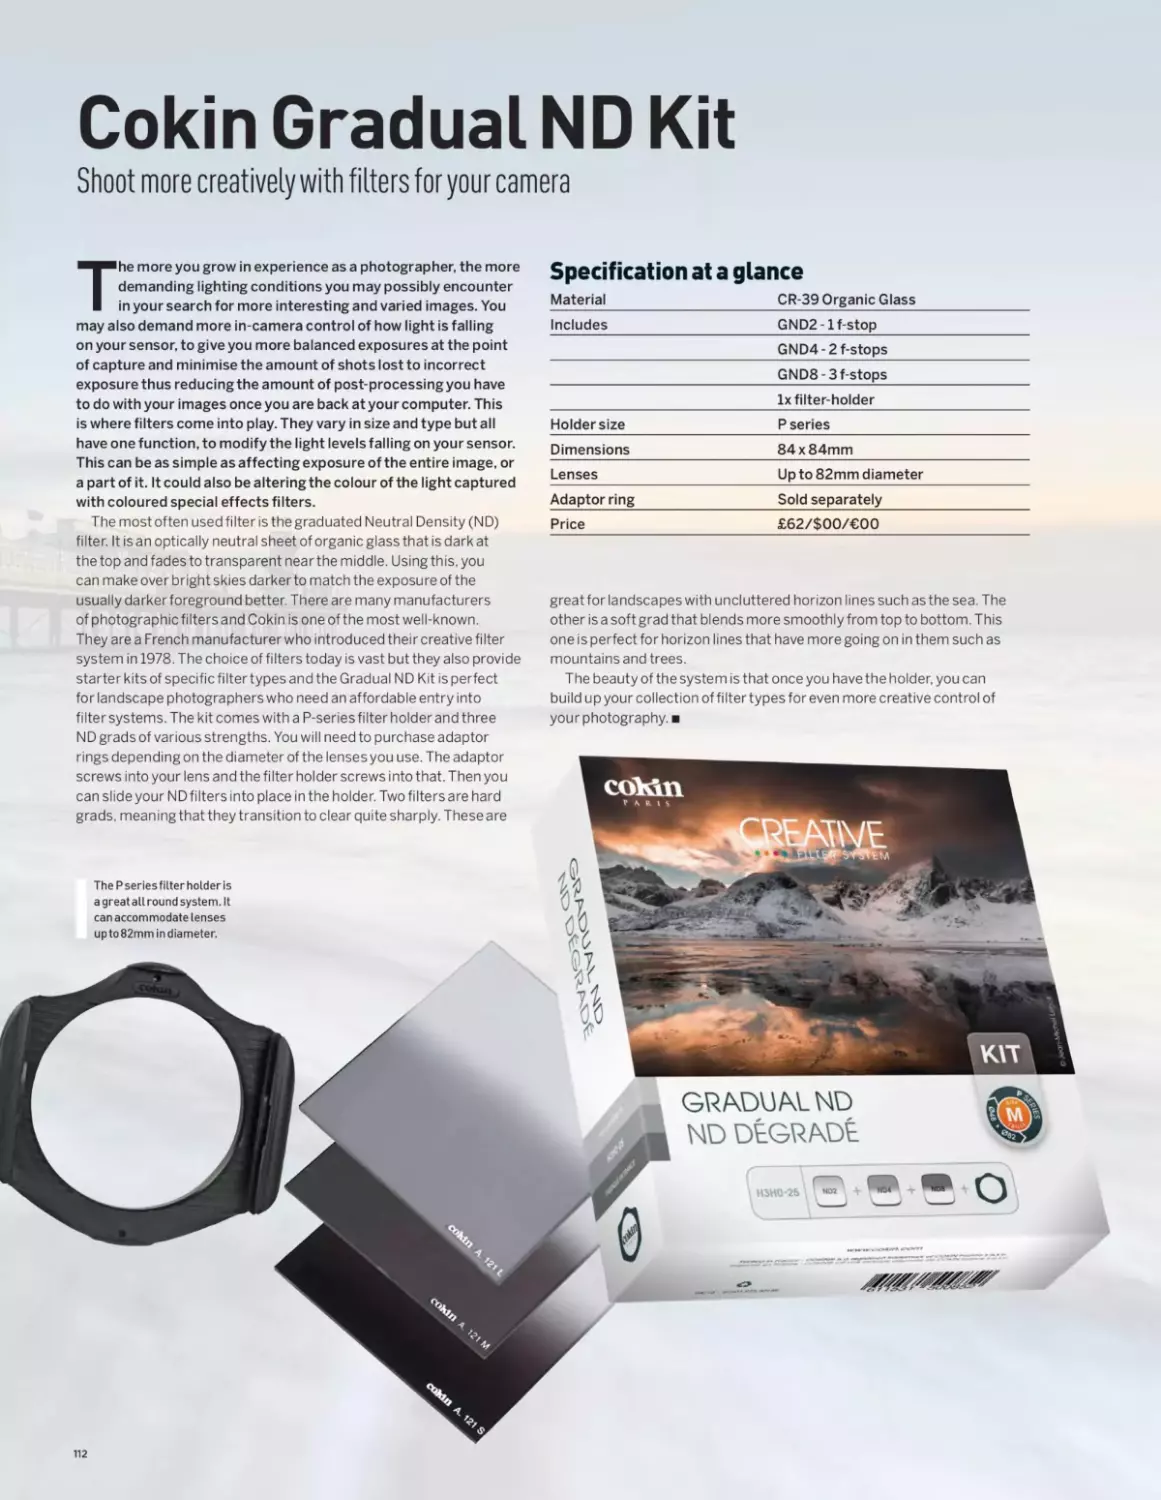
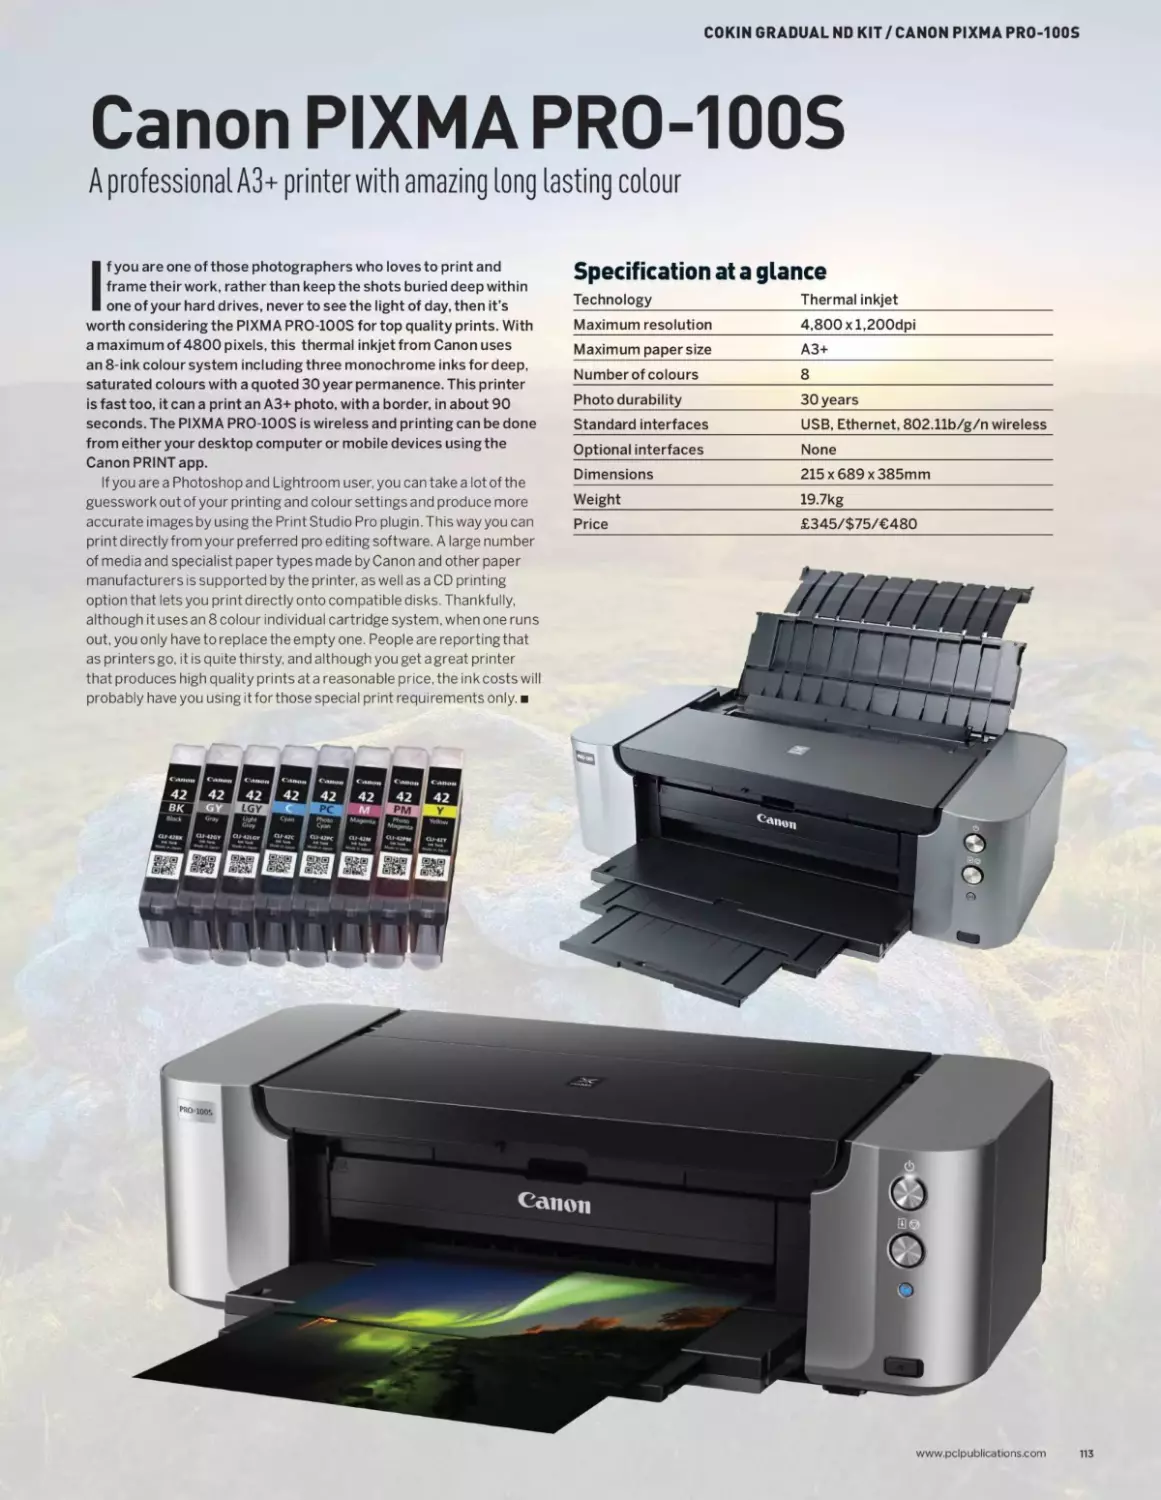
114 Cokin gradual ND kit
115 Canon Pixma Pro - 100S
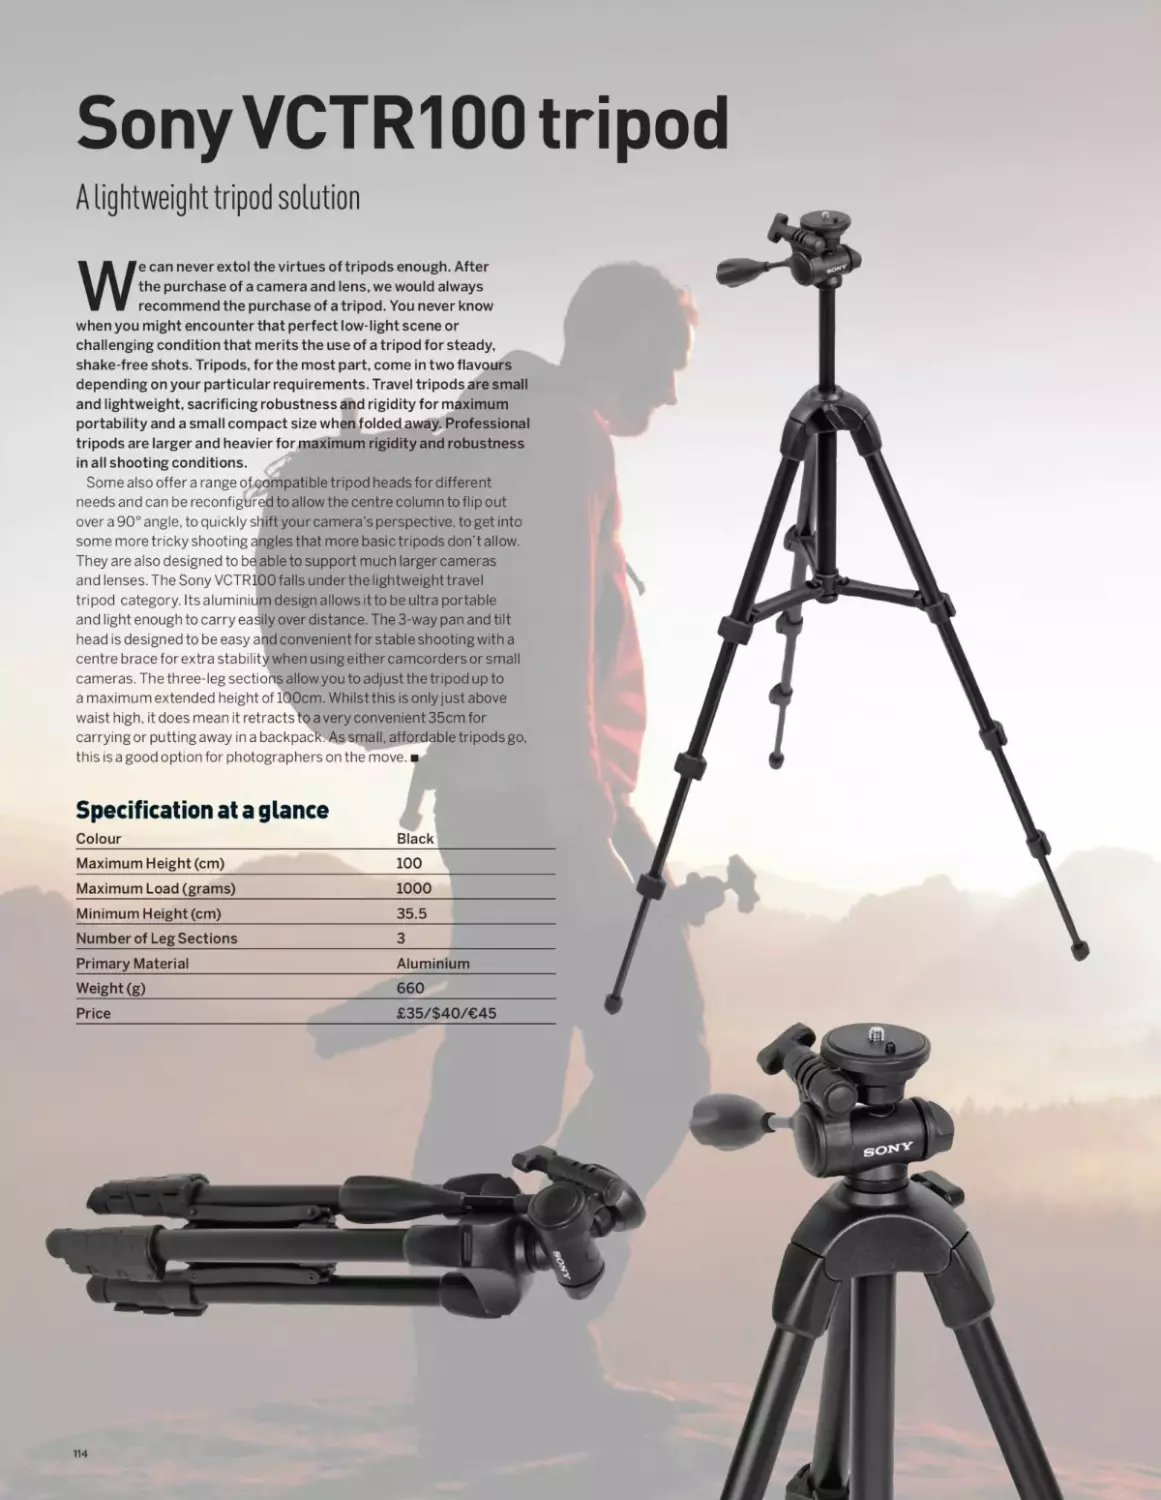
116 Sony VCTR100 tripod
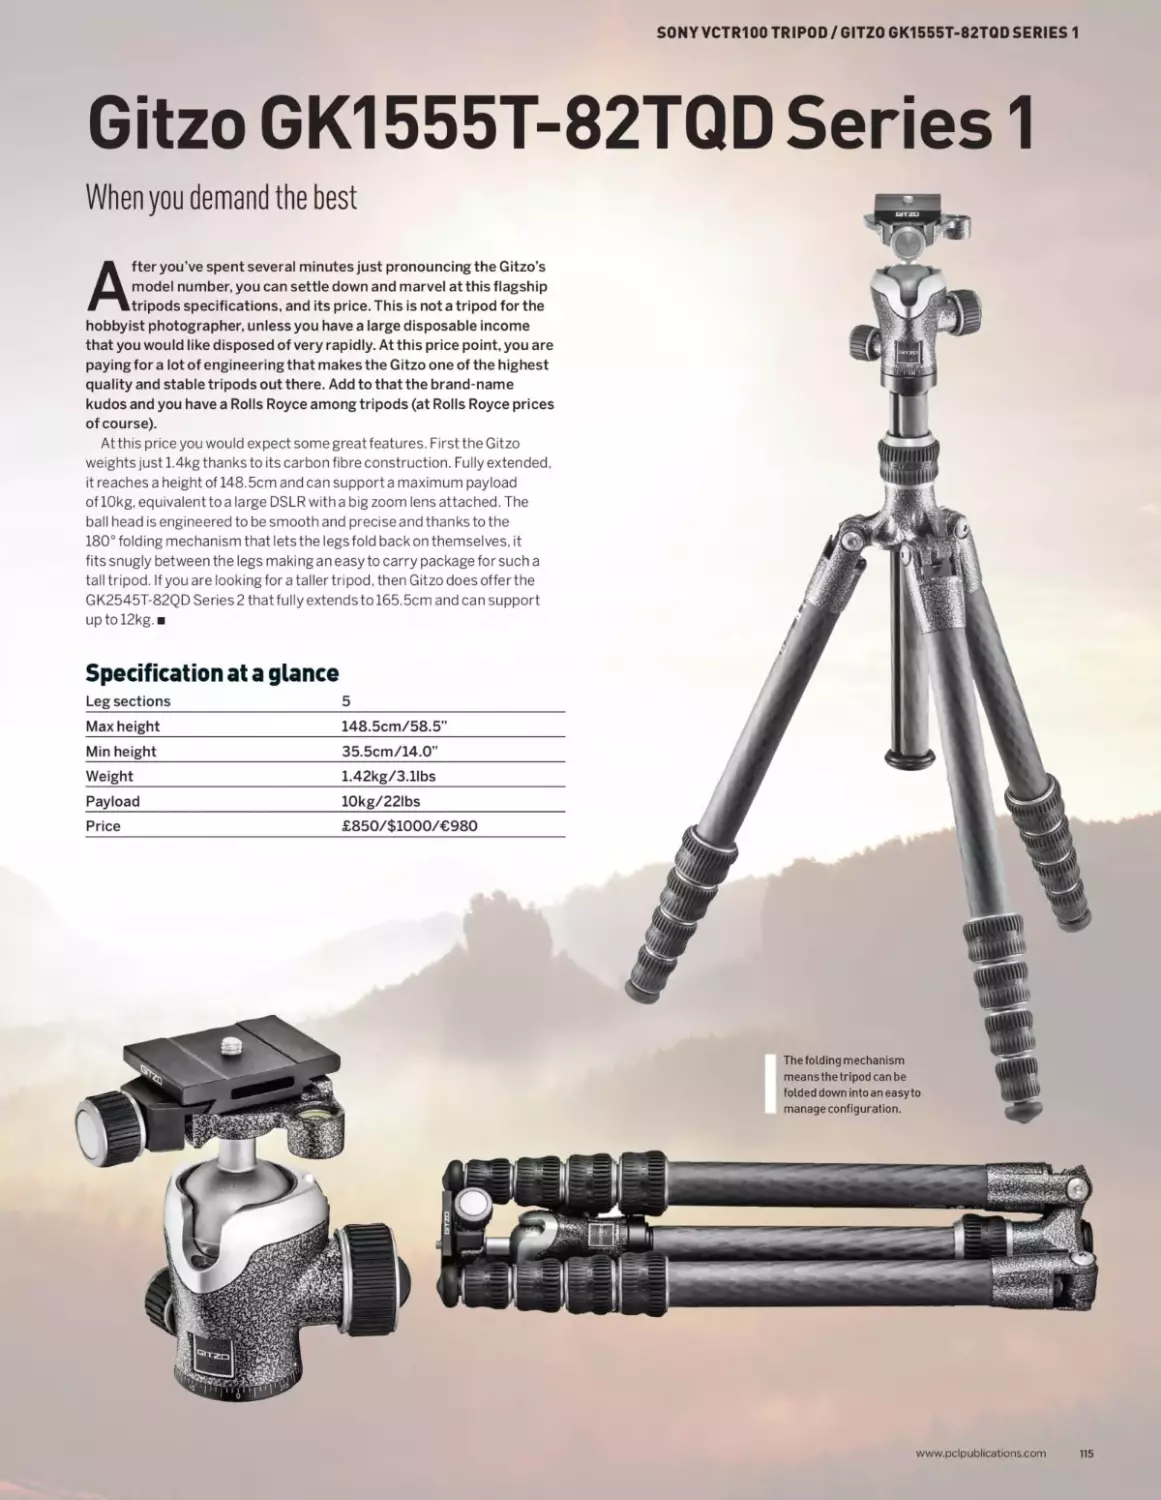
117 GitzoGK1555T-82TQDSeriesl
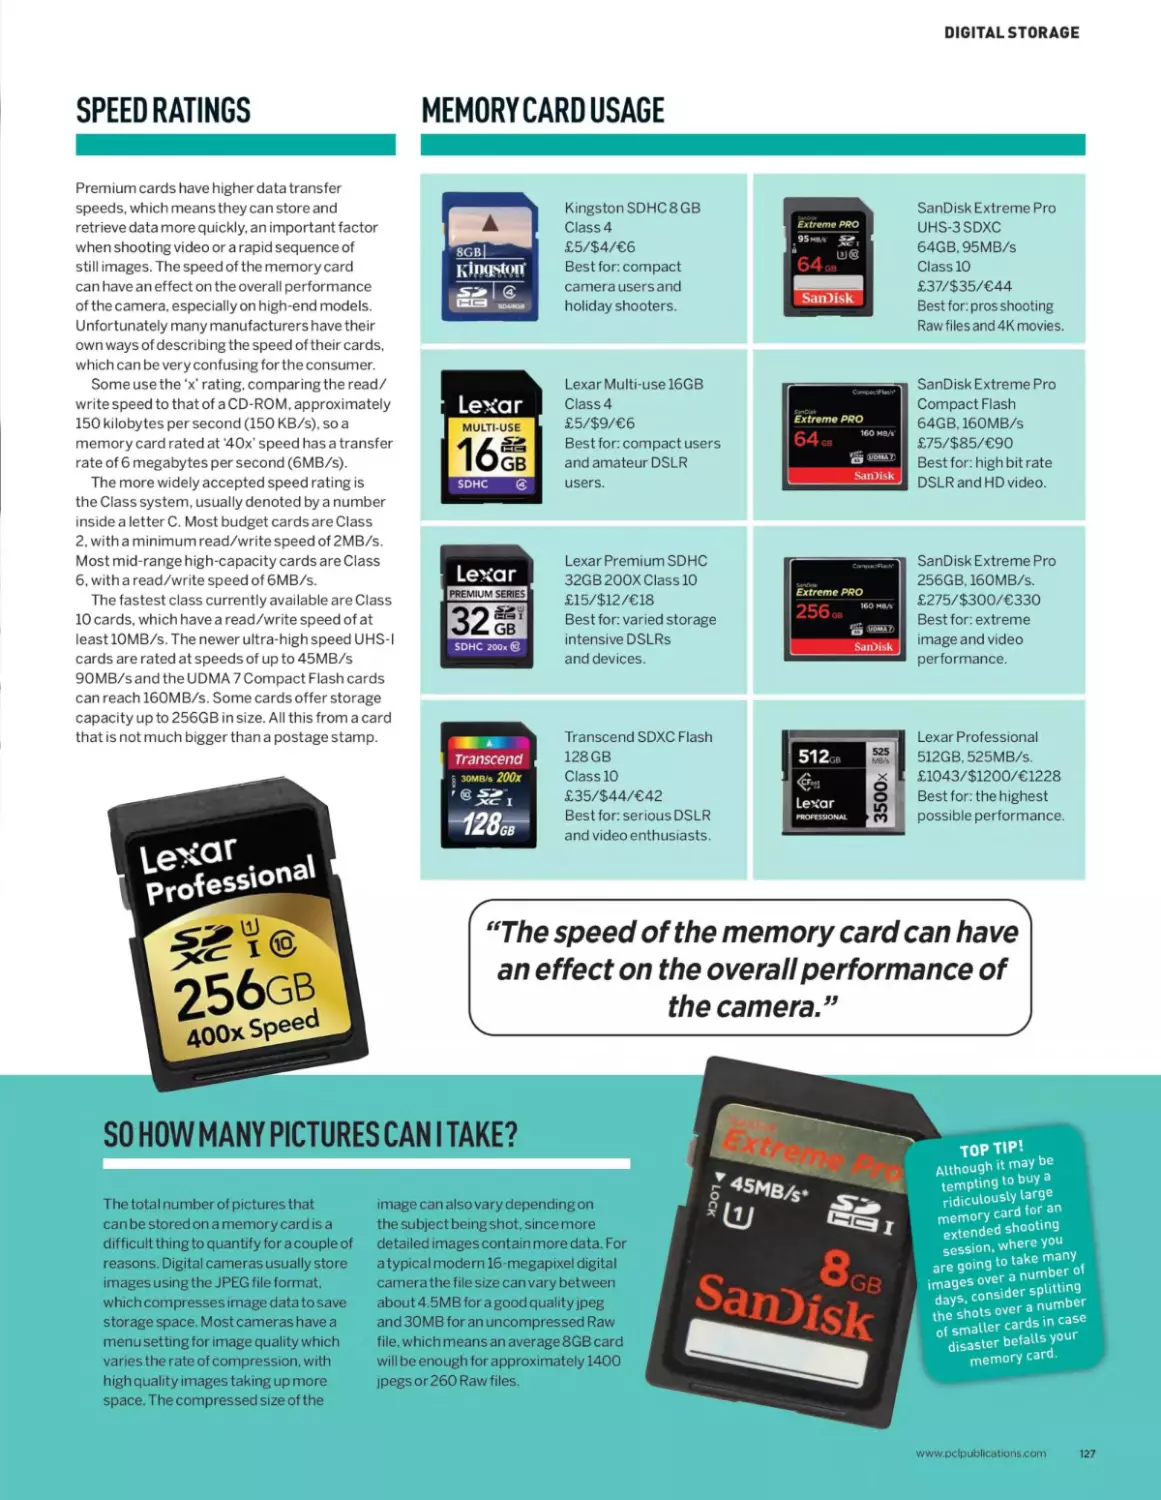
118 Memory cards
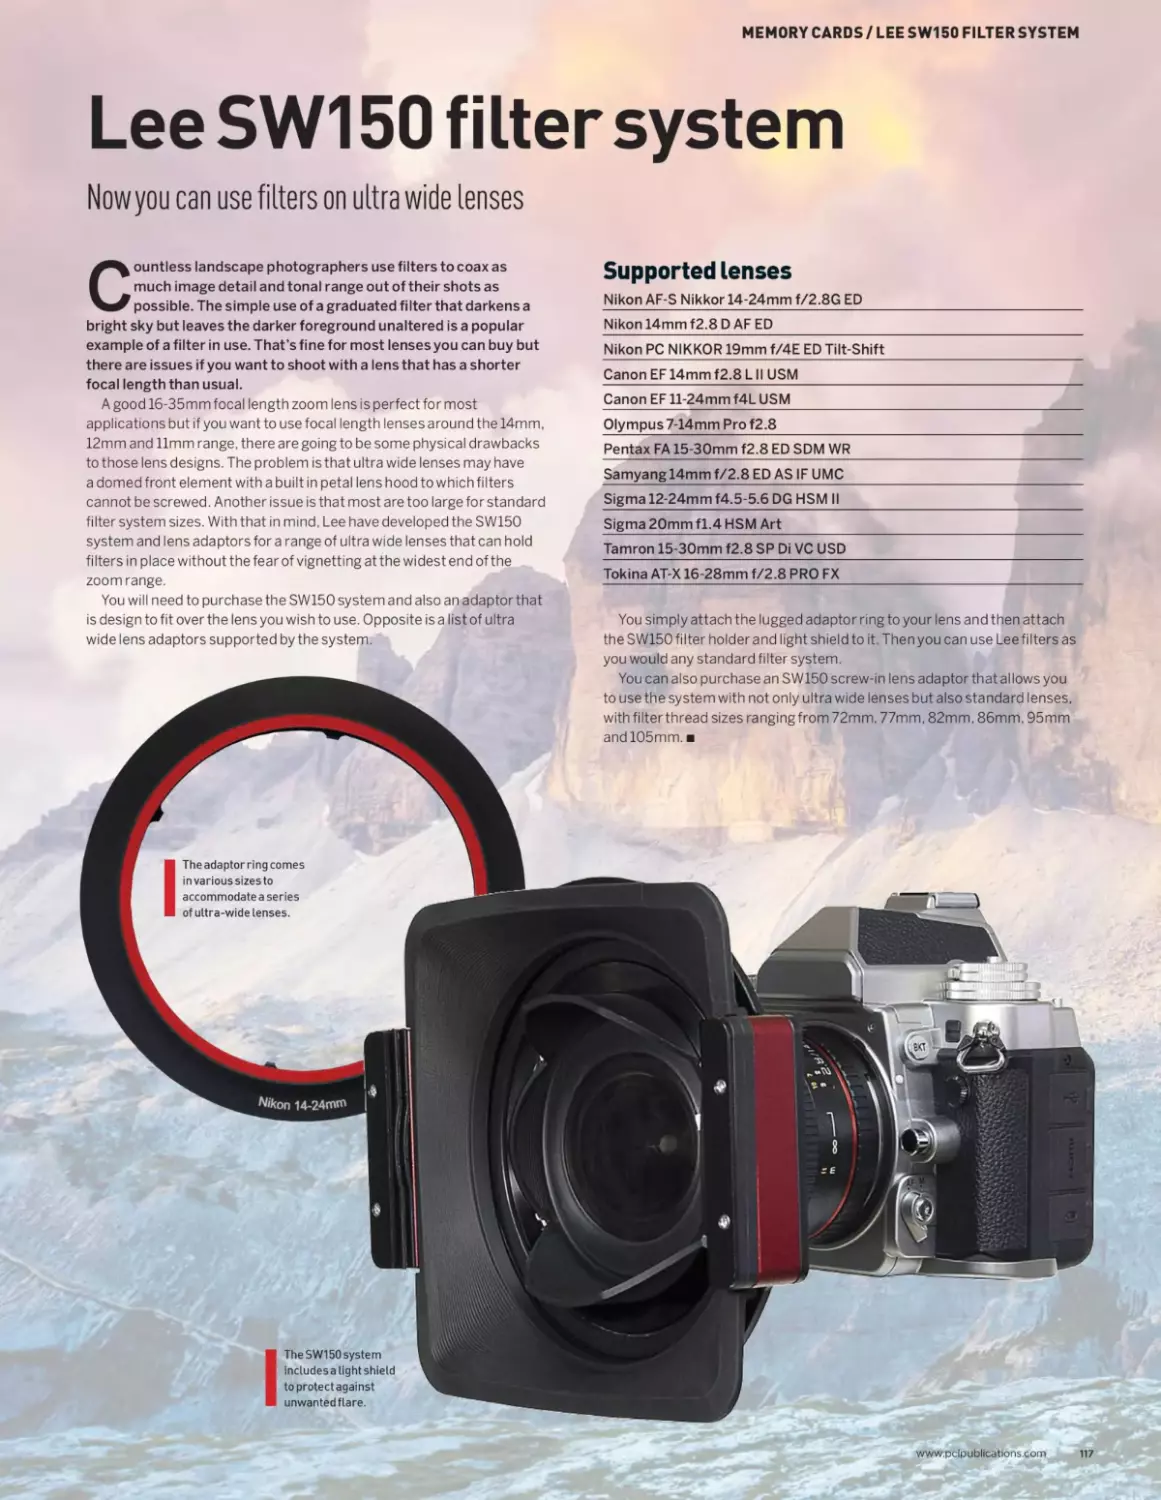
119 LeeSW150filtersystem
Getting Started
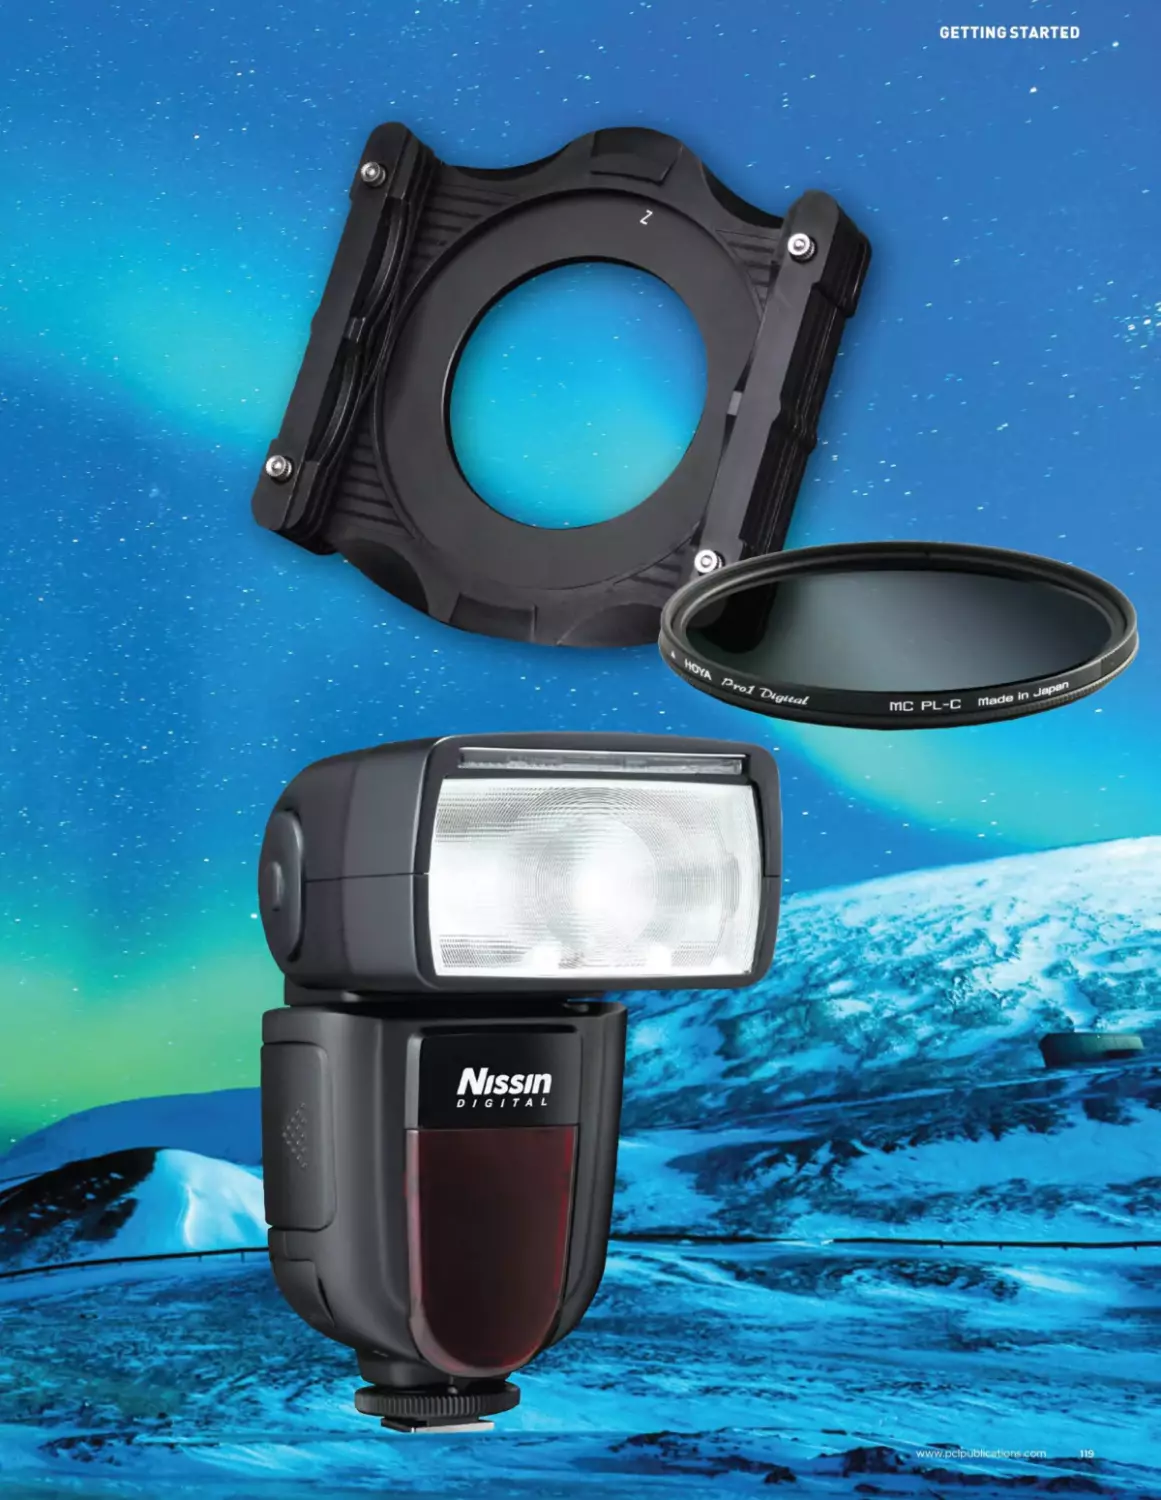
122 Flashes and lighting
124 Typesoflightmodifiers
126 Filters and filter systems
128 Digital storage
Technical Quick-Start
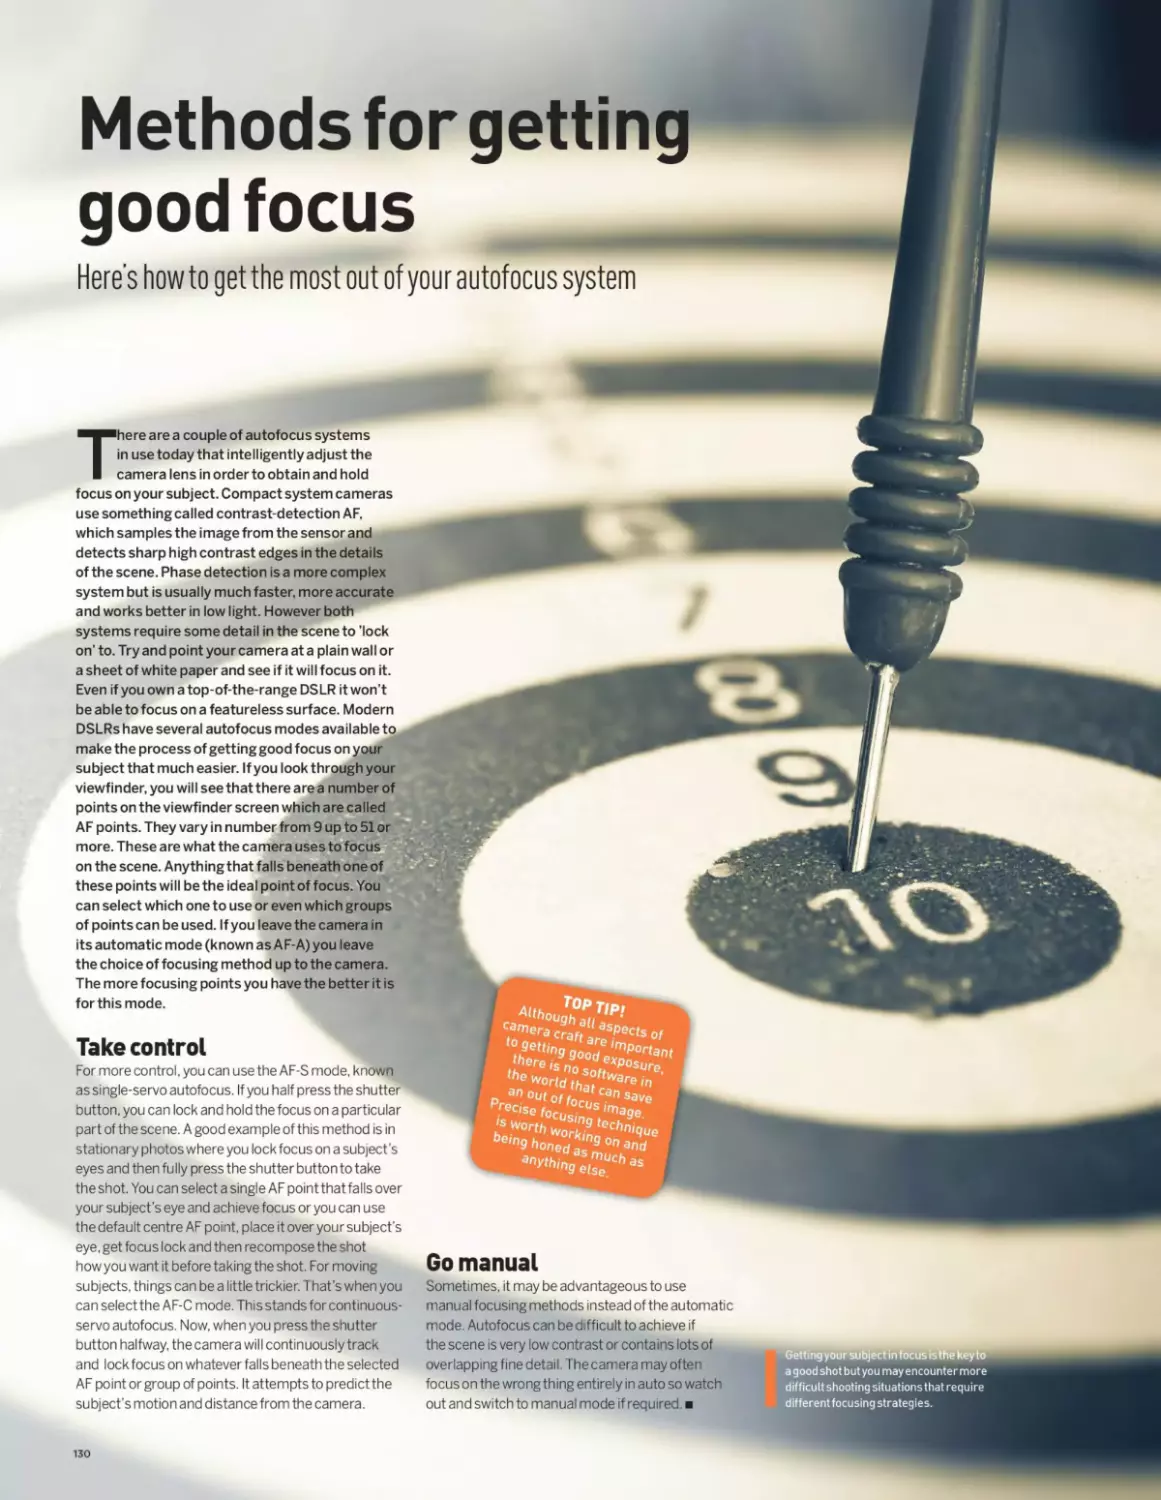
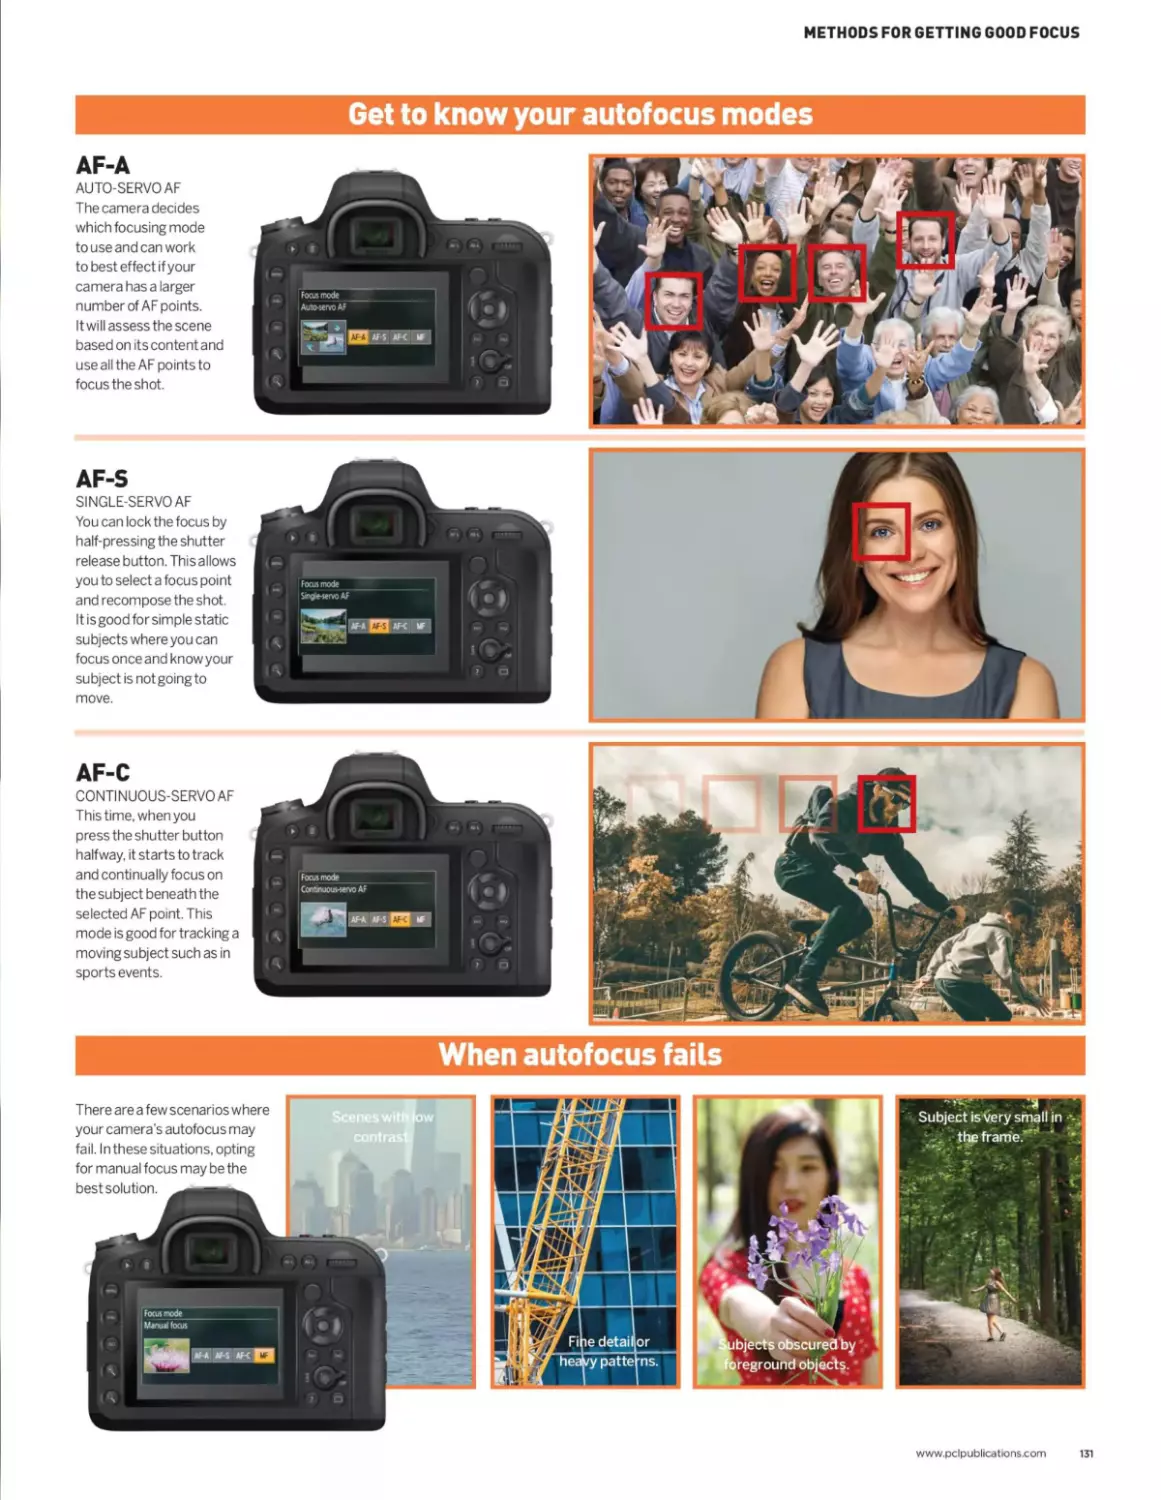
132 Methodsforgettinggoodfocus
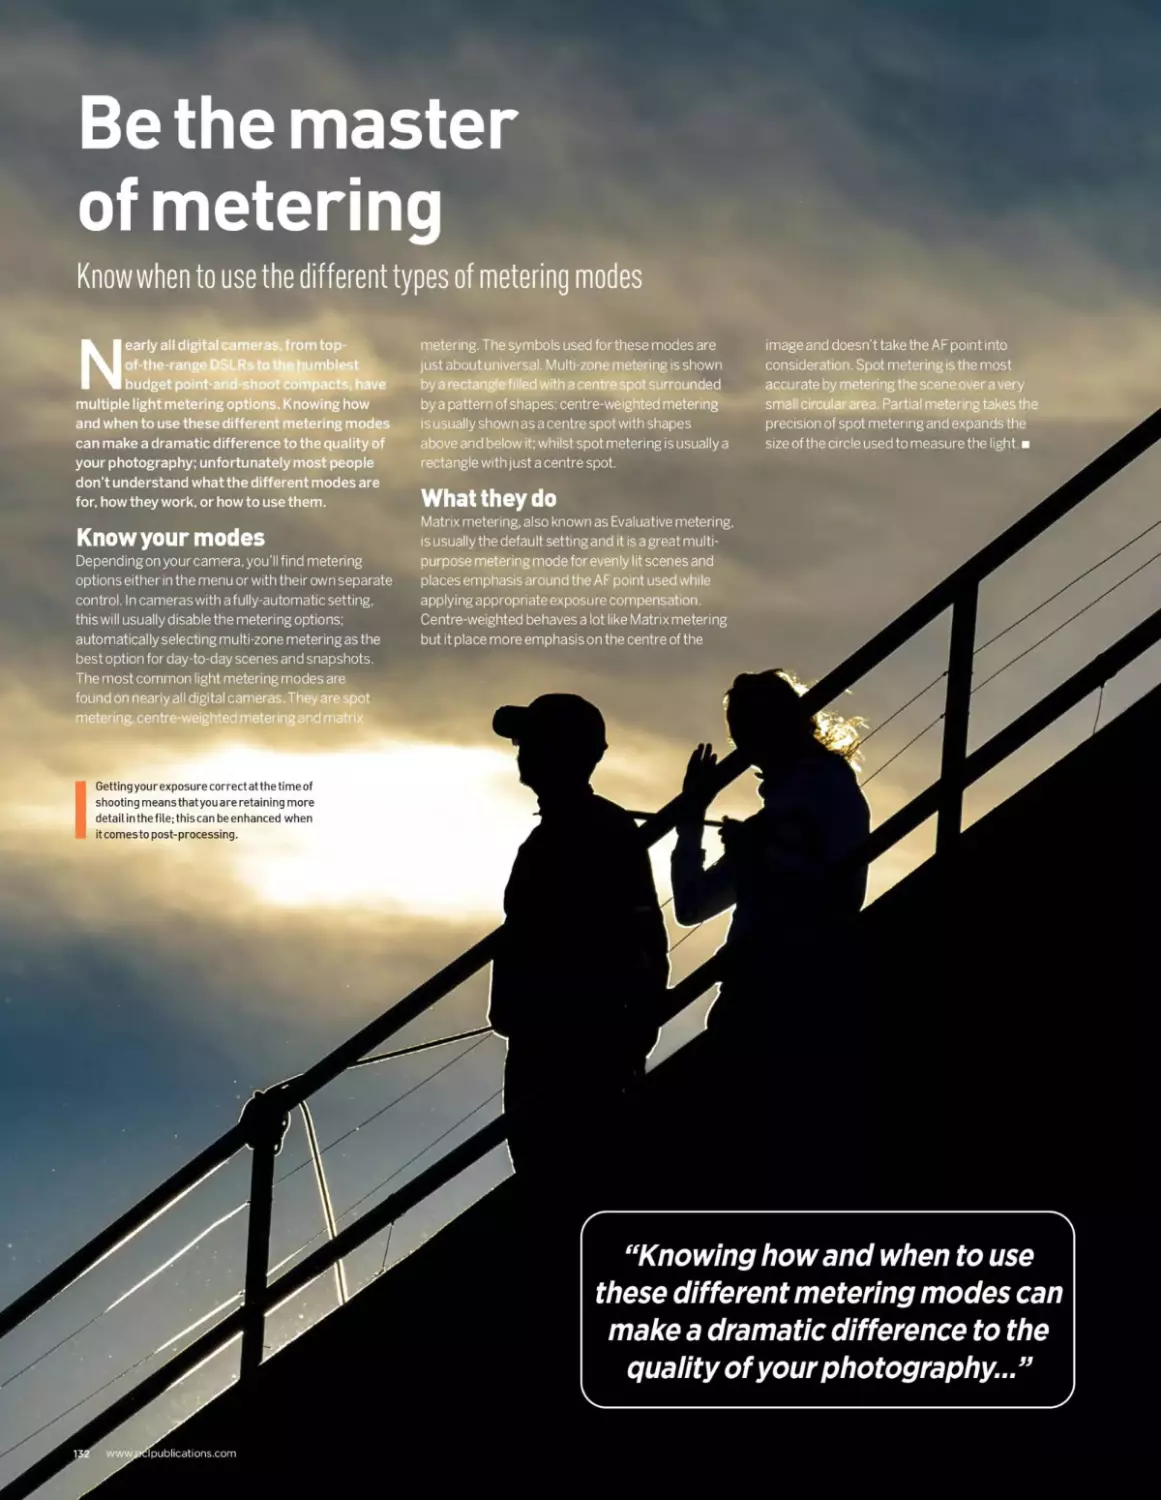
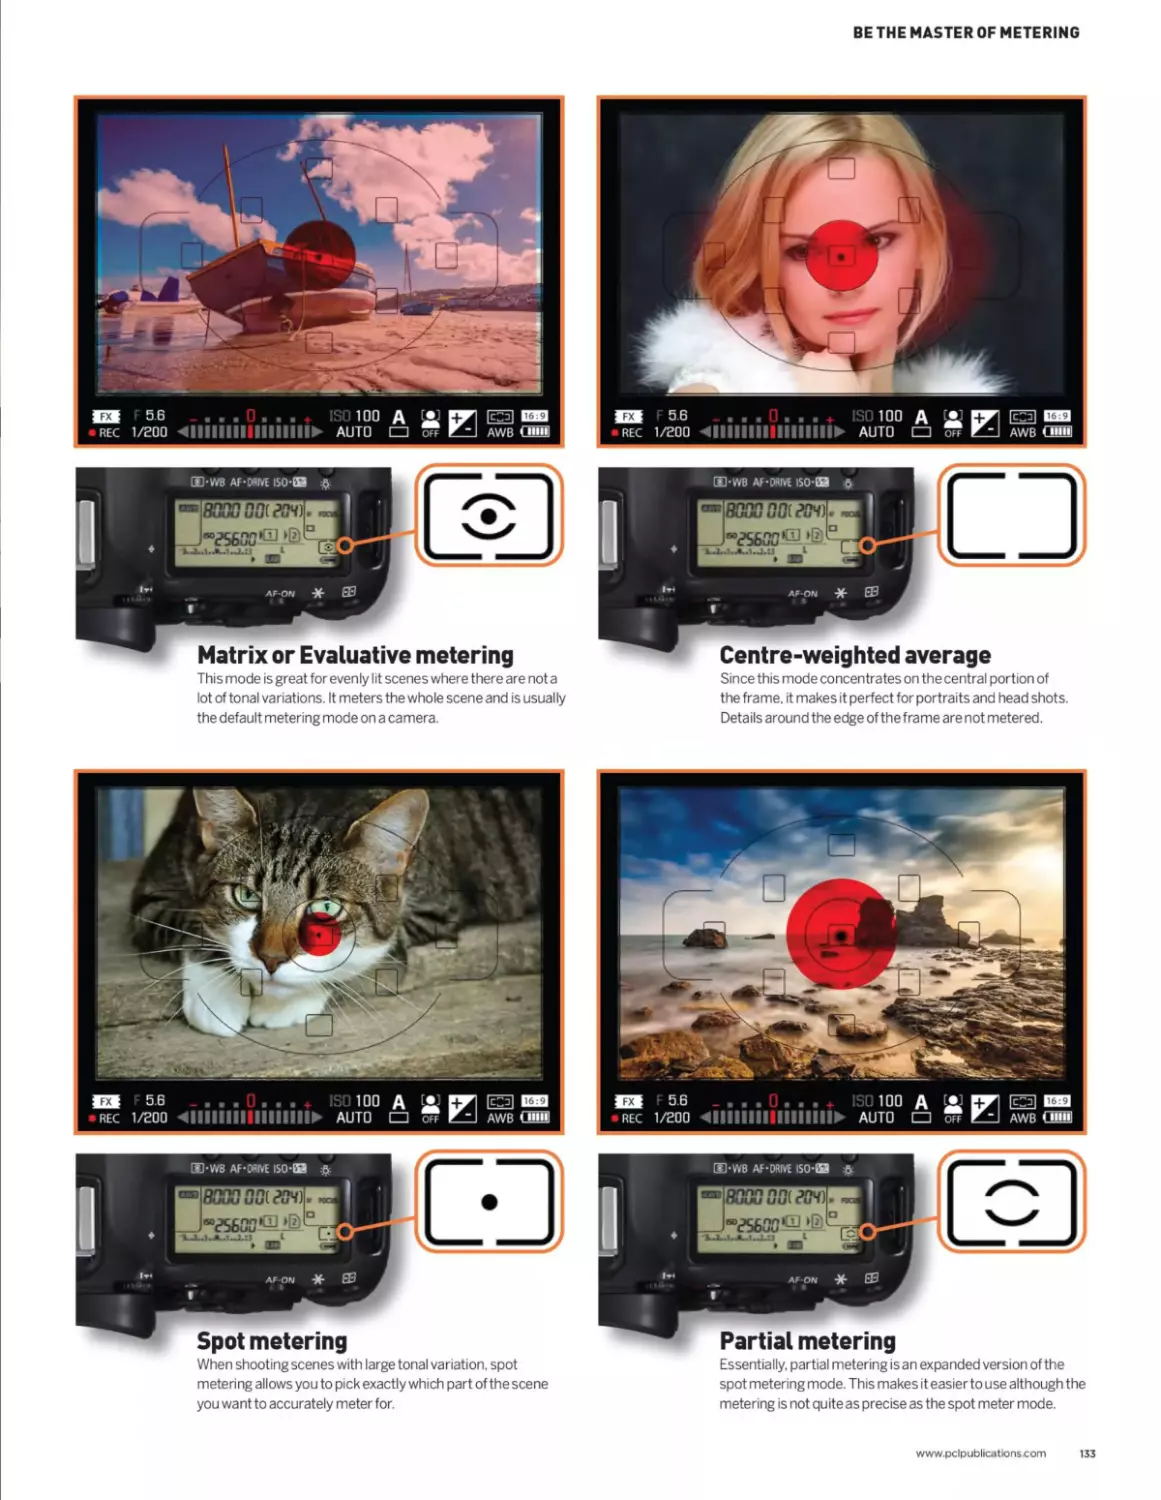
134 Bethemasterofmetering
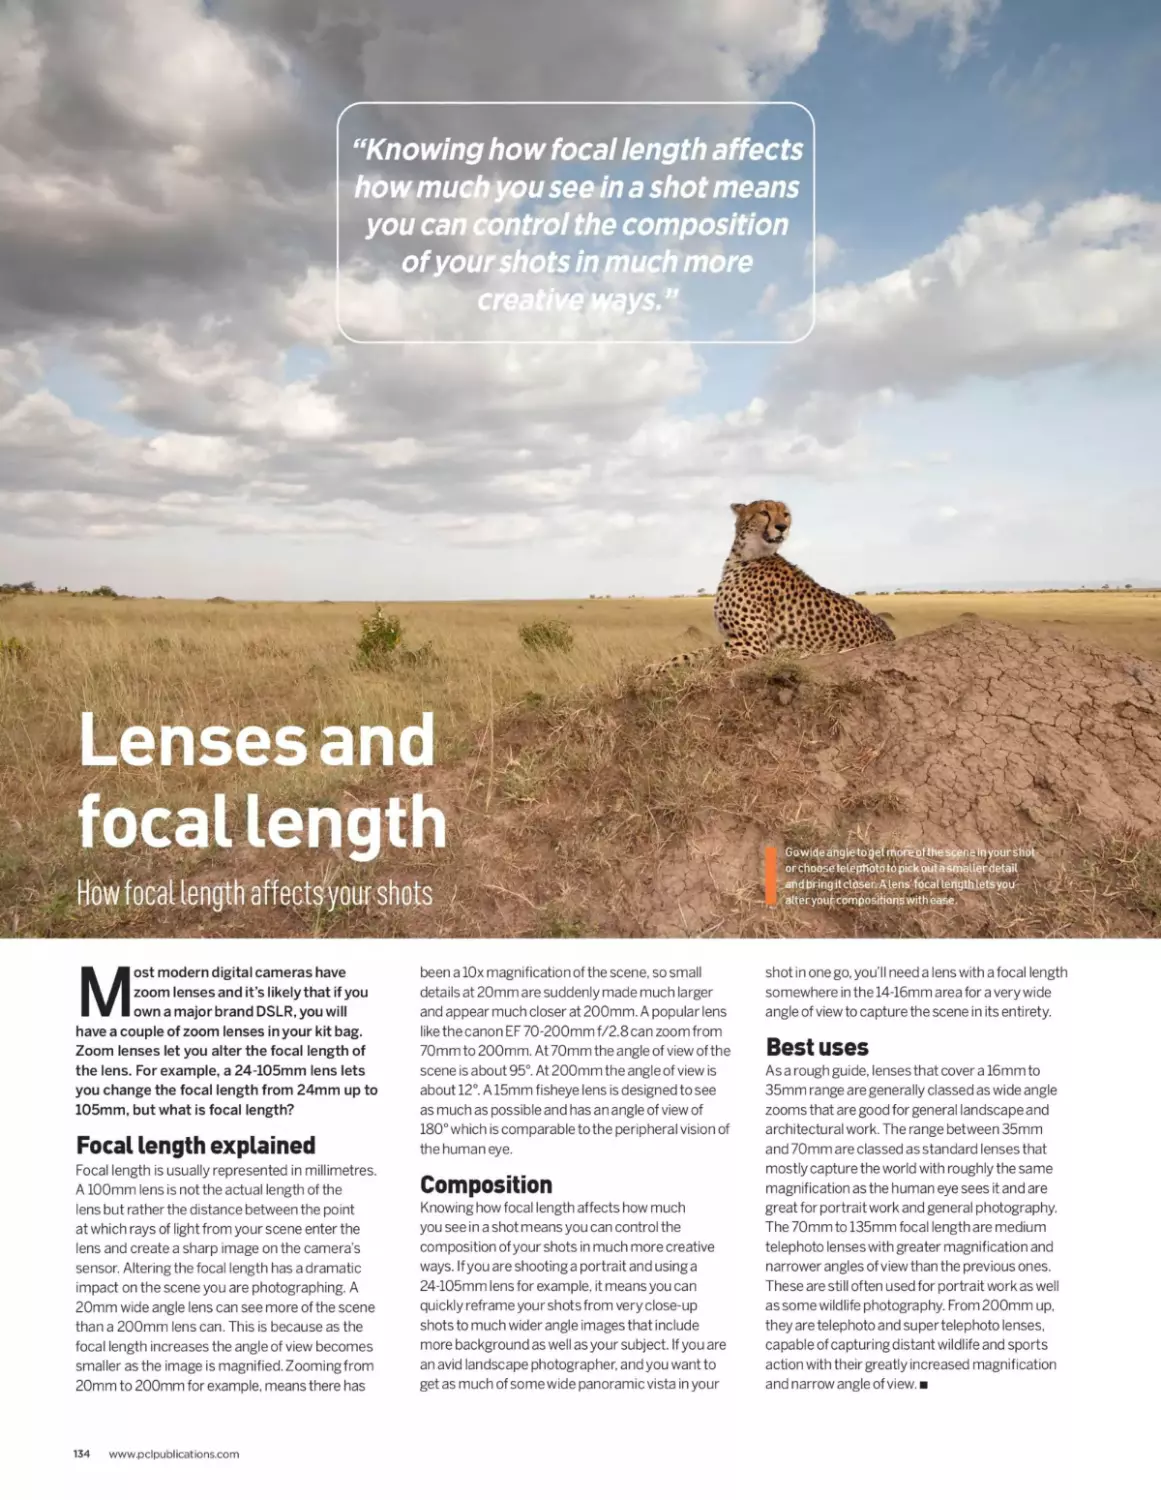
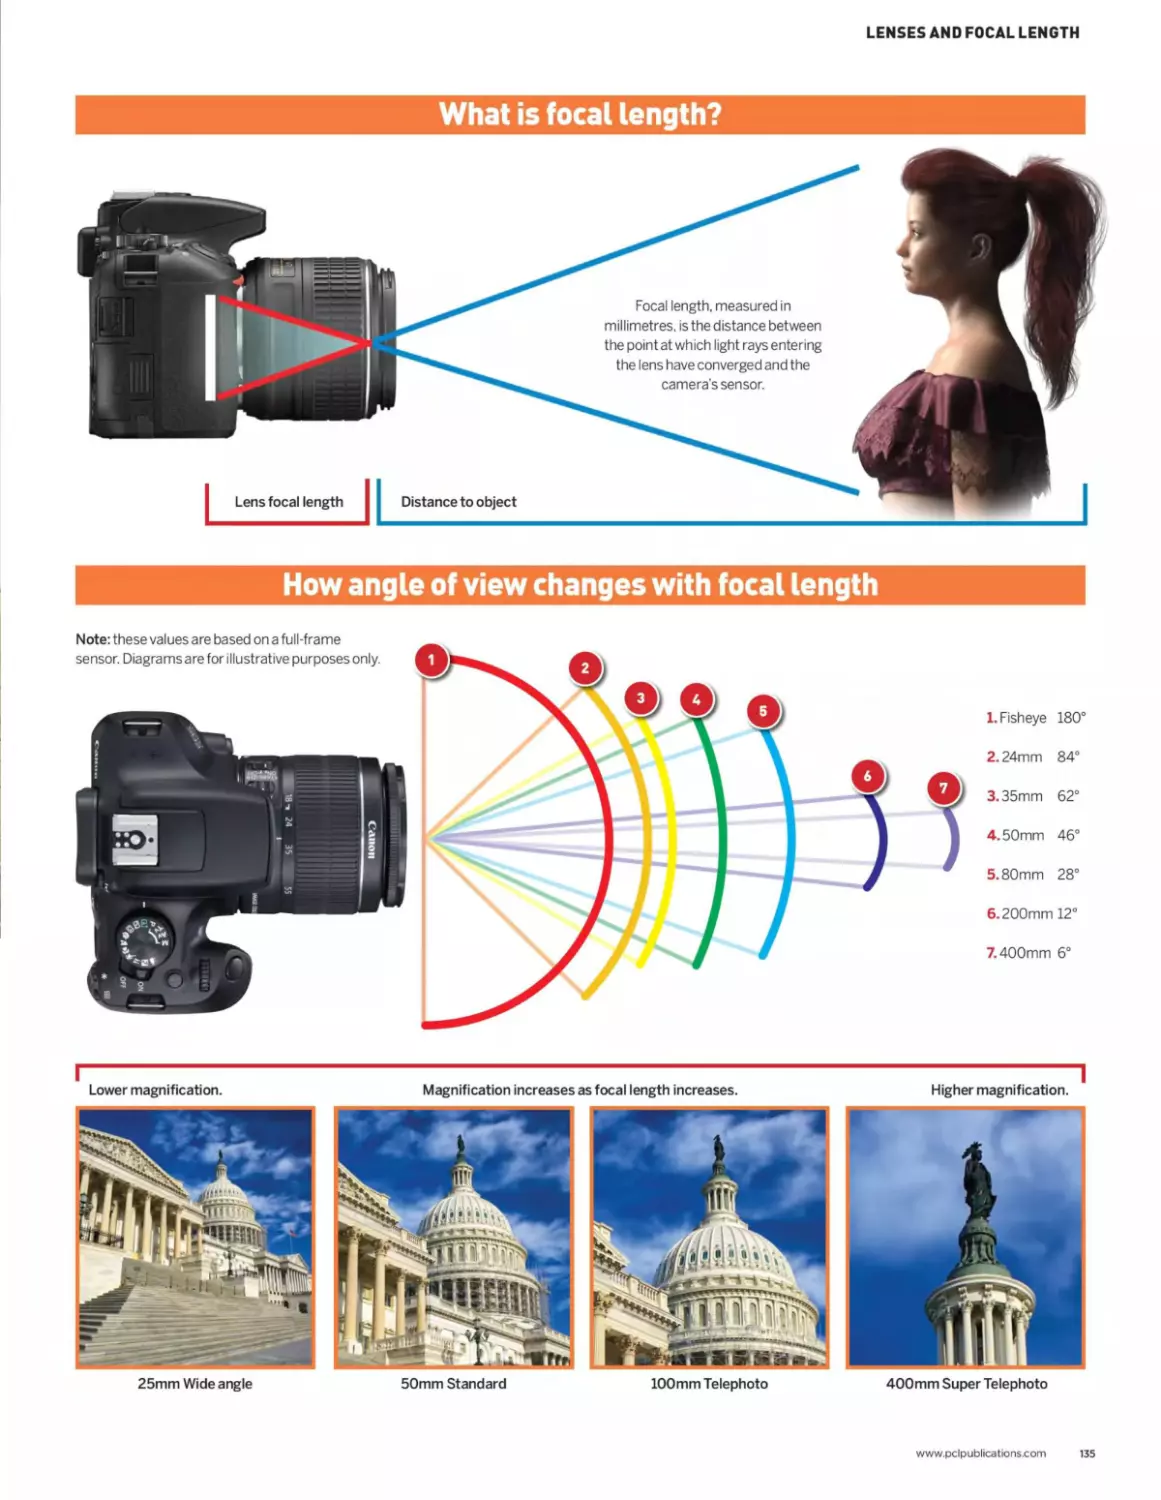
136 Lensesand focal length
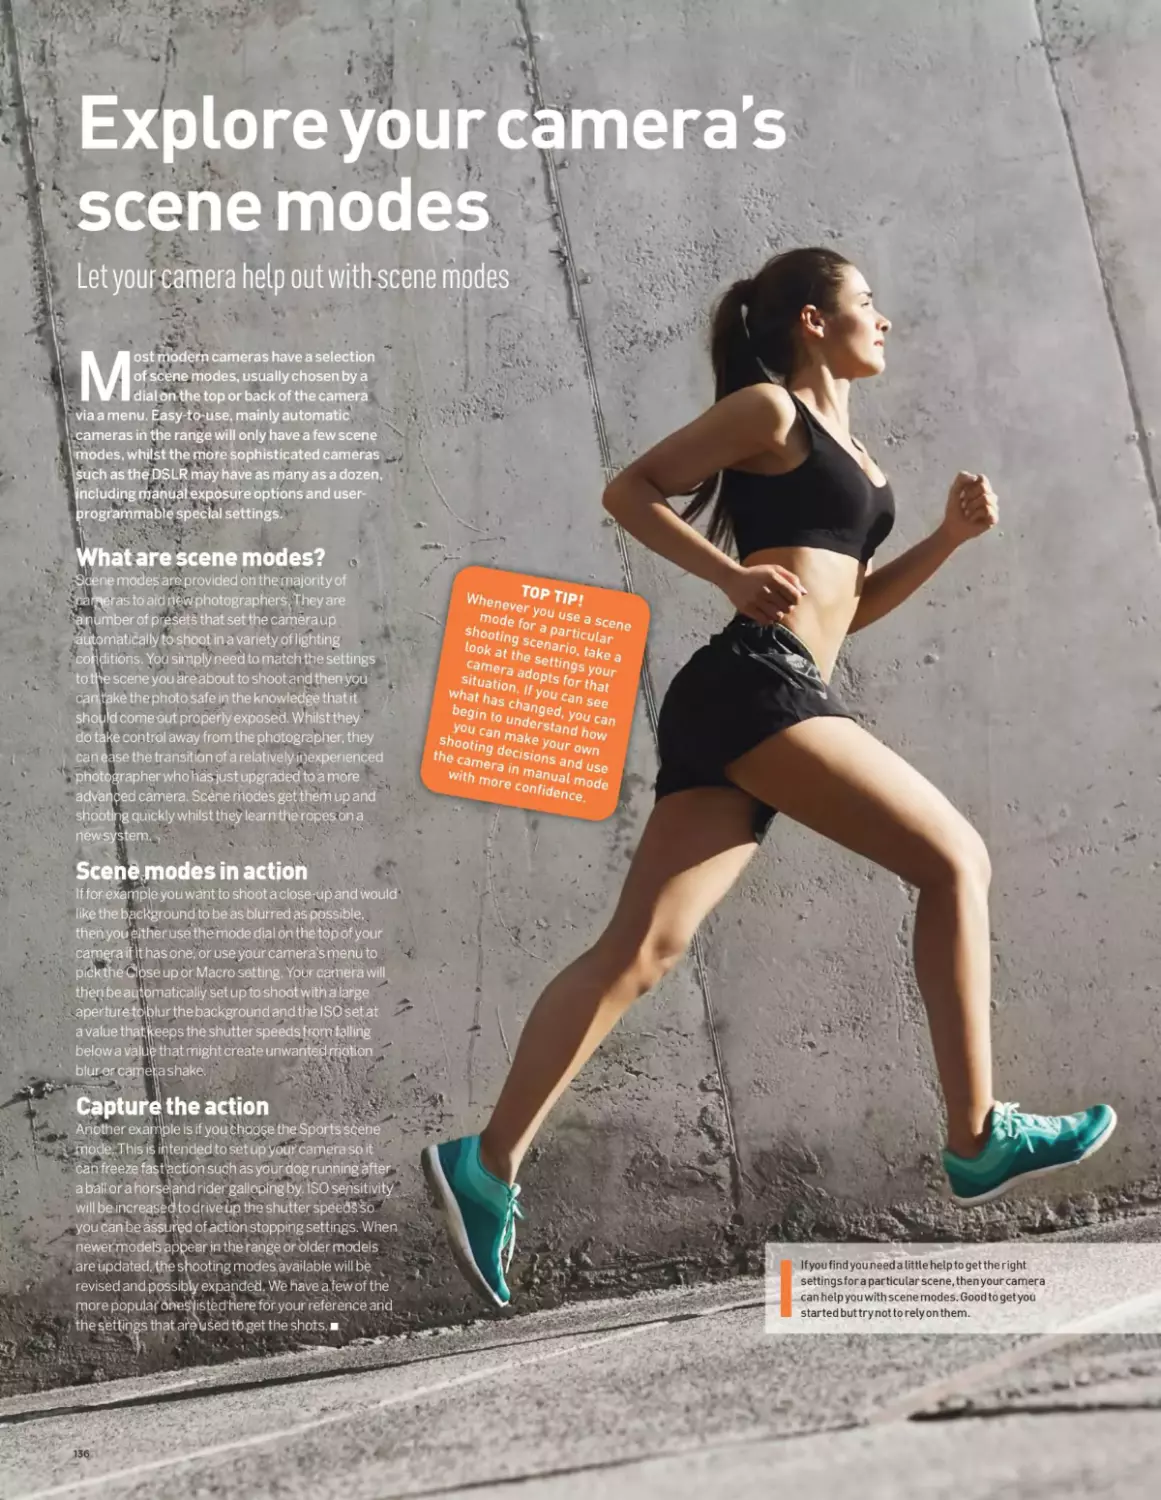
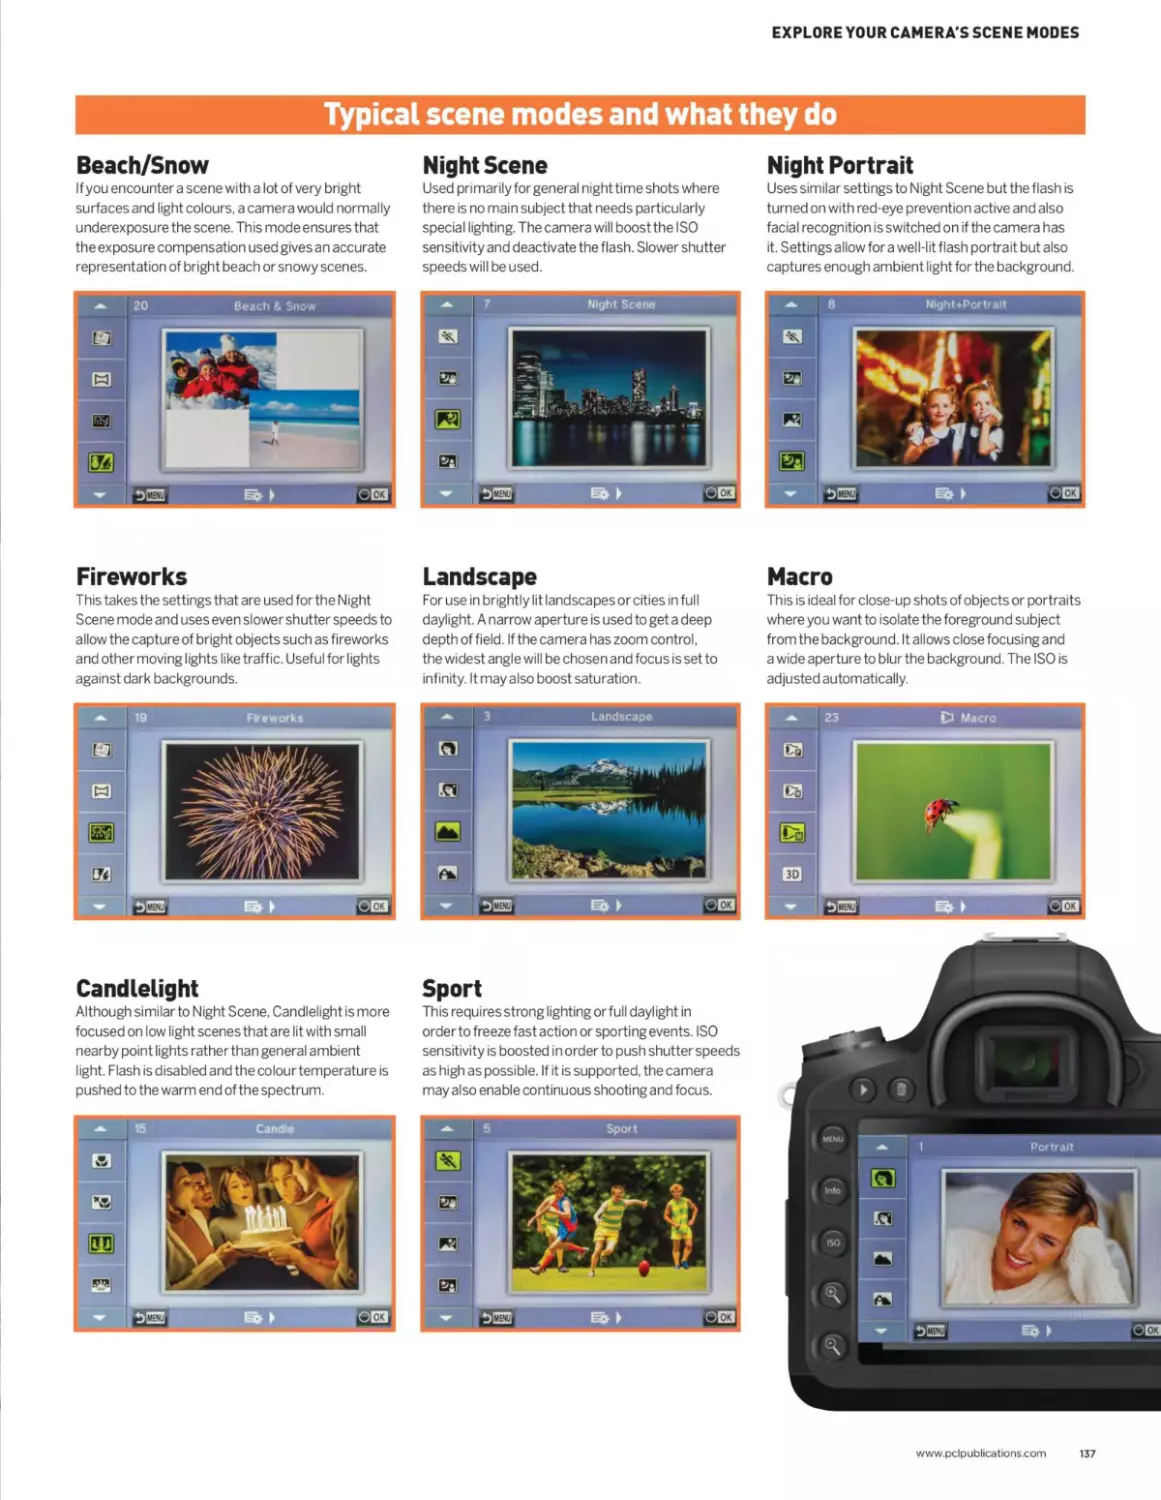
138 Exploreyourcamera’s scene modes
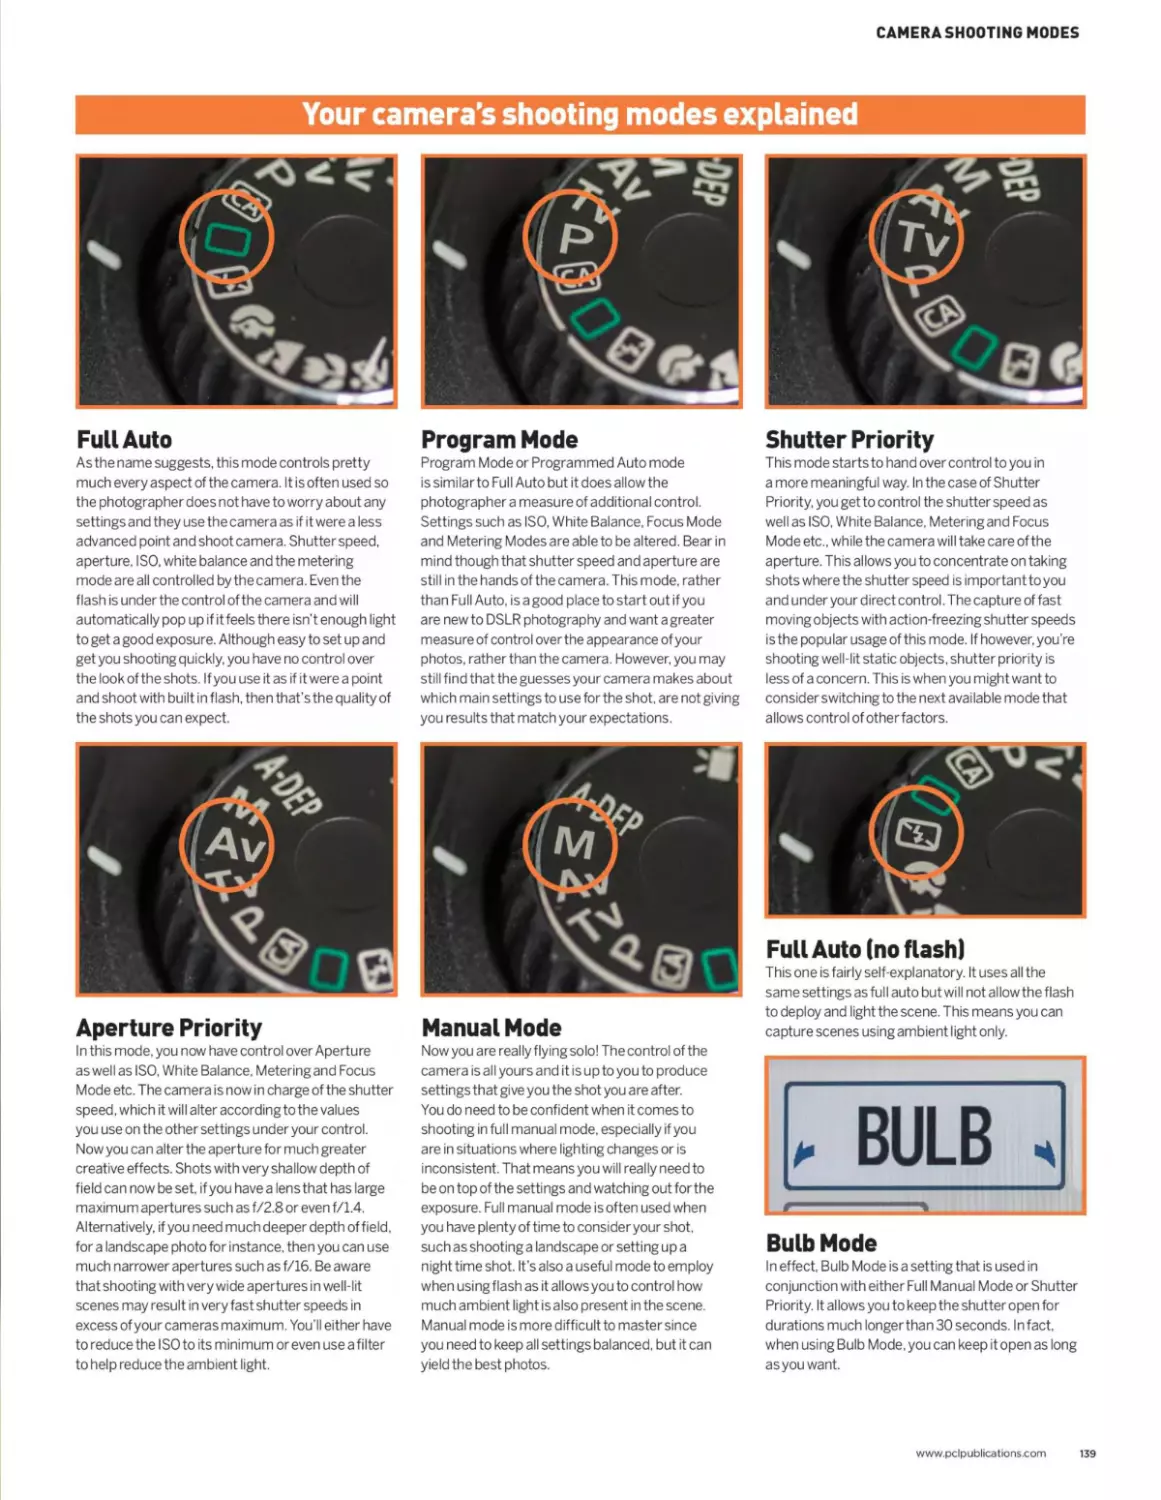
140 Camera shooting modes
6 www.pclpublications.com
Learning New Skills
140 Focusing
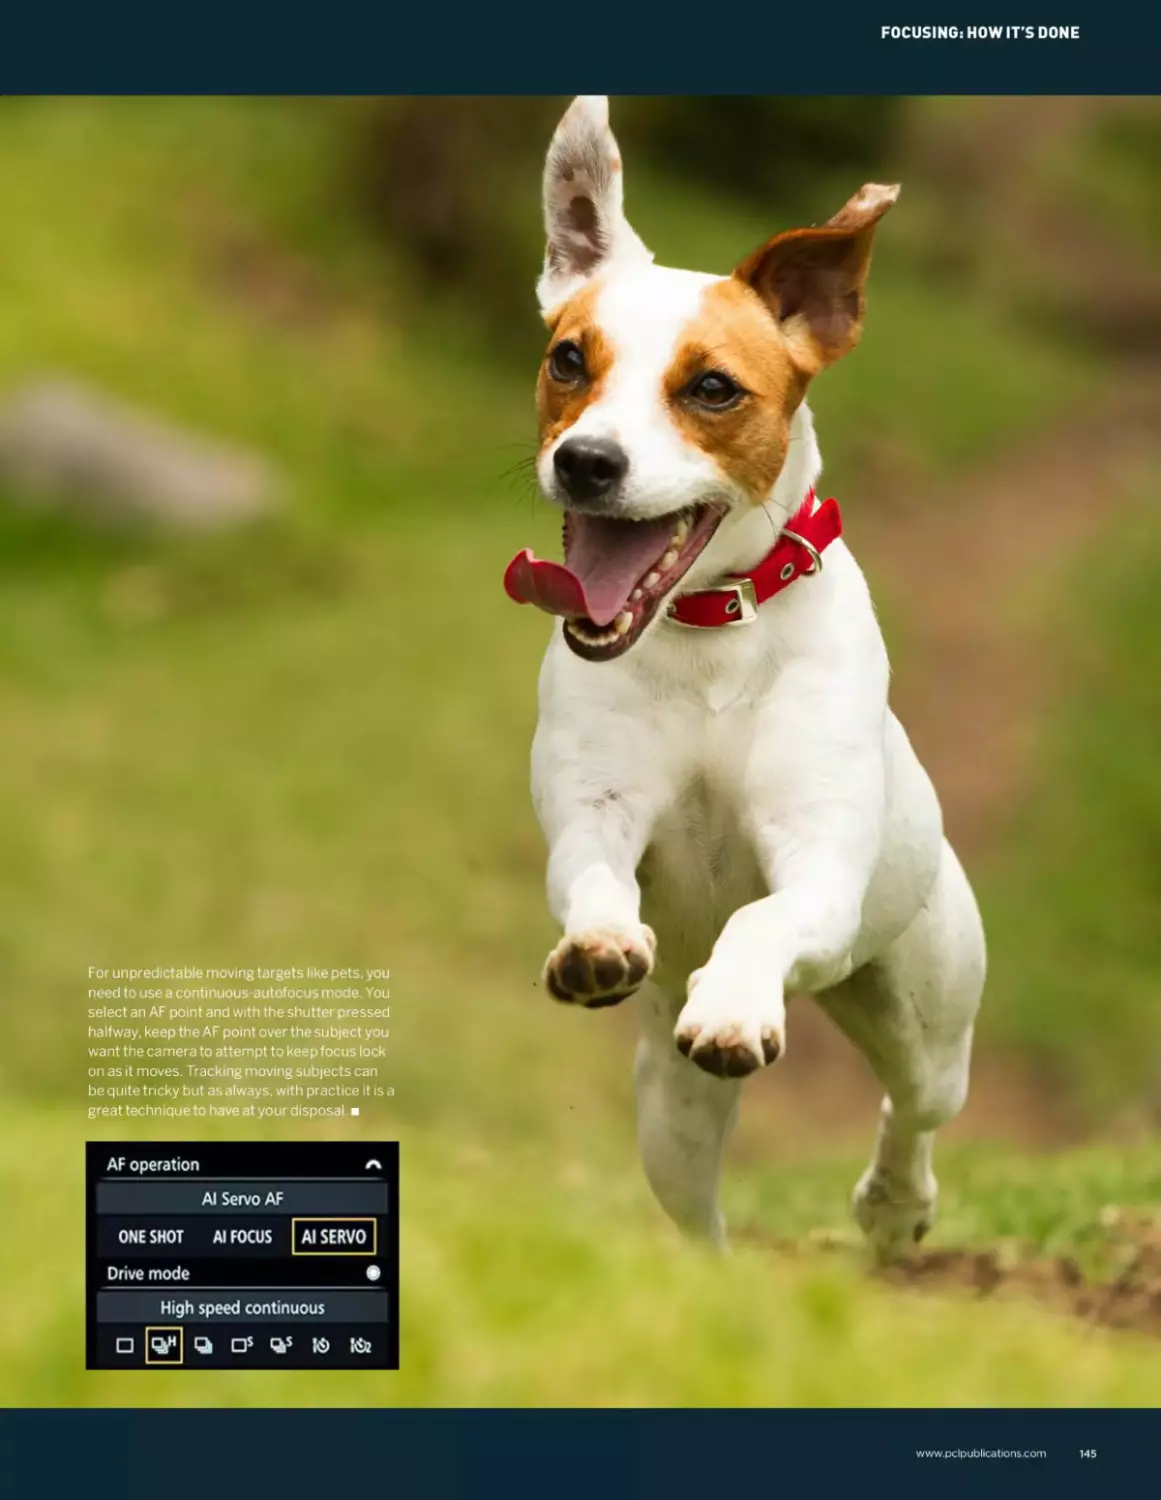
142 Focusing: how it’s done
144 Focal length and zoom
146 Focal length and zoom: how it’s done
148 Exposure and metering
Creative Projects
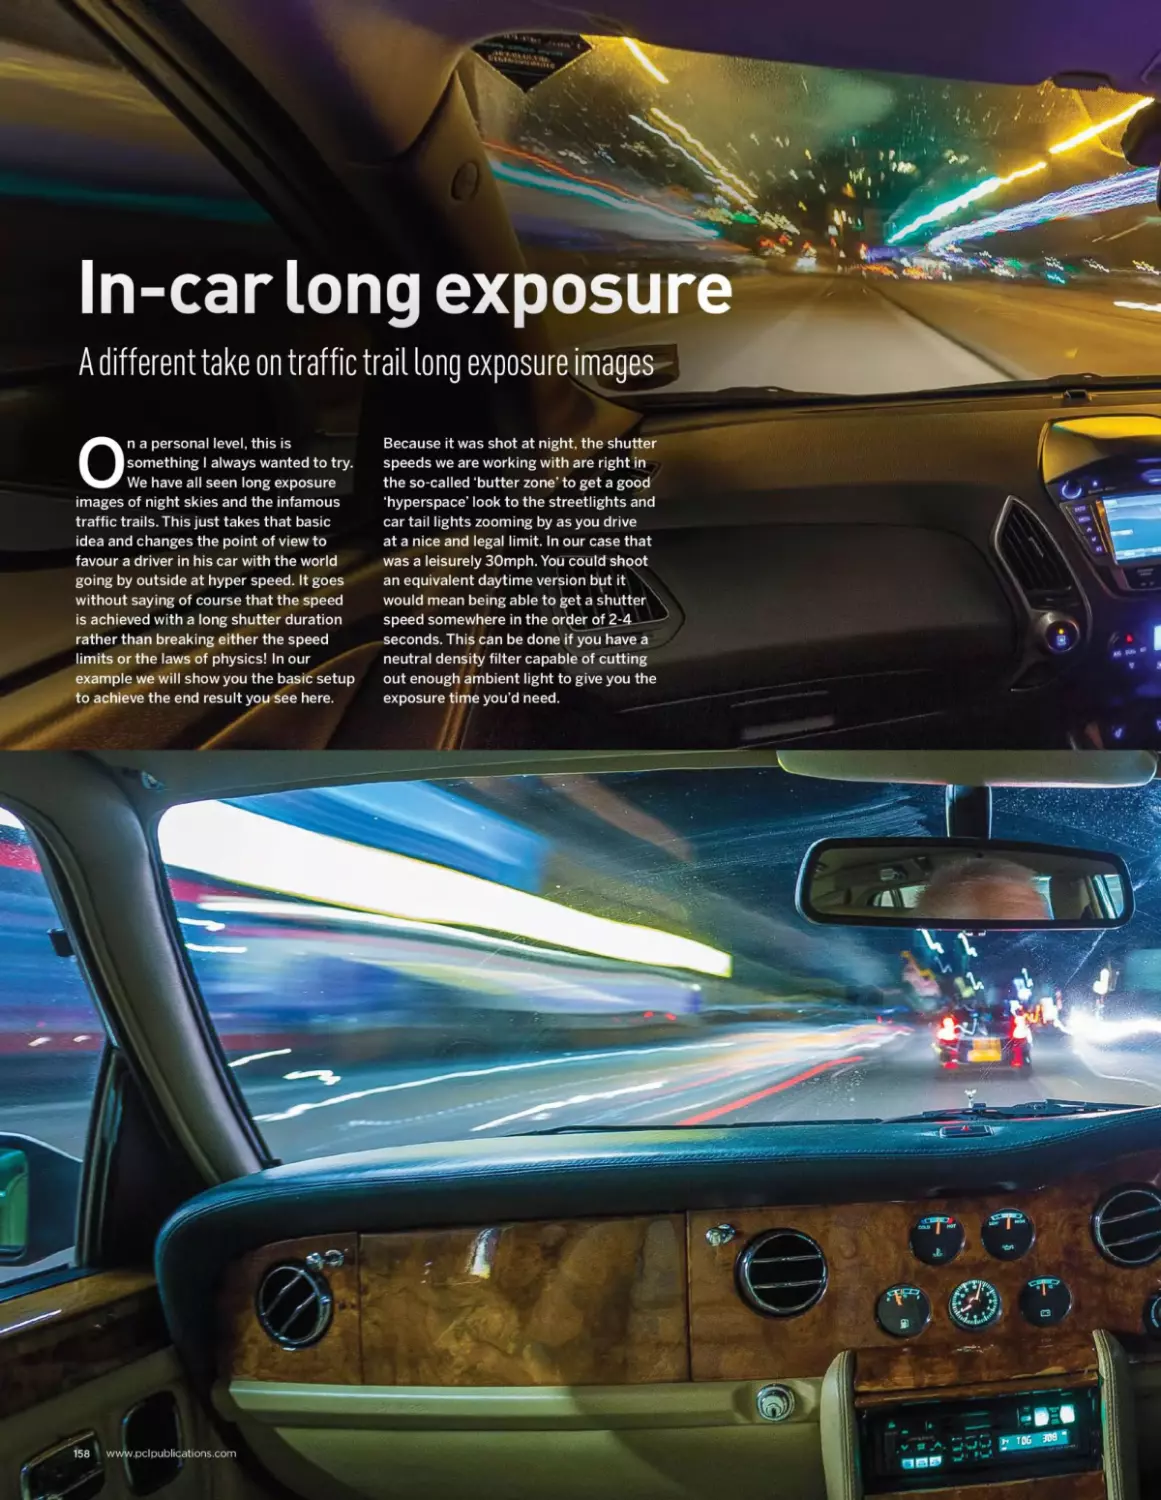
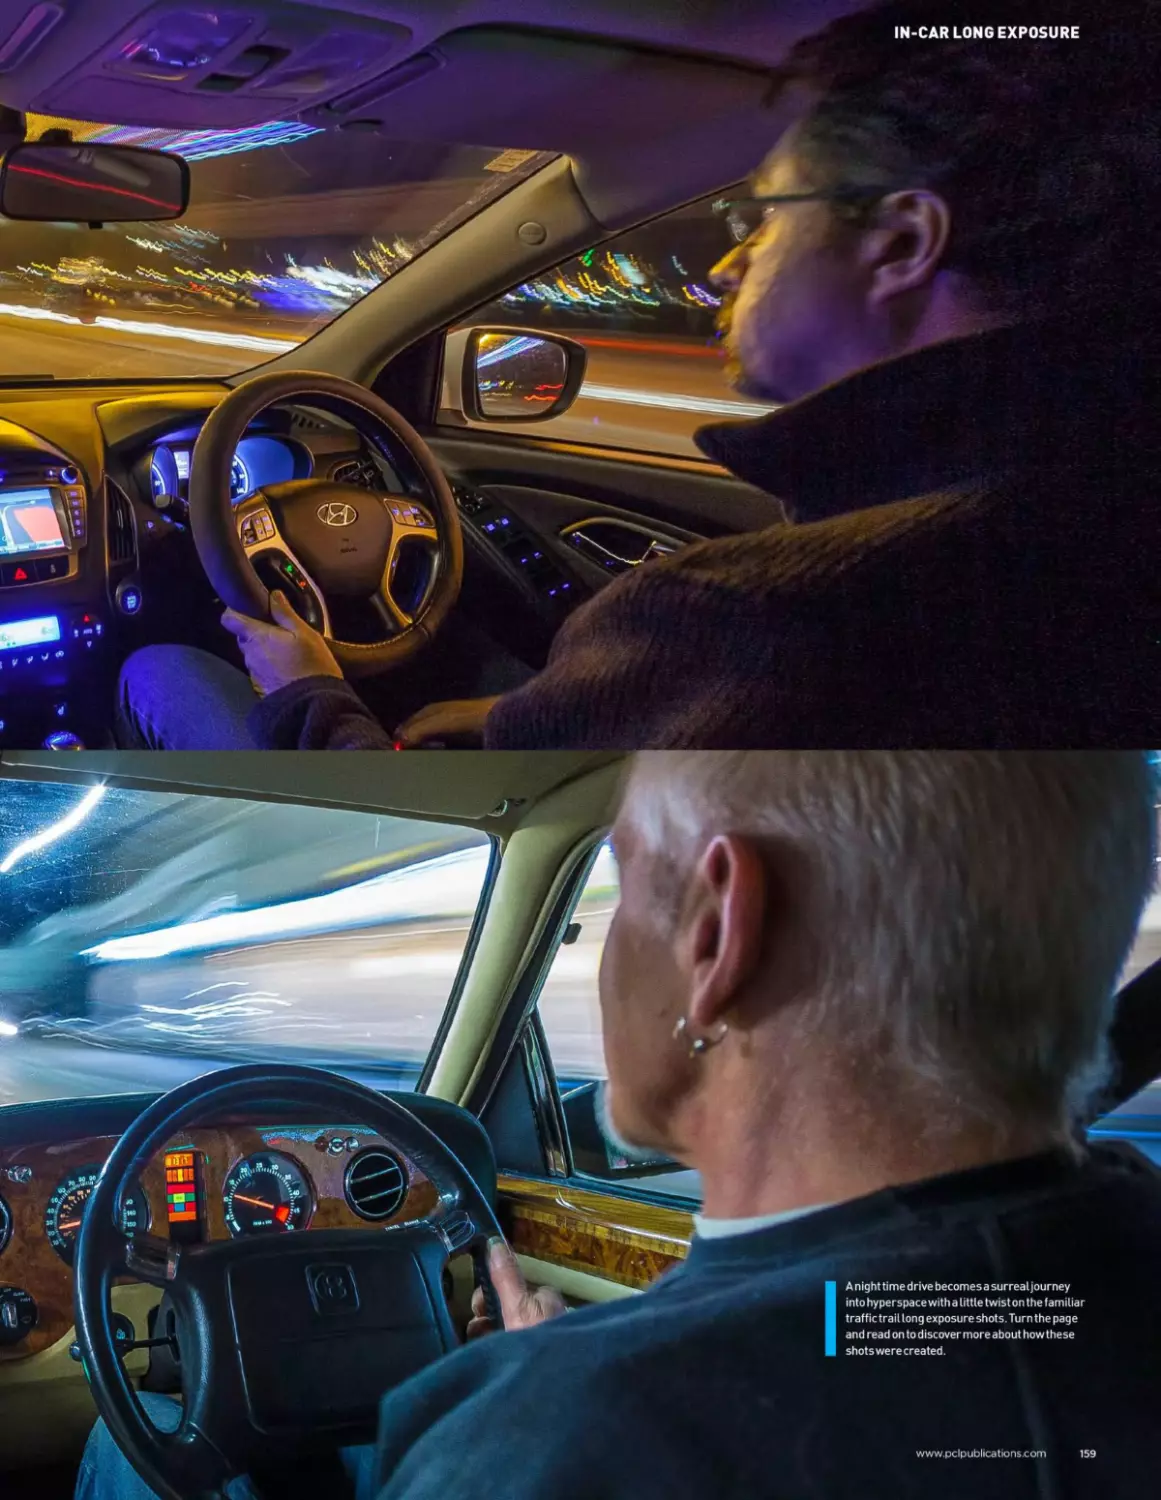
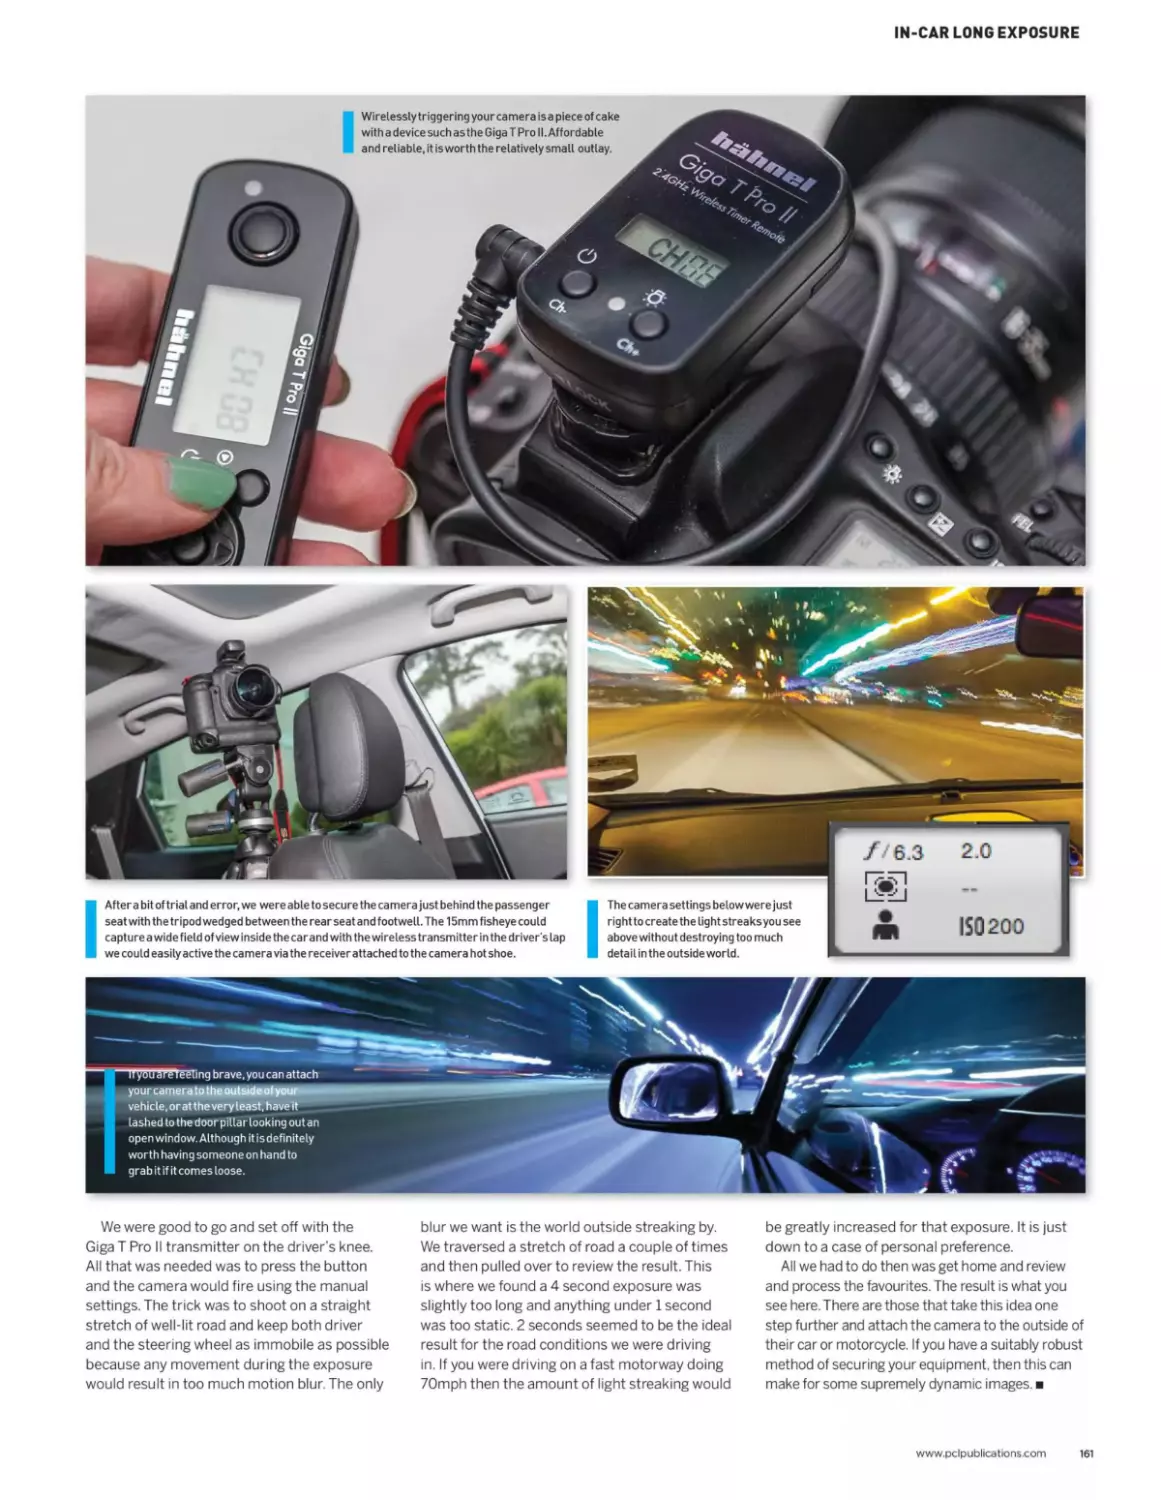
156 In-car long exposure
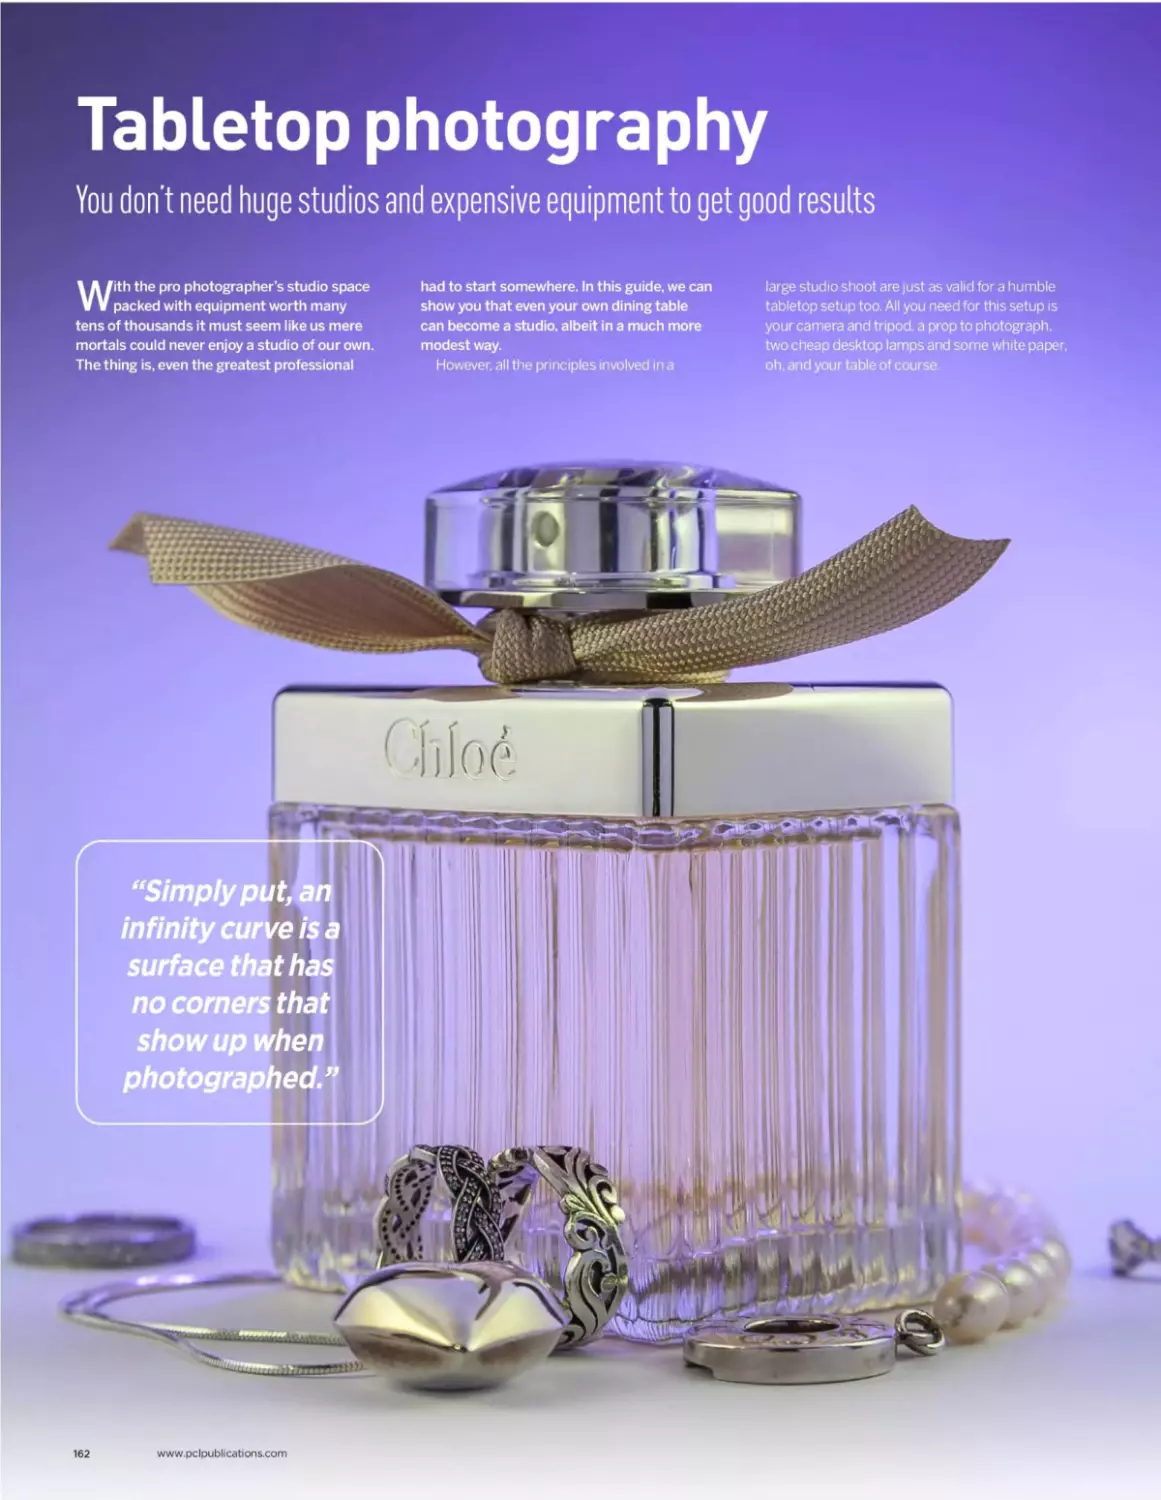
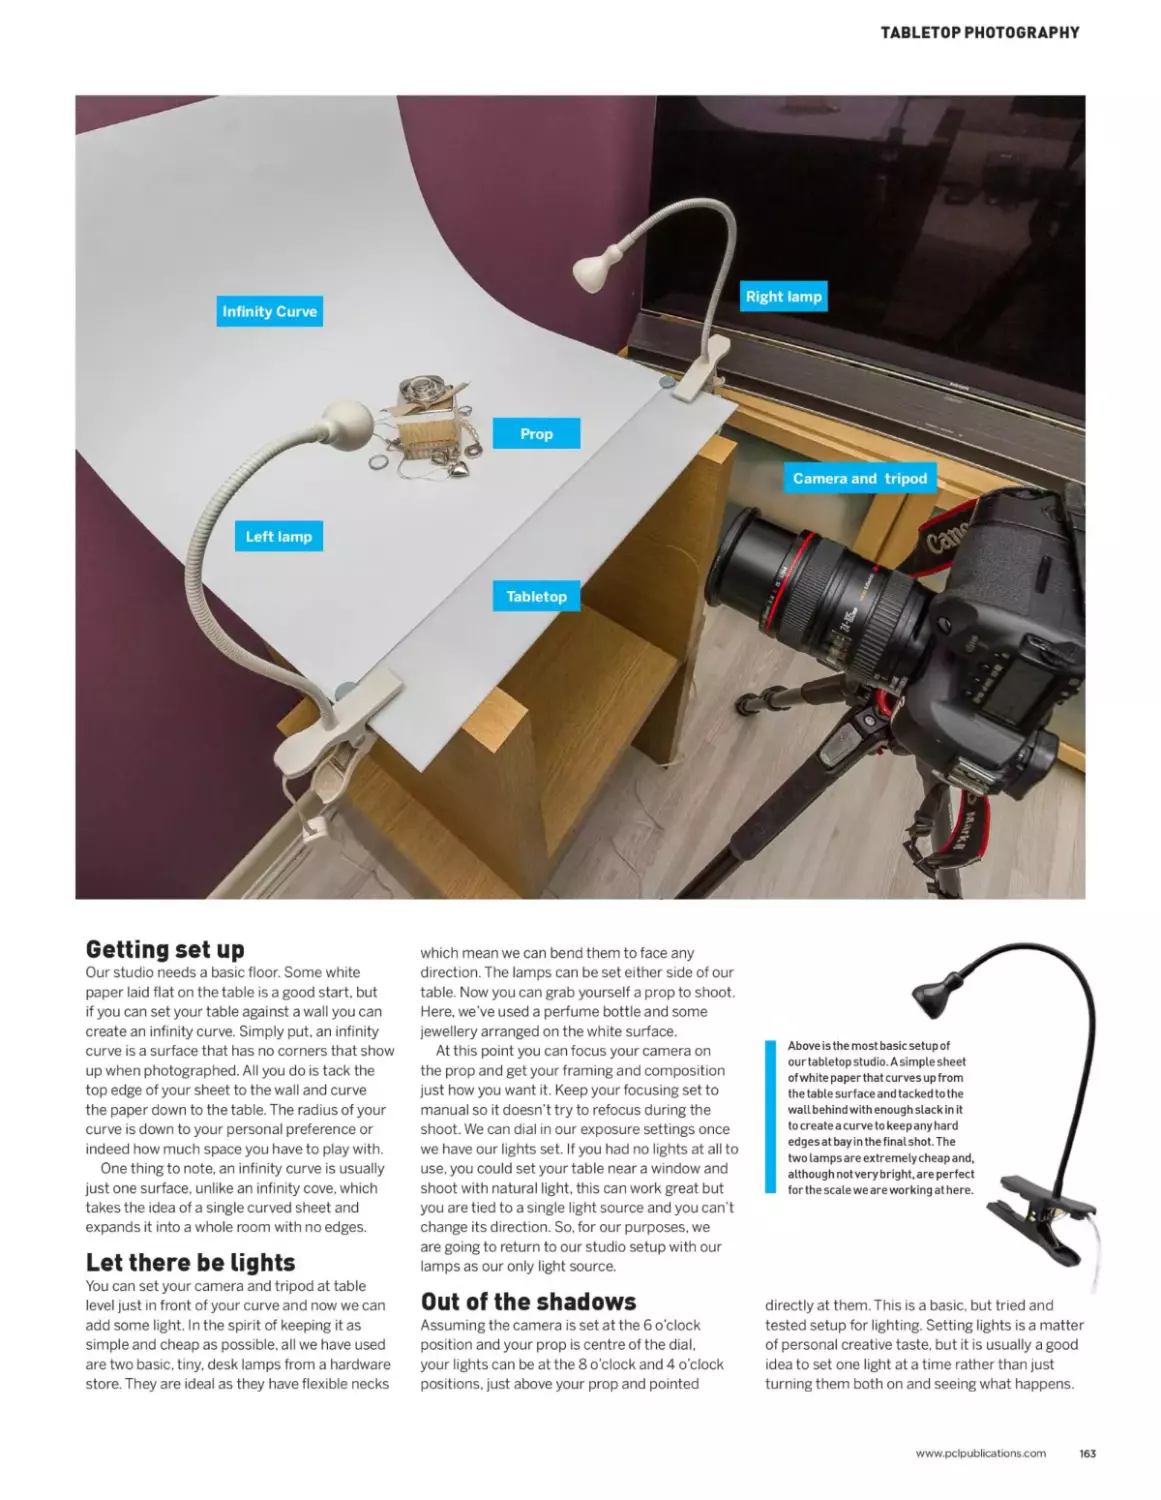
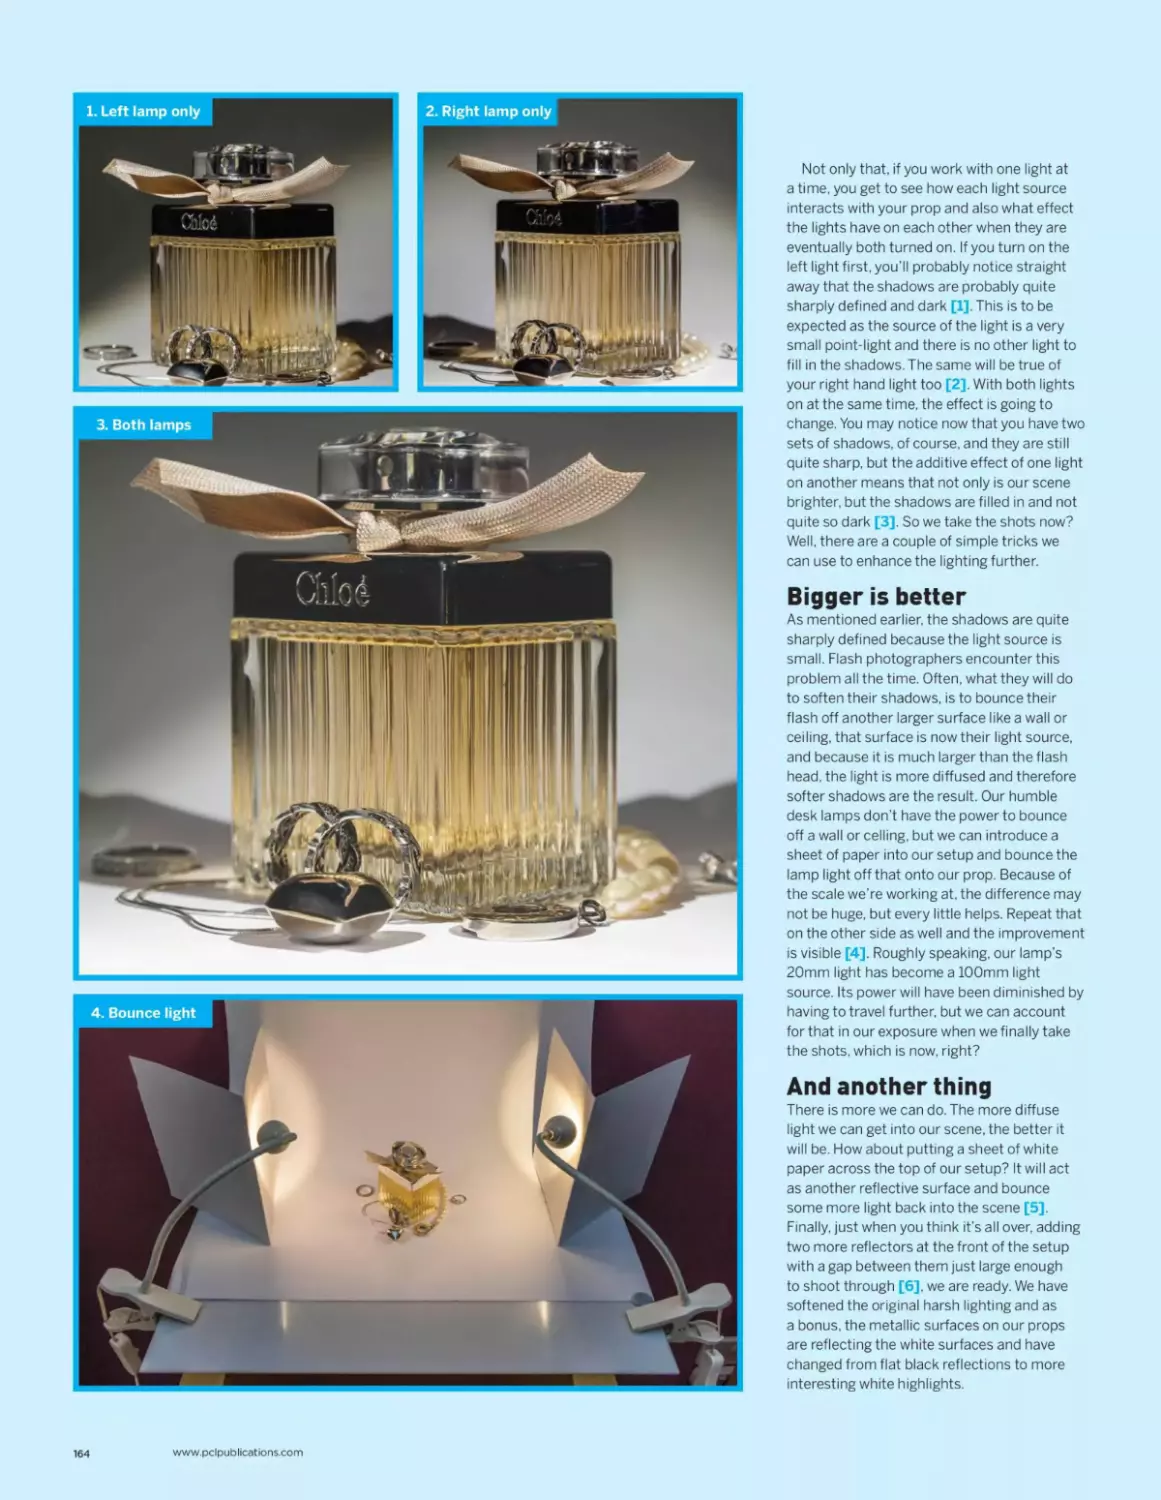
160 Tabletop photography
164 Shooting musical and stage performances
170 Light painting
172 Off-camera flash
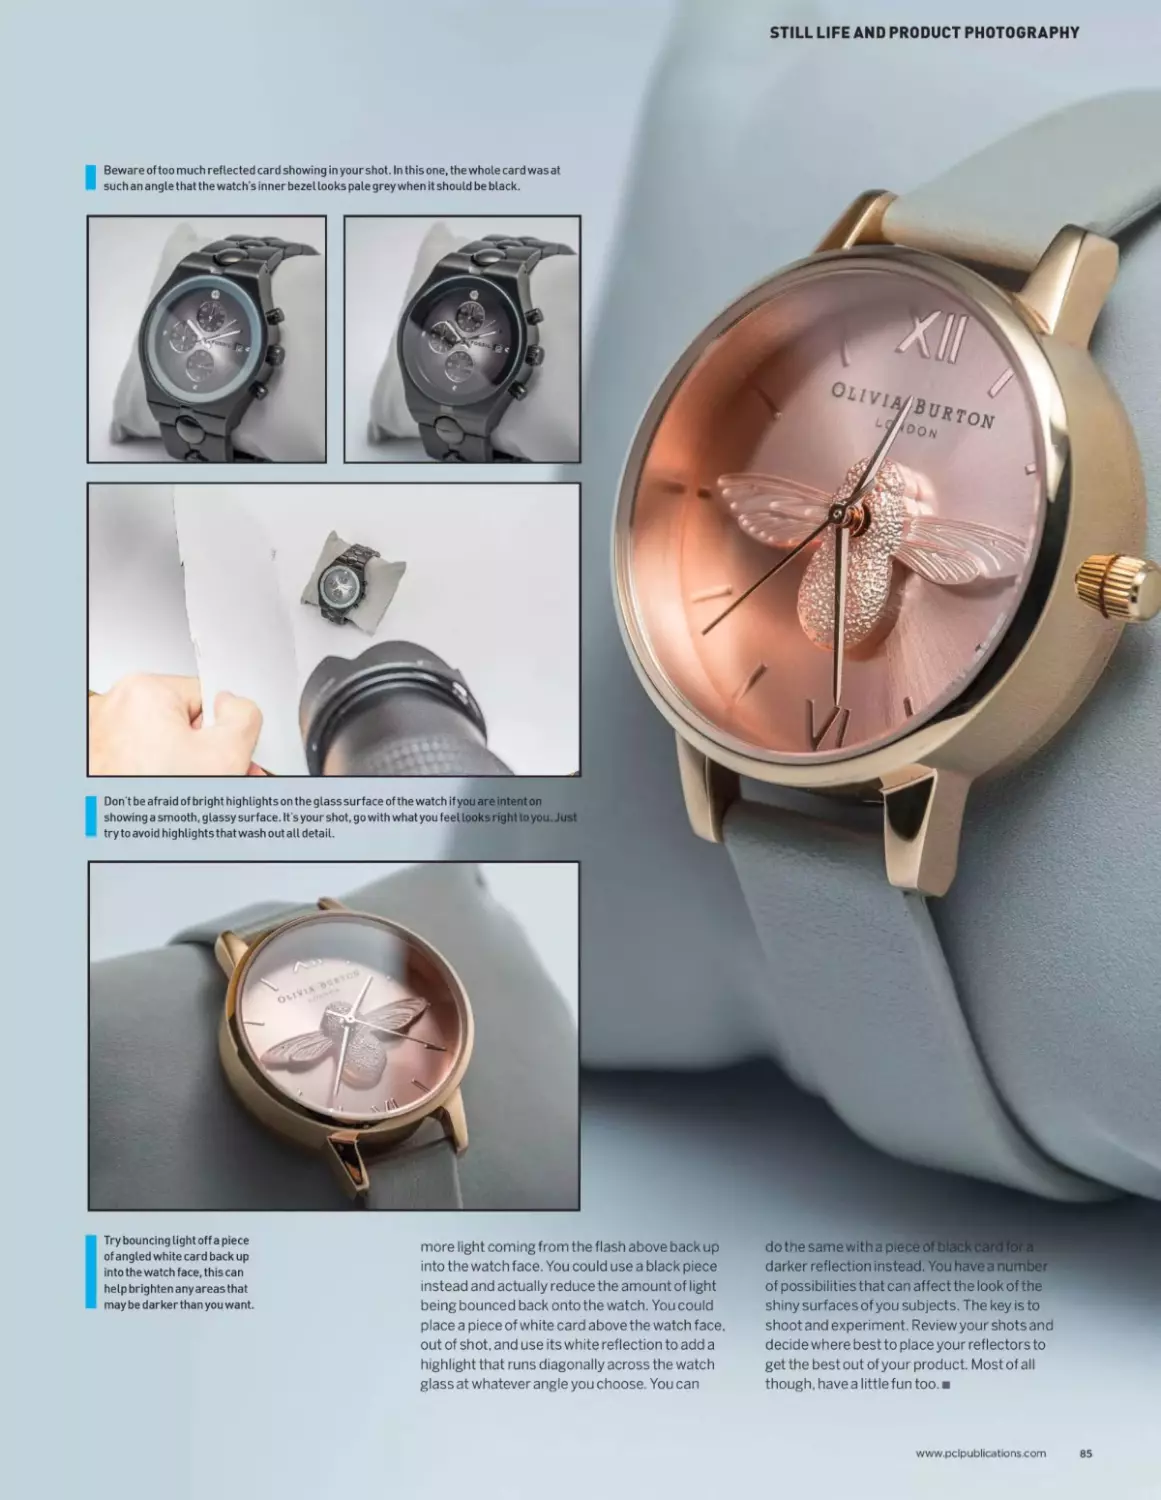
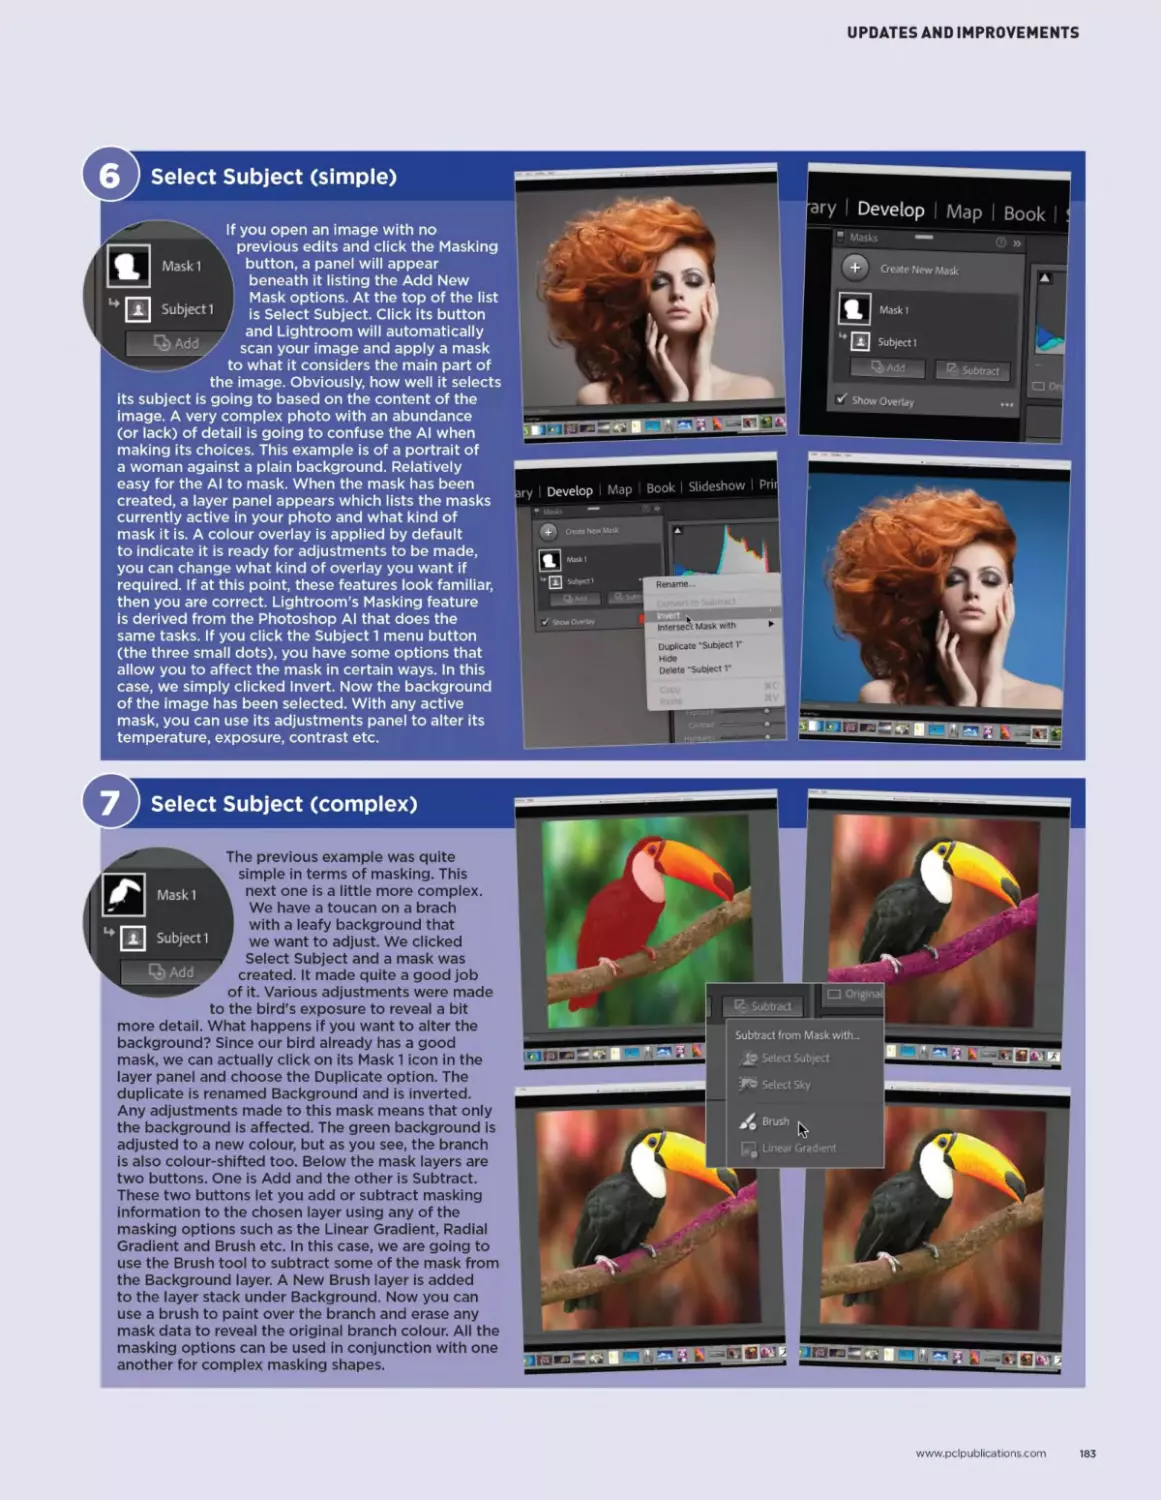
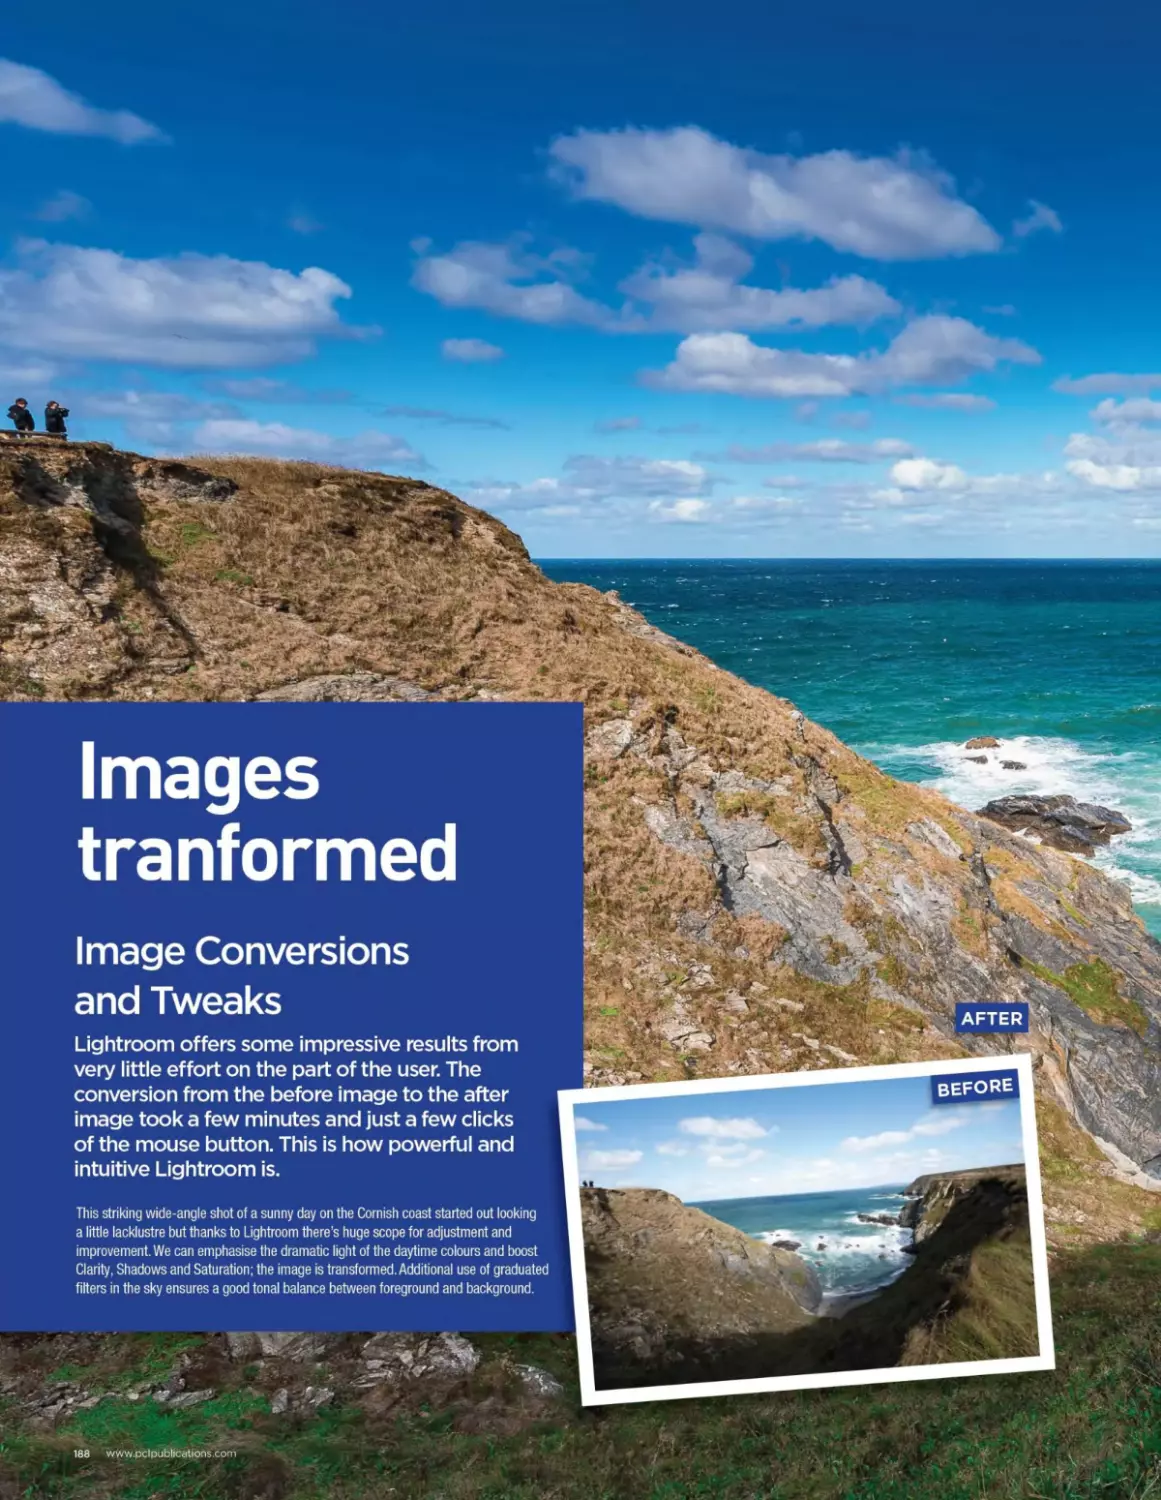
188 How just a few subtle adjustments transform an image
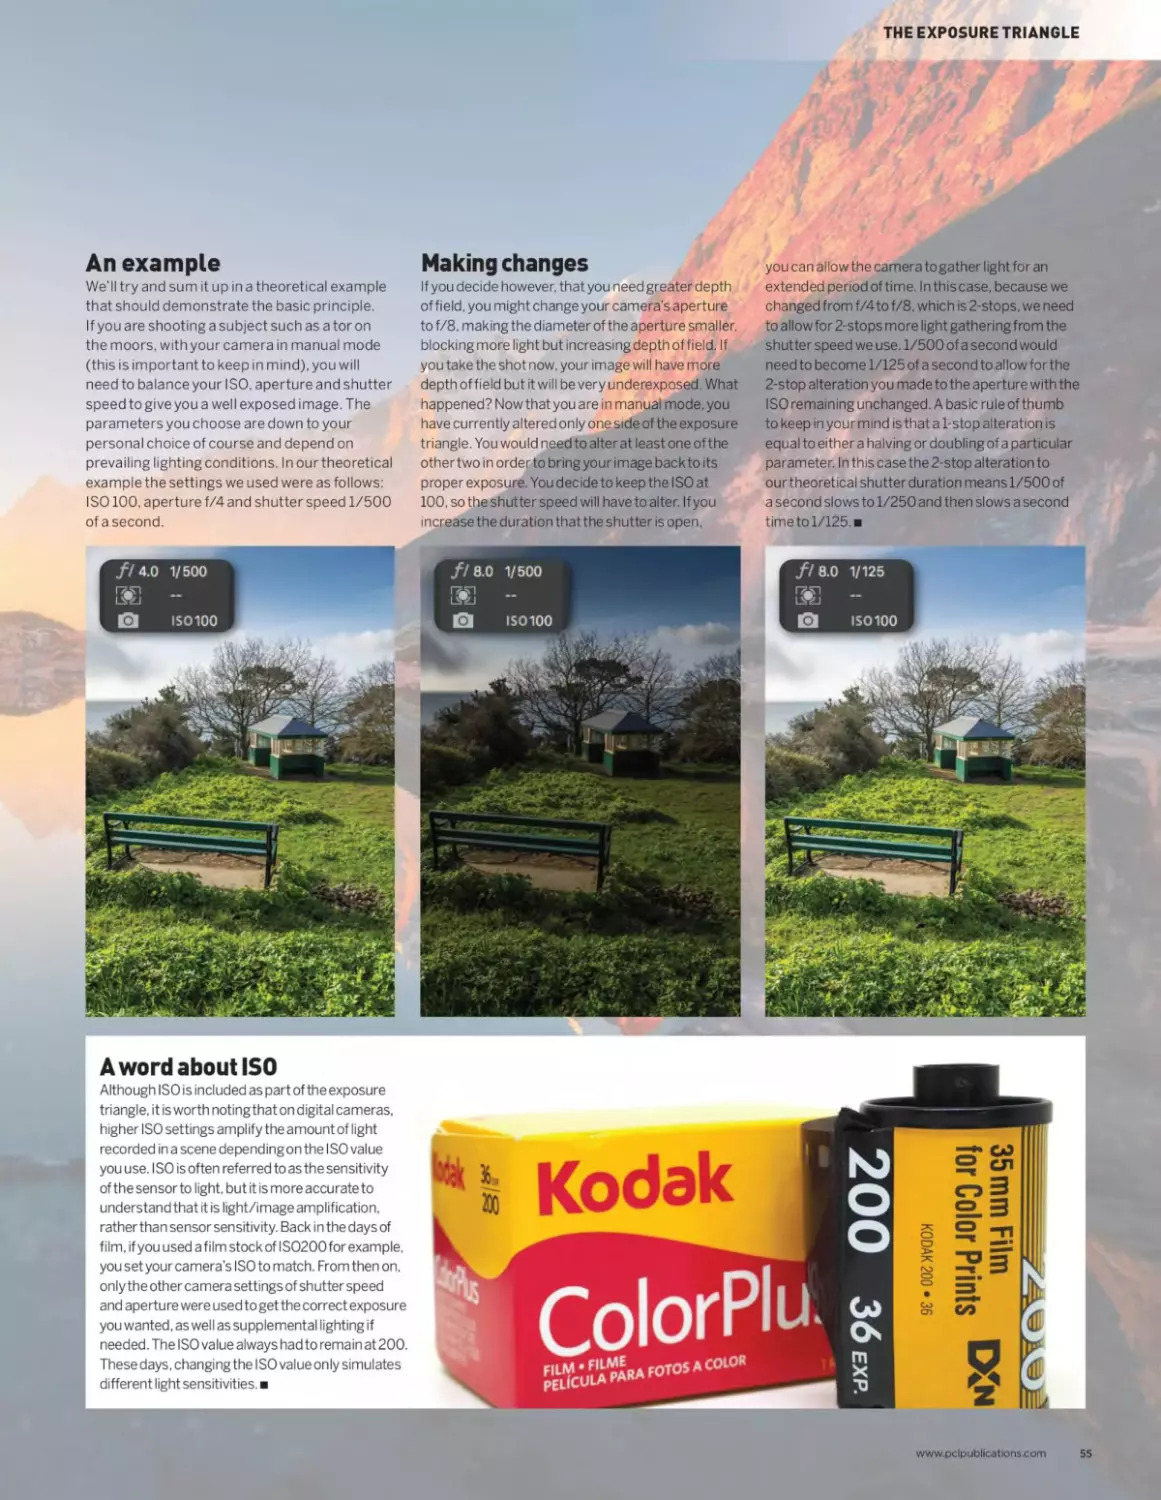
Lightroom Classic
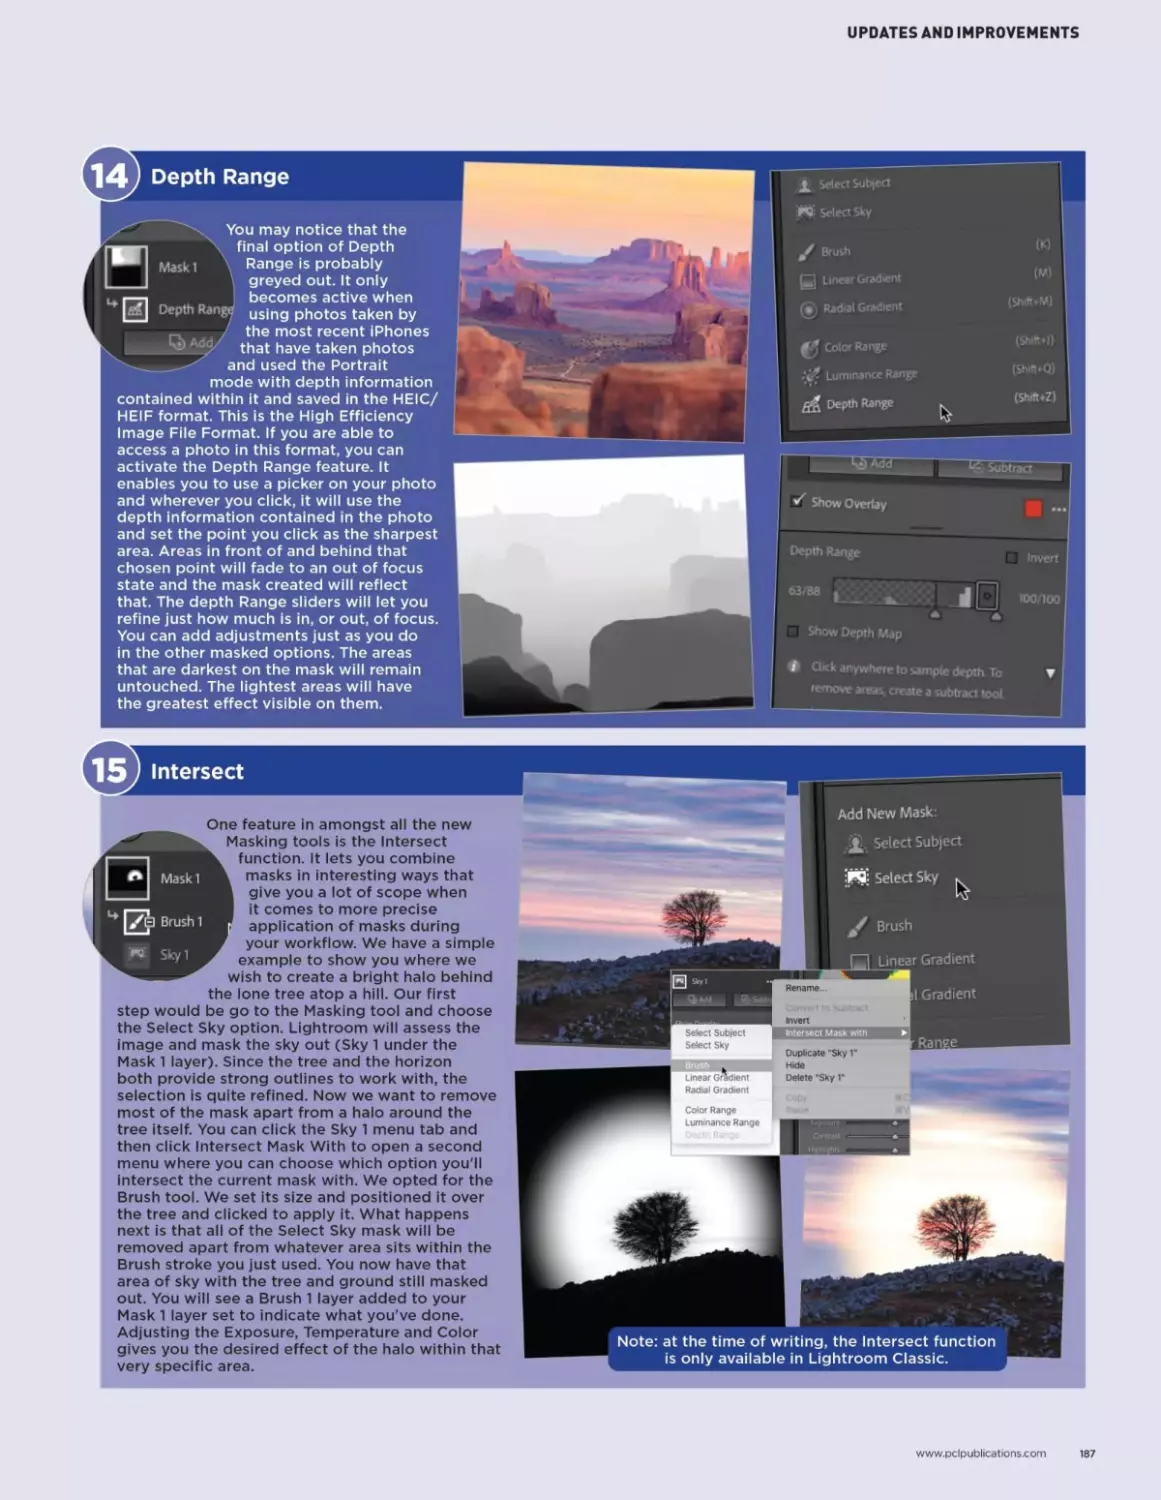
178 Lightroomunderwentabigupdate,
so let’s start with what’s new in the most recent
version and show you the latest new features.
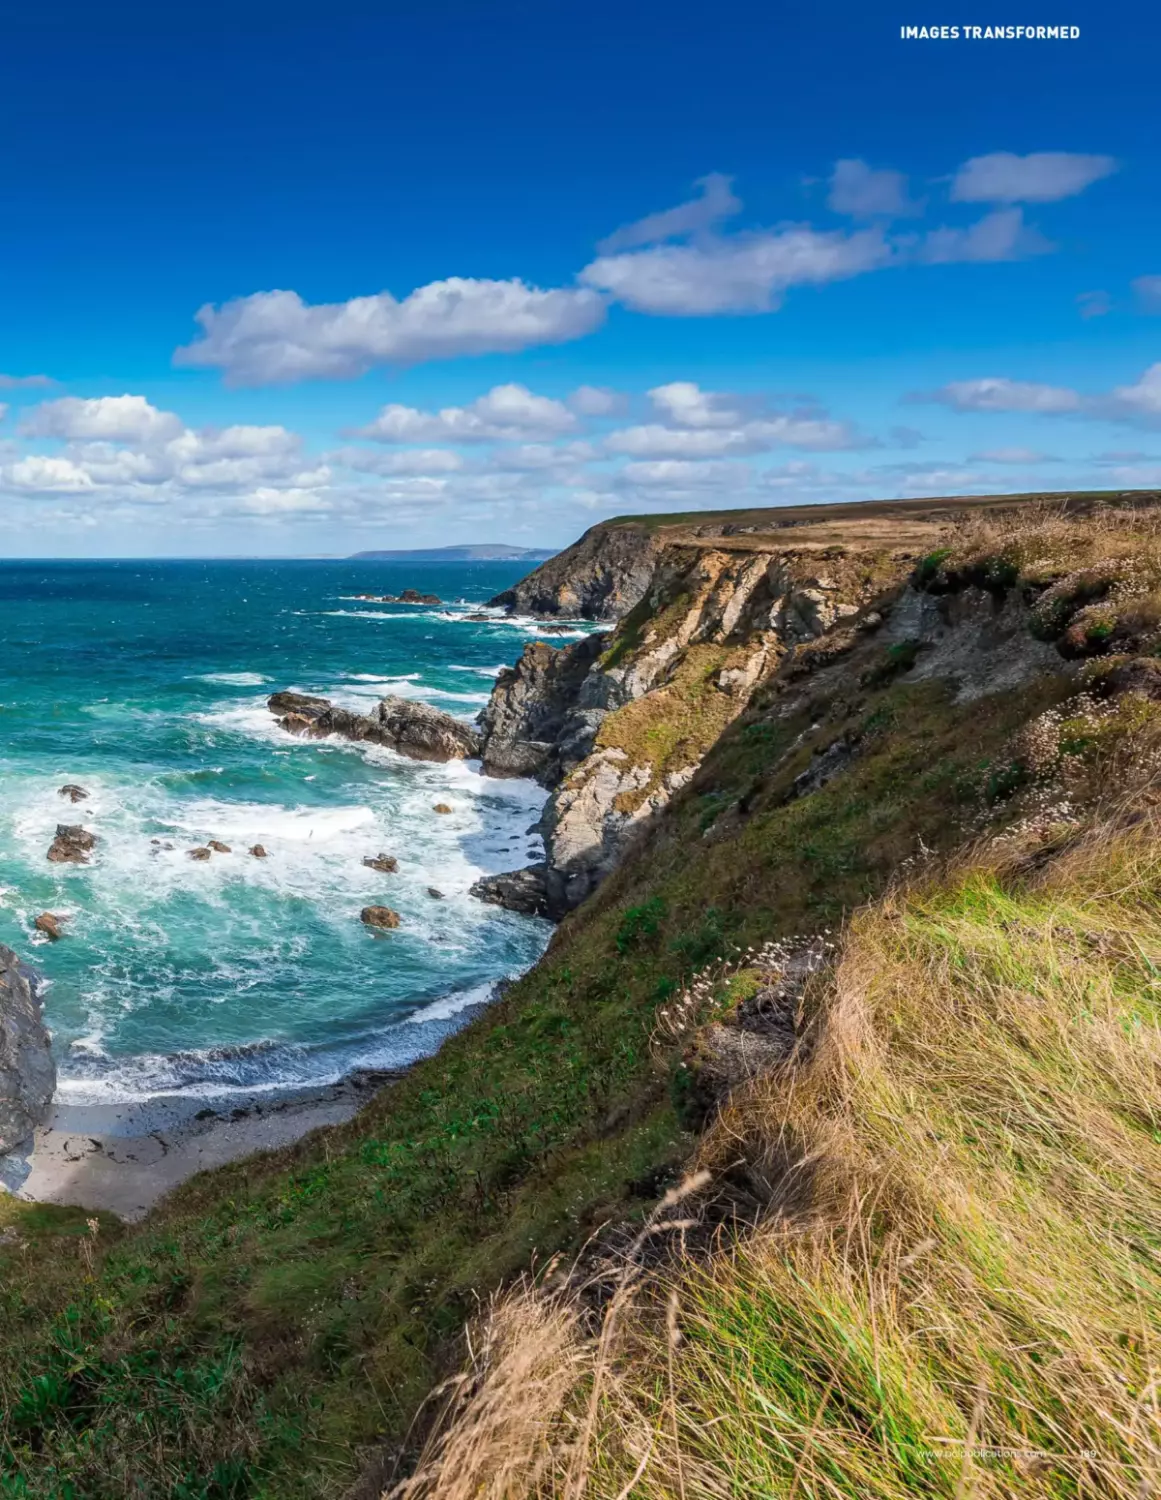
188 Images transformed
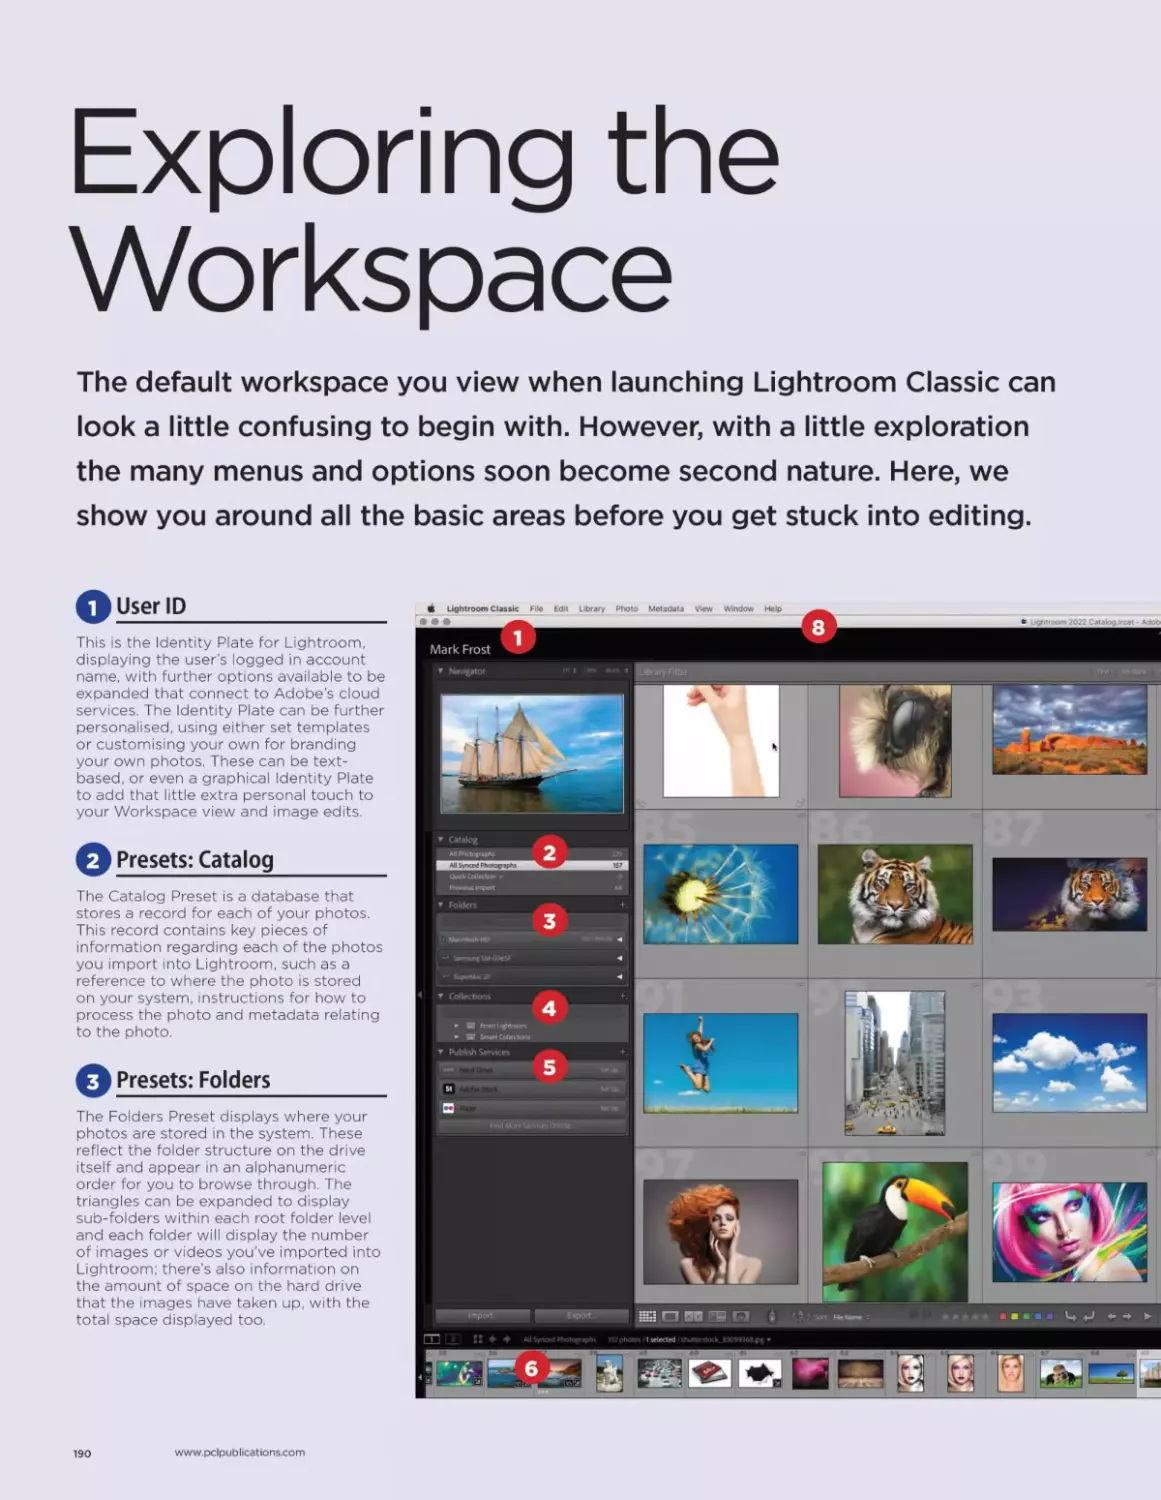
190 Exploring the workspace
www.pclpublications.com 7
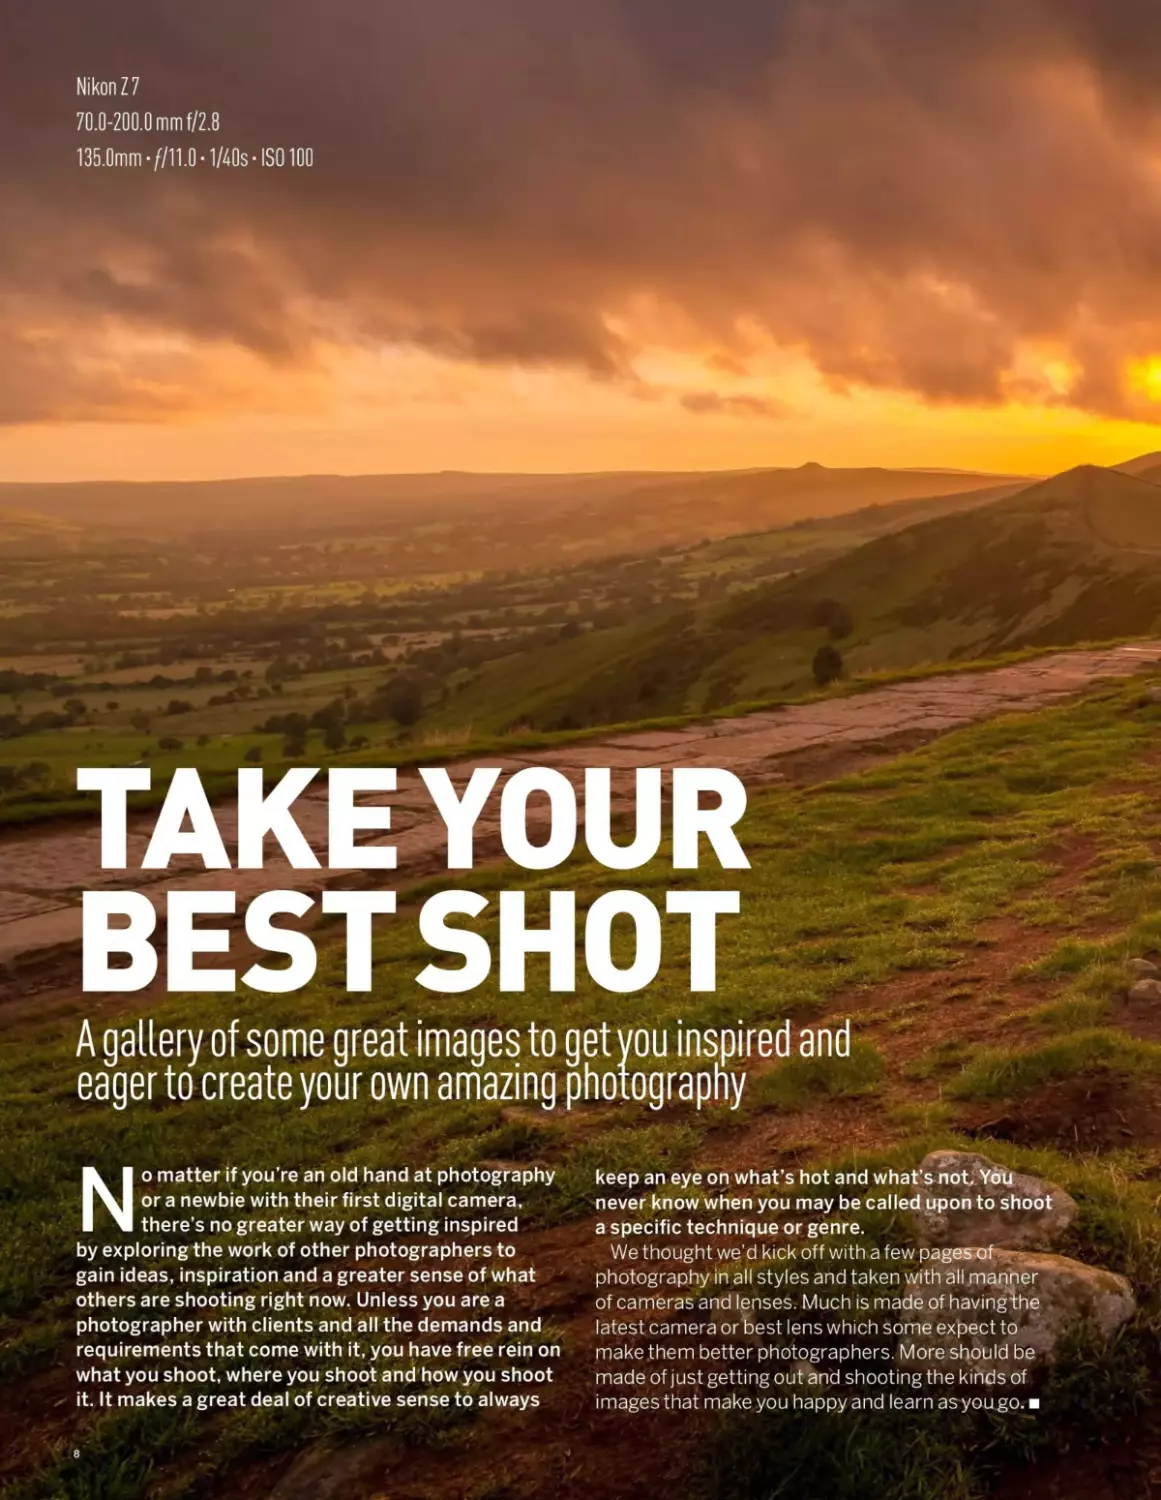
Nikon Z 7
70.0-200.0 mm f/2.8
135.0mm 7/11.0-1/40s-IS0100
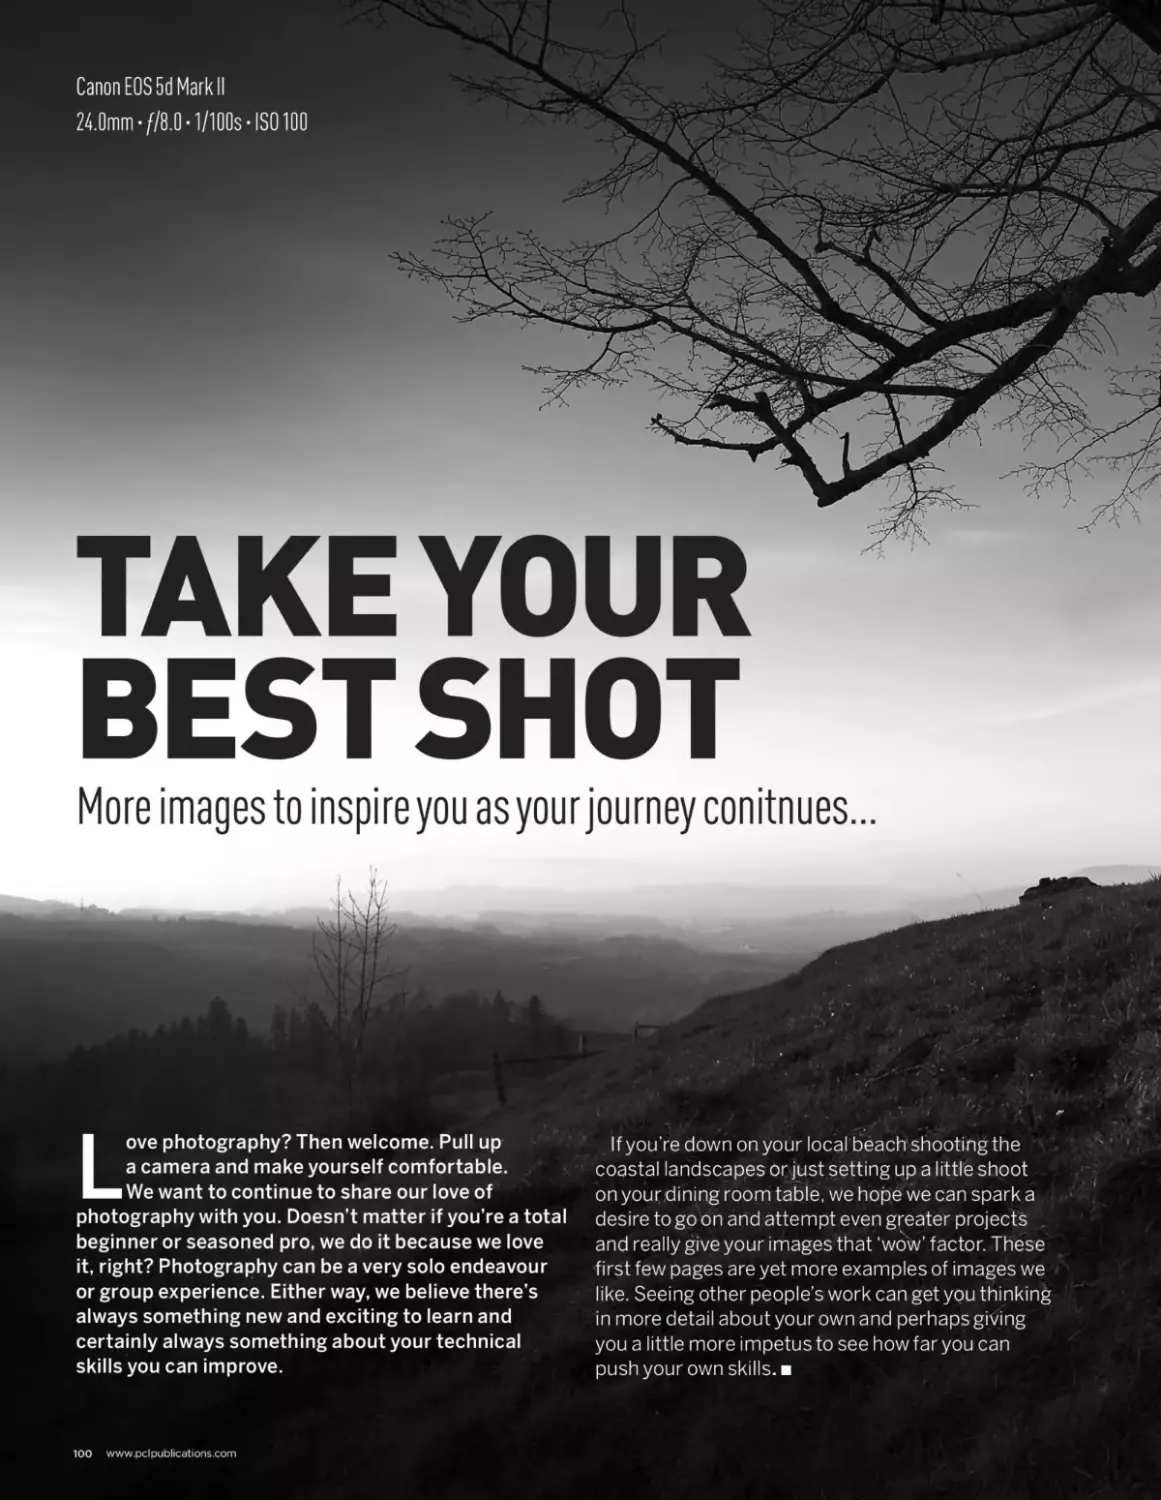
TAKE YOUR
BESTSHOT
A gallery of some great images to get you inspired and
eager to create your own amazing photography
No matter if you’re an old hand at photography
or a newbie with their first digital camera,
there’s no greater way of getting inspired
by exploring the work of other photographers to
gain ideas, inspiration and a greater sense of what
others are shooting right now. Unless you are a
photographer with clients and all the demands and
requirements that come with it, you have free rein on
what you shoot, where you shoot and how you shoot
it. It makes a great deal of creative sense to always
•Г- „
keep an eye on what’s hot and what’s not. You
never know when you may be called upon to shoot
a specific technique or genre.
We thought we’d kick off with a few pages of
photography in all styles and taken with all manner
of cameras and lenses. Much is made of havingVie
latest camera or best lens which some expect to
make them better photographers. More should be
made of just getting out and shooting the kinds of
images that make you happy and learn as you go.
8
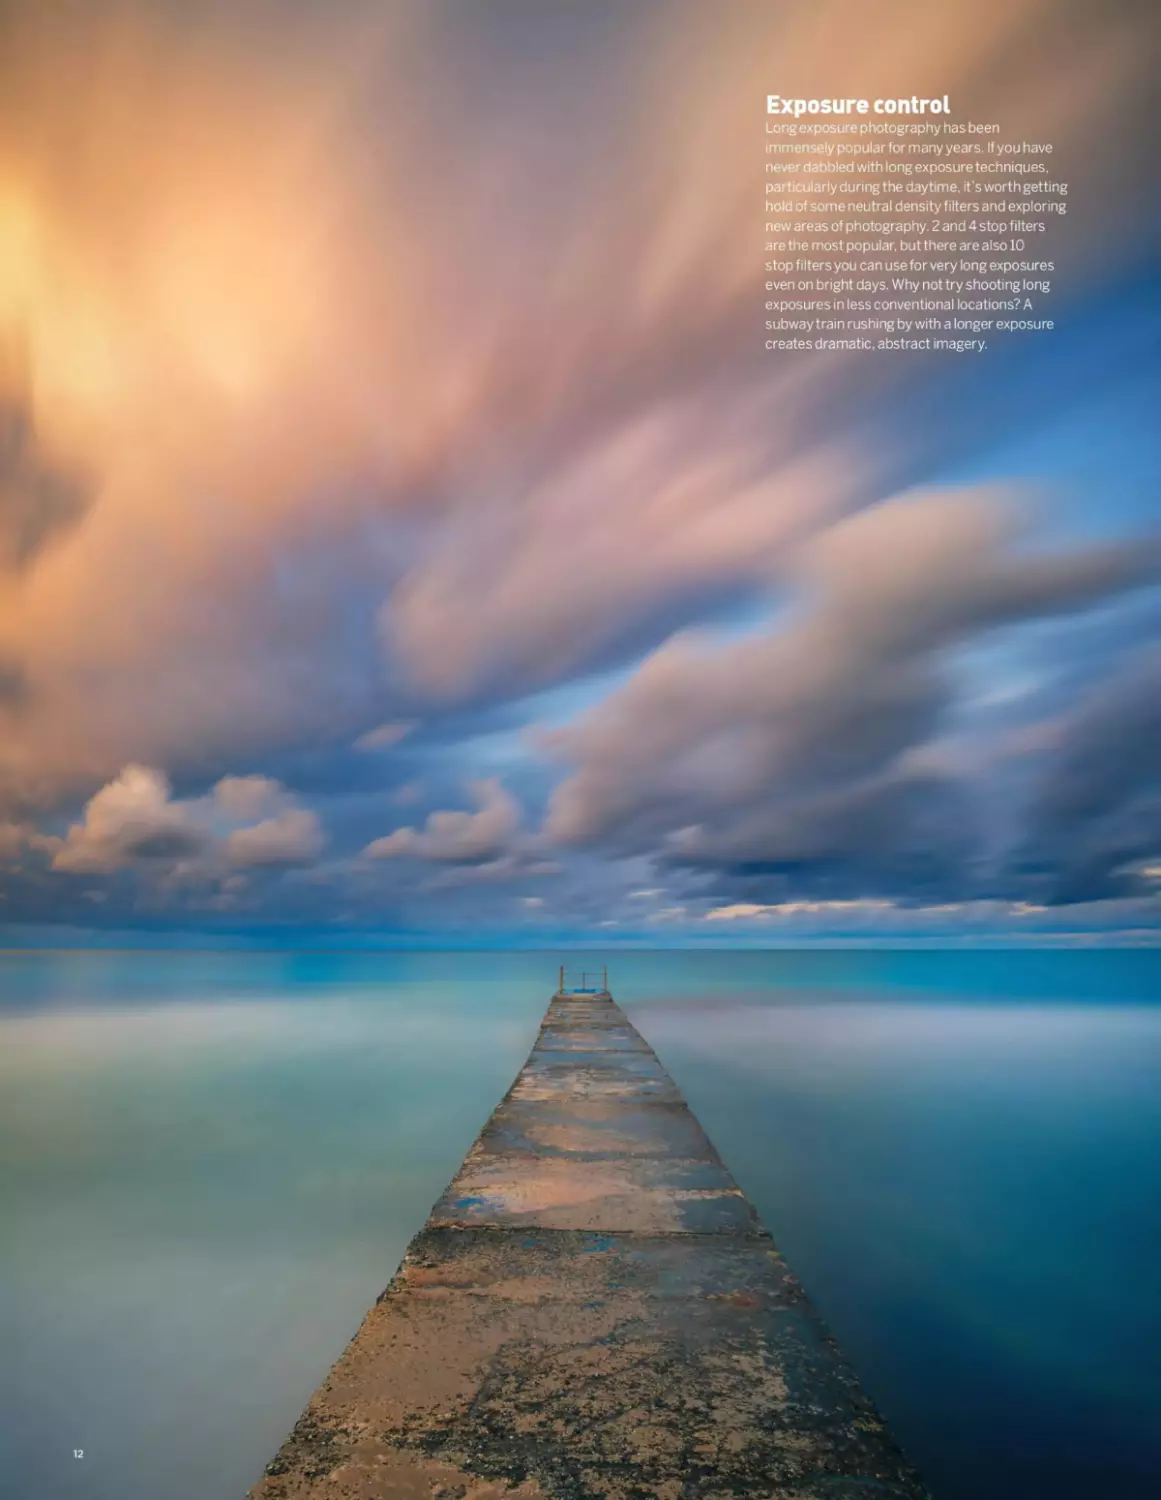
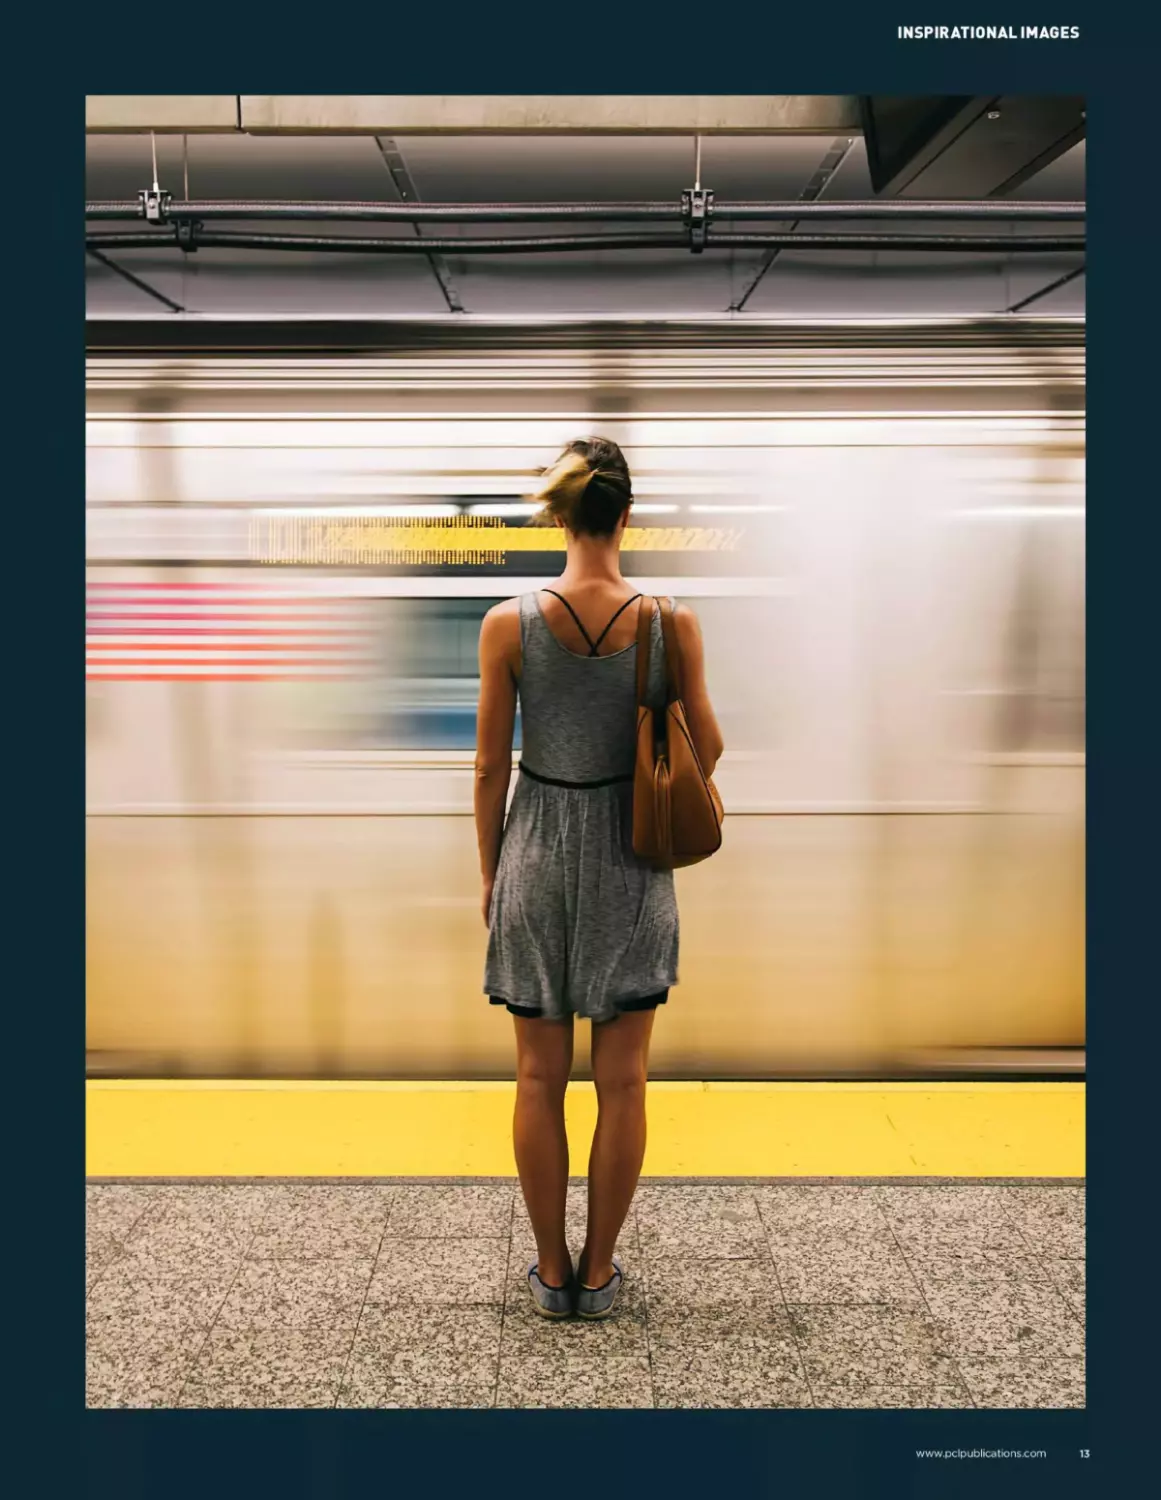
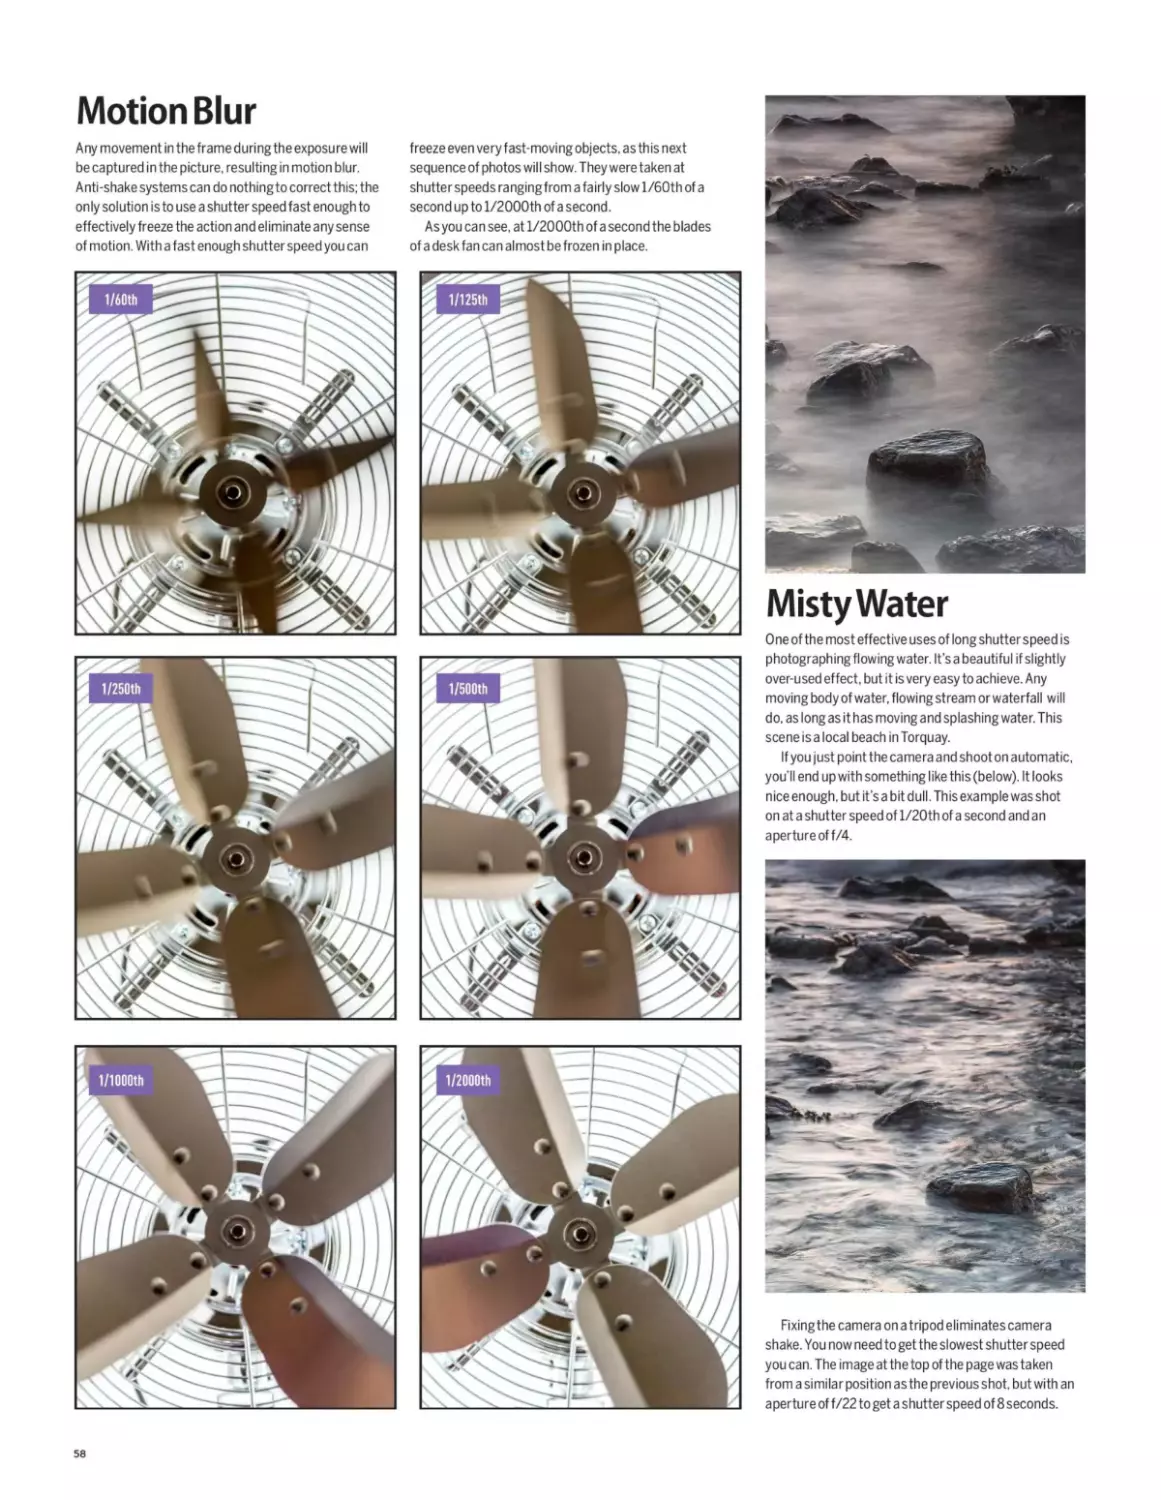
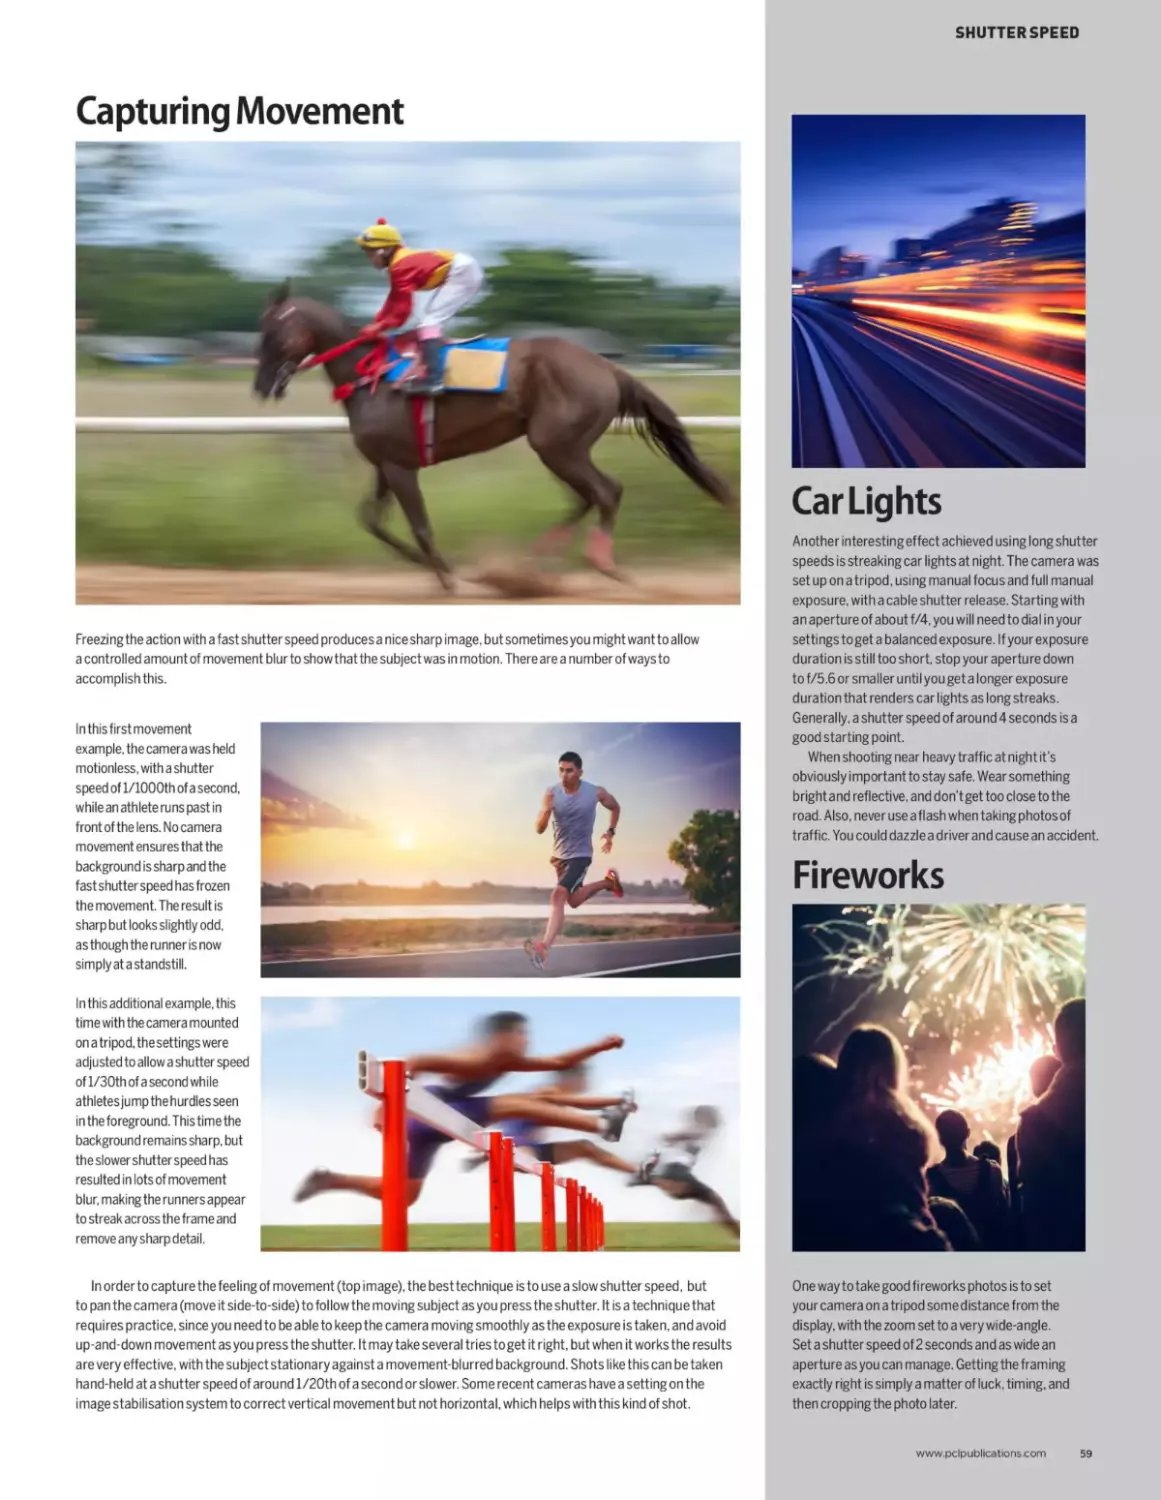
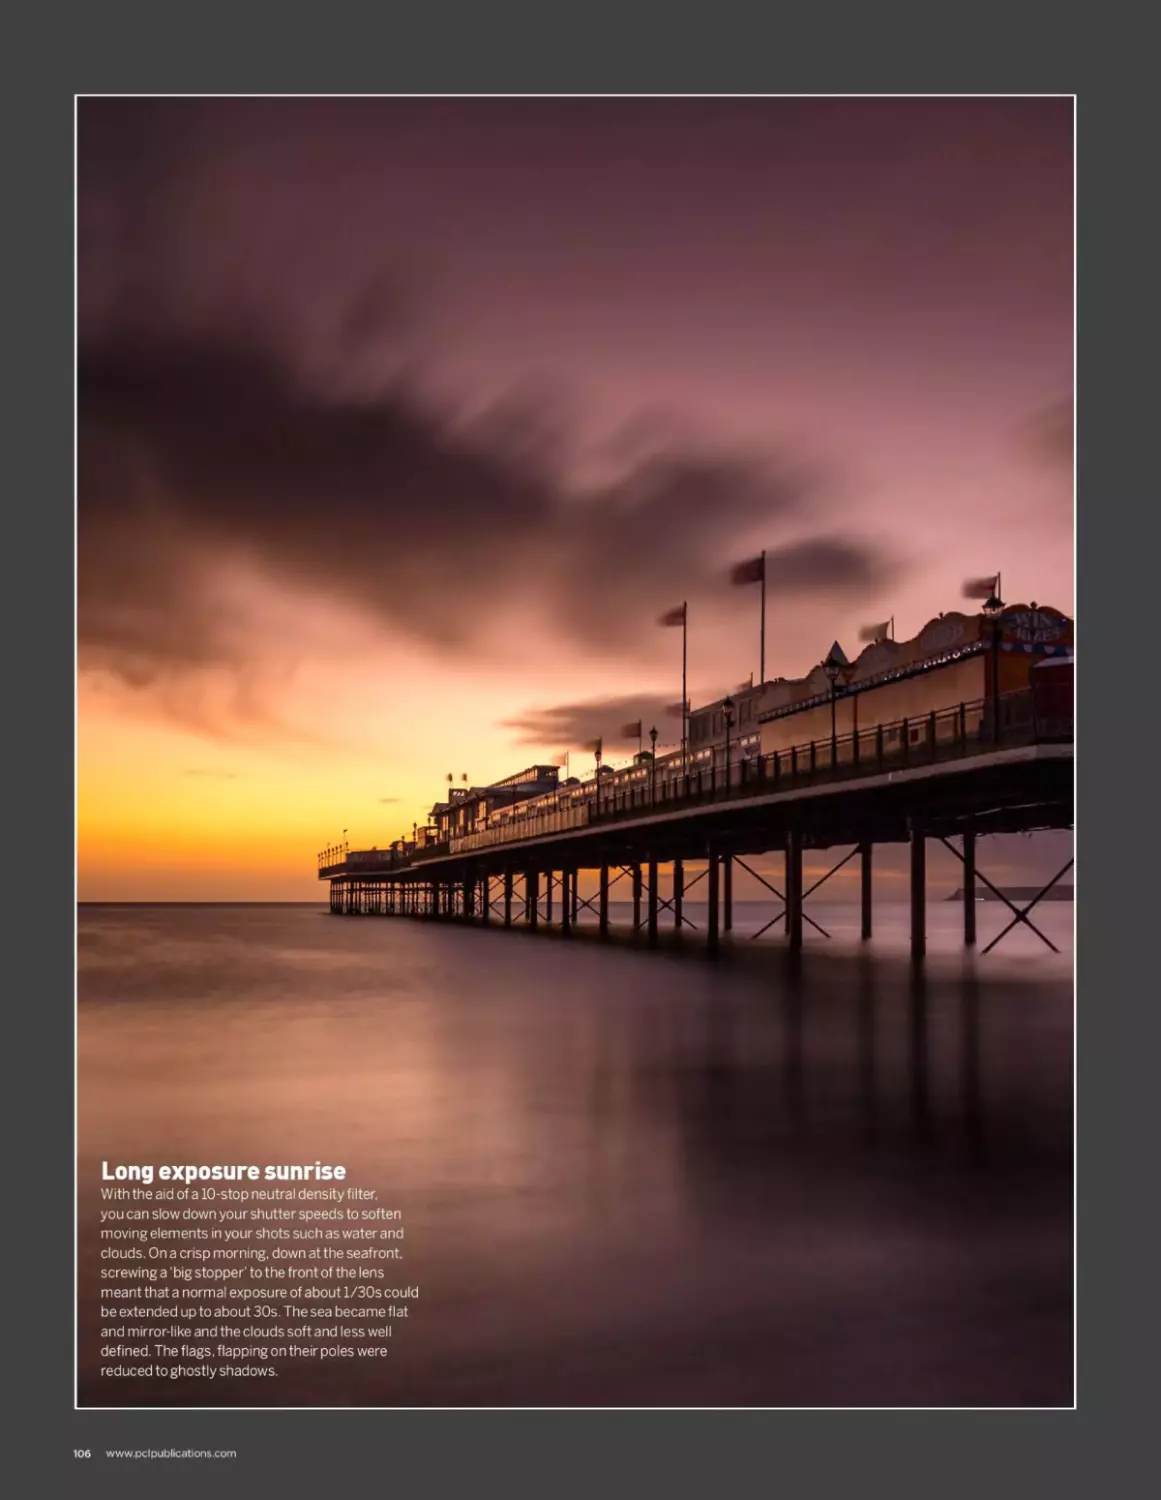
Exposure control
Long exposure photography has been
immensely popular for many years. If you have
never dabbled with long exposure techniques,
particularly during the daytime, it’s worth getting
hold of some neutral density filters and exploring
new areas of photography. 2 and 4 stop filters
are the most popular, but there are also 10
stop filters you can use for very long exposures
even on bright days. Why not try shooting long
exposures in less conventional locations? A
subway train rushing by with a longer exposure
creates dramatic, abstract imagery.
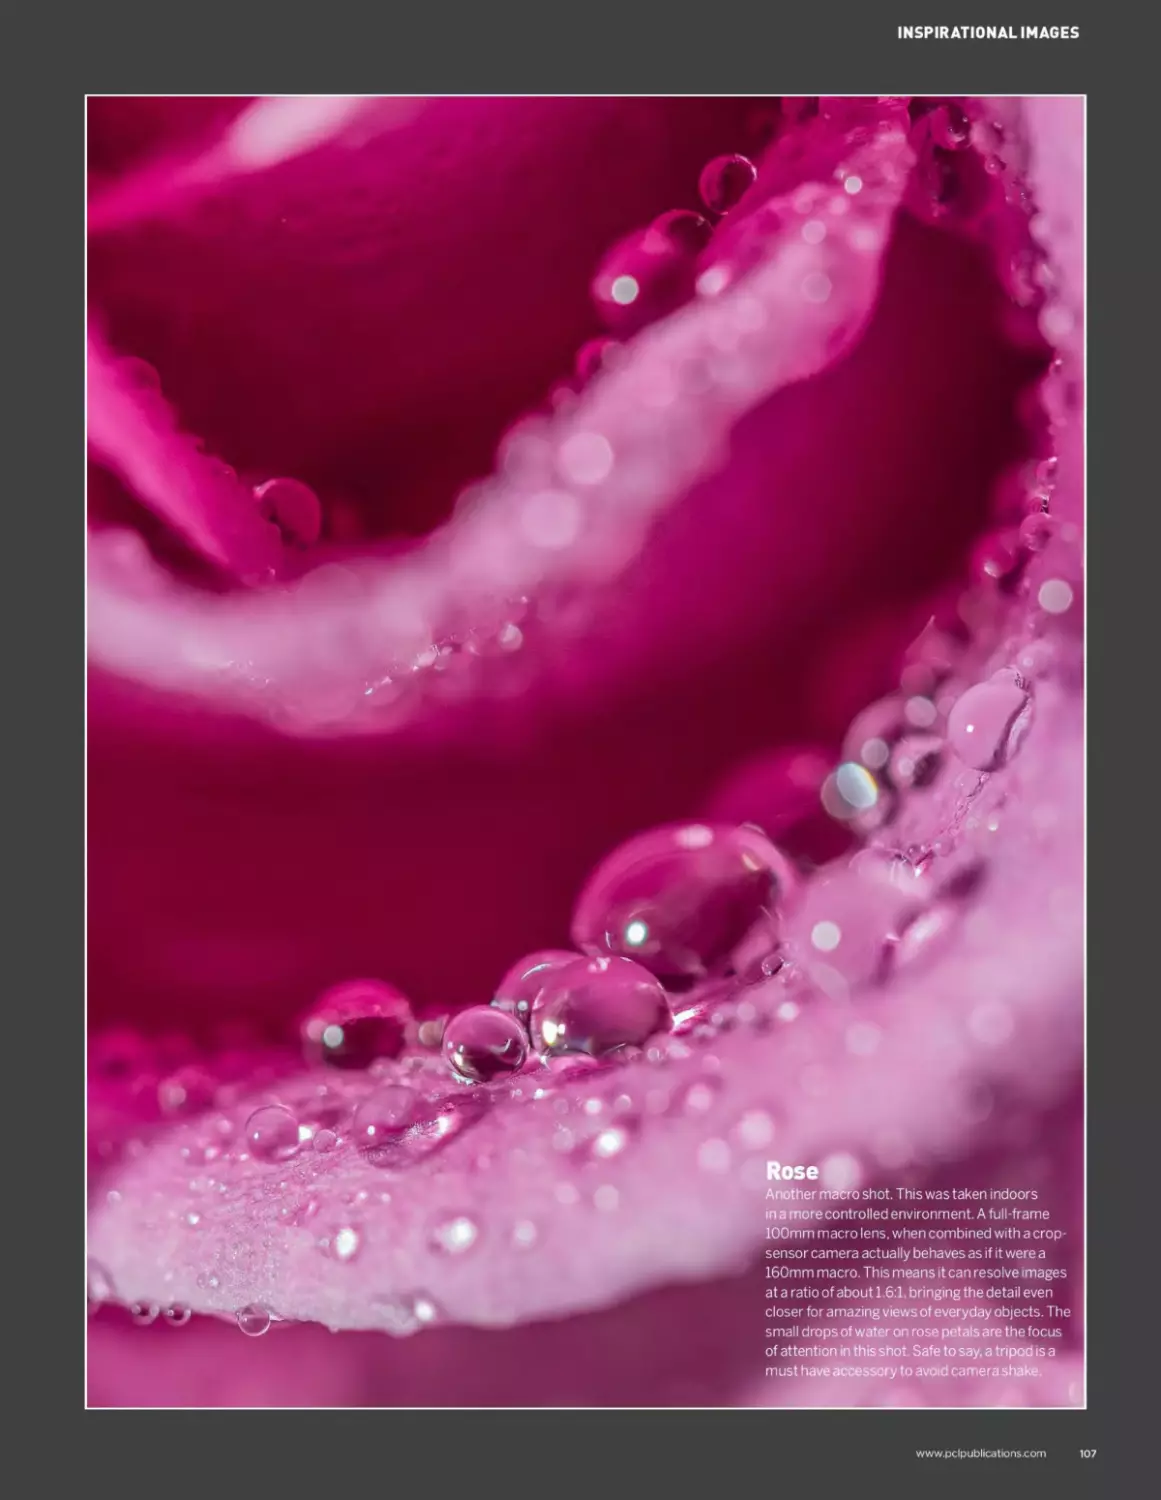
INSPIRATIONAL IMAGES
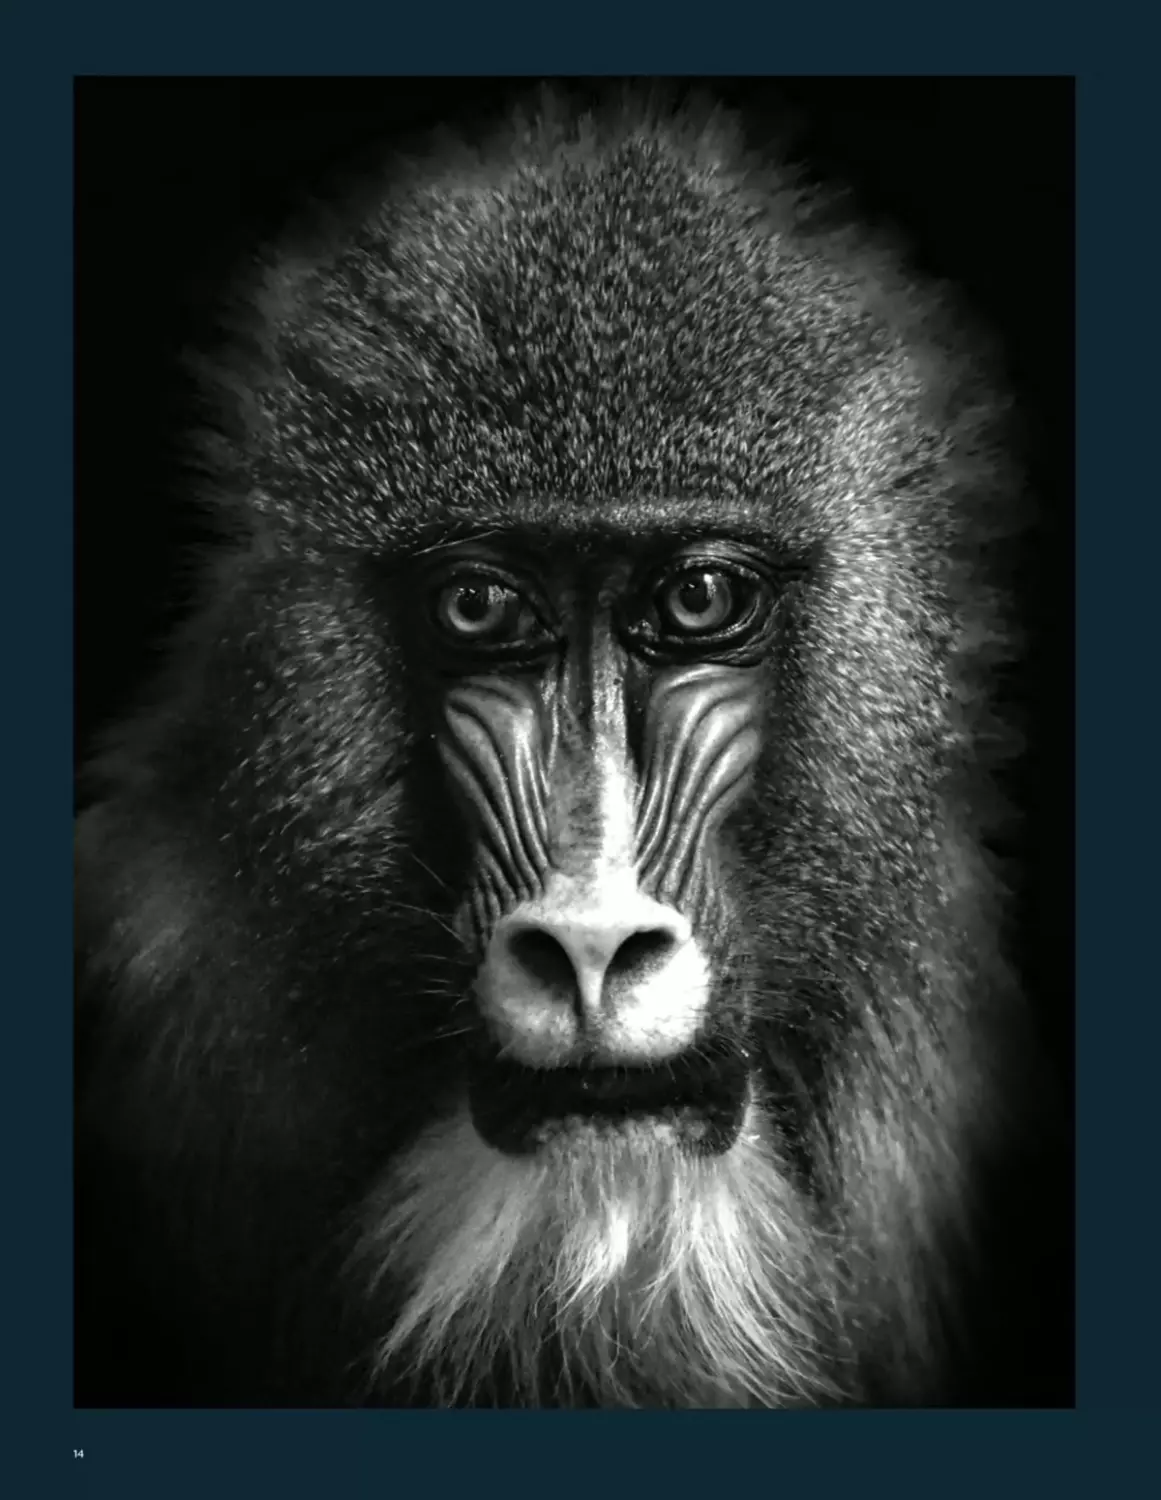
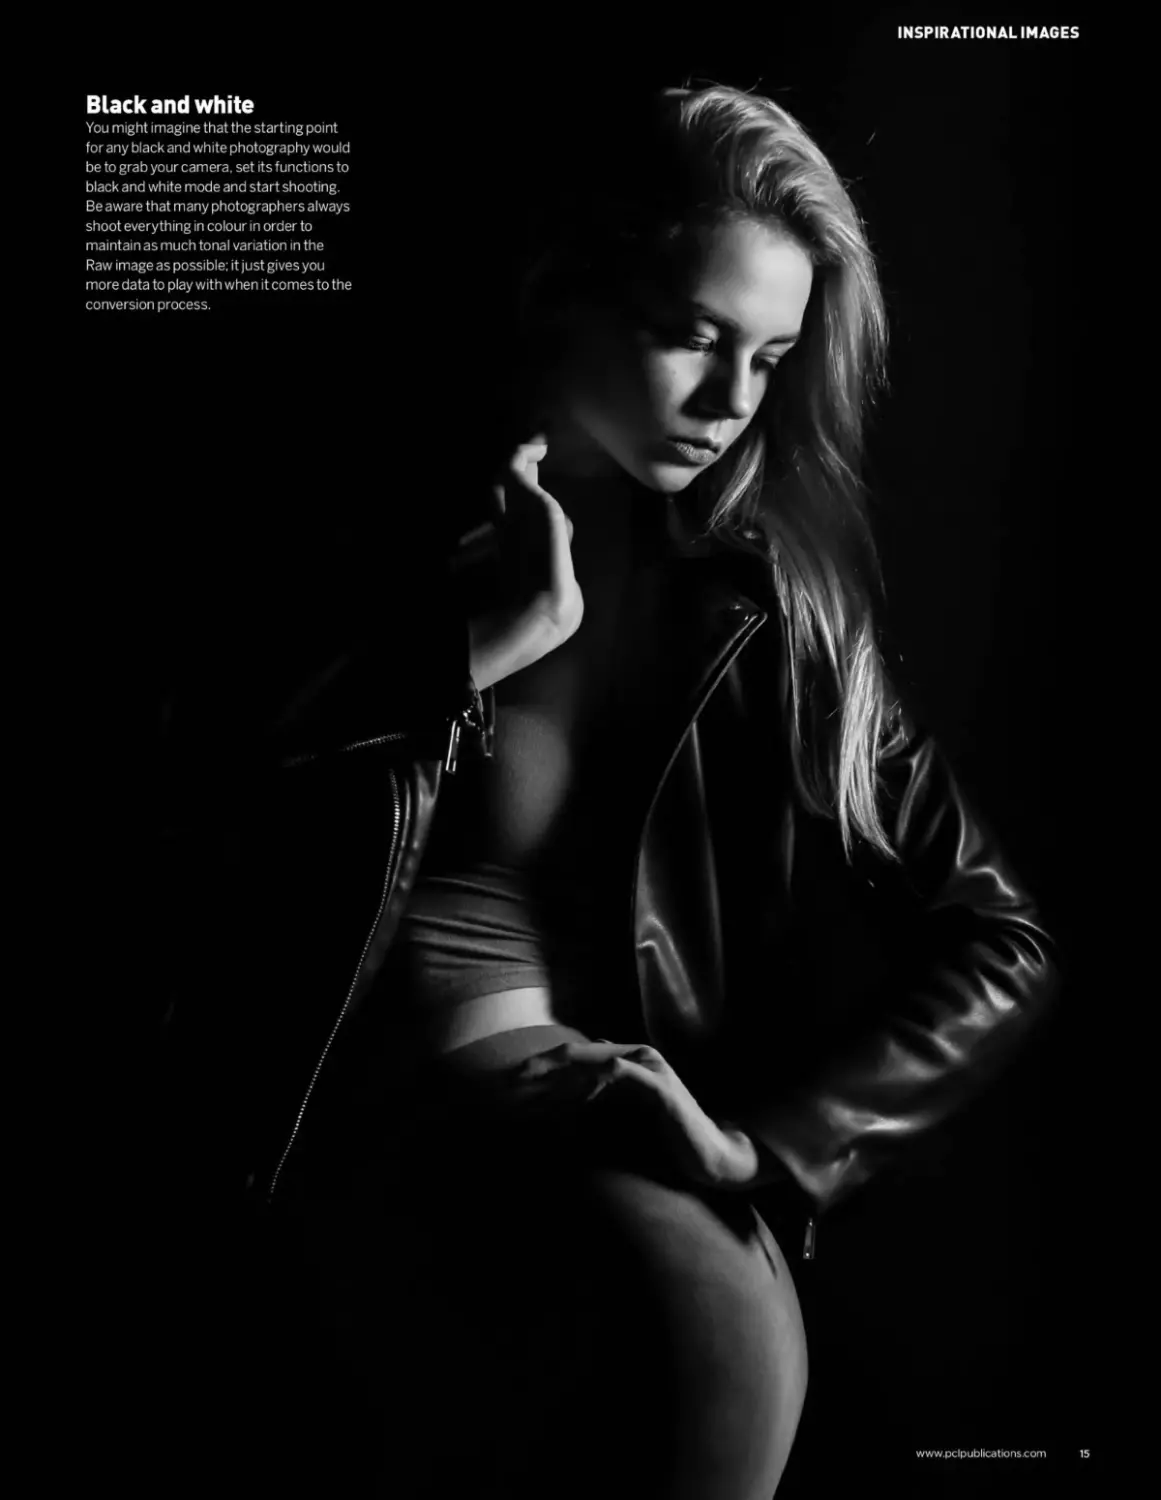
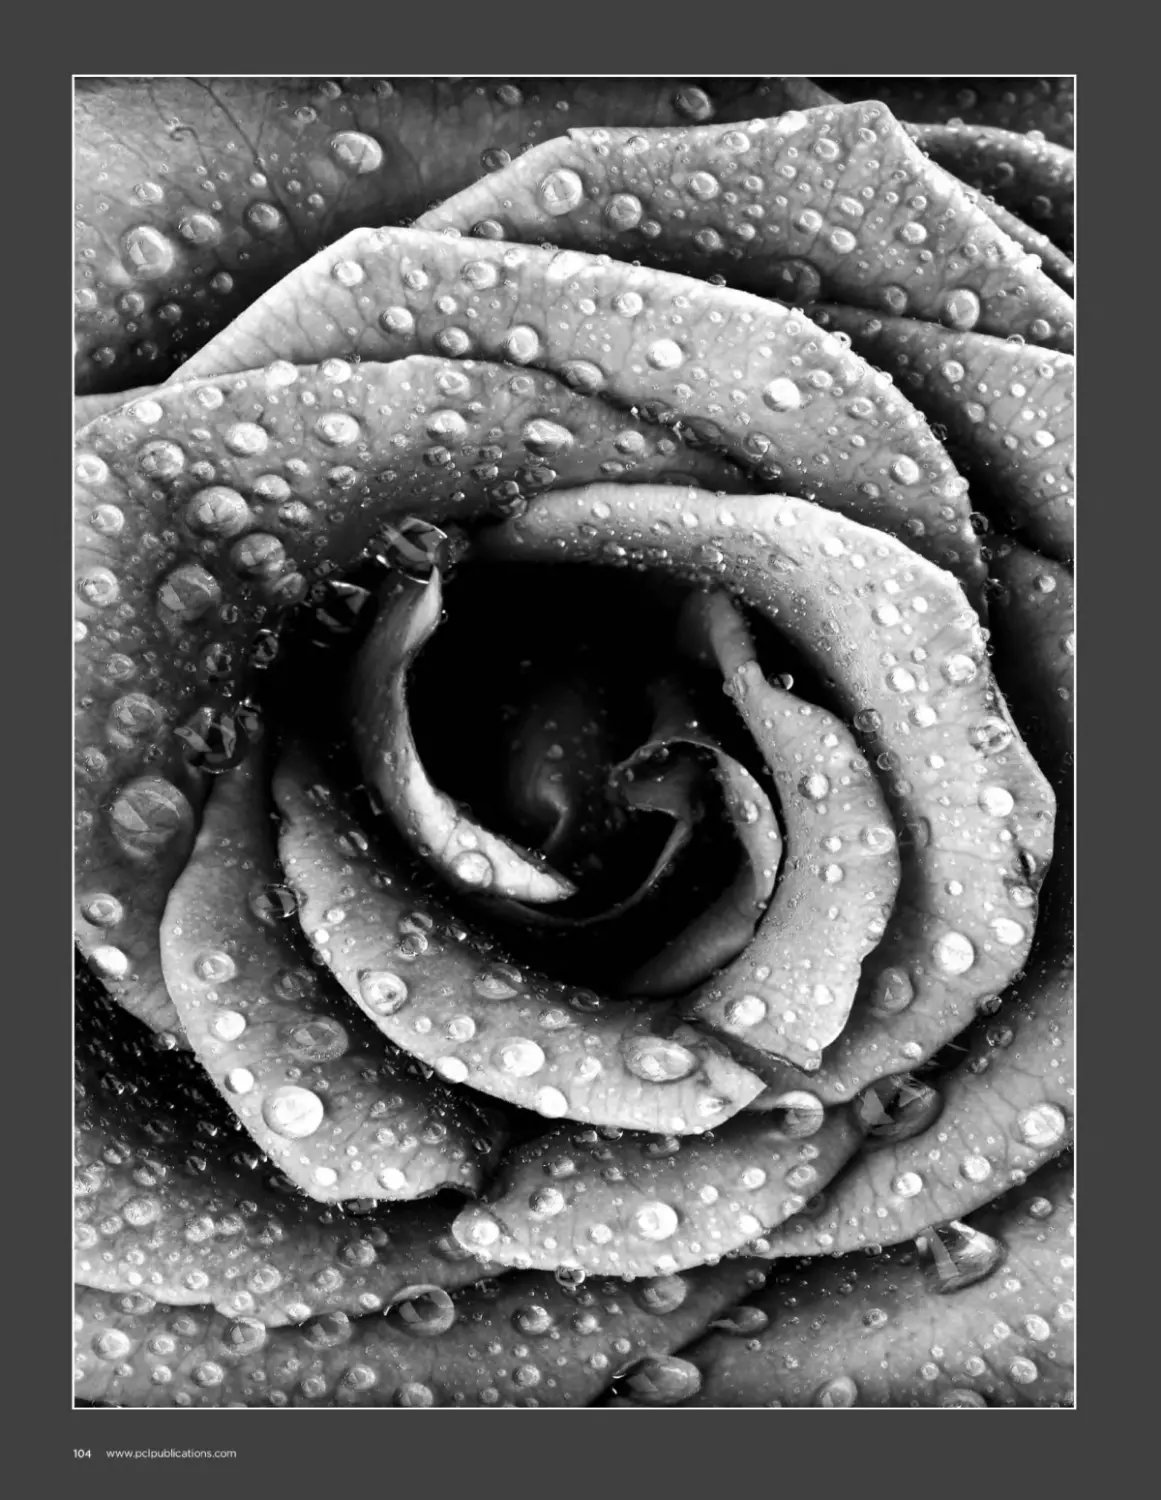
Black and white
You might imagine that the starting point
for any black and white photography would
be to grab your camera, set its functions to
black and white mode and start shooting.
Be aware that many photographers always
shoot everything in colour in order to
maintain as much tonal variation in the
Raw image as possible; it just gives you
more data to play with when it comes to the
conversion process.
www.pclpublications.com
15
THE HANDY
GEARpUIDE
A quick guide to some cool gear, accessories, and gadgets
We can’t speak for other photographers
necessarily, but do you feel like you are always
on the lookout for a new camera, lens, or
device that can enhance your photography? Perhaps
it’s a new filter, backup camera, or a cool gadget that
can make a part of your photography experience a little
more creative, or just a little easier to achieve? Over
these next few pages, we thought we would list off a few
items that, in no particular order, we thought might be
of interest. Some items may be brand new; some may
have been around for a while but are still worth a look
18 Canon EOS 80D
19 Canon Zoemini instant camera
20 Fujifilm XF1Q_______________
21 OlympusToughTG-5
22 PixaproCITI600______________
23 Lowepro Pro Runner X450II
24 Crowd pleasers
none the less. Some might even still be in a crowd funded
development stage, or even just a silly toy that can offer a
pleasing distraction. Whatever the case, whilst we believe
the old adage that a new camera or gadget will not make
you a better photographer, it may just offer you a new
feature that you can use on your next shoot. You never
know, a new gadget or lens type might yield a benefit that
somehow lifts your work and creates a signature look
that you can be identified by. When all is said and done
though, we will forgive you if you just want a new bit of
gear ‘because you do’.
r. I
“You never know, a new gadget or
lens type might yield a benefit that
somehow lifts your work and creates
a signature look that you can be
identified by."
16
THEHANDYGEAR GUIDE
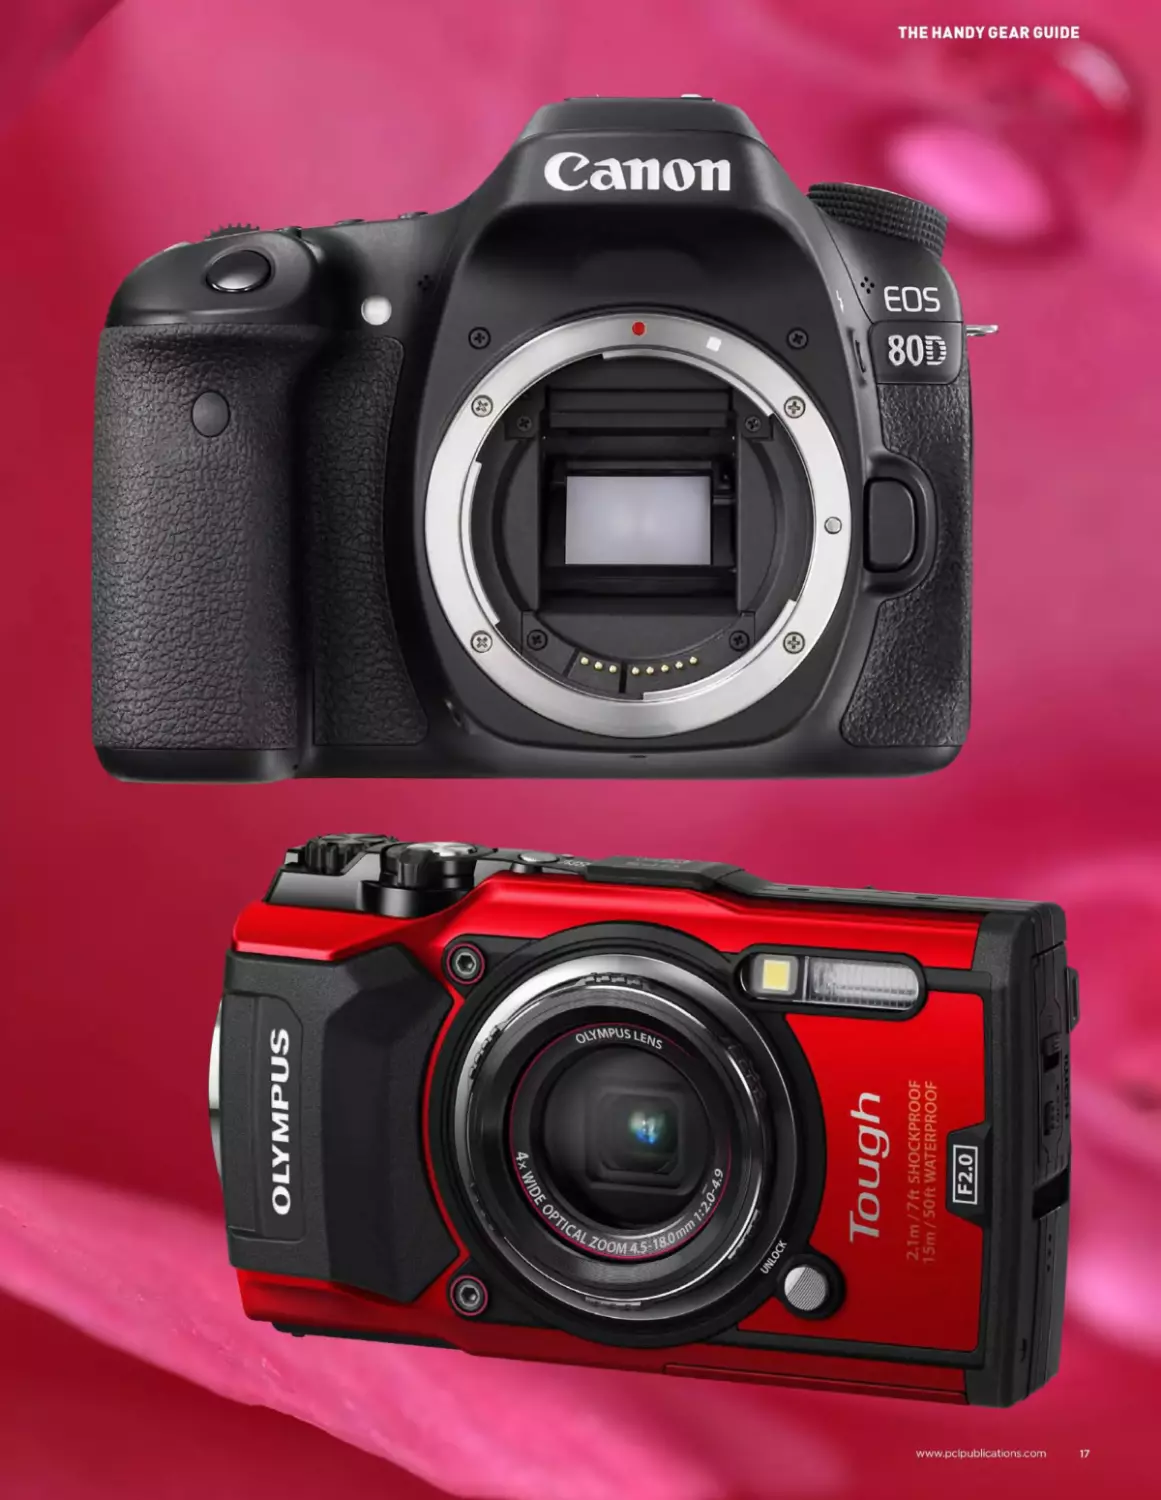
Canon EOS 80D
Affordable power in this great all-rounder
In today’s fast-moving world of tech, a digital camera more than a
couple of years old, is often discounted as being out of date and not
worthy of people’s time and hard-earned cash. There’s no doubt
that can be true in some instances, but in the case of the three year old
canon 80D, we think not. The Canon 80D isa 24.2MP APS-C camera
that replaced the much older 70D. Aimed squarely at enthusiast
photographers, the 80D is simple enough for new users, but offers
enough advanced features to grow with you as you become more
experienced and creative. The 80D represents a very viable option for
those new to photography altogether, or those looking to upgrade from
an entry-level model whilst keeping an eye on their budget. Looking at
canon’s line-up, this model sits somewhere in the range between the
750D/760Dandthe7D Mark II. It is testament to the longevity of the
80D that it is still a sought after quality enthusiasts model.
The beauty of a camera of this nature is that it is able to fulfil the needs
of the enthusiast photographer, who may actually be harder to please
than full-on professionals, since they need to be able to shoot a little bit
of everything, in various conditions, with just the one camera. They also
want access to many of the camera’s top-level controls and features.
Having said that, it's not without its problems. One of the key features we’ve
come to expect in our digital devices of late is the ability to shoot 4K video.
Unfortunately, the 80D only offers Full HD, but it can at least shoot at 5Ofps
for x2 slow motion effects.
The 80D does boast improved dynamic range over its predecessor, but
Specification at a glance
Sensor APS-C
Resolution 24.2MP
Mount Canon EF-S
Continuous shooting 7fps
Image processor Digic6
Video FullHD30p
Display 3.0 inch vari-angle 1,040,000 dots
ISO range 100-16,000
MaxISO 25,600
Viewfinder Optical 100% coverage
AF points 45 cross-type
Memory SD/SDHC/SDXC (UHS-1)
Weight 730g
Dimensions 139 x105 x79mm
Connectivity Wi-Fi/NFC
Battery life 960 shots
Price £879/$1199/€939
it cannot quite compete with the competition. That said, it still produces
great quality, detailed images for an APS-C sensor, and with its new
metering sensor, updated autofocus system, and well-design ergonomics,
it remains a competitive choice for the budding enthusiast with a taste for
photography and videography.
18
CANON EOS 80D / CANON ZOEMINI INSTANT CAMERAS
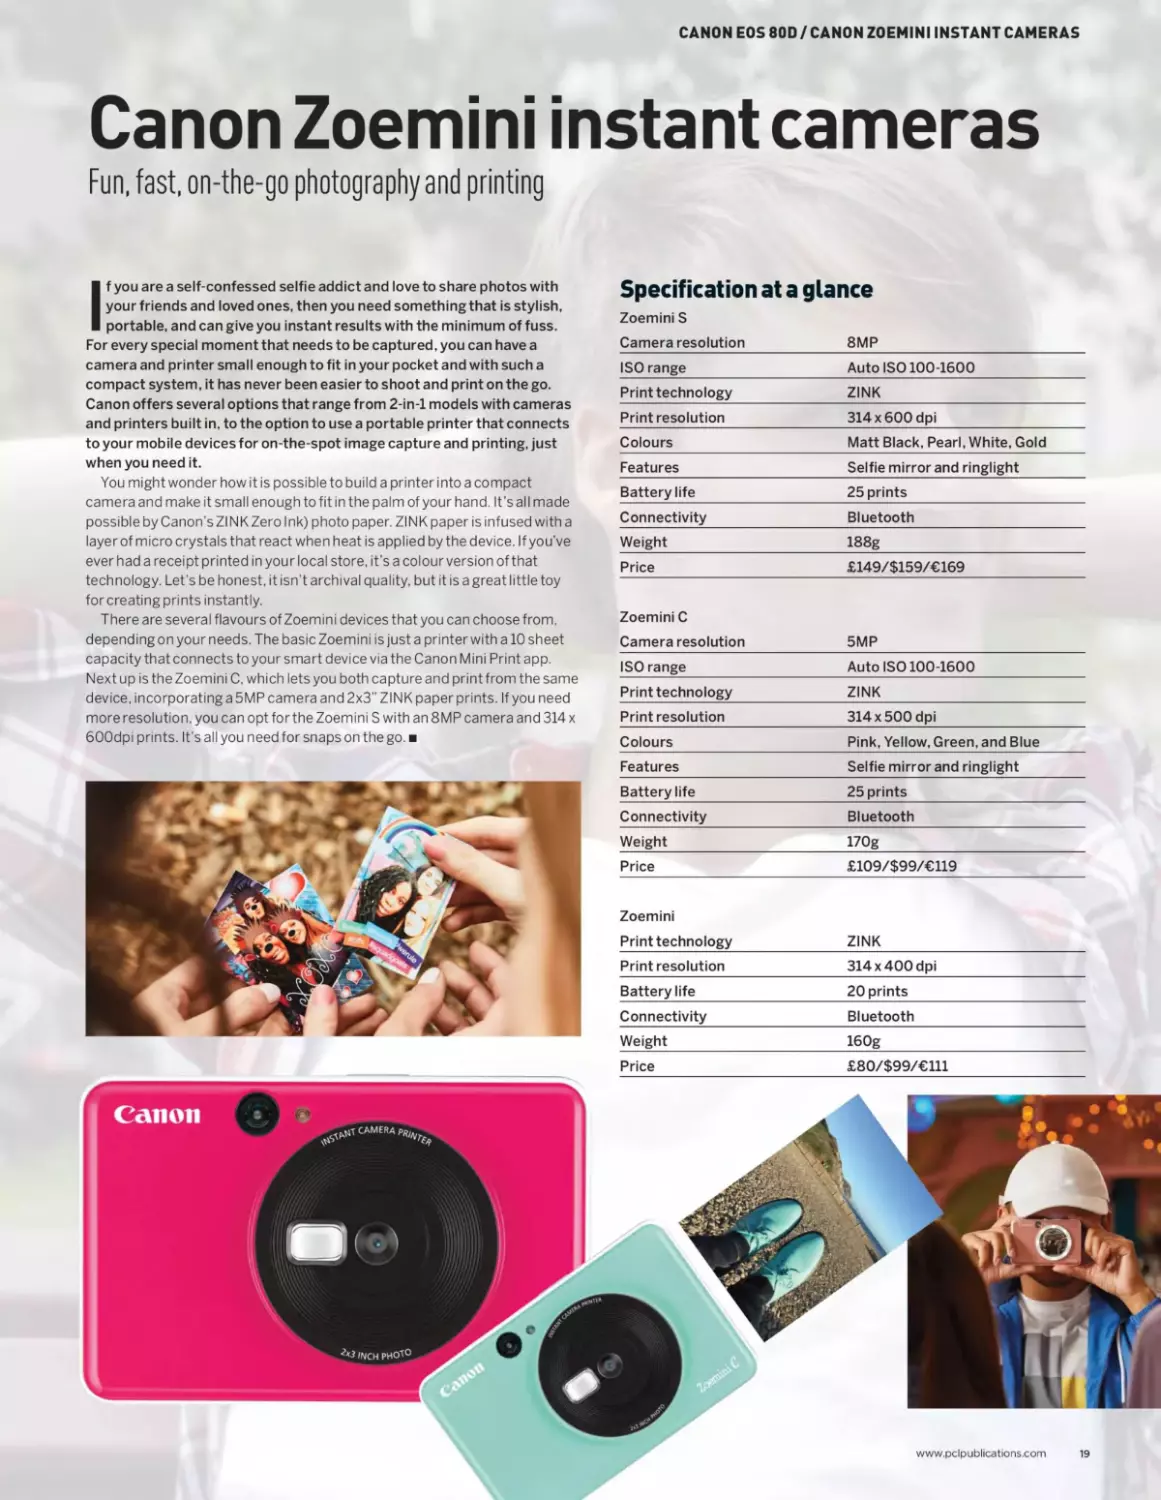
Canon Zoemini instant cameras
Fun, fast, on-the-go photography and printing
(f you are a self-confessed selfie addict and love to share photos with
your friends and loved ones, then you need something that is stylish,
portable, and can give you instant results with the minimum of fuss.
For every special moment that needs to be captured, you can have a
camera and printer small enough to fit in your pocket and with such a
compact system, it has never been easier to shoot and print on the go.
Canon offers several options that range from 2-in-l models with cameras
and printers built in, to the option to use a portable printer that connects
to your mobile devices for on-the-spot image capture and printing, just
when you need it.
You might wonder how it is possible to build a printer into a compact
camera and make it small enough to fit in the palm of your hand. It’s all made
possible by Canon’s Zl NK Zero Ink) photo paper. ZINK paper is infused with a
layer of micro crystals that react when heat is applied by the device. If you’ve
ever had a receipt printed in your local store, it’s a colour version of that
technology. Let’s be honest, it isn’t archival quality, but it is a great little toy
for creating prints instantly.
There are several flavours of Zoemini devices that you can choose from,
depending on your needs. The basic Zoemini is just a printer with a 10 sheet
capacity that connects to your smart device via the Canon Mini Print app.
Next up is the Zoemini C, which lets you both capture and print from the same
device, incorporating a 5MP camera and 2x3’’ ZINK paper prints. If you need
more resolution, you can opt for the Zoemini S with an 8MP camera and 314 x
600dpi prints. It’s all you need for snaps on the go.
Specification at a glance
Zoemini S
Camera resolution 8MP
ISO range Auto ISO 100-1600
Print technology ZINK
Print resolution 314 x600 dpi
Colours Matt Black, Pearl, White, Gold
Features Selfie mirror and ringlight
Battery life 25 prints
Connectivity Bluetooth
Weight 188g
Price £149/$159/€169
Zoemini C Camera resolution 5MP
ISO range Auto ISO 100-1600
Print technology ZINK
Print resolution 314 x500 dpi
Colours Pink, Yellow, Green, and Blue
Features Selfie mirror and ringlight
Battery life 25 prints
Connectivity Bluetooth
Weight 170g
Price £109/$99/€119
Zoemini Print technology ZINK
Print resolution 314 x400 dpi
Battery life 20 prints
Connectivity Bluetooth
Weight 160g
Price £80/$99/€Ul
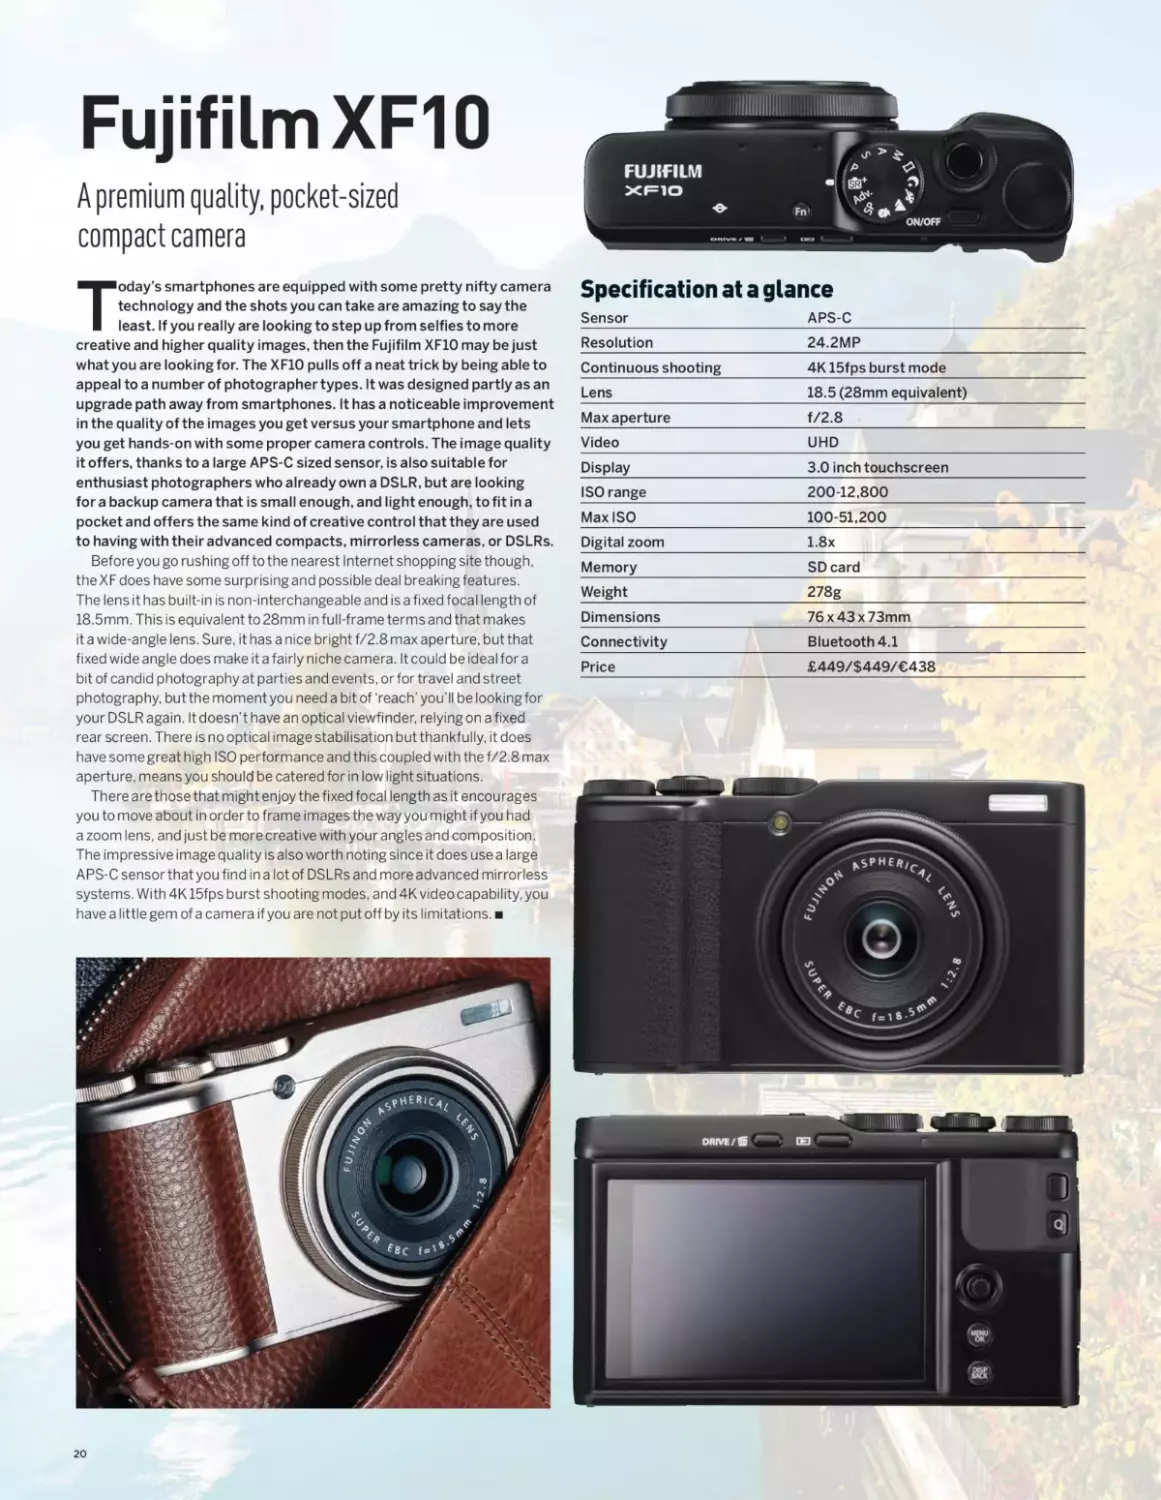
Fujifilm XF10
A premium quality, pocket-sized
compact camera
Today’s smartphones are equipped with some pretty nifty camera
technology and the shots you can take are amazing to say the
least. If you really are looking to step up from selfies to more
creative and higher quality images, then the Fujifilm XF1O may be just
what you are looking for. The XF1O pulls off a neat trick by being able to
appeal to a number of photographer types. It was designed partly as an
upgrade path away from smartphones. It has a noticeable improvement
in the quality of the images you get versus your smartphone and lets
you get hands-on with some proper camera controls. The image quality
it offers, thanks to a large APS-C sized sensor, is also suitable for
enthusiast photographers who already own a DSLR, but are looking
for a backup camera that is small enough, and light enough, to fit in a
pocket and offers the same kind of creative control that they are used
to having with their advanced compacts, mirrorless cameras, or DSLRs.
Before you go rushing off to the nearest Internet shopping site though,
the XF does have some surprising and possible deal breaking features.
The lens it has built-in is non-interchangeable and is a fixed focal length of
18.5mm. This is equivalent to 28mm in full-frame terms and that makes
it a wide-angle lens. Sure, it has a nice bright f/2.8 max aperture, but that
fixed wide angle does make it a fairly niche camera. It could be ideal for a
bit of candid photography at parties and events, or for travel and street
photography, but the moment you need a bit of ‘reach’ you’ll be looking for
your DSLR again. It doesn’t have an optical viewfinder, relying on a fixed
rear screen. There is no optical image stabilisation but thankfully, it does
have some great high ISO performance and this coupled with the f/2.8 max
aperture, means you should be catered for in low light situations.
There are those that might enjoy the fixed focal length as it encourages
you to move about in order to frame images the way you might if you had
a zoom lens, and just be more creative with your angles and composition.
The impressive image quality is also worth noting since it does use a large
APS-C sensor that you find in a lot of DSLRs and more advanced mirrorless
systems. With 4K 15fps burst shooting modes, and 4K video capability, you
have a little gem of a camera if you are not put off by its limitations.
Specification at a glance
Sensor APS-C
Resolution 24.2MP
Continuous shooting 4K 15fps burst mode
Lens 18.5 (28mm equivalent)
Max aperture f/2.8
Video UHD
Display 3.0 inch touchscreen
ISO range 200-12,800
MaxISO 100-51,200
Digital zoom 1.8x
Memory SD card
Weight 278g
Dimensions 76 x 43 x 73mm
Connectivity Bluetooth 4.1
Price £449/$449/€438
20
FUJIFILM XF10 / OLYMPUS TOUGH TG-5
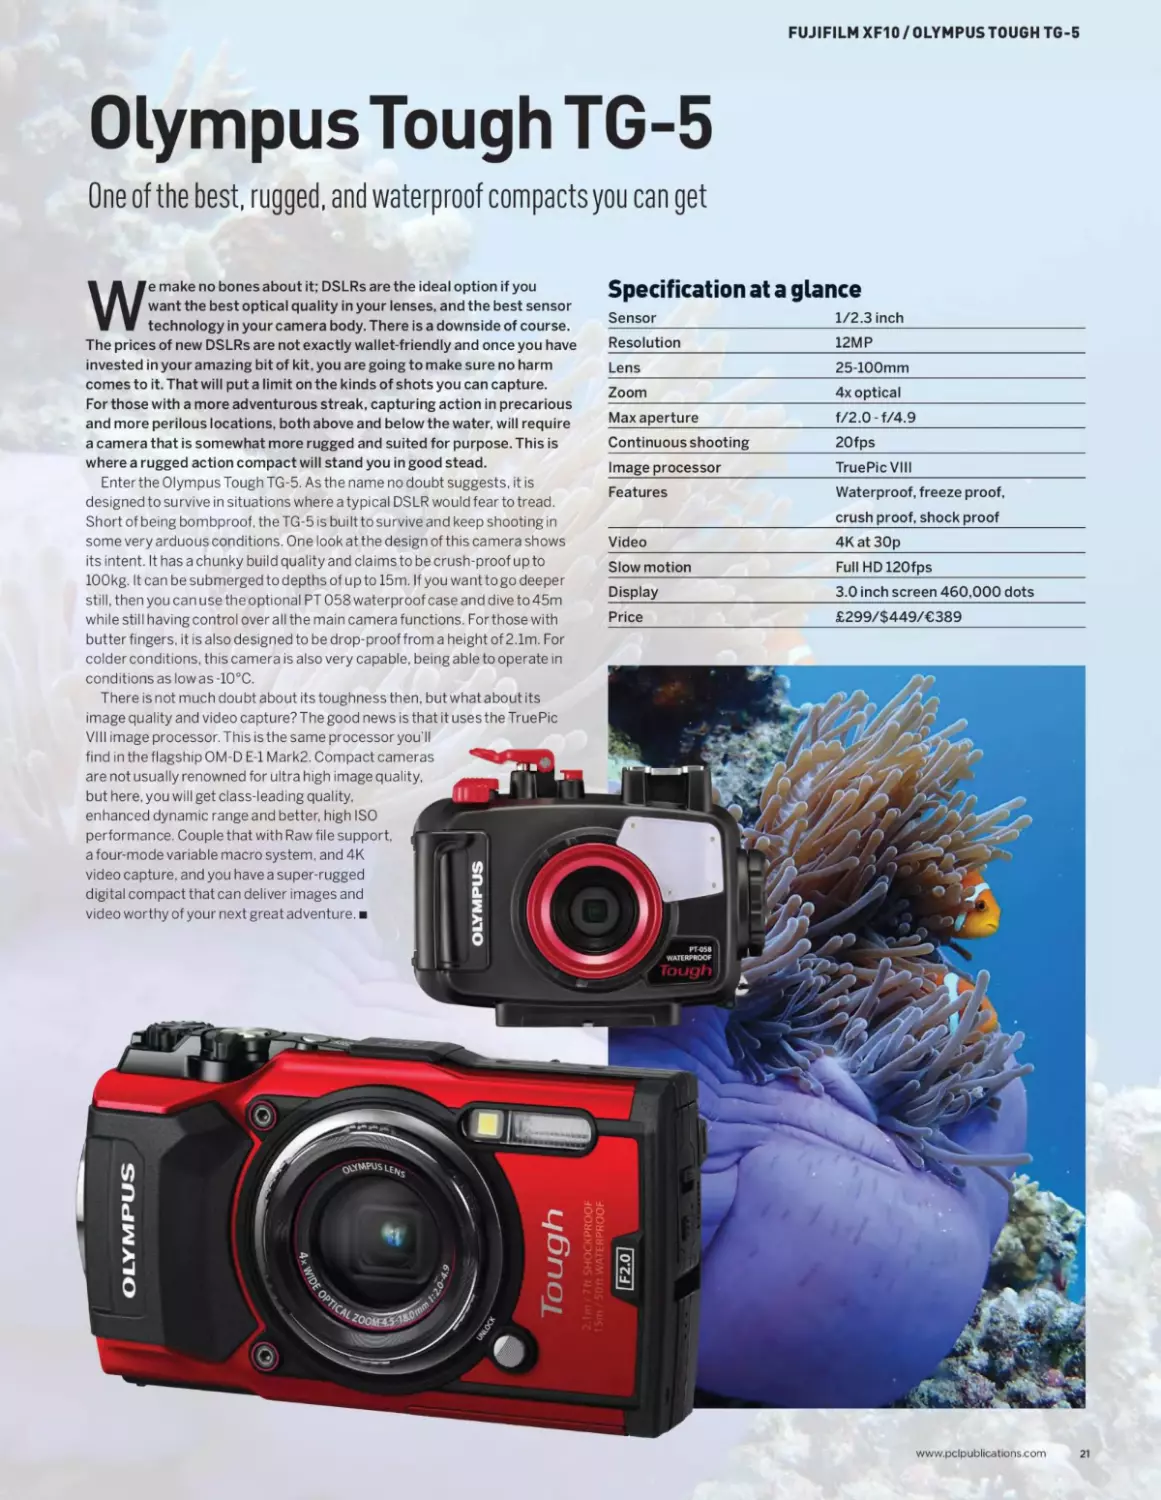
Olympus Tough TG-5
One of the best, rugged, and waterproof compacts you can get
We make no bones about it; DSLRs are the ideal option if you
want the best optical quality in your lenses, and the best sensor
technology in your camera body. There is a downside of course.
The prices of new DSLRs are not exactly wallet-friendly and once you have
invested in your amazing bit of kit, you are going to make sure no harm
comes to it. That will put a limit on the kinds of shots you can capture.
For those with a more adventurous streak, capturing action in precarious
and more perilous locations, both above and below the water, will require
a camera that is somewhat more rugged and suited for purpose. This is
where a rugged action compact will stand you in good stead.
Enter the Olympus Tough TG-5. As the name no doubt suggests, it is
designed to survive in situations where a typical DSLR would fear to tread.
Short of being bombproof, the TG-5 is built to survive and keep shooting in
some very arduous conditions. One look at the design of this camera shows
its intent. It has a chunky build quality and claims to be crush-proof up to
100kg. It can be submerged to depths of upto 15m. If you wanttogo deeper
still, then you can use the optional PT 058 waterproof case and dive to 45m
while still having control over all the main camera functions. Forthose with
butter fingers, it is also designed to be drop-proof from a height of 2.1m. For
colder conditions, this camera is also very capable, being able to operate in
conditions as low as -10°C.
There is not much doubt about its toughness then, but what about its
image quality and video capture? The good news is that it uses the TruePic
VIII image processor. This isthe same processor you’ll
find in the flagship OM-D E-l Mark2. Compact cameras
are not usually renowned for ultra high image quality,
but here, you will get class-leading quality,
enhanced dynamic range and better, high ISO
performance. Couple that with Raw file support,
a four-mode variable macro system, and 4K
video capture, and you have a super-rugged
digital compact that can deliver images and
video worthy of your next great adventure.
Specification at a glance
Sensor 1/2.3 inch
Resolution 12MP
Lens 25-100mm
Zoom 4x optical
Max aperture f/2.0-f/4.9
Continuous shooting 20fps
Image processor TruePic VIII
Features Waterproof, freeze proof, crush proof, shock proof
Video 4Kat 30p
Slow motion FullHD120fps
Display 3.0 inch screen 460,000 dots
Price £299/$449/€389
www.pclpublications.com
21
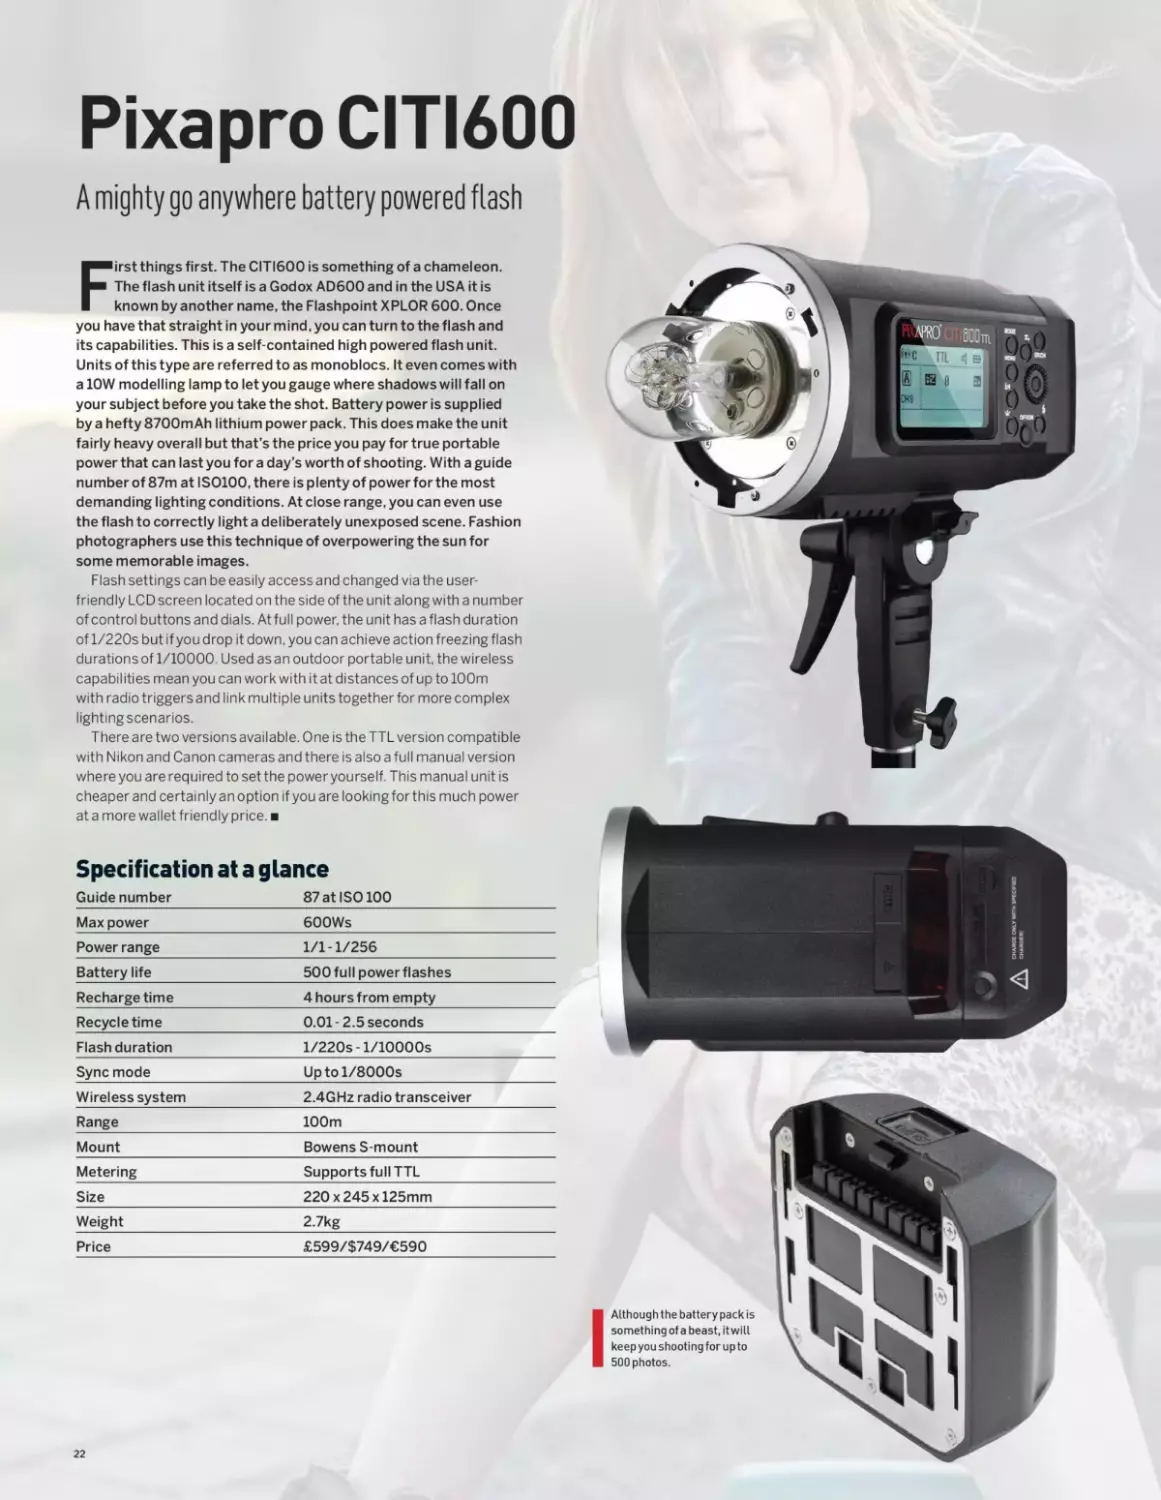
Pixapro CITI600
A mighty go anywhere battery powered flash
First things first. The CITI600 is something of a chameleon.
The flash unit itself is a Godox AD600 and in the USA it is
known by another name, the Flashpoint XPLOR 600. Once
you have that straight in your mind, you can turn to the flash and
its capabilities. This is a self-contained high powered flash unit.
Units of this type are referred to as monoblocs. It even comes with
a 10W modelling lamp to let you gauge where shadows will fall on
your subject before you take the shot. Battery power is supplied
by a hefty 8700mAh lithium power pack. This does make the unit
fairly heavy overall but that’s the price you pay for true portable
power that can last you for a day’s worth of shooting. With a guide
number of 87m at IS0100, there is plenty of power for the most
demanding lighting conditions. At close range, you can even use
the flash to correctly light a deliberately unexposed scene. Fashion
photographers use this technique of overpowering the sun for
some memorable images.
Flash settings can be easily access and changed via the user-
friendly LCD screen located on the side of the unit along with a number
of control buttons and dials. At full power, the unit has a flash duration
of l/220s but if you drop it down, you can achieve action freezing flash
durations of 1/10000. Used as an outdoor portable unit, the wireless
capabilities mean you can work with it at distances of up to 100m
with radio triggers and link multiple units together for more complex
lighting scenarios.
There are two versions available. One is the TTL version compatible
with Nikon and Canon cameras and there is also a full manual version
where you are required to setthe poweryourself. This manual unit is
cheaper and certainly anoption if you are lookingforthis much power
at a more wallet friendly price.
Specification at a glance
Guide number 87 at ISO 100
Max power 600Ws
Power range 1/1-1/256
Battery life 500 full power flashes
Recharge time 4 hours from empty
Recycle time 0.01-2.5 seconds
Flash duration l/220s - 1/lOOOOs
Sync mode Uptol/8000s
Wireless system 2.4GHz radio transceiver
Range 100m
Mount Bowens S-mount
Metering Supports full TTL
Size 220 x245 x125mm
Weight 2.7kg
Price £599/$749/€590
I Although the battery pack is
something of a beast, it will
keep you shooting for up to
500 photos.
22
PIXAPRO CITI600 / LOWEPRO PRO RUNNER X450 II
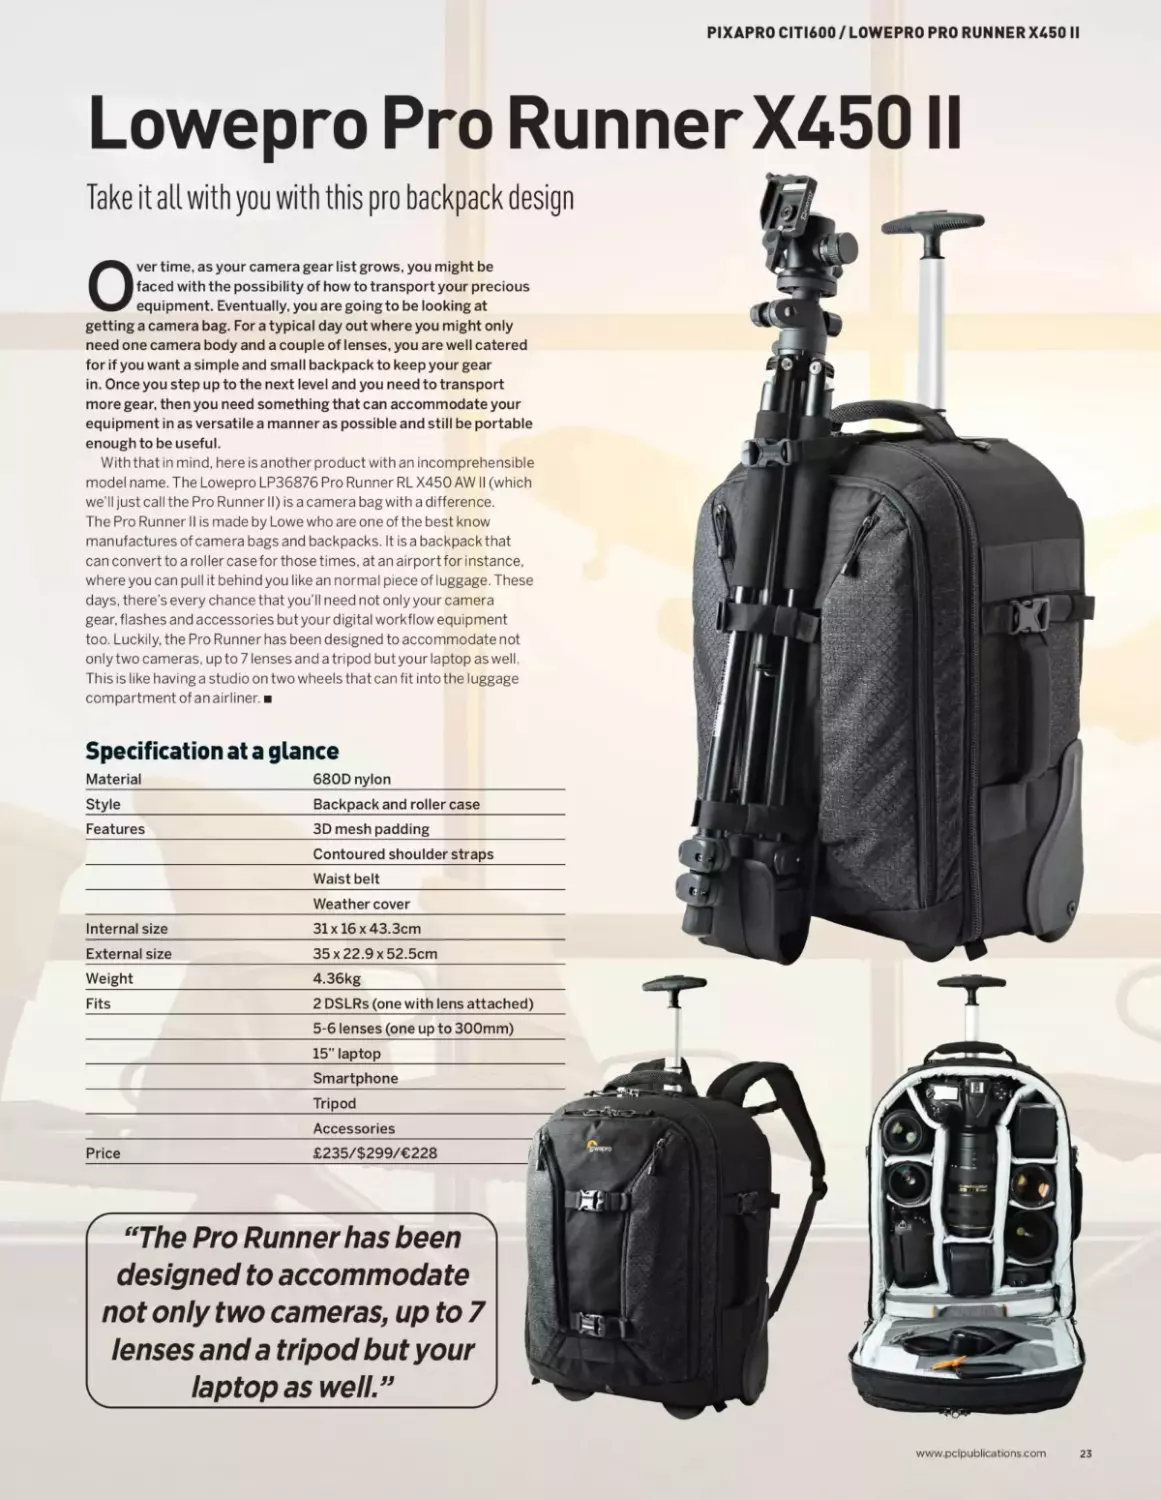
Lowepro Pro RunnerX450 II
Take it all with you with this pro backpack design
Over time, as your camera gear list grows, you might be
faced with the possibility of how to transport your precious
equipment. Eventually, you are going to be looking at
getting a camera bag. For a typical day out where you might only
need one camera body and a couple of lenses, you are well catered
for if you want a simple and small backpack to keep your gear
in. Once you step up to the next level and you need to transport
more gear, then you need something that can accommodate your
equipment in as versatile a manner as possible and still be portable
enough to be useful.
With that in mind, here is another product with an incomprehensible
model name. The Lowepro LP36876 Pro Runner RL X450 AW II (which
we’ll just call the Pro Runner II) is a camera bag with a difference.
The Pro Runner II is made by Lowe who are one of the best know
manufactures of camera bags and backpacks. It is a backpack that
can convert to a roller case for those times, at an airport for instance,
where you can pull it behind you like an normal piece of luggage. These
days, there’s every chance that you’ll need not only your camera
gear, flashes and accessories but your digital workflow equipment
too. Luckily, the Pro Runner has been designed to accommodate not
only two cameras, up to 7 lenses and a tripod butyour laptop as well.
This is like having a studio on two wheels that can fit into the luggage
compartment ofanairliner.
Specification at a glance
Material 680D nylon
Style Backpack and roller case
Features 3D mesh padding
Contoured shoulder straps
Waist belt
Weather cover
Internal size 31 x 16 x 43.3cm
External size 35 x 22.9 x 52.5cm
Weight 4.36kg
Fits 2 DSLRs (one with lens attached)
5-6 lenses (one up to 300mm)
_____________________________15" laptop______
Smartphone
_____________________________Tripod__________
Accessories
Price £235/$299/€228
“The Pro Runner has been
designed to accommodate
not only two cameras, up to 7
lenses and a tripod but your
laptop as well ”
www.pclpublications.com
23
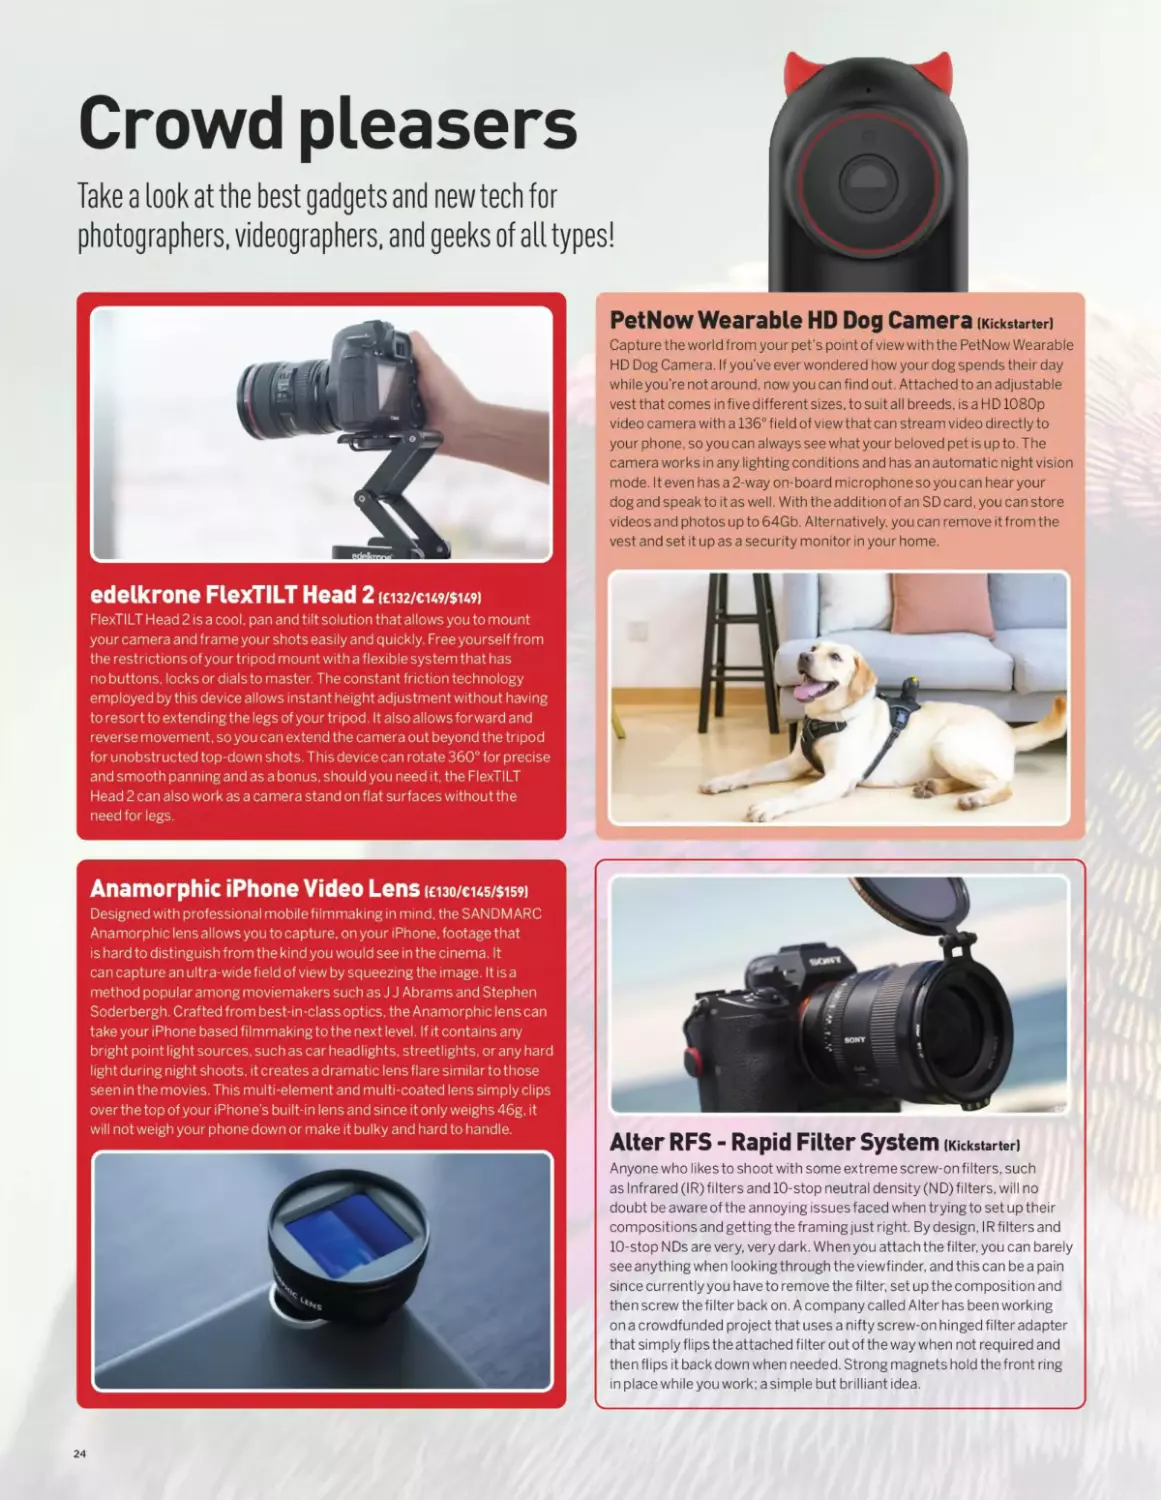
Crowd pleasers
Take a look at the best gadgets and new tech for
photographers, videographers, and geeks of a LI types!
PetNow Wearable HD Dog Camera (Kickstarter)
Capture the world from your pet’s point of view with the PetNow Wearable
HD Dog Camera. If you’ve ever wondered how your dog spends their day
whileyou’re not around, now you can find out. Attached to an adjustable
vest that comes in five different sizes, to suit all breeds, is a H D 1080p
video camera with a 136° field of view that can stream video directly to
your phone, so you can always see what your beloved pet is up to. The
camera works in any lighting conditions and has an automatic night vision
mode. It even has a 2-way on-board microphone so you can hear your
dog and speak to it as well. With the addition of an SD card, you can store
videos and photos up to 64Gb. Alternatively, you can remove it from the
vest and set it up as a security monitor in your home.
edelkrone FlexTILT Head 2 (£132/€149/$149)
FlexTILT Head 2 is a cool, pan and tilt solution that allows you to mount
your camera and frame your shots easily and quickly. Free yourself from
the restrictions of your tripod mount with a flexible system that has
no buttons, locks or dials to master. The constant friction technology
employed by this device allows instant height adjustment without having
to resort to extending the legs of your tripod. It also allows forward and
reverse movement, so you can extend the camera out beyond the tripod
for unobstructed top-down shots. This device can rotate 360° for precise
and smooth panning and as a bonus, should you need it, the FlexTILT
Head 2 can also work as a camera stand on flat surfaces without the
need for legs.
Anamorphic iPhone Video Lens icno/eus/sisfi
Designed with professional mobilefilmmaking in mind, the SANDMARC
Ana morphic lens allows you to capture, on your iPhone, footage that
is hard to distinguish from the kind you would see in the cinema. It
can capture an ultra-wide field of view by squeezing the image. It is a
method popular among moviemakers such as J J Abrams and Stephen
Soderbergh. Crafted from best-in-class optics, the Anamorphic lens can
take your iPhone based filmmaking to the next level. If it contains any
bright point light sources, such as car headlights, streetlights, or any hard
light during night shoots, it creates a dramatic lens flare similar to those
seen in the movies. This multi-element and multi-coated lens simply clips
over the top of your iPhone's built-in lens and since it only weighs 46g, it
will not weigh your phone down or make it bulky and hard to handle.
Alter RFS - Rapid Filter System (Kickstarter)
Anyone who likes to shoot with some extreme screw-on filters, such
as Infrared (IR) filters and 10-stop neutral density (ND) filters, will no
doubt be awa re of the annoying issues faced when trying to set up their
compositions and getting the framing just right. By design, IR filters and
10-stop NDs are very, very dark. When you attach the filter, you can barely
see anything when looking through the viewfinder, and this can be a pain
since currently you have to remove the filter, set up the composition and
then screw the filter back on. A company called Alter has been working
on a crowdfunded project that uses a nifty screw-on hinged filter adapter
that simply flips the attached filter out of the way when not required and
then flips it back down when needed. Strong magnets hold the front ring
in place while you work; a simple but brilliant idea.
24
CROWD PLEASERS
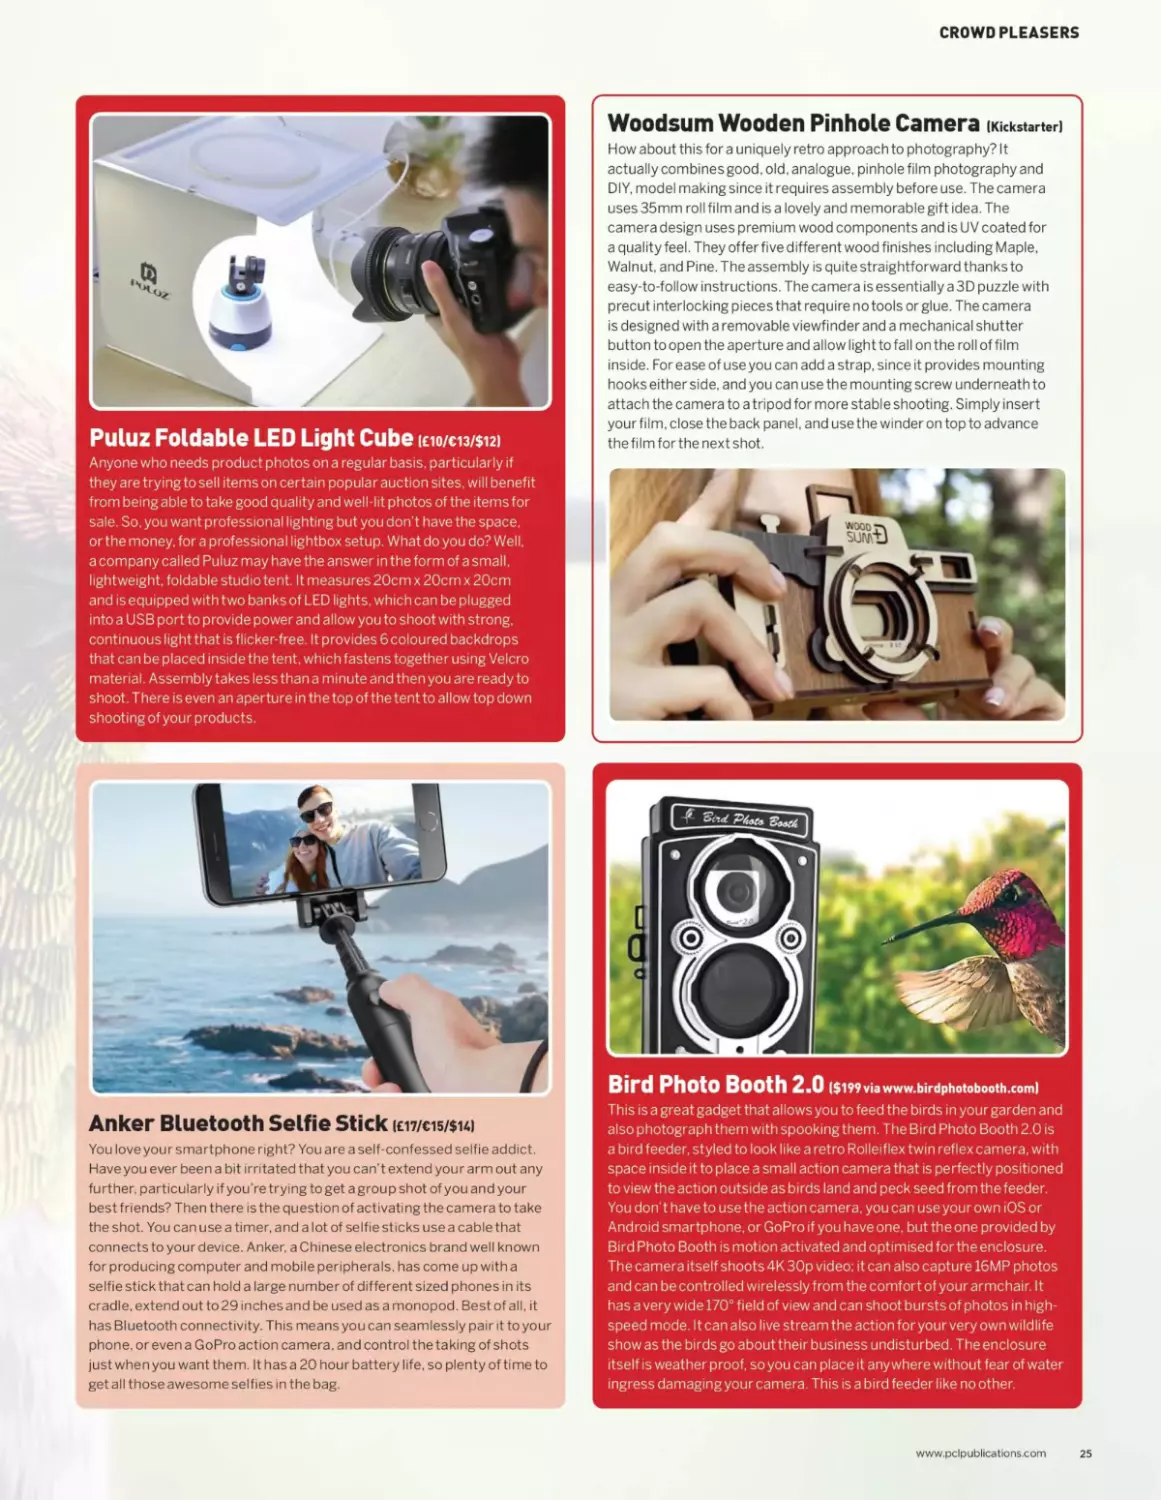
Puluz Foldable LED Light Cube (£10/€13/$12)
Anyone who needs product photos on a regular basis, particularly if
they are trying to sell items on certain popular auction sites, will benefit
from being able to take good quality and well-lit photos of the items for
sale. So. you want professional lighting but you don’t have the space,
or the money, for a professional lightbox setup. What do you do? Well,
a company called Puluz may have the answer in the form of a small,
lightweight, foldable studio tent. It measures 20cm x 20cm x 20cm
and is equipped with two banks of LED lights, which can be plugged
into a USB port to provide power and allow you to shoot with strong,
continuous light that is flicker-free. It provides 6 coloured backdrops
that can be placed inside the tent, which fastens together using Velcro
material. Assembly takes less than a minute and then you are ready to
shoot. There is even an aperture in the top of the tent to allow top down
shooting of your products.
Woodsum Wooden Pinhole Camera (Kickstarter)
How about this for a uniquely retro approach to photography? It
actually combines good, old. analogue, pinhole film photography and
DIY, model making since it requires assembly before use. The camera
uses 35mm roll film and is a lovely and memorable gift idea. The
camera design uses premium wood components and is UV coated for
a quality feel. They offer five different wood finishes including Maple,
Walnut, and Pine. The assembly is quite straightforward thanks to
easy-to-follow instructions. The camera is essentially a 3D puzzle with
precut interlocking pieces that require no tools or glue. The camera
is designed with a removable viewfinder and a mechanical shutter
button to open the aperture and allow light to fall on the roll of film
inside. For ease of use you can add a strap, since it provides mounting
hooks either side, and you can use the mounting screw underneath to
attach the camera to a tripod for more stable shooting. Simply insert
your film, close the back panel, and use the winder on top to advance
the film for the next shot.
Anker Bluetooth Selfie Stick (emis/sui
You love your smartphone right? You are a self-confessed selfie addict.
Have you ever been a bit irritated that you can’t extend your arm out any
further, particularly if you’re trying to get a group shot of you and your
best friends? Then there is the question of activating the camera to take
the shot. You can use a timer, and a lot of selfie sticks use a cablethat
connects to your device. Anker, a Chinese electronics brand well known
for producing computer and mobile peripherals, has come up with a
selfie stick that can hold a large number of different sized phones in its
cradle, extend out to 29 inches and be used as a monopod. Best of all, it
has Bluetooth connectivity. This means you can seamlessly pair it to your
phone, or even a GoPro action camera, and control the taking of shots
just when you want them. It has a 20 hour battery life, so plenty of time to
get all those awesome selfies in the bag.
Bird Photo Booth 2.0 ($199 via www.birdphotobooth.com)
This is a great gadget that allows you to feed the birds in your garden and
also photograph them with spooking them. The Bird Photo Booth 2.0 is
a bird feeder, styled to look like a retro Rol lei flex twin reflex camera, with
space inside it to place a small action camera that is perfectly positioned
to view the action outside as birds land and peck seed from the feeder.
You don’t have to use the action camera, you can use your own iOS or
Android smartphone, or GoPro if you have one, but the one provided by
Bird Photo Booth is motion activated and optimised for the enclosure.
The camera itself shoots 4K 30p video; it can also capture 16MP photos
and can be controlled wirelessly from the comfort of your armchair. It
has a very wide 170° field of view and can shoot bursts of photos in high-
speed mode. It can also live stream the action for your very own wildlife
show as the birds go about their business undisturbed. The enclosure
itself is weather proof, so you can place it anywhere without fear of water
ingress damaging your camera. This is a bird feeder like no other.
www.pclpublications.com
25
'V 1
v* * • *’- .. y
» * ’ * । •''*?
GETTING
STARTED
Make sure you choose the right camera and accessories
Are you looking for a camera? Are you a little unsure
about the various kinds of camera that are available
and which ones might be more suitable than others?
For any newcomer to photography, many questions need
to be answered in order to have a clearer picture of what
kind of camera, lenses and accessories will be needed
to set you up ready to start enjoying the hobby. Then
you may turn your thoughts to flash lighting and light
modification, software and filters. There is a whole world
to explore and we can show you where to start.
28 Know your camera
32 The right camera foryou
36 What lenses do I need?
40 Why do I need a tripod?
“A re you a little unsure about the
various kinds of camera that are
available and which ones might be
more suitable than others?”
26
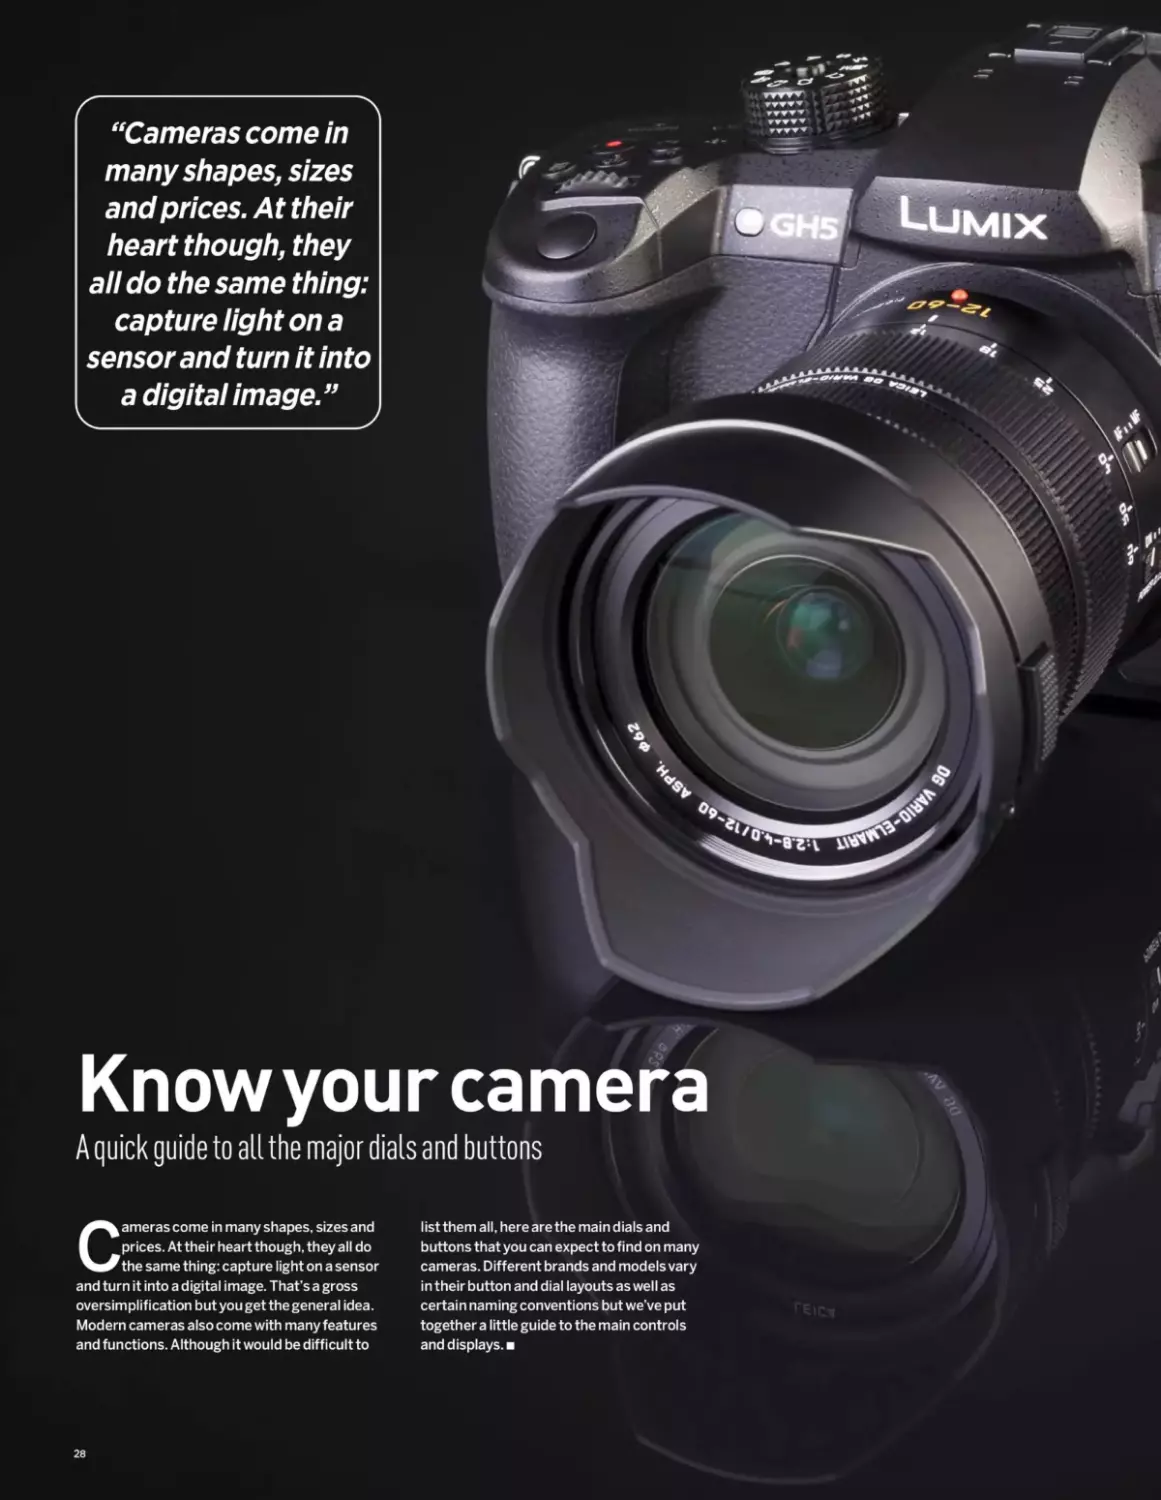
“Cameras come in
many shapes, sizes
and prices. At their
heart though, they
all do the same thing:
capture light on a
sensor and turn it into
a digital image.”
Knowyour camera
A quick guide to all the major dials and buttons
Cameras come in many shapes, sizes and
prices. At their heart though, they all do
the same thing: capture light on a sensor
and turn it into a digital image. That’s a gross
oversimplification but you get the general idea.
Modern cameras also come with many features
and functions. Although it would be difficult to
list them all, here are the main dials and
buttons that you can expect to find on many
cameras. Different brands and models vary
in their button and dial layouts as well as
certain naming conventions but we’ve put
together a little guide to the main controls
and displays.
28
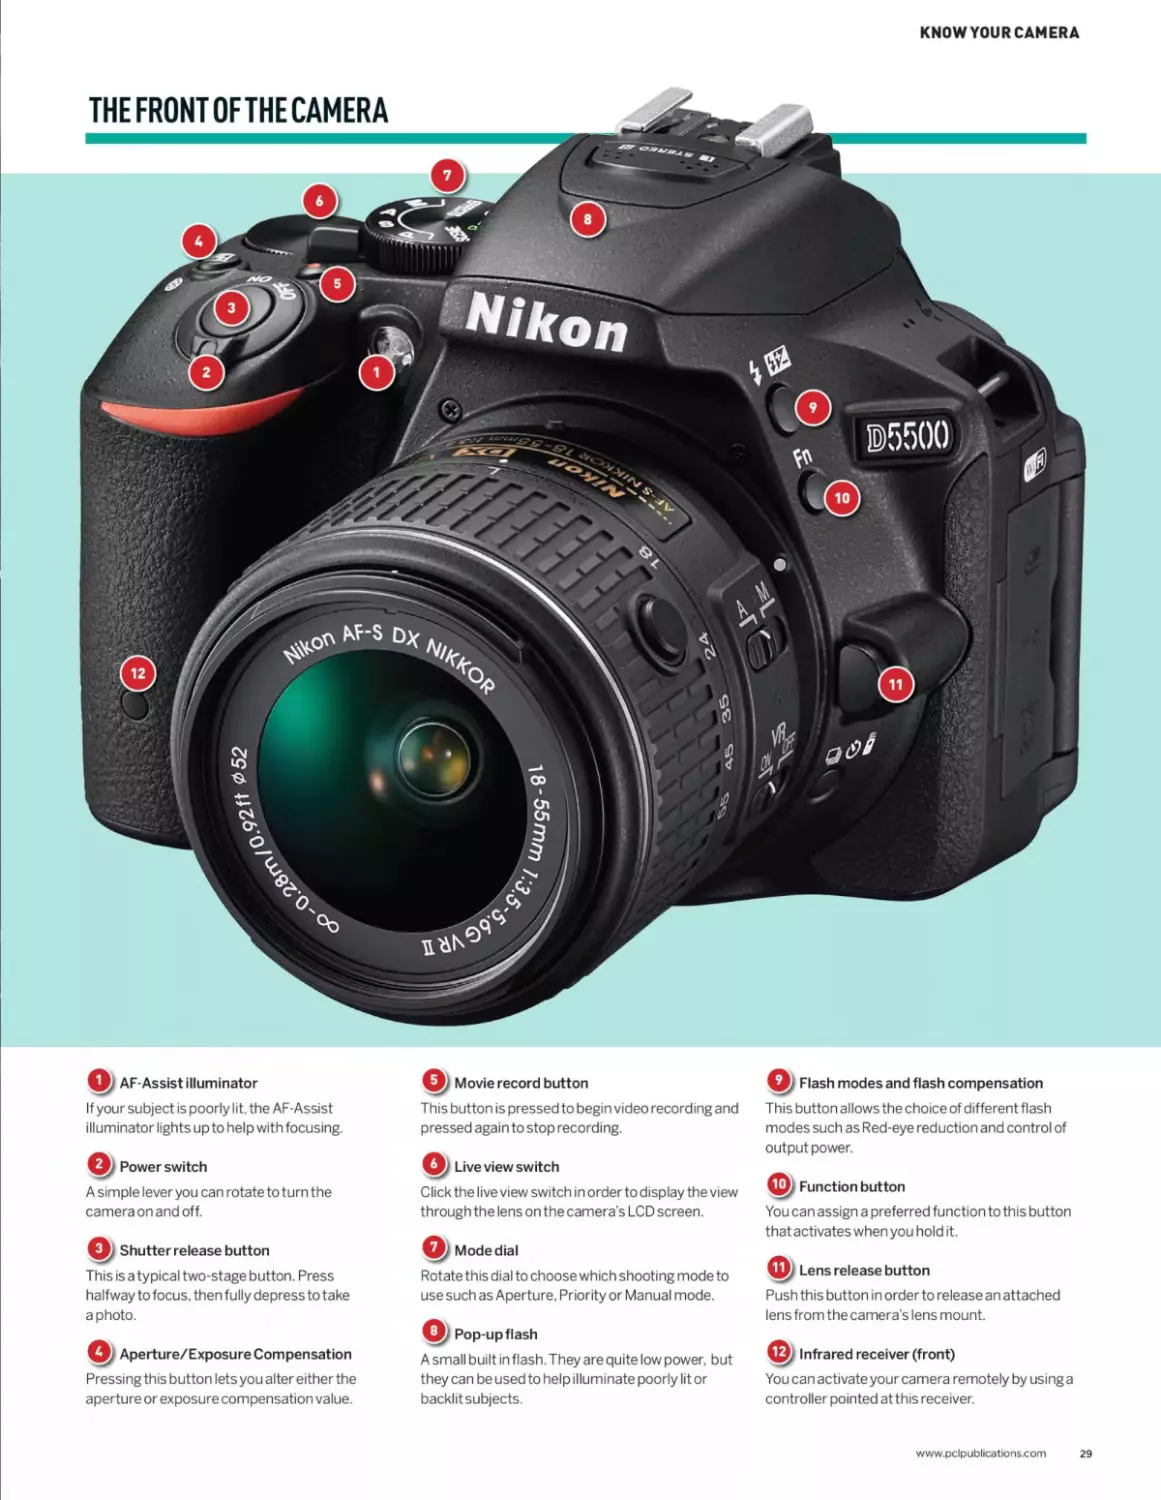
KNOW YOUR CAMERA
Qz AF-Assist illuminator
If your subject is poorly lit, the AF-Assist
illuminator lights upto help with focusing.
Q/ Power switch
A simple lever you can rotate to turn the
camera on and off.
Qy Shutter release button
This is a typical two-stage button. Press
halfway to focus, then fully depress to take
a photo.
Aperture/Exposure Compensation
Pressing this button lets you alter either the
aperture or exposure compensation value.
Q/ Movie record button
This button is pressed to begin video recording and
pressed again to stop recording.
Q. Live view switch
Click the live view switch in order to display the view
through the lens on the camera's LCD screen.
Mode dial
Rotate this dial to choose which shooting mode to
use such as Aperture, Priority or Manual mode.
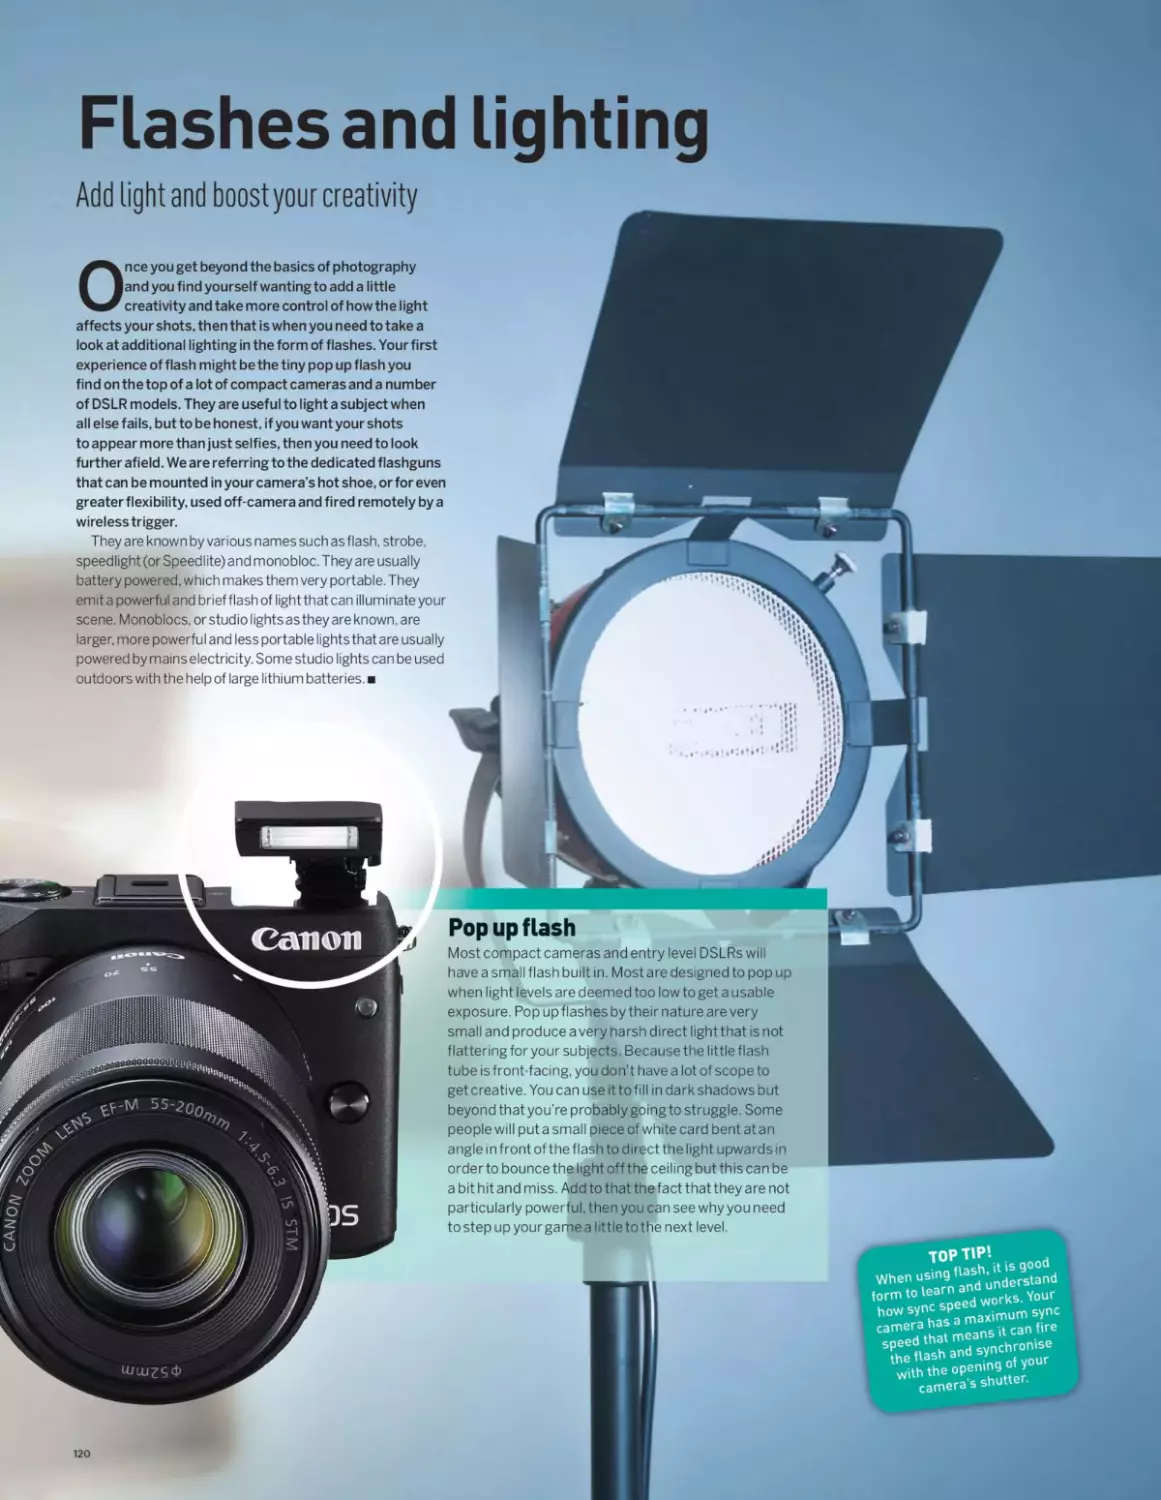
Q) Pop-up flash
A small built in flash. They are quite low power, but
they can be used to help illuminate poorly lit or
backlit subjects.
Q) Flash modes and flash compensation
This button allows the choice of different flash
modes such as Red-eye reduction and control of
output power.
Function button
You can assign a preferred function to this button
that activates when you hold it.
Lens release button
Push this button in order to release an attached
lens from the camera's lens mount.
Infrared receiver (front)
You can activate your camera remotely by using a
controller pointed at this receiver.
www.pclpublications.com
29
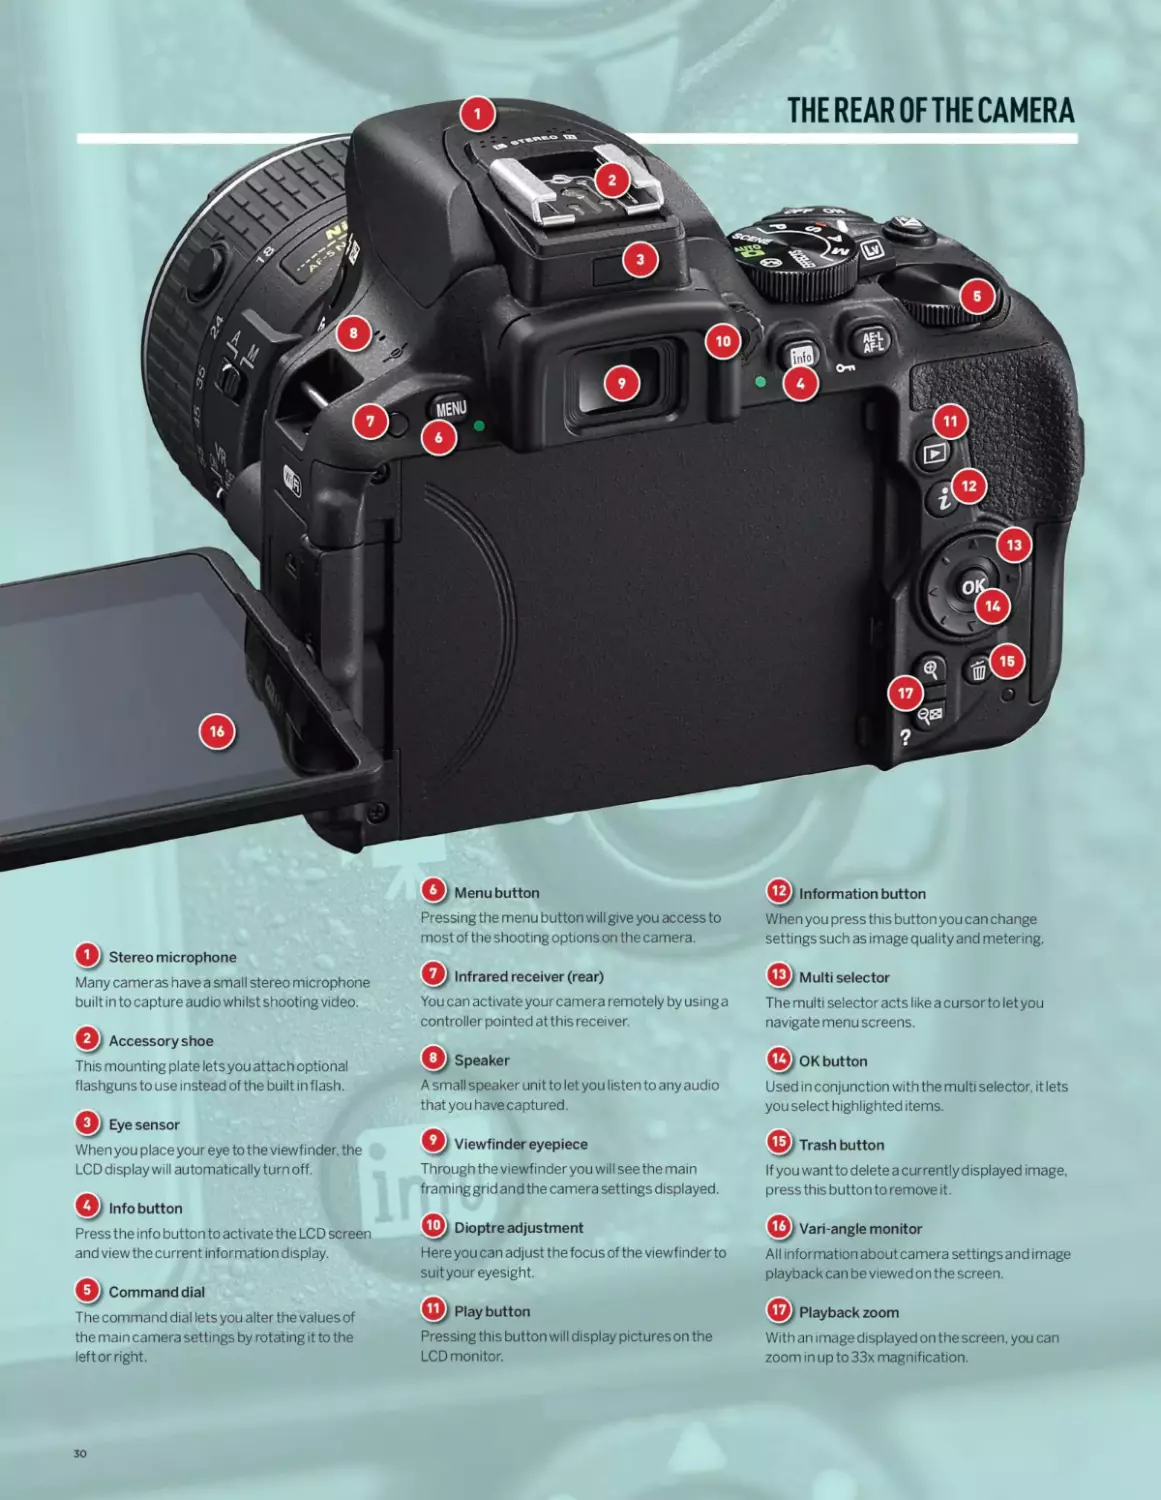
THE REAR OF THE CAMERA
Q/ Menu button
Pressing the menu button will give you access to
most of the shooting options on the camera.
Q; Stereo microphone
Many cameras have a small stereo microphone
built in to capture audio whilst shooting video.
Accessory shoe
This mounting plate lets you attach optional
flashguns to use instead of the built in flash.
Eye sensor
When you place your eye to the viewfinder, the
LCD display will automatically turn off.
Info button
Press the info button to activate the LCD screen
and view the current information display.
Command dial
The command dial lets you alter the values of
the main camera settings by rotating it to the
left or right.
You can activate your camera remotely by using a
controller pointed at this receiver.
A small speaker unit to let you listen to any audio
that you have captured.
Q/ Viewfinder eyepiece
Through the viewfinder you will see the main
framinggrid and the camera settings displayed.
Here you can adjust the focus of the viewfinder to
suit your eyesight.
Play button © Playback zoom
Pressing this button will display pictures on the With an image displayed on the screen, you can
LCD monitor. zoom in up to 33x magnification.
When you press this button you can change
settings such as image quality and metering.
© Multi selector
The multi selector acts like a cursor to letyou
navigate menu screens.
© OK button
Used in conjunction with the multi selector, it lets
you select highlighted items.
If you wantto delete a currently displayed image,
press this button to remove it.
Vari-angle monitor
All information about camera settingsand image
playback can be viewed on the screen.
30
KNOWYOURCAMERA
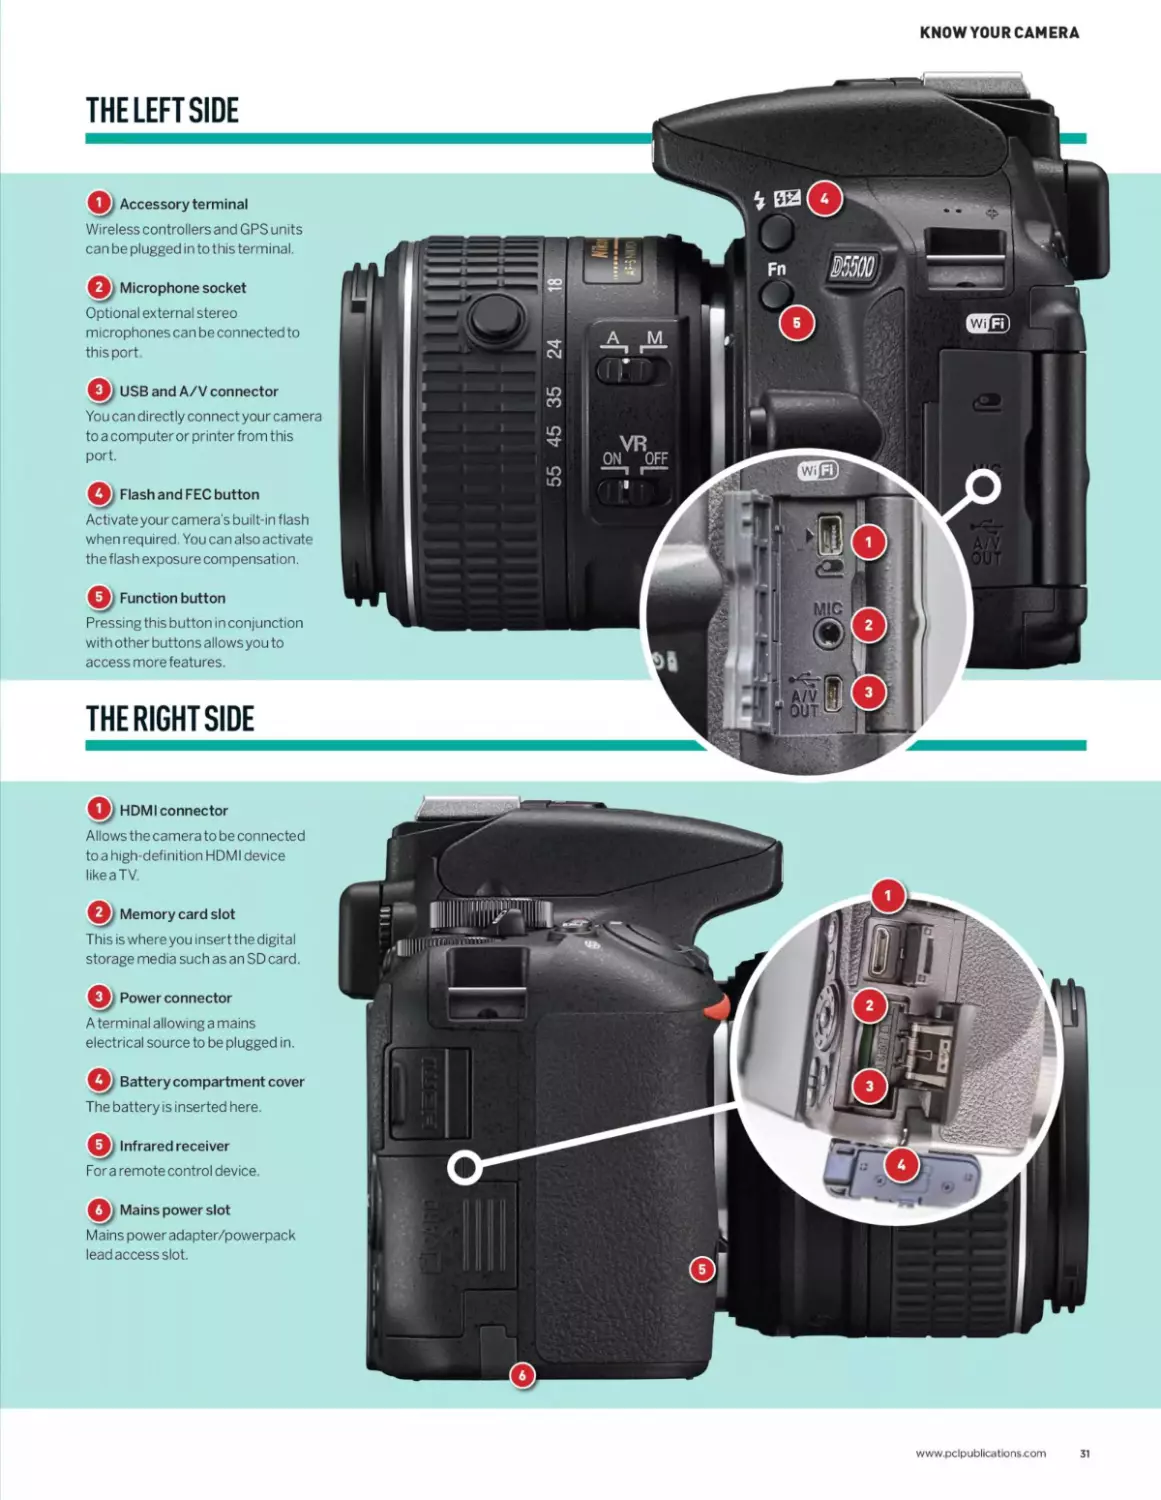
THE LEFTSIDE
Accessory terminal
Wireless controllers and GPS units
can be plugged in to this terminal.
Microphone socket
Optional external stereo
microphones can be connected to
this port.
Q; USB and A/V connector
You can directly connect your camera
to a computer or printer from this
port.
Flash and FEC button
Activate your camera’s built-in flash
when required. You can also activate
the flash exposure compensation.
Function button
Pressing this button in conjunction
with other buttons allowsyou to
access more features.
THE RIGHT SIDE
Q, HDMIconnector
Allows the camera to be connected
to a high-definition HDMI device
like a TV.
Q, Memory card slot
This is where you insert the digital
storage media such as an SD card.
Power connector
A terminal allowing a mains
electrical source to be plugged in.
Q/ Battery compartment cover
The battery is inserted here.
Infrared receiver
Fora remote control device.
Mains power slot
Mains power adapter/powerpack
lead access slot.
www.pclpublications.com
31
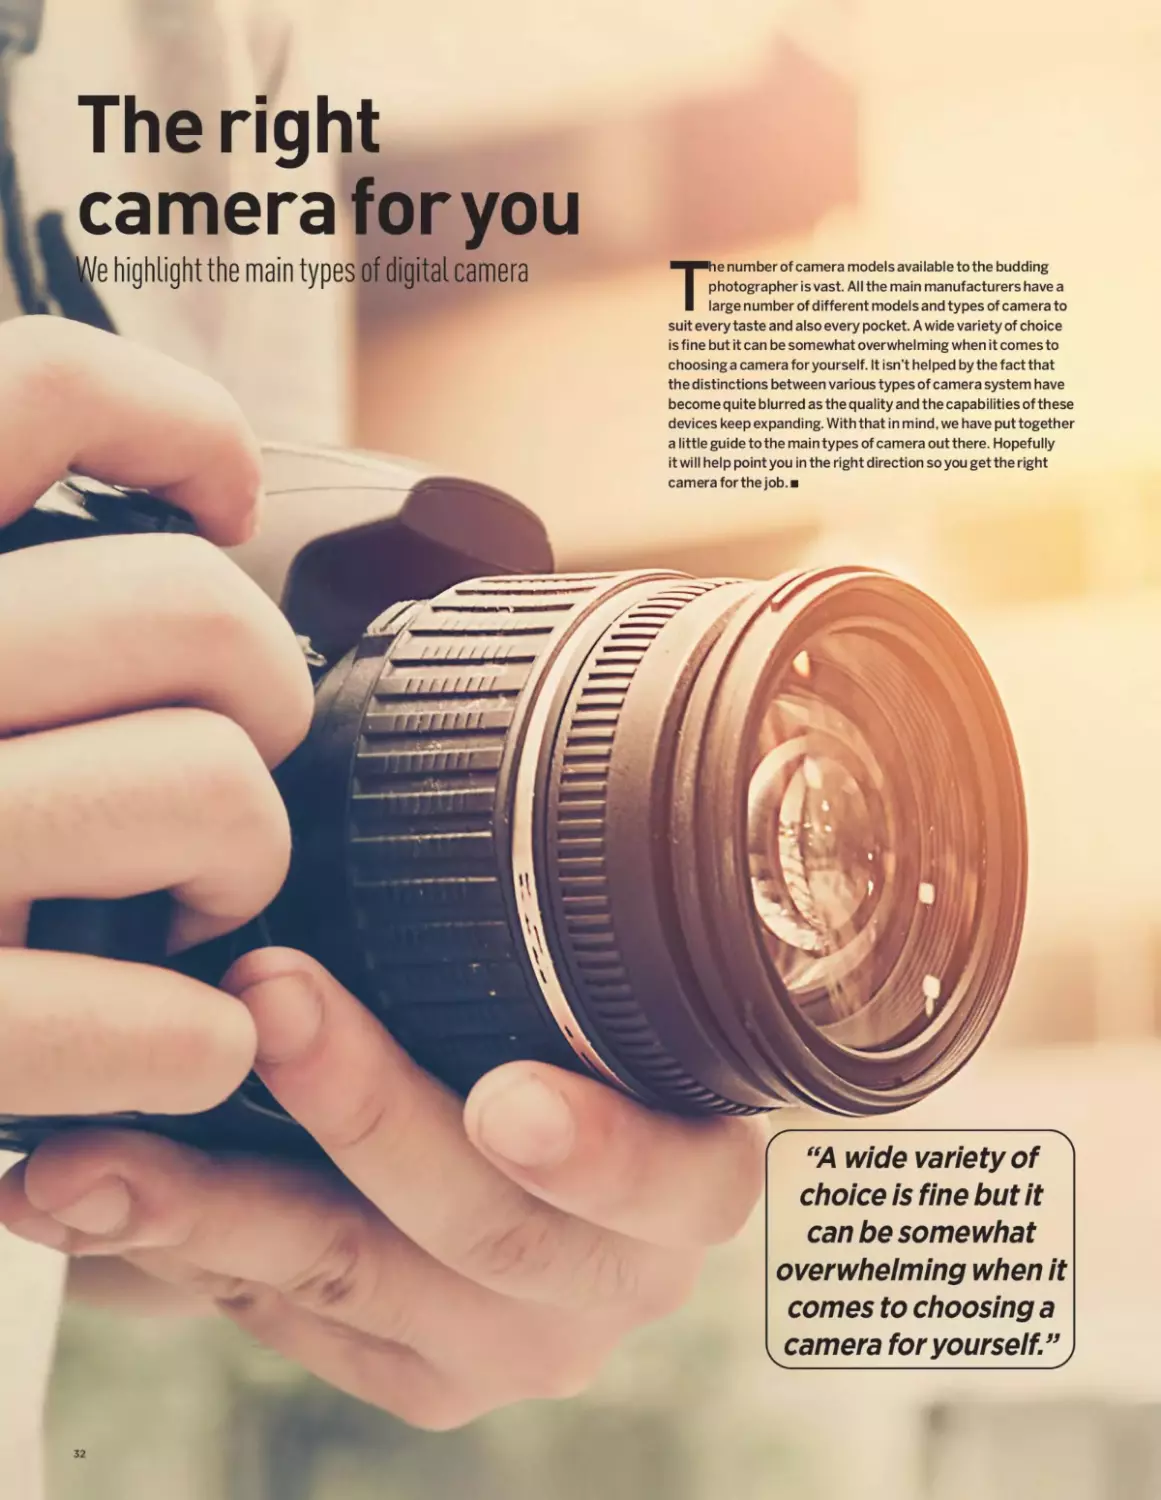
The right
camera foryou
'e highlight the main types of digital camera
become quite blurred as the quality and the capabilities of these
devices keep expanding. With that in mind, we have put together
a little guide to the main types of camera out there. Hopefully
it will help point you in the right direction so you get the right
camera for the job.
The number of camera models available to the budding
photographer is vast. All the main manufacturers have a
large number of different models and types of camera to
suit every taste and also every pocket. A wide variety of choice
is fine but it can be somewhat overwhelming when it comes to
choosing a camera for yourself. It isn’t helped by the fact that
the distinctions between various types of camera system have
“A wide variety of
choice is fine but it
can be somewhat
overwhelming when it
comes to choosing a
camera for yourself.”
THE RIGHT CAMERA FOR YOU
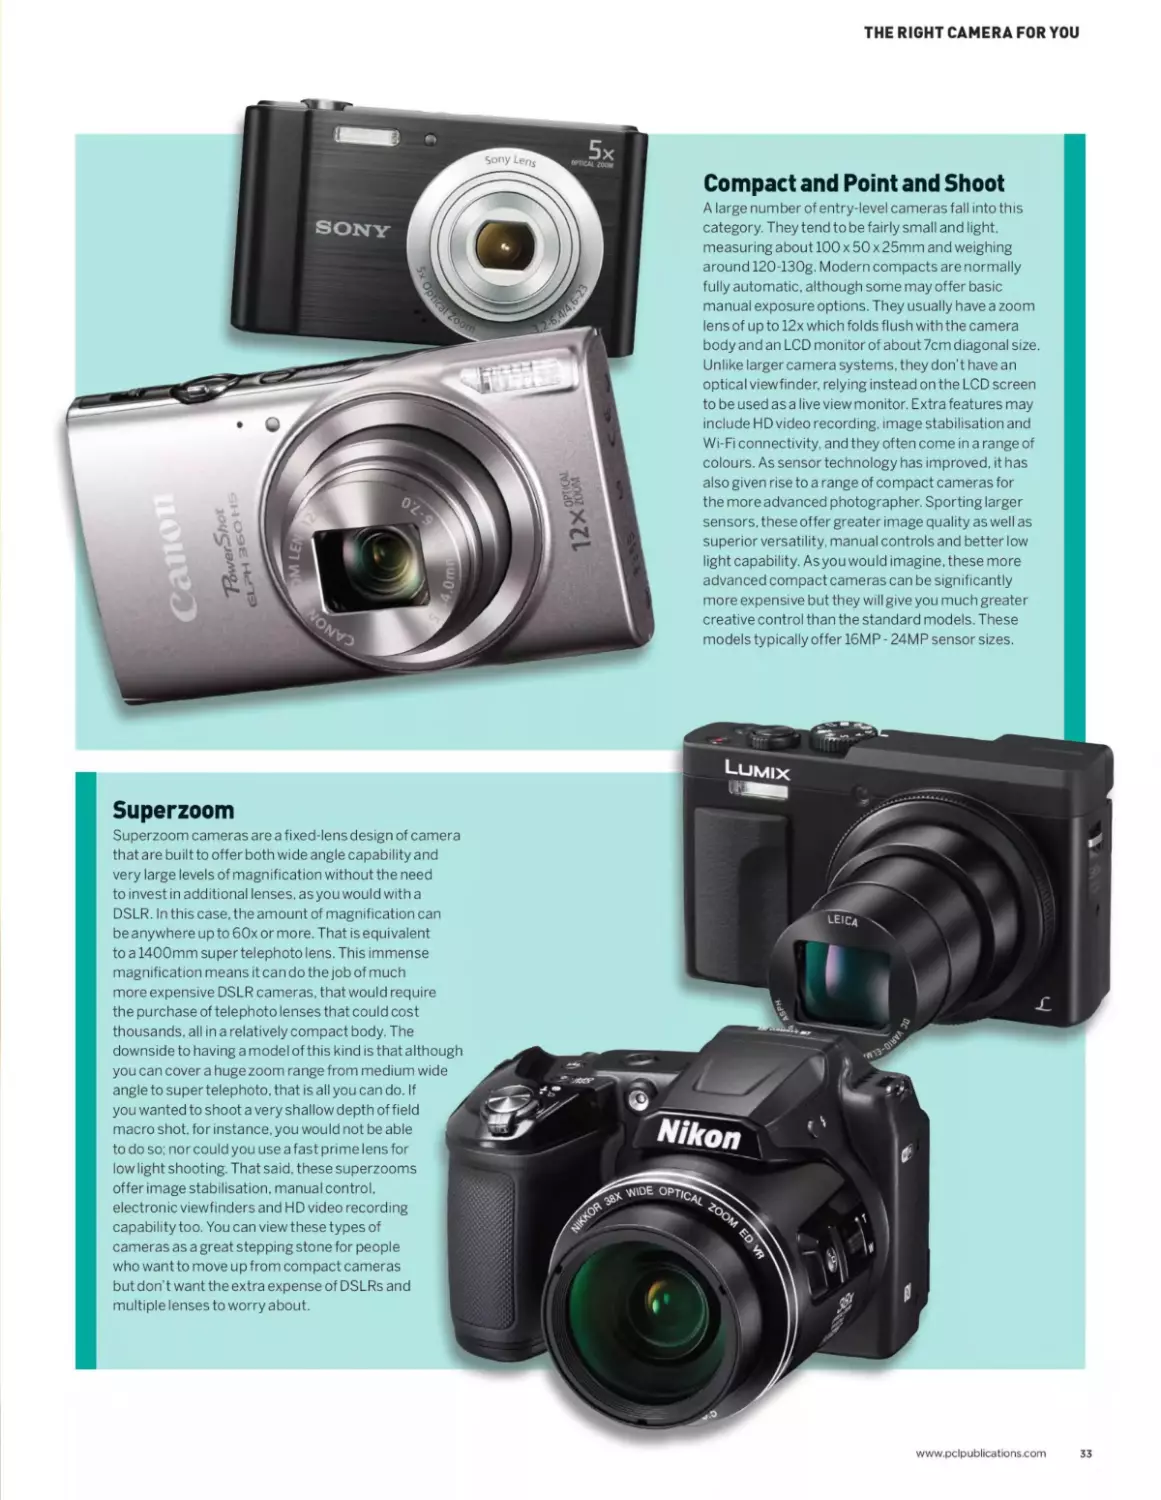
Compact and Point and Shoot
A large number of entry-level cameras fall into this
category. They tend to be fairly small and light,
measuring about 100 x 50 x 25mm and weighing
around 120-130g. Modern compacts are normally
fully automatic, although some may offer basic
manual exposure options. They usually have a zoom
lens of up to 12x which folds flush with the camera
body and an LCD monitor of about 7cm diagonal size.
Unlike larger camera systems, they don’t have an
optical viewfinder, relying instead on the LCD screen
to be used as a live view monitor. Extra features may
include HD video recording, image stabilisation and
Wi-Fi connectivity, and they often come in a range of
colours. As sensor technology has improved, it has
also given rise to a range of compact cameras for
the more advanced photographer. Sporting larger
sensors, these offer greater image quality as well as
superior versatility, manual controls and better low
light capability. As you would imagine, these more
advanced compact cameras can be significantly
more expensive but they will give you much greater
creative control than the standard models. These
models typically offer 16MP - 24MP sensor sizes.
Superzoom
Superzoom cameras are a fixed-lens design of camera
that are built to offer both wide angle capability and
very large levels of magnification without the need
to invest in additional lenses, asyou would with a
DSLR. In this case, the amount of magnification can
be any where up to 60x or more. That is equivalent
to a 1400mm super telephoto lens. This immense
magnification means it can do the job of much
more expensive DSLR cameras, that would require
the purchase of telephoto lenses that could cost
thousands, all in a relatively compact body. The
downside to having a model of this kind is that although
you can cover a huge zoom range from medium wide
angle to super telephoto, that is all you can do. If
you wanted to shoot a very shallow depth of field
macro shot, for instance, you would not be able
to do so: nor could you use a fast pri me lens for
low light shooting. That said, these superzooms
offer image stabilisation, manual control,
electronic viewfinders and HD video recording
capability too. You can view these types of
cameras as a great stepping stone for people
who want to move up from compact cameras
but don’t want the extra expense of DSLRs and
multiple lenses to worry about.
www.pclpublications.com
33
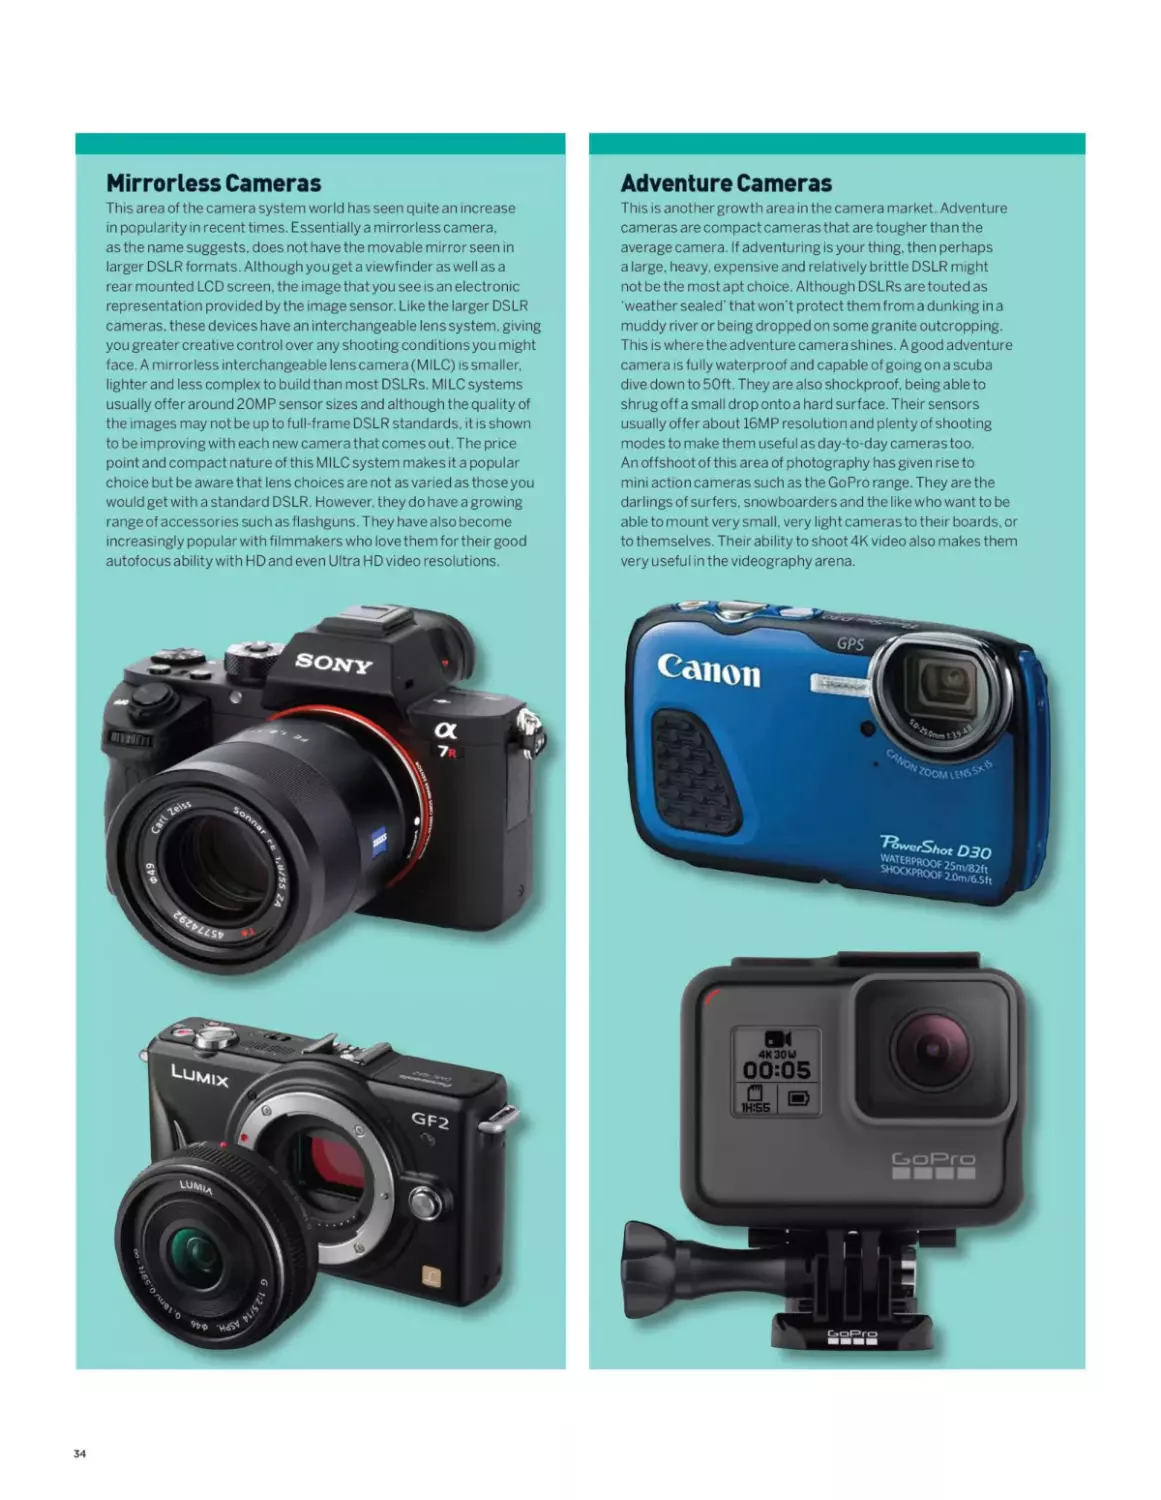
Mirrorless Cameras
This area of the camera system world has seen quite an increase
in popularity in recent times. Essentially a mirrorless camera,
as the name suggests, does not have the movable mirror seen in
larger DSLR formats. Although you get a viewfinder as well as a
rear mounted LCD screen, the image thatyou see is an electronic
representation provided by the image sensor. Like the larger DSLR
cameras, these devices have an interchangeable lens system, giving
you greater creative control over any shooting conditionsyou might
face. A mirrorless interchangeable lens camera (MILC) is smaller,
lighter and less complex to build than most DSLRs. MILC systems
usually offer around 20MP sensor sizes and although the quality of
the images may not be up to full-frame DSLR standards, it is shown
to be improving with each new camera that comes out. The price
point and compact nature of this MILC system makes it a popular
choice but be aware that lens choices are not as varied as those you
would get with a standard DSLR. However, they do have a growing
range of accessories such as flashguns. They have also become
increasingly popular with filmmakers who love them for their good
autofocus ability with HD and even Ultra HD video resolutions.
Adventure Cameras
This is anothergrowth area in the camera market. Adventure
cameras are compact cameras that are tougher than the
average camera. If adventuring is your thing, then perhaps
a large, heavy, expensive and relatively brittle DSLR might
not be the most apt choice. Although DSLRs are touted as
‘weather sealed' that won’t protect them from a dunking in a
muddy river or being dropped on some granite outcropping.
This is where the adventure camera shines. Agood adventure
camera is fully waterproof and capable of going on a scuba
dive down to 50ft. They are also shockproof, being able to
shrug off a small drop onto a hard surface. Their sensors
usually offer about 16MP resolution and plenty of shooting
modes to make them useful as day-to-day cameras too.
An offshoot of this area of photography has given rise to
mini action cameras such as the GoPro range. They are the
darlings of surfers, snowboarders and the like who want to be
able to mount very small, very light cameras to their boards, or
to themselves. Their ability to shoot 4K video also makes them
very useful in the videography arena.
34
THE RIGHT CAMERA FOR YOU
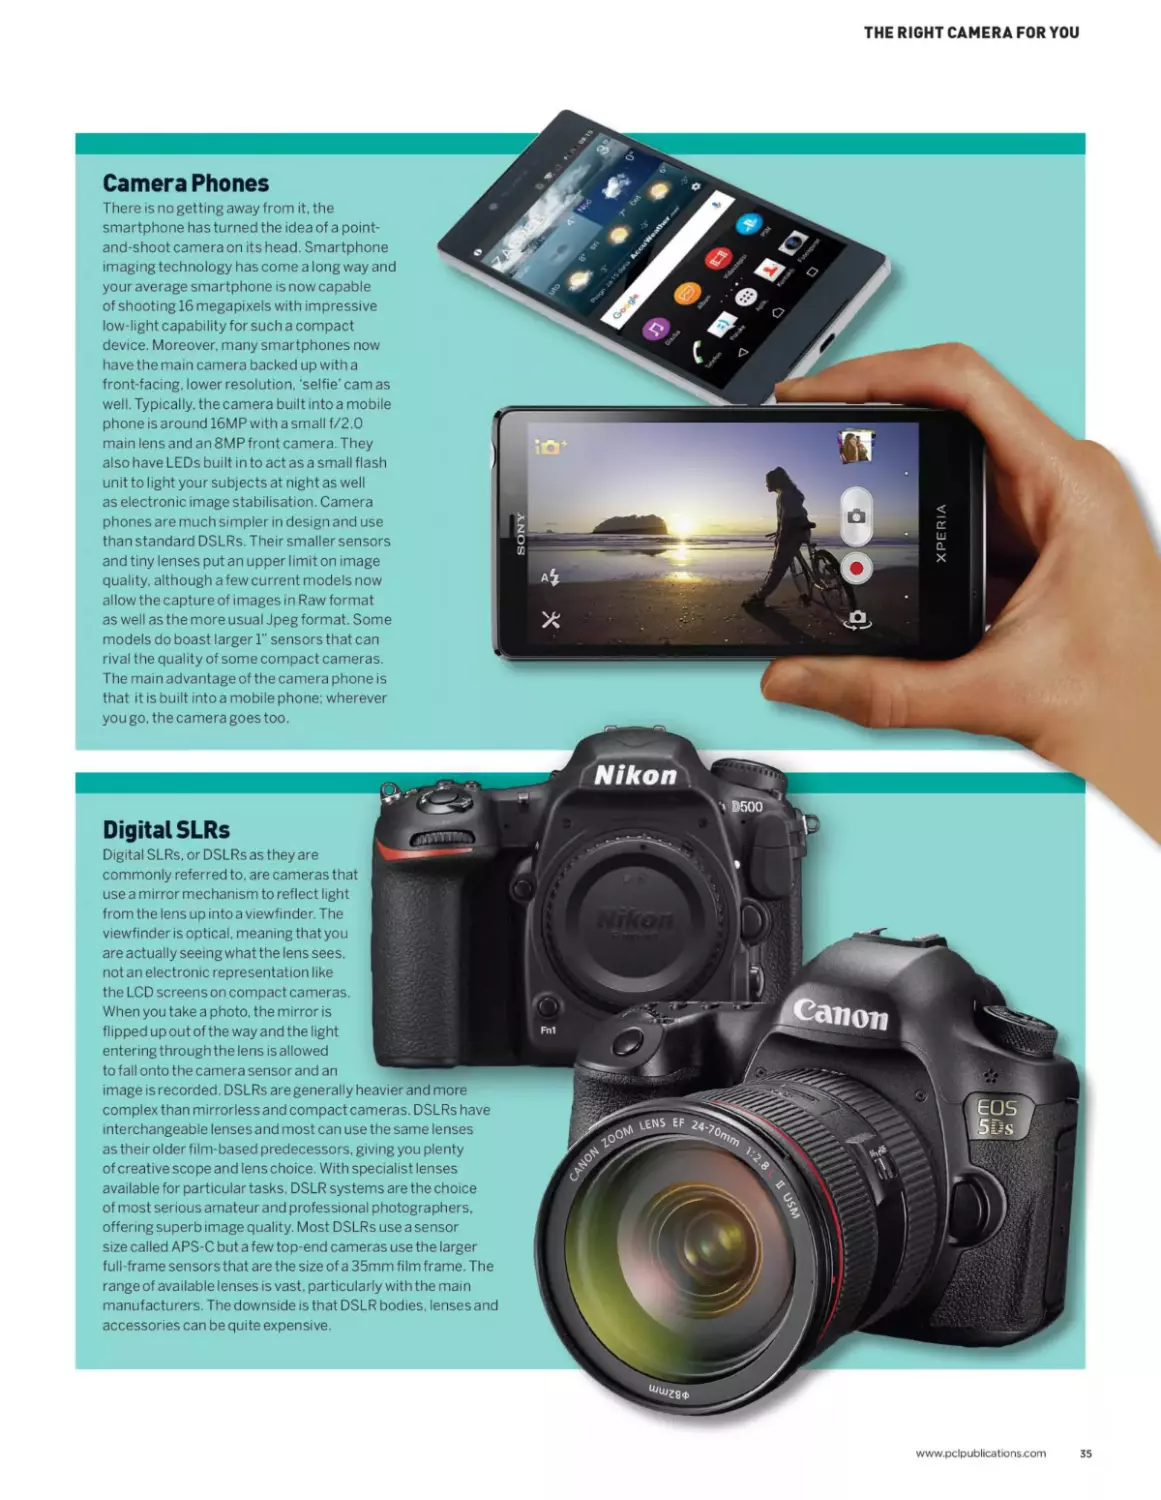
Digital SLRs
Digital SLRs. or DSLRs as they are
i IT I, Wwlh T'V'Tf! t- |t I
use a mirror mechanism to reflect light
from the ens up nto a viewfinder The К ЯИ
viewfinder is optical, meaning that you
are actually seeing what the lens sees.
not an electronic representation like
the LCD screens on compact cameras. ' .
When you take a photo, the mirror is
flipped up out of the way and the light
entering through the lens is allowed Kfergj
to fall onto the camera sensor and an
image is recorded. DSLRs are generally heavier and more
complex than mirrorless and compact cameras. DSLRs have
interchangeable lenses and most can use the same lenses
as their older film-based predecessors, giving you plenty
of creative scope and lens choice. With specialist lenses
available for particular tasks. DSLR systems are the choice
of most serious amateur and professional photographers,
offering superb image quality. Most DSLRs use a sensor
size called APS-C but a few top-end cameras use the larger
full-frame sensors that are the size of a 35mm film frame. The
range of available lenses is vast, particularly with the main
manufacturers. The downside is that DSLR bodies, lenses and
accessories can be quite expensive.
Camera Phones
There is no getting away from it, the
smartphone has turned the idea of a point-
and-shoot camera on its head. Smartphone
imaging technology has come a long way and
your average smartphone is now capable
of shooting 16 megapixels with impressive
low-light capability for such a compact
device. Moreover, many smartphones now
have the main camera backed up with a
front-facing, lower resolution, ‘selfie’ cam as
well. Typically, the camera built into a mobile
phone is around 16MP with a small f/2.0
main lens and an 8MP front camera. They
also have LEDs built in to act as a small flash
unit to light your subjects at night as well
as electronic image stabilisation. Camera
phones are much simpler in design and use
than standard DSLRs. Their smaller sensors
and tiny lenses put an upper limit on image
quality, although a few current models now
allow the capture of images in Raw format
as well as the more usual Jpeg format. Some
models do boast larger Г sensors that can
rival the quality of some compact cameras.
The main advantage of the camera phone is
that it is built into a mobile phone; wherever
you go, the camera goes too.
www.pclpublications.com
35
What lenses
do I need?
We take a look at the main lens types
available foryour camera
It’s no surprise that if you purchase a new camera
with an interchangeable lens system, one of
the first questions you might ask yourself is
‘which lens should I buy for my camera?’. That
is not quite as easy a question to answer
as you would hope. Manufacturers offer
increasingly varied lenses to suit different
photographers’ requirements. To add to
the confusion, there is also quite a varied
range in price and quality to take into q
consideration. On top of that there is
also the cropped sensor and full-frame
issue to consider. Certain lenses
will only work with certain camera
bodies because of the mounting
system used, and so on and on it
goes. Everyone shoots differently,
with a different style and preference
and the type of shot you are trying
to capture will also greatly influence
the kind of lens you need. If you are
a diehard landscape photographer,
then lenses with a greater angle of view
are what you will want to capture the
environment in all its sweeping glory. If
however, you are a portrait photographer,
then your lens requirementswill be quite
different. It’s a bit of a minefield but we’ll
try to break down the main types of lenses
available as you look deeper into your next
choice of lens.e
“If you are a
diehard landscape
photographer, then
lenses with a greater
angle of view are what
you will want to capture
the environment in all its
sweeping glory ”
36
WHAT LENSES DO I NEED?
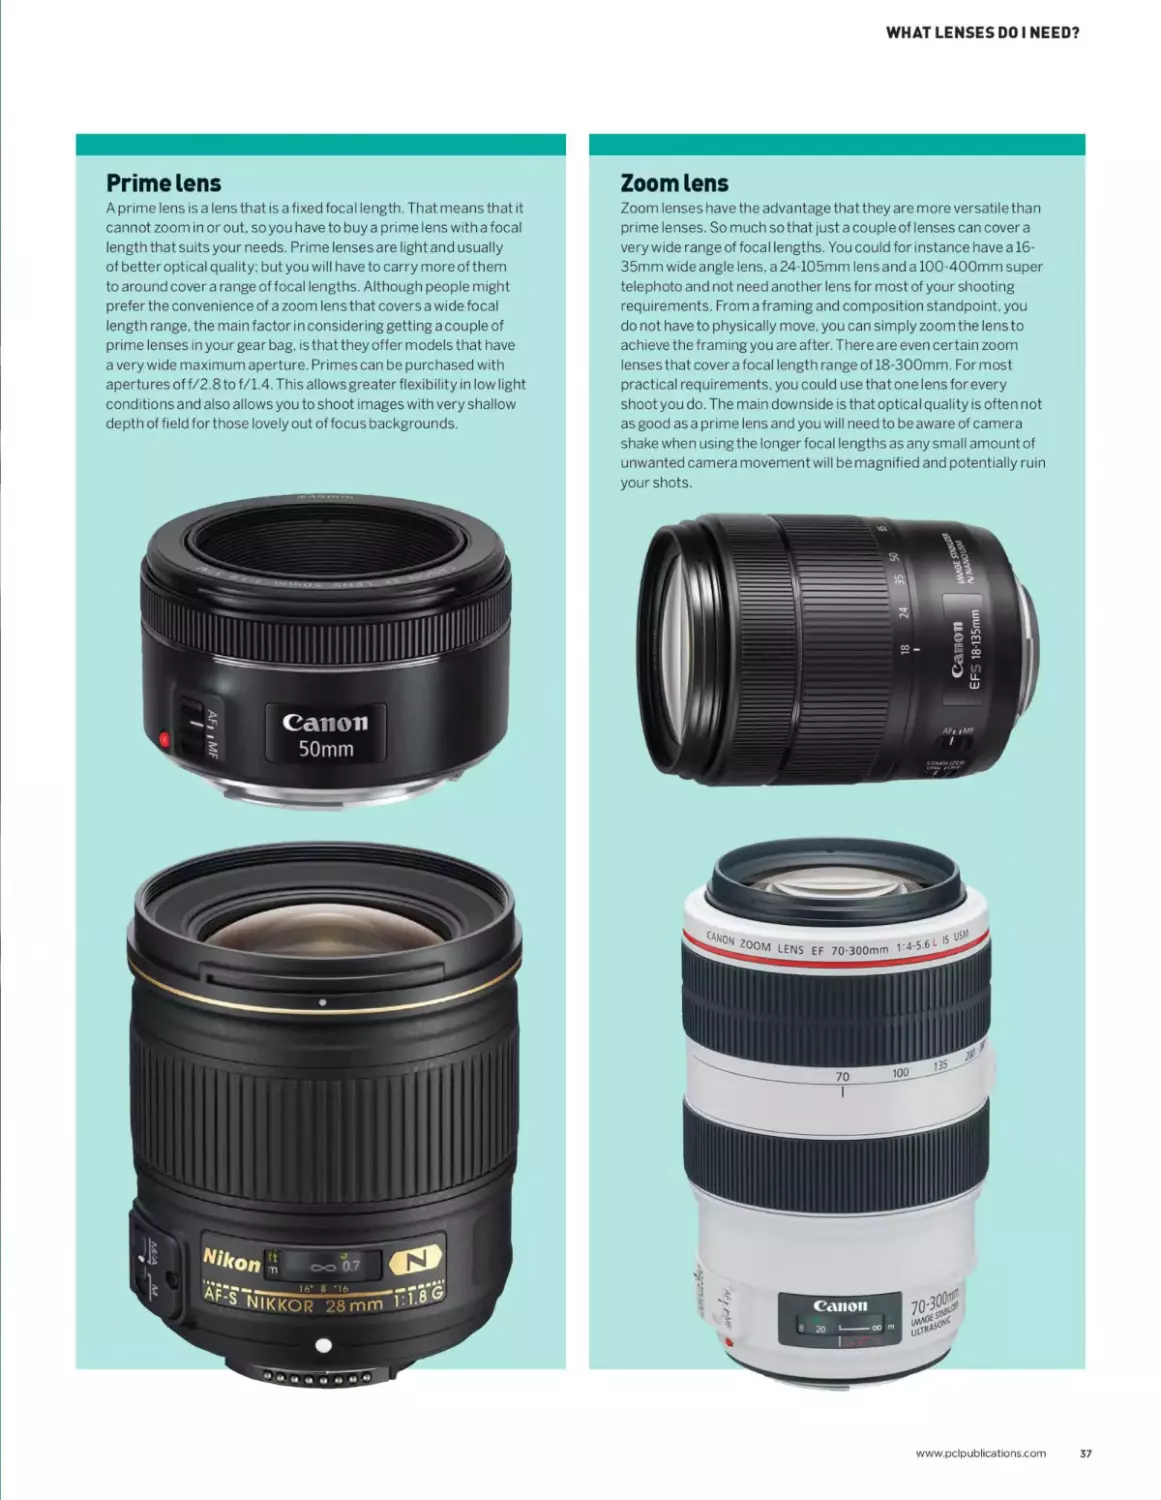
Prime lens
A prime lens is a lens that is a fixed focal length. That means that it
cannot zoom in or out, so you have to buy a prime lens with a focal
length that suits your needs. Prime lenses are light and usually
of better optical quality; but you will have to carry more of them
to around cover a range of focal lengths. Although people might
prefer the convenience of a zoom lens that covers a wide focal
length range, the main factor in considering getting a couple of
prime lenses in your gear bag, is that they offer models that have
a very wide maximum aperture. Primes can be purchased with
apertures of f/2.8 to f/1.4. This allows greater flexibility in low light
conditions and also allows you to shoot images with very shallow
depth of field for those lovely out of focus backgrounds.
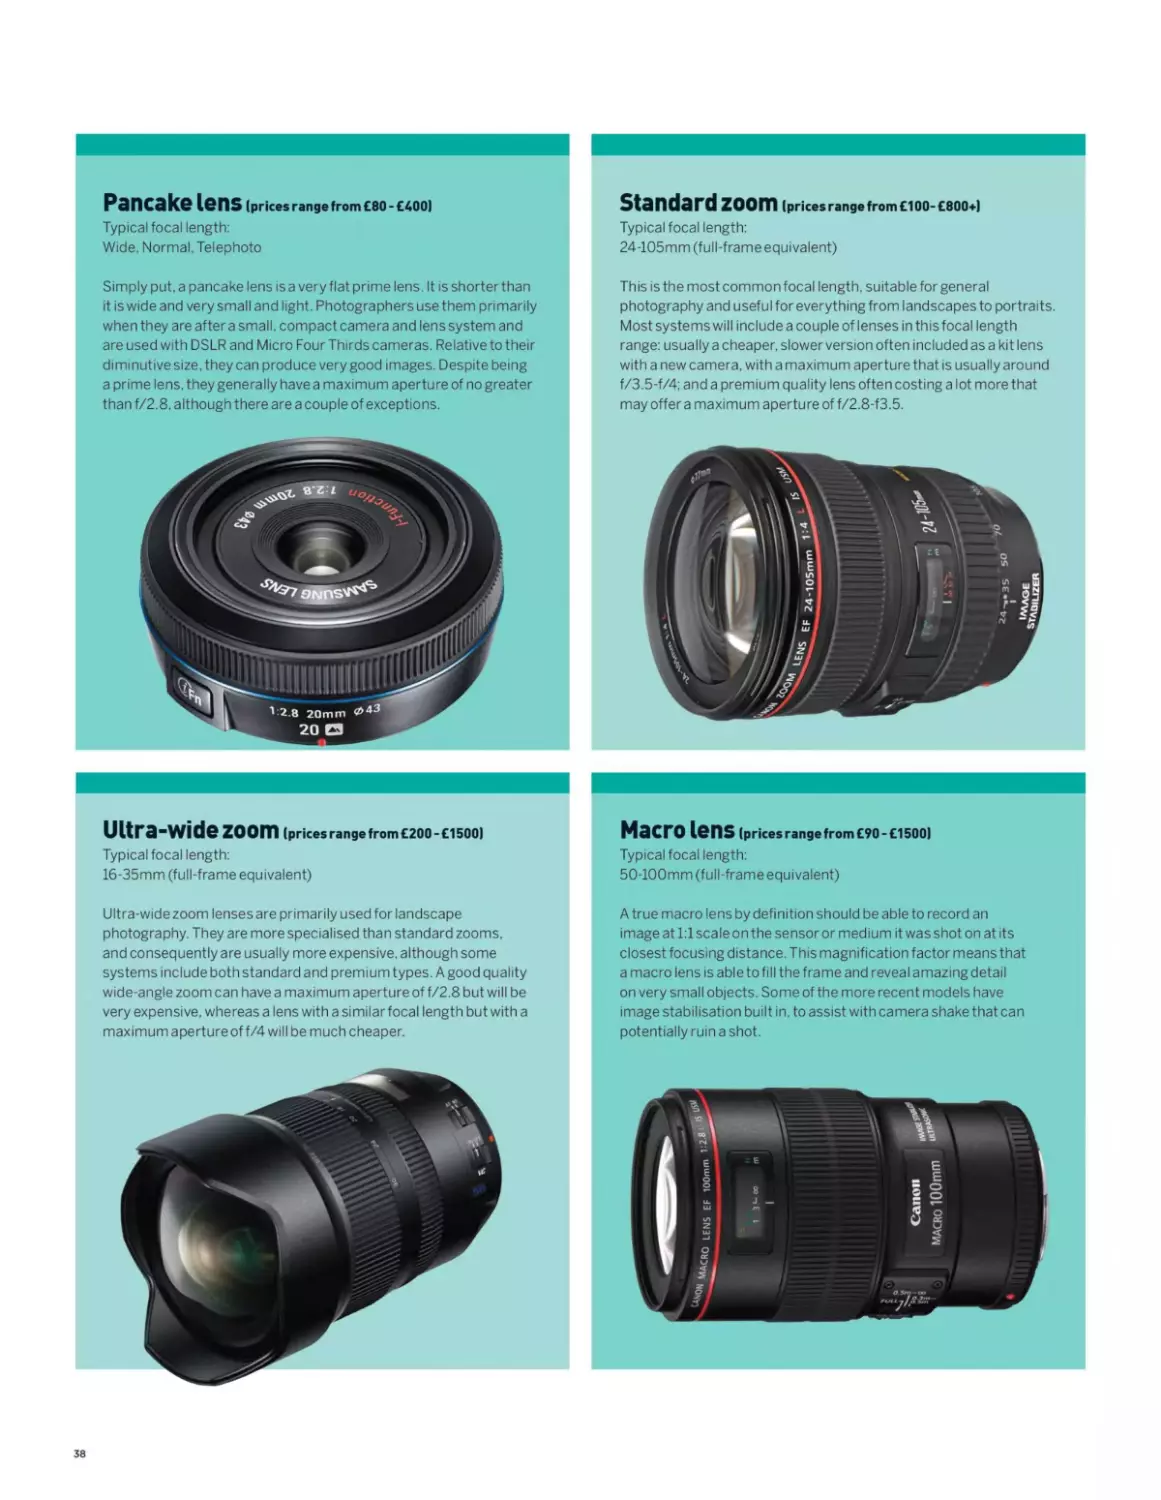
Zoom lens
Zoom lenses have the advantage that they are more versatile than
prime lenses. So much so that just a couple of lenses can cover a
very wide range of focal lengths. You could for instance have a 16-
35mm wideangle lens, a 24-105mm lensand a 100-400mm super
telephoto and not need another lens for most of your shooting
requirements. From a framing and composition standpoint, you
do not have to physically move, you can simply zoom the lens to
achieve the framing you are after. There are even certain zoom
lenses that cover a focal length range of 18-300mm. For most
practical requirements, you could use that one lens for every
shoot you do. The main downside is that optical quality is often not
as good as a prime lens and you will need to be aware of camera
shake when using the longer focal lengths as any small amount of
unwanted camera movement will be magnified and potentially ruin
your shots.
www.pclpublications.com
37
Pancake lens (prices range from £80 - £400)
Typical focal length:
Wide. Normal. Telephoto
Simply put. a pancake lens isa very flat prime lens. It is shorterthan
it is wide and very small and light. Photographers use them primarily
when they are after a small, compact camera and lens system and
are used with DSLR and Micro Four Thirds cameras. Relative to their
diminutive size, they can produce very good images. Despite being
a prime lens, they generally have a maximum aperture of no greater
than f/2.8. although there are a couple of exceptions.
Standard zoom (prices range from £100- £800+)
Typical focal length:
24-105mm (full-frame equivalent)
This is the most common focal length, suitable for general
photography and useful for everything from landscapes to portraits.
Most systems will include a couple of lenses in this focal length
range: usually a cheaper, slower version often included as a kit lens
with a new camera, with a maximum aperture that is usually around
f/3.5-f/4; and a premium quality lens often costing a lot more that
may offer a maximum apertu re of f/2.8-f3.5.
Ultra-wide zoom (prices range from £200 - £1500)
Typical focal length:
16-35mm (full-frame equivalent)
Ultra-wide zoom lenses are primarily used for landscape
photography. They are more specialised than standard zooms,
and consequently are usually more expensive, although some
systems include both standard and premium types. A good quality
wide-angle zoom can have a maximum aperture of f/2.8 but will be
very expensive, whereas a lens with a similarfocal length but with a
maximum aperture of f/4 will be much cheaper.
Macro lens (prices range from £90 - £1500)
Typical focal length:
50-100mm (full-frame equivalent)
A true macro lens by definition should be able to record an
image at 1:1 scale on the sensor or medium it was shot on at its
closest focusing distance. This magnification factor means that
a macro lens is able to fill the frame and reveal amazing detail
on very small objects. Some of the more recent models have
image stabilisation built in, to assist with camera shake that can
potentially ruin a shot.
38
WHAT LENSES DO I NEED?
Medium zoom (prices range from £80-£1000)
Typical focal length:
70-300mm (full-frame equivalent)
The medium telephoto zoom is useful for amateur wildlife or sports
photography and portraits at the shorter end of its focal length
range. Telephoto zooms have a smaller effective aperture than
standard zooms, usually ranging from f/3.5 to f/5.6. A decent 70-
300mm lens can be purchased quite cheaply.
Tilt-shift (prices range from £100- £2500)
Typical focal length:
17mm 24mm 35mm (full-frame equivalent)
A tilt-shift lens is quite a rare breed and not many of its type are
available. It is the modern equivalent of an old bellows film camera.
The lens can be rotated relative to the sensor to control the position
of the area of sharpest focus, as well as moved parallel to the sensor
to move the image area.
www.pclpublications.com
39
Why do I need a tripod?
An essential piece of equipment
Camera ownership goes through a number
of phases. First is the decision about which
camera to actually buy, then comes the
choice of lenses. Then come the choices with
accessories. It may sound like an exaggeration,
but one of the best accessories you can get to
improve your photography, is a good tripod. In
fact, it might be safer to upgrade it from the status
of ’accessory’ to ‘essential purchase’. You might
wonder why a tripod would be considered one of
the top key factors in taking better photographs.
Well, have you ever wanted to take photos in
challenging low light conditions and wondered why
your images are coming out blurry? Have you ever
taken photos of some distant subject with your
superzoom camera at its maximum magnification
and wondered the same thing? This is because one
of the primary causes of unsatisfactory photos
is camera shake. Camera shake is the unwanted
movement of the camera during the capture of the
provides a very stable platform onto which you can
mount your camera, preventing it from moving and
spoiling your shots.
Tripods come in various makes, models and
materials. They are either made from plastic, in the
cheaper models, to metal alloys in the mid-range
versions, all the way up to light but rigid carbon fibre
in the professional models. As the name suggests,
the tripod consists of a three legged arrangement
upon which your camera sits in a tripod mount.
The legs come in 2 or three sections and can be
telescoped out to different heights. The tripod
mount can be tilted, rotated and flipped so you
can shoot at a wide variety of angles as well as in
landscape or portrait orientation. Key factors when
choosing a tripod are rigidity and carrying weight.
The tripod you choose has to be able to support
the weight of your camera and hold it perfectly
still. Some cheaper tripods with plastic heads
and thin aluminium legs are too ‘bouncy’ J
to be used with anything heavier than а уШ
compact or light superzoom. Set the g
tripod up and press down on the top ш
of it. If it flexes by more than a few я
millimetres it’s not going to be ш
stiff enough to support the ш
weight of a heavy camera. g
Top Tip i
fult9of equi‘pmamera ba9
your tripoq ?S aent Under
Of Adding extra91?3* Way
to it- This it ' ^ability
Usef“<witb LPr"cu(aHy
mate^^nd°
shot. This translates as blurry photos, often blurry
enough to ruin the shot completely. The tripod
is instrumental in eliminating camera shake. It
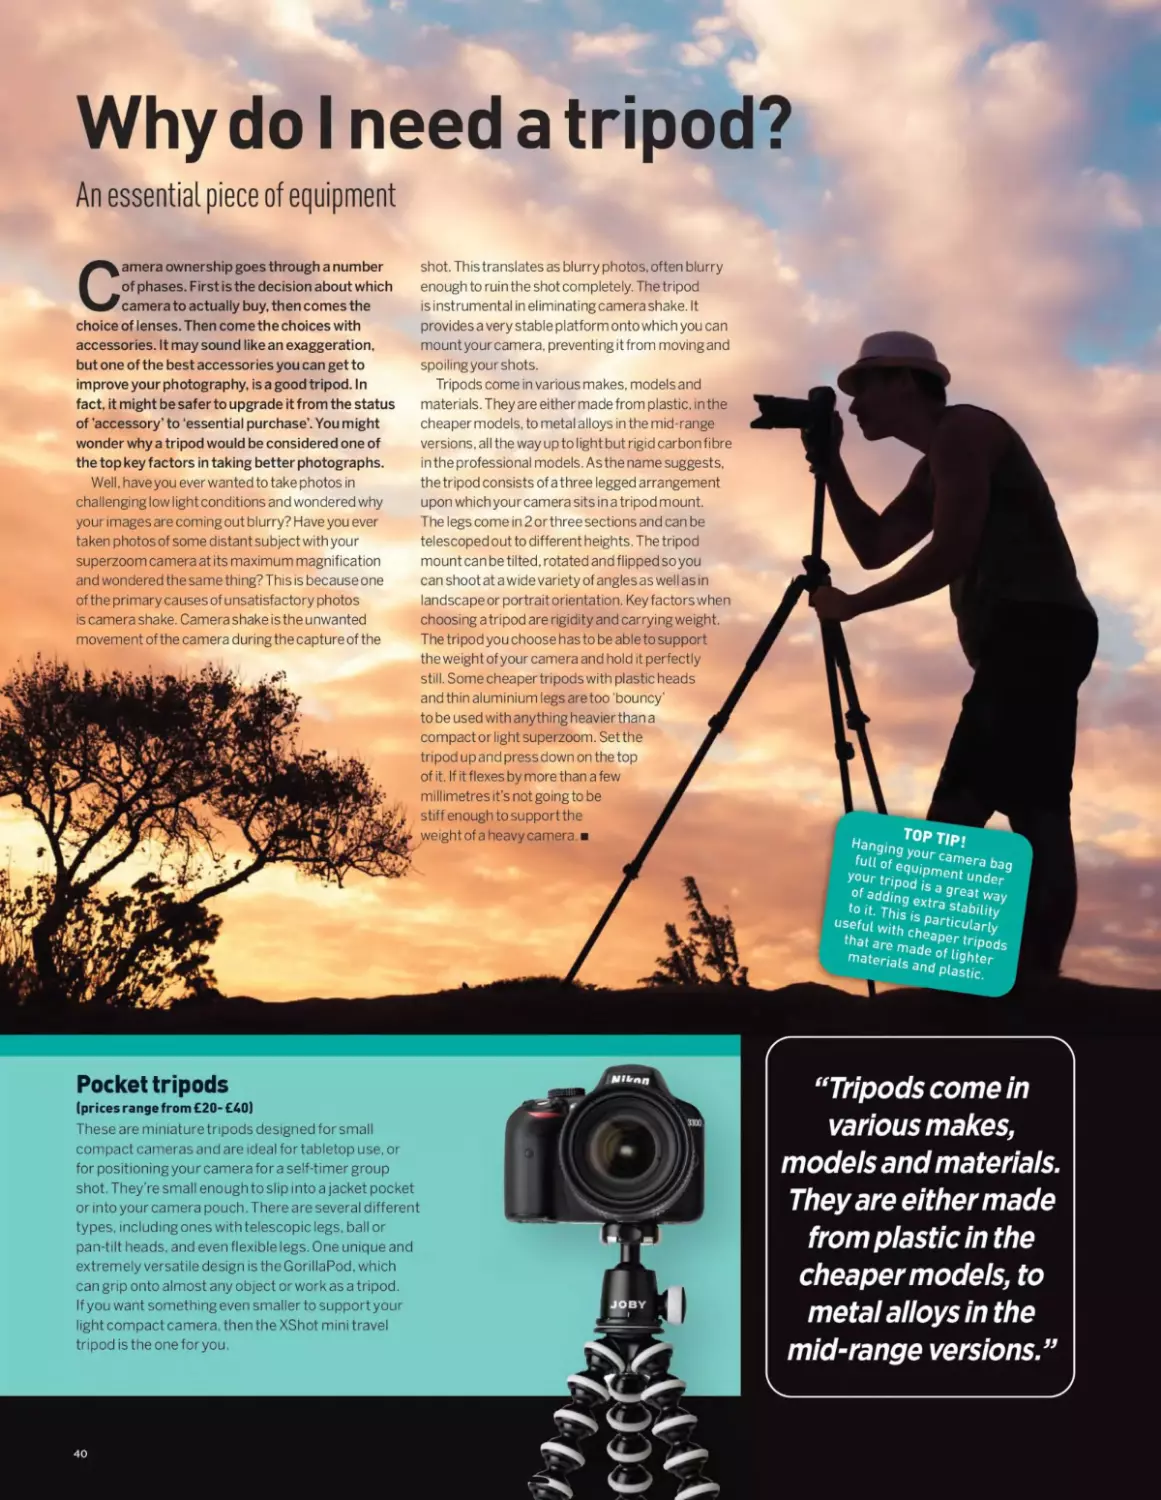
Pocket tripods
(prices range from £20- £40)
These are miniature tripods designed for small
compact cameras and are ideal fortabletop use, or
for positioning you r camera for a self-timer group
shot. They’re small enough to slip into a jacket pocket
or into your camera pouch. There are several different
types, including ones with telescopic legs, ball or
pan-tilt heads, and even flexible legs. One unique and
extremely versatile design is the GorillaPod, which
can grip onto almost any object or work as a tripod.
If you want something even smaller to support your
light compact camera, then the XShot mini travel
tripod is the one for you.
“Tripods come in
various makes,
models and materials.
They are either made
from plastic in the
cheaper models, to
metal alloys in the
mid-range versions.”
40
WHY DO I NEED A TRIPOD?
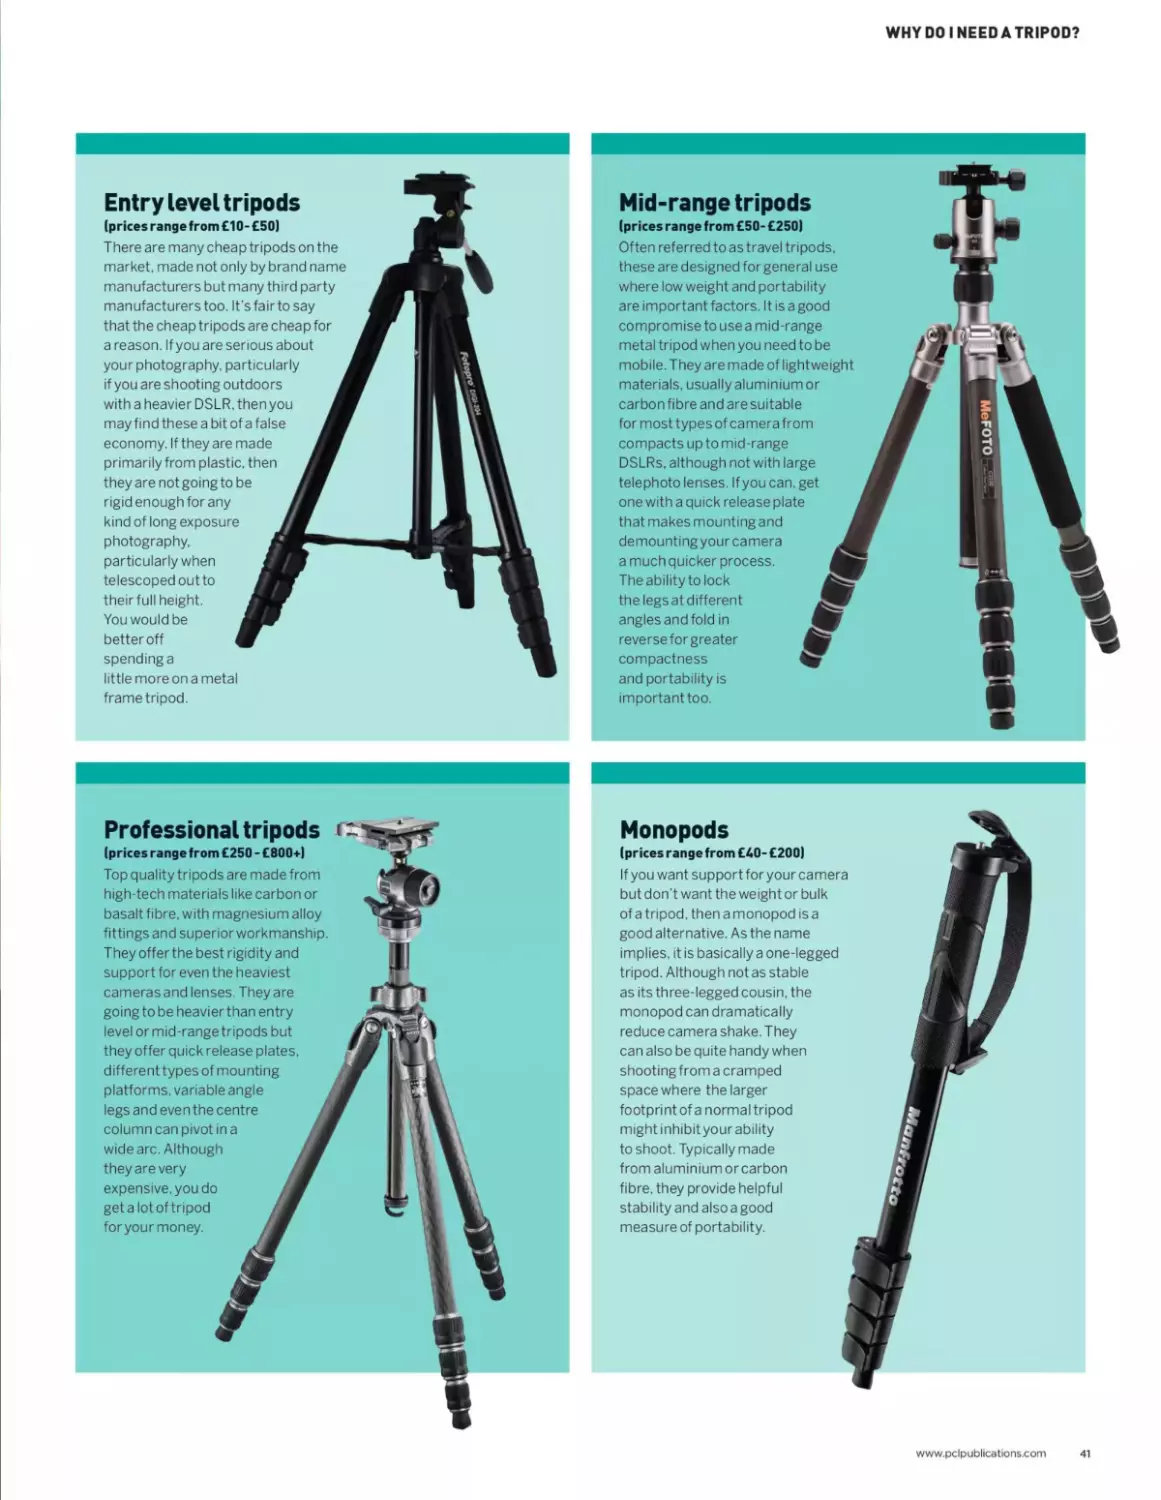
Entry level tripods
(prices range from £10-£50)
There are many cheap tripods on the
market, made not only by brand name
manufacturers but many third party
manufacturers too. It’s fair to say
that the cheap tripods are cheap for
a reason. If you are serious about
your photography, particularly
if you are shooting outdoors
with a heavier DSLR. then you
may find these a bit of a false
economy. If they are made
primarily from plastic, then
they are not going to be
rigid enough for any
kind of long exposure
photography,
particularly when
telescoped out to
their full height.
You would be
better off
spending a
little more on a metal
frame tripod.
Mid-range tripods
(prices range from £50- £250)
Often referred to as travel tripods,
these are designed for general use
where low weight and portability
are important factors. It is a good
compromise to use a mid-range
metal tripod when you need to be
mobile. They are made of lightweight
materials, usually aluminiumor
carbon fibre and are suitable
for most types of camera from
compacts up to mid-range
DSLRs, although not with large
telephoto lenses. If you can, get
one with a quick release plate
that makes mounting and
demounting your camera
a much quicker process.
The ability to lock
the legs at different
angles and fold in
reverse for greater
compactness
and portability is
important too.
MeFOTO
Professional tripods
(prices range from £250 - £800*)
Top quality tripods are made from
high-tech materials like carbon or
basalt fibre, with magnesium alloy
fittings and superior workmanship.
They offer the best rigidity and
support for even the heaviest
cameras and lenses. They are
goingto be heavier than entry
level ormid-rangetripods but
they offer quick release plates,
different types of mounting
platforms, variable angle
legs and even the centre
column can pivot in a
wide arc. Although
they are very
expensive, you do
get a lot of tripod
for your money.
Monopods
(prices range from £40- £200)
If you want supportforyourcamera
but don’t want the weight or bulk
of a tripod, then a monopod is a
good alternative. As the name
implies, it is basically a one-legged
tripod. Although not as stable
as its three-legged cousin, the
monopod can dramatically
reduce camera shake. They
can also be quite handy when
shooting from a cramped
space where the larger
footprint of a normal tripod
might inhibit your ability
to shoot. Typically made
from aluminium or carbon
fibre, they provide helpful
stability and also a good
measure of portability.
www.pclpublications.com
41
TECHNICAL
QUICK-START
A handy quick reference guide to some key photographic techniques
If you are new to photography or simply brushing upon your
skills, the core elements that make up good photography
are your key to getting better exposures, better
composition and more creative results as a by product. Once
you have a good grasp of the essentials, your photography
will feel more natural, intuitive and you can be the one
making the all-important decisions about how you want your
shots to look, rather than the camera's best guess. We will
explore more in further issues, but for now, let’s tap into the
fundamentals with our handy quick-start guides.
44 Aperture and depth of field explained
46 How does shutter speed affect photos?
48 How ISO works on a digital camera
50 Photography software
“Once you have a good grasp of the essentials,
your photography will feel more natural, intuitive
and you can be the one making the all-important
decisions about how you want your shots to look,
rather than the camera’s best guess.”
42 www.pclpublications.com
TECHNICAL QUICK-START
Aperture and depth
of field explained
A key technique that controls how much of your
photograph is in focus
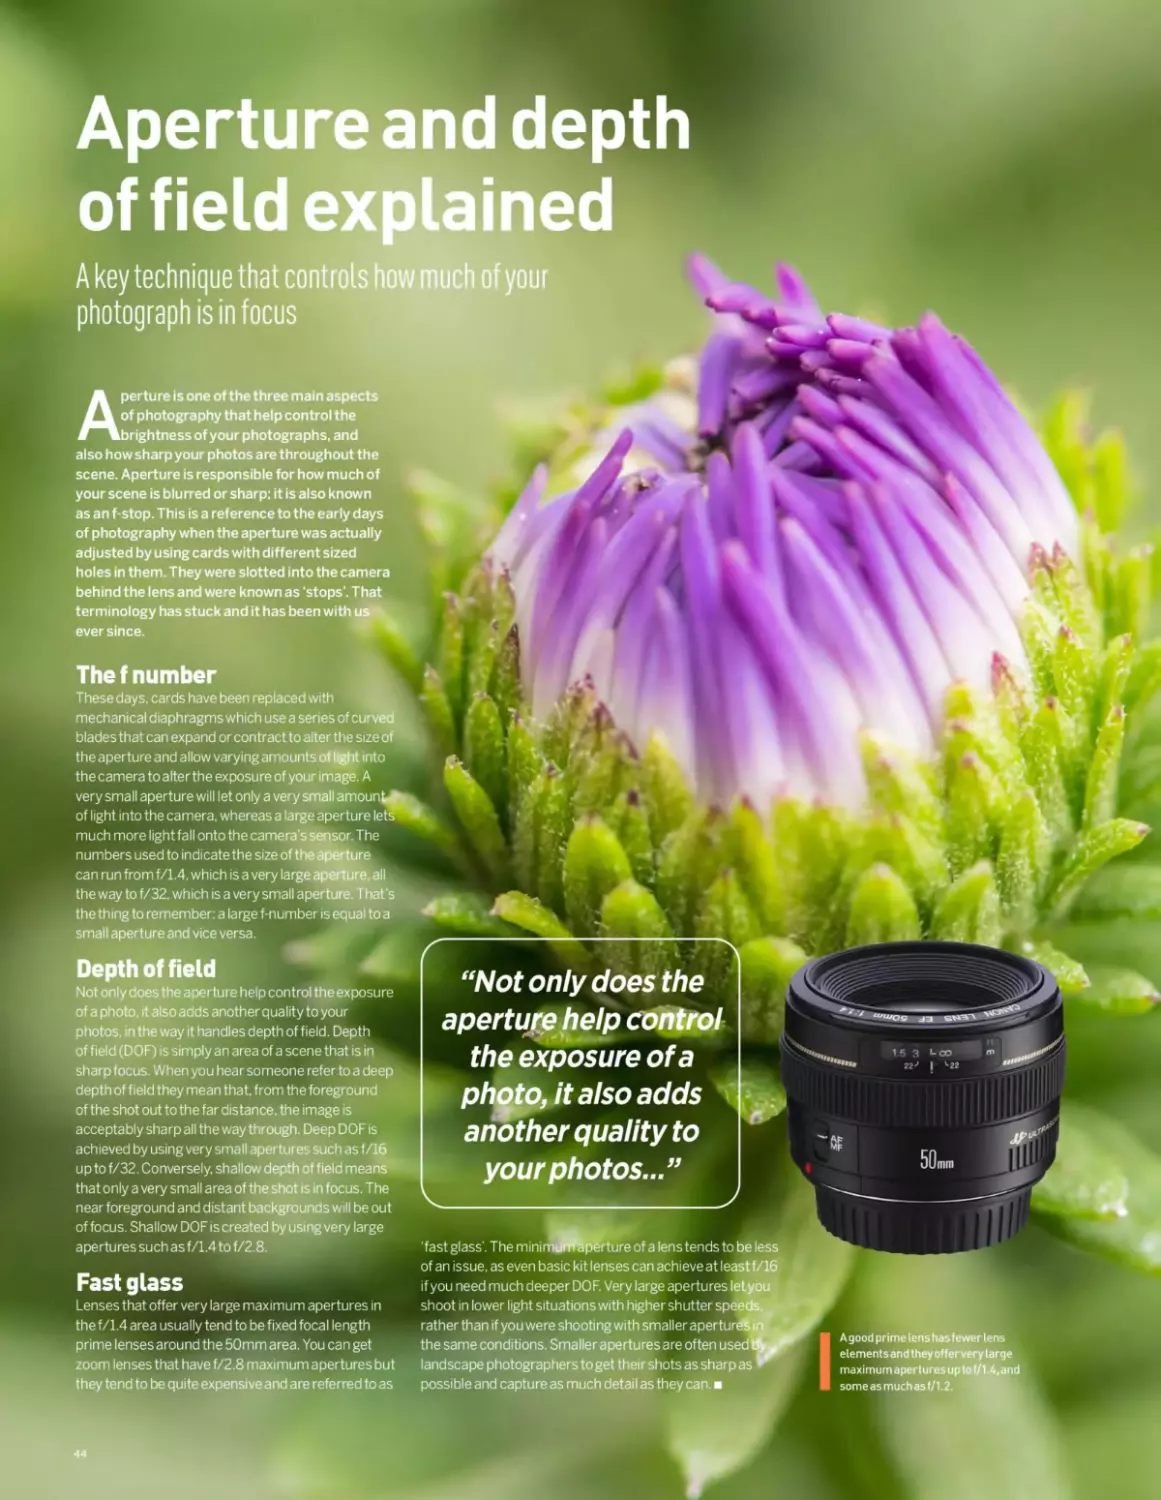
Aperture is one of the three main aspects
of photography that help control the
brightness of your photographs, and
also how sharp your photos are throughout the
scene. Aperture is responsible for how much of
your scene is blurred or sharp; it is also known
as an f-stop. This is a reference to the early days
of photography when the aperture was actually
adjusted by using cards with different sized
holes in them. They were slotted into the camera
behind the lens and were known as ‘stops’. That
terminology has stuck and it has been with us
ever since.
The f number
These days, cards have been replaced with
mechanical diaphragms which use a series of curved
blades that can expand or contract to alter the size of
the aperture and allow varying amounts of light into
the camera to alter the exposure of your image. A
very small aperture will let only a very small amount^
of light into the camera, whereas a large aperture lets
much more light fall onto the camera’s sensor. The
numbers used to indicate the size of the aperture
can run from f/1.4, which is a very large aperture, all
the way to f/32, which is a very small aperture. That’s
the thing to remember: a large f-number is equal to a
small aperture and vice versa.
Depth of field
Not only does the aperture help control the exposure
of a photo, it also adds another quality to your
photos, in the way it handles depth of field. Depth
of field (DOF) is simply an area of a scene that is in
sharp focus. When you hear someone refer to a deep
depth of field they mean that, from the foreground
of the shot out to the far distance, the image is
acceptably sharp all the way through. Deep DOF is
achieved by using very small apertures such as f/16
up to f/32. Conversely, shallow depth of field means
that only a very small area of the shot is in focus. The
near foreground and distant backgrounds will be out
of focus. Shallow DOF is created by using very large
apertures such asf/1.4to f/2.8.
Fast glass
Lenses that offer very large maximum apertures in
the f/1.4 area usually tend to be fixed focal length
prime lenses around the 50mm area. You can get
zoom lenses that have f/2.8 maximum apertures but
they tend to be quite expensive and are referred to as
A good prime lens has fewer lens
elementsand theyoffer very large
maximum apertures up to f/1.4,and
someasmuchasf/1.2.
“Not only does the
aperture help control
the exposure of a
photo, it also adds
another quality to
your photos...”
22> | ^22
50mm
‘fast glass’. The minimunfe|5?rture of a lens tends to be less
of an issue, as even basic kit lenses can achieve at leastf/16
if you need much deeper DOF. Very large apertures let you
shoot in lower light situations with higher shutter speeds,
rather than if you were shooting with smaller aperturdSn
the same conditions. Smaller apertures are often used eV
landscape photographers to get their shots as sharp as
possible and capture as much detail as they can.
44
APERTURE AND DEPTH OF FIELD EXPLAINED
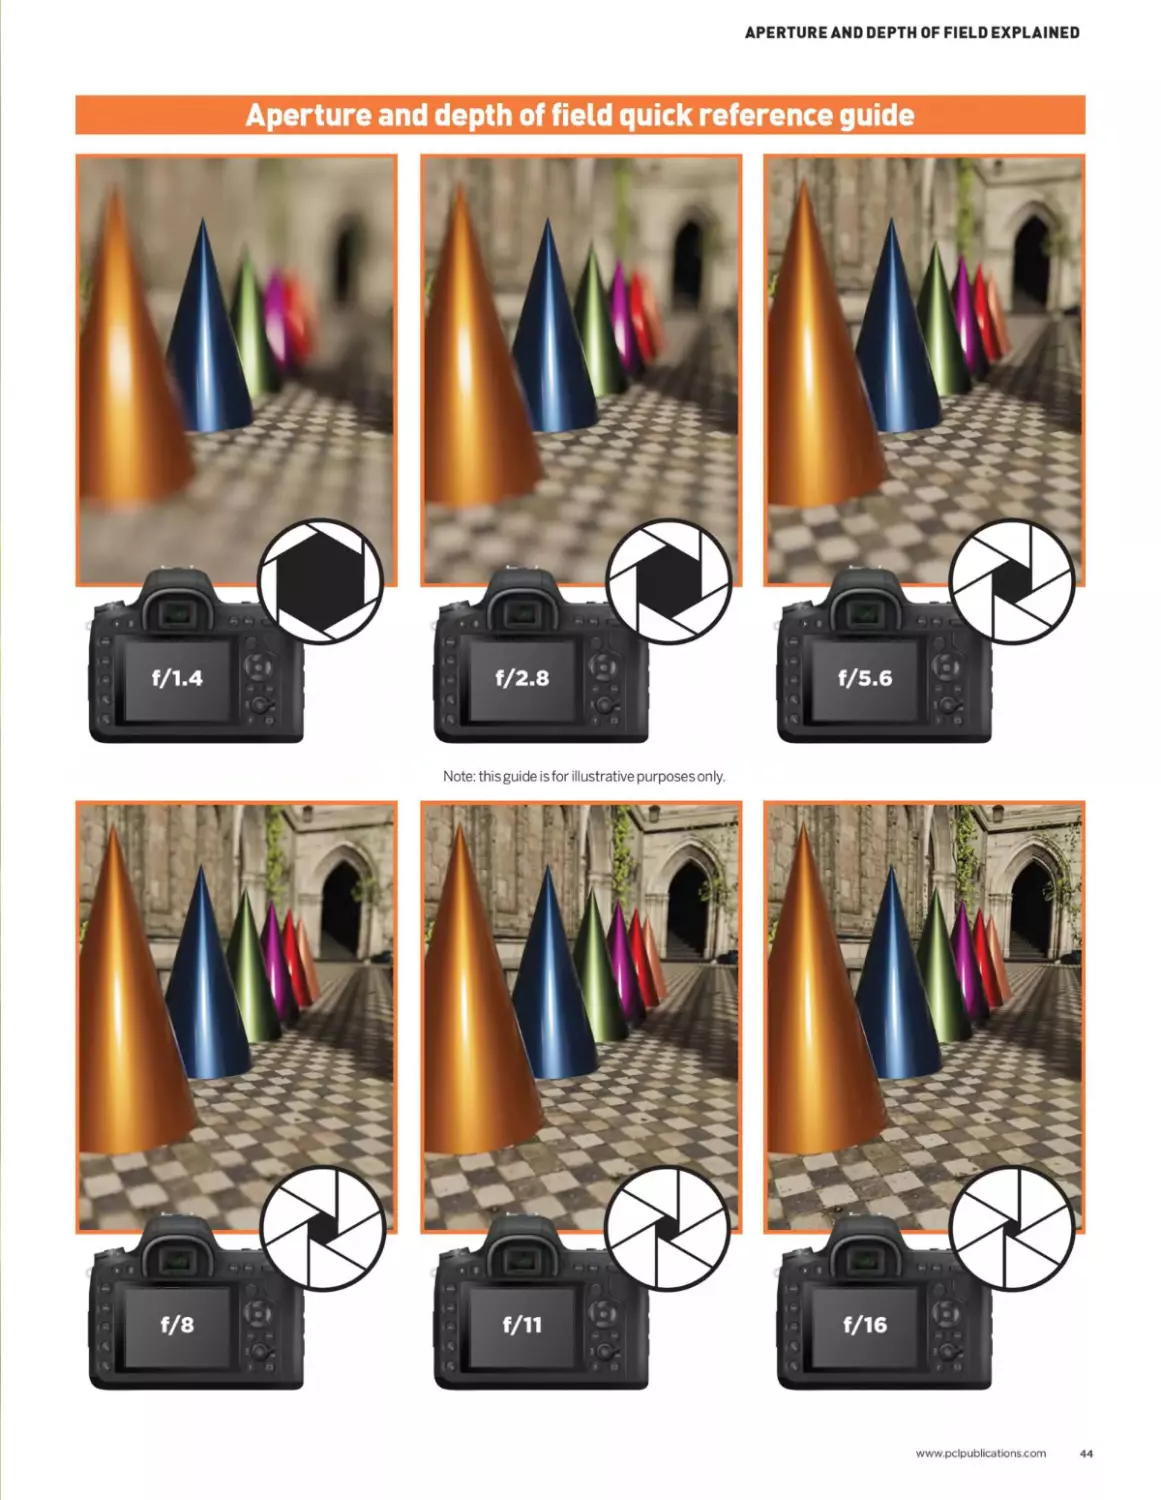
Aperture and depth of field quickreferenceguide
Note: this guide is for illustrative purposes only.
www.pclpublications.com
44
How does shutter
speed affect photos?
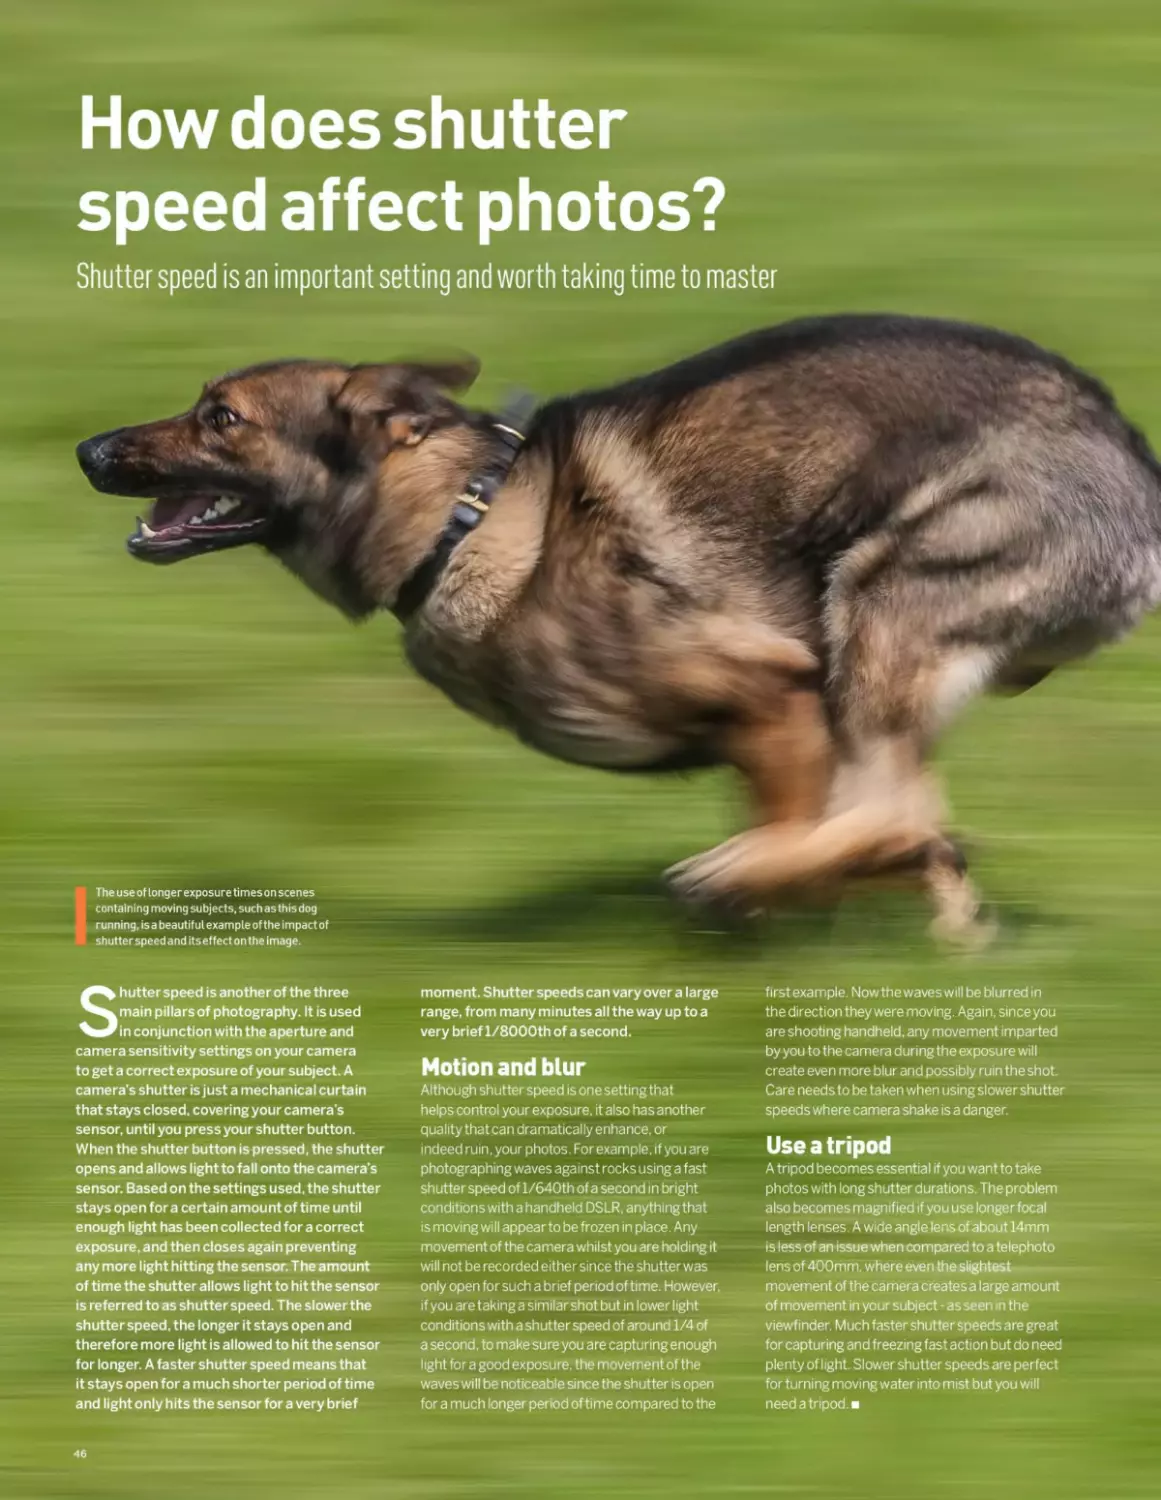
Shutter speed is an important setting and worth taking time to master
Shutter speed is another of the three
main pillars of photography. It is used
in conjunction with the aperture and
camera sensitivity settings on your camera
to get a correct exposure of your subject. A
camera’s shutter is just a mechanical curtain
that stays closed, covering your camera’s
sensor, until you press your shutter button.
When the shutter button is pressed, the shutter
opens and allows light to fall onto the camera’s
sensor. Based on the settings used, the shutter
stays open for a certain amount of time until
enough light has been collected for a correct
exposure, and then closes again preventing
any more light hitting the sensor. The amount
of time the shutter allows light to hit the sensor
is referred to as shutter speed. The slower the
shutter speed, the longer it stays open and
therefore more light is allowed to hit the sensor
for longer. A faster shutter speed means that
it stays open for a much shorter period of time
and light only hits the sensor for a very brief
moment. Shutter speeds can vary over a large
range, from many minutes all the way up to a
very brief l/8000th of a second.
Motion and blur
Although shutter speed is one setting that
helps control your exposure, it also has another
quality that can dramatically enhance, or
indeed ruin, your photos. Forexample, if you are
photographing waves against rocks using a fast
shutter speed of l/640th of a second in bright
conditions with a handheld DSLR.anythingthat
is moving will appear to be frozen in place. Any
movement of the camera whilst you are holding it
will not be recorded either since the shutter was
only open for such a brief period of time. However,
if you are taking a similar shot but in lower light
conditions with a shutter speed of around 1/4 of
a second, to make sure you are capturing enough
light for a good exposure, the movement of the
waves will be noticeable since the shutter is open
for a much longer period of time compared to the
first example. Now the waves will be blurred in
the direction they were moving. Again, since you
are shooting handheld, any movement imparted
by you to the camera during the exposure will
create even more blur and possibly ruin the shot.
Care needs to be taken when using slower shutter
speeds where camera shake is a danger.
Use a tripod
A tripod becomes essential if you want to take
photos with long shutter durations. The problem
also becomes magnified if you use longer focal
length lenses. A wide angle lens of about 14mm
is less of an issue when compared to a telephoto
lens of 400mm, where even the slightest
movement of the camera creates a large amount
of movement in your subject - as seen in the
viewfinder. Much faster shutter speeds are great
for capturing and freezing fast action but do need
plenty of light. Slower shutter speeds are perfect
for turning moving water into mist but you will
need a tripod.
46
HOW DOES SHUTTER SPEED AFFECT PHOTOS?
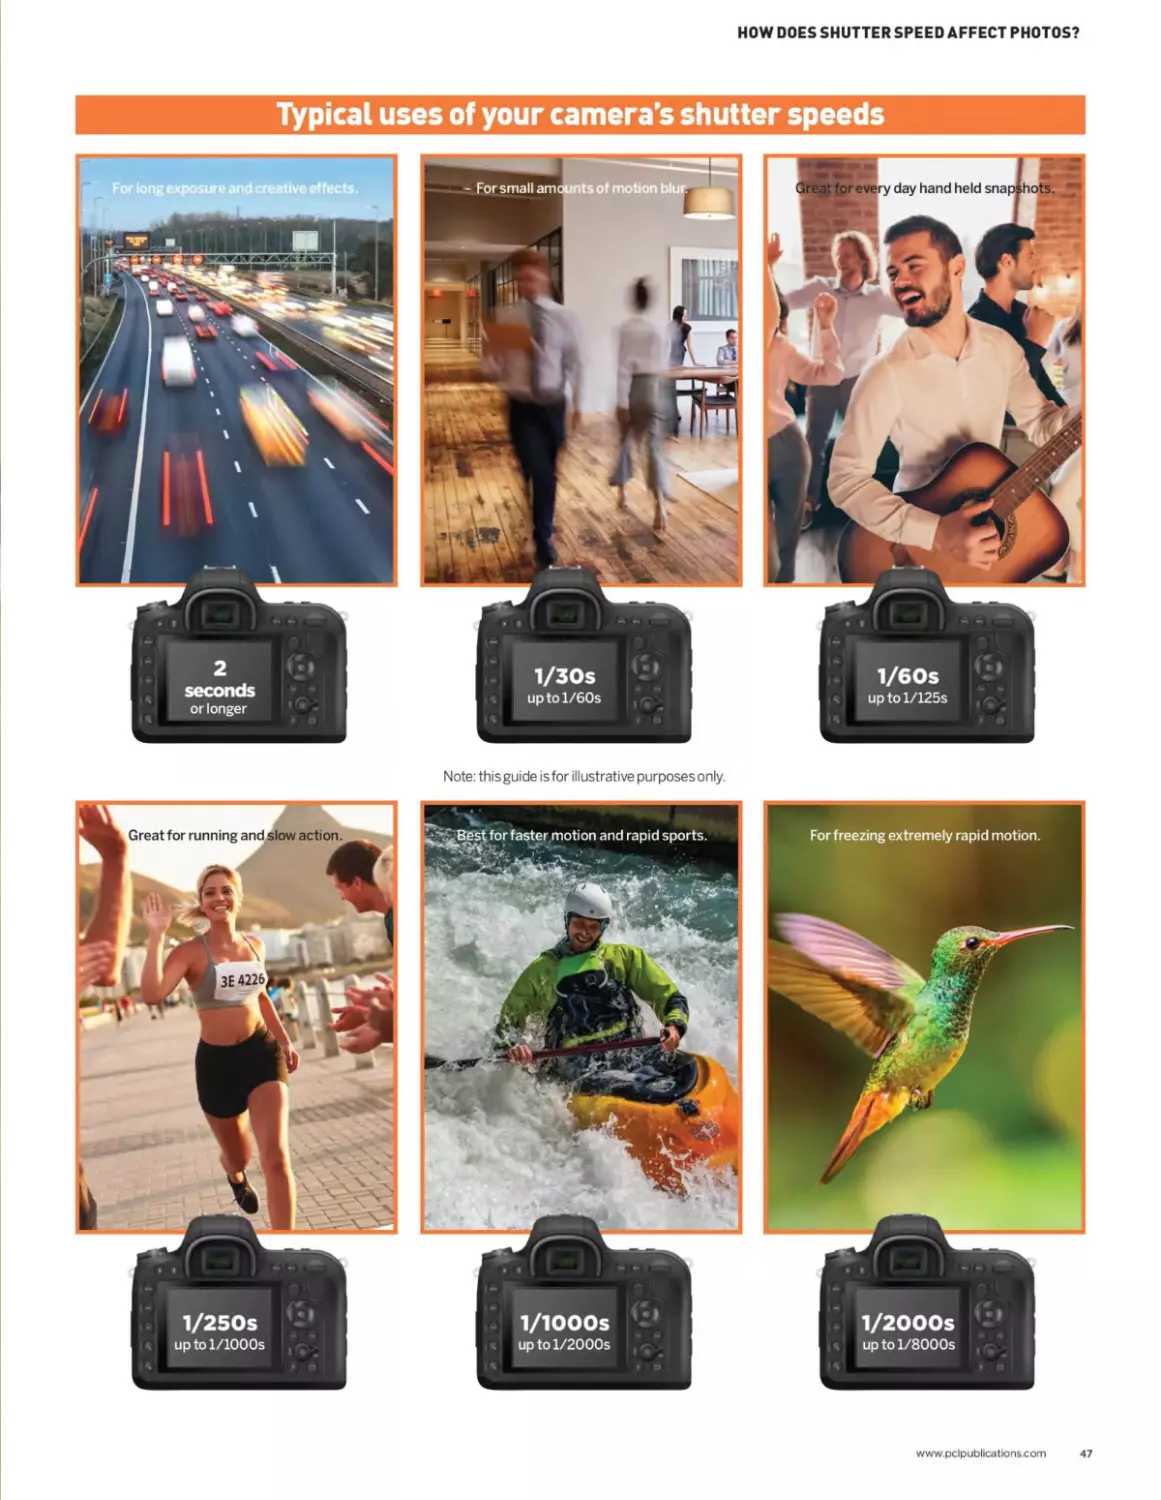
Typical uses of your camera's shutter speeds
Note: this guide is for illustrative purposes only.
1/IOOOs
up to l/2000s
1/2OOOS
up to l/8000s
www.pclpublications.com
47
How ISO works on
a digital camera
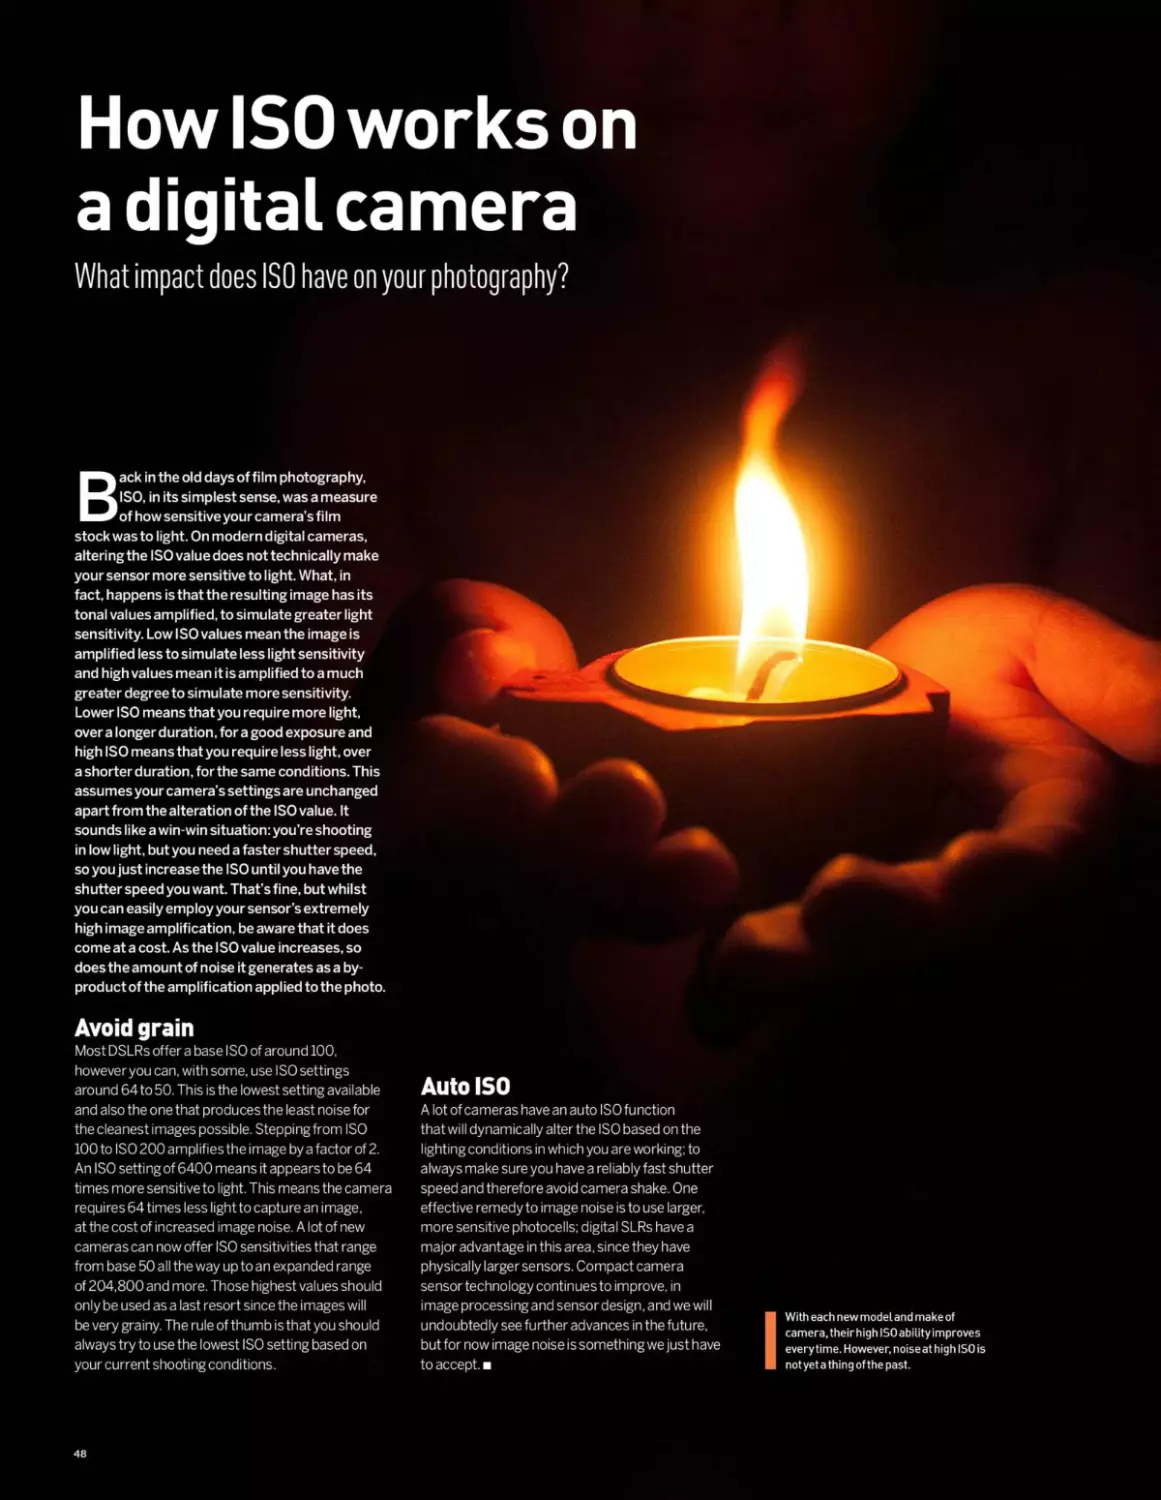
What impact does ISO have on your photography?
Back in the old days of film photography,
ISO, in its simplest sense, was a measure
of how sensitive your camera’s film
stock was to light. On modern digital cameras,
altering the ISO value does not technically make
your sensor more sensitive to light. What, in
fact, happens is that the resulting image has its
tonal values amplified, to simulate greater light
sensitivity. Low I SO values mean the image is
amplified less to simulate less light sensitivity
and high values mean it is amplified to a much
greater degree to simulate more sensitivity.
Lower ISO means that you require more light,
over a longer duration, for a good exposure and
high ISO means that you require less light, over
a shorter duration, for the same conditions. This
assumes your camera’s settings are unchanged
apart from the alteration of the ISO value. It
sounds like a win-win situation: you’re shooting
in low light, but you need a faster shutter speed,
so you just increase the ISO until you have the
shutter speed you want. That’s fine, but whilst
you can easily employ your sensor’s extremely
high image amplification, be aware that it does
come at a cost. As the I SO value increases, so
does the amount of noise it generates as a by-
product of the amplification applied to the photo.
Avoid grain
Most DSLRs offer a base ISO of around 100,
howeveryou can. with some, use ISO settings
around 64 to 50. This is the lowest setting available
and also the one that produces the least noise for
the cleanest images possible. Stepping from ISO
100 to ISO 200 amplifies the image by a factor of 2.
An ISO setting of 6400 means it appears to be 64
times more sensitive to light. This means the camera
requires 64 times less lightto capture an image,
at the cost of increased image noise. A lot of new
cameras can now offer ISO sensitivities that range
from base 50 all the way up to an expanded range
of 204,800 and more. Those highest values should
only be used as a last resort since the images will
be very grainy. The rule of thumb is that you should
always try to use the lowest ISO setting based on
your current shooting conditions.
Auto ISO
A lot of cameras have an auto ISO function
that will dynamically alter the ISO based on the
lighting conditions in which you are working; to
always make sure you have a reliably fast shutter
speed and therefore avoid camera shake. One
effective remedy to image noise is to use larger,
more sensitive photocells; digital SLRs have a
major advantage in this area, since they have
physically larger sensors. Compact camera
sensor technology continues to improve, in
image processing and sensor design, and we will
undoubtedly see further advances in the future,
but for now image noise is something we just have
to accept.
I With each new model and make of
camera, theirhigh ISO ability improves
everytime. However, noise at high ISO is
notyet a thing of the past.
48
HOW ISO WORKS ON A DIGITAL CAMERA
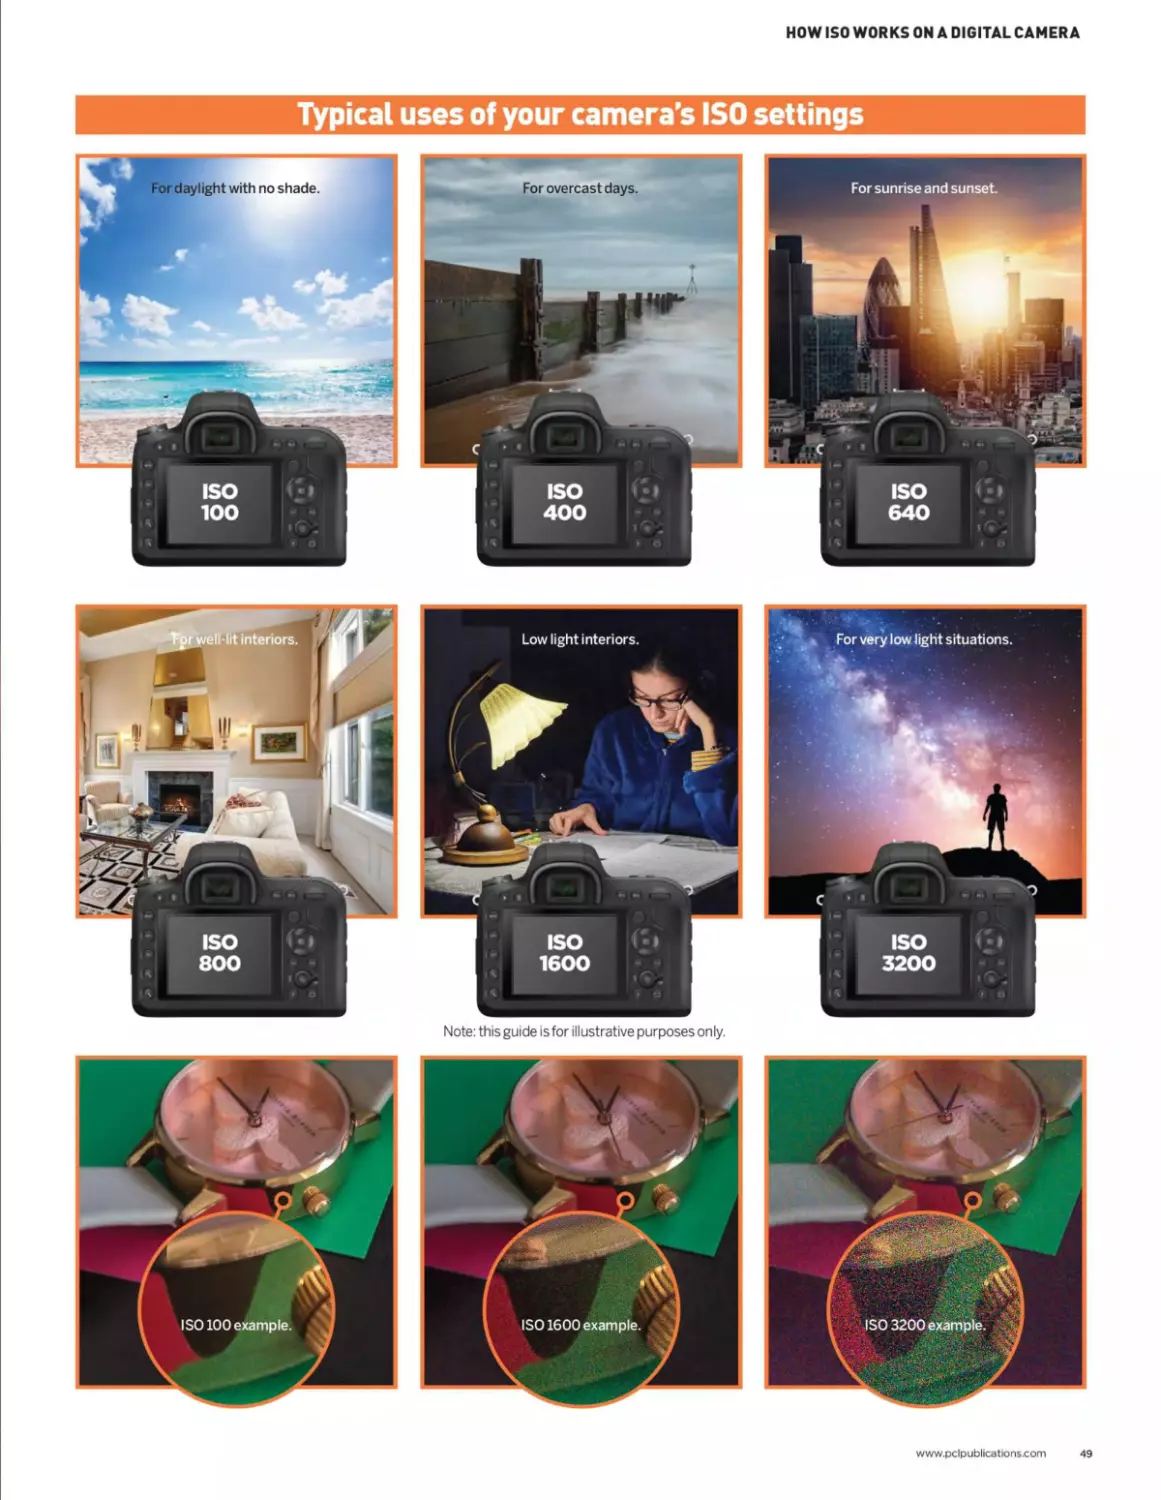
Typical uses of your camera's ISO settings
ISO
1600
Note: this guide is for illustrative purposes only.
www.pclpublications.com
49
Photography sof t wa re
Howto bring your photos to life
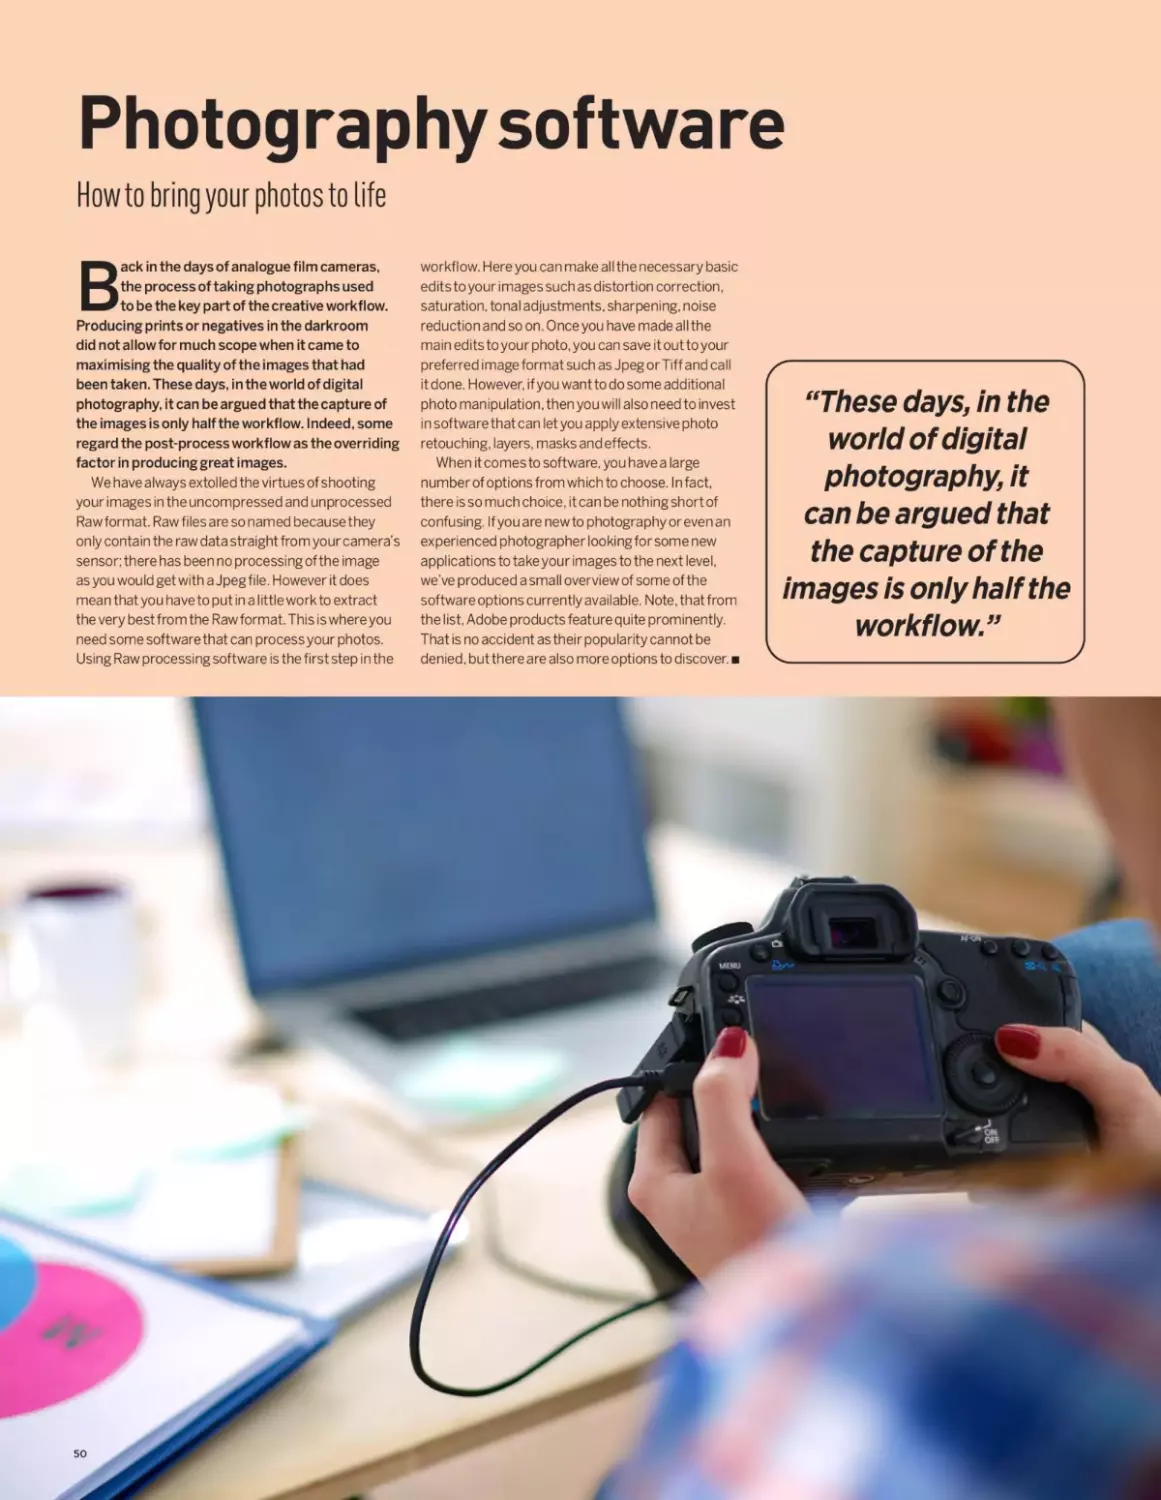
Back in the days of analogue film cameras,
the process of taking photographs used
to be the key part of the creative workflow.
Producing prints or negatives in the darkroom
did not allow for much scope when it came to
maximising the quality of the images that had
been taken. These days, in the world of digital
photography, it can be argued that the capture of
the images is only half the workflow. I ndeed, some
regard the post-process workflow as the overriding
factor in producing great images.
We have always extolled the virtues of shooting
your images in the uncompressed and unprocessed
Raw format. Raw files are so named because they
only contain the raw data straight from your camera’s
sensor; there has been no processing of the image
as you would get with a Jpeg file. However it does
mean that you have to put in a little work to extract
the very best from the Raw format. This is where you
need some software that can process your photos.
Using Raw processing software is the first step in the
workflow. Here you can make all the necessary basic
edits to your images such as distortion correction,
saturation, tonal adjustments, sharpening, noise
reduction and so on. Once you have made all the
main edits to your photo, you can save it out to your
preferred image format such as Jpegor Tiff and call
it done. However, if you want to do some additional
photo manipulation, then you will also need to invest
in software that can let you apply extensive photo
retouching, layers, masks and effects.
When it comes to software, you have a large
number of options from which to choose. In fact,
there is so much choice, it can be nothing short of
confusing. If you are new to photography or even an
experienced photographer looking for some new
applications to take your images to the next level,
we’ve produced a small overview of some of the
software options currently available. Note, that from
the list, Adobe products feature quite prominently.
That is no accident as their popularity cannot be
denied, but there are also more options to discover.
"These days, in the
world of digital
photography, it
can be argued that
the capture of the
images is only half the
work flow.”
PHOTOGRAPHY SOFTWARE
Adobe Photoshop
(Windows and Mac - £120 annual subscription)
Photoshop is probably one of the best known editing programs out
there; so much so that the name of the software has actually become a
verb, as in ‘that image has been Photoshopped’. The great thing about
Photoshop is that it is relatively easy to use, if you only need to bring the
simplest tools to bear on your images, but it is also hugely sophisticated
if you require the most advanced editing tools available. It is the go-to
application not only for photographers but digital artists, designers
and even videographers and 3D artists.
It is probably the
most popular layer-
based image editing
and photo retouching
software currently
available. Photoshop is
now available as part of
Adobe’s Creative Cloud
subscription service.
ACDSee Photo Studio
(Windows - £50 one-time charge)
ACDSee has actually been around for some time now and can
be considered a competent alternative to both Photoshop and
Lightroom. From its humble beginnings, this high-end version of the
software has developed into a fully featured image management
tool, Raw processor and image manipulation program.
Anyone who has used Lightroom will
note that ACDSee has a number of
different workspace environments. Each
workspace has a specificf unctionand
each can be activated and accessed
easily, producing an efficient one-stop
workflowe xperience. You c an u se t he
Manage mode to findandcatalogueyour
photos, then jump into the Develop mode
and process your images, before diving
straight into Edit mode to manipulate your
photo with some extensive editing tools.
Qcd$ee r>.
6 ^oStudo
Adobe Photoshop Lightroom Classic
(Windows and Mac - £120 annual subscription)
Lightroom Classic is an image processing and photo organiser that
allows the organising, non-destructive enhancement and retouching
of images in large numbers. It is a very powerful program that not
only sets the standard for image enhancement but also for its
ability to organise, catalogue and add keywords to all the images in
your library. It also boasts the capability to create photobooks,
print parameters such as layout and
orientation
andean
produce web
galleries for
websites with
a number
of display
templates
provided for
easy styling.
Luminar 4
(Windows and Mac - £65)
Another powerful all-in-one option for photographers and digital
professionals is Luminar 3. This is another example of a hybrid Raw
processing program, image management system and layer-based
image editor. Luminar 3 is being touted as a strong contender
in the growing list of applications trying to
topple Photoshop and Lightroom
from the top spot. Luminar 3 has a
number of workspaces from which
you can choose, or even create your
own custom workspace to suit your
workflow process. The benefits of this
mean that, unlike Lightroom where
you might make a series of global
adjustments and then save the image
and work on it in Photoshop for more
targeted edits, Luminar 3 letsyou do all of
that under one roof.
Affinity Photo
(Windowsand Mac - £50)
Created by Serif, Affinity Photo is a raster image editor very much in
the same vein as Photoshop. It allows the creation of multi-layered
compositions and has a varied toolset for graphics professionals
and photographers alike. Amongst its arsenal of tools and features
is the ability to edit Raw images, create stitched
panoramic photos, retouch photos
and make other
non-destructive
adjustments. It
can also import
and export to
the Photoshop
PSD format, and is
compatible across
iOSand Windows.
Corel PaintShop Pro
(Windows - £55)
Corel Paint Shop Pro pulls off a great trick by being several programs
in one package. You are able to use its file managementcapabilities
to tag, rate and keyword your
images. Then, you can move
to the edit suite and process
your images and make all the
main enhancementsand image
adjustments that your image
needs; there are also a number of
preset art filters, similar tot hose
you find on apps for your mobile
phone. Then you can move to the
edit suite and use the layer-based
editing that makes it a worthy
alternative to Photoshop.
www.pclpublications.com
51
LEARNING
NEWSKILLS
The fundamental knowledge on which all good
photography is based
Photographers come in various shapes, sizes, and skill
levels. They range from professional photographers,
who have studied at college and honed their
technical skills over time, to accomplished photographers,
who have just picked up a camera and learned their craft
with a trial and error method. There are also enthusiasts
who may have stepped up to a more advanced camera and
are beginning to explore the new creative possibilities, and
there are those who have been happy taking snaps on full
automatic but now want to ramp it up and take control.
No matter what kind of skill level you are, the
basics of photography are essential to all and they
all need to have a firm grasp of the fundamentals
before they can get their camera out of full
automatic mode and truly start to explore the
creative aspects of the medium. If you just want
to brush up on your theory, understand a little
more about how light works, or just improve your
composition, this next section has what you need
with some examples thrown in for good measure.
54 The exposure triangle
56 Shutter speed
60 Shutter speed: how it’s done
62 Aperture and depth of field
66 Aperture and depth of field:
how it’s done
LEARNING NEWSKILLS
www.pclpublications.com 53
The exposure triangle
The holy trinity for photographers
If you are keen to express your creativity and
learn more about the nature of photography,
then you will need to be daring and take your
camera out of fully automatic mode and explore
the skills required for shooting in manual mode.
When you shoot fully manual, you have to be
aware of the interplay between each of your
camera’s main settings of ISO, Aperture and
Shutter Speed.
Connect them up
The exposure triangle is a popular visual method
to connect the three main variables of aperture,
shutter speed and ISO amplification that govern
the f inal look of your image. Photography is a
balancing act of these three elements when you
capture an image. Once you have your camera
ready and have a set of variables in place to give
you a balanced shot, as soon as you adjust one
of the three, at least one of the others has to be
adjusted as well, in order to maintain the desired
effect you are after in the shot. You are not only
altering the exposure but also the quality and
appearance of the image.
54
THE EXPOSURE TRIANGLE
An example
We'll try and sum it up in a theoretical example
that should demonstrate the basic principle.
If you are shooting a subject such as a tor on
the moors, withyour camera in manual mode
(this is important to keep in mind), you will
need to balance your ISO, aperture and shutter
speed to give you a well exposed image. The
parameters you choose are down to your
personal choice of course and depend on
prevailing lighting conditions. In our theoretical
example the settings we used were as follows:
ISO 100, aperture f/4 and shutter speed 1/500
of a second.
Making changes
If you decide however, that you need greater depth
of field, you might change your camera's aperture
to f/8, making the diameter of the aperture smaller,
blocking more light but increasing depth of field. If
you take the shot now, your image will have more
depth of field but it will be very underexposed. What
happened? Now that you are in manual mode, you
have currently altered only one side of the exposure
triangle. You would need to alter at least one of the
other two in order to bring your image back to its
proper exposure. You decide to keep the ISO at
100, so the shutter speed will have to alter. If you
increase the duration that the shutter is open,
you can allow the camera togather light for an
extended period of time. In this case, because we
changed from f/4to f/8, which is 2-stops, we need
to allowfor 2-stops more light gathering from the
shutter speed we use. 1/500 of a second would
need to become 1/125 of a second to allow for the
2-stop alteration you made to the aperture with the
ISO remaining unchanged. A basic ruleof thumb
to keep in your mind is that a 1-stop alteration is
equal to either a halving or doubling of a particular
parameter. In this case the 2-stop alteration to
our theoretical shutter duration means 1/500 of
a second slows to 1/250 and then slows a second
time to 1/125.
A word about ISO
Although ISO is included as part of the exposure
triangle, it is worth notingthat on digital cameras,
higher ISO settings amplify the amount of light
recorded in a scene dependingon the ISO value
you use. ISO is often referred to as the sensitivity
of the sensor to light, but it is more accurate to
understand that it is light/image amplification,
rather than sensor sensitivity. Back in the days of
film, if you used a film stock of IS0200for example,
you set your camera's ISO to match. From then on,
only the other camera settings of shutter speed
and aperture were used to get the correct exposure
you wanted, as well as supplemental lighting if
needed. The ISO value always had to remain at 200.
These days, changing the ISO value only simulates
different light sensitivities.
www.pclpublications.com
55
Shutter speed
We look at what shutter speed is and why it is
one of the key ingredients in photography
he shutter of your camera is simply
a mechanical barrier that prevents
light from entering the camera until
it is needed, controlling when and for how
long light is allowed in to expose the sensor.
The latest digital cameras have high-speed
electro-mechanical shutters capable of timing
exposures with an accuracy measured in
fractions of a millisecond.
Along with the
aperture setting and
the ISO control, shutter
speed is one of the three
ways that photographic
exposure is adjusted.
When a picture is taken,
the shutter is opened for
a precisely measured
amount of time allowing
light to pass through. The
duration of the exposure
is set either automatically
by the camera’s light
meter or manually by the photographer. The wider
the range of available shutter speeds, the greater
the creative versatility of the camera.
Modern digital SLR cameras have a very wide
range of shutter speeds available, usually ranging
from 30 seconds to as high as 1/8,000th of a
second, and most also have a ‘B’ setting, in which
the shutter stays open for as long as the shutter
“The wider the range
of available shutter
speeds, the greater the
creative versatility of
the camera.”
release is held down. The ‘B’ is from bulb.
Very old cameras commonly used an air-bulb
attachment as a remote shutter release.
Shutter speed can be manually adjusted in
either full manual exposure mode or in shutter
priority mode, the latter usually denoted by an
’S’ or ’Tv' on the exposure mode dial. Shutter
priority is a semi-automatic exposure mode
in which the photographer sets the desired
I shutter speed, and the
camera’s exposure
system adjusts the
aperture accordingly
to produce the correct
exposure.
In automatic and
program exposure
modes the camera will
set both the shutter
speed and aperture
automatically. Under
normal daylight
conditions, the shutter
speed will usually be set to between l/125th and
l/1000th of a second, since this is fast enough to
freeze most movement and to reduce the effects
of camera shake. However in low light conditions
the camera may set a slower shutter speed, and
with this comes an increased risk of movement
blur caused by camera shake. Most cameras will
display some sort of warning if this occurs.
SHUTTERSPEED
Avoiding Camera Shake
Camera shake is a term used to define the act of accidentally shakinga camera during shooting due to unsteady
hands, which results in blurry images. This generally occurs more often if you’re shooting on a low shutter speed
or with a heavy lens, and can be avoided by using a tripod and cable release setup.
When shooting hand-held and wishing to avoid camera shake, as a rule of thumb you can safely use a shutter
speed roughly equivalent to the reciprocal of the focal length you are using. For example if you’re using a 100mm
focal length then you can take a sharp hand-held shot at a shutter speed of l/100th of a second or faster. If
you're using a 35mm focal length then l/35th of a second is safe, and so on.
Here’s an example shot
h taken hand-held at a
У focal length of 100mm
and a shutter speed of l/100th of a
second. As you can see it’s sharp and
shake free.
Here’s the same hand-held
| shotbutthistimewitha
> shutter speed of l/10th
of a second. At this speed and focal
length it’s much more difficult to hold
the camera steady. As you can see, the
result is quite blurred.
Many modern cameras includetechnology which can reduce the effects of camera shake at low shutter
speeds. Many compact cameras use electronic processing to counteract movement, which does work but
produces relatively poor image quality. AmongdigitalSLRandCSC manufacturers thereare two types of image
stabilisation in common use. Nikon, Canon and Panasonic favour optical stabilisation, where elements within
the camera lens are moved to counteract camera shake. Other brands including Pentax and Sony employ a
system which moves the camera’s sensor to achieve the same effect.
There is no clear advantage between moving-lens and moving-sensor systems. Modern image stabilisation
systems of both types can provide around three or four stops of additional stability, however the sensor-shift
method has an advantage for SLR users
because the non-stabilised lenses are
usually considerably lighter and are
often also cheaper to buy, since the
complex anti-shake system is built into
the camera body. It also means that
photographers using older predigital
lenses can still have the advantage of
image stabilisation.
This example shot
was taken with a focal
length of 100mm at
l/10th of a second as before, but
this time the image stabilisation
(in this case a sensor-shift system)
is switched on. It has detected
the vibration and corrected it by
moving the sensor to compensate,
resulting in a much sharper shot.
www.pclpublications.com
57
Motion Blur
Any movement in the frame during the exposure will
be captured in the picture, resulting in motion blur.
Anti-shake systems can do nothing to correct this: the
only solution is to use a shutter speed fast enough to
effectively freeze the action and eliminate any sense
of motion. With a fast enough shutter speed you can
Fixingthe camera on a tripod eliminates camera
shake. You now need to get the slowest shutter speed
you can. The image at the top of the page was taken
from a similar position as the previous shot, but with an
aperture of f/22 to get a shutter speed of 8 seconds.
freeze even very fast-moving objects, as this next
sequence of photos will show. They were taken at
shutter speeds ranging from a fairly slow l/60th of a
second up to l/2OOOth of a second.
As you can see, at l/2OOOth of a second the blades
of a desk fan can almost be frozen in place.
Misty Water
0 ne of the most effective uses of long shutter speed is
photographing flowing water. It’sa beautiful if slightly
over-used effect, but it is very easy to achieve. Any
moving body of water, f lowi ng stream or waterfall will
do, as long as it has moving and splashing water. This
scene is a local beach in Torquay.
If you just point the camera and shoot on automatic,
you’ll end up with something like this (below). It looks
nice enough, but it’s a bit dull. This example was shot
on at a shutter speed of l/20th of a second and an
aperture of f/4.
58
SHUTTERSPEED
Capturing Movement
Freezing the action with a fast shutter speed produces a nice sharp image, but sometimes you might want to allow
a controlled amount of movement blurto show that the subject was in motion. Therearea number of waysto
accomplish this.
In this first movement
example, the camera was held
motionless, with a shutter
speed of 1/100 Oth of a second,
while an athlete runs past in
front of the lens. No camera
movement ensures that the
background is sharp and the
fast shutter speed has frozen
the movement. The result is
sharp but looks slightly odd,
as though the runner is now
simply at a standstill.
Car Lights
Another interesting effect achieved using long shutter
speeds is streaking car lights at night. The camera was
set up on a tripod, using manual focus and full manual
exposure, with a cable shutter release. Starting with
an aperture of about f/4, you will need to dial in your
settings toget a balanced exposure. If your exposure
duration is still too short, stop your aperture down
to f/5.6 or smaller until you get a longer exposure
duration that renders car lights as long streaks.
Generally, a shutter speed of around 4 seconds is a
good starting point.
When shooting near heavy traffic at night it's
obviously important to stay safe. Wear something
bright and reflective, and don't get too close to the
road. Also, never use a flash when taking photos of
traffic. You could dazzle a driverand cause an accident.
Fireworks
In this additional example, this
time with the camera mounted
on a tripod, the settings were
adjusted to allow a shutter speed
of l/30th of a second while
athletes ju mp the hurdles seen
in the foreground. This time the
background remains sharp, but
the slower shutter speed has
resulted in lots of movement
blur, making the runners appear
to streak across the frame and
remove any sharp detail.
In order to capture the feeling of movement (top image), the best technique is to use a slow shutter speed, but
to pan the camera (move it side-to-side) to follow the moving subject as you press the shutter. It is a technique that
requires practice, since you need to be able to keep the camera moving smoothly as the exposure is taken, and avoid
up-and-down movement as you press the shutter. It may take several tries toget it right, but when it works the results
are very effective, with the subject stationary against a movement-blurred background. Shots like this can be taken
hand-held at a shutter speed of arou nd l/20th of a second or slower. Some recent cameras have a setting on the
image stabilisation system to correct vertical movement but not horizontal, which helps with this kind of shot.
One way to take good f i reworks photos is to set
your camera on a tri pod some distance from the
display, with the zoom set to a very wide-angle.
Set a shutter speed of 2 seconds and as wide an
aperture as you can manage. Getting the framing
exactly right is simply a matter of luck, timing, and
then cropping the photo later.
www.pclpublications.com
59
Be in full creative control of your shutter
60
SHUTTER SPEED: HOW IT'S DONE
www.pclpublications.com
61
Knowing when to use your camera’s
shutter speeds to their greatest
creative effect is something that is
easily learned but can often take time and
practice to master. You have an immense
range of shutter speeds to play with, from
the fastest shutter speeds of l/8000s down
{^durations measured in minutes or even
hours. That is a lot to take in, but once you
start exploring the effect of shutter speed on
your images?you can start to understand its
impact on your shots andlts great potential
Camera shake notwithstanding, in scenes
where there arenomoving objects at-all^he
shutter speed istess iimportant than in scenes
• where therous a Iqtbf rhoVement going.cn. You
can chQpse to freeze movement from l/250s
upwardsio comtJat camera shake ^Qd stop any
’stew moving objects™ their tracks. However,
there are times when slower shutter speeds can
be used to great effect. In our examples, notice
the differencebetween thetwc/action shots.
Although both images are surf action images.
w the choice of shutter speed has created two very
different looking images entirely. The shot on the
left was taken in failing light and the photographer
has^ptedto use longer shutter speeds to capture
the flow and movement of surfer and water. 0 *
the other hand, the shot on thisfl^e was taken in
brigjj^nditions with a much faster shutter speed
• to freeze movement.
• g .
Aperture and
depth of field
With aperture you can control how
much of your picture is in focus
Of the three main controls common to
nearly all cameras, shutter speed, focus
and aperture, it is aperture adjustment
that is the least well understood. This is because
it not only helps to control exposure, but
also affects something called Depth of Field.
Understanding the effects of aperture size is a
vital skill for any keen photographer.
At least there's nothing mysterious about the
name. The aperture is literally a hole through which
light passes after it enters the lens. The diameter of
this hole can be altered, allowing a greater or smaller
amount of light to pass through on its way to the
sensor. In the early days of photography, aperture
was adjusted by slotting cards with different sized
holescut in them into the body of the camera behind
the lens. These cards were known as ‘stops’, and
this is still part of photographic terminology today.
On modern cameras the aperture is controlled by
an arrangement of curved shutters inside the body
of the lens, which move to produce a continuously
variable aperture, however the aperture settings are
usually still referred to as ‘F-stops’.
Aperture adjustment is used in combination
with the shutter speed and ISO amplification to
control photographic exposure. However it is also
the primary means of controlling something called
depth of field, a concept that may need a bit of
explanation.
If you take a photo of a subject at a distance of
about 3 metres with standard zoom lens, in good
light with the focal length set to about 30mm, as
62
APERTURE AND DEPTH OF FIELD
“Understanding the
effects of aperture
size is a vital
skill for any keen
photographer”
How aperture works
Explaining exactly why altering the size of the lens
aperture alters the depth of field is a little complicated,
but a few simple diagrams should help to shed some light
on the matter. For a start, let’s clear up some popular
misconceptionsaboutthe difference between focus and
sharpness.
This is a highly simplified diagram of the arrangement
of lens, aperture and sensor inside a modern digital
camera. I n this first diagram .three subjects at different
distances from the camera lens are represented by
the red, green and blue dots. The lens is focused on the
green spot, so light from it passesthroughthe aperture
and the lens and appears sharply focused on the sensor.
Light from the red and blue spots also passes through
the aperture and lens, but light from the red spot focuses
a short distance in front of the charged coupled device
(CCD), while light from the blue spot focuses a short
distance behind it. The light from these other spots still
hitsthe CCD, butdueto light scattering it is unfocused
and spread over a wide area.
What this means is that the red and blue spots will appear
as large blurred spotson the final image, while the green
spot will be sharp and in focus. The size of the blurred area of
the red and blue spots is called the ‘circle of confusion.’
long as the lens is focused correctly the subject
should appear nice and sharp in the image.
However you’ll usually find that objects about
1.5m in front of the subject, and for about 4
or 5 metres behind the subject, also appear
sharp. This distance, from the closest point of
acceptable sharpness to the most distant, is
known as the depth of field.
By altering the size of the aperture it is
possible to control the extent of this depth of
field, either reducing it so that only the main
subject is in sharp focus, or expanding it so that
an entire landscape can appear to be
just as sharp.
If you have an older camera to hand, take a look
at the lens. It will have a ring for controlling the
aperture setting, labelled with numbers usually
from about F2 to about F22. The focus control
ring will have distances usually calibrated in feet
and metres, and alongside it you’ll usually find
lines marked with the same numbers as the
aperture ring, arranged in pairs either side of the
focal distance mark with the larger numbers
toward the outside. The purpose of this aperture
scale is to help estimate the depth of field at a
particular distance for any given aperture setting;
with the focus set to a particular distance, anything
between the two lines for the selected aperture
setting should be acceptably sharp. Some older
zoom lenses have a series of curved lines etched
into the lens barrel for the same purpose. For some
reason this scale is missing from most modern
auto-focus, auto-aperture lenses, which is a shame
because it makes the whole concept of depth of
field much easier to understand.
Lens
The diagram below shows the same arrangement of
camera and subjects, and the coloured spots are the
same distance from the lens, but this time the aperture
has been reduced to just a small hole. Again the lens is
focused on the green spot, and the red and blue spots
are out of focus. However the narrow aperture restricts
the light scattering and the relative angles of the light
Lens
paths, and as a result the ‘circles of confusion’ are much
smaller. This makes the red and blue spots in the final
image appear much sharper. They are still out of focus,
but the effect is not so noticeable. To make circles of
confusion as large as in the first image, the red and blue
spots would have to be much further away from the
green one.
Film or CCD
l
www.pclpublications.com 63
Focal Length and Depth of Field
The focal length of your lens, in other words how
much you zoom in on your subject, also has a
large effect on depth of field. Short focal lengths
have much greater depth of field than longer
focal lengths. This is one reason why, when
taking a portrait shot, it’s a good idea to step
back a bit and zoom in rather than using a wide-
angle lens up close.
In optics, particularly as it relates to film and
photography, depth of field (DOF) is the distance
between the nearest and farthest objects in a scene
that appear acceptably sharp in an image. Although
a lens can precisely focus at only one distance at a
time, the decrease in sharpness is gradual on each
side of the focused distance, so that within the DOF,
the unsharpness is imperceptible under normal
viewing conditions.
In some cases, it may be desirable to have
the entire image sharp, and a large DOF is
appropriate. In other cases, a small DOF may be
“In optics,
particularly as it
relates to film and
photography, depth
of field (DOF) is the
distance between
the nearest and
farthest objects in
a scene that appear
acceptably sharp in
an image.”
more effective, emphasizing the subject whilst
de-emphasising the foreground and background.
In cinematography, a large DOF is often called
deep focus, and a small DOF is often called shallow
focus.
In the examples shown here, at f2.8, the yellow
chess piece was the point of focus. It is the only
object in sharpest focus and the orange and green
pieces either side are completely out of focus.
At f5.6 the area of acceptable focus has
increased so that the orange and green pieces are
starting to come into focus.
Shooting at fll brings the orange and green
pieces into sharper focus and the green is less
blurred than before.
Stopping the camera down to its narrowest
aperture of f32 has all pieces looking reasonably
sharp along the entire row of chess pieces and the
background is looking acceptably sharp as well.
64
APERTURE AND DEPTH OF FIELD
Landscape Photography
Practical uses
for depth of field
There are several situations where controlling
depth of field is important. The most common
is portrait photography. Subjects shot on an
automatic camera using a medium aperture
usually have a lot of sharp foreground and
background detail, which can distract attention
away from the main subject.
Another situation in which depth of field is an important
issue is landscape photography. Here it is often
important to maximise depth of field, so it is usual to
use the smallest possible aperture. Shots li ke this,
taken using an aperture of f/16, ensure that both the
foreground and distant background are in focus. It also
uses something called Hyperfocal Distance, which
involves a bit of maths to calculate.
Asyou can see in this example, which has a
larger depth of field, the subject is in focus and the
background is visible, which draws the viewer’s
attention away from the subject.
By using a wider aperture, and movingthe
subject further from the background, only it is
now in sharp focus. A blurred background is much
less distracting, and concentrates your attention
on the foreground. The result ensures that the
subject really stands out from the background.
Aperture and
depth of field:
how it's done
Sharp or beautifully blurred, you decide
Much like learning when to use fast
shutter speeds or slow ones, howyou
use aperture to control depth of field
in your shots is just as important a creative
choice as any in photography. Whilst it does
come down to personal preference, there are a
couple of golden rules we’ve mentioned that are
worth bearing in mind. A good portrait photo
with a cluttered background for instance, is
not going to work if the background is in sharp
focus along with your subject. The shot will be
confusing and that background will just be an
eyesore. That’s when setting your lens to its
maximum aperture to create shallow depth
of field will help massively. A good prime lens
around the 50 135mm focal length range with
a wide aperture of f/2.8 or even f/1.4 will blur
your background beautifully whilst drawing the
eye to your subject.
Alternatively, if you are shooting a landscape
and you want as much of the scene in focus
as possible, then a wider angle lens, typically
something in the range of 14-24mm, is your
go to guy for that situation. Correctly
focusing the right distance into the
scene and stopping down your lens to
about f/16 will ensure as much front
to back sharpness as possible.
Whilst these are guidelines
rather than hard and fast rules,
they are a great place to start
as you develop your skills as a
photographer Practi
willingness to tryd
will result in better
you'll have fun along the
66
APERTURE AND DEPTH OF FIELD: HOW IT'S DONE
www.pclpublications.com
CREATIVE
PROJECTS
UnLeash your creative side and learn even
more techniques used by the pros
So, you’ve learned the fundamentals, brushed up
on your theory, and armed yourself with your
favourite camera gear and accessories. Now
what? Well, we would say get out there and have some
creative fun. Shoot, adapt, make mistakes, and learn.
That is easy to say, and sometimes you need a project
to get your teeth into. Something you genuinely enjoy
and can use to really help you stand out as a talented
photographer in contrast to one who’s merely a skilled
technician. It comes down to an eye for the creative and
a desire to learn and do more. By learning and trying
out new ideas and techniques, you can turn your
photographs from snapshots into works of art that
you can be proud of. We start with a couple of projects
that can be done from the comfort of your own dining
table, which are potentially useful if you get stuck in
another lock-down. Over the coming issues, we reveal
some interesting projects that we hope will inspire
you to achieve greater things, explore more genres,
and really get passionate about your photography.
70 Natural light portraits
72 After it gets dark
74 Black and white portraits
78 High speed photography
68
CREATIVE PROJECTS
www.pclpublications.com
69
Taking photos of landscapes is one
thing, but when you decide it’s time to
get involved in portrait photography,
it can seem quite a daunting prospect.
You might imagine it requires armfuls of
expensive equipment and lots of lighting gear.
Don’t worry; there are a few simple things
that you can try to see if portrait work is for
you. Indoor natural light is certainly a great
and easy way to dip your toe into the portrait
world. There are a few basics to be aware of,
but it’s nothing that a photographer of any
skill level can't handle.
Natural light
portraits
You don’t need an expensive studio to
get some great portrait shots
"There are a few basics to be
aware of, but it’s nothing that a
photographer of any skill level
can’t handle.”
STILL LIFE AND PRODUCT PHOTOGRAPHY
The camera
For most applications, the camera can be
anything from a simple point and shoot up to a
pro level DSLR. One consideration, that elevates
portrait shots from the ordinary, is lens choice.
A lens that has a large maximum aperture will
give you two major benefits: Firstly, since you
are in an indoor, natural light environment, there
may not be as much light as you would wish
and your shutter speeds may be quite low. You
can boost the ISO of course, but you want to
retain as much quality in your shot as you can.
A wider aperture allows more light to enter the
camera, giving you the chance to use higher
shutter speeds and therefore reduce the risk
of camera shake. The second benefit is more
of an aesthetic one. Large apertures also have
very shallow depth of field. This fact may be
beneficial, when shooting a portrait, if you have
a subject with a distracting background. Once
focused on your subject, the background will be
blurry and less intrusive.
Canon
The light
Natural light entering a room is your primary
source of illumination. It can be as simple as a
window, roof light, bay window, conservatory,
or doorway. If the light source is near a plain
wall then, if you need it. you instantly have a
backdrop. If it is a harsh, sunny day and the light
entering the room is very strong and directional,
you can always hang a white bed sheet over the
window to act as a diffuser and take some of the
harshness out of the shadows.
Bounce
A large piece of white card is a very cheap method
of creating a reflector. You can use defectors to
bounce light onto your subject and create some
extra fill light that can. if the light is too harsh,
illuminate shadows. If you also happen to have
some lamps in the room, you can employ them as
simple secondary light sources. A bed sheet hung
in from of them can soften their output if required.
The shot
Placing your subject relative to the light source
is a creative decision, but start by trying shots
where the subject is square on to the light. This
will provide even illumination that keeps harsh
shadows away. Avoid the light source dropping
below their head level. Lighting from below is
best used only in horror films! If you pose your
subject at an angle to the light, you will start
to create shadows that fall across the face
away from the light source. This can help make
features more three-dimensional. If the shadows
are too dark, get some extra light in there by
using a white sheet, or card, to bounce light into
the dark parts.
Settings and technique
Longer focal lengths are more flattering
for portraits. Using a wide-angle lens and
getting closer to your subject will distort
their proportions and make them look like
they are reflected in the back of a spoon. Try
focal lengths around 50mm-100mm for more
flattering images. It is best to begin by setting
the camera to your lens’ widest aperture. Keep
an eye on shutter speed. Nothing ruins a shot
more than camera shake. Focusing is key to a
good portrait. Always make sure you have the
eyes in sharp focus. If your subject is turned to
you at an angle, make sure the closest eye is the
one in focus. Aperture priority works well in this
instance, although you can go to manual mode
if you are feeling more confident. Keep ISO as
low as you can. but never let your shutter speed
drop below l/60s.
www.pclpublications.com
71
After it
goesdark
Time to try out the dark side of photography
•e ЯИИП □
/W
«
«E ra
Ml n
I
ЛНН111П
.im m n* pi
> л
Whether it’s the lure of bright city
lights, barren moorland bathed in
moonlight, or a tumbledown barn
in the country under a starry sky, night-
time photography is a big draw for many
photographers. It can be challenging, very
frustrating and time-consuming, but it’s a
hard habit to break when you get such great
results. You are normally dealing with much
longer exposures than usual, while having to
carefully compose and focus your shots and,
as such, it forces you to slow it all down and
take a much more considered approach. We
have some helpful insights to lure you over to
the darkside.
w IW
• M w *
1'4
. I w !!'«' -
this may sdtTffiTabit obvious, but i
phQfographs^re exposure times
opietimes be in the tens of rntfitttes?
you’re going to need something sturdy on
which to put your camera. You can, of course
set your camera to its highest ISO setting,
open t^ aperture as wide a^ it’wiII^o and
---TV--------------------------------O’
justice you should in’ est in a solid tripod.
i «1:
О
“ ®МЬг и'1
A к
•IfcFWCW
. MMMIII !►
MWID
IIMJI/IWI’P
'i -• *
"•ЗД
UjHjir
T.b
r
i
Ы \*
СВ*'
ИТ »
WT
7t can be challenging,
very frustrating and time-
consuming, but it’s a hard
habit to break when you get Г
such great results
X.________________________
lens you are using.
Shield the lens
During the day, the use of a lens hood
may seem quite obvious, but,
sometimes, new photographers
assume they don’t need to
use one at night. Any night
scene with bright city lights,
or other points of bright
illumination, can cause
lens flare just as easily as
a daytime scene. Avoid any
unwanted flare and get in
the habit of always having the
correct type of lens hood for the
Stop the shakes
At night, your camera's shutter is going to open
for long periods of time. The one thing that can
kill a great shot is camera shake. People don’t
realise that the damage to the shot can be done
right at the start, when you press the shutter
button and cause a momentary shake in the
camera body and tripod resulting in a blurred
image. Try using a remote release cable, or
setting a 10 second countdown timer on your
camera, so you are not touching it when the
shutter opens. Also, if your camera has the
option, you can flip up the mirror and lock it
before the shot is taken as. sometimes, even
the 'slap' of the mirror going up can create
small shakes.
The right priority
Depending on what kind of shots you are after,
it is a good starting point to put your camera
in AV mode (aperture priority). This lets you
decide what aperture will be used, until you opt
to change it; f/8 or f/11 are a good jumping in
point. Stopping down to f/16 or f/22 will give you
greater depth of field and much longer exposure
times. Opening up to f/4 or f/2.8 will have the
reverse effect.
Static or blurred?
To keep the static objects in your shots sharply
focussed, you will, as we've mentioned, need
to lock down your camera on a tripod. Longer
exposure times will render any moving objects
blurred. Traffic trails are classic example of
this. If you want moving objects to also appear
static, then you are going to need to open up
your aperture and increase your camera's ISO
settings so your shutter speeds are capable of
freezing the motion of your subject.
AFTER IT GOES DARK
Add light
Have you ever thought about light painting
in your image? Light painting refers to the
technique of illuminating parts of your scene
with additional light sources. Light painting has
become very popular and ranges from simply
using a flashlight to illuminate a dark foreground
subject, to using all manner of light sources,
such as strobes, sparklers, coloured LED lights
and even steel wool set alight - to create huge
showers of sparks. This ‘light art’ is very popular
and great fun to try.
Quick guide
Below is a quick list of exposure times for a
number of general night-time scenes. These
are ballpark figures, but they will help give you a
place to start when it comes to setting up your
camera and sorting out the settings you need.
Our guide assumes an aperture f/11 and an ISO
of 200.
City at night 10s
Landscape at dusk 25s
Fairground at night 6s
Fires at night l-2s
Candles indoors 30s
Full moon landscape lOmin
Startrail 8min
Fireworks 2-15s
www.pclpublications.com
73
Black and
white
portraits
Add power and depth to your
portraits through black and white
he power of the black and white portrait cannot
be denied. A wise soul once said: ‘If you want
fashion, shoot in colour. If you want emotion,
shoot in black and white.’ As we’ve mentioned before,
there is a power and depth to a black and white shot
that is often swamped by colour. The story behind a
shot is easier to comprehend when it is in black and
white and the distraction of colour has gone. Even if
there is no real story being presented in the shot, you
can suddenly find yourself paying more attention to
a black and white portrait. Texture, form and tone
become important to the shot. It draws you in more
than a colour shot ever could.
‘Ifyou want fashion, shoot in
colour. Ifyou want emotion,
shoot in black and white
BLACK AND WHITE PORTRAITS
Although this portrait presents
the subject side-on to the
camera, the eyes are still the
point of focus. It is a point worth
remembering when shooting
people in profile.
A basic rule in a close-up portrait is to have the eyes in focus.
The eyes convey emotion - whether sad, happy, playful or
mysterious. If the eyes are not in focus, then the connection to
the subject is lost. That doesn’t mean the subject must always
be staring down the barrel of the camera lens. It is generally
considered that if subjects are staring at the camera, they are
portraying confidence or arrogance; if they are looking away,
then they can be said to be nervous or mischievous. This is not
always the case, but it can be a starting point in the portrayal of
your subject. Even if the subject has their eyes closed or is facing
away from camera, always think about making the eyes the point
of focus. This can even be true when photographing non-human
subjects. Dogs, for instance, are soulful creatures too, and our
connection to them is through the eyes just like any person.
www.pclpublications.com
75
Head shot or
portrait? The
jury seems to
stilt be out on
that one!
The location you shoot your subject is also
important. If you shoot in a studio with a plain
backdrop, then the story is told only by your
subject’s face. If you shoot on a location,
then it too can help convey emotion or a
context. Shooting a portrait of a fisherman
on his trawler or a lawyer in his office are
some obvious examples where the location is
expanding upon the story being told. It can be
argued that a subject on their own, in close-up
with no background, is a head-shot. A subject
photographed in an environment that is part
of the storytelling, is a portrait. A fine line
perhaps, but there are those who would argue
the definition.
Lighting is an interesting subject when
shooting portraits for black and white
conversion. There are so many different styles
out there, it would be folly to try and pigeonhole
one as being better than another. Light is there
only to illuminate the story being told, or the
emotion being captured. Just keep in mind
the basics of lighting such as trying to avoid
shooting in direct sunlight, as it creates harsh,
dark shadows with no detail in them. Using a
large white surface to reflect light back on to your
subject will create a fill light that can lessen dark
shadows. Alternatively, move to a more shaded
area. If possible, avoid shooting with a camera-
mounted flash, as you run the risk of getting ‘red
eye’ where the light from your flash bounces
of your subject's retina back into the camera
causing the pupils to look red.
4/, J
76
BLACK AND WHITE PORTRAITS
I The AF-S 50mm f1.8G and AF-S 85mm
f/1.8G prime lenses. Superb portrait
lenses, great for soft, out of focus
backgroundsforyour portraits.
Also, give some thought to the lenses you
use. Wide-angle lenses are not considered
appropriate for close-up
portraiture as they distort
the features; but a good
50mm, 85mm or even
135mm prime lens
is much prized for
portrait work. Watch
out for too much
depth of field; it can
be a great distraction
for your background
to be as sharp as your
foreground. A little blur in
your background is a great
way to separate your subject
from their surroundings,
keeping them the focus of
the shot.
Also, keep your eyes
peeled for the classic
error that can crop up,
where an item in the
background appears to
be sprouting out of the
top of your subject's head.
(No.notawi2ardshat.justthespire
c apXrAS'ledireC''ybehindtWs
error.
Try mixing it up a little when shooting.
Close-up portraits are fine, but perhaps
there is a great shot to be had in a full-length
portrait. Trying both landscape orientation
and portrait orientation is also good practice.
It is also a great idea to try shooting from
different levels, both above and below eye-
level. Don’t be afraid to experiment; you
never know what you will discover.
www.pclpublications.com 77
Highspeed photography
A great tabletop project for the artistically adventurous
Just to clarify, when we say high speed, we
don’t mean that we are doing it very fast!
In point of fact high speed, in this context,
refers to being able to catch rapid movement
in such a way that you effectively ‘freeze’ the
action. There are two basic ways we can do this.
First is to have enough light pouring on to your
scene to give you the required shutter speeds
(in excess of l/2000th of a second) to have a
hope of stopping an event dead in its tracks.
The second method relies on the stopping
power of flashguns and not the settings used
on your camera. The camera, depending on
how many flashes you are brining to bear on
the scene, is normally set to ISO 100 or 200,
the aperture somewhere around f/7.1 and the
shutter is set at the max sync speed of your
camera, in this case l/160th of a second on my
5DMk2. It can sometimes be hard to wrap your
head around the idea that the shutter speed
is not really a factor when using this method.
You only need to make sure that if you press
the camera button without the flashes turned
on, the shot should look totally black. The light
will be provided by the flashes of course, but
in a very short ‘pulse’ that stops the action.
Here’s how this is achieved:
“It can sometimes be hard to
wrap your head around the
idea that the shutter speed is
not really a factor when using
this method.”
Thewaterdroplet. Probablyoneof
the most recognisable high speed
imagesand a very popular one to try
andcapture.Tocatchonethoughyou
would need someclever equipment
or a very accurate shutter button
finger! This image does prove that it
can be done, with a little luck and a
lot of trial and error.
78
The technical bit to capture, and is easy enough to set up. The
Flashes (strobes or speedlights as they are camera is set on a tripod [1] in front of a makeshift
also known) have an interesting operating
characteristic. Their output brightness is not
governed by the unit’s power. The effective
brightness of the flash is always the same. It is
only the duration of the flash that changes, so
less power means shorter flash duration. For
instance, a Canon 580EX flash at full power has
a duration of 1/1,OOOth of a second. Dial the
flash down to l/8th power and the flash duration
becomes 1/9,OOOth of a second. Set it at l/64th
power as I have done here for my shoot, and you
can achieve a flash duration of a mind-boggling
1/30,OOOth of a second!
Now imagine if this incredibly fast pulse of
light was your only light source in a dark room.
If you take a shot with your camera with the
flash set as described, even though your shutter
speed is l/160th of a second as we mentioned
above, your subject will only be lit for 1/30,OOOth
of a second during the time your shutter is open.
The trade-off with this method is that your flash
is at a very low power setting and has to be
very close to your subject. As this is a tabletop
project, it’s not an issue because you are going to
be shooting at very close quarters anyway.
The setup
Our shot is going to be a very simple water
droplet splashing down into the surface of a
small body of water. It is quite a popular photo
mini-studio. A table [2] is turned on its side and a
piece of opaque Perspex [3] is set on top. A sheet
of white card is placed at the rear of our ‘set’ [4]
to create the background. Our water receptacle, a
simple glass [5], is placed on the Perspex, in the
middle, and filled to the brim with water.
This example has three flashes [6] [7] [8]
that were originally set up, although after a few
tests, it was only two that were finally used. Just
for the sake of creativity, one was set underneath
the Perspex, firing upwards, to create a nice pool
of light at the base of the glass. Again, just to be
a little creative, the flash underneath the Perspex
and the flash to camera left had coloured gels
[9] put over them. After some trial and error [10]
[1Ц [12] it was decided to use blue underneath
and red on the left [13].
On reflection
One aspect to consider is that when
photographing clear liquids, it can be more
effective if you cast your light on a surface that
the liquid can reflect [14], rather than firing
directly at the liquid itself. The flash on the left
was aimed at the white card at the rear of this
setup so that when it fires, it illuminates the white
card and colours it red. Our water will reflect
this colour as well as the blue light coming from
below and this combination will hopefully create
a nice dramatic effect.
www.pclpublications.com
79
The shoot
The flashes are controlled by a wireless
transmitter [15], but you can also use a camera
mounted flash, bounced off coloured card on to
your scene if needs be. You could also get your
flash off-camera by using a hot-shoe cord. After
a few test shots to get framing and flash power
dialled in, the settings worked out as follows: the
camera was set at ISO 50, aperture f/7.1, shutter
l/160th [16] and was shooting Raw. The lens is a
24-105mm f/4 zoom lens [17] .Theflash firing up
from below was set at 1/16 power [18] and the
flash on the left was set at 1/32 power [19].
The area of focus was the point where we
were attempting to get the water droplet
to land. We could generate a reasonably
consistent flow of drips by using a syringe filled
with water [20] and slowly depressing the
plunger and aiming our drops at the centre of
the water surface. Trying to capture a single
drop hitting the surface without the aid of
specialist timing equipment could have you
trying all day long with no success. This way at
least, you can create a steady series of drops
that will increase your chances of capturing the
decisive moment of splashdown.
ZOOM LENS EF 24-105mrnI 1:4 L IS USM
Drip, drip, drip
The process was to gently drip water into the
glass and shoot at the same time. It can be a
bit random, but as mentioned before, without
special equipment that can time the camera’s
firing down to milliseconds, you just have to
persevere. The sample shots you see here
were all done by one person with syringe in one
hand and the other hand pressing the shutter
release button. So, many frames later, a fairly
decent number with usable droplet captures, it
was time to go for the big one! The water drop
images are very cool and do make for good
fflzoo. 24
17
18
IMAGE
STABILIZER
The shot of a droplet of milk
dripping down intoa small pool
of the same liquid can create the
ever popular and quite iconic
image of the droplet splash.
Even though the milk is white, it
is reflecting the light cast by the
flash with the blue gelon it.
80
HIGH SPEED PHOTOGRAPHY
“The water drop
images are very cool
and do make for good
abstract images.
abstract images, but it was time to end on a
big splash. With the glass full to the brim, an
ice cube was dropped in from a decent height
to create a big splash. It took a couple of goes,
but some great captures were in the bag.
Finally, a quick experiment to see if another
liquid could be used. The Perspex was cleaned
and a pool of milk was dripped into place by
the syringe. Then more milk was dripped from
above and captured in the same way as the
water. Different coloured gels were tried on
the flashes and another set of interesting
images were captured.
To finish
The preferred shots were processed in a Raw
editing package and then edited, rotated and
cropped in Photoshop. Some colour values were
altered even more to give an interesting surreal
look to the pictures. So, with some initial trial
and error, the end results could easily end up as
a large format canvas print and be adorning the
wall of some happy art lover!
www.pclpublications.com
Still life and
product photography
Get hands-on and improve your still life photos
1/160
If you’ve ever been on certain auction
websites where people are selling items,
chances are you’ve encountered a lot of
product photography. Chances are equally
good that you’ve encountered a lot of bad
product photography too. Ifyou want
something to look good in a photograph, then
you need to take care about how it is lit. Placing
it on a table and snapping away with direct flash
is not going to render you results that people
will be attracted to. You’d be amazed at how a
little extra care when photographing the item,
will yield results that stand head and shoulders
above the rest. We’ve already covered how to
get some great captures of glass objects like
wineglasses, and now we’re going to have a look
at some more objects that can be equally tricky
to get right. We have a couple of cool watches
to photograph. They each have their own little
challenges but with a bit of thought regarding
lighting and some card and paper handiwork,
you can be taking some sexy still life product
shots that really catch the eye.
ISO 100
1/16 power
"You’d be amazed at how a little extra care
when photographing the item, will yield results
that stand head and shoulders above the rest." y
82
STILL LIFE AND PRODUCT PHOTOGRAPHY
I A light tent is designed to make small to
medium-sized products easy to photograph
with a minimum of fuss and a minimum of
unwanted reflection from the room.
A light tent
If you are serious about your product
photography, you might consider a light tent.
This is basically a wire frame cube with white
translucent material stretched over it. There is a
large aperture on one face where you can place
the camera and shoot into the cube where your
product is placed. You can buy various size cubes
both with a set of lights or without. You then set
up your lights at strategic places around the cube
to illuminate the contents as you see fit. These
tents are usually collapsible and very quick to set
up. For our project though, we are going to get
hands-on and make something ourselves.
A tiny studio
Firstly we will need to set up a studio that you
can shoot in. Although we use the term studio, it
is a sort of miniature version but it still functions
exactly like its full-sized counterpart. You will
need a surface on which to place your object,
some additional card to control how reflections
and light interact with it, a piece of translucent
white Perspex or even a white sheet to use as a
diffuser and a light source. We are using just one
light again for this. A flash is great as its output
colour is daylight balanced but you can use a
bright lamp if you have one. Rather than a flat
surface to rest on, the watches will be placed on
a white paper sheet that has been curved up on
either side [1]. We’ve done this by placing the
paper sheet inside a small upturned table [2]. The
sides of the table hold the sheet in place nicely.
This is the first step in controlling reflections.
Then you can place a sheet of white card [3] on
the back face of the set to bounce light back into
the scene.
Lighting
With the table upended, it means we can place
our light source across the top of it, facing down
into the small set we’ve just made. We have
our Nikon SB700 Speedlight [4], inside a small
foldable softbox [5], which we’ve placed on top of
a white translucent Perspex sheet [6]. The light
will fire straight down onto the watches which
were placed on a small velvet display pillow.
We could tweak the placement and angle once
the camera was set up and we could see the
composition through the viewfinder.
Theflashfacesdownintotheset,
through the white Perspex sheet,
to create a bright overhead
lighting rig for yoursubject.
The flash was fired inside a small foldable softbox,
which in turn was placed on top of a white Perspex sheet
to help diffuse the light.
A small upturned table
provides the base upon which
we can build our little product
photographystudio.
www.pclpublications.com
83
Camera and lens
For this project, we used a Nikon D5500 and
NIKKOR 18-105mm f/3.5-5.6 zoom lens. The
camera was set up on a tripod and the shot
was framed and focus was set to manual, with
additional tweaking of the placement of the watch,
until we had something we liked. A TwinLink
wireless trigger was attached to the Nikon’s
hot shoe and the receiver was attached to the
SB700. If you have a flash which you still use
atop your camera, the purchase of a cheap set
of radio triggers and receivers will pay dividends
when it comes to getting the flash off the top of
your camera without the need for trailing cables
everywhere. It also means you have a lot more
creative lighting opportunities than before.
Sorting out settings
The only light we want in the scene will be provided
by the flash. We chose manual settings with an
aperture of f/6.3, shutter speed of 1/160 and ISO
100. A shot taken without flash is going to be very
dark, if not black once the curtains are drawn and
any extraneous light is removed.
Then it was time to get the appropriate flash
power settings to light the scene. Because of its
proximity to the subject, the flash only needed to
be set at 1/16 power. A few test shots were taken,
and the watch position and angle was tweaked
again to avoid the brightly lit translucent sheet
above it completely reflecting on the watch’s
surface and turning it white. One other thing that
was also very apparent was that no matter how
clean you think something may look, when it
is lit in this way, it can never be clean enough.
The lighting showed up several fingerprints
on the watch glass. After a thorough clean and
reset, it was ready. More test shots showed us
a good, well-lit shot.
Controlling the light
Now you can take control of the scene. With
additional pieces of black and white card,
you can decide where any additional light or
dark reflections will be seen on your subject
and how light falls upon them. In the case of
both watches used in this project, you could
place a piece of white card on the base sheet
and angle it in such a way as to bounce even
Getting Set Up
I The Nikon D5500and the 18-105mm
3.5/5.6 zoom Lens. Plenty of
resolution from the camera and
compositional leeway with the lens.
I Once your camera is set up and the
composition set, use manual focus
and Live View to get the focus point
exactly where you want it.
I Checkyour surfaces are
clean. Fingerprints and shiny
surfaces do not mix when lit
from above like this.
I The camera settings above would give an almost
black image when shot in the darkened room but in
combination with the flash settings shown below, which
was ouronly intended light source, it worked out well.
Although made of card, paper and a small
upturned table, this tiny studio functions in
the same wayasa large, professional studio.
84
STILL LIFE AND PRODUCT PHOTOGRAPHY
more light coming from the flash above back up
into the watch face. You could use a black piece
instead and actually reduce the amount of light
being bounced back onto the watch. You could
Try bouncing Light off a piece
of angled white card back up
into the watch face, this can
help brighten any areas that
may be darker than you want.
Don’t be afraid of bright highlights on the glass surface of the watch ifyou are intent on
showing a smooth, glassy surface. It’s your shot, go with what you feel looks right to you. Just
try to avoid highlights that wash out all detail.
Beware of too much reflected card showing in your shot. In this one, the whole card was at
such an angle that the watch's inner bezel looks pale grey when it should be black.
do the same with a piece of black card for a
darker reflection instead. You have a number
of possibilities that can affect the look of the
shiny surfaces of you subjects. The key is to
place a piece of white card above the watch face,
out of shot, and use its white reflection to add a
highlight that runs diagonally across the watch
glass at whatever angle you choose. You can
shoot and experiment. Review your shots and
decide where best to place your reflectors to
get the best out of your product. Most of all
though, have a little fun too.
www.pclpublications.com
85
NEW TO IMAGE
PROCESSING?
Whether you’re using Photoshop, Lightroom or Elements, we have
plenty of guides to help you get the most out of your photos
One of the great things about digital
photographs is that it’s very easy to improve
or alter them using the right computer
software. There are dozens of image editing packages
available, ranging from simple, easy-to-use programs
all the way up to the professional-standard Lightroom
and Photoshop, which is available in a number of
subscription packages.
For anyone interested in photography as a
hobby our preferred choice is the range of editing
programs from Adobe. You have Elements for
hobbyist users and Photoshop, Camera Raw and
Lightroom for the more serious photographer.
On the following pages and subsequent issues,
you’ll find a selection of information, tips and
techniques to help you improve and edit your
images. We’ve barely scratched the surface when it
comes to processing and creative image editing, but
hopefully you’ll enjoy these techniques and produce
the results you’re looking for.
88 Lightroom top tips
90 The history of Photoshop
92 The history of Lightroom
94 Photoshop versus Lightroom
96 Shooting in raw mode
98 What is Photoshop Elements?
86
NEW TO IMAGE PROCESSING?
V'
www.pclpublications.com
87
Lightroom
top tips
Less is often more
The cloud-based version of the Lightroom
program is as powerful an app as you could
wish for. It gives you complete control of your
images and you can turn a lacklustre Raw file into
a colourful and dramatic photograph. Getting
familiar with the basics of processing is important
in order to get the most out of your photos.
Photographers as a general rule do not tend to like images that are way over-
processed and have every preset and colour effect thrown at them. The truth is, if
you want to go crazy with your processing, Lightroom CC has the power to do that
but it also has the subtlety when you need it. The kinds of adjustments shown here,
which we will begin to cover in this and future issues, are a good example of less
being more; allowing your images to look their best.
AFTER.
The History
of Photoshop
Before we begin, here’s a little background information
Thomas and John Knoll created Photoshop
in 1988 with the release of Photoshop
1.0 following in February 1990. It is a
raster graphics editor and has become the
predominant industry standard for digital
image editing.
At its heart, it has a suite of tools that allow
the user to edit, assemble and compose
images using multiple layers and masks. It
is this use of layers and masks that are the
core features of Photoshop’s power. Such
layer-based editing means you can build very
complex images and create incredible works
of art using this method.
Photoshop’s Strengths
p t Photoshop is a pixel-level editor. Where
Lightroom allows you to adjust pixels
in an image, Photoshop lets you move
them and manipulate them in a way that’s
nothing short of magical.
p s Photoshop allows multiple layers to be
applied to an image. You can keep images
and edits on separate layers and modify
them accordingly and independently. This
is the basis of non-destructive editing.
p s It’s huge. Mind-bogglingly huge. The
toolbox alone is the stuff of legend and
contains everything the professional
designer and photographer would ever
need from a piece of software.
p s You can record specific actions within
Photoshop, allowing you to apply those
actions to other images with a click of
a button.
p s You’re able to blend many different layers
together, masking areas of an image to
protect it from being edited, even down to
the pixel level.
ps Almost anything is possible in Photoshop.
If you can imagine a scene, then you’re
able to turn your wedding photos into a
dramatic space battle or have a picture
of the kids playing with a Т-Rex. Remove
objects, add objects, touch up skin tones,
the list goes on and on.
90
THE HISTORY OF PHOTOSHOP
Photoshop: The Power to Create
plug-ins require specific versions of Photoshop to
run, but a few of them can also act as stand-
alone image editing applications.
Formats and Versions
The Tools for the Job
Photoshop also has a large variety of tools that
allow the user to edit their images in numerous
ways. Broadly speaking, the tools cover areas
such as drawing, painting, navigation, content
selection, text, masking and retouching. Many
of the tools have additional variants that allow
you to perform different tasks and functions.
As well as the ability to create pixel-based
images and art, it can also create and
manipulate text and handle a number of vector
graphic formats, including EPS files and Adobe
Illustrator files. Older styles of Photoshop had
extended versions that allowed the creation and
handling of 3D graphics, whereas Photoshop
When a Photoshop document is saved, it creates
a default file that has the .PSD file extension. This
stands for Photoshop Document and it contains
all of the layers, adjustments, masks, transparent
items and other content that make up the
finished document. There is another Photoshop
file format known as .PSB, which stands for
Photoshop Big. This is a large document
format that lets you use vastly increased image
dimensions and file sizes.
CC, the cloud-based subscription service
version, has 3D capabilities built in as standard.
It can also, to a limited degree, import and edit
video files.
The program’s main functionality can be
enhanced with the addition of numerous, small
add-on effects and programs called plug-ins.
Although Adobe has a number of plug-ins, such
as Adobe Camera Raw, it is mainly third party
companies that develop them. Most of the
The program has had a large number of
updates and version numbers. In 2003, the
numbers were replaced with CS plus a number,
to reflect its current Creative Suite branding.
It wasn’t until 2013, when Adobe changed its
business model to subscription-based rental and
the introduction of the Creative Cloud brand,
that CS was replaced by the suffix CC which has
recently been dropped altogether. Photoshop is
currently in stable release 2022 (23.1.0).
www.pclpublications.com 91
The History
of Lightroom
Let’s take a closer look at the development of Adobe’s specialist
app for photographers, Adobe Photoshop Lightroom.
Ever since digital cameras first
became popular in the early 1990s,
photographers have sought ways
to adjust and improve digital images
and replicate the darkroom tricks and
techniques that film photographers have
used for decades to get the most out of
their pictures. There are dozens of digital
image editing programs available and
almost everyone who’s ever taken a digital
photo, whether they use a top-end digital
SLR or just the camera on their mobile
phone, has used some sort of editing
software to adjust and enhance the image.
Most smartphones come with some sort of
image editing app as a standard feature.
Adobe Photoshop
For more than two decades the industry
standard for image editing software has
been Adobe Photoshop and ever since
it was first introduced in 1990 it has
been the go-to program for professional
photographers. The editing tools that you
take for granted in your smartphone app
were all inspired by tools first introduced
in Photoshop.
Photoshop is an amazing piece of
software and in skilled hands it is capable
of making almost any adjustment or
alteration imaginable to a digital image.
However, in recent years Adobe has
expanded Photoshop’s capabilities to
include elements such as video editing,
3D texturing and text editing, making
what was already a very complex
program even more difficult to master.
Of course, these expanded capabilities
“...it was clear that
a new app was
needed, that catered
more specifically
to the needs of
photographers.”
have been reflected in the ever-increasing
price, making Photoshop a very expensive
piece of software indeed. Nobody likes
to pay for something they’re not using
and photographers found that most of
Photoshop’s expanded features were surplus
to their requirements; so it was clear that
a new app was needed, that catered more
specifically to the needs of photographers.
This was the remit under which Adobe
Photoshop Lightroom was developed.
Shadowland
Mark Hamburg is a veteran software
engineer who has been working at Adobe
since 1990 and, along with Thomas
Knoll, was part of the original team
behind the development of Photoshop.
In 1999 Hamburg started working on a
new project codenamed Shadowland
(a reference to a k.d. lang album, of all
things). He brought on board Andrei
Herasimchuk, the interface designer
responsible for the distinctive look of
Adobe Creative Suite, and development
was started later that year.
Some people are under the impression
that since it’s officially named Adobe
Photoshop Lightroom, it is essentially
just a repackaged version Photoshop
with some of the features removed, but
this is not true. Hamburg, Herasimchuk
and their team wrote the new program
virtually from scratch, even writing a large
portion of it in a completely different
coding language. Initial development
took three years and in 2002 Hamburg
was able to demonstrate an early version
of the program. An interface was added
the following year and in 2004 full
scale development started at Adobe’s
development facility in Minnesota.
In early January 2006, Adobe took the
unusual step of releasing a beta version of
their new program for public evaluation,
initially on Apple Macintosh computers
only, and used customer feedback to
continue development of the program.
Further beta versions followed later
that year, adding new features, including
support for Microsoft Windows in July,
and integration with Adobe Photoshop in
September. Finally, the full retail version
of Adobe Photoshop Lightroom 1.0 was
announced in January 2007 and released
to the general public the following month.
92 www.pclpublications.com
THE HISTORY OF LIGHTROOM
Lightroom Classic
Over the years since its initial release as a stand-alone
product, there has been major stand-alone versions
released and multiple minor sub-version updates. Then
Adobe launched its subscription based Creative Cloud
service. You were able to choose from the entire suite of
Adobe Products either singly, or in various packages. Adobe
Photoshop Lightroom CC (2015) as it was initially called,
has received various updates over the years of its release
and at the time of writing is in the stable release version
11.1 as of mid-January 2022. It is now known as Photoshop
Lightroom Classic and is the powerful desktop-focused
version of the app. It is widely regarded as the go-to app for
serious photographers.
The Map Module is a great addition to recent versions. Utilising GPS technologies,
you’re able to stamp location specific metadata to your photos.
Lightroom easily imports your photos from many different sources. You can
create Collections, add Presets and custom Filters to each or all of your images.
Lightroom
Photoshop Lightroom was launched mid-September 2017
and at the time of writing is in its stable release version 5.1 as
of mid-January 2022. Photoshop Lightroom is a cloud-based
photo service which caused a bit of a stir at its release. Not only
was it an unexpected new product, it was a much pared down
version of its much more fully-featured cousin Lightroom Classic.
You can only work on images that are stored in the cloud and
if you need extra storage space, then further storage has to be
purchased. There is no doubt it is a faster and more streamlined
product for enthusiasts to use across multiple mobile platforms,
but if you are a professional photographer, then Lightroom
Classic might be your better option.
Adobe Photoshop
Lightroom
Г Adobe Creative Cloud
Apart from basic exposure adjustments, you can crop, heal and add graduated
and radial filters. There are also a number of Presets for one-click adjustments.
The Lightroom interface is a much simpler affair, designed to be less cluttered with
just the main tools for processing your images and adding keywords.
www.pclpublications.com
93
Lightroom versus
Photoshop
At some point in your digital image editing life you’re
going to face the question: Lightroom or Photoshop? It’s
not always an easy answer though as it depends on what
it is you want to achieve. Both are heavyweights in the
photographer’s toolbox, but which is right for you?
Lr or Ps?
It’s not always an easy choice but there are vast differences between Lightroom and Photoshop that can help make your mind up. These
differences depend on the situation and what you intend to do with the finished product. Let’s break down a few strengths of each.
VS
Ps
Lightroom Classic CC Strengths
Photoshop Strengths
Lightroom can manipulate and edit Raw files directly
from your camera, without the need to install or use
another plugin.
Photoshop is a pixel-level editor. Where Lightroom
allows you to adjust pixels in an image, Photoshop lets
you move them and manipulate them in a way that’s
nothing short of magical.
Workflow and image management is one of Lightroom’s
main draws. You can easily import, organise, edit and
manage each of your images without too much in-depth
knowledge of advanced design techniques.
There are less features than with Photoshop, which
lessens its learning curve and thanks to a well-planned
user interface, it’s relatively easy to adapt to if you’re
already familiar with other photo editing tools.
Lightroom has an impressive number of presets available
to the user. Exposure levels, contrast, toning, colour
presets, video presets, effects and many more are readily
available via the Navigator.
You can arrange the images you’ve imported by
keyword, tags and metadata. You can easily publish
finished work and there are many more under-the-hood
tools and preferences to play around with.
You don’t have to dive into the program’s inner workings
to see great results. Most of the common functions that
provide you with a superb image are just a few clicks
away, and available on the surface of the interface.
Photoshop allows multiple layers to be applied to an
image. You can keep images and edits on separate
layers, and modify them accordingly and independently.
This is the basis of non-destructive editing.
It’s huge. Mind-bogglingly huge. The toolbox alone is
the stuff of legend and contains just about everything
the professional designer and photographer would ever
need from a piece of software.
You can record specific actions within Photoshop,
allowing you to apply those actions to other images with
a click of a button.
You’re able to blend many different layers together,
masking areas of an image to protect it from being
edited, even down to the pixel level.
Almost anything is possible in Photoshop. If you can
imagine a scene, then you’re able to turn your wedding
photos into a dramatic space battle or have a picture
of the kids playing with a Т-Rex. Remove objects, add
objects, touch up skin tones, the list goes on and on.
Q
Q
Q
□
Q
94
LIGHTROOM VERSUS PHOTOSHOP
So which one should I use?
In short, Lightroom is designed for
photographers. It’s a powerful image
management tool that you can use to
quickly organise and edit your photo
collection. Most photographers will
utilise Lightroom’s features over that of
Photoshop, but that’s not to say it’s the
only tool they’ll use.
The beauty of both products is that where one reaches
the limit of what it can do for a photographer's
workflow, the other can then step in and take up the
baton to get the image to its finished state. Once you’ve
used up Lightroom’s features and you want to do more
with an image, then you can take it over to Photoshop
for that intricate level of control and possibly image
enhancement and manipulation.
It makes sense to do as much processing work in
Lightroom as you can to get it as close to completion
as possible. Photoshop can then let you do any layer-
based editing on top of that. Both programs are an
integral part of the design process and workflow, but for
the sake of this book and photographers the world over,
we’re opting to start your post-processing adventure
with Lightroom.
Lightroom is a great image editor and organiser, and is remarkably easy to use,
considering how powerful it can be.
Photoshop has an incredible array of benefits on offer; with it you can just about do
anything your imagination comes up with.
Most photographers will use Lightroom for their post-processing, moving to Photoshop for advanced techniques and edits.
www.pclpublications.com
95
Shooting in
Raw Mode
To get the best out of your digital images with Adobe
Lightroom, you should always shoot in Raw Mode.
If you’ve bought this book, we can safely assume that you
know something about digital photography, so you’re probably
already aware that the vast majority of digital images are stored
in a file format known as JPEG. Nearly all digital cameras and
the majority of users, professional photographers want the best
images possible and so any loss of quality is unacceptable. For
this reason, most high-end cameras have an option to store
photos in an uncompressed format usually known as Raw mode.
mobile phones record their images as JPEG files. You can spot a
JPEG file because it will usually have the filename extension .jpg
or .jpeg. The JPEG format has been around since 1992, when the
standard was first specified by the Joint Photographic Experts
Group (after which it takes its name), a standing committee of
imaging and software industry experts. There have been various
attempts to update or replace the JPEG format over the years
but it is now so entrenched in the digital world that it will likely
be with us forever.
Advantages of Raw Mode
A full explanation of JPEG compression would take up much
more space than we have available in this guide and you really
don’t need to know most of it. For our purposes, the major
difference between JPEG and Raw mode is the amount of
information used to describe each pixel in the image. In JPEG
mode each pixel is described by 24 bits, that is 24 ones and
The JPEG format is great for digital images that are shared
or published via the Internet or stored on digital media, because
it is a compressed file format. File compression is a way of
shrinking file sizes by removing redundant information and
encoding the rest in a more efficient way. For digital images
this means that a photograph that is maybe 35 megabytes as
it comes off the camera sensor can be compressed down to a
fraction of that size without losing too much image quality. This
obviously means that you can store a lot more images on your
memory card or hard drive and view your friends’ photos on
Facebook without using up your entire
data allowance at once. Whilst a
slight loss of image quality, as
a trade-off for more efficient
storage, is not a problem for
zeros, 8 for each colour channel of red, green and blue. This 8-bit
encoding allows 256 gradations of brightness per colour channel,
meaning that it can display 256 x 256 x 256, or 16,777,216
different shades of colour. That might sound like a lot but if
you look at a JPEG image of a clear blue sky you may still see
lines between the different tones of blue rather than a smooth
gradation of colour.
In uncompressed Raw mode, each pixel is usually described
by 12 or even 14 bits per channel, giving 36 or 42 bits per pixel.
This might not sound like a big difference but whilst a 12-bit Raw
file can describe 68 billion shades, a 14-bit file can describe four
trillion. This means that not only will your colours look smoother
and more lifelike, much more shadow and highlight detail can
also be recorded, giving your pictures much more dynamic
range. This means that when you’re processing a Raw mode shot
you can pull out much more detail from shadows and highlights.
See the sample photos shown here to see the difference.
AF-ON
Quality
RAW
Skfcv.'ll
JPEG
03OK
IL IL IM IM
RLCQH
Canon
96
* ON
OFF
8Ш2
IS IS
О 1196 В 3528
File Format
JPEG Recorded Pixels
JPEG Quality
RAW File Format
C@®Cancel
RAW
? PEFB
DNG
wb QK ti
SHOOTING IN RAW MODE
This photo was shot using in-camera JPEG compression. As you can see there is
almost no detail in the shadow areas and no amount of brightening can change that
This is the same photo shot in Raw mode and processed in Lightroom. With the greater
exposure, latitude and colour depth this mode provides, shadow detail and colour
saturation are improved, producing a much nicer shot.
Disadvantages of Raw Mode
For day-to-day use there aren’t many disadvantages to shooting
in Raw mode. High capacity memory cards and multi-terabyte
hard disks are now so cheap that storage capacity really isn’t
a problem and if you want to send a photo via email or share
it online it’s very simple to convert a Raw file into a more
manageable JPEG. The only real disadvantage is that there is very
little standardisation of Raw file types between different camera
manufacturers, and all of them have their own proprietary formats.
This means that when you buy a new camera you may find that
Lightroom or Adobe Camera Raw won't be able to open or
process the images until a compatibility update is released, which
can sometimes take several weeks. One way around this is to use
the Adobe DNG Raw format, which is an open-source Raw file
format that is available on some cameras, notably Pentax DSLRs
and some other high-end cameras. All Adobe software can handle
this format by default. Adobe also offer a Raw to DNG converter
that can batch-convert all your Raw files to the more compatible
DNG format. The downside being that you then have native Raw
and DNG versions of all your images.
Raw or RAW?
Most books, magazines, websites
and even camera menu screens
refer to Raw mode all in capital
letters: RAW. There’s really no
reason for this as it’s not an
acronym and just means that you’re
recording the Raw uncompressed
information from the camera’s
primary image processor. As far
as we’ve been able to determine,
the practice of writing it in caps
started with a Canon press release
circa 1998; and was carried on by
other PR departments and camera
journalists who didn’t know any
better. Since we do know better, in
this book we’re going to write
it as‘Raw’.
О О и > -
1^23466789
Б Image Size L12M
E? Aspect Ratio 3:2
^Quality RAW & JPEG
BRAW File Type Uncompressed
Panorama: Size
Panorama: Direction
____________________________ax
www.pclpublications.com 97
What is Photoshop
Elements?
Lets take a moment to get to know a little more about
the software and how it can help you with your day to
day image editing.
Adobe Photoshop Elements is a
great option for those who want
an extensive toolset that can take
on most of their image editing needs,
without the requirement of highly
advanced features such as you would
find in Photoshop CC. It is also a great
choice for those who only need one-
click solutions to their image editing
needs, or perhaps want to start to
learn how to take on the more involved
techniques and tools that Elements has
to offer. Another big plus point in its
favour is that it is one of the very few
remaining Adobe products that can be
purchased outright, without the need
for subscription.
A Worthy Alternative
There was a time when, in certain
quarters, Elements was considered a
dumbed-down version of Photoshop
with a limited toolset, that was
only meant for beginners with no
aspirations to advance to the more
technically advanced techniques seen
in Photoshop. However, recent versions
of Elements have shown that it is a
worthy standalone alternative to using
Photoshop. It is a focused image editor
and cataloging application that is more
than capable of taking on any image
editing task you care to send its way.
In its current form, Adobe Photoshop
Elements is comprised of two main
components. One is the image editing
module of the software where you
can touch up your photos or even
manipulate and transform them beyond
recognition. The Edit section is broken
down into three sections. The first is
the Quick Edit mode, then comes the
Guided Mode section and finally there is
the Expert mode.
Make the Most of Modules
Each module has its own set of tools
and preset options that can quickly get
the job done. Quick Edit, as the name
98
WHAT IS PHOTOSHOP ELEMENTS?
The Adobe Photoshop Elements and Organiser interfaces are
designed to be as intuitive as possible with plenty of options
for beginners and experienced users alike.
suggests, contains the basic editing tools
such as colour correction, cropping, quick
selection, spot healing, sharpening and
lighting fixes. You can also apply some one-
click presets such as Smart Fix, Exposure
and Lighting.
Helping Hand
The Guided module is also fairly self-
explanatory. Here you can make any number
of popular image adjustments to your
photos, with guided step-by-step tutorials,
such as altering brightness and contrast,
resizing photos, rotating and straightening
your images and adding vignettes. It also
has a number of specialised and fun options
for restoring old photos, creating your own
frames and replacing backgrounds.
More Advanced Options
Finally comes the Expert mode. This has
more of the feel of its big brother, Photoshop
to it. It has a toolbar ranged down the left
hand side of the workspace and on the right
is the layers panel that behaves much in the
same way as Photoshop's layers palette. Here
you also have access to a number of photo
colour presets such as Faded Photo, Glow
and Monotone Color. There are also a number
of filters for more artistic effects such as
coloured pencils, watercolours, distortion
effects and sketch filters. You can also add
Bevels, Patterns, Strokes, Photographic
Effects and much more by accessing the
icons in the lower right of the taskbar at the
bottom of your workspace. Expert mode
is the most hands-on of the three modes
you can employ and gives you access to
all the tools, so you can apply all your own
advanced edits to your photos.
Getting Organised
The second main component of the latest
Adobe Photoshop Elements is the Elements
2019 Organiser. At its heart, this is a
cataloguing and photo organising program
that lets you import, sort, tag and rate your
photos. If you wish, you can create albums
and use names, locations, date, time and GPS
data to sort them. The program can even
employ face recognition to find and sort
photos of people and tag them much as you
would in Facebook. Indeed, you can actually
import your list of Facebook friends as an
aid to tagging the people in your photos. If
it detects a similar name being entered
as a tag, it will display those existing
names similar enough as a match to be
an option for tagging.
The two components of Photoshop
Elements and Elements Organiser
are separate programs, which can be
a bit of nuisance if you need to keep
switching between them but you have
at your disposal a set of powerful
editing tools that will keep beginner and
expert happy.
Over coming issues we'll begin to delve
deeper into the workspaces offered by
the Editor and Elements Organiser. It is
best to consider the Editor module as your
digital darkroom and design studio and to
think of Elements Organiser as your library,
where you keep all your media items such
as photos and videos.
www.pclpublications.com
99
TAKE YOUR
BESTSHOT
More images to inspire you as your journey conitnues...
Love photography? Then welcome. Pull up
a camera and make yourself comfortable.
We want to continue to share our love of
photography with you. Doesn’t matter if you’re a total
beginner or seasoned pro, we do it because we love
it, right? Photography can be a very solo endeavour
or group experience. Either way, we believe there’s
always something new and exciting to learn and
certainly always something about your technical
skills you can improve.
If you're down on your local beach shooting the
coastal landscapes or just setting up a little shoot
on your dining room table, we hope we can spark a
desire to go on and attempt even greater projects
and really give your images that 'wow’ factor. These
first few pages are yet more examples of images we
like. Seeing other people's work can get you thinking
in more detail about your own and perhaps giving
you a little more impetus to see how far you can
push your own skills.
100 www.pclpublications.com
TAKEYOUR BEST SHOT
www.pclpublications.com
Hasselblad L1d-20c
28.0mmf/2.8
10.3mm 7/5.0-1/120S-IS0100
102 www.pclpublications.com
Nikon Z 7
70.0-200.0 mm f/2.8
102.0mm 7/11.0-3/5s-IS0100
www.pclpublications.com
103
INSPIRATIONAL IMAGES
r
Black and white
Ansel Adams \ISs an American landscape
photographer known for his black and white
images of the American West. He helped found
Group f/64, an association of photographers
advocating "pure” photography which favored
sharp focus and the use ?)! the full tonal range
of a photograph. When it comes to shooting
in black and white he is famously quoted as
saying: “I can get a far greater sense of ‘colour’
through a well-planned and executed black
and white image than I have ever achieved with
color photography."
Long exposure sunrise
With the aid of a 10-stop neutral density filter,
you can slow down your shutter speeds to soften
moving elements in your shots such as water and
clouds. On a crisp morning, down at the seafront,
screwing a ‘big stopper’ to the front of the lens
meant that a normal exposure of about l/30s could
be extended up to about 30s. The sea became flat
and mirror-like and the clouds soft and less well
defined. The flags, flapping on their poles were
reduced to ghostly shadows.
106 www.pclpublications.com
INSPIRATIONAL IMAGES
of attention in this shot. Safe to say, a tripod is a
must have accessory to avoid camera shake.
www.pclpublications.com
107
THE HANDY
GEAR GUIDE
This issue reveals more cool gear for aspiring photographers
The number of cameras and photographic accessories on the market today is
simply staggering and can be extremely off-putting for those who are looking to
upgrade their gear. This is particularly true for those who may have had an older
camera for some time and are not familiar with the specifications of the current range
of cameras. If you are thinking of upgrading your gear simply because you fancy a
new camera or you are looking to expand your creative abilities with a more advanced
camera, lenses and accessories, then these next few pages are worth a read. We’ve
picked out a few items that are of great interest to us. There is an old adage that a new
camera will not make you a better photographer and whilst that is true, it may just offer
you a new feature that you use on your next shoot.
1
“Something as simple as getting '
the flash off your camera to be use
remotely or just buying a reflector^
to use on your next portrait Я
I -лА4 > лм. ч • -i г' -1
110 The Nikon Z series
111 NIKKORZ series lenses
112 Cokin gradual ND kit
113 CanonPixmaPro-100S
114 Sony VCTR100 tripod_______
115 GitzoGK1555T-82TQD Series 1
116 Memory cards
117 Lee SW150 filter system
J
brand new creative photograph!
J ^possibilitie^”
108 www.pclpublications.com
THE HANDY GEAR GUIDE
www.pclpublications.com
109
The Nikon Z series
A mirrorless system designed to capture more detail, more colour and more light
Nikon have created a camera system that
ushers in a new era of photographic
possibilities. Mirrorless cameras have
been with us for some time, but now Nikon
have changed the game with their two Z series
cameras. Both the Z7 and the Z6 use the new Z
Mount full-frame lens mount; this new design
is actually the widest mount on any camera. At
55mm, it is 17% larger than a standard F Mount,
which allows for more light capture and places
the lens closer to the sensor, allowing smaller,
lighter cameras and lens design. The build and
ergonomics of the two cameras have been
carefully crafted to be lighter than standard DSLR
bodies and allow intuitive control. Combined
with an articulating touchscreen, navigating and
adjusting settings has never been easier.
The new cameras have impressive specifications.
The Z7 sports a huge 45.7MP sensor and the Z6
weighs in at 24.5MP. The Z7 also boasts 493-point
on-sensor PDAF technology, to increase the
focusing speed, while the Z6 employs 273-point
PDAF. Both are powered by the latest EXPEED 6
image processor, for unrivalled handling. The Z6
has a native ISO range from 100 - 51,200 and can
capture 12fps in continuous shooting mode. TheZ7
has a 64 - 25,600 native ISO range and can capture
9f ps in continuous shooting mode.
Couple all the features listed above with the
cinematic 4K UHD video capability and you can see
why the Nikon Z system will capture the imagination
of photographers and videographers everywhere.
Specification at a glance
Nikon Z7
Effective pixels 45.7MP sensor
Native lenses New Nikon Z Mount system
Image processor Powerful EXPEED 6
ISO range 64 - 25600
Autofocus 493 PDAF focus points
Video 4K UHD movies, 8K time-lapse movies
Max burst 9fps continuous shooting
Vibration reduction 5-axis optical
LCD monitor 2.IM dot tilt display
Weather sealing Yes
Connectivity Wi-Fi and Bluetooth
Price £3462/$3500/€3699
Nikon Z6 Effective pixels 24.5MP sensor
Native lenses New Nikon Z Mount system
Image processor Powerful EXPEED 6
ISO range 100-51200
Autofocus 273 PDAF focus points
Video 4K UHD movies
Max burst 12fps continuous shooting
LCD monitor 2.IM dot tilt display
Connectivity Wi-Fi and Bluetooth
Weather sealing Yes
NIKON Z SERIES/NIKKORZSERIES LENSES
NIKKOR Z series lenses
Amazing sharpness and Light gathering capability with the new NIKKOR Z lenses
The new Z Mount NIKKOR Z lenses are
no less impressive than the Z series
mirrorless cameras for which they are
designed. Their optical performance takes
photography to the next level and they boast
amazing specifications of their own. They
are comprehensively sealed to prevent the
ingress of dust and moisture, but are still
lightweight and well balanced. At the moment,
there are 4 lenses available with more to be
rolled out over the next two years.
They cover useful focal ranges such as the 14-
30mm f/4 wide-angle and 24-70mm f/4. If you
need fast primes, then 35mm and 50mm f/1.8
lenses give you the ability to shoot in darker
scenarios and gather more light. Soon to be
added to the list is the 58mm S Noct; this is the
fastest NIKKOR lens in production and boasts a
maximum aperture of f/0.95. This is a low-light
performance lens with incredible depth of field
control and amazing bokeh for portraits. With
the FTZ mount adapter, if you already own
NIKKOR F Mount lenses, you will still be able
to use all your favourites on the new system
camera bodies.
Specifications at a glance
NIKKOR Z14-30mm f/4 S
Lens type_______________Wide-angle zoom
Lens mount Nikon Z
Focal range
14-30mm
Format FX/35mm format
Max aperture f/4
Min aperture___________________f/22
Construction
14 elements in 12 groups
Diaphragm blades 7
Filter size 82mm
Min focus distance 0.28mm
Weight Approx. 485g
Price £1349/$1296/€1449
NIKKOR Z 24-70mm f/4 S Lens type Wide-angle zoom
Lens mount Nikon Z l|MB
Focal range 24-70mm
Format FX/35mm format
Max aperture f/4 Mg*
Min aperture f/22 K|||l '
Construction 14 elements in 12 groups
Diaphragm blades 7 III '
Filter size 72 mm MBS b
Min focus distance 0.3mm Mlb
Weight Approx. 500g
Price £999/$996/€1087 ;
NIKKOR Z 35mm f/1.8 S m-п Hi
Lens type 35mm prime ^M
Lens mount Nikon Z
Focal range 35mm
FX/35mm format
Format
Max aperture f/1.8
Min aperture f/16
Construction 11 elements in 9 groups
Diaphragm blades 9
Filter size 62mm
Min focus distance 0.25mm
Weight Approx. 370g
Price £849/$846/€898
www.pclpublications.com
111
Cokin Gradual ND Kit
Shoot more creatively with filters for your camera
The more you grow in experience as a photographer, the more
demanding lighting conditions you may possibly encounter
in your search for more interesting and varied images. You
may also demand more in-camera control of how light is falling
on your sensor, to give you more balanced exposures at the point
of capture and minimise the amount of shots lost to incorrect
exposure thus reducing the amount of post-processing you have
to do with your images once you are back at your computer. This
is where filters come into play. They vary in size and type but all
have one function, to modify the light levels falling on your sensor.
This can be as simple as affecting exposure of the entire image, or
a part of it. It could also be altering the colour of the light captured
with coloured special effects filters.
The most often used filter is the graduated Neutral Density (ND)
filter. It is an optically neutral sheet of organic glass that is dark at
the top and fades to transparent near the middle. Using this, you
can make over bright skies darker to match the exposure of the
usually darker foreground better. There are many manufacturers
of photographic filters and Cokin is one of the most well-known.
They are a French manufacturer who introduced their creative filter
system in 1978. The choice of filters today is vast but they also provide
starter kits of specific filter types and the Gradual ND Kit is perfect
for landscape photographers who need an affordable entry into
filter systems. The kit comes with a P-series filter holder and three
ND grads of various strengths. You will need to purchase adaptor
you r photography.
rings depending on the diameter of the lenses you use. The adaptor
screws into your lens and the filter holder screws into that. Then you
can slide your ND filters into place in the holder. Two filters are hard
grads, meaning that they transition to clear quite sharply. These are
ThePseriesfilterholderis
a great all round system. It
can accommodate lenses
up to 82mm in diameter.
Specification at a glance
Material CR-39 Organic Glass
Includes GND2-lf-stop
GND4-2f-stops
GND8-3f-stops
lx filter-holder
Holder size P series
Dimensions 84 x 84mm
Lenses Up to 82mm diameter
Adaptor ring Sold separately
Price £62/$00/€00
great for landscapes with uncluttered horizon lines such as the sea. The
other is a soft grad that blends more smoothly from top to bottom. This
one is perfect for horizon lines that have more going on in them such as
mountainsand trees.
The beauty of the system is that once you have the holder, you can
build u p your collection of filter types for even more creative control of
GRADUALND
ND DEGRADE
112
COKIN GRADUAL ND KIT/CANON PIXMAPRO-100S
Canon PIXMAPRO-100S
A professional A3+printer with amazing long lasting colour
If you are one of those photographers who loves to print and
frame their work, rather than keep the shots buried deep within
one of your hard drives, never to see the light of day, then it’s
worth considering the PIXM A PRO-IOOS for top quality prints. With
a maximum of 4800 pixels, this thermal inkjetfrom Canon uses
an 8-ink colour system including three monochrome inks for deep,
saturated colours with a quoted 30 year permanence. This printer
is fast too, it can a print an A3+ photo, with a border, in about 90
seconds. The PIXM A PRO-IOOS is wireless and printing can be done
from either your desktop computer or mobile devices using the
Canon PRINT app.
If you are a Photoshop and Lightroom user, you can take a lot of the
guesswork out of your printing and colour settings and produce more
accurate images by using the Print Studio Pro plugin. This way you can
print directly from your preferred pro editing software. A large number
of media and specialist paper types made by Canon and other paper
manufacturers is supported by the printer, as well as a CD printing
option that lets you print directly onto compatible disks. Thankfully,
although it uses an 8 colour individual cartridge system, when one runs
out, you only have to replace the empty one. People are reporting that
as printers go, it is quite thirsty, and although you get a great printer
that produces high quality prints at a reasonable price, the ink costs will
probably have you using itfor those special print requirements only.
Specification at a glance
Technology Thermal inkjet
Maximum resolution 4,800 x 1,200dpi
Maximum paper size A3+
Number of colours 8
Photo durability 30 years
Standard interfaces USB, Ethernet, 802.11b/g/n wireless
Optional interfaces None
Dimensions 215 x689 x385mm
Weight 19.7kg
Price £345/$75/€480
Cation
www.pclpublications.com
113
Sony VCTR100 tripod
A lightweight tripod solution
We can never extol the virtues of tripods enough. After
the purchase of a camera and lens, we would always
recommend the purchase of a tripod. You never know
when you might encounter that perfect low-light scene or
challenging condition that merits the use of a tripod for steady,
shake-free shots. Tripods, for the most part, come in two flavours
depending on your particular requirements. Travel tripods are small
and lightweight, sacrificing robustness and rigidity for maximum
portability and a small compact size when folded away. Professional
tripods are larger and heavier for maximum rigidity and robustness
in all shooting conditions.
Some also offer a range of compatible tripod heads for different
needs and can be reconfigured to allow the centre column to flip out
over a 90° angle, to quickly shift your camera’s perspective, to get into
some more tricky shooting angles that more basic tripods don’t allow.
They are also designed to be able to support much larger cameras
and lenses. The Sony VCTR100 falls under the lightweight travel
tripod category. Itsaluminium design allows itto be ultra portable
and light enough to carry easily over distance. The 3-way pan and tilt
head is designed to be easy and convenientfor stable shooting with a
centre brace for extra stability when using either camcorders or small
cameras. The three-leg sections allowyou to adjust the tripod up to
a maximum extended height of 100cm. Whilstthis is only just above
waist high, it does mean it retracts to a very convenient 35cm for
carrying or putting away in a backpack. As small, affordable tripods go,
this is a good option for photographers on the move.
Specification at a glance
Colour Black
Maximum Height (cm) 100
Maximum Load (grams)______________1000
Minimum Height (cm)
35.5
Number of Leg Sections 3
Primary Material
Aluminium
Weight (g)_______________________________660
Price
£35/$40/€45
SONY VCTR100 TRIPOD / GITZO GK1555T-82TQD SERIES 1
Gitzo GK1555T-82TQD Series 1
When you demand the best
After you’ve spent several minutes just pronouncing the Gitzo’s
model number, you can settle down and marvel at this flagship
tripods specifications, and its price. This is not a tripod for the
hobbyist photographer, unless you have a large disposable income
that you would like disposed of very rapidly. At this price point, you are
paying for a lot of engineering that makes the Gitzo one of the highest
quality and stable tripods out there. Add to that the brand-name
kudos and you have a Rolls Royce among tripods (at Rolls Royce prices
of course).
At this price you would expect some great features. First the Gitzo
weights just 1.4kg thanks to its carbon fibre construction. Fully extended,
it reaches a height of 148.5cm and can support a maximum payload
of 10kg, equivalent to a large DSLR with a big zoom lens attached. The
ball head is engineered to be smooth and precise and thanks to the
180° folding mechanism that lets the legs fold back on themselves, it
fits snugly between the legs making an easy to carry package for such a
tall tripod. If you are looking for a taller tripod, then Gitzo does offer the
GK2545T-82QD Series 2 that fully extends to 165.5cm and can support
upto 12kg.
Specification at a glance
Leg sections 5
Max height
Min height
Weight______________________________1.42kg/3.1lbs
Payload__________________________10kg/22lbs
Price £850/$1000/€980
The folding mechanism
means the tripod can be
folded down into an easy to
manage configuration.
148.5cm/58.5"
35.5cm/14.0’
www.pclpublications.com
115
Memory cards
SanDisk Extreme Pro SDXC UHS-I
If you are a pro shooter or even just an enthusiast who is keen to
maximise the speed of their image capture between camera and
card, then you can’t go wrong with a SanDisk memory card. They
have become one of the leading brand names when it comes to digital
storage. Their product is reliable and backed up with a lifetime limited
warranty. Their Extreme Pro range of SD cards are also fast. When we
say fast, it means that the card can can have data written to its solid
state memory very quickly. Fast, in this case means at around 95M В
per second. You might wonder why the speed is so important and what
scenario you would find yourself shooting in to be worrying whether
your card is fast enough. Well, for 95 per cent of the time, you probably
wouldn’t need to worry, unless you find yourself in a situation where
you’re shooting bursts of images in Raw format, or shooting high
resolution video. We can give you a simple example where the speed of
the card hindered a shoot though.
We were shooting a portrait using a technique known as the Brenizer
method. This involves not only shooting the subject at close range with
a 50mm lens or longer at its minimum aperture, but also capturing the
entire scene around them by shooting something in the order of 30-60
overlapping frames that can be stitched together later to create a wide
angle shot with an apparent depth of field matching an f/0.5 lens. It does
require those 60 frames to be captured in rapid succession, to not only
make sure light levels don’t change but that your subject does not move
too much in the period of time it takes to capture all those shots. We started
the sequence and it became apparent very quickly thatthe card couldn't
handle the data beingfed to it from the camera's processor and it felt like
an eternity waitingfor the meagre few shots it could manage to be written
to the card. It was an old SanDisk Ultra II card and it just wasn’t able to
handle the Rawfile data comingfrom the Canon5DMark III. We swapped it
out for a SanDisk Extreme 16GBcard with a write speed of 60MB/s and the
next attempt went much more smoothly with the card happily handling the
flurry of shots.
The same can be said for sports shooters where they might be shooting
a continuous burst of shots, tracking the action, hoping to pick out the
Class 10
This has a minimum sustained sequential write speed of least 10 MB/s.
Other Classes
There are also 2,4 and 6 class ratings which indicate their minimum
write speed in MB/s.
U1 rating
Recommended for 1080p video recording and has a minimum write
speed of at least 10 MB/s.
U3 rating
If you are shooting 4K video, the faster U3 cards offer a minimum write
speed of 30MB/s.
UHS-I
This stands for Ultra High Speed Phase-1. This is the first iteration of
ultra high speed cards with a theoretical bus speed of 104MB/S.
UHS-II
The second iteration of the Ultra High Speed Phase for SD cards. This
offers theoretical bus speeds up to 312MB/S
UHS-III
Released in 2017, the third iteration of the SD specification allows bus
speeds up to 624MB/S and is perfect for huge amounts of data such as
shooting 8K video.
Video speed
You may notice newer cards with V6, V10, V30, V60 and V90 ratings
on them. This is a rating that guarantees minimum levels of of video
capture performance.
one shot from the sequence that perfectly captures the moment. Use a
slow card and you are going to struggle to write the data quickly enough
and cause a data log jam that may lead to missed shots. At 95MB/s the
SanDisk Extreme Pro is not
the fastest card, there are
cards that can handle write
speeds up to 300MB/S,
but it does represent great
valuefor money. There are
also a number a storage size
options from 32GB up to
512GB, although be prepared
to spend acres of cash if
you go for the latter. A quick
glance at the Internet and
you may also see that there
are many designations and
ratings for memory cards that
can be a bit confusing. To help
out, here are some of the main
rati ngs to look out for.
SanDisk
MB/s
95 mb/s’
64 GB
SanDisk
MEMORY CARDS / LEE SW150 FILTER SYSTEM
Lee SW150 filter system
Now you can use filters on ultra wide lenses
Countless landscape photographers use filters to coax as
much image detail and tonal range out of their shots as
possible. The simple use of a graduated filter that darkens a
bright sky but leaves the darker foreground unaltered is a popular
example of a filter in use. That’s fine for most lenses you can buy but
there are issues if you want to shoot with a lens that has a shorter
focal length than usual.
A good 16-35mm focal length zoom lens is perfect for most
applications but if you want to use focal length lenses around the 14mm,
12mm and 11mm range, there are going to be some physical drawbacks
to those lens designs. The problem is that ultra wide lenses may have
a domed front element with a built in petal lens hood to which filters
cannot be screwed. Another issue is that most are too large for standard
filter system sizes. With that in mind, Lee have developed the SW150
system and lens adaptors for a range of ultra wide lenses that can hold
filters in place without the fear of vignetting at the widest end of the
zoom range.
You will need to purchase the SW150 system and also an adaptor that
is design to fit over the lens you wish to use. Opposite is a list of ultra
Supported lenses
Nikon AF-S Nikkor 14-24mm f/2.8G ED
Nikon 14mm f2.8DAF ED
Nikon PC NIKKOR 19mm f/4E ED Tilt-Shift
Canon EF 14mm f2.8 LII USM_________
Canon EF ll-24mm f4L USM
Olympus 7-14mm Pro f2.8
Pentax FA 15-30mm f2.8 ED SDM WR
Samyang 14mm f/2.8 ED AS IF UMC
Sigma 12-24mm f4.5-5.6 DG HSM II
Sigma 20mm fl.4 HSM Art
Tamron 15-30mm f2.8 SP Di VC USD
Tokina AT-X 16-28mm f/2.8 PRO FX
You simply attach the lugged adaptor ring to your lens and then attach
wide lens adaptors supported by the system.
the SW150 filter holder and light shield to it. Then you can use Lee filters as
you would any standard filter system.
www.pclpublications.com
117
GETTING
STARTED
Filters, storage and lighting are revealed in this isse
Buying a new camera is an exciting time, whether
it is an upgrade to Ian existing DSLR, or a step
up from using your phone. Either way, exciting
possibilities will present themselves when out shooting.
Once those all-important first big decisions have been
made, your mind may turn to what comes next in terms
of equipment purchases. As ever, the choices of howto
augment your gear with new items is pretty vast, but
we personally feel that the next few pages wiH outline
possible next steps in your journey as a photographer.
120 Flashes and lighting
- 122 Types of light modifiers
124 Filters and.filter systems
126 Digital storage
“Once those all-important first big
decisionshave been made, your
mind may turn to what comes next
in terms of equipment purchases. ”
Flashes and lighting
Add Light and boost your creativity
Once you get beyond the basics of photography
and you find yourself wanting to add a little
creativity and take more control of how the light
affects your shots, then that is when you need to take a
look at additional lighting in the form of flashes. Your first
experience of flash might be the tiny pop up flash you
find on the top of a lot of compact cameras and a number
of DSLR models. They are useful to light a subject when
all else fails, but to be honest, ifyou want your shots
to appear more than just selfies, then you need to look
further afield. We are referring to the dedicated flashguns
that can be mounted in your camera’s hot shoe, or for even
greater flexibility, used off-camera and fired remotely by a
wireless trigger.
They are known by various names such as flash, strobe,
speedlight (or Speedlite) and monobloc. They are usually
battery powered, which makes them very portable. They
emit a powerful and brief flash of light that can illuminate your
scene. Monoblocs, or studio lights as they are known, are
larger, more powerful and less portable lights that are usually
powered by mains electricity. Some studio lights can be used
outdoors with the help of large lithium batteries.
Pop up flash
Most compact cameras and entry level DSLRs will
have a small flash built in. Most are designed to pop up
when light levels are deemed too low to get a usable
exposure. Pop up flashes by their nature are very
small and produce a very harsh direct light that is not
flattering for your subjects. Because the little flash
tube is front-facing, you don’t have a lot of scope to
get creative. You can use it to fill in dark shadows but
beyond that you’re probably going to struggle. Some
people will put a small piece of white card bent at an
angle in front of the flash to direct the light upwards in
order to bounce the light off the ceiling but this can be
a bit hit and miss. Add to that the fact that they are not
particularly powerful, then you can see why you need
to step up your gamea little to the next level.
TOP TIP- .
When using ^^Vstand
'°rm'vnTspee'd'vm'’^5'^our
h0W > hasa maximum sync
“""Id that means it can fire
XO-txXo-
FLASHES AND LIGHTING
Continuous light (prices range from £50- £10000*1
An alternative to the various forms of flash lighting we’ve mentioned
here is to use continuous lighting instead. Sometimes also referred
to as hot lights or photofloods. Rather than emitting a powerful but
brief flash of light, continuous lights are always on. They are not as
powerful as flashes but you do have the benefit of always seeing how
the light is falling on your subject without needing to do a test shot as
you would with flash. At their simplest, they are either an incandescent
bulb housed inside a large reflector, or powerful daylight balanced
fluorescent lights that are more energy efficient. For more powerful
options, you are going to be looking at arc lights; these were developed
for the film industry and are insanely expensive.
Third party flash (prices range from £25- £150)
Just like cameras, there is a bewildering choice. Not just from
the major brands like Canon and Nikon but from 3rd party
manufacturers like Nissin, Yongnuo and Gloxy. With big name
brands costing hundreds for top of the range equipment, the
temptation may be to trawl the pages on eBay looking for a bargain
flash unit. It is fair to point out thatthe
phrase‘you get what you pay
for' has never been more
relevant. You may find
yourself some unknown
brand for a quarter of the
price of one of the major
brand names that seems
too good to be true, and
it probably is. Take the
advice of those whofound
out to their cost, stick
with a major brand or
well-regarded 3rd party
manufacturer. Checkout
user reviews wherever
you can. Make the best
informed choice you are
able within your budget.
Nissin
Brand name flashes (prices range from £100- £600)
All the manufacturers make a variety of flash models for their
cameras. They range from simple front facing small flashes, right
up to their professional-level flashes with wireless control, powerful
flash tubes with variable power control, tilt and swivel flash heads
and a host of customisable features and
accessories to create
your own portable
studio setup.
These models
are notcheap
but they are
the choice of
professionals
fora reason.
They also have
the added bonus of
letting you shoot high-speed
photography because, when
used at lower power settings,
the pulse of light from the flash
is so brief that you could use it to
illuminate a scene for a fraction
of a second and catch a bullet in
flight, freezing the action dead in
its tracks.
0.6'4./ *
Studio lights (prices range from £150- £4000*)
Studio lights can actually be broken down into two
categories. First is the flash head kit. Flash heads are
just the light emitters. A separate power pack supplies
the required voltage and the controls are actually on the
power unit itself. The other variety of studio light is the
monobloc, or monolight. These are either
mains powered or lithium
battery powered flash
units but all the
controls are built
into each unit.
This limits their
power but it does J
make them more I
portable and
more easily used
outdoors. Flash
heads tend to be
more powerful and
you have the advantage
of being able to control
multiple flash head
setups directly from
the power pack.
www.pclpublications.com
121
Types of
light modifiers
Make light yours to command
4
When you use flash lighting, especially if using it to
directly light your subject, you will be aware of how
harsh the shadows it casts can be. You can’t always
be near a large picture window on an overcast day, where the
softness of the light coming through that window makes it
difficult to take a bad photo. You have to work with what you
have, so that means you need to go back to your flash. However,
there are some techniques that al low you to modify and shape
light to suit your needs. This is where light modifiers come in.
A lighting modifier is just what the name suggests. It is an object,
surface, or material that alters the way the light travels from its
source to the subject. If you shoot with an unmodified flashgun, the
light that is emitted is traveling in a concentrated beam from a very
small light source. If this light passes through a modifier, such as
a softbox, the light is diffused, scattered and less concentrated. A
modifier can also turn a small light
source into a large one. A flash,
fired from several feet away onto
a large translucent material, for
instance, creates an illuminated
hot spot that is much larger than
its source. This is the basis of light
modification. Here are a few of the
types of light modifier you could
be working with.
“A lighting modifier
is just what the name
suggests. It is an object,
surface, or material that
alters the way the light
travels from its source to
the subject”
TYPES OF LIGHT MODIFIERS
Omni-Bounce
In effect, this is a tiny
sof tbox that covers the
head ofyourflash.lt
enables light not only to
emit forwards but also
around the sides. This gives
a closer approximation of
a bare bulb and allows for
wider lighting coverage at
the expense of reduced
flash power because not all
the light is thrown forward.
Even from a relatively short
distance, there would bea
visible difference in shadow
softness compared to a
bare flash.
Snoot (prices from £15)
A snoot is a tube that concentrates the light output of your flash. It
gives the resulting beam a searchlight quality that creates a tight
pool of light, ideal for highlighting a small part of your scene. Moving
the flash further away will enable you to define a larger spotlight.
Because the beam of light is so narrow, the rest of your scene would
be in relative darkness. Since the light is effectively reduced in size,
the shadows it creates will be fairly sharp.
Dome diffuser (prices from £50)
The dome diffuser takes the idea of the omni-bounce and expands
upon it. The larger physical size of the dome allows you to use it like
a true, large, bare bulb. With it, you can illuminate larger areas with
a more even light source. Bear in mind that, like the omni-bounce,
light is spread in all directions so your subject illumination will
appeardiminished.
Shoot through
umbrella
The shoot through
umbrella or‘brolly’
is regarded as one of
the best types of light
modifier for those new
to flash photography.
It is a white translucent
material stretched over
an umbrella wireframe
through which the flash
is fired. It is a great way
to spread out light from
a very small original
source. The downside
is that shoot through
umbrellas can be quite
easily broken.
Reflector
umbrella
A reflector umbrella
works in the opposite
manner to a shoot
through. The flash is
fired into the umbrella
which uses its inner
silver liningto reflect
the light backout
onto the subject. This
method allows you to
light large areas within
a 180° radius. The
wide, even light pattern
it creates is ideal for
lighting large groups
from a distance of
around 6m to 7m.
The sof tbox
A softbox is used to soften
and diffuse the output of your
flash into a visually pleasing
even light with no harsh
shadows. The closerthe
softbox is to the subject, or
indeed the larger the softbox,
the softer the light appears.
In fact, many use softboxes
to emulate window light when
shooting portraits or even
product photography. If used
as a key light in portraiture,
the large rectangular
surface creates some lovely
catchlights in the subject's
eyes as if they were looking
outof a window.
(prices from £35)
www.pclpublications.com
123
Filtersand
filter systems
Some must-have filters for creative photography
some of the different
“Levs take a look at
types of filter and
how they can help to
improve your photos.
TOPTIP'-
If you are buying a
filter system that uses
‘a mte7holder. always
remember to get the
t system for У°иГ
COu ?i!ns A very wide
widest ten .
lenS^„yeS of your filter
the edges от у
holder if it is
for your current setup
liters have been an essential part of
photography since its very beginnings.
Used creatively they can improve a hard-
to-capture scene, add an extra artistic element
to an image or just provide a bit of fun. Modern
digital photo editing has provided an, almost too
easy, method to add filter effects to an image
after it has been captured; some effects are
better when applied by actual physical filters
fitted to the camera when the photo is taken
and this is particularly true with black and white
photography. Let’s take a look at some of the
different types of filter and how they can help to
improve your photos.
124
FILTERS AND FILTER SYSTEMS
1. UV filter (prices from £15)
This screw-on filter was used originally to block UV lightfrom hitting
the film in old cameras. Modern digital cameras have U V and infrared
protection on their sensors now, so a UV filter is employed as a method
of defence against scratches and dust getting on the front lens element.
Optionally you can just use a good quality clear glass filter instead. The
higher the quality of glass the better, so as to avoid ghosting and flare in
your shots.
2. Circular polarizing filter (prices from £25)
Circular polarizers are ideal for digital cameras. When correctly aligned,
the filter can render blue skies darker with brighter, white clouds. They
can also increase saturation and reduce reflections on shiny surfaces
and water as well as reduce haze. Polar isers work best when the camera
is about 90° either side of the sun. The polariser has to be rotated until
the maximum effect is achieved, blocking certain light waves. These
filters come in both screw-on and filter holder varieties.
3. Neutral density filter (prices from £35)
ND filters limit the amount of light that is able to fall on the sensor and
therefore require much longer shutter duration. They are made from
darkened materials that are designed to be optically neutral in order not
to create a colour cast. The darker the filter the longer your exposures
can be. ND filters can range from a 2-stop filter to 10-stops of light
reduction. They are excellent for use in daytime to create motion blur in
moving objects like water and clouds.
4. Graduated ND filter (prices from £40)
ND grads work similar to standard ND filters but instead of being one
solid dark material, the filter fades from dark to clear. They are useful in
high contrast situations such as a bright sky versus a dark foreground
where you can use the filter to darken the sky enough to balance the
overall exposure in the scene.
Screw on filter
Rectangularfilter
Filterholder
Filter types
1. Circular screw on filters are the most common type that fits directly
on your lens filter thread. They come in different thicknesses, the
thickest of which can potentially cause vignetting to your shots. Ultra
thin filters get around this but can be more expensive.
2. Square filters are popular with landscape photographers. A holder
designed to house the filters directly attaches to the lens filter thread
and can hold several filters. Generally they range in size from around
75mm to 150mm
3. Rectangular filters are another popular choice among landscape
photographers. These are mounted in the same fashion as their square
counterparts, the main difference is because they are rectangular; they
have more scope to move up and down within the holder.
4. Filter holders are plastic and metal mounting devices that screw onto
the filter thread of your lens. They have several slots moulded into them
to accommodate several filters at once. The most popular filter system
manufacturers are Cokin and Lee and Hitech.
www.pclpublications.com
125
Digital storage
Your precious holiday photos in safe hands
As camera technology develops and the
megapixel count increases with every
new camera that is released, the file sizes
that these cameras create when shooting in Raw
format can be substantial. As an example, ifyou
were to shoot a highly detailed landscape image
with lots of trees, grass, clouds and mountains,
an uncompressed 12-bit Raw file from something
like a Nikon D810 could be as much as 55MB.
Now imagine shooting an action scene of ponies
running across the moorlands in burst mode and
capturing twenty shots in just one sequence, you
can imagine how quickly you would start filling
up any digital storage. There’s more to it than just
the amount of storage you have. A memory card
of 64GB will let you store a lot of images, but if
that card cannot write the data from the camera
fast enough, that burst mode sequence of
photos, that your camera should be able to shoot
at 8 frames per second, is going to hit a digital log
jam after a couple of shots because the buffer
can’t get the image data written to the card and
therefore it all gri nds to a halt while it finishes the
task. Clearly, there is more to memory cards than
meets the eye.
Premium or Budget?
The popularity of SD cards has led to a large
number of budget brands springing up,
and many supermarkets and chain stores
sell their own-brand cards at often very low
prices. However the best advice is to stick
to the premium brands such as SanDisk,
Lexar, Pretec, PNY or Kingston, or to camera
brands such as Fujifilm or Panasonic.
Although they may be more expensive, their
higher standards of quality control mean
that premium cards are usually much more
reliable. Ifyou’vegot a high-performance
camera it's also worth spending a bit extra for
faster data transfer rates to get the best out
of it.
126
DIGITAL STORAGE
SPEED RATINGS
MEMORY CARD USAGE
Premium cards have higher data transfer
speeds, which meansthey can store and
retrieve data more quickly, an important factor
when shooting video or a rapid sequence of
still images. The speed of the memory card
can have an effect on the overall performance
of the camera, especially on high-end models.
Unfortunately many manufacturers have their
own ways of describing the speed of their cards,
which can be very conf usi ng for the consumer.
Some use the *x’ rating, comparing the read/
write speed to that of a CD-ROM, approximately
150 kilobytes per second (150 KB/s), so a
memory card rated at 40x’ speed has a transfer
rate of 6 megabytes per second (6MB/s).
The more widely accepted speed rating is
the Class system, usually denoted by a number
inside a letter C. Most budget cards are Class
2, with a minimum read/write speed of 2MB/s.
Most mid-range high-capacity cards are Class
6, with a read/write speed of 6MB/s.
The fastest class currently available are Class
10 cards, which have a read/write speed of at
least ЮМВ/s. The newer ultra-high speed UHS-I
cards are rated at speeds of up to 45MB/s
90MB/s and the UDMA 7 Compact Flash cards
can reach 160M B/s. Some cards offer storage
capacity up to 256GB in size. All this from a card
that is not much bigger than a postage stamp.
Kingston SDHC 8 GB
Class 4
£5/$4/€6
Best for: compact
camera usersand
holiday shooters.
SarDisk
SanDisk Extreme Pro
UHS-3SDXC
64GB.95MB/S
Class 10
£37/$35/€44
Best for: pros shooting
Raw files and 4K movies.
MULTI-USE
16s
Le\a
SDHC 200x ®
Lexar Multi-use 16GB
Class 4
£5/$9/€6
Best for: compact users
and amateur DSLR
users.
Lexar Premium SDHC
32GB 200X Class 10
£15/$12/€18
Best for: varied storage
intensive DSLRs
and devices.
Transcend SDXC Flash
128 GB
Class 10
£35/$44/€42
Best for: serious DSLR
and video enthusiasts.
Extreme PRO
64^
Sa (Disk
Extreme PRO
256. “0MI“
SdiDisk
SanDisk Extreme Pro
Compact Flash
64GB, 160MB/S
£75/$85/€90
Best for: high bit rate
DSLR and HD video.
SanDisk Extreme Pro
256GB, 160MB/S.
£275/$300/€330
Best for: extreme
image and video
performance.
! 512
| ۥ
Lexar
128tr
Transcend (
। зомв/s 200x
SO HOW MANY PICTURES CAN I TAKE?
The total number of pictures that
can be stored on a memory card is a
difficult thing to quantify for a couple of
reasons. Digital cameras usually store
images usingthe JPEG file format,
which compresses image data to save
storage space. Most cameras have a
menu setting for image quality which
varies the rate of compression, with
high quality images taking up more
space. The compressed size of the
Lexar Professional
512GB, 525MB/S.
£1043/$1200/€1228
Best for: the highest
possible performance.
“The speed of the memory card can have
an effect on the overall performance of
the camera.”
image can also vary depending on
the subject being shot, since more
detailed images contain more data. For
a typical modern 16-megapixel digital
camera the file size can vary between
about 4.5MB for a good quality jpeg
and 30MB for an uncompressed Raw
file, which means an average8GB card
will be enough for approximately 1400
jpegs or 260 Raw files.
to₽t,p! he
Although it may be
tempting * &X
ridiculously large
memory card for an
'extended shooting
session, where yo
disaster befalls yo
memory card.
www.pclpublications.com
127
TECHNICAL
QUICK-START
Our easy-to-follow key photographic techniques continue
At the outset, it is fairly common for us to rely on the
automatic settings provided by our cameras, allowing us
to simply point-and-shoot to take a photo. We feel that an
automatic setting has its place but it does disconnect you from
the actual process of taking a photograph. To be able to take
your shots to the next level, you need to understand the main
principles of photography. In this section, we uncover more
details that help you understand your camera and how you can
start taking the photos that you really want to capture.
130 Methods for getting good focus
132 Bethemaster of metering
134 Lenses and focal length
136 Explore your camera’s scene modes
138 Camera shooting modes
“To be able to take your shots to the next
level, you need to understand the main
principles of photography ”
128
Methods for getting
good focus
Here’s howto getthe most out of your autofocus system
here are a couple of autofocus systems
in use today that intelligently adjust the
camera lens in order to obtain and hold
focus on your subject. Compact system cameras
use something called contrast-detection AF,
which samples the image from the sensor and
detects sharp high contrast edges in the details
of the scene. Phase detection is a more complex
system but is usually much faster, more accurate
and works better in low light. However both
systems require some detail in the scene to ’lock
on’ to. Try and point your camera at a plain wall or
a sheet of white paper and see if it will focus on it.
Even if you own a top-of-the-range DSLR it won’t
be able to focus on a featureless surface. Modern
DSLRs have several autofocus modes available to
make the process of getting good focus on your
subject that much easier. If you look through your
viewfinder, you will see that there are a number of
points on the viewfinder screen which are called
AF points. They vary in number from 9 up to 51 or
more. These are what the camera uses to focus
on the scene. Anythingthat falls beneath one of
these points will be the ideal point of focus. You
can select which one to use or even which groups
of points can be used. If you leave the camera in
its automatic mode (known as AF-A) you leave
the choice of focusing method up to the camera.
The more focusing points you have the better it is
for this mode.
Take control
For more control, you can use the AF-S mode, known
as single-servo autofocus. If you half press the shutter
button, you can lock and hold the focus on a particular
part of the scene. A good example of this method is in
stationary photos where you lock focus on a subject's
eyes and then fully press the shutter button to take
the shot. You can select a single AF point that falls over
your subject's eye and achieve focus or you can use
the default centre AF point, place it over your subject’s
eye, get focus lock and then recompose the shot
how you want it before taking the shot. For moving
subjects, things can be a little trickier. That's when you
can select the AF-C mode. This stands for continuous-
servo autofocus. Now, when you press the shutter
button halfway, the camera will continuously track
and lock focus on whatever falls beneath the selected
AF point or group of points. It attempts to predict the
subject’s motion and distance from the camera.
A,,h^9haJ'P!
craft “as₽ects of
t^t,in9 9Oord\rDP°r,anl
‘here is По softuPOSure'
the >vor(d tha,ft are
P an°utoff‘ ®tcansave
'°CUs"»age
? Worth worb® ,achn'4ue
be"'9h0n°drk'n9onan4de
anyth'n9eZUCh
Go manual
Sometimes, it may be advantageous to use
manual focusing methods instead of the automatic
mode. Autofocus can be difficult to achieve if
the scene is very low contrast or contains lots of
overlapping fine detail. The camera may often
focus on the wrong thing entirely in auto so watch
out and switch to manual mode if required.
Getting your subject in focus Is the key to
agoodshotbutyoumayencountermore
difficult shooting situationsthat require
different focusing strategies.
130
METHODS FOR GETTING GOOD FOCUS
Get to know your autofocus modes
AF-A
AUTO-SERVO AF
The camera decides
which focusing mode
to use and can work
to best effect if your
camera has a larger
number of Appoints.
It will assess the scene
based on its content and
use all the AF points to
focus the shot.
AF-S
SINGLE-SERVO AF
You can lock the focus by
half-pressing the shutter
release button. This allows
you to select a focus point
and recompose the shot.
It is good for simple static
subjects where you can
focus once and know your
subject is not going to
move.
AF-C
CONTI NUOUS-SERVOAF
This time, when you
press the shutter button
halfway, it starts to track
and continually focus on
the subject beneath the
selected AF point. This
mode is good for tracking a
moving subject such as in
sports events.
When autofocus fails
www.pclpublications.com
131
Bethemaster
of metering
Know when to use the different types of metering modes
Nearly all digital cameras, from top-
of-the-range DSLRs to the humblest
budget point-and-shoot compacts, have
multiple light metering options. Knowing how
and when to use these different metering modes
can make a dramatic difference to the quality of
your photography; unfortunately most people
don’t understand what the different modes are
for, how they work, or how to use them.
Know your modes
Depending on your camera, you'll find metering
options either in the menu or with their own separate
control. In cameras with a fully-automatic setting,
this will usually disable the metering options;
automatically selecting multi-zone metering as the
best option for day-to-day scenes and snapshots.
The most common light metering modes are
found on nearly all digital cameras. They are spot
metering, centre-weighted metering and matrix
Getting your exposure correct at the time of
shooting means that you are retaining more
detail in the file; this can be enhanced when
it comes to post-processing.
quality of your photography... ”
metering. The symbols used for these modes are
just about universal. Multi-zone metering is shown
by a rectangle filled with a centre spot surrounded
by a pattern of shapes: centre-weighted metering
is usually shown as a centre spot with shapes
above and below it: whilst spot metering is usually a
rectangle with just a centre spot.
What they do
Matrix metering, also known as Evaluative metering,
is usually the default setting and it is a great multi-
purpose metering mode for evenly lit scenes and
places emphasis around the AF point used while
applying appropriate exposure compensation.
Centre-weighted behaves a lot like Matrix metering
but it place more emphasis on the centre of the
“Knowing how and when to use
these different metering modes can
make a dramatic difference to the
image and doesn’t take the AF point into
consideration. Spot metering is the most
accurate by metering the scene over a very
small circular area. Partial metering takes the
precision of spot metering and expands the
size of the circle used to measure the light.
132 www
publications.com
BE THE MASTER OF METERING
(E-WB AF-DRIVE ISO-00 £
ваза not гм
Matrix or Evaluative metering
This mode is great for evenly lit scenes where there are not a
lot of tonal variations. It meters the whole scene and is usually
the default metering mode on a camera.
When shooting scenes with large tonal variation, spot
metering allows you to pick exactly which part of the scene
you want to accurately meter for.
Centre-weighted average
Since this mode concentrates on the central portion of
the frame, it makes it perfect for portraits and head shots.
Details around the edge of the frame are not metered.
Essentially, partial metering is an expanded version of the
spot metering mode. This makes it easier to use although the
metering is not quite as precise as the spot meter mode.
www.pclpublications.com
133
“Knowing how focal length affects
how much you see in a shot means
you can control the composition
of vour shots in much more
Go wide ang le to c)ef mi leInyourshot
or choose telephoto to pick out a smaller detail
and bring it cldser. A lens' focal length lets you
alter youf compositions with ease. Д'"',
Х.1Ч . чЛаРЯКЁ
Most modern digital cameras have
zoom lensesand it’s likely that if you
own a major brand DSLR, you will
have a couple of zoom lenses in your kit bag.
Zoom lenses let you alter the focal length of
the lens. For example, a 24-105mm lens lets
you change the focal length from 24mm up to
105mm, but what is focal length?
Focal length explained
Focal length is usually represented in millimetres.
A 100mm lens is not the actual length of the
lens but rather the distance between the point
at which rays of light from your scene enter the
lens and create a sharp image on the camera’s
sensor. Altering the focal length has a dramatic
impact on the scene you are photographing. A
20mm wide angle lens can see more of the scene
than a 200mm lens can. This is because as the
focal length increases the angle of view becomes
smaller as the image is magnified. Zooming from
20mm to 200mm for example, means there has
been a lOx magnification of the scene, so small
details at 20mm are suddenly made much larger
and appear much closer at 200mm. A popular lens
like the canon EF 70-200mm f/2.8 can zoom from
70mm to 200mm. At 70mm the angle of view of the
scene is about 95° At 200mm the angle of view is
about 12°. A 15mm fisheye lens is designed to see
as much as possible and has an angle of view of
180° which is comparable to the peripheral vision of
the human eye.
Composition
Knowing how focal length affects how much
you see in a shot means you can control the
composition of your shots in much more creative
ways. If you are shooting a portrait and using a
24-105mm lens for example, it means you can
quickly reframe your shots from very close-up
shots to much wider angle images that include
more background as well as your subject. If you are
an avid landscape photographer, and you want to
get as much of some wide panoramic vista in your
shot in one go, you’ll need a lens with a focal length
somewhere in the 14-16mm area for a very wide
angle of view to capture the scene in its entirety.
Best uses
As a rough guide, lenses that cover a 16mm to
35mm range are generally classed as wide angle
zooms that are good for general landscape and
architectural work. The range between 35mm
and 70mm are classed as standard lenses that
mostly capture the world with roughly the same
magnification as the human eye sees it and are
great for portrait work and general photography.
The 70mm to 135mm focal length are medium
telephoto lenses with greater magnification and
narrower angles of view than the previous ones.
These are still often used for portrait work as well
as some wildlife photography. From 200mm up.
they are telephoto and super telephoto lenses,
capable of capturing distant wildlife and sports
action with their greatly increased magnification
and narrow angle of view.
134 wwwpclpublications.com
LENSES AND FOCAL LENGTH
What is focal length?
How angle of view changes with focal length
Note: these values are based on a full-frame
sensor. Diagrams are for illustrative purposes only.
1. Fisheye 180°
2.24mm 84°
3.35mm 62°
4.50mm 46°
5.80mm 28°
6.200mm 12°
7.400mm 6°
I-----------------------
Lower magnification.
25mm Wide angle
www.pclpublications.com
135
If you find you need a little help to get the right
settingsfora particular scene, thenyourcamera
can help you with scene modes. Good to get you
started but try not to rely on them.
Explore your camera's
Ik f' 1 *
scene modes
Let your camera help out with scene modes
•'I. A 1* ' ” .. A fi rtT.S*
I Ik J| ost modern cameras have a selection
1%/I of scene modes, usually chosen by a
I w I dial on the top or back of the camera
via a menu. Easy-to-use, mainly automatic
cameras in the range will only have a few scene
modes, whilst the more sophisticated cameras
such as the DSLR may have as many as a dozen,
including manual exposure options and user-
irogrammable special settings,
v • 7 ‘
What are scene modes?
Scene modes are provided on the majority of
ca floras to aid new photographers, They are
:a number of presets that set the camera up
automatically to shoot in a variety of lighting
conditions. You simply need to match the settings
to the scene you are about to shoot and then you
canttake the photo safe in the knowledge that it
sho0d come out properly exposed. Whilst they
do take control away from the photographer, they
can ease the transition of a relatively inexperienced
photographer who has just upgraded to a more
advanced camera. Scene modes get them up and
shooting quickly whilst they learn the ropes on a
new system. ,
Scene modes in action
If for example you want to shoot a close-up and would
like the background to be as blurred as possible,
then you either use the mode dial on the top of your
camera if it has one, or use your camera's menu to
pick the dlpse up or Macro setting. Your camera will
then be automatically set up to shoot with a large
apertureto blur the background and the ISO set at
a value that^eeps the shutter speeds from falling
below a va|up that might create unwanted rqotion
blur or camera shake.
Capture the action
Another exarpple is if you Choose the Sports scene
; mode. This is intended to set up your camera so it
can freeze fast action such as your dog running after
a ball ora horsetand rider galloping by. ISO sensitivity
will be increased to drive up the shutter speeds so
you can be assured of action stopping settings. When
newer modelsappear in the range or older models
are updated, the shooting modes available will be
revised and possibly expanded. We have a few of the
more popular dnes'iisted here for your reference and I
the settings that aroused th.get the shots. I
\ : >
Whenever “
footing sceJ^'^lar
°°k a> 'heSe(lr'0’ fa*e a
Car^era adnnJ n9s У°иг
^^atiOn if Pts f°r that
Zhath^chany°u^s^
,e09'nt°^e^y0U^
y°Ucan mail and how
,!hoolin9de^ your°wn
hecamera in 2°ns «nd use
!*T 'Vi
EXPLORE YOUR CAMERA'S SCENE MODES
Typical scene modes and what they do
Beach/Snow
If you encounter a scene with a lot of very bright
surfaces and light colours, a camera would normally
underexposure the scene. This mode ensures that
the exposure compensation used gives an accurate
representation of bright beach or snowy scenes.
Night Scene
Used primarily for general nighttime shots where
there is no main subject that needs particularly
special lighting. The camera will boost the ISO
sensitivity and deactivate the flash. Slower shutter
speeds will be used.
Night Portrait
Uses similar settings to Night Scene but the flash is
turned on with red-eye prevention active and also
facial recognition is switched on if the camera has
it. Settings allow for a well-lit flash portrait but also
captures enough ambient light for the background.
Fireworks
This takes the settings that are used for the Night
Scene mode and uses even slower shutter speeds to
allow the capture of bright objects such as fireworks
and other moving lights like traffic. Useful for lights
against dark backgrounds.
Landscape
For use in brightly lit landscapes or cities in full
daylight. A narrow aperture is used to get a deep
depth of field. If the camera has zoom control,
the widest angle will be chosen and focus is set to
infinity. It may also boost saturation.
Macro
This is ideal for close-up shots of objects or portraits
where you want to isolate the foreground subject
from the background. It allows close focusing and
a wide aperture to blur the background. The ISO is
adjusted automatically.
Candlelight
Although similar to Night Scene, Candlelight is more
focused on low light scenes that are lit with small
nearby point lights rather than general ambient
light. Flash is disabled and the colour temperature is
pushed to the warm end of the spectrum.
Sport
This requires strong lighting or full daylight in
order to freeze fast action or sporting events. ISO
sensitivity is boosted in order to push shutter speeds
as high as possible. If it is supported, the camera
may also enable continuous shooting and focus.
www.pclpublications.com
137
Camera
shooting modes
Which one should you use?
Shooting m
with Scene
camera’s setti for specific lighting
and scene conditions. Shooting modes
are the main core of camera operation and
can often be a source of confusion for new
s should not be confused
es that alter your
photographers, or those moving up from
a simple compact camera or even camera
phone. The main shooting modes on any DLSR
are Auto, Programmed AE, Shutter Priority,
Aperture Priority and Manual Exposure. There
is also the Auto (flash off) feature and Bulb
mode for exposures longer than 30 seconds.
Different models of DSLR have other modes
available and they vary by manufacturers as
well; but the main modes, often abbreviated to
PASM, are the key ones that are worth getting
to know in a little more detail. It is very useful
to know what each mode actually controls,
so you know what input is needed from you
in order to get a well-balanced exposure. Not
only that, each mode has certain advantages
and disadvantages that are key to getting the
shots you want.H
“Shooting modes
are the main core of
camera operation
andean often
be a source of
confusion for new
photographers.”
Canon shooting mode dial
I Some manufacturers have slightly varying names for
theirshooting modes but their function remainsthesame
forall cameras. For example, Canon refer to Shutter
PriorityasTvand Aperture Priorityas Av.
138 www.pclpublications.com
CAMERASHOOTING MODES
Your camera's shooting modes explained
Full Auto
As the name suggests, this mode controls pretty
much every aspect of the camera. It is often used so
the photographer does not have to worry about any
settings and they use the camera as if it were a less
advanced point and shoot camera. Shutter speed,
aperture, ISO, white balance and the metering
mode are all controlled by the camera. Even the
flash is under the control of the camera and will
automatically pop up if it feels there isn’t enough light
to get a good exposure. Although easy to set up and
get you shooting quickly, you have no control over
the look of the shots. If you use it as if it were a point
and shoot with built in flash, then that’s the quality of
the shots you can expect.
Program Mode
Program Mode or Programmed Auto mode
is similar to Full Auto but it does allow the
photographer a measure of additional control.
Settings such as ISO, White Balance, Focus Mode
and Metering Modes are able to be altered. Bear in
mind though that shutter speed and aperture are
still in the hands of the camera. This mode, rather
than Full Auto, is a good place to start out if you
are new to DSLR photography and want a greater
measure of control over the appearance of your
photos, rather than the camera. However, you may
still find that the guesses your camera makes about
which main settings to use for the shot, are not giving
you results that match your expectations.
Shutter Priority
This mode starts to hand over control to you in
a more meaningful way. In the case of Shutter
Priority, you get to control the shutter speed as
well as ISO, White Balance, Metering and Focus
Mode etc., while the camera will take care of the
aperture. This allows you to concentrate on taking
shots where the shutter speed is important to you
and under your direct control. The capture of fast
moving objects with action-freezing shutter speeds
is the popular usage of this mode. If however, you’re
shooting well-lit static objects, shutter priority is
less of a concern. This is when you might want to
consider switching to the next available mode that
allows control of other factors.
Aperture Priority
In this mode, you now have control over Aperture
as well as ISO, White Balance, Metering and Focus
Mode etc. The camera is now in charge of the shutter
speed, which it will alter according to the values
you use on the other settings under your control.
Now you can alter the aperture for much greater
creative effects. Shots with very shallow depth of
field can now be set. if you have a lens that has large
maximum apertures such as f/2.8 or even f/1.4.
Alternatively, if you need much deeper depth of field,
for a landscape photo for instance, then you can use
much narrower apertures such as f/16. Be aware
that shooting with very wide apertures in well-lit
scenes may result in very fast shutter speeds in
excess of your cameras maximum. You’ll either have
to reduce the ISO to its minimum or even use a filter
to help reduce the ambient light.
Manual Mode
Now you are really flying solo! The control of the
camera is all yours and it is up to you to produce
settings that give you the shot you are after.
You do need to be confident when it comes to
shooting in full manual mode, especially if you
are in situations where lighting changes or is
inconsistent. That means you will really need to
be on top of the settings and watching out for the
exposure. Full manual mode is often used when
you have plenty of time to consider your shot,
such as shooting a landscape or setting up a
night time shot. It’s also a useful mode to employ
when using flash as it allows you to control how
much ambient light is also present in the scene.
Manual mode is more difficult to master since
you need to keep all settings balanced, but it can
yield the best photos.
Full Auto (no flash)
This one is fairly self-explanatory. It uses all the
same settings as full auto but will not allow the flash
to deploy and light the scene. This means you can
capture scenes using ambient light only.
> BULB ,
Bulb Mode
In effect, Bulb Mode is a setting that is used in
conjunction with either Full Manual Mode or Shutter
Priority. It allows you to keep the shutter open for
durations much longer than 30 seconds. I n fact,
when using Bulb Mode, you can keep it open as long
as you want.
www.pclpublications.com
139
LEARNING
NEWSKILLS
We presentyet more fundamental knowledge to help
you develop further as a photographer
Photography is an ever-evolving skill with new ways of working being added to your
repertoire. There are also times when going back to the basics is a great way to revive
a love of a particular kind of photography that you just don’t shoot any more. Have you
been content taking snaps on full automatic but now want to ramp up your game and take the
next step? In order to take better photos, a good grasp of the fundamentals of photography
is going to pay dividends in the long run. Don’t be put off by what is sometimes considered
photographic ‘hocus pocus’ - there’s really nothing to fear about it. Whether you just want to
understand more about the basics, understand a little more about how exposure works, or
just improve your focusing hit rate, this next section has what you need.
142 Focusing
144 Focusing: how it’s done
146 Focal length and zoom
148 Focal length and zoom: how it’s done
150 Exposure and metering
140 www.pclpublications.com
Focusing
Getting the best out of your autofocus system
“Autofocus
technology has
improved immensely
and these days
even the most basic
modern AF systems
are generally fast,
accurate and reliable. ”
With only one or two exceptions,
all current digital cameras have
automatic focusing. The first
autofocus systems were developed by Leica in
the 1970s. The first autofocus compact camera,
the Konica C35 AF, was introduced in 1977, and
the first autofocus 35mm SLR, the Pentax ME-F,
was launched in 1981. Since that time autofocus
technology has improved immensely and these
days even the most basic modern AF systems
are generally fast, accurate and reliable.
Although we now rely on autofocus for the
vast majority of photographs, anyone who has
tried taking a photo in low light, with fast-moving
subjects or using very longtelephoto lenses will
have noticed that sometimes even the best AF
system can run into problems. We’ve all stood
there with the lens whirring in and out of focus,
trying to get a lock on our subject, and eventually
missed the shot. It's very frustrating when this
happens, but with a few simple tips you can help
your camera to focus quickly and accurately even
in difficult situations.
There are two main types of autofocus system
in common use today. All compact cameras
and most CSCs use something called contrast-
detection AF, which samples the imagefrom the
main picture taking sensor and detects sharp
high contrast edges in the details of the scene.
Meanwhile all digital SLRs and Sony’s new SLT
cameras use something called phase-detection
AF, which uses an array of separate dedicated
sensors usually mounted below and in front of the
142 www.pclpublications.com
main imaging sensor. Phase detection is a more
complex system, but it is usually much faster, more
accurate and works better in low light. However
both systems require some detail in the scene to
’lock on’ to. Try it for yourself: point your camera at
a plain wall or a sheet of white paper and see if it will
focus on it. Even if you own a top-of-the-range DSLR
it won't be able to focus on a featureless surface.
There are a couple of ways to help your
camera to focus quickly on a scene. Most digital
cameras have the option to select either single or
continuous autofocus. Yourcamera will normally
start to focus on the scene as soon as you half-
press the shutter button. In continuous focus
mode it will continue to update the focus if you
then move the camera, but in single AF mode it will
hold the same focus setting as long as you hold down
the button, until you actually take the shot. You can
use this to focus the camera on low detail targets
by findingan object in the scene that's the same
distance away as your chosen subject, focusing on
that, and then holding the focus and reframing the
shot. Similarly you can use it in reverse to focus on
objects that aren’t in the centre of the frame.
Moving targets
Compact camera AF systems are usually somewhat
slower than those in DSLRs, which means they can
have a real problem focusing on moving subjects. The
way around this is either to use continuous AF or, if
your camera has this option, to use manual focus. If
you can tell where your subject is going to be, such as
a car going round a tight corner on a race track or a
child on a swing, you can pre-focus the camera on this
point and wait to take the picture at the right moment.
This method takes some practice and good reflexes,
but it can produce excellent results.
Close-ups
All cameras and lenses have a minimum focusing
distance, a closest point beyond which they cannot
focus. For many compact cameras this distance can
be very small, in some cases as little as 2cm (lin),
but for standard DSLR lenses the distances tend to
be longer. Most compact cameras have a 'macro'
setting, usually denoted by the symbol of a flower. To
get closer focusing with a DSLR or CSC, special close-
focus macro lenses have to be used.
Depth of field is greatly reduced at very close
focusing distances, and you may find that your AF
system doesn’t focus on the right part of the subject,
for example if you are trying to photograph the centre
of a flower, but the AF focuses on the petals, because
they’re closer. The best option is to use a tripod, and
manually set the focus to the closest distance. Move
the tripod until the front of the subject comes into
focus, then carefully manually adjust the focus point
to get the right part of the flower to look sharp.
www.pclpublications.com
143
Focusing:
how it's done
Choose your focusing method for the job in hand
Along with unwanted camera shake, one
easy way to ruin a shot is to incorrectly
focus on your subject. This can be down to
the camera’s autofocus system being confused
by other obscuring objects in the scene and
attempting to lock on to that instead of your
subject; or just good old human error in the way
you might have set up your autofocus options. We
can speak from embarrassing experience where
a number of portrait shots at an event were taken
when the lens’ autofocus button was knocked
onto manual and we didn’t pay enough attention
to the fact that the focus confirmation light wasn’t
coming on. Luckily we noticed during a quick
review of the shots taken, and could remedy the
problem, but could you imaging getting home only
to find all the shots being out of focus? That’s a
bit of a nightmare. Of course, the nature of your
subject and their movement is key to deciding
your choice of focusing technique.
A studio-based still portrait or still life shot, for
example, is fine with focus set to manual as you
can determine your point of focus and leave it there
without fear of anything moving and the focus
shifting. Portrait shots with the camera in portrait
orientation mean you can use a one-shot autofocus
mode. You can lock focus by pressing the shutter
button halfway, recompose the shot to how you
want it and take the shot by fully depressing the
shutter button.
AV F8.0 ^AUTO
-3..2..1..®..1..2.:3 QjH -o-
E0‘O I^Sl EE0 fes
ONE SHOT o°ogo [®] ЕШ+lL
One-Shot AF
144 www.pclpublications.com
FOCUSING: HOW IT’S DONE
For unpredictable moving targets like pets, you
need to use a continuous-autofocus mode. You
select an AF point and with the shutter pressed
halfway, keep the AF point over the subject you
want the camera to attempt to keep focus lock
on as it moves. Tracking moving subjects can
be quite tricky but as always, with practice it is a
great technique to have at your disposal.
AF operation
Al Servo AF
ONE SHOT
Al FOCUS Al SERVO
Drive mode
High speed continuous
□ V Q ds Qbs KS
www.pclpublications.com
145
Focal length
and zoom
Understanding how focal length
works in composing shots
Nearly all modern compact cameras
have zoom lenses, and most users
of digital SLRs or CSCs will also
have at least a couple of zooms in their kit.
Focal length is one of your primary tools
for adjusting composition. Selecting the
right focal length for the scene allows the
photographer to control perspective, angle of
view and magnification, and can radically alter
the mood and style of the photo. Some focal
lengths are more suited to particular types
of photo, and the properties of wide-angle
and telephoto lenses can be used to produce
particular effects. Understanding how focal
length works and how it affects your photos is
a vital photographic skill.
FOCAL LENGTH AND ZOOM
Lenses and Focal Length
There are basically two types of lens:
those with fixed focal lengths, also
known as prime lenses: and those with
variable focal length, or zoom lenses.
They both have their own advantages
and disadvantages. Prime lenses are
usually smaller and lighter than zooms,
and also generally have much faster
maximum apertures than a zoom lens
at equivalent focal length. The optical
quality of prime lenses is also usually
a little higher than the equivalent
zoom lens. Zoom lenses however are
much more convenient, allowing the
photographer to cover a wide range of
focal lengths with just one or two lenses,
rather than carrying around a bulky
collection of prime lenses. There are
some fast zoom lenses, but they tend to
be extremely expensive.
The focal length of a lens is an
expression of its magnifying power,
and is usually stated in millimetres. If
you look on the front of your camera,
usually inscribed around the front of
the lens you’ll find the focal length, or a
range of values for zoom lenses. For a
typical DSLR kit lens this will usually be
around 18-55mm.
For digital cameras it is fairly usual to
see two figures quoted, both the actual
focal length and the ‘equivalent’ length.
The reason for quoting both is simply
that most people are more familiar with
the sizes of 35mm lenses, so they know
that 28mm is wide-angle and suitable
for panoramic shots, or that 200mm
is a telephoto lens, suitable for
long-range subjects.
Real and equivalent focal lengths are
different because most digital camera
sensors are a lot smaller than a frame
of 35mm film, and are fitted much
closer to the lens than the film would
be. Most consumer DSLRs use the
APS-C sensor format. Exact sizes vary
from one manufacturer to the next, but
are typically around 22.5x15 mm. A
frame
of 35mm film measures 36 x 24mm,
which means that the edges are 1.6x
longer, so the focal length of the
lens would need to be 1.6x greater
to produce the same image size and
magnification. This is usually referred
to as the ‘conversion factor’ or ‘crop
factor’. It means that a typical 18-
55mm DSLR zoom lens is roughly
equivalent to the popular 28-80mm
zoom lens often used on 35mm
systems.
Compact camera sensors are even
smaller still. Because there are several
different sizes of sensor in common
use it is more usual for compact
camera zoom lenses to be rated in
terms of their magnification power,
such as 3x, 4x, lOx etc. This relates to
the difference between the minimum
and maximum focal lengths. A lens with
a range of focal length from 5.8mm to
17.4mm is called a 3x zoom, because
17.4 = 3x5.8.
While in older prime lenses a 200mm
lens would literally be 20cm long,
modern optical systems use multiple
“Selecting the right
focal length for
the scene allows
the photographer
to control
perspective,
angle of view and
magnification.”
lens elements working in combination,
which means that the light path can
be shortened while still maintaining
the same effective magnification. As
a result quite powerful telephoto and
zoom lenses can be relatively compact.
Wide-angle and telephoto are
relative terms. On a 35mm film SLR a
50mm lens produces approximately
the same perspective and
magnification as the human eye, and
has traditionally been the standard lens
for this type of camera.
Anything longer than 50mm is
considered a telephoto, while anything
shorter is considered wide-angle.
Digital SLRs tend to follow this rule too,
although considering the crop factor the
mid-point is approximately 35mm.
50-200MM ZOOM
18-55MM KIT LENS
14MM WIDE-ANGLE
www.pclpublications.com
147
Magnification
The most obvious effect of altering focal
length is the change in magnification. Anyone
who has ever used a zoom lens will be familiar
with this effect. Ifyou want to take a photo of
something a long way away, you zoom in and
the subject appears closer.
This series of photos shows the effect
of a wide-angle zoom equivalent to 25mm,
medium zoom of 100mm and a telephoto of
400mm, all taken from the same position.
What is happening here is not the subject
being brought closer, but the angle of view
“A cropped-down section of the
frame has far fewer pixels than the
full-fra me zoomed-in image.”
being reduced so that a smaller proportion
of the scene fills the frame of the sensor. If
we look at a cropped-down section of the
centre of the wide-angle 25mm view we can
see that it looks very similar to the 400mm
view, although rather less sharp, because this
cropped-down section of the frame obviously
has far fewer pixels than the full-frame
zoomed-in image. This is the way that digital
zoom works on a compact camera, and is
why digital zoom should never be used as a
substitute for optical zoom.
Angle of View
Changing the angle of view can be used to produce
some interesting effects. If we move closer to the
subject while shortening the focal length we can
see that although the subject fills roughly the same
area of the final image, in a wide-angle shot a lot
more of the background is included.
Take a look at this series of five pictures, each
one taken at approximately half the focal length
of the previous one. As the focal length is reduced
more of the background comes into view behind
the subject, while objects in the foreground
appear much closer to the camera, increasing the
appearance of extreme perspective. Watch out for
unflattering distortion on human subjects as you
getclosertothemand shorten the focal length.
148
FOCAL LENGTH AND ZOOM
Distortion
Wide-angle shot
E'-at
Changing the angle of view is important to
remember when shooting portraits. If you use
a short focal length to take a facial portrait at
close range the parts that are closest to the
camera will appear disproportionately larger,
distorting the facial features. The result is a
‘ballooning’ of the face as it appears to bulge
outwards, like a reflection in the back of a spoon:
not such a flattering look, as illustrated above.
Most portrait photographers prefer to step back
a little and zoom in. The most popular choice is a
focal length of about 80-100mm, since this gives
a flattering, natural-looking perspective.
Depth of Field
The perspective-flattening of long lenses can also be used in other circumstances, such as drastically
reducing depth of field. You can use this to isolate a subject by blurring out the background, as in the shot
above on the left. Compare this with the same shot on the right, but taken with a wide-angle lens from
a much closer range. The relative size of the subject is the same in both shots, but due to the increased
depth of field in the wide-angle shot, the background, although apparently more distant, looks sharper.
Telephoto lens
Wide-angle shot
Telephotolens
Careful focusing with a long telephoto lens can pick out individual subjects from a wider view, such
as focusing on a classic car by a lake. A similar scene shot using a wide-angle lens presents a very
different image. The examples we’ve used here are extremes intended to emphasise the effects we’re
demonstrating, but in fact a lot of people only ever use their zoom lenses at either maximum or minimum
settings. Don’t do this out of habit; instead use the full range of the lens to explore all the different
possibilities it offers. Focal length is one of your primary creative tools, so make good use of it.
www.pclpublications.com
149
Focal length and zoom:
how it's done
Use of focal length is a key tool to shot composition
FISHEYE LENS EF 15mm 1
When buying new lenses, it is important
to know what different ones are used
for and which are right for you. The
focal length of a lens is actually measured from
the point of converging inside the lens to the
sensor, not from the front of the lens.
Ultra wide-angle
Usually in the 14-24mm range, these lenses are
considered specialty devices and do command
some very high prices. Ultra wide lenses are
often used in landscape, architectural and event
photography to get the maximum amount
of scene into a single photo, or when space is
restricted.
Wide-angle
With focal lengths starting at 24-35mm. these
lenses are widely included as kit lenses starting
at 24mm with a zoom range up to about 105mm.
They are often used by photojournalists or people
who want a good ‘walkabout’ lens.
We have two examples taken at opposite ends
of the zoom range. One was shot with a 15mm
fisheye lens, covering a 180° field of view and the
other was shot with a 400mm telephoto lens on
a crop sensor body to create an effective focal
length of 640mm.
150 www.pclpublications.com
A
Telephoto
105-400mm covers the range of telephoto
lenses. Used for bringing distant objects closer
and flattening perspective. Above this range you
are into super telephoto lenses used by sports
and wildlife photographers reachingfocal lengths
of up to 800mm.
Standard
Within the range of 35-70mm, a lens will
reproduce the world roughly as our own eyes
see it. A 50mm lens is considered one of the best
focal lengths at which to shoot portraits because
they look more natural with less distortion than a
wide-angle lens.
Medium telephoto
Between 70-105mm is the top of the zoom range
for kit lenses. This range is also equally good for
shooting portraits.
www.pclpublications.com
151
“Apart from camera shake, bad
exposure probably ruins more
photos than any other single cause.
The main problem is over reliance on
automatic metering. ”
Exposure and metering
Accurate exposure is the key to good photography
Understanding exposure and how it
affects your photographs is probably
the single most important technical skill
you can learn in photography. It's certainly the
one that most people get wrong, and apart from
camera shake, bad exposure probably ruins more
photos than any other single cause. The main
problem is over reliance on automatic metering.
Most modern cameras, even relatively cheap
compacts, have sophisticated built-in TTL multi-
zone evaluative exposure meters that measure
light levels at dozens, in some cases hundreds, of
points within the frame, instantly comparing the
results with a built-in library of exposure situations
and automatically adjusting the shutter speed
and aperture to deal with problems such as back-
lighting. close-ups or moving subjects.
In most cases these automatic exposure
systems are very good, and can reliably cope with
most common circumstances. However even the
best automatic meter can be fooled, resulting in
poorly exposed photos. By overriding the camera’s
automatic settings and adjusting exposure
manually we can avoid these problems and take
much better photos.
Let’s take a look at a couple of examples. In this
first scene we have a portrait of a brightly lit fair
skinned model shot against a dark background.
This was taken using a typical DSLR camera set on
automatic exposure. As you can see the camera has
badly over-exposed our model’s face, losing details
in the highlight areas.
In this second example the same camera has
been used to photograph the model, but this time
standing in front of a brightly lit background. In this
case the camera’s automatic exposure system
has seriously under-exposed the shot, leaving the
model’s face in deep shadow with little detail visible.
The same usually reliable exposure meter took
both of these shots, so what went wrong? In order
to understand what happened and accurately
correct it, it is necessary to know how light
meters operate, and the rules by which exposure
is calculated.
152
EXPOSURE AND METERING
Fade to grey
Take a look at the main picture above. What you
see there is a photograph of a meadow in early
sunrise conditions, with a good tonal range, plenty
of colour, and some nice moody light. What your
camera’s light meter sees is very different as our
example above shows. Try it out for yourself. Find
any nice, average snapshot scene, properly lit
and with good contrast like our example FIG 1.
Start upyour image editing software and open
your picture. Light meters only see in black and
white, so reduce the saturation of the shot to zero.
Your light meter doesn’t see detail, so set your
Gaussian blur filter FIG 2 to maximum diameter
and apply it a couple of times. Use the eyedropper
tool to measure the RGB colour value of the
resulting tone. You should find that it averages
out to a mid-tone grey FIG 3 with an RGB value of
around 127,127,127.
It’s an interesting and curious fact that any
average scene reflects 18% of the light falling on
it. Look out of your window, and unless you live in
Antarctica the scene you see is reflecting exactly
the same amount of light as the scene out of my
window. That 18% reflection is exactly the same as
a mid-tone grey, midway between black and white.
Light meters are calibrated with this fact in
mind. When your camera takes a light reading,
the meter averages the scene and adjusts the
exposure to produce that mid-tone grey (or
12% luminance, but that’s another discussion
altogether). If you point the camera at a black
stage curtain, it will try to make the black into a
mid-tone grey, so it will over-expose. If you point it
at snow it will try to make the white into grey, so it
will under-expose.
Adjusting exposure
Let’s take a moment to explain how exposure
is controlled, and what is meant by some of the
terminology. If you already know the basics, feel free
to skip to the next page.
On all cameras, exposure is adjusted by altering
two settings; aperture and shutter speed. Between
them they control the amount of light that hits the
sensor when the shot is taken.
Shutter speed is self-explanatory, it is simply
the amount of time that the sensor is exposed to
light. This is usually controlled by an electrically
operated mechanical shutter in front of the sensor
that opens and closes very quickly for a precisely
measured period of time, usually in the order of a
few hundredths of a second. Obviously a shutter
speed twice as long lets in twice as much light, one
half as long lets in half as much.
The aperture is literally just a hole through which
light passes on its way to the sensor. The diameter
of that hole can be adjusted to precisely calibrated
sizes. A smaller hole lets in less light, and a larger
hole lets in more.
www.pclpublications.com
153
These calibrated aperture sizes, for largely
historical reasons, are called stops, or f-stops. An
aperture setting one stop larger lets in twice as
much light. For reasons that are both historical
and mathematical, the standard full-stop
aperture settings that you are most likely to
encounter go f/1, f/1.4, f/2, f/2.8, f/4, f/5.6, f/8,
f/11, f/16 and f/22. The smaller numbers refer
to larger apertures, and the larger numbers to
smaller ones. Many cameras can set apertures in
increments of l/3rd of a stop, but the whole-stop
numbers are the ones to remember.
Let’s consider an example. With your camera set
to automatic exposure point it at a scene and take
a light reading. For the sake of argument, say the
light meter sets an aperture of f/8 and l/2OOth of
a second. You can produce the same exposure by
increasing the aperture by one stop to f/5.6 and
halving the shutter speed to l/400th of a second,
because this lets the same amount of light through
to the sensor. Similarly, reducing the aperture to
f/11 and setting the shutter speed to l/100th of a
second will also produce the same exposure.
However by altering one setting without altering
the other you will change the exposure. In our
example, changing the aperture to f/5.6 but leaving
the shutter speed at l/2OOth of a second will
increase the exposure by one stop, or one exposure
value (EV), making the picture brighter. Decreasing
the aperture to f/11 will reduce the exposure by one
EV, making the picture darker.
Similarly, changing the shutter speed whilst
leaving the aperture alone will also change the
exposure. Double the shutter speed to l/400th at
f/8 and you reduce the exposure by one stop, halve
the speed to l/100th and you increase the exposure
by one stop.
The Zone System
In 1939-40 the pioneering photographers Ansel
Adams and Fred Archer developed an exposure
system based on this fact, a system that is still used
today. It is called the Zone System, and is quite
possibly the most useful piece of photographic
"The difference between one zone and the next
is equivalent to the difference between one
exposure setting and another one exactly one
stop higher or lower. ”
knowledge you’ll ever learn. There are several
variations on the original system, but I'll go with
the one that is easiest to understand.
Starting with 18% grey as the mid-point, the
system divides all the tones between black and
white into 11 zones, numbered 0-10. Zone 0 is
featureless black with no details visible, which
in your image editor would have an RGB value
of 0,0,0. Zone 10 is pure white with no details
visible, and an RGB value of 255,255,255. The
mid-tone 18% grey is zone 5, and should have an
RGB value of about 127,127,127.
The zones represent exposure values, or EV.
The difference between one zone and the next
is equivalent to the difference between one
exposure setting and another one exactly one
stop higher or lower.
154
EXPOSURE AND METERING
Putting it all Together
If we relate the tone scale of the Zone System ZoneO Pure black, no details or texture visible.
scale to real world objects we can use it to help produce accurately exposed photos. The zones are roughly equivalent to the following scene elements Zonel Black tone but no texture. This is normally as black as you want to get in a picture.
Zone 2 First hint of texture and detail, very deep shadow.
(adapted from Adams’ descriptions). Zone3 Dark materials, details visible.
Zone 4 Dark foliage. Dark stone. Landscape shadow. Shadow on portraits in sunlight.
Zone 5 Clear north sky. Dark skin. Grey stone. Weathered wood. 18% mid grey.
Zone 6 Average Caucasian skin value. Light stone. Shadows in sunlit snow.
Zone 7 Very light skin. Light grey objects. Snow with side lighting.
Zone 8 White with texture. Snow in shade. Highlights on Caucasian skin.
Zone 9 Glaring white surfaces. Snow in flat sunlight. White without texture.
Zone 10 Light sources, reflections of sunlight on metal. Pure white.
Let’s go back to the two troublesome
portraits from the first page. If we use
the spot meter to take a read ing from the
subject’s face, we know that the light meter
will give a reading that would make the face
mid-tone grey, which is zone 5. However
from the zone chart we know that average
Caucasian skin should be zone 6, so we need
to increase the spot metered exposure by
one stop, in this case from l/640th at f/5.6
to l/640th at f/2.8. In the resulting shot the
background details are all burned out, but
the subject is correctly exposed.
For the over-exposed portrait against
the dark background, we can use a similar
approach. Spot metering the background
gives an exposure setting of l/3rd sec at
f/5.6 to render it as zone 5 mid-grey. By
reducing that exposure by four stops to l/3rd
at f/8 we can make the background come
out as what it should be, zone 2 deep shadow,
leaving the model’s face also correctly
exposed.
The zone exposure system can help with
difficult exposures, but it is helpful in another
way. Learning to think of images in terms of
tone and dynamic range will encourage you
to approach these concepts in a creative way,
and to use them to produce better pictures.
Controlling exposure is the primary creative
tool of the photographer, and learning howto
use it will make the difference between what
are mere snapshots and professional artistic
photographs.
This system has been used by professional
photographers for over 70 years. Used
properly, it can help to improve your
photography immensely, probably more than
any other single technique.
www.pclpublications.com
155
CREATIVE
PROJECTS
Variety is the spice of life when it comes to
keeping your passion for photography alive
I 11
A varied set of projects awaits you this issue. They are a little assemblage of
projects to test your skills at tabletop shooting, stage performance capture,
off-camera flash photography and a little technique called light painting.
Obviously after the outbreak of the pandemic, group gatherings are subject to
restrictions that change quite frequently, so be vigilante of any updates. Also, the
skills required for any of these are very transferable to other situations. This will
make you a very flexible photographer, able to tackle any shooting requirement.
158 In-car long exposure
160 Tabletop photography
162 Shooting musical and stage performances
164 Light painting
166 Off-camera flash
“They are a little assemblage of
projects to test your skills at tabletop
shooting, stage performance
capture, off-camera flash
photography and a little technique
called light painting. ”
156 www.pclpublications.com
In-car long exposure
A different take on traffic trail long exposure images
On a personal level, this is
something I always wanted to try.
We have all seen long exposure
images of night skies and the infamous
traffic trails. This just takes that basic
idea and changes the point of view to
favour a driver in his car with the world
going by outside at hyper speed. It goes
without saying of course that the speed
is achieved with a long shutter duration
rather than breaking either the speed
limits or the laws of physics! In our
example we will show you the basic setup
to achieve the end result you see here.
Because it was shot at night, the shutter
speeds we are working with are right in
the so-called ‘butter zone’ to get a good
‘hyperspace’ look to the streetlights and
car tail lights zooming by as you drive
at a nice and legal limit. In our case that
was a leisurely 30mph. You could shoot
an equivalent daytime version but it
would mean being able to get a shutter
speed somewhere in the order of 2-4
seconds. This can be done if you have a
neutral density filter capable of cutting
out enough ambient light to give you the
exposure time you’d need.
www.pclpublications.com
Back to our night time version. The checklist
for this effect is fairly straightforward. You will
TheGorillapodcan
secure smaller
cameras with its
strong but flexible
and multi-jointed
leg arrangement.
This cable release
makes the process
of shooting long
exposures much
easier and also
doublesasan
intervalomter.
cabin and the front windscreen and
side windows. A 10-22mm crop sensor
lens (16-35mm equivalent) will also do
well. It may be that you have to set the
camera further back in the car to get a
wider view if that is what you want.
The camera will need to be kept
immobile for the period of the
exposure. A tripod will be essential.
That said, if you are tight for space in
the vehicle and the tripod doesn’t really
fit, you can always bungee the camera to
the passenger seat headrest or secure it
on the rear parcel shelf. If you are working
with a smaller, light camera, the Gorillapod by
Joby is a good option for securing a camera.
The Gorillapod is small, light and very flexible.
So, you have your camera, lens and means
of securing it inside your vehicle. You can set
yourself up in the back with the camera and get
your driver of the vehicle to start driving around
the night-time roads. This option is great of
course as it means you can do test shots to get
the look you are after. It is worth noting that the
previously mentioned ‘butter zone’ for this long
exposure effect is based partly on personal
taste. Our experience of this type of shot leads
us to recommend exposures somewhere
between 2-4 seconds. We say this as we think
a longer exposure time has greater streaking
of lights but less detail and a shorter exposure
time just looks too normal. We are after a good
hyperspace effect but with enough detail left to
see that you are driving on a road.
Sitting in the back with the camera and doing
testing shots on the move is not an option for
many as they may get terribly motion-sick
if not looking where they're going. So in this
case we found somewhere where the lighting
would be similar to what we’d encounter on the
road, set up the camera and lens on a tripod
and positioned it above the passenger-side
headrest looking out through the windscreen.
The focus was set manually on the windscreen
as this offered a good degree of sharpness in
need your camera that is either able to shoot
up to 30 second exposures or, in the case of
exposures longer than 30 seconds, is capable of
bulb exposures. A bulb exposure, usually shown
as a В on your camera’s settings, is a setting that
allows the camera to keep the shutter open for
an indefinite amount of time. This period of time
can be controlled either by the photographer
with their finger depressing the shutter release
button for the desired amount of time, via a
shutter release cable attached to the camera or
using a device called an intervalometer which
can automate the process without your input.
You just set an exposure time, how many shots
you want taken and the interval between each
shot. Our example has us working around the 2-4
second area, so in this case the camera can be
set accordingly just using manual settings.
Lens choice comes down to personal
preference. Our example was shot using a 15mm
fisheye lens so you can see a lot of the car’s
The Canon EF 15mm f/2.8
fisheye lens. Great for ultra
wide angle capture if you are in
crampedconditions.
I Forthose using crop-sensor
camerasa 10-22mm(16-35mm
equivalent) isagreatwideangle
zoom lens for wide FOV.
the shot both inside and out. Because of the
wide angle there was a lot of the cabin on view.
A few test exposures had settings of 2 seconds
at f/6.3 with ISO 200 to get the best exposure
of the cabin and the world outside. Now the
problem was how to drive a car and be able to
take shots whilst on the move.
The cable release mentioned earlier would
have been a good option as it meant you could
activate the shutter release with one push
of a button and keep your attention on the
road. There is also the option for wirelessly
activating your camera. For a modest £60
you can get a device such as the Giga T Pro
II. It is a 2.4GHz wireless remote control and
intervalometer. It comes with a transmitter and
a receiver which you attach to your camera’s
hot shoe and plug into the cable release port
with the supplied cable. It doesn’t require Iine-
of-sight and can actually be used through walls
to set off your camera.
160
IN-CAR LONG EXPOSURE
ттуоиагетеёйпд brave,you can attach
your camera to the outside of your
vehicle, or at the very least, have it
lashed to the door pillar looking outan
open window. Although it is definitely
worth having someone on hand to
grab it if it comes loose.
We were good to go and set off with the
Giga T Pro II transmitter on the driver’s knee.
All that was needed was to press the button
and the camera would fire using the manual
settings. The trick was to shoot on a straight
stretch of well-lit road and keep both driver
and the steering wheel as immobile as possible
because any movement during the exposure
would result in too much motion blur. The only
blur we want is the world outside streaking by.
We traversed a stretch of road a couple of times
and then pulled over to review the result. This
is where we found a 4 second exposure was
slightly too long and anything under 1 second
was too static. 2 seconds seemed to be the ideal
result for the road conditions we were driving
in. If you were driving on a fast motorway doing
70mph then the amount of light streaking would
be greatly increased for that exposure. It is just
down to a case of personal preference.
All we had to do then was get home and review
and process the favourites. The result is what you
see here. There are those that take this idea one
step further and attach the camera to the outside of
their car or motorcycle. If you have a suitably robust
method of securing your equipment, then this can
make for some supremely dynamic images.
www.pclpublications.com
161
Tabletop photography
You don't need huge studios and expensive equipment to get good results
With the pro photographer’s studio space
packed with equipment worth many
tens of thousands it must seem like us mere
mortals could never enjoy a studio of our own.
The thing is, even the greatest professional
had to start somewhere. In this guide, we can
show you that even your own dining table
can become a studio, albeit in a much more
modest way.
However, all the principles involved in a
large studio shoot are just as valid for a humble
tabletop setup too. All you need for this setup is
your camera and tripod, a prop to photograph,
two cheap desktop lamps and some white paper,
oh, and your table of course.
162
www.pclpublications.com
TABLETOP PHOTOGRAPHY
Getting set up
Our studio needs a basic floor. Some white
paper laid flat on the table is a good start, but
if you can set your table against a wall you can
create an infinity curve. Simply put, an infinity
curve is a surface that has no corners that show
up when photographed. All you do is tack the
top edge of your sheet to the wall and curve
the paper down to the table. The radius of your
curve is down to your personal preference or
indeed how much space you have to play with.
One thing to note, an infinity curve is usually
just one surface, unlike an infinity cove, which
takes the idea of a single curved sheet and
expands it into a whole room with no edges.
Let there be lights
You can set your camera and tripod at table
level just in front of your curve and now we can
add some light. In the spirit of keeping it as
simple and cheap as possible, all we have used
are two basic, tiny, desk lamps from a hardware
store. They are ideal as they have flexible necks
which mean we can bend them to face any
direction. The lamps can be set either side of our
table. Now you can grab yourself a prop to shoot.
Here, we’ve used a perfume bottle and some
jewellery arranged on the white surface.
At this point you can focus your camera on
the prop and get your framing and composition
just how you want it. Keep your focusing set to
manual so it doesn’t try to refocus during the
shoot. We can dial in our exposure settings once
we have our lights set. If you had no lights at all to
use, you could set your table near a window and
shoot with natural light, this can work great but
you are tied to a single light source and you can’t
change its direction. So. for our purposes, we
are going to return to our studio setup with our
lamps as our only light source.
Out of the shadows
Assuming the camera is set at the 6 o'clock
position and your prop is centre of the dial,
your lights can be at the 8 o’clock and 4 o’clock
positions, just above your prop and pointed
Above is the most basic setup of
our tabletop studio. Asimple sheet
of white paper that curves up from
the table surface and tacked to the
wallbehind with enough slack in it
to create a curve to keep any hard
edges at bay in the finalshot. The
two lampsareextremelycheapand,
although notvery bright, are perfect
for the scale we are working at here.
directly at them. This is a basic, but tried and
tested setup for lighting. Setting lights is a matter
of personal creative taste, but it is usually a good
idea to set one light at a time rather than just
turning them both on and seeing what happens.
www.pclpublications.com
163
Not only that, if you work with one light at
a time, you get to see how each light source
interacts with your prop and also what effect
the lights have on each other when they are
eventually both turned on. If you turn on the
left light first, you'll probably notice straight
away that the shadows are probably quite
sharply defined and dark [1]. This is to be
expected as the source of the light is a very
small point-light and there is no other light to
fill in the shadows. The same will be true of
your right hand light too [2]. With both lights
on at the same time, the effect is going to
change. You may notice now that you have two
sets of shadows, of course, and they are still
quite sharp, but the additive effect of one light
on another means that not only is our scene
brighter, but the shadows are filled in and not
quite so dark [3]. So we take the shots now?
Well, there are a couple of simple tricks we
can use to enhance the lighting further.
Bigger is better
As mentioned earlier, the shadows are quite
sharply defined because the light source is
small. Flash photographers encounter this
problem all the time. Often, what they will do
to soften their shadows, is to bounce their
flash off another larger surface like a wall or
ceiling, that surface is now their light source,
and because it is much larger than the flash
head, the light is more diffused and therefore
softer shadows are the result. Our humble
desk lamps don’t have the power to bounce
off a wall or celling, but we can introduce a
sheet of paper into our setup and bounce the
lamp light off that onto our prop. Because of
the scale we’re working at, the difference may
not be huge, but every little helps. Repeat that
on the other side as well and the improvement
is visible [4]. Roughly speaking, our lamp’s
20mm light has become a 100mm light
source. Its power will have been diminished by
having to travel further, but we can account
for that in our exposure when we finally take
the shots, which is now, right?
And another thing
There is more we can do. The more diffuse
light we can get into our scene, the better it
will be. How about putting a sheet of white
paper across the top of our setup? It will act
as another reflective surface and bounce
some more light back into the scene [5].
Finally, just when you think it's all over, adding
two more reflectors at the front of the setup
with a gap between them just large enough
to shoot through [6], we are ready. We have
softened the original harsh lighting and as
a bonus, the metallic surfaces on our props
are reflecting the white surfaces and have
changed from flat black reflections to more
interesting white highlights.
164
www.pclpublications.com
TABLETOP PHOTOGRAPHY
Finally, we can shoot. We're all set up,
the camera is set to shoot Raw and we
are in Aperture Priority Mode, so we just
need to dial in the exposure. Our first test
shot, with settings of aperture f/11, shutter
speed l/15th second and ISO 200 yielded
an underexposed image. This is because
the scene is predominantly white and the
camera's metering system is set to try to
produce an image that conforms to a mid-
grey image. This results in whites that are
too dark. We can compensate for this by
dialling in some exposure compensation,
where we deliberately make the camera
overexpose the image [7] to make our
whites the correct brightness. In this case
+1EV (1 stop) is enough to get us our final
shot [8]. The extra stop made the exposure
time l/6th second, essentially doubling the
length of time the camera was letting light
fall on the sensor.
Coloured lights
You could pack up and be happy with what
you've learned, but you could always add
yet another light source to pep the image
up a bit. We didn't have another desk lamp,
but we did have a powerful led torch, and
as luck would have it, some coloured gels.
You can get coloured cellophane from art
shops but there are those resourceful types
out there who have been known to use the
coloured wrappers from sweets to create
their coloured lights. We used purple to
cover our torch and simply shone the light
onto the curve behind the prop to add an
extra bit of zing to the image [9].
Processing the shots
All that remains is to get your shots into
your favourite Raw processing application
and review the results. This is a good
time to check your colour balance as it is
likely your little desk lamps use tungsten
bulbs that throw an orange colour cast
over your scene. However, because you
have shot in Raw mode, you can easily dial
out the colour cast by altering the colour
temperature of your shots, or using the
White Balance tool to select an area of your
shot you know is white (which, let's face it,
is quite a lot of it) to automatically correct
the colour cast [10].
You’re done!
In our own, cheap to assemble, modest
way, we have just gone through a shooting
process that is used by all photographers
regardless of whether they are using a vast
state-of-the-art facility to shoot the latest
Ferrari, or a tabletop enthusiast wanting to
shoot an item to show on a certain popular
Internet auction site!
7. Exposure compensation
www.pclpublications.com
165
Shooting musicaland
stage performances
How best to tackle indoor events with stage lighting
It is probably going to happen to you at some
point as a photographer, be you beginner
or enthusiastic amateur. The friends and
family that surround you might approach
you and ask for a ‘favour’. You might be asked
if you can photograph an event, a wedding,
someone’s 40th birthday bash, who knows?
We would always advocate that you say yes to
these offers as a means of developing your skills
as a photographer, on the understanding that
you are a beginner and not a paid professional.
Normally, when friends or family approach you,
it is a much more relaxed proposition anyway.
You can go along and take photos, if they like
them, great, if not, no harm done. We know what
this is like, since we have been approached on
various occasions to come along and capture a
record of the event.
One that sticks in the mind was a gala dinner at
Dartmouth Royal Naval College some years ago.
We had been asked, via family members who were
involved in the organising of the event, to set up in a
vestibule near the college entrance and photograph
anyone who wanted a quick portrait of themselves
dressed in their finery. What we hadn't quite grasped
was the enormity of what was about to befall us.
Guests were arriving by the coach load and rather
than all going into the reception area, began queuing
for their photographs. We estimated that there were
somewhere in the order of 400 guests that evening
and a large percentage of them eventually had their
photos taken by us. It was a fraught evening to say
the least. We were lucky, in that we were experienced
enough to handle it and were using a pro lighting
system that was up to the task for the number of
shots that needed to be taken. An inexperienced
photographer with one camera that had a built-in
flash would have had a very bad night.
Okay, that’s an extreme example which also
required additional lighting equipment, however,
what if it's your child’s Christmas play, a production
by students at your local school or your favourite
local band playing a gig at the pub down the road, the
pressure is off in terms of what might be asked of
you. That said, with a few solid techniques under
your belt, there’s no reason to take bad photos.
Small staged events like these are a great way to
flex your creative muscles and learn to work in
more demanding locations and lighting scenarios.
We have a few tips and suggestions to help make
your assignment go as smoothly as possible.
Where do you start?
With indoor events such as a musical
performance, the venue will dictate what you
need to take with you. Not only that, if you are
shooting at a venue with a paying audience, there
are additional issues you will have to address that
will also have an impact on how you shoot, where
you shoot and with what equipment. Wherever
possible, if you are going to be attending a
performance, scouting the venue ahead of time
and talking with the organisers is a key aspect
of preparing for the shoot. Turning up on the
night with no idea what to expect is not the best
approach, even if it is just a small local event. As
a photographer, ‘that will have to do’ is not the
kind of mantra you should have in your head. Even
those new to photography should always strive to
improve.
Dress rehearsal
If you are going to be attending a musical or
theatrical performance, try to find out when they
will be doing a dress rehearsal or sound check. In
many ways, this is the opportune time to get the
bulk of your shots done, since you can check out
the venue, see the actual lighting being used and
see the performance. Crucially, since there will be
no paying audience, you can ask for permission
to get on stage to capture more intimate close-
ups of the action and even get some actual eye
contact with the performers. You can also try out
the best spots from which to capture images. If
they will allow it, you can also get some backstage
and behind the scenes images too.
166 www.pclpublications.com
Alongerfocal length lenssuchasa70-200mm
telephoto, allows you to geta lot more reach if
you cannot get close to the stage. Add a large
maximum aperture of f/2.8 and you also get lovely
out of focus areas behind your subjects and the
opportunityfor faster shutterspeeds.
ИЦ I
Lighting
I n nearly all cases, flash photography at a
stage performance is prohibited, as it can be
a massive distraction to the performers and
audience members alike. Given that it is an indoor
performance, it follows that there will be either
house lighting rigs involved, or the performers will
bring their own, as well as their usual equipment.
Stage lighting, in any form, can be a challenge
for photographers and the gear they use. When
watching a performance with stage lighting, it can
look quite bright to the human eye. To a camera,
it is not quite as bright as you might imagine. You
need to keep a careful eye on settings, particularly
shutter speed, as the lighting patterns and indeed
the colours alter throughout the performance. If the
lighting rig is static and there is no colour cycling,
you should be able to dial in settings that work for
the camera and lens setup you are using, without the
need to keep changing them as the lighting changes.
Gear choice
Let’s assume a worst-case scenario for the venue;
Flash is prohibited so you only have the stage lighting
to work with, there is a paying audience and the
choice of vantage points may be limited. What do
you do? First, if you are required to stay out of sight
at the back of the hall, you will have little choice but
to use a long lens; the longest you have in fact. Even
in a medium sized venue, a 70-200mm lens may
struggle to get you extreme close up action. A better
168 www.pclpublications.com
SHOOTING MUSICAL AND STAGE PERFORMANCES
option is a 75-300mm zoom lens to give you the
extra reach. Failing that, you always have the option
used by sport and wildlife photographers, which is
to use a full frame lens on a crop sensor body. Take
our 70-200mm lens example. It is a lens designed
for full-frame DSLRs, but will also work on the same
manufacturers APS-C crop sensor DSLRs too.
Because the lens projects a 36mm x 24mm sized
image onto a smaller 25mm x 16mm sensor, this
crop factor of about xl.5 can effectively turn the 70-
200mm lens into a 105-300mm lens.
Quiet and invisible
Since you will be among paying guests, it is expected
of you to be quiet and invisible as much as possible.
Modern DSLRs have so called ‘silent’ shooting
modes that stifle the ‘click-clack’ noise, made by
the mirror as it flips out of the way of the sensor
and then drops down again, by slowing the motion
down. Turning this on does not affect image quality
and although it is not exactly silent, it is worth
turning on. It is also recommended that you turn off
any notification noisesyour camera might make.
Chief among which is the chirping noises it makes
when you acquire focus. You will still see a green
confirmation light in your viewfinder, so it shouldn’t
be an issue. Try shooting during the loud parts of the
performance or applause, not when it is quiet. Try
to avoid viewing your images too as, in a darkened
room, the glare of your LCD monitor screen can be
distracting. If you have to check, retire to an area
where nobody can see you.
Normally, we would recommend a tripod or at
least a monopod to help keep your shots stable and
free from camera shake. In certain venues, things
like these may be prohibited, so you will need to
check in advance if there are areas where you can
use a camera support. If not, you may be shooting
handheld. An image stabilised lens will greatly
reduce camera shake but if not, make sure you keep
those shutter speeds as high as you can.
Fast glass
In a darkened environment, you are subject to
lower light levels that will usually result in slower
shutter speeds. If your performers are moving
and dancing, shutter speeds slower than l/60s
will only result in blurry images, especially if you
are using long lenses that magnify even tiny
camera movements. Don’t be afraid to ramp up
your camera’s ISO sensitivity and get shutter
speeds beyond l/125s. Modern DSLRs can still
give acceptable image quality, even at ISO 3200
or more. Think in terms of it being better to have a
noisy image, rather than a blurry one. Lenses with
wider maximum apertures, to let in more light, can
help. Most lenses offer f/3.5 or f/4 as their widest
aperture, if you have lenses with f/2.8or even f/1.4
maximum apertures, they will allowyou to shoot low
light with higher shutter speedsand lower ISO.
One point worth bearing in mind is that sometimes
it is worth shooting with longer shutter durations
to emphasise movement, rather than just trying
to freeze the moment. It can be as simple as the
movement of a hand strumming a guitar. It could just
as likely be a performer or dancer moving rapidly, or
jumping on stage. Using shutter speeds around the
l/30s - l/60s area and panning with your subject,
will create motion blur and add a certain dynamic to
your shots.
Shooting settings
Always shoot in Raw. We’ve said this many times, but
it's important because shooting in challenging low
light situations may result in image files that need
some extra processing leeway, to get the most out
of them, when you are back at your computer. Stay
away from the Auto settings on your camera. As a
www.pclpublications.com
169
The shots on this page were taken with a Nikon
I D810teamedwithaverycheapsecondhand
H Tamron 70-300mm f/4-f/5.6 zoom lens. The
.smaller maximum apertures meant pushing the
I ISO to 6400, but the noise was very acceptable
В underthecircumstances.
photographer, you will learn nothing if the camera
is making all the decisions for you. Instead, try
Aperture Priority (Av) mode or Shutter Speed
Priority (Tv) mode. This will give you access to
more camera functions and you can decide if you
are making Aperture or Shutter Speed the main
priority in your shot-taking, decision making. You
will no doubt find you have to keep your apertures
at their widest maximum setting to allow as much
light in as possible. This means a shallower depth
of field and therefore focusing needs to be precise
to ensure your intended subject is sharp. A good
panningtechnique, to follow subjects, is useful to
increase your chances of capturing more shots
in focus.
If you are using a single AF point to achieve
focus, you can either use the centre point, which
is usually the most accurate, to lock focus and
then recompose your shot, or you can try one of
the other selectable AF points that will position
your subjects, as you want them in the frame,
without the need to recompose. Over and above
that, if you are feeling confident you can try
manual focusing, if the distance between you
and your subject is unlikely to change. If your
subjects do not move much, you can probably
keep your camera’s drive mode in single shot.
If, however, they are active like dancers, then
perhaps it’s worth switchingto continuous and
shooting sequences as they move. Modern
cameras can shoot bursts of images at anywhere
from 3 frames per second (FPS) up to 12 frames
per second on professional models. When trying
to catch the right moment in a moving subject,
shooting a burst will dramatically improve your
chances of capturing the perfect moment.
Metering
If the lighting on the stage is fairly even, you can
use your camera’s default Evaluative Metering
mode, which assesses the whole image and works
out the best exposure for it. If the lighting is more
dynamic and changes, then you may be better off
using either Spot metering or Partial metering.
Spot metering lets you measure the light in a very
small area of the frame, for example a performer’s
face, to make sure that area is correctly exposed.
Partial metering works like Spot metering but the
area being metered is slightly larger. However,
don’t be afraid to be creative by deliberately
underexposing or overexposing shots by using
Exposure Compensation. Controlled from your
camera’s menu, or by a control dial, you can usually
expose 3 stops darker or 3 stops lighter than
normal. Underexposure is actually a great way to
generate silhouettes, if your subject is brightly lit
from behind.
Go wide too
Although we’ve concentrated on getting as close
to the action as possible, with long lenses, don’t
neglect to shoot wide too. Wide shots of the venue,
with the crowd as your foreground, give a greater
sense of place. If there are a number of people on
stage, it also means you can get them all in one
shot together. You also might want to take a shot of
the cast and crew, once the performance is over.
If it’s a big crowd, then that wide-angle lens was
worth bringing.
On stage
With a little luck, if you were able to attend the
dress rehearsal, you will have a sense of how
the performance plays out and how the players
behave on stage. Although you will be capturing the
principle players, don’t forget any supporting cast
members. Try to also catch reactions from those
that aren’t necessarily in the spotlight. Catching
performers at rest can also make for interesting
cameo moments.
Another good piece of advice relates to
composition: where possible, adheringtothe
rule of thirds can make shots more dynamic and
interesting. Placing your subject over one of the
intersecting points of the rule of thirds grid creates
better balance in your shots. If you struggle with
placement and composition, don't be afraid to
shoot a little wider than normal, so rather than
getting in as close as possible, shoot with a little
extra space around your subject. You can always
crop more creatively at the post-process stage.
Remember, the picture that people see after you've
processed it is the one that counts.
www.pclpublications.com
171
Light
painting
Light up night shots with some simple techniques
Light painting is a photographic technique in which exposures are
made by moving a hand-held light source. The term light painting
also encompasses images lit from outside the frame with hand-
held light sources. The latter is what we are looking at in this example. You
don’t necessarily need huge, complicated, flash setups to produce some
amazingly lit images. With a subject to photograph, your camera on a tripod,
one torch with a couple of coloured gels [1], you can light paint to your
heartscontent.
This is an example of one type of light painting technique that uses, ‘a
big brush', shall we say, to colour a scene in large swathes of light. In our
example we have a car parked with a nice evening sky behind it. The camera
was set on a tripod and recorded a basic reference image [2]. Then it was
172
www.pclpublications.com
LIGHT PAINTING
“The method of creating
individually lit images gives you
more control over the look of the
final shot.”
IThefinal image of the mini isa combination of
6 shots where it is lit from various angles with
different coloured lighting. It also includes the lit
interior and the headlights.
time to introduce some more colour and light.
Each light painted exposure was set at f/5.6
for 20 seconds at ISO 200. This meant that the
background was slightly underexposed and our
‘paint’ would show up well. It took a bit of trial
and error, but for each 20 second exposure, the
torch could be used to paint the car for about
half of that exposure time - so about 10 seconds.
The torch was kept at roughly the same distance
from the car each time. So all that we had to
do now was take a succession of exposures,
lighting the car with the torch and using different
coloured gels [3]. Basically you can experiment
all you want as all the single exposures could be
combined in Photoshop later. We even put the
torch inside the car to light the interior.
You could of course set your exposure to give
you enough time to do all your light painting in
one go. This would take a bit of working out with
both the camera settings and the amount of light
you need from the torch. One error means the
shot is potentially ruined and you have to start
again. The method of creating individually lit
images gives you more control over the look of
the final shot by being able to add and subtract
the shots you don't feel contribute to the overall
look you are after.
If you have a flash in your camera setup, you
have no doubt been enjoying the benefits
of having an available light source when
conditions demand it. You may discover there
are times when you want a little more creative
control over the end result. At the moment, your
flash sits atop your camera providing one light
source, perhaps with the option of bouncing it
off a nearby wall or ceiling if you happen to be
indoors so you can modify the light to soften
the shadows. Anything is better than the direct
flash rabbit-in-the-headlights look right? This
is great, bounce flash can create some lovely
images. If you were outdoors though, trying
to do a portrait, where would you bounce the
flash? Options become limited, and you may
have to resort to direct flash which can kill the
mood of the shot. You want to be able to control
the direction of light and create some highlights
and shadows to add modelling and depth to the
scene. This is the point where you would want to
get your flash/strobe/speedlite (whatever you
want to call it) off your camera. But how do you
do that?
“Although there are a bewildering
variety of options out there, the
truth of the matter is, you do have
plenty of choice”
174
www.pclpublications.com
OFF-CAMERA FLASH
ЗЛ
Detaching the flash from your camera and
still being able to control it from a distance is
not as daunting a prospect as it might seem to
the fledgling strobist. The basic methods are:
Sync cords
A wired system of cables and adapters.
Basically, this is an extension cable that
connects one end to the hot-shoe of your
camera and the other to your flash. You can use
multiple flashes if needs be, but it will require
additional cabling, adapters and splitters. Also,
with the correct cable, all the flash’s original
functions and things like eTTL metering and High
Speed Sync will be preserved. The distance you
can get between you and your remote flash is
determined by the length of cables available. A
standard off camera cord is usually about lm.
We have seen videos on YouTube where people
buy several cables and hack them together. It
can be no surprise that the big manufacturers
might possibly limit cable length because they
most likely want you to go for a more expensive
wireless system.
Opticaltriggers
These are very cheap to buy, simple to operate
and readily available. In fact eBay is overflowing
with cheap non name-brand camera accessories
such as this. Simply put, it is a wireless system
that uses optical triggering i.e. a trigger that
attaches to your flash unit and will activate it
remotely when it senses another flash (usually
the one connected to your camera) firing. This
does, of course require a second unit on your
camera (or maybe attached to a sync cord) to
‘pop’ and fire the optical unit attached to your
remote flash. When outdoors, the optical trigger
may become erratic or, at worst, even useless
depending on the power of your trigger flash and
the prevailing lighting conditions.
www.pclpublications.com
175
Yongnuo transceivers may not be the most
feature-rich wireless system you'll ever come
across, but they are cheap and an excellent choice
for a first foray into creating a wireless light setup.
PLUS
The Canon 600EX-RT,
a powerful flash that
can be controlled
bytheST-E3-RT.A
wireless controller
that can work with
multiple groups of
flashes upto 16 units
at once.
on the market have wireless control built-in.
Multiple flashes can readily be triggered with
this system.
Wireless systems
A wireless system that uses 2.4GHz radio
Pocket Wizards are a very popular choice for
pro photographers. There are a number of
systems to choose from and can run to very
high prices, but you do get what you pay for.
Remote infrared
A wireless system that makes use of infrared
signals from a sender unit to trigger a flash
with a built-in IR receiver. IR is good for indoor
use, but does need line-of-sight for the sender
and all receiving flash units. IR setups are also
infamous for erratic behaviour in bright, warm,
sunlit conditions outdoors. The big name
brands have their own native IR-based wireless
systems but it does mean you are tied in to a
specific manufacturer to match your camera
system meaning that this type of setup can be
quite expensive, particularly if you have to buy
a sender unit to control the flashes. You may be
lucky, however, as the newer batch of cameras
frequency from a transmitter to any number of
receivers attached to flashes to trigger them.
The latest crop of wireless systems are based
on what are called transceiver units. This means
each trigger can be set to either send or receive
a flash fire signal just by setting an appropriate
option in a menu or by a flick of a switch on the
unit. Once again, eBay has you covered for any
number of cheap alternatives like Cactus V2’s.
You can pick up a Yongnuo RF 603 twin pack for
about £30. If you are feeling a little more flush,
then £300 will get you a pair of Pocket Wizard
Plus III transceivers. I have to put my hand up
and admit to getting a native brand wireless
system for my Canon setup. It is an ST-E3
wireless transmitter and multiple Speedlite
600EX RT’s.
All these systems, cheap or eye-wateringly
expensive all benefit from not needing line-
of-sight. You can have a flash in the next room
and it will still get the signal to fire ok. They
also have a good range and work equally well
indoors or out. Bear in mind though that the
cheaper units are cheap for a reason. Any flash
connected to them will have to be controlled
manually and individually. TTL metering is not
available in cheaper units as well as High Speed
Sync. Greater control of your flashes, such
as eTTL metering and even High Speed Sync
(even something called HyperSync in top of the
range models), along with advanced control of
multiple groups of flashes, comes at a price.
Although there are a bewildering variety of
options out there, the truth of the matter is,
you do have plenty of choice and within a wide
price range. You just need to assess how you
want your equipment choices to work in your
standard shooting environment. If you shoot
lots of close-up portrait or macro work, then
you don’t necessarily need a high-cost wireless
system that supports multiple flashes that can
be operated from a large distance.
A wired, sync-cord approach, is a great way
to start out. Besides, it is a useful accessory to
have in your kit bag anyway. As with everything
photographic, you always have the option to
upgrade to other systems later if needs be.
With the cord approach in particular, if you
find yourself running out of hands to hold and
operate flash and camera, consider a cheap
light stand to perch your flash on while you are
concentrating on shooting.
176
www.pclpublications.com
OFF-CAMERA FLASH
Bailey the dog gets his close-up
We wanted to show a basic before and after setup using a sync cord and one flash connected to my
camera to show the beginning of possibilities that off-camera flash can give you.
No flash
Camera settings f/3.51/1000 ISO 50
With flash
Flash at 3/4 power. Camera settings f/10 1/200 ISO 50
In the first shot, Bailey is sitting on a wall down by the beach. It is a bright
day with some great cloud formations going on behind him. We metered
the shot to try to balance out the shadows and highlights.
The end result has Bailey correctly exposed but the sky looks a little
washed out. You can probably do a bit to recover the sky using post-
processing, but overall the shot lacks any punch or drama. Note the
shadow from the sun.
For the next shot, knowing we were going to light the subject using the
flash off to the left side, We set the camera at its maximum sync speed
(1/200) and adjusted the camera settings to underexpose the scene by
about 2 stops.
The flash was on manual and set at about 3/4 power several feet away
from Bailey. Now, the sun has been turned into a fill light rather than the
main light source. The shadow cast by the dog in the previous shot is gone
to be replaced by the shadow cast by the flash.
At this close range, the flash has become the main light. The shot has
more drama now, not least because the sky is much stronger now that
it is underexposed. Now that the flash is off to the left hand side, there
are strong highlights and shadows to a give more ‘pop' to the image,
rather than a direct flash which can create the white-faced rabbit-in-the-
headlights look.
Off-camera lighting is a creative and endlessly variable world that can
take you from a ‘sunlight only, shooter' to a full-on ‘strobist’. Hope we have
been able to light the way a little.
I The shots of Bailey the dog were taken using a sync
cordand flash. It is probably thesimplest way of getting
your flash off the camera hot-shoe and is a cheap way to
begin exploring these new lighting possibilities.
www.pclpublications.com
176
LIGHTROOM
CLASSIC
This issue, we reveal more about an Adobe application that can
take your images to the next level
We continue with our section on digital image processing. Namely, using
Lightroom Classic on your desktop. When it comes to the processing of
digital images from your DSLR, Lightroom Classic is unparalleled in terms
of the tools available to you to get the very best out of your images. Let’s look at
a few more aspects of this amazing suite of programs. We will cover the mobile
version of Lightroom in subsequent issues, but for the moment, let’s take time
to see all the new updates and improvements available to you in the latest 2022
version. Then we have a quick tour of the main workspace just to get you up to
speed on things. Stick with us as in subsequent issues, we look in more detail at
how you can begin to unlock the power of Lightroom Classic on your desktop.
180 Colorgrading
180 Customize metadata
181 Additional library filters
181 New Presets
182 Masking
182 Select subject (simple)
182 Select subject (complex)
184 Select sky/Brush
185 Linear gradient
185 Radial gradient
185 Color range
185 Luminance range
186 Depth range
186 Intersect
188 Images transformed
190 Exploring the workspace
178 www.pclpublications.com
LIGHTROOM CLASSIC
"WhenTtJcomes to the processing
ofdigitaTimages from your DSLR,
Lightroom Classic is unparalleled in
terms of the tools available to you to get
the very best out of your images. ”
www.pclpublications.com
179
2 ) Customize Metadata
----------------------------------------------1-------------------------------------------------
• Customize Metadata Default Panel
► Q Basic Info
► Q Camara Info
к IPTC Content
► О IPTC Copyright
► О IPTC Creator
► IPTC Image
P Q IPTC Status
P IPTC Extension Administrative
P IPTC Extension Artwork
Color Grading is one of the adjustment tools found in the
Develop Module. It is a graphical user interface replacement
of the Split Toning panel. It works in the same way by
letting you adjust the hue and saturation in the highlights
or shadows of your image, but the methods by which you
interact with it have been updated. Rather than using a series
of sliders for highlights and shadows, you now click and
drag your cursor over a series of colour wheels. Now you are
able to alter not only highlights and shadows, but also the
mid-tones too. You just choose the corresponding colour
wheel and drag your cursor over it. As you do, the colour
selected will be injected into the image, creating a colour
cast. Dragging the cursor towards the centre of the wheel
decreases saturation, closer to the edge and the saturation
increases. The slider below each wheel lets you control its
luminance and the Blending and Balance sliders also control
how dominant that colour is in relation to the others. When
you click on the colour wheel, if you hold the Shift key, you
can constrain the choice to Saturation only, if you click on the
wheel and then hold the Cmd key, you can constrain it to Hue
selection only.
p Q Basic Info
▼ □ Camera Info
a Megapixels
Q Dimensions
□ Cropped
Make
О Model
Q Camera
О Camera ♦ Lens
Г Camera ♦ Lens Setting
Serial Number
“ Exposure
Q Exposure Time
Q Shutter Speed
Q F-Stop
3 Aperture
a Max Aperture
In photography, metadata is a piece of information that is
generated by your camera and is appended to your image
file. The data this information contains tells you everything
you need to know about that image. It tells you when it was
shot, what camera took the image and what lens was used.
Important technical aspects such as ISO sensitivity, shutter
speed, aperture and lens focal length are included. It goes
far beyond that too. It can contain keywords, copyright
information and even GPS co-ordinates if your device is
suitably equipped. Until recently, when you processed your
images and saved them as other formats such as Jpeg or
Tiff, you had just a few choices as to what aspects of the full
range of original metadata could be saved to your resulting
photo. Now, however, you can click on the Customise button
for a single image or a whole batch and decide for yourself
precisely what metadata is allowed to been seen and what
is not. There are a lot of tick boxes to choose, but you can
tailor it exactly to how you want it. As an example here,
we’ve simply added more camera settings data to what had
previously been set.
File Name cliffs.NEF
Folder SuperMac 27
Title
Caption
Copyright
Creator
Rating................
Capture Date 23 Sep 2018
Dimensions 7360 x 4912
Megapixels 36.2 MP
Camera Nikon D810 #6040721
Camera ♦ Lens Nikon D810 + TAM...8 Di VC
File Type Raw
Exposure Time ’/,60 sec
Shutter Speed ’/,60 sec
F-Stop //7.1
Aperture //7.1 ,
f ,/2 8
180
www.pclpublications.com
UPDATES AND IMPROVEMENTS
Filters Off
3 J Additional Library Filters
When you are working in the Library
Module, you can go to the top right part of
the thumbnail grid and click on the Filters
- Q Off button and choose what filters you
can employ to help you search for your
images. Until recently, the search by Date
filter only gave you the option to search
by year. That meant that if you have taken
many images in one particular year of your
search, you will still have a lot to go through to
find what you are looking for. Now though, you al so have
the newer filter options of both Month and Day. If you have
a set of images you know were taken on the 21st August in
2020, then your filtering options have become much more
focussed, letting you get to your photos just a bit quicker.
Date
► 2014
► 2015 22
► 2016 76
► 2017
► 2018 45
► 2019
► 2020 63
Month_____________________________________________________________________
All (4 Months)
June I
July 55
August 6
November
✓ Default Columns к
p Exposure Info
• Filters Off
| Flagged
Location Columns
Rated
Unrated
Save Current Settings as New Pres
Restore Default Presets
Delete preset ‘Default Columns*-
▼ Subject: Travel II
▼ Subject: Urban Architecture
► Style. Cinematic II j.
▼ Presets
► User Presets
iTi TR11
► Subject: Travel
► Style: Cinematic
► Style: Futuristic
is UA01
Presets are a set of ready-made adjustments
that you can apply to your images with just
k one click. Lightroom has a growing number
of presets available for free and the most
1 recent update to 2022 saw a few more
being added to the roster. Presets are
Г accessed from the left-hand panel when
in the Develop Module. Simply click on
- the Presets tab to expand the list of current
choices. Most notable additions are: Futuristic,
Urban Architecture Cinematic II and Travel II. As you scroll
over each preset, you will see a real-time preview of each
one. When you are happy with your selection, click the
chosen preset to apply its adjustments to your image and
you are free to carry on with more edits.
www.pclpublications.com
181
Preset
Ш 0 A
Lightroom previous version
Basic
5 ) Masking
The mobile version of Lightroom has undergone the same update, but just like Lightroom Classic, the Graduated Filter, Radial
Filter and Adjustment Brush have been relocated and amalgamated under the new Masking tool.
Images edited in older versions of Lightroom have all their masking data kept intact when opening them in the 2022 version.
Library Develop Map I Book Slideshow I Print Web
Lightroom Classic previous version
The main update that sets this
most recent version of Lightroom
Mask 1 Classic and Lightroom is the
Masking toolset. Previous
4 । versions of Lightroom had a
L±J Subject1 set of editing tools that could
be found next to the histogram
___ in the top right corner of the
Develop workspace. Those tools
are still in that location, but they
have altered slightly. Until the 2022 update,
they were: Crop Overlay, Spot Removal, Red
Eye Correction, Graduated Filter, Radial Filter
and Adjustment Brush. Now, you'll find it runs:
Crop Overlay, Spot Removal, Red Eye Correction
and Masking. It is the Masking feature that is
the latest and greatest addition to Lightroom's
arsenal. Although the Graduated and Radial
filters appear to have gone, don't worry. They
are now located within the Masking tool. Any
images you edited using brush adjustments,
graduation and radial filters prior to the 2022
update are still intact. If you open the Masking
option and look at the small layer palette that
appears, all your edits will still be there. Masking
also contains a number of new and powerful
features that give you new and creative ways to
select and mask areas of your photos for much
greater adjustment control. Bear in mind that
although there may be some graphical user
interface design differences, the Masking tools
available in Lightroom Classic are the same as
can be found in the mobile version of Lightroom.
The Graduated Filter, Radial Filter and Adjustment Brush are now
found under the Masking feature along with the other Masking tools.
Note their name changes. Other than that, they work the same.
X Select Subject
яй Select Sky
Lightroom 2022
Select Sky
Mask 1
Exposure
О
Contrast
—о
(К)
(M)
(Shift-M)
(Shift Ч)
(Shift+Q)
Select Sky
MasK i
Exposure
o-
Contrast
Lightroom Classic 2022
Add New Mask:
Select Subject
Select Sky
Brush
Ц Linear Gradient
(•) Radial Gradient
Color Range
'•& Luminance Range
182
www.pclpublications.com
UPDATES AND IMPROVEMENTS
6 ) Select Subject (simple)
If you open an image with no
previous edits and click the Masking
Д Maskl button, a panel will appear
™-----------------beneath it listing the Add New
* i—I Mask options. At the top of the list
I x I StJbject 1 is Select Subject. Click its button
and Lightroom will automatically
ЧЭ Add/ scan your jmage and apply a mask
to what it considers the main part of
the image. Obviously, how well it selects
its subject is going to based on the content of the
image. A very complex photo with an abundance
(or lack) of detail is going to confuse the Al when
making its choices. This example is of a portrait of
a woman against a plain background. Relatively
easy for the Al to mask. When the mask has been
created, a layer panel appears which lists the masks
currently active in your photo and what kind of
mask it is. A colour overlay is applied by default
to indicate it is ready for adjustments to be made,
you can change what kind of overlay you want if
required. If at this point, these features look familiar,
then you are correct. Lightroom's Masking feature
is derived from the Photoshop Al that does the
same tasks. If you click the Subject 1 menu button
(the three small dots), you have some options that
allow you to affect the mask in certain ways. In this
case, we simply clicked Invert. Now the background
of the image has been selected. With any active
mask, you can use its adjustments panel to alter its
temperature, exposure, contrast etc.
he previous example was quite
simple in terms of masking. This
next one is a little more complex.
We have a toucan on a brach
with a leafy background that
we want to adjust. We clicked
Select Subject and a mask was
created. It made quite a good job
f it. Various adjustments were made
to the bird's exposure to reveal a bit
more detail. What happens if you want to alter the
background? Since our bird already has a good
mask, we can actually click on its Mask 1 icon in the
layer panel and choose the Duplicate option. The
duplicate is renamed Background and is inverted.
Any adjustments made to this mask means that only
the background is affected. The green background is
adjusted to a new colour, but as you see, the branch
is also colour-shifted too. Below the mask layers are
two buttons. One is Add and the other is Subtract.
These two buttons let you add or subtract masking
information to the chosen layer using any of the
masking options such as the Linear Gradient, Radial
Gradient and Brush etc. In this case, we are going to
use the Brush tool to subtract some of the mask from
the Background layer. A New Brush layer is added
to the layer stack under Background. Now you can
use a brush to paint over the branch and erase any
mask data to reveal the original branch colour. All the
masking options can be used in conjunction with one
another for complex masking shapes.
www.pclpublications.com
183
8 ) Select Sky
9 ) Brush
As with Select Subject, Select Sky does
—I what it says on the tin. When you choose
Maskl this option, the Al will scan your image
____ for an obvious horizon line and attempt
।—। to mask out the sky. As before, the
Г—I Sky1 p complexity and detail present in the
image will determine how good a mask
Q- Add you get. If there is plenty of blue sky in
the shot, you should get a decent mask. If
you have a busy horizon line with not much
contrast, the Al will struggle, so be aware. In our example,
after clicking the Select Sky button, it takes a moment
and then masks the image. The far horizon, which is misty,
gave it some work to do, but it feathered the mask and
decreased opacity there in order for it to blend a little
better into the ground. Some colour adjustments to alter
the sky to a warmer colour were added and the overall
effect is quite pleasing. As with any masks created by the
Masking feature, you can go in and edit the masks to your
heart's content.
ry I Develop I Map I Book I Slideshow I Print
Maskl
Q)Add
As mentioned before, adjustments made
using the brush feature pre-2022 and
к now in the current version, remain the
1 same basic procedure. You just need
I to open the Masking tool in order to
V find the Adjustment Brush option. By
* default, when you apply an adjustment
with the brush, there is no effect other
than activating the colour overlay so you
know where you’re painting. You can begin
to dial in your adjustments after. Note that as soon as you
add any adjustment, the colour overlay is turned off so
you can see the effect you're having on your image. When
the Brush tool is active, note that you have Brush settings
available that govern the size, softness and density of the
mask you're applying. These can be easily adjusted using
the sliders. You also have the option to use the Auto Mask
feature. When turned on, as you brush over the image, it will
look for obvious changes in contrast that might indicate an
edge and attempt to mask up to the edge. Turn this off if
you don't need it to refine the brush strokes you're making.
Add adjustments to the brush mask as necessary. Remember
that this mask, like all the others can be edited, added to,
removed from, and intersected with, the other masking
options available.
184
www.pclpublications.com
UPDATES AND IMPROVEMENTS
Radial Gradient
Linear Gradient
Mask 1
This masking option allows you to create
a gradient on your image that runs from
J/ 100% of its adjustment visible, down to 0%
of its effect. The effect runs in a straight
line. It can be vertical, horizontal, or at any
angle you choose. A Linear Gradient is most
often used to simulate a graduated filter used
on a digital camera to help darken an overly bright sky in
comparison to the ground. Our example does such a thing
with the gradient being dragged down from the top of the
image. The colour overlay shows you the extent of the grad
you've created. It can be tweaked any time. Then, you can
make your adjustments as you see fit. Altering colour and
exposure are common adjustments to skies in photos. Again,
any of the other masking types can be used in conjunction
with this mask to finesse the gradient’s effect.
www.pclpublications.com
185
12 Color Range
13) Luminance Range
Maskl
This new feature is another interesting
method by which you can select and mask
Sy areas of your photo. As the name would
suggest, it makes its selection based on
Add colour values that are chosen by you. As
seen in our example, if you wanted to mask
the foreground sphinx and pyramid, you could
decide to use Select Sky, invert the mask and alter it that
way. If you choose Color Range, you are given the option to
select a range of colours using the color picker tool. You can
pick a single colour, drag out a sample area box, or click and
press Shift to add additional data points to your selection.
Because the orange tones all fall broadly within the same
range, selecting the sand colours only, is fairly easy to do.
Then you are free to make your adjustments as required.
photo creates a mask that falls within the tonal
values selected. All other tones are protected by the mask.
However, you can use the Luminance Range panel to alter
how many brighter or darker tones are included in the mask.
Think of this a bit like the Levels adjustment in Photoshop.
You're simply telling the mask to include the darker tones
and lighter tones most directly similar to the ones already
selected. When you are happy with the tonal range selected,
you can make your adjustments to the image.
♦ Qtek anywhere to sample luminance To
remove areas, create a subtract tool
Effect Custom :
Temp
Tint
186
www.pclpublications.com
UPDATES AND IMPROVEMENTS
14 Depth Range
You may notice that the
_-i final option of Depth
Maskl Range is probably
I greyed out. It only
k i—q becomes active when
1^1 Depth Ran₽' using photos taken by
the most recent iPhones
that have taken photos
and used the Portrait
mode with depth information
contained within it and saved in the НЕ1С/
HEIF format. This is the High Efficiency
Image File Format. If you are able to
access a photo in this format, you can
activate the Depth Range feature. It
enables you to use a picker on your photo
and wherever you click, it will use the
depth information contained in the photo
and set the point you click as the sharpest
area. Areas in front of and behind that
chosen point will fade to an out of focus
state and the mask created will reflect
that. The depth Range sliders will let you
refine just how much is in, or out, of focus.
You can add adjustments just as you do
in the other masked options. The areas
that are darkest on the mask will remain
untouched. The lightest areas will have
the greatest effect visible on them.
X Select Subject
Select Sky
/ Brush
g Unear Gradient M
(*) Radial Gradient (ShrtuM)
Color Range (ShUUl)
Luminance Range
Depth Range . <shrt”ZI
15) Intersect
w Sky1
One feature in amongst all the new
tasking tools is the Intersect
function. It lets you combine
masks in interesting ways that
give you a lot of scope when
it comes to more precise
application of masks during
your workflow. We have a simple
example to show you where we
wish to create a bright halo behind
the lone tree atop a hill. Our first
step would be go to the Masking tool and choose
the Select Sky option. Lightroom will assess the
image and mask the sky out (Sky 1 under the
Mask 1 layer). Since the tree and the horizon
both provide strong outlines to work with, the
selection is quite refined. Now we want to remove
most of the mask apart from a halo around the
tree itself. You can click the Sky 1 menu tab and
then click Intersect Mask With to open a second
menu where you can choose which option you’ll
intersect the current mask with. We opted for the
Brush tool. We set its size and positioned it over
the tree and clicked to apply it. What happens
next is that all of the Select Sky mask will be
removed apart from whatever area sits within the
Brush stroke you just used. You now have that
area of sky with the tree and ground still masked
out. You will see a Brush 1 layer added to your
Mask 1 layer set to indicate what you've done.
Adjusting the Exposure, Temperature and Color
gives you the desired effect of the halo within that
very specific area.
Linear Gradient
Radial Gradient
Select Subject
Select Sky
Note: at the time of writing, the Intersect function
is only available in Lightroom Classic.
www.pclpublications.com
187
AFTER
BEFORE
www.pclpublications.com
Lightroom offers some impressive results from
very little effort on the part of the user. The
conversion from the before image to the after
image took a few minutes and just a few clicks
of the mouse button. This is how powerful and
intuitive Lightroom is.
This striking wide-angle shot of a sunny day on the Cornish coast started out looking
a little lacklustre but thanks to Lightroom there’s huge scope for adjustment and
improvement. We can emphasise the dramatic light of the daytime colours and boost
Clarity, Shadows and Saturation; the image is transformed. Additional use of graduated
filters in the sky ensures a good tonal balance between foreground and background.
Images
tranformed
Image Conversions
and Tweaks
IMAGES TRANSFORMED
Exploring the
Workspace
The default workspace you view when launching Lightroom Classic can
look a little confusing to begin with. However, with a little exploration
the many menus and options soon become second nature. Here, we
show you around all the basic areas before you get stuck into editing.
О User id_____________________________
This is the Identity Plate for Lightroom,
displaying the user’s logged in account
name, with further options available to be
expanded that connect to Adobe’s cloud
services. The Identity Plate can be further
personalised, using either set templates
or customising your own for branding
your own photos. These can be text-
based, or even a graphical Identity Plate
to add that little extra personal touch to
your Workspace view and image edits.
Q Presets: Catalog____________________
The Catalog Preset is a database that
stores a record for each of your photos.
This record contains key pieces of
information regarding each of the photos
you import into Lightroom, such as a
reference to where the photo is stored
on your system, instructions for how to
process the photo and metadata relating
to the photo.
ф Presets: Folders____________________
The Folders Preset displays where your
photos are stored in the system. These
reflect the folder structure on the drive
itself and appear in an alphanumeric
order for you to browse through. The
triangles can be expanded to display
sub-folders within each root folder level
and each folder will display the number
of images or videos you’ve imported into
Lightroom; there’s also information on
the amount of space on the hard drive
that the images have taken up, with the
total space displayed too.
190
www.pclpublications.com
EXPLORING THE WORKSPACE
Q Presets: Collections________________
Collections provide a way for Lightroom
to group photos in one place for easy
viewing, or for performing a variety of
tasks. For example, to assemble photos
into a slideshow collection, or a web
photo gallery. You can create as many
Collections as you need from Regular,
Smart and Quick Collection listings.
These can store custom defined rules,
temporary groups and various other
clever features.
Q Presets: Publish Services
The Publish Services options menu
allows you to export collections of
photos to your hard drive or a variety of
defined online services, such as popular
social networks as Facebook and Flickr.
Additional information can be added
to the export process and you can find
от Classic * Library
9 Library Develop Map Book Slideshow I Print I Web I A
Histogram
№
more services online via the available
button. It’s even possible to publish entire
folders or collections of photos, reducing
the process considerably compared to
manual uploads. These can be used in
much the same way as the Collections,
with various options and custom defined
rules if needed.
ф Film Strip_________________________
The Film Strip view bar is where you
can quickly display and also access the
photos you are working on as you move
between the modules. This scrolling bar
contains photos and all images from the
currently selected Library folder, your
photo/image collection, or keyword set.
By using this option you can quickly
access your images without having to
open additional folders outside of the
Lightroom software. You can quickly and
easily move between each of the photos
in the Filmstrip using the Left and Right
Quick Develop
Q Modules
Keywording
Keyword List
Metadata
Comments
Arrow keys or by choosing a different
source from the Filmstrip Source
Indicator pop-up menu to the right of the
navigation buttons.
A Histogram and
Adjustment Panels
The Histogram is an often overlooked
feature of Lightroom, which is a shame
as it’s an extraordinarily useful tool to
master. However, we have covered this
and these areas will be looked at in
further detail as we move through the
various Lightroom modules, such as the
Develop Module and other elements of
the software in this book.
ф Top Toolbar________________________
The top toolbar contains the familiar
aspects of a traditional program, with
File, Edit, Library, Photo, Metadata, View,
Windows and Help. Most of these are
self-explanatory, and function in the
same was as any other program. Others
though, contain elements and options to
enhance each of the modules. You could
spend a lot of time trawling through
the many different menu options and
we cover many of them throughout this
book. For now though, take a moment to
explore what’s available and see just how
in-depth Lightroom can get with just a
few clicks of the Mouse button.
Lightroom has seven workspace modules
available: Library, Develop, Map, Book,
Slideshow, Print, and Web. Each module
offers a unique set of tools and features
tailored to your workflow: importing,
organising and publishing, adjusting
and enhancing and generating output
for screen, print or web detail. These
tools, within each Module, are startlingly
powerful in their use, whilst still being
relatively simple to use. We’ll look at
these Modules and the tools within, as we
progress through the book.
Show or Hide Panel Groups
To show or hide a single panel group, click the triangular
Show/Hide Panel Group icon. A solid icon indicates the
panel group is showing.
To show or hide both side panel groups, choose Window
> Panels > Toggle Side Panels, or press the Tab key.
To hide all panels, including side panels, the Filmstrip
and Module Picker, choose Window > Panels > Toggle
All Panels, or press Shift-Tab.
www.pclpublications.com
191
In our next issue of
f* DIGITAL
CamerausEf?
essential photographic guides and tips to help you
on your way to mastering your camera. There are
plenty of new skills to learn and more great image
processing guides to explore too.
On Sale
March 2024
via digital platforms
25% Off!
Photography &
Photoshop Manuals
“Adobe
'Tte CbmplMf Manual'
Outdo
Phot
The Complete
Photoshop ]
User Manual”
KIR DIGHAL a HLM CAMERAS [Q
Digital
Photography
MANUAL
rne esteniKt
Л9пт^9Р
Blacks White Lightroom
। Photography 1»
Lex Manual
190
SCO 3022 COITION
SEP 2022 EDITION
890
ю complete
ograpny
anual
ft* Complete Manual Series
L GoPro
>J Photography
The Complete
Canon
Camera Manual
K)R DIG 11 AL »i HIM Q
Not only can you learn new skills and master your camera,
but you can now SAVE 25% off all of our photography,
Photoshop and tech digital and print manuals!
Simply use the following exclusive code at checkout
NYHF23CN
www.pclpublications.com
Don't miss out on more great
USER magazines
on digital platforms now!
NEW
Bumper Holiday Special! BONUS DOUBLE EDITION!
NEW Bumper Holiday Special! BONUS DOUBLE EDITION!
iPhoner—:
L/SEff
YourFirSt
iPhone
Mastered!
The Essential User Gude for the
New iPhone Owner! >
IVIhcjes?
USER
И"REE^
SPECIAL BOMUS
macOS I
Sonoma^
Mastered!
The Essential User Guide
for the Mac Owner!
SPECIAL B0WU5 V
TECH
SHOPPER
TECH
- • I
Bumper Holiday Special! BONUS DOUBLE EDITION!
NEW Bumper Holiday Special! BONUS DOUBLE EDITION!
L/StM
Windows!»
Windows 11L —
23H2 A Beginners Guide
The Essential User I
Guide for the New I
Windows User! —|—I
Xfree'4 u I
TECH
www.pclpublications.com
Digital Camera User
Issue Eight | December 2023 | ISSN: 2752-5060
Published by: Papercut Limited
Managing Editor: lames Gale
Production Director: Mark Ayshford
Editor: Mark Frost
Production Manager: Mark Ayshford
Design: Mark Frost, Mark Ayshford
Editorial & Photography: Mark Frost
Digital distribution by: Zinio, Pocketmags, Readly & Magzter
2023-2024 © Copyright Papercut Limited. All rights reserved. Notice: Before
purchasing this publication please read and ensure that you fully understand the
following guidelines, if you are in any doubt please don't buy. No part of this
publication may be reproduced in any form, stored in a retrieval system or
integrated into any other publication, database or commercial programs without
the express written permission of the publisher. Under no circumstances should
this publication and its contents be resold, lent, loaned out or used in any form
by way of trade without the publisher's written permission. While we pride
ourselves on the quality of the information we provide, Papercut Limited
reserves the right not to be held responsible for any mistakes or inaccuracies
found within the text of this publication. Due to the nature of the software
industry, the publisher cannot guarantee that all software and/or tutorials, tips,
guides will work on every version of the required camera or hardware. It remains
the purchaser's sole responsibility to determine the suitability of this magazine
and its content for whatever purpose. Any images reproduced on the front and
back cover are solely for design purposes and are not representative of content.
We advise all potential buyers to check listing prior to purchase for confirmation
of actual content. All editorial opinion herein is that of the writer as an individual
and is not representative of the publisher or any of its affiliates. Therefore the
publisher holds no responsibility in regard to editorial opinion and content.
Papercut Limited reserves the right not to be held responsible for any mistakes
or inaccuracies found within the text of this publication. The publisher, editor and
their respective employees or affiliates will not accept responsibility for loss,
damage, injury occasioned to any persons acting or refraining from action as a
result of the content with this publication whether or not any such action is due
to any error, negligent omission or act on the part of the publisher, editor and
their respective employees or affiliates. Our articles are intended as a guide only.
We are not advising you to change your camera or device, and would actually
advise against it if you have even the slightest doubts. There are potential risks
to the camera hardware/software involved, and you must be aware of these
before you decide to alter anything on your device. Read all of the information
here carefully and then make up your own mind whether you want to follow our
guides. We take no responsibility for damage to your camera or any other device
used in the process. If you are unsure, please do not buy this publication.
This Papercut Limited publication is fully independent and as such does not
necessarily reflect the views or opinions of the manufacturers or hardware and
software, applications or products contained within. This publication is
not endorsed or associated in any way with Canon, Nikon or any associate or
affiliate company or any other photographic equipment manufacturer.
All copyrights, trademarks and registered trademarks for the respective
manufacturers, software and hardware companies are acknowledged.
Additional images contained within this publication are reproduced under
license from shutterstock.com.
Some content may have been previously published in other volumes or titles.
We advise potential buyers to check the suitability of contents prior to purchase.
All information was correct at time of publication.
a Papercut Limited
Registered in England & Wales No: 04308513
ADVERTISING - For our latest media packs please contact:
Brad Francis - email: brad@papercutltd.co.uk
Web: www.pclpublications.com
INTERNATIONAL LICENSING - Papercut Limited publishes many
high quality publications and all are available for licensing worldwide.
For more information email: jgale@pclpublications.com