/


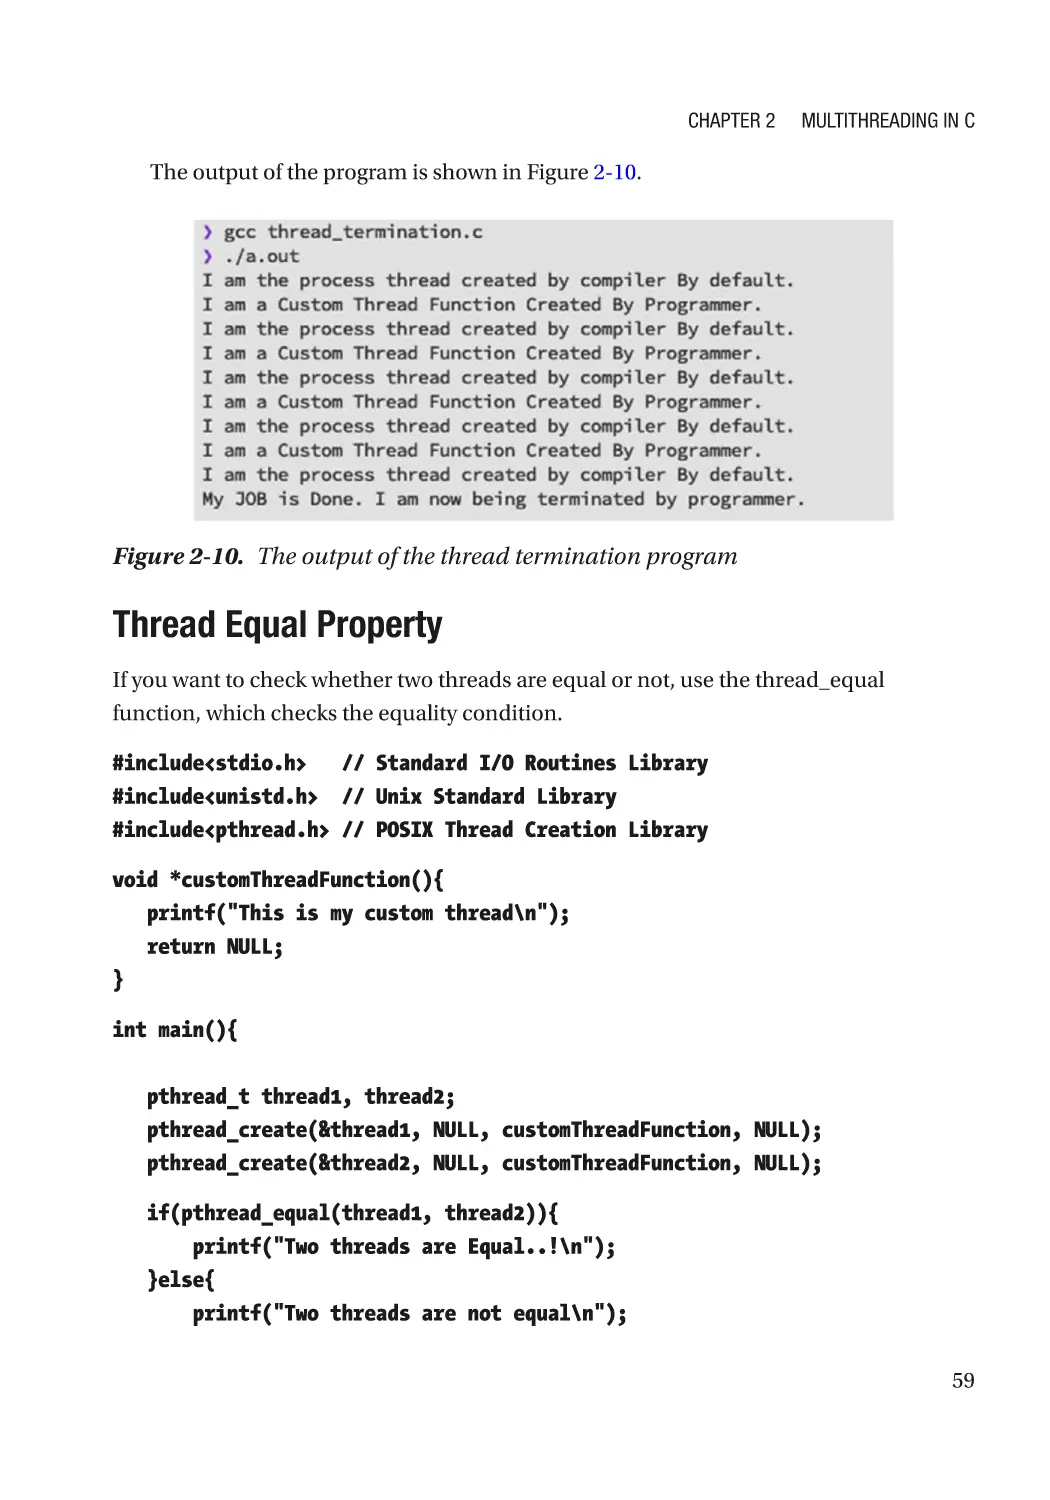


Author: Palakollu S.M.
Tags: programming languages programming operating systems
ISBN: 978-1-4842-6321-1
Year: 2021


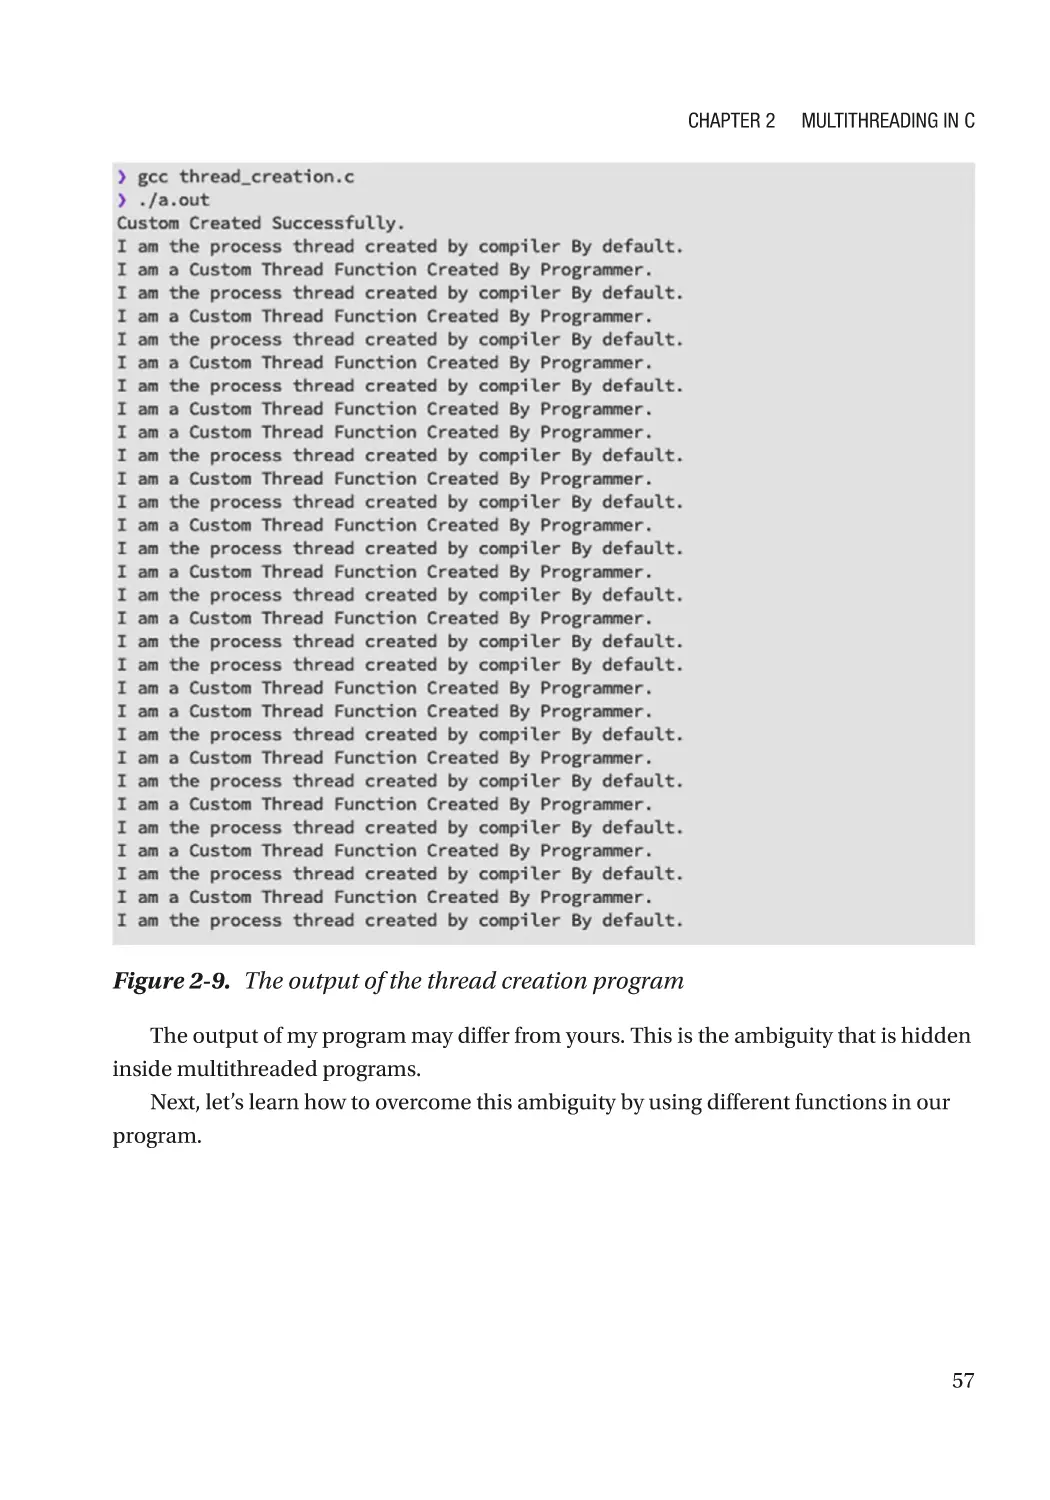
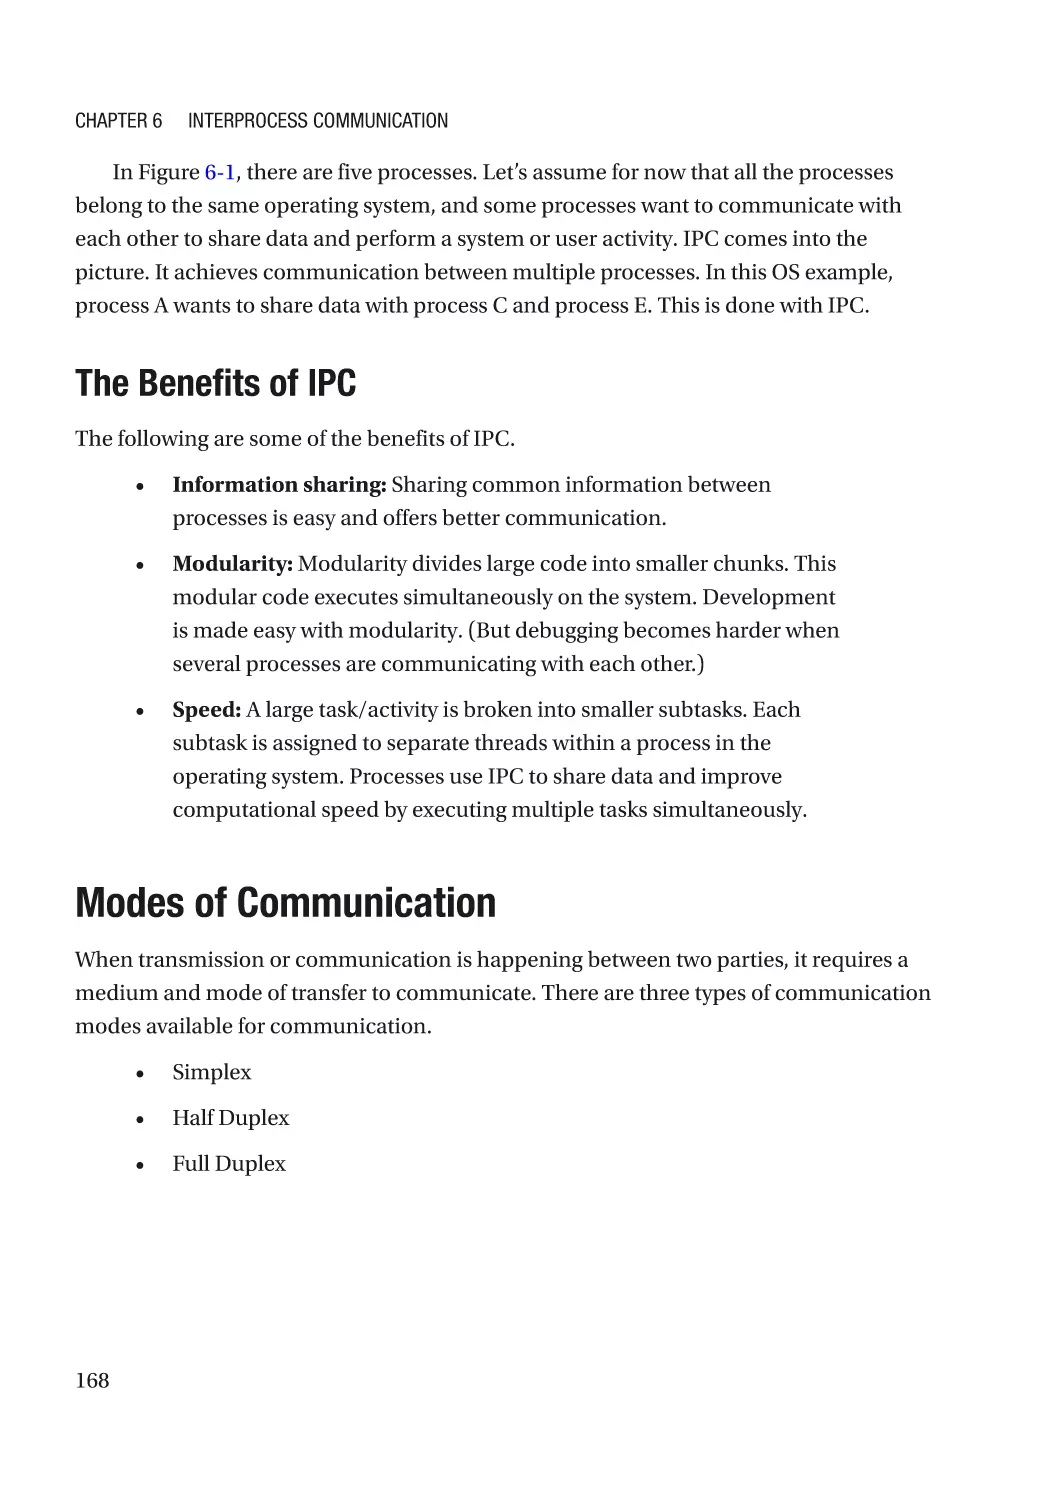
Text
Practical System
Programming
with C
Pragmatic Example Applications in Linux
and Unix-Based Operating Systems
—
Sri Manikanta Palakollu
Practical System
Programming with C
Pragmatic Example Applications
in Linux and Unix-Based
Operating Systems
Sri Manikanta Palakollu
Practical System Programming with C: Pragmatic Example Applications in Linux
and Unix-Based Operating Systems
Sri Manikanta Palakollu
freelance, Hanuman Junction, Hanuman Junction, 521105, Andhra Pradesh, India
ISBN-13 (pbk): 978-1-4842-6320-4
https://doi.org/10.1007/978-1-4842-6321-1
ISBN-13 (electronic): 978-1-4842-6321-1
Copyright © 2021 by Sri Manikanta Palakollu
This work is subject to copyright. All rights are reserved by the Publisher, whether the whole or part of the
material is concerned, specifically the rights of translation, reprinting, reuse of illustrations, recitation,
broadcasting, reproduction on microfilms or in any other physical way, and transmission or information
storage and retrieval, electronic adaptation, computer software, or by similar or dissimilar methodology now
known or hereafter developed.
Trademarked names, logos, and images may appear in this book. Rather than use a trademark symbol with
every occurrence of a trademarked name, logo, or image we use the names, logos, and images only in an
editorial fashion and to the benefit of the trademark owner, with no intention of infringement of the
trademark.
The use in this publication of trade names, trademarks, service marks, and similar terms, even if they are not
identified as such, is not to be taken as an expression of opinion as to whether or not they are subject to
proprietary rights.
While the advice and information in this book are believed to be true and accurate at the date of publication,
neither the authors nor the editors nor the publisher can accept any legal responsibility for any errors or
omissions that may be made. The publisher makes no warranty, express or implied, with respect to the
material contained herein.
Managing Director, Apress Media LLC: Welmoed Spahr
Acquisitions Editor: Steve Anglin
Development Editor: Matthew Moodie
Coordinating Editor: Mark Powers
Cover designed by eStudioCalamar
Cover image by Ricardo Gomez on Unsplash (www.unsplash.com)
Distributed to the book trade worldwide by Apress Media, LLC, 1 New York Plaza, New York, NY 10004,
U.S.A. Phone 1-800-SPRINGER, fax (201) 348-4505, e-mail orders-ny@springer-sbm.com, or visit www.
springeronline.com. Apress Media, LLC is a California LLC and the sole member (owner) is Springer
Science + Business Media Finance Inc (SSBM Finance Inc). SSBM Finance Inc is a Delaware corporation.
For information on translations, please e-mail booktranslations@springernature.com; for reprint,
paperback, or audio rights, please e-mail bookpermissions@springernature.com.
Apress titles may be purchased in bulk for academic, corporate, or promotional use. eBook versions and
licenses are also available for most titles. For more information, reference our Print and eBook Bulk Sales
web page at http://www.apress.com/bulk-sales.
Any source code or other supplementary material referenced by the author in this book is available to
readers on GitHub via the book’s product page, located at www.apress.com/9781484263204. For more
detailed information, please visit http://www.apress.com/source-code.
Printed on acid-free paper
Table of Contents
About the Author��������������������������������������������������������������������������������������������������� xiii
Acknowledgments���������������������������������������������������������������������������������������������������xv
Introduction�����������������������������������������������������������������������������������������������������������xvii
Chapter 1: Introduction to the Linux Environment��������������������������������������������������� 1
Getting Familiar with the Linux Architecture��������������������������������������������������������������������������������� 2
Hardware Layer����������������������������������������������������������������������������������������������������������������������� 3
Kernel�������������������������������������������������������������������������������������������������������������������������������������� 3
Shell���������������������������������������������������������������������������������������������������������������������������������������� 8
System Library������������������������������������������������������������������������������������������������������������������������ 8
Linux Kernels vs. Other OS Kernels���������������������������������������������������������������������������������������������� 9
Introduction to Files���������������������������������������������������������������������������������������������������������������������� 9
Text File��������������������������������������������������������������������������������������������������������������������������������� 10
Program File�������������������������������������������������������������������������������������������������������������������������� 10
Binary File����������������������������������������������������������������������������������������������������������������������������� 10
Special File���������������������������������������������������������������������������������������������������������������������������� 11
Regular File��������������������������������������������������������������������������������������������������������������������������� 11
File Handling Utilities������������������������������������������������������������������������������������������������������������������ 11
mkdir������������������������������������������������������������������������������������������������������������������������������������� 11
cd������������������������������������������������������������������������������������������������������������������������������������������� 12
rmdir�������������������������������������������������������������������������������������������������������������������������������������� 12
rm������������������������������������������������������������������������������������������������������������������������������������������ 13
touch������������������������������������������������������������������������������������������������������������������������������������� 15
ls�������������������������������������������������������������������������������������������������������������������������������������������� 15
cat����������������������������������������������������������������������������������������������������������������������������������������� 17
head��������������������������������������������������������������������������������������������������������������������������������������� 17
iii
Table of Contents
tail����������������������������������������������������������������������������������������������������������������������������������������� 19
nl������������������������������������������������������������������������������������������������������������������������������������������� 20
wc������������������������������������������������������������������������������������������������������������������������������������������ 21
copy��������������������������������������������������������������������������������������������������������������������������������������� 22
ulimit������������������������������������������������������������������������������������������������������������������������������������� 22
File Permission Commands�������������������������������������������������������������������������������������������������������� 22
chmod������������������������������������������������������������������������������������������������������������������������������������ 23
Process Utilities�������������������������������������������������������������������������������������������������������������������������� 26
Process���������������������������������������������������������������������������������������������������������������������������������� 26
Process Commands��������������������������������������������������������������������������������������������������������������� 27
Network Utilities������������������������������������������������������������������������������������������������������������������������� 29
ifconfig���������������������������������������������������������������������������������������������������������������������������������� 30
hostname������������������������������������������������������������������������������������������������������������������������������� 30
netstat����������������������������������������������������������������������������������������������������������������������������������� 30
nslookup�������������������������������������������������������������������������������������������������������������������������������� 32
traceroute������������������������������������������������������������������������������������������������������������������������������ 33
host���������������������������������������������������������������������������������������������������������������������������������������� 34
ping��������������������������������������������������������������������������������������������������������������������������������������� 34
dig����������������������������������������������������������������������������������������������������������������������������������������� 35
Summary������������������������������������������������������������������������������������������������������������������������������������ 36
Chapter 2: Multithreading in C������������������������������������������������������������������������������� 37
Introduction to Threads��������������������������������������������������������������������������������������������������������������� 37
Thread Classification������������������������������������������������������������������������������������������������������������������ 39
User-Level Threads���������������������������������������������������������������������������������������������������������������� 39
Kernel-Level Threads������������������������������������������������������������������������������������������������������������� 41
Threads vs. Processes���������������������������������������������������������������������������������������������������������������� 42
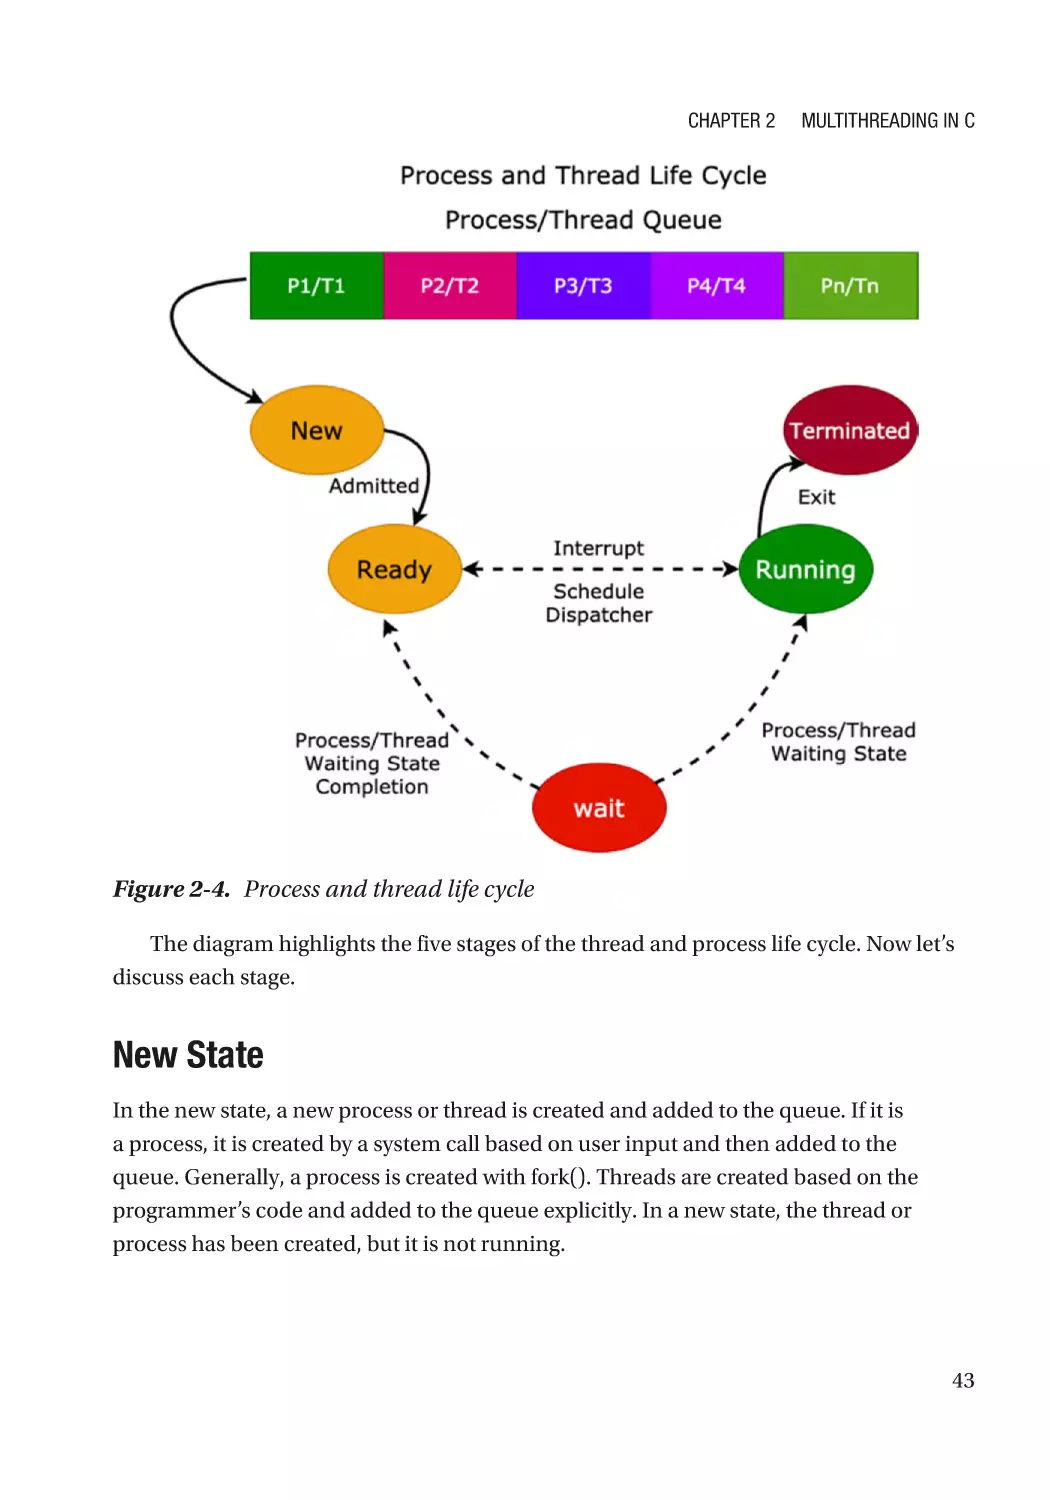
New State������������������������������������������������������������������������������������������������������������������������������ 43
Ready State��������������������������������������������������������������������������������������������������������������������������� 44
Wait State������������������������������������������������������������������������������������������������������������������������������ 44
Running State������������������������������������������������������������������������������������������������������������������������ 44
Terminated���������������������������������������������������������������������������������������������������������������������������� 44
iv
Table of Contents
Introduction to Multithreading���������������������������������������������������������������������������������������������������� 45
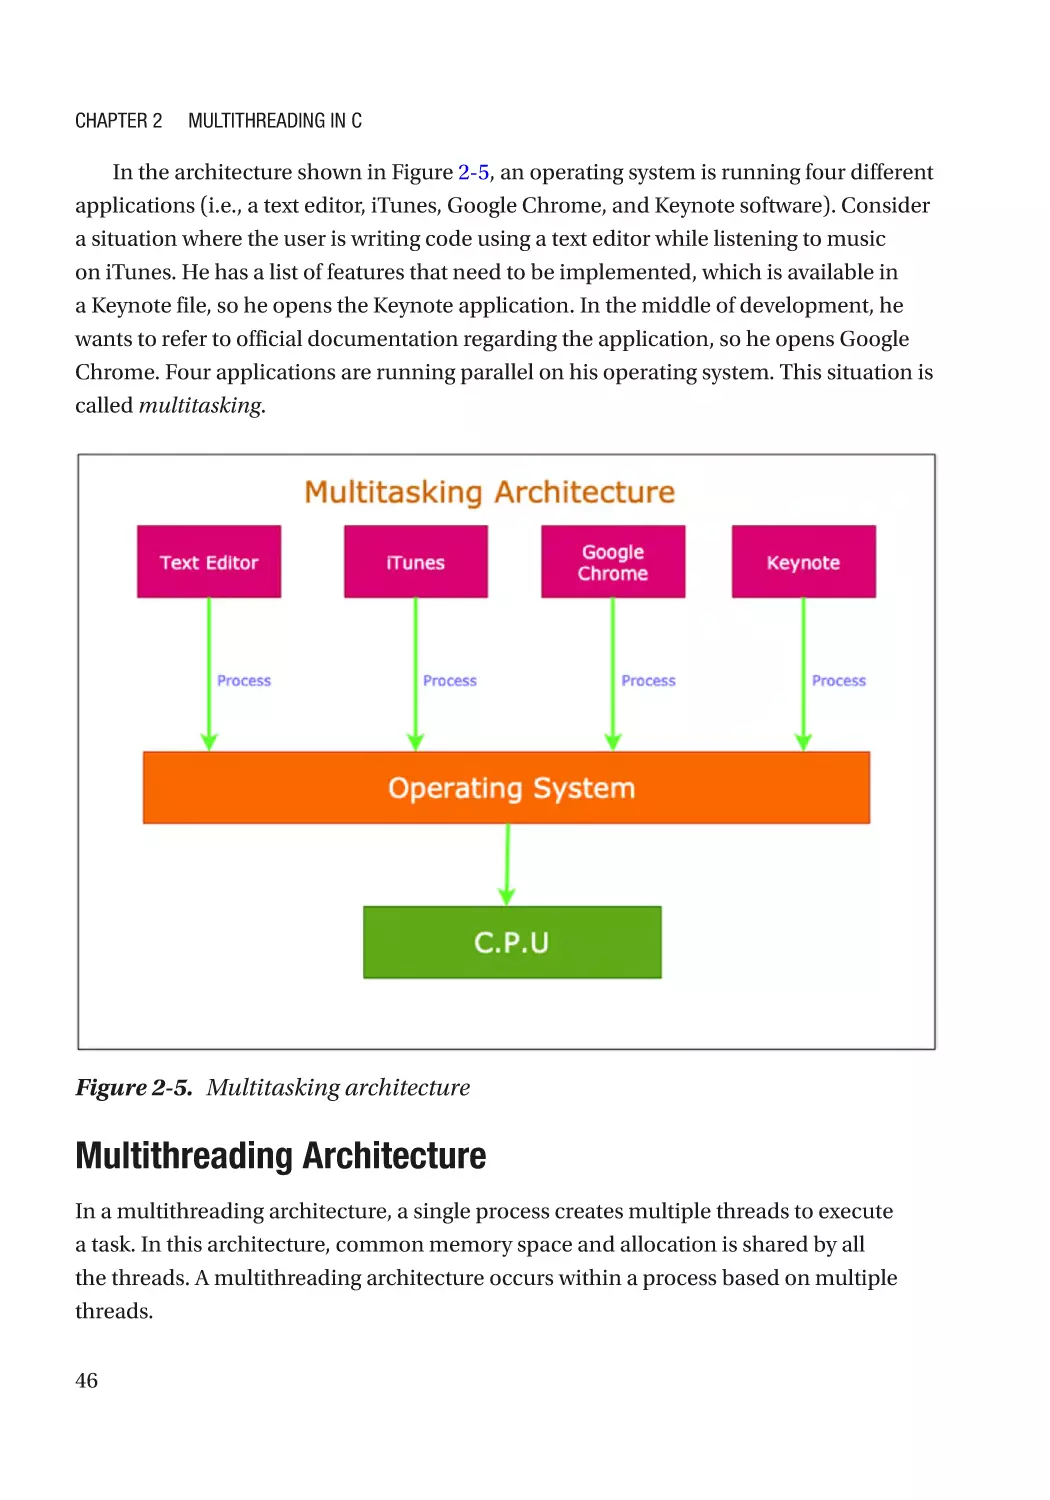
Multitasking Architecture������������������������������������������������������������������������������������������������������ 45
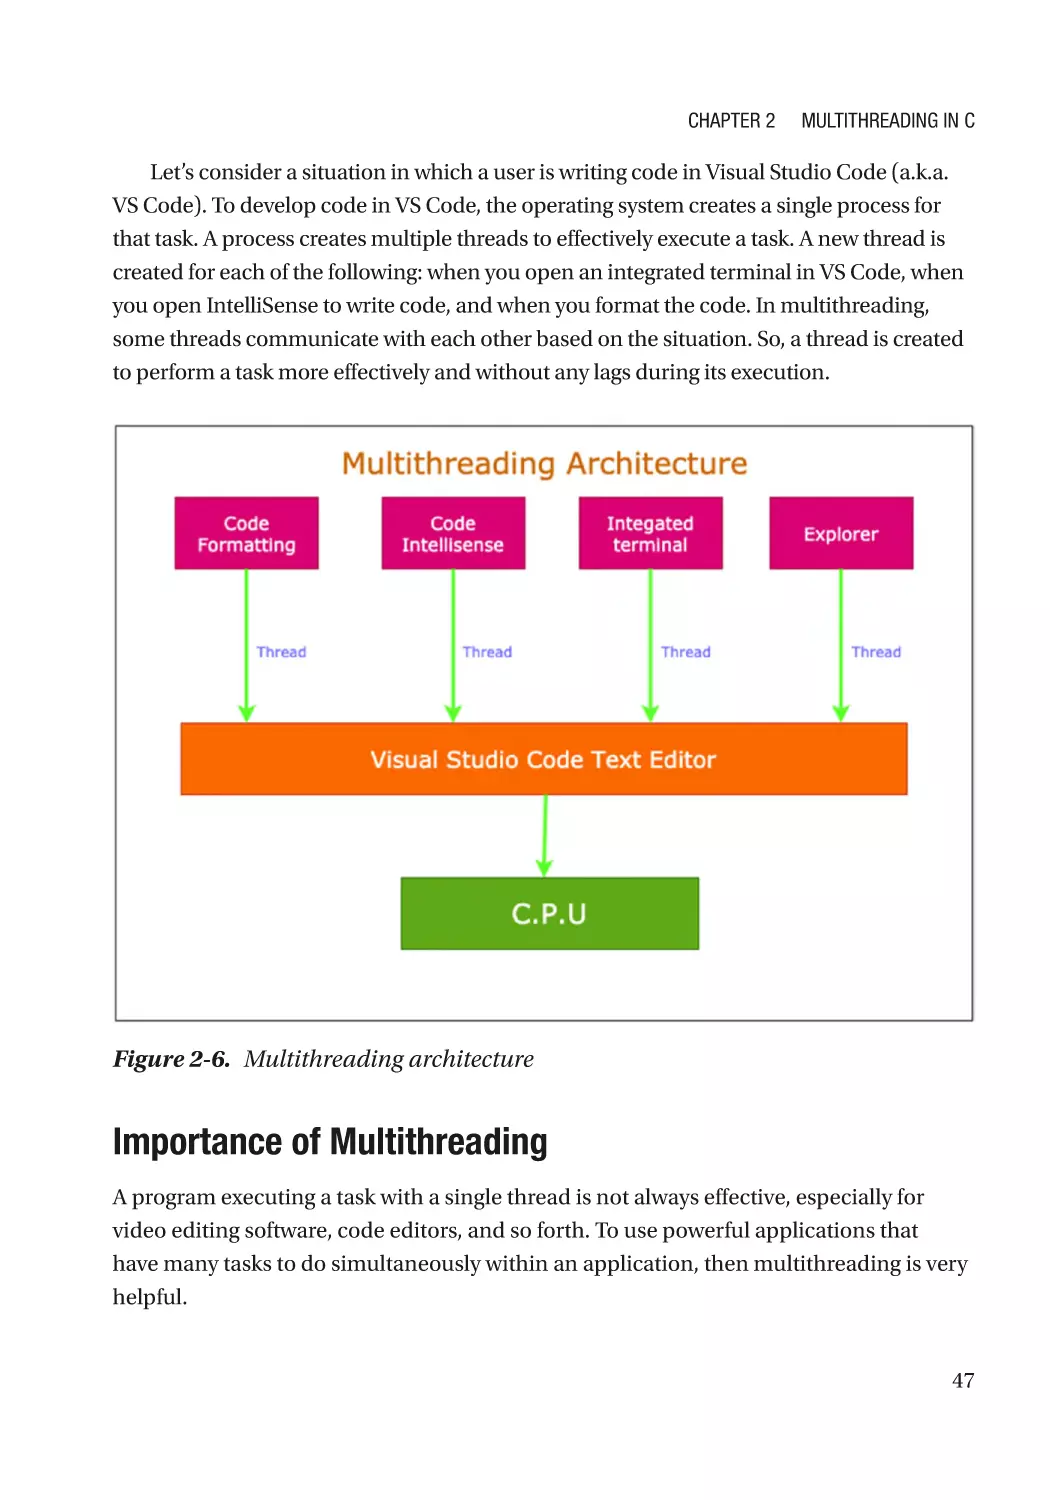
Multithreading Architecture��������������������������������������������������������������������������������������������������� 46
Importance of Multithreading������������������������������������������������������������������������������������������������ 47
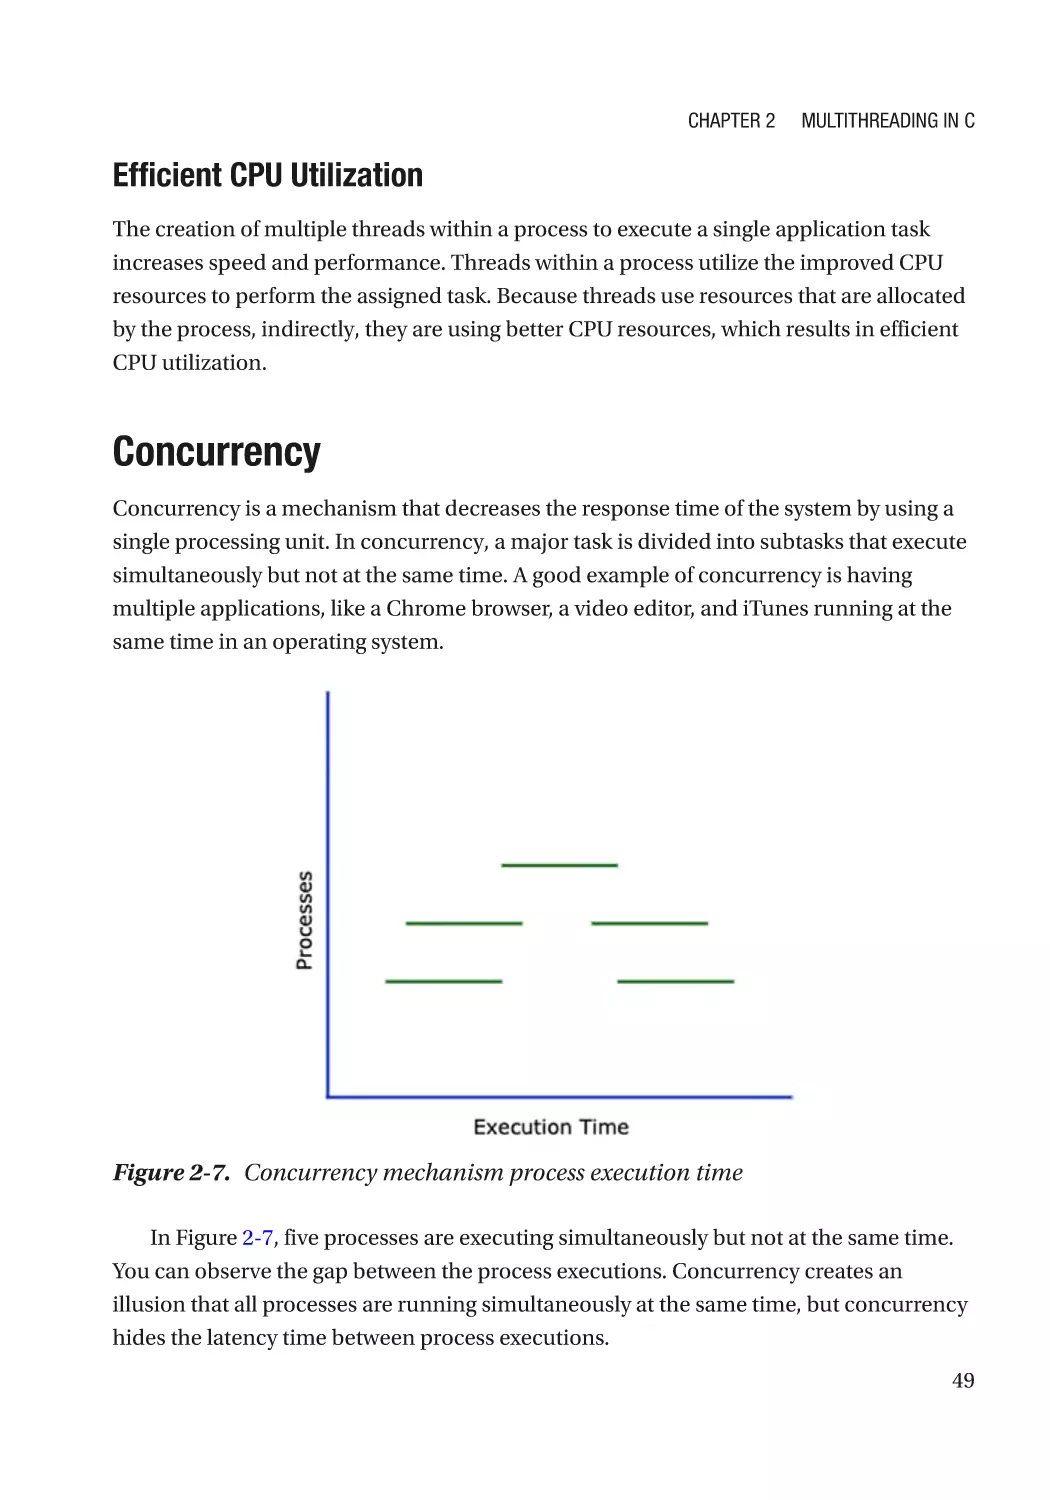
Concurrency�������������������������������������������������������������������������������������������������������������������������������� 49
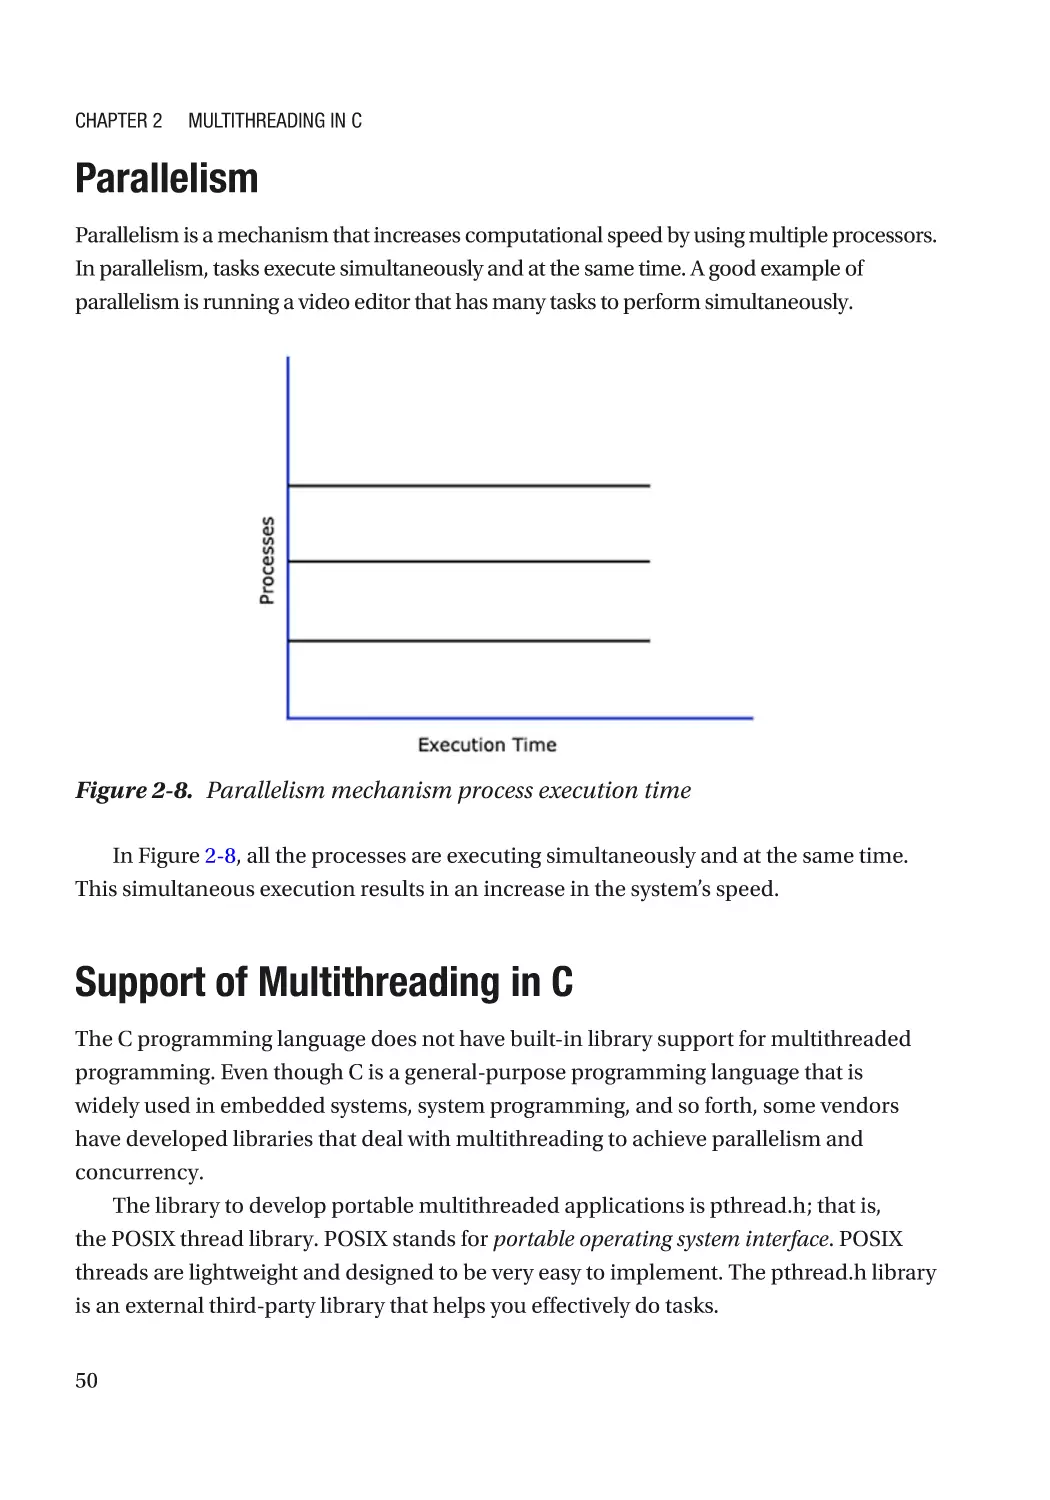
Parallelism���������������������������������������������������������������������������������������������������������������������������������� 50
Support of Multithreading in C���������������������������������������������������������������������������������������������������� 50
pthread_create���������������������������������������������������������������������������������������������������������������������� 51
pthread_join�������������������������������������������������������������������������������������������������������������������������� 52
pthread_self�������������������������������������������������������������������������������������������������������������������������� 53
pthread_equal����������������������������������������������������������������������������������������������������������������������� 53
pthread_exit�������������������������������������������������������������������������������������������������������������������������� 53
pthread_cancel���������������������������������������������������������������������������������������������������������������������� 54
pthread_detach��������������������������������������������������������������������������������������������������������������������� 54
Creating Threads������������������������������������������������������������������������������������������������������������������������� 54
Practical Examples of Multithreading����������������������������������������������������������������������������������������� 58
Thread Termination���������������������������������������������������������������������������������������������������������������� 58
Thread Equal Property����������������������������������������������������������������������������������������������������������� 59
Passing a Single Argument to a Thread Function������������������������������������������������������������������ 60
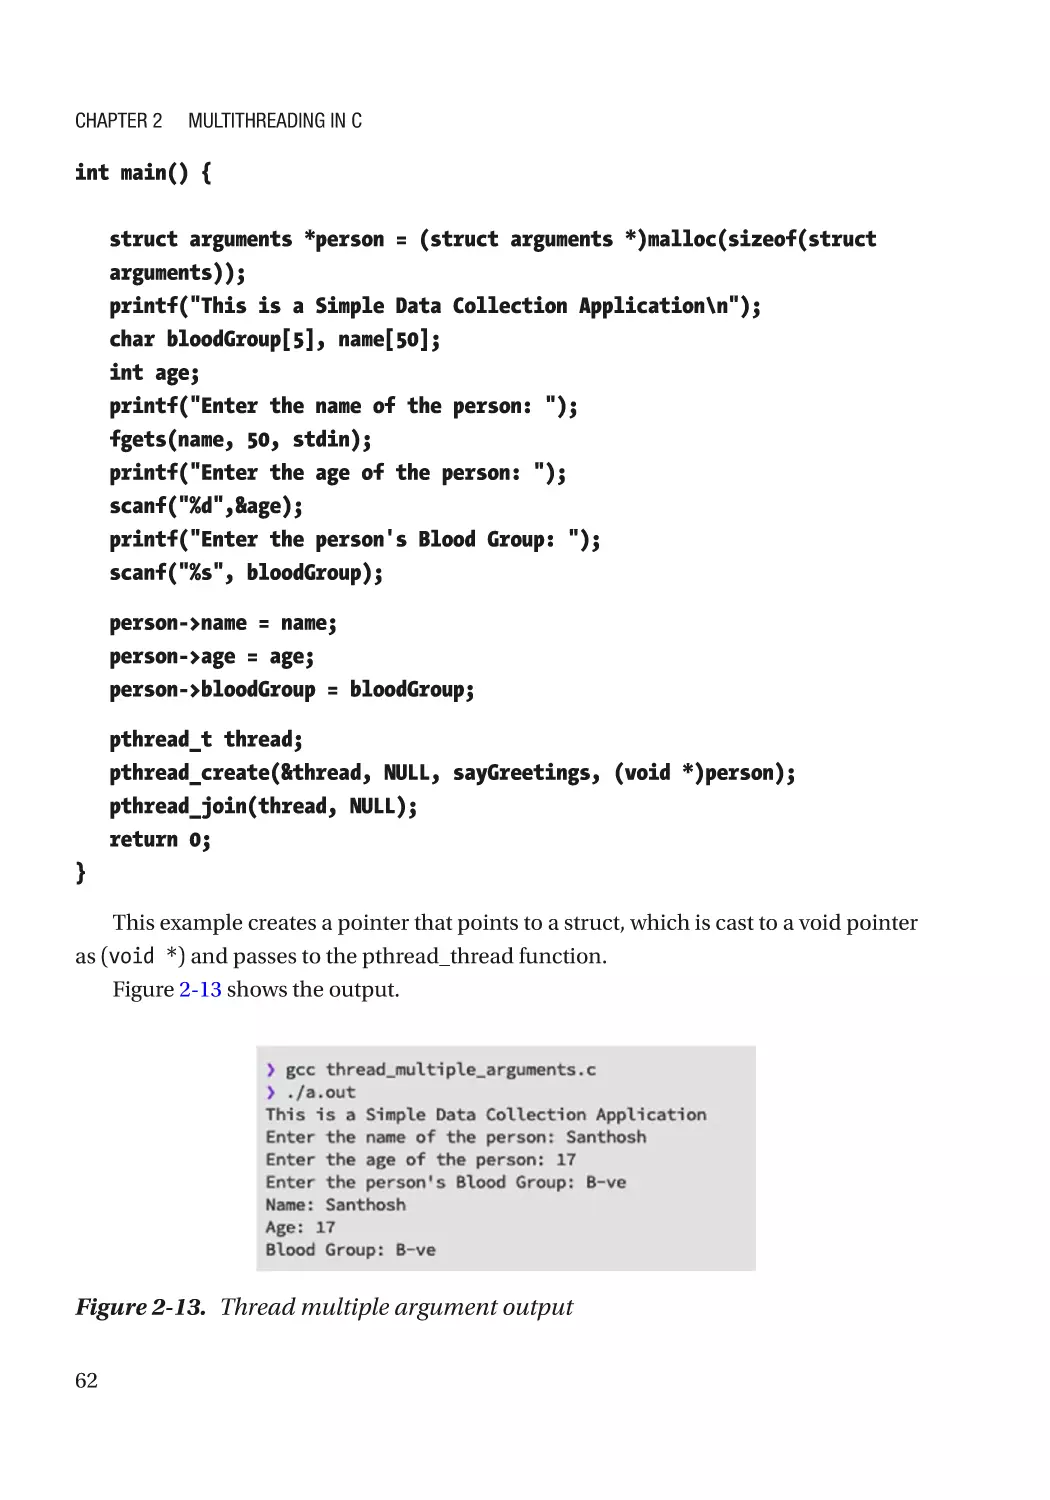
Passing Multiple Arguments as Parameters�������������������������������������������������������������������������� 61
The Relationship Between Threads and the CPU������������������������������������������������������������������������ 63
Multithreading Use Cases����������������������������������������������������������������������������������������������������������� 63
Summary������������������������������������������������������������������������������������������������������������������������������������ 64
Chapter 3: Introduction to POSIX Standards and System-Level APIs��������������������� 65
Understanding POSIX Standards������������������������������������������������������������������������������������������������� 65
POSIX.1 Standards����������������������������������������������������������������������������������������������������������������� 66
POSIX.1b Standards��������������������������������������������������������������������������������������������������������������� 67
POSIX.1c Standards��������������������������������������������������������������������������������������������������������������� 67
POSIX.2 Standards����������������������������������������������������������������������������������������������������������������� 67
POSIX Support����������������������������������������������������������������������������������������������������������������������������� 68
v
Table of Contents
Introduction to APIs��������������������������������������������������������������������������������������������������������������������� 68
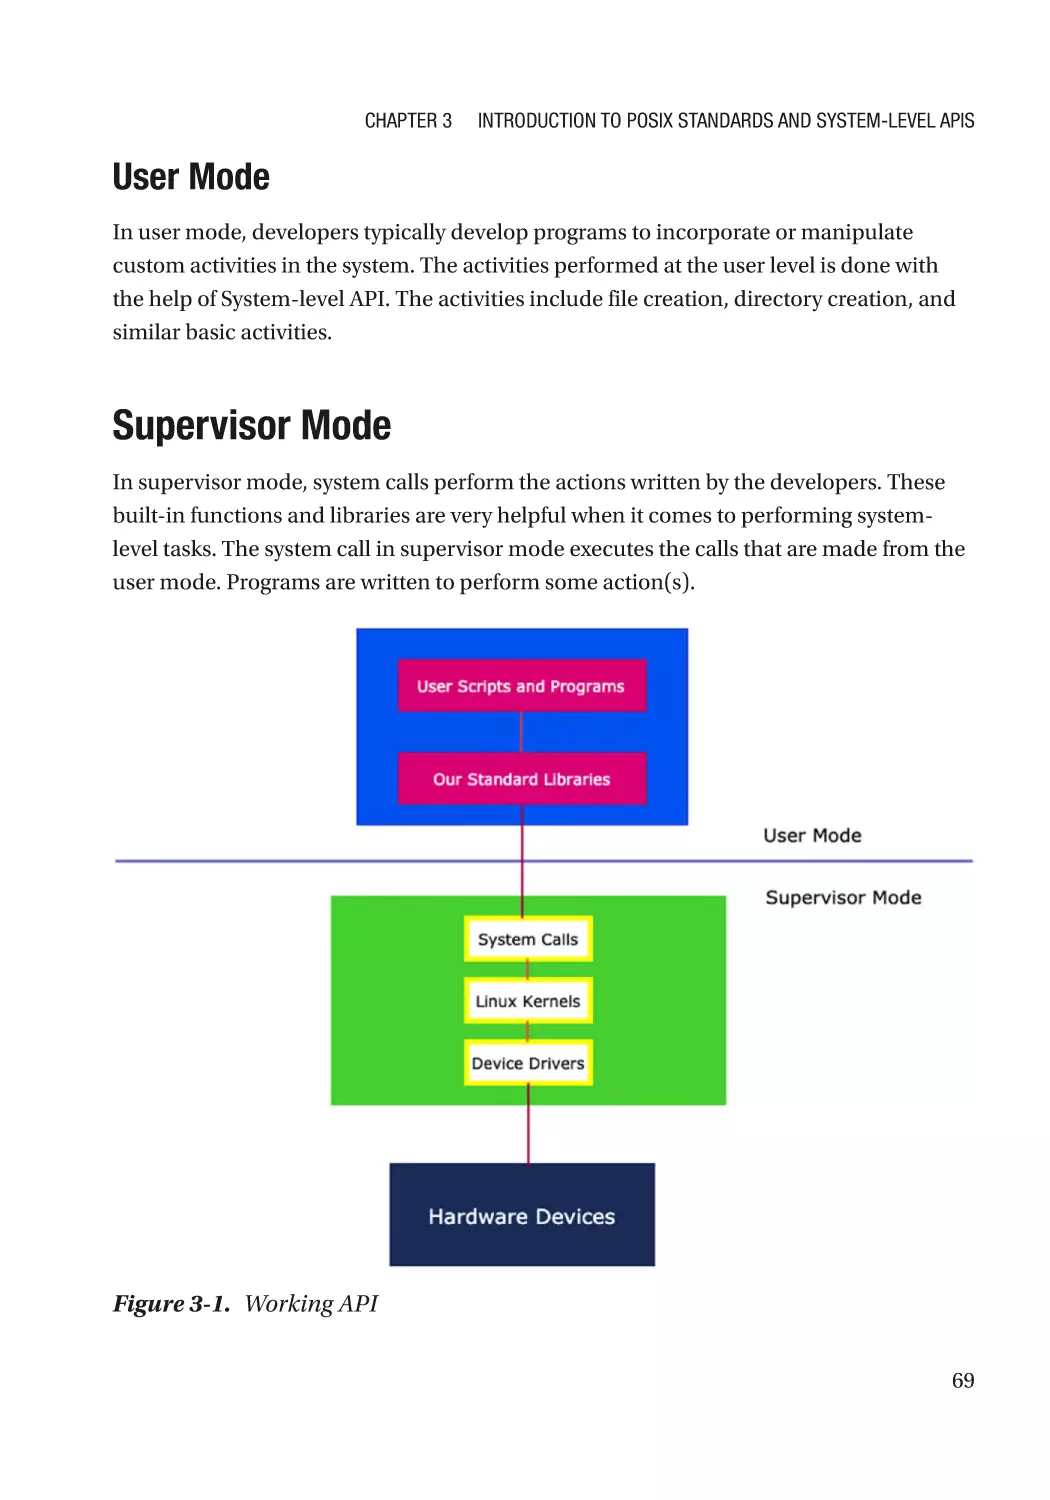
User Mode����������������������������������������������������������������������������������������������������������������������������� 69
Supervisor Mode������������������������������������������������������������������������������������������������������������������������� 69
The Importance of System-Level APIs����������������������������������������������������������������������������������� 70
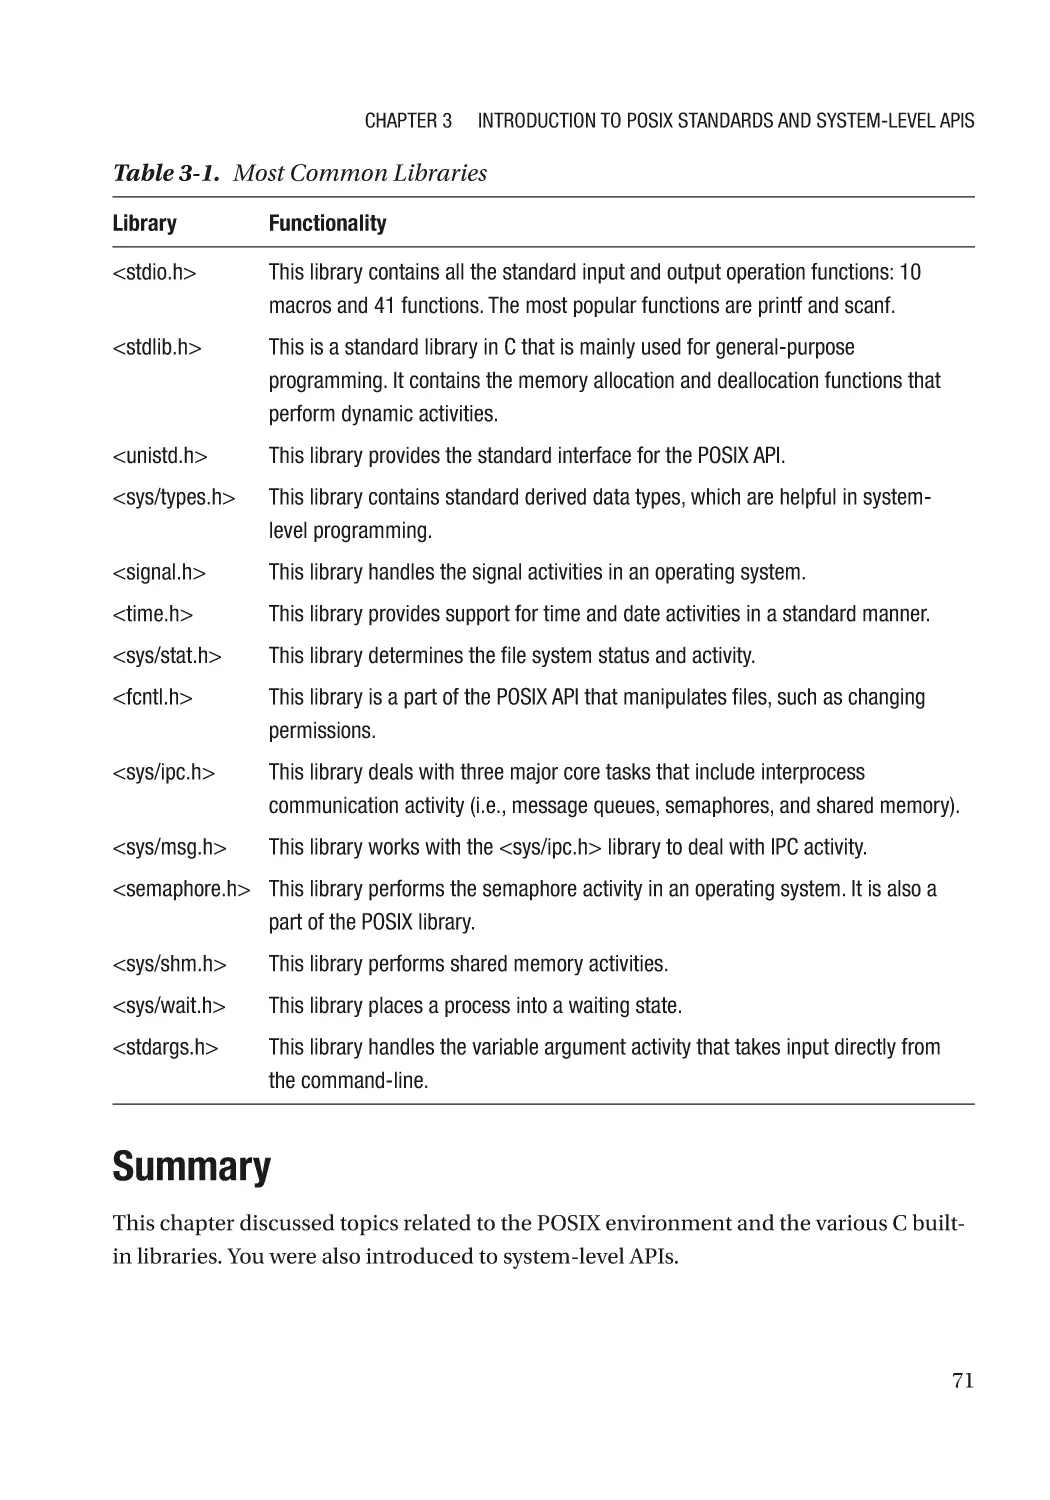
Built-in APIs in C�������������������������������������������������������������������������������������������������������������������� 70
Summary������������������������������������������������������������������������������������������������������������������������������������ 71
Chapter 4: Files and Directories����������������������������������������������������������������������������� 73
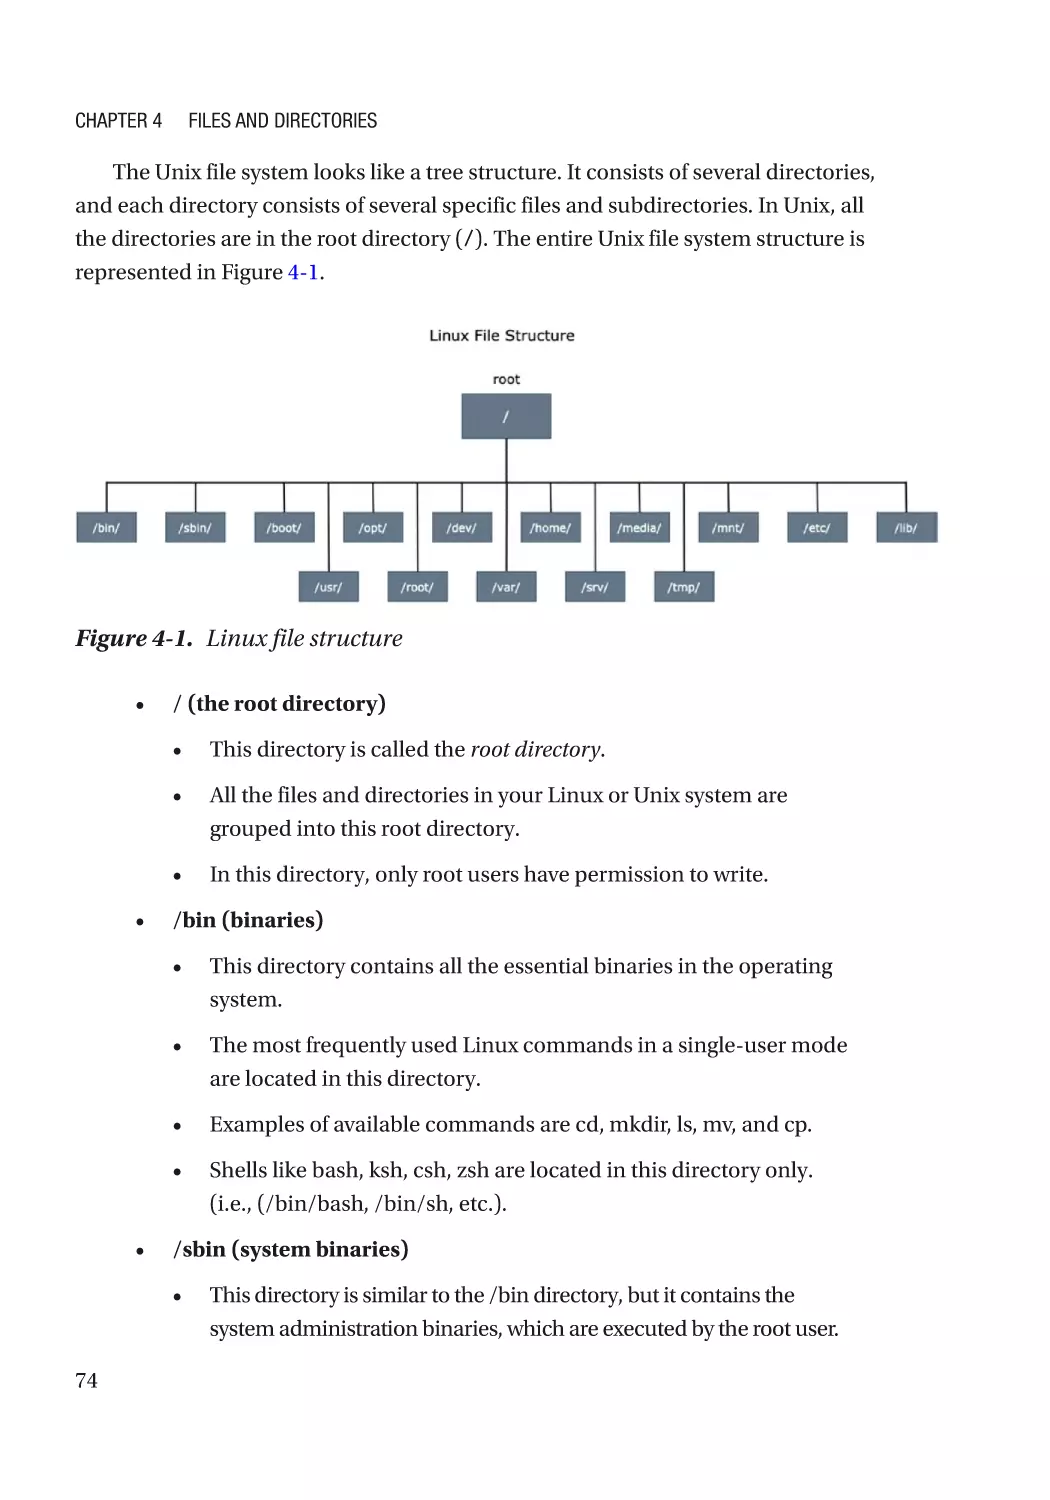
File Systems�������������������������������������������������������������������������������������������������������������������������������� 73
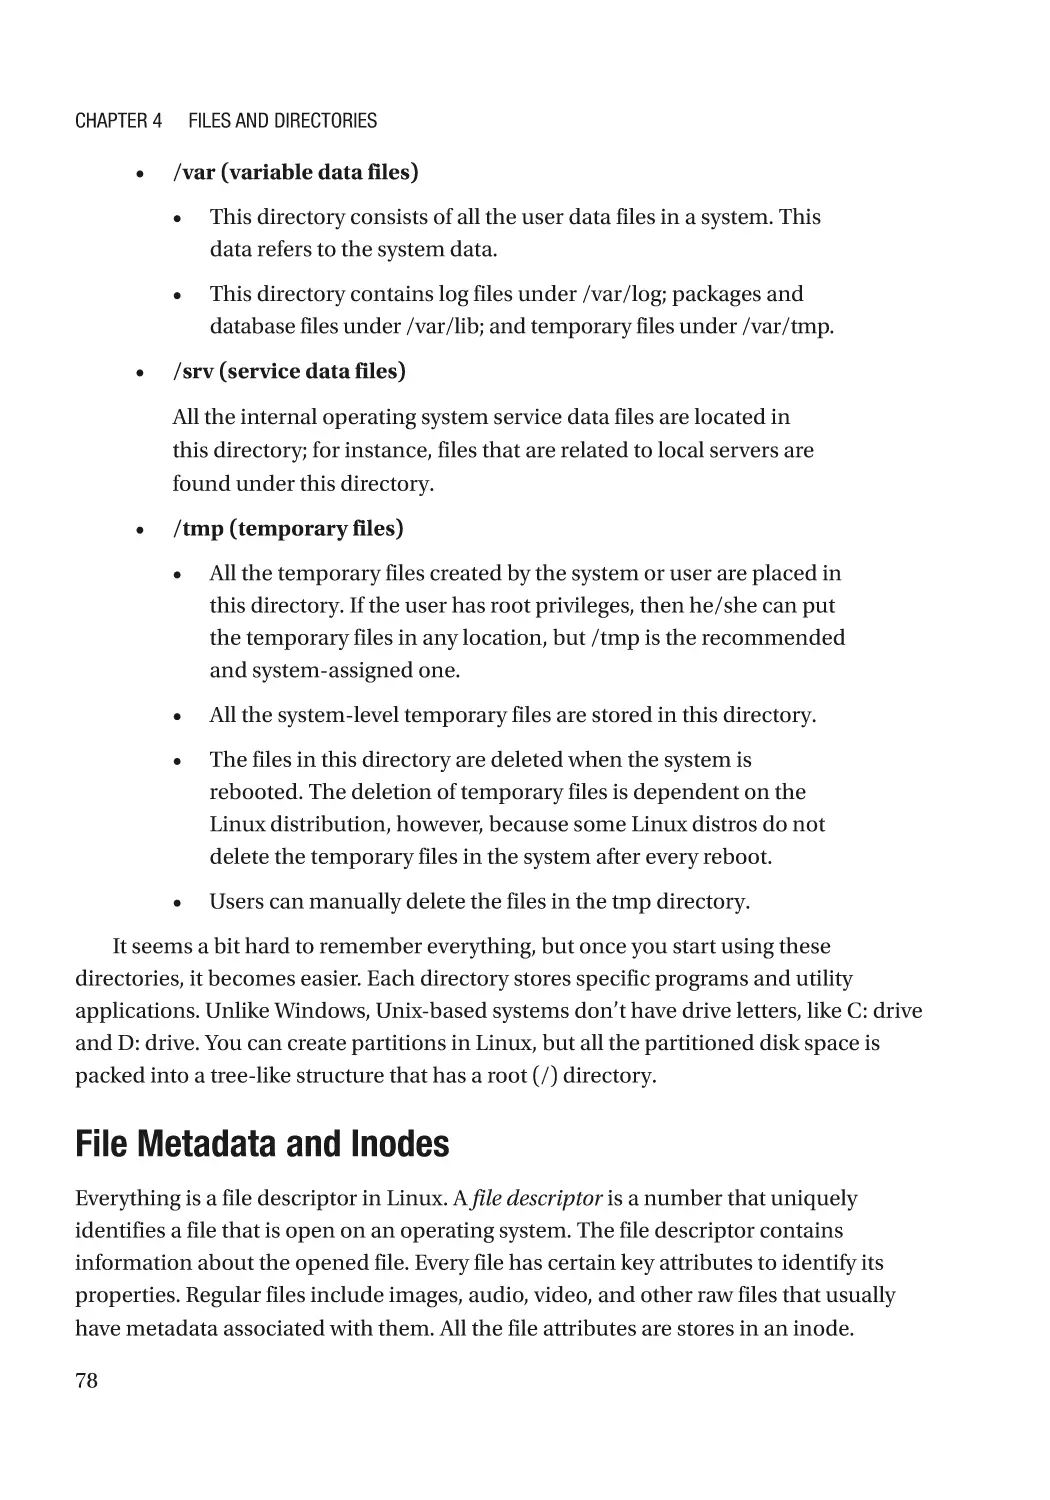
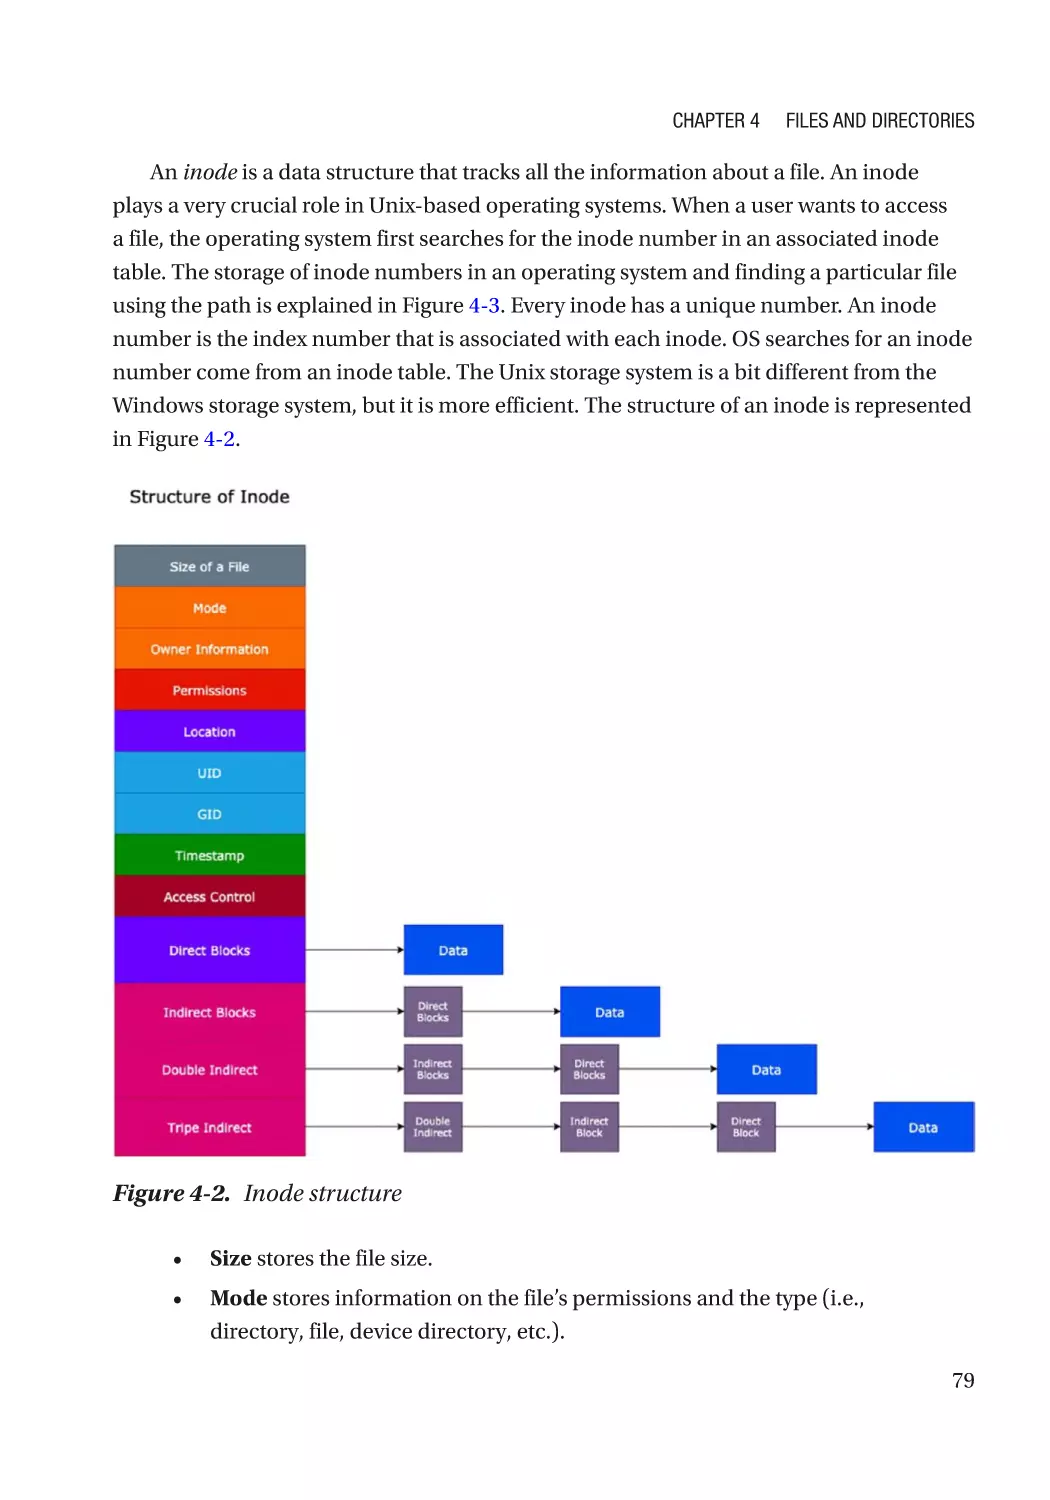
File Metadata and Inodes������������������������������������������������������������������������������������������������������ 78
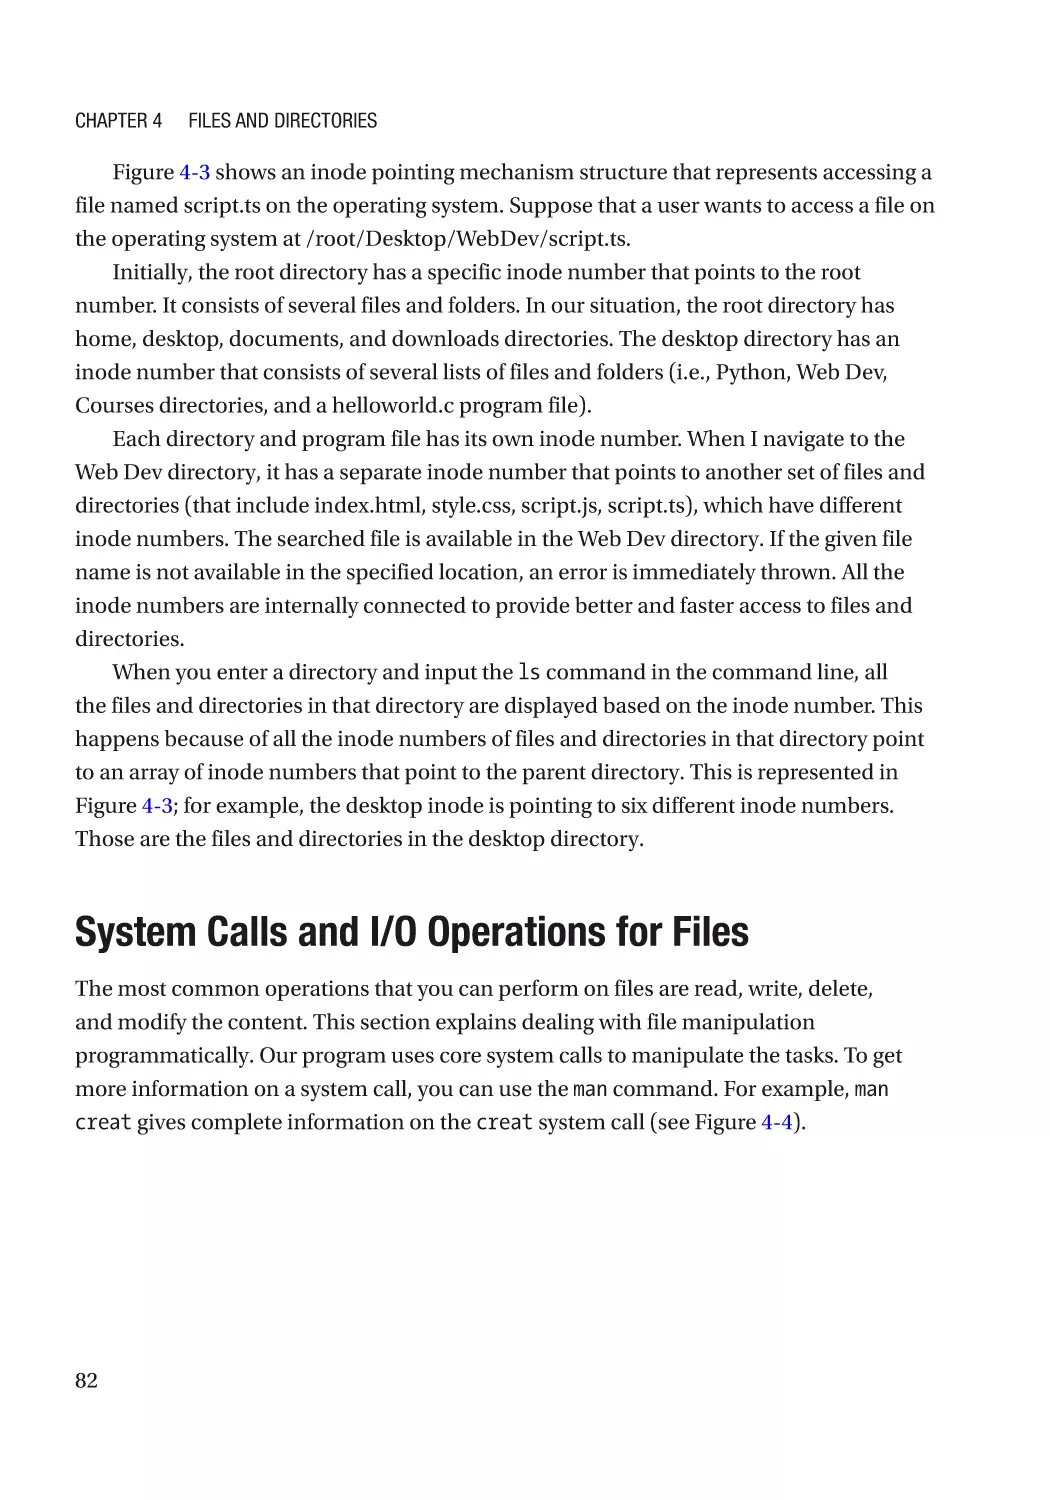
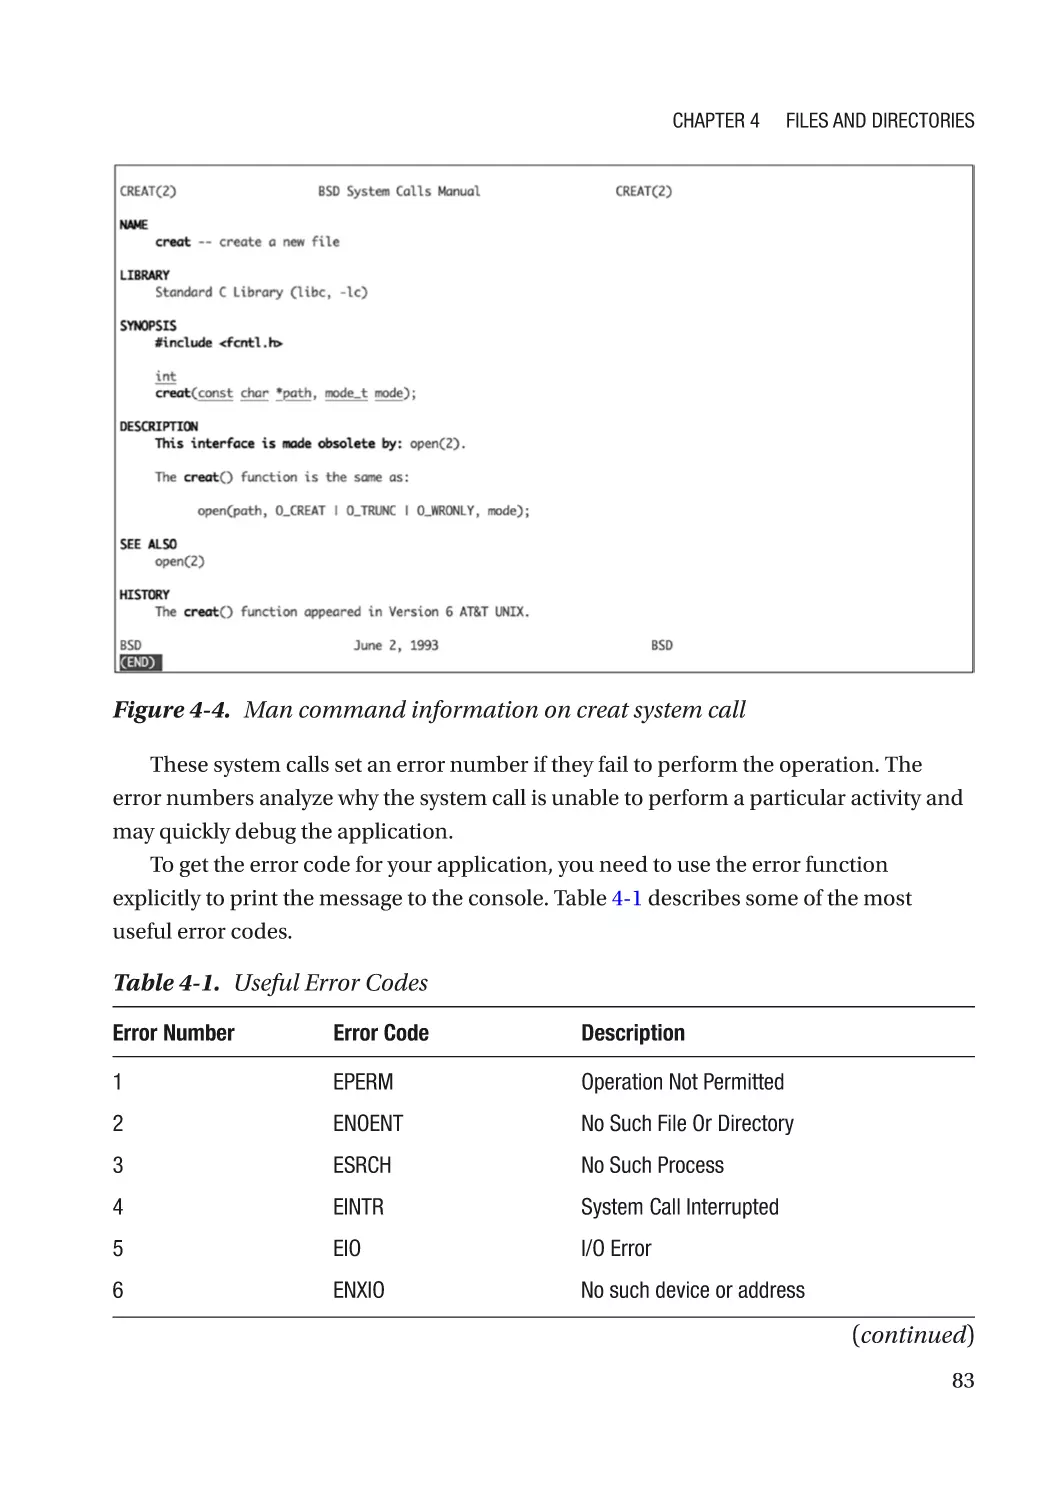
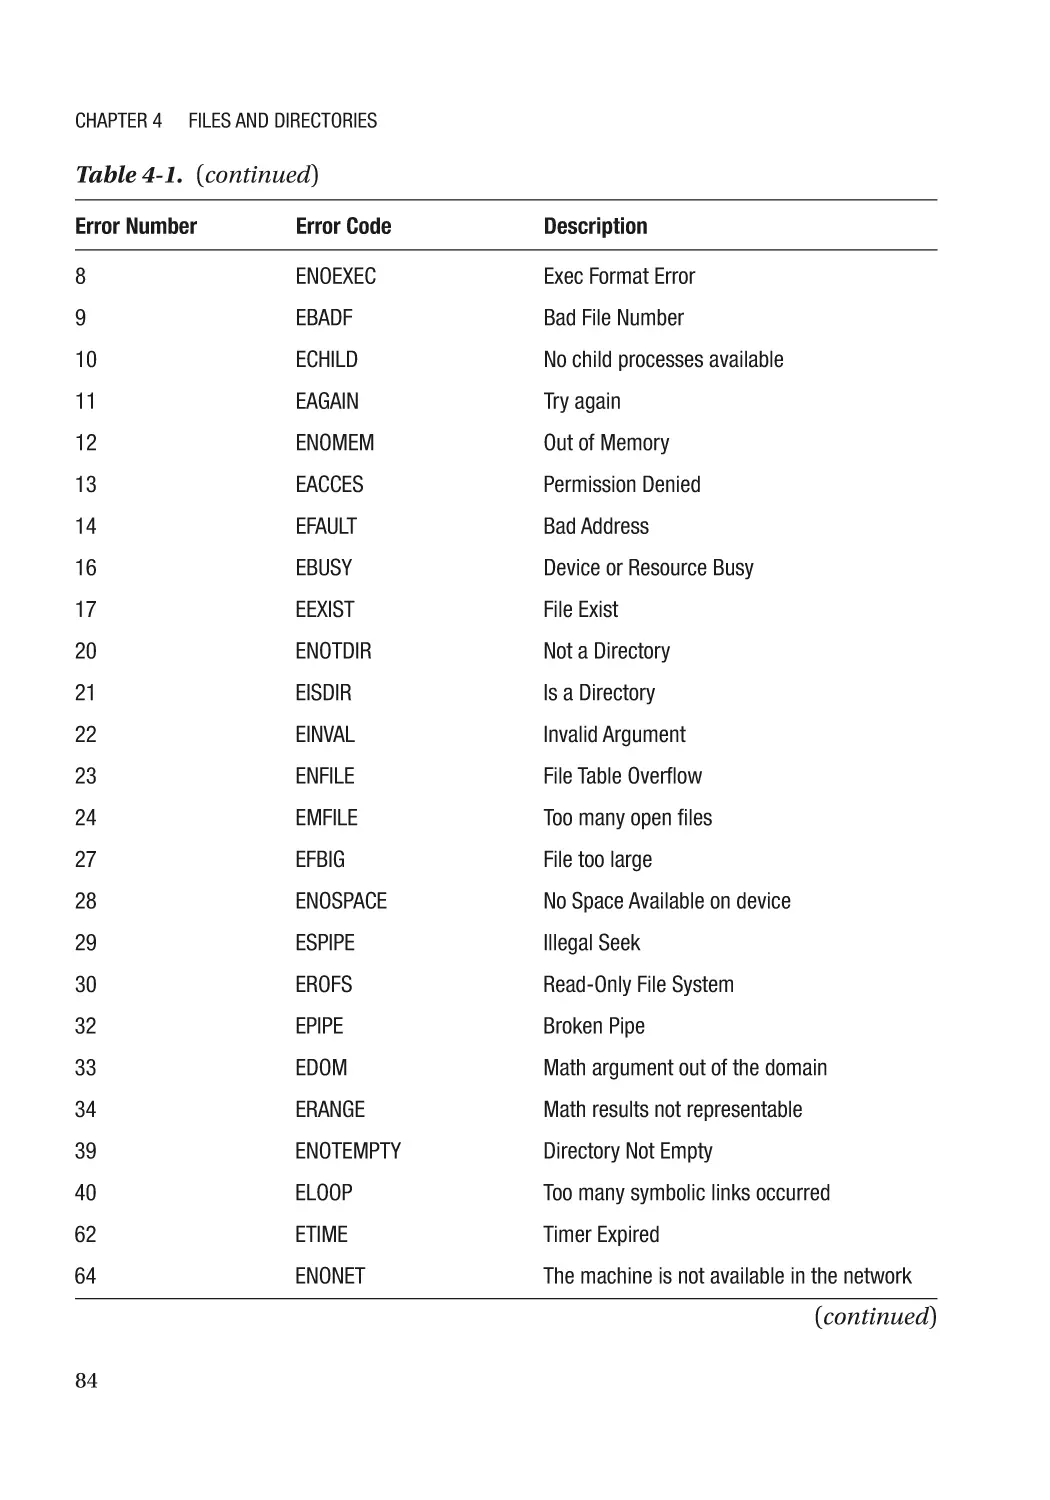
System Calls and I/O Operations for Files����������������������������������������������������������������������������������� 82
creat�������������������������������������������������������������������������������������������������������������������������������������� 85
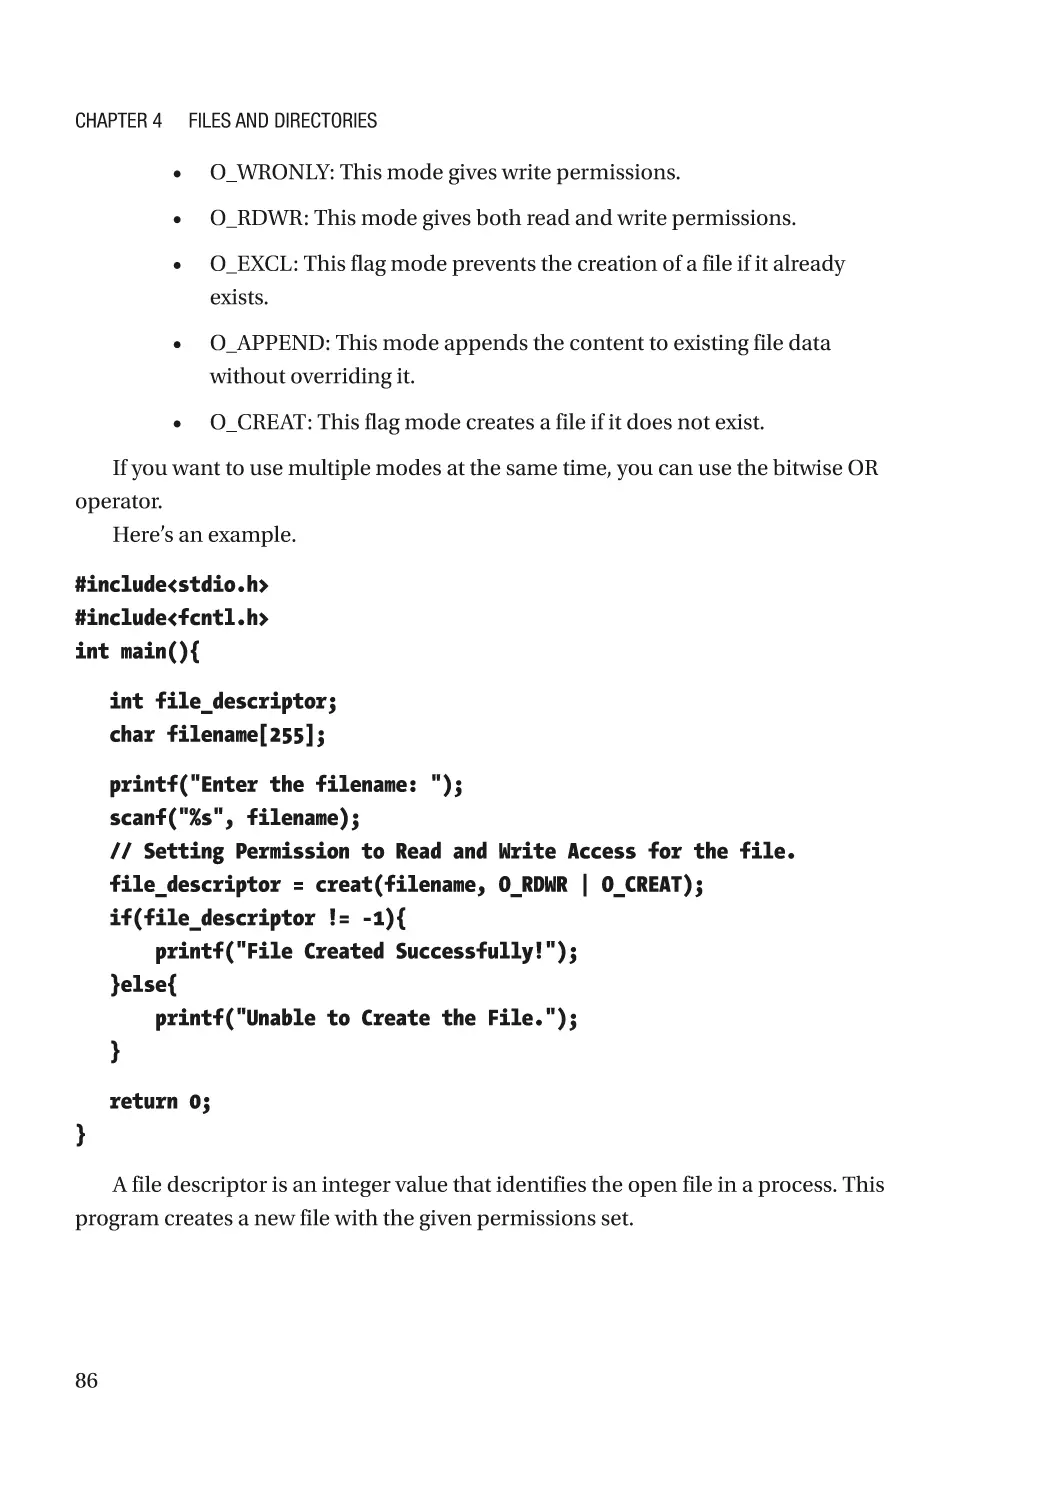
open��������������������������������������������������������������������������������������������������������������������������������������� 87
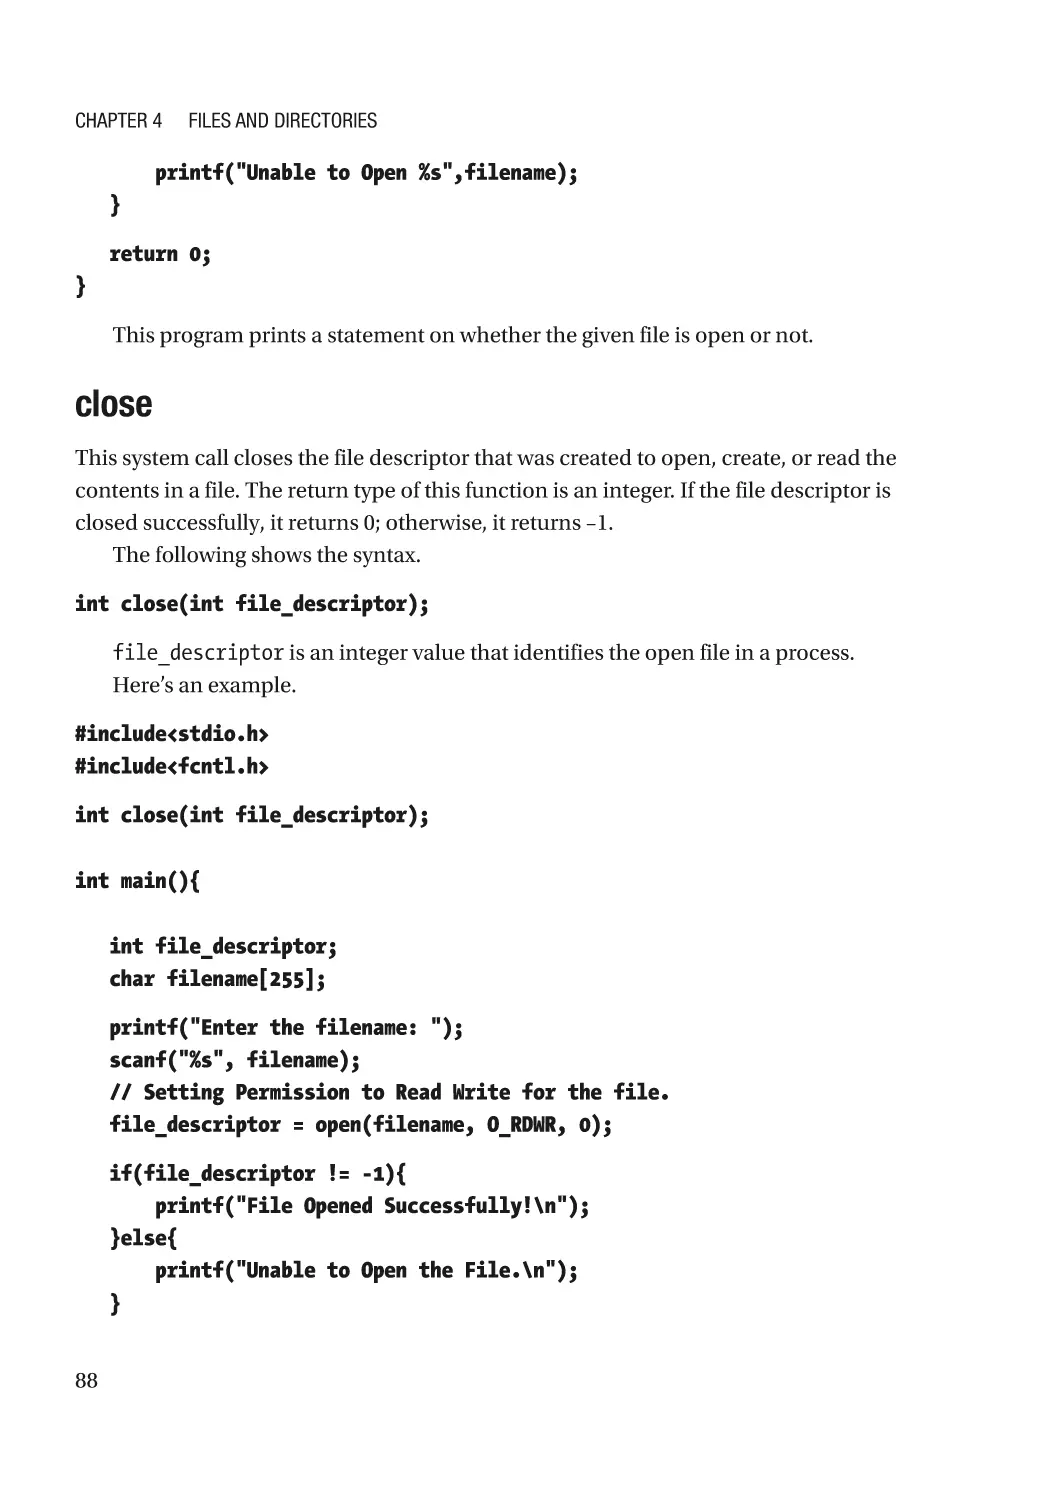
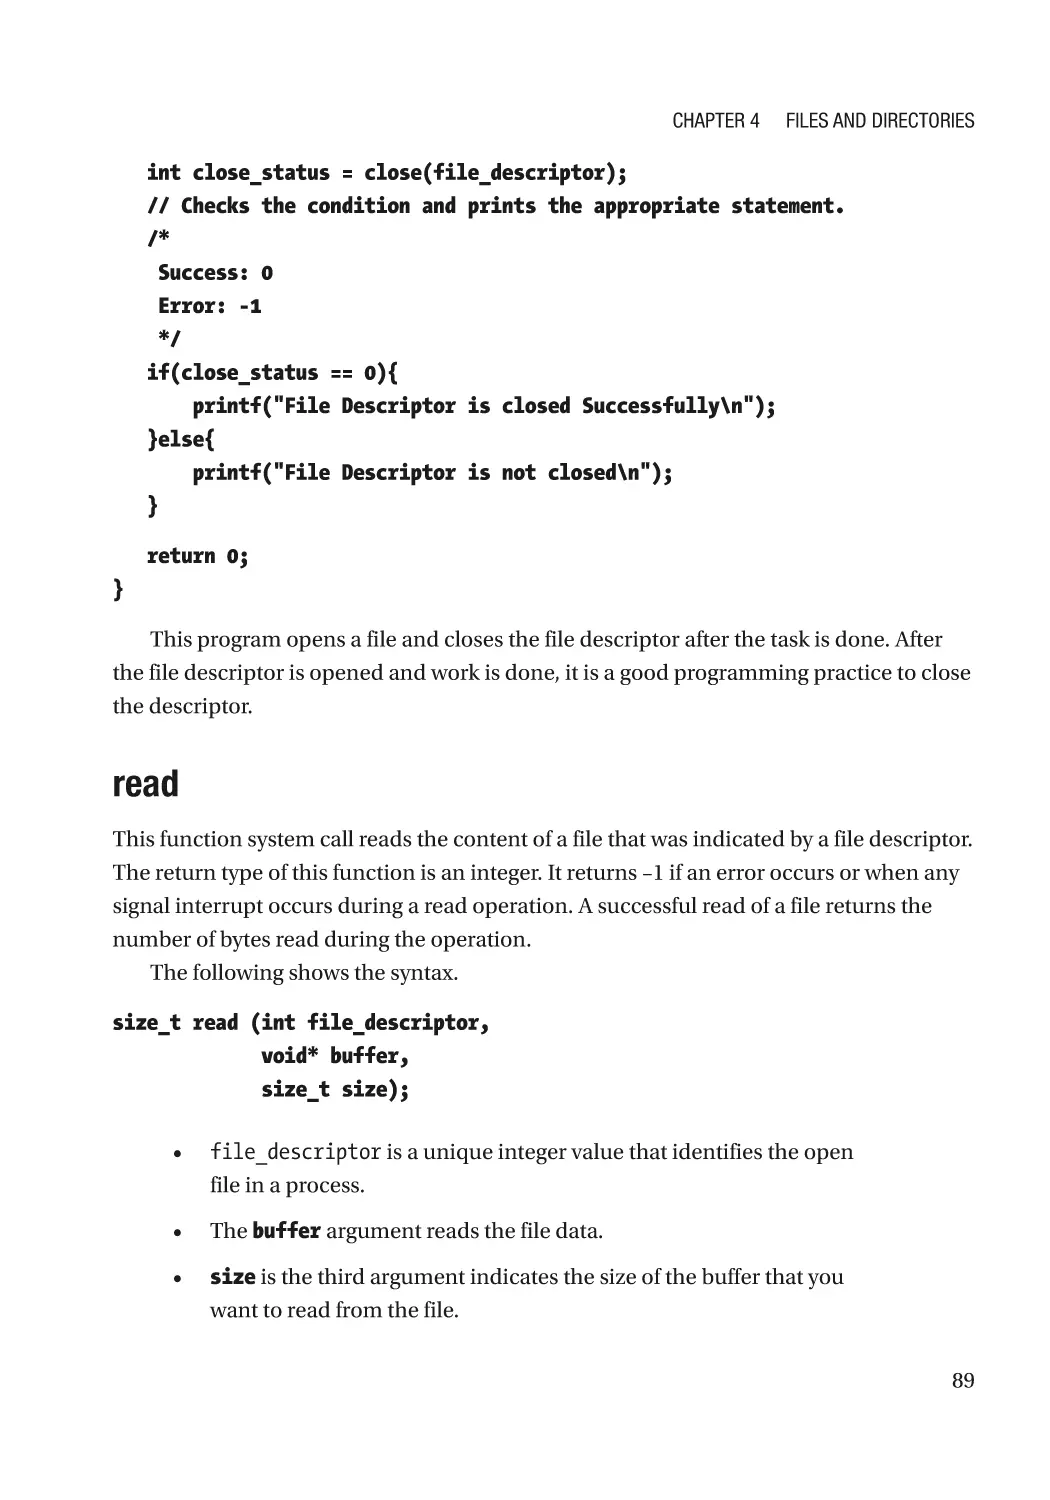
close�������������������������������������������������������������������������������������������������������������������������������������� 88
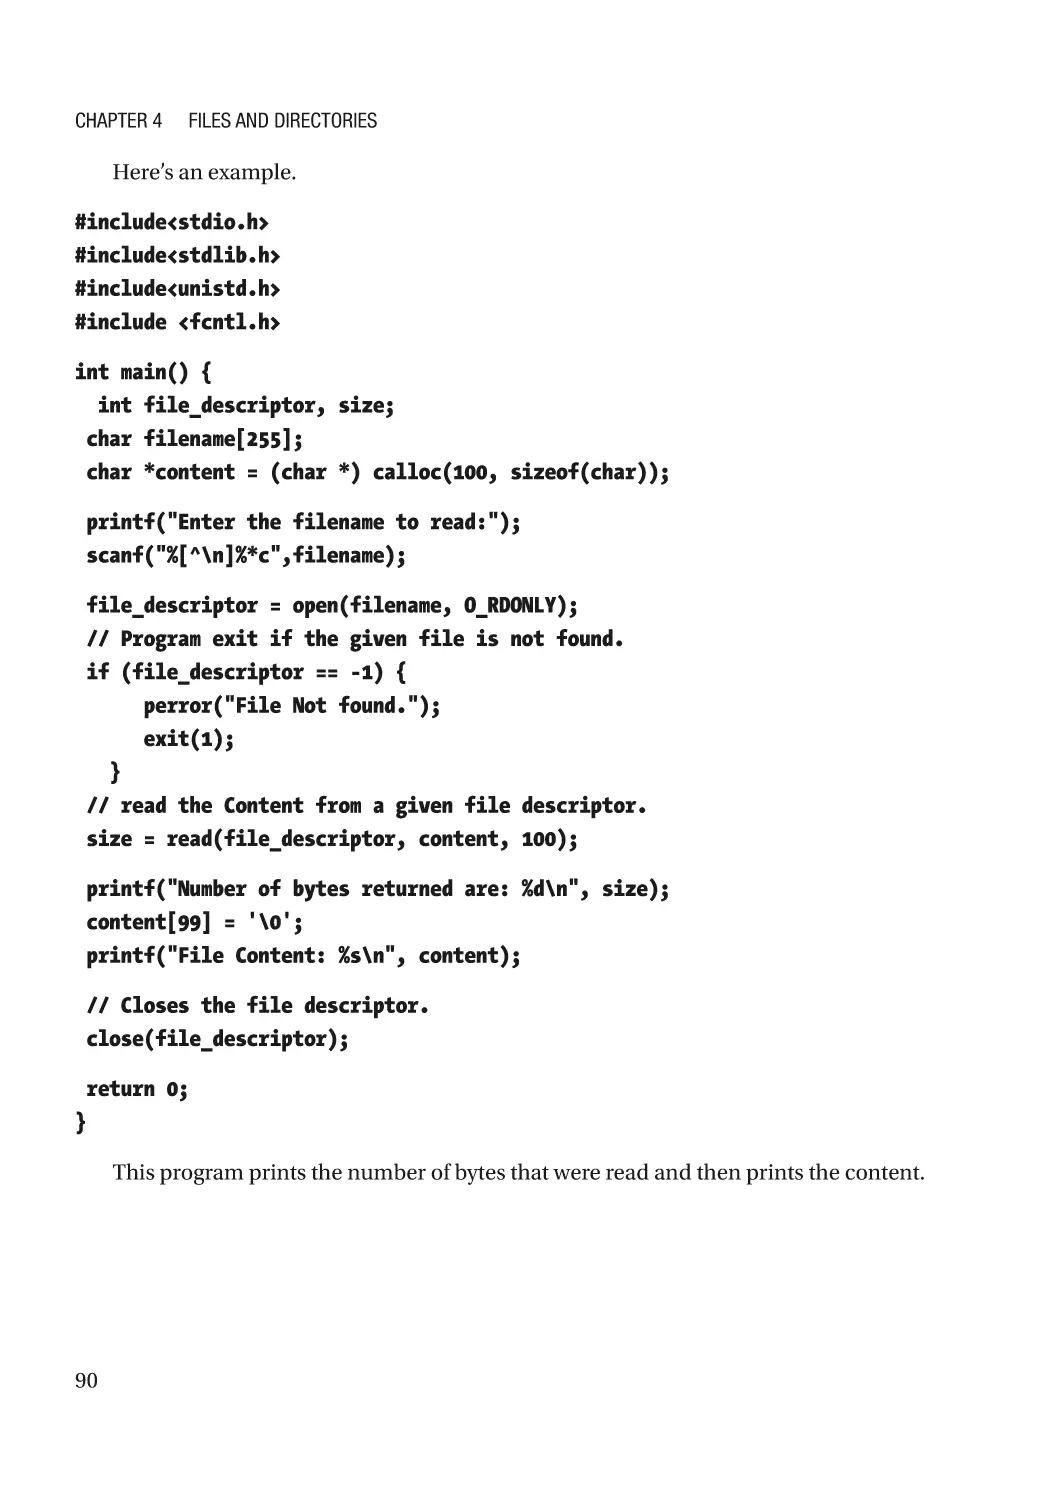
read��������������������������������������������������������������������������������������������������������������������������������������� 89
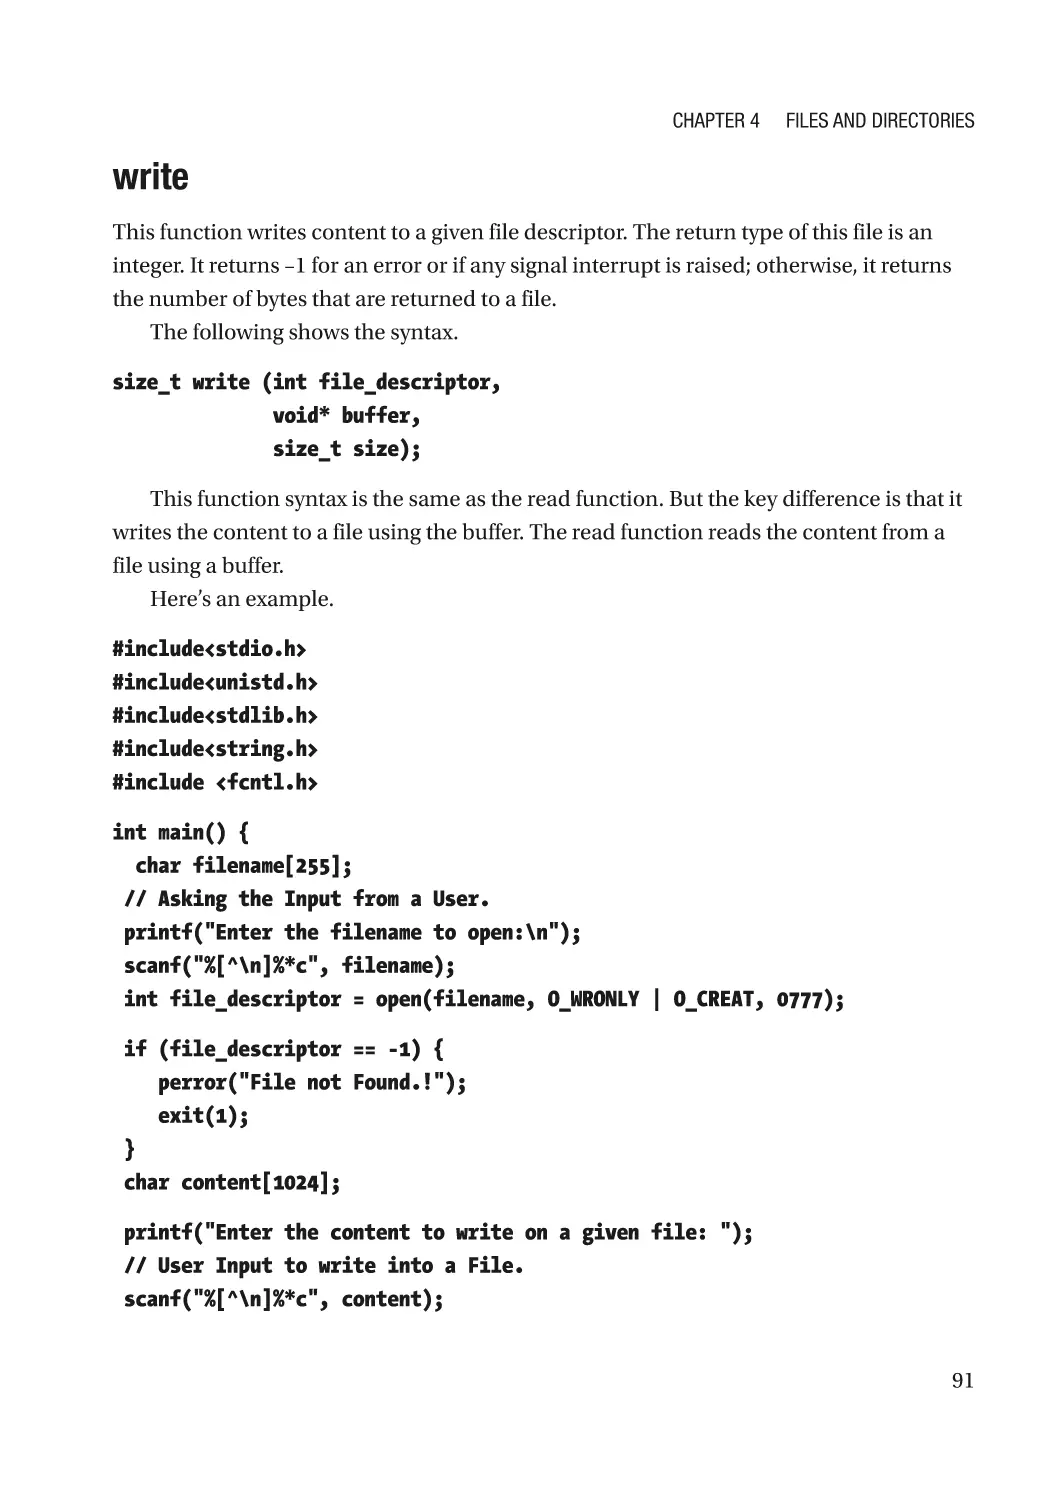
write�������������������������������������������������������������������������������������������������������������������������������������� 91
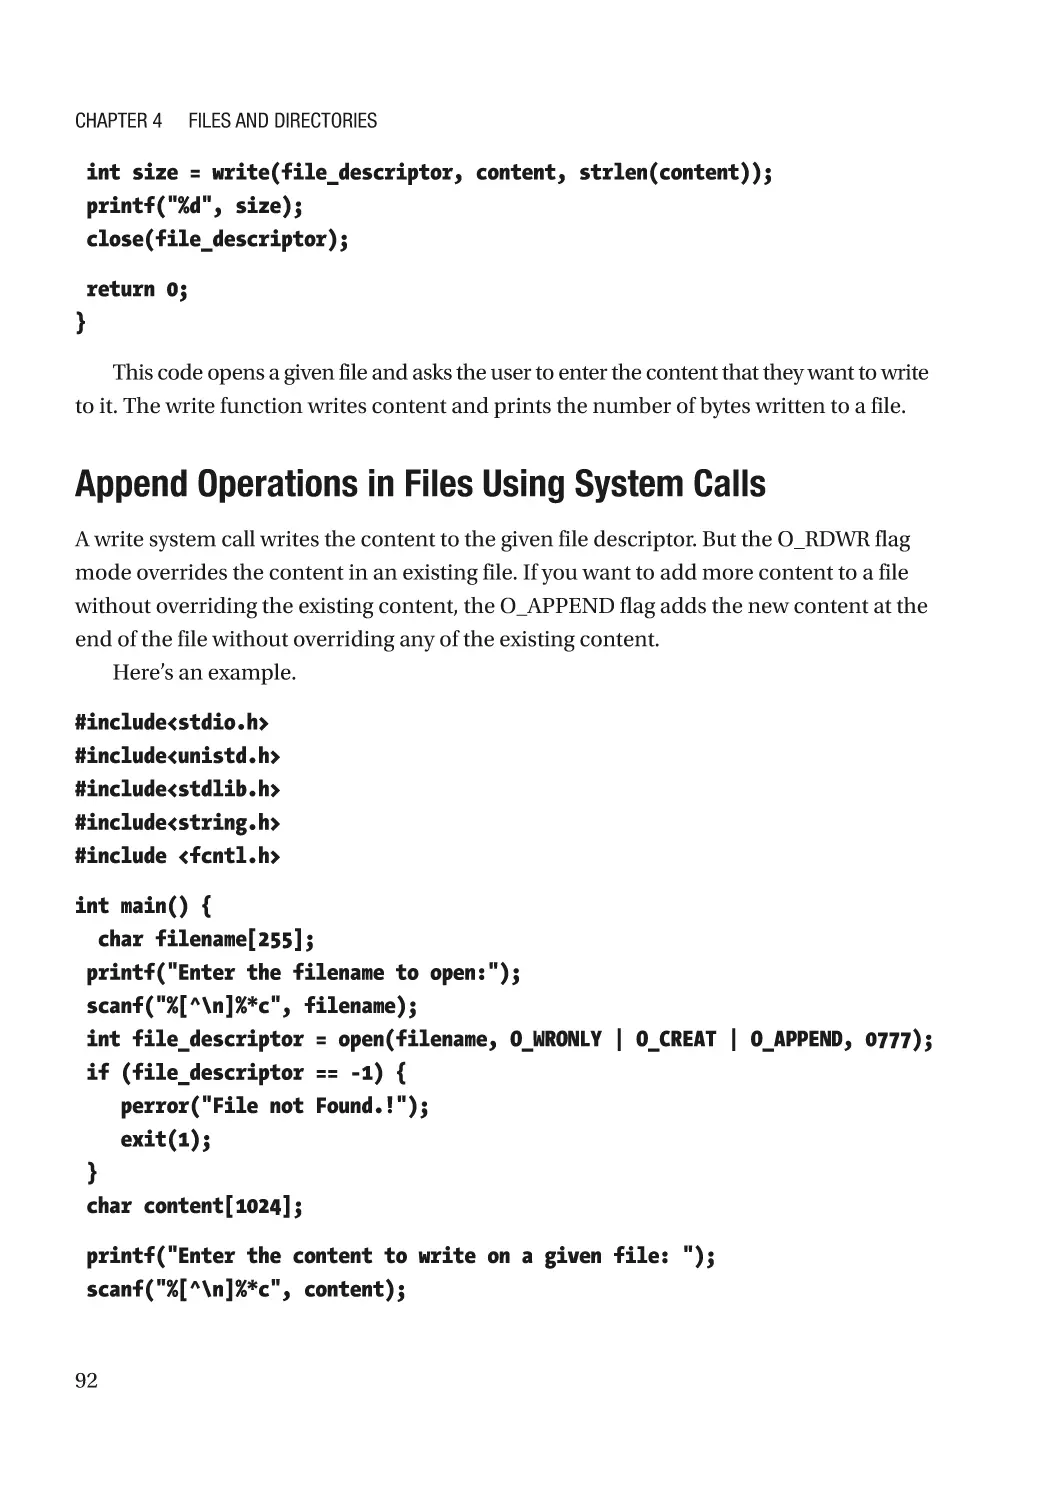
Append Operations in Files Using System Calls�������������������������������������������������������������������� 92
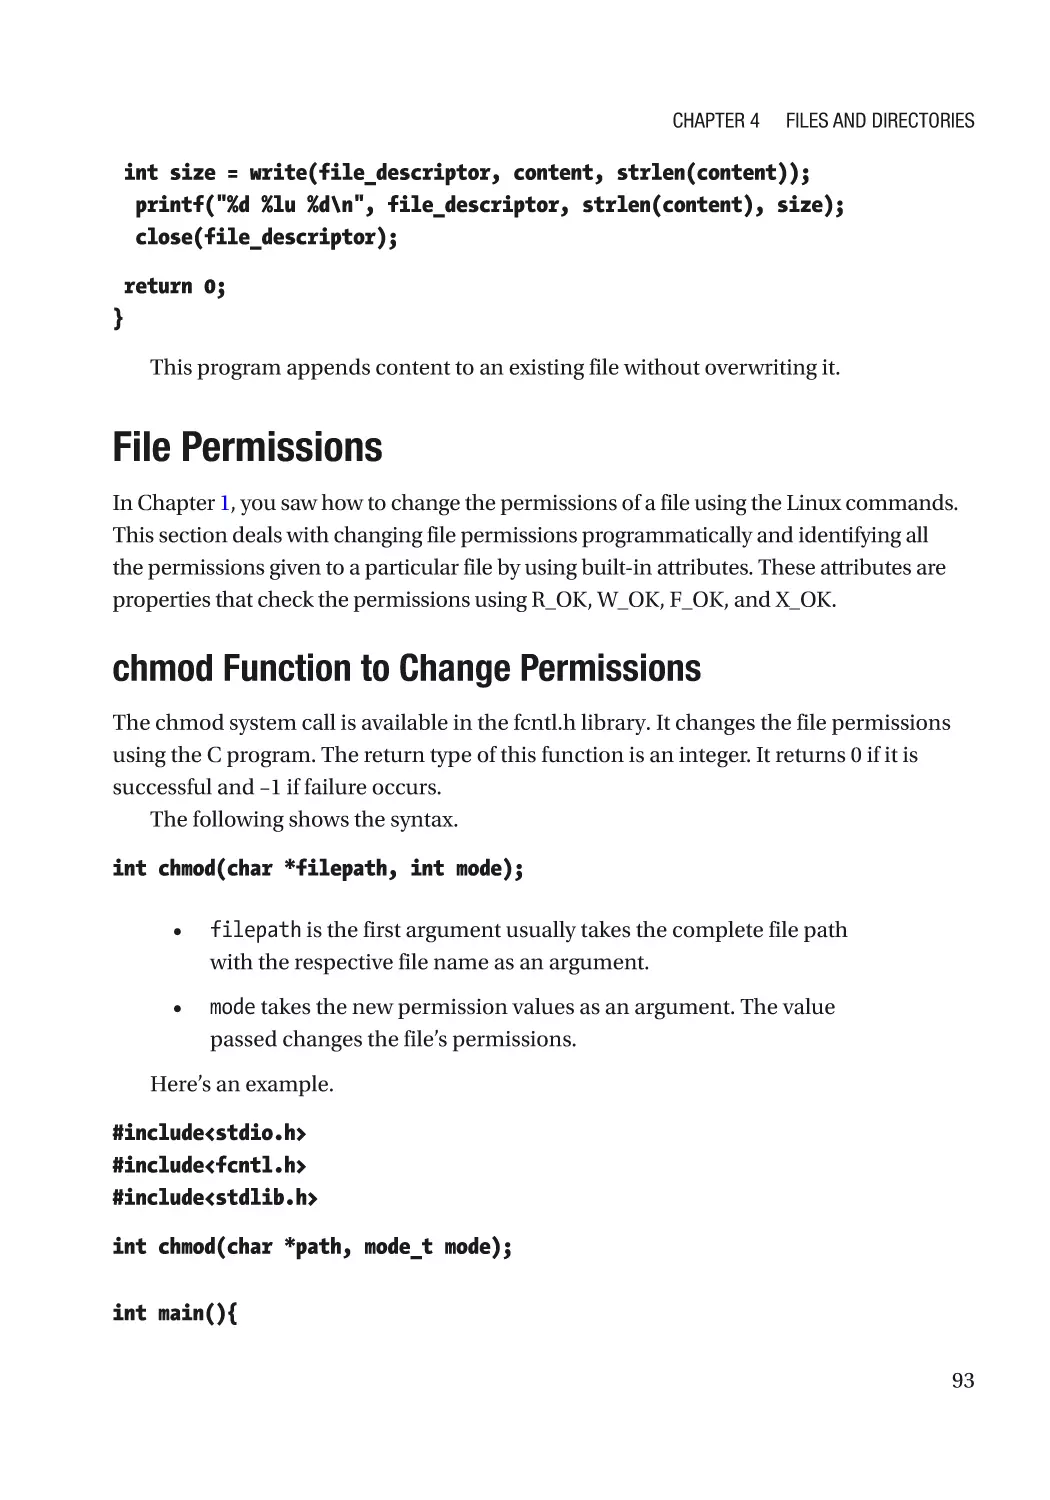
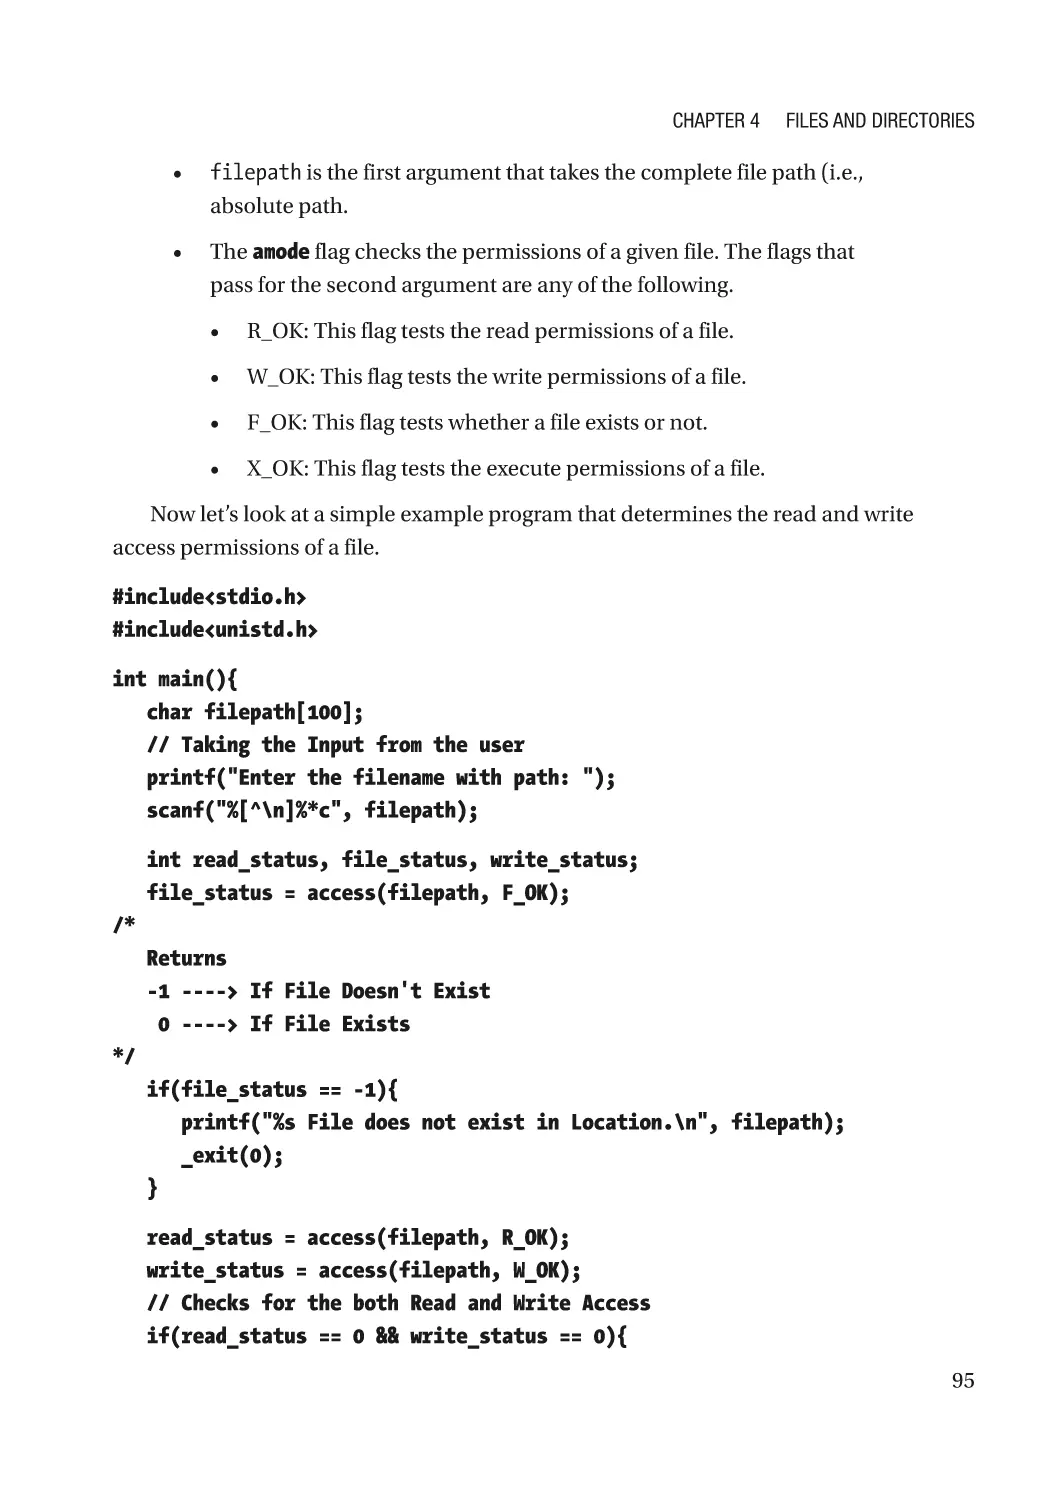
File Permissions�������������������������������������������������������������������������������������������������������������������������� 93
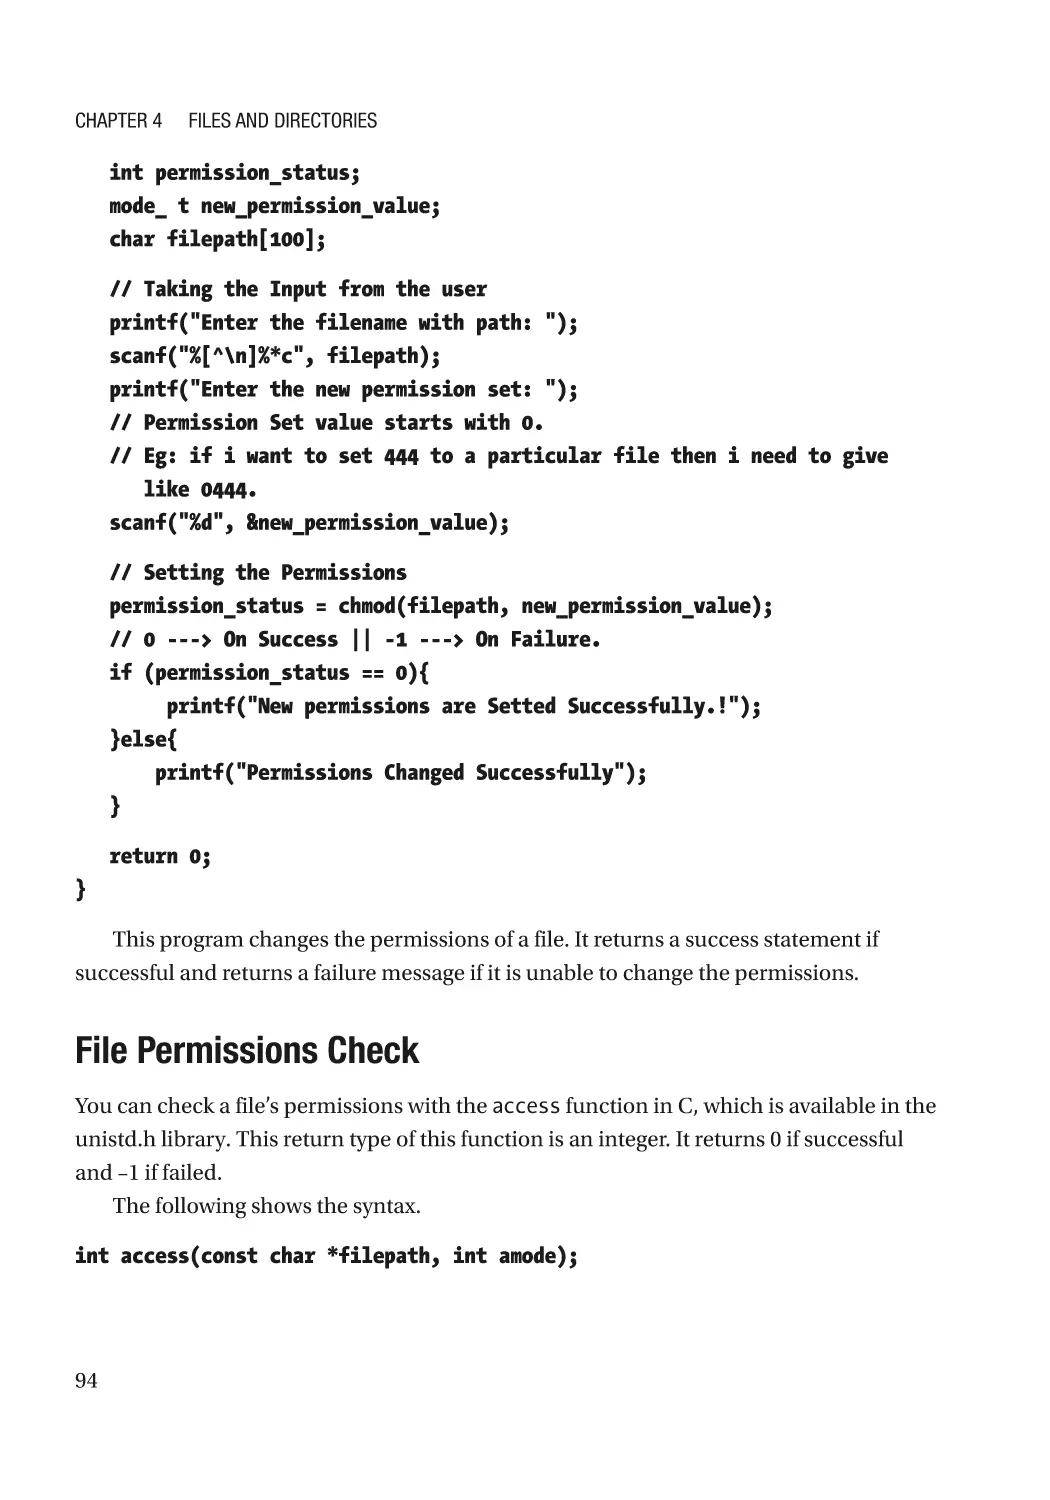
chmod Function to Change Permissions������������������������������������������������������������������������������� 93
File Permissions Check��������������������������������������������������������������������������������������������������������� 94
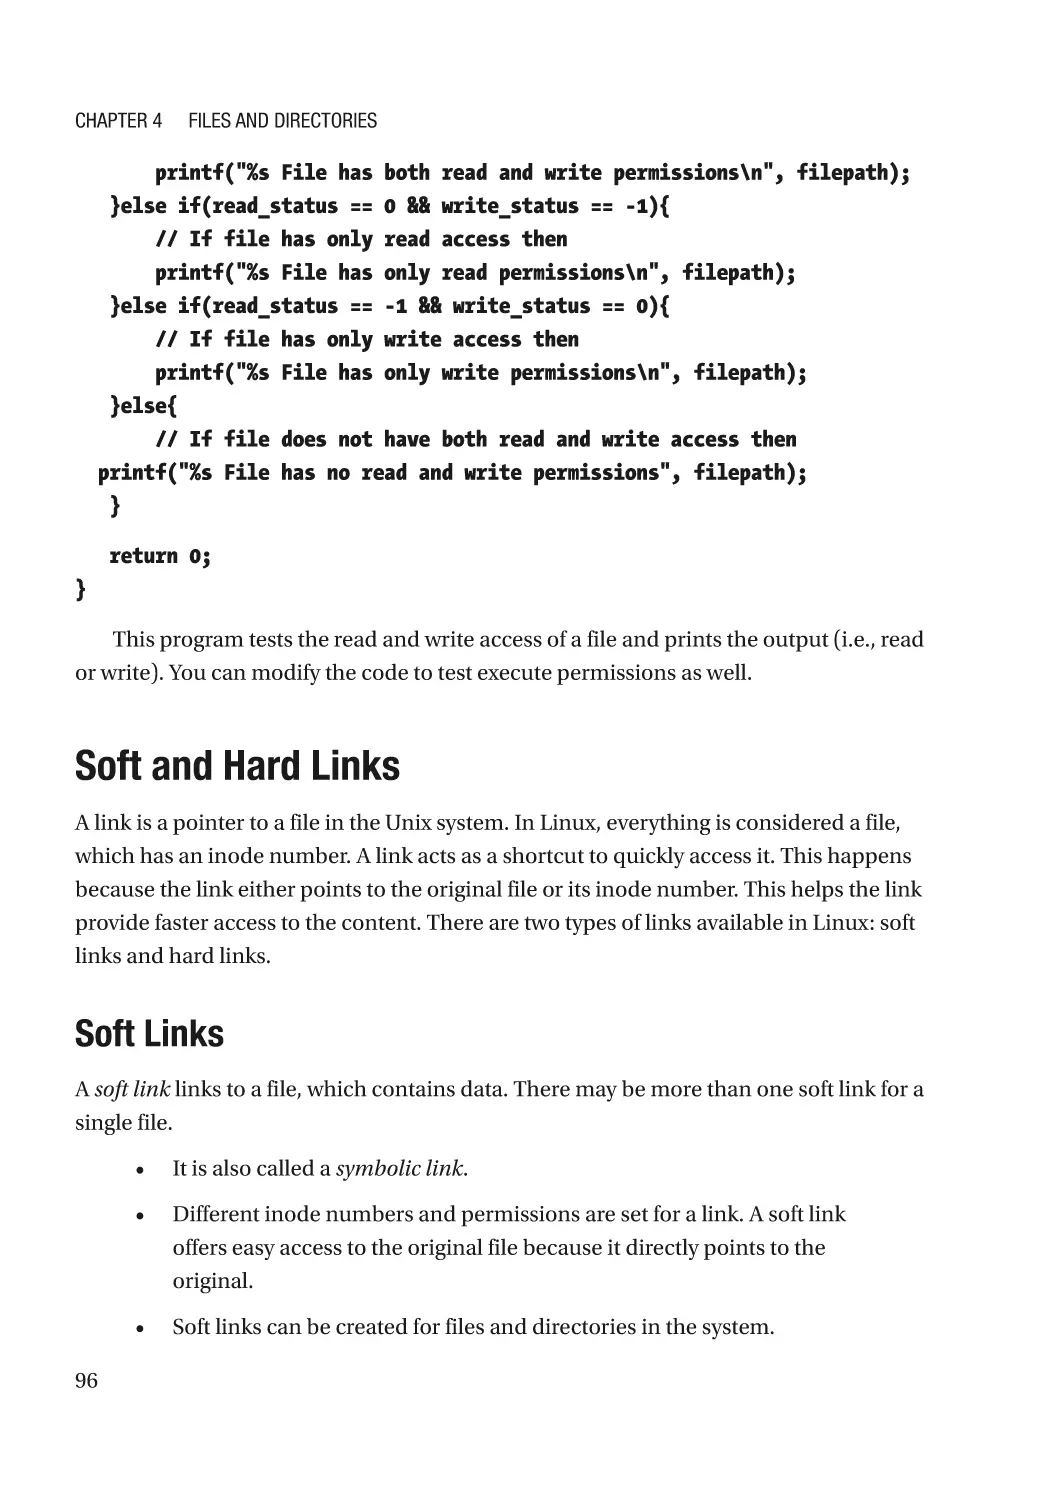
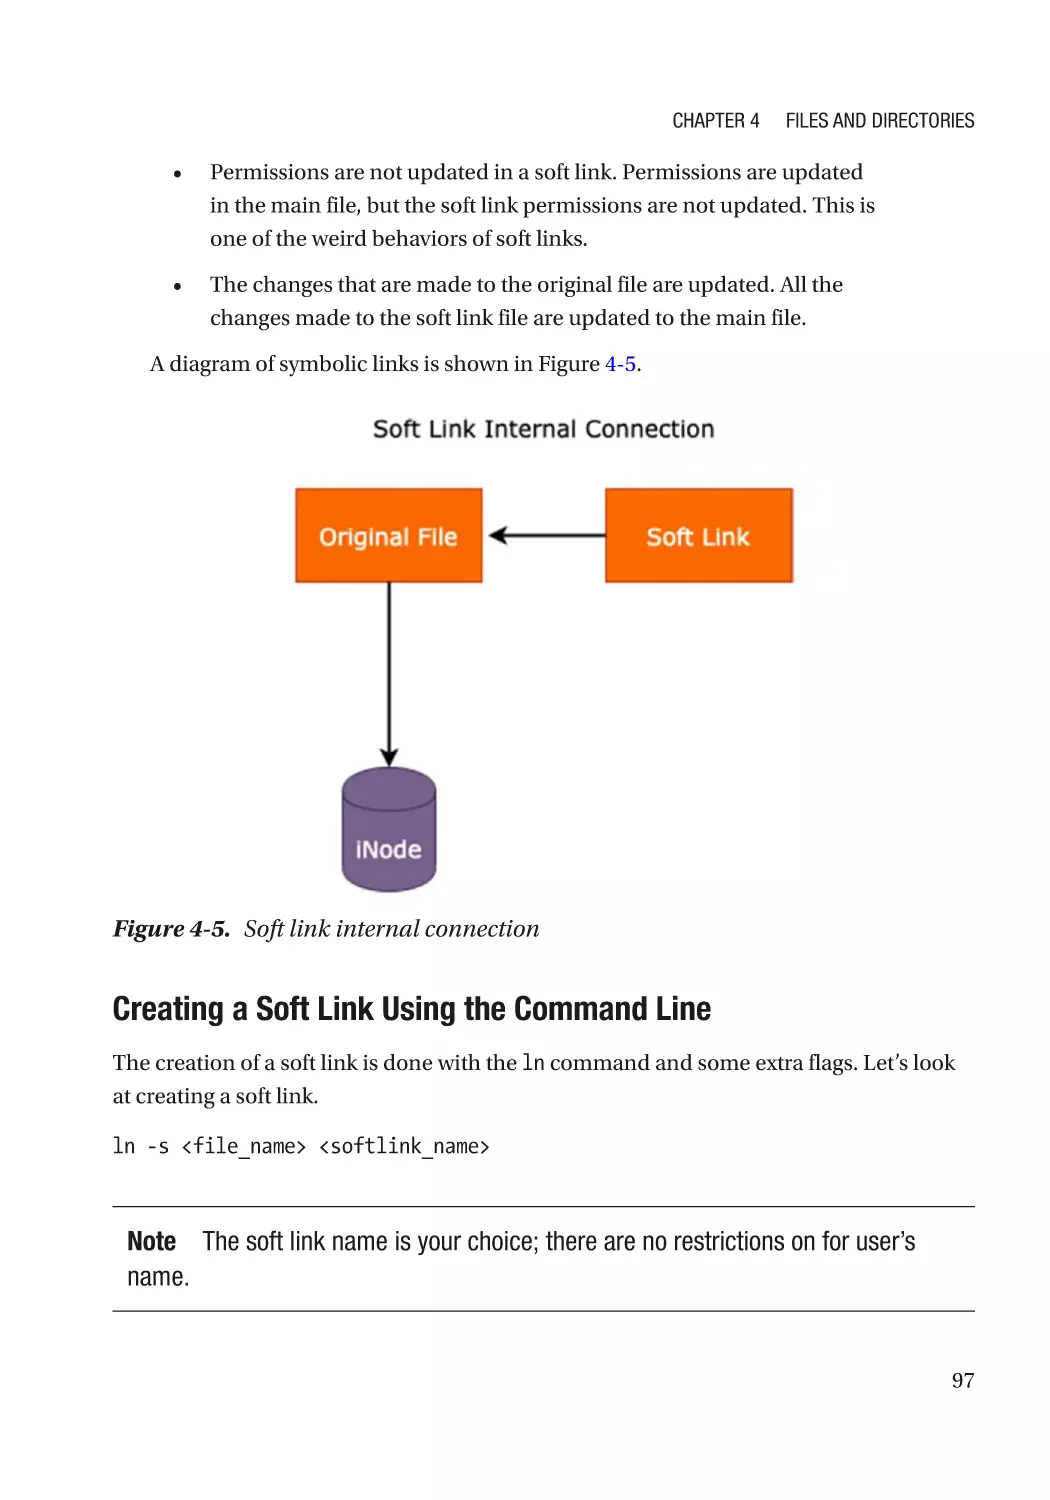
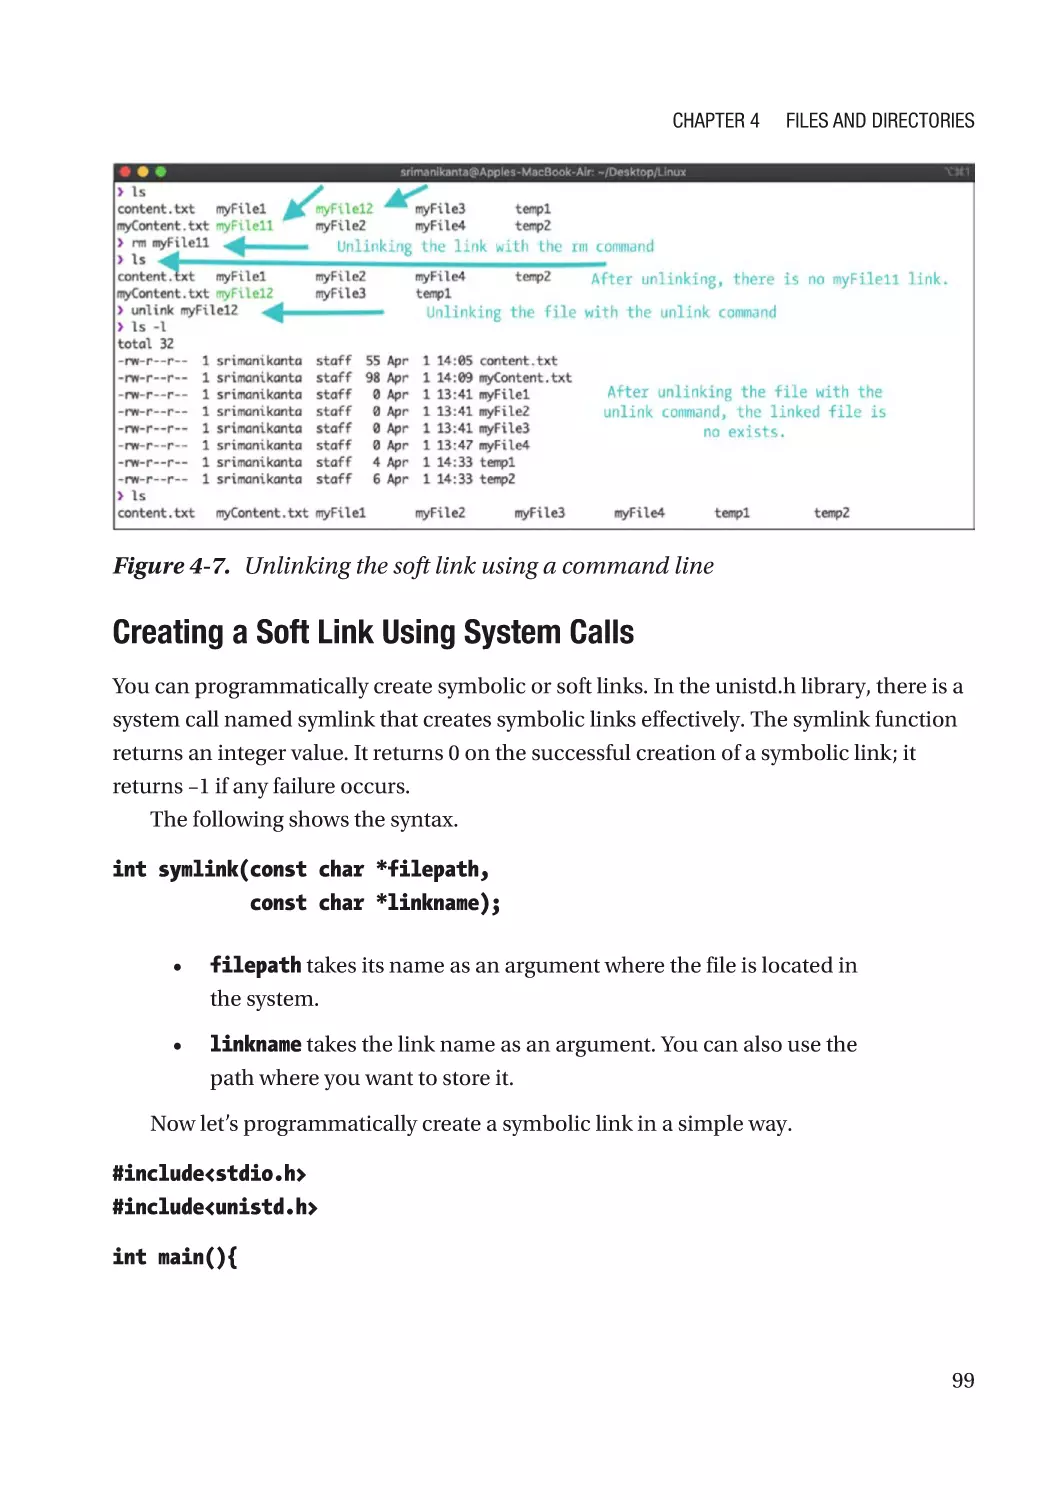
Soft and Hard Links��������������������������������������������������������������������������������������������������������������������� 96
Soft Links������������������������������������������������������������������������������������������������������������������������������� 96
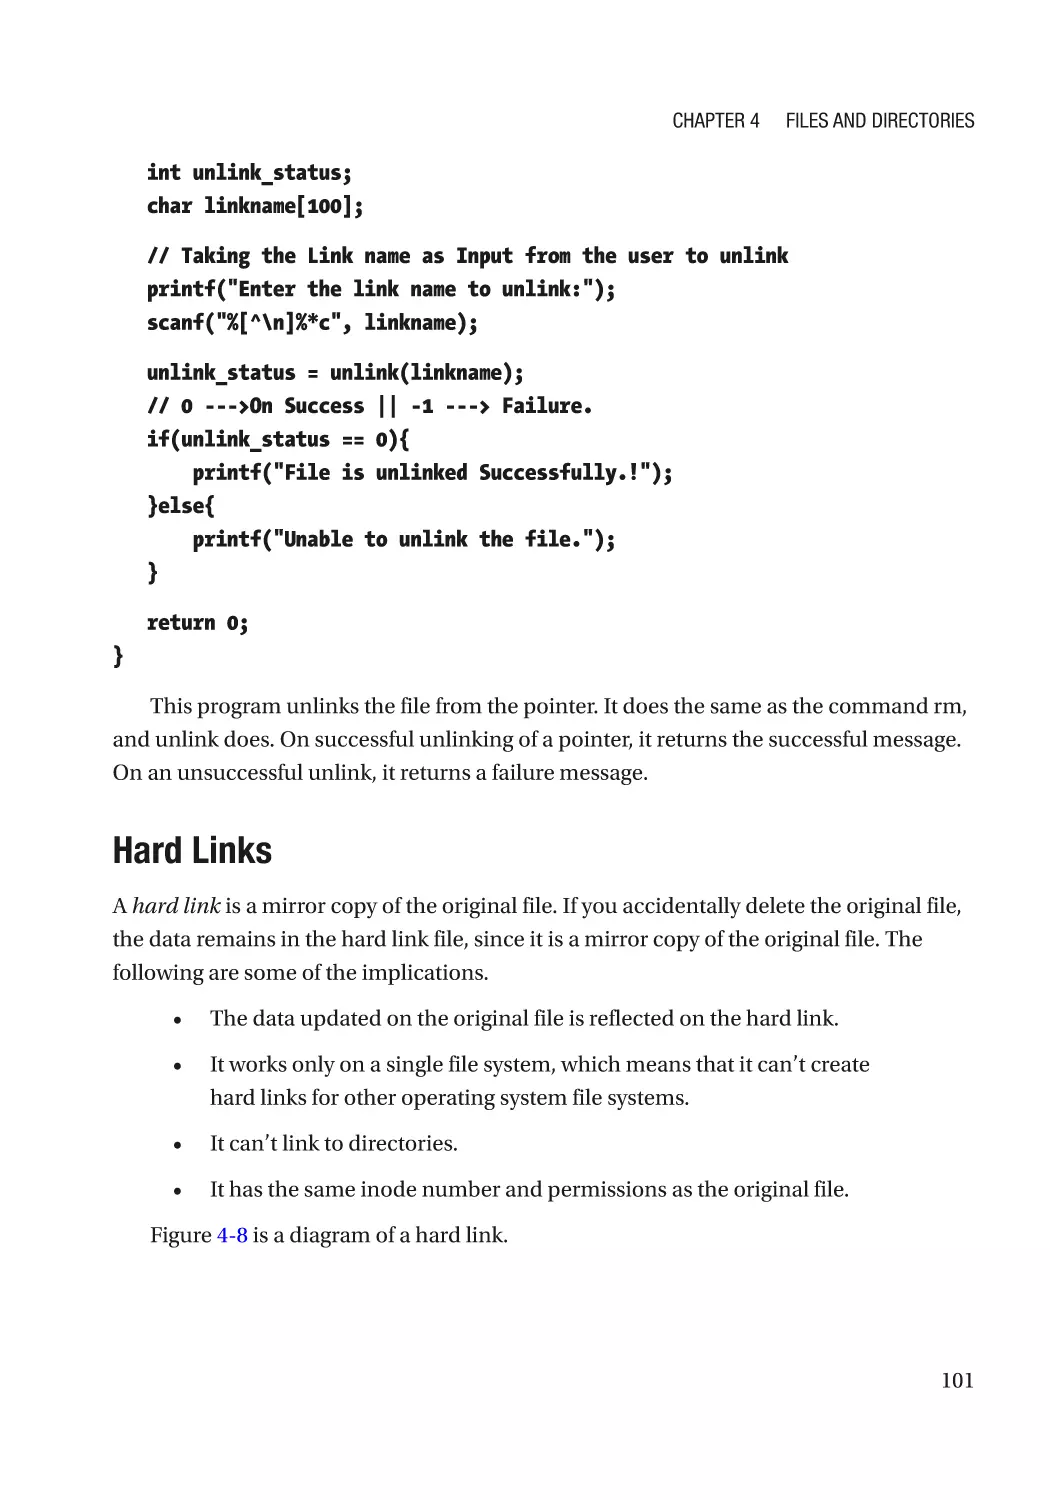
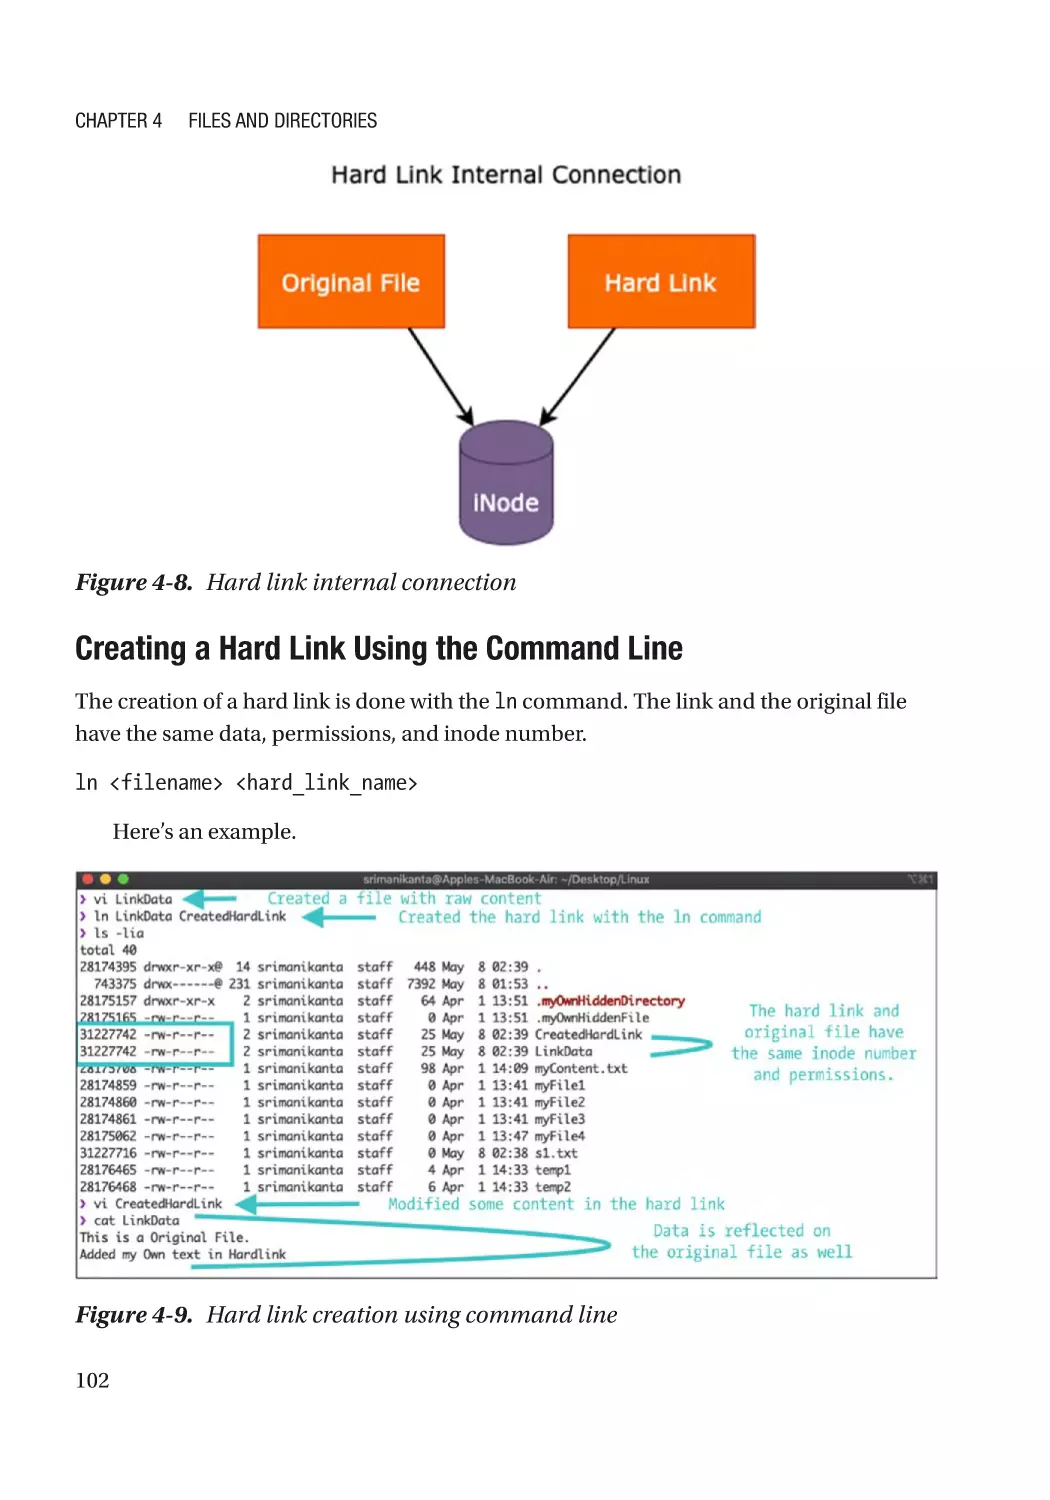
Hard Links��������������������������������������������������������������������������������������������������������������������������� 101
System Calls for Directories������������������������������������������������������������������������������������������������������ 104
Creating a Directory������������������������������������������������������������������������������������������������������������� 104
Deleting a Directory������������������������������������������������������������������������������������������������������������� 105
Getting the Current Working Directory��������������������������������������������������������������������������������� 106
Changing Directory�������������������������������������������������������������������������������������������������������������� 107
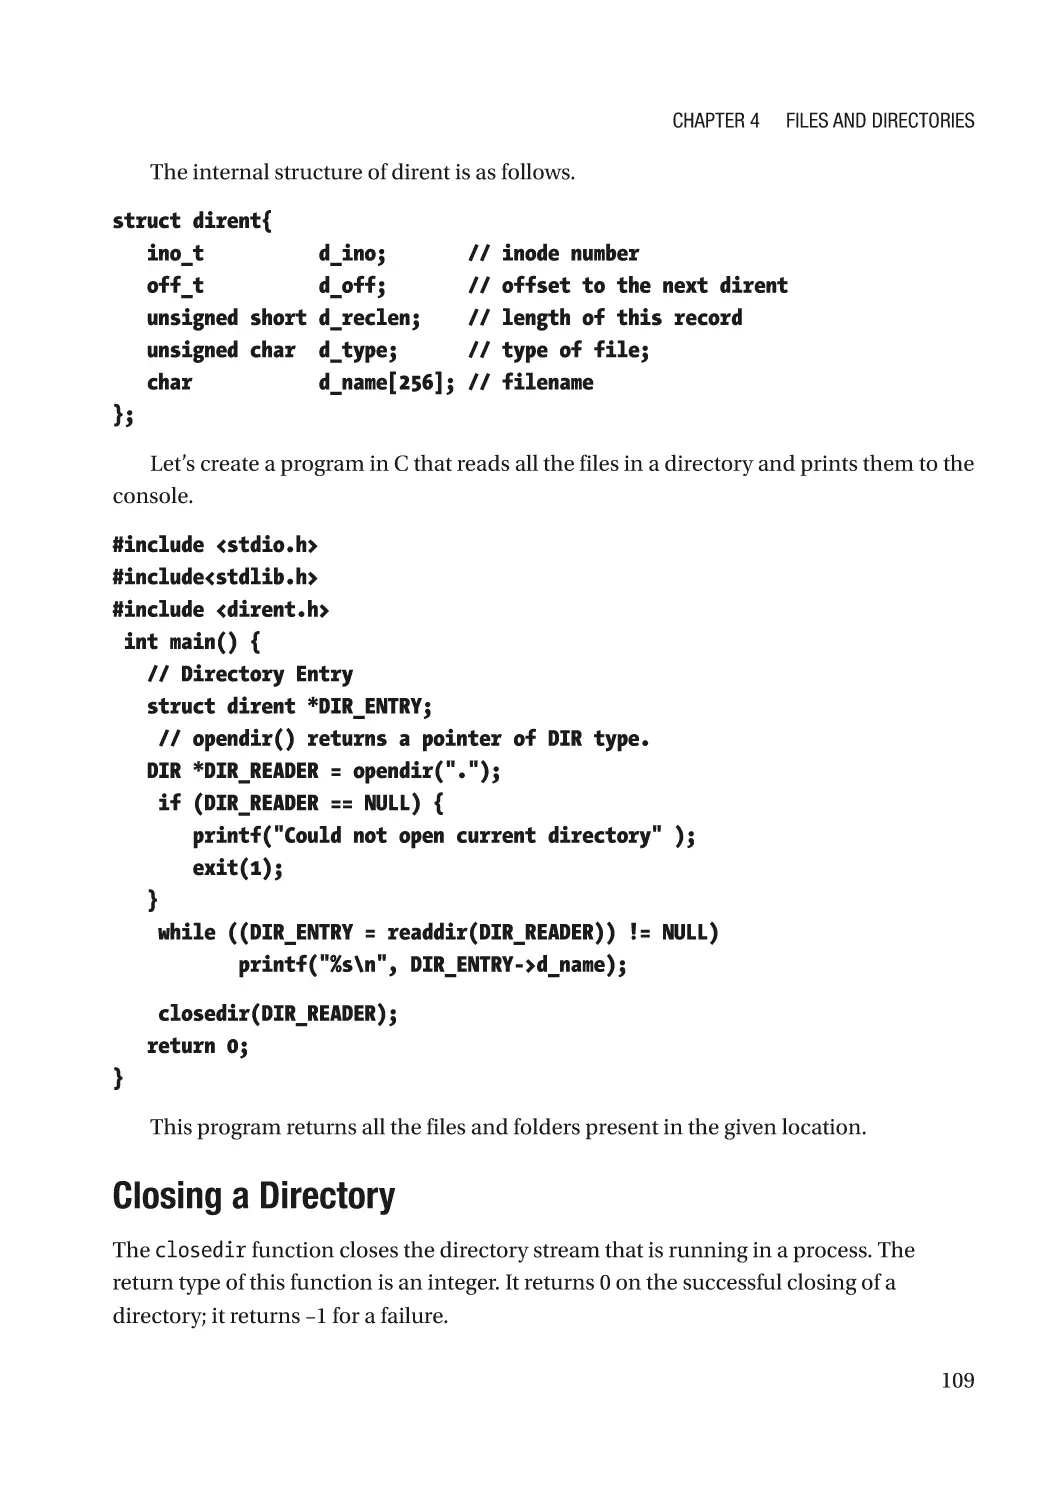
Reading a Directory������������������������������������������������������������������������������������������������������������� 108
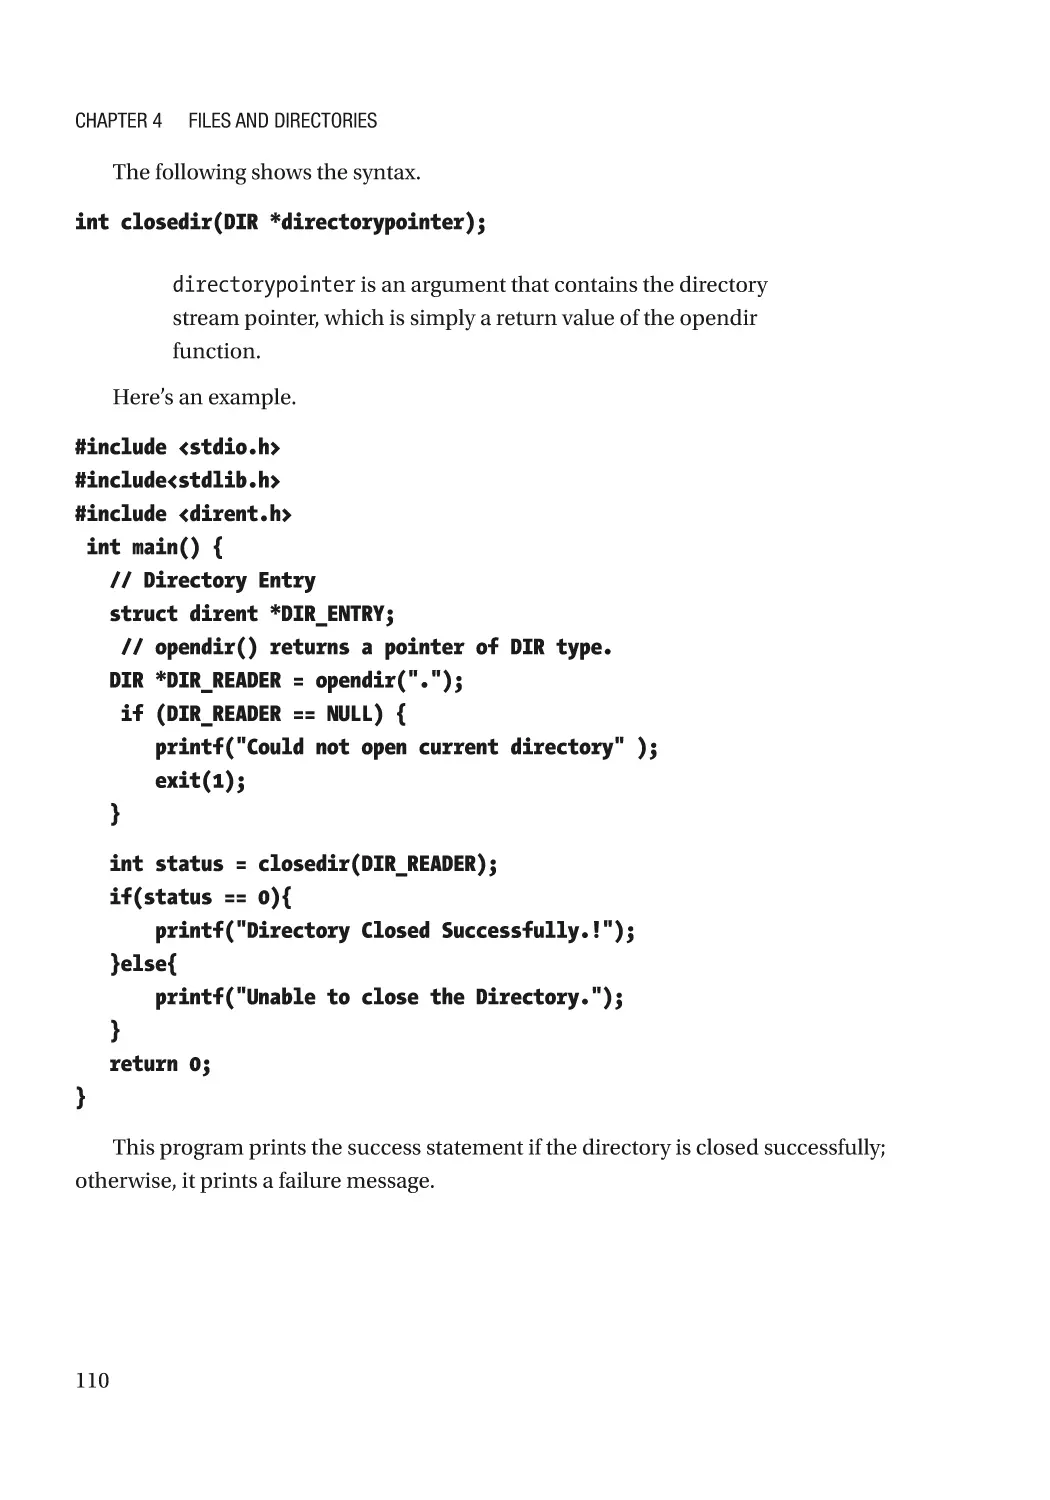
Closing a Directory�������������������������������������������������������������������������������������������������������������� 109
Summary���������������������������������������������������������������������������������������������������������������������������������� 111
vi
Table of Contents
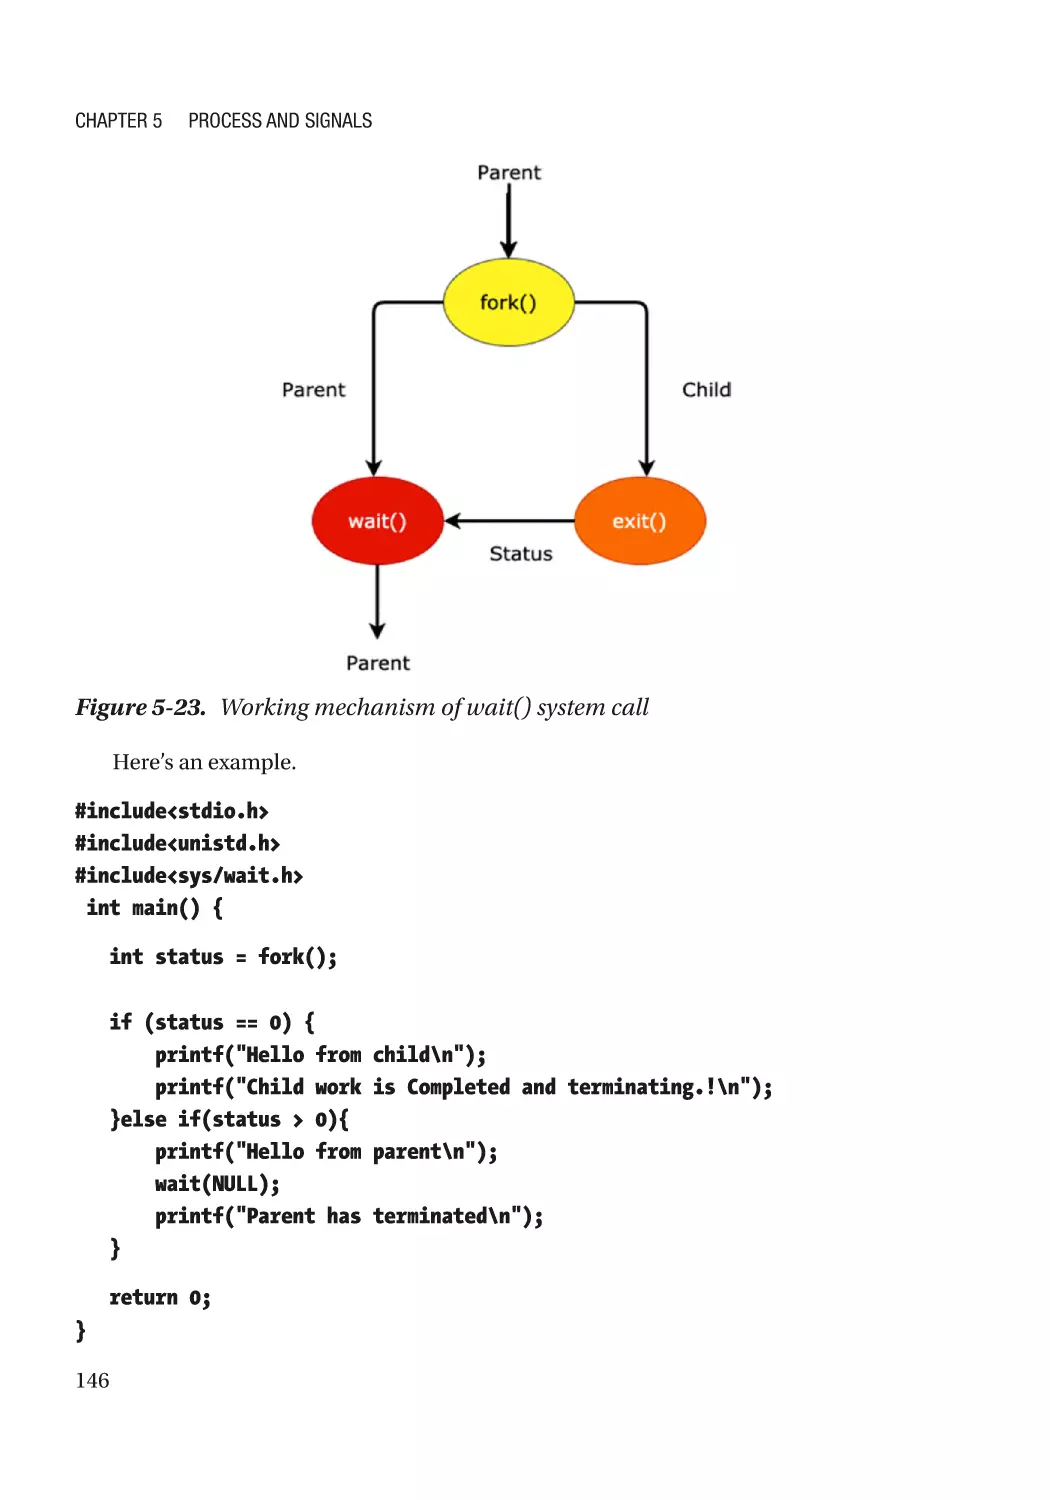
Chapter 5: Process and Signals���������������������������������������������������������������������������� 113
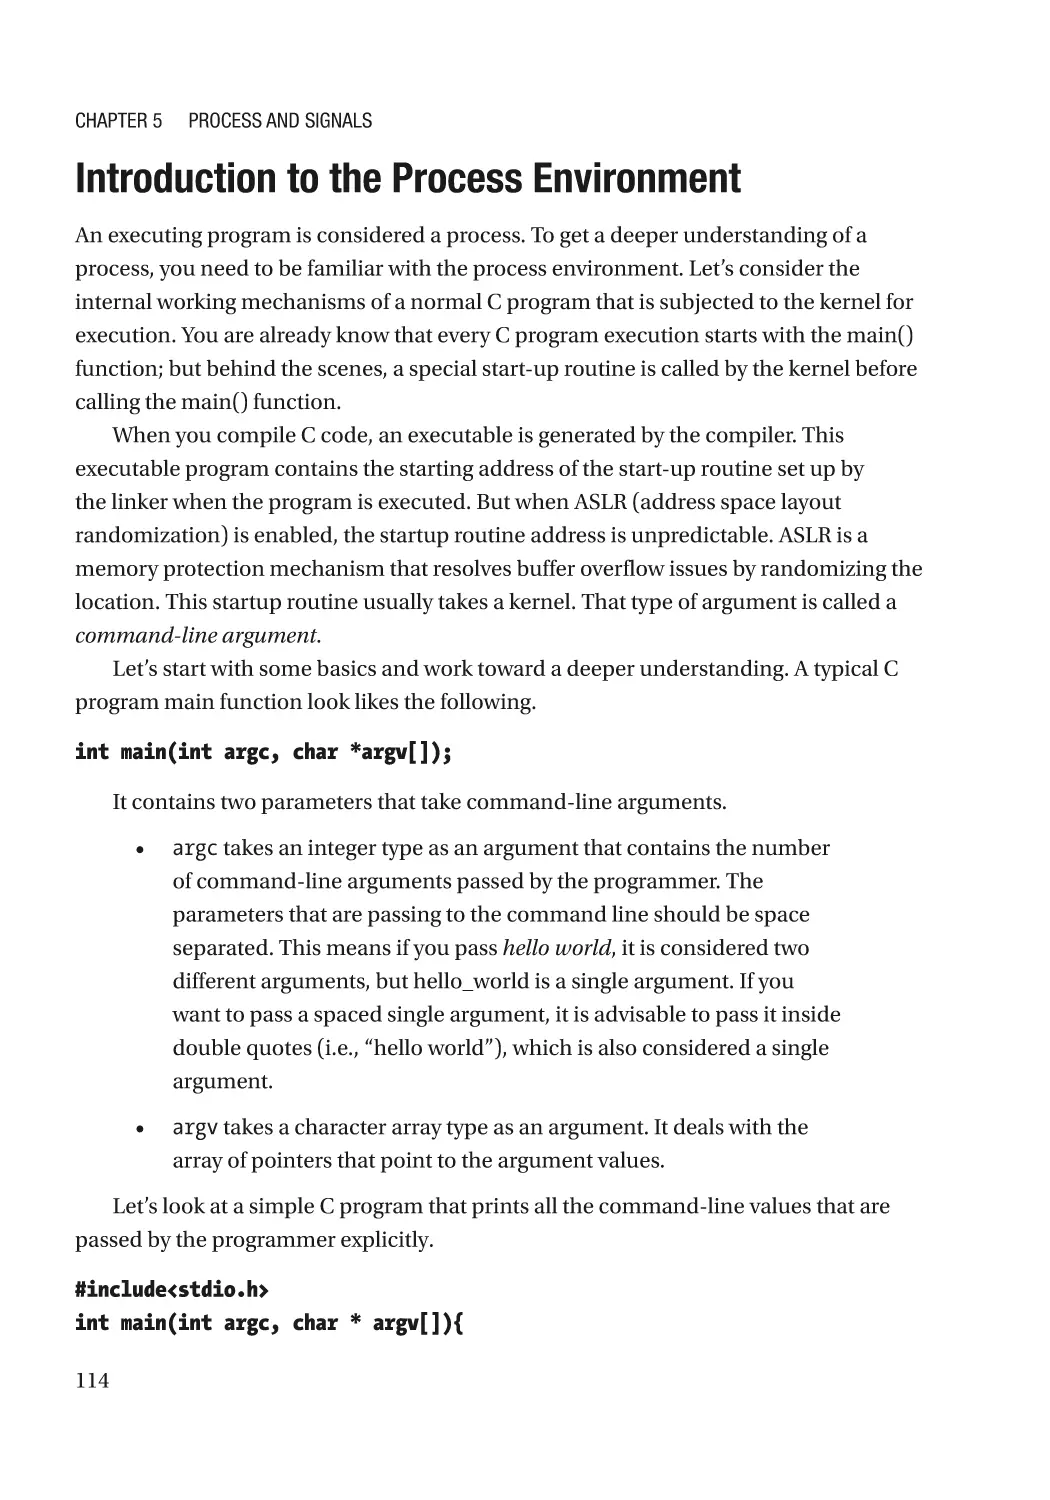
Introduction to the Process Environment���������������������������������������������������������������������������������� 114
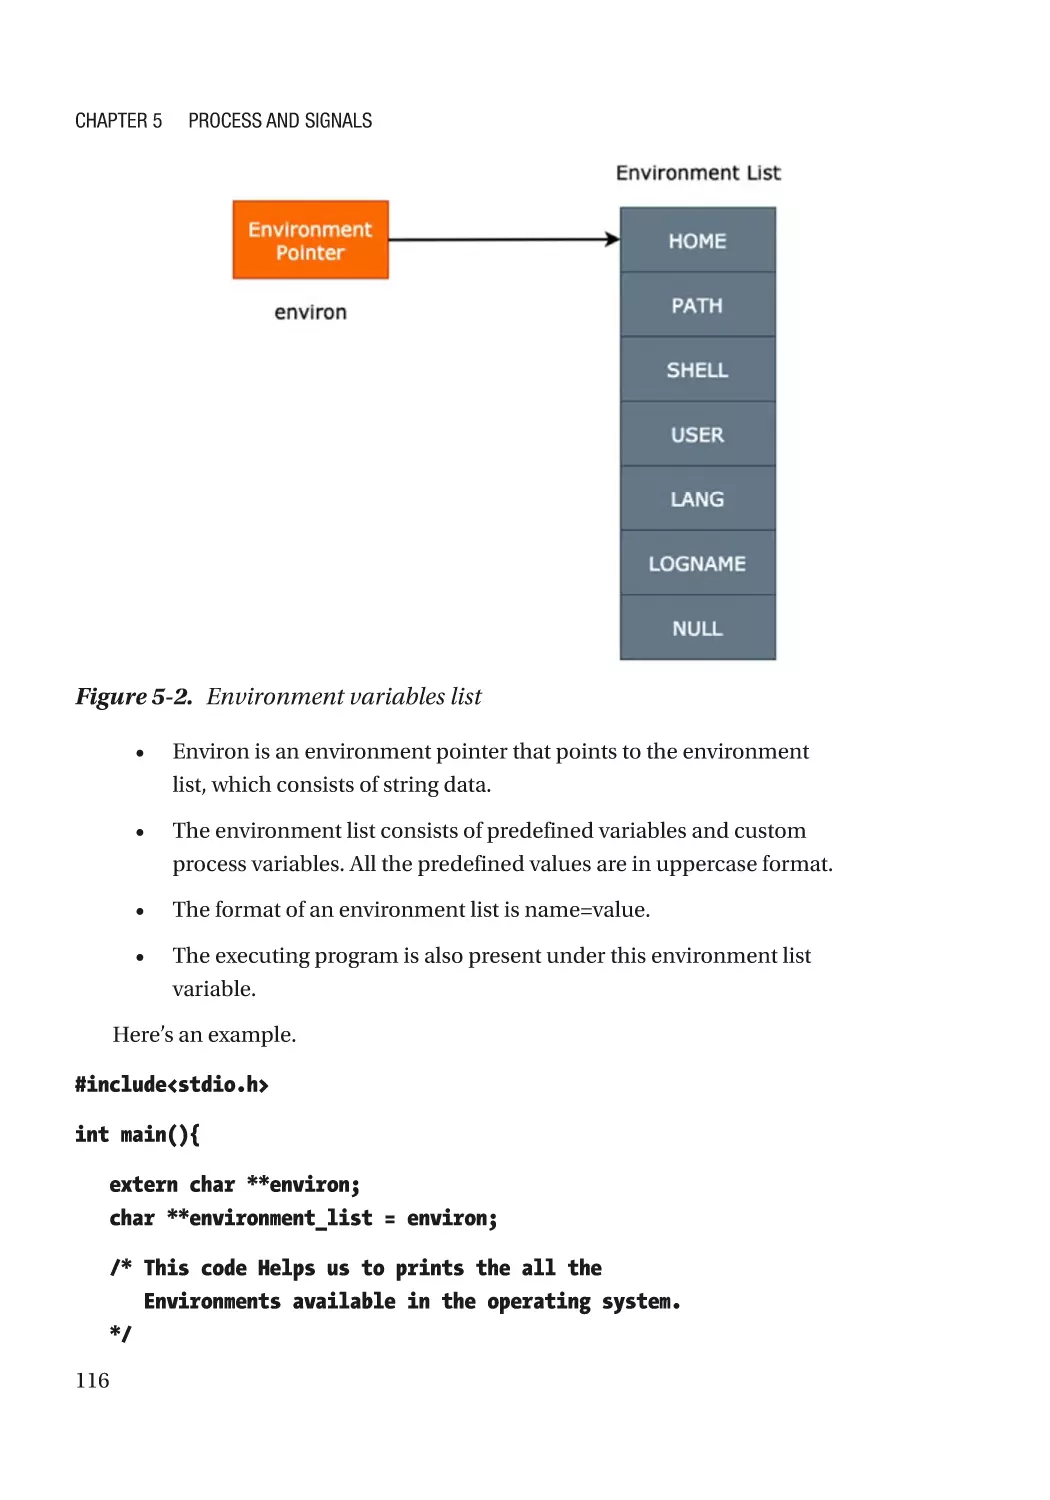
Environment List������������������������������������������������������������������������������������������������������������������ 115
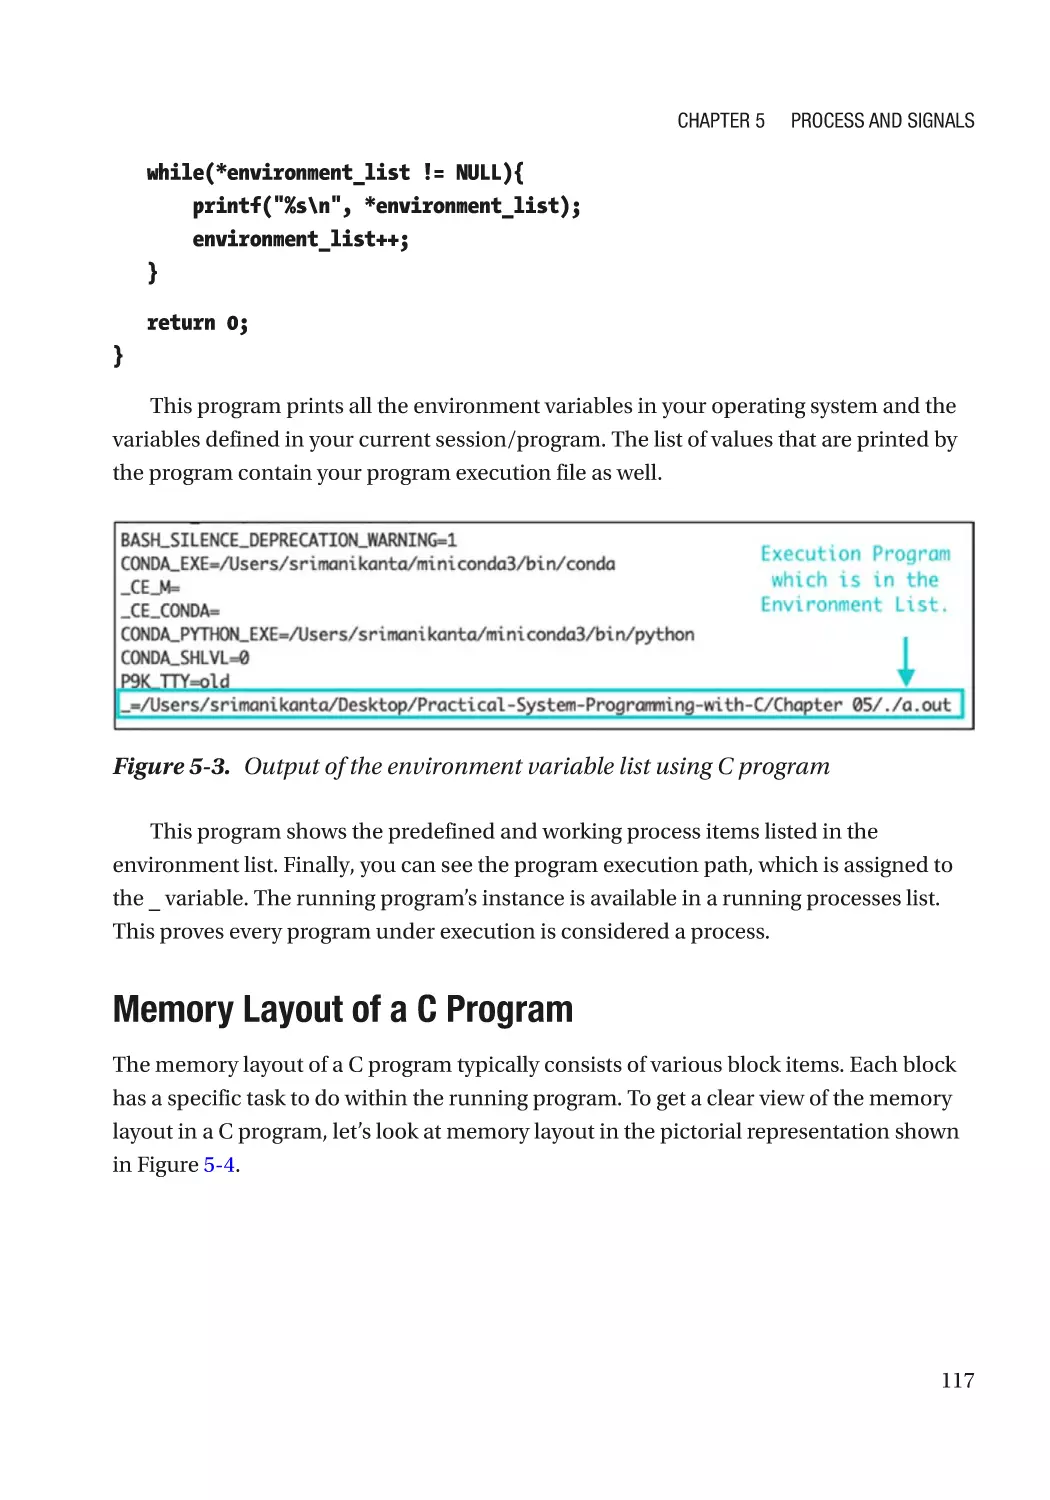
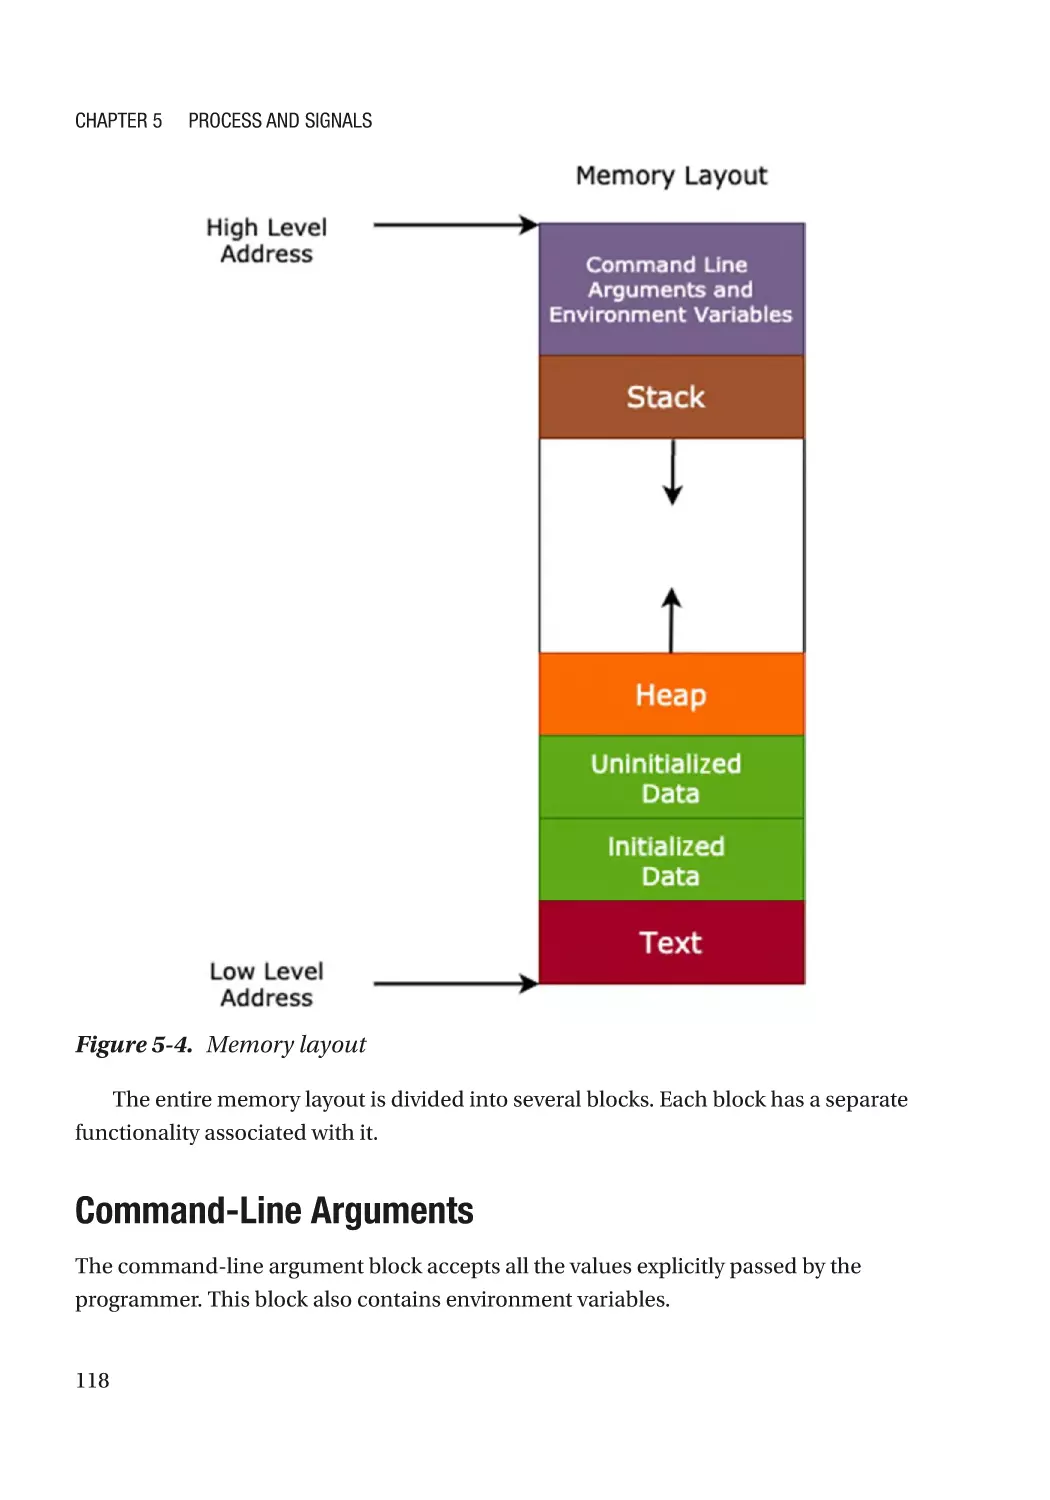
Memory Layout of a C Program������������������������������������������������������������������������������������������� 117
Command-Line Arguments�������������������������������������������������������������������������������������������������� 118
Process Termination Methodologies������������������������������������������������������������������������������������ 119
Environment Variables�������������������������������������������������������������������������������������������������������������� 121
User-Level Environment Variables��������������������������������������������������������������������������������������� 121
System-Level Environment Variable������������������������������������������������������������������������������������ 121
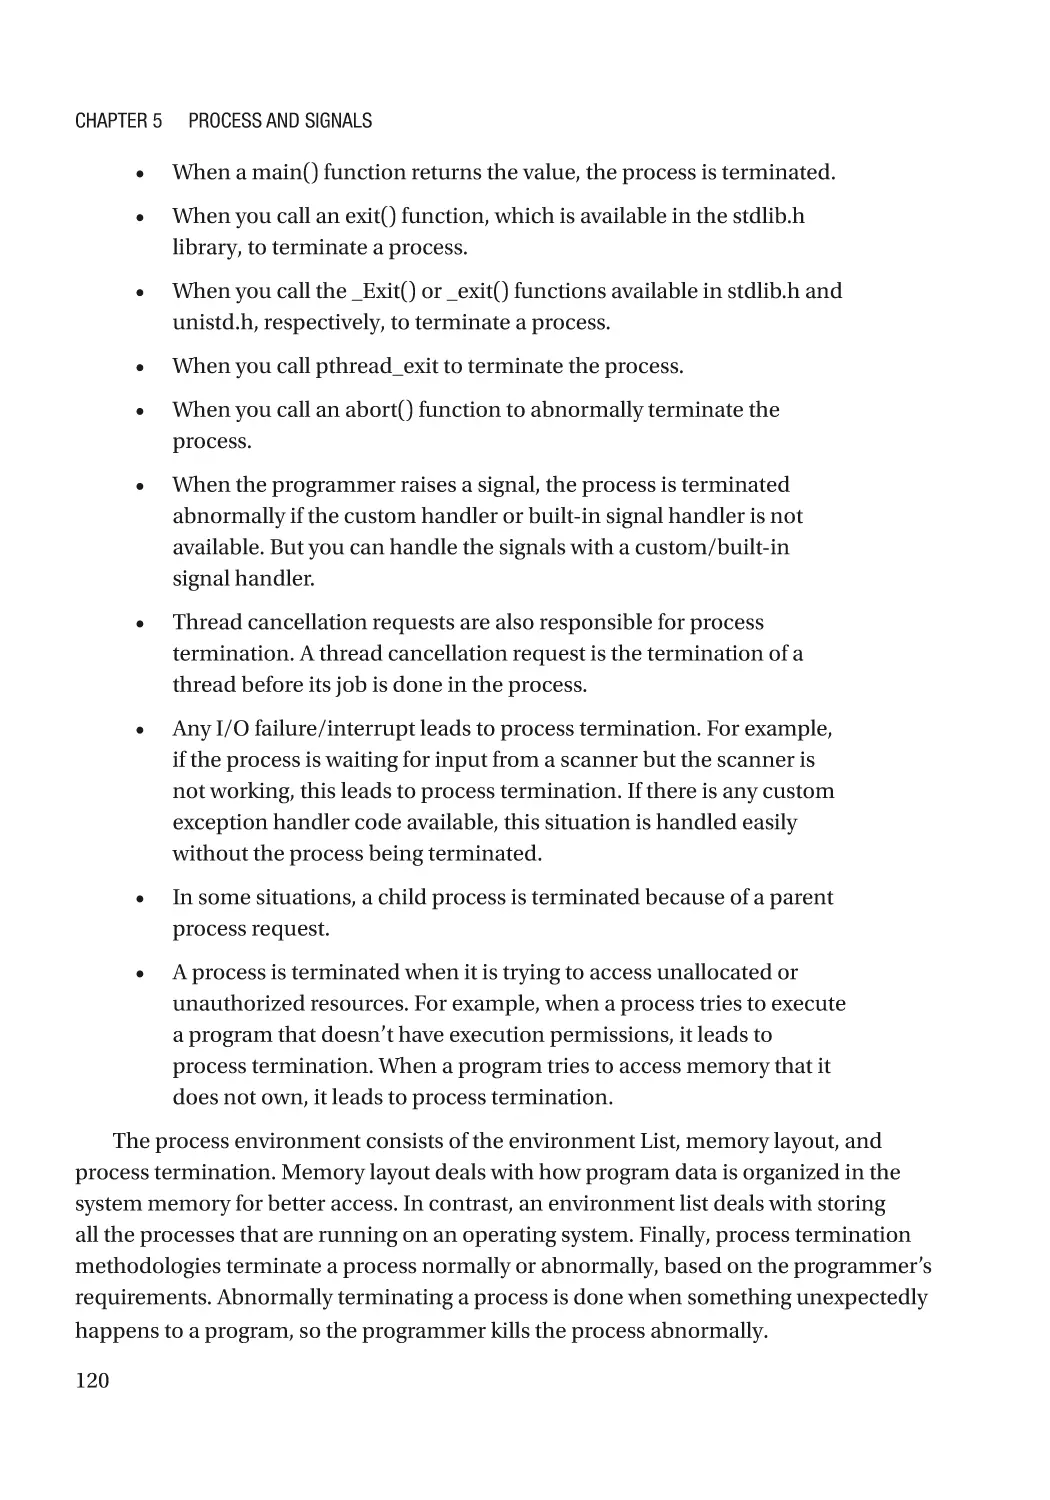
Environment Variable Examples������������������������������������������������������������������������������������������ 121
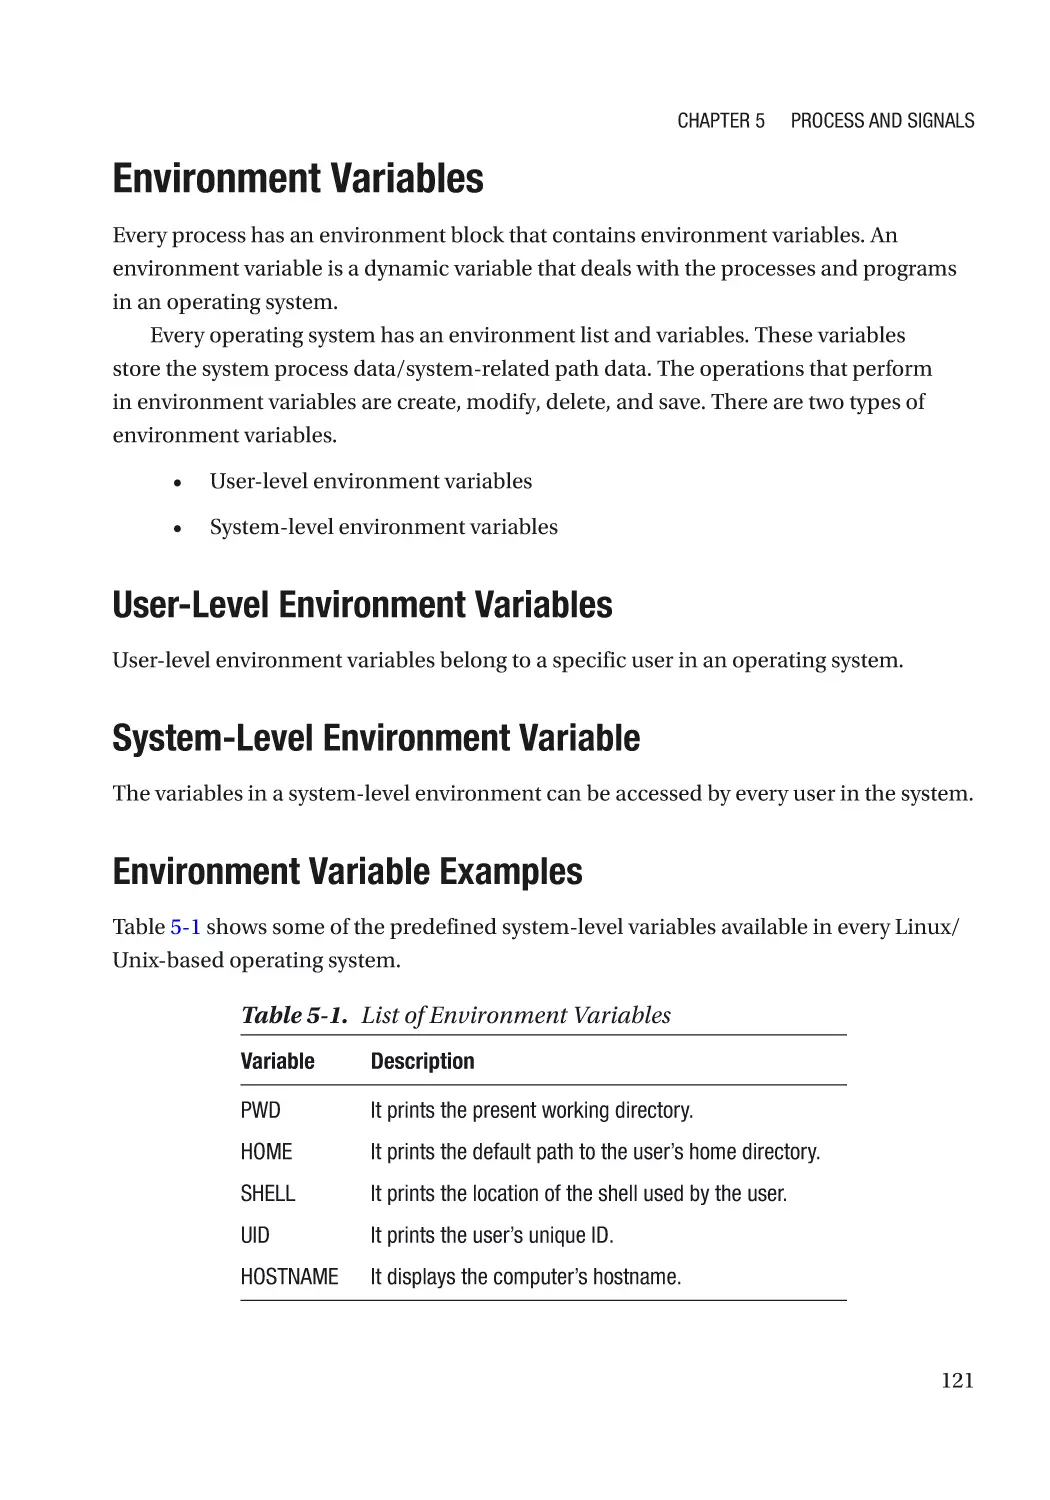
Accessing an Environment Variable������������������������������������������������������������������������������������ 122
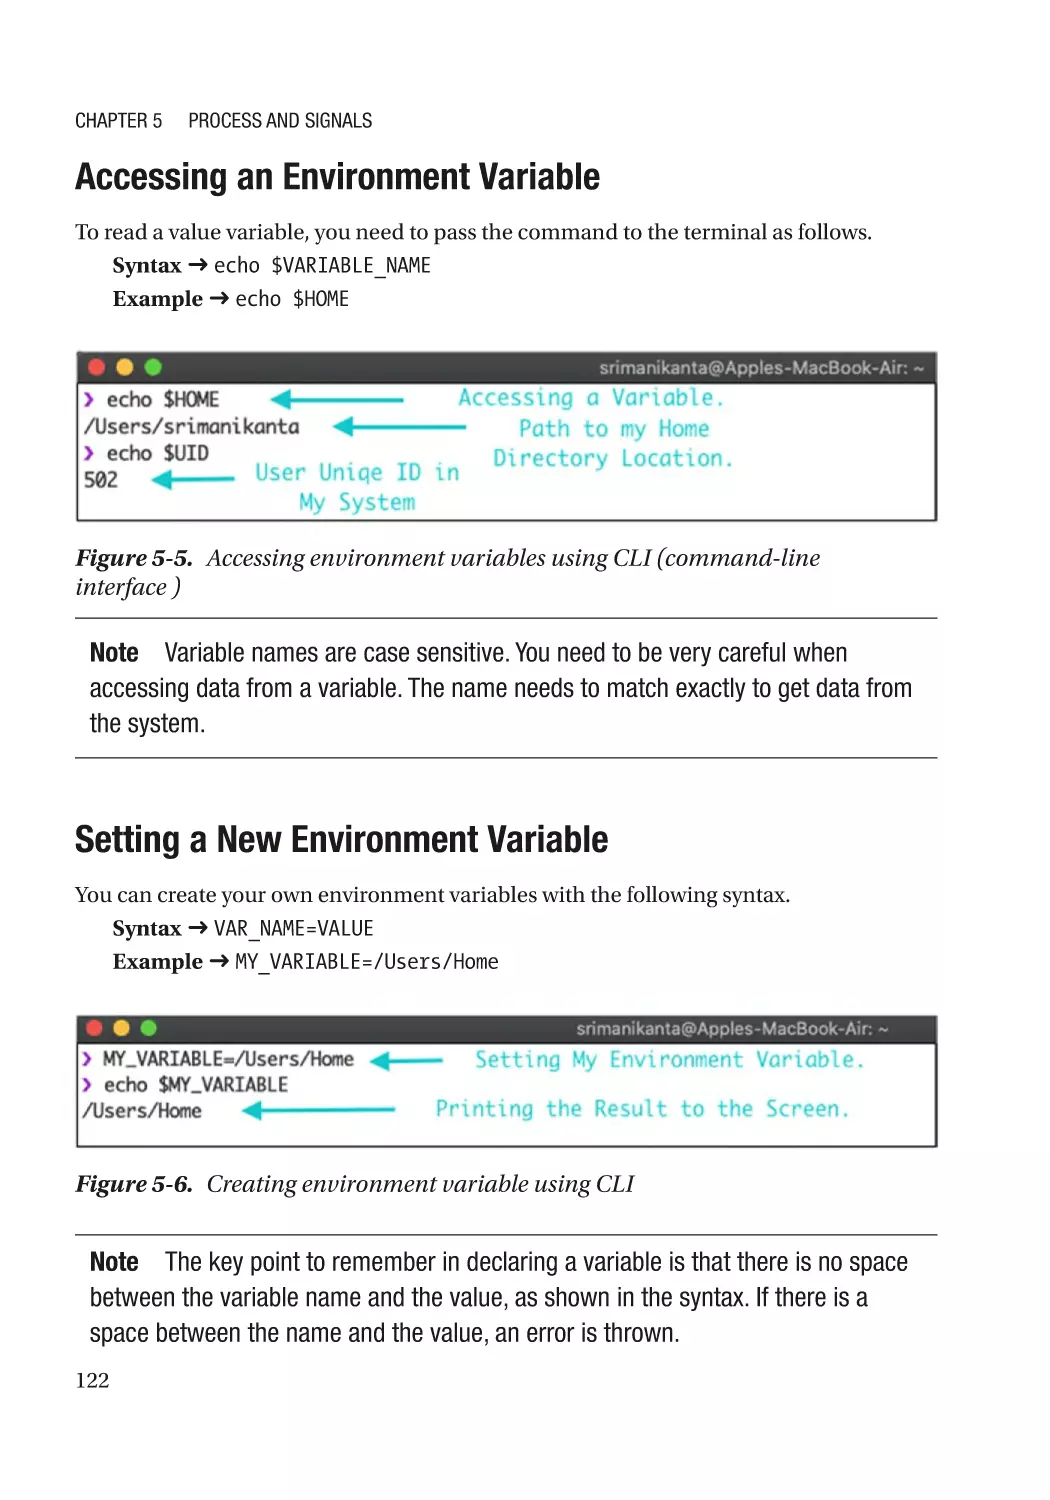
Setting a New Environment Variable����������������������������������������������������������������������������������� 122
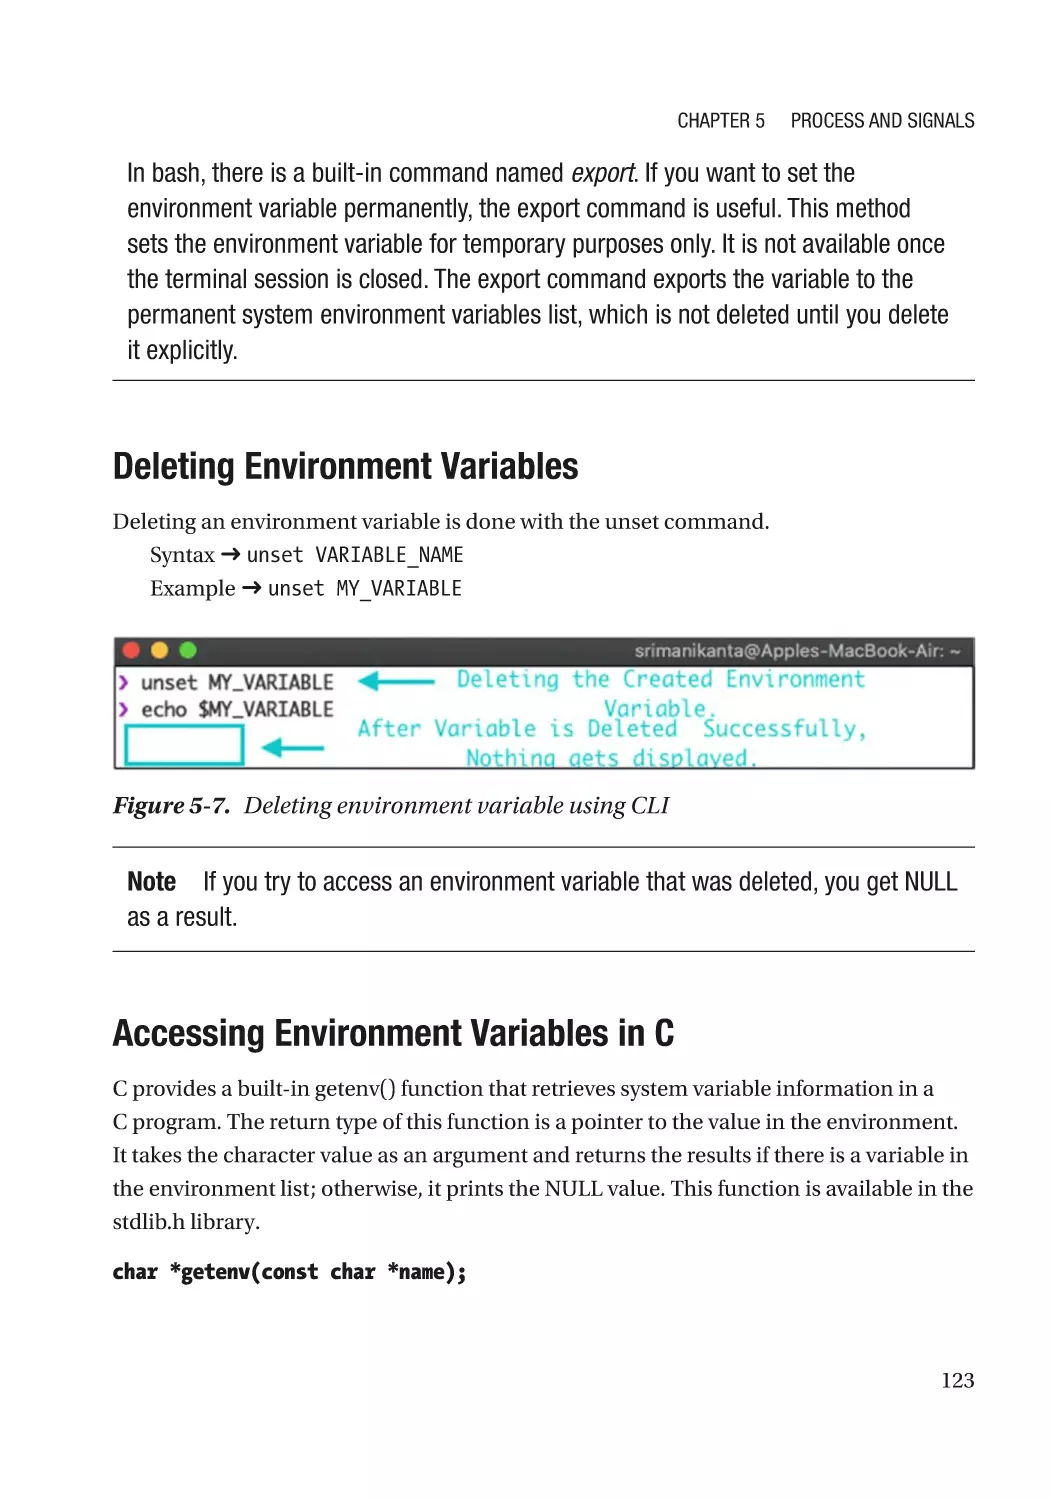
Deleting Environment Variables������������������������������������������������������������������������������������������� 123
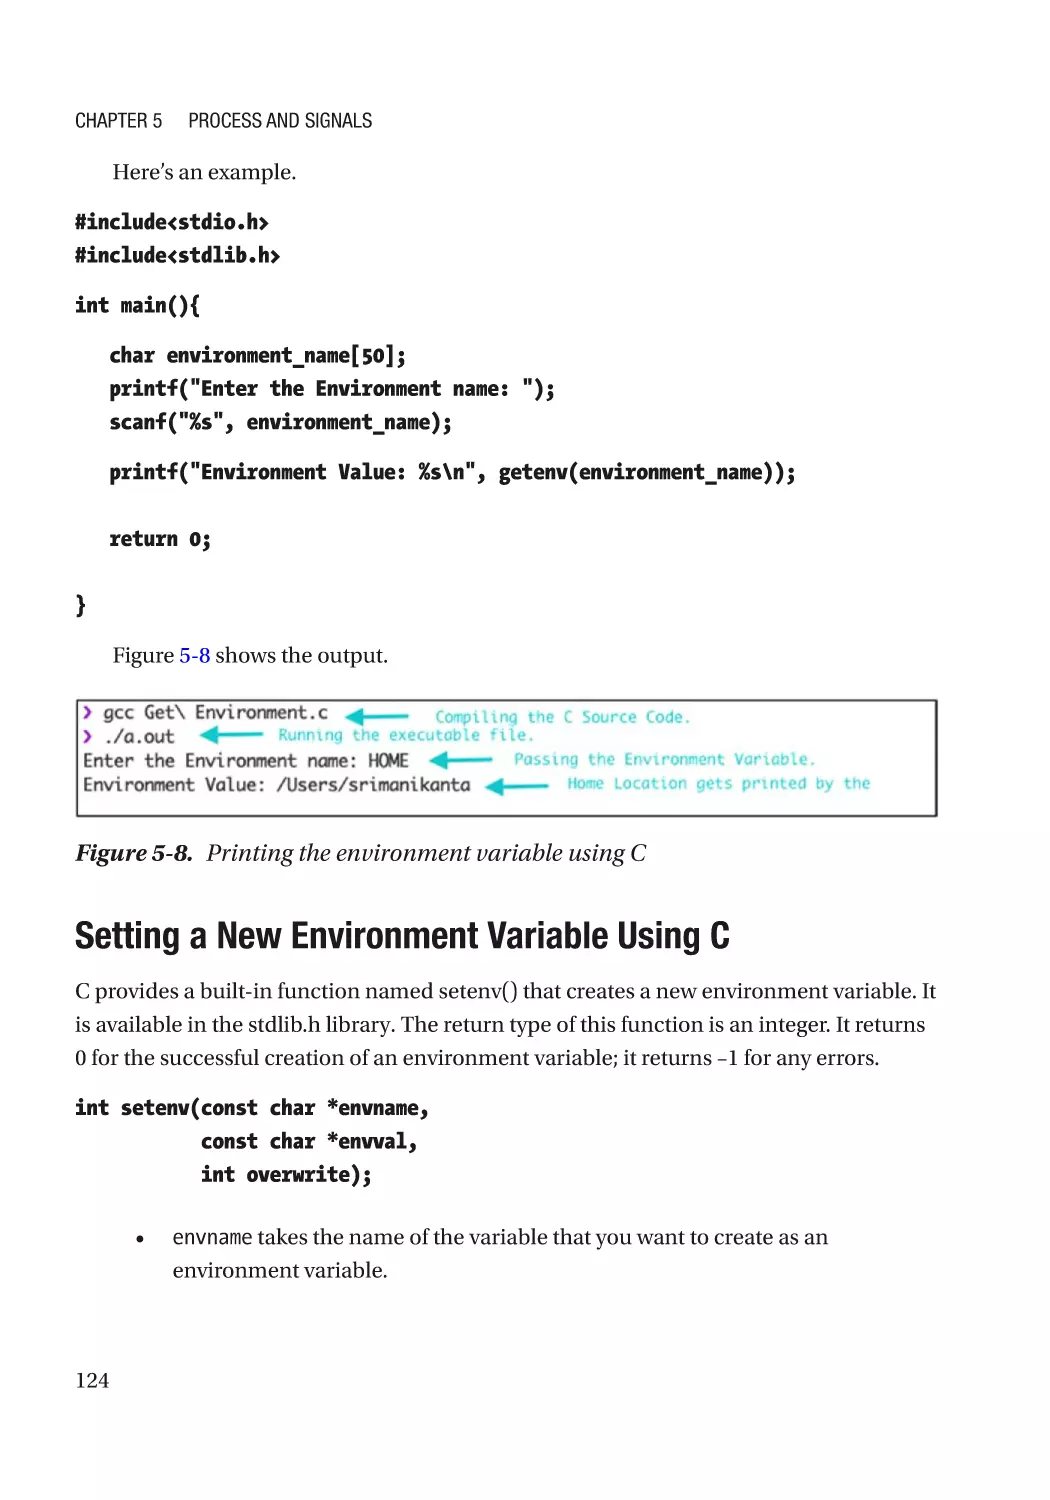
Accessing Environment Variables in C�������������������������������������������������������������������������������� 123
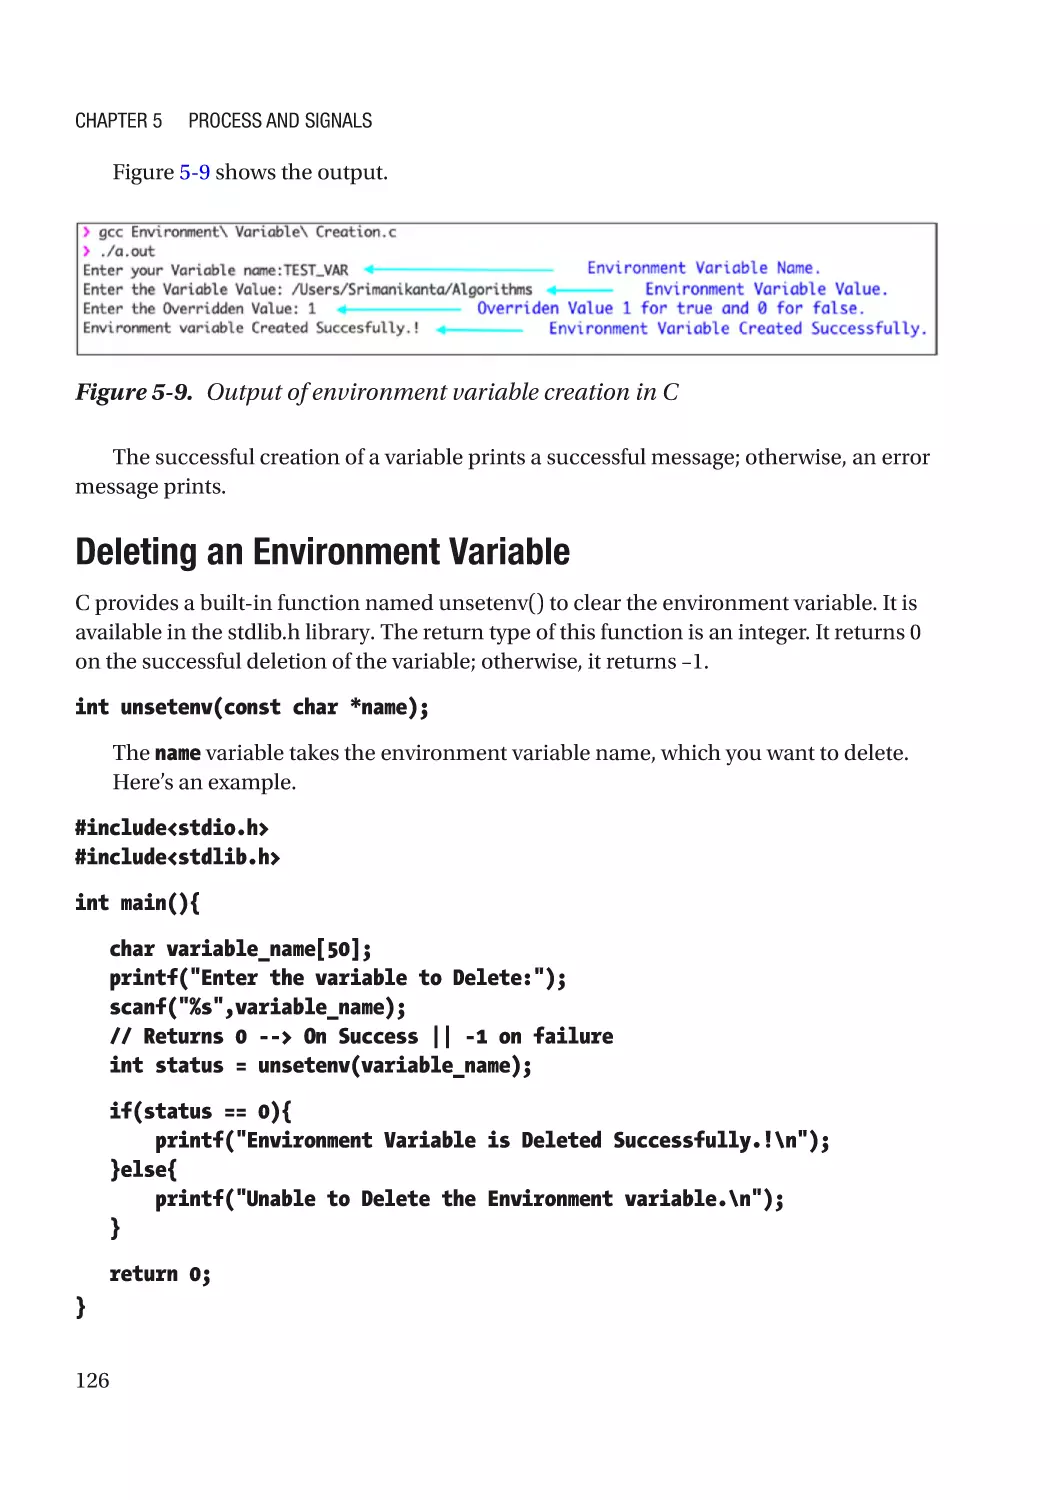
Setting a New Environment Variable Using C���������������������������������������������������������������������� 124
Deleting an Environment Variable��������������������������������������������������������������������������������������� 126
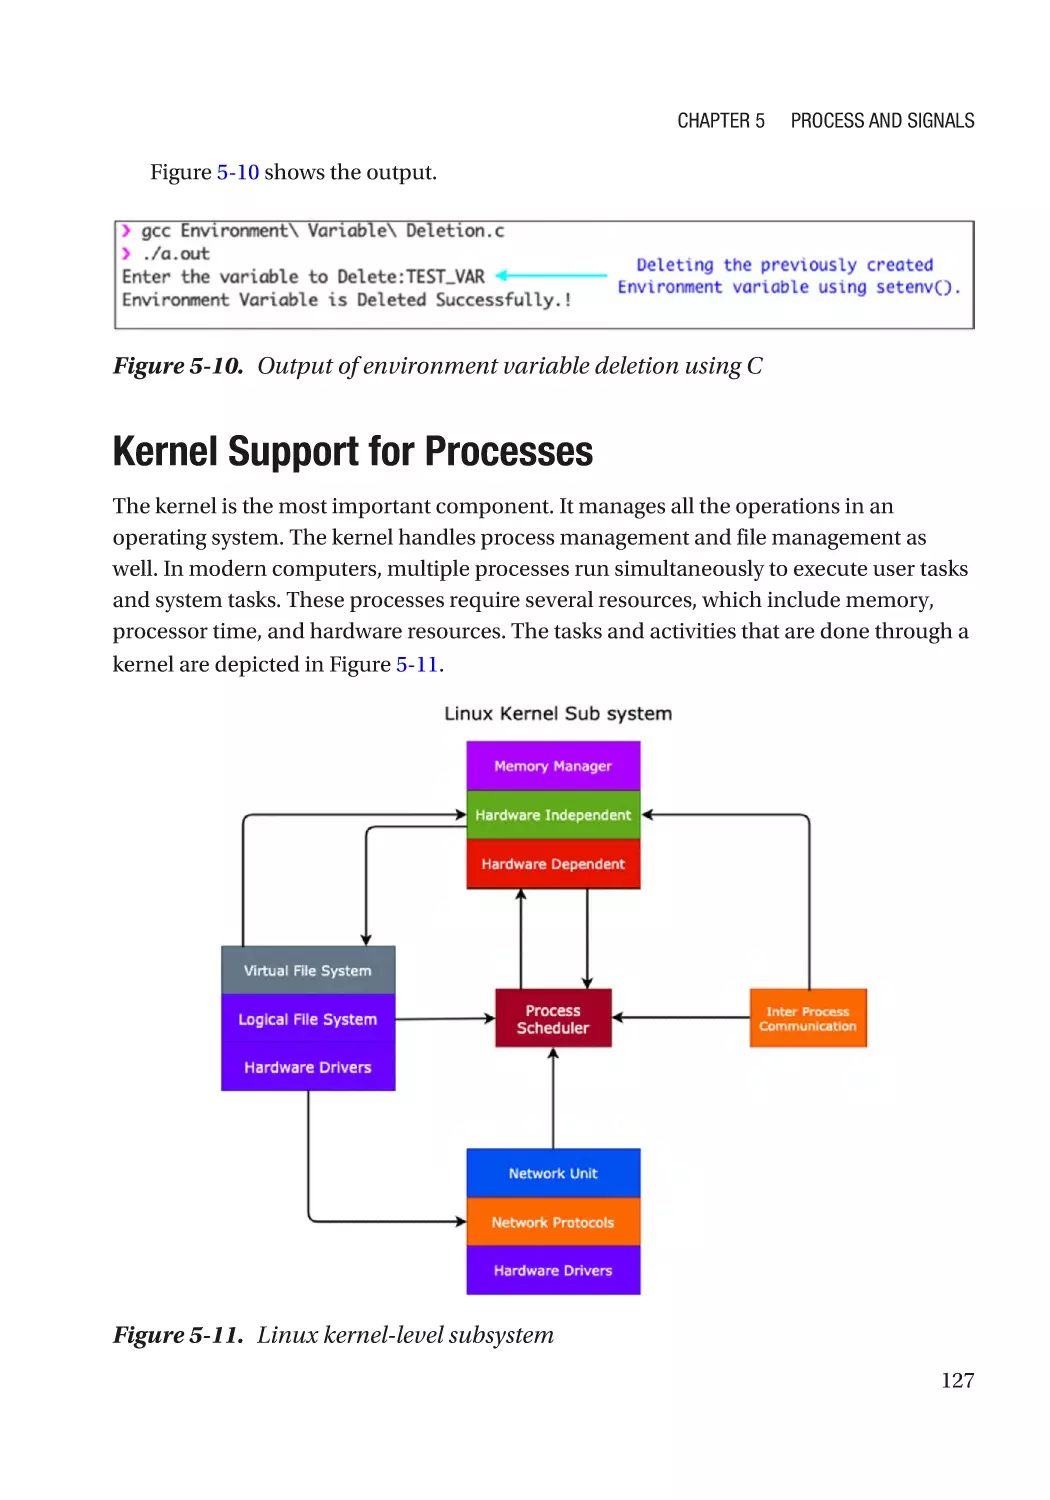
Kernel Support for Processes��������������������������������������������������������������������������������������������������� 127
Process Scheduler��������������������������������������������������������������������������������������������������������������� 128
Memory Manager���������������������������������������������������������������������������������������������������������������� 128
Virtual File System��������������������������������������������������������������������������������������������������������������� 129
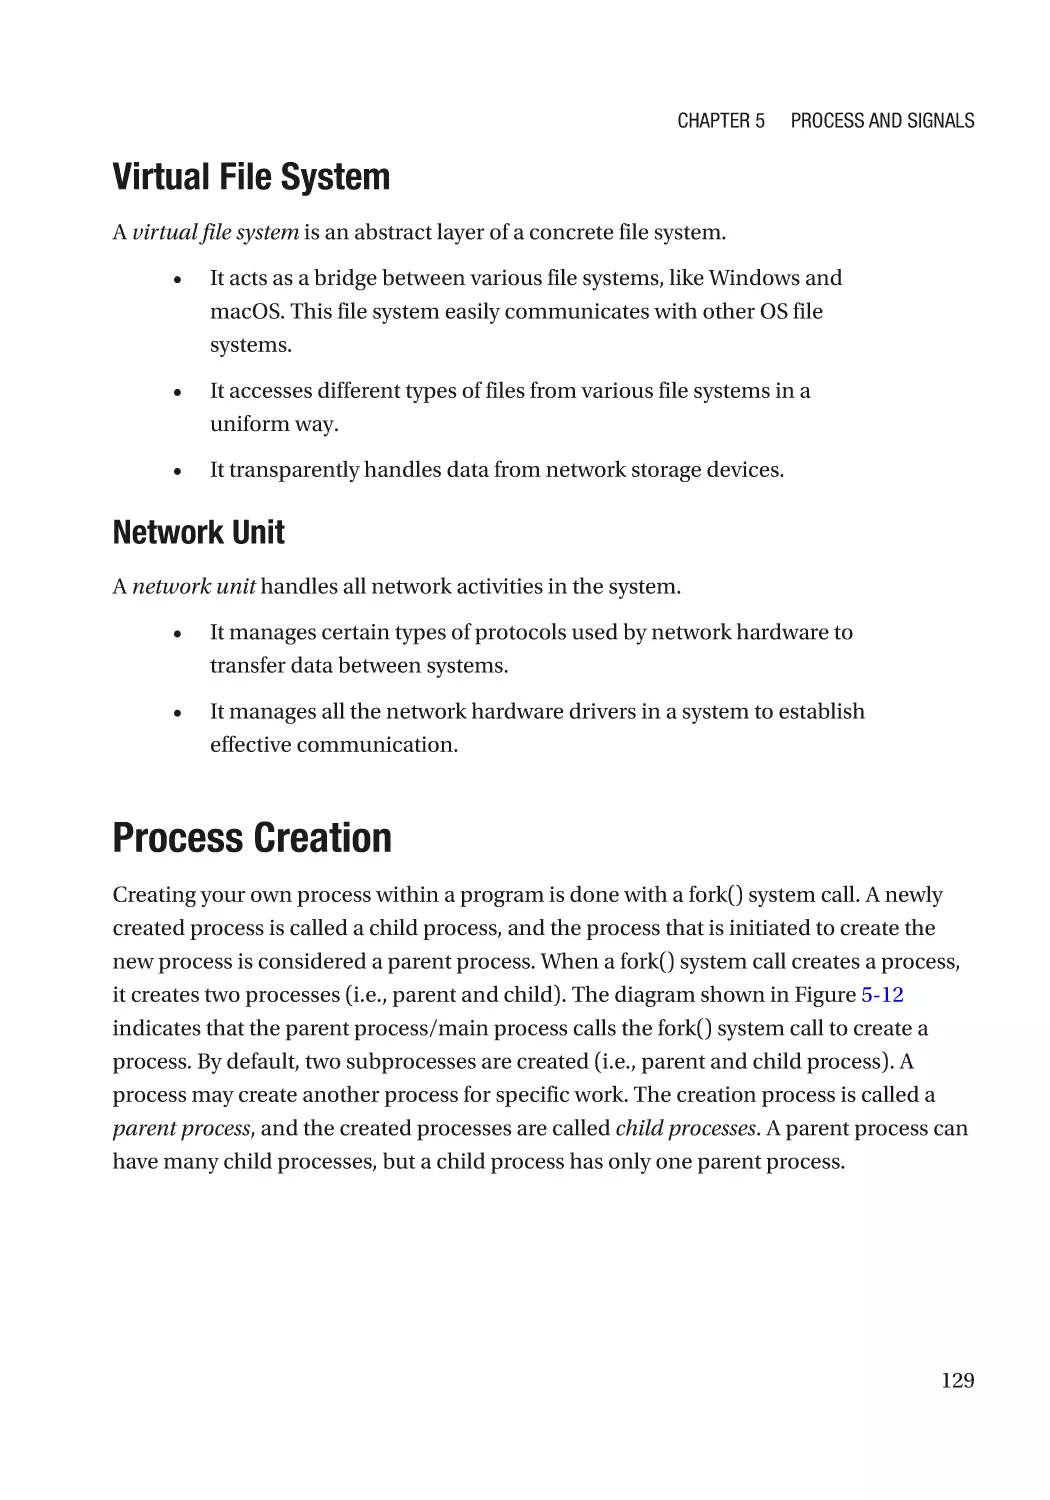
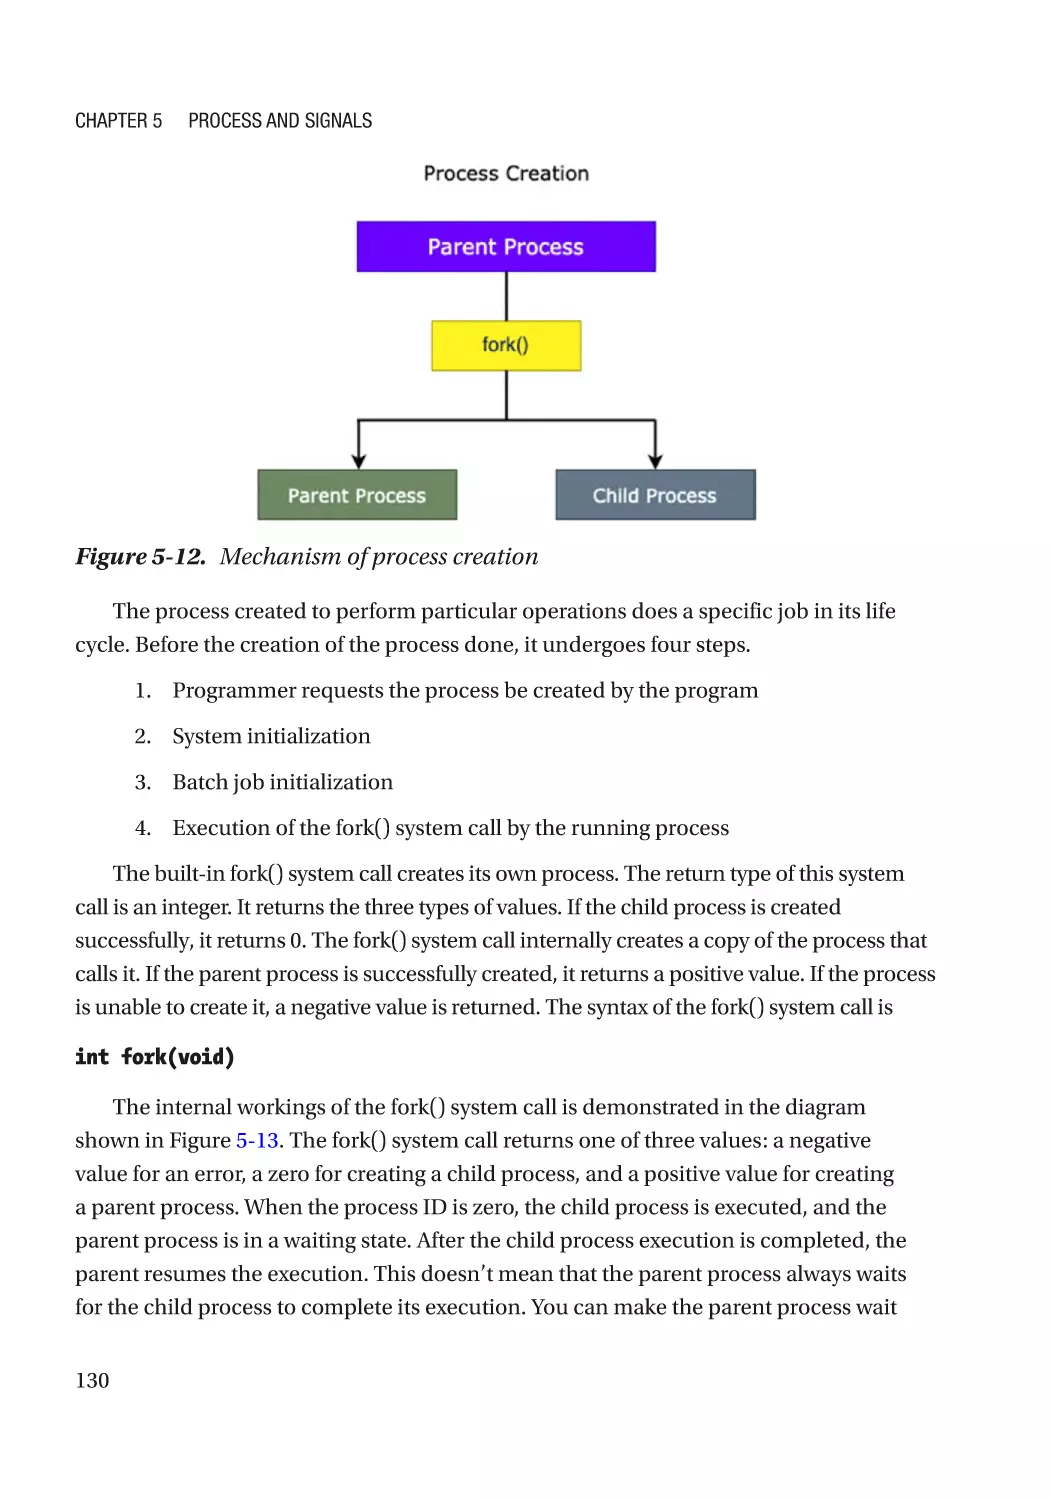
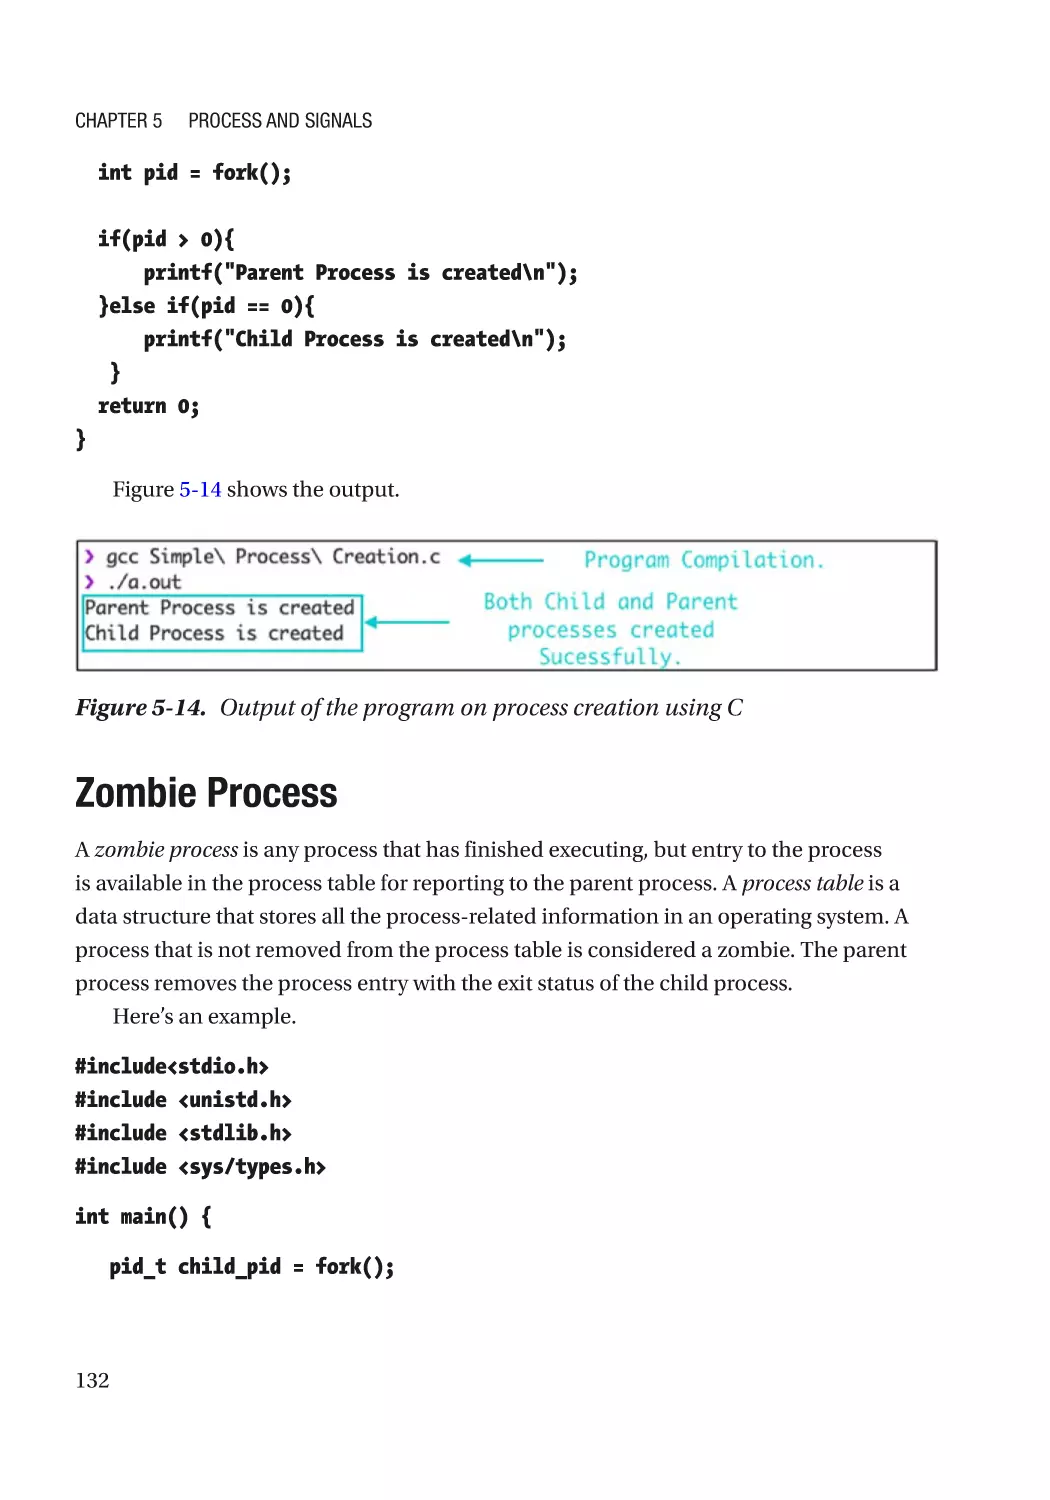
Process Creation����������������������������������������������������������������������������������������������������������������������� 129
Zombie Process������������������������������������������������������������������������������������������������������������������������ 132
Orphan Process������������������������������������������������������������������������������������������������������������������������� 133
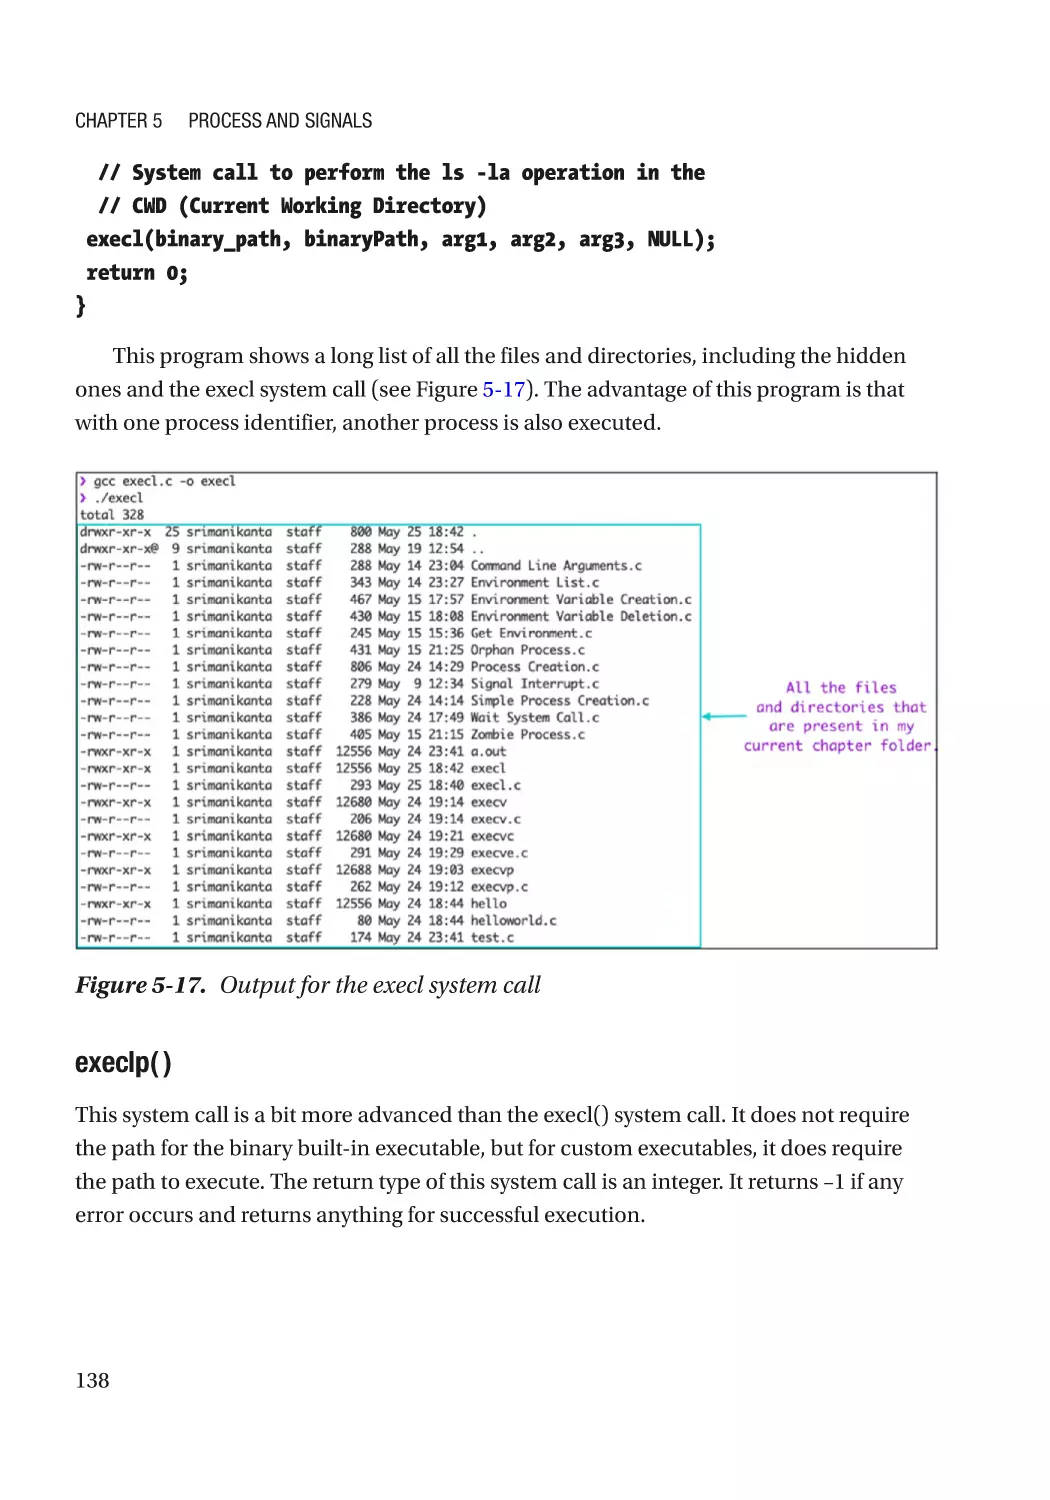
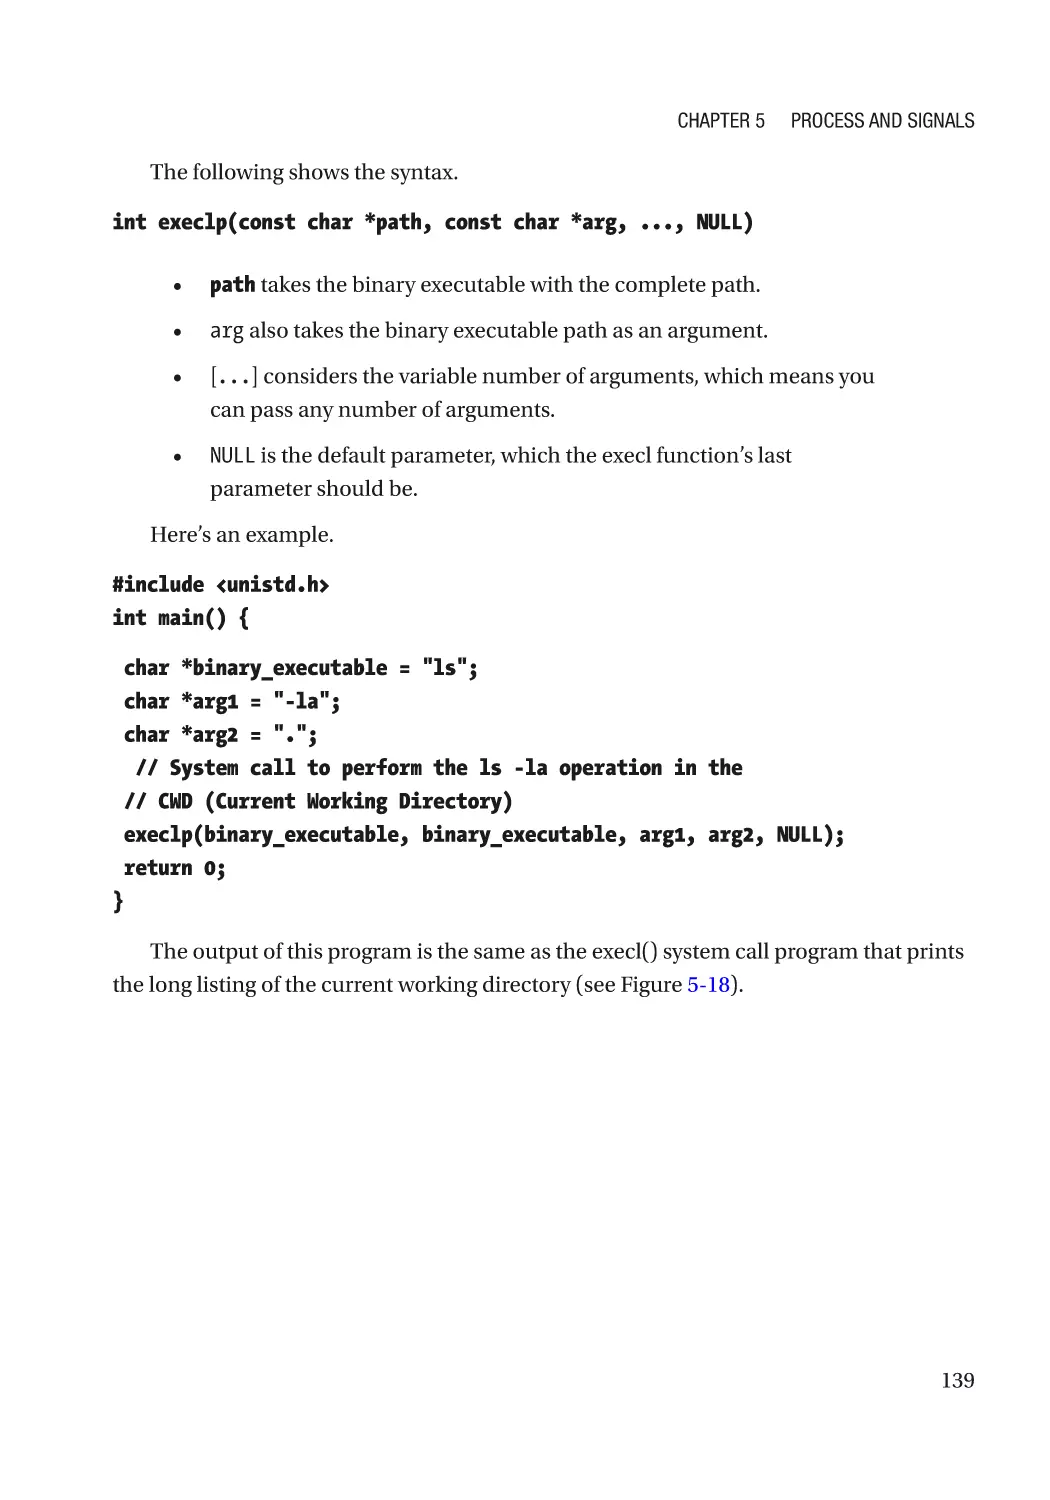
System Calls for Process Management������������������������������������������������������������������������������� 134
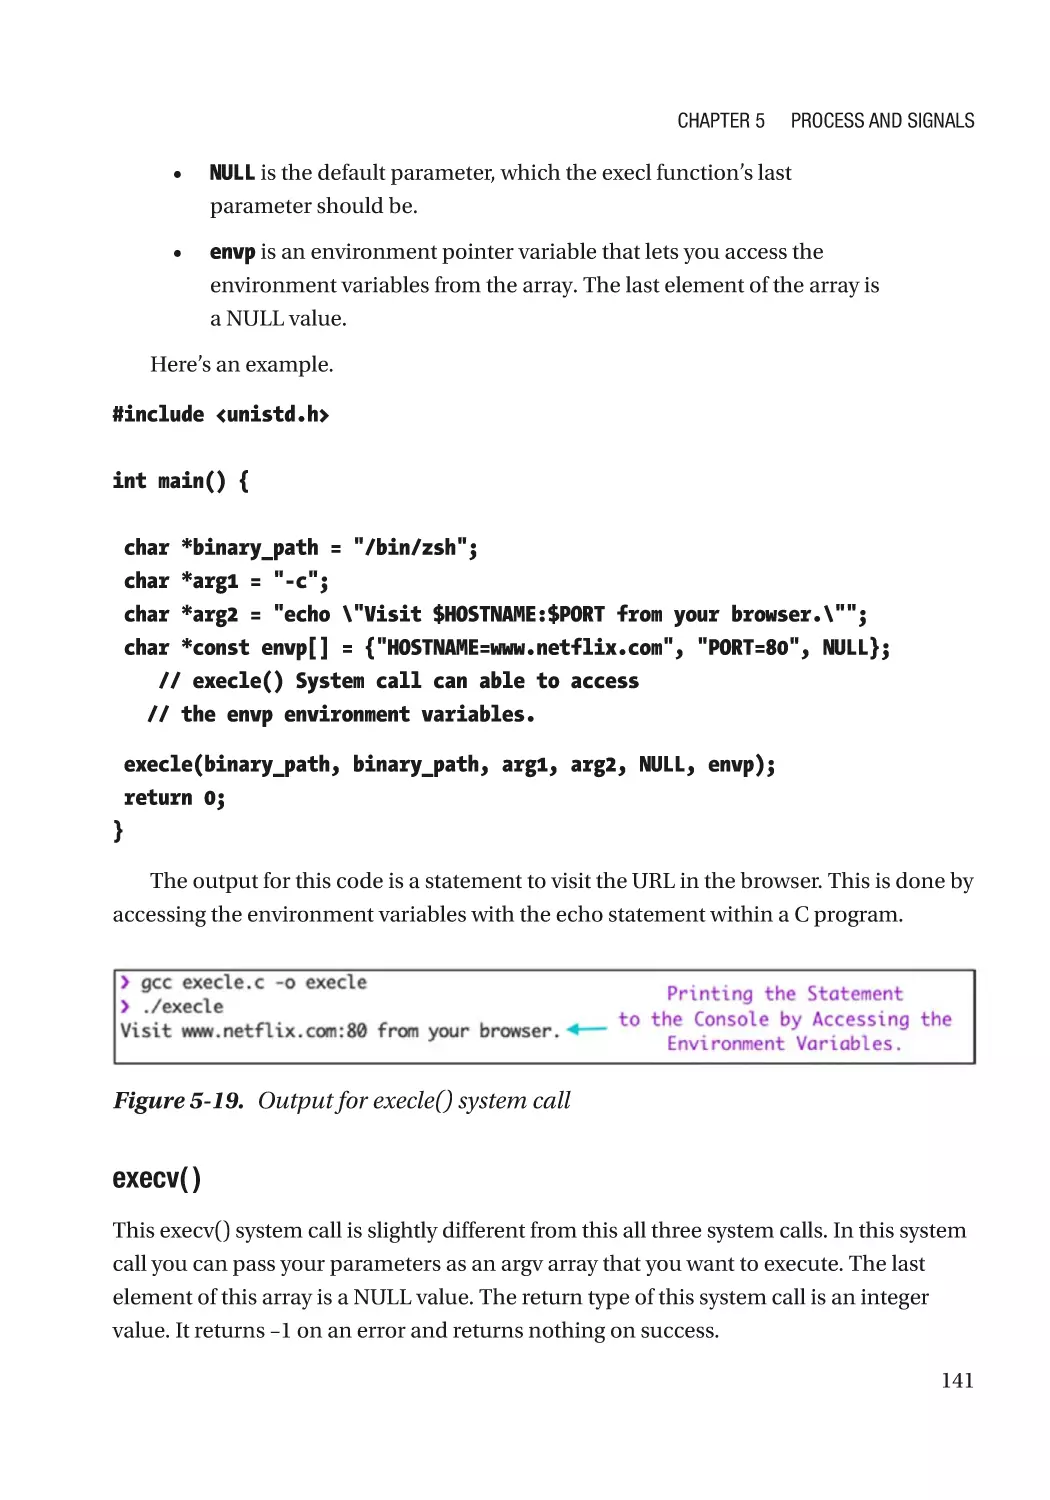
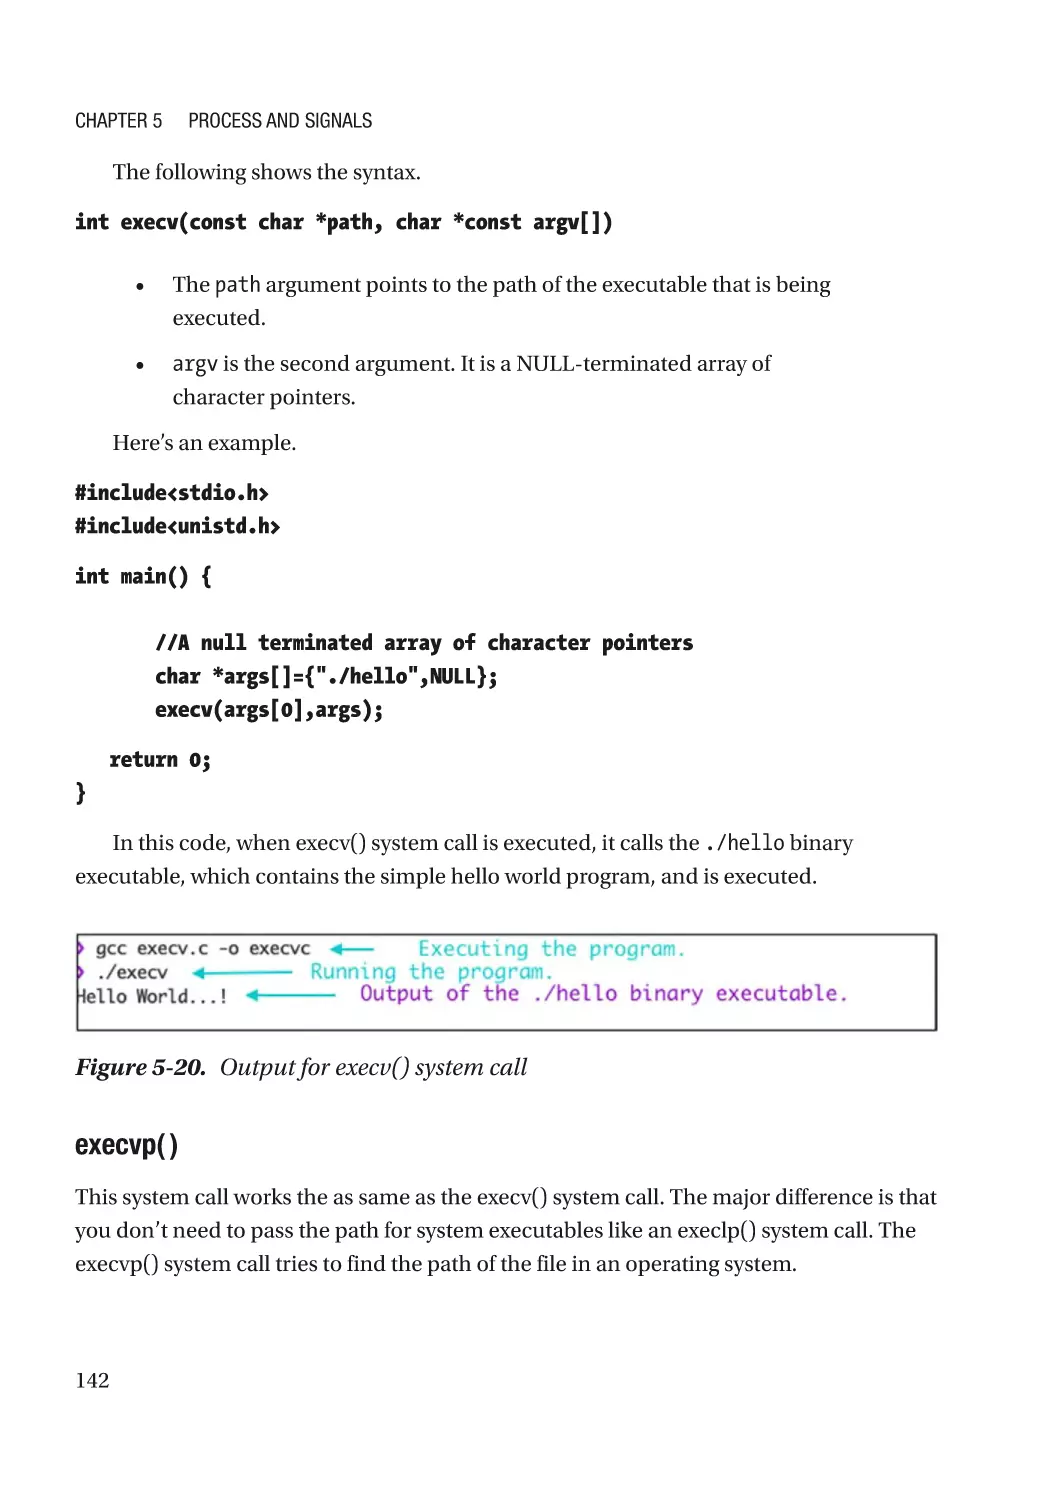
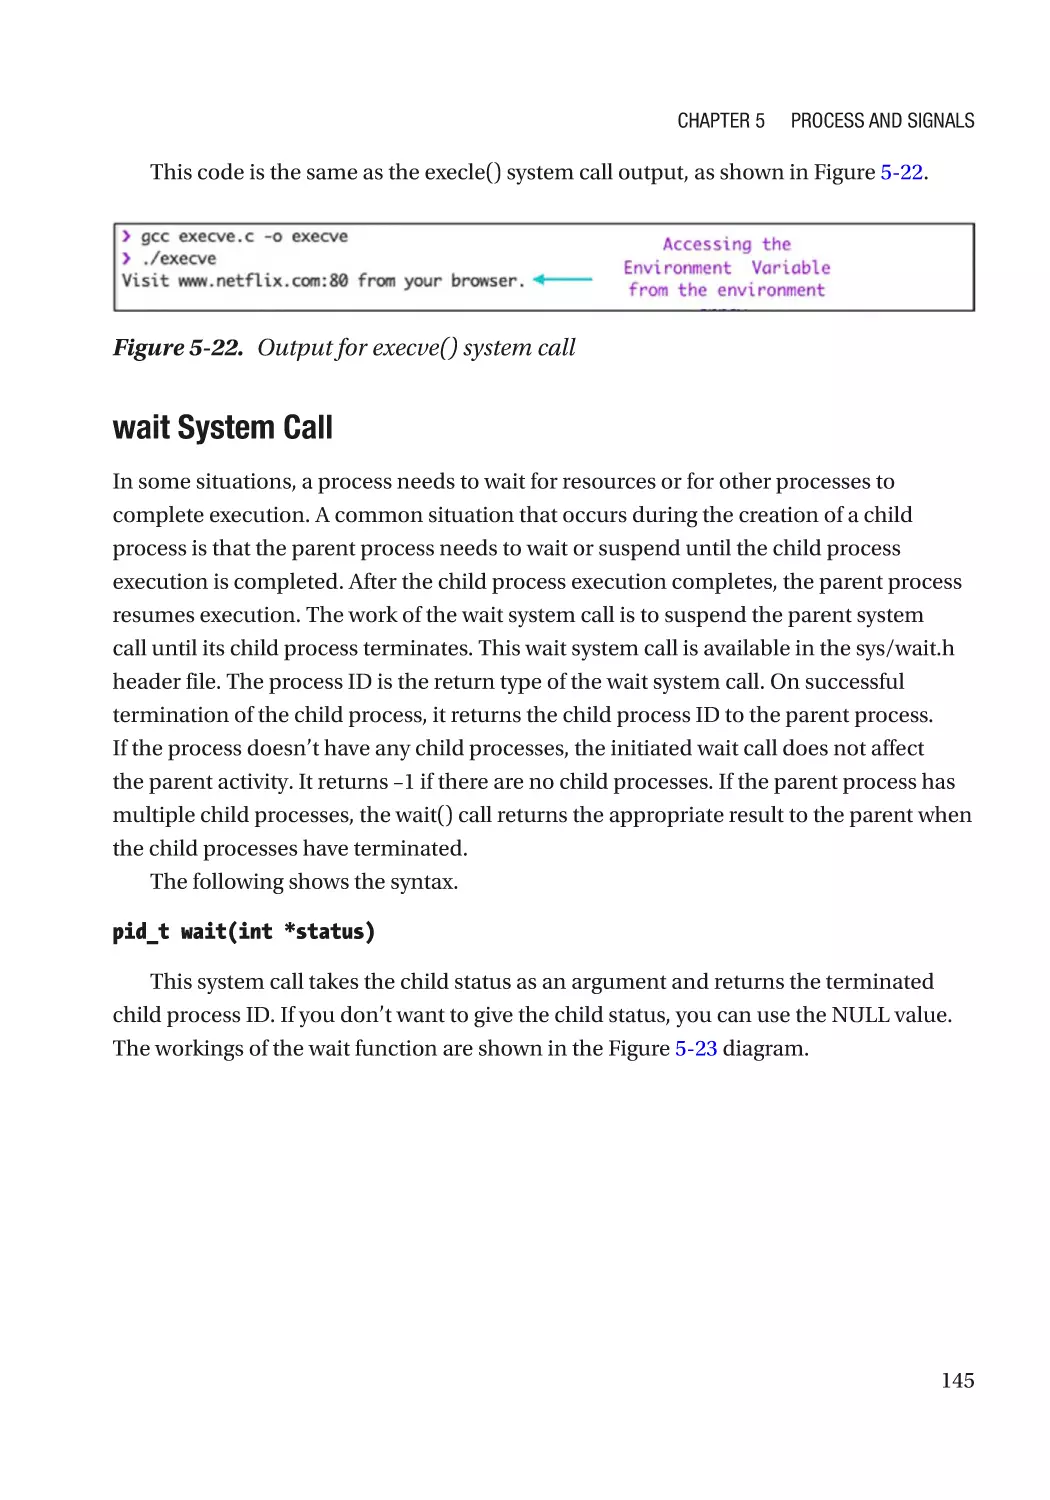
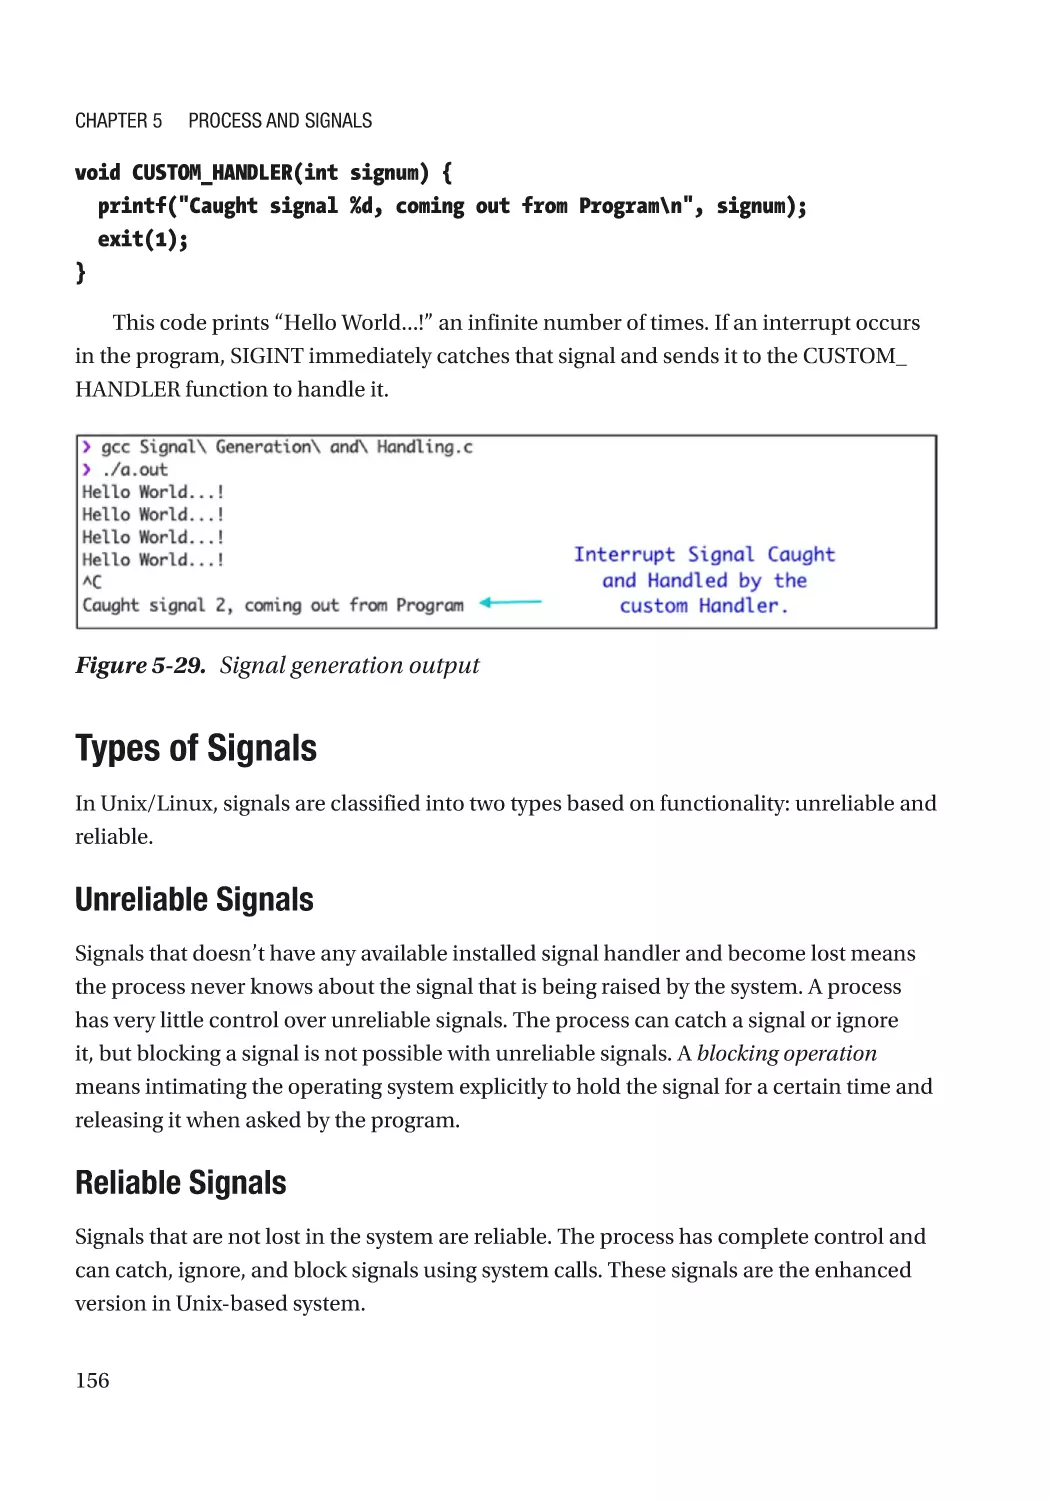
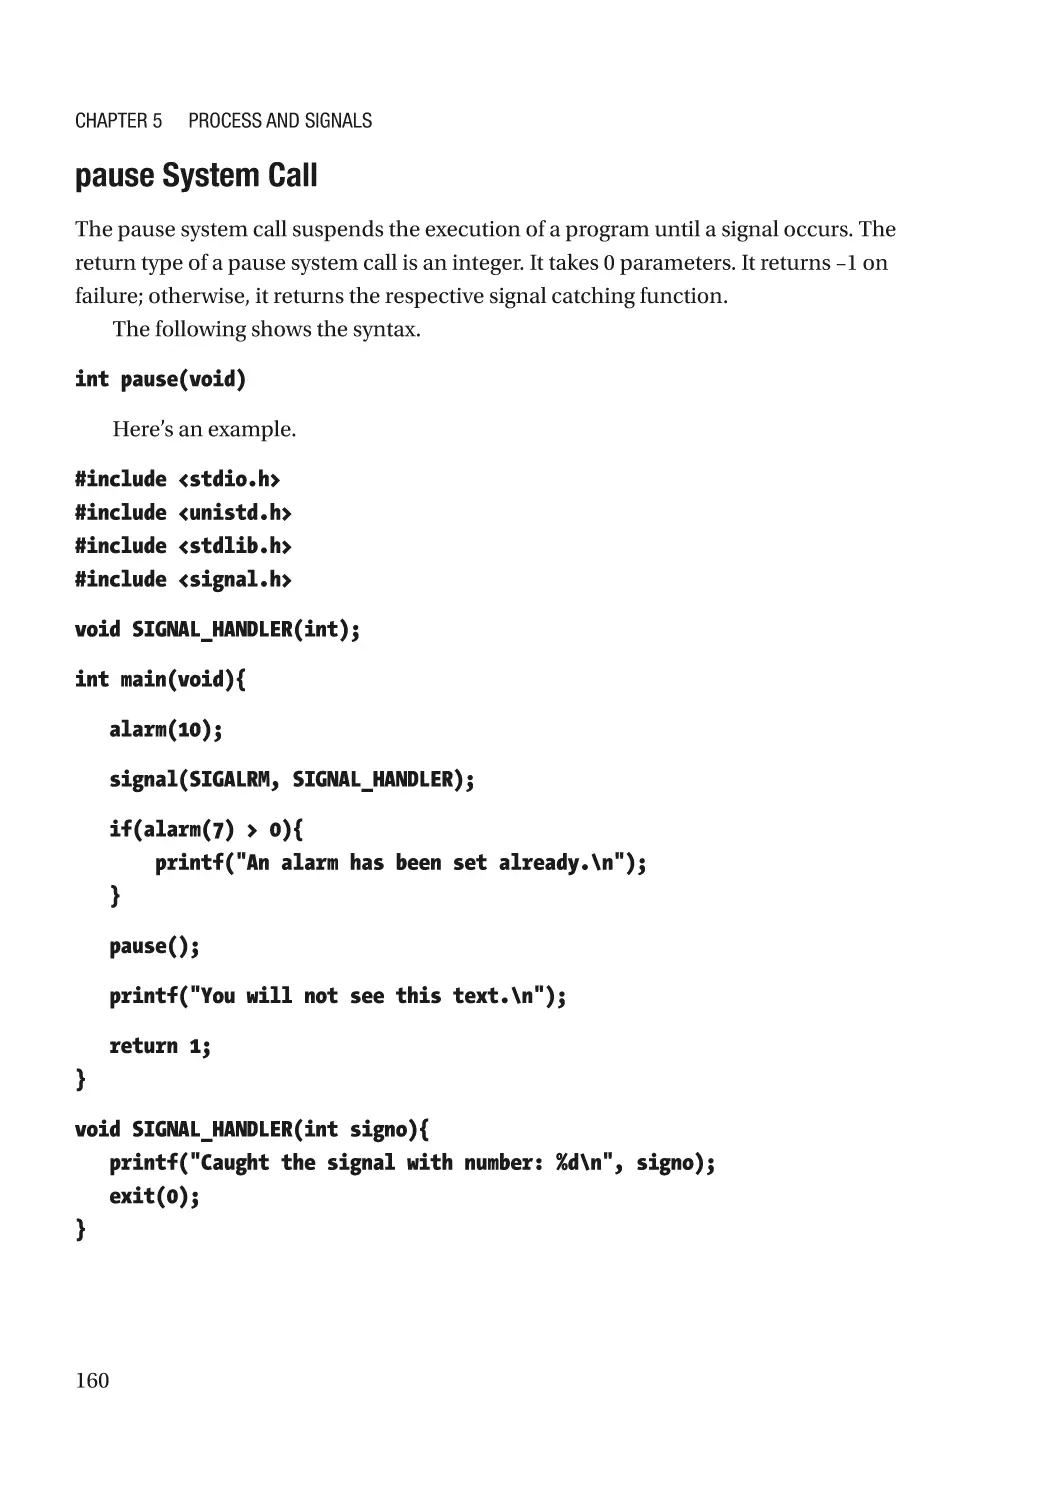
Introduction to Signals�������������������������������������������������������������������������������������������������������������� 152
Catch the Signal������������������������������������������������������������������������������������������������������������������ 152
Ignore the Signal����������������������������������������������������������������������������������������������������������������� 152
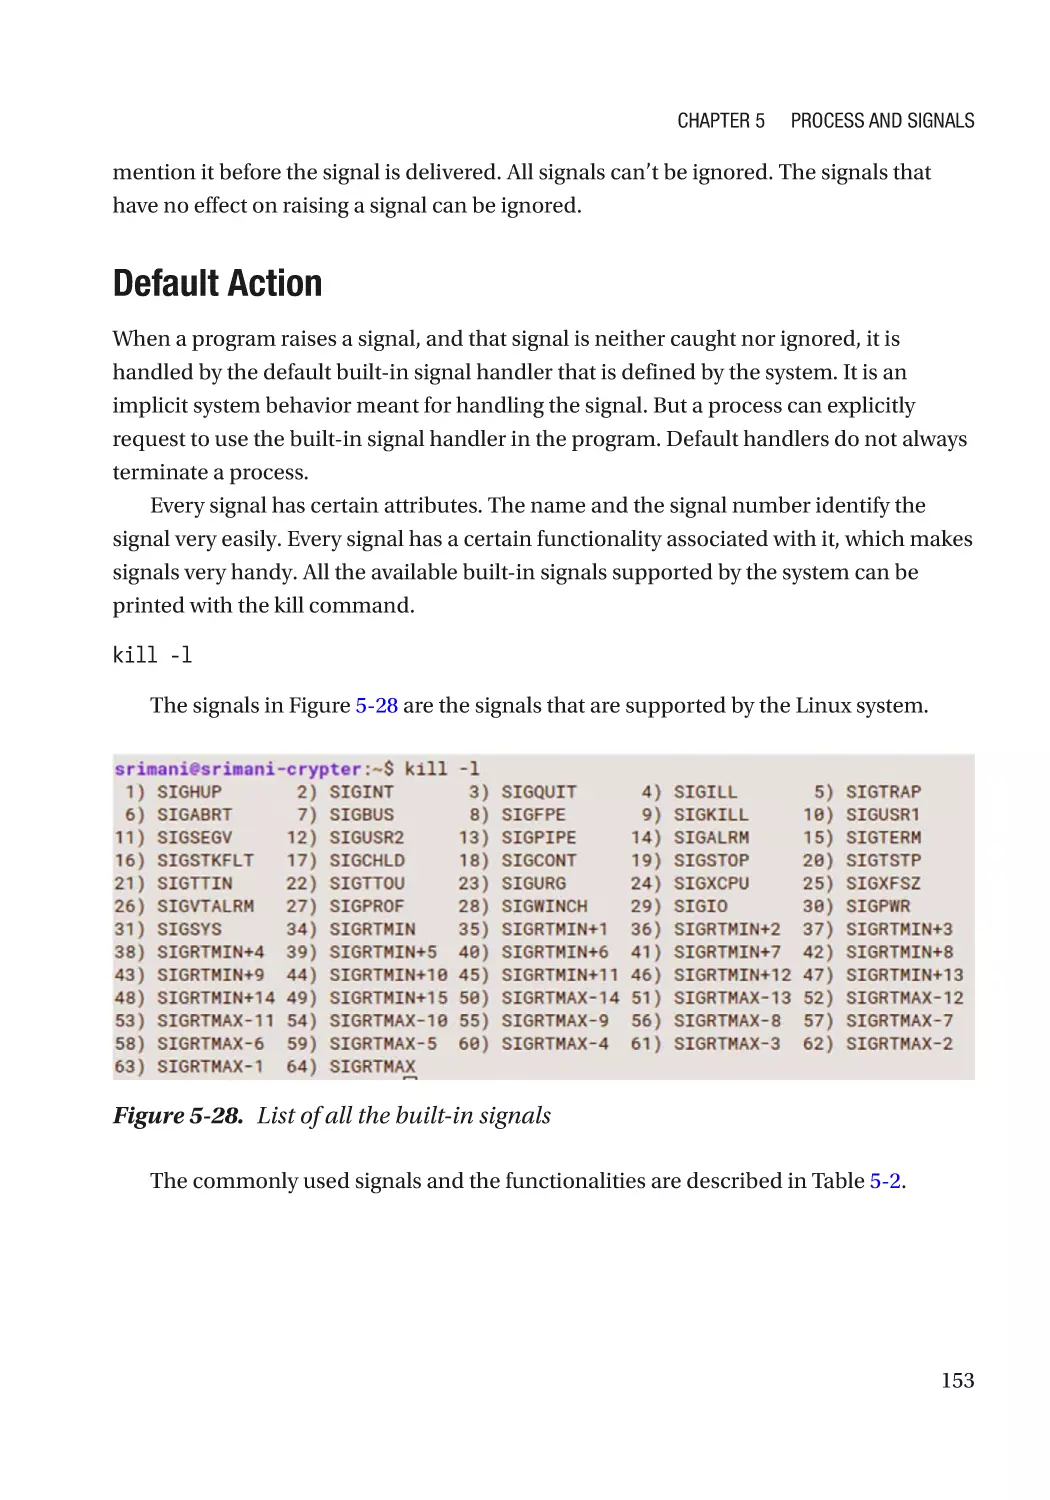
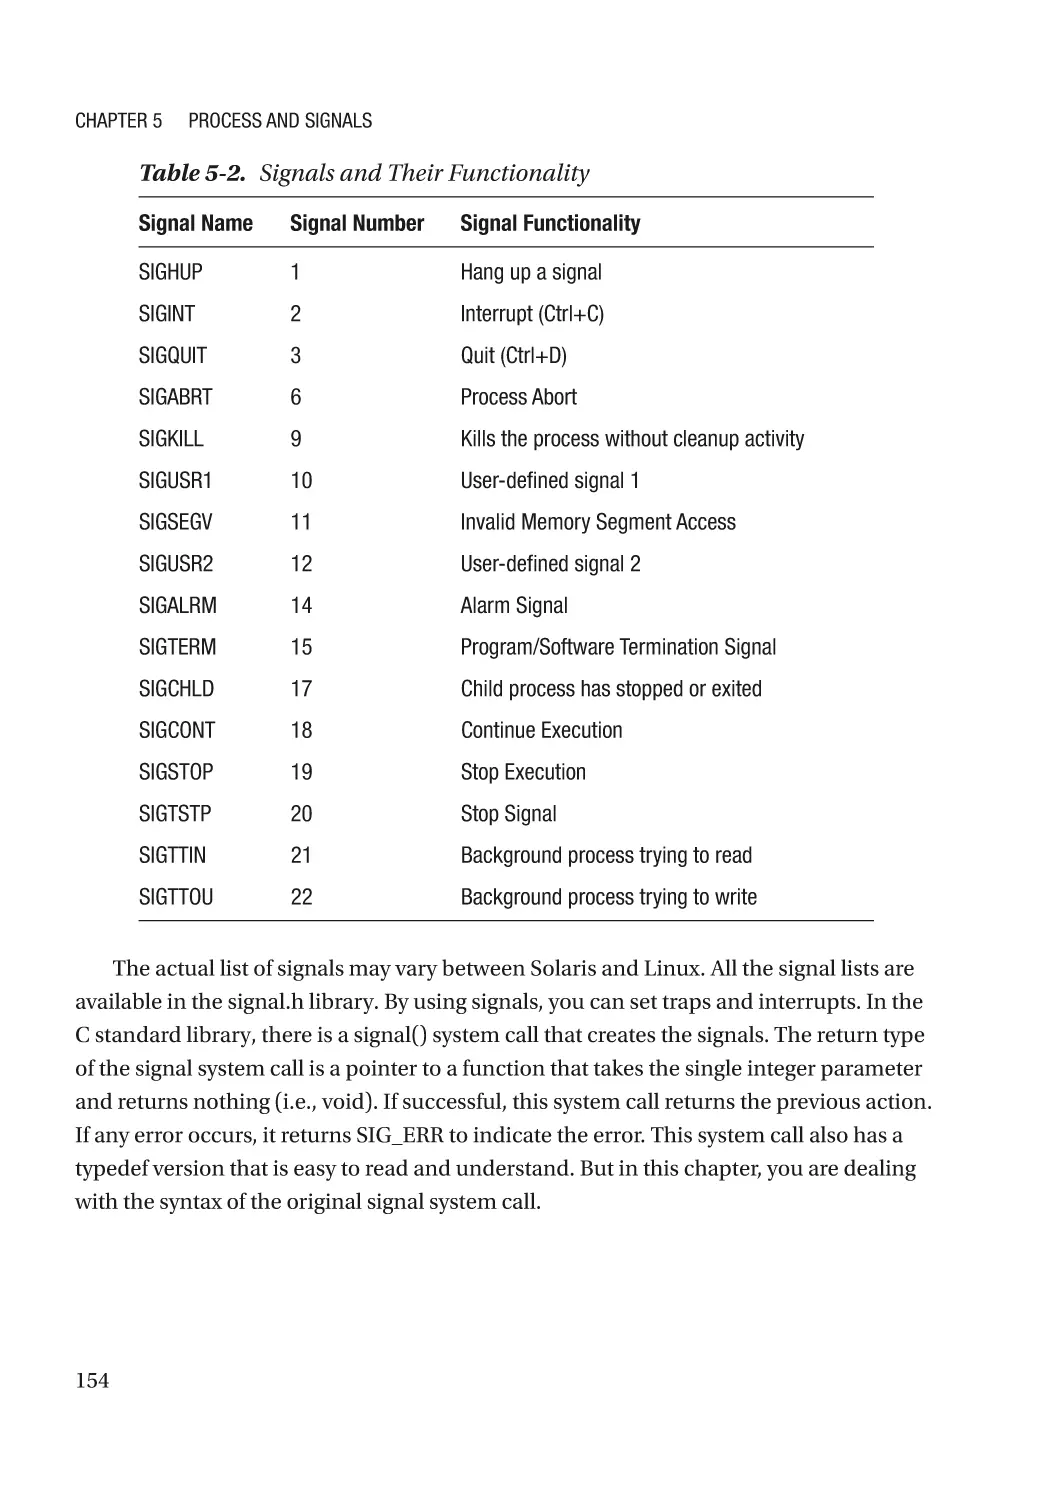
Default Action���������������������������������������������������������������������������������������������������������������������� 153
Types of Signals������������������������������������������������������������������������������������������������������������������ 156
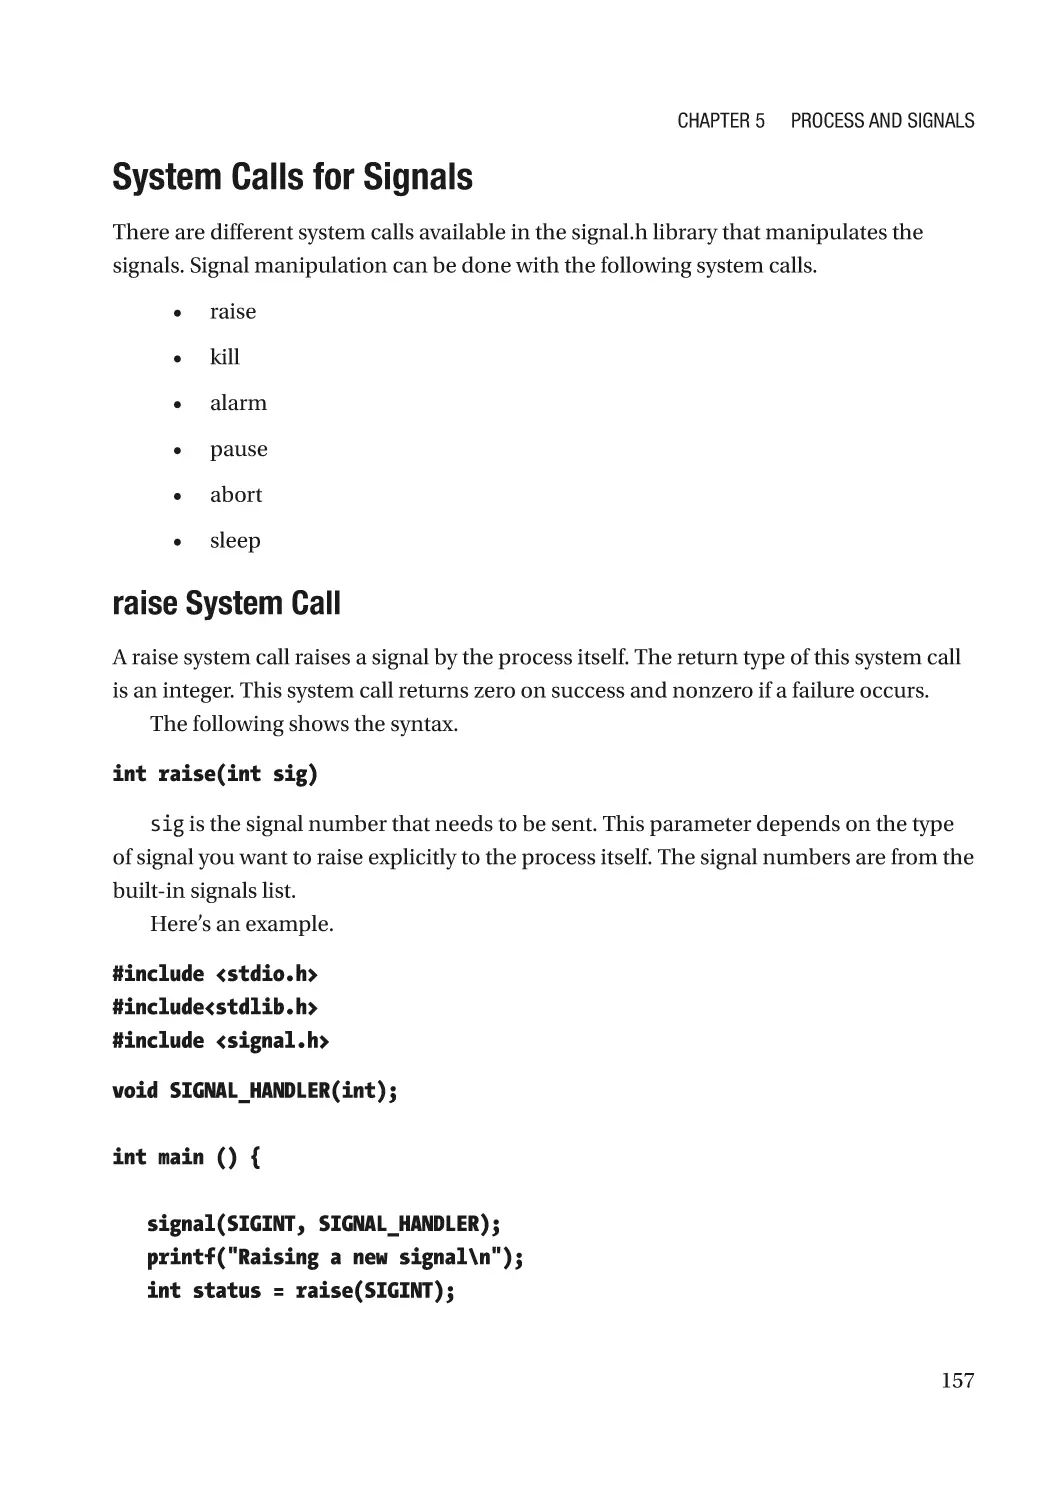
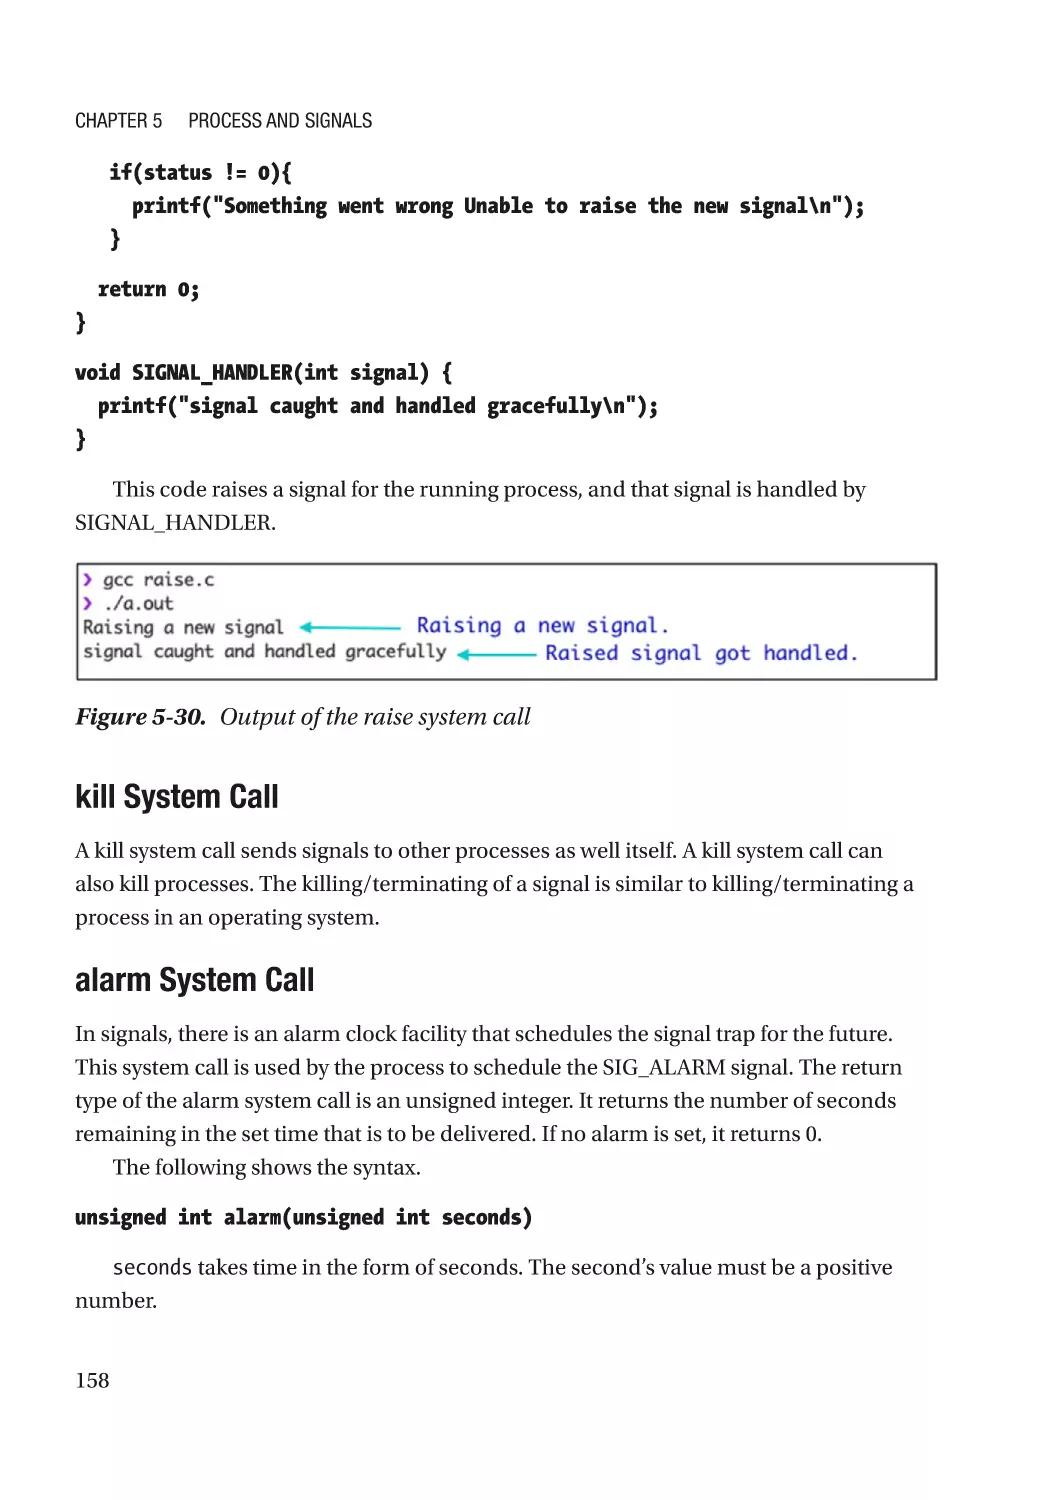
System Calls for Signals������������������������������������������������������������������������������������������������������ 157
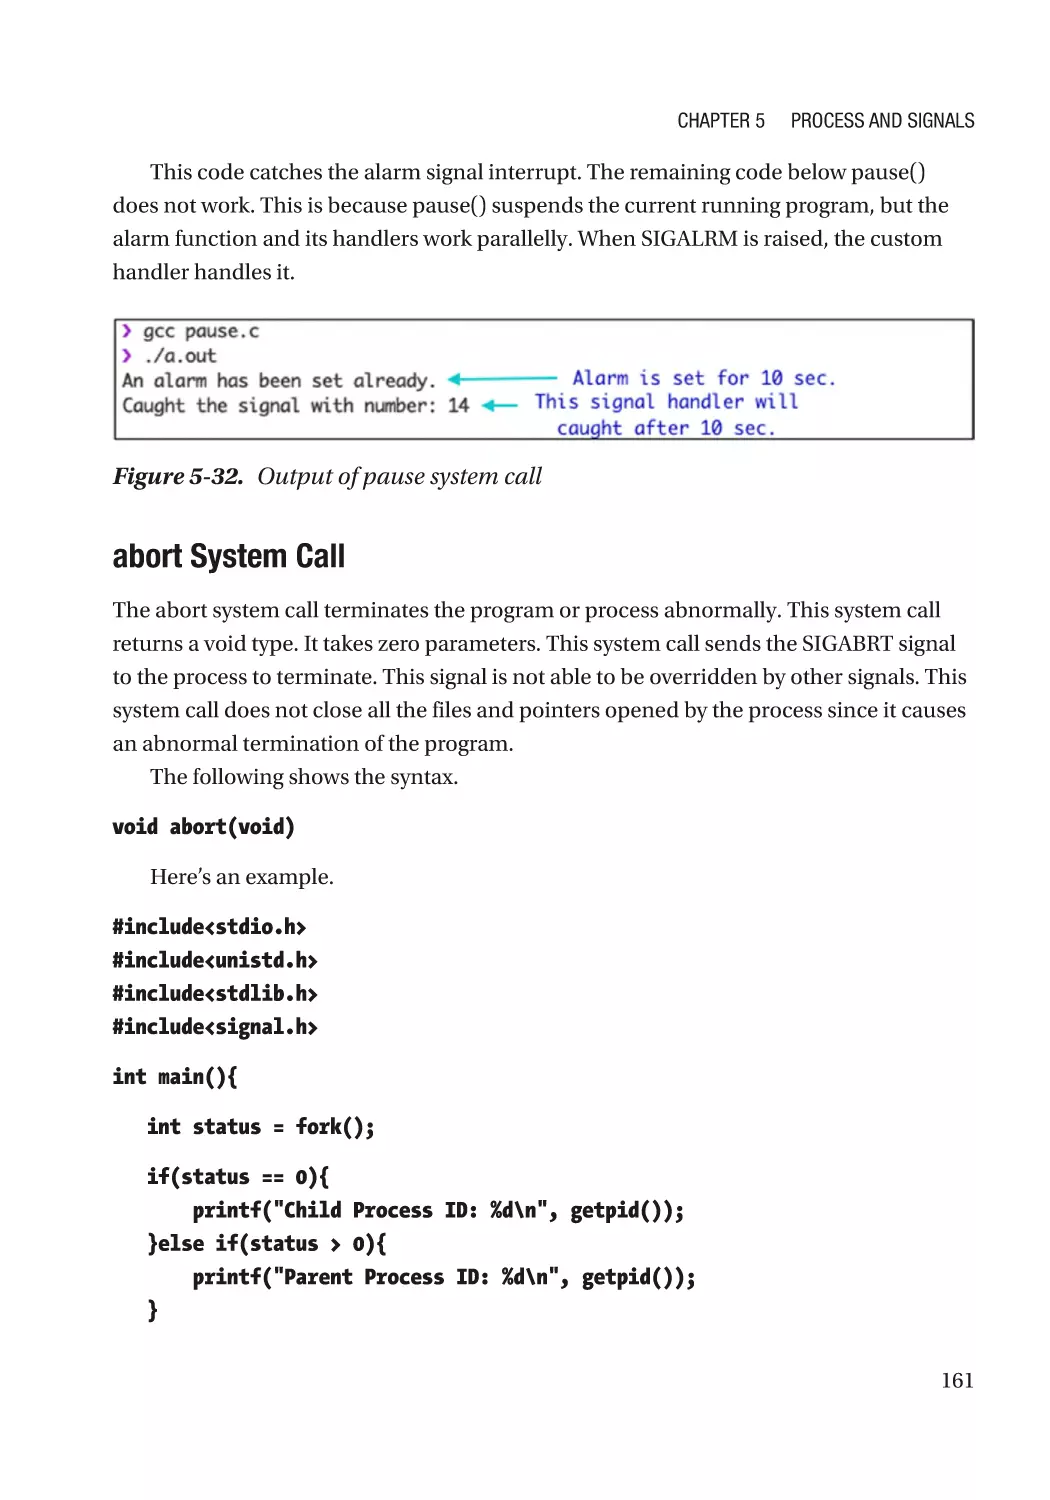
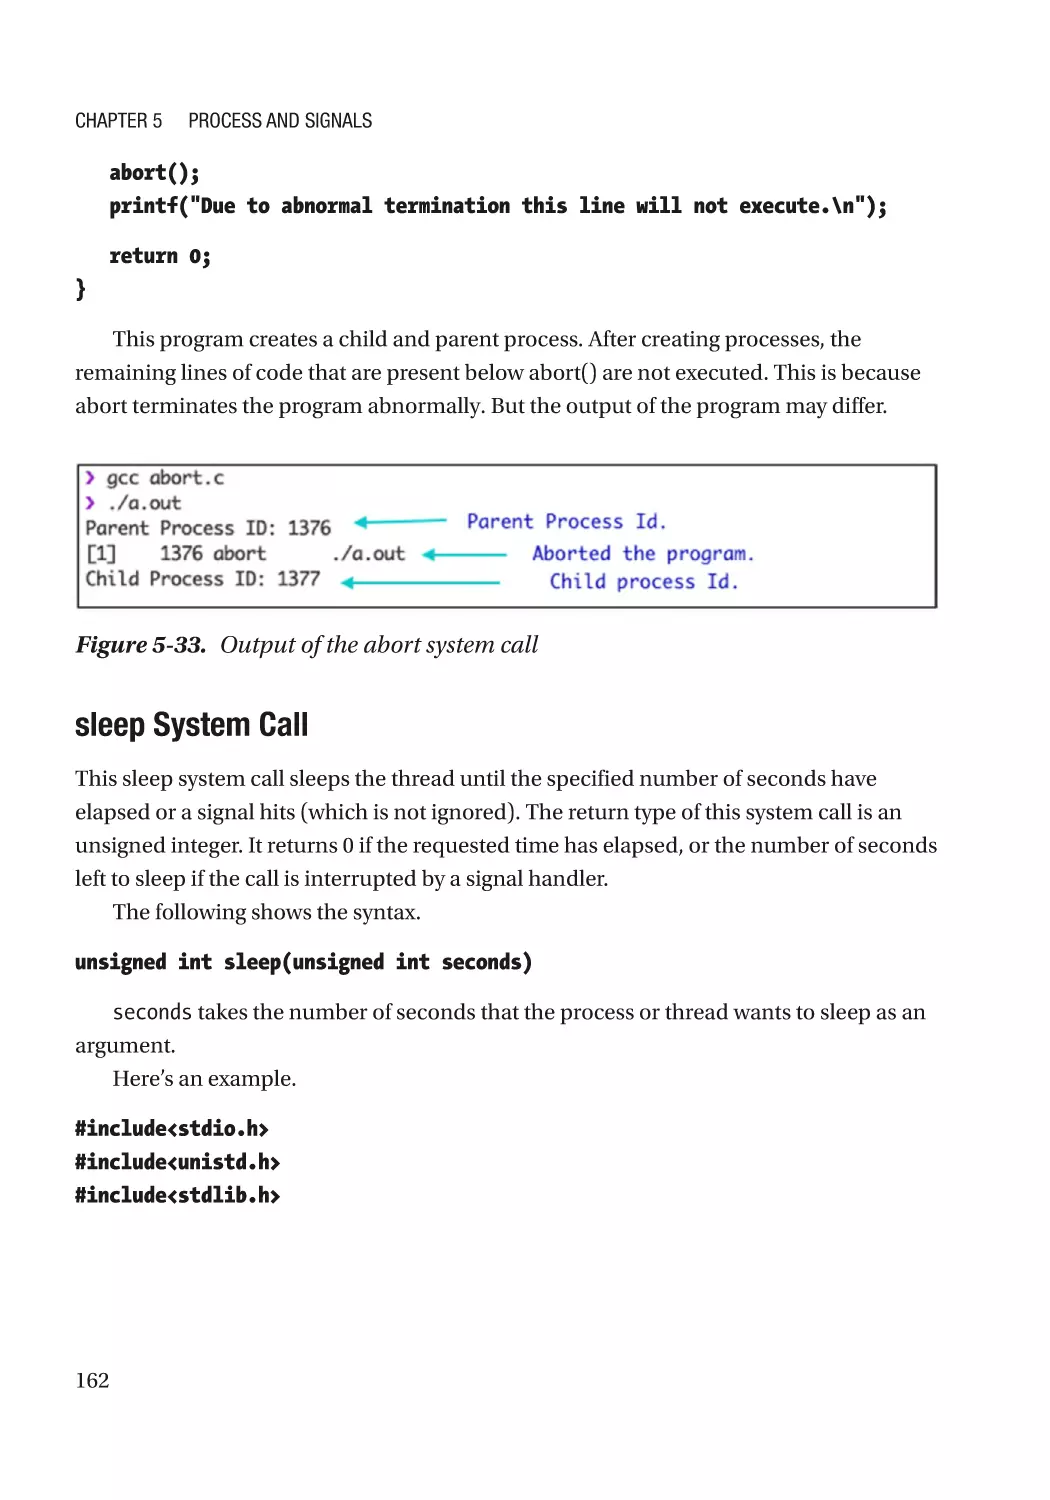
Summary���������������������������������������������������������������������������������������������������������������������������������� 163
vii
Table of Contents
Chapter 6: Interprocess Communication�������������������������������������������������������������� 165
Introduction to IPC�������������������������������������������������������������������������������������������������������������������� 166
Independent Processes������������������������������������������������������������������������������������������������������� 166
Cooperating Processes�������������������������������������������������������������������������������������������������������� 166
The Benefits of IPC�������������������������������������������������������������������������������������������������������������� 168
Modes of Communication��������������������������������������������������������������������������������������������������������� 168
Simplex�������������������������������������������������������������������������������������������������������������������������������� 169
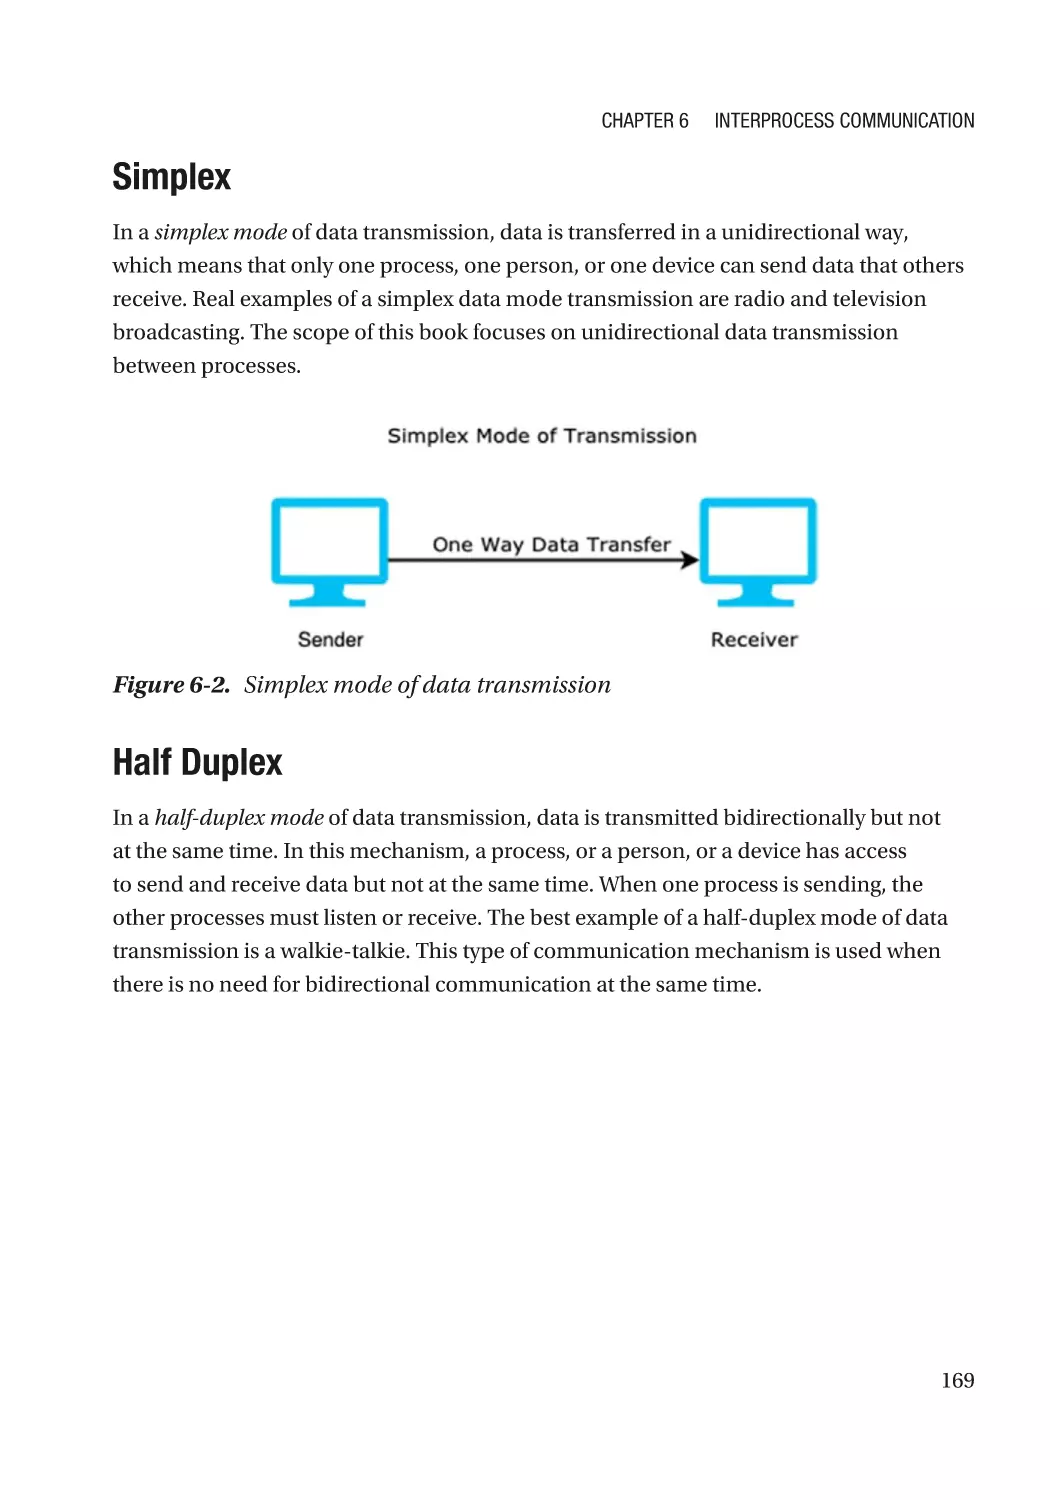
Half Duplex�������������������������������������������������������������������������������������������������������������������������� 169
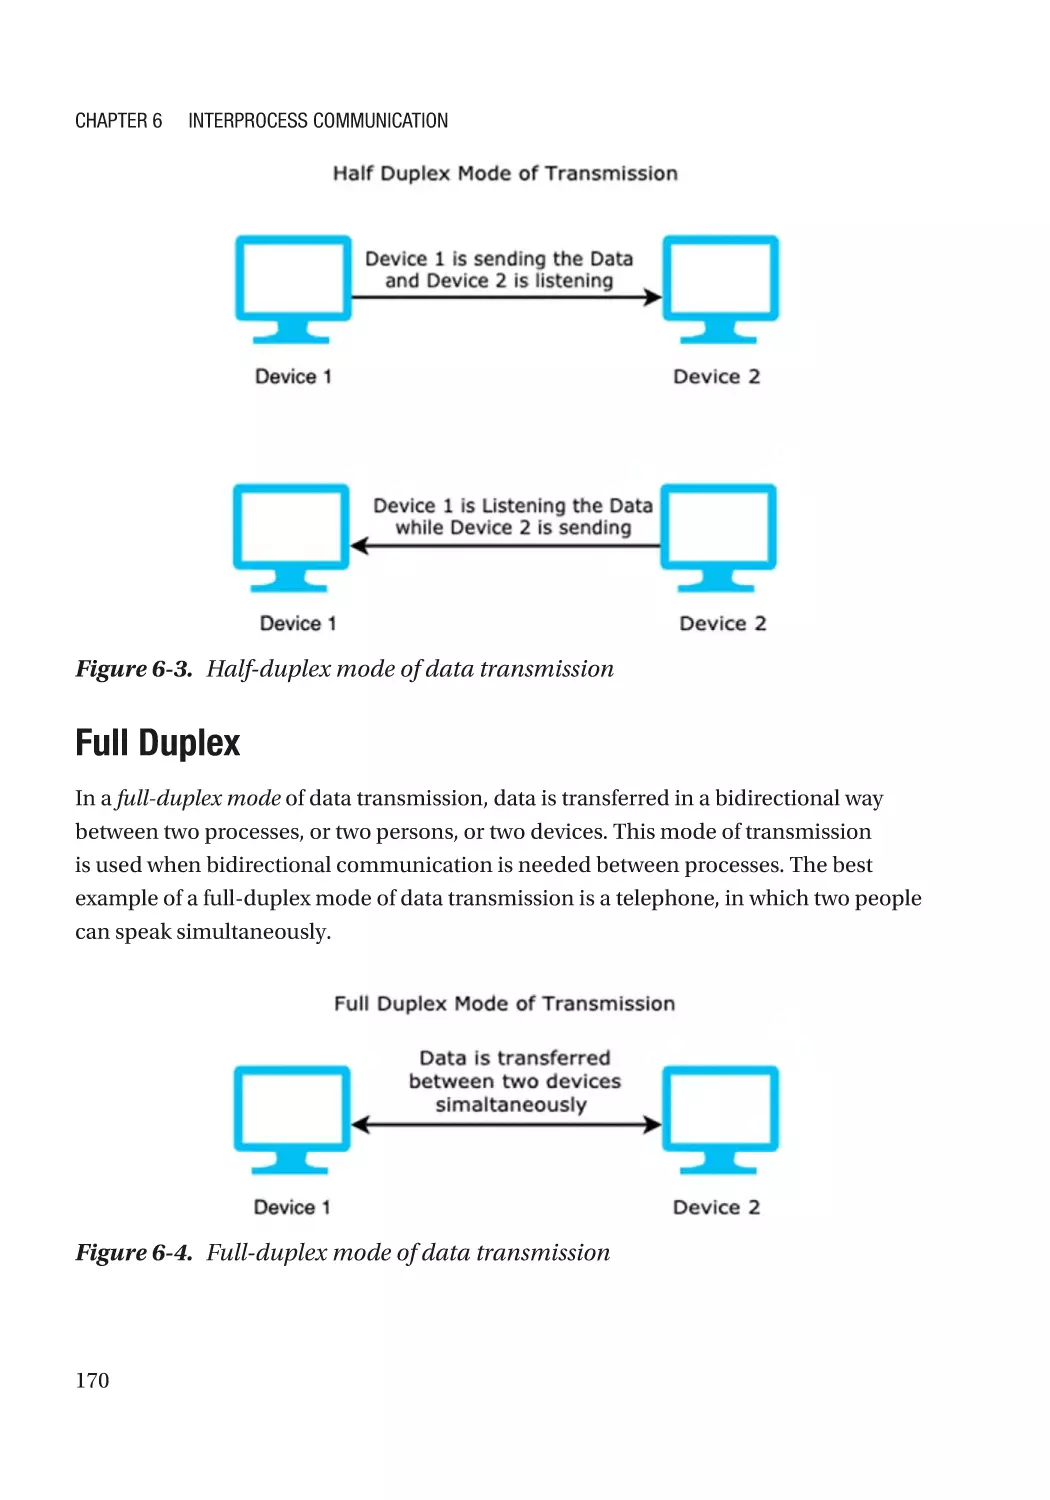
Full Duplex��������������������������������������������������������������������������������������������������������������������������� 170
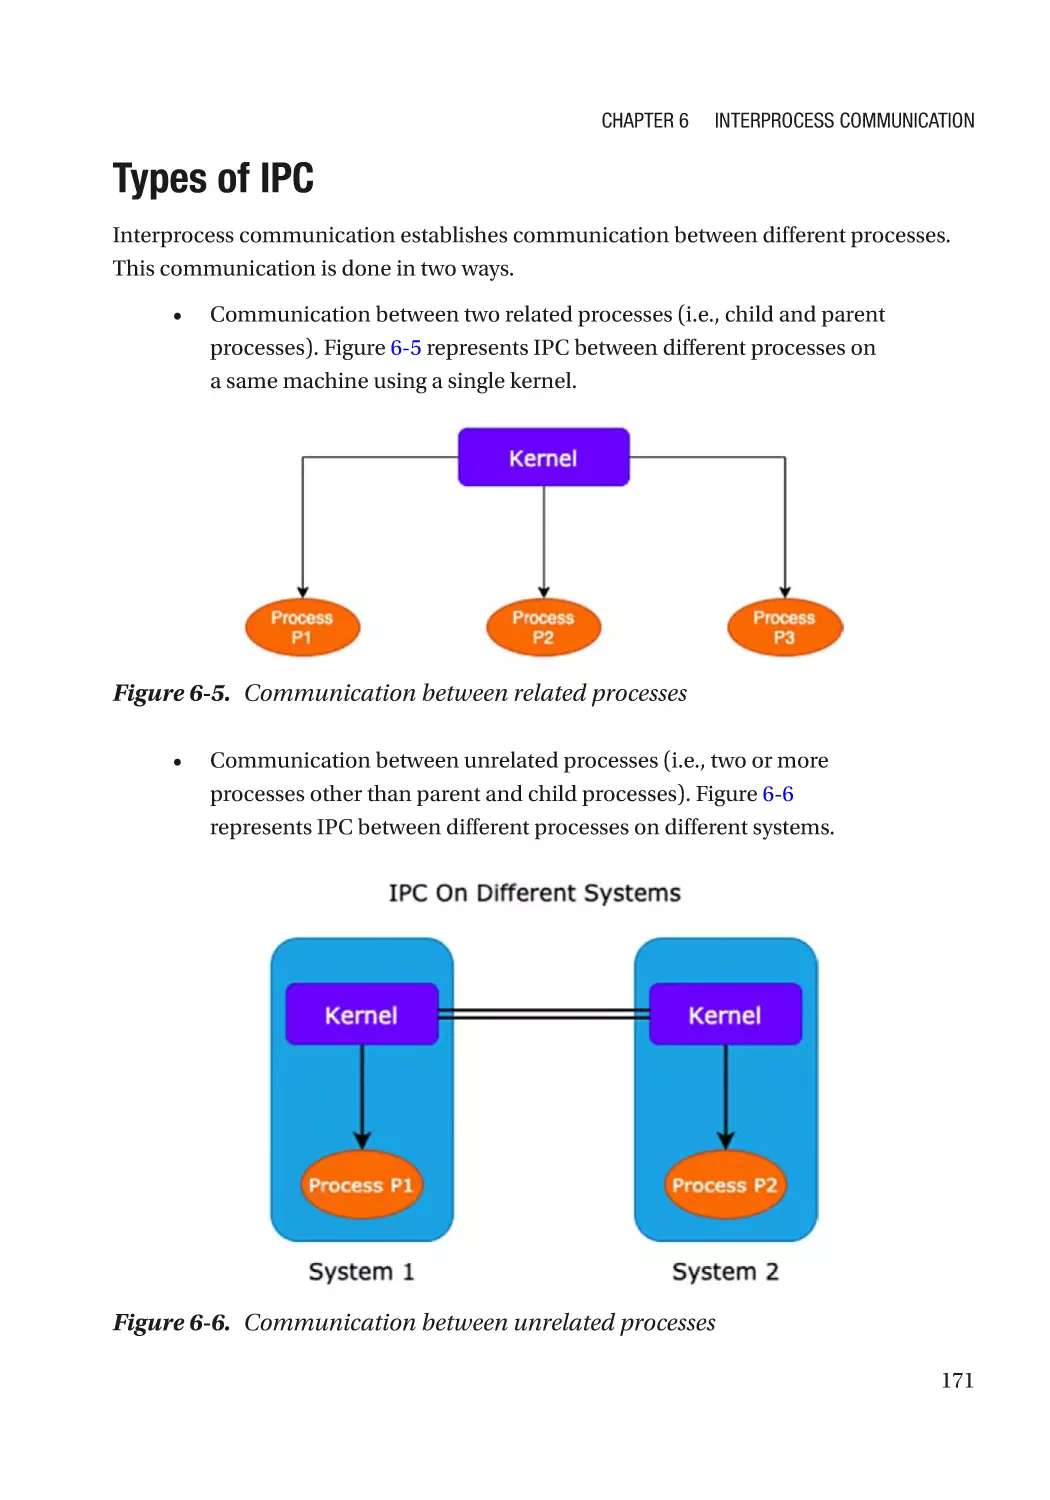
Types of IPC������������������������������������������������������������������������������������������������������������������������������� 171
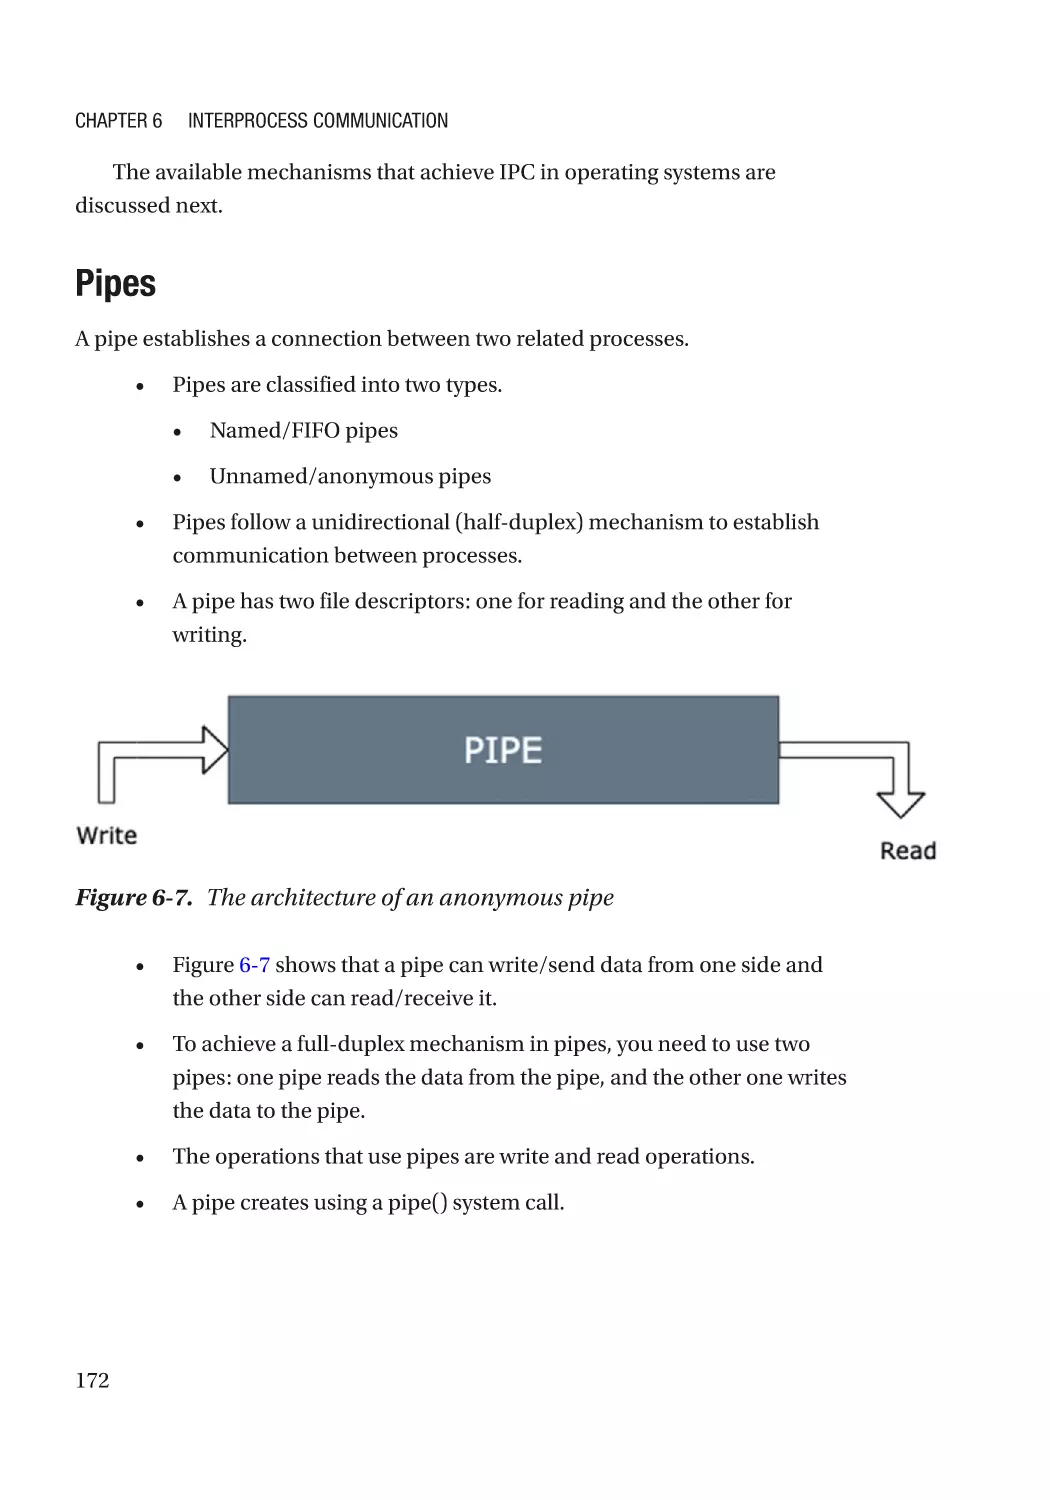
Pipes������������������������������������������������������������������������������������������������������������������������������������ 172
FIFO (Named Pipe)��������������������������������������������������������������������������������������������������������������� 173
Message Queues����������������������������������������������������������������������������������������������������������������� 173
Semaphores������������������������������������������������������������������������������������������������������������������������ 173
Shared Memory������������������������������������������������������������������������������������������������������������������� 174
Sockets�������������������������������������������������������������������������������������������������������������������������������� 174
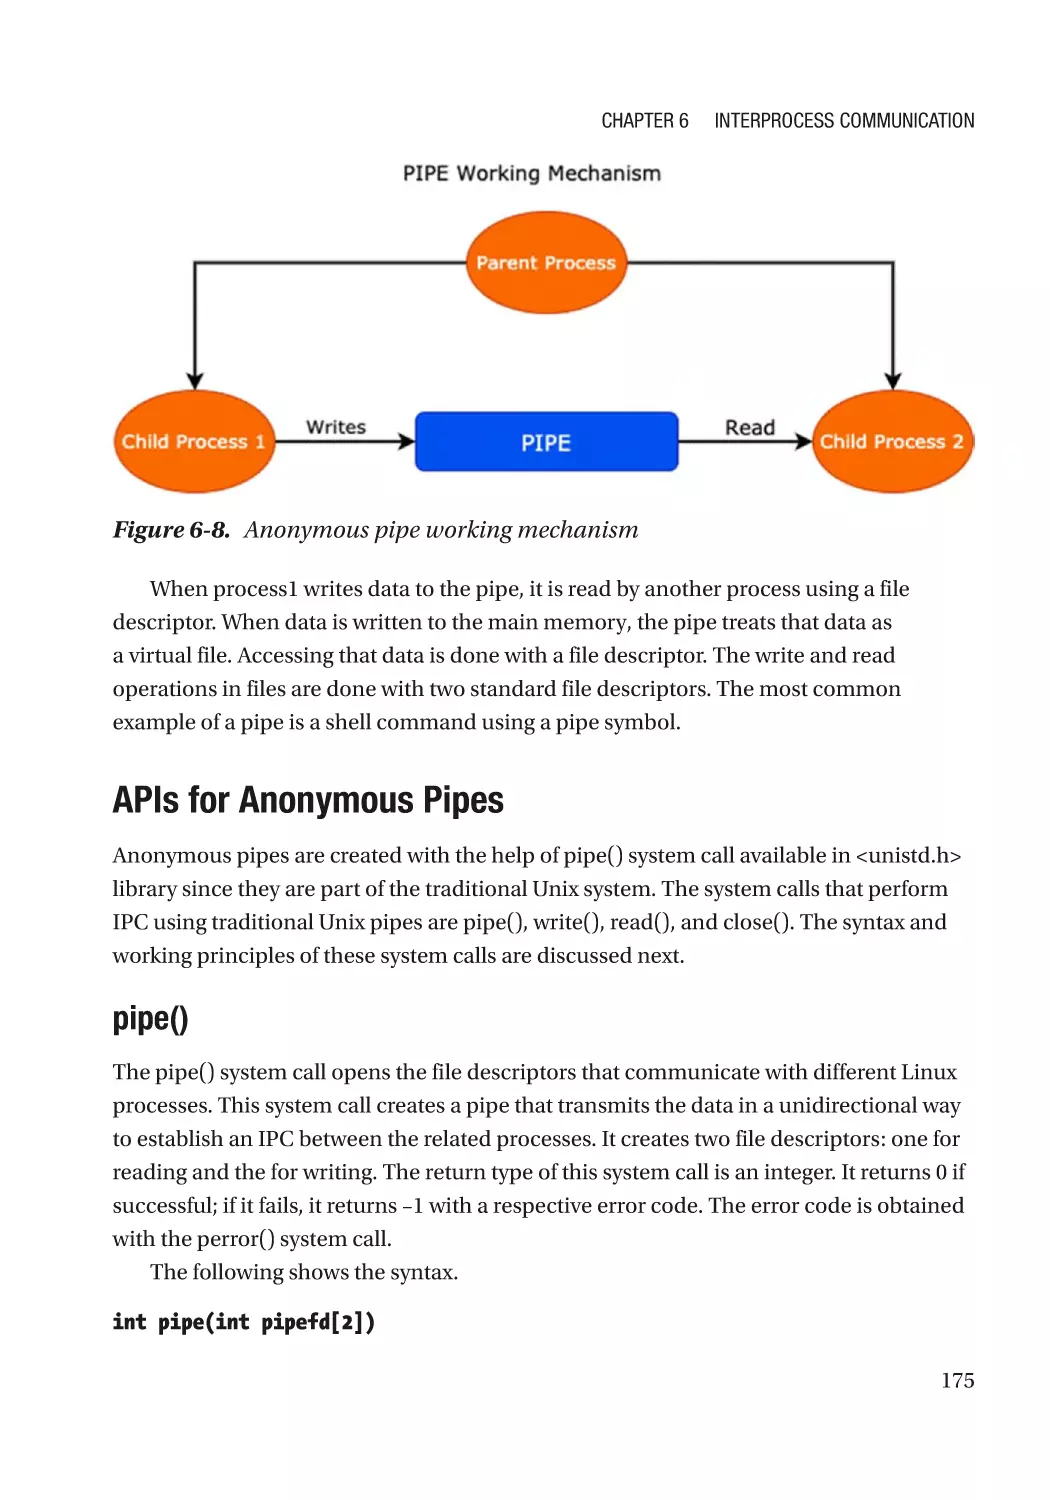
Anonymous Pipes���������������������������������������������������������������������������������������������������������������������� 174
APIs for Anonymous Pipes��������������������������������������������������������������������������������������������������� 175
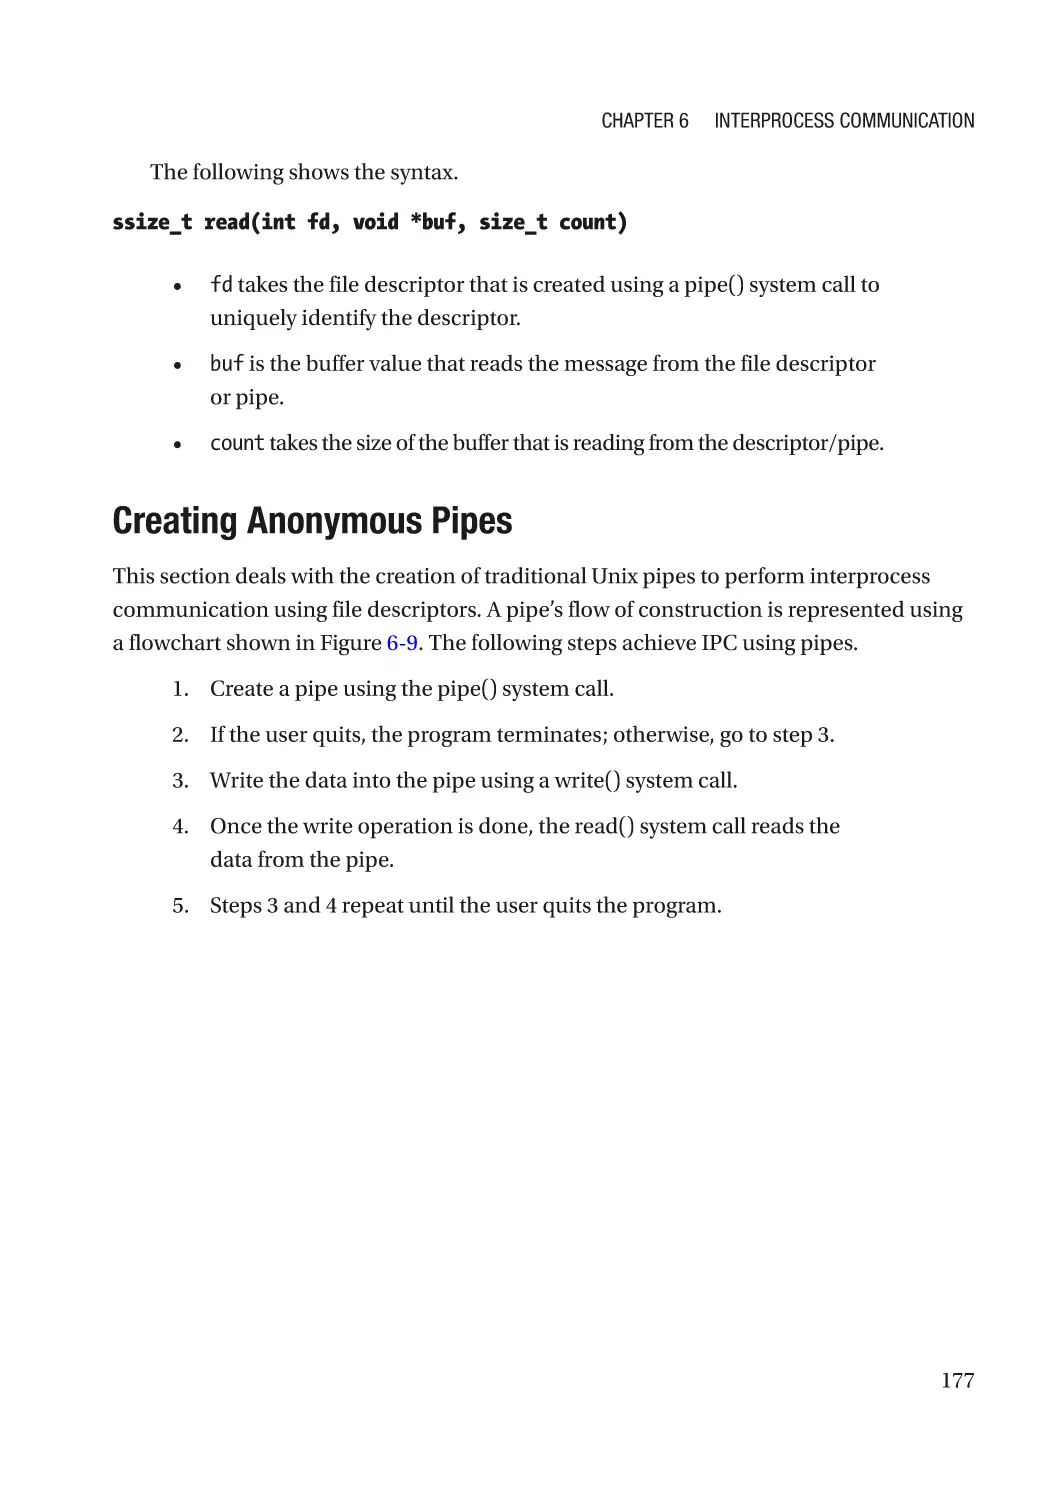
Creating Anonymous Pipes�������������������������������������������������������������������������������������������������� 177
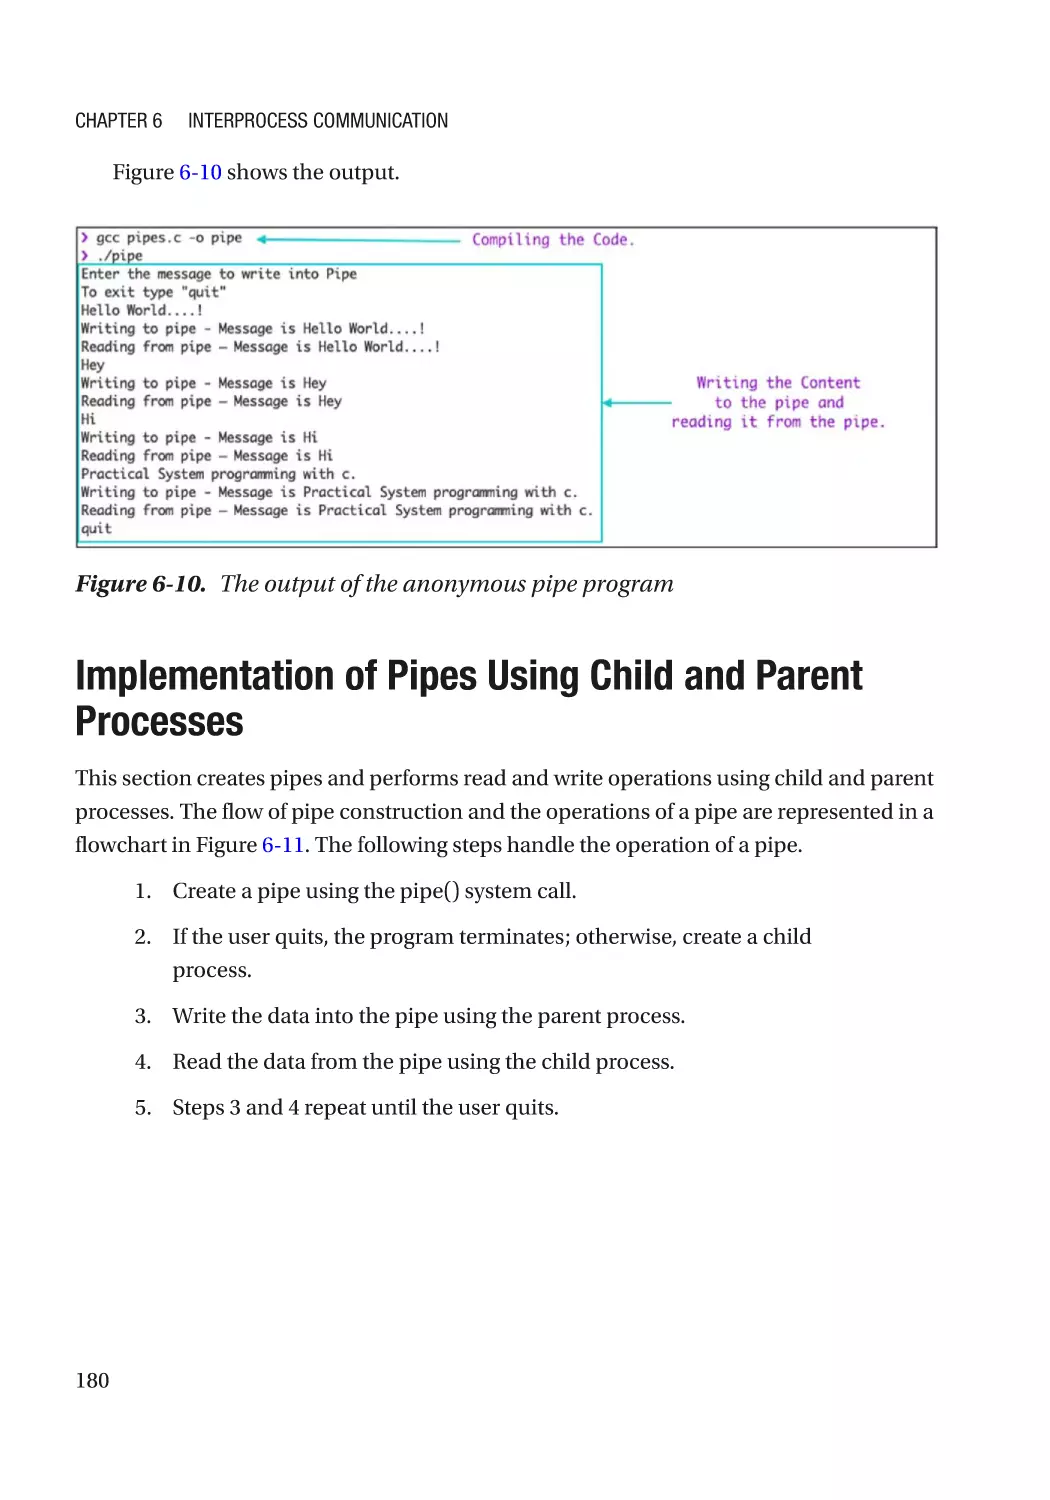
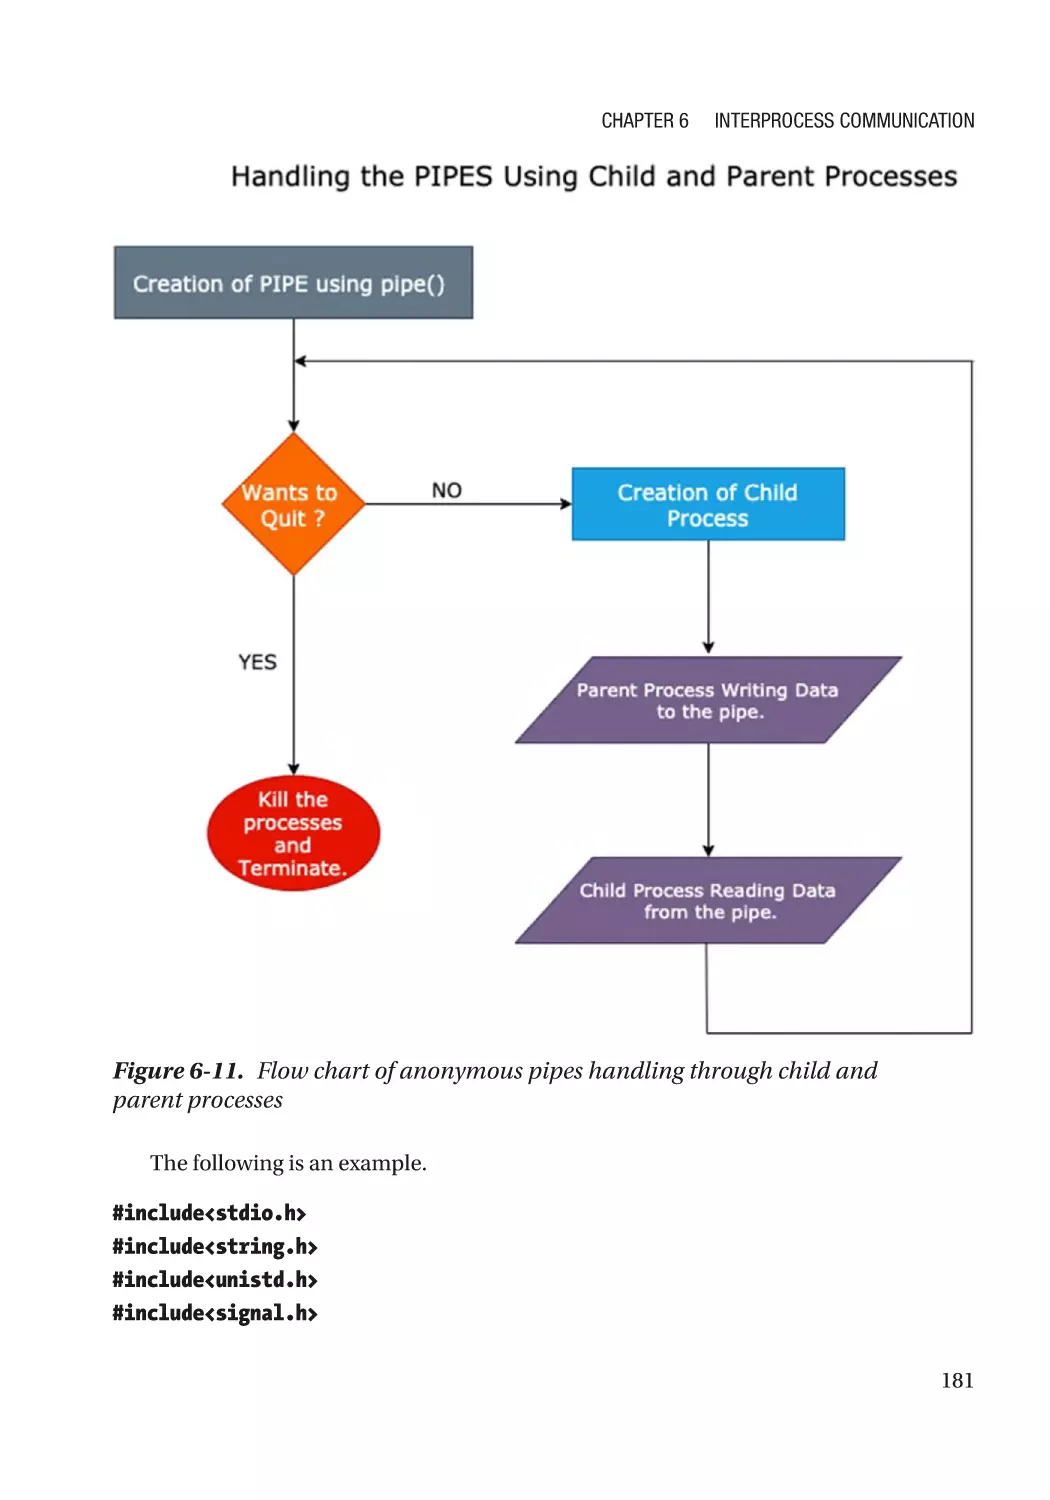
Implementation of Pipes Using Child and Parent Processes���������������������������������������������������� 180
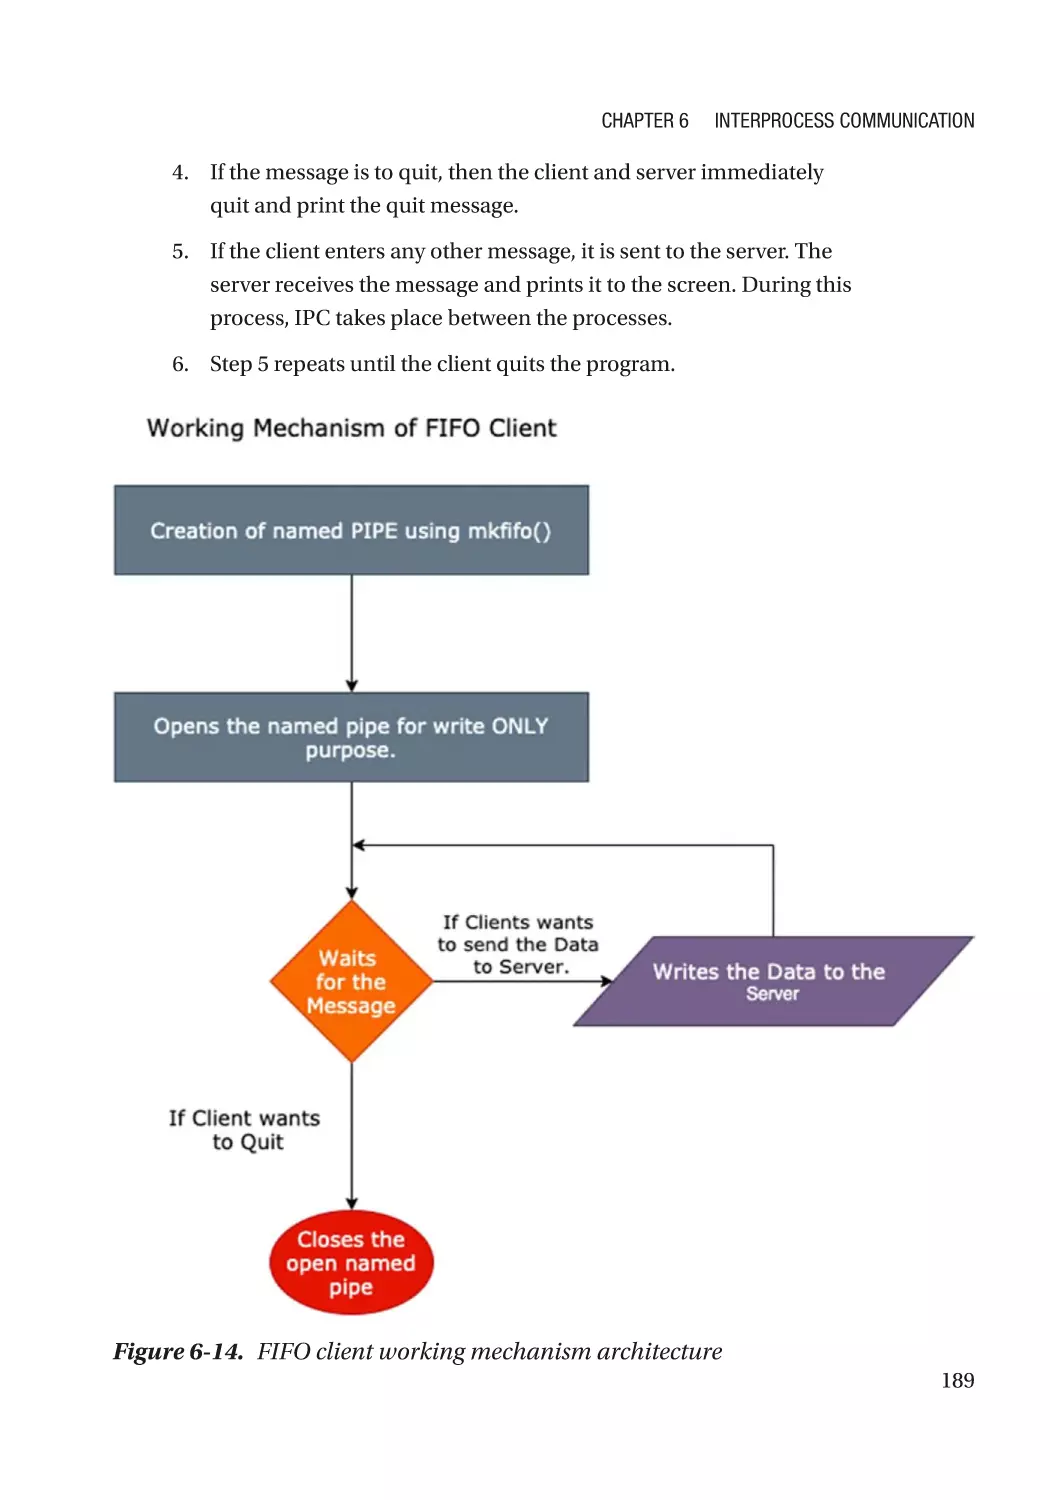
Working with Named Pipes������������������������������������������������������������������������������������������������������� 183
mknod() System Call����������������������������������������������������������������������������������������������������������� 183
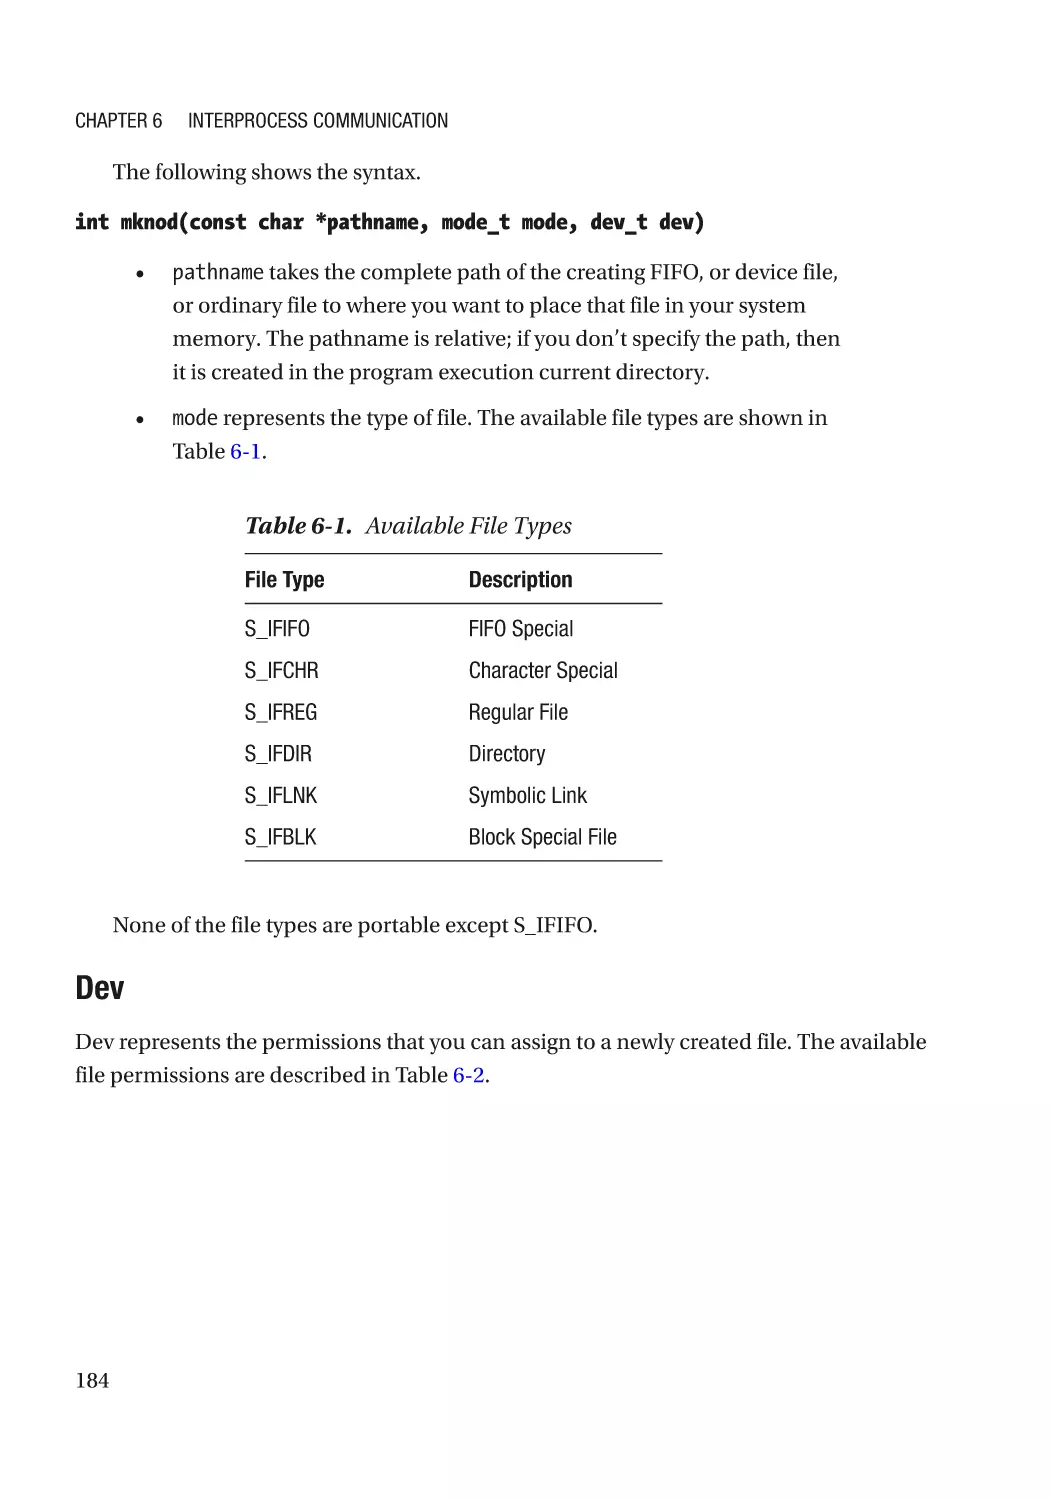
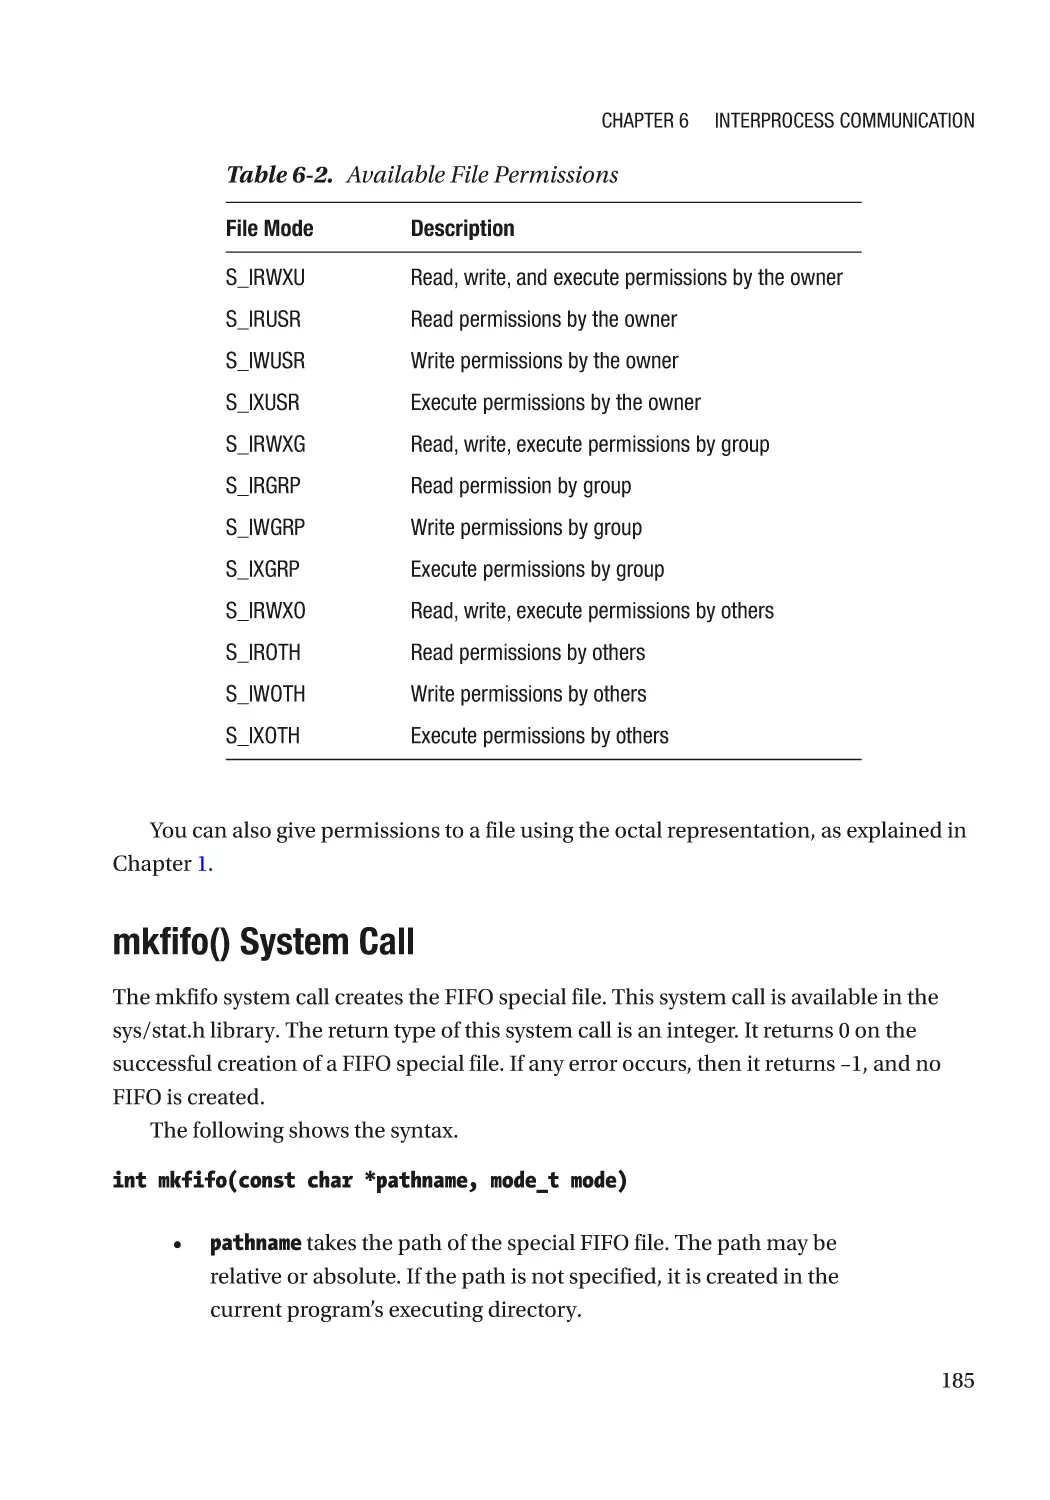
mkfifo() System Call������������������������������������������������������������������������������������������������������������ 185
mknod vs. mkfifo����������������������������������������������������������������������������������������������������������������� 186
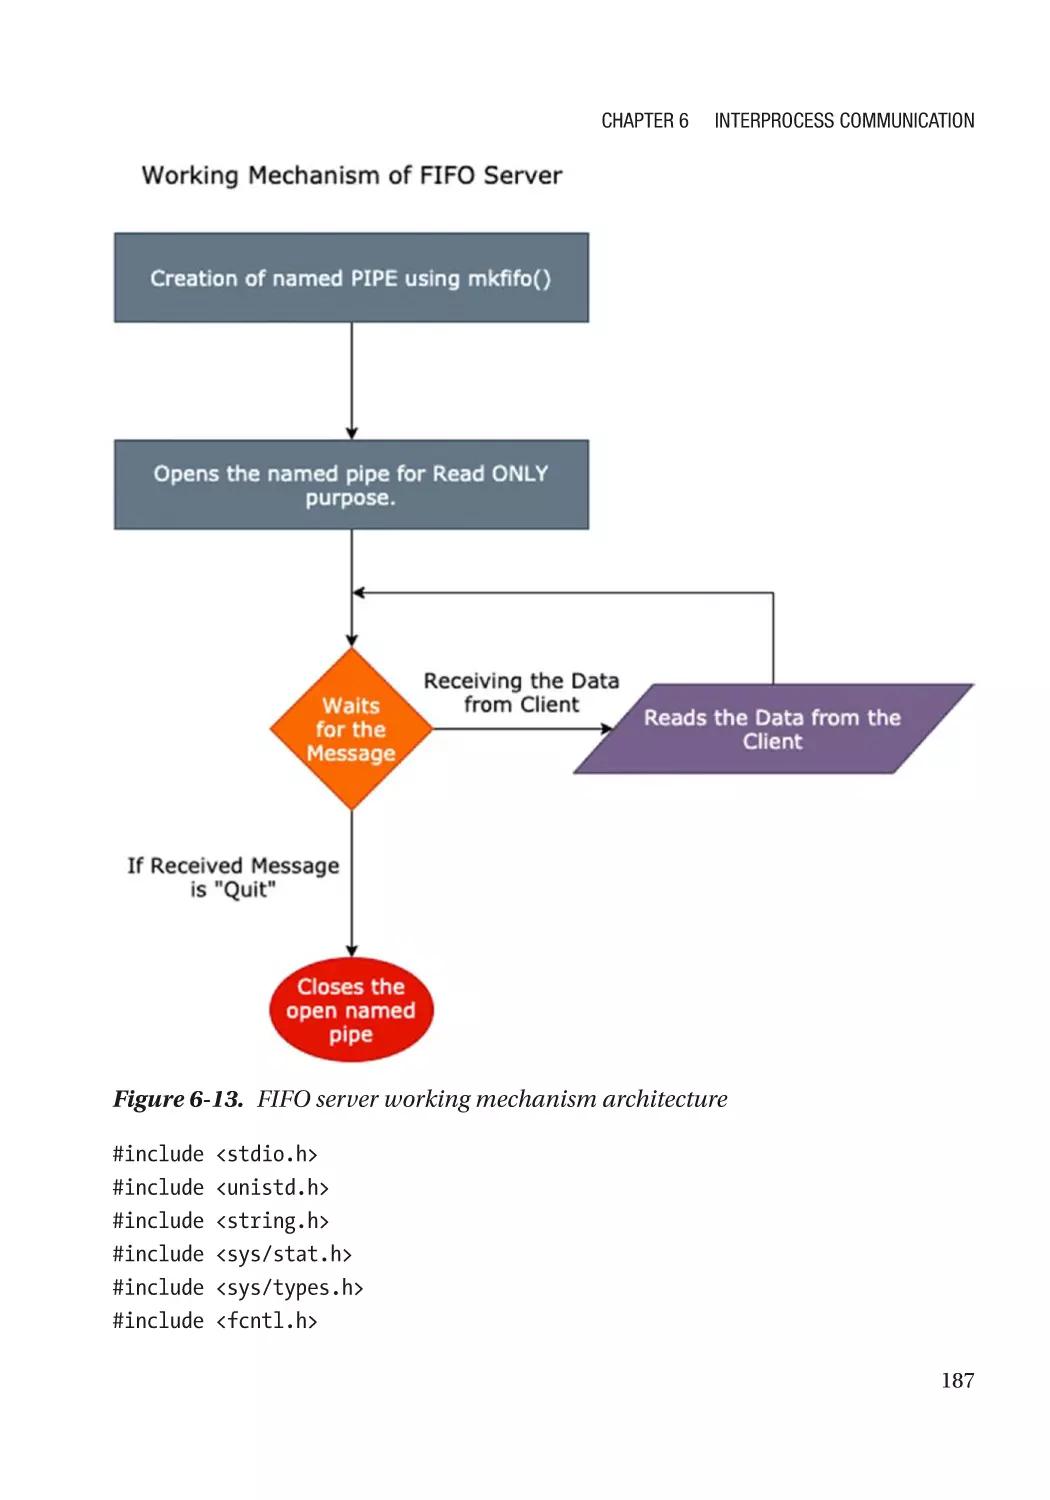
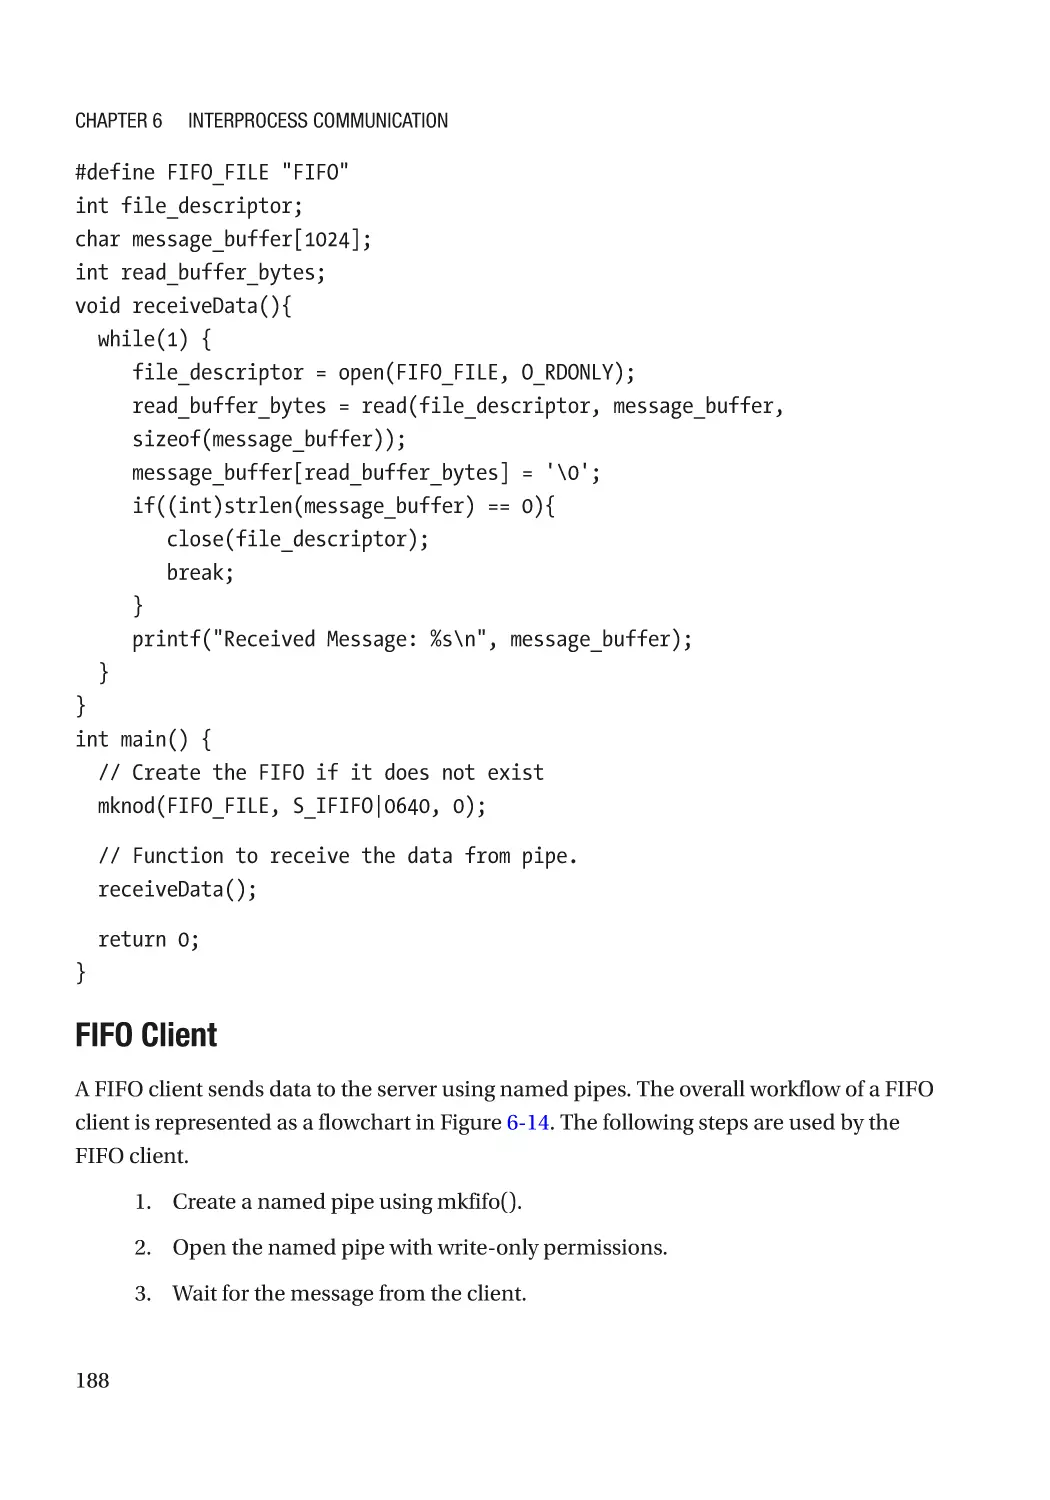
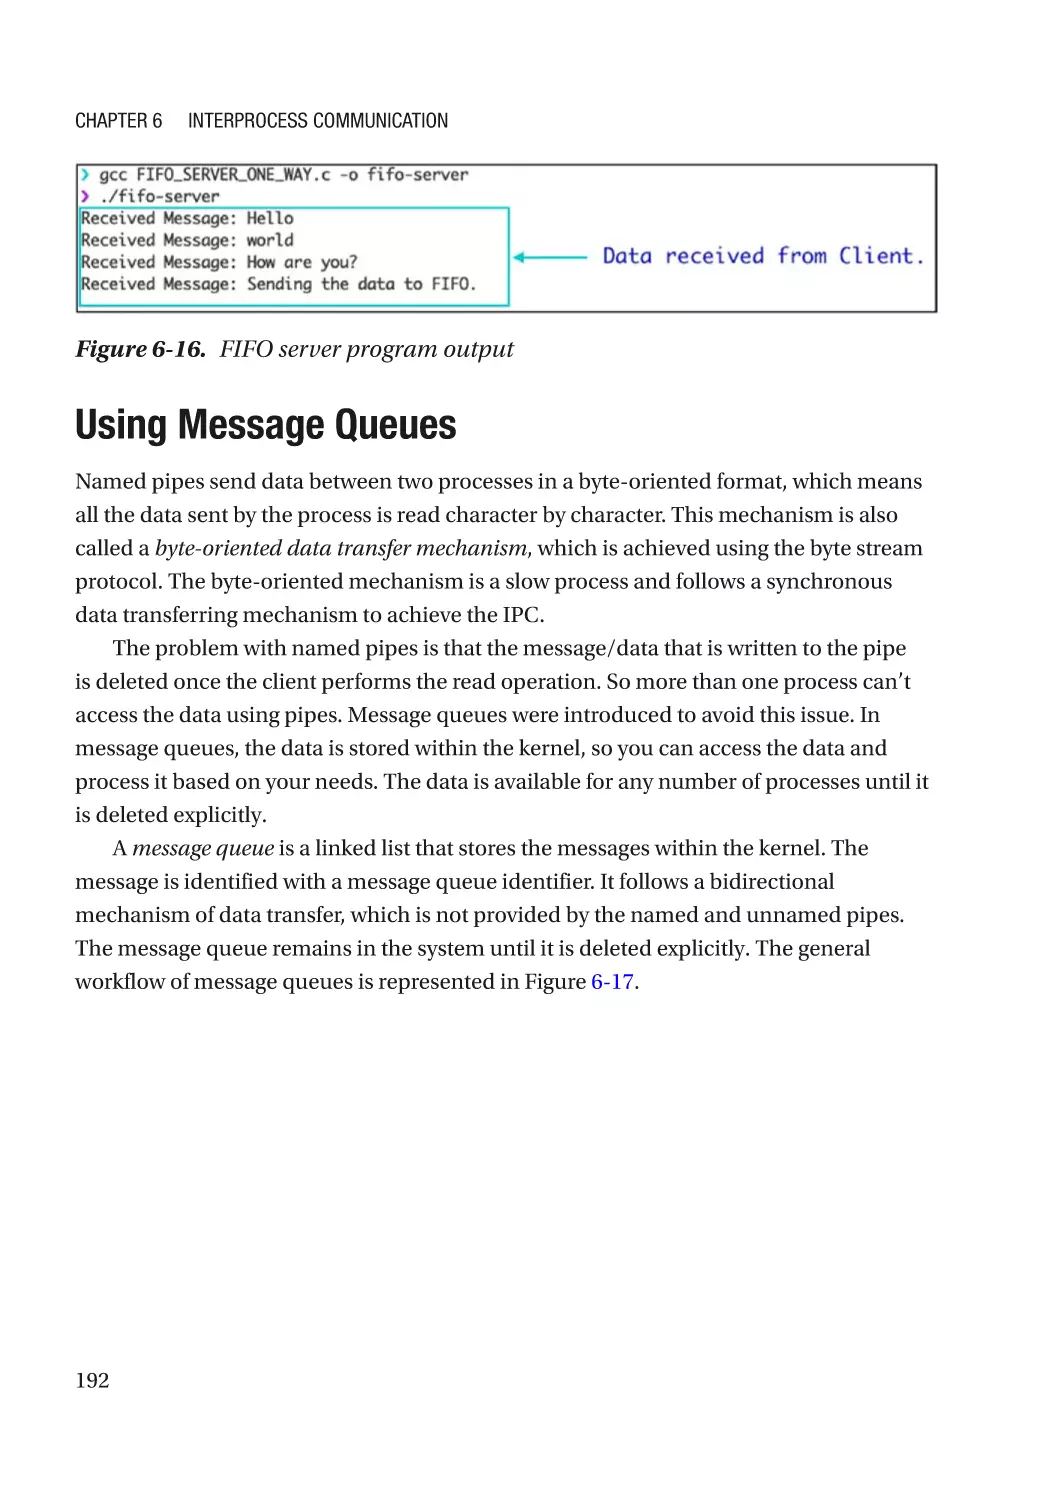
Creating FIFO����������������������������������������������������������������������������������������������������������������������� 186
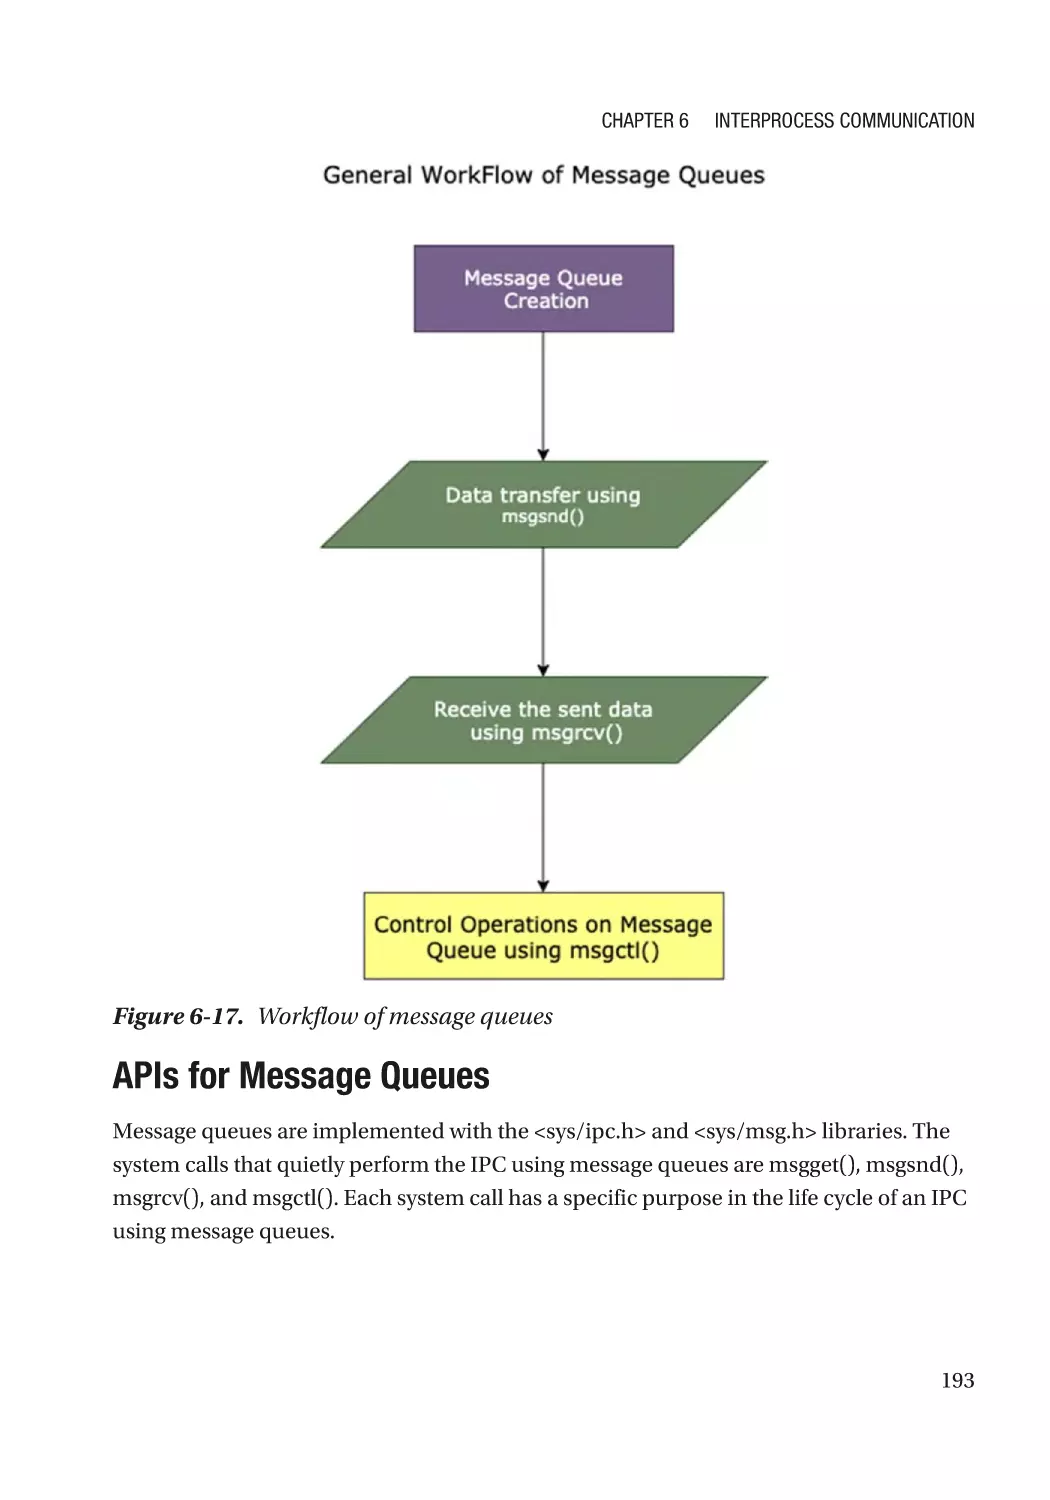
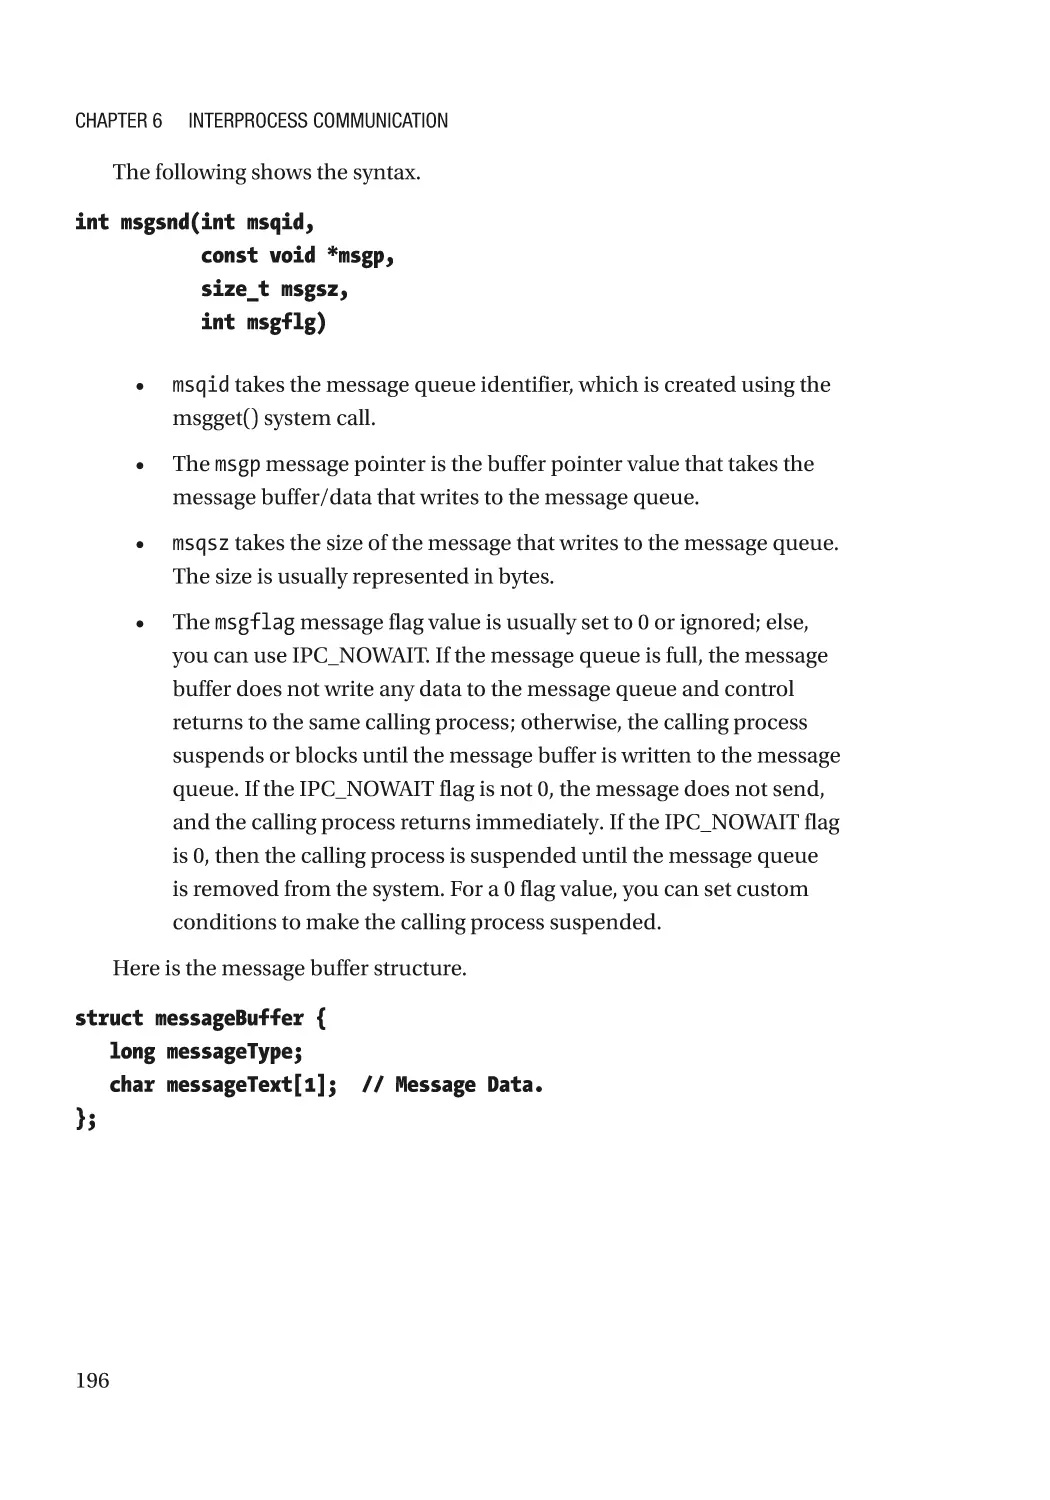
Using Message Queues������������������������������������������������������������������������������������������������������������� 192
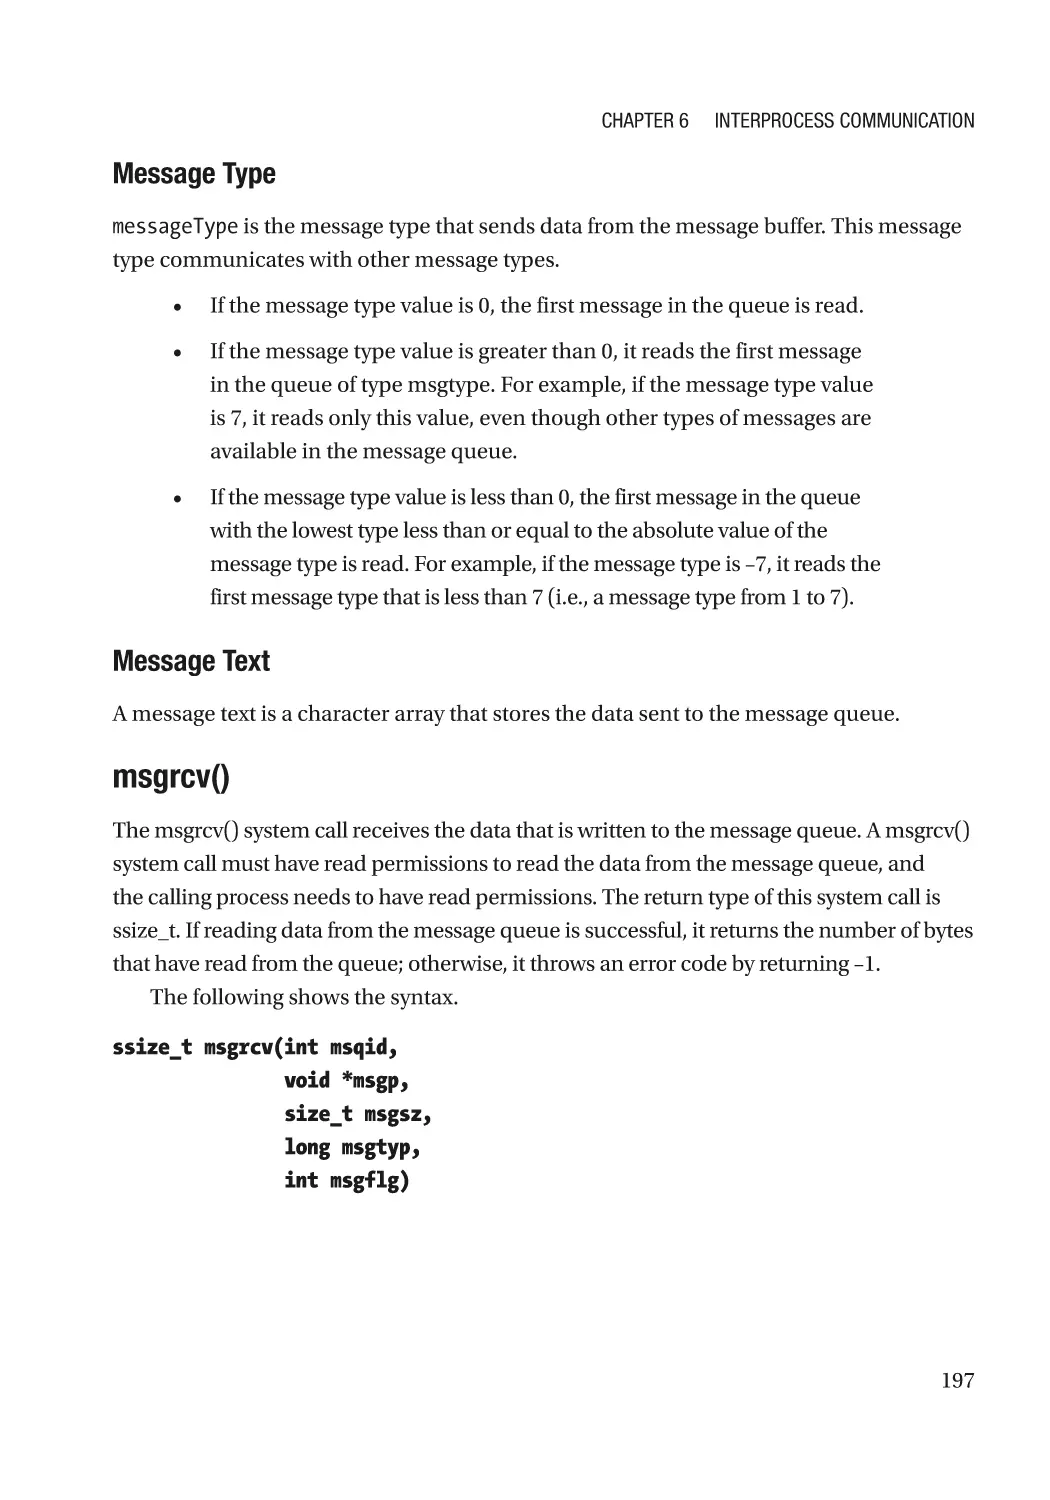
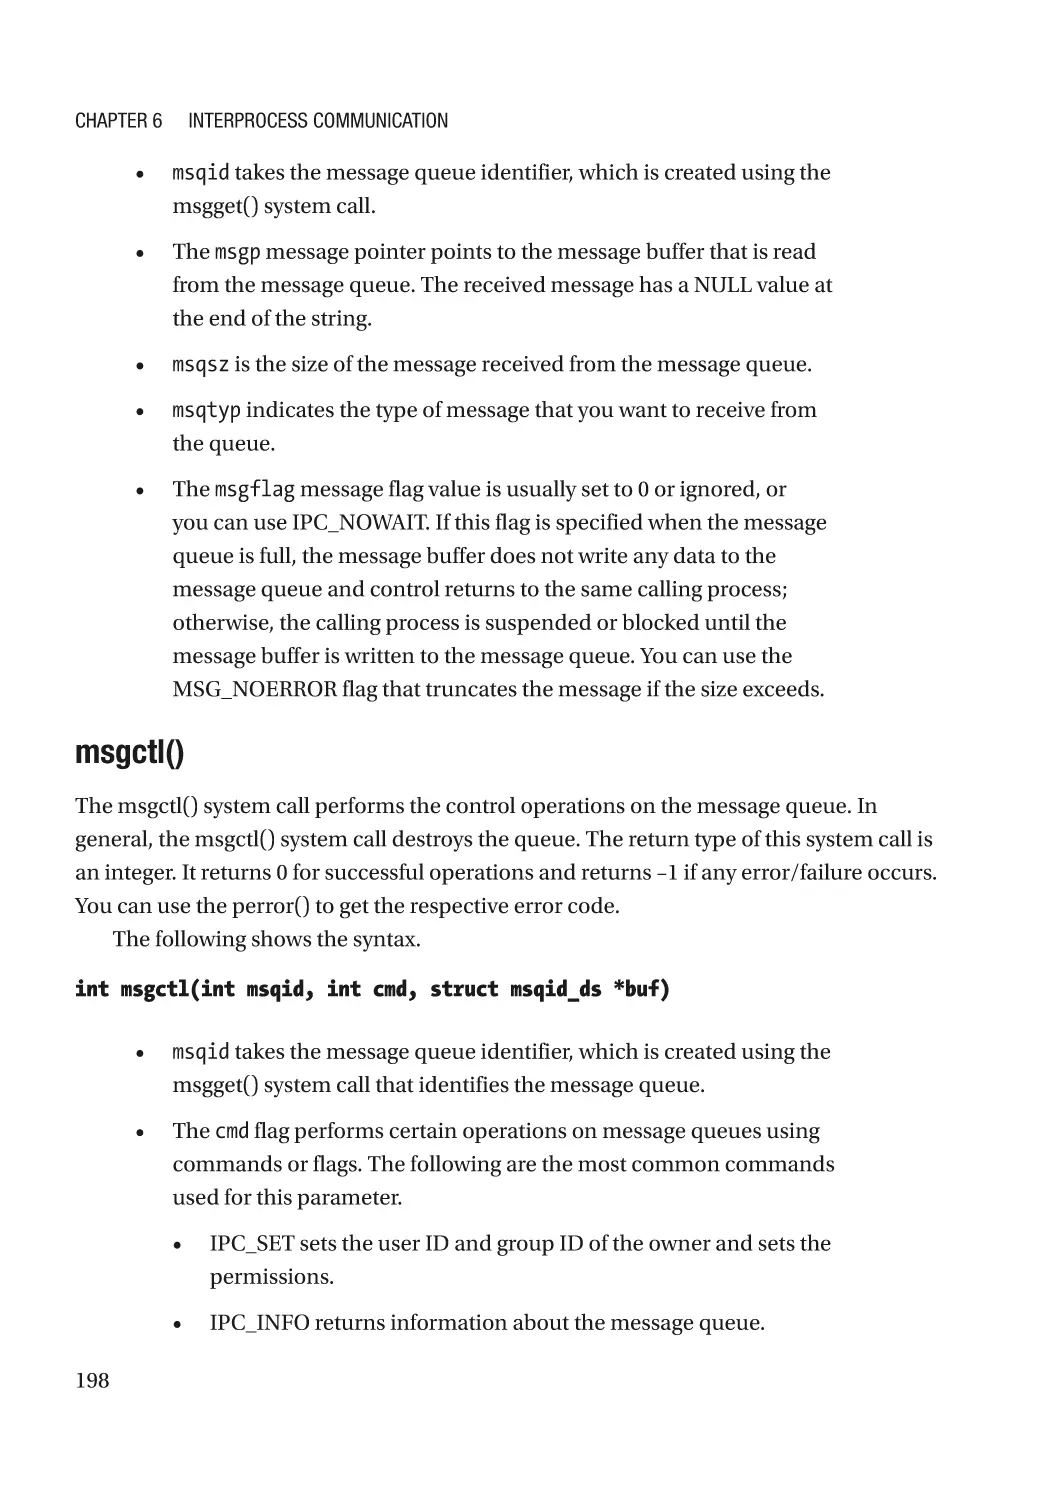
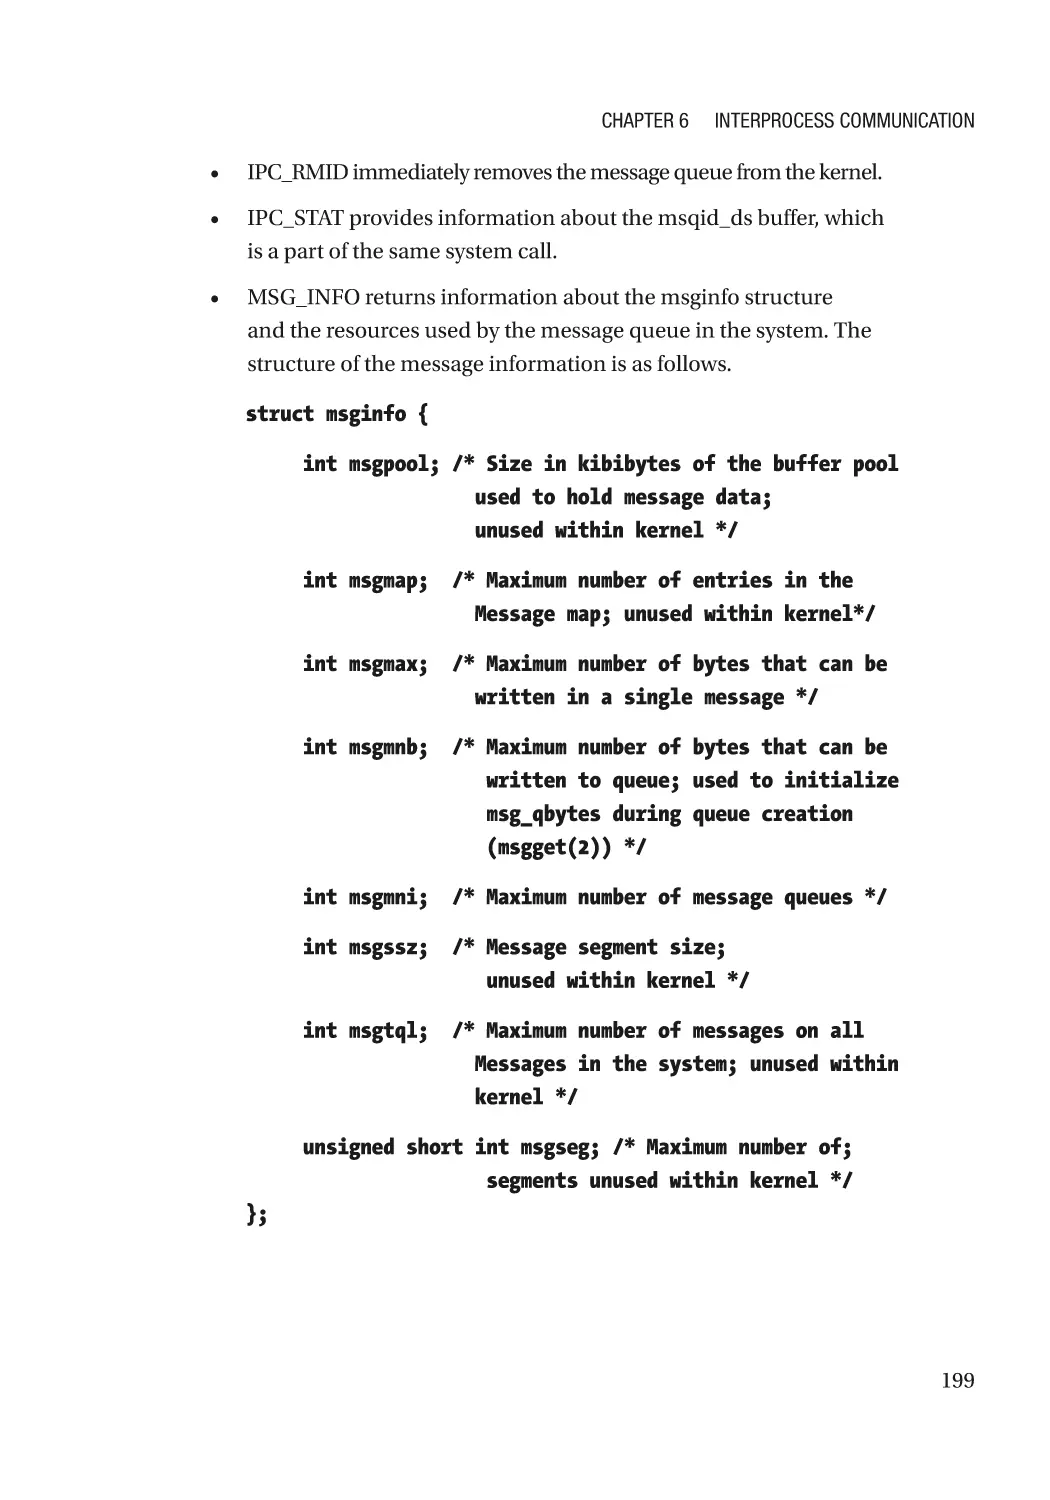
APIs for Message Queues���������������������������������������������������������������������������������������������������� 193
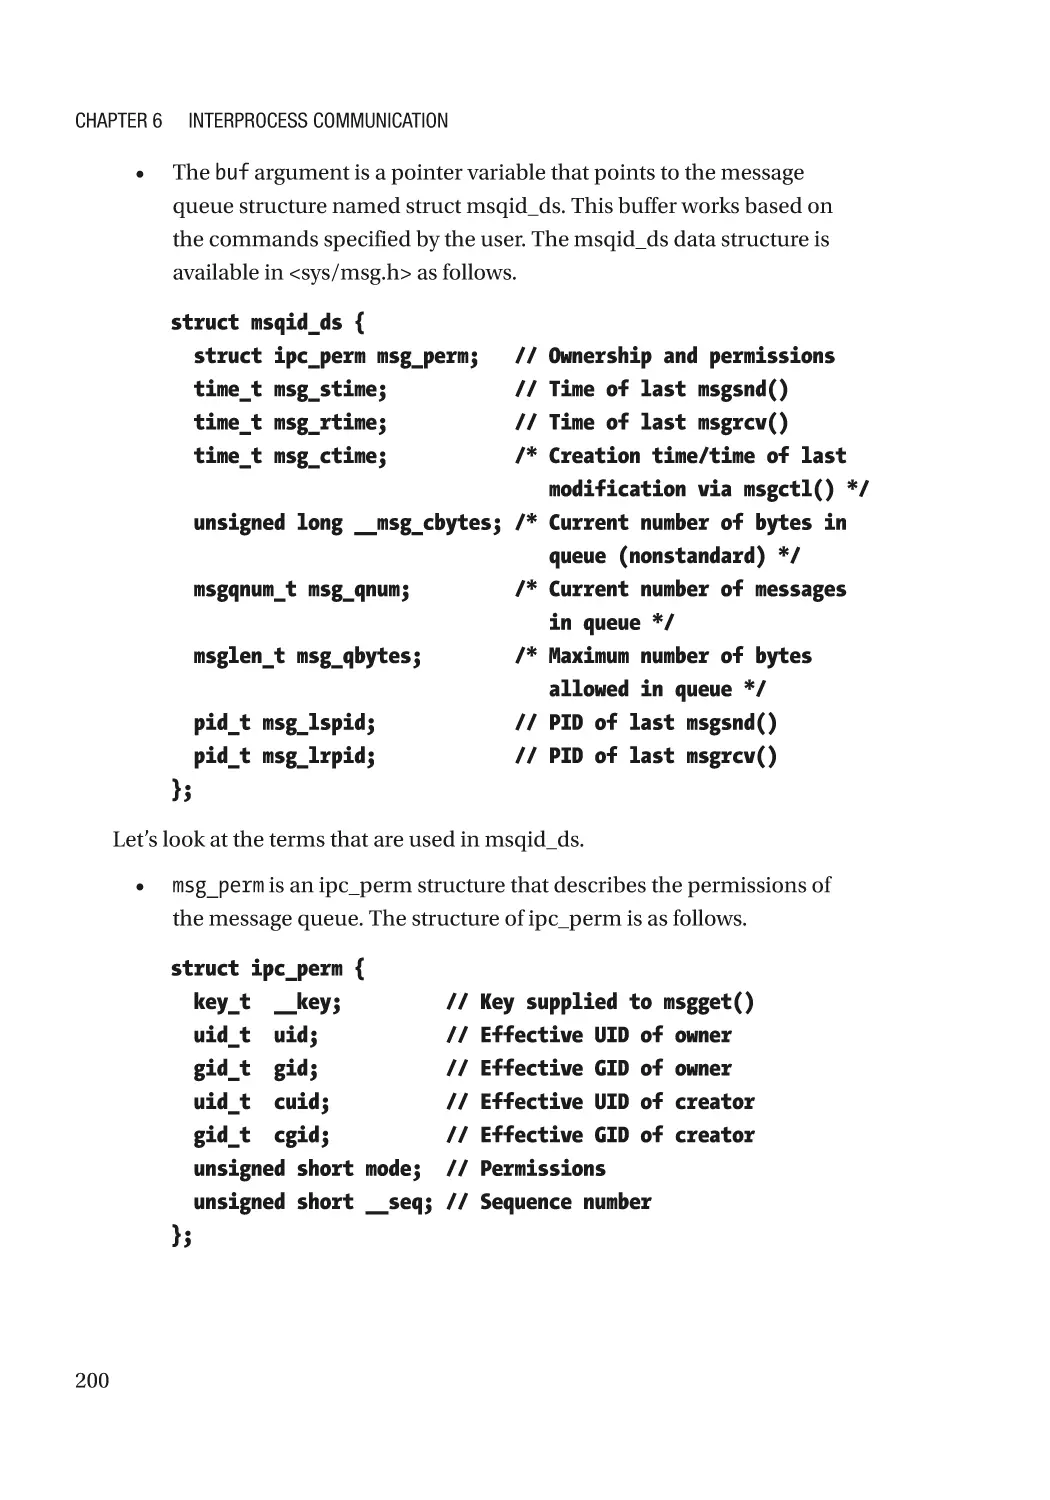
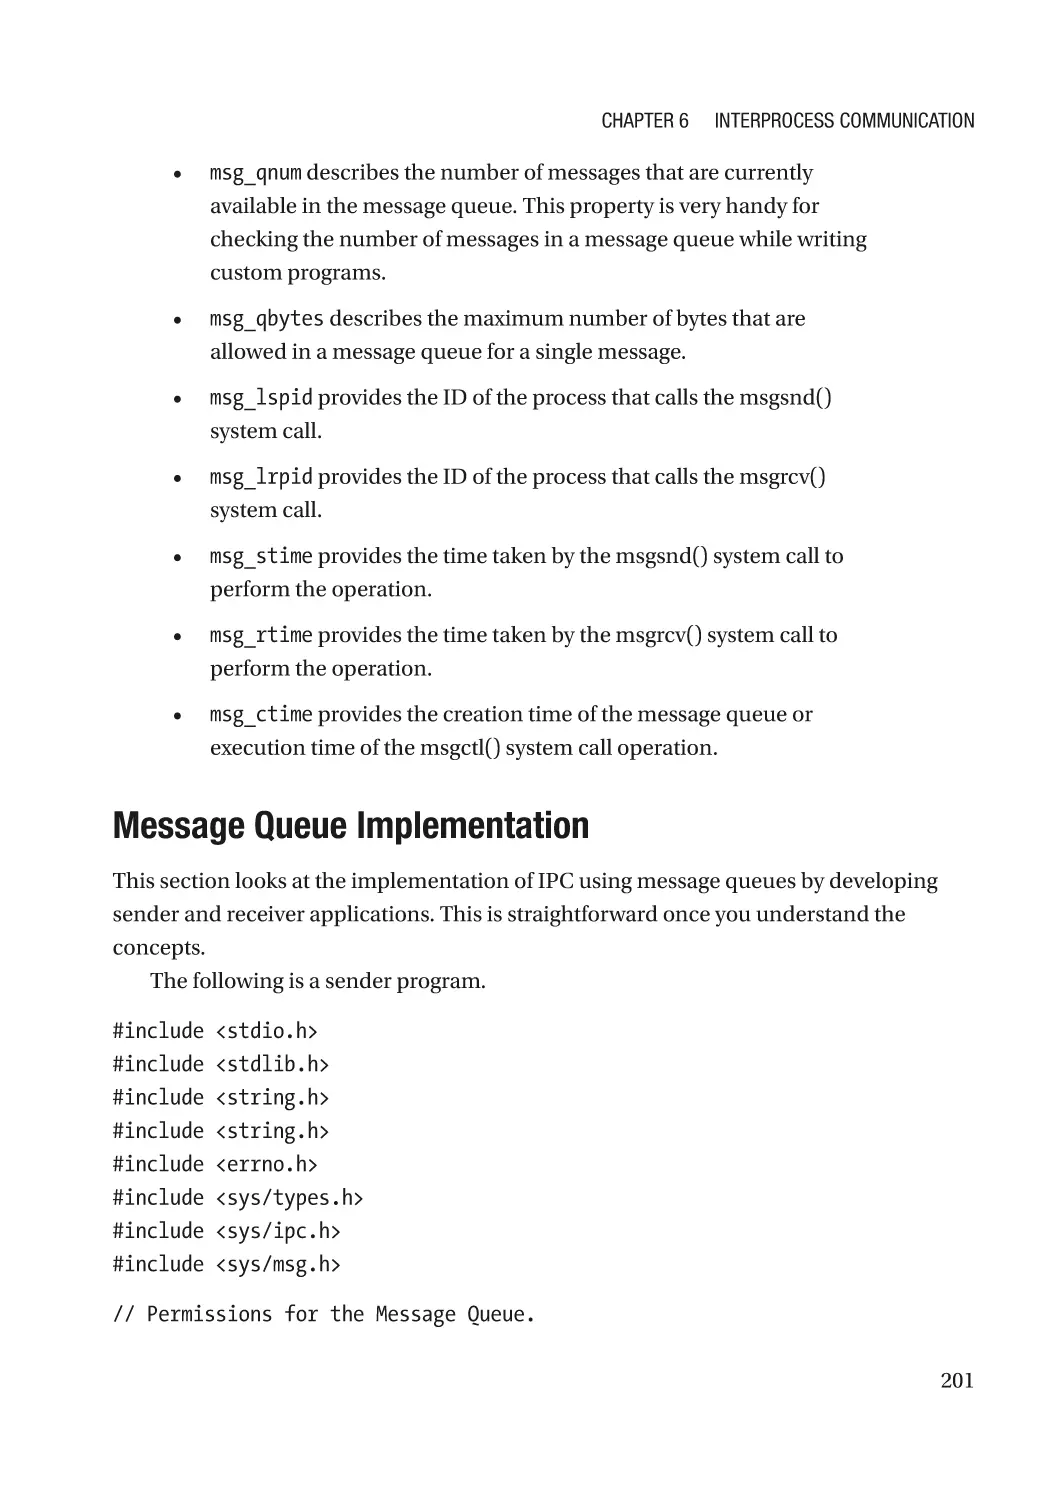
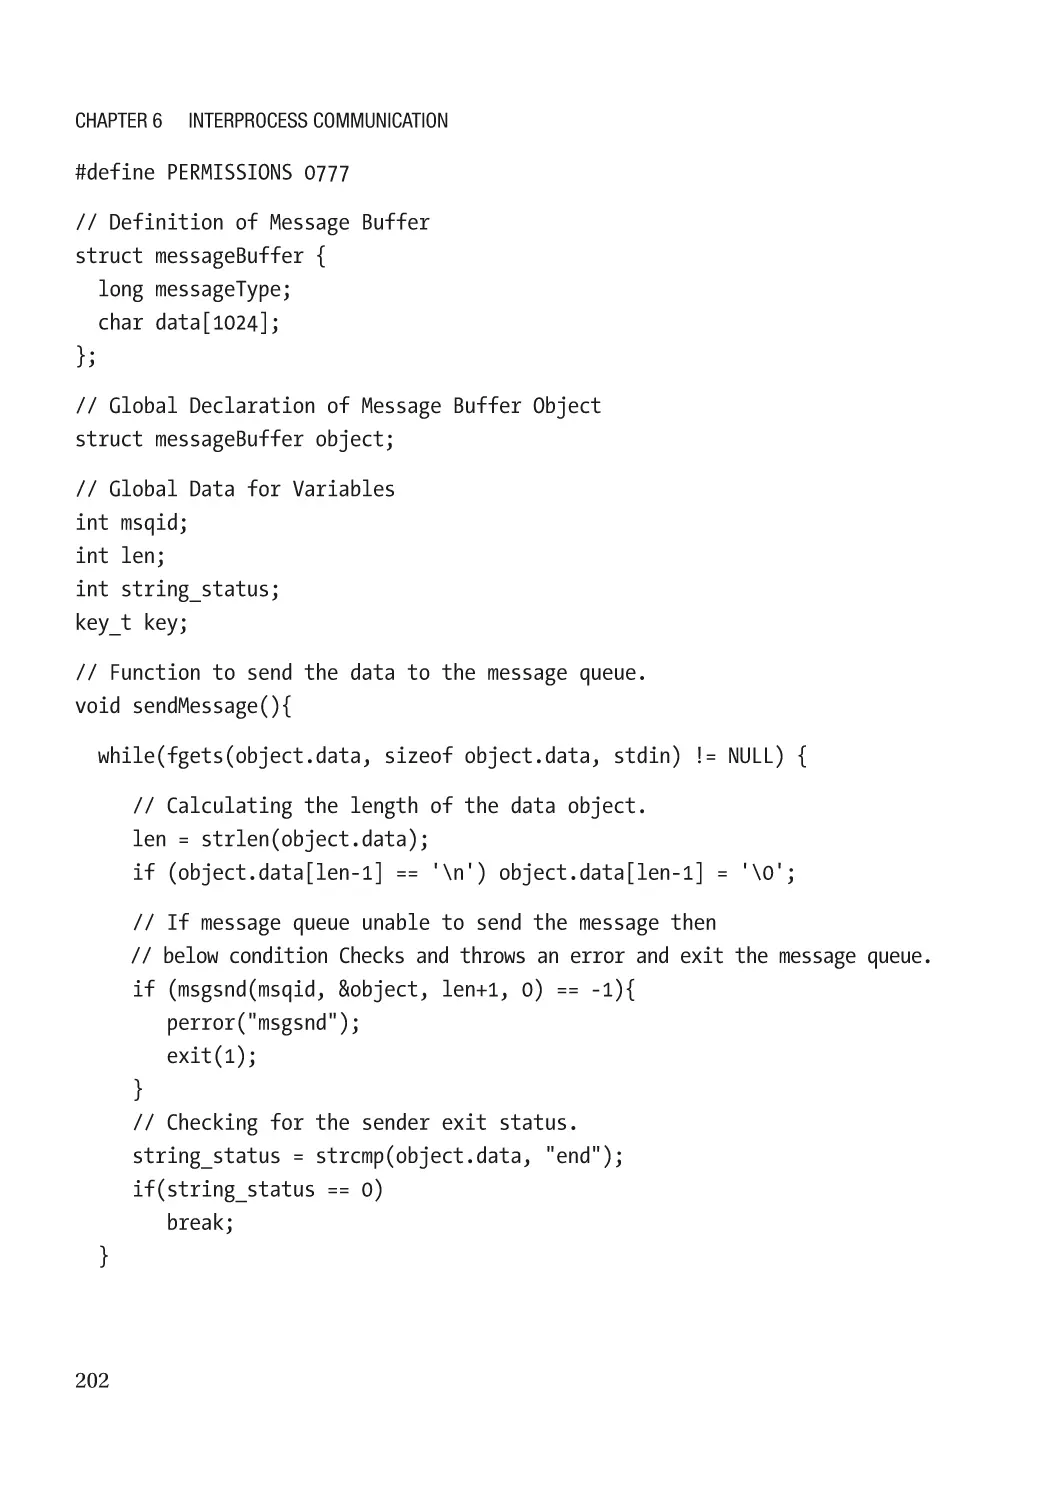
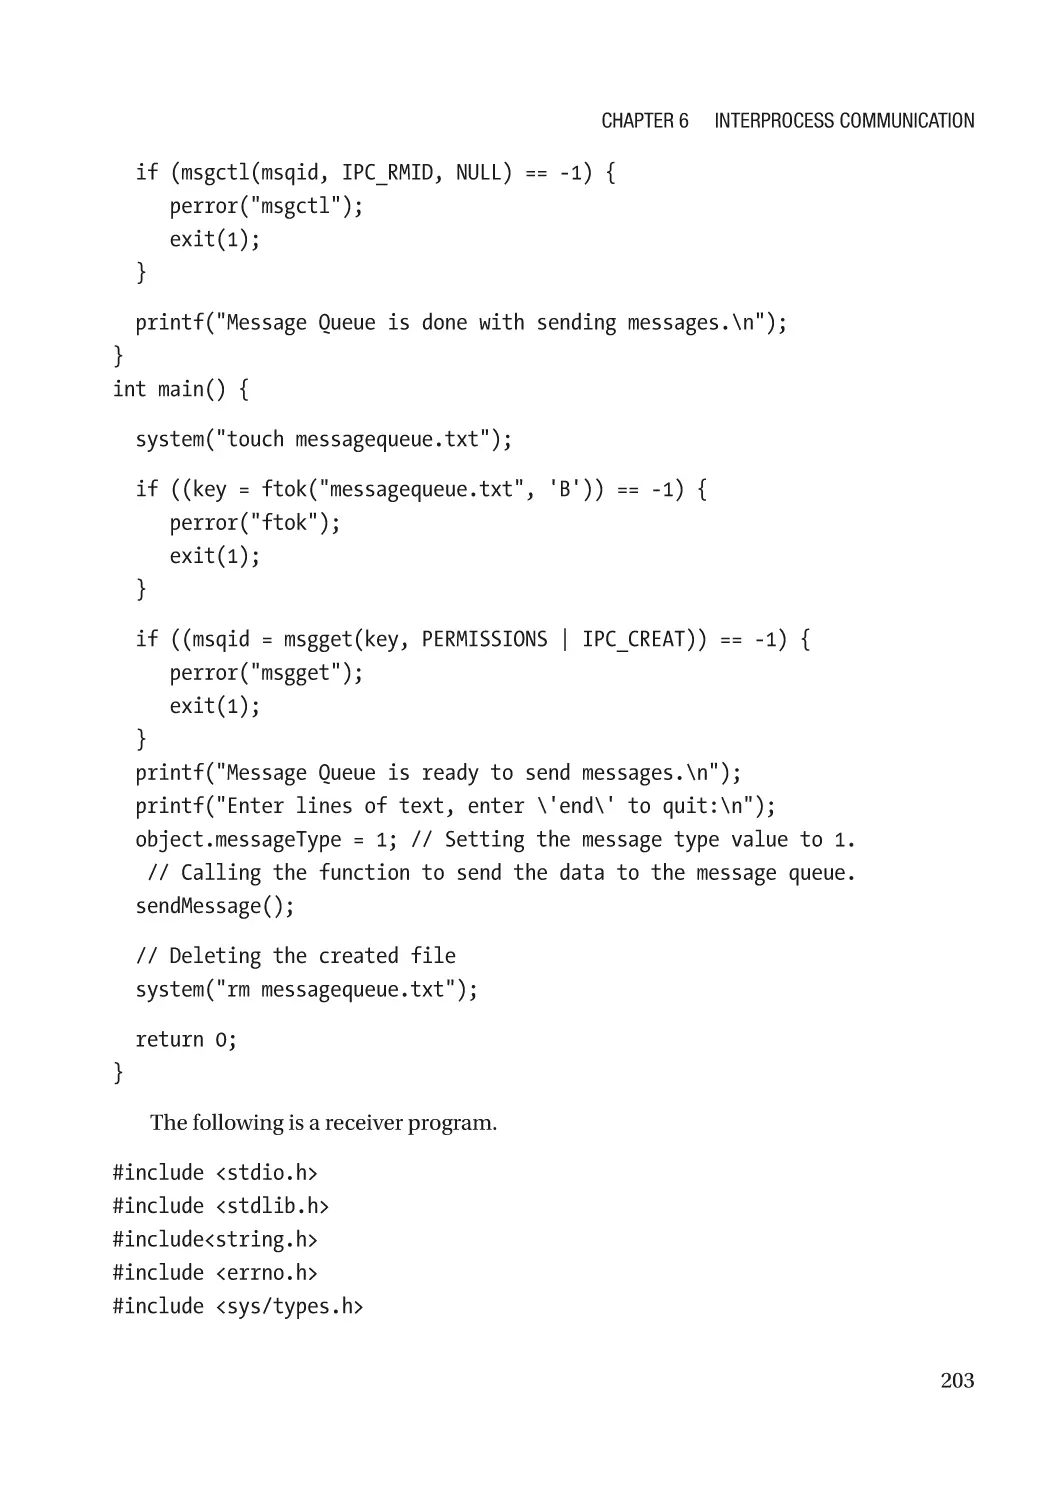
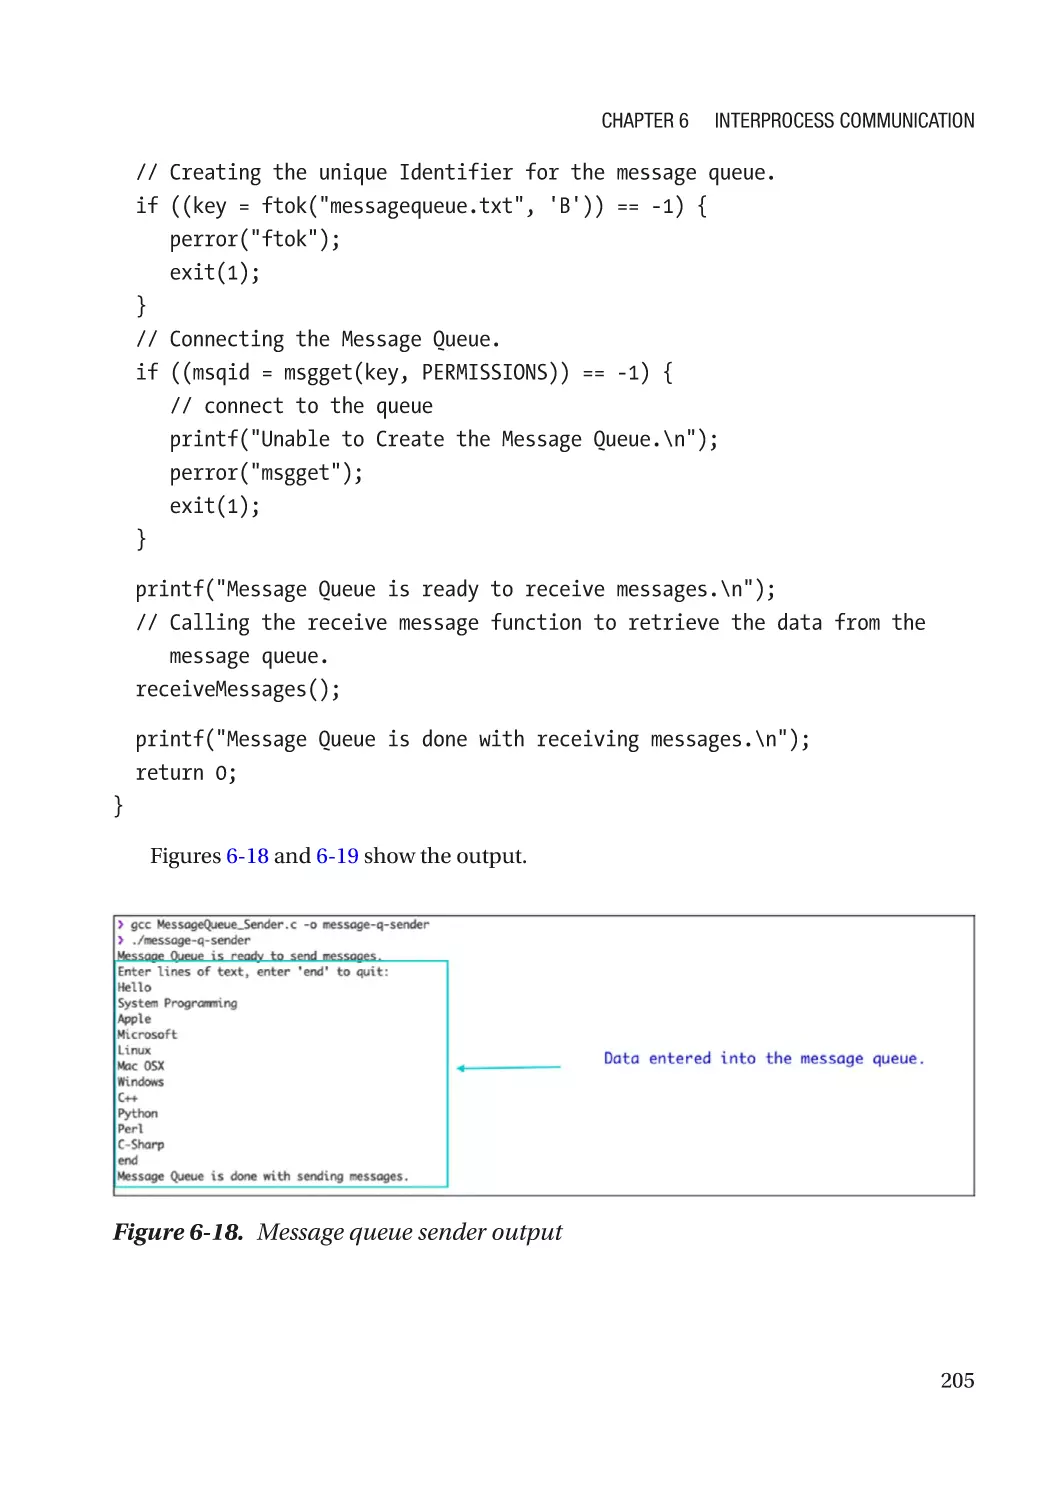
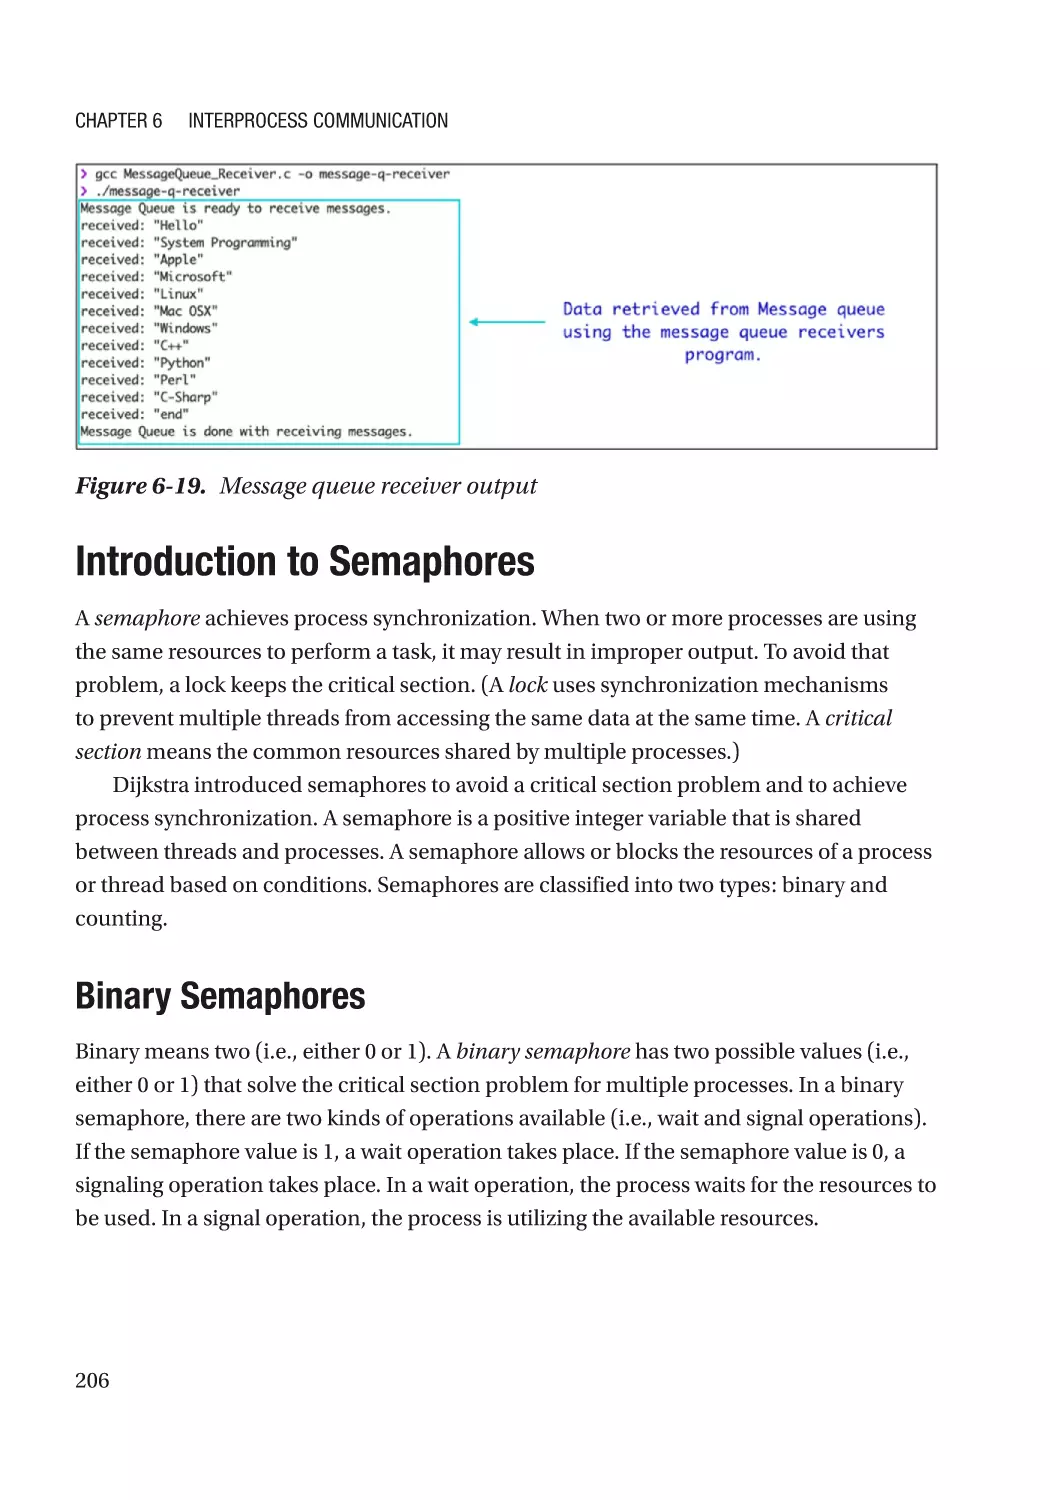
Message Queue Implementation����������������������������������������������������������������������������������������� 201
Introduction to Semaphores������������������������������������������������������������������������������������������������������ 206
Binary Semaphores������������������������������������������������������������������������������������������������������������� 206
Counting Semaphores��������������������������������������������������������������������������������������������������������� 207
viii
Table of Contents
Characteristics of Semaphores������������������������������������������������������������������������������������������� 207
The Advantages of Using a Semaphore������������������������������������������������������������������������������� 207
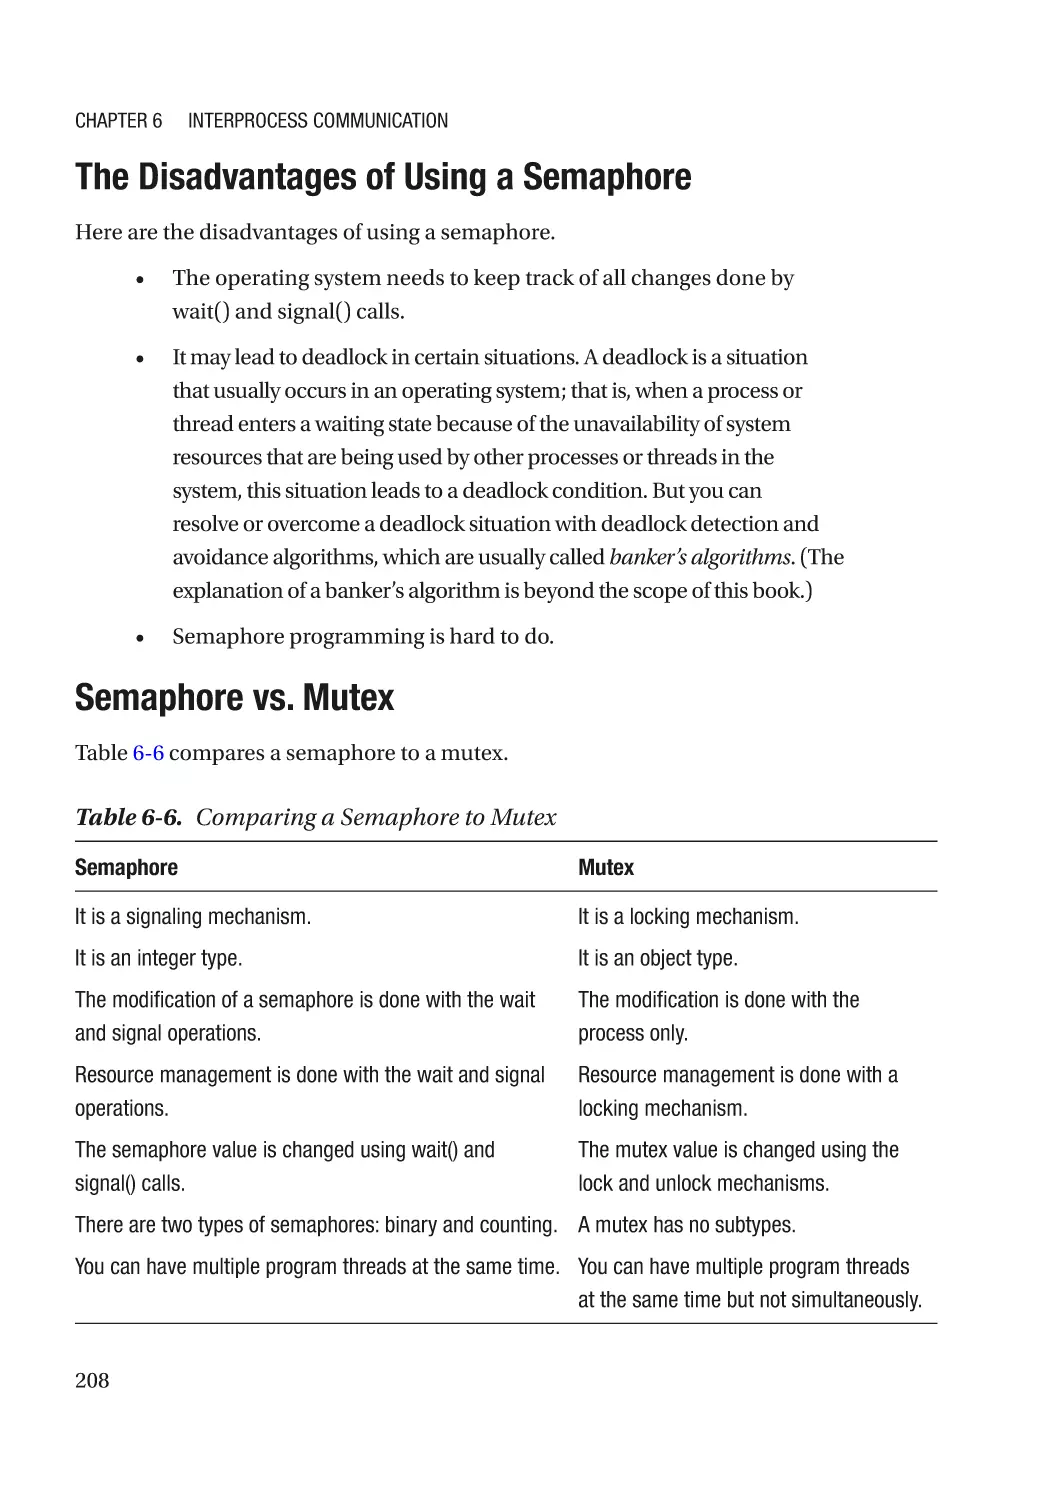
The Disadvantages of Using a Semaphore�������������������������������������������������������������������������� 208
Semaphore vs. Mutex���������������������������������������������������������������������������������������������������������� 208
APIs for a Semaphore���������������������������������������������������������������������������������������������������������� 209
Accessing Global Data Without Semaphores���������������������������������������������������������������������������� 211
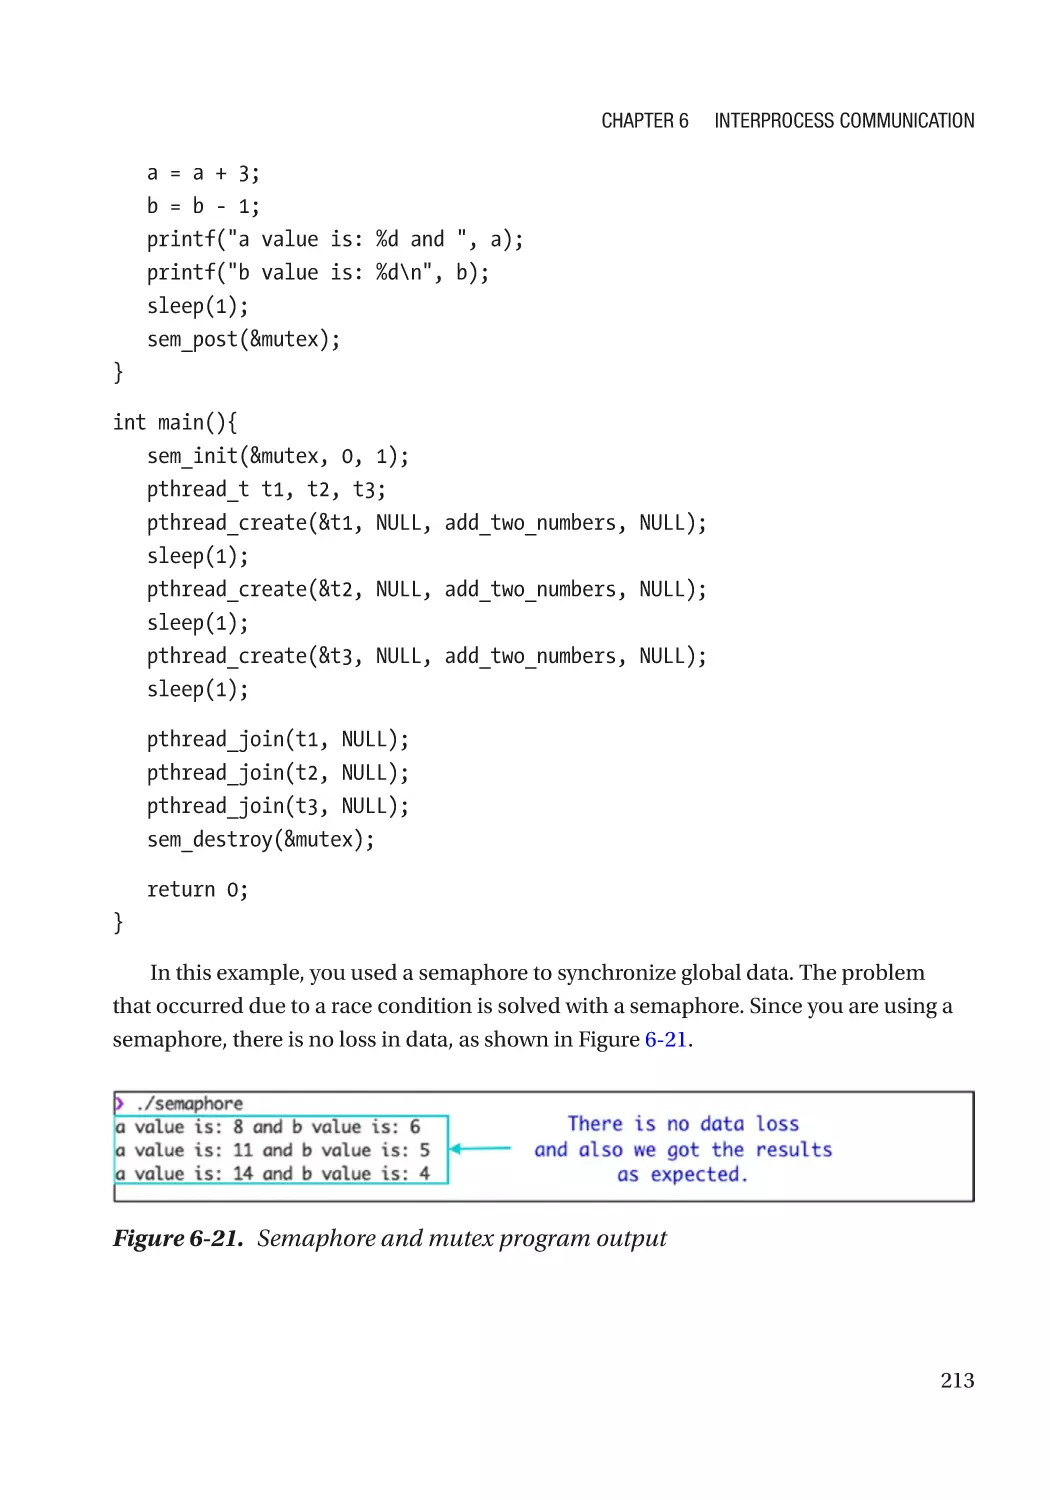
Implementing the Data Consistent Model Using a Semaphore and a Mutex���������������������������� 212
Summary���������������������������������������������������������������������������������������������������������������������������������� 214
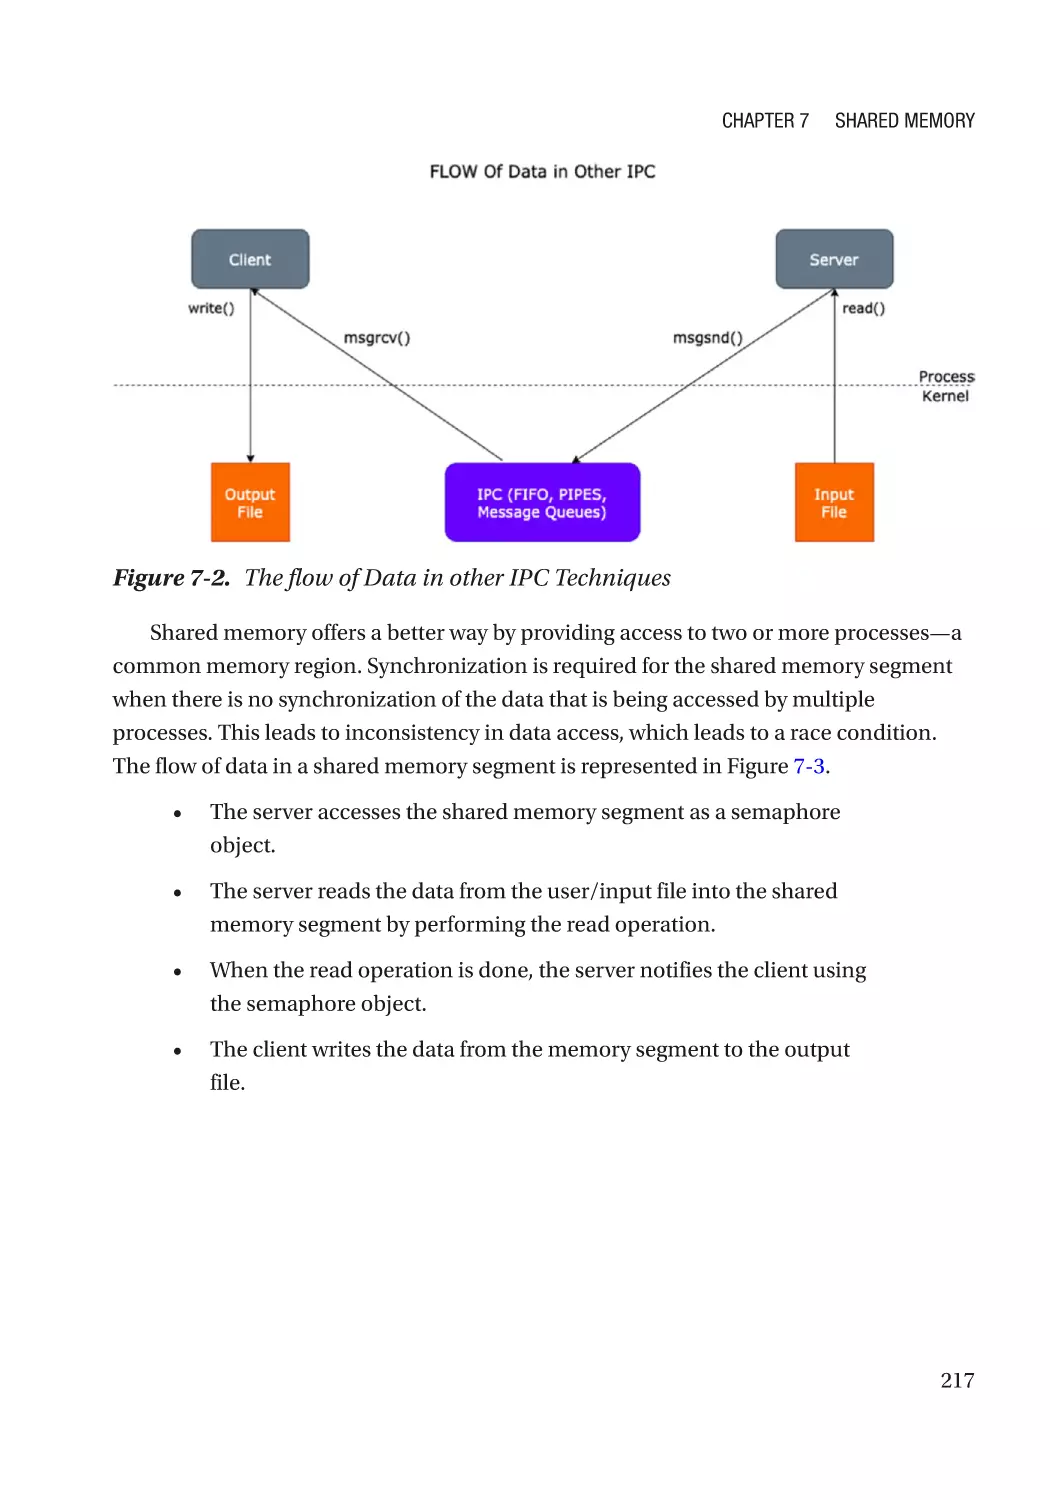
Chapter 7: Shared Memory����������������������������������������������������������������������������������� 215
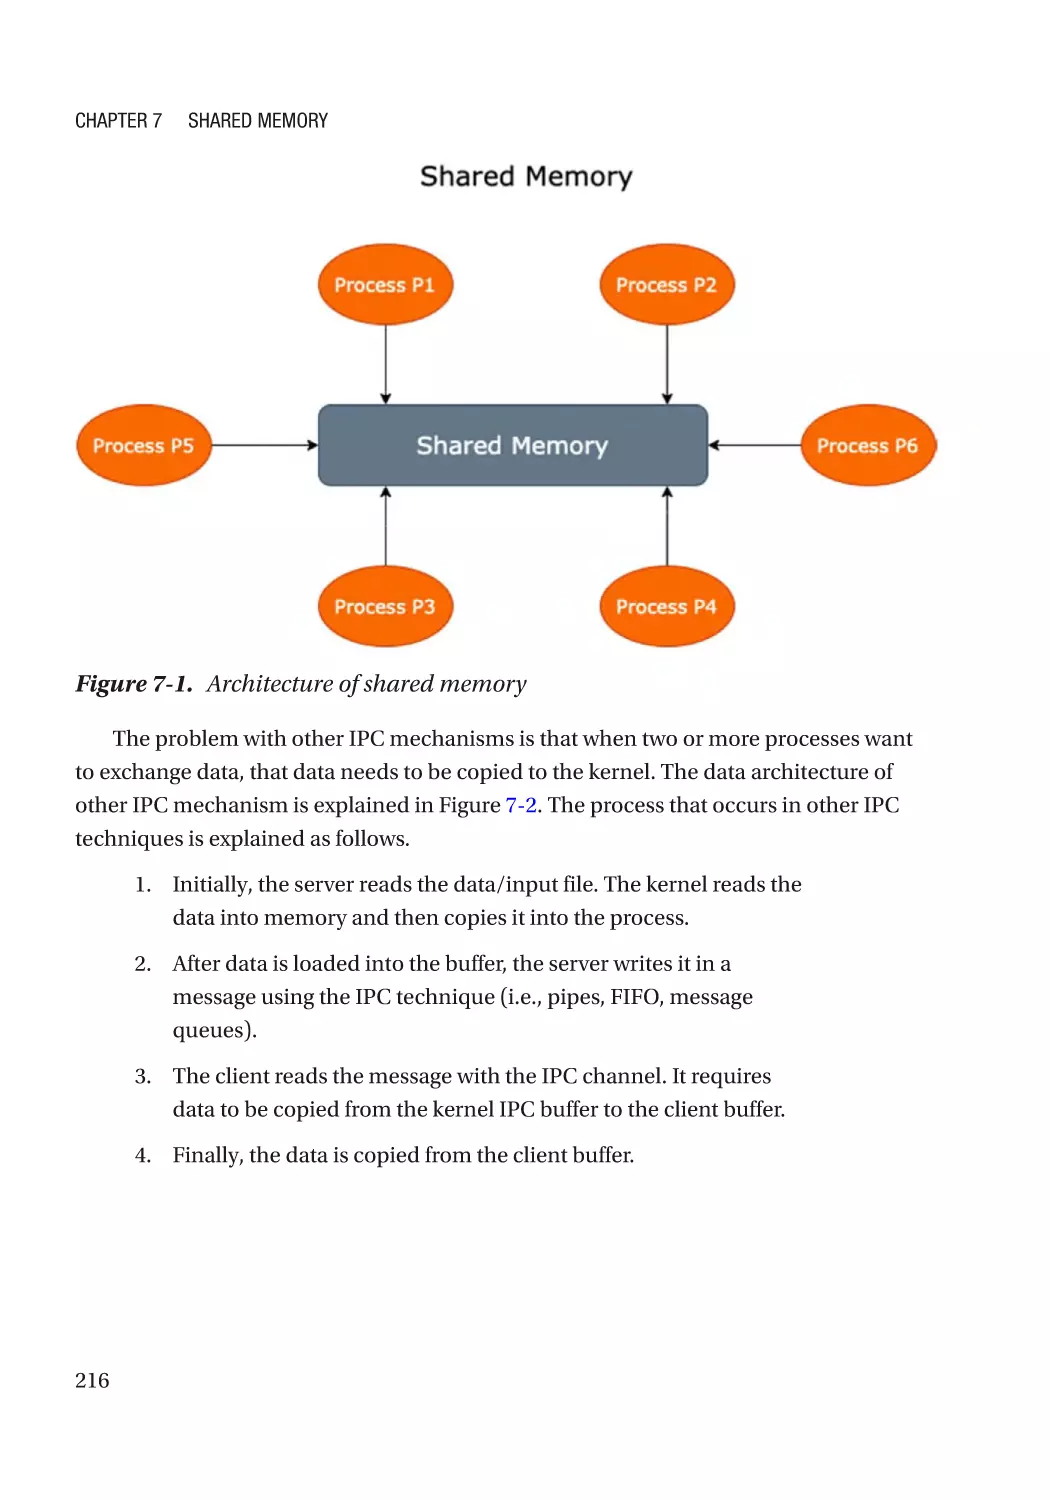
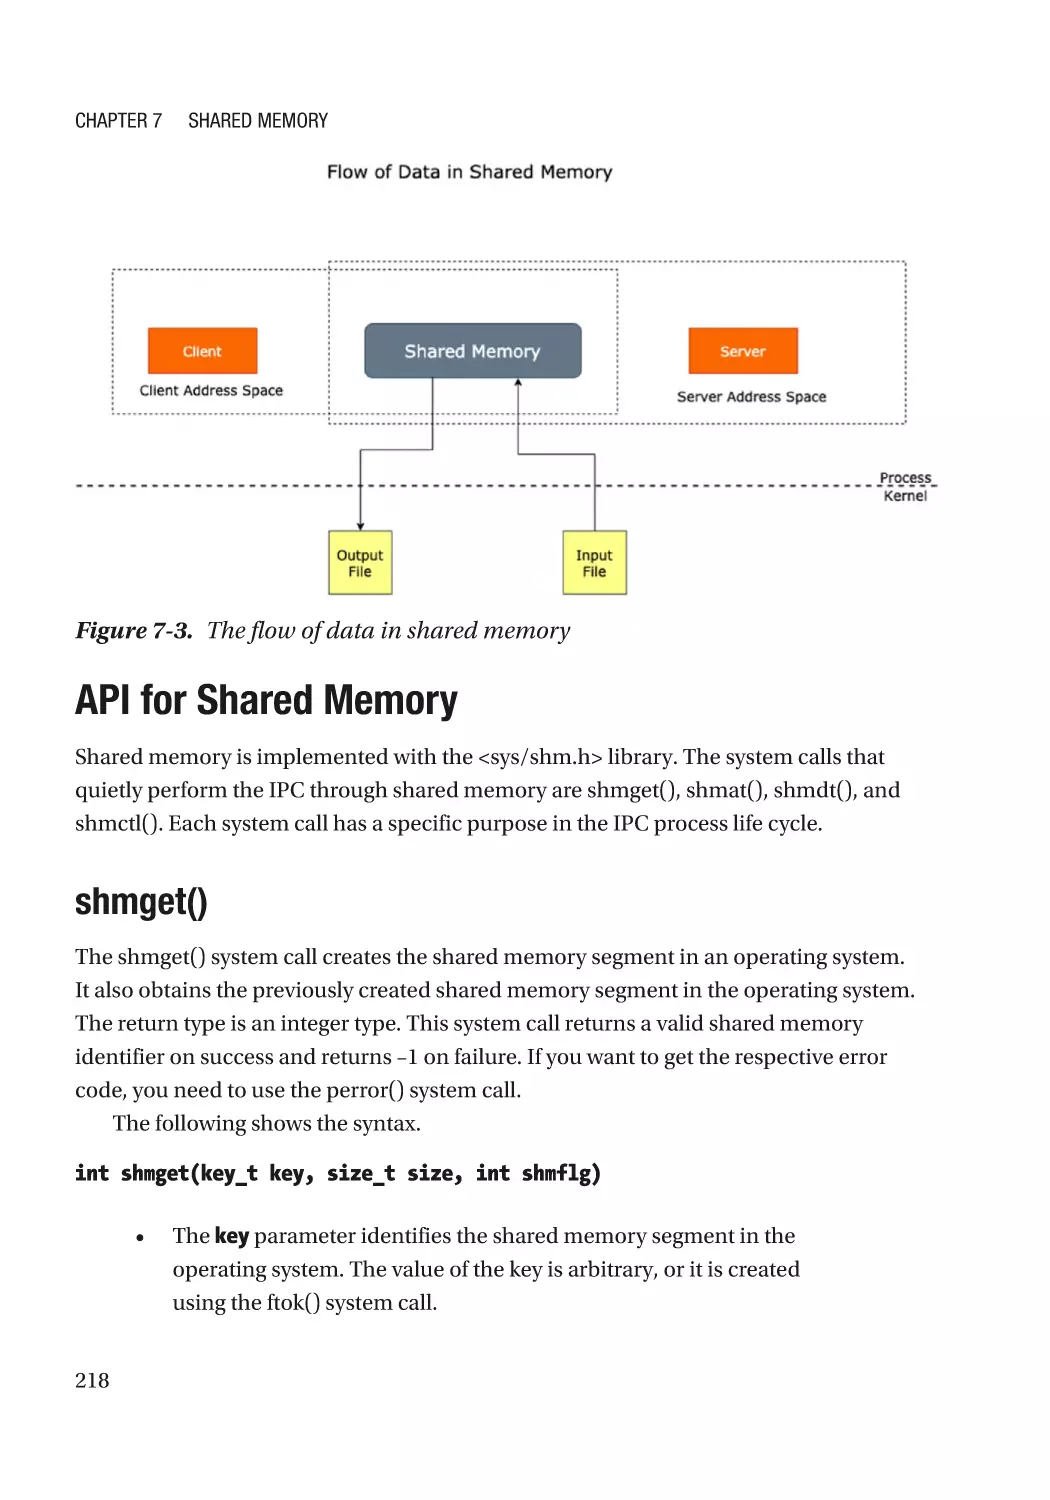
Introduction to Shared Memory������������������������������������������������������������������������������������������������ 215
API for Shared Memory������������������������������������������������������������������������������������������������������������� 218
shmget()������������������������������������������������������������������������������������������������������������������������������ 218
shmat()�������������������������������������������������������������������������������������������������������������������������������� 219
shmdt()�������������������������������������������������������������������������������������������������������������������������������� 220
shmctl()������������������������������������������������������������������������������������������������������������������������������� 220
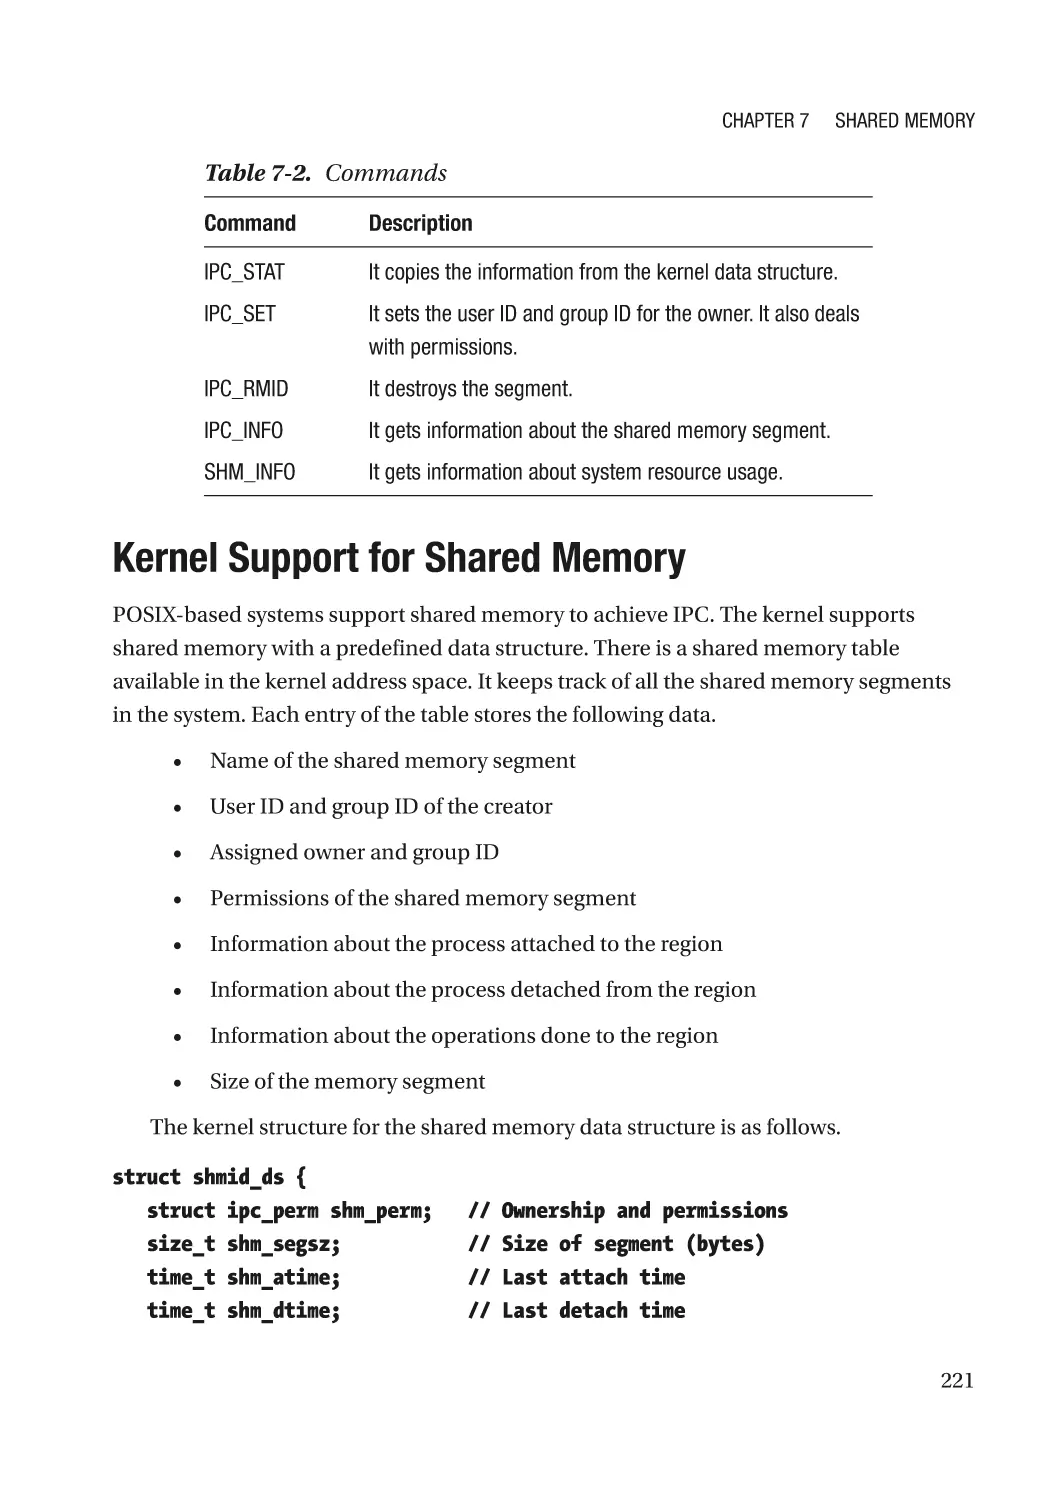
Kernel Support for Shared Memory������������������������������������������������������������������������������������������ 221
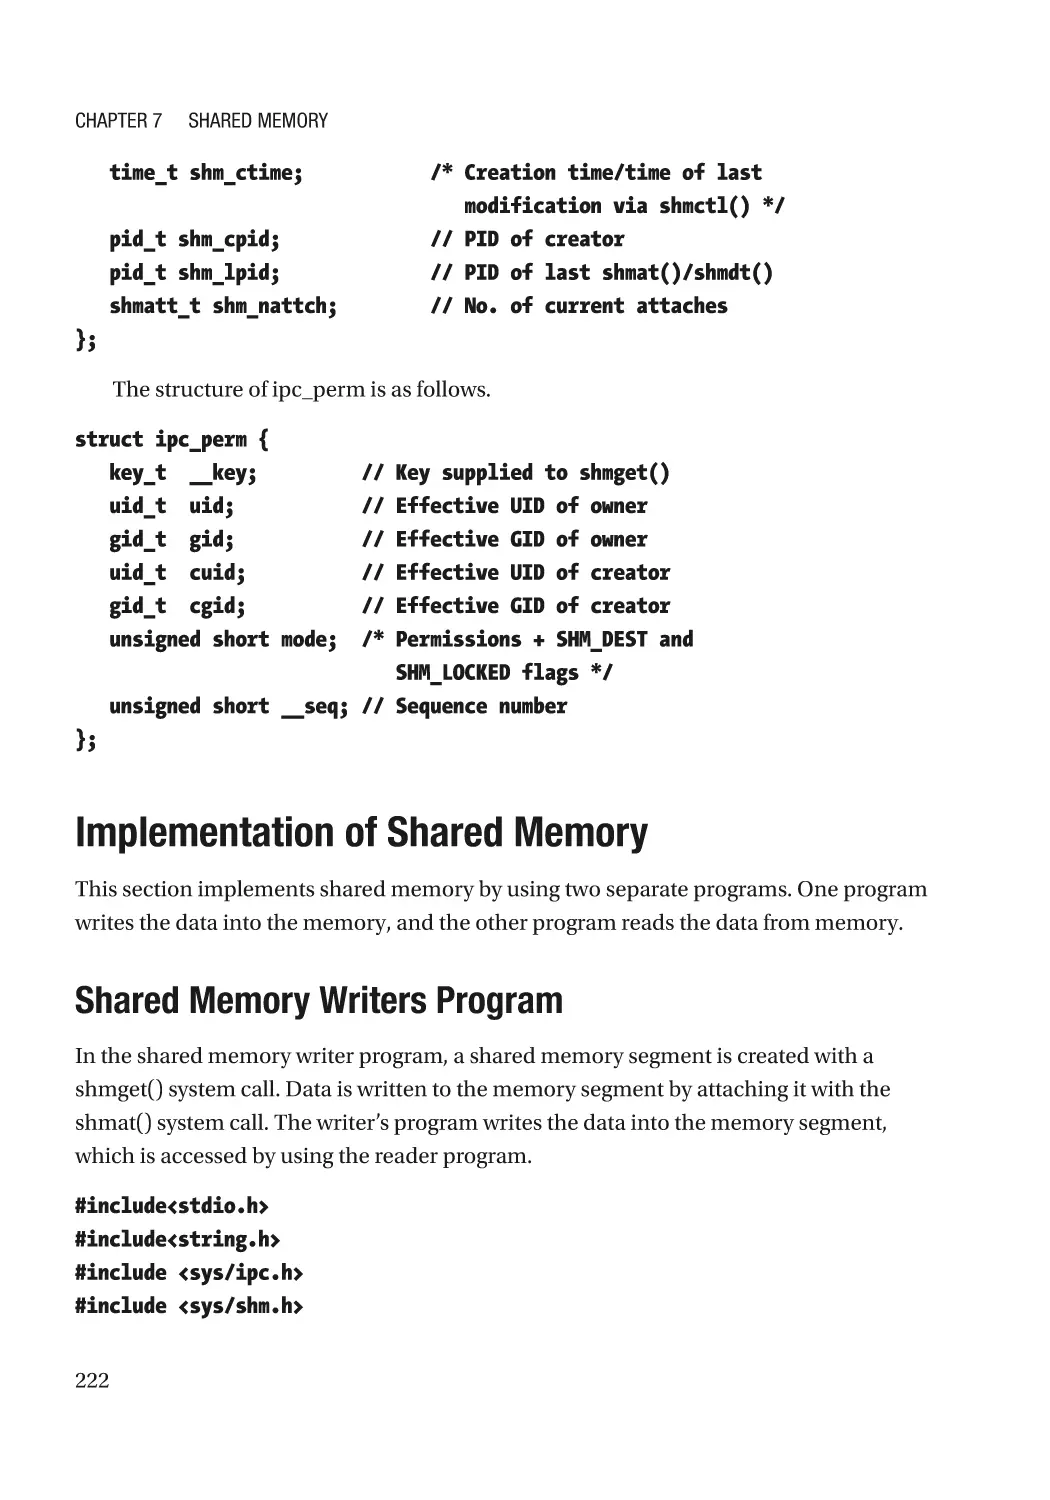
Implementation of Shared Memory������������������������������������������������������������������������������������������ 222
Shared Memory Writers Program���������������������������������������������������������������������������������������� 222
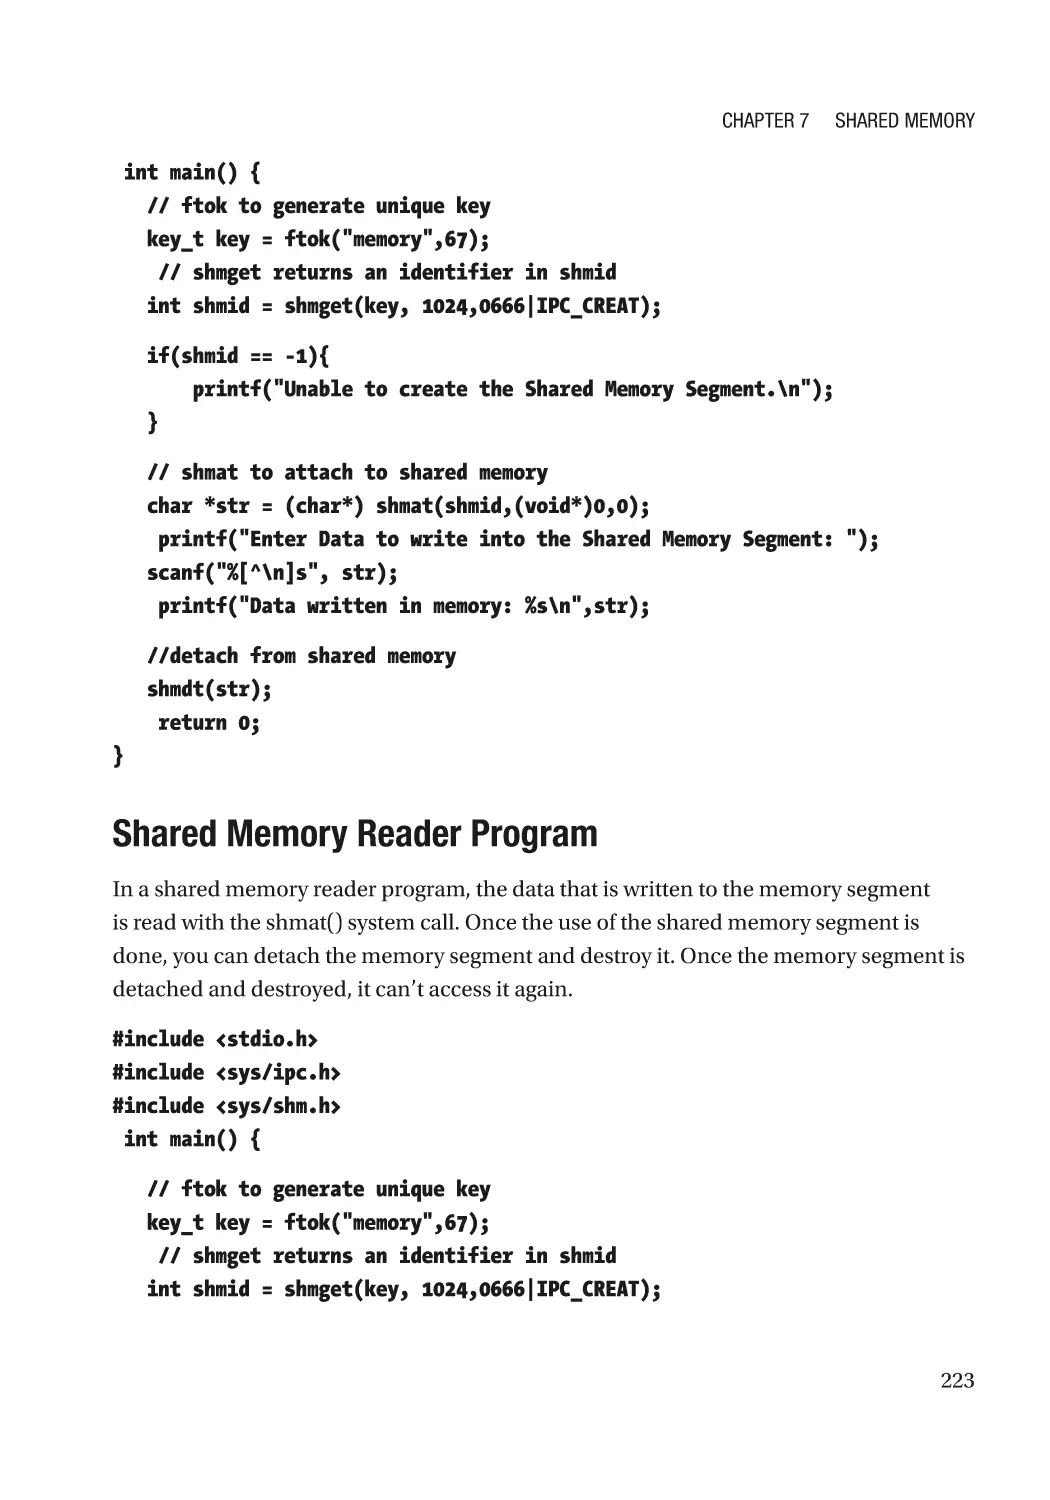
Shared Memory Reader Program���������������������������������������������������������������������������������������� 223
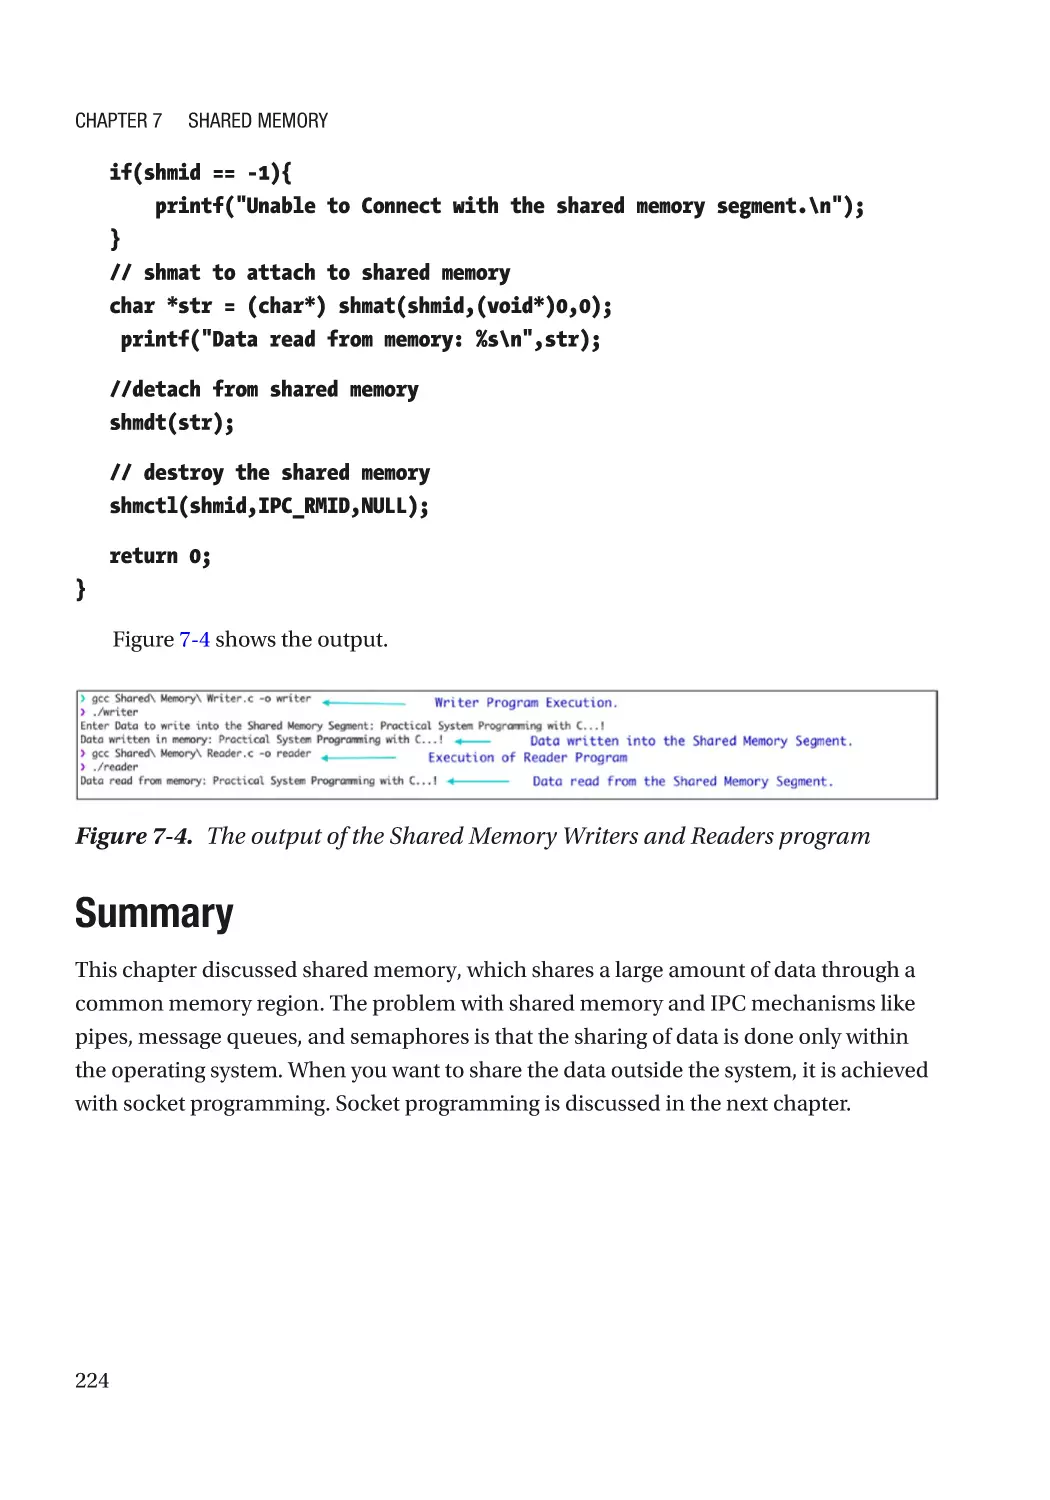
Summary���������������������������������������������������������������������������������������������������������������������������������� 224
Chapter 8: Socket Programming�������������������������������������������������������������������������� 225
Introduction to Sockets������������������������������������������������������������������������������������������������������������� 225
Stream Sockets������������������������������������������������������������������������������������������������������������������� 226
Datagram Sockets��������������������������������������������������������������������������������������������������������������� 226
Raw Sockets������������������������������������������������������������������������������������������������������������������������ 226
Domain Sockets������������������������������������������������������������������������������������������������������������������� 227
Internet Domain Sockets����������������������������������������������������������������������������������������������������� 227
IPC Over Network���������������������������������������������������������������������������������������������������������������������� 227
Communication Style���������������������������������������������������������������������������������������������������������� 227
Namespaces������������������������������������������������������������������������������������������������������������������������ 228
Protocol������������������������������������������������������������������������������������������������������������������������������� 228
ix
Table of Contents
API for Socket Programming����������������������������������������������������������������������������������������������������� 228
OSI Architecture Model������������������������������������������������������������������������������������������������������������� 230
Physical Layer��������������������������������������������������������������������������������������������������������������������� 231
Data Link Layer�������������������������������������������������������������������������������������������������������������������� 232
Network Layer��������������������������������������������������������������������������������������������������������������������� 233
Transport Layer�������������������������������������������������������������������������������������������������������������������� 234
Session Layer���������������������������������������������������������������������������������������������������������������������� 235
Presentation Layer��������������������������������������������������������������������������������������������������������������� 236
Application Layer����������������������������������������������������������������������������������������������������������������� 236
Advantages of the OSI Model���������������������������������������������������������������������������������������������� 237
Disadvantages of the OSI Model������������������������������������������������������������������������������������������ 237
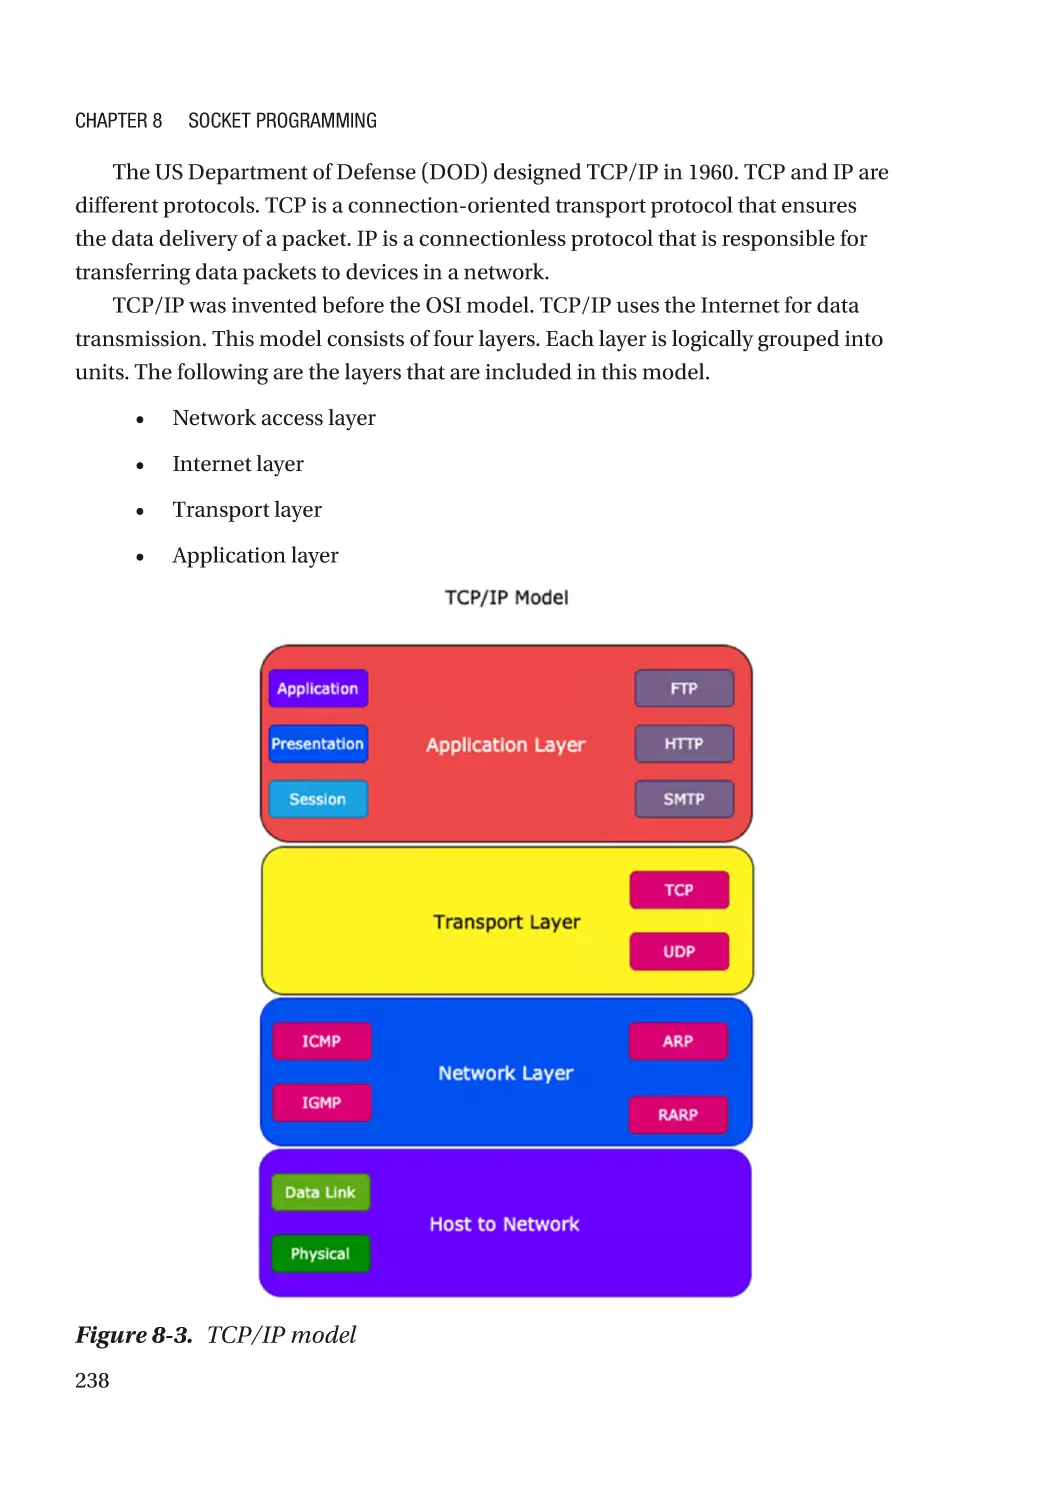
TCP/IP Architecture Model�������������������������������������������������������������������������������������������������������� 237
Network Access Layer��������������������������������������������������������������������������������������������������������� 239
Internet Layer���������������������������������������������������������������������������������������������������������������������� 239
Transport Layer�������������������������������������������������������������������������������������������������������������������� 240
Application Layer����������������������������������������������������������������������������������������������������������������� 241
Advantages of TCP/IP���������������������������������������������������������������������������������������������������������� 242
Disadvantages of TCP/IP������������������������������������������������������������������������������������������������������ 242
Client-Server Architecture�������������������������������������������������������������������������������������������������������� 242
Client����������������������������������������������������������������������������������������������������������������������������������� 242
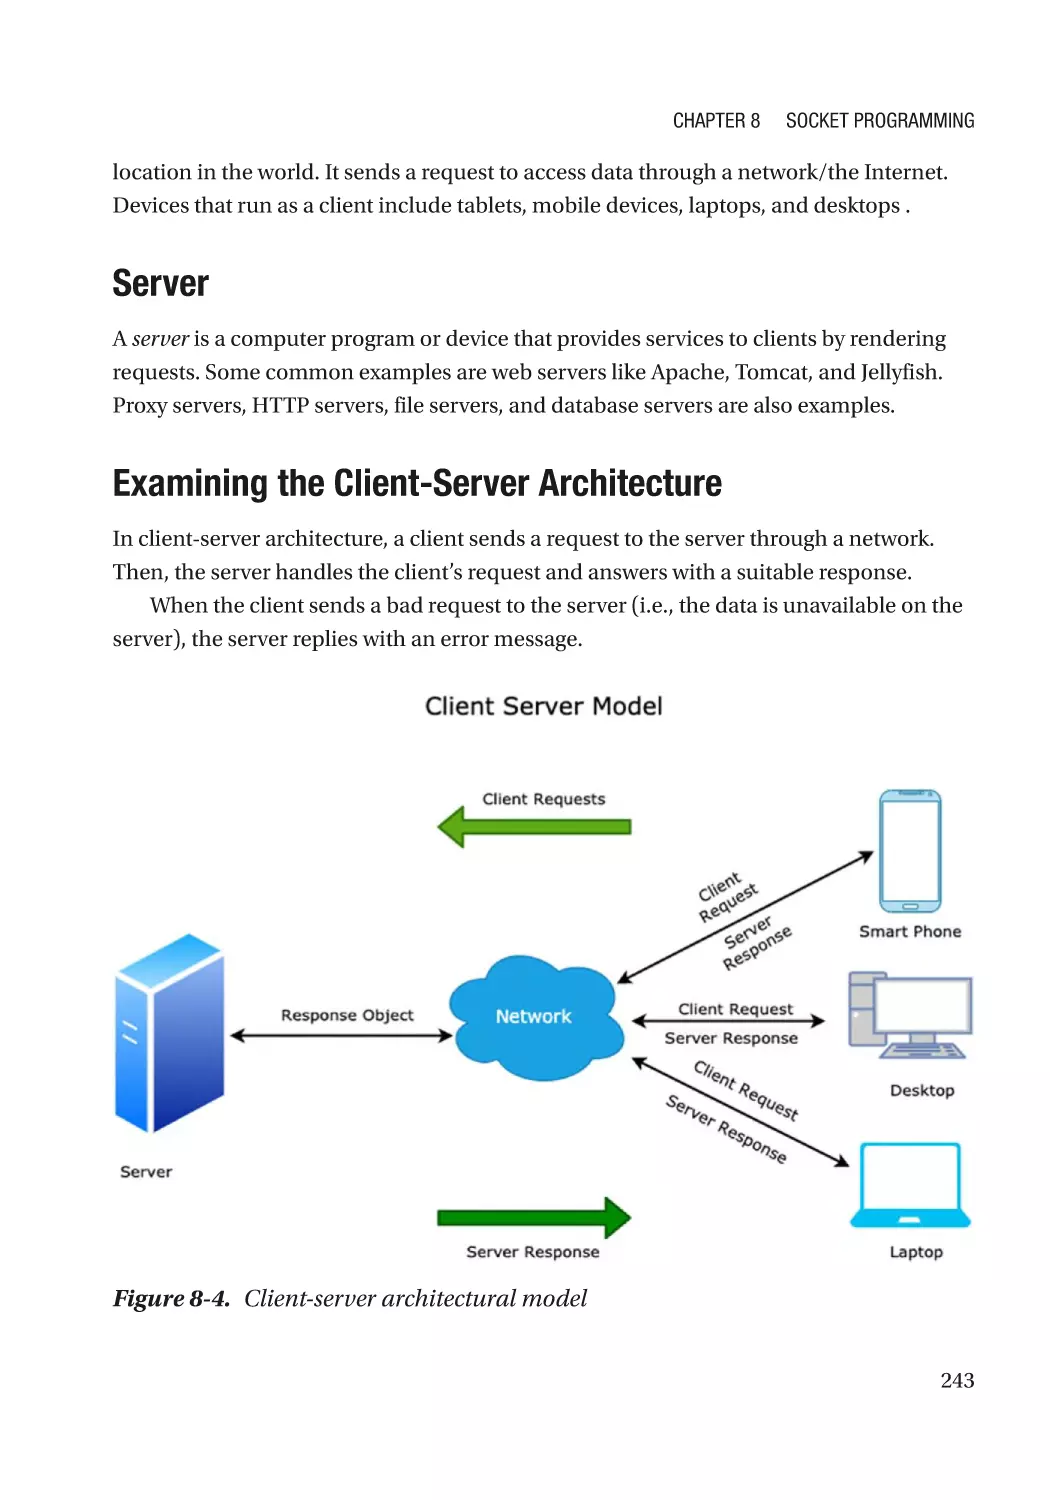
Server���������������������������������������������������������������������������������������������������������������������������������� 243
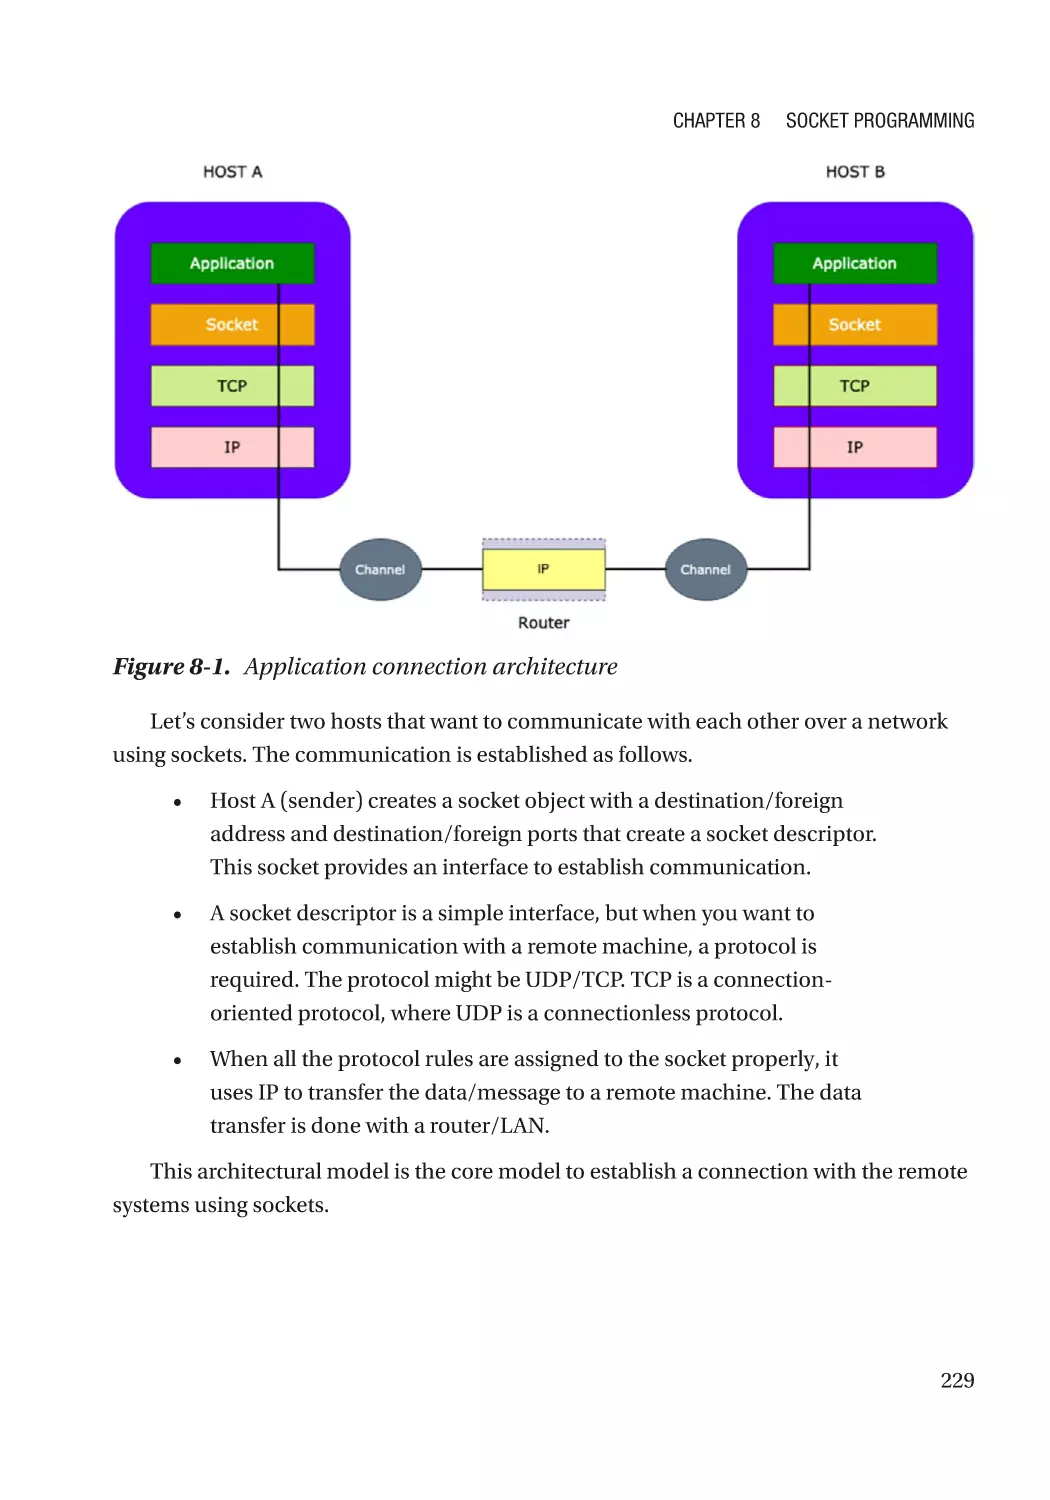
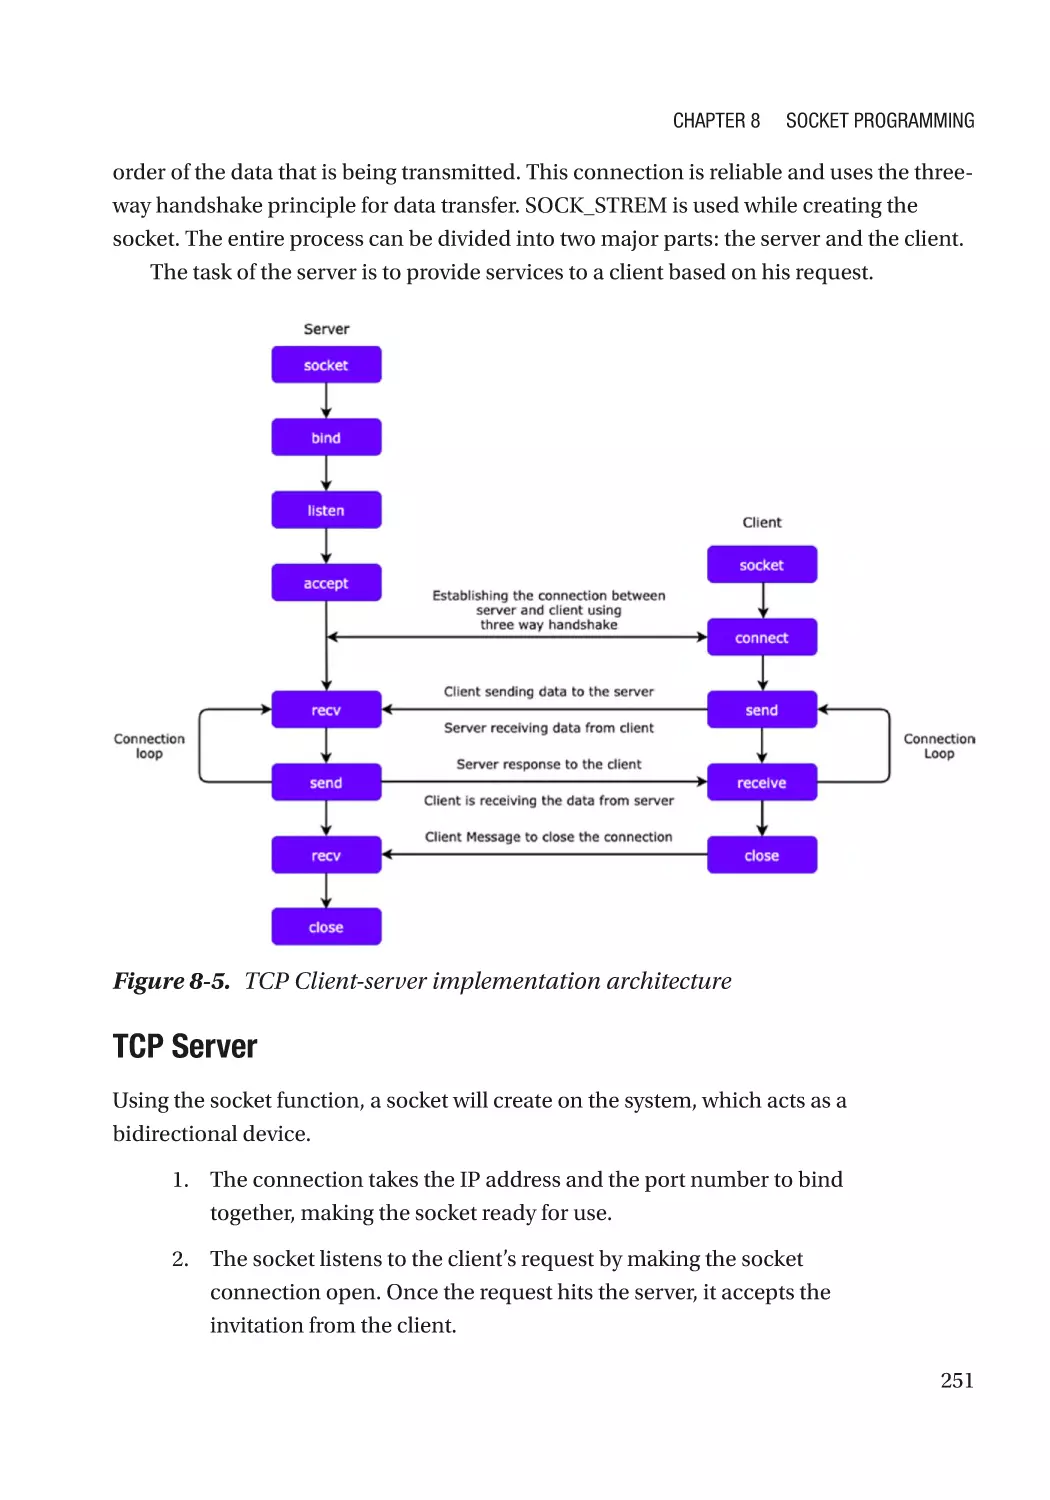
Examining the Client-Server Architecture��������������������������������������������������������������������������� 243
Advantages of the Client-Server Model������������������������������������������������������������������������������� 244
Disadvantages of the Client-Server Model�������������������������������������������������������������������������� 244
System Calls for Socket Programming������������������������������������������������������������������������������������� 244
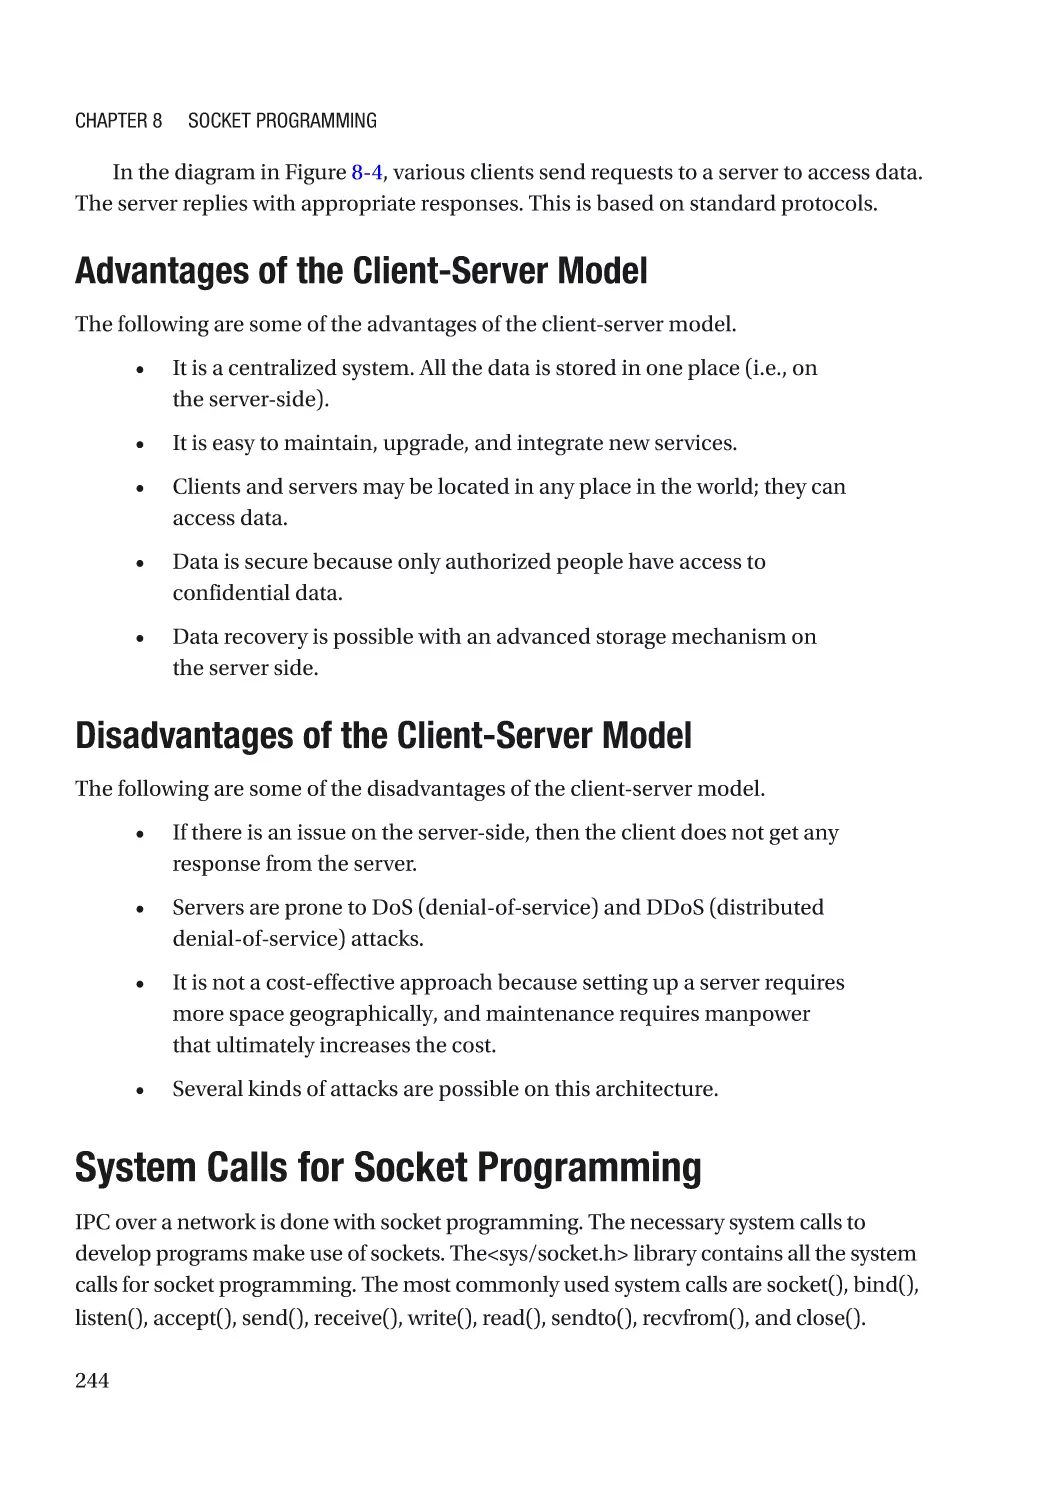
socket()�������������������������������������������������������������������������������������������������������������������������������� 245
bind()����������������������������������������������������������������������������������������������������������������������������������� 246
listen()���������������������������������������������������������������������������������������������������������������������������������� 246
accept()�������������������������������������������������������������������������������������������������������������������������������� 247
send()����������������������������������������������������������������������������������������������������������������������������������� 247
recv()����������������������������������������������������������������������������������������������������������������������������������� 248
x
Table of Contents
sendto()������������������������������������������������������������������������������������������������������������������������������� 249
recvfrom()���������������������������������������������������������������������������������������������������������������������������� 249
close()���������������������������������������������������������������������������������������������������������������������������������� 250
Implementation of Client Server Architecture��������������������������������������������������������������������������� 250
TCP Client-Server Architecture�������������������������������������������������������������������������������������������� 250
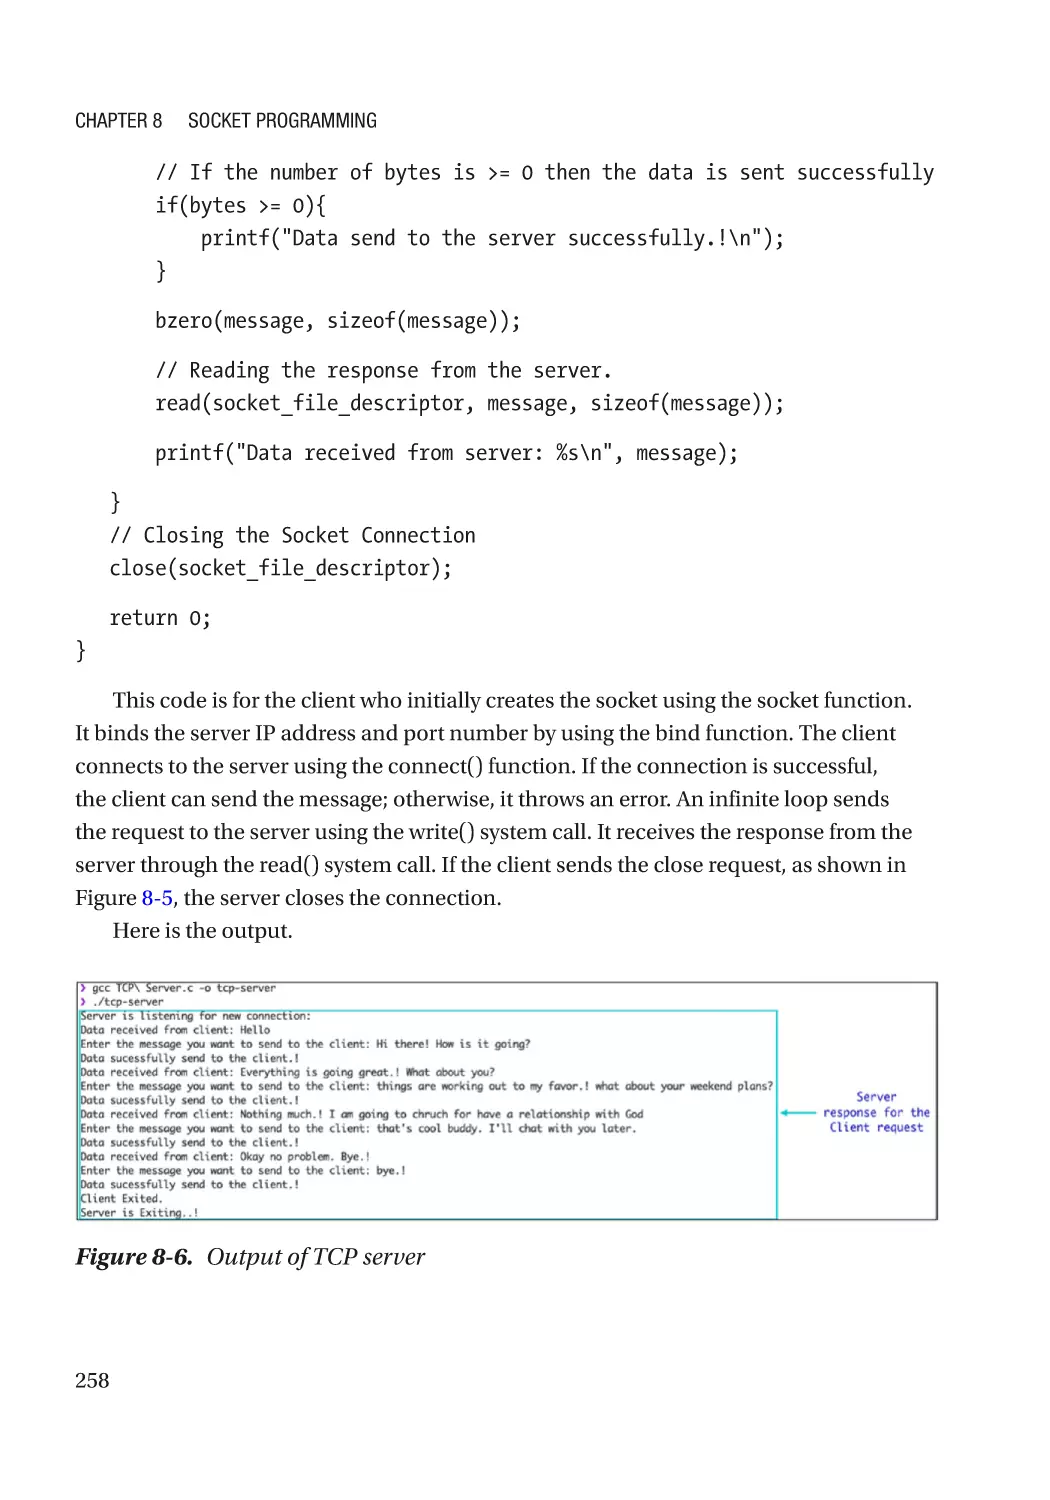
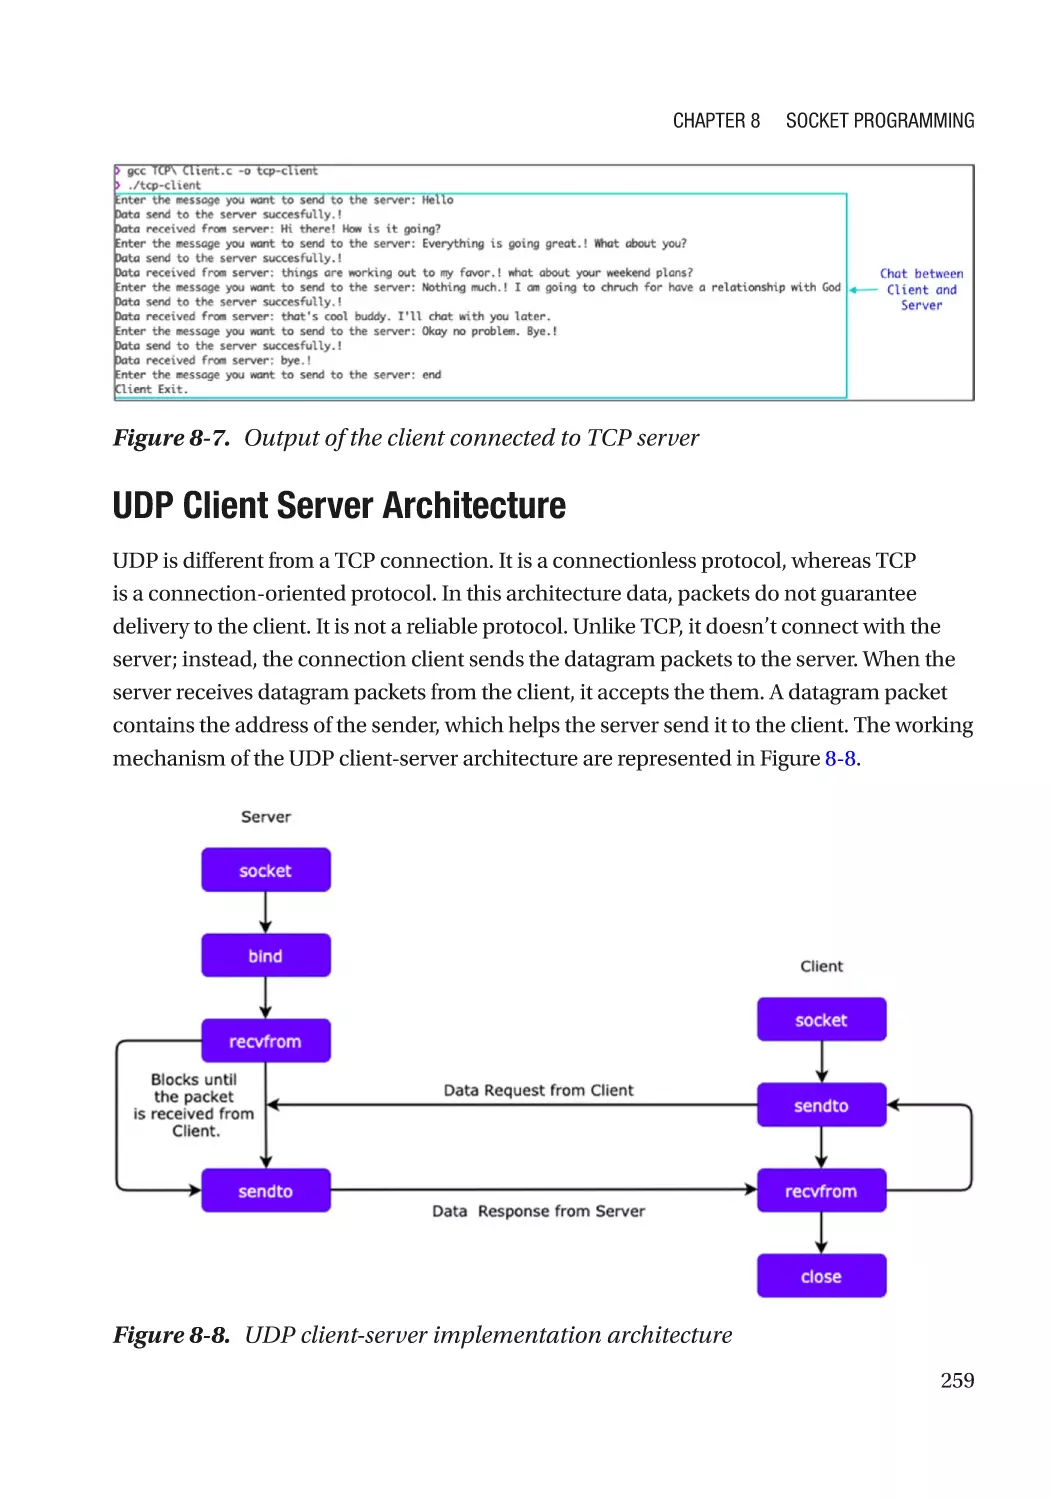
TCP Client-Server Code������������������������������������������������������������������������������������������������������� 253
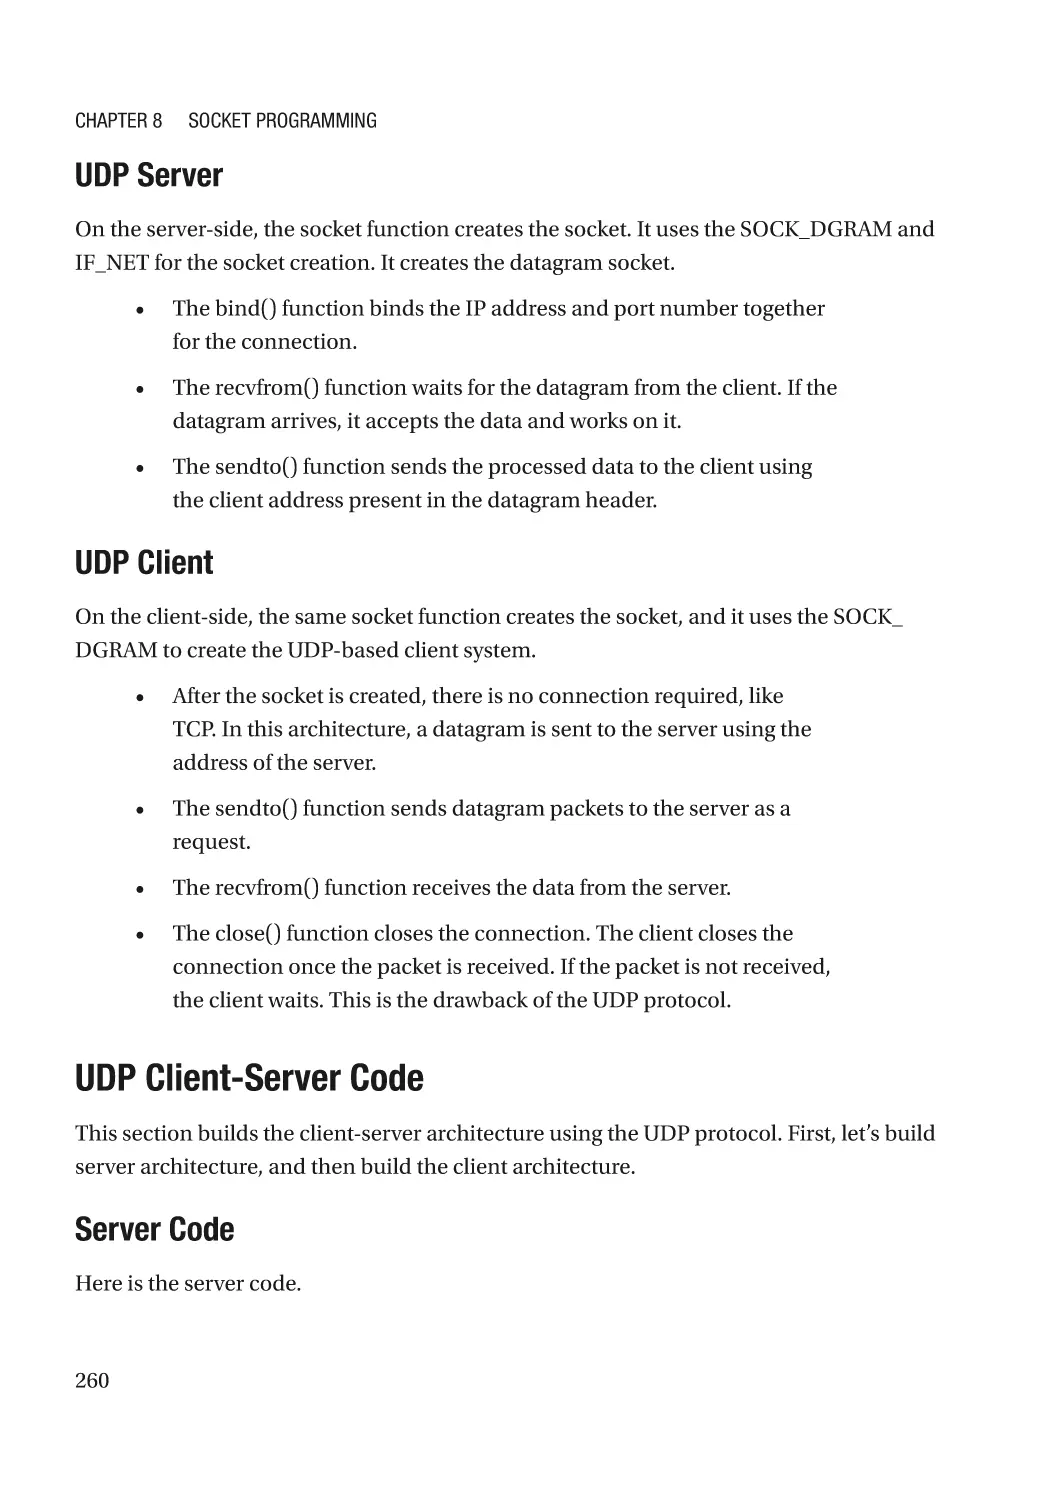
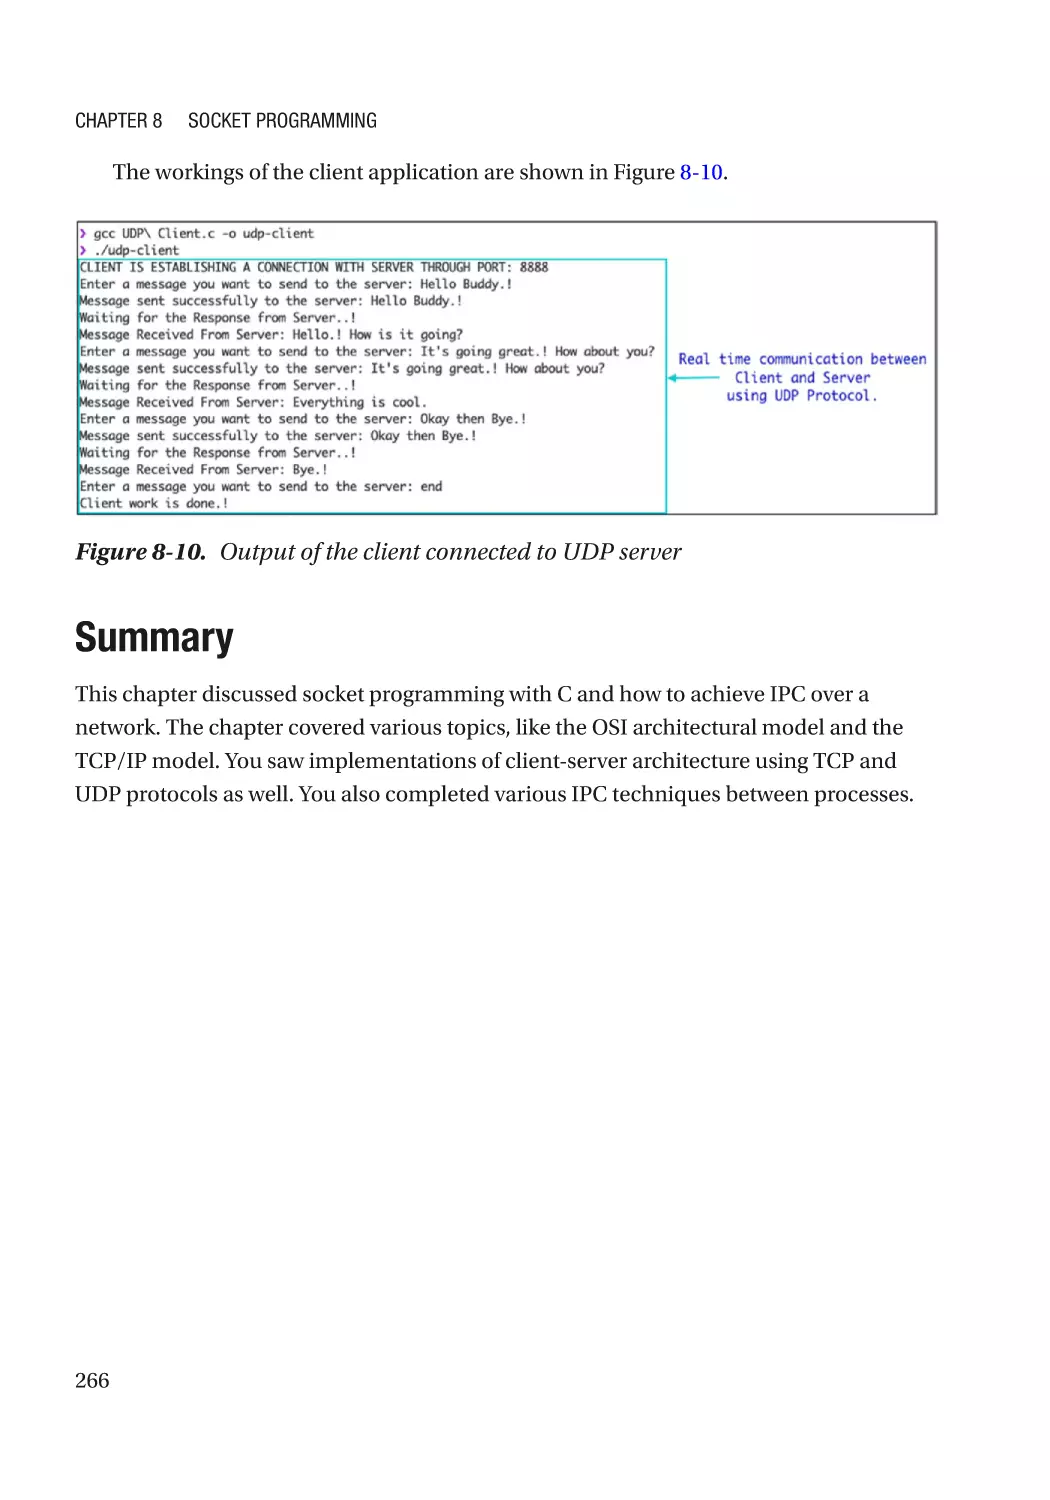
UDP Client Server Architecture�������������������������������������������������������������������������������������������� 259
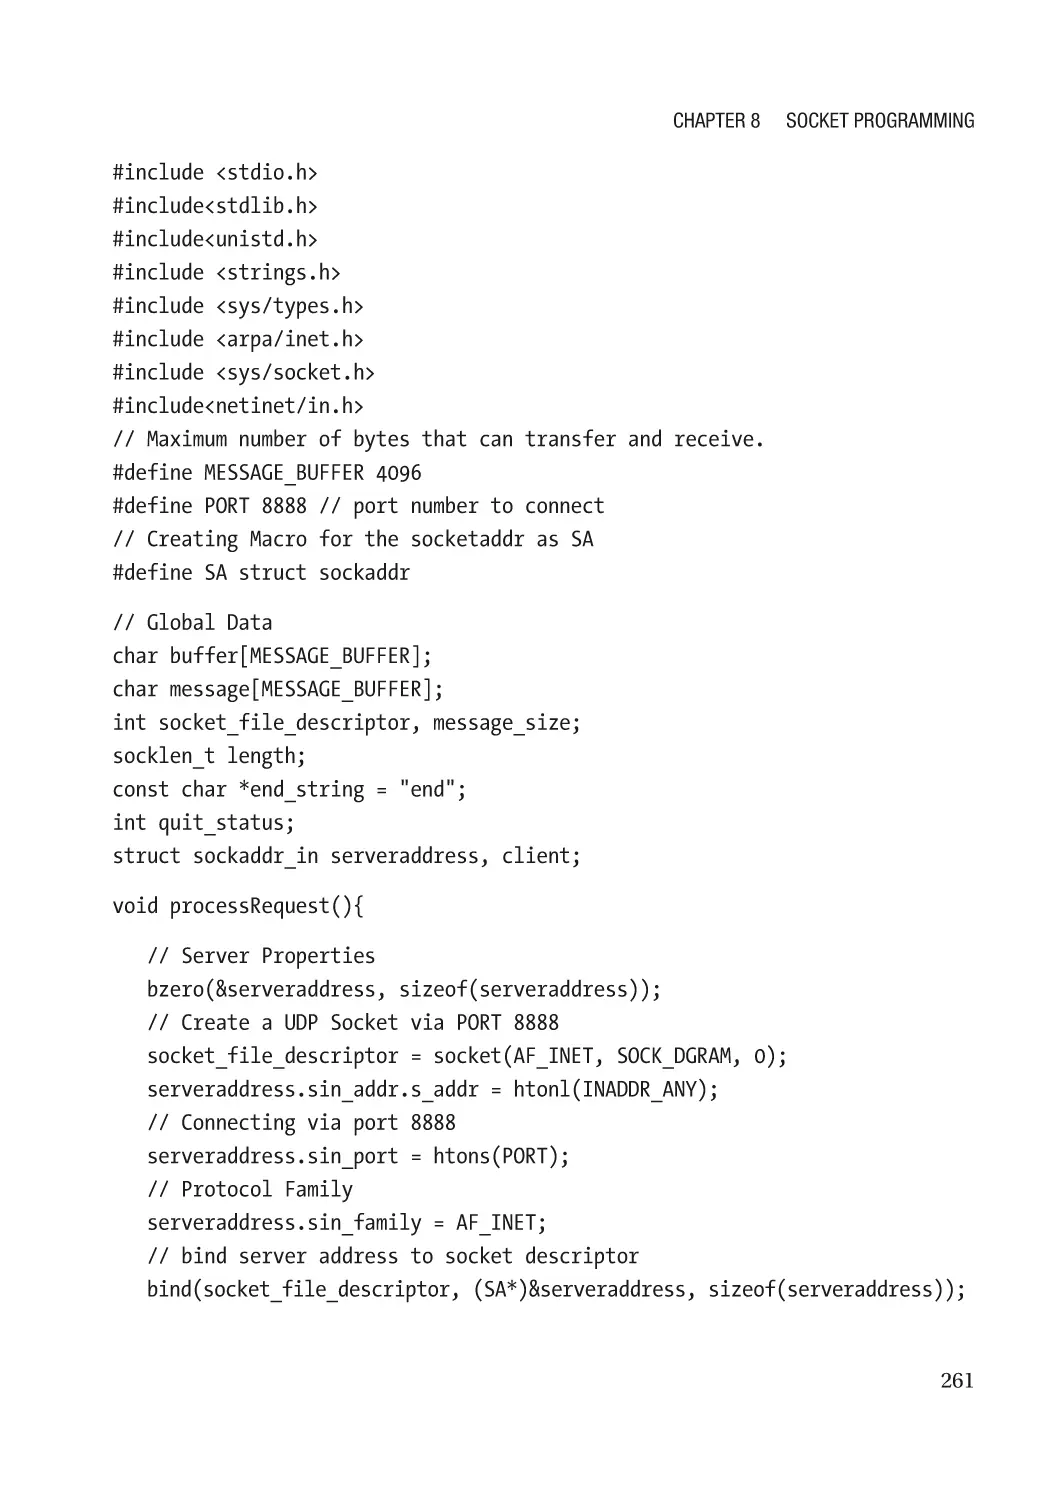
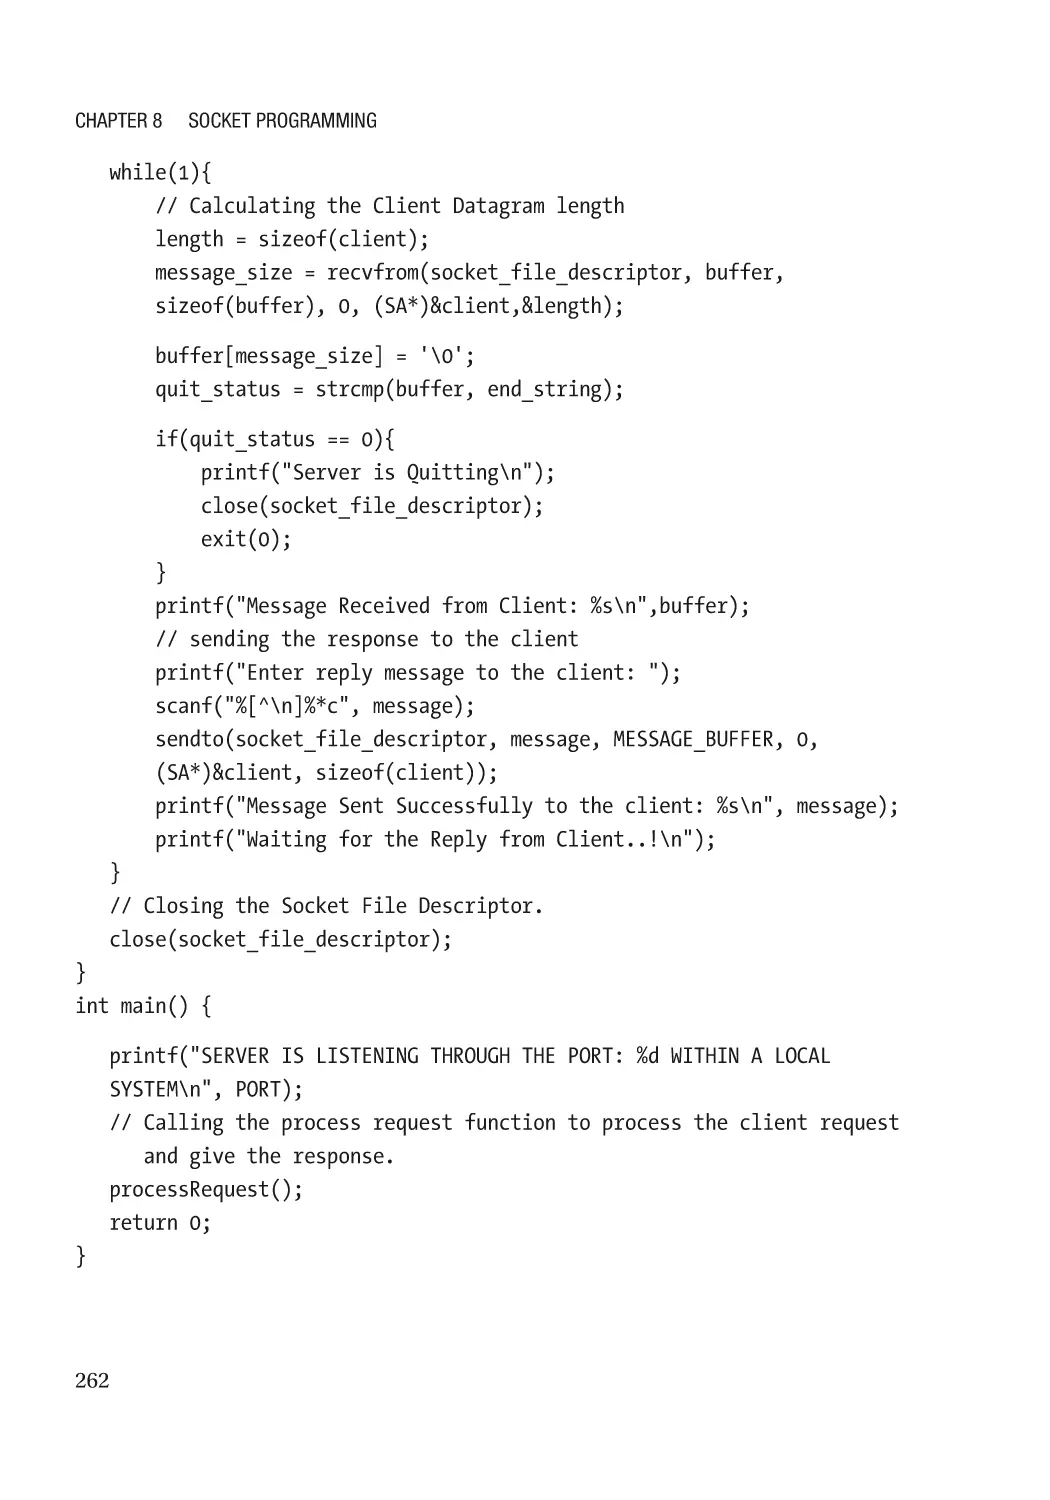
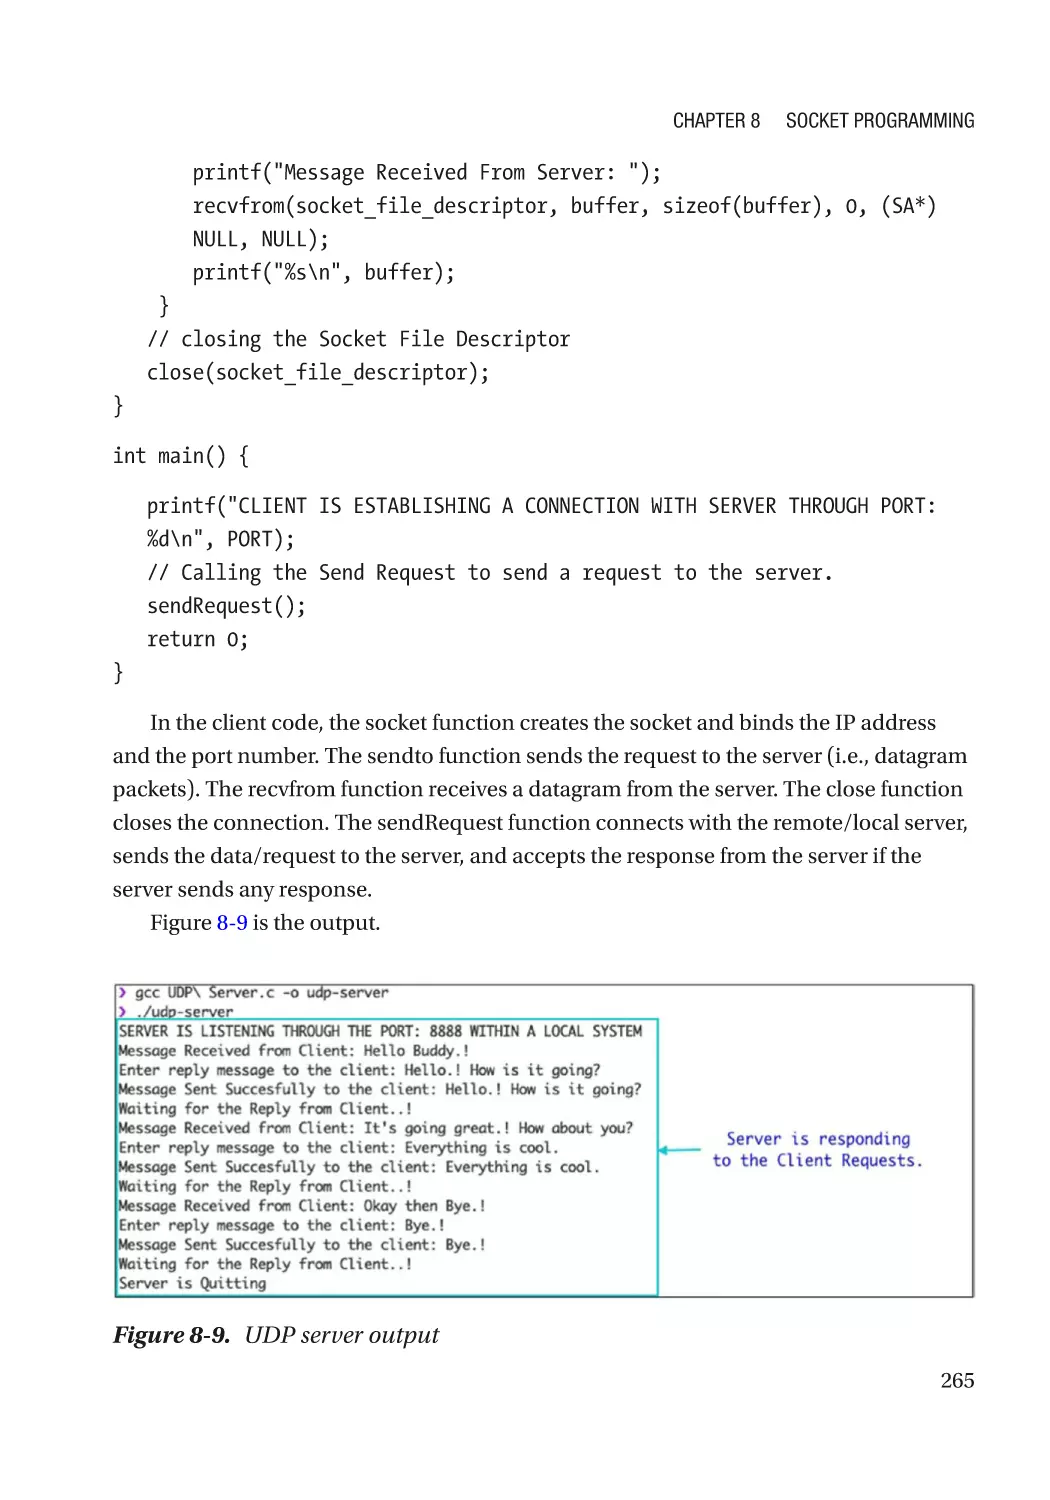
UDP Client-Server Code������������������������������������������������������������������������������������������������������� 260
Summary���������������������������������������������������������������������������������������������������������������������������������� 266
Index��������������������������������������������������������������������������������������������������������������������� 267
xi
About the Author
Sri Manikanta Palakollu is a programmer and software developer with experience in
C, C++, Java, and Python as well as Linux and POSIX-based systems-level programming.
He is a tech reviewer for various tech book publishers. He has written many technical
articles on data science, programming, and cybersecurity. Sri Manikanta has won a
national-level hackathon and contributes to various open source projects.
xiii
Acknowledgments
I would like to thank my savior, the Lord Jesus Christ, for giving me the strength,
knowledge, wisdom, and ability to write this book. I would like to express my
deepest gratitude to the Apress team: Steve Anglin (Acquisition Editor), Mark Powers
(Coordinating Editor), and Matthew Moodie (Development Editor) for giving me this
opportunity and providing constant support during the entire development process.
Thanks to my technical reviewer for his efforts in reviewing this book.
Special thanks to my friends Sai Vardhan Poloju, Aravind Medamoni, Vamsi
Thanjagari, and PTS Vaishnavi for helping me during this journey.
Thanks to my spiritual parents, Rev. Amos Varma and Amrutha, for their constant
prayer support and love. I would like to thank my parents, Basaveswara Rao and Vijaya
Lakshmi, for their love and support. I thank my brother Santhosh and my sister Sri
Lakshmi for helping me design the diagrams in this book.
—Sri Manikanta Palakollu
xv
Introduction
The main goal of this book is to introduce system programming using the C language.
The topics covered in this book teach you how to programmatically manipulate Linux
and POSIX-based operating systems. The wide variety of topics include
•
The basics of the Linux operating system
•
Multithreaded programming in C
•
Deadlocks
•
An introduction to POSIX standards
•
The need for processes and signals
•
Various IPC techniques
•
Developing client-server architecture using TCP and UDP protocols
The prerequisites for learning the concepts discussed in this book are
•
A basic knowledge of the C programming language
•
A basic knowledge of operating systems
xvii
CHAPTER 1
Introduction to the
Linux Environment
Linux is an open source, Unix-like operating system based on the Linux kernel. It was
developed by Linus Torvalds in 1991. It is used in personal computers, mainframe
computers, supercomputers, Android mobile devices, routers, and embedded systems.
Linux is a very lightweight and powerful kernel that effectively communicates with
software programs through any kind of hardware.
The growth of Linux is increasing with the relative growth of technology. IoT devices
like Raspberry PI use the Linux kernel with a variety of Linux distributions. Since Linux
is open source, you can modify the source code as you require. There are more than 500
active Linux distributions (a.k.a. distros) available on the market; most of them are free.
Some distributions require payment for advanced features. The best examples of Linux
kernel-based distros are Ubuntu, Linux Mint, Fedora, Debian, and Arch Linux.
This chapter discusses the following topics.
•
The Linux architecture
•
Kernel types
•
Linux kernel vs. other OS kernels
•
File handling utilities
•
Process utilities
•
Backup utilities
© Sri Manikanta Palakollu 2021
S. M. Palakollu, Practical System Programming with C, https://doi.org/10.1007/978-1-4842-6321-1_1
1
Chapter 1
Introduction to the Linux Environment
Getting Familiar with the Linux Architecture
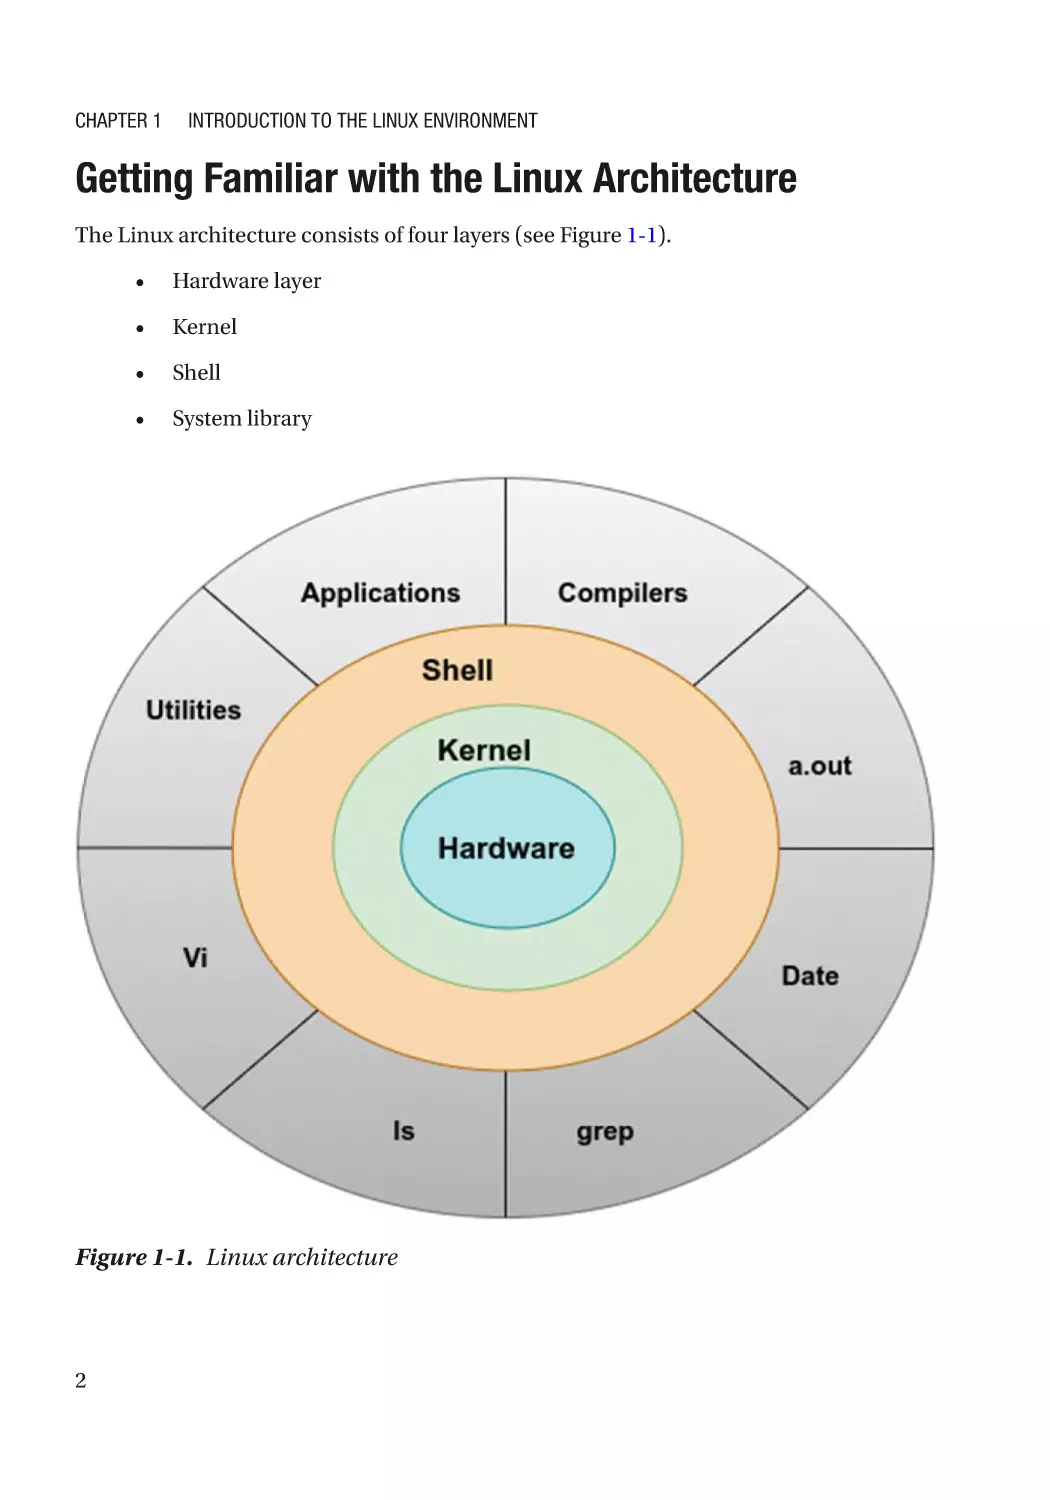
The Linux architecture consists of four layers (see Figure 1-1).
•
Hardware layer
•
Kernel
•
Shell
•
System library
Figure 1-1. Linux architecture
2
Chapter 1
Introduction to the Linux Environment
Hardware Layer
This layer consists of drivers that are required to handle peripheral devices like the
mouse, keyboards, hard disks, SSD, printers, and so forth.
Kernel
The kernel is the heart of the operating system; without kernels, you are not able
to communicate with application programs and the operating system on hardware
devices. The kernel acts as an interface between hardware components and application
programs. A kernel has the following functionalities.
•
I/O management
•
Process management
•
Resource management
•
Device management
I/O Management
A kernel has several I/O management advantages that make a system more intelligent.
•
It provides I/O scheduling with standard scheduling algorithms.
•
It effectively buffers the data transfer between two devices.
•
It caches data, which improves the performance of the system.
•
It handles errors and issues when a user performs an illegal
operation.
Process Management
On an operating system, process management is important in performing a certain task
or activity requested by the user; for example, executing a program, playing music, or
editing a video or photo using a software application. These activities are represented
by tasks that need to be executed by the CPU with the help of the processor. The kernel
properly manages the threads without any conflicts.
3
Chapter 1
Introduction to the Linux Environment
Resource Management
When a task is performed in an operating system, it requires system resources. The CPU
allocates the required resources to perform the task. The kernel optimizes the resources
during process synchronization.
Device Management
A peripheral device requires a specific driver to connect to the operating system. The
kernel maintains the device drivers so that they properly connect when needed.
Types of Kernels
There are five types of kernels. Each type has advantages and disadvantages.
•
Monolithic kernel
•
Microkernel
•
Hybrid kernel
•
Nanokernel
•
Exokernel
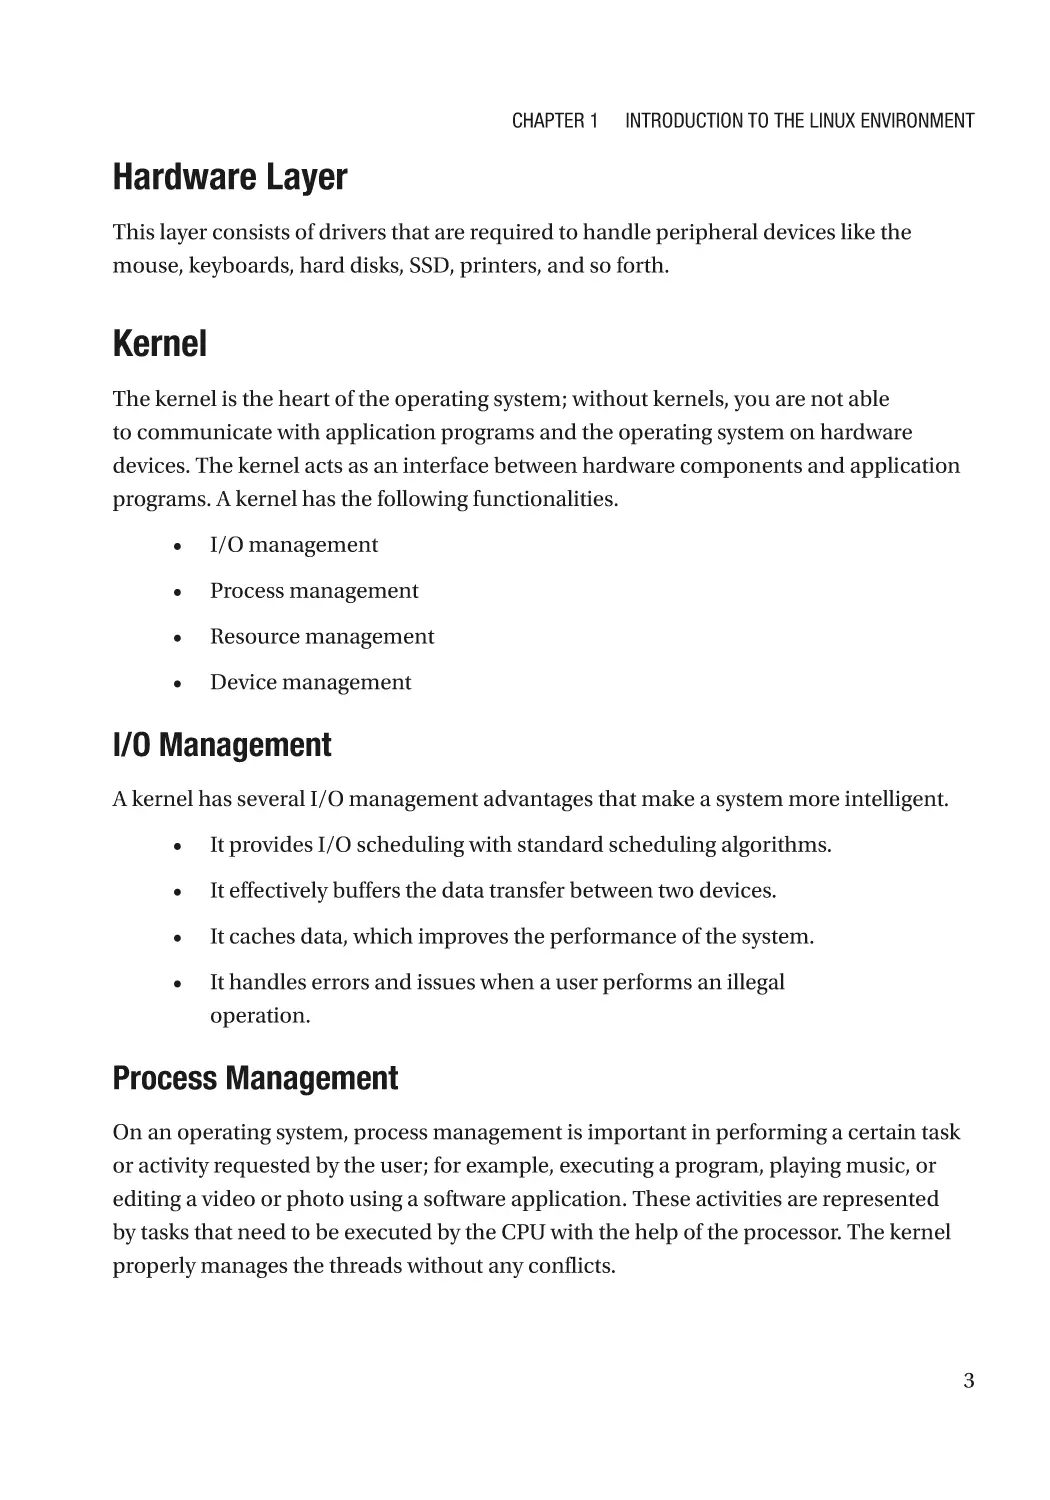
Monolithic Kernels
In a monolithic kernel, the memory space between the user and the kernel services is
not shared. The advantage of this kernel is that memory management, CPU scheduling,
and file management is done through system calls only. A monolithic kernel works faster
because it acts under a single memory space. The disadvantage is that creating new
services is a difficult task.
4
Chapter 1
Introduction to the Linux Environment
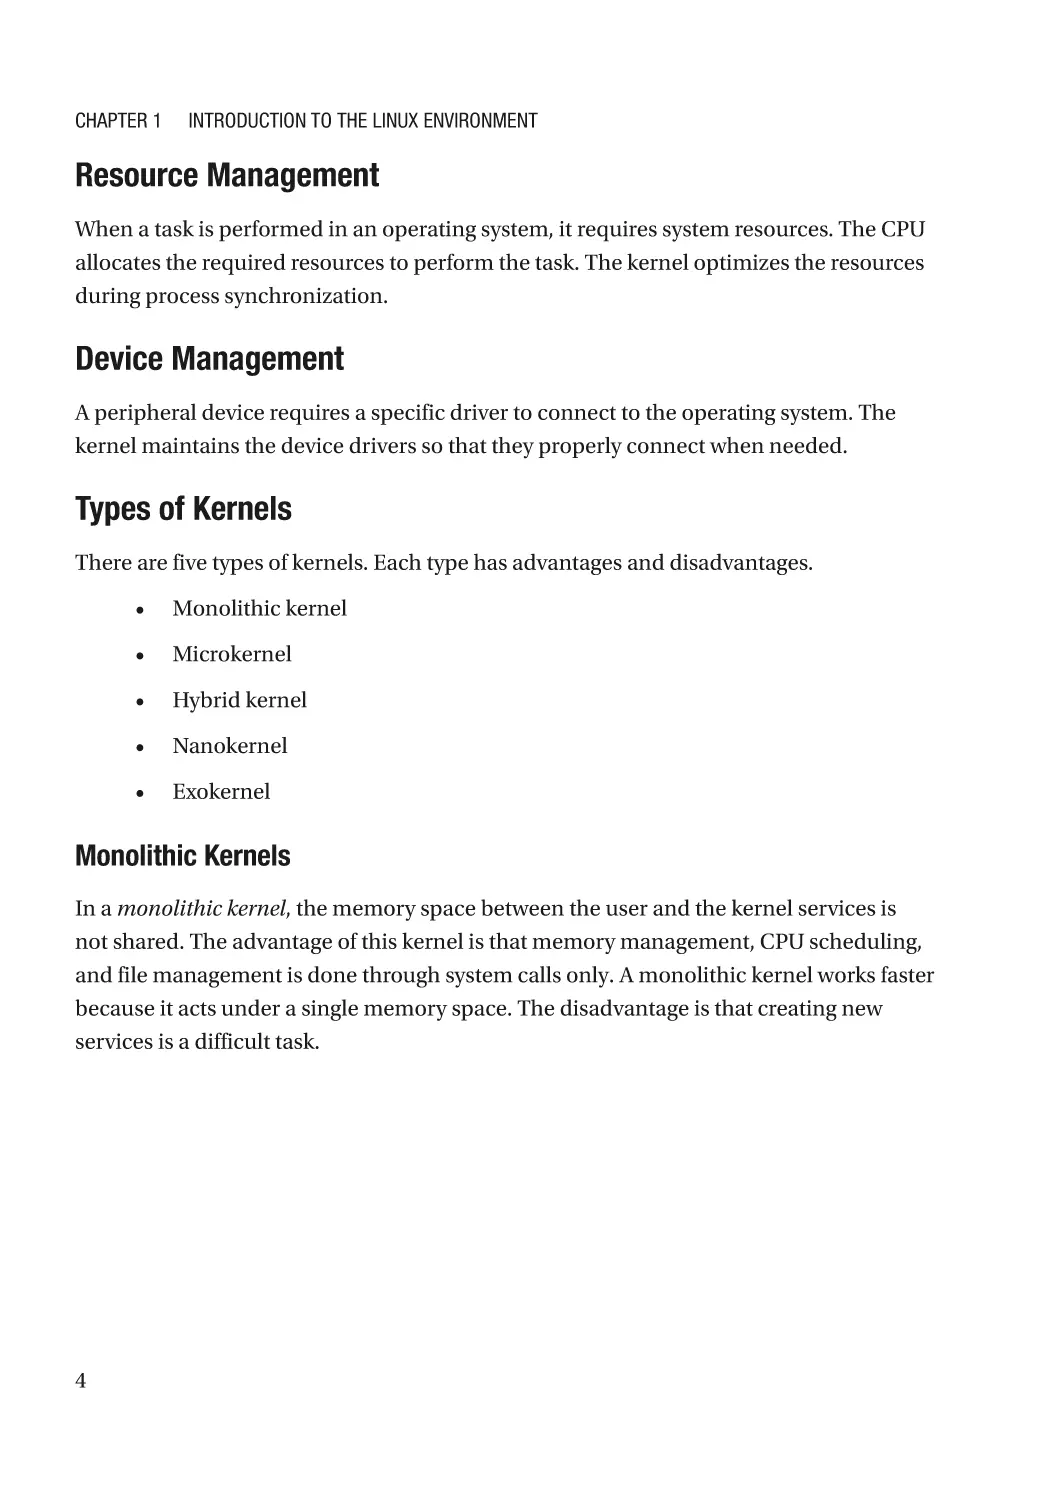
Figure 1-2. Monolithic kernel architecture
Microkernels
Before discussing microkernels, let’s talk about kernel space and user space.
Kernel Space
The space that is allocated to run the core part of an operating system is called
kernel space. This space has access to the system hardware and provides all the core
functionalities to the system applications. A user can access this space only with the help
of system calls. Kernel space contains the kernel code, which are data structures that are
identical to all the processes that are running on the system. In kernel space, memory is
directly mapped to the physical memory.
User Space
The space that is allocated to the running applications is called user space. User space
consists of data, process data, and memory-mapped files. In user space, memory
mapping differs from one address space to another address space. The kernel supervises
the activities that a process needs to perform on the user space.
5
Chapter 1
Introduction to the Linux Environment
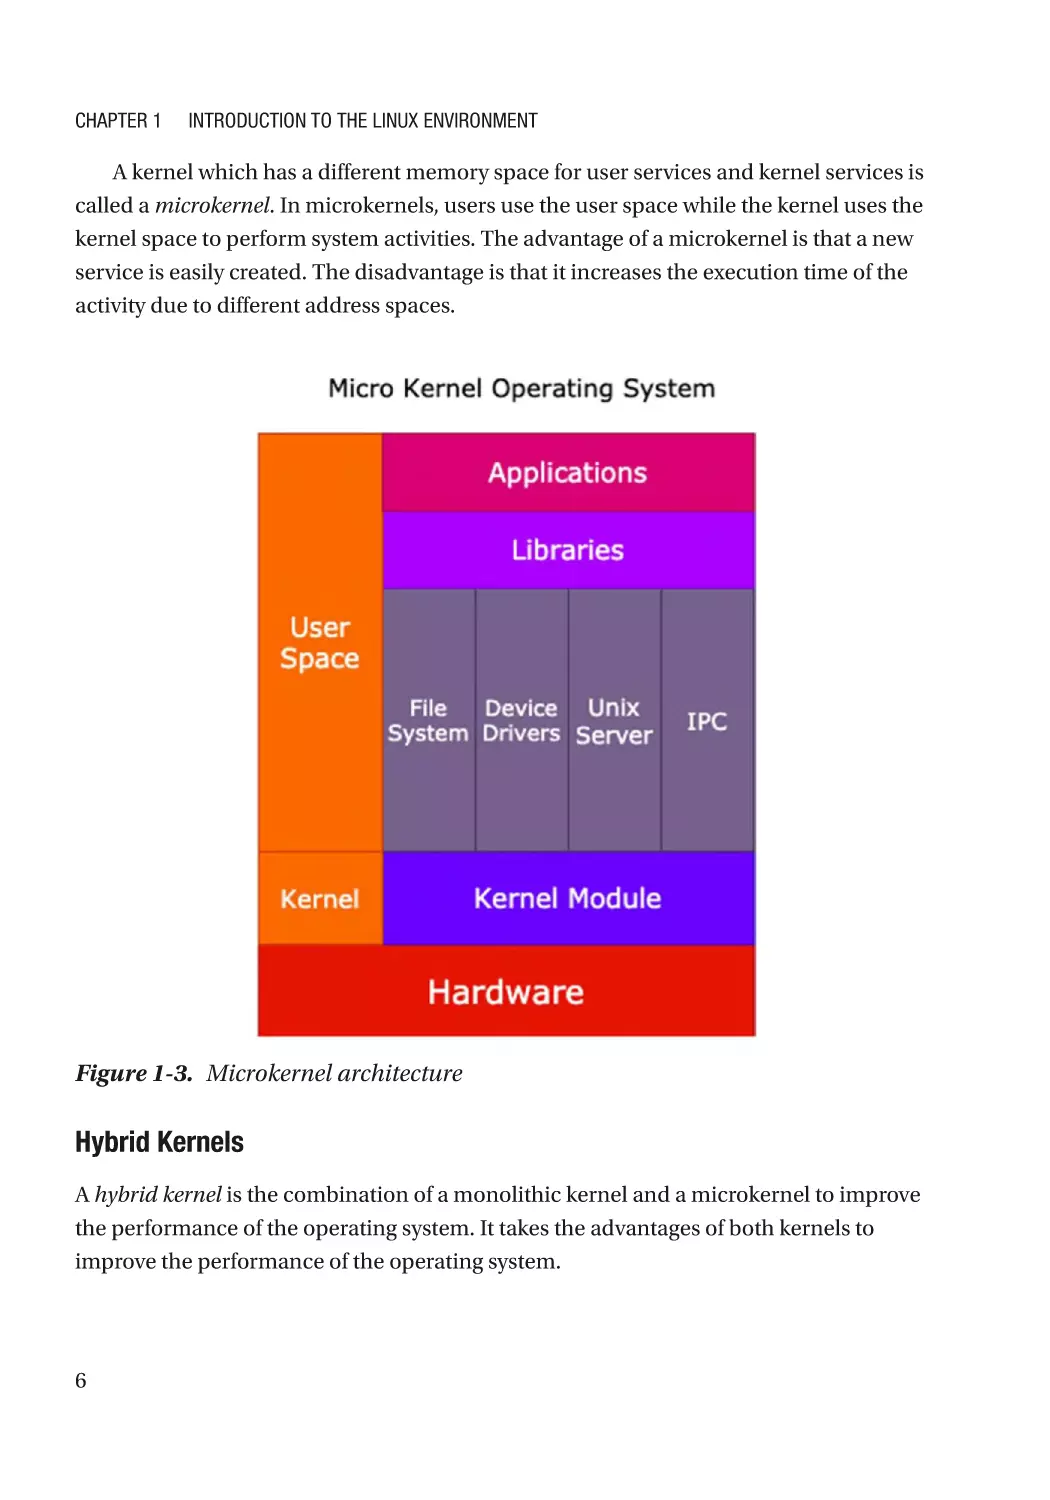
A kernel which has a different memory space for user services and kernel services is
called a microkernel. In microkernels, users use the user space while the kernel uses the
kernel space to perform system activities. The advantage of a microkernel is that a new
service is easily created. The disadvantage is that it increases the execution time of the
activity due to different address spaces.
Figure 1-3. Microkernel architecture
Hybrid Kernels
A hybrid kernel is the combination of a monolithic kernel and a microkernel to improve
the performance of the operating system. It takes the advantages of both kernels to
improve the performance of the operating system.
6
Chapter 1
Introduction to the Linux Environment
Nanokernels
A nanokernel works on a nanosecond clock resolution. It is a very small and minimalistic
kernel that performs an activity. It provides good hardware abstraction, but there
is a lack of system services. The functionality of the kernel does not depend on IPC
(interprocess communication).
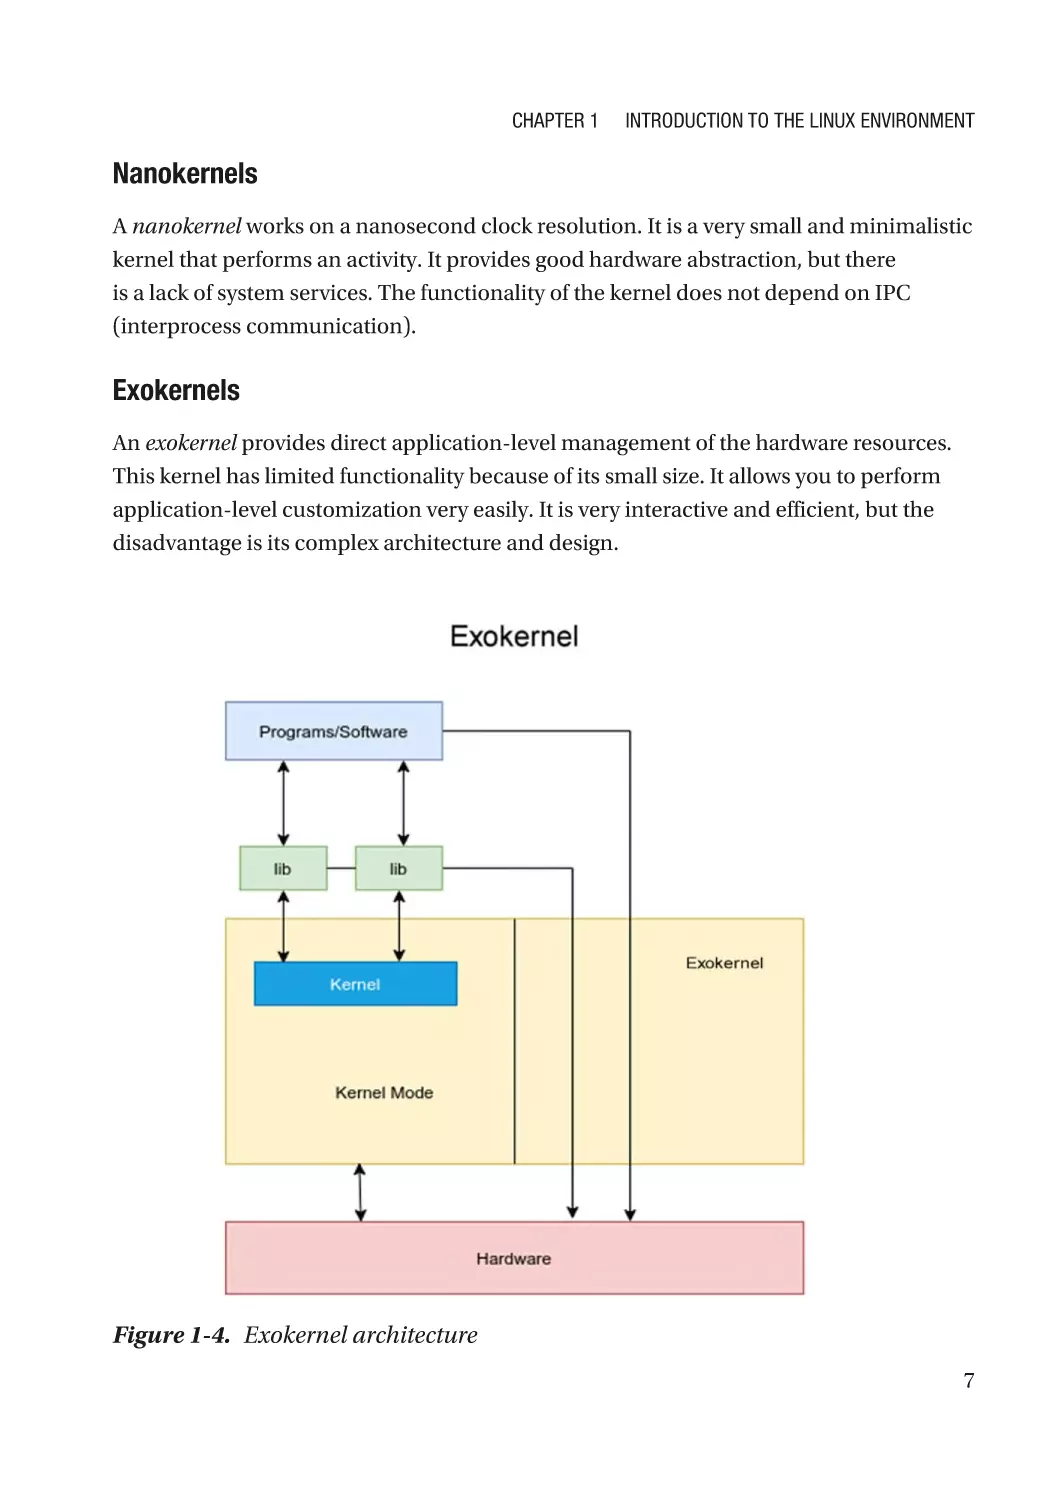
Exokernels
An exokernel provides direct application-level management of the hardware resources.
This kernel has limited functionality because of its small size. It allows you to perform
application-level customization very easily. It is very interactive and efficient, but the
disadvantage is its complex architecture and design.
Figure 1-4. Exokernel architecture
7
Chapter 1
Introduction to the Linux Environment
Shell
A shell is a software program that executes other commands in a Unix-based operating
system. The task of the shell is that it takes input from the user and performs the action
based on the given input. By default, all Unix/Linux-based operating systems contain a
bash shell. This shell hides the complexity of the kernel functionality from the users.
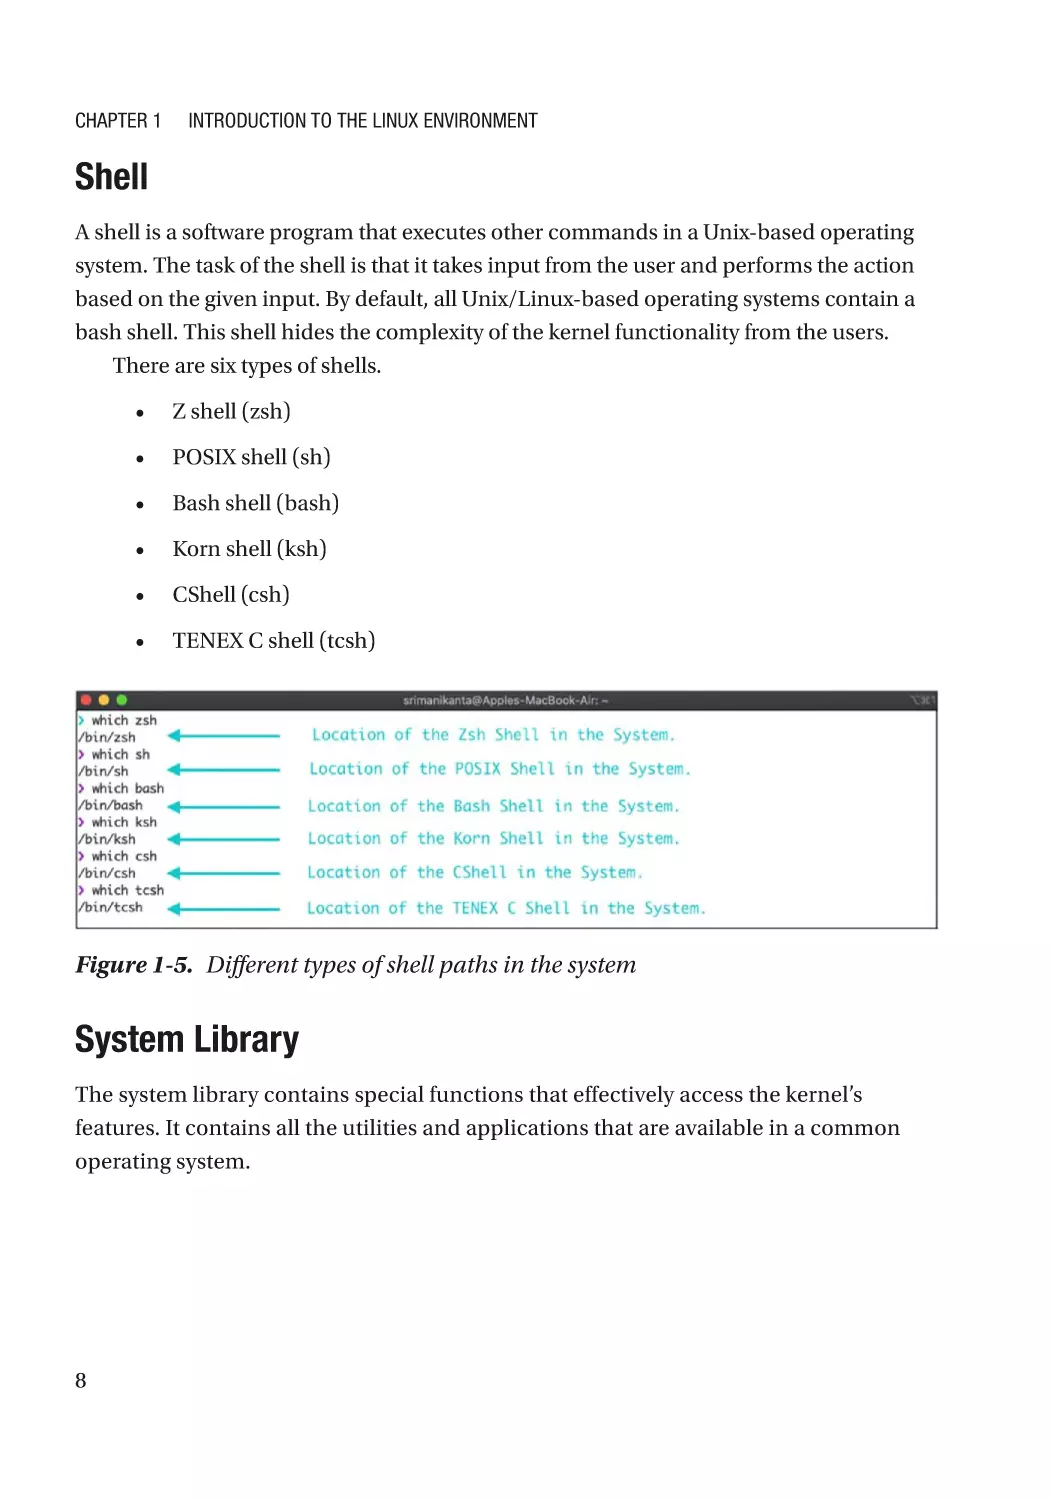
There are six types of shells.
•
Z shell (zsh)
•
POSIX shell (sh)
•
Bash shell (bash)
•
Korn shell (ksh)
•
CShell (csh)
•
TENEX C shell (tcsh)
Figure 1-5. Different types of shell paths in the system
System Library
The system library contains special functions that effectively access the kernel’s
features. It contains all the utilities and applications that are available in a common
operating system.
8
Chapter 1
Introduction to the Linux Environment
Linux Kernels vs. Other OS Kernels
Linux uses the monolithic kernel, whereas operating systems like Windows and macOS
use the hybrid kernel. The performance of the Linux operating system is faster because it
does not have the same address space for the applications and kernel. Since Linux uses the
monolithic kernel, which is a core kernel that does not have any hybrid features, it makes
Linux more advantageous than other operating systems. These monolithic kernel activities
allow Linux to perform out-of-the-box system activities that other operating systems cannot.
Linux has a good package manager that downloads and sets up software very easily.
This is not available on other operating systems. Homebrew is the “missing” package
manager available for macOS that resolves this issue to some extent. There is no such
kind of package manager to install software and set up easily on Windows.
In Linux, you can set up device drivers more easily other than on other operating
systems. In Linux, the system calls are very fast and interactive.
The following are some simple reasons why using Linux is preferable to using
Windows or macOS.
•
Open source
•
Flexibility
•
Reliability
•
Customization
•
Security
•
Good hardware support
Linux is open source so that developers can perform reverse engineering on the
operating system’s code, which helps developers build custom modules and modify the
operating system. Operating systems like macOS X and Windows don’t have an open
source feature, which is why Linux is so popular among developers.
Introduction to Files
Files are commonly used to store data. The data in a file determines the file type. In
general, there are five types of files available on any operating system.
•
Text files
•
Program files
9
Chapter 1
Introduction to the Linux Environment
•
Binary files
•
Special files
•
General files
A file type is revealed by its extension. An image is a file that contains the most
common extensions (.png, .jpg, .jpeg, .tiff, .gif, etc.). Files are maintained and managed
by the file system, which is a hierarchical structure that stores the content in a structured
format. These file structures are discussed in upcoming chapters. For now, let’s discuss
each file type.
Text File
A text file contains data that the reader can easily read. These files are created by the user
or system-generated log files. There are many types of text files. Log files usually have the
.log extension. The README.md file is a normal text file that uses markup language.
Program File
A program file contains a set of instructions written by the software developer to produce
the software or application. There is no common extension for program files because
there are multiple programming languages. The program file extension is based on the
programming language in which the file content is written. The rules and syntax differ
by programming language. The most common extensions are .c, .cpp, .java, .sh, and .bat.
These program files become executable based on the requirements and usage. You can
use any type of extension to perform the same task, but it is recommended to use the
standard extension given by the ISO.
Binary File
A binary file contains information that is a combination of 0s and 1s. The information
in a binary file is not human-readable or understandable. It is only understood by
computers. Binary files are generally executable files. These files are generated by
compiling a program file. You can convert a program file into an executable file; for
example, when you compile a C program, it will generate an executable file.
10
Chapter 1
Introduction to the Linux Environment
Special File
A special file is implicitly created by a system process, or it is explicitly created by a
programmer for a specific purpose. Examples of a special file include pipes and message
queue files. Special files are explained in upcoming chapters.
Regular File
A regular file contains information on a photo, song, or video that is downloaded from
the Internet or created by the user. The most common examples are images, audio, and
videos.
File Handling Utilities
There are various built-in commands in Unix-like operating systems to handle the files
on the operating system. These commands and utilities are executed from the terminal
and are described next.
mkdir
Syntax ➔ mkdir <dirname_with_Location>
Explanation ➔ mkdir stands for make directory. It creates a directory on an operating
system. A directory is like a box that stores various types of files and other directories.
Example ➔ mkdir Linux
Figure 1-6. mkdir command
11
Chapter 1
Introduction to the Linux Environment
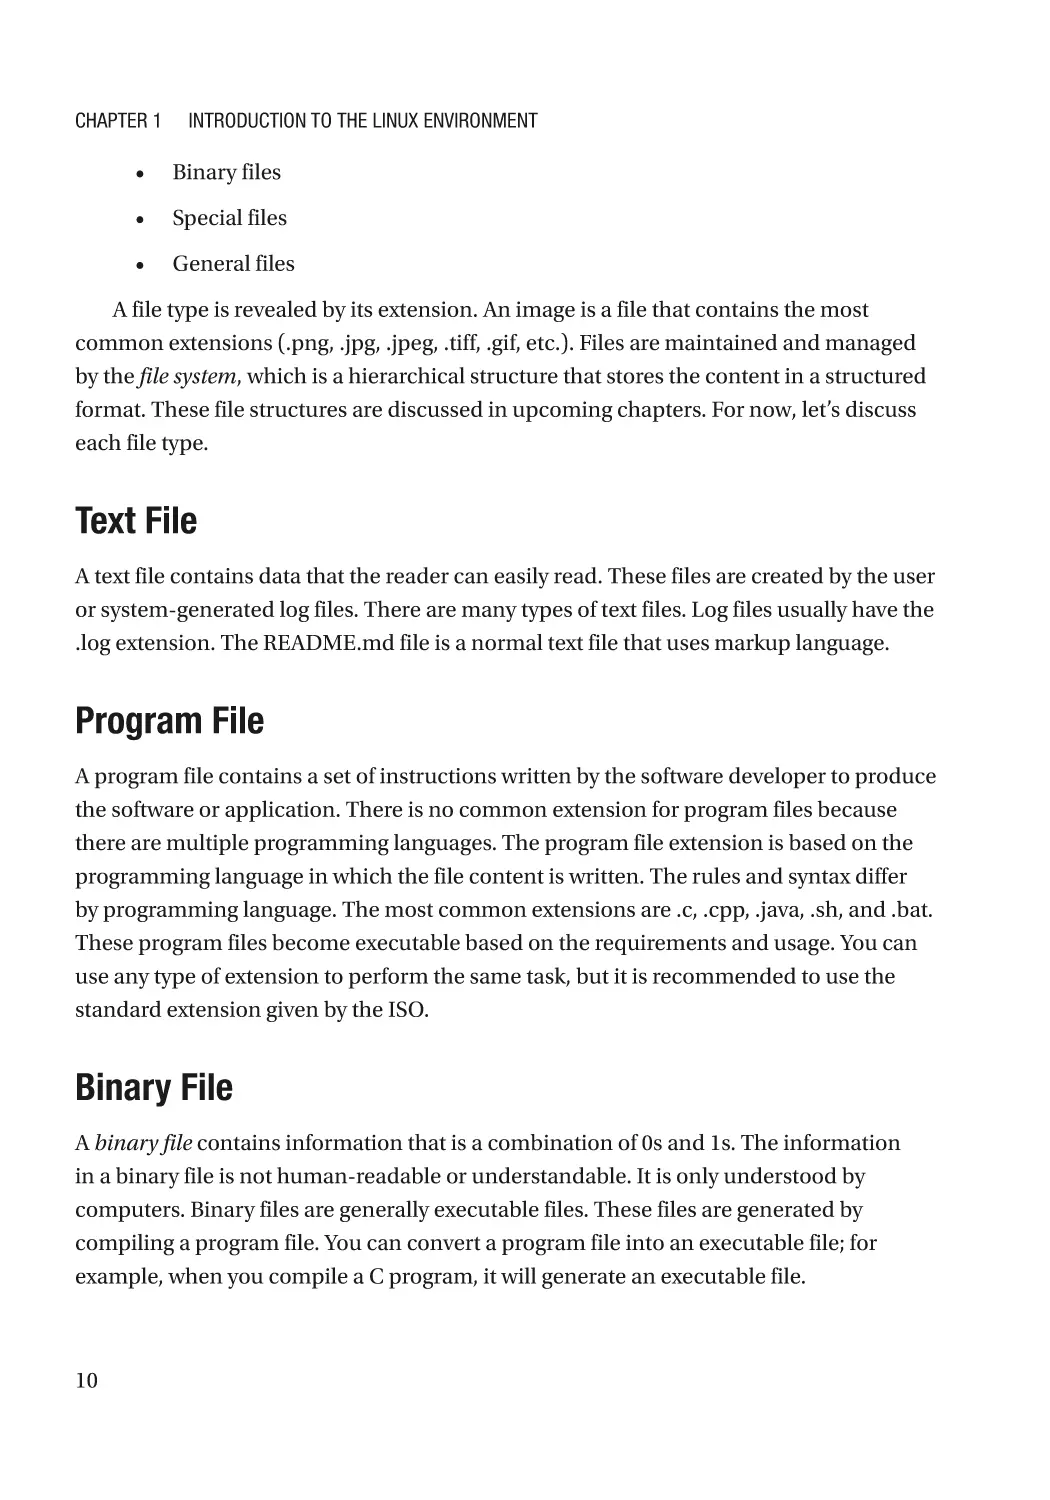
cd
Syntax ➔ cd <dirname>
Explanation ➔ cd stands for change directory. It changes the directory from the
current directory to a specified directory with the help of a destination directory location.
Example ➔ cd Linux
Figure 1-7. cd command
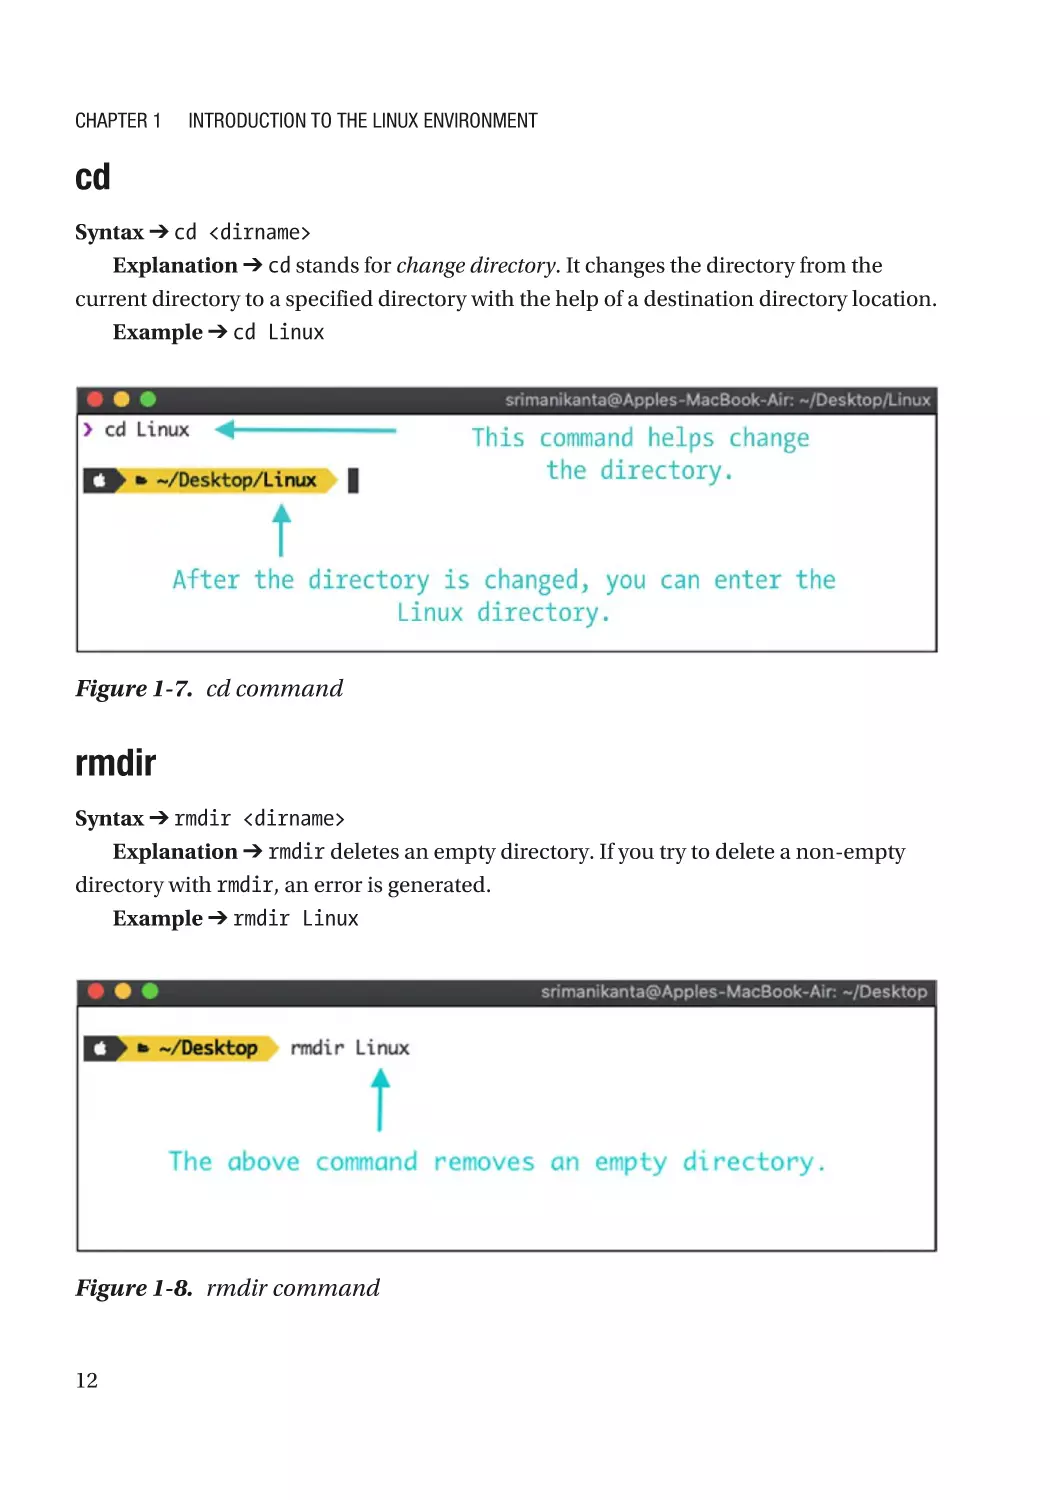
rmdir
Syntax ➔ rmdir <dirname>
Explanation ➔ rmdir deletes an empty directory. If you try to delete a non-empty
directory with rmdir, an error is generated.
Example ➔ rmdir Linux
Figure 1-8. rmdir command
12
Chapter 1
Introduction to the Linux Environment
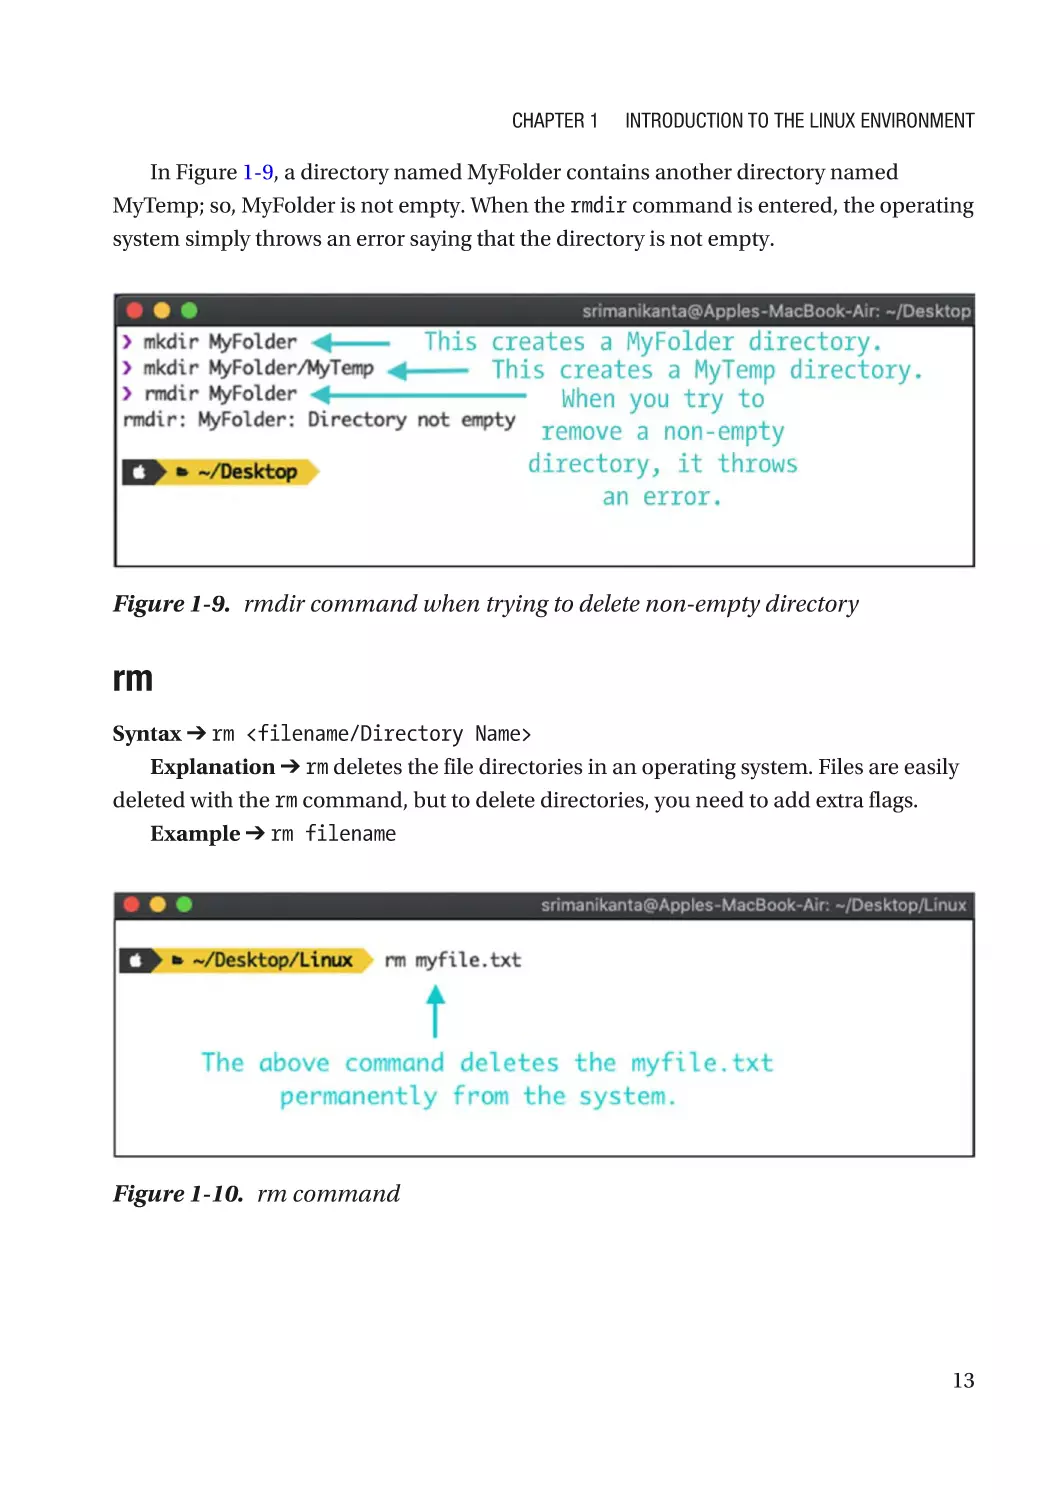
In Figure 1-9, a directory named MyFolder contains another directory named
MyTemp; so, MyFolder is not empty. When the rmdir command is entered, the operating
system simply throws an error saying that the directory is not empty.
Figure 1-9. rmdir command when trying to delete non-empty directory
r m
Syntax ➔ rm <filename/Directory Name>
Explanation ➔ rm deletes the file directories in an operating system. Files are easily
deleted with the rm command, but to delete directories, you need to add extra flags.
Example ➔ rm filename
Figure 1-10. rm command
13
Chapter 1
Introduction to the Linux Environment
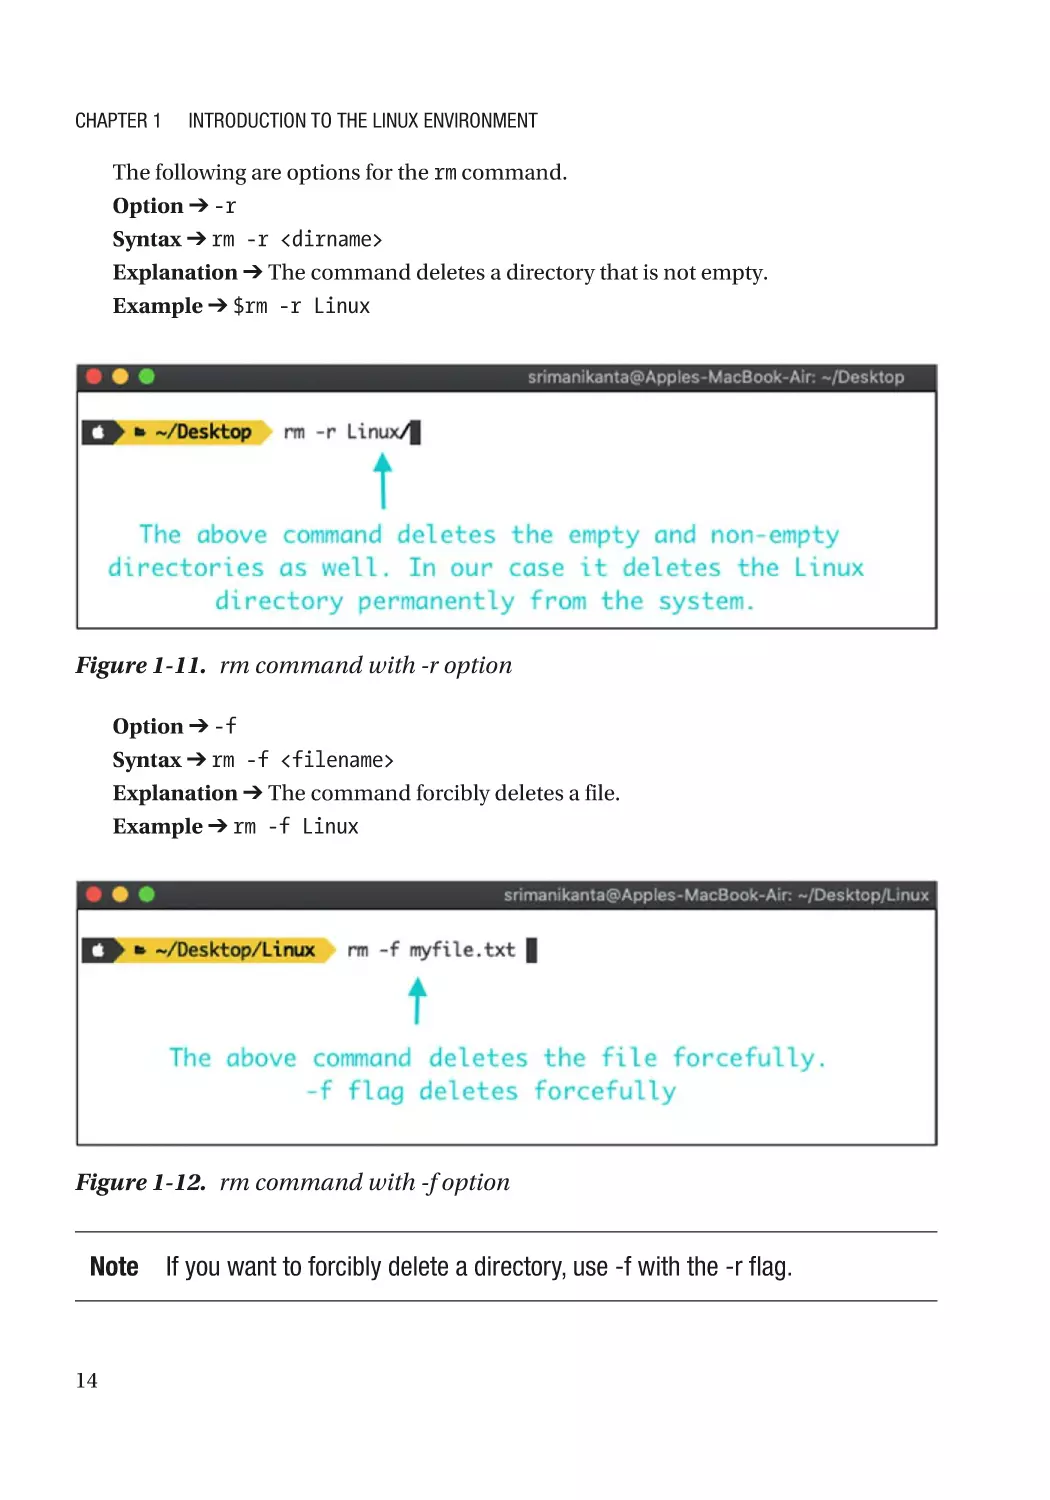
The following are options for the rm command.
Option ➔ -r
Syntax ➔ rm -r <dirname>
Explanation ➔ The command deletes a directory that is not empty.
Example ➔ $rm -r Linux
Figure 1-11. rm command with -r option
Option ➔ -f
Syntax ➔ rm -f <filename>
Explanation ➔ The command forcibly deletes a file.
Example ➔ rm -f Linux
Figure 1-12. rm command with -f option
Note
14
If you want to forcibly delete a directory, use -f with the -r flag.
Chapter 1
Introduction to the Linux Environment
Figure 1-13. rm command with -rf option
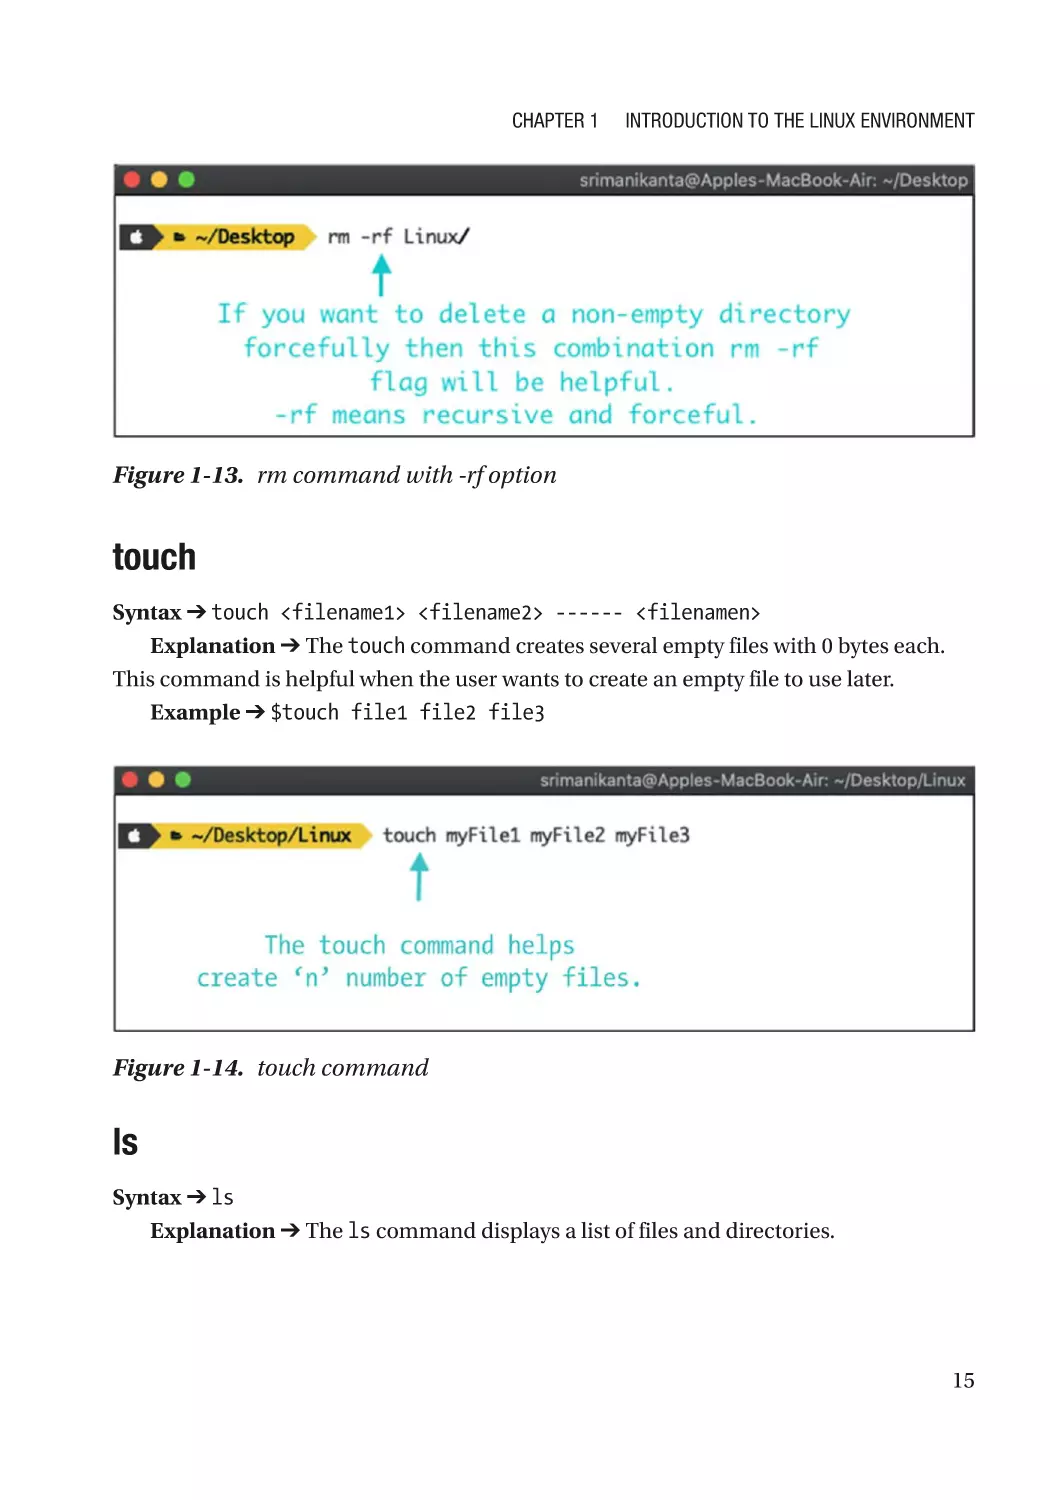
touch
Syntax ➔ touch <filename1> <filename2> ------ <filenamen>
Explanation ➔ The touch command creates several empty files with 0 bytes each.
This command is helpful when the user wants to create an empty file to use later.
Example ➔ $touch file1 file2 file3
Figure 1-14. touch command
ls
Syntax ➔ ls
Explanation ➔ The ls command displays a list of files and directories.
15
Chapter 1
Introduction to the Linux Environment
Figure 1-15. ls command
The following are some of the options for ls.
Option ➔ -l
Syntax ➔ ls -l
Explanation ➔ This command displays a long list of files and directories.
Figure 1-16. ls command with -l option
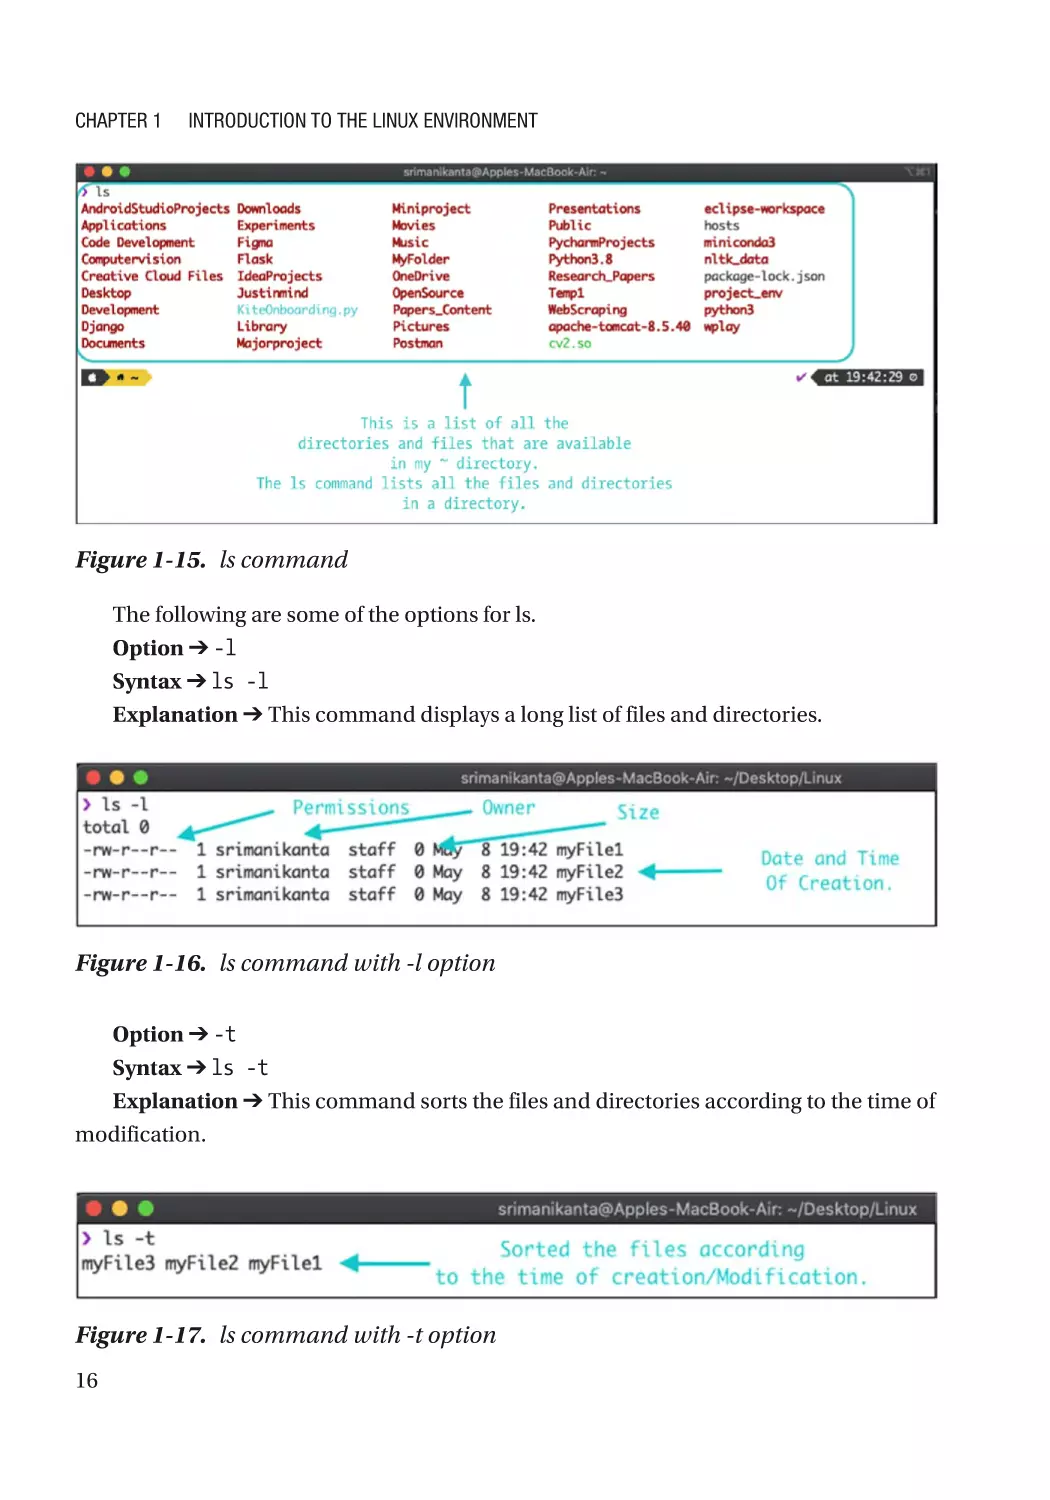
Option ➔ -t
Syntax ➔ ls -t
Explanation ➔ This command sorts the files and directories according to the time of
modification.
Figure 1-17. ls command with -t option
16
Chapter 1
Introduction to the Linux Environment
Option ➔ -a
Syntax ➔ ls -a
Explanation ➔ This command lists all the hidden files and directories. A hidden file
is easily created with the . operator. A file or directory name that starts with . is a hidden
directory or file.
Figure 1-18. ls command with -a option
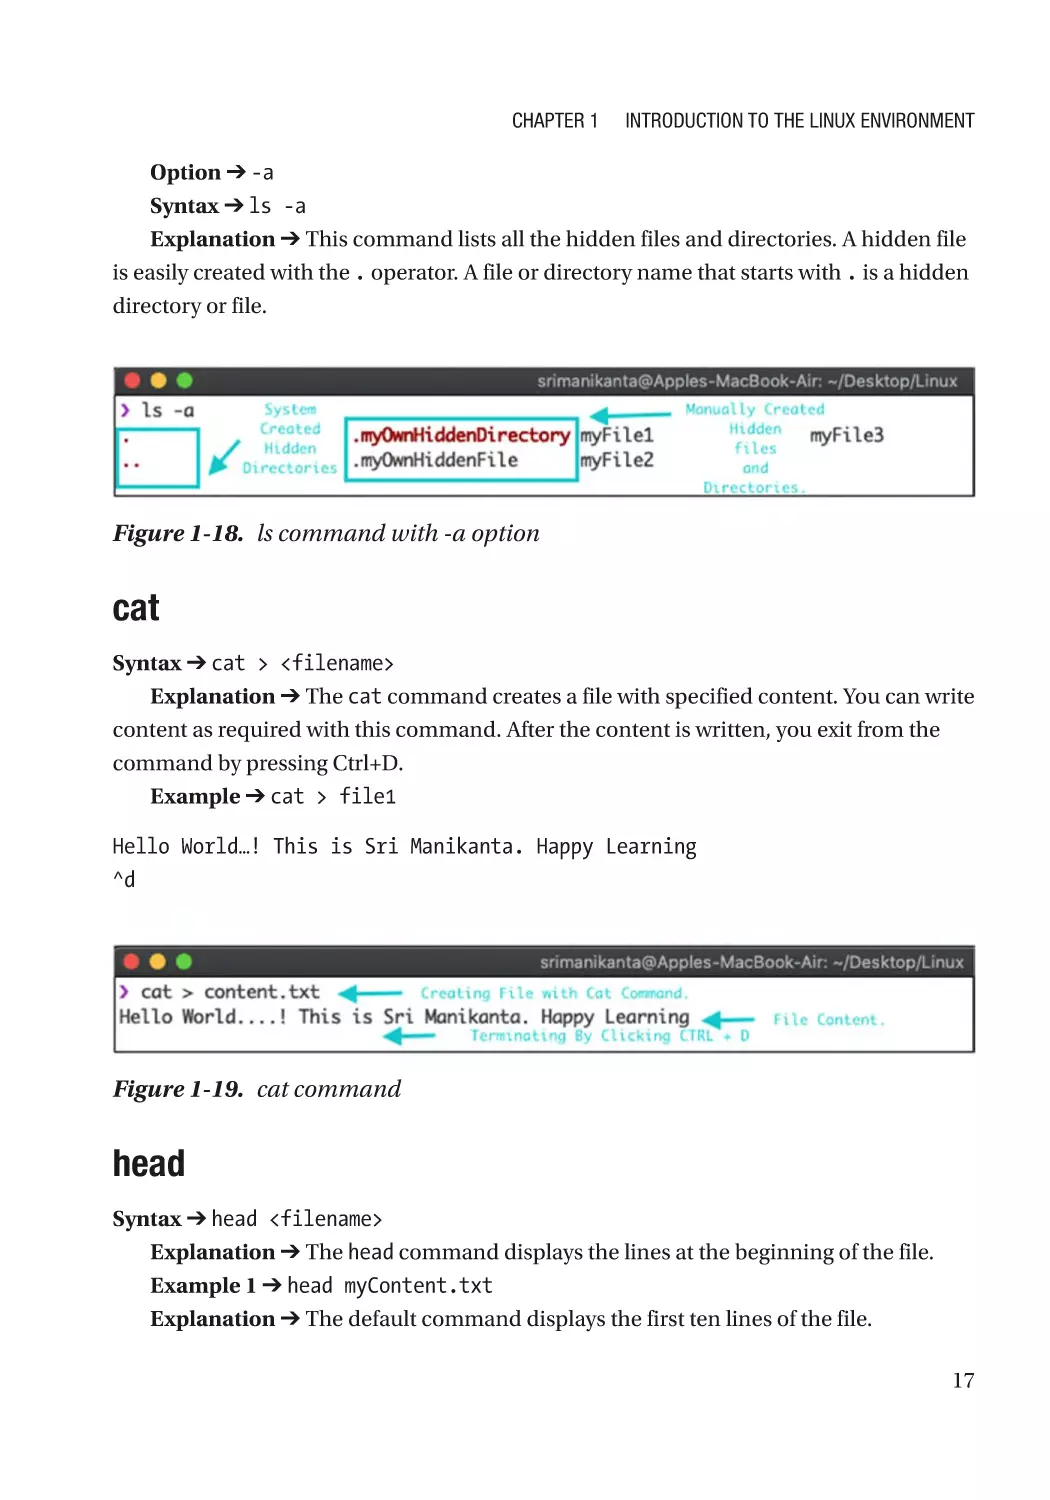
cat
Syntax ➔ cat > <filename>
Explanation ➔ The cat command creates a file with specified content. You can write
content as required with this command. After the content is written, you exit from the
command by pressing Ctrl+D.
Example ➔ cat > file1
Hello World…! This is Sri Manikanta. Happy Learning
^d
Figure 1-19. cat command
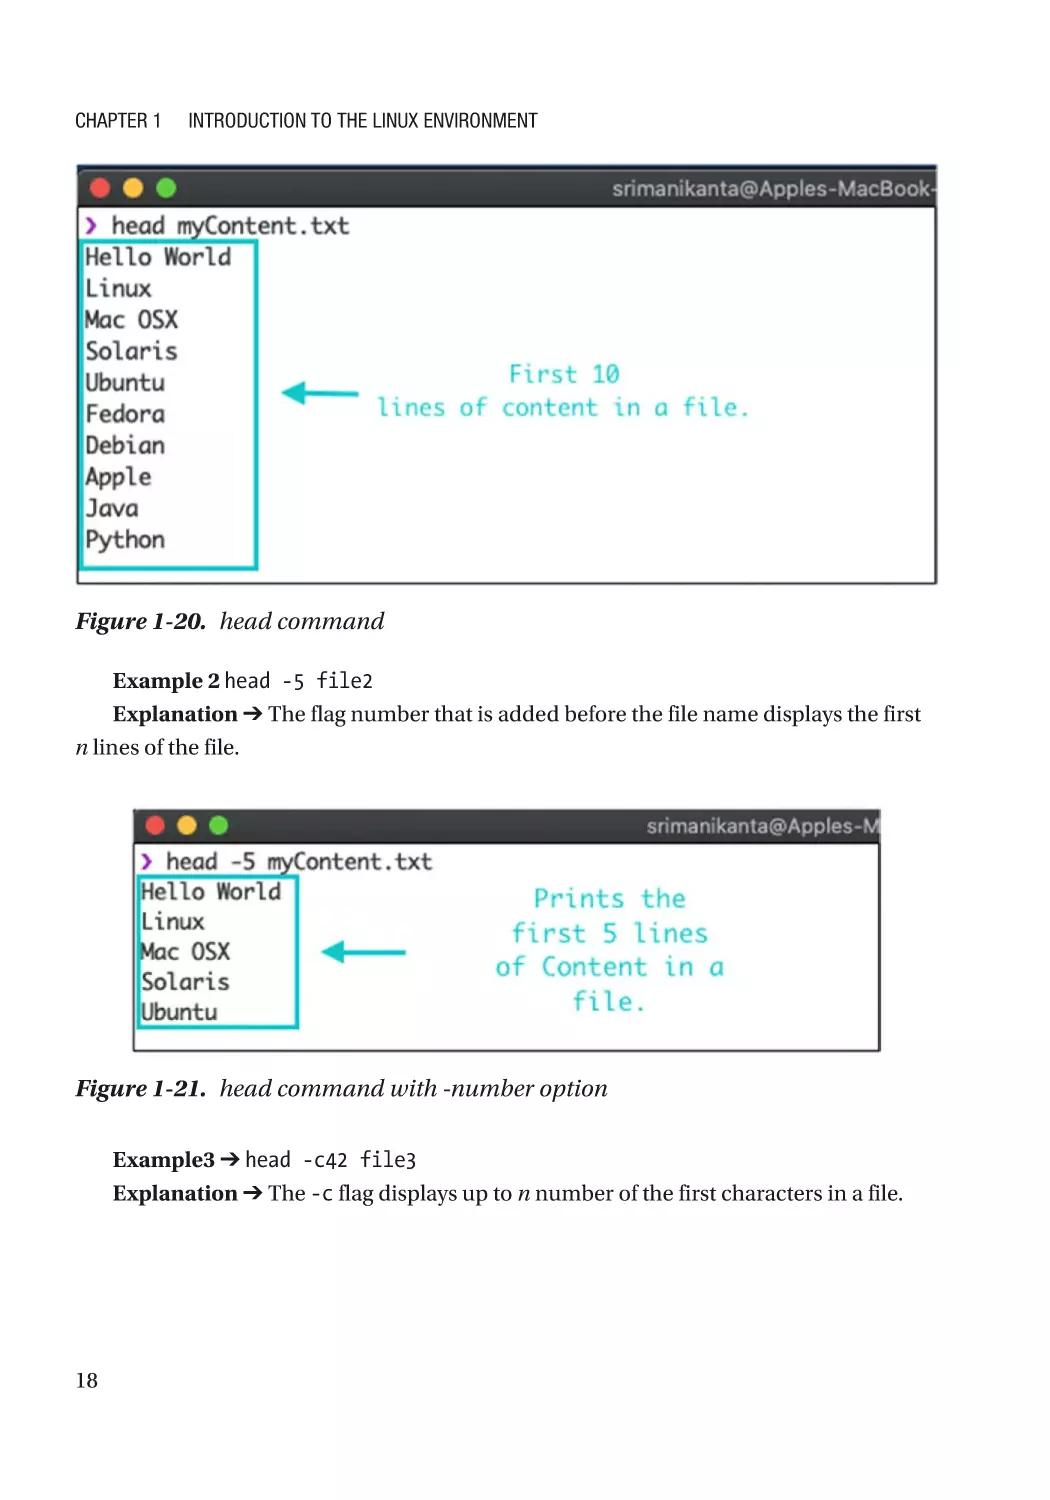
head
Syntax ➔ head <filename>
Explanation ➔ The head command displays the lines at the beginning of the file.
Example 1 ➔ head myContent.txt
Explanation ➔ The default command displays the first ten lines of the file.
17
Chapter 1
Introduction to the Linux Environment
Figure 1-20. head command
Example 2 head -5 file2
Explanation ➔ The flag number that is added before the file name displays the first
n lines of the file.
Figure 1-21. head command with -number option
Example3 ➔ head -c42 file3
Explanation ➔ The -c flag displays up to n number of the first characters in a file.
18
Chapter 1
Introduction to the Linux Environment
Figure 1-22. head command with -number of characters option
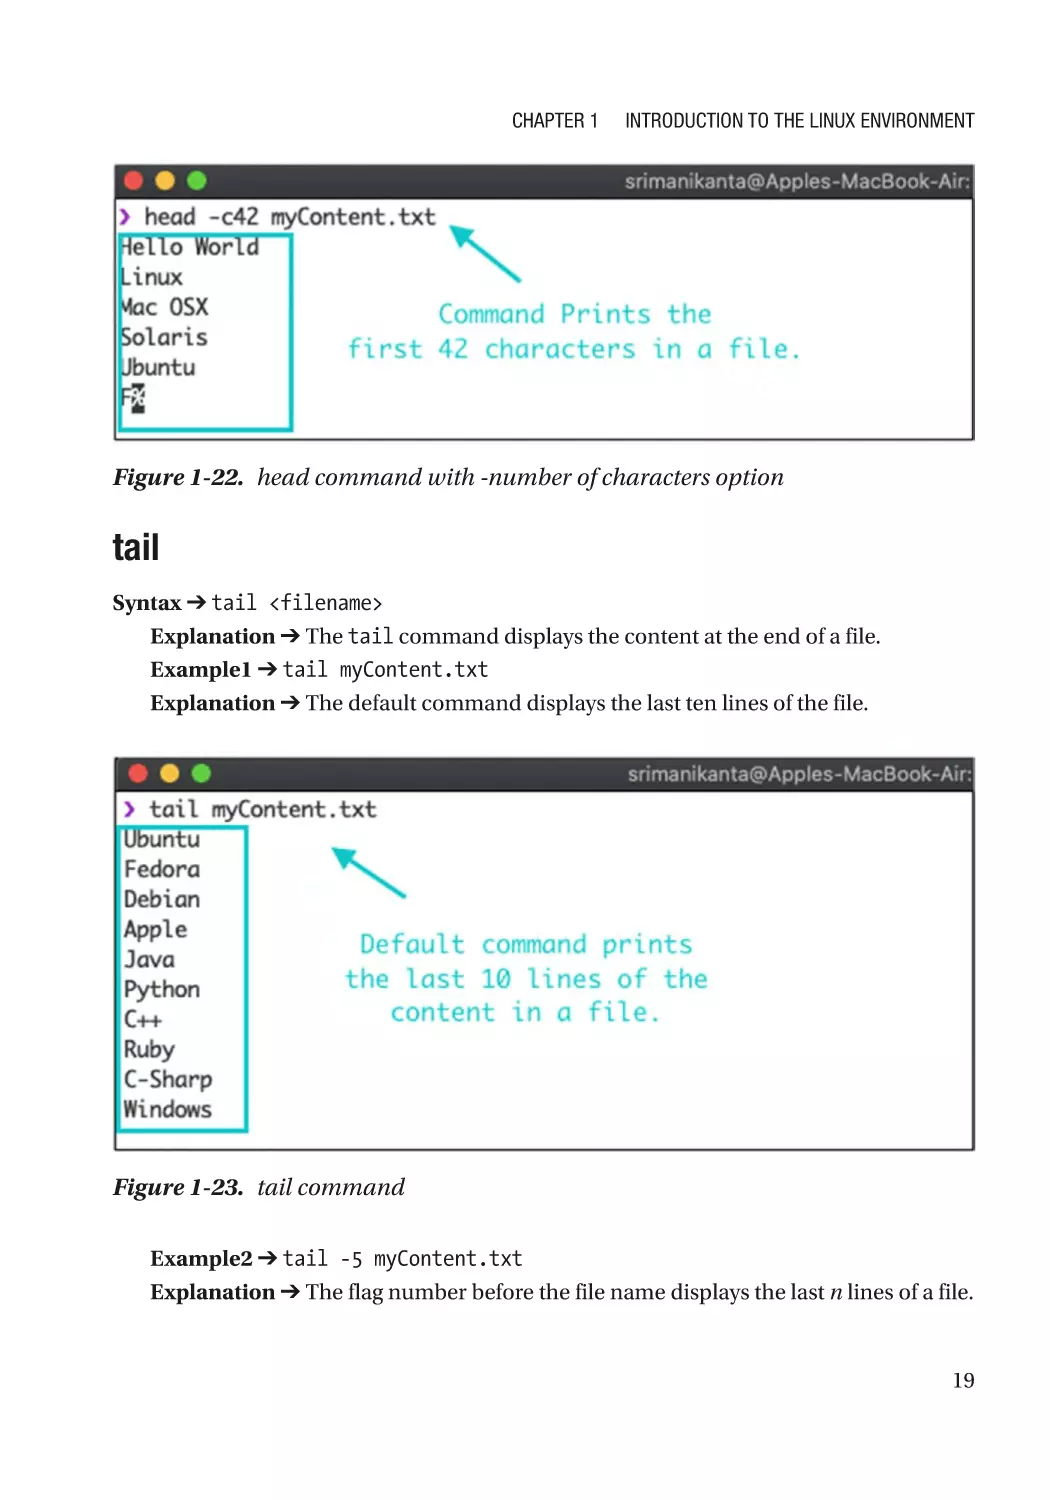
tail
Syntax ➔ tail <filename>
Explanation ➔ The tail command displays the content at the end of a file.
Example1 ➔ tail myContent.txt
Explanation ➔ The default command displays the last ten lines of the file.
Figure 1-23. tail command
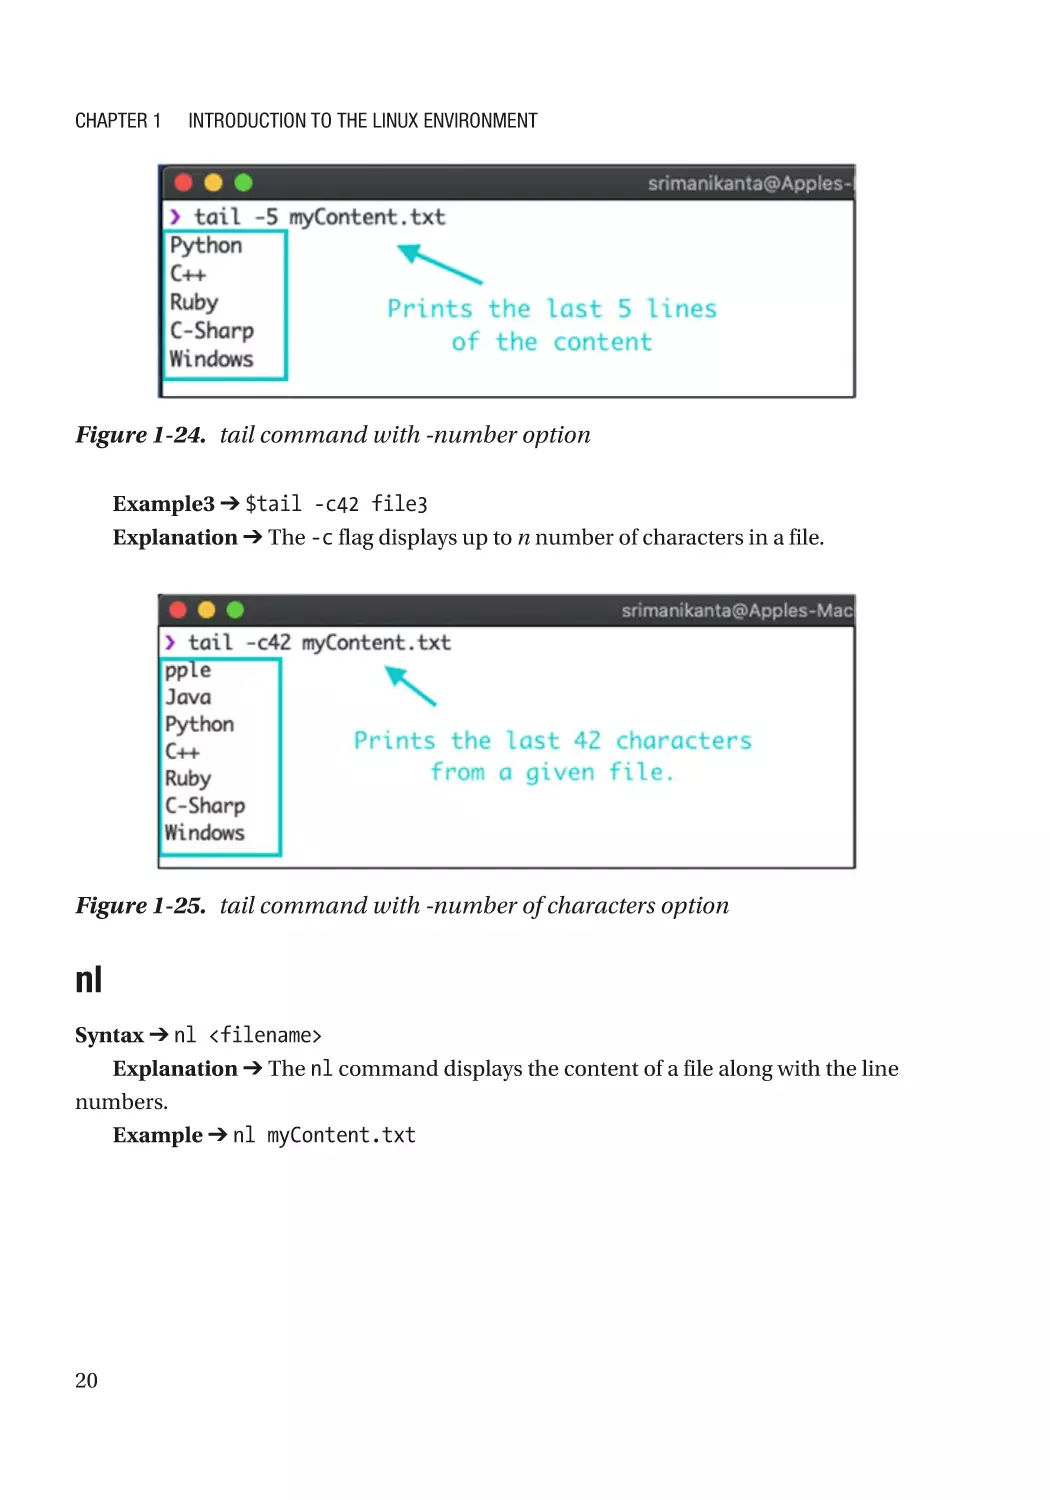
Example2 ➔ tail -5 myContent.txt
Explanation ➔ The flag number before the file name displays the last n lines of a file.
19
Chapter 1
Introduction to the Linux Environment
Figure 1-24. tail command with -number option
Example3 ➔ $tail -c42 file3
Explanation ➔ The -c flag displays up to n number of characters in a file.
Figure 1-25. tail command with -number of characters option
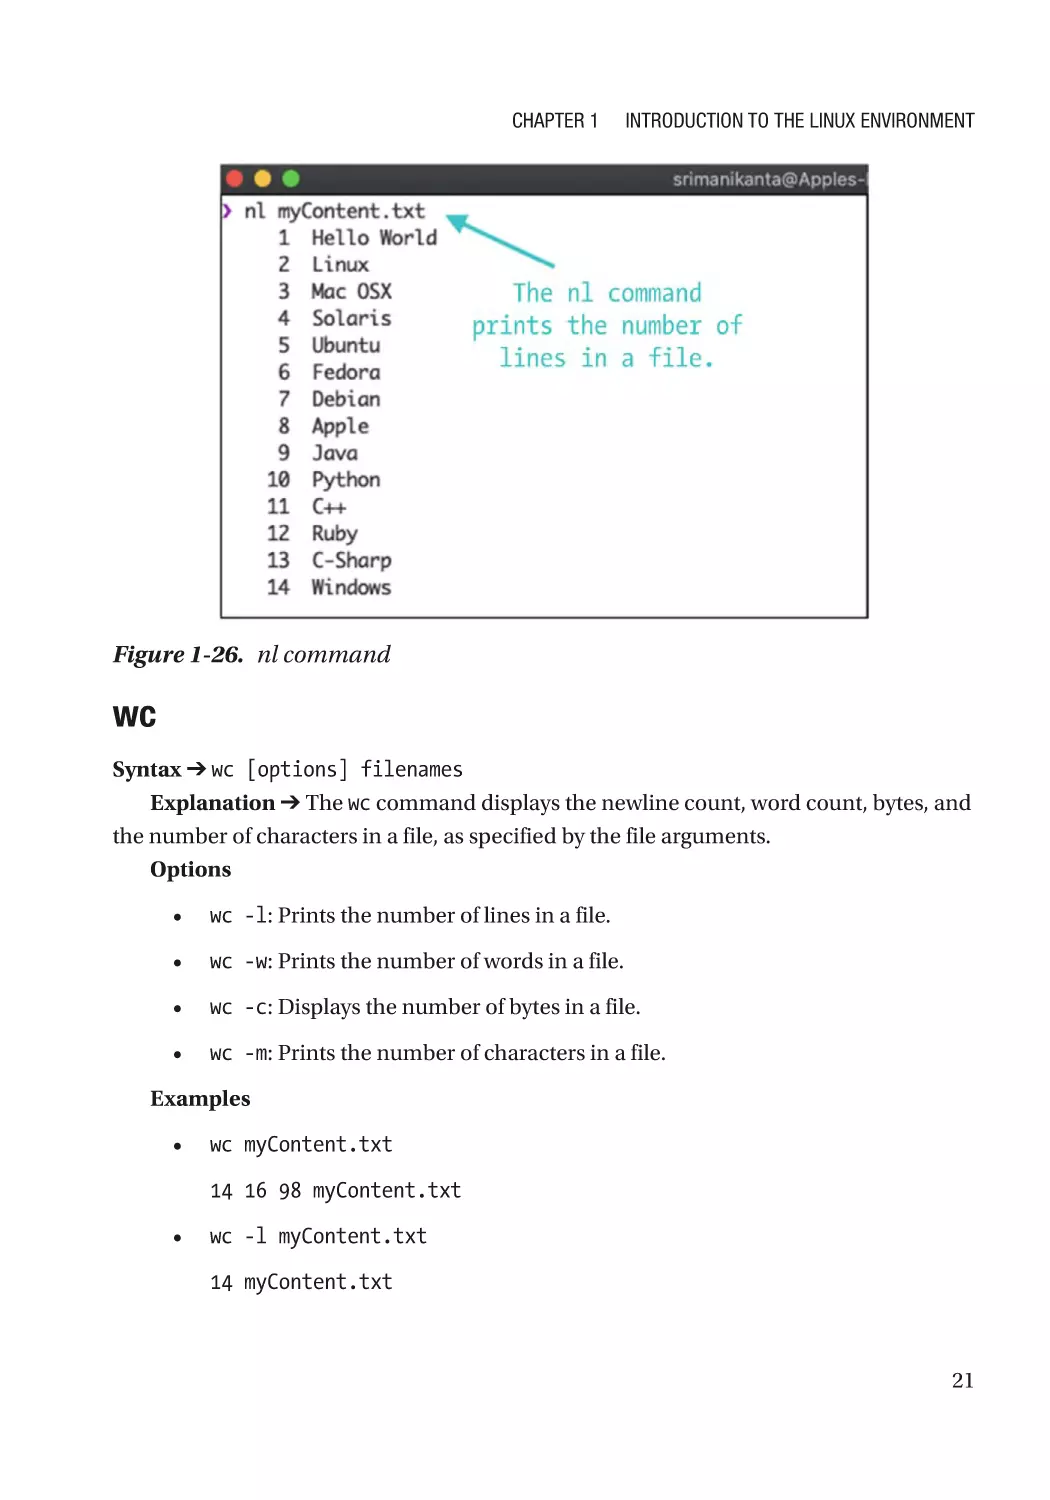
nl
Syntax ➔ nl <filename>
Explanation ➔ The nl command displays the content of a file along with the line
numbers.
Example ➔ nl myContent.txt
20
Chapter 1
Introduction to the Linux Environment
Figure 1-26. nl command
wc
Syntax ➔ wc [options] filenames
Explanation ➔ The wc command displays the newline count, word count, bytes, and
the number of characters in a file, as specified by the file arguments.
Options
•
wc -l: Prints the number of lines in a file.
•
wc -w: Prints the number of words in a file.
•
wc -c: Displays the number of bytes in a file.
•
wc -m: Prints the number of characters in a file.
Examples
•
wc myContent.txt
14 16 98 myContent.txt
•
wc -l myContent.txt
14 myContent.txt
21
Chapter 1
•
Introduction to the Linux Environment
wc -w myContent.txt
16 myContent.txt
•
wc -c myContent.txt
98 myContent.txt
•
wc -m myContent.txt
98 myContent.txt
copy
Syntax ➔ cp <source_file> <destination_file>
Explanation ➔ The cp command copies data from one file to another or to a directory.
To copy content from directories, you need to use the recursive flag, which is -r.
Example1 ➔ cp file1 file2
Explanation: This command copies the contents of file1 to file2. If file2 does not
exist, it is created.
Example2 ➔ cp file1 file2 Files/
Explanation: This command copies multiple files into a single directory. The
directory must exist.
ulimit
Syntax ➔ ulimit
Explanation ➔ ulimit stands for user limit. It signifies the largest file that can be
created by the user in the file system.
File Permission Commands
File permission commands are very useful for changing the permissions of a file or
directory. These commands grant or revoke access rights, such as read, write, or execute
to a particular file.
22
Chapter 1
Introduction to the Linux Environment
chmod
Syntax ➔ chmod [who] [+/-/=] [permissions] <filename>
Explanation ➔ Unix grants permissions for files and directories. You can change
permissions using the chmod command.
In the syntax, who can be any four of the following items.
•
u stands for user. The user is the owner of the file or directory. The
person who creates the file or directory is considered the user or
owner.
•
g stands for group. A group consists of multiple users who have the
same access permission for a file.
•
o stands for others. This is any user who has access to a file but did
not create the file and does not belong in a user group. It is generally
considered setting the permissions for the world to use the data.
•
a stands for all. It includes all types of users (i.e., owner, groups, and
others to use the file data.
[+/-/=] can be classified as
•
+ adds the permissions to a file or directory
•
- removes the permissions to a file or directory
•
= instructs chmod to add the specified permissions and take away all
others, if present
Permissions include any of the following three categories in a Linux/Unix file system.
Read
Read access allows you to view the content of a file or list the files in a directory. With this
permission, you are not able to edit or modify any content in the file. You are not able to
add or remove any file from the directory with this access.
Write
Write permission allows you to modify the content in a file. Write permissions allow you
to add, remove, delete, and rename a file or directory.
23
Chapter 1
Introduction to the Linux Environment
Execute
To execute a program in Linux, you need to set the execute permissions to the file. The
following are examples.
•
chmod +rw myContents.txt gives read and write permissions to all.
•
chmod go-x myContents.txt takes away execute permission from
groups and others.
•
chmod ug+r, go-w myContents.txt gives read permission to users
and groups and takes away write permission to groups and others.
•
chmod go=w, u=rwx myContents.txt removes all existing
permissions and replaces them with write permission for groups
and others and read, write, and execute permissions for the owner of
myContents.txt.
You can change the permissions of certain files and directories in an operating
system. This method is a little tricky for beginners in the Linux environment. There is
a better and easier way to change the permissions for a file or directory. It is done with
weights.
Changing Permissions with Weights
Instead of using u/g/o and +/–/=, you can use weights. It is an octal representation.
•
Read: (4)
•
Write: (2)
•
Execute: (1).
The weight for read access is 4.
The weight for write access is 2.
The weight for execute access is 1.
24
Chapter 1
Introduction to the Linux Environment
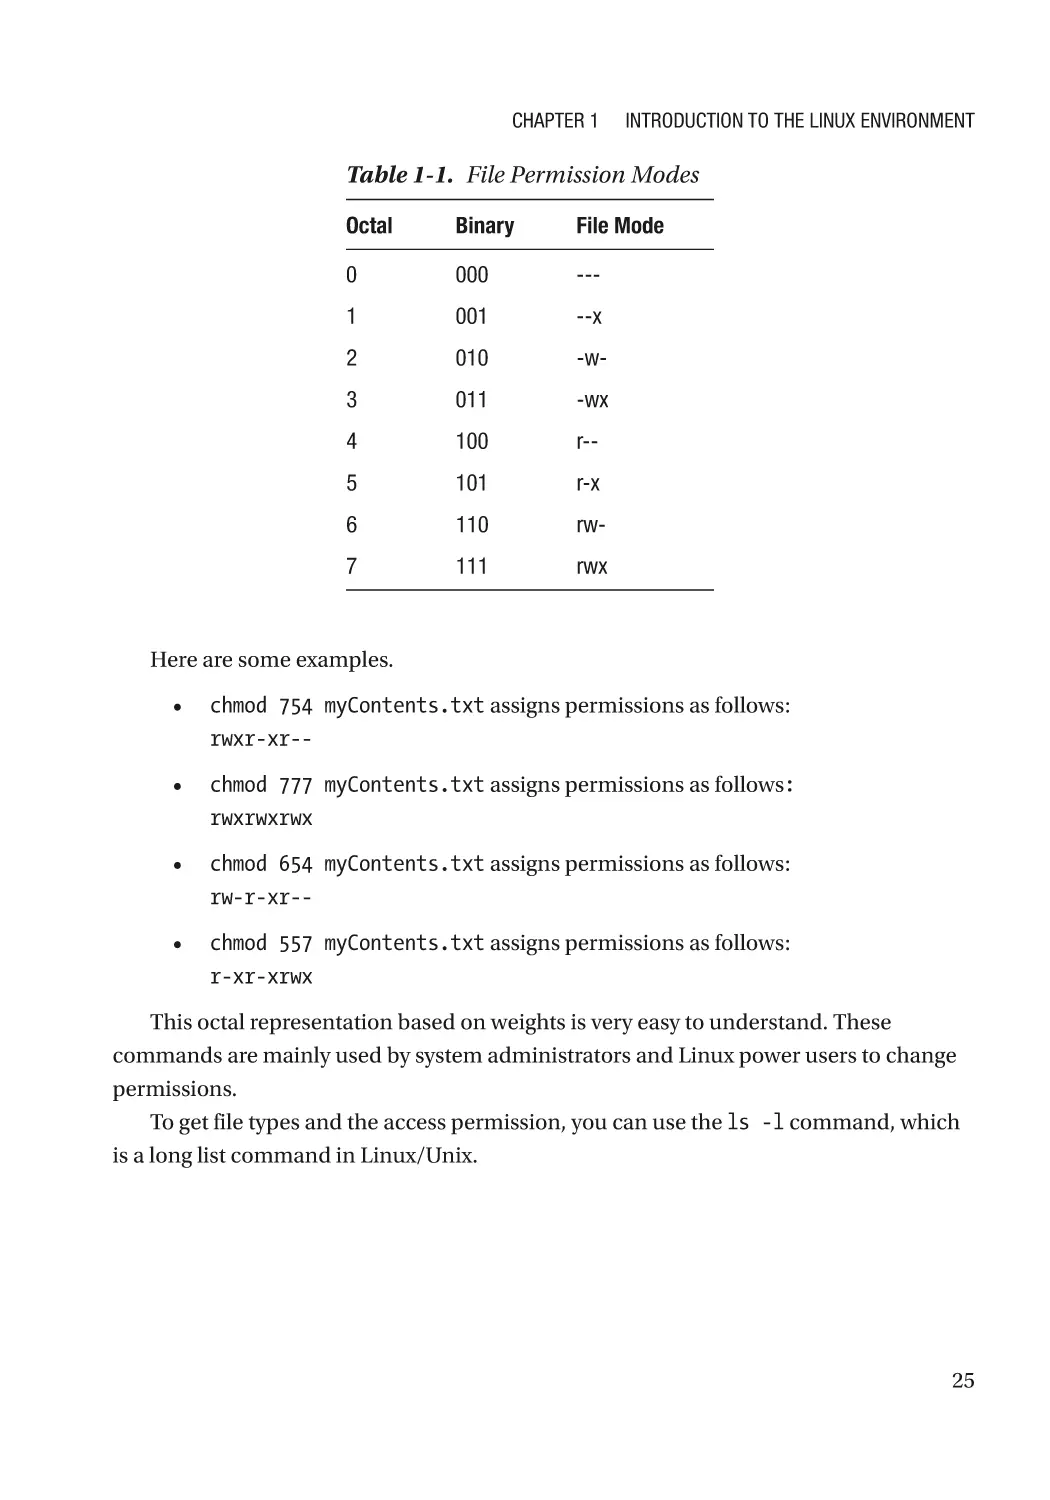
Table 1-1. File Permission Modes
Octal
Binary
File Mode
0
000
---
1
001
--x
2
010
-w-
3
011
-wx
4
100
r--
5
101
r-x
6
110
rw-
7
111
rwx
Here are some examples.
•
chmod 754 myContents.txt assigns permissions as follows:
rwxr-xr--
•
chmod 777 myContents.txt assigns permissions as follows:
rwxrwxrwx
•
chmod 654 myContents.txt assigns permissions as follows:
rw-r-xr--
•
chmod 557 myContents.txt assigns permissions as follows:
r-xr-xrwx
This octal representation based on weights is very easy to understand. These
commands are mainly used by system administrators and Linux power users to change
permissions.
To get file types and the access permission, you can use the ls -l command, which
is a long list command in Linux/Unix.
25
Chapter 1
Introduction to the Linux Environment
Process Utilities
Process
A process is a program under execution. You can call it as an instance of a program.
To get a clear view of a process, let’s look at an example. Suppose that when you open
your terminal to create a file with data in it, you use the cat command, which creates,
writes, concatenates file content, and prints to the standard output. In this case, you are
creating a normal text file and writing content in it. When a user performs this action
automatically, a process is created. Whenever you assign tasks to the operating system,
the OS automatically creates a process for it.
Every process has unique properties.
•
The process has a unique process ID that is generated by the
operating system.
•
The task of each process independent.
•
A process can have multiple threads.
There are two types of processes: foreground and background.
Foreground Process
A process that depends on input from the user is called a foreground process. Initially,
every process created by the user is a foreground process.
The creation of a file and entering data into it is a good example of the foreground
process.
Background Process
A background process runs independently of the shell. The biggest advantage of a
background process is that you can multitask. If the background process requires user
input, it waits until the input is provided.
The following are two examples.
26
•
Listing all the files in a directory with extensions.
•
Executing a program that does not depend on user input. The best
example of these kinds of programs is stress tests in Competitive
programming.
Chapter 1
Introduction to the Linux Environment
Process Commands
The types of processes are discussed in the upcoming chapters. Let’s dive into the
process utilities that monitor the processing activity in a system.
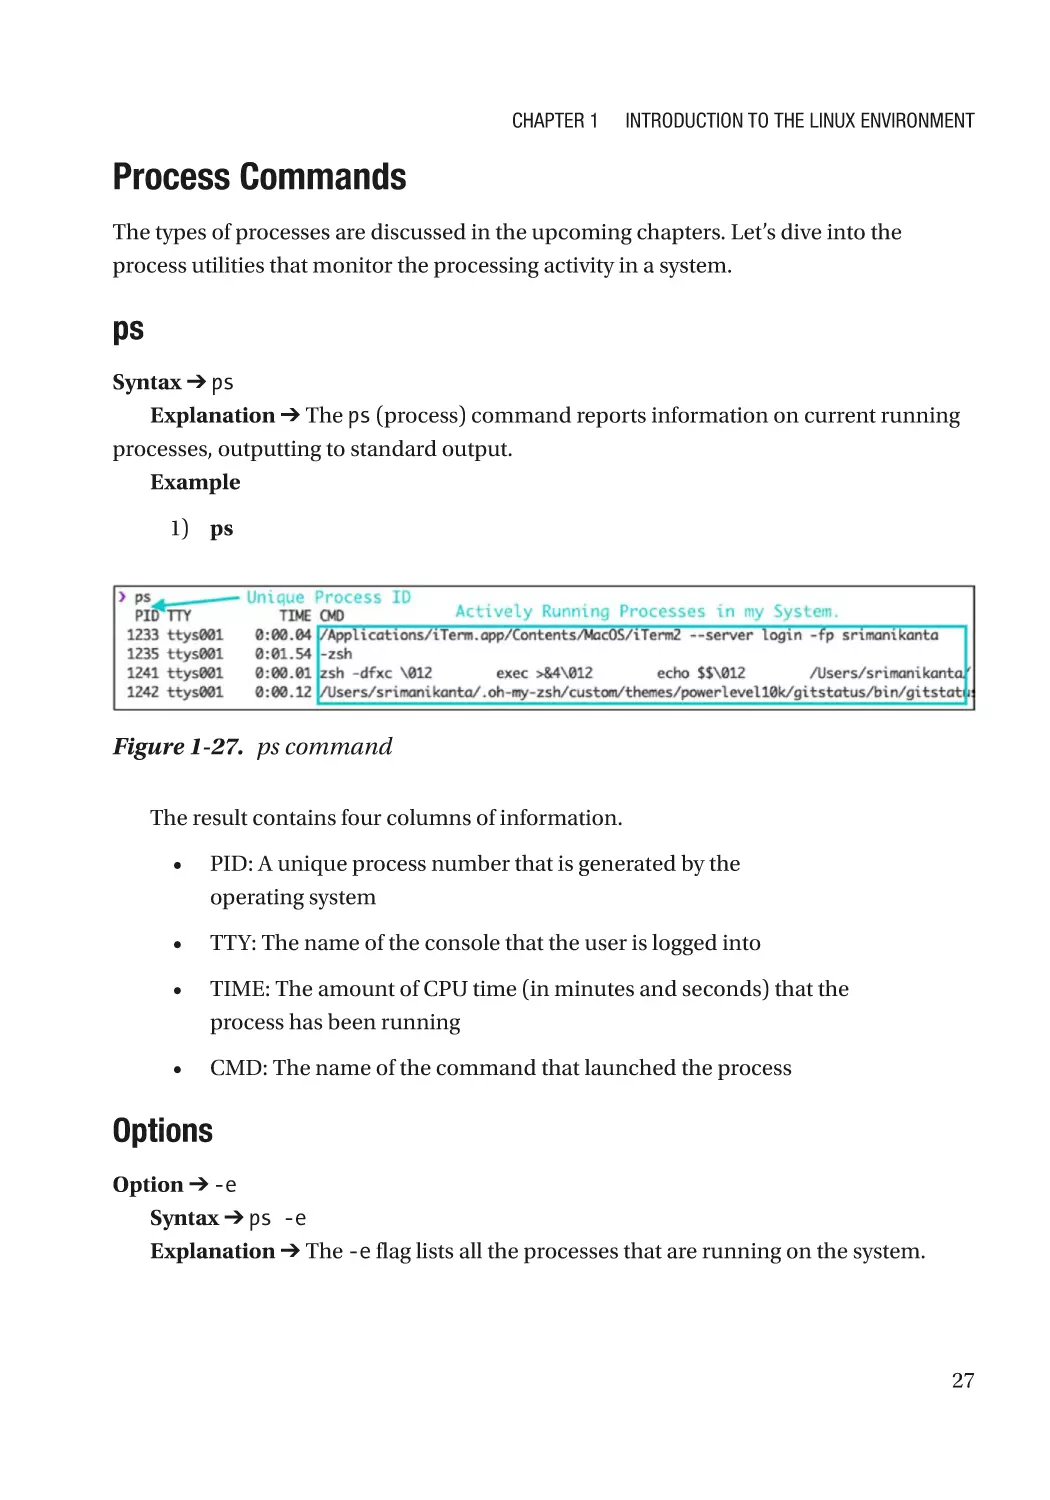
ps
Syntax ➔ ps
Explanation ➔ The ps (process) command reports information on current running
processes, outputting to standard output.
Example
1) ps
Figure 1-27. ps command
The result contains four columns of information.
•
PID: A unique process number that is generated by the
operating system
•
TTY: The name of the console that the user is logged into
•
TIME: The amount of CPU time (in minutes and seconds) that the
process has been running
•
CMD: The name of the command that launched the process
Options
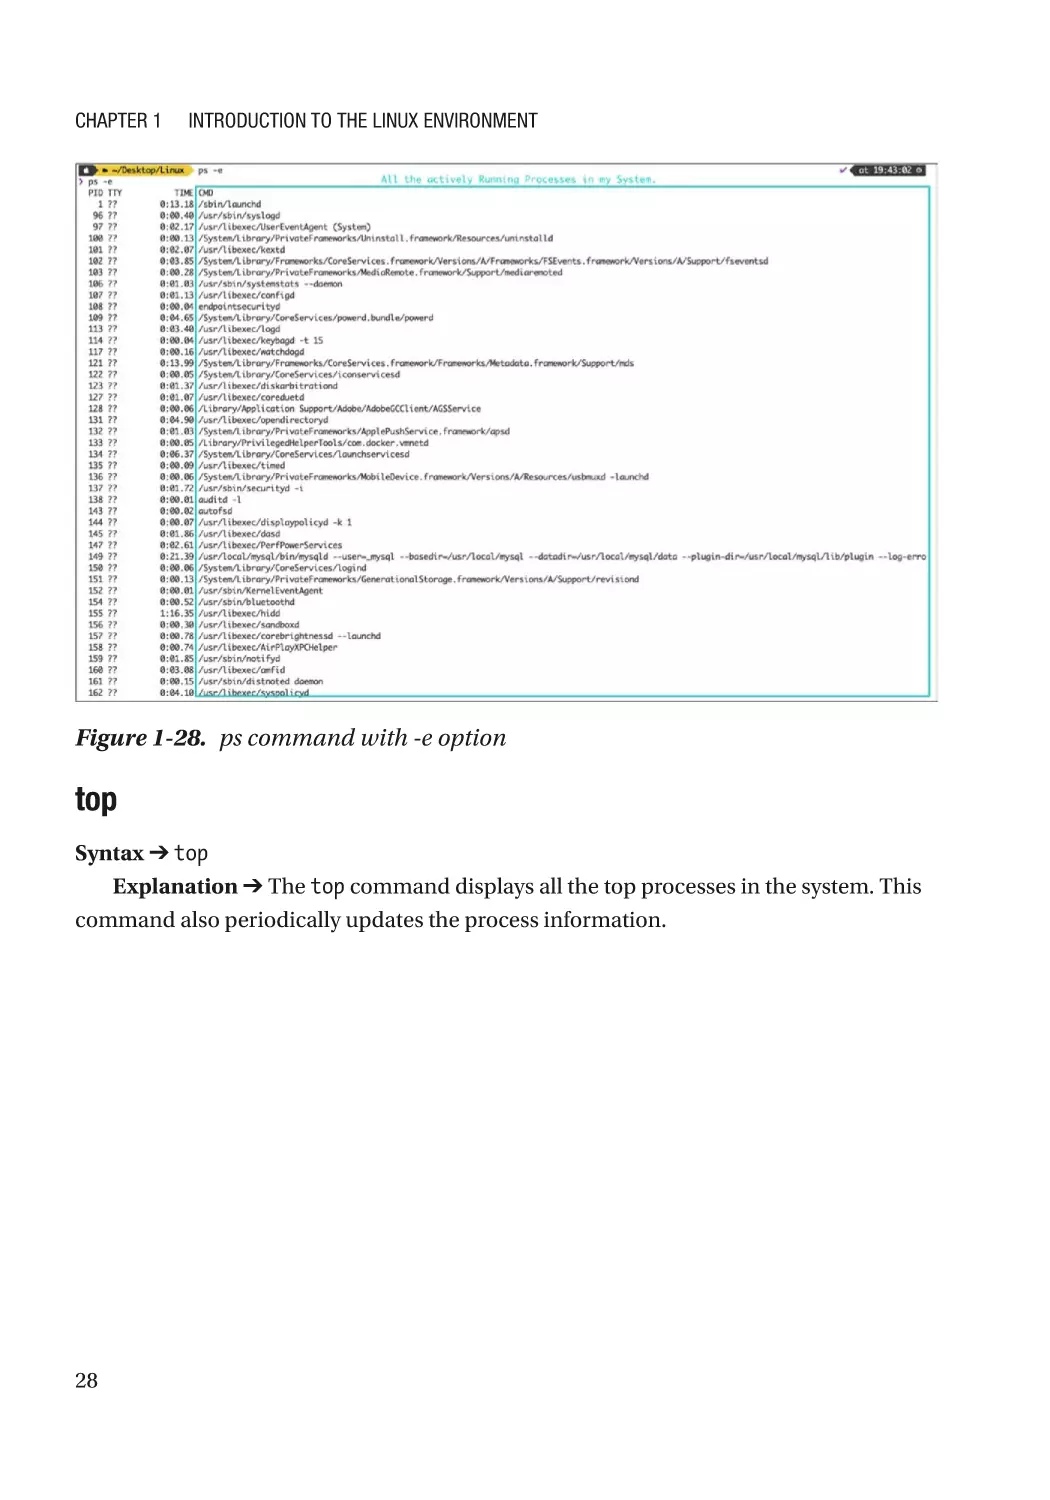
Option ➔ -e
Syntax ➔ ps -e
Explanation ➔ The -e flag lists all the processes that are running on the system.
27
Chapter 1
Introduction to the Linux Environment
Figure 1-28. ps command with -e option
top
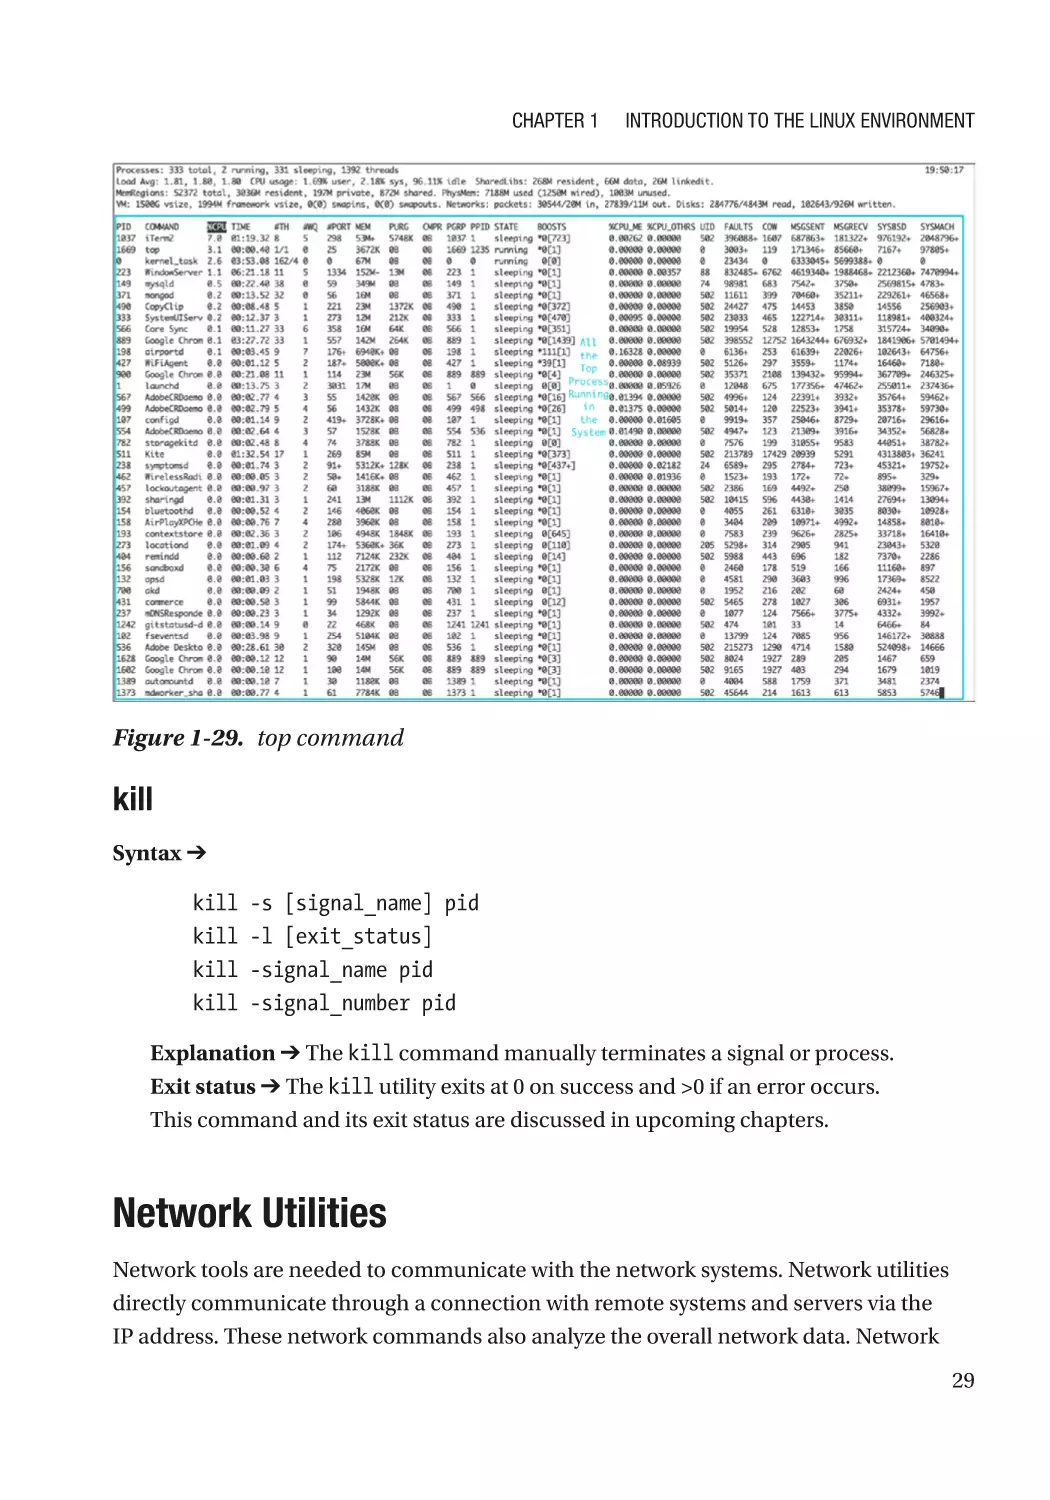
Syntax ➔ top
Explanation ➔ The top command displays all the top processes in the system. This
command also periodically updates the process information.
28
Chapter 1
Introduction to the Linux Environment
Figure 1-29. top command
kill
Syntax ➔
kill
kill
kill
kill
-s [signal_name] pid
-l [exit_status]
-signal_name pid
-signal_number pid
Explanation ➔ The kill command manually terminates a signal or process.
Exit status ➔ The kill utility exits at 0 on success and >0 if an error occurs.
This command and its exit status are discussed in upcoming chapters.
Network Utilities
Network tools are needed to communicate with the network systems. Network utilities
directly communicate through a connection with remote systems and servers via the
IP address. These network commands also analyze the overall network data. Network
29
Chapter 1
Introduction to the Linux Environment
utilities are very powerful. The minimalistic commands run and execute programs to
analyze the network traffic locally. These commands analyze the whole network from the
working system.
ifconfig
Syntax ➔ ifconfig
Explanation ➔ The ifconfig command obtains network configuration information
and lets you view network configuration information. It displays the current network
adapter configuration. It determines if you are getting transmit (TX) or receive (RX)
errors as well.
hostname
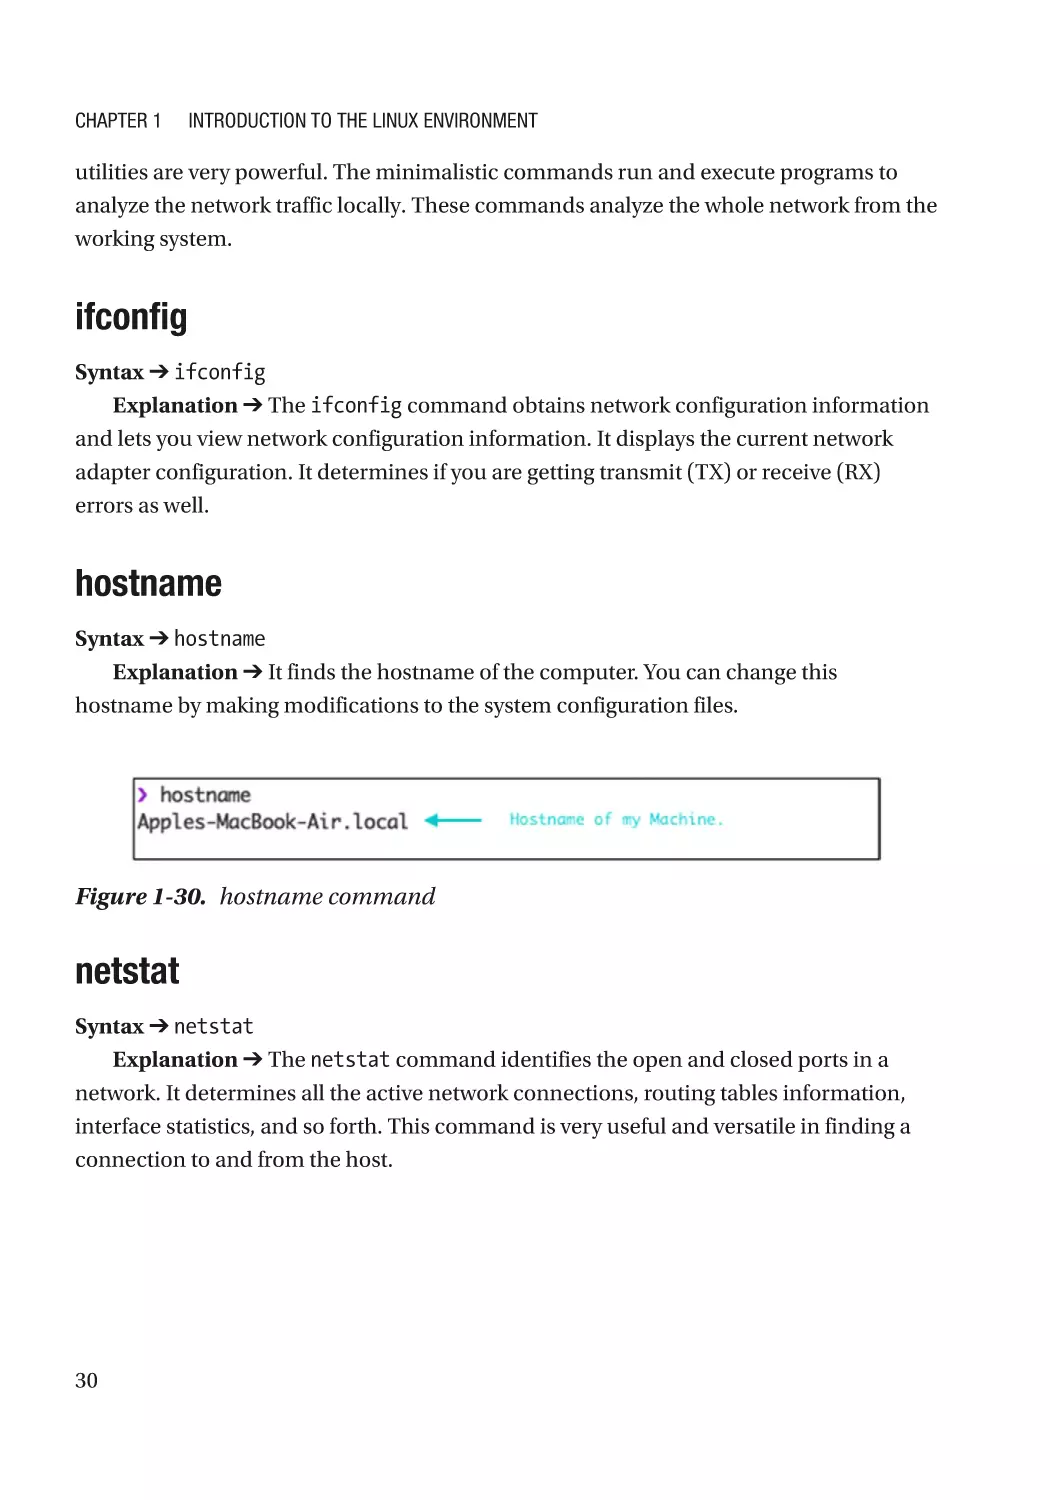
Syntax ➔ hostname
Explanation ➔ It finds the hostname of the computer. You can change this
hostname by making modifications to the system configuration files.
Figure 1-30. hostname command
netstat
Syntax ➔ netstat
Explanation ➔ The netstat command identifies the open and closed ports in a
network. It determines all the active network connections, routing tables information,
interface statistics, and so forth. This command is very useful and versatile in finding a
connection to and from the host.
30
Chapter 1
Introduction to the Linux Environment
Figure 1-31. netstat command
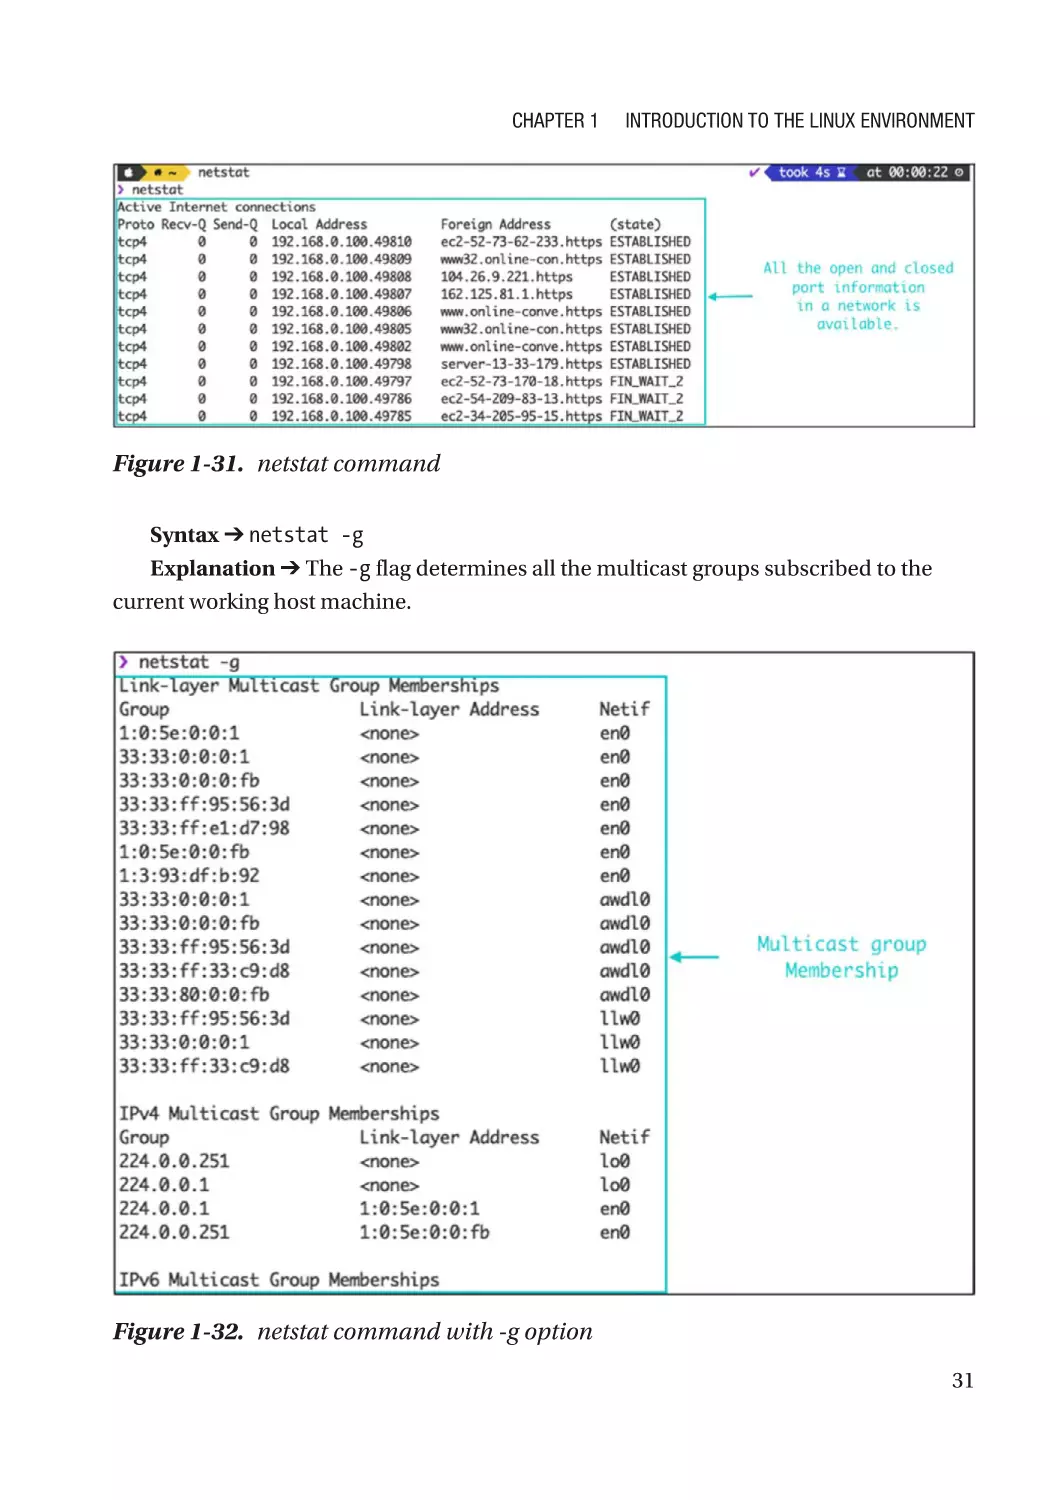
Syntax ➔ netstat -g
Explanation ➔ The -g flag determines all the multicast groups subscribed to the
current working host machine.
Figure 1-32. netstat command with -g option
31
Chapter 1
Introduction to the Linux Environment
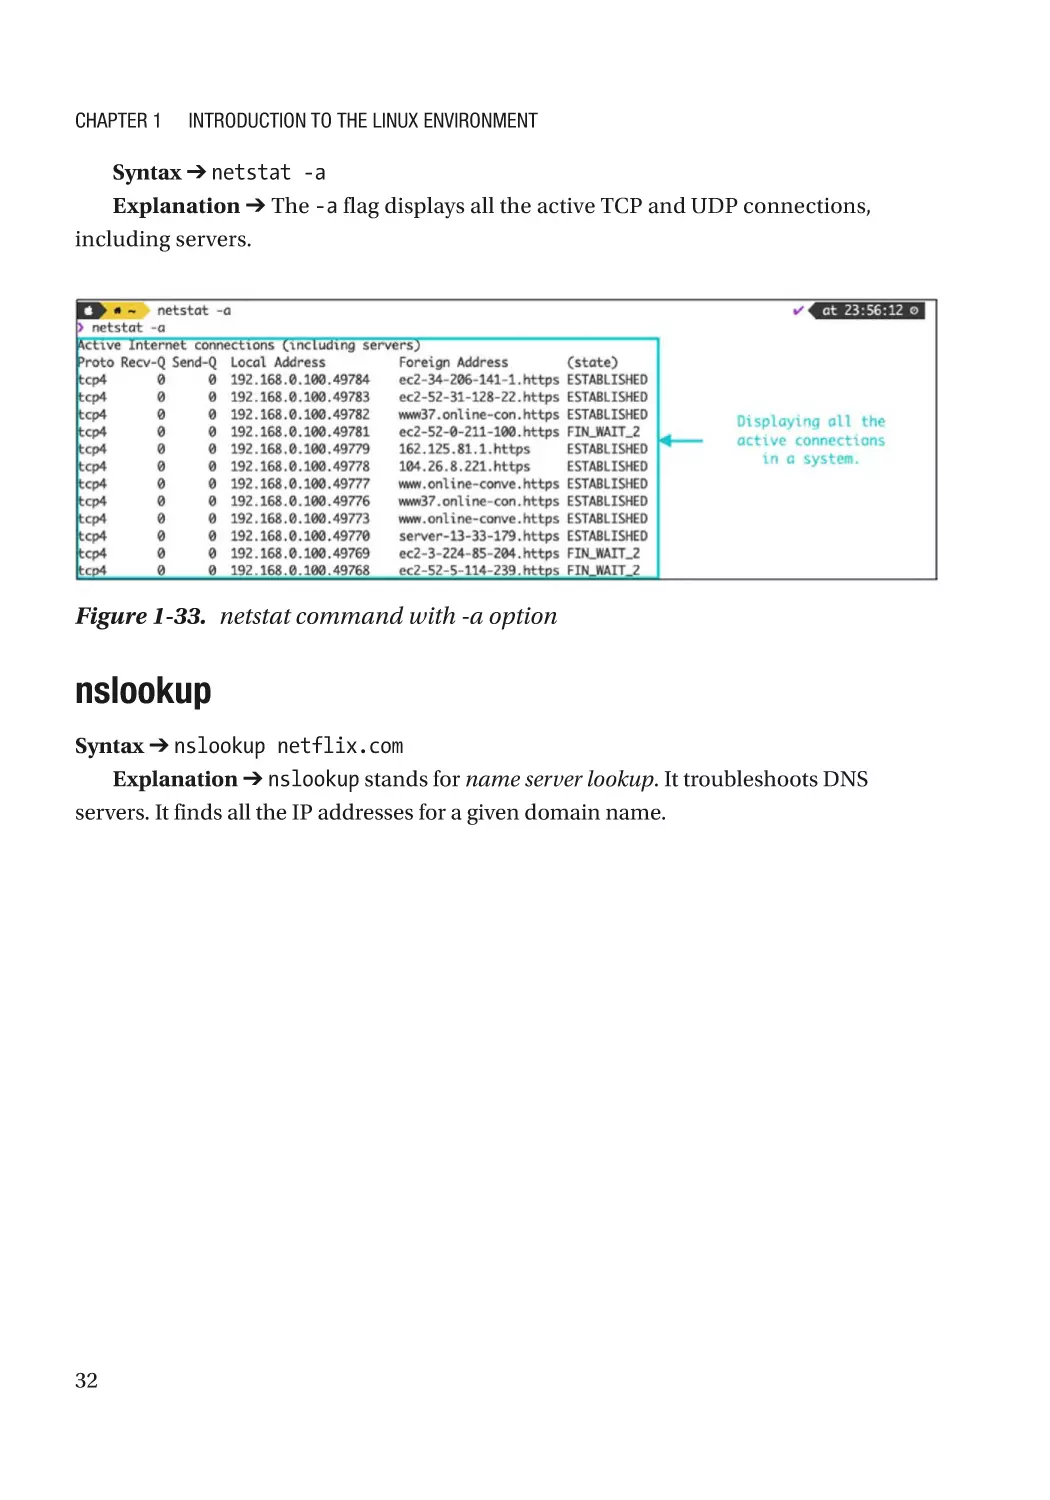
Syntax ➔ netstat -a
Explanation ➔ The -a flag displays all the active TCP and UDP connections,
including servers.
Figure 1-33. netstat command with -a option
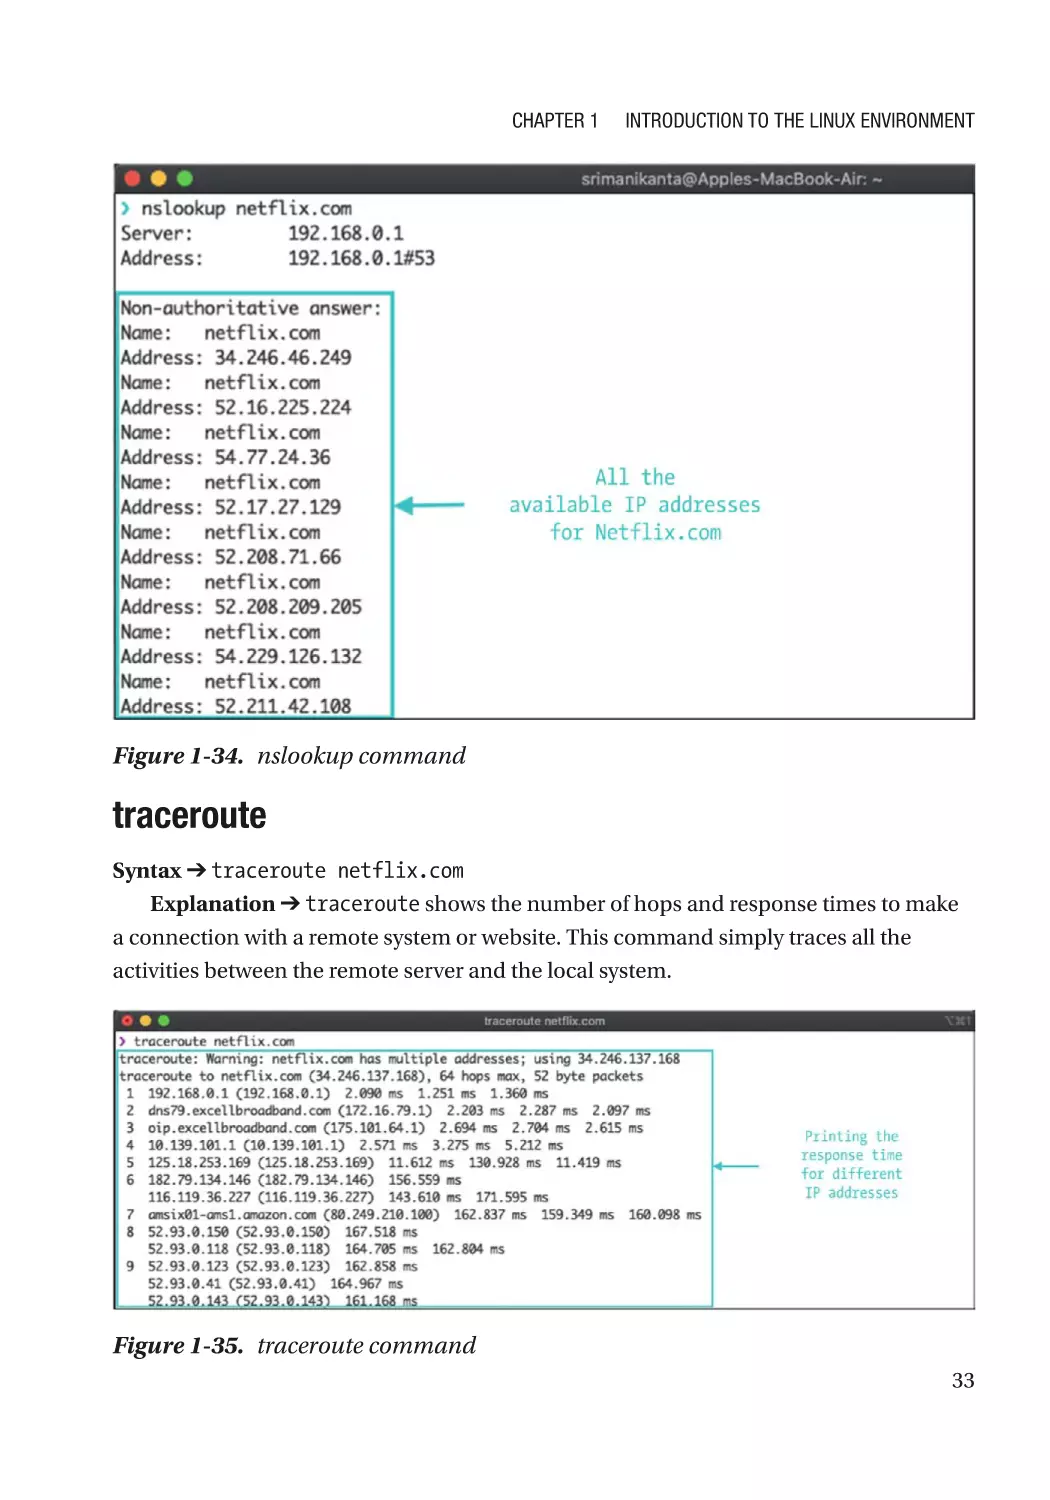
nslookup
Syntax ➔ nslookup netflix.com
Explanation ➔ nslookup stands for name server lookup. It troubleshoots DNS
servers. It finds all the IP addresses for a given domain name.
32
Chapter 1
Introduction to the Linux Environment
Figure 1-34. nslookup command
traceroute
Syntax ➔ traceroute netflix.com
Explanation ➔ traceroute shows the number of hops and response times to make
a connection with a remote system or website. This command simply traces all the
activities between the remote server and the local system.
Figure 1-35. traceroute command
33
Chapter 1
Introduction to the Linux Environment
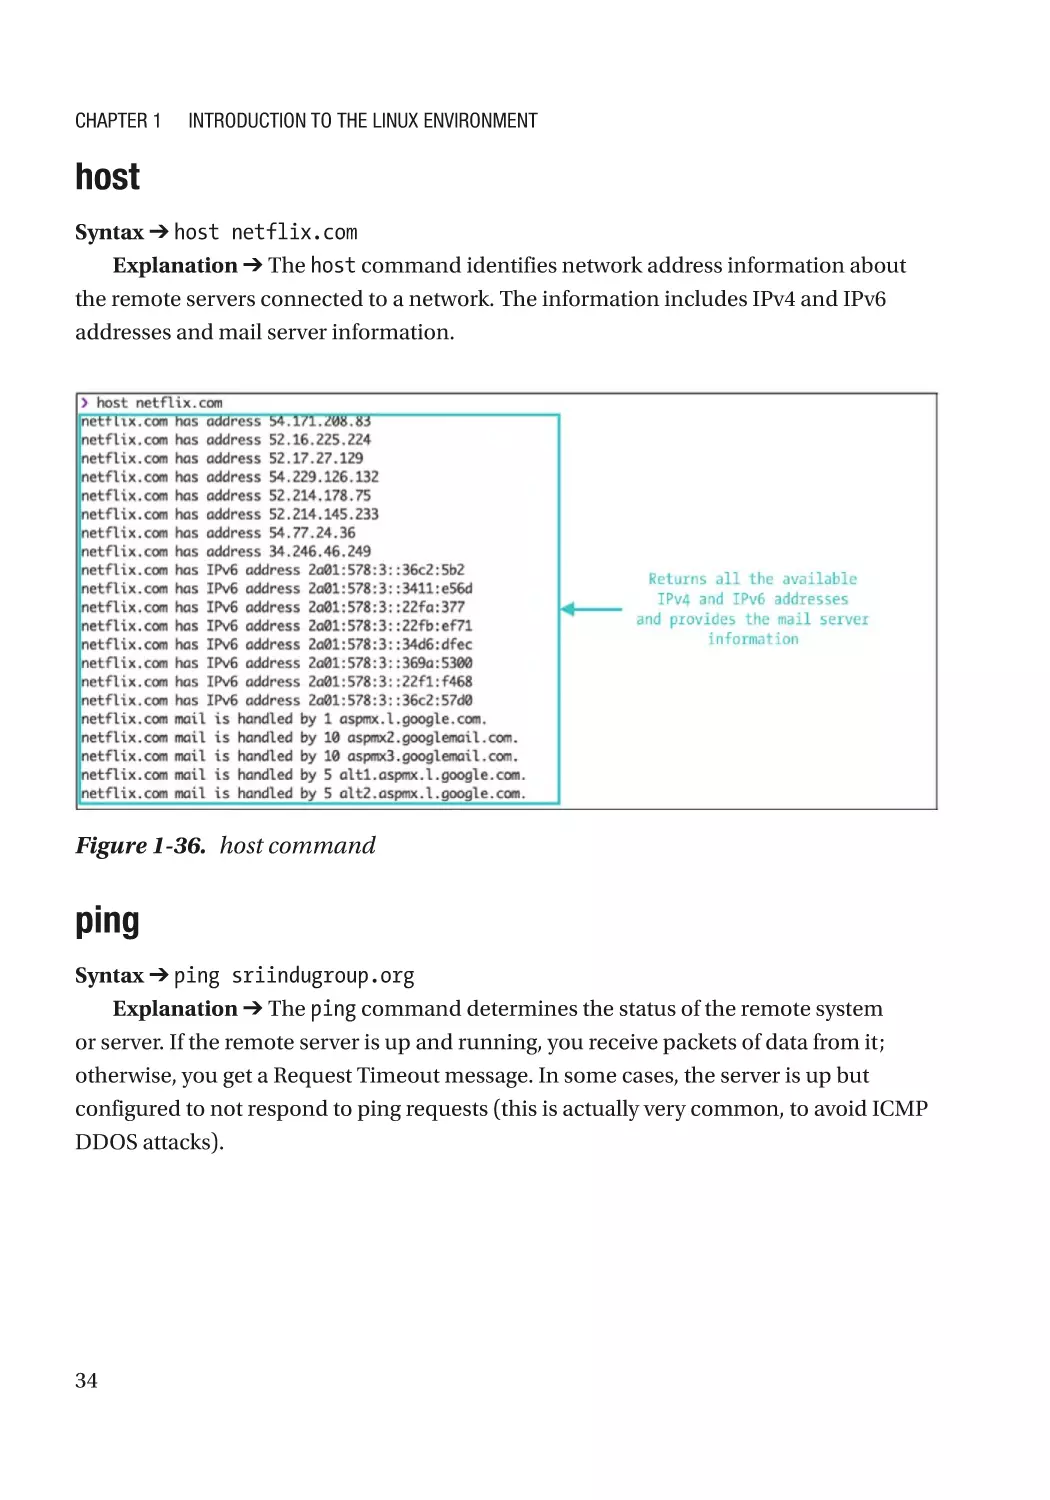
host
Syntax ➔ host netflix.com
Explanation ➔ The host command identifies network address information about
the remote servers connected to a network. The information includes IPv4 and IPv6
addresses and mail server information.
Figure 1-36. host command
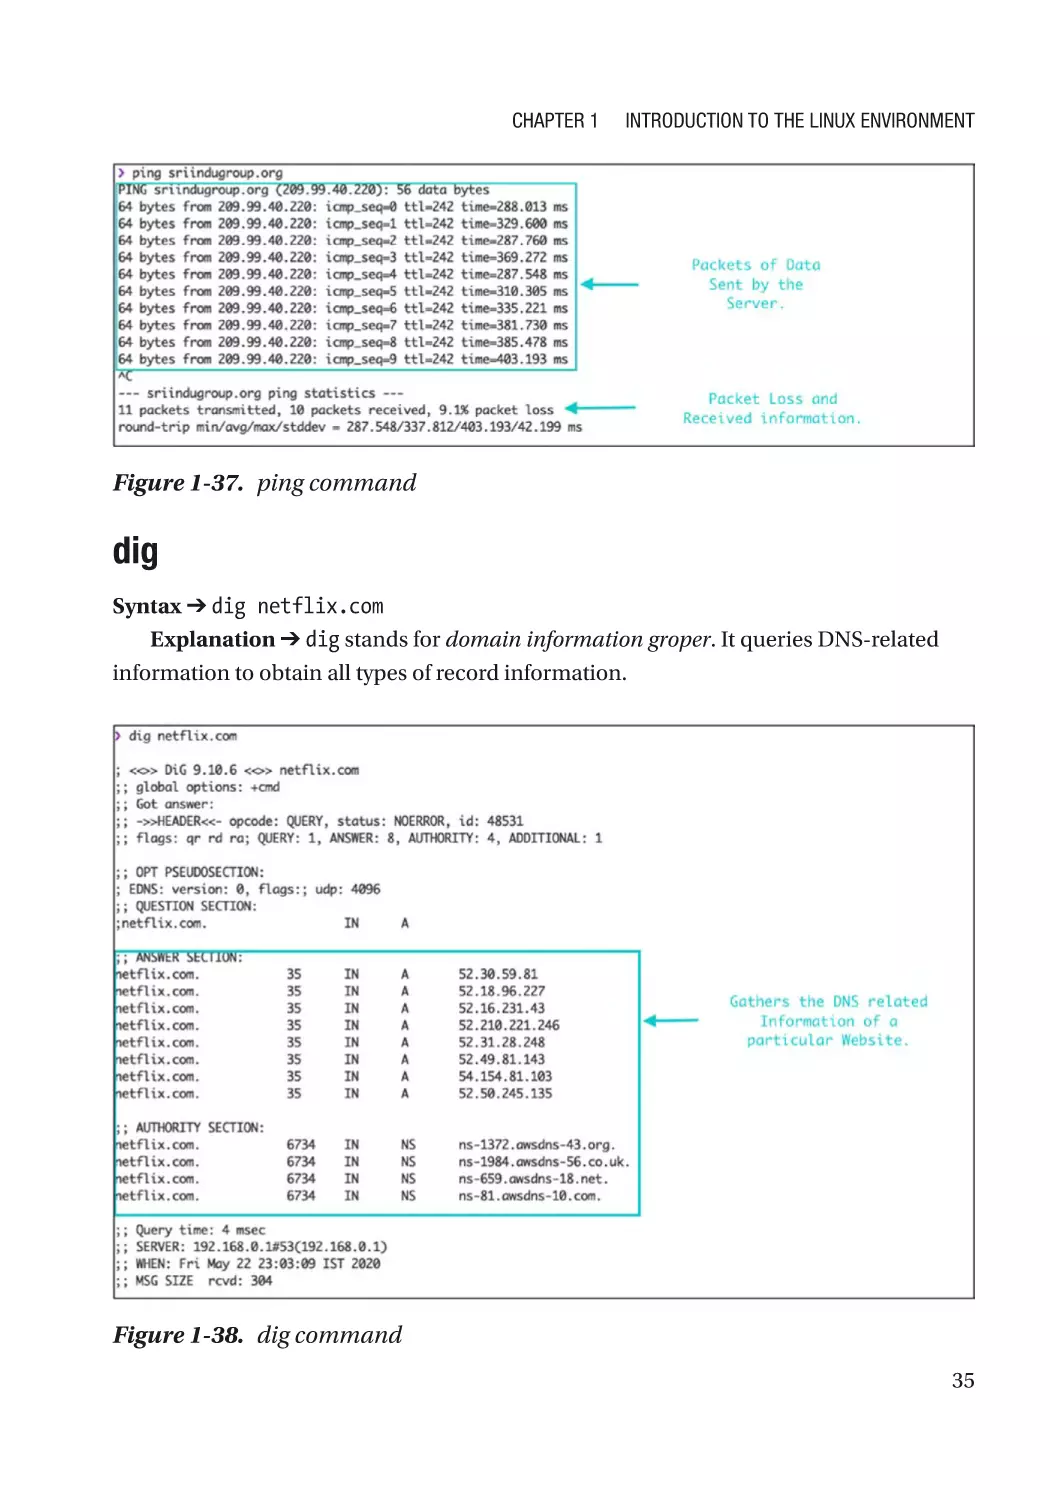
ping
Syntax ➔ ping sriindugroup.org
Explanation ➔ The ping command determines the status of the remote system
or server. If the remote server is up and running, you receive packets of data from it;
otherwise, you get a Request Timeout message. In some cases, the server is up but
configured to not respond to ping requests (this is actually very common, to avoid ICMP
DDOS attacks).
34
Chapter 1
Introduction to the Linux Environment
Figure 1-37. ping command
dig
Syntax ➔ dig netflix.com
Explanation ➔ dig stands for domain information groper. It queries DNS-related
information to obtain all types of record information.
Figure 1-38. dig command
35
Chapter 1
Introduction to the Linux Environment
Summary
36
•
In this chapter, you were introduced to the Linux environment and
architecture.
•
You learned about the different types of kernels and their pros and
cons. File handling utilities in the Linux OS were also discussed.
•
Processes and the different types of built-in utilities that are available
were explained. There was a discussion on how network utilities
identify and extract various kinds of information.
•
By the end of this chapter, you should be able to work with the Linux
environment.
CHAPTER 2
Multithreading in C
Multithreading is a program’s ability to execute multiple threads simultaneously
to maximize the utilization of the CPU. Multithreading helps achieve concurrency.
Concurrenscy is parallelly executing multiple threads at the same time. In this chapter,
you learn about the following topics with practical coding.
•
Introduction to threads and thread behavior
•
The difference between threads and processes
•
Concurrency
•
Parallelism
•
Introduction to multithreading
•
Importance of multithreading
•
Multithreading API in C
•
Creating multithreading programs in C
•
Practical examples of multithreading
•
Multithreading use cases
I ntroduction to Threads
A thread is a lightweight process that shares a common address space with the
owner process. Threads are very helpful in performing parallel programming tasks to
achieve concurrency. Applications such as video editing software, web servers, online
conferencing software, and text editors use multiple threads to do their jobs more
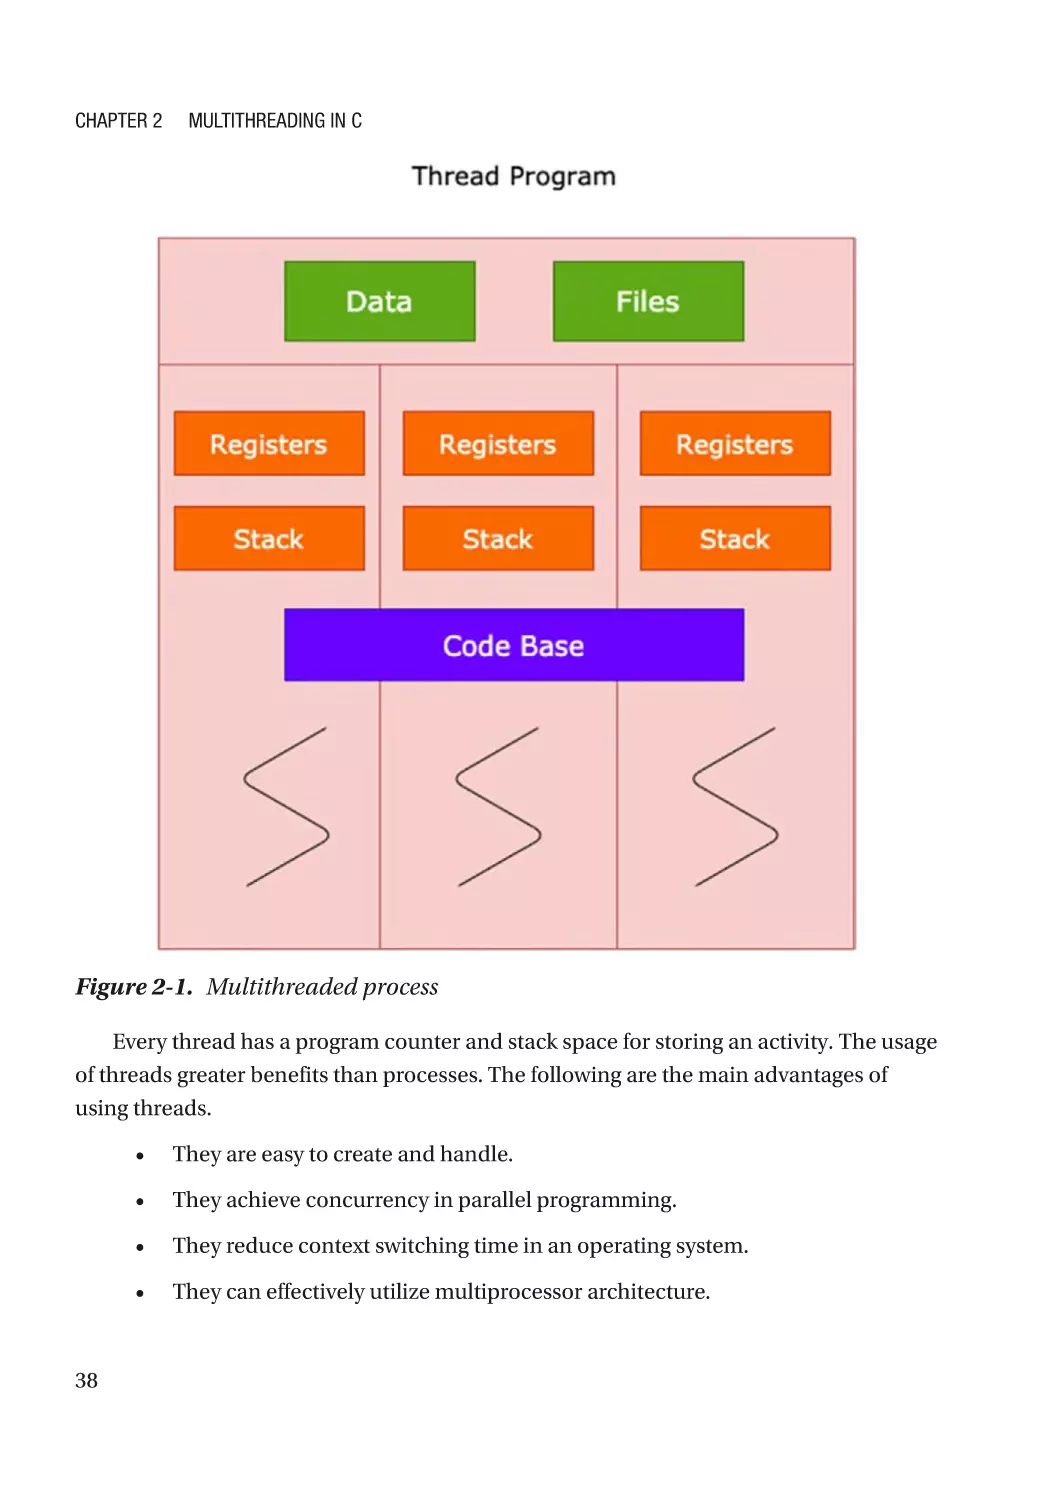
efficiently. A thread is a small segment in a process, as shown in Figure 2-1.
© Sri Manikanta Palakollu 2021
S. M. Palakollu, Practical System Programming with C, https://doi.org/10.1007/978-1-4842-6321-1_2
37
Chapter 2
Multithreading in C
Figure 2-1. Multithreaded process
Every thread has a program counter and stack space for storing an activity. The usage
of threads greater benefits than processes. The following are the main advantages of
using threads.
38
•
They are easy to create and handle.
•
They achieve concurrency in parallel programming.
•
They reduce context switching time in an operating system.
•
They can effectively utilize multiprocessor architecture.
Chapter 2
Multithreading in C
•
Thread communication is much faster than process communication
because threads share common address space.
•
They increase the overall performance of a system.
Thread Classification
Threads are classified into two types: user-level threads and kernel-level threads.
User-Level Threads
The user creates user-level threads with thread libraries rather than system calls. These
threads are independent of the kernel. The user does thread management according
to his needs and requirements. For example, creating a thread is done by the user. The
thread library performs thread management in the user space. It doesn’t depend on the
operating system’s system calls.
The creation of user-level threads is much faster than kernel-level threads. User-level
threads don’t depend on hardware utility. Context switching is easier with user-level
threads because it is done in the user space with a thread library. But, when it comes to
kernel-level threads, context switching is done in a kernel space. In a kernel space, there
might be a situation where more than one thread is in an active state at a particular time.
If the multiple threads are in a kernel space, then it takes some extra time for context
switching.
In general, context switching in user-level threads is faster than in kernel-level
threads, but this may change based on the situation. User-level threads are represented
by a program counter. Some good examples of user-level threads are POSIX threads and
Java threads.
39
Chapter 2
Multithreading in C
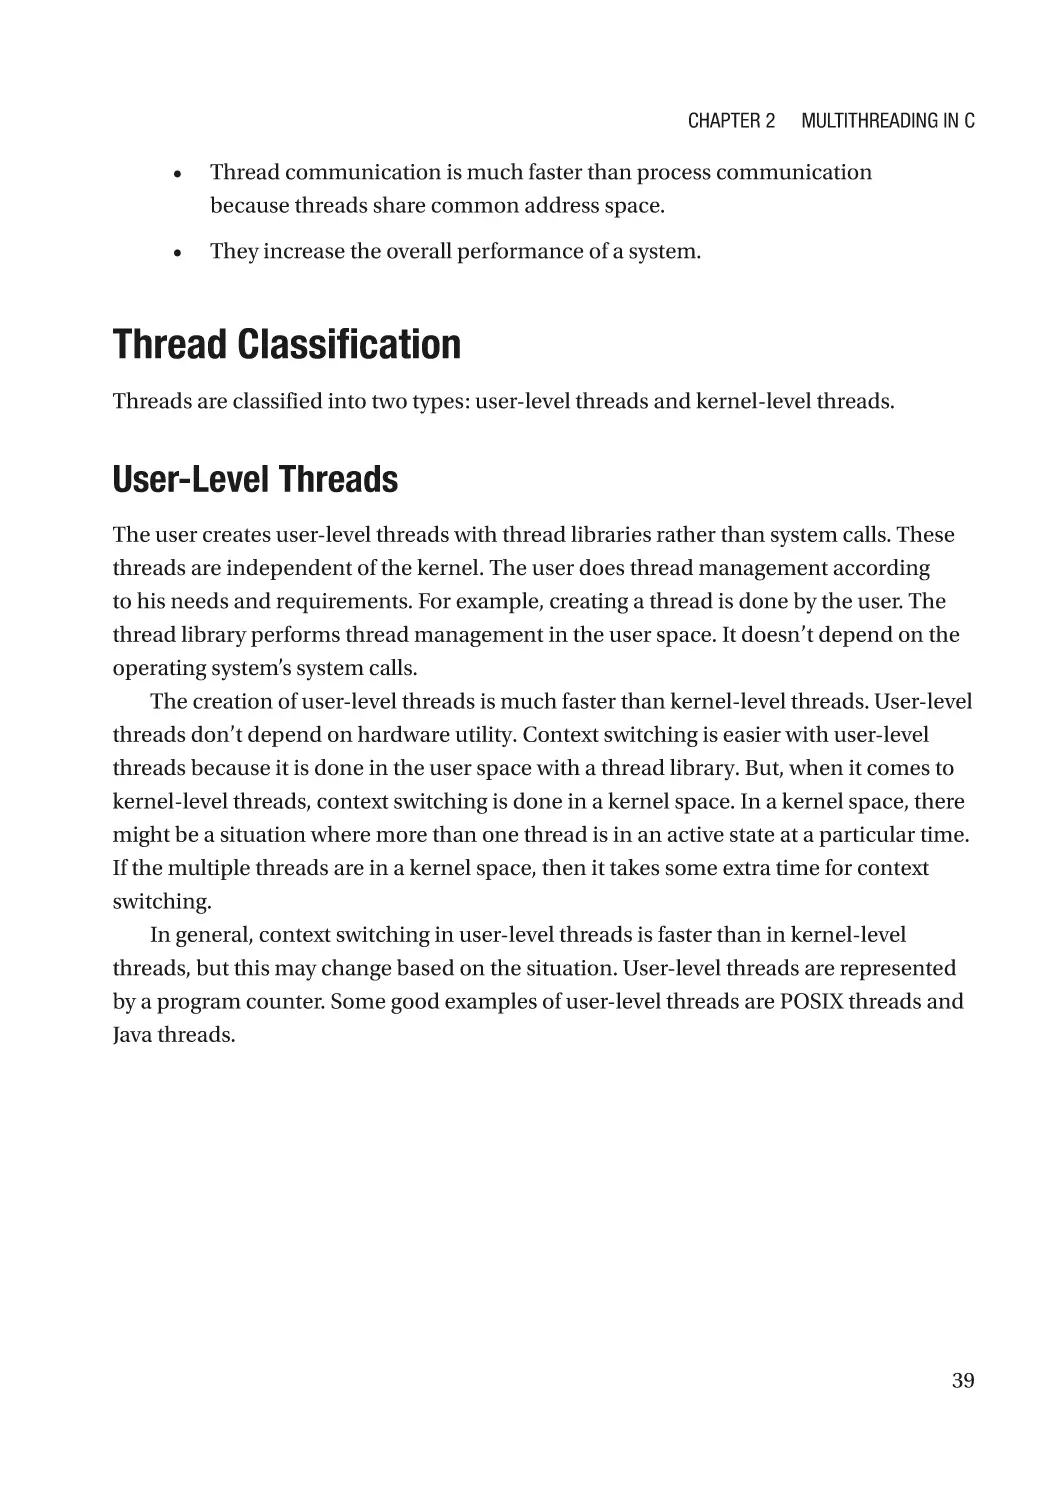
Figure 2-2. User-level threads working mechanism
The following are the advantages of user-level threads.
40
•
They are easy to create.
•
They are platform-independent, which means they can run on any
operating system.
•
Kernel-mode privileges are not required for thread switching.
•
Context switching is very easy for an operating system.
•
They don’t depend upon the system hardware.
Chapter 2
Multithreading in C
The following are the disadvantages of user-level threads.
•
Multiprocessing is very difficult because it is independent of the
kernel. When you want to perform a multiprocessing task in an
operating system, kernel support is required to execute the task. This
is impossible with these threads.
•
They require nonblocking I/O calls; otherwise, the entire process
may be blocked in the kernel.
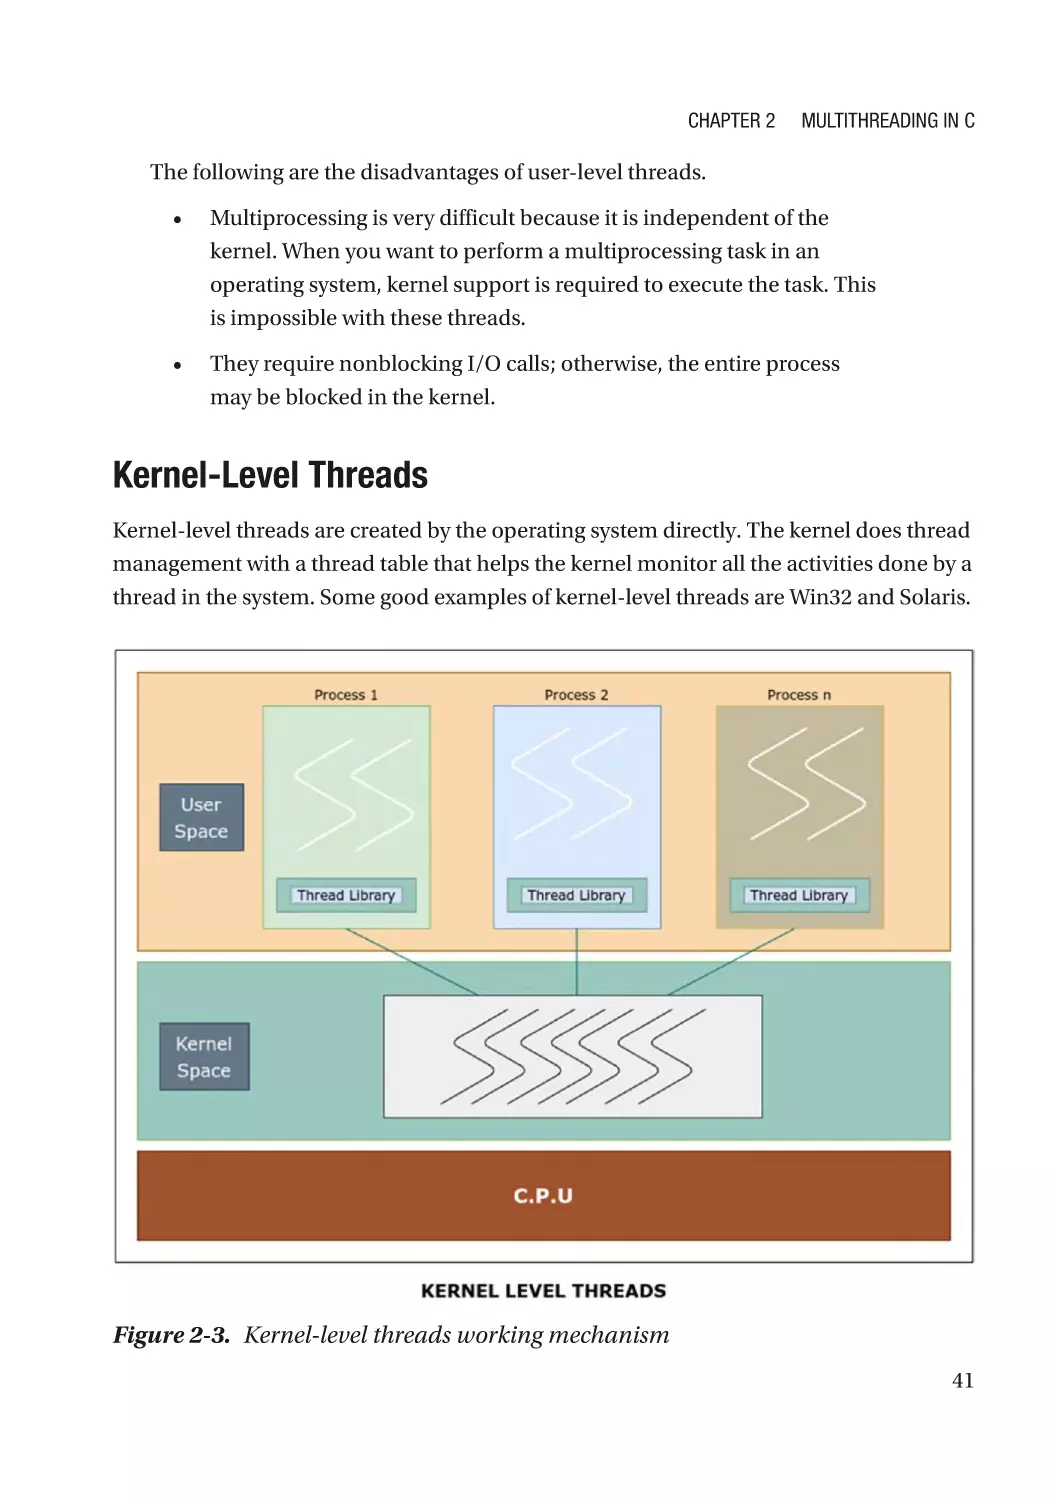
Kernel-Level Threads
Kernel-level threads are created by the operating system directly. The kernel does thread
management with a thread table that helps the kernel monitor all the activities done by a
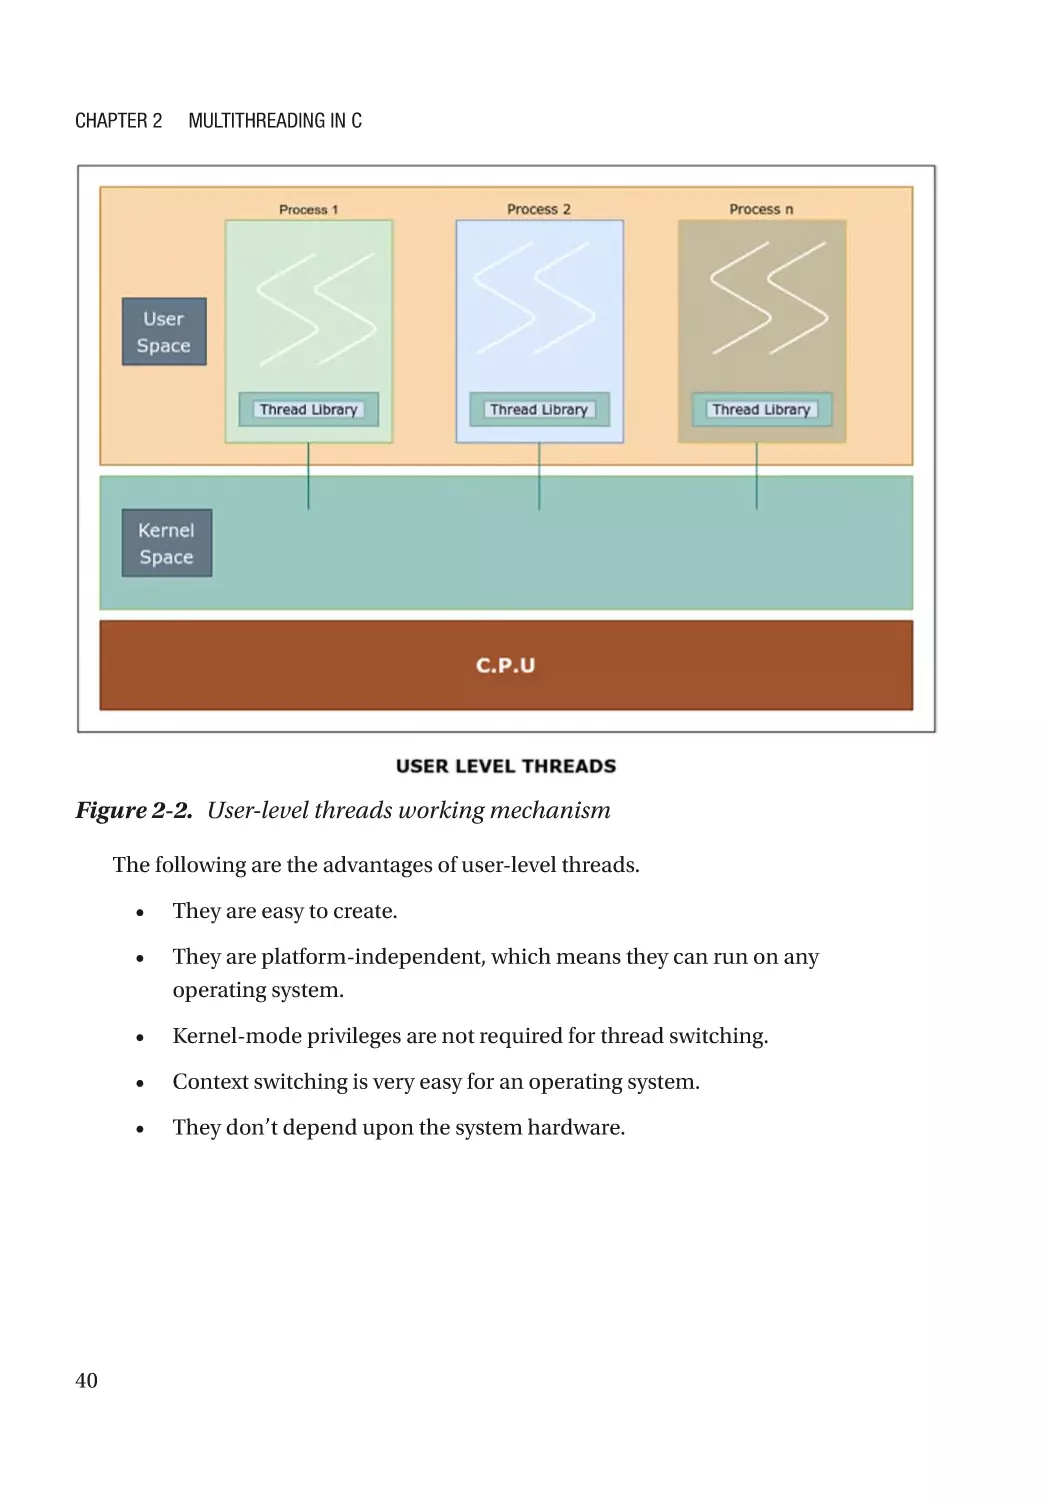
thread in the system. Some good examples of kernel-level threads are Win32 and Solaris.
Figure 2-3. Kernel-level threads working mechanism
41
Chapter 2
Multithreading in C
The following are the advantages of kernel-level threads.
•
Multiprocessing is done very easily.
•
They work on the blocking I/O protocol.
The following are the disadvantages of kernel-level threads.
•
They are slow and inefficient compared to user-level threads.
•
They are very hard to create and manage.
•
Multiple switching is required to transfer control from one thread to
another thread.
Threads vs. Processes
Even though threads are small segments inside a process, there are differences between
threads and processes in terms of parameters. A thread can do all the tasks that a process
can do, but the major difference between these two is that a process is a program or
software that is executing. Threads are a lightweight segment of a process. A process
can have multiple child processes. A process and a thread have a similar life cycle that
consists of five stages.
1. New
2. Ready
3. Wait
4. Running
5. Terminated
42
Chapter 2
Multithreading in C
Figure 2-4. Process and thread life cycle
The diagram highlights the five stages of the thread and process life cycle. Now let’s
discuss each stage.
New State
In the new state, a new process or thread is created and added to the queue. If it is
a process, it is created by a system call based on user input and then added to the
queue. Generally, a process is created with fork(). Threads are created based on the
programmer’s code and added to the queue explicitly. In a new state, the thread or
process has been created, but it is not running.
43
Chapter 2
Multithreading in C
R
eady State
In the ready state, a process or a thread is ready for execution.
W
ait State
In the wait state, a process or thread has been blocked for some reason and for some
amount of time. When it resumes, it goes to the ready state; otherwise, the thread/
process is terminated.
R
unning State
The running state describes the execution of the process/thread. In this state, if the sleep
method is called on a thread/process, it goes to the wait state.
T erminated
When the execution of a process or thread has been completed, it moves to the
termination state.
The differences between threads and processes are based on certain characteristics,
as shown in Table 2-1.
Table 2-1. Relationship Between Threads and Processes
Characteristics Threads
Processes
Definition
A thread is a lightweight segment that A process is any program or software that
is a part of a process.
is executing.
Creation Time
Threads usually take very little time to A process requires more time to create
create since they are lightweight.
because the process is heavier than a
thread.
Termination
Time
A thread requires little time to
A process requires more time to
terminate because of its simple nature. terminate because of its complex
structure.
(continued)
44
Chapter 2
Multithreading in C
Table 2-1. (continued)
Characteristics Threads
Processes
Resource
Usage
A thread needs a minimal number of
resources to do its task.
A process uses more resources than
threads.
Memory
Sharing
Threads share memory with other
threads based on the task to perform.
All the processes created in an operating
system are isolated. They don’t
communicate with any other processes.
Communication Threads can communicate with other Processes are less efficient than threads.
threads within the same process more
effectively than a process.
Context
Switching
A thread requires less time for
context switching in an OS. It is less
expensive.
A process requires more time for context
switching because of its heaviness. It is
more expensive in processes.
Management
Threads do not depend on any OS
system calls.
A process depends on system calls.
Introduction to Multithreading
In your operating system, generally, you can perform multiple tasks at the same
time. For example, listening to music on iTunes while writing code in a text editor is
considered multitasking. In multitasking, computer applications execute different tasks
simultaneously. Multithreading is very similar to multitasking, but the key difference is
that multitasking works on the process, whereas multithreading works on threads.
Multitasking Architecture
When the CPU executes multiple tasks with the process by switching between activities
in a minimal amount of time, multitasking enables users to interact with several
applications at the same time. In multitasking architecture, the execution of a task is
done by the processor by sharing memory space and allocation for each task.
45
Chapter 2
Multithreading in C
In the architecture shown in Figure 2-5, an operating system is running four different
applications (i.e., a text editor, iTunes, Google Chrome, and Keynote software). Consider
a situation where the user is writing code using a text editor while listening to music
on iTunes. He has a list of features that need to be implemented, which is available in
a Keynote file, so he opens the Keynote application. In the middle of development, he
wants to refer to official documentation regarding the application, so he opens Google
Chrome. Four applications are running parallel on his operating system. This situation is
called multitasking.
Figure 2-5. Multitasking architecture
M
ultithreading Architecture
In a multithreading architecture, a single process creates multiple threads to execute
a task. In this architecture, common memory space and allocation is shared by all
the threads. A multithreading architecture occurs within a process based on multiple
threads.
46
Chapter 2
Multithreading in C
Let’s consider a situation in which a user is writing code in Visual Studio Code (a.k.a.
VS Code). To develop code in VS Code, the operating system creates a single process for
that task. A process creates multiple threads to effectively execute a task. A new thread is
created for each of the following: when you open an integrated terminal in VS Code, when
you open IntelliSense to write code, and when you format the code. In multithreading,
some threads communicate with each other based on the situation. So, a thread is created
to perform a task more effectively and without any lags during its execution.
Figure 2-6. Multithreading architecture
Importance of Multithreading
A program executing a task with a single thread is not always effective, especially for
video editing software, code editors, and so forth. To use powerful applications that
have many tasks to do simultaneously within an application, then multithreading is very
helpful.
47
Chapter 2
Multithreading in C
High-level programming languages like C, C++, Java, and Python have a single
thread by default—without creating anything. In the C language, the main function
creates a single thread in the background by default; it works as a background thread,
and it does its job as assigned by the compiler. Executing higher-order tasks with a single
thread is not efficient, which leads to the need for multithreading.
The importance of multithreading in modern application development is due to its
advantages over a single-threaded architecture. Multithreading architecture has many
benefits, which are discussed next.
Efficient Resource Sharing
An application that executes a task may require common resources to share among
multiple threads. This is done with standard techniques, such as message passing and
shared memory (which are covered in upcoming chapters), which are very efficient in
multithreading because of the common memory address space.
Application Scalability
Multithreading increases the scalability of the application because the application’s
subactivities are easily performed with multiple threads. For instance, a single-threaded
application runs only on a single processor regardless of the number of processors. But a
multithreaded application utilizes the multiple cores that are available in a machine. So,
a multithreaded application can increase the parallelism in an operating system that has
multiple core CPUs.
Responsiveness
Multithreading operations are performed in an application. All the internal threads
work together to provide efficiency and a good user experience by increasing the
responsiveness of the application.
Efficient Memory Utilization
In a multithreading environment, there is no need to create a separate memory for each
thread. All threads share the same address space, so they use the memory effectively
without creating new allocation spaces.
48
Chapter 2
Multithreading in C
Efficient CPU Utilization
The creation of multiple threads within a process to execute a single application task
increases speed and performance. Threads within a process utilize the improved CPU
resources to perform the assigned task. Because threads use resources that are allocated
by the process, indirectly, they are using better CPU resources, which results in efficient
CPU utilization.
C
oncurrency
Concurrency is a mechanism that decreases the response time of the system by using a
single processing unit. In concurrency, a major task is divided into subtasks that execute
simultaneously but not at the same time. A good example of concurrency is having
multiple applications, like a Chrome browser, a video editor, and iTunes running at the
same time in an operating system.
Figure 2-7. Concurrency mechanism process execution time
In Figure 2-7, five processes are executing simultaneously but not at the same time.
You can observe the gap between the process executions. Concurrency creates an
illusion that all processes are running simultaneously at the same time, but concurrency
hides the latency time between process executions.
49
Chapter 2
Multithreading in C
P
arallelism
Parallelism is a mechanism that increases computational speed by using multiple processors.
In parallelism, tasks execute simultaneously and at the same time. A good example of
parallelism is running a video editor that has many tasks to perform simultaneously.
Figure 2-8. Parallelism mechanism process execution time
In Figure 2-8, all the processes are executing simultaneously and at the same time.
This simultaneous execution results in an increase in the system’s speed.
Support of Multithreading in C
The C programming language does not have built-in library support for multithreaded
programming. Even though C is a general-purpose programming language that is
widely used in embedded systems, system programming, and so forth, some vendors
have developed libraries that deal with multithreading to achieve parallelism and
concurrency.
The library to develop portable multithreaded applications is pthread.h; that is,
the POSIX thread library. POSIX stands for portable operating system interface. POSIX
threads are lightweight and designed to be very easy to implement. The pthread.h library
is an external third-party library that helps you effectively do tasks.
50
Chapter 2
Multithreading in C
Note You can develop multithreaded programs with the pthread.h library in all
Unix-based operating systems but not for Windows. If you want to develop an
application that works on Windows, the windows.h library is very effective for
multithreading-supported Windows operating systems.
The following are the functions in the pthread.h library that create, manipulate, and
exit the threads.
•
pthread_create
•
pthread_join
•
pthread_self
•
pthread_equal
•
pthread_exit
•
pthread_cancel
•
pthread_detach
pthread_create
pthread_create creates a new thread with a thread descriptor. A descriptor is an
information container of the thread state, execution status, the process that it belongs to,
related threads, stack reference information, and thread-specific resource information
allocated by the process. This function takes four arguments as parameters. The return
type of this function is an integer.
The following shows the syntax.
int pthread_create(pthread_t *thread,
const pthread_attr_t *attr,
void * (*start_routine)(void *),
void *arg);
51
Chapter 2
Multithreading in C
The following describes the parameters.
•
pthread_t is a thread descriptor variable that takes the thread
descriptor, has an argument, and returns the thread ID, which is an
unsigned long integer.
•
pthread_attr_t is an argument that determines all the properties
assigned to a thread. If it is a normal default thread, then you set the
attribute value to NULL; otherwise, the argument is changed based
on the programmer’s requirements.
•
start_routine is an argument that points to the subroutines that
execute by thread. The return type for this parameter is an void type
because it typecasts return types explicitly. This argument takes a
single value as a parameter. If you want to pass multiple arguments, a
heterogeneous datatype should be passed that might be a struct.
•
args is a parameter that depends on the previous parameter; it takes
multiple parameters as an argument.
pthread_join
This function waits for the termination of another thread. It takes two parameters as
arguments and returns the integer type. It returns 0 on successful termination and –1 if
any failure occurs.
The following shows the syntax.
int pthread_join(pthread_t, *thread,
void **thread_return)
The following describes the parameters.
52
•
thread takes the ID of the thread that is currently waiting for
termination
•
thread_return is an argument that points to the exit status of the
termination thread, which is a NULL value.
Chapter 2
Multithreading in C
pthread_self
This function returns the thread ID of the currently running thread. The return type of
this thread is an integer or the thread_t descriptor. It takes zero parameters as arguments.
The following shows the syntax.
pthread_t pthread_self()
or
int pthread_self()
pthread_equal
This function checks whether two threads are equal or not. If the two threads are equal,
then the function returns a nonzero value. If the threads are not equal, then it is zero. It
takes two parameters as arguments and returns the integer as output.
The following shows the syntax.
int pthread_equal(pthread_t thread1,
pthread_t thread2);
The following describes the parameters.
thread1 and thread2 are the IDs for the first and second thread,
respectively.
pthread_exit
This function terminates a calling thread. It takes one argument as a parameter and
returns nothing.
The following shows the syntax.
void pthread_exit(void *retval);
The following describes the parameters.
retval is the return value of a thread that you want to detach it.
53
Chapter 2
Multithreading in C
pthread_cancel
This function is used for thread cancellation. It takes one parameter as an argument and
returns an integer value.
The following shows the syntax.
int pthread_cancel(pthread_t thread);
The following describes the parameter.
pthread is the thread ID of the thread that you want to cancel.
pthread_detach
This function detaches a thread in a detached state. It takes a thread descriptor as an
argument and returns the integer value as output.
The following shows the syntax.
int pthread_detach(pthread_t thread);
The following describes the parameter.
thread is a descriptor variable that is passed as an ID, which you
want to detach it.
These functions are the most common functions in multithreading operations.
Creating Threads
As discussed earlier, the pthread_create function creates threads. This section deals
with thread creation and how to execute multithreaded programs. It examines the weird
behavior of multithreaded programs and how to overcome ambiguous output during the
development process. A simple multithreaded program can be created in simple three steps.
1. Import the required libraries. Our program includes the headers
that are necessary for the operation.
#include<stdio.h> // Standard I/O Routines Library
#include<unistd.h> // Unix Standard Library
#include<pthread.h> // POSIX Thread Creation Library
54
Chapter 2
Multithreading in C
2. Develop the thread function to make it multithreaded. The thread
function must have a return type as a pointer.
void *customThreadFunction(){
for(int i = 0; i < 15; i++){
printf("I am a Custom Thread Function Created By
Programmer.\n");
sleep(1);
}
return NULL;
}
In this custom thread function, a for loop is written, which iterates 15 times
[0–14] and prints the statement using the printf function. It sleeps for one
second after the iteration of every print statement. sleep() is available in the
unistd.h library.
3. In this step, the main function comes into the picture. In the
main function, you need to create a thread descriptor variable
and method. The following program tells you whether a thread is
created successfully or not. The pthread_create function returns
the status codes 0 and 1 for success or failure. If the thread is
successful, the thread function executes; otherwise, you exit out of
the program.
In the pthread_create function, the first argument is the address
of the thread descriptor variable. Since this deals with the custom
default threads, don’t bother with the second argument; take it as
a NULL value. The third value is a custom thread function that is
executed in the thread. The last argument is also NULL because,
in this custom thread function, there aren’t any arguments to pass.
int main(){
pthread_t thread; // Thread Descriptor
55
Chapter 2
Multithreading in C
int status; // Status Variable to store the Status of the
thread.
status = pthread_create(&thread, NULL, customThreadFunction, NULL);
/* status = 0 ==> If thread is created Sucessfully.
status = 1 ==> If thread is unable to create. */
if(!status){
printf("Custom Created Successfully.\n");
}else{
printf("Unable to create the Custom Thread.\n");
return 0;
}
// Main Function For loop
for(int i = 0; i < 15; i++){
printf("I am the process thread created by compiler By
default.\n");
sleep(1);
}
return 0;
}
After the compilation is done, run the ./a.out command, which gives the output for
your program.
56
Chapter 2
Multithreading in C
Figure 2-9. The output of the thread creation program
The output of my program may differ from yours. This is the ambiguity that is hidden
inside multithreaded programs.
Next, let’s learn how to overcome this ambiguity by using different functions in our
program.
57
Chapter 2
Multithreading in C
Practical Examples of Multithreading
Thread Termination
Termination of a thread is mandatory in certain situations. In our program, let’s
terminate the thread after the three iterations. It is done using the pthread_exit function,
which takes a single argument. Let’s pass that argument as NULL since this deals with
the default threads. You can see the difference in the thread termination in the output.
#include<stdio.h> // Standard I/O Routines Library
#include<unistd.h> // Unix Standard Library
#include<pthread.h> // POSIX Thread Creation Library
void *customThreadFunction(){
for(int i = 0; i < 5; i++){
printf("I am a Custom Thread Function Created By Programmer.\n");
sleep(1);
if(i == 3){
printf("My JOB is Done. I am now being terminated by
programmer.\n");
pthread_exit(NULL);
}
}
return NULL;
}
int main(){
pthread_t thread; // Thread Descriptor
pthread_create(&thread, NULL, customThreadFunction, NULL);
for(int i = 0; i < 5; i++){
printf("I am the process thread created by compiler By default.\n");
sleep(1);
}
return 0;
}
58
Chapter 2
Multithreading in C
The output of the program is shown in Figure 2-10.
Figure 2-10. The output of the thread termination program
Thread Equal Property
If you want to check whether two threads are equal or not, use the thread_equal
function, which checks the equality condition.
#include<stdio.h> // Standard I/O Routines Library
#include<unistd.h> // Unix Standard Library
#include<pthread.h> // POSIX Thread Creation Library
void *customThreadFunction(){
printf("This is my custom thread\n");
return NULL;
}
int main(){
pthread_t thread1, thread2;
pthread_create(&thread1, NULL, customThreadFunction, NULL);
pthread_create(&thread2, NULL, customThreadFunction, NULL);
if(pthread_equal(thread1, thread2)){
printf("Two threads are Equal..!\n");
}else{
printf("Two threads are not equal\n");
59
Chapter 2
Multithreading in C
}
return 0;
}
The output is shown in Figure 2-11.
Figure 2-11. The output of the thread equal program
Passing a Single Argument to a Thread Function
Passing arguments to the thread function is done with a few changes to the pthread_
create function arguments, as shown in the following code.
#include <stdio.h>
#include <pthread.h>
void *sayGreetings(void *input) {
printf("Hello %s\n", (char *)input);
pthread_exit(NULL);
}
int main() {
char name[50];
printf("Enter your name: \n");
fgets(name,50, stdin);
pthread_t thread;
pthread_create(&thread, NULL, sayGreetings, name);
pthread_join(thread, NULL);
return 0;
}
60
Chapter 2
Multithreading in C
The pthread_create function takes four arguments as parameters. In general, if a
custom thread does not take any arguments, then you should pass fourth parameter as
a NULL value. If your custom thread function requires a single parameter as an
argument, then you pass that variable to the fourth variable. Passing multiple arguments
is discussed in the next example.
Figure 2-12 shows the output.
Figure 2-12. Thread argument program output
Passing Multiple Arguments as Parameters
If you want to pass multiple arguments for a custom thread function, then you use
heterogeneous data types (i.e., structures that collect all your required data into one
variable, which pass as a fourth argument in the pthread_create function).
#include <stdio.h>
#include<stdlib.h>
#include <pthread.h>
// Data Collector.
struct arguments {
char* name;
int age;
char *bloodGroup;
};
// Thread Function
void *sayGreetings(void *data) {
printf("Name: %s", ((struct arguments*)data)->name);
printf("Age: %d\n", ((struct arguments*)data)->age);
printf("Blood Group: %s\n", ((struct arguments*)data)->bloodGroup);
return NULL;
}
61
Chapter 2
Multithreading in C
int main() {
struct arguments *person = (struct arguments *)malloc(sizeof(struct
arguments));
printf("This is a Simple Data Collection Application\n");
char bloodGroup[5], name[50];
int age;
printf("Enter the name of the person: ");
fgets(name, 50, stdin);
printf("Enter the age of the person: ");
scanf("%d",&age);
printf("Enter the person's Blood Group: ");
scanf("%s", bloodGroup);
person->name = name;
person->age = age;
person->bloodGroup = bloodGroup;
pthread_t thread;
pthread_create(&thread, NULL, sayGreetings, (void *)person);
pthread_join(thread, NULL);
return 0;
}
This example creates a pointer that points to a struct, which is cast to a void pointer
as (void *) and passes to the pthread_thread function.
Figure 2-13 shows the output.
Figure 2-13. Thread multiple argument output
62
Chapter 2
Multithreading in C
The Relationship Between Threads and the CPU
Table 2-2 defines the relationship between threads and the CPU.
Table 2-2. Relationship Between Thread and CPU
Parameters Thread
CPU
Definition
A thread is a small segment
in a process. It is a virtual
component that manages tasks
in an operating system.
The CPU is a hardware component that contains
multiple cores. A core is a single computing
component that helps the CPU execute and read
program instructions. The number of cores is directly
proportional to the processing speed.
Work
The process assigns a thread’s The tasks are assigned by the threads to process.
work.
Task
The task of the threads is to
achieve concurrency.
The task of the CPU is to multitask and
multiprogram.
Dependent It is dependent on the CPU.
It is dependent on the core (i.e., internal component).
Processing It requires multiple processing
Units
units.
It requires a single processing unit.
Benefits
Threads improve the
throughput and computation
speed.
It performs arithmetical and logical operations in a
system.
Example
Running a visual code editor
Running multiple applications, like a browser, code
application is a multithreaded- editor, and iTunes, at the same time.
based process
Multithreading Use Cases
There are a lot of practical use cases that implement multithreading. All the topics in this
chapter used socket programming, which is discussed in Chapter 8. But briefly, in socket
programming, multithreading is helpful for listening to requests from various clients.
This section looks at things that use multithreading. Here are some of the applications
that use it.
63
Chapter 2
Multithreading in C
•
Web crawler applications
•
Online booking applications, which runs on PHP or Java
•
3D games
•
Integrated development environments
•
Video editing software
•
Text editors
•
Word processors
And the list goes on, but here are a few types of applications that internally use
multithreading. There are certain issues that programmers face during the usage of
multithreading, but handling these issues is done with synchronization. All these topics
are covered in the upcoming chapters.
Summary
In this chapter, you were introduced to threads on an operating system. The chapter also
discussed the following.
64
•
The life cycle of a process and thread
•
The importance of multithreading and its support in C
•
Creating a thread in C and examples in the pthread.h library
•
The differences between a CPU and threads
•
Multithreading use cases
CHAPTER 3
Introduction to POSIX
Standards and System-
Level APIs
POSIX standards help maintain compatibility between operating systems. System-level
APIs help to efficiently develop applications very within a short development period. In
this chapter, you learn about the following introductory topics.
•
The POSIX standard
•
POSIX support
•
Introduction to APIs
•
Importance of APIs
•
Built-in C Standard APIs
Understanding POSIX Standards
POSIX is the acronym for Portable Operating System Interface on Unix-based operating
systems. They are IEEE standards to formalize certain common standards in all
operating systems in the enterprise market.
© Sri Manikanta Palakollu 2021
S. M. Palakollu, Practical System Programming with C, https://doi.org/10.1007/978-1-4842-6321-1_3
65
Chapter 3
Introduction to POSIX Standards and System-Level APIs
In the olden days, programmers struggled to develop an application for computer
systems. Before POSIX standards, there were no common standards for developing a
computer operating system model, so developers needed to develop their applications
for every model—from scratch—to be compatible with all systems. This increased
development time and the cost of an application. Debugging was also very difficult
because of new bugs and issues in every new computer model, which caused a lot of
problems for developers.
To avoid these issues, IEEE introduced standard rules to practice when developing
new computer models. These standards helped develop all kinds of applications.
Developers no longer need to develop new code for new system models. These standard
rules are classified into four main categories.
•
POSIX.1
•
POSIX.1b
•
POSIX.1c
•
POSIX.2
POSIX.1 Standards
POSIX.1 standards deal with the core services of all operating system models. The
following are features included in this standard.
66
•
Process creation and control
•
Process triggers
•
Files and directory operations
•
Segmentation faults
•
Memory faults
•
Floating-point exceptions
•
Pipes
•
Signals
•
Standard C library implementation
•
Standard I/O interface and control
Chapter 3
Introduction to POSIX Standards and System-Level APIs
These are some of the core features that the IEEE addressed to improve the interface
of all operating systems.
POSIX.1b Standards
Along with the POSIX.1 standards, there are additional core features specifically related
to real-time application development. These POSIX.1b rules include the following
topics.
•
CPU scheduling algorithms
•
Message passing
•
Shared memory
•
Semaphore
•
Memory-locking interfaces
•
Synchronous and asynchronous data transfer interfaces
All the core features are covered in upcoming chapters.
POSIX.1c Standards
This standard category includes core features related to multithreading.
•
Thread creation
•
Thread control
•
Thread deletion
•
Thread synchronization
•
Thread scheduling
POSIX.2 Standards
POSIX.2 standards address the core functionality features of an operating system.
•
uname
•
tty
•
cd
•
ls
67
Chapter 3
Introduction to POSIX Standards and System-Level APIs
•
mkdir
•
echo
•
cp
•
rm
•
mv
This standard list includes all common utilities and the tools that are commonly
used by the users.
P
OSIX Support
All OS models do not use POSIX standards. macOS uses the complete POSIX standards
for its operating system, but most Linux distros use the Linux Standard Base (LSB),
which includes more powerful features than POSIX. It is a superset of POSIX standards
but also independent of POSIX standards. The Windows 10 operating system uses POSIX
as a subsystem with the same standard features.
I ntroduction to APIs
API stands for application programming interface. It is a collection of protocols and
subroutines that communicate between various systems and subsystems. APIs make
developers’ lives a lot easier. There are several types of APIs.
•
Public API or open API
•
Private API
•
Partner API
•
Composite API
All the APIs are normal web services standard APIs, but this book concentrates on
system-level APIs. System-level APIs are normal programs written by developers to
improve the core functionality of a programming language. A system-level API has two
different modes: user mode and supervisor mode (see Figure 3-1).
68
Chapter 3
Introduction to POSIX Standards and System-Level APIs
User Mode
In user mode, developers typically develop programs to incorporate or manipulate
custom activities in the system. The activities performed at the user level is done with
the help of System-level API. The activities include file creation, directory creation, and
similar basic activities.
Supervisor Mode
In supervisor mode, system calls perform the actions written by the developers. These
built-in functions and libraries are very helpful when it comes to performing s ystem-
level tasks. The system call in supervisor mode executes the calls that are made from the
user mode. Programs are written to perform some action(s).
Figure 3-1. Working API
69
Chapter 3
Introduction to POSIX Standards and System-Level APIs
The Importance of System-Level APIs
Built-in system APIs improve the performance of the developed system. There is no
need to write the code from scratch. Built-in functions and libraries are not required
to perform testing because there are tested rigorously before release. The following are
some of the benefits of using these functions.
•
Performance: These libraries are under active development, and
developers continuously try to improve the performance of existing
functions. Also, they use standard algorithms, such as standard
sorting and searching algorithms, to get the best performance.
•
Reliable code: There are fewer errors because most of the activities
are done with built-in functions, and because the libraries are under
active development.
•
Reduces development time: Most of the code is written by
developers to perform a particular activity, which reduces
development time because there is no need to write code from
scratch.
•
System-independent: C-program compiled binaries are system-
dependent, but these built-in libraries are system-independent,
which means that they don’t depend on the system. All the built-in
functions work the same on all operating systems.
Built-in APIs in C
Standard libraries are used in the rest of this book. To perform certain system core
activities with a specific programming language, you need to check whether the
language has a standard library that allows you to interact with your OS or not. Luckily,
the C language provides support for a system’s core functionality. Table 3-1 lists the most
commonly used libraries.
70
Chapter 3
Introduction to POSIX Standards and System-Level APIs
Table 3-1. Most Common Libraries
Library
Functionality
<stdio.h>
This library contains all the standard input and output operation functions: 10
macros and 41 functions. The most popular functions are printf and scanf.
<stdlib.h>
This is a standard library in C that is mainly used for general-purpose
programming. It contains the memory allocation and deallocation functions that
perform dynamic activities.
<unistd.h>
This library provides the standard interface for the POSIX API.
<sys/types.h>
This library contains standard derived data types, which are helpful in systemlevel programming.
<signal.h>
This library handles the signal activities in an operating system.
<time.h>
This library provides support for time and date activities in a standard manner.
<sys/stat.h>
This library determines the file system status and activity.
<fcntl.h>
This library is a part of the POSIX API that manipulates files, such as changing
permissions.
<sys/ipc.h>
This library deals with three major core tasks that include interprocess
communication activity (i.e., message queues, semaphores, and shared memory).
<sys/msg.h>
This library works with the <sys/ipc.h> library to deal with IPC activity.
<semaphore.h> This library performs the semaphore activity in an operating system. It is also a
part of the POSIX library.
<sys/shm.h>
This library performs shared memory activities.
<sys/wait.h>
This library places a process into a waiting state.
<stdargs.h>
This library handles the variable argument activity that takes input directly from
the command-line.
Summary
This chapter discussed topics related to the POSIX environment and the various C built-
in libraries. You were also introduced to system-level APIs.
71
CHAPTER 4
Files and Directories
You have learned about command-line topics in Linux. You were introduced to
multithreading and the practical implementation of multithreading in C. You saw
API support in C to develop efficient applications. This chapter discusses files and
directories. By the end of this chapter, you should have a deep knowledge of the core
concepts regarding Linux files, directories, and storage mechanisms. The chapter’s code
examples and discussions cover the following topics.
•
File system
•
Inodes and file metadata
•
Inode storage mechanisms
•
System calls and I/O operations for files
•
Systems calls for file permissions
•
File permission checks
•
Soft links
•
Hard links
•
System calls for directories
F ile Systems
Storage is one of the most essential components of an OS. The storage system must
have a well-organized structure, and it must be easy to access the content. In Linux/
Unix-based systems, everything is a file, which maintains the consistency that makes the
files easy to access. The file system in Unix is groups files into folders based on purpose
and use in a well-organized way. For most beginners, this seems intimidating. But once
you understand the purpose of each directory that is part of the Unix file system, then it
becomes easy to use and work with it.
© Sri Manikanta Palakollu 2021
S. M. Palakollu, Practical System Programming with C, https://doi.org/10.1007/978-1-4842-6321-1_4
73
Chapter 4
Files and Directories
The Unix file system looks like a tree structure. It consists of several directories,
and each directory consists of several specific files and subdirectories. In Unix, all
the directories are in the root directory (/). The entire Unix file system structure is
represented in Figure 4-1.
Figure 4-1. Linux file structure
•
•
•
/ (the root directory)
•
This directory is called the root directory.
•
All the files and directories in your Linux or Unix system are
grouped into this root directory.
•
In this directory, only root users have permission to write.
/bin (binaries)
•
This directory contains all the essential binaries in the operating
system.
•
The most frequently used Linux commands in a single-user mode
are located in this directory.
•
Examples of available commands are cd, mkdir, ls, mv, and cp.
•
Shells like bash, ksh, csh, zsh are located in this directory only.
(i.e., (/bin/bash, /bin/sh, etc.).
/sbin (system binaries)
•
74
This directory is similar to the /bin directory, but it contains the
system administration binaries, which are executed by the root user.
Chapter 4
•
•
•
Files and Directories
•
The commands and programs available in this directory are only
executed by the superuser.
•
The most common programs available in /sbin are ifconfig,
iptables, and reboot.
/boot (boot files)
•
This directory contains all boot loader–related files, which are
very important for booting an operating system.
•
All the files in this directory are static boot files. This directory
does not contain any boot configuration files.
•
An example of a boot loader file is a GRUB loader file, which
boots an operating system when you power-on your laptop or
desktop.
/opt (optional packages)
•
This directory consists of all the files that are not part of the
default installation.
•
Third-party software installed on your system that did not come
as a default installation on Unix/Linux. Proprietary software
installation files are placed in this directory.
•
Examples of software installed on Unix/Linux from third-party
sources include Apache server and Apache Tomcat server.
/dev (device files)
•
The files in this directory represent the hardware device files.
•
As with everything in Linux, devices are represented by a
directory or a file; so, all device-supported files for the system are
placed here.
•
This directory consists of special device files that come with the
installation of the operating system. They help the operating
system to support all types of devices detected while running the
operating system.
75
Chapter 4
•
•
•
•
Files and Directories
/home (home directory)
•
This is the home directory, which contains each user’s files.
•
This directory consists of the user’s personal data and
configuration files. The configuration files in this directory vary
from user to user.
•
If your system user name is Alex, then you have a home folder
located at /home/Alex. The number of user accounts on your
system equals the number of subdirectories present.
/media (removable media)
•
This directory consists of all the removable device directories.
•
When an external removable device is mounted in a Linux
system, then automatically, a new directory is created under this
directory.
•
When a USB is inserted to a laptop/PC that is running on a Linux/
Unix-based operating system, then the /media directory creates
a directory for the removable USB. This directory contains all
the removable media files that are automatically created by the
operating system.
/mnt (mount directory)
•
This directory consists of all the mounted files in a system.
•
Suppose that your PC is dual booted (dual boot means you
can have two operating systems on one PC). The number is
not restricted. You can have any number, but hard disk space
is limited. In a dual boot PC, all the other operating system
mounted files are placed in this directory.
•
System administrators use this directory to unmount a mounted
file system. Normal users can’t mount a filesystem without root
privileges.
/etc (configuration files)
•
76
This directory consists of all the configuration files that are used
by all the programs in a Linux operating system.
Chapter 4
•
•
System-level configuration files are placed in this directory. The
user-level configuration files are placed in the user-level home
directory.
•
Startup and shutdown scripts are located in this directory.
•
You can configure it with editors for your own use; for instance,
the configuration of a LAMP server.
/lib (system libraries)
•
•
•
Files and Directories
This directory contains the essential libraries needed by the
binaries that are in the /bin and /sbin directories.
/usr (user programs and data)
•
This directory contains all the binary files and applications that
are used by the user.
•
/usr/lib contains the binaries for /bin and /sbin.
•
Applications installed from the source are placed in the /usr/local
directory.
•
/usr/sbin contains the binary files for system administrators. If
you are unable to find the required files in this directory, go to the
root level /sbin directory.
•
This directory contains the source code for second-level
programs, which do not come from the default installation.
•
All the files in this folder have read-only access because they are
system-related binary files.
/root (root home directory)
•
This is the home directory for the root user; it is not a system root
directory.
•
Most people confuse / and /root. The major difference is that /
is a system-level root directory. And /root is the user-level root
directory.
77
Chapter 4
•
•
Files and Directories
/var (variable data files)
•
This directory consists of all the user data files in a system. This
data refers to the system data.
•
This directory contains log files under /var/log; packages and
database files under /var/lib; and temporary files under /var/tmp.
/srv (service data files)
All the internal operating system service data files are located in
this directory; for instance, files that are related to local servers are
found under this directory.
•
/tmp (temporary files)
•
All the temporary files created by the system or user are placed in
this directory. If the user has root privileges, then he/she can put
the temporary files in any location, but /tmp is the recommended
and system-assigned one.
•
All the system-level temporary files are stored in this directory.
•
The files in this directory are deleted when the system is
rebooted. The deletion of temporary files is dependent on the
Linux distribution, however, because some Linux distros do not
delete the temporary files in the system after every reboot.
•
Users can manually delete the files in the tmp directory.
It seems a bit hard to remember everything, but once you start using these
directories, it becomes easier. Each directory stores specific programs and utility
applications. Unlike Windows, Unix-based systems don’t have drive letters, like C: drive
and D: drive. You can create partitions in Linux, but all the partitioned disk space is
packed into a tree-like structure that has a root (/) directory.
File Metadata and Inodes
Everything is a file descriptor in Linux. A file descriptor is a number that uniquely
identifies a file that is open on an operating system. The file descriptor contains
information about the opened file. Every file has certain key attributes to identify its
properties. Regular files include images, audio, video, and other raw files that usually
have metadata associated with them. All the file attributes are stores in an inode.
78
Chapter 4
Files and Directories
An inode is a data structure that tracks all the information about a file. An inode
plays a very crucial role in Unix-based operating systems. When a user wants to access
a file, the operating system first searches for the inode number in an associated inode
table. The storage of inode numbers in an operating system and finding a particular file
using the path is explained in Figure 4-3. Every inode has a unique number. An inode
number is the index number that is associated with each inode. OS searches for an inode
number come from an inode table. The Unix storage system is a bit different from the
Windows storage system, but it is more efficient. The structure of an inode is represented
in Figure 4-2.
Figure 4-2. Inode structure
•
Size stores the file size.
•
Mode stores information on the file’s permissions and the type (i.e.,
directory, file, device directory, etc.).
79
Chapter 4
Files and Directories
•
Owner information points to the person who created the file.
•
Permissions contain all the permissions levels for a file (i.e., user,
group, other users).
•
Location describes the exact location of the file on the operating
system.
•
UID is short for user ID. It stores the user ID of the currently working
user and represents the owner of the file.
•
GID stands for group ID. It stores the group ID of the file that belongs
to and represents the group owner.
•
Timestamp stores the inode creation time and when the file was
modified.
•
Access control contains information on the special privileges given
to groups and other users (the outside real-world users).
•
Direct block
•
•
Linux usually follows the file system ext2, et3, et4; but for now,
we discuss the ext2 file system, which is popular. In the ext2 file
system, an inode consists of 12 direct block pointers.
•
The first 12 block pointers are direct.
•
The direct block directly points to the file data, as shown in
Figure 4-2.
•
In the direct block system, 12 blocks are reserved for storing the
file pointer’s address and directly pointing to the data/file.
•
Each direct block points to a file that is 4 KB. In total, direct blocks
can store 48 KB.
•
Direct block storage is very limited (i.e., 48 KB). It can’t point to
large data files or directories. Indirect blocks overcome this issue.
Indirect block
•
80
It points to the files or directories that are greater than 4 KB and
less than or equal to 4 MB.
Chapter 4
•
•
Files and Directories
•
It is more advanced than the direct block method. It creates 1024
different blocks internally. Each block stores 4 KB of data, which
is very small. Data pointers point to the 1024 blocks. Since each
block stores 4 KB of data, this results in a total 4 MB of data. This
is called the indirect block mechanism.
•
The Unix/Linux system is intelligent at detecting and effectively
monitoring data. If the size of a file/directory is more than 4 MB,
it automatically moves to the double indirect block method.
•
Data pointers internally point to the 1024 block pointers that
store the file data.
Double indirect block
•
It creates 1024 different blocks to point the data. Each block
can store 4 MB of data. Internally, it points to the indirect block
address, which can point up to 4 MB.
•
It can point up to 4 GB of data. If the file or directory is greater
than 4 GB, it automatically transfers the pointer data to the triple
indirect block.
•
It internally points to 1024 indirect block pointers.
Triple indirect block
•
It creates 1024 different blocks to point the data. Each block can
store 4 GB of data. Internally, it points to the double indirect
block address, which can point up to 4 GB.
•
It can point to as much as 4 TB of data. It internally points to the
1024 double indirect block pointers.
Figure 4-3. Structure of inode for file storage mechanism in Linux
81
Chapter 4
Files and Directories
Figure 4-3 shows an inode pointing mechanism structure that represents accessing a
file named script.ts on the operating system. Suppose that a user wants to access a file on
the operating system at /root/Desktop/WebDev/script.ts.
Initially, the root directory has a specific inode number that points to the root
number. It consists of several files and folders. In our situation, the root directory has
home, desktop, documents, and downloads directories. The desktop directory has an
inode number that consists of several lists of files and folders (i.e., Python, Web Dev,
Courses directories, and a helloworld.c program file).
Each directory and program file has its own inode number. When I navigate to the
Web Dev directory, it has a separate inode number that points to another set of files and
directories (that include index.html, style.css, script.js, script.ts), which have different
inode numbers. The searched file is available in the Web Dev directory. If the given file
name is not available in the specified location, an error is immediately thrown. All the
inode numbers are internally connected to provide better and faster access to files and
directories.
When you enter a directory and input the ls command in the command line, all
the files and directories in that directory are displayed based on the inode number. This
happens because of all the inode numbers of files and directories in that directory point
to an array of inode numbers that point to the parent directory. This is represented in
Figure 4-3; for example, the desktop inode is pointing to six different inode numbers.
Those are the files and directories in the desktop directory.
System Calls and I/O Operations for Files
The most common operations that you can perform on files are read, write, delete,
and modify the content. This section explains dealing with file manipulation
programmatically. Our program uses core system calls to manipulate the tasks. To get
more information on a system call, you can use the man command. For example, man
creat gives complete information on the creat system call (see Figure 4-4).
82
Chapter 4
Files and Directories
Figure 4-4. Man command information on creat system call
These system calls set an error number if they fail to perform the operation. The
error numbers analyze why the system call is unable to perform a particular activity and
may quickly debug the application.
To get the error code for your application, you need to use the error function
explicitly to print the message to the console. Table 4-1 describes some of the most
useful error codes.
Table 4-1. Useful Error Codes
Error Number
Error Code
Description
1
EPERM
Operation Not Permitted
2
ENOENT
No Such File Or Directory
3
ESRCH
No Such Process
4
EINTR
System Call Interrupted
5
EIO
I/O Error
6
ENXIO
No such device or address
(continued)
83
Chapter 4
Files and Directories
Table 4-1. (continued)
Error Number
Error Code
Description
8
ENOEXEC
Exec Format Error
9
EBADF
Bad File Number
10
ECHILD
No child processes available
11
EAGAIN
Try again
12
ENOMEM
Out of Memory
13
EACCES
Permission Denied
14
EFAULT
Bad Address
16
EBUSY
Device or Resource Busy
17
EEXIST
File Exist
20
ENOTDIR
Not a Directory
21
EISDIR
Is a Directory
22
EINVAL
Invalid Argument
23
ENFILE
File Table Overflow
24
EMFILE
Too many open files
27
EFBIG
File too large
28
ENOSPACE
No Space Available on device
29
ESPIPE
Illegal Seek
30
EROFS
Read-Only File System
32
EPIPE
Broken Pipe
33
EDOM
Math argument out of the domain
34
ERANGE
Math results not representable
39
ENOTEMPTY
Directory Not Empty
40
ELOOP
Too many symbolic links occurred
62
ETIME
Timer Expired
64
ENONET
The machine is not available in the network
(continued)
84
Chapter 4
Files and Directories
Table 4-1. (continued)
Error Number
Error Code
Description
65
ENOPKG
Package is not available
71
EPROTO
Protocol Error
86
ESTRPIPE
Stream Pipe Error
87
EUSERS
Too many users
91
EPROTOTYPE
Protocol error for socket
The following are the system calls that are available for file operations.
•
creat
•
open
•
close
•
read
•
write
creat
This system call creates a new empty file with a system call. It is available in the fcntl.h
library, which is a file handling library for Unix and Linux. The return type for this
function is an integer. If file creation is successful, it returns a non-negative integer. If the
creation of the file fails, it returns –1.
The following shows the syntax.
int creat(char *filename, mode_t mode);
•
The first parameter in the creat function is the name of a file.
•
The second parameter, mode, deals with the permissions of the file.
The permission modes are different from normal Linux file system
permissions. There are various modes available for this flag, but the
following are the most common modes.
•
O_RDONLY: If you set this flag mode to the creat function, the
file has read-only permission.
85
Chapter 4
Files and Directories
•
O_WRONLY: This mode gives write permissions.
•
O_RDWR: This mode gives both read and write permissions.
•
O_EXCL: This flag mode prevents the creation of a file if it already
exists.
•
O_APPEND: This mode appends the content to existing file data
without overriding it.
•
O_CREAT: This flag mode creates a file if it does not exist.
If you want to use multiple modes at the same time, you can use the bitwise OR
operator.
Here’s an example.
#include<stdio.h>
#include<fcntl.h>
int main(){
int file_descriptor;
char filename[255];
printf("Enter the filename: ");
scanf("%s", filename);
// Setting Permission to Read and Write Access for the file.
file_descriptor = creat(filename, O_RDWR | O_CREAT);
if(file_descriptor != -1){
printf("File Created Successfully!");
}else{
printf("Unable to Create the File.");
}
return 0;
}
A file descriptor is an integer value that identifies the open file in a process. This
program creates a new file with the given permissions set.
86
Chapter 4
Files and Directories
open
The open system call function opens a file and can perform read and write operations
based on the mode set to the function. An open system call can also create a file. If the
specified filename is not available, then it automatically creates a new file with the given
name. The return type of this function is an integer. If the file opens successfully, it
returns a positive integer value; otherwise, it returns –1.
The following shows the syntax.
int open(const char *filepath, int flags, ...);
•
The first parameter deals with the absolute path of a file that you
want to open.
•
The flags that are passed as a second argument are O_RDONLY, O_
WRONLY, O_RDWR, and so forth.
Here’s an example.
#include<stdio.h>
#include<fcntl.h>
int main(){
int file_descriptor;
char filename[255];
printf("Enter the filename: ");
scanf("%s", filename);
// Setting Permission to Read Only for the file.
file_descriptor = open(filename, O_RDONLY);
/*
On Success: It returns any value other than -1.
*/
if(file_descriptor != -1){
printf("%s Opened Successfully!",filename);
}else{
87
Chapter 4
Files and Directories
printf("Unable to Open %s",filename);
}
return 0;
}
This program prints a statement on whether the given file is open or not.
close
This system call closes the file descriptor that was created to open, create, or read the
contents in a file. The return type of this function is an integer. If the file descriptor is
closed successfully, it returns 0; otherwise, it returns –1.
The following shows the syntax.
int close(int file_descriptor);
file_descriptor is an integer value that identifies the open file in a process.
Here’s an example.
#include<stdio.h>
#include<fcntl.h>
int close(int file_descriptor);
int main(){
int file_descriptor;
char filename[255];
printf("Enter the filename: ");
scanf("%s", filename);
// Setting Permission to Read Write for the file.
file_descriptor = open(filename, O_RDWR, 0);
if(file_descriptor != -1){
printf("File Opened Successfully!\n");
}else{
printf("Unable to Open the File.\n");
}
88
Chapter 4
Files and Directories
int close_status = close(file_descriptor);
// Checks the condition and prints the appropriate statement.
/*
Success: 0
Error: -1
*/
if(close_status == 0){
printf("File Descriptor is closed Successfully\n");
}else{
printf("File Descriptor is not closed\n");
}
return 0;
}
This program opens a file and closes the file descriptor after the task is done. After
the file descriptor is opened and work is done, it is a good programming practice to close
the descriptor.
read
This function system call reads the content of a file that was indicated by a file descriptor.
The return type of this function is an integer. It returns –1 if an error occurs or when any
signal interrupt occurs during a read operation. A successful read of a file returns the
number of bytes read during the operation.
The following shows the syntax.
size_t read (int file_descriptor,
void* buffer,
size_t size);
•
file_descriptor is a unique integer value that identifies the open
file in a process.
•
The buffer argument reads the file data.
•
size is the third argument indicates the size of the buffer that you
want to read from the file.
89
Chapter 4
Files and Directories
Here’s an example.
#include<stdio.h>
#include<stdlib.h>
#include<unistd.h>
#include <fcntl.h>
int main() {
int file_descriptor, size;
char filename[255];
char *content = (char *) calloc(100, sizeof(char));
printf("Enter the filename to read:");
scanf("%[^\n]%*c",filename);
file_descriptor = open(filename, O_RDONLY);
// Program exit if the given file is not found.
if (file_descriptor == -1) {
perror("File Not found.");
exit(1);
}
// read the Content from a given file descriptor.
size = read(file_descriptor, content, 100);
printf("Number of bytes returned are: %d\n", size);
content[99] = '\0';
printf("File Content: %s\n", content);
// Closes the file descriptor.
close(file_descriptor);
return 0;
}
This program prints the number of bytes that were read and then prints the content.
90
Chapter 4
Files and Directories
write
This function writes content to a given file descriptor. The return type of this file is an
integer. It returns –1 for an error or if any signal interrupt is raised; otherwise, it returns
the number of bytes that are returned to a file.
The following shows the syntax.
size_t write (int file_descriptor,
void* buffer,
size_t size);
This function syntax is the same as the read function. But the key difference is that it
writes the content to a file using the buffer. The read function reads the content from a
file using a buffer.
Here’s an example.
#include<stdio.h>
#include<unistd.h>
#include<stdlib.h>
#include<string.h>
#include <fcntl.h>
int main() {
char filename[255];
// Asking the Input from a User.
printf("Enter the filename to open:\n");
scanf("%[^\n]%*c", filename);
int file_descriptor = open(filename, O_WRONLY | O_CREAT, 0777);
if (file_descriptor == -1) {
perror("File not Found.!");
exit(1);
}
char content[1024];
printf("Enter the content to write on a given file: ");
// User Input to write into a File.
scanf("%[^\n]%*c", content);
91
Chapter 4
Files and Directories
int size = write(file_descriptor, content, strlen(content));
printf("%d", size);
close(file_descriptor);
return 0;
}
This code opens a given file and asks the user to enter the content that they want to write
to it. The write function writes content and prints the number of bytes written to a file.
Append Operations in Files Using System Calls
A write system call writes the content to the given file descriptor. But the O_RDWR flag
mode overrides the content in an existing file. If you want to add more content to a file
without overriding the existing content, the O_APPEND flag adds the new content at the
end of the file without overriding any of the existing content.
Here’s an example.
#include<stdio.h>
#include<unistd.h>
#include<stdlib.h>
#include<string.h>
#include <fcntl.h>
int main() {
char filename[255];
printf("Enter the filename to open:");
scanf("%[^\n]%*c", filename);
int file_descriptor = open(filename, O_WRONLY | O_CREAT | O_APPEND, 0777);
if (file_descriptor == -1) {
perror("File not Found.!");
exit(1);
}
char content[1024];
printf("Enter the content to write on a given file: ");
scanf("%[^\n]%*c", content);
92
Chapter 4
Files and Directories
int size = write(file_descriptor, content, strlen(content));
printf("%d %lu %d\n", file_descriptor, strlen(content), size);
close(file_descriptor);
return 0;
}
This program appends content to an existing file without overwriting it.
F ile Permissions
In Chapter 1, you saw how to change the permissions of a file using the Linux commands.
This section deals with changing file permissions programmatically and identifying all
the permissions given to a particular file by using built-in attributes. These attributes are
properties that check the permissions using R_OK, W_OK, F_OK, and X_OK.
chmod Function to Change Permissions
The chmod system call is available in the fcntl.h library. It changes the file permissions
using the C program. The return type of this function is an integer. It returns 0 if it is
successful and –1 if failure occurs.
The following shows the syntax.
int chmod(char *filepath, int mode);
•
filepath is the first argument usually takes the complete file path
with the respective file name as an argument.
•
mode takes the new permission values as an argument. The value
passed changes the file’s permissions.
Here’s an example.
#include<stdio.h>
#include<fcntl.h>
#include<stdlib.h>
int chmod(char *path, mode_t mode);
int main(){
93
Chapter 4
Files and Directories
int permission_status;
mode_ t new_permission_value;
char filepath[100];
// Taking the Input from the user
printf("Enter the filename with path: ");
scanf("%[^\n]%*c", filepath);
printf("Enter the new permission set: ");
// Permission Set value starts with 0.
// Eg: if i want to set 444 to a particular file then i need to give
like 0444.
scanf("%d", &new_permission_value);
// Setting the Permissions
permission_status = chmod(filepath, new_permission_value);
// 0 ---> On Success || -1 ---> On Failure.
if (permission_status == 0){
printf("New permissions are Setted Successfully.!");
}else{
printf("Permissions Changed Successfully");
}
return 0;
}
This program changes the permissions of a file. It returns a success statement if
successful and returns a failure message if it is unable to change the permissions.
File Permissions Check
You can check a file’s permissions with the access function in C, which is available in the
unistd.h library. This return type of this function is an integer. It returns 0 if successful
and –1 if failed.
The following shows the syntax.
int access(const char *filepath, int amode);
94
Chapter 4
Files and Directories
•
filepath is the first argument that takes the complete file path (i.e.,
absolute path.
•
The amode flag checks the permissions of a given file. The flags that
pass for the second argument are any of the following.
•
R_OK: This flag tests the read permissions of a file.
•
W_OK: This flag tests the write permissions of a file.
•
F_OK: This flag tests whether a file exists or not.
•
X_OK: This flag tests the execute permissions of a file.
Now let’s look at a simple example program that determines the read and write
access permissions of a file.
#include<stdio.h>
#include<unistd.h>
int main(){
char filepath[100];
// Taking the Input from the user
printf("Enter the filename with path: ");
scanf("%[^\n]%*c", filepath);
int read_status, file_status, write_status;
file_status = access(filepath, F_OK);
/*
Returns
-1 ----> If File Doesn't Exist
0 ----> If File Exists
*/
if(file_status == -1){
printf("%s File does not exist in Location.\n", filepath);
_exit(0);
}
read_status = access(filepath, R_OK);
write_status = access(filepath, W_OK);
// Checks for the both Read and Write Access
if(read_status == 0 && write_status == 0){
95
Chapter 4
Files and Directories
printf("%s File has both read and write permissions\n", filepath);
}else if(read_status == 0 && write_status == -1){
// If file has only read access then
printf("%s File has only read permissions\n", filepath);
}else if(read_status == -1 && write_status == 0){
// If file has only write access then
printf("%s File has only write permissions\n", filepath);
}else{
// If file does not have both read and write access then
printf("%s File has no read and write permissions", filepath);
}
return 0;
}
This program tests the read and write access of a file and prints the output (i.e., read
or write). You can modify the code to test execute permissions as well.
Soft and Hard Links
A link is a pointer to a file in the Unix system. In Linux, everything is considered a file,
which has an inode number. A link acts as a shortcut to quickly access it. This happens
because the link either points to the original file or its inode number. This helps the link
provide faster access to the content. There are two types of links available in Linux: soft
links and hard links.
Soft Links
A soft link links to a file, which contains data. There may be more than one soft link for a
single file.
96
•
It is also called a symbolic link.
•
Different inode numbers and permissions are set for a link. A soft link
offers easy access to the original file because it directly points to the
original.
•
Soft links can be created for files and directories in the system.
Chapter 4
Files and Directories
•
Permissions are not updated in a soft link. Permissions are updated
in the main file, but the soft link permissions are not updated. This is
one of the weird behaviors of soft links.
•
The changes that are made to the original file are updated. All the
changes made to the soft link file are updated to the main file.
A diagram of symbolic links is shown in Figure 4-5.
Figure 4-5. Soft link internal connection
Creating a Soft Link Using the Command Line
The creation of a soft link is done with the ln command and some extra flags. Let’s look
at creating a soft link.
ln -s <file_name> <softlink_name>
Note The soft link name is your choice; there are no restrictions on for user’s
name.
97
Chapter 4
Files and Directories
Figure 4-6 shows an example.
Figure 4-6. Soft link creation using command line
Unlinking a Soft Link
When a soft link is created, a link file is too. There are two ways to remove these links
from the file.
•
Delete the link file
rm <soft_link_name>
•
Unlink the file
unlink <soft_link_name>
After the unlinking action is done, the soft link is no longer available in the system.
Let’s closely look at the example shown in Figure 4-7.
98
Chapter 4
Files and Directories
Figure 4-7. Unlinking the soft link using a command line
Creating a Soft Link Using System Calls
You can programmatically create symbolic or soft links. In the unistd.h library, there is a
system call named symlink that creates symbolic links effectively. The symlink function
returns an integer value. It returns 0 on the successful creation of a symbolic link; it
returns –1 if any failure occurs.
The following shows the syntax.
int symlink(const char *filepath,
const char *linkname);
•
filepath takes its name as an argument where the file is located in
the system.
•
linkname takes the link name as an argument. You can also use the
path where you want to store it.
Now let’s programmatically create a symbolic link in a simple way.
#include<stdio.h>
#include<unistd.h>
int main(){
99
Chapter 4
Files and Directories
int link_status;
char filepath[50], linkname[50];
// Taking User Input for file path
printf("Enter the filepath: ");
scanf("%[^\n]%*c", filepath);
printf("Enter the linkname: ");
scanf("%[^\n]%*c", linkname);
link_status = symlink(filepath,linkname);
// 0 ---> On Success || -1 ---> If Any Error Occurs
if(link_status == 0){
printf("Soft link is Created Successfully.!");
}else{
printf("Unable to Create the Link.");
}
return 0;
}
This program creates a soft link and returns a success statement if there is success
and failure messages if any error occurs.
Unlinking Using a System Call
The unlink function unlinks a link. It is available in the unistd.h library. It returns an
integer value: 0 if successful and –1 if any failure occurs.
The following shows the syntax.
int unlink(const char *pathname);
pathname takes the link path as an argument and unlinks the
pointer from the original file.
Let’s look at unlinking a pointer from a file in a simple way.
#include<stdio.h>
#include<unistd.h>
int main(){
100
Chapter 4
Files and Directories
int unlink_status;
char linkname[100];
// Taking the Link name as Input from the user to unlink
printf("Enter the link name to unlink:");
scanf("%[^\n]%*c", linkname);
unlink_status = unlink(linkname);
// 0 --->On Success || -1 ---> Failure.
if(unlink_status == 0){
printf("File is unlinked Successfully.!");
}else{
printf("Unable to unlink the file.");
}
return 0;
}
This program unlinks the file from the pointer. It does the same as the command rm,
and unlink does. On successful unlinking of a pointer, it returns the successful message.
On an unsuccessful unlink, it returns a failure message.
H
ard Links
A hard link is a mirror copy of the original file. If you accidentally delete the original file,
the data remains in the hard link file, since it is a mirror copy of the original file. The
following are some of the implications.
•
The data updated on the original file is reflected on the hard link.
•
It works only on a single file system, which means that it can’t create
hard links for other operating system file systems.
•
It can’t link to directories.
•
It has the same inode number and permissions as the original file.
Figure 4-8 is a diagram of a hard link.
101
Chapter 4
Files and Directories
Figure 4-8. Hard link internal connection
Creating a Hard Link Using the Command Line
The creation of a hard link is done with the ln command. The link and the original file
have the same data, permissions, and inode number.
ln <filename> <hard_link_name>
Here’s an example.
Figure 4-9. Hard link creation using command line
102
Chapter 4
Files and Directories
Creating a Hard Link Using a System Call
The creation of a hard link is done with a link system call. This system call function is
available in the unistd.h library. It returns an integer value: 0 for a success and –1 for a
failure.
The following shows the syntax.
int link(const char *filepath,
const char *linkname);
•
filepath takes its name as an argument where the file is located in
the system.
•
linkname takes the link name as an argument. You can also provide
the path where you want to store it.
Here’s an example.
#include<stdio.h>
#include<unistd.h>
int main(){
int link_status;
char filepath[50], linkname[50];
printf("Enter the filename: ");
scanf("%[^\n]%*c", filepath);
printf("Enter the linkname: ");
scanf("%[^\n]%*c", linkname);
link_status = link(filepath, linkname);
// Hardlink be Created.
// 0 ---> Successful || -1 ---> Failure.
if(link_status == 0){
printf("HardLink is Created Successfully.!");
}else{
printf("Unable to Create the Hard Link.");
}
return 0;
}
103
Chapter 4
Files and Directories
This program creates a hard link and prints the success message if appropriate. If any
error occurs, it prints a failure message.
Note The unlinking of both the hard and soft links can be done in the
same command (i.e., using either the rm command or the unlink command.
Programmatically, the same unlink system call which is available in the unistd.h
unlink the link that is created. Once the link is unlinked, it is deleted from the
system.
System Calls for Directories
So far, various file concepts and their respective system calls have been covered.
Several activities were performed programmatically. Now it’s time to dig deeper into
the directories and various system functions that are associated with it. Directories are
frequently used in daily life to organize files in a well-structured manner. This section
discussed the various system calls that are available in C programming. The following
are the most common operations performed in a directory.
•
Creating a directory
•
Removing a directory
•
Getting the current working directory
•
Changing a directory
•
Reading a directory
•
Closing a directory
Creating a Directory
The creation of a directory is done with the mkdir function, which is available in the sys/
stat.h library. The return type of this function is an integer. It returns 0 on the successful
creation of a directory; it returns –1 for a failure.
104
Chapter 4
Files and Directories
The following shows the syntax.
int mkdir(const char *path, mode_t mode);
•
path is the first argument that describes the path and the new
directory name to create in the system.
•
mode represents the permissions to give to a new directory.
Let’s look at a simple example of creating a directory programmatically. The
following code creates a new directory in the current program location.
#include<stdio.h>
#include<sys/stat.h>
#include<sys/types.h>
int main(){
int isCreated;
char *DIR_NAME;
printf("Enter the Directory name you want to create: ");
scanf("%[^\n]%*c", DIR_NAME);
// You can Set your own permissions based on your Requirements.
isCreated = mkdir(DIR_NAME, 0777);
if(isCreated == 0){ // The value is 0 for Successful
printf("Directory is Created Successfully\n");
}else{ // Value is -1 if it is unsuccessful.
printf("Unable to Create Directory\n");
}
return 0;
}
This creates a new directory and prints a success message if the creation operation is
successful; otherwise, it prints an error message.
Deleting a Directory
The deletion of a directory is done with the rmdir function, which is available in the sys/stat.h
library. The return type of this function is an integer. It returns 0 on the successful deletion of
a directory; it returns –1 if a failure.
105
Chapter 4
Files and Directories
The following shows the syntax.
int rmdir(const char *pathname);
pathname determines the directory name with the absolute path to
remove from the system.
Let’s look at an example of how to delete a directory from the system.
#include<stdio.h>
#include<sys/stat.h>
#include<sys/types.h>
int rmdir(char *dirname);
int main(){
int isRemoved;
char DIR_NAME[512];
printf("Enter the Directory name you want to create: ");
scanf("%[^\n]%*c", DIR_NAME);
isRemoved = rmdir(DIR_NAME);
if(isRemoved == 0){ // The value is 0 for Successful
printf("Directory is Deleted Successfully\n");
}else{ // Value is -1 if it is unsuccessful.
printf("Unable to Delete Directory\n");
}
return 0;
}
This program deletes the directory from the system and prints a success message for
a successful operation; otherwise, it returns a failure message.
Getting the Current Working Directory
The getcwd function gets the current working directory. It is available in the unistd.h
library. The return of this function is a character data type. It returns the program’s
current working directory.
106
Chapter 4
Files and Directories
The following shows the syntax.
char getcwd(char *buffer, size_t buffersize);
•
buffer is the first argument; it describes the char array that stores the
buffer content.
•
buffersize is the second argument; it is the length of the buffer.
Let’s look at a program to print the current working directory using the C program.
#include<stdio.h>
#include<unistd.h>
int main(){
char DIR[75];
printf("Current Working Directory is: %s\n", getcwd(DIR, 75));
return 0;
}
This program prints the current working directory when a success; otherwise, it
prints NULL.
Changing Directory
There is a chdir system call that changes directory in your operating system. It is
available in the unistd.h library. The return type of this function is an integer. It returns 0
on the successful change in a directory; it returns –1 for a failure.
The following shows the syntax.
int chdir(const char *path);
path describes the path to change.
Here is a C program that changes the directory in a system.
#include<stdio.h>
#include<unistd.h>
int main(){
char DIR[75];
107
Chapter 4
Files and Directories
// Prints the Current Working Directory Before change
printf("Working Directory Before Operation:%s\n",
getcwd(DIR, 75));
//The below chdir("..") change to the parent directory.
int status = chdir("..");
//Success ---> 0 & Failure ---> -1
if(status == 0){
printf("Directory Changed Successfully.!\n");
}else{
printf("Unable to change the Directory.\n");
}
// Prints the Current Working Directory After change
printf("Working Directory After Operation: %s\n",
getcwd(DIR, 75));
return 0;
}
This program changes the working directory of the calling process.
Reading a Directory
Two types of functions read the content in directories: opendir and readdir. They are
available in the dirent.h library. The return type of the opendir function is the directory
stream.
A directory stream is an ordered sequence of all directory entries in a directory. A
directory entry represents the files. This directory stream points to the start position.
The return type of readdir is a dirent structure, which returns NULL if the directory
reaches its end. Dirent is a built-in structure that is implemented in the dirent.h library.
The following shows the syntax.
DIR *opendir(const char *path);
•
The path argument indicates the value that you want to open.
struct dirent *readdir(DIR *directorypointer);
•
108
The directorypointer argument should contain the directory
stream pointer, which is a return value of the opendir function.
Chapter 4
Files and Directories
The internal structure of dirent is as follows.
struct dirent{
ino_t d_ino; //
off_t d_off; //
unsigned short d_reclen; //
unsigned char d_type; //
char d_name[256]; //
};
inode number
offset to the next dirent
length of this record
type of file;
filename
Let’s create a program in C that reads all the files in a directory and prints them to the
console.
#include <stdio.h>
#include<stdlib.h>
#include <dirent.h>
int main() {
// Directory Entry
struct dirent *DIR_ENTRY;
// opendir() returns a pointer of DIR type.
DIR *DIR_READER = opendir(".");
if (DIR_READER == NULL) {
printf("Could not open current directory" );
exit(1);
}
while ((DIR_ENTRY = readdir(DIR_READER)) != NULL)
printf("%s\n", DIR_ENTRY->d_name);
closedir(DIR_READER);
return 0;
}
This program returns all the files and folders present in the given location.
Closing a Directory
The closedir function closes the directory stream that is running in a process. The
return type of this function is an integer. It returns 0 on the successful closing of a
directory; it returns –1 for a failure.
109
Chapter 4
Files and Directories
The following shows the syntax.
int closedir(DIR *directorypointer);
directorypointer is an argument that contains the directory
stream pointer, which is simply a return value of the opendir
function.
Here’s an example.
#include <stdio.h>
#include<stdlib.h>
#include <dirent.h>
int main() {
// Directory Entry
struct dirent *DIR_ENTRY;
// opendir() returns a pointer of DIR type.
DIR *DIR_READER = opendir(".");
if (DIR_READER == NULL) {
printf("Could not open current directory" );
exit(1);
}
int status = closedir(DIR_READER);
if(status == 0){
printf("Directory Closed Successfully.!");
}else{
printf("Unable to close the Directory.");
}
return 0;
}
This program prints the success statement if the directory is closed successfully;
otherwise, it prints a failure message.
110
Chapter 4
Files and Directories
Summary
This chapter focused on the Unix file structure, including the following topics.
•
A file’s metadata and inode structure and how the Unix system
identifies a file in the system.
•
The system calls that are available for file operations in the Unix
system and various file I/O operations.
•
How chmod() changes file permissions programmatically. The
access function checks file permissions with attributes like R_OK,
W_OK, F_OK, and X_OK.
•
The various Linux commands to create soft and hard links, including
the programmatic ways to create them. This included a discussion on
unlinking a link in both command-based and programmatic ways.
•
The various directory system calls that manipulate directory
operations.
111
CHAPTER 5
Process and Signals
Processes play a major role on an operating system. When you execute a computer
program in your system, it is done with a process. Without processes, you aren’t able
to do any activity on an OS. In this chapter, you look at processes and how to perform
various tasks. You also see various types of processes that can occur during the execution
of a program.
Signals are interrupts or traps (a trap is a fault) that raise an event when an exception
occurs. It is very handy to be able to detect exceptions and interrupts caused by the
system or a program. Signals are more helpful when working with core system-level
applications. This chapter discusses the following topics.
•
Introduction to process environments
•
Linux subsystems
•
Process creation
•
A zombie process
•
An orphan process
•
System calls for process management
•
Signals and their types
•
System calls for signal management
© Sri Manikanta Palakollu 2021
S. M. Palakollu, Practical System Programming with C, https://doi.org/10.1007/978-1-4842-6321-1_5
113
Chapter 5
Process and Signals
Introduction to the Process Environment
An executing program is considered a process. To get a deeper understanding of a
process, you need to be familiar with the process environment. Let’s consider the
internal working mechanisms of a normal C program that is subjected to the kernel for
execution. You are already know that every C program execution starts with the main()
function; but behind the scenes, a special start-up routine is called by the kernel before
calling the main() function.
When you compile C code, an executable is generated by the compiler. This
executable program contains the starting address of the start-up routine set up by
the linker when the program is executed. But when ASLR (address space layout
randomization) is enabled, the startup routine address is unpredictable. ASLR is a
memory protection mechanism that resolves buffer overflow issues by randomizing the
location. This startup routine usually takes a kernel. That type of argument is called a
command-line argument.
Let’s start with some basics and work toward a deeper understanding. A typical C
program main function look likes the following.
int main(int argc, char *argv[]);
It contains two parameters that take command-line arguments.
•
argc takes an integer type as an argument that contains the number
of command-line arguments passed by the programmer. The
parameters that are passing to the command line should be space
separated. This means if you pass hello world, it is considered two
different arguments, but hello_world is a single argument. If you
want to pass a spaced single argument, it is advisable to pass it inside
double quotes (i.e., “hello world”), which is also considered a single
argument.
•
argv takes a character array type as an argument. It deals with the
array of pointers that point to the argument values.
Let’s look at a simple C program that prints all the command-line values that are
passed by the programmer explicitly.
#include<stdio.h>
int main(int argc, char * argv[]){
114
Chapter 5
Process and Signals
printf("Number of Arguments Passed: %d\n", argc);
// This loop prints the all the command line values
// that are passed through the program.
for(int i=0;i<argc;i++){
printf("%s\n", argv[i]);
}
return 0;
}
The output of the program look like Figure 5-1.
Figure 5-1. Output of C program for command-line arguments
The program is named “Command\ Line\ Arguments.c”. The gcc compiler compiles
this program. After the compilation is done, the programmer run the program. This
program was run with five types of command-line values. A loop to print all the
command-line values was written. This program prints all the passed arguments and
the number of arguments. There is an odd behavior that you can observe in the output:
there were six arguments passed because it counted the executable file value as well.
E nvironment List
Your operating system has an environment list of items stored in an array of character
pointers. A process environment has an environment list. An environ is a character
pointer variable that points to an environment list. You can access this variable data with
the extern keyword. The syntax is as follows; also see Figure 5-2.
extern char **environ;
115
Chapter 5
Process and Signals
Figure 5-2. Environment variables list
•
Environ is an environment pointer that points to the environment
list, which consists of string data.
•
The environment list consists of predefined variables and custom
process variables. All the predefined values are in uppercase format.
•
The format of an environment list is name=value.
•
The executing program is also present under this environment list
variable.
Here’s an example.
#include<stdio.h>
int main(){
extern char **environ;
char **environment_list = environ;
/* This code Helps us to prints the all the
Environments available in the operating system.
*/
116
Chapter 5
Process and Signals
while(*environment_list != NULL){
printf("%s\n", *environment_list);
environment_list++;
}
return 0;
}
This program prints all the environment variables in your operating system and the
variables defined in your current session/program. The list of values that are printed by
the program contain your program execution file as well.
Figure 5-3. Output of the environment variable list using C program
This program shows the predefined and working process items listed in the
environment list. Finally, you can see the program execution path, which is assigned to
the _ variable. The running program’s instance is available in a running processes list.
This proves every program under execution is considered a process.
Memory Layout of a C Program
The memory layout of a C program typically consists of various block items. Each block
has a specific task to do within the running program. To get a clear view of the memory
layout in a C program, let’s look at memory layout in the pictorial representation shown
in Figure 5-4.
117
Chapter 5
Process and Signals
Figure 5-4. Memory layout
The entire memory layout is divided into several blocks. Each block has a separate
functionality associated with it.
Command-Line Arguments
The command-line argument block accepts all the values explicitly passed by the
programmer. This block also contains environment variables.
118
Chapter 5
Process and Signals
Stack
A stack is used for static allocation in a program. It stores all the automatic variables.
The function call’s results are stored in the stack area, but you can’t estimate or predict
exactly where a function call’s results will store. It depends on the hardware architecture.
Function call results are ABI (application binary interface) dependent. The values stored
in the stack are directly stored in RAM (random-access memory). Access time for items
in the stack space is very fast.
Heap
A heap is used for dynamic memory allocation. Allocation of memory is done at runtime
and accessing the items present in a heap space is slower than in a stack space. The size
of the heap is limited to the size of your virtual memory.
Uninitialized Data
The kernel assigns the data present in this segmented block to an arithmetic zero or the
NULL pointer before the program starts executing. This block is also called a BSS block,
which is a block started by symbol. Global and static variables that don’t have any explicit
initialization in the program are stored in this data block. This block contains only
uninitialized data.
Initialized Data
Global and static variables initialized by the programmer with predefined values in the
program are stored in the initialized data block.
Text
The text block contains the machine code/instructions the CPU needs to execute.
Process Termination Methodologies
A process is terminated normally or abnormally based on the program flow or
unexpected interrupts. The termination of a process is done in the following ways.
119
Chapter 5
Process and Signals
•
When a main() function returns the value, the process is terminated.
•
When you call an exit() function, which is available in the stdlib.h
library, to terminate a process.
•
When you call the _Exit() or _exit() functions available in stdlib.h and
unistd.h, respectively, to terminate a process.
•
When you call pthread_exit to terminate the process.
•
When you call an abort() function to abnormally terminate the
process.
•
When the programmer raises a signal, the process is terminated
abnormally if the custom handler or built-in signal handler is not
available. But you can handle the signals with a custom/built-in
signal handler.
•
Thread cancellation requests are also responsible for process
termination. A thread cancellation request is the termination of a
thread before its job is done in the process.
•
Any I/O failure/interrupt leads to process termination. For example,
if the process is waiting for input from a scanner but the scanner is
not working, this leads to process termination. If there is any custom
exception handler code available, this situation is handled easily
without the process being terminated.
•
In some situations, a child process is terminated because of a parent
process request.
•
A process is terminated when it is trying to access unallocated or
unauthorized resources. For example, when a process tries to execute
a program that doesn’t have execution permissions, it leads to
process termination. When a program tries to access memory that it
does not own, it leads to process termination.
The process environment consists of the environment List, memory layout, and
process termination. Memory layout deals with how program data is organized in the
system memory for better access. In contrast, an environment list deals with storing
all the processes that are running on an operating system. Finally, process termination
methodologies terminate a process normally or abnormally, based on the programmer’s
requirements. Abnormally terminating a process is done when something unexpectedly
happens to a program, so the programmer kills the process abnormally.
120
Chapter 5
Process and Signals
E nvironment Variables
Every process has an environment block that contains environment variables. An
environment variable is a dynamic variable that deals with the processes and programs
in an operating system.
Every operating system has an environment list and variables. These variables
store the system process data/system-related path data. The operations that perform
in environment variables are create, modify, delete, and save. There are two types of
environment variables.
•
User-level environment variables
•
System-level environment variables
User-Level Environment Variables
User-level environment variables belong to a specific user in an operating system.
System-Level Environment Variable
The variables in a system-level environment can be accessed by every user in the system.
Environment Variable Examples
Table 5-1 shows some of the predefined system-level variables available in every Linux/
Unix-based operating system.
Table 5-1. List of Environment Variables
Variable
Description
PWD
It prints the present working directory.
HOME
It prints the default path to the user’s home directory.
SHELL
It prints the location of the shell used by the user.
UID
It prints the user’s unique ID.
HOSTNAME
It displays the computer’s hostname.
121
Chapter 5
Process and Signals
Accessing an Environment Variable
To read a value variable, you need to pass the command to the terminal as follows.
Syntax ➜ echo $VARIABLE_NAME
Example ➜ echo $HOME
Figure 5-5. Accessing environment variables using CLI (command-line
interface )
Note Variable names are case sensitive. You need to be very careful when
accessing data from a variable. The name needs to match exactly to get data from
the system.
Setting a New Environment Variable
You can create your own environment variables with the following syntax.
Syntax ➜ VAR_NAME=VALUE
Example ➜ MY_VARIABLE=/Users/Home
Figure 5-6. Creating environment variable using CLI
Note The key point to remember in declaring a variable is that there is no space
between the variable name and the value, as shown in the syntax. If there is a
space between the name and the value, an error is thrown.
122
Chapter 5
Process and Signals
In bash, there is a built-in command named export. If you want to set the
environment variable permanently, the export command is useful. This method
sets the environment variable for temporary purposes only. It is not available once
the terminal session is closed. The export command exports the variable to the
permanent system environment variables list, which is not deleted until you delete
it explicitly.
Deleting Environment Variables
Deleting an environment variable is done with the unset command.
Syntax ➜ unset VARIABLE_NAME
Example ➜ unset MY_VARIABLE
Figure 5-7. Deleting environment variable using CLI
Note If you try to access an environment variable that was deleted, you get NULL
as a result.
Accessing Environment Variables in C
C provides a built-in getenv() function that retrieves system variable information in a
C program. The return type of this function is a pointer to the value in the environment.
It takes the character value as an argument and returns the results if there is a variable in
the environment list; otherwise, it prints the NULL value. This function is available in the
stdlib.h library.
char *getenv(const char *name);
123
Chapter 5
Process and Signals
Here’s an example.
#include<stdio.h>
#include<stdlib.h>
int main(){
char environment_name[50];
printf("Enter the Environment name: ");
scanf("%s", environment_name);
printf("Environment Value: %s\n", getenv(environment_name));
return 0;
}
Figure 5-8 shows the output.
Figure 5-8. Printing the environment variable using C
Setting a New Environment Variable Using C
C provides a built-in function named setenv() that creates a new environment variable. It
is available in the stdlib.h library. The return type of this function is an integer. It returns
0 for the successful creation of an environment variable; it returns –1 for any errors.
int setenv(const char *envname,
const char *envval,
int overwrite);
•
124
envname takes the name of the variable that you want to create as an
environment variable.
Chapter 5
Process and Signals
•
envval takes the environment variable value that you want to assign
to the created value.
•
overwrite takes the integer value as argument (i.e., either 0 or 1). A 0
doesn’t overwrite an existing variable value; 1 overwrites the value.
If the variable already exists in the environment, a non-zero value
overwrites it.
Here’s an example.
#include<stdio.h>
#include<stdlib.h>
int main(){
char variable_name[15];
char variable_value[255];
int overwrittenValue;
printf("Enter your Variable name:");
scanf("%s", variable_name);
printf("Enter the Variable Value: ");
scanf("%s", variable_value);
// 1 ---> Represents the Overridden of Value.
// 0 ---> Doesn't override the value
printf("Enter the Overridden Value: ");
scanf("%d", &overwrittenValue);
// Returns 0 --> On Success || -1 on failure
int status = setenv(variable_name, variable_value, overwrittenValue);
if(status == 0){
printf("Environment variable Created Successfully.!\n");
}else if(status == -1){
printf("Environment variable Created Successfully.!\n");
}
return 0;
}
125
Chapter 5
Process and Signals
Figure 5-9 shows the output.
Figure 5-9. Output of environment variable creation in C
The successful creation of a variable prints a successful message; otherwise, an error
message prints.
Deleting an Environment Variable
C provides a built-in function named unsetenv() to clear the environment variable. It is
available in the stdlib.h library. The return type of this function is an integer. It returns 0
on the successful deletion of the variable; otherwise, it returns –1.
int unsetenv(const char *name);
The name variable takes the environment variable name, which you want to delete.
Here’s an example.
#include<stdio.h>
#include<stdlib.h>
int main(){
char variable_name[50];
printf("Enter the variable to Delete:");
scanf("%s",variable_name);
// Returns 0 --> On Success || -1 on failure
int status = unsetenv(variable_name);
if(status == 0){
printf("Environment Variable is Deleted Successfully.!\n");
}else{
printf("Unable to Delete the Environment variable.\n");
}
return 0;
}
126
Chapter 5
Process and Signals
Figure 5-10 shows the output.
Figure 5-10. Output of environment variable deletion using C
K
ernel Support for Processes
The kernel is the most important component. It manages all the operations in an
operating system. The kernel handles process management and file management as
well. In modern computers, multiple processes run simultaneously to execute user tasks
and system tasks. These processes require several resources, which include memory,
processor time, and hardware resources. The tasks and activities that are done through a
kernel are depicted in Figure 5-11.
Figure 5-11. Linux kernel-level subsystem
127
Chapter 5
Process and Signals
Process Scheduler
The process scheduler schedules programs that are constantly running in the OS and
delivers resources within a minimum response time to all programs. This is done with
scheduling algorithms. The process scheduler uses two types of algorithms.
•
Preemptive scheduling algorithm
•
Non-preemptive scheduling algorithm
Preemptive Scheduling Algorithm
•
In a preemptive scheduling algorithm, the process is interrupted
before the completion of the process task.
•
Starvation occurs after adding a high-priority process to the queue.
•
CPU utilization is high in preemptive scheduling. In preemptive
scheduling, you can keep the CPU as busy as possible with multiple
processes.
•
Resources are allocated for a limited time.
Non-Preemptive Scheduling Algorithm
•
In a non-preemptive scheduling algorithm, a process is not
interrupted until its task are finished.
•
CPU utilization is low. The CPU does not allow other processes to
utilize resources.
•
The process utilizes resources until the task is done.
Memory Manager
The memory manager is responsible for managing memory in the operating system.
128
•
It deals with the implementation of virtual memory, demand paging,
and memory allocation for kernel-level space and user-level space
programs.
•
It maps the files required to run a process.
•
It effectively manages interprocess communication tasks.
Chapter 5
Process and Signals
Virtual File System
A virtual file system is an abstract layer of a concrete file system.
•
It acts as a bridge between various file systems, like Windows and
macOS. This file system easily communicates with other OS file
systems.
•
It accesses different types of files from various file systems in a
uniform way.
•
It transparently handles data from network storage devices.
N
etwork Unit
A network unit handles all network activities in the system.
•
It manages certain types of protocols used by network hardware to
transfer data between systems.
•
It manages all the network hardware drivers in a system to establish
effective communication.
P
rocess Creation
Creating your own process within a program is done with a fork() system call. A newly
created process is called a child process, and the process that is initiated to create the
new process is considered a parent process. When a fork() system call creates a process,
it creates two processes (i.e., parent and child). The diagram shown in Figure 5-12
indicates that the parent process/main process calls the fork() system call to create a
process. By default, two subprocesses are created (i.e., parent and child process). A
process may create another process for specific work. The creation process is called a
parent process, and the created processes are called child processes. A parent process can
have many child processes, but a child process has only one parent process.
129
Chapter 5
Process and Signals
Figure 5-12. Mechanism of process creation
The process created to perform particular operations does a specific job in its life
cycle. Before the creation of the process done, it undergoes four steps.
1. Programmer requests the process be created by the program
2. System initialization
3. Batch job initialization
4. Execution of the fork() system call by the running process
The built-in fork() system call creates its own process. The return type of this system
call is an integer. It returns the three types of values. If the child process is created
successfully, it returns 0. The fork() system call internally creates a copy of the process that
calls it. If the parent process is successfully created, it returns a positive value. If the process
is unable to create it, a negative value is returned. The syntax of the fork() system call is
int fork(void)
The internal workings of the fork() system call is demonstrated in the diagram
shown in Figure 5-13. The fork() system call returns one of three values: a negative
value for an error, a zero for creating a child process, and a positive value for creating
a parent process. When the process ID is zero, the child process is executed, and the
parent process is in a waiting state. After the child process execution is completed, the
parent resumes the execution. This doesn’t mean that the parent process always waits
for the child process to complete its execution. You can make the parent process wait
130
Chapter 5
Process and Signals
for the child process execution. The parent process terminates once its assigned work is
completed. The hierarchy may vary from program to program. All the created processes
share the same memory allocated to the program but have a different address space.
Figure 5-13 is a simple example of creating a process using the fork() system call.
Figure 5-13. Internal mechanism of fork() system call
When a process is created with a fork() system call, two processes (i.e., child and
copy of the parent processes) are created. When the main program creates parent and
child processes, they try to execute simultaneously. This achieves concurrency in the
program.
Here’s an example.
#include <stdio.h>
#include <unistd.h>
int main() {
131
Chapter 5
Process and Signals
int pid = fork();
if(pid > 0){
printf("Parent Process is created\n");
}else if(pid == 0){
printf("Child Process is created\n");
}
return 0;
}
Figure 5-14 shows the output.
Figure 5-14. Output of the program on process creation using C
Z ombie Process
A zombie process is any process that has finished executing, but entry to the process
is available in the process table for reporting to the parent process. A process table is a
data structure that stores all the process-related information in an operating system. A
process that is not removed from the process table is considered a zombie. The parent
process removes the process entry with the exit status of the child process.
Here’s an example.
#include<stdio.h>
#include <unistd.h>
#include <stdlib.h>
#include <sys/types.h>
int main() {
pid_t child_pid = fork();
132
Chapter 5
Process and Signals
// Parent process
if (child_pid > 0){
printf("In Parent Process.!\n");
// Making the Parent Process to Sleep for some time.
sleep(10);
}else{
printf("In Child process.!\n");
exit(0);
}
return 0;
}
In this program, the fork() function creates a new child process. If the child_process
value is greater than zero, it is a parent process. If the child process ID is equal to zero, it
is a child process. If it is a child process, the program is terminated; otherwise, the parent
process is under execution in a sleep state. Meanwhile, the child process is terminated,
but the process ID is in the process table, making the child process a zombie.
Orphan Process
A process that does not have a parent process is an orphan process. A child process
becomes an orphan when either of the following occurs.
•
When the task of the parent process finishes and terminates without
terminating the child process.
•
When an abnormal termination occurs in the parent process.
Here’s an example.
#include<stdio.h>
#include <unistd.h>
#include <stdlib.h>
#include <sys/types.h>
int main() {
pid_t child_pid = fork();
133
Chapter 5
Process and Signals
// Parent process
if (child_pid > 0){
printf("In Parent Process.!\n");
}else{
printf("In Child process.!\n");
// Making the Child Process to Sleep for some time.
sleep(10);
printf("After Sleep Time");
}
return 0;
}
In this program, the parent process completes its execution and exits while the child
process is in execution, so it is considered an orphan process. If there is no parent for a
process, then that process is adopted by the init process.
System Calls for Process Management
When you are working with a process for a task, it is good to know how to manage the
processes effectively. Until now, you have seen fork() system calls create a process. This
section looks at various types of system calls that manage process activities effectively.
The following system calls manage processes.
134
•
vfork
•
exec
•
wait
•
waitpid
•
kill
•
exit
•
_Exit
Chapter 5
Process and Signals
vfork System Call
A vfork system call creates a new process, but the behavior is undefined in certain
circumstances. If the process is created using a vfork system call, the parent process
is blocked until the child block is executed. In the vfork system call, the child process
shares a common address space as the current calling process. Since they share the
common address space, changes in the code are visible to other processes. The return
type of this system call is an integer. When a child is successfully created, it returns 0 and
the child process ID to the parent process. If any error occurs, it returns –1.
The following shows the syntax.
pid_t vfork(void)
It takes zero arguments but creates the child process and blocks the parent process.
Here’s an example.
#include<stdio.h>
#include<unistd.h>
#include<stdlib.h>
int main(){
pid_t status;
status = vfork();
printf("Process is Executing: %d\n", getpid());
if(status == 0){
printf("Process is executing: %d\n", getpid());
exit(0);
}
return 0;
}
This code explains the working mechanisms of the vfork system call. Initially, the
child process is created and executes its task after the parent process is executed.
135
Chapter 5
Process and Signals
Figure 5-15. Output of process creation using vfork() system call
Note The vfork() system call is removed from POSIX standards due to its
undefined behavior in certain circumstances.
exec System Call Family
The exec system call family replaces the currently running process with a new process.
But the original process identifier remains the same, and all the internal details, such as
stack, data, and instructions. The new process replaces the executables. This function
call family runs binary executables and shell scripts. Figure 5-16 shows the workings of
the exec system call.
Figure 5-16. Working mechanism of exec system call
There are several system calls of the same family type available in the unistd.h
library. They create a new process or execute another binary executable. The family of
the exec system call functions include the following.
136
Chapter 5
•
execl
•
execlp
•
execle
•
execv
•
execvp
•
execve
Process and Signals
execl( )
This system call takes the first and second parameter as a path of the binary executable.
and the remaining parameters are the ones that you need to pass as based on your
interest; that is, optional parameters or flags that are required for the executable program
and purpose followed by a NULL value. This system call is available in the unistd.h
library. The return type of this function is an integer. If the execution is unsuccessful, it
returns –1; otherwise, it returns nothing.
The following shows the syntax.
int execl(const char *path, const char *arg, ..., NULL)
•
path takes the binary executable with the complete path.
•
arg also takes the binary executable path as an argument.
•
[...] considers the variable number of arguments, which means you
can pass any number of arguments.
•
NULL is the default parameter, which the execl function’s last
parameter should be.
Here’s an example.
#include <unistd.h>
int main() {
char
char
char
char
*binary_path = "/bin/ls";
*arg1 = "-l";
*arg2 = "-a";
*arg3 = ".";
137
Chapter 5
Process and Signals
// System call to perform the ls -la operation in the
// CWD (Current Working Directory)
execl(binary_path, binaryPath, arg1, arg2, arg3, NULL);
return 0;
}
This program shows a long list of all the files and directories, including the hidden
ones and the execl system call (see Figure 5-17). The advantage of this program is that
with one process identifier, another process is also executed.
Figure 5-17. Output for the execl system call
execlp( )
This system call is a bit more advanced than the execl() system call. It does not require
the path for the binary built-in executable, but for custom executables, it does require
the path to execute. The return type of this system call is an integer. It returns –1 if any
error occurs and returns anything for successful execution.
138
Chapter 5
Process and Signals
The following shows the syntax.
int execlp(const char *path, const char *arg, ..., NULL)
•
path takes the binary executable with the complete path.
•
arg also takes the binary executable path as an argument.
•
[...] considers the variable number of arguments, which means you
can pass any number of arguments.
•
NULL is the default parameter, which the execl function’s last
parameter should be.
Here’s an example.
#include <unistd.h>
int main() {
char *binary_executable = "ls";
char *arg1 = "-la";
char *arg2 = ".";
// System call to perform the ls -la operation in the
// CWD (Current Working Directory)
execlp(binary_executable, binary_executable, arg1, arg2, NULL);
return 0;
}
The output of this program is the same as the execl() system call program that prints
the long listing of the current working directory (see Figure 5-18).
139
Chapter 5
Process and Signals
Figure 5-18. Output for execlp() system call
execle( )
This system call works similarly to the execl() system call. The major difference is
that you can pass your own environment variables as an array. You can access the
environment variables from the envp constant array pointer. The return type of this
system call is an integer. It returns –1 on an error and returns anything for the successful
execution of the executable.
The following shows the syntax.
int execle(const char *path,
const char *arg,
..., NULL,
char * const envp[])
140
•
path takes the binary executable with the complete path.
•
arg also takes the binary executable path as an argument.
•
[...] considers the variable number of arguments, which means you
can pass any number of arguments.
Chapter 5
Process and Signals
•
NULL is the default parameter, which the execl function’s last
parameter should be.
•
envp is an environment pointer variable that lets you access the
environment variables from the array. The last element of the array is
a NULL value.
Here’s an example.
#include <unistd.h>
int main() {
char *binary_path = "/bin/zsh";
char *arg1 = "-c";
char *arg2 = "echo \"Visit $HOSTNAME:$PORT from your browser.\"";
char *const envp[] = {"HOSTNAME=www.netflix.com", "PORT=80", NULL};
// execle() System call can able to access
// the envp environment variables.
execle(binary_path, binary_path, arg1, arg2, NULL, envp);
return 0;
}
The output for this code is a statement to visit the URL in the browser. This is done by
accessing the environment variables with the echo statement within a C program.
Figure 5-19. Output for execle() system call
execv( )
This execv() system call is slightly different from this all three system calls. In this system
call you can pass your parameters as an argv array that you want to execute. The last
element of this array is a NULL value. The return type of this system call is an integer
value. It returns –1 on an error and returns nothing on success.
141
Chapter 5
Process and Signals
The following shows the syntax.
int execv(const char *path, char *const argv[])
•
The path argument points to the path of the executable that is being
executed.
•
argv is the second argument. It is a NULL-terminated array of
character pointers.
Here’s an example.
#include<stdio.h>
#include<unistd.h>
int main() {
//A null terminated array of character pointers
char *args[]={"./hello",NULL};
execv(args[0],args);
return 0;
}
In this code, when execv() system call is executed, it calls the ./hello binary
executable, which contains the simple hello world program, and is executed.
Figure 5-20. Output for execv() system call
execvp( )
This system call works the as same as the execv() system call. The major difference is that
you don’t need to pass the path for system executables like an execlp() system call. The
execvp() system call tries to find the path of the file in an operating system.
142
Chapter 5
Process and Signals
In the following example, the ls command is a program name. The execvp() system
call automatically finds its path in the system and performs the action.
The following shows the syntax.
int execvp (const char *file, char *const argv[])
•
file points to the executable file name associated with the file being
executed.
•
argv is a NULL-terminated array of character pointers that contain
the executables information.
Here’s an example.
#include<stdio.h>
#include<unistd.h>
int main() {
char *program_name = "ls";
//A null terminated array of character pointers
char *args[]={program_name,"-la", ".", NULL};
execvp(program_name,args);
return 0;
}
In this code, the execvp() system call calls the built-in ls command, displaying all
the contents in a directory. External parameters like -la with . means that it performs
a long-list operation by displaying the hidden details of the current directory. This
operation simply refers to the ls -la, where . is an external parameter that considers
the current working directory of the program.
143
Chapter 5
Process and Signals
Figure 5-21. Output for execvp() system call
execve( )
This system call works the same as the execle() system call. You can pass the
environment variables, and those variables can access it from your program.
int execve(
const char *file,
char *const argv[],
char *const envp[]
)
Here’s an example.
#include <unistd.h>
int main() {
char *binary_path = "/bin/bash";
// Argument Array
char *const args[] = {binary_path, "-c", "echo \"Visit $HOSTNAME:$PORT
from your browser.\"", NULL};
// Environment Variable Array
char *const env[] = {"HOSTNAME=www.netflix.com", "PORT=80", NULL};
execve(binary_path, args, env);
return 0;
}
144
Chapter 5
Process and Signals
This code is the same as the execle() system call output, as shown in Figure 5-22.
Figure 5-22. Output for execve() system call
wait System Call
In some situations, a process needs to wait for resources or for other processes to
complete execution. A common situation that occurs during the creation of a child
process is that the parent process needs to wait or suspend until the child process
execution is completed. After the child process execution completes, the parent process
resumes execution. The work of the wait system call is to suspend the parent system
call until its child process terminates. This wait system call is available in the sys/wait.h
header file. The process ID is the return type of the wait system call. On successful
termination of the child process, it returns the child process ID to the parent process.
If the process doesn’t have any child processes, the initiated wait call does not affect
the parent activity. It returns –1 if there are no child processes. If the parent process has
multiple child processes, the wait() call returns the appropriate result to the parent when
the child processes have terminated.
The following shows the syntax.
pid_t wait(int *status)
This system call takes the child status as an argument and returns the terminated
child process ID. If you don’t want to give the child status, you can use the NULL value.
The workings of the wait function are shown in the Figure 5-23 diagram.
145
Chapter 5
Process and Signals
Figure 5-23. Working mechanism of wait() system call
Here’s an example.
#include<stdio.h>
#include<unistd.h>
#include<sys/wait.h>
int main() {
int status = fork();
if (status == 0) {
printf("Hello from
printf("Child work
}else if(status > 0){
printf("Hello from
wait(NULL);
printf("Parent has
}
return 0;
}
146
child\n");
is Completed and terminating.!\n");
parent\n");
terminated\n");
Chapter 5
Process and Signals
In this program, the parent process is executed first, and then it enters a wait state.
When the parent process enters a wait state, the child process enters the action to
execute its assigned task. Once the child task is completed and terminated, the parent
completes the remaining tasks that are assigned to it.
Figure 5-24. Output of the C program for wait() system call
waitpid System Call
The waitpid() system call is an advanced version of the wait() system call. It takes three
parameters as arguments. The first parameter takes the child process identifier. The
second parameter deals with the status of the child process and stores the status code of
the child process. The third parameter is an options parameter that takes several options
to get the child process-related information. The values that are passed to this argument
are built-in macros. The return type of the waitpid system call is a process ID. If an error
occurs, it returns –1.
The following shows the syntax.
pid_t waitpid(pid_t pid, int *status, int options)
The following are options parameters.
•
WIFEXITED(status): It checks if the child exits normally or not.
•
WEXITSTATUS(status): It returns the status code when a child exits.
•
WIFSIGNALED(status): It informs the child exit status if the child
exits because a signal was not caught.
•
WTERMSIG(status): It gives the number of terminating signals.
•
WIFSTOPPED(status): It returns the status information when the
child stops execution.
147
Chapter 5
Process and Signals
•
WSTOPSIG(status): It returns the number of stop signals in a
program.
•
WUNTRACED: It returns the child status that has stopped, but it
doesn’t trace the child.
•
WNOHANG: It returns the status immediately if the child exits.
•
WCONTINUED: It returns the status code if a signal resumes the
stopped child process.
Here’s an example.
#include <stdio.h>
#include <unistd.h>
#include <sys/wait.h>
int main(){
int pid;
int status;
pid = fork();
// Terminates the Child process.
if(!pid){
printf("My PID: %d\n",getpid());
_exit(0);
}
waitpid(pid,&status,WUNTRACED);
if(WIFEXITED(status)) {
printf("Exit Normally\n");
printf("Exit status: %d\n",WEXITSTATUS(status));
_exit(0);
}else {
printf("Exit NOT Normal\n");
_exit(1);
}
return 0;
}
148
Chapter 5
Process and Signals
In this code, you get the status of the child process that is being terminated explicitly.
WEXITSTATUS returns the status of the exited child process. WUNTRACED untraces the
exited child process.
Figure 5-25. Output of C program using waitpid() system call
kill System Call
A kill system call kills processes and signals. Killing a signal or process is the termination
of a program/process/signal. The return type of this kill system call is an integer value.
It returns 0 on the successful execution of the system call; otherwise, it returns –1 for an
error.
The following shows the syntax.
int kill(pid_t pid, int sig);
•
pid takes the process identifier of the process.
•
sig takes the built-in signal parameter that needs to send to the
process.
Here’s an example.
#include<stdio.h>
#include<unistd.h>
#include<signal.h>
int main(){
int pid = fork();
if(pid == 0){
printf("Child PID: %d\n",getpid());
149
Chapter 5
Process and Signals
}else{
printf("Parent PID: %d\n", getppid());
}
sleep(2);
kill(getpid(), SIGQUIT);
return 0;
}
This code prints the process ID of the child and parent processes. The current
process ID is set to the kill system call that kills the currently running program after
sleeping for two seconds.
Figure 5-26. Output of the C program for kill() system call
exit System Call
An exit system call exits the calling process without executing the rest of the code that is
present in the program. It is available in the stdlib.h library. The return of this system call
is void. It doesn’t return anything on execution.
The following shows the syntax.
void exit(int status)
status takes the value that is returned to the parent process.
Here’s an example.
#include<stdio.h>
#include<stdlib.h>
#include<unistd.h>
int main(){
int pid = fork();
150
Chapter 5
Process and Signals
if(pid == 0){
// Prints the Child Process ID.
printf("Child Process ID: %d\n", getpid());
exit(0);
}else{
// Prints the Parent Process ID.
printf("Parent Process Id: %d\n", getppid());
exit(0);
}
printf("Processes are exited and this line will not print\n");
return 0;
}
This code prints the parent and child process ID and exits the program without
executing the last printf statement. This is because the exit() system call has exited
the parent and child processes, and there is no process left to execute the last printf
statement, so it doesn’t print to the console screen.
Figure 5-27. Output of the C program for exit() system call
_Exit System Call
_Exit terminates the process normally, but it doesn’t perform any cleanup activity. This
system call is available in the unistd.h library. The return type of this system call is void.
It doesn’t return anything. After the process is terminated, the control is given to the host
environment (currently running) in this system call.
The following shows the syntax.
void _Exit(int status)
status takes the value, which is returned to the parent process.
151
Chapter 5
Process and Signals
Here’s an example.
#include<stdio.h>
#include<stdlib.h>
#include<unistd.h>
int main(){
printf("Current Running Process ID: %d\n", getpid());
_Exit(0);
printf("Nothing will execute\n");
return 0;
}
This code does not give any results. It simply terminates the process and returns
control to the host environment.
Introduction to Signals
A signal is a software interrupt or an event generated by a Unix/Linux system in response
to a condition or an action. There are several signals available in the Unix system. All
signal mechanisms are implemented in the signals.h library. In this section, the signals.h
library is used to create custom signals and to handle the signals that are created by the
system. When a signal is raised, the kernel is guided as discussed next.
Catch the Signal
When the kernel raises a signal, you can create a custom routine to handle the signal. But
to use your custom handling routines, the process needs to register the custom routine
before the processed signal is delivered to the user space.
Ignore the Signal
When the program is raising a signal, and that signal has no effect, you go to the ignore
case. This ignores the signal that does not affect the program, but you need to explicitly
152
Chapter 5
Process and Signals
mention it before the signal is delivered. All signals can’t be ignored. The signals that
have no effect on raising a signal can be ignored.
D
efault Action
When a program raises a signal, and that signal is neither caught nor ignored, it is
handled by the default built-in signal handler that is defined by the system. It is an
implicit system behavior meant for handling the signal. But a process can explicitly
request to use the built-in signal handler in the program. Default handlers do not always
terminate a process.
Every signal has certain attributes. The name and the signal number identify the
signal very easily. Every signal has a certain functionality associated with it, which makes
signals very handy. All the available built-in signals supported by the system can be
printed with the kill command.
kill -l
The signals in Figure 5-28 are the signals that are supported by the Linux system.
Figure 5-28. List of all the built-in signals
The commonly used signals and the functionalities are described in Table 5-2.
153
Chapter 5
Process and Signals
Table 5-2. Signals and Their Functionality
Signal Name
Signal Number
Signal Functionality
SIGHUP
1
Hang up a signal
SIGINT
2
Interrupt (Ctrl+C)
SIGQUIT
3
Quit (Ctrl+D)
SIGABRT
6
Process Abort
SIGKILL
9
Kills the process without cleanup activity
SIGUSR1
10
User-defined signal 1
SIGSEGV
11
Invalid Memory Segment Access
SIGUSR2
12
User-defined signal 2
SIGALRM
14
Alarm Signal
SIGTERM
15
Program/Software Termination Signal
SIGCHLD
17
Child process has stopped or exited
SIGCONT
18
Continue Execution
SIGSTOP
19
Stop Execution
SIGTSTP
20
Stop Signal
SIGTTIN
21
Background process trying to read
SIGTTOU
22
Background process trying to write
The actual list of signals may vary between Solaris and Linux. All the signal lists are
available in the signal.h library. By using signals, you can set traps and interrupts. In the
C standard library, there is a signal() system call that creates the signals. The return type
of the signal system call is a pointer to a function that takes the single integer parameter
and returns nothing (i.e., void). If successful, this system call returns the previous action.
If any error occurs, it returns SIG_ERR to indicate the error. This system call also has a
typedef version that is easy to read and understand. But in this chapter, you are dealing
with the syntax of the original signal system call.
154
Chapter 5
Process and Signals
The following shows the syntax.
void (*signal(int sig, void (*function)(int)))(int)
•
sig takes the signal number. The signal number completely depends
on the purpose and the type of signal you want to send.
•
function is a pointer that points to either the function implemented
by the programmer or the built-in ones. These are the built-in
functions.
•
SIG_DFL handles the signal by default. It is considered the
default handling of signals, which means it sends the interrupt
that is caused by the program.
•
SIG_IGN ignores the signal that is caused by the program.
Here’s an example.
#include
#include
#include
#include
<stdio.h>
<unistd.h>
<stdlib.h>
<signal.h>
void CUSTOM_HANDLER(int);
int main () {
// SIGINT is used to intimate when any interrupt occurs to
// the program.
signal(SIGINT, CUSTOM_HANDLER);
while(1) {
printf("Hello World...!\n");
sleep(1);
}
return 0;
}
// This function will call when any signal interrupt occurs.
155
Chapter 5
Process and Signals
void CUSTOM_HANDLER(int signum) {
printf("Caught signal %d, coming out from Program\n", signum);
exit(1);
}
This code prints “Hello World...!” an infinite number of times. If an interrupt occurs
in the program, SIGINT immediately catches that signal and sends it to the CUSTOM_
HANDLER function to handle it.
Figure 5-29. Signal generation output
Types of Signals
In Unix/Linux, signals are classified into two types based on functionality: unreliable and
reliable.
Unreliable Signals
Signals that doesn’t have any available installed signal handler and become lost means
the process never knows about the signal that is being raised by the system. A process
has very little control over unreliable signals. The process can catch a signal or ignore
it, but blocking a signal is not possible with unreliable signals. A blocking operation
means intimating the operating system explicitly to hold the signal for a certain time and
releasing it when asked by the program.
Reliable Signals
Signals that are not lost in the system are reliable. The process has complete control and
can catch, ignore, and block signals using system calls. These signals are the enhanced
version in Unix-based system.
156
Chapter 5
Process and Signals
System Calls for Signals
There are different system calls available in the signal.h library that manipulates the
signals. Signal manipulation can be done with the following system calls.
•
raise
•
kill
•
alarm
•
pause
•
abort
•
sleep
raise System Call
A raise system call raises a signal by the process itself. The return type of this system call
is an integer. This system call returns zero on success and nonzero if a failure occurs.
The following shows the syntax.
int raise(int sig)
sig is the signal number that needs to be sent. This parameter depends on the type
of signal you want to raise explicitly to the process itself. The signal numbers are from the
built-in signals list.
Here’s an example.
#include <stdio.h>
#include<stdlib.h>
#include <signal.h>
void SIGNAL_HANDLER(int);
int main () {
signal(SIGINT, SIGNAL_HANDLER);
printf("Raising a new signal\n");
int status = raise(SIGINT);
157
Chapter 5
Process and Signals
if(status != 0){
printf("Something went wrong Unable to raise the new signal\n");
}
return 0;
}
void SIGNAL_HANDLER(int signal) {
printf("signal caught and handled gracefully\n");
}
This code raises a signal for the running process, and that signal is handled by
SIGNAL_HANDLER.
Figure 5-30. Output of the raise system call
kill System Call
A kill system call sends signals to other processes as well itself. A kill system call can
also kill processes. The killing/terminating of a signal is similar to killing/terminating a
process in an operating system.
alarm System Call
In signals, there is an alarm clock facility that schedules the signal trap for the future.
This system call is used by the process to schedule the SIG_ALARM signal. The return
type of the alarm system call is an unsigned integer. It returns the number of seconds
remaining in the set time that is to be delivered. If no alarm is set, it returns 0.
The following shows the syntax.
unsigned int alarm(unsigned int seconds)
seconds takes time in the form of seconds. The second’s value must be a positive
number.
158
Chapter 5
Process and Signals
Here’s an example.
#include<stdio.h>
#include<stdlib.h>
#include<unistd.h>
#include<signal.h>
void raisedAlarm(int sig);
int main(){
alarm(5);
signal(SIGALRM, raisedAlarm);
while(1){
printf("Hello World...!\n");
sleep(1);
}
return 0;
}
void raisedAlarm(int sig){
printf("The Alarm has Raised.\n");
exit(0);
}
This code raises the alarm after seconds of code execution. It is very handy to set
signal traps for time-dependent applications. Since the exit() function is used in the
raisedAlarm function, it terminates the program.
Figure 5-31. Output of the alarm system call
159
Chapter 5
Process and Signals
pause System Call
The pause system call suspends the execution of a program until a signal occurs. The
return type of a pause system call is an integer. It takes 0 parameters. It returns –1 on
failure; otherwise, it returns the respective signal catching function.
The following shows the syntax.
int pause(void)
Here’s an example.
#include
#include
#include
#include
<stdio.h>
<unistd.h>
<stdlib.h>
<signal.h>
void SIGNAL_HANDLER(int);
int main(void){
alarm(10);
signal(SIGALRM, SIGNAL_HANDLER);
if(alarm(7) > 0){
printf("An alarm has been set already.\n");
}
pause();
printf("You will not see this text.\n");
return 1;
}
void SIGNAL_HANDLER(int signo){
printf("Caught the signal with number: %d\n", signo);
exit(0);
}
160
Chapter 5
Process and Signals
This code catches the alarm signal interrupt. The remaining code below pause()
does not work. This is because pause() suspends the current running program, but the
alarm function and its handlers work parallelly. When SIGALRM is raised, the custom
handler handles it.
Figure 5-32. Output of pause system call
abort System Call
The abort system call terminates the program or process abnormally. This system call
returns a void type. It takes zero parameters. This system call sends the SIGABRT signal
to the process to terminate. This signal is not able to be overridden by other signals. This
system call does not close all the files and pointers opened by the process since it causes
an abnormal termination of the program.
The following shows the syntax.
void abort(void)
Here’s an example.
#include<stdio.h>
#include<unistd.h>
#include<stdlib.h>
#include<signal.h>
int main(){
int status = fork();
if(status == 0){
printf("Child Process ID: %d\n", getpid());
}else if(status > 0){
printf("Parent Process ID: %d\n", getpid());
}
161
Chapter 5
Process and Signals
abort();
printf("Due to abnormal termination this line will not execute.\n");
return 0;
}
This program creates a child and parent process. After creating processes, the
remaining lines of code that are present below abort() are not executed. This is because
abort terminates the program abnormally. But the output of the program may differ.
Figure 5-33. Output of the abort system call
sleep System Call
This sleep system call sleeps the thread until the specified number of seconds have
elapsed or a signal hits (which is not ignored). The return type of this system call is an
unsigned integer. It returns 0 if the requested time has elapsed, or the number of seconds
left to sleep if the call is interrupted by a signal handler.
The following shows the syntax.
unsigned int sleep(unsigned int seconds)
seconds takes the number of seconds that the process or thread wants to sleep as an
argument.
Here’s an example.
#include<stdio.h>
#include<unistd.h>
#include<stdlib.h>
162
Chapter 5
Process and Signals
int main(){
for(int i=0; i<5; i++){
printf("Hello World.\n");
sleep(1);
}
return 0;
}
This code prints “Hello World” five times by sleeping for 1 second after every
iteration of the loop.
Figure 5-34. Output of sleep system call
Summary
In this chapter, you were introduced to the process environment, including how to create
and terminate a process.
•
You looked at the environment variable and how to create it
programmatically and by using commands.
•
You explored the memory layout of the C program and how things
are stored in a computer’s memory.
•
Kernel support for the process teaches you about the Linux
subsystem. In the Linux subsystem, you looked at various
management schemes done by the Linux kernel internally.
•
The creation of processes achieves concurrency. You learned a lot
about how to create processes using built-in system calls in C.
163
Chapter 5
Process and Signals
•
You learned that a process could become a zombie or an orphan.
•
You learned about the various system calls that are available for
process management. The system calls include vfork(), wait(),
waitpid(), kill(), execv family system calls, and exit(), and _Exit()
system calls.
•
You saw signals and traps set in a program to create your custom
interrupt in a program. You learned types of signals and system calls
for signal management include abort(), sleep(), pause(), alarm(),
raise(), and kill().
You now know the core concepts of process and signals in an operating system. You
should be able to work with your custom applications and scripts in a very comfortable
manner.
164
CHAPTER 6
Interprocess
Communication
Interprocess communication (IPC) is a mechanism that is widely used in an operating
system to effectively access shared data. This mechanism is very important to the design
process of microkernel and nanokernel development. An IPC mechanism is usually
seen in a distributed computing environment, but it is also widely used in traditional
computing environments. There are two types of IPC mechanisms: synchronous and
asynchronous. In this chapter, you learn about the various techniques that achieve
IPC. The following topics are covered.
•
Introduction to IPC
•
Benefits of IPC
•
Modes of transmission
•
Types of IPC
•
Anonymous pipes
•
APIs for anonymous pipes
•
Implementation of anonymous pipes
•
Named pipes, or FIFO
•
Implementation of FIFO
•
Introduction to message queues
•
APIs for message queues
•
Implementation of message queues
•
Introduction to semaphores
© Sri Manikanta Palakollu 2021
S. M. Palakollu, Practical System Programming with C, https://doi.org/10.1007/978-1-4842-6321-1_6
165
Chapter 6
Interprocess Communication
•
Characteristics of semaphores
•
Advantages and disadvantages of semaphores
•
APIs for semaphores
•
Race condition examples
•
Solving the race condition by using semaphore and mutex
mechanisms
Introduction to IPC
Interprocess communication is a mechanism that lets processes communicate with
other processes in an operating system. The process can be in the same system or
a different system. IPC also involves synchronizing the actions of processes and
managing data-sharing activity. The processes in an operating system are of two types:
independent and cooperating.
Independent Processes
A process that doesn’t share data with other processes is an independent process. It
doesn’t affect other processes, and it is not affected by other processes. Independent
processes are not involved in any interprocess communication activity.
Cooperating Processes
A process that shares data with other processes is called a cooperating process. These
processes achieve interprocess communication in an operating system. A cooperating
process helps you achieve IPC in a system. Interprocess communication between
processes are achieved in two ways: shared memory and message passing.
Shared Memory
The IPC methodology simultaneously gives common memory access to multiple
processes. It helps multiple processes communicate with each other. All POSIX-based
and Windows operating systems use a shared memory mechanism to perform IPC.
166
Chapter 6
Interprocess Communication
Message Passing
Message passing is a model for performing IPC in an operating system. It is done by
reading and writing data to the message queue created using the msgget() system call
without being connected. Messages are stored in a queue until the receiver retrieves it.
Message passing helps you achieve different modes of communication.
•
Communication between different threads within a process.
•
Communication between different processes running on the same
host machine.
•
Communication between different processes running on different
machines.
Figure 6-1. Interprocess communication between processes
167
Chapter 6
Interprocess Communication
In Figure 6-1, there are five processes. Let’s assume for now that all the processes
belong to the same operating system, and some processes want to communicate with
each other to share data and perform a system or user activity. IPC comes into the
picture. It achieves communication between multiple processes. In this OS example,
process A wants to share data with process C and process E. This is done with IPC.
The Benefits of IPC
The following are some of the benefits of IPC.
•
Information sharing: Sharing common information between
processes is easy and offers better communication.
•
Modularity: Modularity divides large code into smaller chunks. This
modular code executes simultaneously on the system. Development
is made easy with modularity. (But debugging becomes harder when
several processes are communicating with each other.)
•
Speed: A large task/activity is broken into smaller subtasks. Each
subtask is assigned to separate threads within a process in the
operating system. Processes use IPC to share data and improve
computational speed by executing multiple tasks simultaneously.
M
odes of Communication
When transmission or communication is happening between two parties, it requires a
medium and mode of transfer to communicate. There are three types of communication
modes available for communication.
168
•
Simplex
•
Half Duplex
•
Full Duplex
Chapter 6
Interprocess Communication
Simplex
In a simplex mode of data transmission, data is transferred in a unidirectional way,
which means that only one process, one person, or one device can send data that others
receive. Real examples of a simplex data mode transmission are radio and television
broadcasting. The scope of this book focuses on unidirectional data transmission
between processes.
Figure 6-2. Simplex mode of data transmission
Half Duplex
In a half-duplex mode of data transmission, data is transmitted bidirectionally but not
at the same time. In this mechanism, a process, or a person, or a device has access
to send and receive data but not at the same time. When one process is sending, the
other processes must listen or receive. The best example of a half-duplex mode of data
transmission is a walkie-talkie. This type of communication mechanism is used when
there is no need for bidirectional communication at the same time.
169
Chapter 6
Interprocess Communication
Figure 6-3. Half-duplex mode of data transmission
Full Duplex
In a full-duplex mode of data transmission, data is transferred in a bidirectional way
between two processes, or two persons, or two devices. This mode of transmission
is used when bidirectional communication is needed between processes. The best
example of a full-duplex mode of data transmission is a telephone, in which two people
can speak simultaneously.
Figure 6-4. Full-duplex mode of data transmission
170
Chapter 6
Interprocess Communication
T ypes of IPC
Interprocess communication establishes communication between different processes.
This communication is done in two ways.
•
Communication between two related processes (i.e., child and parent
processes). Figure 6-5 represents IPC between different processes on
a same machine using a single kernel.
Figure 6-5. Communication between related processes
•
Communication between unrelated processes (i.e., two or more
processes other than parent and child processes). Figure 6-6
represents IPC between different processes on different systems.
Figure 6-6. Communication between unrelated processes
171
Chapter 6
Interprocess Communication
The available mechanisms that achieve IPC in operating systems are
discussed next.
P
ipes
A pipe establishes a connection between two related processes.
•
Pipes are classified into two types.
•
Named/FIFO pipes
•
Unnamed/anonymous pipes
•
Pipes follow a unidirectional (half-duplex) mechanism to establish
communication between processes.
•
A pipe has two file descriptors: one for reading and the other for
writing.
Figure 6-7. The architecture of an anonymous pipe
172
•
Figure 6-7 shows that a pipe can write/send data from one side and
the other side can read/receive it.
•
To achieve a full-duplex mechanism in pipes, you need to use two
pipes: one pipe reads the data from the pipe, and the other one writes
the data to the pipe.
•
The operations that use pipes are write and read operations.
•
A pipe creates using a pipe() system call.
Chapter 6
Interprocess Communication
FIFO (Named Pipe)
FIFO (first in, first out) establishes a connection between two unrelated processes.
•
FIFO is also called a named pipe.
•
FIFO is an extension of the traditional pipe in the Unix system.
•
FIFO uses the unidirectional (half-duplex) mechanism to establish
communication between processes.
•
A named pipe is created using the mkfifo() system call.
Message Queues
Message queues establish communication between multiple processes using a full-
duplex mechanism.
•
It uses the asynchronous mechanism to serve the processes.
•
The operating system’s kernel manages message queues.
•
It is an easy way to transfer the data between processes.
•
A message queue is created using a msgget() system call that returns
the queue identifier.
Semaphores
A semaphore provides synchronization of the data to avoid race conditions.
•
When two or more processes are accessing the same code/data block
in a program, the block is called the critical section.
•
A race condition is a situation that occurs inside a critical section
when two or more threads are trying to access and change the same
data at the same time. This leads to incorrect results. Synchronization
is required to avoid this situation. It is done with semaphores and
other locking mechanisms.
•
A semaphore maintains data consistency and security. Data
consistency refers to the maintenance of data without any loss, even
when multiple threads and processes are using it.
173
Chapter 6
Interprocess Communication
S
hared Memory
Shared memory communicates between multiple processes using common shared
memory.
Shared memory needs to be protected from race conditions. This is done by using
a semaphore technique. Race conditions can also be avoided using proper thread
synchronization techniques and locking mechanisms.
S
ockets
Sockets establish communication over a network.
•
IPC between different computers is achieved using the socket
mechanism.
•
It enables you to use channel-based communication over a network.
•
Data is transferred based on protocol standards.
•
In the TCP protocol standard, data is transferred in sequential order.
•
There is no standard for data transfer in the UDP protocol.
A
nonymous Pipes
Anonymous pipes create a communication medium between interrelated processes.
Anonymous pipes are also called unnamed pipes. Anonymous pipes establish a
communication parent process and child process or a parent process and grandchild
process. The working mechanism of a pipe is represented in Figure 6-8.
174
Chapter 6
Interprocess Communication
Figure 6-8. Anonymous pipe working mechanism
When process1 writes data to the pipe, it is read by another process using a file
descriptor. When data is written to the main memory, the pipe treats that data as
a virtual file. Accessing that data is done with a file descriptor. The write and read
operations in files are done with two standard file descriptors. The most common
example of a pipe is a shell command using a pipe symbol.
APIs for Anonymous Pipes
Anonymous pipes are created with the help of pipe() system call available in <unistd.h>
library since they are part of the traditional Unix system. The system calls that perform
IPC using traditional Unix pipes are pipe(), write(), read(), and close(). The syntax and
working principles of these system calls are discussed next.
pipe()
The pipe() system call opens the file descriptors that communicate with different Linux
processes. This system call creates a pipe that transmits the data in a unidirectional way
to establish an IPC between the related processes. It creates two file descriptors: one for
reading and the for writing. The return type of this system call is an integer. It returns 0 if
successful; if it fails, it returns –1 with a respective error code. The error code is obtained
with the perror() system call.
The following shows the syntax.
int pipe(int pipefd[2])
175
Chapter 6
Interprocess Communication
pipefd takes an integer descriptor array of size 2, which performs the read and
write operations. Pipefd[1] writes the content into the pipe, and pipefd[0] reads the
content from the pipe. Since pipes follow a unidirectional flow of data transfer, the read
operation needs to be done after the write action is performed.
close()
The close() system call closes the opened descriptors. The return type of this system call
is an integer. It returns 0 if successful and –1 if any failure occurs. When you want to get
the error code, you need to use the perror() system call.
The following shows the syntax.
int close(int fd)
fd takes the file descriptor parameter and closes the given file descriptor. Once a file
descriptor is closed, it is no longer available to use again.
write()
The write() system call writes the content to a specific file with certain arguments of that
file descriptor. This system call uses a buffer to write the content into the file descriptor.
The return type of this system call is ssize_t. If successful, it returns the number of bytes
written to the file; otherwise, it returns –1.
The following shows the syntax.
ssize_t write(int fd, const void *buf, size_t count)
•
fd takes the file descriptor that is created with the pipe() system call
to uniquely identify the file descriptor.
•
buf takes the message that is written to the pipe or file descriptor.
•
count takes the size of the buffer that is writing to the pipe/file
descriptor.
read()
The read() system call reads the content from the file descriptor or pipe. The return type
of this system call is ssize_t. It returns the number of bytes read from the file descriptor
and returns –1 if any failure occurs.
176
Chapter 6
Interprocess Communication
The following shows the syntax.
ssize_t read(int fd, void *buf, size_t count)
•
fd takes the file descriptor that is created using a pipe() system call to
uniquely identify the descriptor.
•
buf is the buffer value that reads the message from the file descriptor
or pipe.
•
count takes the size of the buffer that is reading from the descriptor/pipe.
Creating Anonymous Pipes
This section deals with the creation of traditional Unix pipes to perform interprocess
communication using file descriptors. A pipe’s flow of construction is represented using
a flowchart shown in Figure 6-9. The following steps achieve IPC using pipes.
1. Create a pipe using the pipe() system call.
2. If the user quits, the program terminates; otherwise, go to step 3.
3. Write the data into the pipe using a write() system call.
4. Once the write operation is done, the read() system call reads the
data from the pipe.
5. Steps 3 and 4 repeat until the user quits the program.
177
Chapter 6
Interprocess Communication
Figure 6-9. Flowchart of an anonymous pipe
The following is an example.
#include<stdio.h>
#include<string.h>
#include<unistd.h>
#define BUFFER_SIZE 1024
// Global Variables
int pipefds[2];
int status;
char writemessage[BUFFER_SIZE];
178
Chapter 6
Interprocess Communication
char readmessage[BUFFER_SIZE];
// pipeOperation() to perform read and write Operations.
void pipeOperation(){
printf("Writing to pipe - Message is %s", writemessage);
write(pipefds[1], writemessage, sizeof(writemessage));
read(pipefds[0], readmessage, sizeof(readmessage));
printf("Reading from pipe – Message is %s", readmessage);
}
int main() {
status = pipe(pipefds);
if (status == -1) {
printf("Unable to create pipe\n");
return 1;
}
printf("Enter the message to write into Pipe\n");
printf("To exit type \"quit\" \n");
fgets(writemessage, BUFSIZ, stdin);
// This loop is used to take continuous Standard input.
while (strcmp(writemessage, "quit\n") != 0) {
pipeOperation();
fgets(writemessage, BUFSIZ, stdin);
}
close(pipefds[0]);
close(pipefds[1]);
return 0;
}
179
Chapter 6
Interprocess Communication
Figure 6-10 shows the output.
Figure 6-10. The output of the anonymous pipe program
Implementation of Pipes Using Child and Parent
Processes
This section creates pipes and performs read and write operations using child and parent
processes. The flow of pipe construction and the operations of a pipe are represented in a
flowchart in Figure 6-11. The following steps handle the operation of a pipe.
1. Create a pipe using the pipe() system call.
2. If the user quits, the program terminates; otherwise, create a child
process.
3. Write the data into the pipe using the parent process.
4. Read the data from the pipe using the child process.
5. Steps 3 and 4 repeat until the user quits.
180
Chapter 6
Interprocess Communication
Figure 6-11. Flow chart of anonymous pipes handling through child and
parent processes
The following is an example.
#include<stdio.h>
#include<string.h>
#include<unistd.h>
#include<signal.h>
181
Chapter 6
Interprocess Communication
#define BUFFER_SIZE 1024
// Global Variables
int pipefds[2];
int status, pid;
char writemessage[BUFFER_SIZE];
char readmessage[BUFFER_SIZE];
void pipeOperation(){
pid = fork();
// Child Process to Read the Data.
if(pid == 0){
read(pipefds[0], readmessage, sizeof(readmessage));
printf("Child Process: Reading from pipe – Message is %s",
readmessage);
}else{ // Parent Process to write the data.
printf("Parent Process: Writing to pipe - Message is %s",
writemessage);
write(pipefds[1], writemessage, sizeof(writemessage));
}
}
int main() {
status = pipe(pipefds);
if (status == -1) {
printf("Unable to create pipe\n");
return 1;
}
printf("Enter the message to write into Pipe\n");
printf("To exit type \"quit\" \n");
fgets(writemessage, BUFSIZ, stdin);
while (strcmp(writemessage, "quit\n") != 0) {
pipeOperation();
fgets(writemessage, BUFSIZ, stdin);
182
Chapter 6
Interprocess Communication
kill(pid, SIGKILL); // Killing
}
return 0;
}
Figure 6-12 shows the output.
Figure 6-12. The output of the anonymous pipes handled by child and parent
processes
Working with Named Pipes
Named pipes (also called FIFO) communicate with two unrelated processes. Traditional
Unix pipes achieve IPC between related processes. When you want to communicate
with an unrelated/different process, then FIFO achieves it. A named pipe is used for
bidirectional communication. In traditional Unix pipes, bidirectional communication is
done with two different pipes: one for writing the data and the other for reading the data.
A named pipe can be created with two different system calls: mknod() or mkfifo().
mknod() System Call
The mknod system call creates a special file, device file, or FIFO file. This system call is
available in a sys/stat.h header file. The return type of this system call is an integer. On
the successful execution of a system call, it returns 0; if any error occurs, it returns –1.
183
Chapter 6
Interprocess Communication
The following shows the syntax.
int mknod(const char *pathname, mode_t mode, dev_t dev)
•
pathname takes the complete path of the creating FIFO, or device file,
or ordinary file to where you want to place that file in your system
memory. The pathname is relative; if you don’t specify the path, then
it is created in the program execution current directory.
•
mode represents the type of file. The available file types are shown in
Table 6-1.
Table 6-1. Available File Types
File Type
Description
S_IFIFO
FIFO Special
S_IFCHR
Character Special
S_IFREG
Regular File
S_IFDIR
Directory
S_IFLNK
Symbolic Link
S_IFBLK
Block Special File
None of the file types are portable except S_IFIFO.
D
ev
Dev represents the permissions that you can assign to a newly created file. The available
file permissions are described in Table 6-2.
184
Chapter 6
Interprocess Communication
Table 6-2. Available File Permissions
File Mode
Description
S_IRWXU
Read, write, and execute permissions by the owner
S_IRUSR
Read permissions by the owner
S_IWUSR
Write permissions by the owner
S_IXUSR
Execute permissions by the owner
S_IRWXG
Read, write, execute permissions by group
S_IRGRP
Read permission by group
S_IWGRP
Write permissions by group
S_IXGRP
Execute permissions by group
S_IRWXO
Read, write, execute permissions by others
S_IROTH
Read permissions by others
S_IWOTH
Write permissions by others
S_IXOTH
Execute permissions by others
You can also give permissions to a file using the octal representation, as explained in
Chapter 1.
mkfifo() System Call
The mkfifo system call creates the FIFO special file. This system call is available in the
sys/stat.h library. The return type of this system call is an integer. It returns 0 on the
successful creation of a FIFO special file. If any error occurs, then it returns –1, and no
FIFO is created.
The following shows the syntax.
int mkfifo(const char *pathname, mode_t mode)
•
pathname takes the path of the special FIFO file. The path may be
relative or absolute. If the path is not specified, it is created in the
current program’s executing directory.
185
Chapter 6
•
Interprocess Communication
mode represents the permission that you want to keep for the newly
created FIFO file. All the file mode permissions are the same as the
mknod’s system call.
mknod vs. mkfifo
Both system calls create a FIFO special file. The mkfifo system call can create a
standard and portable FIFO, whereas mknod can’t create a standard and portable
FIFO. The mknod system call creates not only FIFO but also different types of files. It
is highly recommended that you use mkfifo to create a FIFO for IPC because it makes
communication more reliable than mknod.
C
reating FIFO
This section creates a simple communication application that sends data from the client
to the server using named pipes. The server reads the content that is sent by the client.
The client sends the data to the server. The server has read permissions, whereas the
client has write permissions.
Let’s look at the server and client working mechanisms.
F IFO Server
A FIFO server reads the data sent by the client using the named pipe that establishes
an IPC between the processes. The workflow of the FIFO server is represented as a
flowchart in Figure 6-13. The following are the steps involved in a FIFO server.
1. Create a named pipe using mkfifo().
2. Open the named pipe with read-only permissions.
3. Accept the messages/data from the FIFO client.
4. If the client sends a quit message, it prints on the standard console
and terminates the server program.
5. If the client sends a normal message, it prints it to the standard
console and waits to receive messages from the client.
6. Step 5 repeats until the client quits the server program.
186
Chapter 6
Interprocess Communication
Figure 6-13. FIFO server working mechanism architecture
#include
#include
#include
#include
#include
#include
<stdio.h>
<unistd.h>
<string.h>
<sys/stat.h>
<sys/types.h>
<fcntl.h>
187
Chapter 6
Interprocess Communication
#define FIFO_FILE "FIFO"
int file_descriptor;
char message_buffer[1024];
int read_buffer_bytes;
void receiveData(){
while(1) {
file_descriptor = open(FIFO_FILE, O_RDONLY);
read_buffer_bytes = read(file_descriptor, message_buffer,
sizeof(message_buffer));
message_buffer[read_buffer_bytes] = '\0';
if((int)strlen(message_buffer) == 0){
close(file_descriptor);
break;
}
printf("Received Message: %s\n", message_buffer);
}
}
int main() {
// Create the FIFO if it does not exist
mknod(FIFO_FILE, S_IFIFO|0640, 0);
// Function to receive the data from pipe.
receiveData();
return 0;
}
F IFO Client
A FIFO client sends data to the server using named pipes. The overall workflow of a FIFO
client is represented as a flowchart in Figure 6-14. The following steps are used by the
FIFO client.
1. Create a named pipe using mkfifo().
2. Open the named pipe with write-only permissions.
3. Wait for the message from the client.
188
Chapter 6
Interprocess Communication
4. If the message is to quit, then the client and server immediately
quit and print the quit message.
5. If the client enters any other message, it is sent to the server. The
server receives the message and prints it to the screen. During this
process, IPC takes place between the processes.
6. Step 5 repeats until the client quits the program.
Figure 6-14. FIFO client working mechanism architecture
189
Chapter 6
Interprocess Communication
#include <stdio.h>
#include<stdlib.h>
#include <unistd.h>
#include <string.h>
#include <sys/stat.h>
#include <sys/types.h>
#include <fcntl.h>
#define FIFO_FILE "FIFO"
// Global Variables Data
int file_descriptor;
int end_process;
int stringlen;
char message_buffer[1024];
char end_message_buffer[5];
void sendMessage(){
while (1) {
fgets(message_buffer, sizeof(message_buffer), stdin);
stringlen = strlen(message_buffer);
message_buffer[stringlen - 1] = '\0';
end_process = strcmp(message_buffer, end_message_buffer);
// FIFO Client Exist Condition
if(strcmp(message_buffer, "end") == 0){
printf("FIFO PIPE is done with sending the data.\n");
close(file_descriptor);
exit(1);
}
// Prinitng the Data to the Screen that is sent to the Server
if (end_process != 0) {
write(file_descriptor, message_buffer, strlen(message_buffer));
printf("Sent Message: %s\n", message_buffer);
190
Chapter 6
Interprocess Communication
} else {
write(file_descriptor, message_buffer, strlen(message_buffer));
printf("Sent Message: %s\n", message_buffer);
close(file_descriptor);
break;
}
}
}
int main() {
printf("FIFO CLIENT is ready to send the messages to server.\n");
printf("Enter lines of text, enter \'end\' to quit:\n");
file_descriptor = open(FIFO_FILE, O_CREAT|O_WRONLY);
// Function call to send the data to the FIFO.
sendMessage();
return 0;
}
Figures 6-15 and 6-16 show the output.
Figure 6-15. FIFO client program output
191
Chapter 6
Interprocess Communication
Figure 6-16. FIFO server program output
Using Message Queues
Named pipes send data between two processes in a byte-oriented format, which means
all the data sent by the process is read character by character. This mechanism is also
called a byte-oriented data transfer mechanism, which is achieved using the byte stream
protocol. The byte-oriented mechanism is a slow process and follows a synchronous
data transferring mechanism to achieve the IPC.
The problem with named pipes is that the message/data that is written to the pipe
is deleted once the client performs the read operation. So more than one process can’t
access the data using pipes. Message queues were introduced to avoid this issue. In
message queues, the data is stored within the kernel, so you can access the data and
process it based on your needs. The data is available for any number of processes until it
is deleted explicitly.
A message queue is a linked list that stores the messages within the kernel. The
message is identified with a message queue identifier. It follows a bidirectional
mechanism of data transfer, which is not provided by the named and unnamed pipes.
The message queue remains in the system until it is deleted explicitly. The general
workflow of message queues is represented in Figure 6-17.
192
Chapter 6
Interprocess Communication
Figure 6-17. Workflow of message queues
APIs for Message Queues
Message queues are implemented with the <sys/ipc.h> and <sys/msg.h> libraries. The
system calls that quietly perform the IPC using message queues are msgget(), msgsnd(),
msgrcv(), and msgctl(). Each system call has a specific purpose in the life cycle of an IPC
using message queues.
193
Chapter 6
Interprocess Communication
f tok()
The ftok() system call creates a unique key that is used by the message queues,
semaphore, and shared memory. The ftok() system call is available in the <sys/ipc.
h> library. The return type of this system call is key_t type, which returns a key that is
a positive value. Successful creation of this key returns a unique key value; otherwise,
it returns –1 with an error code message. Some of the most common error codes are
described in Table 6-3.
Table 6-3. Common Error Codes
Error Code
Description
EACCES
Permissions are denied.
ENOTDIR
The component of the path prefix is not a directory.
ENAMETOOLONG
The length of the argument exceeds the size.
The following shows the syntax.
key_t ftok(const char *path, int id)
•
path takes the absolute path of the special file as a parameter to the
point with a special key.
•
id takes the character value, which typecasts automatically into an
integer type and assigns the key to the given file.
m
sgget()
The msgget() system call creates a new message queue identifier or connects with the
existing message queue identifier. The return type of this system call is an integer. A
successful creation or connection of the message queue identifier returns the value of
the message queue identifier, which is a positive value; otherwise, it returns –1 with any
one of the error messages in Table 6-4.
194
Chapter 6
Interprocess Communication
Table 6-4. Error Messages
Error Code
Description
ENOMEM
No sufficient memory for message queue creation
EEXIST
Message queue already exists
ENOSPC
System limit exceeded for message queue creation
EACCES
Permissions issues with key and message queue identifier
The following shows the syntax.
int msgget(key_t key, int msgflg)
•
key takes the unique key that is created using the ftok() system call.
•
The msgflag message flag sets the permissions and creates the IPC. If
the message queue is ready, it gives an error message with EEXIST
code.
m
sgsnd()
The msgsnd() system call sends data to the message queue using the message buffer
object to achieve the IPC. The msgsnd() system call has permissions to write the data
to the buffer. The process that calls the msgsnd() system call also needs to have write
permissions. The return type of this system call is an integer. It returns 0 if writing data to
the buffer was successful; otherwise, it returns –1 with an error code (see Table 6-5).
Table 6-5. Error Codes
Error Code
Description
EACCES
If the calling process doesn’t have write permissions
EIDRM
Message queue is removed in the middle of the process
ENOMEM
System doesn’t have enough memory
EINVAL
Invalid Message Queue Identifier
195
Chapter 6
Interprocess Communication
The following shows the syntax.
int msgsnd(int msqid,
const void *msgp,
size_t msgsz,
int msgflg)
•
msqid takes the message queue identifier, which is created using the
msgget() system call.
•
The msgp message pointer is the buffer pointer value that takes the
message buffer/data that writes to the message queue.
•
msqsz takes the size of the message that writes to the message queue.
The size is usually represented in bytes.
•
The msgflag message flag value is usually set to 0 or ignored; else,
you can use IPC_NOWAIT. If the message queue is full, the message
buffer does not write any data to the message queue and control
returns to the same calling process; otherwise, the calling process
suspends or blocks until the message buffer is written to the message
queue. If the IPC_NOWAIT flag is not 0, the message does not send,
and the calling process returns immediately. If the IPC_NOWAIT flag
is 0, then the calling process is suspended until the message queue
is removed from the system. For a 0 flag value, you can set custom
conditions to make the calling process suspended.
Here is the message buffer structure.
struct messageBuffer {
long messageType;
char messageText[1]; // Message Data.
};
196
Chapter 6
Interprocess Communication
Message Type
messageType is the message type that sends data from the message buffer. This message
type communicates with other message types.
•
If the message type value is 0, the first message in the queue is read.
•
If the message type value is greater than 0, it reads the first message
in the queue of type msgtype. For example, if the message type value
is 7, it reads only this value, even though other types of messages are
available in the message queue.
•
If the message type value is less than 0, the first message in the queue
with the lowest type less than or equal to the absolute value of the
message type is read. For example, if the message type is –7, it reads the
first message type that is less than 7 (i.e., a message type from 1 to 7).
Message Text
A message text is a character array that stores the data sent to the message queue.
msgrcv()
The msgrcv() system call receives the data that is written to the message queue. A msgrcv()
system call must have read permissions to read the data from the message queue, and
the calling process needs to have read permissions. The return type of this system call is
ssize_t. If reading data from the message queue is successful, it returns the number of bytes
that have read from the queue; otherwise, it throws an error code by returning –1.
The following shows the syntax.
ssize_t msgrcv(int msqid,
void *msgp,
size_t msgsz,
long msgtyp,
int msgflg)
197
Chapter 6
Interprocess Communication
•
msqid takes the message queue identifier, which is created using the
msgget() system call.
•
The msgp message pointer points to the message buffer that is read
from the message queue. The received message has a NULL value at
the end of the string.
•
msqsz is the size of the message received from the message queue.
•
msqtyp indicates the type of message that you want to receive from
the queue.
•
The msgflag message flag value is usually set to 0 or ignored, or
you can use IPC_NOWAIT. If this flag is specified when the message
queue is full, the message buffer does not write any data to the
message queue and control returns to the same calling process;
otherwise, the calling process is suspended or blocked until the
message buffer is written to the message queue. You can use the
MSG_NOERROR flag that truncates the message if the size exceeds.
msgctl()
The msgctl() system call performs the control operations on the message queue. In
general, the msgctl() system call destroys the queue. The return type of this system call is
an integer. It returns 0 for successful operations and returns –1 if any error/failure occurs.
You can use the perror() to get the respective error code.
The following shows the syntax.
int msgctl(int msqid, int cmd, struct msqid_ds *buf)
198
•
msqid takes the message queue identifier, which is created using the
msgget() system call that identifies the message queue.
•
The cmd flag performs certain operations on message queues using
commands or flags. The following are the most common commands
used for this parameter.
•
IPC_SET sets the user ID and group ID of the owner and sets the
permissions.
•
IPC_INFO returns information about the message queue.
Chapter 6
Interprocess Communication
•
IPC_RMID immediately removes the message queue from the kernel.
•
IPC_STAT provides information about the msqid_ds buffer, which
is a part of the same system call.
•
MSG_INFO returns information about the msginfo structure
and the resources used by the message queue in the system. The
structure of the message information is as follows.
struct msginfo {
int msgpool; /* Size in kibibytes of the buffer pool
used to hold message data;
unused within kernel */
int msgmap; /* Maximum number of entries in the
Message map; unused within kernel*/
int msgmax; /* Maximum number of bytes that can be
written in a single message */
int msgmnb; /* Maximum number of bytes that can be
written to queue; used to initialize
msg_qbytes during queue creation
(msgget(2)) */
int msgmni; /* Maximum number of message queues */
int msgssz; /* Message segment size;
unused within kernel */
int msgtql; /* Maximum number of messages on all
Messages in the system; unused within
kernel */
unsigned short int msgseg; /* Maximum number of;
segments unused within kernel */
};
199
Chapter 6
•
Interprocess Communication
The buf argument is a pointer variable that points to the message
queue structure named struct msqid_ds. This buffer works based on
the commands specified by the user. The msqid_ds data structure is
available in <sys/msg.h> as follows.
struct msqid_ds {
struct ipc_perm msg_perm; // Ownership and permissions
time_t msg_stime; // Time of last msgsnd()
time_t msg_rtime; // Time of last msgrcv()
time_t msg_ctime; /* Creation time/time of last
modification via msgctl() */
unsigned long __msg_cbytes; /* Current number of bytes in
queue (nonstandard) */
msgqnum_t msg_qnum; /* Current number of messages
in queue */
msglen_t msg_qbytes; /* Maximum number of bytes
allowed in queue */
pid_t msg_lspid; // PID of last msgsnd()
pid_t msg_lrpid; // PID of last msgrcv()
};
Let’s look at the terms that are used in msqid_ds.
•
msg_perm is an ipc_perm structure that describes the permissions of
the message queue. The structure of ipc_perm is as follows.
struct ipc_perm {
key_t __key; //
uid_t uid; //
gid_t gid; //
uid_t cuid; //
gid_t cgid; //
unsigned short mode; //
unsigned short __seq; //
};
200
Key supplied to msgget()
Effective UID of owner
Effective GID of owner
Effective UID of creator
Effective GID of creator
Permissions
Sequence number
Chapter 6
Interprocess Communication
•
msg_qnum describes the number of messages that are currently
available in the message queue. This property is very handy for
checking the number of messages in a message queue while writing
custom programs.
•
msg_qbytes describes the maximum number of bytes that are
allowed in a message queue for a single message.
•
msg_lspid provides the ID of the process that calls the msgsnd()
system call.
•
msg_lrpid provides the ID of the process that calls the msgrcv()
system call.
•
msg_stime provides the time taken by the msgsnd() system call to
perform the operation.
•
msg_rtime provides the time taken by the msgrcv() system call to
perform the operation.
•
msg_ctime provides the creation time of the message queue or
execution time of the msgctl() system call operation.
Message Queue Implementation
This section looks at the implementation of IPC using message queues by developing
sender and receiver applications. This is straightforward once you understand the
concepts.
The following is a sender program.
#include
#include
#include
#include
#include
#include
#include
#include
<stdio.h>
<stdlib.h>
<string.h>
<string.h>
<errno.h>
<sys/types.h>
<sys/ipc.h>
<sys/msg.h>
// Permissions for the Message Queue.
201
Chapter 6
Interprocess Communication
#define PERMISSIONS 0777
// Definition of Message Buffer
struct messageBuffer {
long messageType;
char data[1024];
};
// Global Declaration of Message Buffer Object
struct messageBuffer object;
// Global Data for Variables
int msqid;
int len;
int string_status;
key_t key;
// Function to send the data to the message queue.
void sendMessage(){
while(fgets(object.data, sizeof object.data, stdin) != NULL) {
// Calculating the length of the data object.
len = strlen(object.data);
if (object.data[len-1] == '\n') object.data[len-1] = '\0';
// If message queue unable to send the message then
// below condition Checks and throws an error and exit the message queue.
if (msgsnd(msqid, &object, len+1, 0) == -1){
perror("msgsnd");
exit(1);
}
// Checking for the sender exit status.
string_status = strcmp(object.data, "end");
if(string_status == 0)
break;
}
202
Chapter 6
Interprocess Communication
if (msgctl(msqid, IPC_RMID, NULL) == -1) {
perror("msgctl");
exit(1);
}
printf("Message Queue is done with sending messages.\n");
}
int main() {
system("touch messagequeue.txt");
if ((key = ftok("messagequeue.txt", 'B')) == -1) {
perror("ftok");
exit(1);
}
if ((msqid = msgget(key, PERMISSIONS | IPC_CREAT)) == -1) {
perror("msgget");
exit(1);
}
printf("Message Queue is ready to send messages.\n");
printf("Enter lines of text, enter \'end\' to quit:\n");
object.messageType = 1; // Setting the message type value to 1.
// Calling the function to send the data to the message queue.
sendMessage();
// Deleting the created file
system("rm messagequeue.txt");
return 0;
}
The following is a receiver program.
#include <stdio.h>
#include <stdlib.h>
#include<string.h>
#include <errno.h>
#include <sys/types.h>
203
Chapter 6
Interprocess Communication
#include <sys/ipc.h>
#include <sys/msg.h>
#define PERMISSIONS 0777
// Definition of Message Buffer
struct messageBuffer {
long mtype;
char data[1024];
};
// Global Declaration of Message Buffer Object
struct messageBuffer object;
// Global Data for Variables
int msqid;
int string_status;
key_t key;
// Function to receive the data from message queue.
void receiveMessages(){
while(1) {
// Trying to retrieve the data from message queue by checking the condition.
// If there is any error, while retrieving the data then
// condition throw an error and exits the function.
if (msgrcv(msqid, &object, sizeof(object.data), 0, 0) == -1) {
perror("msgrcv");
exit(1);
}
printf("received: \"%s\"\n", object.data);
string_status = strcmp(object.data,"end");
if (string_status == 0)
break;
}
}
int main() {
204
Chapter 6
Interprocess Communication
// Creating the unique Identifier for the message queue.
if ((key = ftok("messagequeue.txt", 'B')) == -1) {
perror("ftok");
exit(1);
}
// Connecting the Message Queue.
if ((msqid = msgget(key, PERMISSIONS)) == -1) {
// connect to the queue
printf("Unable to Create the Message Queue.\n");
perror("msgget");
exit(1);
}
printf("Message Queue is ready to receive messages.\n");
// Calling the receive message function to retrieve the data from the
message queue.
receiveMessages();
printf("Message Queue is done with receiving messages.\n");
return 0;
}
Figures 6-18 and 6-19 show the output.
Figure 6-18. Message queue sender output
205
Chapter 6
Interprocess Communication
Figure 6-19. Message queue receiver output
Introduction to Semaphores
A semaphore achieves process synchronization. When two or more processes are using
the same resources to perform a task, it may result in improper output. To avoid that
problem, a lock keeps the critical section. (A lock uses synchronization mechanisms
to prevent multiple threads from accessing the same data at the same time. A critical
section means the common resources shared by multiple processes.)
Dijkstra introduced semaphores to avoid a critical section problem and to achieve
process synchronization. A semaphore is a positive integer variable that is shared
between threads and processes. A semaphore allows or blocks the resources of a process
or thread based on conditions. Semaphores are classified into two types: binary and
counting.
Binary Semaphores
Binary means two (i.e., either 0 or 1). A binary semaphore has two possible values (i.e.,
either 0 or 1) that solve the critical section problem for multiple processes. In a binary
semaphore, there are two kinds of operations available (i.e., wait and signal operations).
If the semaphore value is 1, a wait operation takes place. If the semaphore value is 0, a
signaling operation takes place. In a wait operation, the process waits for the resources to
be used. In a signal operation, the process is utilizing the available resources.
206
Chapter 6
Interprocess Communication
Counting Semaphores
Counting semaphores control the resources that have multiple instances. A counting
semaphore has a value over a certain domain range, and it solves the critical section
problem. If the counter value is 0, the resources are unavailable. If the resources are
utilizing the process with multiple instances, the counter value is incremented based on
the number of instances. If resources are unavailable for the new instance, the value is
set to 0.
Characteristics of Semaphores
Here are the characteristics of a semaphore.
•
It is a low-level synchronization mechanism for processes.
•
A semaphore has a nonnegative integer value.
•
It can work with many processes at the same time.
•
It synchronizes the global memory that is accessed by many
processes/threads.
•
Each critical section has a specific semaphore, but that is not
mandatory. You can set the same semaphore for multiple critical
sections as well.
The Advantages of Using a Semaphore
Here are the advantages of using a semaphore.
•
It allows only one thread/process at a time to use the critical section
because it uses mutual exclusion.
•
It is a machine-independent mechanism.
•
It manages resources flexibly.
•
It reduces process time and resources because the process, which
is in a waiting state, doesn’t use processor time to check for the
condition to enter the critical section. Semaphores handle everything
related to the critical section.
207
Chapter 6
Interprocess Communication
The Disadvantages of Using a Semaphore
Here are the disadvantages of using a semaphore.
•
The operating system needs to keep track of all changes done by
wait() and signal() calls.
•
It may lead to deadlock in certain situations. A deadlock is a situation
that usually occurs in an operating system; that is, when a process or
thread enters a waiting state because of the unavailability of system
resources that are being used by other processes or threads in the
system, this situation leads to a deadlock condition. But you can
resolve or overcome a deadlock situation with deadlock detection and
avoidance algorithms, which are usually called banker’s algorithms. (The
explanation of a banker’s algorithm is beyond the scope of this book.)
•
Semaphore programming is hard to do.
Semaphore vs. Mutex
Table 6-6 compares a semaphore to a mutex.
Table 6-6. Comparing a Semaphore to Mutex
Semaphore
Mutex
It is a signaling mechanism.
It is a locking mechanism.
It is an integer type.
It is an object type.
The modification of a semaphore is done with the wait
and signal operations.
The modification is done with the
process only.
Resource management is done with the wait and signal
operations.
Resource management is done with a
locking mechanism.
The semaphore value is changed using wait() and
signal() calls.
The mutex value is changed using the
lock and unlock mechanisms.
There are two types of semaphores: binary and counting. A mutex has no subtypes.
You can have multiple program threads at the same time. You can have multiple program threads
at the same time but not simultaneously.
208
Chapter 6
Interprocess Communication
APIs for a Semaphore
Semaphore programming is done with the <sys/sem.h> library. The system calls that are
widely used to work with semaphore programming are semget(), semop(), semctl(). This
section addresses system calls.
semget()
The semget() system call creates a new semaphore or gets an existing semaphore. The
return type of this system call is an integer. It returns the valid semaphore identifier if
successful and returns –1 if any failure occurs. When you want to get the respective error
code, you need to use the perror() system call.
The following shows the syntax.
int semget(key_t key, int nsems, int semflg)
•
key is the first parameter that takes the key value as an argument that
identifies the message queue identifier. The key is either set manually
or created by ftok() system call.
•
nsems takes the parameter of the number of semaphores. In a binary
semaphore, 1 implies the need for one semaphore set. In a counting
semaphore based on the count, the number of semaphores is added.
•
The semflg parameter deals with the flags required to create the
semaphore and the permissions that are set for the newly created
semaphore.
semop()
The semop() system call acquires or releases the semaphore. This system call deals with
resource allocation and freeing the resources. The return type of this system call is an
integer. It returns 0 if successful and returns –1 if any failure occurs.
The following shows the syntax.
int semop(int semid,
struct sembuf *semops,
size_t nsemops)
209
Chapter 6
Interprocess Communication
•
semid takes the semaphore identifier that is created using the
semget() system call.
•
semops is a pointer to an array of operations that must be performed
on the semaphore. The structure variable is as follows.
struct sembuf {
unsigned short sem_num; // Semaphore set num
short sem_op; // Semaphore operation
short sem_flg; // Operation flags, IPC_NOWAIT, SEM_UNDO
};
In this structure, sem_op represents the semaphore operation that
needs to be performed.
•
•
If the sem_op value is negative, then semaphore obtains or
allocates the resources to the processes.
•
If the sem_op value is positive, then the semaphore releases the
resources.
•
If the sem_op value is 0, then the calling process waits until the
semaphore value reaches 0.
nsemops represents the number of operations to perform on that array.
semctl()
The semctl() system call performs various operations on the semaphore. The operations
include getting and setting information about the semaphore. semctl() also removes the
semaphore from the operating system. The return type of this system call is an integer. It
returns a positive integer if successful and returns –1 if any error occurs.
The following shows the syntax.
int semctl(int semid, int semnum, int cmd, ...)
•
210
semid is a semaphore identifier value that is created using a semget()
system call, which uniquely identifies the semaphore on an operating
system.
Chapter 6
Interprocess Communication
•
semnum deals with the number of semaphores counted; the value
starts at 0.
•
cmd takes the command that you want to perform on a semaphore.
Accessing Global Data Without Semaphores
This section presents a simple example that accesses global data without a semaphore
using multiple threads, and shows how this leads to inconsistency in data.
#include<stdio.h>
#include<stdlib.h>
#include<unistd.h>
#include<pthread.h>
// Global Data variables.
int a = 5, b = 7;
// Function that access the global data.
void* add_two_numbers(void* arg){
a = a + 3;
b = b - 1;
printf("a value is: %d and ", a);
printf("b value is: %d\n", b);
sleep(1);
exit(0);
}
int main(){
// Creating the thread instances.
pthread_t t1, t2, t3;
pthread_create(&t1, NULL, add_two_numbers, NULL);
pthread_create(&t2, NULL, add_two_numbers, NULL);
pthread_create(&t3, NULL, add_two_numbers, NULL);
pthread_join(t1, NULL);
pthread_join(t2, NULL);
pthread_join(t3, NULL);
211
Chapter 6
Interprocess Communication
//Destroying the threads.
pthread_exit(t1);
pthread_exit(t2);
pthread_exit(t3);
return 0;
}
In this code example, the add_two_numbers function acts like a critical section. Three
threads are trying to access the global data of a and b. Since there is no proper locking
mechanism for global data, this leads to race conditions and inconsistent results. The
result of the program is shown in Figure 6-20.
Figure 6-20. Race condition program output
Implementing the Data Consistent Model Using
a Semaphore and a Mutex
This section implements a semaphore and a mutex to achieve process and thread
synchronization.
#include<stdio.h>
#include<stdlib.h>
#include<unistd.h>
#include<pthread.h>
#include<semaphore.h>
sem_t mutex;
int a = 5, b = 7;
// Function to access the global data
void* add_two_numbers(void* arg){
sem_wait(&mutex);
212
Chapter 6
Interprocess Communication
a = a + 3;
b = b - 1;
printf("a value is: %d and ", a);
printf("b value is: %d\n", b);
sleep(1);
sem_post(&mutex);
}
int main(){
sem_init(&mutex, 0, 1);
pthread_t t1, t2, t3;
pthread_create(&t1, NULL, add_two_numbers, NULL);
sleep(1);
pthread_create(&t2, NULL, add_two_numbers, NULL);
sleep(1);
pthread_create(&t3, NULL, add_two_numbers, NULL);
sleep(1);
pthread_join(t1, NULL);
pthread_join(t2, NULL);
pthread_join(t3, NULL);
sem_destroy(&mutex);
return 0;
}
In this example, you used a semaphore to synchronize global data. The problem
that occurred due to a race condition is solved with a semaphore. Since you are using a
semaphore, there is no loss in data, as shown in Figure 6-21.
Figure 6-21. Semaphore and mutex program output
213
Chapter 6
Interprocess Communication
Summary
This chapter discussed various IPC techniques and how to achieve them using C
programming. The code samples and topics covered in this chapter should help you
better understand interprocess communication.
•
Anonymous pipes share data in a unidirectional way.
•
Named pipes build a client-server-based application.
•
Message queues build a client-server architecture within an
operating system.
•
Semaphores better synchronize processes, especially in critical
sections.
The upcoming chapters discuss other IPC techniques, including shared memory and
sockets.
214
CHAPTER 7
Shared Memory
Shared memory is a highly efficient way of sharing data between running processes
or programs. It allows two or more unrelated processes to access the logical memory
segment. Sharing a common piece of the memory segment is the fastest way that IPC
can be achieved. This chapter covers the following topics, which include code samples.
•
Introduction to shared memory
•
The API for shared memory
•
Kernel support for shared memory
•
Implementation of shared memory
Introduction to Shared Memory
Shared memory occurs among multiple processes. Communication between processes
is done in a commonly shared memory region. All other processes can view any change
made by a single process. It is one of the fastest forms of IPC available because, in a
shared memory mechanism, data is not copied from one address space to another
address space. Also, memory allocation happens only once in shared memory, which is
the reason it’s is faster than other forms of IPC techniques. Processes accessing shared
memory have a separate address space. All the processes are independent of each other,
but they are dependent on the commonly shared memory region. The architecture of
shared memory is represented in Figure 7-1.
© Sri Manikanta Palakollu 2021
S. M. Palakollu, Practical System Programming with C, https://doi.org/10.1007/978-1-4842-6321-1_7
215
Chapter 7
Shared Memory
Figure 7-1. Architecture of shared memory
The problem with other IPC mechanisms is that when two or more processes want
to exchange data, that data needs to be copied to the kernel. The data architecture of
other IPC mechanism is explained in Figure 7-2. The process that occurs in other IPC
techniques is explained as follows.
1. Initially, the server reads the data/input file. The kernel reads the
data into memory and then copies it into the process.
2. After data is loaded into the buffer, the server writes it in a
message using the IPC technique (i.e., pipes, FIFO, message
queues).
3. The client reads the message with the IPC channel. It requires
data to be copied from the kernel IPC buffer to the client buffer.
4. Finally, the data is copied from the client buffer.
216
Chapter 7
Shared Memory
Figure 7-2. The flow of Data in other IPC Techniques
Shared memory offers a better way by providing access to two or more processes—a
common memory region. Synchronization is required for the shared memory segment
when there is no synchronization of the data that is being accessed by multiple
processes. This leads to inconsistency in data access, which leads to a race condition.
The flow of data in a shared memory segment is represented in Figure 7-3.
•
The server accesses the shared memory segment as a semaphore
object.
•
The server reads the data from the user/input file into the shared
memory segment by performing the read operation.
•
When the read operation is done, the server notifies the client using
the semaphore object.
•
The client writes the data from the memory segment to the output
file.
217
Chapter 7
Shared Memory
Figure 7-3. The flow of data in shared memory
API for Shared Memory
Shared memory is implemented with the <sys/shm.h> library. The system calls that
quietly perform the IPC through shared memory are shmget(), shmat(), shmdt(), and
shmctl(). Each system call has a specific purpose in the IPC process life cycle.
shmget()
The shmget() system call creates the shared memory segment in an operating system.
It also obtains the previously created shared memory segment in the operating system.
The return type is an integer type. This system call returns a valid shared memory
identifier on success and returns –1 on failure. If you want to get the respective error
code, you need to use the perror() system call.
The following shows the syntax.
int shmget(key_t key, size_t size, int shmflg)
•
218
The key parameter identifies the shared memory segment in the
operating system. The value of the key is arbitrary, or it is created
using the ftok() system call.
Chapter 7
Shared Memory
•
The size parameter takes the size of the shared memory segment.
•
The shmflg parameter takes the parameters to create the shared
memory segment and the permissions set for the shared memory on
the system.
shmat()
The shmat() system call attaches the shared memory segment to the address space of the
calling process. When you want to use the created shared memory, you need to attach
the shared memory segment with the calling process address space. The return type is a
void pointer return type. It returns the address of the shared memory segment attached
segment and returns –1 if any failure occurs.
The following shows the syntax.
void * shmat(int shmid,
const void *shmaddr,
int shmflg)
•
shmid takes the shared memory identifier as an argument created
using the shmget() system call. This identifier value helps the shmat()
system call properly attach the calling process.
•
shmaddr takes the attaching address as an argument. If you set the
address as NULL, then by default, the system assigns the suitable
address for attaching the segment. If the address value is not NULL,
then you can set the address value based on shmflg.
•
shmflg takes certain parameters to manipulate the shared memory
segment and the address space value.
Table 7-1. Flags
Flag Value
Description
SHM_
RDONLY
This flag attaches the shared memory segment for the read-only purpose only.
SHM_RND
It rounds off the address space to the SHMLBA (shared memory lower boundary
address).
SHM_EXEC
It allows the shared memory segment to be executed.
219
Chapter 7
Shared Memory
s hmdt()
The shmdt() system call detaches the shared memory segment from the address space
of the calling process. The return type is an integer type. It returns 0 on the successful
detachment of the address space and returns –1 if any failure occurs.
The following shows the syntax.
int shmdt(const void *shmaddr)
shmaddr takes the address of the shared memory that needs to be detached from the
address space. The value must be the address that is returned by the shmat() system call.
s hmctl()
The shmctl() system call performs the various operations on the shared memory
segment. It is also used to destroy the shared memory segment after the work is done.
The return of this system call is an integer type. It returns 0 on successful operations and
returns –1 if any error occurs.
The following shows the syntax.
int shmctl(int shmid, int cmd, struct shmid_ds *buf)
220
•
shmid takes the identifier of the shared memory segment that is
created using the shmget() system call. The operations and the
destroying of shared memory activity be performed on the given
shared memory identifier.
•
cmd takes the command to perform the operations on the shared
memory segment. The commands that can be passed to this
argument are shown in Table 7-2.
•
buf is a pointer to the shmid_ds data structure. It works as per the
cmd argument.
Chapter 7
Shared Memory
Table 7-2. Commands
Command
Description
IPC_STAT
It copies the information from the kernel data structure.
IPC_SET
It sets the user ID and group ID for the owner. It also deals
with permissions.
IPC_RMID
It destroys the segment.
IPC_INFO
It gets information about the shared memory segment.
SHM_INFO
It gets information about system resource usage.
Kernel Support for Shared Memory
POSIX-based systems support shared memory to achieve IPC. The kernel supports
shared memory with a predefined data structure. There is a shared memory table
available in the kernel address space. It keeps track of all the shared memory segments
in the system. Each entry of the table stores the following data.
•
Name of the shared memory segment
•
User ID and group ID of the creator
•
Assigned owner and group ID
•
Permissions of the shared memory segment
•
Information about the process attached to the region
•
Information about the process detached from the region
•
Information about the operations done to the region
•
Size of the memory segment
The kernel structure for the shared memory data structure is as follows.
struct shmid_ds {
struct ipc_perm shm_perm; //
size_t shm_segsz; //
time_t shm_atime; //
time_t shm_dtime; //
Ownership and permissions
Size of segment (bytes)
Last attach time
Last detach time
221
Chapter 7
Shared Memory
time_t shm_ctime; /* Creation time/time of last
modification via shmctl() */
pid_t shm_cpid; // PID of creator
pid_t shm_lpid; // PID of last shmat()/shmdt()
shmatt_t shm_nattch; // No. of current attaches
};
The structure of ipc_perm is as follows.
struct ipc_perm {
key_t __key; // Key supplied to shmget()
uid_t uid; // Effective UID of owner
gid_t gid; // Effective GID of owner
uid_t cuid; // Effective UID of creator
gid_t cgid; // Effective GID of creator
unsigned short mode; /* Permissions + SHM_DEST and
SHM_LOCKED flags */
unsigned short __seq; // Sequence number
};
Implementation of Shared Memory
This section implements shared memory by using two separate programs. One program
writes the data into the memory, and the other program reads the data from memory.
Shared Memory Writers Program
In the shared memory writer program, a shared memory segment is created with a
shmget() system call. Data is written to the memory segment by attaching it with the
shmat() system call. The writer’s program writes the data into the memory segment,
which is accessed by using the reader program.
#include<stdio.h>
#include<string.h>
#include <sys/ipc.h>
#include <sys/shm.h>
222
Chapter 7
Shared Memory
int main() {
// ftok to generate unique key
key_t key = ftok("memory",67);
// shmget returns an identifier in shmid
int shmid = shmget(key, 1024,0666|IPC_CREAT);
if(shmid == -1){
printf("Unable to create the Shared Memory Segment.\n");
}
// shmat to attach to shared memory
char *str = (char*) shmat(shmid,(void*)0,0);
printf("Enter Data to write into the Shared Memory Segment: ");
scanf("%[^\n]s", str);
printf("Data written in memory: %s\n",str);
//detach from shared memory
shmdt(str);
return 0;
}
Shared Memory Reader Program
In a shared memory reader program, the data that is written to the memory segment
is read with the shmat() system call. Once the use of the shared memory segment is
done, you can detach the memory segment and destroy it. Once the memory segment is
detached and destroyed, it can’t access it again.
#include <stdio.h>
#include <sys/ipc.h>
#include <sys/shm.h>
int main() {
// ftok to generate unique key
key_t key = ftok("memory",67);
// shmget returns an identifier in shmid
int shmid = shmget(key, 1024,0666|IPC_CREAT);
223
Chapter 7
Shared Memory
if(shmid == -1){
printf("Unable to Connect with the shared memory segment.\n");
}
// shmat to attach to shared memory
char *str = (char*) shmat(shmid,(void*)0,0);
printf("Data read from memory: %s\n",str);
//detach from shared memory
shmdt(str);
// destroy the shared memory
shmctl(shmid,IPC_RMID,NULL);
return 0;
}
Figure 7-4 shows the output.
Figure 7-4. The output of the Shared Memory Writers and Readers program
S
ummary
This chapter discussed shared memory, which shares a large amount of data through a
common memory region. The problem with shared memory and IPC mechanisms like
pipes, message queues, and semaphores is that the sharing of data is done only within
the operating system. When you want to share the data outside the system, it is achieved
with socket programming. Socket programming is discussed in the next chapter.
224
CHAPTER 8
Socket Programming
Socket programming is a way of connecting two nodes on a network to communicate
with each other. It achieves the IPC over a network. The following topics and code
samples are covered in this chapter.
•
Introduction to sockets
•
IPC over network
•
Generic API for socket programming
•
OSI architectural model
•
TCP/IP model
•
Client-server architecture
•
Implementation of client-server architecture using TCP protocol
•
Implementation of client-server architecture using UDP protocol
I ntroduction to Sockets
A socket is a bidirectional gateway that communicates with different processes on the
same machine or different machines. In Unix/Linux, it is a file descriptor that establishes
a network connection with real-world applications. Real-world applications like telnet,
FTP, and other popular network services use sockets for establishing a connection and
for sending and receiving data.
A socket is a combination of an IP address and a port number. A port number/port
is a communication endpoint that connects with an external device. When you send a
request to a website using the HTTP protocol, by default, you are trying to connect and
establish a connection with that website through port 80.
© Sri Manikanta Palakollu 2021
S. M. Palakollu, Practical System Programming with C, https://doi.org/10.1007/978-1-4842-6321-1_8
225
Chapter 8
Socket Programming
Sockets build client-server architecture systems. The client-server architecture is
discussed later in this chapter.
Sockets transfer data between systems using a remote IP address and the port
number. Some application-level protocols like POP3, FTP, and popular mail services
use sockets to establish a connection with remote systems/servers. The types of sockets
available are differentiated based on data transfer mechanisms.
Stream Sockets
Packet delivery flow follows the order of stream sockets. When a socket transfers
data, it converts the data into packets to transfer to the remote system. In this stream
socket mechanism, all the data packets deliver effectively without any loss. It uses a
connection-oriented approach for data transfer. The underlying protocol used by this
socket methodology is TCP (Transmission Control Protocol). Stream sockets guarantee
data delivery in any case. If the packets are impossible to deliver, it generates an error
message to the receiver with a negative acknowledgment.
Datagram Sockets
The data delivery mechanism in a datagram socket is completely different from the
stream socket mechanism. In a datagram socket mechanism, the data delivery does
not follow the order the packets may arrive in any order to the receiver. The underlying
protocol used by the datagram socket system is UDP (User Datagram Protocol). This
system doesn’t guarantee that data gets to the receiver. It is a connectionless approach
for data transfer.
Raw Sockets
Raw sockets use a datagram sockets mechanism. But the characteristics of this protocol
are completely dependent on the interface provided by the protocol. Raw sockets are
intended for advanced users who want to take advantage of the protocol features that
are not directly accessible from the general interface. These sockets also develop new
protocols on top of the existing protocols.
226
Chapter 8
Socket Programming
Domain Sockets
Domain sockets provide a medium to communicate with the processes of the same host
system. Stream and datagram sockets are the generic sockets that provide an abstract
layer for communication. But you need domain sockets to use them in various domains.
In this chapter, you are working with the Unix sockets because it supports the POSIX
standards. To implement IPC in Unix-based systems, domain-level sockets are required.
Internet Domain Sockets
Unix sockets are communicate only with other process in the same system. When you
want to communicate with remote systems, advanced protocols that can establish a
connection with remote systems are required. Internet domain sockets communicate
with the other processes available in remote systems. The underlying protocol used
by Internet domain sockets is the TCP/IP protocol (Transmission Control Protocol/
Internet Protocol). An Internet protocol is a low-level protocol that sends data through
the Internet by splitting and joining data packets. A TCP protocol works on top of the IP
protocol to guarantee that the data packets get to the receiver.
IPC Over Network
Interprocess communication happens over a network with sockets. When you are
designing your socket server to establish an IPC activity, it should follow certain
guidelines.
•
Communication style
•
Namespaces
•
Protocols
Communication Style
Communication style deals with how data should transfer over the network. When data
is transferring through the socket, it is divided into small packets during transmission.
On the receiver side, the small packets are grouped to make the complete data. This is
called a transferring mechanism. It is only applicable to connection-oriented protocols
like TCP, whereas it doesn’t apply to connectionless protocols like UDP.
227
Chapter 8
Socket Programming
N
amespaces
Namespaces deal with the type of connection system that transfers the data (i.e., stream
socket, datagram socket, etc.). It determines the connection style of the data transfer. If
you use a stream socket connection, it guarantees data delivery to the receiver through a
connection-oriented approach.
A connection-oriented approach is a methodology that connects the communication
devices before transferring data, and after that, it transfers data between systems. The
data is delivered to the receiver in the same order that it was sent. It determines the
approach of the data transfer and connection establishment between the systems.
P
rotocol
Two or more entities in a network wanting to communicate requires a standard
protocol. A protocol is a set of rules and procedures to follow when two entities want
to communicate with each other in a network. A protocol consists of error recovery
mechanisms and synchronization mechanisms. When IPC needs to occur over a
network, protocols are mandatory. The protocols that are typically used are TCP and
UDP.
API for Socket Programming
To implement socket programming or achieve IPC over a network, you need to
consider the various guidelines that you must follow. But when you want to implement
those features and make use of their benefits, you need an appropriate API/library
that reduces your development time. In C programming, the <sys/socket.h> library
implements socket programming. Generic sockets are also called Berkeley sockets, which
provide access to interprocess communication services. The workflow of applications
that want to communicate over a network using sockets is diagrammatically represented
in Figure 8-1.
228
Chapter 8
Socket Programming
Figure 8-1. Application connection architecture
Let’s consider two hosts that want to communicate with each other over a network
using sockets. The communication is established as follows.
•
Host A (sender) creates a socket object with a destination/foreign
address and destination/foreign ports that create a socket descriptor.
This socket provides an interface to establish communication.
•
A socket descriptor is a simple interface, but when you want to
establish communication with a remote machine, a protocol is
required. The protocol might be UDP/TCP. TCP is a connection-
oriented protocol, where UDP is a connectionless protocol.
•
When all the protocol rules are assigned to the socket properly, it
uses IP to transfer the data/message to a remote machine. The data
transfer is done with a router/LAN.
This architectural model is the core model to establish a connection with the remote
systems using sockets.
229
Chapter 8
Socket Programming
OSI Architecture Model
When two computers want to communicate with each other a network medium is
requried. In modern life, you usually use the Internet to communicate with other
systems around the world.
When a computer wants to connect with the Internet to establish a connection,
it requires a network adaptor or network interface controller, which are commonly
known as network cards. The operating system provides drivers to work with network
adaptors to support network communication. When two different kinds of devices are
trying to communicate with each other through a network medium, there should be a
common understanding between both parties. In earlier days, vendors created their own
proprietary network models to provide communication between systems over a network.
Suppose that Microsoft creates a proprietary network model for communication
over a network for their own devices. When a Microsoft device wants to communicate
with another company’s device, it causes an issue because other companies use
other network proprietary models for their communication purposes. This causes
a incompatible communication issue. Another problem with this approach is that
when a new network model is introduced at the same company, the older model is not
compatible with the new model, which causes a huge communication gap.
To provide a good standard for communication between a wide range of software
and hardware devices, OSI layered architecture was introduced. OSI stands for
Open System Interconnect, which was developed by ISO in 1984. It is a seven-
layered architecture, as shown in the diagram in Figure 8-2. Each layer has a specific
functionality and task associated with it. This architecture makes communication better
because every system is using a common set of guidelines for communication. There is
no need to bother about the hardware, software, or system the other person is using.
There are several different types of protocols available to perform communication
over the network but OSI is the standard system model. Protocols like FTP and HTTP can
be embedded into this model.
230
Chapter 8
Socket Programming
Figure 8-2. OSI layered architecture
Physical Layer
The physical layer is the lowest layer of the OSI layered architecture.
•
It is also called the hardware layer.
•
It is responsible for making the physical connection between two
parties over a network.
231
Chapter 8
Socket Programming
•
This layer transfers the information in the form of electrical signal
bits (i.e., 0 and 1).
•
When the physical layer receives data from the sender, it transfers
that data to the data link layer in the form of binary data.
•
The most common physical layer devices are cables, modems, hubs,
and repeaters.
•
The following are the physical layer’s functions.
•
Bit synchronization:
The physical layer provides good synchronization for the data
bits using clock synchronization. This synchronization helps
the sender and receiver send data effectively without any loss
in data between transmission.
•
Transmission control:
The physical layer deals with the number of bits that are
transmitting per second.
•
Transmission mode:
The physical layer also deals with the type of transmission that
is happening between two connected devices. The transmission
mode might be simple duplex, half duplex, or full duplex.
Data Link Layer
This data link layer is responsible from node to node to delivery.
232
•
The data is converted into frames in the data link layer to make an
error-free transmission. A frame is a data unit that consists of the
MAC address of the sender and receiver associated with the data.
•
Devices in the data link layer are switches and bridges.
•
The data link layer is divided into two sublayers.
•
Media access layer
•
Logic link layer
Chapter 8
Socket Programming
•
The main functionality of the data link layer is to provide error-free
data from one node to another node.
•
The following are data link layer functionalities.
•
Error control:
It provides the error control mechanism by using standard
algorithms to transmit error-free data.
•
Flow control:
The data link layer provides a flow control mechanism to
transmit data between two nodes at a constant speed rate.
•
Framing:
One of the core functionalities of the data link layer is framing.
It provides a better way to transmit data between both parties.
All data bits are converted into frames by adding extra bits at
the beginning and end of the frame. This frame is transmitted
at once to another node at a constant speed.
•
Physical addressing:
The data present in this layer is converted into frames. While
converting the data into frames, the layer adds a physical MAC
address to the data’s header section at both the sender and
receiver sides. Each data frame has a physical address.
Network Layer
This layer transmits data between multiple hosts that are located on the same or
different networks.
•
Routers are the hardware devices used in this layer.
•
Data is converted into packets in this layer.
•
All the packets are sent to other host devices through the network
using routing algorithms. Routing algorithms decide the best route
for a data packet to reach the required destination station.
233
Chapter 8
Socket Programming
•
Routing algorithms help packets reach the destination host by using
the shortest path. Sometimes this changes based on the algorithm
and network traffic. Routing algorithms and its issues are beyond the
scope of this book.
•
The network layer adds a logical address at the header section of a
packet.
•
The following are the main functionalities of the network layer.
•
Logical addressing:
Logical addressing uniquely identifies packets in the network
with IP addresses.
•
Routing:
Routing helps packets reach their destination by using the
shortest path.
Transport Layer
The main functionality of the transport layer is to provide services to the application
layer.
234
•
This layer converts data into segments.
•
It is the heart of the OSI-layered architecture because of its end-to-
end delivery mechanism.
•
It provides end-to-end delivery for the entire application.
•
On the sender side, the transport layer receives data from the
top layers and converts it into segments. It adds the source and
destination port number in the header section and transmits to the
network layer.
•
On the receiver side, the data is collected from the network layer.
It converts the data into segments, reads the port address from the
header section, and sends it to the respective application.
•
It provides the two kinds of services to the user.
Chapter 8
•
Socket Programming
Connection-oriented services:
In this service, data is transmitted based on the acknowledgment.
It is a more secure way of transmitting data. There is no loss in
data. It is a slow process for transferring data between devices.
The connection has three different phases.
•
•
Connection establishment
•
Data transfer
•
Connection termination
Connectionless service:
In this service, data is transmitted without acknowledgment.
There is a chance of losing data while transferring. Since there
are no optimization techniques in connectionless mode, data is
transferred much faster between devices. The data transferred
through this mode is called a datagram. The frequently used
protocols in a connectionless service are UDP and IP. These
protocols are stateless.
•
The following are the functionalities of the transport layer.
•
Port addressing:
The transport layer adds the source and destination port address in
the header section to successfully deliver the proper host machine.
Session Layer
The session layer is responsible for connection establishment, sessions, and
authentication.
•
This layer provides security for the data that is transmitted by using
standard authentication protocols for connection establishment. If
you use a weak authentication protocol in the session layer, it may
lead to malicious brute force attacks.
•
It is a software layer.
•
The session layer provides good session management. These sessions
establish and terminate a connection between two devices.
235
Chapter 8
Socket Programming
Presentation Layer
The presentational layer is responsible for encryption and decryption of the data that is
being transmitted.
•
This layer is also called a translation layer.
•
The following are the functionalities of the presentation layer.
•
Encryption:
The transferred data is encrypted at the sender’s side to
provide good security for the data. Encryption is the process of
converting plain text into ciphertext.
•
Decryption:
The received data needs to be decrypted at the receiver’s side to
return it to normal data.
Application Layer
The application layer acts as an interface for the end user. This layer is responsible for
transferring and receiving the data through the network. All the data transferred to or
received from the remote system display in this layer only.
236
•
This layer usually has software-based or command-line based
applications that interact with remote machines.
•
The applications used in this layer for transmitting and receiving data
include browsers, Skype, Messenger, mail delivery services, and so
forth.
•
The end-user applications must use proper application standards
while in development to ensure proper security for the user.
Chapter 8
Socket Programming
Advantages of the OSI Model
•
It provides common guidelines for transferring data between two
parties.
•
Network hardware does not need to be from the same vendor.
•
It is considered a generic model for communication over a network.
•
It allows you to communicate between various software and
hardware parties with generic rules.
•
It helps network administrators easily troubleshoot network issues.
•
It adopts different types of protocols.
•
It provides both connection-oriented and connectionless services.
Disadvantages of the OSI Model
•
It is a complex and theoretical model that doesn’t have any practical
implementation.
•
Addressing duplication of services (i.e., error control, flow control,
and data) is done at various layers.
•
It is very difficult to fit protocols into this model. Since it is a generic
model, it is your responsibility to fit the protocol.
•
The session and presentation layers have less functionality than other
layers.
•
The layers cannot work in parallel because each layer needs to wait to
obtain data from another layer.
TCP/IP Architecture Model
The OSI model is a theoretical model that does not have any practical implementation.
This model is considered a reference model for developing networking applications.
The OSI model divided a logical group of functionalities into simple components to
make it more effective for network troubleshooting. Network administrators can easily
troubleshoot issues in the OSI model. The problem with the OSI model is that it is just a
reference model. Everything must be done from scratch, and some functionalities have
duplicates in multiple layers.
237
Chapter 8
Socket Programming
The US Department of Defense (DOD) designed TCP/IP in 1960. TCP and IP are
different protocols. TCP is a connection-oriented transport protocol that ensures
the data delivery of a packet. IP is a connectionless protocol that is responsible for
transferring data packets to devices in a network.
TCP/IP was invented before the OSI model. TCP/IP uses the Internet for data
transmission. This model consists of four layers. Each layer is logically grouped into
units. The following are the layers that are included in this model.
•
Network access layer
•
Internet layer
•
Transport layer
•
Application layer
Figure 8-3. TCP/IP model
238
Chapter 8
Socket Programming
Network Access Layer
The network access layer groups the data link and physical layers.
•
It is the lowest layer of the TCP/IP model.
•
This layer deals with the physical data transmission between two
devices on the same network.
•
The main functionalities of the network access layer are the mapping
IP addresses into physical addresses. The physical address is the
MAC address of your system.
Internet Layer
The Internet layer is the second layer of the TCP/IP protocol. It transfers data over the
same network.
•
It is also called a network layer.
•
The protocols that transfer the data over the network are as follows.
•
•
ICMP: Internet Control Message Protocol
•
ARP: Address Resolution Protocol
•
RARP: Reverse Address Resolution Protocol
•
IGMP: Internet Group Management Protocol
These are the functionalities of this layer.
•
Host-to-host communication:
It transfers the data to different hosts within a network. The data
that is transferred through this layer requires a certain path to
transfer. One of the key functionalities of the Internet layer is
identifying the path to transfer the data.
•
Routing:
When the data is transferred within the same network, direct
data delivery is possible. But when the host is on a different
network, direct delivery is not possible. Routing provides an
efficient and reliable data transmission for different hosts.
239
Chapter 8
Socket Programming
•
Data formatting:
In the Internet layer, the data to be transferred needs to
be formatted for lossless data transmission. Lossless data
transmission means the data transferred from the sender to the
receiver is not lost during transmission. To make lossless data
transmission, data is encapsulated into units. Encapsulation of
data is the binding of data into a single unit.
Transport Layer
The transport layer is responsible for error-free data delivery to receivers.
•
It determines how much data should transfer between the nodes.
•
It also determines the number of bits that are transferring per second.
•
This layer acknowledges that the data was transferred successfully.
Acknowledgment is only available in connection-oriented protocols
like TCP. When it comes to connectionless protocols like UDP, there
is no acknowledgment.
•
These are the protocols that are used in this layer.
•
240
•
TCP: Transmission Control Protocol is a connection-oriented
protocol. This protocol efficiently sends data without any errors.
It is a reliable protocol for data transmission. It has a flow and
error control mechanism.
•
UDP: User Datagram Protocol is a connectionless protocol. It
does not have the features provided by TCP, but it is more costeffective and transfers the data very fastly. It is not a reliable
protocol.
The functionalities offered by the transport layer are as follows.
•
Flow control: It manages the rate of data transmission between
the nodes.
•
Error control: It uses the error control mechanism to transfer
error-free data for the nodes.
Chapter 8
Socket Programming
•
Segmentation: It divides data into several segments before
transferring it to the other nodes. It reduces the duplication of
data.
•
Desegmentation: After data is received from the sender, it
is desegmented to make it original data. This makes the data
transfer in sequence. It is not the same as encryption and
decryption.
Application Layer
The application layer interacts with application programs.
•
It is the highest level of the TCP/IP model.
•
This layer consists of application, session, and presentation layers.
•
It is responsible for node-to-node data delivery.
•
The protocols that are used in this layer are
•
FTP: File Transfer Protocol
•
SMTP: Simple Mail Transfer Protocol
•
NTP: Network Time Protocol
•
HTTP: Hypertext Transfer Protocol
•
HTTPS: Hypertext Transfer Protocol with SSL Certificate
•
DNS: domain name server
•
The applications used in this layer are Skype, email services, remote
logins, and so forth.
•
The protocols in this layer are the most common, but there are many
other types available. If you want, you can implement your own
protocol.
241
Chapter 8
Socket Programming
Advantages of TCP/IP
The following are the advantages of TCP/IP.
•
It is an open source protocol suite model.
•
It establishes a connection between two systems.
•
It supports different types of routing protocols.
•
It does not depend on a device’s operating system or hardware.
•
It is a scalable architecture for communication.
•
It assigns a unique IP address for each device in the network.
•
It uses flow control, error control, and congestion control
mechanisms for better data transmission. These mechanisms are
only applicable for connection-oriented protocols like TCP. They are
not applicable for a connectionless protocol like UDP.
•
It guarantees the data without any duplication and provides better
throughput.
Disadvantages of TCP/IP
The following are the disadvantages of TCP/IP.
•
It is not a generic protocol like the OSI model.
•
It is complex to set up and use.
•
Adopting new protocols and new technologies is very difficult.
Client-Server Architecture
Let’s look at client-server architecture.
Client
An application that tries to access the resources from the server by sending the
appropriate request to the server from his device is called a client. A client may be in any
242
Chapter 8
Socket Programming
location in the world. It sends a request to access data through a network/the Internet.
Devices that run as a client include tablets, mobile devices, laptops, and desktops .
Server
A server is a computer program or device that provides services to clients by rendering
requests. Some common examples are web servers like Apache, Tomcat, and Jellyfish.
Proxy servers, HTTP servers, file servers, and database servers are also examples.
Examining the Client-Server Architecture
In client-server architecture, a client sends a request to the server through a network.
Then, the server handles the client’s request and answers with a suitable response.
When the client sends a bad request to the server (i.e., the data is unavailable on the
server), the server replies with an error message.
Figure 8-4. Client-server architectural model
243
Chapter 8
Socket Programming
In the diagram in Figure 8-4, various clients send requests to a server to access data.
The server replies with appropriate responses. This is based on standard protocols.
Advantages of the Client-Server Model
The following are some of the advantages of the client-server model.
•
It is a centralized system. All the data is stored in one place (i.e., on
the server-side).
•
It is easy to maintain, upgrade, and integrate new services.
•
Clients and servers may be located in any place in the world; they can
access data.
•
Data is secure because only authorized people have access to
confidential data.
•
Data recovery is possible with an advanced storage mechanism on
the server side.
Disadvantages of the Client-Server Model
The following are some of the disadvantages of the client-server model.
•
If there is an issue on the server-side, then the client does not get any
response from the server.
•
Servers are prone to DoS (denial-of-service) and DDoS (distributed
denial-of-service) attacks.
•
It is not a cost-effective approach because setting up a server requires
more space geographically, and maintenance requires manpower
that ultimately increases the cost.
•
Several kinds of attacks are possible on this architecture.
System Calls for Socket Programming
IPC over a network is done with socket programming. The necessary system calls to
develop programs make use of sockets. The<sys/socket.h> library contains all the system
calls for socket programming. The most commonly used system calls are socket(), bind(),
listen(), accept(), send(), receive(), write(), read(), sendto(), recvfrom(), and close().
244
Chapter 8
Socket Programming
s ocket()
A socket() system call creates an endpoint for the communication of certain socket
types. This system call creates a socket that returns a socket file descriptor on successful
creation. If any error occurs, it returns –1. The socket() system call creates a simple
interface for communication, but it doesn’t have any information about the sender and
receiver.
The following shows the syntax.
int socket(int domain, int type, int protocol)
domain deals with the type of communication domain for
establishing communication. It describes the protocol family. The
most common protocol families are AF_INET(IP v.4 Protocol) and
AF_INET6 (IP v.6 Protocol).
The type argument describes the data transfer format between
two communicating systems. Certain semantics are available
to use a format to send and receive the data. The semantics that
commonly are commonly used are described in Table 8-1.
Table 8-1. Semantics
Semantic
Description
SOCK_
STREAM
It provides connection-oriented, stable, and reliable communication between two
systems.
SOCK_
DGRAM
It provides connectionless communication between two systems. Communication is
unreliable and data should be in fixed length.
SOCK_RAW
It establishes the communication system based on a raw network protocol.
SOCK_RDM
It provides a reliable datagram layer for communication that doesn’t guarantee the
order of messages transferred to the receiver.
•
protocol takes the protocol value that is used for communication
purposes. The value for an Internet Protocol is 0 by default.
245
Chapter 8
Socket Programming
bind()
A bind() system call binds the socket with a port number and address. The return type of
this system call is an integer. It returns 0 if a success and –1 if any failure occurs.
The following shows the syntax.
int bind(int sockfd,
const struct sockaddr *addr,
socklen_t addrlen)
•
sockfd takes the coket descriptor that is created using the socket()
system call.
•
addr describes the address structure for the socket that binds with
the created socket interface/descriptor. The structure of the socket
address structure is as follows.
struct sockaddr {
sa_family_t sa_family; // Address Family
char sa_data[14]; // Family Specific Address Info
}
•
size takes the size (in bytes) for the socket address structure.
listen()
A listen() system call listens for the connections on a socket. It is a nonblocking system
call that waits continuously to make a connection with the client. This system call waits
for the client to establish a connection. The socket is in passive mode until the client
connects to it. The return type of this system call is an integer. It returns 0 if it is listening
properly and returns –1 if any error occurs.
The following shows the syntax.
int listen(int sockfd, int backlog)
•
246
sockfd takes the socket file descriptor as an argument created using
the socket() system call.
Chapter 8
•
Socket Programming
backlog takes the parameter of the maximum length of the queue.
This length determines the number of connections that are possible
with that socket. Once the limit is reached and any new socket
connection is trying to establish a connection, the connecting socket
gets an error.
accept()
An accept() system call is used only for connection-based socket types. It takes the first
connection request from the queue and creates a new file descriptor referring to the
request socket. The return type of this system call is an integer. It returns a file descriptor
value for the accepted socket if a success and returns –1 if any failure occurs.
The following shows the syntax.
int accept(int sockfd,
struct sockaddr *addr,
socklen_t *addrlen)
•
sockaddr takes the socket descriptor that is created using the socket()
system call.
•
addr takes the socket address structure of the peer socket to establish
a connection. It is the client address of the connected socket.
•
addrlen takes the length of the peer address (i.e., client address)
length.
send()
A send() system call sends data to another socket. This system call only works when
the socket is in a connected state; otherwise, it throws an error. The return type of this
system call is ssize_t. It returns the number of bytes sent to the peer if a success and
returns –1 if any failure occurs.
The following shows the syntax.
ssize_t send(int sockfd,
const void *buf,
size_t len,
int flags)
247
Chapter 8
Socket Programming
•
sockfd takes the socket descriptor that is created using the socket
system call.
•
The buf (buffer) parameter takes the message object that you want to
transmit to the peer connection.
•
len takes the length of the message (in bytes) to transmit to a peer
connection.
•
flags are external flags that handle certain exceptions while
transmitting data. Usually, you set this value to 0.
recv()
A recv() system call receives the message/data from a peer/connected socket. The return
type of this system is ssize_t. It returns the length of the message (in bytes) that are
received from the socket. It returns –1 if any failure occurs.
The following shows the syntax.
ssize_t recv(int sockfd,
void *buf,
size_t len,
int flags)
•
sockfd is the socket descriptor created using the socket() system call.
•
buf is a message that is received from the connected socket.
•
len is the length of the message/data that is being received.
•
flags takes the external flags to handle the exceptions.
Note send() and recv() system calls only work for the connection-oriented
protocols (i.e., TCP). When you want to work with the UDP protocol, you need to use
the sendto() and recvfrom() system calls to send and receive the data.
248
Chapter 8
Socket Programming
sendto()
A sendto() system call sends data to the connected socket. It returns the number of bytes
that are being sent to the socket. It returns –1 if any failure occurs.
The following shows the syntax.
ssize_t sendto(int sockfd,
const void *buf,
size_t len,
int flags,
const struct sockaddr *dest_addr,
socklen_t addrlen)
•
sockfd is a socket descriptor that is created using a socket() system
call.
•
buf is message/data that is sent to the socket.
•
len is the length of the data in bytes that is sent to the socket address.
•
flags handles exceptions while transmitting the data.
•
destaddr takes the address of the destination socket.
•
addrlen takes the address length of the destination address.
recvfrom()
A recvfrom() system call receives the message/data from the socket. It returns the
number of bytes received from the socket. It returns –1 if any failures occur.
The following shows the syntax.
ssize_t recvfrom(int sockfd,
void *buf,
size_t len,
int flags,
struct sockaddr *src_addr,
socklen_t *addrlen)
•
sockfd takes the socket descriptor using the socket() system call.
249
Chapter 8
Socket Programming
•
buf is the message/data to send to the socket.
•
len is the message length being transmitted.
•
flags handles exceptions while transmitting data.
•
srcaddr takes the address of the client.
•
addrlen takes the length of the client address.
Note
write() and read() system calls also send and receive data.
close()
A close() system call closes the connection once usage is completed. It also frees up the
port that is used by the socket. It returns 0 if a success and –1 if any failure occurs.
The following shows the syntax.
int close(int sockfd)
sockfd takes the socket descriptor that you want to close.
Implementation of Client Server Architecture
This section discusses the implementation of client-server architecture using the TCP
and UDP protocols. TCP guarantees data delivery to the client, whereas UDP does not
guarantee data delivery. The mechanisms of data transfer differ from TCP to UDP. This
section discusses the TCP and UDP mechanisms and uses practical examples.
TCP Client-Server Architecture
TCP is a connection-oriented protocol. There are certain steps to follow to build your
own TCP network connection. This connection is built with the socket API. A client-
server architecture has clients and servers.
In a single client-server architecture, you build a single client and server on your
machine to communicate with each other. The advantage of using a TCP connection for
developing a socket connection is that it guarantees data delivery. It also maintains the
250
Chapter 8
Socket Programming
order of the data that is being transmitted. This connection is reliable and uses the three-
way handshake principle for data transfer. SOCK_STREM is used while creating the
socket. The entire process can be divided into two major parts: the server and the client.
The task of the server is to provide services to a client based on his request.
Figure 8-5. TCP Client-server implementation architecture
TCP Server
Using the socket function, a socket will create on the system, which acts as a
bidirectional device.
1. The connection takes the IP address and the port number to bind
together, making the socket ready for use.
2. The socket listens to the client’s request by making the socket
connection open. Once the request hits the server, it accepts the
invitation from the client.
251
Chapter 8
Socket Programming
3. The accepted invitation establishes the client-server connection.
The data delivery in TCP is done with three-way handshaking, in
which there is an acknowledgment between the client and server
after data is transferred.
4. When a client sends a request to the server after the connection is
reestablished, the server takes the request and processes it.
5. The server sends the data to the client after the request is
processed.
6. When a client sends the close connection request, the server
closes the connection between the client device and the server
device.
7. Once the connection is established, a connection loop
communicates with the server and client continuously until the
client makes a closing request to the server. Once the client sends
a close request, the connection is closed by the server.
TCP Client
The client uses the socket function to create a socket object to establish a connection
with a remote or local server.
1. Once the socket object is being created, it tries to connect with a
server IP address and port number.
2. Once a connection is established, the client sends the request to
the server for processing.
3. The server processes the request and responds to the client.
Then the client, accepts/receives the response that is being sent
by the server.
4. When the client sends the close request to the server, the server
closes the request that is created between the client and the
server.
252
Chapter 8
Socket Programming
TCP Client-Server Code
Now let’s look at the implementation of the client and server separately in C. First, let’s
build the server code to provide services to the client using socket programming. After
that, let’s build the client code using the same socket programming.
Server Code
Here is the server code.
#include<stdio.h>
#include<stdlib.h>
#include<unistd.h>
#include<string.h>
#include<sys/socket.h>
#include<sys/types.h>
#include<netdb.h>
#include<netinet/in.h>
#define MESSAGE_LENGTH 1024 // Maximum number of data that can transfer
#define PORT 8888 // port number to connect
#define SA struct sockaddr // Creating Macro for the socketaddr as SA
struct sockaddr_in serveraddress, client;
socklen_t length;
Int sockert_file_descriptor, connection, bind_status, connection_status;
char message[MESSAGE_LENGTH];
int main(){
// Creating the Socket
sockert_file_descriptor = socket(AF_INET, SOCK_STREAM, 0);
if(sockert_file_descriptor == -1){
printf("Scoket creation failed.!\n");
exit(1);
}
253
Chapter 8
Socket Programming
// Erases the memory
bzero(&serveraddress, sizeof(serveraddress));
// Server Properties
serveraddress.sin_addr.s_addr = htonl(INADDR_ANY);
// Setting the port number
serveraddress.sin_port = htons(PORT);
// Protocol family
serveraddress.sin_family = AF_INET;
// Binding the newly created socket with the given Ip Address
bind_status = bind(sockert_file_descriptor, (SA*)&serveraddress,
sizeof(serveraddress));
if(bind_status == -1){
printf("Socket binding failed.!\n");
exit(1);
}
// Server is listening for new creation
connection_status = listen(sockert_file_descriptor, 5);
if(connection_status == -1){
printf("Socket is unable to listen for new connections.!\n");
exit(1);
}else{
printf("Server is listening for new connection: \n");
}
length = sizeof(client);
connection = accept(sockert_file_descriptor, (SA*)&client, &length);
if(connection == -1){
printf("Server is unable to accept the data from client.!\n");
exit(1);
}
// Communication Establishment
while(1){
254
Chapter 8
Socket Programming
bzero(message, MESSAGE_LENGTH);
read(connection, message, sizeof(message));
if (strncmp("end", message, 3) == 0) {
printf("Client Exited.\n");
printf("Server is Exiting..!\n");
break;
}
printf("Data received from client: %s\n", message);
bzero(message, MESSAGE_LENGTH);
printf("Enter the message you want to send to the client: ");
scanf("%[^\n]%*c", message);
// Sending the data to the server by storing the number of bytes
transferred in bytes variable
ssize_t bytes = write(connection, message, sizeof(message));
// If the number of bytes is >= 0 then the data is sent successfully
if(bytes >= 0){
printf("Data successfully sent to the client.!\n");
}
}
// Closing the Socket Connection
close(sockert_file_descriptor);
return 0;
}
This code is responsible for the entire server functionality. Initially, the socket
function creates the socket object. If the socket is unable to be created, the program
immediately throws an error. Once the socket is created, the bzero() function erases the
data of the object being created. The data might be in a string format.
After the socket object is created, it binds the client IP address and port number. The
server sets the type of Internet family and the data transfer mode. In any case, if binding
the IP and port fails, it throws an error.
255
Chapter 8
Socket Programming
Now the server is listening to establish a connection. If the server is unable to listen,
the server exits the connection loop. If the client sends the data, the server accepts the
data. If any error occurs, the server exists. An infinite while loop receives data from the
client and sends the appropriate response to the client. If the client sends the message
as 'end', both the client and server are terminated. You can customize the code for your
own purposes.
Client Code
Here is the client code.
#include<stdio.h>
#include<stdlib.h>
#include<unistd.h>
#include<string.h>
#include<sys/socket.h>
#include<netdb.h>
#include<arpa/inet.h>
// Maximum number of data that can transfer
#define MESSAGE_LENGTH 1024
#define PORT 8888 // port number to connect
// Creating Macro for the socketaddr as SA
#define SA struct sockaddr
// Global Data
int socket_file_descriptor, connection;
struct sockaddr_in serveraddress, client;
char message[MESSAGE_LENGTH];
int main(){
// Socket Creation
socket_file_descriptor = socket(AF_INET, SOCK_STREAM, 0);
if(socket_file_descriptor == -1){
printf("Creation of Socket failed.!\n");
exit(1);
}
256
Chapter 8
Socket Programming
// Erases the memory
bzero(&serveraddress, sizeof(serveraddress));
// Setting the Server Properties
serveraddress.sin_addr.s_addr = inet_addr("127.0.0.1");
// Setting the port number
serveraddress.sin_port = htons(PORT);
// Protocol family
serveraddress.sin_family = AF_INET;
// Establishing the Connection with server
connection = connect(socket_file_descriptor, (SA*)&serveraddress,
sizeof(serveraddress));
if(connection == -1){
printf("Connection with the server failed.!\n");
exit(1);
}
// Interacting with the server
while(1){
bzero(message, sizeof(message));
printf("Enter the message you want to send to the server: ");
scanf("%[^\n]%*c", message);
if ((strncmp(message, "end", 3)) == 0) {
write(socket_file_descriptor, message, sizeof(message));
printf("Client Exit.\n");
break;
}
// Sending the data to the server by storing the number of bytes
transferred in bytes variable
ssize_t bytes = write(socket_file_descriptor, message, sizeof(message));
257
Chapter 8
Socket Programming
// If the number of bytes is >= 0 then the data is sent successfully
if(bytes >= 0){
printf("Data send to the server successfully.!\n");
}
bzero(message, sizeof(message));
// Reading the response from the server.
read(socket_file_descriptor, message, sizeof(message));
printf("Data received from server: %s\n", message);
}
// Closing the Socket Connection
close(socket_file_descriptor);
return 0;
}
This code is for the client who initially creates the socket using the socket function.
It binds the server IP address and port number by using the bind function. The client
connects to the server using the connect() function. If the connection is successful,
the client can send the message; otherwise, it throws an error. An infinite loop sends
the request to the server using the write() system call. It receives the response from the
server through the read() system call. If the client sends the close request, as shown in
Figure 8-5, the server closes the connection.
Here is the output.
Figure 8-6. Output of TCP server
258
Chapter 8
Socket Programming
Figure 8-7. Output of the client connected to TCP server
UDP Client Server Architecture
UDP is different from a TCP connection. It is a connectionless protocol, whereas TCP
is a connection-oriented protocol. In this architecture data, packets do not guarantee
delivery to the client. It is not a reliable protocol. Unlike TCP, it doesn’t connect with the
server; instead, the connection client sends the datagram packets to the server. When the
server receives datagram packets from the client, it accepts the them. A datagram packet
contains the address of the sender, which helps the server send it to the client. The working
mechanism of the UDP client-server architecture are represented in Figure 8-8.
Figure 8-8. UDP client-server implementation architecture
259
Chapter 8
Socket Programming
UDP Server
On the server-side, the socket function creates the socket. It uses the SOCK_DGRAM and
IF_NET for the socket creation. It creates the datagram socket.
•
The bind() function binds the IP address and port number together
for the connection.
•
The recvfrom() function waits for the datagram from the client. If the
datagram arrives, it accepts the data and works on it.
•
The sendto() function sends the processed data to the client using
the client address present in the datagram header.
UDP Client
On the client-side, the same socket function creates the socket, and it uses the SOCK_
DGRAM to create the UDP-based client system.
•
After the socket is created, there is no connection required, like
TCP. In this architecture, a datagram is sent to the server using the
address of the server.
•
The sendto() function sends datagram packets to the server as a
request.
•
The recvfrom() function receives the data from the server.
•
The close() function closes the connection. The client closes the
connection once the packet is received. If the packet is not received,
the client waits. This is the drawback of the UDP protocol.
UDP Client-Server Code
This section builds the client-server architecture using the UDP protocol. First, let’s build
server architecture, and then build the client architecture.
Server Code
Here is the server code.
260
Chapter 8
Socket Programming
#include <stdio.h>
#include<stdlib.h>
#include<unistd.h>
#include <strings.h>
#include <sys/types.h>
#include <arpa/inet.h>
#include <sys/socket.h>
#include<netinet/in.h>
// Maximum number of bytes that can transfer and receive.
#define MESSAGE_BUFFER 4096
#define PORT 8888 // port number to connect
// Creating Macro for the socketaddr as SA
#define SA struct sockaddr
// Global Data
char buffer[MESSAGE_BUFFER];
char message[MESSAGE_BUFFER];
int socket_file_descriptor, message_size;
socklen_t length;
const char *end_string = "end";
int quit_status;
struct sockaddr_in serveraddress, client;
void processRequest(){
// Server Properties
bzero(&serveraddress, sizeof(serveraddress));
// Create a UDP Socket via PORT 8888
socket_file_descriptor = socket(AF_INET, SOCK_DGRAM, 0);
serveraddress.sin_addr.s_addr = htonl(INADDR_ANY);
// Connecting via port 8888
serveraddress.sin_port = htons(PORT);
// Protocol Family
serveraddress.sin_family = AF_INET;
// bind server address to socket descriptor
bind(socket_file_descriptor, (SA*)&serveraddress, sizeof(serveraddress));
261
Chapter 8
Socket Programming
while(1){
// Calculating the Client Datagram length
length = sizeof(client);
message_size = recvfrom(socket_file_descriptor, buffer,
sizeof(buffer), 0, (SA*)&client,&length);
buffer[message_size] = '\0';
quit_status = strcmp(buffer, end_string);
if(quit_status == 0){
printf("Server is Quitting\n");
close(socket_file_descriptor);
exit(0);
}
printf("Message Received from Client: %s\n",buffer);
// sending the response to the client
printf("Enter reply message to the client: ");
scanf("%[^\n]%*c", message);
sendto(socket_file_descriptor, message, MESSAGE_BUFFER, 0,
(SA*)&client, sizeof(client));
printf("Message Sent Successfully to the client: %s\n", message);
printf("Waiting for the Reply from Client..!\n");
}
// Closing the Socket File Descriptor.
close(socket_file_descriptor);
}
int main() {
printf("SERVER IS LISTENING THROUGH THE PORT: %d WITHIN A LOCAL
SYSTEM\n", PORT);
// Calling the process request function to process the client request
and give the response.
processRequest();
return 0;
}
262
Chapter 8
Socket Programming
In this code, the socket function creates the socket and binds the IP address and
the port number. The recvfrom function receives the datagram from the client, and the
sendto function sends the data packet to the client. The processRequest function does all
the activities of the server, like receiving the data, processing the data, and sending the
data/response to the client. The output of the server architecture is shown in Figure 8-9.
C
lient Code
Finally, the client.
#include<stdio.h>
#include<unistd.h>
#include<stdlib.h>
#include<strings.h>
#include<sys/socket.h> // To work with socket programming
#include<sys/types.h>
#include<arpa/inet.h>
#include<netinet/in.h>
// Maximum number of bytes that can transfer and receive.
#define MESSAGE_BUFFER 4096
#define PORT 8888 // port number to connect
// Creating Macro for the socketaddr as SA
#define SA struct sockaddr
// Global Data
char buffer[MESSAGE_BUFFER];
char message[MESSAGE_BUFFER];
int socket_file_descriptor, n;
int size = 0;
int quit_status;
const char *end_string = "end";
struct sockaddr_in serveraddress;
void sendRequest(){
// Setting the properties to connect with Server
bzero(&serveraddress, sizeof(serveraddress));
263
Chapter 8
Socket Programming
// Working with Localhost Address
serveraddress.sin_addr.s_addr = inet_addr("127.0.0.1");
// Connecting via port 8888
serveraddress.sin_port = htons(PORT);
// Protocol Family
serveraddress.sin_family = AF_INET;
// creating the datagram socket
socket_file_descriptor = socket(AF_INET, SOCK_DGRAM, 0);
// Establishing a connection with the server.
if(connect(socket_file_descriptor, (SA *)&serveraddress,
sizeof(serveraddress)) < 0) {
printf("\n Something went wrong Connection Failed \n");
exit(1);
}
while(1){
printf("Enter a message you want to send to the server: ");
scanf("%[^\n]%*c", message);
quit_status = strcmp(message, end_string);
if(quit_status == 0){
sendto(socket_file_descriptor, message, MESSAGE_BUFFER, 0, (SA*)
NULL, sizeof(serveraddress));
printf("Client work is done.!\n");
close(socket_file_descriptor);
exit(0);
}else{
sendto(socket_file_descriptor, message, MESSAGE_BUFFER, 0, (SA*)
NULL, sizeof(serveraddress));
printf("Message sent successfully to the server: %s\n", message);
printf("Waiting for the Response from Server..!\n");
}
264
Chapter 8
Socket Programming
printf("Message Received From Server: ");
recvfrom(socket_file_descriptor, buffer, sizeof(buffer), 0, (SA*)
NULL, NULL);
printf("%s\n", buffer);
}
// closing the Socket File Descriptor
close(socket_file_descriptor);
}
int main() {
printf("CLIENT IS ESTABLISHING A CONNECTION WITH SERVER THROUGH PORT:
%d\n", PORT);
// Calling the Send Request to send a request to the server.
sendRequest();
return 0;
}
In the client code, the socket function creates the socket and binds the IP address
and the port number. The sendto function sends the request to the server (i.e., datagram
packets). The recvfrom function receives a datagram from the server. The close function
closes the connection. The sendRequest function connects with the remote/local server,
sends the data/request to the server, and accepts the response from the server if the
server sends any response.
Figure 8-9 is the output.
Figure 8-9. UDP server output
265
Chapter 8
Socket Programming
The workings of the client application are shown in Figure 8-10.
Figure 8-10. Output of the client connected to UDP server
S
ummary
This chapter discussed socket programming with C and how to achieve IPC over a
network. The chapter covered various topics, like the OSI architectural model and the
TCP/IP model. You saw implementations of client-server architecture using TCP and
UDP protocols as well. You also completed various IPC techniques between processes.
266
Index
A
Abort system call, 161, 162
accept() system call, 247
Address space layout
randomization(ASLR), 114
Alarm system call, 158, 159
Anonymous pipes
API
close() system, 176
pipe() system, 175
read() system, 176
write() system, 176
creation, 177
flow chart, 178, 179
output, 180
unnamed pipes, 174
working mechanism, 175
Application programming interface (API)
built-in, 70, 71
definition, 68
supervisor mode, 69
system-level, 70
types, 68, 69
user mode, 69
B
Banker’s algorithms, 208
Berkeley sockets, 228
Binary semaphore, 206, 209
bind() system call, 24, 206
Byte-oriented mechanism, 192
C
cat command, 17, 26
cd command, 12
Child processes, 129, 131, 145, 151, 175
chmod command, 23
Client-server architecture, 242
advantages, 244
disadvantages, 244
model, 243
TCP, server code, 250–253
closedir function, 109
Close() system call, 176, 250
Command-line arguments
heap, 119
initialized data, 119
stack, 119
text book, 119
uninitialized data, 119
Connection-oriented approach, 226, 228
Cooperating process, 166
Counting semaphores, 207
cp command, 22
D
Data consistent model, 212, 213
Datagram, 235
© Sri Manikanta Palakollu 2021
S. M. Palakollu, Practical System Programming with C, https://doi.org/10.1007/978-1-4842-6321-1
267
Index
Datagram socket, 226, 228, 260
dig command, 35
Domain sockets, 227
E
environ, 115
Environment variable
deleting, 123
dynamic, 121
getenv() function, 123, 124
Linux/Unix operating system, 121, 122
setenv() function, 124–126
setting, 122, 123
system-level, 121
unsetenv() function, 126, 127
user-level, 121
exec system call family
binary executable, 136
execl(), 137, 138
execle(), 140, 141
execlp(), 138, 140
execv(), 141
execvp(), 142, 144, 145
workings, 136
execv() system call, 141, 142
Exit system call, 150–152
Exokernel, 7
F, G
File descriptor
direct block, 80
double indirect block, 81
indirect block, 80, 81
inode, 78, 79
triple indirect block, 81
File permission
chmod, 23–25
268
chmod system call, 93, 94
process commands, 27–29
process utilities, 26
read/write access, 95
return type, 94
Files
definition, 9
types, 9, 10
File systems
boot files, 75
configuration files, 76
home directory, 76
Linux file structure, 74
removable device directories, 76
root home directory, 77
service data files, 78
storage, 73
temporary files, 78
user programs/data, 77
First in, first out (FIFO), 173
client, 188–191
server, 186–188
Frames, 232, 233
ftok() system call, 194, 195, 209, 218
Full-duplex mode, 170
H
Half-duplex mode, 169, 170
Hard link
command line creation, 102
internal connection, 102
mirror copy, 101
system call function, 103, 104
head command, 17–19
Heap, 119
host command, 34
Hybrid kernel, 6, 9
Index
I, J
ifconfig command, 30
Interprocess communication (IPC)
access shared data, 165
benefits, 168
cooperating process, 166
definition, 166
FIFO, 173
full-duplex mode, 170
half-duplex mode, 169, 170
message passing, 167
message queues, 173
namespaces, 228
pipes, 172
protocol, 228
related processes, 171
semaphores, 173
shared memory, 174
simplex, 169
sockets, 174, 227
style, 227
unrelated processes, 171
K
Kernel
exo, 7
hybrid, 6
Linux vs. OS, 9
memory manager, 128
micro, 6
nano, 7
network unit, 129
non-preemptive scheduling
algorithm, 128
operating system, 127
preemptive scheduling algorithm, 128
space, 5
subsystem, 127
tasks/activities, 127
types, 4, 5
virtual file system, 129
kill command, 29, 153
Kill system call, 149, 150, 158
L
Linux architecture
device management, 4
hardware layer, 3
I/O management, 3
kernel, 3
process management, 3
resource management, 4
listen() system call, 246, 247
ls command, 15–17, 82, 143
M
Memory layout, 117, 118, 120
Message passing, 166, 167
Message queues, 173
APIs, 193
byte-oriented format, 192
ftok() system call, 194
identifier, 192
implementation, 201, 203, 205, 206
messageType, 197
msgctl() system call, 198, 199, 201
msgget() system call, 194, 195
msgrcv() system call, 197
msgsnd() system call, 195, 196
named pipes, 192
workflow, 193
Microkernel, 6
269
Index
mkdir command, 11, 104
Monolithic kernel, 4–6, 9
msgrcv() system call, 173, 197
Multithreading
application scalability, 48
architecture, 46, 47
concurrency, 49
CPU memory utilization, 49
creating threads, 54, 55, 57
definition, 37, 45
efficient resource sharing, 48
examples
equal property, 59, 60
termination, 58, 59
high-level programming languages, 48
multiple task, 45, 46
parallelism, 50
passing arguments to thread function,
60, 61
passing multiple arguments,
parameters, 61, 62
pthread_cancel, 54
pthread_create, 51, 52
pthread_detach, 54
pthread_equal, 53
pthread_exit, 53
pthread.h library, 51
pthread_join, 52
pthread_self, 53
responsiveness, 48
use cases, 63
N
Named pipes
Dev, 184, 185
FIFO, 186
mkfifo system call, 185, 186
270
mknod system, 183
unrelated processes, 183
Nanokernel, 7
netstat command, 30–32
Network adaptor/interface controller, 230
Network unit, 129
Network utilities
dig, 35
host, 34
hostname, 30
ifconfig, 30
netstat, 30, 31
nslookup, 32, 33
ping, 34
nl command, 20, 21
Non-preemptive scheduling algorithm, 128
O
Orphan process
child process, 133
management, 134
OSI architecture model
advantages, 237
application layer, 236
data link layer, 232, 233
disadvantages, 237
network cards, 230, 231
network layer, 233, 234
physical layer, 231, 232
protocols, 230
session layer, 235
transport layer, 234–236
P, Q
Pause system call, 160, 161
ping command, 34, 35
Index
Pipes, 172
child and parent processes, 180
flowchart, 181
output, 183
Portable Operating System Interface
(POSIX) standards
definition, 65
POSIX.1, 66
POSIX.2, 67, 68
POSIX.1b, 67
POSIX.1c, 67
support, 68
Preemptive scheduling algorithm, 128
Process creation
child processes, 129
fork() system call, 129, 131, 132
mechanism, 130
syntax, 130
Processes
argc, 114
argv, 114
ASLR, 114
command-line arguments, 114, 115
environment list, 115–117
executing program, 114
gcc compiler, 115
memory layout, 117
operating system, 113
Process termination methodologies,
119, 120
ps (process) command, 27
pthread_create function, 54, 55, 60, 61
R
Raise system call, 157, 158
Raw sockets, 226
recvfrom() system call, 249
recv() system call, 248
rm command, 13–15, 104
rmdir command, 12, 13
Routing algorithms, 233, 234
S
Semaphore, 173
Semaphores
accessing global data, 211, 212
advantages, 207
APIs
semctl() system call, 210, 211
semget() system call, 209
semop() system call, 209, 210
binary, 206
characteristics, 207
counting, 207
critical section, 206
disadvantages, 208
positive integer variable, 206
process synchronization, 206
vs. mutex, 208
semctl() system call, 210
semget() system call, 209
semop() system call, 209
send() system call, 247
sendto() system call, 249
Shared memory
AI
shmat() system call, 219
shmctl() system call, 220
shmdt() system call, 220
shmget() system call, 218
architecture, 216, 217
definition, 215
flow data, 218
kernel supports, 221
271
Index
Shared memory (cont.)
processes, 215
reader program, 223
writers program, 222
shmat() system call, 219
shmctl() system call, 220
shmdt() system call, 220
Signals
catch, 152
CUSTOM_HANDLER function, 156
default action, 153
functionalities, 154
ignore, 152
interrupts/traps, 113
reliable, 156
software interrupt, 152
syntax, 155
unreliable, 156
Sleep system call, 162, 163
Sockets, 174
application connection
architecture, 229
bidirectional gateway, 225
connecting two nodes, 225
datagram, 226
domain, 227
internet domain, 227
protocol rules, 229
raw, 226
stream, 226
socket() system call, 245–249
Soft link
command-line, creation, 97
internal connection, 97
symbolic link, 96
system calls, 99–101
unlinking, 98, 99
Stream sockets, 226
272
System calls and I/O operations
append, 92, 93
close, 88, 89
creat, 85, 86
creat system call, 82, 83
error codes, 83–85
open, 87, 88
reads, 89, 90
write, 91, 92
System calls, directories
changing, 107
changing, 108
closedir function, 109, 110
creation, 104, 105
deletion, 105, 106
getcwd function, 106
operations, 104
reading, 108, 109
System library, 8
T
tail command, 19, 20
Transmission Control Protocol/Internet
Protocol (TCP/IP)
advantages, 242
application layer, 241
connection-oriented protocol, 250
data transmission, 238
disadvantages, 242
internet layer, 239, 240
network access layer, 239
Thread
advantages, 38
applications, 37
classification
kernel-level, 41
user-level, 39, 40
Index
definition, 37
vs. CPU, 63
Thread vs. process, 42
lifecycle
new state, 43
ready state, 44
running state, 44
termination state, 44
wait state, 44
Transferring mechanism, 192, 227
Translation layer, 236
U
UDP client server
architecture, 259, 260
code, 260, 262–266
US Department of
Defense (DOD), 238
Utilities
cat, 17
cd, 12
copy, 22
head, 17–19
ls, 16, 17
mkdir, 11
nl, 20, 21
rm, 13–15
rmdir, 12, 13
tail, 19, 20
touch, 15
ulimit, 22
wc, 21, 22
V
vfork system call, 135
Virtual file system, 129
W, X, Y
waitpid() system call, 147–149
wait() system call, 145–147
wc command, 21
Z
Zombie process, 132, 133
273