/


Text
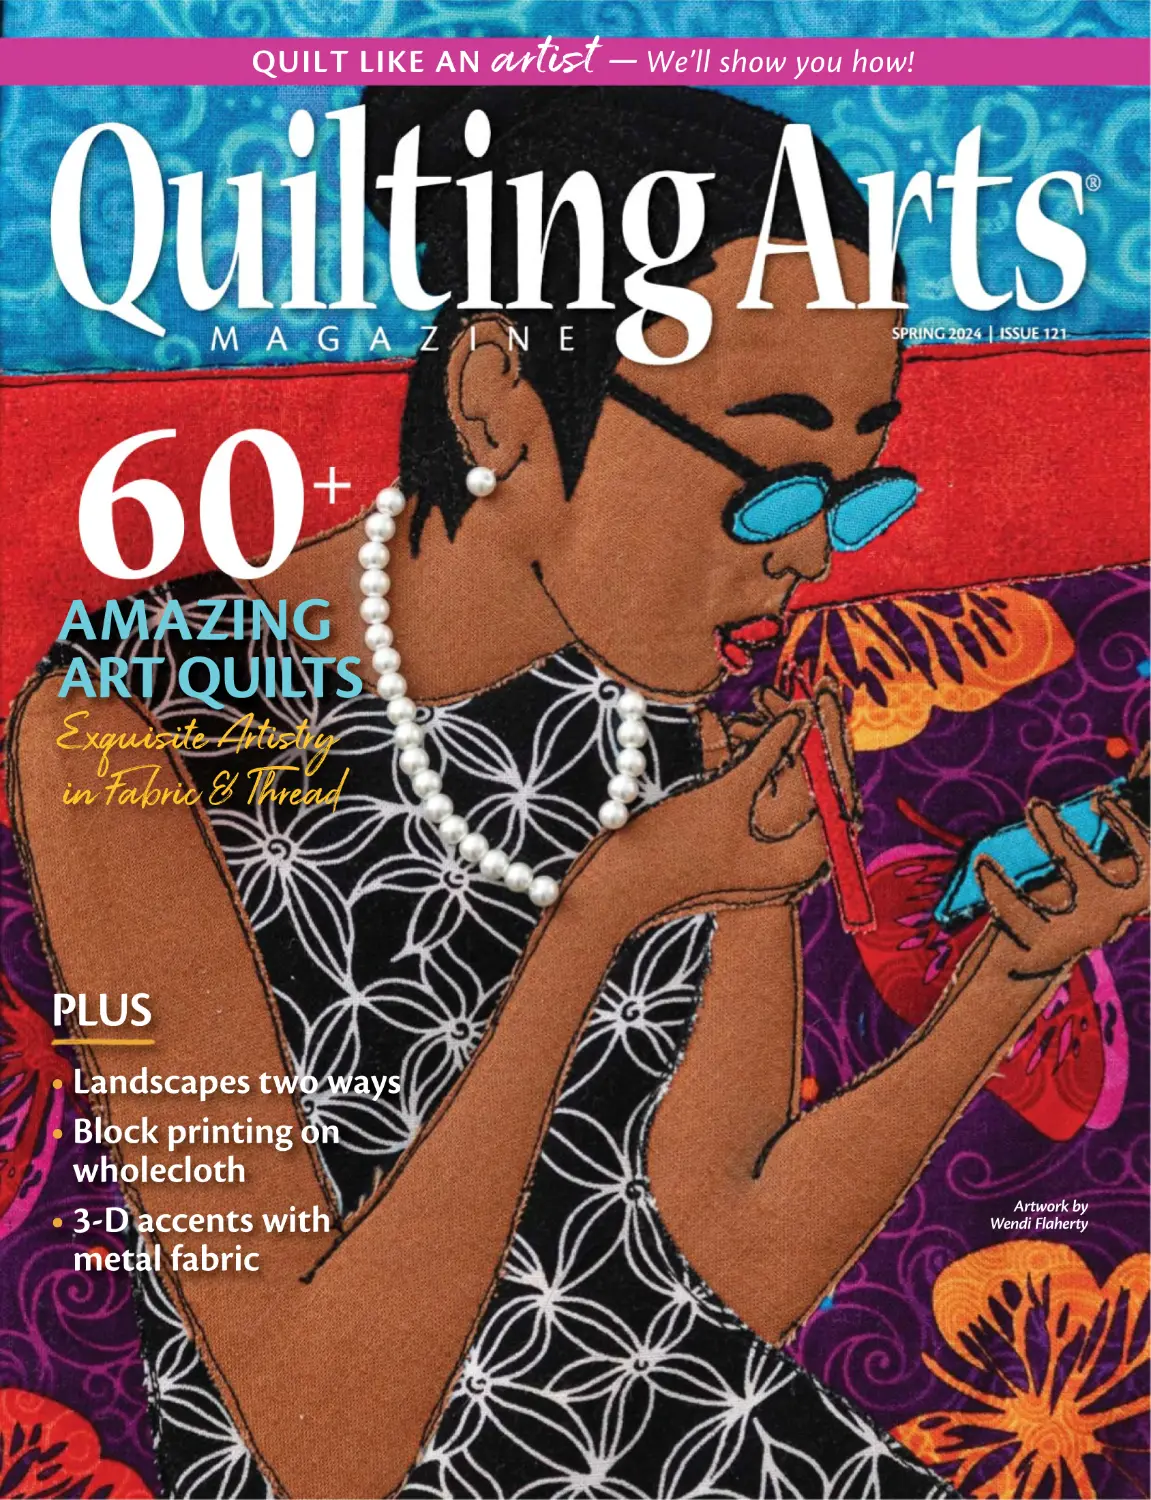
                    QUILT LIKE AN

artist

— We’ll show you how!

AMAZING
ART QUILTS

Exquisite Artistry
in Fabric & Thread
PLUS
• Landscapes two ways
• Block printing on
wholecloth
• 3-D accents with
metal fabric

Artwork by
Wendi Flaherty

Quilt Seminars at Sea
Explore the world with fellow quilters!
GLACIER BAY ALASKAN EXPLORER
August 17 – 24, 2024

Holland America Line

•

Embark on a convenient roundtrip Seattle adventure, offering
spectacular Glacier Bay National Park, whale-watching and stops
in rugged Ketchikan and Alaska’s capital, Juneau.

Featuring Gail Garber, Michele Everts & Rita Lynne

CANADA & NEW ENGLAND
October 5 – 12, 2024

•

Holland America Line

A history lover’s dream cruise from Boston to Québec City with
an overnight in Québec City to wander the fortifications, tour the
Citadel, or visit historic battlegrounds.

Featuring Chardel Blaine and Kathy Wylie

SOUTHERN CARIBBEAN SEAFARER
November 8 – 17, 2024

•

Holland America Line

Water adventures await on a cruise to Southern Caribbean
jewels. Dive Bonaire’s majestic reefs and the Antilla wreck in
Aruba. All with four days at sea to quilt along the way!

Featuring Michele Everts, Pat Delaney
& Renee Fleuranges-Valdes

BATIKS OF BALI
December 8 – 22, 2024

•

Holland America Line

Delve into Southeast Asia’s textile markets. Explore creating
Batiks, Endek and other traditional weaving.

JAPAN & SOUTH KOREA DISCOVERY
March 16 – 30, 2025

•

Holland America Line

Visit fascinating destinations across Japan and South Korea.
Spend the night in Kobe, enjoy scenic cruising through the Kanmon
Strait and call on Incheon (Seoul).

Featuring Paula Nadelstern & Sue Nickels

KENYAN TEXTILE SAFARI
July 15 – 25, 2025 • Club Adventures
Explore the fabric markets in Kenya, amazing wildlife and beautiful
ifull
landscapes on this once-in-a-lifetime trip!

For more information,
contact Alisa Vandenbosch:
(866) 573-6351 • QuiltCruises.com
Cruise itineraries, dates and ports of call subject to change until final confirmation by the cruise line, approximately one year prior to sailing. Agency #178-018-521 Job #8648 11/23

editor’s note

SPRING IS THE SEASON OF
NEW BEGINNINGS AND ENDLESS
POSSIBILITIES.
A dozen years ago, I shared that
heartfelt sentiment in my first
Editor’s Note for QUILTING ARTS
MAGAZINE. I was thrilled to have
been tapped to lead this cuttingedge publication and to carry on
the vision as its editor. What a gift
these last 12 years have been!
From day one, bringing each
issue to print has been a team
effort. I appreciate the many artists
who have shared their work, the
hundreds of contributors whose
innovative articles expanded our
knowledge of art quilting, and the
scores of people behind the scenes
who made this content shine.
I am especially thankful for my
longtime friend and Managing
Editor, Kristine Lundblad,
whose expertise, good humor,
and attention to detail helped
keep QUILTING ARTS at the top of
its game.
But now, it is time for me to
spend more time in my own fiber
2

art studio and pass the torch to the
next editor. Editing QUILTING ARTS has
been an amazing experience. I have
made so many connections with
people who have been true partners
in creativity, wonderful mentors,
dedicated colleagues, and fabulous
friends. I’m pleased to introduce
our new consulting editor, Brandy
Maslowski, who is one of those
special people. Brandy has a deep
knowledge of art quilting both as a
creator and industry professional. I’m
sure her fresh perspective will bring
new insights into our craft and keep
us all ‘in stitches.’
The theme for this issue is
‘Exquisite Artistry in Fabric and
Thread’ and the following pages
are full of color, texture, and
artistic innovation. Jenny K. Lyon
is back with a fascinating look at
incorporating sheers in her quilts. In
addition, Margarita Korioth creates
delightful 3-D flowers that can add
a touch of whimsy to any project.

You’ll love the texture and depth these
techniques achieve.
Quilt artists are often inspired
by nature and we’ve included two
takes on landscape quilts (by Sarah
Entsminger on page 34 and Jane
Haworth on page 94), as well as
thread-sketched bees from artist
Karen Fricke.
Lisa Thorpe—featured many times
in QUILTING ARTS, teaching a new
technique . . . or two or ten—is ‘In
The Spotlight’ this issue. We’re sure
you’ll enjoy knowing more about this
talented artist and seeing her beautiful
art quilts. Plus, many more articles
explore art quilting in myriad forms.
I love that we all live our passion
and continue to be creative every day.
And I can’t wait to see what the future
brings!
Best,

Vivika Hansen DeNegre

Below: Vivika
and Kristine
coordinated a
dye party in
2012 with their
colleagues.

Above: Vivika was thrilled with the group quilt made to honor
a milestone birthday and her retirement in 2023; presented to
her by Kristine.

SPRING 2024

|

Q U I LT I N G A RT S ® M A G A Z I N E

BERNINA L 890 QUILTERS EDITION

UNLOCK CREATIVE
QUILTING

INCLUDES

Free Gifts*
with Purchase

bernina.com

*Available while supplies last.
Exclusions may apply. See BERNINA Dealer for details.

EDITORIAL

MARKETING
& ADVERTISING

EDITORIAL DIRECTOR
Denise McKenna

SENIOR MARKETING
MANAGER
Jessi Rodriguez

CONSULTING EDITOR
Vivika Hansen DeNegre

AD SALES ACCOUNT EXECUTIVES
Lisa Buelow
lbuelow@goldenpeakmedia.com
(800) 726–9966 | (715) 257–6021

MANAGING EDITOR
Kristine Lundblad
EDITORIAL COORDINATOR
Gabby Axner

Kiley Jo Stevenson
kstevenson@goldenpeakmedia.com
(267) 858-0327

CREATIVE
GRAPHIC DESIGNER
Kerry Jackson

AD COORDINATOR
Kay Sanders

PHOTOGRAPHY
George Boe
unless otherwise noted

CHIEF EXECUTIVE OFFICER
Jeff Litvack

CHIEF INTEGRATION OFFICER
Nicole Woods

CHIEF CONTENT OFFICER
Kate Lee Butler

VP, STRATEGY
Andrew Flowers

NEWSSTAND SALES
Ron Murray
rmurray@npsmediagroup.com

Spring 2024. QUILTING ARTS® MAGAZINE (ISSN 1538-4950) is published quarterly by Peak Media
Properties, LLC, dba Golden Peak Media, 500 Golden Ridge Road, Suite 100, Golden, CO 804019552. Periodical postage paid at Golden, CO, and additional mailing offices. Canadian return
address: Bluechip International, P.O. Box 25542, London, ON N6C 6B2, Canada.
EDITORIAL COMMENTS OR CONCERNS:
QAinfo@goldenpeakmedia.com
QUILTING ARTS MAGAZINE, 500 Golden Ridge Rd., Suite 100, Golden, CO 80401

Quilting

BACK ISSUES: Quiltingdaily.com/go/QA-issues
SUBSCRIPTIONS: To subscribe to QUILTING ARTS MAGAZINE, renew your subscription, or
change the address of your current subscription, contact: QUILTING ARTS MAGAZINE, P.O.
Box 1486, Lincolnshire, IL 60069-0486, call 1-847-305-4536 (U.S. and international), email
QuiltingArts@omeda.com, or manage your account at goldenpeakmedia.com/help.
Golden Peak Media publishes QUILTING ARTS MAGAZINE on a quarterly basis, but reserves the right to
change the number of issues in an annual term, including discontinuing any format and substituting and/or modifying the manner in which the subscription is distributed.

Learn classic quilt patterns or try your hand at
a one-of-a-kind crazy quilt. Use fabric scraps
or old clothes from family members to create a
cozy heirloom that generations will enjoy.

POSTMASTER: Please send address changes to QUILTING ARTS MAGAZINE, P.O. Box 1486,
Lincolnshire, IL 60069-0486.
SHOPS: If you are interested in carrying this magazine in your store,
email sales@goldenpeakmedia.com.
ERRATA: Visit QuiltingDaily.com/errata if you suspect a problem.

UPCOMING CLASSES INCLUDE:

We invite previously unpublished manuscripts and materials, but Golden Peak Media assumes no
responsibility for unsolicited manuscripts or other materials submitted for review. Our submission
guidelines can be found on our website at QuiltingDaily.com. The editor reserves the right to
edit, shorten, or modify any material submitted. Entire contents of this issue copyrighted 2024 by
Golden Peak Media and contributing artists. All rights reserved. Readers are welcome to make
copy/copies of any pattern(s) included in this issue for their own personal use. Other reproduction,
in whole or in part, including photocopy, is prohibited without expressed written permission of the
publisher. Artwork in this issue of QUILTING ARTS MAGAZINE is for inspiration and personal use only.
QUILTING ARTS MAGAZINE is not responsible for any liability arising from errors, omissions, or mistakes
contained in the magazine, and readers should proceed cautiously, especially with respect to
technical information. QUILTING ARTS MAGAZINE does not recommend, approve, or endorse any of
the advertisers, products, services, or views advertised in QUILTING ARTS MAGAZINE, nor does QUILTING
ARTS MAGAZINE evaluate the advertisers’ claims in any way. Printed in the USA.

I Am Here: Improv Mapping
Basic Quilt Making
Rail Fence: Quilting with Light and Color
Quilting with Transfer-painted Fabric
Bear Paws and More
Robin's Wreaths

Copyright © 2024 Golden Peak Media

folkschool.org/quiltingarts

VISIT US ON THE WEB:
QuiltingDaily.com

BRASSTOWN, NORTH CAROLINA 1-800-FOLK-SCH

4

SPRING 2024

|

Q U I LT I N G A RT S ® M A G A Z I N E

34

departments

design & stitch

2 EDITOR’S NOTE

34 QUILT LIKE AN ARTIST: LANDSCAPE
ELEMENTS OF DESIGN

6 IT’S YOUR TURN

Sarah Lykins Entsminger

8 ABOUT OUR CONTRIBUTORS

38 WORKING WITH SHEERS

33 CALL FOR SUBMISSIONS

Jenny K. Lyon

61 STUDIO STYLE

56 BLOCK-PRINTED AND STITCHED
Mel Beach

102 READER CHALLENGE ANNOUNCEMENT
One Color, One Quilt

104

38

10 IN THE SPOTLIGHT

62 APIARY APPLIQUÉ
Turn a photograph into fiber art

THE LAST WORD.

Karen Fricke

Valerie Komkov Hill

in profile & gallery
Lisa Thorpe

14 QUILT FESTIVAL WINNERS

77 IT’S NOT JUST A SHARP BLADE
Kristin Barrus

90 ADD WIRED ACCENTS FOR 3-D FUN
Margarita Korioth

94 LANDSCAPES REVISITED
Collage and paint your favorite vistas

Jane Haworth

98 FABRIC HAIKU
Create small quilts that honor this
intentional poetry

Margaret Abramshe

A gallery of top quilts from the 2023
Judged Show

28 IT IS YOUR GRANDMOTHER’S QUILT
How women of a certain age have shaped
the modern quilt movement

Frances O’Roark Dowell

43 READER CHALLENGE INVITATIONAL:
PART 1
A gallery of select quilts from our
contributors

66 BEYOND THE MIRROR
A SAQA Global Exhibition

81 GET IT DONE!
Results from the ‘Good Intentions’
Reader Challenge

98

Cover art by Wendi Flaherty

get more online
Want more from this issue?
Use our QR code!
To scan the code, open the camera app on your phone or tablet
and point the camera at the code. Once your device recognizes the
code, it will provide a link that will take you directly to this issue’s
home page containing additional bonus content. If you prefer, you can access this page
by visiting QuiltingDaily.com/quilting-arts-magazine-spring-2024.

90
SPRING 2024

|

Q U I LT I N G A RT S ® M A G A Z I N E

5

it’s your turn

Our latest prompt:

Upheaval

Our Readers Respond!
In the last issue, we asked our readers to respond to this prompt: Time
Change. We asked them to share their thoughts, experiences, advice, and
even their quilts to examine how the transition from one year to the next—
or even the change from Standard to Daylight Savings time—affects them.
Thank you to our readers who took the time (get it?) to respond and

Photo courtesy of the artist

we’re delighted to share a few responses with you here.

“Purple Quilt” • 73" × 65"

Dear Quilting Arts,
I was diagnosed with lupus in Winter 2022.
It was a shock that my body was fighting
within itself. Your magazine, sewing, and
fabric dyeing kept me going through to
Spring 2023. July found me fatigued but my
mind wanted to create. I grabbed purple
scraps—not a color I favor, BTW—and just
started randomly sewing. No pattern, no
thinking, just sewed. I figured if it was terrible,
it didn’t matter. It was only purple. The
random blocks got bigger and bigger. I was
having fun! My sister-in-law LOVES purple. I
entertained thoughts of a quilt for her. She
received it in October and was thrilled.
Time changes our lives just as nature
adapts to the different seasons of the year.
If you’re fatigued, have lost your mojo, or
just don’t like your current project, just grab
some scraps and SEW!!

Dear Quilting Arts,
They hate change.
My animals are my world; the time
change sends them all into a tizzy.
They have a routine and insist I
follow it, such as being fed at the same
time every day. My Corky, a Goffin’s
cockatoo parrot, squawks so loud
in protest, I try to prepare him by
switching things up and changing his
routine. He’s too smart for that.
I made a small quilt with all of my
animals in mind. Yes, I have dogs, cats,
and birds. I played with white-onwhite fabric, embroidery stitches, and
watercolor paints. It was fun!
I like to mix things up; this is my
second attempt at using watercolor on
fabric and I encourage others to try it,
too. I often mix textures in my art quilts
which makes things interesting. I always
tell my quilter friends, try new things
and open the door to inspiration.
The change of seasons from flowers
to fall leaves and then changing to snow
is Mother Nature at her finest. What
I learned is that I need to take more
creative chances, slow down, and enjoy
the process.
Theresa Nielsen
Royal Oak, Michigan

Transitions come and go. Some we
weather well, others . . . well . . . perhaps,
not so much.
Sometimes chaos and the unexpected
can be fruitful and mined for new
creative inspiration. Has this happened
to you?
Tell us about a situation where you
used an adverse circumstance or
seemingly insurmountable challenge as a
springboard to creativity.
Show us your work and share your
story in an email to QAfeedback@
goldenpeakmedia.com with “ITY–
Upheaval” in the subject line by March
29, 2024. Please include your name, city/
town and state (country if not U.S.), and
additional information about your quilt
such as materials and techniques used, its
title, and dimensions.
Look for our readers’ responses in the
Summer issue.
We look forward to hearing from you and
thank you from the Editorial Team!

We love to hear from
you, our readers.
What are you working on now? How has
Quilting Arts inspired or educated you?
What new techniques or influences
are you exploring?
Correspondence we receive is considered property of Golden Peak
Media and letters may be edited as necessary for length and clarity.

Subscription Address Changes and Inquiries: visit
goldenpeakmedia.com/help

Facebook® @QuiltingDaily
Instagram @_Quilting_Daily
Pinterest @QuiltingDaily

Shoni Maulding
Saint Ignatius, Montana

Golden Peak Media
QuiltingDaily.com
QAfeedback@goldenpeakmedia.com

6

SPRING 2024

|

Q U I LT I N G A RT S ® M A G A Z I N E

th

Get Ready for the 30 Spectacular
Season of Quilting Arts TV
STREAMING NOW!
Join host Susan Brubaker Knapp
for a fresh look at art quilting
using state-of-the-art tools and
innovative techniques. In this
milestone 30th season, Susan is
joined by a dozen talented
artists who share their creative
perspectives and demonstrate
that art quilts have no limits.

Visit QuiltingArts-TV.com for more
information and ways to watch.

Want more art quilting? Get the full season AND a yearly subscription
to Quilting Arts Magazine for just $59.95—a savings of $19.99.

For more information visit QuiltingArts-TV.com
Thanks to our sponsors:

about our contributors
Sarah Lykins
Entsminger is a fiber
and mixed-media artist,
photographer, writer, and
curator who lives and works
in northern Virginia. The primary subject of
her work is landscapes. Sarah’s art and
imagery reflect personal memories of place
that evoke a sense of calm for viewers. Her
work has been shown in museums, galleries,
and exhibitions around the world.
studioatripplingwaters.com

Karen Fricke is a quilt
artist, specializing in Judaic
ritual fiber art. She teaches
classes and workshops,
lectures to guilds, and works
from her studio in her home in New Jersey.
karenfrickequilts.com

Valerie Komkov Hill
is an award-winning artist
working in a variety of
media including painting,
fiber arts, and mixed media.
Her work has been shown regionally and
internationally. She is a member of Studio Art
Quilt Associates (SAQA) and the Caprock
Art Quilters, a SAQA Circle in West Texas.
art-by-valya.squarespace.com

Jane Haworth loves
to photograph nature and
animals to use in her collage
quilts. She teaches nationally
and internationally,
encouraging her students to step out of their
comfort zones and not to seek perfection. Her
collage book, Capture Your Own Life in
Collage Quilting, was recently published
by Landauer Publishing.

Jenny K. Lyon is a
fiber artist, author, and
teacher. Her work focuses
on free-motion quilting on
wholecloth and has been
juried into international quilt shows, art
shows, and galleries. Jenny teaches and
lectures on free-motion quilting wherever
she is invited. She claims the title Encouragerin-Chief as she believes that every quilter has
the skills to free-motion quilt some of their
own work. She lives in northern California
with her husband and Australian shepherd.

Margaret Abramshe
has been teaching art for
40 years. She received a BFA
at the University of
Colorado, a degree in Art
Education from Florida International
University, and a master’s degree from the
University of Northern Colorado. Since
retiring in 2014, Margaret works in her studio,
creates workshops, and presents lectures.
Margaret’s artwork has been juried into
numerous exhibitions.
margaretabramshe.com

quiltskipper.com

Kristin Barrus is an academic
Margarita Korioth
is a fiber artist and quilt
instructor living in and
teaching online classes from
Tennessee. Her recent work
features dyeing, stamping, silk screening, and
stitching with a focus on lettering on fabric.
Margarita’s work has been featured in
national and international publications and
she has appeared on “Quilting Arts TV.”

quiltmaker who has traded the beaches
of Oregon for the mountains of Utah. She
considers herself a modern-traditional
maker. Kristin is pursuing a Doctorate at
the University of Leicester looking at quilt
fabric changes post-2000 and women
entrepreneurs from Generation X in the
quilt world.
kristinbarrus.com

margascrafts.blogspot.com

Lisa Thorpe is a
mixed-media fiber artist
and explorer who has used
many mediums over the
years—from fabric to
painting to printing and collage. She has a
degree in Design from University of
California, Davis, and has been teaching art to
adults and children for years. She has been
published in Quilting Arts and appeared on
“The Quilt Show” and “Quilting Art TV”
Series 3000. She leads workshops virtually and
in-person at creative events and retreat
centers throughout the country.
lisathorpe.com

janehaworth.com

WANTED:

You & Your Work
Quilting Arts Magazine
is always looking for fresh
voices, beautiful images, and
artwork that represents the
diverse and ever-changing art
quilting scene. If you have a
dream to see your name and
bio on this page, reach out to
us! Learn more on page 33.

Frances O’Roark Dowell first
Mel Beach is a San Jose,
California-based, fun-loving
artist and teacher who loves
to create through play every
day. Mel enjoys rolling the
dice as part her six 100-Day Projects,
including 100 Days of Hand Carved Stamps.
melbeachquilts.com

combined her love of storytelling and
quiltmaking in her 2016 novel, Birds in the
Air, followed by the short story collection,
Margaret Goes Modern. She currently
leads a thriving online community at
QuiltFiction.com, where the second volume
of her historical quilting series, A Friendship
Album, is being released.
@offkilterquilt

8

SPRING 2024

|

Q U I LT I N G A RT S ® M A G A Z I N E

ONLINE WORKSHOP

Create your own quilt jacket in our new, on-demand
workshop taught by the Quilt & Tell podcast hosts, Tracy,
Lori and Ginger and Sew & Tell podcast host Meg. In this
comprehensive online class, you’ll learn how to turn the
Maybe Bob quilt pattern designed by Michelle Freedman
(Quiltmaker Nov/Dec 2022), into a beautiful, quilted jacket
designed by Kimberly Payne (Sew News Winter 2023).

Enroll online at QuiltingDaily.com
to get started on your stylish new
quilt jacket!

Sponsored by:

in the

SPOTLIGHT

“Shadow Me” (detail) • 42" × 50"

Lisa
Thorpe
LITTLE ROCK, ARKANSAS

i
“

began my artistic journey as a kid sewing crazy clothes for all my Barbie
dolls on my hand crank, kiddy sewing machine. My mom and grandma
taught me proper stitch techniques, but I was never very good at following
directions. All through school I made clothes for myself and found a tribe of
friends in art classes. This led me to a degree in Design from University of
California, Davis, with an emphasis in textiles and wearable art. No surprise,
after college I found it difficult to pay the bills with my wearable art, so I got my
teaching credential in Art and Education from San Francisco State University.
As an art teacher, I needed to be a generalist. I taught block printing,
monotype, drawing, painting, collage, and whatever else I thought would spark
the creative verve of my students. During this period in my life, textiles and
fabric slipped to the back burner. Apart from sewing interesting ‘Miss Art
Teacher’ outfits, my trusty Bernina 1030 rested in my closet for a good long time.

Artmaking Gets Personal
My personal artmaking wandered from painting landscapes to printmaking and
then a nice long meander with collage and encaustic. I think it was about 15
years ago that I got reconnected with fabric as a primary medium. At the time,
I was teaching art part-time at several local public schools and was the resident
10

SPRING 2024

|

Q U I LT I N G A RT S ® M A G A Z I N E

Art 2.0
It wasn’t long before I started playing
with fabric to print, stamp, stencil,
dye, splatter, spray-paint, photo
transfer … as a mixed-media artist
there are no limits. If a technique or
medium will achieve my goals, I’ll try
it, I’ll play with it, I’ll shape it to
my purpose.
The teacher in me always wants
to share my discoveries so I began
submitting technique articles to
QUILTING ARTS and leading workshops
for other curious fabric art explorers.
I found quilters to be an organized
bunch who are willing to pay for a
lecture or a workshop, so I began
putting more of my teaching energy
toward connecting with quilt guilds
and art quilters. I found a new path
for my gifts as an artist and as
a teacher.

Pandemic Reboot
Then the pandemic hit. All my
teaching dried up. At the same time
my life took another dramatic turn.
The retreat center I had lived at with
my husband for over 20 years had a
shake up and we decided it was time
to leave.

My husband took a job in Little
Rock, Arkansas. We packed up and
moved. For me, this was a deeply
challenging change. Already the
pandemic had slowed teaching to a
trickle and groups began exploring
virtual learning, so I had a bit of
teaching work but mostly it was me
and my little dog wandering a new
neighborhood, a new city, a new
state, a new life. I felt isolated
and adrift.
Somewhere in my sorrow,
I realized that while this change was
a deep, painful challenge, it was also
an opportunity, an invitation really,
to express myself through my art.
With no work and very few
obligations tugging at me, I began to
observe first—then create. On my
morning dog walks in the
neighborhood, I found myself taking
pictures of shadows, leaves, and
puddles. Rusty ironwork fences and
faded peeling paint caught my eye.
I started cataloging the pictures by
categories in my phone, creating
photo albums labeled ‘shadows,’
‘doors,’ ‘hands,’ ‘old paint,’ ‘clouds.’
I began to see a pattern in what I was
drawn to, what I was stopping to
catalog each day.
I started making some small
14" × 20" art pieces combining these
photos with hand-printed and dyed
fabrics layered with stitch. These
have become an ongoing series titled
‘Shift Happens.’ Each piece uses
photos I’ve collected along my
wanderings and has a word or phrase
in heavy stitch. The work feels real
and important—both deeply personal
and universal all at once. ‘Ask
Nothing’ and ‘Upon Reflection’ are
from this series. Their creation helped
me refocus my voice and recenter my
heart, and provided the jumping off
point for some larger work.

SPRING 2024

|

Photos courtesy of the
t artist
i

artist at a retreat and conference
center in Northern California. A
group of art quilters was on retreat at
the center, and I found myself
wandering their tables and chatting
about their quilts.
One of the women invited me to
set up a table and bring my sewing
machine over and join them. It was
like coming home. I had always
thought of fabric as a medium to
clothe and comfort the body in the
form of bed quilts and garments—
that day, my mind was opened to the
idea of fabric as a medium for my
ideas, my stories, my art.

“Ask Nothing” • 18" × 24"

“Upon Reflection” • 18" × 24"

Q U I LT I N G A RT S ® M A G A Z I N E

11

A Slow Journey
I noticed doors as a theme in my photo collection. The
metaphor of doors opened and doors closed began to spark
and I created the piece ‘Again and Again We Are Invited In.’
It features wide open doors of homes about to be torn down
in my neighborhood—open doors, open hands, all
invitations to enter. The finished piece is approximately the
size of a door. It was the first large, substantial piece I made
in Arkansas. It felt like a renaissance. It is me but a new
me. A deeper, more authentic me.
The next large piece I created was ‘Shadow Me’ featuring
photos again—this time of shadows and peeling paint, an
old photo I found that my grandfather had taken the month
and year of my birth, and a chest X-ray but no one was sure
whose. I combined these remnants and family relics with
hand-printed fabric and stitched symbols of forgotten
meaning to express the mystery of time and change in the
individual and human story.
Noticing became my muse. Paddling through the lakes
and rivers of my new home, I discovered the vast and
beautiful lotus fields floating there. Encountering these
floating wonders, I was reminded of the book by Buddhist
leader and activist Thich Nhat Hanh, NO MUD, NO LOTUS.
He offers practices and inspiration to transform suffering
into presence and awareness of wonder. My triptych of the
same name explores this theme and begins to tell the story
of my slow journey from sadness to awakening.

“Again and Again We Are Invited In” • 37" × 70"

I have more work percolating, a few things on my
design wall in progress, and more ideas in my sketch
book, too. All are tightly bound in the beauty of the world
that I encounter and try to cherish and mark every day.
Each is stamped and printed with the grief and growth of
being human, then stitched and woven into the story of
life and inevitable change … more to come, more change,
more challenges, more trials, more beauty, and more art.

To learn more about Lisa and her work, visit
lisathorpe.com.
“Shadow Me” (detail)
12

SPRING 2024

|

Q U I LT I N G A RT S ® M A G A Z I N E

”

“No Mud, No Lotus” • 37" × 53"
SPRING 2024

|

Q U I LT I N G A RT S ® M A G A Z I N E

13

Quilt Festival
WINNERS
A gallery of top quilts from the 2023 Judged Show

t

he quilts at International Quilt Festival, Houston, represent the
finest examples of craftsmanship, artistry, and design. Every

year, hundreds of entries pour in from around the world, but only a
percentage is selected for exhibition. The night before the opening of
Festival, the top-winning IQA quilts are revealed during the awards
ceremony. The following pages feature a sampling of the exceptional
quilts from the show.

BEST OF SHOW
Sponsored by Handi Quilter®

Monkeys in my Hair—Evie
41" × 48" • DEBORAH HYDE • WEST BLOOMFIELD, MICHIGAN

“This art is a celebration of my granddaughter, Evie—her portrait and
her personality.”
Original design.

14

SPRING 2024

|

Q U I LT I N G A RT S ® M A G A Z I N E

SPRING 2024

|

Q U I LT I N G A RT S ® M A G A Z I N E

15

GAMMILL
MASTER AWARD FOR
MACHINE ARTISTRY
Sponsored by Gammill®

Filigree Calligraphy
60" × 76" • JANET STONE • OVERLAND PARK, KANSAS

“I wanted to use linen fabrics, a collection of solid hand-dyed fabrics, and
incorporate a free-motion embroidered alphabet. This is the 25th quilt
in my Alphabet Quilt series.”
Original design.

16

SPRING 2024

|

Q U I LT I N G A RT S ® M A G A Z I N E

GRACE COMPANY
MASTER AWARD FOR
TRADITIONAL ARTISTRY
Sponsored by Grace Company

Beauty in the Broken
71" × 71" • KATHY K. WYLIE • WHITBY, ONTARIO, CANADA

“In the same way that stars can only be seen at night, there is beauty that
is only experienced in hardship. This quilt was inspired by those profound
moments of love amid our suffering, laughter in our sorrow, hope in our
despair. The beauty in the broken.”
Original design.

SPRING 2024

|

Q U I LT I N G A RT S ® M A G A Z I N E

17

JANOME MASTER
AWARD FOR
INNOVATIVE ARTISTRY
Sponsored by Janome

Those Darn Boys
35" × 47" • JUDY CROTTS • LONG BEACH, CALIFORNIA

“Watch out boys, there’s a powerful girl in the house! Besides working with the
children’s delightful faces in many different colors and fabrics, I experimented with
using a single fabric in their clothing. I cut the fabric and rearranged it to give the
effect of movement. The use of tulle for shading completed the overall effect.”
Original design.

18

SPRING 2024

|

Q U I LT I N G A RT S ® M A G A Z I N E

INNOVA MASTER
AWARD FOR
CONTEMPORARY
ARTISTRY
Sponsored by Innova

Summer Shower
76" × 77" • AKIKO MATSUMURA • IIDA CITY, NAGANO, JAPAN

“On a summer morning, when I looked up on the walkway where I usually walk,
I saw a slight blue sky among the many leaves. The sight was very pleasant to
me, and I love this place. I made this quilt with that feeling in mind.”
Original design.

SPRING 2024

|

Q U I LT I N G A RT S ® M A G A Z I N E

19

SUPERIOR THREADS
MASTERY AWARD FOR
THREAD ARTISTRY
Sponsored by Superior® Threads

Fullness
82" × 67" • YOSHIYUKI ISHIZAKI • ASHIYA CITY, HYOGO, JAPAN

“Embroidery has been added to the traditional Baltimore to make the appliqué
stand out. Look for the hidden chameleon and praying mantis. Even the
sparrows that come to the balcony joined in!”
Original design.

20

SPRING 2024

|

Q U I LT I N G A RT S ® M A G A Z I N E

C AT E G O R Y AWA R D S

ABSTRACT
Third Place
Sponsored by Sew Steady®

Wing Variation 2
24" × 41" • JANE SASSAMAN
HARVARD, ILLINOIS

“This quilt is one of a series
inspired by the wings of
butterflies and moths.”
Original design.

SPRING 2024

|

Q U I LT I N G A RT S ® M A G A Z I N E

21

PICTORIAL—LARGE
First Place
Sponsored by
World of Quilts Travel

Ice Lilies
44" × 59 ½" • ANDREA BROKENSHIRE • ROUND ROCK, TEXAS

“I have always loved Stargazer Lilies and this one is planted next to my greatgrandmother’s Snowball bush. I love the juxtaposition between the smooth leaves
of the lily next to the serrated leaves of the Snowball bush. The challenge for me in
this quilt was to create the different textures between the two. My focus was the left
stems and leaves but, of course, the lilies themselves are just wonderful too.”
Original design.

22

SPRING 2024

|

Q U I LT I N G A RT S ® M A G A Z I N E

PICTORIAL—LARGE
Second Place
Sponsored by
World of Quilts Travel

Something About Succulents
76" × 72" • CYNTHIA ENGLAND • DICKINSON, TEXAS

“Made during Covid to keep me sane. Used a palette of 160 fabrics.
Approximately 18,500 individual pattern pieces. Machine pieced using the
technique I developed. Not paper pieced; no fusing. There is a honeybee amid
the leaves on the left side.”
Original design.

SPRING 2024

|

Q U I LT I N G A RT S ® M A G A Z I N E

23

PICTORIAL—LARGE
Third Place
Sponsored by
World of Quilts Travel

A Crowd of
Strangers
82" × 48" • JILL KERTTULA
CHARLOTTESVILLE, VIRGINIA

“I have taken hundreds of
pictures of the regulars on the
Charlottesville downtown mall.
This piece is a combination
of about 15 of those images
combined into one. Even in
a crowd, few of us look at or
interact with each other. We
are a crowd of strangers: each
in their own world. One place,
many lives, many times, all
in their individual world of
thought.”
Original design.

24

SPRING 2024

|

Q U I LT I N G A RT S ® M A G A Z I N E

SPRING 2024

|

Q U I LT I N G A RT S ® M A G A Z I N E

25

Resources
Bob Ruggiero’s interviews
with Judged Show winners
quilts.com/quilt-festival/
judged-show-winners-2023
More about International
Quilt Festival and their
YouTube Channel
quilts.com/quilt-festival

PICTORIAL—SMALL
Second Place
Sponsored by Allbrands.com

The Last Call
37" × 49" • KESTREL MICHAUD • WEST MELBOURNE, FLORIDA

“This quilt was my attempt to illustrate ‘fate.’ Lightning flashes behind Jacques, the
steampunk-enhanced raven. The raven, the seedy setting, creepy low light, and dramatic
three-point perspective convey a feeling that ‘bad things are coming.’ Despite the
unsettling vibe, Jacques himself is a beloved pet. There is a peculiar juxtaposition
between a treasured raven and the sense of impending doom he is foreshadowing.”
Original design.

26

SPRING 2024

|

Q U I LT I N G A RT S ® M A G A Z I N E

READY TO LEARN?
New Online Quilting Workshops Added Monthly!

Take your quilting skills to
the next level anytime, anywhere.

Sign Up Today at QuiltingDaily.com

delicate wash

Pamper Your Quilts with
Eucalan Delicate Wash
Elevate your laundry experience with our gentle,
eco-friendly formula. Eucalan preserves the beauty
of your quilt masterpieces, ensuring vibrant colors
and softness. The specially crafted no-rinse formula
conditions and protects to enhance the longevity of
your most cherished pieces. Experience the luxury of
Eucalan – where delicate meets durable. Quilt with
confidence, quilt with Eucalan!

(8&$/$1&20

SPRING 2024

|

Q U I LT I N G A RT S ® M A G A Z I N E

27

It IS Your
Grandmother’s
Quilt
w
How women
of a certain age
have shaped the
modern quilt
movement
by Frances O’Roark
Dowell

28

hat is a modern quilt? What distinguishes it from an art
quilt? What defines the modern aesthetic? Interesting

questions, all. But for some, the answer boils down to this: It’s not
your grandmother’s quilt.
Don’t believe it? Google “not your grandmother’s quilt” and you’ll be
rewarded with millions of hits in 0.42 seconds, all of them announcing that

SPRING 2024

|

Q U I LT I N G A RT S ® M A G A Z I N E

Photos courtesy of the artist unless otherwise noted

Photo by Melanie Zacek for Quiltfolk magazine

Above: Gwen Marston
Right: Barb Strick and grandchild
in front of “Bullseye.”

19th- and early
20th-century quilts

Carol M. Highsmith, photographer. Gee’s
Bend, Alabama. April 5. Photograph.
Retrieved from the Library of Congress,
www.loc.gov/item/2010639056/

modern quiltmakers have wrested
quiltmaking out of the hands of
boring old matrons and made it
something new and vital. There are
variations on the theme—“not your
grandmother’s log cabin,” for instance,
and “not your granny’s quilt show”—
but the message is clear: Modern quilts
are fresh and exciting quilts made by
fresh and exciting young people.
It’s time for some myth-busting. In
more ways than one, the modern quilt
is, in fact, your grandmother’s quilt.
From popular teachers and designers
to modern quilting’s most iconic
makers, women over the age of 50
are richly represented in the modern
quilt movement. Not all these women
are grandmothers, of course, but
they all give the lie to the notion that
older women are no longer creative or
capable of innovative work.

Needless to say, this has always been
true, even of those buttoned-up 19thand 20th-century women whose stern,
seemingly disapproving countenances
stare out at us from sepia-toned
photos.
Those ladies got funky with it, too.
In fact, many quilts from the
19th- and early 20th-century show
idiosyncratic, original minds at
work. “Random color placement,
pieced patches, color substitution,
asymmetry, blocks turned different
ways, no corner resolutions, and less
concern about precision all combined
to make these quilts unstudied,
unpretentious, and more interesting,
not to mention less stressful and more
fun to make,” Gwen Marston wrote
in A COMMON THREAD, discussing the
antique quilts she studied as a new
quiltmaker.
We can see these approaches to
quilt making in a circa-1880 sampler
of sorts from Pennsylvania, which
conforms to few conventional
standards. Sixteen-Patch blocks are
joyfully interspersed with Broken
Dishes, Bowties, and other block

SPRING 2024

variations without rhyme or reason.
In Nancy Rachel Bartlett’s 19thcentury homespun quilt, we see a
more orderly design, but it’s evident
that many of this quilt’s elements have
been improvisationally pieced.
To be clear, these quilters would
not have considered themselves
modern. But the historic photographic
record shows that many 19th- and
20th-century quiltmakers were as
creative and willing to bend the rules
as today’s modern quilters.

The proto-modern quilters
Long before the advent of the
modern quilt movement, a number
of influential quilters over the age
of 50 (some of them grandmothers)
were making quilts and writing
books that would profoundly shape
the modern aesthetic. In 1996, at

Above: 19th-century homespun quilt by
Nancy Rachel Bartlett. Photo courtesy of
International Quilt Museum

Left: Sixteen-Patch sampler, circa-1880,
maker unknown. Photo courtesy of Stella
Rubin (http://stellarubinantiques.com)

|

Q U I LT I N G A RT S ® M A G A Z I N E

29

“Weathering the Storm” • Karen Duling

Roberta James.
Photo by Donovan
Jugarap (@hapa.films)

Right: Karen
Duling with
“Catnado” at
QuiltCon.

“The Inner Life of Trees: Wood and
Bast” • Roberta James

age 60, Gwen Marston published
her groundbreaking book, LIBERATED
QUILTMAKING, which encouraged
quilters to stop worrying so much
about making precise, perfectly pieced
quilts and to create their own designs.
“Marston helped further abstract
quilting into becoming a respected
and legitimate art form,” says modern
quilter (and grandmother) Roberta
James. “This encouraged me as I
discovered my own work pulling me
in that direction. I think it is also
liberating to recognize how vast and
varied her quilting life was.”
30

Karen Duling, another modern
grandmother, attended many of
Marston’s retreats and considered
her a friend and a mentor. “Gwen
Marston was my quilt hero,” she says.
Many modern quilters point to
the influence of Nancy Crow on
their work. In fact, the most recent
QuiltCon winner, “Bullseye” by Barb
Strick, originated in a Nancy Crow
workshop. Highly regarded modern
quilters such as Sherri Lynn Wood
and Maria Shell have also studied
with Crow. Born in 1943, Crow was
in her 50s when she began using the

SPRING 2024

|

Time and trouble
will tame an
advanced young
woman, but
an advanced
old woman is
uncontrollable by
any earthly force.

Q U I LT I N G A RT S ® M A G A Z I N E

—Dorothy L. Sayers

Annie Hudnut
at QuiltCon.

Photo courtesy of International Quilt Museum

Right: “Bowl
of Cherries”
Annie Hudnut

“Brill” • Nancy Crow

improvisational cutting techniques
that would become a hallmark of
her style. Her continued interest in
minimalism and the use of negative
space has helped define modern
quilting.
“It was the work of the Gee’s Bend
quilters that attracted me to modern
quilting,” says Arita Rai, 66, who
started as a traditional quilter. Rai
wasn’t the only one who changed
course after seeing the Gee’s Bend
quilts. Deborah Batson, 60, recalls
visiting the Gee’s Bend exhibit at the
Museum of Fine Arts, Houston. “It

was breathtakingly beautiful, raw,
elegant, expressive, and humbling,”
she recalls, and it changed her
trajectory as a quiltmaker.
The influence of the Gee’s Bend
quilts on modern quilting is so
nearly ubiquitous that arguably there
would be no modern quilt movement
without them. As the Gee’s Bend
exhibit traveled the country in the
early aughts, many of the quilters
were well over the age of 50, and
many of them, including Lucy
Mingo and Annie Mae Young, were
grandmothers. Not only that, but

SPRING 2024

|

Q U I LT I N G A RT S ® M A G A Z I N E

these quilters were also working in
the style of their grandmothers.

Today’s modern quilters:
women of a certain age
Countless quilters came to modern
quiltmaking after years, even decades,
of making traditional quilts. Annie
Hudnut, 65, started shifting her focus
in her mid-50s when she read Gwen
Marston’s LIBERATED QUILTMAKING
and the books Marston co-authored
with Freddy Moran. “I am mostly
an improv quilter,” she says of her
work now. “I like the clean aesthetic
31

Above: “November
Rainbows” • Karen
Smith
Right: “Housetop”
Nettie Pettway Young

It’s not only your
grandmother’s quilt
Walk into any local modern guild meeting and you’ll
be met by quilters of all ages, genders, and hair
colors—some of them with tattoos, others without.
You’ll see that creativity knows no age limits and
that fertile imaginations don’t disappear after
menopause.
Some of the most iconic modern quilts come
from the hands—and the minds—of women over
50. Some of these women are grandmothers, others
aren’t, but their quilts disprove the idea that women
of a certain age no longer have anything interesting
to say. It’s time to honor the contributions of older
women to the modern quilt movement. After all,
they’re the ones who invented it.
“Borrowed Blue” • Jen Broemel

32

SPRING 2024

|

Q U I LT I N G A RT S ® M A G A Z I N E

Photo by Frances O’Roark Dowell

of modern quilts and the abstract quality of
improvisation.”
Modern quilter and grandmother many times
over, Karen Smith also began as a traditional quilter.
“I stepped away from quilting for a while, while my
boys were growing, and came back to it about seven
years ago,” she reports. “When I jumped back in, it
was with an eye for bright and bolder fabrics than
before, and that is what draws me to modern quilts.
I love experimenting with old patterns in fresh
settings and colors.”
Other quilters over 50 were modern from the
beginning. Jen Broemel began making quilts in
2015 when she joined a friend whose mother was
teaching her to quilt, though it didn’t take Jen
long to realize she wasn’t interested in following
patterns. “I was lucky [at the library] to stumble
on Sherri Lynn Wood’s improv quilting book,
Victoria Findlay Wolfe’s 15 MINUTES OF PLAY, several
books by Cas Holmes, Quilt National Catalogs and
UNCONVENTIONAL AND UNEXPECTED: AMERICAN QUILTS
BELOW THE RADAR 1950-2000 by Roderick Kiracofe,”
she says. “These books changed me and helped me
find my voice. They gave me the freedom to try it
out in my own way.”

WANTED:

You and Your Work

Submit today and become part of the Quilting Arts family

N

ow that you’ve experienced our latest
issue, isn’t it time for you to become
part of QUILTING ARTS?
What do you want to read—how about writing it yourself! Share your
inspiring work, unique techniques, and new ideas with us and our readers.
If you are teaching, blogging about, or exhibiting your art quilts, we want to
hear from you!
To submit, send us a short summary of your idea along with three images
and we’ll get back to you within 12 weeks. Visit quiltingdaily.com/quiltingarts-magazine-submission-guidelines for our submissions guidelines.
Questions? Email QAsubmissions@goldenpeakmedia.com.

Counterclockwise
from top, artwork by
Mel Beach, Karen
Fricke, and Sarah
Lykins Entsminger

SPRING 2024

|

Q U I LT I N G A RT S ® M A G A Z I N E

33

Quilt Like an Artist:

Landscape Elements
of Design
by Sarah Lykins Entsminger

i

n order to create a successful landscape,

First Steps

you need to consider specific design

Where do you begin? Start a journal or sketchbook
that you can fill with ideas and research. Plan visits
to museums, galleries, and libraries to see different
aspects of landscapes.
Isolate specific ideas to look for in the artwork
on display. Some examples are exterior vs. interior
lighting, depth, composition, blending of colors, how
weather is depicted, or any other design component
you are interested in learning about.
Notice what catches your eye and try to identify
why a particular element resonates with you. Try to
sketch or journal the reasons you respond emotionally
to a specific artwork or place. Use your camera as you
explore outdoors to record both overall views as well
as natural details that help to focus your attention on a
specific aspect of the landscape.

details. The usual fundamentals of line,
shape, value, form, texture, and color are
simply not enough. Additional elements are
needed—season, weather, time of day, point
of view, movement, and physical location.
Given the incredible amount of visual information
available when looking at a scene or a photograph, you
need to be able to focus your attention on these details
to convey your desired image and draw a viewer
into your work. It takes planning and preparation to
identify and illustrate the design elements you need
to consider.
34

SPRING 2024

|

Q U I LT I N G A RT S ® M A G A Z I N E

Seasonal Influence
Seasons can be a fun element to
research, as they are very different
depending on physical location.
Specific colors of materials help
to illustrate seasons and changing
temperatures: warm colors for spring
and summer, and cool colors for fall
and winter.
Landscape details change with
the seasons, either by being present
or absent—leaves sprout and fall,
grasses go from green to brown, warm
rain becomes snow, and water flows
smoothly or is iced over and still. List

Left: “Afternoon Walk” • 28" × 14"
Hand-dyed fabrics, color pencil, acrylic paint,
threads; machine appliqué, painting; machine
quilted.

Below: “Night Music” • 38" × 40"
Hand-dyed and commercial fabrics, color
pencil, wax pastel, threads; machine appliqué,
painting; machine quilted.

characteristics of seasonal details in
your journal and look for a variety of
colors you can mix with materials that
reflect your chosen season.
Weather is closely related to season
and is often illustrated with varying
textures. By adding stitched details or
layered materials, the direction of falling
rain, sleet, or snow can be shown.
The sky becomes a focal point when
considering weather. You will notice
different types of clouds, colors of
fog or bright sunlight, and how light
moves into shadow. Observe how the
sky changes over time and collect
photographs of different types of
weather you have observed.
Try sketching cloud structure
or trails left by airplanes. Think
about materials you can source that
resemble clouds, rain, or snow. Sheer
layers could represent fog, beads for
raindrops, or spots of paint for snow.

Passing of Time
Choosing the time of day is one of the
most dramatic decisions you can make
in planning a landscape. Color changes
illustrate the passing of time. Sunrise,
high noon, sunset, or night all have
distinctive colors that reflect on both
the sky and ground.
Observation will show you that
many different colors can be reflected
as time passes. Sunlight and moonlight
illuminate the landscape differently.
Choose the time of day for your
landscape based on significant memories
or images you have taken; things that
are meaningful and inspire you to
experiment with different designs.

Point of View
You will need to decide the point of
view from which you are designing
your landscape. Are you above ground

SPRING 2024

|

Q U I LT I N G A RT S ® M A G A Z I N E

35

level, at the same elevation, below ground level, or
underwater? Are you looking through a window, a
gate, an opening in a wall, or out of an automobile
windshield? Which direction are you facing? How
does the light or shadow change if you are facing
north, south, east, or west?
Determining point of view will require you to be
thoughtful in your research—consider perspective
and sketch a variety of possibilities. Consistency in
cues for point of view will help lead the viewer into
your landscape.

Movement
Illustrating movement is a critical element of a
landscape. This is where the incredible versatility
of fabric shines bright. Stitching through layers of
fabric with a variety of threads or adding layers of
materials will help you show movement. Ripples in
slow-moving water, crashing waves at the coastline,
grasses bending in the wind, leaves falling, or the
direction of rain, sleet, and snow are all types of
movement that will bring a landscape to life.
Use your journal to record descriptions of
movement, and which elements in a landscape
move or which remain solidly in place. Practice freemotion quilting lines that simulate the breeze in the
sky or the current in water.
Learning to use quilting to add movement and
dimension to a landscape gives you another excellent
tool for success.

Reality or Imagination
Your landscape does not need to illustrate an actual
place. While you have collected photographs and
researched physical locations, you may find an
imaginary place more compelling to design. Perhaps
it is one you have seen in your dreams, one you
imagined while reading a book, or even an actual
place that you imagined how it would look at a
different time of day or in a different season.
Removing unwanted details from an actual
landscape to illustrate how you would want it
to look differently also gives you options. When
gathering the tools and materials you might need for
a specific physical location, consider different colors,
textures, supplies, or art mediums to alter aspects of
the landscape to create an imaginary place.

“Rough Water” • 18" × 44"
Hand-dyed fabrics, color pencil, acrylic paint, threads; machine appliqué,
painting; machine quilted.

36

SPRING 2024

|

Q U I LT I N G A RT S ® M A G A Z I N E

Reducing details leaves an
opportunity for a viewer to overlay
their own memories and emotions as
they experience your landscape.

Trust your Instincts
Your journal and photographs
are intended as a jumping off
point for a collection of ideas. It
is almost impossible to replicate
every leaf, branch, or blade of grass
in a landscape. By distilling the
vast amount of visual information
available and reducing details, you
will be able to focus on an emotional
connection to your landscape. By
concentrating on how you feel while
creating the necessary elements, your
finished landscape will allow a viewer
to be drawn into your work.
Artists often create small studies
as they process different ideas and
work with materials in preparation
for a larger work. A smaller size
may give you more freedom in
exploring materials and techniques.
You can decide what boundaries or

parameters you want to place on your
studies. You may decide to try all the
suggested elements of design or only a
few that resonate with you. Remember
that it is your work and your point of
view that is important.

Further Exploration
Continue to use your journal to keep
track of materials and art supplies that
have created the results you want. It is
also helpful to record those materials
or techniques that you don’t want to
use again.

We are fortunate that our chosen
medium encompasses a wide variety
of materials, techniques, and fiberfriendly art media. Wander the
aisles of fabric stores, art or craft
supply stores, hardware shops, or
reuse and recycle businesses. Try
anything that catches your eye—
different combinations will create
varied results, and over time you will
develop your favorite methods for
creating landscapes.

Above: “Golden
Valley” (detail)
50" × 24"
Handmade artisan
papers, hand-dyed and
commercial fabrics,
color pencil, wax pastel,
threads; machine pieced,
machine appliqué,
painting; machine
quilted.

Left: “Morning
Rain” • 53" × 33"
Hand-dyed and
commercial fabrics,
color pencil, wax pastel,
acrylic paint, threads;
machine pieced,
machine appliqué,
painting; machine
quilted.

SPRING 2024

|

Q U I LT I N G A RT S ® M A G A Z I N E

37

Working with
MATERIALS
Makes a small 11" × 15" quilt
• 2 (15" × 19")) quilt sandwiches of solid
cotton fabric on top, cotton or cotton
blend batting, and cotton fabric
backing

by Jenny K. Lyon
•

t

his is a whimsical project with few rules and lots of
opportunity for fun! Let’s play with sheer fabrics, layer

upon layer, to create colorful effects. Most free-motion
quilters will enjoy the childlike joy of playing with color

•
•
•
•

while improving their quilting skills and experienced quilters
may enjoy creating more complex scenes. Even quilters new
to free-motion quilting can enjoy this technique!
Your quilting does not have to
be skillful and as you will see on
my pieces—‘sloppy woppy’ quilting
adds more whimsy to the work.
This is a low-stress way to play with
color and free-motion quilting!
I refer to flowers and leaves in
my directions, but you can build
whatever scene you want. I have
also made work with messages
in letters, and my students have
38

made cacti, cats, and even abstract
images, all using this same
technique.
As a bonus, I also include
directions on how to repurpose
and retrofit a jean jacket into
wearable art.
Editor’s note: Jenny’s article about
her ‘sloppy woppy’ quilting method
appears in the Winter 2024 issue of
QUILTING ARTS.

SPRING 2024

|

•
•

•

NOTE: One quilt sandwich is for
practice.
Thread, 50wt or 60wt thread in white
or off-white and black with matching
bobbin thread for each
Size 80 topstitch needle
Water-soluble marker
Paper for design practice
Sheer fabric, 7–10 large scraps (4"
square or so; polyester or silk) in an
assortment of pastel ‘flower colors’
and assorted greens for stems and
leaves; can be prints and/or solids
NOTE: Sheer fabrics can be hard to
find in a variety of colors. I have found
Etsy to be the best source for a variety
of sheers; search for ‘sheer fabrics.’
Tweezers (I use HeidI Proffetty’s
Precision Tweezers.)
Thread snips (I use Easy Kut Spring
Action Scissor from Tool Tron; I love
the Rainbow version.)
Cupped presser foot (I find this style
of foot glides over the multiple layers
without catching, I use BERNINA #74
or #44C.)

Q U I LT I N G A RT S ® M A G A Z I N E

Tips To Quilt a Simple
Wavy Line Background

DIRECTIONS
Prepare the background
1. With a water-soluble marker, draw

Using a water-soluble marker, draw a
horizontal line every 3". This will keep
the quilted lines from dipping to one
side or another.
Keep the quilt sandwich parallel to
your belly and move the fabric back
and forth horizontally to quilt the wavy
lines, generally following the drawn
line. Gentle waves that are no more
than ⅜" high work best. (figure 1)

2. Quilt the background within these

drawn lines; this does not have to
be fancy quilting! I suggest freemotion quilting over walking-foot
quilting.

Much of this background will be
covered with sheers. Don’t stress over
less-than-perfect quilting. Remember,
sloppy woppy is okay on this piece!

NOTE: If you are using a practice
piece to warm up, move on to the
second quilt sandwich and fill it with
background quilting for the next
steps.

My favorite temporary markers are
blue water-soluble ones. Several
manufacturers make washable markers
in a variety of colors—especially for
children’s drawing projects—but I find
them harder to wash out, so I stick
with blue water-soluble markers.

Create the scene

figure 1
NOTE: You may be tempted to spray
the water-soluble marks away but
this will not completely remove them
and could later result in a stain when
exposed to heat. Water-soluble marks
must be rinsed away. Once the quilting
is completed, soak and swish the quilt in
water for 2–3 minutes to make sure the
marks are completely removed. Let it dry
completely before embellishing.

Process photos courtesy of the artist

a perimeter around the quilt top,
2" in from the raw edges. The
stitching and design will lie within
this area.

1. Unless you plan to work

intuitively, sketch out a basic plan
for the shapes on paper. Keep it
nearby as a reference while you
work.
TIP: An online search for “leaf shapes” or
“flower shapes” will provide a rich source
of inspiration if you need drawing ideas.
2. Using the water-soluble marker,

outline the basic placement of
the flowers and leaves from your
‘plan’; there is no need for details
at this point, just a simple circle or
oval to indicate their overall size
and placement. (figure 2)
3. Play with the sheers before

building the flowers, stems, and
leaves to get the effect you want.

figure 2

figure 3

NOTE: In general, I layer no more
than three colors and one patterned
piece. More layers will make the
colors look muddy. A patterned piece
is one that is translucent, but has a
pattern, like lace or polka dots, etc.
Place patterned pieces on the bottom

and layer colored sheers on top. Add a
small pop of color in the center of the
flower—I like to take a very strong
color and rough cut a piece around
¼" × 1" and fold it in half twice to
make the center; secure with a fine
pin. (figure 3)

SPRING 2024

|

Q U I LT I N G A RT S ® M A G A Z I N E

39

figure 4

figure 5

4. Cut bits of sheers can be a little

pesky to work with—they tend to
fly away. To streamline the process,
I put like colors on individual
paper plates. (figure 4)

figure 6

figure 7

continuous line. (figure 5) Make
two passes in total to secure the
sheer fabric. Stitch details inside
the petals if desired.
3. Once the stitching is done, cut the

TIP: A pair of long, skinny tweezers can
be helpful to put bits of sheers in place.

Complete the piece with
free-motion stitch
1. Free-motion stitch the stems first.

Your brain will relax once they
are in place and the flowers have
something to connect to. Place
strips of green sheer fabric on the
background (revisit figure 2 for
general placement). Stitch up the
stem and back down again; the
width is up to you but remember
most flowers have fairly narrow
stems. Trim the excess fabric away
from the stem if it will get in the
way of sewing the flower (and if
not, you can trim both stem and
flower when directed in step 3).
2. Create the flowers. Beginning in

the flower’s center, free-motion
stitch the center securely, then
stitch around the petals in one
40

excess fabric away from the flower.
Don’t cut right to the stitching,
leave a little space so that the
fabric will not pull away. (figure 6)
TIP: I use curved-tip thread snips for
this; it’s easier than using straight-tipped
scissors.

“June Bloom

4. Add all the flowers and stems you

want and then add leaves, using
the same method as the flowers.
NOTE: I usually use one layer of
sheer for greens, but you can overlap
a variety of colors if you wish. Leaves
and flowers can overlap each other.
(figure 7)
Wasn’t that fun? Build your own
whimsical garden and watch your
free-motion skills improve!

"

” • 11" × 11

“Sheer Beauty” • 14

½" × 10½"

SPRING 2024

|

Q U I LT I N G A RT S ® M A G A Z I N E

Finishing Tips
Y
You can bind the quilt
i in a traditional manner oor use one of these
ttechniques that I like to use on smaller
s
art quilts..

•

Put a wavy cutt blade in the rotary cutter and cut around the outside
edge of the quilt, leaving a lovely wavy edge.

NOTE: I have found that if washing is needed, a gentle hand wash will
not dislodge the wavy edge.

•

“Summer’s Glory”

Choose the triple stitch on your machine (feed dogs up now) and a
stitch length of 3.5 and stitch around the perimeter. I like to add two
lines of stitching in strong colors that pick up the composition.

• 12" × 16"

NEXT CHALLENGE:

A Sheer-Paneled
Now that you’ve made a small quilt and practiced
cticed
this technique, here is a fun way to alter a garment,
arment,
adding a panel of sheer flowers—in this case,
e, on
the back of a denim jacket!

MATERIALS
• Well-fitting denim jacket with

• Tracing paper

a center back panel
• Two pieces plastic screening
material large enough to fit the
center back panel of the jacket
(TIP: This screening material is
available in a hardware store; the
same material used for home
window screens.)
• Sheer fabrics in a variety of
colors (To make a floral motif,
as illustrated, obtain at least 6
greens and 8 ‘flower colored’
sheers.)

large enough to
cover the center
back panel
• Black mid-weight
thread (I use
Aurifil™ 50/2.)
• Heavy thread
to attach screening
panel to
jean jacket (I use jeans thread
or a heavier cotton thread like
Superior® Threads King Tut™
40/3.)

SPRING 2024

|

• Topstitch needles to

match the weight of your
chosen threads
• Curved tip snips
Optional
• Walking foot

Q U I LT I N G A RT S ® M A G A Z I N E

41

DIRECTIONS
Create the pattern
1. Secure a piece of tracing paper

to the back panel of the jacket
with a pin at each corner.
TIP: You may have to tape several
pieces together to get a piece large
enough.
2. Starting at the bottom of the

panel, run your finger along the
jacket’s seam, creating a score
in the paper. Then run your
fingernail in that same groove to
create a well-defined line.
3. Do the same on the other three

sides, being mindful to keep the
tracing paper in place. This is
your pattern.

Cut the screening

Play with your fabric!
1. Build the design as-you-go or

plan it ahead of time. Many of
my students choose a “field of
flowers” or “flowers in vase”
motif.

Jenny’s 8 Tips
for Working
with a Pre-made
Garment
•

Use the same needle/thread
combinations as you would on
quilting cotton. Surprisingly
enough, no adjustment of tension
or needle needs to be made.

•

You can add things on top of already
stitched designs if you decide you
need more.

•

Each line needs to be stitched twice
or more.

•

Leave a little extra sheer fabric
beyond the stitching line when
cutting.

•

Curved tip snips (like the Easy Kut
snips recommended for the flower
project) are best for cutting the
sheers.

•

Even stitch length is not important,
but you don’t want long stitches as
the stitching is holding the sheers
in place.

•

Usually you need no more than
three layers of sheers. Too many
layers can dull the colors and you’ll
lose the “sparkle” of the sheers.

•

Care: I wash my jacket in the
washing machine on a delicate or
gentle setting, but please test yours
first before laundering.

2. Start working with your

sheers—using the skills you
learned making your first
piece—starting from the bottom
and working up. Layer the
sheers and then stitch on to
the screening material and trim
the excess from the sheers.
Treat the screening as any other
background material.

1. Place the tracing paper pattern

flat on a work surface and then
place two layers of screening on
top of the pattern.
2. Secure the screening to the

pattern with four pins inserted
away from the edges.

Finishing
1. Trim the completed screening

panel to the previously marked
edge (1"–1½" beyond the edge
of the panel).
2. Cut away the jean jacket’s panel

to the seam line.
3. Using a water-soluble marker,

transfer the line from the
tracing paper onto the screening
material.
4. Mark another line on

the screening material
approximately 1"–1½" away
from the previous line for a
seam allowance and wiggle
room. I eyeball this.

42

3. Secure the trimmed screening

panel to the inside of the jacket
with pins.
4. Stitch the screening panel to the

jacket by triple stitching along
the stitching lines of the jean
jacket. A walking foot may be
helpful. Most jean jackets have
two lines of stitching.

SPRING 2024

|

Resource
Heidi Proffetty’s Precision Tweezers
heidiproffetty.com/shop

Q U I LT I N G A RT S ® M A G A Z I N E

READER CHALLENGE

I N VI TAT IO N AL
Part 1

WE KNOW THE READER CHALLENGES ARE FAVORITES among our readers—

they tell us so and they show us with their participation! One reader wrote
just after the new year—“I am going to need you to stop putting out such
interesting challenges if I am to make any progress on my UFOs this year,”
she said with a laughing emoji. This is precisely why we present these
Reader Challenges—no, not to distract you from other projects but to
inspire, motivate, and challenge you to create something special, using a
theme or prompt, and perhaps working outside of your comfort zone. We
all know that is good exercise for quilt artists!
For only the second time in QUILTING ARTS history, we invited a select
group of past Reader Challenge participants to submit their best work for
this special gallery. As with the first time (Summer and Fall 2022), we
were so pleased with the response we received from these talented quilters
that we have chosen to share their work in two galleries, here and in the
Summer issue. Please enjoy these beautiful quilts from your fellow readers.

SPRING 2024

|

Q U I LT I N G A RT S ® M A G A Z I N E

43

Earth Music
13 ½" × 14 ½" • JANET REYMAN • SPRING VALLEY, CALIFORNIA

“Earth Music” was inspired by nature and Ana Buzzalino’s articles in Quilting Arts. I started with a
raw-edged, pieced background in neutral colors. I added narrow rows of quilting to create the texture.
The tree, leaves, and sheer fabric photos were applied with matte medium. Stenciled circles and fabric
‘stones’ along with hammered copper wire completed the design.

44

SPRING 2024

|

Q U I LT I N G A RT S ® M A G A Z I N E

Wellsprings 2
10 ¼" × 10 ¼" • RITA SUMMERS • ST. MARY’S, TASMANIA, AUSTRALIA

What began as doodling became my inspiration. As I stitched, I realized that the shapes and lines were like water
features in the landscape—some dry, some flowing, some still. Water is life, representing refreshment and survival both
in a literal and symbolic sense. I have lived through drought, and we rely on rain for our home’s water supply. The title
of this work expresses the importance of water in the environment, and the longed-for times of refreshing in our lives.
After hand stitching some linen samples together in sets of four, I drew lines and shapes directly onto the cloth, allowing
them to intersect—or not. I cut more shapes from earth-painted and eco-printed papers and fused them in place. After
fusing the completed design onto thin batting, I hand quilted it with very fine machine embroidery thread.

SPRING 2024

|

Q U I LT I N G A RT S ® M A G A Z I N E

45

The Touch Up
7 ¾" × 9 ½" • WENDI FLAHERTY • SURPRISE, ARIZONA

I tend toward meticulous realism so for this challenge from my local art quilt group, I decided to try for
a flatter, Matisse-inspired, fauvist look. I chose to enter this piece because it is a departure from most of
my work.

46

SPRING 2024

|

Q U I LT I N G A RT S ® M A G A Z I N E

The Duality of Light
17 ½" × 17 ½" • LESLIE DEMASEK • NEW BERLIN, WISCONSIN

I always wanted to merge my interest in science into my artwork. When thinking about the nature of
light and how it is both a wave and a particle, I realized how well that idea could be shown visually.
Making science approachable made this project so intellectually interesting to me that I couldn’t stop
working on it. As an electrical engineer, computer scientist, and artist, I really think I’ve found a nexus
for all three in art quilting. I have the feeling this is the start of a series. Many types of fabrics (chiffon,
cotton, polyester, metallic, non-woven) and many different threads were used—it was all about what
looked just right.

SPRING 2024

|

Q U I LT I N G A RT S ® M A G A Z I N E

47

Nyhavn Copenhagen
10" × 8" • JUDITH AHLBORN • LITTLETON, COLORADO

I have always been drawn to art and paintings of street scenes and interesting architecture from
European cities. Back in 2017, I had the opportunity to take a cruise through the Baltic Sea. One of my
favorite spots from the trip was in the Nyhavn waterfront canal district of Copenhagen. This piece came
from one of many photos I took from this iconic area. I loved walking past this row of colorful buildings
and restaurants while admiring the shimmering water and boats coming and going. I digitally edited my
photo, printed it to fabric, and stitched the building and window outlines.

48

SPRING 2024

|

Q U I LT I N G A RT S ® M A G A Z I N E

Pinwheels
11 ½" × 11 ½"• MARGARITA KORIOTH • COLLIERVILLE, TENNESSEE

My daughter got married. The months before the big event my heart felt like a pinwheel, going round
and round experiencing all kind of emotions. That’s why I chose this motif. Each block is 3" × 3". I used a
cutting machine to precisely cut recycled orphan papers for the centers (a technique I called ‘washable
paper-cloth’), ECO friendly paints, and Aurifil® Lana wool threads for the stitching.

SPRING 2024

|

Q U I LT I N G A RT S ® M A G A Z I N E

49

Around the Corner
12" × 12" • ETHELDA ELLIS ERASMUS • CO. LAOIS, IRELAND

I am blessed to live in the green Irish countryside down a small road. There is this sharp bend in the
road that always makes me wonder what—just like in life—I’ll find around the corner. I love to capture
the light filtering through the trees in my landscapes. I use dozens of snippets of different commercial
or dyed cotton fabrics and occasionally gray or black tulle to get the effects I want. I do a lot of freemotion quilting and embroidery with a variety of threads to stitch everything down.

50

SPRING 2024

|

Q U I LT I N G A RT S ® M A G A Z I N E

Out of the Dark
9 ½" × 11 ¾" • ABBIE DICK • WASHOUGAL, WASHINGTON

My granddaughter and friend gave me the center fossil. To display it on fabric I asked a metal worker
friend to make a bezel for me, which she did out of copper. The green circle is commercial cotton and
represents the layers of earth it was under. The two mini quilts it is attached to are hand-dyed fabric.
It is hand embroidered and hand quilted. This piece represents my favorite parts of creating fiber art:
working with a non-fiber artist and, best of all, hand stitching.

SPRING 2024

|

Q U I LT I N G A RT S ® M A G A Z I N E

51

Elk at Cataloochee Valley Great Smoky Mountain National Park
8" × 10" • MARIETTA B. NESTER • MONTVALE, VIRGINIA

While honeymooning in the Great Smoky Mountains, we passed through the beautiful Cataloochee
Valley. In the early morning light, we pulled over so I could photograph this magnificent elk grazing.
I hand painted on fabric using my own photography—this is my textile joy—then I embellished with
thread, changing the colors to highlight what water, paint, and GAC 900 fabric painting medium do. The
piece was free-motion machine quilted.

52

SPRING 2024

|

Q U I LT I N G A RT S ® M A G A Z I N E

Beneath the Surface III—Barnacle Bike
13" × 18" • DEBRA E. OLSON • PORT TOWNSEND, WASHINGTON

This is the third quilt in a series of underwater imaginings. The bicycle photo—printed on fabric, then
hand colored—was taken by a friend as we walked by a marina near our home. It had been pulled out
of the water, obviously having been there quite some time, becoming home for barnacles! I painted on
canvas for the background, adding monoprinted paper and fabric with beaded and machine-stitched
embellishments. It is lightly quilted.

SPRING 2024

|

Q U I LT I N G A RT S ® M A G A Z I N E

53

The Heart of the Matter
12" × 12" • LISA THORPE • LITTLE ROCK ARKANSAS

My work starts with words. There is always a story, two stories really—the one I’m imbuing the art with
and the one the viewer brings. This piece began with the common phrase “the heart of the matter”—
I took those five words to their literal imagery to pique and poke interest and wonder. I used an old
chest X-ray as the beginning of the piece—scanned, color manipulated, and printed on fabric. The
anatomical heart with its arteries and veins is enhanced with embroidery thread that winds its way
to the words. Three of the adjoining fabrics are botanical gel prints. I completed the piece with spraypainted dots and white gel pen accents.

54

SPRING 2024

|

Q U I LT I N G A RT S ® M A G A Z I N E

Ocean Breeze
15 ½" × 16 ¾" • CAROL WEBER • GOODYEAR, ARIZONA

On a recent trip to Hilton Head Island, I fell in love with the sea oat grass waving in the breeze on
the sand dunes. That trip sparked the idea of interpreting the sand dunes and grass in a quilt for this
invitational challenge. The sky was pieced with dark blues and purples. I used an actual seed painted
with acrylic paint to stamp the grass onto the background and I then used thread to fill in the rest of
the plant. The sand dune is a combination of free-motion quilting and 3-D grasses to add texture.

SPRING 2024

|

Q U I LT I N G A RT S ® M A G A Z I N E

55

MATERIALS
• Micro-filament material cut

BLOCK-PRINTED
and STITCHED
by Mel Beach

and have since carved nearly 200 blocks as part of my

participation in two 2022 challenges: 100 Days of Hand Carved
Stamps (part of the annual 100-Day Project) and Carve December.
To showcase my collection of block prints, I embarked on a series of

• Batting (16" square or larger)
• Lightweight fusible web

(I use Pellon® WonderUnder® 805.)
• Ultra-firm stabilizer (I use

Pellon® 70 Peltex® Sew-In
Ultra Firm Stabilizer.)
• Liquid acrylic fabric paint
(I use PRO™Chemical & Dye
PRO Silk & Fabric Paint and/
or Jacquard® Dye-na-Flow®.)
• Flat plastic board and pintsized plastic containers
• Latex or nitrile gloves
• Parchment paper
• Hand-carved blocks or

block-printed and stitched wholecloth art quilts. Each piece starts with a
square of white Evolon CR Non-Woven Textile and is transformed through a
combination of faux dyeing, block printing, and stitching.
Experience the meditative process of mixing and matching your favorite
block prints—use these suggested materials and techniques to create small art
quilts that are layered with incredible color, pattern, and stitched texture and
go down your own rabbit hole of mixed-media fun!

•

•

•

DIRECTIONS
Faux dyeing

•

The absorbent nature of Evolon makes
it easy to ‘faux dye’ using liquid acrylic
paints, creating colorful backgrounds for
the block-printed design.

•

1. Mix and/or dilute the paints with

water in pint-sized containers to
achieve light or medium-value colors
and fully submerge a cut square of
Evolon in each container. (figure 1)
56

figure 1

SPRING 2024

|

Q U I LT I N G A RT S ® M A G A Z I N E

commercially produced
rubber/foam stamps
Ink pads (I used Tsukineko®
VersaFine Clair™ ink pads
in dark colors such as
Nocturne and Medieval
Blue.)
Sewing machine with an
open-toe, free-motion
quilting foot
Assortment of thread
colors, fibers, and weights
for machine stitching and
hand embroidery along with
appropriate sewing needles
Sequins and/or beads in
assorted colors, sizes, and
shapes
Dimensional fabric paint
(I use Tulip® Puff y™ paint.)

Optional
• Painter’s tape, hinged
mirrors, Stanley® Fatmax®
chisel compass, an acrylic
block mounted with
Tsukineko® Tack ’N Peel™
reusable cling sheet

Process photos courtesy of the artist

t

wo years ago, I fell down the rabbit hole of block printing

into 13"–14" squares (I use
Evolon CR Non-Woven
Textile. See “Why Evolon
CR?” for details.)

NOTE: Due to the super absorbency of
Evolon, more paint and extra drying time
will be required than usual painted projects.
2. Wearing latex or nitrile gloves, massage

the paint into the cut squares to ensure
complete coverage. Remove the squares
from the containers to dry.
NOTE: For a solid appearance, place the
squares flat on a plastic board to dry. To
create a more mottled pattern, leave the
painted square slightly scrunched on the
plastic board.
3. Once the Evolon is completely dry,

cover with a sheet of parchment paper
and heat set with a hot, dry iron.

“Emerald Gardens” • 12" × 12"

Block printing
The next transformation involves gathering
your favorite blocks and ink pads to
block print the newly painted squares of
Evolon. You can use hand-carved blocks
or commercially produced rubber and/or
foam stamps. The block printing can be
planned and mapped out ahead of time or
spontaneous and improvisational.

Why Evolon CR?
Evolon CR is a white, non-woven micro-filament textile made with 70%
polyester and 30% polyamide. It is very soft to the touch and has a beautiful
drape. It is approximately 80 grams per square meter, making it a thin yet
strong fiber that is lint free and fray resistant.
It is a highly absorbent fiber that can easily be colored with liquid acrylic
paints. Evolon stitches beautifully by machine and by hand, however since it is
a non-woven fabric, any pin holes or ripped out stitching holes will be difficult
to conceal. To avoid this, use a lightweight fusible to baste quilt sandwiches.

Create a grid layout

Evolon can be purchased in sheets or on a 40" × 50’ roll from Talas, a New
York-based company specializing in book binding and conservation.

1. To plan a grid-based layout, (figure 2)

use similar sized blocks (mine are all
2" square) to make it easy to mix and
match your favorite designs.
TIP: To streamline the audition process, use
blocks printed on paper to create two master
sheets with one featuring individual prints
of your favorite blocks and a second sheet
printed with repeat border shapes (such as
half-circle blocks to create a scalloped border).
Photocopy each master sheet; cut out the
individual shapes and border options to create
tiles that can be moved around within the
grid layout until you find the most pleasing
arrangement. (figure 3)

SPRING 2024

figure 2
|

Q U I LT I N G A RT S ® M A G A Z I N E

figure 3
57

“Peacock FANdango”
12½" diameter

2. Once you lay out a quadrant, use

hinged mirrors to create the other
three quadrants and take a photo
before rearranging to exploree
other combinations. If not using
mirrors, print copies of the photos
to explore arrangements.
3. Once you’ve decided on a design,

place the Evolon on a work surface
and choose a colored ink pad.
NOTE: Dark-colored ink pads work
best to stamp your favorite layouts
onto the background squares of
colored Evolon.
4. Place strips of blue painter’s tape

marked with 2" increments onto
the Evolon to help to keep the
printed blocks aligned. (figure 4)

TIP: To
o minimize smudged fingerprints,,
consider mounting the carved or
foam blocks onto acrylic blocks using
Tsukineko Tack ’N Peel.

1. Start with a motif for the center

Create a mandala design

TIP: To evenly distribute all eight repeats,
picture a compass and start by printing
the motifs in the cardinal directions
(north, south, east, and west), and repeat
for the intercardinal directions that bisect
the cardinals (northeast, southeast,
southwest, and northwest).

The mandala designs are printed
using a radial grid layout which can
be planned as outlined above or
improvised. These intricate mandala
designs benefit from having a
collection of block prints in varying
sizes and shapes such as tear drops/
hearts, arches, ogee, clamshells,
leaves, flowers, and repeat mandala
designs. (figure 5)

focal point and surround it with
rings featuring one or more shapes
printed in multiples of eight.

2. Continue auditioning different

block combinations to create
subsequent rings. Consider
including negative space when
printing the mandala design.
3. Use parchment paper to heat set

the block-printed designs.

Stitching
Embellish the block-printed design
with machine stitching and/or hand
embroidery.
1. Stabilize and prepare the block-

figure 4
58

printed Evolon by fusing a
lightweight fusible web to it and

figure 5
SPRING 2024

|

Q U I LT I N G A RT S ® M A G A Z I N E

then fusing it, centered, onto the
slightly larger square of batting.
2. Add dimension with threads in

varying colors, fibers, and weights.
(figure 6) Consider adding sparkle
by stitching with variegated,
metallic, and/or rayon threads.
3. Using a sewing machine, free-

motion quilt. Outline some of the
block-printed motifs and surround
them with background fills such as
dense zigzag stitching. (figure 7)

figure 6

figure 7

figure 8

figure 9

TIP: Leave some areas unquilted which
allows them to pop and/or offers the
option to accentuate this space with
hand stitching.
4. Add handsewn details. Simple

hand embroidery stitches tend to
be easy to stitch and versatile for
use in different areas of the blockprinted designs. (figure 8) Here are
a few easy stitches to help you get
started: backstitch, colonial knots
(similar to French knots), lazy
daisy stitch, whipped backstitch,
seed stitch, and pistil stitch ending
with a colonial knot.
TIP: Some of my current favorite
hand embroidery threads are from
r
Wonderfil® Specialty Threads:
Eleganza™ 8wt perle cotton,
Spagetti™ 12wt cotton, Razzle™
rayon, and Dazzle™ metallic
rayon. Add extra sparkle by
using two strands of 8wt
perle cotton to affix sequins
ns
using a central colonial knot.
ot.

“Limelight & Delight”
12½" diameter

SPRING 2024

|

Q U I LT I N G A RT S ® M A G A Z I N E

59

Finishing
1. Once the machine- and hand-

stitching is complete, fuse the quilt
top to a layer of ultra-firm stabilizer
and backing fabric. The fusible
will help secure the thread tails
while the stabilizer will provide
structure, especially if finishing with
scalloped edges.
2. For trimming the mandala shape, a

Stanley Fatmax compass (figure 9)
can be adjusted to mark a circle
perimeter around the design.

figure 10

figure 11

3. For smaller art quilts, minimal

machine stitching is required to hold
the layers together, although stitching
around the perimeter twice (figure 10)
helps secure the edges before using
sharp scissors to trim alongside the
outermost stitched edge. (figure 11)
4. Finish the raw edges with

dimensional fabric paint. Tulip®
Puffy™ paints are available in a variety
of colors with a fine tip applicator,
making it easy to paint the edges.

5. Prop the quilt on top of

a surface to air dry—an
elevated surface will allow
air circulation and prevent
the paint from sticking to
a work surface. I place my
quilt onto several jars of a
similar size.
“Yoga Flow(ers)” • 13" × 13"
60

SPRING 2024

|

Q U I LT I N G A RT S ® M A G A Z I N E

Resources
The 100 Day Project
the100dayproject.org
Carve December
juliebalzer.com/carvedecember--print-inktober

studio style
Focus on your studio: add these finds to your quilter’s tool kit and library
Gloriosa Garden
JANE SASSAMAN

There is something so opulent, colorful, and joyful about the fabrics Jane Sassaman
designs and Gloriosa Garden is no exception. Her designs are instantly recognizable
for their bold color and graphic style. Primarily blossoming in oranges, greens,
and purples, Jane balances color and scale so well in this collection of ten fabrics.
Designs range from geometrics to graceful nature-inspired motifs. You will have
fun integrating these beautiful fabrics into your work.
freespiritfabrics.com

Sewing Machine LED Lighting Kit
INSPIRED LED

Oh boy do we wish this product were around years ago—remember those tiny
lightbulbs on our machines way back when? So inadequate . . . but not anymore!
This phenomenal LED lighting kit in cool white is designed specifically for sewing
machines and can be trimmed to size. The flexible light strip can be adhered to
any spot you need extra light such as the top of the harp on a domestic machine
or anywhere on a mid- or longarm machine. The pool of light from these LEDs is
amazing! An expansion kit is also available to accommodate an additional machine.
$30–$45 • inspiredled.com/product/sewing-machine-led-lighting-kit

THE PIGMENT TRAIL: INSPIRATION FROM THE COLORS, TEXTURES,
AND PEOPLE OF INDIA
DEBRA LUKER

As a traveler in India, Debra Luker was amazed, enthused, and empowered by the color
and beauty around her. She writes, “captivating color moments happen often and are the
very essence of this vibrant country. India’s colors are rooted in its culture and everyday life,
stories, and legends that bind its people and their beliefs.” Brimming with amazing photos
and artwork, this alluring book will capture your imagination and inspire your sense of
discovery. As a mixed-media artist, Debra shares her observations and work, combined in
this sketchbook journal-cum-picture book for art lovers. This is a glorious and beautifull book
to travel through.
$34.99 • schiffercraft.com

Verdigris
LIBS ELLIOTT

The word verdigris has a few definitions but most of us are familiar with the
greenish deposits formed on metals like bronze and copper—also knows as
patina—and we love how Libs Elliott evokes this feeling in her latest fabric
collection with Andover Fabrics. The colors are subdued and the palette
controlled; graphic designs and even some funky, graffiti-like motifs grace prints
that will sparkle in a quilt or garment—a jacket in the bird print, perhaps? There
are eight distinct patterns in different colorways to complete this 24-piece group..
andoverfabrics.com
SPRING 2024

|

Q U I LT I N G A RT S ® M A G A Z I N E

61

“Brood X” (detail) • 16" × 12"
“Worker Bee” (detail) • 17" × 17"

“Queen Bee” (detail) • 21½" × 23"

Apiary
Appliqué
t

Turn a photograph
into fiber art
by Karen Fricke

his spring we installed a beehive on our property and I have been
inspired by the honeybees’ dedication to making the colony function

successfully. And, as frequently happens, I wanted to capture in fabric
some of what I see and feel watching them.
I have written, lectured, and taught workshops on my technique,
Thread Sketching on a Photograph. My students are always amazed and
delighted that they can so easily create with thread what looks remarkably
like a pen-and-ink style drawing.
This article takes that process a step further—I’ll show you how to
enhance the composition of a thread-sketched image to create a more
realistic portrait by adding layers of fabrics and ink shading.
62

SPRING 2024

|

Q U I LT I N G A RT S ® M A G A Z I N E

DIRECTIONS
Prepare the photo
1. Choose a photograph. Enlarge it

to about 8" × 10" and edit it so the
focal subject almost fills the page.

4. Use a fine-line permanent pen on

computer paper. Print the FIRST
photo in color just as it is. Print
the SECOND photo in grayscale,
switching the orientation
horizontally, so if the bee is facing
left in the original, in this second
one, she will be facing right in
mirror image. (figure 1)

the stabilizer copy to define any
lines that you want to emphasize
in your stitching, or that were
lost in the printing process.
(figure 2) Use the second photo as
a reference.
5. Pin the stabilizer to the

background fabric, wrong sides
together.

3. Print a THIRD copy in grayscale—

in the same orientation as the
second photo—but print this onto
the stabilizer. Let it dry for 24
hours and heat set the ink with a
dry iron.

Begin thread sketching
1. Prepare the sewing machine:

thread it with black sewing thread
(I use Mettler® silk-finish #50 wt.)

MATERIALS
• Fat quarter of light-colored fabric for

•

•
•

•
•
•
•

the background, solid or almost-solid
(TIP: I use tightly woven fabric like
batiks; their sturdiness holds up
well when removing the stabilizer.)
Scraps of solid, hand-dyed, sheer, and
metallic fabrics that replicate the
dominant colors in the photograph
Photograph, your own or copyright
free (see step 1 for details)
Tear-away stabilizer trimmed to
8½" × 11" (I use Pellon® Stitch-NTear®.)
Permanent marker (I use Sakura®
IDenti-Pen®.)
Sewing machine with free-motion
capability
Free-motion or darning foot
Embroidery machine needle size
75/11 or Microtex machine needle
size 80/12 (also known as ‘sharp’)

figure 1
Process photos courtesy of the artist

2. Print two copies on regular

NOTE: Yes, stabilizer will feed
through most home printers, just
like a page of cardstock, if you feed it
through one sheet at a time. Be sure
to press the stabilizer flat and cut it to
the exact dimensions of printer paper.

• Duckbill appliqué scissors
• Liquid seam sealant (I use Dritz® Fray

Check®.)
• Tsukineko® all-purpose ink (TIP:

You can add shading to almost any
fabric with three colors: Cool Gray,
Real Black, and Truffle.)
• Fanastix® applicators (TIP: These

come in bullet or brush tips; I like to
have one of each for every color.)
• Jacquard® Lumiere® paint in Hi-Lite
Blue (576) or Pearlescent White (568)
• Small paintbrush
Optional
• Teflon™ free-motion slider mat (I use
Sew Steady® or Supreme Slider®.)
• Machine quilting gripper gloves (I
use The Gypsy Quilter® Hold Steady
gloves as they do not make my
hands too warm.)

SPRING 2024

|

Q U I LT I N G A RT S ® M A G A Z I N E

figure 2
in the needle and bobbin, insert an
embroidery or sharp needle, add
a free-motion or darning foot, and
place the feed dogs down.
TIP: Always, always test the tension
before sewing a project. Use a scrap of
the background fabric pinned to a scrap
of the tear-away stabilizer, and place
the stabilizer face up on the machine.
Stitch free-motion loops and zigzags to
check the tension, especially along tight
curves of the loops and the corners of the
zigzags, where faulty tension shows up
most clearly.
2. Starting with the background of

the photograph, decide which
component is farthest away and
begin with that. In my example,
since parts of a pink flower are the
components that are the farthest
thing in the photo from the viewer,
I’ll create that area first.
63

figure 3

figure 4

figure 5

figure 6

figure 7

figure 8

TIP: If it’s made up of a dark color in the
front and a medium color in the back,
begin with the lighter color.
3. Carefully align the fabric, right

side up, into place on the right
side of the background fabric.
Hold the fabrics up to a light to
make sure that the entire area is
covered by the fabric. Pin into
place. (figure 3)

outside the outline from the front
side, using care not to snip the
stitching.
6. Continue adding colored fabrics

to the design in the same manner,
following steps 3–5, working
from the background toward the
foreground of the photo. If you
are using sheer fabrics, wait to
add them until the stitching is
complete.

4. With the stabilizer facing up, stitch

once around just those elements
in the photo that will be the first
color. (figure 4) When you have
finished stitching the design, flip
it over—the result will look like
a coloring book image, a very
simple outline with only the most
essential details visible. (figure 5)

TIP: When using specialty fabrics that
fray such as tissue lamé, run a thin line
of seam sealant just outside the stitching
line on the fabric, allowing it to dry
completely before trimming away the
excess fabric.

trim away the excess fabric

64

2. Allow the ink to dry and set it with

a dry iron. Be careful of specialty
fabrics you’ve used—some won’t
tolerate the heat. In that case or if
you are unsure, cover these fabrics
with a press cloth and use caution.

Enhance with paint
1. With the ink and coloring tools,

5. Using duckbill appliqué scissors,

TIP: Keep extra fabric to test the colors
and ‘strip’ out the ink to achieve a softer
hue. (For you non-painters, this is when
you remove the brush from the paint and
drag the brush against the container’s
edge to remove some of the excess paint.
Like you do with nail polish.) You can
always add more color to deepen it,
but you can’t remove it once it’s there.
Have fun blending and playing with
the saturation of the ink, always testing
the intensity on the extra fabric before
moving to the project. (figure 6)

add shading and color to the
design. Use the first photograph as
a guide.

SPRING 2024

|

3. Add highlights with Lumiere paint,

which works well on fabric.

Q U I LT I N G A RT S ® M A G A Z I N E

to alter the color, shimmer, and
transparency. (figure 8) Pin the
sheer fabrics in place.

TIP: It is very hard to differentiate ink
colors by looking at a stained applicator
tip. I write the ink number on the
applicator so I don’t confuse them.

3. Turn the piece over and with the

Resume sewing

stabilizer facing up, stitch around
the elements in the photo that will
be covered by the sheer fabric.
Turn the project over and on the
fabric side, run a thin line of seam
sealant on the sheer fabric just
outside the stitching line. Let it
dry completely, and then trim
away the excess fabric.

1. Return to the machine and with

the stabilizer facing up, complete
the stitching that will be visible
underneath any sheer layers.
Define the shadows and contours
of the design with thread, referring
to the first photo for reference.
(figure 7)

figure 9
NOTE: Stitch over the outlines several
times, but don’t try to follow them
exactly. Allowing the stitching lines
to meander just a bit makes the end
result look more like a pen-and-ink
drawing.

4. Return to the machine, and with

the stabilizer facing up, complete
the detail stitching of the sheer
fabric areas. Be sure you have
outlined the entire design two or
three times to make it easier to tear
away the stabilizer.

2. If you are using it, align sheer

fabric, right side up, on the right
side of the composition in the
same manner as you added the
solid color fabrics. Choose one
fabric or layer several sheer fabrics

5. Carefully remove as much of

the stabilizer as you can, using a
seam ripper and tweezers. Leave
it in place under heavily stitched
areas.

Dip Your Toe
into Thread
Sketching on
a Photograph
If you haven’t attempted thread
sketching on a photograph before,
it might be helpful to first try this
technique without adding the layers
of fabric and ink.
Rather than print the first photo in
color, print it in grayscale, along with
the second photo in which you’ve
flipped the orientation horizontally.
Then print this second image onto
stabilizer. Mark the important lines
with a permanent pen (figure 2) and
pin it to light-colored fabric, wrong
sides together.
With black thread in the needle and
bobbin, a free-motion foot, and feed
dogs down, begin stitching with the
photo-printed stabilizer facing up on
the machine. Follow the lines you’ve
drawn and the shading and details in
the photograph.

““Queen Bee”
21½" × 23"

SPRING 2024

|

Q U I LT I N G A RT S ® M A G A Z I N E

When you flip the stabilizer over
to the fabric side, the result will
look surprisingly like a pen-and-ink
drawing. (figure 9)

65

Photos courtesy of SAQA unless otherwise noted
Pho

Becoming One with the Night
45" × 35" • BOBBI BAUGH • DELAND, FLORIDA

Go out into the cool night and sit on the porch step. Feel the evening air. Breathe it
in. Let the air enfold you. Become one with its sounds. Then, when you look to see
who you have become, you will find that night and its shadows are within you.

66

SPRING 2024

|

Acrylic paint, muslin, sheer polyester, felt;
monotype printed, stenciled, relief printed,
painted, collaged; machine stitched.

Q U I LT I N G A RT S ® M A G A Z I N E

Beyond the
A SAQA Global Exhibition
VIEWING THE SUBMISSIONS FOR “BEYOND THE MIRROR” filled

me with both awe and joy … and selecting the artwork for this
exhibition proved to be a task not for the fainthearted. All the artists
demonstrated a high degree of imagination and technical skill. I based
my selections on how closely the artists adhered to the original entry
call—that is, how well they went beyond the superficial and delved
deeper into the more complicated and ambivalent thoughts and feelings
that lie beneath societal roles or activities.
In fact, I searched for the presence of ambivalent feelings
associated with all the societal roles the artists alluded to. In other
words, for every happy moment in our lives, there is often a moment of
self-doubt, and a question about how to be a good and valuable person.
Going ‘beyond the mirror’ means, to me, reckoning with our flaws,
worries, and pain. It means recognizing and confronting the fact that
even in good times, life is hard and grief is normal. To do so is to
become a fully realized person capable of compassion for oneself and
others. When we accept our own imperfections and love ourselves
anyway, we are more able to accept the flaws of everyone around us, to
feel empathy, and a profound sense of understanding and connection.
—ANDRA F. STANTON, JUROR

SPRING 2024

|

Q U I LT I N G A RT S ® M A G A Z I N E

67

Leaving
33" × 34" • JILL KERTTULA • CHARLOTTESVILLE, VIRGINIA

As we see our mirrored image age, it is easy to discount the years we have lived. But then we should
remember the Ginkgo tree. Ginkgo trees are at their most beautiful just before their leaves fall. That is
something for us all to aspire to. This piece was originally created for a show about death. It is a self-portrait
that celebrates the fragility of life as well as the gift of our existence. Layers of fabric, above and below the
photo, allow me to slash into the photo, hide parts, and invent textures.
Photographs, fabric, tulle, decorative netting; photographed, hand and machine stitched, raw-edge appliquéd, layered, slashed.

68

SPRING 2024

|

Q U I LT I N G A RT S ® M A G A Z I N E

Bryna Flowers
33" × 38 ½" • FUZZY MALL • DUNDAS, ONTARIO, CANADA

My work in portraiture is interaction driven.. I get to know my subjects
j
by taking candid photos and studying
their unique body language.. Focusing on the person in mid- motion, I capture the raised eyebrows, crooked
o
smiles, and waving hands that we all use to communicate. I sit with my subject and try to have intimate
moments. This is a response to the deluge of Instagram and Facebook
images currently
flooding our daily
c
r
lives. My intention is to reinterpret fleeting imagery by creating a permanent object from an ephemeral
image that we are accustomed to seeing swiped away by a finger. Tapping into the tradition of quilts and
painted portraits as family heirlooms, I create contemporary portraits from these casual photographs that
are snapped by cell phones, often live in the cloud, and usually disappear.
Reclaimed textiles, felt; raw-edge appliquéd, machine sewn.

SPRING 2024

|

Q U I LT I N G A RT S ® M A G A Z I N E

69

Photo by Peter Gardner

Can this be me?
33 ½" × 34 ½" • BODIL GARDNER • LYSTRUP, DENMARK

As we get older, the mirror often surprises!
Mostly cotton recycled fabrics; appliquéd; machine quilted.

70

SPRING 2024

|

Q U I LT I N G A RT S ® M A G A Z I N E

Looking In
33" × 30" • PHYLLIS CULLEN • NINOLE, HAWAII

This piece explores identity and image; the older female artist, and those whose pictures are etched into
my mind. Without a stethoscope and scrubs, do people see me as I am, the doctor who has traveled on
multiple volunteer missions to heal those without resources? And, more importantly, do they see the
courage and persistence of my impoverished patients who have come for help? Can they see that the
beauty and color of my work is an antidote to the suffering I have witnessed and a celebration of the
strength of the human spirit?
Commercial cotton fabrics; Raw edge appliquéd, photo transferred, free motion quilted.

SPRING 2024

|

Q U I LT I N G A RT S ® M A G A Z I N E

71

72

SPRING 2024

|

Q U I LT I N G A RT S ® M A G A Z I N E

Self Portrait #6

Poppy Picnic

38" × 52" • SHIN-HEE CHIN • MCPHERSON, KANSAS

59" × 42" • MAGGIE DILLON • SARASOTA, FLORIDA

I made yo-yos in varying sizes and shades of purple.
When viewed from afar, the sharp contrast between
the purple yo-yos and the white background makes
it appear to be a black and white image. When
viewed within close range, each yo-yo dot is clearly
distinguished from its neighbors, but the entire image
is lost at this proximity.

Influenced by the nostalgia of old film, I capture candid moments from the
1930s to the 1950s in my textile work. Choosing images that appear photojournalistic, I pull pieces from the images that I like and join them with other
vintage images until I create a composition that satisfies me. I am inspired by
the subtleties of an image. I begin with a palette reminiscent of old film…greys,
dusty blues, ashen greens, and a variety of browns. Lately I’ve been adding more
pops of color, though my heart still yearns for the subdued tones. My work
celebrates an unawareness of the camera in contrast to contemporary selfie
culture, creating a more honest and intimate acceptance of a social portraiture
that is simultaneously ordinary and meaningful. There’s no showing off, just
pure moments ... in the moment.

Recycled fabric, dye, paint; hand stitched.

Commercial batiks; hand cut, raw-edge machine appliquéd; machine quilted.

SPRING 2024

|

Q U I LT I N G A RT S ® M A G A Z I N E

73

Photo by Larry Berman

Tesoro Escondido

The Canary

40 ½" × 30 ½" • PATTY KENNEDY-ZAFRED • MURRYSVILLE, PENNSYLVANIA

36" × 42" • VIRGINIA GREAVES • ROSWELL, GEORGIA

The concept, interpretation, and characteristics of beauty are remarkably
different from country to country, across continents, and even within
tribunal communities. Tesoro Escondido is based on images of native
Argentines from the Chaco area captured from vintage postcards of the
1900s. It is part of a series portraying women from all over the world, with
strikingly varied and distinct definitions of beauty. The images reflect the
specific heritage and cultural identity of this Chaco community, including
uniquely painted and tattooed faces, hairstyles, and jewelry. Stern, resolute
expressions reflect strength and equality, a common ethnic value of these
indigenous people.

My self-portrait shows the visual me, but looking
beyond the veil, you can see the vines of other people’s
perceptions. I am held in that embrace, and yet the
yellow canary of freedom, life, and creativity perches
quietly on my shoulder, whispering guidance as I enter
the darkness of the world. It gives me a path to follow, a
breadcrumb trail to reach a better place, and it teaches
me how to look outside my cage to find a way out.
Cotton; appliquéd; machine quilted.

Cotton, dyes, textile inks, silkscreen materials, fusible web, textile paint, foils; silkscreened,
fused, foiled, painted, machine pieced; machine quilted.

74

SPRING 2024

|

Q U I LT I N G A RT S ® M A G A Z I N E

SPRING 2024

|

Q U I LT I N G A RT S ® M A G A Z I N E

75

For more
information about
Studio Art Quilt
Associates, visit
saqa.com.

Memory Lane#1-Chanig
#
n in Spring
• ARRADON, FRANCE
35" × 47" • GENEVIÈVE ATTINGER
T I
C

Chanig is part of my roots, and I am her future. Born at the very end of the
t 19th century she was a lace maker and a
knitter who taught me embroidery and sewing in my younger days. This work does not look backward—it expresses
the links that connect me to my past. Chanig made me the person I am, the person who thinks that hands are an
extension of the mind and contribute to creation. Speaking about my innermost feelings is rather difficult. As a
textile artist, threads and fabrics have become my means of expression. They are my vocabulary to make free- motion
machine portraits, in which the art is the narrative.
Cotton, linen, satin; free-motion machine embroidered, appliquéd, pulled thread work, machine pieced, hand dyed; machine quilted.

76

SPRING 2024

|

Q U I LT I N G A RT S ® M A G A Z I N E

Photo by Adonyi Gábor/Pexels

It's Not Just a

SHARP BLADE
w

hat if someone were to tell you
they wanted to try making a

quilt for the first time? After expressing
your extreme endorsement of the idea,
you would probably recommend a few
basic supplies to purchase even before
a sewing machine: some fabric, your
favorite ruler, a self-healing cutting mat,
and a rotary cutter. That ubiquitous
gadget often seems an extension of our
very hands—while being one of the
first tools we reach for—and it has a
much larger story to tell. Its connection
to emotional experiences and socioeconomic issues lives largely unrealized
and are taken for granted.
SPRING 2024

|

by Kristin Barrus

In our defense, many of us are surrounded by many
physical things in today’s world. And this particular device
as we know it has been around for over 40 years—the entire
quilt making lifetimes of many of today’s makers. Having said
that, the humble rotary cutter can be looked at through much
bigger eyes than merely getting a cutting job done quickly
and precisely.
When we examine this steely-bladed instrument more
closely, we see a hand tool steeped in international relations,
technological advances, occupational and corporeal
positioning, women-led commercial successes, and even
folklore, to say nothing of the vital art that has come about
through its use. Author bell hooks wrote, “Objects are not
without spirit. As living things they touch us in unimagined
ways.” So important is the rotary cutter that it has become an
icon of quilt making today.

Invention and Adoption
Although something referred to as a rotary cutter can be
found in the Smithsonian’s catalog of objects taken to the
World’s Columbian Exposition in 1893, it wasn’t until nearly

Q U I LT I N G A RT S ® M A G A Z I N E

77

The World’s First Rotary Cutter, 1979

Photo by the author

Photos courtesy of OLFA

The World’s First Snap-Off Blade Cutter, 1956

The OLFA logo parallelogram evokes the
original snap-off blade.

90 years later that the rotary cutter we use today was
invented. But first, war.
Following the end of World War II, Yoshio Okada
and his brother worked in paper manufacturing in Japan
while American G.I.s passed out a lot of chocolate bars.
Okada lamented the waste of so many dull blades to cut
paper, and so, taking inspiration from the way American
chocolate bars snap into pieces, they invented the first
snap-off blade cutter in 1956. OLFA CORPORATION was
born. They introduced their signature egg yolk-yellow
color to make their tools stand out, evoking safety and
familiarity for an international client base.
In 1979, Okada was watching a European tailor
cut a single piece of silk with long shears on an Italian
television show. He combined the tailor’s needs with
rotating automobile tires to create the 45mm OLFA®
rotary cutter. The next year he introduced his new
tool to the United States and Canada through sewing
notion representatives and at the American National
Needleworker’s Association convention.
Quiltmakers have historically been quick to adopt
and advance related technology. From advances in
sewing machines to fabric design changes, instantly
downloadable pdf patterns, the computerized longarm
machine, the use of digital designs and social media, even
the Modern Quilt Movement, quiltmakers absorb, modify,
and share new tech.
78

SPRING 2024

Above: Personal safety
Several women entrepreneurs
negotiations of this
saw the value in this new tool. Early
tool have become
wholesalers, store owners, and artists
legendary. My favorite
like Marti Michell and Linda Seward
was the Tulsa Modern
Quilt Guild’s QuiltCon
said that once clear, acrylic rulers
2020 quilt, “Who
and self-healing cutting mats were
Needs Words to Tell
devised—saving their dinner tables
A Story: A Day in the
from ending up like their pizza pans— Life of a Quilter.” It
depicted a quiltmaker’s
quiltmakers put down their scissors.
typical day through an
Marti told me, “It was like magic for
emoji grid, complete
people. It was the kind of thing you
with a bloody rotary
blade and follow-up
shared as soon as you got it.”
wound care.
Marti Michell and Mary Ellen
Hopkins demonstrated the cutter
for the early Schoolhouse demonstrations at International
Quilt Festival around 1981. Barbara Sweetman of Yarn
Loft International (YLI) began importing the cutter in
bulk. Peggy Shaeffer started Omnigrid® in her carport. By
the time Eleanor Burns started stripping, the rotary cutter
was on its way to becoming a cultural marker.
Upon closer examination, it turns out we are not just
making more quilts. We are also participating in healing
wounds developed by a previously warring East and
West over 75 years ago. We are supporting women-led
businesses, changing social norms inside their homes and
out, and adapting new ergonomics of creating, with the
rotary cutter at the center of it all.

|

Q U I LT I N G A RT S ® M A G A Z I N E

Author Meg Cox argues, “[The
rotary cutter] sparked a revolution
comparable to the effect of the food
processor on home cooking.” We now
see a variety of companies producing
their versions of the blade. We have
rows and rows of rulers, templates,
and mats that fold, light up, or rotate.
Fabric purchasing increased and
stores needed ways to cut and bundle
more fabric. As quilt production sped
up, so did the need to quilt them all.
This led to a rise in longarm machines
and larger yoked domestic machines.
And once you pull your quilt off the
machine, larger rotary blades for
trimming excess batting and backing
are helpful. All of this requires more
and more financial resources and
physical space inside of the home,

changing layouts, budgets, and leisure
time for millions of lives. Truly, the
rotary cutter fueled both economic
as well as social change. I bet Okada
never saw that coming.
Not only is the tool a socioeconomic influencer, it also has
made an impact on quilt culture.
Enlarged cardboard rotary cutters
are frequently used in selfie booths
at events. It has appeared in fabric
lines, from designers such as Tula
Pink and the duo Annaliese Johnson
and Brenda Reed. Karen Roberts’ laser
cut quilt pattern reads, “Quilt Free
or Die!” above the Statue of Liberty
holding a rotary cutter in place of
her torch. Even illustrator Samarra
Khaja joined the trend with the
imagery for Husqvarna Viking’s 2017
advertisement depicting a Vikinglike woman standing with a life-sized
rotary cutter as her weapon against
the world. Iconic status achieved.
Finally, the rotary cutter changed
the ergonomics of how we position
ourselves when making quilts.
We moved from the seated, open-

Above: An example of an enlarged
rotary cutter being used in a selfie
booth at a quilt retreat. Pictured
are sisters Jennifer Harrison and
Kristen Perschon. Photo courtesy of
Kristen Perschon

Right: Samarra Khaja’s illustration
for Husqvarna Viking® sports a
rotary cutter alongside other iconic
symbols of the quilting culture.

SPRING 2024

|

Q U I LT I N G A RT S ® M A G A Z I N E

Photo by the author

Emblem and Icon

Quilt Free or Die laser cut block by
David & Karen Roberts of Evil Mad Quilter.

close action with scissors used for
centuries, to an upright relationship
with our tables and sewing spaces.
For everyone except astronauts.
NASA astronaut and quiltmaker Karen
Nyberg reported not being able to
use a rotary cutter in the gravity-free
International Space Station.

An Emotional Connection
Thousands of years ago, humans used
hand tools in artistic ways for uses
other than physical survival. Fiber
artist Renate Hiller goes further by
saying, “In a way, the entire human
being is in the hands.” Clearly all
of this holding and cutting creates a
human imprint, a special relationship
between maker and tool, not just
between maker and quilt. Our rotary
cutters are clearly precious to us.
And they should be. They bridge
international waters. They promote
women-driven economy. They stand
as emblematic icons for a leisure
activity and subjective career that
holds great value for millions of
makers across the globe. They help us
create neat, little, perfect fabric piles
in a world where things are rarely neat
nor perfect. Next time you pick up
your rotary cutter, think about all that
it holds in its plastic shape. You’re not
just cutting fabric with it.
79

What’s Your Story?

I do a lot of improv
piecing and this small
28mm OLFA® cutter is
a more responsive tool
for freehand cutting. It’s
also very lightweight
which makes it easier
on your wrists.

Photos courtesy of the artists

We know how much quilters love their rotary cutters, but
everyone seems to have a favorite. We asked some of the
faculty from this year’s QuiltCon to share their perspective
of this ubiquitous tool.

My rotary cutter makes me feel
like Edward Scissorhands. I’m never
without my Clover 60mm and
28mm—you’ll regularly find me using
both simultaneously.

—Jo Avery

—Jen Carlton Bailly

I prefer a simple rotary
cutter that I can use with
either hand. I put a little
piece of my favorite washi
tape on all my tools before a
workshop or a group retreat
so I can remember which
things are mine.

I’ve tried a variety
of rotary cutters
over the years,
but my favorite
is still the OLFA
45mm I purchased
20 years ago.

—Daisy Aschehoug

—Kristin Barrus

My favorite rotary cutter is one
that I recently developed with
Brewer Sewing. Not only is it
comfortable to hold, it also comes
infused with ‘magical’ Christa
Quilts pixie dust which will make
you a better quilter, guaranteed!
—Christa Watson

80

SPRING 2024

|

Q U I LT I N G A RT S ® M A G A Z I N E

GET IT
RESULTS FROM THE
‘GOOD INTENTIONS’ READER CHALLENGE

i

n the Fall issue we shared a lament of many quilters—
the unfinished project … or 2 … or 20. We all have

them—how can we not? With so many wonderful fabrics,
designs, techniques, and tools, the thrill of starting
something new is almost a gravitational pull! Many of us
feel a longing to complete these ‘babies’ and yet they linger.
No more! This challenge was about taking up one of
those past projects and completing it. Special credit is
given to folks who started but never finished a past Reader
Challenge. In these pages, there is a sprinkling of them
plus other UFOs that our intrepid readers completed and
submitted. We hope you enjoy this gallery of their nowcompleted work!

SPRING 2024

|

Q U I LT I N G A RT S ® M A G A Z I N E

81

My Meadow
9 ½" × 8 ¼" • ELLEN WITHERLY • PRINCE RUPERT,
BRITISH COLUMBIA, CANADA

This piece started out as a piece of fabric I made in a dyeing
class years ago. I know it involved tying marbles in the fabric
before I dyed it, but beyond that I can’t remember. I loved the
result, a spring green fabric with yellow and white circles that
made me think of daisies. Every few years I’d look at it and plan
the daisies I’d make . . . someday. Well, ‘someday’ arrived and the
strangest thing happened—it didn’t want to be what I planned
for it at all! In fact, you cannot even see much of the original
dyed fabric in this piece. You can see the original fabric in two
of the flowers and in the allium flower that popped in there.
Who knew that it needed a carpet of forget-me-nots! This was a
real lesson in just letting the piece take me where it wanted to
go, and this is the result.
Hand-dyed and other fabric, metallic beads; appliqué, hand embroidery,
machine stitching.

Joyful Learning
3 ¾" × 30" (UNROLLED) • JENNIFER GOTTLIEB • TROY, MICHIGAN

I fell in love with the idea of the “Scrolls and Rolls” Reader
Challenge when I saw it! I immediately ordered some vintage
spools and started playing with scraps of fabric. I assembled
several long strips with different ideas—one that started to tell
the story of our pandemic
m lockdown, a rainbow strip made from
scrappy solids, and another
t one with fabric scraps from the shirts
I’ve made for my husband. None of them seemed quite right,,
and then life took over, and I never did anything
with any of it. This year, my mom turned 80
and the two of us spentt a week in North
Carolina learning how tto weave. It was
magical! When we returned home,
I struggled with how to commemorate
this experience—then I thought of
my abandoned scrolls. Imagine
my surprise a week later when
I received my Fall 2023 issue of
Quilting Arts announcing
c this
challenge—it was not too late
to submit my scroll after all!
The “Scrolls and Rolls” Reader
Challenge was announced in the
Summer 2021 issue.

82

SPRING 2024

|

Q U I LT I N G A RT S ® M A G A Z I N E

Quiet Beauty
10" × 10" • MERIUL EASTON • PUNTA GORDA, FLORIDA

While sipping my morning coffee on my backyard deck, I noticed a lovely butterfly
enjoying what the potted flowers had to offer. Immediately, I became aware of the
glorious beauty in front of me! I snapped a photo and began the process of creating a
piece to enter into the “Take a Hike” Reader Challenge. Needless to say, life happened
and this piece was put on a shelf until recently when I saw the “Good Intentions”
Reader Challenge. I knew instantly that the forgotten piece I had started during the
pandemic needed to be brought to life!
The “Take a Hike” Reader Challenge was announced in the Spring 2021 issue.

SPRING 2024

|

Q U I LT I N G A RT S ® M A G A Z I N E

83

Sweet Tweets
17 ½" × 17 ½" • LOIS KIRKWOOD
MT. POCONO, PENNSYLVANIA

In late 2021, Quilting Arts issued
an invitational call for submissions
to more than 100 artists whose
work has been part of one or
more Reader Challenge galleries
in the recent past. Alas, the piece
I wanted to submit didn’t get
finished in time. “Sweet Tweets” is
finally finished thanks to this new
challenge! I’ve been inspired by pen/
ink/watercolor sketches and these
cute birds featuring ice-dyed fabrics
are my current design. Such fun!!
Ice-dyed and commercial fabric; appliqué,
thread painting; machine quilted.

Eruption
10" × 6" • PAM HARRIS • CODY, WYOMING

I generally cut up my challenge quilts to
repurpose into other art quilt projects, cards,
or postcards.
This is part of my letter ‘I’ quilt, titled “Ice Dye
Meets Indigo,” for the “Quilt Art: A Quilter’s
Alphabet” challenge (announced in the
Summer 2022 issue). This piece was based
on the “Stitch by Stitch” Reader Challenge
introduced in the October/November 2019
issue. The ‘I’ portion of the quilt was cut out
for another art quilt project so I was left
with an odd-shaped UFO. This challenge was
a perfect way to use it, as I am not bound
by a specific size. I added some additional
stitching and cut it down to a more pleasing
size and orientation. I prefer this version, as
the piece is more focused and energized.
Cotton fabric and embroidery floss; ice and indigo
dyeing; hand quilted.

84

SPRING 2024

|

Q U I LT I N G A RT S ® M A G A Z I N E

T for Tools
10" × 10" • DENISE EPP • ROSTHERN, SASKATCHEWAN, CANADA

This quilt is an unfinished Reader Challenge from the Summer 2022 issue 114, where free
verse poetry was used as a descriptor, as done by “The Migrant’s Alphabet” artists.
My personal challenge—a good intention at the time—was to do the entire alphabet
accompanied with free verse. Then energy dwindled to just ‘A R T.’ The ‘A’ that anchored
me was published; the ‘R’ that rooted me, was not; and the ‘T’ didn’t meet the deadline.
Now T has been completed. A and R will be delighted for the company of T.
Cotton fabrics, wooden spools, plastic measuring tape, button, ribbon, embroidery floss with labels;
machine pieced, appliquéd; machine quilted.

SPRING 2024

|

Q U I LT I N G A RT S ® M A G A Z I N E

85

Chaos to Calm
10" × 5" • CHERRI ANN PEARSON
ORANGE, MASSACHUSETTS

My husband and I visit Cape Cod
a couple of times a year. Life can
feel chaotic and out of control
at times. Once we cross the
Bourne Bridge, we feel calm and
peaceful. This challenge was not
completed because I got food
poisoning. No fun.
Started for the “Art is a Bridge” Reader
Challenge announced in the Spring
2023 issue. Cotton fabric, cotton
batting, bookbinding glue, polyester
thread; thread painted; machine
quilted.

Paper Dolls
13 ¾" × 8" • MARY ROBBINS • BOZEMAN, MONTANA

My ‘good intentions’ were to submit this to the “Print, Paint, + Play!”
challenge but I couldn’t decide how to proceed after the initial
screen printing. I used a multi-fold-and-cut paper technique to
create a chain of paper dolls from newsprint. I used this as a mask
for screen printing a dark blue background around the dolls which
left the dolls in the original color of the fabric which was yellow.
I made several printed copies then decided to sew two together to

86

SPRING 2024

|

have a longer row of paper dolls. By machine quilting around the
doll outlines, I was able to use a reverse appliqué method and cut
away the top fabric to reveal the dresses beneath. One of the dresses
is painted instead of appliquéd then embellished with dimensional
fabric paint. The shoes are painted with metallic paint. I recently
read that playing with paper dolls encourages creativity. Hurray for
one of my favorite childhood activities.
Begun for the “Print, Paint, + Play!” Reader Challenge announced in the Winter
2023 issue.

Q U I LT I N G A RT S ® M A G A Z I N E

Persimmons and Doves
6" × 6" • FRANCES HOLLIDAY ALFORD • GRAFTON, VERMONT

Chinese Farmer Paintings are exquisite renderings of iconic subjects. “Persimmons and
Doves” is a response to this artwork. Originally designed to look like a postage stamp,
I have added another border and a red cork backing. Austrian crystals and embroidery
are added to commercially printed knit fabric. The painting is original to me—inspired
by the Chinese Farmer paintings—and printed by Spoonflower.
This quilt was a UFO from the “Art as Inspiration” Reader Challenge announced in the October/
November 2020 issue.

SPRING 2024

|

Q U I LT I N G A RT S ® M A G A Z I N E

87

Solitude
11" × 13" • CYNTHIA BOOS • HIGHLANDS RANCH, COLORADO

A sweet little trail above our mountain house rejuvenates my soul. It only takes a few strides and
a moment of travel for its healing power to fill my heart. Before, during, and after the pandemic
it has been my refuge. The trees, sunshine, rocky path, wildflowers, and especially an ancient
dead tree have been there to greet me. A few fussy-cut pieces, a confetti background, and heavy
stitching were the perfect techniques to capture this scene.
This quilt was inspired by the “Travel Near and Far” Reader Challenge announced in the Fall 2021 issue.

88

SPRING 2024

|

Q U I LT I N G A RT S ® M A G A Z I N E

Ebb & Flow
8 ½" × 11" • THERI DUFOUR • AVON, INDIANA

The night sky fascinates me. Above all, the moon traversing the star-flecked sky draws me time and again to
photograph, recreate, or just gaze in wonder at the glowing orb. Constant but ever-changing, this past year we
experienced micromoon, supermoon, and blue moon as well as two lunar eclipses. This is the first of a series of
quilts which are freezer-paper pieced from mostly batiks and hand-dyed cotton. They have been pinned to my
wall for months while I considered making more of them. The Good Intentions challenge has finally prodded
this lunatic into adding the binding to complete these little quilts!
Hand-dyed cotton and batik fabric; freezer-paper foundation piecing, hand appliqué.

SPRING 2024

|

Q U I LT I N G A RT S ® M A G A Z I N E

89

Add

Wired
Accents i

using unexpected materials when creating

fiber art. Currently I am working with copper

for

mesh to add dimension to my work. This
tightly woven, 80-weight metal mesh fabric is a

3-D Fun

wonderful addition to an artist’s toolbox.
Incorporated in your artwork, it provides textural
and 3-D possibilities—the mesh will hold its shape after
folding or bending and it is lightweight. Best of all, it can
be sewn easily by machine.

by Margarita Korioth

90

enjoy exploring different techniques and

SPRING 2024

|

Q U I LT I N G A RT S ® M A G A Z I N E

DIRECTIONS

paper, and place it, fusible side
down, onto the right side of the
flower shape.

Prepare the motif

6. Using a permanent marker, trace

the shape onto the woven metal
fabric. (figure 4) With paper
scissors, cut on the line.

1. Iron paper-backed fusible web

to the back of each small piece
of colored fabric following the
manufacturer’s instructions.

TIP: Use a lightbox to center the circle
within the drawn flower shape.

TIP: To avoid dulling fabric scissors,
always use scissors dedicated to paper for
cutting the metal fabric.

4. Press the circle onto the flower.
2. Draw a design—in this example, a

Once cool, cut out the flower
shape. Remove the release paper
from the back of the flower.
(figure 2)

flower shape—onto the paper side
of the fusible web. (figure 1) Turn
the fabric over, right side facing up.
3. Draw a detail for this design using

MATERIALS
• Woven metal fabric (I use

5. From the template plastic,

a different colored fabric—in this
example, a center yellow circle.
Cut it out, remove the release

80wt WireMesh® sheets of
100% copper by Amaco Brent.)

cardboard, or paper, draw a
similar shape—the flower—but
significantly smaller. Cut out the
shape. (figure 3)

• Various small pieces of colored

fabric for appliqué elements
(TIP: Visit your scrap basket.)
• Fat quarter of colored fabric

•
•
•
•

figure 1

figure 2

for appliqué backing (TIP: This
can be any color but keep in
mind it may be seen when
the 3-D metal-lined petals are
bent and manipulated.)
Paper-backed fusible web
28wt cotton thread for
topstitching (I use Aurifil™.)
90/14 topstitch sewing
machine needle
Paper scissors for cutting the
woven metal fabric

• Fabric scissors

Process photos courtesy of the artist

• Template plastic, cardboard,

figure 3

or paper for creating the wire
shape patterns
• Permanent ultra-fine point
black marker
• Small quilt or artwork to
embellish
Optional
• Opaque gel pens (I use Gelly
Roll® Moonlight® pens by
Sakura®.)

figure 4

SPRING 2024

|

Q U I LT I N G A RT S ® M A G A Z I N E

91

figure 5
7. Place the flower, right side down,

on a work surface. Place the woven
metal fabric shape centered on the
flower shape. (figure 5)
8. Carefully flip over the flower

and woven metal shape together
and place it on the backing
fabric. Press to fuse the flower to
the backing. Repeat all steps to
create as many motifs as desired.
(figure 6)

figure 6
4. Cut around each shape.

NOTE: If desired, add details with the
opaque gel pens. In my quilt, I added
polka dots inside the yellow centers of
each flower.

Finish the quilt
1. On the reverse side of each flower,

TIP: To quilt under a flower petal, simply
bend it out of the way while stitching.
The final reveal: Bend, fold, and
manipulate the flower petals—the
woven metal fabric inside each shape
makes them pliable! Admire how
you transformed your art from flat to
3-D!

place a small piece of fusible web
in the center.
2. Arrange the flowers and/or other

Add stitching to the motif
1. Thread the sewing machine with

28wt cotton thread in the top and
bobbin.

appliqué designs on a quilt. Press
the centers to activate the fusible
web.
3. Free-motion topstitch around the

2. Install a free-motion foot but don’t

lower the feed dogs.

center of each design. In my quilt,
I stitched around each yellow
circle.

3. Slowly topstitch around the outer

edges of the flowers, securing
them to the backing fabric.

92

4. Continue quilting the quilt as

desired.

SPRING 2024

|

Q U I LT I N G A RT S ® M A G A Z I N E

“Popping Flowers”
12" × 14½"

Margarita’s Top 5
Tips for Success
1. Use tightly woven cotton fabric for the flowers/

2.

3.

4.

5.

SPRING 2024

|

appliqué elements and the backing. This will help
control fraying of the edges a bit better than more
loosely woven fabric.
Install a single-hole throat plate on the sewing machine,
if available, for precision and control of straight
stitching.
Use a medium-large sewing machine needle—
Margarita uses a 90/14 topstitch needle—to pierce the
metal and protect the thread when sewing.
Margarita finds it very important to choose a sturdy
cotton thread when you sew on the metal; 28wt is ideal
for this project. She says finer thread snags and breaks
easily.
Don’t be afraid to try unusual materials. Do a test first
with the same elements you are planning to use later in
your final art piece.

Q U I LT I N G A RT S ® M A G A Z I N E

93

LANDSCAPES
Collage and paint your favorite vistas
by Jane Haworth

m

y family loves to travel,
camp, and hike and I
am always stopping to take photos
of the scenery along the way. But
using these photos to create quilts
seemed like a daunting project I was
putting off. When I was approached
by Landauer Publishing to write a
book, CAPTURE YOUR OWN LIFE WITH
COLLAGE QUILTING, and they requested
landscapes as a project theme, I knew
it was time.
I have made a lot of collage
quilts—the majority featured a single,
focal image in the center of the
quilt—so tackling a landscape quilt
was something new to me. There are
many books already written about
landscape quilts so I knew I had to
make these landscape quilts my way.
My approach to collage quilting is
free-form and serendipitous, starting
with a simple design and without
making pattern pieces in advance.
I like to select fabrics, cut and place
them—and as I layer the pieces,
the chosen image or landscape
reveals itself.
94

MATERIALS
• 8½" × 11" landscape photo printed in

• Pre-stretched artist canvas, 12" square

color and black and white (I chose a
horizontal image but you could work
in a vertical format.)
• 8½" × 11" white paper
• Black permanent marker (I use a fine
point Sharpie® which has a thick tip.)

• Fat quarter black fabric for borders

• Selection of fabrics (TIP: A little

texture is good; hand-dyed and
batik fabrics work well. Other cotton
fabrics in suitable colors even cheater
print fabrics—with rocks, trees,
etc.—may work well for you.)
• Sky fabric, printed or hand painted

(See “Hand Paint a Sky.”)
• Cotton batting or felt, 13" square

SPRING 2024

|

• Fabric glue and applicator (I like

Aleene’s® Original Tacky Glue®.)
• Chalk marker or pencil
• Sewing machine with free-motion
capability
• Staple gun
Optional
• Clear page protector or similar plastic
for drawing a copy of the pattern
• Freezer paper
• Light box

Q U I LT I N G A RT S ® M A G A Z I N E

Keep It Simple to Start
When tackling these landscape quilts, I wanted to create a project that
would be a good introductory collage for beginners. Keeping the design,
pattern, and fabric shapes simple was important to me.
Along that line, I suggest starting with an 8½" × 11" photo that can be
easily traced and used as the pattern. If you are looking to make an easy
landscape that captures the essence of a location and your visit, this could
be the perfect project for you.
These finished quilts are wrapped onto a 12" square artist canvas. Since I like
to start with a horizontal photo for the pattern—and I believe that keeps
the project uncomplicated—the trick to making the collage large enough
to cover the artist canvas is to extend the sides by a couple of inches and
then the sky and/or foreground by 5" or so.
o.
I use the 13" square of batting
as a base and cover it with the
collage fabrics. Once stitched,
I trim this to 12½" square and
attach a small border that
wraps around the artist canvas.
“Trinity Alps” • 12" × 12"

Hand Paint a Sky
Sometimes it is hard to find a natural-looking sky fabric. Don’t believe me? Give
it a try! I’m not talking about the commercial fabrics with printed clouds, etc.—
they are definitely NOT my cup of tea!
The answer: Make your own! With a few supplies and a couple of practice pieces,
you can paint it yourself. It is not hard and for a little effort you will be surprised
i
at the great results you achieve.

• 6" × 13" white cotton fabric
• Fabric or acrylic paints in

•
•
•
•

blues, white, black, yellow,
or red (I use inexpensive
craft acrylic paints.)
Paper plate or paint palette
Foam brush
Paintbrush
Plastic sheeting to protect
the work surface

TIP: Keep
e in mind thatt the colors

using the foam brush and clean water.
2. On a paper plate or paint palette, add a
few color drops. Dilute the color with small
amounts of water and begin mixing with the
paintbrush, adding more water if needed.
Mix the colors together as you fancy.
3. With the foam brush, apply the paints like
watercolors onto the damp fabric, diluting
and blending the colors as you go. If the
color is too strong, add a little more water.
Practice blending.

may lighten once dry.

Process photos courtesy of the artist

MATERIALS

1. Place the fabric on the plastic and dampen it

4. Allow the fabric to dry and then heat set

with a hot, dry iron. (figure 1)

SPRING 2024

|

Q U I LT I N G A RT S ® M A G A Z I N E

figure 1

95

DIRECTIONS
Make the pattern
Technique 1
1. Using the black pen, draw on

the black and white photo,
breaking the landscape into
simple shapes.

it will represent. Place the
fabric over the shape on
the drawing and, using the
pencil or chalk marker, make
a small line on top of the
fabric as you draw the line
or shape. (figure 4) You may
need to peek under the fabric
or use a light box.

figure 2

2. Trace the lines onto a piece

of white paper. This will be
the pattern; cut the pieces
apart. (figure 2)

Technique 2

NOTE: Remember, pieces
will layer or tuck under
others so leave extra fabric
(approximately ¼"), usually at
the bottom of the shape.

1. Trace the line drawing on

a plastic sheet like a page
protector and use it as a
master pattern to line up the
pieces as you construct the
collage. (figure 3)

4. Cut the piece and place it

back onto the pattern to
check for accuracy. It doesn’t
have to be perfect.
5. Trace, cut, and layer more

2. To make and use pattern

pieces, trace the line drawing
onto freezer paper, cut the
pieces apart, and iron the
pieces to the fabrics before
cutting.

Construction
1. Using the color photo as

inspiration, select fabrics.
2. Place the sky fabric on the

figure 3

shapes to complete the
collage.
NOTE: Remember to increase
the width so the total collage is
13" wide. (figure 5)
6. Once you are happy with the

arrangement, place dots of
glue on the reverse side of
the fabric where the pieces
layer one another.

figure 4

13" batting square.
7. Position the collage onto the

NOTE: You will be working
from the top of the collage (the
sky) on down to the foreground.
3. Select a fabric to represent

the element furthest away
from the foreground.
Roughly cut this in a
similar size to the shape

sky/batting base, assuring the
base is covered with fabric.
Glue the final layers.

Finish the quilt
1. Free-motion quilt using a

variety of colored threads.
2. Trim to 12½" square.

figure 5
96

SPRING 2024

|

Q U I LT I N G A RT S ® M A G A Z I N E

3. From the black fat quarter,

cut 2 (2½" × 12½") strips
and 2 (2½" × 16½") strips
for borders.
4. Sew the short pair of black

strips to opposite sides of
the collage. (figure 6) Press
toward the border. Sew the
long pair of black strips to
the top and bottom. Press.
Also press under a ¼" along
the entire outside edge of the
border.

5. Center the collage on the

canvas, wrap the borders
around the frame. Using
the staple gun, staple the
border to the back side of the
wooden frame of the artist
canvas.
TIP: Work on opposite sides at a
time and keep the quilt taut. Trim
extra fabric from the corners, if
needed. Fold and staple.
6. Add a label to the back of the

canvas and add a hanging
wire.

figure 6

Above: “West of Crater Lake, Oregon” • 12" × 12"
Right: “Sabino Canyon, Tucson, Arizona” • 12" × 12"

SPRING 2024

|

Q U I LT I N G A RT S ® M A G A Z I N E

97

H
A
I
K
U

F
A
B
R
I
C

Create small quilts that honor this intentional poetry
by Margaret Abramshe

a

haiku is a traditional form of Japanese poetry. Haiku often
capture the beauty of nature through simple observation.

Here is a haiku poem by the Japanese master of the art form,
Matsuo Basho (1644–1694), translated from the original Japanese.
The formal structure of these poems consists of three lines. Line one and
three have five syllables; the second line has seven. This framework reduces
decision making and challenges the writer to work within limitations.
I wondered: How can I transfer these qualities and influences to my art
quilting practice?

Furuike ya
Kawazu tobikomu
Mizu no oto
[English translation]
The old pond
A frog leaps in.
Sound of the water.
—Matsuo Basho

98

SPRING 2024

|

Q U I LT I N G A RT S ® M A G A Z I N E

Begin with play
As a visual artist, I value structure for
creating. A cohesive series of work
uses this quality to hold multiple
compositions together. A structure
might be a common color scheme or
process. Consistency forces a deeper
dive into a visual problem instead of a
one-and-done approach.
In art school, I would start a
project with a page of rapid small
sketches about the size of my thumb
to start the creative ideas flowing. In
my experience, this process hones
compositional skills by creating
quickly without the pressure of
making something ‘good.’ The
emphasis is on just putting an idea
on the page. This process helps me
generate ideas for larger projects.
These fabric haiku are miniature
quilts that remind me of these
thumbnail sketches. I often begin my
day in the studio with a couple of
haiku quilts.
Before I begin, however, I need
inspiration. One simple method I use
is to imagine taking a walk around a
garden, in a park, or on a short hike—
or actually doing it. What colors grab
my attention? What sort of shapes do

I see in the foliage? Look for textures
like the bark of a tree or changes in
value when the sun sets. I either make
a mental list or post a few words on
my white board. Ask yourself these
questions or create your own.
Hint: During these virtual or actual
walks, keep your eye out for elements
found in art—colors, shapes, lines, or
textures.
Don’t try to duplicate exactly
what you see, rather, what is your
impression? Get down to the essence
of the elements; such as:
Small circles of red = berries
Pink fading into blue = sky
Rough gray texture = lava rock

Formulate your thoughts
Like haiku poetry, I use a consistent
three-part structure in my fabric
haiku. My process for creating
space on a flat surface starts with a
background, followed by a middle
ground, and ends with a focal point in
the foreground.
1. The background consists of one

piece of fabric.

2. The middle ground uses several

fabrics to divide the space and
create asymmetrical balance,
which distributes visual
weight unequally to improve a
composition.
3. The third step is to create a single

focal point which will grab visual
attention.
NOTE: After some practice I can now
create two or three fabric haiku in an
hour.
Let’s consider these components
more thoroughly.
BACKGROUND: The part of a
composition in the distance, appearing
behind objects in the middle and
foreground.
Think of an inspiration that can be
expressed in a few descriptive words
such as, ‘the pine needles are scattered
below the evergreens.’ I would express
these as light brown random lines on
a neutral background. Or, ‘the red dirt
trail is spotted with pebbles’—these
can be represented by small irregular
circles of deep orange. Swirls of teal
and blue would describe the water of
a pond. A sky at dusk or dawn may be
a color gradation from pink to yellow.

SPRING 2024

|

Q U I LT I N G A RT S ® M A G A Z I N E

99

To begin the process, I gather a pile
of scrap batting and fabric cut into
small rectangles. As I search through
the pile of fabric, I am looking for
fabric which can fit my descriptive
words. This is best done within a short
timeframe; 5 minutes or less. I attach
the fabric to the batting with fusible
web or a glue stick.
MIDDLE GROUND: The space between
the farthest distance (background) and
what is in the front (foreground) of the
composition.
Using the same process as the
background, I start by visualizing a
scene in nature and follow up with a
few words. Mountains and hills in the
distance are irregular lines that run from
edge to edge. Grasses are crisscrossing
lines. Leaves are overlapping organic
shapes. Like a haiku, I try to think of the
essence of what I will be placing in the
middle ground.
Prefused fabric scraps are ideal for
creating items in the middle ground;
trim them as needed. I add pieces of
fabric that break up the space into
uneven proportions. (figure 1) The
visual weight of these pieces should
take up more than half of the space.
Using odd numbers of objects: 1,3, or 5
is an easy way to create a more pleasing
composition.
I give myself a few options before
I fuse the fabric to the background.
(figure 2) If some of the pieces of fabric
float over the edge, trim them with a
rotary cutter after fusing them.
FOCAL POINT: A focal point is that area
of a composition that attracts the eye and
creates visual interest.
When I am looking for inspiration,
I focus on what captures my attention
in nature. For example, when I see a
100

figure 1

figure 2

figure 3

figure 4

bird or flock flying overhead at sunset,
I think of the impression that creates.
Birds are darker values than the sky
and their shape is like a V in a flock or
an irregular X when alone. In a flock
they form a visual pathway.
Bright red flowers on a cactus or a
large rose grab my attention because
of their intense color. The setting sun
is a round object which dominates
the sky and is often used as a focal
point. These are a few focal point
inspirations.
The essence of a focal point comes
down to color, shape, and placement.

In the composition, place the center
of interest off-center in the upper or
lower third and to the left or right.
If you are creating a visual pathway
by grouping three objects, try to
avoid placing them in a straight line.
(figure 3)

SPRING 2024

|

TIP: In my studio I have a bin for my
haiku supplies, including 3" × 4" pieces
of batting, background scraps cut to the
approximate size of the batting, and small
prefused scraps in sandwich bags. I store
my partially finished haiku quilts in this
bin, too, until I am ready to finish them.

Q U I LT I N G A RT S ® M A G A Z I N E

Finish the fabric haiku
I make these fabric haiku in
batches, often as I am getting
ready to sew a larger project.
Using decorative stitches and an
inspiring color of thread, I stitch
enough to catch all the fabric
under the needle. (figure 4)
For a fun display, I sometimes
sandwich two haiku quilts
together, back to back, with a
zigzag or straight topstitch running

figure 5

up the left and right sides leaving
a gap at the top and bottom. I slip
a folded ribbon through the top
gap to create a loop for hanging
and sew the top and bottom shut,
creating a two-sided piece of
artwork. (figure 5)
Another option is to string two
or three haiku quilts along one
long ribbon and then sew the tops
and bottoms. These can be hung
on trees in the yard, from a cup
hook or doorknob, or pinned to
your design board.
The impact of these small
compositions eventually appears
in my larger work. Unlike a 100Day project, creating fabric haiku
is a routine studio practice I use to
wake up the right side of my brain
and dive into visual thinking. As if
by magic, over time I find myself
using color combinations, unusual
shapes, and inspiration from an
increased focus on observing
nature—creating these little gems
is the satisfying result of gaining
new skills and insights.

I leave you with something to imagine from a
haiku written by Masaoka Shiki (1867–1902),
who was a major figure in the development of
modern haiku poetry and credited with writing
nearly 20,000 stanzas during his life.

Toward those short trees
We saw a hawk descending
On a day in spring.
—Masaoka Shiki

SPRING 2024

|

Q U I LT I N G A RT S ® M A G A Z I N E

101

ANNOUNCING OUR LATEST READER CHALLENGE
AS QUILTERS, WE ARE CONSTANTLY EXPLORING color, shape, texture, and
construction. For many of us, though, color is the ‘fun part’ of the journey. We
looovvvvee color! Whether we’re searching our stashes for that perfect daisy yellow
or inspecting the bolts at our LQS for something that evokes the morning light,
our color senses are dialed up to a 10.
This issue, we are challenging you to work
monochromatically to fully flex that color muscle—choose
one hue and create a 10" × 10" quilt using only shades and
values of that color. You may also add one of the following
hues to the composition: black, white, or gray. The final
part of this challenge: Work outside of your comfort zone
and choose a color that is not your favorite or one you
infrequently use as a featured hue.
We are also leaving the subject matter of the quilt totally
up to you, the artist. Include an artist statement with your
submission about your journey with this challenge—we
think you’ll have stories to tell and reflections to share. Read
on for the details.

Rules
4. You may submit more than one entry, but each
entry must be in an individual email.

2. Your entry must be an original design and
be free of any text or images protected by
copyright unless you have the expressed written
permission from the person or institution that
holds the copyright and you include that written
permission with your submission.

7. If you are a finalist: Put your name and contact
information on your quilt. Indicate the top, if
needed. A hanging sleeve is not required; you
may include one if you work that way. For safety,
place your entry in a plastic bag before packing
it for shipping. We reserve the right to keep and
possibly display your ‘One Color, One Quilt’ quilt
until December 2024. Your artwork will then be
returned to you.

3. To be considered for the challenge, attach two
jpeg images of your completed quilt to an
email—one of the entire quilt, including all four of
the edges, and one of a detail—by April 26, 2024
to QAchallenges@goldenpeakmedia.com
with ‘One Color, One Quilt’ in the subject line.
Include in the email your name, city/state/
country (if not U.S.), email address, title of the
quilt, and a statement about your quilt’s story—
no longer than 150 words, please—plus the
materials and techniques you used to create it.

102

5. To learn tips for photographing your Reader
Challenge submission, visit quiltingdaily.com/
photographytips.
6. On May 1, 2024 we will post the finalists at
quiltingdaily.com/one-color-one-quiltreader-challenge. Please check this post, as
artists will not be notified directly.

8. Finalists’ artwork must arrive in our office by
May 24, 2024.
If you have questions, contact us at
QAchallenges@goldenpeakmedia.com.
We look forward to seeing your work!

SPRING 2024

|

mark your

calendar
APRIL 26: Emailed submissions are due with
two jpeg photos.
MAY 1: Names of finalists will be posted at
quiltingdaily.com/one-color-one-quiltreader-challenge.
MAY 24: Finalists’ quilts must be received in
our offices.
LATE SUMMER 2024: Look for a gallery of
‘One Color, One Quilt’ quilts in the Fall 2024
issue of Quilting Arts Magazine!

NOTE: By submitting your Reader Challenge entry, you
confirm the originality of your design and authorize
Golden Peak Media to publish your quilt in an
upcoming publication and promotional materials, on
our websites and in other e-media, as well as possibly
display it at shows and other venues. Golden Peak
Media will not be held responsible for loss or damage
due to circumstances beyond our control.

Q U I LT I N G A RT S ® M A G A Z I N E

From top, photos by Neosaiam, Irina Iriser, and Pixabay | pexels.com

1. Create a 10" × 10" quilt based on the theme
‘One Color, One Quilt.’ The quilt must be a
monochromatic composition, limited to shades
of one chosen hue—including fabric, thread,
embellishments, etc. If desired, you may also add
one of the following colors: black, white, or gray.
Embellishments, if used, must not protrude more
than ½" from the surface of the quilt. The quilt
may be made with any materials but must consist
of three layers and be closed along the edges.

Never miss

a stitch!

Browse our digital library of
Quilting Arts magazines to find
the one you are missing! Catch up
on issues dating as far back as the
early 2000’s and enjoy years of
tips, techniques and inspiration.

BROWSE NOW AT

QuiltingDaily.com
g

Learn from
instructors
you know
and trust, $JUST
7.99
anytime,
anywhere!
PER MONT
H

SUBSCRIBE AT

QuiltingDaily.com/QDTV
SPRING 2024

|

Q U I LT I N G A RT S ® M A G A Z I N E

103

the last word.
Photos courtesy of the artist

BY

VALERIE KOMKOV HILL

T

hose of us who have been making
I played with textures and pattern, and I straddled a fine
art quilts since the term was first
line between kitschy craft and artistic sensibility. I was,
coined have often been told we should
I realized with a start, creating a series!
work in a series, especially if we are to
To this day—from 2018 to the present—I have created
be taken seriously as fine artists and if
over 150 small, 5" × 5" houses, churches, townhouses, and
we plan to display in galleries, enter
even camper vans. Some of these became commissions for
shows, and participate in exhibits.
actual residences. And as we all know, commissions are a
I have admired my fellow art quilters
tougher challenge because we can’t just play with whatever
who have explored and developed concepts, deconstructed, pops out of our brains, we must please a client.
abstracted, extended, played with, and followed their bliss
Then came 2020. In the solemn quiet of that year—
down beautiful rabbit holes of theme and variation. This
spent in lockdown, spent in uncertainty and anxiety—
was not me. After spending weeks and months on a new
many of us turned to our artwork and projects for solace
artwork, even when pleased with the result or responding
and reassurance. At some point, I decided to go larger.
to a theme or challenge, I realized I was done. My magpie
I made my first 8" × 8" house mounted on a 12" × 12"
brain needed something new and shiny: a different palette,
canvas and fitted in a float frame, which gave me more
some lovely random scraps of fabric, or a new idea or
room to create atmosphere and nuance. That house was
technique, pondered in the middle of the night while
situated in a dark, moody environment of cool colors, soft
avoiding a 3 a.m. existential crisis.
textures, an ambiguous background,
Many of these ideas would often
and a sense of isolation. I called it
have a lofty, exciting launch then
“Solitude #1” because, in my mind,
end up in the drawer of forgotten
I already saw more. And more
dreams—another UFO to be
came, more styles of architecture,
postponed for later—except for
varied landscapes, new materials,
one or two that would make the
and the inspiration to keep going.
final cut—or literally the final
It turns out that for a variety
stitch—ready to be labelled,
of reasons people are drawn to
photographed . . . and done with.
houses. And these houses, created
Meanwhile, my side hustle was
during Covid, represented feelings
creating very small works that
and moods both positive and
could be finished in under a week
negative: loneliness, security, fear,
because there is nothing more
protection, seclusion, reflection, and
satisfying than finishing a project.
regeneration.
I think Michaelangelo would
Perhaps it takes a major life
“Solitude #11" • 8" × 8" • mounted on
agree. So it started with a house.
event to create a series. One
12" × 12" painted wood board
What is simpler than taking scraps of
friend I know did a series of quilts
leftover projects, a snippet of lovely material, a few trims,
addressing her battle with cancer. Maybe it’s a love of a
some quick embroidered embellishments, and a length of
certain place or landscape that draws them in, as with
novelty yarn, and then assembling them with little squares
another friend who constantly uses a beloved canyon
and triangles to make a tiny abode?
in her works. Or it could be a passion for certain color
So I made one on a 5" charm square. Then I made
combinations and geometric shapes.
another and another, and I mounted them on small
While I have no idea if more series are awaiting me in
painted canvases to give them more presence, allowing
my future, I am happy looking back on this current series
them to be hung easily in groupings.
and feeling a sense of accomplishment. I will also be happy
Here is the best part: people started buying them,
to go forth and make random quilts as well because the
then asking for more, and then collecting them. I had
path of creativity is never predictable and often leaves
accidentally created, dare I say it, a cottage industry. Was
some side roads or dead ends behind it.
it art? Well, it depends. I certainly brought my principles
Will I do more series? Will all of you? It starts with
of design and color into play. I made each house unique,
one idea.
104

SPRING 2024

|

Q U I LT I N G A RT S ® M A G A Z I N E

The World of Quilting
at Your Fingertips
Subscribe to the top quilting
magazines from Quilting Daily!
DISCOVER NOW:
• The Latest
Quilting Trends
• Fresh Scrap
Quilt Patterns
• Festive Patriotic
Quilts
• Time-saving
Techniques
... and lots more
quilting inspiration!

SUBSCRIBE TODAY AT QuiltingDaily.com/Subscribe

ROUND-THE-CLOCK
CREATIVITY
MEETS TOP-NOTCH
SUPPORT.
Ann L.
My call was returned in a timely manner. The
person was able to answer my question as well as
give me more helpful information. Thank You.

Pam M.
First, someone answered my call immediately. I
didn’t have to push buttons for 10 minutes!... Your
customer service is top notch. I am very pleased
and impressed. Thank you

Januari R.
...Innova has NOT disappointed yet. Thankfully I
have not needed either because the machines are
the best “Industrial” work horses on the market...
Thank you again for prompt professional service.

Chad J.
Everyone was very knowledgeable and
accommodating. Great customer service.

SCAN TO BUILD YOUR
DREAM
www.innovalongarm.com

@innovalongarm