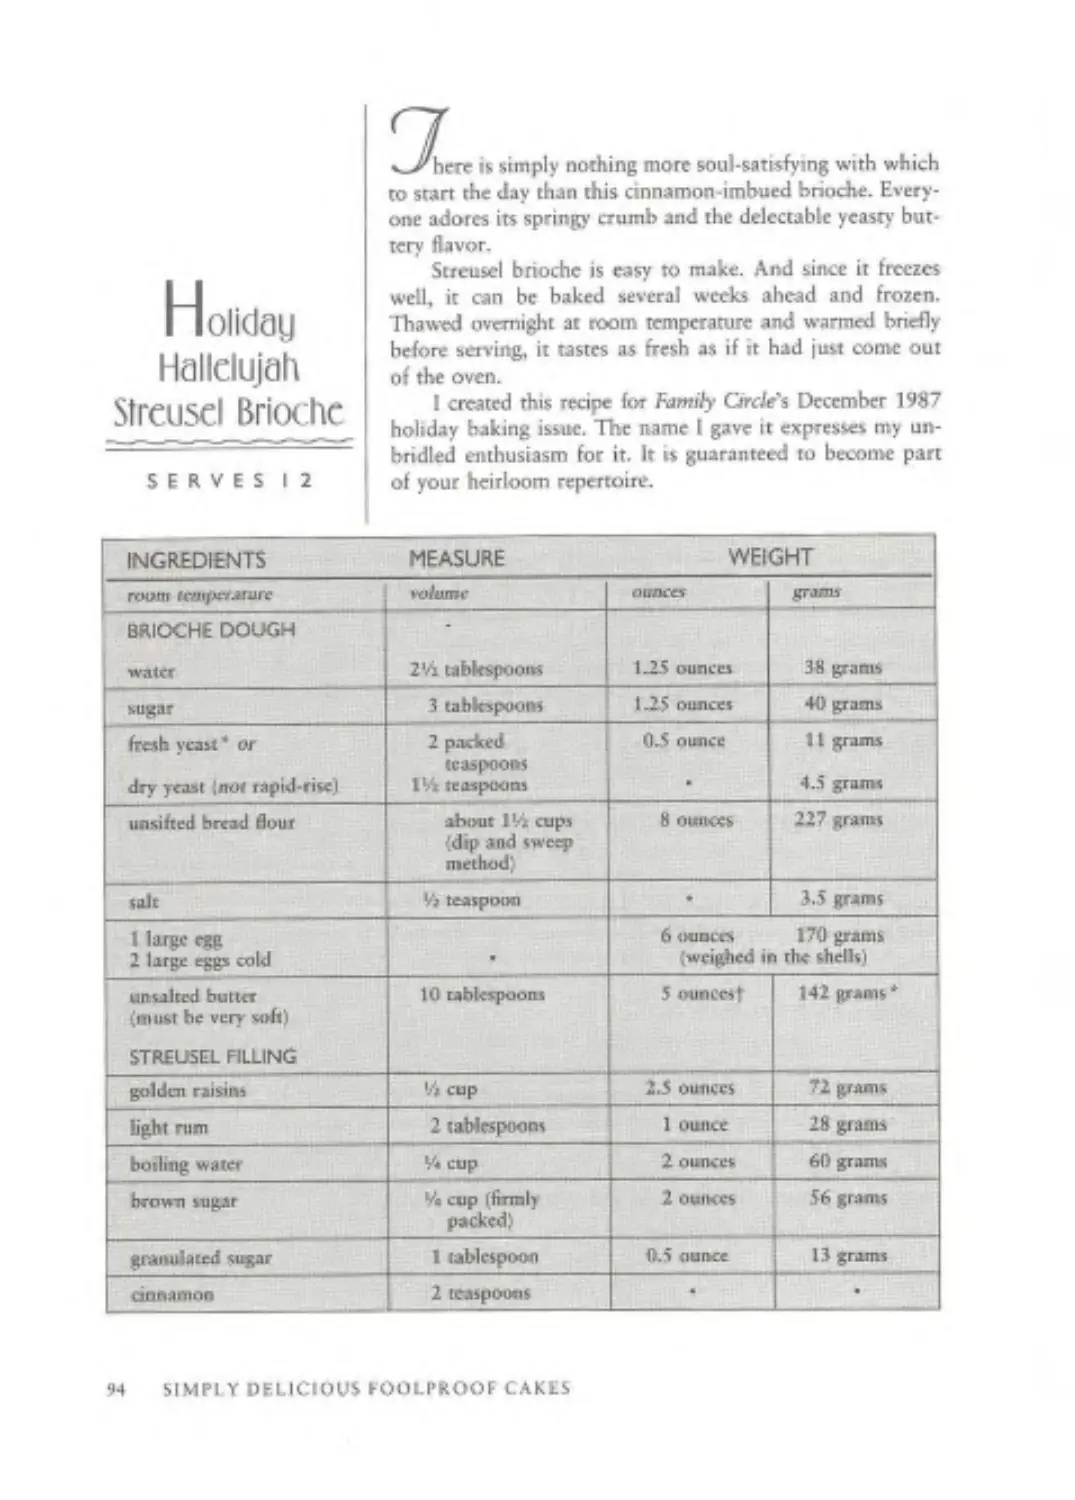
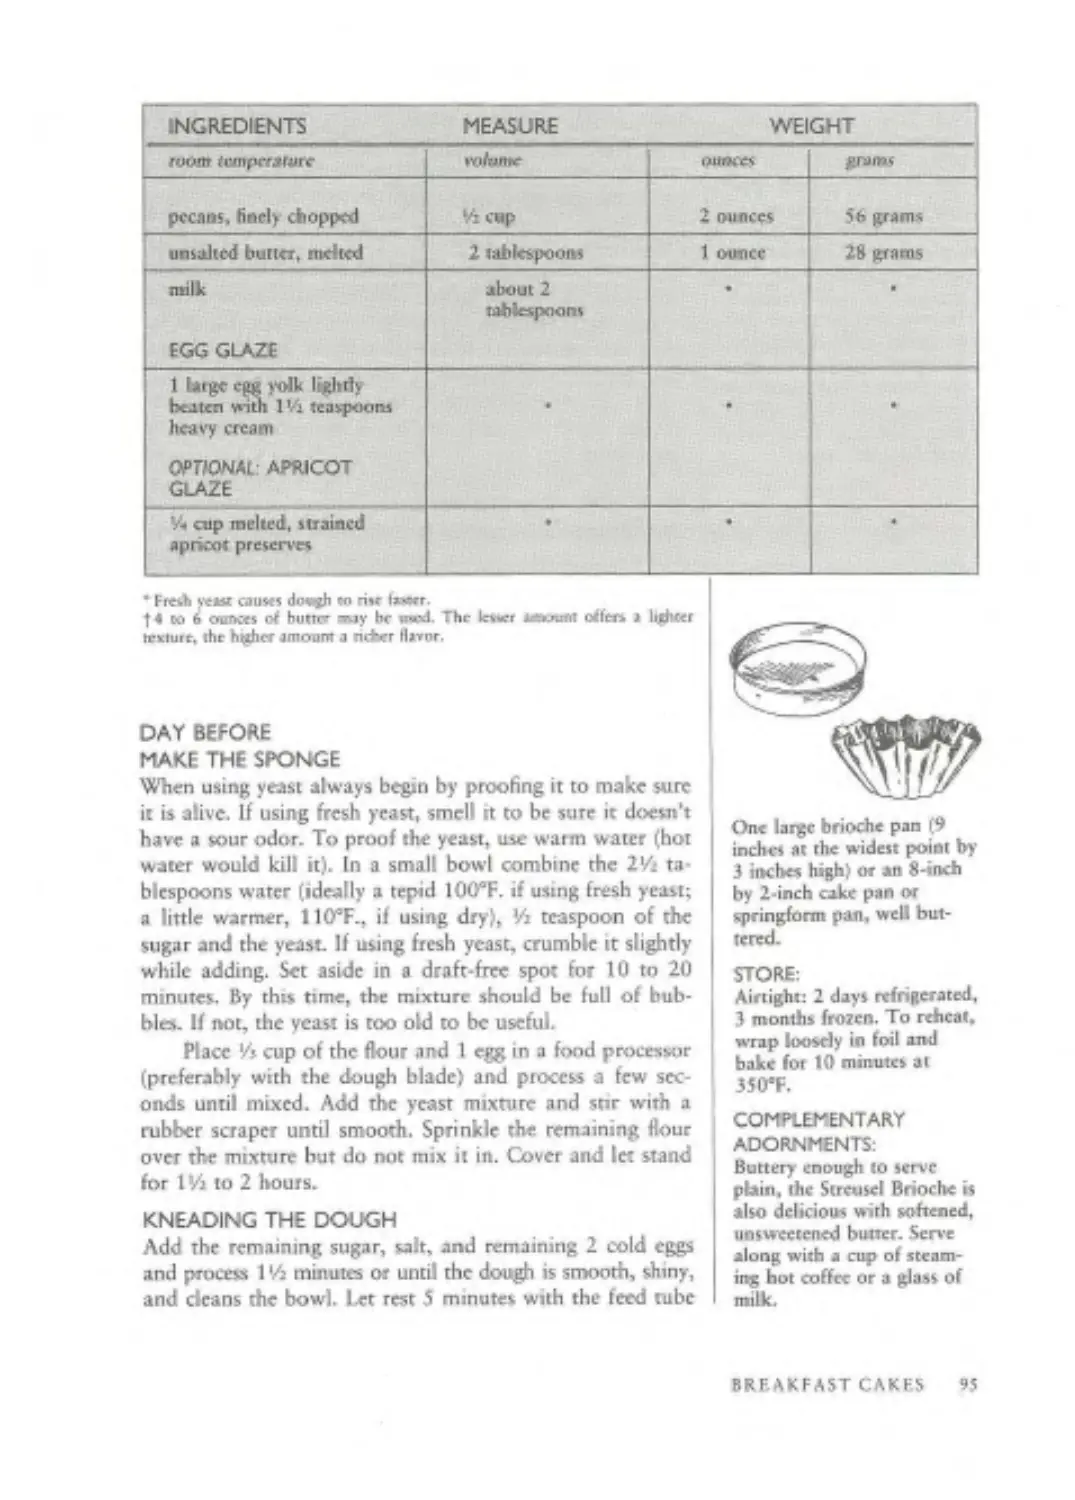
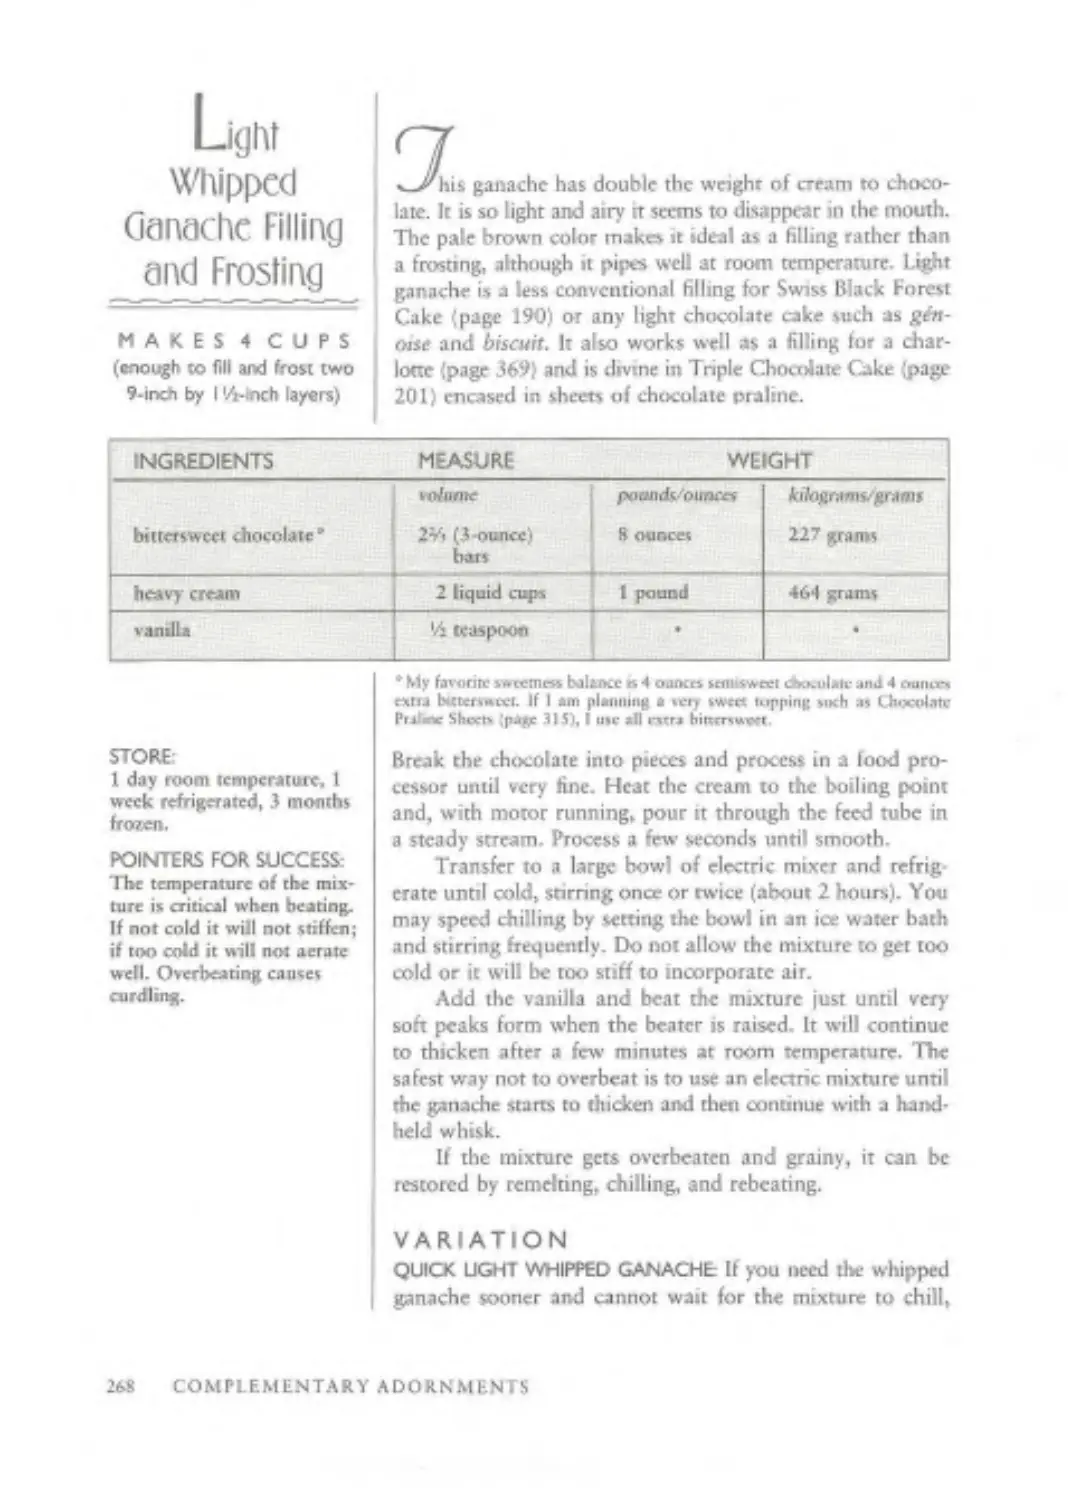
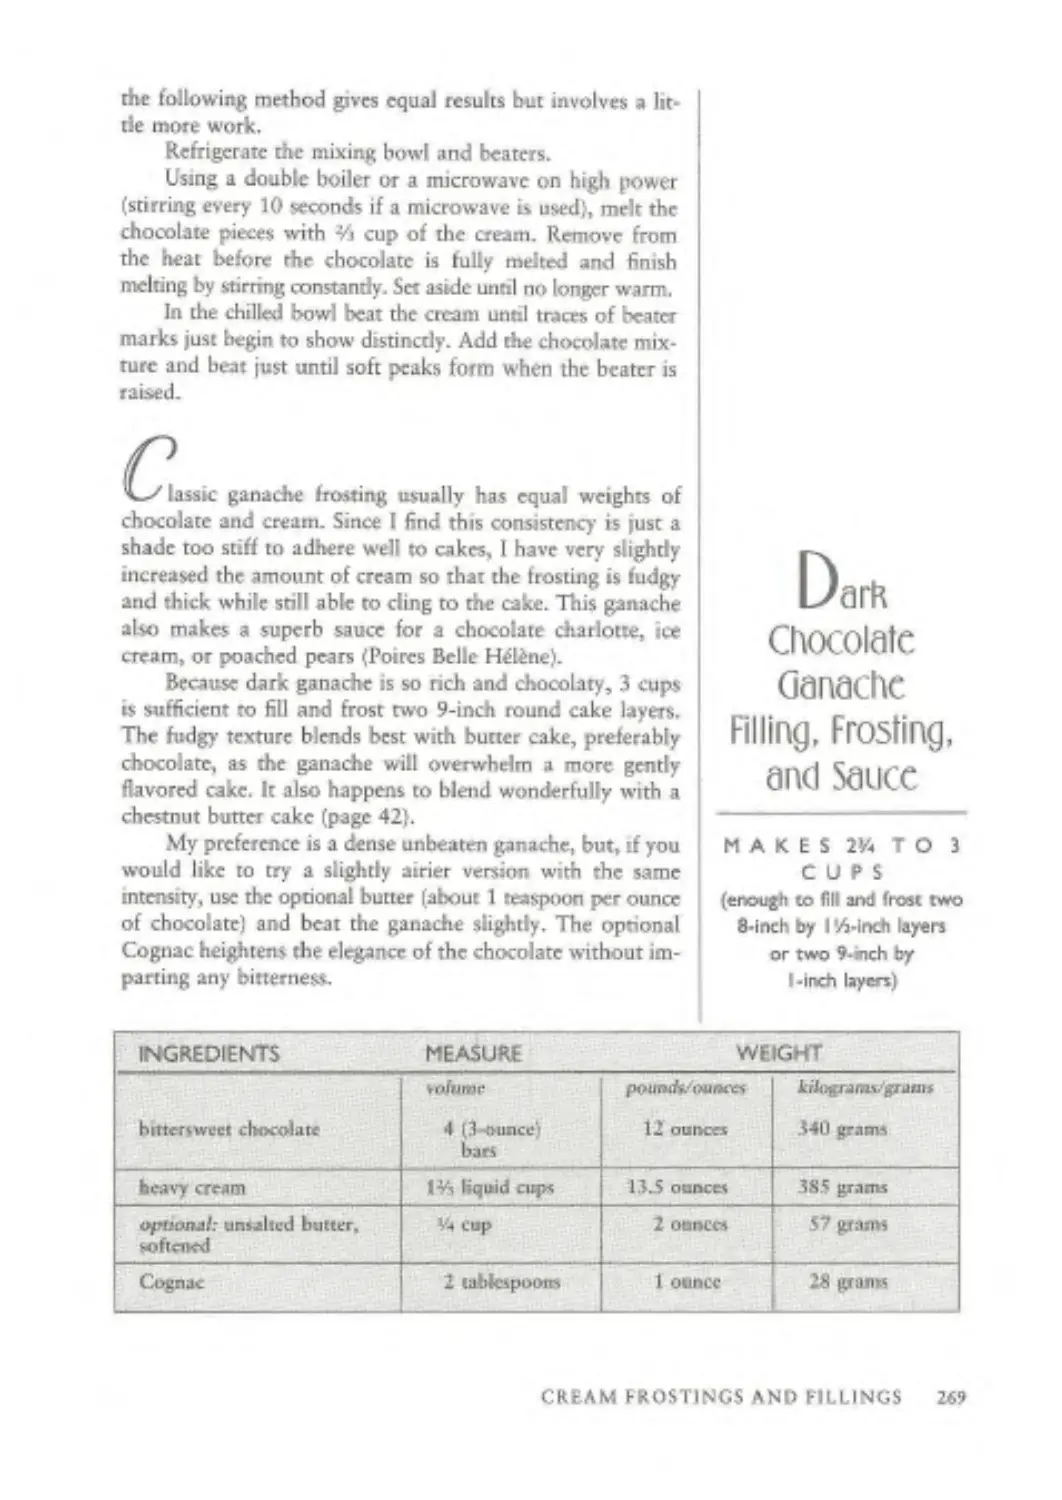
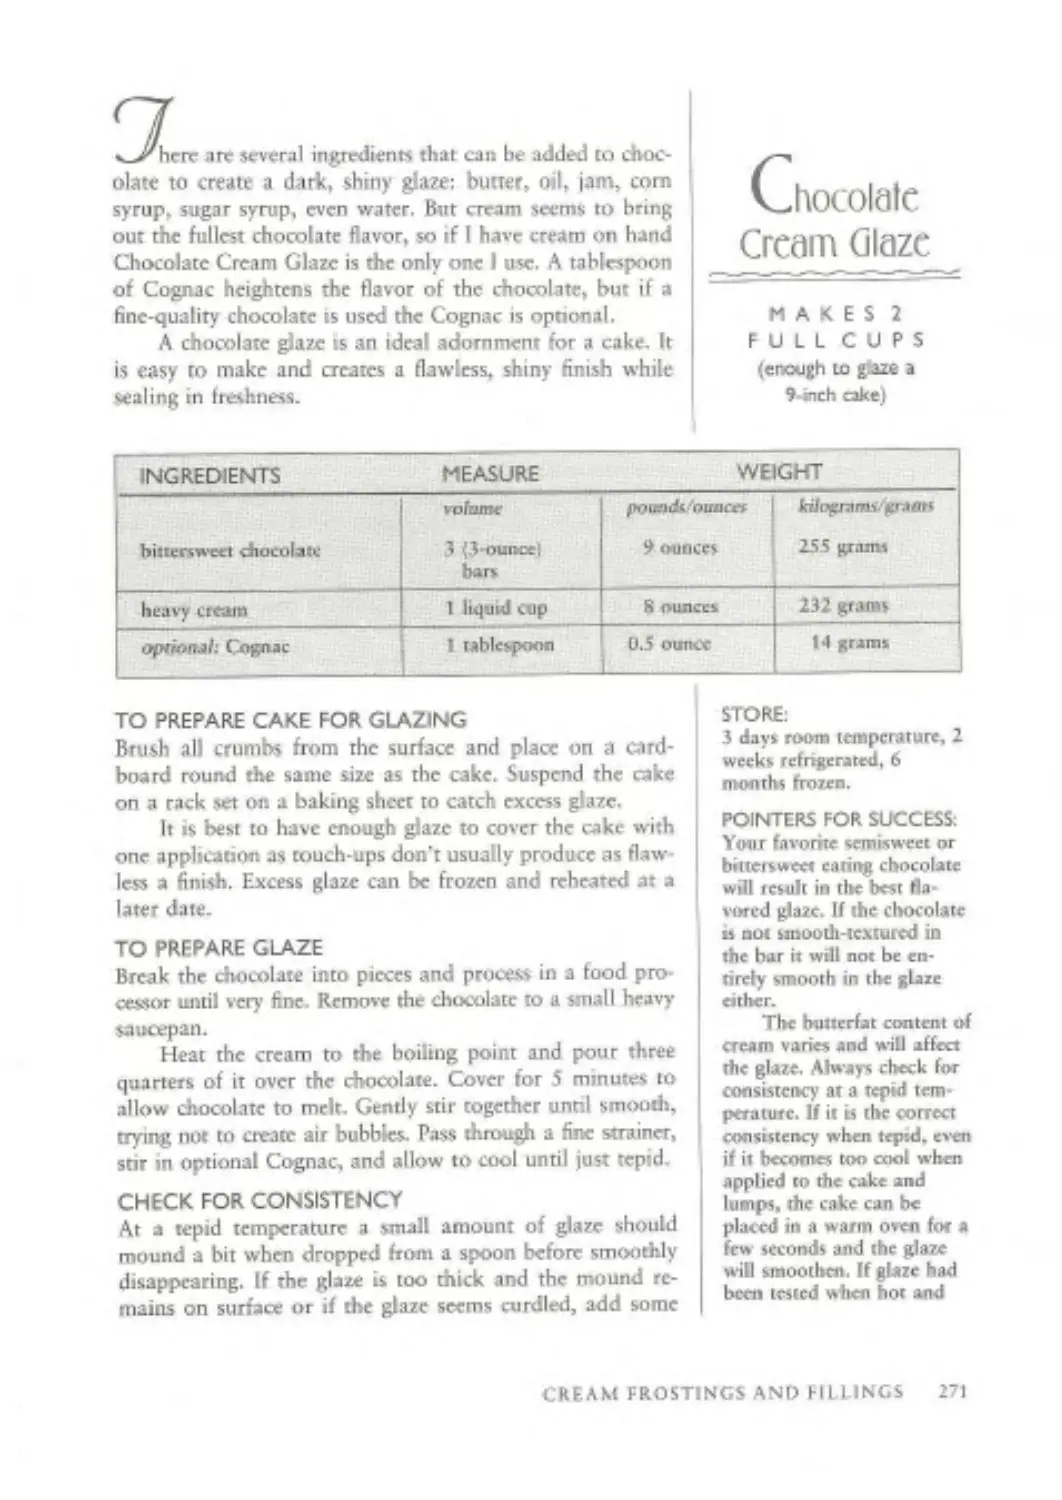
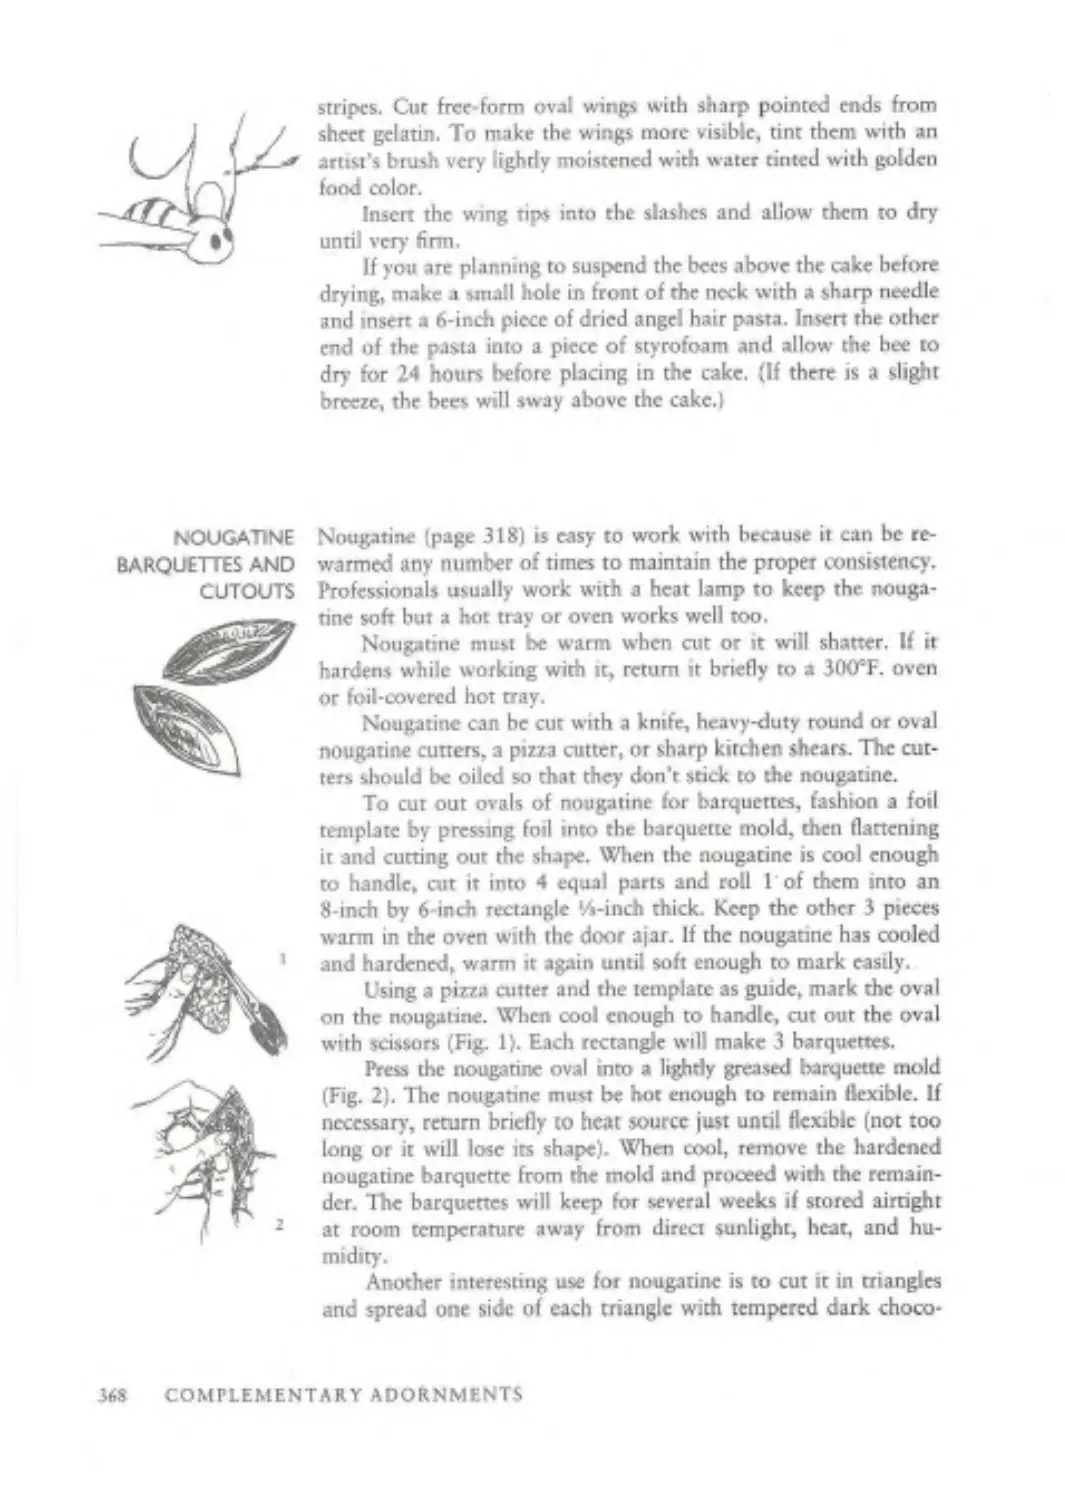
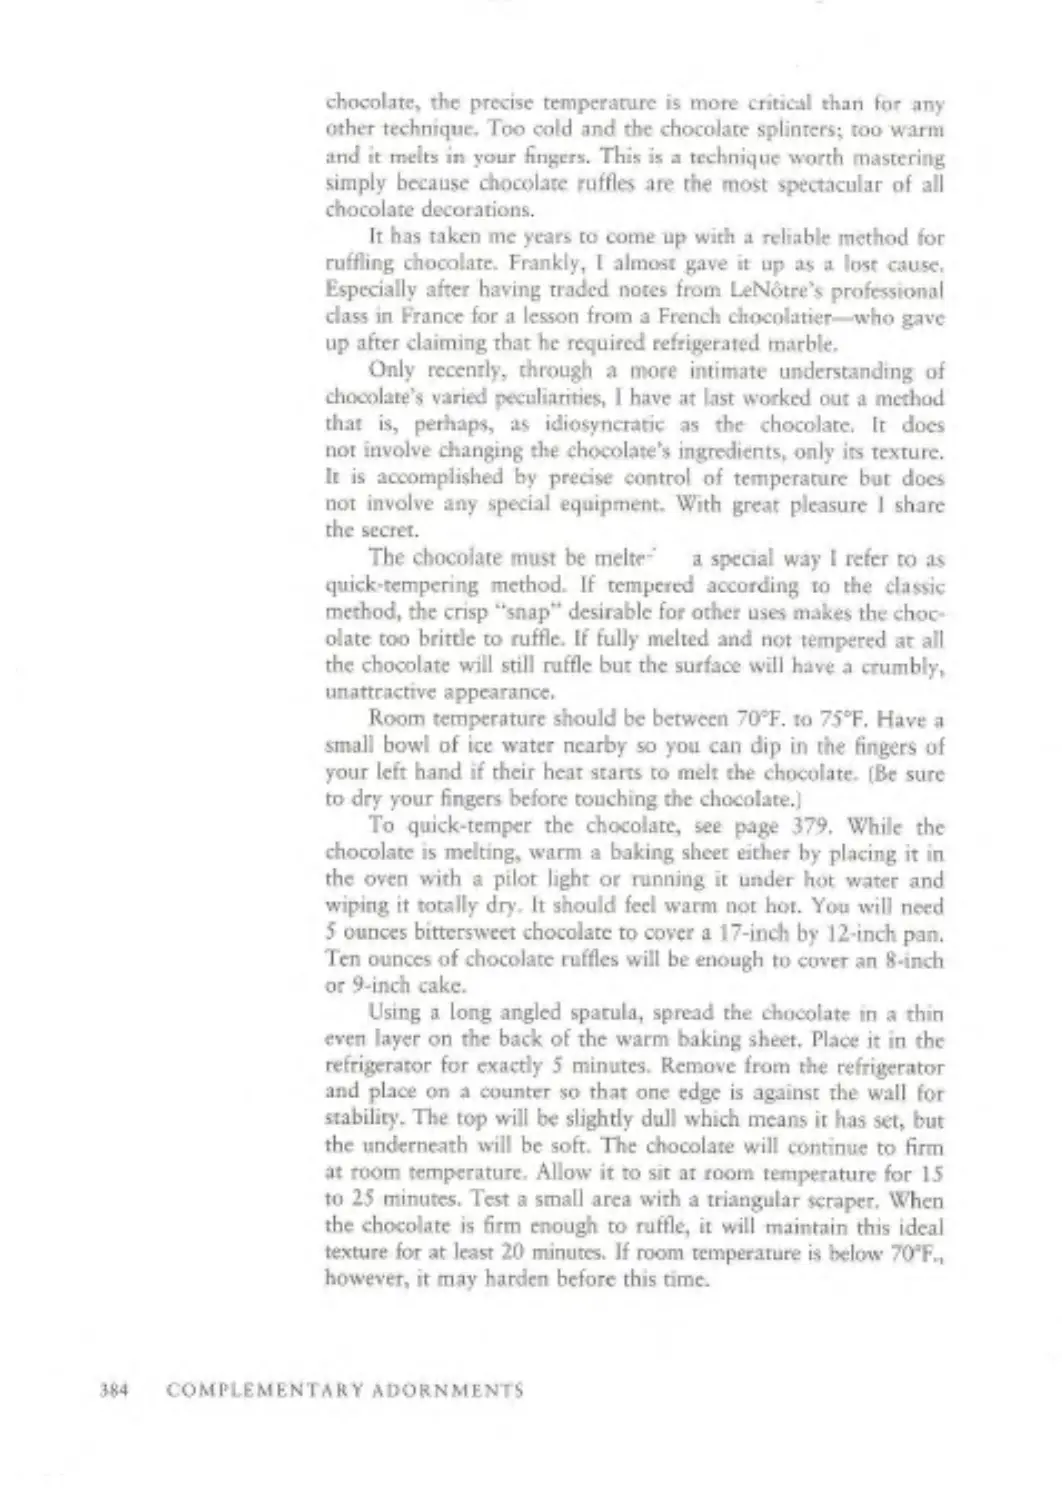
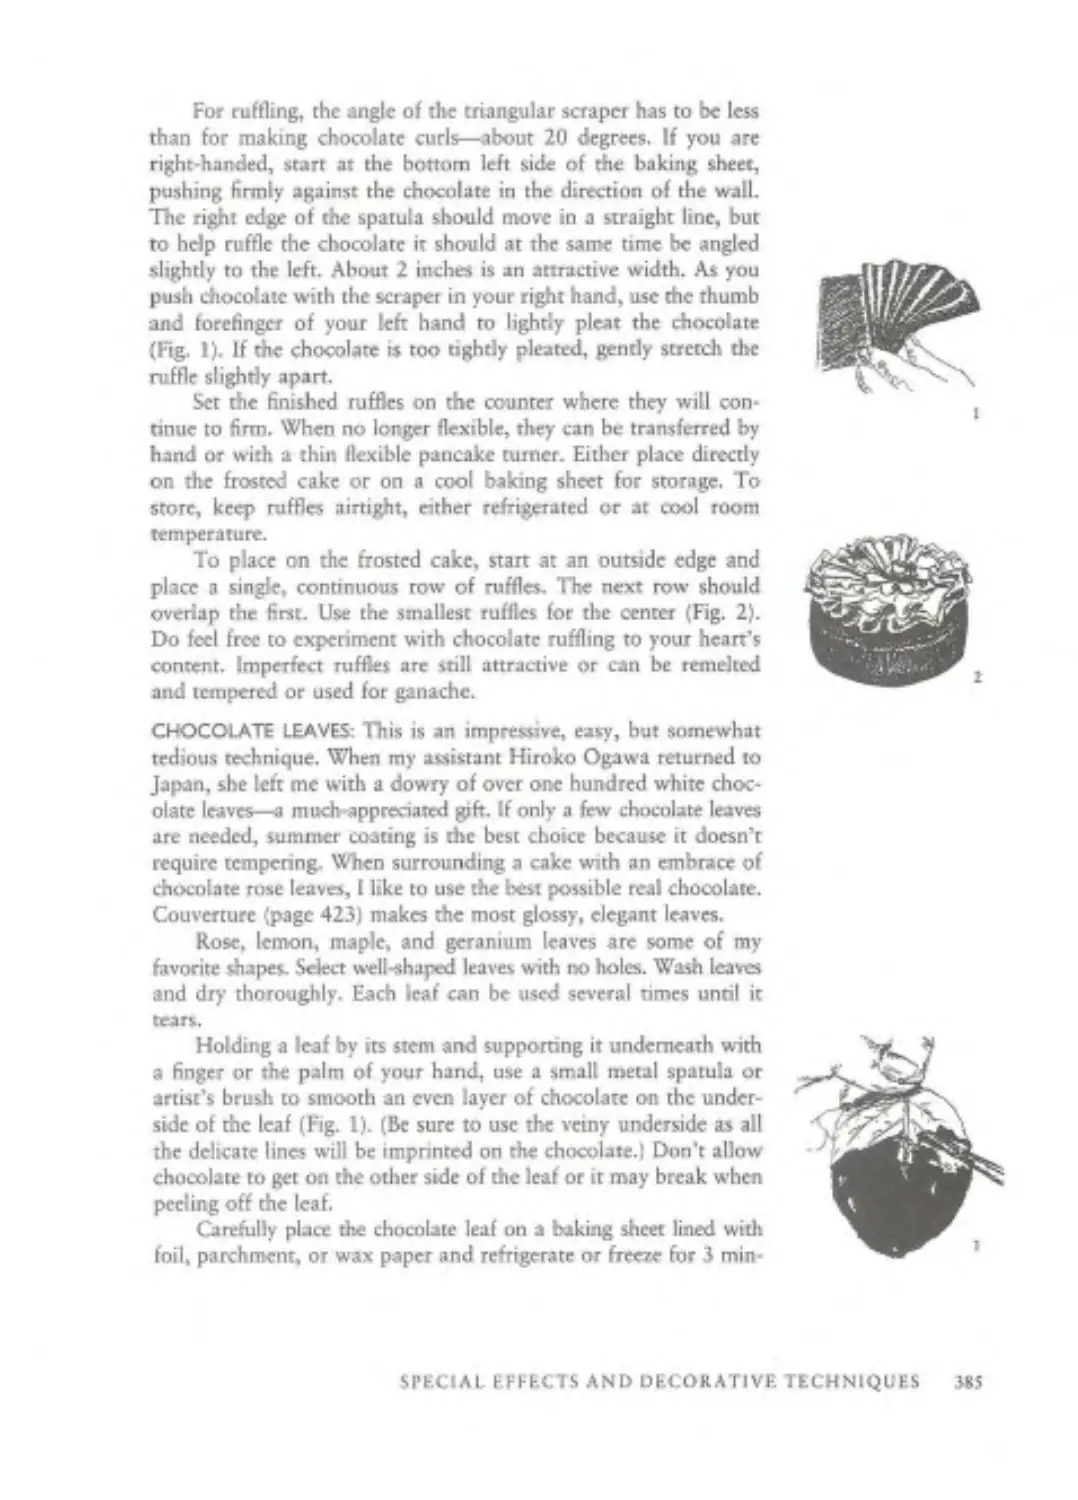
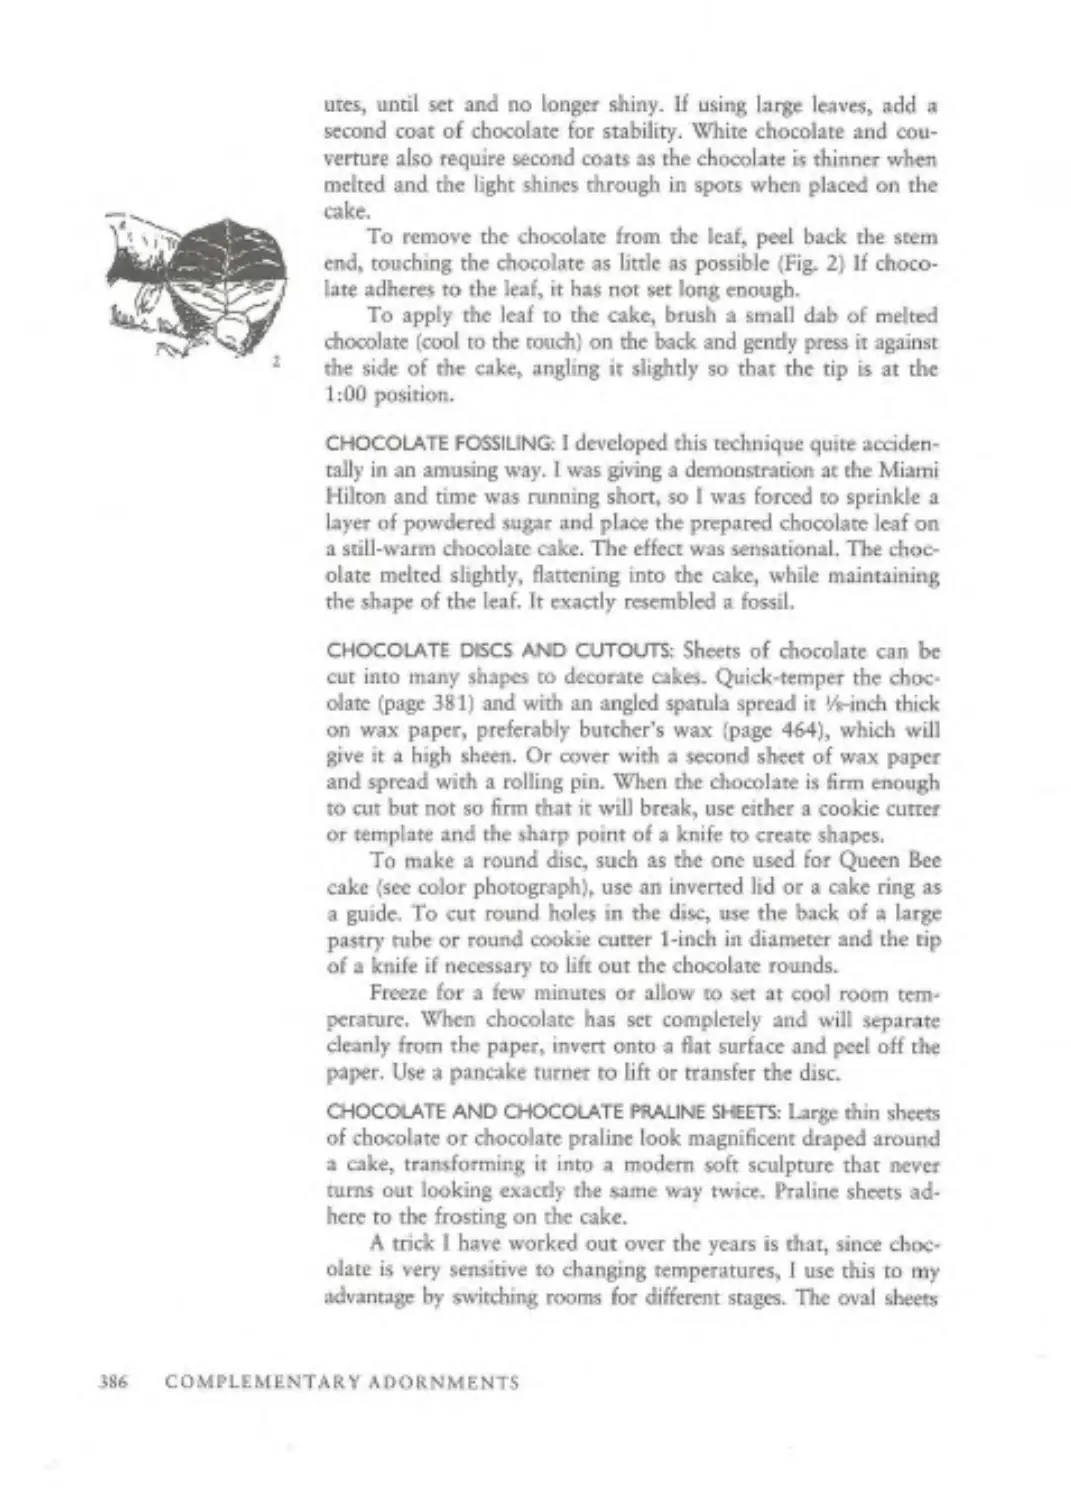
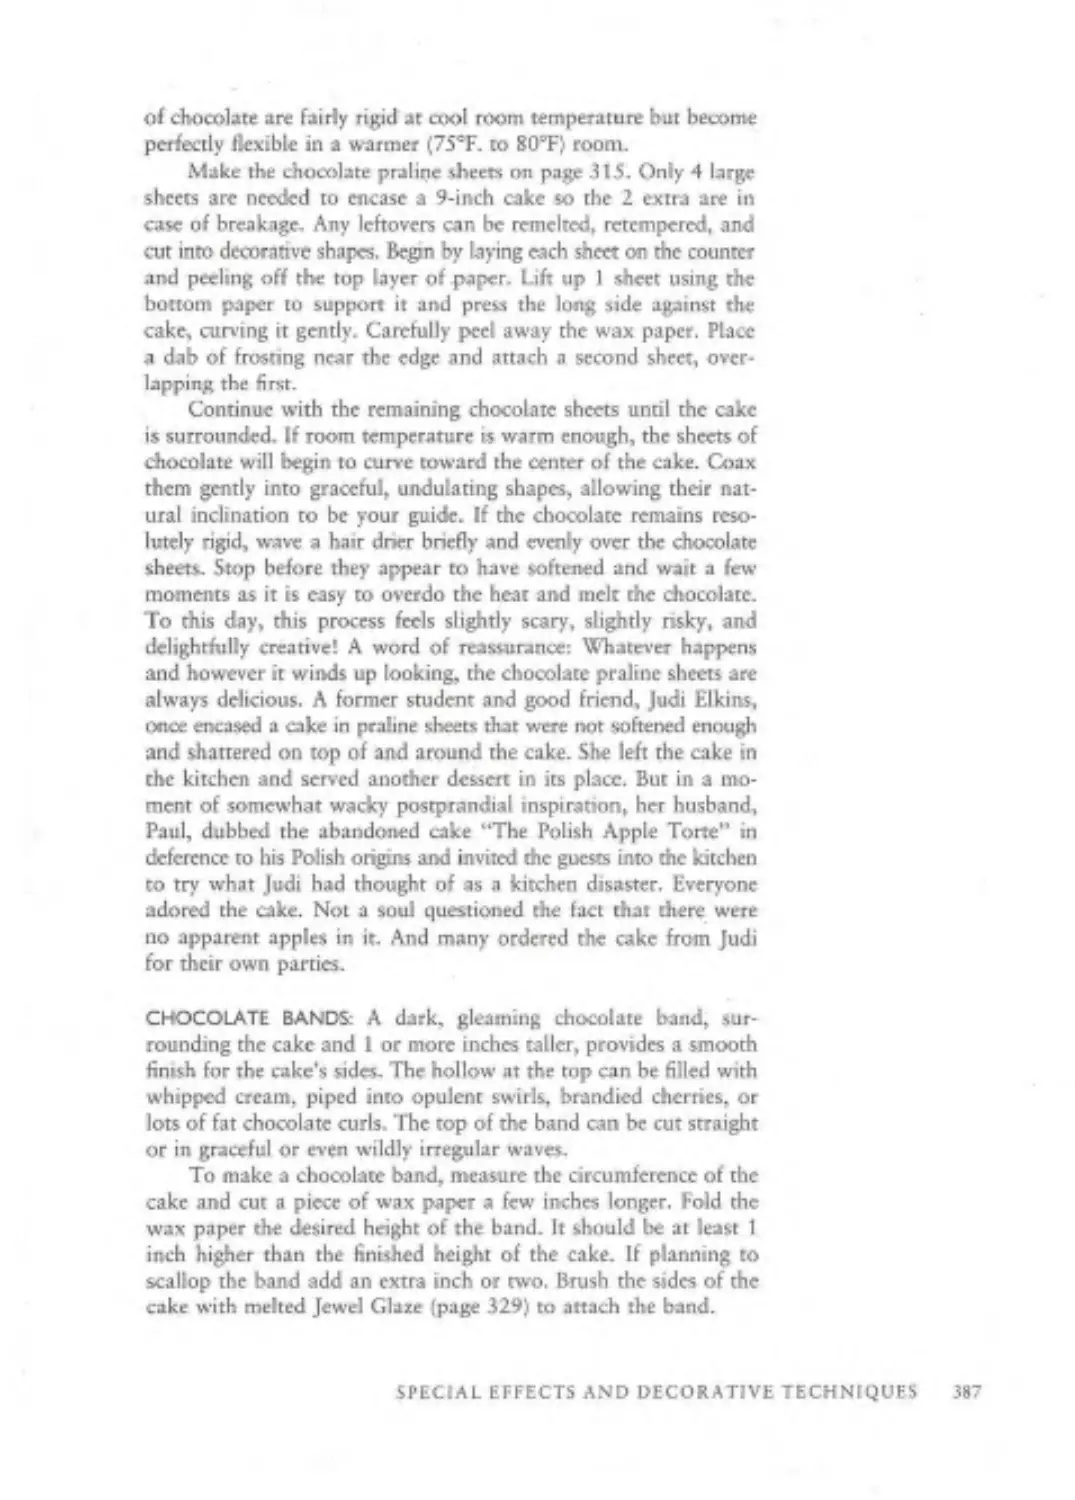
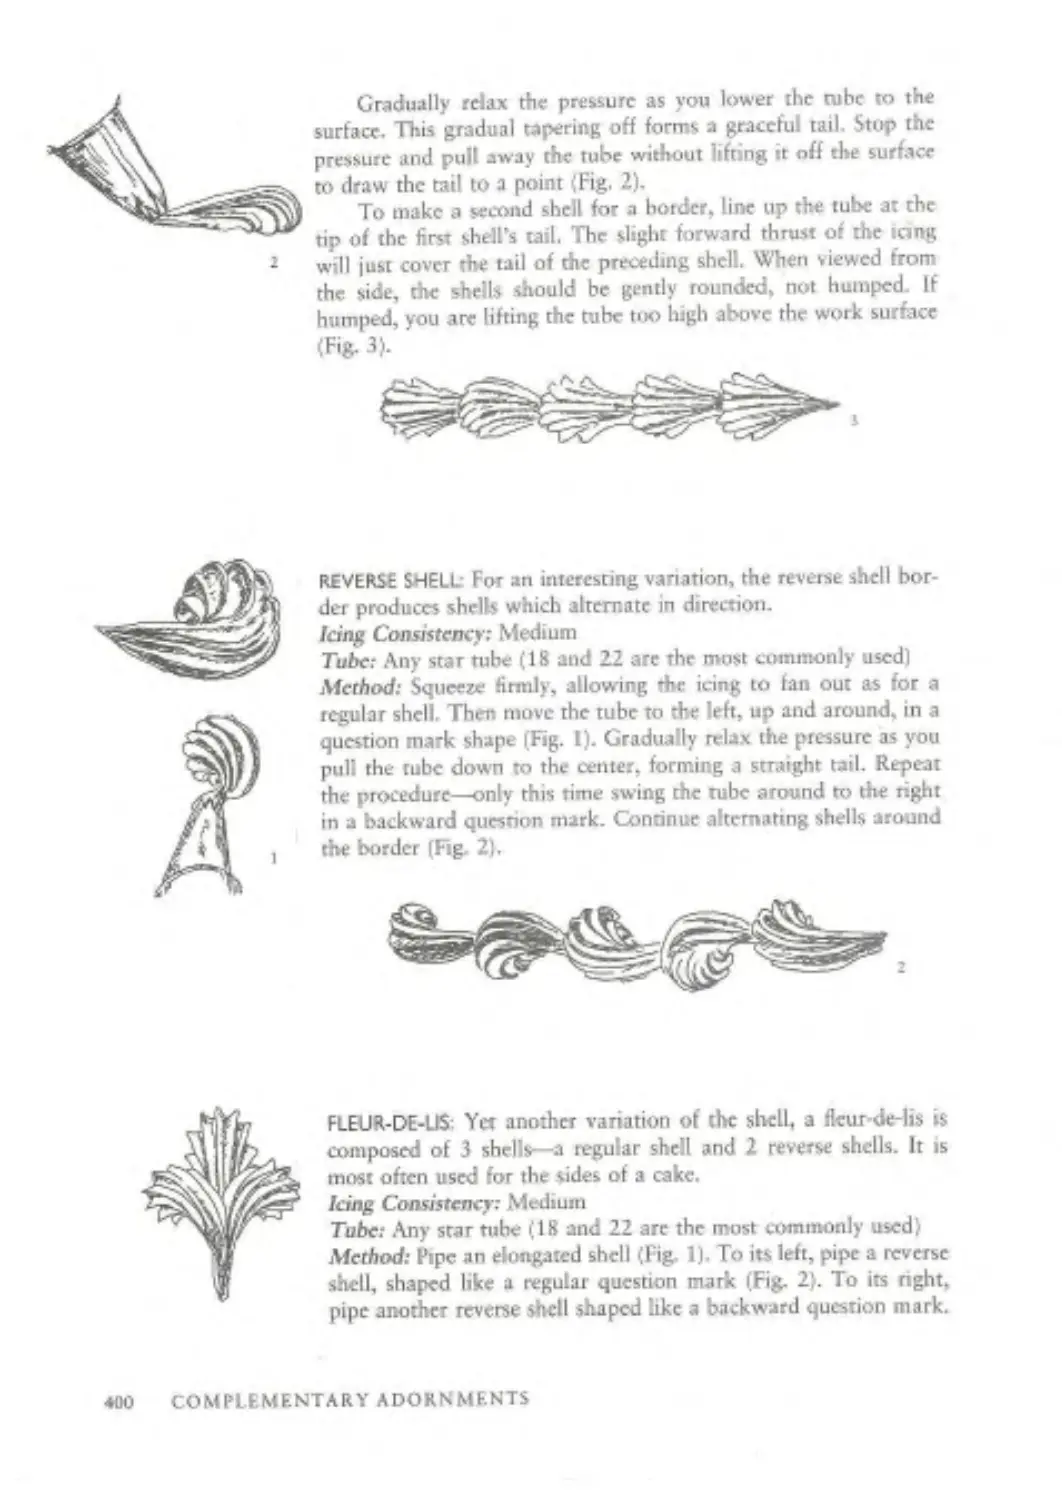
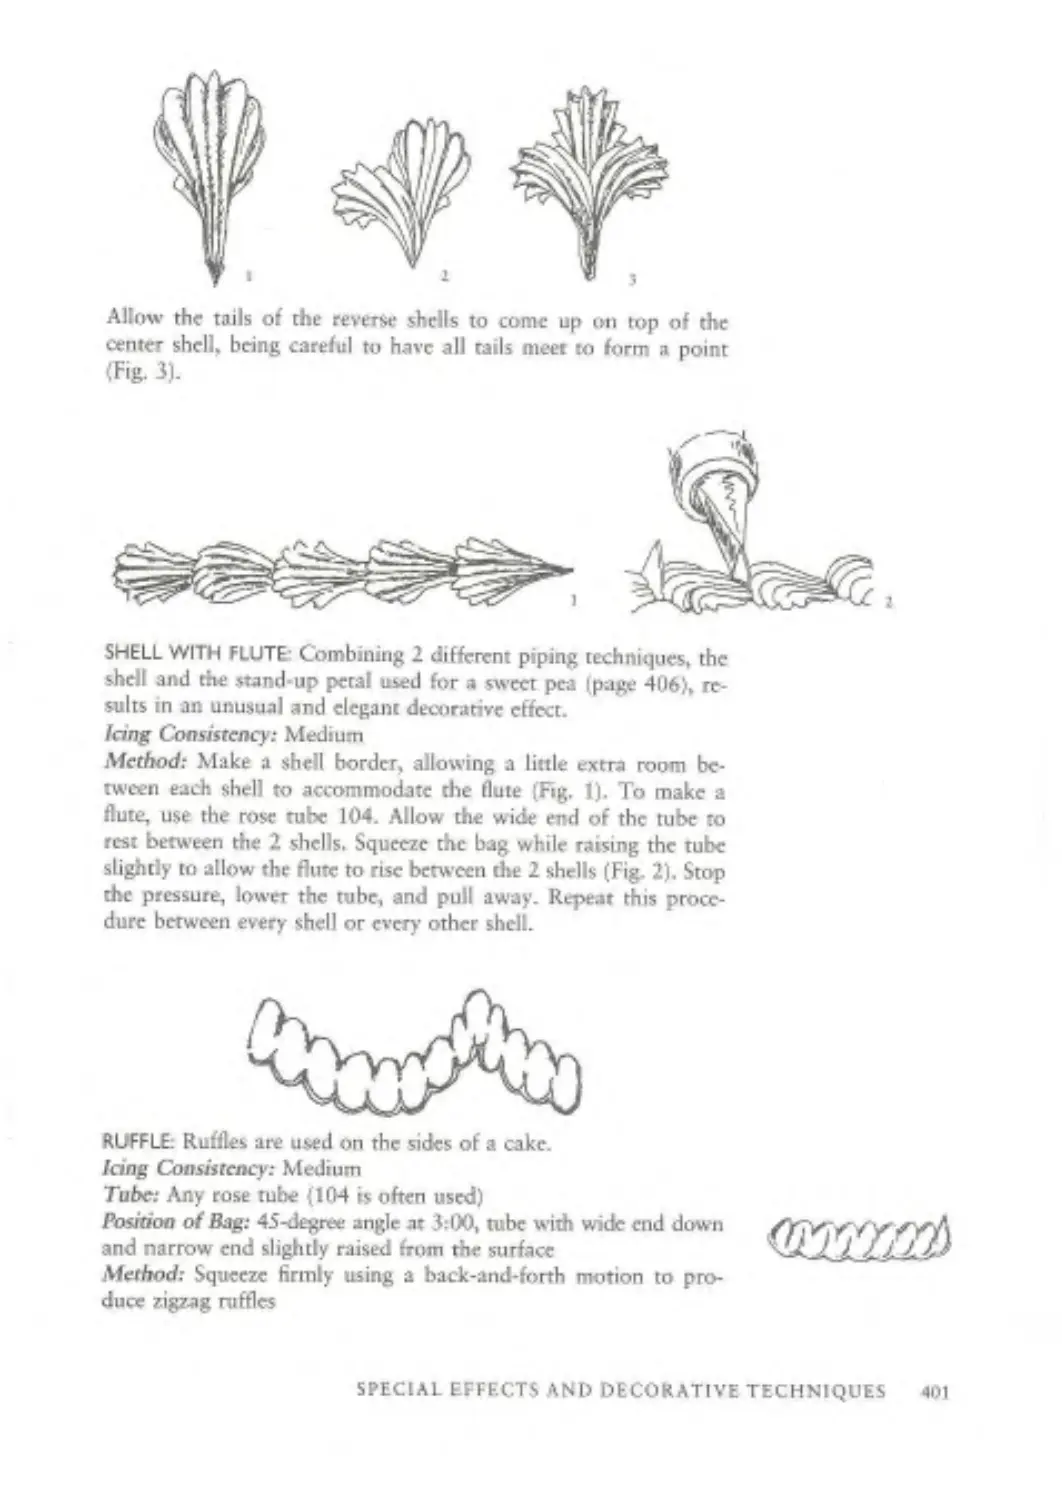
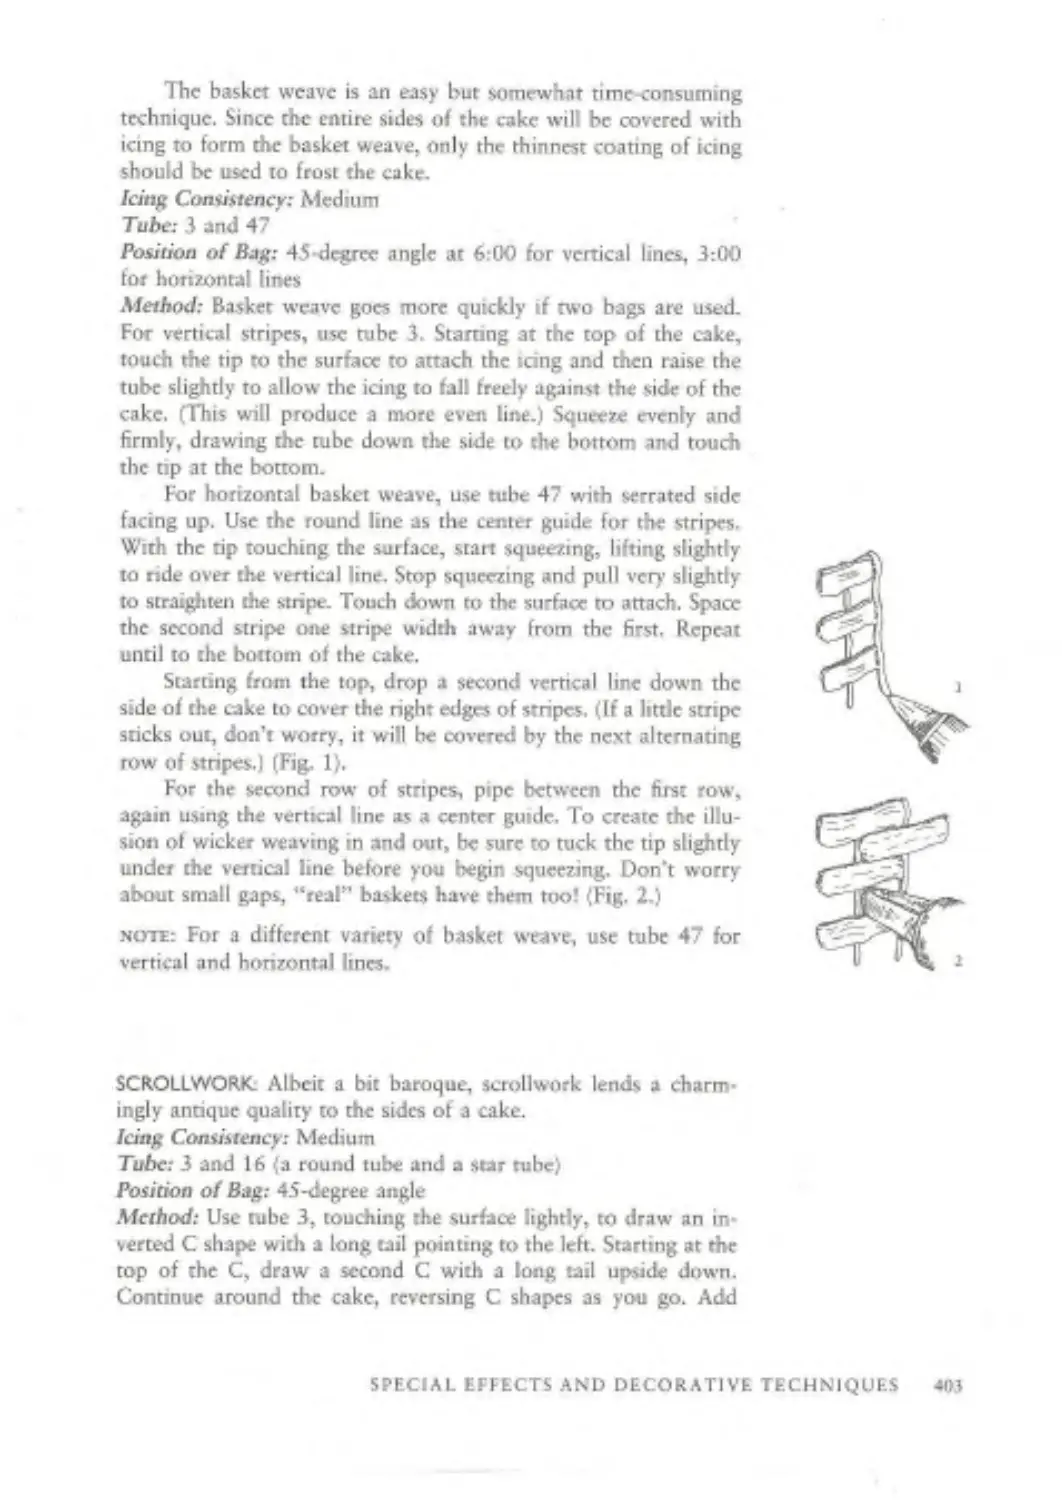
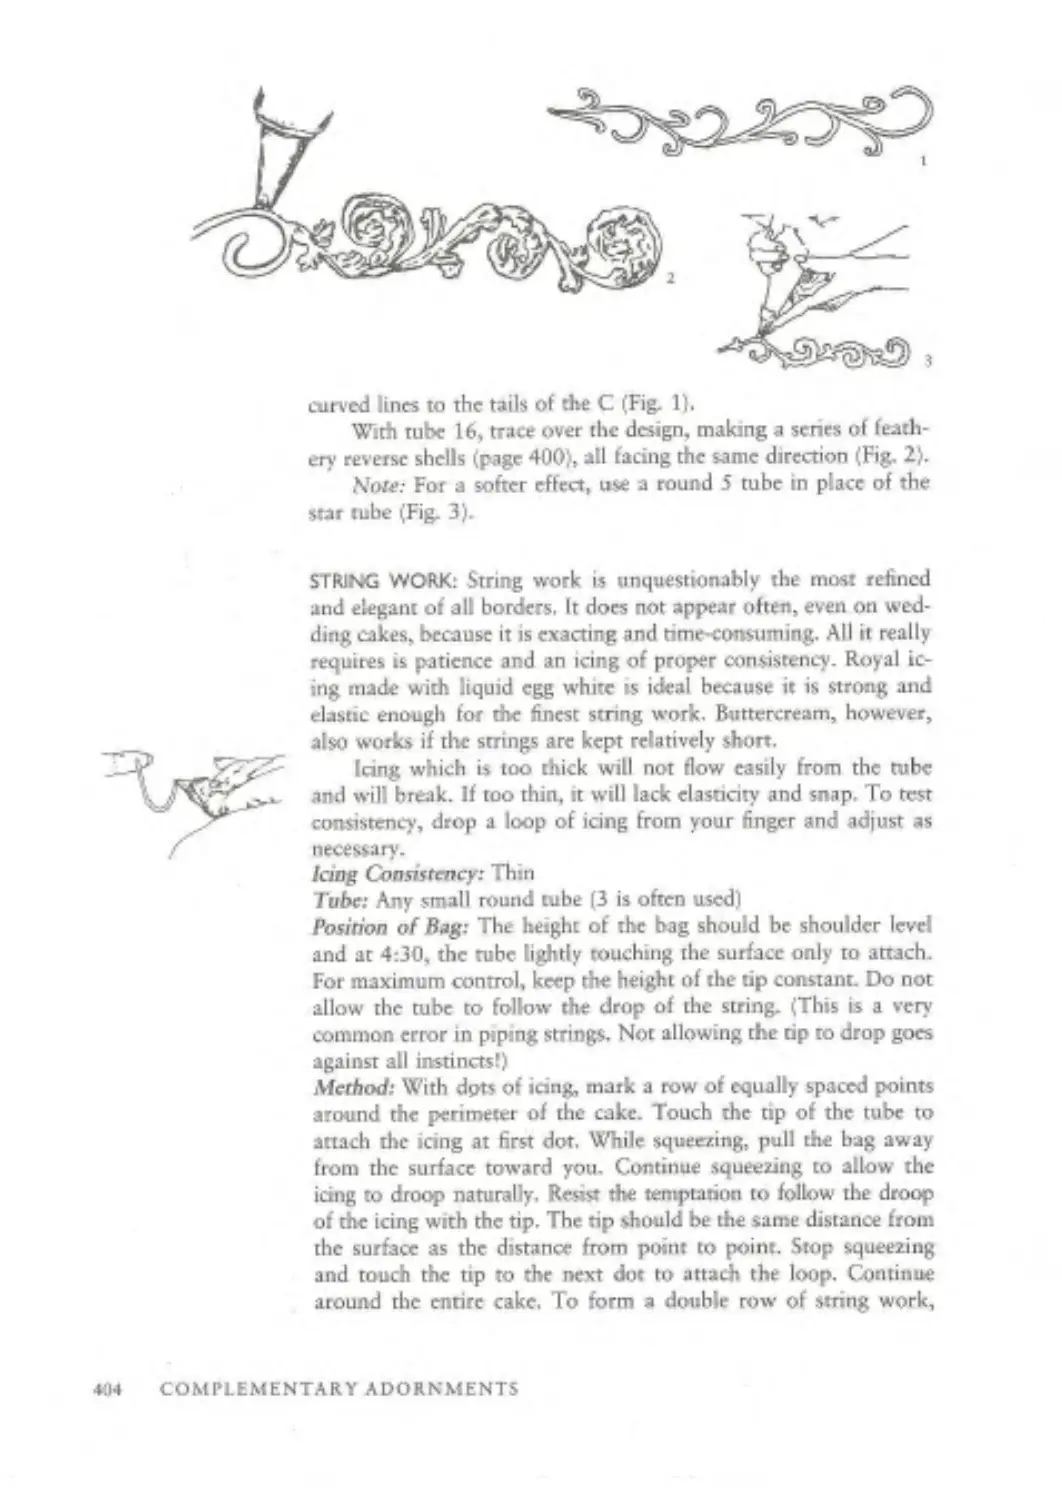
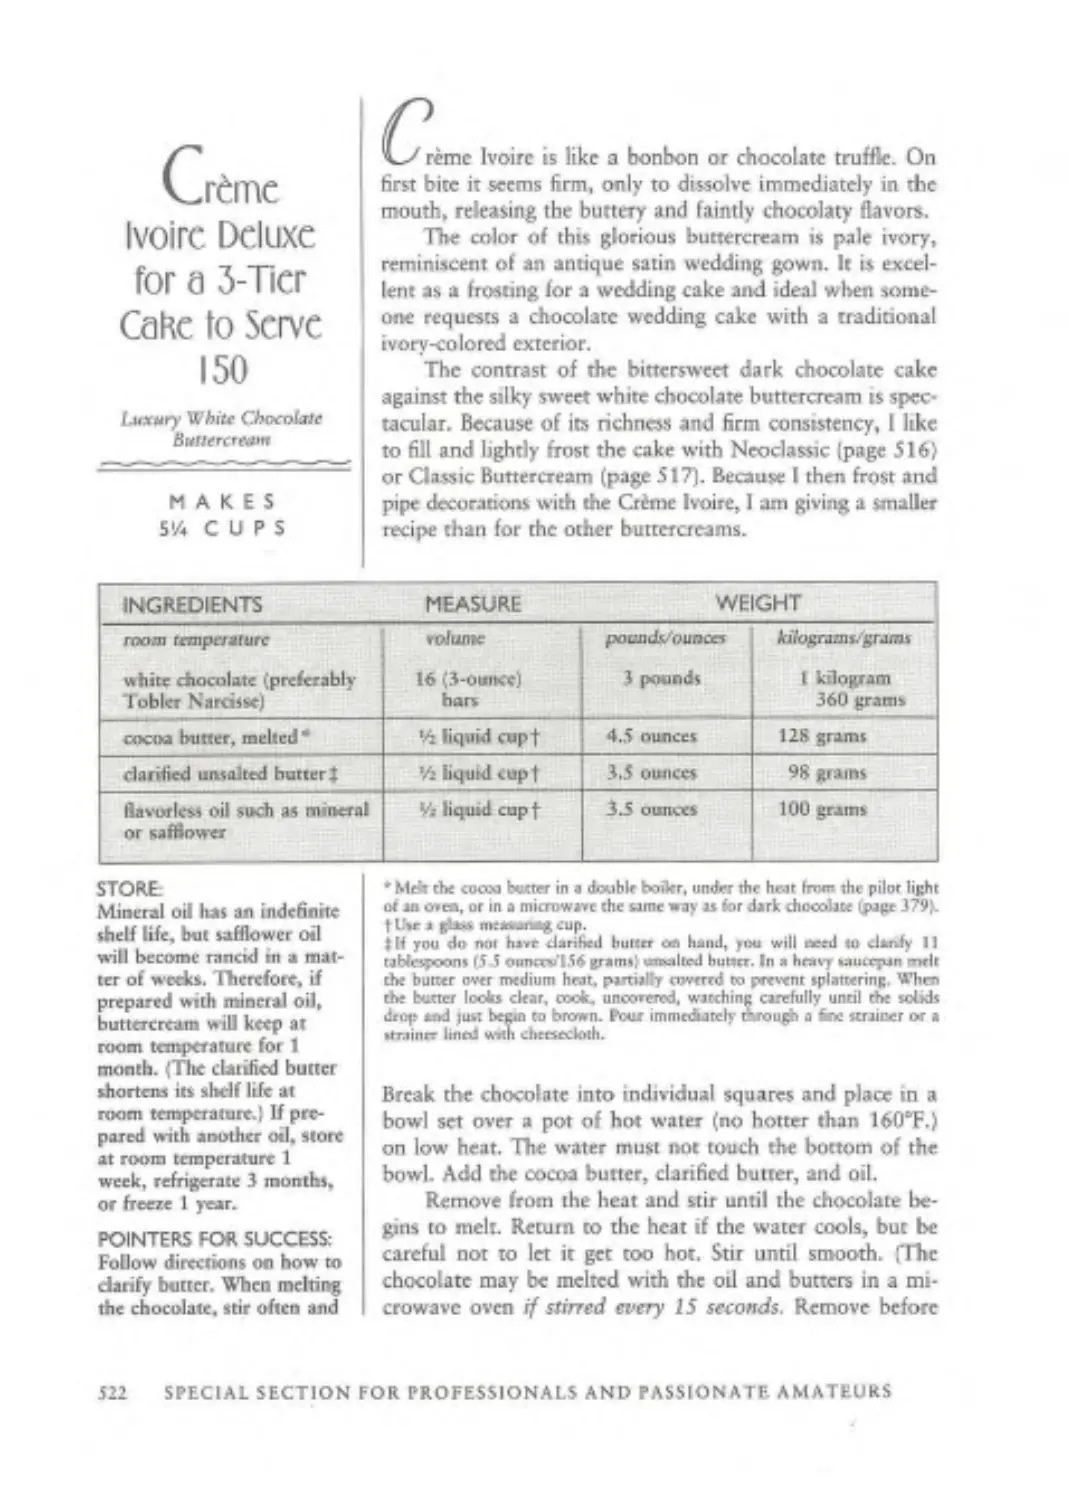
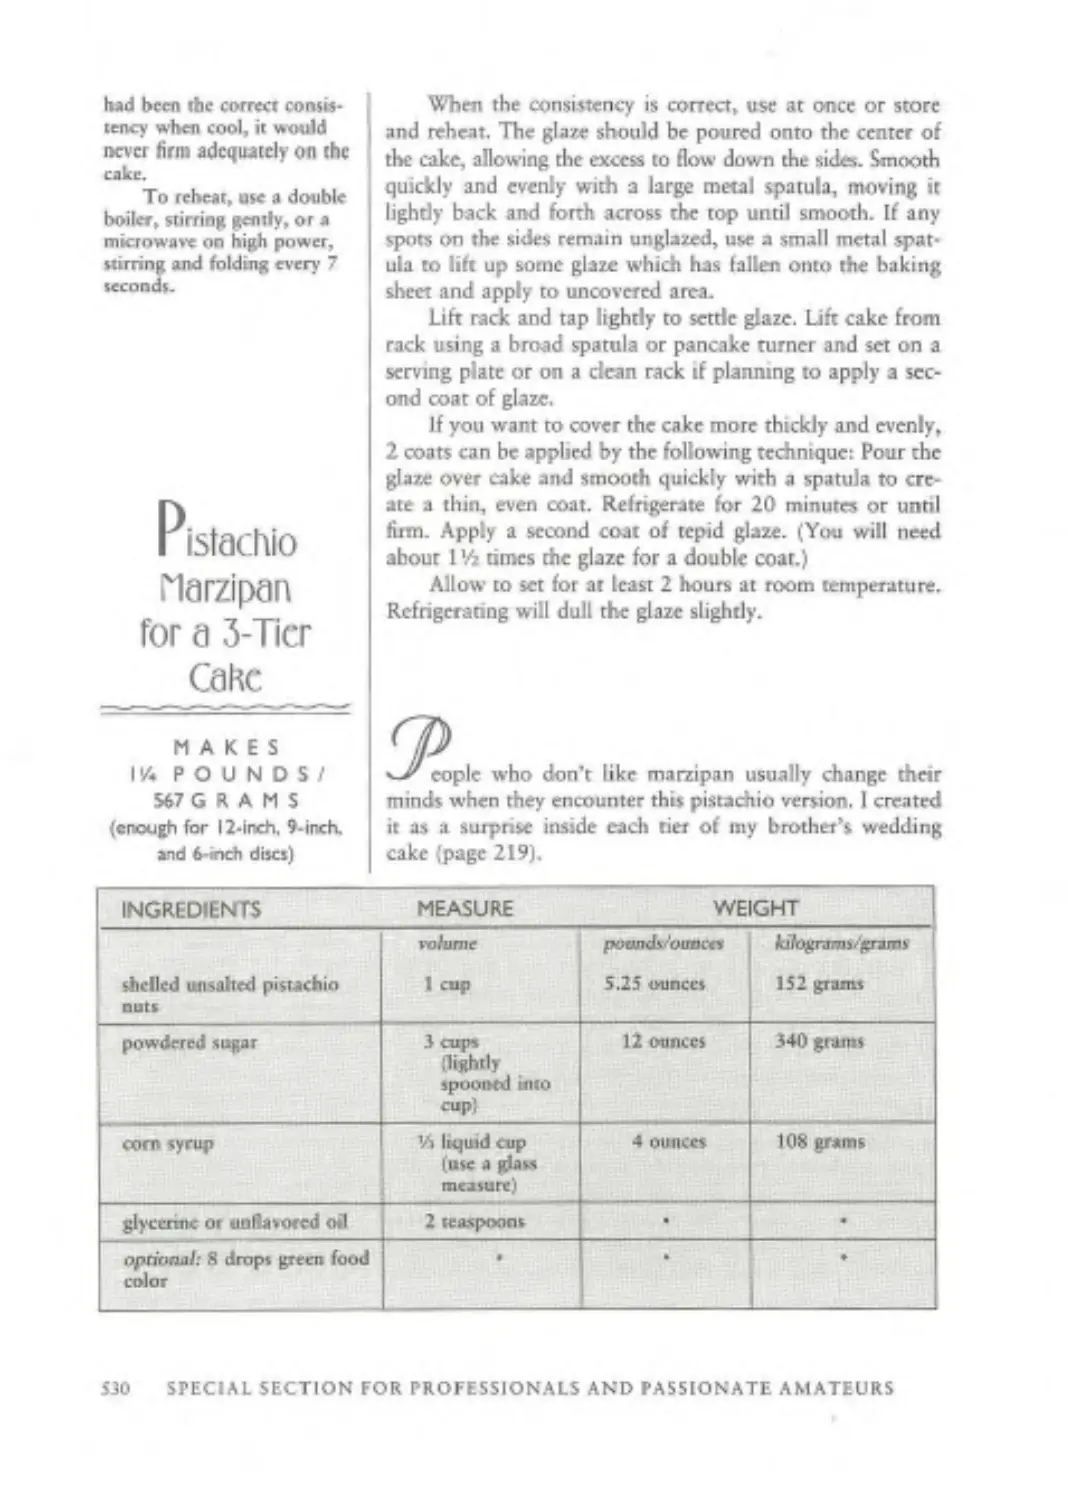
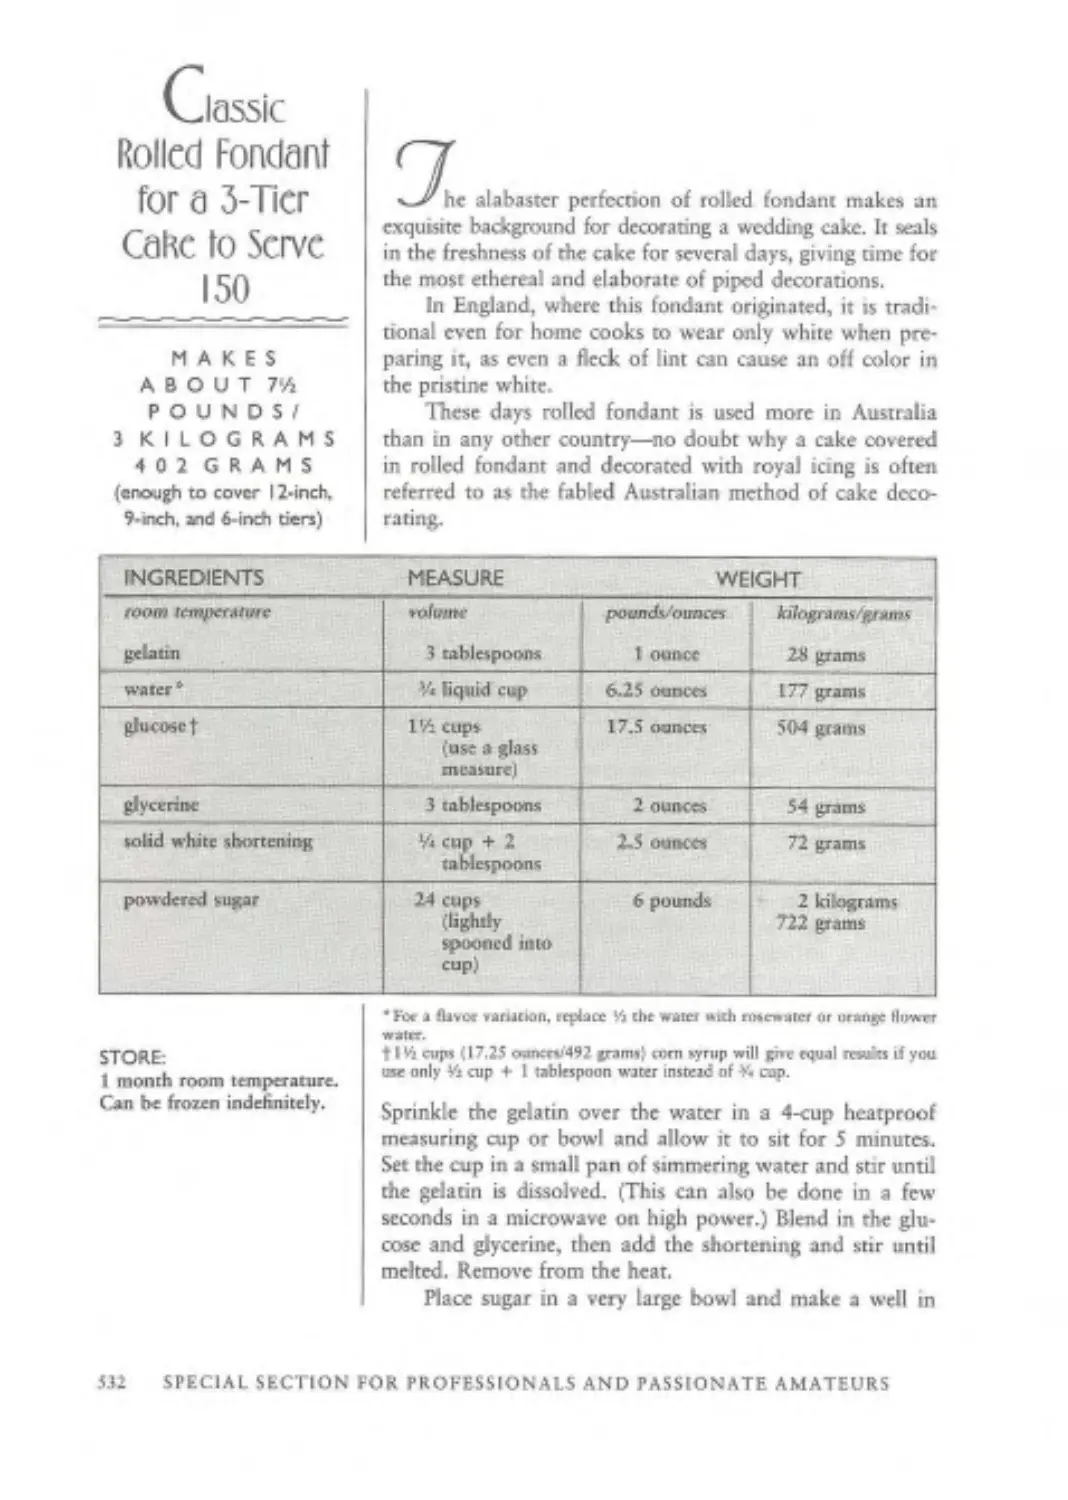
/


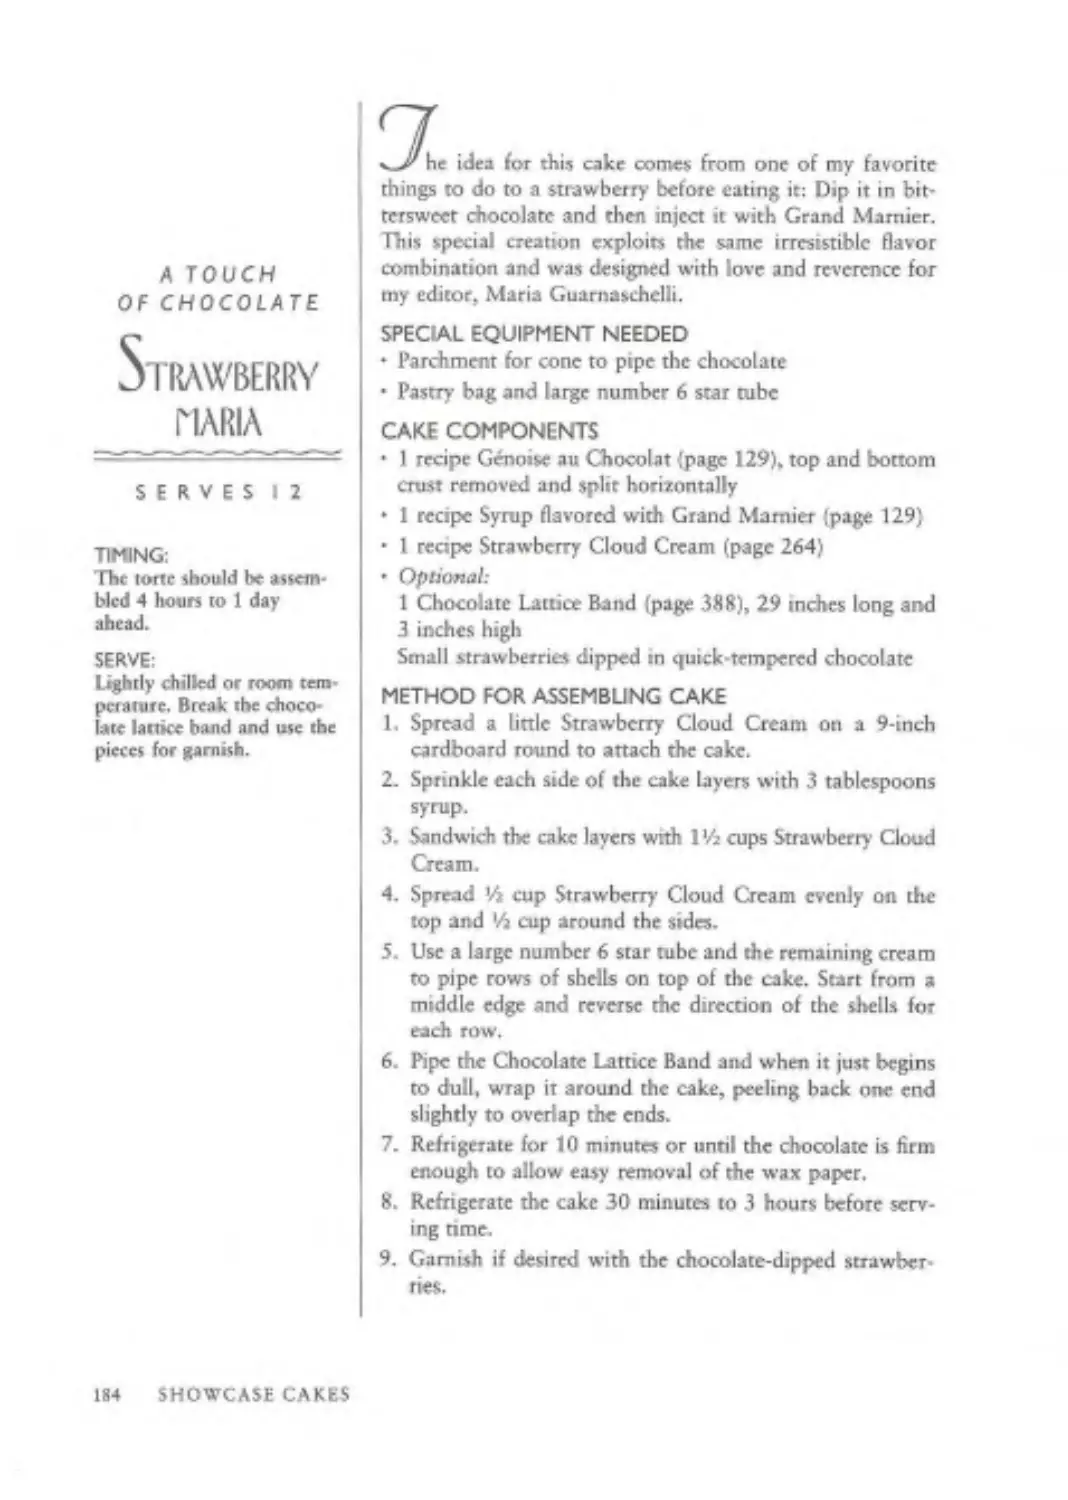
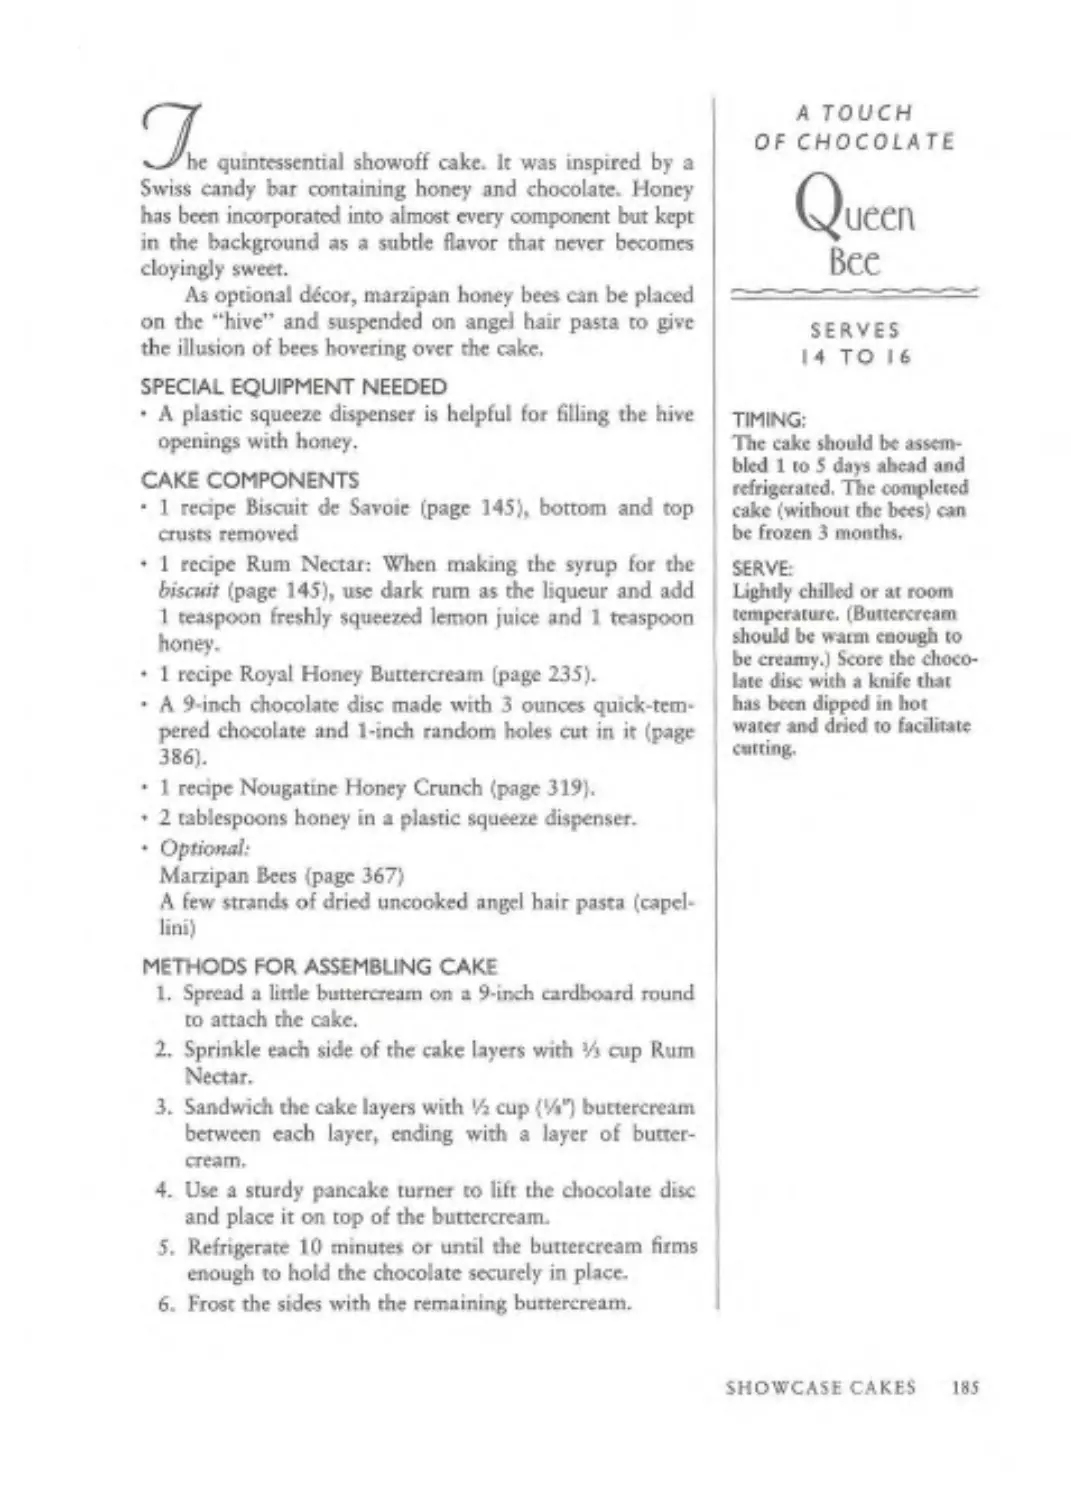
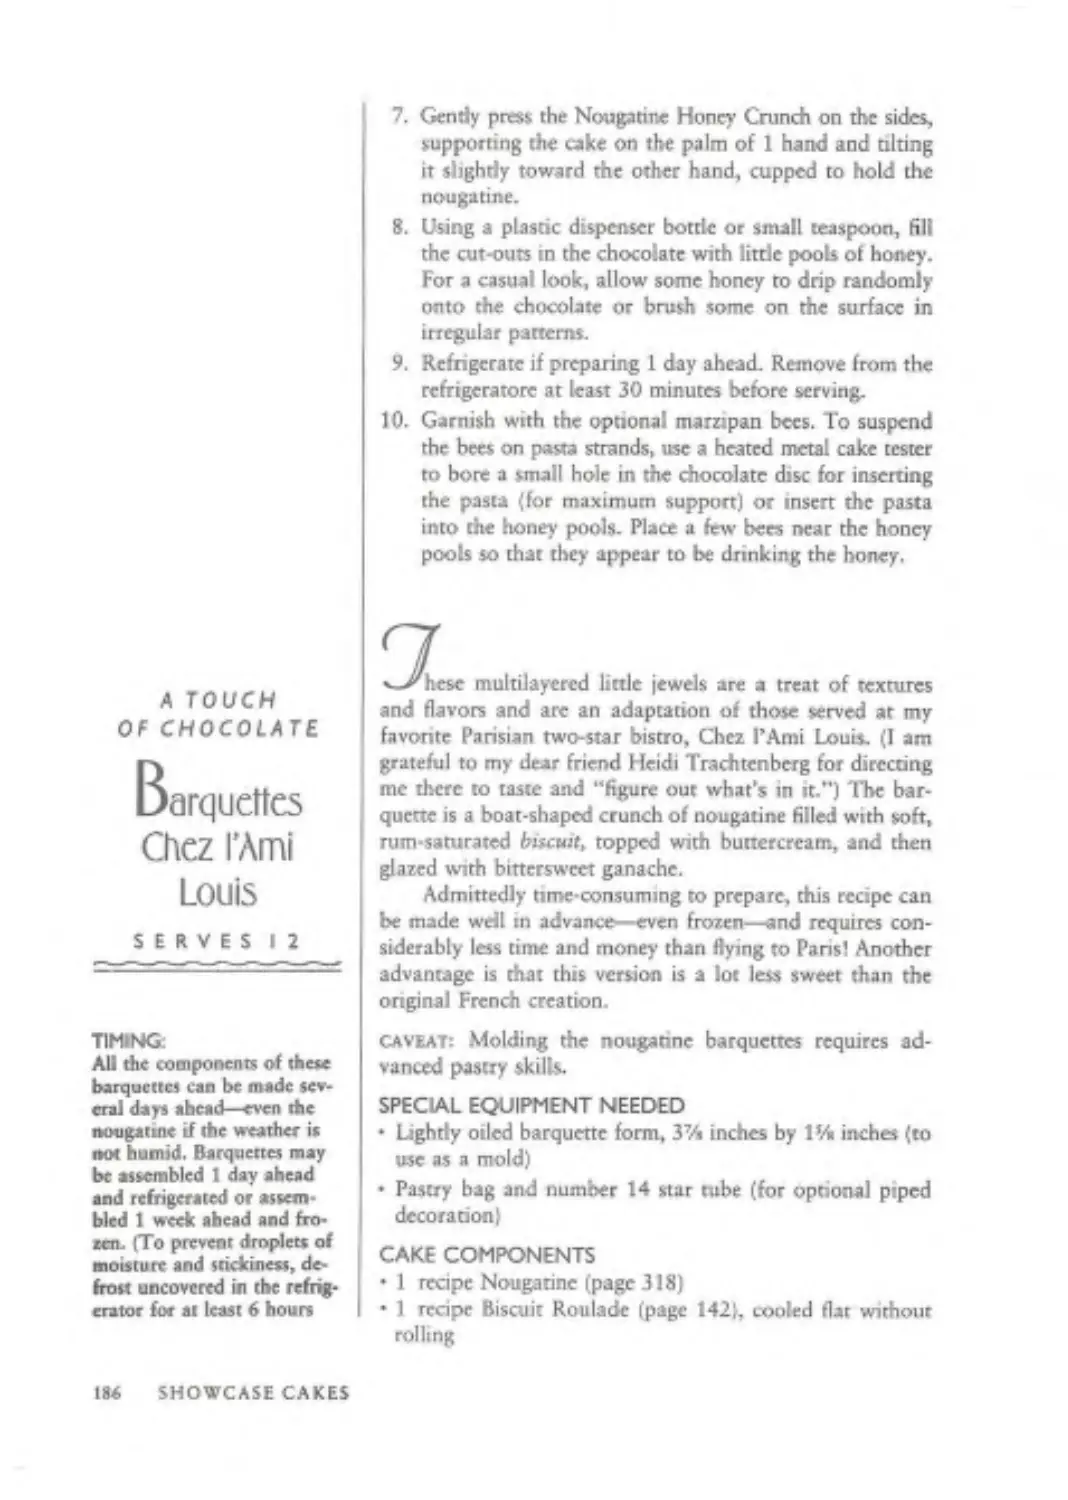


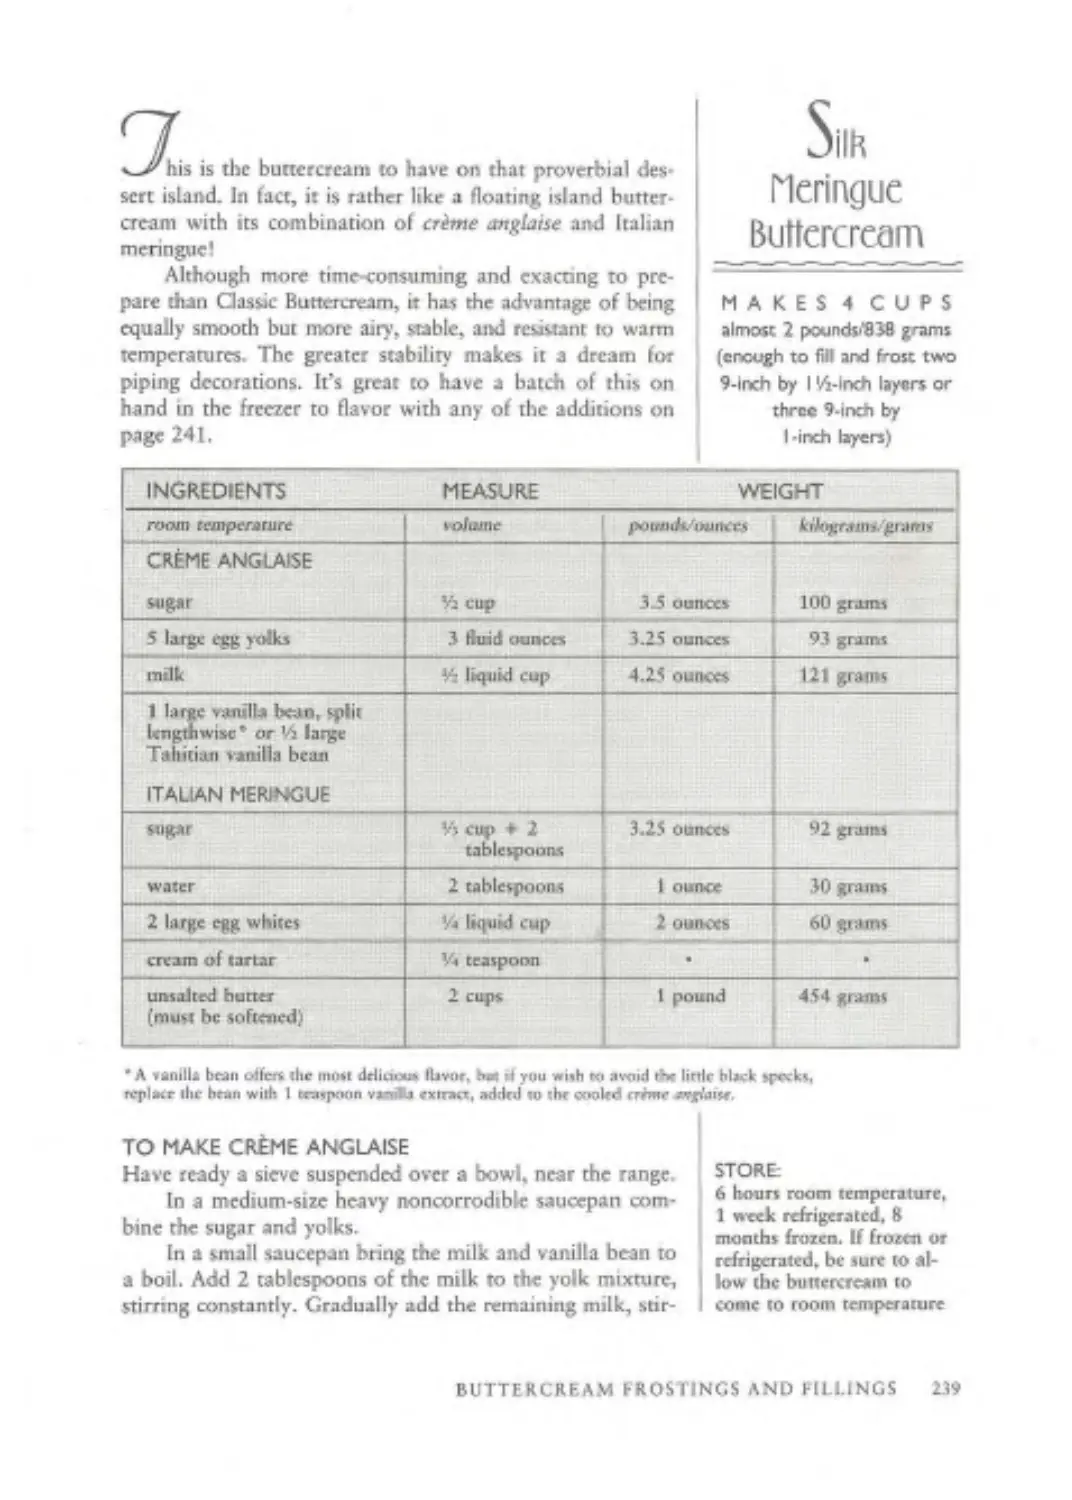


Text
THE
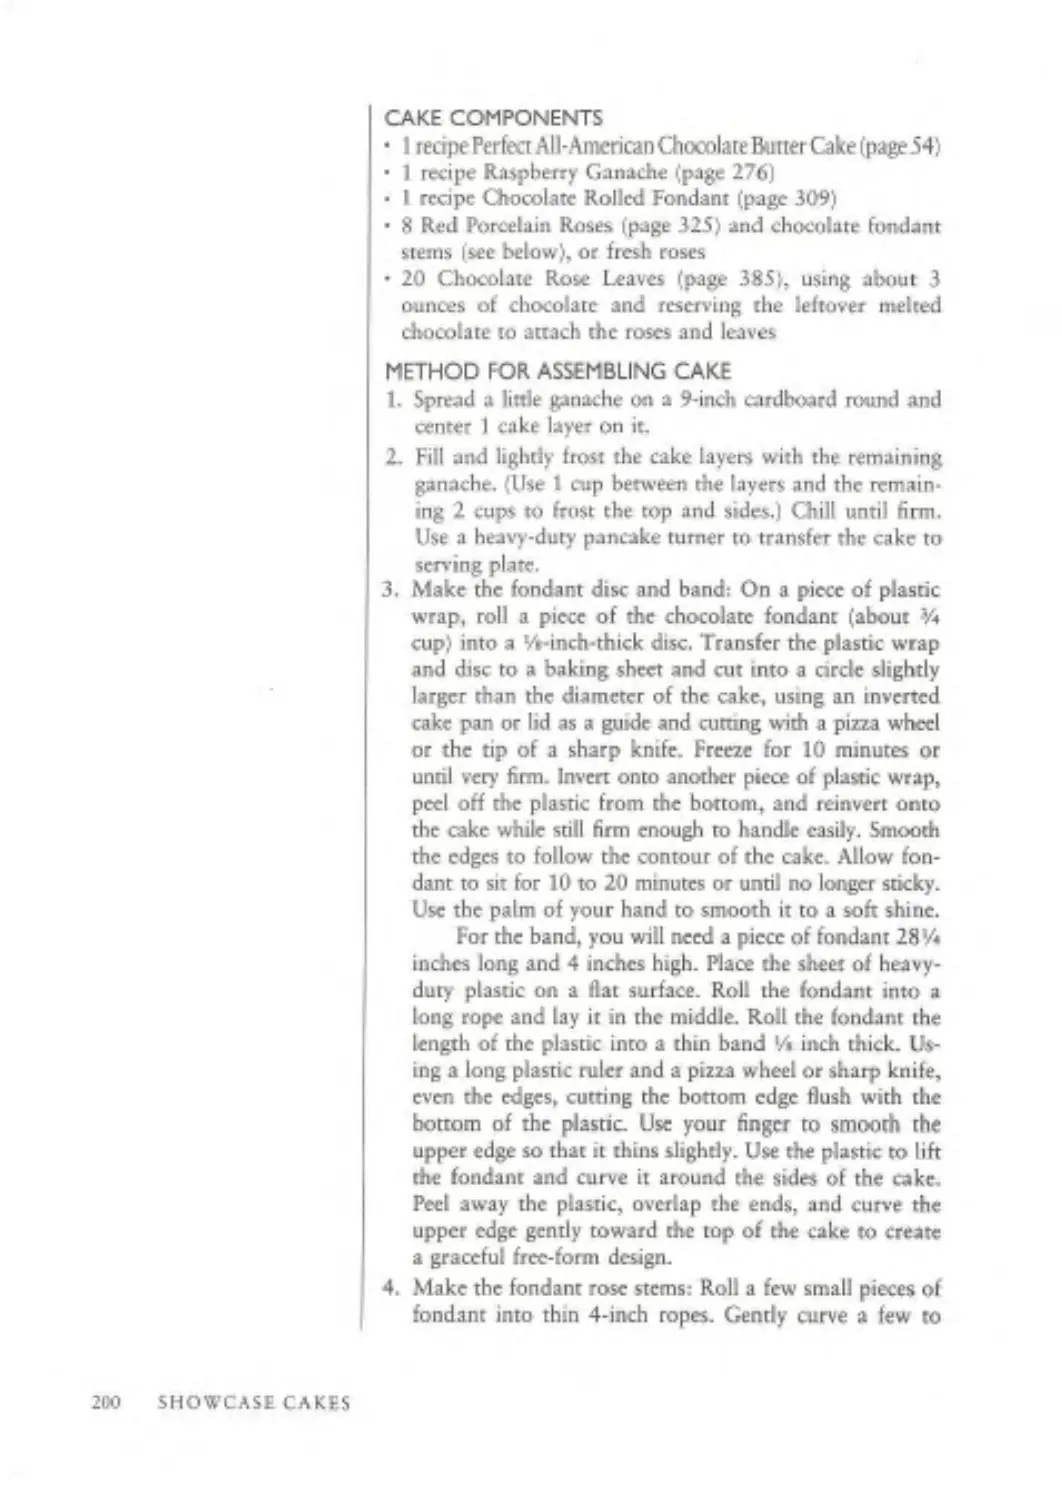
CAKEBIBLE
ROSE LEVY BERANBAUH
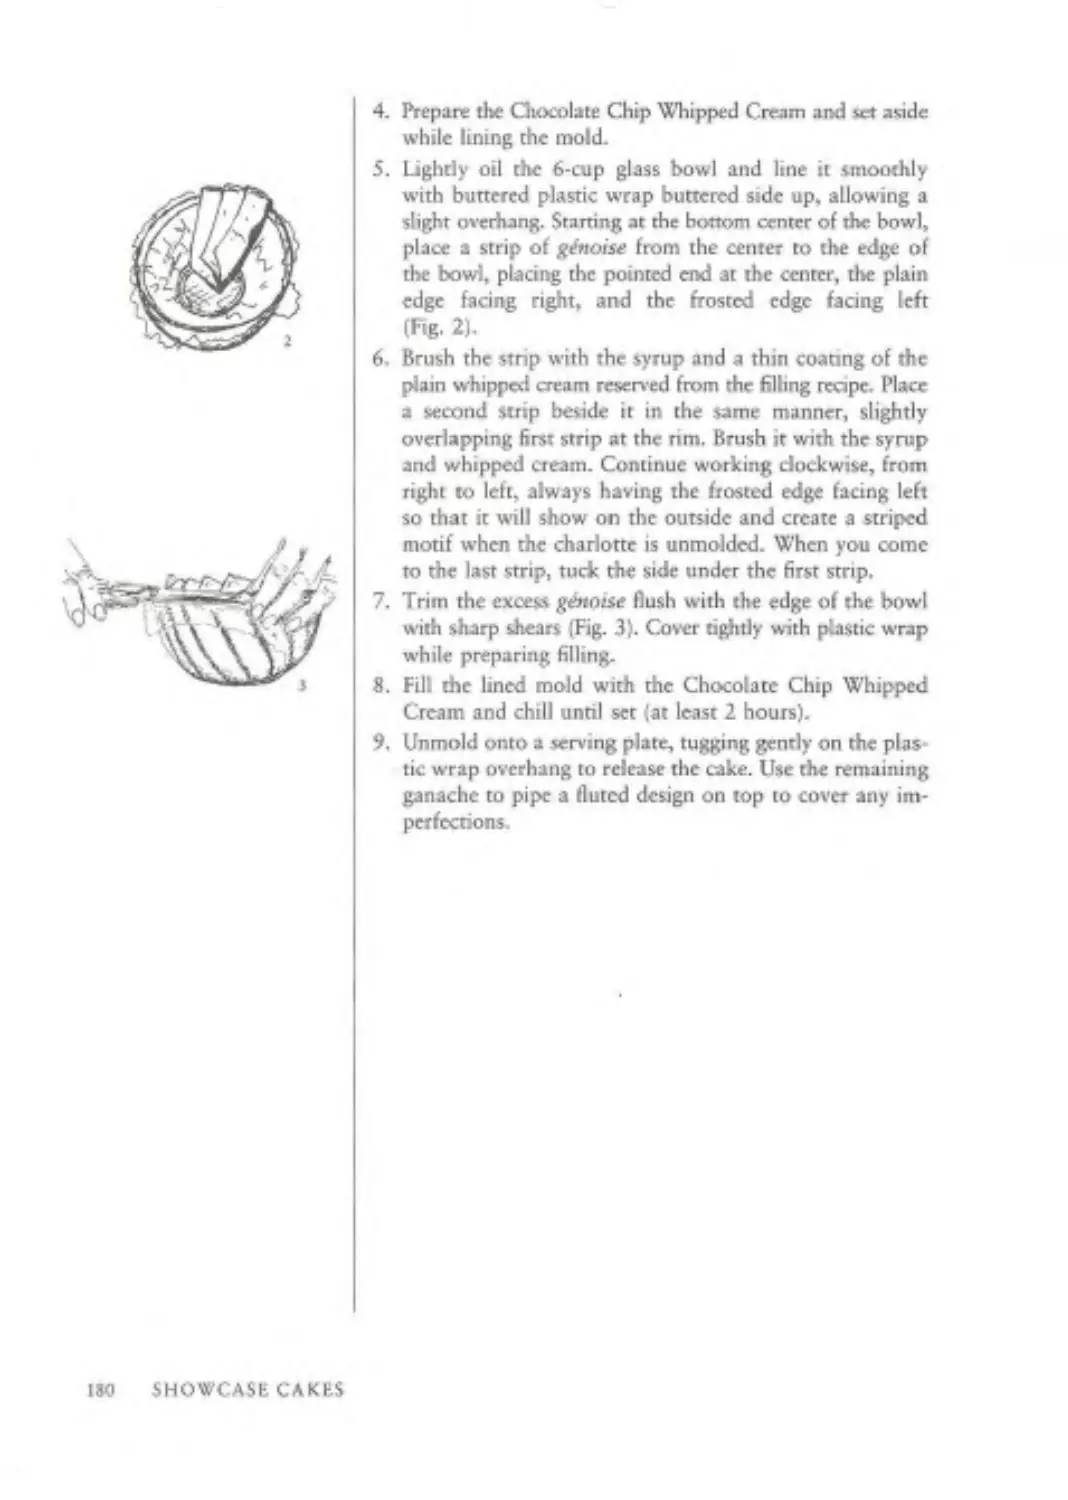
"If you ever bake a cake,
this book will become your partner
in the kitchen.”
— FROM THE FOREWORD BY MAJDA HEATTER
fpt t$bk o-uaa-ouuoa-i
ROSE LEVY BERANB/Xllil
Tins Ь a grand, encyclopedic codec*
tion erf cakes and everything related to
them—crystallized flowers, fondant,
thirty-eight different but icecreams*
и bite or dark chocolate roses* lifelike
beesmadc of marzipan, spun sugar,
chocolate ribbons, car amel cages,
chocolate writing* 22K gold-leaflet-
ters and decorations* enough piped
flowers to fill a florist's drop, and still
more. ...It is seldom that I really want
to make (icy single recipe from coier
to cover in a book. I do in tins book."
—From the Foreword by Maida Hiahlx
More than 200 recipes. 350drawings of
techniques and equipment. 32 pages of
finished cakes in full color.
The Cake Bible i* уоэг magic п л nd tor bak-
ing the eakft ed you rd гелтч —the drfinititc
ur>rk on cakes by the country's top baker.
Ejsy-to-follov recipes for pancakes,
pound cuke, butter cake, genorse. ladv-
fingers. fruitcake, scgctable cakes, cheese-
cake, sponge cake, chiffon cake,
angel food cake, motKse cakes, jelly rolls,
upside-down cakes, ice-cream cakes, even
four-tiered wedJing cakes!
Al! kinds of frosting*, fellings, and toppings
including buttcrcreams. chocolate gan-
ache, Bavarian creams, ice cream, creme
anglaise, meringue, dacquoise, nougatinc.
spun sugar, fondants, fruit purees and con-
serves-with advice on boss to pair them
with the nght cakes.
Many recipes featuring less sugar, low
cholesterol and saturated fat without
compromising flavor or texture.
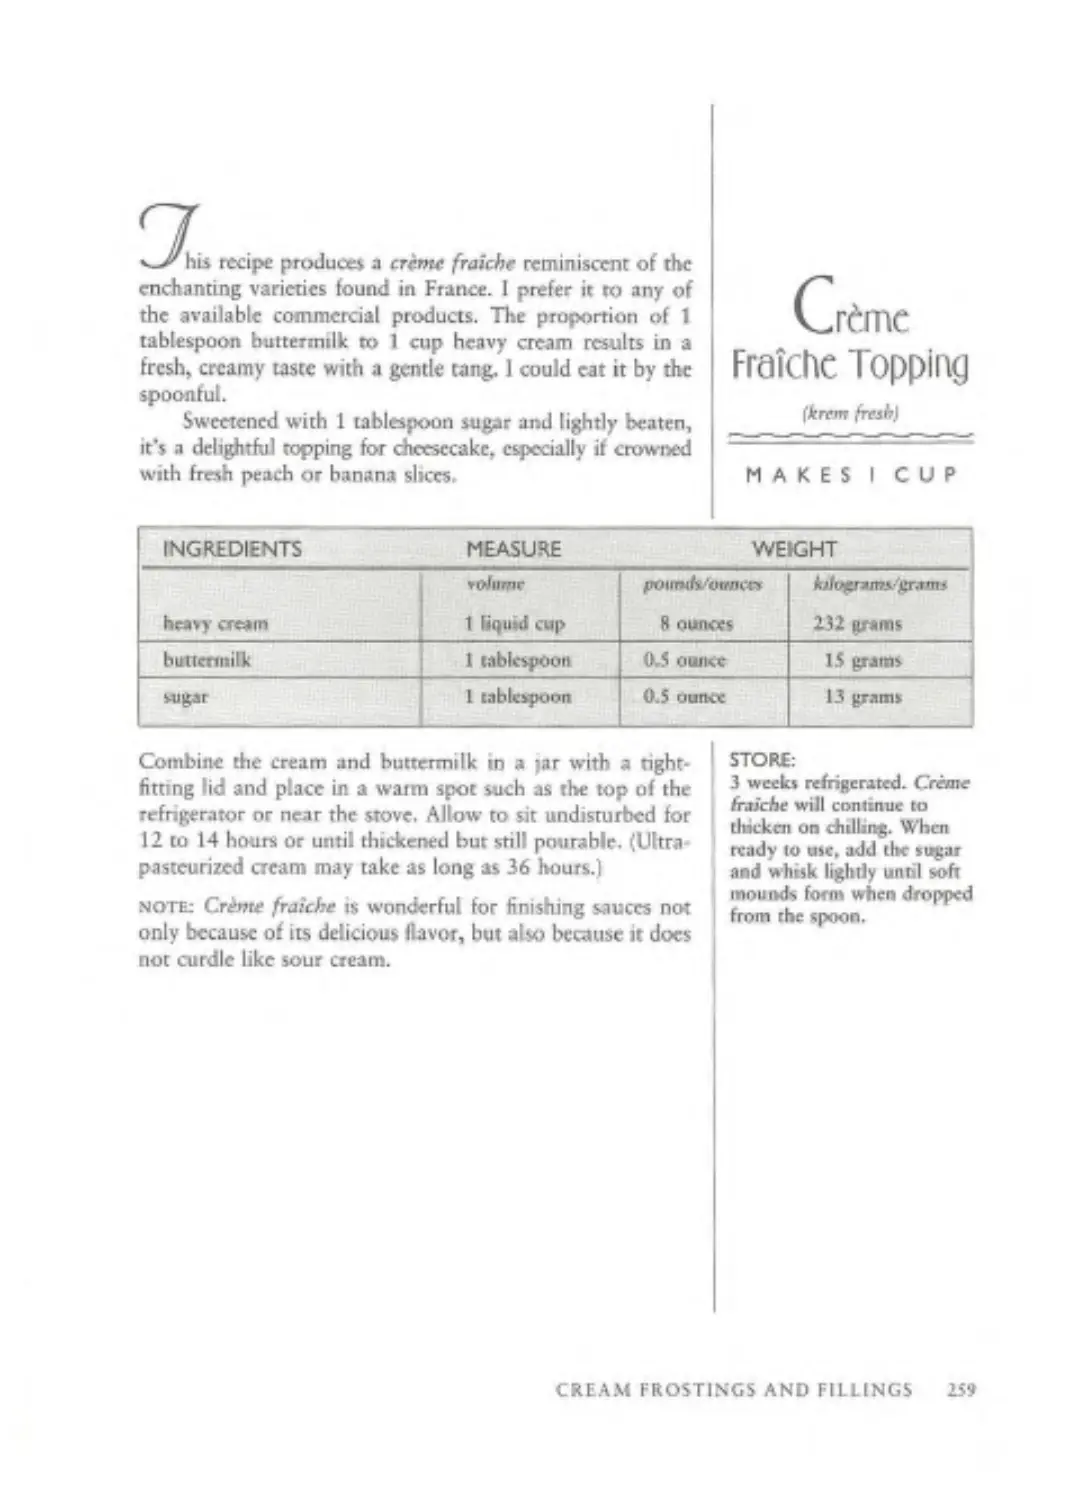
(itMtM ыг/ Krek flip)
191
M
Morrow
ISSN C-ha£-CUU02-b
Countless tips that solve all the problems
i nd tiding the secrets for never again having
to sift cocoa and overheat mg egg whites.
; > How to mxx a buttery, tender layer rake in
under five minutes.
: > How to nuke the most fabulous chocolate
cake you ever imagined with just three
ingredient).
Extensive decorating techniques tor the be*
ginning baker and the professional, to
make the finished product "look like i:
came from a bakery."
Detailed information on ingredients (in-
cluding everything you want to know
about working with chocolate) and equip-
ment. Hus where to get the hnest ingredi-
ents and equipment previously available
only to professionals.
•-.j* j A special chapter devoted to the master
baker, offering precise instructions for
making any size special -occasion cake up
to eighteen inches in diameter.
Pointers for success follow the recipes,
guaranteeing perfect results even time.
The Cake Bible will change forever the
way America bakes.
Rose Lesy Beranbaum is the owner of the
renowned Cordon Rose Cooking School in
New York City. She has instructed hundreds
of students m the art of making cakes. She
has written more than fifty cover stones for
the food magazines, women’s magazines,
and newspapers, including The Хеь’ York
Tinted Her M.A. in food scicecc and culi-
nary arts is the foundation for her years of
experience, which she enjoys conveying to
her students and readers in the clearest,
simplest language.
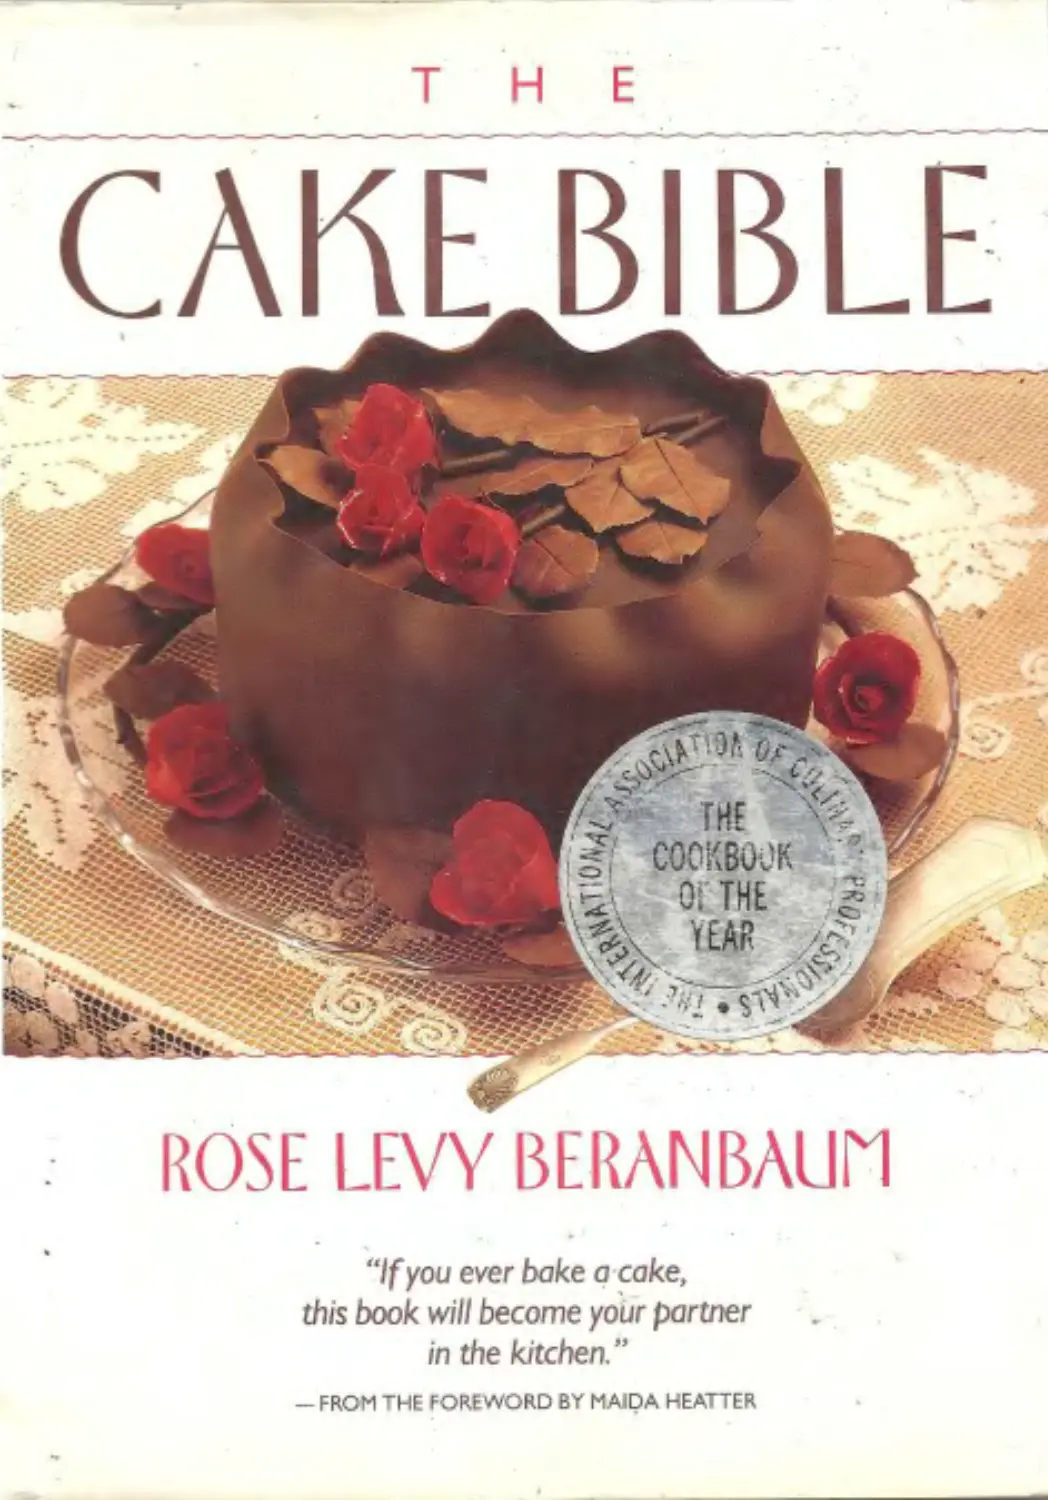
CaU p* tired оч }uket:
La ipagr 199},
by Yvutfit Lee
jjdtl detif/t by Kebitd Onolo
William Morrow & Company. Inc.
1550 Avenue of itc Americas
New York. N.Y. КЮ19
I
ISA.
“Rose is a baker, a chemist, an artist, a sculptor of porcclam-hke flowers in
sugar, a magician, a missionary and a passionate teacher....Of course her
book would be the bible.”
< -Gael Greene
“No book on the subject, in my opinion, can approach the definitive gospel of
Rose Levy Bcranbaum's The Cake Bible. This tome demystifies the art of
baking with such consummate good sense one could easily believe there
is a guardian angel beside you at the oven.”
-Bert Greene
“Rose Bcranbaum has it all: the passion for her subject, a deep technu j
knowledge and supreme elegance and artistry of presentation. Her book
offers outstanding and extensive materials for all bakers, be they beginners
or proficient professionals.”
-Madeleine Kam man
“A marvelous baking book, well written and constantly mouth-watering’'
—PAULA Vi OLEERT
“No one else bakes like Rose! She teaches how every single cake can be a
delicious work of art.”
—JULEE ROSSO
“Rose Levy Beranbaum is America's foremost cake maker. She works like a
scientist and creates delicious perfection.”
-Martha Stewart
“Rose Beranbaum’s The Cake Bible is an exquisitely detailed, beautifully
written and illustrated book that will help the professional as well as the
amateur baker. A must for serious cooks."
-Jacqles Pepin
22B1
isbn o-tas-DMMca-b
THE
CAKE
BIBLE
ALSO BY ROSE LEVY BERANBAUM
Romantic and Classic Cakes
(Irena Chalmers, 1981)
THE
CAKE
BIBLE
ROSE LEVY
BERANBAUM
Edited by ALz/ы D. Guamascbelb
Photographs by Vincent Lee
Book design by Rwhard Oriolo
Food styimg by Rose Levy ВетапЬамт
Line drawings by Dean Bomstem
Foreword by Maida Heat ter
WILLIAM MORROW
AND COMPANY. INC.
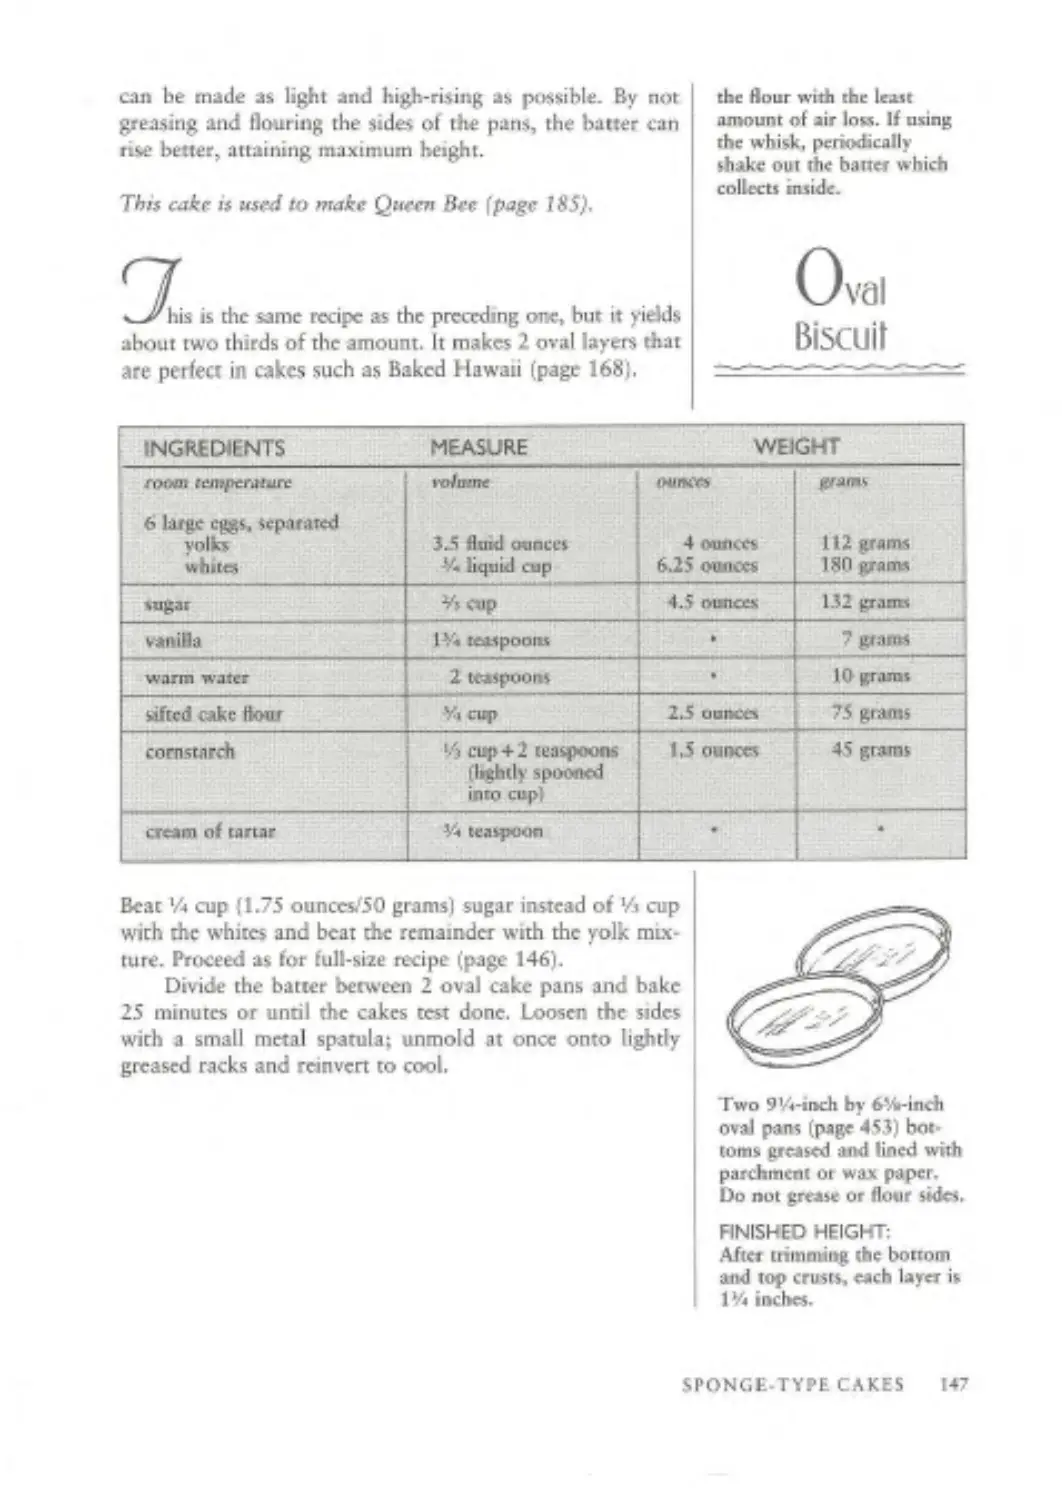
NEW YORK
PHOTO CREDITS
Over the уеагк, both Vincent Lee and I have been col-
lecting the many beautiful plates, serving pieces, and
Linens shown in these photographs I’d like to express
special gratitude to my tnends for generously offering
me some of their treasures with which to enhance my
cakes.
NANCY BLItXtR
Georgian sterling-silver plate I Black Forest Cake*
Victorian tablecloth (Swan Lake)
antique taMeckxh (Perfect All-American Chocolate
Butter Cake with Burnt Orange Silk Menngue Butter-
cream)
Crown Derby dessert plate I Orange Chocolate Crown)
cut-crystal sauce bowl (Scarlet Empress)
CHKLSEA PASSAGE AT BARNEYS
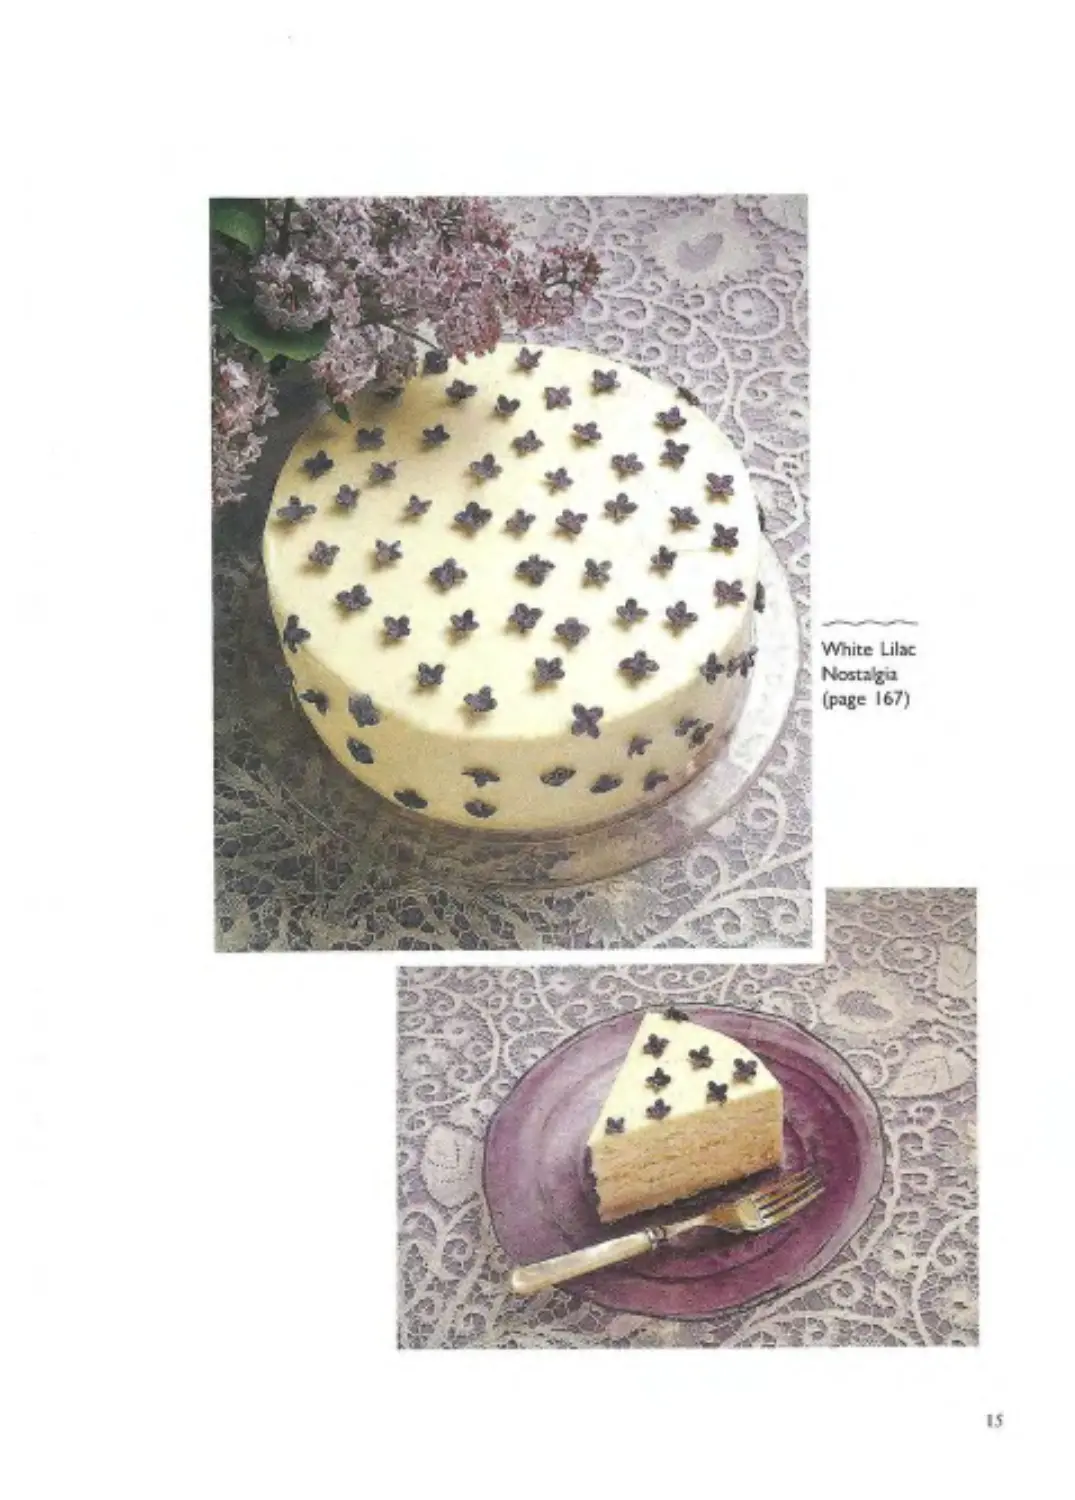
antique lace cloth (White Lilac Nostalgia Cake I
DEAN N DELUCA
porcelain Pillivuyt cake plate |Guil<-Free Chocolate
Chiffon Cake and Cordon Rote Banana Cake with Sour
Cream Ganachel
JUDI ELKINS
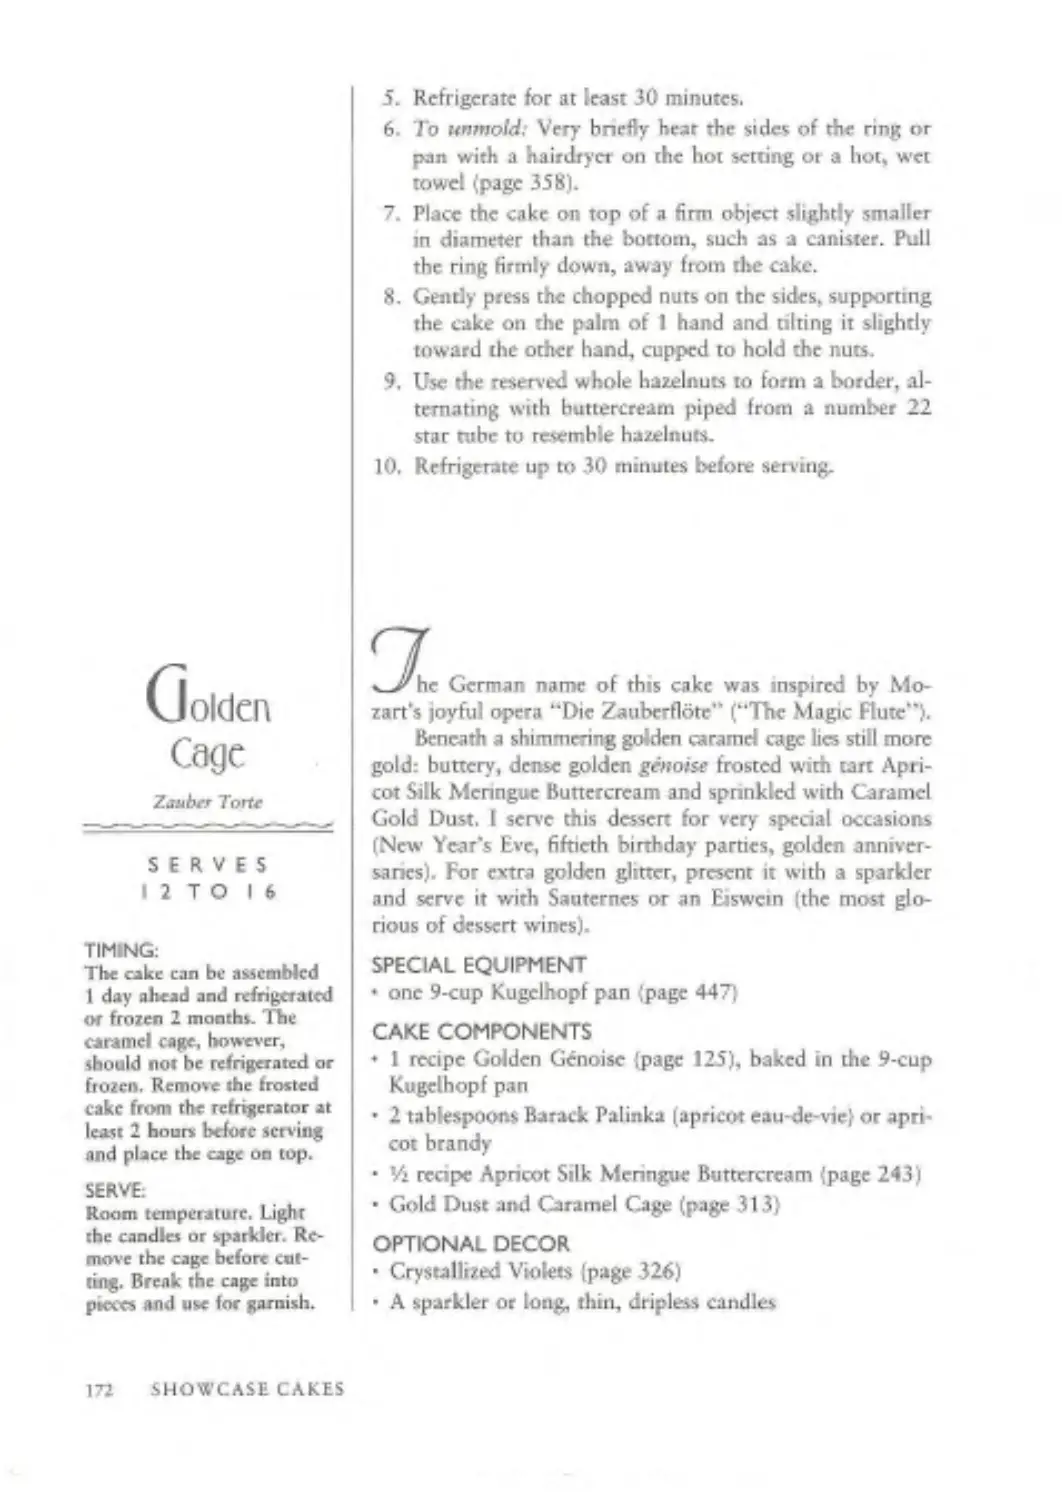
glass cake stand (Golden Cage)
lace tablecloth (U Porcelaine)
purple cake plate and vase (White Lilac Nostalgia)
Art Deco plate I Art Deco Cake)
FORTUNOFF
sterling-silver oval planer with gadroon edge (Swan
Lake!
ROYAL COPENHAGEN PORCELAIN CORP-, N.Y.
Georg Jensen blossom pattern pastry fork lA Таяе of
Heaven ।
MCNULTY’S TEA AND COFFEE COMPANY, NYC
coffee beans lAll-Occasiun Downy Yd low Butter Cake
with Classic Coffee Buttercream)
ML'MM
Cordon Rose champagne I Rose Trellis)
ROMANOFF CAVIAR
beluga caviar I Best Buckwheat Bhm La Tultpe)
DAVID SHAMAH
Andree Putman dermtasse cup and saucer (Art Deco
Cake)
WILLIAM EMANUEL SONNENRE1CH
special effects (Star-Spangled Rhapsody Cake I
TYSON OF LES FLEURS
exone pineapple crown (Baked Hawaii)
Cupyfuht <5 19XS by Rose Levy
Beranbaum
a^ryright £ 1988 by
Vinixnt Lee
Lane Drawing copyright 0 198K by
Dean Bornstcin
All nghr* reserved. No part of this book
may be reproduced or utilised in wt hem
or by am means, electronic or mechani-
cal, inuludiny photocopying, recording,oc
by an» inforvnitinn storage and retrieval
syetrm, wilhuul peniUMiiak in writing
from the Publisher Inquiries dow»ld be
addressed tn Permissions Department,
Wilium Mixro<w and Company, Inc., 1.15(1
Avenue of thr Апкткжч, New Yurt, N.Y.
10019.
Rmrqpiixmg the importance oi what has been
written, it is the policy of William Morrow and
Company Inc., and its imprints and affricates, to
have the hook» »r pubirji ponied on aetd free
paper, and ur exert our best efloetx to that nod.
Library of Congress Cxalofpnf-in-
Publicaixxn Data
Rrranhnum. Ri»c Levy.
The Cake Bible > Rn«- Lr«y
Beranbaum; edited by Maria D.
Guarmudselli; pliutugtjphoi by Vincent
Lee-, line draawgs b| Dean Bornstcin.
RmhI by Rir< Levy Beranbaum;
tnrrword by Maida Hcutn-r
p. cm
Includes index.
ISBN 0-644 iMKQ 6
I, Qikr- I Guaxwmhclli,
Магм. 11. Lee, Vincent, ill Orioln,
Ri.liuid. (V. Тл1е-
TX771 R4tS 144»
641.8 653—de 19 84-1369
CIP
Printed in the Unared Stares of America
19 20
BOOK DASHIN RY RICHARD ORIOLO
(Lose Levy Betanbaum has an amazing ability to karn every-
thing there is to know about a recipe, and then to teach it care-
fully to her readers. She was born to teach. Her patience is
extraordinary. She writes with loving care and attention. She tells
you not only “how,” but “why.** If you ever bake a cake, or if
you always bake cakes—professionally or not—this book will be-
come your partner in the kitchen.
Although many of the cakes have names that you will rec-
ognize, all through the book you will come across new ways of
doing things. 1 am intrigued by the technique for putnng together
a butter cake. The dry ingredients are mixed in a bowl, then the
butter and the liquids are added (just the reverse of starting by
beating or creaming the butter). It is quick and easy—and the
result* are delicious.
The first cakes I made from this book were simple little but-
ter cakes made in loaf pans. They were Lemon Poppy Seed Pound
Cake and White Spice Pound Cake. I simply followed the metic-
ulously complete instructions—and had great fun while doing it.
When 1 served the cakes to two European-trained pastry chefs
who are friends of ours, they liked them so much they wanted the
recipes.
Then (using the same technique) 1 made rhe Chocolate Dom-
ingo Cake, about which Rose says, "The most intense, round,
full, chocolate flavor of any. . . How could I resist? It is won-
derful—and it is quick and easy. It is a round cake that doc* not
have any icing—it doesn’t need any.
Making yeast doughs can be one of the most absorbing and
gratifying—and addictive—techniques of all baking. When I read
the recipe for Rose's Holiday Halleluiah Streusel Brioche I knew
it would not be long before I tried it. Actually, I waited only a
few minutes. As with the other recipes 1 made, I felt Rose guiding
me every step of the way. And then, “hallelujah” to be sure. It is
as pretty as a picture. It can be made ahead and frozen. As Rose
says, “It is guaranteed to become one of your favorite».*'
Foreword
FOREWORD S
Many of us have pct peeves in the kitchen; things we would
rather not have to do. I have only a few. One procedure 1 have
always disliked is sifting or straining cocoa. I usually have to spend
more time cleaning up after it than actually doing it. In this book
I read a tip about processing it in the food processor to get the
same results as straining. 1 tried it. it is a pleasure. I’ll never do it
any other way from now on.
Rose developed a trick tor making real old-fashioned whip-
png cream that has enough far content when the only kind you
can buy has a low fat content. And she lets you in on a secret tor
making whipped cream that will hold up for six hours without
separating, even at room temperature.
It was difficult not to spend all my time making one after
another of these cakes. They’ all cry out, “Make mc.M It is seldom
that I really want to make every single recipe from cover to cover
in a book. I do in this book.
This is a grand, encyclopedic collection of cakrs and every-
thing related to them—crystallized flowers, fondant, thirty-eight
different buttercrcams, white or dark chocolate roses, lifelike bees
made of marzipan, spun sugar, chocolate ribbons, caramel cages,
chocolate writing, 22K gold leaf letters and decorations, enough
piped flowers to fill a florist*! shop, and still more. Throughout it
all I have the feeling that Rose really shines the brightest when
she is talking about cakes for special occasions. Show oft cakes.
Wedding cakes. Celebration cakes. Cakes to serve a hundred and
fifty people. They arc splendid, breathtaking, dramatic, exquisite,
memorable works of art.
Frankly, 1 am in awe of Rose’s scientific and scholarly mind.
She approaches a recipe like a chemist in a laboratory. But mainly.
Rose is a wonderful cook and baker—and her book is, to be sure,
a bi hie.
-MAIDA HLA1TER
6 FOREWORD
must Lxrgin by thanking my parents: my mother for passing
on the specter of perseverance (my favorite and most viral at-
tribute!, my father for his hands of gold, and both my parents for
their example of love of then craft. I cannot think of a more
precious gift, except perhaps for another one, that of kindness.
This book could nor have been written without rhe vocal sup-
port and consideration of my husband, Elliott. I also want to thank
my stepchildren, Beth and Mkhad, who offered so much enthu-
siasm and advice over the years while they and these recipes were
growing up.
Much credit goes to my generous and brilliant fnend Shirley
Corriher, who cares more than anyone else I know what really
happens inside a cake and has offered me unending conversation
and information to this effect.
There is simply no way to do justice to Mana Guamaschelh.
I feel that I am among the luckiest authors in the world to have
Ivor as my editor. Never have 1 felt more encouraged or better
understood. Noe only did we share the same vision, we both were
always open to possibilities and ready to pur aside our own egos
for the sake of what was “best for the book.” I am especially
grateful to Mana for offering me total creative freedom and .ill
the time that I needed in which to accomplish my best work. Her
brilliantly unswerving wisdom and personal touches made the book
come alive.
Vincent Lee is an artist with a camera. Without his exquisite
color photographs, this book would be a mere shadow of what it
is. I am thankful for his untiring patience, his infinite inventive*
ness and his friendship. Working with him has been a special |oy.
No nne has contributed more to this book than my assistant.
David Shamah. When I first scarred rhis book, be was still in high
school. In rhe interim he graduated from rhe Culinary Institute of
America. Despite distance, long and early hours in the kitchen,
and final exams, hardly a night went by that we did not have long
conversations about cake concepts and what is new in the culi*
nary world. David is well acquainted with every theory, every
recipe, and every word in this book. In fact, it is often hard to
separate the ideas that originated from his bnllianriy inquiring
young mind. He has worked on this book with as much love as
if it were his own. I am blessed with his friendship.
1 want co express my undying gratitude to all the people who
involved themselves with the production of this book, taking a
personal interest and making it a part of their lives. It has been a
privilege to be part of a team, a network of such extraordinary
dedication and creativity.
Acknow-
ledgments
ACKNOWLEDGMENTS 7
Chief copy editor: Deborah Weiss
Book design director: Marta Epes
Designer: Richard Oriok)
Managing editor; Andrew Ambraziejus
Assistant to the editor: John Guamaschelli
Production: Harvey Hotfman
My chief proofreader; Heidi Trachtenberg. Other proofreaders: Shirley Comher,
Dr. Lillian Wager Levy, David Shamah, Madeline Shamah.
Testers: Nancy Blitzer, Marion Bush, Judi Elkins, Ruth Margolies, David Shamah
Chief technical consultant: Shirley Comber, Research Biochemist of Confident
Cooking, Atlanta, Georgia
Technical advisers: albert uster imports: Albert Uster and Ben Reed, Claude Burke;
chocolate gallery: Joan Mansour; cpc international: Sherry McGoldrick;
CU1SINART5, inc.: Carl Sonthcimer; hauser CHOCOLATIER: Rudi Hauser; LINDT:
Rudolph Sprungli and Arthur Oberholzer; Deanne Miller; SUGAR ASSOCIATION: Jack
O’Conndi; thomas j. lipton, inc., knox gelatin: Anna Marie Coccia; tobler/
SUCHARD: Dr. Baser and Marcus Gerber; TUSCAN DAIRIES: Helen Shull; wilton
ENTERPRISES: Zella Junkin; Richard Walker; wolf range company: Laxminara-
simhan Vasan.
Special thanks to:
Bert Greene for naming this book.
Terron Hecht for her contribution to the artwork,
Bernard and Florence Wager, my chemist uncle who devoted his Saturday
mornings to tutor me through high school chemistry and my aunt who made deli’
cious lunches for afterward.
Eleanor Lynch and Cecily Brownstone for encouraging me to continue my studies.
Dr. Jed H. Irvine, Dr. Stephen L. Gumport, and Dr. Harold H. Sage for en-
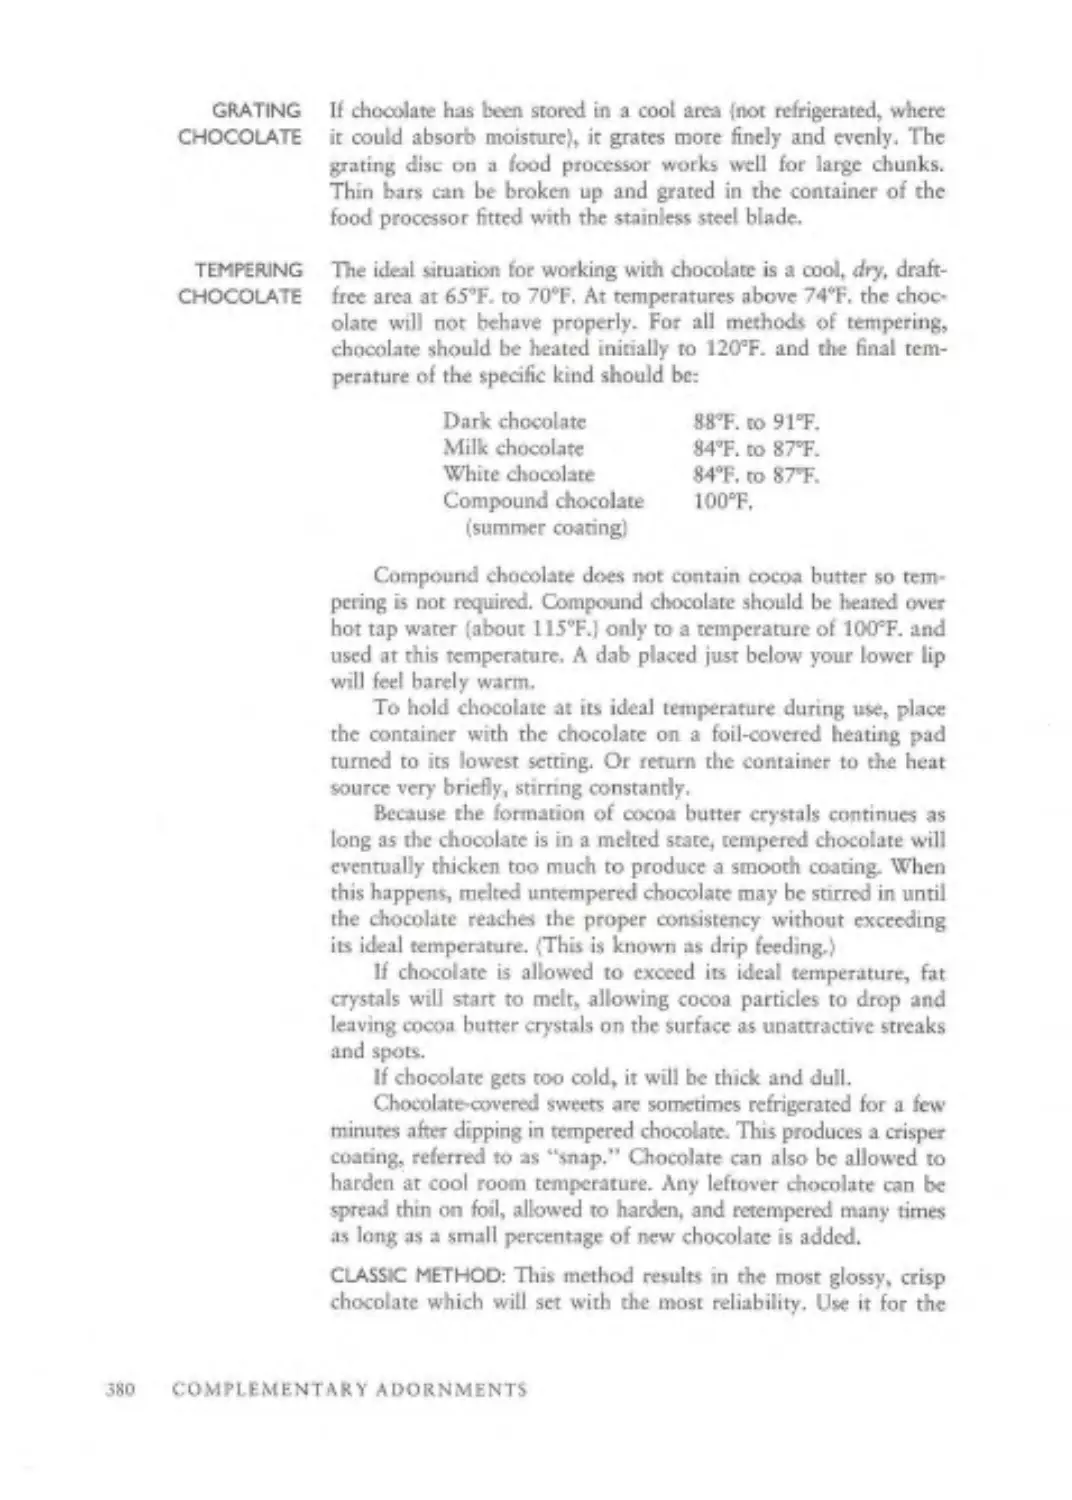
abling me to finish college.
James Beard and Julia Child, my first teachers, for setting a wonderful example
of passion and professionalism.
John Clancy, for his generosity, humor and unforgettable pastry lessons.
Maida Heatter, my sweets guru, whose wonderful writing and recipes showed
me just how sensational a dessert could be and who graced this book with her
wonderful presence.
Sue Huffman, former food editor of the Ladies’ Home Journal, who had faith
in me.
Linda Foster Gome, former head of the Ladies' Home Journal rest kitchen, who
took me under her wing and taught me rhe principles of food styling, recipe testing,
and development—I know no hands more skilled than hers,
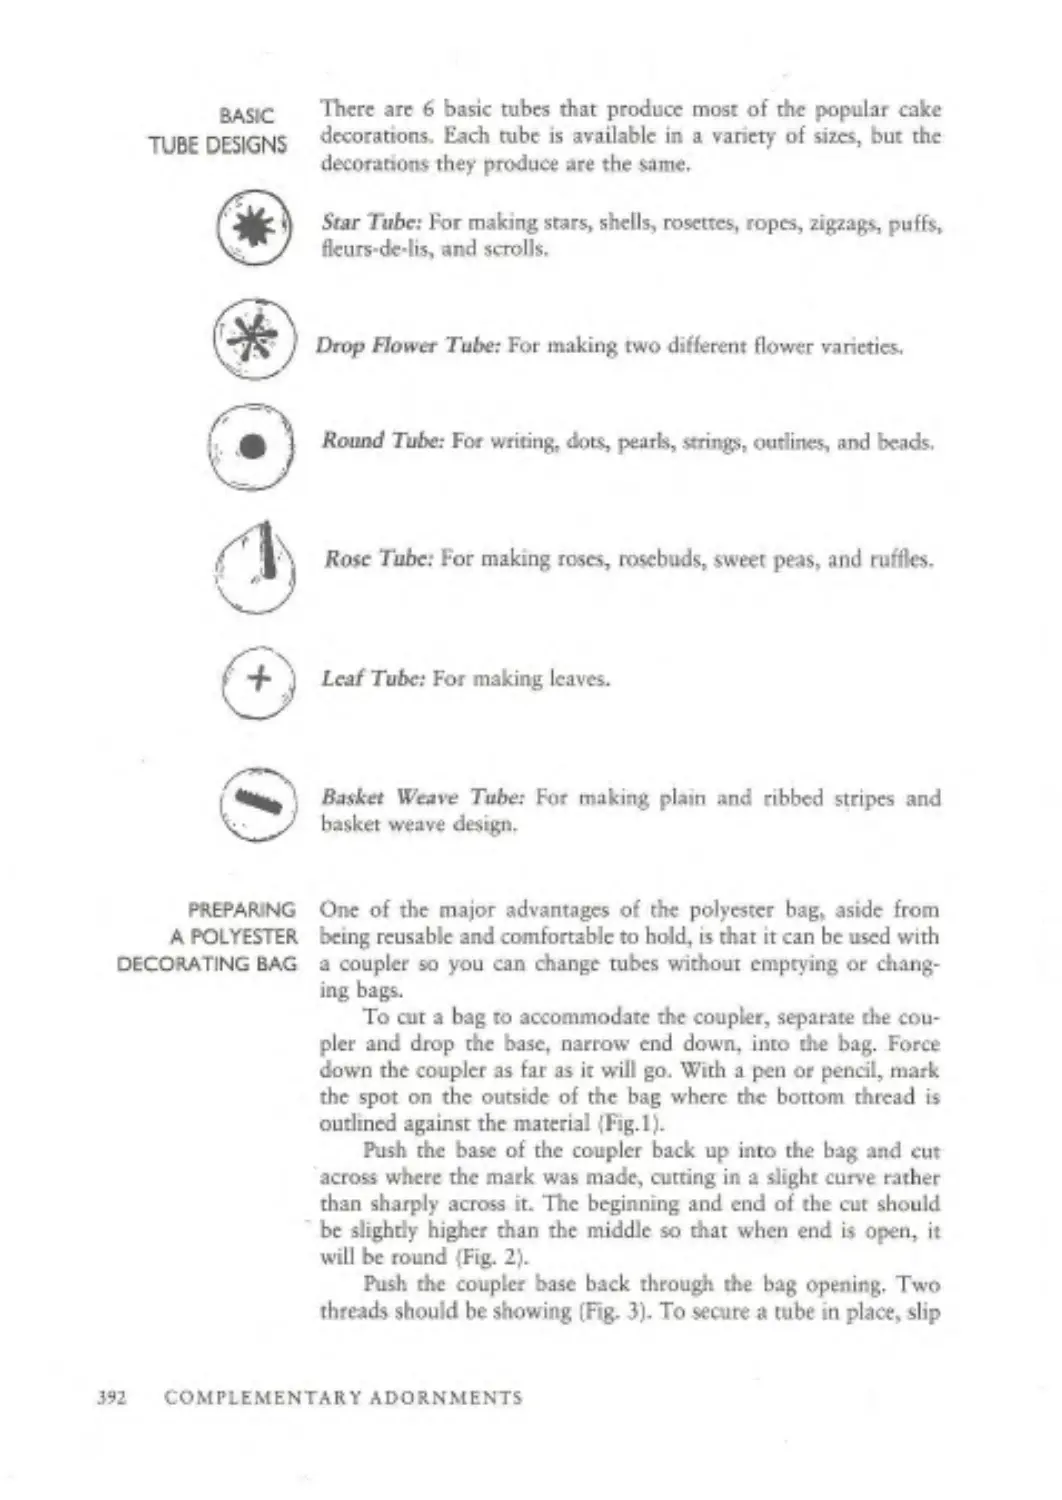
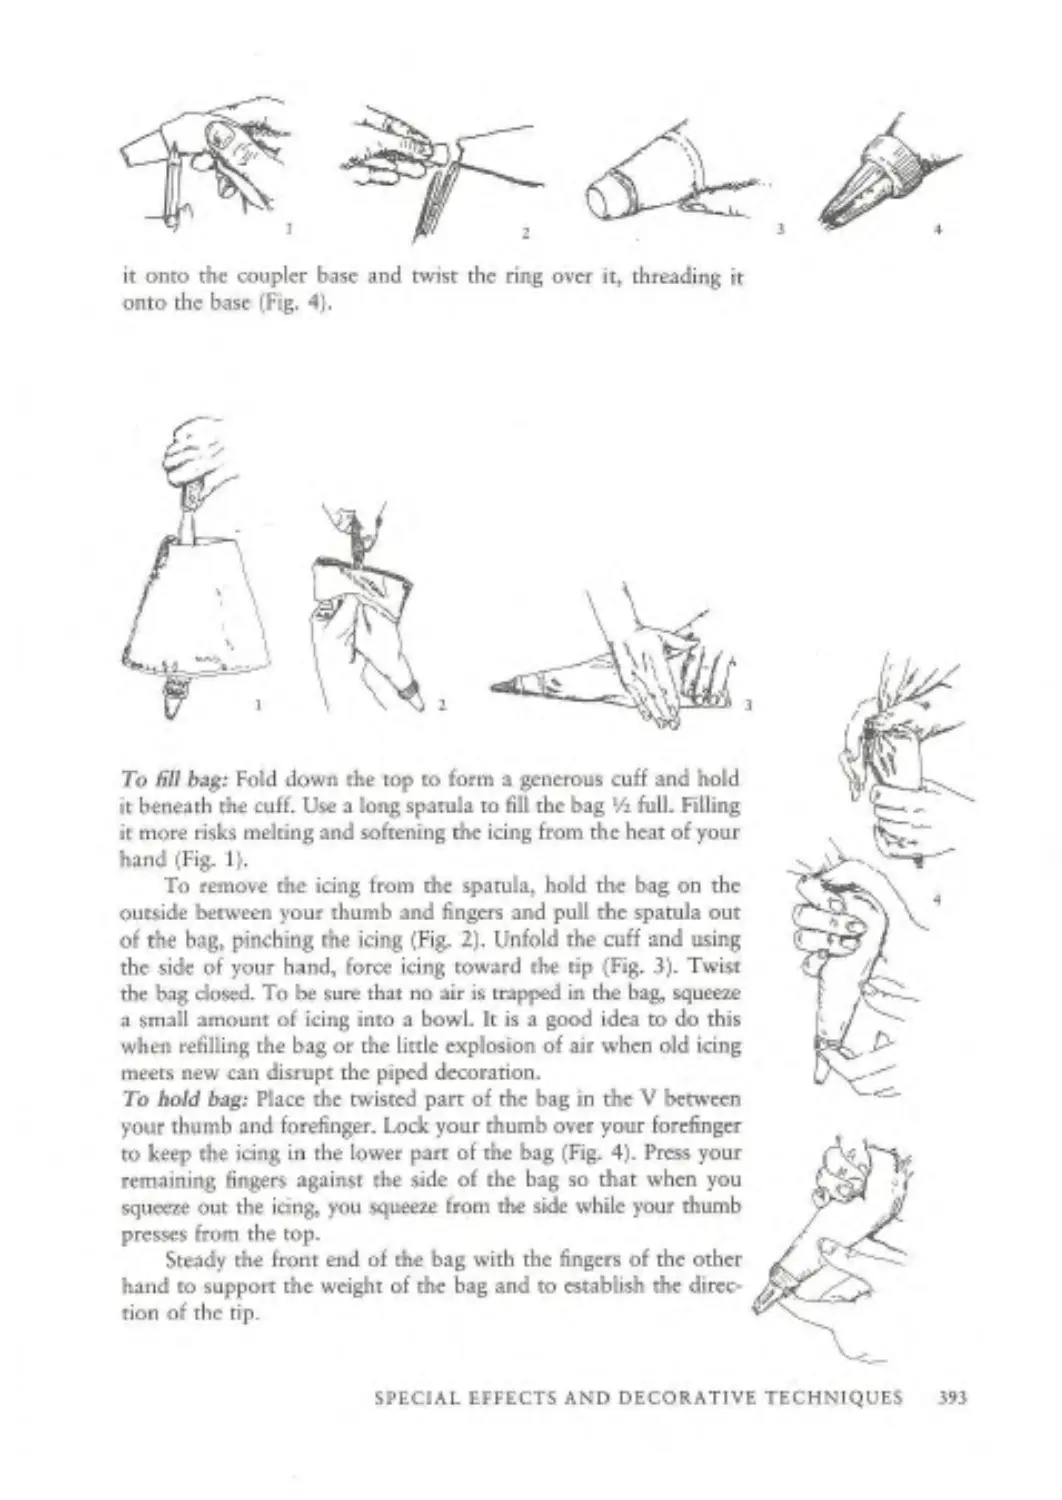
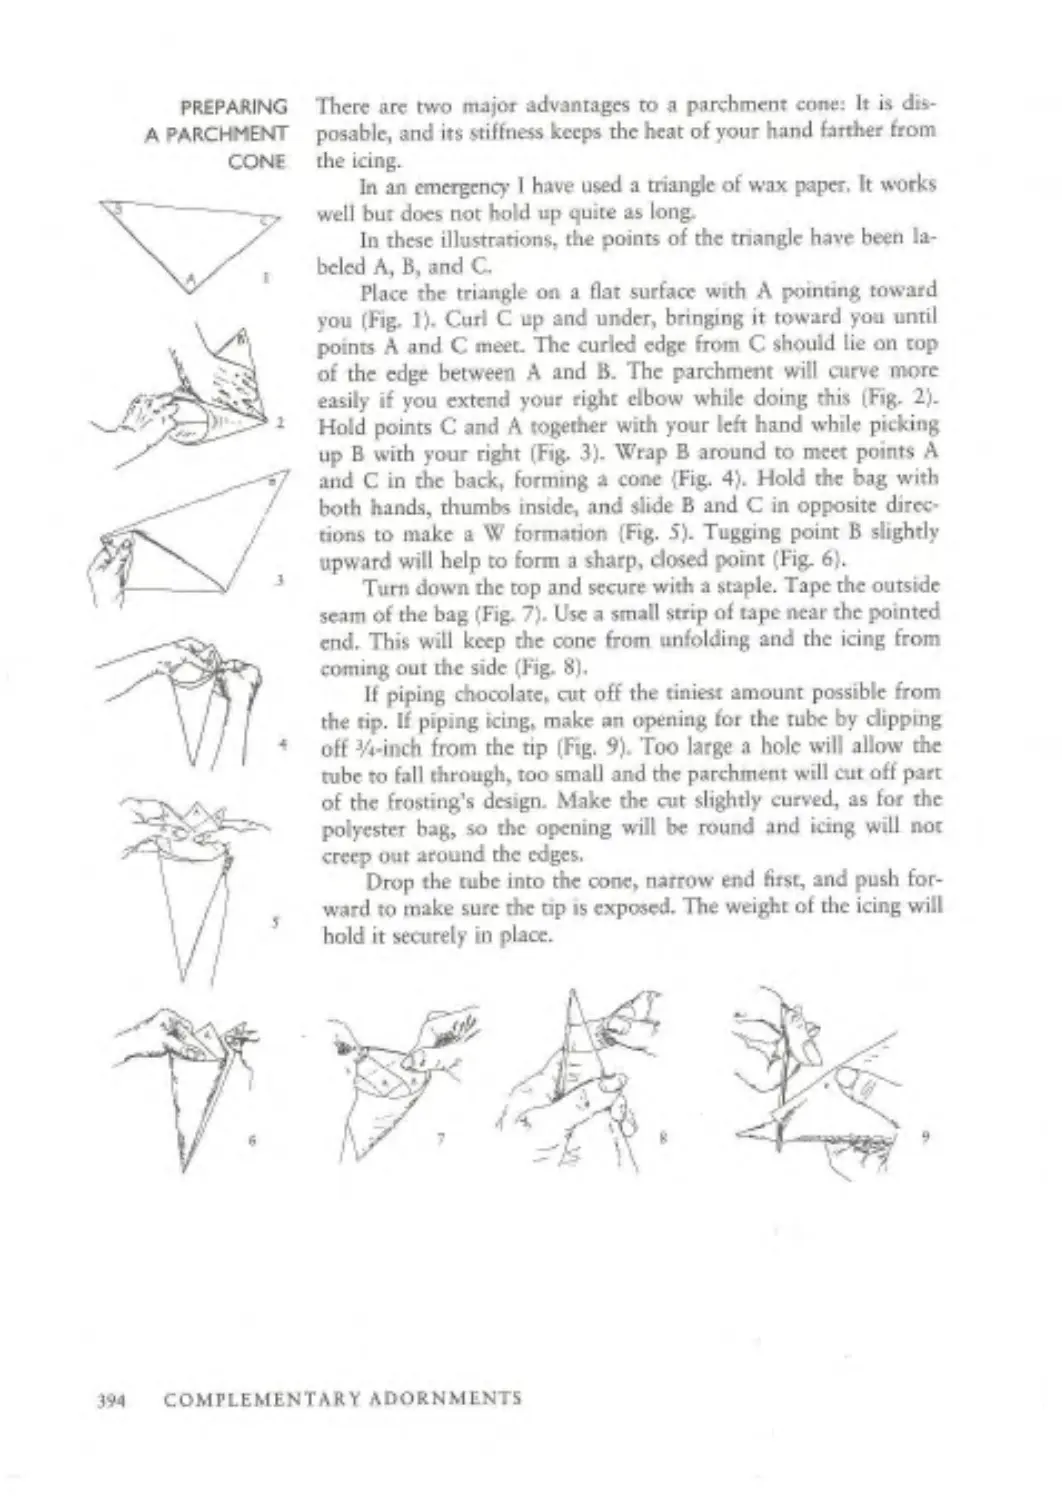
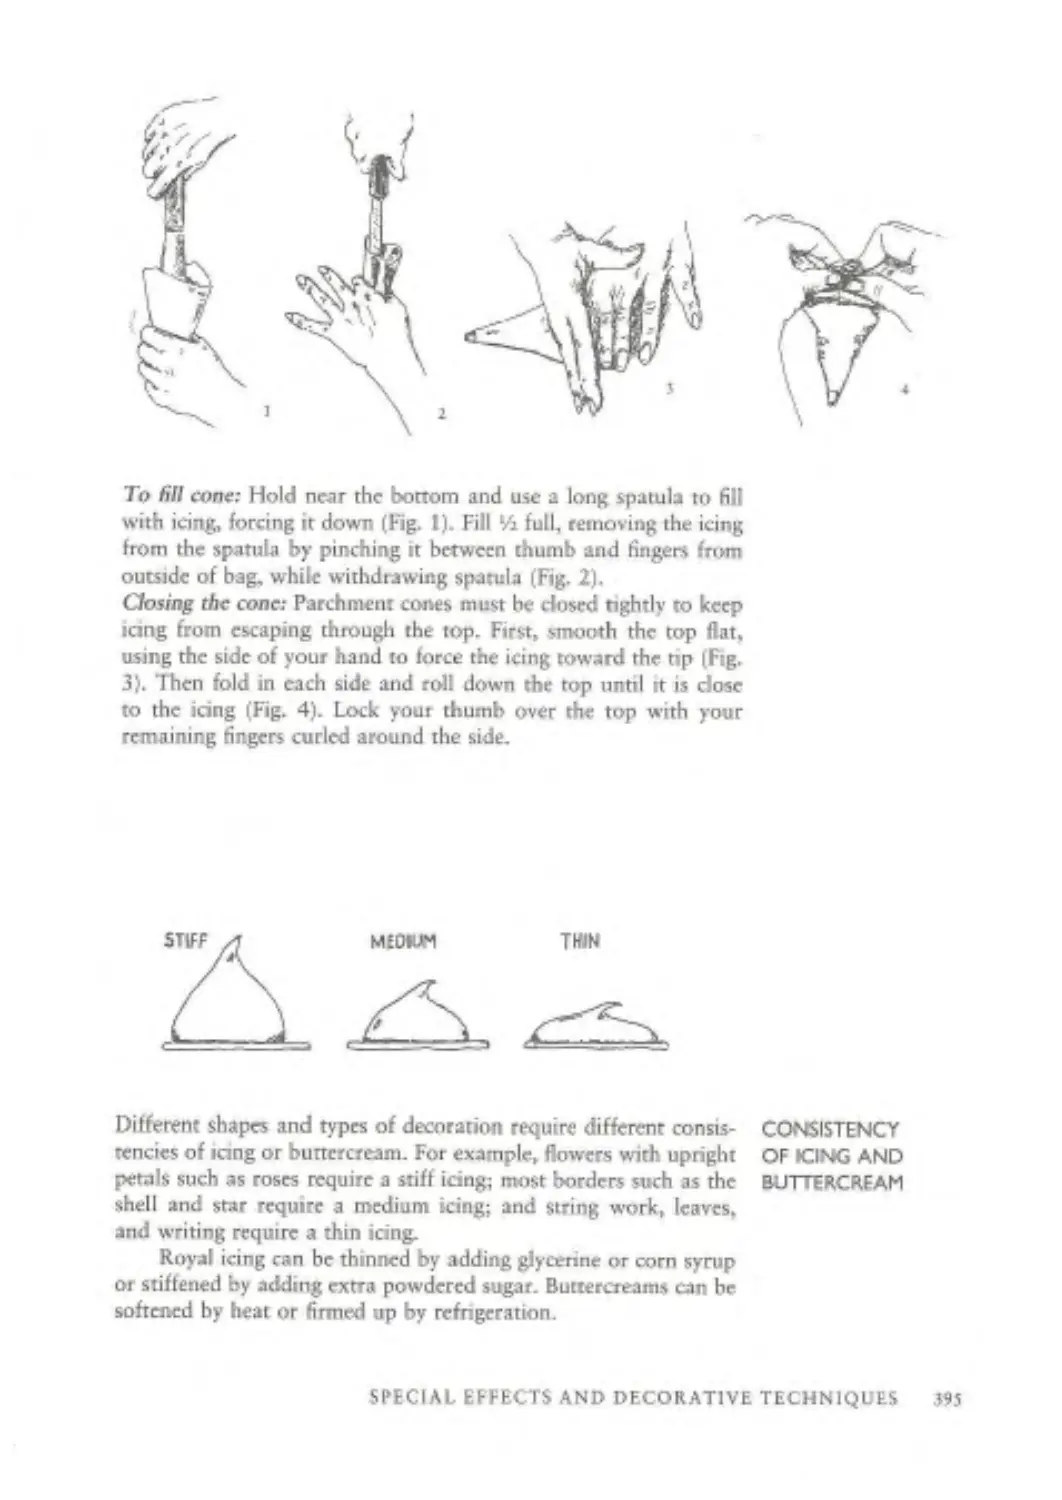
Lydie Marshall for encouraging me to specialize in cakes.
Mimi Sheraton for first telling me about LeNorre.
Irena Chalmers, my first publisher, for showing me the way to be a food writer,
Barbara Langley and Gus Belveno of Pinehill Farms for their never-ending sup-
ply of fresh farm eggs
Paula Perils for her never-ending supply of friendship.
8 ACKNOWLEDGMENTS
Contents
Foreword 5
Acknowledgments 7
Special Categories 11
Introduction 15
PARTI CAKES
Simply Dellocus Foolproof Cakes 19
Butter Cakes 23
Fruit, Vegetable, and Bread Cakes 65
Custard Cakes BO
Breakfast Cakes 89
Sponge-Type Cakes 118
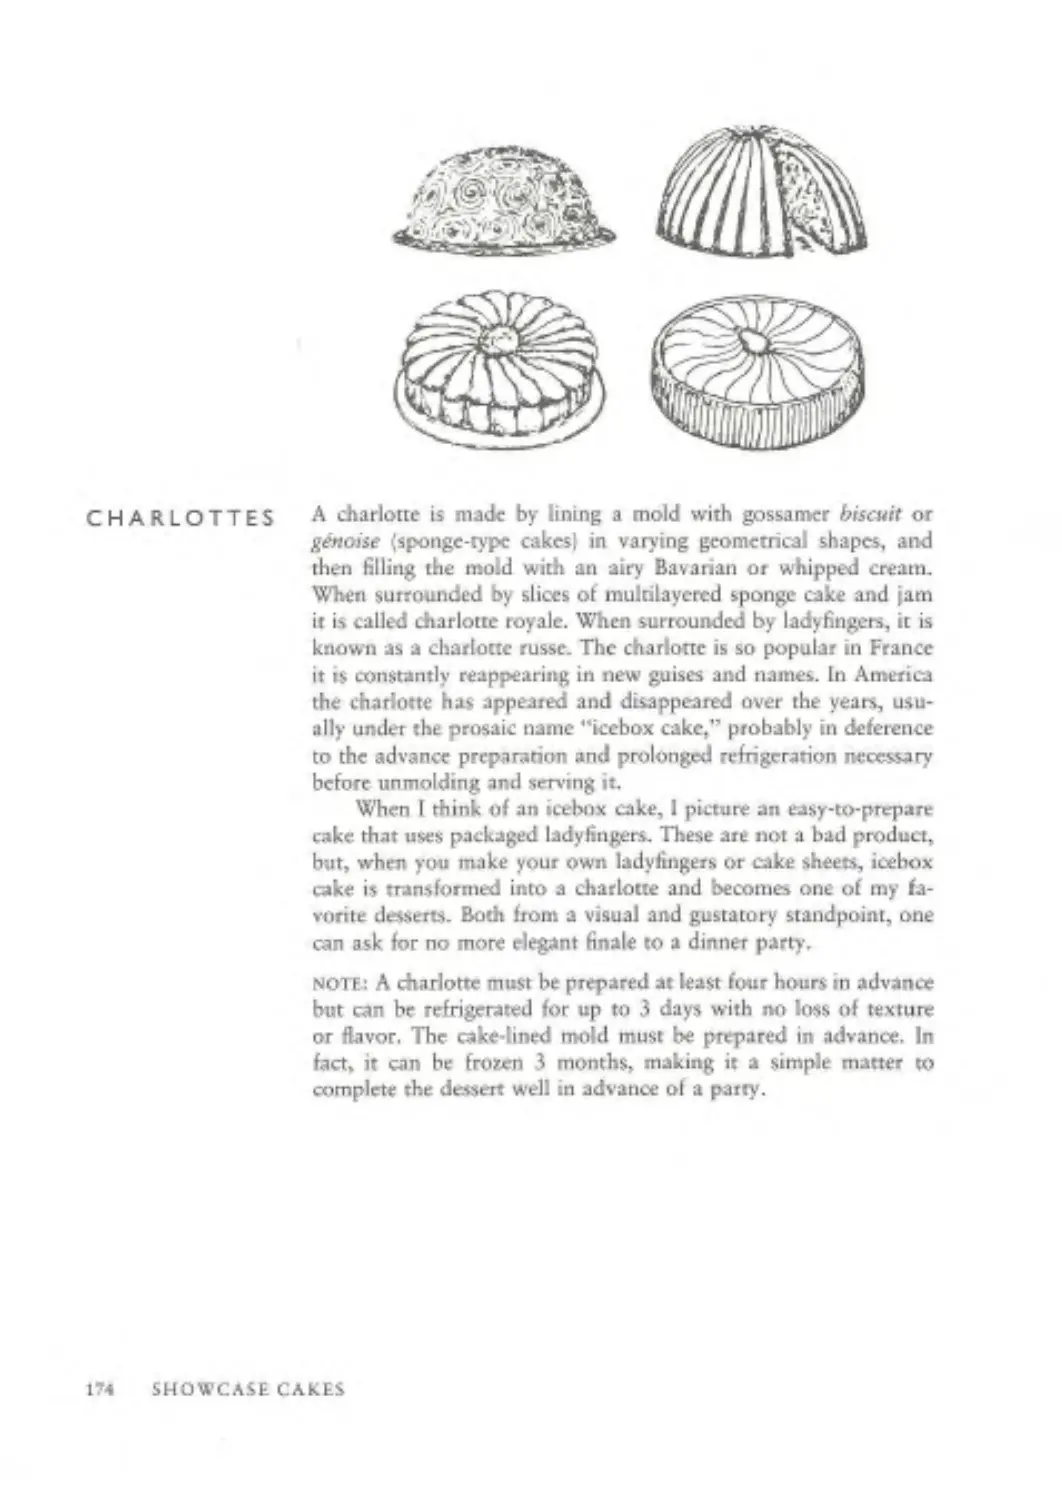
Showcase Cakes 163
Tips for Showcase Cakes 164
PART II COMPLEMENTARY ADORNMENTS FOR ALL CAKES
Buttorcream Frowings and Fillings 227
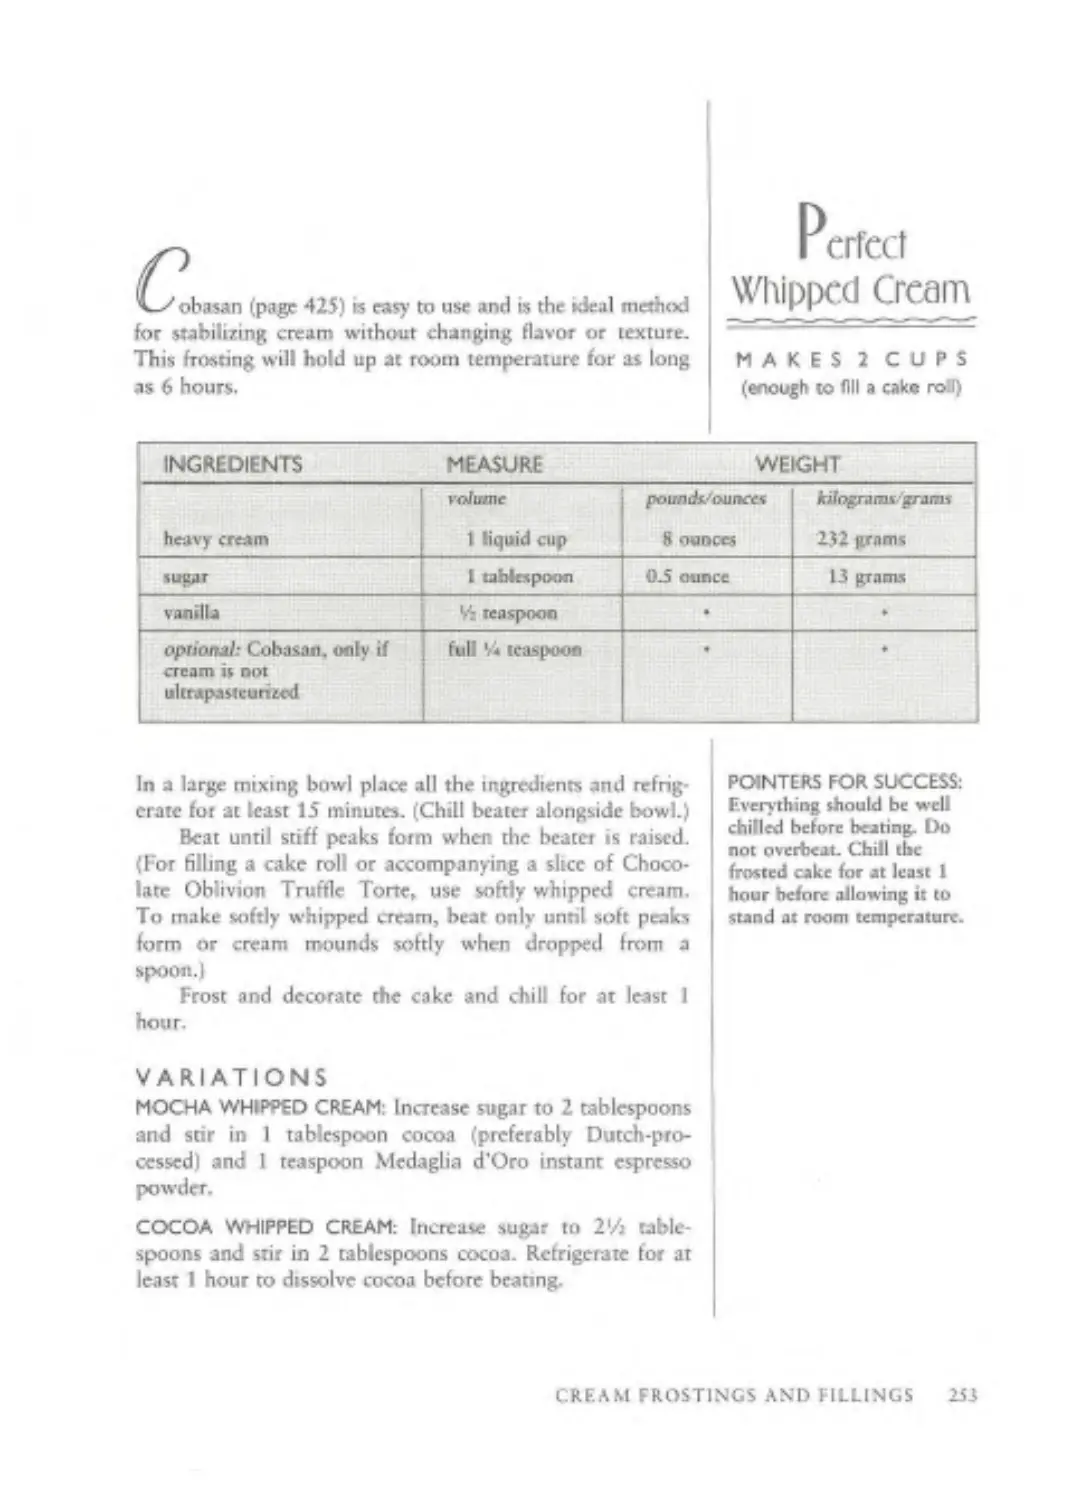
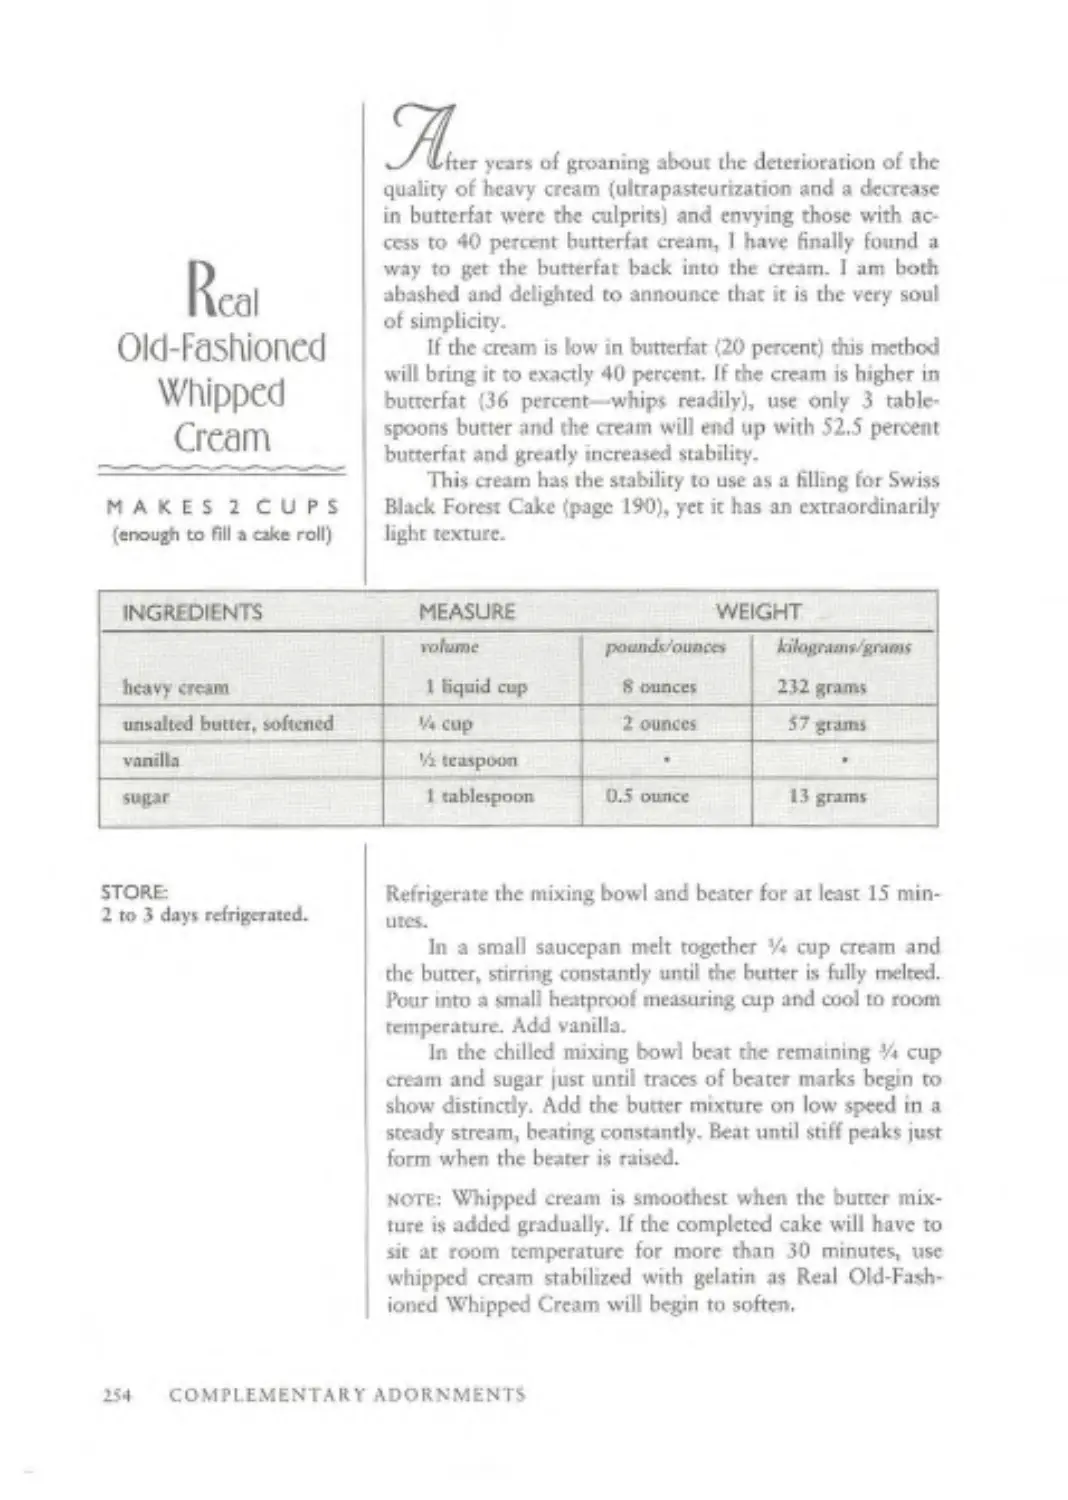
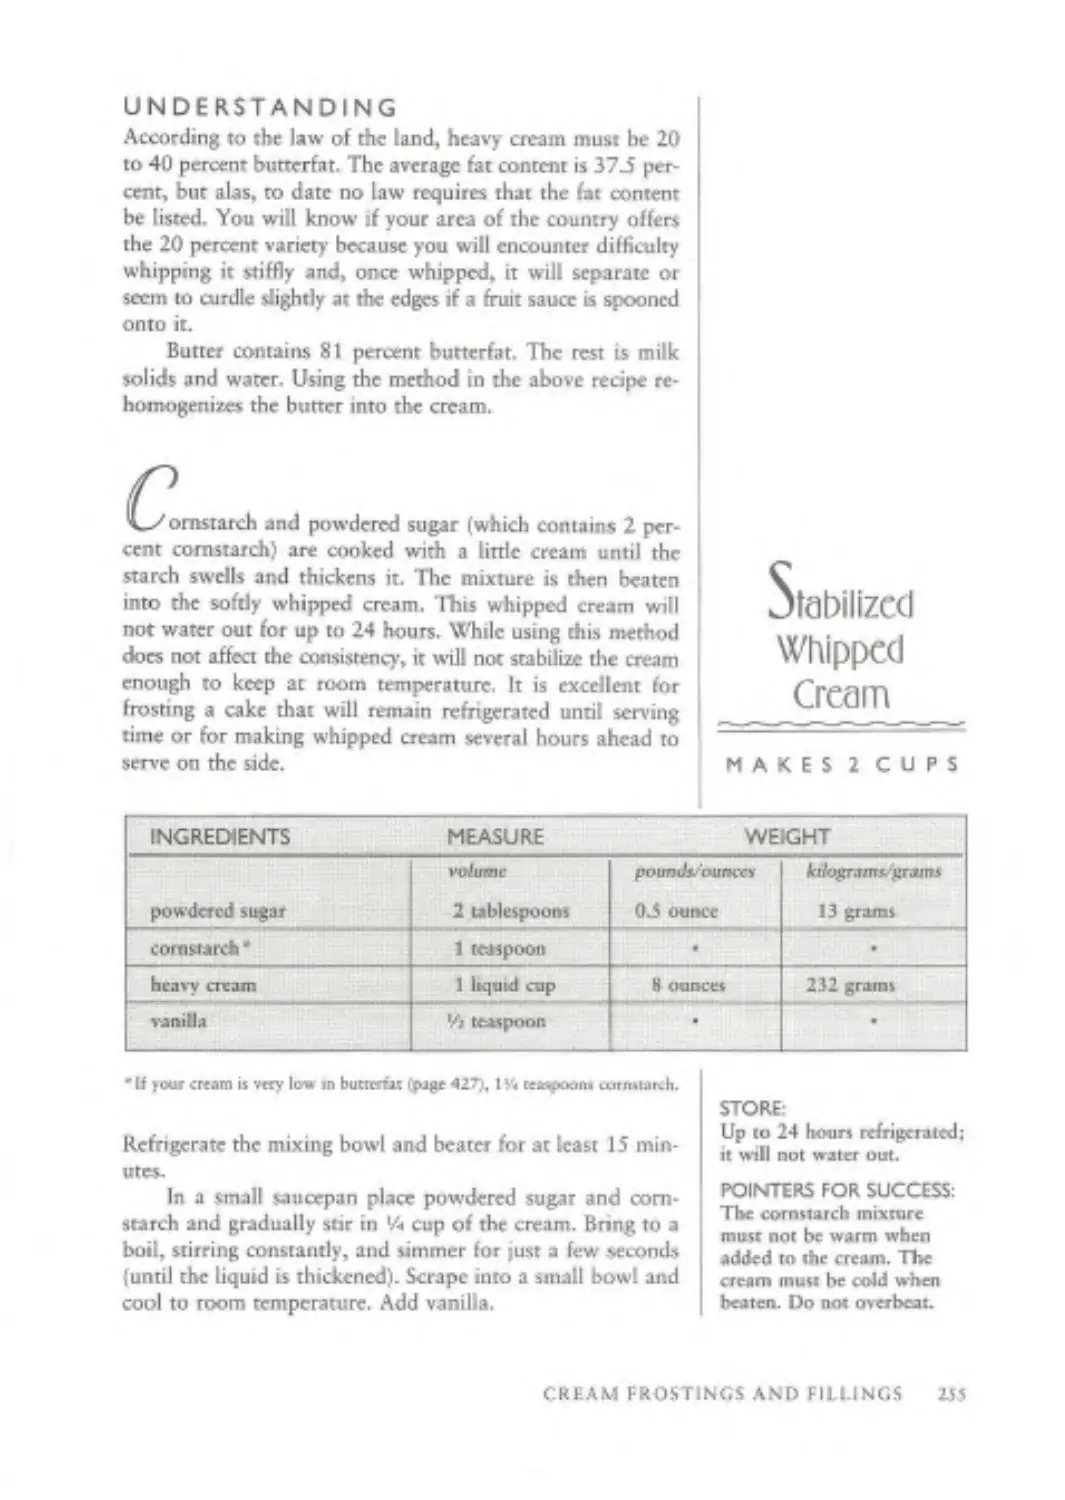
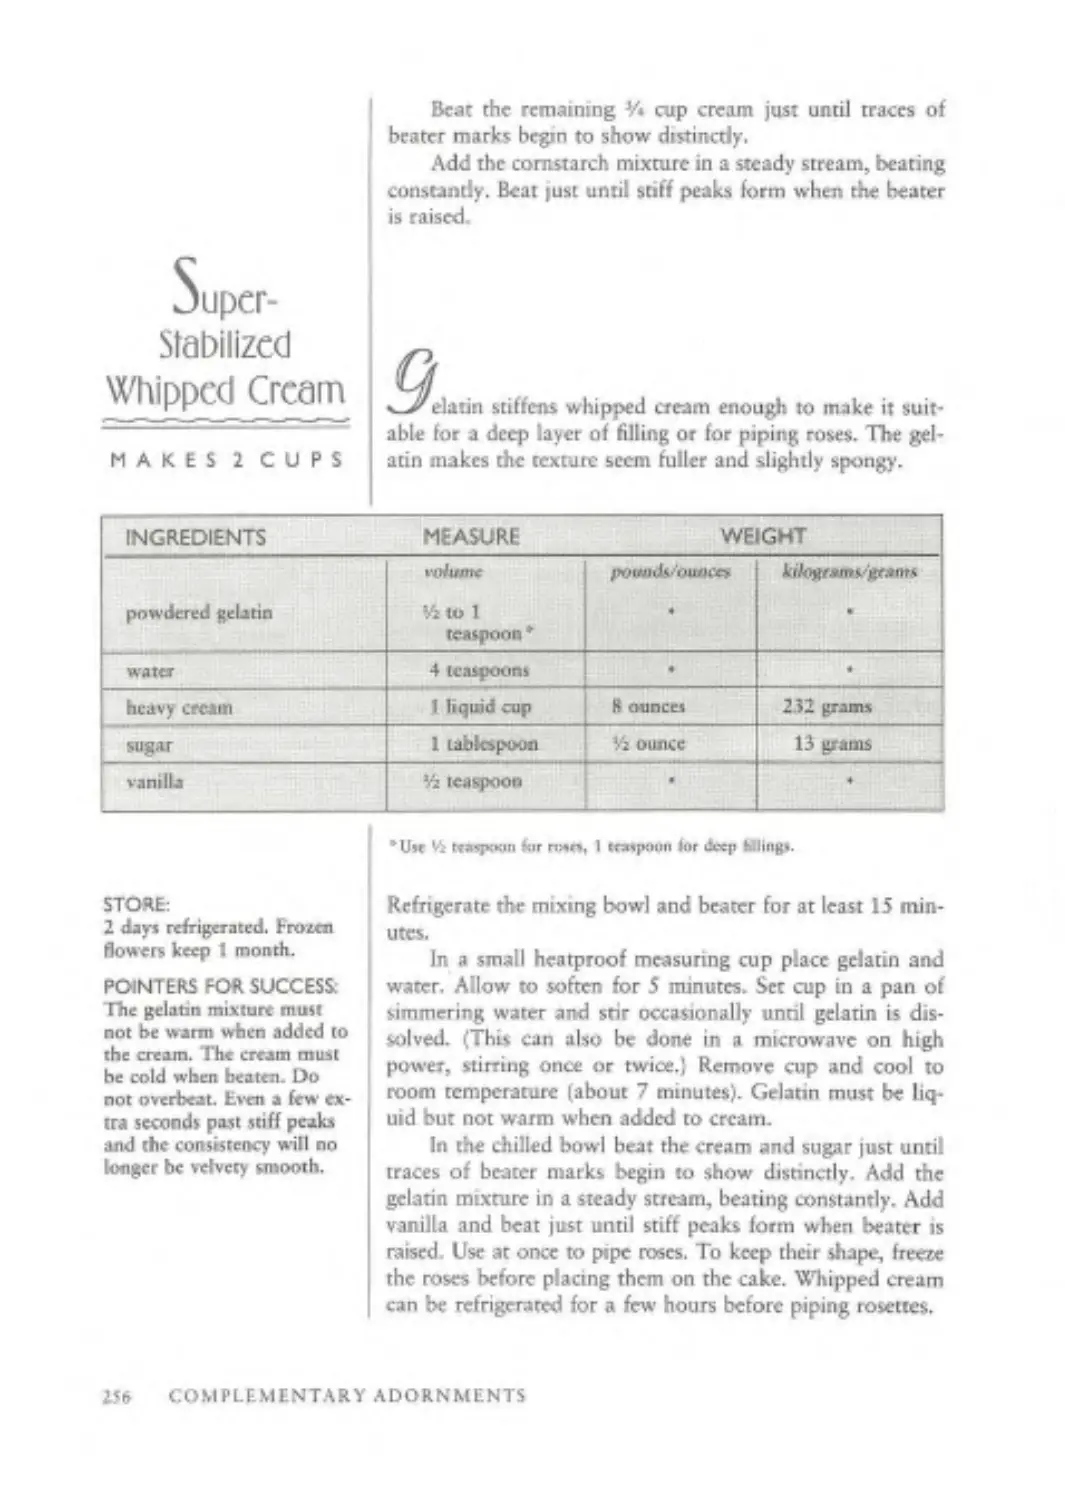
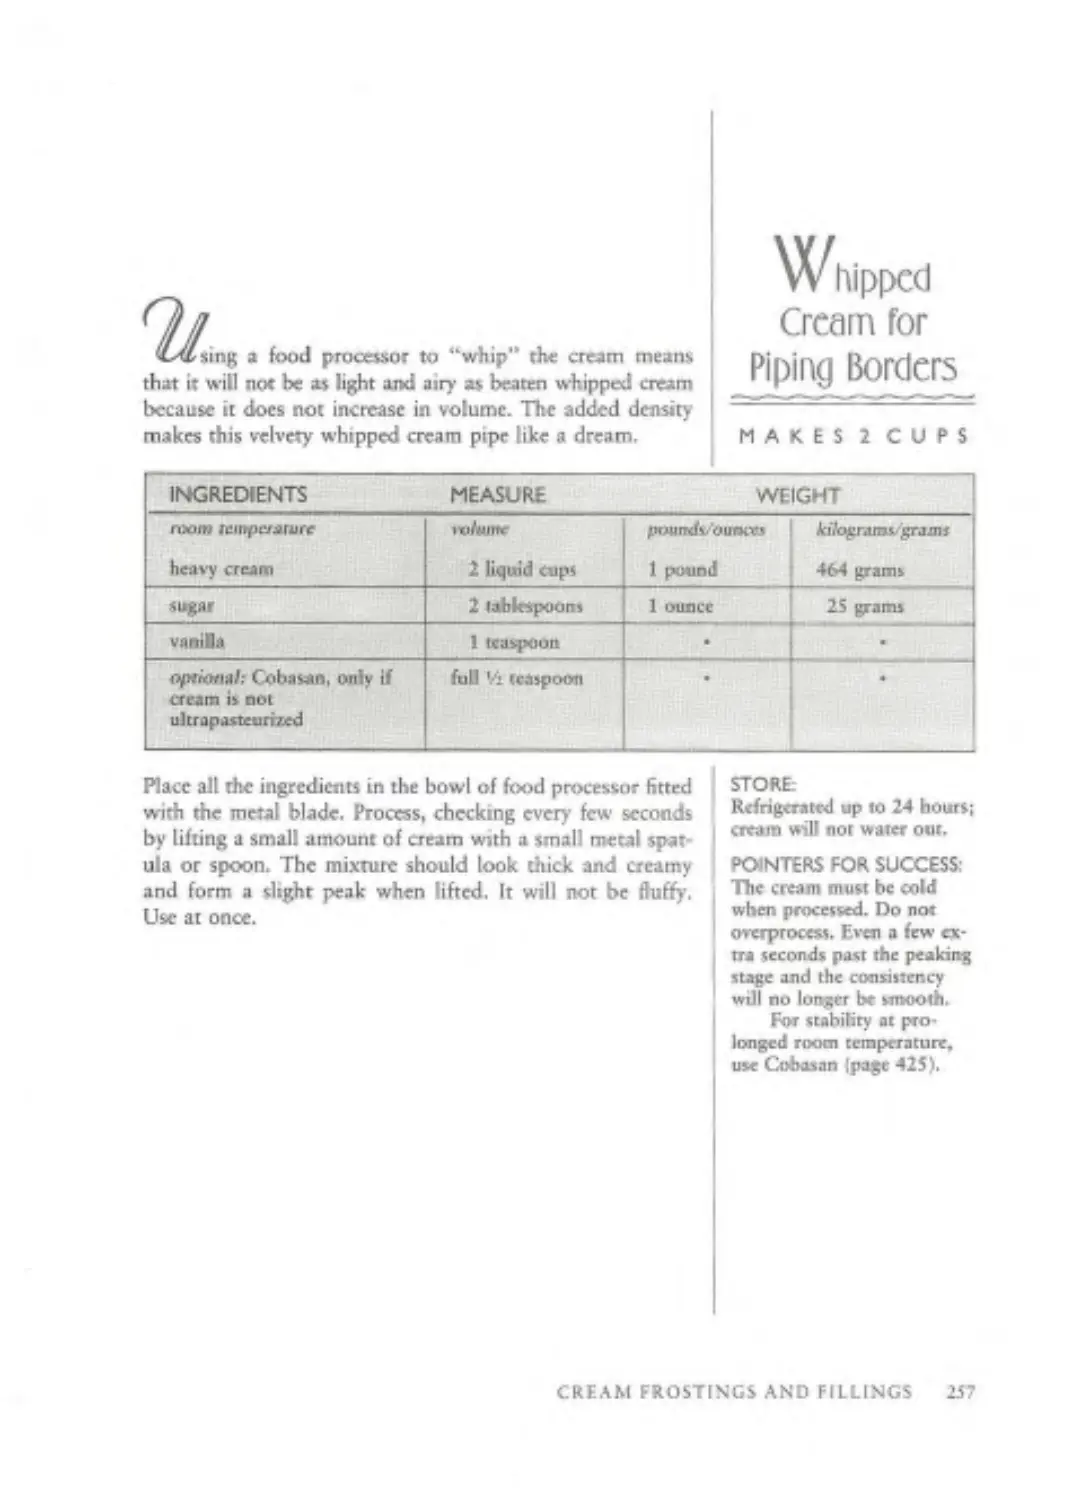
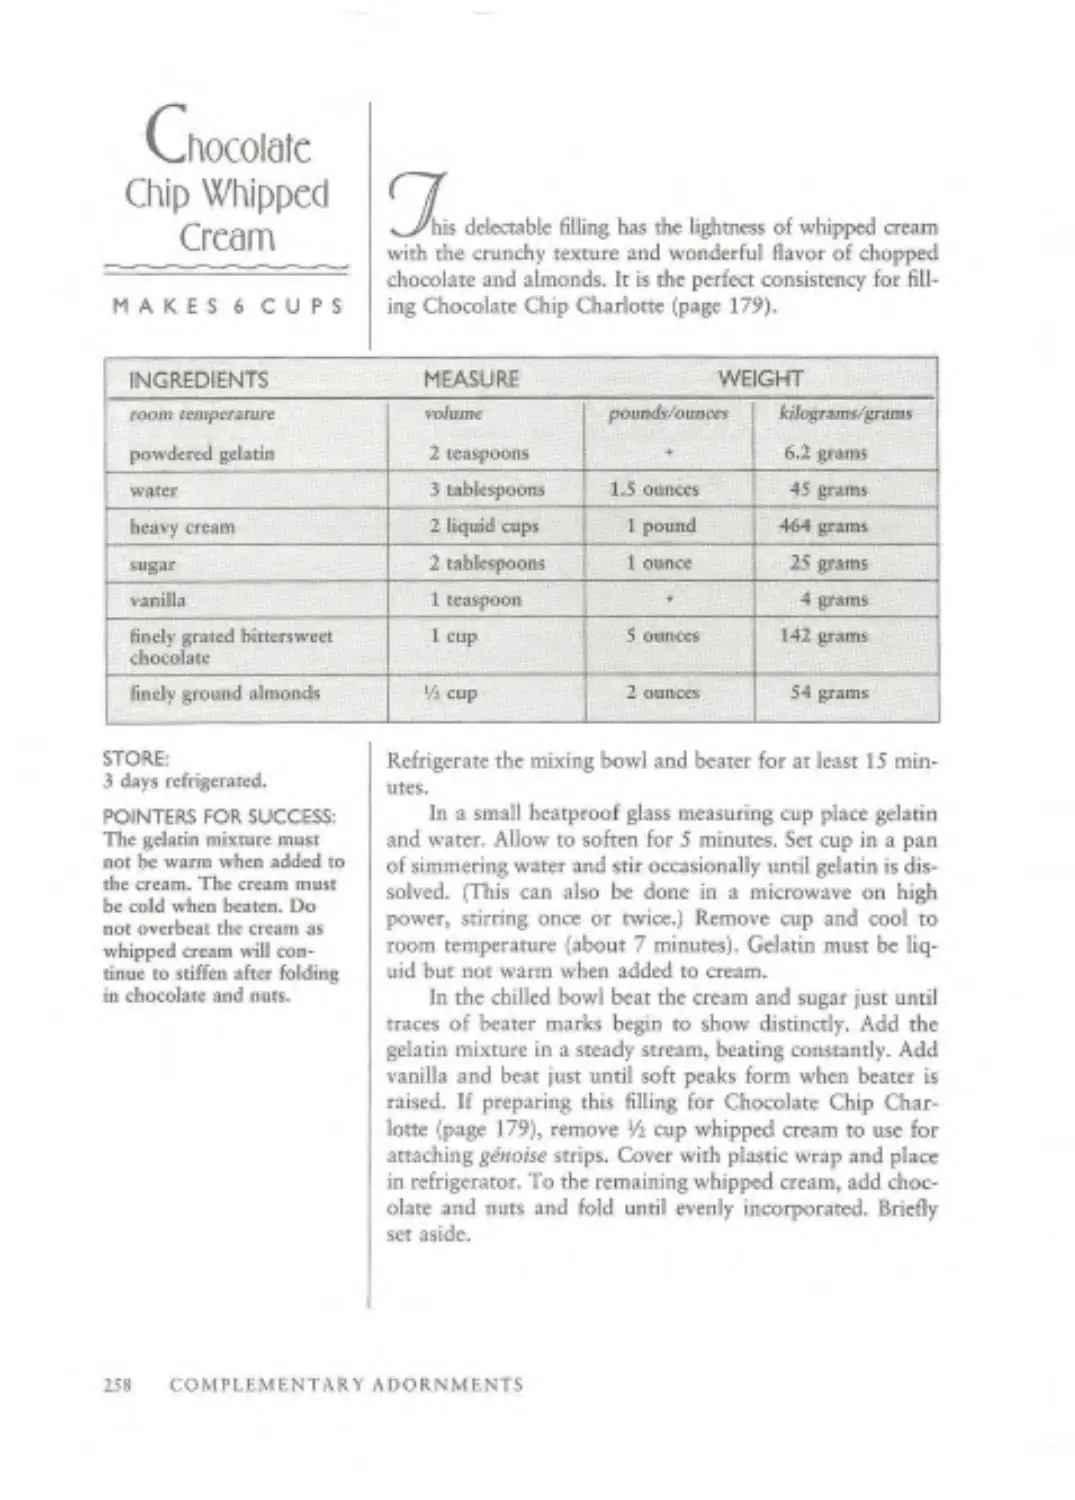
Cream Frostings and Fillings 251
Custard Cream Allings and Sauce* 279
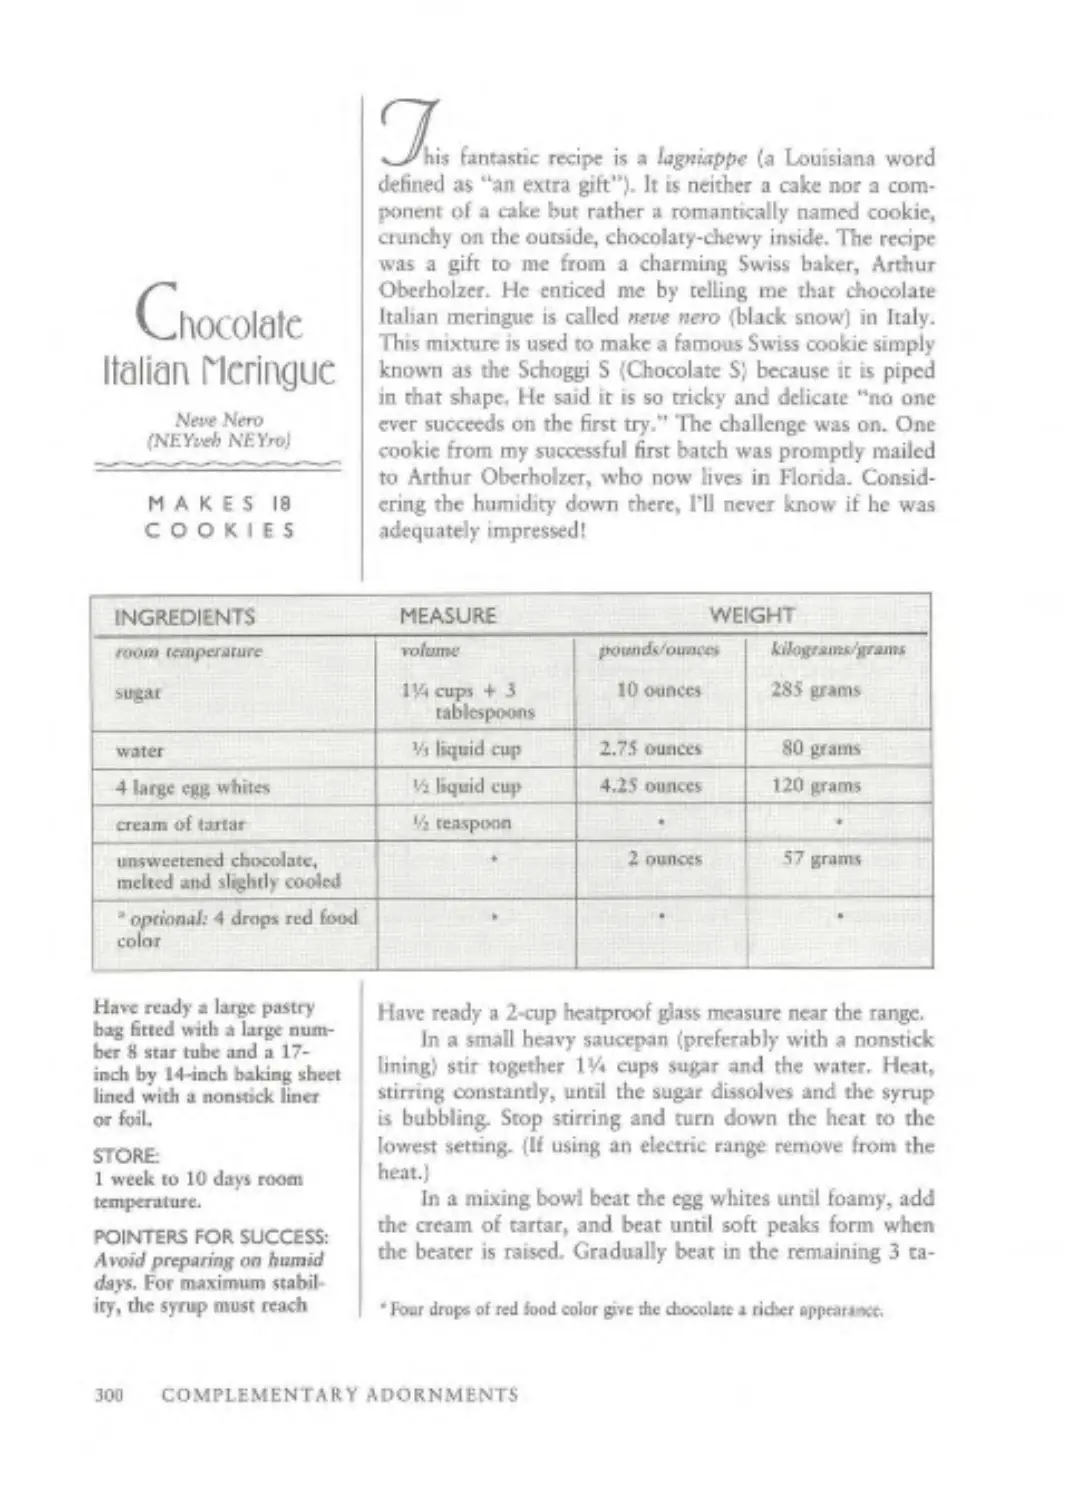
Mennguc Icings, Fillings, and Decorations 292
Candy and Nut Embellishments 304
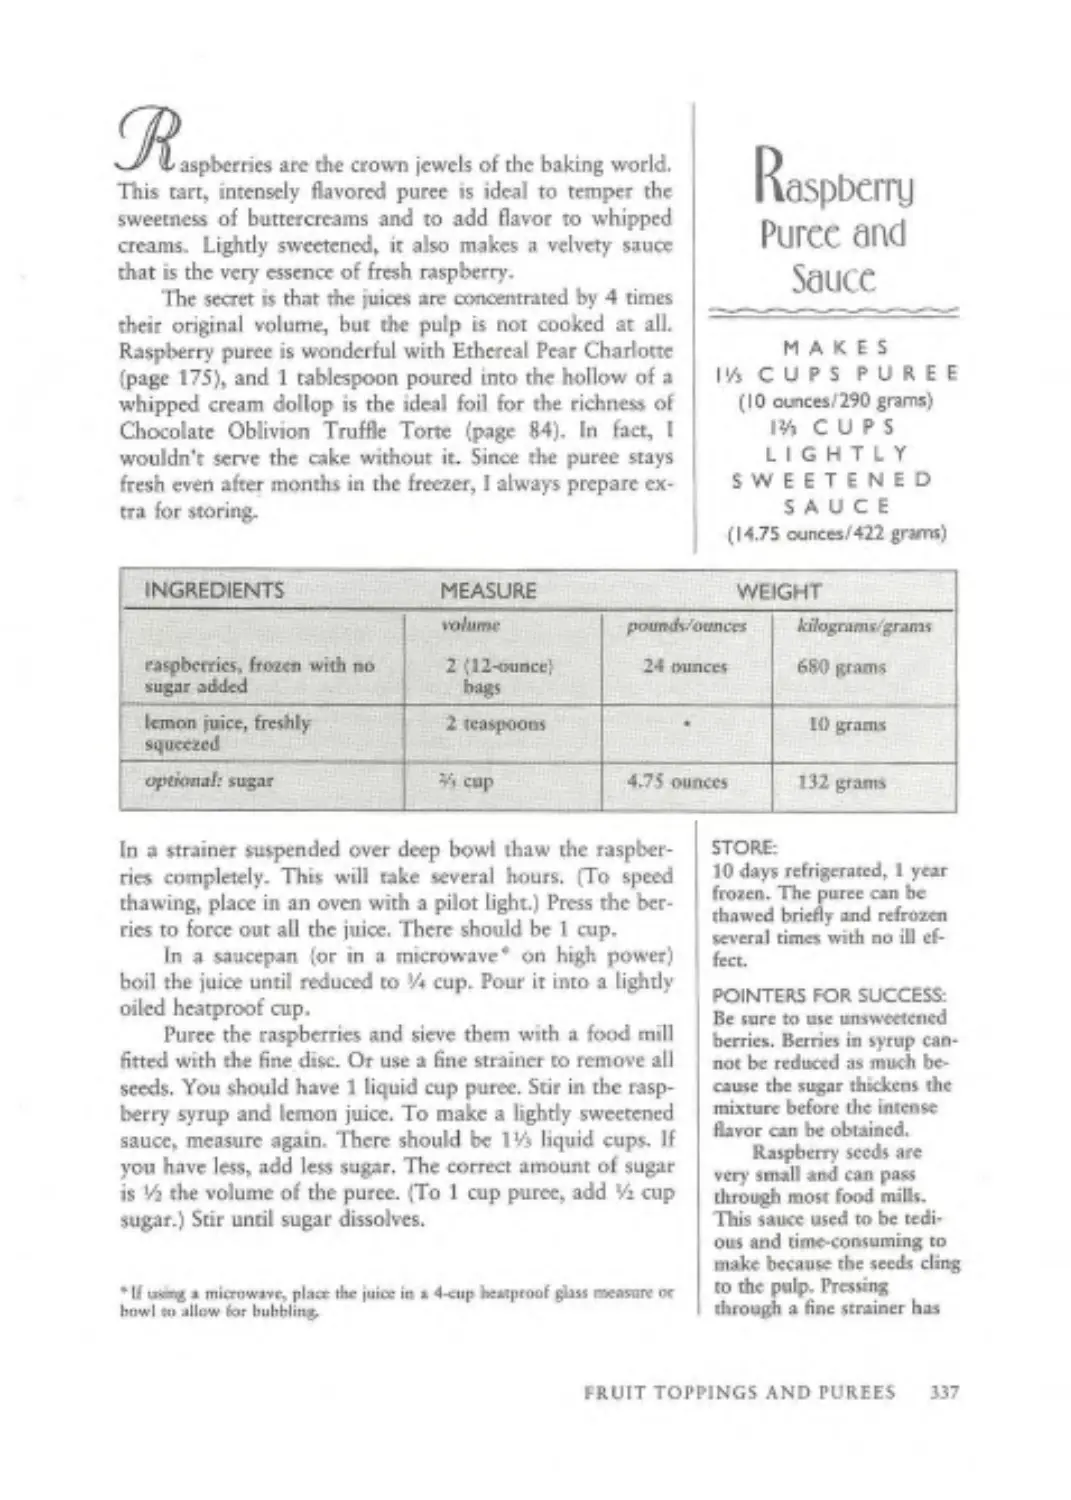
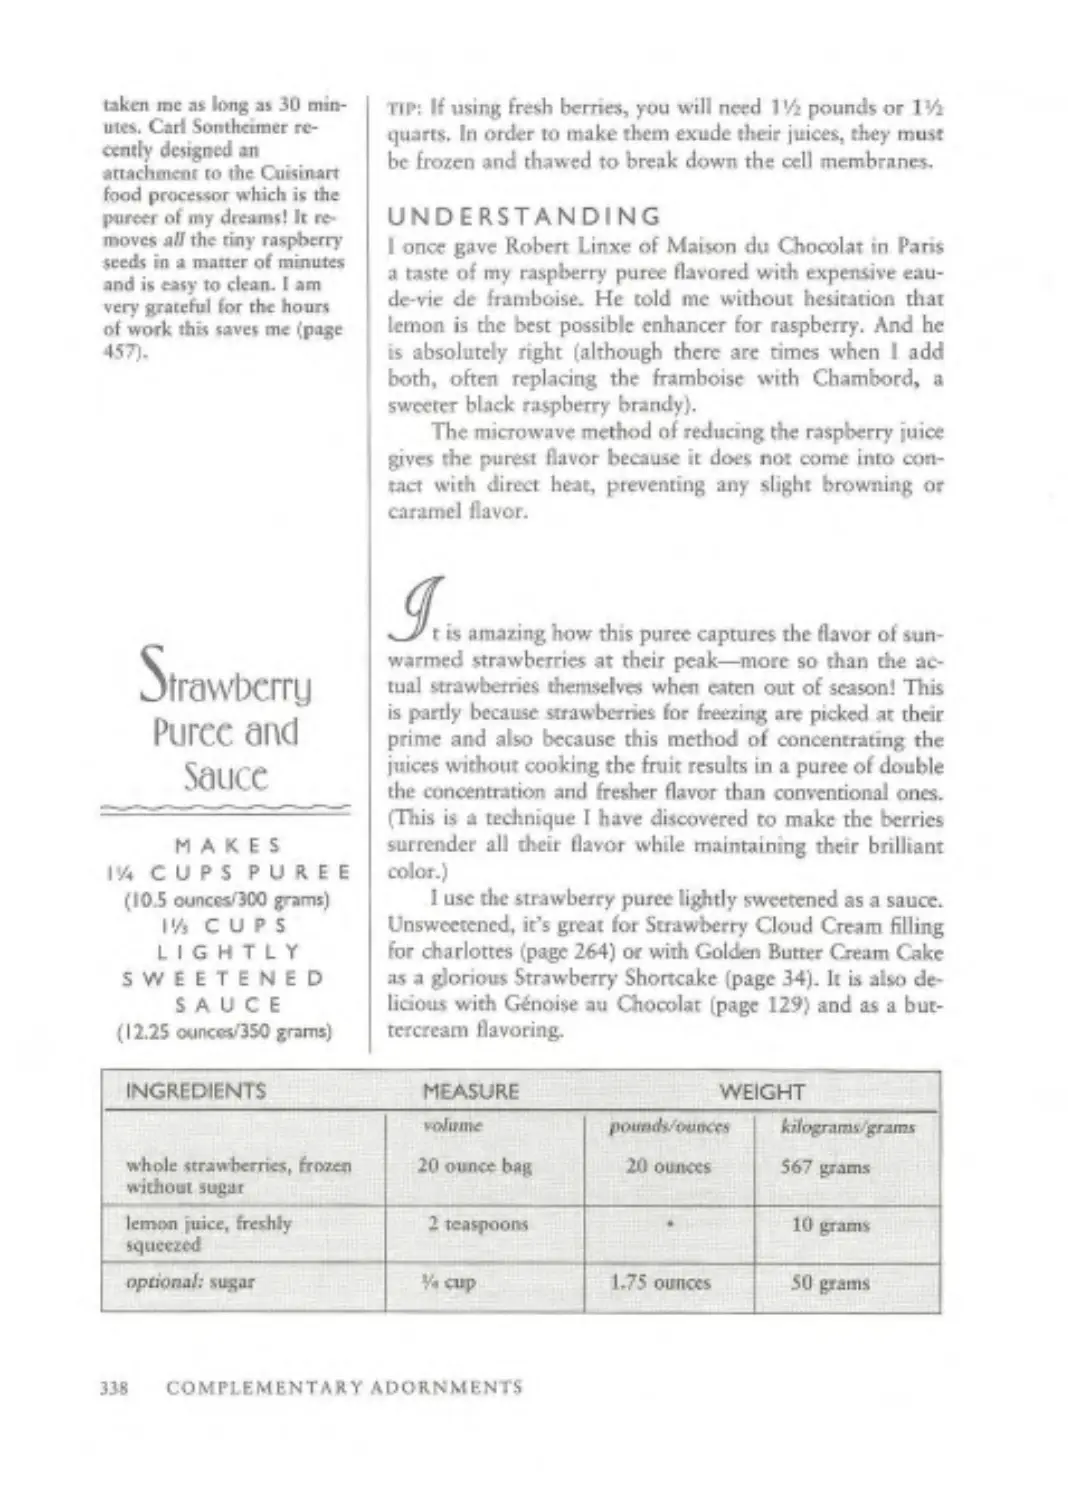
Fruit Topprigs and Purees 32B
Spec al Effects and Decorative Techniques 355
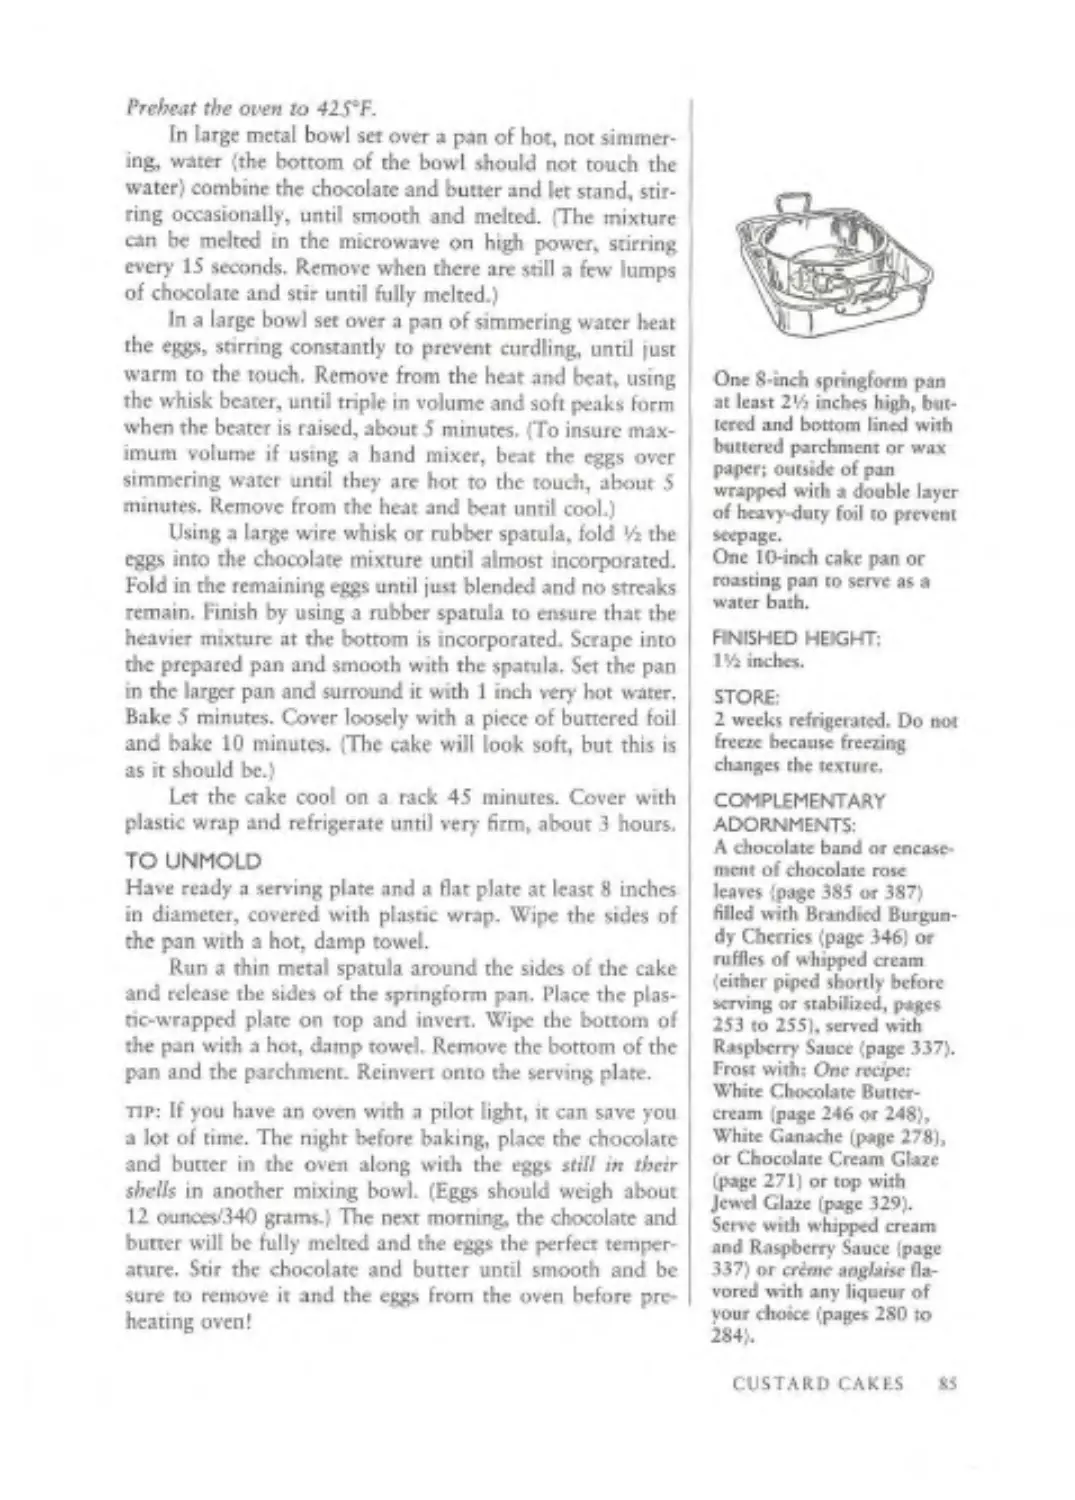
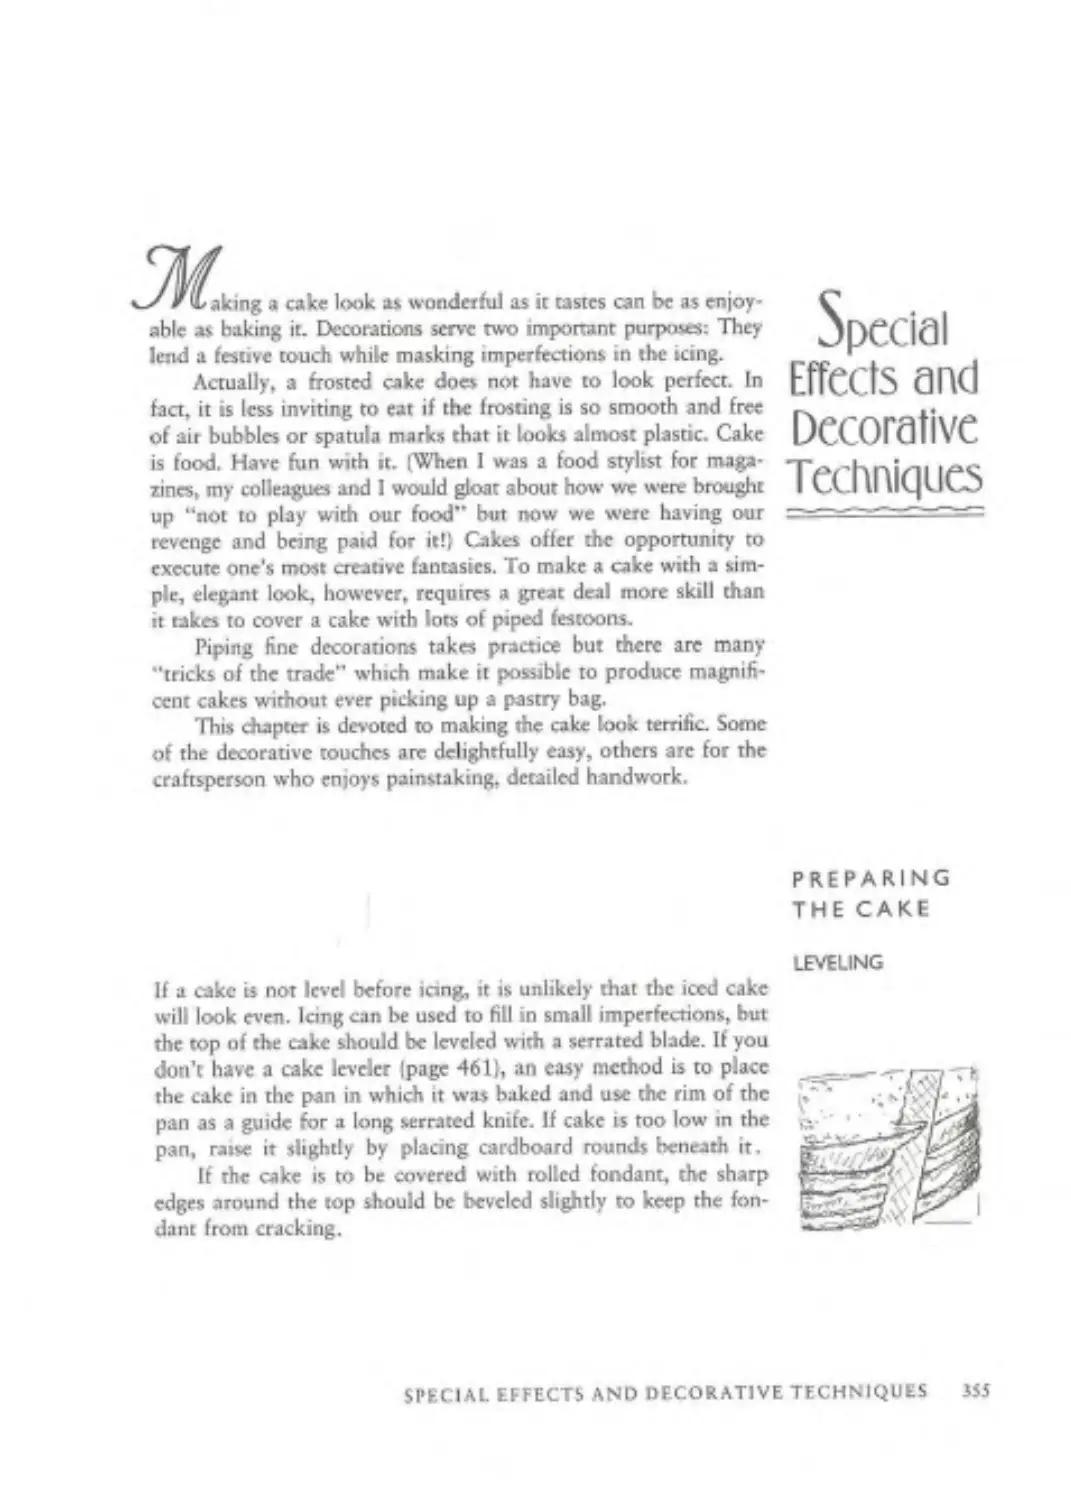
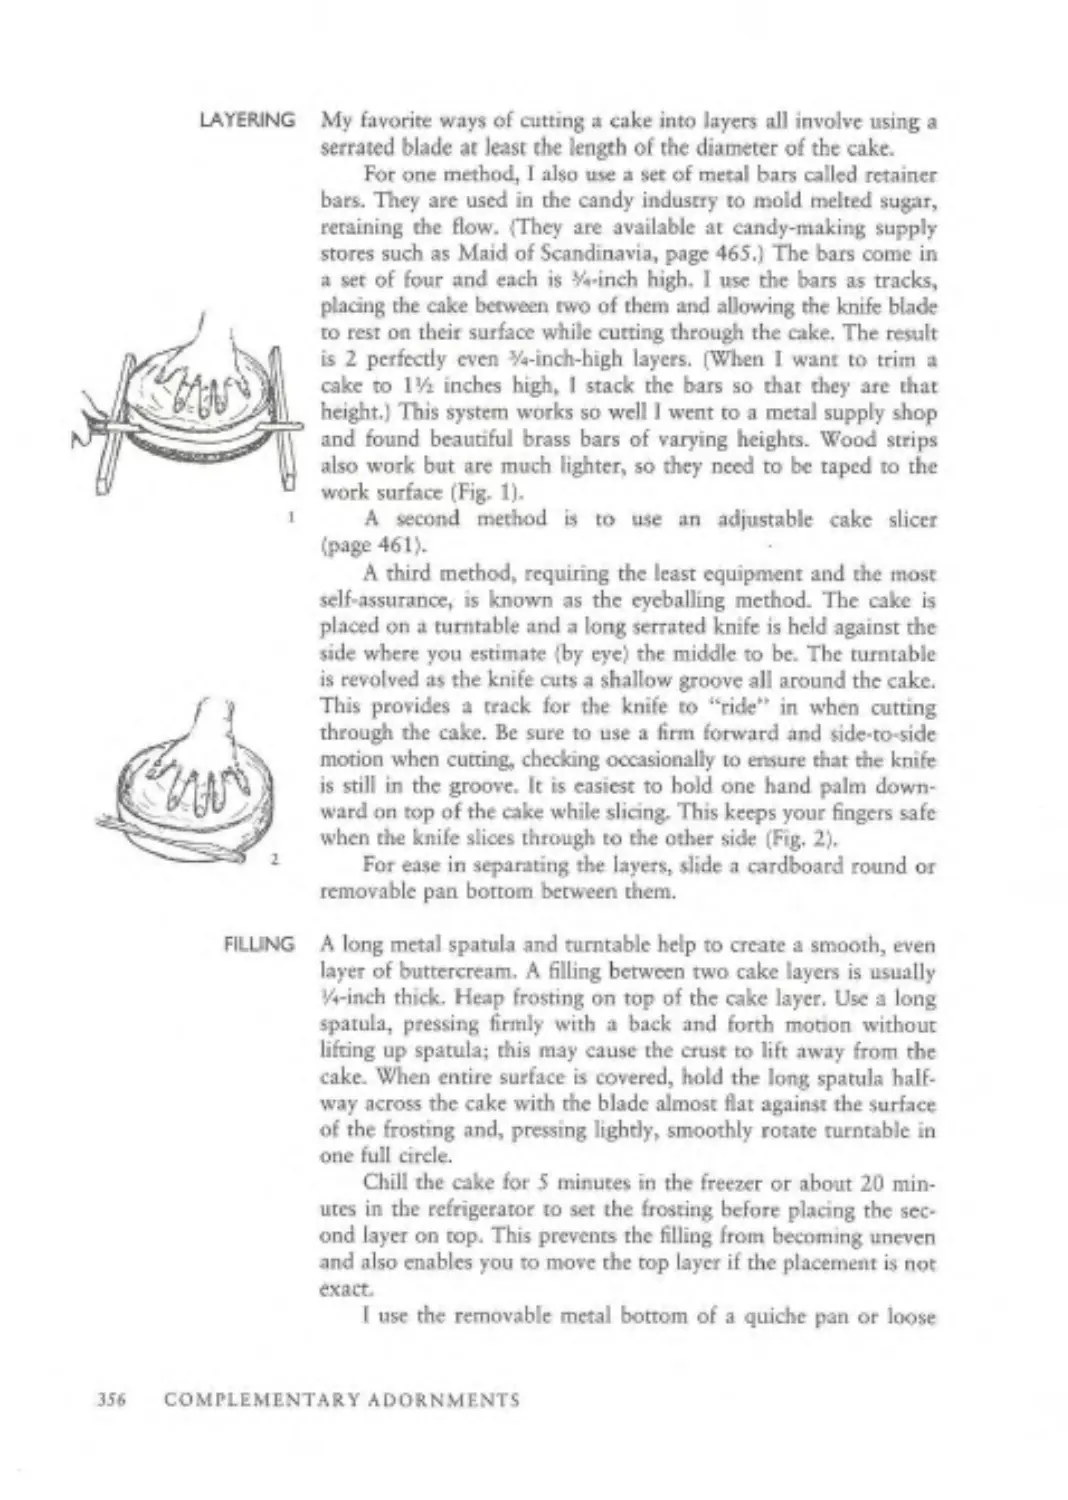
Preparing rhe Cake 355
Covering the Cake 358
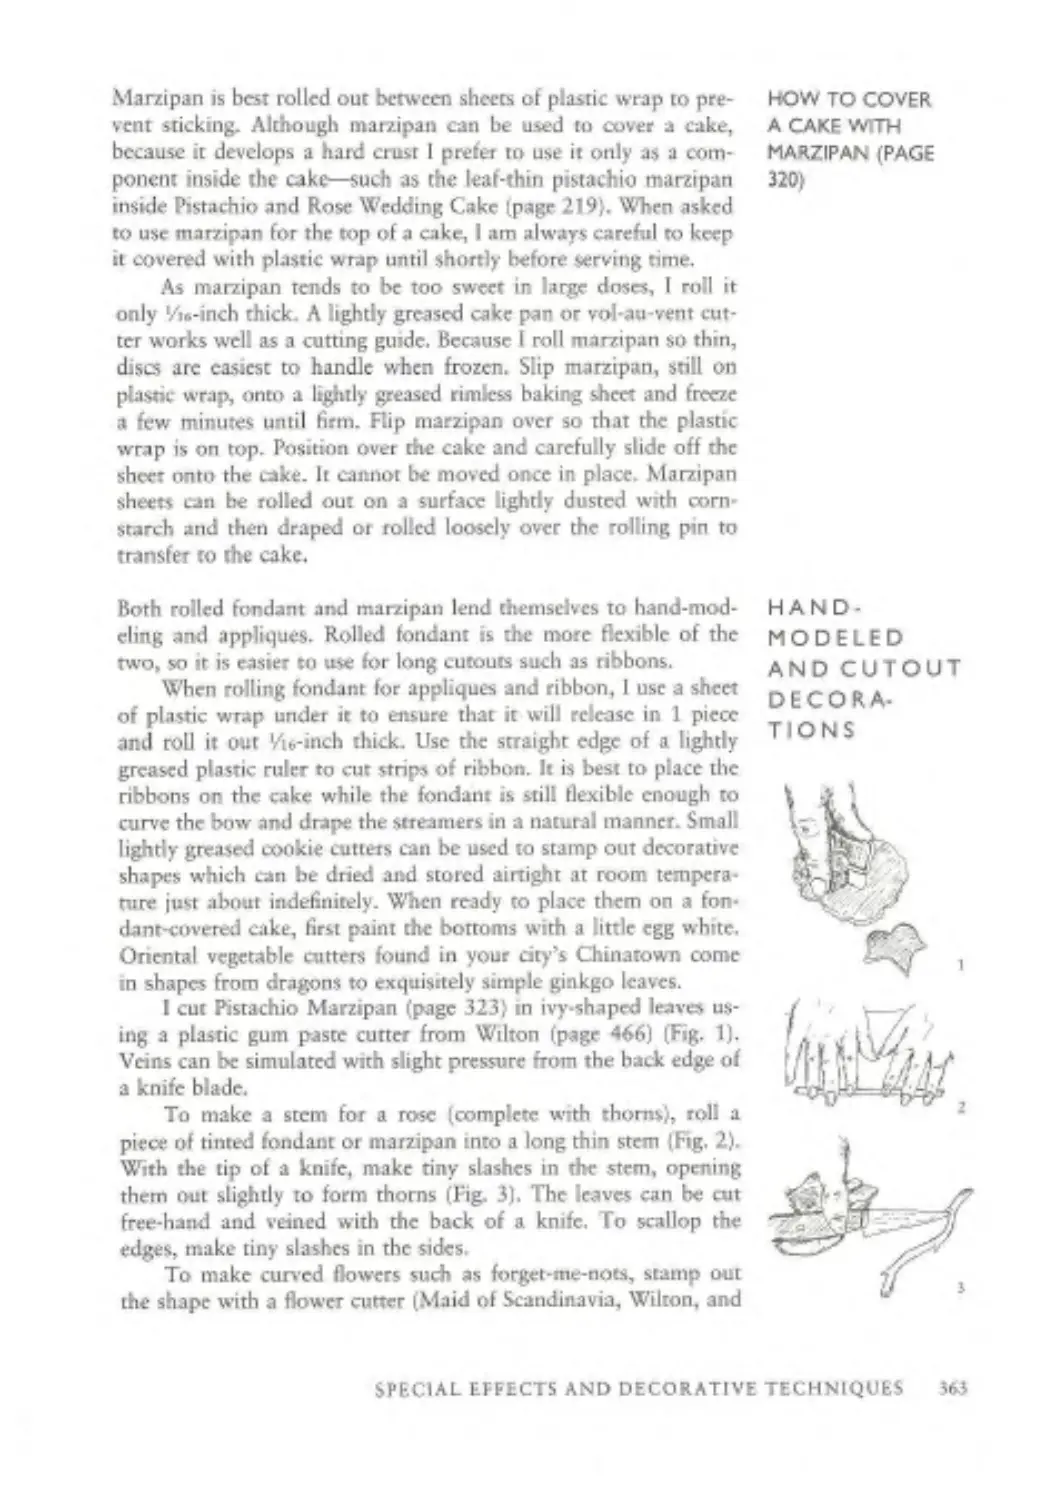
Hand-Modeled and Cutout Decorations 363
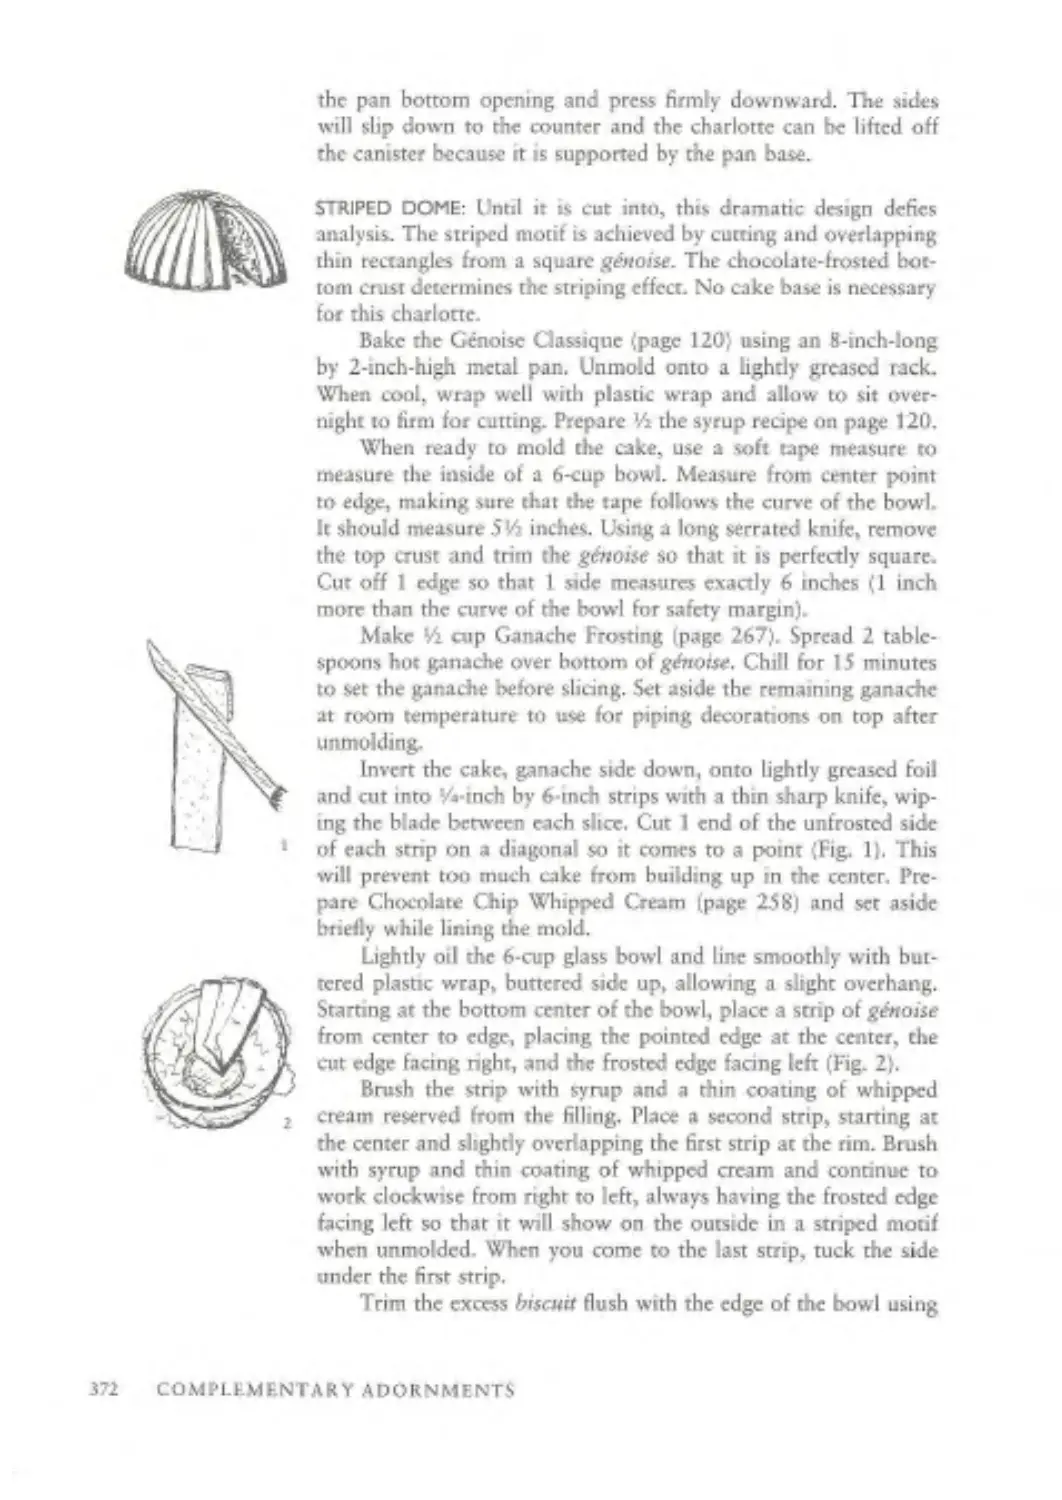
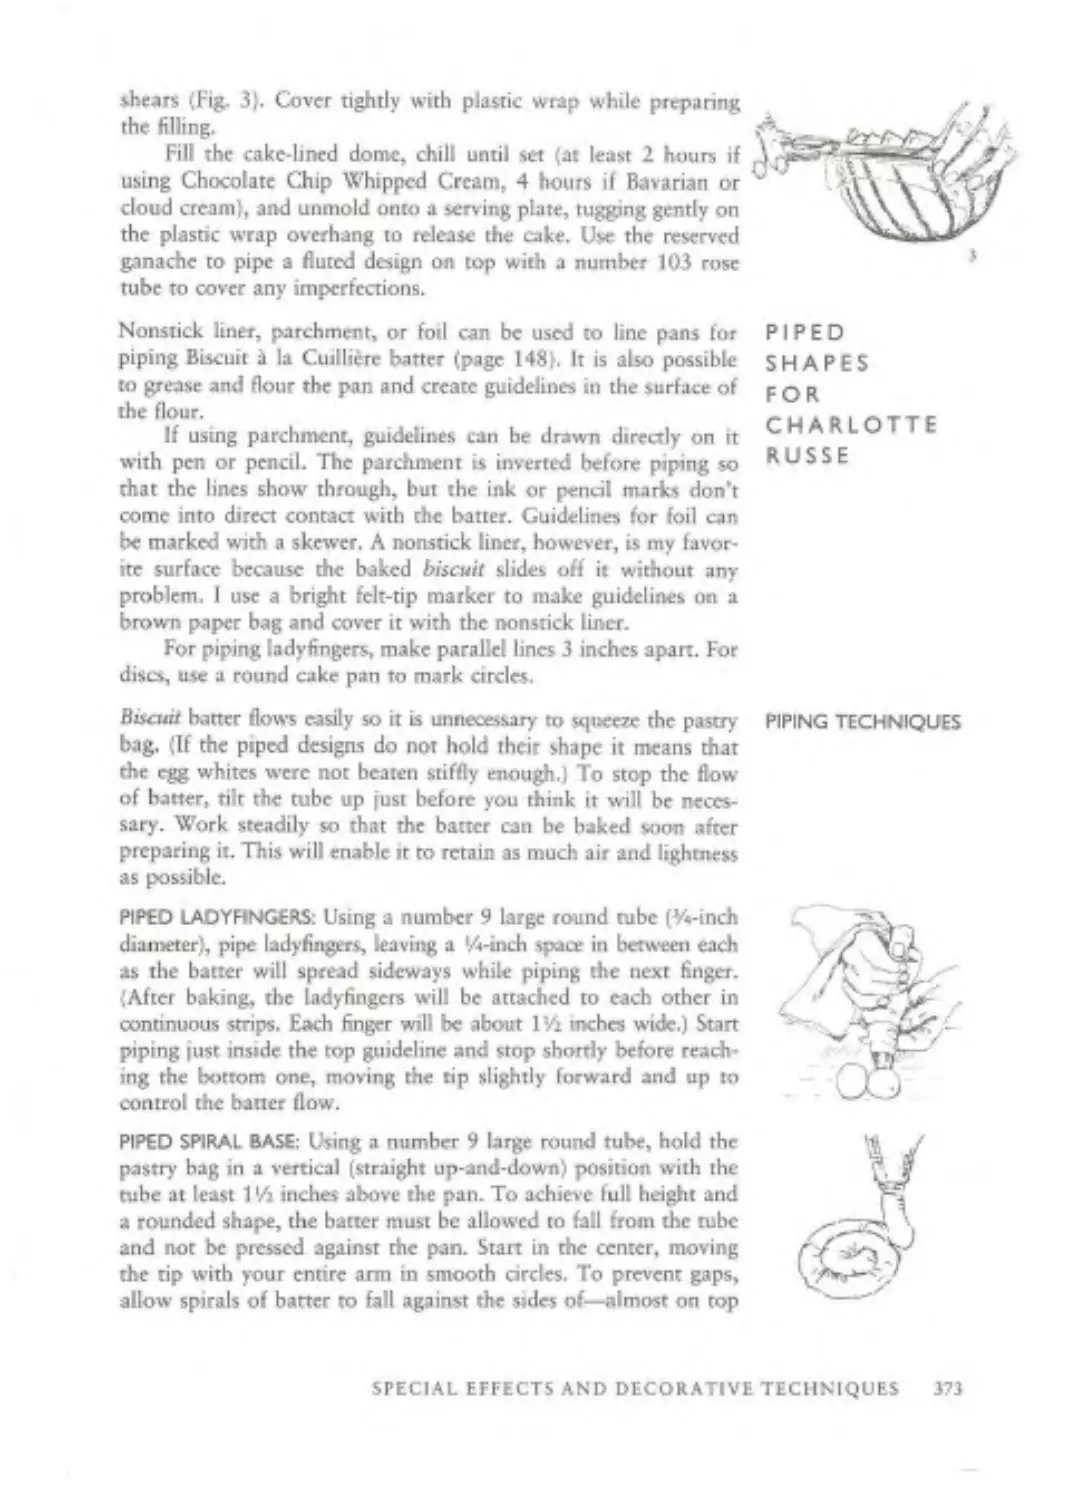
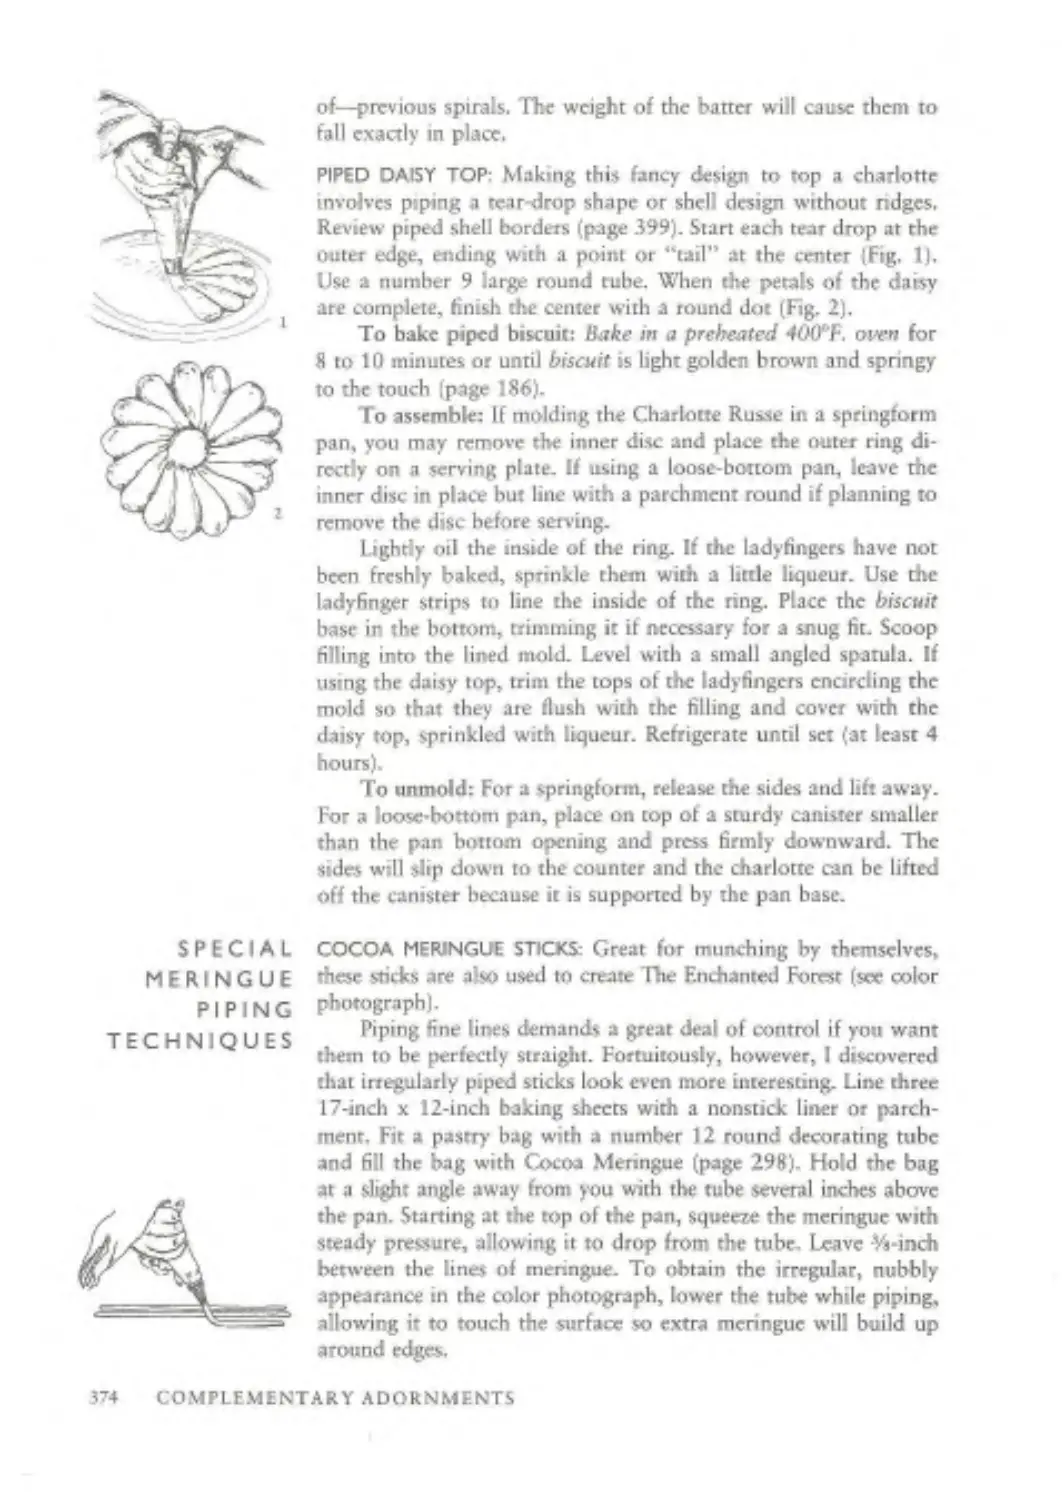
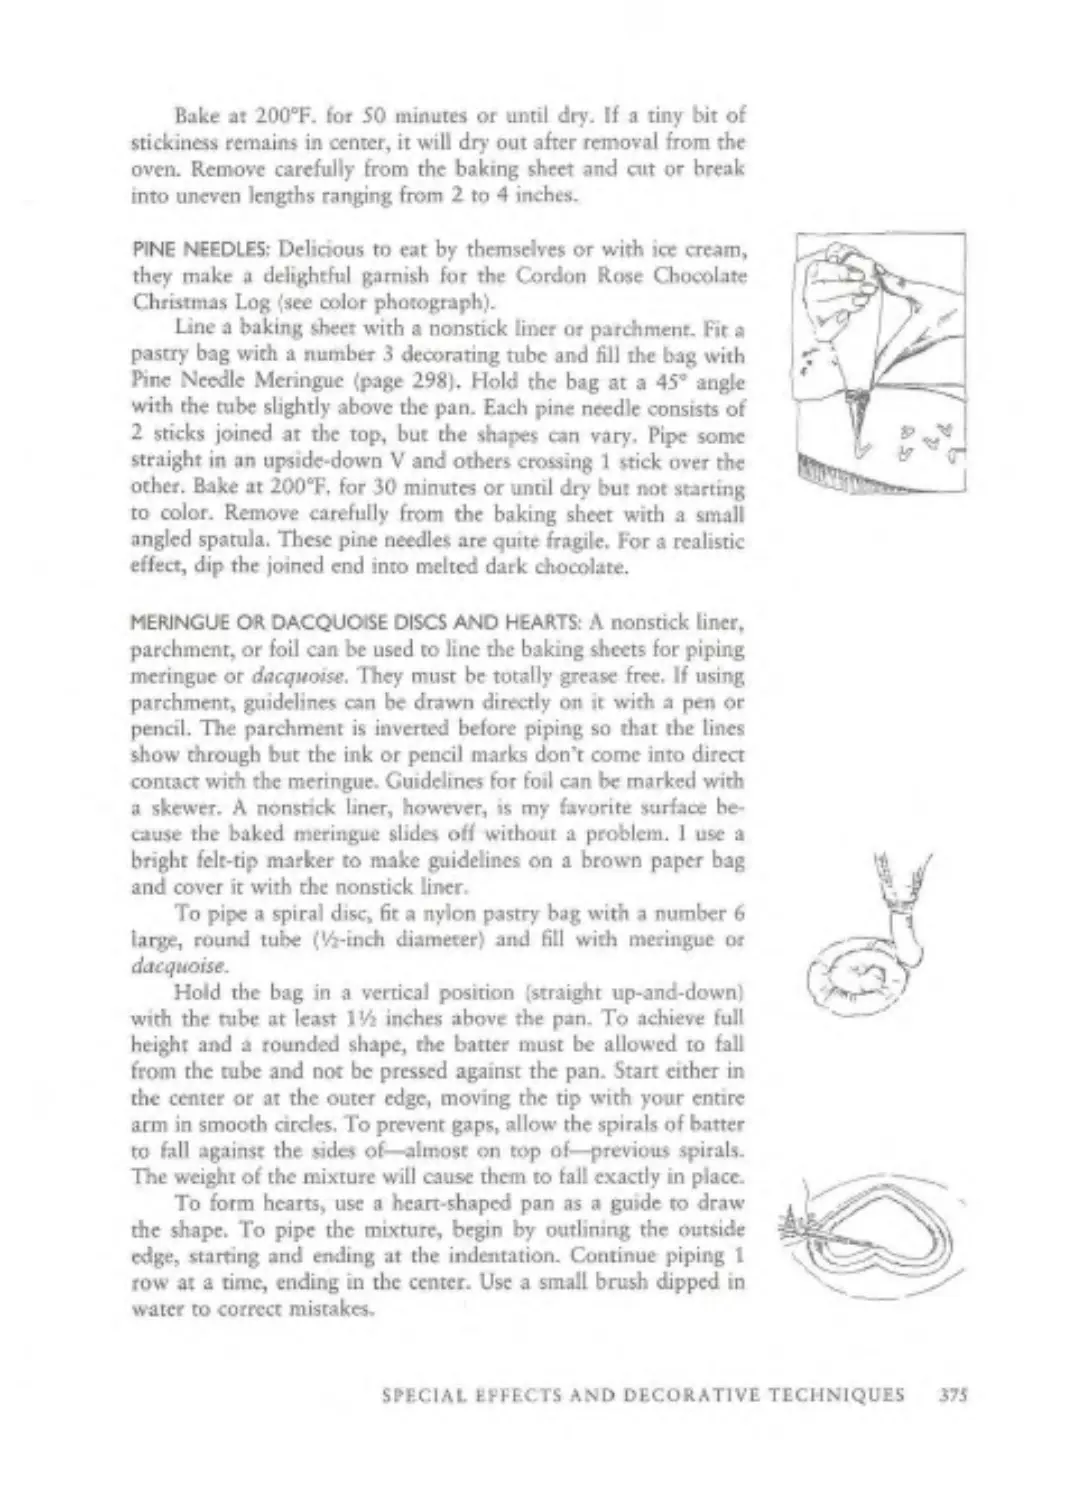
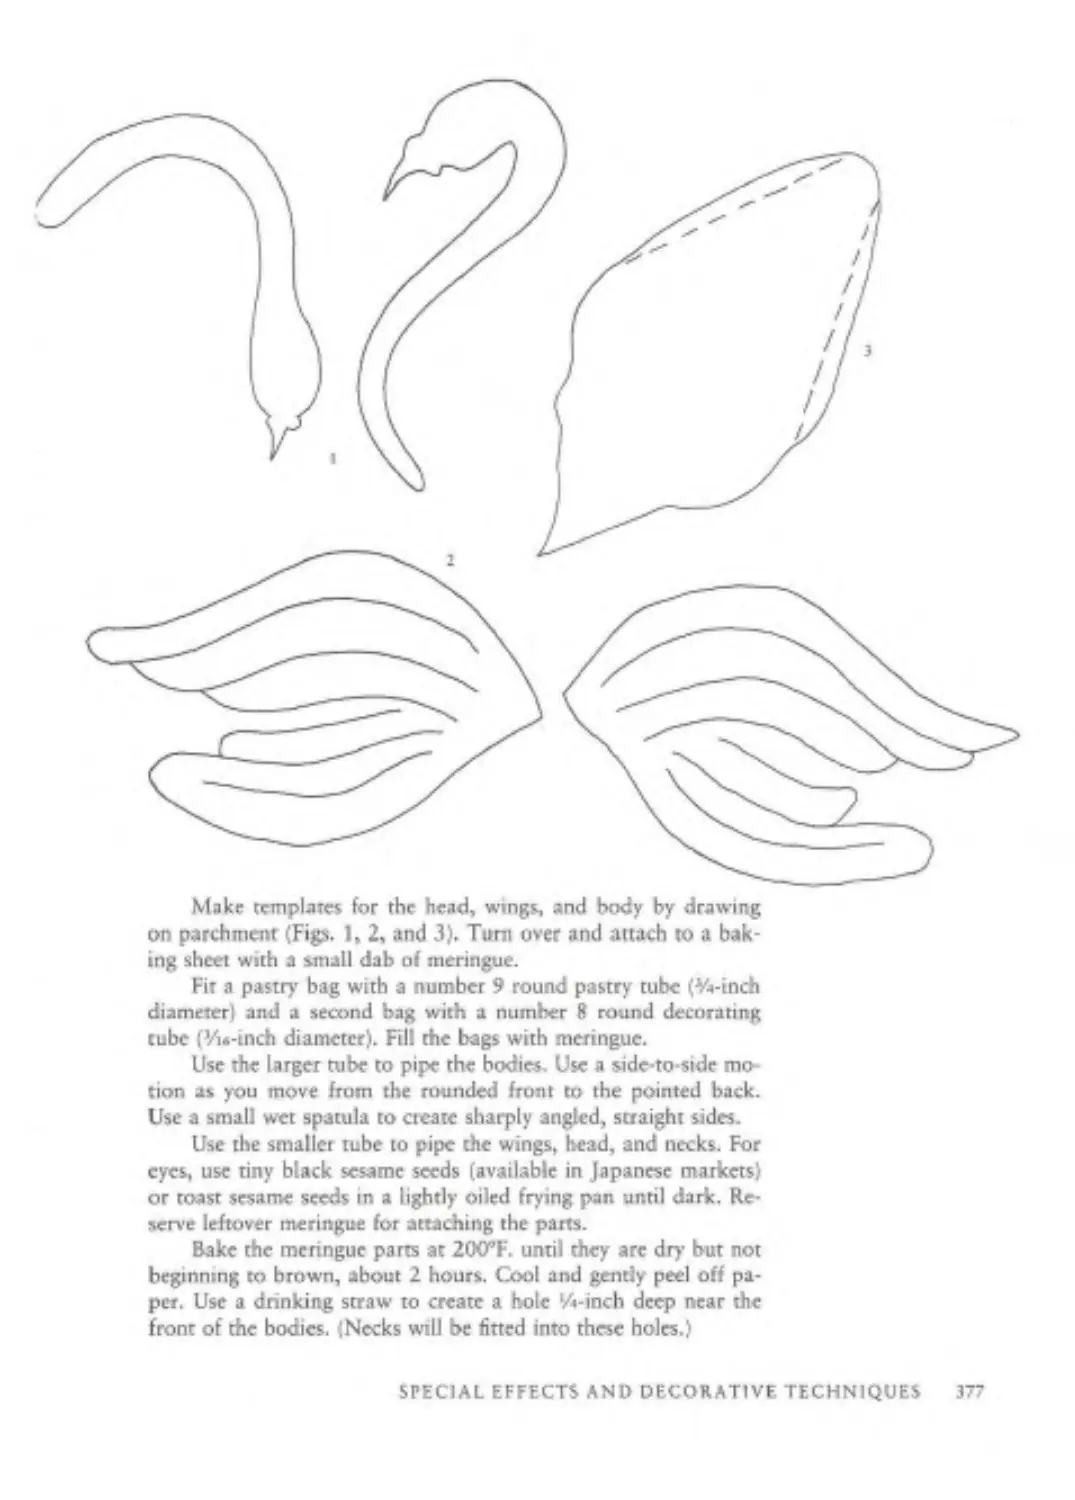
Piped Shapes for Charlotte Russe 373
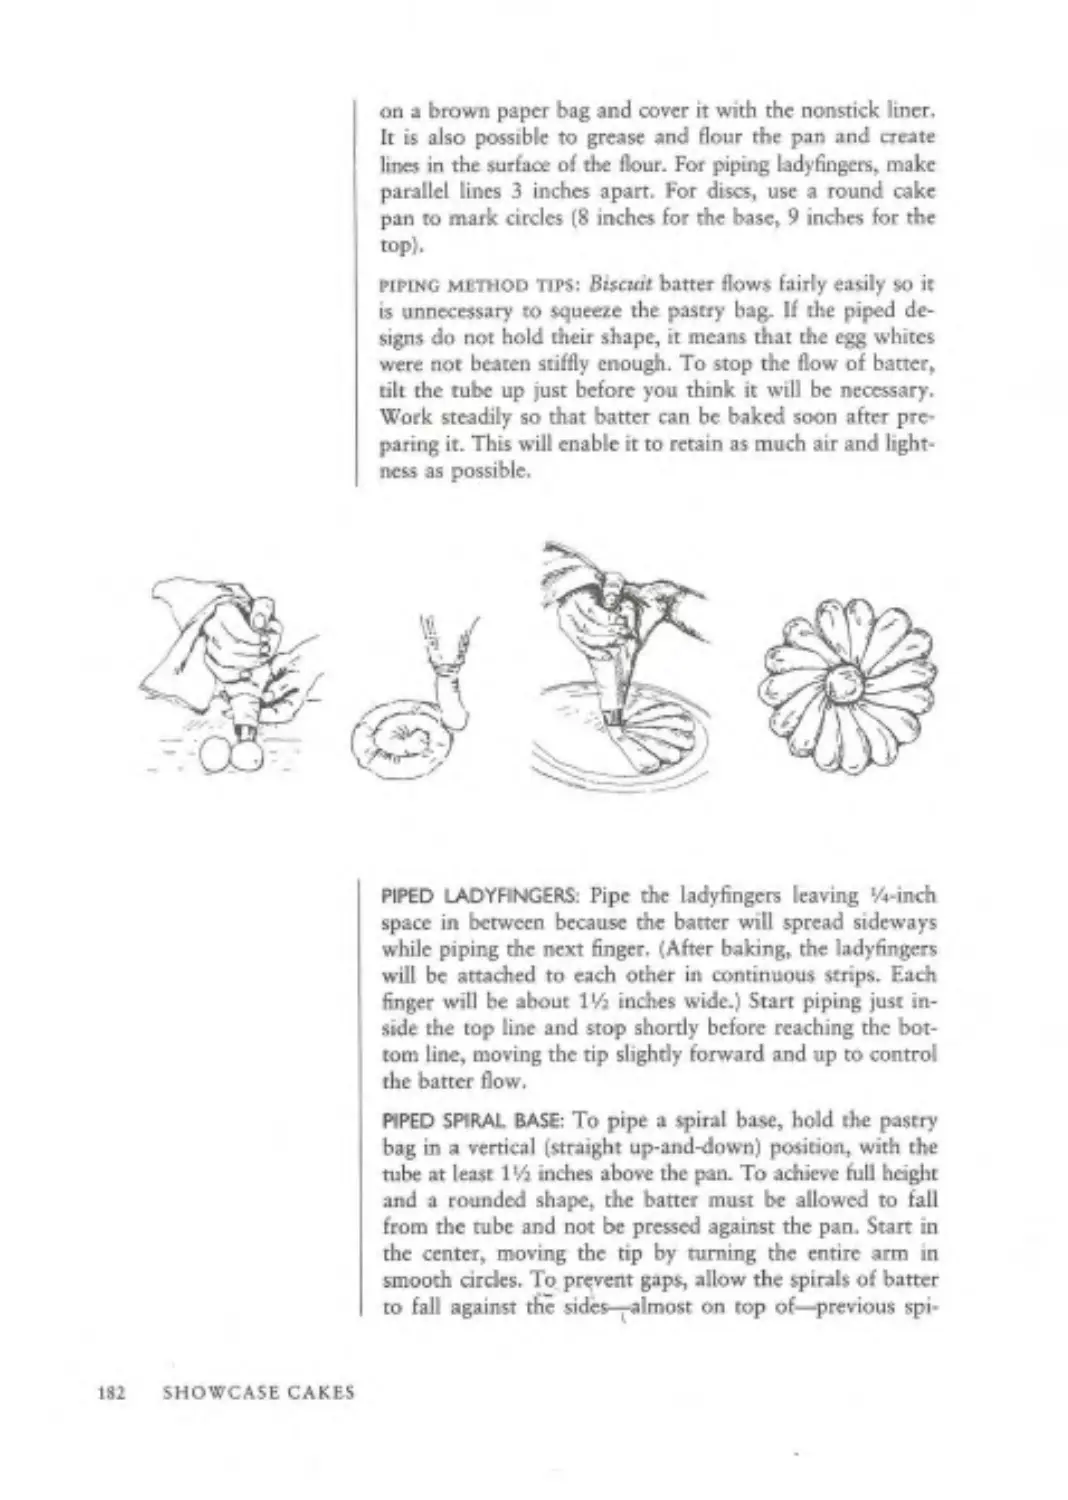
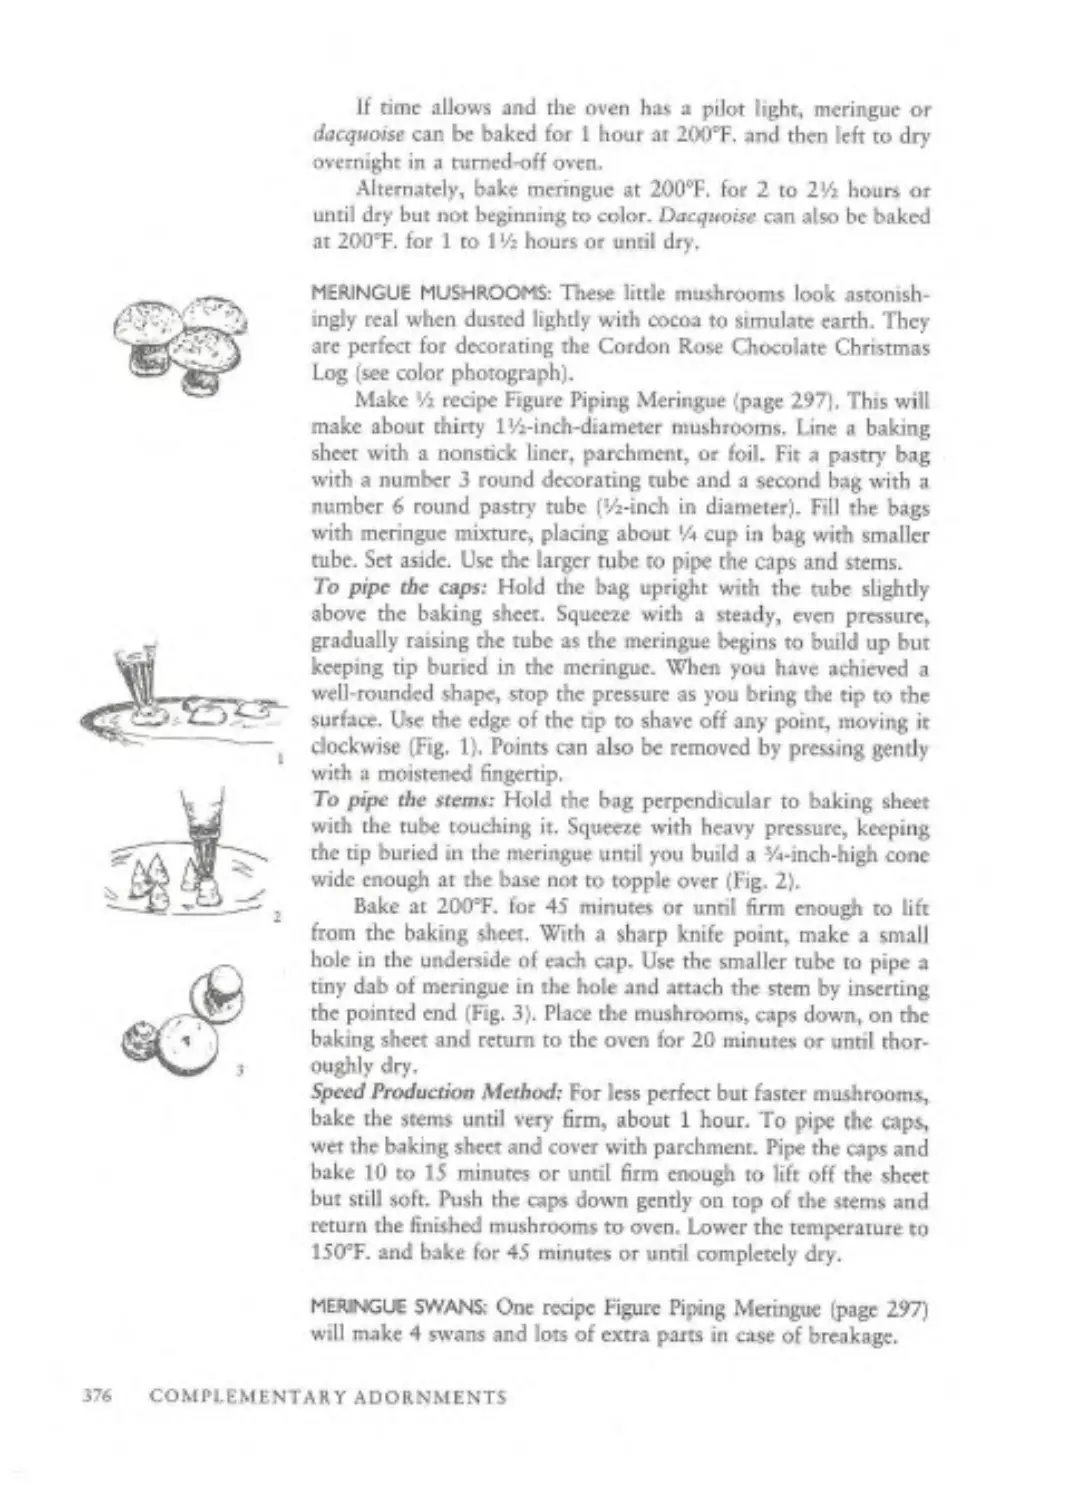
Special Menngue Piping Techniques 374
Chocolate 378
Piped Decorations 391
CONTENTS 9
PART III INGREDIENTS AND EQUIPMENT
Ingredients 419
Ман'г Ingredients Distributors and
Manufacturers 443
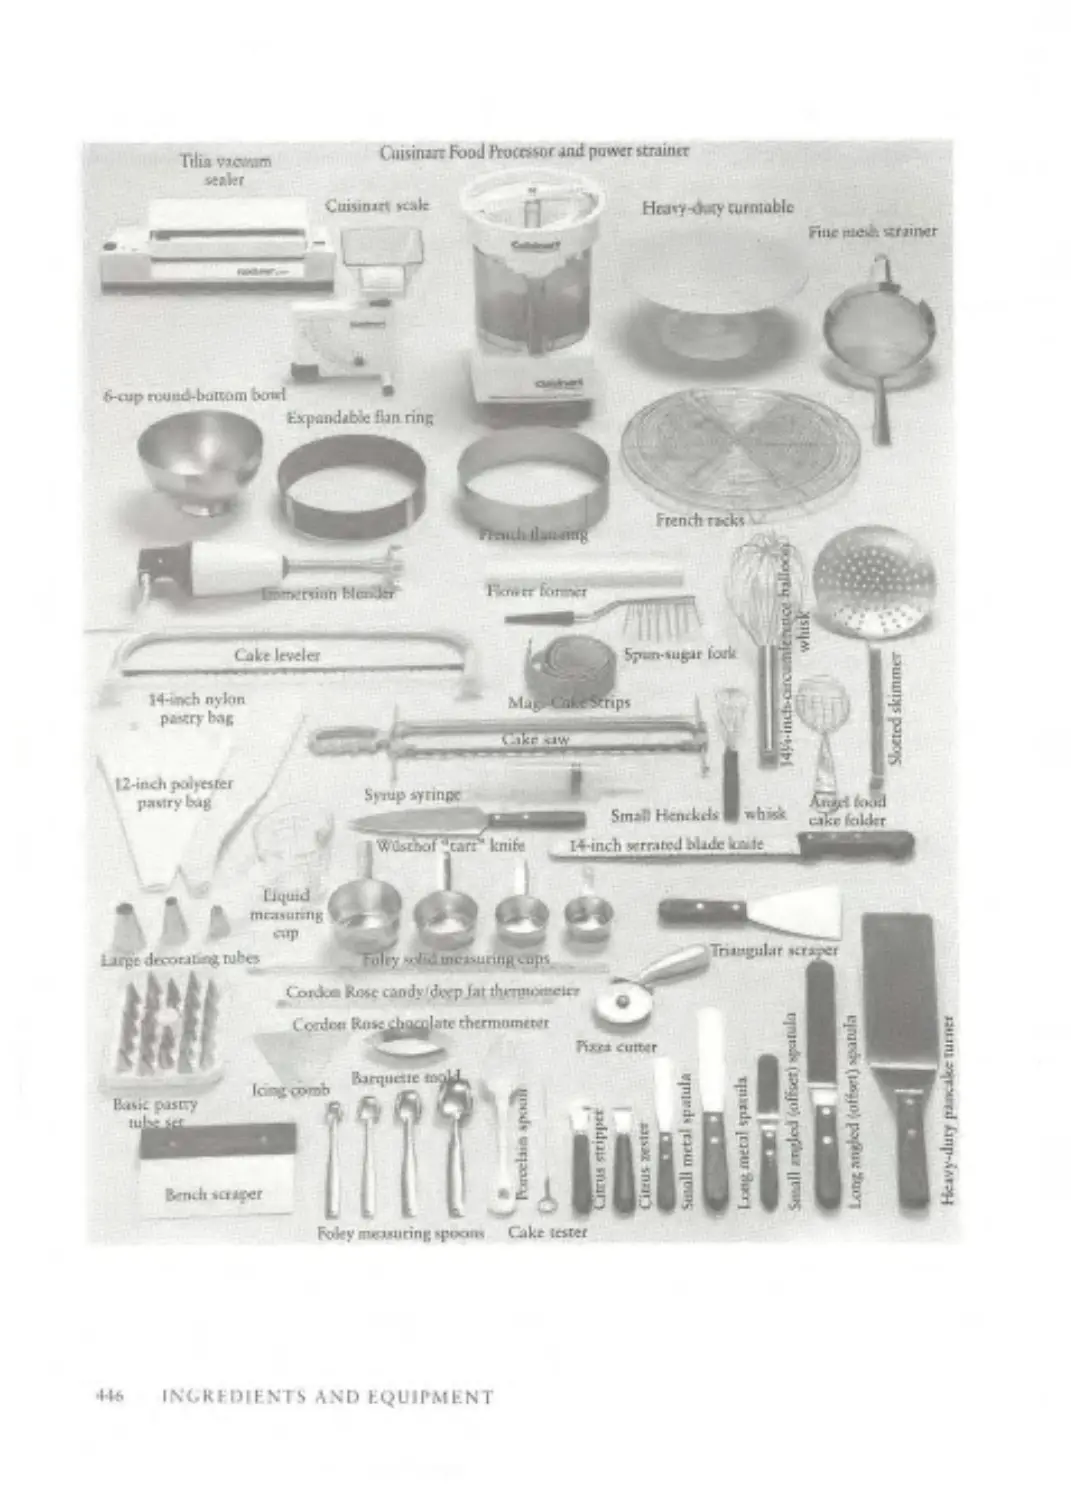
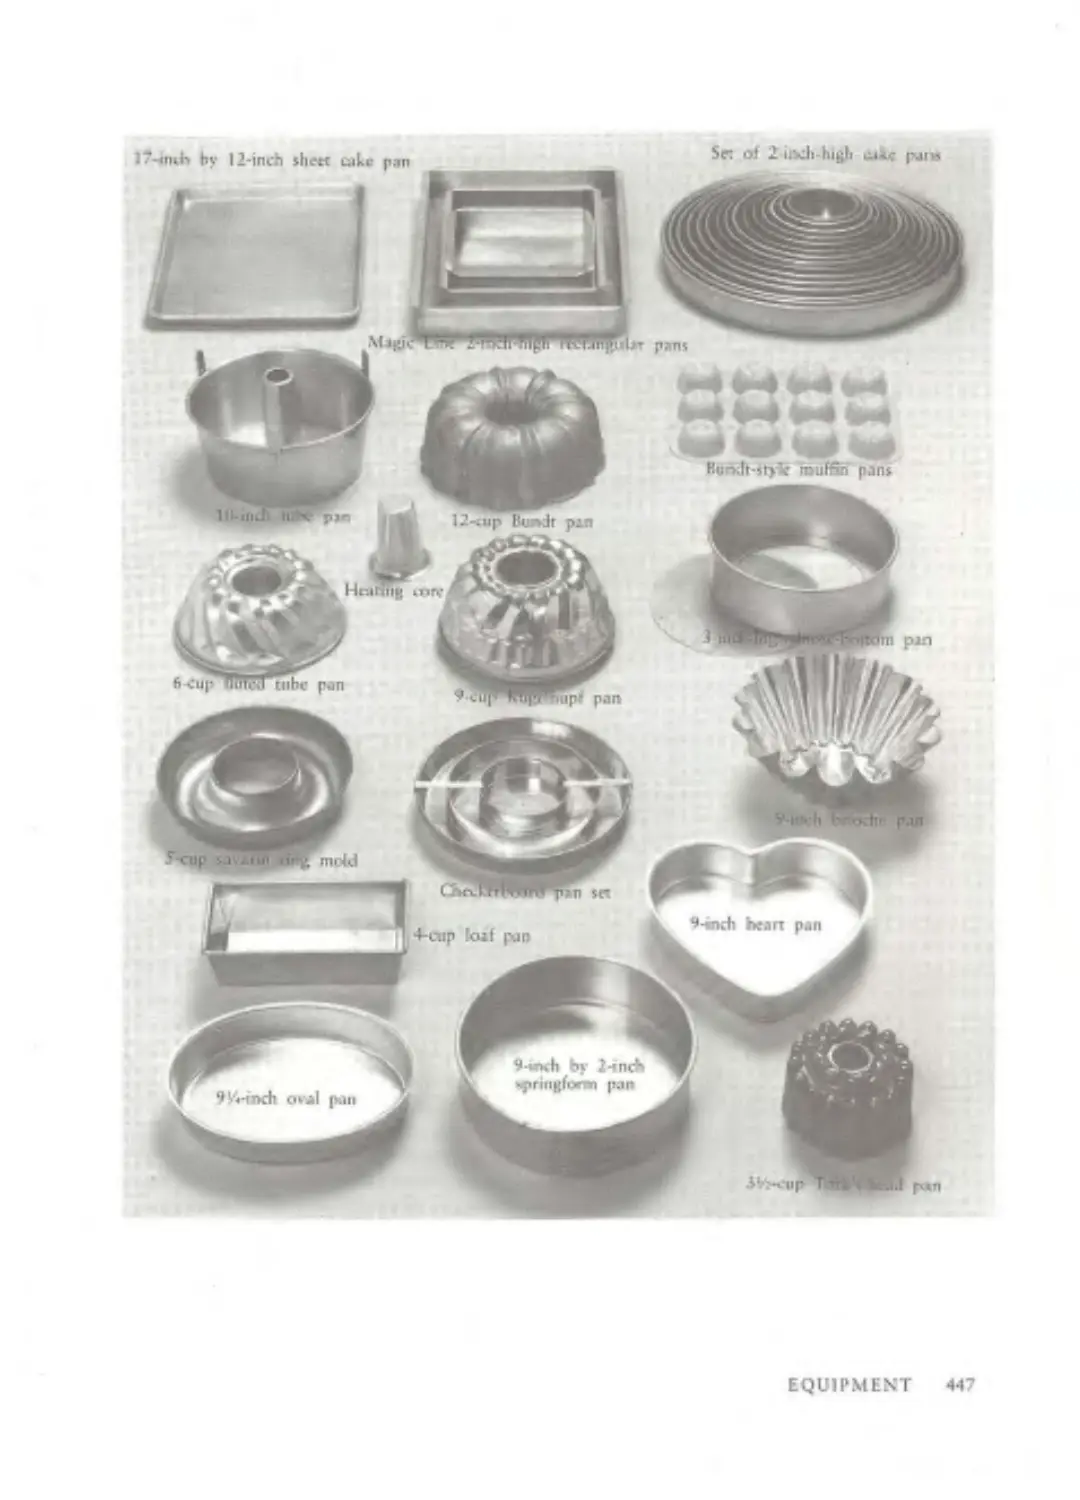
Equipment 448
Major Equipment Distribute»™ and Manufacturers 465
PART IV SPECIAL SECTION FOR PROFESSIONALS AND
PASSIONATE AMATEURS
Understanding Cakes 469
Understanding Butter Cakes 471
Understanding G&ioisc and Sponge
(Foam)-Type Cakes 476
Foolproof Formulas and Techniques for Making
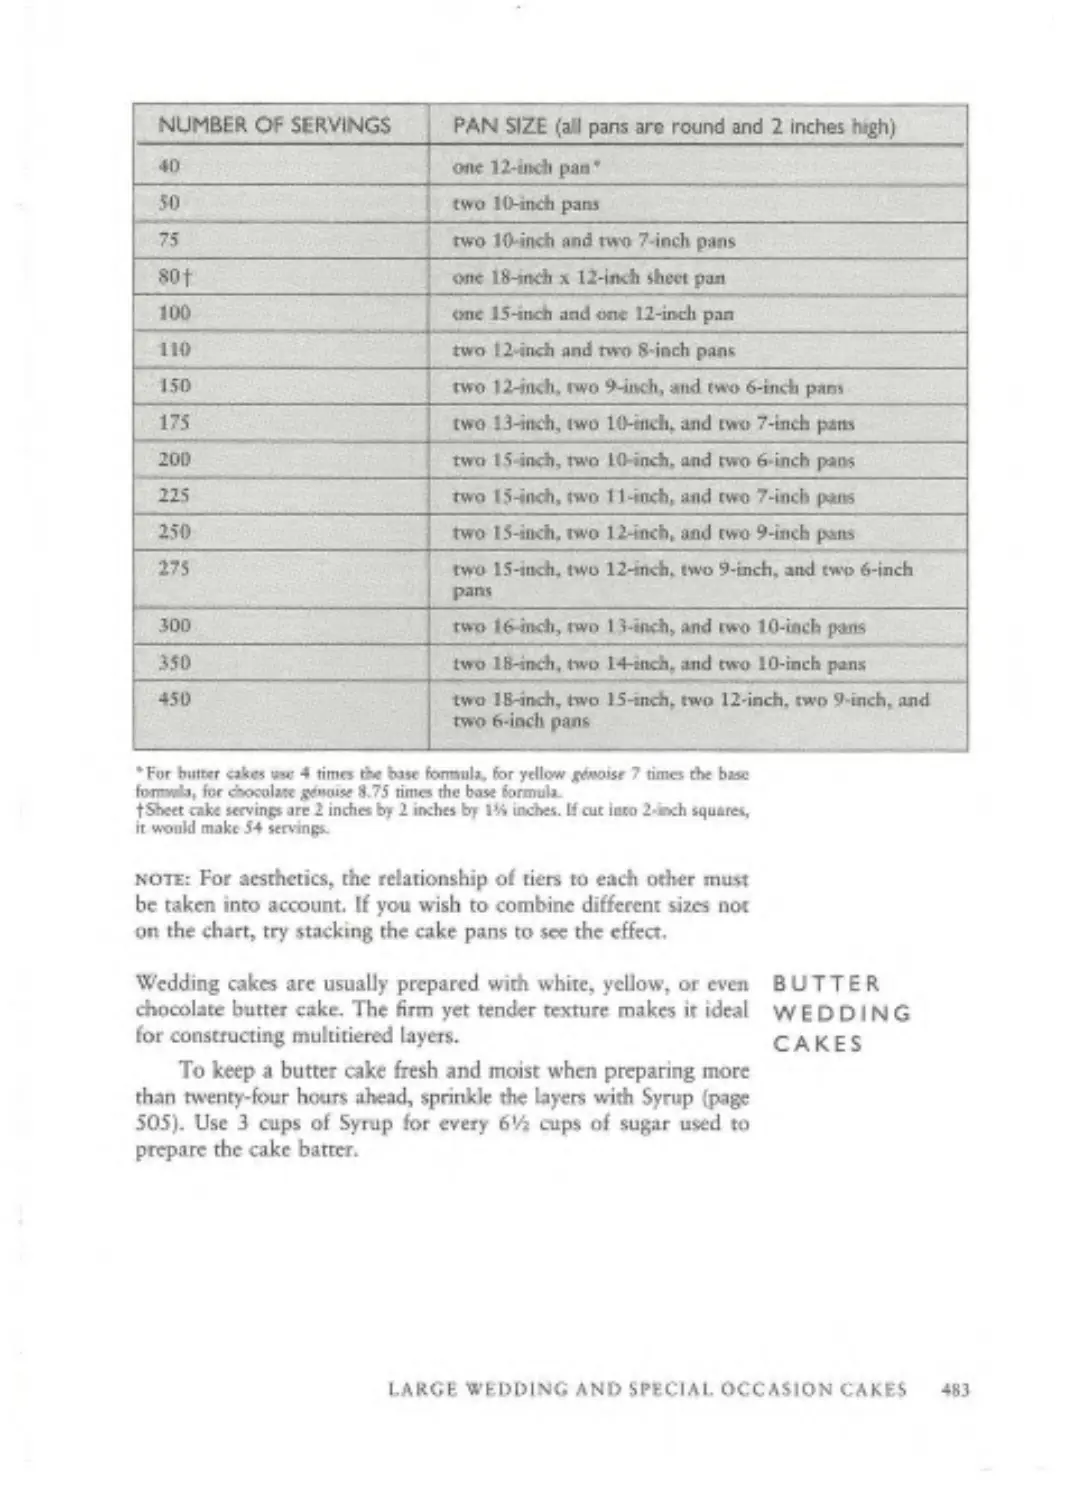
Large Wedding and Special Occasion Cakes 479
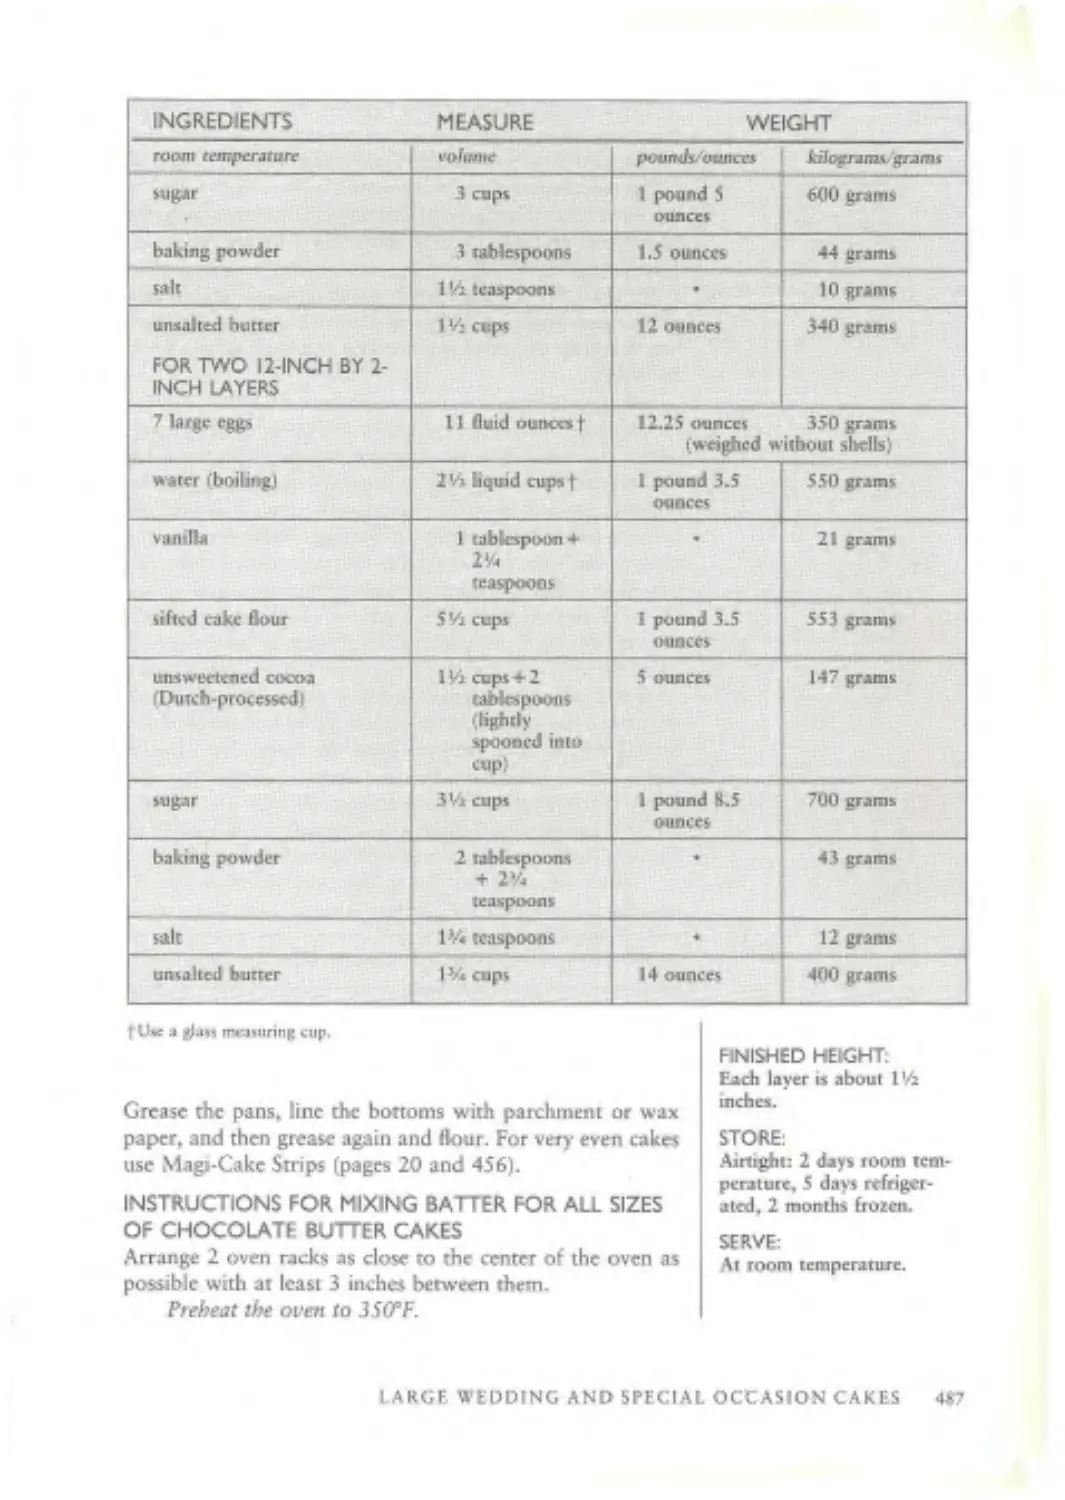
Buttrr Wedding Cakes 483
Genoist Wedding Cakes 496
Wedding Cheesecakes 505
Large-Scale Butrencreams for Wedding Cakes 512
Frosting, Tiering, and Stonng Wedding Cakes 533
Transporting and Serving Wedding Cakes 536
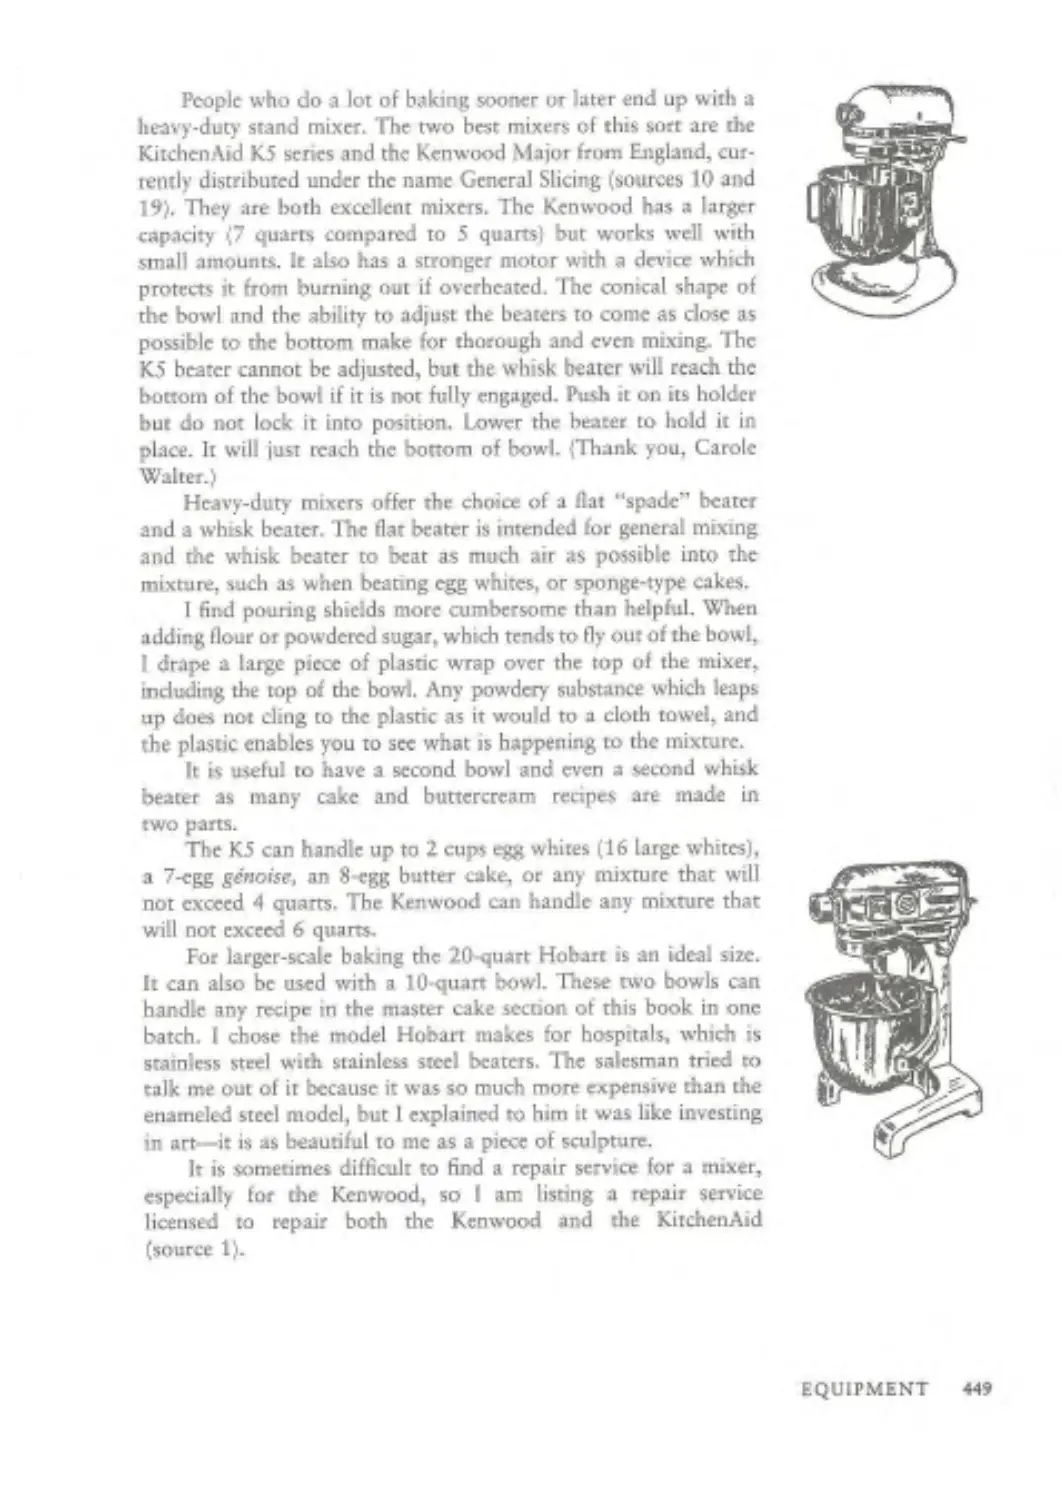
Biography 538
Index 541
II) CONTENTS
Special
Categories
RECIPES USING ALL EGG YOLKS
Golden Butter Cream Cake ipagc 34)
Sour Cream Butter Cake (page 35)
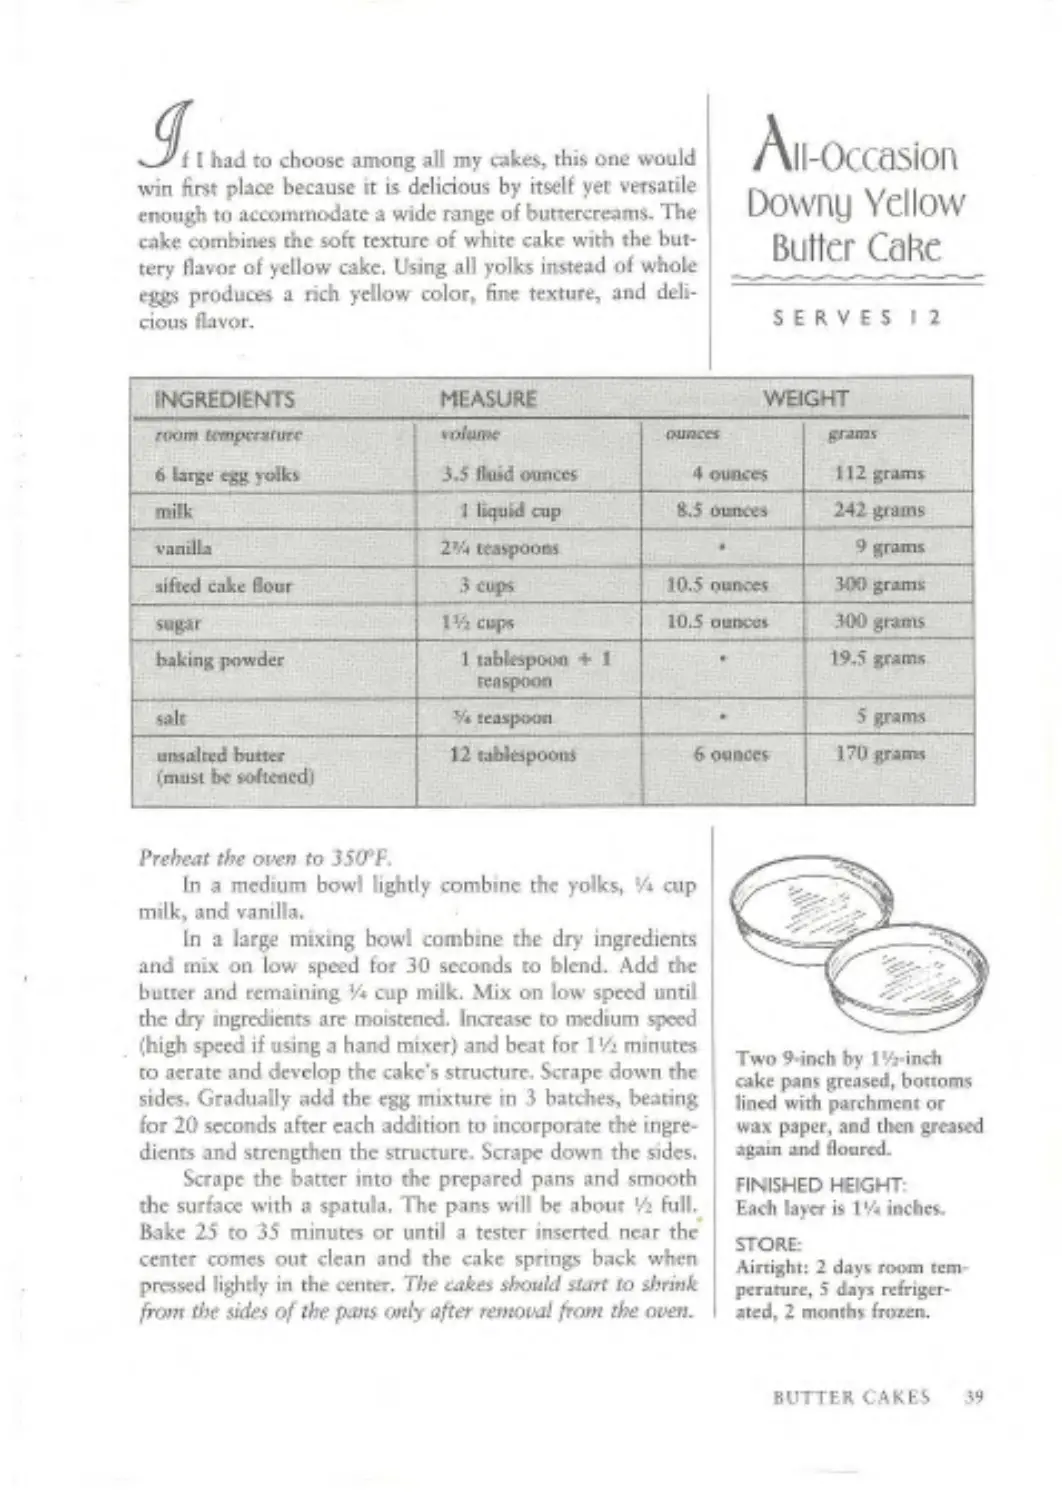
All-Occasion Downy Yellow Butter Cake (page 39)
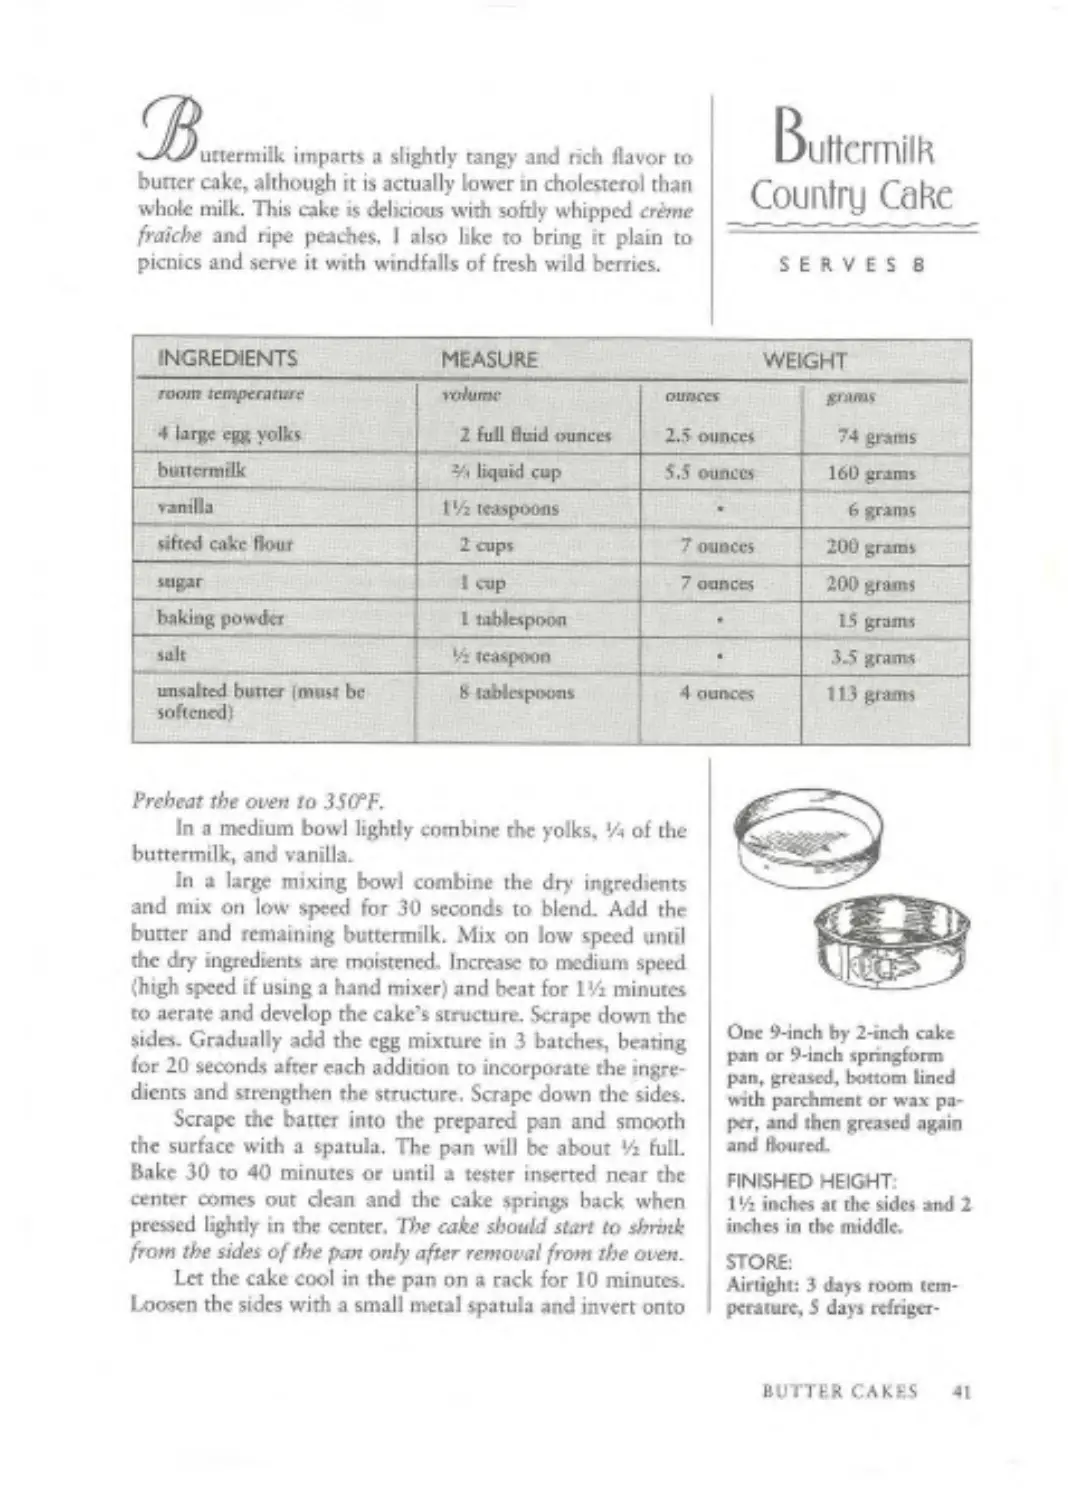
Buttermilk Country Cake (page 41)
Golden Luxury Butter Cake (page 48)
Perfect All-American Chocolate Torre (page 56)
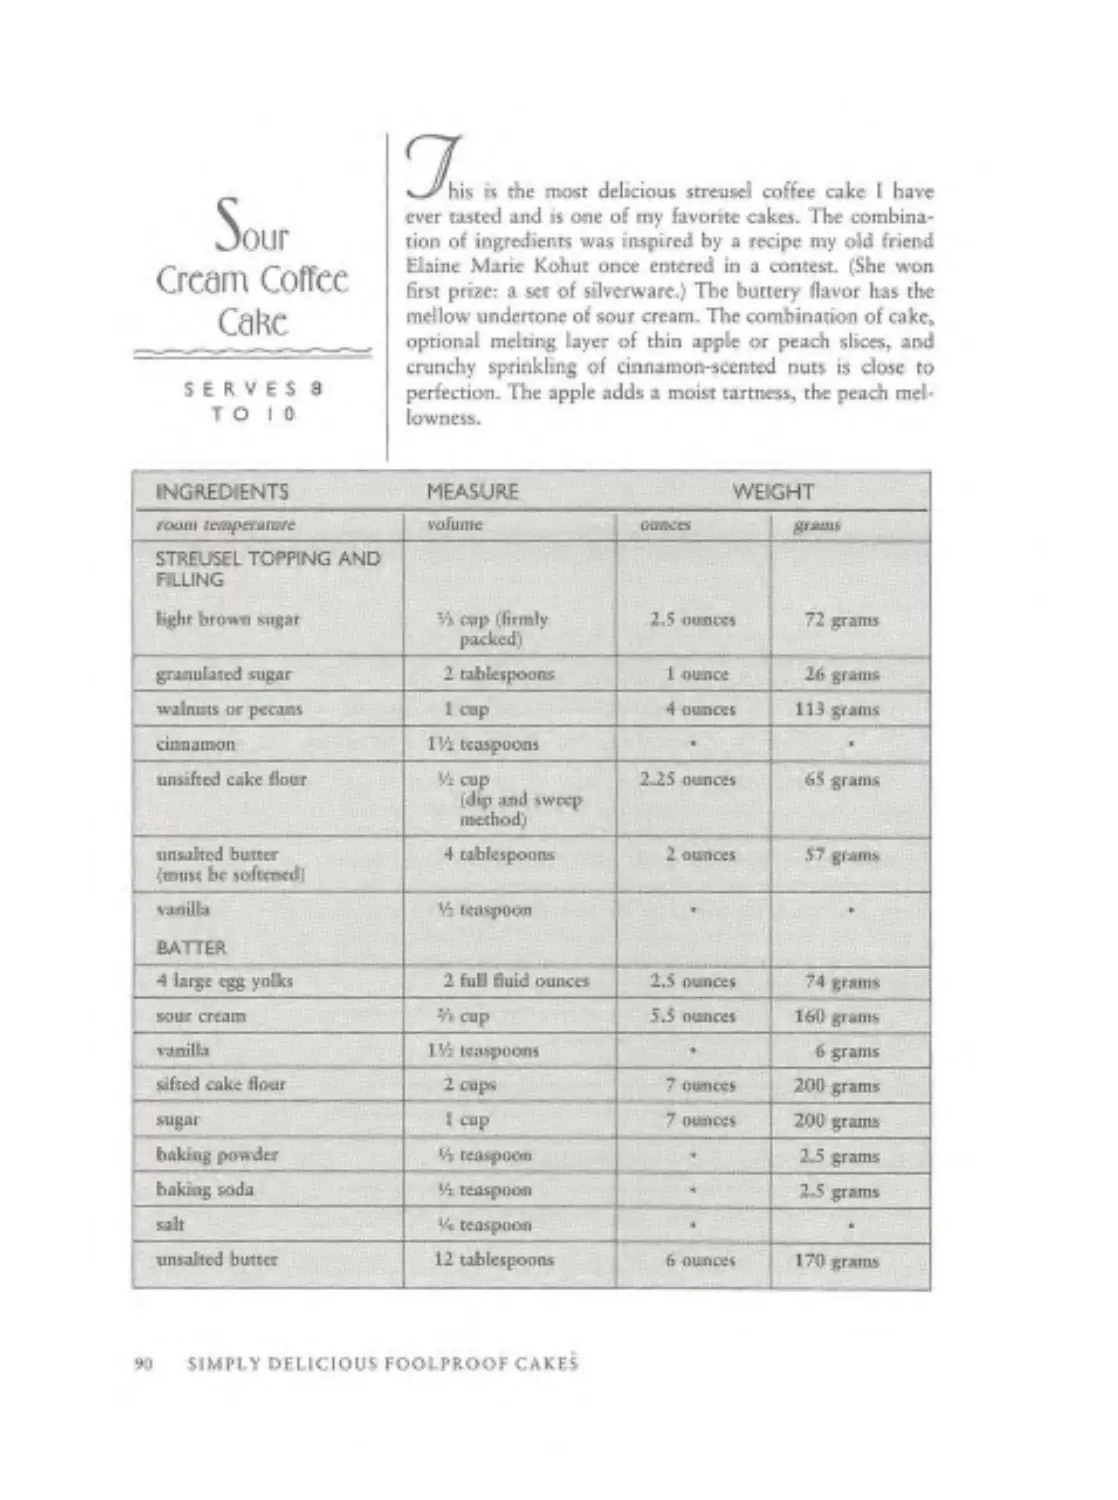
Sour Cream Coffee Cake (page 90)
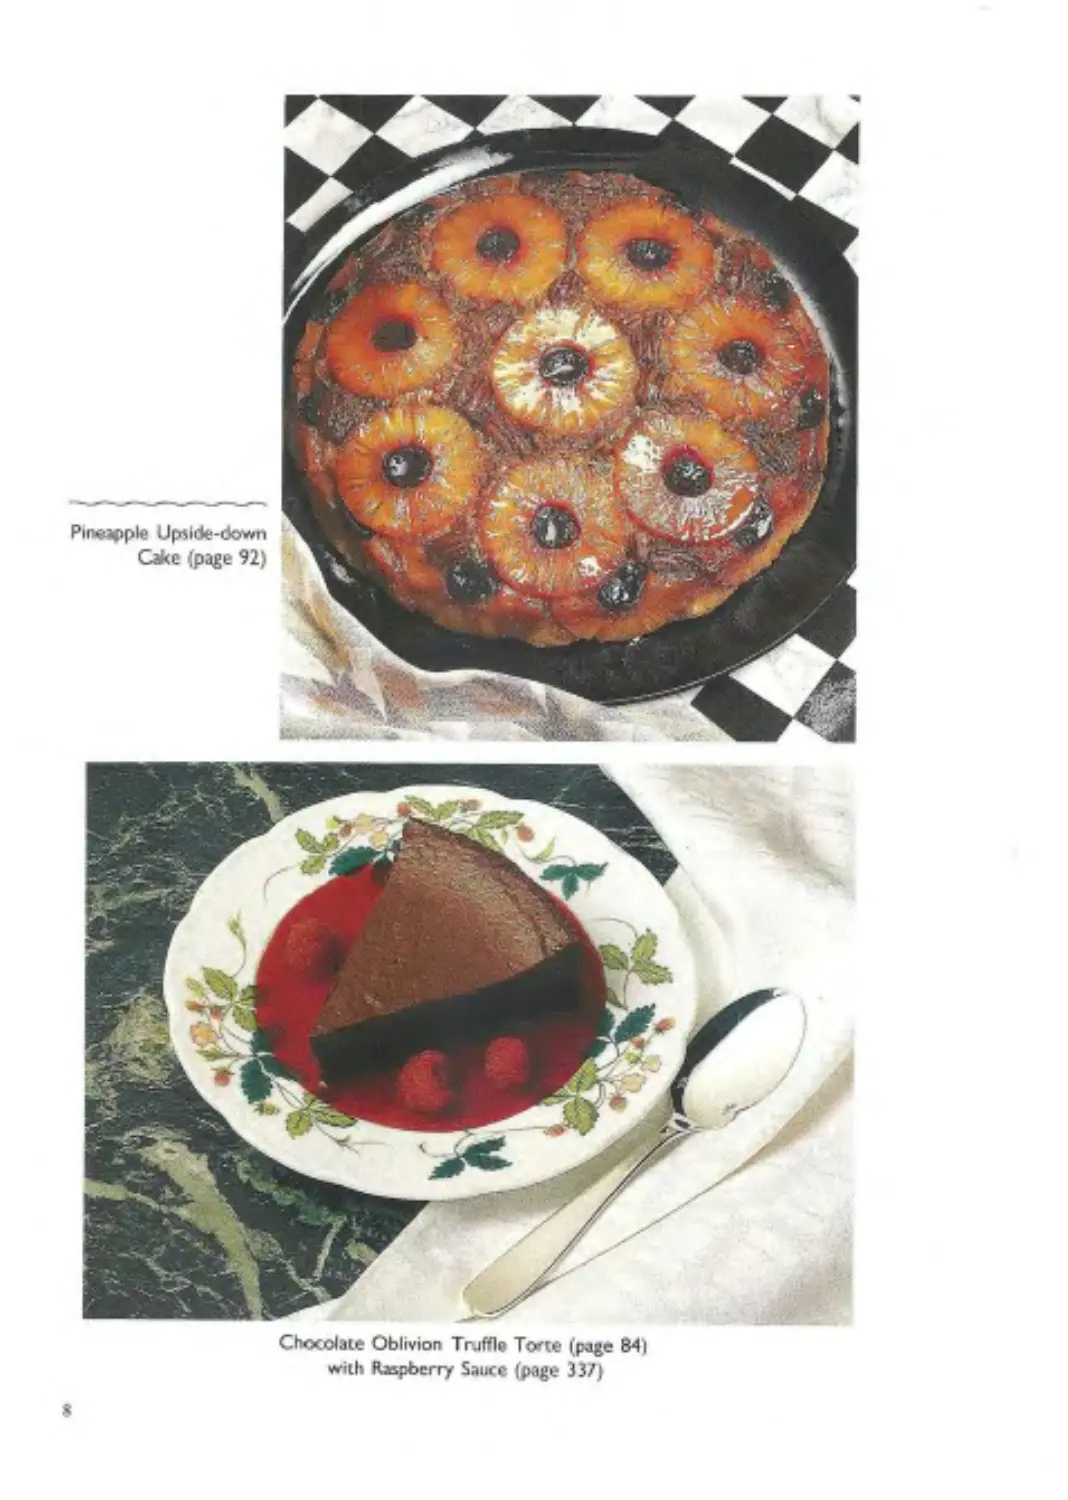
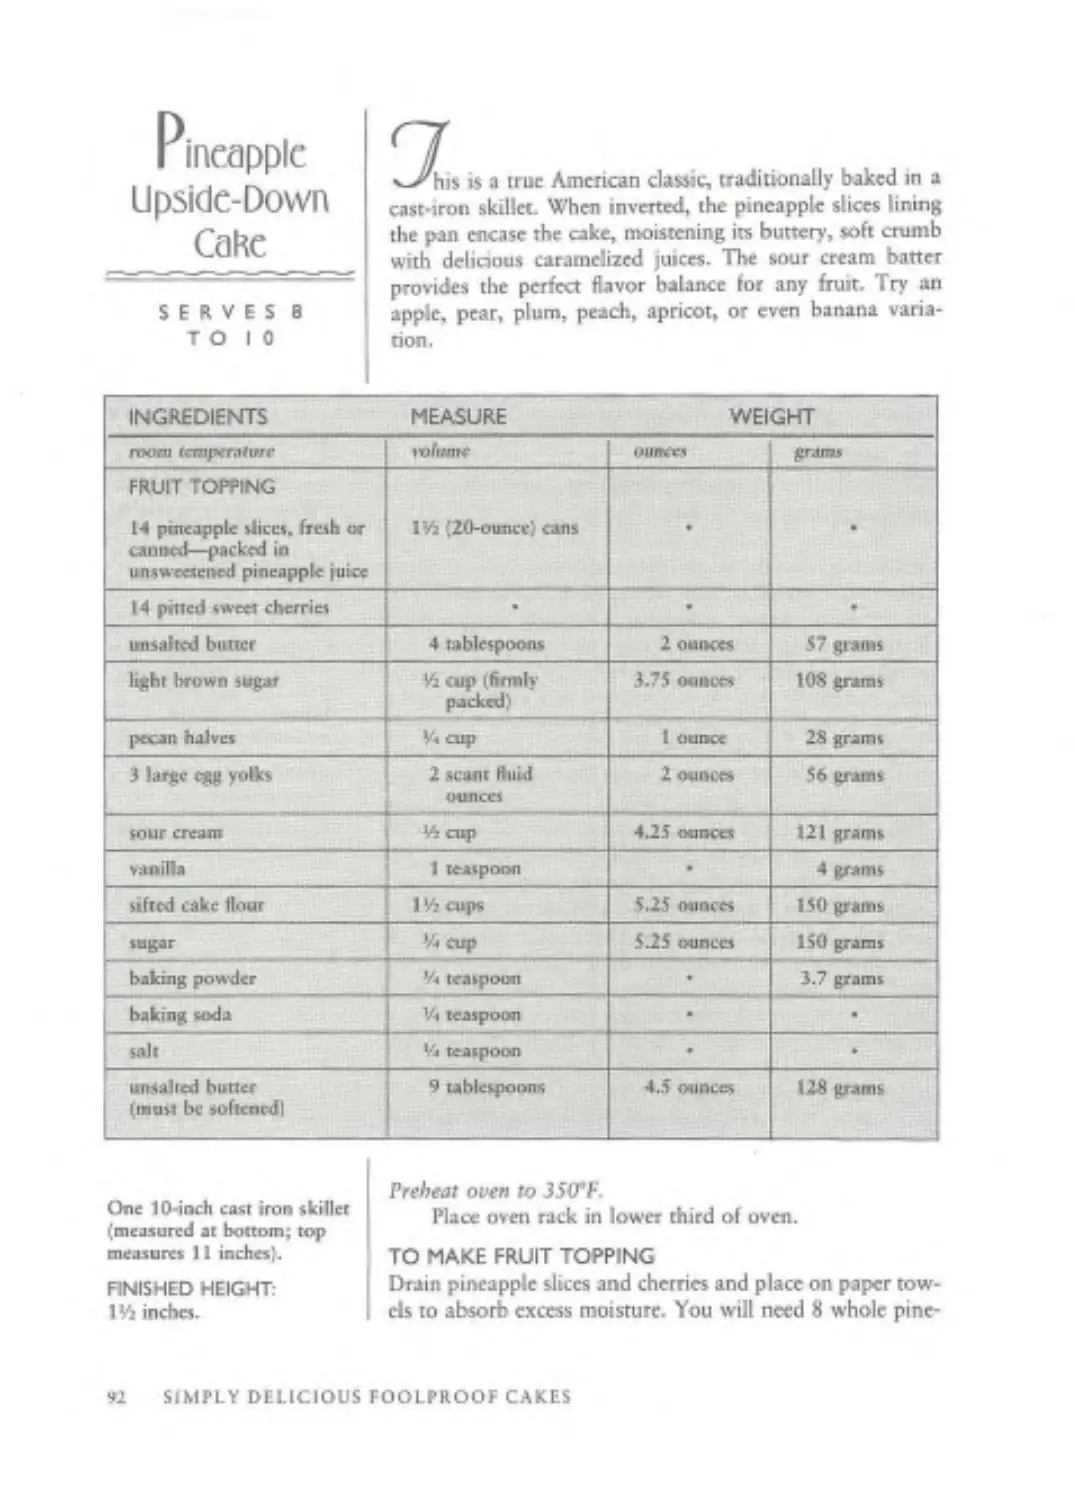
Pineapple Upside-Down Cake ipage 92)
Golden Ginoise (page 125)
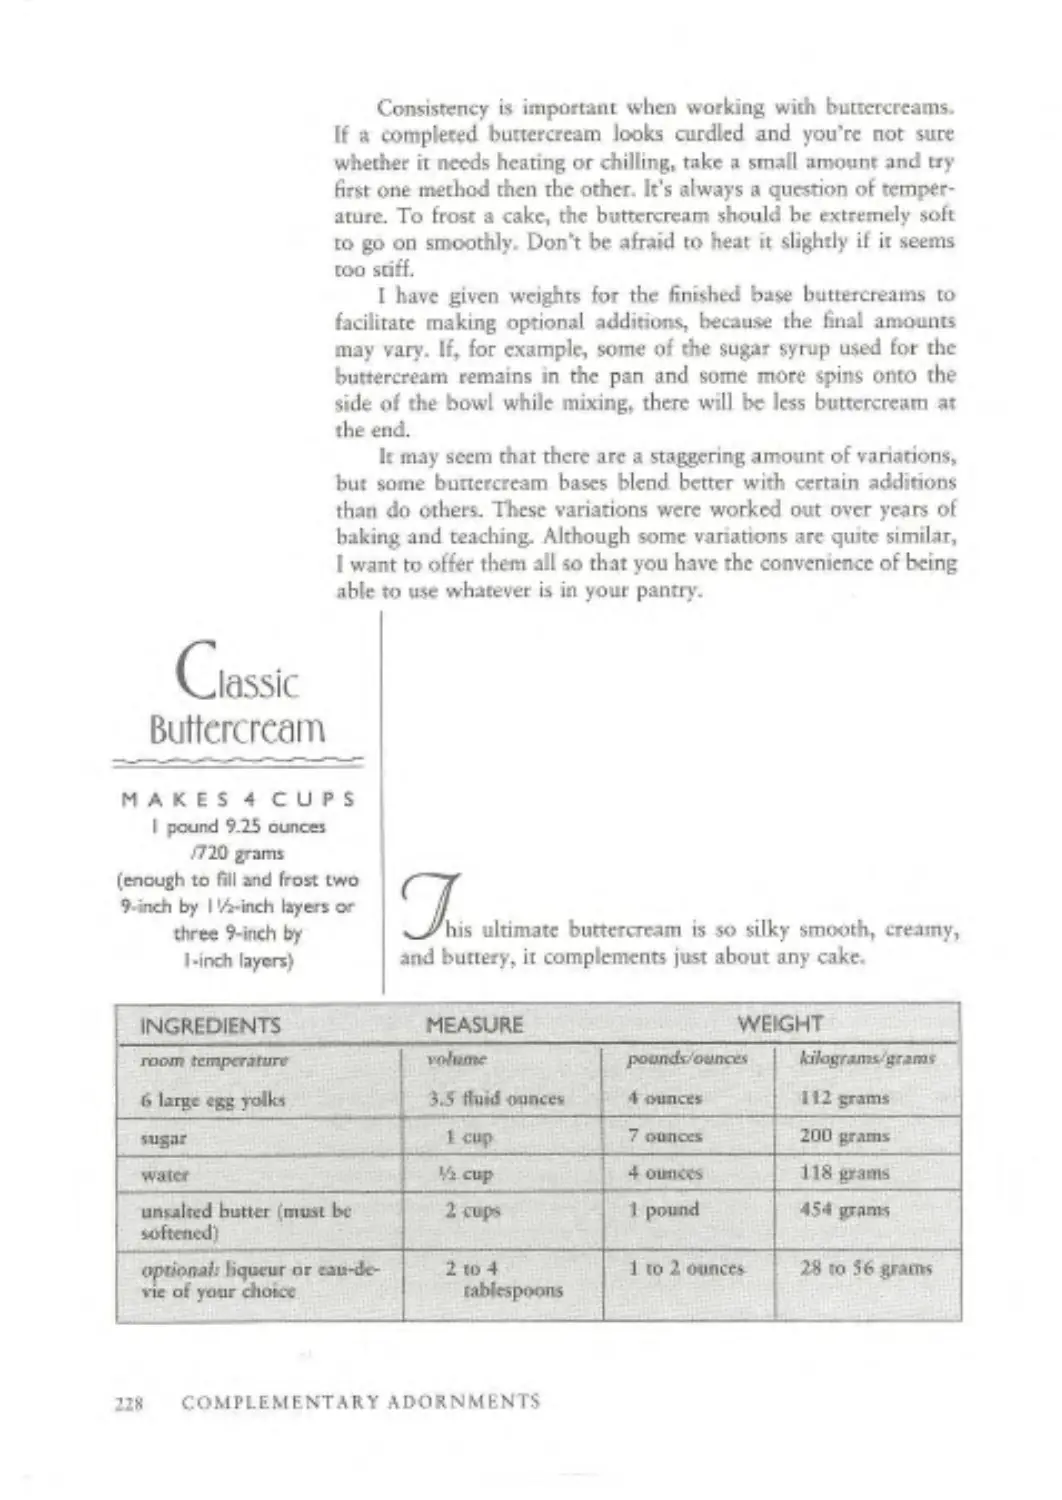
Classic Buttercream {and variations) (page 228]
Neoclassic Buttercream (and variations) (page 230)
Royal Honey Buttercream (page 235)
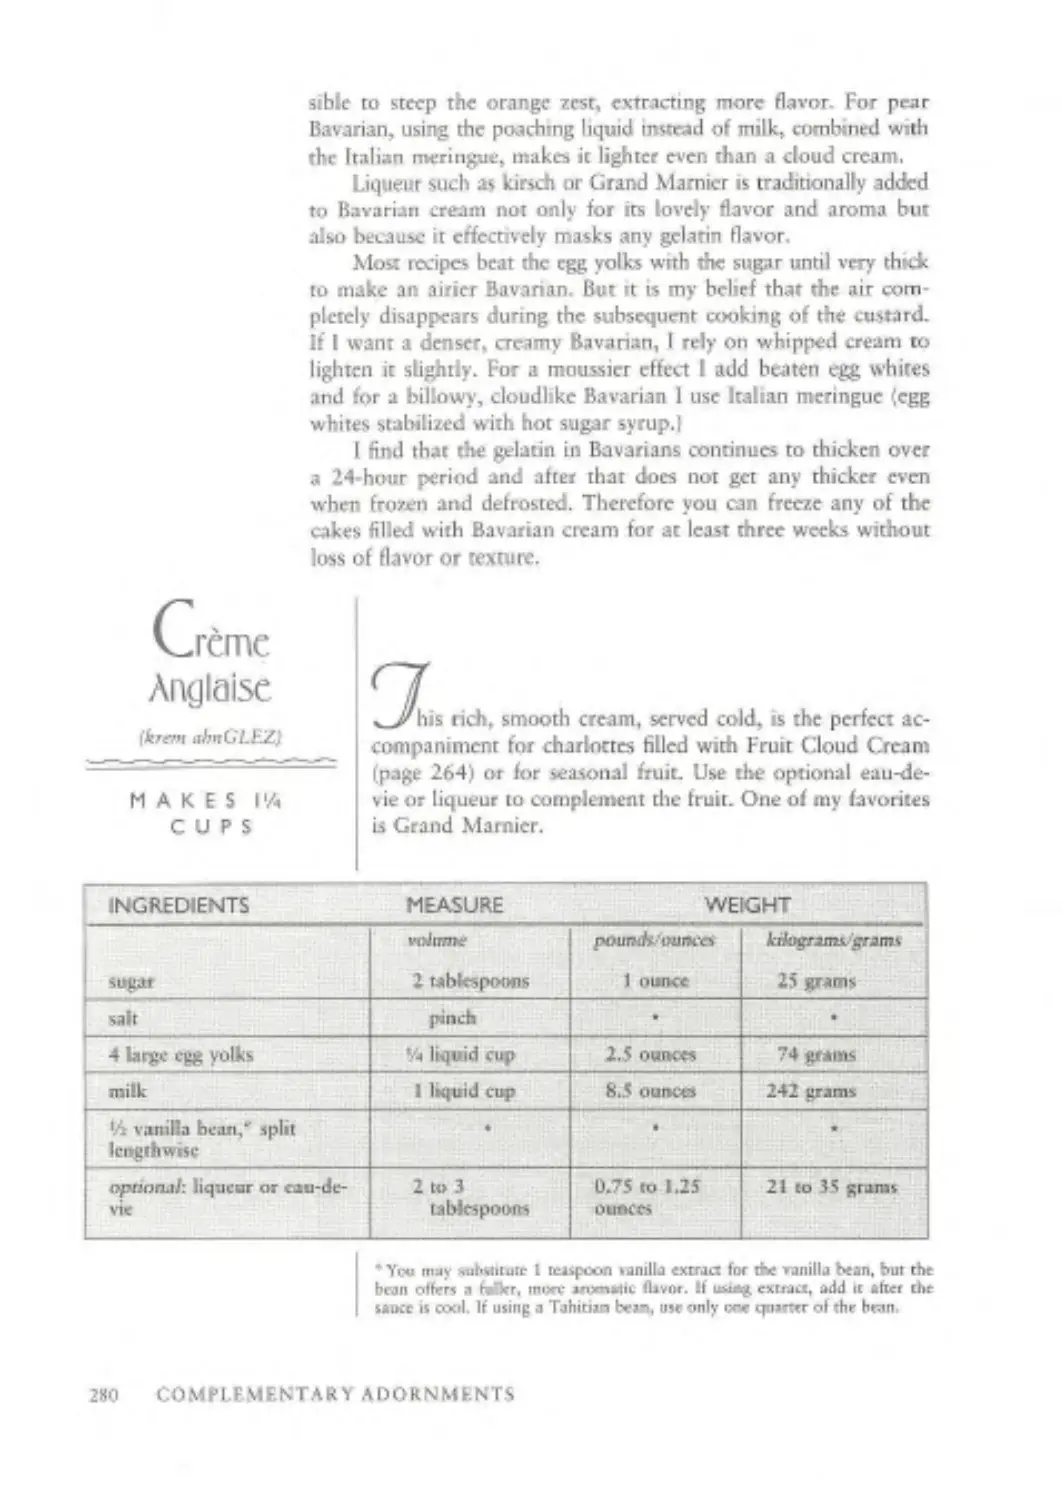
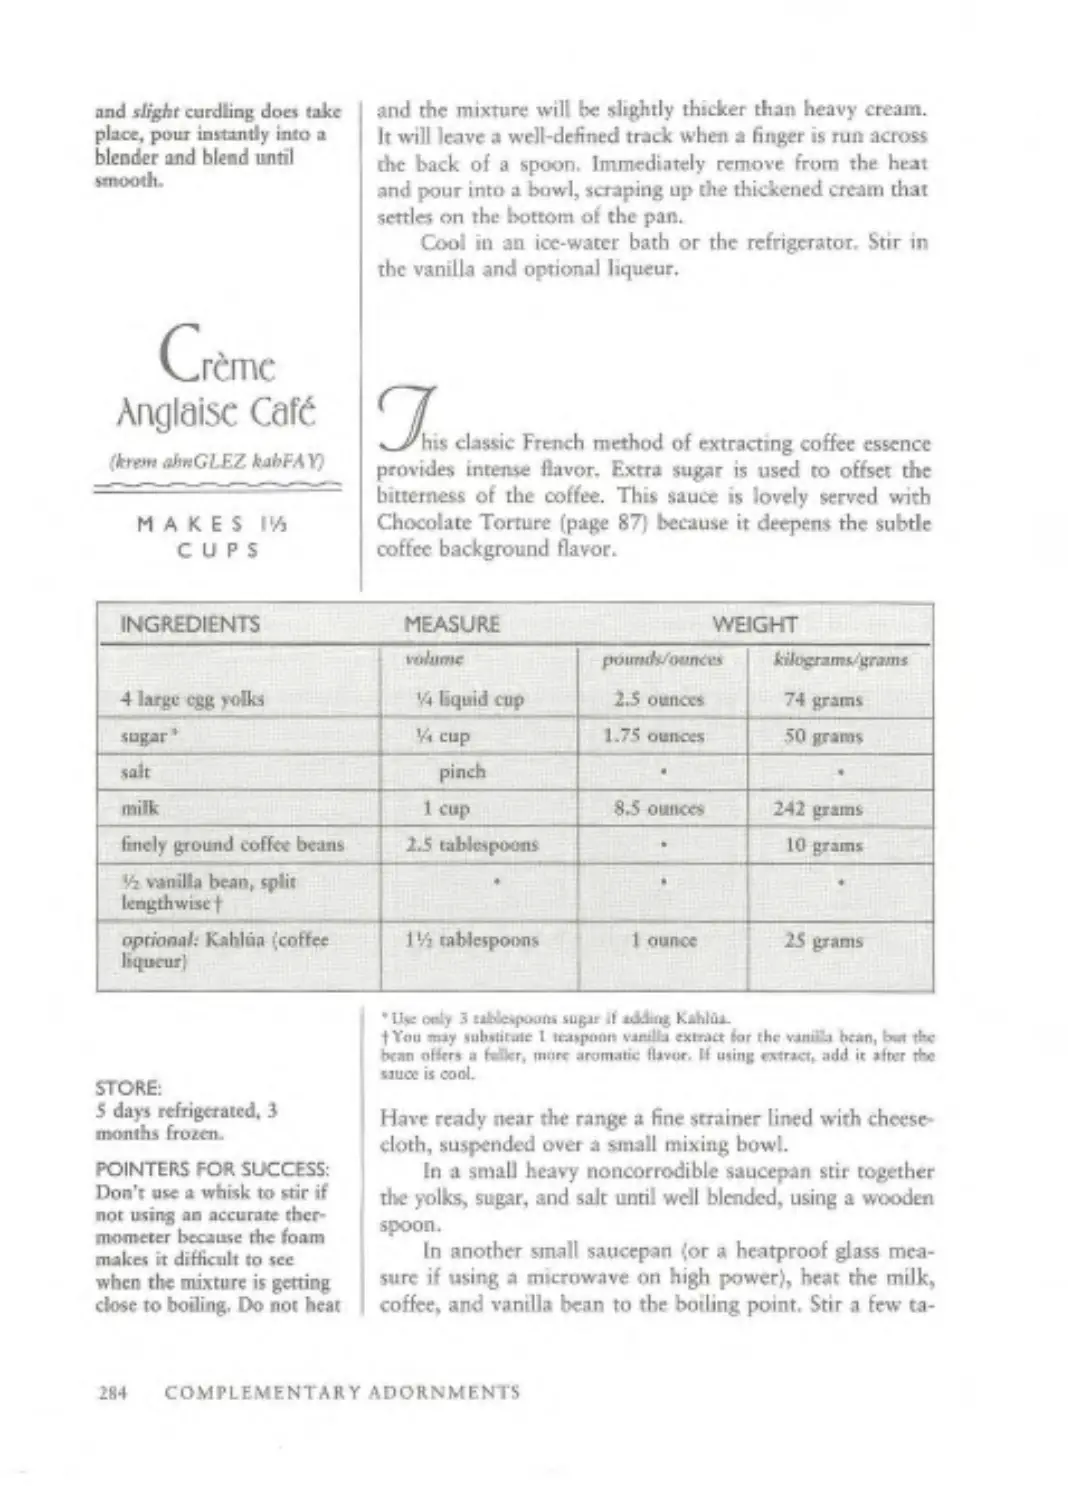
Creme Anglaiw (page 280)
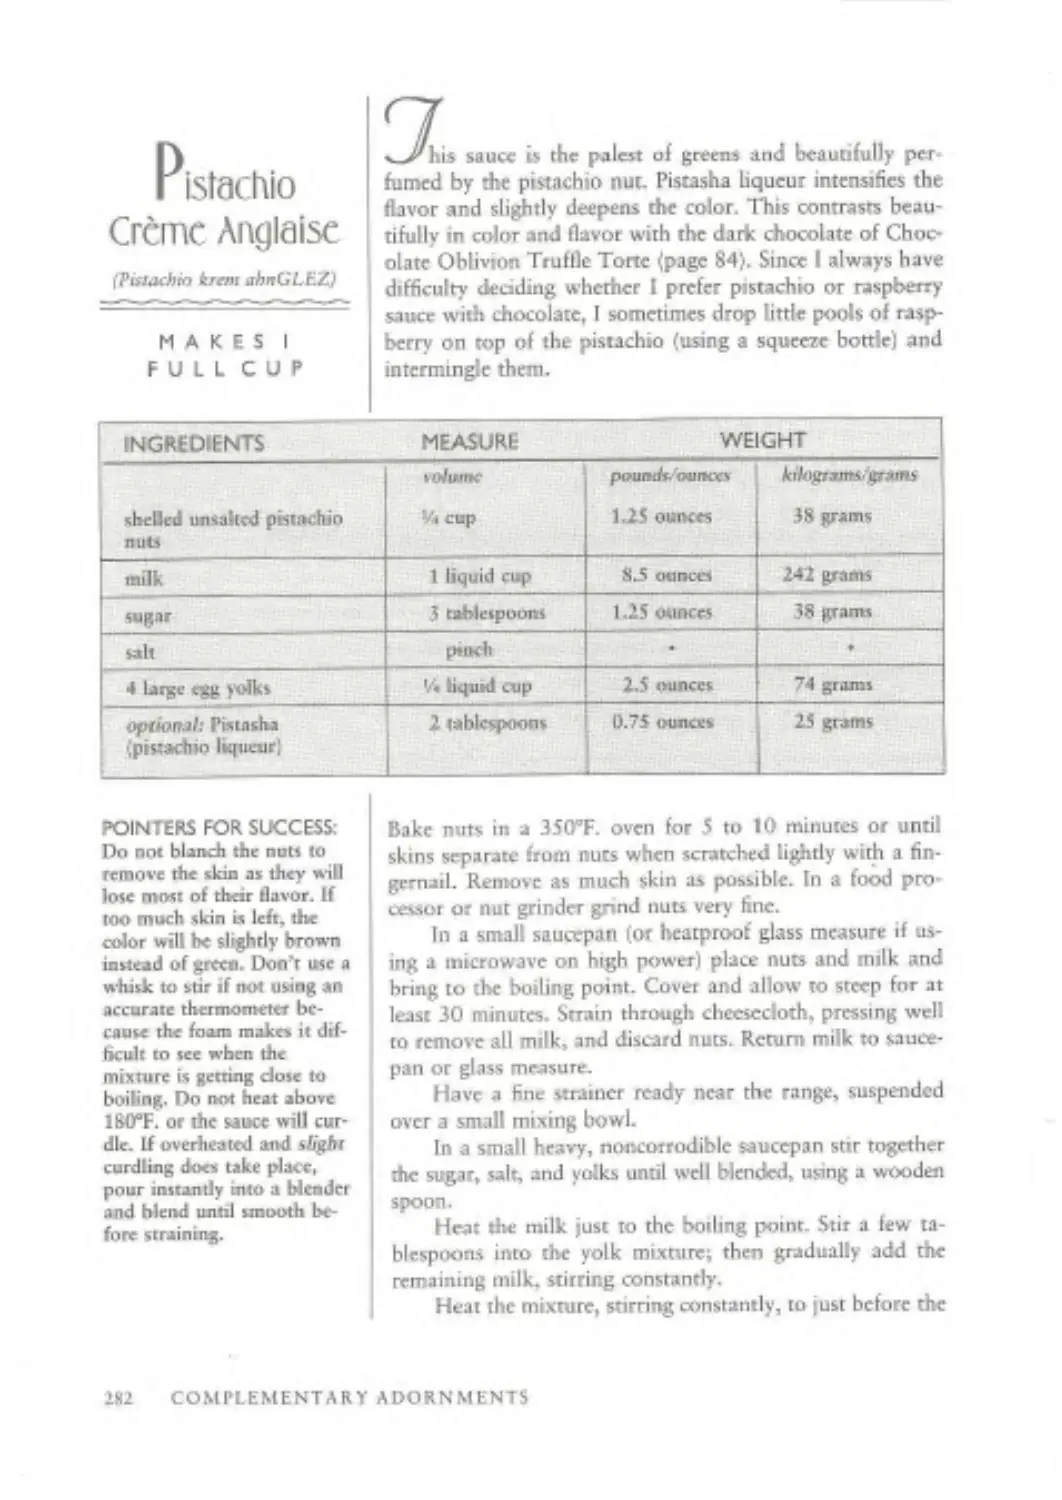
Pistachio Creme Anglaisc (page 282)
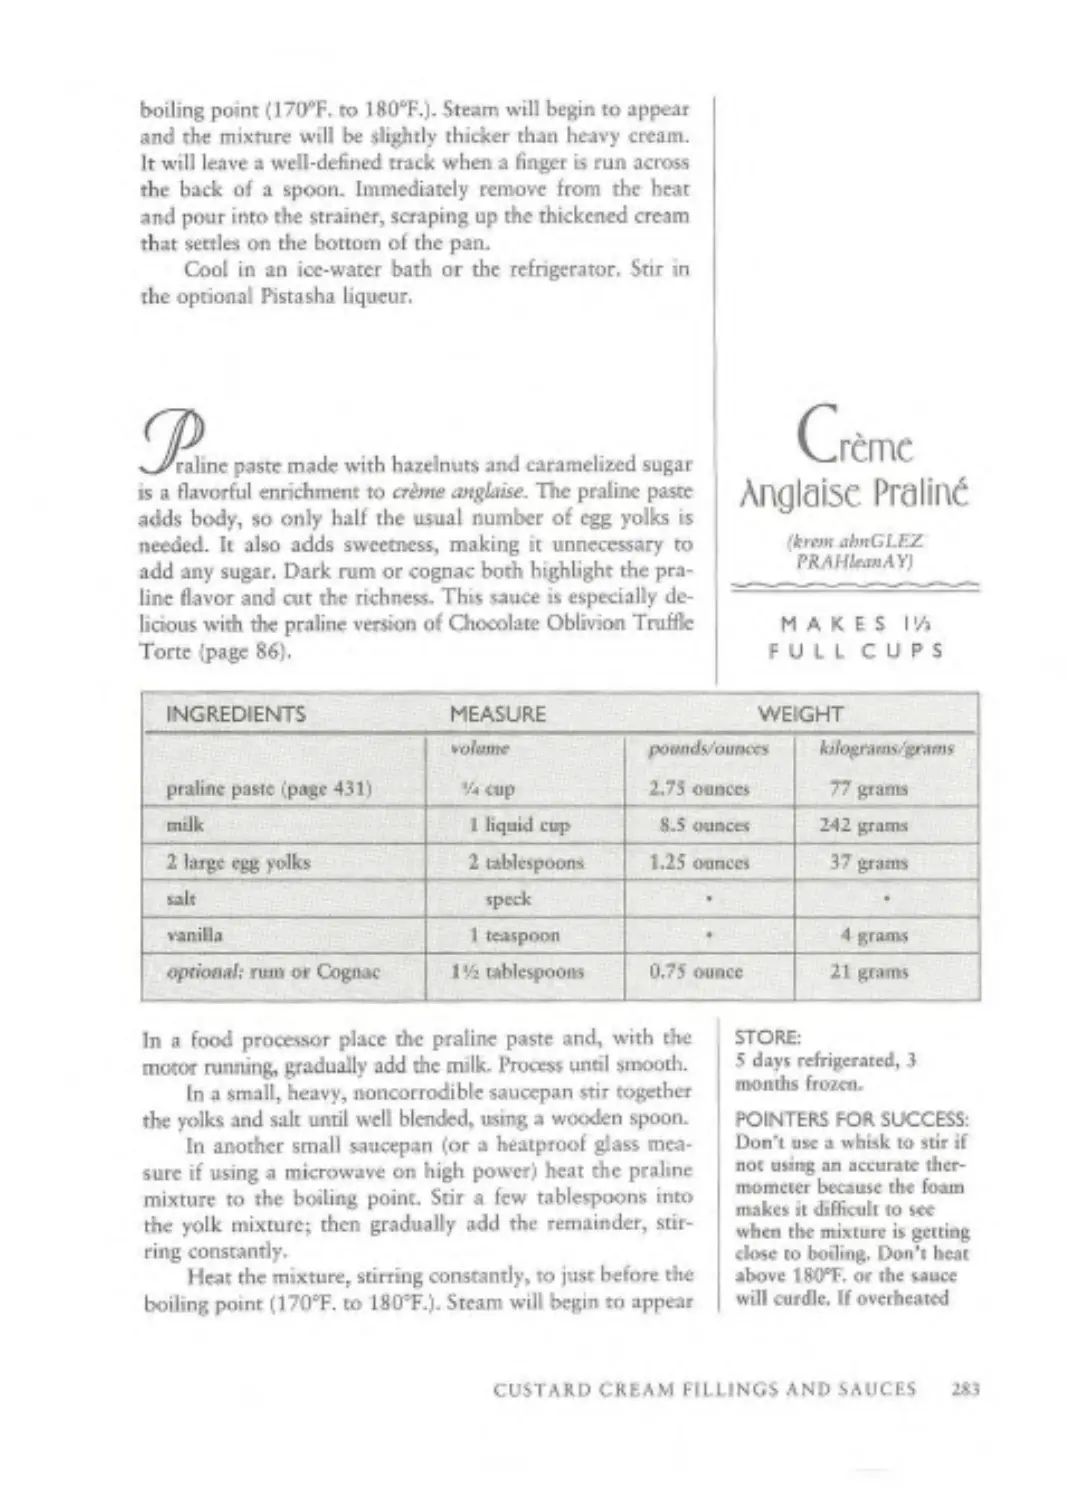
Crime Anglaisc Praline (page 283)
Creme Anglaisc Cafe (page 284)
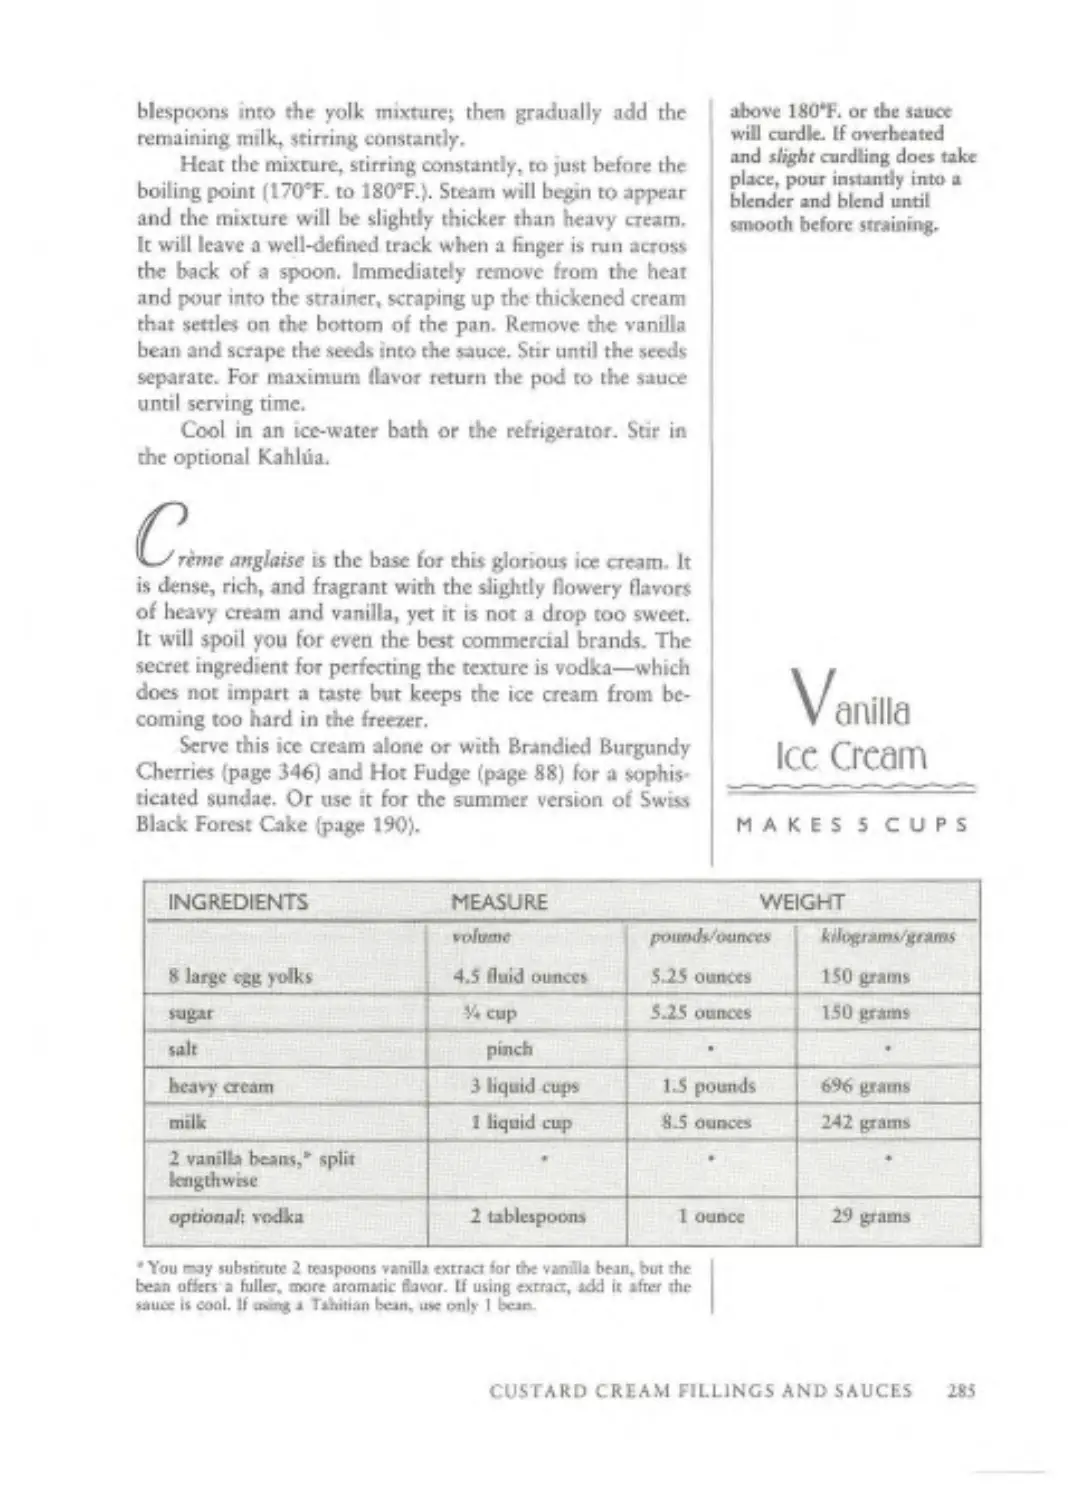
Vanilla Ice Cream (page 285)
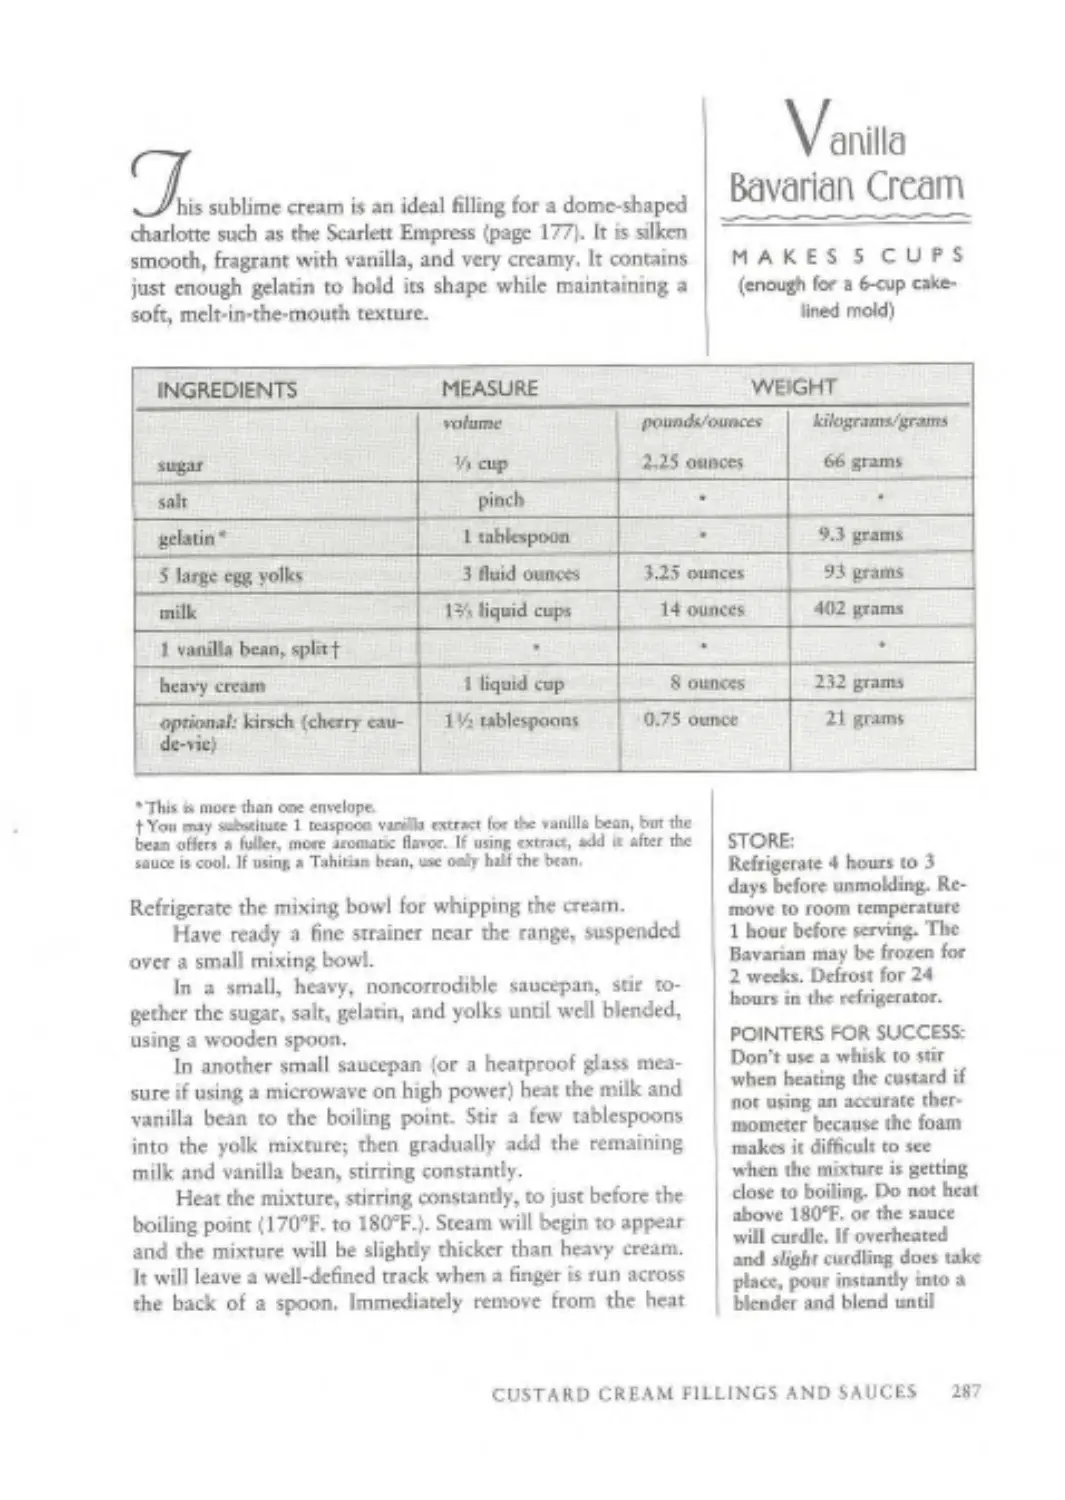
Vanilla Bavarian Cream {page 287)
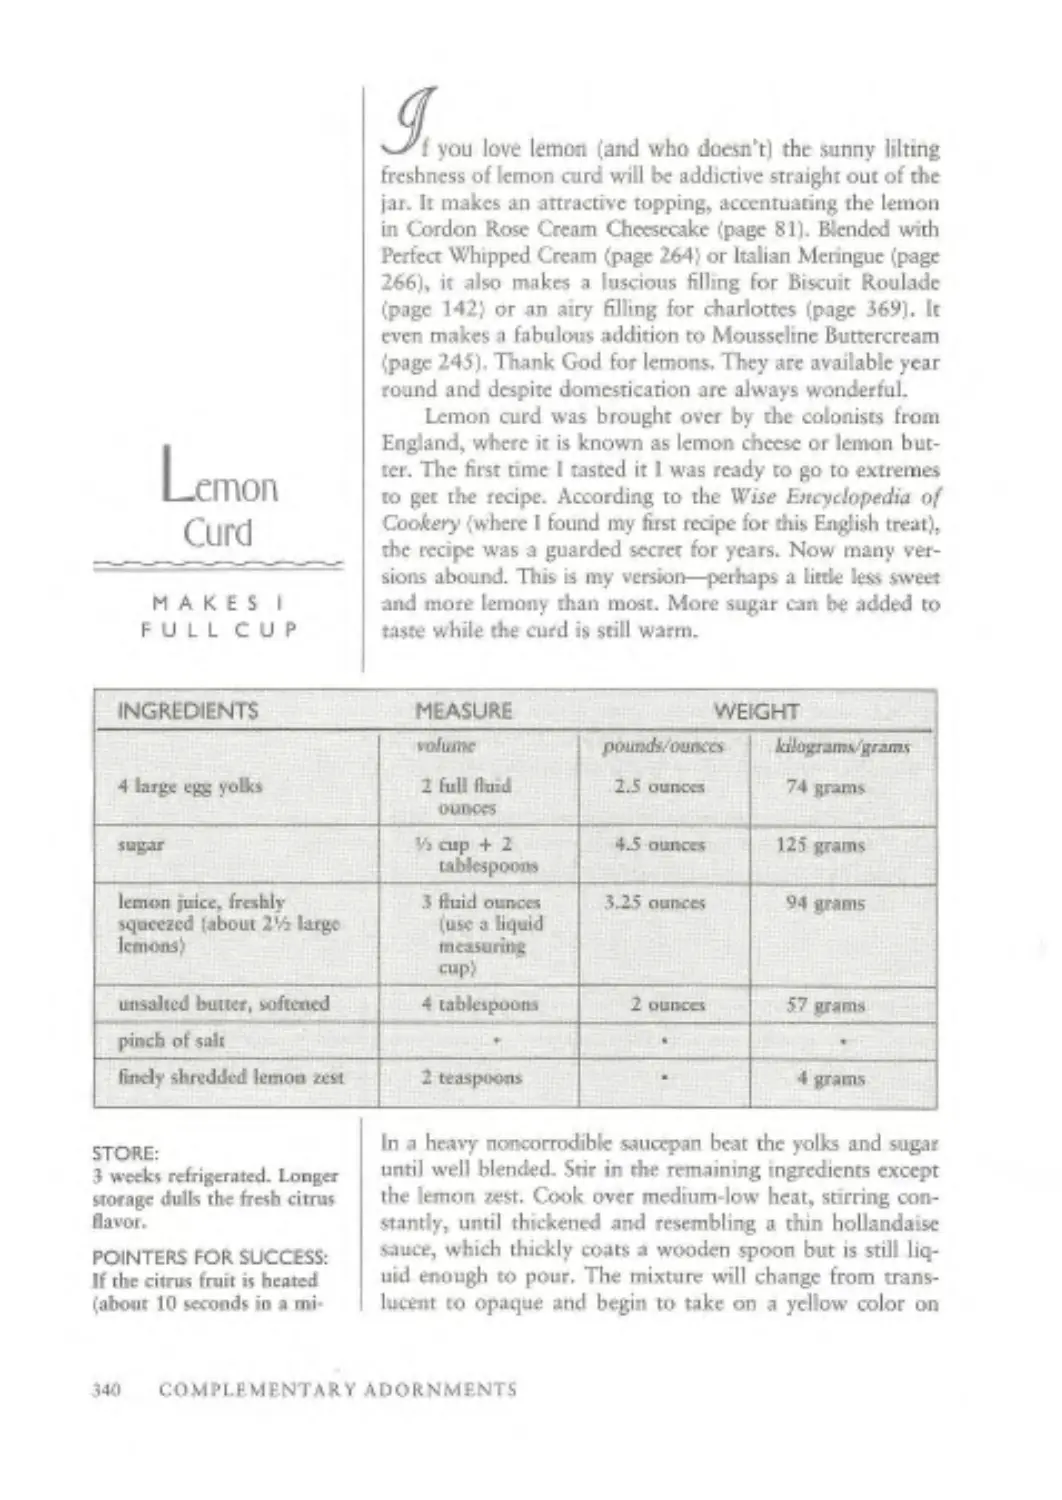
Lemon Curd Ipage 340)
Lime Curd (page 341)
Passion Curd (page 342)
Orange Curd (page 342)
RECIPES USING ALL EGG WHITES
White Spice Pound Сакс (page 30)
White Velvet Butter Cake (page 46)
White Chocolate Whisper
Cake
Pumpkin-Walnut King
Zucchini Cupcakes
White Ginoise
Classic Egg White Chocolate
Buttercream
Mousseline Buttercream
(and variations]
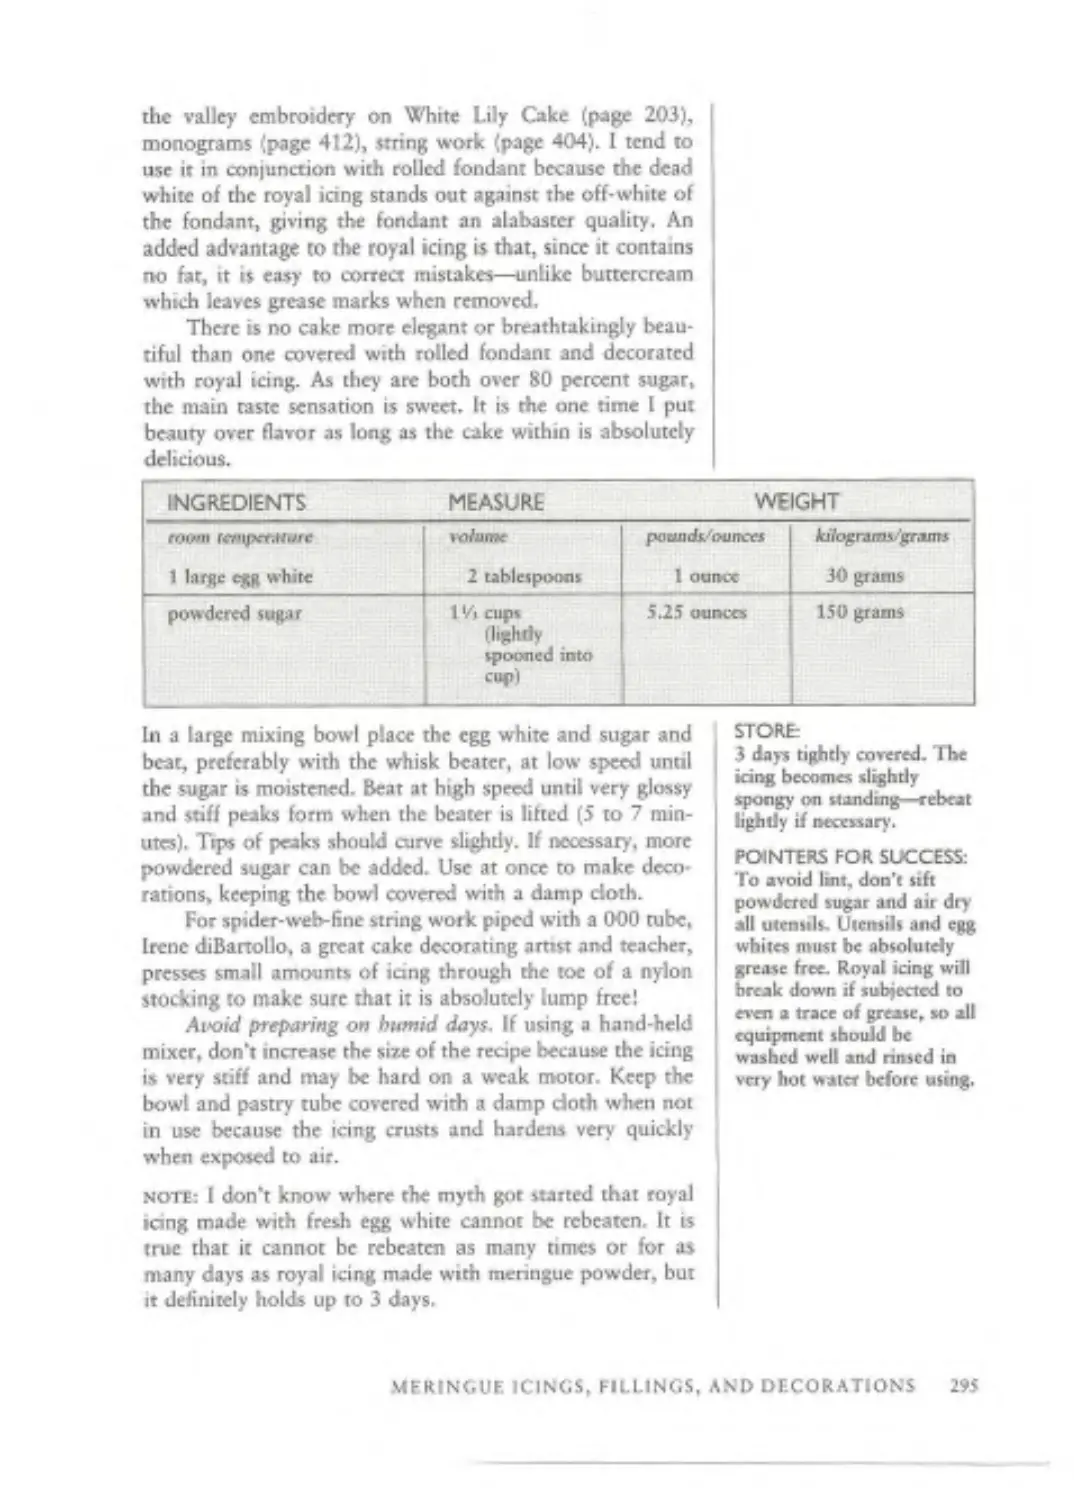
Royal Icing
Crisp French Meringue
Cocoa Menngue
Chocolate-Spangled
Meringue
Pine Needle Menngue
Light Italian Meringue
Chocolate Italian
Meringue
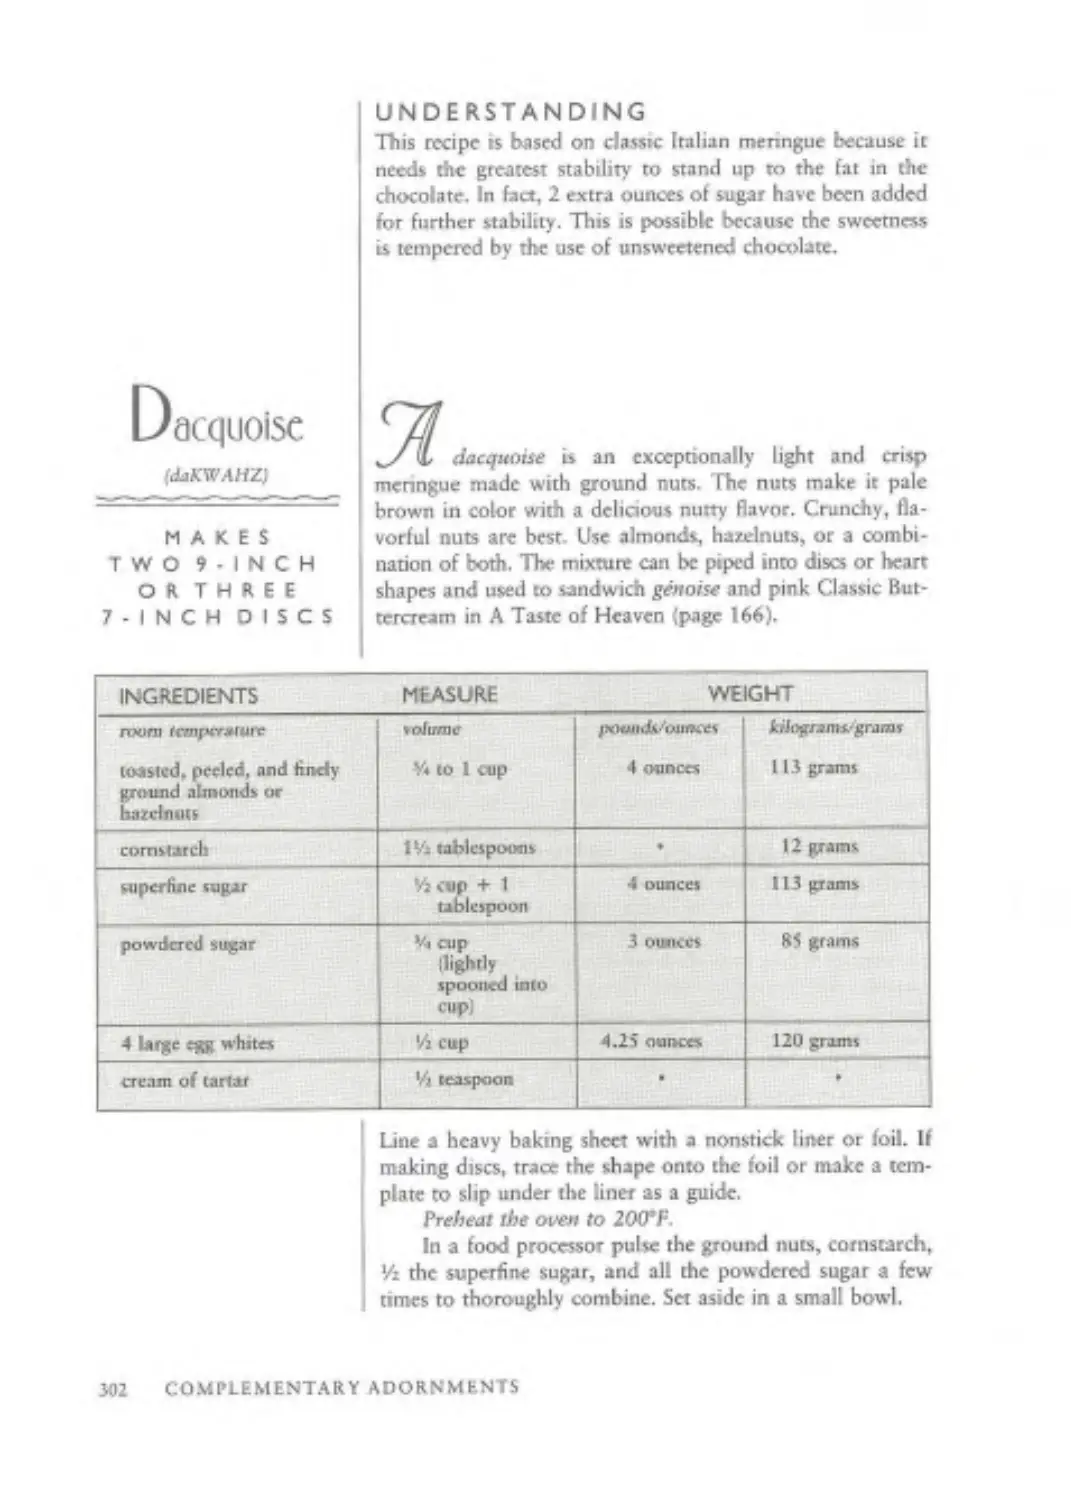
Dacquotse
Chocolate Dacquoise
(page 50)
(page 71)
(page 73)
(page 127)
(page 236)
(page 244)
(page 294)
(page 296)
(page 298]
(page 298)
I page 298)
(PW 298)
(page 300)
(page 302)
(page 303)
RECIPES WITH NO
CHOLESTEROL
AND LOW
SATURATED FAT
Pumpkin-Walnut Ring
(made with egg whites) [page 71)
Zucchini Cupcakes {made
with egg whites) i pagc 73)
Chocolate Lover’s Angel
Food Cake 'page 160)
Royal lang (page 294)
SPECIA I. CATEGORIES II
Cnsp French
Meringue
Pine Needle Meringue
Cocoa Meringue
Chocolate-Spangled
Meringue
Light Italian
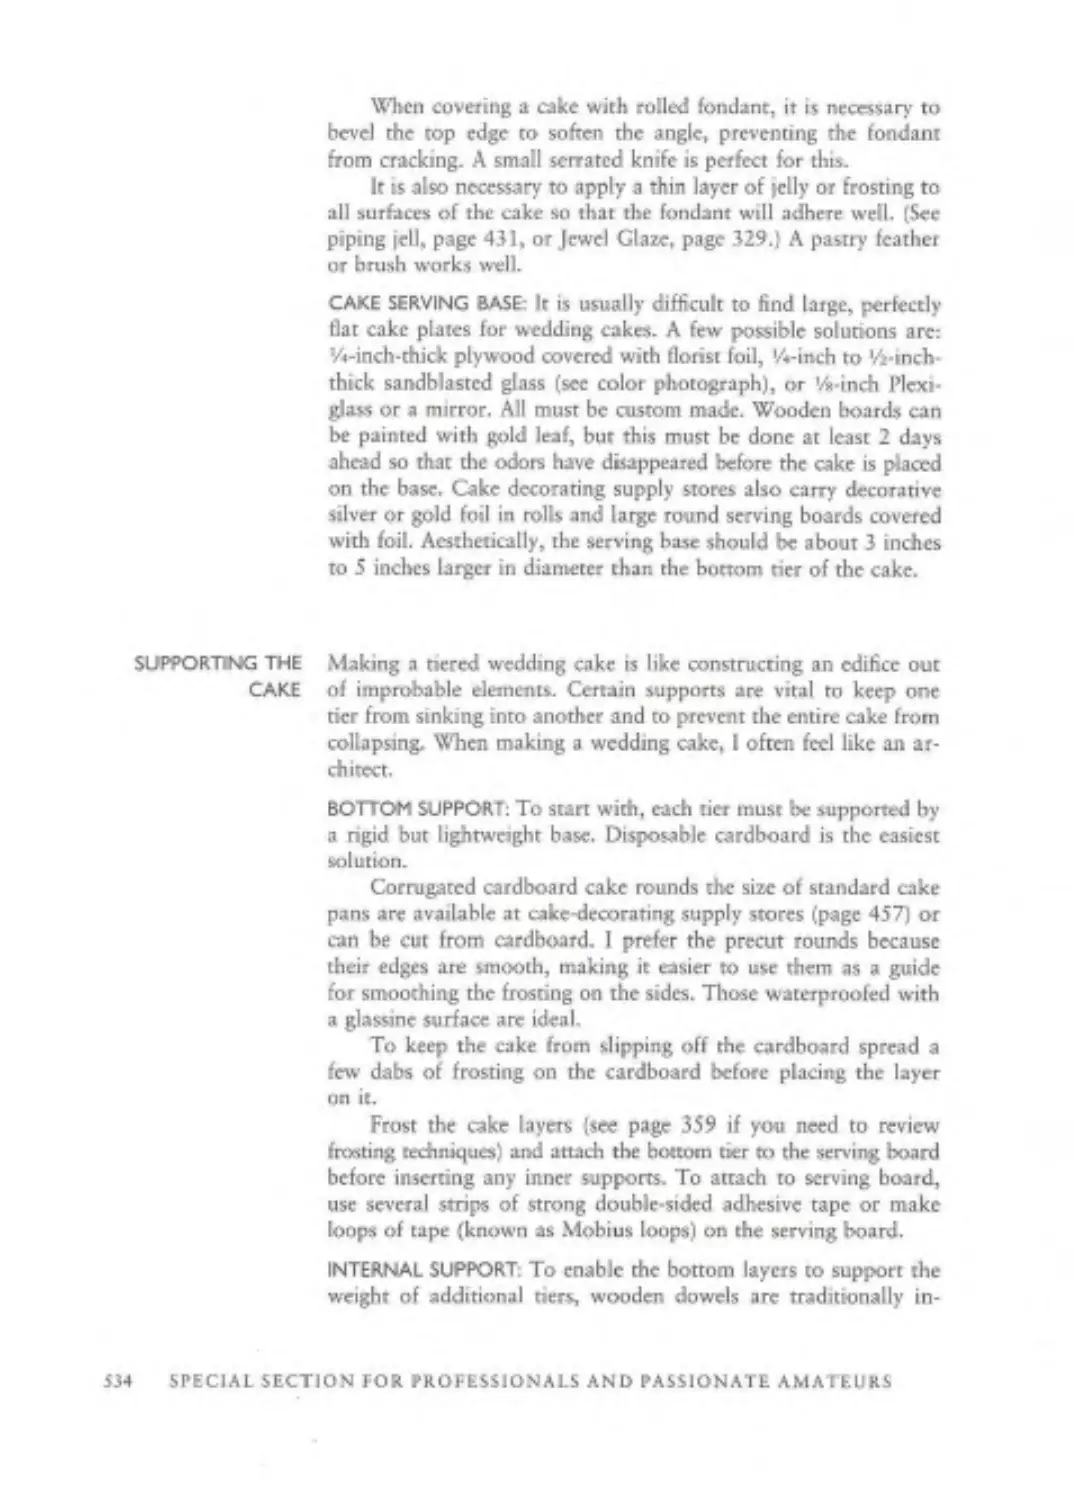
Meringue
Chocolate Italian Menngue
Dacquoise
Chocolate Dacquoise
Food Processor Poured
Fondant
Classic Rolled Fondant
Chocolate Rolled Fondant
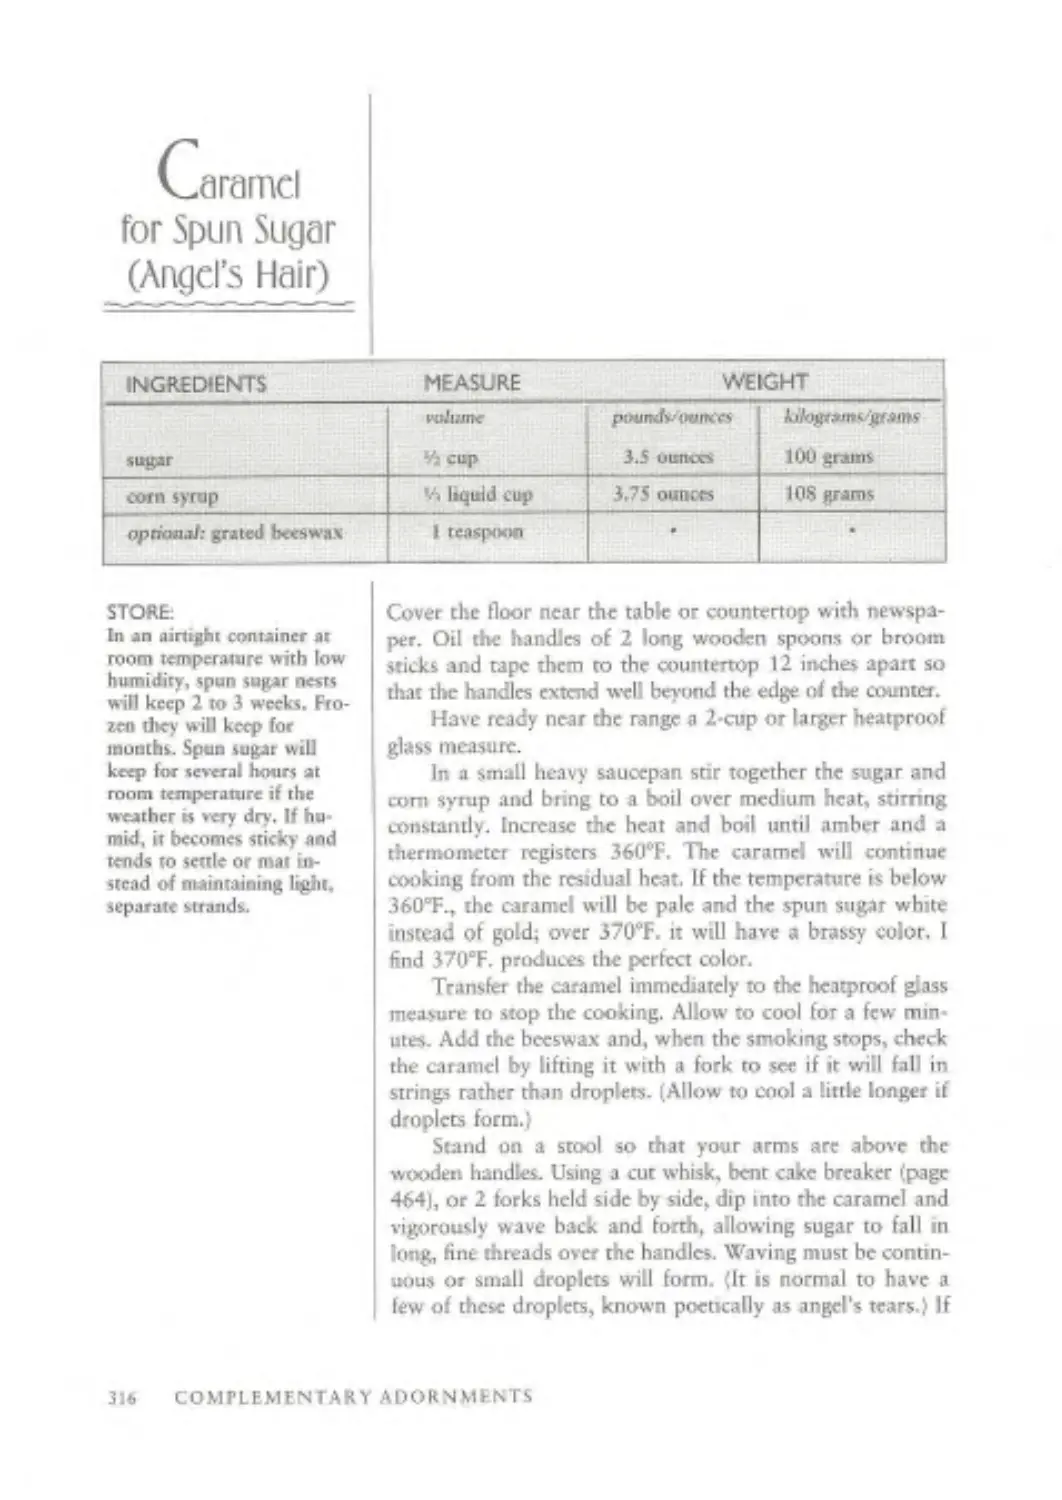
Caramel
Chocolate Praline
Spun Sugar
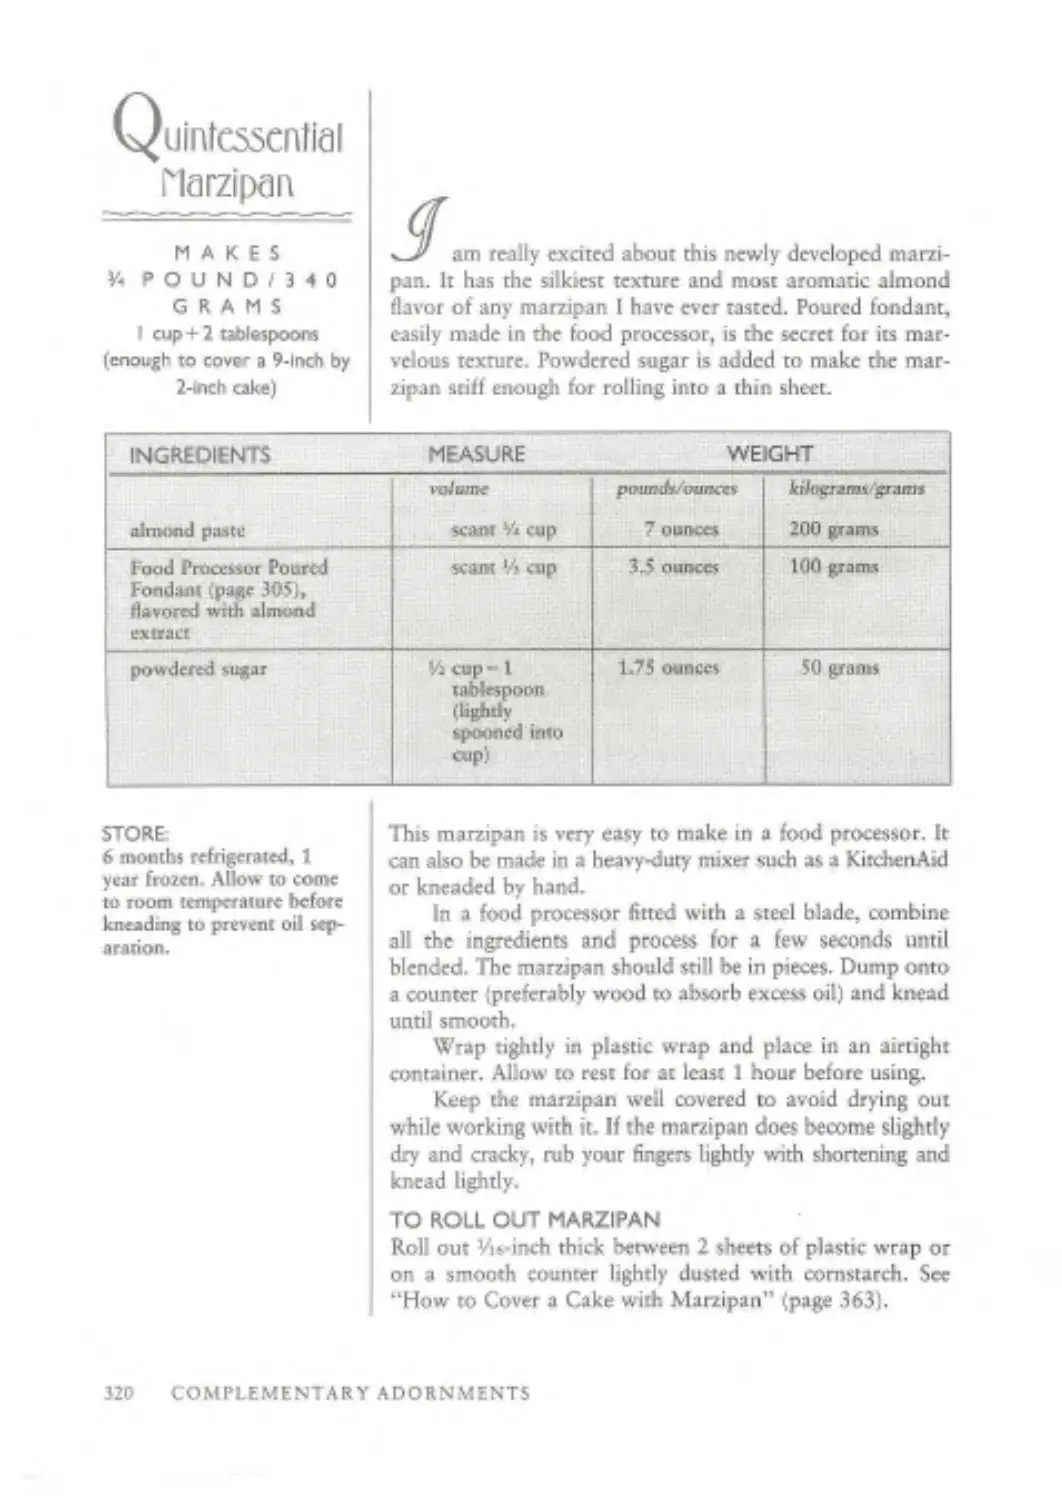
Quintessential Marzipan
Orange Marzipan
Green lea Marzipan
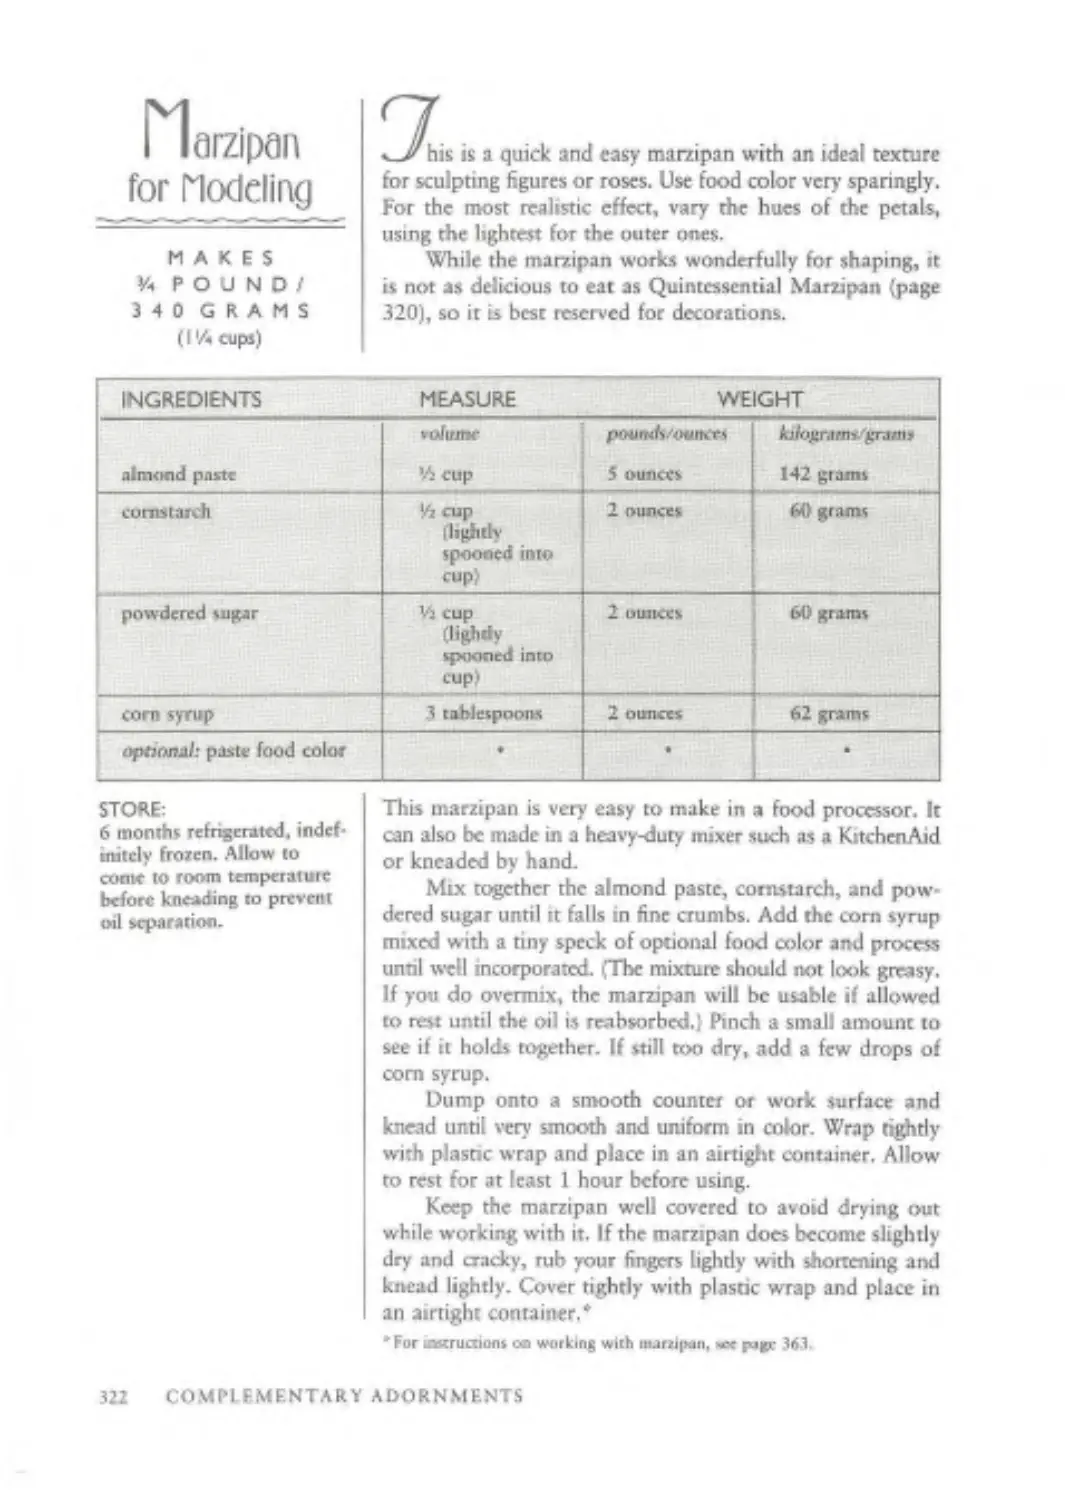
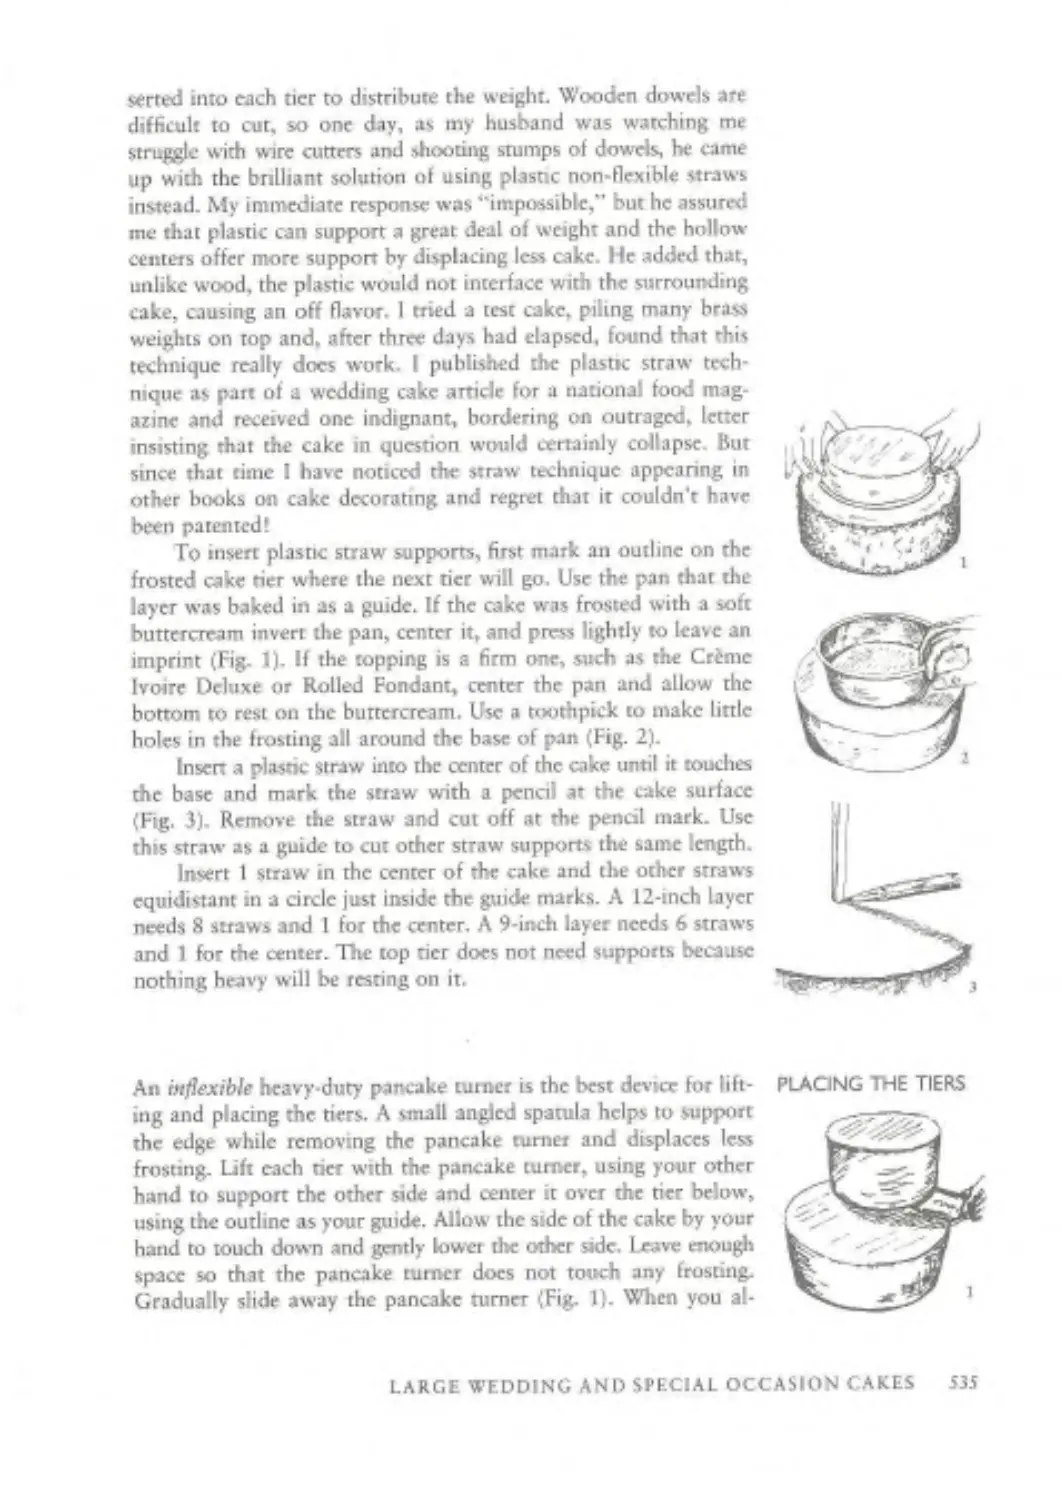
Marzipan for Modeling
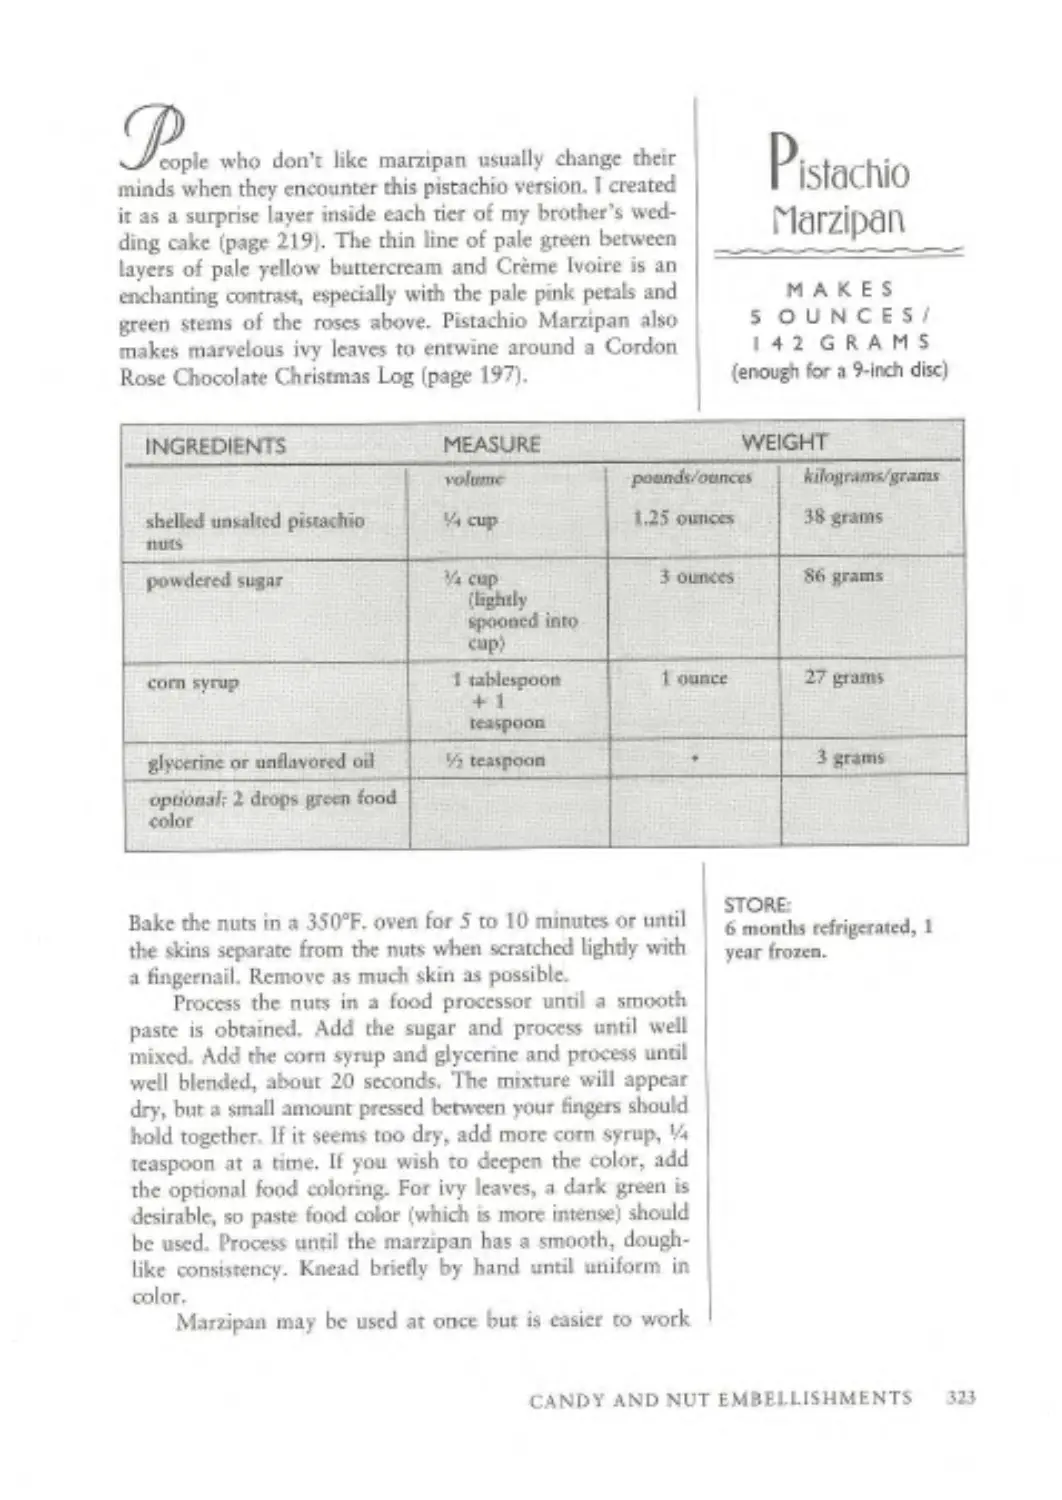
Pistachio Marzipan
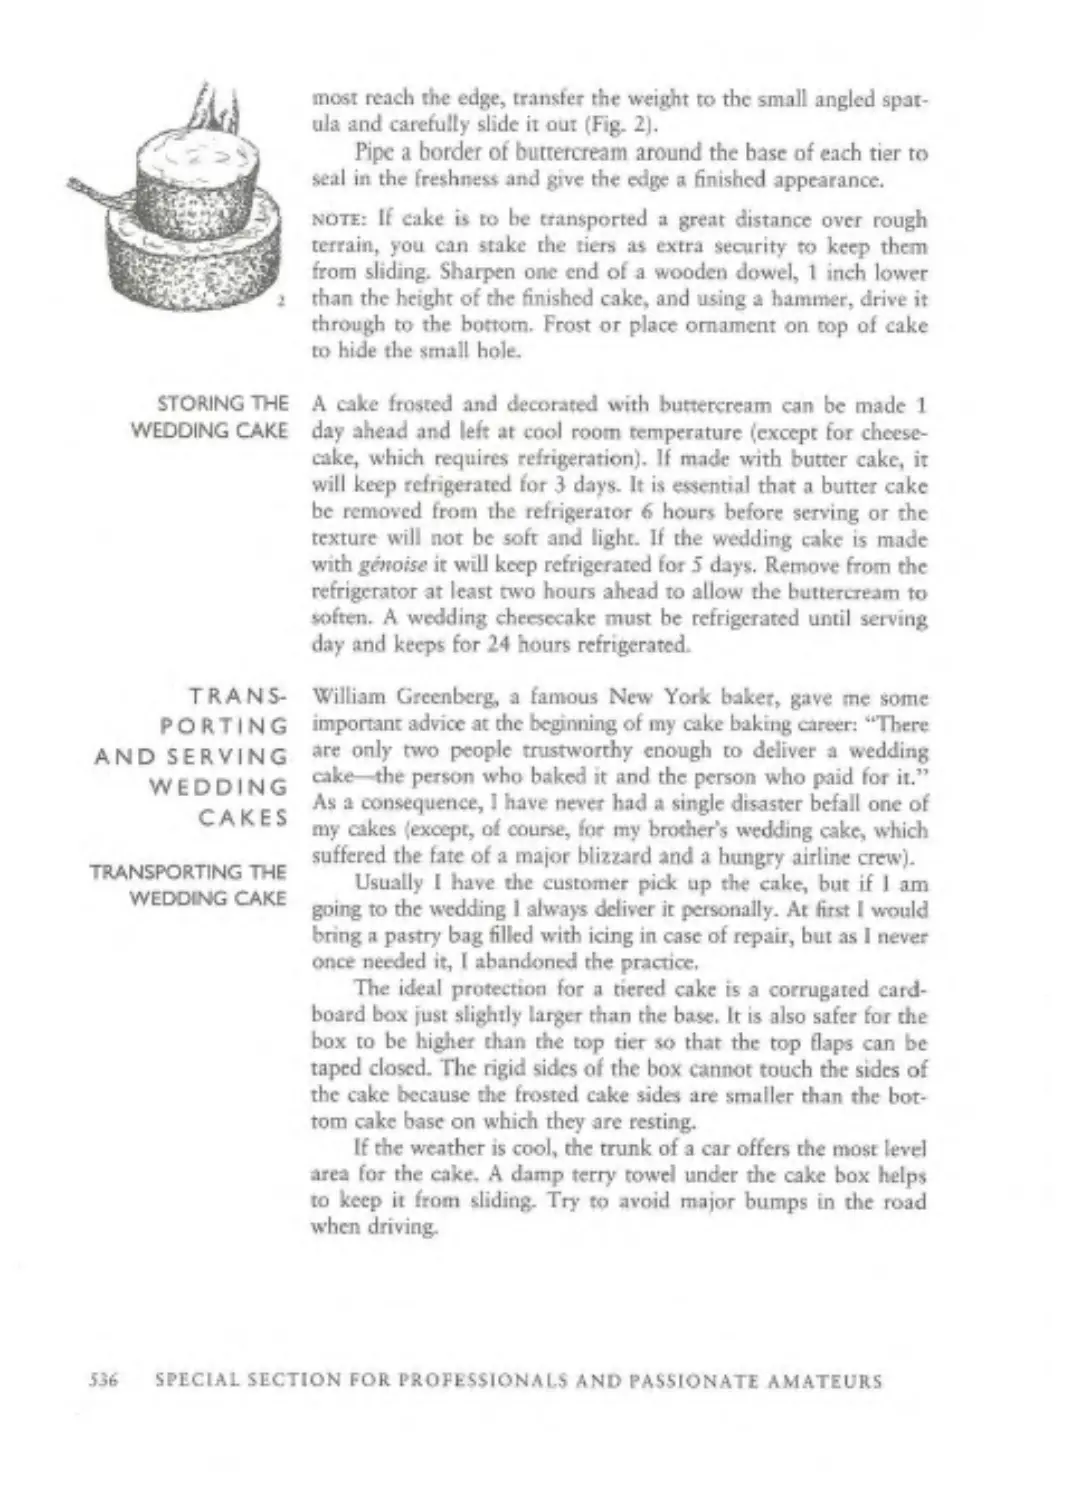
Chopped Nuts
Jewel Glaze
Cordon Rose Raspberry
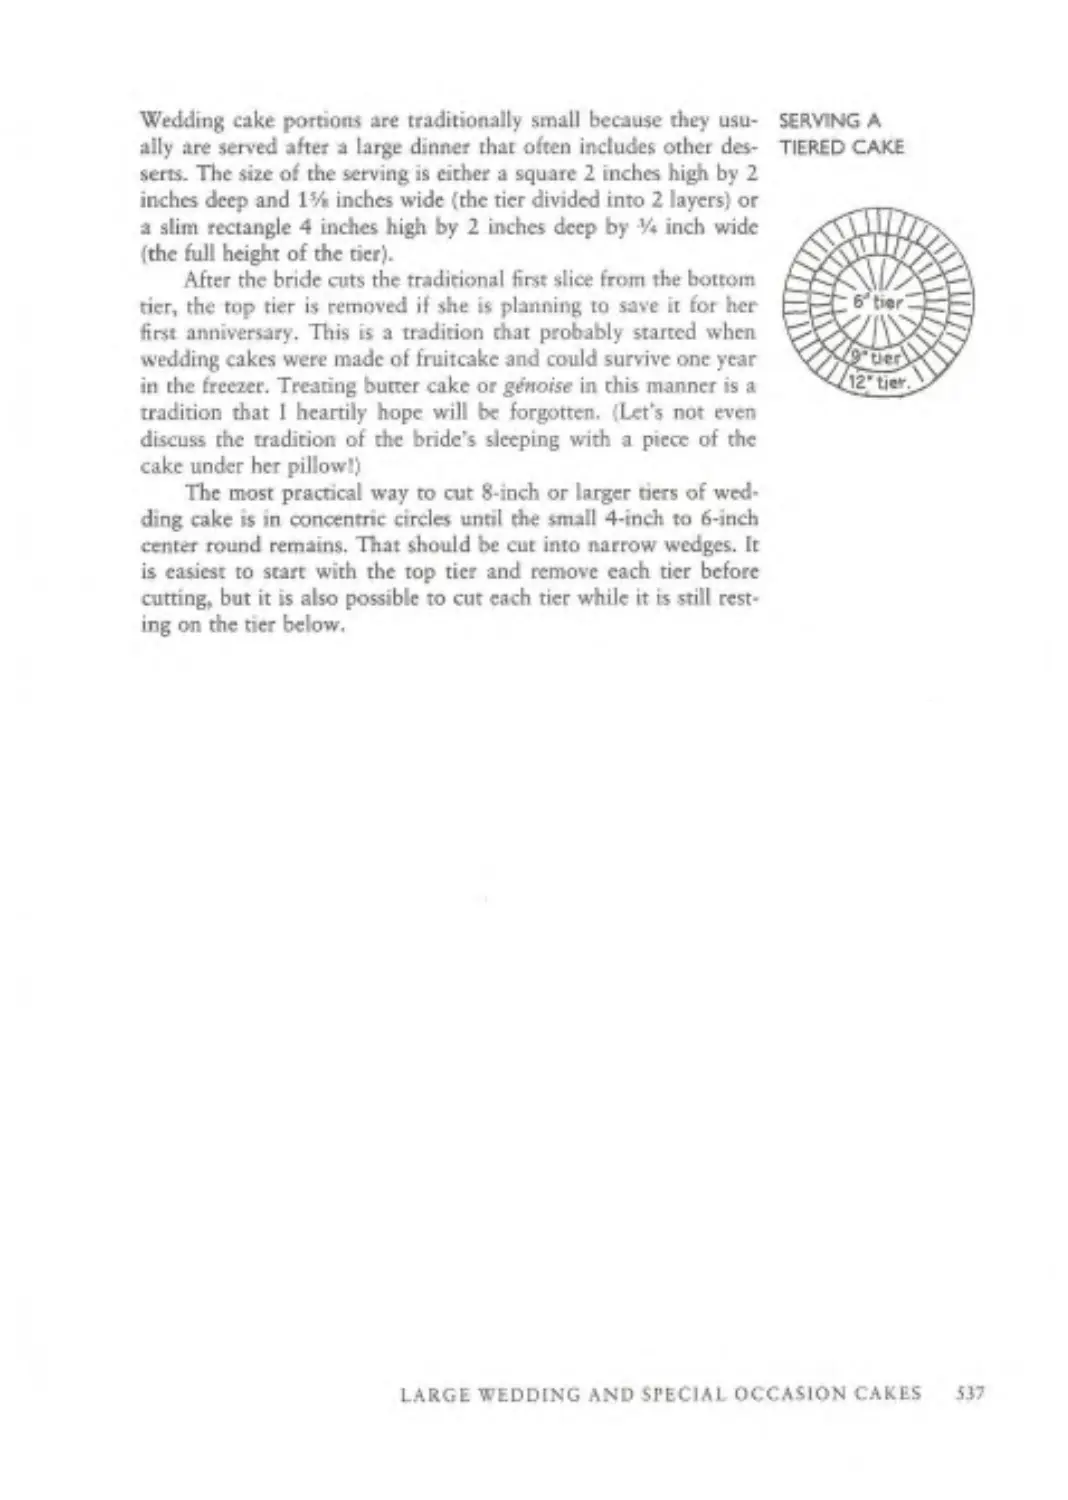
Conserve
Cordon Rose Strawberry
Conserve
Apricot Puree
Peach Puree
Raspberry Puree and Sauce
Strawberry Puree and Sauce
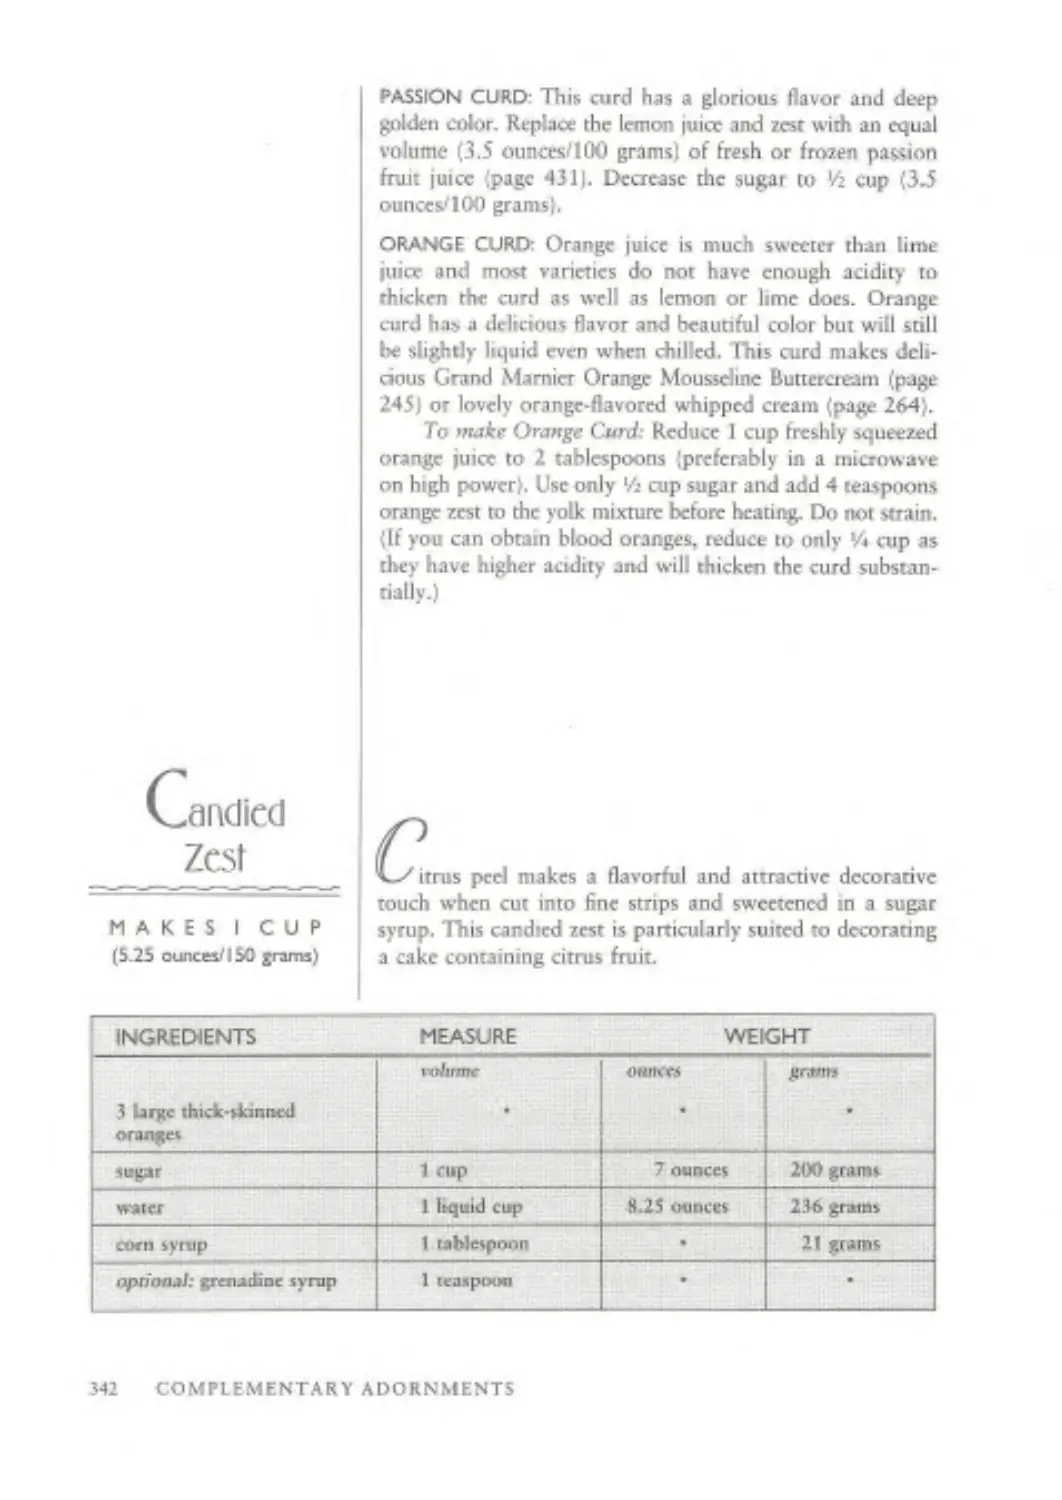
Candied Zest
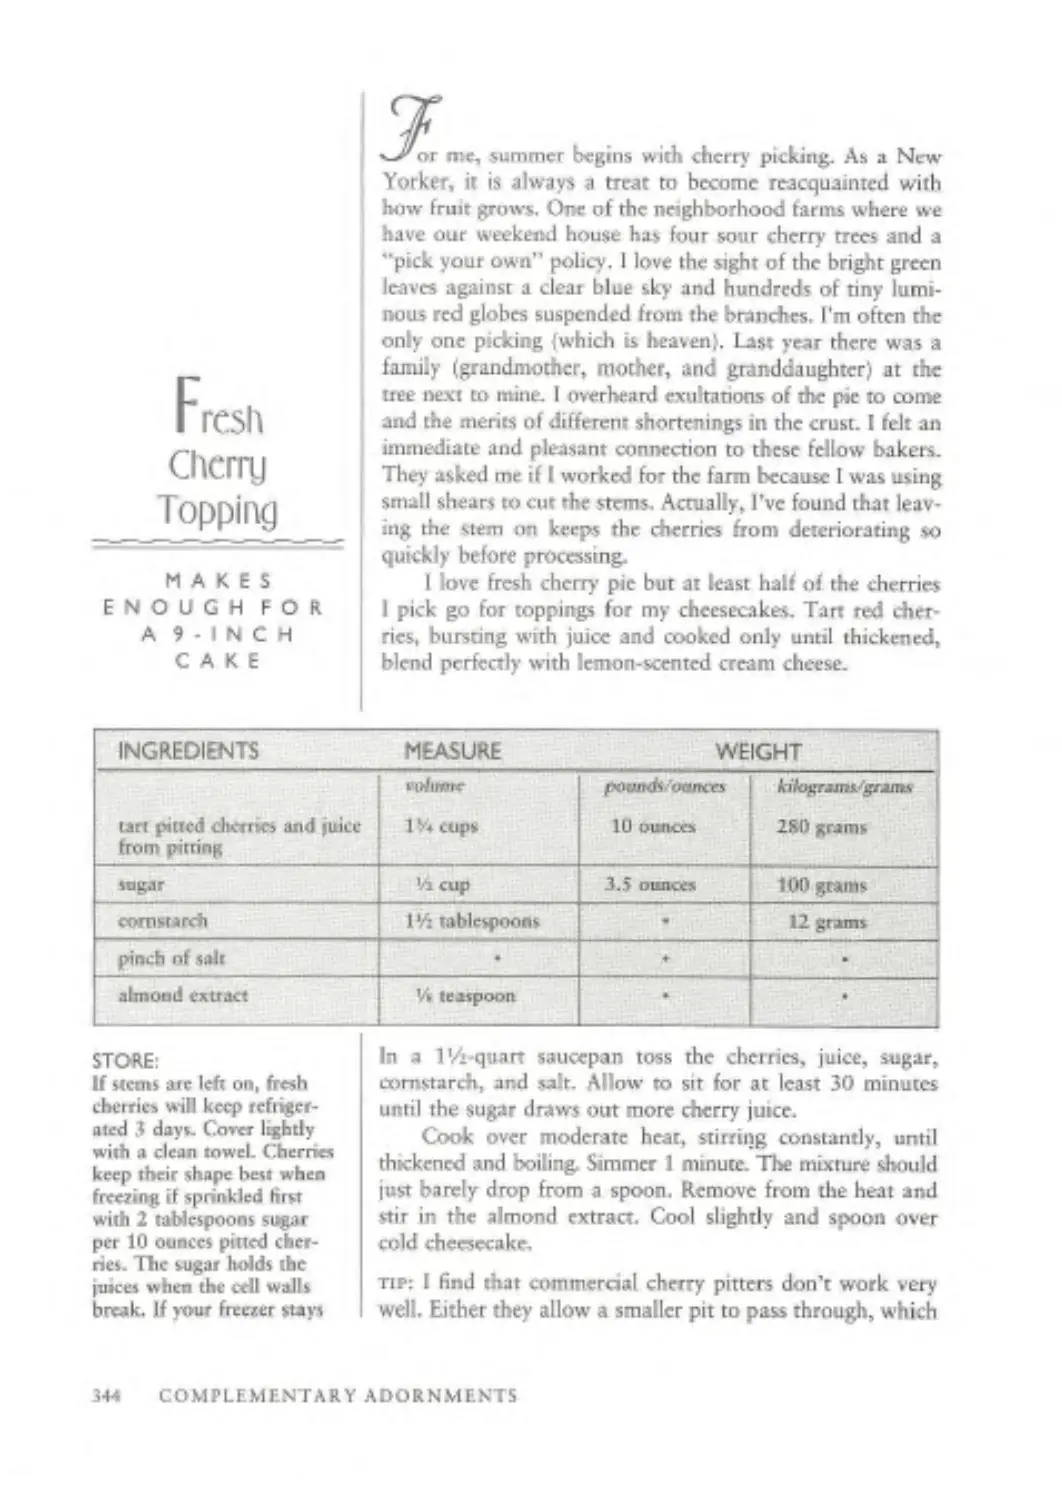
Fresh Cherry Topping
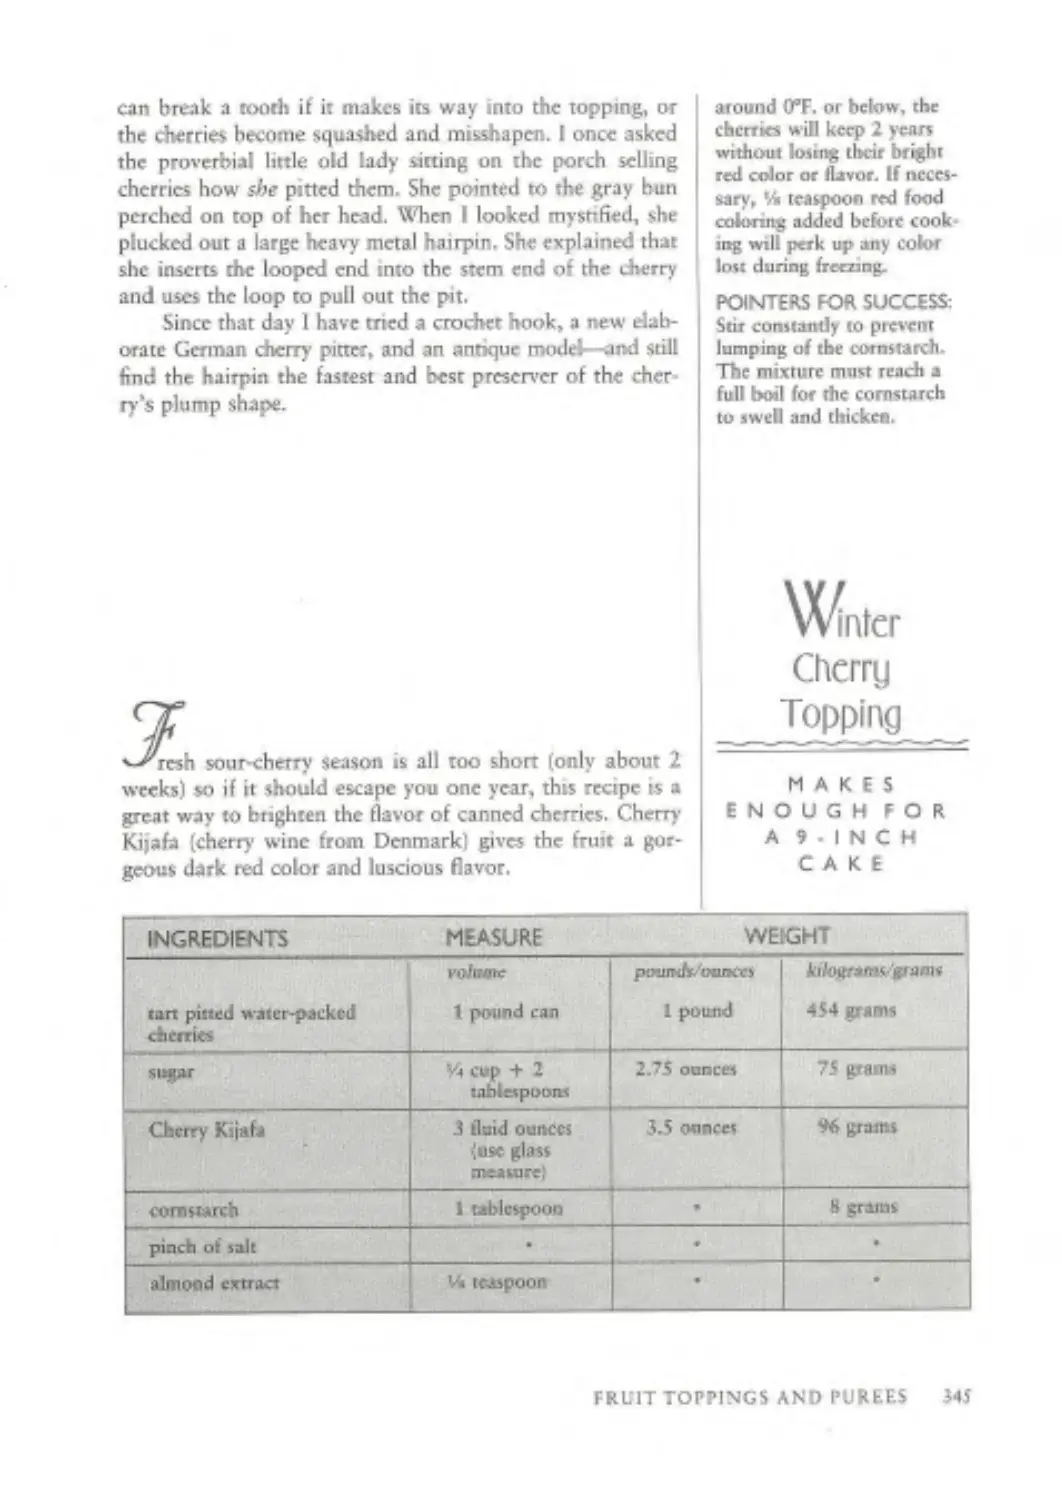
Winter Cherry Topping
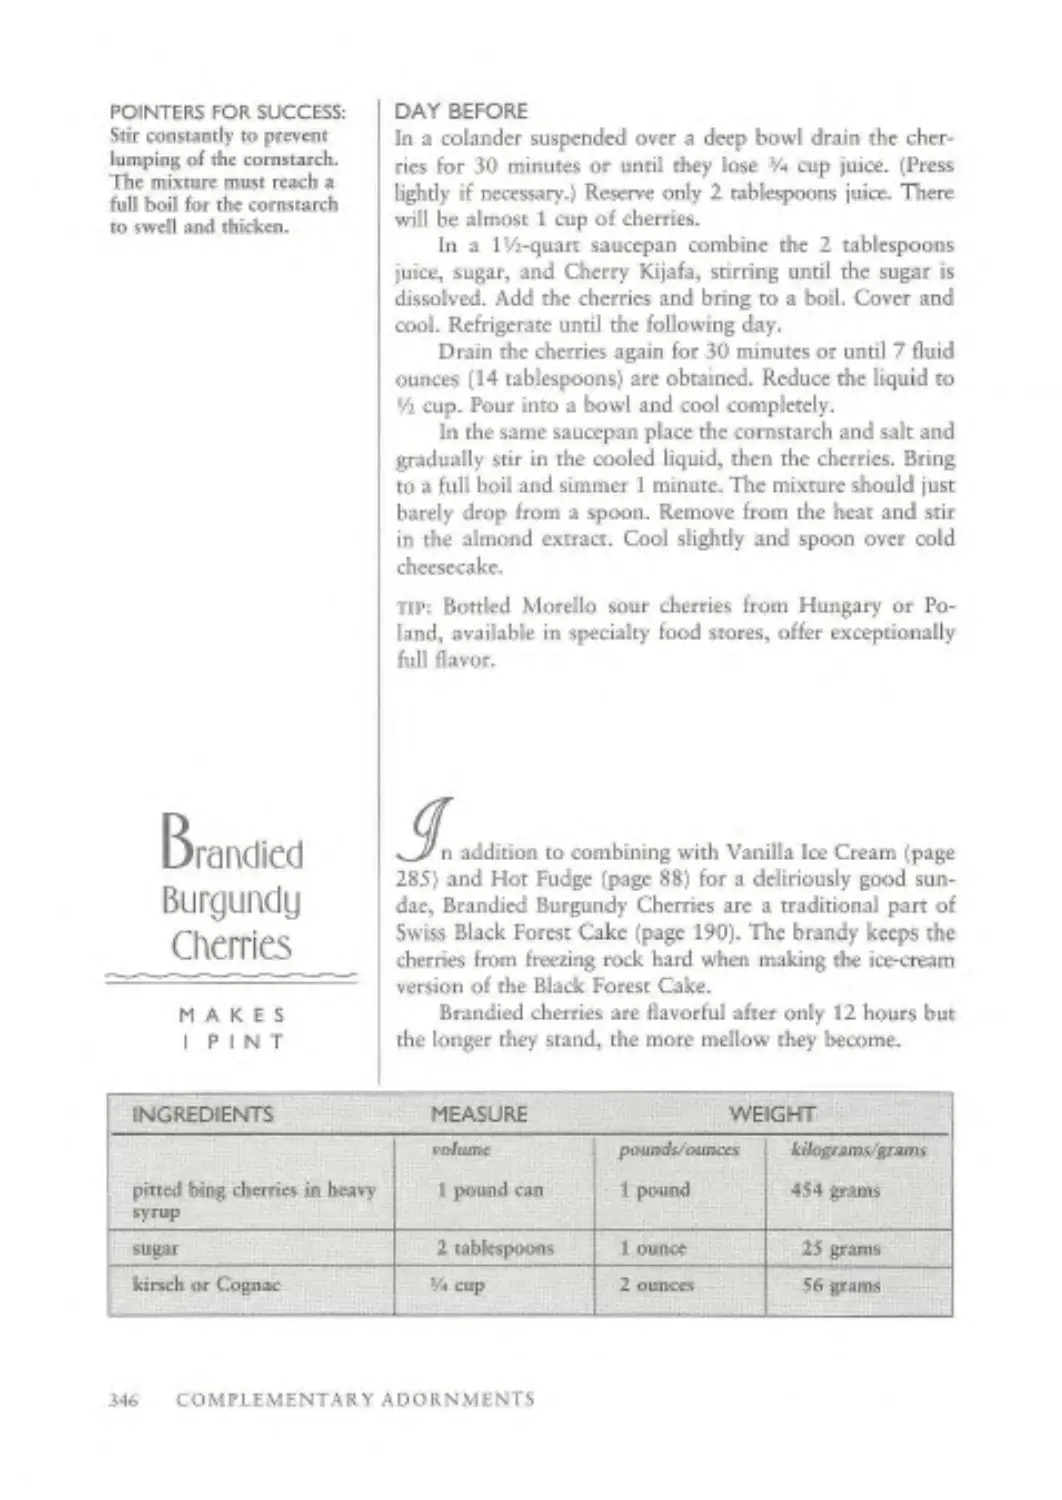
Branched Burgundy Cherries
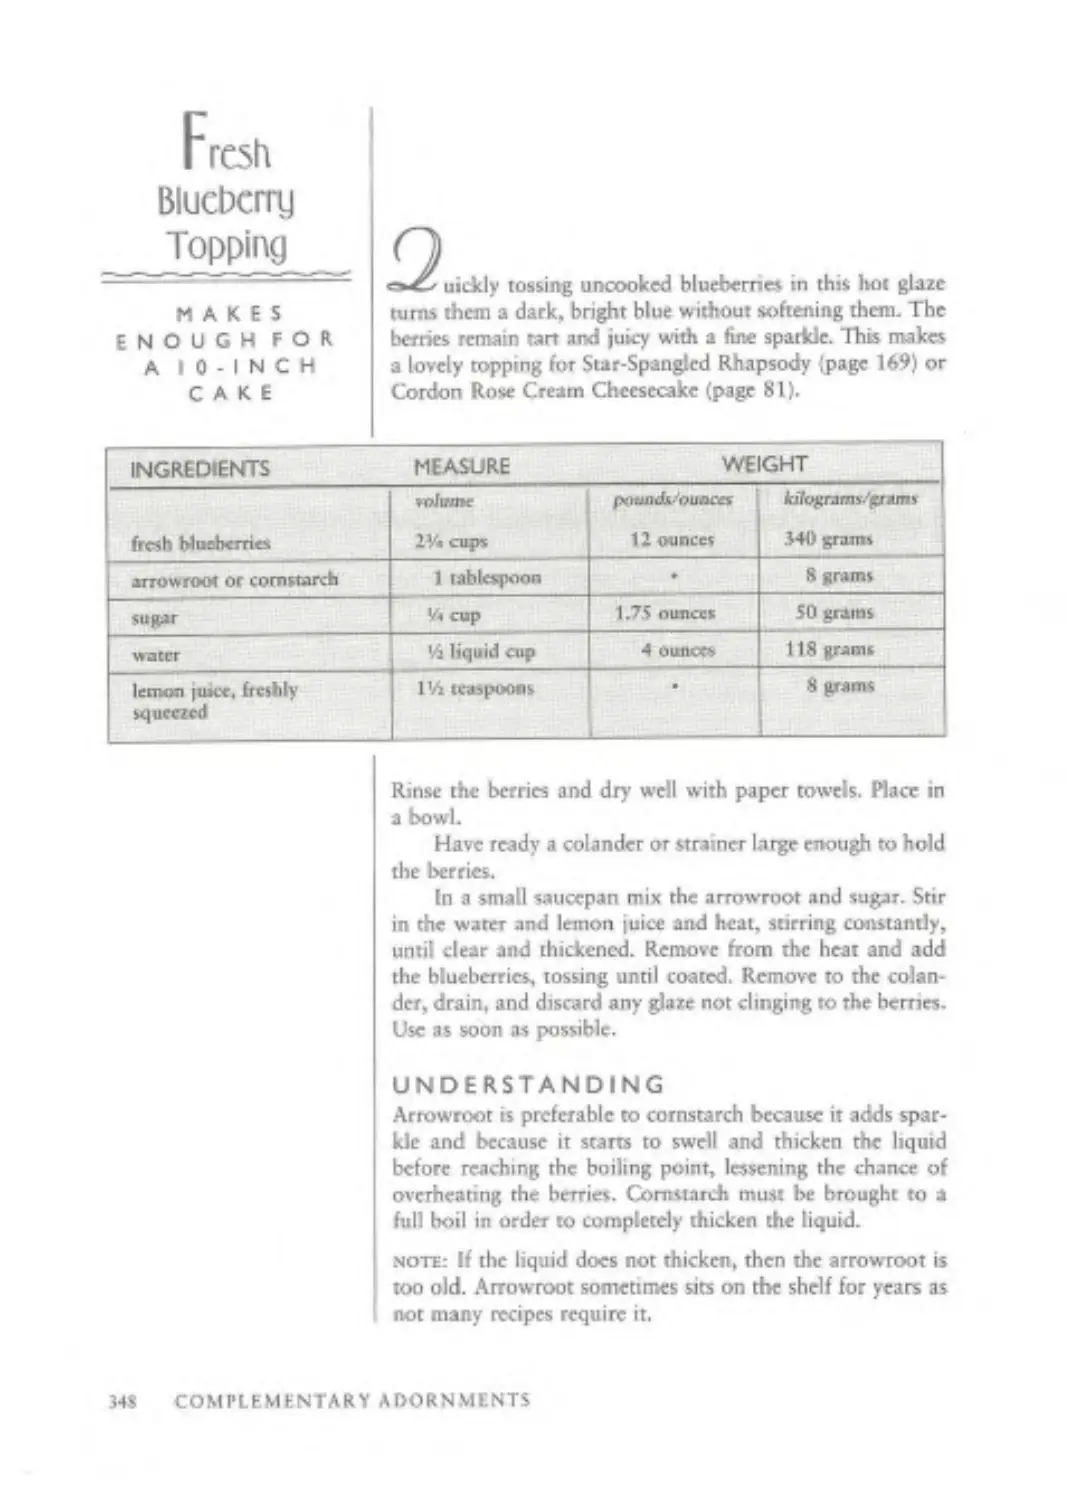
Fresh Blueberry Topping
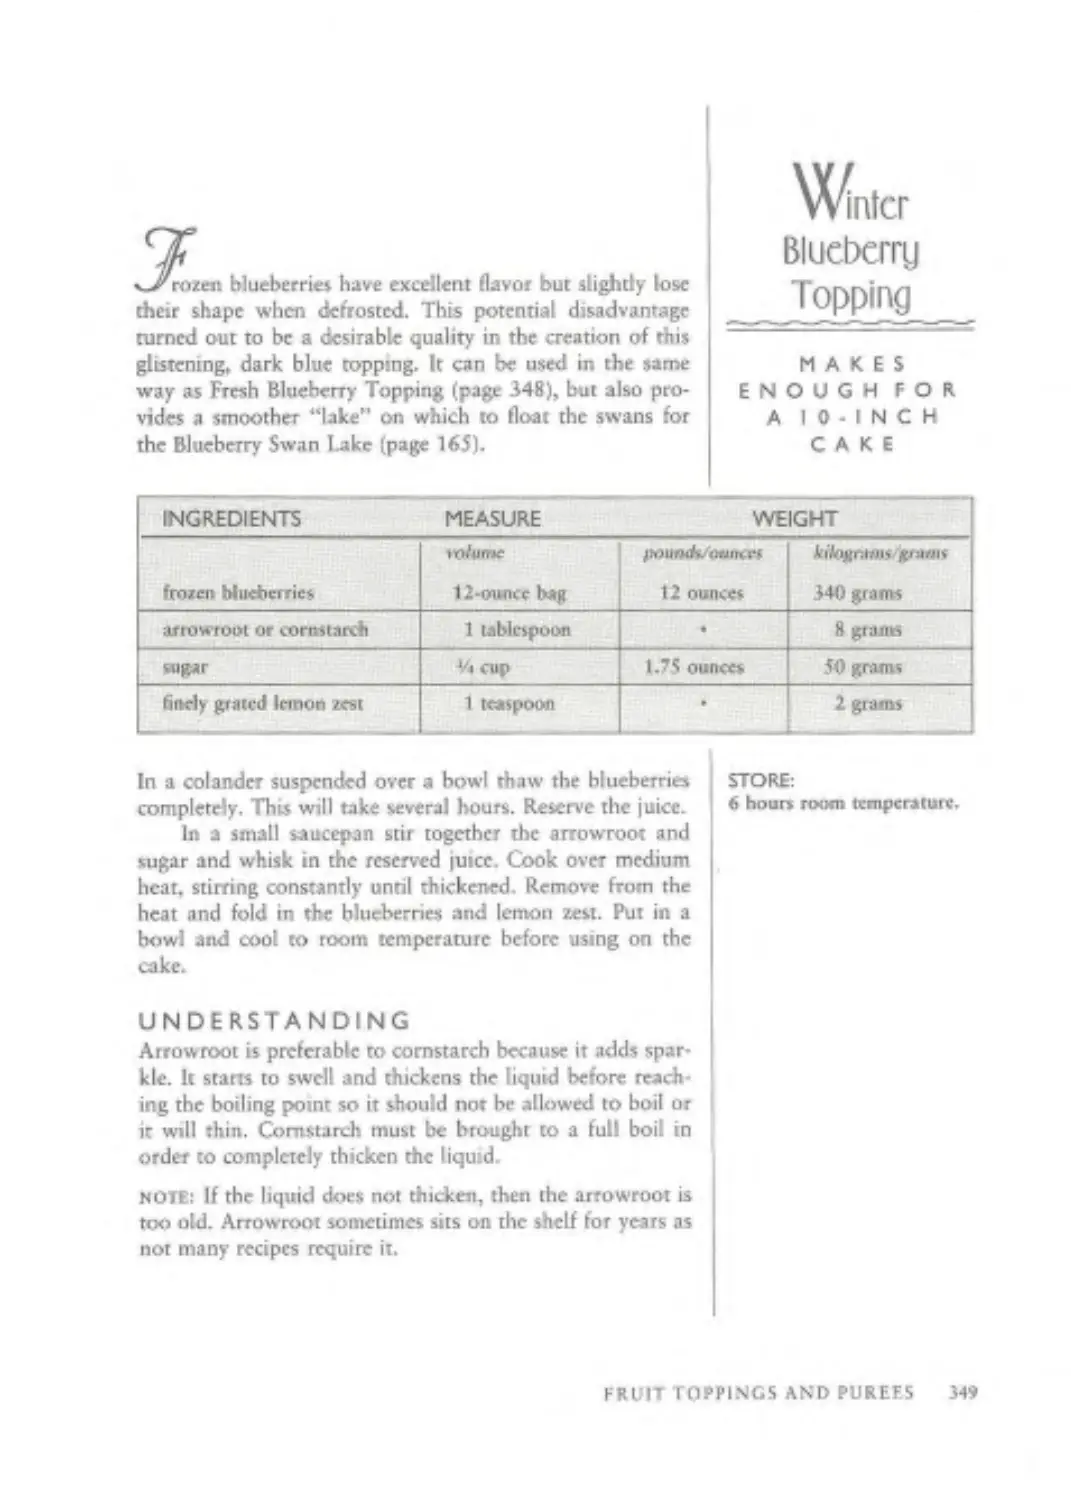
Winter Blueberry Topping
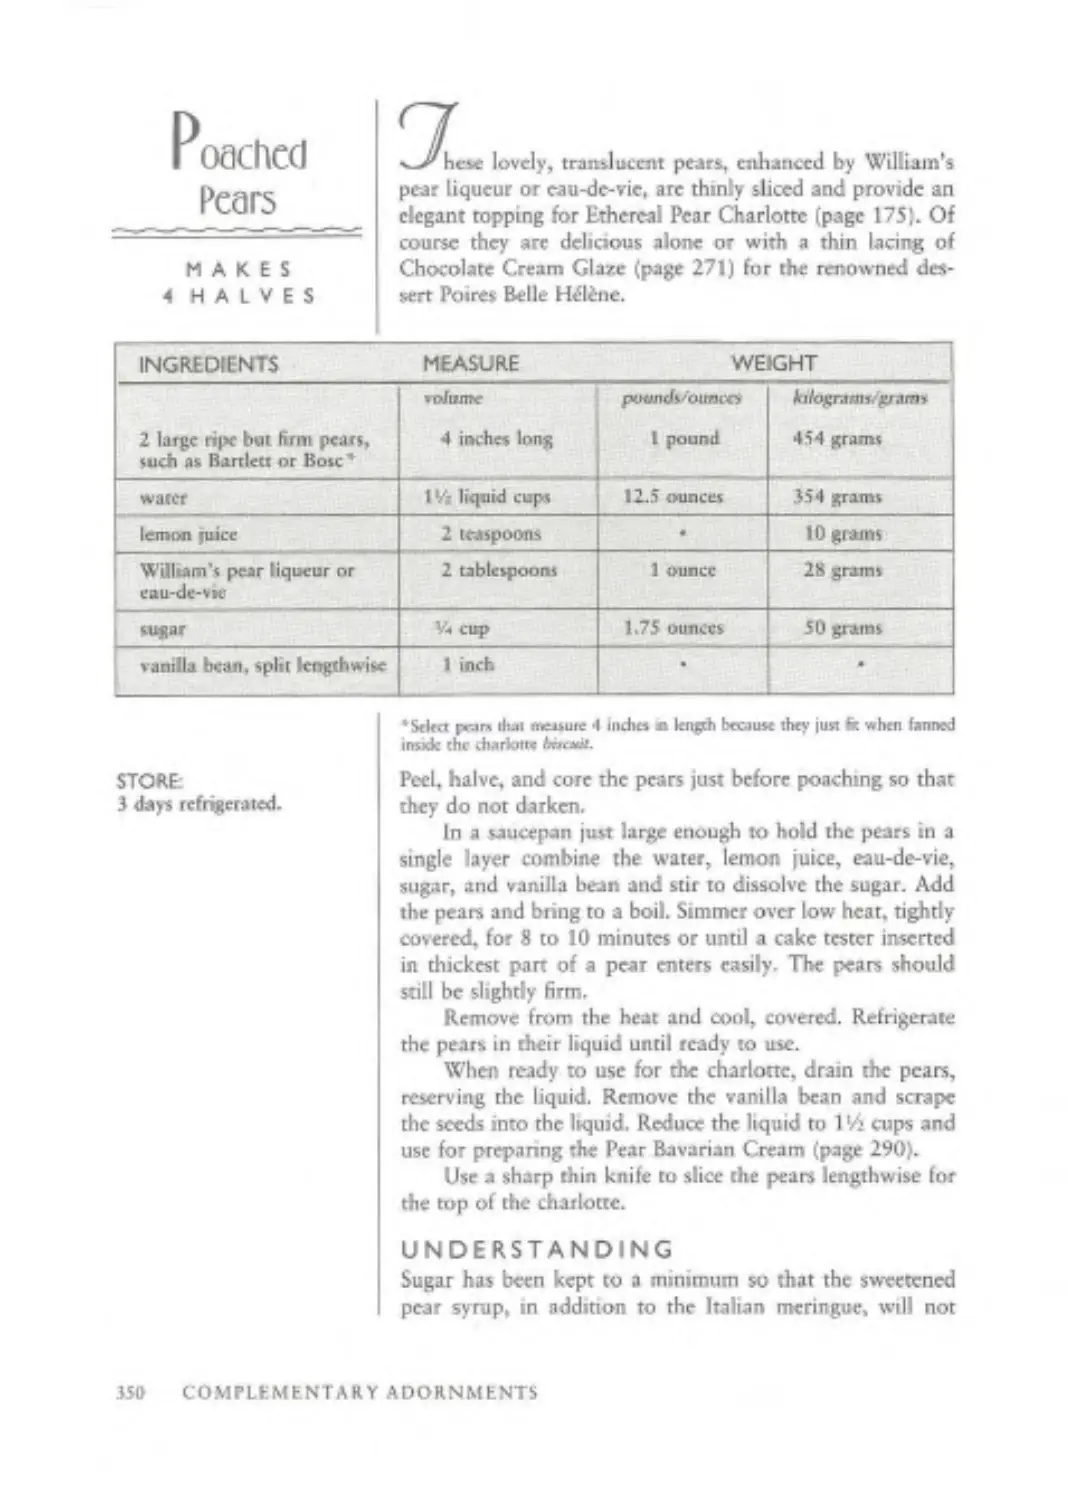
Poached Pears
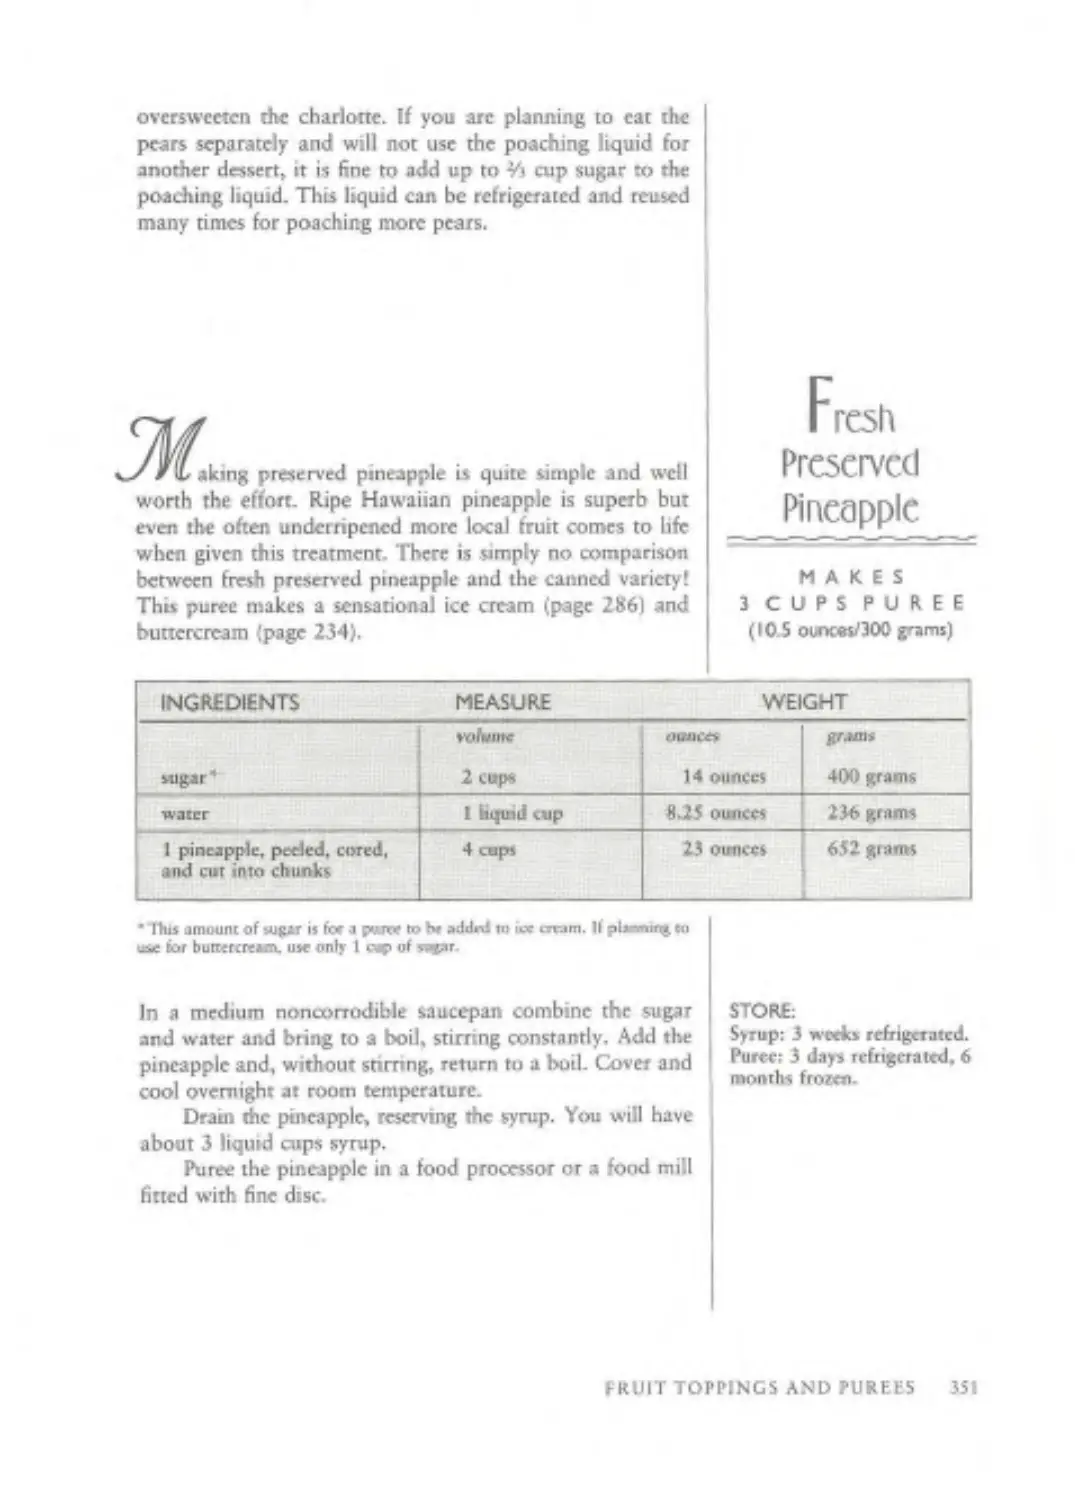
Fresh Preserved Pineapple
Pumpkin Puree
ipage 296)
(page 298)
Ipage 298)
(page 298)
(page 298)
(page 300)
(page 302)
(page 303)
(page 305)
(page 306)
(page 309)
(page 313)
(page 315)
(page 316)
(page 320)
(page 321)
(page 321)
(page 322)
(page 323)
(page 324)
(page 329)
(page 331)
(page 333)
(page 335)
(page 336)
(page 337)
(page 338)
(page 342)
(page 344)
(page 345)
(page 346}
(page 348}
(page 349)
(page 350)
(page 351)
(page 354)
RECIPES WITH LOW CHOLESTEROL AND SATURATED FAT
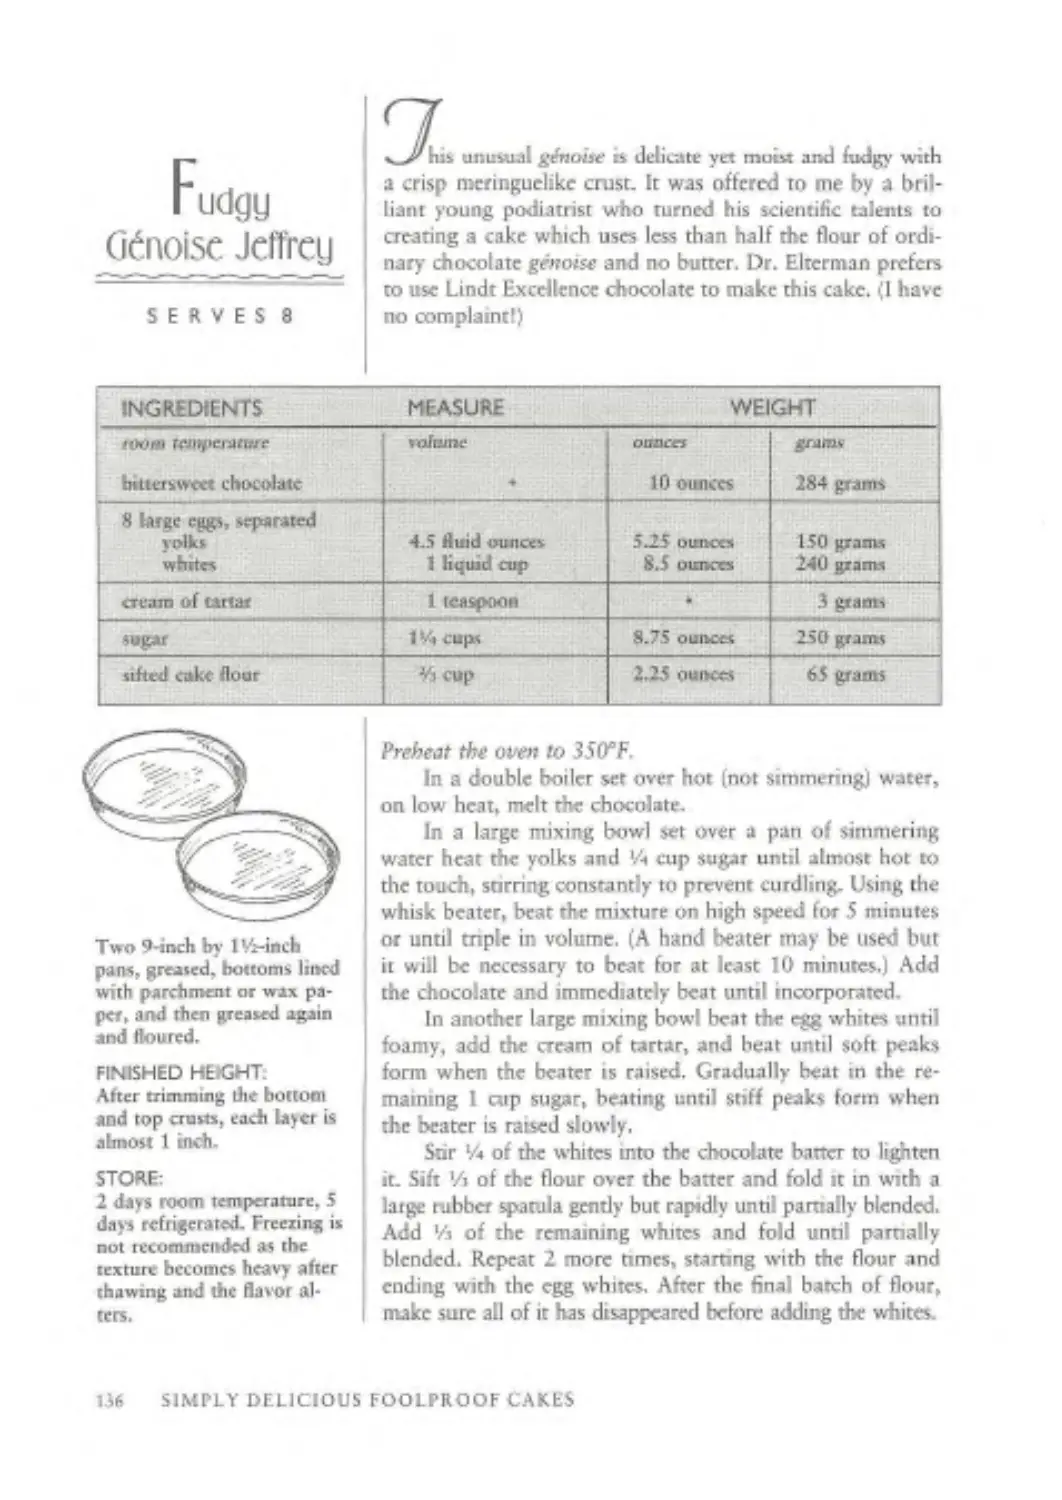
Nut-Flavored Chocolate G&ioise (page 131)
Fudgy Genoise Jeffrey Ipage 136)
Chocolate Cloud Roll (page 138)
Cocoa Souffle Roll (page 140)
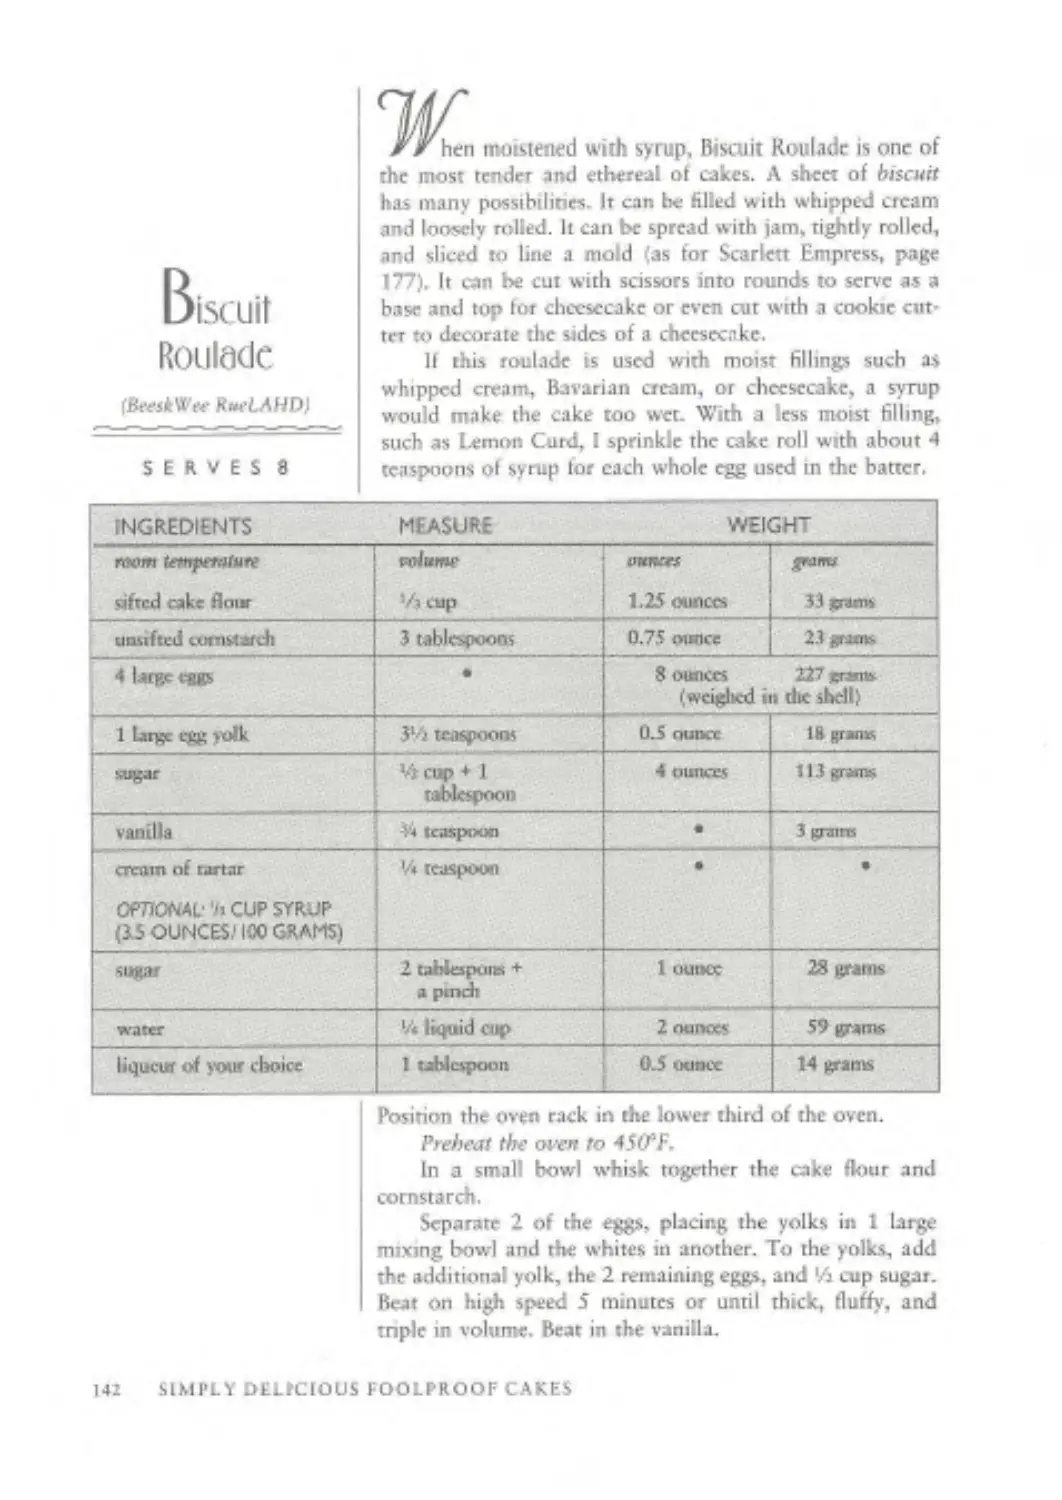
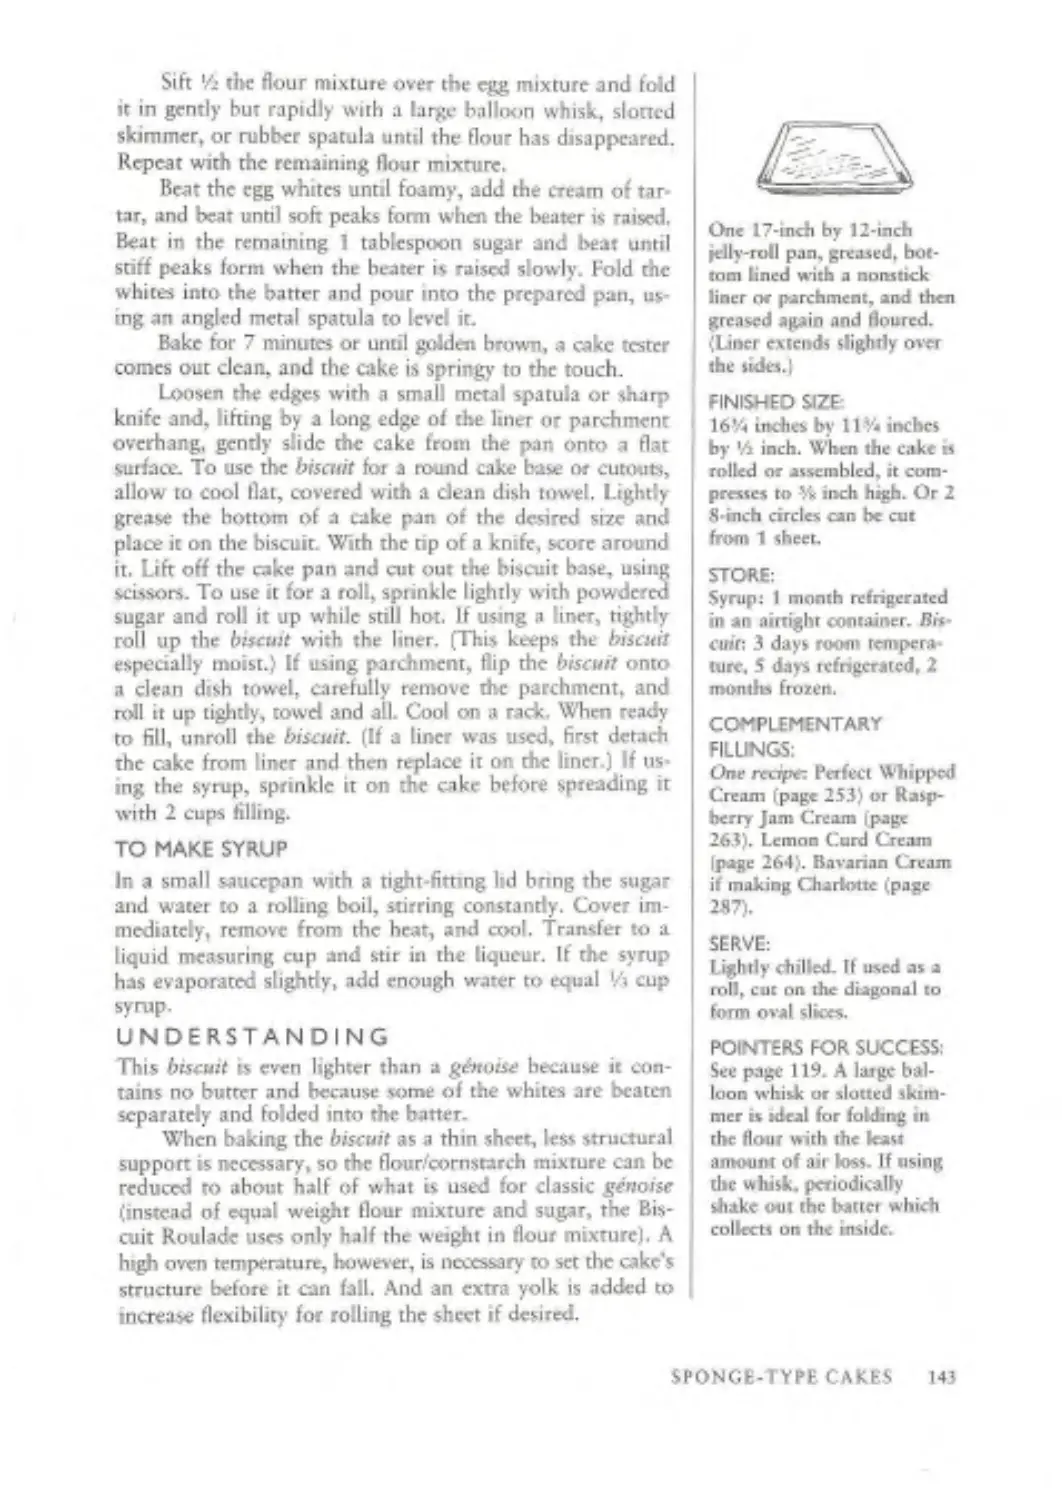
Le Biscuit Roulade (and variations) (page 142)
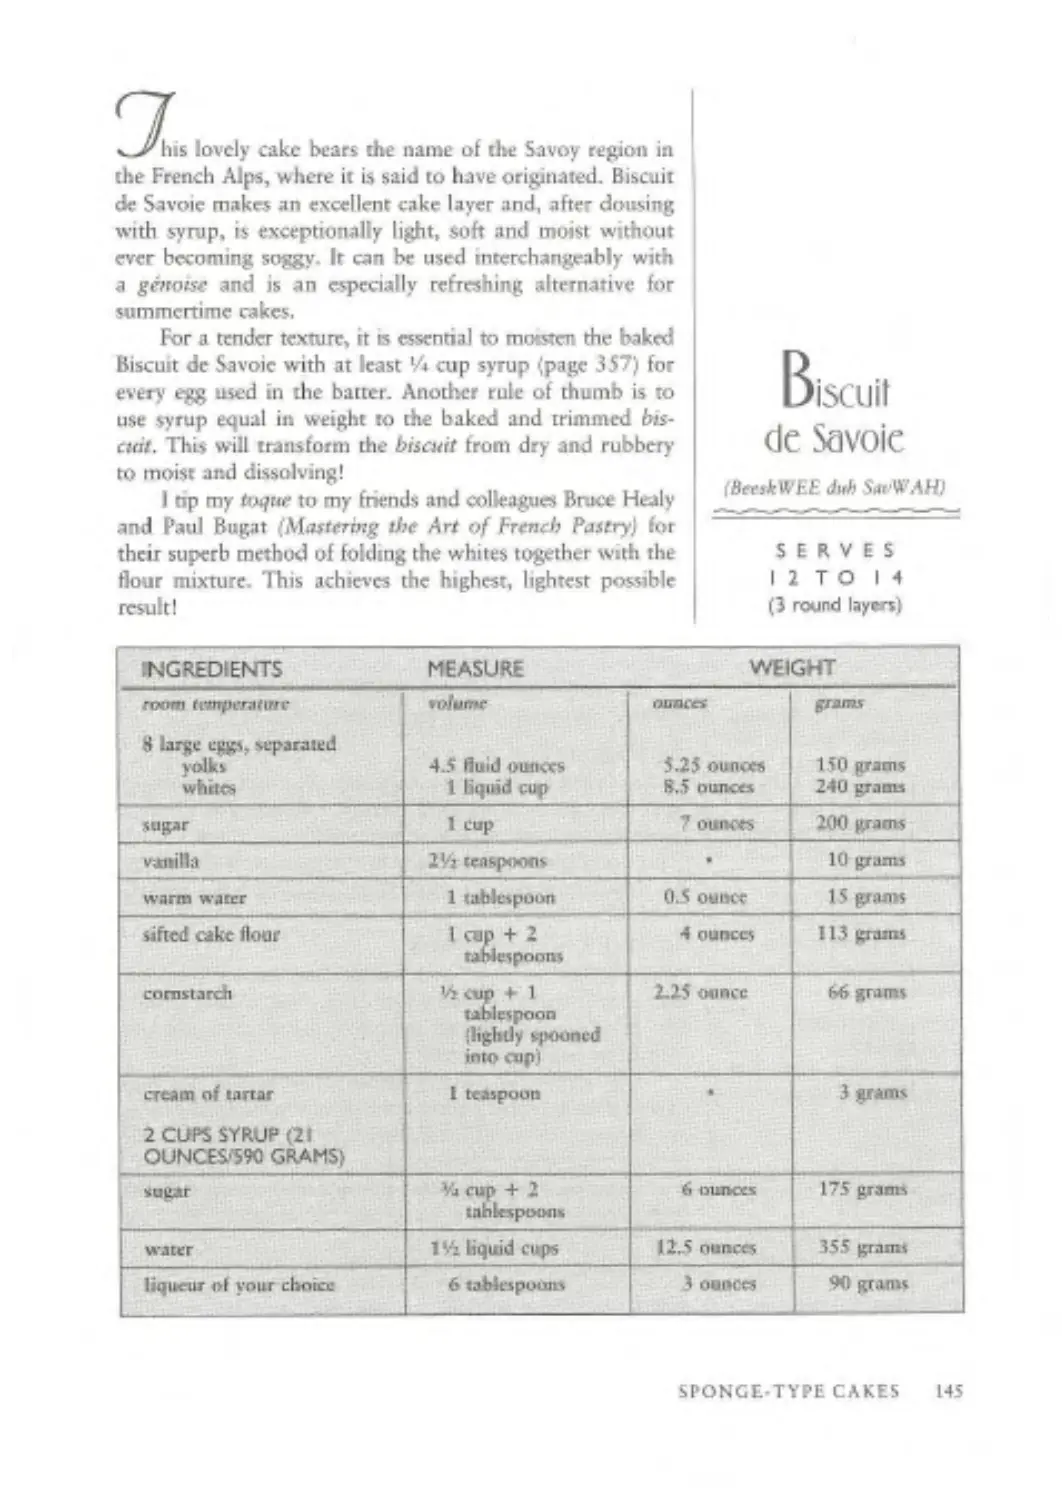
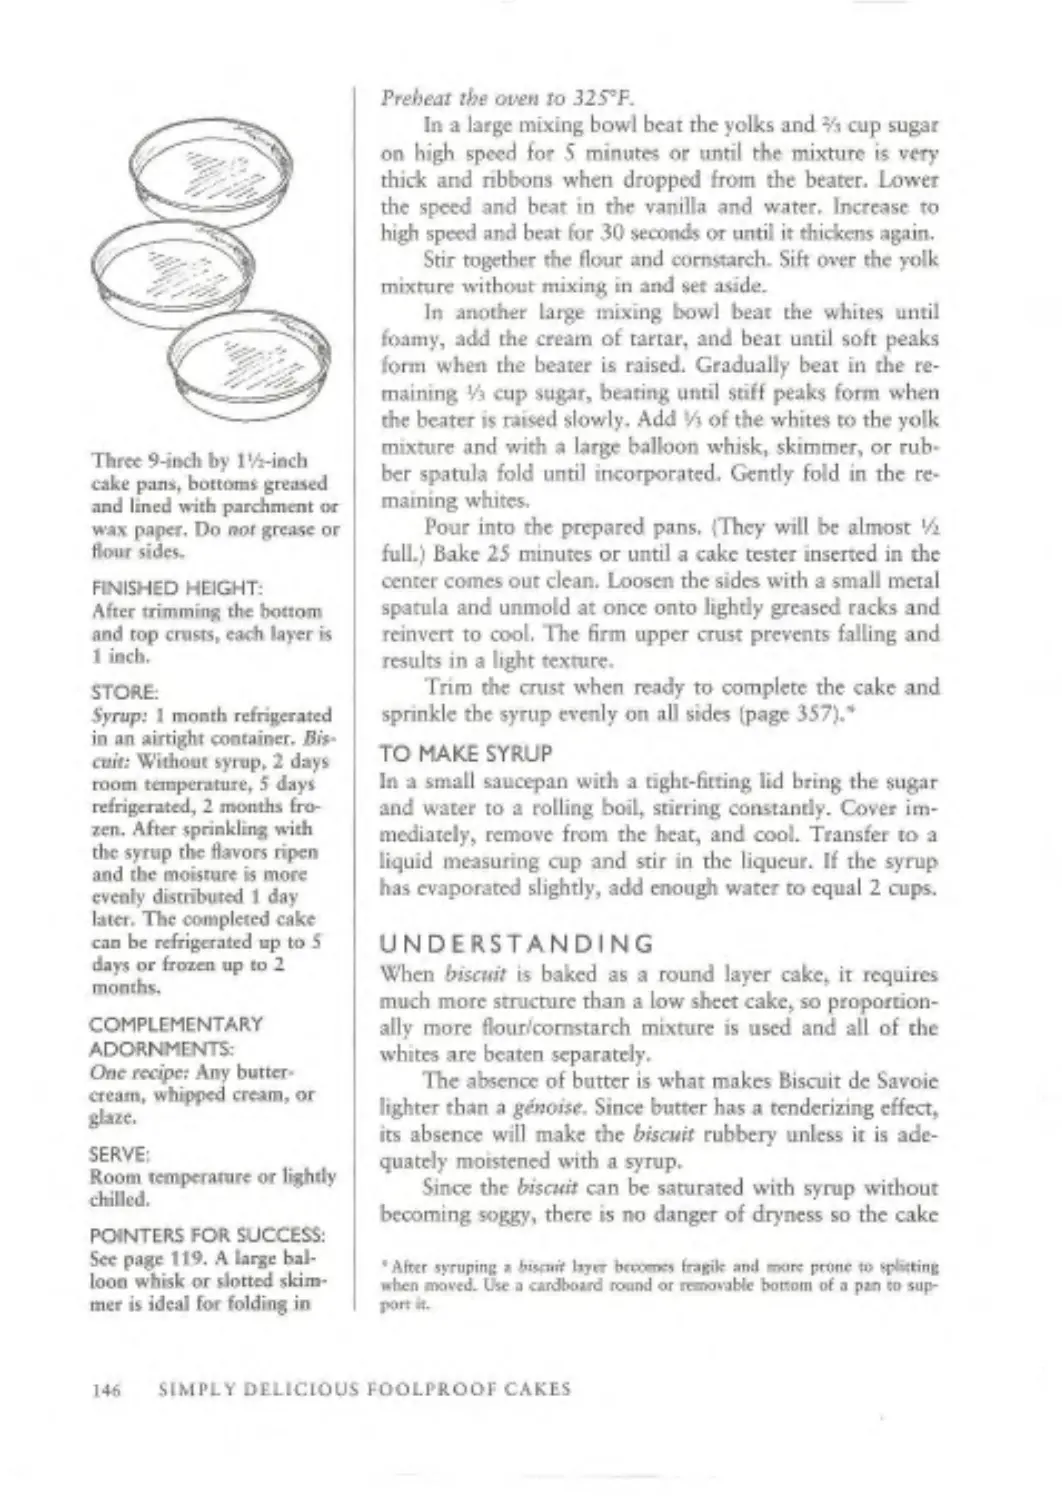
Biscuit de Savoie (page 145)
Biscuit i la Cuilliere (page 148)
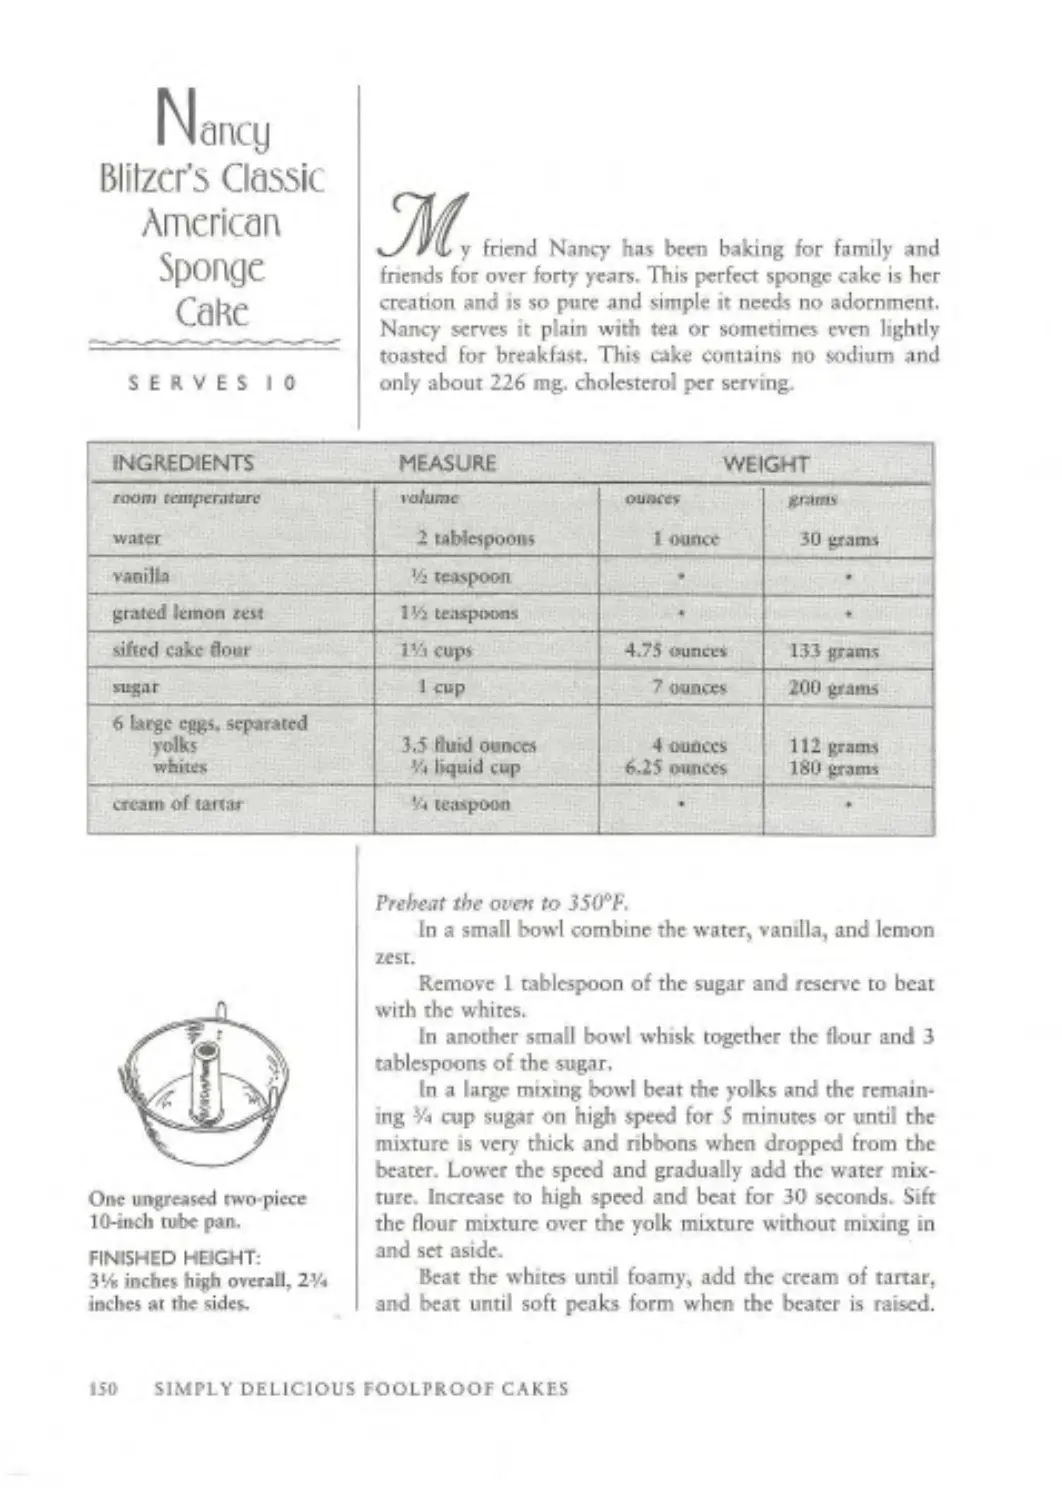
Nancy Blitzer’s Classic American Sponge Cake (page 150)
Bert Greene's Special Sponge Cake (page 152)
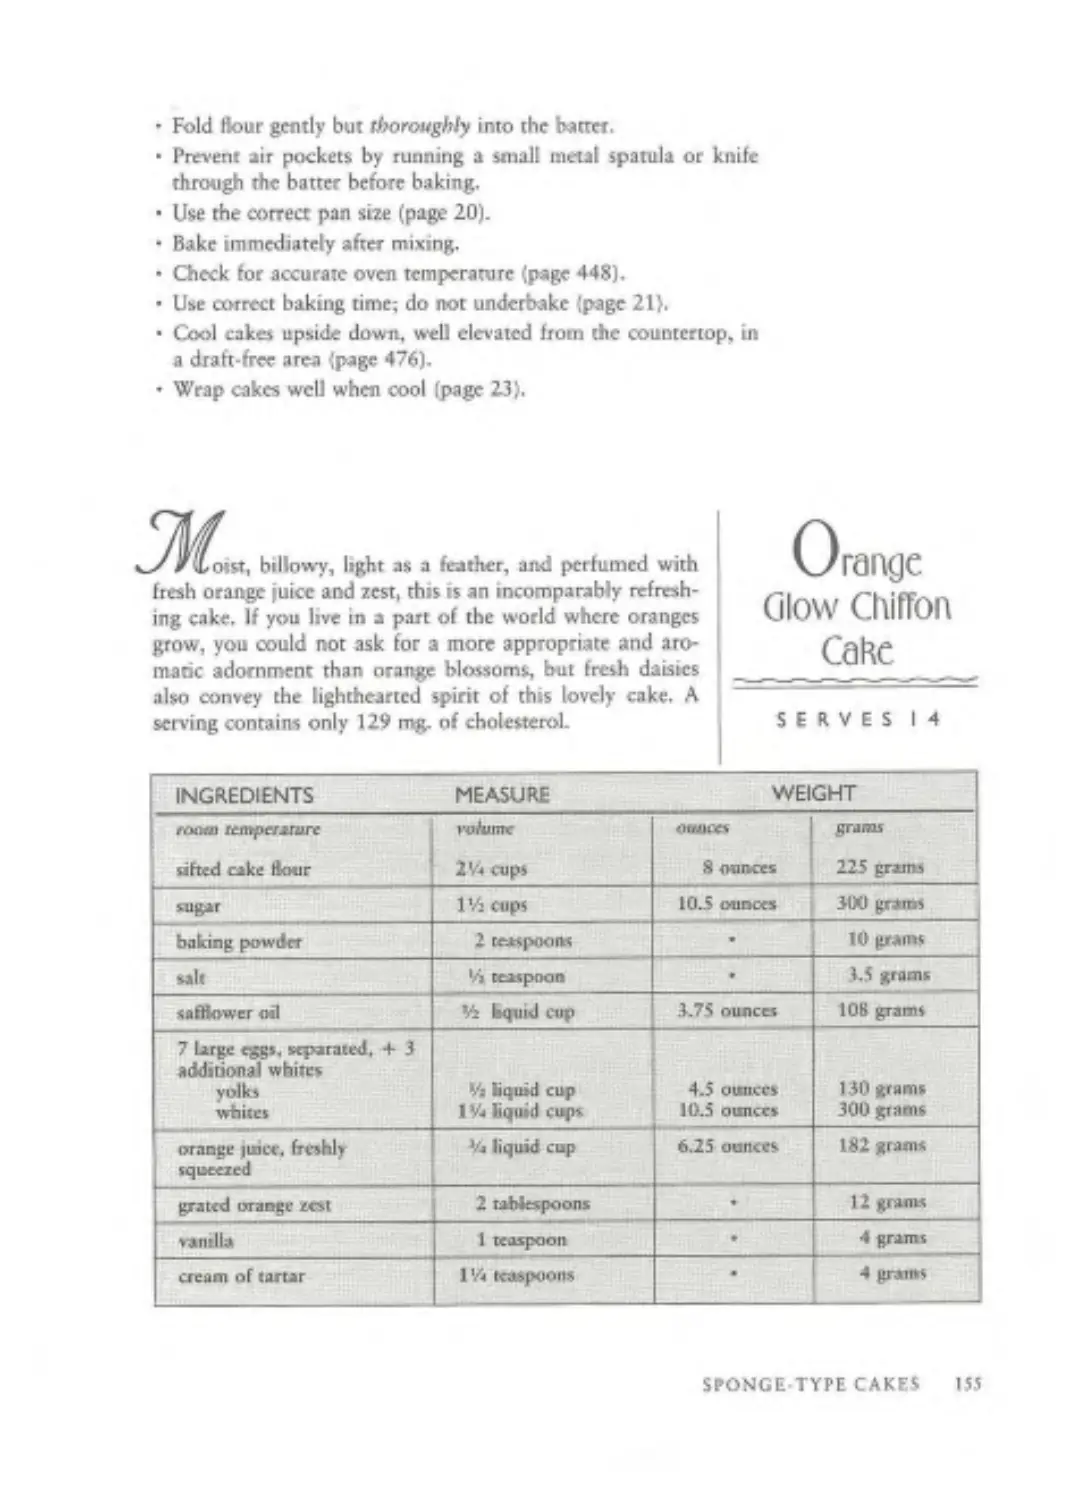
Orange Glow Chiffon Cake (page 155)
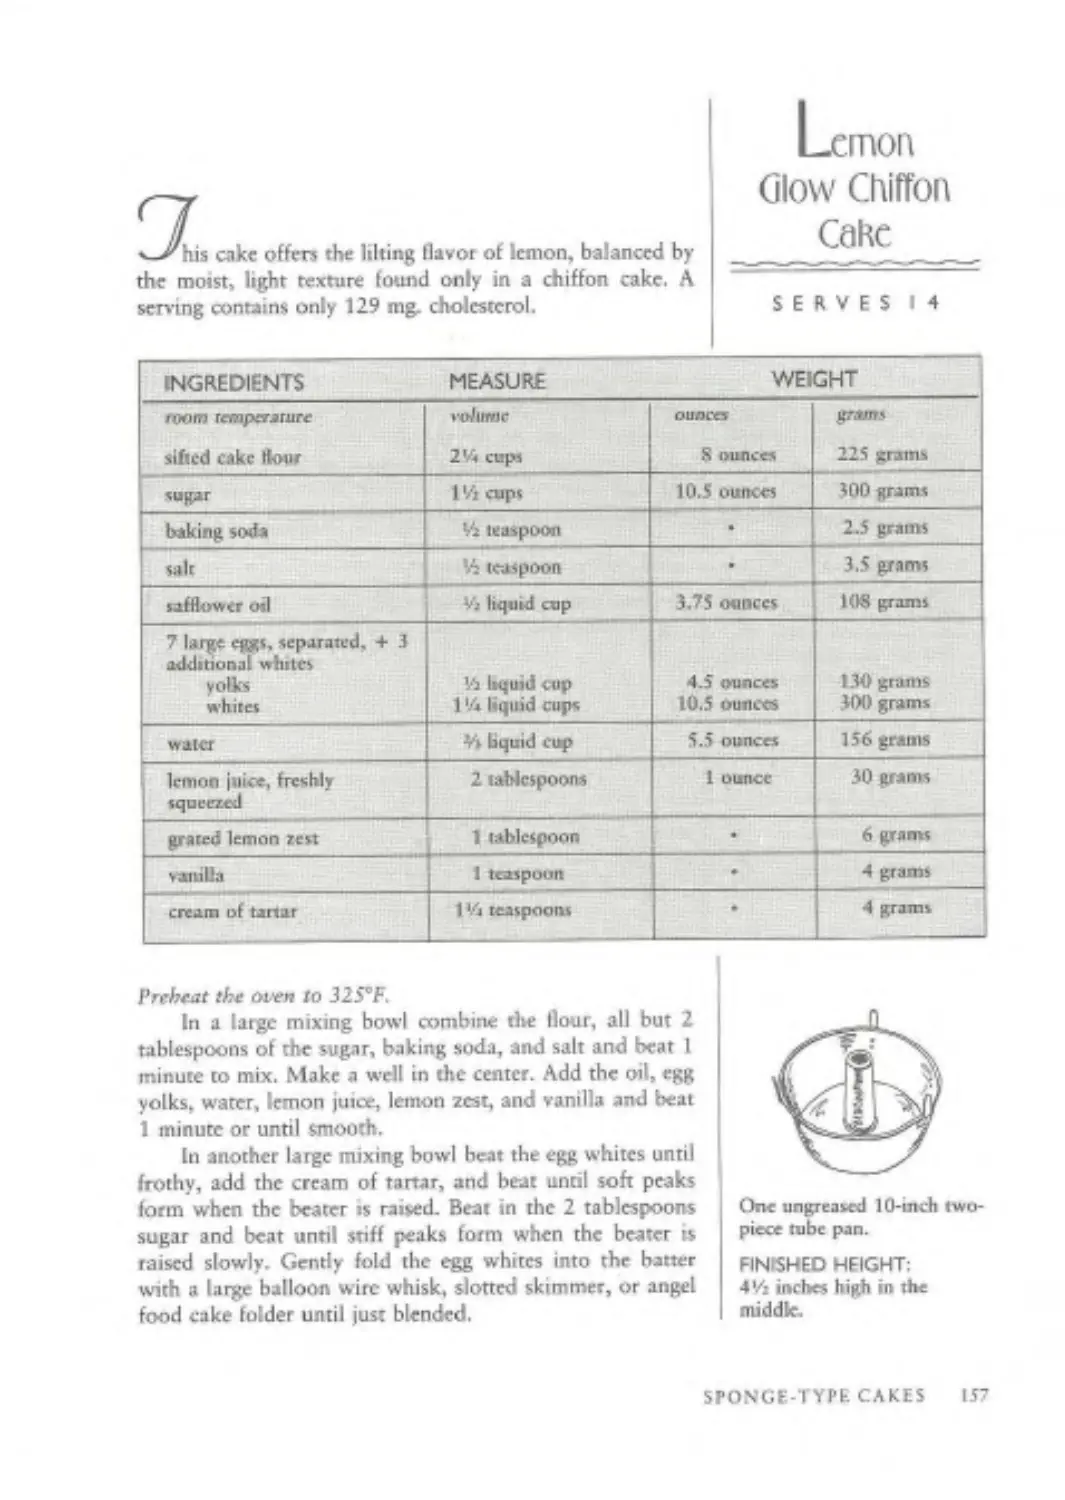
Lemon Glow Chiffon Cake (page 157)
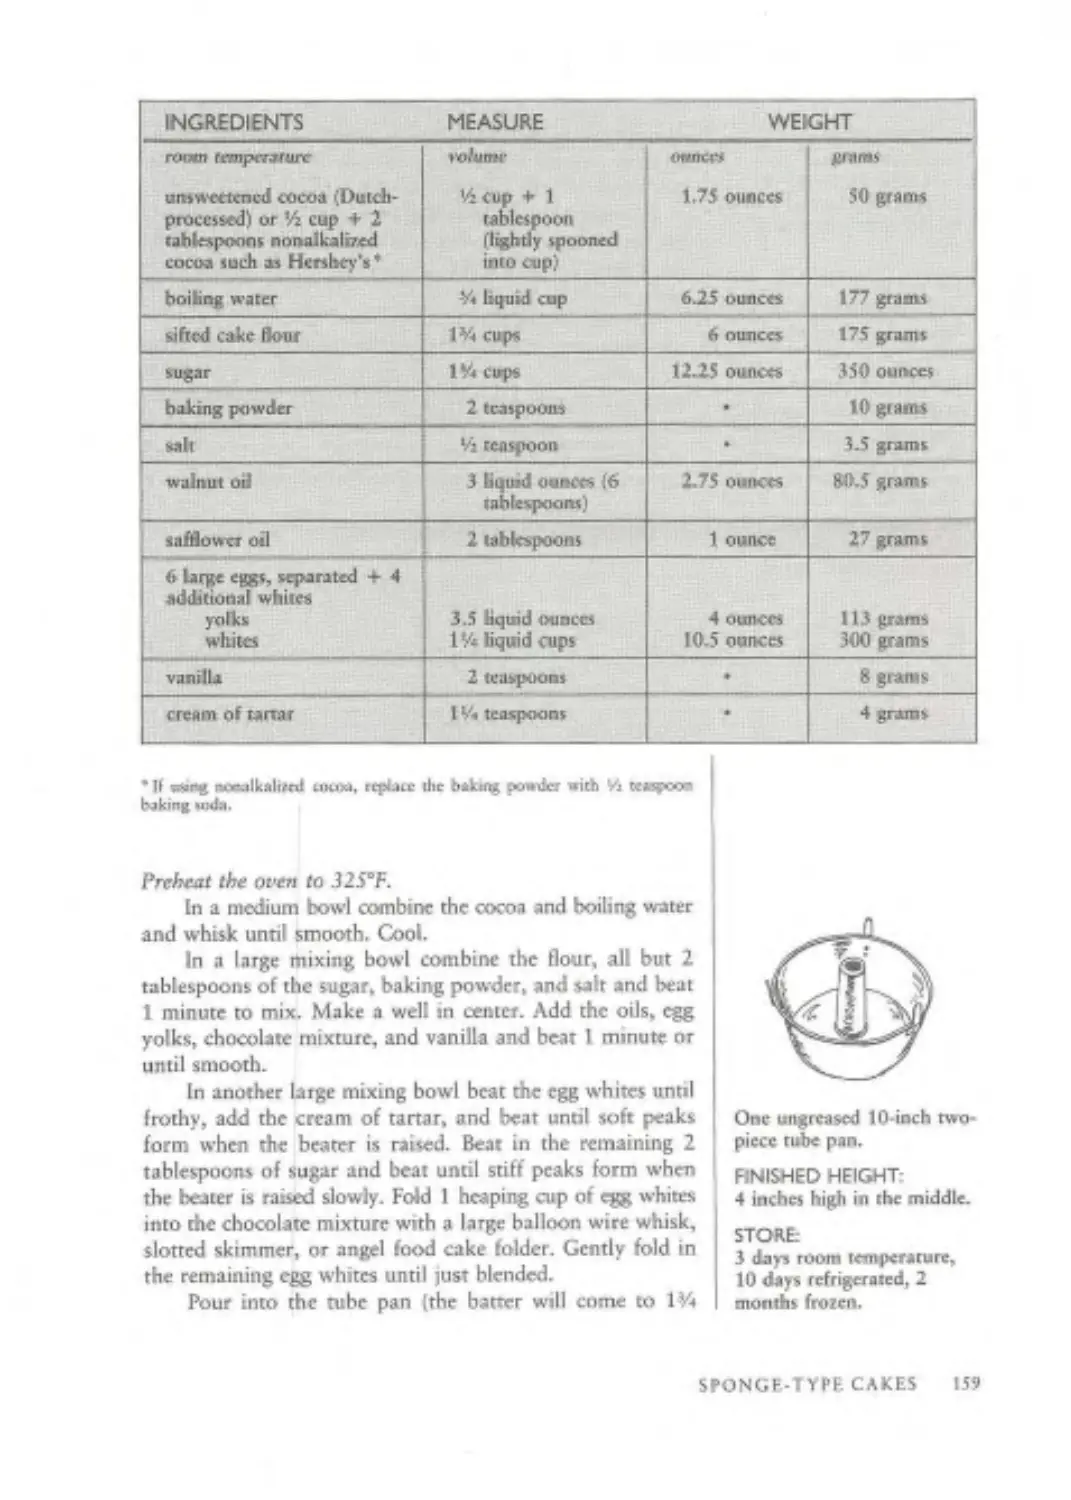
Guilt-Free Chocolate Chiffon Cake (page 158)
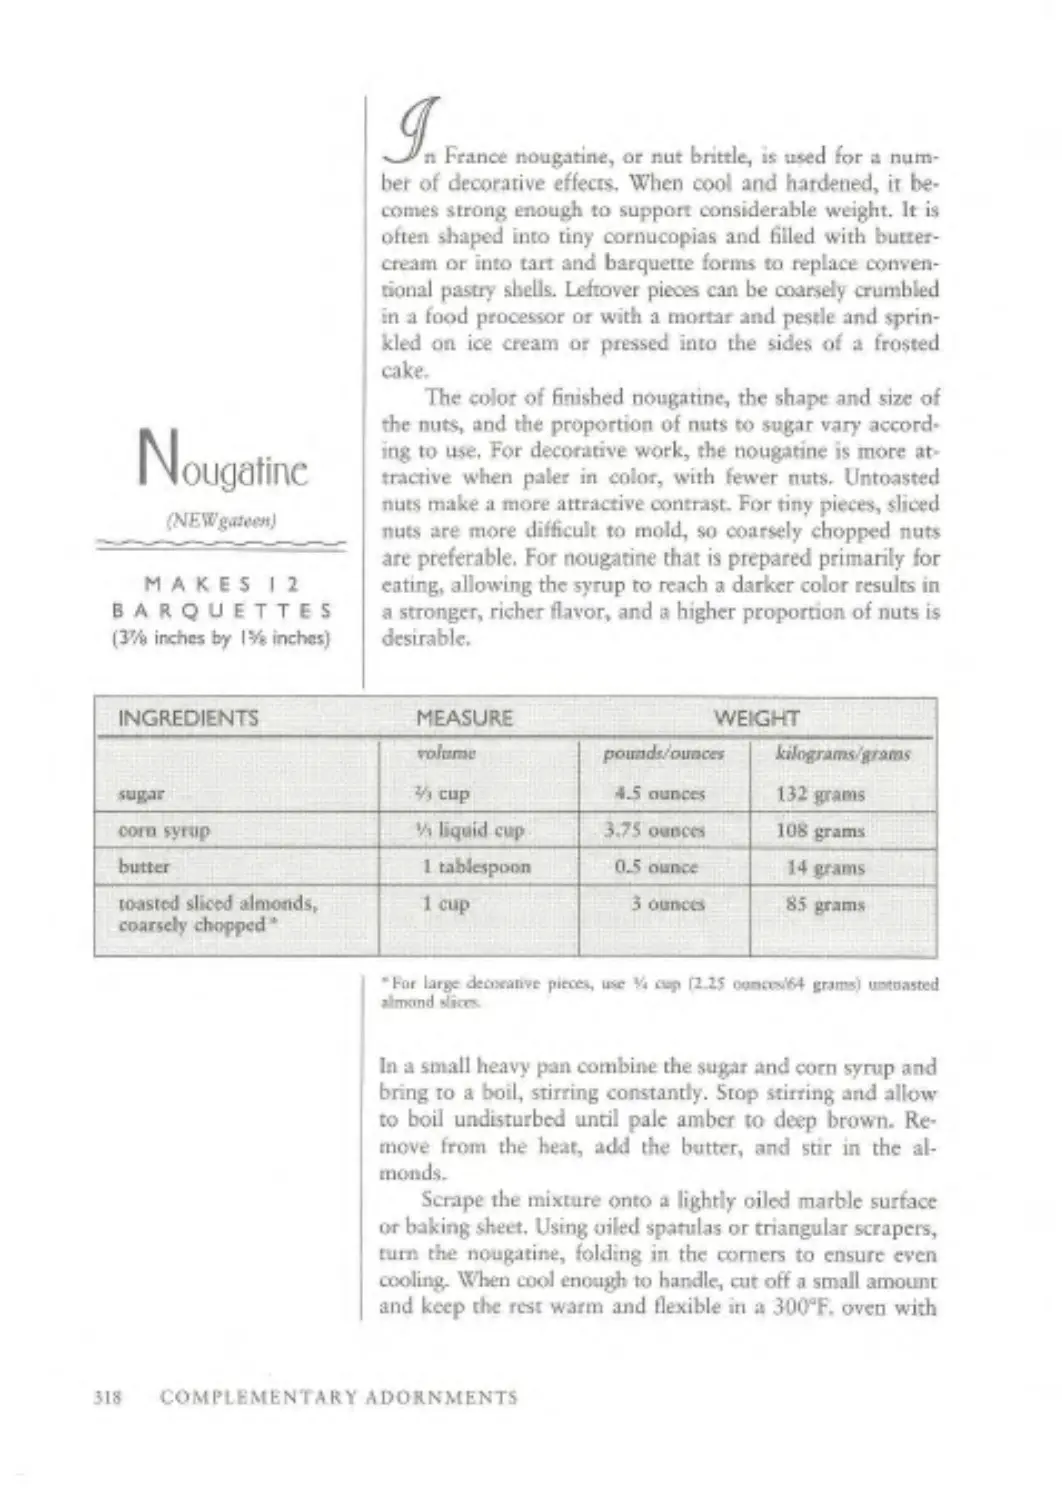
Nougatine (page 318)
Nougatine Honey’ Crunch (page 319)
Chestnut Puree Ipage 353)
CAKES BETTER MADE AHEAD
Perfect Pound Cake (and variations) (page 25)
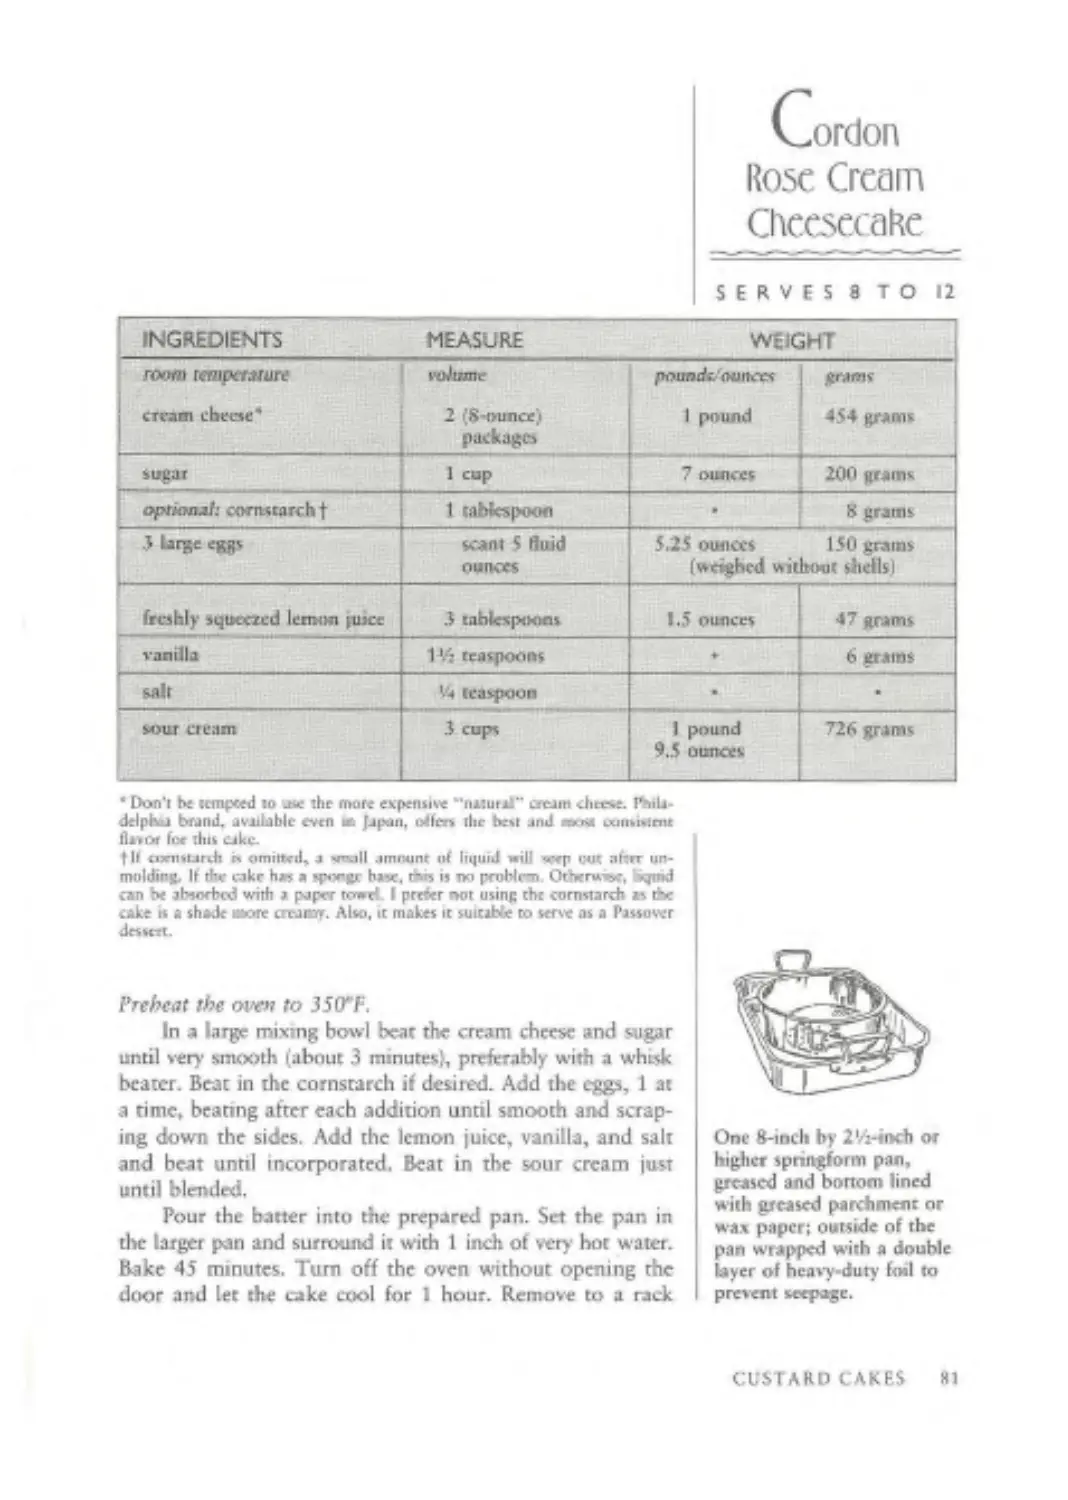
Cordon Rose Cream Cheesecake (and variations) (page 81)
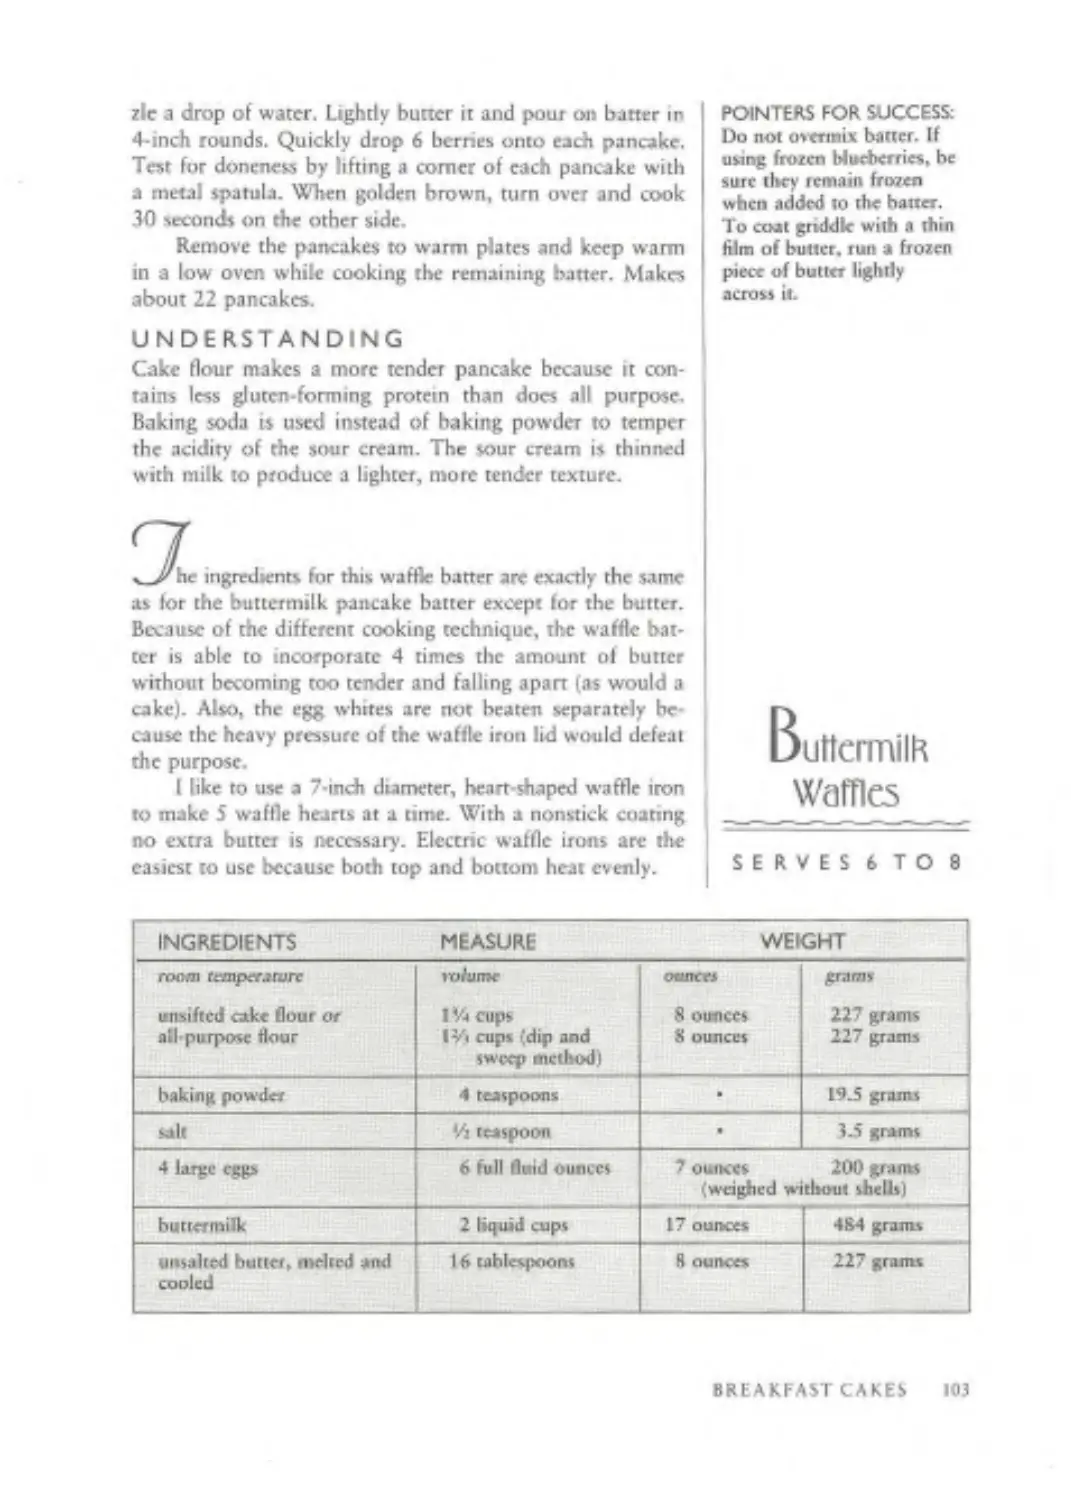
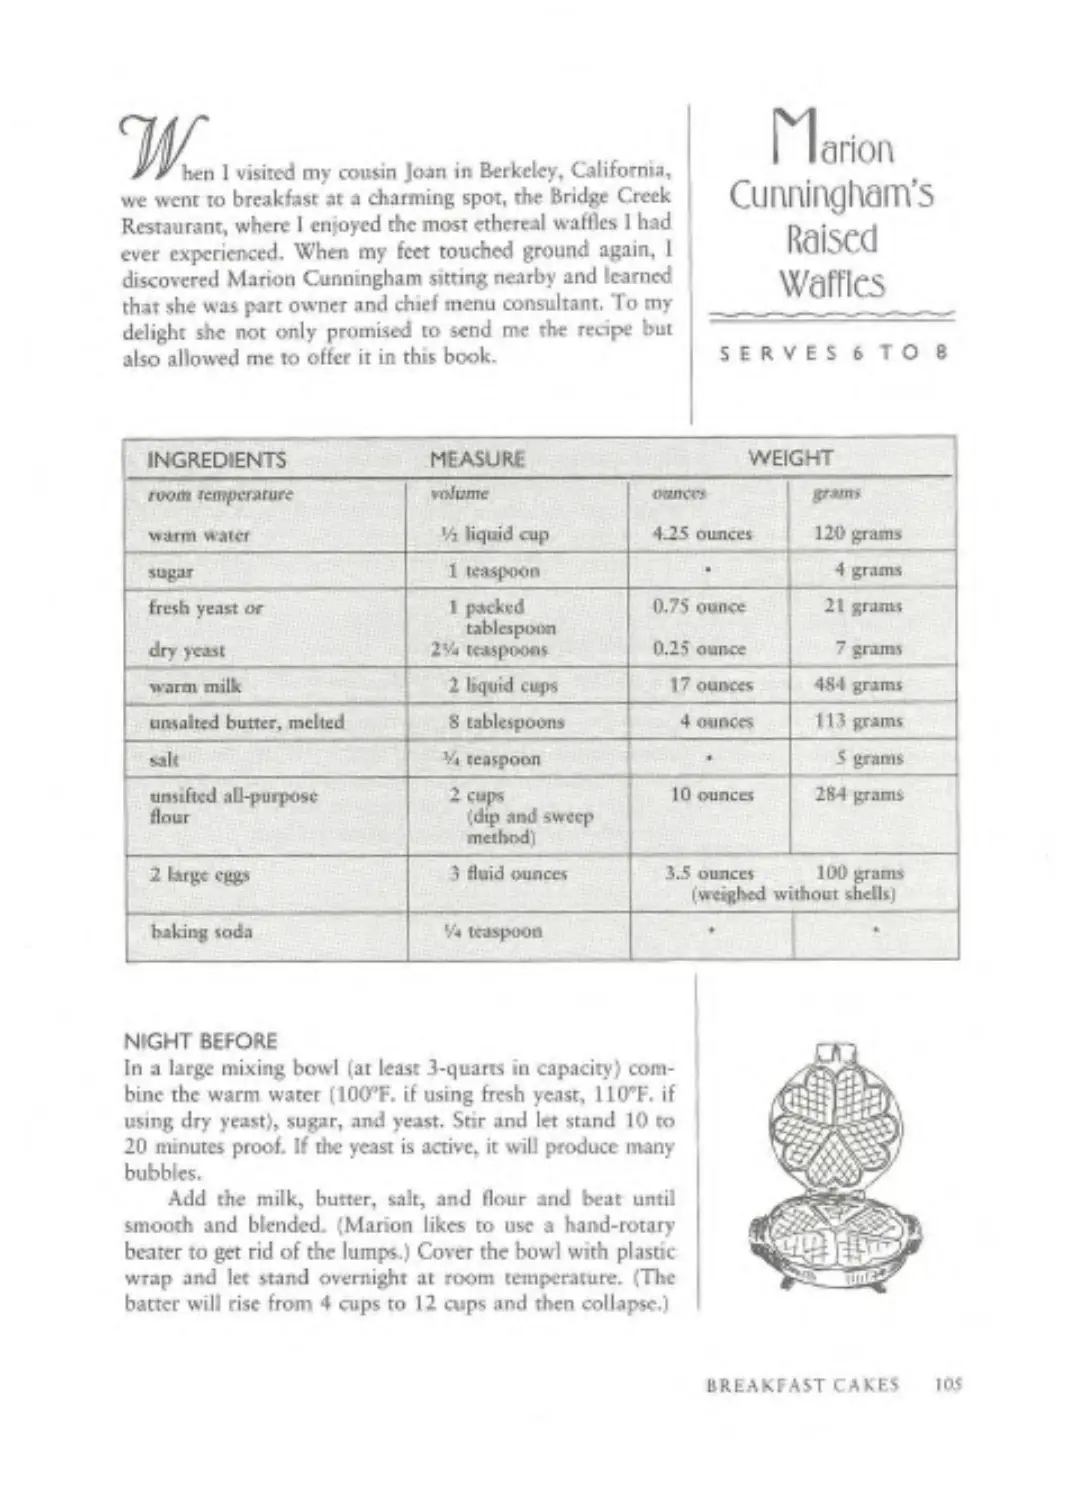
Manon Cunningham’s Raised Waffles (page 105)
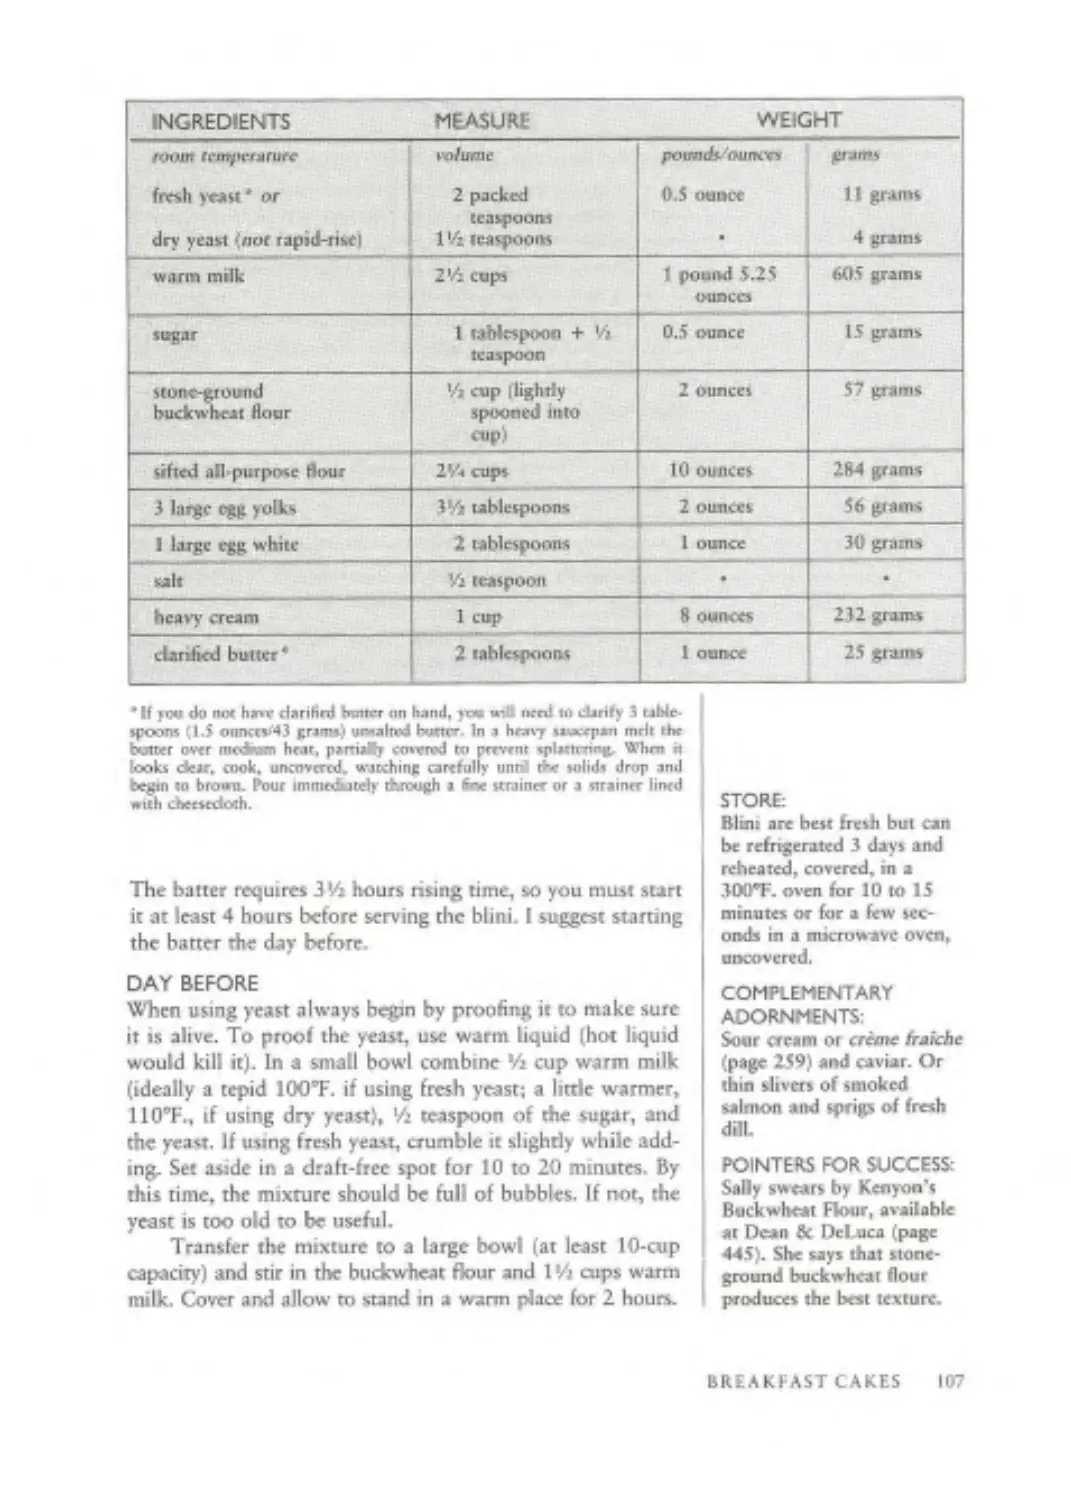
Best Buckwheat Bl mi La Tulipe (page 106)
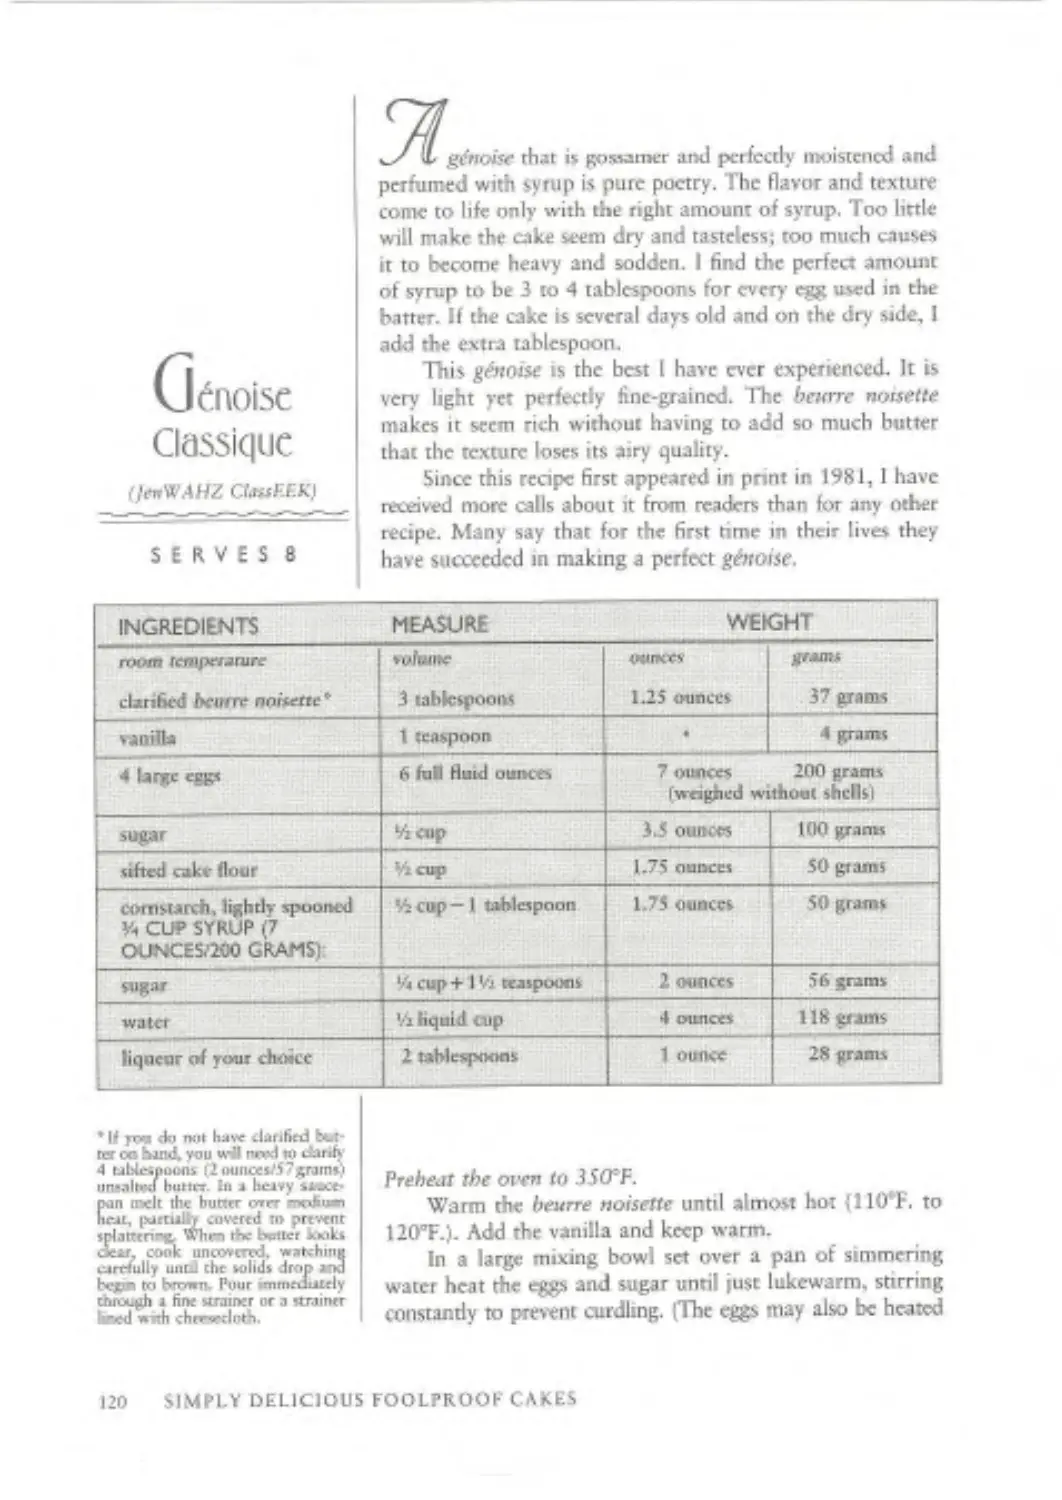
Genoise Classique (page 120)
Chestnut Gtaoise (page 122)
Genoise au Chocolat (page 129)
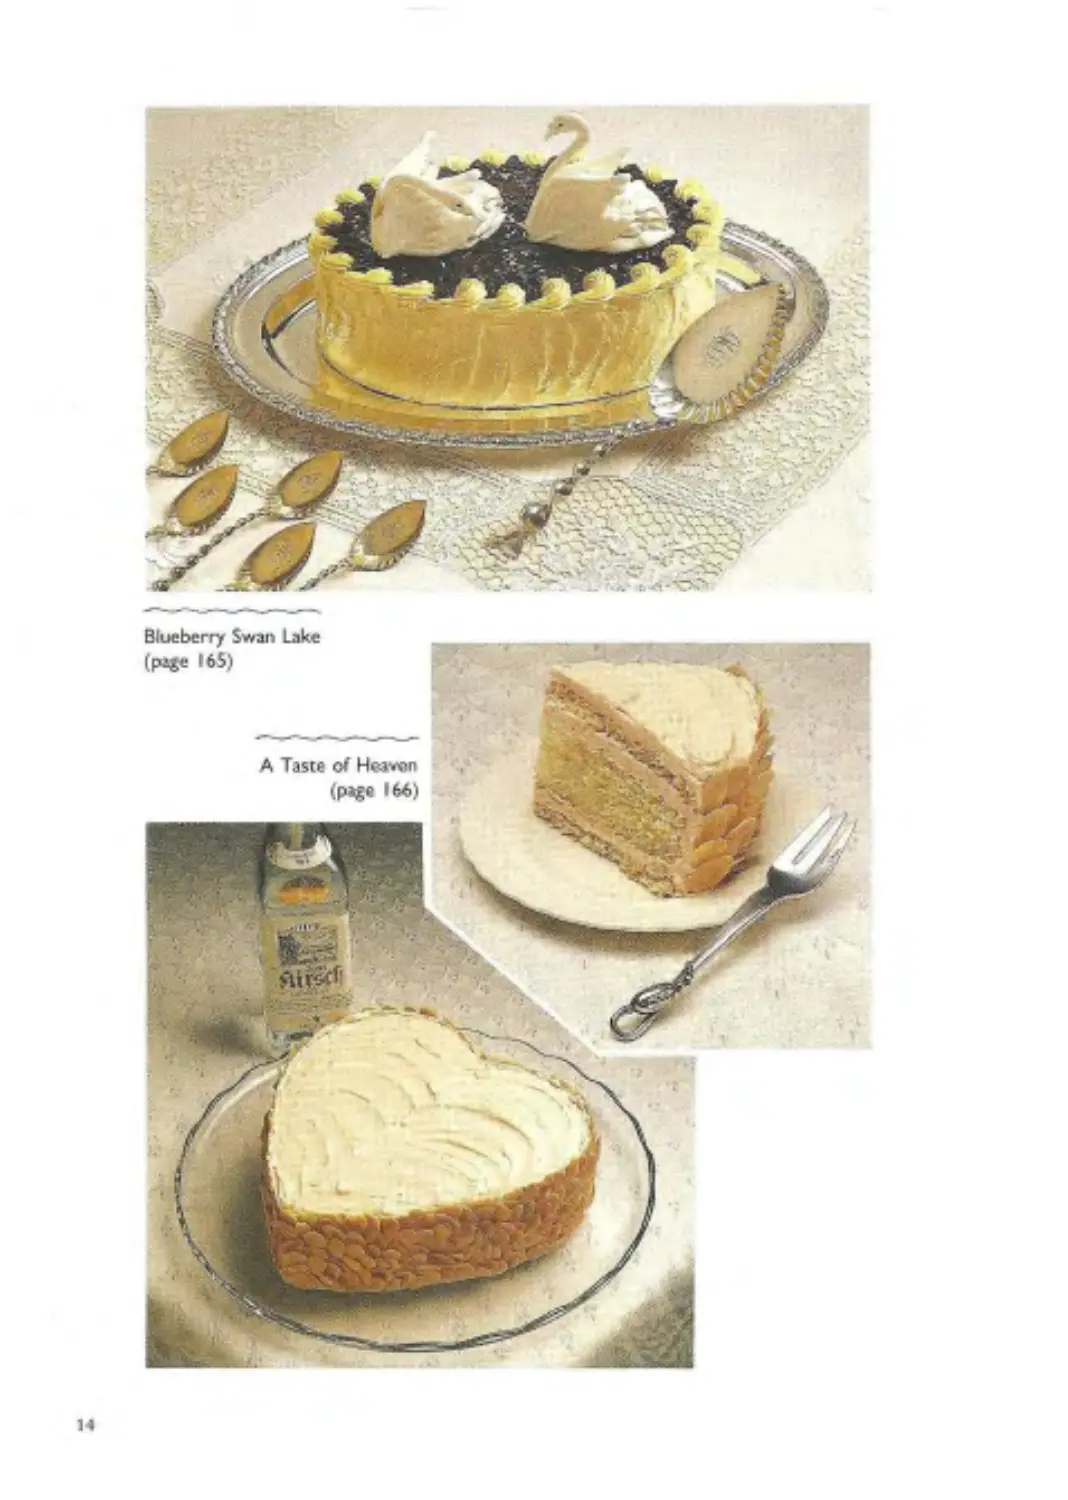
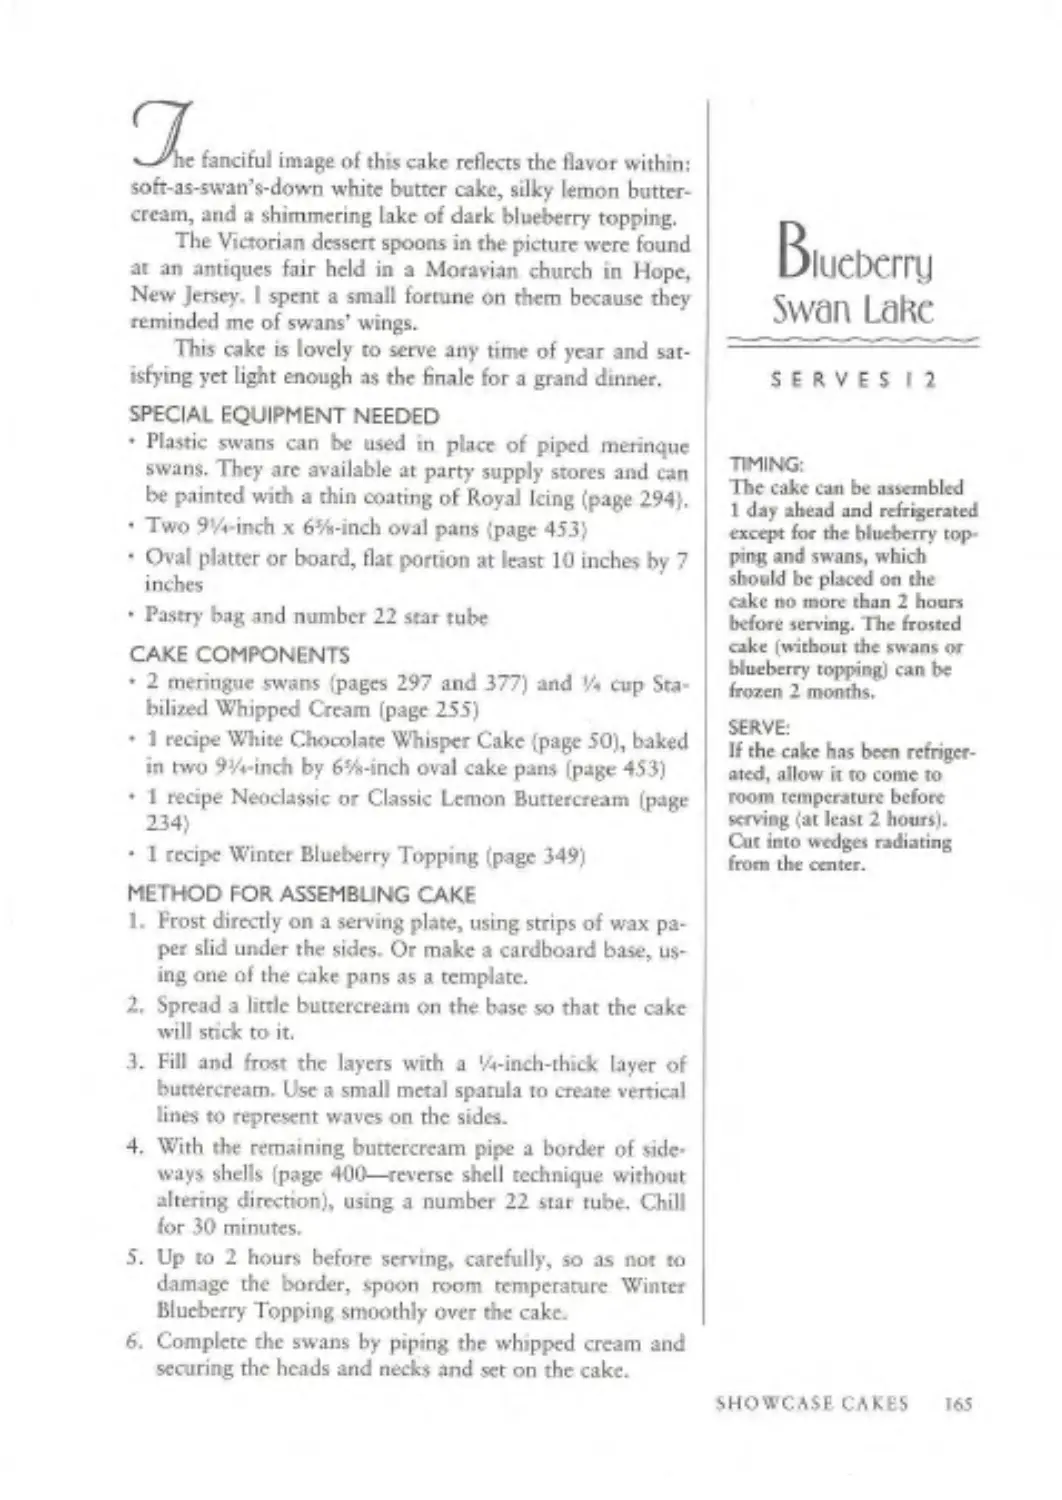
A Taste of Heaven (page 166)
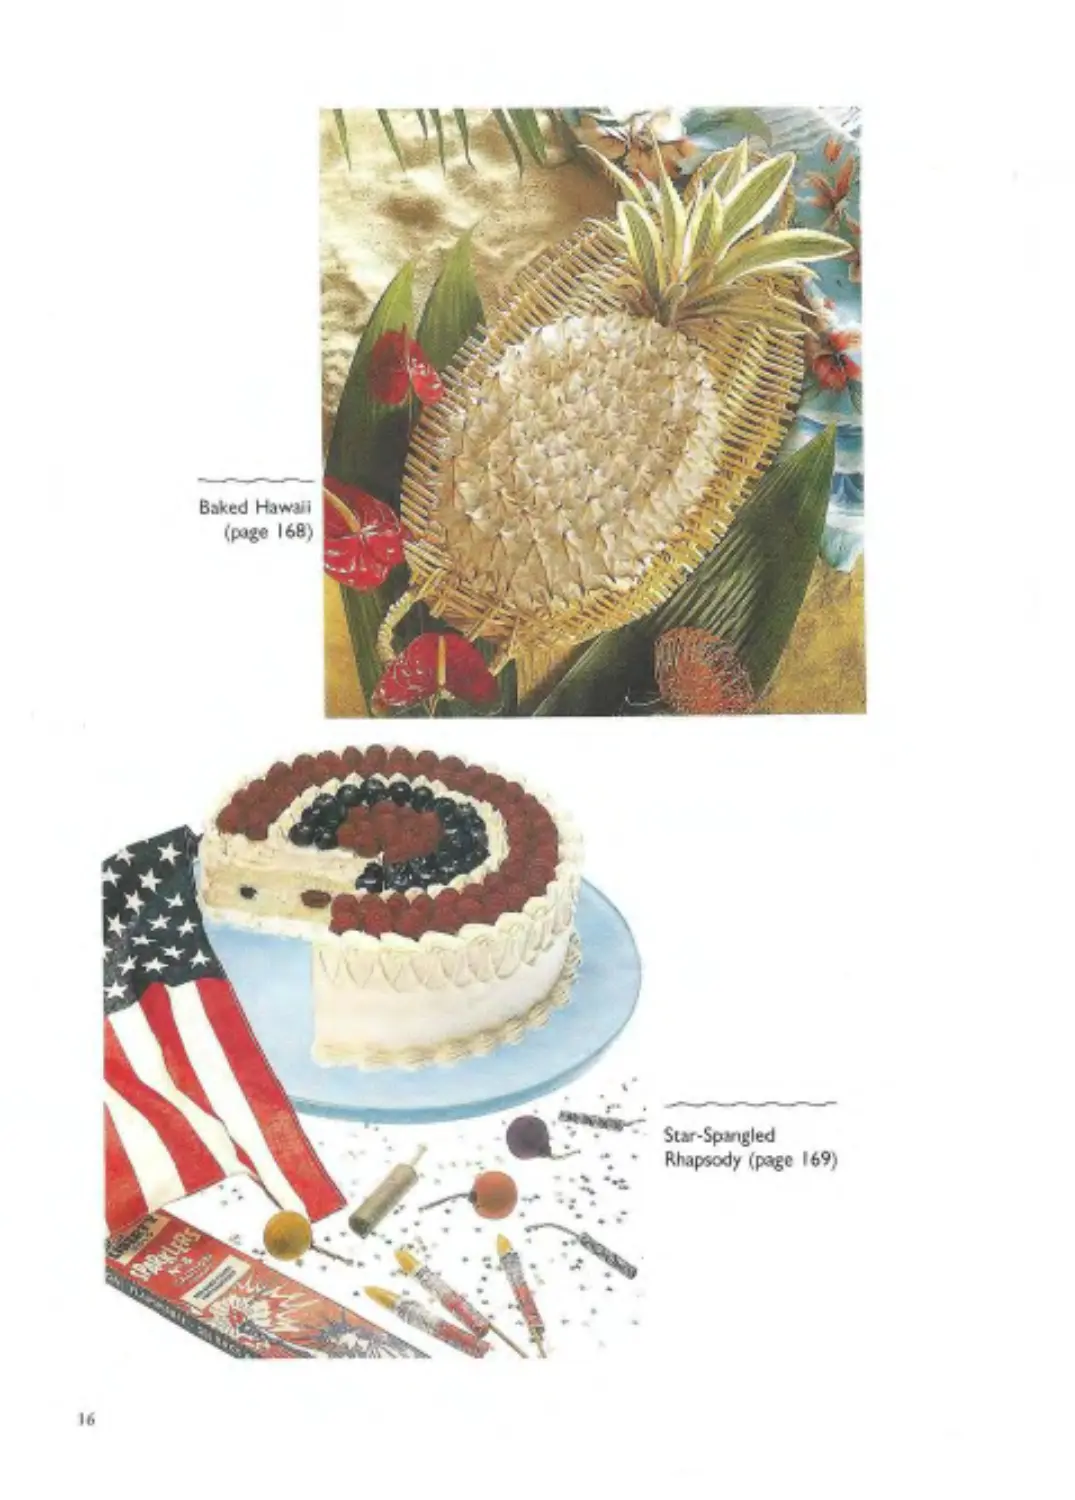
Baked Hawaii (page 168)
Star-Spangled Rhapsody (page 169)
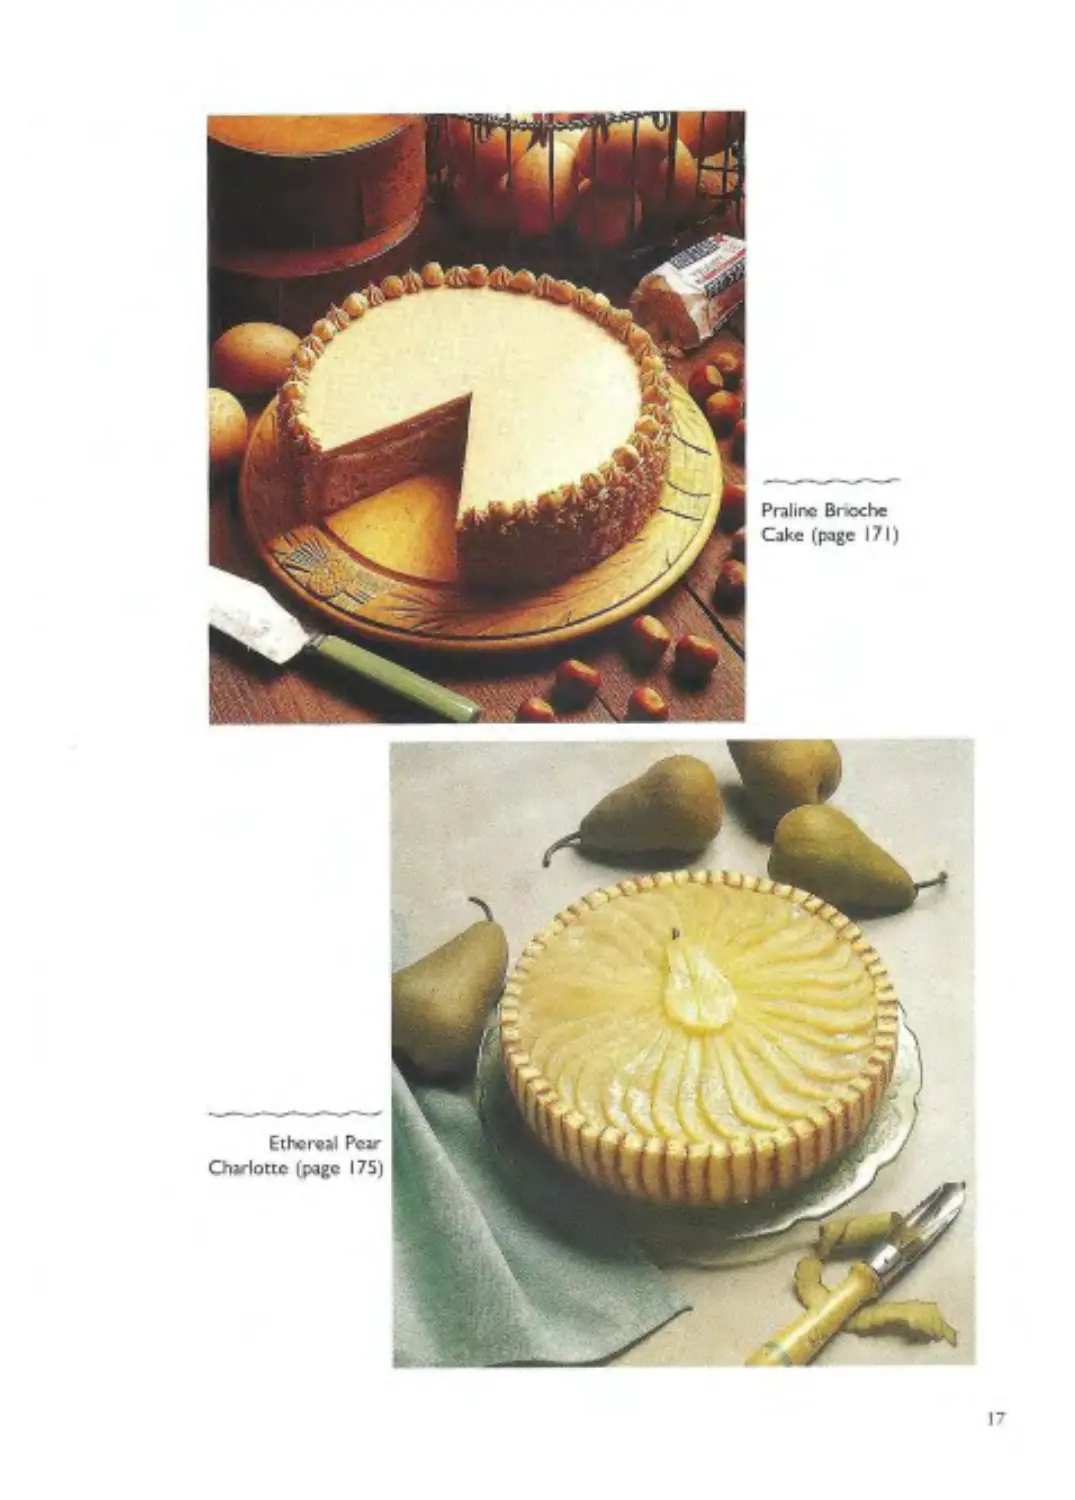
Praline Bruicbe Cake (page 171)
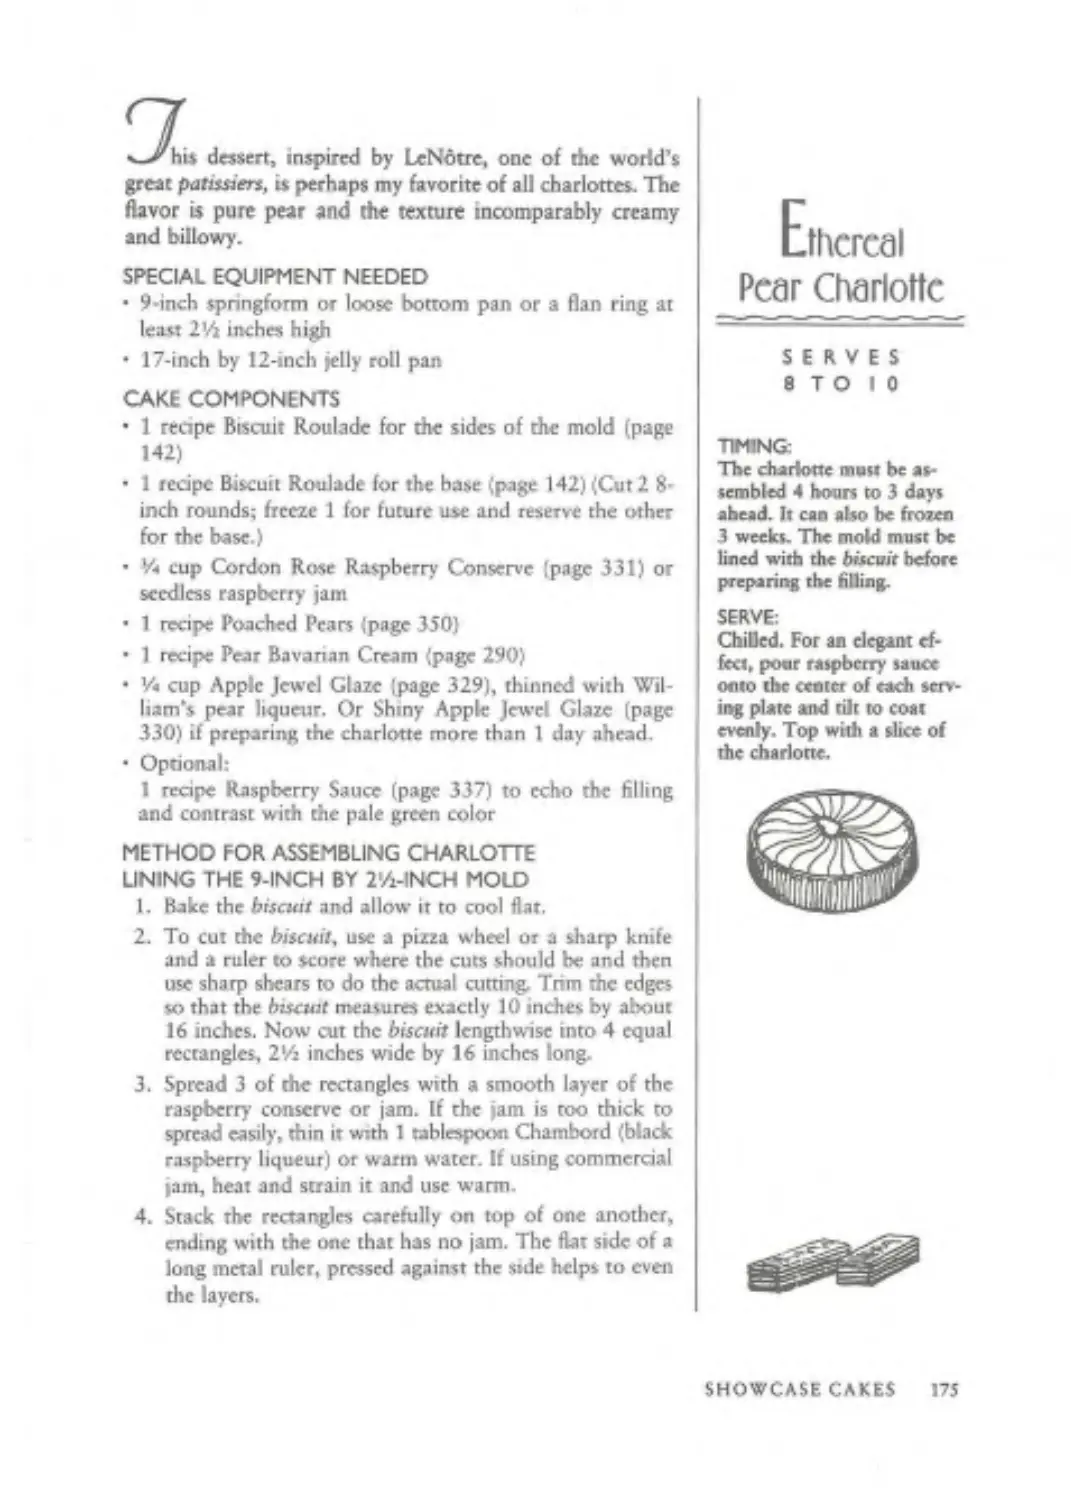
Ethereal Pear Charlotte (page 175)
Scarlett Empress (page 177)
Chocolate Chip Charlotte (page 179)
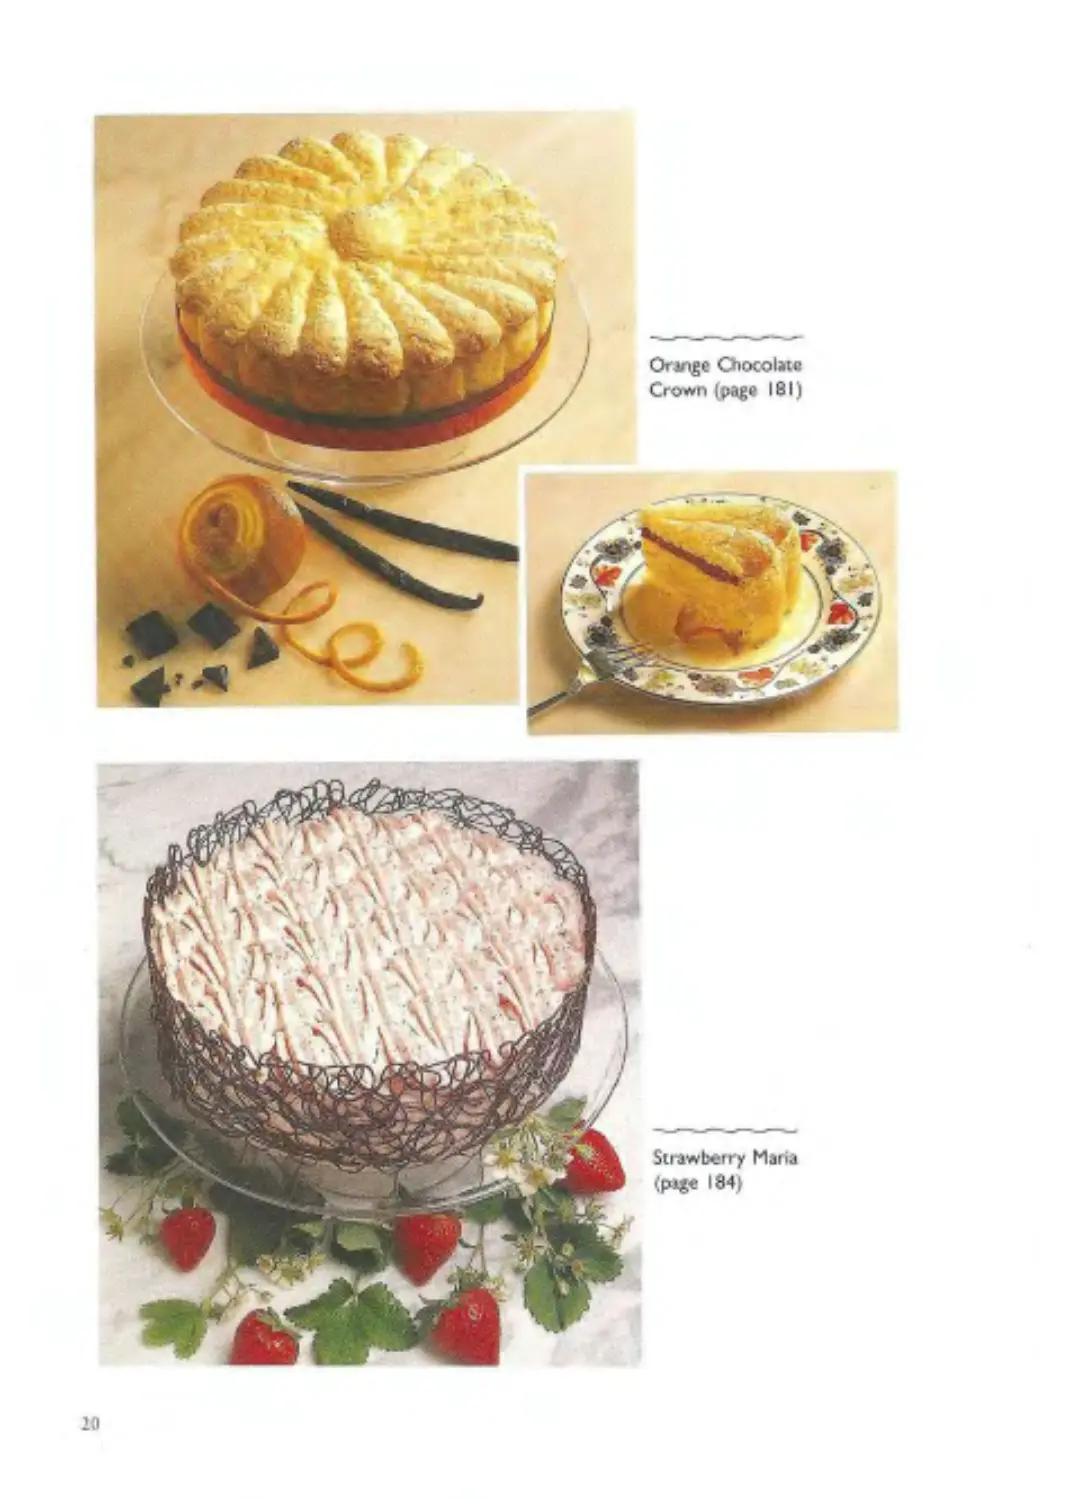
Orange Chocolate Crown (page 181)
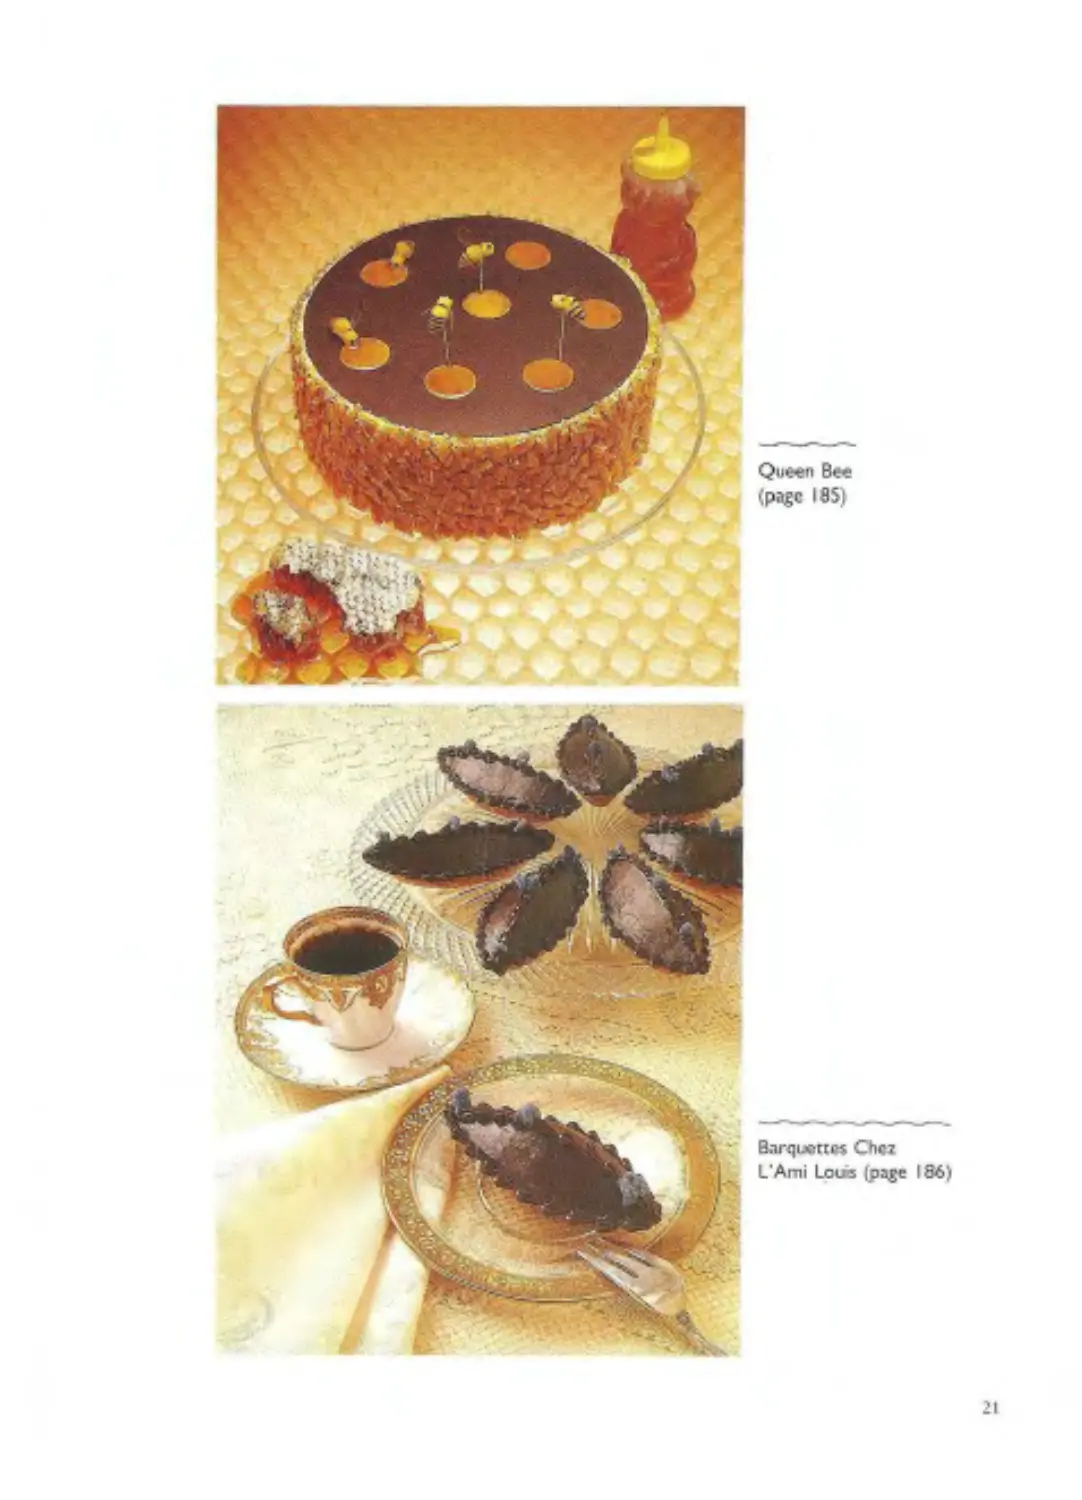
Queen Bee (page 185)
12 SPECIAL CATEGORIES
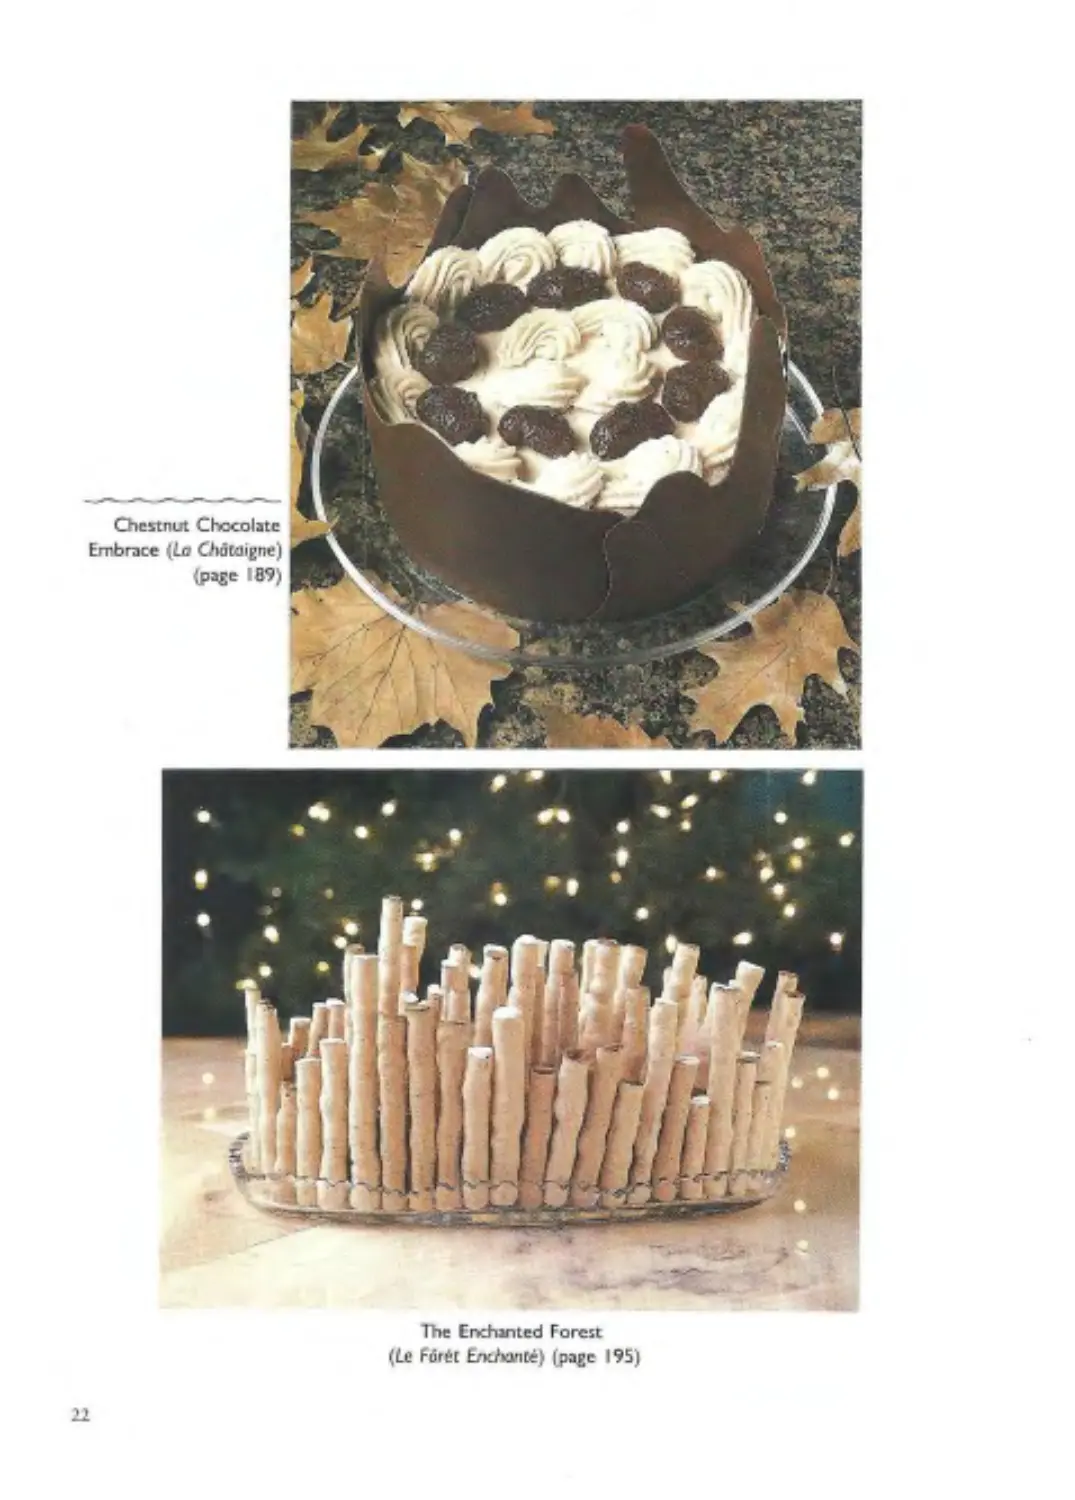
Chestnut Chocolate All-Occasion Downy Yellow
Embrace (page 189} Butter Cake (page 39)
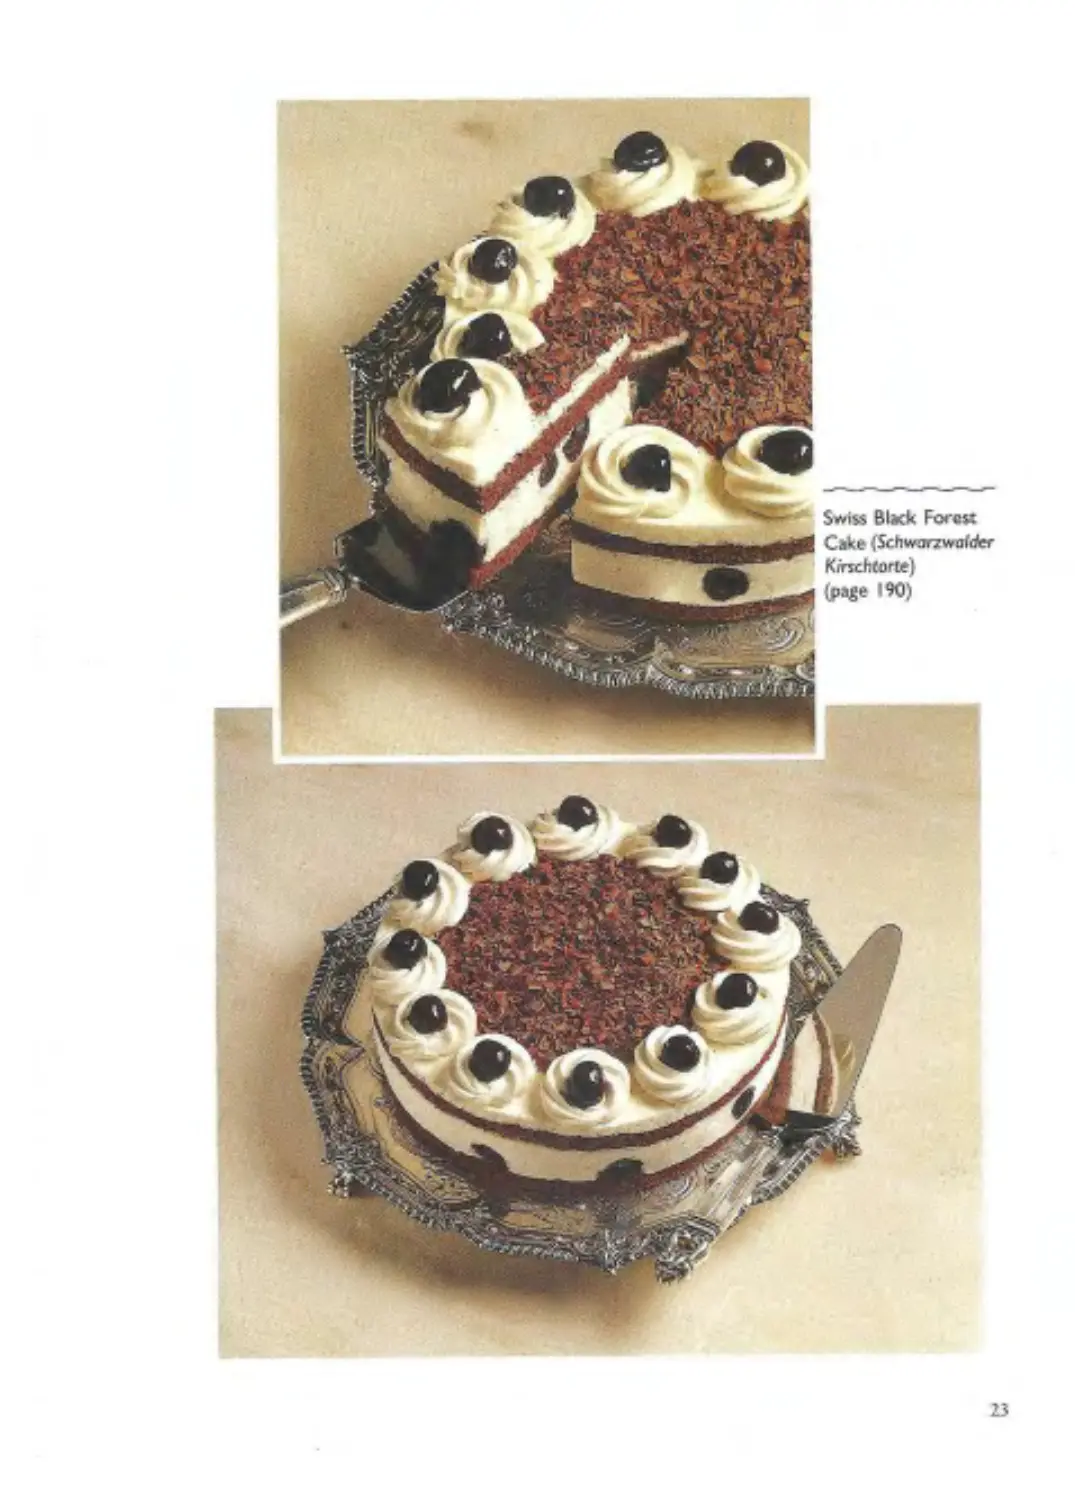
Black Forest Ice Cream Buttermilk Country Cake (page 41)
Torte (page 192] Chestnut Sand Cake (page 42)
Black Forest ke Cream Roll (page 193) White Velvet Butter Cake Golden Luxurv Butter (page 46)
Art Deco Cake (page 204) Cake (page 48)
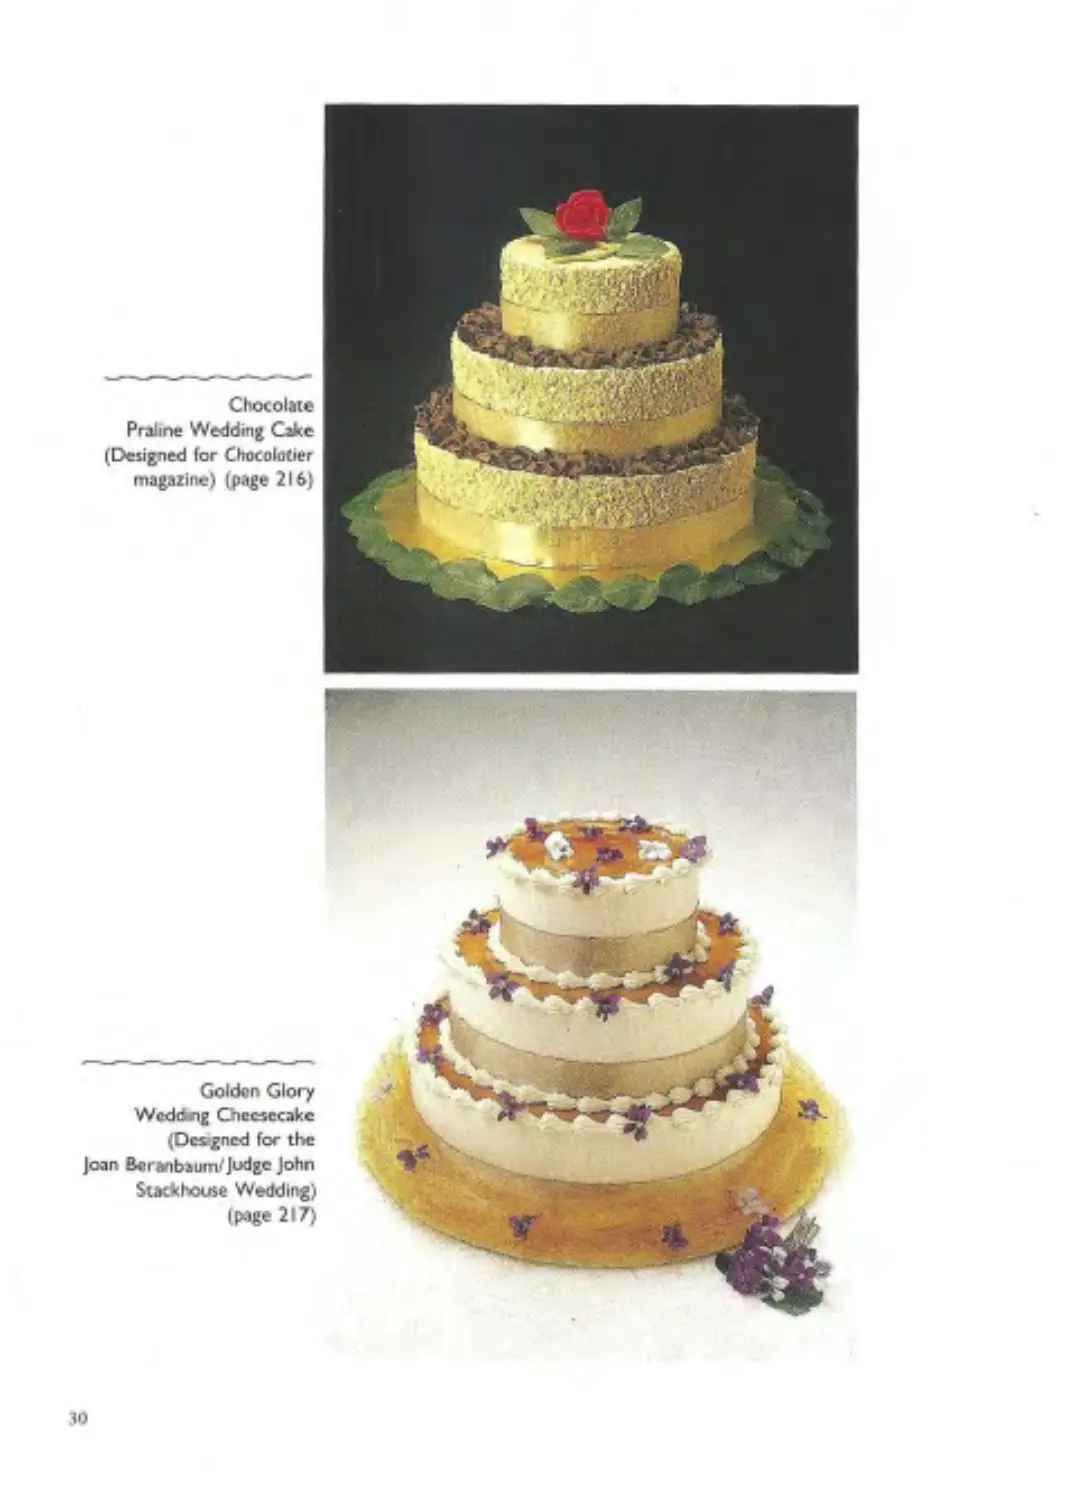
Golden Glory Wedding (page 217) White Chocolate Whisper
Cheesecake Cake (page 50)
CAKES FOR PASSOVER Perfect All-American Chocolate Butter Cake (page 54)
(WITHOUT FLOUR)* Perfect All-American
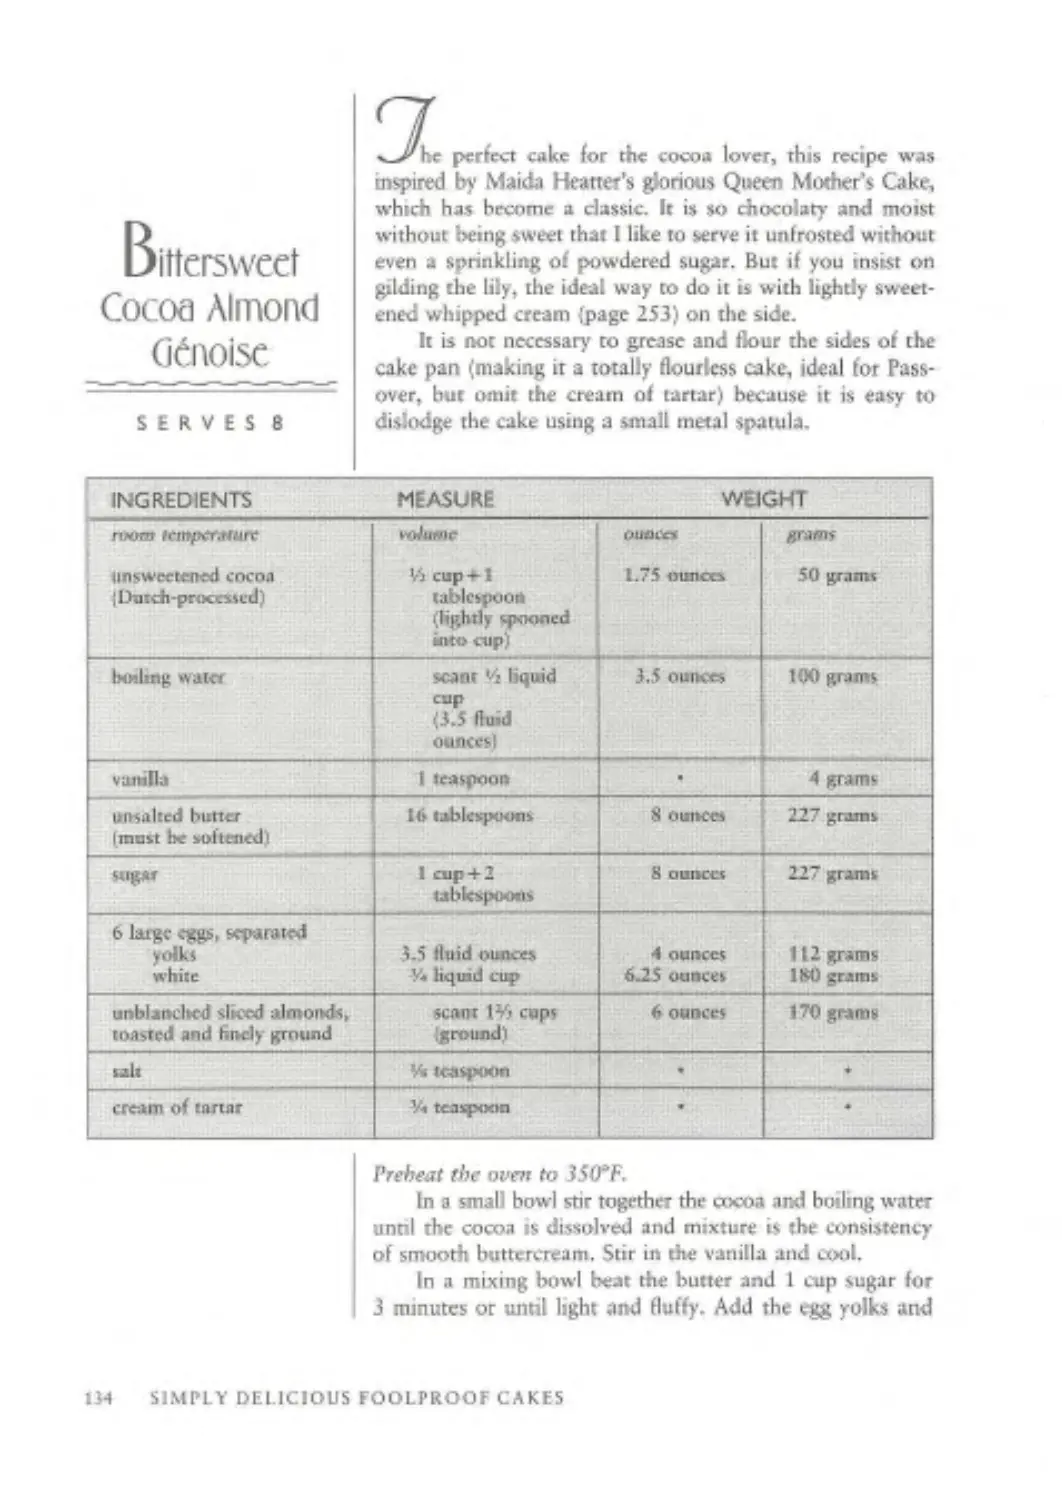
Bittersweet Cocoa Almond Chocolate Torte (page 56)
G^noise [page 134) Chocolate Domingo Cake (page 58)
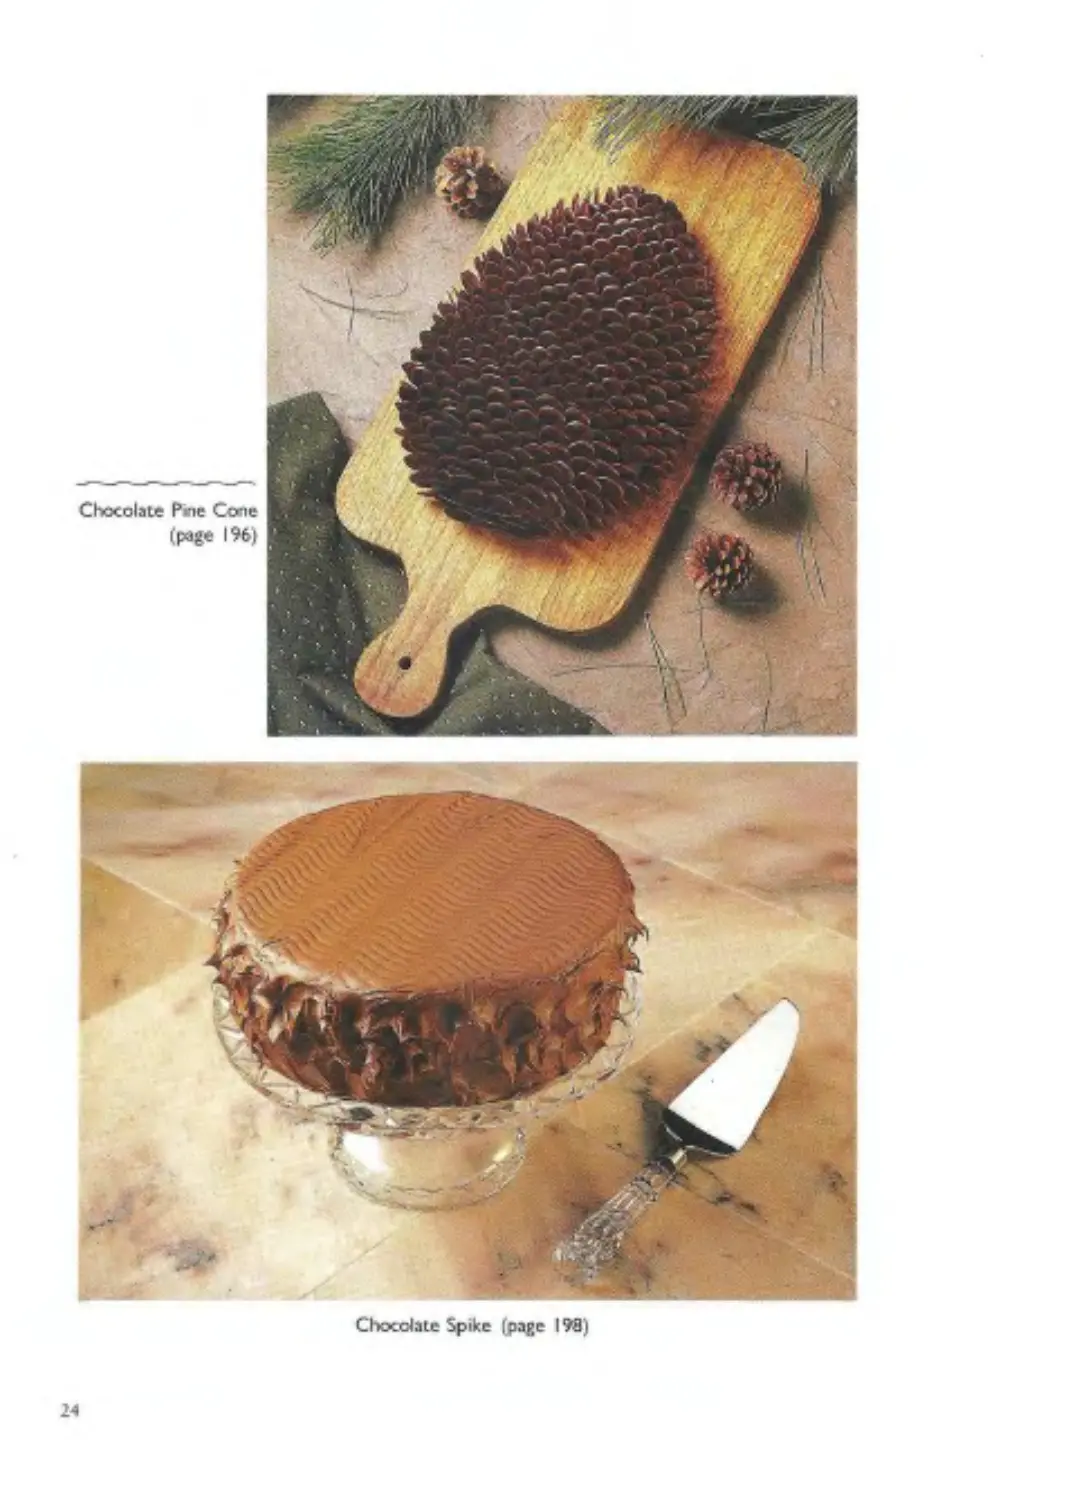
Chocolate Pine Cone (page 196) Chocolate Fudge Cake (page 60)
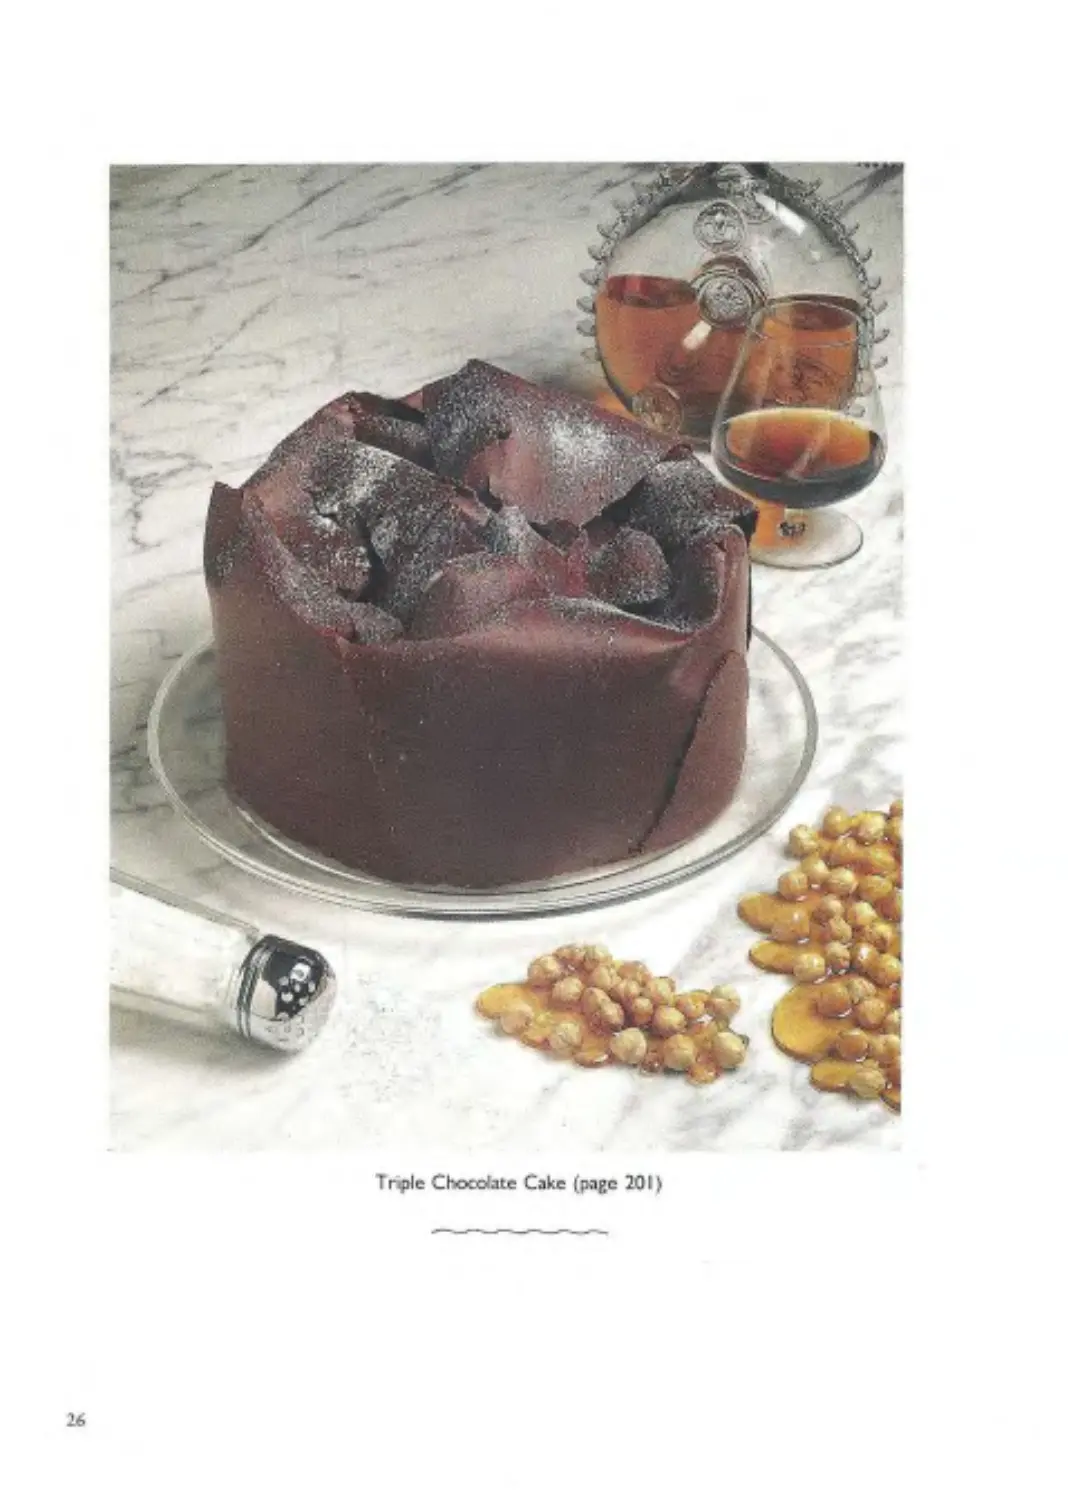
Triple Chocolate Cakef (page 201) Down-Home Chocolate (page 64)
Cordon Rose Cream Mayonnaise Cake
Cheesecake Cordon Rose Banana
(omit the cornstarch) Cake (page 69)
(and variations) (page 81) Pumpkin-Walnut Ring (page 71)
Chocolate Oblivion Zucchini Cupcakes (page 73)
Truffle Tone (page 84) Golden Wheat Carrot
(and variations) Ring (page 75)
Chocolate Cloud Roll (page 138) Cordon Rose
Cocoa Souffle Roll (page 140) Cream Cheesecake
Barquettes Chez I’Ami Louis [and variations) (page 81)
(use Chocolate Cloud Roll Chocolate Oblivion
in place of Biscuit) (page 186) Truffle Torte [and variations) (page 84)
QUICK-TO-MIX CAKES Chocolate Cloud Roll [page 138)
THAT ARE GREAT WITHOUT Cocoa Souffle Roll (page 140)
FROSTING OR ADORNMENT Nancy Blitzer’s Classic
Perfect Pound Cake (page 25) American Sponge Cake Bert Greene’s Special (page 150}
(and variations) Sponge Cake (page 152)
Chocolate Bread (page 28) Orange Glow Chiffon Cake (page 155}
White Spice Pound Cake (page 30) Lemon Glow Chiffon Cake (page 157}
Golden Butter Cream (page 34) Guilt-Free Chocolate
Cake Chiffon Cake (page 158}
Sour Cream Butter Cake (page 35) Chocolate Lover’s Angel
Golden Almond Cake (page 37) Food Cake (page 160)
• Fr»r kinhrr chocvbtr^ *cc Macsrrani (page 4221
ft**» a J<5<jK< reap*—2 Uycn—Ы Btnenweei Cocoa Alniund G^nouc Ip^gr 134)
intend of Moist Chocolate Gdiotse
SPECIAL CATEGORIES 11
and students; often regard my commitment to the con-
fectionery as treasonous since my mother was a dentist. That is
not, however, entirely the case—although I was aware of the pit-
falls of sweets at a very young age. My father remembers that I
confiscated his candy, stating matter-of-factly that it would give
him “rarities!”
It was when I wrote my masters dissertation on whether sifting
affects the quality of a yellow cake that I discovered my calling.
My conclusions were so thorough I received not only ап A+ but
also an invitation to read my paper to the next class the following
year. Feeling proud, after seven years of night school as a food
major, 1 presented my paper to a boyfriend who was a physician.
To my amazement, he actually snickered, saying: "Ls this what
you consider a suitable topic for a dissertation?”
It only required a week's interval to recover sufficiently to
hazard showing the paper on a first date to Elliott Beranbaum,
also a physician whose specialty was radiology of the gastrointes-
tinal tract. By then the paper had taken on rhe aspect of a test of
sorts. 1 watched as he leafed through thr twenty-four pages, gravely
nodding his head. Finally, I couldn't resist asking: “You don’t
find this topic a little funny?”
“Not ar all,” he replied, “I have encountered the same prob-
lem with dry ingredients for my digestion studies and my conclu-
sion is the same as yours: Sifting does not uniformly mix dry
ingredients—it merely aerates them, helping them absorb the liq-
uid more uniformly. In fact,” he continued, “I bought a blender
to mix the dry ingredients after sifting.” This was so remarkably
similar to my solution of beating dry ingredients together in a
mixer that with a burst of intuition 1 thought to myself: “Ah hah!
Ibis is the man I'm going to marry. We have the same approach
to life.”
It was never the flavor of desserts alone that beguiled me. It
was also my fascination with the variety of textures derived from
so few ingredients. When reading through cookbooks I encoun-
tered endless variations of cakes and buttercreams and dcscrip-
INTRODUCTION 15
aons of how delicious they were. But nowhere was there an ex-
planation of how they compared to each other or a due as to
how they» looked and tasted. When faced with three chocolate
buncrcream recipes—(one with yolks, one with whites, and one
with cream—how could one decide which to make?
It became increasingly apparent to inc chat there were certain
basic formulas from which all these seemingly disparate recipes
evolved. I began to long for a book which would demystify and
reveal all the basic and classic cakes, bunercreams, icings, fillings,
and toppings in their simplest form and then show how to com-
bine them to create just about any cake imaginable. While I would
have preferred to be mixing a cake batter or shaping a chocolate
rose, 1 finally realized that in order to have the ideal cake book I
was going to have to write it!
This book is dedicated to my husband who, among other
wonderful qualities. unquestioningly supports my commitment to
my profession, and to the many students and readers who want
to understand the basics of baking in order to be free to create
new and wondrous desserts of their own.
SPECIAL Three systems have been used throughout this book: Volume,
NOTE avoirdupois, and metric. Each of these methods will yield perfect
О N T H E results. Personally. I prefer weighing to measuring because it is
much faster and more precise, but measuring is fine if you meas
ure with care.
WEIGHTS
AND
MEASURING
SYSTEM
Do not expect the mathematics of the metric system to cor-
relate exactly with the avoirdupois system. The grams have been
rounded off to the nearest whole number without decimal points
(except for leavening, which needs to be more precise) whereas
the ounces have been rounded off to the nearest quarter ounce.
1r> INTRODUCTION
Chocolate Bread (page 28)
All-Occasion Downy
Yellow Butter Cake
(page 39}
with Classic
Coffee B<it tore ream
(page 232)
I
Checkerboard
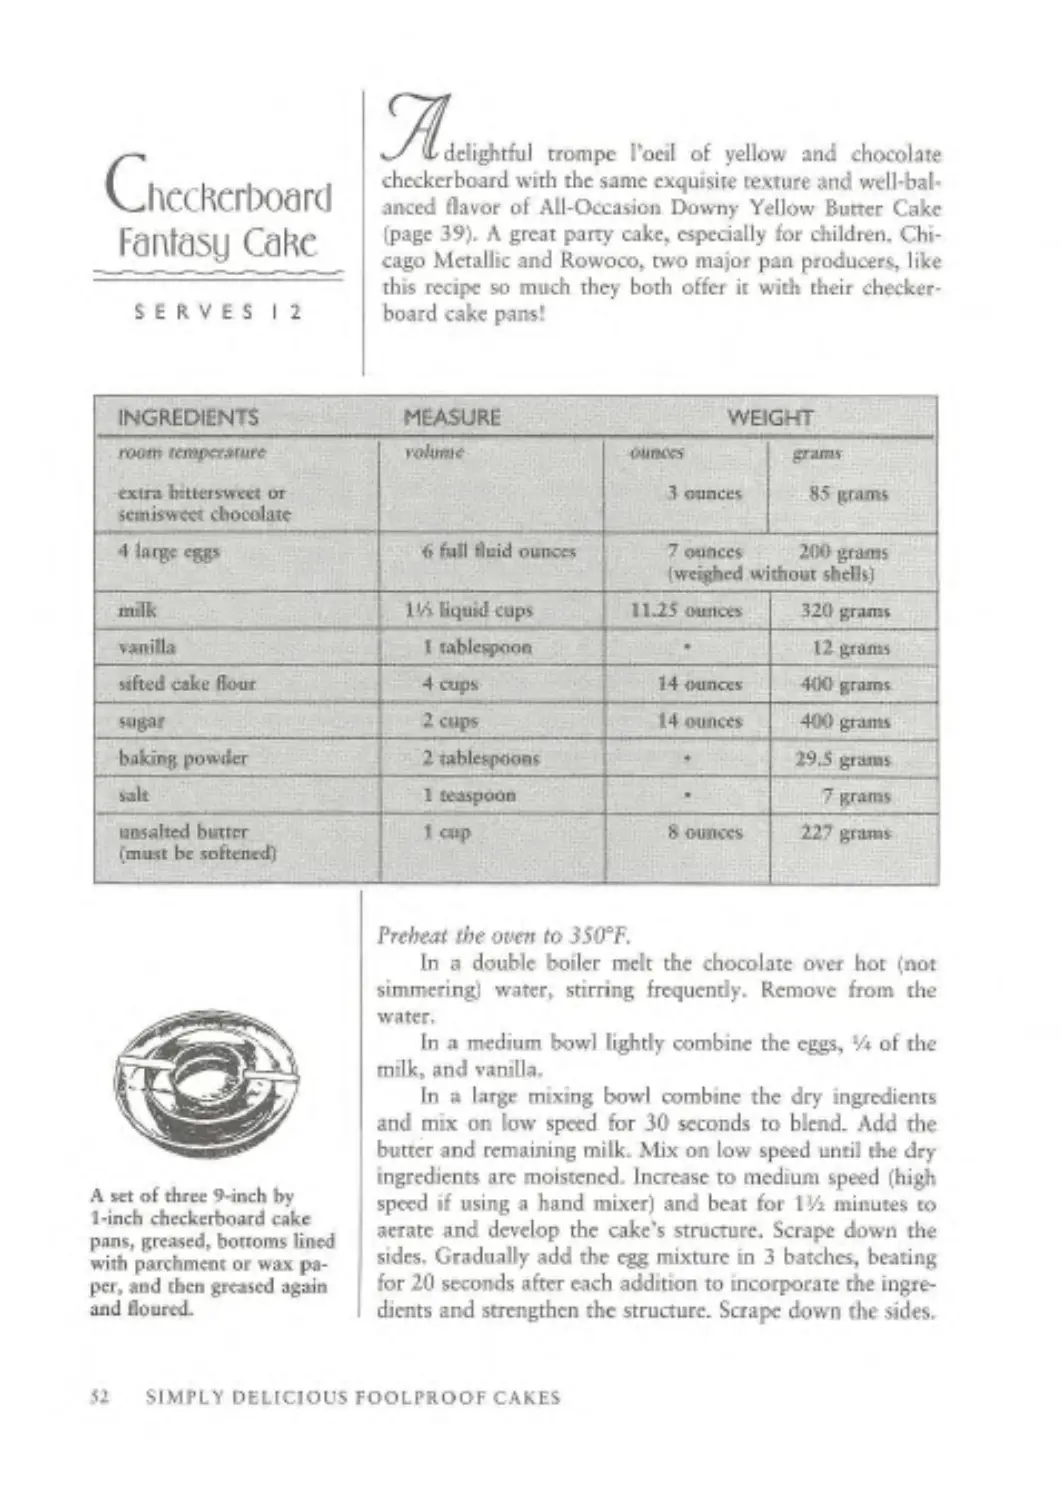
Fantasy Cake
(page 52)
Golden Grand
Harn kjr Cake
(page 44)
Chocolate
Lover's Angel
Food Cake
(page 160)
Lemon Poppy
Seed Pound
Cake
(page 27)
1
White Spice Poind Cake (page 30) Orange Glow Chiffon Cake (раде 155)
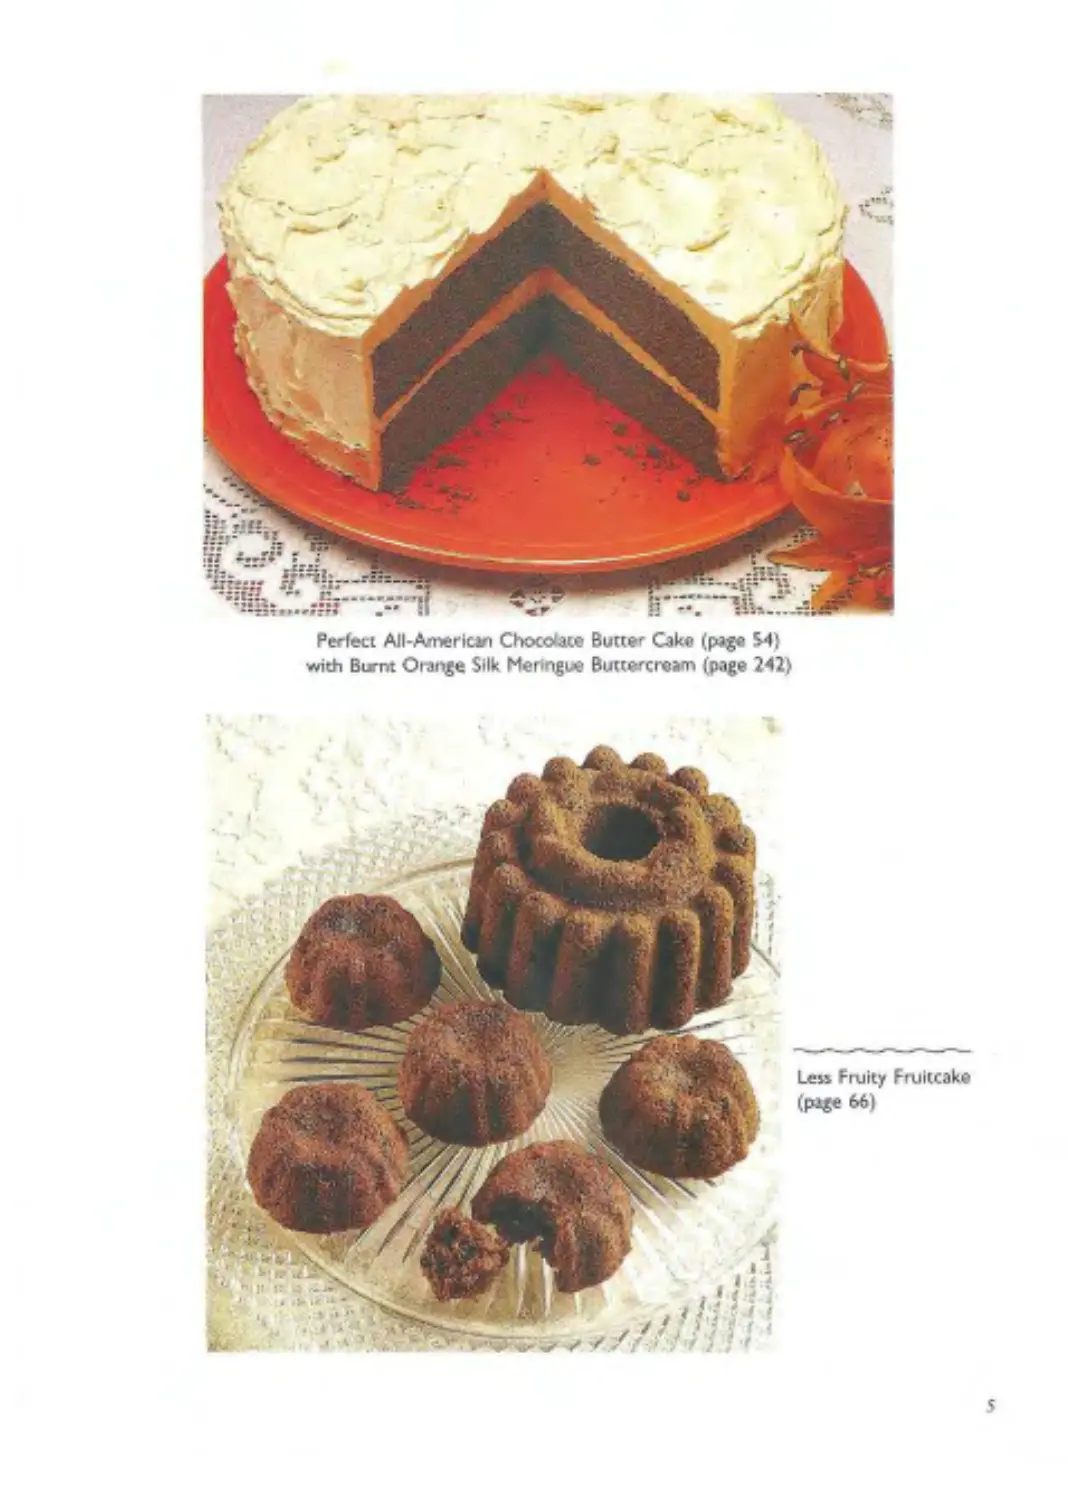
Less Fruity Fruitcake (раде 66)
Cordon Rose Cream Cheesecake (page 81)
with Fresh Cherry Topping (page 544)
Schoggi S (Chocolate S) (page 300)
Sour Cream Coffee Cake (page 90)
Chocolate Domngo Cake (page 58) 3
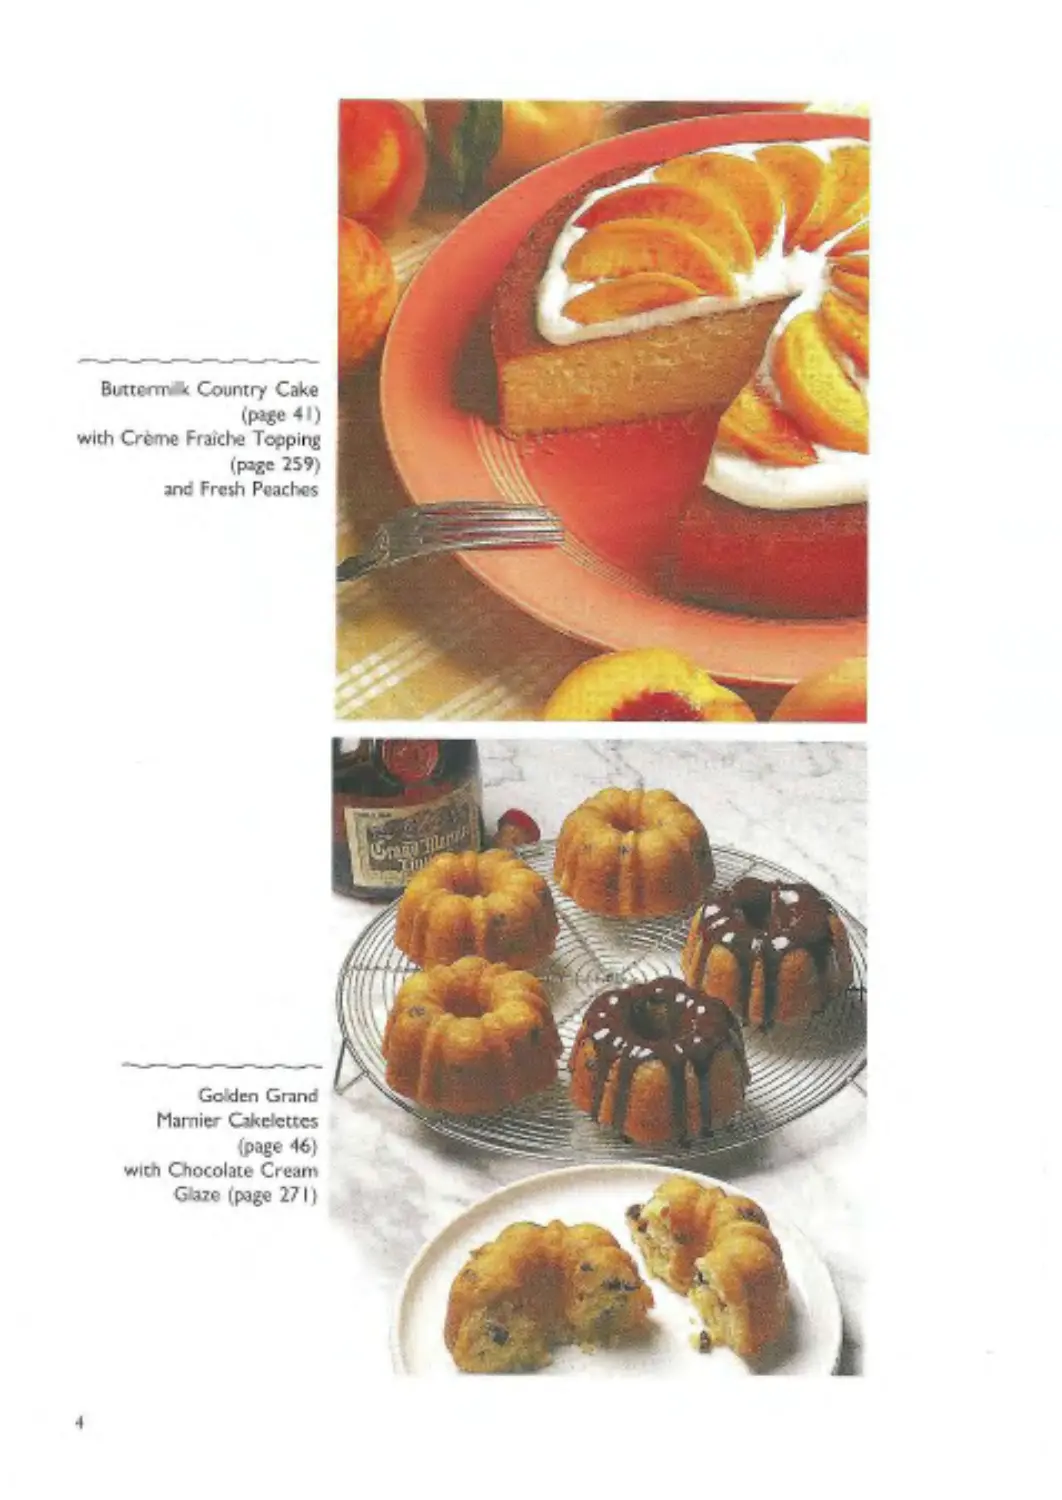
Випеог- к Country Cake
W 41)
with Create Fraiche Topping
(page 259)
and Fresh Peaches
Goden Grand
Marnier Cakdcttcs
{page 461
with Chocolate Cream
G aic i page 2711
4
Perfect AJI-Americm ChocoUce Butter Cake (page S4)
with Burnt Orange Silk Meringue Buttercream (page 242>
5
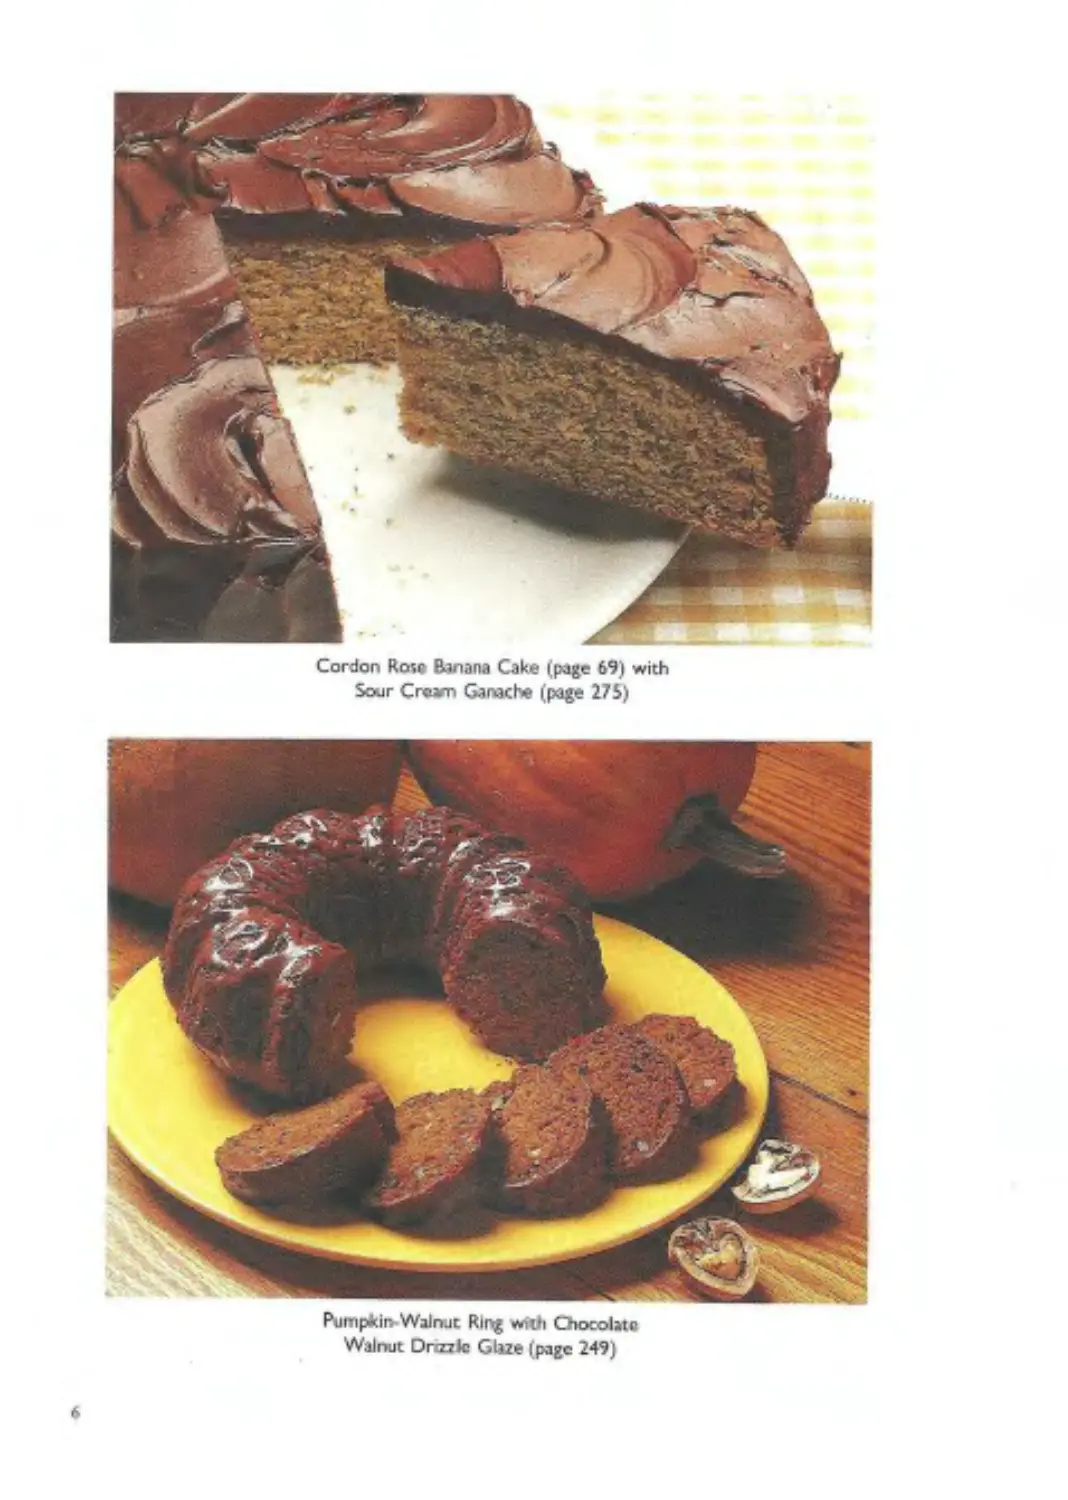
Cordon Row Banana Cake (page 69) with
Sour Cream Ganache (page 275)
Pumpkirv Walnut Ring with Chocolate
Walnut Dnzzk Glaze ( page 249)
6
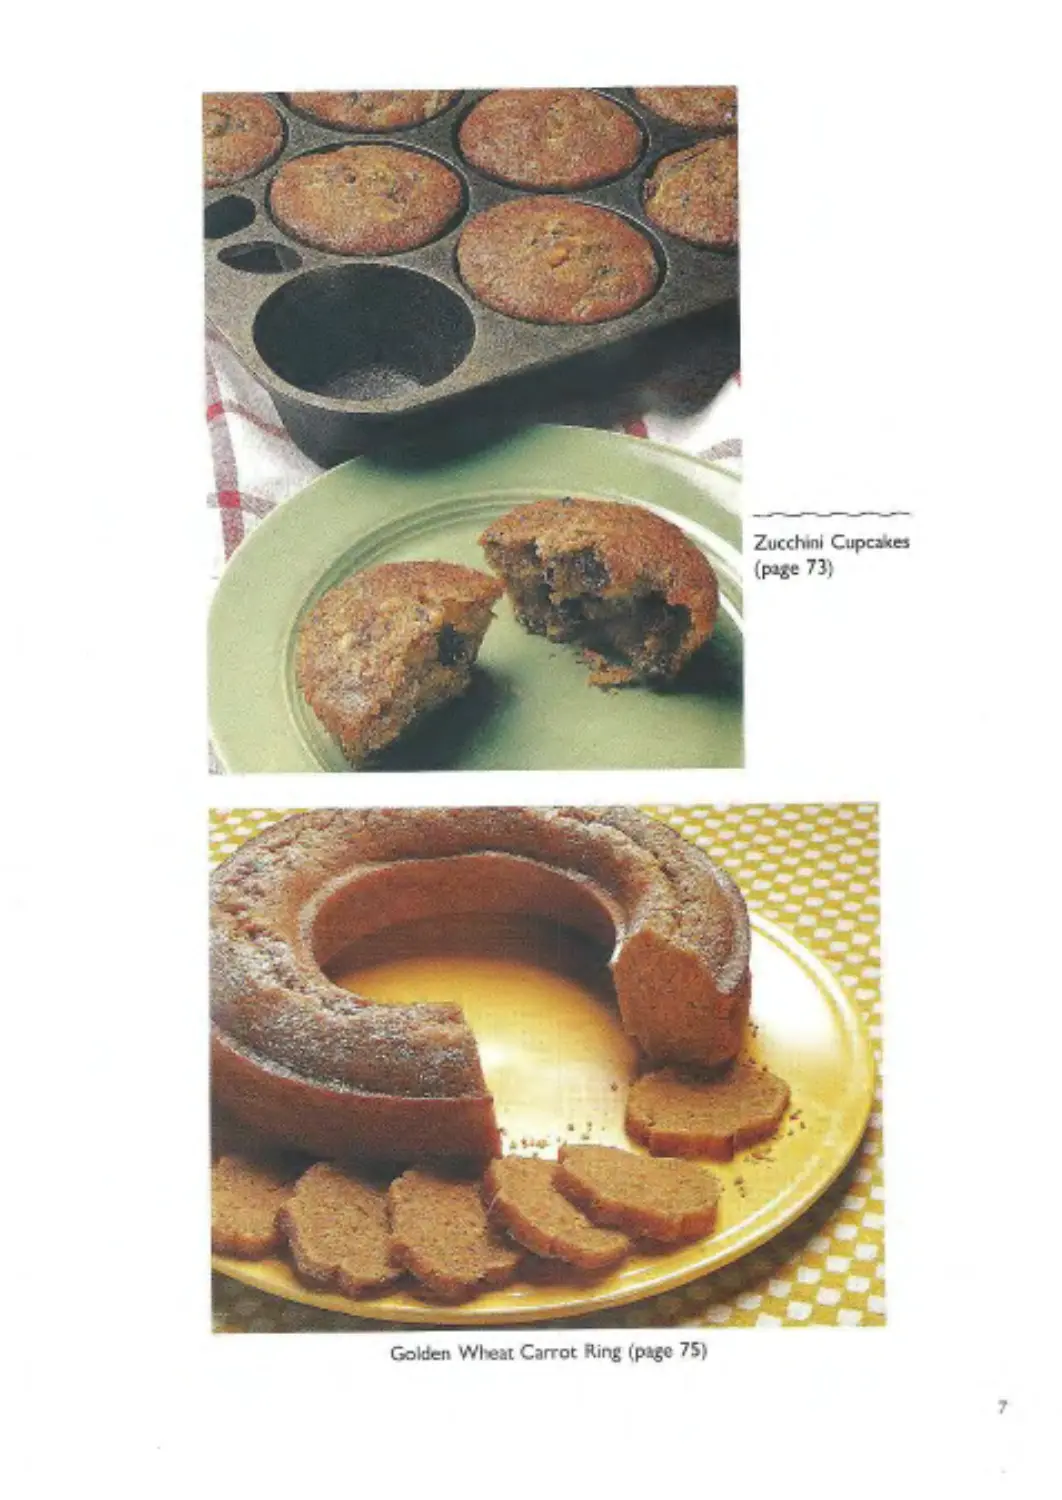
Golden Wteat Carrot Ring (page 75)
7
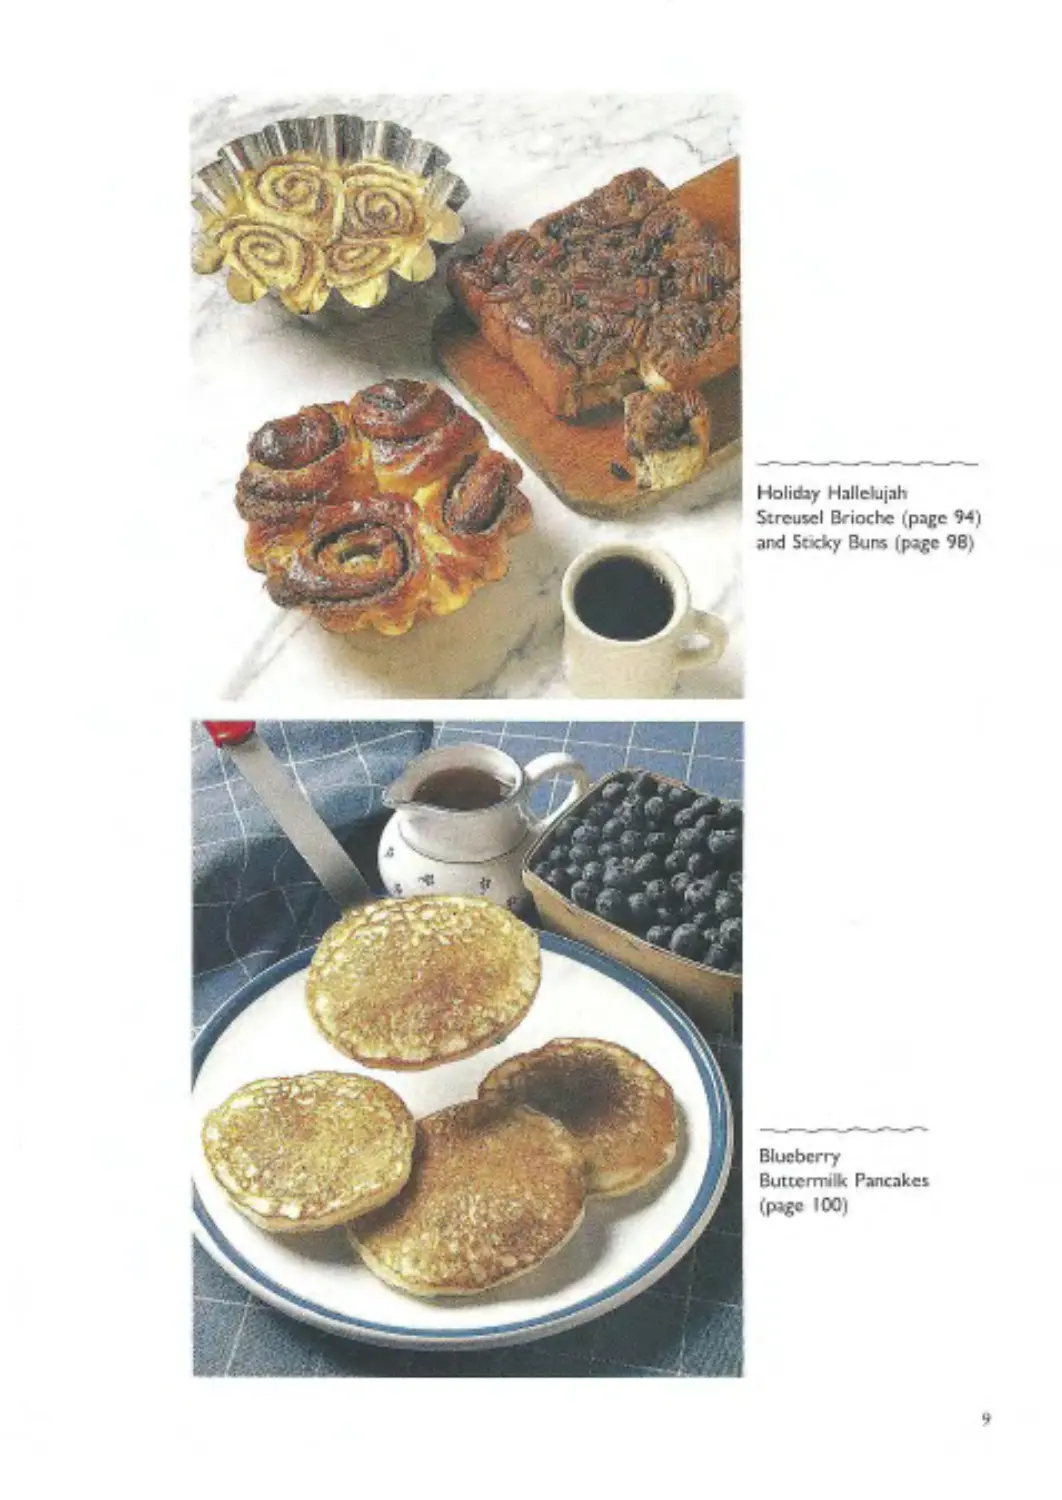
Chocolate Oblivion Truffle T<xte (page 841
with Raspberry Sauce Ipage 337)
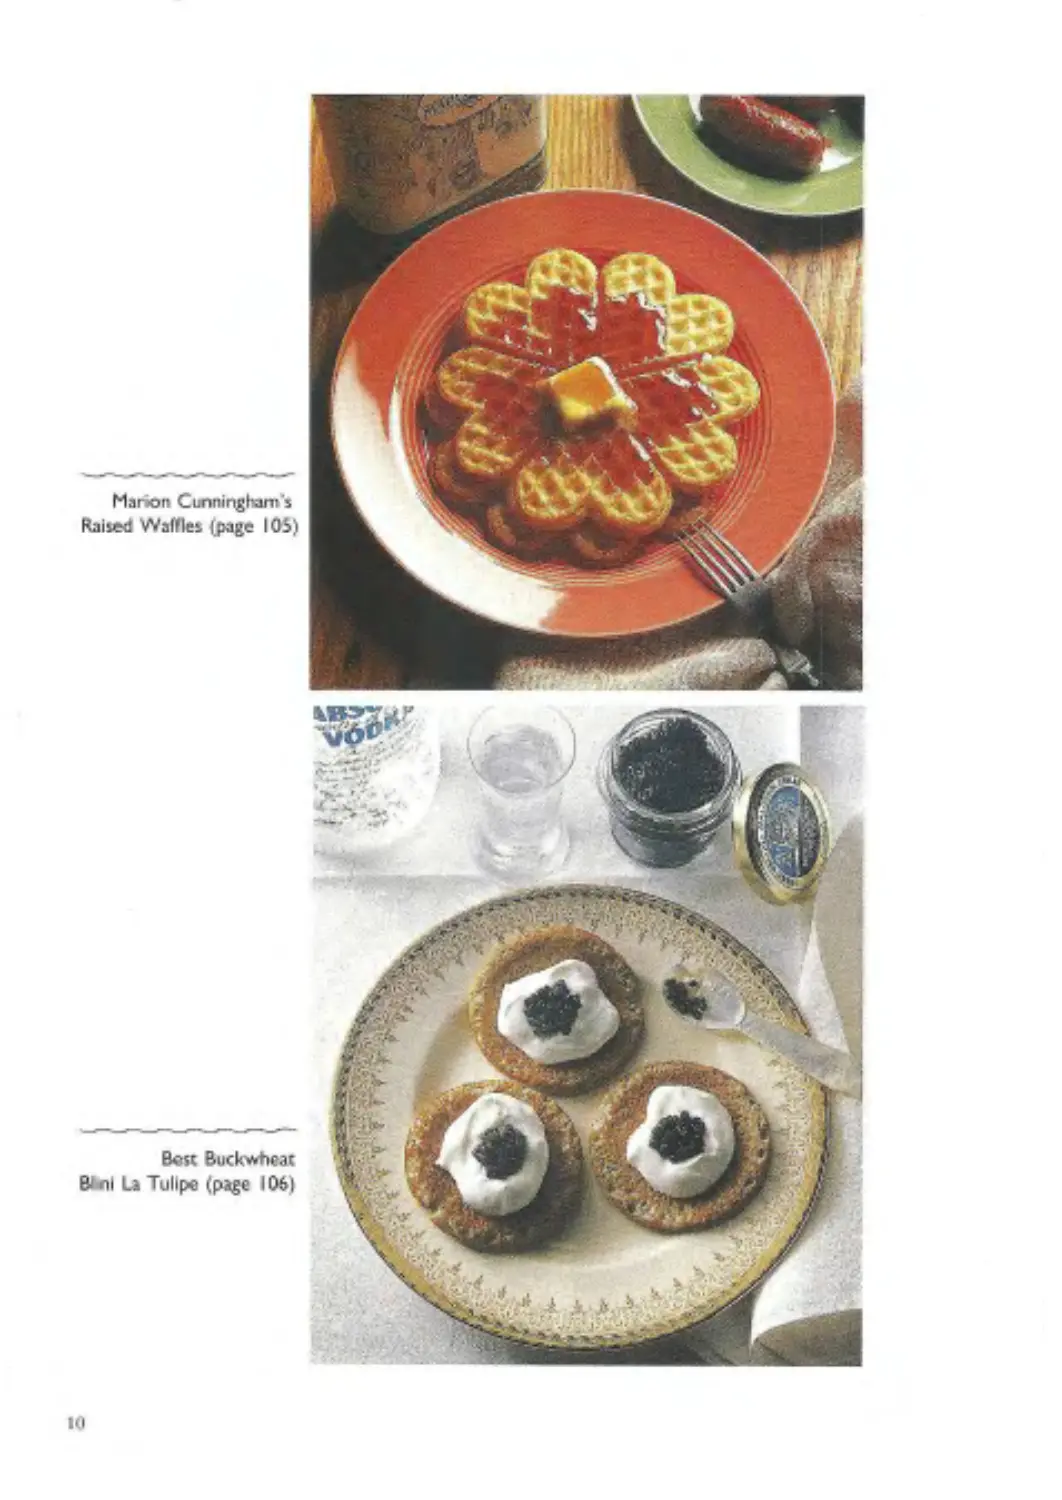
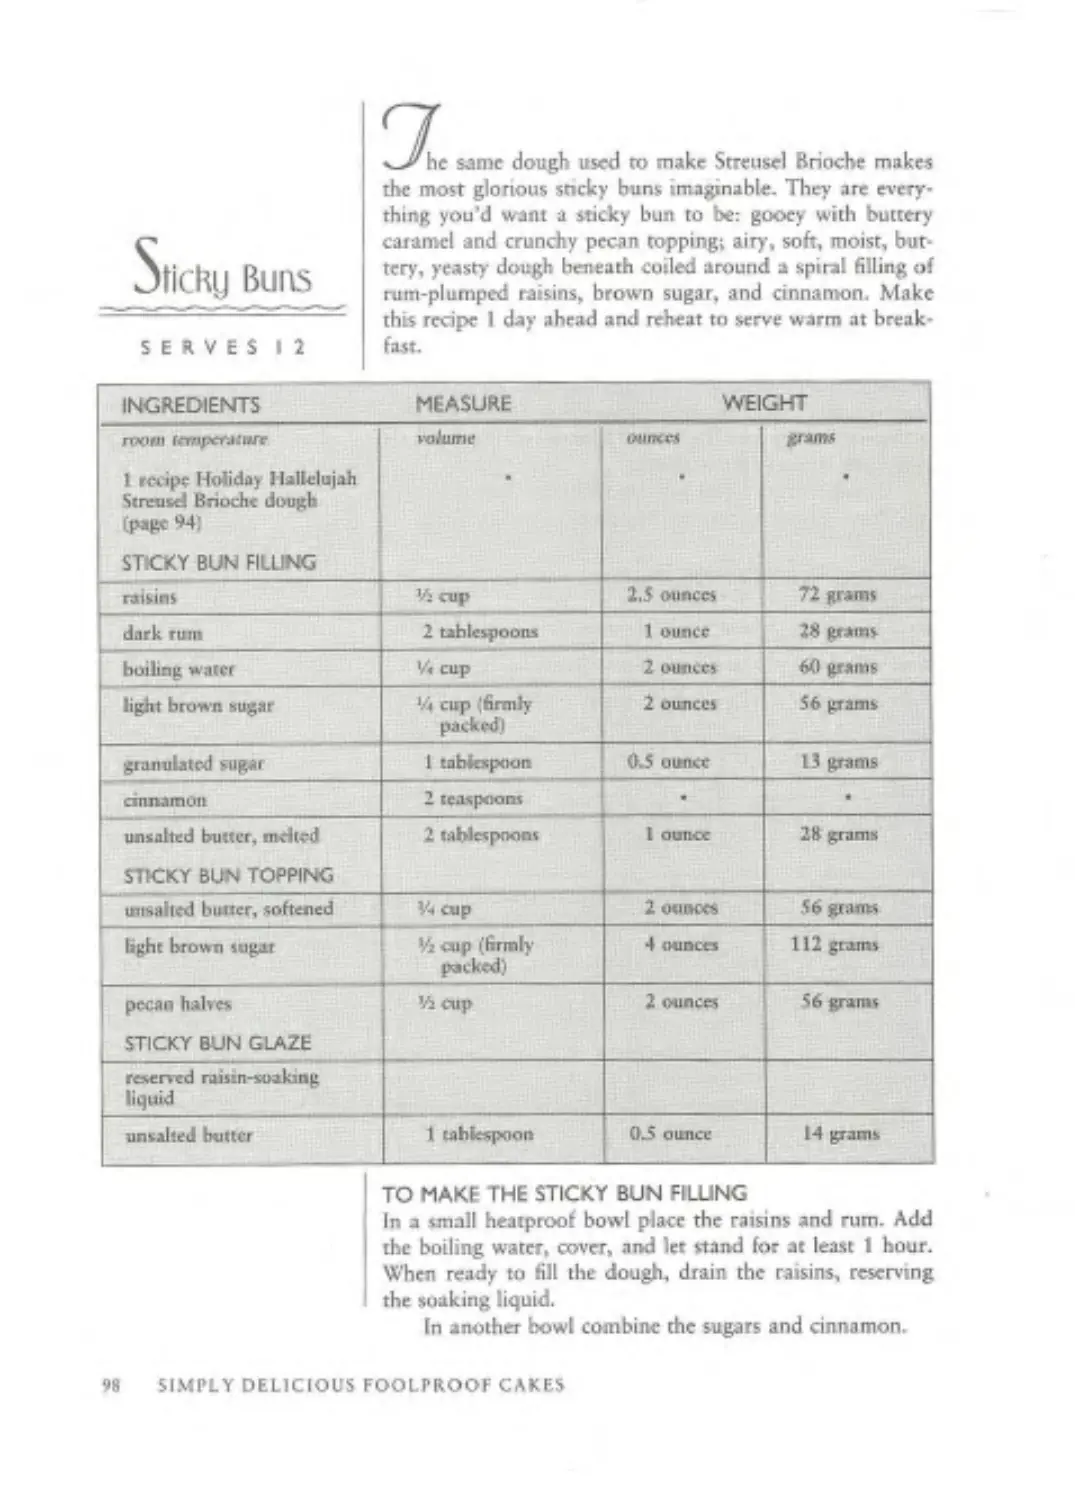
Holiday Hallelujah
Streusel Brioche (page 94)
and Socky Bun» (page 98)
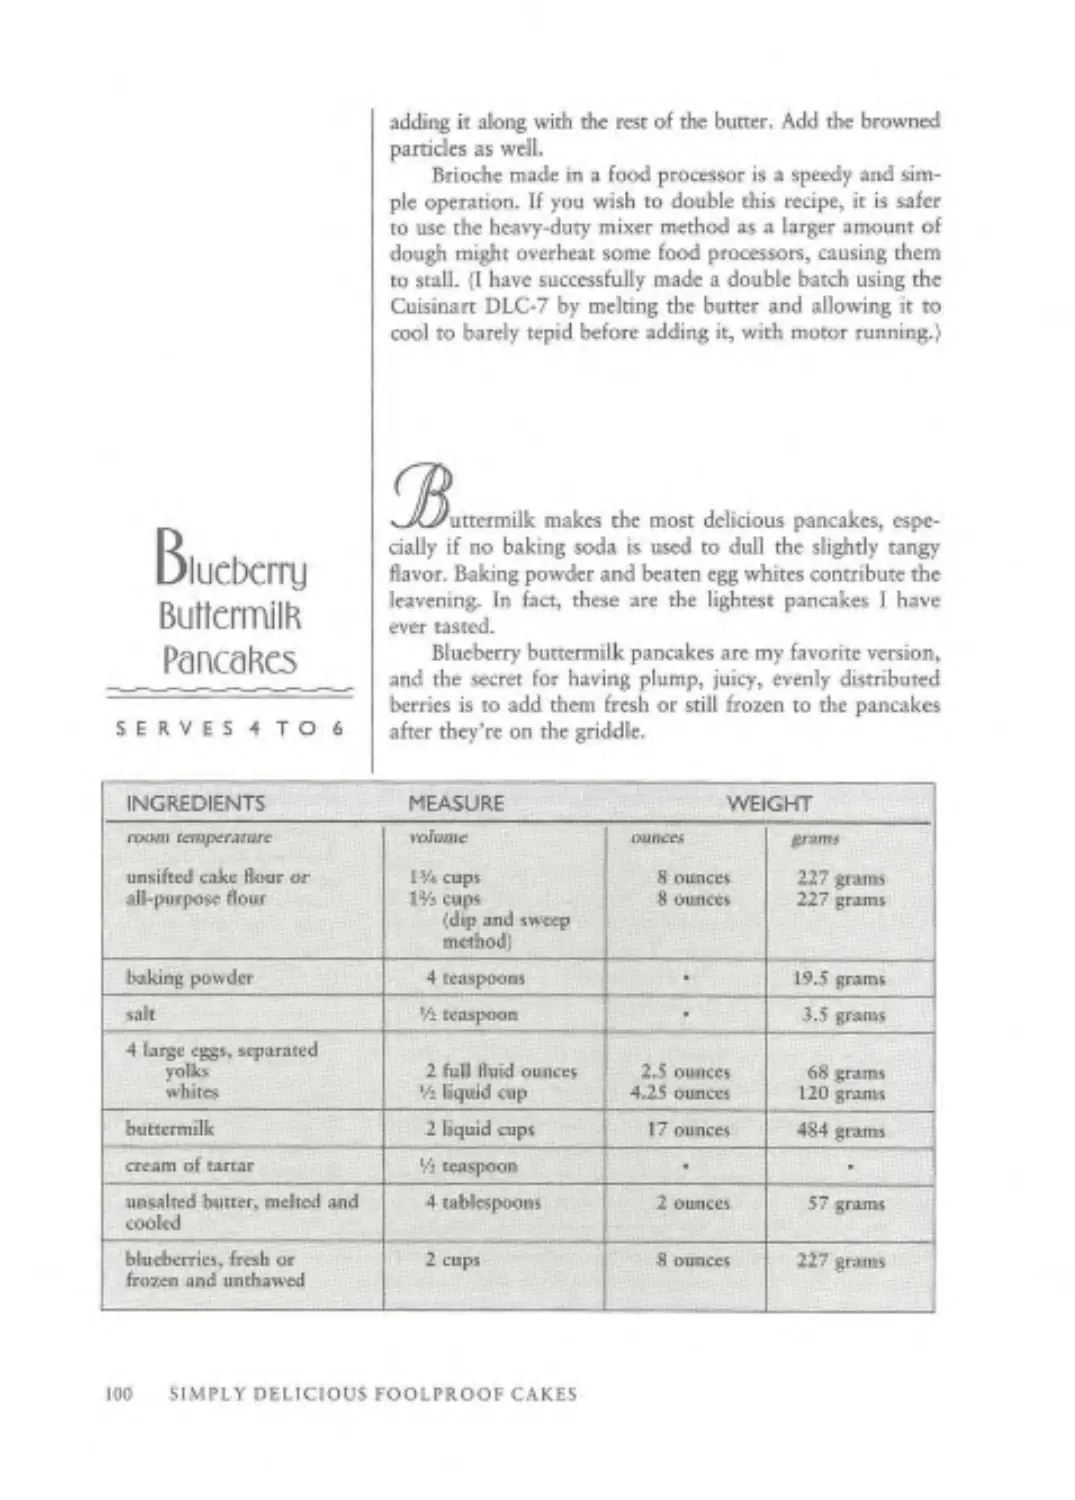
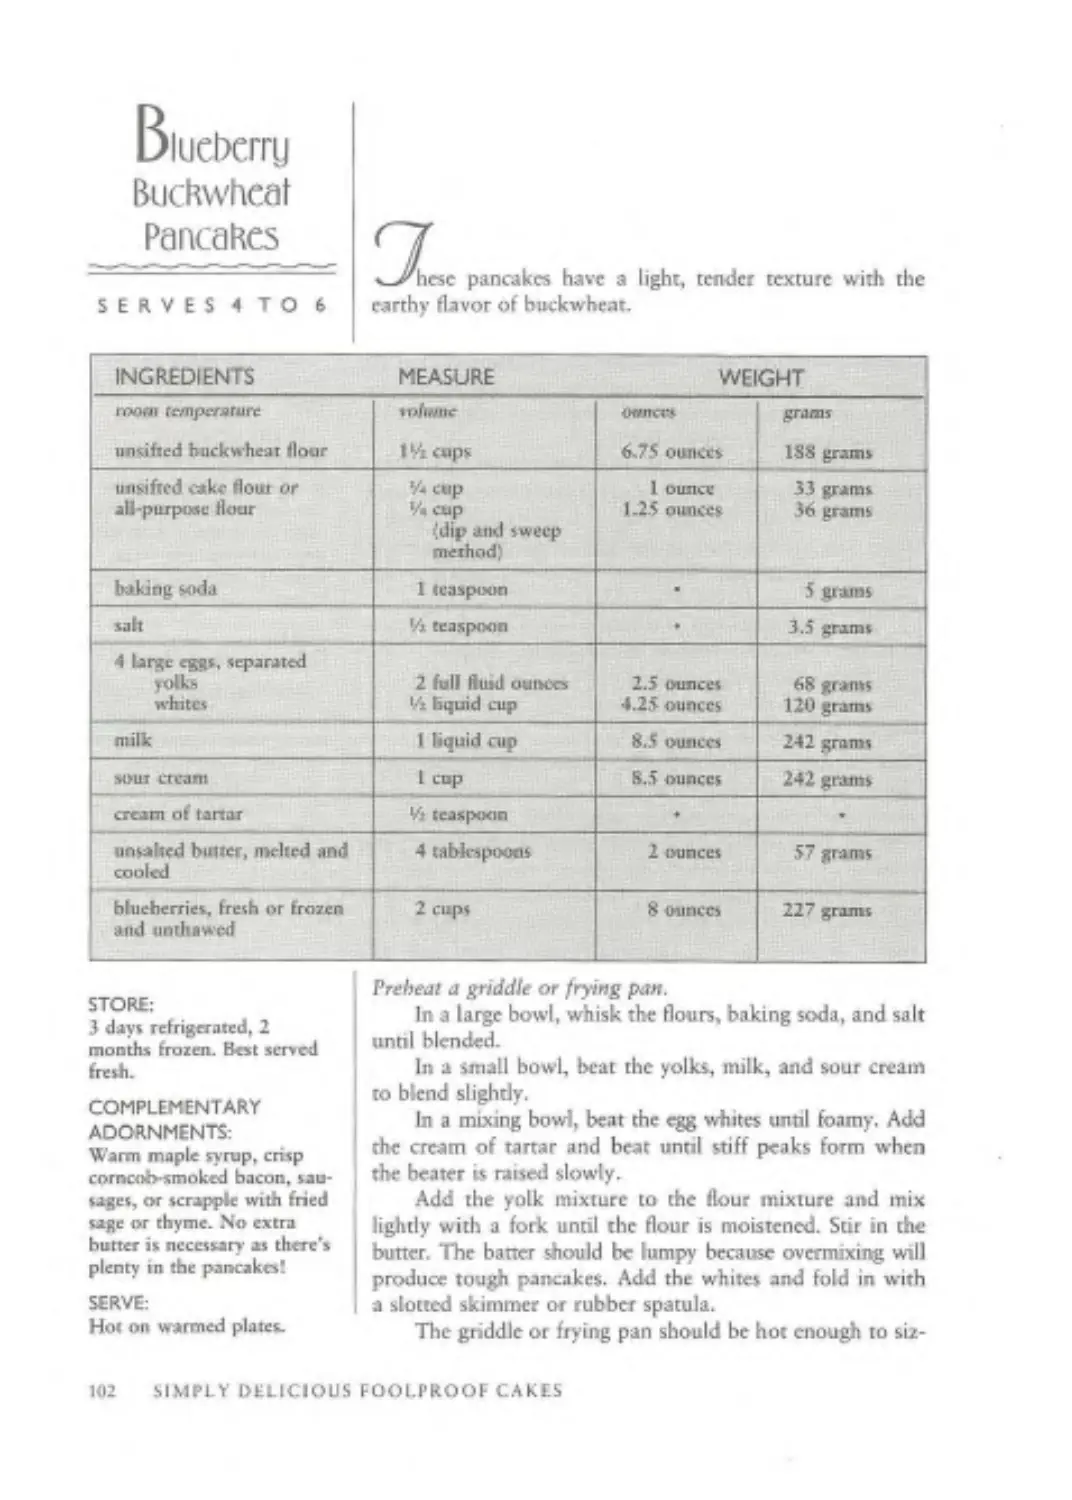
Blueberry
Buttermilk Pancakes
(page 1001
9
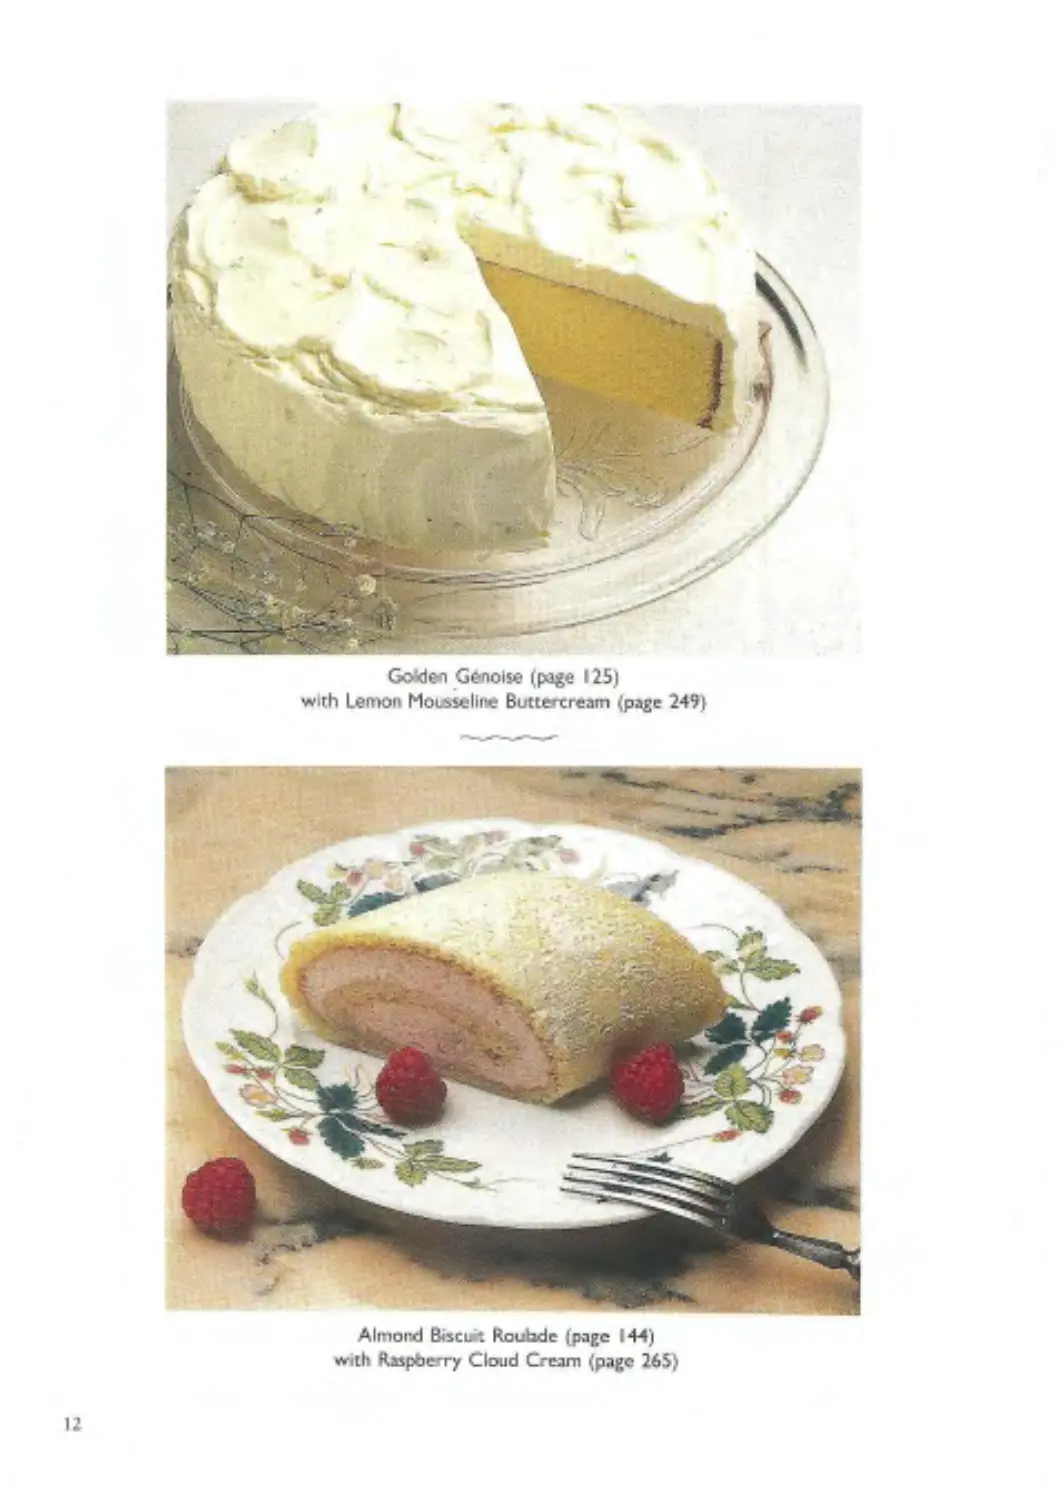
Manon Cunningham'з
Railed Waffles I page 105)
Век Buckwheat
Bin I La Tullpe (page 106»
Ю
Chantilly Crepes
Suzette (page 112)
11
И
Goden Genets* (page 1251
with Lemon MoiASeline Buttercream (page 249)
Almond BhciM Roubde I page 144)
wtth Raspbe'ry Cloud Cream (page 265)
12
II
14
15
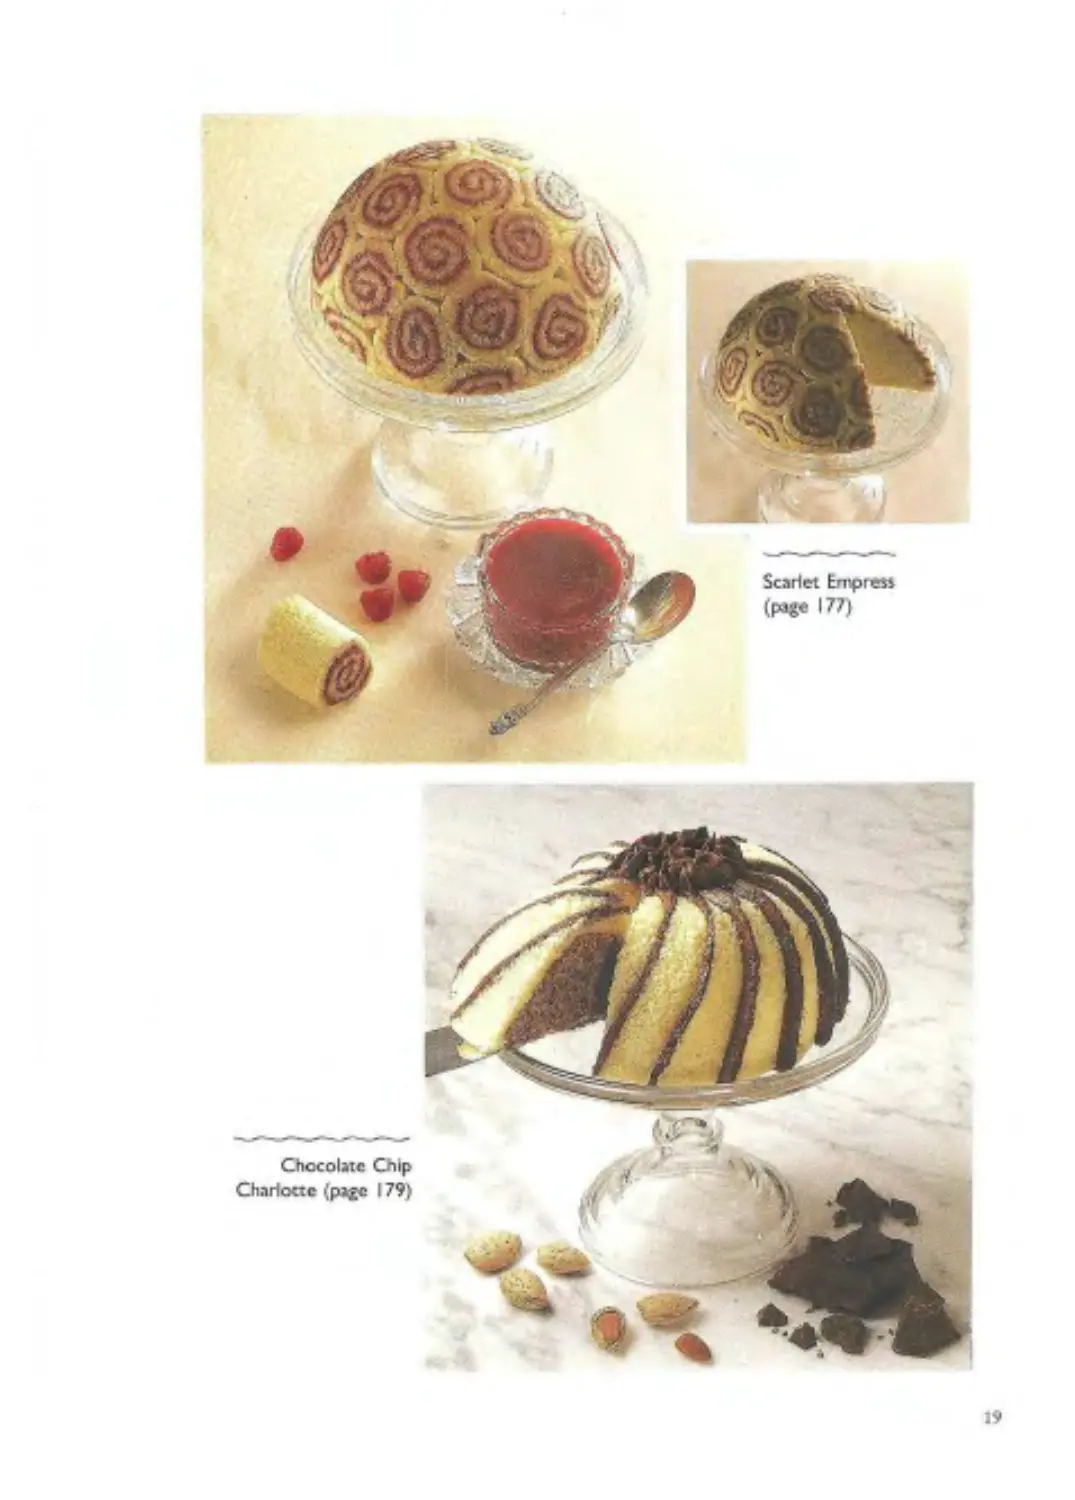
Siar-SpMigled
Rhapsody (p^gc 169)
16
J7
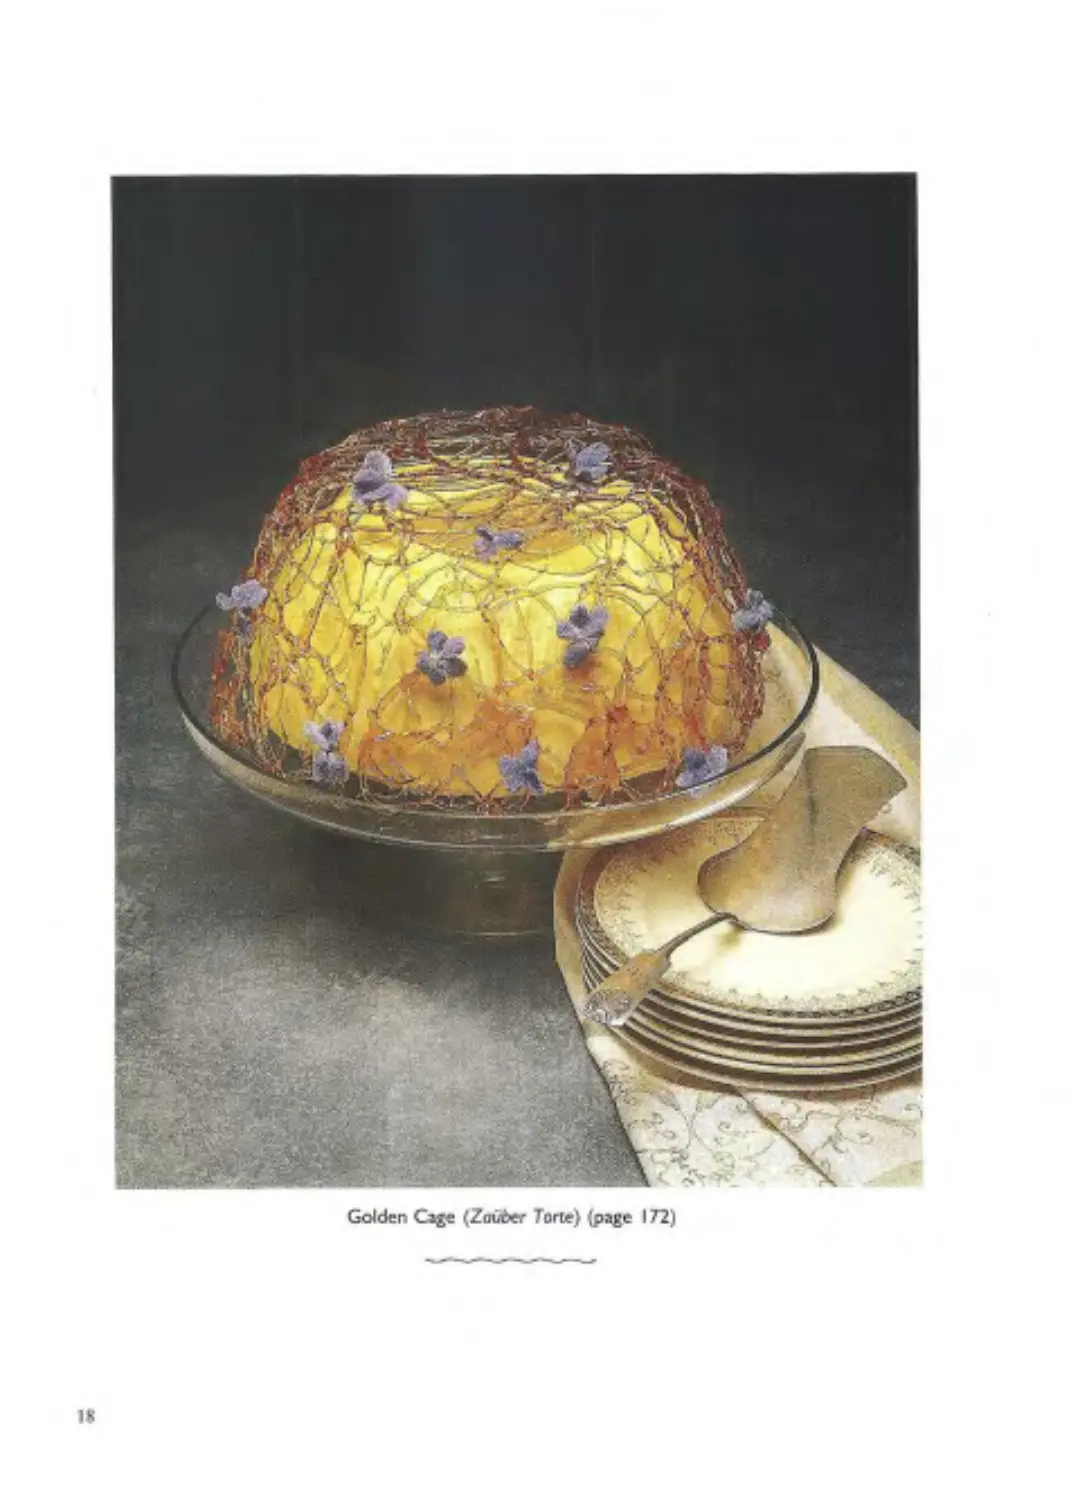
Golden Cage (Zavber Tone) (page 172)
IS
19
20
Queen Bee
(page 185)
Barquenes Chez
L'Ami Lous Ipa^e 186)
21
Chestnut Chocolate
Embrace {La Chdtoigne)
(pstge 189)
The Enchanted Forest
(Le Ебгё( Е/кЛолСё) Ipage 195)
22
23
Chocolate Spike (page 198)
24
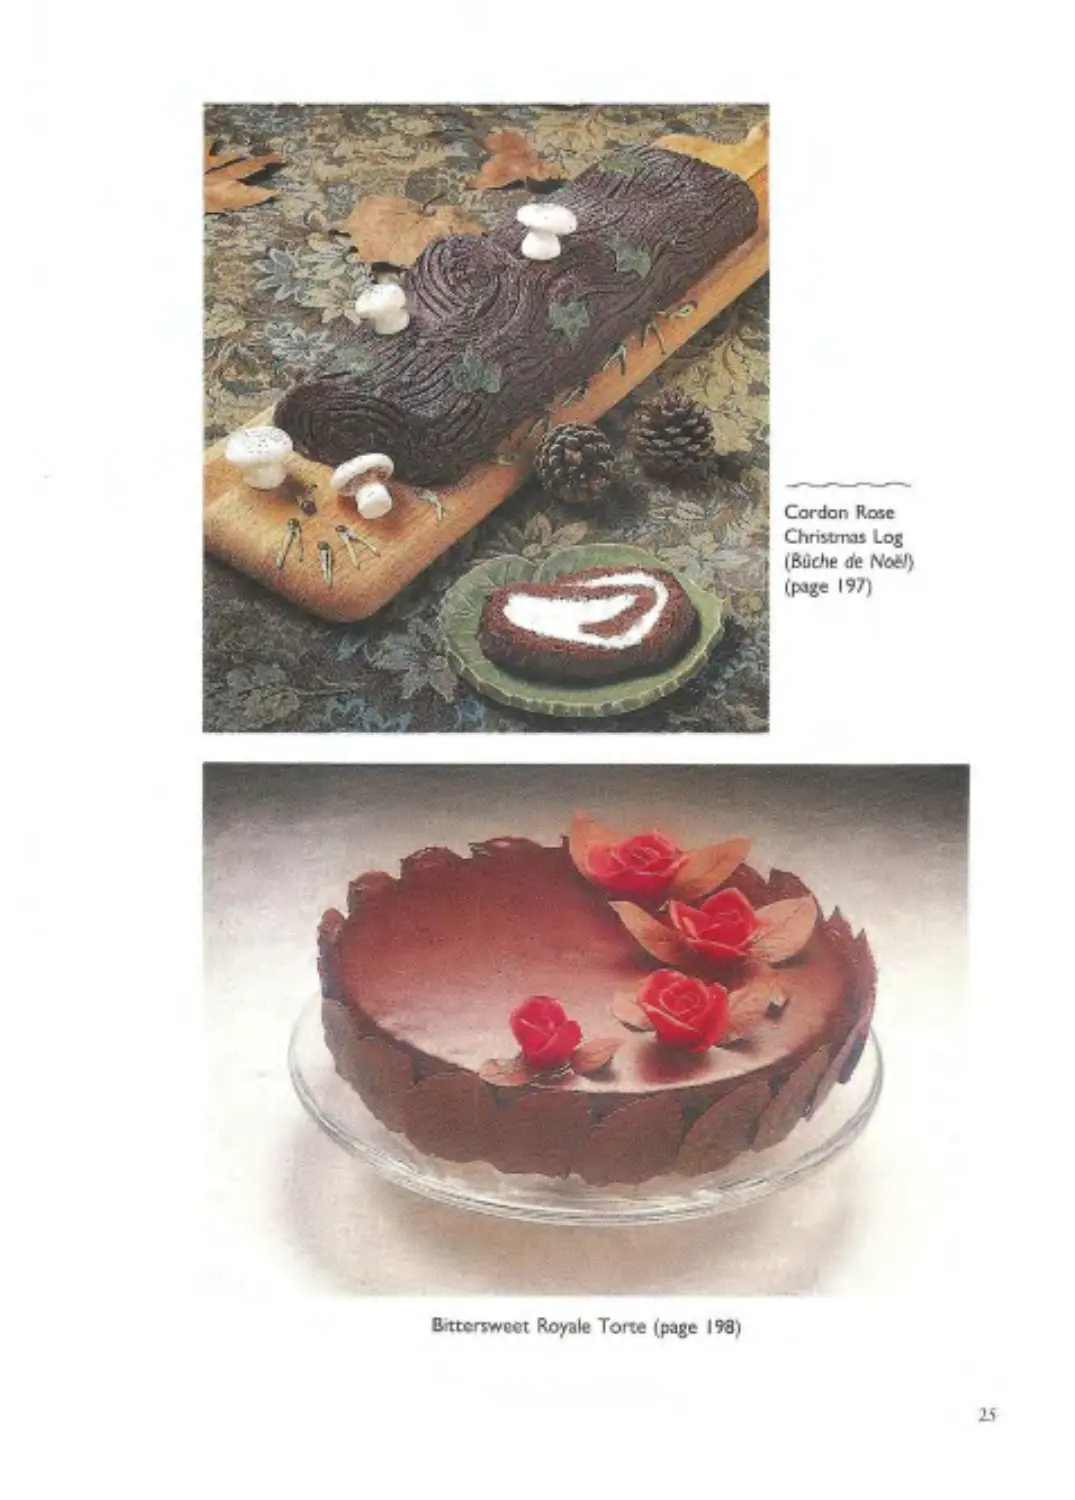
Cordon Rose
ChriMmas Log
(Budie de
(page 197)
Brttcrwwjt Royale Tone (page 198)
L4
Tnple Chocolate Cake (page 201)
26
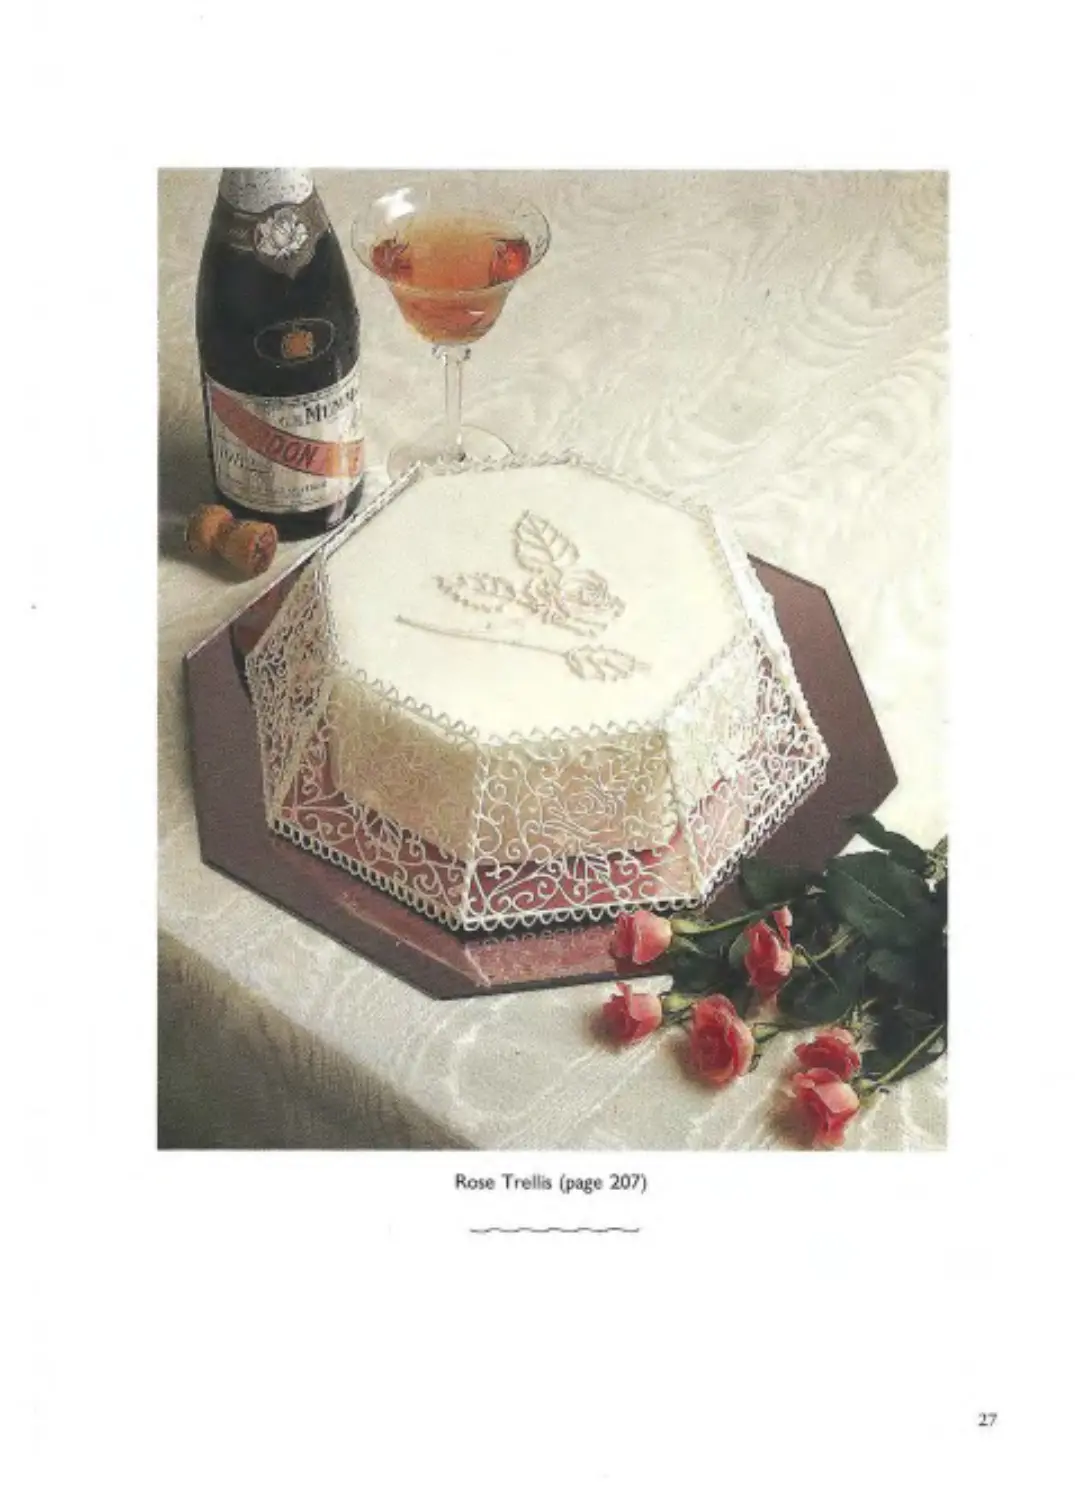
Rose Trellts (page 20?)
27
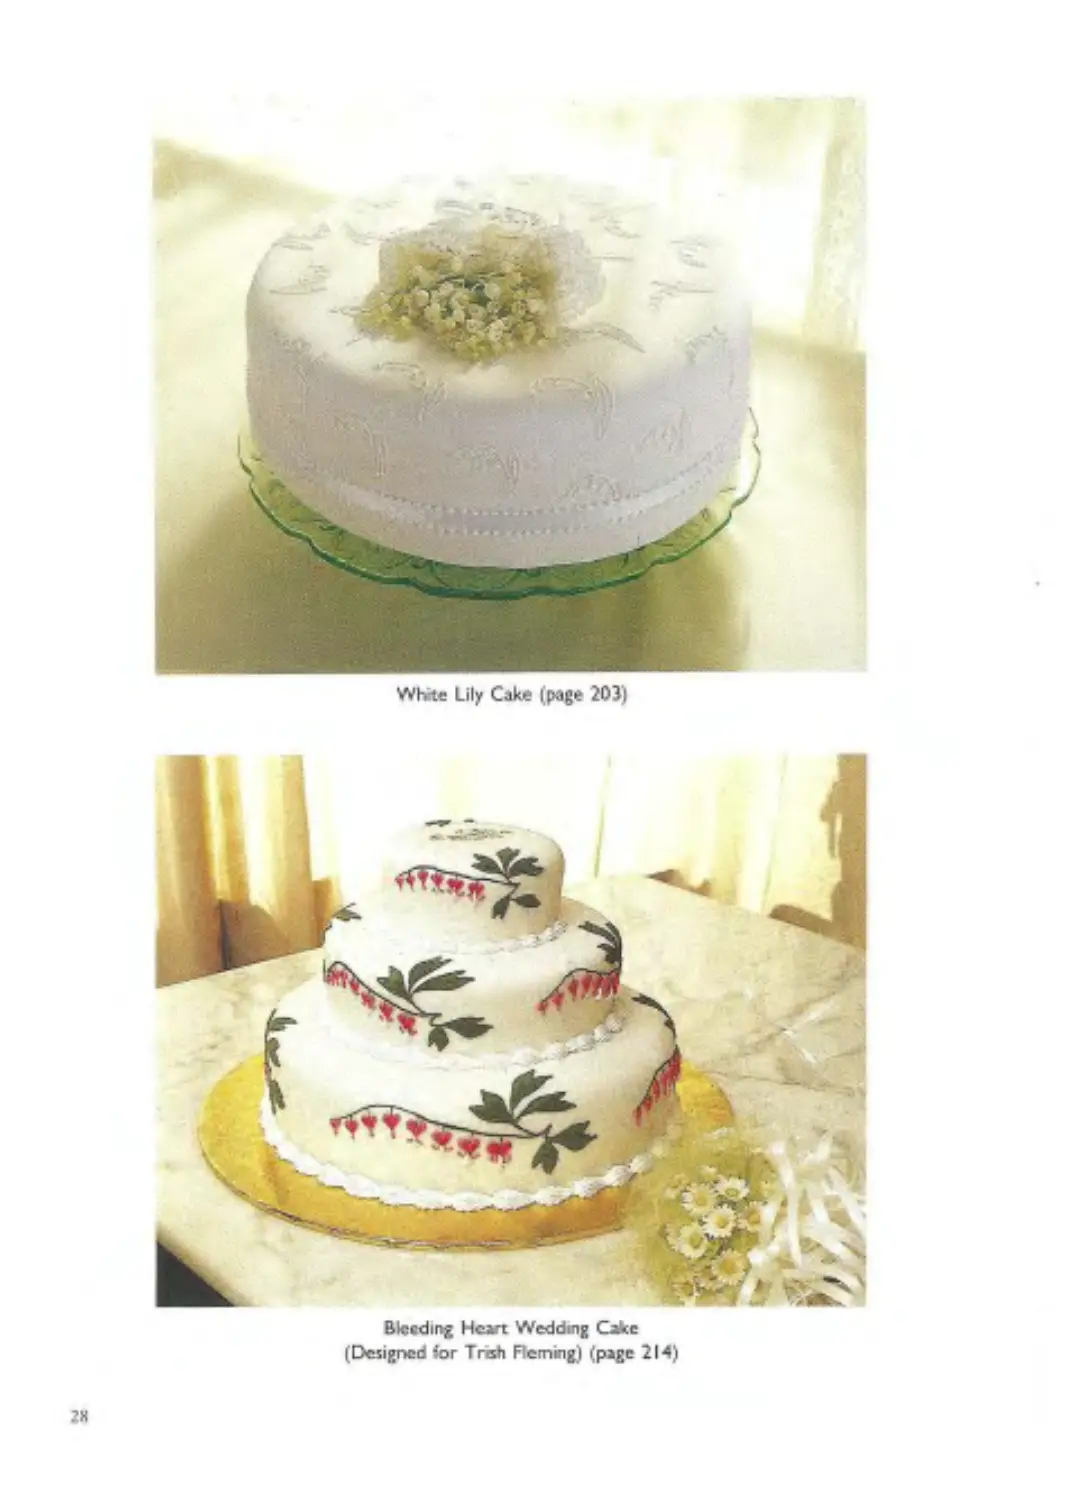
Whrte Lily Cake (page 203)
Bleeding Heart Wedding Cake
(Designed for Tnsh Flemmg) (page 214)
2X
29
Chocolate
Praline Wedding Cake
(Designed for Chocolatier
magazine) (page 216}
Golden Glory
Wcdfing Cnccsccakc
(Dcsgned for the
Joan ВсгалЬашп'Judge John
Stack house Wedding)
(page 217)
10
31
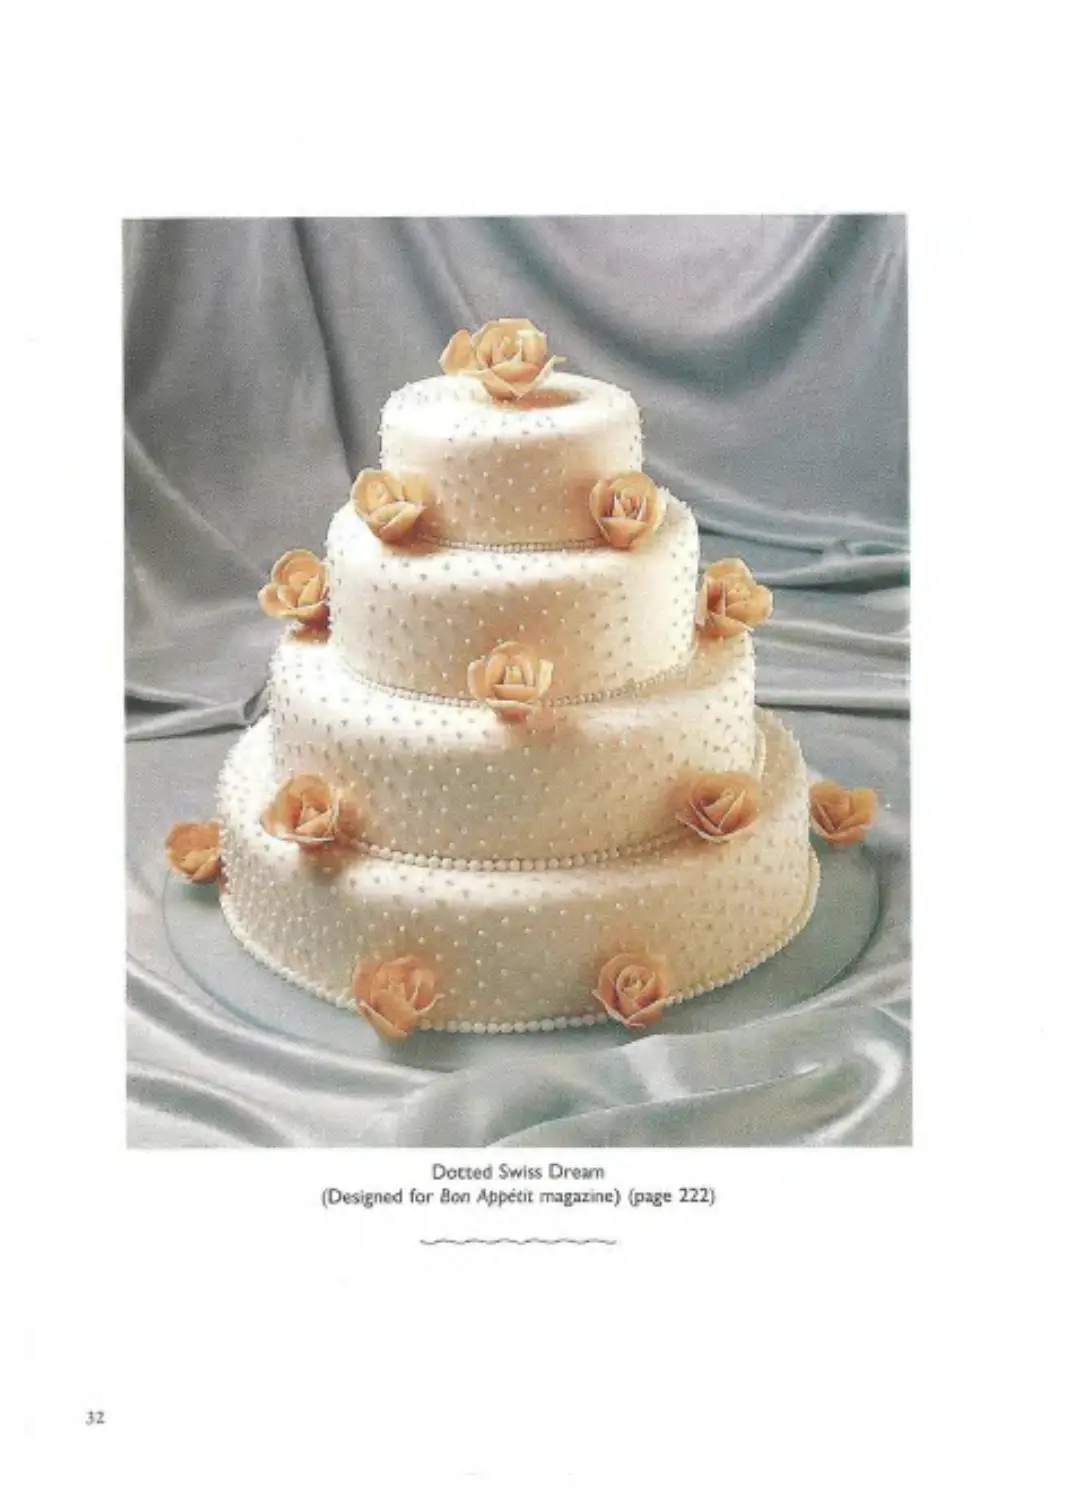
Dotted Swiss Dream
(Designed for flon Appetit magazine) page 222)
32
PARTI
Cakes
<-^eu pleasures arc greater than turning out a perfect cake.
And perfect cakes can be achieved by any cook who is careful
and who is willing to follow recipe directions. Cake-making is
an exact process; the ingredients and their relation to each other
are balanced like a chemical formula; in fact, during the baking,
a chemical process takes place transforming the raw ingredients
into a delicious new entity. . . . However inspired, no written
definition of the word “cake" could approximate the glories of
sweetened dough, baked, filled, frosted, and made ravishing with
edible decorations. Such creations can bring happiness to both
our childhood and mature years, for few, if any, people arc im-
mune to their charm, and memories of them will Lighten rhe
dark corners of life.*
Simply
Delicious
Foolproof
Cokes
Ibis chapter contains my favonte foolproof tendinous of most
basic cakes, including cheesecakes, breakfast cakes, vegetable cakes,
and even a brioche cake (which is really a bread). Not only are
Amendola and Lundberg absolutely correct in stating that work-
ing from a well-balanced recipe will yield perfect cakes, 1 know
that they also agree about how fascinating it is to have a peck
behind the scenes and understand what goes into the creation of
a cake formula and how one type of cake differs from another. It
i$ fascinating, and also puts you in control. If something goes
wrong, for example, it is possible to figure out the problem and
correct it. If you want to alter a component, you must understand
what it consists of and how it contributes to the cake. I have
organized this chapter so that you can start baking with as little
interference and as much basic guidance as possible. Separate from
each recipe are pointers that highlight key factors and also, for
those who are interested, a little about the science of each cake
and how it compares to others.
I am beginning with pound cake because it is from this basic
formula that all other butter cakes evolve. For a fuller under-
•Jorcpa Amendola ind Donald F Lnndbeix. (31
Publishing С<хпсмпу, 1970), p. 9t
5IMPLY DELICIOUS FOOLPROOF CAKES 19
BAKING AND
STORING
CAKES
CAKE PANS
standing of cake formulation, ingredients and baking, there is an
in-depth section called Understanding Cakes at the back of the
book (page 469).
Rapid heat penetration gives superior cake texture, so ideally cake
pans are manufactured from highly conductive metals such as alu-
minum, that have a dull, heat-absorbing finish, Stainless steel pans»
with their shiny, heat-reflective finish, arc poor heat conductors
and should not be used for baking cakes. (They make pretty
planters if you already happen to have them.) Black metal is also
a poor choice because it absorbs heat too quickly and overbtowns
the crust.
What is best for the inside of a cake is not, unfortunately,
best tor the outside. The sides of rhe cake, touching the hot metal,
bake and set faster than the center, which continues to rise result-
ing m a peaked surface. The solution us to slow down the baking
at the sides while promoting rapid and even penetration at the
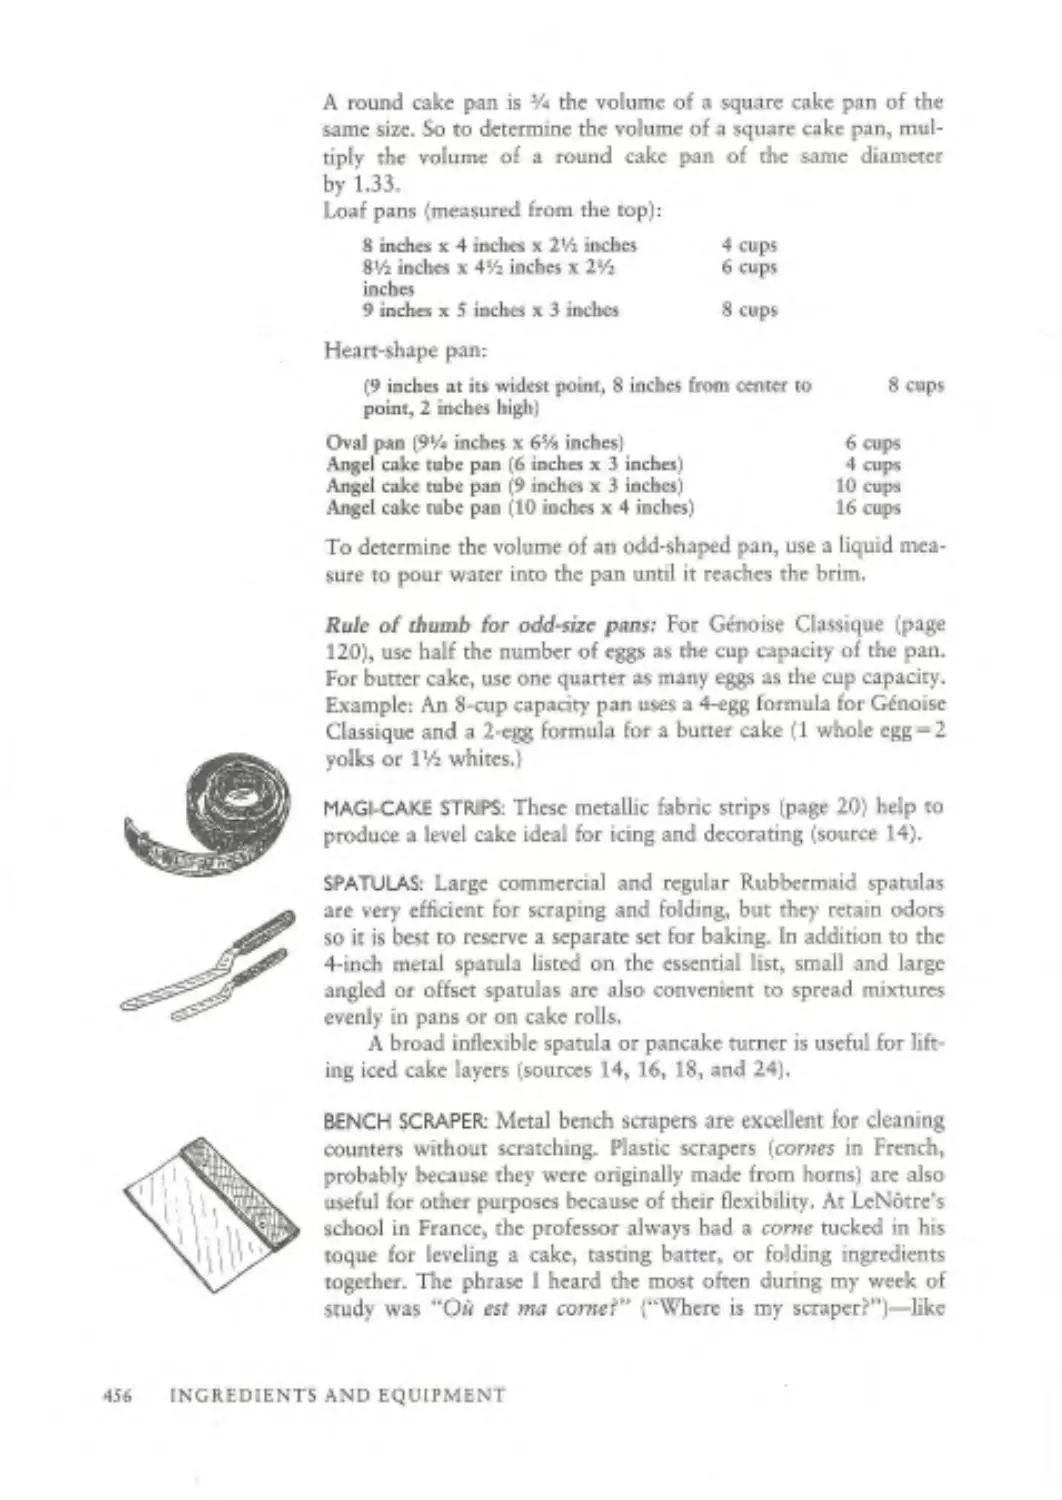
bottom of the pan. Magj-Cake Strips I pages 20 and 456) are made
of aluminized fabric which, when moistened and wrapped around
a pan, keep the sides cooler. This slows down the baking at the
perimeter so that it rises at the same rate as the center and results
in a level top.
The size of the pan in relation to rhe amount of barter also
influences how the cake bakes. Ideally, the pan should be the same
height as the cake will be at its highest point during baking. Parts
should be filled no less than one-half full. If the pan is too big,
the sides shield the batter and slow down the baking. The result-
ing cake will be drier with a paler surface. If the pan is too small,
the batter will run over the sides and the cake will collapse from
inadequate support.
PREPARING THE PANS: J like to use a round of parchment to line
the bottom to ensure that the bottom crust releases completely.
While this is not essential for yellow or white cakes, chocolate
cakes are notorious for sticking, so lining the pan is important
insurance.
A pan for a cake that will rise must never be greased without
flouring because a slippery surface will premt the cake from ad-
hering and rising to its full volume.
Baker's Joy, a shortening spray mixed with flour, is ideal for
creating a smooch, tightly sealed crust. Alternately, solid vegetable
shortening is preferable to butter and can be applied with a piece
of plastic wrap. Butter, unless it is clarified, will leave gaps where
the flour will not adhere but the cake unfailingly will. After greas-
ing the pan, add some flour, tilt the pan and rotate it, tapping the
sides to spread the flour evenly. Invert the pan and tap lightly.
20 SIMPLY DELICIOUS FOOLPROOF CAKES
Return the exec» flour to rhe bin, If desired, wrap the pan with
Magi-Cake Strips.
Most cakes (with rhe exception of very low sheet cakes, which
bake in the loxver third of rhe oven) should be baked as close to
the center of the oven as possible, with room for air circulation
between the pans. I find 3S0T. the ideal temperature for baking
most cakes. Lower than 35O°F., the texture will be coarse for layer
cakes and lacking volume for sponge-type cakes. Higher than
375°R, layer cake tops will peak and sponge-type cakes will
overbrown.
When a cake is at rhe end of its baking period, the walls
surrounding the air bubbles rupture, releasing their leavening gases
and causing the cell walls to shrink very slightly. There is a visible
lowering in the pan at this point—-a clue to doneness.
To test for doneness, insert a wire cake tester or toothpick as
clow to the center as possible. It should come out dean, with no
crumbs dinging to it. Cakes should also spring back when pressed
lightly in the center. Layer cakes under ten inches should not start
shrinking from the sides of the pan before being removed from
the oven or they will be slightly dry.
Cakes that require mure than forty minutes baking rime usu-
ally need to be covered loosely with lightly greased foil after forty
minutes to prevent overbrowning.
Problems with cake baking usually begin at over three thousand
feet. Lower air pressure causes water to boil at a lower tempera-
ture so that more evaporation takes place during baking and cakes
may be dry. If too much evaporation takes place, there will not
be adequate moisture to fully gelatinize the starch and set the
structure. Structure is further weakened by the tendency for cakes
to rise too much at decreased air pressure and subsequently col-
lapse.
Decreasing the sugar to make more liquid available for gela-
tinizing the starch is one of the standard approaches to this prob-
lem. Since my butter cake formulas have less sugar than most
(equal weights of sugar and flour) and are more velvety than those
made by the creaming method (where one creams the butter and
sugar before adding the other ingredients}, they will be less af-
fected by high altitude. Also, decreasing the sugar would ad-
versely affect the flavor balance, so I recommend slightly decreasing
the leavening and slightly increasing the liquid. The next possibil-
ity would br to increase the number of eggs to add more struc-
ture.
At elevations above thirty-five hundred feet, increasing the
oven temperature by 25'T. will help to set the structure faster.
BAKING THE CAKE
HIGH ALTITUDE
BAKING AND STORING CAKES 21
For a butter cake which uses very little baking powder and a high
level of butter, such as a pound cake, it may help to strengthen
the cake’s structure by decreasing the butter. As each cake for-
mula vanes, guidelines can be given but experimentation is the
only sure way.
The USDA lists the following recommendations for high-al-
titude adjustment:
AdriBtrnrnf 3.000 feet 5,000 feet ?,1W feet
decrease baking powder per teaspoon used Ц teaspoon •4 to ¥« teaspoon *4 teaspouci
increase 1 to 2 2 to 4 3 to 4
liquid pct cup used table» poom tables poom tablespoons
UNMOLDING THE
CAKE
In studies performed by General Mills over twenty years ago, the
recommended increase in flour was 2.5 percent at thirty-five
hundred feet, gradually increasing to 10 percent at eight thousand
feet.
Sponge-type cakes are affected by high altitude in a way sim-
ilar to butter cakes. In a sponge-type cake that does not contain
baking powder, it is advisable to decrease the sugar. This will
speed coagulation of the egg proteins which stabilize or set the
cake and interfere less with gelatinization of the starch. Alter-
nately, slightly more flour can be added to strengthen the struc-
ture and, over thirty-five hundred feet, the temperature can be
increased to 375®?.
Genoise and biseuit must be unmolded as soon as they are baked
to prevent steam from softening the cake and collapsing it. Sponge-
type cakes that arc usually baked in ungreased two-piece tube
pans—such as chiffon, sponge, and angel food—need to cool up-
side down in the pan to prevent collapsing.
Small butter cakes can be unmolded immediately, but butter
cakes larger than nine inches risk breaking if unmolded too soon.
To be on the safe side, it's fine to wait ten to twenty minutes
before turning the cakes out onto lightly greased racks. Always
run a small metal spatula around the sides first to be sure they
are completely dislodged. Be careful to press the spatula against
the sides of the pan, not the sides of the cake.
It is usually best to reinvert unmolded cakes so that top side
is up. This prevents splitting if the top is rounded, and the firm
top crust helps to maintain maximum volume.
22 SIMPLY DELICIOUS FOOLPROOF CAKES
Allow cakes to cool fully before storing or frosting or resid-
ua) heat will make them soggy and melt rhe frosting.
Refrigerated or frozen cakes must be stored airtight to prevent
drying out or absorbing odors. Wrap them first in plastic wrap,
then in heavy-duty foil.
To freeze a frosted cake, place it uncovered in the freezer just
until the frosting is very firm and it should not be damaged by
wrapping. Wrap first in plastic wrap, then in heavy-duty toil, trying
to eliminate as much air space as possible without pressing on
decorations. The most airtight wrap is known as the drugstore
w rap: Place the cake in rhe center of the foil and bring the two
long sides together so that the edges meet. Fold the edges over
several times until dose to the cake. Proceed in the same way for
the short ends. Delicate decorations can be protected further by
placing the wrapped cake tn a rigid box.
For unfrosted cake, remove from the freezer and thaw without
unwrapping If desired, freshen the thawed cake by placing it in
a 350°F. oven for five minutes or in a microwave oven on low
power for a few seconds.
To thaw frosted cake, unwrap it and place it in the refriger-
ator overnight. It i$ best to keep the cake in a large airtight con-
tainer such as a cake carrier or glass dome (page 461) to avoid
absorbing any odors. Iced cakes should be defrosted gradually to
prevent moisture condensation or beading.
The pound cake, according to Larousse Gastronomique. origi-
nated in England and was the first “butter cake.” France adopted
it, calling it quatres-quarts because traditionally it was prepared
using one-fourth flour, one-fourth butter, one-fourth eggs, and one-
fourth sugar.
In America the pound cake is often thought of as die “mother’*
cake from which all oilier butter cakes (usually referred to as layer
cakes) evolved. The American butter cake contains 6 to 12 per-
cent solid butter (not including the liquid and milk solids in the
butter) or other shortening, 18 to 36 percent liquid (usually milk
or water), 27 percent flour or я combination of flour and cocoa,
27 to 40 percent sugar, 3 to 10 percent egg, a small amount of
salt and flavoring, and leavening such as baking powder and/or
baking soda.
The butter cake derives its light texture from the air bubbles
produced by creaming the sugar and fat and by the leavening—
which enlarges these bubbles during baking. In rhe traditional
method, the butter and sugar are creamed before adding the other
ingredients. The method J have chosen for my butter cakes is faster.
STORING THE CAKE
TO DEFROST CAKE
BUTTER
CAKES
BUTTER CAKES 23
easier, and virtually eliminates any possibility of toughening the
cake by overheating. Creaming still takes place hut in a different
way: All the dry ingredients are first combined with the butter
and a minimum amount of liquid, which coats the flour before
adding the remaining liquid ingredients.
The American butter cake is flavorful yet not overly sweet,
soft and light in texture, and moist enough tn stand on its own
or to accommodate a variety of frosnngs and toppings. It is one
of the world's great cakes.
Noil: All butter cake recipes can be doubled if you have extra
pans. Be sure to place them in the oven so air can circulate freely
around the sides of all the pans. If you lack room, pour the batter
into the pans and refrigerate them until the first set of cake layers
has baked. (Г>о not refrigerate batter in a bowl as it will lose
leavening power if not transferred to рапл won after mixing.)
HIGHLIGHTS FOR
SUCCESSFUL
BUTTER
CAKES
For fuller details, see the suggested page number.
• Have all ingredients near room temperature (65°F. to 75eF., page
4’5:.
• Use cake flour that does not already contain leavening (page
471). Do not use seif nsing cake flour.
• Use superfine sugar for finest texture (page 472).
• Use unsalted butter (pages 423 and 472}.
• Use fresh baking powder I pages 420 and 473).
• Measure or weigh ingredients carefully Ipage 438j.
• If using a ha nd*held mixer, beat at high speed.
• Use the correct pan size (page 20},
• For very even layers and maximum height use Magi-Cake Strips
(pages 20 and 456).
• Check for accurate oven temperature (page 448).
• Use correct baking time; do not overbake Ipage 21).
• Wrap cake layers well or frost them when cool (page 23).
24 SIMPLY DELICIOUS FOOLPROOF CAKES
I crfcct
Pound Cake
SERVES 8
his cake not only has a silky-smooth dissolving texture
similar to famous Sara Lee pound cake but also the incom-
parable moist, buttery flavor of a home-baked cake. Its ex-
cellent keeping qualities make it ideal for slicing ahead and
bringing on picnics.
INGREDIENTS MEASURE WEIGHT
room tcmpe/лгше milk volume 3 tablespoons OUULCS 1.5 ounces grams 45 grams
5 large eggs scant 5 fluid ounces 5.25 ounces 1 SO grams 1 weighed without sheik)
vanilla sifted cake Hour 1 Vi teaspoons 1*Л cups • $.25 ounces 6 grams 150 grams
sugar % cup $.25 ounces 150 grams
baking powder % teaspoon ♦ 3.7 grams
salt V* teaspoon • ♦
unsalted butter «.must be softened) 13 table«p<XMis bS ounces 1S4 grams
Preheat the oi<en to 3S(FF.
In a medium bowl lightly combine the milk, eggs, and
vanilla.
In a large mixing bowl combine the dry ingredients
and mix on low speed for 30 seconds to blend. Add the
butter and half the egg mixture. Mix on low speed until
the dry ingredients are moistened. Increase to medium speed
(high speed if using a hand mixer) and bear for 1 minute
to aerate and develop rhe cake’s structure.
Scrape down the sides. Gradually add the remaining
egg mixture in 2 batches, bearing for 20 seconds after each
addition to incorporate the ingredients and strengthen rhe
structure- Scrape down the sides.
Scrape the batter into the prepared pan and smooch
the surface with a spatula. The batter will be almost *6
inch from the top of rhe 4-cup loaf pan. (If your pan is
slightly smaller, use any excess barter for cupcakes.) Bake
55 to 65 minutes (35 to 45 minutes in a fluted tube pan)
or until a wooden toothpick inserted in the center comes
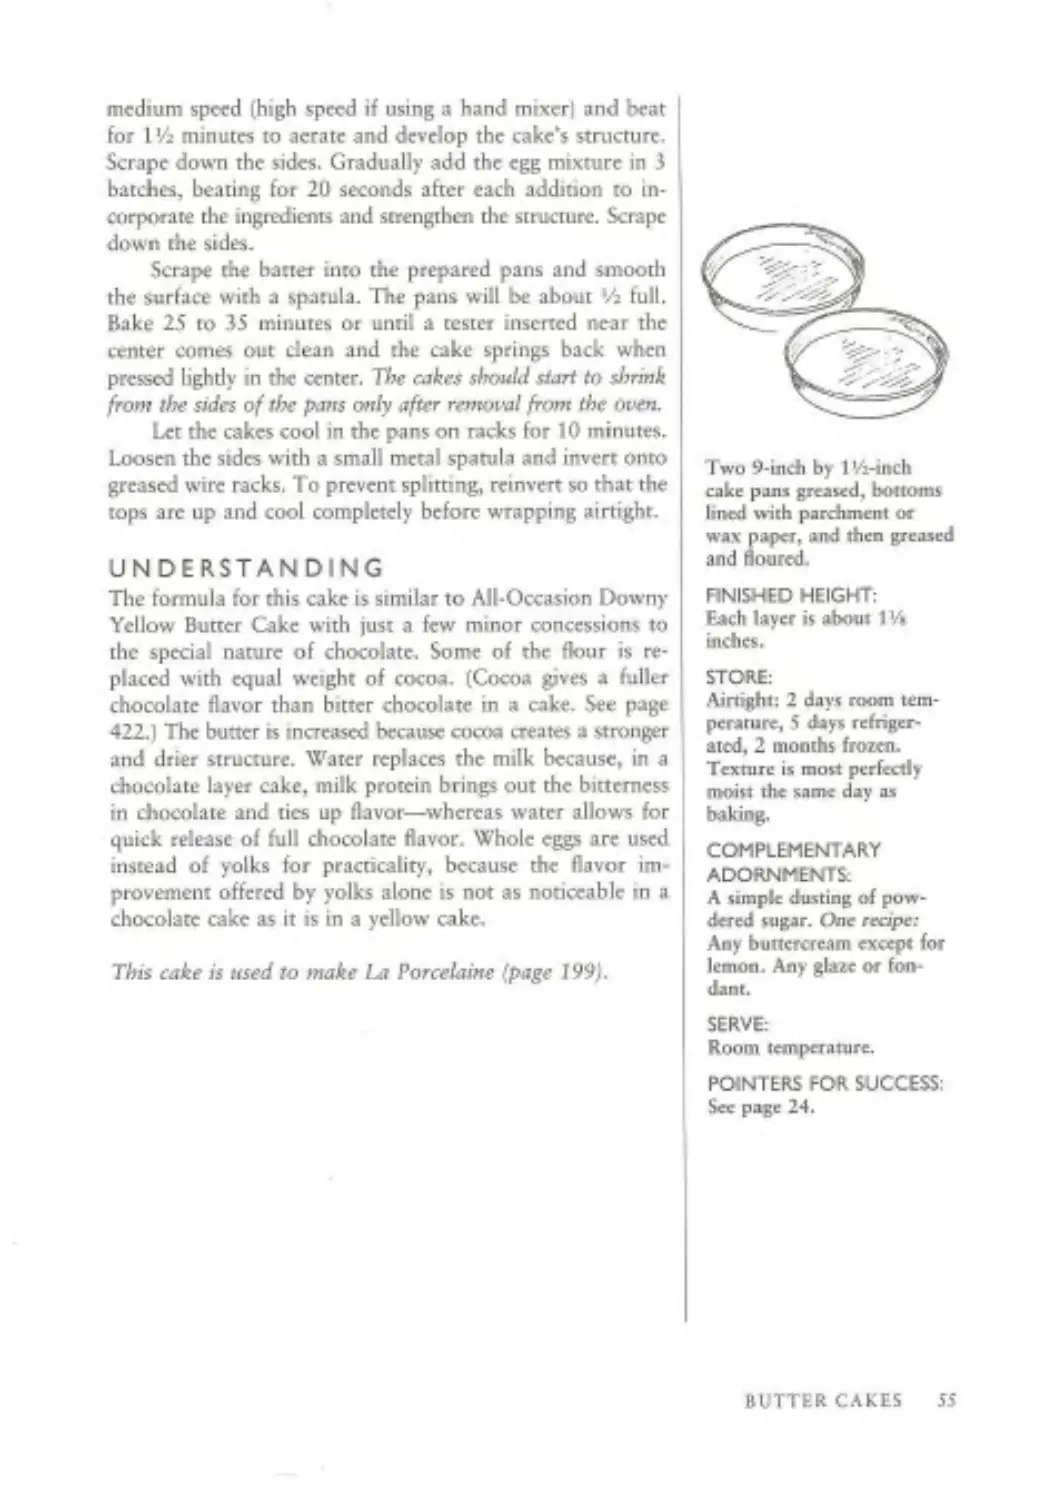
One H-inch by 4-nsch by
211-inch loaf pan (4 cups)—
moit attractive size^-or any
6-cup loaf or fluted cube
pan, greased and floured. If
using a loaf pan, grease it,
line the bottom with parch-
ment or wax paper, and
then grease again and flour.
FINISHED HEIGHT:
In a 4-cup loaf: 2 Mi inches
at the sides and 3VS inches
BUTTER CAKES 25
in (he m»ddk. In a 6-<up
loaf: 1 У» indies at the sides
and Щ inches in the mid-
dle. In a 6-cup fluted tube:
2V* inches in the middle.
STORE:
Airtight: 3 days room tem-
perature, 1 week refriger-
ated, 2 months frozen.
Texture is most evenly
moitl when prepared at
least 8 hours ahead of serv-
ing.
COMPLEMENTARY
ADORNMENT:
A simple dusting of pow-
dered sugar.
SERVE:
Room temperature,
POINTERS FOR SUCCESS
See page 24. Be sure to use
a wooden toothpick to test
for doneoess. The cake will
spring hack when pressed
lightly in the center even be-
fore it is done. If the cake is
underbaked, it will have
tough, gummy spots instead
of a fine, tender crumb.
out clean. Cover loosely with buttered foil after Л0 minutes
to prevent overbrowning. The cake should start to shrink
from the udes of the pan only after removal from the oven.
To get an attractive split down the middle of the crust,
wait until the natural split is about to develop (about 20
minutes) and then with a lightly greased sharp knife or sin-
gle-edged razor blade make a shallow mark about 6 inches
long down the middle of the cake. This must be done quickly
so that the oven door does not remain open very long or
the cake will fall. When cake splits, it will open along the
mark.
Let the cake cool in the pan on я rack for 10 minutes
and invert it onto a greased wire rack. If baked in a loaf
pan. to keep the bottom from splitting, reinvert so that the
top is up and cool completely before wrapping airtight.
UNDERSTANDING
In creating this recipe 1 started out with the classic pound
cake proportions; equal weights of flour, sugar, eggs, and
butter and no leavening. But I soon discovered that the tra-
ditional balance of ingredients benefits from a few minor
alterations: A small amount of milk adds marvelous mois-
ture and also strengthens the cake's structure by gelatiniz-
ing the flour and joining the gluten-forming proteins enough
to be able to hold some extra butter. More butter adds
flavor and tenderizes the crumb, producing that “melt-in-
the-mouth" quality. A very small amount of baking pow-
der opens the crumb slightly, contributing more tenderness
and less of that heavy chewiness characteristic of the orig-
inal pound cake.
Over fort}* trials have led me to believe that thetc is
no way to get this melting texture in a pound cake that is
larger so it is best to keep the cake small If you happen to
prefer a denser, chewier cake, hosvever, replace the regular
sugar with equal weight powdered sugar (IV» cups un-
sifted) and reduce the buttet to 10Vi tablespoons |5.23
ounces^ 150 grams) and the baking powder to 'Л teaspoon.
(The smooth grains of the powdered sugar do not trap air
the way the sharp-edged grains of granulated sugar do. The
cornstarch added to powdered sugar to prevent lumping
ahn increases the chewy quality* of the cake.)
VARIATIONS
DELUXE DOUBLE-VANILLA POUND CAKE: Tiny black grains
from rhe vanilla bean offer a round, full flavor and a barely
26 SIMPLY DELICIOUS FOOLPROOF CAKES
perceptible crunch. Using a vanilla bean along with vanilla
extract is a technique that can be applied to any cake or
custard sauce. The vanilla bean imparts a deeper, sweeter,
more aromatic flavor, but not in a sugary sense. By con-
trast increasing the extract would add a hint of bitterness.
To make Deluxe Double-Vandla Pound Cake: You will nerd
1 vanilla bean (№ bean if it is Tahitian, exceptionally aro-
matic and delicious). With a small, sharp knife split it in
half lengthwise. Place it in a small saucepan with the 3 ta-
blespoons of milk and scald the milk (small bubbles will
start to form around edges). Cover immediately, remove
from the heat, and allow to cool to room temperature. Re-
move rhe vanilla bean and scrape the black grains from its
center into the milk. {Vanilla beans may be saved for future
use, see page 436). Add the vanilla-infused milk to the va-
nilla extract and eggs and proceed as usual with the recipe.
NOTE
This cake м very attractive
made in individual portions.
A б'саке Bundi-kuc pan
(page 453) is the perfect
site. This recipe will make 6
individual cakeienes, which
require about 20 minutes to
bake.
LEMON POPPY SEED POUND CAKE Thus is perhaps my fa-
vorite way to cat pound cake! The fresh light flavor of Lemon
blends beautifully with the buttery flavor of pound cake.
The lemon syrup tenderizes, adds tartness, and helps to keep
the cake fresh for a few days longer than usual. Poppy seeds
add a delightful crunch. Lemon blossoms and lemon leaves
make a lovely and appropriate garnish.
To make Lemon Pappy Seed Pound Cake: You will need
1 tablespoon (6 grams)
loosdy packed grated
lemon zest
3 tablespoons (1 ounce»*
28 grams) poppy seeds
V» cup + 2 tablespoons
sugar (2.75 ounces/75
grams)
% cup freshly squeezed
lemon juice (2 ounces/63
grams)
Add the lemon zest and poppy seeds to the dry ingredients
and proceed as above. Shortly before the cake is done, pre-
pare the Lemon Syrup: In a small pan over medium heat,
stir the sugar and lemon juice until dissolved. As soon as
the cake comes out of the oven, place the pan on a rack,
poke the cake all over with a wire tester, and brush it with
'/i the syrup. Cool in the pan for 10 minutes. Loosen the
sides with a spatula and invert onto a greased wire rack.
Poke the bottom of the cake with the wire tester, brush it
with some syrup, and reinven onto a greased wire rack.
Brush the sides with the remaining syrup and allow to cool
before wrapping airtight. Store 24 hours before eating to
give the syrup a chance to distribute evenly. The syrup will
keep the cake fresh a few days longer than a cake without
syrup.
BUTTER CAKES 27
Chocolate
Bread
сУНе individual slices of this cake resemble pieces of dark
bread» so it is a delightful surprise co discover instead a
moesx, exceptionally full-flavored chocolate pound cake! This
is, in fact, a chocolate cake quite unlike any other butter
cake and deserves a category of its own. This is perfect to
take to the beach because it requires no frosting.
SERVES 8
INGREDIENTS MEASURE WEIGHT
rtxxn rempmrure vofurnc ounces grams
unsweetened cocoa 1 Dutch-processed) 3 tablespoons + 1 % teaspoons 0.75 ounce 21 grams
boiling water 3 tablespoons 1.5 ounces 44 grams
vanilla IVi teaspoons ♦ 6 grams
3 large eggs scant 5 fluid ounces 5.25 ounces ISO grams (weighed without sheik)
sifted елке flour cups 4.5 ounces 125 grams
»ugar ¥♦ cup ♦ 2 tablespoons 6 ounces 175 grams
baking powder У* teaspoon • 3.7 grams
salt •4 teaspoon • •
unsaJtcd butter Iniust be softened) 13 tablespoons 6.5 ounces IR4 grams
One 8-inch by 4-mch by
2!'r-inch loaf pan (4 cups)—
mow attractive size—or any
6-cup loaf oc fluted tube
pan, greased and floured. If
using a loaf pan, grease rt,
Preheat the oven to 3S(FF-
In a medium mixing bowl whisk together the cocoa
and water until smooth. Allow to cool to пют tempera-
ture and lightly whisk in the vanilla and eggs.
In a large mixing bowl combine the remaining dry* in-
gredients and mix on low speed for 30 seconds to blend.
Add VS the chocolate mixture and the butter. Mix on low
speed until the dry ingredients are moistened. Increase to
medium speed (high speed if using a hand mixer) and beat
for I minute to aerate and develop the cake’s structure.
Scrape down the sides. Gradually add the remaining choc-
olate mixture in 2 batches, beating for 20 seconds after
each addition to incorporate the ingredients and strengthen
the structure. Scrape down the sides.
2Я SIMPLY DELICIOUS FOOLPROOF CAKES
Scrape the barter into the prepared pan and smooth
the surface with a spatula. The batter will be almost VS
inch from the top of the 4-cup pan. (If your pan is slightly
smaller, use any excess barter for cupcakes.) Bake 50 to 60
minutes (40 to 50 minutes m fluted tube pan} or until a
wooden toothpick inserted in the center comes out clean,
lent loosely with buttered foil after 25 minutes to prevent
overbrowning. The cake should start to shrink from the
sides of the pan only after removal from the oven.
To get an attractive split down rhe middle of rhe crust,
wait until the natural split is about to develop {about 20
minutes} and then with a lightly greased sharp knife or sin-
gle-edged razor blade make a shallow mark 6 inches long
down the middle of the cake. This must be done quickly so
that the oven door docs not remain open very long or the
cake will fall. When cake splits, it will open along mark.
Let the cake cool in the pan on a rack for 10 minutes.
Loosen the sides with a small metal spatula and invert onto
a greased wire rack. If baked tn a loaf pan, to keep the
bottom from splitting, reinven so that the top is up and
cool completely before wrapping airnght.
UNDERSTANDING
This is a variation on the basic formula for Perfect Pound
Cake. Some of the flour is replaced by Dutch-processed co-
coa and the sugar increased slightly to balance the bitter-
ness. The result is a dense, velvety cake.
note: For extra moistness and a subtle coffee accent, brush
cake with syrup. To make syrup: In a small pan, stir to-
gether ‘Л cup water and 2 tablespoons sugar. Bring to a
full rolling boil. Cover and remove from heat, When cool,
add 1 tablespoon Kahlua.
When the cake is baked, brush half the syrup onto the
top. Coot the cake 10 minutes and invert it onto a lightly
greased rack. Brush the bottom and sides with the remain-
ing syrup. Reinvert unto a rack, top side up, to finish cooling.
The coffee flavor stays in the background, accentuating the
chocolate.
line rhe bottom with parch-
ment or wax paper, and
then grease again and flour.
FINISHED HEIGHT:
In а 4чир loaf: 2Mt inches
at the sides, and 3 inches tn
the middle. In a бчир loaf;
1¥« inches ar rhe sides, and
2Mi inches in the middle.
STORE:
Airtight: 3 days room tem-
perature, 1 week refriger-
ated, 2 months frozen.
Texture is most evenly
moist when prepared ar
least H hours ahead of serv-
ing.
COMPLEMENTARY
ADORNMENT:
A simple dusting of pow-
dered sugar.
SERVE.
Room temperature.
POINTERS FOR SUCCESS:
See page 24. Be sure to use
a wooden toothpick to test
for doneness. The cake will
spring back when pressed
lightly in the center even be-
fore it is done. If the cake ts
underbaked, it will have
tough, gummy spots instead
of a fine, tender crumb.
BUTTER CAKES 29
White
Spice Pound
Cake
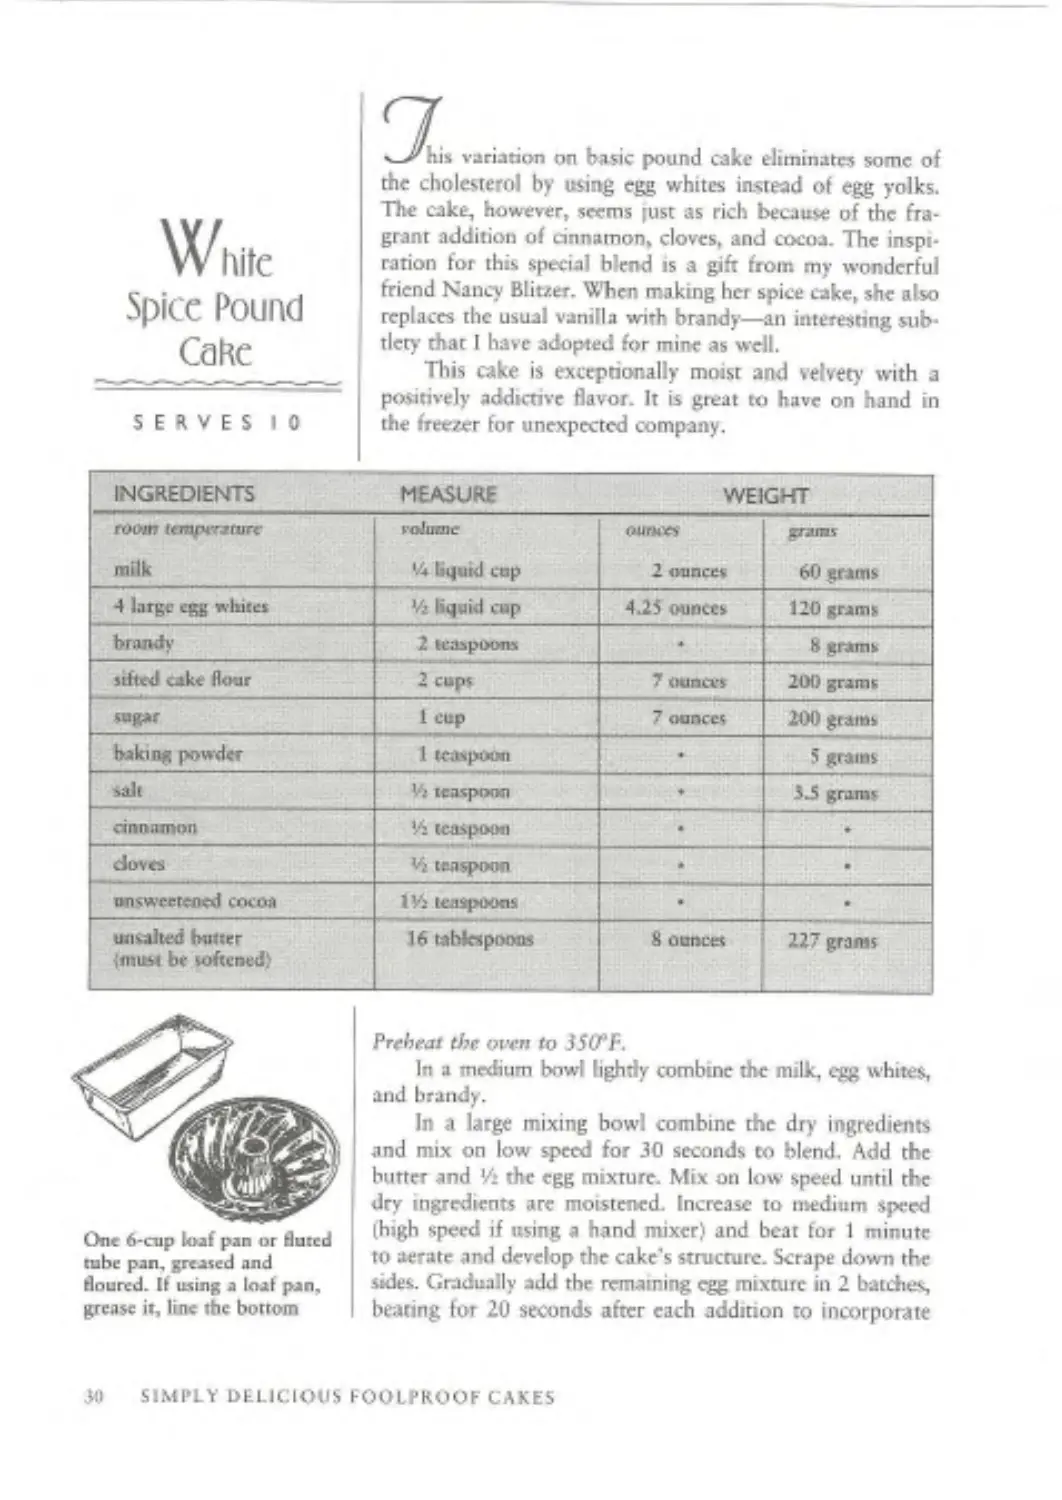
K-Xhi* variation on basic pound cake eliminates some of
the cholesterol by using egg whites instead of egg yolks.
The cake, however, seems just as rich because of the fra-
grant addition of cinnamon, cloves, and cocoa. The inspi*
ration for this special blend is a gift from my wonderful
friend Nancy Blitzer. When making her spice cake, she also
replaces the usual vanilla with brandy—an interesting sub-
tlety that I have adopted for mine as well.
Tliis cake is exceptionally moist and velvety with a
positively addictive flavor. It is great to have on hand in
the freezer for unexpected company.
SERVES 10
INGREDIENTS MEASURE WEIGHT
room 1<тл4-лиг<- milk FoJutne •4 liquid cup ounces 2 ounces grams 60 grams
4 large egg whites Vz liquid cup 4.25 ounces 120 grams
brands' 2 teaspoons ♦ 8 grams
sifted cake flour 2 cups 7 ounces 200 grams
sugar 1 cup 7 ounce* 200 grams
baking powder 1 teaspoon • 5 grams
salt Vj teaspoon ♦ ЗЛ grams
cinnamon VS teaspoon • ♦
doves Ц teaspoon • •
unsweetened cocoa IVS teaspoons • •
iMisaited butter {must be softened) 16 tabkspooas 8 ounces 227 grams
One 6-cup loaf pan or fluted
tube pan. greased and
floured. If using a loaf pan.
grease it, line the bottom
Preheat the own to 3$(fF.
In a medium bowl lightly combine the milk, egg whites,
and brandy.
In a large mixing bowl combine the dry ingredients
and mix on low speed for 30 seconds to blend. Add the
butter and ’/*the egg mixture. Mix on low speed until the
dry ingredients are moistened. Increase to medium speed
(high speed if using a hand mixer) and beat fur 1 minutr
to aerate and develop the cake’s structure. Scrape down the
sides. Gradually add the remaining egg mixture in 2 batches
bearing for 20 seconds after each addition to incorporate
Ml SIMPLY DELICIOUS FOOLPROOF CAKES
the ingredients and strengthen the structure. Scrape down
the sides.
Scrape the batter into the prepared pan and smooth
the surface with a spatula. The batter will almost fill the
pan. Bake 45 to 55 minutes (40 tn 50 minutes in a fluted
tube pan) or until a wire cake tester inserted in the center
comes out dean and the cake springs back when pressed
lightly in the center. 77>e cake should start to shrink from
the sides of the pan only after removal from the oven.
To get an attractive split down the middle of the crust
when using a loaf pan, wait until the natural split is about
to develop iabuut 20 minutes) and then with a lightly greased
sharp knife or single-edged razor blade make a shallow mark
6 inches long down the middle of the cake. This must be
done quickly so that the oven door does not remain open
very long or the cake will fall. When cake splits, it will
open along the mark.
Let the cake cool in the pan on a rack for 10 minutes
and invert onto greased wire rack. If baked tn a loaf pan,
to keep the bottom from splitting, reinvcrt so that the top
ts up and cool completely before wrapping airtight.
with parchment or wax pa-
per, and then grease again
and flour.
FINISHED HEIGHT:
In a loaf pan: 2 inches at
the sides and 2V5 inches in
the middle, in a 6-cup fluted
tube: 4 indies in the middle.
STORE
Airtight: Л days room tem-
perature, I week refriger-
ated, 2 months frozen.
COMPLEMENTARY
ADORNMENT:
A simple dusting of pow-
dered sugar.
SERVE;
Room temperature.
POINTERS FOR SUCCESS
See page 24.
UNDERSTANDING
Aside from the flavoring and the substitution of egg whites
for whole eggs, the formula for this cake is identical to the
one for Perfect Pound Cake bur ts one third larger. In this
version it is srill possible to have a melting, tender quality
despite the larger size because there are no yolks to
toughen it.
BUTTER LAKES n
Chocolate
Cherry Almond
Pound Cake
SERVES 10
sJ'hc uniquely flavorful base for this moist cake is the
creation of one of my favorite of all pastry chefs: Peter
Roggrnsmger, His grandmother made it for him when he
was a child in Switzerland. He normally uses an apricot
and a lemon glaze, which is wonderful, but as I adore the
flavors of chocolate, almond, and cherry, I am offering this
cherry version.
INGREDIENTS MEASURE WEIGHT
room rcmpcrarurc Brandicd Burgundy Cherries Ipage 346) ix^uror 1 cup, drained ounces • grams •
hiuelnub with skins % cup 4 ounces IB grams
chocolate 'preferably extra- bittersweet or bittersweet) 1 VS 13 -ounce) bars 4,5 ounces 123 grams
cornstarch 1 tablespoon 0.25 ounce 7.5 grams
rifted cake flour 1 cup 3.5 ounces 100 grams
2 large e®j> 5 Hu id (Minces 3.5 ounces 100 grams [weighed without shells)
2 large egg whites ¥4 liquid cup 2 ounces 60 grams
cream of tartar Mi teaspoon • •
sugar 1 cup 7 ounces 200 grams
softened uns.aited butter 8 tablespoons 4 ounces 113 grams
almond рамс (domestic] 2Yi tablespoons 1.5 ounces 43 grams
vanilla У« teaspoon • •
hot water V» liquid cup 2 ounces 60 gtams
cherry jelly, melted % cup 2,75 ounces 77 grams — 1
One S-сир loaf pan |9inch
by 5-inch by 3-inch)
greased, bottom lined with
Preheat oven to 35O*F.
Place cherries in a single layer m the bottom ol the
prepared pan. Toast hazelnuts for 10 to 15 minutes or until
skim split and nuts are lightly brown. Cool completely, grate
finely, and mix with cornstarch. Place in a medium bowl.
Using a sharp knife, chop chocolate into coarse little
pieces and add to the nuts. Mix in cake flour and set aside.
Divide the eggs between two bowU, placing three egg
whites in a large bowl and one whole egg plus one yolk in
32 SIMPLY DELICIOUS FOOLPROOF CAKES
a smaller bowl. Add vanilla to egg yolks and mix lightly to
blend.
In a mixing bowl, at medium speed, cream butter, al-
mond paste, and all but 16 cup sugar until fluffy. Gradually
beat in egg yolk mixture until incorporated. Add flour mix-
ture and beat just until mixed into the barter. Beat in the
hot water and set aside. On low speed, beat egg whites
until foamy. Add cream of tartar, raise speed to medium,
and beat until soft peaks form when beater is raised. Grad*
□ally add the remaining *6 cup sugar. Raise speed to high
and beat until stiff peaks form when the beater is raised
slowly. With a large rubber spatula, stir about one quarter
of the egg whites into the barter until blended. Gently but
rapidly fold m the remaining whites. Scrape the batter into
the prepared pan.
Bake for one hour and check for doneness. Cake tests
done when a small sharp knife inserted in the center comes
out clean.
Let the cake cool in the pan on a rack for 10 minutes.
Loosen the sides w ith a small metal spatula and invert onto
a serving plate or greased rack. Remove parchment and
brush with heated cherry jelly. Cool completely before
wrapping airtight.
NOTE: To make the apricot version, use a 6-cup loaf pan
to bake the cake; omit the Brandied Burgundy Cherries and
replace the cherry jelly with sieved apricot preserves. After
spreading the glaze on the cake, allow it to set for about
10 minutes. Stir together *4 cup powdered sugar and 2 tea-
spoons lemon juice and spread on top of apricot glaze.
parchment or wax paper,
then greased again and
floured.
FINISHED HEIGHT OF
CAKE
2'4 inches.
STORE:
Airtight: 3 days at room
temperature, 5 days refriger-
ated, 3 muntin frozen.
SERVE:
Room temperature.
POINTERS FOR SUCCESS:
See page 24. To get nice
tiny chunks of chocolate,
me a sharp knife. To keep
nets from becoming oily
while grating, use the fine
shredding due of the food
processor and then the
metal blades. See almond
paste (page 430). If im-
ported almond paste is
used, the cake will be much
sweeter.
UNDERSTANDING
This cake contains about half the butter of other pound
cakes. Less butter is required to tenderize it because nuts
replace some of the flour, affording less structure. Because
baking powder is not needed to tenderize the cake, the egg
whites, beaten into a meringue, are used instead for extra
volume. Hot water is added to the barter to make it less
Stiff and easier to fold in the egg whites.
BUTTER CAKES 33
Golden
Butter Cream
Cake
SERVES 8
you love butter, this will be your favorite cake. There
is, quite simply, no cake with more mellow, buncry flavor
or golden color. It needs no buttercream bur marries well
with one if you should choose to frost it. The high propor-
tion of butter makes it seem dense at first bite, but this cake
instantly dissolves in the mouth, leaving behind a heavenly
flavor and the illusion of lightness.
INGREDIENTS MEASURE WEIGHT
/апл» tempersnir volume OtrtUXS grams
3 large egg yolks scam 2 fluid ounces 2 ounces 56 grams
heavy cream ‘Zi liquid cup 4 ounces 116 grams
vanilla ¥« teaspoon ♦ 3 grams
sifted cake flour 1’Л cups 5.25 ounces 150 grams
sugar ¥< cup 5.2$ ounces 150 grams
baking powder IV4 teaspoons ♦ b grams
salt •X» icaspcxMi 4 •
ums<ed butter Imnst be softened) 10.5 tablespoons 5-25 ounces : 150 grams
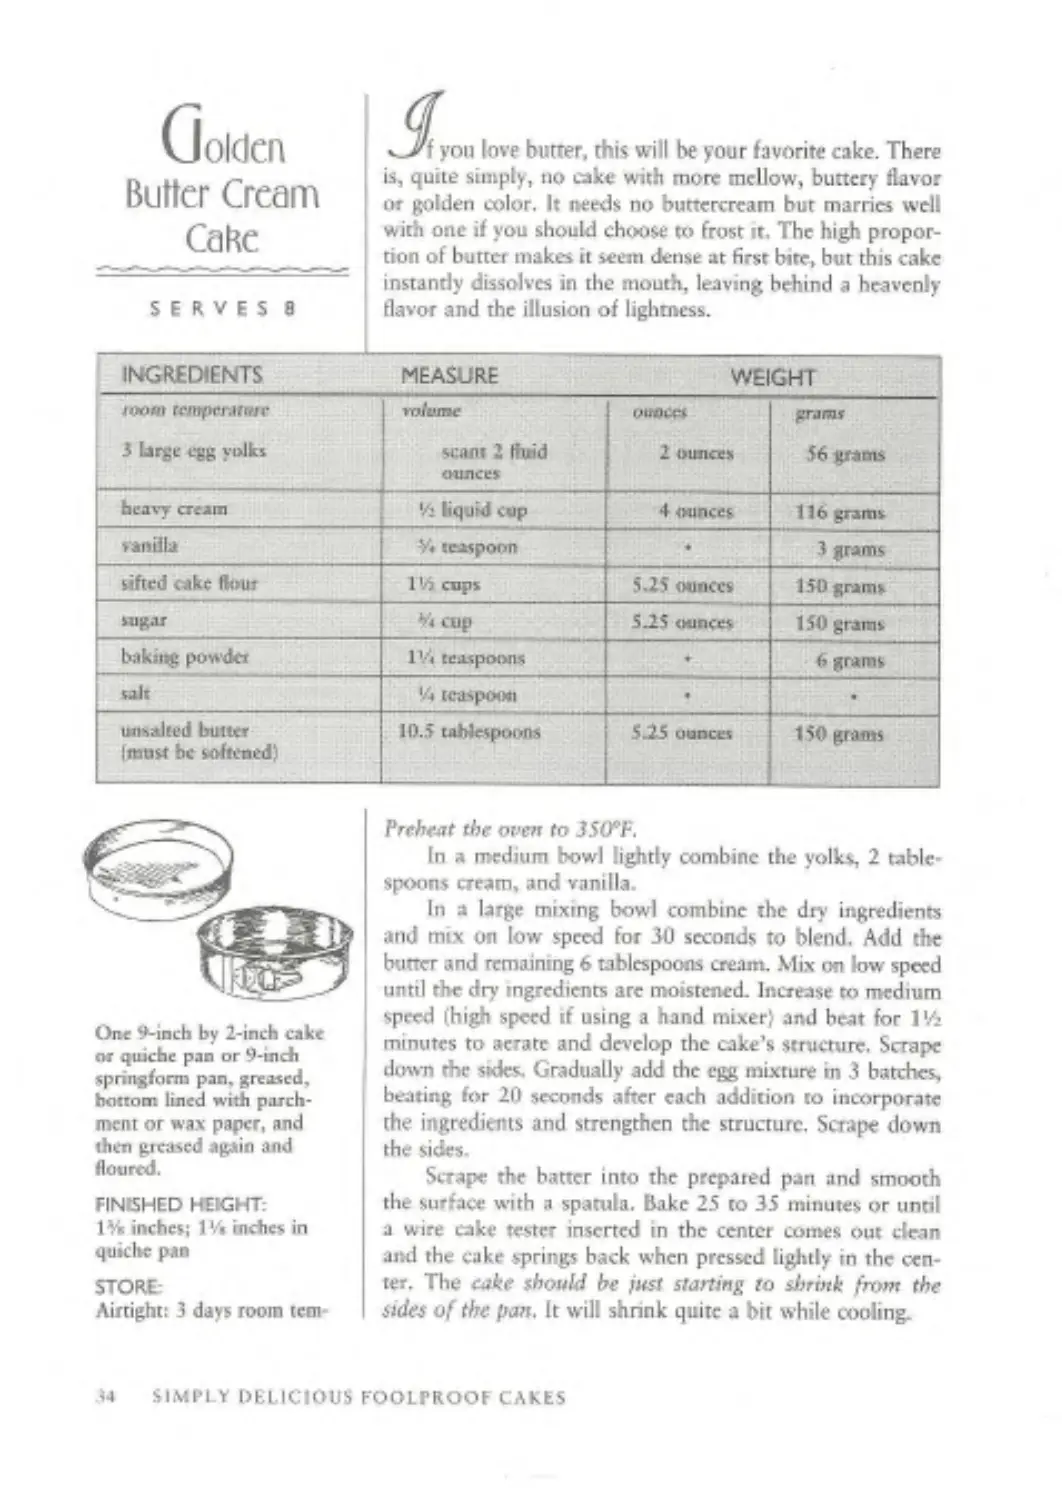
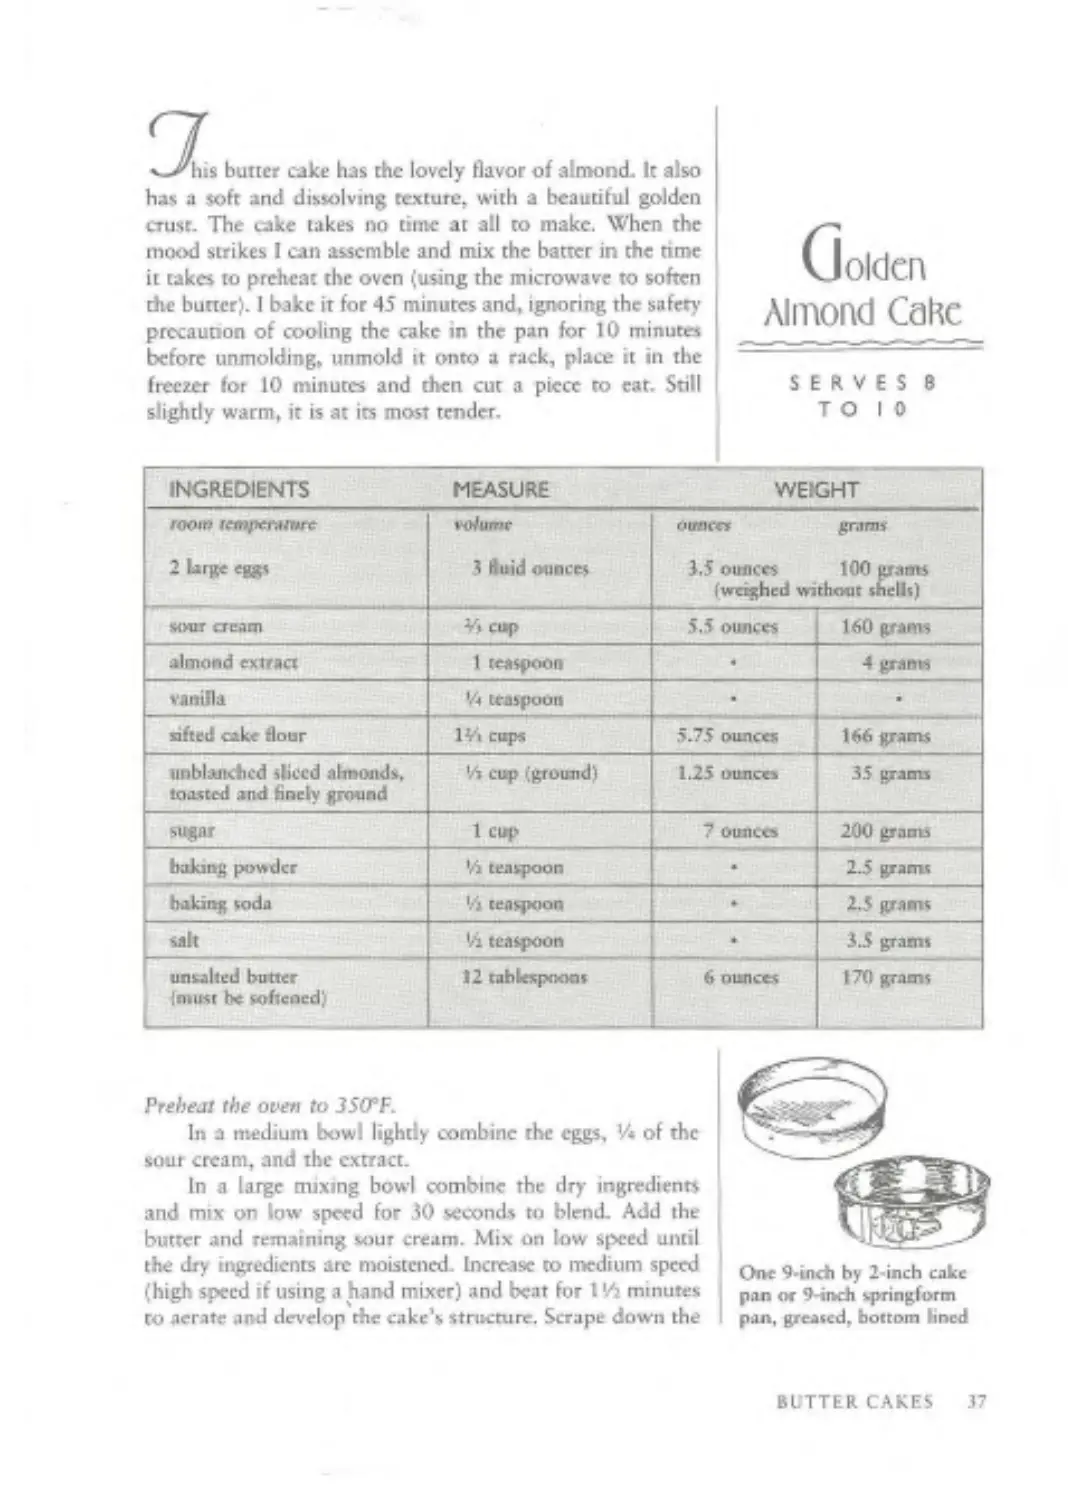
One 9-inch by 2-inch cake
or quiche pan or 9-inch
spnngform pan. greased,
bottom lined with parch-
ment or wax paper, and
then gieased again and
floured.
FINISHED HEIGHT.
14 inches; 1 ’/» inches in
quiche pan
STORE
Airtight: 3 days room tom
Preheat the oven to 35(fF.
In a medium bowl lightly combine the yolks, 2 table*
spoons cream, and vanilla.
In a large mixing bowl combine the dry ingredients
and mix on low speed for 3U seconds to blend. Add the
butter and remaining 6 tablespoons cream. Mix on low speed
until the dry’ ingredients are moistened- Increase to medium
speed (high speed if using a hand mixer} and heat for 1’Л
minutes to aerate and develop the cake’s structure. Scrape
down the sides. Gradually add the egg mixture in 3 batches,
beating for 20 seconds after each addition to incorporate
the ingredients and strengthen the structure. Scrape down
the sides.
Scrape the batter into the prcpaied pan and smooth
the surface with a spatula. Bake 25 to 35 minutes or until
a wire cake tester inserted tn the center comes out dean
and the cake springs back when pressed lightly in the cen-
ter. The cake should be fust starting to shrink from the
Sides of the pan. It will shrink quite a bit while cooling.
.34 SIMPLY DELICIOUS FOOLPROOF CAKES
Let the cake cool in the pan on a rack for 10 minutes.
It will have a level top. Loosen the sides with a small metal
spatula and invert onto a greased wire rack. For an attrac-
tive top crust, reinvert so that the top is up and cool com-
pletely before wrapping airtight.
UNDERSTANDING
This cake is a cross between Perfect Pound Cake and All-
Occasion Downy Yellow Butter Cake, with the incom-
parable. flowery flavor of cream replacing the milk. The
butter content is about the same as in Perfect Pound Cake
when one takes into account the butterfat in the cream.
Compared to Perfect Pound Cake. Butter Cream Cake has
egg yolks instead of whole eggs, to add color and fineness
of crumb. It also has more baking powder for a more ten-
der, lighter texture.
ТЪй aike ts used to nuke Rose Trellis (page 207).
peranire, 1 week reft iter-
ated, 2 months frozen.
Montune distributes most
ovnli the day after baking.
COMPLEMENTARY
ADORNMENTS:
A simple dusting of pow-
dered sugar. Royal Honey
Buttercream (page 235).
Perfect Whipped Cream
Ipage 253) and fresh straw-
berries.
SERVE
Room temperature.
POINTERS FOR SUCCESS:
See page 24.
Sour Cream
Butler Cake
v_Xhis moist, tender yellow cake has a light, soft crumb.
The sour cream imparts a mellow undertone which blends
perfectly with the buttery flavor. This is one of my favorite
cakes to make in summer, and 1 serve it with creme fraiche
and fresh berries, peaches, or nectarines.
SERVES 8
T О I 0
INGREDIENTS MEASURE WEIGHT
oxwn tempera nine volume otmets grtimt
4 large egg yolks 2 full fluid ounces 2.5 ounces 74 giams
sour cream ¥» cup 5.5 ounces 16*0 grams
vanilla 1 Mi teaspoons ♦ 6 grams
sifted cake flour 2 cups 7 ounces 200 grams
sugar 1 cup 7 ounces 200 grams
baking powder Уз teaspoon ♦ 2.5 grams
baking soda У? teaspoon • 2.5 grams
salt Mt teaspoon ♦ 3.5 grams
unsalrcd butter \must be softened! 12 tablespoons lai 6 ounces 170 grams
BUTTER CAKES И
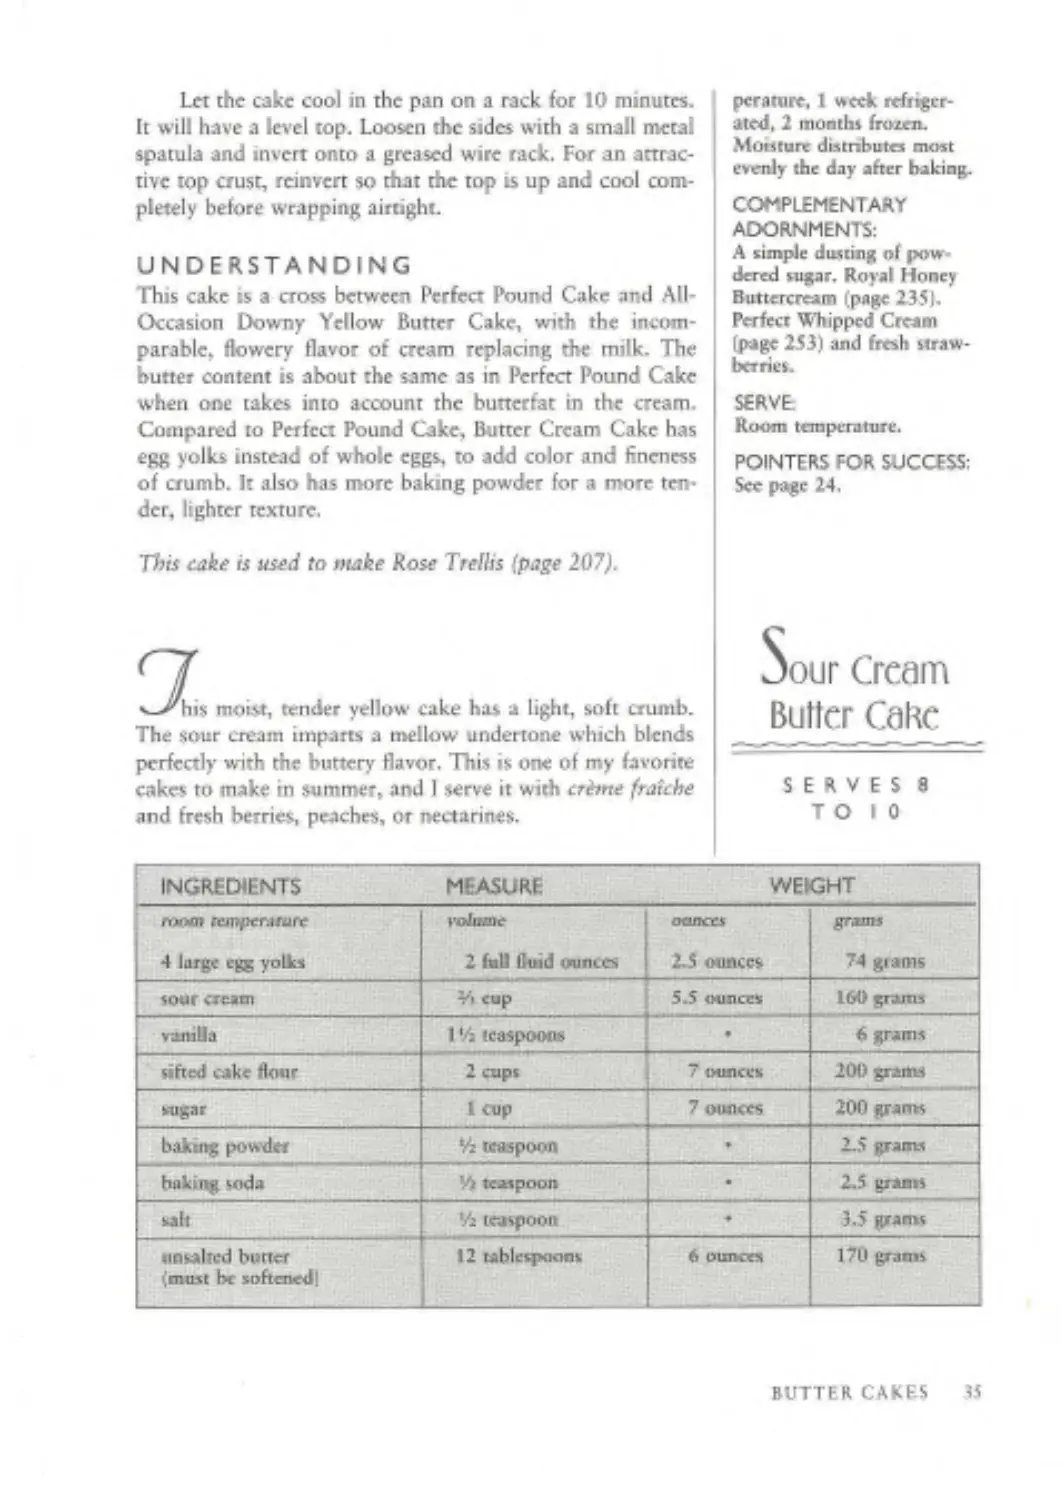
One 9-inch tpringform pan,
greased, bottom lined with
parchment or wax paper,
and then greased again and
floored.
FINISHED HEIGHT.
1 % inches.
STORE
Airtight; 2 days room tem-
perature, 5 days refriger-
ated, 2 months frozen.
Moisture distributes evenly
and any pastiness disappears
(he day after baking.
COMPLEMENTARY
ADORNMENTS:
A simple dusting of pow-
dered sugar. One recipe:
.Apricot Buttercream (page
253 or 243). Sour Cream
Ganache Ipage 275). Creme
fraiche (page 259! topped
with fresh peaches.
SERVE;
Room temperature.
POINTERS FOR SUCCESS:
See page 24.
Preheat the огея to 35(PF.
In a medium bowl lightly combine the yolks, *4 of the
sour cream, and the vanilla.
In a large mixing bowl combine the dry ingredients
and mix on low speed for 30 seconds to blend. Add the
butter and the remaining sour cream. Mix on low speed
until the do* ingredients are moistened. Increase to medium
speed thigh speed if using a hand mixer) and beat for l‘A
minutes to aerate and develop the cake's structure. Scrape
down the sides. Gradually add the egg mixture in 3 batches,
beating for 20 seconds after each addition to incorporate
the ingredients and strengthen the structure. Scrape down
the sides. Scrape the batter into the prepared pan and smooth
the surface with a spatula.
Bake 35 to 45 minutes or until a wire cake tester in-
serted m the center comes out dean and the cake springs
back when pressed lightly in the center. The cake should
start to shrink from the sides of the pan only1 after removal
from the oven.
Let the cake cool in the pan on a rack for 10 minutes.
It will have a level top. Loosen the sides with a small metal
spatula and remove the sides of the pan. Invert onto a lighdy
greased cake rack and cool completely before wrapping air-
tight. If you wish to remove the pan bottom, slide a card-
board round at least 9 inches in diameter between the
parchment and metal bottom when the cake is completely
cool.
UNDERSTANDING
The ratio of ingredients is similar to Butter Cream Cake
except for a decrease in butter which makes the cake lighter
and more suitable with fillings and toppings. Baking soda
is used to temper the acidity* of the sour cream. The com-
bined leavening is higher in this cake to compensate for the
lower amount of butter. (Both butter and leavening agents
tenderize cake. Butter, however, produces a denser texture
while leavening creates a lighter texture.)
36 SIMPLY DELICIOUS FOOLPROOF CAKES
butter cake has the lovely flavor of almond, к also
has a soft and dissolving texture, with a beautiful golden
crust. The cake takes no time at all to make. When the
mood strikes 1 can assemble and mix the batter in the time
it takes to preheat the oven (using the microwave to soften
rhe butter). I bake it for 45 minutes and, ignoring the safety
precaution of cooling the cake in the pan for 10 minutes
before unmolding, unmold it onto a rack, place it in the
freezer for 10 minutes and then cut a piece to cat. Still
slightly warm, it is at its most tender.
Golden
Almond Cake
SERVES 8
T О I 0
INGREDIENTS MEASURE . 1 . WEIGHT
room rriw;>etM/r*rc 2 large eggs wWumr 3 fluid ounces ouwco grams 3,5 ounces 100 grams 1 weighed without shells)
m>ut cream ¥> cup 5.5 ounces 160 grams
almond extract 1 teaspoon < 4 grams
vanilla •4 teaspoon • •
sifted cake flour IVi cups 5.75 ounces 166 grams
unblanchcd sliced almonds, toasted and finely ground 'A cup (ground) 1.25 ounces 35 grams
sugar 1 cup 7 ounces 200 gram»
baking powder •A teaspoon a 2.5 gram»
baking soda •4 teaspoon ♦ 2,5 grams
salt *4 teaspoon • 3.5 grams
unsalted butter ‘must be softened) 12 tablespoon» 6 minces 170 grams
Preheat the oven to 3S(FF.
In a medium bow! lightly combine rhe eggs, ’4 of rhe
sour cream, and the extract.
In a large mixing bowl combine the dry ingredients
and mix on low speed for 30 seconds to blend. Add the
butter and remaining sour cream. Mix on low speed until
the dry ingredients are moistened. Increase to medium speed
(high speed if using a hand mixer) and beat for 1 ’A minutes
to aerate and develop the cake's structure. Scrape down the
One 9-inch by 2-inch cake
pan oc 9-inch springform
pan, greased, bottom lined
BUTTER CAKES 37
with parchment or wax pa-
per, and then greased again
and floured.
FINISHED HEIGHT:
1 Vi inches at the sides and
1¥« inches in the middle.
STORE:
Airtight: 2 days room tem-
perature. 5 days refriger-
ated, 2 months frozen.
COMPLEMENTARY
ADORNMENTS;
A simple dusting of pow-
dered sugar. Raspberries,
peaches and chocolate all
have a natural affinity for
almonds. One rtxipe: Rasp-
berry Buttercream Ipage
233, 243, or 245). Sour
Cream Ganache ;pagc 275).
Сгбпе frsiche Ipage 259)
topped with fresh peaches
or raspberries.
SERVE:
Room temperature.
POINTERS FOR SUCCESS:
Sec page 24.
sides. Gradually add die egg mixture in 3 batches, beating
for 20 seconds after each addition to incorporate the ingre-
dients and strengthen the structure. Scrape down the sides.
Scrape the batter into the prepared pan and smooth
the surface with a spatula. Bake 35 to 45 minutes or until
a wire cake tester inserted in the center comes out dean
and the cake springs back when pressed lightly in the cen-
ter. The cake should start to shrink from the sides of the
pan only after removal from the oven.
Let rhe cake cool in the pan on a rack for 10 minutes.
Loosen the sides with a small metal spatula and unmold or
remove the sides of the spnngform pan. Allow to cool com-
pletely before wrapping airtight.
UNDERSTANDING
The formula for this cake is the same as that for Sour Cream
Butter Cake except that */i cup flour is replaced by Уз cup
finely grated almonds. The almonds add flavor and bulk
but do not contribute structure so whole eggs are needed
and leavening must be decreased. The small amount of va-
nilla is added to enhance the almond flavor.
38 SIMPLY DELICIOUS FOOLPROOF CAKES
t I had to choose among all my cakes, this one would
win first place because it is delicious by itself yet versatile
enough to accommodate a wide range of buttercream*. The
cake combines the soft texture of white cake with the but-
tery flavor of yellow cake. Using all yolks instead of whole
rgg* produces a nch yellow color, fine texture, and deli-
cious flavor.
All-Occasion
Downy Yellow
Butter Cake
SERVES 12
INGREDIENTS MEASURE WEIGHT
zoom «wipcvarurc 6 large egg yolks tril/UfNC 3.5 Ihisd ounces ouores 4 ounces gran» 112 grams
milk 1 liquid cup B.5 ounces 242 grains
vanilla I'm teaspoons • 9 grams
sifted cake flour 3 cups 10.5 ounces 300 grams
sugai 1 Vi cups 10.5 ounces 300 grams
baking powder 1 tablespoon ♦ 1 teaspoon ♦ 19.5 grams
salt V* teaspoon • 5 grams
uncalled butter (must be softencdl 12 taMespoorts 6 ounces 171) grams
Preheat the oven to ISU'F.
In a medium bowl lightly combine the yolks, Ms cup
milk, and vanilla.
In a large mixing bowl combine the dry ingredients
and mix on low speed tor 30 seconds to blend. Add the
butter and remaining ¥♦ cup milk. Mix on low speed until
the dry ingredients are moistened. Increase to medium speed
(high speed if using a hand mixer) and beat for 1 Vi minutes
to aerate and develop the cake’s structure. Scrape down the
sides. Gradually add the egg mixture in 3 batches, beating
for 20 seconds after each addition to incorporate the ingre-
dients and strengthen the structure. Scrape down the sides.
Scrape the batter into the prepared pans and smooth
the surface with a spatula, The pans will be about ¥1 full.
Bake 25 to 35 minutes or until a tester inserted near the
center comes out dean and the cake springs back when
pressed lightly in the center. The cakes should start to shrink
from the sides of the pans only after removal from the осей.
Two 9-inch by 1 Mr inch
cake pans greased, bottoms
lined with parchment or
wax paper, and then greased
again and floured.
FINISHED HEIGHT
Each layer is 1 % inches.
STORE.
Airtight: 2 days room tern
perature, 5 days refriger-
ated, 2 months frozen.
BUTTER CAKES v#
Texture к most perfectly
moist the same day as
baking.
COMPLEMENTARY
ADORNMENTS
A simple ducting of pow-
dered sugar. One ntipft
Any buttercream, glaze, or
fondant.
SERVE:
Room temperature.
POINTERS FOR SUCCESS:
Sec page 24.
Let the cakes cool tn the pans on racks for 10 minutes.
Loosen the sides with a small metal spatula and invert unto
greased wire racks. To prevent splitting, reinvert so that the
tops are up and cool completely before wrapping airtight.
VARIATION
MAPLE BUTTER CAKE: This cake has a deep golden color
and a real New England flavor. It is superb frosted with
Neoclassic Maple Buttercream [page 233) and enctusted with
toasted walnuts, coarsely chopped (page 324),
To make this cake, simply replace the sugar with an
equal weight of maple sugar (or 2 cups). Decrease the va-
nilla to ’Л teaspoon and add 1 teaspoon of maple flavoring,
note: Maple sugar is available in specialty stores such as
Dean fie DeLuca (page 445). It is expensive, but the result-
ing cake, frosted with Maple Buttercream, is uniquely de-
licious.
UNDERSTANDING
Compared to Perfect Pound Cake, this cake has more than
double the baking powder, less than half the butter, and no
egg whites. The decrease in butter ts responsible for the
lighter and softer texture. The increased baking powder
further lightens the cake and also makes it more tender.
40 SIMPLY DELICIOUS FOOLPROOF CAKES
K-*C#unermiik imparts a slightly tangy and nch flavor to
buncr cake, although it is actually lower in cholesterol than
whole milk. This cake is delicious with softly whipped creme
fraiche and ripe peaches. 1 also like to bring it plain to
picnics and serve it with windfalls of fresh wild berries.
Buttermilk
Country Cake
SERVES 8
INGREDIENTS MEASURE WEIGHT
room 4 large egg yolks iri/urw 2 full fluid ounces ounce* 2.5 ounces giams 74 grams
buuermtlk liquid cup 5.5 ounces 160 grams
ramlla 1 ‘Л teaspoons • 6 grams
sifted cake Hour 2 cups 7 ounces 200 grams
*ugar 1 cup 7 ounces 200 grams
baking powder I tablespoon • 15 grams
salt Vi teaspoon • 3.5 grams
unpaired buncr |musr be softened) b tablespoons 4 ounces L_ 113 grams
Preheat the oven to 3S(?F.
In a medium bowl lightly combine rhe yolks. *Л of the
buttermilk, and vanilla.
In a large mixing bowl combine the dry ingredients
and mix on low speed for 30 seconds to blend. Add the
butter and remaining buttermilk. Mix on low speed until
the dry ingredients are moistened. Increase to medium speed
(high speed if using a hand mixer) and beat for 1У4 minutes
to aerate and develop rhe cake's structure. Scrape down the
sides. Gradually add the egg mixture in 3 batches, beating
for 20 seconds after each addition to incorporate the ingre-
dients and strengthen the structure. Scrape down the sides.
Scrape the batter into the prepared pan and smooth
the surface with a spatula. The pan will be about Vi full.
Bake 30 to 40 minutes or until a tester inserted near the
center comes out dean and the cake spnngx hack when
pressed lightly m the center. The cake should start to shrink
from the sides of the pan only after removal from the oven.
Let the cake cool in the pan on a rack for 10 minutes.
Loosen the sides with a small meta) spatula and invert onto
One 9-inch by 2-meh cake
pan or 9-mch spnngtorm
pan. greased, bottom lined
with parchment or wax pa-
per, and then greased again
and Houred.
FINISHED HEIGHT
1 ‘6 inches at the sides and 2
inches in the middle.
STORE:
Airtight: 3 days room tem-
perature. 5 days refngcr-
BUTTER CAKES at
at©d, 2 month» frozen.
Texture К most perfectly
moist die same day as
baking.
COMPLEMENTARY
ADORNMENTS
A simple dusting of pow-
dered sugar. One recipe:
Lemon Buttercream {page
234 o< 245). Creme fraichc
(page 259| topped with
peach sluts.
SERVE:
Room temperature,
POINTERS FOR SUCCESS:
See page 24.
Chestnut
Sand Cahe
a greased wire rack. To prevent splitting, reinsert mi that
the top is up and cool completely before wrapping airtight.
UNDERSTANDING
This cake is »innlar to All-Occasion Downy Yellow Butter
Cake, except that buttermilk replaces the whole milk. Al-
though buttermilk has a rangy taste and most recipes using
buttermilk call for baking soda to temper it. it ts not nec-
essary to use the baking soda. Actually, when buttermilk is
added to a batter, it does not lower the pH {make it more
acid). Instead, the buttermilk acts as a buffer, neutralizing
any extremes of acid or base already in the batter. Using
baking powder instead of baking soda allows the subtle,
delicious tangmess of the buttermilk to come through and
results in a cake with a much finer texture.
hestnut flour gives this cake its lovely hue and fine,
moist texture. In combination with bread flour, it produces
a tender layer cake with unusual, subtle chestnut flavor and
a suggestion of spiciness. I fill and frost this cake with
Chestnut Buttercream (page 233, 243, or 353) and call it
14 Marron, which in French, means “chestnut/*
SERVES 12
INGREDIENTS MEASURE WEIGHT
mom temperature 3 large eggs volume scant 5 fluid ounce» ounce» grams $.25 ounces ISO grains (weighed without shells]
milk 1 liquid cup 8.5 ounces 242 grams
vanilla 2¥« teaspoon» ♦ 9 grams
silled bread flour t¥z cups *4 1 tablespoon 6.75 ounces 190 grams
sifted chestnut flour 1 cup 3.75 ounces 110 grams
sugar I Vi cups 10.5 ounces 300 grams
baking ponder 1 tablespoon • 14.5 grams
salt Vi teaxpoon • 3.5 grams
umahed butter itmtsr be softened) 12 tablespoons 6 ounces 170 grams
42 SIMPLY DELICIOUS FOOLPROOF CAKES
Preheat the oven to 350PF.
In a medium bowl lightly combine rhe eggs, '4 cup
milk, and vanilla.
In a large mixing bowl combine the dry ingredients
and mix on low speed for 50 seconds to blend. Add the
butter and remaining У< cup milk. Mix on low speed until
the dry ingredients arc moistened. Increase to medium speed
(high speed if using a hand mixer) and beat for 1 */z minutes
to aerate and develop the cake’s structure. Scrape down the
sides. Gradually add the egg mixture in 3 batches, bean ng
for 20 seconds after each addition to incorporate the ingre-
dients and strengthen the structure. Scrape down the sides.
Scrape the batter into the prepared pans and smooch
the surface with a spatula. The pans will be about Vi full.
Bake 25 to 35 minutes or until a tester inserted near the
center comes out clean and the cake springs back when
pressed lightly in the center. (The cakes should start to shrmk
from the sides of the pans only after removal from the OWW.)
Let the cakes cool in the pans on racks for 10 minutes.
Loosen the sides with a small metal spatula and invert onto
greased wire racks. To prevent splitting, reinvert so that the
tops are up and cool completely before wrapping airtight.
UNDERSTANDING
Chestnut flour» available in specialty or health food stores
(see page 421), contains mainly starch and has no gluten
to support a cake’s structure—so I added sufficient bread
flour to provide the necessary gluten. This cake also con-
tains whole rggs instead of yolks and less baking powder
than All-Occasion Downy Yellow Butter Cake to further
strengthen its structure.
Two 9-inch by IVS-inch
cake pans greased, bottoms
lined with parchment or
wax paper, and then greased
again and floured.
FINISHED HEIGHT:
Each layer w 1М» inches.
STORE
Airtight: 2 days room tem-
perature. 5 days refriger-
ated. 2 months frozen.
Moisture distributes most
evenly the day after baking.
COMPLEMENTARY
ADORNMENTS
A simple dusting of pow-
dered sugar. One recipe:
Chestnut Buttercream of
any dark chocolate frosting
or glaze such as ganache
(page 267 or 271).
SERVE:
Room temperature.
POINTERS FOR SUCCESS:
See page 24.
BUTTER CAKES 43
(J olden
Grand Marnier
Cake
SERVES 12
he divine flavors of orange. Grand Marnier, chocolate,
and almond—supported by a mellow sour cream butter cake
base—combine to produce a sensational cake. The orange
flower water enhance* the flavor. The Grund Marnier syrup
makes the cake soft and moist [though not at all wet) and
helps to preserve it so well that I used to ship this cake to
the University of Michigan for my daughter Beth’s birth-
INGREDIENTS MEASURE WEIGHT
twin tcmpcrattin chocolate mtni-chips or bittersweet chocolate chopped into Vn-inch pieces iyj/шпс Vj cup ounces 3 ounces gTMltf 85 gram*
Grand Marnier V* teaspoon • •
cake flour 1¥? teaspoons ♦ •
3 large eggs scant 5 fluid ounces 5.25 ounces t SO grams 1weighed without shellsl
sour cream 1 cup 8.5 ounces 242 grams
orange flower water or vanilla 2 teaspoon.* ISi teaspoons * • 8 grams 6 grams
sifted cake flour IVz cups 8.75 ounces 250 grams
unblanched sliced almonds, toasted and find) ground Vi cup + 1 tablespoon Iground) 2 ounces 60 grams
sugar 1 cup 7 ounces 200 grams
baking powder 1‘6 teaspoons • 7.5 grams
baking soda 1 teaspoon 5 grams
salt % teaspoon • 5 grams
grated orange zest urwalted butter (must be softened/ GRAND MARNJFR SYRUP 2 tablespoons 1 cup • 8 ounces 12 grams 227 grams
sugar *Л cup 3.5 ounces 100 grams
orange juux. freshly squeezed V» liquid cup 2 ounces 60 grams
Grand Marnier У> liquid cup 2.75 ounces 80 grams
44
SIMPLY DELICIOUS FOOLPROOF CAKES
day. I once added a lirtle extra Grand Marnier and sent it
airmail to a friend m France?
Preheat the oven to 35 (FT
In a small bowl toss the chocolate chips and Grand
Marnier until the chips are moistened and shiny. Add the
1 Vi teaspoons flour and toss until evenly coated.
in a medium bowl lightly combine the eggs, V» cup
sour cream, and orangr flower water or vanilla.
In a large mixing bowl combine the dry ingredients
and orange zest and mix on low speed for 30 seconds to
blend. Add the butter and remaining 4'4 cup sour cream.
Mix on low speed until the dry ingredients are moistened.
Increase to medium speed (high speed if using a hand mixer)
and beat for 1’Л minutes to aerate and develop the cake’s
structure. Scrape down the sides. Gradually add the egg
mixture in 3 batches, bearing for 20 seconds after each ad-
dition to incorporate the ingredients and strengthen the
structure. Scrape down the sides. Stir m the chocolate chips.
Scrape the batter into the prepared pan and smooth
rhe surface with a spatula. Bake 55 to 65 minutes or until
a wire cake tester inserted in the center comes out dean
and the cake springs back when pressed lightly in the cen-
ter. The cake should start to shrink from the sides of the
pan only after removal from the oven.
Shortly before the cake is done, prepare the syrup: Heat
die sugar, orange juice, and Grand Marnier until the sugar
is dissolved. Do not boil. As soon as the cake comes out of
the oven, place the pan on a rack, poke the top all over
with a wire tester, and brush on Vj the syrup. Cool in the
pan nn the rack for 10 minutes, then invert onto a serving
plate or cardboard round. Brush with the remaining syrup
and cool completely before glazing with chocolate or wrap-
ping airtight.
UNDERSTANDING
This cake is similar to Buttermilk Country Cake with the
less tangy tour cream replacing the buttermilk. A more sig-
nificant difference, however, is that Vi cup flour is replaced
by ground almonds and that ¥2 cup sugar, dissolved in or-
ange juice and Grand Marnier, is added to the cake after
baking.
To compensate for the missing Vi cup of sugar during
baking, the leavening is increased to aerate and tenderize
the texture. 1 like to add tiny chocolate chips to the batter
because dark chocolate blends so beautifully with the or-
One 9-cup fluted lube pan,
greased and floured.
FINISHED HEIGHT:
Depends on design of pan.
STORE:
Airtight, 3 days room tem-
perature, 7 days refriger-
ated, 2 months frozen.
Moisture distributes most
evenly one day after baking.
COMPLEMENTARY
ADORNMENTS
A light dusting of powdered
sugar. ¥i recipe Chocolate
Cream Glaze (page 271),
SERVE:
Room temperature.
POINTERS FOR SUCCESS:
See page 24.
BUTTER CAKES 45
ange flavor. This cake can support the chips because of both
the decrease in sugar and the acid provided by the sour
cream. An old baker’s trick to suspend ingredients in a bat-
ter is to make the batter more acid. The acid coagulates the
egg faster, in effect setting the cake's structure before the
heavier particles can fall to the bottom. A decrease in sugar
also enables the rgg to coagulate faster and for the starch
in the flour to gelatinize better, also strengthening the
structure. Another trick is coating the chips with flour, giv-
ing them a rougher surface with which to chng to the barter.
NOTE: This cake is very attractive made in individual por-
tions. A 6-cakc Bundt-lette pan Ipagc 453) is the perfect
size. This recipe will make 9 individual cakdettes, so you
will need either to make only recipe, using 114 tea-
spoons baking powder, or bake rhe cakdettes in 2 batches.
Be sure to fill any unused sections of the pan with water to
promote even baking. The cakdettes require 30 to 4П min-
utes baking time.
White
Velvet Butler
Cake
SERVES 12
his is the softest and most delicate of all butter cakes.
The butter and vanilla give the cake an off-white color but
also contribute delicious flavor. This versatile cake blends
well with rust about any buttercream except for choco-
late—which tends to overwhelm the delicate flavor.
INGREDIENTS MEASURE WEIGHT
ЛХМП temperлшге whittle ounces grams
4*.<t large egg whites 4 hill liquid ounces 4.75 ounces 135 grams
milk 1 liquid cup 8.5 ounces 242 grams
vanilla 2У-4 teaspoons • 9 gram*
sifted coke flnur 3 cups 10.5 ounces 300 grams
sugar 1 Vi cups 10.5 ounces 300 grams
baking powder 1 LabkipixMi 4 1 teaspoon 9 19.5 grams
salt Vk teaspoon 4 5 grams
unsahed buncr (must be softened; 12 tablespoons 6 ounces 170 grams
4h SIMPLY DELICIOUS FOOLPROOF CAKES
Preheat the oven to 3S(FF.
In a medium bowl lightly combine (he egg whites, *4
cup milk and vanilla.
In a large mixing bowl combine the dry ingredients
and mix on low speed lor 30 seconds to blend. Add the
butter and remaining Ц cup milk. Mix on low speed until
the dry ingredients are moistened. Increxw to medium speed
(high speed if using a hand mixer) and brat for 1 V> minutes
to aerate and develop the cake's structure. Scrape down the
sides. Gradually add the egg mixture in 3 batches, beating
for 20 seconds after each addition to incorporate the ingre-
dients and strengthen the structure. Scrape down the sides.
Scrape the barter into the prepared pans and smooth
the surface with a spatula. The pans will be about lA full.
Bake 25 to 35 minutes or until a tester inserted near the
center comes our clean and the cake springs back when
pressed lightly in rhe center. The cakes should start to shrink
from tire sides of tire pans only after removal from the oven.
Let the cakes cool in the pans on racks tor 10 minutes.
Lexнеп the sides with a small metal spatula and invert onto
greased wire racks. To prevent splitting, reinsert so that the
tops are up and cool completely before wrapping airtight.
UNDERSTANDING
This cake is identical to All-Occasion Downy Yellow But-
ter Cake except that each 2 egg yolks are replaced by 1 'A
whites. Egg whites produce a softer cake than yolks or whole
eggs.
This cake is used to make White Lilac Nostalgia (page 167).
Two 9-itKh by 1'4-iach
cake pans greased, bottoms
Lined with parchment or
wax paper, and then greased
again and floured.
FINISHED HEIGHT:
Each layer is 1 *4 inches.
STORE:
.Airtight: 2 days гост tem-
perature, 5 days refriger-
ated. 2 months frozen.
Texture is most perfectly
moist the same day as
baking.
COMPLEMENTARY
ADORNMENTS:
A simple dusting of pow-
dered sugar. Any nonchoco-
late buttercream, glare, or
fondant.
SERVE:
Room temperature.
POINTERS FOR SUCCESS
See page 24.
BUTTER CAKES 47
Golden
Luxury Buller
Cake
t7 f о one would ever guess that while chocolate is one
of the ingredients in this cake. The addition of real white
chocolate (the kind which contains cocoa butter) to a cake
adds a velvety texture, deepens the yellow color, and
heightens the “melt-in the-mouth1 quality. This is because
cocoa butter is ven’ firm at room temperature but melts
faster than butter at body temperature. Cocoa butter is also
a splendid emulsifier and is responsible for the extra
smoothness of the batter and thr velvety grain of the baked
cake. The slight acidity of the cocoa butter, together with
the milk solids in the chocolate, perfumes the cake with an
almost lemony edge. Accentuate this flavor with a lemon
buttercream.
SERVES 12
INGREDIENTS MEASURE WEIGHT
rtwm trmpfiMurc white chocolate vohnne ♦ ounces 6 ounces grams 170 grains
6 large egg yolks 3.5 fluid ounces 4 ounces 112 grams
milk 1 liquid cup 8.5 ounces 242 grams
... vanilla I ¥1 teaspoons • 6 grams
sifted cake flour 3 cup* J 0.5 ounces 3(10 grams
sugar 1 cup + 3 tablespoons 8.5 ounces 240 grains
baking powder 1 tablespoon + 1 Vi teaspoons < 22 grams
salt V'« teaspoon ♦ $ grants
unsalced burter 1 must be softened) 9 tablespoons 4.S ounces 12R grams
Two 9-mch by 1 Mr inch
cake pan» greased, bottoms
lined with parchment or
was paper, and then greased
again and flouted.
Preheat the oven to 35(fP.
In a double boiler melt the chocolate over hot (not
simmering; water, sorting frequently. Remove from the
water.
In a medium bowl lightly combine the yolks, lA cup
milk, and vanilla.
In a large mixing bowl combine the dry ingredients
and mix on low speed for 30 seconds to blend. Add the
butter and remaining ¥4 cup milk. Mix on low speed until
the dry ingredients are moistened. Increase to medium speed
(high speed if using a hand mixer) and beat for 1№ minutes
4.4 SIMPLY DELICIOUS FOOLPROOF CAKES
to aerate and develop the cake’s structure. Scrape down the
sides. Gradually add the egg mixture in 3 batches, beating
for 20 seconds after each addition to incorporate the ingre-
dients and strengthen the structure. Scrape down the sides.
Add the melted chocolate and beat to incorporate.
Scrape the batter into the prepared pans and smooth
the surface with a spatula. The pans will be a little more
than 'Л full. Bake 25 to 35 minutes or until a tester inserted
near the center comes out dean and the cake springs hade
when pressed lightly in the center. The cakes should start
to shrink from the sides of the only after removal from
the oten.
Let the cakes cool in the pans on racks for 10 minutes.
Loosen the sides with a small metal spatula and invert onto
greased wire racks. To prevent splitting, reinvett so that the
tops are up and cool completely before wrapping airtight.
UNDERSTANDING
The formula for this cake is, beneath the surface, practi-
cally identical to Al I-Occasion Downy Yellow Butter Cake.
The added fat from the cocoa butter is balanced by remov-
ing the equivalent butter from the basic recipe. The added
sugar in the chocolate has also been subtracted. The milk
solids are the only extra and, as they tend to toughen a
cake’s structure» a slight increase in baking powder was used.
FWMISHED HEIGHT:
Each layer is 1 ‘4 indies.
STORE:
Airtight: 2 days room tem-
perature. 5 days refriger-
ated. 2 months frozen.
Texture is most perfectly
moist the same day as
baking.
COMPLEMENTARY
ADORNMENTS:
A simple dusting of pow-
dered %ugar. One recipe;
Lemon Buttercream (page
234 or 245). White Choco-
late Buttercream or Glaze
[page 246 or 248).
SERVE;
Room temperature.
POINTERS FOR SUCCESS:
See page 24 and Melting
White Chocolate (page 379).
BUTTER CAKES 49
W*
Chocolate
Whisper Cake
SERVES 12
// hire chocolate offers the double advantage of vel-
vet}’» mclt-in-the-mouth texture and» because of white cake's
gentle flavor» a definite whisper of cocoa butter, This spe-
cial flavor blends well with a lemon buttercream or. of
course, a white chocolate buttercream or glaze.
INGREDIENTS MEASURE WEIGHT
ними temptmtwe wlvmc owners grams
white chocolate • 6 ounces 170 grams
4 VS large egg whites 4 full liquid ounce* 4.75 ounces 135 grams
milk 1 liquid cup Я-5 ounces 242 grams
vanilla 116 teaspoons • 6 grams
sifted cake flour 3 cups 10.5 (Minces 300 grams
sugar 1 cup + 3 laMcspoofts ounces 240 grams
baking powder 1 tables p oon + 116 teaspoons • 22 grams
sail 16 teaspoon ♦ 7 grams
unsalted butter [must be softened) 9 tablespoons 4.5 ounces 12H grams
Two 9-mch by l№-inch
cake pans greased, bottoms
lined with parchment or
wax paper, and then greased
again and floured.
FINISHED HEIGHT:
Each layer is 1У» inches (1¥«
inches when baked in oval
Preheat the oi'en to JStFF.
In a double boiler melt the chocolate over hot {not
simmering) water, stirring frequently. Remove from the
water.
In a medium bowl lightly combine the egg whites, ¥»
cup milk, and vanilla.
In a large mixing howl combine the dr}’ ingredients
and mix on low speed for 30 seconds to blend. Add the
butter and remaining Vi cup milk. Mix on low speed until
the dn* ingredients are moistened. Increase to medium speed
(high speed if using a hand mixer) and beat for 1’Zt minutes
to aerate and develop the cake’s structure. Scrape down the
sides. Gradually add the egg mixture in 3 batches, beating
for 20 seconds after each addition to incorporate the ingre-
dients and strengthen rhe structure. Scrape down the sides.
Add the melted chocolate and beat to incorporate.
50 SIMPLY DELICIOUS FOOLPROOF CAKES
Scrape the barret into the prepared pans and smooth
the surface with a spatula. The pans will be about Vi full.
Bake 25 to 35 minutes or until a tester inserted near the
center comes our clean and the cake springs back when
pressed lightly in the center. The cakes should start to shrink
from the sides of the pans onfy after remotuJ from the oven.
Let rhe cakes cool in rhe pans on racks for 10 minutes,
[jooscri the sides with a small metal spatula and in ven onto
greased wire racks. To prevent splitting, remvert so that the
tops are up and cool completely before wrapping airtight
UNDERSTANDING
Real white chocolate ts made up of one-third cocoa butter,
one-third sugar, one-third milk solids, and a tiny amount
of vanilla and lecithin, a natural emulsifier found in soy*
beans. In this cake a small amount of white chocolate is
added and comparable amounts of fat (butter) and sugar
are subtracted. The result, compared to White Velvet Cake,
is a more velvety crumb and fuller flavor. Because of the
extra milk solids and the lecithin, the cake is also higher,
lighter, and more golden in color.
The cocoa butter, which is firmer than butter yet melts
tn the mouth, makes this cake easy to cut.
This cake is used to make Blueberry Swan Lake ipage 165),
STORE:
Airtight: 2 days room tem-
perature, 5 day» refriger-
ated, 2 months frozen.
Texture ie mwt perfectly
moist the чате day as
baking.
COMPLEMENTARY
ADORNMENTS:
A simple dusting of pow-
dered sugar. One redpe:
Lemon Buttercream (page
234 or 245). White Choco-
late Buttercream or Glaze
'page 246 or 248),
SERVE:
Room temperature.
POINTERS FOR SUCCESS:
See page 24.
BUTTER CAKES 51
Chcchcrtxjard
Fantasy Сакс
SERVES 12
«У '1 delightful trompc Toeil of yellow and chocolate
checkerboard with the same exquisite texture and well-bal-
anced flavor of All-Occasion Downy Yellow’ Butter Cake
(page 39). A great party cake, especially for children. Chi-
cago Metallic and Rowoco. two major pan producers, like
this recipe so much they both offer it with their checker-
board cake pans!
INGREDIENTS MEASURE WEIGHT
room fcmpCTMure extra bittersweet ur semisweet chocolate ro/ume ounces 3 ounce* gram* 85 grams
4 large egg* f> full fluid ounce* 7 ounces 200 grams 1 weighed without shells 1
milk 1 *A liquid cups 11.25 ounces 320 gram*
vanilla 1 tablespoon • 12 grants
st Ft cd cake flour 4 cups 14 ounces 44Ю gram*
sugar 2 cups 14 ounces 400 grams
baking powder 2 tablespoons ♦ 29J> grams
salt 1 teaspoon • 7 grams
u&salted butter I'musl be softened) 1 CUp 8 ounces 227 grams
A set of three 9-inch by
i-inch checkerboard cake
pans, greased, bottoms lined
with parchment or wax pa-
per. and then greased again
and floured.
Preheat the oven to 35O°F.
In a double boiler melt the chocolate over hot (not
simmering! water» stirring frequently. Remove from the
water.
In a medium bowl lightly combine the eggs, ¥♦ of the
milk» and vanilla.
In a large mixing bowl combine the dry ingredients
and mix on low speed for 30 seconds to blend. Add rhe
butter and remaining milk. Mix on low speed until the dry
ingredients are moistened. Increase to medium speed (high
speed if using a hand mixer) and beat for 114 minutes to
aerate and develop the cake’s structure. Scrape down the
sides. Gradually add the egg mixture in 3 batches, beating
for 20 seconds after each addition to incorporate the ingre-
dients and strengthen the structure. Scrape dow n the sides.
52 SIMPLY DELICIOUS FOOLPROOF CAKES
Divide rhe batter approximately in half (1 Уч pounds/
793 grams in one bowl, l’/j> pound&680 grams in another
howl). Snr the melted chocolate mto the smaller batch of
batter until uniform in color. Fill 2 large pastry hags fitted
with large round tubes У» inches in diameter (a large num*
her 9 tube) with the 2 battens.*
Place the divider rings in 1 of the prepared pans and
pipe batter into each section, alternating hatter colors. The
batter should till the pan about ‘/a full. Using a small metal
spatula or the back of a spoon, smooth any seams or divi-
sions in the batter. Now carefully lift out the divider and
rinse it off. When piping batter for the second layer, alter-
nate the colors, i.e. if you started with yellow for the out-
side nng, start with chocolate. Pipe batter for the third layer
exactly like the first.
Bake 25 minutes or until a tester inserted near the cen-
ter comes out Jean and the cakes spring back when pressed
lightly in the centers. The cakes should start to shrink from
the sides of the pans only after removal from the oven.
Let the cakes cool in the pans on racks for 10 minutes.
Loosen the sides with a small metal spatula and invert onto
greased wire racks. To prevent splining, reinven so that the
tops are up and cool completely before wrapping airtight.
When stacking the layers, use a very thm coating of
yellow or chocolate (rusting to adhere the layers without
disturbing the checkerboard effect.
UNDERSTANDING
A slightly higher level of baking powder is used for this
cake because the pans are only 1-inch high. Whole eggs
provide the structure to accommodate the tndred choco-
late, which is stirred into half the batter at the very end of
mixing. The batter is thick enough to pipe through a pastry
bag, making filling the special sections of these pans quick
and easy.
I use melted chocolate instead of cocoa because it is
convenient to add to the batter and also because its less
intense chocolate flavor blends better with the more subtle
yellow cake.
FINISHED HEIGHT.
Each layer n 14 inches.
STORE:
Airtight: 2 day* room tem-
perature. 5 days refriger-
ated, 2 months frozen.
Texture is most perfectly
moist the same day as
baking.
COMPLEMENTARY
ADORNMENTS:
One recipe: Any dark choc-
olate frosting or glaze such
as Chocolate Cream Glaze
I page 271) or Classic But-
tercream
(page 228 or 23OJ.
SERVE:
Room temperature.
POINTERS FOR SUCCESS:
See page 24.
• You may An iw rIjm measuring caps to pour tbe barter into the pans, but
pastry hags arc iawer and easier to use
BUTTER CAKES 53
Icrfect
All-American
Chocolate
Butter Cake
к-^his cake has a full chocolate flavor and exceptionally
soft, fine texture for a chocolate buner cake. Dutch-pro-
cessed cocoa makes the neutralizing effect ot baking soda
unnecessary, eliminating the slightly bitter edge often asso-
ciated with baking soda chocolate cakes. Ross Horowitz,
after photographing this cake for Chocolatier magazine,
came up with a marvelous description: “When you bite into
this cake," he rhapsodized, “it seems light; then it becomes
fudgy and chocolaty; then, |ust when you begin to think
you have something, it simply vanishes so you want to take
another bite!” My mother was more succinct: “It tastes just
like a chocolate bar but softer." (And that was my goal.)
SERVES 12
INGREDIENTS MEASURE WEIGHT
roam temperature unsweetened cocoa 1 Dutch-processed I volume ‘A cup * 3 LablespcKHir (lightly spooned into enp) ounces 2.25 ounces gram* 63 grams
txnhng water 1 liquid cup 8.25 ounces 236 grants
3 large eggs scant 5 fluid ounces 1 > 5.25 ounces 150 grams 1 weighed without thellyl
vanilla 2Vi teaspoons • 9 grams
sifted cake floor 2*4 cups + 2 tablespoons 8.25 ounces - 1 J 235 grams
sugar FA cups 10.5 ounces 300 grams
baking powder 1 tablespoon • j 15 grams
salt ¥4 teaspoon • 5 grams
uns&kcd butter (muM be softened) 1 cup R ounces 227 grams
Preheat the oirn to 35(ГР.
in a medium bowl whisk together the cocoa and boil-
ing water until smooch. Cool to room temperature.
In another bowl lightly combine the eggs, ’4 of the
cocoa mixture, and vanilla.
In a large mixing bowl combine the remaining dry in-
gredients and mix on low speed for 30 seconds to blend.
Add the butter and remaining cocoa mixture. Mix on low
speed until the dry ingredients are moistened. Increase to
54 SIMPLY DELICIOUS FOOLPROOF CAKES
medium speed (high speed if using a hand mixed and beat
for 1 Vi minutes to aerate and develop the сакеЧ structure.
Scrape down rhe sides. Gradually add the egg mixture in 3
batches, beating for 20 seconds after each addition to in-
corporate the ingredients and strengthen the structure. Scrape
down the sides.
Scrape the batter into the prepared pans and smooth
the surface with a spatula. The pans will be about 'Л lull.
Bake 25 to 35 minutes or until a tester inserted near the
center comes out dean and the cake springs back when
pressed lightly in the center. IK’ cakes should start fn shank
from the sides of the parts only after removal farm the Oven.
Let the cakes cool in rhe pans on racks for 10 minutes.
Loosen the sides with a small metal spatula and invert onto
greased wire racks. To prevent splitting, reinsert so that the
tops are up and cool completely before wrapping airtight.
UNDERSTANDING
The formula for this cake is similar to All-Occasion Downy
Yellow Butter Cake with just a few minor concessions to
the special nature of chocolate. Some of the flour is re-
placed with equal weight of cocoa. (Cocoa gives a fuller
chocolate flavor than bitter chocolate m a cake. See page
422.1 The butter ts increased because cocoa creates a stronger
and drier structure. Water replaces the milk because, in a
chocolate layer cake, milk protein brings out the bitterness
in chocolate and tics up flavor—whereas water allows for
quick release of full chocolate flavor. Whole eggs are used
instead of yolks for practicality, because the flavor im-
provement offered by yolks alone is not as noticeable in a
chocolate cake as it is in a yellow cake.
This cake is used to make La Porcelaine (page I99J.
7 wo 9-mch by 1 Vi-inch
cake pans greased, bottoms
lined with parchment or
wax paper, and then greased
and floured.
FINISHED HEIGHT:
Each layer is about 1 Vi
inches.
STORE:
Airtight: 2 days room tem-
perature, 5 days refriger-
ated, 2 months frozen.
Texture is most perfectly
moist the same day as
baking.
COMPLEMENTARY
ADORNMENTS;
A simple dusting of pow-
dered sugar. One recipe:
Any buttercream except for
lemon. Any glaze or fon-
dant.
SERVE:
Room temperature.
POINTERS FOR SUCCESS:
Sec page 24.
BUTTER CAKES 55
P crfccl
All-American
Chocolate
Torlc
v-x о my taste, there is no more appealing presentation
than an elegant tone glazed with a shiny coating of dark
or whirr chocolate. (Especially if one suspects that there is
more chocolate within!)
This richly chocolate butter cake is 1У« inches high-
just right for a tone. It is easy to serve and, with a single
long stemmed red rose on top, fancy enough for a black-
tie dinner party.
SERVES В
INGREDIENTS MEASURE WEIGHT
room r<rnprzanrr<- V<Wu«h? ounces gr.iztr
unsweetened cocoa (Dutch-proc essedl ’/« cup ♦ 3 ublcspcoas 1.5 ounces 42 grams
boiling water Ух liquid cup 5.5 ounces 156 grams
4 large egg yolks 2 full fluid ounces 2.5 ounces 74 grams
vanilla 1 teaspoons • 6 grams
sifted cake flour 1 Vj cups + I tablespoon 5.5 ounces 156 grams
sugar 1 cup 7 ounces 200 grams
baking powder 2 teaspoons • 10 grams
salt Vi teaspoon • Jj5 grams
uncalled butter (must be softened) 10 tablespoons 5 ounces 142 grams
One 9-inch by 2-iuch cake
pan or 9-iftch spnngform
pan, greased, bottom lined
with parchment or wax pa-
per. and (hen greased again
and floored.
FINISHED HEIGHT:
inches.
Preheat the oirn to 35 (PF.
In a medium bowl whisk together the cocoa and boil-
ing water until smooth. Cool to room temperature.
in another bowl lightly combine the eggs, % of the
cocoa mixture, and vanilla.
In a large mixing bowl combine the remaining dry* in-
gredients and mix on low speed for 30 seconds to blend.
Add the butter and remaining cocoa mixture. Mix on low
speed until the dry ingredients are moistened. Increase to
medium speed (high speed if using a hand mixer) and beat
for 1V2 minutes to aerate and develop the cake's structure.
Scrape down the sides. Gradually add the egg mixture in 3
batches, beating for 20 seconds after each addition to in-
corporate the ingredients and strengthen the structure. Scrape
down the sides.
56 SIMPLY DELICIOUS FOOLPROOF CAKES
Scrape the batter into the prepared pan and smooth
the surface with a spatula. The pan will be about Vi full.
Bake 30 to 40 minutes or until a tester inserted near the
center comes out clean and the cake springs back when
pressed lightly in the center. The cake should start to shrink
from the sides of the pan only after remoiMl from the oven.
Let the cake cool in the pan on a rack for 10 minutes.
Loosen the sides with a small metal spatula, invert onto a
greased wire rack, and cool completely before wrapping
ai night.
UNDERSTANDING
The formula for this cake is almost identical to the preced-
ing one with two exceptions: Egg yolks are used in place
of whole eggs (which weakens the structure enough to re-
sult in a perfectly level top), and only two-thirds of the
batter is prepared.
This cake is used to make Bittersweet Royale Torte
(page 198).
STORE
Airtight: 2 day* room tem-
perature, 5 days refriger-
ated, 2 months frozen.
Texture is most perfectly
moist the same day as
baking.
COMPLEMENTARY
ADORNMENTS:
A simple dusting of pow-
dered sugar. One recipe:
Any chocolate glaze (white
chocolate is especially at-
tractor I or fondant.
SERVE;
Room temperature.
POINTERS FOR SUCCESS
See page 24. Magi-Cake
Strips (pages 20 and 456)
gives the best shape for
glazing.
BUTTER CAKES 57
Chocolate
Domingo
Cake
his ic quire cimply rhe tenor of chocolate hurter cakes.
It has the most intense, round, full chocolate flavor notes
of any I have experienced, mainly due to the almost double
amount of butter it contains. In effect, I have taken the
butter usually used in the buttercream and pur it in the
cake, making it unnecessary’ and almost undesirable to frost
the cake. This cake literally meins in the mouth. The extra
butter in this cake also makes it slightly fudgy and easy to
slice without crumbs.
In the ancient tradition of creating a fabulous recipe
for a favorite opera star, this cake is named for mine: Pla-
cido Domingo, in gratitude for the pleasure of his incom-
parable performances.
SERVES 10
T О I 2
INGREDIENTS MEASURE WEIGHT
room tcmpcr,Hwr unswccteiscd cocoa I.Thitch processed) or *A cup nonalkalizcd cocoa such ал Hershey's volume cup + 3 tablespoons ounces 1.5 ounces grams 42 grams
war cream Уз cup 5.5 ounces 160 grams
2 large eggs 1 fluid ounces 3.5 ounces 100 grams •weighed widtout shells!
vanilla 1*6 teaspoons • 6 grams
sifted cake Hour 1 ’Л cups +1 tablespoon 5,5 ounces 156 grams
I sugar 1 cup 7 ounces 200 grams
baking powder •Mi teaspoon • 4 grams
baking soda Vi teaspoon • 1.5 grams
salt */» teaspoon • 3.5 grams
unsalted butter I must be softened! 14 tablespoons 7 ounces 200 grams
Preheat the oven to 35(fF.
In a medium bowl whisk together the cocoa, sour
cream, eggs, and vanilla until smooth.
In a large mixing bowl combine all the remaining dry
ingredients and mix un low speed for 30 seconds to blend.
Add the hurter and Vi the cocoa mixture. Mix on kiw speed
5» SIMPLY DELICIOUS FOOLPROOF CAKES
until the dry ingredients are moistened. Increase to medium
speed (high speed if using a hand mixer) and beat for 1У5
minutes to aerate and develop the cake’s structure. Scrape
down the sides. Gradually add the remaining cocoa mix-
ture ia 2 batches, beating for 20 seconds after each addi-
tion to incorporate the ingredients and strengthen the
structure. Scrape down the sides.
Scrape the batter into die prepared pan and smooth
the surface with a spatula. The pan will be about half full.
Bake 30 to 40 minutes or until a tester inserted near the
center comes out clean and the cake spnngs back when
pressed lightly in the center. The cake should start to shrink
from the sides of the pan only after removal from the oven.
Let the cake cool in the pan on a rack for 10 minutes.
Loosen the sides with a small metal spatula and invert onto
a greased wire rack. Reinvert so that the top is up and cool
completely before wrapping airtight.
UNDERSTANDING
This formula is similar to Perfect All-American Chocolate
Torte, but sour cream replaces the water to add a lovely,
mellow flavor to the chocolate. Although rhe protein m sour
cream normally acts as a flavor inhibitor in chocolate cakes,
the close to double amount of butter (this includes the but-
terfat in the sour cream) corrects this tendency because it
is a superb releaser of other flavors. Butter tenderizes cake,
so I decreased the leavening to equal half the leavening power
of the Perfect All-American Chocolate Torte (page 56).
note: This cake was created at the insistence of my incom-
parable assistant, David Shamah. He loves the quality that
sour cream gives to yellow cake and felt certain it would
do something equally wonderful for chocolate unlike milk
or buttermilk. He was right; sour cream, it seems, is an
exception, and this has become his favorite chocolate cake.
One Я-inch by 2-inch cake
pan or a 9-inch springform
pan, greased, bottom lined
with parchment or wax pa-
per, and then greased again
and floured.
FINISHED HEIGHT:
1W inches (the cop of the
cake will be rounded when
done and will become per-
fectly flat on cooling).
STORE:
Airtight: 2 days room tem-
perature, 5 days refriger-
ated, 2 months frozen.
Texture is most perfectly
moist the same day as
baking.
COMPLEMENT ARY
ADORNMENTS:
A dusting of powdered
sugar and a red chocolate
rose (page 390; or real red
rose. Or the special Choco-
late Fossil technique (page
3B6J.
SERVE:
Room temperature.
POINTERS FOR SUCCESS:
See page 24.
NOTE:
This cake is divine eaten hot
from the oven!
BUTTER CAKES 59
Chocolate
Fudge Cake
SERVES 12
^-^he molasses in the brown sugar gives this cake a dis-
tinctive and pleasantly bitter edge. The texture is soft and
light yet moist with good chocolate Flavor impact and a
lingering bittersweet aftertaste. The particular bittersweet
chocolate Flavor of this cake goes splendidly with Milk
Chocolate Buttercream (page 250).
INGREDIENTS MEASURE WEIGHT
пх»Л1 reznperarure tohrme grants
unsweetened cocoa )[>u(cb-pruccs»cd) or 1 cup nooolkalized cocoa such as Hershey’s * У» cup + 3 cablespoons (lightly spooned into я cup) 3 ounces 85 grants
boiling water IVj liquid cups 12.5 ounces 354 grams
3 large eggs scant 5 fluid ounces 5-25 ounces 150 grams (weighed without shells)
vanilla 1V» teaspoons ♦ 6 grams
sifted cake floor 5 cups 10.5 Dunces 100 grams
light bcovsn sugar 2 cup» l.tirmly packed) 15.25 ounces 434 grains
baking powder 2'Zi teaspoons * 11 gram
baking soda % teaspoon ♦ 4 grams
salt ¥« teaspoon • 5 grains
unsaltcd butter {must be softened) 1 cup i 8 ounces 227 grams
Two 9-inch by ! ’/j-inch
cake pans greased, bottoms
lined with parchment or
wax paper, and then greased
again and floured,
Preheat tbe oi en to 3SCPF.
In a medium bowl whisk together the cocoa and boil-
ing water until smooth. Cool to room temperature.
In another bowl lightly combine the eggs, 54 of the
cocoa mixture, and vanilla.
In a large mixing bowl combine the remaining dry in-
gredients and mix on low speed for 30 seconds. Add the
butter and remaining cocoa mixture. Mix on low speed un-
til the dry ingredients are moistened. Increase to medium
speed (high speed if using a hand mixer) and bear for ll/t
’ if tnxialkslrrcd cvcoa, eliminate the baking powder and use • lutal «□!
IV* mspccas of bikirg sodi.
61) SIMPLY DELICIOUS FOOLPROOF CAKES
minutes to aerate and develop the cake’s structure. Scrape
down the sides. Gradually add the egg mixture in 3 batches,
beating tor 20 seconds after each addition to incorporate
the ingredients and strengthen the structure. Scrape down
the sides.
Scrape the batter into the prepared pans and smooth
the surface with a spatula. The pans will be about Yz full.
Bake 20 tn 30 minutes or until a tester inserted near the
center comes out dean and the cake springs back when
pressed lightly in the center. The cakes should start to shrink
from the sides of the pans only after removal from the otv*.
Let the cakes cool in the pans on racks for 10 minutes.
Loosen the sides with a small metal spatula and invert onto
greased wire racks. To prevent splitting» ranvert so that
tops arc up and cool completely before wrapping airtight.
UNDERSTANDING
The formula for this cake is similar to Perfect All-American
Chocolate Burter Cake. The most significant differences are
brown sugar instead of granulated and extra liquid (from
the water and the molasses in the brown sugar) replacing
one of the eggs. Baking soda is used to neutralize some of
the molasses’ acidity. The baking soda and baking powder
provide equivalent leavening to 2 tablespoons of baking
powder. Less vanilla is necessary because the brown sugar
conuibutcs so much flavor. This cake has less structure leggj
and more liquid, therefore it is moister, softer, and more
tender.
Thu cake is used to make Chocolate Spike (page ! 98/.
FINISHED HEIGHT:
Each layer к IMi inches.
STORE:
Airtight: 2 days room tem-
perature, 5 days refriger-
ated. 2 months frozen.
Texture is most perfectly
moist кате day as baking.
COMPLEMENTARY
ADORNMENTS:
A simple dusting of pow-
dered sugar. One recipe;
Milk CTiocnlate Buttercream
(page 250k Ganache Frost-
ing (page 267}.
SERVE:
Room temperature.
POtNIERS FOR SUCCESS
Sec page 24.
BUTTER CAKES 61
Layer Devil’s
FOOd CakC I v-Xhis is a moist, fine-textured, intensely chocolate cake,
z—w)th a flavor -strongly reminiscent of the beloved deeply co-
S E R V E S I 8 ooa cake of childhood.
INGREDIENTS
MEASURE
WEIGHT
roam tempc.-jiurc unsweetened cocoa IncMialkalized, such as Hershey's) volume 1 Clip (lightly spooned into cap) ounces 3 ounces gram.* 82 grains
boiling water 1Vi liquid cups 12.5 ounces 354 grams
4 large ««К* 6 full fluid ounces 7 ounces 200 grams (weighed without shelhl
vanilla 1 tablespoon 12 grams
sifted cake Hour 3Vi cups 12.25 ounces 350 grams
sugar 2'4 cups 15.75 ounces 450 grants
baking w»da I teaspoon • 5 grams
salt 1 teaspoon ♦ 7 grants
urtsahed buner (muu be softened) 1 */i cup* 12 ounces 340 grams
Three 9.ind» by 1 'Л-inch
cake pans greased, bottoms
lined with parchment ur
wax paper, then greased
again and floured.
Preheat aiett to 3.5(FF.
In a medium bowl whisk together cocoa and boiling
water until smooth and cool to room temperature.
In a second medium bowl lightly combine eggs, about
•A of the cocoa mixture, and the vanilla.
In a large mixing bowl combine the remaining dry in-
gredients and mix on low speed for 30 seconds. Add butter
and remaining Уч of the cocoa mixture. Mix on low speed
until dry ingredients are moistened. Increase to medium speed
{high speed if using hand mixer) and beat for l'/a minutes
to aerate and develop cake's structure. Scrape down the
sides.
Gradually add the egg mixture to barter in three batches,
beating for 20 seconds after each addition to incorporate
ingredients and strengthen structure. Scrape down the sides.
Scrape batter into prepared pans and smooth surface
62 SIMPLY DELICIOUS FOOLPROOF CAKES
with л spatula. Pans will be about half full. Bake 20 to 30
minutes or until a tester inserted near center coma out clean
and the cake springs back when pressed lighdy in center.
The cakes should start to shrink from sides of pans only
after removal from the oven. Let the cakes cool tn the pans
on racks for 10 minutes, l oosen the sides with a small meral
spatula and invert onto greased wire racks. To prevent
splitting, reinvert so that tops are up and cool completely
before wrapping airtight.
UNDERSTANDING
This cake » essentially the same formula as Perfect All-
American Chocolate Butter Cake, one and a half times the
quantity. The difference is the use of nonalkalized cocoa
and baking soda to neutralize its acidity . The texture is quite
similar, due to having maintained the acid balance. It is
perhaps a shade less moist due to a slight decrease in cocoa
butter contained in the nonalkalized cocoa. The flavor,
however, packs a strong, less subtle chocolate punch.
FINISHED HEIGHT ;
Each layer about 1H inch.
STORE:
Airtight: 2 days room tem-
perature, 5 days refriger-
ated, 2 months frozen.
Texture is most perfectly
moist the same day as
baking.
COMPLEMENTARY
ADORNMENTS:
One recipe: Milk ClnxoUte
Buttercream ipoge 250};
Burnt Almond Milk Choco-
late Ganache Frosting I page
277] or Classic Coffee But-
tercream (page 232).
SERVE:
Room temperature.
POINTERS FOR SUCCESS
See page 24.
Bake 20 to 25 minutes or until tester inserted near cen-
ter comes out dean and cake springs back when pressed
lightly in center. Слк« should start to shrink from jutes of
pans only after removal from oven Allow cakes to cool in
pans on racks for 10 minutes. Loosen the sides with a small
metal spatula and invert onto greased wire racks. Cool
completely betore wrapping airtight.
UNDERSTANDING
No one will ever divine the mystery ingredient, but may-
onnaise is simply an emulsification of egg yolk and oil will)
a tiny bit of vinegar. The large amounts of oil (in rhe may-
onnaise) and baking soda account for the tenderness of this
cake. The extra baking soda also creates the slightly dipped
center and the coarse, dark, reddish crumb with a deli-
ciously bitter edge.
FINISHED HEIGHT:
Each layer is 1V'- inches {1 *4
inches in center I.
STORE:
Airtight: 3 days room ttm-
perature. 5 days refriger-
ated, 2 months frozen.
COMPLEMENTARY
ADORNMENTS:
A simple dusting of pow-
dered sugar. One recipe:
Any buttercream except for
lemon.
SERVE
Room temperature.
POINTERS FOR SUCCESS:
See page 24.
The cakes in this section are all (with the exception of brioche!
variations of basic butter cake, with fruit or vegetable purees sup-
plying most of the liquid. Banana Cake, one of my personal fa-
vorites, is the most similar in texture to butter cake. The other
cakes are denser, moister and chewier and for the most pan speedy
to make. Because of their moistness and complexity of flavors and
textures, they require no frosting and have a longer shelf life than
most other cakes. These qualities also make them suitable for gift-
giving. To offer as a more lavish gift, wrap and present the cake
in the pan in which it was baked. (Be sure to spray the pan with
nonstick vegetable spray before returning the cake to the pan.)
MOTE: Recipes can be doubled if you have extra pans.
FRUIT,
VEGETABLE,
AND BREAD
CAKES
FRUIT, VEGETABLE, AND BREAD CAKES 65
Less Fruity
Fruitcake
SERVES 10
TO I 2
'fruitcake ts one of the most personal cakes. Either you
love it or hate it; prefer all fruit to a more cakelike type;
prefer the cake saturated with spirits or the spirits in the
background.
Robert Farrar Capon stated his case with eloquent and
zany humor in a Christmas article called “Fruitcakes: Solid
Evidence of Christmas,'* written some yean ago for The
New York Tones. He begins with the question “Whatever
happened to the cake in these concoctions?” and proceeds
with the following possible explanation as to its disappear-
ance:
Since the public would be unwilling to purchase fruit-
cakes of a size large enough to contain all of these ingre-
dients (the usual assortment of dried fruits and nuts)—and
since making them smaller (the fruitcakes) would raise the
probability that a given fruit or nut might not find its way
into a given cake—the purveyors of fruitcakes found
themselves forced to choose between the two basic com-
ponents of their product. The cake, of course, lost, giving
rise to the now omnipresent and unavoidable holiday gift:
the fruit brick. In recent studies by the physics depart-
ments of mapr universities, the atomic weight of this re-
markable confection has been calculated to be just below
that of uranium.
This extreme density, it was discovered, is due to the
method by which modern fruitcakes are made. After the
manufacturers abandoned the use of agglutinating agents
such as flour and eggs, they developed a special bonding
technique by which the fruits and nuts were compacted by
a hydraulic press. This special piece of “bakery” equip-
ment, seventy times more powerful than the ram that
reduces used cars to crumpled blocks, creates in the
“cake” an internal pressure so great that the fruits and
nuts adhere to each other by their own molecular at-
traction.
My fruited offering to posterity is an answer to
Capon's opening question “Whatever happened to tbe
cake ...?'* It's back. In fact, it is the sort of fruitcake
that has more barter than fruit and is so moist it can almost
be described as a pudding. Molasses provides rhe slightly
bitter edge to temper the sweetness of the glaceed fruit. The
rum flavor comes through as aromatic but subdued. It took
years to perfect this reape because each venion had to ripen
66 SIMPLV DELICIOUS FOOLPROOF CAKES
for three months before listing, and many months would
pass between tasting and subsequent rebaking. A taste of
this triumphant final fruitcake calls up images of dark Victor-
ian houses filled with secret comers and haunting old mem-
ories.
The texture and flavor of this cake are at their best
when baked in small pans, which also makes serving the
small, rich portions easier. Decorative baking molds such
as the Turk's head provide attractive shapes for gift-giving.
As a special note I must add that my friend Blair Brown
offered her six month-old daughter. Julia, a taste of this
cake and she wanted more. |We call her Julia child.} It was
the first cake she‘d ever eaten and, I would say, a dramatic
initiation into the world of sweets!
INGREDIENTS MEASURE WEIGHT
room rcmpcruturc vnJumr ounce# grams
small mixed candied fruit V*s cup 2.25 ounces 64 grams
candied citron 2 tablespoons 1,25 ounces 35 grams
dried currants % cup 1.25 ounces 35 grams
broken pecan? Vi cup I ounce 28 grains
Myers’? dark nun VS liquid cup 3.75 owners 110 grams
unsifted cake Hour VS cup idip and sweep method; 2.25 omxcs 65 grams
ciimamoo Vi teaspoon • •
baking soda •A teaspoon ♦ •
salt Vi teaspoon 3.5 grams
unbaked butter i.ratBi be softened? Я tablespoons 4 ounces 113 grams
dark brown sugar Vi cup i hrmh packed) 2 ounces 60 grams
1 large egg 3 tablespoons L75 ounces 50 grams 1 weighed without shell*
umulfarcd molasses {preferably Grandma's) *.*4 liquid cup 2.75 ounces 80 grams
milk 2 tablespoons 1 ounce 30 grams
FRIJI Г, VEGETABLE, AM) BREAD CARES 6?
One 334- to 4-cup taking
mold o* a 6-inch by 2-inch
cake pan, greased and
floured. My favorite mold is
a 3-CUp TurkS bead 'page
453). И using the Turks’
head, till it only three-
fourths full and take the re-
maining tatter in a small
greased and floured cus-
tard cup.
FINISHED HEIGHT:
Baked in a 3-cup Turk’s
head mold: 236 inches.
STORE:
Keep at cool room tempera-
ture for 3 months without
opening the container. This
will allow the rum to mel-
low. If you plan to store it
longer, unwrap rhe cake and
sprinkle it with an addi-
tional tablespoon of rum or
else the aromatic edge of the
rum will dull and the cake
will become dry. Repeat this
procedure every 3 months.
Fruitcakes have been known
to keep for years. (I usually
cat the lirrle one baked in
the custard cup as soon as
it’s baked—still warm from
the oven!)
COMPLEMENTARY
ADORNMENTS:
If baked in a decorative
mold, the cake u beautiful
unadorned or with a simple
wreath of holly or box-
wood. Baked in a plain cake
pan, the cake can be cov-
Preheat the oven to 32S°F.
At least 24 hours ahead mince the candied fruit and
citron (a food processor sprayed lightly with nonstick veg-
etable spray works beautifully for this sticky task) and soak
with rhe currants and nuts in 34 cup rum. Cover tighdy and
store ar room temperature.
In a small bowl whisk the flour, cinnamon, baking soda,
and salt to combine. In a large mixing bowl cream the but-
ter and sugar until light and fluffy. Beat in the egg and then
the flour mixture in 3 batches alternating with the molas-
ses and milk. Add the candied fruit mixture with the soak-
ing rum and bear until blended. The batter will be slightly
curdled because of the small amount of flour but this will
not affect the cakc‘s texture.
Scrape the batter into the prepared mold and bake 40
to 45 minutes or until the cake springs back when lightly
touched and just begins to shrink from the sides of the pan
and a tester comes out dean.
Let the cake cool in the pan for 10 minutes and then
sprinkle with 2 tablespoons rum. Place a piece of plastic
wrap large enough to wrap the cake on the counter. Moisten
a piece of cheesecloth also large enough to wrap the cake
with 1 tablespoon rum. Place the cheesecloth on the plastic
wrap, unmold cake onto it, and sprinkle rhe top with the
remaining 1 tablespoon rum. Drape the top and sides of
the hot cake with the cheesecloth and plastic wrap, press-
ing closely to the cake.
Let the cake cool to room temperature before covering
tightly with heavy-duty foil. Place the cake in an airtight
container such as a small tin or heavy-duty plastic con-
tainer. If using the tin, run a piece of masking tape around
the rim to create a better seal.
VARIATION
FRLIT CUPCAKES: For some mystical reason, these little gems
require no mellowing. They are delicious warm from the
oven and remain moist for up to 6 weeks! Fill 8 greased
and floured muffin tins 34 full and bake 20 minutes or until
a cake tester inserted in the center comes out clean. Sprin-
kle each with 1 teaspoon rum, unmold after 5 minutes and
store airtight at room temperature. For a more decorative
shape, use a Bundt-style muffin pan (see page 447 and Maid
of Scandinavia, page 465}. The batter makes 11 little cakes.
Bake for 20 minutes.
SIMPLY DELICIOUS FOOLPROOF CAKES
For ihote who prefer a sweeter cake without the bitter
edge: Replace 2 tablespoons of the molasses with Lyle's
refiner’s syrup or light corn syrup. Cake will not be as dark
brown.
ered with rolled fondant and
decorated. The contrast of
the pristine white fondant
against the almost black
color of the fruitcake is
breathtaking,
SERVE:
Room temperature, cut into
thm slivers with a serrated
knife.
POINTERS FOR SUCCESS:
Sec page 24.
v-Xhis moist, light, exquisitely tender cake with the rich
taste of banana is accented by the lively tang of sour cream
and lemon. The 2-inch layer is perfect as a Europcan-stylc
torte. Unfrosted, it makes a great picnic cake. Because
chocolate and banana are such a perfect combination. Sour
Cream Ganache (page 275) ts sublime with this cake. For
a more subtle combination, pick up the lemon accent in-
stead and frost with Lemon Buttercream Ipage 234 oc 245}.
Cordon
Rose Banana
Cake
SERVES 8
INGREDIENTS MEASURE WEIGHT
room tempera lure 2 large ripe bananas wAnwr 1 cup OMM 8 ounces grants 227 grams
sour cream' 2 tablespoons 1 ounce 30 grams
2 large eggs 3 fluid ounces 33 ounces 100 grams 1.weighed without shells)
grated lemon zest 2 teaspoons ♦ 4 grams
vanilla PA teaspoons ♦ 6 grams
sifted cake Hour 2 cups 7 ounces 200 grams
sugar Vi cup + 2 tablespoons 6 ounces 170 grams
baking soda 1 tcatptMMi • 5 grams
baking powder Mi teaspoon • 3.7 grams
salt Vj teaspoon • 3.5 grams
unbilled boner (must be softened) 10 tablespoons 5 ounces 142 grams
’lor extra mmseness you can use up co Vi cup (4У» ounces'121 jcrarml sour err am
FRUIT. VEGETABLE, AND BREAD CAKES 69
One 9 inch by 2-inch cake
pan or 9-inch spfingform
pan, greased, bottom lined
with pardimcnt or wax pa-
per, and then greased again
and floored.
FINISHED HEIGHT:
2 inches to within I inch of
the »ide; I Vi inches at the
side.
STORE
Airtight: 2 days room tern
pcrarure, 5 days refriger-
ated, 2 months frozen.
COMPLEMENTARY
ADORNMENTS:
A simple dusting of pow-
dered sugar. One recipe-.
Sour Cream Ganache i page
27$). A half recipe: Lemon
Buttercream [page 254 or
245) or Passion Buttercream
(page 245} and chopped m*
cadamia nuts.
SERVE;
Room temperature.
POINTERS FOR SUCCESS:
See page 24.
Preheat the oven to 35(PF.
In a food processor ргосея the banana and sour cream
until smooth. Add the eggs, lemon zest, and vanilla and
process briefly just to blend.
In a large mixing bowl combine the dry ingredients
and mix on low speed for 30 seconds to blend. Add the
butter and W the banana mixture. Mix on low speed until
the dry ingredients are moistened. Increase to medium speed
(high speed if using a hand mixer) and beat for 1 *6 minutes
to aerate and strengthen the cake's structure. Scrape down
rhe sides. Gradually add the remaining banana mixture in
2 batches» beating for 20 seconds after each addition to
incorporate the ingredients and develop the structure. Scrape
down the sides.
Scrape the batter into the prepared pan and smooth
the surface with a spatula. Bake 30 to 40 minutes or until
a wire cake tester inserted in the center comes out dean
and the cake springs back when pressed lightly m the cen-
ter. The eake should start to shrink from the sides of the
рам only after removal from the. oven.
Let the cake cool in the pan on a rack for 10 minutes.
Loosen the sides with a small metal spatula and unmold or
remove the sides of the spnngform pan. .Allow the cake to
cool completely before wrapping airtight.
UNDERSTANDING
This banana cake is based on a basic buttrr cake (page
470|. Banana, which is about 75 percent water, supplies
the liquid. Because it also adds sweetness, the sugar is re-
duced by 15 percent. The reduction of sugar and the addi-
tion of fiber from the banana toughen the cake so an extra
ounce of butter is added to compensate for this. Baking
soda is used to temper the acidity of the banana and die
sour cream. The fiber makes it possible to add extra sour
cream without weakening rhe structure. (With Vi cup sour
cream, the cake will keep 5 days at wm temperature)
70 SIMPLY DELICIOUS FOOLPROOF CAKES
his firm, moist cake, fragrant with spices, is perfect for
holiday entertaining. A snap to prepare, it freezes bcauti*
fully and the flavor and texture actually benefit from prep-
aration a day or two ahead. The subtlety of walnut oil echoes
and complements the walnuts in the cake; pumpkin adds
the illusion of richness. Actually, it is hard to believe that
this delicious cake has low cholesterol {64.5 mg. per serv-
ing!. To make it cholesterol-free, substitute 3 large egg whites
(3 liquid ounces) for the 2 whole eggs.
P umpRin-
Walnut
Ring-
SERVES 6 TO 8
INGREDIENTS MEASURE WEIGHT
room temperature sifted cake floor volume 1 ’/'* cups ounces 4.5 ounces granw 125 grams
baking soda I teaspoon • 5 grams
cinnamon 1 teaspoon ♦ ♦
nutmeg У; teaspoon • •
ground doves Mi teaspoon ♦ ♦
vah Mi teaspoon •
coarsely chopped toasted walnuts Vj cup 2 ounco 57 grams
2 large eggs 3 fluid ounce* 3.5 ounces 100 grains (weighed wrthoiK shefls?
light brown sugar Mi cup {firmly packed! 5.75 ounces 163 grams
safflower od 3 liquid ouikvs 2.75 ounces 80 grams
walnut oil 2 tablespoons 1 ounce 28 grams
fresh or canned unsweetened pumpkin purer 1 cup 8-25 ounces 218 grams
Preheat the oven to 3.S(PF.
In a small bowl combine the flour, soda, spices, and
walnuts and whisk to blend.
In a large mixing bowl, beat the eggs, sugar, and oils
for 2 to 3 minutes or until very smooth. Add the pumpkin
and beat just until smooth. Add the flour mixture and beat
until completely moistened.
FRUIT, VEGETABLE. AND BREAD CAKES 71
One 6-cup baby Bundi pan
or loaf pan, greased and
floured.
FINISHED HEIGHT:
Baked in a 6-cup Bundi: 3
inches high in the middle.
STORE
When completely cool, wrap
well in plastK wrap and foil
and store at room tempera-
lute overnight. Keeps 5 days
refrigerated or 3 months
frozen. Flavors blend best
when prepared 1 day ahead.
COMPLEMENTARY
ADORNMENTS:
One Recipe. Chocolate Wal-
nut Drizdc Glaze (page
249).
SERVE
Room temperature.
POINTERS FOR SUCCESS:
Sec page 24. Do not double
thus recipe to bake in a
larger pan as the wde crust
gets too brown.
Scrape the batter into the prepared pan and bake 30
to 35 minutes or until a cake tester inserted tn the thickest
parr of the cake comes out clean. Cool tn the pan on a rack
for 10 minutes and then unmold onto the rack.
UNDERSTANDING
Compared to a butter cake, rhe addition of nuts and the
fiber from the pumpkin are compensated for by using less
flour. Oil replaces the butter (a little less is used because oil
is 100 percent fat, whereas butter is only 81 percent fat).
The liquid is provided by the pumpkin, which is 90 percent
water. Baking soda is used to temper the aadity of the
pumpkin and the molasses in the brown sugar, and Mi cup
extra sugar is added to balance the pumpkin and spice fla-
vors.
72 SIMPLY DELICIOUS FOOLPROOF CAKES
hesc cupcakes arc mimarurc versions of zucchini bread,
which, to my mind, has always seemed more like a cake
than a bread. Perhaps it was dubbed “bread’* because it is
traditionally baked in a loaf pan. The cupcakes are less sweet
than most cakes in this book and tar less sweet than com-
mercial muttins.
These healthy, easy-to-make gems arc deliaous treats
to pack in lunch boxes or to serve for breakfast. The op-
tional raisins make the cupcakes even moister and more
nutntious. To make them cholesterol free, substitute 3 lat^c
egg whites (3 liquid ounces) for the 2 whole eggs.
Although zucchini “breads” are usually made with white
sugar» I prefer rhe richer color and flavor of brown sugar.
Zucchini
Cupcakes
MAKES
I 4 T О I 6
CUPCAKES
INGREDIENTS MEASURE WEIGHT
nxwt rrmpcrattrrv cake flour vulrunc 1 Vr cup* I lightly spooned into cup) owners 6 ounces jtmm* 17U grams
baking soda 1 teaspoon • 5 gram*
cinnamon 1 teaspoon •
powdered ginger Vr teaspoon ♦ •
ground doves V* teaspoon • •
sale •A teaspoon • •
coarsely* chopped toasted walnuts [page 324) ¥> cup 23 оопсек 73 grams -- -- —
2 large eggs 3 fluid ounces 3-5 ounces 100 gram* {weighed without shell*;
light brown sugar V< cup (firmly packed' 5,75 ounce» 163 grams
safflower oil Vi cup 3,75 ounces 107 grams
grated zncchmi 2 cups (firmly packed! S ounces 227 grams
opnooAl: raisins ‘A cup 2.5 ounces 72 grams
Preheat the oven to 35 (Ph
In a small howl combine the flour, baking soda, spices,
and walnuts and whisk to blend.
In a mixing bawl beat the eggs, sugar, and oil for 2 to
FRUIT. VEGETABLE. AND BREAD CAKES 73
Greased and floured muthn
tins.
STORE:
Airtight: 3 dap room tem-
perature. 5 days refriger-
ated. or 3 months frozen.
The flavor n even more deli-
cious the day after baking.
SERVE:
Room temperature.
POINTERS FOR SUCCESS.
See page 24. U«e a food
processor with the 'hreddmg
disc or the largest holes on a
hand grater to grate the me-
diant To promote even hak
mg, add a few tablespoon*,
of water to any unfilled
muffin cups.
3 minutes or until very smooth. Add the zucchini and beat
just until smooch. Add the dry ingredients and optional rai-
sins and beat until completely moistened.
Scrape the batter into the prepared muffin tins, filling
each cup ’/♦ full, and bake 20 to 25 minutes nr until a cake
tester inserted in the center comes out clean. Cool in the
pan on a rack for 5 minutes. Unmold onto the rack. Cool
and wrap airtight.
UNDERSTANDING
This formula is almost identical to Pumpkin Walnut Cake.
Since pumpkin supplies a little more structure than zuc-
chini, extra flour is added to compensate.
If using all whites instead of whole egg, the cakes will
be slightly more chewy.
note: If you prefer a paler version with a more delicate
flavor, replace the brown sugar with cup (5.25 ounces/
150 grams) granulated sugar, reduce the baking soda to Vi
teaspoon, and add '/a teaspoon baking powder,
74 SIMPLY DELICIOUS FOOLPROOF CAKES
*-#his cake, inspired by Jean Hewitt’s Carrot Cake,* is
mew without being heavy. It is wheat colored with flecks
of golden carrot throughout, and has a fresh, wheaty, de-
licious flavor with the sweet perfume of honey coming
through only as a wonderful lingering aftertaste. Of course,
it is lovely with White Chocolate Cream Cheese Frosting,
but I'd just as soon eat this cake au nature. I‘m sure it is
an illusion, but eating this cake makes me feel pure and
healthy!
Golden
Wheat Carrot
Ring
SERVES 10
T О I 2
INGREDIENTS MEASURE WEIGHT
room tcmpcTarurc finely shredded carrots 2 cups oimocs 7 ounces gram» 200 grams
lemon juice, freshly squeezed V. liquid cup 2 ounces 62 grams
ufted whole wheat flour I cup 4Л ounces 125 grams
sifted cake flour 1 cup 3.3 ounces 100 grants
salt ’<4 teaspoon ♦ 3.5 grams
baking powder ’4 teaspoon ♦ 2.S grams
baking soda 1 teaspoon • 5 grams
cinnamon 1 teaspoon • <
2 large eggs 3 fluid ounces 3.5 ounces 100 grams (weighed without shells)
unxalted butter, melted 10 tablespoons 5 ounces 142 grams
hooey *4 liquid cup 8.75 ounces . 250 grams
Preheat the oven to 35(PF.
In a small bowl combine the carrots and lemon juice.
In a large mixing bowl combine the dry ingredients
and mix for 30 seconds to blend. Add the eggs, butter,
honey, and carrot mixture. Mix on low speed until the dry
ingredients are moistened. Increase to medium speed (high
speed if using a hand mixerl and beat for 30 seconds or
until well mixed.
Scrape the batter into the prepared mold and bake .30
minutes or until the cake springs back when lightly pressed
in the center and a tester comes out dean.
*Яап Hnwirt, 7br Nw >'гдг> T»w Neural Fondi Gx>№oo6 (Ntw York
Quadrant Books. 1971).
One 6-eup sasann ring
mold, wdl-buttcrvd. I No
flour necessary. The butter
gives a lovely flavor to the
outside of the cake.)
FINISHED HEIGHT:
21 inches.
FRUIT. VEGETABLE, AND BREAD CAKES 75
STORE:
When completely cool, wrap
well in plastic wrap and foil
and store at room tempera-
ture overnight. Keep 5 days
refrigerated or 3 months
frozen.
COMPLEMENTARY
ADORNMENTS:
A light dusting of powdered
sugar and cinnamon. One
recipe: White Chocolate
Cream Cheese Buttercream
Ipage 237).
SERVE:
Room temperature.
POINTERS FOR SUCCESS
See page 24.
Lo Brioche
Cake
SERVES
I 4 T О 16
(frosted)
Let the cake cool 10 minutes in the pan on a rack.
Unmold onto a lightly greased rack and cool completely.
UNDERSTANDING
Compared to basic butter cake (page 470), the ’/♦ cup of
honey replaces the sweetness of 1 cup of sugar, and the
carrots, which are 88 percent water, provide the liquid. To
compensate for the extra water prov ided by rhe honey and
carrots, V» cup flour has been added. Because more flour
and water tend to toughen and strengthen a cake's struc-
ture, an extra ounce of butter and extra leavening have been
added. To temper the acidity of the honey and lemon juice,
part of the leavening is baking soda. The butter is melted
to increase its tenderizing capability. The extra leavening
also helps to lighten the texture.
X fine bread such as bnoche makes a glonous base for
a cake. It offers a satiny-soft, resilient texture, yeasty fla-
vor, and the advantage of very little sugar (only enough to
feed the yeast). This means that the cake can be refresh-
ingly saturated with syrup without becoming cloyingfy sweet.
My favorite buttercream for this cake is Praline Silk
Meringue Buttercream (page 241) or Creme Ivoire Praline
(page 249). Both blend beautifully with the faint edge of
molasses and burnt sugar in the dark rum syrup.
Although this brioche takes two days to make, rhe to-
tal working time only adds up to about 15 minutes!
DAY BEFORE
MAKE THE SPONGE
When using yeast always begin by proofing it to make sure
it is alive. If using fresh yeast, smell it to be sure it doesn’t
have a sour odor. To proof the yeast, use warm water (hot
water would kill it). In a small bowl combine the water
(ideally a tepid 10U°F. if using fresh yeast; a little warmer,
110T., if using dry), Vi teaspoon sugar, and the yeast. If
using fresh yeast, crumble it slightly while adding. Set aside
in a draft-free spot for 10 to 20 minutes. By this time, the
mixture should be full of bubbles. If not, the yeast is too
old to be useful.
Place VS cup of rhe flour and 1 egg in a food processor
(preferably with the dough blade) and process a few
seconds until mixed. Add the yeast mixture and stir
76 SIMPLY DELICIOUS FOOLPROOF CAKES
INGREDIENTS MEASURE WEIGHT
room raitperarwre water volume 256 tablespoons ounces 1.23 ounces grams 37 grams
sugar 2 tablespoons 1 ounce 25 grains
fresh yeast* or dry yeast (not raptd-rrsc) 2 packed teaspoons 116 tcaspoum 03 ounce a 14 grams 43 grams
unsifted bread flour about PA cups (dip and sweep method; 8 ounces 227 grams
salt Vt teaspoon • 3.5 grams
1 large egg 2 large eggs, cold • 6 ounces 170 grams 1 weighed in dte shells I
unsalted butter INCURS SYRUP (18 OUNCESi’S 10 GRAMS) 10 tablespoons 5 ounces t 142 grams f
sugar У» cup 5.25 ounces I SO grams
water 1% liquid cups 103 ounces 295 grams
dark mm 6 tablespoons 3 ounces 82 grams
• Fresh yr*»t c»«w* dough to rite fatter.
•f4 co 6 mine** of hulw mjy he uted- Тле lesser amount uHers a lipterr
тгчюгг» rhe highr- rrnnunr a richer flavor (Brioche Mousseline в nude wnh
equal weight of butter and flenir. bur it амзя be prepared by bind Madeleine
Kamman tells me chat in Prince the dough for tfaas bnoche is mixed using
only the fingertips so as iux to develop much gfsMen. Ihis keeps the buner
Irtir» (ншгф. out during baking.I
with a rubber scraper until smooth. Sprinkle the remaining
flour over the mixture but do not mix it in. Cover and let
stand for V/2 to 2 hours.
KNEADING THE DOUGH
Add the remaining sugar, salt, and remaining 2 cold eggs
and process 1 V minutes or until the dough is smooth, shiny,
and cleans the bowl. Let rest 5 minutes with the feed tube
open. Add the buner in 2 batches and process for 20 sec-
onds after each addition or until incorporated. [The butter
must be soft so as not to overtax the motor of the proces-
sor. If the processor should stall, let rest 5 minutes.) *
*Tu pnrarr brioche dm^h in a hcivy-dury mixrr tuch 4» rhe KitvhcnAid,
use the flat bearer ind. when the dough stim ro ditnb up the beater, ch»»or
to the d'uigh book. Beat about 5 minutes on medium speed or until the dough
is smooth, shiny, very dasoc, and Ьедагл to clean the bowl. Beat in the better
by the tablespoon unnl incorporated.
One 8-inch by 2-inch cake
pan or S-inch spnngform
pan, buttered.
FINISHED HEIGHT:
116 inches.
STORE:
Syrup: 1 month refrigerated
in an airtight container,
Brioche: Wrapped airtight,
2 days room temperature
and 3 months frozen. It ts
FRUIT, VEGETABLE, AND BREAD CAKES 77
best not to refrigerate
brioche as it hardens.
COMPLEMENTARY
ADORNMENTS:
Hal/ redpc Praline Silk Me-
ringue Buttercream (page
241) or one recipe Creme
Ivoire Praline Ipage 249}
and toasted chopped hazel-
nuts {page 324}.
SERVE
Room temperature or Itghtiv
chilled.
POINTERS FOR SUCCESS:
Use bread Hour. Do not ute
rapid-rise yeast. Be sure the
yeau и active. Do not allow
rising dough to be in an
area over 8CP-8 ST. Do not
allow the dough to rise
more than the recommended
amounts or it will weaken
the structure. Do not deflate
the dough before chilling or
the butter w’ill leak out. If
this should happen inadver-
tently, chill the dough for 1
hour and knead the butter
back into the dough.
FIRST RISE
Scrape the dough into a lightly buncred bowl. It will be
very soft and clastic. Sprinkle lightly with flour to prevent
a crust from forming. Cover the bowl tightly with plastic
wrap and let rise in a warm place (80T. but not above or
the yeast will develop a sour taste) until double in bulk,
about 2 hours. Refrigerate for at least 50 minutes to 1 hour.
Deflate dough by gently stirring it and refrigerate for an-
other hour.
REDISTRIBUTING THE YEAST
Turn dough onto a lightly floured surface and gently press
it into a rectangle. Fold the dough into thirds (as in folding
a business letter) and again press it out into a rectangle,
lightly flouring the surface as needed to prevent stickiness.
Fold it again into thirds and dust it lightly with flour on all
sides. Wrap it loosely but securely in plastic wrap and then
foil and refrigerate it for 6 hours or up to 2 days to allow
dough to ripen and harden.
Gently deflate the dough by kneading lightly with
floured hands, and press it into the prepared pan.
Cover the dough loosely with buttered plastic wrap and
let rise in a warm, preferably humid, area away from drafts
for 1 *Zz to 3 hours or until it has almost tripled in bulk. It
will reach the top of a 2-inch-high cake pan.
Place a baking sheet in the oven and preheat to 425“F.
{The hot baking sheet will boost the "oven spring”—the
sudden expansion of the dough during the first few minutes
of baking.}
Place rhe cake pan on the hot baking sheet and bake
for 5 minutes. Lower the temperature to 375°F. and bake
for 20 minutes or until a skewer comes out clean. Un mold
the brioche and cool on a rack. W’hen ready to complete
the cake, tnm rhe top, bottom, and sides with a serrated
knife so that the brioche measures 7 inches by 1VS to 1У*
inches {about 1 pound in weight).
Place in a 9-inch pan and pour the syrup on top. Let
stand for 10 minutes or until the syrup is absorbed, turning
the cake over to help absorption.
TO MAKE SYRUP
In a small saucepan with a tight-fitting lid combine the sugar
and water and bring to a rolling boil, stirring constantly.
Cover immediately, remove from the heat, and cool com-
pletely. Transfer to a liquid measuring cup and stir in the
73 SIMPLY DELICIOUS FOOLPROOF CAKES
mm. И syrup his evaporated slightly, add enough water to
equal 1 ¥» cup* syrup.
UNDERSTANDING
Unlike a cake, which is primarily a starch structure, bread
depends on protein in the form of gluten to create its
framework. The higher the protein content of the flour, the
stronger the structure will be and the finer the gram of the
bread (directly the opposite of cake). This dough is excep-
tionally wet. Just enough extra flour is added to handle it
for shaping, resulting in a very hght, soft brioche.
I do not use rapid-rise yeast because the flavor devel-
opment and texture are superior with slower rising. During
extended periods of rising, the yeast produces a desirable
acidic quality, and it is tor this reason that dough is refrig-
erated overnight before baking. A brilliant technique, dis-
covered by Shitiey Cornher, to stimulate this acidicity when
time docs not allow to let the dough rest overnight is to
add teaspoon cider vinegar or mild flavored fruit vinegar
for every I'/i cups of Hour. Add it to the flour and salt
before blending. Do not add any more vinegar or it will
weaken the gluten.
Paula Wolfert (in her superb articles on brioche m Tbe
Pleasures of Cooking, which greatly influenced the devel-
opment of this recipe) recommends melting and browning
one fifth (2 tablespoons} of the butter for extra rich flavor.
Be sure to let the butter cool before adding it along with
the rest of the butter. 1 add the browned particles as well.
Paula’s sponge method and technique for redistribut-
ing the yeast result in the lightest, finest grained brioche
possible. The dough actually surges upward, practically
leaping from the pan, when baked!
Brioche made in a food processor is a speedy and sim-
ple operation. If you wish to double this recipe, it is safer
to use the heavy-duty mixer method because a larger amount
of dough might overheat some food processors, causing them
to stall. (I have successfully made a double batch using the
Cui sin art DLC-7 by melting the butter and allowing it to
cool to barely tepid before adding it with the motor run-
ning.)
This cake is used to make Praline Brioche (page 171),
VARIATION
STRAWBERRY SAVARIN: A Savann is actually a brioche
dough baked in the shape of a ring. Use a well-buttered 6-
ERUIT, VEGETABLE, AND BREAD CAKES 79
CUSTARD
CAKES
CHEESECAKES
cup nng mold. Bulking nme is the same as for brioche baked
in a cake pan. For thr syrup, replace the dark rum with 2
tablespoons of freshly squeezed lemon juice, ’4 cup kirsch
and I tablespoon finely grated lemon zest.
For an attractive and delicious accompaniment, fill
center of ring with 2 pints of strawberries, washed and hulled
and brush savarin and berries with V* cup red current >dly.
heated and strained. Garnish with rosettes of lightly sweet-
ened Perfect Whipped Cream (page 253) and Crystallized
Violets (page 326).
The two basic cakes in this section, Cheesecake and Chocolate
Mousse or Truffle Cake, contain no Hour, rise little, and arc cooked
in water baths to keep them creamy. They are actually custard
fillings in the shape of cakes—rich, delicious, and lush in texture.
These cakes are probably the two most beloved and timeless
of American cakes, so I have included all of my favorite permu-
tations. A bonus: These cakes are quick and easy to make.
NOTE: Recipes can be doubled if you have extra pans. Dental
floss, held taut, works beautifully to cut a custard cake. Pull it out
sideways after each cut.
I am passionate on the subject of cheesecake. While many ethnic
groups have versions of cheesecake, my favorite is my own cul-
ture’s claim to fame: New York Jewish. It is one of rhe things
displaced New Yorkers seem to miss most. (Why else would menus
as tar away as California boast ’’New York Cheesecake”?) It is a
thoroughly creamy cheesecake, smooth and dense yet easy to ear
because of the refreshing tanness of lemon and sour cream.
Cheesecake could really be classified more as a custard than
as a cake. When this realization first hit me 1 decided to treat
cheesecake as a custard and bake it in a water bath. To my de-
light, the result was perfectly creamy from stem to stern (without
the usual dry outer edge).
It has been reported to me that this cheesecake converts peo-
ple who think they don’t like cheesecake and that it spoils those
who are already devotees. A fnend told me that after making this
cake for every major family event dunng the past three years, one
of her nephews turned down the cheesecake at a renowned res-
taurant stating: “I don't cat cheesecake out!” This same friend,
Shirley Corriher, once featured this cake on her local radio pro-
gram. The station informed her several weeks later that the pro-
gram brought in more letters requesting the recipe than did any
other in the history of the station. The gem of the collection w’as
from the Atlanta Federal Penitentiary which read (and you have
to supply the southern draw!): *‘We simple must have the reape
for that Cordon Rose Cheesecake?”
80 SIMPLY DELICIOUS FOOLPROOF CAKES
Cordon
Rose Cream
Cheesecake
SERVES a TO 12
INGREDIENTS MEASURE WEIGHT
room temperature cream cheese* vohmc 2 (S-ounce) packages pound; nonces I pound grams 454 grams
sugar 1 cup 7 ounces 200 grams
оргюпл!: cornstarch f 1 tabkspoon 8 grams
3 Large eggs scant 5 fluid ounces 5.25 ounces 150 grains 1 weighed without shells 1
freshly squeezed lemon puce 3 tablespoons 1.5 ounces 47 grams
vanilla 1Vj teaspoons ♦ 6 grains
salt Mi teaspoon • •
sour cream 3 cups 1 pound 9.5 ounces 726 grams
• Don’t be tempted to ме the more expensive “пмигяГ cream cheese. ISiU-
delphu brand, available even M Japan, oilers the best and я*м uuihtv.mi
flavor ice this cake.
fit eixnttarih л Omitted, a *nxi|| .imixint uf liquid will uxp <XM nhrr un-
molding. It the сакс Им a hwrt hs-se. is no proHc-n Otherwise, tqmd
can be absorbed with a paper rowel I prefer not usinp the cornstarch к the
cake ts a shade esore ircjmv. Alto, it makes it suitable to sene as a Passover
dessert.
Preheat the oiw to 350*E
In a large mixing bowl bear the cream cheese and sugar
until ver}* xmexsth i about 3 minutes], preferably with a whisk
bearer. Bear in the cornstarch if desired. Add the eggs, 1 at
a rime, beating after each addition until smooth and scrap-
ing down the sides. Add the lemon juice, vanilla, and salt
and beat until incorporated. Beat in the sour cream just
until blended.
Pour the batter into the prepared pan. Set the pan in
the larger pan and surround it with 1 inch of very hot water.
Bake 45 minutes. Turn off the oven without opening the
door and let the cake cool for 1 hour. Remove to a rack
Ont B-tnch by 2 Vi-inch or
higher springform pan,
greased and bonorn lined
with greased parchment ar
wax paper; outside of the
pan wrapped with a double
layer of heavy-duty 1<м1 to
present seepage.
CUSTARD CAKES HI
One 10-indi cake рал or
roasting pan io serve as a
water hath.
FINISHED HEIGHT:
2Vi inches.
STORE:
1 week rcingerated. Do not
freeze because the texture
will become less smooth.
COMPLEMENTARY
ADORNMENTS:
4 cup Lemon Curd (page
340). Ont revrpc White
Chocolate Cream Cheese
Buttercream Ipage 237).
Cherry Lopping Ipage 344
or 345). Blueberry lopping
ipage 348 or 349). Cran-
Raspbcrry Glaze tipage 330).
POINTERS FOR SUCCESS:
Wrapping the pan with foil
keeps it watertight. Grease
the sides of the pan so the
surface will not crack when
the cake starts to shrink on
cooling. Chill thoroughly
before unmoldtng.
The water bath pan must
not be higher than the
springfotni pan or it will
slow down baking.
and cool to room temperature (about 1 hour I. Cover with
plastic wrap and refrigerate overnight.
To Unmold: Have ready a serving plate and a flat plate
at least 8 inches in diameter, covered with plastic wrap.
Place pan on heated burner and move it around for 15 sec-
onds. Wipe sides of pan w’ith a hot, damp towel.
Run a thin metal spatula around the sides of the cake
and release the sides of the springform pan. Place rhe plas-
tic-wrapped plate on top and invert. Remove the bottom
of the pan and the parchment. Rein vert onto the serving
plate and use a small metal spatula to smooth the sides.
Refrigerate until shortly before serving.
notes: An 8- by 3*mch solid cake pan can be used instead
of a springform. To unmold the cake, run a thin spatula
around the sides, place the pan on heated burner for 10 to
20 seconds, moving the pan back and forth, and then in-
vert. If the cake does not release, return to the hot burner
for a few more seconds.
For a richer, denser cheesecake that completely holds
it$ moisture without cornstarch, replace rhe 3 whole eggs
with 6 egg yolks.
PROCESSOR METHOD
A food processor also works well to mix this baiter. Proc-
ess the cream cheese and sugar tor 30 seconds or until
smooch. Add the cornstarch if desired and pulse to blend.
Add the eggs, 1 at a time, with the motor running. Add the
lemon juice, vanilla, salt, and sour cream and pulse to com-
bine.
BOTTOMS FOR CHEESECAKE
AU NATUREL This cheesecake is firm enough to be un-
molded and served without a base if desired.
BISCUIT ROULADE: A very elegant presentation is to "sand-
wich” the cheesecake between soft layers of sponge-type
cake. Almond Biscuit blends particularly well with the lemon
and cheese flavors. Bake Almond Biscuit (page 144) and
cut it into two 8-mch rounds. Use 1 round to line the bot-
tom of the parchment-lined springform pan before pouring
in the batter. After baking the cheesecake, top it with the
second round. Chill and unmold as usual. Sprinkle with
pow dered sugar if desired. Cake scraps can be cut into shapes
to decorate the sides.
BISCUIT A LA CULLIERE: Homemade (page 148) or pack-
aged lady’fingers can be used to line the bottom and sides
of the cake pan. Use a 9- by 3-mch pan and butter to grease
SIMPLY DELICIOUS FOOLPROOF CAKES
the sides of rhe pan; this holds the ladyfingers in position.
After baking 25 minutes, cover the top of the cheesecake
loosely with foil to present over browning. Before unmoid-
mg, wipe the outside of the pan with a hot, wet towel.
COOKIE CRUMB CRUST: Chocolate cookies blend well with
cherry copping. Ginger, graham, and kmon-nut cookies go
well with fruit-flavored tilling* or toppings. As crumb crusts
become soggy if placed in rhe pan before baking, I prefer
to pat the crumbs onto the cake after baking and unmold*
ing. You will need about % cup if you wish to do the bot-
tom as well as tbe sides. Use the same technique as for
applying chopped nuts I page 324).
FILLINGSAND RECIPE VARIATIONS
There arc so many possible ways to flavor a cheesecake
that entire books have been devoted to rhe subject. Here-
with are some of my own personal favonres.
WHITE CHOCOLATE CHEESECAKE Fine-quality white
chocolate, such as Tobler Narcisse (which contains cocoa
butter), adds a lusetous flavor to rhe cream cheese base.
The cake is mildly reminiscent of white chocolate and slightly
tangy. It is nnt doyingly sweet because rhe amount of sugar
contained in the white chocolate n removed from the amount
of sugar in the batter. The texture of this cake is slightly
firmer because of the cocoa butter bur is still creamy with
a special melt*in-the-muuth quality.
To make White Chocolate Cheesecake: Reduce rhe sugar
to *A cup 11.75 ounces'SO grams) and the lemon juice to 2
tablespoons. Melt 9 ounces.1255 grams white chocolate and
cool. Blend into rhe batter after the sour cream is incorpo-
rated.
BANANA CHEESECAKE Anyone who has ever eaten ba
nanas and sour cream and loved it will know before even
wring this cake just how mellow and delicious it's going
to be. The bananas seem to have some preserving quality
as well because this cake stays fresh tasting for at least 12
days! Banana* and sour cream have about the same mois-
ture content so all ycxi do is replace I cup of rhe sour cream
with 1 cup of mashed banana. Blueberry Topping (page
348 or 349) is a perfect complement.
To make Banana Cheesecake: Replace 1 cup 18.5 ounce*1'
242 grams! sour cream with 1 cup |8 o«mcti/227 gramsl
mashed banana. (You will need 2 very npe bananas.) To
keep the banana from discoloring, stir rhe 3 tablespoons of
lemon juice into the mashed banana. Blend into the batter
after rhe sour cream is incorporated.
CUSTARD CAKES «1
FRUIT SWIRL CHEESECAKE Tarr, assertive fruit purees such
as apricot, raspberry, and strawberry arc splendid addi-
tions to a cheesecake base.
To nuke Fruit Sutrl Cheesecake: Add 46 cup lightly sweet-
ened fruit puree (page 335» 337 or 338} in the following
way: Pour ’A of rhe cheesecake barter into the prepared
pan. Drizzle Vz the purer over it. Add another '/i of the
batter and repeat with the remaining puree. Top with the
remaining batter. Using a small spatula or knife, cut through
the barter and swirl to marble the puree throughout the
tilling (including the top).
tip: Do not use peach puree as it curdles the filling.
NOTE: If you like apneots, please try the apricot version.
My assistant and collaborator, David Shamah, did not like
cheesecake before he tned this cake. Now it is one of his
favorite cakes in this book, and he insisted that I sing its
praises. (I don't disagree!)
Chocolate
Oblivion Truffle
Torte
his cake is my favorite way to eat chocolate. It is easy
to make and contains only three essential ingredients: the
very best chocolate,* for a full, rich flavor and smooth,
creamy texture; unxalted butter to soften the chocolate and
release the flavor; and eggs to lighten it. The result is like
the creamiest truffle wedded to the purest chocolate mousse.
It is chocolate ar its most intense flavor and perfect consis-
tency. I prefer to serve this cake at room temperature be-
cause, when served chilled, rhe texture metamorphoses into
dense fudge. But as my fnend Susan Wyler says: “Who on
earth is going to complain about that?0
SERVES 16
*Twci«»( my bwiriies are LmJr Gxirante Ipuge 421) and ТоЫег extra tatcr-
,wttt If wanfc Cotiranre dboooluc, add v, cup ii.25 оипсеьбб ддпн; sugar
to rf*< <Rt* bearing. Il ming rhe extra btftcrxwcct. add I uMcipOOO*
(13 cwKes'JT jarams: Lmdt and Toblrr- hntcrxwrrt are alto rxcdlcM.
84 SIMPLY DELICIOUS FOOLPROOF C\KES
Preheat the oven to 425*F.
In large meral bowl set over a pan of hot, not simmer-
ing, water /the bottom of the bowl should not touch the
water) combine the chocolate and butter and kt stand, stir-
ring occasionally, until smooth and melted. (The mixture
can be melted tn the microwave on high power, stirring
every 15 seconds. Remove when there are still a few lumps
of chocolate and stir until fully melted.)
In a large bowl set over a pan of simmering water beat
the eggs, stirring constantly to prevent curdling, until |ust
warm to rhe touch. Remove from the heat and beat» using
the whisk beater, until tnple in volume and soft peaks form
when the beater is raised, about 5 minutes. {To insure max-
imum volume if using a hand mixer, beat the eggs over
simmering water until they are hot to the touch, about 5
minutes. Remove from the heat and beat until cool.)
Using a large wire whisk or rubber spatula, fold 16 the
eggs into the chocolate mixture until almost incorporated.
Fold in the remaining eggs until just blended and no streaks
remain. Finish by using a rubber spatula to ensure that the
heavier mixture at the bottom is incorporated. Scrape into
the prepared pan and smooth with the spatula. Set the pan
tn the larger pan and surround it with 1 inch very hot water.
Bake 5 minutes. Cover loosely with a piece of buttered foil
and bake 10 minutes. (The cake will look soft, but this is
as it should be.)
Let the cake cool on a rack 45 minutes. Cover with
plastic wrap and refrigerate until very firm, about 3 hours.
TO UNMOLD
Have ready a serving plate and a flat plate at least 8 inches
in diameter, covered with plastic wrap. Wipe the sides of
the pan with a hot, damp towel.
Run a thin metal spatula around the sides of die cake
and release the sides of the spnngtorm pan. Place the plas-
tic-wrapped plate on top and invert. Wipe the bottom of
the pan with a hot, damp towel. Remove the bottom of the
pan and the parchment. Rcinven onto the serving plate.
tip: If you have an oven wnth a pilot light, it can save you
a lot of time. The night before baking, place the chocolate
and butter in the oven along with the eggs still in their
sheik in another mixing bowl. (Eggs should weigh about
12 cMincei'‘34O grams.) The next morning, the chocolate and
buner will be fully melted and the eggs the perfect temper-
ature. Snr the chocolate and buner until smooth and be
sure to remove it and the eggs from the oven before pre-
heating oven!
One Я-inch springforin pan
at least 216 inches high, but-
tered and bottom lined with
buttered parchment or wax
paper; outside of pan
wrapped with a double layer
of heavy-duty foil to prevent
seepage.
One 10-inch cake pan or
roasting pan co serve as a
water bath.
HNISHED HEIGHT:
1*6 inches.
STORE:
2 weeks refrigerated. Do not
freeze because freezing
changes the texture.
COMPLEMENTARY
ADORNMENTS:
A chocolate band or encase
mait of chocolate rose
leaves (page 385 or 387)
filled with Btandtcd Burgun-
dy Cherries (page 3461 or
ruffles of whipped cream
(either piped shortly before
serving or stabilized, pages
2S3 to 255). served with
Raspberry Sauce (page 337).
Frost with: One recipe:
White Chocolate Butter-
cream (page 246 or 248),
White Ganache Ipage 278),
or Chocolate Cream Glaze
ipage 271] or top with
Jcwd Glaze Ipage 329).
Serve with whipped cream
and Raspberry Sauce Ipage
337) or creme arijfhirsr fla-
vored with any liqueur of
your choice (pages 280 to
284(.
CUSTARD CAKES 85
SERVE:
Room temperature. Cut mto
narrow wedges with a thin
sharp knife rhat has been
dipped in hot water.
POINTERS FOR SUCCESS
For a пхмм airy texture, be
Mire to add beaten eggs to
chocolate mixture and not
tbe chocolate to the eggs.
Wrapping tbe pan with foil
keeps it watertight. Chill
thoroughly before unmold*
ing. Use the plastic-wrapped
plate when unmolding to
protect the surface of cake if
you're not planning to use a
topping.
NOTE: An 8- by 2-inch solid cake pan can be used instead
of a springform—or an 8- by 3-inch pan if adding other
ingredients from the variation section I pages 86 and 87).
Once in San Francisco I made this cake for my newly mar-
ried brother and his wife using a straight-sided Calphalon
saucepan because they had no cake pans. The handle worked
well to unmold the cake! To unmold, run a thin spatula
around the sides, place the pan on a heated burner for 10
to 20 seconds, moving it back and forth, and then invert.
If the cake does not release, return к to the hot burner for
a few more seconds.
A triple recipe of this cake is used tv make the Art Deco
Cake {page 204).
UNDERSTANDING
Just as for cheesecake, baking the Oblivion in a water bath
keeps the texture creamy throughout. When this cake is
served at room temperature, you get a rush of chocolate
from the moment it enters your mouth. The full flavor of
chocolate can best he appreciated only in a softened state.
(A chocolate bar, for example, has to start melting in the
mouth before the flavor comes through.) The butter and
eggs do not distract. Instead they contribute structure and
the desired creamy texture.
VARIATIONS
These variations are so special that over the years 1 have
given each its own special name.
MB44-MOUSSE TORTE: A darling size, just right for 6 to 8
servings.
To make Mini Mousse Torte: Use Vj the recipe (16 pound
chocolate, 4 ounces butter, and 3 large eggs) in a 6-inch by
2-inch pan. Bake for the same amount of time.
CHOCOLATE INDULGENCE: Smooth praline paste (page
430), commercially made with hazelnuts and 50 percent
sugar, stays in the background but does wonders to inten-
rify the chocolate flavor. It is important to use a chocolate
that is not too sweet as the praline paste adds about 2.75
ounces of sugar.
To make Chocolate Indulgence: Use Lindt Courante or
Tobler extra bittersweet chocolate. Add ‘6 cup (53 ounces.1
156 grams) praline paste to the chocolate before melting.
(If using Courante, add 1 tablespoon sugar to the eggs while
beating.)
86 SIMPLY DELICIOUS FOOLPROOF CAKES
CHOCOLATE DEPENDENCE: Liqueur heightens the flavor
of chocolate. Stir 2 tablespoons of your favorite into the
melted chocolate mixture and serve with creme anglaise fla-
vored with the same liqueur. A few of my favorites are
Grand Marnier, Cointreau, Mandarine Napoleon, Wil-
liam's pear, Cognac, bourbon, and Pistasha.
CHOCOLATE FLAME Raspberry Puree (page 337) blends
magnificently with the chocolate, brightening the flavor and
deepening the color. Add ruby Raspberry Jewel Glaze and
serve with creme anRknse flavored with Chambord (black
raspberry liqueur).
To make Chocolate Flame: Stir Уз cup slightly sweetened
Raspberry Sauce or У» cup sieved Cordon Rose Raspberry
Conserve into rhe melted chocolate mixture and add ’/• cup
sugar when beating the eggs. You may also use % cup
commercial needless raspberry jam, but, to cut the sweet-
ness, use extra bittersweet chocolate for the cake.
CHOCOLATE TORTURE; My friend Paula Perlis, an en-
chanting rcsourceress, once creatively mispronounced
Choculat Teuscher (TOYsher), a renowned Swiss chocolate
boutique. I saved this best name of all for the best version
of this cake, which incorporates both coffee and hot fudge.
It is divine accompanied by Brandicd Burgundy Cherries
(page 346) and creamy Vanilla Ice Cream (page 285)—a
deluxe hot fudge sundae cake. If desired, warm the cherries
and flambe them by heating a link cognac in a ladle over
the flame and tipping rt slightly to ignite or using a long
match.
To make Chocolate Torture: Make Hot Fudge (recipe fol-
lows). For the batter, Tobler extra bittersweet chocolate is
preferable. Add 2 tablespoons instant expresso powder
to the melted chocolate mixture. Before beating the eggs,
warm the Hot Fudge until just pourable. Scrape Й the barter
into the prepared pan. Pour on V5 the Hot Fudge and top
with the remaining batter. Pour on the remaining Hot Fudge
and bake.
CUSTARD CAKES 47
Hot Fudge
his sticky, intense hot fudge is as fabulous over Vanilla
lee Cream (page 285) as it is in Chocolate Torture I page
87). The chocolate contributes the irresistible edge of burnt
sugar; the cocoa offers a deep chocolate flavor and rich,
dark color.
MAKES ABOUT
4$ C U P
STORE:
1 month refrigerated.
In a small heavy saucepan (ideally with a nonstick lining)
melt the chocolate and cocoa with the water, stirring con-
stantly. Add the butter, sugar, com syrup, and salt. Sim-
mer, stirring until the sugar has completely melted. Stop
stirring and cook at a moderate boil 5 to 10 minutes or
until the mixture thickens and reduces to just under ¥> cup
{grease a heatproof glass cup before measuring^. Swirl the
mixture in the pan occasionally but do not stir.
Cool slightly and add the vanilla. Keep warm or reheat
in a water bath or microwave, stirring gendy.
NOTE: The microwave is great for making hot fudge be-
cause the chocolate does not come into contact with direct
heat so there is less risk of scorching. Use a 4-cup heat-
proof glass measure or bowl as the fudge will bubble while
reducing.
KK SIMPLY DELICIOUS FOOLPROOF CAKES
I never hive time on weekdays for mure chan a hurried cup of
coffee for breakfast, so indulging in pancakes or waffles on week-
ends is a special treat.
A pancake or waffle is similar to a buncr cake except it has
about half rhe flour and no sugar. A cake baked without sugar is
usually rubbery and tough, hue a pancake, if nor overmixed, man*
ages to be even mure tender than a butter cake. This contradic-
tion is because of the low amount of hour and because, during
the mixing stage, almost no gluten is activated. The structure re-
lies on the intense heat of trying to set the outside and support
the incredibly soft, light interior. Also, unlike cakes, pancakes are
eaten hot while still ar their most tender. The absence of sugar
makes it possible to add lots of maple syrup!
A pancake or wattle batter is much more forgiving than a
regular cake batter. The size of the eggs or the type of flour is far
less important. All purpose flour works almost as well as cake
flour {although cake flour makes more tender pancakes}, and it’s
fine to dip the measuring cup into the flour bin and level it off; it
really isn't necessary to sift.
I am presenting these recipes in the usual precise way for
consistency of style, but weekends arc the time to relax and it’s
great to know that you can have your cake and eat it too!
Often, 1 mix all the dry ingredients and rake out the eggs and
buner rhe night before. Raised Waffles are ideal for slow risers as
most of the barter must be prepared the night before.
I don't mind waking up a little early on the weekends at our
country house in Hope, New Jersey, just to be able to have the
pleasure of an old-fashioned breakfast. I always accompany my
pancakes or waffles with corncob-smoked bacon or sausage from
Harrington’s tn Vermont (page 445) or slices of scrapple (from a
stand down the ruadl, fried crisp and sprinkled with freshly ground
pepper and thyme from my garden. In the fall 1 can't resist adding
Staytnan-Winesap apple rings, fned in a little butter with chopped
walnuts and a drizzle of Vermont maple syrup.
Leftover pancakes and waffles freeze beautifully for future
carefree yet indulgent weekend breakfasts.
Two marvelous old-fashioned cakes, Sour Cream Coffee Cake
and Pineapple Upside-Down Cake, are terrific fur brunch.
This chapter also indudcs crepes, the world’s most delicate
pancakes, and buckwheat blini, the ultimate vehide for caviar,
both eminently suitable for special brunches.
You will also find two of my favorite breakfast treats—Streu-
sel Brioche and Sticky Buns—glorious yeast breads, perfect for
pampering weekend guests.
BREAKFAST
CAKES
BREAKFAST CAKES 89
Sour
Cream Coffee
Cake
SERVES a
тою
s-Xhis к rhe nxatt delicious streusel coffee елке I have
ever tasted and is one of my favorite cakes. I he combina-
tion of ingredients was inspired by a recipe my old friend
Elaine Mane Kohut once entered in a contest. (She won
first prize: a set of silverware.) The buttery flavor has the
mellow undertone of sour cream. The combination of cake»
optional melting Layer of thin apple or peach slices, and
crunchy sprinkling of cinnamon-scented nuts is dose to
perfection. The apple adds a moist tartness^ the peach mel-
lowness.
INGREDIENTS MEASURE WEIGHT
room icmpefAiwe volume otrrtce* gram*
STREUSEL TOPPING AND FILLING hghr brown Kttgar V> cup (firmly packed) 2.5 ounces 72 grams
granulated sugar 2 tablespoons 1 ounce 26 grams
walnuts ur pecans 1 cup 4 ounces 113 grams
cinnamon I Ml teaspoons • •
unsifted cake floor Mt cu p idifi -uh! sweep method) 2.25 ounces 65 grams
unsahed buner s'muM be softoacdl 4 tablespoons 2 ounces 5? grams
san ilb feATTER V5 teaspoon • •
-1 large egg yolks 2 full fluid ounces 2.5 ounces 74 grams
sour cream Vi cup 5.5 ounces 160 grams
vanilb IV; teaspoons • 6 grams
sifted cake flour 2 cup» 7 oiMues 200 grams
sugar 1 cup 7 outlies 200 grains
baking powder Ц teaspoon 2-5 grams
baking soda Mi teaspoon 2.5 grams
salt Mi teaspoon < •
unsuhed butter i 12 tablespoons h ounces 170 grams
*0 SIMPLY DELICIOUS FOOLPROOF CAKES
OPTIONAL: 1 Greening or Granny Smith apple, peeled,
cored, sliced %-inch thick (1 heaping cup of slices), and
sprinkled with 2 teaspoons fresh lemon juice. Or 1 heaping
cup frozen peaches, thawed on paper towels and sliced %•
inch thick while still partially frozen.
Preheal the oven io 35(PF.
TO MAKE STREUSEL TOPPING AND FILLING
In a food processor fitted with the metal blade, pulse the
sugars, nuts, and cinnamon until the nuts are coarsely
chopped. Reserve % cup to use as a filling. To the remain-
der add the flour, butter, and vanilla and pulse briefly co
form a coarse, crumbly mixture for the topping.
TO MAKE BATTER
In a medium bowl lightly combine the yolks, about V* of
the sour cream, and vanilla.
In a large mixing bowl combine the dry ingredients
and mix on low speed for 30 seconds to blend. Add the
butter and remaining sour cream. Mix on low speed until
the dry ingredients are moistened- Increase to medium speed
(high speed if using a hand mixer) and beat for 1 ’Л minutes
to aerate and develop the cake’s structure. Scrape down the
sides. Gradually add rhe egg mixture in 3 batches, heating
for 20 seconds after each addition to incorporate the ingre-
dients and strengthen the structure. Scrape down rhe sides.
Reserve about V) of the batter and scrape the remain-
der into the prepared pan. Smooch the surface, preferably
with a small angled spatula. Sprinkle with the streusel fill-
ing and top with the apple or peach slices if desired. Drop
the reserved batter in large blobs over the fruit and spread
evenly with the spatula. Sprinkle with the streusel topping
and bake 55 to 65 minutes or until a wire cake tester in-
serted in the center comes our dean and the cake springs
back when pressed lightly m rhe center. iMovc aside a small
parch of the streusel before testing.) 77?e cake should start
to shrink from the sides of the pan only after removal from
tire oven. Cover loosely with buttered foil after 45 minutes
to prevent overbruwning.
Let the cake cool in the pan on a rack for 10 minutes.
The cake will have a level top. Loosen the sides with a
small metal spatula and remove the sides of the springform
pan. Cool completely before wrapping airtight. If you wish
to remove the bottom of the pan, slide a cardboard round
at least 9 inches in diameter between the parchment and
the bottom when die cake is completely cool.
One 9-mch sprmgform рал,
greased, bottom lined with
parchment of wax paper,
and then greased again and
floured. Magi-Cake Stops
(pages 20 and 456) are espe-
cially useful foe this cake be-
cause the side crust tends to
brown more than with other
cakes due to the use of all
yolks and the lung baking
period.
FINISHED HEIGHT:
2 inches.
STORE:
Airtight: 2 days room tem-
perature, 5 days refriger-
ated, 2 months frozen.
Moisture distributes most
evenly the day after baking.
SERVE:
Room temperature.
POINTERS FOR SUCCESS;
See page 24.
BREAKFAST CAKES 91
Upside-Down
Сакс
SERVES 8
T О I О
his i$ a true American classic, traditionally baked in a
cast-iron skillet. When inverted, the pineapple slices lining
the pan encase the cake, moistening its buttery, soft crumb
with delicious caramelized juices. The sour cream barter
provides the perfect flavor balance for any fruit. Try an
apple, pear, plum, peach, apricot, or even banana varia-
tion.
INGREDIENTS MEASURE WEIGHT
room tcmpcrjtirrc ivfrwnc oumrs grams
FRUIT TOPPING 14 pineapple dice*, fresh or canned—packed in unsweetened pineapple juice 1% (20-ouncc) cans • •
14 pined sweet cherries • • ♦
unsalted buncr 4 tablespoons 2 ounces 57 grams
light brown sugar Vi cup (firmly packed) 3.75 ounces 108 grams
pecan halves V» cup I ounce 28 grams
3 large egg yolks 2 scant fluid ounces 2 ounces 56 grams
sour cream VS cup 4.25 ounces 121 grams
vanilla 1 teaspoon • 4 grams
sifted cake flour 116 cups 5.25 ounces 150 grams
sugar % cup 5.25 ounces 150 grams
baking powder У< teaspoon • 3.7 grams
baking soda Vi teaspoon • •
salt Vi teaspoon ♦ ♦
unpaired buner (mnM be* softened 1 9 tablespoons 4.5 ounces 128 grams
One 10-inch cast iron skillet
(measured at bottom; top
measures 11 inches).
FINISHED HEIGHT:
IVi inches.
Preheat oven to 35U*F.
Place oven rack in lower third of oven.
TO MAKE FRUIT TOPPING
Drain pineapple slices and cherries and place on paper tow-
els to absorb excess moisture. You will need 8 whole pine-
92 SIMPLY DELICIOUS FOOLPROOF CAKES
apple slices and 8 whole cherries. Halve 6 of the remaining
dices and the remaining cherries.
In the skillet, melt the butter over medium hear. Stir
in the brown sugar until moistened and remove from the
heat.
Place 1 whole pineapple dice in the center of the pan
and 7 whole slices surrounding it. Place the half dices side
by side against the sides of the pan, the two cut edges down,
touching the brown sugar. Place the whole cherries in the
center of the whole pineapple slices; the halved cherries in
the center of the half slices. Tuck the pecans into any gaps
between the fruit.
TO MAKE CAKE BATTER
In a medium bowl, lightly combine yolks, about Va of the
sour cream, and the vanilla.
In a large mixing bowl, combine the dry ingredients
and mix on low speed for 30 seconds to blend. Add butter
and the remaining sour cream. Mix on low vpeed until dry
ingredients are moistened. Increase to medium (high speed
if using hand mixer) and beat for 1 Vj minutes to aerate and
develop cake's structure. Scrape down the sides.
Gradually add egg mixture to batter in 3 batches,
beating for 20 seconds after each addition to incorporate
ingredients and strengthen structure. Scrape down the sides.
Scrape batter into fruir-lined skillet, smoothing evenly with
a spatula. Bake for 40 to 50 minutes or until golden brown
and the wire cake tester inserted in center comes out clean
and the cake springs back when pressed lightly in center.
Run a small metal spatula around sides and invert at once
onto a serving plate. Leave the skillet in place one or two
minutes before lifting it. If any fruit has stuck co tbe skillet,
simply use a small spatula to place it back on the cake.
UNDERSTANDING
A cast-iron skillet is ideal for preparing this cake not only
because the butter and brown sugar for the topping can be
heated directly m it on top of the stove, but because it helps
the brown-sugar topping to caramelize while baking. If you
prefer to use a 10-inch springform pan, it is advisable to
wrap rhe outside in heavy-duty foil to prevent leakage. Pre-
heat an aluminum baking sheet and place the springform
dirccrly on it to help caramelize the sugar.
STORE:
Airtight: 1 day room tem-
perature, 3 days refriger-
ated, 2 months frozen.
SERVE:
Warm or room temperature.
POINTERS FOR SUCCESS.
See page 24.
BREAKFAST CAKES 93
Holidau
Hallelujah
Streusel Brioche
SERVES 12
v^xherr is simply nothing more soul-satisfymg with which
co start the day than this cinnamon-imbued bniiche. Every-
one adores its springy crumb and the delectable yeasty but-
tery flavor.
Streusel brioche is easy to make. And since it freezes
well, it can be baked several weeks ahead and Frozen.
Thawed overnight at room temperature and warmed briefly
before serving, it tastes as fresh as if it had just come out
of the oven.
1 created this recipe for Family Circle's December 1987
holiday baking issue. The name I gave it expresses my un-
bridled enthusiasm for it. It u guaranteed to become part
of your heirloom repertoire.
INGREDIENTS MEASURE WEIGHT
room (епцкг/миге »о/шпс ounces grams
BRIOCHE DOUGH water 2*Л tablespoons t.25 ounces 38 grams
sugar 3 tabkspoons 1.25 ounces 40 grams
fresh ycasl * or dry yeast Inert rapid-rise) 2 packed teaspoons I Mt teaspoons (1.5 ounce • It grams 4.5 grams
unsifted bread flour about IM cups (dip and sweep method' 8 ounces 227 grams
salt M teaspoon ♦ 3,5 grams
1 large egg 2 large eggs cold • 6 ounces 170 grams {weighed in rhe «.hells)
unsalted butter (must he very softi STREUSEL FILLING tO tablespoons 5 ounces f 142 grams *
golden raisins Vt cup 2.3 ounces 72 grams
light rum 2 tabkspocm 1 ounce 28 grams
boiling water M cup 2 ounces 60 grams
brown sugar M cup 1 firmly packed? 2 ounces 56 grams
granulated sugar 1 tablespoon 0.5 nonce 13 grams
dnnamnn 2 teaspoons • •
94
SIMPLY DELICIOUS FOOLPROOF CAKLS
• Fresh «*« causes do«gh to rise t»err.
f4 no 6 ounces of butter way be ю*ч1. The k*«er uttjM offers j Itfthcer
texture, the higher tmourx □ richer Havoc.
DAY BEFORE
MAKE THE SPONGE
When using yeast always begin by proofing it to make sure
it is alive. If using fresh yeast, smell it co be sure it doesn't
have a sour odor. To proof the yeast, use warm water (hot
water would kill it). In a small bowl combine the 2Vi ta-
blespoons water (ideally a tepid lOO^F. if using fresh yeast;
я little warmer, HOT., if using dry), Ух teaspoon of the
sugar and the у east If using fresh yeast, crumble it slightly
while adding. Set aside in a draft-free spot for 10 to 20
minutes. By this time, the mixture should be full of bub-
bles. If not, the yeast is too old co be useful.
Place 54 cup of the flour and 1 egg in a food processor
(preferably with the dough blade) and process a few sec-
onds until mixed. Add the yeast mixture and stir with a
rubber scraper until smooch. Sprinkle che remaining flour
over the mixture but do not mix it in. Cover and let stand
for 1 Ух to 2 hours.
KNEADING THE DOUGH
Add rhe remaining sugar, salt, and remaining 2 cold eggs
and process 1 Vi minutes or until the dough is smooth, shiny,
and deans che bowl. Lee rest 5 minutes with the feed tube
One large brioche pan (9
inches at rhe widest point by’
3 inches high) or an 8-indi
by 2-inch cake pan <x
speingform pan, well but-
tered.
STORE:
Airtight: 2 days refrigerated,
3 months frozen. To reheat,
wrap loosely in foil and
bake for 10 minutes al
MOT.
COMPLEMENTARY
ADORNMENTS:
Buttery enough to serve
pbin. the Streusel Brioche is
also delicious with softened,
unsweetened butter. Serve
along with a cup of steam-
ing hot coffee or a glass of
nhlk.
BREAKFAST CAKES 9S
POINTERS FOR SUCCESS:
Use bread flour. Do not use
rapsd-nsc yeast. Be sure (he
yeast is active. Do not allow
rising dough to be in an
area over 80° to 85T’. Do
not allow tbe dough to rise
mure than recommended
amounts or it will weaken
tbe structure. Do not deflate
tbe dough before chilling or
tbe butter win leak «.nt 11
this should happen inadver-
tently, dull the dough for 1
hour and knead tbe butter
back into die dough.
open. Add the butter in 2 batches and process for 20 sec-
onds after each addition or until incorporated. (The butter
must be soft so as not to overtax the motor of the proces-
sor. If the processor should stall, let rest 5 minutes.)*
FIRST RISE
Scrape the dough into a lightly buttered bowl, it will be
very soft and clastic. Sprinkle lightly with flour to prevent
a crust from forming. Cover the bowl tightly with plastic
wrap and let rise in a warm place (8Q°F. but not above or
the yeast will develop a sour taste) until double in bulk,
about 2 hours. Refrigerate for at least 30 minutes to 1 hour.
Deflate dough by gently stirring it and refrigerate for an-
other hour.
REDISTRIBUTING THE YEAST
Turn dough onto a lightly floured surface and gently press
it into a rectangle, Fold the dough into thirds (as in folding
a business letter) and again press it out into a rectangle,
lightly flouring the surface as needed to prevent stickiness.
Fold it again into thirds and dust it lightly with flour on all
sides. Wrap it loosely but securely in plastic wrap and then
foil and refrigerate it for 6 hours or up to 2 days to allow
dough to ripen and harden.
TO MAKE STREUSEL FILLING
In a small heatproof bowl place the raisins and light rum.
Add the boiling water, cover, and let stand for at least 1
hour. When ready to fill the dough, drain the raisins. Use
your fingers or a fork to blend all the ingredients except
the butter and milk.
The dough will have expanded. Gently deflate it by
kneading lightly with floured hands. Roll it out on a heav-
ily floured surface into an 18-inch by 8-indi rectangle. Brush
with the melted butter, sprinkle with the streusel and rai-
sins, and roll up from a short end, brushing off the excess
flour as you go.
Use a sharp knife or string to an the roll into 4 pieces
if using a large brioche mold, 8 pieces if using a cake pan.
Stand the dices cut ends up and down, wedging them into
the pan and brushing between them with the milk so they
will adhere well during bakmg.
* To prepare br.ocbe dough m a heavy-duty mixer vach ae the KnchcnAtd,
ate fiat beater and. «hen the doufb starts to dimb up the beater, chan де to
die duugh hook. Beat about 5 minute on medium speed or until the dough
к «in.i.iih. . dauiu and begins to dean the bowl. Beat in the butter
by the tablespoon until tfKorpofued.
% SIMPLY DELICIOUS FOOLPROOF CAKES
Lee rise 1 to 2 hours (fresh yeast rises faster) or until
che dough comes to the top of the mold and is very light.
Place a foilcd-lined baking sheet in the oven and pre-
heat co 425*F. (The hot baking sheet will boose the "oven
spring** of the bnoche; the foil will catch any bubbling car-
amelized sugar. |
Brush the bnoche with che egg glaze, being careful not
to dnp any on the side of the pan or it will impede rising
(although link can stop this energetic dough).
Place the brioche on the hot baking sheet and bake 5
minutes. Lower the heat to 375°F. and bake 20 to 25 min-
utes or until a wooden skewer inserted in rhe center comes
out dean. Cover loosely with foil after 10 to 15 minutes or
when che crust starts to darken.
Unmold unto a wire rack and rein ven to cool top side
up. For a glistening surface, brush with Apricot Glaze.
UNDERSTANDING
See page 79.
BREAKFAST CAKES 97
he same dough used to make Streusel Brioche makes
the most glorious sticky buns imaginable. They are every-
thing you’d want a sticky bun to be: gooey with buttery
caramel and crunchy pecan topping; airy, soft, moist, but-
tery, yeasty dough beneath coiled around a spiral filling of
rum-plumped raisins, brown sugar, and cinnamon. Make
this recipe I day ahead and reheat tn serve warm at break-
fast.
Stick!) Buns
SERVES 12
INGREDIENTS MEASURE WEIGHT
nxiwi «тирелиилг 1 recipe Holiday Hallelujah Streu&d Brioche dough (page *M! STICKY BUN FILLING • ounce* • /Cianw •
raisins Vi cup 2,5 ounces 72 grams
dark rum 2 tablespoons 1 ounce 28 grams
boiling water V« cup 2 ounces 60 grams
fight brown sugar */< cup ' firmly packed! 2 ounces 56 grams
granulated sugar 1 tablespoon 0.5 ounce 15 grams
cinnamon 2 teaspoons • •
unsalted butter, melted STICKY BUN TOPPING 2 tablespoons I ounce 2B grams
uusahed buner, softened ¥4 cup 2 ounces 56 gram;
light brown sugar V2 cup (firmly pecked) 4 ounces 112 grams
pecan halve* STICKY BUN GLAZE Vi cup 2 ounces 56 grams
reserved nuiin-soakmg liquid
unsalted butter 1 tablespoon 03 ounce 14 grams
TO MAKE THE STICKY BUN FILLING
In a small heatproof bowl place the raisins and rum. Add
the boiling water, cover, and let stand for at least 1 hour.
When ready to fill the dough, drain the raisins, reserving
the suaking liquid.
In another bowl combine the sugars and cinnamon.
98 SIMPLY DELICIOUS FOOLPROOF CAKES
TO MAKE THE STICKY BUN TOPPING
In a small bowl stir together the butter and sugar until well
mixed. Spread evenly in the prepared pan with a small
spatula or rubber scraper. Top with the pecan halves top
sides down.
FILLING THE DOUGH
Roll out the dough on a well-floured surface into a 14-inch
by 12*inch rectangle. Brush with the 2 tablespoons of melted
butter and sprinkle with the sugar mixture and raisins. Roll
up from a short end» brushing off the excess flour as you
go. The dough will have that lively» silky, “soft as a baby’s
bottom” feel.
Using a very sharp knife» cut the roll into 4 pieces and
then cut each piece into thirds. Place each piece cut side
down in the prepared pan» presung tops so that the sides
couch. Cover with well-buttered plastic wrap and let rise
until the dough reaches the top of the pan (about 1 hour if
uung fresh yeast, up to 2 hours if using dryl.
TO MAKE THE STICKY BUN GLAZE
In a small saucepan over high heat or in a 2-cup heatproof
measuring cup in a microwave on high power reduce the
raisin soaking syrup to 1 tablespoon. Add the butter and
stir until melted. The glare should be lukewarm when used.
Set a foil-lined baking sheet on lowest shelf and preheat the
oven to 425’F. (The hot baking sheet will boost the “oven
spring” of the brioche; the foil will catch any bubbling car-
amelized syrup.)
Brush the buns with the glaze. Place the pan on the
hot baking sheet and bake 10 minutes. Low’er the heat to
375*F. and bake 15 minutes or until a skewer inserted in
the center comes out clean. If becoming too brown, cover
loosely with foil after 5 or 10 minutes.
Let the buns cool in the pan for 3 minutes before un-
molding onto a serving plate or foi Mined counter. Sticky
buns may be eaten at once or reheated in a 35O°F. oven for
10 minutes, loosely wrapped in foil.
NOTES: The butter and raisin syrup glaze keeps the tops of
the buns soft. My friend Shirley Comber swears by the
plumping raisins method. She says she hates finding a hard,
dried-up raisin in an otherwise soft dough.
Paula Wolfert (in her superb articles on bnoche in
P features of Cooking, which greatly influenced che devel-
opment of this recipe) recommends melting and browning
about one fifth of the butter (2 tablespoons) for an extra
rich, delicious flavor. Be sure to let the butter cool before
One 8-inch by 2-inch square
pan, lightly greased.
Day ahead, prepare (he
Bnoche Dough. The Sticky
Bun Topping and Filling
can also be prepared the day
ahead.
STORE
Airtight: 2 day» room tem-
perature, 3 months frozen.
COMPLEMENTARY
ADORNMENTS:
The texniral variation and
moisture from the caramel
makes any addition to the
Sticky Buns unnecessary.
However, they cry out for a
cup of hot coffee or a glass
of cold milk.
SERVE:
Preferably warm.
POINTERS FOR SUCCESS:
Use bread flour. Do nor use
rapid-rise yeast. Be sure the
yeast is active. Do not allow
rising dough to be in an
area over 80* to SS’F. Do
not allow the dough to rise
more than the recommended
amounts or it will weaken
the structure. Do not deflate
the dough before chilling
or the butter will leak out.
If this should happen inad-
vertently, chill the dough for
1 hour and knead the butter
back into it.
BREAKFAST CAKES M
Blueberry
Buttermilk
Pancakes
adding it along with the rest of the butter. Add the browned
parades as well.
Brioche made m a food processor is a speedy and sim-
ple operation. If you wish to double this recipe, it is safer
to use the heavy-duty mixer method as a larger amount of
dough might overheat some food processors, causing them
to stall. (I have successfully made a double batch using the
Cuisinart DLC-7 by melting the butter and allowing it to
cool to barely tepid before adding it, with motor running./
uttcrmilk makes tbe most delicious pancakes, espe-
cially if no baking soda is used to dull the slightly rangy
flavor. Baking powder and beaten egg whites contribute the
leavening. In fact, these are the lightest pancakes I have
ever tasted.
Blueberry buttermilk pancakes are my favorite version,
and the secret for having plump, juicy, evenly distributed
berries is to add them fresh or still frozen to the pancakes
after they’re on rhe griddle.
SERVES 4 TO 6
INGREDIENTS MEASURE WEIGHT
n*Mii tempef.uure unsifted cake flour or alf-purpose flout mfauie 1Уч cups 136 cups (dip and sweep method; ounce» Я ounces 8 ounces 227 grams 227 grains
baking powder 4 teaspoons • 19.5 grams
sah Vi teaspoon • 1.5 grams
4 large eggs. separated yolk» whites 2 full Huid ounces *6 liquid «ip 2.5 ounces 4.25 ounces 68 grams 120 grams
buttermilk 2 liquid cups 17 ounces 484 grams
cream ol tartar Vj teaspoon •
uncalled butter, mehod and cooled 4 tablespooni 2 ounces 57 grams
bhicbcrrics. fresh or frozen and unthawed 2 cups Я ounces 227 grams '
100 SIMPLY DELICIOUS FOOLPROOF CAKES
Preheat a griddle or frying pan.
In a large bowl whisk the flour, baking powder, and
salt until blended.
In a small bowl beat the yolks and buttermilk to blend
slightly.
In a mixing bowl beat the egg whites until foamy. Add
the cream of tartar and beat until stiff peaks form when
the beater is raised slowly.
Add the yolk mixture to the flour mixture and mix
lightly with a fork until the flour is moistened. Stir in the
butter. The batter should be lumpy as overmixing will pro-
duce tough pancakes. Add the whites and fold in with a
slotted skimmer or rubber spatula.
The griddle or trying pan should be hot enough to siz-
zle a drop of water. Lightly butter it and pour on the batter
in 4-inch rounds. Quickly drop 6 berries onto each pan-
cake. Test for doneness by lifting a comer of each pancake
with a metal spatula. When golden brown, turn over and
cook 30 seconds on the other side.
Remove the pancakes to warm plates and keep warm
in a low oven while cooking the remaining baiter.
Makes about 22 pancakes.
VARIATION
BUTTERMILK PUFFS Frying the barter in a Danish Eble-
skiver pan (page 460}» which has 8 round recesses, pro-
duces pancake puffs with a delightfully airy and moist
texture. You will need 1VS tablespoons clarified butter for
brushing on the preheated pan before frying. Fill each re-
cess Yz full with batter. Use a small metal spatula to turn
the puffs. Blueberries tend tn stick slightly, making it nec-
essary to wash the pan between batches, so, if you add
them, use only 2 per puff and push them in slightly so they
are covered with barter. The barter makes 54 puffs.
UNDERSTANDING
Cake flour makes a more tender pancake because it con-
tains less gluten-forming protein than does all purpose.
STORE:
5 days refrigerated, 2
month* frozen. Best served
fresh.
COMPLEMENTARY
ADORNMENTS:
Warm maple syrup, crisp
corncob-smoked bacon, sau-
sages, or scrapple with fried
sage or thyme. No extra
butter is necessary as there’s
plenty in the pancakes!
SERVE:
Hot on warmed plates.
POINTERS FOR SUCCESS:
Do not overmix batter. If
using frozen bluebccficx, be
sure they remain frozen
when added to the batter.
To coat griddle with a thin
film of butter, run a frozen
piece of buner lightly
across it.
BREAKFAST CAKES 101
Blueberry
Buckwheat
Pancakes
SERVES 4 TO 6
hese pancakes have a lighq tender texture with the
earthy flavor of buckwheat.
INGREDIENTS MEASURE WEIGHT
mom temperature unsifted buckwheat flour ♦o/iwrrc 1 S4 cups vnrncrs 6.75 ounces grams 188 grams
unsifted cake flout or all-purpose flour У» cup % cup 'dip and sweep method*1 1 ounce 1.25 ounces 33 grams 36 grams
baking coda 1 teaspoon • 5 grains
salt *A teaspoon > 3.5 grams
4 targe eggs, separated tulks whites 2 full fluid ounces •A bquid cup 2.5 ounces 4.25 ounces 68 grams 120 grams
milk I liquid cup 8.5 ounces 242 grams
m>ik cream I cup 8.5 ounces 242 grams
cream of tartar V- teaspoon ♦ ♦
unsahed binier, melted and cooled 4 lablespooeis 2 ounces 57 grams
blueberries, fresh or frozen and tinthawcd 2 cups 8 ounces 227 grams
STORE:
3 days refrigerated, 2
months frozen. Best served
fresh.
COMPLEMENTARY
ADORNMENTS:
Warm maple syrup, cnsp
corncob-smoked bacon, sau-
sages, or scrapple with fried
sage or thyme. No extra
butter is necessary as there's
plenty in the pancakes!
SERVE:
Hot on warmed plates.
Preheat a griddle or frying pan.
In a large bowl, whisk the flours, baking soda, and salt
until blended.
In a small bowl, beat the yolks, milk, and sour cream
to blend slightly.
In a mixing bowl, beat the egg whites until foamy. Add
the cream of tartar and beat until stiff peaks form when
the beater us raised slowly.
Add the yolk mixture to the flour mixture and mix
lightly with a fork until the flour is moistened. Stir in the
buner. The batter should be lumpy because overmixing will
produce tough pancakes. Add the whites and fold in with
a dotted skimmer or rubber spatula.
The gnddle or frying pan should be hot enough to siz-
102 SIMPLY DELICIOUS
FOOLPROOF CAKES
zle a drop of water. Lightly butter it and pour on batter in
4-inch rounds. Quickly drop 6 bernes onto each pancake.
Test for doncness by lifting a comer of each pancake with
a metal spatula. When golden brown, turn over and cook
30 seconds on the other side.
Remove the pancakes to warm plates and keep warm
in a low oven while cooking the remaining batter. Makes
about 22 pancakes.
UNDERSTANDING
Cake flour makes a more tender pancake because it con-
tains less gluten-forming protein than does all purpose.
Baking soda ts used instead of baking powder to temper
the acidity of rhe sour cream. The sour cream is thinned
with milk to produce a lighter, more tender texture.
<_/he ingredients for this waffle hatter are exactly the same
as for the buttermilk pancake batter except for the butter.
Because of the different cooking technique, the waffle bat-
ter is able to incorporate 4 times the amount of butter
without becoming coo tender and falling арап (as would a
cake). Also, the egg whites are not beaten separately be-
cause the heavy pressure of the waffle iron lid would defeat
the purpose.
I like to use a 7-mch diameter, heart-shaped waffle iron
to make 5 waffle hearts at a time. With a nonstick coating
no extra butter is necessary. Electric waffle irons art* the
easiest to use because both top and bottom heat evenly.
POINTERS FOR SUCCESS:
Do not overran* batter. If
using frozen blueberries, he
sure they remain frozen
when added to rhe hatter.
To coat griddle with a thin
film of butter, run a frozen
piece of butter lightly
across it.
Buttermilk
Waffles
SERVES 6 TO 8
INGREDIENTS MEASURE WEIGHT
room temperjnirc unsifted cake flour or all-purpose flour ш/umc 1 % cups l¥< cups I dip and sweep method) ounces 8 ounces 8 ounces grams 227 grams 227 grams
baking powder 4 teaspoons • 19.5 grams
salt lA teaspoon • 3.5 grams
4 large eggs 6 full fluid ounces 7 ounces 200 grants (weighed without shells)
buttermilk 2 liquid cups 17 ounces 4S4 grams
unsahed butter, melted and cooled 1 f> tablespoons R ounces 227 grams
BREAKFAST CAKES 103
STORE:
2 months frozen. Reheat in
a toaster. Best served fresh.
COMPLEMENTARY
ADORNMENTS:
Warm maple syrup, and
crisp corncob-smoked ba-
con, sausage, or scrapple
with fried sage or thyme.
(Please, no more butter!)
SERVE
Hot on wamsed plates.
POINTERS FOR SUCCESS.
Do not ovcrmix the batter.
Use a sizzling hot waffle
tron.
Prebeat a waffle iron. (For cnspy waffles, be sure to pre-
heat both sides until very hot before adding the hatter.)
In a large bowl whisk the flour, baking powder, and
salt until blended.
In a small bowl beat the eggs and buttermilk until well
mixed. Add to the flour mixture and mix lightly with a
fork until the flour is moistened. Stir in the butter. The
batter should be lumpy as overmixing will produce tough
waffles.
The waffle iron should be hot enough to sizzle a drop
of water. Pour the batter onto center of the waffle iron,
using a light hand because the batter will spread when the
lid is lowered. If using a 7-inch heart-shaped iron, use a
scant Yz cup barter and a spoon or small metal spatula to
spread it around the outer edges. Lower the hd and cook
until the bottom is golden brown. Flip the waffle iron over
and briefly cook the other side until just golden brown. (If
using an electric waffle iron, follow the manufacturer's di-
rections.)
Keep the waffles warm and crisp by placing them in a
single layer on racks in a warm oven with the door slightly
ajar to allow any moisture to escape. Makes about twelve
7-inch heart-shaped waffles or about six 9-inch square waf-
fles.
UNDERSTANDING
Cake flour makes a more render waffle because it contains
less ghiten-forming protein than does all purpose.
104 SIMPLY DELICIOUS FOOLPROOF CAKES
Jr у Hen 1 visited my cousin Joan in Berkeley, California,
we went to breakfast at a charming spot, rhe Bridge Creek
Restaurant, where 1 enjoyed the most ethereal waffles 1 had
ever experienced. When my feet touched ground again, 1
discovered Manon Cunningham sitting nearby and learned
that she was part owner and chief menu consultant. To my
delight she not only promised to send me rhe recipe but
also allowed me to offer it in this book.
Marion
Cunningham’s
Raised
Waffles
SERVES 6 TO 8
WEIGHT
MEASURE
INGREDIENTS
room remperarure warm water roJunrr liquid cup <К2Л№ 4.25 ounces grams 120 grams
sugar 1 teaspoon • 4 grams
fresh yeast or dry yeast 1 packed tablespoon 2V- teaspoons 0.7$ ounce 0.25 ounce 21 grams 7 grams
warm milk 2 liquid cups 17 ounces 4Я4 grams
unsalted butter, melted S tablespoons 4 ounces 113 grams
salt ¥a teaspoon • 5 grams
unsifted all-purpose flour 2 cups (dtp and sweep method) 10 ounces 284 grams
2 Urge eggs ' fluid ounces 3.5 ounces 1D0 grams (weighed without shells)
baking soda V» teaspoon ♦ ♦
NIGHT BEFORE
In a large mixing bowl (at least 3-quarts in capacity) com-
bine the warm water (10CFF. if using fresh yeast, HOT, if
using dry yeast), sugar, and yeast. Stir and let stand 10 to
20 minutes proof. If the yeast is active, it will produce many
bubbles.
Add the milk, butter, salt, and flour and beat until
smooth and blended. [Manon likes to use a hand-rotary’
bearer to get rid of the lumps.) Cover the bowl with plastic-
wrap and let stand overnight at room temperature. (The
batter will rise from 4 cups to 12 cups and then collapse.)
BREAKFAST CAKES 105
STORE
The buner keeps well for
several days refrigerated or
frozen for up to 2 months.
To use frozen barter, thaw
in the refrigerator overnight.
COMPLEMENTARY
ADORNMENTS:
Powdered sugar and a drib-
ble of maple syrup, and
emp corncob-smoked ba-
con, sausage, or scrapple
with fried sage or rhyme.
SERVE:
Hoc on warmed plates.
POINTERS FOR SUCCESS;
Do ncM overbeat the yeast.
Use a large bowl as the bat-
ter will пэс to 3 times its
original volume. Use a siz-
zling hoc waffle iron. Do not
use rapid rise yeast.
bi
Buckwheat
Blini La
Tulipe
SERVES 8
T О I 0
MORNING
Preheat the waffle iron until it w hot enough to sizzle a
drop of water. (For crispy waffles, be sure to preheat both
sides until very hoc before adding the batter.)
Beat in the eggs. Add the baking soda and stir until
well mixed. The batter will be very thin.
Pour the barter onto center of the waffle iron, using a
ight hand because the barter will spread when the lid is
kiwered. If using a 7-inch heart-shaped iron, use a scant Vs
cup barter. Tilt rhe waffle iron to spread the batter around
the edges- Lower the l»d and cook until the bottom is golden
brown. Flip the waffle iron over and briefly cook the other
side until just golden brown. {If using an electric waffle iron,
follow rhe manufacturer’s directions.)
Keep the waffles warm and crisp by placing them in a
single layer on racks in a warm oven with the door slightly
ajar to allow any moisture to escape. Makes about eight 9-
m ch-square waffles or about sixteen 7-inch heart-shaped
waffles.
UNDERSTANDING
The formula for these waffles is quite similar to Buttermilk
Waffles except that they have half the eggs and butter. This
is parr of the reason for their lightness, but the real secret
is that they are leavened with yeast. The tiny amount of
baking soda does not add leavening—instead it rounds out
the slightly acidic flavor produced by the yeast. The yeast
also contributes a richness and depth of flavor.
(L good recipe for buckwheat blmi ts very hard to find.
The combination of assertive buckwheat flavor and light
tender texture is elusive.
I fell in love with these blini at a New York Women’s
Culinary Alliance caviar tasting given several years ago by
Sara Moulton, the group's founder. She was then chef tour-
nant at La Tulipe, one of my favorite Village restaurants,
and was honor-bound not to divulge the reape.
It was almost as this book went to press that it sud-
denly occurred to me to ask Sally Darr, chef-owner of La
Tulipe, if I could indude her blini recipe. She said yes. 1
lived in fear for one week that she might change her mind.
These blini are that wonderful.
106 SIMPLY DELICIOUS FOOLPROOF CAKES
INGREDIENTS MEASURE WEIGHT
room tempewwe fresh yeast * or dry yeast (not rapid-ristl ra/umc 2 packed teaspoon* 1 *4 teaspoons pounds-‘ ounce* 0.5 ounce • grams 11 grams 4 grams
warm milk 2’6 cup 1 pound 5.25 ounces 605 grams
sugar 1 tablespoon + 14 teaspoon 0.5 ounce 15 grams
stone-ground buckwheat flour */i cup I lightly spooned into cup) 2 ounces $7 grams
sifted йП purpose flour 2% cups 10 ounces 284 grams
3 large egg yolks 3*4 tablespoons 2 ounces » .... 56 grams
1 large egg white 2 tablespoons 1 ounce 30 grama
salt Yi teaspoon • •
heavy cream 1 cup 8 ounces 232 grams
clarified butter4 2 tablespoons 1 ounce 25 grants
* If уou do nof hanr darilird hmtcr on hand, pou will nerd tn darify 3 table-
spoons (1.5 owtkcv43 grama) umalnd ixxur In а Ьгячз мчдержп mdt the
buner over rnoiwn hear, panialy «nrrrd to prevent tplartrnng. When й
Looks dear. cook, uncovered, watching carefully unci the solid* drop and
begin «о brown. Pour immedutely through a Sne мглпет or a nrainer lined
wtch cbeesedoth.
The batter requires 3V6 hours rising time, so you must start
it at least 4 hours before serving the blini. I suggest starting
the batter die day before.
DAY BEFORE
When using yeast always begin by proofing it to make sure
it is alive. To proof the yeast, use warm liquid (hot liquid
would kill it). In a small bowl combine Vi cup warm milk
(ideally a tepid lOOT. if using fresh yeast; a little warmer,
IIO’F., if using dry yeast), Vi teaspoon of the sugar, and
the yeast. If using fresh yeast, crumble it slighdy while add-
ing. Set aside in a draft-free spot for 10 to 20 minutes. By
this time, the mixture should be full of bubbles. If not, the
yeast is too old to be useful.
Transfer the mixture to a large bowl (at least 10-cup
capacity) and stir in the buckwheat flour and 1 Vi cups warm
milk. Cover and allow tn stand in a warm place for 2 hours.
STORE:
Bluu are best fresh but can
be refrigerated 3 days and
reheated, covered, in a
300*F. oven for 10 to 15
minutes o< for a few sec-
onds in a microwave oven,
uncovered.
COMPLEMENTARY
ADORNMENTS:
Sour cream or creme frarche
(page 259) and caviar. Or
thin slivers of smoked
salmon and sprigs of fresh
dill.
POINTERS FOR SUCCESS.
Sally swears by Kenyon’s
Buckwheat Flour, available
at Dean & De Luca (page
445). She says that stone-
ground buckwheat flour
produces the best texture.
BREAKFAST CAKES 107
Stir in die all-purpose flour and the remaining Vi cup
milk until smooth. Add the egg yolks, remaining sugar, and
salt. Mix well, cover, and allow to stand in a warm place
for 1 hour. (The recipe may be prepared to this point I day
ahead.) Refrigerate overnight. The barter will be thick and
have bubbles all over the surface.
Whip the cream until soft peaks form when the beater
is raised and fold into the batter.
Beat the egg white until soft peaks form when the beater
is raised and fold into the batter. You will have about E
cups batter.
SERVING DAY
Preheat the oven to 300* F.
Pour 2Vi-inch rounds of batter (2 scant tablespoons)
onto a hot griddle, lightly greased with the clarified butter
between each batch. Cook until puffed and golden, about
1S4 minutes. Turn and cook the other side for 30 seconds
or until lightly brown. Place in the oven for 10 minutes to
finish cooking the inside of the blini. Makes 70 blini.
NOTE: A Swedish pancake or “Plett” pan {page 460j with
2l/i4Dch round individual recesses is very convenient to use.
Fill each section to che top.
Swedish
Pancakes
Piauar
SERVES 8
T О I 0
assistant, David Shamah, a recent graduate of the
Culinary Institute of America, raved about these pancakes,
which he learned from chef-instructor John Jensen. The
original recipe used part light cream and milk, but I have
converted it to heavy cneam and milk (maintaining the same
percentage of butterfat) due to the scarcity of light cream
on the market.
Swedish pancakes are a cross between American pan-
cakes and crepes. Sprinkled with powdered sugar and topped
with lingonberries, they arc traditionally eaten with the fin-
gers as a lovely brunch dish or as an unusual dessert for an
informal dinner.
HIM SIMPLY DELICIOUS FOOLPROOF CAKES
INGREDIENTS MEASURE WEIGHT
rooa rrmprzarure vohune ounces gram*
4 large eggs % liquid cup 7 ounces 200 grams (weighed without shdh|
heavy cream •6 cup 4 ounces 116 gram*
cake Hour or all-purpose Bom 1 <Vp +2 tablespoons 1 cup 1 measured by dip and sweep nsethod) 5 ounces 5 ounce* 145 grams 145 grams
milk I VS cups 12.75 ounces 363 grams
unpaired buner, melted 3 tablespoon* L5 ounces 43 grams
salt Vi teaspoon •
grated lemon rest Mi teaspoon • •
clarified butter’ 2 tablespoons 1 ounce 25 grams l~
• If *хя do not Save clarified butter on hand, yw *i>l nerd to chnfy 3 table-
spoons {1.5 ounccs/43 grams] unsahed buner. In a heavy saucepan meh the
tamer over medium beat, partully covered to prevent splattering. When it
xx>ks dear, mjuu, uncovered, «aiding carefully uncd Che udub drop Mhd
begin li> bruwh. Pour mt median4, у through л tine strainer or a (trainer lined
with chrrMxknh.
In a large bowl bear the eggs and cream. Add the flour and
bear until smooth. Beat in rhe remaining ingredients. The
batter is quite thin.
Pour 2'6-inch rounds of batter (1 tablespoon} onto a
hot griddle, lightly greased with darihed butter between cadi
batch. Cook over medium-high heat 1*6 minutes or until
golden brown. Turn and cook the other side for 30 seconds
or until lightly brown. The pancakes will be ‘A-tnch thick.
Remove the pancakes to warm plates and keep warm
in a low oven while cooking the remaining barter. Makes
4 dozen pancakes.
note: A Swedish pancake or “Plett” pan 'page 460) with
2l/i-inch round individual recesses is very convenient to use.
Fill each section almost to the top.
UNDERSTANDING
Cake flour makes a more tender pancake because it con-
tains less gluten-forming protein than does all purpose.
STORE
3 day» refrigerated. Reheat,
loosely covered, in a 300“F.
oven for 10 io 15 nuautes
or for a few seconds in a
microwave oven, uncovered.
Best served fresh.
COMPLEMENTARY
ADORNMENTS:
Powdered sugar and lingoo-
berries in syrup (available at
specialty food stores).
BREAKFAST CAKES 109
Clwntilly
CrCpcs
стер as m >*/>,
not crJtp)
SERVES 6 TO 8
hese are the lightest» laciest, most tender crepes imag-
inable. I discovered the idea of using cornstarch instead of
the usual flour when 1 did a free-lance project at CPC In-
ternational (Com Products) many years ago. In addition to
producing more tender crepes» you can also cook the crepes
immediately after mixing the batter, unlike the hour-long
wait when using flour.
I discovered that using half the recommended amount
of cornstarch produces crepes that are as delicate as hand-
kerchiefs.
INGREDIENTS MEASURE WEIGHT
room temperature 3 large eggs vofumc scant V, cup ounces grams 5.25 ounces 150 grains ]weighed without sheik)
milk 1 cup 8.5 ounces 242 grams
vanilla 1 teaspoon ♦ 4 grams
unsahed butter, melted 3 tablespoons 1.5 ounces 43 grams
Cirand Marnier 1 tablespoon 0.5 ounce 15 grams
cornstarch * % cup 3 ounces 90 grams
salt % teaspoon •
sugar 1 tablespoon 0J5 ounce 12 grams
clarified buner f I tablespoon 0.5 ounce 12 grams
One 6-uich crept- pan.
STORE:
2 days refrigerated, 3
months frozen.
I * You can uk up to I cop cornstarch if rou prefer j thicker crvpc with mure
i bite.
f If tou do not have cUnlicd butter on hand, yuu will need ii> clady 3 иЫс-
(].$ ounuc»45 graami utttahni butler. In a hruvy «мссрап mrlt rhe
butter nw medium hrjt, partially utwrrrd to promt splirtcnng. When it
кк>Ь dc»r, rook, unronrnrd. watdw< carefully vnnl the solids drop and
begat co brown. Four immcdurdv through □ fine strainer or a strainer lined
wich cheesecloth.
The easiest and fastest way to mix the barter is m a blender.
Place the ingredients in the order given in a blender and
blrnd at high speed for 10 seconds.
Heat the crepe pan on rnedium-high beat until hot
enough to sizzle a drop of water. Brush lightly with clari-
fied buner and pour a scant 2 tablespoons barter into the
center. Immediately tilt the pan to the left and then down
HO SIMPLY DELICIOUS FOOLPROOF CAKES
and around го the right so that the batter moves in a counter-
clockwise direction, covering tbe entire pan.
Cook until the top starts to dull and the edges begin
to brown, about 15 to 20 seconds. I like ro use a small
metal spatula to lift the upper edge and check ro see if the
сгеёре is golden brown. Then, grasping the edge ot the crepe
with my fingers, 1 flip it over and cook for 10 seconds, or
just until lighdy browned. Invert the pan over the counter
and the crepe will release.
к is fine to place 1 стёрс on top of another if serving
the same day. If refrigerating or freezing the crepes, how-
ever, separate them with pieces of wax paper or they may
sock to each ocher. Makes 21 to 24 crepes (the larger amount
if using 1 cup cornstarch).
BREAKFASTCAKES It!
Crepes
Suzctte
SERVES 6 TO 8
Ч-X his is one of rhe world's most glorious and dramatic
desserts. There was a time, when I first discovered Crepes
Suzette in a class with James Beard, that everyone I loved
had to experience them. I made them for my parents when
they invited me fur dinner, for my mentor Cecily Brown-
stone and her sister when 1 graduated from college, for a
sophisticated Parisian girl friend who picked up her plate
and licked it (prompting me to do the same); fur a cellist
who broke our date and never knew what he missed. (I
never forgave him.) Ihen for years I stopped making them
only to rediscover them with renewed interest. My favorite
sauce version was inspired by Julia Child and Simone Beck
tn .Mastrnng the Art of French Cooking. Although it is tra-
ditional to rub sugar cubes on the orange rind to absorb
the oils, it has become difficult to find large sugar cubes, so
I candy the rind instead and use it to garnish the crepes. It
Й delicious to ear.
INGREDIENTS MEASURE WEIGHT
room tempeTMurc 1 recipe Chantilly Crepes tpagc 110) FOR CANDYING THE RJND ounce* grams
I large orange
sugar Va Clip 2.25 ounces 67 grams
water VS Clip 2.75 ouncci 79 grams
com syrup ORANGE/BUTTER SAUCE 1 teaspoon *
1 large orange • • •
lemon juice, freshly squeezed IM: teaspoons • •
unsalted butter 1 cup Я ounces 227 grams
sugar % cup 1.75 ounces 50 grams
Cirand Manner FOR FLAMBEING 3 tablespoons 1.5 ounces 46 grams
powdered sugar 3 tablespoon* 1.25 ounces 58 grams
Grand Marnier or Curasao М» cup 2.75 ounces SO grams
brandy Mi cup 2.5 ounces 74 grams
112 SIMPLY DELICIOUS FOOLPROOF CAKES
TO CANDY THE ORANGE RIND
Use a stripper (page 458) or vegetable peeler to peel 1 of
the oranges. Be sure to remove only the orange portion and
not the bitter white pith beneath. It using the vegetable
peeler» cut the snips with a knife to make them narrower
(about ySrinch wide).
Place the strips in a saucepan of boiling water and sim-
mer 15 minutes. Dram and rinse under cold water.
In a small saucepan combine rhe ’/i cup sugar, 'Л cup
water and 1 teaspoon com sy rup and bring to a boil, stir-
ring constantly. Stop stirring, add the orange strips, and
cover tightly. Simmer on low heat for 15 minutes without
stirring or uncovering. Cnol covered,
TO MAKE THE ORANGE BUTTER SAUCE
Remove the rind of the second orange with a zester or veg-
etable peeler and chop into fine zest.
Squeeze both oranges and strain the juice. You should
have % cup. Add the lemon juice.
In mixing bowl, with whisk beater cream the butter
and sugar for 1 minute or until very soft. Very gradually
beat in the juice, chopped zest, and the 3 tablespoons of
Grand Marnier. (Makes 2% cups orange butter sauce.) Set
aside at room temperature for 1 day, refrigerate up to 5
days, or freeze up to 3 months.
TO serve: Lay а сгёре with its most attractive side down
and spread lightly with the orange buner. Fold in half and
spread with more orange butter. Fold into triangles by
folding in half or thirds. (To fold in thirds, the center of
the flat edge will become the point of the triangle. Fold
each side down so that they meet in the center, spread with
a little more orange butter, and fold in half.) Use a total of
1 tablespoon orange butter for each crepe. Place the re*
ma i nt ng orange butter in a large crepe or sautl pan and
heat until melted and bubbling. Place the crepes and can-
died orange rind in the pan. Heat for 1 lA minutes, spoon-
ing the orange butter over the crepes. Remove from the
heat and sprinkle with the powdered sugar.
Place the liqueur in a large ladle or saucepan with a
long handle. Heat until very hot and starring to flame. If
necessary, tilt the ladle slightly so that the gas burner flame
will ignite it or use a very long match. Pour over the crepes
and allow to flame until it goes out.
Serve the crepes garnished with the orange rind.
note: The butter-spread, folded crepes and remaining or-
ange buner can be frozen for 3 months. Reheat covered in
a 350vF. oven 20 to 30 minutes or until bubbling hot.
BREAKFAST CAKES IB
Lemon
Crapes Suzcfic
SERVES 6 TO 8
overs of lemon may prefer this lilting butter sauce to
the traditional orange one. Light rum accents the refreshing
lernon flavor. Fresh blueberries are a colorful addition.
WEIGHT
MEASURE
INGREDIENTS
room tcmpcfjrure 1 recipe Chantilly Crepes (page 1 LOt LEMON BUTTER SAUCE ro/ufflC oc/mr» grams
unsalted butter ¥• cup 6 ounces 170 grams
1 cup 7 ounce* 200 gram*
grated lemon zest 2 teaspoons • 4 grams
lemon juscc, freshly squeezed cup 4.25 ounces 125 grams
optional: fresh blueberries FOR FLAMBEING 1 cup 4 ounces 114 grams
powdered sugar 3 tablespoons 1.25 ounces 38 grams
light rum ’Л cup 2 ounces 56 grams
In a mixing bowl with whisk beater, cream the butter and
sugar for 1 minute or until very soft. Very gradually beat
in the lemon zest and juice. (Makes cups lemon butter
sauce.) Set aside at room temperature for 1 day, refrigerate
up to 5 days, or freeze up to 3 months.
TO serve: Lay a crepe with its most attractive side down
and spread lightly with the lemon butter. Fold in half and
spread with more lemon butter. Fold into triangles by fold-
ing in half or thirds. (To fold in thirds, the center of the
flat edge will become the point of the triangle. Fold each
side down so that they meet in the center, spread with a
little more lemon butter, and fold in half.) Use a total of 1
tablespoon lemon butter for each crepe. Place the remain
mg lemon butter in a large crepe or saute pan and heat
until melted and bubbling. Place the crepes and optional
blueberries in the pan. Heat for 1V6 minutes, spooning the
114 SIMPLY DELICIOUS FOOLPROOF CAKES
lemon butter over the crepes. Remove from the heat and
sprinkle with the powdered sugar.
Place the rum in a large ladle or saucepan with a long
handle. Heat until very hot and starting to Наше. If neces-
sary, tilt the ladle slightly so that the gas burner flame will
ignite it or use a very long match. Pour over the crepes and
allow to flame until it goes out.
noth: The butter-spread, folded crepes and remaining lemon
butter can be frozen for 3 months.
«^hese individual little lemon soutfl^ed crepes arc abso-
lutely divine. They were inspired by the invention of Lemon
Cream Illusion. This lemon curd and Italian meringue mix-
ture is layered into each стере. During baking, it puffs up
slightly to form an airy but creamy filling. This elegant pre-
sentation, unbelievably, can he assembled 1 day ahead and
briefly baked just before serving.
Lemon
Cream Illusion
Crepes
III" ll-
SERVES 6 TO 8
1 large sheet cake or jelly-
mil pan, lightly buttered
INGREDIENTS
1 recipe Lemon Cream Illusion without gdatni (page 2661
1 recipe Chantilly Crepes ipage 110}
Lay a crepe with its most attractive side down on a work
surface and spread one half with 2 tablespoons Lemon
Cream Illusion. Fold, spread 1 tablespoon of cream on half,
and fold again.
Place the crepes in the prepared pan. If not baking same
day, cover with plastic wrap and refrigerate.
When ready to bake, prebeat the oven to 35QPF.
to serve: Bake for 10 minutes or until slightly puffed. (Bake
15 minutes if the crepes were refrigerated.) Sprinkle with
powdered sugar, if desired.
BREAKFAST CAKES 115
Chocolate
Velour Сгёрез
with
Orange-Apricot
Sauce
SERVES 6
he flavor combination of velvety bittersweet chocolate
and tangy, golden honeyed apricot i$ a marriage made in
heaven. A scoop of Vanilla Ice Cream (page 285), slowly
melting in the hot apneot sauce, is not entirely unwelcome.
INGREDIENTS MEASURE WEIGHT
roam еещретпне volume ounces grams
BATTER
1 Urge egg 3 tablespoons 4- Vj teaspoon 1.75 ounce* 50 grams (weighed without shellj
I large egg yull 1 tablespoon +- •4 teaspoon 0.6 ounce 19 grams
milk *Л cup 53 ounces 160 grams
vanilla V« teaspoon • 3 grains
litis a Iced butter, melted 2'4 tablespoons 1.15 ounces 35 grams
cognac 2 teaspoons • 9 grams
cornstarch Vi cup 13 ounces 40 grams
unsweetened cocoa (Dutch-processed' or ‘4 cup nonalkalizcd cocoa such as Hershey’s 3 tablespoons 0,75 ounce IS grams
sugar 3 tablespoons 1.25 ounces 38 grams
salr pinch • •
clarified bullet * . I tablespoon 0.5 ounce 12 grams
* If rou do not hr»t clanged buner on hand, you will need tn dnrily 2 мЫс*унижл
|1 ounce.1?) grams• unwind buctrr. 1л a heavy Mucepin melt the butter <nrr medium
heat, purtiillf covered co prevent spbttcring. When the butter looks clear, cock un-
crwrrd, watching carefully until the «did» drop .ind К-р<» tt Ьгоши. Hout immedb
Atch through i Hr* «trainer •* а strainer lined with cheeiecloth
116 SIMPLY DELICIOUS FOOLPROOF CAKES
INGREDIENTS MEASURE WEIGHT
геюга rempcrirure *1а1мггг<- омосеч gram»
ORANGE-APRJCOT SAUCE
grated orange zest 2 teaspoons • 4 grams
orange juice, freshly squeezed Уз liquid cup 4.25 ounce» 121 grams
unsoltcd butter 2 tablespoons 1 nance 28 grams
apneut lekvar or preserve* FOR FLAMBEING Уз cup • •
powdered sugar 2 tablespoon'. 0.5 ounce 13 grams
Barack Palinka or apricot brandy V» cup 2 ounces 56 grams
TO MAKE BATTER
The easiest and fastest way to mix the batter is in a blender.
Place the ingredients in the order given into a blender and
blend at high speed for 10 seconds.
Heat the crepe pan on medium beat until hoc enough
to sizzle a drop of water. Brush lightly with clarified butter
and pour a scant 2 tablespoons batter (1 tablesp<M>n if us-
ing a 4-inch pan) in the center. Immediately tilt the pan to
the left and then down and around to the right so that the
batter moves in a counter clockwise direction, covering the
entire pan.
Cook until the top starts to dull and the edges begin
to brown, about 15 to 20 seconds. I like to use a small
metal spatula to lift the upper edge and check to see if the
crepe is golden brown. Then, grasping the edge of the crepe
with my fingers, I flip it over and cook for 10 seconds, or
just until lightly browned. Do not use too high a heat as
chocolate crepes are more prone to burning. Invert the pan
over the counter and the crepe will release.
It is fine to place 1 crepe on top of another if serving
the same day. If refrigerating or freezing the crepes, how-
ever, separate them with pieces of wax paper or they may
Stick to each other. Makes fourteen 6-inch crepes or twenty-
four 4-inch crepes.
TO MAKE ORANGE-APRICOT SAUCE
In a bowl stir together the orange zest, juice, buner, and
preserves until smooth.
One 6-inch or 4-inch cr^pc
pan.
STORE:
2 days refrigerated, 3
months frozen.
BREAKFAST CAKES 117
SPONGE-TYPE
CAKES
то serve: Lay сгёре with its most attractive vide down and
spread very lightly with the orange-apricot butter. Fold in
half and spread with more hurter. Fold inro triangles by
folding tn half or thirds. (To fold in thirds» the center of
the flat edge wdl become the point of the triangle. Fold
each side down so that they meet in the center, spread with
a little more orange-apricot butter, and fold in half.) Use
Vi tablespoon orange-apricot butter for each crepe.
Place the remaining orange-apricot butter in a large,
attractive cr^pe or sauW pan and heat until melted and
bubbling. Place the crepes tn the pan. Heat for l’/t minutes,
spooning the orange-apricot sauce over the crepes. Remove
from the heat and sprinkle with the powdered sugar.
Place the hqueur in a large ladle or saucepan with a
long handle. Heat until very hot and starring to flame. If
necessary tilt the ladle slightly so that the gas burner flame
w ill ignite it or use a very long match. Pour over the crepes
and allow to flame until it goes out.
note: The butter-spread, folded crapes and remaining
orange-apricot buner can be frozen for 3 months.
Sponge-type (also known as foaml cakes, depend on a Urge amount
of beaten egg tor their light, airy texture. These are the cakes to
consider it you arc trying to cut cholesterol, as most do not use
butter and the angel food cake uses no egg yolks, making it cho-
lesterol free.
Some ot these cakes, such as sponge cake and chiffon cake,
are moist enough to be eaten without a soaking syrup and there-
fore maintain their springy, lighter-than-air quality. The texture
and flavors are so delightful chat these cakes arc usually eaten
without frosting.
Other sponge-type cake», such as classic gttaow and Biscuit
de Savoie, would seem dry and even rubbery without a soaking
syrup and rather plain without whipped cream or buttercream,
laqueur-flavored syrup transforms the resilient quality of g&tatae
or initial into a delightfully tender and soft crumb.
Genoise is a European sponge-type cake which differs from
American sponge in that it contains buner to partially tenderize
and flavor it and much less sugar. Even when syrup has been
added to genotse, it is still less sweet than sponge cake, though a
lo< more moist. With a judicious amount of syrup, genoise is moist
without being wet. Europeans, however, tend to favor a greater
amount of syrup than do Americans. This is a question of per
sonal preference.
Biscuit de Savoie is also a European sponge-type cake which,
IIS SIMPLY DELICIOUS FOOLPROOF CAKES
like American sponge, contains no butter or oil but a lot more
egg, making it lighter, drier, and tougher until well soaked with
syrup. Because it contains no added fat, it is lighter and can ah*
sorb more syrup than a genoise without losing its delicate texture.
This makes it an especially refreshing cake.
For a detailed explanation of sponge-type cakes and a chart
comparing the percentage of components in all cakes, see page
470.
NOTE: It is best not to double most recipes in this chapter as stan-
dard mixing bowls are too small to accommodate their volume.
For fuller details see the suggested page number.
• Use cake flour that does not contain leavening {page 476). {Do
not use self-rising cake flour.)
• Use superfine sugar for finest texture (page 476).
• Measure or weigh ingredients carefully [page 438).
• Heat eggs lor allow to warm) to temperature indicated in recipe.
• If a recipe indicates heating the egg-'sugar mixture and you arc
using a hand held mixer, beat the mixture over hot water until
thickened. Then remove and continue beating until cool.
• When beating egg whites, use cream of tartar or beat just until
stiff peaks form when the beater is raised slowly
♦ Work quickly once the eggs are beaten so that they do not dc«
flatr.
• Fold flour gently hut thoroughly into the batter.
* Bake immediately after mixing.
• Use the correct pan size (page 20).
• For very* even layers and maximum height use Magi-Cake Strips
[pages 20 and 456).
• Check lor accurate oven temperature (page 448).
• Use correct baking time; do not underbake {page 21 J.
• Wiap cake la vers well or glaze and frost them when cool (page
23).
HIGHLIGHTS
FOR SUCCESSFUL
GENOISE,
BISCLMT, AND
SPONGE
CAKES
SPONGE-TYPE CAKES 119
Udnoisc
Classiquc
(JenWAHZ CfJwF-EKI
SERVES 8
ч>/ X gfyioise that is gossamer and perfectly moistened and
perfumed with syrup is pure poetry, ’he flavor and texture
come to life only with the right amount of syrup. Too lirtk
will make the cake seem dry and tasteless; too much causes
it to become heavy and sodden. I find the perfect amount
of syrup to be 3 to 4 tablespoons for every egg used in the
batter. H the cake is several days old and on the dry side, I
add the extra tablespoon.
This genoise is rhe best I have ever experienced. It is
very light yet perfectly fine-grained. 1Ъе beurre noisette
makes it seem rich without having to add so much butter
that the texture loses its airy quality.
Since this recipe first appeared in print in 1981, 1 have
nxvived more calls about it from readers than for any other
recipe. Many say that for the first time in their lives they
have succeeded in making a perfect gen vise.
INGREDIENTS MEASURE WEIGHT
roum (cnipeiJiurc clarified bciwre naiitttc * vo/uine 3 tablespoons ounces 1.25 ounces grams 37 grams
. •.c ilU 1 teaspoon ♦ 4 grams
4 large eggs 6 fuB Huid ounces 7 ounces 200 pram % (weighed without shed»)
sugar Vi cup 3 J ounces 100 grams
sifted cake flour Vi cup 1.75 ounce» 50 grams
cornstarch. lightly spooned ¥4 CUP SYRUP (7 OUNCES'200 GRAMS) •6 cup - 1 tablespoon 1.75 ounces 50 grams
sugar ‘4 cup + 1 Vi ccaspuom 2 ounces 56 grams
water Vi hqutd cup 4 ounces 118 grams
liqueur of your choke 2 ГаЫеярсют 1 OIHKC 28 grams
* If ут»я <ki not have clarified bwr-
rer co bind, you u-’l ro-J tu liunh.
4 uNespiHMis (2ouncu/57granw
untalhKi butter, in л heavy 1—ce
pan melt the butter c*»rr ocduen
hrui, purtuilr covered tn prevent
tpljtrtnr^t when the batter looks
dear, cook uncovered, watching
utrrlully utiul the Hihiis drop and
chnxigh a fine strainer or □ strainer
lined with chrrvednth.
Preheat the oven to 350°F.
Warm the brurre noisette until almost hot (110'F, to
IICFF.). Add the vanilla and keep warm.
In a large mixing bowl set over a pan of simmering
water heat the eggs and sugar until just lukewarm, stirring
constantly to prevent curdling. (The eggs may also be heated
120 SIMPLY DELICIOUS FOOLPROOF CAKES
by placing them still m their shells in a large mixing bowl
tn an oven with a pilot light for 3 hours or up to overnight.
The weight of the unshelled eggs should be 8 ounces.) Us-
ing the whisk beater, beat the mixture on high speed for 5
minutes or until triple in volume. (A hand beater may be
used but it will be necessary to beat for at least 10 min-
utes.)
While the eggs are beating, sift together the flour and
cornstarch.
Remove 1 scant cup of the egg mixture and thor-
oughly whisk it into the beurre noisette.
Sift ‘/a the Hour mixture over the remaining egg mix-
ture and fold it in gently but rapidly with a large balloon
whisk, slotted skimmer, or rubber spatula until almost all
the flour has disappeared. Repeat with rhe remaining floor
mixture until the fluur has disappeared completely. Fold in
the butter mixture until just incorporated.
Pour immediately into the prepared pan (it will be about
У» full} and bake 25 to 35 minutes or unnl the cake is
golden brown and starts to shrink slightly from the sides
of the pan. (No need for a cake tester. Once the sides shrink
the cake is done.} Avoid opening rhe oven door before the
minimum time or die cake could fall. Test toward the end
of baking by opening the door slightly and, if at a quick
glance it does not appear done, dose door at once and check
again in 3 minutes.
Loosen the sides of the cake with a small metal spatula
and unmold at once unto a lightly greased rack. Rennert
to cool. Tnm the bottom and top crust when ready to com-
plete the cake and sprinkle the syrup evenly on both sides
(page 357).*
TO MAKE SYRUP
In a small saucepan with a tight-tiering lid bring the sugar
and water to a rolling boil, stirring constantly. Cover im-
mediately, remove from the heat, and allow to cool com-
pletely. Transfer ro a liquid measuring cup and stir m the
liqueur. If the syrup has slightly evaporated, add enough
water to equal Уч cup syrup.
UNDERSTANDING
It is fascinating to compare genoise to bask buner cake.
For the same size cake, the gemiue uses double the egg,
•Aller being sprinkled wuh syrup. ttnutu betonir* ftiglle uui move prone
to tphrnrig “bai Moved. Ike a cardboard round nr а гелю» able pan becrom
tor kupport.
One 9-inch by 2-incfa pan or
9-mch sprmgform pan or 9-
inch by 2-inch heart-shaped
pan or Я-inch by 2-inch
square pan, greased, bottom
lined with parchment, and
then greased again and
floured.
AhltSHED HEIGHT:
After trimming bottom and
tup crusts: 1% inches.
STORE:
Syrup: 1 month refrigerated
in an airtight container.
Genoise.' Without syrup, 2
days room temperature, 5
days refrigerated, 2 months
frozen. After adding the
syrup the flavors npen and
the moisture is more evenly
distributed 1 day later. The
completed cake can be re-
frigerated up to $ days and
frozen up to 2 months.
COMPLEMENTARY
ADORNMENTS:
One recipe: Any butter-
cream, whipped cream,
glaze, or fondant.
SERVE
Room temperature or lightly
chilled.
POINTERS FOR SUCCESS:
See page ! 19. A large bal-
loon whsk or a slotted
skimmer i« ideal for folding
in the flour with the least
amount of air loss. If using
the whnk, periodically
shake out the batter which
caDects on the inside.
SPQNGK-TYPb CAKES 121
half the sugar» flour/cornstarch. and butter, and no chemi-
cal leavening or added liquid. This explains why the gen-
oise is "lighter than air!” With the addition of syrup,
however, the sugar level is almost as high as in the butter
cake.
I once spent an entire week playing with genoise vari-
ations, proportions, and techniques. I discovered by acci-
dentally burning the butter that brown butter (brurre
noisette) transforms the flavor of a genoise, adding richness
and dimension. (This was published in Cook's magazine,
May/June 1981.) Butter is warmed before folding into rhe
batter so that it stay's liquid and does not weigh down the
batter.
Replacing some of the flour with cornstarch (a Euro-
pean technique) tightens the grain and holds rhe moisture
supplied by the eggs and sugar. Although using pan cake
flour produces the best texture, other flours will work, even
flours that arc all starch such as potato flour (although the
higher rhe starch content, the low-er the genoise). 1 have
demonstrated this cake in England, France, and even Japan
with "nanvc" flours and always with success.
VARIATION
GENOISE RICHE (JenWAHZ Reesh): For a more buttery gen-
oise that is denser and moister, use VS cup (2.5 ounces<71
grams) beurre noisette. This will require only half
the syrup for moisture and flavor so it will be richer but
less sweet!
Thu cake и used to make A Taste of Heaven (page 166),
Star-Spangled Rhapsody (page 169), and Chocolate Chip
Charlotte (page 179).
Chestnut
Gdnoisc
SERVES 8
x—z hestnut flour has almost the same starch content as
cornstarch, so it occurred to me one day to try substituting
it for the cornstarch portion of a genoise. The result was
exciting: The incredible lightness of gtnoise remained, aug-
mented by the mild spiciness of chestnut. This particular
genoise tastes exquisite with rum syrup and filled and frosted
with Chestnut Whipped Cream. 1 call the finished cake La
Chataignc (lah shaTAINl, a lovdy French word for '‘chest-
nut?’ This cake makes an elegant and unusual Thanksgiv.
mg dessert.
122 SIMPLY DELICIOUS FOOLPROOF CAKES
INGREDIENTS MEASURE WEIGHT
roam гетреглгиге clarified bcum mwsrtte* wsluriie % cop ounces 1.75 ounces grains 50 grams
vanilla 1 Vi teaspoons • 6 grams
6 large eggs 10 Kant fluid ounces (scant IV* liquid cups! 10.5 ounces 300 grams (weighed without shrlk)
sugar ¥4 cup 5.25 ounces 150 grams
sifted cake flour ¥» cup 2.63 ounces} 75 grams
silted chestnut Hour 1 CUP + 2 TABLE SPOONS RUM SYRUP (10.5 OUNCES/300 GRAMS»: Vi cup 2.63 ounces) 75 grams
sugar ¥♦ cup + 3 tab les poors 3 ounces 88 grams
water ¥« liquid cup 6 ounces 177 grams
dark rum 3 tabkbpuons 1.5 ounces 44) grains
* И гои do not have tbrAcd frrwrrr vruffttf cm hand, you will need o> clarify
5 Vi able spoons (2.75 ошк«~8 «yarnsI amahed butter, bi a heavy saucepan
meh the butter о» er medrum heat, pxrttUb covered to prcteui hptatten^.
When the butter look* dear, люк waKOvercd, watching carefully until the
solids drnp and hrjyn to brown, When they become deep brown, pour im-
medutely through J tine strainer or a strainer uned with cheesedoth.
t И you don't have a* electronic scale, doo4 worry about getn^g the ounces
for the cake ftaur and chestnut lluur exact аз. as their combined total в.
S.2S ounces.
Preheat the oi'en to 35 (PF.
Warm rhe beurre noisette until almost hot (110eE. to
120*F,). Add the vanilla and keep warm.
In a laqge mixing bowl set over a pan of simmering
water heat the eggs and sugar until just lukewarm, stirring
constantly to pres ent curdling. (The eggs may also be heated
by placing them still in their shells in a large mixing bowl
in an oven with a pilot light for 3 hours or up to overnight.
The weight of the unshellcd eggs should be 12 ounces.) Us-
ing the whisk beater, beat the mixture on high speed for 5
minutes or until triple in volume. (A hand beater may be
used but it will be necessary to bear for at least 10 min-
utes.)
While the eggs are beating, sift together the flours.
Two 9-inch by I'.'i-inch
pans, greased, bottoms lined
with parchment. and then
greased again and floured.
FINISHED HEIGHT:
After trimming the bottom
and top crusts each layer is
1 inch.
STORE:
Syrup: 1 month refrigerated
tn airtight container. G6
noise; Without syiup, 2
days at room temperature, 5
days refrigerated, 2 months
SPONGE-TYPE CAKES 1X5
frozen. After adding the
syrup (be flavors ripen and
rhe’ moisture is more evenly
dinributed 1 day later. The
completed cake can be re-
frigerated up to 5 days and
frozen up to 2 months.
COMPLEMENTARY
ADORNMENTS!
Chestnut Mousse Cream
I page 262).
SERVE:
Lightly chilled.
POINTERS FOR SUCCESS;
Sec page 119. A large bal-
loon whisk or a slotted
skimmer ts ideal for folding
in the flour with the least
amount of air loss. И using
rhe whisk, periodically
shake out the batter which
collects on tbe inside.
Remove 1 scant cup of tbe egg mixture and thor-
oughly whisk it into the beurre noisette.
Sift Vi the flour mixture over the remaining egg mix-
ture and fold it in gently but rapidly with a large balloon
whisk, slotted skimmer, or rubber spatula unnl almost all
the flour has disappeared. Repeat with the remaining flour
mixture until the flour has disappeared completely. Fold in
the butter mixture until just incorporated.
Pour immediately into rhe prepared pans {they will be
almost % full) and bake 25 to 30 minutes or until the cakes
are golden brown and start to shnnk slightly from the sides
of the pans. {No need for a cake tester. Once the «des shrink
the cakes are done.) Avoid opening the oven door before
the minimum time or the cakes could fall. Test toward the
end of baking by opening the door slightly and, if at a quick
glance they do not appear done, dose the door at once and
check again in 5 minutes.
Loosen the sides of the cakes with a small metal spat-
ula and unmold at once onto lightly greased racks. Rein-
vert to cool. Trim the bottom and top crusts when ready
to complete the cakes and sprinkle the syrup evenly on all
sides (page 357).*
TO MAKE SYRUP
In a small saucepan with a tight-fitting lid bring tbe sugar
and water to a rolling boil, stirring constantly. Cover im-
mediately, remove from the heat, and allow to cool com-
pletely. Transfer to a liquid measuring cup and stir in the
rum. Il the syrup has evaporated slightly, add enough water
to equal 1 cup + 2 tablespoons syrup.
This cake is used io make Chestnut Chocolate Embrace
(page 189).
• Alter lieng «prinLkd with »ynip, pww become *ra®k and mat prone to
when moved. Ute a cj rd board round or a removable pan bottom for
МфрОП.
124 SIMPLY DELICIOUS FOOLPROOF CAKES
his unique genotse has the most velvety, tender texture
and rich golden color of any cake tn this book. The batter,
by the way, also makes the loveliest of madelemts (shell-
shaped cookies).
Golden Genoise is so moist no syrup is necessary, but
a sprinkling of liqueur is a fine enhancement. The fine, dense
texture of this cake can support any buttercream, from classic
to mousseime. This is a superb party cake—a real favorite.
Golden
Gcnoisc
SERVES 12
INGREDIENTS MEASURE WEIGHT
room temperature clarified heurre noisette ' ►o/wne 3.5 fluid ounces (a scam VS cup) oueces 3 ounces grams 85 grams
vanilla 1 teaspoon 4 grams
12 large egg yolks 7 fluid ounces 7.75 ounces 223 grams
sugar ’4 cop ♦ 2 tablespoons 6 ounces 175 grams
sifted cake Hour 1 cup 3.5 ounces 100 grams
unsifted cornstarch 3 tablespoons 0,75 ounce 24 grams
watei V« liquid cup 2 ounces 60 grams
* If you do n»x has* LUnAed Ь*мгн notsertf on hand, you will need to ebritr
9 tabkspocm \4.5 пгпитО2К gnnw) untalted buner. In a heavy saucepan
meh die buner o»cr medium heat, pirtuUy ny»mxJ to preveue splanenng.
Wbrn the butter dear, cook uncovered, waidii^g carefully w»til the
solid? drop xnd h«->yn tn bnn»a. When they become deep brown, pour im-
mediately thn>jfth 1 Hne sminrr w a xrtaner lined witii cheesedoth.
Preheat the oven to 35(PF.
Warm the beurre noisette until almost hot I110T. to
12(УТ.). Add the vanilla and keep warm.
In a large mixing bowl set over a pan of simmering
water heat the yolks and sugar until almost hot to che touch,
stirring constantly to prevent curdling. Using a whisk bearer,
beat (he mixture on high speed for 5 minutes or until triple
in volume. (A hand beater may be used but it will be nec*
essary to beat for at least 10 minutes.)
While the eggs are beating, sift together the flour and
cornstarch. Decrease the speed and beat in the water. Sift
¥2 the flour mixture over the egg mixture and fold it in
gently but rapidly with a large balloon whisk, slotted skim-
mer, or rubber spatula until almost all the flour has disap-
One 9-inch by 2-inch heart-
shaped pan or a 9-inch
springform pan, greased,
bottom lined with parch-
ment, and then greased
again and Houred. Or a 9-
cup Kugelhopf pan. greased
and floured.
FINISHED HEIGHT;
2 inches including crust. Ku-
gclhopf is 3 inches.
SPONGE TYPE CAKES 125
STORE:
2 days room temperature, 5
days refrigerated, 1 nivoihs
frozen.
COMPLEMENTARY
ADORNMENTS:
The texture of thri елке is
firm enough to support any
nonchocolate buttercream
(chocolate would overwhelm
the flavor; hut interesting
enough to stand up beauti-
fully under just a light sprin-
kling of powdered sugar.
Suggested buttercreams:
One recipe; Any fruit-fla-
vored buttercream such as
Apricot Buttercream (page
233 or 243) or Orange
Blossom Bunercream {page
234) or Praline Bunercream
(page 239 or 249).
SERVE
Room temperature.
POINTERS FOR SUCCESS:
See page 119. A large bal-
loon whiik or a cloned
skimmer is ideal for folding
in the flour with (he least
amount of air loss. If using
the whisk» periodically
shake out the batter which
collects on the inside.
peared. Repeat with rhe remaining flour mixture until the
flour has disappeared completely. Fold in the beurre no-
isette in 2 batches until just incorporated.
Pour immediately into the prepared pan (no more than
V* full) and bake 30 to 40 minutes or until the cake is
golden brown and springs back when pressed lightly in the
center.
(In the Kugelhopf pan the cake should start to shrink
slightly from the sides. In the heart-shaped pan it will rise
about Vi inch above the top dunng baking and will start
to sink slightly when done. No need for a cake tester. Once
the sides shrink the cake is done.) Avoid opening the oven
door before the minimum time or the cake could tall. Test
towards the end of baking by opening the door slightly and,
if at a quick glance it does not appear done, close the door
at once and check again tn 5 minutes.
Unmold at once onto a lightly greased rack. Reinvrrt
to cool. If sprinkling with liqueur, trim the top and bottom
crusts to prevent pastiness. The cake may be split horizon-
tally to make 2 layers. 1 love the texture of this cake so
much I prefer 1 uninterrupted layer with frosting on
the top.
UNDERSTANDING
In contrast to classic Genoise, this reape uses all yolks in-
stead of whole eggs, more butter, and lew flour. A small
amount of water is added because the yolks alone make
such a thick batter.
This cake is used to make Golden Cage (page 172).
126 SIMPLY DELICIOUS FOOLPROOF CAKES
his is another unusual genoise with less cholesterol than
the classic formula. It is a cross between an angel food cake
and a genoise: less airy than the angel food but buttery and
more tender. Syrup makes the cake’s texture pasty, so for
flavor orange zest is added to the batter instead. For a de-
lightful orange blossom flavor, replace 1 tablespoon of the
water with orange flower water. Any fruit-flavored butter-
cream, especially orange, is a fine complement.
Wnne
Genoise
SERVES
I О T О I 2
INGREDIENTS MEASURE WEIGHT
mom гетре/ягиге clarified beurre покегге * vo/unre J hill fluid ounces (6.5 tablespoons. ounces 2.75 ounces grams 80 grams
samlla 116 teaspoons • 6 grams
grated orange zest 2 tablespoons 0.5 ounce 12 grams
cake flour 1 56 cups llighdy spooned into cup) 6 ounces 170 grams
cornstarch 56 cup minus 2 teaspoons i lightly spooned into cup) 5 ounces 85 grams
9 large egg white* 9 fluid ounce* (I liquid cup 4- 2 tablespoons) 9.5 ounces 270 grams
*ugar 1 •/• cups 9 ounces 255 grams
water ¥« liquid cup 6.25 ounces 177 grams
oprronaJ. (. лиntreau 1 Vi cup 4.25 ounces 122 grams
• It you do ом ha»e clarified beurre noiseffr an hand. you wiO need m ebniy
9 иЫемроагь {4.S ounce*' 12S grams! umalced butter, In a heavy aucapia
melt the butter over medium кем, partially covered to pcrrciic splattering
When the butter Imth* clear, iudi uncovered. watching carefully until the
solids drop and hqpn to hraun. When they become deep brown, pour im-
mediately through a fine «trainer ur a strainer lined with Jicdecioch.
Preheat the oven to 35CPF.
Warm the beurre noisette until almost hot (11(X*F to
120*F.). Add the vanilla and orange zest and keep warm.
Sift together the flour and cornstarch.
In a large mixing bowl bear the egg whites until soft
peaks form when the heater ts raised. Gradually beat in rhe
Two 9-inch by IVa-iach
pans, greased, bottoms lined
with parchment, and then
greased again and floured.
SPONGE-TYPE CAKES 127
FINISHED HEIGHT
After trimming the bottom
and top cructt <uch layer ia
l¥a inches.
STORE:
1 day room temperature, 3
dap refrigerated. 1 mon th $
froxen.
COMPLEMENTARY
ADORNMENTS
One recipe; Change, Lemon,
or Raspberry Buttervream
(pages 233 to 234). Any fla-
vored whipped cream, espe-
cially Chocolate ('hip (page
25R). Rolled Fondant Ipage
nr.
SERVE:
Room temperature.
POINTERS FOR SUCCESS
See page 119. A Urge bal-
loon whisk or slotted skim-
mer is ideal for folding in
the flour with the least
amount of air loss. If using
the whisk, periodically
shake out the batter that
cuUcctv on the ms»de.
sugar, beating justt until stiff peaks form when rhe beater is
raised slowly. Gradually beat in the water until incorpo-
rated. Remove 1 scant cup of the mixture and thoroughly
whisk it into the butter.
Sift Vi the flour mixture over the remaining egg mix-
ture and fold it in gently but rapidly with a large balloon
whisk, slotted skimmer, or rubber spatula until the flour
has disappeared. Repeat with the remaining flour mixture.
Fold in the butter mixture until just incorporated.
Pour immediately into the prepared pans and bake 20
to 25 minutes or until the cake is golden brown and a tester
inserted in the center comes out clean. Avoid opening the
oven door before the minimum time or the cakes could fall.
Test towards the end of baking by opening the door slightly
and, if at a quick glance glance they do not appear done,
close the door at once and check again in 5 minutes.
Unmold at once onto lightly greased racks. Reinsert to
cool.
Trim bottom and top crusts when ready to complete
cake. For extra moistness and flavor, sprinkle evenly on all
sides with Cointreau (page 357).
UNDERSTANDING
The proportions of this cake are similar to classic grnoisc
(equal weight sugar and flour.'cornstarch: one quarter their
combined weight in butter, before it has been clarified) but
live yolks are replaced by water. The water enables the whites
to stretch and expand in the oven resulting m a fine-tex-
tured, tender cake.
This cake is used to make White Lily Cake (page 203).
128 SIMPLY DELICIOUS FOOLPROOF CAKES
genoise variation is as light and airy as a classic
genoise but with the magic seduction of rich chocolate fla-
vor! A syrup maintains a moist, tender quality. Be sure to
flavor the syrup with a complementary liqueur. Coffee, ha-
zelnut, raspberry, and orange are all delicious with choco-
late. An airy frosting (flavored to correspond with the syrup)
such as a Fruit Cloud Cream (page 264) or Fruit Mousse-
line (page 245) adds just the right touch.
This elegant cake is light enough to serve at rhe end of
an elaborate dinner party. Conveniently, it benefits from
advance preparation.
Genoise
au Chocolat
enW A HZ ам-ChocoLA)
SERVES 8
INGREDIENTS MEASURE WEIGHT
nxxn гстргглгмгс vnJtwne ounces «ГЛ1Ш
clanhed beam noisenc* 3 tablespoons 1.25 ounces 37 grams
unsweetened cocoa i Dutch-processed] or •/< cup 4-2 tablespoons nonafkalized cocoa such as Hershey’s VS cup (lightly spooned into cap) I ounce 28 grams
boding water У« liquid cup 2 ounces 60 grants
it vjuulla 1 teaspoon a 4 grams
5 large eggs 1 liquid cup 8.75 ounces 250 grams
1 weighed without shells)
sugar Vi cup 3.5 ounces 100 grams
sifted cake flour ¥< CUP SYRUP (7 OUNCES.200 GRAMS): ¥4 cup 2.5 ounces 75 grams
sugar %cup*l!6 teaspoons 2 ounces 56 grams
water Vj liquid cup 4 ounces 118 grams
liqueur of your choice 2 tablespoons ! ounce 28 grams
* I- you du noc h*»e darificd frtwmr oouttre ни Kind. kou will need to clarrty
a wblr»p.x»n? fl iMiAcesj'i’ grams.) insulted butter. In л hrair uuctpin melt
the burtcr over mexfcum heut, purtulb covered to percent splatter u
tbe butter looks clear, cook uncovered, watching cjTchjIly until the wihds
dnx» and bepn to bcowr- When tHty bccuttvc deep brown. poor immcdixtrlv
through л hnc хгилег or a strainer lined with ifuvwvkiTh.
SPONGE-TYPE CAKES 129
One 9-inch by 2-tnch pan,
9-mch ipnngforwi рал, or я
9-inch by 2-inch heart*
shaped pan, greased, bottom
lined with parchment or
wax paper, and then greased
again and floored.
FINISHED HEIGHT:
After trimming the bottom
and top crusts: 1’4 inches.
STORE:
Syrup: 1 month refrigerated
in an airtight container,
Genoese; Without syrup, 2
days at room temperature, 5
days refrigerated, 2 months
frozen. After adding the
syrup the flavors ripen and
the moisture is more evenly
distributed 1 day later. The
completed cake can be re*
fngerated up to 5 days and
frozen up to 2 months.
COMPLEMENTARY
ADORNMENTS:
One recipe: Any glaze, fon-
dant, buttercream, or
whipped cream—especially
coffee, praline, chestnut, or-
ange, apricot, and raspberry.
SERVE:
Room temperature or lightly
chilkd.
Preheat the oiwr to 35 (TP.
Warm the Ьсмлт noisette until almost hot (110eF. to
120°F.} and keep warm.
In a small bowl whisk together the cocoa and boiling
water until the cocoa is completely dissolved. Stir in the
vanilla and sec aside, leaving whisk in bowl and cover with
plastic wrap.
In a large mixing bowl set over a pan of simmering
water heat the eggs and sugar until just lukewarm, stirring
constantly to prevent curdling. {The eggs may also be heated
by placing them still m thevr shells in a large bowl in an
oven with a pilot light for at least 3 hours. The weight of
the unshelled eggs should be 10 ounces.) Using the whisk
beater, beat the mixture on high speed for 5 minutes or
until triple in volume. {A hand beater may be used but it
will be necessary to beat for at least 10 minutes.)
Remove 2 cups of the egg mixture and whisk it into
the cocoa mixture until smooth.
Sift the flour over the remaining egg mixture and fold
it in gently but rapidly with a slotted skimmer or large rub-
ber spatula until the flour has disappeared. Fold in the co-
coa mixture until almost incorporated. Fold in the beurre
noisette tn 2 batches with a large whisk or rubber spatula
until just incorporated.*
Pour immediately into the prepared pan (it will be about
14 full) and bake 30 to 35 minutes or until the cake starts
to shrmk from the sides of the pan. [No need for a cake
tester. Once the sides shrink the cake is done.) Avoid open-
ing the oven door before the minimum time or the cake
could fall. Test toward the end of baking by opening the
oven door slightly and. if at a quick glance it does not ap-
pear done, close door at once and check again in 5 min-
utes.
Loosen the sides of the cake with a small metal spatula
and umnold at once onto a lightly greased rack. Reinsert
to cool. The firm upper crust prevents falling. Trim the bot-
tom and top crusts when ready to complete the cake and
sprinkle the syrup evenly on both sides (page 35 7).f
TO MAKE SYRUP
In a small saucepan with a tight-fitting lid bnng the sugar
and water to a rolling boil, stirring constantly. Cover im-
* LWng your lingers в actual!-? the bew wwy to feel for lamp* of Hour. Div
mjIvc them by pressing them between thumb and fore^.n^cr.
f After being «prmUed with rytup, becomes frapk aad more prone
to splitting when mowed. Uw a cardboard round or a rrmmsbk jun butiixn
lor support.
130 SIMPLY DELICIOUS FOOLPROOF CAKES
mediately, remove from the heat, and allow to cod com-
pletely. Transfer to a liquid measuring cup and stir in the
liqueur. If the syrup has evaporated slightly, add enough
water to equal ¥« cup syrup.
UNDERSTANDING
1 have never before liked chocolate gdnub* as much as clas-
sic genoise because I fed a mere shadow of chocolate is nor
enough to justify the loss of delicate texture. The problem
is that cocoa is very difficult tu incorporate into an egg
mixture as it tends to lump and drop to the bottom. Also,
it docs not release its full flavor unless it has been dissolved
in water before being added to the batter (page 474). Al-
though water is not conventionally used in genow, to solve
these problems I combined the cocoa with rust enough water
to dissolve it and softened the resulting “cream'’ by whisk-
ing in 2 cups of the beaten egg sugar mixture before folding
it into the remainder. An extra egg has been added to make
up for deflating some of the batter with the cocoa. For fur-
ther lightness, the cornstarch has been eliminated. The co-
cnaflour mixture is equal in weight to the comstarch-'flour
mixture of classic genoise.
This cake is used to make Strawberry Манд (page 184b
VARIATION
NUT-FLAVORED CHOCOLATE GENOISE: This interesting
variation substitutes nut oil for the butter, giving it nut fla-
vor without affecting the lovely, light texture of the gen-
oise. It also lowers the cholesterol content. The nut motif
can be enhanced by using Frangehco as the liqueur in the
syrup.
To make Nut-Flavored Chocolate Genoise Substitute 3 ta-
blespoons (40 grams'1.5 ounces) walnut or hazelnut oil for
the butter. There is no need to warm the oil as it remains
liquid at room temperature and does not harden when added
to the batter.
NOTES: The ideal amount of syrup to use for the finished
genoise is equal in volume tu the flour.
The upper crust of a chocolate genoise is usually easy
to remove in one piece. It has a wonderful texture and very
chocolaty flavor so I usually spread it with a layer of lighdy
sweetened whipped cream, roll and slice it. and serve the
slices as petit* foots.
POINTERS FOR SUCCESS:
Sec роде 119. The cocoa
mixture must be thoroughly
mixed into the batter to
keep from dropping IO the
bottom. The cake must start
shrinking from the sides of
the pan before removal from
the oven or it will fall
slightly o«i cooling.
SPONGE-TYPE CAKES 151
Hoist
Chocolate
Cidnoisc
SERVES 10
Toil
x-^his cake has the light texture of a gJttoise but is more
velvet}’ and moist. An equivalent amount of chocolate is
used instead of cocoa, but a special technique is employed
to intensify the flavor. Before being added to the batter, the
chocolate is cooked with water which releases its flavor \pagc
474). This enables you to have a genoise the flavor of your
favorite bittersweet chocolate bar!
WEIGHT
MEASURE
INGREDIENTS
пмып temper j rare bittersweet chocolate voJumc ♦ ounces 8 ounces grams 227 grams
1мл Li ng water 1 liquid cup 8.25 ounce* 236 grams
8 large eggs IM: liquid cup* 14 ounces 400 grams (weighed wrthcHJi shell»;
sugar I cup 7 ounces 24Ю grams
sifted cake flour 1 CU₽ + 2 TABLE- SPOONS SYRUP (105 ounces.'300 grams) 1Уг cup» 5.25 ounces 150 grams
sugar cup + 3 tablespoons 3 ounces 88 grams
water Уч liquid cup 6 ounces 182 grams
liqueur of your choice 3 tablespoon* 1.5 ounces 40 grams
Two 9-inch by 2-inch cake
pans or 9-inch spnngforrn
pans, greased, bottoms hned
with parchment, and then
greased again and floured.
Preheat the oven to 35 (TP.
In a heavy saucepan bnng the chocolate and water to
a boil over low heat, stirring constancy. Simmer, stirring,
for 5 minutes or until the chocolate thickens to a pudding-
like consistency. (It will fall from the spoon and pool slightly
before disappearing.) Cool completely.
In a large mixing bowl, beat the eggs and sugar with
the whisk beater on high speed for 5 minutes or until tnple
in volume. (A hand beater may be used but it will be nec-
essary to beat for at least 1U minutes.)
Sift VS the flour over the egg mixture and fold it in
gently but rapidly with a slotted skimmer or large rubber
spatula until some of the flour has disappeared. Repeat with
B2 SIMPLY DELICIOUS FOOLPROOF CAKES
the remaining flour until all flour has disappeared. Fold in
the chocolate mixture until incorporated.
Pour immediately into the prepared pans (they will be
about Vi full) and bake 30 to 35 minutes or until a tester
inserted in the centers enters as easily as it does when in-
serted closer to the sides. The cakes rise to the tops of the
pans during baking and will lower slightly when done,
pulling slightly away from the sides. Avosd opening the oven
door before the minimum time or the cakes could tall.
Loosen the sides of the cakes with a small metal spat-
ula and unmold at once onto lightly greased racks. Rem-
vert to cool. The firm upper crusts prevent falling. Trim the
bottom and top crusts when ready to complete the cake
and sprinkle syrup evenly on all sides.*
TO MAKE SYRUP
In a small saucepan with a right-fitting lid bring the sugar
and water to a rolling boil, stirring constantly. Cover im-
mediately, remove from the beat and allow to cool com-
pletely. Transfer co a liquid measuring cup and stir in rhe
liqueur. If che syrup has evaporated slightly, add enough
water to equal 1 cup plus 2 tablespoons syrup.
UNDERSTANDING
The ratio of ingredients in this cake is similar to Genoise
au Choco’at. The Moist Chocolate Genoise has the same
amount of sugar and flour as die same size Genoise Au
Chocolat (the 4 ounces of sugar provided by the bitter-
sweet chocolate are exactly equal to the 4 ounces of sugar
provided by the syrup used for two layers of the Genoise
au Chocolat). Moist Chocolate Genoise, however, contains
a little less egg, more than double the water, and, instead
of butter, 2.5 ounces of cocoa butter contained by the
chocolate. All of these variables are responsible for making
this cake’s texture more moist and dense than classic Gen-
oisc au Chocolat. Because this cake is not as light and airy,
two layers are necessary for sufficient height Since the
chocolate contains vanilla, no extra vanilla is added.
This cake и юег/ to make Swiss Black Forest Cake [page
190) and Triple Chocolate Cake (page 201).
FINISHED HEIGHT:
After trimming the bottom
and tnp crusts each Layer is
IVa inches.
STORE
Synip: 1 month refrigerated
in an airtight container.
Gcnohc without syrup: 2
days room temperatun:, 5
days refrigerated, 2 months
frozen. After adding the
syrup rhe flavors ripen and
the moisture is mure evenly
distributed ] day later. The
completed cake can be re-
frigerated up to 5 days and
frozen up to 2 months.
COMPLEMENTARY
ADORNMENTS’
A light sprinkling of liqueur.
Any ganache (pages 267 to
278), This cake is nut too
sweet so it is perfect as a
base for some of the sweeter
decorative toppings such as
Chocolate Praline I eaves
Ipage 386). It also makes an
excellent base (or the Swiss
Black Forest Cake Ipage
!90>.
SERVE:
Room temperature or lightly
chilled.
POINTERS FOR SUCCESS
See page 119.
* After Ix'inc sprinkled with syrup, а Ьспитхч fragile and more prone
to splitting uben moved. Use a uirdhuard round or rrmnvjb'c bettnen of a
pan to support if
SPONGE.TYPE CAKES 133
Dittcrswcct
Cocoa Almond
(knoisc
чУ1к perfect cake for the cocoa lover, this recipe was
inspired by Maida Heatter’s glorious Queen Mother’s Cake,
which has become a classic. It is so chocdaty and moist
without being tweet that I like to serve it unfrosted without
even a sprinkling of powdered sugar. But if you insist on
gilding the lily. the ideal way co do it is with lightly sweet*
ened whipped cream {page 253) on the side.
It is nor necessary to grease and flour the sides of the
cake pan (making it a totally flourkss cake, ideal for Pass-
over, but omit the cream of tartar) because it is easy to
dislodge the cake using a small metal spatula.
SERVES 8
INGREDIENTS MEASURE WEIGHT
пют temperature unsweetened cocoa ; Dutch -proccxscd) mWuwic Vj cup 4-1 tablespoon (lightly spooned into cup) MUfllrt 1.75 ounces grams 50 grams
boiling w a let scant Ц liquid cup (3.5 fhnd ounces 1 3.5 ounces 100 grams
v am Ila 1 teaspoon • 4 grams
unsalted butter Imust be softened I 16 tablcxpoons 8 ounces 227 grams
sugar 1 cup+ 2 tabkvpoom 8 ounces 227 grams
6 huge eggs, separated yolks white 3.5 fluid ounce* Vi liquid cup 4 ounces 6.2$ ounces 112 grams 1 HO grams
unblanchcd sliced almonds, coasted and finely ground scant 136 cups [ground! 6 ounces 170 grams
uh 54 teaspoon • ♦
cream of tartar V« tcaspsxin • ♦
Preheat the oven to 35 (PF.
In a small bowl snr together the cocoa and boding water
until the cocoa is dissolved and mixture is the consistency
of smooth buttercream. Stir in the vanilla and cool.
In a mixing bowl beat the butter and 1 cup sugar for
3 minutes or until light and fluffy. Add the egg yolks and
134 SIMPLY DELICIOUS FOOLPROOF CAKES
bear until incorporated, scraping down the sides. Add the
cocoa mixture and almonds and beat until blended, scrap-
ing down the sides.
In a large mixing bowl beat the egg whites and salt
until foamy. Add the cream of tartar and beat until soft
peaks form when the beater is raised. Gradually beat in the
remaining 2 tablespoons sugar, beating until stiff peaks form
when the heater is raised slowly. Stir ’/< of the whites into
the chocolate mixture to lighten it. Then gently fold in the
remaining whites with a large rubber spatula.
Pour into the prepared pan (it will be V* full in the fl-
inch pan, about ’<£ full in the 9-inch pan I and bake 70 min-
utes. After 30 minutes, cover the top loosely with foil to
prevent overbrowning. Cool the cake in the pan for 45
minutes. Run a small metal spatula around the sides of the
cake and remove the sides of the pan. Invert onto a lightly
greased rack and rcinvert to cool. The cake sinks very slightly
in the center which adds interest to its shape!
UNDERSTANDING
The formula for Chocolate Nut Genoise is almost identical
to Maida Heatter’s Queen Mother’s Cake,* with the choc-
olate replaced by Dutch-processed cocoa, which contains
less cocoa butter and no sugar. Therefore the sugar has
been increased and butter replaces the cocoa butter. A small
amount of water releases and intensifies the flavor of the
cocoa. The result is a cake with assertive flavor but lighter
texture than the original, particularly because butter is sof-
ter at room temperature and cocoa butter is firm. Cream
of tartar is used to stabilize the egg whites as the chocolate
mixture is quite heavy and tends to break them down.
One 8-inch or 9-»r»ch spnng-
form pan ungreased, bottom
lined with parchment or
wax paper, sides wrapped
with MagrCakc Strips
Images 20 and 456/. with
mis cake it is particularly
wise to u»< Map-Cake
Strip» to prevent the sides
from overbrowning during
the long baking rime.
FINISHED HEIGHT:
1VS mehes at the sides. 1'4
mches in the center.
STOKE:
3 day» room temperature. 5
days refrigerated, 2 month»
frozen.
COMPLEMENTARY
ADORNMEN TS:
A light dusting of powdered
sugar. Perfect Whipped
Cream (page 253).
SERVE:
Room temperature or very
lightly chilled.
POINTERS FOR SUCCESS
See page 119.
• Maida Meaner. ManAi Heatter'i Uoofe of Great Dessertr |Ncw York Alfred
A. Kncpl. 19741.
SPONGE TYPE CAKES 135
Fudyy
(iCnoisc Jeffrey
his unusual genoise is delicate yet mum and fudgy with
л crisp mcringuelikc crust. It was offered to me by a bril-
liant young podiatrist who turned his scientific talents to
creating a cake which uses less than half the flour of ordi-
nary chocolate geworse and no butter. Dr. Elterman prefers
to use Lindt Excellence chocolate to make this cake. (1 have
SERVES 8
no complaint!)
INGREDIENTS MEASURE WEIGHT
room rcmpcninwr bittersweet chocolate lalrunc ♦ ounces 10 ounces gram*. 284 grams
8 large eggs, separated yolks whites 4.5 fluid ounces 1 liquid cup 5.25 ounces 8.5 ounces 150 grams 240 grams
cream of tartar 1 teaspoon • 3 gram-i
sugar 1V» cups 8.75 ounces 250 gran»
sifted cake flour ¥j cup 2.25 ounces 65 grams
Two 9-mch by IMt-inck
pans, greaied. bottoms lined
with parchment or wax pa-
per, and then greased again
and floured.
FINISHED HEIGHT.
After trimming the bottom
and top crusts, each layer is
almost 1 inch.
STORE:
2 days room temperature. 5
days refrigerated. Freezing is
not recommended as the
texture becomes heavy after
thawing and the flavor al-
ters.
Preheat the oven to 35О°Е
In a double boiler set over hot (not simmenngj water,
on low heat, melt the chocolate.
In a large mixing bowl set over a pan of simmering
water hear the yolks and ’A cup sugar until almost hot to
the touch, stirring constant;у to prevent curdling. Using the
whisk beater, bear the mixture on high speed for 5 minutes
or until triple in volume. (A hand beater may be used but
it will be necessary to beat for at least 10 minutes.) Add
the chocolate and immediately beat until incorporated.
In another large mixing bowl beat the egg whites until
foamy, add the cream of tartar, and heat until soft peaks
form when the beater is raised. Gradually beat m the re-
maining 1 cup sugar, beating until stiff peaks form when
rhe beater is raised slowly.
Snr lZ« of the whites into the chocolate batter to lighten
it. Sift */i of the flour over the batter and fold it in with a
large rubber spatula gently but rapidly until partially blended.
Add *Zi of the remaining whites and fold until partially
1 blended. Repeat 2 more times, starting with the flour and
! ending with the egg whites. After the final batch of flour,
make sure all of it has disappeared before adding the whites.
lift SIMPLY DELICIOUS FOOLPROOF CAKES
Pour immediately into the prepared pans and bake for
35 minutes.
Loosen the sides with a small metal spatula and un-
mold at once onto lightly greased racks. Reinsert to cool.
UNDERSTANDING
Aside from the unusually small quantity of flour, this cake
is similar in formula to Moist Chocolate Genoise. The
chocolate, however, is not cooked in water (which would
release more flavor). Instead, an extra ounce is used to in-
tensify flavor. Also, more sugar is added to produce a choc-
olaty flavor without a hittersweet edge. As in Moist
Chocolate Gdnoise, the only fat here comes from the cocoa
butter in the chocolate.
COMPLEMENTARY
ADORNMENTS:
Cake can be served plain in
small wedges or with a dol-
lop of Perfect Whipped
Оеятп (page 253) or Light
W hipped Ganache !pagc
268) spooned on top.
SERVE:
Room temperature.
POINTERS FOR SUCCESS;
See page 119.
SPONGE-TYPE CAKES 117
Chocolate
Cloud Roll
his is more a flour less souffle (han a cake. Ic is so light
and delicate (both in texture and flavor) it has to be baked
in a low sheet pan or it will fall. I have discovered since
including it in my first cookbook {Romantic and Classic
Cakes) that severely cutting back the sugar not only inten-
sifies rhe chocolate flavor but also improves the texture and
helps to prevent cracking when the cake is rolled! Attrac-
tive as a cake roll» it also may be cut into squares, rounds,
or ovals and used as a layer cake.
Optional nuts add a subtle texture and flavor. Omit
the nuts for an uninterrupted silken smooth texture. Filled
with whipped cream and fresh bemes, this cake is the per-
fect light summer dessert for chocolate lovers.
SERVES В
INGREDIENTS MEASURE WEIGHT
room temperature ro/anu- ounce* grams
Ц cup 4- 2 tablespoons 2.75 ounces 78 grams
6 large eggs. separated yolks whites 3.5 fluid ounce* V« liquid cup 4 ounces 6.25 ounces 112 grams 180 grams
bittersweet chocolate, melted • 4 ounces 113 grams
optional: unbundled sliced dmoods, toasted and finely ground •A cup (finely grotindj 1.25 ounces 35 grams
cream of tartar % teaspoon • ♦
unsweetened cocoa 1 tablespoon 0-25 ounce 6 grams
One 17-inch by 12-snch
jelly-roll pan, greased, bot-
tom lined with a nonstick
liner or foil (extending
slightly over the sides), and
then greased again and
floured. (For Passover, it’s
fine to omit the Hour as
Position the oven rack in the lower third of the oven.
Preheat the oiwf to 3S(PF.
In a mixing bowl beat Vi cup sugar and the egg yolks
for 5 minutes or until light and fluffy. Add the chocolate,
and almonds if desired, and beat until incorporated, scrap-
ing down the sides.
In a large mixing bowl beat the egg whites until foamy,
add the cream of tartar, and beat until soft peaks form
when the beater is raised. Gradually beat in the remaining
2 tablespoons sugar, beating until stiff peaks form when
the beater is raised slowly.
With large balloon whisk, slotted skimmer, or rubber
spatula fold *A of the whites into the chocolate mixture to
138 SIMPLY DELICIOUS FOOLPROOF CAKES
lighten it. Then gently fold in remaining egg whites.
Pour into the prepared pan, spreading evenly with a
spatula, and bake 16 minutes. The cake will have puffed
and lost its shine and will spring back when lightly pressed
with a finger.
Wet a clean dish towel and wring it out well. Remove
the cake from oven and leave it in the pan. Dust with the
cocoa and cover immediately with the damp towel. (Use a
dry towd if planning to cut the cake into shapes.) Allow
the cake to cooL Remove the towel and, lifting by a long
edge of the liner or foil overhang, gently slide the cake from
the pan onto a flat surface. To use as a roll, spread at once
with 2 cups filling and roll up. using the liner or foil for
support and gently peeling it away as you go. To use as
layers, cut in half for 2 rectangles or use an 8-inch card-
board round to cur out 2 rounds or a 9-inch oval card-
board to cur out 2 ovals.
UNDERSTANDING
A larger amount of sugar causes chocolate rolls to crack
because it absorbs some of the batter’s moisture, making
the cake mure brittle.
Tbis cake is used to make Chocolate Pore Cone (page 196)
and Cordon Rose Chocolate Christmas Log (page 197).
cake will release almost as
smoothly without it. Also
omit the cream of tartar. I
FINISHED HEIGHT
VS inch before rolling.
STORE.
3 days room temperature, 5
days refrigerated, 2 months
frozen.
COMPLEMENTARY
FILLINGS-
One tecipc: Perfect Whipped
Cream or Raspberry Jam
Cream /page 253 of 263),
Perfect Mocha Whipped
Cream (page 253J. Light
Whipped Ganache (page
26Я).
SERVE:
Lightly chilled. If used an a
roll, cut on the diagonal to
form oval dices.
POINTERS FOR SUCCESS:
See page 119. A Urge bal-
loon whisk or slotted skim
met is ideal for folding in
the egg whites with the least
amount of air loss. If using
tbe whisk, periodically
shake out the batter which
collects in suk.
SPONGE-TYPE CAKES B9
Cocoa
Souffle Roll
SERVES 8
v>his chocolate roll is airy yet exceptionally moist and
intensely chocolate. The high moisture makes it virtually
incapable of cracking! It is perfect with any whipped cream
filling.
INGREDIENTS MEASURE WEIGHT
room tempcraiurc vo/cime ounce? grams
unsweetened cocoa {Dutch-processed; or cup 4-3 tablespoon» nonalkali zed cocoa such as Hershey’s *6 CUp 4-1 tablespoon Highlit spooned intn a cup) 1.25 ounces 37 grams
boiling water ¥« liquid cup 2 ounces bU grams
vanilla 1 teaspoon • 4 grams
unsaiicd buner (must be softened) 2 tablespoons 1 ounce 28 grams
sugar ¥« cup 4.5 ounces 132 grams
6 large eggs, separated yolks whites 33 fluid ounces ¥* liquid cup 4 ounces 6.25 ounces 112 grams 1S0 grams
optional: unbianefaed sliced almonds. toasted and finely ground Vi cup (finely ground! 1.2$ ounces 35 grams
cream of tartar ¥4 teaspoon • <
One 17-inch by 12-inch
iclly-rull pan, greased, bot-
tom lined with a nonstick
Inter or foil | extending
slightly over the sides), and
then greased again and
Routed. (For Passover, it’s
Position the oven rack in the lower third of the oven.
Preheat the oven to 35(FF.
In a small bowl stir together all but 1 tablespoon co-
coa and the boiling water until the cocoa is completely dis-
solved. Stir tn the vanilla and butter and cool.
In a mixing bowl beat Vt cup sugar and the egg yolks
for 5 minutes or until light and Huffy. Add the chocolate
mixture and alinonds if desired and beat until incorpo-
rated, scraping down the sides.
In a large bowl bear the egg whites until foamy, add
the cream of tartar, and beat until soft peaks form when
the beater is raised. Gradually beat in the remaining sugar,
beating until stiff peaks form when the beater is raised
140 SIMPLY DELICIOUS FOOLPROOF CAKES
slowly. With large balloon whisk, slotted skimmer, or rub-
ber spatula fold *4 of the whites into the chocolate mixture
to lighten it. Then gently fold in the remaining egg whites.
Pour into the prepared pan, spreading evenly with a
spatula, and bake 18 minutes. The cake will have puffed
and lost its shine and will spring back when lightly pressed
with a finger.
Wet a clean dish towel and wnng it out well. Remove
the cake from oven and leave it in the pan. Dust with the
remaining 1 tablespoon cocoa and cover immediately with
the damp towel. (Use a dry towel if planning to cut the
cake into shapes.) Allow the cake to cool. Remove the towel
and, lifting by a long edge of the liner or foil overhang,
gently slide the cake from the pan onto a flat surface. Tn
use as a roll, spread at once with 2 cups filling and roll up,
using the liner or foil for support and gently peding it away
as you go. To use as layers, cut in half for 2 rectangles or
use an 8-inch cardboard round to cut out 2 rounds, or a 9-
inch cardhoard to cut out 2 ovals.
UNDERSTANDING
Cocoa replaces the cocoa wlids previously provided by the
chocolate. In the same way butter compensates for the co-
coa butter and extra sugar for the sugar originally con-
tained in the bittersweet chocolate. Water is used to dissolve
the cocoa, releasing fuller chocolate flavor and providing
moisture.
ТЬм cake и used to make The Enchanted Forest {page 195).
fine to omit the flour he-
cause rhe cake will release
almost as smoothly without
it. Ako omit the cream of
tartar.)
FINISHED HEIGHT:
Vi inch before rolling.
STORE
3 days room temperature, 5
days refrigerated, 2 months
frozen.
COMPLEMENTARY
ADORNMENTS:
Owe recipe: Perfect Whipped
Cream (page 253) Of Rasp-
berry Jam Cream Ipagc
263). Perfect Mocha
Whipped Cream (page 253).
Light Whipped Ganache
[page 2681.
SERVE:
Lightly chilled. If used as a
roll, cut on the diagonal to
form oval sheet.
POINTERS FOR SUCCESS:
See page 119. A large bal-
loon whisk or slotted skim-
mer is ideal for folding tn
the egg whites with the least
amount of air loss. If using
the whisk, periodically
shake out the barter sshich
collects inside.
SPONGE TYPE CAKES 141
Jr Г hen moistened with syrup. Biscuit Roulade is one of
rhe most tender and ethereal ot cakes. A sheer of biscuit
Biscuit
Roulade
iBtrsWrt- RveLAHD}
SERVES 8
has many possibilities. It can be filled with whipped cream
and loosely rolled. It can be spread with jam, rightly rolled,
and sliced to line a mold (as for Scarlett Empress, page
177). It can be cur with scissors into rounds to sene as a
base and top for cheesecake or even cut with a cookie cut*
ter to decorate the sides of a cheesecake.
И this roulade is used with moist fillings such as
whipped cream, Bavarian cream, or cheesecake, a syrup
would make the cake too wet. With a less moist filling,
such as Lemon Curd, 1 sprinkle the cake roll with about 4
teaspoons ol syrup tor each whole egg used m the batter.
INGREDIENTS MEASURE WEIGHT
mom temperature sifted cake flour FllJufflT ’/? cup 1.25 ounces 33 догпь
umrfted cornstarch 3 tablespoons 0.75 ounce 23 grans
4 large eggs • 8 ounces 227 jerens (weighed in die shell)
1 Large egg >ulk 31^ teaspoons 03 ounce Hi grams
sugar Vj cup ♦ 1 tablespoon 4 ounces 113 grams
vanilla 4*4 teaspoon • 3 grams
cream of tartar OPTIONAL1 7i CUP SYRUP (33 OUNCES.' 100 GRAMS) Vi teaspoon 9 •
sugar 2 tablespuie + A pinch 1 ounce 28 grains
water Vi liquid Clip 2 ounces 59 grams
liqueur of your choice 1 tablespoon 0.5 ounce 14 grants
Position the oven rack in the lower third of the oven.
Preheat the oivtr to 4 5 (PF.
In a smal' bowl whisk together the cake flour and
cornstarch.
Separate 2 of the eggs, placing the yolks in 1 large
mixing bowl and the whites in another. To the yolks, add
the additional yolk, the 2 remaining eggs, and */r cup sugar.
Beat on high speed 5 minutes or until thick, fluffy, and
triple in volume. Beat in the vanilla.
142 SIMPLY DELICIOUS FOOLPROOF CAKES
Sift ’Zt the flour mixture over the egg mixture and fold
it in gently bur rapidly with a large balloon whisk, slotted
skimmer, or rubber spatub until the flour has disappeared.
Repeat with the remaining flour mixture.
Beat the egg whites until foamy, add the cream of tar-
tar, and beat until soft peaks form w hen the beater is raised.
Beat in the remaining 1 tablespoon sugar and beat until
stiff peaks form when the heater is raised slowly. Hold the
whites into the batter and pour into the prepared pan, us-
ing an angled metal spatula to level it.
Bake for 7 minutes or until gulden brown, a cake tester
comes out dean, and the cake is spring}- to the touch.
Loosen the edges with a small metal spatula or sharp
knife and, lifting by a long edge of the liner or parchment
overhang, gently slide the cake from the pan onto a flat
surface. To use the biscuit far a round cake base or cutouts,
allow to cool flat, covered with a dean dish towel. Lightly
grease the bottom of a cake pan of the desired size and
place it on the biscuit. With the np of a knife, score around
it. Lift off the cake pan and ait out the biscuit base, using
scissors. To use it for a roll, sprinkle lightly with powdered
sugar and roll it up while still hot. If using a liner, tightly
roll up the biscuit with the liner. (This keeps the biscuit
especially moist.) If using parchment, flip the biscuit onto
a clean dish towel, carefully remove the parchment, and
roll it up tightly, towd and all. Cool on a rack. When ready
to fill, unroll the biscuit. (If a liner was used, first detach
the cake from liner and then replace it on the liner.) If us-
ing the syrup, sprinkle it on the cake before spreading it
with 2 cups tilling.
TO MAKE SYRUP
In a small saucepan with a tight-fitting lid bring the sugar
and water to a rolling boil, stirring constantly. Cover im-
mediately, remove from the heat, and cool. Transfer to a
liquid measuring cup and stir in the liqueur. It the syrup
has evaporated slightly, add enough water to equal Vj cup
syrup.
UNDERSTANDING
This biscuit is even lighter than a genius* because it con-
tains no butter and because some of the whites are beaten
separately and folded into the barter.
When baking the biscuit as a thin sheet, less structural
support is necessary, so the flour/cornstarch mixture can be
reduced to about half of what is used for classic genoise
(instead of equal weight flour mixture and sugar, the Bis-
cuit Roulade uses only half the weight in flour mixture). A
high oven temperature, however, is necessary to set the cake’s
structure before it can fall. And an extra yolk is added to
increase flexibility for rolling the sheet if desired.
One 17-inch by 12-inch
pelly-roll pan, greased, bot-
tom lined with a nonstick
liner or parchment. and then
greased again and floured.
(Liner extends slightly over
the sides.!
FINISHED SIZE
16% inches by 1154 inches
by ’Л inch. When the сакс и
rolled or assembled, it com-
presses to И meh high. Or 2
S-mch circles can be cut
from 1 sheet.
STORE:
Syrup: 1 month refrigerated
in an airtight container. Hit*
cuir. 3 days room tempera-
ture. 5 days refrigerated, 2
months frozen.
COMPLEMENTARY
FILLINGS:
One reerptr. Perfect Whipped
Cream Ipage 253) or Rasp-
berry Jam Cream i page
263). Lemon Curd Cream
Ipage 264). Bavarian Cream
if making Charlotte (page
2S7).
SERVE:
lightly chilled. И used as a
roil, cut on the diagonal to
form oval slices.
POINTERS FOR SUCCESS:
See page 119. A large bal-
loon whisk or slotted skim-
mer » ideal for folding in
the flour with the least
amount of air toes. If using
die whisk, periodically
shake out the batter which
collects on the inside.
SPONGE-TYPE CAKES 143
This cake is used to make: Ethereal Pear Charlotte {page
175), Scarlett Empress {page 177), and Rarquettrs C.htrz
17Ami Louts {page 18 в).
VARIATIONS
GINGER B6CUIT 1 tablespoon ginger juice added co the yolk
mixture cuts the sweetness and adds a unique, subtle fla-
vor (To make ginger juice, grate fresh ginger on a fine gra-
ter and press with your finger* to squeeze out is much juice
as possible.)
COMPLEMENTARY FILLING: Perfect Whipped Cream and
poached pears.
CHOCOLATE BtSCUIT: Ideal for use as a chocolate version
of rhe Scarlett Empress (page 177) because it is tinner than
the Cloud Roll. It also has an excellent texture to use as
ice-cream roll. Replace rhe cornstarch with equal weight or
14 cup cocoa. Dissolve the cocoa in 3 tablespoons boding
water and cool. Stir in the vanilla and add to die beaten
yolk mixture, beating a feu seconds or until incorporated.
If not using the syrup, increase the sugar to 36 cup plus 1
tablespoon (5 ounces/145 grams).
COMPLEMENTARY FILLINGS: Perfect Whipped Cream. Light
Whipped Gar ache. Bavarian Cream, especially orange or
raspberry.
ALMOND BISCUIT: My favorite of all Inscuds—moist, tender,
and flavorful because there are mone almonds than flour.
In place of the flour/cormtarch mixture, use VS cup
(1.25 ouncrs'35 grams) blanched, toasted, and finely ground
almonds and 3 tablespoons unsifted cake flour (.75 ounces1'
21 grams).
COMPLEMENTARY FILLINGS: Perfect Whipped Cream,
Raspberry Jam Cream, or any Cloud Cream. This is won
derful as a bottom for cheesecake.
GREEN TEA BISCUIT: The moss-grrrn tea of the Japanese
tea ceremony adds a lovely color and exquisitely haunting
flavor tn the delicacy of biscuit. Filled with Green Tea
Mousse Cream (page 261), it is an unforgettable dessert, it
must be served the day it is baked or the elusive flavor is
lost. To make this biscuit, replace 1 tablespoon of the corn-
starch with equal measure or weight of powdered green tea
(available in stores where Japanese and Oriental products
arc sold, page 445).
COMPLEMENTARY FILLINGS: Perfect Whipped Cream (page
253) or Green Tea Whipped Cream (page 261),
144 SIMPLY DELICIOUS FOOLPROOF CAKES
his lovely сакс bears the name of die Savoy region in
the French Alps, where it is said to have originated. Biscuit
de Savoie makes an excellent cake layer and, after dousing
with syrup, is exceptionally light, soft and moist without
ever becoming soggy. It can be used interchangeably with
a grzrrnw and is an especially refreshing alternative for
summertime cakes.
For a tender texture, it is essential to moisten the baked
Biscuit de Savoie with at least */i cup syrup {page 357) for
every egg used in die batter. Another rule of thumb is to
use syrup equal in weight to the baked and trimmed bis-
cuit. Thb will transform the biscuit from dry and rubbery
to moist and dissolving!
I tip my toque to my friends and colleagues Bruce Healy
and Paul Bngat (Ma^rertug d?e Art of French Pastry) (or
their superb method of folding the whites together with the
flour mixture. This achieves the highest, lightest possible
result!
Biscuit
de Savoie
(BeeskWEt duh SavWAH)
SERVES
I 2 T О 14
(3 round layers)
INGREDIENTS MEASURE WEIGHT
rtXWl MMfMnfttrr 8 large eggs, separated yolks whites volume 4.5 fluid ounces 1 liquid cup ounce* 5.25 ounces 8.5 ounces grams 150 grams 240 grams
sugar 1 cup 7 ounces 200 grams
vanilla 2¥r teaspoons • 10 grams
warm water 1 tablespoon 0.5 ounce -1 15 grams
sifted cake flour I cup + 2 tablespoons 4 ounces 113 grams
cornstarch Vi vup + 1 tablespoon ’lightly spooned into cup) 2.25 (Mince 66 grams
cream of tartar 2 CUPS SYRUP (21 OUNCES/590 GRAMS) I teaspoon • 3 grams
sugar ¥4 cup + 2 tables ptMwis 6 ounces 175 grams
water 1*4 liquid cupe 1X5 ounces 355 grams
liqueur <>t your choice 6 tablespoons 3 ounces 90 grams
SPONGE TYPE CAKES 145
Three 9-inch by 1 ‘.4-iach
cake pam, bottoms greased
and lined with parchment oc
wax paper. Do nor grease or
flour sides.
FINISHED HEIGHT:
After trimming the bottom
and top crests, each layer is
1 inch.
STORE:
Syrup: 1 month refrigerated
in an airtight container. Bit-
cuit: Without syrup. 2 days
room temperature, 5 days
refrigerated, 2 months fro-
zen. After sprinkling with
tbe syrup the flavors ripen
and tbe moisture is more
evenly distributed 1 day
later. The completed cake
can be refrigerated up to 5
days or frozen up to 2
months.
COMPLEMENTARY
ADORNMENTS:
One recipe: Any butter-
cream, whipped cream, or
glaze.
SERVE:
Room temperature or lightlv
chilled.
POINTERS FOR SUCCESS:
See page 119. A large bal-
loon whisk or slotted skim-
mer is ideal for folding in
Preheat the oven to JIFF.
In a large mixing bowl beat rhe yolks and % cup sugar
on high speed for 5 minutes nr until rhe mixture is very
thick and ribbons when dropped from the beater. Lower
the speed and beat in the vanilla and water. Increase to
high speed and brat fur 30 seconds or until it thickens again.
Stir together the flour and cornstarch. Sift over the yolk
mixture without mixing in and set aside.
In another large mixing bowl beat the whites until
foamy, add the cream ot tartar, and beat until soft peaks
fonn when the beater is raised. Gradually beat in the re-
maining V? cup sugar, bearing until stiff peaks form when
the beater is raised slowly. Add VS of the whites to the yolk
mixture and with a large balloon whisk, skimmer, or rub»
ber spatula fold until incorporated. Gently fold in the re-
maining whites.
Pour into the prepared pans. [They will be almost l/i
full.) Bake 25 minutes or until a cake tester inserted in the
center comes out clean. Loosen the sides with a small metal
spatula and unmold at once onto lightly greased racks and
reinven to cool. The firm upper crust prevents falling and
results in a light texture.
Trim the crust when ready to complete the cake and
sprinkle the syrup evenly on all sides (page 357).*
TO MAKE SYRUP
In a small saucepan with a tight-fitting lid bring the sugar
and water to a rolling boil, stirring constantly. Cover im-
mediately, remove from the beat, and cool. Transfer to a
liquid measuring cup and stir in the liqueur. If the syrup
has evaporated slightly, add enough water to equal 2 cups.
UNDERSTANDING
When biscuit is baked as a round layer cake, it requites
much more structure than a low sheet cake, so proportion-
ally more flour'cornstarch mixture is used and all of the
whites are beaten separately.
The absence of butter is what makes Biscuit de Savoie
lighter than a genoise. Since butter has a tenderizing effect,
its absence will make the biscuit rubbery unless it is ade-
quately moistened with a syrup.
Since the biscuit can be saturated with syrup without
becoming soggy, there ts no danger of dryness so the cake
• After lyruping a hiuwrf layer bmwnc, ln«pk ami «ncirc prnnr to ^Matting
when moved. Use a cardboard round or removable bottom of a pin to sup-
port «t.
146 SIMPLY DELICIOUS FOOLPROOF CAKES
can be made as light and high-rising as possible. By not
greasing and flouring the sides of the pans, the batter can
rise better, attaining maximum height.
This cake м used ю make Queen Bee ipage 185),
his is the same recipe as the preceding one, but it yields
about two thirds of the amount. It makes 2 oval layer* that
are perfect in cakes such as Baked Hawaii (page 1681.
the flour with the least
amount of air loss. If using
the whisk, periodically
shake our flic baner which
collects inside.
Oval
Biscuit
INGREDIENTS MEASURE WEIGHT
room ttunperarure ixWtrme ounces irrants
6 large eggs, separated yolkx whites 3J5 fluid ounces V* liquid cup 4 ounces 6.25 ounce» 112 grams 1 ЯП grams
sugar ¥s cup 4.5 ounces 132 grams
vaniHa !¥« teaspoons a 7 grams
warm water 2 teaspoons • 10 grams
sifted cake flour ¥» cup 2.5 ounces 75 grams
cornstarch ‘6 cup + 2 teaspoons (lightly spooned into cup} 1,5 ounces 45 grams
cream of tartar ¥1 teaspoon • •
Beat ‘Xi cup (1.75 ounces/50 grams) sugar instead of *6 cup
with the whites and beat the remainder with the yolk mix-
ture. Proceed as for full-size recipe (page 146j.
Divide the batter between 2 oval cake pans and bake
25 minutes or until rhe cakes test done. Loosen the sides
with a small metal spatula; unmold at once onto lightly
greased racks and reinven to cool.
Two 9V«-inch by 6'v-inch
oval pans (page 455) hot
toms greased and lined with
parchment or wax paper.
Do not grease or flour sides.
FINISHED HEIGHT:
After trimming the bottom
and top crusts, each layer is
1 Mi inches.
SPONGE-TYPE CAKES 147
Biscuit
6 Io Cuillitrc
(BeeskWEF. jJj M KowAfRJ
MAKES ABOUT
2 DOZEN
3-lnch by I 'A-inch
hdyflngers anc an B-inch
circular cake base or about
396 dozen fingers
hr name cmV/rerc, the French word for *‘spoon,'* was
given to these traditional ladyfingers because they were
originally shaped with a spoon. Using a pastry bag, how-
ever, results in a more uniform shape and much greater
speed.
This biscuit is so light that it stales quickly. It is best
to eat it the day it is baked. For less fresh biscuit, sprinkle
lightly with liqueur.
Ladyfingers have the perfect, ethereal but firm texture
to encase and support a Bavarian cream filling such as Or-
ange Chocolate Crown (page 181).
INGREDIENTS MEASURE WEIGHT
room temperature voAwe grams
6 large <gg>, separated yolks whites 3.5 fluid ounces liquid cup 4 ounces 6.25 ounces 112 grams 180 grams
sugar ¥» tup 5.25 ounces 150 grams
vanilla 2 Mi teaspoons • 10 grams
warm wafer 1 юЫсцхкмз 0.5 ounce 15 grams
sifted cake ftour 1 ‘A cup* 5.25 ounces 150 grams
cream of tartar ¥« teaspoon • •
powdered sugar for dusting about 1 cup • <
Two large baking sheets,
lined with a nonstick liner,
parchment, or foil and out-
lined with piping guides
'parallel fines 3 mches apart
and an 8-uich to 9-incfa cir-
cle, page 373). A large
pastry bag fitted with a V«-
inch diameter pastry tube
(no. 9|.
FINISHED SIZE:
Ladyfingers; 3 strips, each
12 inches long, or 2 strips,
each 18 inches long. Cake
base: 7 to 8 inches (for an
8-inch or 9-inch charlotte).
Preheat the oven to 400°F,
In a large mixing bowl beat the yolks and Vi cup sugar
on high speed for 5 minutes or until the mixture is very
thick and ribbons when dropped from the beater. Lower
the speed and beat in the vanilla and water. Increase to
high speed and beat for 30 seconds or until thick again.
Sift rhe flour over the yolk mixture without mixing in and
set aside.
In another large mixing bowl beat the whites until
foamy, add the cream of tartar, and beat until soft peaks
form when the beater is raised. Gradually beat in the re-
maining '/* cup sugar, beating until very stiff peaks form
when the beater is raised slowly. Add 16 of the whites to
the yolk mixture and with a skimmer or rubber spatula
148 SIMPLY DELICIOUS FOOLPROOF CAKES
fold until all the flour is incorporated. Gently fold in the
remaining whites.
Working quickly so that the batter does not lose vol-
ume, scoop 4 cups into the pastry bag and pipe out the
disc for the base (page 573). An 8-inch charlotte requires
about 17 ladyfingers to go around rhe sides, a 7-mch base
to tit inside the lingers, and an 8-inch top if desired. A 9-
inch charlotte requires about 19 ladyfingers to go around
the sides, an 8-inch base to lit inside the fingers, and a 9-
inch top if desired. (To make a decorative top you will need
to make another Vi batch of batter.)
Scoop the remaining batter into the pastry bag and pipe
our 3-inch by I’/j-inch side-by-side “fingers.” Be sure to
hold the pastry tube high enough above the surface of the
sheet so that the batter can fall freely from the tube and
not get flattened by the edge of the tube (page 373). There
should be a ’/•-inch space between the “fingers' as they
spread sideways as they are piped. (After baking, the lady-
fingers will be attached to one another in continuous strips.
Each finger will be about 1 Vi inches wide.) Sift the pow-
dered sugar completely over the fingers. After a few sec-
onds the batter will dissolve and absorb some of the sugar.
For a pearled effect, sprinkle with a second coat. Bake 8 to
10 minutes or until light golden brown and springy to the
touch. Remove the sheets to racks and cool slightly. To
prevent cracking, remove from the sheets while still warm
with a long, thin spatula or pancake turner. For discs, in-
vert onto a rack covered with a paper towel, peel off the
liner, and rcinvert onto a second rack. Cool on racks and
then wrap airtight.
STORE:
Use same day or freeze 1
month.
COMPLEMENTARY
FILLINGS.
Ladyfingcr-hncd molds can
be filled with one ndpc:
Bavarian Cream (pages 287
to 289), Fruit Cloud Cream
(page 264), or Lemon
Cream Illusion 'page 266).
SERVE
Room temperature if served
phut, lightly chilled if used
as a Char lone (page 181).
POINTERS FOR SUCCESS:
See page 119. Fgg whites
must be beaten stiffly
enough for the batter to
hold its shape and form at-
tractive designs If the
proper amount of cream of
tartar is used it is virtually
impossible to overheat the
whites. A slotted skimmer M
ideal for folding in the flour
with the least amount of air
loss.
UNDERSTANDING
Ibis hisewt recipe has the same weight flour and sugar and
double rhe egg as Genoise Cbssique hut no butter. Biscuit
a la Curllere has more flour than Biscuit de Savoie in order
to hold its shape when piped. (It is also baked ar a higher
temperature to set tbe shape faster.)
To achieve a lighter texture no cornstarch is used and
all of the rgg whites are beaten separately and t^ry stiffly.
This cake w »aed to nuke Orange Chocolate Crouni 'page
181).
SPONGE-TYPE CAKES 149
Nancy
Bl iter's Classic
American
Sponge
Cake
SERVES 10
у friend Nancy has been baking for family and
friends for over forty years. This perfect sponge cake is her
creation and is so pure and simple it needs no adornment.
Nancy serves it plain with tea or sometimes even lightly
toasted for breakfast. This cake contains no sodium and
only about 226 mg. cholesterol per serving.
INGREDIENTS
MEASURE
WEIGHT
room temperature water . . . . .. . . . ratumc 1 tablespoons ounces 1 ounce grams 30 grams
vanilla % teaspoon • •
grated krnon zest 1V> teaspoons • ♦
sifted cake flour l¥i cups 4.75 ounces 133 grams
sugar 1 cup 7 ounce* 200 grams
6 large eggs, separated yolks whiten 3,5 fluid ounces ¥4 liquid cup 4 ounces 6.25 ounces 112 grams 180 grams
cream of Uttar ; ¥< teaspoon • ♦
One ungreased iwn piece
10-mch rube pan.
FINISHED HEIGHT:
39b inches high overall, 2¥«
incises ar rhe sides.
Preheat the oven to 35(fF.
In a small bowl combine the water, vanilla, and lemon
zest.
Remove 1 tablespoon of the sugar and reserve to beat
with the whites.
In another small bowl whisk together the flour and 3
tablespoons of the sugar.
In a large mixing bowl beat the yolks and the remain-
ing % cup sugar on high speed for 5 minutes or until the
mixture is very thick and ribbons when dropped from the
beater. Lower the speed and gradually add the water mix-
ture. Increase to high speed and beat for 30 seconds. Sift
the flour mixture over the yolk mixture without mixing m
and set aside.
Beat the w hites until foamy, add the cream of tartar,
and beat until soft peaks form when the beater is raised.
150 SIMPLY DELICIOUS FOOLPROOF CAKES
Bear in reserved I tablespoon sugar and brat until very stiff
peaks form when the beater is raised slowly. Add Vs of rhe
whites to the yolk mixture and with a large skimmer or
rubber spatula fold until incorporated. Gently fold in the
remaining whites in 2 batches.
Pour into the pan. (It will be a little more than Vi full.)
Run a small metal spatula or knife through the batter to
prevent air pockets. Bake 30 to 35 minutes or until golden
brown and a cake tester comes out clean when inserted in
the center. Invert the pan, placing the tube opening over
the neck of a soda or wine bottle to suspend it well above
counter, and cool the cake completely in the pan (this takes
about 1 hour).
Loosen the sides with a long metal spatula and remove
the center core of the pan. (To keep the sides attractive,
press the spatula against the sides of the pan and avoid any
up-and-down motion.) Dislodge rhe bottom and center core
with a metal spatula or thin, sharp knife. (A wire cake tester
works wdl around the core.) Invert onto a greased wire
rack and reinsert onto a serving plate. Wrap airtight.
STORE
3 days room temperature, 5
days refrigerated, 2 months
frozen.
COMPLEMENTARY
ADORNMENTS-
A light sprinkling of pow-
dered sugar. Or decorate the
base and center with fresh
Howers.
SERVE:
Room temperature or lightly
chilled.
POINTERS FOR SUCCESS:
See page 119. A slotted
skimmer is ideal for folding
in the floor with the least
amount of air loss.
UNDERSTANDING
This sponge cake contains the same basic ingredients as
Biscuit de Savoie except that the biscuit has half the weight
of sugar to eggs and this sponge has almost as much sugar
as eggs. The high quantity of sugar produces a sponge cake
so moist and tender that no syrup or frosting ts necessary.
Some of the sugar is added to the flour to separate the grams
and help keep rt from dumping when folded into the batter.
The addition of lemon zest tempers the sweetness.
Baking at 35O*F. rather than 325*E, ensures a more tender
and moist cake (page 476).
SPONGE TYPE CAKES 151
Bert
Greene’s Special
Sponge
Cake
am so pleased to be able to present this extraurdi
nary recipe» offered by one of my dearest friends and most
esteemed colleagues. Bert has come up with some truly
original and inventive tricks to create one of the most moist
and tender sponge cakes I’ve ever tasted.
As a special touch, some of the sugar is sprinkled on
top of the raw batter to produce a delightfully crunchy crust.
This cake is perfect for the person with a real sweet tooth,
although extra lemon zest helps temper the sweetness and
makes salt unnecessary. As an added bonus, it has only 161
mg. cholesterol per serving.
SERVES 8
INGREDIENTS MEASURE WEIGHT
лют ti’mptraturt wWtMttt* OltVMXS grams
orange juice 2 tablespoons 1 ounce 30 grams
grated lemon zest 2 teaspoons • 4 grams
vanilla *6 teaspoon • 6 grains
superfine sugar 1 cup + 7 tables peons 10 ounces 288 grams
sifted cake Hour 1 cup 3-5 ounce* 100 grams
5 large eggs, «parated, + 3 additional white» yolks whites full 'A liquid cup 1 liquid cup 3.25 cxincer S.5 (Minors 93 gram* 2+0 grams
cream of tartar 1 teaspoon ♦ 3 grams
One untreated IQ-inch two-
piece rube pan, preheated
for ar lean 5 minute*.
FINISHED HEIGHT:
3 inches.
Preheat the oven to 35(FF.
In a small bowl combine tbr orange juice, lemon zest,
and vanilla.
Remove 2 tablespoons of the sugar and reserve to beat
with the whites. Remove another 2 tablespoons of the sugar
and reserve to sprinkle on top of raw batter.
Remove 3 more tablespoons of the sugar and whisk
together with the flour.
Rinse a large mixing bowl with hoc water and w’rap
the sides with a hot towel. (If using a hand mixer, place
the bowl in a sink partially filled with hot water.}
Beat the yolks, gradually adding the remaining 1 cup
sugar, on high speed for 5 minutes or until the mixture is
very thick and nbbuns when dropped from the beater. Lower
152 SIMPLY DELICIOUS FOOLPROOF CAKES
the speed and gradually add the orange juice mixture. In-
crease to high speed and beat for 30 seconds. Sift the flour
mixture over the yolk mixture without mixing in and set
aside.
Beat the whites until foamy» add the cream of tartar»
and continue to beat until soft peaks form when the beater
is raised. Gradually beat in the 2 tablespoons of reserved
sugar» beating until very stiff peaks form when the beater
is raised slowly. Add VS of the whites to the yolk mixture
and with a large skimmer or rubber spatula fold until in-
corporated. Gently fold in the remaining whites in 2 batches.
Pour the batter into the hot pan. (It will be a little
more than V$ full.) Run a small metal spatula or knife
through the batter to present air pockets. Sprinkle the top
evenly with the remaining 2 tablespoons sugar. Bake 35 to
40 minutes or until golden brown and a cake tester comes
out dean when inserted in the center. Invert the pan, plac-
ing the tube opening over the neck of a soda or wine bottle
to suspend it well above the counter, and cool the cake
completely in the pan [this takes about 1 hour).
Loosen the sides with a long metal spatula and remove
the center core of the pan from the sides. (To keep the sides
attractive» press the spanila against the sides of the pan and
avoid any up-and-down motion.; Dislodge the bottom and
center core with a spatula or thin, sharp knife. (A wire cake
tester works well around the core.) Inven onto a greased
wire rack and rcinvert onto a serving plate. Wrap airtight.
STORE
3 days room temperature, 5
days refrigerated, 2 mouths
frozen.
COMPLEMENTARY
ADORNMENTS:
Decorate base and center
with fresh flowers.
SERVE:
Room temperature or lightlv
chilled.
POINTERS FOR SUCCESS:
See page 119. Superfine
sugar is important to attain
maximum volume and for
sprinkling on tap of the
cake. Heating the yolk» also
improves volume. A dotted
skimmer is ideal for folding
in the flour with the least
amount of air kws.
UNDERSTANDING
One of the secrets of this cake’s exceptional moistness and
tenderness is using ’/> cup less flour than classic sponge cake
and a very high proportion of sugar (almost Vi cup more).
For additional volume, Bert applies heat while beating the
yolks and uses 3, sometimes even 4, extra egg whites to
compensate for structure usually provided by a higher
quantity of flour. To ensure that rhe cake will not collapse
during baking, he preheats the empty pan so that the batter
starts to expand and set immediately.
NOTE: Bert eliminates the cream of tartar and uses a copper
bowl to whisk the egg whites by hand. This results in ex-
tra-high volume for those of you who have the strength
(not to mention the will} to do it.
SPONGE-TYPE CAKES 15Л
CHIFFON
CAKES
HIGHLIGHTS
FOR SUCCESSFUL
CHIFFON AND
ANGEL CAKES
When Harry Baker, a Los Angdcs insurance salesman who baked
for private Hollywood parties, invented the chiffon cake, it was
the first major new type of cake since the angel food cake, in-
vented about one hundred years before it. He kept the recipe a
secret for twenty years and finally, deciding to share it with the
world, approached Betty Crocker, owned by General Mills. They
purchased the recipe in 1947 and billed it as “glamorous as an
angel food cake bur easier to make.”
The chiffon cake combines the moist richness of a butter cake
with the lightness of a sponge cake. Because oil, which remains
liquid at room temperature, is used instead of butter, the texture
ts much softer than a layer cake. Even refrigerated, the oil tn the
cake remains soft (unlike butter). Oil also tenderizes and provides
moisture, making the chiffon cake much more tender than а 6м-
cutt. Safflower oil is my preference (except for the chocolate chif-
fon, which is much more delicious with walnut oil) because it
contains no silicates (which inhibit foaming).
A chiffon cake has many virtues. It is easy to make, keeps
exceptionally well, and slices easily even when frozen. It has about
half the fat of a buner cake and less cholesterol and saturated fat
than any other cake except for angel food. But, unlike angel food,
it does not have the disadvantage of excessive sweetness. On top
of all these wonderful qualities it also provides a use for your
extra-egg-white collection.
Chiffon cakes are best baked at 325*F. because the tops crack
more at higher temperatures.
I don’t like to ice chiffon cakes because that defeats the light-
ness and the low cholesterol advantage. (The icings of my prefer-
ence all have cither butter or cream.)
Any of the follownng chiffon reapes can be halved and baked
in a 9-inch rube pan (page 447) for a 3-inch-high cake that serves
6 to 8. Bake for only 35 minutes or until the cake tests done.
For fuller details see the suggested page number,
* L’se cake flour that does not contain leavening (page 476). (Do
not use self-rising cake flour.)
• Use superfine sugar for finest texture and maximum volume (page
476).
• Measure or weigh ingredients carefully (page 438).
• Do not use oil that contains silicates—it will be listed on the
label (page 431).
• Egg whites must he free of even a trace of yolk and the bowl
must be spotless.
♦ When beating egg whites, use cream of tartar or be careful to
beat just until stiff peaks form when the beater is raised slowly.
154 SIMPLY DELICIOUS FOOLPROOF CAKES
• Fold flour gently but thoroughly into the batter.
• Prevent air pockets by running a small metal spatula or knife
through the batter before baking.
• Use the correct pan size (page 20).
• Bake immediately after mixing.
• Check for accurate oven temperature (page 448).
• Use correct baking time; do not underbake (page 21>.
• Cool cakes upside down, well elevated from the countertop, in
a draft-free area (page 476).
• Wrap cakes well when cool Ipage 23).
Ж
rXotst, billowy, light as a feather, and perfumed with
fresh orange juice and zest, this is an incomparably refresh-
ing cake. If you live in a part of the world where oranges
grow, you could not ask for a more appropriate and aro-
matic adornment than orange blossoms, but fresh daisies
also convey the lighthearted spirit of this lovely cake. A
serving contains only 129 mg. of cholesterol.
Orange
Glow Chiffon
Cake
SERVES 14
INGREDIENTS MEASURE WEIGHT
r/ммп гетре/arurc sifted cake Hour rofomc 2’/4 cups <wo 8 ounces grams 225 gram»
mgar 116 cups 10.5 ounces 300 grams
baking powder 2 teaspoons • 10 grams
salt 16 teaspoon • 3.5 grams
saftiower ml 16 hquiJ cup 3.7$ ounces 108 grams
7 Large eggs. separated, 4 3 additional whites yolks whites Ms liquid cup 1У4 liquid cups 4.5 ounces 10.5 ounces 130 grams 300 grams
orange juacc. freshly squeezed Vi liquid cup 6.25 ounces 182 grams
grated orange zest 2 tablespoons • 12 grams
vanilla 1 teaspoon ♦ 4 grams
cream of tartar I’/i teaspoons • -* gram*
SPONGE TYPE CAKES 155
One ungreased 10-inch (wo-
piecc tube pan.
FINISHED HEIGHT:
4'6 inches high tn the
middle.
STOKE:
3 days room temperature,
10 day» refrigerated, 2
months Frozen.
COMPLEMENTARY
ADORNMENTS:
A light sprinkling of pow-
dered sugar and/or decorate
the base and center with or-
ange blossom» or frc»h dai-
sies. Candied Orange Zest
(page 342) scattered on top
also makes an attractive and
flavorful addition.
SERVE:
Room temperature or lightly
chilled. Cut with a serrated
knife.
POINTERS FOR SUCCESS:
Ser page 154. An angel food
cake folder, large balloon
whisk, or slotted skimmer ia
ideal for folding in the flour
with the least amount of air
loss. If using tbe whisk, pe-
riodically shake out the hat-
ter which collects ms»de.
Preheat the oi'en to 32S*F.
In a large mixing bowl combine the flour, all but 2
tablespoons of the sugar, baking powder, and salt and beat
I minute to mix. Make a well in the center. Add the oil,
egg yolks, orange juice, orange rest, and vanilla and beat 1
minute or until smooth.
In another large mixing bowl beat the egg whites until
frothy, add the cream of tartar, and beat until soft peaks
form when the beater is raised. Beat in the remaining 2
tablespoons sugar and beat until stiff peaks form when the
beater is raised slowly. Gently fold the egg whites into the
batter with a large balloon wire whisk, slotted skimmer, or
angel food cake folder until just blended.
Pour into the rube pan (the batter will come to 1 inch
from the top), run a small metal spatula or kmfe through
the batter to prevent air pockets, and bake for 55 minutes
or until a cake tester inserted in the center comes out dean
and the cake springs back when lightly pressed in the cen-
ter. Invert the pan, placing tbe tube opening over the neck
of a soda or wine bottle to suspend it well above the anmter,
and cool the cake completely m the pan (this takes about
1 Va hours).
Loosen the sides with a long metal spatula and remove
the center core of the pan. Dislodge the bottom and center
core with a metal spatula or thin, sharp knife. (A wire cake
tester works well around the core. To keep the sides attrac-
tive, press the spatula against the sides of the pan and avoid
any up-and-down motion.) Inven onto a greased wnre rack
and «invert onto a serving plate. Wrap airtight.
156 SIMPLY DELICIOUS FOOLPROOF CAKES
ч-Xhis сакс offers the lilting flavor of lemon, balanced by
the moist» light texture found only in a chiffon cake. A
Lemon
Glow Chiffon
Cake
serving contains only 129 mg. cholesterol.
SERVES 14
INGREDIENTS MEASURE WEIGHT
rorim temper лиге ixWutwr ounces grams
sifted cake flour 2*4 cups S ounce* 225 grams
sugar 1 */j cups 10.5 ounces 300 grams
baking soda Vi teaspoon • 2.5 grains
salt 36 teaspoon • 3.5 grams
safflower oil Vi liquid cup 3.75 ounces IOS grams
7 large eggs, separated. + 3 additional whites yolks whites VS liquid cup 1 *4 liquid cups 4.5 ounces 10.5 ounces 130 grains 300 grams
water Vi liquid cup 5.5 ounces 156 grams
lemon juice, freshly squeezed 2 tablespoons 1 ounce 30 grams
grated lemon zest 1 tablespoon 6 grams
vanilla 1 teaspoon ♦ 4 grams
cream of tartar 1 *4 teaspoons ♦ 4 grams
Preheat the oxm to UFF.
In a large mixing bowl combine die llour, all but 2
tablespoons of the sugar» baking soda, and salt and beat 1
minute to mix. Make a well in the center. Add the oil, egg
yolks, water, lemon juice, lemon zest, and vanilla and beat
1 minute or until smooth.
In another large mixing bowl heat the egg whites until
frothy, add the cream of tartar, and beat until soft peaks
form when the beater is raised. Beat in the 2 tablespoons
sugar and beat until stiff peaks form when the beater ts
raised slowly. Gently fold the egg whites into the batter
with a large balloon wire whisk, slotted skimmer, or angel
food cake folder until just blended.
One ungreased 10-mch two-
piece tube pan.
FINISHED HEIGHT:
4'6 inches high in the
middle.
SPONGE-TYPE CAKES 157
STORE:
3 days roam temperature,
10 days refrigerated, 2
muntin frozen.
COMPLEMENTARY
ADORNMENTS:
A light sprinkling of pow-
dered sugar and/or decorate
the base and center with
lemon blossoms or fresh
daisies.
SERVE:
Room temperature or lightly
chilled. Cut with a serrated
knife.
POINTERS FOR SUCCESS:
Sec page 154. An angel food
cake folder, large balloon
whisk, or slotted skimmer и
ideal for folding in the Hour
with tbe least amount of air
loss. If using tbe whisk, pe-
riodically shake out the bat-
ter which collects inside.
Uuill-Frcc
Chocolate
Chiffon
Cake
SERVES 14
Pour into the tube pan (the batter will come to 1 inch
from the top), run a small metal spatula or knife through
the barter to prevent air pockets, and bake for 55 minutes
or until a cake tester inserted in the center comes out dean
and the cake springs back when lightly pressed in the cen-
ter. Invert the pan, placing the tube opening over the neck
of a soda or wine boale to suspend it well above the counter,
and cool the cake completely in the pan (this takes about
1*A hours I.
Loosen the sides with a long metal spatula and remove
the center core of pan. Dislodge the bottom and center core
with a metal spatula or thin, sharp knife. (A wire cake tester
works well around the core. To keep the sides attractive,
press the spatula against tbe sides of the pan and avoid any
up-and-down mo non. I Invert onto a greased wire rack and
reinven onto a serving plate. Wrap airtight.
UNDERSTANDING
Raking Mida replaces baking powder to retain the lemon
flavor while neutralizing some of the acidity.
Uu is a rare thing indeed that so intensely chocolate a
cake can boast a minuscule cholesterol content. It hap-
pened behind my back.
I never liked chocolate chiffon cakes because the oil
did not seem to enhance the flavor of chocolate the way
butter does and because the lower pan of the cake always
seemed heavy and gummy. But my mother so loudly sang
the praises of its possibilities (ult has delicate chocolate fla-
vor and heavenly texture even eaten directly from the
freezer’*) that I decided to give it one last try. I took advan-
tage of the synergistic effect of chocolate and walnut by
replacing some of the vegetable oil with walnut oil. Cocoa
offered richness, and extra whites and I less yolk perfected
the texture so beautifully that 1 now use a total of 10 whites
for the orange and lemon chiffon cakes as well. A serving
of this cake contains only 110.6 mg. cholesterol.
158 SIMPLY DELICIOUS FOOLPROOF CAKES
INGREDIENTS MEASURE WEIGHT
гхижп trmpcrjfurc unsweetemrd cocoa (Dutch- processed) or ¥i cup 4- 2 tablespoons nonalkalized cocoa such as Hershey's* ♦ofurm- VS Cup ♦ 1 tablespoon 1 lightly spooned into cop) owner, 1.75 ounces grams 50 grams
boiling water ¥« liquid cap 6.25 ounces 177 grams
sifted cake Hour 1¥« cups 6 ounces 175 grams
sugar 1% cups 12-25 ounces 350 ounces
baking powder 2 teaspoons • 10 grams
salt Vi teaspoon • 1.5 grams
walnut od 3 liquid ounces !6 table&poans) 2.75 ounces 80.5 grams
safflower oil 2 tablespoons 1 ounce 27 grams
6 large eggs, separated + 4 additional whites yolks whites 3.5 Equid ounces 1 Vk liquid cups 4 ounces 10-5 ounces 113 grams 300 grams
vanilla 2 teaspoons • 8 grams
cream of tartar l ¥<• teaspoons • 4 grams
* II wng. ncaulkalircd uhjm, rtpLuc die btkiiu powder with Vi ttaepoon
baking uxJa.
Preheat the oven to .32S°F.
In a medium bowl combine the cocoa and boiling water
and whisk until smooth. Cool.
In a large mixing bowl combine the Hour, all but 2
tablespoons of the sugar* baking powder* and salt and beat
1 minute to mix. Make a well in center. Add the oils* egg
yolks* chocolate mixture, and vanilla and beat 1 minute or
until smooth.
In another large mixing bowl beat the egg whites until
frothy, add the cream of tartar, and beat until soft peaks
form when the beater is raised. Beat in the remaining 2
tablespoons of sugar and beat until stiff peaks form when
the beater is raised slowly. Fold 1 heaping cup ot egg whites
into the chocolate mixture with a large balloon wire whisk,
slotted skimmer, or angel food cake folder. Gently fold in
the remaining egg whites until just blended.
Pour into the tube pan (the batter will come to l¥i
One ungreased ID inch two-
piece rube pan.
FINISHED HEIGHT:
4 inches high in rhe middle.
STORE
3 days room temperature,
10 dap refrigerated, 2
months frozen.
SPONGE-TYPE CAKES 159
COMPLEMENTARY
ADORNMENTS:
A light «prinkling of pow-
dered sugar or cocoa. Or
decorate die bax and center
with fresh flowers such as
fresia.
SERVE
Room temperature or lightly
chilled. Cut with a serrated
knife.
POINTERS FOR SUCCESS:
See page 154. An angel food
cake folder, Urge balloon
whisk, or slotted skimmer is
ideal for folding in the flour
with the least amount of ан
loss. If using the whisk, pe-
riodically shake uut the bat-
ter which collects inside.
Chocolate
Lover’s /\ngel
Food
Cake
SERVES 14
inches from the tup), run a small metal spatula or knife
through the batter to prevent air pockets and bake for 60
minutes or until a cake tester inserted in rhe center comes
out dean and the cake springs hack when lightly pressed
in rhe center. Invert the pan, placing the tube opening over
the neck of a soda or wine bonle co suspend it well above
the counter, and cool the cake completely in the pan (this
takes about l‘/i hours).
Loosen the sides with a long metal spatula and remove
the center core of the pan. Dislodge the bottom and center
core with a metal spatula or thin, sharp knife. (A wire cake
tester works well around the core. To keep the sides attrac-
tive. press the spatula against the sides of the pan and avoid
any up-and-down motion.) Inven onto a greased wire rack
and reinvert onto a serving plate. Wrap airtight.
his cake has many special qualities, not least of which
is that it is the only cake I deem worth eating that has no<
even a smidgen of “devil” cholesterol!* It is lovely on its
own, with fresh strawberries or raspberries, or for dipping
into chocolate fondue.
Angel food cake is one of the sweetest cakes because
it has virtually no fat to tenderize it and relies on an extra-
high proportion of sugar for this purpose. I find white an-
gel food ovetpowenngly sweet but cocoa does wonders to
temper the sweetness in this version.
Interestingly, everyone who has tasted this cake, when
questioned individually about the sweetness level, has said:
“I don’t usually like sweet things, but this cake is so moist,
light and wonderful, I don’t find it too sweet at all.” My
doorman went one step further: All smiles, eyes glowing,
and seemingly at a loss for words, he expressed himself
most eloquently by kissing my hand. Coincidentally, his
name is Angelo!
* The cocoa oomams 7 grams or less of wiuiareJ iu.
160 SIMPLY DELICIOUS FOOLPROOF CAKES
INGREDIENTS MEASURE WEIGHT
room rempefjuure voJttttK ounces grams
unsweetened cocoa I Dutch- processed) ‘/4 cup + 1 table spoon tbghtls spooned into cup) 1 ounce 28 grams
boilmg water V* liquid cup 2 ounces 60 grams
vantRa 2 teaspoons • 8 grams
sugar VA cups 12.25 ounces 350 grams
ufted cake flour I cup 3,5 ounces 100 grams
sak ¥4 teaspoon ♦ 1.7 grams
16 large egg whites 2 liquid cups 17 ounces 480 grams
cream of tartar 2 teaspoons • 6 grams
Preheat the oven to 3S(FF.
In a medium bowl combine tbe cocoa and boiling water
and whisk until smooth. Whisk in vanilla.
In another medium bowl combine ¥4 cup sugar, the
flour, and salt and whisk to blend.
In a large mixing bowl beat the egg whites until frothy,
add the cream of tartar, and beat until soft peaks form
when the beater is raised. Gradually beat in the remaining
1 cup sugar, beating until very stiff peaks form when the
beater is raised slowly. Remove 1 heaping cup of egg whites
and place it onto the cocoa mixture.
Dust the flour mixture over the remaining whites, ¥♦
cup at a time, and fold in quickly but gently. It is not nec-
essary to incorporate every speck until the last addition.
The ideal implement was designed in England especially for
this type of саке Ipage 458), but a large balloon wire whisk
or slotted skimmer also works well.
Whisk together the egg white and cocoa mixture and
fold into the batter until uniform. Pour into the tube pan
(the batter will come to ¥4 inch from the top), nin a small
metal spatula or knife through the batter to prevent air
pockets, and bake for 40 minutes or until a cake tester in-
serted in the center comes out dean and the cake springs
back when lightly pressed. (The center will rise above the
pan while baking and sink shghdy when done. The surface
will have deep cracks like a souffle.)
Invert the pan, placing the tube opening over the neck
of a soda or wine bottle to suspend it well above the counter,
One ungtcased 10-inch two
ptece tube pan.
FINISHED HEIGHT:
4 inches high in rhe middle.
STORE
3 days room temperature,
10 days refrigerated. Freez-
ing toughens the texture.
COMPLEMENTARY
ADORNMENTS:
A light sprinkling of cocoa.
Lacy drizzles of Chocolate
Lattice (page 388). Or fresh
flowers.
SERVE:
Room temperature or lightly
chilled. Lovely with ice
SPONGE-TYPE CAKES 161
cream and/or chocolate
MIBCe. Or, to keep totally
free of choir sterol, Tofutn
and/or Raspberry Sauce
ipage 337). Cut with a ser-
rated knife.
POINTERS FOR SUCCESS:
See page 154. An angel food
cake folder, large balloon
whisk, or slotted skimmer is
ideal for folding in the flour
with the least amount of air
loss. И using che whisk, pe-
riodically shake out the bat-
ter which collects on the
inside.
and cool the cake completely in the pan (tins rakes about
1У1 hours).
Loosen the sides with a long metal spatula and remove
the center core of the pan. Dislodge the bottom and center
core with a metal spatula or thin, sharp knife. (A wore cake
tester works well around the core. To keep the sides attrac-
tive, pre» the spatula against the sides of the pan and avoid
any up-and-down motion.) Inven onto a serving plate. Wrap
airtight,
UNDERSTANDING
In contrast to chocolate chiffon cake, an equal volume of
egg whites replaces the whole eggs, and the oil and baking
powder are eliminated. This produces a stronger structure
so rhe flour can be cut back by % cup, yielding a lighter
texture. The sugar remains the same because it is needed to
tenderize what would otherwise be a rubbery cake. This
means chat the sugar in relation to the other ingredients is
higher than for rhe chiffon cake so the angel food cake is
somewhat sweeter. Part of the sugar is beaten into the whites
to add stability and the remainder is mixed with the flour
to separate the grains, which helps it to incorporate evenly
into the resulting meringue.
A small amount of cocoa tempers the excessive sweet-
ness so often objectionable in an angel food. As in the Gen-
oise au Chocolat, I have used my new technique of adding
water (not traditionally called for in this type of cake) to
the cocoa. The water adds moisture, tenderizes the cake,
and dissolves the exxoa, thereby both facilitating its incor-
poration and intensifying the flavor. Also, a slightly higher
baking temperature is used compared to chiffon cake
to produce a lighter and more tender and moist cake
(page 476).
162 SIMPLY DELICIOUS FOOLPROOF CAKES
Showcase
Cakes
cakes in this chapter illustrate how to achieve glorious
creations from the basic recipes in the rest of the book. They are
perfect for important occasions like weddings anniversaries,
birthdays, graduations, promotions, holiday*!, and dinner parties.
Some have appeared already in magazines, others only at private
gatherings. Each cake has its own story, and—for inspiration and
amusement—I am including two of the most dramatic in this
chapter.
To invoke romance and poetry, some of my cakes bear Eu-
ropean titles but most are as American as I am. The handful of
European classics have undergone contemporary American cult-
nary evolution. They contain less sugar, are lighter in texture, and
have more pronounced flavors.
For the sake of practicality and purity of flavor, I limit the
number of components in each cake to three or four. Although
narrow layers filled with many varying creams sound exciting and
scrumptious, the taste tends to confuse the palate and diminish
eating pleasure—the way mixing together too many colors in a
painting results in loss of individual identity.
Cakes made for special occasions must dazzle the eye. But no
matter how carried away I get with decorating, my chief concerns
are always flavor and texture. If a cake isn’t going to taste abso-
lutely delicious, there is no point in making it!
Once you have learned some of the the techniques in this
book, the special cakes in this chapter will showcase all your bak-
ing and decorating skills. Believe it or not, the cakes are easy to
assemble. The components can be made in steps and, as much as
possible, I have suggested timing and plans for preparation at the
beginning of each cake. The recipes for the individual components
(given in other chapters) also contain tips for advance preparation
and storage.
Of course recipe components can be used interchangeably and
the cakes decorated in any number of ways, including the simple
frosting techniques on page 360- But fur special occasions, here
are some examples to inspire you to ever-greater flights of fan-
tasy.
SHOWCASE CAKES
THAT APPEAR IN
OTHER CHAPTERS
Chocolate Scarlet Em-
press ipage 1441
Fresh Berry Meringue
Torte (page 260)
Chestnut Sand Cake
Ipage 42)
Maple Butter Cake
page 40:
I4na Colada Cake
(page 352)
Strawberry Savarin
(page 79)
Strawberry Shortcake
(page 338)
Vermicelli Ipage 262)
SHOWCASE CAKES 163
TIPS FOR
SHOWCASE
CAKES
EXTRA
BUTTERCREAM
STORING A
COMPLETED CAKE
FREEZING A
COMPLETED CAKE
STORING LEFTOVER
CAKE
The buttercream recipes in this chapter are generous to ensure
that there will be enough to complete the cake. Any leftover but-
tercream can be frozen for future use. In fact, when 1 have col-
lected several different varieties, I make cupcakes using the All-
Occasion Downy Yellow Butter Cake (page 39) or Perfect All-
American Chocolate Butter Cake (page 54). Half recipe of either
makes 9 cupcakes. Use 2% teaspoons baking powder for ’Л recipe
of yellow cake, 1У« teaspoons of baking powder for recipe of
chocolate cake. Fill paper-lined or greased and floured muffin tins
two thirds full and bake 20 to 25 minutes or until the cupcakes
test done. 1 frost the cupcakes with thawed, rebeaten buttercream.
Arranged on a serving plate, they are most attractive, often dis-
playing a rainbow of colors.
Cakes and buttercreams are prone to absorbing other flavors so,
if cakes are frosted far ahead, precautions must be taken. A small
cake can be stored in an airtight plastic cake carrier or glass cake
dome (page 461). A large tiered cake can be placed in a heavy
cardboard box and taped shut.
If you are planning to freeze a frosted cake, place it uncovered in
the freezer just until the frosting is very firm and it will not be
damaged by wrapping. Wrap the cake first in plastic wrap, then
in heavy-duty foil, trying to eliminate as much air as possible
without pressing on the decorations. The most airtight wrap is
known as tbe drugstore wrap; Place the cake m center of the foil
and bring the two long sides together so that the edges meet. Fold
the edges over several times until dose to the cake. Proceed in the
same way for the short ends. Delicate decorations can be pro-
tected further by placing the wrapped cake m a rigid box.
Be sure to defrost the cake overnight in the refrigerator and
then allow it to come to room temperature before serving. Grad-
ual defrosting prevents water droplets from forming on the frost-
ing. W’hen you remove the cake from the freezer, take off the
wrapping while the frosting is still frozen solid—before refriger-
ating the cake in an airtight container.
Begin by offering any leftover cake to your guests; it’s rare to
receive a refusal. Most cakes are still delicious the day after if
wrapped airtight in plastic wrap and foil, even without refngrra
twn. I sometimes cut individual pieces of leftover cake, wrap them
tightly in plastic wrap and foil, and freeze them for future desserts
or afternoon tea.
caveat: Butter cake must be eaten at room temperature to fully
appreciate the flavors and soft, tender texture. Cakes cold from
the refrigerator have muted flavors and much firmer textures.
164 SHOWCASE CAKES
fanciful image of this cake reflects the flavor within:
soft-as-swan’s-down white butter cake, silky lemon butter-
cream, and a shimmering lake of dark blueberry topping.
The Victorian dessert spoons in the picture were found
at an antiques fair held in a Moravian church in Hope,
New Jersey. I spent a small fortune on them because they
reminded me of swans’ wings.
This cake is lovely to serve any time of year and sat-
isfying yet light enough as the finale for a grand dinner.
SPECIAL EQUIPMENT NEEDED
• Plastic swans can be used in place of piped mennque
swans. They are available at party supply stores and can
be painted with a thin coating of Royal Icing (page 294},
• Two 9 %-inch x 6’A-inch oval pans (page 453)
• Oval platter or board, flat portion at least 10 inches by 7
inches
• Pastry bag and number 22 star tube
CAKE COMPONENTS
♦ 2 meringue swans ipages 297 and 377) and ’A cup Sta-
bilized Whipped Cream (page 255)
♦ 1 recipe White Chocolate Whisper Cake {page 50), baked
in two 934-inch by 6%-inch oval cake pans (page 4.53)
♦ 1 recipe Neoclassic or Classic Lemon Bunercream (page
234)
• I recipe Winter Blueberry Topping (page 349)
METHOD FOR ASSEMBLING CAKE
1. Frost directly on a serving plate, using strips of wax pa-
per slid under the sides. Or make a cardboard base, us-
ing one of the cake pans as a template.
1. Spread a little buttercream on the base so that the cake
will stick to it.
3. Fill and frost the layers with a '/r-inch-thick layer of
buttercream. Use a small metal spatula to create vertical
lines to represent waves on the sides.
4. With the remaining bunercream pipe a border of side-
way* shells I page 400—reverse shell technique w ithout
altering direction), using a number 22 star tube. Chill
for 30 minutes.
5. Up to 2 hours before serving, carefully, so as not to
damage the border, spoon room temperature Winter
Blueberry Topping smoothly over the cake.
6. Complete the swans by piping the whipped cream and
securing the heads and necks and set on the cake.
Blucbcrnj
Swan Lohe
SERVES 12
TIMING:
The cake can be assembled
1 day ahead and refrigerated
except for the blueberry top-
ping and swans, which
should be placed on the
cake no mure than 2 hours
before serving. Fhe frosted
cake I without the swans or
blueberry topping! can be
frozen 2 months.
SERVE:
If the cake has been refriger-
ated, allow it to come to
room temperature before
serving (at least 2 hours l.
Cut into v*edges radiating
from the center.
SHOWCASE CAKES 165
A Taste of
I leaven
SERVES 8 TO 10
TIMING’
The cake caa be assembled
2 days alscad and refriger-
ated. It can be frozen 2
months.
SERVE:
Lightly chilled or room tem-
perature. (Buttercream
should be warm enough to
be creamy.) Cut with a ser-
rated knife into wedges ra-
diating from lIh* center.
his i$ my personal translation of the classic Swiss Zu-
ger Kirschtorrc. In Swiss German the word Zu ger sounds
like the word 7мскет, which means ‘Sugar.*’ Actually, Zu-
ger refers to something that comes from the town of Zug,
renowned for its kirsch (cherry liqueur).*
In Switzerland this cake ranks as the favorite non-
chocolate cake. Truly, it is a miracle of textures—a small
taste of heaven. My version consists of a genoise heart
drenched in kirsch syrup, cloaked in pale pink buttercream,
and embraced by a pair of cnsp, heart-shaped dacquoise.
Due to the nature of the components, this is one of the
sweeter cakes in this book, It is, however, less sweet than
the Swiss version because I have decreased the sugar tn the
syrup and opted for dacquotse rather than the sweeter me-
ringue normally used.
Traditionally, Zuger Kirschtorrc is round, but 1 think
the heart shape emphasizes the romance of this exquisite
dessert. And it provides the perfect centerpiece for a Val-
entine's Day celebration or engagement party.
SPECIAL EQUIPMENT NEEDED
• 9-inch by 2-inch heart-shaped pan -The cake also can be
made in a 9-inch by 2-inch cake pan or a 9-inch spring-
form pan.)
CAKE COMPONENTS
• 1 recipe Genoise Classiquc {page 120), baked in a 9-inch
by 2-inch heart-shaped pan (page 453) and top and bot-
tom crusts removed
• 1 recipe syrup flavored with kirsch (page 120}
• 1 recipe Dacquoise (page 302), piped in 2 heart-shaped
discs slightly smallel than the outline of the pan to allow
for spreading during baking (page 375)
• 1 recipe Neodassic or Classic Buttercream (page 230 or
228), flavored with Ул cup kirsch and tinted pale pink
with 6 drops of red fond color
• 1 cup sliced blanched almonds |3 ounce$/85 grams), toasted
at 350^. for a few minutes until lightly browned
METHOD FOR ASSEMBLING CAKE
1. Use the heart-shaped pan to trace a heart-shaped card-
board base.
2. Sprinkle each side of the cake with 3 tablespoons syrup.
' The best kind) I have ever lasted ts Icier Kirsch, лшпиПмarcd m th*.* town
of Zug. Switnerbnd. If pew visit Suitarrhnd, be sure to bring back a bonk-
166 SHOWCASE CAKES
3. Spread a feu* small dabs of buttercream on che card-
board base and place 1 ddLQMoiie disc Hat side down
on it,
4. Spread a thin layer of buttercream on the dacquoite and
top with the genoitc layer. Spread another thin layer of
buttercream on the genoise and top with the second
dacqwHte flat side up.
5. Use the remaining buttercream to frost the top and sides.
6. Gently press the toasted almond slices on the sides, sup-
porting the cake on the palm of 1 hand and tilting it
slightly toward the other hand, cupped to hold the nuts,
7. Refrigerate up to 1 hour before serving.
L/ne of my earliest memories is of the smell of lilacs, and
sunshine glinting through their leaves as my stroller was
pushed to and fro to encourage the ever-resisted afternoon
nap. Individual lilac blossoms are exquisite. Crystallized with
lavender sugar and embedded in white chocolate butter-
cream, they make magnificent cake decorations. The pale
pink of Raspberry Mousseline Buttercream against the pale
yellow’ cake provides a harmony of color and flavor.
This cake would make a lovely centerpiece for a
Mother's Day part].’.
CAKE COMPONENTS
• 1 recipe White Velvet Butrer Cake Ipage 46), layers split
in half horizontally
• ‘/j recipe Raspberry Mousseline (page 245), tinted with 3
drops of red food color
♦ I recipe Creme Ivoire Deluxe (page 246)
• Crystallized Lilacs (page 326)
METHOD FOR ASSEMBLING CAKE
1. Spread a link mousseline on a 9-inch cardboard round
so the cake layers adhere.
2. Stack the cake layers on top of each other, sandwiching
each with cup mousseline (VS of the mousseline in
between each layer).
3. Chill the cake for 10 minutes.
4. Frost with Сгёте Ivoire Deluxe.
5. Decorate the sides and top with the crystallized lilacs. If
necessary, make a nny hole in the frosting with a skewer
before inserting a lilac. The cake can be held at cool
room temperature until the following day.
White Lilac
Nostalgia
SERVES
I 0 T О 12
TIMING:
The cake can be anembJed
1 day ahead. It can he
frozen without rhe lilacs for
2 montht-
SERVb
Room temperature. Cut
with a thin, sharp knife.
SHOWCASE CAKES 167
Bate!
Hawaii
SERVES
I О T О 12
TIMING:
The cake should be assem-
bled 1 to 2 days ahead. The
menngue must be applied
and baked for 5 minutes in
a very hoc oven just before
serving.
SERVE:
Starting at the bottom, cut
thin slices—making (Ik first
slice thicker as it will con-
tain less of the see cream—
with a thin, sharp knife
dipped m hoc water. If the
ice cream its very firm, allow
the cut pieces to sit for 10
minutes or until it starts to
soften slightly before
serving.
STORE:
Leftovers will stay delicious
fur at least 2 days if
wrapped airtight and kept
frozen.
o'/IL any years ago, on my first trip to France, I wa.s
invited by Stella Standard, to eat at the legendary Left Bank
bistro Chez Allard. It was renowned for its canard aux na-
vels (‘‘duck with turnips”), but it was a dessert, in all its
perfect simplicity, which most intrigued me: ripe fresh
pineapple, bathed in a fine-quality kirsch. That was all. And
it was divine.
The combination of pineapple and kirsch experienced
those twenty years ago is what inspired this special version
of Baked Alaska. Every component contains either kirsch
or pineapple and sometimes both. The kirsch keeps the ice
cream and biscuit from freezing too hard, while fresh pine-
apple juice keeps the Italian meringue tnun being too sweet.
This is a real showstopper dessert. Although the me-
ringue must be piped and browned just before serving, it's
quick arid easy to do, and guests enjoy the anticipation of
watching the final preparations.
SPECIAL EQUIPMENT NEEDED
• Two 9l4-inch by 65/«-inch oval pans (page 453)
• Ice-cream freezer
• Pastry bag and a large number 6 star tube
CAKE COMPONENTS
• 1 recipe Fresh Preserved Pineapple in syrup (page 351),
Be sure to save the pineapple juice while cutting pineap-
ple for the meringue. The preserved pineapple is used in
the ice cream, the syrup tor brushing on the cake.
• 4 cups Pineapple Ice Cream (pages 286 and 351), slightly
softened
• 1 recipe Oval Biscuit (page 147)
• 2 tablespoons melted and strained apricot preserves
• 1 cup Pineapple Kirsch Syrup: Snr together % cup re-
served pineapple poaching syrup (page 351) and 14 cup
kirsch.
• IVj recipes Light Italian Menngue (page 298), replacing
the water with fresh pineapple juice
METHOD FOR ASSEMBLING CAKE
1, Cut 1 biscuit oval in half horizontally for the top and
bottom of the cake.
2. Cut out the center of the second oval, leaving a 14-inch
ring. Reserve the center for another use.*
* I freeze this center nvd until I am ready to use it. Then I sprinkle it with ib
weight in Pineapple Kitsch Syrup, frost it *uh Pineapple Випекгемп, and
□dum rt with crated coconut.
16H SHOWCASE CAKES
3. Sprinkle 3 tablespoons syrup on cad» side of the 2 ovals
and brush 2 tablespoons on each side of rhe ring.
4. Use an oval cake pan to make an oval cardboard base.
Wrap the base in foil.
5. Place I biicuii oval on the base and carefully stack the
ring on top, brushing the nng and the outside perime-
ter of the base with the apricot preserves to make then»
adhere. (Support the ring with a flat baking sheet when
lifting.)
6. Spoon softened ice cream into the center of rhe ring,
mounding it.
7. Top with the second oval.
8. Wrap with plastic wrap and then foil and freeze for at
least 24 hours.
9. Just before serving, place a rack in the upper third of
the oven and preheat the oven to 5OCTF. Spread the
cake with the Italian Meringue to seal it. Pipe connect-
ing stars of menngue with a large number 6 star tube.
10. Bake the cake 3 to 5 minutes or until the meringue
begins to brown. Watch carefully to prevent burning.
Jr (1 aspberry scented buttercream encases a complexity
of textures from soft moist догоде to crisp meringue. Fresh
raspberries and blueberries interrupt rhe crunchy layers with
bursts of juicy tartness.
This pretty and delectable cake works with other fruit
themes as well (see Note). I designed the raspberry red, white,
and blueberry theme for a 100th anniversary of the Statue
of Liberty party. When I use blueberries alone, my husband
calls the cake “Rhapsody in Blueberries.0 This is a fun cake
to make for Fourth of July celebrations.
SPECIAL EQUIPMENT NEEDED
• Pastry bag and number 3 round tube and number 22 star
tube
CAKE COMPONENTS
♦ 1 recipe Crisp French Meringue (pages 296 and 375), piped
in two S'/i-inch spiral discs
• 1 recipe Genoise Classique (page 120), cop and bottom
crusts removed and sliced in half horizontally
• 1 recipe Syrup flavored with errmr de myridles (blue-
berry liqueur), framboise (eau-de-vie of raspberries), or
amaretto (page 120)
Star-
Spangled
Rhapsody
SERVES
I 4 T О 16
TIMING
The cake should be assem
bled 1 to 3 days ahead and
refrigerated. The berries
should not be placed on top
until the day of serving. The
completed cake freezes wdl
without the fruit topping for
3 muntin.
SERVE:
Lightly chilled or room tem-
perature. (Buttercream
should be warm enough to
be creamy.} Cut with a ser-
rated knife.
SHOWCASE CAKES 169
• 1 recipe Mousseline Buttercream (page 244) flavored with
framboise eau-de-vie (which is dear in color)
• 'A cup heavy cream softly whipped with % teaspoon va-
nilla (page 253)
• 1 cup Fresh Blueberry Topping (use large blueberries) (page
348) and 2 cups small raspberries
METHOD FOR ASSEMBLING CAKE
1. Trim the meringue discs to the same diameter or slightly
smaller than the grrtorse Use a small serrated knife and
support the discs on a cardboard round or removable
pan bottom, allowing the pan to be trimmed to extend
slightly over the edge.
2. Sprinkle each side of the genoise with 3 tablespoons
syrup.
3. Spread a little mousseline on the 9-mch cardboard round
and attach a meringue disc, flat side down. Spread with
a thin layer (about 'A meh) of mousseline and top with
1 layer of genoise,
4. Spread the whipped cream on the genoise and top with
V* cup each Fresh Blueberry Topping and raspberries,
saving the most attractive berries for decor.
5. Top with the second genoise layer. Spread curved top
side of second meringue disc with another thin layer of
mousseline and place on top of genoise layer.
6. Frost the sides and top with some of the remaining
mousseline.
7. Pipe mousseline decorations with a number 3 round tube
for the string work (page 404) and a number 22 star tip
for the shell border (page 399). Refrigerate until firm.
8. Top with the remaining Fresh Blueberry Topping and
raspberries in a decorative pattern. Use the number 22
star rip to pipe stars (page 398).
note: Other fruit possibilities: Fresh or Winter Cherry
Topping (page 344 or 345), fresh strawberries, or an
11-ounce can of mandarin orange shoes, drained and mar-
inated overnight in 2 tablespoons Mandarine Napoleon li-
queur. Use liqueurs for the syrup and buttercream to
complement the fruit (kirsch for the cherries, Grand Mar-
nier for the strawberries, and Mandarine Napoleon for the
oranges). Mandarine Napoleon is especially pretty because
it gives the mousseline a pale apricot hue.
170 SHOWCASE CAKES
K^he first time I encountered brioche as a cake was at
LcNotre’s school in Plaisir, France. It was my favorite of
all the cakes we made during that intensive week of classes.
The original version of this cake was in my first book,
Romantic and Classic Cakes. 1 have since made my praline
buttercream much less sweet and sometimes vary the recipe
by using white chocolate praline buttercream in its place.
The cake is a study in contrasts—goesamer-soft brioche
saturated with a refreshingly light nun syrup and encased
by a rich, light, smooth praline bunercream. The nutty
richness makes it especially suitable for cool weather occa-
sions.
SPECIAL EQUIPMENT NEEDED
• 2-inch high expandable flan ring and an 8-inch cardboard
round. Or an 8-inch loose-bottom or spnngform pan fit-
ted with cardboard rounds until the correct depth is ob-
tained
• Pastry bag and number 22 star tube
CAKE COMPONENTS
• 1 recipe La Brioche Cake (page 76), trimmed to 7 inches
by I Vi inches to 1 ’/♦ inches
• 1 recipe Rum Syrup - page 76}
• Vs recipe Praline Silk Meringue Buttercream (page 241)
or 1 recipe Creme Ivoire Praline (page 249)
• Vi cup (2 ounces/57 grams) skinned and toasted hazel-
nuts (page 324). Reserve 24 whole nuts for the garnish
and coarsely chop the remainder.
METHOD FOR ASSEMBLING CAKE
1. Place the bnoche cake in a large pan and pour the syrup
over it. Allow it to sit for 10 minutes or until the syrup
is absorbed. Turn the bnoche occasionally or use a bulb
baster to help it absorb as much syrup as possible.
2. Spread the cardboard round with a very thin layer of
buttercream and place it in the bottom of the ring. If
using a bottomless ring, set on a baking sheet for sup-
port.
3. Using a small metal spatula, spread a thin layer of but-
tercream inside the ring.
4. Slide the brioche into the ring and top with some but-
tercream. Use a long metal spatula to create a smooth
top, allowing the blade to rest on the sides of the ring
to create a very even surface.
P ratine
Brioche Cake
SERVES
I 4 T О 16
TIMING:
Ihr cake can be assembled
1 to 4 days ahead and re-
frigerated. The completed
cake can be frozen 3
months.
SERVE:
Lightly chilled or room tem-
perature. I Buttercream
should be warm enough to
be creamy.)
SHOWCASE CAKES 171
5. Refrigerate for at least 30 minutes.
6. To иnmold; Very briefly hear rhe sides of the ring or
pan with a hairdryer on che hoi setting or a hot, wet
towd «page 358).
7. Place the cake on top of a firm object slightly smaller
in diameter than the bottom, such as a canister. Pull
the ring firmly down, away from the cake.
8. Gently press the chopped nuts on the sides, supporting
the cake on the palm of 1 hand and tilting it slightly
toward the other hand, cupped to hold the nuts.
9. Use the reserved whole hazelnuts to form a border, al-
ternating with buttercream piped from a number 22
star tube to resemble hazelnuts.
10, Refrigerate up to 30 minutes before serving.
Golden
Cage
Zauber Torte
SERVES
I 2 T О 16
TIMING:
The cake can be assembled
1 day ahead and refrigerated
or frozen 2 months. The
caramel cage, however,
should not be refrigerated or
frozen. Remove the frosted
cake from the refrigerator at
least 2 hours before serving
and place the cage on top.
SERVE:
Room temperature. Light
the candles or sparkler. Re-
move the cage before cut-
ting. Break the cage into
pieces and use for garnish.
^Xhe German name of this cake was inspired by Mo-
zart’s joyful opera “Die Zauberflotc” (“The Magic Flute”).
Beneath a shimmering golden caramel cage lies still more
gold: buttery, dense golden gewoise frosted with tart Apri-
cot Silk Meringue Buttercream and sprinkled with Caramel
Gold E>ust. I serve this dessert for very special occasions
(New Year’s Eve, fiftieth birthday parties, golden anniver-
saries). For extra golden glitter, present it with a sparkler
and serve it with Sautcrnes or an Eiswein Ithe most glo-
rious of dessert wines).
SPECIAL EQUIPMENT
♦ one 9-cup Kugelhopf pan Ipage 447)
CAKE COMPONENTS
♦ 1 recipe Golden Genoise Ipage 125), baked in the 9-cup
Kugelhopf pan
• 2 tablespoons Barack Palinka (apricot eau-de-vie) or apri-
cot brandy
• ¥i reape Apncot Silk Meringue Buttercream {page 243)
• Gold Dust and Caramel Cage (page 313)
OPTIONAL DECOR
• Crystallized Violets (page 326)
- A sparkler or long, thin, dripless candles
172 SHOWCASE CAKES
METHOD FOR ASSEMBLING CAKE
1. FriKt directly on a serving plate, using strips of wax pa-
per slid under the sides. Or make a cardboard base, us-
ing rhe inverted cake pan as a guide.
2. Split the R&toise in half honzontaliy with a serrated knife.
Sprinkle each cut side with 1 tablespcxm Barack Pa-
linka.
3. Sandwich the layers together with VS cup buttercream.
Remove any loose crust and spread the remaining but-
tercream over the outside of the cake. If not serving the
same day, refrigerate.
4. Using a small strainer, sift rhe Gold Dust over the but-
tercream, tilting the cake to get an even coating. Place
the cake on a large flat platter or serving plate and cover
it with the Caramel Cage, (if the cage should acciden-
tally break, use the broken pieces as decoration right on
the frosting.)
5. Attach the crystallized violets, if desired, with tiny dabs
of caramel. (Leftover caramel from die cage can be re-
melted in the microwave on high power or in a small
heavy saucepan over medium heat.)
6. If desired, insert candles through the cage so that they
radiate from the center. If using a sparkler, insen it at
an angle away from the cake so sparks do not fall on
the cake.
SHOWCASE CAKES 173
CHARLOTTES
A charlotte is made by lining a mold with gossamer biscuit or
genoise (sponge-type cakesl in varying geometrical shapes, and
then filling the mold with an airy Bavarian or whipped cream.
When surrounded by slices ot multilayered sponge cake and jam
it is called charlotte royale. When surrounded by lady fingers, it is
known as a charlotte russe. The charlonc is so popular in France
it is constantly reappearing in new guises and names. In America
the charlotte has appeared and disappeared over the years, usu-
ally under the prosaic name “icebox cake,” probably in deference
to the advance preparation and prolonged refrigeration necessary
before unmoldtng and serving it.
When I think of an icebox cake, 1 picture an easy-to-prepare
cake that uses packaged lady fingers. These are not a bad product,
but, when you make your own ladyfingers or cake sheets, icebox
cake is transformed into a charlotte and becomes one of my fa-
vorite desserts. Both from a visual and gustatory standpoint, one
can ask for no more elegant finale to a dinner party,
NOTE: A charlotte must be prepared at least four hours in advance
but can be refrigerated for up to 3 days with no kiss of texture
or flavor. The cake-lined mold must be prepared in advance. In
fact, it can be frozen 3 months, making it a simple matter to
complete the dessert well in advance ol a party.
174 SHOWCASE CAKES
dessert, inspired by LeNdtre, one of the world’s
great pat listers, is perhaps my favorite of all charlottes. The
flavor is pure pear and the texture incomparably creamy
and billowy.
SPECIAL EQUIPMENT NEEDED
• 9-inch spnngform or loose bottom pan or a flan ring ar
lexst 2’Л inches high
• 17-inch by 12-inch jelly roll pan
CAKE COMPONENTS
• 1 recipe Biscuit Roulade for the sides of the mold (page
142)
• 1 recipe Biscuit Roulade for the base (page 142) (Cut 2 8’
inch rounds; freeze 1 for future use and reserve the other
for the base.)
• cup Cordon Rose Raspberry Conserve [page 331) or
seedless raspberry jam
• 1 recipe Poached Pears (page 350}
• 1 recipe Pear Bavarian Cream (page 290)
• Va cup Apple Jewel Glaze [page 329), thinned with Wil-
liam’s pear liqueur. Or Shiny Apple Jewel Glaze (page
330) if preparing the charlotte more than 1 day ahead.
• Optional:
1 recipe Raspberry Sauce (page 337) to echo the filling
and contrast with the pale green color
METHOD FOR ASSEMBLING CHARLOTTE
LINING THE 9-INCH BY 2'A-INCH MOLD
I. Bake the biscuit and allow it to cool flat.
2. To cut the biscuit, use a pizza wheel or a sharp knife
and a ruler to score where the cuts should be and then
use sharp shears to do the actual cutting, Tnm the edges
so that the biscuit measures exactly 10 inches by about
16 inches. Now cut the biscuit lengthwise into 4 equal
rectangles, 2'/i inches wide by 16 inches long.
3. Spread 3 of the rectangles with a smooth layer of the
raspberry conserve or jam. If rhe jam is too thick to
spread easily, thin it with 1 tablespoon Chambord (black
raspberry liqueur) or warm water. If using commercial
jam, heat and strain it and use warm-
4. Stack rhe rectangles carefully on top of one another,
ending with the one that has no jam. The fiat side of a
long metal ruler, pressed against the side helps to even
the layers.
Ethereal
Pear Charlotte
SERVES
8 T О I 0
TIMING
The charione mu« be as-
sembled 4 hours to 3 days
ahead. It can also be frozen
3 weeks. The mold must be
lined with the biscuit before
preparing the filling.
SERVE:
Chilled. For an elegant ef-
fect, pour raspberry sauce
onio the center of each serv-
ing plate and tilt to coat
evenly. Top with a slice of
the charione.
SHOWCASE CAKES 175
5. Cut the stacked rectangles in half to form 2 shorter
rectangles (each 7УЬ inches long). You now have two
4-hyer rectangles, each lYi inches wide, 7r/j inches long,
and 2 inches high. iThe only important measure is che
width because when sliced and positioned in the pan,
it will determine the height of the striped border.)
6. Wrap the rectangles in wax paper and pur them in a
large heavy-duty plastic freezer bag. Place them on a
baking sheet to maintain their shape and freeze until
firm.
7. Use a small serrated knife to cut rhe rectangles into Ум-
inch slices. If necessary, trim each slice so that it is
exactly 2’Л inches high when the stripes are up and
down.
8. If molding the charlotte in a springform pan, remove
the inner disc and place the outer nng directly on a
serving plate. If using a loose-bottom pan, leave the
inner disc in place but line it with a parchment round
if planning to remove it before serving.
9. Lightly oil the inside of the ring. Place the striped slices
around the ring so that the stnpes are straight up and
down. Brush 1 side of each slice with a light coat-
ing of conserve before placing the next slice firmly
against it.
10. Measure the inside diameter of the lined ring for mak-
ing the biscuti disc. Cover the ring tightly with plastic
wrap and set aside while preparing the disc and filling.
11. Trim the biscuit base if necessary and fit it snugly into
the bottom of the lined ring. Re-cover nghdy with the
plastic wrap.
12. Poach rhe pears reserving the liquid for the filling.
13. Prepare the Pear Bavarian Cream and scoop it into the
prepared mold. Level with a small angled spatula. Cover
tightly and refrigerate for ar least 30 minutes.
14. Use a thin, sharp knife to cut the poached pears
lengthwise into thin slices. Place a fan of overlapping
slices on top of the filling with the pointed ends at the
center. To form я center pear-shaped decoration, place
2 small pear dices (slightly overlapping) and a small
piece of stem at the top.
15. If serving the same day, brush the pears with a thin
film of Apple Jewel Glaze. For a thicker glaze that keeps
the pears moist and fresh for several days, brush with
Shiny Apple Jewel Glaze instead. Allow the charlotte
to set for 4 hours to 3 days before unmolding.
176 SHOWCASE CAKES
To unmold: For a spnngform, release the sides of the
pan and lift away. For а loose-bottum pan, place on
top of a sturdy canister smaller than the pan’s bottom
and press firmly downward. The pan sides wdl slip
down to the counter and the charlotte can be lifted off
the canister because it is supported by the pan base.
Use a heavy-duty pancake turner to slide between the
parchment and pan base and place the charlotte on a
serving plate.
V^pital slices of jam filled tender Biscuit Roulade form a
dome to encase a smooth vanilla Bavarian cream. This is a
light, intensely flavorful cake with a dramatic design. It is
especially delicious and attractive served with a tart rasp-
berry sauce.
SPECIAL EQUIPMENT NEEDED
• 6-cup round-bottom bowl
• 17-inch by 12-tnch jelly-roll pan
CAKE COMPONENTS
• Vz cup Cordon Rose Raspberry Conserve (page 331) or
seedless raspberry jam
• 1 recipe Biscuit Roulade (page 142) for jam-filled roll and
base
• 1 recipe Vanilla Bavarian Cream (page 287)
• Optional:
Shiny Apncot Glaze (page 178) for a transparent golden
film which keeps the cake fresh and adds a pleasant tart-
ness
1 recipe Raspberry Sauce (page 337)
METHOD FOR ASSEMBLING CHARLOTTE
LinMf the 6-cup mold:
1. Lightly oil the 6-cup bowl and line it as smoothly as
possible with a sheet of plastic wrap, leaving a small
overhang. Measure the diameter of the bowl. You will
need a round biscuit base that just fits inside.
2. As soon as the biscuit has finished baking, use lining
to slip it out of the pan onto the counter and cut off a
strip from 1 of rhe short ends just wide enough to serve
as the top.
3. While still hot, roll the remaining biscuit as indicated
in the recipe and allow it to cool.
4. When the cut strip has cooled, cut it with shears into
Jcarld
Empress
SERVES 6 TO 8
TIMING:
The charlotte must be as-
sembled 8 hours to 3 days
ahead. It can also be frozen
3 weeks. The mold must be
lined with the jelly-roll slices
before preparing lhe filling.
SERVE:
Chilled. For an elegant ef-
fect, pout raspberry sauce
onto the center of each serv-
ing plate and rift it to coat
evenly. Top with a dice of
the charlotte.
SHOWCASE CAKES 177
a circle for the base. Wrap in plastic and set aside.
5. The jelly-roll slices used to line this charlotte muse be
rightly rolled for the most attractive appearance. To
accomplish this» unroll the cooled biscuit, leaving it on
the nonstick liner or rowel» and spread the crust side
with a very thin layer of raspberry conserve or jam. If
the jam is ton thick to spread easily, thin it with 2
teaxp<x>ns chambord (black raspberry liqueur) or warm
water.
6. Roll up the biscuit nghdy about ’Zi of the way and
turn it so that the unrolled portion is facing you. Fold
over the lining or towel to cover the rolled section and
a little of the flat section. With the edge of a straight-
sided baking sheet held at an angle on top of the towel
just at the point where the rolled section ends, press
firmly against the roll and rug the bottom of the towel
toward you to compress the roll. Litt away the towel
overlap, roll up another '/i of the way, and repeat
process. Repeat 1 more time, again angling the baking
sheet at the base of the roll. The completed roll will be
2 inches in diameter.
7. Wrap snugly with plastic wrap and then foil and freeze
until firm enough to slice.
8. With a small serrated knife, cut the roll into ’/«-inch
slices.
9. To hne the bowl, place 1 slice in the center and place
other slices around it as tightly as possible to avoid
gaps. It is usually necessary to cut the slices in half or
smaller to fit the last row {Figs. 1 and 2).
10. Cover the lined bowl tightly to keep it from drying out
until the filling is ready.
11. Make the Vanilla Bavarian Cream, spoon it into the
mold, and place the round biscuit base in place. Cover
righdy and refrigerate until set {ar least 8 hours).
To unntold: Invert onto a serving plate and lift away die
bowl, tugging gently on the plastic wrap to release it. To
prevent drying out, glaze with Shiny Apricot Glaze or sim-
ply leave the plastic wrap in place until shortly before serv-
ing time.
TO MAKE SHINY APRICOT GLAZE
Sprinkle 1 teaspoon gelatin over ¥i cup water and allow to
sit for at least 3 minutes. Heat until the gelatin is dissolved.
Heat ¥» cup apricot preserves and strain it. Stir in the gel-
atin mixture and allow to thicken slightly. Or stir briefly
over ice w ater until syrupy before brushing onto cake.
ITS SHOWCASE CAKES
ч^/be dramatically complex shape of this charlotte is de-
ceptively simple—merely cut and overlap rectangular strips
of genoise. The easy-to-makc Chocolate Chip Whipped
Cream filling is light» crunchy and utterly delectable.
SPECIAL EQUIPMENT NEEDED
• 6-cup round bottom bowl
• 8-inch by 2-mch square metal pan
• Pastry bag and number 103 rube
CAKE COMPONENTS
• 1 recipe Genoise Classique (page 120), baked in an 8-
inch by 2-inch square metal pan
• Vs cup Ganache Frosting (page 269), made with 2 ounces
bittersweet chocolate and 14 cup heavy cream
• */j the Syrup recipe on page 120, made with Cognac or
amareno
• 1 recipe Chocolate Chip Whipped Cream (page 258)
• Optional:
1 cup Ganache Sauce is a nice textural contrast to the
soft cake and creamy filling. Simply make extra ganache
when preparing it for frosting the genoise.
METHOD FOR ASSEMBLING CHARLOTTE
Lining the 6-cup moM
1. Use a soft tape measure to measure the inside of the 6-
cup bowl, measuring from the center to the edge and
making sure that the tape follows the curve of the bowl.
It should measure about 5 ¥2 inches. Using a long ser-
rated knife, remove the top crust of the genoise and trim
it so that it is perfectly square. Cut off 1 edge so that 1
side measures exactly 6 inches (one inch more than the
curve of the bowl for a safety margin).
2. Prepare the Ganache Frosting and spread 2 tablespoons
of the hot ganache on the top of the cake. Chill the cake
for 15 minutes to set the ganache. Set aside the remain-
ing ganache at room temperature.
3. Invert the cake, ganache side down, onto lightly greased
foil and cut it into 6-inch by 14-inch strips with a thin,
sharp knife, wiping the blade between each slice. Cut 1
end of the unfrosted side of each strip on the diagonal
so that it comes to a point (Fig. 1). This will prevent
too much cake from building up in the center. Keep the
slices covered with plastic wrap to prevent drying.
A TOUCH
OF CHOCOLATE
Chocolate
Chip
Charlotte
SE RYES 6 TO 8
TIMING:
Generic should be baked 1
day ahead to be firm enough
for cutting. The charlotte
must be assembled 2 hours
to 3 days ahead. It can also
be frozen 3 weeks. The
cream filling is prepared just
before lining the mold with
the cake so that some of the
whipped cream can be used
to attach the cake strips.
SERVE:
Chilled. For an elegant ef-
fect, pour Ganache Sauce
onto the center of each serv-
ing plate and rilt it to coat
evenly. Top with a slice of
the charlotte. If the ganache
is too thick to pour, warm it
gently in a double boiler.
For extra flavor, add 1 ta-
blespoon cognac or amar-
SHOVPCASB CAKES 179
4. Prepare the Chocolate Chip VChipped Cream and set ande
while lining the mold.
5. Lightly oil the 6-cup glass bowl and hne it smoothly
with buttered plastic wrap buttered side up, allowing a
slight overhang. Starting at the bottom center of the bnwl,
place a strip of genoise from the center to the edge of
the bowl, placing the pointed end at the center, the plain
edge facing right, and the frosted edge facing left
(Fig. 2).
6. Brush the strip with the syrup and a thin coating of the
plain whippet! cream reserved from the filling recipe. Place
a second strip beside it in the same manner, slightly
overlapping first strip at the nm. Brush it with the syrup
and whipped cream. Continue working clockwise, from
right to left, always having the frosted edge facing left
so that it will show on the outside and create a striped
motif when the charlotte is unmolded. When you come
to the last strip, tuck the side under the first strip.
7. Trim the excess genoise flush with the edge of the bowl
with sharp shears (Fig. 3). Cover tightly with plastic wrap
while preparing filling.
8. Fill the lined mold with the Chocolate Chip Whipped
Cream and chill until set {at least 2 hours).
9. Unmokl onto a serving plate, tugging gently on the plas
tic wrap overhang to release the cake. Use the remaining
ganache to pipe a fluted design on top to cover any im-
perfections.
SHOWCASE CAKES
<-/ (t crown of ladyfingers encases layers of Orange Ba-
varian Cream and Light Whipped Ganache. The contrast-
ing flavors and textures are so pleasing that, even if time
docs nor allow to make your own ladyfingers, the charlotte
is still delicious with the packaged variety, freshened with
a light sprinkling of Grand Marnier. The fingers can also
be cut for rhe base and tapered to form a daisy top.
SPECIAL EQUIPMENT NEEDED
• Pastry bag and number 9 large tube (Уч-inch diameter)
for piping ladyfingers and discs
* 9-inch by 2-inch or 3-inch loose-bottom pan, springform
pan, or flan nng
CAKE COMPONENTS
* 1 recipe Biscuit i la Cuilliere (page 148), piped to make
2 dozen ladyfingers (you will need ar least 19) and an
8Vl-inch base (page 373)
♦ ’A recipe Biscuit a la Cuilliere, piped to make a 9-inch
daisy top (page 182)
• If using packaged ladyfingers for tbe sides, base and top,
purchase 2 packages [48 ladyfingers)
♦ 1 recipe Orange Bavarian (page 288)
• *4 recipe Light Whipped Ganache (page 268)
• Optional:
Orange Zest (page 342), a pretty garnish that adds a real
sparkle of orange flavor and delightful chewy candied
texture
1 recipe Grand Marnier Crime Anglaise (page 280), fra-
grant with vanilla and a hint of orange, it ties together
all the harmonious elements of this cake
Brown and orange grosgrain or satin ribbons, to hint at
the chocolate and orange flavors within
GUIDELINES FOR PIPING THE LADYFINGERS. BASE.
AND DAISY TOP
A nonstick liner, parchment, or foil can be used tn line the
pans for piping the Biscuit a la Cuillidre batter. If using
parchment, lines can be drawn directly on it with pen or
penal. The parchment is inverted before piping co that the
lines show through but the ink or pencil marks don't come
into direct contact with the batter. Lines for foil can be
marked with a skew'er. A nonstick liner, however, is my
favorite surface because the baked biscuit slides off it with-
out hesitation. 1 use a bright felt-tip marker to make lines
A TOUCH
OF CHOCOLATE
Orange
Chocolate
Crown
S E R V E S 8 TO I 0
TIMING:
The charlotte must be as-
sembled 4 hours to 3 days
ahead. It mat also be frozen
3 weeks. The mold must be
lined with the bfsenir or la-
dyfingers before preparing
the filling.
SERVE
Remove from (be refrigera-
tor 1 hour before serving.
For an elegant effect, pour
rhe crime ang/aiie onto the
center of each serving plate
and tih it to coat evenly.
Top with a slice of the char-
lotte and garnish with the
orange zest.
SHOWCASE CAKES 181
on a brown paper bag and cover it with the nonstick liner.
It is also possible to grease and flour rhe pan and create
lines in the surface of the flour. For piping lady fingers, make
parallel lines 3 inches арап. For discs, use a round cake
pan to mark circles (8 inches for the base, 9 inches for the
top}.
PIPING METHOD TIPS: Bifcwt batter flows fairly easily so it
is unnecessary to squeeze the pastry bag. If the piped de-
signs do not hold their shape, it means that the egg whites
were not beaten stiffly enough- To stop the flow of batter,
tilt the tube up just before you think it will be necessary.
Work steadily so that batter can be baked soon after pre-
paring it. This will enable it to retain as much air and light-
ness as possible.
PIPED LADYHNGERS; Pipe the ladyfingers leaving Ул-inch
space in between because the batter will spread sideways
while piping the next finger. (After baking, the ladyfingers
will be attached to each other in continuous Strips. Each
finger will be about I'/j inches wide.) Start piping just in-
side the top line and stop shortly before reaching the bot-
tom line, moving the tip slightly forward and up to control
the batter flow.
PIPED SPIRAL BASE: To pipe a spiral base, hold the pastry
bag in a vertical (straight up-and-down) position, with the
tube at least 1 Vi inches above the pan. To achieve full height
and a rounded shape, rhe barter must be allowed to fall
from the tube and not be pressed against the pan. Stan in
the center, moving the tip by turning the entire arm in
smooch ardcs. To prevent gaps, allow the spirals of batter
to fall against the sides—almost on top of—previous spi-
182 SHOWCASE CAKES
rak. The weight of the hatter will cause them to fall exactly
in place.
PIPED DAISY TOP: Making this fancy design to top the
charlotte involves piping a tear drop shape or shell design
without ridges, radiating from the outline to center. Review
piped shell borders (page 399). Finish the center with a round
dot. PearieJ SicRar Effect: After piping the fingers and daisy
top, use a strainer and spoon to sift powdered sugar over
them. After a few seconds, the barter will dissolve and ab
sorb some of rhe sugar. For a pearled effect, sprinkle with
a second coat.
Preheat the oven to 40&F.
BAKING BISCUIT:
Bake К to 10 minutes or until light golden brown and springy
to the touch. Remove the pans to racks and cool slightly.
To prevent cracking, remove from the pans while still warm
with a long, thin spatula or pancake aimer. For discs in
ven onto a rack covered wirh a paper towel, peel off the
backing, and rrinvert onto a second rack. Finish cooling on
racks and then wrap airtight.
METHOD FOR ASSEMBUNG CHARLOTTE
Lining the 9-inch by 2-inch or 3-inch pan:
1. If molding the charlotte m a springform pan, you may
remove rhe inner disc and place the outer nng directly
on a serving plate. If using a loose-bottom pan, leave
the inner disc in place but line with a parchment round
if planning to remove the disc before serving. Lightly oil
the inside of the ring.
2. If the ladyfingers have not been freshly baked, sprinkle
them with a little Grand Marnier. Use the ladyfinger stnps
to line the inside of the ring.
3. Place the Ь«смл base in the bottom, trimming it if nec
cssary for a snug fit.
4. Prepare the Orange Bavarian and scoop it into the lined
mold. Level with a small angled spatula.
5. Add the Light Whipped Ganache and spread smoothly.
6. If not using the daisy top, garnish with the optional or-
ange zest.
7. If using the daisy top, trim the tops of the lady fingers
encircling the mold so that they are flush with the filling
and cover with the daisy top, sprinkled with Grand
Marnier.
SHOWCASE CAKES 1 IB
A TOUCH
OF CHOCOLATE
Strawberry
i'IARIA
SERVES 12
TIMING:
Tbe torte should be assem-
bled 4 hours to 1 day
ahead.
SERVE:
Lightly chilled or room tem-
perature. Break the choco-
late lattice band and use the
pieces for garnish.
v-X he idea for this cake comes from one of my favorite
things to do to a strawberry before eating it: Dtp it in bit-
tersweet chocolate and then inject it with Grand Marnier.
This special creation exploits the same irresistible flavor
combination and was designed with love and reverence for
my editor. Maria Guarnaschclli.
SPECIAL EQUIPMENT NEEDED
• Parchment for cone to pipe the chocolate
• Pastry bag and large number 6 star tube
CAKE COMPONENTS
• 1 recipe Genoise au Chocolat (page 129)» top and bottom
crust removed and split horizontally
• 1 recipe Syrup flavored with Grand Marnier (page 129)
• 1 recipe Strawberry Cloud Cream (page 264)
• Optional:
1 Chocolate Lattice Band (page ЗЯК), 29 inches long and
3 inches high
Small strawberries dipped in quick-tempered chocolate
METHOD FOR ASSEMBUNG CAKE
1. Spread a little Strawberry Cloud Cream on a 9-mch
cardboard round to attach the cake.
2. Sprinkle each side of the cake layers with 3 tablespoons
syrup.
3. Sandwich the cake layers with I’/z cups Strawberry Cloud
Cream.
4. Spread Vi cup Strawberry Cloud Cream evenly on the
top and ‘/j cup around the sides.
5. Use a large number 6 star tube and the remaining cream
to pipe rows of shells on top of the cake. Start from a
middle edge and reverse the direction of the shells for
each row.
6. Pipe the Chocolate Lattice Band and when it just begins
to dull, wrap it around the cake, peeling back one end
slightly to overlap the ends.
7. Refrigerate for 10 minutes or until the chocolate is firm
enough to allow easy removal of the wax paper.
8. Refrigerate the cake 30 minutes to 3 hours before serv-
ing time.
9. Garnish if desired with the chocolate-dipped strawber-
ries.
184 SHOWCASE CAKES
чУЬс quintessential showoff cake. It was inspired by a
Swiss candy bar containing honey and chocolate. Hone)’
has been incorporated into almost every component but kept
in the background as a subtle flavor that never becomes
cloying]у sweet.
As optional d^cor, marzipan honey bees can be placed
on the “hive” and suspended on angel hair pasta to give
the illusion of bees hovering over the cake.
SPECIAL EQUIPMENT NEEDED
• A plastic squeeze dispenser is helpful for filling the hive
openings with honey.
CAKE COMPONENTS
• 1 reape Biscuit de Savoie (page 145), bottom and top
crusts removed
• 1 recipe Rum Nectar: When making the syrup for the
biscwt (page 145). use dark rum as the liqueur and add
I teaspoon freshly squeezed lemon juice and 1 teaspoon
honey.
• 1 recipe Royal Honey Buttercream (page 235).
• A 9*inch chocolate disc made with 3 ounces quick-tem-
pered chocolate and 1-inch random holes cut in it (page
386).
• 1 reape Nougatinc Honey Crunch (page 319).
♦ 2 tablespoons honey in a plastic squeeze dispenser.
• Optional:
Marzipan Bees (page 367)
A few strands of dried uncooked angel hair pasta (capel-
lini)
METHODS FOR ASSEMBLING CAKE
1. Spread a little buttercream on a 9-inch cardboard round
to attach the cake.
2. Sprinkle each side of the cake layers with Ц cup Rum
Nectar.
3. Sandwich the cake layers with '/i cup {‘/«*1 buttercream
between each layer, ending with a layer of butter-
cream.
4. Use a sturdy pancake turner to lift the chocolate disc
and place it on top of the buttercream.
5. Refrigerate 10 minutes or until the buttercream firms
enough to hold the chocolate securely in place-
6. Froet the sides with che remaining buttercream.
A TOUCH
OF CHOCOLATE
Queen
Bee
SERVES
14 TO 16
TIMING;
The cake should be assem-
bled 1 to 5 days ahead and
refrigerated. The completed
cake (without the bees) can
be frozen 3 months.
SERVE
Lightly chilled or at room
temperature. I Buttercream
should be watm enough to
be creamy. I Score the choco-
late disc with a knife that
has been dipped m hot
water and dried to facilitate
cutting.
SHOWCASE CAKES 185
7. Gendy press the Nougatine Honey- Crunch on the sides,
supporting the cake on the palm of 1 hand and tilting
it slighdy toward the ocher hand, cupped to hold the
nougatine.
8. Using a plastic dispenser bottle or small teaspoon, fill
the cut-outs in the chocolate with little pools of honey.
For a casual look, allow some honey to drip randomly
onto the chocolate or brush some on the surface in
irregular patterns.
9. Refrigerate if preparing 1 day ahead. Remove from the
refngeratore at least 30 minutes before serving.
10. Garnish with the optional marzipan bees. To suspend
the bees on pasta strands, use a heated metal cake tester
to bore a small hole in the chocolate disc for inserting
the pasta {for maximum support) or insert the pasta
into the honey pools. Place a few bees near the honey
pools so that they appear to be drinking the honey.
A TOUCH
OF CHOCOLATE
Barqucttcs
Chez I’Ami
Louis
SERVES 12
TIMING.
AU the components of these
barqucttci can be made sev-
eral days ahead—even the
iHMigattnc if the weather is
not humid. Barquertes may
be assembled 1 day ahead
and refrigerated or assem-
bled 1 week ahead and fro-
zcn. (To prevent dropleu of
moisture and stickiness, de-
frost uncovered in the refrig-
erator for ai least 6 hours
v«Xhese multilayered little jewels are a treat of textures
and flavors and are an adaptation of those served ar my
favontc Parisian two-star bistro, Chez Г Ami Louis. (1 am
grateful to my dear friend Heidi Trachtenberg for directing
me there to taste and ‘'figure out whafs in it.**) The bar-
quette is a boat-shaped crunch of nougatine filled with soft,
rum-saturated biscuit, topped with buttercream, and then
glazed with bittersweet ganache.
Admittedly time-consuming to prepare, this recipe can
be made wdl in advance—even frozen—and requires con-
siderably less time and money than flying to Pans! Another
advantage is that this version is a lot less sweet than the
original French creation.
caveat: Molding the nougatine barquetres requires ad-
vanced pastry skills.
SPECIAL EQUIPMENT NEEDED
• Lightly oiled barquette form, 3% inches by 1% inches (to
use as a mold)
• Pastry bag and number 14 star rube (for optional piped
decoration}
CAKE COMPONENTS
• 1 recipe Nougatine (page 318)
• 1 recipe Biscuit Roulade (page 142}, cooled flat without
rolling
184 SHOWCASE CAKES
• 1 reape Nougatinc (page 318)
• Scant У» cup Rum Syrup'. In a small saucepan with a tight-
fitting lid, stir together 2 tablespoons water and 1 table-
spoon sugar over high heat, until a hill rolling boil. Cover
immediately, turn off the heat, and allow to cool. Pour
into a 1-cup glass measure and add 1 tablespoon dark
rum. If syrup has evaporated, add enough water to equal
a scant Уа cup syrup.
• ¥« cup Neoclaatc Buttercream: The following recipe will
yield 1 cup, but die recipe requires only 14 cup. Freeze
the extra to use for cupcakes. In a bowl bear 2 large egg
yolks with an electric mixer until light in color. In a small
saucepan (preferably with a no ns nek lining) combine ’A
cup sugar and 3 tablespoons com syrup and cook over
high heat, stirring constantly, until the sugar dissolves and
the syrup comes to a rolling boil. (The entire surface will
be covered by large bubbles.) Immediately transfer the
syrup to a glass cup to stop the cooking. Beat the hot
syrup into the yolks, avoiding pouring it on the beaters.
When cool, beat in 5 ounces (10 tablespoons) softened
unsalted butter until smooth and creamy.
before removing co room
temperature.)
SERVE:
Room temperahire. Bar-
quenes art most gracefully
eaten by hand.
• about Уз cup Dark Ganache Frostm%: Stir У* cup heavy
cream into 4 ounces melted bittersweet chocolate until
smooth. Use at once while still soft, or reheat gently in a
double boiler or for a few seconds in a microwave. (If
planning to pipe the optional shell border, double the rec-
ipe and allow the remainder to cool until firm enough to
pipe.)
• Optional:
A small amount of whipped cream and Crystallized Li-
lacs or Violets (page 326).
METHOD FOR ASSEMBLING CAKE
Preheat the oien to 300°F. for warming the nougatine.
1. To cut ovals of nougatine for the barquettes, make a
foil template by pressing foil into the barquette mold,
then flattening it and cutting out the shape.
2. After the nougatine is cool enough to handle, cut it
into 4 equal parts and roll 1 of them into a 7-inch by
4'A-inch rectangle 'А-inch thick. Keep the other 3 pieces
warm in the oven with the door ajar. If the nougatine
SHOWCASE CAKES 187
has cooled and hardened, warm it again until май
enough to mark easily.
3. Using a pizza cutter and the template as a guide, mark
oval shapes on the nougatinc rectangle. When cool
enough to handle, cur out the ovals with scissors. Each
rectangle will make 3 barquerte ovals.
4. Press 1 oval into the barquerte mold. The nouganne
must still be warm enough to remain flexible. If nec-
essary, return it briefly to a heat source until just flex-
ible (not too long or it will lose its shape).
5. When cool, remove the hardened nouganne barquerte
from the mold and make more in the same manner.
The barquettes keep for several weeks if stored airtight
at room temperature away from direct sunlight, brat,
and humidity.
6. Cut out ovals of biscwt with scissors, using the bar-
quette mold as a guide.
7. Sprinkle teaspoon rum syrup on each side of each
biscuit oval and lit it into a nouganne shell.
8. With a small metal spatula spread 1 tablespoon butter-
cream tn the center of each barquettc, mounding it
slightly in the center co create a ridge at the top. Freeze
for 5 minutes to firm the buttercream.
9. Using the same size spatula spread a thin coat of gan-
ache over the buttercream, also mounding it slightly in
the center. To form an attractive center crest, hold the
barquerte in 1 hand and with the other hand hold the
spatula against the side, angled slightly inward. Start
at 1 end and bring the spatula smoothly to the other
end. Repeat on reverse side.
10. Pipe a trimming of tiny ganache shells along the ridge
and sides if desired. Or garnish with Crystallized Lilacs
or Violets- (Use »ce to chill your hand so the chocolate
will stay firm enough to pipe.)
18» SHOWCASE CAKES
hi» fabulous cake is perfect for the holiday season, when
fresh chestnuts abound. Although spicy and almost earthy
in flavor, it is delicate enough to serve after a bountiful
Thanksgiving or Chnstmas dinner. Chestnut Whipped Cream
is a Swiss creation and so delicious it inspired my invention
of the Chestnut Genoise to go with it. The band dramati-
cally encases the cake while tying in the lovely combination
of chocolate and chestnut.
SPECIAL EQUIPMENT NEEDED
• Pastry bag and large number 7 star tube
CAKE COMPONENTS
• 1 recipe Chestnut Genoise (page 122), top and bottom
crusts removed
• 1 recipe Rum Syrup (page 122)
• 1 recipe Chestnut Mousse Cream (page 262)
• 1 Chocolate Band (page 387)
• Marrons glacis (candied chestnuts), brushed with choco-
late
METHOD FOR ASSEMBLING CAKE
1, The cake can be frosted directly on a serving plate, us-
ing strips of wax paper slid under rhe sides. Or use a 9-
inch cardboard round as a base.
2. Spread a little Chestnut Mousse Cream on the plate or
cardboard round to attach the cake.
3. Sprinkle each side of the cake layers with table-
spoons syrup.
4. Place the cake layers on the base and sandwich them
with 2 cups chestnut mousse.
5. Reserve 1 cup chestnut mousse for piping the garnish
and frost the cake with the remainder.
6. Make the Chocolate Band: The circumference of the cake
is about 29 inches so cut a piece of wax paper 31 inches
long. Fold the wax paper so that it is at least 1 inch
higher than the finished height of rhe cake (about 2J/*
inches). If planning to scallop the band, add an extra
meh or 2. Temper 4 to 8 ounces dark chocolate, pref-
erably couveriure, using the classic or quick temper
methods on pages 380 and 381. (If you don’t temper
the chocolate when melting it or if room temperature is
too warm, the band may not be firm enough to wrap
around the cake. Four ounces of chocolate will be enough
VERY CHOCOLATE
Chestnut
Chocolate
Embrace
La Cbdtaigne
llr shaTAlN)
SERVES 12
TIMING:
!hc cake can be assembled
1 day ahead and refriger-
ated.
SERVE:
Lightly chilled or al room
temperature. Break the
chocolate band into pieces
and use it for garnish.
SHOWCASECAKES U9
for a band ЗУ» inches high. Eight ounces will make a
band 5 inches high.) Using an angled spatula, spread rhe
chocolate evenly on the wax paper scrip, making it a
little longer than the desired length- Lift strip by the ends
and transfer to dean section of counter for chocolate
to set.
7. When the chocolate is firm but soil malleable, use a small
sharp knife to cut a straight line or a free-form scallop
along 1 side. Attach the strip scallop side up around the
cake. Gently pull away the ends of the wax paper and
use a bit of melted chocolate to attach the overlapping
ends. If the chocolate sticks to the paper, let it set longer
or refrigerate for a few minutes until firm enough to
release cleanly. Cut edge will break away easily on slight
pressure.
8. Decorate the top of the cake with swirls of Chestnut
Mousse Cream piped with a large number 7 star tube.
9. Garnish with the matrons glacis.
VERY CHOCOLATE
Swiss Black
Forest Cake
UchwarztMlih^ KtrtcJnurtr
SERVES
I О T О 12
TIMING
The cake should be assem-
bled 4 to 12 hours ahead.
SERVE;
Chilled.
/(L у version of this classic was inspired by Confisene
Tschirren in Berne. Switzerland. They brought the recipe
from Germany after World War II; and it has since become
the national cake of Switzerland.
The Swiss rendition is far lighter and more delicate than
die original German one, which also includes buttercream.
A lofty layer of whipped cream studded with liqueur-soaked
cherries is sandwiched between two thin, light layers of li-
qucur-motswicd chocolate genoise. The chocolate flakes on
top dissolve like snowflakes on the tongue.
In Switzerland, the Black Forest Cake is served in all
сом/wer/M and konditorei for afternoon tea, but the cake is
elegant enough for fancy dinner parties as well.
SPECIAL EQUIPMENT:
• 8%-inch by IVi-inch (22-centimcter by 6-ccntimeter)
French flan nng (page 453). Or a 9-inch springform or
loose-bottom pan fitted with cardboard rounds until a
depth of 2'Л inches is achieved. Molding the cake this
way makes it perfectly symmetrical. The French flan ting
is the ideal size because rhe 9-mch cake layer shrinks to
just that size after baking. The springform pan also works
but the sides of die finished cake will not be quite as even.
• Pastry bag and a large number 6 star tube
190 SHOWCASE CAKES
CAKE COMPONENTS
• 1 герре Brandi ed Burgundy Chernes (page 346}, well
drained and the syrup reserved
• % cup kirsch or brandy
• Vi reape (1 layer) Moist Chocolate Ginoise 'page 132|,
top and bottom crusts removed and split in hall horizon-
tally to make (2) Vi* layers
• 3 times the quantity* of reape for Super-Stabilized Whipped
Cream (page 256) or Real Old-Fashioned Whipped Cream
(page 254). The Real Old-Fashioned Whipped Cream is
lighter in texture, but rhe cake cannot be held at mom
temperature for mote than 15 to 30 minutes.
• Vi cup Chocolate Snowflakes (page 382)
METHOD FOR ASSEMBLING CAKE
1. Place the flan ring on a serving plate or cut our a card-
board round to fit the diameter of the ring. Or use a
loose-bottom or springform pan fitted with cardboard
founds to a depth of inches.
2. Add the kirsch or brandy to the reserved cherry syrup
to make Vi cup. Sprinkle each side of the cake layers
with 2 tablespoons syrup.
3. Reserve 12 whole cherries for decor and ait the re-
maining chernes in half if they are large.
4. Reserve 2’4 cups whipped cream for the top of the
cake and the rosettes. (This may be refrigerated for up
to 6 hours).
5. Place 1 cake layer in the bottom of the flan ring and
top with the remaining whipped cream.
6. Poke the chernes into the whipped cream, pressing some
of the cut sides against the pan.
7. Use a small angled spatula to level the cream and top
with the second cake layer.
8. Spread with 1 cup of the reserved whipped cream. Use
a long metal spatula to create a smooth top, allowing
the blade co rest on the sides of the nng to create a
very even surface.
9. Cover with foil and refrigerate for at least 4 hours.
10. Wipe the sides of the ring with a warm, damp towel
and lift away the ring or remove the sides of the pan.
11. Use the remaining whipped cream to decorate the top
with rosettes using a large number 6 star tube. Top the
rosettes with the reserved whole cherries. Spoon the
chocolate snowflakes in the center.
SHOWCASE CAKES 191
VARIATION
Three rimes the quantity of reape for White Ganache .page
278} or 1 Yi times the quantity of recipe for Light Whipped
Ganache (page 268) may be used in place of the whipped
cream for a more chocolaty effect.
VERT CHOCOLATE
Black
Forest
Ice Cream
Tortc
SERVES 12
TIMING:
The cake should be assem-
bled 1 to 5 days ahead.
his summertime version of classic Black Forest Torre
was inspired by Kleiner Konditurei in Zunch. It works as
a frozen dessert because the Liqueur keeps it from freezing
too firmly. Chocolate Biscuit Roulade is an excellent base
because it remains soft when frozen.
When the chocolate glaze is poured over the frozen ice
cream» it sets immediately into an effortlessly even, shiny
topping.
SPECIAL EQUIPMENT NEEDED
• Two 10-inch round cake pans
• 9-mch by 3-inch spnngform or loose-bottom pan, outside
of pan wrapped with a double layer of heavy-duty foil
• Optional: pastry bag and large number 6 star tube
CAKE COMPONENTS
♦ 1 recipe Brandied Burgundy Cherries (pagr 346)
« 1 recipe Vanilla Ice Cream (page 2851, using 2 table
spoons kirsch. Or 5 cups commercial vanilla ice cream
• 1 recipe Chocolate Biscuit Roulade (page 144), baked in
two 10-inch round pans. When cool, trim with scissors
tu 9 inches Ithe exact diameter of the springform pan).
• Chocolate Cream Glaze: Process or chop 3 ounces bitter-
sweet chocolate until very fine and place in a small bowl.
Scald Vj cup heavy cream and add to the chocolate. Cover
and allow to sit for 5 minutes. Add 1 teaspoon cognac
and stir gently until the chocolate is fully mdted and the
mixture smooth. Cool until just tepid. When a small
amount of glaze is dropped back onto the surface it should
disappear smoothly.
I • Optional:
I. cup heavy cream whipped with 2 teaspoons sugar and
Vi tea-spoon vanilla (for rosettes)
METHOD FOR ASSEMBLING CAKE
1. Dram rhe cherries, reserving Ya cup syrup. Dry the cher-
ries well on paper towels. Refrigerate 12 whole chcrnes
for the decor and dice the remaining cherries in half.
192 SHOWCASE CAKES
2. Remove rhe ice cream from the freezer and allow to soften
slightly until spreadable.
3. While assembling the cake, set the spnngform pan in a
larger pan surrounded by ice to keep the ice cream from
melting.
4. Sprinkle each side of the cake layers with 1 tablespoon
syrup.
5. Ptace 1 cake layer in the bottom of the spnngform pan
and spread with Vi the ice cream. Top with the cherries,
pressing some against the sides of the pan, and top with
the remaining ке cream. Arrange the second cake layer
on top. Cover with foil and freeze for at least 24 hours.
6. Up to 4 hours ahead glaze the cake: Pour tepid Ganache
Glaze onto the center of the cake and quickly tilt the
pan to coat evenly. The glaze will set almost immedi-
ately.
7. Wipe the sides of the spnngform pan with a hot, damp
rowd and remove rhe sides, Refrigerate 1 hour to soften.
Just before serving, pipe rosettes of whipped cream on
top if desired and garnish with the reserved whole
chernes.
lack Forest tee Cream Cake also makes a terrific ice-
cream roll. The chocolate biscuit is the perfect cake to use
because it stays flexible enough to roll, even when spread
with ice cream. The attractive slices are even more delicious
when topped with a hot ganache sauce and brandied
cherries.
SPECIAL EQUIPMENT NEEDED
• 17-inch by 12-inch jelly roll pan
• Optional: pastry bag and large number 6 star tube
CAKE COMPONENTS
• 1 recipe Brandied Burgundy Chernes (page 346)
♦ № recipe Vanilla Ice Cream (page 2851, using 1 table-
spoon kirsch. Or 2 cups commercial vanilla ice cream
* 1 recipe Chocolate Biscuit Roulade (page 144), baked in
a 17-mch by 12-mch jelly roll pan. (Roll rhe cake while
still hot.)
VERY CHOCOLATE
Black
Forest
Icc Cream
Roll
SERVES 12
TIMING:
The cake should be assem-
bled 1 tv 5 days ahead
SHOWCASE CAKES 193
• Optional:
Vi cup heavy cream whipped with 2 teaspoons sugar and
•Л teaspoon vanilla (for rosettes)
• Vi cup Chocolate Snowflakes (page 382)
♦ Ganache Sauce: tn a food processor grate finely 6 ounces
bittersweet chocolate. Heat М» cup heavy cream to the
boiling point and add to the chocolate. Process for a few
seconds or until smooth.
METHOD FOR ASSEMBLING CAKE ROLL
1. Place a 17-inch by 12-inch jelly-roll pan m the freezer
to chill.
2. Drain 1 cup of the cherries reserving rhe syrup. Dry
the cherries well on paper towels. Refrigerate 12 whole
cherries for the decor and slice the remaining cherries
in half.
3. Remove the ice cream from the freezer and allow to
soften slightly until spreadable.
4. Unroll the chocolate biscuit onto back of chilled jelly-
roll pan, leaving the towel underneath the bacuit.
5. Brush the cake evenly with VS cup branched cherry syrup.
6. Using an angled spatula, quickly spread the softened
ice cream over the cake, leaving one inch uncovered
along one long side. (Freeze any leftover ice cream.)
7. If the ice cream begins to melt, place the pan in the
freezer for 5 to 10 minutes or until firm.
8. Scatter the halved cherries over the ice cream.
9. Starting with the long side that is covered with ice cream,
use the towel to roll the cake. Set seam side down,
cover lightly with plastic wrap, and return to the freezer.
10. When the roll is very firm, wrap airtight in foil and
freeze for at least 12 hours before serving.
11. For an attractive presentation, use a large number 6
star tube to pipe 12 whipped cream rosettes on top of
the roll. Place 1 whole cherry in the center of each.
(Sprinkle with chocolate snowflakes. This may be done
up to 3 hours ahead and the cake returned to the
freezer.)
12. Gently heat the ganache sauce in a double boiler set
oxer simmering water, snrrmg constantly, unnl hot. Or
use a microwave on high power, stirring every 3 sec-
onds. Heat the remaining cherries in any remaining
syrup until just hot. Top each slice of ice cream roll
with Ganache Sauce and Brandied Cherries or paw them
separately.
I'M SHOWCASE CAKES
гг hen you cut into this fantasy cake, you will experi-
ence three distinctly different chocolates: velvety Light
Whipped Ganache, moist flourless Cocoa Cloud Roll, and
the lightest cnsp Cocoa Menngue.
The meringue sticks keep their shape below the surface
of the cake but turn mousse-like. Above the surface they
stay perfectly crunchy.
I recently made this cake in a larger round shape and
renamed it for the occasion: Mom’s Chocolate Candle 75th
Birthday Cake.
SPECIAL EQUIPMENT NEEDED
• Pastry bag and number 12 round tube
CAKE COMPONENTS
• 1 recipe Cocoa Souffle Roll (page 140}
• 1 reape Light WTiipped Ganache (page 268)
• 1 recipe Cocoa Meringue (page 298; piped in sticks
METHOD FOR ASSEMBLING CAKE
1. Use an inverted oval pan as a template or draw a free-
form 9%-inch by 7-inch oval on cardboard. Use the
cardboard oval and a sharp knife to cut 2 ovals from
the cocoa roll. Carefully slide a long metal spatula un-
der ovals to dislodge them. Remove all the cake sur-
rounding the ovals.
2. Spread a little ganache on the cardboard oval so that
cake will stick to it. Carefully slide a long pancake turner
under I cake oval and transfer it to the cardboard.
3. Spread ¥i of the ganache {a layer} over the oval and
top with the second oval. Spread the remaining ganache
on the top and «des. Cake will be about Wi high.
4. Surround the cake with some of the menngue sticks,
using random lengths and pressing the flat sides against
the ganache. This can he done 2 days ahead. Refrigerate
uncovered.
5. Up to 1 hour before serving, insert the remaining me-
ringue sacks into the cake so that they reach the base.
All flat ends should face the same direction. For a pretty
effect, dip the tops of the sticks in cocoa or powdered
sugar. Allow the cake to sit at room temperature fur 1
hour.
VERY CHOCOLATE
The
Enchanted
Forest
/.t F6ret f.iuhMOi
{kfawRAY
AHNSCHAHWTAY}
SERVES 10
TIMING:
The cake can be assembled
2 days ahead and refriger-
ated or frozen 2 months,
but it is best not lo place
the meringue sticks in the
tilling more than 1 hour be-
fore serving. If you must in-
sert them earlier and they
start to soften and tilt, sim-
ply posh them slightly fur-
ther into (be cake.
SERVE
Room temperature. Cut into
wedges radiating from the
center.
SHOWCASE CAKES 195
VERY CHOCOLATE
Chocolate
Pine Cone
SERVES 14
TIMING:
Tbe cake may be assembled
2 days ahead and refriger-
ated.
SERVE:
Room temperature. Cut the
cake into narrow curved
stripe, starting from the
pointed end and working
toward tbe hack.
C^zmall petals of chocolate create the illusion of a pine
cone. They are held in place by bittersweet ganache tex-
tured with chopped pine nuts. The ganache fills and frosts
a moist light chocolate cake. Because it contains no Hour
this cake is marvelous for a Passover seder. The chocolate
petals provide a lovely crunch against the soft and creamy
textures within the cake. The petals look perky and ador-
able when the cake is cut, giving the individual pieces great
visual distinction.
CAKE COMPONENTS
• I reape Chocolate Cloud Roll (page 138).
• 1 recipe Dark Chocolate Ganache Frosting (page 269),
with 36 cup (2Л ounccs/70 grams) chopped pine nuts
added while still warm
• 8 ounces Chocolate Pine Cone Petals (page 38.3).
• 1 tablespoon pine nuts for garnish
METHOD FOR ASSEMBLING CAKE
1. Draw a free-form U’Zt-inch by 8-inch oval on a piece
of cardboard, tapering 1 end slightly to resemble a pine
cone. Use the oval and a sharp knife to cut 2 ovals from
the Chocolate Cloud Roll. Remove the scraps and stir
them into the ganache. Carefully slide a long metal spat-
ula under the ovals to dislodge them.
2. Spread a little ganache on the cardboard oval so that
cake will sock to it. Carefully slide a long pancake turner
under 1 cake oval and transfer it to the cardboard.
3. Spread *Zz of the ganache on the cake and top with the
second cake oval. Spread the remaining ganache on the
top and sides, mounding it slightly in the center.
4. Insert the Chocolate Pine Cone Petals, starting at the
capered end and, staggering each row. Place the whole
pine nuts under some of the petals.
1M6 SHOWCASE CAKES
made this traditional holiday cake for Christmas
dinner m France some yean; ago in the home of my dear
friends the Brossollets. (Something like bringing coals to
Newcastle!) It quickly became a family project» with Mar-
tin, the youngest, running out to the aimer store to pur-
chase parchment for piping the mehngue mushrooms and
Nadige sneaking her husband's oldest rum for the ganache,
saying he would have a fit if he knew it was being used for
a cake. The best part, however, was when Max (Papa) con-
tributed his antique toy buglers for the decoration.
My version uses a moist chocolate roll and whipped
cream instead of the usual yellow cake roll and chocolate
buttercream, which I always found too nch and heavy un-
der the chocolate “bark.”
CAKE COMPONENTS
• I recipe Chocolate Cloud Roll (page 138)
• 1 recipe Perfect Whipped Cream (page 253}
• 1 recipe Dark Ganache Frosting (page 2691
OPTIONAL DECOR
• Mennguc Mushrooms (pages 298 and 376)
• Pistachio Marzipan Ivy Leaves Ipage 3631
• Green Tea Pine Needles (pages 298 and 375)
METHOD FOR ASSEMBLING CAKE
1. Fill the Chocolate Cloud Roll with the Perfect Whipped
Cream.
2. Chill fur at least 1 hour.
3. Cut a diagonal slice from one end of the roll and place
on top to form a knot.
4. Spread the ganache frosting over che log and use the
tines of a fork to make lines resembling bark. Make a
few round swirls with rhe fork on top of the knot.
5. Decorate with the meringue mushrooms, marzipan leaves,
green tea pine needles, and any small appropriate fig-
ures such as porcelain elves or trumpeters.
6. Refrigerate until I hour before serving.
VERT CHOCOLATE
Cordon Rose
Chocolate
Christmas Log
BiirJbe de иоЛ
SERVES 12
TIMING
The cake can be astemhled
and refrigerated 2 days
ahead. The meringue mush-
rooms should not be set on
the log until serving day,
SERVE:
l ightly chilled or room tem-
perature. Cut diagonal slices
with a thin, sharp knife.
SHOWCASE CAKES 197
INTENSELY
CHOCOLATE
Chocolate
Spike
SERVES
I 0 TO I 2
TIMING.
The cake an be fronted 1
day ahead and does not re-
quire refrigeration. It can be
frozen 2 month*.
SERVE:
Room temperature.
his casual, down-home cake is quick to make and cl*
egant enough for special occasions as well. Perky little spikes
of Milk Chocolate Frosting encase bittersweet Chocolate
Fudge Cake.
CAKE COMPONENTS
♦ 1 recipe Chocolate Fudge Cake (page 60}
• 1 recipe Milk Chocolate Buttercream (page 250)
METHOD FOR ASSEMBLING CAKE
1. Frost the cake directly on a serving plate, using strips of
wax paper slid under the sides. Or use a 9-inch card-
board round as a base.
2. Spread a little buttercream on the serving plate or card-
board to attach the cake.
3. Place the cake layers on the plate or cardboard and
sandwich and frost with the buttercream.
4. For a decorative wave design on top, use a long serrated
knife, moving it from left to right as you pull it forward.
5. For spikes, use a small metal spatula to lift the butter-
cream away from the sides in peaks (page 360).
INTENSELY
CHOCOLATE
Bittersweet
Itoyalc Torlc
SERVES
8 T О I 0
TIMING:
The cake should be filled,
frosted, and refrigerated 4
hours to 1 day ahead. The
glaze is most shiny *hcn
not refrigerated so it ts bot
to glaze and decorate the
cake tame day as serving,
к-^his elegant torte has rhe flavor of a fine-quality Swiss
chocolate bar bur the soft, appealing texture of layer cake.
An optional layer of Classic Chocolate Buttercream pro-
vides an interesting contrast in color and texture.
The chocolate roses are hand-modeled, but you can
substitute real roses if you like.
SPECIAL EQUIPMENT NEEDED
• Fresh rose leaves without tears or holes
• Artist's paint brush or small metal spatula
CAKE COMPONENTS
• Optional;
Vz recipe Neoclassic or Classic Chocolate Buttercream
(page 228 or 230}
• 1 recipe Perfect All-Amencan Chocolate Torte (page 56)
• 1 reape Chocolate Cream Glaze (page 271)
• 20 chocolate rose leaves, each 2’/z inches long, and 9
smaller chocolate rose leaves (page 385—use about 3
ounces of chocolate)
• 4 Red Chocolate Roses (pages 325 and 390), each slightly
larger than the next
|9g SHOWCASE CAKES
METHOD FOR ASSEMBLING CAKE
1. It using the optional Classic Chocolate Buttercream, make
a 9-inch cardhoard round for the base. If not using the
buttercream, trim the cardboard round to 8*6 inches or
slightly smaller than the diameter of cake.
2. Spread a little buttercream or ganache on rhe cardboard
round to attach the cake.
3. И using the buttercream, frost the cake and refrigerate
it for at least I hour or until very firm.
4. Glaze rise cake as per instructions in the Chocolate Cream
Glaze recipe. {Use the extra glaze which falls onto the
sheet to attach the rose leaves.)
5. Place the cake on a serving plate and attach the large
chocolate rose leaves, using little dabs of room temper-
ature Chocolate Cream. Angle each leaf a little to the
right, overlapping slightly.
6. Use the back of a wooden spoon to make shallow
depressions in the cake for the chocolate roses. Set the
roses in place.
7, Insert the small chocolate rose leaves into the glaze, us-
ing little mounds of the Chocolate Cream to support
them.
The cake can stay unrefng-
erated for 1 day.
SERVE
Room temperature.
к-Л (Led “porcelamized” roses against a dark chocolate
fondant-covered cake provide stunning visual appeal. This
cake is at once elegant and nchly, warmly inviting. The
theme of long-stemmed chocolate roses was inspired by a
cake I designed for Good Housekeeping magazine s one
hundredth anniversary. The roses smell cbocolary and can
even be eaten but are best saved as mementos.
This cake is a soft, full chocolate sensation; it is filled
with my favorite ganache ringed with a scarlet edge of
raspberry, and encased in fudgy chocolate fondant. Make
this cake to celebrate the best events of your life.
note: Il making fondant stems for the roses, allow at least
30 minutes for them to dry before placing on the cake.
SPECIAL EQUIPMENT NEEDED
♦ Sheet of heavy-duty plastic, 31 inches by 6 inches {can be
purchased in hardware or dime stores)
INTENSELY
CHOCOLATE
Porcdainc
SERVES
I 0 T О 12
TIMING:
The cake con he J«emblcd
1 day ahead without refrig-
eration or refrigerated 3
days.
SERVE
Room temperature. Cut
with a thin, sharp knife.
SHOWCASE CAKES
CAKE COMPONENTS
• 1 recipe Perfect All-American Chocolate Buner Cake (page 54)
• 1 recipe Raspberry Ganache (page 276)
• I recipe Chocolate Rolled Fondant (page 309)
• X Red Porcelain Roses (page 325) and chocolate fondant
steins (see below), or fresh roses
• 20 Chocolate Rose Leaves (page 385), using about 3
ounces of chocolate and reserving the leftover melted
chocolate to attach the roses and leaves
METHOD FOR ASSEMBLING CAKE
1. Spread a little ganache on a 9-inch cardboard round and
center 1 cake layer on it.
2. Fill and lightly frost the cake Layers with the remaining
ganache. (Use 1 cup between the layers and the remain*
mg 2 cup* to frost the top and sides.) Chill until firm.
Use a heavy-duty pancake turner to transfer the cake to
serving plate.
3. Make the fondant disc and band: On a piece of plastic
wrap, roll a piece of the chocolate fondant (about V»
cup) into a ¥r-inch-thick disc. Transfer the plastk wrap
and disc to a baking sheet and cut into a circle slightly
larger than the diameter of the cake, using an inverted
cake pan or hd as a guide and cutting with a pizza wheel
or the tip of a sharp knife. Freeze for 10 minutes or
unnl very firm. Invert onto another piece of plastic wrap,
peel off the plastic from the bottom, and reinvert onto
the cake while still firm enough to handle easily. Smooth
the edges to follow the contour of the cake. Allow fon-
dant to sit for 10 to 20 minutes or until no longer sbeky.
Use the palm of your hand to smooth it to a soft shine.
For the band, you will need a piece of fondant 28¥<
inches long and 4 inches high. Place the sheet of heavy-
duty plastic on a flat surface. Roll the fondant into a
long rope and lay it in the middle. Roll the fondant the
length of the plastic into a thin band '/ inch thick. Us-
ing a long plastic ruler and a pizza wheel or sharp knife,
even the edges, cutting the bottom edge flush with the
bottom of the plastic. Use your finger to smooth rhe
upper edge so that it thins slightly. Use the plastic to lift
the fondant and curve it around the sides of the cake.
Peel away the plastic, overlap the ends, and curve the
upper edge gently toward the top of the cake to create
a graceful free-form design.
4. Make the fondant rose stems: Roll a few small pieces of
fondant into thin 4-inch ropes. Gently curve a few to
200 SHOWCASE CAKES
use around the base. Place on plastic wrap and allow to
dry for at least 30 minutes or until stiff enough to trans-
fer to the cake.
5. Sepals: Cut from little scraps of rolled fondant and press
gently onto the roses.
6. Place the rows on top of the cake, securing them in place
with dabs of melted chocolate.
7. Place the stems at the bases of the roses. Place the leaves
on top. also securing with dabs of melted chocolate.
8. Store the cake uncovered or fondant will absorb mois-
ture from the cake and become sticky.
v-#his intense chocolate cake resembles an abstract sculp-
ture and consists of three distinct chocolate experiences:
crunchy» creamy, and velvety soft.
Making it is always an exciting experience because it
never looks the same way twice. Earing it is even more ex-
citing. It seems to elicit dramatic responses. Over the years,
I have received several marriage proposals at first bite and
one thoroughly seduced victim suggested renaming it “The
Triple Chocolate Orgasm.” Why not?
CAKE COMPONENTS
• 1 recipe bght Whipped Ganache ipage 268), preferably
made with extra bittersweet chocolate
• 1 recipe Moist Chocolate Genoise Ipage 132), top and
bottom crusts removed
♦ 1 recipe Syrup Ipage 132), flavored with Frangehco (ha-
zelnut liqueur)
♦ 1 recipe Chocolate Praline Sheets (page 386)
• Optional;
1 teaspoon powdered sugar
METHOD FOR ASSEMBLING CAKE
1. Frost the cake directly on a serving plate, using strips of
wax paper slid under the sides. Or use a 9-inch card-
board round as a base. Place a dab of ganache on the
base to attach the cake.
2. Sprinkle Ул cup syrup on each side of the cake layers.
3. Иасе 1 layer on the place or cardboard (support layer
when lifting it with a spare cardboard round}. Sandwich
the layers with 1 cup ganache. Reserve *Zi cup ganache
INTENSELY'
CHOCOLATE
T riplc
Chocolate
Cohc
SERVES
I 4 T О I 6
TIMING:
The cake can be assembled
I day ahead and refriger-
ated. The completed cake
can be frozen 4 months.
Freeze until firm, wrap with
plastic wrap, and then wrap
in heavy-duty foil. Mace in a
cake container or box to
protect it.
SERVE:
Room temperature. Cut
with a thin, sharp knife.
The chocolate praline sheets
will shaner—which part
of rhe special effect.
SHOWCASE CAKES 201
to attach the praline sheet* and frost top and sides of
the cake with the remainder.
4. Applying the chocolate praline sheets: A warm room |80
to 85’F.) will make the sheets more flexible. (Any left-
over can be remelted, retempered, and cut into decora-
tive shapes.) Begin by laying each sheet on the counter
and peeling off its top layer of paper. Lafe up 1 sheet,
using the bottom paper to support it, and press the long
side against the cake, curving it gently to mold against
the side. Carefully peel away the wax paper. Place a dab
of frosting near the edge of the sheet and attach a sec-
ond sheet, overlapping the first. Continue with the re-
maining sheets until the cake is completely surrounded.
(Only 4 sheets are needed to encase a 9-inch cake so
there are 2 extra in case of breakage.) If the room is
warm enough, the sheets will begin to curve downward
toward rhe center of the cake. Coax them gently into
graceful, undulating shapes, allowing their natural incli-
nation to be your guide. If the chocolate remains reso-
lutely rigid, wave a hair drier (set on warm) briefly and
evenly over the sheets. Stop before they appear to have
softened and wan a few moments as it is easy to apply
too much heat and melt the chocolate. To this day, this
process feels slightly scary, slightly risky, and delight-
fully creative! A word of reassurance: Whatever hap-
pens, however it w’inds up looking, the sheets are always
delicious.
5. A breath of powdered sugar contrasts nicely with the
dark chocolate. For the finest possible dusting of sugar,
place a few spoonfuls in a fine strainer and flick the side
with your finger.
While
Lily Cake
SERVES
8 T О I 0
TIMING
The cake can be assembled
2 day** ahead. Refrigeration
is unnecessary.
hts ethereal vision was designed as a bridal shower cake,
but it would also be lovely for a special anniversary, sweet
sixteen, or engagement party. The nosegay of lilies on top
is contained by an antique handmade lace handkerchief given
to me by my grandmother to carry at my wedding.
All the components arc white or pale yellow in color,
light in texture, and faintly scented with orange.
SPECIAL EQUIPMENT
• Narrow white satin ribbon to encircle cake
202 SHOWCASE CAKES
• 2 hatpins or pins with visible heads to hold nbbon while
piping dots
• Pastry bag and numbers 1 and 8 round tubes
• Small artist's paint brush
• Optional:
Lace handkerchief and nosegay of lilies of the valley
noti: Lilies of the valley have a short season. Your florist
can order them from Holland any time of year, bur they
are expensive. As an alternative, you can use pale lavender
cymbidiums or pale sweetheart roses.
CAKE COMPONENTS
• 1 recipe White Genoise (page 127), top and bottom crusts
removed and layers split in half horizontally
♦ ‘4 cup Cointreau
• Vi recipe Orange Fruit Mousseline (page 245)
• 1 recipe Rolled Fondant with orange flower water (page
306)
• 1 recipe Royal Icing (page 294]
METHOD FOR ASSEMBLING CAKE
1, Sprinkle each side of the cake layers with 1 tablespoon
Cointreau.
2. Spread a small amount of moussehne on a 9-inch card-
board round and place I cake layer on top.
3. Stack the remaining 3 layers on top of each other, sand-
wiching each with ¥4 cup mousseline.
4. With a small serrated knife bevel the top edges of the
cake (page 355).
5. Frost the top and sides with the thinnest possible layer
of mousseline (just enough to make the fondant ad-
here],
6. The fondant should be rolled out on a lightly greased
surface to 14 inches in diameter and ¥*-inch thick. Ro-
tate the fondant after every 2 or 3 rolls to ensure that it
1$ not sticking. If necessary, apply more nonstick spray
or shortening to tlsc counter. With your hands palm sides
down lift the rolled fondant onto the cake. Quickly
smooth the top with a circular motion, starting from the
center, to eliminate air bubbles. (Bubbles can be pierced
with a needle and smoothed out if necessary.) Smooth
the fondant against the sides, working from the top down
with a semicircular motion. Oil from your hands will
give the fondant a lustrous glow. Use a pizza cutter or
SERVE:
Be sure to remove the lily
nosegay as the lilies are in-
edible. The cake should be
served at room icmpcrannc.
Cut with a thin, sharp knife.
SHOWCASE CAKES >01
small sharp knife tn trim the fondant at the base of the
cake. Transfer the cake to a serving plate and allow the
fondant to dry overnight before decorating,
7. Tn attach a narrow band of satin ribbon around the
cake, pin one end to the cake and then wrap the ribbon
evenly around the cake's circumference, overlapping the
ends and securing both ends with a second pin. Pipe
tiny beads of Royal Icing with a number 1 round tube
along both edges of the ribbon. When the cake has been
completely encircled, the pins can be removed. For a
pearl border around the base, use a number 8 round
tube. If points form, flatten and smooth with a damp
artist’s paint brush.
8. To pipe lilies wc page 414.
9. If desired, fold the handkerchief and invert fresh lihes in
the center. If cake will sit fur several hours before serv-
ing, use a florist’s flower sinker containing a moist sponge
to keep them fresh.
Arr
Dcco Coke
SERVES 50
TIMING:
The cake layert mart be
chilled for at least 12 hours
before covering with rolled
fondant and another 12
houn before placing 1 tier
on top of the other. Prepa-
ration should begin 4 days
before serving to lease
plenty of time for decorat-
ing. After tiering, the com-
pleted cake can be served
the same day or refrigerated
for an additional 2 days.
SERVE:
Room temperature. Remove
the top tier and cut into
narrow wedges. Use a thin,
sharp knife dipped in hot
ч-x he clean lines of the Art Dcco look do not prepare you
for the shock of bittersweet chocolate within this cake. The
chocolate looks almost black against the pristine whiteness
of the fondant. People actually gasp when the cake is cut
and its velvet dark secret core revealed. The calla lilies are
easy to make and in keeping with the An Deco design.
This cake would be lovely for a small wedding or a
black-tie affair. I designed it originally for Marcia Germa-
now, a New Jersey caterer, whose future son-in-law, an ar-
chitect, had a special appreciation fur the Art Dcco period.
She designed the entire wedding using rhe An Deco motif.
Raspberry sauce and whipped cream are the perfect
accompaniments for this cake, but it is also absolutely de-
licious on its own.
SPECIAL EQUIPMENT NEEDED
* 6-inch springform pan and 10-inch spnngform pan, both
buttered, lined with parchment paper, and wrapped with
a double layer of heavy-duty foil
• 2 larger pans to serve as water barhs
• Pastry bag and numbers 3, 6, and 8 round tubes
• Artist's paint brush
STRUCTURAL SUPPORTS
♦ 2 cardboard rounds, 6 inches and 10 inches
204 SHOWCASE CAKES
♦ 14-inch-round black glass, silver foil-covered or mirrored
serving board
• 5 inflexible plastic drinking straws
CAKE COMPONENTS
• 3 times the quantity of rcapc for Chocolate Oblivion
Truffle Torte (page 84), using 3 pounds chocolate. 1’6
pounds unsalted butter, and 18 eggs (use a 10-quart
Hobart mixer to beat eggs or beat eggs in two batches)
• 2 times the quantity of recipe for Classic Rolled Fondant
(page 306)
• 1 recipe Royal king (page 294)
• Green liquid food color
• Optional:
Silver Leaf (page 429) and 1 lightly beaten egg white or
silver cord
3 times the recipe for Raspberry Sauce (page 337)
3 times the recipe for Perfect Whipped Cream (page 253)
• 3 Rolled Fondant Calla Lilies (page 366)
METHOD FOR ASSEMBLING CAKE
1. Prepare batter for Chocolate Oblivion Truffle Torte.
Use a 10-quart or larger bowl to melt the chocolate
and butter so there will be room to add the eggs. Fill
the 6-mch spnngform pan 2 inches deep and scrape
the remainder into che 10-inch pan. Bake in a pre-
heated 425T. oven in water baths 15 minutes for 6
inches, 20 minutes for 10 inches, covering loosely with
foil after 5 minutes. Cool the cakes on a rack for 45
minutes and refngerate for at least 4 hours.
2. Wipe outside of pans with a hoc, damp towel. Run a
thin metal spatula around the sides of the cakes and
release the sides of the springform pans. Unmold the
cakes onto the cardboard rounds and refrigerate for at
least 12 hours. Use a hoc, wet spatula to smooth sur-
face of cakes so they are perfectly smooth. Smooth edges
to bevel slightly. Return to refrigerator.
3. The fondant should be rolled out on a lightly greased
surface in 2 parts: 10 inches in diameter for the smaller
cake and 14 inches for the larger cake (both should be
’/«-inch thick). Start with a 14-inch piece and knead
any dean trimmings into remaining fondant. Rotate the
fondant after every 2 or 3 rolls to ensure that it is not
sticking. Apply more nonstick spray or shortening to
the surface as necessary. With your hands palm sides
down lift the rolled fondant onto the cakes. Quickly
water and wiped dean be-
tween cuts. If serving the
raspberry sauce and
whipped cream, spoon 2 ta-
blespoons of whipped cream
next ro each slice of cake.
Make a small hollow in it
with the back of a spoon
and pour 1 tablespoon rasp-
berry sauce into it.
SHOWCASE CAKES 205
smooch rhe tops with a circular motion, starting from
the center, to eliminate air bubbles. (Bubbles can be
pierced with a needle and smoothed out if necessary.)
Smooth the fondant gently against rhe sides, working
from the top down with a semicircular motion. Oil from
your hands will give the fondant a lustrous glow. Use
a pizza cutter or small sharp knife to trim the fondant
at the bases of the cakes. (Save scraps to tint green for
decoration.)
4. Using a heavy-duty pancake turner, transfer the larger
cake to the mirrored base, placing it off-center 1 inch
from the edge. Use a loop of tape to adhere to it. Al-
low both tiers to dry overnight.
5. Place the bottom of the 6-mch pan off-center on the
10-inch tier 1 inch from the edge and mark a circle
with a toothpick. Insert a straw into the center of the
outline, straight through cake, until it reaches the card-
board bottom. Mark rhe straw at the surface of the
cake, remove it, and cut 4 more of the same length.
Insert 4 straws at even intervals msidc the marked out-
line and the final one in the center.
6. Using a heavy-duty pancake turner, place the smaller
ост off-center on top of the larger tier.
7. Use a toothpick and a ruler or string to mark lines on
the cake for placement of the green fondant strips and
Royal Icing lines. (You may instead use silver cord and
pin it in place, but be sure to remove cord and all pins
before serving.)
8. Using a number 3 round tip, pipe lines of Royal Icing
to create 2 large V’s, starting at the edge of the top tier
and continuing down the sides.
9. Tint *Z» cup of the fondant scraps green, kneading well
to incorporate the color. Roll out Vh-inch thick and cut
out two W-inch strips, each 14 inches long. Work
carefully when placing the strips on the cake as the
fondant will stick to the fondant beneath it, making
repositioning difficult.
10. If desired, apply silver leaf, using a bit of lightly beaten
egg white brushed on the Royal Icing lines to make it
adhere (page 412).
11. Using a number 8 tip, pipe a peart border at the base
of the bottom пег. Use a number 6 tip for the base of
the 6-mch top tier. If points form, flatten and smooth
them with a damp artist’s paint brush.
12. Attach the calla lilies with dots of Royal Icing.
206 SHOWCASE CAKES
cake was designed for my friends Connie and Mar-
cel Desaulniers. Marcel is chef and part-owner of the Trel-
lis Restaurant in Williamsburg, Virginia. Those fortunate
enough to have dined there will understand immediately
why it inspired this exquisitely detailed cake and why I in-
tertwined our names in its d6cor and tide.
The inside is also very special: Moist layers of Golden
Butler Cream Cake are filled with an airy, fresh tasting
strawberry buttercream. The intricacy of this cake makes it
comparable to a tiered wedding cake but in miniature form.
Make it for small family weddings, showers, anniversaries,
or other very special occasions.
SPECIAL EQUIPMENT NEEDED
2 pastry bags and 2 number 2 round tubes
• Decorative foil or paper to cover the octagonal cardboard
bases (page 463)
CAKE COMPONENTS
• 2 recipes Golden Butter Crearn Cake (page 34), baked m
two 9-mch by 2-inch pans or two 3-inch-h>gh springform
pans
• Vi reape Strawberry Silk Menngue Buttercream (page
234), tinted with 3 drops of red food color
♦ 1 recipe Rolled Fondant (page 306], flavored with rose
water
♦ 2 recipes Royal Icing (page 294) for the lattice. Tint Vi
cup pmk, using 1 drop of red food color.
METHOD FOR ASSEMBLING CAKE
1. Make the lattice panels, piping the rose with the pink
icing. Pipe 1 pink rose without the rest of the panel to
use for the top of the cake.
2. Make an octagonal cardboard template to place on top
of the cake as a cutting guide. The baked cake will
measure 814 inches in diameter, so first cut a circle of
that size. (Plain cardboard is easier to cut than corru-
gated.) Then make eight 3‘4-mch connecting lines. Each
line should begin and end at the edge of the circle. Cut
exactly on the lines and the template ts complete. Make
a second octagon cardboard exactly the same to serve
as the first base. (Cake will have 3 bases, each one
larger than the one before.)
3. Make another larger octagon cardboard for the second
base by placing the already-made template on a piece
Rose
Trellis
SERVES
16 TO 2 0
TIMING.
If the weather is not humid,
the lattice panels can be
piped months in advance.
The cake can be assembled
1 day ahead if stored in a
cool room. The lattice
should not be refrigerated as
humidity could soften it.
SERVE:
Room temperature. Remove
the panels and set aside. Cut
cake with a thin, sharp
knife.
SHOWCASE CAKES 207
of cardboard and drawing Lines in a I Vi-inch border
all around it. Cover with decorative foil.
4. For che third base, make another still larger octagon
using che second base and che same method as for pre-
vious one ! again with I’/i-inch border). Use sturdy
cardboard and cover it with decorative foil.*
5. Spread a small amount of buttercream on the first
cardboard base.
6. Place 1 cake layer on a 9-inch cardboard round and
frost with 1 cup buttercream.
7. Add a second layer and place the template on top. Cut
8 sides on the cake, cutting straight down. Remove the
template.
8. Slightly bevel the edges with a serrated knife and lightly
frost the top and sides with the thinnest possible layer
of remaining buttercream (fust enough to make the
fondant adhere).
9. The fondant should be rolled out on a lightly greased
surface to 15 inches in diameter and Mt-mch thick. Ro-
tate the fondant after every 2 or 3 rolls to ensure that
it is not sticking. Apply more nonstick spray or short-
ening to the counter as necessary. With your hands palm
sides down lift the rolled fondant onto the cake. Quickly
smooth the top with a circular morion, starring from
the center, to eliminate air bubbles- (Bubbles can be
pierced with a needle and smoothed out if necessary.)
Smooth the fondant against the sides, working from
the top down with a semicircular motion. Oil from your
hands will give the fondant a lustrous glow. Use a pizza
cutter or small sharp knife to trim the fondant at the
base of the cake.
10. Using a heavy-duty pancake turner, center the cake on
the second (foil-covered) cardboard base, using а loop
of tape to afix it.
11. Use a second loop of tape ro afix cake to third (foil
covered) cardboard base. Allow the cake to dry for at
least 3 hours.
12. Attach the pink rose outline to the top of the cake with
a few tiny dots of Royal Icing. Use pink Royal Icing to
pipe a free-form stem and leaves.
13. Carefully attach the filligree panels to the sides with
white Rnyal lang. The tops of the panels should touch
•For the phnc«igr*ph, I u*rd pink Plrxigl*» octicrai 1пнп Слп»1 Plaxbca in
Nrw York Qty. It il ПП.ПМП to prcrtidr the template.
208 SHOWCASE CAKES
the top of the cake. The bottom* should touch the edge
of the second base.
14. Using white Royal king» pipe tiny loops suspended from
the bottom edge of the panels. Do not allow the loops
co touch the base to prevent possible breakage when
moving the cake if the base is at all flexible.
Valentine’s Day, 1983, was the scheduled date for my only and
beloved brother’s San Francisco wedding. It was with great joy
that several weeks before I began to prepare a most spectacular
wedding cake in my New York kitchen as my present to Michael
and Suzy. The cake was a tnple-tiered fantasy, large enough to
feed 150 guests (page 219). Tbe tiers consisted of layers of soft
white butter cake filled with silky buttercream and topped with
pistachio marzipan. The frosting was a Swiss white chocolate but-
tercream invented especially for the occasion, and the decorations
were a guld lame ribbon from Pans, gold dragees, white chocolate
rose leaves, and a dozen real pink sweetheart roses.
This was a very special cake not only because it was intended
for my brother’s wedding but also because it was destined to ap-
pear in the June 1983 issue of Cook’s magazine and, subse-
quently, on the cover and inside thousands of recipe booklets, its
arrival in San Francisco, however, was thwarted by fate: the great
snowstorm of February, 1983, which locked in the entire north-
cast coast—along with me and my cake.
Much planning had gone into the projected transportation of
this perishable masterpiece. Because photography for the maga-
zine had been scheduled a few week* before the wedding, the cake
needed to be frozen during the interim. An ordinary freezer was
not large enough, but my butcher, Ottomanelli. upon learning that
the cake was for a family wedding, sympathetically offered a safe
comer in his spacious walk-in freezer.
My father, a cabinetmaker. fashioned a special protective crate
to protect the cake from falling sides of beef in the freezer and
from unknown hazards in the belly of the airplane.
My publicist had arranged special red-carpet treatment for
me and the cake enroute, so the airline consented to store the
crated cake in the plane’s kitchen. Fresh roses were ordered from
the Aorist. In short, everything was perfectly planned. The plans
of mice and men . . .
The snow starred falling early in the morning the day of the
flight. My ninety-etght-year-old grandmother and my aunt Ruth
were already on their way to California from their home in Pom-
pano Beach, Florida. My parents had departed from Kennedy hours
MY
BROTHER’S
WEDDING
CAKE OR THE
SNOWSTORM
OF 1983
SHOWCASE CAKES 209
before. The airline suggested that I board an earlier flight than the one I had booked
because the snow seemed to be coming taster than anticipated. So I picked up the
cake from the butcher shop, optimistically leaving all the baggage for my husband,
who was unable to leave work earlier than planned, and set out for Newark
Airport.
No seats in tourist class were available on rhe earlier flight, so, when the airline
offered me a first-class seat, 1 enthusiastically accepted.
Having made sure that The Cake was safely stored in the kitchen below, I sat
looking out the window, watching the snow steadfastly falling, feeling relieved to
have a scat on what might be the last flight leaving Newark that day. “Let’s go!
Let’s go!” I thought, as the snow fell thicker and thicker. Then came the inevitable
announcement: “We are now below minimal clearance . . . but this flight has not
been officially canceled.” A fellow passenger snickered at the word officially. The
words below minimal and canceled were ignored by my brain as 1 desperately dung
to the not officially canceled pan. Gradually, the horrible truth hit me with full
impact: Nor only was my brother not to have this much planned and most extraor-
dinary wedding cake, he was not going to have me at his wedding either!
When it was officially decided that the passengers were to disembark, I ob-
tained permission to store my cake in the terminal's refrigerator. I then called my
husband to ask him to pick me up—only to hear that the storm bad become so
severe that the streets in Manhattan were impassable. He suggested that I take the
airport bus to the Port Authority bus terminal.
With some indignation I got on line for rhe bus and soon considered myself
lucky to have been the last person to gel a seat on the last bus. Four hours later J
began to think I would have been luckier to have missed that bus and luckier still
tn get back to the airport! All traffic had stopped. The bus had no bathroom and
no gas gauge. The driver was forced to open the door for ventilation, admitting
exhaust fumes from countless other vehicles. Hie situation was unbelievable. Would
we freeze to death, stranded between Newark and the Lincoln Tunnel? How could
this civilized, familiar terrain have become a wilderness over which we had no con-
trol? Would people from nearby houses take us in, or would they panic like those
in lifeboats fleeing the sinking (dame and bar their doors?
Passengers started to take sides. The majority wanted to attempt a turnaround
and go back to the airport. 1Ъе unrealistic few who kept insisting that they wanted
to go to Manhattan were transferred to a bus behind us. Several young male passen-
gers forged into the snow-filled highway to direct traffic and give us space to turn
around. I>espite my distress, I could not help but notice what a splendid study of
human nature this emergency was presenting. Already our small bus had become a
mini-community.
With all remaining passengers in full agreement, we set out for the airport, but
got stuck in a drift at the foot of a hill four miles from the first terminal. The snow
was already several feet deep, and 1 started to wonder how long it takes to get
frostbitten without boots. Luckily, a nearby taxi offered [after much arm-twisting
and demands for fare) to take six of us up to the main terminal. The rest would
have to walk.
211) SHOWCASE CAKES
The first terminal (where my cake was stored/ was dark and locked for the
night, but the second terminal, a quarter mile down the road, wax filled with penpie
who had already commandeered sleeping areas for themselves and their families.
Hordes of people were stretched out on every available chair and all over the floor.
Any food in the canteens had long since been consumed. 1 found a relatively cozy
spot on the red-carpeted snail-shaped section of the baggage-unloading area and
curled up to sleep. (Here, at last, was my red-carpet treatment!} 1 slept fitfully all
night, awakened occasionally by the surrounding noise and the empty feeling in my
stomach from not having eaten since the night before. Remembering that I was
going to miss the wedding, 1 would cry against my better judgment and then go
back to sleep. There was nothing else to do.
When dawn broke, we were informed that no planes would be able to take off
until one or two days later. I managed to locate a manager and asked if the airline
would hold my cake until I could come back by car to reclaim it. He looked at me
in a puzzled way and said: “There is no more cake.” When he smiled, I thought he
was teasing me. “Well, what happened to the cake?” I asked, pretending to go along
with the ill-fated joke. “Oh, we ate the cake,” he said with imperturbable calm-
“You what!” I practically screamed. He then explained, with total confidence that 1
would sec the logic of his decision, that there had been no room in the terminal
refrigerators for food from rhe stranded planes so the crew had removed my cake
to make room for those incomparable airline delicacies. Then, evidently assuming
(incorrectly) that the cake would spoil unrefrigerated, they are it to keep it from
going to waste. Not even rhe special crate remained. {Could they have been that
hungry?)
Somehow, hours later, I got back to our Manhattan apartment. The streets
were like ski trails, and it didn't seem at al! like New York. My husband greeted
me at the door and said there u’as no point crying. I had already reached that
conclusion myself, and it didn't help.
I eventually got a full report on the wedding from my mother, which is about
as close as 1 could get to having been there my self. (She always knows what I'm
most interested in hearing.) For a wedding cake a few of my brother’s fnends had
chipped in and purchased one of those hulking white baroque numbers, adorned
with plastic Grecian columns and insipid cupids. A lot had been left over because,
according to my mother, it was very, very sweet.
Months later 1 presented my brother and new sister-in-law with a framed photo
of their intended wedding cake, dipped from Cook’s, together with an article from
The New York Times in which the cake had been immortalized by Manon Burros
as one of the great mishaps of the snowstorm of ’83. Eating the cake ourselves
couldn't have been as unforgettable.
SEQUEL: Seven months later I baked and frosted one layer exactly like the onginal
and dropped it off in San Francisco, enroute from reaching in Alaska to food-tour-
ing Japan. When 1 saw the first piece of cake enter my brother’s mouth, I could
finally lay to rest the whole sad episode. But it will be only with the greatest reluc-
tance that I will ever attempt to fly a wedding cake anywhere again.
SHOWCASE CAKES 211
THE
ST CLEMENT
WEDDING
CAKE OR THE
BLACKOUT
OF 1981
The events surrounding this wedding were so extraordinary it made
The New York Times under the tide "A Heaven Made in Mar
nagc.” Courtney was an artist from Texas marrying a sculptor
from New York. The cake she had commissioned was enor-
mous—large enough to feed at least 280 people, although the guest
list was only 150, because MWe Texans eat big." Courtney even
presented me with a watercolor of her cake-to-be: chocolate cov-
ered with white fondant and adorned with long-stemmed roses
on each tier. She was a dream to work with. She knew just what
she wanted, but understood that certain compromises would be
necessary due to the fact that the "medium” of the art material
was to be nothing short of delicious to eat.
The theme of the wedding, "a marriage made in heaven,”
was to be executed in a friend’s SoHo loft, decorated to look as
though the event were actually taking place in—you guessed—
heaven.
In addition to a ten thousand dollar budget, Courtney had a
very talented and willing assortment of relatives and friends who
were generous with their time and created some fantastic effects.
Courtney herself, having worked as a set designer, devoted a year
to creating eighteen foot silvcrspraycd facsimiles of her two fa-
vorite skyscraper tops: the Empire State and the Chrysler build-
ings. I ler brother Tom, an inventor and art restorer for Sotheby's,
strung tiny lights to resemble stars. Dry ice created billowing clouds
underfoot and a taxidermist preserved the white pigeon wings worn
by the angelic blonde ring bearer.
Courtney’s friend Evelyn, a Broadway costume designer, cre-
ated a white pearl-appliqucd silk chiffon dress, with petal-shaped
layers inspired by the Chrysler building—and lovingly embroi-
dered Courtney’s name in white inside the white waistband. An-
other friend designed a sapphire wedding nng, again inspired by
the Chrysler budding’s Art Deco peak. Even the groom's ex-wife
contributed Texas chili!
Weeks before the wedding 1 started sculpting pink marzipan
roses. Courtney’s brother cast plaster of Paris leaf molds so 1 could
create realistic marzipan leaves. The stems were to be piped on
the cake after rhe roses were in place, using pale green royal icing,
Having never made a 15-inch chocolate cake before, I started
baking a few days earlier than usual. Fortunately. I assumed (log-
ically though incorrectly I that a larger cake would need extra baking
powder in proportion to its other ingredients. Five minutes before
the 15-inch layers were done I checked them by gently pressing
the centers with my fingertip. Not quite.
Five minutes later, just as 1 opened the oven door, all the
lights in the apartment went out and even the refrigerator motor
came to an ominous halt. I could not see the cake, but I would
212 SHOWCASE CAKES
feel it. I extended my index finger tu where the center of one of
the layers should be. Where minutes before there had been a cake*
none was to be found. I carefully lowered my finger another inch
and there was the cake. My aim had been impeccable—the center
had sunk to the bottom of the pan.
It means only one thing when a cake falls five minutes before
it has finished baking: The structure was not strong enough and
the resulting cake will be heavy and somewhat fudgy. (Our son
Michael was delighted because he knew he would get to eat the
••failed” layers.) It turned out, after much analyses, research, and
more baking the following day, that the larger the cake, the /ess
baking powder is required.
The coincidence, though, was staggering. The cake had cho-
sen to fall the exact moment of one of the two major New York
City blackouts. Unfortunately, the reporter for the Times could
not resist temptation. He dramatized the story by writing that my
cake had fallen because of the blackout (my oven was gas, not
electric) and blithely implied that 1 had sold a fallen thousand-
dollar cake!
Actually, this cake was most instructive. I went on co develop
precise formulas and techniques for achieving enormous, show-
piece cakes with the same soft, downy texture and exquisite flavor
as small cakes. If you use the same kind of cake flour (either Sof-
tasilk or Swan’s Down) and carefully weigh or measure the other
ingredients, you will be very happy with the results. As one little
hoy I overheard at a wedding put it: “But wedding cakes aren't
suppose to taste this good!”
SHOWCASE CAKES 213
Bleeding
Heart Wedding
Cake
i.DesJjpwrf for
Trish FlmtMji)
SERVES ISO
TIMING:
Ail tbe eumpooents CU be
prepared ahead. It is hue to
bake tbe cake 3 to 4 days
ahead and refrigerate be-
cause the fondant will keep
it frech. The fondant must
he applied at least 12 hours
before tienng tbe cake.
SERVE:
Room temperature, hur cut-
ting instructions, see page
537.
rf hen Trish Fleming ordered her wedding cake, she
brought me a picture of bleeding hearts and asked if it was
possible to design a cake around this theme. It was a de-
lightful challenge and rhe blossoms and leaves were fun to
pipe.
Because Trish is an industrial designer, she had strong
feelings about the proportion of the tiers. She wanted them
to be 5, 9 and 13 inches instead of the traditional 6, 9, and
12. As 5-inch pans are almost extinct, 1 have re-created the
proportions back to the standard ones. If you prefer the
original proponions and have 5-inch cake pans or souffU
dishes, refer to the chart on page 490 for batter quantities
[use IVi times the Rose factor for the 5-inch layers).
I chose Raspberry Bunercream as the filling to echo
the pink blossoms on the rolled fondant.*
SPECIAL EQUIPMENT NEEDED
(see introduction to Master Cakes on page 481)
* 2 pastry bags, numbers 14 and 22 star tubes, and num-
bers 2 and 5 round tubes
STRUCTURAL SUPPORTS
• 3 cardboard rounds: 6 inches, 9 inches, and 12 inches
• Cake plate or foil-covered serving board at least 15 inches
in diameter
• Inflexible plastic drinking straws
CAKE COMPONENTS
• 1 recipe for 3-Tier Yellow Butter Wedding Cake to Serve
150 (page 484}
• Optional:
3 times the quantity of the recipe for Syrup flavored with
framboise ’.page 505)
• 1 large scale recipe (8 cups) for Neoclassic or Classic But-
tercream (page 516 or 517). Beat in 1 cup Raspberry Sauce
(page 337) and add enough red food color to attain a
pale pink color.
• 1 recipe (7.5 poundsj’3 kilograms, 402 grams) lemon-fla-
vored Classic Rolled Fondant for a 3-Tier Cake to Serve
150 (page 532)
* Reno»* Frntnng. Tienng. «nd Scoring a Weddkr# Cake 533} and oom-
erwg, a «ike Utth Rotted Fcodaac ip^gr 560).
214 SHOWCASE CAKES
• 2 times rhe quantity of recipe for Royal Icing {page 294).
Use red fcx>d color to tint the blossoms pink and some
green paste food color for the leaves
♦ Optional:
Gold monogram (page 412)
METHOD FOR ASSEMBLING CAKE
L Level the cake layers and bevel the edges (page 355).
Sprinkle with optional syrup for extra moistness.
2. Spread a small amount of buttercream o<i the 3 card*
board rounds and place a cake layer on each. Frost the
tops with a generous layer of buttercream (about Mi-
inch thick) and add the second layers. There are now
3 tiers. Frost the top and sides of each tier with the
thinnest possible layer of buttercream—ju*t enough tn
make the fondant adhere.
3. Roll out У-4 of the fondant l4-inch thick and 17 inches
in diameter and cover the largest tier. Tnm the bottom
flush with the base of the cake and knead all the clean
scraps into the remaining fondant
4. Attach the tier to the serving board with several loops
of tape. The fondant should be allowed to harden for
at least 12 hours before tienng cake.
5. Cover the other 2 tiers with the remaining fondant,
rolled out Vi-inch thick (14 inches in diameter for the
9 inch tier and 11 inches in diameter for the 6 meh
tier). Allow all 3 tiers to Mt uncovered at least 12 hour*
to firm.
6. Center a 9-inch cake pan on the 12-inch tier and use a
toothpick or skewer to mark a circle. Use a 6-inch cake
pan as a guide to mark a circle on the 9-inch cake.
Working made the marked circle on the 12-inch tier,
insert a straw straight through the cake until it reaches
the cardboard bottom. Mark the place on the straw
where it reaches the top of the cake. Remove the straw
and cut 6 more of the same length. Insert che 6 straws
at even intervals inside the marked circle. Place the fi-
nal straw in the center. Repeat the procedure for the
9-mch tier, using 5 straws.
7. Using 1 or 2 large spatulas, place rhe 9-inch tier on
top of the 12-inch tier. Carefully center the 6-inch tier
on the 9-inch tier.
8. Using a number 22 star tip and white Royal Icing, pipe
a shell border at the base of each tier. Save a small
amount of icing to pipe blossom tips and use the rest
SHOWCASE CAKES >15
to make the pink and green icing. Remember that rhe
color will continue to deepen for several hours as
it sits.
9. Pipe bleeding heart stems and leaves and then the blos-
soms (page 414).
10. Place optional monogram on top of cake.
Chocolate
Praline Wedding
Cake
(Designed for
<Ъосо1апег тдртгте/
SERVES 150
TIMING:
All the components can be
prepared ahead. It is best to
hake the cake no more than
1 day before assembling it.
The completed cake can be
kept at room temperature
for 1 day before serving or
it can be frozen 2 months.
Allow 24 hours to defrost in
the refrigerator and at least
4 additional hours at room
temperature.
SERVE:
Room temperature. For cut*
ting instructions, sec page
537.
he warmth and elegance of chocolate and gold repre-
sents a sophisticated break with tradition. Dark chocolate
cake blends with luscious praline buttercream and crunchy
hazelnuts.* *
SPECIAL EQUIPMENT NEEDED
(se e introduction to Master Cakes on page 481)
• 3 pieces of gold lame ribbon (page 463): 20 inches, 30
inches and 40 inches
CAKE COMPONENTS
♦ 1 recipe 3-Tier Chocolate Butter Wedding Cake to Serve
150 -Ipage 4861
• Optional:
3 times die quantity of recipe for Syrup flavored with
Frangelico (page 505}
• 1 rcape {13 cups) for Silk Meringue Praline Buttercream
for a 3-Tier Cake (page 526)
• Ш cups {8 ounces-‘227 grams] hazelnuts, skinned, toasted,
and coarsely chopped to equal 2 cups (page 324]
• Bittersweet Chocolate Cuds (a 4-ounce block of choco-
late} (page 382)
• Red Chocolate Rose (pages 325 and 390)
• Marzipan Stem and Leaves (page 363)
STRUCTURAL SUPPORTS
• 3 cardboard rounds: 6 inches, 9 inches, and 12 inches
• Cake plate or foil-covered serving board at least 15 inches
in diameter (flat pan must be at least 12 inches)
• Inflexible plastic drinking straws
METHOD FOR ASSEMBLING CAKE
1. Level the cake layers. Sprinkle with optional syrup for
extra moittnesx.
2. Spread a small amount of buttercream on all 3 card-
• Review Frmrxng* Twrmj, and Stanag л Wnlthng Cake Jpap-* 533).
216 SHOWCASE CAKES
board rounds and place a cake layer on each. Frost the
tops with V» inch of buttercream and top with the sec-
ond layers. There are now 3 tiers. Frost the top and
sides of each tier with the remaining buttercream.
3. Apply the chopped nuts to the sides of each tier
(page 324).
4. Attach the largest tier to the serving board with several
pieces of double-faced tape or loops of tape.
5. Invert a 9-inch cake pan over the center of the 12-inch
tier and lightly touch the frosting to mark a circle. In-
vert a 6-inch cake pan over the 9" cake and mark a
circle on the 9-inch cake. Working msrde the marked
circle on the 12-mch tier, insert a straw straight through
the cake until it reaches the cardboard bottom. Mark
the place on the straw where it reaches the top of the
cake. Remove the straw and cut 6 more of the same
length. Insert the 6 straws at even intervals tnstde the
marked circle. Place the final straw in the center. Repeat
the procedure for the 9-inch tier, using 5 straw’s.
6. Using 1 or 2 large spatulas, place the 9-inch tier on top
of the 12-inch tier. Carefully center the 6-inch tier on
the 9-inch пет. Using a spoon, distribute the chocolate
curls over the exposed areas of each tier. Do not place
chocolate curls on top of the cake.
7. Encircle the cake with the ribbon if desired.
8. Place the chocolate rose, marzipan stem, and leaves on
top.
reamy cheesecake, marbled with apricot and frosted
w’ith White Chocolate Cream Cheese Frosting. (Where is it
written that the bode can’t have her favorite cake as a tiered
wedding cake?)
This cake was designed for my niece and her bride-
groom and was featured in Martha Stewart’s fabulous book
Wrddingj. The layers do not require a base, but almond
biicuit is a lovely option.*
SPECIAL EQUIPMENT NEEDED
[see introduction to Master Cakes on page 481)
• 3 pieces of gold lank ribbon {page 463): 20 inches, 30
inches, and 40 inches
• Pastry bag and number 22 star rube
• Kcym Frronnc. Tiering. «nd Storing a Wedding; Cale (РЧ*
Golden
Glory Wedding
Cheesecake
fD«0pwd for the
foan Straftbatuit:Judge John
Stacihouie Wedding)
SERVES ISO
TIMING:
All che components can be
prepared ahead except for
SHOWCASE CAKES 217
the ipun nigar, which will
last for several hours if the
weather is not humid. The
cake should be assembled 1
day ahead and refrigerated.
SERVE:
Lightly chilled or room tem-
perature. f or cutting in-
structions. sec page 537.
CAKE COMPONENTS
• 1 recipe 3-Tier Wedding Cheesecake to Serve 150 (page
507)
• 1 large-scale recipe Apricot Swirl Filling for Cheesecake
(page 510)
• 1 recipe (13 cups) White Chocolate Cream Cheese Frost-
ing for a 3-Tier Cake to Serve 150 (page 525)
• Optional:
Two recipes Almond Biscuit (page 144), cooled flat
• 1 cup Apricot Topaz Jewel Glaze (page 329)
• Fresh wild violets or Crystallized Violets (page 326)
• Spun Sugar (page 316)
STRUCTURAL SUPPORTS
• 3 cardboard rounds: 6 inches, 9 inches and 12 inches
(preferably rhe sort that has been coated with glassine to
waterproof them)
• Cake plate or foil-covered serving board at least 15 inches
in diameter
• Inflexible plastic drinking straws
METHOD FOR ASSEMBUNG CAKE
1. Spread a thin layer of frosting on all 3 cardboard
rounds.
2. If using the optional biscuit, cut a 9-mch and a 6-mch
disc from I sheet and a 12-inch disc from the other.
(The baked biscuit is 11% inches by 16% inches so
you will not get a full 12-inch circle). Place a biscuit
disc on each cardboard round.
3. Un mold the cheesecake layers onto the biscuit or card-
board round.* and remove the parchment. There are
now 3 tiers.
4. Frost the top and sides of each tier and chill thor-
oughly. Reserve any leftover icing at room temperature
for piping the borders.
5. Attach the largest tier to the serving board with several
pieces of double-faced tape or loops of tape.
6. Invert a 9-inch cake pan over the center of the 12-inch
tier and lightly touch the frosting to mark a circle. In-
vert a 6-inch cake pan over the 9-inch cake and mark
a circle on the 9-inch cake. Working inside the marked
circle on the 12-inch tier, insert a straw straight through
the cake until it reaches the cardboard bottom. Mark
the place on the straw where it reaches the top of the
cake. Remove the straw and cut 6 more of the same
218 SHOWCASE CAKES
length, lose л the 6 straws at even intervals inside the
marked circle. Place the final straw in the center. Re-
peat the procedure for 9-inch tier using 5 straws.
7. Using 1 or 2 large spatulas, place the 9-inch tier on
top of the 12-inch tier. Carefully center the 6-inch tier
on the 9-inch tier.
8. Encircle the cake with the ribbons it desired.
9. With a small spoon or metal spatula, carefully spread
the apricot glaze on each layer.
10. Using a number 22 star tube, pipe the remaining frost-
ing in a shell border on the edge of each tier. (Chill
your hand with ice from time to time to maintain the
firm consistency of the frosting.)
11. Up to 4 hours ahead, make the spun sugar and wrap
it around the base of the cake. Shortly before present-
ing the cake, place fresh violets on top and in the sugar
strands. (If using crystallized violets, they can be placed
as soon as the spurt sugar is wrapped around the cake.)
v-^his is the cake that made history—the one that, while
en route to my brother^ San Francisco wedding, was eaten
instead by airline employees during a snow layover! I shall
always be grateful to Marion Burros and Alex Ward, who
immortalized the cake in The New York Times and helped
to assuage a good deal (but not all) of the pain!
The flavors and textures of chi* cake are unique. The
soft white butter cake is frosted with Classic Buttercream.
A thin layer of Pistachio Marzipan separates the butter-
cream from the firmer Creme Ivoire Deluxe (white choco-
late buttercream].*
SPECIAL EQUIPMENT NEEDED
(see introduction to Master Cakes (on page 481)
• 3 pieces of gold lame ribbon (page 463): 20 inches, 30
inches, and 40 inches
♦ Pastry bag and number 18 star tube
• Review Fencing, Tiering, and Storing • Wedding Cake ijMgr S33).
Rstochio
and Rose
Wedding
Cake
{Designed for Michael Levy)
SERVES ISO
TIMING:
All rhe com pone no can he
prepared ahead. It is best to
bake the cake no more than
1 day before assembling it.
The completed cake can be
SHOWCASE CAKES 214
kept at room temperature
for 1 day or it can be frozen
2 months.
SERVE:
Room temperature, for cut-
ting interactions, sec page
537. Be sure to remove the
tweerpeas before serving.
STRUCTURAL SUPPORTS
♦ 3 cardboard rounds: 6 inches, 9 inches, and 12 inches
♦ Cake place or foil-covered serving board at least 15 inches
in diameter I flat pan must be at least 12 inches)
• Inflexible plastic drinking straws
CAKE COMPONENTS
• 1 recipe 3-Tiet White Buner Wedding Cake to Serve 150
Ipage 484)
• Optional:
3 times the quantity of recipe for Syrup flavored with Pis-
tasha or framboise (page 505)
• 1 large-scale recipe (8 cups) Neoclassic or Classic Butter-
cream Ipage 516 or 517)
• 1 large-scale recipe (1.25 poundi'567 grams) Pistachio
Marzipan (page 530)
• 1 large-scale recipe (5.25 cups) Creme Ivotre Deluxe Ipage
522)
• 2 tablespoons (1 ounce/28 grains) gold dragees
• Rose and sweetpea corsage cake top (6 inches by 3 inches)
purchased from a florist
• 18 pink sweetheart roses and lavender sweetpeas
• 36 white chocolate rose leaves (page 385)
METHOD FOR ASSEMBLING CAKE
1. Level the cake layers. Sprinkle with optional syrup for
extra moismess.
2. Spread a small amount of buttercream on all 3 card-
board rounds and place a cake layer on each. Frost the
tops with Vi inch of the buttercream and top with the
second layers. There are now 3 tiers. Frost the top and
sides of each tier with the remaining buttercream.
3. Divide the marzipan in half. Roll Vt between 2 sheets
of plastic wrap into a thin circle. Peel the top layer of
plastic wrap off marzipan. Using a lightly greased 12-
inch cake pan as a guide, cut a circle of marzipan with
a sharp knife or pizza cutter. Knead the marzipan scraps
into the remaining marzipan. Roll the remaining mar-
zipan between 2 sheets of plastic wrap into a thin cir-
cle. Using a 9-mch cake pan as a guide, cur out a circle.
Knead the marzipan scraps together and roll out be-
tween 2 sheets of plastic wrap into a thin circle. Using
a 6-mch cake pan as a guide, cut our a circle. It is
easiest to apply marzipan if it has been frozen for a
few minutes to make it less flexible. Pick up the 12-
220 SHOWCASE CAKES
inch marzipan disc. Invert it (the marzipan will stick
to the plastic} and position it over the 12-inch tier.
Support it with your palm if necessary and lay it on
the cake, к will be difficult co move once it is set down.
Invert die 9-inch and 6-inch marzipan discs in the same
manner.
4. Frost the top and sides of each tier with Creme Ivoire
Deluxe.
5. Attach the largest tier to the serving board with strips
of double-faced tape or several loops of tape. Allow
the frosting to set until firm.
6. Center a 9-mch cake pan on the 12-inch ncr and use a
toothpick or skewer to mark a aide. Use a 6-mch cake
pan to mark a cirde on the 9-tnch cake. Working in-
side the marked cirde on the 12-inch tier, insert a straw
straight through the cake until it teaches the cardboard
bottom. Mark the place on the straw where it reaches
the tnp of tbe cake. Remove the straw and cut 6 more
of the same length. Insert the 6 straws at even intervals
inside the marked circle. Place the final straw in the
center. Repeat the procedure for the 9-inch tier using
5 straws.
7. Using 1 or 2 large spatulas, place the 9-inch tier on
top of the 12-inch tier. Carefully center the 6-mch tier
on the 9-inch tier.
8. Encircle the cake with the ribbons if desired and place
gold dragees in free-form swirls, pressing them lightly
into the sides. (A tweezer helps to pick them up.}
9. Using a number 18 star tube, pipe a shell border of
Creme Ivoire Deluxe on the edge of each tier.
10. Place the corsage on top and the sweetheart roses and
chocolate leaves around the tiers up to 4 hours ahead
of serving. To keep sweerpeas from wilting, use small
flower sinkers (page 463), camouflaged by the choco-
late rose leaves, or place on cake no more than 30
minutes before serving.
SHOWCASE CAKES 221
Dotted
Swiss Drcam
(Dttrpttd fof Bon Appetit
THREE- TIER
CAKE
SERVES ISO
FOUR-TIER
С А К E f
SERVES 275
TIMING:
AU the components can be
prepared ahead, in fact, the
marzipan roses can be pre-
pared nwxuhs ahead. (I rec-
ommend starring to make
(hem (he day rhe engage-
ment i« announced!) It »
tine to bake the cake 3 to 4
days ahead as the fondant
wiil keep it fresh even with-
out refrigeration. (The
decorated cake may be re-
frigerated if desired.! Fon-
dant must be applied at
least 12 hours before tiering
the cake.
SERVE:
Room temperature. For cut-
ting instructions, sec page
537,
// hen I first designed this wedding cake-, I bad a vision
of pearls on the cop net cascading down the alabaster fon-
dant sides. But perhaps even more than the poetic image of
pearls, this cake is reminiscent of the ethereal fabric called
dotted Swiss. And many a hnde who ordered this cake de-
signed her entire wedding around the theme, from brides-
maids* * dresses to tablecloths!
In the years following rhe сакеЧ first appearance, the
outside has remained essentially the same. But instead of a
lemon curd filling, 1 now use my newest buttercream crea-
tion: Ljcmon Curd Mousseline. Either a white or yelkiw layer
cake blends beautifully with the filling?
SPECIAL EQUIPMENT NEEDED:
(See introduction to Master Cakes (on page 481.)
• Pastry bag and numbers 3, 4, 6, and 8 round tubes
STRUCTURAL SUPPORTS
• 3 cardboard rounds: 6 inches, 9 inches, and 12 inches
• Cake plate or foil-covered serving board at least 15 inches
in diameter
• Inflexible plastic drinking straws
CAKE COMPONENTS
♦ 1 recipe 3-Tier White or Yellow Wedding Cake to Serve
150 (page 484}.
♦ Optional:
3 times the quantity of recipe for Syrup flavored with
Barack Palinka, apneot brandy, or framboise Ipage 505)
• IVx rimes the quantity of recipe (6У» cups) for Fruit
Mousseline (page 245), using 1 recipe of Lemon Curd
(page 340). With l-c mon Curd it will be almost 8 cups-
• 1 recipe (73 pounds/3 kilograms 44)2 grams) Classic
Rolled Fondant for a 3-Tier Cake to Serve I SO (page 532),
flavored with rosewater
• 3 times the quantity of recipe (2V. cups) for Royal king
Ipage 294).
• 13 pale pink marzipan roses (page 365} or fresh sweet-
heart roses. You will need I recipe of Marzipan for
Modding for the manapan roses (page 322]. Make a large
* Review Егояяж. Trnrc and Storing a Weddmg Cake (page 5331. сомсппе
* икс with Roiled Fondant ijagr 360), *nd рцхзд Коул! kins pearl» (page
402).
| f Sec pupe 224 tor four-tier inifflKtiixu.
222 SHOWCASE CAKES
full-blown rose with 3 rows of petals for the top and
smaller roses with 2 row's of petals for the tiers.
METHOD FOR ASSEMBLING CAKE
1. level the cake layers and bevel the edge* (page 355).
Sprinkle with optional Syrup for extra moistness.
2. Spread a small amount of mousseline on all 3 cardboard
rounds and place a cake layer on each. Frost the tops
with a generous layer of mousseline (H-inch thick) and
top with the second layers. There are now 3 tiers. Frost
the top and sides of each tier with the thinnest possible
layer of mousseline—|ust enough to make the fondant
adhere.
3. Roll out % of the fondant (5 pounds/2 kilograms. 268
grams) Vi-inch thick and 17 inches diameter and cover
rhe 12-inch tier. Trim the bottom flush with tbe base of
the cake and knead all the clean scraps into remaining
fondant.
4. Attach rhe 12-inch tier to the serving board with stops
of double-faced tape or several loops of tape. The fon-
dant should be allowed to harden for at least 12 hours
before tiering the cake.
5. Cover the remaining tiers with fondant, rolled Vi-inch
thick (3¥i pounds'1 kilogram» 587 grams, 14 inches in
diameter for the 9-mch tier, 2 pounds/907 grams. 11
inches in diameter for the 6-tnch tier). Allow all 3 tiers
to rit uncovered ar least 12 hours to firm.
6. Center a 9-mch cake pan on the 12-inch tier and use a
toothpick or skewer to mark a circle. Use a 6-inch cake
pan to mark a cirde on die 9-inch cake. Working inside
the marked circle on the 12-inch ber. insert a straw
straight through the cake until it reaches the cardboard
bottom. Mark the place on the straw where it reaches
the top of the cake. Remove straw and cut 6 more of
the same length. Insert the 6 straws at even intervals
mskk the marked cirde. Place the final straw in the cen-
ter. Repeat the procedure for the 9-mch ber using 5
straws.
7. Using 1 or 2 large spatulas, place the 9-inch tier on top
of the 12-inch tier. Carefully center the 6-inch tier on
the 9-inch tier.
8. Using a number 8 round tube and the Royal Icing, pipe
a pearl hirder at thr base of the 12-inch tier (page 402).
If points form, flatten and smooth them with a damp
artist's paint brush. Make a second row on top of the
SHOWCASE CAKES 223
first it desired. piping the pearls between those on the
first row. Use a number 6 round tube for rhe 9-inch
base border and number 4 round tube for the 6-inch
base border. Use a number 3 round tube to pipe pearls
on the sides of the tiers.
9. Place 4 roses around the base of the cake, 4 more on
the 12-inch tier, 4 on the 9-tnch tier, and the full-blown
rose on top. Attach them with large dots of Roy al lang.
SPECIAL INSTRUCTIONS FOR
A FOUR-TIER CAKE
ADDITIONAL EQUIPMENT NEEDED
• 15-inch cardboard round
• 18-inch serving board (instead of the 15-inch one)
♦ Lightweight wooden dowels for the bottom tier. (They
are needed to support the weight of the 3 large layers.
You will need a heavy-duty clipper or saw to cut them.)
ADDITIONAL CAKE COMPONENTS
• Two 15-mch cake layers (see chart on page 490)
• Optional:
A total of 6 times the quantity* of recipe for Syrup fla-
vored with Barack Palinka, brandy, or framboise Ipage
505)
• A total of 1 large-scale reapc (11 cups) Lemon Mousse-
line (page 515), using 1% cups Lemon Curd (page 340).
With Lemon Curd, it will be about 13 cups.
• A total of 5 recipe* Rolled Fondant {12.5 pounds) Ipage
306)
• A total of 6 reapes Royal lang (4. 5 cups! (page 294)
• A total of 21 marzipan roses (8 for the base, 4 on each
tier, and rhe full-blown rose on top) (pages 322 and 365)
note: Rolling Fondant for a 15-mch Bottom Tier: Start by
rolling 5 to 6 pounds/2 kilograms, 600 grams, (about Vi)
of the fondant, into a round 20 inches in diameter and 14-
inch thick.. Cover the 15-mch tier, trim, and knead the dean
scraps into rhe remaining fondant.
When rolling fondant for the 15чпсЬ and 12-tnch tiers,
use a piece of plastic wrap to cover the fondant and keep
it from drying during the extended time needed to roll the
larger diameters.
224 SHOWCASE CAKES
p A RT II
COMPLEMENTARY
ADORNMENTS
FOR ALL
CAKES
hese days it seems that rich buttercreams are suffering in
favor of lighter counterparts made with whipped cream or fruit.
Some people even prefer their cakes unfrosted. There are many
cakes in this book—such as chiffon cakes, angel food cakes, fruit-
cakes, and my favorite coffee cake, to name just a few—which
are more delicious unfrosted. But there ts a time and a place for
frosting» and certain cakes simply cry out for them. One of the
must satisfying cakes, Praline Brioche Cake, combines tour basic
textures: ro/t (La Brioche cake), rwoist (Rum Syrup), creamy (Pra-
line Silk Meringue Buttercream), and сгилсЬу (chopped hazel-
nuts).
Butter-
cream
Frostings
and
Fillings
Special occasion cakes become more festive and memorable
with elaborately piped buttercream decorations. When you plan
to make a major cake, however, it is important to remember that
it is intended to be eaten. Large bunercream swirls and festoons
mean large servings of buttercream in proportion to the cake.
My philosophy is that the cake is the main event and should
be featured. Buttercream is lovely but should be kept to a mini-
mum. I am not a proponent of seven-layer cakes which contain
as much buttercream as cake.
Butter cakes which are velvety and firmer than sponge-type
cakes lend themselves to buttercream frostings, whereas lighter
whipped cream frostings are more suitable for genoise and bis-
cuit. Buttercreams can be used for the lighter cakes ton if not
applied too thickly.
I think that many people object to buttercreams not because
they are ttxi nch but because they are often too sweet. When
looking at a buttercream recipe, consider the ratio of butter to
sugar and it will tell you more about the flavor than any other
factor because if the sugar is too high it will dominate. I find a
good balance to be at least double the weight of butter to sugar.
Every buttercream recipe in this chapter, except for Creme Ivoire
whose major ingredient is white chocolate, has 2.27 times butter
to sugar. Creme Ivoire is a wonderful buttercream for wedding
cakes because it is pale ivory and very creamy. To temper the
sweet richness, 1 use only about half the thickness 1 would with
another buttercream. And I add contrasting flavors such as Pista-
chio Marzipan between the outer Creme Ivoire and the inner, less
sweet Classic Buttercream.
BUTTERCREAM
THAT APPEARS
IN ANOTHER
CHAPTER:
Easy Chestnut Butter-
cream (page 353)
BUTTERCREAM FROSTINGS AND FILLINGS 227
Consistency is important when working with buttercream*.
И a completed buttercream looks curdled and you're not sure
whether it needs heating or chilling, take a small amount and try
first one method then rhe other. It’s always a question of temper-
ature. To frost a cake, the buttercream should be extremely soft
to go on smoothly. Don’t be afraid to heat it slightly if it seems
too stiff.
I have given weights for the finished base buttercreams to
facilitate making optional additions, because the final amounts
may vary. If, for example, some of the sugar syrup used for the
buttercream remains in the pan and some more spins onto the
Side of the bowl while mixing, there will be less buttercream at
the end.
It may seem that there arc a staggering amount of vanations,
hut some buncrcream bases blend better with certain additions
than do others. These variations were worked out over years of
baking and reaching. Although some variations arc quite similar,
I want to offer them all so that you have the convenience of being
able to use whatever is in your pantry’.
Classic
Buttercream
MAKES 4 CUPS
I pound 9.25 ounces
.'720 grams
(enough to fill and frost two
9-inch by I 'Л-inch layers or
three 9-inch by
I-inch layersji
his ultimate buttercream is so silky smooth, creamy,
and buttery, it complements just about any cake.
INGREDIENTS MEASURE WEIGHT
room temperature 6 Urge egg yolks voltune 33 Huh! ounces potuuhourrees 4 ounces kikigrAim- gr Am » 112 grams
sugar I cup 7 ounces 200 grams
water V» cup 4 ounces 118 grawis
uncalled butter (must be softencdi 2 cups 1 pound 454 grants
(.фйоплЬ liqueur or eau-de- vie of your chosoe 2 to 4 cables poons 1 to 2 ounces 28 io 56 grams
22K COMPLEMENTARY ADORNMENTS
Have ready a greased 1-cup heatproof glass measure near
the range.
In a bowl beat the yolks with an electric mixer until
light in color. Meanwhile, combine the sugar and water in
a small saucepan (preferably with a nonstick lining! and
heat, stirring constantly, until the sugar dissolves and the
syrup is boiling. Stop stirring and boil to the soft-ball stage
(238'F.). Immediately transfer the syrup to the glass meas-
ure to stop the cooking.
If using an electric hand-held mixer» beat the syrup into
the yolks in a steady stream. Don’t allow syrup ro tall on
the beaters or they will spin it onto rhe sides of the howl.
If using a stand mixer, pour a small amount of syrup over
the yolks with the mixer turned off. Immediately beat at
high speed for 5 seconds. Stop the mixer and add a larger
amount of syrup, Beat at high speed for 5 seconds. Con-
tinue with the remaining syrup. For the last addition, use a
rubber scraper to remove the syrup clinging tu the glass
measure. Continue beating until completely cool.
Gradually beat in rhe butter and, if desired, any op-
tional flavoring Ipage 231). Place in an airtight bowl. Bring
to room temperature before using. Rebeat if necessary to
restore texture.*
STORE:
6 hours room temperature,
1 week refrigerated, 8
months frozen.
POINTERS FOR SUCCESS:
See Sugar Syrups (page
435). To pres ent cry^talliza-
tiun. do nut stir after the
syrup comes to a boil. To
keep the temperature from
rising, remove the syrup
from the pan as mkxi as it
has reached 238*F. Don't al-
low the syrup to fall directly
on the beaters as it will spin
the syrup arosind the sides
of rhe bowl. Using a hand-
held beater makes this easier,
* Do not r<hcJt chilled buncrcreMri until и Ьж* readied room temperature ar
it may curdle.
BUTTERCREAM FROSTINGS AND FILLINGS 229
N coclassic
Buttercream
MAKES 4 CUPS
IУ» pcunds/800 g rims
(enough co fill and frost two
9-inch by I \6-inch layers or
three 9-inch by
I-inch layers)
his is an easier technique than that for Classic Butter*
cream and yields identical results. In fact, since 1 have come
up with this method, I have never gone back to the classic
way. I am also pleased to see that other bakers have adapted
this technique in their work.
In the neoclassic method, some of the sugar and all of
the water is replaced by corn syrup. {Q»rn syrup, by vol-
ume, is about half the sweetness of sugar so 'Zt cup is needed
to replace the !4 cup sugar.) The cum syrup provides just
the right amount of water so that, when brought to a full
boil, the temperature of the syrup is exactly 238eF. There
it no need to use a thermometer. The corn syrup also pre-
vents crystallization.
INGREDIENTS MEASURE WEIGHT
room temperature valumc poMidiotMice* krfqgrams'grams
6 Urge egg yolks 3.5 Hind ounces 4 ounces 112 grams
wgar % cup 5.25 ounces 150 grams
corn syrup Vi liquid cup 5.75 ounces 164 grams
unsaltcd butter (must be softened) 2 cups 1 pound 454 grams
optional: liqueur or eau-de- vie of your choice 2 to 4 tablespoon*» 1 to 2 ounces 28 to 56 grams
STORE:
6 hours room temperature,
1 week refrigerated, 8
months frozen.
Have ready a greased 1 -nip heatproof glass measure near
the range.
In a bowl beat the yolks with an electric mixer until
light in color. Meanwhile, combine the sugar and com syrup
in a small saucepan (preferably with a nonstick lining) and
heat, stirring constantly, until rhe sugar dissolves and die
syrup comes to a rolling boil. (The entire surface will be
coveted with large bubbles.) Immediately transfer the syrup
to the glass measure to stop the cooking.
If using an electric hand held mixer, beat the syrup into
the yolks in a steady stream. Don't allow syrup to fall on
the beaters or they wull spin it onto the sides of the bowk
If using a stand mixer, pour a small amount of syrup over
230 COMPLEMENTARY ADORNMENTS
the yolks with the mixer turned off. Immediately beat at
high speed for 5 seconds. Stop the mixer and add a larger
amount of syrup. Beat at high speed for 5 seconds. Con-
tinue with the remaining syrup. For the last addition» use a
rubber scraper to remove the syrup dinging to the glass
measure- Continue beating until completely cool.
Gradually heat in the butter and, if desired, any op-
tional flavoring (page 231). Place in an airtight bowl. Bring
to room temperature before using. Reheat to restore tex-
ture.*
Vy lassie or Ncodassic Buttercream can be used plain or
as a base for any number of flavors. One recipe can accom-
modate as much as Vi cup liquid without becoming too
soft. Spirits can heighten the flavor of a buttercream, but
do not add them to buttercream* containing fruit pu-
rees as they will become too liquid. Spirits are best kept in
rhe background, so start with 2 tablespoons and add more
only to taste.
Fresh fruit purees such as raspberry and strawberry
blend beautifully with classic burtererrams and maintain their
lovely hues. Apricot puree tends to curdle the buttercream
slightly, however, so heated, strained apricot preserves or
lekvar Ipage 429), cooled to room temperature, arc prefer-
able.
The sweetness level of the base buttercream is perfectly
balanced so whatever is added must be neither too sweet
nor too tart or adjustments to the base need to be made as
indicated.
CLASSIC CHOCOLATE: Classic buttercreams can incorpo-
rate about 6 ounces of melted chocolate without becoming
too stiff. This results in a light chocolate color and flavor
which docs not overpower yellow or white cake layers.
To make chocolate buttercream: Beat 6 ounces melted and
cooled chocolate, preferably extra bittersweet or bitter-
sweet, intn Qavuc or Neoclassic Buttercream.
• Do not rcbcat chilled bnttenertam until it hai mdwd nxxn n-mpmuurv «и
и mi> curdle.
POINTERS FOR SUCCESS:
The syrup mast come to a
rolling boil or the butter-
cream will be too thin.
Don’t allow the syrup to fall
directly onto the beaters ax
it will spin the syrup around
the side* of the bowl. Using
a hand-held beater makes
this easier.
Classic
Buttercream
Variations
fO»re Recipe of CJawc or
N'rocldwi ВмКепгеат)
BUTTERCREAM FROSTINGS AND FILLINGS 231
I CLASSIC CHOCOLATE CARAMEL CRUNCH: The flavor* of
caramel and chocolate blend beautifully and the powdered
caramel adds a slightly crunchy texture. Because caramel is
sweet it is best to use extra bittersweet chocolate in the
base.
To make chocolate caramel crunch buttercream: Beat *4
cup powdered caramel (page 313) into Classic Chocolate.
CLASSIC COFFEE: This simple method makes a buttercream
with the rich taste of good strong coffee.
To make coffee buttercream: Beat 2 tablespoons Medaglia
d'Oro instant espresso powder dissolved in 1 teaspoon
boiling water into Classic or Neoclasskc Buttercream. For a
more aromatic flavor, add 2 to 4 tablespoons Kahlua.
CLASSIC MOCHA ESPRESSO Chocolate and coffee always
make a lovely combination.
To make mocha espresso buttercream: Beat 2 tablespoons
Medaglia d'Oro instant espresso powder dissolved in 1 tea-
spoon boiling water into Classic Chocolate. For more in-
tense coffee flavor, add 2 to 4 tablespoons Kahlua.
CLASSIC PRALINE. The best praline paste (page 430), a
smooth combination of hazelnuts and caramelized sugar,
makes a fabulous addition to any buttercream. Because the
paste contains about 50 percent sugar it is necessary to re-
move some of rhe sugar from the buttercream base.
To make pralme buttercream: When making Classic But-
tercream, decrease the sugar by 1 */i tablespoons. Beat in Vi
cup praline paste.
CLASSIC CHOCOLATE PRAUNE Praline intensifies the deli-
cious flavor of chocolate.
To make chocolate praline buttercream: Bear 6 ounces
melted and cooled bittersweet chocolate into Classic Pra-
line Buttercream. Alternately, beat % cup praline paste into
Classic Chocolate Buttercream made with extra bittersweet
chocolate. (Each method is the same level of sweetness.)
CLASSIC PRALINE CRUNCH: Praline powder is made of
ground hazelnuts and caramel but is not turned into a paste.
This gives a crunchy texture to the buttercream.
To make praline crunch buttercream: When making Clas-
sic Buttercream, decrease the sugar by IVi tablespoons. Bear
in VS cup praline powder (page 315).
CLASSIC CHOCOLATE PRAUNE CRUNCH: This buttercream
is exactly like classic Chocolate Praline except for the
crunchy texture provided by the praline powder.
232 COMPLEMENTARY ADORNMENTS
To make chocolate praline crunch buttercream.' Brat 6
ounces melted and cooled bittersweet chocolate into Clas-
sic Praline Crunch Buttercream. Alternately, beat ’/» cup
praline powder into Classic Chocolate Buttercream made
with extra bittersweet chocolate. (Each method results in
the same level of sweetness.)
CLASSIC CHESTNUT: This buttercream is perfect with
Chestnut Sand Cake or with the suhde spicy flavors of
Chocolate Fudge Cake.
To make chestnut buttercream: Stir ¥1 recipe Classic or
Neoclassic buttercream into 1 recipe of lightly sweetened,
rum-flavored chestnut puree (page 353). (This will make 3
full cups buttercream.)
CLASSIC MAPLE: The essence of pure Vermont maple syrup,
this buttercream is excellent with any white or yellow but-
ter cake and is still more delicious encrusted with coarsely
chopped walnuts.
To make maple buttercream: When making Ncoclassic
Buttercream, replace the com syrup with an equal amount
of pure maple syrup. Beat in 2 teaspoons of maple extract
to the finished buttercream.
CLASSIC RASPBERRY: My Raspberry Sauce is so concen-
trated it scarcely affects the consistency of the buttercream
base. This is the purest raspberry flavor of any fronting 1
know.
To make raspberry buttercream; Beat Vi cup lightly sweet-
ened Raspberry Sauce (page 337) into finished buttercream.
If not planning to use the same day, add a few drops of
red food color to prevent fading.
CLASSIC STRAWBERRY: The strawberry flavor is surpris-
ingly fresh and intense. It is also, of course, silky and creamy
but has the added interest of tiny strawberry seeds. I find
that strawberries frozen without sugar have more flavor than
most commercially available fresh strawberries—even at the
height of season.
To make strawberry buttercream. Beat ¥2 cup unsweetened
Strawberry Puree (page 338) into finished buttercream and
add a few optional drops of essence of wild strawberry [page
427) for further intensity. If not planning to use the same
day. add a few drops of red food color to prevent fading.
CLASSIC APRICOT: This buttercream has a tart, honeyed
flavor and a very pale golden color.
To make apricot buttercream: Beat ’/j cup heated, strained,
BUTTERCREAM FROSTINGS AND FILLINGS 233
and cooled apncot preserve* or lekvar (page 429) into fin-
ished buttercream and add a few optional drops of essence
of apricot Ipage 427) for further intensity.
CLASSIC PINEAPPLE: Home-preserved pineapple is a deli-
cious, slightly tart addition to buttercream.
To make pineapple buttercream: Beat 1 cup pureed pine-
apple (page 351) into finished buttercream and add 1 to 2
tablespoons kirsch or rum.
CLASSIC LEMON: To achieve a truly lemon flavor it is nec-
essary to use both fresh lemon juice and lemon extract (ac-
tually the pure oil of lemon). Lemon juice alone is not intense
enough and the extract alone is too bitter.
To make lemon buttercream: When making Classic Butter-
cream, replace *Z» cup of the water with freshly squeezed
lemon juice. After adding the buner, beat in ’/♦ teaspoon
lemon extract
CLASSIC ORANGE An intense orange flavor is difficult to
achieve using orange extract because it is quite bitter. Finely
grated orange zest (the orange pan of rhe nnd only, as the
pith is bitrerl and an aromatic French orange essence (page
427), which includes the pulp, do produce an excellent or-
ange flavor, however.
To make orange buttercream- Add 2 teaspoons orange pulp
essence and 1 tablespoon grated orange zest.
CLASSIC ORANGE BLOSSOM: Orange flower water gives this
buttercream rhe perfume of orange blossoms. Be sure to
add the Tang, which is mainly orange oil. The small amount
serves to add the lilting zip associated with fresh orange
flavor. This buttercream perfectly complements Orange
Chiffon Cake.
To make orange blossom buttercream- Add 1 teaspoon (13.5
grams) Tang dissolved tn Vs cup orange flower water, 1
tablespoon (18 grams) grated orange zest, and 2 table-
spoons Grand Manner.
CLASSIC PASSION: This buttercream captures the slightly tart,
utterly distinctive taste of fresh passion fruit.
To make passion buttercream: Beat up to У» cup passion
curd (page 342) into finished buttercream and add 1 tea-
spoon of essence of passton fruit (page 427) for further in-
tensity. This buttercream ts fabulous with Cordon Rose
Banana Cake (page 69).
ZM COMPLEMENTARY ADORNMENTS
СЪ
Replacing both the sugar and the corn syrup of Neo-
classic Buttercream with honey results in a mellifluous, sub
tly perfumed buttercream. Mild clover honey, available in
supermarkets, produces the best flavor. (I find the more ex-
otic varieties too assertive.) This buttercream is wonderful
with any yellow cake but 1 created it especially for Queen
Bee cake (page 185).
Royal Honey
Buttercream
MAKES 3 У<
CUPS
(enough to fiii and frost two
9-inch by I 'А-inch layers or
three 9-och by
I-inch layers)
INGREDIENTS MEASURE WEIGHT
room revnperarure 6 large egg yolks »o/wnc 3.5 fluid ounces pounds- ounces 4 ounces Ыодолк. grams 112 grams
duvet honey l/j liquid cup 4 ounces 112 grams
unsahed butter imust be softened 1 2 cups 1 pound 454 grams
I lave ready a greased heatproof glass measure neat the range.
In bowl beat tbe yolks with an electric mixer until light
in color. Meanwhile heat the honey in a small saucepan
(preferably with a nonstick lining), stirring constantly, until
it come to a rolling boil, Immediately transfer the honey to
the glass measure to stop the cooking.
If using an electric hand-held mixer, beat rhe honey
into rhe yolks in a steady stream. Don't allow honey to fall
on the beaters or they will spin it onto sides of bowl. If
using a stand mixer, pour a small amount of honey over
the yolks with the mixer turned off. Immediately beat at
high speed for 5 seconds. Stop the mixer and add a larger
amount of honey. Beat at high speed for 5 seconds. Con-
tinue with the remaining honey. For the last addition, use
a rubber scraper to remove the honey clinging to the glass
measure. Continue beating until completely cool.
Gradually beat in the butter. Place in an airtight bowl.
Bring to room temperature before using. Rebeat to restore
texture.”
* Do mu rcbcai diillcd Ьеисгсгеде until it h js reached nxxn temperature or
it may curdk
STORE:
6 hours room temperature,
1 week refrigerated, 8
months frozen.
POINTERS FOR SUCCESS:
Ihc honey must come to a
rolling boil or the batter-
cream will be too thin.
Don’t allow the honey to
fall directly onto the beaters
as it will spin the honey
around the sides of the
। bowl.
BUTTERCREAM FROSTINGS AND HI LINGS 2И
Classic
Egg White
Chocolate
Buttercream
MAKES 4%
CUPS
35 ounces/1 kilogram
(enough co fill and frost two
9-och by I W-tnch layers <x
enree 9-inch by
I-inch layers)
special version of chocolate buttercream is the color
of rich milk chocolate and has a more assertive chocolate
flavor than the traditional one made with egg yolks. In fact,
it is just as smooth and even easier and faster to prepare
than Classic or Neoclassic Buttercream because a sugar syrup
is not needed.
This buttercream is airy yet» because of the whites'
structure, has more body than a buttercream made with all
yolks. It is an excellent texture and flavor for both choco-
late butter cakes and chocolate g&toift.
INGREDIENTS MEASURE WEIGHT
rtxiiw rcwifwarure volume pounds 'ounce» li/ogranH. grams
bittersweet chocolate 3*4 (3-ounce) bars 10 ounces 284 grains
unsalted butter (must be softened; 2 cup* 1 pound 454 grams
4 large egg whiles % liquid cup 4.25 ounces 120 grams
sugar 1 cup 7 ounces 200 grams
STORE:
3 days room temperature, 2
weeks refrigerated, 6
months frozen.
POINTERS FOR SUCCESS
Have egg whites at room
temperature before beating.
See Melting Chocolate Ipage
379).
Break the chocolate into squares and place in a double boiler
over very hot water or low heat. The water must not ex-
ceed 160°F. or touch the bottom of the double boiler insert.
Remove double boiler from the heat and stir fre-
quently until the chocolate begins to melt.
Return to the heat if the water cools, but be careful
that it does not get too hot- Stir 8 to 10 minutes or until
the chocolate is smooth. (Chocolate may he melted in a
microwave oven on high power if stirrfd every 15 seconds.
Remove before fully melted and stir, using residual heat to
complete the melting.)
In a mixing bowl beat the butter until smooth and
creamy.
In another mixing bowl beat the egg whites until soft
peaks form when the beater is raised. Gradually beat in the
sugar until stiff peaks form when the beater is raised slowly.
Beat in the butter by rhe tablespoon. If the mixture looks
slightly curdled, increase the speed a little and beat until
236 COMPLEMENTARY ADORNMENTS
smooth before continuing to add mote butter. Add the
melted and cooled chocolate all at once and beat until
smooth and uniform in color. Place in an airtight bowl.
Reheat to restone texture.*
UNDERSTANDING
While it is necessary to cook egg yolks for a buttercream
to prevent bacterial growth, raw egg whites are far less prone
to this problem. Because the whites are not thickened by a
hoc syrup, the resulting buttercream is softer than the Clas-
sic or Neochssic versions and can accommodate 4 more
ounces of chocolate without becoming too stiff and un-
workable.
к-Xhis ivory buttercream is mellow and creamy, ks lus-
cious» slightly tangy flavor is a perfect complement for yel-
low cake, carrot cake, and especially cheesecake. It makes
a spectacular presentation because it pipes wonderfully and
is rhe identical color of cheesecake. White chocolate adds
firmness of texture, sweetness, and an undefinabte flavor.
Wute
Chocolate
Cream Cheese
Buttercream
MAKES 4¥«
CUPS
I pound 10 ounce*'
765 grams
(enough to fill and frost two
9-inch by 116-lnch layers or
three 9-inch by
I -inch (ayers|
INGREDIENTS MEASURE WEIGHT
room lempcrttufe white chocolate ^preferably Tobler Narcisse) nu/urwc 3 f3-ounce) bars pounds ounces 9 ounces kiiagramt.$TAm> 255 grants
cream cheese must be softened) 4 small packages 12 ounces 340 grams
uncalled butter {must be softened) % cup 6 чипе» 170 grams
lemon juice, freshly squeezed IVx tablespoons • 23 grams —
• Do not rebejt dulled buttercream until it has reached room кефегмигс <x
it may curdle.
BUTTERCREAM FROSTINGS AND FILLINGS 237
STORE:
1 day room temperature, 2
weeks refrigerated. 2
months frozen.
POINTERS FOR SUCCESS;
Do not overheat the white
chocolate and be sure to tor
constantly while melting. Be
sure no moisture gets into
the melted chocolate (sec
Mdting Chocolate, page
379). Beal constantly while
adding the cooled chocolate
to prevent lumping. If lump
ing should occur, it can be
remedied by pressing the
buttercream through a (inc
strainer.
The buttercream may
separate slightly if room
temperature is very warm.
This can be corrected by
setting the bowl in ice water
and whisking tbe mixture.
Buttercream becomes
spongy on standing, Rebeat
to restore smooth creamy
texture. Use ice to chill your
hand during piping to main
tarn firm texture.
Break the chocolate into squares and place in the top of a
double boiler set over very hoc water (no hotter than 160*F.)
on low heat. The water must not touch the bottom of the
double hotter insert.
Remove the double boiler from the heat and stir until
the chocolate begins to melt. Return to the heat if the water
cools, but be careful that it does not get too hot. Stir 10
minutes or until smooth. (The chocolate may be melted in
a microwave oven if stirred every 15 seconds. Remove be-
fore fully melted and stir, using residual heat to complete
the melting.) Allow to cool.
In a mixing bowl beat rhe cream cheese (preferably
with a flat beater! until smooth and creamy. Gradually heat
in the cooled chocolate until smoothly incorporated. Beat
in the butter and lemon juice. Rebeat at room temperature
to ensure smoothness before frosting.*
note: .My friend Shirley Corriher reports that, when using
this frosting for a wedding cake m the heat of an Atlanta
summer, she tried decreasing the butter tn 2 ounces and it
hdd up quite well.
• Do MX rebeat cMW hutwraam until it hi* mebed пмхп мтпретжигг or
и аму tunic
23S COMPLEMENTARY ADORNMENTS
я
his is the buttercream to hive on that proverbial des*
sert island. In (act, it is rather hke a floating island butter*
cream with its combination of crime anglaiie and Italian
mennguc!
Although more time-constiming and exacting to pre-
pare than Classic Buttercream, it has the advantage of being
equally smooth but more airy» stable, and resistant to warm
temperatures. The greater stability makes it a drcam for
piping decorations. It’s gteat to have a batch of this on
hand tn the freezer to flavor with any of the additions on
page 241.
Silk
Meringue
Buttercream
MAKES 4 CUPS
almost 2 pcondv'fl sfl g'-ams
(enough to fill and frost two
9-inch by I ‘6-inch layers or
three 9-inch by
I -inch layers)
INGREDIENTS MEASURE WEIGHT
room temperature ialtune /WJIMldc'iNinCeS кгкупмт. grams
CREME ANGLAISE «•Rat % cup 3 J ounces 100 grams
5 large egg yolks 3 ttind ounces 3.25 ounces 93 grams
milk 4A liquid cup 4.25 ounces 121 grams
1 large vanilla bean, split lengthwise* or VS large Tahitian vanilla bean ITALIAN MERINGUE
sugar V’s cup ♦ 2 tablespoons 3.2$ ounces 92 grams
water 2 tablespoons 1 ounce 30 grams
2 large egg whites 4 liquid rup 2 ounces 60 grains
cream of tartar V« teaspoon • •
unsalted butter (must be softened) 2 cups 1 pound 454 grams
* A vanilla bean utters the mint deiiuuu» IUvik. hat d you with to av<ud the link black specks,
гср1жг tin- bran with I wavjxKin vwnXi extract, .-vd.lnl w the cooled гтлне zvpjite,
TO MAKE CREME ANGLAISE
Have ready a sieve suspended over a bowl, near the range
In a medium-size heavy nonoorrodtbk saucepan com-
bine the sugar and yolks.
In a small saucepan bring the milk and vanilla bean to
a boil. Add 2 tablespoons of the milk to che yolk mixture,
stirring constantly. Gradually add the remaining milk, stir-
STORE:
6 hours room temperature,
1 week refrigerated, В
months frozen. If frozen or
refrigerated, be sure to al-
low the buttercream co
i come to room temperature
BUTTERCREAM EROSTINGS AND FILLINGS 239
before rehearing it or it wifi
break down. Buttercream
becomes almost liquid when
it has reached room temper-
ature but reheating wdl
make it as firm as before.
POINTERS FOR SUCCESS:
Creme Angiaise: Tbe tem-
perature must reach at least
160°F. and must not exceed
180*F. or it will curdle.
Italian Meringue: For
maximum stability, the
syrup must reach 24B*F. and
not exceed 25O*F. or the
whites will break down. The
whites must be free of any
grease or trace of yolk. Do
not overheat.
Finished buttercream:
Reheat when it becomes
spongy.
nng, and cook over medium-low beat, stirring constantly,
until just below tbe boiling point. The mixture will start to
steam slightly and an accurate thermometer will register
I70T. Strain immediately, scraping up any dinging to the
bottom of the pan.
Scrape the seeds from the vanilla bean into tbe custard
and cool to room temperature. (To speed cooling, put tbe
bowl in another bowl or sink partially tilled with ice water.)
Cover and refrigerate up to 5 days or until ready to com-
plete the buttercream.
TO MAKE ITALIAN MERINGUE
Have ready a heatproof glass measure near the range.
In a small heavy saucepan (preferably with a nonstick
lining) combine Vi cup sugar and the 2 tablespoons of water.
Heat, stirring constantly, until the sugar dissolves and the
mixture ls bubbling. Stop stirring and reduce the hear to
low. lit using an electric range remove from the heat.)
In a mixing bowl beat tbe egg whites until foamy. Add
the cream of tartar and beat until soft peaks form when the
beater is raised. Gradually bear in the remaining 2 table-
spoons sugar until stiff peaks form when tbe beater is raised
slowly.
Increase rhe heat and boil the syrup until a thermom-
eter registers 248°F. to 250°F. (the firm-ball stage). Imvir
dlately transfer the syrup to the glass measure to stop the
cooking.
If using an electric hand-held mixer, beat the syrup into
the egg whites in a steady stream. Don’t allow syrup to fall
on the beaters or they will spin it onto sides of bowl. If
using a stand mixer, poor a small amount of syrup over the
egg whites with the mixer off. Immediately beat at high
speed for 5 seconds. Stop the mixer and add a larger amount
of syrup. Beat at high speed for 5 seconds. Continue with
the remaining syrup. For the last addition, use a rubber
scraper to remove the syrup dinging co the glass measure.
Lower speed to medium and continue beating until com-
pletely cool (about 2 minutes). (The Italian Meringue keeps
for 2 days refrigerated. Rebeat briefly before using.)
TO COMPLETE BUTTERCREAM
Place the butter tn a large mixing bowl and beat on me-
dium speed for 30 seconds or until creamy. Gradually beat
in the creme anglatse until smooth. Add the Italian Me-
nngue and beat until just incorporated. If the mixture looks
curdled instead of smooth it ts too cold. Allow it to sit at
room temperature to warm to 7(PF. before continuing to
240 COMPLIMENTARY ADORNMENTS
beat. Or place the bowl in a hot water bath very briefly
until the buttercream touching the bow1 just starts to meh. I
Remove at once and beat until smooth. Bear in opnonal
additions (page 241). Place in an airtight bowl. The butter-
cream becomes slightly spongy on standing. Rebeat before
using.*
UNDERSTANDING
Crime jnglrnce must be heated to at least 160sF. to ade-
quately thicken die egg yolks. Over 180*F. rhe yolks will
start to curdle and the cream may not be smooth. (Com-
mercial establishments sometimes bring it to a boil and
quickly strain it, discarding the curdled part. This is done
only to save time and ensure that the temperature is hot
enough without bothering with other tests. 1 do not rec-
ommend this method.)
When stirring the hot milk into the yolk mixture, it is
best to use a wooden spoon because a whisk will create air
bubbles, making it difficult to |udgc when the mixture is
done.
PRALINE SILK MERINGUE BUTTERCREAM: The nutty, burnt
sugar flavor and smooth texture of fine-quality praline paste
(page 431) make this a delicious buttercream. Because pra-
line paste contains at least 50% sugar» it is necessary to use
less sugar in the Silk Meringue base.
To make praline buttercream: Use only */♦ cup sugar in-
stead of Vi cup when making rhe creme anglaise. Beat Vi
cup (5.5 ounces/154 grams) praline paste into the butter-
cream before adding the meringue.
To make chocolate praline buttercream: Add 8 ounces
melted and cooled extra bittersweet or bittersweet choco-
late.
CARAMEL SILK MERINGUE BUTTERCREAM: This version of-
fers the pure flavor of burnt sugar without any bitter over-
tones. When making the creme anglaite, the sugar is
caramelized and dissolved in the milk. Double the milk is
needed to compensate for evaporation when added to the
hot caramel.
* Dn жж rrbr-ir dulled huncraram uncil it hat reached гишп lemperature <u
it may curdle-
Silk
Meringue
Bullen ream
Variations
BUTTERCREAM FROSTINGS AND FILI INGS 24!
To make caramel buttercream: When making the creme
anglatse, add the vanilla bean to 1 cup milk» bring to a
boil, and keep warm. In a heavy pan combine the *4 cup
sugar with 2 tablespoons water and bring to a boil» stirring
constantly. Cook without stirring until deep amber (JbCTF.k
Remove immediately from the hear and slowly pour in rhe
hot milk, reserving the vanilla bean. Return to low heat
and cook, stirring, until rhe caramel is totally dissolved.
Proceed as for regular creme anglaue by gradually adding
the caramel mixture to the yolks, cooking to 170T., and
adding the vanilla seeds.
BURNT ORANGE SILK MERINGUE BUTTERCREAM: This is an
exating combination of caramel with orange overtones.
To make burnt orange buttercream: Make caramel butter*
cream and beat in 1 tablespoon thawed orange juice con-
centrate and 1 tablespoon grated orange zest. I You can make
your own concentrate by reducing Vi cup freshly squeezed
orange juice.) If desired, use a tiny dab of orange paste
food color to tint buttercream pale orange.
COFFEE CARAMEL SILK MERINGUE BUTTERCREAM. This
subtle combination produces a harmonious melding of fla-
vors.
To make coffee caramel buttercream: Make caramel but*
tercream and beat in 2’Л teaspoons Medaglia d’Oro instant
espresso powder dissolved in ’Zz teaspoon very hot water.
ESPRESSO SILK MERINGUE BUTTERCREAM Although it is
possible to steep ground coffee brans in the creme anglaise
and then strain it through cheesecloth to give the butter-
cream a rich coffee flavor, instant espresso, such as Me-
daglia d'Oro, is a lot easier to use and also results in a deep
nch coffee flavor.
To make espresso buttercream: Dissolve 2 tablespoons
Medaglia d’Oro instant espresso powder in the hot creme
angkuse Bear up to М» cup Kahlua into the finished butter-
cream.
CHOCOLATE SILK MERINGUE BUTTERCREAM: Extra bitter-
sweet chocolate adds a cafe au lait hue and thickens the
buttercream, making it a dream for decorative piping.
To make chocolate buttercream: Beat 8 ounces melted and
cooled extra bittersweet or bittersweet chocolate into the
finished buttercream.
CHOCOLATE TRUFFLE SILK MERINGUE BUTTERCREAM: If you
happen to have some leftover Ught Whipped Ganache» it
makes a terrific addition to silk menngue buttercream. The
242 COMPLEMENTARY ADORNMENTS
resulting buttercream is more creamy arid stable than tbe
airy ganache bur lighter than the silk meringue butter-
cream. It is pale chocolate in color with a delicate flavor.
To make chocolate truffle buttercream: Beat together equal
amounts of silk meringue buttercream base and Light
Whipped Ganache (page 268).
CHESTNUT SILK MERINGUE BUTTERCREAM: The dassic
combination of chestnut and rum makes a buttercream with
spicy, earthy overtones that blends beautifully with choco-
late cakes.
To make chestnut buttercream: Use ‘A recipe buttercream
bxse and beat in 1 reape of lightly sweetened chestnut puree
(page 353) flavored with rum. (Makes 3 full cups.)
APRKZOT SILK MERINGUE BUTTERCREAM: Bright orange,
premium-quality dried apricots from California (purchased
in a Health food or specialty produce stores) make an in-
tensely flavored bunercream. (Fruit puree buttercream* are
slightly softer than the other versions but using this base
they still pipe exceptionally well.)
To make apricot buttercream: Beat I cup unsweetened
apricot puree (page 335) into the finished buttercream. Add
2 teaspoons apricot essence for further intensity if desired
ipa^e 427).
RASPBERRY SILK MERINGUE BUTTERCREAM: Raspberry
Conserve or )am gives a better texture to this buttercream
than raspberry sauce. This buttercream is slightly less in-
tense in flavor than the dassic one and has a lighter tex-
ture.
To make raspberry buttercream: Add V> cup Cordon Rose
Raspberry Conserve (page 331) or 1 cup commercial seed-
less raspberry jam plus 1 tablespoon freshly squeezed lemon
juke to the finished buttercream. If the conserve or jam ts
very stiff, heat gently until softened. Add the lemon juice
and allow to cool to room temperature before adding to
the buttercream. To retain a nice pale pink color, stir in 6
drops of red food color.
STRAWBERRY SILK MERINGUE BUTTERCREAM: Avoid com
mercial strawberry jams, most are far too sweet to add to
buttercream.
To make srrau^berry buttercream: Add ’A cup purecd Cor-
don Rose Strawberry Conserve (page 333} to the finished
buttercream. To retain a pale pink color, stir in 6 drops of
red food color. Add a few drops of essence of wild straw-
berry* if desired for further intensity (page 247).
BUTTERCREAM FROSTINGS AND FILLINGS 243
Mousseline
Buttercream
\ moos ah LEAN'/
MAKES 4'4 CUPS
I pound 14 ounces/
858 grams
(enough to fill and frost two
9-nch by I '4-inch layers or
three 9-inch by
I-inch layers)
his buttercream is very light, smooth and incredibly
easy to work with, к is soft enough tor beautiful shell bor-
ders yet strong enough to pipe roses. Liqueur gently per-
fumes the buttercream, and if it is tinted it also enhances
the color. Mandan nr Napoleon, for example, lends the pal-
est aura of apricot.
It is a thrilling buttercream to prepare because it starts
out looking thin and lumpy and, about three-fourths of the
way through, scans to emulsify and turn into a luxurious
cream.
A word of caution: If the butter is too soft or the room
too hot, what could have been a satin-smooth cream breaks
down into a grainy hopeless puddle. Once rhe buttercream
is made, however, it holds up bencr than any other.
Be sure to try the fruit variations (page 245}. They are
all superb and the orange is my favorite of all orange but-
t ere reams, к is excellent with both chocolate and non-
chocolate butter cakes and gritoise.
INGREDIENTS MEASURE WEIGHT
ГГМЛХИ rnv^wntritre ixi/шгм* pounds owner* krJograms. grams
uncalled butter, softened but cool ,65*F.) 2 cups 1 pound 454 grams
tugar 1 cup 7 ounces 200 gram*
water Ул liquid cup 2 ounces 60 grams
5 large egg whit» 5 fluid ounces iu« a glass measuring cup} 5.25 ounces i 150 grams
cream of tartar Vi ♦ *4 teaspoon • •
liqueur such as Mandarine Napoleon, Grand .Manner, or an eau-de-vie 3 fluid ounces (use a gtats measuring cup: 3 ounces I 90 grams — J
tn a mixing bowl beat the butter until smooth and creamy
and set aside in a cool place.
Have ready a heatproof glass measure near the range.
In a small heavy saucepan (preferably with a nonstick
lining) heat ’4 cup sugar and the '4 cup water, stirring con-
। stantly, until the sugar dissolves and the mixture is buh-
244 COMPLEMENTARY ADORNMENTS
bling. Stop stirring and reduce the heat to low. (If using an
electric range remove from the heat.)
in another mixing bowl beat the egg whites until foamy,
add the cream of tartar» and beat until soft peaks form
when the beater is raised. Gradually beat in rhe remaining
14 cup sugar until stiff peaks form when the beater is raised
slowly. Increase the heat and boil the syrup until a ther-
mometer registers 248’F. to 250°F. (the firm-ball stage).
Immediately transfer the syrup to the glass measure to stop
tire cooking.
It using a hand-held mixer beat the syrup into the whites
in a steady stream. Don't allow rhe syrup to fall on the
beaters or they will spin it onto the sides of the bowl. If
using a stand mixer, pour a small amount of syrup over the
whites with the mixer off. Immediately hear at high speed
for 5 seconds. Stop the mixer and add a larger amount of
syrup. Beat al high speed for 5 seconds. Continue with the
remaining syrup. For rhe last addition, use a rubber scraper
to remove the syrup clinging to the glass measure. Lower
speed to medium and continue beating up to 2 minutes or
until cool. If not completely cool, continue beating on low-
est speed.
Beat in the butter at medium speed 1 tablespoon at a
time. At first the mixture will seem thinner but will thicken
beautifully by the rime all tbe buner is added. If at any time
rhe mixture looks slightly curdled, increase the speed slightly
and beat until smooth before continuing to add more buner.
Lower the speed slightly and dnzzie in the liqueur. Place
in an airnghr bowl. Rebeat lightly from time to time to
maintain silky texture.4 Buttercream becomes spongy on
standing.
VARIATIONS
CHOCOLATE MOUSSEUNE Beat in 5 ounces of melted and
cooled extra bittersweet or bittersweet chocolate.
WHITE CHOCOLATE MOUSSELINE. Beat in 6 ounces melted
and cooled white chocolate, preferably Tobler Narcisse.
FRUIT MOUSSELINE: Add up to ¥-» cup lightly sweetened
strawberry or raspberry puree or orange, passion, lemon,
or lime curd.
STORE.
2 days room temperature,
10 days refrigerated, H
months frown. Allow to
come to room temperature
before reheating or it will
break down irretrievably.
POINTERS FOR SUCCESS:
Correct butter temperature
is crucial. If you suspect that
the butter was too warm (or
the kitchen it very hot I and
the buttercream starts thin-
ning out and curdling, check
the temperature. If the mix-
ture docs not feel cool, re-
frigerate until it reaches
65*F. to 7(X*F. or is cool to
the touch. If by chance you
have used buner straight
from the refrigerator and
the mixture feels ice-cold,
suspend the bowl over a pan
of simmering water (don’t
let the bowl touch the
water) and heat very briefly,
stirring vigorously when the
mixture just starts to melt
slightly at the edges. Dtp the
bottom of the bawl m а
larger howl of ice water far
a few seconds to cool it. Re-
move and beat by hand un-
til smooth.
• Do not reheat chilled buttercream until it ha» mchcil room irmpcraiun.- im
it may curdle.
BUTTERCREAM FROSTINGS AND FILLINGS 24$
Creme
Ivoire Deluxe
{krtm n*WAH duh LOU X)
t.к лигу White Chocolate
Buttercream and Glaze
STORE;
Mineral oil has an indefinite
shelf life, but safflower oil
will become rancid in a mat-
ter of weeks. Therefore, if
prepared with mineral oil,
the buttercream will keep at
room temperature 1 month.
(The clarified butter short-
ens the shelf life at room
temperature.) If prepared
with other oils, store at
room temperature up to 1
week, in the refrigerator up
to 3 months ar freeze up to
1 year.
ч_х hts glorious buttercream is for the white chocolate lover.
The addition of extra cocoa butter, clarified butter, and a
neutral oil softens the texture and provides a pale ivory
color reminiscent of an antique satin wedding gown. It is
excellent xs frosting (or a wedding cake and equally dra-
matic when used to frost or glaze a one-layer cake such as
the Chocolate Oblivion Truffle Cake Ipage 84}, This but-
tercream pipes with the most exquisite detail. The contrast
of the bittersweet chocolate against the white chocolate
buttercream is striking.
Creme Ivoire is like the finest bonbon or chocolate
truffle. On first bite it seems firm, only to dissolve imme-
diately in the mourh, releasing the buttery and faintly choc-
olate flavors. Because of its richness, this amount is enough
to glaze or lighdy frost and decorate a 9-mch by 5-inch
cake.
MAKES 1 CUPS
INGREDIENTS MEASURE WEIGHT
room temperature viJiime /HJUfkA'OWIlO
white chocolate (preferably Tablet Narcisse} 8 iT-ouncel bars 13 pounds 6Я0 grams
cocoa butter, mehed * V« liquid cup US ounces 64 grams
clarified unsalted buttert *Zi liquid cup L75 ounces 50 grams
flavorless oil such as mineral nr safflower !4 liquid cup 1.75 ounces 50 grams
I * Мел cocoa butter ta a double boiler, in an o»en with the hear of the pilot
light, or imcrow*>e rhe time way as chocolate ;рАдс 379).
f II you Ju nut hive iliriheti butter on hand, you will aced to clarify 356
uWc-spoons |2.?5 ounce*'?* gramil unwdtrd harnrr. In з heavy «зжгрзп meh
the butter over тесная» heat, pjmjlly covered »o prevent iplxitermt When
tbe butter loch* dear, cook unowend. uarchmj carefully nnril the jolid»
drop ud just bejun to brown. Pour immediately through □ fine strainer or a
strainer Lned with cheesecloth
Break the chocolate into squares and place in the top of a
double boiler. Add the cocoa butter, clarified butter, and
oil and place over very hot water on low heat. The water
mint not exceed 160°F. or touch the bottom of the double
boiler insen.
Remove the double boiler from tbe heat and stir until
rhe chocolate begins to melt. Return to the heat if the water
cook, but be careful that it docs not get too hoc. Stir 10
minutes or until smooth. (The chocolate may be melted with
the oil and butters in a microwave oven un high power if
246
COMPLEMENTARY ADORNMENTS
stirred every IS seconds. Remove before fully mdred and
stir, using residual heat to complete the melting.'
Because of che milk solids in the white chocolate, the
btmercream must be chilled and stirred to prevent seeding
(the formation of tiny lumps). Fill a large bowl with ice
cubes and water and sprinkle the ice with 1 or 2 table-
.tprxsns salt. Fill a second bowl or the sink with very hot
water. Set the top of the double boiler directly in rhe ice
water.
TO MAKE A BUTTERCREAM
Stir constantly with whisk until you |ust see whisk marks
on the surface. Immediately place over a bowl of hot water
to take off the chill. This will take only seconds. The bot-
tom of the pan should feel barely cool.
Allow the buttercream to sit for a few minutes, whisk-
ing occasionally. If it does not form peaks when the whisk
is raised, chill again for a little longer.
TO MAKE A GLAZE
Stir the chocolate with a spoon to avoid air bubbles. Chill
only until a small amount dropped from spoon just mounds
before smoothly disappearing into the mixture. For glazing
instructions, sec page 272.
POINTERS FOR SUCCESS:
When clarifying butter, the
solids must begin to brown
to ensure that all the water
in the buncr has evaporated.
Be sure that not even a drop
of water gets into the melted
chocolate. If seeding should
occur, try beating with an
immersion blender ipage
457) or rrmelt tbc butter-
cream, past through a tine
strainer, and chill again,
stirring constantly. Be sure
to use fine-quality white
chocolate which contains
cocoa butter. I find Toblcr
Narcisse to have the best
flavor and the least sweet-
ness.
1 tike to frost the cake
first with a thin layer of
Classic Buttcrctcam. This
offers an interesting textural
contrast and gives the
Creme Ivoire Deluxe an
ideal surface on which to
adhere. Otherwise it has a
tendency to separate from
the cake when serving. (1
also use the classic butter-
cream plain or flavored as a
Alling.) Keep piped decora-
tions simple—such as a shell
border Ipage 399|.
The heat of your hand
makes piping more than a
few designs at a time diffi-
cult. To counteract this
problem, use several parch-
ment bags, placing fust a
small amount of butter-
cream m each, and switch
bogs at hr st sign of soften-
ing. ('noting your hand in
ice water also helps.
BUTTERCREAM FROSTINGS AND FILLINGS 247
Creme
Ivoirc
(Krew ewWAHj
VC'feiCr Chocolate В nt ten ream
and Glaze
STOKE:
Mineral oil hat an indefinite
shelf life, hut %afHower oil
will become rancid in a mat-
ter of weeks. Therefore, if
prepared with mineral oil,
the buttercream will keep at
room temperature 6 months.
If prepared with other oils,
store at room tempctature 1
week, refrigerate up to 3
months, ur freeze up tu one
year. (The pralmc version
keep* at room temperature
3 weeks if mineral nd was
used instead of safflower
oil.)
POINTERS FOR SUCCESS:
Be sure that not even a drop
of water gers into the mdred
chocolate. If seeding should
occur, try beating with an
v.-Zhr delicious creamy flavor of (his buttercream is simi-
lar to the preceding recipe but this version is simpler and
less expensive to make, к consists of white chocolate soft-
ened with a neutral oil to frosting or glazing consistency.
Its melt-in the mouth quality comes from the cocoa butter
in rhe white chocolate. (That is the only "butter" tn the
buttercream J
This buttercream is suitable for glazing or frosting but
is too soft to hold its shape for decorative piping. If you
wish to make decorative borders on your cake» prepare the
Creme Ivoirc Deluxe instead (page 246} or the praline ver-
sion of this buttercream. A tart filling such as raspberry or
lemon buttercream is an ideal contrast to the sweetness of
the white chocolate. Because of its richness, I ¥4 cups is
enough to glaze or frost a 9-inch by 3-inch cake.
MAKES 2 CUPS
INGREDIENTS MEASURE WEIGHT
room temperature white chocolate (preferably Tobkr Narcisse] tJumc 5% 3-ounce) bars pounds, ounces 1 pound Lriograms-'g/ams 454 gram*»
flavorless oil such as mineral or safflower scant Vi liquid cup 3 ounces 87 grams
Break the chocolate into squares and place in the top of a
double boiler. Add the 01I and place over very hot water
on low bear. Thr water must not exceed IbOT. or touch
the bottom of double boiler insert.
Remove the double boiler from the heat and stir fre-
quently until the chocolate begins to melt. Return to the
hear if the water cools, but be careful that it docs not get
too hot. Srir 8 to 10 minutes or until smooth. (The choco-
late may be melted with the oil in a microwave oven on
high power if stirred etvry 15 seconds. Remove before fully
melted and sur, using residual heat to complete the melt-
»ng-)
White chocolate buttercream must be chilled and stirred
to prevent seeding (the formation of tiny lumps). Fill a large
bowl with ice cubes and water and sprinkle the ice with 1
or 2 tablespoons salt. Fill a second bowl or the sink with
very hot water. Set the top of the double boiler directly in
the ice water. If making buttercream, whisk constantly un-
til you just see whisk marks on the surface. Immediately
place over a bowl of hot water to take off the chill. This
248 COMPLEMENTARY ADORNMENTS
will only take seconds. The bottom of the pan should feel
barely cool.
Allow buttercream to sit for a few minutes, stirring
occasionally with whisk. If it does not form peaks when
the whisk is raised, chill again for a link longer.
If making a glaze instead of a buttercream. stir the
chocolate with a spoon to avoid air bubbles. Chill only un-
til a small amount dropped from the spoon mounds a bit
before smoothly disappearing into the mixture. For glazing
instructions see page 272.
VARIATION
CREME IVOIRE PRALINE: This is the most intense of all pra-
line buttercream* and pipes like a dream. It is imperative
to use 100 percent hazelnut paste without sugar. This
product must be purchased (page 430) because homemade
versions are not smooth enough. To prepare buttercream,
whisk */z cup (4.25 ounces'120 grams) pure hazelnut paste
into the melted chocolate and oil. (You may use some of
the oil which forms on top of the hazlenut paste to make
up some of the oil needed fur the buttercream. I
O'he assertive flavor of walnuts does wonders when used
judiciously with chocolate. Using part milk chocolate tem-
pers the slight bitterness of the walnut. The oil softens the
chocolate and keeps it dark and shiny.
This glaze is particularly complementary to cakes con-
taining walnuts or walnut oil—such as Pumpkin Walnut
Ring (page 71) or Guilt-Free Chocolate Chiffon Cake (page
158).
immersion blender (fitted
with a disc blade) or remelt
the buncrcrcam. pass
through a fine strainer, and
chill again, uirnng con-
stantly. If the weather rs
SCTF. or above, reduce the
oil to 6 tabkipoons (3 liq-
uid ounces).
Chocolate
Walnut Drizzle
Glaze
MAKES 'A CUP
INGREDIENTS MEASURE WEIGHT
room temperature voJuoic pounds orwicr» ki/ngram*. grants
bittersweet chocolate of a 3-aunce bar 1 ounce 28 grains
milk chocolate Vi of a 3-ounce bar 1 ounce 28 grams
walnut oil 1 tablespoon 03 ounce 13 grams
Break the chocolates intu squares and place in the top of a
double boiler. Add the oil and place over very hot but not
simmering water on low heat. The water must not touch
the bottom of the double boiler insert.
BUTTERCREAM FROSTINGS AND FILLINGS 249
STORE:
I week room temperature,
3 months refrigerated or
frozen.
POINTERS FOR SUCCESS:
Smell walnut oil to ensure
that it is not ranad before
adding rt to tbe chocolate.
Пик
Chocolate
Buttercream
MAKES 3 CUPS
(enough to fill and frost two
8-lnch by I '/i-«nch layers
or two 9-inch by
I-inch layers)
Remove the double boiler from the heat and stir until
the chocolate begins to melt. Return to the heat if the water
cook, but be careful that it does not get too hot. Stir until
smooth. (The chocolate may be melted with the oil in a
microwave oven if stirred every 15 seconds. Remove before
fully melted and stir, using residual heat to complete the
melting.)
Using a parchment cone (page 394} or cup with a spout,
drizzle over the top and sides of the cake. Allow to set tor
at least 3 hours at room temperature.
*^Xhts is the quintessential easy-to-raake bunercream for
the milk chocolate lover. Since melted or softened milk
chocolate seems much sweeter than the original bar, 1 have
added half the milk chocolate's weight in bittersweet choc-
olate to compensate. The result is like eating a slightly soft-
ened bar of your favorite milk chocolate! This buttercream
is especially good tor filling and frosting Chocolate Fudge
Cake (page 60} or Perfect All-American Chocolate Butter
Cake (page 54).
INGREDIENTS MEASURE WEIGHT
room temperature milk chocolate * w/umc • poumk ounces 1 pound к ttoprams. prams 454 grains
dark chocolate, preferably extra bittersweet or bittersweet ♦ 8 ounces 227 grams
unsalted hotter (must be softened) 1 ‘A cups 12 ounces 340 grams
STORE:
3 days room temperature. 3
weeks refrigerated. 6
months frozen.
POINTERS FOR SUCCESS:
Be sure that not even a drop
of water gets into the melted
chocolate.
Break the chocolate into squares and place in the top of a
double boiler. Set over hot but not simmering water on low
heat. The water must not touch the bottom of the double
boiler insert. Remove the double boiler from the heat and
stir until the chocolate begins to melt. Return to the heat if
the water cools, but be careful that it does not get too hot.
Snr until smooth, and cool until no longer warm to the
touch. (The chocolate may be melted in a microwave oven
if stirred every 15 seconds. Remove before fully incited and
Stir, using residual heat to complete the melting.)
In a bowl beat the butter with an electric mixer at me-
dium speed and beat in the cooled chocolate until uniform
m color.
* Lzndt offers a smucch texture and caramd undertone.
250 COMPLEMENTARY ADORNMENTS
(Leavy cream is as good a medium as butter for blending
flavors, but, because it has lighter texture and less pronounced
flavor, it lets other flavors come through more dearly. Fruit pur-
ees lightened with whipped cream have the intense, fresh flavor of
rhe fruit and make heavenly fillings and piped toppings. Choco-
late, blended with heavy cream to become the most divine of all
chocolate frostings. ganache, can be whipped full of air or left
alone to become dense and creamy.
Plain lightly sweetened whipped cream complements any cake
because of its soft, doudlike texture and rich, faintly flowery fla-
vor. It is particularly suited to sponge-type cakes such as genoise,
biscuit, chiffon, and angel food cakes.
When used to fill a cake roll or accompany a slice of cake,
whipped cream is loveliest when beaten only until rt sofdy mounds
when dropped from a spoon—nut until stiff peaks form when the
beater is lifted. To avoid overbearing, 1 usually finish the beating
by hand with the detached whisk beater from the machine. When
I raise the whisk and small but straight peaks form the cream ts
perfect.
VFhcn beaten conventionally, heavy cream at least doubles in
volume. The food processor, how’ever, produces a whipped cream
that does not increase in volume. Its dense and velvety texture
makes it ideal for piping decorative borders.
I like to sweeten whipped cream with I tablespoon granu-
lated sugar per cup of cream. Powdered sugar adds an undesira»
hie, slightly powdery texture because of the cornstarch it contains
to keep it from lumping. (1 use powdered sugai only when it is
dissolved in liquid and heated to boiling to swell the starch and
make its presence undetectable.)
Whipped cream usually must be refrigerated to preserve its
texture. So when frosting and decorating a cake with whipped
cream, sdcct a sponge-type cake, not a butter cake which would
harden if chilled.
The high heat required for ultrapavteurizing destroys some of
the butterfat in cream; many areas of the country have cream
with a low butterfat content to begin with. The combination of
ultrapaxteunzatson and kiw butterfat content make whipping cream
more difficult and causes the finished cream to lack stability, los-
ing 2 or more tablespoons of water per cup of cream if allowed
Cream
Frostings
and
Fillings
CREAM FROSTINGS AND FILLINGS 251
to sit, even in the refrigerator. Consequently ultra pasteurized cream
has many stabilizers added to it to enable it to whip. I have re-
cently worked out a simple method for increasing the butterfat
content of cream (page 254) and another easy method using corn-
starch that locks in the moisture without increasing the butterfat.
Both result in a more stable cream that holds up beautifully when
piped.
Chilling che mixing bowl, beater, heavy cream, and even the
sugar before heating helps to make the most of what butterfat the
cream does contain. Whipped creams flavored with firm ingredi-
ents such as chocolate, cocoa, chestnut, powdered green tea, or
fruit jams do not require any additional stabilizer. Except for
chocolate or chestnut whipped cream, however, they will not hold
for prolonged periods at room temperature.
To make plain whipped cream ahead without stabilizers, place
the whipped cream m a cheesecloth-lined sieve to allow the liquid
to drain off and then refrigerate lightly covered with plastic wrap.
Or refrigerate the whipped cream and when ready to use whip
lightly to rcmcorporate the liquid.
For icing a cake or making decorations, it is best to use
whipped cream as soon as it is made, when its texture is smooth-
est. Decorated cakes may be kept one or two days in the refrig-
erator. Place them in an airtight cake carrier or glass dome (page
461) as cream absorbs other odors.
1 have always been amazed and impressed by the whipped
cream in Black Forest cakes in Switzerland. The taste is of nch
cream and the texture is exceptionally light and soft, yet with a
seemingly magical, invisible veil maintaining its form. I have only
recently discovered die secret: A liquid product from Germany
called Cobasan (page 425). It consists of sorbitol and glucose and
stabilizes whipped cream and buttercreams. A minute quantity
added to cream before whipping enables the whipped cream to
hold up for as long as 6 hours at room temperature. It has no
discernible color or odor and does not change the whipped cream’s
texture. This makes it possible to use whipped cream to frost and
decorate cakes that are served at mom temperature such as butter
cakes and Chocolate Oblivion Truffle Torte.
Cobasan doesn’t do a thing for ultrapasteunzed cream (which
is the soul of mediocrity and should be banned). If cream is ultra-
pasteurized, it will be indicated on the container. Cobasan stabi-
lizes low butterfat cream but for a filling [as in the Black Forest
Cakel, a minimum of 35 percent butterfat cream is needed for it
to work its wonders without the additional help of gelatin. The
presence of gelatin in whipped cream is slightly detectable, but it
does offer a firm texture for attractive slices of cake and whipped
creain flowers.
252 С0МИ1 EMENTARY ADORNMENTS
obasan (page 425) is easy to use and is the ideal method
for stabilizing cream without changing flavor or texture.
This frosting will hold up at room temperature for as long
as 6 hours.
Pcrfcct
Whipped Cream
MAKES 2 CUPS
(enough to fill a cake roll)
INGREDIENTS MEASURE WEIGHT
11 heavy cream volume 1 liquid cup poumk.-'ounces H ounces kilogra ли grams 2)2 grams
sugar I tables pixni 03 ounce 13 grams
vanilla Mi teaspoon • ♦
opnona/r Cuba san. only if cream it not ultra pasteurized full % teaspoon • ♦
In a large mixing bowl place all the ingredients and refrig-
erate for at least 15 minutes. (Chill beater alongside bowl.)
Beat until stiff peaks form when the beater is raised.
(For filling a cake roll or accompanying a slice of Choco-
late Obhvion Truffle Топе» use sofdy whipped cream.
To make softly whipped cream, beat only until soft peaks
form or cream mounds softly when dropped from a
spoon. I
Frost and decorate the cake and chill for at least 1
hour.
VARIATIONS
MOCHA WHIPPED CREAM; Increase sugar to 2 tablespoons
and stir in I tablespoon cocoa (preferably Dutch-pro-
cessed) and 1 teaspoon Medaglia d’Oro instant espresso
powder.
COCOA WHIPPED CREAM: Increase sugar to 2‘/j table-
spoons and stir in 2 tablespoons cocoa. Refrigerate for at
least I hour to dissolve cocoa before beating.
POINTERS FOR SUCCESS:
Everything should be well
chilled before beating. Do
not overheat. Chill the
frosted cake for at least 1
hour before allowing it to
stand at roam temperature.
CREAM FROSTINGS AND FILLINGS 253
Real
Old-Fashioned
Whipped
Cream
*4ftrr years of groaning about the deterioration of the
quality of heavy cream (ultrapasteunzation and a decrease
in butterfat were the culprits] and envying those with ac-
cess to 40 percent butterfat cream, I have finally found a
way to get the butterfat back intu the cream. 1 am both
abashed and delighted to announce that it is the very soul
of simplicity.
If the cream is low tn butterfat (20 percent) this method
will bring it to exactly 40 percent. If the cream is higher in
butterfat |36 percent—whips readily), use only 3 table-
spoons butter and rhe cream will end up with 52.5 percent
butterfat and greatly increased stability.
This cream has the stability to use as a filling for Swiss
Black Forest Cake (page 190), yet it has an extraordinarily
light texture.
MAKES 2 CUPS
(enough to fill a cake roil)
INGREDIENTS MEASURE WEIGHT
ttjfumc pounds'ounces Ajkigfionf/gninic
heavy cream 1 liquid cup 8 ounces 232 grams
unsalted butter, softened 14 cup 2 ounces $7 grams
vanilla *4 teaspoon • •
sugar I tablespoon 0.5 ounce 13 grams
STORE:
2 to 3 days refrigerated.
Refrigerate the mixing bowl and beater for at least 15 min-
utes.
In a small saucepan melt together % cup cream and
the butter, snrnng constantly until the butter is fully melted.
Pour into a small heatprcxif measuring cup and cuol to room
temperature. Add vanilla.
In the chilled mixing bowl beat the remaining 34 cup
cream and sugar just until traces of beater marks begin to
show distinctly. Add the butter mixture on low speed in a
steady stream, beating constantly. Beat until stiff peaks just
form when the heater is raised.
note: Whipped cream is smoothest when the butter mix-
ture is added gradually. If the completed cake will have to
sic at room temperature for more than 30 minutes use
whipped cream stabilized with gelatin as Real Old-Faxh-
ioned Whipped Cream will begin to soften.
154 COMPLEMENTARY ADORNMENTS
UNDERSTANDING
According to the law of the land, heavy cream must he 20
to 40 percent butterfat. The average fat content is 375 per-
cent, bur alas, to date no law requires that the fat content
be listed. You will know if your area of the country offers
the 20 percent variety because you will encounter difficulty
whipping it stiffly and, once whipped, it will separate or
seem to curdle slightly ar the edges if a fruit sauce is spooned
onto it.
Buner contains St percent butterfat. The rest is milk
solids and water. Using the method in the above recipe re-
homogenizes the butter into the cream.
omstarch and powdered sugar (which contains 2 per-
cent cornstarch) are cooked with a link cream until the
starch swells and thickens it. The mixture is then beaten
into the sofdy whipped cream. This whipped cream will
not water out for up to 24 hours. While using this method
does not affect the consistency» it wall not stabUize the cream
enough to keep at room temperature. It is excellent for
frosting a cake that will remain refrigerated until serving
time or for making whipped cream several hours ahead to
serve on the side.
MAKES 2 CUPS
INGREDIENTS MEASURE WEIGHT
powdered sugar vo/uwic 2 tablespoons pounds. ounces 03 ounce ki/ograms. grams 13 grams
cornstarch “ 1 teaspoon • •
heavy cream 1 liquid cup H ounce* 232 grams
vanilla teaspoon • •
• If your cream is very Io» m butterfat (page 427), 1 y< tea^oun* wrmiun.h.
Refrigerate the mixing bowl and beater for at kast 15 min-
utes.
In a small saucepan place powdered sugar and corn-
starch and gradually stir in lA cup of the cream. Bring to a
boil, stirring constantly, and simmer for just a few seconds
(until the Liquid is thickened). Scrape into a small bowl and
cool to room temperature. Add vanilla.
Stabilized
Whipped
Cream
STORE:
Up to 24 hours refrigerated;
it will not water out.
POINTERS FOR SUCCESS:
The cornstarch mixture
musr not be warm when
added to the cream. The
cream muu he cold when
beaten. Do not overbear.
CREAM FROSTING'S AND FILLINGS 255
Beat the remaining ¥♦ cup cream just until traces of
beater marks begin to show distinctly.
Add the cornstarch mixture in a steady stream, beating
constantly. Beat just until stiff peaks form when the beater
is raised.
Supcr-
Stabilizcd
Whipped Cream
MAKES 2 CUPS
STORE:
2 days refrigerated. Frozen
flowers keep 1 month.
POINTERS FOR SUCCESS.
The gelatin mixture mutt
not he warm when added to
the cream. The cream must
be cold when beaten. Do
not overbeat. Even a few ex-
tra seconds past stiff peak
and the consistency will no
longer be velvety smooth.
\-Jr elatin stiffens whipped cream enough to make it suit-
able for a deep layer of filling or for piping roses. The gel-
atin makes the texture seem fuller and slightly spongy.
* U»c И- ttawpoan fcir пяп, 1 Knpotin Inr deep Idling,.
Refrigerate the mixing bowl and beater for at least 15 min-
utes.
In a small heatproof measuring cup place gelatin and
water. Allow to soften for 5 minutes. Set cup in a pan of
simmering water and stir occasionally until gelatin is dis-
solved. (Thu can also be done in a microwave on high
power, stirring once or twice.} Remove cup and cool to
room temperature (about 7 minutes). Gelatin must be liq-
uid but not warm when added to cream.
In the chilled bowl brat the cream and sugar |ust until
traces of beater marks begin to show distinctly. Add the
gelatin mixture in a steady stream, beating constantly. Add
vanilla and beat just until stiff peaks form when beater is
raised Use ar once to pipe noses. To keep their shape, freeze
the roses before placing them on the cake. Whipped cream
can be refrigerated for a few hours before piping rosettes.
256 COMPLEMENTARY ADORNMENTS
мС-Wxing a f<xid processor to *lwhip’‘ the cream means
that it will not be as light and airy as beaten whipped cream
because it docs not increase in volume. The added density
makes this velvety whipped cream pipe like a dream,
W hipped
Cream for
Piping Borders
MAKES 2 CUPS
INGREDIENTS MEASURE WEIGHT
nxirw icinpetarurc heavy cream ixi/wirrc 2 liquid cups pounds-'ountvs 1 pound kilofj-ams grams 464 grams
sugar 2 tablespoons 1 ounce 25 grams
vanilla 1 teaspoon • •
opfixwia/r Cohawin, only if cream is not ukrapasteurized full Vi teaspoon • . •
Place all the ingredients in the bowl of food processor fitted
with rhe metal blade. Process, checking every few seconds
by lifting a small amount of cream with a small metal spat-
ula or spoon. The mixture should look thick and creamy
and form a slight peak when lifted. It will not be fluffy.
Use at once.
STORE
Refrigerated up to 24 hours;
cream will not water out.
POINTERS FOR SUCCESS:
The cream must be cold
when processed. Do no<
ovcrproccss. Even a few ex-
tra seconds past the peaking
stage and the consistency
wdl no longer be smooth.
For stability at pro-
longed room temperature,
use Cobosan Ipage 42$).
CREAM FROSTINGS AND FILLINGS 157
Chocolate
Chip Whipped
Cream
STORE
3 days refrigerated.
POINTERS FOR SUCCESS:
The gelatin mixture must
not he warm when added to
the cream- The cream must
be cold when beaten. Do
nut overheat the cream as
whipped cream will con-
tinue to stiffen after folding
tn chocolate and nuts.
<^xhts delectable filling has the lightness of whipped cream
with the crunchy texture and wonderful flavor of chopped
chocolate and almonds. It is the perfect consistency for fill-
ing Chocolate Chip Charlotte (page 175?).
MAKES 6 CUPS
INGREDIENTS MEASURE WEIGHT
mom rempe/arure powdered gelatin yxiJumc 2 teaspoons pounds-'omcn ♦ krJugranTs.'gran>s 6.2 grams
water 3 tablespoons 1.5 ounces 45 grams
heavy cream 2 liquid cups I pound 464 grams
sugar 2 tablespoons 1 ounce 25 grams
vanilla 1 teaspoon ♦ 4 grams
finely grated bittersweet chocolate 1 cup 5 owncxs 142 grams
finely ground almonds Vj cup 2 ounces 54 grams
Refrigerate the mixing bowl and beater for at least 15 min-
utes.
In a small heatproof glass measuring cup place gelatin
and water. Allow to soften for 5 minutes. Set cup in a pan
of simmering water and stir occasionally until gelatin is dis*
solved. (This can also be done in a microwave on high
power, stirring once or twice.) Remove cup and cool to
room temperature (about 7 minutes). Gelatin must be liq-
uid but not warm when added to cream.
In the chilled bowl beat the cream and sugar just until
traces of beater marks begin to show distinctly. Add the
gelatin mixture in a steady stream, beating constantly. Add
vanilla and beat |ust until soft peaks form when beater is
raised. If preparing thus filling fur Chocolate Chip Char-
lotte (page 179), remove Vi cup whipped cream to use for
attaching genotse strips. Cover with plastic wrap and place
in refrigerator. To the remaining whipped cream, add choc-
olate and nuts and fold until evenly incorporated. Briefly
set aside.
158 COMPLEMENTARY ADORNMENTS
his recipe produces a creme fraiche reminiscent of the
enchanting varieties found in France. I prefer it to any of
the available commercial products. The proportion of 1
tablespoon buttermilk to 1 cup heavy cream results in a
fresh, creamy taste with a gentle tang. 1 could eat it by the
spoonful.
Sweetened with 1 tablespoon sugar and lightly beaten,
it’s a delightful topping for cheesecake, especially if crowned
with fresh peach or banana slices.
INGREDIENTS MEASURE WEIGHT
heavy cream vo/irmr 1 liquid cup /wjurwh-owner* 8 ounces hlv^nunx- jgrams 232 grams
buttermilk 1 tablespoon 0.5 ounce 15 grams
mi gar — 1 tablespoon 0.5 ounce ... . 13 grams
Combine the cream and buttermilk m a jar with a tight-
fitting lid and place in a warm spot such as the top of the
refrigerator nr near the stove. Allow to sit undisturbed for
12 to 14 hours or until thickened but still pourable. (Ultra-
pasteurized cream may take as long as 36 hours.l
note: Crime fraiche is wonderful for finishing sauces not
only because of its delicious flavor, but also because it docs
not curdle like sour cream.
Crdmc
Frakhc Topping
I'krrnr fresh)
MAKES I CUP
STORE:
3 weeks refrigerated. Creme
fraiche will continue to
thicken un dulling. When
ready to uic, add the sugar
I and whisk lightly until soft
mounds form when dropped
from the spoon.
CREAM FROSTINGS AND FILLINGS 159
Quick
Creme Fraiche
Mascarpone
Frosting and
Filling
MAKES 3 CUPS
his is an excellent substitute for the preceding recipe
when rime does not allow waiting for the creme fraiche to
thicken. The taste is perhaps a bit less tangy.
The yield ts perfect for filling 3 crispy rounds of me-
ringue or dacquoise (pages 296 and 302) for a Fresh Berry
Meringue Torre Simply add a handful of fresh berries to
each layer and top with a single decorative layer of berries.
If you want the torte to stay crispy, assemble it 1 hour
before earing. If made several hours ahead, the crisp rounds
soften, and the torte becomes so light it seems to levitate.
MAKES 3¥«
CUPS
INGREDIENTS MEASURE WEIGHT
heavy cream voiume 1 Vi liquid cups pOWldlOUfMrS 12 ounces kilogram*. grams 348 grams
sour cream *<6 cup 4.25 ounces 121 grams
sugar 2 tablespoons 1 ounce 25 grams
STORE:
24 hours refrigerated. Re-
heat lightly before using.
In a large mixing bowl place all the ingredients and refrig-
erate for at least 15 minutes. Beat just until soft peaks form
when the heater is raised or until it mounds when dropped
from a spoon.
on« saw a 4gn in Balduccfs, a renowned New York
food store, announcing: “Mascarpone Has Arrived from
Italy!*’ My first thought was Marcel Mascarpone? Who is
this? When [ asked the cheese buyer, he offered me a taste
of what turned out to be a creamy, delicious cheese. We
both agreed that while similar co creme fraiche. it was more
flavorful. I decided that I had to find a way to transform
this slightly tangy, almost yeaxy, utterly luscious cheese into
a cake frosting.
On the first try, the frosting curdled drastically. I>is-
appointed, I kept beating it relentlessly thinking: “What’s
rhe use?'* Suddenly it emulsified and gained the perfect
consistency for frosting or piping. It is especially delicious
with fresh strawberries and Golden Butter Cream Cake
(page 34).
260 COMPLEMENTARY ADORNMENTS
INGREDIENTS
WEIGHT
MEASURE
mascarpone КХ|ЦЛ1С 2 cups /нжгк/». turners 1 pound кткмггити grams 454 grams
sugar 2 tablespoons 42 teaspoons 1.25 ounces 33 grams
heavy cream liquid cup 5.5 ounces 160 grams
STORE;
5 days refrigerated; 2
months frozen,
In a mixing bowl place the mascarpune and sugar and start
beating at medium speed, preferably using a whisk bearer.
Gradually beat in the cream. The mixture will curdle at
first but continue beating and it will become a smooth cream.
note: Mascarpone varies in flavor. It it is more tangy it
will require a bit more sugar.
he bitter moss green tea of the Japanese tea ceremony
lends an exquisite color and flavor to whipped cream. Used
to fill Green Tea Biscuit Roulade (page 144) it creates an
extraordinary dessert, especially suitable for a Chinese or
Japanese dinner when most Western desserts seem inappro-
priate. For further drama, make Grven Tea Marzipan (page
321) and wrap the individual slices sushi-style by draping
each with a thin free-form leaf shape. Oriental vegetable
cutters in varying shapes also make dramatic marzipan dec-
orations. Powdered green tea is available in Oriental food
shops. For a mail-order source, see Katagiri (page 445).
MAKES 2 CUPS
(enough to flfl a cake roll)
INGREDIENTS MEASURE WEIGHT
powdered green tea volume 2 teaspoons pOUMds'CMirxes • Aa/ogramx grams •
sugar 1 tablespoon + 1 teaspoon 0.5 ounce 16 grams
heavy cream 1 liquid cup H ounces 242 grams
Refrigerate the mixing bowl and beater at least 15 minutes.
In the chilled mixing bowl place the green tea and sugar
and gradually whisk in the cream. Bear until cream gently
mounds when dropped from a spoon or until small peaks
form when the beater is raised. Use at once.
Green
Tea Mousse
Cream
STORE:
8 hours refrigerated.
POINTERS FOR SUCCESS
Make Green Tea Mousse
Cream the same day as serv-
ing because the Havor di-
minishes overnight.
CREAM FROST1NGS AND FILLINGS 261
Chestnut
Mousse Cream
MAKES 5 CUPS
(enough to fit and frost two
9-inch by I A-inch cake
layer»)
STORE:
4 hours room temperature.
24 hours refrigerated.
POINTERS FOR SUCCESS:
The type of chestnut puree
used will make or break this
frosting. Crime de Marrons
is cloying I у swtel and
should not be used. French
chestnut puree (puree de
microns), available in fancy
food stores (page 421}, is
softer than homemade but is
acceptable. It is best to
make your own from fresh
or canned chestnuts (page
35.3) or use 1У» cups (11.5
ounces/327 grams) Carma's
chestnut puree (page 420),
which has 25 to 30 percent
sugar, and omit the pow-
dered sugar.
hestnut puree added to whipped cream makes one of
my favorite cake fillings and toppings. The texture remains
light and airy but the flavor, enhanced with rum, is asser-
tive and earthy. This frosting and filling goes beautifully
with Chestnut Genoise bur also blends and contrasts well
with any chocolate genoise or roll.
INGREDIENTS MEASURE WEIGHT
unsweetened chestnut puree (see below) voiumc 1 cup pound*.'ormers 9.25 cxinces kiJofrcam^grannf 264 grams
powdered sugar 36 cup (lightly spooned mto cup] 2.5 ounces 75 grams
dark rum 2 tablespoons 1 ounce 25 grams
heavy cream 2 liquid cups I pound 464 grams
Refrigerate the mixing bowl and bearer for at least 15 min-
utes.
In a food processor fitted with the metal blade process
tbe puree, sugar, and rum until smooth.
In the chilled bowl beat the cream until beater marks
just start to appear. Add the chestnut mixture and beat just
until stiff peaks form when the beater is raised.
note: Whipped cream and chestnut puree are two of the
components which make up my favorite winter dessert—
discovered in Switzerland—Vermicelli. As the third com-
ponent, dacquoise, is also in this book (page 302), I can’t
resist offering my version.
TO MAKE VERMICELLI
You will need a dacquoise disc (page 302), lightly whipped
cream Ipage 253}, about I’A cups sweetened chestnut puree,
and optional Chocolate Snowflakes (page 382). (The choc-
olate flakes arc my contribution to this classic dessert.) For
the chestnut puree, use the same proportion of unsweet-
ened puree, powdered sugar, and rum as in the preceding
recipe. Do not use canned puree as it will be too soil. An
hour before serving, spoon the whipped cream over rhe
262 COMPLEMENTARY ADORNMENTS
dacquoise. With a potato ricer or food mill fitted with the
line disc press the chestnut puree, allowing it to drop di-
rectly onto the whipped cream in vermicelli-like strands. If
desired sprinkle with a flurry of chocolate flakes. This des-
sert can be made in a large 9- to 10-inch disc or individual
3- to 4-inch discs. At Confiseric Spriingli in Zilrich, individ-
ual portions are served in 3-mch decorative bonbon cups.
(1 could never pass the Paradeplatz without feeling the pull
to go in and consume one.)
ILaspberry whipped cream has the fresh tang of the
berry with the billowy texture of whipped cream. The nat-
ural pectin in the berries acts as a stabilizer for the cream,
preventing it from watering out and making it just firm
enough for filling cake rolls.
Cordon Rose Raspberry Conserve is more than double
the flavor concentration and less than two thirds the sugar
of most jams. If using a commercial seedless raspberry jam
in its place, double the amount will be required for equal
flavor intensity and the sugar in the recipe should be elim-
inated.
Raspberry Jam Cream makes a lovely filling for Choc-
olate Cloud Roll (page 136) or Almond Biscuit Roulade
(page 144).
MAKES 4'A
CUPS
(enough for 2 cake rolls)
INGREDIENTS MEASURE WEIGHT
Cordon Rote Raspberry Conserve (page 331) *«Wumr Vi cup pound* ounces 5 ounces kilogram* grams 145 giants
Chambotd liqueur or water J tablespoon ♦ 16 grants
heavy cream 2 liquid cups 1 pound 464 grants
sugar 2 tablespoons 1 ounce 26 grams
Refrigerate the mixing bowl and beater for at least 15 min-
utes. In a small bowl place the raspberry conserve or seed-
less jam and whisk in the chambord or water to soften it.
In the chilled bowl beat rhe cream and sugar just until
beater marks begin to show distinctly. Add the conserve
and beat just until stiff peaks form when the beater is raised.
Use at once.
Raspberry
Jam Cream
STORE:
Filled cake Soldi 2 hours at
room temperature or 2 days
refrigerated.
POINTERS FOR SUCCESS
Cream must be cold when
beaten. Do not overheat.
CREAM FRO5T1NG5 AND FILLINGS 263
VARIATIONS
Cordon Rose Strawberry Conserve also make» a delicious
Jam Cream using the same proportions. Puree the conserve
in a food processor before adding to the cream. (Do not
use commercial strawberry jam; it h much too sweet.}
Strawberry Jam Cream makes an exquisite filling and top-
ping for Strawberry Shortcake. Use layers of Golden Buner
Cream Cake (page 34) as the base. Or for a lighter, more
elegant version, try layers of Genoise Classique moistened
with Grand Marnier syrup. (Grand Mantier and straw-
berry is a classic and lovely combination.)
FRUIT CURD CREAM: Replace the conserve with 1 cup of
Lemon, Lime» Passion, or Orange Curd (pages 340 to 342).
Omit the Chambord and use water or a compatible fruit
liqueur.
Kiii
Cloud
Cream
MAKES S CUPS
(enough for an 8-inch
charlotte, page 369)
ruit purees lightened with whipped cream are wonder-
ful charlotte fillings because of their pure flavor and light
texture. A small amount of gelatin makes the doud cream
just firm enough to unmold and to hold its form when sliced.
This cream is also excellent for frosting and decorating
genoise.
INGREDIENTS
MEASURE
WEIGHT
powdered gelatin 2.5 teaspoons pomaifc/iMinces • krfojtrtm* grams 7.75 grams
cooked fruit puree, unsweetened and at ream temperature about 1 cup (sec specific variations, page 265) • •
heavy cream 2 liquid cups 1 pound 464 grams
sugar 7 tablespoons to 36 cup (see specific va nations, page 265) • •
Refrigerate the mixing bowl and beater for at least 15 min-
utes.
264 COMPLEMENTARY ADORNMENTS
In a small heatproof measuring cup place the gdatin
and ‘4 cup fruit puree and allow to sit for 5 minutes. Set
cup in a pan of simmering water for a few minutes» stirring
occasionally until the gelatin is dissolved. (This can also be
done in a few seconds in a microwave on high power, stir-
ring once or twice.}
Remove the cup and stir the gdatin mixture into the
remaining puree. The mixture should now be cool co the
touch (not warm or ice cold J.
In the chilled bowl beat the cream just until it mounds
softly when dropped from a spoon. Add the sweetened purer
and heat just until stiff peaks form when the beater is raised.
Taste and fold in more sugar if you prefer a sweeter flavor.
Use as soon as possible.
VARIATIONS
The strawberry and raspberry creams аге rose colored, the
apricot pale gold, and the peach pale ydlow. All highlight
the flavor of the fruit. The peach cream has the most deli-
cate flavor.
STRAWBERRY CLOUD CREAM: 1 cup unsweetened cooked
Strawberry Puree (8.2S ouoces/238 grams) (page 338) mixed
with 7 tablespoons sugar (325 ounces/92 grams). Serve with
optional Grand Marnier Creme Anglai.se (page 280).
RASPBERRY CLOUD CREAM: 1 cup unsweetened cooked
Raxpberry Puree (8 ounccs/227 grams] (page 337) mixed
with 35 cup sugar (4Л ounces'132 grams]. Serve with op-
tional Chambord liqueur or Pistachio Creme Angiaise (page
282).
APRICOT CLOUD CREAM: 1 cup unsweetened conked Apri-
cot Puree (9.5 ounccs*'270 grams) (page 335) mixed with
l/i cup sugar (3.5 ounces'*100 grams). Use only 2 teaspoons
gelatin with 1 tablespoon of water when softening in the
lA cup puree. Serve with optional Barack Pahnka (apneof
eau-de-vie], apricot brandy, or Pistachio Creme Angjaise
(page 282).
PEACH CLOUD CREAM 2’4 cups unsweetened cooked Peach
Puree (18 ouncex''.$ 10 grams) (page 336) mixed with 35 cup
sugar (4.5 ounces'132 grams}. Use only I’A cups cream.
Serve with optional peach brandy, Pechcr Mignon, or Poire
William Creme Anglaise (page 282}.
NOTE: When serving the charlotte, if desired, use a comple-
mentary ели de vie or liqueur to flavor с/ёгие anglatse (page
280) to serve on the side and to flavor the soaking syrup
for the biscuit. For a lighter touch serve raspberry sauce
instead of erbne anglaise.
STORE
4 hours to 3 days refriger-
ated before unmoldtng filled
cake; remove <o room tem-
perature 1 io 2 hours before
serving.
POINTERS FOR SUCCESS;
The ltearn must be cold
when beaten. The puree
should be cool (not warm or
ice cold) when added to the
cream. For velvety smooth
textun.*, do not overheat.
CREAM FROSTINGS AND FILLINGS Ш
Lemon
Cream Illusion
his tart, intensely lemony cream is not technically a
’‘cream*’ at all. Italian menngue replaces the whipped cream
and the result ts spectacular: lighter texture than Lemon
Curd Cream (page 264j, more intense lemon flavor, and tar
fewer calories! It is firm enough to use as filling tor a cake
roll hut it needs the small amount of gelatin for a molded
dessert such as a charlotte. Raspberry sauce is a perfect
complement.
MAKES 5 CUPS
{enough for an 8-inch
charlotte, page 369)
INGREDIENTS MEASURE WEIGHT
грош temperatwe optional; gelatin volume 1% teaspoons pounds.'Qtincc.i • b/rjgraeis. grams .
water 2 tablespoons 1 ounce 3D grams
t recipe Light kalian Mcrmgue [page 298) • • •
1 recipe lemon Curd (page 340) prepared with % cup sugar • • •
STORE
4 hours to 3 days refriger-
ated before unmolding a
filled cake; remove to room
temperature 1 to 1 hours
before serving.
If using the gelatin: In a small heatproof glass measuring
cup place the gelatin and water and allow to sit for 5 min-
utes. Set cup in a pan of simmering water for a few min-
utes, stirnng occasionally until rhe gelatin is dissolved. [This
can also be done in a few seconds in a microwave on high
power, stirring once or twice.)
Prepare the Light Italian Meringue. When mixer is nn
medium speed to cool rhe meringue, beat in the optional
gelatin. When completely cool, add cold Lemon Curd and
beat fust to incorporate. Taste and fold in more sugar if
desired. Use as soon as possible.
266 COMPLEMENTARY ADORNMENTS
Ganache, a wondrous combination of chocolate and heavy cream,
has many permutations and possibilities. It is said to have origi-
nated tn Switzerland, where it is used mainly as the base for choc-
olate truffles. Because of its dark, gleaming color and rich flavor
it is my favorite of all chocolate fmstmgs. (Of course, this is de-
pendent on using the finest chocolate!)
Ganache is more chocolaty but less nch and buttery' than a
buttercream. It ts so flavorful, however, that 1 use only about three
quarters as much ganache frosting as buttercream.
The proportion of chocolate to cream can vary widely for a
ganache, starting from less than ounce of cream per ounce of
chocolate (for a ganache so fudgy it cannot frost a cake without
separating from the crumb) all the way up to 2 ounces of cream
for every ounce of chocolate (for a light-colored, airy ganache).
When I use a higher proportion of cream I use a more hitter
chocolate because the natural sugar in the cream adds sweetness.
In general, I prefer whipped ganache with airy cakes such as gen-
oise and denser ganache for chocolate butter cakes.
Any ganache should be smooth and creamy. Overbearing will
curdle it and ruin its texture, but it is possible to remelt the mix-
ture in a double boiler or microwave and start again. In the dark
ages BC (Before Cuisinarts), ganache was tncky because the choc-
olate had to be heated with the cream and sometimes the cocoa
buner in the chocolate would separate and come to the surface.
In that case, I'd let the mixture cool and stir it back to a smooch
emulsion.
The food processor has made this magnificent chocolate
frosting into the easiest and most foolproof of all frost mgs to pre-
pare! It also ensures che besc possible flavor because the chocolate
gets heated only enough to melt it. Tins places me in permanent
debt to Carl Sonthcimer, who brought the food processor to this
country, enormously improved the design, and, in the old days,
used to nudge me with occasional phone calls daring me to make
the big transition from knife to processor. Actually this was a
mental block that took years for the American cooking culture to
overcome. As recently as five years ago 1 remember hearing at
least two chocolate celebrities unequivocably state that “No!
Ganache cannot be made in a fond processor!" So much for that.
GANACHE
FROSTING.
FILLING.
GLAZE. AND
SAUCE
CREAM FROST1NGS AND FILLINGS >67
STORE
1 day room temperature, 1
week refrigerated, 3 months
frozen.
POINTERS FOR SUCCESS:
The temperature of the mix-
ture is critical when beating.
If not cold it will not stiffen;
if tno cold it will not aerate
well. Overbearing causes
curdling.
ganache has double the weight of cream to choco-
late. к is so light and airy tt seems to disappear in the mouth.
The pale brown color makes it ideal as a filling rather than
a frosting, although it pipes well at room temperature. Light
ganache is a less conventional filling for Swiss Black Forest
Cake (page 190) or any light chocolate cake such as nbt-
оне and biscuit, к also works well as a filling tor a char-
lotte (page 369) and is divine in Tnple Chocolate Cake ipage
201) encased in sheets of chocolate praline.
Light
Whipped
Ganache Filling
and Frosting
MAKES 4 CUPS
(enough to fill and frost two
9-inch by I ’A-<nch layers)
* My favorite swcemcM balance u 4 oancn smusweri cbcculAii- and 4 aunan
rxru batcftmiKi. if I am planning a very tweet kipping »ikIi at Choouhrtv
Рга1мж Sheen !раде 315), I u»c all rwa hiftmwwt.
Break the chocolate into pieces and process in a food pro-
cessor until very tine. Heat the cream co the boiling point
and, with mocor running, pour it through the feed tube in
я steady scream. Process a few seconds until smooth.
Transfer to a large bowl of electric mixer and refrig
crate until cold, stirring once or twice (about 2 hours). You
may speed chilling by setting the bowl in an ice water bath
and stirring frequently. Do not allow the mixture to get too
cold or it will be too stiff to incorporate air.
Add the vanilla and beat rhe mixture just until very
soft peaks form when the beater is raised. It will continue
to thicken after a few minutes at room temperature. The
safest way not to overheat is to use an electric mixture until
the ganache starts to thicken and then continue with a hand-
held whisk.
If the mixture gets overbeaten and grainy, it can be
restored by remelting, chilling, and reheating.
VARIATION
QUICK UGHT WHIPPED GANACHE If you need the whipped
ganache sooner and cannot wait for the mixture to chill,
268 COMPLEMENTARY ADORNMENTS
rhe fallowing method gives equal results but involves a lit-
tle more work.
Refrigerate the mixing bowl and beaters.
Using a double boiler or a microwave on high power
(stirring every 10 seconds if a microwave is used), melt the
chocolate pieces with % cup of the cream. Remove from
the heat before rhe chocolate is fully melted and finish
melting by stirring constantly. Set aside until no longer warm.
In the chilled bowl beat the cream until traces of beater
marks just begin to show distinctly. Add the chocolate mix-
ture and beat just until soft peaks form when the beater is
raised.
lassie ganache frosting usually has equal weights of
chocolate and cream. Since I find this consistency is just a
shade too stiff to adhere well to cakes, I have very slighdy
increased the amount of cream so that the frosting is fudgy
and thick while still able to ding to the cake. This ganache
also makes a superb sauce for a chocolate charlotte, ice
cream, or poached pears (Poires Belle Helene).
Because dark ganache is so nch and chocolaty, 3 cups
is sufficient to fill and frost two 9-inch round cake layers.
The fudgy texture blends best with butter cake, preferably
chocolate, as the ganache will overwhelm a more gently
flavored cake. It also happens to blend wonderfully with a
chestnut butter cake (page 42}.
.My preference is a dense unbeaten ganache, but, if you
would like to try a slightly airier version with the same
intensity, use the optional butter (about 1 teaspoon per ounce
of chocolate) and beat the ganache slightly. The optional
Cognac heightens the elegance of the chocolate without im-
parting any bitterness.
Dark
Chocolate
Ganache
Filling, Frosting,
and Sauce
MAKES 2И TO 3
CUPS
(enough to fill and frost two
8-inch by I 'Л-inch layers
or two 9-mch by
I-inch layers)
INGREDIENTS MEASURE WEIGHT
hrrtersweet chocolate vn/umr 4 (3-ounce‘i bars pounds ounce* 12 ounces LrJogranav grams 340 grams
heavy cream 1% liquid cups 15.5 ounces 385 grams
optional: unsalted butter. Miftcned М» cup 2 ounces 57 grams
Cognac 2 tablespoon* 1 ounce 28 grams
CREAM FROSTINGS AND FILLINGS 269
STORE
3 days room temperature. 2
weeks refrigerated, 6
month* frozen. To soften
ganache after chilling, allow
to warm to room tempera-
ture and. if necessary, warm
just to soften using a hot
water bath or a few seconds
in the microwave. Stir gently
if you do not wish to aerate.
POINTERS FOR SUCCESS.
Your favorite scmrswcct or
bittersweet eating chocolate
will result in the best fla-
vored ganache. If the choco-
late « not smooth'iextured
in bar form it will not be
entirely smooth in the ga-
nache either.
Break the chocolate into pieces and process in a food pro-
cessor until very fine. Heat the cream to the boiling point
and, with the motor running, pour it through the feed tube
in a steady stream. Process a few seconds until smooth.
Transfer to a bowl and cool completely. Gently stir in the
optional butter and'or Cognac. Allow to cool for several
hours until of frosting consistency. И using butter, whisk
for a few seconds to aerate. The color will lighten.
To use ganache as sauce, reheat until pourable if made
ahead, using a double boiler or a microwave on low power,
stirring every 15 seconds.
VARIATION
PRALINE GANACHE: Add Vs cup praline paste (page 430)
to the chocolate before processing.
UNDERSTANDING
Student* have often asked me why it isn’t advisable to add
unheated cream to melted chocolate. If the cream is added
cold, the chocolate hardens unevenly, forming little specks
that melt on the tongue but are not visually attractive. The
reason that the cream is brought to the boiling point is not
only to melt the chocolate but also to give a longer shelf
life to the ganache. In commercial establishments in France,
the cream is brought to a full boil three times to destroy
any bacteria. This may be because their cream is not pas-
teurized to the same temperature as ours. It may also be to
improve shelf life in a commercial situation. If using ultra-
pasteurized cream, it is unnecessary to bring it to a boil
other than to meh the chocolate.
270 COMPLEMENTARY ADORNMENTS
here л ле several ingredients that can be added to choc-
olate W CMffl a dir- glaze: butter, oil, jam, com
syrup, sugar syrup, even water. But cream seems to bring
out the fullest chocolate flavor, so if I have cream on hand
Chocolate Cream Glaze is the only one I use. A tablespoon
of Cognac heightens the flavor of the chocolate, but if a
fine-quality chocolate is used the Cognac is optional.
A chocolate glaze is an ideal adornment for a cake. It
is easy to make and creates a flawless, shiny finish while
sealing in freshness.
Chocolate
Cream Glaze
MAKES 2
FULL CUPS
(enough to gaze a
9-cich cake)
INGREDIENTS MEASURE WEIGHT
bittersweet chocolate vo/amr 3 (3-ouncel bars pounds ounce* 9 ounces Iri/tyentrnv grants 255 grams
heavy cream I liquid Clip S ounces 232 grams
opriona/.* Cognac 1 tablespoon 0.5 ounce 14 grams
TO PREPARE CAKE FOR GLAZING
Brush all crumbs from the surface and place on a card-
board round the same size as the cake. Suspend the cake
on a rack set on a baking sheet to catch excess glaze.
It i$ best to have enough glaze to cover the cake with
one application as touch-ups don’t usually produce as flaw*
less a finish. Excess glaze can be frozen and reheated at a
later date.
TO PREPARE GLAZE
Break the chocolate into pieces and process in a food pro-
cessor until very fine. Remove the chocolate to a small heavy
saucepan.
Heat the cream to tbe boiling point and pour three
quarters of it over the chocolate. Cover for 5 minutes to
allow chocolate to melt. Gently stir together until smooth,
trying not to create air bubbles. Pass through a fine strainer,
stir in optional Cognac, and allow to cool until just tepid.
CHECK FOR CONSISTENCY
At a tepid temperature a small amount of glaze should
mound a bit when dropped from a spoon before smoothly
disappearing. If the glaze is too thick and the mound re-
mains on surface or if the glaze seems curdled, add some
STORE:
3 days room temperature, 2
weeks refrigerated, 6
months frozen.
POINTERS FOR SUCCESS:
Your favorite semisweet or
bittersweet eating chocolate
will result in the best fla*
voted glaze. If the chocolate
is not smooth-textured in
the bar it will not be en-
tirely smooth in the glaze
either.
The butterfat content of
cream varies and will affect
the glaze. Always check for
consistency at a tepid tem-
perature. If it is (he correct
consistency when tepid, even
if it becomes too cool when
applied to the cake and
lumps, the cake can be
placed tn a warm oven for a
few seconds and the glaze
will smoothen. If glaze had
been tested when hoc and
CREAM FROSTINGS AND FILLINGS 271
was die right comastoicy.
the extra heat would not
help if glaze lumps. On the
ocher hand, if glam had
been the correcr cornntency
when cool, it would never
firm adequately on the cake.
To reheat glaze: l'$c a
double butler, surfing
gently, or a microwave oven
on high power, stirring and
folding every 5 second».
of the warm remaining cream by the teaspoon. If the glaze
is too thin, gently stir in a small amount of melted choco*
late. When the consistency is correct, use at once or store
and reheat.
The glaze should be poured onto die center of tlx cake,
allowing the excess to flow down the sides. Smooth quickly
and evenly with a large metal spatula, moving it Lightly back
and forth across the top until smooch. If any spots on the
sides remain unglazed, use a small metal spatula to lift up
some glaze which has fallen onto the baking sheet and ap-
ply to uncovered area.
Lift rack and tap lightly to settle glaze. Lift cake from
rack using a broad spatula or pancake turner and set on a
serving plate or on a dean rack if planning to apply a sec-
ond coat of glaze.
If you want to cover the cake more thickly and evenly,
two coats of glaze can be applied by the following tech-
nique: After the first coat is applied, refrigerate the cake
for 20 minutes or until the glaze is firm. Apply a second
coat of tepid glaze. {You will need 1 *4 times rhe glaze for
a double coat.)
Allow cake to set for a least 2 hours at гчхип temper-
ature. Refrigerating the cake will dull the glaze slightly.
NOTT: If planning to refrigerate glazed cake, replace 2 ta-
blespoons of the cream with com syrup. This will keep
ganache from cracking and also add sheen.
272 COMPLEMENTARY ADORNMENTS
Chocolate
Butter (Jlazc.
им» this recipe when I need a dark, shiny chocolate
glaze and there is no cream in the house ft here 4 always
butter!). It t$ similar in makeup and flavor to Chocolate
Cream Glaze (see Understanding below) hut nut quite as
mellow.
MAKES 2
FULL CUPS
(enough to glaze one
9-inch cake)
INGREDIENTS MEASURE WEIGHT
bittersweet chocolate, chopped *otum< 4 (3-ouncc) bars pounds. O'JfKO 12 ounces kilograms 340 grams
tmsalted butter, softened % cup 6 ounces 17П grams
water И liquid cup 4 ounces 11Я grams
com syrup 1 tablespoon 0.75 (Mince 20 grams
vanilla 1 tablespoon 0.5 ounce 12 grams
TO PREPARE CAKE FOR GLAZING
Brush all crumbs from the surface and place on a card*
board round the same size as the cake. Suspend the cake
on a rack set on a baking sheet to catch excess glaze.
It is best to have enough glaze to cover rhe cake with
one application as touch-ups don't usually produce as flaw
less a finish. Excess glaze can be frozen and reheated at a
later date.
TO PREPARE GLAZE
Using a double boiler set over hot, not simmering, water
on low heat or a microwave on high power (stirring every
10 seconds] melt the chocolate. Remove from the heat be-
fore the chocolate is fully melted and stir until melted. Stir
in the butter, 1 tablespoon at a time, until blended. И nec-
essary return briefly co the heat but do nut allow to become
too hot or the butter will separate.
Heat the water to 12Q”F. or use hot tap water. Add all
at once to the chocolate mixture and stir until smooth. Stir
in the com syrup and vanilla until uniform in color.
CHECK FOR CONSISTENCY
Allow glaze to cool, stirring occasionally, until a small
amount mounds a bit when dropped from a ?*poon before
STORE:
3 days room temperature. 2
weeks refrigerated. 6
months frozen.
POINTERS FOR SUCCESS;
Your favorite semis wect or
bittersweet eating chocolate
will result in the best fla-
vored glaze. If the chocolate
is not smooth-textured in
bar form it will not be en-
tirely smooth ш the glaze
either.
CREAM FROSTINGS AND FILLINGS 273
smoothly disappearing. The glaze will be cool when the
proper consistency is attained but will harden on setting.
Use at once or store and reheat. For a glaze that is
perfectly uniform in color, hold a fine strainer over the cake
and pour che glaze through the strainer.
If you want to cover rhe cake more thickly and evenly,
two coats of glaze can be applied hy the following tech-
nique: Pour the glaze and smooth quickly with a spatula to
create a thin, even coating. Refrigerate the cake for 20 min-
utes or until the glaze is firm. Apply a second coat of tepid
glaze.
Allow the cake to set for at least 2 hours at room tem-
perature. Refrigerating the cake will dull the glaze slightly.
UNDERSTANDING
For a glaze, 12 ounces chocolate require either 10.67 ounces
cream or 6 ounces butter plus water to approximate the
water contained by the cream.
Butter is 81 percent fat, 15.5 percent water, and 3.5
percent milk solids.
Cream is 37.6 percent fat, 56.5 percent water, and 5.8
percent milk solids.
Six ounces butter contain 4.86 ounces fat, 0.93 ounce
water, and 0.21 ounce milk solids.
There arc 4 ounces fat, 6 ounces water, and 0.62 ounce
milk solids in 10.67 ounces cream.
This means that the butter has 0.86 ounce more fat,
about 5 ounces less water, and almost Vi ounce less milk
solids. The missing water for the glaze is supplied by the 4
ounces water, vanilla, and com syrup. Com syrup adds
sweetness (the absent milk solids contain sugar) and extra
shine.
Chocolate Butter Glaze is slighdy thinner than Choc-
olate Cream Glaze (page 271) at a tepid temperature be-
cause of the missing milk solids and extra butterfat, but
when set it is equally firm because the butter hardens.
274 COMPLEMENTARY ADORNMENTS
Sour
Cream Ganache
and lilting frosting with excellent piping consistency. This
easy-to-make ganache has a unique tangincss which I find
delicious with any chocolate layer cake. It is especially good
with Cordon Rose Banana Cake (page 69).
MAKES 2%
CUPS
(enough to frost one 9-inch
by 2-inch cake layer)
INGREDIENTS MEASURE WEIGHT
room temperature bittersweet chocolate w/wne 4 (3-ouncel bars potutdi-ounces 12 ounces kilogram*, gramt 340 grams
MMir cream !¥» cup» 14 ounce» 400 grams
In a double boiler set over hot water or in a microwave on
high power, stirring every 10 seconds, melt the chocolate.
Remove from the heat and add the sour cream. Stir with a
rubber spatula until uniform in oolor. If the pan feels warm,
transfer to a bowl.
Use at once or store, and when ready to use soften by
placing the bowl in a water bath or a microwave for a few
seconds, stirring gently.
STORE:
3 days room temperature. 3
weeks refrigerated, 6
months froien.
POINTERS FOR SUCCESS:
The chncnlate must still be
warm and rhe sour cream
room temperature when
combined ar the chocolate
will lump.
CREAM FROSTINGS AND FILLINGS 275
Raspberry
Ganache
MAKES 3 CUPS
(enough to fill and frost two
S-mch by I '/>mch layers
or two 9-inch by
I «inch layers)
^Zhis mW unique and glorious of ganache frosting* is
ideal for a special occasion. Be sure to use imported white
chocolate that contains pure cocoa butter.
The intense puree adds a tangy undertone and linger-
ing taste of raspberries to the chocolate, creating a subtle
reddish brown gleam. A small amount of white chocolate
tames the tartness of the raspberries.
INGREDIENTS MEASURE WEIGHT
bitter sweet chocolate nWunic 4 (3-oenct) bars pooudi Ъиасп 12 ounces kilogram f.gra m f 340 grams
white chocolate 1 (3-ounccl bar 3 ounces H5 grams
he.iv) cream 1 liquid cup H ounces 232 grams
Raspberry Sauce, lightly sweetened (page 337) ’Л liquid cup 4.75 ounces 135 gram*
optional: Chambord (black raspberry hquearl 1 Уг tablespoons • 24 grams
STORE:
1 day room temperature, 10
days refrigerated, 6 months
frozen.
POINTERS FOR SUCCESS:
Use your favorite bitter -
sweet chocolate and im-
ported white chocolate,
which contains cocoa buner.
Tobkr Narcisse is my per-
sonal preference.
Break the chocolate into pieces and process in food proces-
sor until very fine.
Heat the cream and raspberry puree in a saucepan or
microwave on high power to the boiling point.
With the motor running, pour rhe cream mixture
through the feed rube in a steady stream. Process a few
seconds until smooth.
Transfer to a bowl and stir in the optional Chambord.
Allow to cool for several hours until mixture reaches frost-
ing consistency.
TJP: Raspberry Ganache makes an excellent glaze but needs
to be slighdy thinner. Add warm cream or more Chambord
by the tablespoon until of glazing consistency (see tech-
niques for Ganache Glaze, page 271). To avoid air bubbles,
do not use the food processor.
276 COMPLEMENTARY ADORNMENTS
Burnt
Almond Milk
Chocolate
Ganache
his luscious frosting was inspired by Hershey ’s addic-
tive Golden Almond bar. The cocoa is added to enrich the
flavor and temper che sweetness of the melted milk choco-
late. It is a wonderful frosting for just about any chocolate
cake.
MAKES 3 CUPS
(enough to fill and frost two
8-inch by ГЛ-inch cake
layers or two 9-inch
by I -inch layers}
In a food processor, break chocolate into large pieces and
process together with the cocoa until the almonds arc
coarsely chopped, Transfer to a medium bowl.
In a saucepan or microwave on high power, heat cream
to the boiling point. Pour into chocolate and stir until
smooth. Slit in ainaretto, if desired, and allow mixture to
cool for several hours until it reaches frosting consistency.
STORE:
1 day at room temperature,
10 days refrigerated. 6
months frozen.
CREAM FROSTINGS AND FILLINGS 277
White
Ganache
STORE:
I day room temperature, 3
days refrigerated, 2 mouths
frozen.
POINTERS FOR SUCCESS:
Use imported white choco-
late w hich contains cocoa
butter. Toblcr Narcisse is
my personal preference. If
leaving a decorated cake at
rexxn temperature, do not
caver it or the ganache will
koften.
W
* x hire chocolate is a superb stabilizer for whipped
cream. It prevents watering out and enables it tn bold its
shape for several hours at room temperature. It pipes even
from a small tube and also freezes well. If a judicious amount
of white chocolate is used, there is no reason for White
Ganache to be cloyingly sweet. In fact, the 3 ounces white
chocolate in this recipe contain only 7 teaspoons sugar,
making the ganache |usc a little sweeter than Perfect Whipped
Cream (page 253).
In addition to stabilizing and sweetening the cream,
the white chocolate also flavors it with vanilla and cocoa
buner. lending it a chocolate quality so delicate as not to
overwhelm other flavors.
White Ganache can be used in any number of ways.
Serve it with fresh berries or fold in a stiffly beaten egg
white and have an instant white chocolate mousse to serve
with Raspberry (page 337) or Strawberry Sauce (page 338).
Use the White Ganache to fill and frost Swiss Black Forest
Cake (page 190] or to pipe elaborate festoons on Choco-
late Oblivion Truffle Torte (page 84).
MAKES 2 CUPS
(enough to frost one B-inch
by 3-«ncb cake byer)
INGREDIENTS MEASURE WEIGHT
white chocolate, chopped >n/umr 1 ;3-ounce) bar pounds ounces 3 ounces iulogram*.grants fi5 grams
heavy cream 1 liquid cup S ounces 232 grams
Refrigerate the mixing bowl and beater for at least 15 min-
utes.
Using a double boiler or microwave on high power
(stirring every 10 seconds if using microwave}, melt the
chocolate with l/« cup cream. Remove from the heat before
the chocoiate is fully melted and stir until melted. Set aside
until no longer warm.
In the chilled bowl beat the cream until traces of beater
marks |ust begin to show distinctly. Add the white choco-
late mixture and beat just until stiff peaks form when the
beater is taised.
tip: For a deliciously tart white ganache, great for serving
with fresh fruit, replace the heavy cream with creme fraiche.
278 COMPLEMENTARY ADORNMENTS
ustard creams arc rhe foundation for many desserts. The ba-
sic creme anglaisc (or English custard sauce) consists of egg yolks,
sugar, and milk or cream (or a combination of the two) and is a
base for Silk Meringue Buttercream (page 239), an accompani-
ment to charlottes or fresh fruit, an ingredient in Bavarian creams,
and the start of the richest, creamiest ice creams.
When making crime anglaisc, I favor the lighter versions made
with all milk to accompany a nch dessert and those with three-
quarters cream tn serve with fresh fruit. Ice cream has the smoothest
texture when crime anglaisc is made with at least three-quarters
cream to one-quarter milk. More than that becomes too rich for
my taste.
Three to four egg yolks per cup of cream or milk are ideal to
thicken and enrich the sauce. If I am using praline paste, however,
which adds more body, I use only two yolks.
1 also prefer a rather low amount of sugar, two to three ta-
blespoons per cup of milk or cream. Ice cream requires the higher
amount because freezing makes it seem less sweet. In any event,
it is a simple matter to stir in more sugar to taste even after mak-
ing the sauce.
Bavarian cream is a molded crime anglaisc with whipped
cream added. It rehes on gelatin to keep its shape, and, if pre-
pared in a decorative mold, it may be served without cake. En-
cased by gossamer Biscuit Roulade (page 142) filled with a thin
layer of tan jam and served with an intense raspberry чаисе, it is
(in my book) the most perfect of desserts. 1 call it the Scarlett Empress
{page 177).
It is, of course, possible to flavor Bavarian cream with choc*
olate or fruit puree, but 1 find that most of these flavors become
overwhelmed and dulled by the Bavarian base. I much prefer fla-
voring the Bavarian with vanilla and liqueur and making Light
Whipped Ganache (page 268) or Fruit Cloud Cream (page 264)
instead when I am in the mood for other flavors.
Tw’o noteworthy exceptions are orange and pear Bavarians.
For orange Bavarian, the crime anglaisc s milk base makes it pos-
Custard
Cream
Fillings
and
Sauces
CUSTARD CREAM FILLINGS AND SAUCES 279
siblc co steep the orange zest, extracting more flavor. For pear
Bavarian, using the poaching liquid instead of milk, combined with
the Italian meringue, makes it lighter even than a cloud cream,
Liqueur such as kirsch or Grand Marnier is traditionally added
to Bavarian cream not only for its lovely flavor and aroma but
also because it effectively masks any gelarm flavor.
Most recipes beat the egg yolks with the sugar until very thick
to make an airier Bavarian. But it is my belief that the air com-
pletely disappears during the subsequent cooking of the custard.
If I want a denser, creamy Bavarian, I rdy on whipped cream to
lighten it slightly. For a moussier effect I add beaten egg whites
and for a billowy, cloudhke Bavarian 1 use Italian meringue !egg
whites stabilized with hot sugar syrup.l
I find that the gelatin in Bavarians continues to chicken over
a 24-hour period and after that docs not get any thicker even
when frozen and defrosted. Therefore you can freeze any of the
cakes filled with Bavarian cream for at least three weeks without
loss of flavor or texture.
Creme
Anglaise
fkrem ahnCLEZ)
MAKES 1%
CUPS
his rich, smooth cream, served cold, is the perfect ac-
companiment for charlottes tilled with Fruit Gloud Cream
(page 264) or for seasonal fruit. Use tbe optional eau-de-
vie or liqueur to complement the fruit. One of my favorites
is Grand Marnier.
INGREDIENTS MEASURE WEIGHT
sugar VljJinTR' 2 tablespoons роитб оиосл 1 ounce krtogranu. grarm 25 grams
salt - pinch • •
4 Urge egg yolks % liquid cup 2.$ ounces 74 grams
milk 1 liquid cup S.5 ounces 242 grams
vanila bean/ split lengthwise * • •
оргюгык liqueur ar eau-de- vie 2 to 3 labkspooirs 0.75 co 1.25 ounces 21 to 35 grant
* Yom nijу 4uhMitutr I itiipxin tanilla extract for the vanilla bean, but tbe
bean often л fuikr, mixv wixn»tii flavor. If иыаед extract, add it alter the
sAixe it axil. If using □ Tahitian bcm, u»e only one quarter of the bran,
280 COMPLEMENTARY ADORNMENTS
Have a fine strainer ready near rhe range, suspended over
a small mixing bowl.
In a small» heavy, noncorrodiblc saucepan stir together
rhe sugar, salt, and yolks until well blended, using a wooden
spoon.
In another small saucepan (or heatproof glass measure
if using a microwave on high power) heat the milk and
vanilla bean to the boding point. Stir a few tablespoons
into the yolk mixture; then gradually add the remaining
milk and vanilla bean, stirring constantly.
Heat the mixture, stirring constantly» to just before the
boiling point (17(FF. to 180°F.). Steam will begin to appear
and the mixture will be slightly thicker than heavy cream.
It will leave a well-defined track when a finger is run across
the back of a spoon. Immediately remove from the heat
and pour into the strainer, scraping up the thickened cream
that settles on the bottom of the pan. Remove the vanilla
bean and scrape the seeds into the sauce. Stir until seeds
separate. For maximum flavor, return the pod to the sauce
until serving time.
Cool in an ice-water bath nr the refrigerator. Stir in
the optional liqueur.
UNDERSTANDING
Commercial establishments sometimes bring the mixture to
a boil and quickly strain it» discarding the curdled part.
This is done only to save time and to ensure that the tem-
perature is hot enough without bothering with other tests.
(1 do not recommend this method.}
STORE
5 days refrigerated, 3
months frozen. Sauce thick*
ens slighdy overnight in re-
frigerator.
POINTERS FOR SUCCESS:
Don’t иле whisk to stir if
not using accurate thermom-
eter because the foam makes
it difficult to see when mix-
ture is getting dose to the
boiling point. Do not heat
above 18(y*F. or the sauce
will begin (0 CUfdlc. If over-
heated and bhght curdling
doo take place, pour in-
stantly into a blender and
blend until smooth before
straining.
CUSTARD CREAM KILLINGS ANO SAUCES 281
Pistachio
Creme Anglaisc
{Pisiachin krent ahnGLEZ)
MAKES I
FULL GUP
v^/’his sauce is the palest of greens and beautifully per-
fumed by the pistachio nut. Piscaaha liqueur intensifies the
flavor and slightly deepens the color. This contrasts beau-
tifully in color and flavor with rhe dark chocolate of Choc-
olate Oblivion Truffle Tone (page 84). Since I always have
difficulty deciding whether I prefer pistachio or raspberry
sauce with chocolate, I sometimes drop little pools of rasp-
berry on top of the pistachio (using a squeeze bottle) and
intermingle them.
INGREDIENTS MEASURE WEIGHT
vo/unw pound». OU!K'l> клкфгмпь gram*
shelled unsalted ptsiachin nub У« cup 1.25 ounces 38 grams
milk 1 liquid cup S3 ounce 242 grams
sugar 3 tableipoom 1.25 ounces 38 grams
salt pvndi • ♦
4 large egg yolks Vk liquid cup 2.5 ounces 74 grams
optional: Pwusha (pistachio Isqucur] : - 2 tablespoons 0.75 ounces ! 25 grams
POINTERS FOR SUCCESS.
Do not blanch the null to
remove the skin as they will
lose most of their flavor. If
too much skin is left, the
color will be slightly brown
instead of green. Don’t use я
whisk to stir if not using an
accurate thermometer be-
cause the foam makes it dif-
ficult tn tee when the
mixture is getting dose to
boiling. Do not heat above
1&O“F. or the sauce will cur-
dle. If overheated and blight
curdling does take place,
pour instantly mto a blender
and blend until smooth be-
fore straining.
Bake nuts in a 350°F. oven for 5 to 10 minutes or until
skins separate from nuts when scratched lightly with a fin-
gernail. Remove as much skm as possible. In a food pro
Lessor or nut grinder gnnd nuts very fine.
In a small saucepan (or heatproof glass measure if us-
ing a microwave on high power) place nuts and milk and
bring to the boiling point. Cover and allow co steep for at
least 30 minutes. Strain through cheesecloth, pressing well
to remove all milk, and discard nuts. Return milk to sauce-
pan or glass measure.
Have a fine strainer ready near the range, suspended
over a small mixing bowl.
In a small heavy, noncorrodible saucepan stir together
the sugar, salt, and yolks until well blended, using a wooden
spoon.
Heat the milk just to the boiling point. Stir a few ta-
blespoons into tbe yolk mixture; then gradually add the
remaining milk, stirring constantly.
Heat the mixture, stirring constantly, to just before the
2K2 COMPLEMENTARY ADORNMENTS
boiling рем nr (17(УТ. го IHtTF.J. Steam will begin to appear
and rhe mixture will be slightly thicker than heavy cream.
It will leave a well-defined track when a finger is run across
the back of a spoon. Immediately remove from the bear
and pour into the strainer, scraping up the thickened cream
that settles on the bottom of the pan.
Cool in an ice-water bath or the refrigerator. Stir in
the optional Pistasha liqueur.
x^rahne paste made with hazelnuts and caramelized sugar
is a flavorful enrichment to erbne angLuse. The praline paste
adds body, so only half the usual number of egg yolks is
needed. It also adds sweetness, making it unnecessary to
add any sugar. Dark rum or cognac both highlight the pra-
line flavor and cut the richness. This sauce is especially de-
licious with the praline version of Chocolate Oblivion Truffle
Torte {page 86).
INGREDIENTS MEASURE WEIGHT
praline paste (page 431) Уа cup ponMids-'uirrMV* 2.73 ounces 77 grams
milk 1 liquid cup M.S ounces 242 grams
2 large egg yolks 2 tablespoons 1.25 ounces 37 grams
salt speck •
vanilla 1 teaspoon • .. - 4 grams
oprtonaJ.- rum or Cognac 1 ¥2 tablespoons 0.75 ounce 21 grams
In a food processor place the praline paste and, with the
motor running, gradually add the milk. I’n.mi until smooth.
In a small, heavy, noncorrodible saucepan stir together
the yolks and salt until well blended, using a wiKxlen spoon.
In another small saucepan (or a heatproof glass mea-
sure if using a microwave on high power) heat rhe praline
mixture to the boating point. Stir a few tablespoons into
the yolk mixture; then gradually add the remainder, stir-
ring constantly.
Hear the mixture, stirring constantly, to just before the
boiling point (170T. to 180'F.). Steam will begin to appear
Creme
Anglaise Praline1
'irwK ahnGLEZ
PRAHlranAY)
MAKES I 'Л
FULL CUPS
STORE:
5 day» refrigerated, 3
months frozen.
POINTERS FOR SUCCESS:
Don't use a whisk to stir if
nut using an accurate ther-
mometer because the foam
makes it difficult to see
when the mixture is getting
close to boslirig. Don’t heat
above 1 KOT. or the sauce
will curdle. If overheated
CUSTARD CREAM FILLINGS AND SAUCES 2X1
and slight curdling does take
place, pour instantly into a
blender and blend until
smooth.
and che mixture will be slightly thicker than heavy cream.
It will leave a well-defined track when a finger is run across
the back of a spoon. Immediately remove from the heat
and pour into a bowl, scraping up che thickened cream that
settles on the bottom of the pan.
Cool in an ice-water bath or the refrigerator. Stir in
the vanilla and optional liqueur.
Creme
Anglaisc Cate
fihtGLEZ kahFAY)
his classic French method of extracting coffee essence
provides intense flavor. Extra sugar is used co offset the
bitterness of the coffee. This sauce is lovely served with
Chocolate Torture (page 87| because it deepens the subtle
coffee background flavor.
MAKES 1'Л
CUPS
INGREDIENTS MEASURE WEIGHT
4 large egg yolks itthimc liquid cup poirmfiuosmci’s 2.5 ounces kUogntns grams 74 grams
sugar * V« cup 1.75 ounces 50 grams
salt pinch • •
milk 1 cup 83 ouikcv 242 grams
finely ground coffee beam 2.5 tablmpoom • 10 grams
¥2 vanilla bean» split lengthwise f ♦ • У ' ’* J-
apntmal: Kahlua (coffee liqueur; I Vi tablespoons 1 ounce 25 grams
STORE:
5 days refrigerated, 3
months frozen.
POINTERS FOR SUCCESS:
Don’t use a whisk to stir if
not using an accurate ther-
mometer because rhe foam
makes it difficult to see
when the mixture is getting
close to boding. Do not heat
*Utc tioly 3 ttHebpoum *ugar if uMur* Kahlua.
f Yau may «uhitituie I tratpiHin vxntliu extract Sat the «Miib bean, bet Hx
bean nHrr, a hrikr, mure aromatic lUvur. it uiing extract, add it alter the
siuoc is cool.
Have ready near the range a fine strainer lined with cheese-
cloth, suspended over a small mixing buwl.
In a small heavy noncorrodible saucepan stir together
the yolks, sugar, and salt until well blended, using a wooden
spoon.
In another small saucepan (or a heatproof glass mea-
sure if using a microwave on high power), heat the milk,
coffee» and vanilla bean to the boiling point. Stir a few* ta-
284 COMPLEMENTARY ADORNMENTS
blespoons into the yolk mixture; then gradually add the
remaining milk, stirring constantly.
Heat the mixture, stirring constantly, to just before the
boiling point (170'F. to 180°F.). Steam will begin to appear
and the mixture will be slightly thicker than heavy cream.
It will leave a well-defined track when a finger is run across
the back of a spoon. Immediately remove from the heat
and pour into the strainer, scraping up tbe thickened cream
that settles on the bottom of the pan. Remove the vandla
bean and scrape the seeds into the sauce. Stir until the seeds
separate. For maximum flavor return the pud to the sauce
until serving time.
Cool in an ice-water bath or the refrigerator. Stir in
the optional Kahlua.
rcme anglaise is the base for this glorious ice cream. It
is dense, rich, and fragrant with the slightly flowery flavors
of heavy cream and vanilla, yet it is not a drop too sweet.
It will spoil you for even the best commercial brands. The
secret ingredient for perfecting the texture is vodka—which
docs not impart a taste but keeps the ice cream from be-
coming too hard in the freezer.
Serve this ice cream alone or with Brandied Burgundy
Cherries !page 346) and Hoc Fudge (page 88) for a sophis-
ticated sundae. Or use it for the summer version of Swiss
Black Forest Cake (page 190).
above 180*F. or the sauce
will curdle. If overheated
and tltght curdling does take
place, pour instantly into a
blender and blend until
smooth before straining.
Icc Cream
MAKES 5 CUPS
INGREDIENTS MEASURE WEIGHT
8 large egg yolks •oltftne 4.5 fluid ounces pomth-'ounce* 5.25 ounces kflog/MHAjtfanu 150 grams
sugar У» cup 5JL5 ounces 150 grams
salt pinch • •
heavy cream 3 liquid cups 1.5 pounds 6% grams
milk 1 liquid cup 8.5 ounces 242 grams
2 vanilla beans/ split lengthwise • • ♦
optional', vodka 2 tablespoons 1 ounce 29 grams
• You may MjbstKutc 2 twtpoom vanilla extract lor tbe vanilla bean, but the
bean often a fuller, mare aromatic flavor. If u&mg extract, add it after die
miuiX it cool. II UKsng л Tahitian bean. дес only I bean
CUSTARD CREAM FILLINGS AND SAUCES 2«5
STORE:
kc cream Ims die best tex-
cure within 3 days of
freezing.
POINTERS FOR SUCCESS
Don't use a whisk to stir if
not using an accurate ther-
mometer because the foam
makes it difficult to sec
when the mixture is gening
dose to boiling. Do not heat
above 180‘F. or the sauce
will curdle. If overheated
and Jrght curdling docs take
place, pour instantly into a
blender and blend until
smooth before viramiog. Do
not add mure than the rec-
ommended amount of
vodka or ice cream will not
freeze.
Have a fine strainer ready near the range, suspended over
a medium mixing bowl.
In a small heavy nofKorrodible saucepan stir togethci
the yolks, sugar, and salt until well blended, using a wooden
spoon.
In another small saucepan (or a heatproof glass mea-
sure it using a microwave on high power) beat the cream,
milk, and vanilla beans to the boiling point. Stir a few ta-
blespoons into the yolk mixture; then gradually add the
remainder, stirring constantly.
Heat the mixture, stirring constantly, to just before the
boiling point (170T. to 18ОЧЕ.). Steam will begin to appear
and the mixture will be slightly thicker than heavy cream.
It will leave a well-defined track when a finger is run across
the back of a spoon. Immediately remove from the hear
and pour into the strainer, scraping up the thickened cream
that settles on the bottom of the pan. Remove the vanilla
beans and scrape rhe seeds into the sauce. Stir until the
seeds separate. Return the pod to the sauce until ready to
freeze.
Cool in an kc-water bath or the refrigerator until cold.
Stir in the optional vodka. Freeze in an ice-cream maker.
Allow to npen for 2 hours in the freezer before serving.
VARIATIONS
PINEAPPLE ICE CREAM This is a sensational flavor. Do make
ynur own pineapple puree (page 351]. It is far superior to
canned pineapple. For a generous quart of ice cream, pre-
pare only two thirds of the recipe, using 5 egg yolks, a 2-
inch long piece of vanilla bean, and 1 tablespoon plus 2
teaspoons of kirsch instead of vodka. Before freezing, stir
Vi cup pinrappie purer into the chilled cream mixture. This
ice cream is delicious by itself but was created especially
for Baked Hawaii {page 168).
FIRE AND ICE- For a slightly nutty, slightly fiery, utterly de-
licious flavor, add 2 teaspoons pink peppercorns, crushed,
with the vanilla extract.
2S* COMPLEMENTARY ADORNMENTS
Vanilla
his sublime cream is an ideal filling for a dome-shaped
charlotte such as the Scarlett Empress (page 177). It is silken
smooth, fragrant with vanilla, and very creamy. It contains
just enough gelatin to hold its shape while maintaining a
soft, mdt-in-the-mouth texture.
Bavarian Cream
MAKES S CUPS
(enough for a 6<up cake-
lined mold)
INGREDIENTS MEASURE WEIGHT
vio/umc pounik -ounces kilogram*'grams
sugar V» cup 2.2$ ounces 66 grams
salt pinch •
gelatin* 1 tablespoon • 9.3 grams
5 large egg yolks 3 fluid ounces 3.25 ounces 93 grams
milk liquid cups 14 ounces 402 grams
1 vanilla bean, spirt f • • ♦
heavy cream 1 liquid cup 8 ounces 232 grants
opwonaL kirsch {cherry cau- dc-vic) 1 Vj tablespoons 0.75 ounce 21 grams
*Tht4 л matt than one envelope
fYaii rruv 1 teaspooc varafa extract hx the vanilla bean, bnt the
bean offers а Мкг, tno»e inxnutK flavor. It using extrau, odd tt after the
sauce is cool. If using a Tahitun bean, use мйу half the bean.
Refrigerate the mixing bowl for whipping the cream.
Have ready a fine strainer near the range, suspended
over a small mixing bowl.
In a small, heavy, noncorrodible saucepan, stir to-
gether the sugar, salt, gelatin, and yolks until well blended,
using a wooden spoon.
In another small saucepan (or a heatproof glass mea-
sure if using a microwave on high power) heat the milk and
vanilla bean to the boiling point. Stir a feu tablespoons
into the yolk mixture; then gradually add the remaining
milk and vanilla bean, stirring constantly.
Heat the mixture, stirring constantly, to just before the
boiling point (170“F. to 18(У°Е.). Steam w ill begin to appear
and the mixture will be slightly thicker than heavy cream.
It will leave a well-defined track when a finger is run across
the back of a spoon. Immediately remove from the heat
STORE:
Refrigerate 4 hours to 3
days before unmolding. Re-
move to room temperature
1 hour before serving. The
Bavarian may be frozen for
2 weeks. Defrost for 24
hours in the refrigerator,
POINTERS FOR SUCCESS.
Don't use a whisk to sth*
when heating the custard if
not using an accurate (her*
tnometer because the foam
makes it difficult to see
when the mixture is getting
clove to boiling. Do not heat
above 180*Е. or the sauce
will curdle. If overheated
and slighr curdling does take
place, poor instantly into a
blender and blend until
CUSTARD CREAM FILLINGS AND SAUCES 2Я7
smooth before straining. To
prevent separation, the yolk
mixture must start to
thicken before adding the
egg whites or whipped
cream. If it starts tu set pre*
maturely, set the bowl
briefly over hot water, and
stir until smooch. Once the
whipped cream has been
added, avoid overmixing. Be
sure to measure or weigh
the gelatin. One envelope
equals about 2.25 tea*
spoons.
and pour into the strainer, scraping up the thickened cream
that settles on the bottom of the pan. Remove rhe vanilla
bean and scrape the seeds into the sauce. Stir until the seeds
separate.
In the chilled bowl whip the cream until it mounds
softly when dropped from a spoon. Refrigerate.
Cool the sauce in an ice-water hath, stirring with a
large wire whisk until whisk marks barely begin to appear.
The mixture will start to set around the edges but will still
be very- liquid. Whisk in the optional kirsch and continuing
with whisk, fold in the whipped cream until just incorpo-
rated. The mixture will be soupy like melted ice cream. Re-
move at once from the water bath and pour into a 6-cup
tacwr lined bowl Ipage 3701. Refrigerate for at least 4 hours
before unrnolding.
note: If time allows, the Bavarian cream can be chilled in
the refrigerator instead of stirred over ice water. It will take
about l¥i hours to thicken and should be stirred occasion-
ally. The advantage of refrigeration over ice water is that
the thickening process is mure gradual so there is less dan-
ger of the mixture becoming too thick before folding in the
remaining ingredients
UNDERSTANDING
Kirsch or other liqueurs are added to Bavarian creams not
only for the lovely flavors but also to mask any gelatin flavor.
VARIATIONS
ORANGE BAVARIAN: Delicately perfumed with orange and
Grand Marnier, Becked with tiny dots of orange zest, this
Bavarian is delicious topped with a thm layer of Light
Whipped Ganache 'ipage 268) to create a stunning two-toned
effect. If blood oranges arc available, they provide a lovely
pink color and more intense flavor. Preparation is similar
tn basic Bavarian cream with the following changes: Use lA
cup sugar. Replace the kirsch with Grand Marnier. Add 2
tablespoons fresh orange concentrate and 1 tablespoon
grated orange zest. To make orange concentrate, start with
Vi cup freshly squeezed orange juice i a bout 2 oranges) and
reduce it to 2 tablespoons. (Using a microwave on high
power gives rhe purest flavor.) Add the zest to the milk
before hearing and do not strain the custard. Add the or-
ange concentrate when the mixture is cool. Pour into an 8-
inch £tfcurt<lined mold ipage 181) and refrigerate.
Make V» recijx l ight Whipped Ganache (page 268J
and immediately after whipping smooth over top of orange
2НЯ COMPLEMENTARY ADORNMENTS
Bavarian. Top with Chocolate Curls (page 382) and Can-
died Orange Zest (page 342} or a piped disc of Daisy Bis-
cuit (page 183). Tie a brown and an orange ribbon around
the finished mold. *(See Orange Chocolate Crown, page 181.)
BAVARIAN CHIRON: This Bavarian is also silky and creamy
but has a lighter, faintly spongy texture from beaten egg
whites. To make this version, beat 3 large egg whites (3
ounce$.'90 grams) until foamy, add И teaspoon cream of
tartar, and beat until soft peaks form when the beater is
raised. Gradually add 3 tablespoons sugar and beat until
stiff peaks form when the beater is raised slowly. With a
large whisk fold into the chilled yolk mixture. Then fold in
the whipped cream. This will make 7 cups of Bavarian
Chiffon Cream, enough for a 9-inch biscuit-lined mold (page
369).
CUSTARD CREAM FILLINGS AND SAUCES 289
rear
Bavarian Cream
MAKES 6 CUPS
(enough for one 9-inch by
2-inch cnanoctc)
(page 174)
x—x fell in love with charlottes and Bavarian cream fill-
ings at the renowned Ecole LeNdtrt in Platsir, France, where
I went to study seven years ago. This Bavarian cream for
Ethereal Pear Charlotte (page 175) was my favorite. The
flavor is purely pear and tbe texture incomparably creamy,
billowy and light, yet, miraculously, it holds its shape for
serving. The secrets are the use of pear juice instead of milk
for the creme anglaist (LeNdtre jokingly called it сгёте
fran^aiM) and the addition of Italian menngue. The chal-
lenge in re-creating this recipe was to keep it from being
too sweet because the meringue contains so much sugar.
Instead of adding extra sugar to protea the eggs from cur-
dling when adding the pear juice, I stole some sugar from
the menngue and a little more from the poaching syrup.
The result is a succis fou\ It is one of my favorite recipes
in this book.
INGREDIENTS MEASURE WEIGHT
го/шпе pounds-ou nces liAugramc/grams
CUSTARD s»Mtar V* cup 1.75 ounce* 50 grams
salt pinch a •
gdatin 1 tablexpoon • 9.3 grams
5 large egg ynlks 3 fluid ounces 3.25 ounces 93 grams
pear poaching liquid (page 350) 1 Vi cups 14 ounces 400 grams
cold heavy cream fTAUAN MERINGUE 1 cup S ounces 232 grams
Migar V» cup 2.25 ounces 66 grams
water 2 tablespoons 1 ounce 30 grams
2 large egg whites •4 cup 2 ounces 60 grams
cream of tartar Бимммвммам» V* teaspoon • •
William's pear liqueur or eau-de-vie 2 tablespoons 1 ounce 2Я grams
2**1 COMPLEMENTARY ADORNMENTS
Refrigerate the mixing bowl for whipping the cream.
Have a fine strainer ready near the range, suspended
over a small mixing bowl.
In a small, heavy, noncorrodible saucepan snr together
¥4 cup of the sugar, salt, gelatin, and yolks until well blended,
using a wooden spoon.
In another small saucepan {or a heatproof glass mea-
sure if using a microwave on high power) heat the pear
poaching liquid to the boiling point. Stir a few tablespoons
into the yolk mixture; then gradually add the remaining
liquid, stirring constantly.
Heat the mixture, stirring constantly, to just before the
boiling point (i8(FF. to 190°F). Steam will begin co appear
and the mixture will be slightly thicker than heavy cream.
It will leave a well-defined track when a finger is run across
the back of a spoon. Immediately remove from the heat
and pour into the strainer, scraping up the thickened cream
that settles on the bottom of the pan.
In the chilled bowl whip the cream until it mounds
softly when dropped from a spoon. Refrigerate and prepare
the Italian meringue.
Have ready a 1-cup heatproof glass measure near the
range.
In a small heavy saucepan (preferably with a nonstick
lining) stir together the ‘Л cup sugar and water. Heat, stir-
ring constantly, until the sugar dissolves and the syrup is
bubbling. Scop stirring and cum down the heat to the low-
est setting. (If using an electric range remove from the heat.)
In a mixing bowl beat the egg whites until foamy, add
die cream of tartar and bear until stiff peaks form when
the beater is raised slowly.
Raise the heat and boil the syrup until a thermometer
registers 248*F. to 25<TF. (firm-ball stage). Immediately re-
move from the heat and pour the syrup into the glass mea-
sure to stop the cooking
If using an electric hand-held mixer, bear the synip into
the whites in a steady stream, avoiding the bearers, to keep
syrup from spinning onto sides of bowl. If using a stand
mixer, pour a small amount of syrup over the whites with
the mixer off. Immediately hear at high speed for 3 sec-
onds. Stop mixer and add a larger amount of syrup. Beat
at high speed for 5 seconds. Continue with remaining syrup.
With che last addition use a rubber scraper to remove the
synip dinging to the glass measure. Beat at medium speed
until cool [about 2 minutes). Cover with plastic wrap and
set aside.
STORE:
Refrigerate 4 hours co 3
days before unmoldmg. The
Bavarian may be frozen for
2 weeks.
POINTERS FOR SUCCESS:
Custard: Don't use a whisk
to stir if not «sang an accu-
rate thermometer because
the foam makes it difficult
to see when the mixture is
getting dose to boiling. Do
not beat above 190*F. or the
sauce will curdle. If over-
heated and slight curdling
docs take place, pour in-
stantly into a blender and
blend until smooth before
straining.
It is possible to heat
this sauce 10 degrees higher
than one made with milk
because the acidity of the
pear fusee raises the boiling
po<nt.
Zra/ian Meringue: For maxi-
mum stability, the syrup
must reach 24S*F. and not
exceed 2$0*F. as higher tem-
peratures will break down
the whites. The whites must
be free of any grease or
trace of yolk. Don’t over-
beat.
Bavarian; To prevent sepa-
ration, the yolk mixture
must stan to thicken before
adding the Italian meringue
and whipped cream. If it
starts to set prematurely, set
the bowl briefly over hot
water and stir until smooth.
Once the Italian meringue
and whipped cream have
been added, avoid overmix-
ing. Be sure to measure or
weigh the gdatin. One enve-
lope equals about 2.25 tea-
spoons using Foley
measuring spoons. If may
CUSTARD CREAM FILLINGS AND SAUCES 291
measure 2.5 teaspoons with
other brands of measuring
spoons. The gelatin contin-
ues to chicken under refrig-
eration.
Cool the custard sauce in an ice-water bath, stirring
with a large wire whisk just until trace of whisk marks
begin to appear. The mixture will start to set around the
edges but will still be very liquid. Whisk in the pear eau-
de-vie and, continuing with whisk, fold in the Italian me-
nngue and whipped cream until fust incorporated. The
mixture will be very billowy and soupy like melted ice cream.
Remove at once from the water bath and pour into a 9-
inch £ricmt-lined mold (page 175).
note: If time allows, the Bavarian cream can be chilled in
rhe refrigerator instead of stirred over ice water. It will take
about 1 Vi hours to thicken and should be stirred occasion-
ally. The advantage of refrigeration over ice water is that
the thickening process is more gradual so there is less dan-
ger of the mixture becoming too thick before folding in the
remaining ingredients.
ilcringuc
Icings.
Fillings,
and
Decorations
(Loyal icing, meringue, and doc^Mocse all have two major in-
gredients in common: egg whites and sugar. Since their texture is
dependent on properly beaten egg whites, this seems like a perfect
place foi a brief discussion on egg whites in general. First let's
deal with the great baker’s controversy: Which beat better, fresh
egg whites or aged? It's six of one, half a dozen of the other.
Fresh whites are thicker so they take longer to beat. The resulting
foam has less volume but more stability and loses less volume
when folded into other ingredients. Older whites arc thinner so
they beat more quickly and yield greater but less stable volume.
When folded into other ingredients they lose the extra volume.
The flavor of fresh egg whites is slightly superior to that of
older whites, so I tend to prefer them for recipes like mousses
where the egg white does not get cooked.
Now for a simple demystification from my dear fnend and
brilliant colleague, Shirley Comber:
29i COMPLEMENTARY ADORNMENTS
Egg white n made up of water and prolan. When exposed co
air. heat, or add. the proteins in the egg white change from their
original form (denature). For the perfect egg white foam, the egg
whites should be beaten so that the egg white proteins denature
(change) just the right amount. The) must remain motif and
flexible and not dry out and become rigid. When the beaten egg
white, hlkd with air bubbles, goes into a hot oven or и sub-
jected to hot syrup, it should be soft, moist, flexible, and able to
expand until it reaches the temperature tlvat coagulates (sets) it.
Overheating produces dried out, rigid egg white foam that will
not expand properly in the oven. 1 he cook has several secret
weapons to produce rhe perfect degree of egg white denaturira*
lion to result m beaten egg whites with the greatest volume and
stability. These arc the copper bowl, cream of tartar, and sugar.
The copper bowl produces stable egg whites by combining with
conalbumin, the protein in the egg white that lines each air bub-
ble, to form a totally new protein, copper conalbumin. This cop-
per conalbumin remains moist and flexible even when slightly
oserbeaten and provides a more stable foam.
Cream of tartar, an acid salt (byproduct of the wine indus-
try I, provides an even more «able foam in another way. The acid
serves to denature the protan just enough to produce a moist
stable foam. 1 have performed several experiments with cream of
tartar and find that when the correct amount 11 teaspoon per cup
of egg whites) is used, there is no danger at all of overbearing.
Because of thus I recommend always using cream of tartar for egg
whites that will be cooked. If rhe egg whites will remain un-
cooked. I prefer the cupper bowl because it offers (he lea« possi-
bility of extraneous flavor.
Sugar is effective with cither the copper bowl or cream of
tartar to keep (he proteins moist and flexible because sugar itself
holds moisture. Superfine sugar is preferable because it dissolves
faster. Sugar can be added at any time whde beating the egg whites,
however if added early it will require much longer beating and
may not reach as great a volume. If added very late in tbe beating
process, drying may have starred to occur. Most recipes specify
starting to add the sugar after the sort peak stage hut before stiff
peaks form.
Salt not only increases beating time, it decreases the foam's
stability by drawing out water from the egg whites. I prefer add-
ing salt to the other ingredients m the recipe.
Any fat substance or egg yolk 13 a foam inhibitor and even
one drop will keep the egg whites from becoming stiff.
For the most stable foam, start beating rise egg whites slowly,
gradually increasing speed. Never decrease speed as the volume
MERINGUE ICINGS. FILLINGS. AND DECORATIONS 29J
will permanently decrease. When it is necessary to stop the beater
to check consistency, turn it off qusckly and brrng up speed quickly
to present deflation.
When making a syrup to beat into egg whites, use a pan with
a nonstick lining or a lot of the syrup will stick to the pan instead
of getting into the whites.
Finally, because sugar is hygroscopic (readily absorbs water),
do not make royal temg, mertngue, or dacquoise on humid days
as they will be soft and sticky and will not set well.
The reapes in this chapter appear as components throughout
the book in many interesting and varied ways. Royal king is used
for fine decorative designs on some of the special occasion cakes.
Delicious, crunchy dacquoise is an important part of A Taste of
Heaven Ipage 166), while crisp French menngue is juxtaposed
against soft genoise and buttercream in Star-Spangled Rhapsody
(page 169). Italian meringue adds its billowy texture to mixtures
from buttercream to Bavarian cream. And, of course, the various
meringues, from chocolate to green tea, are perfect to cat by
themselves.
Royal
Icing
MAKES ¥♦ CUP
чУк amount of sugar in royal icing is almost five rimes
the weight of the egg white, resulting in a very stiff me-
nngue used exclusively for cake decorating. Flowers made
from royal icing and air dried will last almost indefinitely,
so many bakers feel they are great to have on hand. How-
ever, it was a royal icing rose which remains in my memory
as one of the great disappointments of childhood. I still
remember the birthday party—holding my breath as the
serving knife approached that special piece with the exquis-
ite pink rose on it, hoping against hope that it would be
mine and then, with dizzying ecstasy, there it was being
lowered toward my plate. The joy of that moment ended
when the rose crumbled between my baby molars like so
much powdered cement.
I To this day, I would never dream of putting royal ic-
ing flowers on a cake and disappointing some other unsus-
I pecting child. Real flowers are preferable, and most people
realize that they arc merely there for dfcor. Once though,
at a wedding, my husband nervously pointed out a certain
ambassador's wife cheerfully munching on a pale lavender
cymbidium from one of my wedding cakes! (Sec edible
flowers, page 428.)
Royal icing is extremely well suited to small decorative
I couches: dots on Dotted Swiss Dream (page 222), lilies of
294 COMPLEMENTARY ADORNMENTS
the valley embroidery on White Lily Cake (page 203),
monograms (page 412), string work (page 404). 1 tend to
use it in conjunction with rolled fondant because the dead
white of the royal icing stands out against the off-white of
the fondant, giving the fondant an alabaster quality. An
added advantage to the royal icing is that, since it contains
no hr, it is easy to correct mistakes—unlike buttercream
which leaves grease marks when removed.
There is no cake more elegant or breathtakingly beau-
tiful than one covered with rolled fondant and decorated
with royal icing. As they are both over 80 percent sugar,
the main taste sensation is sweet. It is the one time I put
beauty over flavor as lung as the cake within is absolutely
delicious.
INGREDIENTS MEASURE WEIGHT
rooon 1 large egg white ю/ume 1 tablespoons pounds ounces 1 ounce kiioftram*grams 30 grams
powdered sugar 1 Vi cups (hghdy spooned into cupl 5.25 ounces 150 grams
hi a large mixing bowl place the egg white and sugar and
beat, preferably with the whisk beater, at low speed until
the sugar is moistened. Beat at high speed until very glossy
and stiff peaks form when the beater is lifted (5 to 7 min-
utes). Tips of peaks should curve slightly. If necessary, more
powdered sugar can be added. Use at once to make deco-
rations, keeping the bowl covered with a damp cloth.
For spider-web-fine string work piped with а ООО tube,
Irene diBartollo, a great cake decorating artist and teacher,
presses small amounts of iang through the toe of a nylon
stocking to make sure that it is absolutely lump free!
Atvid preparing on humid days. If using a hand-held
mixer, don’t increase the size of the recipe because the icing
is very stiff and may be hard on a weak motor. Keep the
bow! and pastry tube covered with a damp doth when not
in use because the icing crusts and hardens very quickly
when exposed to air.
note: I don't know where the myth got started that royal
King made with fresh egg white cannot be rebeaten. It is
true that it cannot be rebeaten as many times or for as
many days as royal icing made with menngue powder, but
it definitely holds up to 3 days.
STORE
3 day's tightly covered. T be
icing becomes slightly
spongy on standing—reheat
lightly if necessary.
POINTERS FOR SUCCESS:
To avoid lint, don’t sift
powdered sugar and air dry1
all utcnuls. Utensils and egg
whites must be absolutely
grease free. Royal icing will
break down if subjected to
esen л trace of grease, so all
equipment should be
washed well and nnsed in
very hot water before using.
MERINGUE ICINGS, FILLINGS, AND DECORATIONS 295
VARIATION
Royal icing made with fresh egg whites is strong and elas-
tic, making it ideal foe String work. Royal icing made with
meringue powder is only slightly less clastic but can be stored
and rebcaten up to 2 weeks. Meringue powder, available
at cake decorating supply stores such as Maid of Scandi-
navia (page 445), contains mainly dried egg whites.
To make Menngue Powder Royal Icing: Replace the egg
white with 1 tablespoon meringue powder and 2 table-
spoons warm water (this is approximately the amount of
water contained by the white). Proceed as for basic royal
icing. Extra water or com syrup may be added to ebe icing
to soften it slightly for borders or string work (1 table-
spoon per pound of powdered sugar). The addition of water
will result in a harder, more bottle icing. If the weather is
very dry and rhe icing crusts too quickly, 1 teaspoon glyc-
erine per 2 pounds powdered sugar will keep it soft longer.
To store the icing, place in an airtight container (not plas-
tic, which is petrol-based and can break down rhe icing) at
room temperature and rebcat before using.
CHOCOLATE ROYAL ICING: For a light chocolate royal ic-
ing which contrasts niedy with Chocolate Rolled Fondant
(page 309), add 2 tablespoons cocoa to the powdered sugar.
Crisp
French
Meringue
MAKES
TWO 9-INCH
OR THREE
7-INCH DISCS
he classic proportions for crisp meringue are approxi-
mately double the weight of sugar to egg white. But there
is a special reason I have called this recipe French me-
nngue. к is because of a French pastry chef named Didier
who came to visit me one day when 1 had just baked a
batch of meringue shells. He hefted one on his thumb and
three hngeis and muttered in a kiw voice “C’est lourd."
(“It’s heavy.*’) 1 waivered between insult and curiosity and
then decided that 1 might have something to learn, к turns
out that Didier’s grandfather used mostly superfine sugar
for the meringue in his pastry shop and always put in a
pDQpret (“fistful”) of powdered sugar. Since Didier could
not recall the size of the batches prepared in his grandfath-
er’s bakery, I spent several days in my country kitchen ex-
perimenting with quantities ranging from 100 percent
powdered sugar down to about 50 percent (which turned
out to be the ideal). Didier was right. These are the lightest
mrnngues I’ve ever experienced.
296 COMPLEMENTARY ADORNMENTS
Crisp meringue shells provide delightful containers for
ice cream and fresh fruit. Meringue discs make spectacular
cake components when used to sandwich layers of genoise
as in Star-Spangled Rhapsodv Cake Ipage 169).
INGREDIENTS MEASURE WEIGHT
room fempcrarure 4 large egg whites volume % liquid cup pounds-'oimors 4_25 ounces kiiogntim gram r 120 grams
cream of tartar teaspoon •
superfine sugar Vx cup + i tablespoon 4 ounces 115 grams
powdered sugar 1 cup (lightly spooned into cup! 4 ounces 115 grams
Line a heavy baking sheet with a nonstick liner or foil. If
making discs, trace shape onto foil or make template to slip
under liner as a guide.
Pre/jrat oven to 200*F.
In a mixing bowl beat the whites until frothy, add the
cream of tartar, and beat at medium speed while gradually
adding 2 tablespoons superfine sugar. When soft peaks form
when the beater is raised, add 1 tablespoon superfine sugar
and increase speed to high. When stiff peaks form when
the beater is raised slowly, gradually beat in remaining su-
perfine sugar and beat until very stiff and glossy.
Sift powdered sugar over meringue and fold tn using a
dotted skimmer or large rubber tpanila. Use at once to pipe
or spread on prepared baking sheet. (See piping instruc-
tions page 375.]
If your oven has a pilot light, the ideal way to dry rhe
meringue is to bake it for 1 hour at 200°F. and then leave
it overnight in the tumed-off oven. Alternately, bake the
discs for 2 to 2'Zz hours at 200:F. or until dry but not be-
ginning to color. The most reliable way to test for doneness
is to dig out a small amount of meringue from the center
with the tip of a sharp knife. If only slightly sticky it will
continue to dry at гехэгп temperature.
VARIATIONS
FIGURE PIPING MERINGUE: When piping figures such as
swans (page 376) for Blueberry Swan Lake (page 165} or
mushrooms (page 376) for Cordon Rose Chocolate Chrisc-
STORE:
Tightly covered ai room
temperature and low humid-
ity. mcnngucs will keep for
mote than 6 months.
POINTERS FOR SUCCESS
Superfine sugar is as fine as
sand. If you have trouble
finding it, make your own
by processing regular granu-
lated sugar for я few min •
utes in a food processor. All
utensils and egg whites must
be free of grease. A void pre-
paring on humid days. Do
not use parchment or a
greased and floured baking
sheet because menngue
often sticks to them. To pre-
vent cracking, do not open
the oven door during the
first three quarters of cock-
ing lime.
MERINGUE ICINGS, FILLINGS. AND DECORATIONS 297
Light
Italian ncrlnguc
MAKES 5 CUPS
mas Log (page 197), a less fragile meringue is preferable.
Replace the 4 ounces powdered sugar with 4 additional
ounces superfine sugar (using a total of 8 ounces. 226 grams
or 1 cup + 2 tablespoons). Beat all of the sugar into rbc
meringue. For piping and baking instructions, see page 377.
PINE NEEDLE MERINGUE: Elizabeth Andoh and I worked
out this Japanese-inspired pale green meringue, ideal for
piping the most fragile of pine needles (page 375). Use 2 egg
whites (‘A cup, 2 ounce^60 grams) and beat in *4 cup (1.75
ounces»50 grams) superfine sugar which has been whisked
with 2 teaspoons Japanese powdered green tea (page 429).
For piping and baking instructions, see page 375.
COCOA MERINGUE: Whisk 2 tablespoons cocoa with the
powdered sugar until uniformly blended. For piping and
baking little puffs, round or heart-shaped discs, and me-
ringue sticks ser pages 374 and 375.
CHOCOLATE-SPANGLED MERINGUE: For a pale tan me-
ringue with little speckles of chocolate throughout, place
the powdered sugar and 2 ounces unsweetened chocolate
in a food processor and process until chocolate is powdery.
Fold into the beaten whites until uniformly blended. This
meringue has a lovely chocolate flavor and dissolves in rhe
mouth. The bitter chocolate makes it less sweet than ocher
meringue recipes. Spangled menngue can be piped into lit-
tle puffs, round or heart-shaped discs, and sticks (pages 374
and 375}.
I^Jassic Italian menngue has double the weight of sugar
to egg whites. This recipe has only a little more than 1 Vi
times the sugar, giving it |ust enough body and sweetness
to support the addition of lemon curd for Lemon Cream
Illusion (page 266).
INGREDIENTS MEASURE WEIGHT
rrxxm temperature grams
sugar ¥4 cup + 2 ГАНечроот 6 ounces 175 grams
water •A cup 2 ounces 60 grams
4 large egg whites *A liquid cup 4.25 ounces 120 grams
cream of tartar 'A teaspoon • ♦
298 COMPLEMENTARY ADORNMENTS
Have ready near the range a 1-cup heatproof glass mea-
sure.
Ln a small heavy saucepan (preferably with a nonstick
lining' stir together ¥♦ cup sugar and the water. Heat, stir-
ring constantly, until the sugar dissolves and the syrup ts
bubbling. Stop stirring and turn down the heat to the low-
est setting. (If using an electnc range remove from the heatj
In a mixing bowl bear the egg whites until foamy, add
the cream of tartar, and beat until soft peaks form when
the beater is raised slowly. Gradually beat m rhe remaining
2 tablespoons sugar until stiff peaks form when the beater
is raised slowly. Increase the heat and boil the syrup until
a thermometer registers 24&*F. to 250rF. (firm-ball stage).
Immediately pour into the glass measure to stop the cooking
If using an electric hand-held mixer, beat rhe syrup into
the whites in я steady stream, avoiding the beaters to keep
syrup from spinning onto sides of bowl. If using a stand
mixer, pour a small amount of syrup over rhe whites with
the mixer off.
Immediately beat at high speed for 5 seconds. Stop the
mixer and add a larger amount of syrup. Bear ar high speed
for 5 seconds. Continue with remaining syrup. With the
last addition use a rubber scraper to remove the syrup
clinging to the measure. Beat at medium speed until cool
(about 2 minutes).
UNDERSTANDING
People have asked me if it is possible to use glucme (which
has less water than corn syrup) to replace the warer and
some of the sugar the way I use com syrup for Ncociassic
Buttercream (page 230). Unfortunately, the resulting Italian
meringue does not get firm enough even when the syrup is
brought to 248*F.
STORE:
2 hours room temperature,
2 days refrigerated. Rcbcat
briefly before using.
POINTERS FOR SUCCESS:
For maximum stability,
syrup must reach 248*F. and
not exceed 250*F. as higher
temperatures will break
down the whites. The
white» must be free of any
grease or trace of yolk. Do
not overbear. Avoid prepar-
ing humid dayi.
MERINGUE ICINGS, FILLINGS, AND DECORATIONS 299
Chocolate
Italian ricringuc
New? Nero
(NEYveh NEYro)
MAKES 18
COOKIES
fantastic recipe is a lagniuppe (a Louisiana word
defined as “an extra gift”). It is neither a cake nor a com-
ponent of a cake but rather a romantically named cookie,
crunchy on the outside, chocolaty-cbewy inside. The recipe
was a gift co me from a charming Swiss baker. Arthur
Obcrholzer. He enticed me by telling me that chocolate
Italian menngue is called netv пего {black snow) in Italy.
This mixture is used co make a famous Swiss cookie simply
known as the Schoggi S {Chocolate S) because it is piped
in that shape. He said it is so tricky and delicate “no one
ever succeeds on the first try/’ The challenge was on. One
cookie from my successful first batch was promptly mailed
to Arthur Obcrholzer. who now lives in Flonda. Consid-
ering the humidity’ down there. 1*11 never know if he was
adequately impressed!
INGREDIENTS MEASURE WEIGHT
zoom temperature sugar to/unx' 1У^ cups 4 3 tablespoons pound* -'cMMWCS 10 ounces k ilogfanti jjrxim 285 grams
water Vt liquid cup 2.75 ounces 80 grams
4 large egg whiter Vj liquid cup 4.25 ounces 120 grams
cream of tartar Vi teaspoon •
unsweetened chocolate, melted and slightly cooled ♦ 2 ounces 57 grams
optional: 4 drops red food color » • •
Have ready a large pastry
bag fitted with a large num-
ber H star tube and a 17-
inch by 14-inch baking shed
lined with a nonsuck liner
or foil.
STORE
1 week to 10 days room
temperature.
POINTERS FOR SUCCESS:
Avoid preparing nn humid
days. For maximum stabil-
ity, the syrup must reach
Have ready a 2-cup heatproof glass measure near the range.
In a small heavy saucepan (preferably with a nonstick
lining/ stir together H4 cups sugar and the water. Heat,
stirring constantly, until the sugar dissolves and the syrup
is bubbling. Stop stirring and turn down the heat to the
lowest setting. |lf using an electric range remove from the
heat.)
In a mixing bowl beat rhe egg whites until foamy, add
the cream of tartar, and bear until soft peaks form when
the beater is raised. Gradually beat in the remaining 3 ca-
* Four drops of red food color gne the duxoliu a richer йрргамлее.
300 COMPLEMENTARY ADORNMENTS
blespoons sugar until stiff peaks form when the beater is
raised slowly.
Increase the heat and boil rhe syrup until a thermom-
eter registers 248'T. to 25 ОТ. (firm-hall stage). Immedi-
ately pour into the glass measure to stop the cooking.
И using an electric hand-held mixer, beat the syrup into
the whites in a steady stream. Don’t allow the syrup to fall
on the beaters or they will spin the syrup onto the sides of
the bowl. If using a stand mixer, pour a small amount of
syrup over the whites with the mixer off. Immediately beat
at high speed 5 seconds. Stop the mixer and add a larger
amount of syrup. Beat at high speed for 5 seconds. Con-
tinue with remaining syrup. With the last addition use a
rubber scraper to remove the syrup dinging to the measure.
Beat 1 minute.
Now comes the critical moment. Stop beating, disen-
gage the beater, and add the melted chocolate and optional
food color. Holding the beater with your hand, immedi
ately beat for a few seconds only until incorporated. Trans-
fer at once to the pastry bag and pipe immediately while
still hot. If overbeaten, the mixture wdl be soft and the
ridges will not show.
Use a small spot of menngue at each comer of the pan
to attach the liner. Pipe large, high S shapes, allowing the
mixture to fall from the bag. Avoid flattening it by having
the pastry tip too low. From end to end each S should mea-
sure 3’4 inches. They will expand Vi inch when baked so
leave at least РЛ inches between the cookie*. Allow cook-
ies to dry for 2 hours or until set. [When finger tip touches
surface, meringue stays intact.)
Preheat opew to 35(PF. Place cookies in preheated oven
10 minutes. Lower heat to 200*F. and bake without open-
ing oven door just until they can easily be removed (using
fingers) from the baking sheet. This will take 20 to 30 min-
utes. Do nor overbake. The cookies should be wet inside as
they continue to dry on removal from oven and should be
soft and chewy inside even after cooling.
Put the cookies on a rack and as soon as they are cool
store in airtight containers.
24S*F. and not exceed
25CTF. as higher tempera-
tures will break down the
whites. The whites must be
free of any grease or trace
of yolk
The melted chocolate
should be warm (ideally
100*F.) when added to the
meringue. Beating must be
nummal after adding the
chocolate. Pipe the mixture
while still hot. To prevent
cracking, do not open the
oven doof during the early
stage of baking. Don't over-
bake cookies. They should
be chewy, not dry, inside.
VARIATION
Instead of S shapes, pipe hearts (page 415). Broken pieces
of this menngue ane an interesting addition when folded
into Bavarian cream.
MERINGUE ICINGS, FILLINGS, AND DECORATIONS 301
UNDERSTANDING
This recipe ts based on classic Italian menngue because it
needs the greatest stability to stand up to the fat in the
chocolate. In fact, 2 extra ounces of sugar have been added
for further stability. This is possible because the sweetness
is tempered by the use of unsweetened chocolate.
Dacquoise
(daKWAHZ)
MAKES
TWO 9-INCH
OR THREE
7-INCH DISCS
d dacquoise is an exceptionally light and crisp
menngue made with ground nuts. The nuts make it pale
brown in color with a delicious nutty flavor. Crunchy, fla-
vorful nuts are best Use almonds, hazelnuts, or a combi-
nation of both. The mixture can be piped into discs or heart
shapes and used to sandwich genoise and pink Classic But-
tercream in A Taste of Heaven {page 166).
INGREDIENTS MEASURE WEIGHT
ЛМ1П1 ггглгнгдпше loaned, peeled, and finely ground almond» or hazelnut» voJirmc ¥4 to 1 cup jMMMidc'oumres 4 ounces kilogram* gram s 113 grams
cormtarch tablespoon» ♦ 12 grams
uiperhne sugar ¥2 cup + 1 tablespoon 4 ounces 113 gram»
powdered sugar % cup llighrly spooned into cupj 3 ounces 85 grams
4 large 4W whites Vi cup 4.25 ounces 120 grams
cream of tartar Vi teaspoon • •
Line a heavy baking sheet with a nonstick liner or foil. If
making discs, trace the shape onto the foil or make a tem-
plate to slip under the liner as a guide.
Preheat the oven to 200*F.
In a food processor pulse the ground nuts, cornstarch,
Yz the superfine sugar, and all the powdered sugar a few
times to thoroughly combine. Set aside in a small bowl.
502 COMPLEMENTARY ADORNMENTS
In a Urge mixing bowl beat the whites until frothy,
add the cream of tartar, and beat at medium speed while
gradually adding 1 tablespoon superfine sugar. When soft
peaks form when the beater is raised, gradually add the
remaining superfine sugar and beat at high speed until stiff
peaks form when the beater is raised slowly.
Fold in reserved nut mixture with a slotted skimmer
or large rubber spatula. Use at once to pipe or spread on
the prepared baking sheet. {See piping instructions, page
375.} It the mixture is too soft to pipe well, pipe only an
outline and fill in rhe center with a spoon.
If your oven has a pilot light, the ideal way to dry* the
dacqwjiM is to bake it for 1 hour and then leave it over-
night in the turned-off oven. Alternately, bake the discs for
1 Va to 2 hours or until dry but not beginning to color. The
most reliable way co test for donencss is to dig out a small
amount of dacquoisc from the center with the rip of a sharp
knife. If only slightly sticky it will continue to dry at room
temperature.
UNDERSTANDING
Dacquoisc varies in the proportion of nuts and sugar to egg
white. It и possible to use as much as two thirds the com-
bined weight of the egg whites and sugar in nuts but the
dacquoise will be more fragile and have less body. The above
recipe uses dose to equal weight nuts and egg whites and,
instead of double the sugar to egg whites, it has IV» the
sugar. This decrease in sugar and the addition of nuts nukes
it far less sweet than a menngue. A small amount of corn-
starch is used to help absorb any grease exuded by the nuts.
VARIATION
CHOCOLATE DACQUOISE: For a delicate chocolate flavor
and color, whisk 2 tablespoons cocoa into the powdered
sugar.
STORE.
Tightly covered at room
temperature and low humid*
try. the dacquoisc will keep
for several weeks. The nuts
will eventually become
rancid.
POINTERS FOR SUCCESS:
Because grease breaks down
menngue, it в important to
grind the nub in such a way
that there is as little grease
released as possible. If using
a food processor, the best
method is to use the shred-
ding disc. Then add the
cornstarch and use the steel
blade to pulse until line. Su-
perfine sugar is as fine as
sand. If you haw trouble
finding it. make your own
by processing regular granu-
lated sugar in a food proces-
sor. The dbuquotse will not
be as light and delicate if us-
ing fine granulated instead
of superfine sugar. All uten-
sils and egg whites must be
free of grease. Avow/ prepar-
ing on humid days. Do not
use parchment or a greased
and flouted baking sheet as
dacquoise often sticks to
them. To prevent cracking,
do not open the oven door
during the first three-quar-
ters of baking time.
.MERINGUE ICINGS, FILLINGS. AND DECORATIONS 503
Candy
and Nut
Embdlish-
mcnts
«У X II of the reapes in this chapter, with the minor exception
of chopped nuts, are on the sweet side of the dessert spectrum.
Fondants, marzipans, caramel, and nougatine all have sugar as
their major ingredient. Although I would not eat most of these
components on their own, each can contribute something very
special to the flavor and texture of a cake.
Rolled fondant is easy to prepare and fun to handle. It has a
sensual, satiny texture that is lovely to smooth into place. It drapes
and clings to a cake, sealing in freshness for several days and
giving you time for the most painstaking and impressive piped
decorations.
Chocolate rolled fondant, my newest creation, has the attri-
butes of classic white rolled fondant with the flavor and texture
of what one might fantasize a grown-up Tootsie Roll to possess.
Caramel is a component that has endless possibilities: It can
be spun into angel's hair, threaded into a golden cage to adorn a
cake Ipage 313)» or grated into gold dust to sprinkle on top of a
cake or to add to buttercream and melted chocolate for that spe-
cial burnt sugar flavor and crunchy texture.
With the addition of nuts, caramd becomes nougatine. a
crunchy confection that can be molded into forms and filled with
cake and buttercream as in Barquettes Chez L’Ami Louis
(page 186).
Marzipan, another confectionery component based on nuts
and sugar, also adds superb flavor, texture, and color to cakes.
The finest marzipan in the world is said to come from Lubek,
Germany, and there is a recipe in this chapter that rivals its silky
texture and almond-imbued flavor. Pistachio marzipan can be in-
corporated into a cake (Pistachio and Rose Wedding Cake., see
color photograph) with its intense flavor and exquisite green color
echoing the stems of the roses garnishing the cake. Orange mar-
zipan, flecked with bits of golden zest, is especially delicious be-
neath a cake encased tn or drizzled with dark chocolate glaze.
The recipes in this chapter truly deserve an honored place in
this book as rhe most breathtaking and dramatic of all decora-
tions. From the alabaster perfection of rolled fondant to the ethe-
real spun gold of angel’s hair, these recipes offer joy in the making,
a dramatic presentation, and magical eating.
304 COMPLEMENTARY ADORNMENTS
his shiny Fondant is the traditional topping for petits
fours but can be used to glaze larger cakes as well. 1 jome-
times add it to marzipan for a more refined texture. Profes-
sional bakers rarely make poured fondant because it is
available ready made (see Maid of Scandinavia, page 445)
and keeps for months refrigerated. Classic poured fondant
has always been too slow and tedious for most people to
bother with (even for me, who will spend hours embroider-
ing a cake) until Helen Hercher, in The Neiv Pastry Cook,
came up with this superb food processor method which
makes it easier to prepare than to order!
INGREDIENTS
MEASURE
WEIGHT
sugar in/iMJie 2 Vi cups po irn dr'ounces 17.5 ounces Ыодгаии grarm SOO grams
water Vi liquid cup 4 ounces 118 grams
1 corn syrup •/a liquid cup 3 ounces 82 grams
оргюпл!: 1 teaspoon vanilla or Va teaspoon almond extract ♦ •
Have ready near the range a food processor fitted with the
steel blade.
in a medium-size, heavy saucepan (preferably with a
nonstick lining) combine the sugar, water, and com syrup
and bring to a boil, stirring constantly. Stop stirring and
allow the syrup to cook to the soft-ball stage (238’F.). Im-
mediately pour into the food processor.
Wash the thermometer and reinsert into the syrup. Al-
low to cool, uncovered, to exactly 140®F. This will take 25
to 35 minutes. Add optional flavoring and process for 2 to
3 minutes or until fondant becomes opaque. (The fondant
starts as a transparent syrup. As crystallization of the sugar
starts, it becomes translucent and finally opaque or white.)
Pour the fondant into a heatproof container, such as a
2-cup glass measure, lined with a small heavy-duty plastic
freezer bag. Close the bag without sealing. When com-
pletely cool and firm, expel the air, seal the bag, and lift
out of the container. Store at room temperature for at least
24 hours.
Fowl
Processor
Poured Fonda ill
MAKES 1% CUPS
I *A pounds' 600 granw'
(enough to glaze a
9-inch cake)
STORE
1 week at room tempera
tun:. 6 month* refrigerated.
POINTERS FOR SUCCESS:
See sugar syrups Ipage 435).
To prevent premature crys-
tallization, do not stir after
the syrup comes to a boil.
To keep the temperature
from rising too high, remove
the pan From the beat
slightly before the syrup
reaches 238’F. and pour
into the processor as soon
as it reaches 238*F. It is es-
sential to use an accurate
thermometer (page 451). To
prevent crystallization, the
thermometer must be clean
before reinsertion into
syrup. When reheating fon-
CANDY AND NUT EMBELLISHMENTS .101$
darit, do no< им: an alumi-
num pan as rt causes
discoloration. Fondant must
not be overheated or it will
кие its shine. Avoid vigor-
ous «tiering to prevent air
bubbles.
Classic
Rolled Fondant
MAKES
2'Л P О U N D S / I
KILOGRAM
4 0 GRAMS
(enough to cover a 9-inch by
4-inch cake)
TO GLAZE CAKES WITH FONDANT
Fondant must be thinned to make it pourable. Prepare a
stock syrup {30 percent syrup) by combining 1 pan water
to 2 parts sugar (by volume) and bring it to a full boil,
stirring constantly. Cool until warm. The syrup will keep
for months at room temperature.
Heat the fondant in the top of a double boiler set over
hot water, stirring gently, until warm. To maintain its sheen,
fondant must not exceed 105‘F. Stir in enough warm syrup
to make the fondant pourable.
UNDERSTANDING
This fondant is prepared by controlling crystallization of
the sugar syrup. The thermometer is washed after removing
it from the boiling syrup so that, on reinsertion, the syrup
dinging to the thermometer does not cause premature crys-
tallization. Crystallization can also occur if sugar crystals
form on sides of saucepan, but they usually get washed down
by the steam of the boiling syrup. The syrup can be covered
for 1 minute after coming to a full boil to ensure that this
takes place.
IL cake covered with the alabaster perfection of rolled
fondant has the most exquisite background for decorating.
Rolled fondant is much less painstaking to make than poured
fondant (page 305). Instead of a shiny, glistening surface,
this fondant has a soft, matte glow.
Rolled fondant seals in the freshness of the cake for
several days, giving rime for the most ethereal and elabo-
rate of piped decorations. It also can be cut into decorative
shapes such as ribbons or figure appliques (page 363).
This fondant originated in England, where it was used
to cover fruitcakes to keep them fresh. It is traditional for
even a home cook to wear only white when preparing fon-
dant, because just a fleck of lint can cause an off color.
306 COMPLEMENTARY ADORNMENTS
INGREDIENTS MEASURE WEIGHT
room rempr/arurc gelatin vo/irme 1 tablespoon pounds Ounces ♦ Lj/о^Г4Л1V ЦГ.1ШЛ 10 gtams
water * Va liquid cup 2 ounces 60 grams
glttcoscf •Л cup 6 ounces 170 grams
glycerine 1 tablespoon ♦ 18 grams
wild white shortcnuig 2 tablespoons 0.75 ounce 24 grams
powdered sugar 8 cups • lightly spooned turn cupl 2 pounds. 920 grams
• far а На»or vanioon ггр1ке 2 г*Ьк»р<нип water ммЬ rosewater, <ir*njr
flower water, or freshly squeezed lemon juice
f V? итлр Г5.75 ouwcci lb-l gums) oocn srrup will give equal results if you «sc
only 3 tjHespcKin, water in*rcwl o4 V* sup.
STORE:
1 month room temperature.
Can be frozen indefinitely.
Sprinkle the gelatin over rhe water in a 2-cup heatproof
glass measure or bowl and allow to sit tor 5 minutes. Set
in a small pan of simmering water and stir until the gelatin
ts dissolved. (This can also be done in a few seconds in a
microwave on high power.) Blend in the glucose and glyc-
erine, then add the shortening and stir unnl melted. Re-
move from the hear.
Place the sugar in a large howl and make a well in the
center. Add the gelatin mixture arid stir with a lightly greased
w'oodcn spoon until blended. Mix with lightly greased hands
and knead vigorously in the bowl until most of the sugar
is incorporated. Turn out onto a smooth, .ighdy greased
surface such as Formica or marble and knead until smooth
and satiny. If the fondant seems dry, add several drops of
water and knead well. If it seems too sticky, knead in more
powdered sugar. The fondant will resemble a smooth, welk
shaped stone. When dropped, it should spread very slightly
but retain its shape. It should be malleable like day, soft
but not sticky.
Rolled fondant may be used at once but seems to work
more easily when allowed to rest for several hours. It is
important to cover the fondant to prevent it from drying.
Wrap tightly with plastic wrap and place in an airtight con-
tainer. It will firm slightly on standing.
When ready to roll out, spray the work surface and
rolling pin with nonstick vegetable spray. For covering a
cake or making ribbons and appliques, see pages 360 and
363.
CANDY AND NUT EMBELLISHMENTS 307
TIPS:
• If stored fondant seems very stiff, a few seconds in the
microwave before kneading it makes it pliable and saves
wear and tear on your hands!
• The easiest way to color rolled fondant evenly is to add
a touch of paste food color to the finished fondant and
blend it in with a food processor. At first it will separate
into little pieces, but when it comes together to form a
smooth ball the color is evenly dispersed. The friction of
the processor blades may heat the fondant enough to soften
it slightly, but if allowed to rest a few minutes it will firm
up again. It the color is too bright, simply knead in some
uncolored fondant.
• 1 use nonstick vegetable spray to grease the counter, roll-
ing pin, cutters—even my hands.
• For large batches: I use my 10- ur 20-quart Hobart mixer
and the spade beater for the ininal mixing. Kneading must
always be done by hand or the texture suffers. A
Kitchen Aid mixer can be used for smaller amounts, but
stirring by hand is so quick and easy I usually don't use
the mixer for small batches.
• Rolled fondant can be purchased already made, which is
practical for large volume baking. An excellent product
is available under the name Masa Ticino (page 428).
UNDERSTANDING
Rolled fondant is traditionally made with glucose. As com
syrup is merely a lower concentration of com sugar (it con-
tains more water] it will yield dose to the same results if
the water balance in the recipe is maintained, Technically,
9 tablespoons corn syrup contain the same com sugar (glu-
cose) as Vi cup glucose, but rhe amounts given here are
more convenient to measure and work as well.
Although the outside of the fondant will form a thin
hard crust, die glycerine keeps the inside soft and chewy.
Glycerine is available at candy supply stores (page 429},
KIK COMPLEMENTARY ADORNMENTS
his fondant is my proudest creation! When draped
around a cake, at first glance it looks like “plastic choco-
late” (a traditional combination of chocolate and corn
syrup), but the differences are soon apparent. Instead of a
high shine, it has a soft glow that seems lit from within,
strongly reminiscent of the warm sensuality of fine Italian
leather. And the taste! It can best be compared to an up
scale Tootsie Roll; intensely ch о co I ary and fudgy. The co
coa keeps the fondant from being tcx> sweet. It also a I low’s
it to be more malleable than “plastic chocolate” because
there is only 3.5 percent cocoa butter compared to the 20
percent in the chocolate used to make plastic chocolate.
This makes Chocolate Rolled Fondant a treat even for those
on a low-saturated fat diet.
Chocolate
Rolled Fondant
MAKES
2¥« POUNDS/
I KILOGRAM
250 GRAMS
(enough co cover a 9-«h by
3-lnch cake and a 6-lnch by
3-inch cake)
INGREDIENTS MEASURE WEIGHT
gebtin vofume 1 tablespoon pounds, oumxv • Idograms'grjmb 10 grams
water VY liquid cup 2,75 ounces 80 grams
corn syrop % liquid cup 73 ounces 215 grams
glycerine 1 tablespoon • 18 grams
solid white vegetable shortening Vi cup 1.75 ounces 48 grams
vanilla 1 teaspoon ♦ 4 grams
powdered sugar bl/4 cups 1 lightly >piHiR<xl into cup] I pound 9 OttlKCS 720 grams
unsweetened cocoa (Dutch-processed) or 2Vi cups niMialkalized cocoa such as Hershey's 2 cups + 2 tablespoons (tightly spooned into cup) 7 ounces 200 grams
Sprinkle the gelatin over the water in a 2-cup heatproof
glass measure or bowl and allow to sit for 5 minutes. Set
in a small pan ot simmering water and stir until the gelatin
is dissolved. (This can also be done in a few seconds in a
microwave on high power, stirring once or twice.) Blend in
the corn syrup and glycerine, then add the shortening and
stir until melted. Remove from the heat and stir in vanilla.
Mix the sugar and cocoa in a large bowl and make a
STORE:
1 week room tempcreature,
I month refrigerated, 6
months frozen. Although re-
frigerated fondant docs not
lose its texture, the flavor
becomes unpleatant after 1
month.
CANDY AND NUT EMBELLISHMENTS Ж
well in the center. Add the gdatin mixture and stir with a
wooden spoon until blended. Mix with your hands and
knead vigorously in the bowl until it forms a ball. Turn out
onto a smooth, lightly greased surface such as Formica or
marble, clean your hands, and knead until smooth and sa-
tiny. It the fondant seems dry or brittle, add several drops
of water and knead well. The water will make it very sticky
and messy at first. When the mixture holds together, scrape
the counter dean, lightly grease it, and knead the fondant
until smooth. If it seems too sneky, knead in more pow-
dered sugar.
Chocolate Rolled Fondant may be used at once but is
easier to work with if made 1 day ahead to give the mois-
ture .1 chance to distribute evenly. It is important to cover
the fondant to prevent drying out. Wrap tightly with plas-
tic wrap and place in an airtight container.
When ready to roll out, spray rhe work surface and
rolling pin with nonstick vegetable spray. Don’t he alarmed
if tiny cracks appear in the surface of the fondant; the
warmth from kneading or pressure from the rolling pin will
make it smooth and satiny. For covering a cake or making
ribbons and appliques, see page 360.
tips:
• If the cocoa is lumpy, process it in a food processor for a
few seconds until powdery. If lumpy cocoa is used it may
not incorporate evenly into the fondant. If this should
happen, the chocolate fondant can also be placed in the
food processor for a few seconds until completely smooth.
Don’t try to process the whole batch at one time.
• I use nonstick vegetable spray to grease the counter, roll-
ing pin. cutters—even my hands.
• If stored fondant seems very stiff, a few seconds in the
microwave before kneading it will make it pliable.
♦ Don’t be tempted to substitute butter for rhe solid white
shortening. This is one rare instance where there is no
perceivable difference in flavor and the shortening ac-
tually blends better (without steaking) than tbe butter.
UNDERSTANDING
Compared to Classic Rolled Fondant, Chocolate Rolled
Fondant replaces 7 ounces powdered sugar with cocoa. Be-
cause cocoa behaves differently, the fondant now requires
double the shortening, a little more glucose or corn syrup,
and about double the water.
310 COMPLEMENTARY ADORNMENTS
astiHage is rolled fondant without any of the softening
ingredients (glycerine, com syrup, or shortening). It is used
mainly for decorative ribbons, three-dimensional shapes, and
appliques because it dries bone-hard and crusts more quickly
than fondant.
P aslillagc
(poster AH/)
MAKES
114 POUNDS/
600 GRAMS/
W CUPS
INGREDIENTS MEASURE WEIGHT
gelatin itthrme 1 tablespoon pound* «ШЛСГ4 ♦ кИо^гагт.'рат* 10 grams
water scam Vk liquid cup 23 ounces 74 grams
powdered sugar 4 cups llightly spooned into cup) 1 pound 454 grams
cornstarch % cup ilightly spooned into cupl 2.2$ guikcs 64 grams
optional: pinch cream of tartar • • •
STORE
1 month room temperature.
Can be frozen indefinitely.
Sprinkle the gelatin over the water m a small heatproof
glass cup and allow* to sit for 5 minutes. Set in a small pan
of simmering water and stir until the gelatin is dissolved.
(This can also be done in a few seconds in a microwave on
high power.) Remove from the heat.
Combine the sugar, cornstarch, and optional cream of
tana г in a large bowl and make a well in the center. Add
the gelatin mixture and stir with a wooden spoon until
blended. Mix with lightly greased hands and knead vigor-
ously in the bowl until most of the sugar is incorporated.
Turn out onto a smooth, lightly greased surface such as
Formica or marble and knead until smooch and satiny. If
the pastillage seems very dry. add several drops of water
and knead well. If it seems too sticky, knead in more pow-
dered sugar. The pastillage will resemble a smexith, well-
shaped stone. When dropped, it should not spread.
Pasnllage is easiest to work with if it has rested for at
least 1 hour. It dries very quickly so it is important to cover
it to prevent drying. I wrap it in a cloth rubbed with a bit
CANDY AND NUT EMBELLISHMENTS 311
CARAMEL
TIPS FOR
WORK1SJG WITH
CARAMEL
of solid white shortening, then tightly in plastic wrap, and
place it in an airtight container.
When ready to roll out. Spray the work surface and
rolling pin with nonstick vegetable spray. For making rib-
bons and appliques, see page 363. Pastil I age can be rolled
out as thinly as '/a inch. It dries and holds its shape very
quickly.
tips:
• If stored pasnllage seems very stiff, a few seconds in rhe
microwave make it pliable.
• To give pastil I age the look of real marble, dab it with a
bit of coffee concentrate or brown food color and knead
only until the color streaks.
UNDERSTANDING
The acidity of cream of tartar whitens the pasnllage. Be-
cause there i$ no corn syrup or shortening, the pastillage
does not have tbe pearlized quality of rolled fondant.
* Do not make any form of caramel except caramel sauce
in humid weather—it will be sticky.
* When making the sugar syrup, bring it co a boil stirring
constantly, then scop stirring so sugar will not crystallize.
• Oil the counter and all uccnsils to prevent sticking.
• Use a pan that conducts heat well (such as unhned cop-
per, aluminum, or anodized aluminum) so that cooking
stops soon after it is removed from the heat. Alternately,
have ready a larger pan or sink partly filled with cold
water to immerse rhe bottom of the pan. Do not use a
pan with a tin or nonstick lining as rise melting point is
below that of caramel.
• To determine tbe color of the caramel, use an accurate
thermometer of drop a bit of caramel on a white surface
such as a porcelain plate. When making spun sugar, too
light a caramel produces a ghostly effect, too dark pro-
duces a brassy color when spun.
• To prevent breakage, never put a thermometer used for
caramel into water until completely cool.
• Soaking utensils in hot water will remove all hardened
caramel.
• When making a caramel cage, allow tbe caramel to cool
until it falls in thick strands. Make extra loops at the base
for strength.
312 COMPLEMENTARY ADORNMENTS
•То make Urge amounts of spun sugar, cut the loops of a
wire whisk with a wire cutter or bend the tines of a “cake
breaker'’ [page 464].
• Most importantly: When making caramel, be careful to
concentrate every moment. Sugar burns are extremely
painful.
DO NOT MAKE IN HUMID WEATHER—CARAMEL
WILL BE STICKY
his amber, hard-as-glass bumt sugar offers many dra-
matic ways to enhance cakes. Drizzled on the back of a
bowl it becomes a lacy, golden cage with which to encase
a cake; spun in the air it metamorphosizes into golden an-
gel's hair; ground into a powder and sprinkled on top of
buttercream, it sparkles like gold dust. Combined with
ground nuts and melted chocolate the caramel becomes a
wonderful confection that can be rolled paper thin and
draped over a cake.
Caramel
for a Cage and
Gold Dust
INGREDIENTS MEASURE WEIGHT
sugar volume 1 cup pounds ounce* 7 ounces кИорглть crams 200 gram-k
water (6 liquid cup 2.75 ounces 80 grams
cream of tartar 9* teaspoon • •
optional: Crystallized Violets (page 326) • • •
In a small heavy saucepan combine the ingredients and cook
over medium-low heat, stirring constantly, co dissolve the
sugar. Increase the heat and boil without snrring until pale
amber (35O*F. to 360*F.). Remove from the heat and set
the bottom of the pan tn cold water co stop the cooking.
Allow to cool for 7 minutes or until no more than 240*F.
The caramel will not fall in thick strings when warmer.
Reheat if necessary. (1 like to pour caramel into a heatproof
glass measure. Reheating is then easily accomplished by a
few seconds in a microwave on high power.)
TO MAKE CAGE
Invert a Kugelhupf pan (page 447) and cover it, preferably
with a nonstick liner or foil. If using nonstick liner, tape it
STORE;
The caramel cage can be re-
turned to the outside of the
well-oiled Kugelhupf pan.
Stored in an airtight con-
tainer at room temperature
away from humidry, it will
keep 2 to 3 weeks. The car-
amel powder will keep sev-
eral week» at room
temperature and several
months frozen.
CANDY AND NUT EMBELLISHMENTS 313
to the inside of the pan to keep it in place. If using foil,
mold it to die pan and trim it flush with the bottom. Do
not curve the toil under the pan or the cage will crack when
the foil is removed. The neck of die pan can be held or
suspended from a soda bottle. Dip a spoon in the caramel
and allow the caramel to fall over the pan in lacy strands.
If desired, glue crystallized violets on the cage with dabs of
caramel.
When the cage has hardened, remove it from the pan.
With the nonstick liner it will slide right off, but with the
foil it is necessary to invert onto a soft towel. Carefully
remove the pan and the foil by pulling it gradually away
from the sides of the cage.
TO MAKE CARAMEL POWDER
Remelt any remaining caramel and pour on a piece of foil
to harden. Break into small pieces and process in a food
processor until powdery. Store in an airtight jar.
tips: A porcelain spoon is perfect for applying caramel be-
cause it docs not conduct heat.
Candied violets or dragees can be attached to the cage
before it has completely hardened or can be attached later
using more melted caramel or a dot of Royal Icing Ipage
294).
314 COMPLEMENTARY ADORNMENTS
Caramel
for Praline
Powder and
Chocolate Praline
INGREDIENTS MEASURE WEIGHT
hazelnut*. peckd volume 1 cup powmA'овлеез 5 ounces kilogram* grMn.i 142 grams
sugar V» cup 5 ounces 142 grams
wafer % liquid cup ' • •" -1 2 ounces *0 grams
STORE:
3 weeks room temperature.
Bake the hazelnuts in a 35(FF. oven for 20 minutes or until
lightly browned. Place them on a nonstick or lightly oiled
baking sheet or a 12-inch square of lightly oiled heavy-duty
foil.
In a small heavy' saucepan combine die sugar and water
and bring to a boil over medium heat» stirring constantly,
until the sugar is dissolved. Increase heat to medium-high
and boil undisturbed until the sugar begins to caramdrze.
It will begin to look like dark corn syrup and take on the
characteristic smell of burnt sugar. (The temperature should
be 370Т.} Immediately pour the caramel over the nuts. Al-
low to harden completely (15 to 20 minutes). Remove from
the sheer and break into a few pieces. Grind in a food pro-
cessor until finely powdered.
UNDERSTANDING
This praline powder has 50 percent hazelnuts, just like the
finest quality praline paste, but it has a cruncher texture.
VARIATION
CHOCOLATE PRALINE Quick-temper 8 ounces chocolate
(page 381), preferably extra bittersweet or bittersweet, to
89 F to 9 IT. Stir in the praline powder until smooth. Pour
the mixture onto six 12-inch long sheets of wax paper,
preferably butcher’s wax Ipage 464>. Cover with more wax
paper and roll mto thin oval sheets. Stack on a baking sheet
and chill briefly or until firm enough to peel off paper. For
shaping, see decorative techniques, page 386. Store airtight.
If necessary, chocolate can be netempered even with the
praline in it.
CANDY AND NUT EMBELLISHMENTS 315
Caramel
for Spun Sugar
(Angel's Hair)
INGREDIENTS MEASURE WEIGHT
voJume % cup puumfv owners 3.5 ounces kikw&nugffiint 10U grams
corn syrup V« liquid cup 3,75 ounces 108 grams
optioaaJ: grated beeswax 1 teaspoon • •
STORE;
In an airtight container ar
room Temperature with low
humidity, spun sugar nests
will keep 2 to 3 weeks. Fro-
zen they win keep for
months. Spun sugar wiU
keep for several hours at
room temperature if the
weather к very dry. If hu-
mid, it becomes sticky and
rends to scale or mat in-
stead of maintaining light,
separate strands.
Cover the floor near the table or countertop w ith newspa-
per. Oil the handles of 2 long wooden spoons or broom
sticks and rape them to the countertop 12 inches apart so
that rhe handles extend well beyond the edge of tlw counter.
Have ready near the range a 2-cup or larger beatproof
glass measure.
In a small heavy saucepan stir together the sugar and
corn syrup and bnng to a boil over medium heat, stirring
constantly. Increase the heat and boil until amber and a
thermometer registers 360фЕ. The caramel will continue
cooking from the residual heat. If the temperature is below
360°F., the caramel will be pale and the spun sugar white
instead of gold; over 370*F. it will have a brassy color. I
find 370°F. produces tlic perfect color.
Transfer the caramel immediately to the heatproof glass
measure to scop rhe cooking. Allow to cool for a few min-
utes. Add the beeswax and, when the smoking stops, check
the caramel by lifting it with a fork to see if it will fall in
strings rather than droplets- (Allow to cool a little longer if
droplets form.)
Stand on a stool so that your arms are above the
wxxxien handles. Using a cut whisk, bent cake breaker (page
464J, or 2 forks held side by side, dip into the caramel and
vigorously wave back and forth, allowing sugar to fall in
long, fine threads over the handles. Waving must be contin-
uous or small droplets will form. (It is normal to have a
few of these droplets, known poetically as angel’s rears.) If
31fc COMPLEMENTARY ADORNMENTS
the caramel starts to get too thick» return briefly to tbe heat
but be careful not to darken or burn it.
Wrap the strands around the base and sides of a cake
or oiled form as they will not stay flexible for too long,
especially if tbe beeswax was omitted- Any leftover strands
may be shaped into little nests by pressing them into lightly
oiled custard cups and freezing them in airtight containers.
They can be filled with small colorful ovals of ice cream or
sorbet.
UNDERSTANDING
See Sugar Syrups (page 435). The nature of sugar syrup,
which is prone to recrystallization when agitated, makes it
necessary to use “interfering agents"' such as cream of tar-
tar, lemon juice, or corn syrup to inhibit recrystallization
when rhe caramel is to be used for dipping or agitated in
any way. If, for example, when making praline you were
to add the hazelnuts to caramel which docs not have an
interfering agent, the caramel would harden and crystallize
and the texture would not be as fine as when the caramel
is poured over the nuts and allowed to harden into a trans-
parent sheet. Corn syrup is an invert sugar which inhibits
crystallization. It is added with beeswax to caramel for spun
sugar because it keeps the strands flexible. Beeswax is pref-
erable to paraffin because it has a higher smoking point.
Caramel can be made with no water by constantly stir-
ring the sugar to prevent uneven browning. Just a few drops
of lemon juice can be added to prevent crystallization if the
caramel will be used for dipping.
I find it far easier to add a little water to dissolve the
sugar before allowing it to caramelize. The resulting cara-
mel seems just as hard. Adding a large quantity of water,
on the other hand, slows down caramelization which re-
sults in a softer, stickier caramel.
CANDY AND NUT EMBELLISHMENTS 317
Nougatine
кУп France nougatine, or nut brittle, is used for a num-
ber of decorative effects. When cool and hardened, it be-
comes strong enough to support considerable weight. It is
otten shaped into tiny cornucopias and filled with butter-
cream or into tart and barquette forms to replace conven-
tional pastry shells. Leftover pieces can be coarsely crumbled
in a food processor or with a mortar and pestle and sprin-
kled on ice cream or pressed into the sides of a frosted
cake.
The color of finished nougatine, the shape and size of
the nuts, and the proportion of nuts to sugar vary accord-
ing to use. For decorative work, the nougatine is more at-
tractive when paler in color, with fewer nuts, Untoasted
nuts make a more attractive contrast. For tiny pieces, sliced
nuts are more difficult to mold, so coarsely chopped nuts
arc preferable. For nougatine that is prepared primarily for
eating, allowing the syrup to reach a darker color results in
a stronger, richer flavor, and a higher proportion of nuts is
desirable.
MAKES 12
BARQUETTES
(3% inches by IH inches)
• Far Urge deuxaave pieie*, u>r % iiap fl.15 ixxkvCM grams) unrnaitcd
»>nxmd •J»rr>-
In a small heavy pan combine the sugar and corn syrup and
bring to a boil, stirring constantly. Stop stirring and allow
to boil undisturbed until pale amber to deep brown. Re-
move from the heat, add the butter, and stir in the al-
monds.
Scrape the mixture onto a lightly oiled marble surface
or baking sheet. Using oiled spatulas or triangular scrapers,
tum the nougatine, folding in the comers to ensure even
cooling, When cool enough to handle, cut off a small amount
and keep the rest warm and flexible m a 300°F. oven with
318 COMPLEMENTARY ADORNMENTS
the door ajar, under a hut lamp, ur on a warming tray
lined with lightly greased foil.
Use a lightly oiled heavy rolling pin and heavy pres-
sure to roll the nougatine as thin as possible. In France a
lam t noir (’‘hollow iron rod'*) is used. For rolling nougatine,
I prize my solid stainless steel rod (a gift from my cabinet-
making father). The heavy weight makes rapid rolling eas-
ier, bur an ordinary oiled wooden rolling pm will also work
when pressure is applied. (For a heavy metal rolling pin,
sec J. B. Prince, page 465.}
Work quickly: If the nougatine hardens you will have
to return it briefly to the heat until flexible again. When
cutting shapes, be sure to oil all cutters or knives. To mold
nougatine, press into or over a lightly oiled mold. Cut any
uneven edges with a serrated knife while still warm. A pizza
cutter or scissors work well if the nougatine is warm enough;
if too cold the nougatine will shatter. For instructions on
shaping barquenes, see page 368.
UNDERSTANDING
Nougatine, which is opaque, differs from transparent car-
amel by the controlled crystallization of the sugar. Butter
is added as the interfering agent to keep the addition of
nuts from prematurely crystallizing the sugar. The mixture
is then turned and folded to promote tbe formation of fine,
even sugar crystals, giving the nougatine its characteristic
golden-brown opaque color.
VARIATION
NOUGATINE HONEY CRUNCH: 1 developed this honeyed
version of nougatine especially for Queen Bee cake (page
185). The honey makes the nougatine delightfully sticky (as
1 imagine a beehive to be). For ease in application, it is best
prepared the same day as the cake. For 2 cups of Nouga'
tine Crunch, make */> recipe nougatine, replacing the com
syrup with Vi cup honey and cooking the syrup to 360°F.
Roll into a thin sheet and, when cool, chop coarsely.
CANDY ANO NUT EMBELLISHMENTS 319
Quintessential
Marzipan
MAKES
У- POUND/340
GRAMS
I cup + 2 tablespoons
(enough to cover a 9-lnch by
2-Mich cake)
am really excited about this newly developed marzi-
pan. It has the silkiest texture and most aromatic almond
flavor of any marzipan I have ever tasted. Poured fondant,
easily made in rhe food processor, is the secret for its mar-
velous texture. Powdered sugar is added to make the mar-
zipan stiff enough for rolling into a thin sheet.
INGREDIENTS MEASURE WEIGHT
roJwne pound», vuncn kilograms gram»
almond paste scant Ул cup 7 ounces 200 grams
Food Processor Poured Fondant (page 305), flavored with almond extract scant cup 3.5 ounces 100 grants
powdered sugar И cup - 1 tablespoon (lightly spooned into oip) 1.75 ounces 50 grants
STORE
6 months refrigerated, 1
year frozen. Allow to come
to room temperature before
kneading to prevent oil sep-
aration.
This marzipan is very easy to make in a food processor. It
can also be made in a heavy-duty mixer such as a KitehenAid
or kneaded by hand.
In a food processor fitted with a steel blade, combine
all the ingredients and process for a few seconds until
blended. The marzipan should still be in pieces. Dump onto
a counter [preferably wood to absorb excess oil) and knead
until smooth.
Wrap tightly in plastic wrap and place in an airtight
container. Allow to rest for ar least 1 hour before using.
Keep the marzipan well covered to avoid drying out
while working with it. If the marzipan does become slightly
dry and cracky, rub your fingers lightly with shortening and
knead lightly.
TO ROLL OUT MARZIPAN
Roll out Ун-inch thick between 2 sheets of plastic wrap or
on a smooth counter lightly dusted with cornstarch. Set
“How to Cover a Cake with Marzipan” (page 363).
320 COMPLEMENTARY ADORNMENTS
TIP: Any impurities, such ;w flecks of almond skin, can be
removed using the tip of a sharp knife.
UNDERSTANDING
Thus marnpan has 62 percent sugar and 38 percent nuts.
This is based on an almond paste which contains 33 per-
cent sugar (page 430). Marzipan normally has between 30
and 50 percent nuts. The higher the percentage of sugar,
the whiter the color but the stiffer and more difficult it is
to roll.
Classic marzipan is almond paste with extra sugar and
glucose (or corn syrup) added to make it stiff enough for
rolling. Most of the sugar/glucose is normally added in the
form of a 250eF. syrup. Since poured fondant is also a sugar
syrup, made with the same ratio of sugar to glucose but
with controlled crystallization, it produces marzipan with
a smoother texture.
Almond paste is a mixture of almonds, hitter almonds,
sugar, and glucose. Bitter almonds have a distinctive, aro-
matic flavor. As bitter almonds are very difficult, if not im-
possible, to obtain, it is best to use commercial almond paste.
VARIATION
ORANGE MARZIPAN: Roland Mesnier, the White House
pastry chef, shared this marvelous way of flavoring and
delicately coloring marzipan. The orange zest also lends a
slightly tart, refreshing quality to the marzipan. Knead 3
tablespoons very finely grated orange zest into 1 cup of
marzipan.
GREEEN TEA MARZJPAN: Powdered Japanese green tea added
to almond paste makes a speedy marzipan with a lovely,
pale green color. Although there is not really any perceiv-
able flavor of green tea, the marzipan is far less sweet since
no additional sugar is added. The marzipan is also com-
patible in spirit for decorating a Green Tea Biscuit filled
with Green Tea Mousse Cream (page 261). Elizabeth An-
doh, a food writer and specialist in Japanese cuisine, and 1
created this recipe as a joint effort.
To make Green Tea Marzipan: Knead 6 tablespoons al-
mond paste with 1 teaspoon powdered green tea. Roll out
between 2 sheets of plastic wrap and cut into decorative
shapes with a cookie cutter or sharp knife.
CANDY AND NUT EMBELLISHMENTS 321
Plarzipan
for Plodding
his is a quick and easy marzipan with an ideal texture
for sculpting figures or roses. Use food color ver}’ sparingly.
For the most realistic effect, vary the hues of the petals,
using the lightest for the outer ones.
While the marzipan works wonderfully for shaping, it
is not as delicious to eat as Quintessential Marzipan (page
320), so it is best reserved for decorations.
MAKES
POUND/
340 GRAMS
(I 'A cups)
INGREDIENTS MEASURE WEIGHT
almond paste voJume ’Л cup posimh--ounces 5 ounces kilogram* gram» 142 grams
cornstarch Vi cup ilighth spooned into cup) 2 ounces 64) grams
powdered sugar Vj cup (lightly spooned into cup) 2 ounces 64) grams
corn syrup 3 tablespoons 2 ounces 62 grams
opemnaf: paste food color ♦ •
STORE:
6 months refrigerated. indef-
initely frozen. Allow to
come to room temperature
before kneading to prevent
oil separation.
This marzipan is very easy to make in a food processor. It
can also be made in a heavy-duty mixer such as a KitchenAid
or kneaded by hand.
Mix together the almond paste, cornstarch, and pow-
dered sugar until it falls in fine crumbs. Add the com syrup
mixed w ith a tiny speck of optional food color and process
unnl well incorporated. (The mixture should not look greasy.
If you do overmix, the marzipan will be usable if allowed
to rest until the oil is reabsorbed.] Pinch a small amount to
see if it holds together. If still too dry, add a few drops of
com syrup.
Dump onto a smooth counter or work surface and
knead until very smooth and uniform in color. Wrap tightly
with plastic wrap and place in an airtight container. Allow
to rest for at least 1 hour before using.
Keep the marzipan well covered to avoid drying out
while working with it. If the marzipan does become slightly
dry and cracky, rub your fingers lightly with shortening and
knead lightly. Cover tightly with plastic wrap and place in
an airtight container.*
*For instructions on working with tturupun, pj^r 36.1
322 COMPI FMENTARY ADORNMENTS
cople who don’t like marzipan usually change their
minds when they encounter this pistachio version. I created
it as a surprise layer inside each tier of my brother's wed-
ding cake (page 219}. The thin line of pale green between
layers of pale yellow buttercream and Creme Ivoire is an
enchanting contrast, especially with the pale pink petals and
green stems of the roses above. Pistachio Marzipan also
makes marvelous ivy leaves to entwine around a Cordon
Rose Chocolate Christmas Log (page 197).
P istachio
Marzipan
MAKES
5 OUNCES/
14 2 GRAMS
{enough for a 9-inch disci
INGREDIENTS MEASURE WEIGHT
shelled uncalled pistachio nuts vcJwnc M« cup potutdf-oenev* 1.25 ounce» Й4 fng иен granu 38 grams
pondered sugar ¥i cup 1 lightly spooned into C»p) 3 Ounces Sb grams
com syrup 1 tablespoon 4 1 teaspoon 1 ounce 27 grams
glycerine nr unfavored ud ¥2 teaspoon ♦ 3 grams
optional; 2 drops green food color
STORE
6 months refrigerated, 1
year frozen.
Bake the nuts in a 350°F. oven for 5 to 10 minutes or until
the skins separate from the nuts when scratched lightly with
a fingernail. Remove as much skin as possible.
Process the nuts in a food processor until a smooth
paste is obtained. Add the sugar and process until well
mixed. Add rhe com syrup and glycerine and process until
well blended, about 20 seconds. The mixture will appear
dry, but a small amount pressed between your fingers should
hold together. И it seems too dry, add more corn syrup, М»
Teaspoon at a time. If you wish to deepen the color, add
the optional food coloring. For ivy leaves, a dark green is
desirable, so paste food color (which is more intense) should
be used. Process until the marzipan has a smooth, dough-
like consistency. Knead briefly by hand until uniform in
color.
Marzipan may be used at once bur is easier to work
CANDY AND NUT EMBELLISHMENTS 323
with if allowed to rest 1 hour. Wrap tightly with plastic
wrap and place in an airtight container.*
note: My imaginative fnend Lora Brody, of Growing Up
oh the Chocolate Diet and Indulgences fame, came up with
a splendid idea for this marzipan. She doubled the recipe
and rolled it out into a large rectangle about 17 inches by
12 inches. She then prepared a Biscuit Roulade {page 142),
spread it with 2 cups of Neoclassic Buttercream (page 230),
and topped it with the Pistachio Marzipan sheet before
rolling it. The combination of colors, textures, and flavors
is exquisite.
The roll can be served unadorned or frosted with Crfcme
Ivoire (page 248) and decorated with chopped pistachios
and a long-stemmed pink rose. For an even more intense
pistachio flavor, make the optional syrup for the Biscuit
Roulade (page 142) and flavor it with Pistasha liqueur.
• For initroctiom on rolling mH «1Ьсл and ivy leaves »c page .165.
Chopped
Nuts
jr uts surrounding a cake provide an elegant decorative
effect. Almonds, macademias, hazelnuts, pecans, and wal-
nuts all make wonderful coatings. Lightly toasting them
brings out the flavor.
Some nut skins, such ax hazelnut, are very bitter and
should be removed by toasting or blanching. An easy sys-
tem for skinning the recalcitrant hazelnut is to place % cup
nuts (3 ounces'BS grams) in a saucepan containing 1 */j cups
boiling water. Add 2 tablespoons baking soda and boil 3
minutes. Test a nut by running it under cold water to sec
if the skin slips off easily. If not, boil a few minutes longer.
Rinse the nuts well under cold running water and toast tn
a 350°F. oven for 20 minutes or until golden brown.
Cool and coarsely chop. If using a food processor with
the meral blade, pulse until uniform in size; then finish by
hand using a large chef's knife for best texture.
You will need ¥« cup chopped nuts (3 ounces.85 grains)
for a 9-inch by 3-inch cake; 1 cup (4 ounces.'! 14 grams)
for a 12-inch by 3-inch cake; and 1 *A cups (5.25 ounces'
152 grams) for an 18-inch by 12-inch cake. I always make
extra because leftover nuts keep tor months in the freezer
and may be used as they are or recrisped in a 40(fF. oven
for 5 minutes. For greater uniformity, I like to shake nuts in
a fine strainer to nd them of smaller fragments and powder.
324 COMPLEMENTARY ADORNMENTS
TO APPLY NUTS TO CAKE
The frosted cake should be attached to a cardboard round
no larger than the cake. If the cake is not too heavy, sup-
port it on rhe palm of your hand. Tilt the cake a hit toward
the other hand, cupped to hold the nuts, and press the nuts
gently into the sides. Alternately, if the cake is heavy, place
it on a large sheet of foil and use a bench scraper (page
456) or wide, flat spatula to lift the nuts onto the sides of
the cake.
his combination of com syrup and chocolate is also
known as plastic chocolate. It is not nearly as delicious to
eat as Chocolate Rolled Fondant (page 309), but it has the
advantage of drying ro a very firm, brittle consistency,
making it ideal for modeling exquisitely delicate red or dark
chocolate roses. Brushing the roses with a thrn layer of com
syrup creates a finish as shiny as porcelain.
Chocolate.
Rose Modding
Paste
MAKES
8 ROSES
INGREDIENTS MEASURE WEIGHT
volume pound*-ounces kilogram* gr.inrs
RED ROSES
red summer coating* ♦ 6 ounces 170 grams
powdered red food coloring “ 1 ссацхюп • <
optional: powdered blue food coloring • ♦ ♦
com «упор 2 tables poor» 1.5 ounces 41 grams
‘Summer coating, я1м> known л» ixvnpuund chocoUre, and puwdmxl ml
food colocui^ are bc<h available at candy supply («ее pages 424 and
42Я1.
Melt the coating in a double boiler set over very hot cap
water (11 (TF. to 115aF.) on low heat. The cop must not
touch rhe water.
Remove from the heat and stir in red food coloring.
Mix in a few specks of blue coloring to tone down the
brightness if necessary.
Stir in the full amount of com syrup (push it off spoon
with your finger). Ar this point, the chocolate will begin to
harden and form a ball.
STORE:
Ihe mixture will keep for
several weeks if placed in
airtight container or may be
frozen indefinitely. Reknead
jut* until pliable. Dried
roses will keep for over 1
year if stored airtight in a
cool, dry room or rhe refrig-
erator.
CANDY AND NUT EMBELLISHMENTS 325
POINTERS FOR SUCCESS:
L4e the full amount of com
synip. To ensure this, spray
or grease the measuring
spoon and push out all of
the corn syrup with your
linger. Knead the chocolate
paste until completely
smooth and lump-free.
Scrape onto plastic wrap and wrap tighdy. Place in an
airtight container and allow to rest and firm for at least 6
hours at room temperature.
Knead briefly until soft and supple before shaping. Keep
well covered to avoid drying out while working.*
VARIATIONS
WHITE CHOCOLATE ROSES: Use white summer coating or
white chocolate and reduce the corn syrup to 1 table-
spoon + 1 te-aspoon.
DARK CHOCOLATE ROSES: Use bittersweet chocolate and
increase the com syrup to 3 tablespoons +• 1 teaspexm.
Crystallized
Flowers
'O'oinmcrcially candied or crystallized violets arc nice to
have on hand but only about 1 in 20 actually resembles the
flower it once was! Making your own crystalized flowers is
time-consuming, hut the results are dazzling. By handling
each flower separately, the petals stay separate. Most flow-
ers can be crystallized successfully (see page 428 for edible
flowers). My favorites arc tiny rose buds, wild violets» and
lilacs. As the colors tend to fade, I add a little powdered
fcxid coloring or paste color to the sugar. You will have to
judge for yourself on the amount, as food coloring varies
from brand to brand. It is best tn make rhe color a little
more intense if not planning to use the finished flowers for
several months, as it fades slightly. Most flowers will keep
for years—with the exception of lilacs, which brown slightly
after a few months. Crystallized Howers look spectacular
caught up in strands of spun sugar Ipage 316}. Crystallized
lilacs have a firm link stub at the bottom which makes
them ideal for embroidering the sides and top of a cake,
especially one frosted with White Chocolate Buttercream
(pages 346 to 348) such as White Lilac Nostalgia (page
16?) or Classic Rolled Fondant (page 306). (Use a tooth-
pick to make a small hole in che surface of the fondant in
order to insen the lilac.)
'For mnrucnons on modeling fovek. vet f»4ge 390.
326 COMPLEMENTARY ADORNMENTS
TO CRYSTALLIZE FLOWERS YOU WILL NEED
• superfine granulated sugar: 9 dozen lilac blossoms re-
quire only 2 tablespoons sugar bur make Vs cup to have
ample for spooning over rhe blossoms.
• powdered or paste food color: Wilton makes a grape paste
color the perfect hue for crystalled lilacs and a violet paste
color the perfect hue for crystalled violets.
♦ lightly beaten egg white: 9 dozen lilac blossoms require
l/i egg white (1 tablespoon).
• small edible flowers (page 428).
In a small bowl mix the sugar and food color with
your fingers until a uniform color is achieved, adding more
color if necessary to deepen the shade. Pass the sugar through
a fine sieve if necessary to perfectly distribute the color. It
is best nor to use the food processor for this as the sugar
crystals lose their glitter.
With a small paint brush, paint the egg white over the
flower petals on all sides. Holding the flower above the bowl
of colored sugar, spoon the sugar lightly over it, coating ail
sides. Gently shake off the excess and place on a nonstick
surface. Allow the flowers to dry thoroughly (about 24
hours) and then store airtight away from direct sunlight to
prevent fading.
TIPS: Violets will have the best shape if you allow them to
dry upside down. Use a hair dip or clothespin to suspend
them by their stems until dry.
Gum arabic, available in candy supply stores, can he
used in place of egg white for extra sparkle. Dissolve it in
a tiny amount of water.
CANDY AND NUT EMBELLISHMENTS 527
Fruit
Toppings
and
Purees
ruit, fresh, dried, and conserved, adds much to the flavor and
appearance of cakes. It can be used as a topping for cheesecakes,
charlottes, or even frosted cakes like Star-Spangled Rhapsody (page
169).
Conserves make tart and colorful glares which temper the
sweetness of buttercreams and layer cakes.
Preserved fruits and concentrated purees make wonderfully
flavored buttercreams and whipped creams (which I call cloud
creams). Making your own conserves enables you to decrease the
sugar and maintain more of the integrity of the fruit. I concen-
trate the fruit jukes so much that neither pectin nor a high pro-
portion of sugar is necessary for gdbng. My thick conserves contain
whole fruit and very little sugar.
Included in this chapter are recipes for making your own
chestnut and pumpkin purees. Although the canned varieties are
excellent in flavor and texture and undeniably convenient, during
the fall and winter, when these fresh ingredients are available, it's
nice to be able to use them. The flavor is always a shade more
delicious. This is not always true with fruit. Reconstituted dried
apricots, for example, give much more flavor than the fresh fruit.
Strawberries, frozen without sugar, are often more delicious than
most fresh strawberries—even picked at the height of the season.
This chapter has a new and exciting technique for making
fruit purees. It involves concentrating the juices without cooking
the fruit itself. The resulting purees will enable you to make but-
tercreams and whipped creams which have the flavor of the fresh
fruit at rhe peak of its season!
328 COMPLEMENTARY ADORNMENTS
yJ' ruit jellies and preserves, particularly ran ones such as
raspberry, apricot, «and currant, nuke easy and beautiful
toppings for cakes. Ruby Raspberry Jewel Glaze lends a
bnlliant glow to Chocolate Flame (page 87). A pale golden
glisten of Apple Jewel Glaze keeps the poached pears juicy
and fresh atop Ethereal Pear Charlotte (page 175).
Jewel Glaze is also ideal for attaching chocolate bands
to a cake (page 387).
A 9-inch cake needs ’Zz cup glaze, a 12*inch cake У«
cup plus 2 tablespoons. Leftover glaze keeps for months
refrigerated.
Jewel
Glaze
MAKES A FULL
Й C U P
(enough to glaze a 9-inch
to 10-inch cake)
INGREDIENTS MEASURE WEIGHT
tO/ttOK pvumf.-. i/unco Idugrami gramr
fruit jdly or preserves Viz cup 5.25 ounces 154 grains
fruit liqueur ' or eau-de-vie (see suggestions following recipe) I ubkxpiMHi U.50 ounces 14 grams
• Ccwipfcwwntary LtijnrMri
For raspberry jelly: Chambord or eau-de-vie de inmborsr
For apiKot jelly: Barazk Pahnka tn apricot brandy
For currant jelly: Caaato
For appk icily: Catadm or pear liqueur
In a small heavy saucepan melt the jelly over low heat. Snr
in the liqueur or hot water to thin slightly and strain.
If you are using a glaze to seal the surface of a porous
cake prior to glazing with chocolate, pour the glaze on the
cake while still hot and fluid. Use a long metal spatula to
spread it evenly.
To glaze a buttercream-frosted cake, chill the frosted
cake until the buttercream is firm. Using the back of a long
sharp knife, make shallow parallel diagonal slashes evenly
across the cake, first in 1 direction and then at a 45° angle
to create diamond shapes. Wipe the blade dean after each
cut. When the glaze is applied it will sink deeply into these
aits, providing an intensely colored design. The glaze should
be barely warm when applied and the buttercream solid to
the touch to keep it from melting.
Put any leftover glaze into a container with a tight-
fitting lid and refrigerate.
STORE:
1 year refrigerated.
POINTERS FOR SUCCESS:
If glazing on top of frosting,
be sure the glaze is hardy
warm and that the butter-
cream firm to tbe touch or it
will meh.
FRUIT TOPPINGS AND PUREES 329
To use preserves or apncai lekvar: Apricot lekvar con-
tains the skin of the apricot ax well as the fruit. к is thicker
and more intensely flavored than ordinary apricot pre-
serves. It is necessary to strain apricot preserves or lekvar
to obtain a dear glaze. Start with 114 times the amount
you need. Use a food processor to soften the preserves and
then heat to melt before pressing through a fine sieve. Add
the liqueur at the end or use warm water before sieving.
VARIATIONS
SHINY JEWEL GLAZE: A small amount of gelatin will pro-
duce a thicker but transparent fluid glaze which holds up
for several days. Place 7 tablespoons water in a custard
cup. Sprinkle 2 teaspoons gdatm over it and allow to soften
for at least 5 minutes. Heat in a microwave on high power,
stirring once or twice, or in a pan surrounded by simmer-
ing water until the gelatin is dooolved. Add the gelatin to
the melted and sieved jelly and liqueur. Refrigerate until
thickened slightly or stir over ice water until syrupy. Use at
once.
CRAN-RASPBERRY GLAZE This flavorful, pretry glaze is
wonderful to top a creamy cheesecake (page 81) as a holi-
day dessert.
In a small saucepan dissolve 4 teaspoons cornstarch in
¥4 cup cranberry-raspberry juice, preferably made from
frozen concentrate. Bnng to a boil, stirring constantly. Lower
the heat and simmer for 1 minute- Remove from the heat
and stir in 1 tablespoon Chambord (black raspberry) or
Boggs (cranberryI liqueur. Spoon over the cake, spreading
it evenly.
330 COMPLEMENTARY ADORNMENTS
t is worth every bit ot the work involved to make this
reape because a conserve of this quality cannot be bought.
It would take a jar ot commercially made jam 2 Уз times
the size to equal rhe amount of fruit used for this method.
This raspberry conserve captures the magical essence of the
berry. The side benefits are a kitchen permeated with the
scent of raspberry and the sight of bowls filled with velvety,
ruby-red berries. There also seems to be an atavistic plea-
sure in the act of preserving summer's bounty for the cold
winter months ahead.
This unique method of preparing jam triples the con*
centration of the fruit so that it gels without having to add
pectin or the accompanying high amount of sugar (in ex-
cess of two thirds more). The conserve is tart and intensely
flavored, with a deep garnet hue. It is perfect for spreading
on cake rolls or adding to bunercre-am.
Cordon Rose
Raspberry
Conserve
MAKES
I QUART
4 half-pint jars 4- 16 cup
(2.5 pounds1'I kilogram 157
grams)
INGREDIENTS MEASURE WEIGHT
sugar voJirme 2 cups +> 2 tablespoons pound*. 0Ш9СП 15 ounces krJugratm /grams 425 grams
water 1 liquid cup + 2 tablespoons 9J5 ounces 266 grams
raspberries 3 quarts 5 pounds 1 kilngram 361 grams
In a large diameter pot combine the sugar and water and
bring to a boil, stirring constantly. Boil for 1 minute. Add
3 to 4 cups berries (so that they are in a single layer) and
boil 1 minute. Remove with a slotted spoon or skimmer to
a colander suspended over a bowl to catch the syrup. Re-
duce the syrup in the pot to 2 cups and repeat the proce-
dure with more berries. From time to time return the syrup
that drams from the cooked berries to the pot. Skim the
white foam from the surface.
When the last batch of raspberries is completed, boil
the syrup down to 2 cups (the temperature will be 210°F.)
and reserve. Sieve the hemes to remove most of the seeds.
(When condensing raspberries to this degree, leaving all the
seeds would be excessive; however some seeds lend a nice
texture to the conserve. I use the colander and the sieve
STORE:
I have stored this conserve
for as long as 4 years. The
flavor docs not deteriorate,
but after 2 years the color
deepens and n less bright.
FRUIT TOPPINGS AND PUREES .Ш
attachment oil my KitchenAid, which has large enough holes
to allow a tew seeds to pass through. You can also use a
food mill fined with the finest disc.) You should have 2
cups raspberry pulp and ¥1 cup seeds.
Add the sieved hemes to the reserved synip and sim-
mer 10 minutes or until reduced to 4 cups. Fill canning jars
which have been nnsed in boding water, leaving 4-inch
head space. Screw on the cap* and place them in a water
bath, covered, fur 10 minutes after the water comes to a
boil. Remove and allow to cool before checking the seat.
Jars m the water bath must be sitting on a rack to
allow the water to flow all around them, and the water
must be high enough to cover them by I inch. They must
be upright to expel any air inside the jars, producing a vac-
uum which seals the jars. It this process is eliminated, be
sure to Store the conserve in a cool, dry area away from
light as there are no preservatives in it to prevent mold
from forming. (If mold does form, scrape it off and reboil
the conserve.) The convene takes 2 dayv in the jar to thicken.
TIP. The conserve can he prepared using raspberries frozen
without sugar. Allow them to defrost m a colander, reserv-
ing the juice. Add the juice co the sugar syrup and proceed
as with fresh berries. The flavor will be indistinguishable
from conserve prepared with fresh berries.
NOTE: Half-pint |ars can hold only 7 fluid ounces because
of the 4-inch head space required on top. You will have a
bonus of about 4 cup conserve left. Refrigerated it will
keep for 2 weeks.
UNDERSTANDING
formula. 1 pound bernes'5 ounces sugan'3 ounces water
A large unlined copper pot is traditional for jam-making
because the faster the berries and syrup cook, the better the
flavor and gelling. Be sure to use a pot with a large diam-
eter to speed evaporation of the syrup.
Raspberries are very fragile and washing causes them
to break down faster. Raspberry growers have assured me
that any sprays are administered at a prescribed time so
that their effects have entirely dissipated before harvesting.
They do not recommend washing the hemes. If washed,
berries should be cooked as soon as possible.
332 COMPLEMENTARY ADORNMENTS
к-Xhtt highly concentrated conserve has very little sugar—
only about oise twelfth the sugar and four times the con-
centration of most commercial jams made with pectin. It is
designed to be added to buttercreams and whipped cream
and spread on cake rolls. More sugar can be added if the
conserve is to be used as a spread on toast.* Either way, it
captures the quality of fresh ripe strawberries. Strawberries
during the peak of the season are full of sweet sunny flavor.
Out of season frozen bemes make a far more delicious
conserve.
Cordon Rose
Strawberry
Conserve
MAKES
316 CUPS
4 half-pint jm
(2 pounds 3 ounces1'
988 grams)
INGREDIENTS
MEASURE
WEIGHT
hulled strawberries 4 quarts pounds-ooners 4 pound* 1 kilogram 814 grams
sugar* 1 cup 4- 2 tablespoon* 8 ounces 227 grams
water 116 liquid cups 12 ounces 354 grams
STORE
I have stored this conserve
for as long as 4 years. The
flavor docs not deteriorate,
but after 2 years the color
deepens and is less bnght.
• To make ягпНкпу con»crw tor «preidtng <m lueiwi, jdU 1 iuncn |a want I
Vi cup I sugar
If the berries are sandy, wash them before hulling and dry
on paper towels.
In a large-diameter pot combine the sugar and water
and bang to a boil, stirring constantly. Boil (or 1 minute.
Add 3 to 4 cups berries (so that they are in a single layer}
and boil 1 minute. Remove with a sinned spoon or skim-
mer to a colander suspended over a bowl to catch the syrup.
Reduce the syrup in the pot to 1У* cups and repeat the
procedure with more berries. From time to time return the
syrup that drains from the cooked berries to the pot. Skim
the white foam from the surface.
When the last batch of berries is completed, boil the
syrup down to 1% cups (the temperature will be 208*F.)
Return the berries to the syrup and simmer 10 minutes
or until reduced to 316 cups.
Fill canning jars which have been rinsed in boiling
water, leaving Vi-inch head space. Screw on the caps and
place them in a water bath, covered, for 10 minutes after
the water comes to a boil. Remove and allow to cool be-
fore checking the seal.
FRUIT TOPPINGS AND PUREES 333
Jars in the water bath must be sitting on a rack to
allow the water to flow all around them, and the water
must be high enough to cover them by I inch. They must
be upright to expel any air inside the jars, producing a vac-
uum which seals the jar. И this process is eliminated, be
sure to store the conserve in a cool, dry area away from
light as there are no preservatives in it to prevent mold
from forming. (If mold docs form, scrape it off and rcboil
the conserve.) The conserve takes 2 days in the jar to thicken.
tips:
• Recently I discovered an extraordinary essence of wild
strawberry imported from France. A few drops perform
magic in this or any strawberry conserve (page 427).
• The conserve can be prepared using strawberries frozen
without sugar. Allow them to defrost in a colander, re-
serving the juice. (This will take several hours.) Add the
|uice to the sugar syrup and proceed as with fresh berries.
The flavor will be indistinguishable from conserve pre-
pared with fresh berries.
UNDERSTAND ING
Strawberries contain more water than raspberries so it is
necessary to start with 4 pounds instead of only 3 pounds
to get the same quantity of conserve.
Fomtuki: 1 pound berr.es.2 ounces sugar/3 ounces water
A large unlined copper pot is traditional for jam be-
cause the faster the heroes and syrup cook, the better the
flavor and gelling. Be sure to use a pot with a large diam-
eter to speed evaporation of the syrup.
334 COMPLEMENTARY ADORNMENTS
oiL/ricd California apricots make a puree with greater
flavor and richer hue than fresh apricots, even at the height
of their season. The puree freezes well so I always have
some on hand to add to buttercrcams or to swirl into
Puree
cheesecake batter.
MAKES
i'A to m cups
(unsweetened)
INGREDIENTS MEASURE WEIGHT
dried California apricots 2 cups, packed pounds ounces 12 ounces ki/ogranu.gr.inrs 340 grams
water 1Ц liquid cups 1X5 ounces 354 grams
lemon juice, freshly squeezed 1 ’6 tablespoons 1 (Mince 23 grams .. ....
optional: superfine sugar ’A cup ♦ 1 tablespoon 4 ounces 113 grams
STORE
5 days refrigerated, 1 year
frozen.
In a small saucepan place rhe apricots and water and allow
to stand, covered, for 2 hours. Simmer 20 minutes on very
low heat, tighdy covered, or until the apricots are soft. Purer
along with any remaining liquid in a food processor.
Press through a fine strainer (page 457). You should
have 1VS to 1!4 cups.* Stir in the lemon juice. (If you have
less puree, slighdy decrease the lemon juice.}
To make lighdy sweetened puree, add sugar to equal
‘/i the volume of rhe puree (i.e., if there is only 1 cup puree,
add ‘A cup of sugar instead of */z cup + 1 tablespoon).
Store in an airtight container.
TIP: Premium quality California apricots, found in spe-
cialty and health food stores, are brighter orange and have
a superior flavor tn most packaged varieties.
note: It is essential to use a fine strainer to achieve the best
texture.
•I get IV» сирь (1 nound‘473 grams) usmj; the Cuisinart p"»w strainer M-
ttdxnnK. It intng me power strainer. there is no need to piwm the яргклич
first
FRUIT TOPPINGS AND PUREES Ш
Puree
к-/'caches and cream are a time-bonored combination. This
puree is the base for my Peach Cloud Cream charlotte fill-
ing. When it’s a great peach season 1 use ripe, juicy peaches
and make extra to freeze for later m the year. When peaches
are lacking in flavor, I buy frozen ones with no sugar added.
MAKES
27< CUPS
INGREDIENTS MEASURE WEIGHT
9 ripe peaches, peeled and pitted vcMcifnc 5 cups oi dices i Г<1шкк ounces 2 pounds 1 without peels and pits I kHagrama grjunt, 907 grams
lemon juice, freshly squeezed 1 tablespoon 0.5 ounce 16 gtams
almond extract 1 teaspoon * 4 gram.
... vanilla ¥4 teaspoon ♦
STORE:
2 days refrigerated, 8
months frozen.
In a food processor process the peaches briefly until broken
up and liquidy. Press through a food mill fitted with a fine
disc or use a fine strainer (page 457) to obtain a smooth
puree. Combine the puree and lemon juice in a heavy non*
corrodible saucepan and simmer until reduced to 2 ¥4 cups.
Cool and stir in the extracts. Store in an airtight container,
tip: To peel peaches» place in simmering water for 1 mm*
ute or until the skins slip off easily. Do not add this puree
to cheesecake batter a\ it will curdle it.
UNDERSTANDING
Almond has an excellent affinity with peach. Vanilla serves
as a flavor enhancer for both.
336 COMPLEMENTARY ADORNMENTS
L aspberrics arc die crown jewels of the baking world.
This tart, intensely flavored puree is ideal to temper the
sweetness of buttcrcrcams and to add flavor to whipped
creams. Lightly sweetened» it also makes a velvety sauce
that is the very essence of fresh raspberry.
The secret is that the juice* are concentrated by 4 times
their original volume, but the pulp is not cooked at all.
Raspberry puree is wonderful with Ethereal Pear Charione
(page 175)» and 1 tablespoon poured into the hollow of a
whipped cream dollop is the ideal foil for the richness of
Chocolate Oblivion Truffle Tone (page 84). In fact, I
wouldn’t serve the cake without it. Since the puree stays
fresh even after months in the freezer, 1 always prepare ex-
tra for storing.
Raspberry
Puree and
Sauce
MAKES
I'A CUPS PUREE
(10 ounces.'290 grams)
l¥> CUPS
LIGHTLY
SWEETENED
SAUCE
(14.75 ounces/422 grams)
INGREDIENTS MEASURE WEIGHT
♦ofunw pounds- 'owners kifognimr grams
raspberries, frozen with no sugar added 2 (12-ouncr! bags 24 ounces 680 grams
lemon juice, freshly- squeezed 2 teaspoons • 10 grams
uptwnal: sugar Vi cup 4.7 J ounces 132 grams
In a strainer suspended over deep bowl thaw the raspber-
ries completely. This will take several hours. (To speed
thawing, place in an oven with a pilot light.) Press the ber-
ries to force out all the juice. There should be 1 cup.
In a saucepan (or m a mxnjwave* on high power)
boil the juice until reduced to У* cup. Pour it into a lightly
oiled heatproof cup.
Puree the raspberries and sieve them with a fexxi mill
fitted with the fine disc. Or use a fine strainer to remove all
seeds. You should have 1 liquid cup puree. Stir in the rasp-
berry syrup and lemon juice. To make a lightly sweetened
sauce» measure again. There should be HA liquid cups. If
you have less» add less sugar. The correct amount of sugar
is 16 the volume of the puree. (To 1 cup puree, add Уз cup
sugar.) Stir until sugar dissolves.
*11 u«ng a mitrowavr, pl act the |ui<x in * 4-cup beatpruut gliss measure or
howl Hi 4lluw tar huhhlin$.
STORE:
10 days refrigerated, 1 year
frozen. The puree can be
thawed briefly and refrozen
several times with no ill ef-
fect.
POINTERS FOR SUCCESS:
Be core to me unsweetened
berries. Berne» in syrup can-
not be reduced as much be-
cause the sugar thickens the
mixture before the intense
flavor can be obtained.
Raspberry seeds are
very small and can ром
through most food milk.
This sauce used to be tedi-
ous and time-consuming to
make because the seeds ding
to the pulp. Presung
through я fine strainer has
FRUIT TOPPINGS AND PUREES 337
taken me as long as 30 min-
utes. Cart Sonthcimer re-
cently dengned an
attachment to the Cum nan
food processor which is the
psircer of my dreamt! It re*
moves all the tiny raspberry*
seeds in a matter of minutes
and is ему to clean. I am
very grateful for the hours
of work this saves me (page
4571.
Strawberry
Puree and
Sauce
MAKES
1/4 CUPS PUREE
(10 5 ounces1 SCO grams)
l'/j CUPS
LIGHTLY
SWEETENED
SAUCE
(12.25 ouncev'350 grams)
TIP: If using fresh hemes, you will need 1 Vi pounds or 1 Vi
quarts. In order to make them exude their juices, they must
be frozen and thawed to break down the cell membrane*.
UNDERSTANDING
I once gave Robert Linxe of Maison du Chocolat in Pans
a taste of my raspberry puree flavored with expensive eau-
de-vie de framboise. He told me without hesitation that
lemon is the best possible enhancer for raspberry. And he
is absolutely right (although there are rimes when I add
both, often replacing the framboise with Chambord, a
sweeter black raspberry brandy).
The microwave method nf reducing the raspberry juice
gives the purest flavor because it does not come into con-
tact with direct heat, preventing any slight browning or
caramel flavor.
t is amazing how this puree captures the flavor of sun-
warmed strawberries at their peak—more so than the ac-
tual strawberries themselves when eaten out of season! This
is partly because strawberries for freezing are picked at their
prime and also because this method of concentrating the
juices without cooking the fruit results in a puree of double
the amcentration and fresher flavor than conventional ones.
(This is a technique I have discovered to make the berries
surrender all their flavor while maintaining thetr brilliant
color.)
1 use die strawberry puree lightly sweetened as a sauce.
Unsweetened, it’s great for Strawberry Cloud Cream filling
for charlottes (page 264) or with Golden Butter Cream Cake
as a glorious Strawberry Shortcake (page 34). It is also de-
licious with Genoise au Chocolat (page 129) and as a but-
tercream flavoring.
INGREDIENTS MEASURE WEIGHT
whole «гаwherries, frozen without sugar volume 20 ounce hag poimdcovixes 20 ounces kilograms prams 567 grams
lemon juice, freshly squeezed 2 геацюогм • 10 grams
optional: sugar cup 1.75 ounces 50 grams
338 COMPLEMENTARY ADORNMENTS
tn a colander suspended over a deep bowl thaw rhe straw-
berries completely. This will take several hours. Press them,
if necessary, to force out the juice. There should be close
to 1 ’/« cups of juice.
In a small saucepan (or a microwave* on high power)
boil the juice until reduced to */« cup. Pour it into a lightly
oiled heatproof glass measure.
In a food processor puree the strawberries. You should
have 1 full liquid cup of puree. Snr in the strawberry synip
and lemon juice. To make a lightly sweetened sauce, mea
sure again. There should be 1% liquid cups. If you have
less, add less sugar. The correct amount of sugar is ‘/t the
volume of the puree. .For 10 tablespoons puree, add 2 Ta-
blespoons sugar.) Stir until the sugar dissolves.
TIP: Fresh bemes are line to use only in season when the
berries are full of flavor. If using fresh berries, you will
need 20 ounces or 5 cups. In order to make them exude
their juices, they must be frozen and thawed to break down
the cell membranes. A few drops of Ftench essence of wild
strawberry (page 427) add flavor intensity.
UNDERSTANDING
The little seeds in strawberries create a lovely textural ef-
fect and, together with the pink color of the buttercream
or whipped cream, give the unmistakable message of straw-
berry flavor.
The microwave method of reducing the strawberry juice
gives the purest flavor because it docs not come into con-
tact with direct heat, preventing any slight browning or
caramel flavor.
STORE.
10 day» refrigerated, 1 year
frozen. The puree can be
thawed briefly and refrozen
several timet with no ill ef-
fect.
‘If u»mg a «KrciiMW, the |ul« in * 4<up heatproof |Ы» mcj»urt or
bowl no »lkiu fee babbling.
FRUIT TOPPINGS AND PUREES 33$
Lemon
Curd
you love lemon (and who doesn't) the sunny lilting
freshness of lemon curd will be addictive straight out of the
jar. It makes an attractive topping, accentuating the lemon
in Cordon Rose Cream Cheesecake (page 811. Blended with
Perfect Whipped Cream (page 264J or Italian Menngue (page
266), it also makes a luscious filling for Biscuit Roulade
(page 142) or an airy filling for charlottes (page 36M). It
even makes a fabulous addition to Mousseline Buttercream
(page 245). Thank God for lemons. They arc available year
round and despite domestication are always wonderful.
Lemon curd was brought over by the colonists from
England, where it is known as lemon cheese or lemon but-
ter. The first time I tasted it I was ready to go to extremes
to get the recipe. According to the Wise Ettcydopedia of
Cookery (where I found my first recipe for this English treat),
the recipe was a guarded secret for years. Now many ver-
sions abound. This is my version—perhaps a little lets sweet
and more lemony than most. More sugar can be added to
taste while the curd is still warm.
MAKES I
FULL CUP
STORE:
3 weeks refrigerated. Longer
storage dulls rhe fresh cirrus
flavor.
POINTERS FOR SUCCESS:
If tbe citrus fruit is heated
(about 10 seconds in a mi-
In a heavy noncorrodible saucepan beat the yolks and sugar
until well blended. Stir in the remaining ingredients except
the tertian zest. Cook over medium-low heat, stirring con-
stantly, until thickened and resembling a thin hollandaise
sauce, which thickly coats a wooden spoon but is still liq-
uid enough to pour. The mixture will change from trans-
lucent to opaque and begin to take on a yellow color on
34(1 COMPLEMENTARY ADORNMENTS
the hack of a wooden spoon. It must not be allowed to
boil or it will curdle- Whenever steam appears, remove briefly
from heat, stirring constantly, to keep from boiling. When
the curd has thickened, pour at once into a strainer Press
with the back of a spoon until only coarsc residue remains.
Discard the residue. Stir in the lemon zest and cool. Pour
mto an airtight container. The curd will continue to thicken
while resting and chilling.
TO GLAZE CHEESECAKE
Pour the lemon curd over a chilled cake while the curd is
still warm and liquid. Spread quickly with a metal spatula
to form a smooth film.
UNDERSTANDING
An aluminum pan should not be used because it reacts with
rhe egg yolks, turning them a chartreuse. Sugar raises the
coagulation point of the yolk. It also protects it from pre-
mature coagulation during the addition of the citric acid. If
the citrus juice were added directly to the unprotected yolk,
it would partially coagulate and, when strained, a large
percentage would be left behind in the strainer.
When yolks reach the boiling point, they begin to cur-
dle. Commercial establishments sometimes bring the curd
to rhe boiling point and strain immediately. The pan that
has begun to curdle is discarded. This is done merely for
speed (it's one way to take the guesswork out of whether
the mixture is hut enough!).
Sttarning the lemon or lime curd after cooking pro-
duces the silkiest texture because it removes any coagulated
bits of egg. The zest is therefore added after straining. If
desired, it can be added with the juice and removed on
straining. This way, it imparts some of its flavor without
adding texture. For orange curd, it is important to add the
orange zest with the juice to intensify the elusive orange
flavor.
VARIATIONS
LIME CURD: Replace the lemon juice and zest with freshly
squeezed lime juice and zest. (Limes are smaller than lem-
ons but contain much more juice. Three small limes should
suffice.; Decrease the sugar to 14 cup (3-5 ounces.'100 grams)
as lime is much less tart than lemon. The Lime Curd will
be yellow with grten flecks from the zest. If desired, add a
few drops of green liquid food coloring. Be conservative;
only the palest of green hues is attractive.
ernwave oven on high
power) and rolled around
while pressing on ir lightly,
the fruit will release a signif-
icantly greater quantity of
juice.
To prevent curdling, be
sure to mix the sugar well
with the yolks before adding
the juice. Use a heavy no<i-
cnrrodible pan which con-
ducts heat evenly or a
double boiler. To further
present curdling, do not al-
low the mixture to boil. Re-
move immediately from (he
heat when thickened and
strain at once as (he residual
heat in the pot will raise the
temperature.
If you are working with
an accurate thermometer,
the temperature of the thick-
ened curd will be 1?6°F.
FRUIT TOPPINGS AND PUREES 541
PASSION CURD: This curd has a glorious flavor and deep
golden color. Replace the lemon juice and zest with an equal
volume (3.5 ouncrs/100 grams) of fresh or frozen p action
fruit |uicc Ipage 431|. Decrease the sugar to *6 cup (ЗЛ
ounces'100 grams).
ORANGE CURD Orange juice is much sweeter than lime
juice and most varieties do not have enough acidity to
thicken the curd as well as lemon or lime docs. Orange
curd has. a delicious flavor and beautiful color but will still
be slightly liquid even when dulled. This curd makes deli-
cious Grand Marnier Orange Mousseline Buttercream (page
245} or lovely orange-flavored whipped cream (page 264}.
To make Orange Curd: Reduce 1 cup freshly squeezed
orange juice to 2 tablespoons ^preferably in a microwave
on high power), Use only Vb cup sugar and add 4 teaspoons
orange zest to the yolk mixture before heating. Do not strain.
(If you can obtain blood oranges, reduce to only ft cup as
they have higher acidity and will thicken the curd substan-
tially.)
Candied
Zest
itrus peel makes a flavorful and attractive decorative
touch when cut into fine strips and sweetened in a sugar
syrup. This candied zest is particularly suited to decorating
a cake containing citrus fruit.
MAKES I CUP
(5.25 ounces*'ISC grams)
.42 COMPLEMENTARY ADORNMENTS
With a small sharp knife remove smps of peel, avoiding
the bitter white pith beneath. If any pith remains on the
zest, scrape it away. Cut the peel into fine julienne strips.
Place m a saucepan of boiling water and simmer 15
minutes to soften and remove bitterness. Drain and rinse
under cold water.
In the same saucepan combine the sugar, water, and
com syrup and bring to a boil, stirring constantly. Stop
stilting, add the zest, and cover tightly. Simmer over low
heat for 15 minutes without stirring or uncovering. Re-
move from the hear and cool, covered. To brighten the color,
add thr grenadine.
Refrigerate the candied zest in the syrup in an airtight
container up to 1 month. When ready to use, drain the
zest If you wish to use the syrup for cakes, add water to
equal 1 */: times the volume of the syrup to dilute the sweet-
ness and add an orange-based liqueur to taste.
UNDERSTANDING
The com syrup prevents crystallization of the sugar when
the zest is added.
STORE:
1 month refrigerated.
FRUIT TOPPINGS AND PUREES 343
F rcsh
Cherry
Topping
MAKES
ENOUGH FOR
A 9-INCH
CAKE
or me, summer begins with cherry picking. As a New
Yorker, it is always a treat to become reacquainted with
b<iw fruit grows. One of the neighborhood farms where we
have our weekend house has four sour cherry* trees and a
’’pick your own" policy. 1 love the sight of the bright green
leaves against a clear blue sky and hundreds of tiny lumi-
nous red globes suspended from the branches. I’m often the
only one picking (which is heaven). Last year there was a
family (grandmother, mother, and granddaughter) at the
tree next to mine. I overheard exultations of the psc to come
and the merits of different shortenings in the crust. I felt an
immediate and pleasant connection to these fellow bakers.
They asked me if I worked for the farm because 1 was using
small shears to cut rhe stems. Actually, I’ve found that leav-
ing the stem on keeps the chernes from deteriorating so
quickly before processing.
I love fresh cherry pie but ar least half of the cherries
1 pick go for toppings for my cheesecakes. Tart red cher-
ries, bursting with juice and cooked only until thickened,
blend perfectly with lemon-scented cream cheese.
INGREDIENTS MEASURE WEIGHT
tart pitted chemos and juice from pitting VtWlNWC 1У» tups p(HMtdS- ООЛСТП 10 ounces Ai/ogranM. grams 2S0 gram*
sugar Vl cup 3.5 ounces 100 grams
cornstarch 1‘Л tablespoons • 12 grams
pinch nf salt • ♦ •
almond extract % teaspoon • •
STORE: If stems ate left on, fresh cherries will keep reft iter- ated 3 days. Cover lightly with a dean towel. Chernes keep their shape best when freezing if sprinkled first with 2 tablespoons sugar per 10 ounces pitted cher- ries. The sugar holds the iu>ces when the cell walls break. If your freezer stays In a 1 ’/» quart saucepan toss the cherries, juice, sugar, cornstarch, and salt. Allow to sit for at least 30 minutes until the sugar draws out more cherry juice. Cook over moderate hear, stirring constantly, until thickened and boiling Simmer 1 minute. The mixture should just barely drop from a spoon. Remove from the heat and stir in the almond extract. Cool slightly and spoon over cold cheesecake. tip: I find that commercial cherry piners don’t work very well. Either they allow* a smaller pit to pass through, which
344 COMPLEMENTARY ADORNMENTS
can break a tooth if it makes its way into the topping, or
the cherries become squashed and misshapen. 1 once asked
the proverbial little old lady sitting on the porch selling
cherries how she pitted them. She pointed to the gray bun
perched on cop of her head. When I looked mystified, she
plucked out a large heavy metal hairpin. She explained that
she inserts the looped end into the stem end of the cherry
and uses the loop to pull out the pit.
Since that day 1 have tried a crochet hook, a new elab-
orate German cherry pitter, and an antique modrk -and still
find the hairpin the fastest and best preserver of the cher
ry’s plump shape.
around ОТ. or below, tbe
cherries will keep 2 yean
without losing their bright
red color or flavor. If neces-
sary, Mi teaspoon red food
coloring added before cook-
ing will perk up any color
low during freezing.
POINTERS FOR SUCCESS:
Stir constantly to present
lumping of tbe cornstarch.
The mixture muri reach a
full boil for the cornstarch
to swell and thicken.
Winter
Cherry
Topping
v-^resh sour-cherry season is all too short (only about 2
weeks) so if it should escape you one year, this recipe is a
great way to brighten the flavor of canned cherries. Cherry
Kijafa (cherry wine from Denmark) gives the fruit a gor-
geous dark red color and luscious flavor.
MAKES
ENOUGH FOR
A 9-INCH
CAKE
INGREDIENTS MEASURE WEIGHT
tan pitted water-packed cherries voJnme 1 pound can pounds- ounces 1 pound 454 grams
Ц cup + 2 tablespoons 2.75 ounces 75 grains
Cherry Kijafa J fluid ounces {use glass measure! 3.5 ounces 96 grams
comwarch 1 tablespoon ♦ H grams
pinch of salt • ♦ • - -
almond extract Mi teaspoon • ♦
FRL’IT TOPPINGS AND PUREES 345
POINTERS FOR SUCCESS:
Stir constantly to prevent
lumping of the cornstarch.
The mixture must reach a
full boil for the cornstarch
co swdl and thicken.
Branded
Burgundy
Cherries
DAY BEFORE
In a colander suspended over a deep bowl drain the cher-
ries for 30 minutes or until they lose ¥< cup juice. (Press
lightly if necessary.) Reserve only 2 rabtapoons juice. There
will he almost 1 cup of cherries.
In a IVi-quan saucepan combine the 2 tablespoons
juice, sugar, and Cherry Kijafa, stirring until the sugar is
dissolved. Add the cherries and bnng to a boil. Cover and
cool. Refrigerate until the following day,
Drain the cherries again for 30 minutes or until 7 fluid
ounces (14 tablespoons) are obtained. Reduce the liquid to
¥i cup. Pour into a bowl and cool completely.
In the same saucepan place the cornstarch and salt and
gradually stir in the cooled liquid, then the cherries. Bring
to a full boil and simmer 1 minute. The mixture should just
barely drop from a spoon. Remove from the heat and stir
in the almond extract. Cool slightly and spoon over cold
cheesecake.
TIP: Bottled Morello sour cherries from Hungary or Po-
land, available in specialty food stores, offer exceptionally
full flavor.
n addition to combining with Vanilla Ice Cream (page
285) and Hot Fudge (page 88) for a deliriously good sun-
dae, Brandied Burgundy Cherries are a traditional pan of
Swiss Black Forest Cake (page 190). The brandy keeps the
chernes from freezing rock hard when making the ice-cream
version of the Black Forest Cake.
Brandied cherries are flavorful after only 12 hours but
the longer they stand, the more mellow they become.
MAKES
I P I N T
INGREDIENTS MEASURE WEIGHT
pined bing cherries in heavy syrup vo/umc 1 pound can pt>UO<fi.'<>UI3CO 1 pound krk>gf*m\ g/amt 454 grams
sugar 2 tabkspooos 1 ounce 25 grams
kirsch or Cognac - — .J У4 cup 2 ounces 56 grams
346 COMFLEMENTARY ADORNMENTS
In a colander suspended over a deep bowl drain the cher-
ries for 30 minutes. Reserve lZz cup syrup. There will be
about 1 Vi cups cherries.
In a medium saucepan combine the syrup and sugar
and bring to a boil, stirring constantly. Add the cherries
and simmer, covered, 1 minute. Remove from the heat.
Transfer the cherries with a slotted spoon to a pint jar and
add the kirsch or Cognac.
Boil the syrup until reduced to Vi cup and pour over
the cherries. Cover tightly and swirl to mix. If planning to
score longer than 3 months, add enough liqueur co reach
almost to the top of the jar. Cool, cover tightly, and refrig-
erate.
VARIATIONS
MORELLO CHERRIES From Hungary or Poland, these are a
tart and delicious alternative. They are packed in 2-pound
1-ounce jars (Dean & DeLuca, page 445) so double the
recipe, using a total oi Vi cup sugar (tan cherries need more
sugarl, 1 cup cherry liquid, and Vi cup kirsch or brandy.
FROZEN CHERRIES Available in supermarkets, these are more
delicious than canned and just about as good ax fresh! To
use frozen cherries, empty two 12-ounce bags cherries fro-
zen without sugar into a colander suspended over a bowl
and allow to defrost. This will take several hours. Add
enough water to the juice tu equal I cup. Add Vs cup sugar
and proceed as for canned cherries.
FRESH CHERRIES: When I have a windfall of fresh dark
cherries, I use this method adapted from Helen Witty and
Elizabeth Schneider Colchie's invaluable book Better Than
Store-Bought. For 1 pint cherries, simmer 1 cup pitted
cherries with Vi cup water in a covered saucepan for 10
minutes or until easily pierced with a cake tetter. Remove
the cherries with a slotted spoon to a pint jar and add rhe
kirsch or brandy. Add Vi cup sugar to rhe liquid in the pan
and bring to a boil, stirring constantly. Reduce to Vi to */э
cup and pour over the chcrnes. Cover tightly and swirl to
mix. Add enough liqueur to reach almost to the top of the
jar. (The recipe can be increased if desired.}
STORE:
At least 1 month in the re-
frigerator or a cool, dark
closet. I he cherries will
keep almost indefinitely.
FRUIT TOPPINGS AND PUREES 347
Fresh Blueberry -Topping MAKES ENOUGH FOR A 10-INCH CAKE uickly tossing uncooked bluebcme» in this hoc glaze turns them a dark, bright blue without softening them. The berries remain tart and juicy with a fine sparide. This makes a lovely topping for Star-Spangled Rhapsody Ipage 169) or Cordon Rose Cream Cheesecake (page 81).
INGREDIENTS MEASURE WEIGHT
fresh blueberries voJtrme 2M« cup» powidk-ouacev 12 ounces -'I 540 grams
arrowroot Of cornstarch 1 tablespoon ♦ S grams
sugar V« cup 1.75 ounces 50 grams
water Mi liquid cup 4 ounces 118 grams
lemon |UM.*e, freshly squeezed 1’Л teaspoons I 8 grams
Rinse the berries and dry well with paper towels. Hacr in
a bowl.
Have ready a colander or strainer large enough to hold
the berries.
In a small saucepan mix the arrowroot and sugar. Snr
in the water and lemon juice and heal, stirring constantly,
until clear and thickened. Remove from the heat and add
the blueberries, tossing until coated. Remove to the colan-
der, drain, and discard any glaze not dinging to the hemes.
Use as soon as possible.
UNDERSTANDING
Arrowroot is preferable to cornstarch because it adds spar-
kle and because it starts to swell and thicken the liquid
before reaching the boiling point, lessening the chance of
overheating rhe berries. Cornstarch must be brought to a
full boil in order to completely thicken the liquid.
note: If the liquid does not thicken, then the arrowroot is
too old. Arrowroot sometimes sits on the shelf for years as
not many recipes require it.
MS COMPLEMENTARY ADORNMENTS
Water
rozen blueberries have excellent flavor but slightly lose
their shape when defrosted. This potential disadvantage
turned out to be a desirable quality in the creation of this
glistening» dark blue topping. It can be used in the same
way as Fresh Blueberry Topping (page 348), but also pro-
vides a smoother “lake” on which to float the swans for
the Blueberry Swan I^ake (page 165).
Blueberry
Topping
MAKES
ENOUGH FOR
A I O-INC H
CAKE
INGREDIENTS MEASURE WEIGHT
/юитА. (wirvec Ankignmiji goMits
frozen blueberries 12-oiMice bag 12 ounces 340 grams
arrowroot or cornstarch 1 tablespoon • 8 grants
War cup 1.75 ounces 50 grams
finely grated lemon zest 1 teaspoon • 2 gtams
STORE:
6 hours room temperature.
In a colander suspended over a bowl thaw the blueberries
completely. This will take Mtveral hours. Reserve the juice.
In a small saucepan stir together the arrowroot and
sugar and whisk in the reserved juice. Cook over medium
heat, stirring constantly until thickened. Remove from the
heat and fold in the blueberries and lemon zest. Put in a
bowl and cool to room temperature before using on the
cake.
UNDERSTANDING
Arrow root is preferable to cornstarch because it adds spar-
kle. к starts to swell and thickens the liquid before reach-
ing the boiling point so it should not be allowed to boil ur
it will thin. Cornstarch must be brought to a full boil in
order to completely thicken the liquid.
NOTE: If the liquid does not thicken, then the arrowroot is
too old. ArrowrcxM sometimes sits on the shelf for years as
not many recipes require it.
FRUIT TOPPINGS AND PUREES 349
Poachcd
Pears
hesc lovely, translucent pears, enhanced by William’s
pear liqueur or eau-de-vie, are thinly sliced and provide an
elegant topping for Ethereal Pear Charlotte (page 175}. Of
course they arc delicious alone or with a thin lacing of
Chocolate Cream Glaze (page 271) for the renowned des-
sert Poires Belle Нёкпе.
MAKES
4 HALVES
INGREDIENTS MEASURE WEIGHT
2 large ripe but firm pears, such as Banleu or Bose * 4 inches long pounc/soimco I pound Ajfograuij. grams 454 grams
water IM: liquid cups 12.5 ounces 354 grams
lemon juice 2 teaspoons ♦ 10 grams
WilltAm's pear liqueur or cau-de-VK- 2 tablespoons 1 ounce 28 grams
sugar V-4 cup 1.75 ounces 50 grams
vanilla bean, spin lengthwise 1 inch • •
STORE
3 days refrigerated.
*Seka p-.irx that measure I indies л kngch because they just 6c when fanned
inode the dwrkrtt» hatttU.
Peel, halve, and core the pears just before poaching so that
they do not darken.
In a saucepan just large enough to hold the pears in a
single layer combine the water, lemon juice, eau-de-vie.
sugar, and vanilla bean and stir to dissolve the sugar. Add
the pears and bring to a boil. Simmer over low heat, tightly
covered, for 8 to 10 minutes or until a cake tester inserted
in thickest pan of a pear enters easily. The pears should
still be slightly firm.
Remove from the heat and cool, covered. Refrigerate
the pears in their liquid until ready to use.
When ready to use for the charlotte, drain the pears,
reserving the liquid. Remove the vanilla bean and scrape
the seeds into the liquid. Reduce the liquid to РЛ cups and
use for preparing rhe Pear Bavarian Cream (page 290).
Use a sharp thin knife to slice the pears lengthwise for
the top of the charlotte.
UNDERSTANDING
Sugar has been kept to a minimum so that the sweetened
pear syrup, in addition to the Italian meringue, will not
350 COMPLEMENTARY ADORNMENTS
ovcrswccten the charlotte. If you arc planning to cat the
pears separately and will not use the poaching liquid for
another dessert, it is fine to add up to 46 cup sugar to the
poaching liquid. This liquid can be refrigerated and reused
many times for poaching more pears.
w . __
kX / leaking preserved pineapple is quite simple and well
worth rhe effort. Ripe Hawaiian pineapple is superb but
even the often underripcned more local fruit comes to life
when given this treatment. There is simply no comparison
between fresh preserved pineapple and the canned variety?
This puree makes a sensational ice cream (page 286) and
buttercream Ipage 234).
Fresh
Preserved
Pineapple
MAKES
3 CUPS PUREE
(105 ouncev'300 grams)
INGREDIENTS MEASURE WEIGHT
vugar ’ vohune 2 cup* 14 ounces gram» 400 grams
water 1 hquid cup 8.25 ounces 236 grams
1 pineapple, peeled, cored, and cur into chunks 4 cups 23 ounces 652 grams
• Ihis amount of sugar is few J prrrr n? h* »d«ird m ux cream. If р1»ш^ «i
use tor buttercream. use only t cwp uf п<яг
In a medium noncorrudible saucepan combine the sugar
and water and bring to a boil, stirring constantly. Add the
pineapple and, without stirring, return to a boil. Cover and
cool overnight at room temperature.
Drain die pineapple, reserving the syrup. You will have
about 3 liquid cups syrup.
Puree the pineapple in a food processor or a food mill
fined with fine disc.
STORE:
Syrup: 3 weeks refrigerated.
Puree; 3 day* refrigerated. 6
months frozen.
FRUIT TOPPINGS AND PUREES 351
F rcshly
Grated
Coconut
STORE
One week refrigerated, one
year frozen.
reshiy grated coconut is a fabulous topping for cakes,
worlds apart from tbe sweetened canned or packaged va-
rieties. A medium coconut, weighing about 1 '4 pounds, will
yield about ЗУ* cups (103 ounoes/300 grams I of grated co-
conut.
To open the coconut, preheat ot-ew to 4(XPF. With an
icepick or nail and hammer, pierce rhe three holes at one
end of the coconut. Drain liquid and reserve, if desired, for
another use. Bake coconut until shell cracks (about 20 min-
utes). Wrap it with a towel to keep the shell from flying
about and use a hammer to crack open the shell. Separate
the coconut meat from the shell and use a vegetable parer
to remove the brown skin. With the fine shredding disc of
a food processor or grater, grate the coconut meat.
For toasted coconut, spread grated meat on a baking
sheet in a single layer and bake at 35(TF. for about 10
minutes or until light brown.
lagkiapfe: To make a delectable Pina Colada Caket make
Genoise Classique (page 120) and cut it into two layers.
Sprinkle it on all sides with pina colada syrup. To make
syrup, stir together Vi cup reconstituted frozen unsweet-
ened pineapple juice, У* cup canned cream of coconut, and
3 tablespoons light rum. Make whipped cream, using
cups heavy cream, 2’Л tablespoons sugar, and ¥» teaspoon
vanilla.
Use 1 cup of whipped cream to fill die cake and sprin-
kle it with */2 cup grated coconut. Frost the cake with the
remaining whipped cream and sprinkle tbe sides and top
with about I cup of the grated coconut.
352 COMPLEMENTARY ADORNMENTS
hestnuts are, of counse, a starchy vegetable not a fruit,
but when pureed and sweetened, the faintly spicy, earthy
flavor ts an unusual addition to buttercreams and whipped
cream. The creams are wonderful for frosting chestnut but-
ter cake, chestnut genoise, or chocolate cake. Canned
chestnuts from France are fine to use (page 420), but the
fresh chestnut puree ts even more delicious.
Chestnut
Puree
MAKES 2
FULL CUPS
WEIGHT
MEASURE
INGREDIENTS
about 36 chestnuts ♦ родясь ounces 1 pound 2 ounces kilogram* granu 510 grams
milk 1 liquid cup 8.5 ounces 242 grams
L4ing a chestnut cutter or a sharp paring knife, cut an X
through the skin on the flat side of each chestnut.
In a medium saucepan place the chestnuts and cold
water to cover and bring to a boil. Simmer for a few min-
utes. Turn off the heat and remove a few nuts at a time to
peel. Remove both rhe outer shell and as much of the inner
skin as possible.
In a medium saucepan combine the chestnuts and milk
and simmer covered until easily pierced with a cake tester,
20—40 minutes, depending on how dry the chestnuts are.
Add more milk if necessary to keep them covered. Cool
and then drain, reserving milk, and process in a food pro-
cessor. To obtain a silky smooth puree and remove any bits
of skin, pass through a food mill fitted with the fine disc.
Or use a fine strainer (page 451). If puree is very stiff, stir
in some of the reserved milk. Store in an airtight container,
note: Creme de Marrons contains pieces of candied chest-
nut and is almost 50 percent sugar and glucose.
Puree de Marrons has water added which makes it too
soft for certain preparations.
To use canned chestnuts, simply drain them and pro-
cess in a food processor as you would fresh chestnuts.
STORE
Sweetened or unsweetened
chestnut puree will keep for
1 week refrigerated, 1 year
frozen.
VARIATIONS
LIGHTLY SWEETENED CHESTNUT PUREE FOR BUTTER-
CREAM: Place 1 cup (H.5 ounces/244 grams) chestnut puree
in a food processor. Add *4 cup powdered sugar, lightly
FRUIT TOPPINGS AND PUREES 355
spooned into cup (1.25 nuncejv'37 grams), and 1 table-
spoon dark rum. Process briefly until smooth.
note: The puree for adding to whipped cream has double
the powdered sugar {page 262).
EASY CHESTNUT BUTTERCREAM: The buttercream is less
airy but smoother and more chestnutty than either Classic
or Silk Meringue Chestnut Butrercreams. It is even strong
and elastic enough for piping string work! As it contains
no egg it has a longer shelf life as well. To make 3 cups
buttercream, blend together 1 cup chestnut puree (9.25
ounces'264 grams), % cup powdered sugar, lightly spooned
into cup {2.5 ounces/75 grams), 1 cup softened, unsalted
butter (8 ouncesi'213 grams), and 1 scant tablespoon dark
rum
Pumpkin
Puree
STORE:
Airtight: 6 months
«^Zf the mood strikes you to make a Pumpkin-Walnut
Ring (page 71) around Halloween time, chances are you
may be tempted to use fresh pumpkin for the puree. It is
simple to make, especially if you own an electric power
strainer attachment to your food processor (page 457).
The smallest pumpkin will make a lot more puree than
the 1 cup needed for the recipe, but if s a perfect cake for
holiday gift-giving as it stores well, so you can make sev-
eral cakes. Alternately, the puree can be frozen for at least
6 months.
Bake the pumpkin whole in a 375°F. oven until soft,
about 2 hours. If you have a microwave, cut the pumpkin
in hall and microwave cut side down. Start with 5 minutes
per pound on high power and rotate the halves partway
through to promote even cooking. In either case, cut off
the stem to avoid an unpleasant odor and cook until the
pumpkin feels soft when pressed.
Allow the pumpkin to cool. Scrape out the seeds.* Re
move the skin and puree the pumpkin in a food processor.
Press the puree through a food mill fined with a fine disc
or a fine strainer to remove any fibers.
* Biked pumpkin wxxh arc a bonus my husband idum Place them in a sin-
gle layer on a biking sheet ind return to the oven until dry.
354 COMPLEMENTARY ADORNMENTS
Z /(Caking a cake Icxik as wonderful as it castes can be as enjoy-
able as baking it. Decorations serve two important purposes: They
lend a festive touch while masking imperfections in the icing.
Actually» a frosted cake does not have co look perfect. In
fact» it is less inviting to eat if tbe frosting is so smooth and free
of ait bubbles or spatula marks that it looks almost plastic. Cake
is food. Have fun with it. iWheri I was a food stylist for maga-
zines, my colleagues and 1 would gloat about how we were brought
up “not to play with our food’* but now we were having our
revenge and being paid for it!) Cakes offer the opportunity to
execute one's most creative fantasies. To make a cake with a sim-
ple, elegant look, however, requires a great deal more skill chan
it takes to cover a cake with Iocs of piped festoons.
Piping fine decorations takes practice but there are many
’’tricks of the trade” which make it possible to produce magnifi-
cent cakes without ever picking up a pastry bag.
This chapter is devoted to making the cake l<x>k terrific. Some
of the decorative couches are delightfully easy, others arc for the
craftspcrson who enjoys painstaking, detailed handwork.
Special
Effects and
Decorative
Techniques
PREPARING
THE CAKE
LEVELING
If a cake is not level before icing, it is unlikely that the iced cake
will look even. Icing can be used to fill in small imperfections, but
the top of the cake should be leveled with a serrated blade. If you
don’t have a cake leveler Ipage 461}, an easy method is to place
the cake in the pan in which it was baked and use the rim of the
pan as a guide for a long serrated knife. If cake is too low in tbe
pan, raise it slightly by placing cardboard rounds beneath it.
If the cake is to be covered with rolled fondant, the sharp
edges around the top should be beveled slightly to keep rhe fon-
dant from cracking.
SPECIAL EFFECTS AND DECORATIVE TECHNIQUES 155
LAYERING
/
l
My favorite ways of cutting a cake into layers all involve using a
serrated blade at least the length of the diameter of the cake.
For one method, I also ute a set of metal bars called retainer
bars. They are used in the candy industry to mold melted sugar,
retaining the flow. {They are available at candy-making supply-
stores such as Maid of Scandinavia, page 465.) The bars come in
a set of four and each is ¥«-inch high. 1 use the bars as tracks,
placing the cake between two of them and allowing the knife blade
to rest on their surface while cutting through the cake. The result
is 2 perfectly even Уд-mch-high layers. (When I want to trim a
cake to 1 Vi inches high, I stack the bars so that they are that
height.] This system works so well 1 went to a metal supply shop
and found beautiful brass bars of varying heights. Wood strips
also work but are much lighter, so they need to be taped to the
work surface (Fig. 1).
A second method is to use an adjustable cake slicer
(page 461).
A third method, requiring the least equipment and the most
self-assurance, is known as the eyeballing method. The cake is
placed on a turntable and a long serrated knife is held against the
side where you estimate (by eye) the middle to be. The turntable
is revolved as the knife cuts a shallow groove all around the cake.
This provides a track for the knife to “ride” in when cutting
through the cake. Be sure to use a firm forward and side-to-side
morion when cutting, checking occasionally to ensure that the knife
is still in the groove. It ts easiest to hold one hand palm down-
ward on top of the cake while slicing. This keeps your fingers safe
when the knife slices through to the other side (Fig. 2).
For ease in separating the layers, .slide a cardboard round or
removable pan bottom between them.
FILLING A long metal spatula and turntable help to create a smooth, even
layer of buttercream. A filling between two cake layers is usually
14-inch thick. Heap frosting on top of the cake layer. Use a long
spatula, pressing firmly with a back and forth motion without
lifting up spatula; this may cause the crust to lift away from rhe
cake. When entire surface is covered, hold the long spatula half-
way across the cake with the blade almost flat against the surface
of the frosting and, pressing lightly, smoothly rotate turntable in
one full circle.
Chill the cake for 5 minutes in the freezer or about 20 min-
utes in the refrigerator to set the frosting before placing the sec-
ond layer on top. This prevents the filling from becoming uneven
and also enables you to move the cop layer if the placement is not
exact.
I use the removable metal bottom of a quiche pan or loose
356 COMPLEMENTARY ADORNMENTS
bottom pan to support tbe second layer while placing it on tup of
the Riling.
A serrated knife is also the ideal tool to cut cakes into different
shapes. To cut an octagon shape, for example, for Rose Trellis
Cake (page 207), make a cardboard template to place on top of
the cake as a cutting guide. As the baked cake will measure 8‘Zr
inches in diameter, first cut a circle of that size. (Plain cardboard
iS easier to cut than corrugated.) Then make eight 3V«-inch con-
necting lines. Each line should begin and end at the edge of tbe
circle. Cur exactly on the lines and tbe octagon template is com-
plete. Place on top of the cake and cut 8 sides, cutting straight
down through the cake.
Sponge-type cakes absorb syrup most easily if the bottom and top
crusts are removed. If left on, the crusts would become pasty.
It is only necessary to remove the thinnest possible layer. To
remove the bottom crust, scrape gently with a serrated knife. The
top crust tends to separate easily from the cake with the help of
a long serrated knife.
The best technique for applying a syrup to genoise or biscuit is to
sprinkle it rather than brush it because brushing picks up crumbs.
The best implement is a large medical syringe. (Use your imagi-
nation; syringes are made for other, usually medical, uses and
the}' will work well for cakes if reserved only for this use.)
To support the cake while frosting, it should be on a ngid surface
such as a serving plate or cardboard round. If using a serving
plate, slide a few strips of wax paper under the edges. These keep
the planer clean and can be pulled out after the cake is frosted.
Cardboard rounds have the advantage of providing a guide
for the amount of frosting used on the sides of the cake since they
are cut rhe size of the cake pan and the cake normally shrinks Vi
inch in diameter. When smoothing the sides, keep the spatula
pressed to the side of the cardboard, not allowing it to tilt toward
the cake, to get a ‘Z»-inch layer of hosting (the distance between
the cake and edge of the cardboard).
Whatever surface is used to support the cake, a small dab of
frosting or melted chocolate in the center helps keep the cake in
place.
If the sides have a lot of loose crumbs, it is helpful to apply a
crumb coating to seal them in and keep them from getting into
the frosting. A thin layer of warmed fruit Jewel Glaze (page 329)
or piping gel (page 431) can be brushed over tbe cake to seal in
CUTTING
DECORATIVELY
SHAPED CAKES
REMOVING
THE CRUST
SYRUP1NG
SUPPORTING
THE CAKE FOR
DECORATING
CRUMB COATING
SPECIAL EFFECTS AND DECORATIVE TECHNIQUES 357
the crumbs. It is best to allow the glaze to dry until it feels tacky-
before frosting. It is also possible to use a very thin coat of frost-
ing as a crumb coating.
COVERING
THE CAKE
The six basic methods of covering a cake are:
1. Dusting it with cocoa or powdered sugar, placing a stencil on
top before dusting, if desired, to create a pattern.
2, Glazing with or without buttercream underneath {page 271).
3. Frosting and encrusting with nuts (page 234).
4. Frosting and making designs in the frosting with a spatula,
serrated knife, or other items (page 359).
5. Frosting and decorating with a pastry tube (page 398).
6. Covering the cake with rolled fondant (page 360).
To frost a cake smoothly and evenly with buttercream takes
practice. It is deceptive to look at cake decorating books where
you will see pictures of cakes with sides smooth as plaster. Ac-
tually they are as close to plaster as you can get—they are covered
with royal icing (sometimes referred to as cake decorator’s ce-
ment! that has been allowed to dry until very hard and is then
sanded down to a smooth finish, an impossibility with butter-
cream.
There is a baker’s trick to frost a cake smoothly and evenly
which requires special equipment but little practice. The results
are always picture perfect. The equipment consists of a Han ring
or loose-bottom pan and a butane torch or electric hair dryer.
The cake is molded with the frosting right in the pan, using
the top of the pan to level the frosting. Just enough heat is applied
to the outside to melt the thinnest layer of frosting so that the
cake can be slid out with perfectly frosted sides and top.
To frost a cake using this method, place a cardboard round
the exact size of the mold’s diameter in the bottom. If necessary,
use a few pieces of tape to hold it in place. The sides of the mold
should not be more than Vi-inch higher than the cake or the frost-
ing w ill be too thick. Extra cardboard rounds can be used to raise
the cake to the proper height.
With a metal spatula, coat the sides of the mold with ’/«-inch
buttercream or frosting and slide the cake into the mold. Scoop
buttercream on top (repeat if using more layers), filling the entire
mold, and use a long metal spatula, ruler, or knife to level it. To
make a wavy line, use a serated knife, moving it from left to right
as you pull it forward (Fig. 1). Chill the cake to set the frosting
for at least 1 hour or freeze for 10 minutes.
To i<nrvold: Set a heavy canister on top of a turntable. The di-
ameter of the canister must be smaller than the removable section
Л5Я COMPLEMENTARY ADORNMENTS
of rhe mold. Remove any tape holding the mold co the cardboard
bottom and using a butane torch or hair drier, rotate the tumta
ble so the sides of the cake are heated evenly. Not much heat is
required, especially if using the torch. One steady turn around is
usually sufficient to release the cake.
Firmly press down the sides of the mold until it slides away
from the cake. A perfectly frosted cake will be perched atop the
canister {Fig. 2).
To frost a cake in the traditional way, use a metal spatula to
cover the sides and top with a thin frosting. A stiff frosting will
not go on smoothly, so, if necessary, warm the frosting to soften
it. Heaping on large gobs will help to keep the crust from coming
up and excess frosting is easy to remove.
I like to stan with the sides of the cake. If the cake is 9 inches
or smaller, I frost the sides by holding rhe cake in the palm of one
hand, smoothing the frosting with a small metal spatula. (The
cake is supported by a cardboard round.) [Fig. 1] Cakes larger
than 9 inches are too heavy for me so I use a turntable. To smooth
the frosting, the spatula should be held parallel to the sides of the
cake and the blade angled slightly outward so that the edge can
remove excess frosting. Hold the spatula steady and rotate the
turntable with rhe other hand. (Fig. 2).
When frosting the sides, bring the frosting up Vi-inch higher
than the top of cake to make a foundation for the top frosting.
When the sides are reasonably smooth (you can go back to them
after finishing the topi, heap frosting on top of the cake. Use a
long spatula, pressing firmly with a back-and-forth motion with-
out lifting up the spatula because that might lift the crust away.
When the entire surface is covered, hold the spatula halfway across
the cake with the blade almost flat against the frosting. Pressing
lightly, rotate the turntable in 1 full circle (Fig. 3). Remove the
excess frosting from the sides by holding a small spatula parallel
to the sides and rotating again. If the cake needs further smooth-
ing, dip a spatula in hot water, shake off the water, and repeat
the smoothing process, pressing lightly as there will be little ex-
cess frosting to remove.
The frosted sides of a tail cake tier sometimes look a bit plain.
One solution is piping a design in frosting such as a scroll border
(page 403). Another solution is creating a pattern in the icing
itself. Larry Rosenberg, in CaAc Decorating Simplified: The Roth
Method, came up with a most original and creative way to ac-
complish this. He uses the rough pattern embossed on paper tow-
els to pattern the frosting. The basic technique is to press 3
thicknesses of paper towels against the side of the frosted layer.
Spray the paper towels liberally with a water mister so they won't
5
EMBOSSED
FROSTING
SPECIAL EFFECTS AND DECORATIVE TECHNIQUES ДО
SWIRLED FROSTING
stick to the frosting. Press the paper towels against the sides of
the cake using a metal spatula (as if you were smoothing the
frosting). It is fine to do a small area at a time. Remove the tow-
els, spraying with more water if necessary.
One of the most appealing decorations, especially for chocolate
cake, is a luxurious series of swirls covering the sides and top. No
other decoration is needed to tell the eye that this cake is going
to be delicious. If making swirls, the cake should be frosted with
the same basic technique but great care needn’t be taken to ensure
evenness. Simply use a small metal spatula to make circular swirls
in the icing (Fig. 1).
SPIKES
2
RIBBON
CUTTING A
FROSTED CAKE
HOW TO COVER
A CAKE WITH
ROLLED FONDANT
(PAGE 306)
Perky little peaks of frosting are easy to make and add a whim-
sical touch. They can be used only for the sides or for the top as
well. To make the spikes, do not smooth the frosting too thinly
or evenly as there must be enough frosting to pull out into peaks.
Use a small metal spatula to lift the frosting away from die cake.
The icing should be fairly stiff (Fig. 2).
Attractive nbbon is an easy decoration for the sides of a cake. Of
course it must be removed before serving.
Choose a waterproof ribbon for soft frostings; any ribbon is
fine for Classic Rolled Fondant (page 306) or a firm frosting such
as Creme Ivoire (page 248). Gold lame and grosgrain are two of
my favorites. Most ribbon can be taped to hold it in place. Tape
does not work on the lame so I use a spot of royal lang, a paper
clip hidden by a chocolate rose leaf, or a hat pin with a large
head (so that it cannot accidentally be left in the cake when
serving).
Use a thin, sharp blade. When the blade reaches the bottom of
cake, wiggle it slightly to be sure that the slice is free and slide it
out. Never lift the blade straight up through the top of the cake
as it will lift crumbs into the frosting and mar the appearance.
Working with rolled fondant is a real pleasure. It feels like silk
and looks like alabaster. It's a lot easier to make a cake look
wonderful with rolled fondant than with buttercream, providing
that it is rolled no less than V»-mch thick. Thinner fondant will
show all the imperfections of the cake it is covering.
To practice handling the fondant, try applying it to the back
of a cake pan before committing it to a cake. This way it can be
gathered up, nekneaded, and rerollcd without being full of crumbs.
360 COMPLEMENTARY ADORNMENTS
The first step before applying the fondant is to place the cake
on a rigid cardboard base. If this step is omitted, the cake cannot
be moved until the fondant becomes very firm, which takes about
24 hours. It the cake base is flexible and tbe fondant only par-
tially dry, it will wrinkle.
The next step is to bevel the edge (page 355} and to coat the
cake with a very thin layer of buttercream or melted jelly to ad-
here to the fondant. (A link beaten egg white will also work.)
Fondant should be rolled on a lightly greased surface until
large enough to cover the entire cake layer. If a layer is 9 inches
by 3 inches, for example, it will require rolling the fondant to 15
inches in diameter. Don’t worry if it is a little small as fondant
can be stretched at least ¥< inch and smoothed into place. Never
pull the fondant, however, because it will tear. Rotate fondant
after every 2 or 3 rolls to ensure that it is not sticking. If neces-
sary, apply more nonstick vegctabk spray or shortening to the
work surface. In cool, dry weather, or if rolling a large piece of
fondant, 1 cover the fondant with plastic wrap to keep the surface
from drying and cracking. When covering cakes 12 inches and
larger, it helps to use a rolling pin to lift fondant. Lightly spray
surface of fondant with nonstick vegetable spray so it doesn’t sock
when rolled around the pin.
Use your hands palms down to lift the rolled fondant over
the cake. Quickly smooth over the top, using a circular motion
and starting from rhe center to prevent air bubbles. (Bubbles can
be pierced with a needle and smoothed out if necessary.) Use your
palms to smooth and ease the fondant against the sides, working
from the top down in a semicircular motion (Fig. 1). Oil from
your hands will give the fondant a lustrous glow.
Use a pizza cutter or small sharp knife to crim the fondant at
the base (Fig. 2). if necessary, it is fine to continue to smooth the
fondant as it dries dunng the first 30 minutes or so. (Actually, it’s
hard to resist.)*
Small vertical slits can be made at even intervals around the
sides with a Detecto knife or scalpel so short pieces of ribbon can
be inserted. This gives the illusion that the nbbon is weaving in
and out of the fondant.
To attach a narrow band of satin nbbon around the cake,
pin one end to the cake. Wrap it around the circumference, over-
lap the ends, and secure with a second pin (Fig. 1). Pipe tiny beads
of royal iang with a number 1 or 2 round decorating tube along
both edges of ribbon (Fig. 2). When the cake has been completely
encircled, the pins can be removed.
• Candy supply stores sudi as -Maid of Scandin-ivu carry diflrrrndy ahaped uuasper»
for decorating rnilcd fuoduM. Foadant must be enmped soon alter ч’Рк'Ж. "hdc
«ill wft and malleable.
SPECIAl EFFECTS AND DECORATIVE TECHNIQUES 361
For the base, use a number 8 round decorating tube. If points
form* flatten and smooth them with a damp artist’s paint brush.
For a pale golden luminescence* use an artist’s brush to duvt
on hardened fondant with edible gold petal dust (Maid of Scan-
dinavia, page 445).
CHOCOLATE ROLLED FONDANT (PAGE JW): Chocolate Rolled
Fondant can be used to cover a cake m the same way as white
fondant* but* since it is a little trickier to work with* I have de-
veloped a slightly different design for it which is easier to execute.
It consists of a top disc and band.
Roll out a disc '/ inch thick on top of a piece of smooth
plastic wrap. Transfer the plastic wrap and disc to a baking sheet
and cut into a circle slightly larger than the diameter of the cake*
using an inverted cake pan or lid as a guide and a pizza wheel or
the tip of sharp knife to cut. Freeze for 10 minutes or until very
firm. Invert onto another sheet of plastic wrap, peel off the plastic
wrap from the bottom, and reinsert onto the cake while still firm
enough to handle easily. Smooth the edge to follow the contour
of the cake.
For the band* measure the circumference of the cake and cut
a piece of heavy-duty plastic sheeting (it comes in rolls in 5 5c 10
or hardware stores) a few inches longer than the circumference
and a few inches wider than the desired height. A good height is
1 to 2 inches higher than the sides. A 9-inch cake will need a band
that is 28 lA inches long. Place the plastic on a flat surface and
roll the fondant into a long rope. Lay it on the middle of the
plastic and roll into a thin band U-inch thick. Using a long plastic
ruler and a pizza cutting wheel, even the edges* cutting the bot-
tom edge flush with rhe bottom ot the plastic. Use your finger to
smooth the upper edge so that it thins slightly. Allow the band to
sit for 30 minutes or until firm but still flexible. Use the plastic to
lift the fondant and curve it around the sides of the cake—which
have been brushed with a thin coating of melted Jewel Glaze (page
329). If the fondant is very soft and floppy, refrigerate for a few
minutes to firm. Peel away the plastic and curve the top edge
gently toward the top of the cake to create a graceful free-form
design.
Do not store for a long period of time in a covered container
as fondant will absorb moisture from the cake or frosting and
become sticky.
Chocolate Fondant is also perfect for making butterflies. Roll
it out on plastic wrap Ук-inch thick and cut with a lightly greased
butterfly cutter. Make a V support form from heavy-duty foil or
use the recesses of an egg crate to prop up the wings until the
fondant dries.
362 COMPLEMENTARY ADORNMENTS
Marzipan is best rolled out between sheers of plastic wrap to pre-
vent sticking. Although marzipan can be used to cover a cake,
because it develops a hard crust I prefer to use it only as a com-
ponent inside the cake—such as the leaf-thin pistachio marzipan
inside Pistachio and Row Wedding Cake Ipage 219}. When asked
to use marzipan for the top of a cake, I am always careful to keep
it covered with plastic wrap until shortly before serving time.
As marzipan tends to be too sweet in large doses, I roll it
only ‘/u-inch chick. A lightly greased cake pan or vol-au-vent cut-
ter works well as a cutting guide. Because I roll marzipan so thin,
discs arc easiest to handle when frozen. Slip marzipan, still on
plasm wrap, onto a lightly greased rimless baking sheet and freeze
a few minutes until firm. Hip marzipan over so that the plastic
wrap is on top. Position over the cake and carefully slide off the
sheet onto the cake. It cannot be moved once in place. Marzipan
sheets can be rolled out on a surface lighdy dusted with corn-
starch and then draped or tolled loosely over the rolling pm to
transfer to the cake.
HOW TO COVER
A CAKE WITH
MARZIPAN (PAGE
320)
Both rolled fondant and marzipan lend themselves to hand-mod-
eling and appliques. Rolled fondant is the more flexible of the
two, so it is easier to use for long cutouts such as ribbons.
When rolling fondant for appliques and ribbon, I use a sheet
of plastic wrap under it to ensure that it will release in 1 piece
and roll it out Vu-inch thick. Use the straight edge of a lightly
greased plastic ruler to cut strips of ribbon. It is best to place the
ribbons on the cake while the fondant is still flexible enough to
curve the bow and drape the streamers in a natural manner. Small
lightly greased cookie cutters can be used to stamp out decorative
shapes which can be dried and stored airtight at room tempera-
ture just about indefinitely. When ready to place them on a fon-
dant-covered cake, first paint the bottoms with a little egg white.
Oriental vegetable cutters found in your city’s Chinatown come
in shapes from dragons to exquisitely simple ginkgo leaves.
I cut Pistachio Marzipan (page 323) in ivy-shaped leaves us-
ing a plastic gum paste cutter from Wilton (page 466) (Fig. 1).
Veins can be simulated with slight pressure from the back edge of
a knife blade.
To make a stem for a rose (complete with thorns), roll a
piece of tinted fondant or marzipan into a long thin stem (Fig. 2).
With the tip ot a knife, make tiny slashes in the stem, opening
thrrn out slightly to form thorns (Fig. 3). The leaves can be cut
free-hand and veined with the back of a knife. Го scallop the
edges, make tiny slashes in the sides.
To make curved flowers such as forget-me-nots, stamp out
the shape with a flower cutter (Maid of Scandinavia, Wilton, and
HAND-
MODELED
AND CUTOUT
DECORA-
TIONS
SPECIAL EFFECTS AND DECORATIVE TECHNIQUES 563
ceramic supply stores carry these;». To make it curve» place the
flower in the palm ot your hand (dusted with cornstarch or lightly
greased; or on a small piece of foam rubber and, using a little
wooden stick with a rounded end (also available at above storesl
or a cotton swab, press into the center of the flower, causing the
petals to curve upward. Allow the flowers to dry until firm enough
to hold their shape.
MARZIPAN ROSES
No icing squeezed from a tube can ever equal the exquisite deli-
cacy and detail of a rose hand-sculpted from marzipan or choco-
late paste. It is, in fact, so life-like, that it’s my favorite flower to
use on cakes. (I was once described by Jim Gaynor in Сиюте
magazine as “Marzipan Rose”?)
Bndcs sometimes give these marzipan flowers as souvenirs to
their bridesmaids. Marzipan is easier to work with than chocolate
paste, so the technique for making roses can be slightly more
elaborate and the flower can support more petals. Ceramic and
cake decorating supply stores carry rose petal cutters in varying
sizes, but the large end of a pastry tube (such as a 2D which is
almost 1 inch in diameter) also works if you roll the marzipan
slighdy thicker for the larger petals. Grease the cutting edge if the
marzipan sticks.
I like to tint marzipan for roses the palest possible shade of
pink, To achieve this shade, use only the point of a needle’s worth
of paste food color. Or tint only a small batch a stronger pink
and knead bits of it into untinted marzipan. You’ll be surprised
ar how easily the color can turn to bubble gum pink if too much
is used.
Another realistic touch is to tint the marzipan for the inner
petals a slightly deeper shade. 1 like to work with a real rose in
front of me for inspiration.
tip: Aftet rolling out and cutting the petals, use a fingertip to thin
the edges of the petals. If the marzipan seems slightly soft and the
petals droop, allow them to dry' for a few minutes before applying
them.
note: Marzipan roses can be purchased through Albert Uster Im-
ports (page 445).
44 COMPLEMENTARY ADORNMENTS
To shape roses: Begin by forming the center cone and base. Use
the natural contours of your hand to form a pointed cone and
pedestal base which will be removed after the rose is completed
(Fig. I/-
Have ready a little bowl of water or lightly beaten egg white
and a small artist's paint brush.
Roll out thin sheets of marzipan between 2 pieces of plastic
wrap—but not too thinly because each piece will be rolled and
shaped a second time, keep the marzipan covered at all times to
prevent drying.
Cut out a free-form rounded rectangle 2 inches long. Lift it
from the plastic sheet and roll it a second time between plastic
wrap to thin it {Fig. 2). Wrap it around the cone, overlapping to
form a point and then folding it back. This is the dosed bud of
the flower (Fig. 3).
Cut three 1-inch rounds for petals. Remove each, 1 at a time,
to a second set of plastic sheets and roll the upper section to thin
tip and form oval shape (Fig. 4}. Place around the bud, overlap*
ping slightly and curving one side realistically back (Fig. 5). Paint
tiny dabs of water or egg white toward base to attach the petals.
A small metal cuticle pusher is ideal for molding the petals and
pushing them slightly away from the center bud.
For the second row of 3 petals, the rounds must be rolled
slightly more elliptically because they have a wider circumference
to cover. Cut three 1 ’4-inch rounds, again making the edges thin-
ner than the base (Fig. 6). When the petals are in place, use a
fingertip ro form a center point and curve the sides slightly back
(Fig. 7).
SPECIAL EFFECTS AND DECORATIVE TECHNIQUES 565
For a full blown rose do one final row of 4 petals. These will
be the widest—almost oval in shape as they have the greatest dis-
tance to cover (Fig. 8). Use a slightly larger cutter {114 inchest to
ait three initial circles, because, if they are thinned too much co
achieve the correct size, they will not be sturdy enough. Use fin-
gertips to create 3 points on each petal, encouraging the edges in
between to roll back slightly (Fig. 9). You may need to prop up
this final row of petals using little balls of fondant dipped in corn-
starch to keep the petals in place until they dry enough to hold
by themselves.
The completed rose will hold its shape well if placed in a bed
of cornstarch to support the petals. When the marzipan sets and
is firm enough to hold its shape, cur off the base with a small
sharp knife. When the rose is thoroughly dry, use a small paint-
brush or dust atomizer to dust off the cornstarch.
ROLLED FONDANT
GALLA HUES
These flowers are very easy to form and make lovely decorations
for an Art Deco-inspired cake. All that is required is white rolled
fondant, beaten egg white, and yellow sugar crystals {available in
supermarkets or at candy-making supply stores such as Maid of
Scandinavia). If you like, you can tint a small amount of fondant
pale green to make sepals at the base.
Start with the centers by rolling thm yi-inch-diametrr ropes
of fondant. Cut off sections slightly shorter than the projected
length of the finished flower. Round 1 end. Brush the entire piece
with lightly beaten egg white and roll in the yellow sugar crystals.
Allow to dry until firm enough to handle (Fig, 1).
366 COMPLEMENTARY ADORNMENTS
For flowers, roll the fondant thin and cut out ovals 3 inches
long, with 1 end rounded and the other pointed (Fig. 2).* Bring
together the rounded ends, overlapping slightly, and uve a tiny bit
of egg white to hold them in place (Fig. 3). Slip the center in place
so that it conies to 1 inch from point. Cur out a I ‘4-inch circle
of rolled green fondant fur the sepal. Roil to elongate it slightly
and wrap it around the base. (Fig. 6). Allow the flowers to dry
until very firm before placing them on the cake. For a realistic
effect, brush centers of flowers with powdered yellow food coloring.
A much speedier method than hand-modeling flowers is to use
real flowers! (See list of appropriate and edible flowers on page
428.) The stems of sweetheart roses can be inserted into the cake
by making a small hole with a skewer or they can be strewn around
each tier. They will remain fresh-looking for hours. If they must
be placed the day before, little flower sinkers (page 463) can be
inserted into the cake to keep the flowers watered and fresh.
Real roses are sometimes coo tightly closed to look their best.
If time does not allow them to be placed in warm water, a florist's
trick is to blow on them to force them open. Imperfect outer pet-
als can be removed.
One of my friends and former students, Jan Kish of La Petite
Fleur in Columbus, Ohio, flies special-order cakes all over the
country. Because shipping cakes by plane does not lend itself to
the use of fresh flowers, she sometimes uses dned flowers and
herbs to decorate the cakes. The exquisite pastel shades and ethe-
real textures provide a slightly faded, dreamlike quality. Some of
the flowers and herbs she uses are: tiny pink sweetheart roses,
larkspur, globe amaranth, lavender, thyme, myrtle, and rosemary.
Each has its own symbolic meaning: rosemary for remembrance,
myrtle for virginity, lavender for love.
1 designed these bees for Queen Bee cake (page 185) and, quite
honestly, they can be more time-consuming than the cake. Bur if
you are a craftspervon you will love making them. The gossamer
gelatin wings look almost real. Sheet gelatin and icing pens are
available through Maid of Scandinavia (page 445). Thin plastic
can be used in place of the gelatin but, of course, is inedible.
Shape the bee's body from marzipan tinted bright yellow (a
combination of Wilton’s golden yellow and lemon yellow food
color produces just the right shade). Use the tip of a sharp knife
to make 2 tiny slashes ar the neck to receive the wings. Use a
black icing pen or pipe black-tinted royal icing to form eyes and
* Wilton, раде 466, тако я gum pa»ic «all* hly ewetet which offers a subdc curve to
the towers edge.
FRESH FLOWERS
DRIED FLOWERS
MARZIPAN BEES
SPECIAL EFFECTS AND DECORATIVE. TECHNIQUES 3«7
stripes. Cur free-form oval wings with sharp pointed ends from
sheet gelatin. To make the wings more visible, tint them with an
artist's brush very tightly moistened with water tinted with golden
food color.
Insert the wing tips into the slashes and allow them co dry
until very firm.
If you are planning to suspend the bees above the cake before
drying, make a small hole in front of rhe neck with a sharp needle
and insert a 6-inch piece of dried angel hair pasta. Insert the other
end of the pasta into a piece of styrofoam and allow’ the bee to
dry for 24 hours before placing tn the cake. (If there is a slight
breeze, the bees will sway above the cake.l
NOUGATINE
BARQUETTES AND
CUTOUTS
Nougatine (page 318) is easy to work with because it can be re-
warmed any number of times to maintain the proper consistency.
Professionals usually work with a heat lamp to keep the nouga-
tinc soft but a hot tray or oven works well too.
Nougatine must be warm when cut or it will shatter. If it
hardens while working with it, return it briefly to a JOO'F. oven
or foil-covered hot tray.
Nougatine can be cut with a knife, heavy-duty round or oval
nougatine cutters, a pizza cutter, or sharp kitchen shears. The cut-
ters should be oiled so chat they don't stick to the nougatine.
To cut out ovals of nougatine for barquettes, fashion a foil
template by pressing foil into the barquetie mold, then flattening
it and cutting out the shape. When the nougatine is cool enough
to handle, cut it into 4 equal parts and roll 1 of them into an
8-inch by 6-inch rectangle ‘Л-inch thick. Keep the other 3 pieces
warm in the oven with rhe door ajar. If the nougatine has cooled
and hardened, warm it again until soft enough to mark easily.
Using a pizza cutter and the template as guide, mark the oval
on the nougatine. When cool enough to handle, cut out the oval
with scissors (Fig. 1). Each rectangle will make 3 barquettes.
Press the nougatine oval into a lightly greased barquette mold
(Fig. 2). The nougatine must be hot enough to remain flexible. If
necessary, return briefly to heat source just until flexible (not too
long or it will lose its shape). When cool, remove the hardened
nougatine barquette from the mold and proceed with the remain-
der. The barquettes will keep for several weeks if stored airtight
at room temperature away from direct sunlight, heat, and hu-
midity.
Another interesting use for nougatine is to cut it in mangles
and spread one side of each triangle with tempered dark choco-
368 COMPLEMENTARY ADORNMENTS
late. This can be used to make a pinwheel around the top of a
cake (similar to the traditional decor for a Dobos Torte). Small
triangles or irregular pieces make elegant and delicious petits fours
to serve with coffee at the end of a formal dinner.
A charlotte consists of a cream filling encased in a thin layer ot a
sponge-type cake such as a biscuit. The filling is stabilized with
gelatin to make it firm enough to hold its shape for slicing. Char-
lottes are formed in a mold which will support their shape until
the gelatin sets.
There are many delightful cake shapes and designs for lining
a mold, flan, or spnngform. The completed charlotte often looks
like a feat of wizardry, but actually the various shapes are easy to
accomplish by cutting rectangles of thin cake and sandwiching
them together with jam. Biscuit Roulade (page 142) is an ideal
cake to use for this purpose because it is baked in large thin layers
and is springy enough to compress and mold into complex shapes
without sacrificing delicacy of texture. Genoise works well for
cutting and overlapping long scrips to form a dome shape. And,
of course, Biscuit a la Cuilhere (or ladyfingers) encircling the fill-
ing is the classic Charlotte Russe. Before filling the lined mold
with cloud creams. Bavarian creams, or whipped cream, the cake
can be brushed lightly with syrup or sprinkled with liqueur. If
filling the cake with a fruit cloud cream such as strawberry or
raspberry, a nice addition is to brush the base of the cake with a
thin coating of the fruit sauce. Piping free-form loops or swirls
with che doud cream, after smoothing the surface, and spooning
vome of the fruit sauce into the depressions also makes an attrac-
tive design.
A 6-cup [1.5 liter) bowl is a good size for domed charlottes.
When lined with a thin layer of cake it will hold 5 cups of filling.
Loose-bottom 8-inch or 9-inch pans or springforms are good sizes
for other shapes. (Flan rings are fine, but will not be exactly 8 or
9 inches.) The exact height of rhe sides is unimportant, but should
be at least 2'Л inches high to offer adequate support. An 8-inch
ring needs 5 to 6 cups filling; a 9-inch ring 6 to 7 cups. The inner
circumference of an 8-inch nng is 25 inches and a 9 inch ring is
28 inches. This means you will need about seventeen iVi-inch-
wide ladyfingers (or a 25-inch-long cake strip} to line an 8-indi
ring and nineteen I ’Л-inch-widr ladyfingers (or a 28-inch-lcmg cake
strip) to line a 9-inch ring. A 7V6-inch to 8'Л-inch round of cake
is trimmed to fit |ust inside the circle of the cake to serve as the
base. This can be cut from a sheet of biscuit or piped from Biscuit
a la Cuilliere batter (page 148).
CHARLOTTE SHAPES
SPECIAL EFFECTS AND DECORATIVE TECHNIQUES 369
CUT SHAPES
A single layer of Biscuit Roulade is easiest to cut using scissors. A
serrated knife works best for layers or sandwiches of biscuit, which
cut most precisely when frozen,
SPIRALED DOME Lining the bow! with plastic wrap makes it easy
to unmold a dome-shaped charlotte. Lightly oil a 6-cup howl and
line it as smoothly as possible with plastic wrap, leaving a small
overhang. Measure the diameter of the bowl. You will need a
round biscuit base slightly smaller.
When the biscuit has finished baking, use the lining to slip it
out of the pan onto the counter and cut off a strip from one of
rhe short ends just large enough to sene as the base. While still
hot, roll the biscuit as indicated in the recipe and allow it to cool.
When the cut strip has cooled, cut with shears into a circle for
the base. Wrap with plastic and set aside.
The |elly-roll slices used to line this charlotte must be tightly
rolled for the most attractive appearance. To accomplish this, un-
roll the cooled biscuit, leaving it on the nonstick liner or towel,
and spread with a very thin layer of Cordon Rose Raspberry Con-
serve (page 331) or commercial jam (about ¥2 cup). For height-
ened flavor, stir 2 teaspoons Chambord (black raspberry liqueur)
into the conserve.
Roll up the biscuit tightly ’6 of the way and turn so that the
unrolled portion is facing you. Lap over the lining or towel to
cover the rolled section and a little of the flat section. Hold the
edge of a straight-sided baking sheet at an angle on top of the
towel just at the point where rhe rolled section ends. Press firmly
against the roll and tug the bottom of the towel toward you. Lift
away the overlap. Continue rolling И of the way and repeat the
process. Finish rolling and repeat 1 more time, again angling the
sheet just at rhe base of the completed roll. The roll will be IVt
inches in diameter. Wrap snugly with plastic wrrap, then foil, and
freeze until firm enough to slice.
With a small serrated knife, cut into ’/«-inch-thick slices. To
line the mold, start by placing 1 slice in the center and place slices
around it as tightly as possible to avoid gaps. It ts sometimes nec-
essary to cut slices m half or smaller to fit the last row. Cover the
f/rscwrr-lined bowl tightly to keep it from drying out until the fill-
ing is ready. Fill the mold and place the round biscuit base in
place. Cover tightly and refrigerate until set (at least 4 hours).
To Monoid- Inven onto a serving plate and lift away the bowl,
tugging gently on the plastic wrap to release it. To prevent drying
out, glaze with melted jelly or Shiny Jewel Glaze (page 330) or
simply leave the plastic wrap in place until serving time.
VERTICAL STRIPES: For this elegant design, thin layers of biscuit
are sandwiched with raspberry conserve and cut into small rec-
370 COMPLEMENTARY ADORNMENTS
tangles to line the sides of a loose bottom or spnngform pan. A
disc of Biscuit a la Cuilliere, cur to fit inside, sen es as the base.
Bake the Biscuit Roulade ;page 142) and allow it to cool flat.
To cut the biscuit, use a pizza wheel or a sharp knife and a
ruler to score where the cuts should be. Use sharp shears to do
the actual cutting.
Trim the edges so that the biscuit measures exactly 10 inches
by 16 inches. Cut the biscuit lengthwise into 4 equal rectangles.
Each will be 25/i inches wide by 16 inches long. Spread 3 of them
with a smooth layer of Cordon Rose Raspberry Conserve or seed-
less commercial raspberry jam. You will need about cup to
complete the cake. For extra flavor intensity, thin the conserve
with 1 tablespoon Chambord (black raspberry liqueur}. If using
commercial jam. hear and sieve it and use it warm.
Stack the rectangles carefully on top of each other, ending
with the layer without jam. The flat side of a long metal ruler set
against the side help* to erven the layers. Cut tbe finished stack in
half, to form 2 shorter stacks (each 7|£ inches long).
You now have two 4-layer rectangles 2V$ inches wide and 2
inches high (Fig. 1). (The only important measurement is the width
because when sliced and positioned in the pan, it will determine
the height of the striped border.) Wrap the rectangles in wrax pa-
per and slip it into a large heavy-duty plastic freezer bag. Place
on a flat surface such as a baking sheet to maintain the shape and
freeze until firm.
Use a small serrated knife to cut the rectangles into Va-mch-
thick slices (Fig. 2). Trim tops and bottoms so that each slice is
even and the same height.
If molding the charlotte in a spnngform, you may remove the
inner disc and place the outer nng directly on a serving plate. If
using a loose-bottom pan, leave the inner disc in place but line
with a parchment round if planning to remove the disc before
serving.
laghdy butter tbe inside of the ring. Mace biscuit slices around
the ring so that the stripes are straight up and down. Brush 1 side
of each slice with a light coating of conserve before placing the
next rectangle firmly against it.
Measure the inside diameter of the biscKrt-lmed ring for mak-
ing the biscuit disc. Cover tightly with plastic wrap and set aside
while preparing the disc and filling.
Pipe and bake a spiral of Biscuit a la Cuillierc (page 148) the
desired size of the charlotte base. When cool, tnm if necessary
and fit snugly into the bottom of the lined nng (Fig. 3). Scoop in
the filling, cover tighdy. and refrigerate until set (at least 4 hours).
To unmold; For a spnngform, гг!еале the sides and lift away. For
a loose-bottom pan, place on top of a sturdy canister smaller than
2
SPECIAL EFFECTS AND DECORATIVE TECHNIQUES 371
the pan bottom opening and press firmly downward. The .sides
will slip down to rhe counter and the charlotte can be lifted off
rhe canister because it is supported by the pan base.
STRIPED DOME: Until it is cut into, this dramatic design defies
analysis. The striped motit is achieved by cutting and overlapping
thin rectangles from a square g&toise. The chocolate-frosted bot-
tom crust determines the striping effect. No cake base is necessary
tor this charlotte.
Bake rhe Genoise Qassique (page 120} using an 8-inch-long
by 2-mch-high metal pan. Unmold onto a lightly greased rack.
When cool, wrap well with plastic wrap and allow to sit over-
night to firm fat cutting. Prepare Yi rhe syrup recipe on page 120.
When ready to mold the cake, use a soft tape measure to
measure the inside of a 6-cup bowl. Measure from center point
to edge, making sure that the tape follows the curve of the howl.
It should measure 516 inches. Using a long serrated knife, remove
the top crust and trim che g&toite so that it is perfectly square.
Cut off ] edge so that 1 .«de measures exactly 6 inches (1 inch
more than the curve of the bowl for safety margin).
Make Vi cup Ganache Frosting Ipage 267). Spread 2 table-
spoons hot ganache over bottom of g<6ruwe. Chill for 15 minutes
to set the ganache before slicing. Set aside the remaining ganache
at room temperature to use for piping decorations on top after
unmulding.
Invert the cake, ganache side down, onto lightly greased foil
and cut into V«-inch by 6*mch strips with a thin sharp knife, wip-
ing the blade between each slice. Cut 1 end of the unfrosted side
of each strip on a diagonal so it comes to a point (Fig. 1). This
will prevent too much cake from building up in the center. Pre-
pare Chocolate Chip Whipped Cream Ipage 2.5 8j and set aside
briefly while lining the mold.
Lightly oil the 6-cup glass bowl and line smoothly with but-
tered plastK wrap, buttered side up, allowing a slight overhang.
Starting at the bottom center of the bowl, place a strip of gtftoiie
from center to edge, placing the pointed edge at rhe center, die
cut edge facing right, and the frosted edge facing left (Fig. 2}.
Brush the strip with syrup and a thin coating of whipped
cream reserved from the filling. Place a second strip, starring at
the center and slightly overlapping the first strip at the rim. Brush
with syrup and thin coating of wrhipped cream and continue to
work clockwise from right to left, always having the frosted edge
facing left so that it will show on the outside in a stnpcd motif
when unmolded. WTien you come to the last strip, tuck the side
under the first strip.
Trim the excess btsewt flush with the edge of the bowl using
372 COMPLEMENTARY ADORNMENTS
shears (Fig. 3). Cover tightly with plastic wrap while preparing
the filling.
Fill the cake-lined dome, chill until set (at least 2 hours if
using Chocolate Chip Whipped Cream, 4 hours if Bavarian or
cloud cream), and unmold onto a serving plate, tugging gently on
the plastic wrap overhang to release the cake. Use the reserved
ganache to pipe a fluted design on top with a number 103 rose
tube to cover any imperfections.
Nonstick liner, parchment, or foil can be used to line pans for
piping Biscuit a la Cuillierr batter (page 148), It is also possible
to grease and flour the pan and create guidelines in the surface of
the flour.
If using parchment, guidelines can be drawn directly on it
with pen or pencil. The parchment is inverted before piping so
chat the lines show through, but the ink or pencil marks don't
come into direct contact with rhe batter. Guidelines for foil can
be marked with a skewer. A nonstick liner, however, is my favor-
ite surface because the baked biscuit slides off it without any
problem. I use a bright felt-tip marker to make guidelines on a
brown paper bag and cover it with the nonstick liner.
For piping ladyfingers make parallel lines 3 inches арап. For
discs, use a round cake pan to mark circles.
BucuU batter flows easily so it is unnecessary to squeeze the pastry
bag. (If the piped designs do not hold their shape it means that
rhe egg whites were not beaten stiffly enough.) To stop the flow
of batter, tilt the tube up just before you think it will be neces-
sary. Work steadily so that the bancr can be baked soon after
preparing it This will enable it to retain as much air and lightness
as possible.
PIPED LADYHNGERS: Using a number 9 large round tube (¥»-inch
diameter), pipe ladyfingers, leaving a *4-inch space in between each
as the batter will spread sideways while piping the next finger.
(After baking, the ladyfingers will be attached to each other in
continuous strips. Each finger will be about 1У4 inches wide.) Start
piping |ust inside the top guideline and stop shortly before reach*
mg the bottom one, moving the tip slightly forward and up to
control the bancr flow.
PIPED SPIRAL BASE: Using a number 9 large round tube, hold the
pastry bag in a vertical (straight up-and-down) position with the
tube at least 1 */j inches above the pan. To achieve lull height and
a rounded shape, the bancr must be allowed to fall from the rube
and nor be pressed against rhe pan. Stan in rhe center, moving
the tip with your entire arm tn smooth circles. To prevent gaps,
allow spirals of barter to fall against the sides of—almost on top
PIPED
SHAPES
FOR
CHARLOTTE
RUSSE
PIPING TECHNIQUES
SPECIAL EFFECTS AND DECORATIVE TECHNIQUES 373
SPECIAL
MERINGUE
PIPING
TECHNIQUES
of—previous spirals. The weight of the barter will cause them to
fall exactly in place.
PIPED DAISY TOP: Making this fancy design to top a charlotte
involves piping a tear-drop shape or shell design without ndges.
Review piped shell borders (page 399). Start each tear drop at the
outer edge, ending with a point or ‘Tail” at the center I Fig. 1).
Use a number 9 iarge round rube. When the petals of the daisy
are complete, finish the center with a round dot (Fig. 2).
To bake piped biscuit: Bake in a preheated 400*‘Р. oven for
Я to 10 minutes or until biscuit is light golden brown and spongy
to the touch (page 186).
To assemble: if molding the Charlotte Russe in a springform
pan, you may remove the inner disc and place the outer ring di-
rectly on a serving plate. If using a loose-bottom pan, leave the
inner disc in place but line with a parchment round if planning to
remove the disc before serving.
lightly oil the inside of the ring. If the ladyfingcrs have not
been freshly baked, sprinkle them with a little liqueur. Use the
ladyfinger strips to line the inside of the ring. Place the biscuit
base in the bottom, trimming it it necessary for a snug lit. Scoop
filling into the lined mold. Level with a small angled spatula. If
using the daisy top, trim the tops of the ladyfingers encircling the
mold so that they are flush with the filling and cover with the
daisy top, sprinkled with liqueur. Refrigerate until set (at least 4
hours).
To unmold: For a springform, release the sides and lift away.
For a loose-bottom pan, place on top ot a sturdy canister smaller
than the pan bottom opening and press firmly downward. The
sides will slip down to the counter and the charlotte can be lifted
off the canister because it is supported by the pan base.
COCOA MEWNGL/E STICKS Great for munching by themselves,
these sticks are also used to create The Enchanted Forest (see color
photograph).
Piping fine lines demands a great deal uf control if you want
them to be perfectly straight. Fortuitously, however, 1 discovered
that irregularly piped sticks look even more interesting. Line three
17-inch x 12-inch baking sheers with a nonstick liner or parch-
ment. Fit a pastry bag with a number 12 round decorating tube
and fill the bag with Cocoa Menngue (page 298). Hold the bag
at a slight angle away from you with the tube several inches above
the pan. Starting at the top of the pan, squeeze the menngue with
steady pressure, allowing it to drop from the tube. Leave 44-inch
between the lines <if menngue. To obtain the irregular, nubbly
appearance m the color photograph, lower the tube while piping,
allowing it to touch the surface so extra menngue will build up
around edges.
374 COMPLEMENTARY ADORNMENTS
Bake at 200°F. for 50 minutes or until dry. If a tiny bit of
stickiness remains in center, it will dry out after removal from rhe
oven. Remove carefully from the baking sheet and cut or break
into uneven lengths ranging from 2 to 4 inches.
PINE NEEDLES: Delicious to eat by themselves or with ice cream,
they make a delightful garnish for the Cordon Rose Chocolate
Christmas Log (see color photograph).
Line a baking sheet with a nonstick liner or parchment. Fit a
pastry bag with a number 3 decorating tube and fill the bag with
Pine Needle Meringue (page 2981. Hold the bag at а 45е angle
with the tube slightly above the pan. Each pine needle consists of
2 sticks joined at the top, but the shapes can vary. Pipe some
straight in an upside down V and others crossing 1 stick over the
ocher. Bake at 200°F. for 30 minutes or until dry but not starting
to color. Remove carefully from the baking sheet with a small
angled spatula. These pine needles are quite fragile. For a realistic
effect, dip the joined end into melted dark chocolate.
MERINGUE OR DACQUOtSE DISCS AND HEARTS: A nonstick liner,
parchment, or foil can be used co line the baking sheets for piping
meringue or dacquoiM. They must be totally grease free. If using
parchment, guidelines can be drawn directly on it with a pen or
pencil. The parchment is inverted before piping so that the lines
show through but the ink or pencil marks don't come into direct
contact with the meringue. Guidelines for foil can be marked with
a skewer. A nonstick liner, however, is my favorite surface be-
cause the baked meringue slides off without a problem. 1 use a
bright felt-tip marker co make guidelines on a brown paper bag
and cover ic with rhe nonstick liner.
To pipe a spiral disc, fir a nylon pastry bag with a number 6
large, round tube (Vi-inch diameter) and fill with meringue or
dacquoise.
Hold the bag in a vertical position [straight up-and-down)
with the tube at least J Vi inches above the pan. To achieve full
height and a rounded shape, rhe batter must be allowed to fall
from the tube and not be pressed against the pan. Stan either in
the center or at the outer edge, moving the tip with your entire
arm in smooth circles. To prevent gaps, allow the spirals of batter
to fall against the sides of—almost on top of—previous spirals.
The weight of the mixture will cause them to tall exactly in place.
To form hearts, use a heart-shaped pan as a guide co draw
the shape. To pipe the mixture, begin by outlining the outside
edge, starting and ending at the indentation. Continue piping t
row at a time, ending m the center. Use a small brush dipped m
water to correct mistakes.
SPECIAL EFFECTS AND DECORATIVE TECHNIQUES 373
If rime allows and the oven ha* a pilot light, meringue or
cfacquoise can be baked for 1 hour at 200&F. and then left to dry
overnight in a turned-off oven.
Alternately, bake menngue at 200°F. for 2 to 214 hours or
until dry but not beginning to color. Dacquoise can also be baked
at 200*7. for 1 to 1 ’Л hours or until dry.
MERINGUE MUSHROOMS: These little mushrooms look astonish-
ingly real when dusted lightly with cocoa to simulate earth. They
are perfect for decorating the Cordon Rose Chocolate Christmas
Log [see color photograph).
Make ‘Л recipe Figure Piping Meringue (page 297). This will
make about thirty I’A-inch-diameter mushrooms. Line a baking
sheet with a nonstick liner, parchment, or foil. Fit a pastry bag
with a number 3 round decorating tube and a second hag with a
number 6 round pastry tube (!6*inch in diameter). Fill the bags
with menngue mixture, placing about % cup in bag with smaller
tube. Set aside. Use the larger tube to pipe the caps and stems.
To pipe tbe caps: Hold the bag upright with the rube slightly
above the baking sheet. Squeeze with a steady, even pressure,
gradually raising rhe tube as the meringue begins to build up but
keeping tip buried in the meringue. When you have achieved a
well-rounded shape, stop the pressure as you bring the tip to the
surface. Use the edge of the tip to shave off any point, moving it
dockwise (Fig. 1). Points can also be removed by pressing gently
with a moistened fingertip.
To pipe the stem*: Hold the bag perpendicular to baking sheet
with the tube touching it. Squeeze with heavy pressure, keeping
the tip buried in the meringue until you build a ¥<-inch-high cone
wide enough at the base not to topple over (Fig. 2).
Bake at 2CXFF. for 45 minutes or until firm enough to lift
from the baking sheet. With a sharp knife point, make a small
hole in the underside of each cap. Use the smaller tube to pipe a
tiny dab of meringue in the hole and attach the stem by inserting
the pointed end (Fig. 3). Place the mushrtMims, caps down, on the
baking sheet and return to the oven for 20 minutes or until thor-
oughly dry.
Speed Production Method; For less perfect but faster mushrooms,
bake the stems until very firm, about 1 hour. To pipe the caps,
wet the baking sheet and cover with parchment. Pipe the caps and
bake 10 to 15 minutes or unnl firm enough to lift off the sheet
but still soft. Push the caps down gently on top of the stems and
return the finished mushrooms to oven. Lower the temperature to
15(FF. and bake for 45 minutes or until completely dry.
MERINGUE SWANS One reape Figure Piping Menngue Ipage 297)
will make 4 swans and lots of extra parts in case of breakage.
376 COMPLEMENTARY ADORNMENTS
Make templates for the head, wings, and body by drawing
on parchment (Figs. 1, 2, and 3). Turn over and attach to a bak-
ing sheet with a small dab of meringue.
Fir a pastry bag with a number 9 round pastry tube (V»-inch
diameter I and a second bag with a number 8 round decorating
cube I’/u-mch diameter). Fill rhe bags with meringue.
Use the larger tube to pipe the bodies. Use a side-to-side mo
tion as you move from the rounded front to the pointed back.
Use a small wet spatula to create sharply angled, straight sides.
Use the smaller tube to pipe the wings, head, and necks. For
eyes, use tiny black sesame seeds (available in Japanese markets)
or toast sesame seeds in a lightly oiled frying pan until dark. Re-
serve leftover meringue for attaching the parts.
Bake the menngue parts at ZOO^F. until they arc dry but not
beginning to brown, about 2 hours. Cool and gently peel off pa-
per. Use a drinking straw to create a hole Vi-inch deep near the
front of the bodies. (Necks will be fined into these holes.)
SPECIAL EFFECTS AND DECORATIVE TECHNIQUES 377
CHOCOLATE
Attach the wings to the sides using some of the leftover me-
ringue. Return the bodies to the 200*F oven for 30 minutes. Re-
move carefully and cool. The swans will keep in a dry room for
weeks.
At the last minute, when ready to position the swans on the
finished cake, prepare stiffly beaten whipped cream (page 253).
Place the whipped cream in a small pastry bag fitted with a large
dosed star tube (number 2D). Position the bodies on the cake.
Pipe the whipped cream into the bodies to create ruffled backs.
Place heads and necks in the holes in che bodies using a dab of
leftover menngue or whipped cream to secure. Let rest against the
whipped cream for support. With a number 8 small round tube,
pipe an upside-down tear-drop shape between the front of the
wings for breast.
NOTE: For swans the easy way, purchase plastic swans ar a party-
supply store or mail-order from Wilton [page 4661 and paint them
with a thin coat of royal icing, lang works best if not too stiff.
All chocolate that we buy has been tempered during production
to perfect its consistency and glossy appearance. Tempering con-
trols the crystalline structure of the cocoa butter. It also inhibits
rhe formation of large crystals with lower melting points, which
result in “bloom” (gray streaks on the surface) and a coarse crumbly
texture.
Chocolate that docs not contain cocoa butter, such as com-
pound chocolate or summer coating Ipage 423), can be melted and
used for decorations without tempering. Real chocolate, however,
which contains cocoa butter, must be retempered if it is melted
for decorations or if it loses its temper and grays due to improper
temperature during storage.
Tempering chocolate consists of controlling the temperature
at which the chocolate melts and sets. The classic method of tem-
pering involves using a marble slab and an accurate thermometer.
This produces the glossiest sheen for the longest period of time.
Quicker methods which don't require any special equipment will
still tame the chocolate into submission for any of the decorative
techniques offered in this chapter. If you prefer not to temper
chocolate, use compound chocolate as real chocolate melted with-
out tempering will be an unending source of frustration.
Tetnpenng is unnecessary when the chocolate will not be used
in its pure state, for example when it is mixed with heavy cream
for a ganache glaze.
37S COMPLEMENTARY ADORNMENTS
Two important rule* fur melting chocolate:
1. Chocolate must never exceed 12O0F. or there will be a loss of
flavor.
2. Water—even a drop in the form of steam—must never touch
the chocolate.
When a droplet of water enters melted chocolate, the choco-
late becomes lumpy {a process called seizing). Shirley Corriher's
“sugar bowl theory’* explains this process. If you place a wet spoon
in a sugar bowl, hard, irregular crystals form. If you pour a cup
of water in the bowl, the sugar would merely dissolve. Chocolate
behaves the same way because it also contains sugar crystals (even
unsweetened, “bitter” chocolate has natural sugar). There must
be a minimum of 1 tablespoon water per ounce of chocolate to
keep this from happening.
If seizing docs occur, the addition of fat such as vegetable
shortening, clarified butter, or cocoa butter will somewhat restore
the chocolate to a workable condition.
For melting chocolate, unlmed copper is the traditional
“chocolate pot” because it is so responsive to changes in temper-
ature. Aluminum, preferably lined with a nonstick surface, or
heatproof glass also work well. Enameled cast iron, however, is
unsuitable because the residual heat will overheat the chocolate.
Ideally, chocolate should be heated to 12CFF., the point at which
all the different far fractions in the cocoa butter are melted.
When melting chocolate or cocoa butter, temperatures ex-
ceeding 12CTF. adversely affect the flavor. There are many accept-
able methods for melting dark chocolate (or cocoa butter). If the
heat source does not exceed 120°F. (pilot light of oven, lowest
setting on an electric griddle, or hot tray, page 459), it is fine to
add the dark chocolate in large pieces and leave it to mdt unmon-
itored. When rhe hear source is capable of bringing the chocolate
over 120T., however, rhe chocolate should be finely chopped or
grated to ensure uniformity of melting. The chocolate must be
carefully watched and stirred to avoid overheating. If using a mi-
crowave oven on high power, for example, the chocolate must be
stirred every 15 seconds without fail. If using a double boiler,
water in the lower container should not exceed 14(TF. and the
upper container should not touch the water. The chocolate should
be stirred constantly.
Milk and white chocolate must always be stirred frequently
while melting because they contain milk solids which seed [lump)
if left undisturbed.
Remove chocolate from the heat source when it reaches 115”F.
as the temperature may continue to nse and stir vigorously to
prevent overheating and to distribute the cocoa butter evenly.
Always melt chocolate uncovered as moisture could condense
on the lid, drop back in the chocolate, and cause seizing.
MELTING
CHOCOLATE
FOR DECORATIONS
SPECIAL EFFECTS AND DECORATIVE TECHNIQUES J 79
GRATING
CHOCOLATE
If chocolate has been stored in a cool area {not refrigerated, where
it could absorb moisture)» it grates more finely and evenly. The
grating disc on a food processor works well for large chunks.
Thin bars can be broken up and grated in the container of the
food processor fitted with rhe stainless steel blade.
TEMPERING
CHOCOLATE
The ideal situation for working with chocolate is a cool, dry, draft-
free area at 65Т. to 70**F. At temperatures above 74*F. the choc-
olate will not behave properly. For all methods of tempering,
chocolate should be heated initially to 120T. and the final tem-
perature of the specific kind should be:
Dark chocolate
Milk chocolate
White chocolate
Compound chocolate
(summer coating!
88'T. to 9IT.
84T. to 87T.
84T. to 87T.
I GOT.
Compound chocolate does not contain cocoa butter so tem-
pering is nor required. Compound chocolate should be heated over
hot tap water [about 115T.J only to a temperature of 100T. and
used ar this temperature. A dab placed just below your lower lip
will feel hardy warm.
To hold chocolate at its ideal temperature during use, place
the container with the chocolate on a foil-covered heating pad
turned to its lowest setting. Or return the container to the heat
source very briefly, stirring constantly.
Because the formation of cocoa butter crystals continues as
long as the chocolate is in a melted state, tempered chocolate will
eventually thicken too much to produce a smooth coating. When
this happens, melted untemperrd chocolate may be stirred in until
the chocolate reaches the proper consistency without exceeding
its ideal temperature. {This is known as drip feeding,)
If chocolate is allowed to exceed its ideal temperature, fat
crystals will start to melt» allowing cocoa particles to drop and
leaving cocoa butter crystals on the surface as unattractive streaks
and spots.
If chocolate gets too cold, it will be thick and dull.
Chocolate-covered swrrts are sometimes refrigerated for a few
minutes after dipping in tempered chocolate. This produces a crisper
coating, referred to ax “snap.” Chocolate can also be allowed to
harden at cool room temperature. Any leftover chocolate can be
spread thin on foil, allowed to harden, and rctcmpcrcd many times
as long as a small percentage of new chocolate is added.
CLASSIC METHOD: This method results in the most glossy, crisp
chocolate which will set with the most reliability. Use it for the
380 COMPLEMENTARY ADORNMENTS
most demanding chocolate techniques such as dipping, bands, aid
sheets.
The main difference between the classic method and other
methods is that here the melted chocolate ts cooled to 8(FF., which
is below the final dipping temperature. When heating it to the
ideal temperature, all large and unstable cocoa butter crystals
(which have a low melting point) dissolve, leaving only the stable
crystals on which to complete crystallization or hardening of the
chocolate.
Chop or grate the chocolate and bring it to 115* F. to 120'T
I Fig. 1|. Remove from rhe heat, stirring vigorously for a few sec-
onds to cool. (If using a double boiler, be careful to wipe off
moisture dinging to the bottom of the upper container insert so
that it won’t dnp onto the chocolate.)
Pour Ул of the melted chocolate onto a smooth, cool, dry-
surface (ideally marble). Spread with an angled spatula and bench
scraper (Fig- 2). Move the chocolate towards the center, dean the
scraper with the spatula, and spread continuously unril the choc-
olate begins to thicken (fllTF. to 82&F.J. Scoop it immediately into
the container with the remaining melted chocolate (do not allow
it to harden on counter) and return it to heat, stirring continu-
ously. It will require very little heat to reach proper working tem-
perature (page 380). (Fig. 3.)
QUICK-TEMPERING METHOD: There are several comparable meth-
ods for quick-tempering chocolate. All involve reserving some al-
ready tempered unmelted chocolate to serve as the pattern of cocoa
butter crystal formation for rhe melted chocolate- (All chocolate
you buy ha*. already been tempered.) The unmeltrd chocolate is
added to the melted chocolate and stirred until the temperature
descends to the ideal temperature. This can be tested either with
an accurate thermometer (page 451) or by placing a dab of choc-
olate just below your lower lip. Ar the point when it just begins
to feel cool, it is about 91”F. (the ideal temperature for dark choc-
olate). Use one of these methods for simple techniques and small
decorative shapes such as pine cone petals, cigars, or leaves.
1. The simplest of all methods is to remove the melting chocolate
from the heat source before it has fully melted and stir until
fully melted and cool.
2. It is equally simple to add clarified buner, vegetable shorten-
ing, or oil to the chocolate, preferably before melting. This
serves two purposes. It produces a thinner coating of chocolate
and the addition of extra fat also keeps the existing cocoa but-
ter in suspension. Because it is a different type of fat it retards
formation of large cocoa butter crystals. For dark chocolate
use I tablespoon far for every 3 ounces chocolate. For milk
SPECIAL EFFECTS AND DECORATIVE TECHNIQUES 381
DECORATIVE
TECHNIQUES
and white chocolate use only 1 teaspoon fat for 3 ounces of
chocolate. (Note: The chocolate will be softer so do not use
for cigarettes or petals.)
3. When melting chocolate» reserve a large 2- to 3-inch piece.
Melt the chocolate to 115*F. to 120®F., remove from the heat,
and add die reserved chocolate. Stir until the correct tempera-
ture has been reached and remove any unmeltcd chocolate.
(Wrap this in plastic wrap. It can be used for future tempering
or melting.)
4. Chop or grate chocolate, reserving about Уз. Heat the larger
amount to 115°F. to 120T. and remove from the heat. Stir in
the reserved chocolate, 1 tablespoon at a time, stirnng until it
is cooled to proper temperature.
CHOCOLATE SNOWFLAKES: I call these snowflakes because they
should be so thin that they melt instantly on the tongue. This is
an easy garnish to make as there is no need to melt or temper the
chocolate. Use white chocolate for white snowflakes. Dark choc-
olate makes pale brown flakes.
The chocolate needs to be as hard as possible to make thin
flakes, so don’t leave it in a warm kitchen. A large piece of choc-
olate is easiest to work with, hut a flat bar will also work.
Use a melon-baller to scrape the chocolate, making short, light
strokes that do not cut too deeply into the chocolate. A good-
quality melon bailer, produced by knife manufacturers such as
Wiisthof, has sharpened edges and works best to cut thin flurries
of chocolate.
Allow the flakes to tall onto a small cool baking sheer. Place
the sheet inside a large plastic bag and shake rhe flakes into the
bag. Avoid couching them because they’ melt very easily. Score
refrigerated or at cool room temperature. Use a large spoon to lift
chocolate flakes onto the cake.
CHOCOLATE CURLS: Another simple decorative technique that
doesn’t require tempering, curls are easy to make providing the
correct chocolate is used and that it ft at the right temperature
and has not absorbed moisture from humidity. (I tried these once
during a New Orleans summer, and. although the room was air-
conditioned, 1 could not get the chocolate to curl.)
Couverture chocolate {page 423), which comes in large blocks,
makes die most attractive, shiny curls. I have had the best luck
with any of the three Lindt bittersweet couvertures (Cour ante,
Excellence, or Surfin).
If the chocolate is left in an 80*F. room for several hours it
is usually a gcxxl working temperature. Alternately, a small block
of chocolate can be softened to perfect consistency by placing it
382 COMPLEMENTARY ADORNMENTS
under a lamp (from the hear of tbe light bulb) or in a microwave
oven using 3-second bursts of high power. It takes a few tries to
get the chocolate soft enough without oversoftening it» but once
this point is reached it will stay for at least 10 minutes during
which lime many curls can be formed.
Chocolate can be curled with a melon-bailer, but my favorite
utensil is a sharp potato peeler.
Hold the chocolate block in one hand, against a wad of pa-
per toweling so that heat of your hand doe«Vt melt the chocolate.
Hold the peeler against the upper edge and, digging in one edge
of the cutter, bang the blade toward you. Greater pressure forms
thicker, more open curls. Lighter pressure makes tighter curls. If
the chocolate is not warm enough it will splinter. If too warm, it
will come off in soft strips that will not curl. If nut too soft, strips
can be rolled into curls with cool fingertips.
CHOCOLATE CIGARETTES: These arc actually long curls. To make
cigarettes, it is necessary to quick-temper the chocolate using any
method on page 381, Spread the tempered chocolate into a long
band Winch-thick on a smcxith marble or Formica counter and
allow* it to set. Don't wait too long or the chocolate will harden
too much and will not curl. Test small sections at the edges to sec
when the consistency is perfect.
Using a knife or pizza wheel, score the chocolate to deter-
mine the desired length of the cigarette. Using a triangular scraper
held at а 45ч1е£гее angle co the chocolate, push firmly against the
counter, starting at the bottom of the chocolate band and pushing
away from you. The higher the angle and the thinner the choco
late, the tighter the curl.
Use a pancake turner to lift the cigarettes and store airtight,
refrigerated, or at cool room temperature.
CHOCOLATE PINE CONE PETALS Quick-temper 6 to 8 ounces
milk or bittersweet chocolate {page 381). This will make two 24-
inch by 18-inth sheet cake pans of petals—enough for Chocolate
Pine Cone (page 196). Tape a sheer of parchment or foil on a flat
surface. Dip the tip of a small metal spatula in the chocolate and
dab it onto the parchment, pressing lightly down to form a ta-
pered petal shape while drawing the spatula toward you. The pet-
als should be УачгкЬ wide and 1-inch long. When the petals have
set and are easy to remove from the parchment, store airtight
refrigerated or at cool room temperature. (Use a flexible spatula
to remove them from the parchment).
Use tweezers to place the petals on the cake.
SUCCESSFUL CHOCOLATE RUFFLES This can be the most pains-
taking and frustrating of any decorative technique I know—even
for a professional chocolatier—because, if working with real
SPECIAL EFFECTS AND DECORATIVE TECHNIQUES 383
chocolate, the precise temperature is more critical than tor any
other technique. To© cold and the chocolate splinters; COO warm
and it melts in your lingers. This is a technique worth mastering
simply because chocolate rutiles are rhe most spectacular of all
chocolate decorations.
It has taken me years to come up with a reliable method for
ruffling chocolate. Frankly, I almost gave it up as a lost cause.
Especially after having traded notes from LeN6tre\ professional
class in France for a lesson from a French chocolatier—who gave
up after claiming that he required refrigerated marble.
Only recently, through a more intimate understanding of
chocolate's varied peculiarities, 1 have at last worked out a method
that is, perhaps, as idiosyncratic as the chocolate. It docs
not involve changing the chocolate’s ingredients, only its texture.
It is accomplished by precise control of temperature but docs
not involve any special equipment. With great pleasure 1 share
the secret.
The chocolate must be melte a special way I refer to xs
quick-tempering method. If tempered according to the classic
method, the cnsp “snap*’ desirable for other uses makes the choc-
olate too brittle to ruffle. If fully melted and not tempered ar all
the chocolate will still ruffle but the surface will have a crumbly,
unattractive appearance.
Room temperature should be between 70®F. to 75CF. Have a
small bowl of ice water nearby so you can dip in (he fingers of
your left hand if their heat starts to melt the chocolate- (Be sure
to dry your fingers before touching the chocolate.)
To quick-temper the chocolate, see page 379. While the
chocolate is melting, warm a baking sheet either by placing it in
the oven with a pilot light or running it under hot water and
wiping it totally dry It should feel warm not hot. You will need
5 ounces bittersweet chocolate to cover a 17-inch by 12-inch pan.
Ten ounces of chocolate ruffles will be enough to cover an 8-mch
or 9-inch cake.
Using a long angled spatula, spread the chocolate m a thin
even layer on che back of the warm baking sheet. Place it in the
refrigerator for exactly 5 minutes. Remove from the refrigerator
and place on a counter so that one edge is against the wall for
stability. The tup will be slightly dull which means it has set» but
the underneath will be soft. The chocolate will continue to firm
at room temperature. Allow it to sit ar room temperature for 15
to 25 minutes. Test a small area with a triangular scraper. When
the chocolate is firm enough to ruffle, it will maintain this ideal
texture for at least 20 minutes. If room temperature is below 7(FF.,
however, it may harden before this time.
184 COMPLEMENTARY ADORNMENTS
For ruffling, the angle of the triangular scraper has to be less
than for making chocolate curls—about 20 degrees. If you arc
right-handed, start at the bottom left side of the baking sheet,
pushing firmly against the chocolate in the direction of the wail.
The right edge of the spatula should move in a straight line, but
to help ruffle the chocolate it should at the same time be angled
slightly to the left. About 2 inches is an attractive width. As you
push chocolate with the scraper in your right hand, use the rhumb
and forefinger of your left hand to lighdy pleat the chocolate
(Fig. 1). If the chocolate is too tightly pleated, gently stretch the
ruffle slightly apart.
Set the finished ruffles on the counter where they will con-
tinue to firm. When no longer flexible, they can be transferred by
hand or with a thin flexible pancake turner. Either place directly
on the frosted cake or on a cool baking sheet for storage. To
store, keep ruffles airtight, either refrigerated or at cool room
temperature.
To place on the frosted cake, start at an outside edge and
place a single, continuous row of ruffles. The next row should
overlap the first. Use the smallest ruffles for the center (Fig. 2).
Do feel free to experiment with chocolate ruffling to your heart's
content. Imperfect ruffles are still attractive or can be remelted
and tempered or used for ganache.
CHOCOLATE LEAVES: This is an impressive, easy, but somewhat
tedious technique. When my assistant Hiroko Ogawa returned to
Japan, she left me with a dowry of over one hundred white choc-
olate leaves—a much-appreciated gift. If only a few chocolate leaves
are needed, summer coating is the best choice because it doesn’t
require tempering. When surrounding a cake with an embrace of
chocolate ruse leaves, I like tu use the best possible real chocolate.
Couverturc (page 4231 makes the most glossy, elegant leaves.
Rose, lemon, maple, and geranium leaves are some of my
favorite shapes. Select well-shaped leaves with no holes. Wash leaves
and dry thoroughly. Each leaf can be used several times until it
tears.
Holding a leaf by its stem and supporting it underneath with
a finger or the palm of ynur hand, use a small metal spatula or
artist's brush to smooth an even layer of chocolate on the under-
side of the leaf (Fig. 1). (Be sure to use the veiny underside as all
the delicate lines will be imprinted on rhe chocolate.! Don’t allow
chocolate to get on the other side of the leaf or it may break when
peeling off the leaf.
Carefully place the chocolate leaf un a baking sheet lined with
foil, parchment, or wax paper and refrigerate or freeze for 3 min-
1
SPECIAL EFFECTS AND DECORATIVE TECHNIQUES Ш
utes, until set and no longer shiny, if using large leaves, add a
second coat of chocolate for stability. White chocolate and cou-
verture also require second coats as the chocolate is thinner when
melted and the light shines through in spots when placed on the
cake.
To remove the chocolate from the leaf, peel back the stem
end, touching the chocolate as little as possible (Fig. 2) If choco-
late adheres to the leaf, it has not set long enough.
To apply the leaf to the cake, brush a small dab of melted
chocolate (cool to the touch] on the back and gently press it against
the side of the cake, angling it slightly so that the tip is at the
1:00 position.
CHOCOLATE FOSSILING: 1 developed this technique quite acciden-
tally in an amusing way. 1 was giving a demonstration at the Miami
Hilton and time was running short, so I was forced to sprinkle a
layer of powdered sugar and place the prepared chocolate leaf on
a stilI-warm chocolate cake. The effect was sensational. Tbe choc-
olate melted slightly, flattening into the cake, while maintaining
the shape of the leaf. It exactly resembled a fossil.
CHOCOLATE DISCS AND CUTOUTS: Sheets of chocolate can be
cut into many shapes to decurate cakes. Quick-temper the choc*
date (page 381) and with an angled spatula spread it ‘/к-inch thick
on wax paper, preferably butcher’s wax (page 464), which will
give it a high sheen. Or cover with a second sheet of wax paper
and spread with a rolling pin. When the chocolate is firm enough
to cut but not so firm that it will break, use either a cookie cutter
or template and the iharp point of a knife to create shapes.
Tn make a round disc, such as the one used for Queen Bee
cake (see color photograph), use an inverted lid or a cake ring as
a guide. To cut round holes in the disc, use the back of a large
pastry tube or round cookie cutter 1-inch in diameter and the tip
of a knife if necessary to lift out the chocolate rounds.
Freeze for a few minutes or allow to set at cool room tem-
perature. When chocolate has set completely and will separate
cleanly from the paper, invert onto a flat surface and peel off the
paper. Use a pancake turner to lift or transfer the disc.
CHOCOLATE AND CHOCOLATE PRALINE SKETS: Urge thin sheets
of chocolate or chocdate praline look magnificent draped around
a cake, transforming it into a modem soft sculpture that never
turns out looking exactly the same way twice. Praline sheets ad-
here to the frosting on the cake.
A tnck I have worked out over the years is that, since choc-
date is very sensitive to changing temperatures, I use this to my
advantage hy switching rooms for different stages. The oval sheets
386 COMPLEMENTARY ADORNMENTS
of chocolate are fairly rigid at axil room temperature but become
perfectly flexible in a warmer (75°F. to 8 ОТ) room.
Make the chocolate praline \heetx on page 315. Only 4 large
sheets are needed to encase a 9-inch cake so the 2 extra are in
case of breakage- Any leftovers can be remelted, retempered, and
Cut into decorative shapes, Begin by laying each sheet on the counter
and peeling off the top layer of paper. Lift up 1 sheet using the
bottom paper to support it and press the long side against the
cake, curving it gently. Carefully peel away the wax paper. Place
a dab of frosting near the edge and attach a second sheet, over-
lapping the first.
Continue with rhe remaining chocolate sheets until the cake
is surrounded. If room temperature is warm enough, the sheets of
chocolate will begin to curve toward the center of the cake. Coax
them gently into graceful, undulating shapes, allowing their nat-
ural inclination to be your guide. If the chocolate remains reso-
lutely rigid, wave a hair dner briefly and evenly over the chocolate
sheets. Stop before they appear to have softened and wait a few
moments as it is easy to overdo the heat and melt the chocolate.
To this day, this process feels slightly scary, slightly nsky, and
delightfully creative! A word of reassurance: Whatever happens
and however it winds up looking, the chocolate praline sheets are
always delicious. A former student and good friend, Judi Elkins,
twice encased a cake in praline sheets that were not softened enough
and shattered on top of and around the cake. She left the cake in
the kitchen and served another dessert tn its place. But in a mo-
ment of somewhat wacky postprandial inspiration, her husband,
Paul, dubbed the abandoned cake “The Polish Apple Torte’’ in
deference to his Polish origins and invited the guests into the kitchen
to try what Judi had thought of as a kitchen disaster. Everyone
adored the cake. Not a soul questioned the fact that there were
no apparent apples in it. And many ordered the cake from Judi
for their own parties.
CHOCOLATE BANDS: A dark, gleaming chocolate band, sur-
rounding the cake and 1 or more inches taller, provides a smooth
finish for the cake’s sides. The hollow at the top can be filled with
whipped cream, piped into opulent swirls, brandied cherries, or
lots of fat chocolate curls. The top of the band can be cut straight
or in graceful or even wildly irregular waves.
To make a chocolate band, measure the circumference of the
cake and cut a piece of wax paper a few inches longer. Fold the
wax paper the desired height of the band. It should be at least 1
inch higher than the finished height of the cake. If planning to
scallop the band add an extra inch or two. Brush the sides of the
cake with melted Jewel Glaze Ipage 329) to attach the band.
SPECIAL EFFECTS AND DECORATIVE TECHNtQUFS 387
For a band long enough to encircle a 9-inch cake, classic-
temper or quick-temper 4 to 8 ounces dark chocolate, preferably
couverture. Eight ounces will be sufficient to make a band 5 inches
high. (If you don't temper the chocolate when mdnng it or if the
room is too warm, the band will not be firm enough to wrap
around the cake.)
Using an angled spatula, spread the chocolate evenly over the
wax paper strip, making it a little longer than the desired length.
I aft the strip by the ends and transfer to a dean sectnin of the
counter to set. When firm but soil malleable, use a small sharp
knife to cut a free-form scalloped design along one side if desired.
Attach the strip, scalloped side up, to the side of the cake. Gently
pull away the wax paper and use a bit of melted chocolate or jelly
to attach where the ends overlap. If the chocolate sticks to the
paper, allow it tu set longer or refrigerate for a few minutes until
firm enough to release cleanly. The scalloped edge will break away
easily on slight pressure to reveal the scalloped border.
CHOCOLATE LATTICE BANO This is pretty much the same tech-
nique as the solid chocolate hand bur the chocolate is piped in a
free-form filigree before wrapping it around the cake. As the sides
of the cake will show through the openings of the filigree, they
should be smoothly frosted with chocolate frosting, preferably
lighter than the filigree to show off the design.
You will need 2 ounces chocolate for a lattice band to encir-
cle a 9-inch cake, so melt 3 ounces chocolate to have enough
extra to squeeze in the parchment cone. The piping chocolate must
be thickened slightly so that it will fall smoothly from the parch-
ment cone like a spider s web. Although a drop of water will
cause the chocolate to seize or lump, a fraction of a drop will
thicken it in a more controlled way. Glycerine (page 429) is the
ideal liquid to use because it contains a very minute proportion
of liquid. Stock syrup will also work. (Bring an equal volume of
water and sugar to a full rolling boil, cover, and cool.} Add only
I drop glycerine or stock syrup at a time, stirring and testing
thickness by allowing rhe chocolate to drop from a height of 4
inches. If it falls in a smooth string, the thickness is right.
If using real chocolate as opposed to compound chocolate, it
should be quick-tempered (page 381) before adding glycerine
or syrup.
Chocolate is traditionally piped from a parchment cone be-
cause a metal tube would make the chocolate too firm. To make
a parchment piping cone (page 394), cut off only a tiny bit from
the end and try piping a few swirls to test the thickness of the
line. If too thin and chocolate does not flow evenly, cut a tiny bit
more from the tip. Allow the chocolate to fall in a thin fluid line,
using the motion of your entire arm to form curves.
ЗЯ8 COMPLEMENTARY ADORNMENTS
If rhe chocolate hardens in the tip, press with your fingers to
soften it and squeeze out any hard lumps blocking the opening.
Pipe a free-form filigree on wax paper and allow to set until
dull. Wrap around the cake, peeling back one end of wax paper
slightly to overlap ends. Chill until very' firm and carefully peel
off the paper.
CHOCOLATE WRITING The fluid flow’ of melted chocolate pro-
duces a very elegant script even without perfect penmanship. Some
of the most beautiful chocolate writing I have ever seen on a cake
was piped by my Oriental students in exquisite Chinese cal-
ligraphy.
Chocolate writing looks most elegant on top of a chocolate-
glazed cake. Prepare the chocolate and parchment cone as for the
above filigree lattice- If you prefer nor to risk free-form writing,
make a template by tracing letters (page 412} or designing your
own letters. Tape a piece of nonstick liner (page 458} or parch-
ment over rhe template and trace the design in chocolate. Chill
the chocolate until very firm before removing from the liner. Re-
move with a very thin knife blade or spatula. Or set the design
near the edge of a table and, pressing the back edge of rhe liner
to the table, slowly pull the liner from the chocolate design until
almost completely released. Lift the design with a small angled
Spatula.
If writing directly on the cake. Cocoa Piping Gel is slightly
softer and much shinier than chocolate. To make 46 cup: in a
small saucepan stir together 3 tablespoons piping gel, 1 table-
spoon hot water, 3 tablespoons unsweetened cocoa, and 6 table-
spoons powdered sugar. Cook over low hear, sorting constantly,
until just smooth. Cool completely to obtain piping consistency.
CHOCOLATE DOILIES: I pipe this directly on the serving plate as
it is for visual effect only and does not get eaten. Summer coating
page 423} or the above cocoa piping gel are appropriate choices
as they require no tempering. If using summer coating, thicken
die chocolate as for filigree lattice (page 388) and fill a parch-
ment cone.
Pipe free-form swirls or flowers directly on the serving plate,
surrounding the cake. If you wish to follow a precise pattern, use
a flat glass serving plate and tape a template underneath it. Re-
move the template after piping the design.
CHOCOLATE GLAZING WITH WEBBING: Dark, shiny Chocolate
Cream Glaze (or Chocolate Butter Glazel is one of the most stun-
ning adornments for a cake. The sides of a glazed cake are al-
ways, however, slightly lumpy or less perfect than the top, so I
usually vurround the sides with chocolate rose leaves, a chocolate
band, or cutouts.
SPECIAL EFFECTS AND DECORATIVE TECHNIQUES 389
Webbing the top of the cake with lines of contrasting white
chocolate makes an interesting variation.
Glatt the cake (page 271 or 27.3) and prepare a white choc-
olate decorating glaze. Quick-temper 2 ounces white chocolate by
removing it from the heat before fully melted and stirring until
melted. Stir in either 1 tablespoon flavorless oil or 1 tablespoon
+ 1 teaspoon Armagnac or Cognac. Fill a parchment cone or
plastic squeeze bottle* with the white chocolate, and before the
glaze sets, pipe either evenly spaced straight lines across a square
cake or concentric circles on a round cake.
For straight lines, start at 1 edge of the cake and hghdy drag
a small knife blade at even intervals in a straight line toward you—
at right angles to the piped white lines. To reverse the direction
of the lines, turn the cake around and repeat, making lines be-
tween the first set of lines.
For circles, start at the center of the cake, dragging the knife
blade to the edge at 8 evenly spaced intervals. Then reverse the
direction, starting at the edge and going toward the center for 8
more lines between the first 8 lines.
CHOCOLATE ROSE MOOEUNG: Knead Chocolate Rose Modeling
Paste (page 325) until pliable and roll between sheets of plastic
wrap until VU-inch thick. Cut small circles for petals using the
back of a pastry tube or lightly greased rose petal cutters Ipage
461} (Fig. 1). (Use a 1-inch cutter for the first row, a 1%-inch
cutter for the second row, and a 1 ’Zt inch cutter for the third row.)
Roll the circles to elongate them slightly, leaving the base thick
for support and thinning the upper section only.
If chocolate becomes too soft, allow it to sit briefly and it
will get firm.
Form the base of the rose by shaping a small ball and then
pinching it to form a cone shape (Fig. 2).
Wrap chocolate petals around the base, overlapping them as
you go (Fig. 3). The first set of 3 petals should curve inward to
hide the core. The second row of 3 petals should be straight up,
and the third row should curve out and open up slightly. Push
petals away from each other and the core with a blunt instrument
such as a metal cuticle pusher (Fig. 4). For a natural look, use
your fingertips to softly curl back rhe edges of each petal except
for the first row of inner petals (Fig. 5).
When the rose is completed, allow it to sit at room temper-
ature away from direct sunlight for 48 hours or until firm enough
to place tn an airtight container on a nest of plastic wrap. Keep
in a cool room, refrigerate up to 1 year, or freeze indefinitely.
'Atailsbk in ikvjjstum by iUcihjj toe i squmr bottlr fur hair coloring.
390 COMPLEMENTARY ADORNMENTS
PORCELAINIZM4G CHOCOLATE ROSES; For a glaze that dries as
hard and shiny as porcelain, brush a well-dried chocolate rose’
with unflavored oil. Before the oil has a chance to be absorbed
and appear dry, coat the petals with light com syrup. Allow to
dry for several hours or until the glaze is hard to the touch.
I learned both string figures and the intricate art of origami {Jap-
anese paper folding} from books. It was nut easy but it was pos-
sible. Piped cake decorations, however, were another matter. I
carefully followed the printed instructions that came with the pastry
bag and tube set, but the blobs emerging from my pastry tip bore
no semblance to the fine ridged swirls tn the pictures. I did not
realize that thr main problem was the consistency of the icing.
Too soft and the shapes will not be articulated; too stiff and the
icing will break sharply instead of curving into smooth designs.
It was a two week intensive course at Wilton Enterprises in
Chicago that turned me into a cake decorator. I am also indebted
to Wilton for writing piping directions that explain the angle of
the pastry bag in terms of both degrees of elevation and clock
position. This concept, together with the proper icing consistency,
makes it indeed possible to learn from the printed page.
Piped decorations take practice but are a lot of fun. It is a
great project to do with children because they are so delighted
with whatever design they manage, even if it does not resemble
the “model/* To keep icing from coming out of the top of the
bag and making a mess, 1 use a twist-пе to secure the opening.
At Wilton the first decoration we learned was the star. It is
easy to pipe and even when imperfectly executed looks attractive.
Top Border: A continuous decoration piped around the top of
a cake.
Bottom Border: A continuous decoration piped around the base
of a cake (which has the added function of scaling in freshness}.
Side Decoration: Piped decorations used around the sides of
a cake.
Decorating or Pastry Bag: Tbe container that holds the decorating
rube, coupler, and icing or buttercream.
Coupler: A grooved insert and retainer ring that allows tube
changes without changing hags.
Decorating Tubes: Open end tubes in various shapes used to form
icing decorations.
Flower Nail: A round, flat nail head used as a turntable surface
for making icing flowers.
PIPED
DECORATIONS
TERMS
FOR PIPED
DECORATIONS
* Ro«e imm ch? for »< I daps or the xLii« does not take evenly.
SPECIAL EFFECTS AND DECORATIVE TECHNIQUES 391
BASIC
TUBE DESIGNS
C1)
There are 6 basic tubes that produce most of the popular cake
decorations. Each tube is available in a variety of sizes, but the
decorations they produce are the same.
Star Tube: For making stars, shells, rosettes, ropes, zigzags, puffs,
fleurs-de-lis, and scrolls.
Drop Flower Tube: For making two different flower varieties.
Round Tube: For writing, dots, pearls, strings, outlines, and beads.
Rose Tube: For making roses, rosebuds, sweet peas, and ruffles.
Leaf Tube: For making leaves.
Basket Weave Tube: For making plain and ribbed stripes and
basket weave design.
PREPARING One of the major advantages of the polyester bag, aside from
A POLYESTER being reusable and comfortable to hold, is that it can be used with
DECORATING BAG a coupler so you can change tubes without emptying or chang-
ing bags.
To cut a bag to accommodate rhe coupler, separate the cou-
pler and drop the base, narrow end down, into the bag. Force
down the coupler as far as it will go. With a pen or pencil, mark
the spot on the outside of the bag where the bottom thread is
outlined against the material (Fig.l).
Push the base of the coupler back up into the bag and cut
across where the mark was made, cutting in a slight curve rather
than sharply across it. The beginning and end of the cut should
be slighdy higher than the middle so that when end is open, it
will be round (Fig. 2).
Push the coupler base back through the bag opening. Two
threads should be showing (Fig. 3). To secure a tube in place, slip
392 COMPLEMENTARY ADORNMENTS
it onto the coupler base and twist the ring over it, threading it
onto the base (Fig. 4}.
To fill baf: Fold down the top to form a generous cuff and hold
it beneath the cuff. Use a long spatula to fill the bag l6 full. Filling
it more risks melting and softening the icing from the heat of your
hand (Fig. 1
To remove the icing from the spatula, hold the bag on the
outside between your thumb and lingers and pull the spatula out
of the bag, pinching rhe icing (Fig. 2). Unfold the cuff and using
the side of your hand, force icing toward the tip (Fig. 3). Twist
the hag dosed. To be sure that no air is trapped in the bag, squeeze
a small amount of icing into a bowl. It is a good idea to do this
when refilling the bag or the livtle explosion of air when old icing
meets new can disrupt the piped decoration.
To hold bag: Place the twisted part of the bag in the V between
your thumb and forefinger. Lock your thumb over your forefinger
to keep the idng in the lower part of the bag (Fig. 4). Press your
remaining fingers against the side of the bag so that when you
squeeze out the icing, you squeeze from the side while your thumb
presses from the top.
Steady the front end of the bag with the fingers of the other
hand to support the weight of the bag and to establish the direc-
tion of rhe rip.
SPECIAL EFFECTS AND DECORATIVE TECHNIQUES 393
PREPARING
A PARCHMENT
CONE
There are two major advantages co a parchment cone: It is dis-
posable, and its stiffness keeps the heat of your hand farther from
the icing.
In an emergency I have used a triangle of wax paper. It works
well but does not bold up quite as long.
In these illustrations, the points of the triangle have been la-
beled A, B, and G
Place the triangle on a flat surface with A pointing toward
you (Fig. 1). Curl C up and under, bringing it toward you until
points A and C meet. The curled edge from C should lie on top
of the edge between A and B. The parchment will curve more
easily if you extend your right elbow while doing this (Kg. 2).
Hold points C and A together with your left hand while picking
up В with your right (Fig. 3). Wrap В around to meet points A
and C in the back, forming a cone (Fig. 4). Hold the bag with
both hands, rhumbs inside, and slide В and C in opposite direc-
tions to make a W formation {Fig. 5). Tugging point В slightly
upward will help to form a sharp, dosed point (Fig. 6}.
Turn down the top and secure with a staple. Tape the outside
seam of the bag (Fig. 7). Use a small strip of tape near the pointed
end. This will keep the cone from unfolding and the icing from
coming out the side (Fig. 8).
If piping chocolate, cut off the tiniest amount possible from
the tip. If piping icing, make an opening for the tube by dipping
off Vi-inch from the tip (Fig. 9). Too large a hole will allow the
tube to fall through, too small and the parchment will cut off part
of the frosting’s design. Make the cut slightly curved, as for the
polyester hag, so the opening will be round and icing will not
creep out around the edges.
Drop the tube into the cone, narrow end first, and push for-
ward to make sure the op is exposed. The weight ot the icing will
hold it securely in place.
194 COMPLEMENTARY ADORNMENTS
To fill cone: Hold near the bottom and use a long spatula to fill
with icing, forcing it down (Fig. 1). Fill l/i full, removing the icing
from the spatula by pinching it between thumb and fingers from
outside of bag, while withdrawing spatula (Fig. 2).
Closing the cone: Parchment cooes must be dosed tightly to keep
icing from escaping through the top. First, smooth the top flat,
using the side of your hand to force the icing toward the tip (Fig.
3). Then fold in each side and roll down the top until it is dose
to the icing (Fig. 4). Lock your thumb over the top with your
remaining fingers curled around the side.
Different shapes and types of decoration require different consis-
tencies of icing or bunercream. For example, flowers with upright
petals such as roses require a stiff icing; most borders such as the
shell and star require a medium icing; and string work, leaves,
and writing require a thin icing.
Royal icing can be thinned by adding glycenne or corn syrup
or stiffened by adding extra powdered sugar. Buttercream* can be
softened by heat or firmed up by refrigeration.
CONSISTENCY
OF ICING AND
BUTTERCRFAM
SPECIAL EFFECTS AND DECORATIVE TECHNIQUES 5$ 5
COLOR SHADING
STORING PIPED
DECORATIONS
Tn determine the consistency of an icing or buttercream, take
a small dollop and dab it on the work surface. With a small spat*
ula, lift it to form a peak.
Stiff icing will hold a %-inch peak.
Medium idng will hold a ’Л-inch peak.
Soft icing will hold a 14-inch peak.
This technique gives a subtle rwo-tone effect to each decoration
piped from the tube. It is particularly suitable for piped roses.
Mix two or more batches of icing so that rhe colors are in
the same tone but vary slightly in intensity of hue. Starting from
close to the tip and continuing to the top of the bag, make a long
crease. With a metal spatula place a long strip of idng against the
crease. Carefully place a second shade of icing up against the first
strip and continue until the bag is full. Strips should only be as
long as ki the bag so that it is not overfilled.
Decorations made from royal icing can be air-dried and stored
indefinitely at room temperature.
Buttercream decorations which are not piped directly on the
cake should be chilled or frozen until firm enough to transfer to
the cake. If time is short, a buttercream rose can be transferred
directly to the cake with scissors: Hold them slightly open to lift
rhe rose from the flower nail; set down on the cake with the scis-
sors still slightly open; then close the scissors and slide away from
the rose.
P racticc
“Buttercream”
MAKES 3 CUPS
v^'his buttercream is for practicing piping techniques.
Vegetable shortening stays firmer ar warm temperatures than
does butter because it has a higher melting point. While
this quality makes it suitable for playing with decorating
techniques it makes it undesirable fur eating because its slow
melting point makes it feel like an oily skin against the palate.
Practice buttercream may be reused almost indefi-
nitely. Rebeat occasionally using a flat beater at slow-me-
dium speed to keep it smooth. It may be chilled to speed
up firming if it softens during use.
3% COMPLEMENTARY ADORNMENTS
INGREDIENTS MEASURE WEIGHT
—
mwn temperature solid vegetable shortening ю/imre 1 Vi cups prumda'ouacct 10 ounces kiloframs .graaif 2$ 7 grams
powdered sugar 4 rcps I potmd 452 grams
Ilighdv spooned into
cup)
water 2 tablespoons * 0.5 ounce , i, 15 grams
light corn syrup 1 tablespoon t 0.75 ounce 20 grams
* Fot tbift consistency used tix wrinng, stem*, and leaves use J ublnpouiu
•atrr and 2 taNrspoons li^ht corn syrup, The oom syrvp jkM» a di<h< shine,
moiscness, and stretchy quibey to tbe «cine.
fEui ЛЦУ оопшсслс? used foe fkmets *wi upright petals such as iw*x omit
the oom syrup.
STORE:
1 year room temperature,
indefinitely refrigerated.
In a large mixing bowl place shortening. Gradually bear tn
remaining ingredients on low speed, alternating dry and
liquid. Increase speed to medium and beat until smooth and
creamy. Scrape the sides occasionally. Store in an airtight
container.
The two most important entena for piping decorations with
a pastry tube (in addition to icing consistency) arc the position of
the bag and the amount and type of pressure applied.
Posidon of bag: 'lhe position in which the bag is held must be
precise to produce a specific design. Position refers both to the
angle of the bag relative to the work surface and the direction in
which it points. The two basic angles at which the bag is posi-
tioned are:
90 degree (perpendicular)
45 degree (halfway between vertical and honzontal)
When decorating, one hand ts used to squeeze the bag and
the other to help establish and steady the angle. If drop flowers
or stars come out asymmetrical, chances arc the bag is not being
held at a 90a angle (perpendicular to the decorating surface).
Most tubes have symmetrical openings, however, there are
some tubes, such as the rose tube, which are broader at the base
than ar the tip. When this is the case, the position of the tube
must also be considered. The rose tube is almost always used with
the broad end down.
Direction of the bag: This refers to the direction in which the end
of the bag, farthest from the tip, is pointing. It is most easily
described by using the position of numbers on a clock face. To
SPECIAL EFFECTS AND DECORATIVE TECHNIQUES 197
« 00
bencr visualize this» try holding the bag at an angle to the surface
and keeping the tip in place, make a circle with the back end of
the bag by rolling your wrist. Imagine that the circle is a
clock face.
Ihrecriofi of movement when piping: A right-handed person should
always decorate from left to right; a left-handed person from right
to left except when writing.
Pressure control: The size and uniformity of icing decorations are
determined by the amount and type of pressure exerted on the
bag. Some decorations require a steady, even pressure, others re-
quire a gradual tapering off. The more rhythmic and controlled
the pressure, the more exact the decoration.
It is also particularly important to release all the pressure
before lifting off the tube to present little “tails’* of icing from
forming. Try wiggling your fingers slightly to be sure they arc not
inadvertently exerting pressure before lifting off the tube.
PIPED BORDERS
AND SIDE
DECORATIONS
STAR: This makes a very attractive outline to border a cake or can
be used to fill in sections or even the entire surface of a cake.
Place the stars close enough together so that the points interlock
and fill in all gaps.
Icing Consistency: Medium
Tube: Any star tube (18 or 22 is a good size for most borders}
Position of Bng: 90-degrcc upright angle, tube Уч-indi above surface
Method: Squeeze bag firmly without moving it until the icing star
is as wide ал you desire. Push tube down slightly and stop squeez-
ing, Slowly and precisely lift the tube straight up and away.
note: You can change the size of the star by increasing the length
of time you squeeze or by the amount of pressure. If too much
icing is squeezed, the lines will start to waver.
Two of the most common problems in piping show up when
piping stars:
1. continuing to squeeze while lifting off the tube.
2. not holding the tube upright for a symmetrical decoration.
398 COMPLEMENTARY ADORNMENTS
ROSETTE: Rosettes are often used as continuous borders nr, when
piped with a large tube and widely spaced, as a decorative de-
marcation for portion size.
Ictng Consistency: Medium
Tube: Any star tube
Powbon of Bag: 90-dcgree upright angle, tube %-tnch above surface
Method: As you squeeze out the icing, move the rube in a tight
arc from the 9:00 position around to the 6:00 position (Fig. 1).
Release the pressure but do not lift the tube until you have fol-
lowed the circular motion all the way around to the 9:00 position
from which you started (Fig. 2). This will give the rosette a wrap-
around look.
SHELL If there were only one border to be used in cake decorat-
ing, the graceful shell would be my first choice. In fact, the shell
or one of its many variations ts almost always present on some
part of a decorated cake.
Idng Consistency: Medium
Tube: Any star tube (18 and 22 are the most commonly used)
Posioon of Bag: 45- to 90-degnre angle ar 6:00, tube slightly above
surface. [I prefer the flatter, wider shell you get from the higher
angle.)
Method: Squeeze firmly, allowing the idng to fan out generously
as you lift up the tube slightly. (Do not move the tube forward;
the force of the icing will push the shell slightly forward on its
own.) (Fig. I)
SPECIAL EFFECTS AND DECORATIVE TECHNIQUES 399
Gradually relax the pressure as you lower rhe cube co the
surface. This gradual tapering off forms a graceful tail. Stop the
pressure and pull away the rube without lifting it off the surface
to draw the tail to a point (Fig. 2).
To make a second shell for a border, line up the tube at the
tip of the first shell’s tail. The slight forward thrust of the icing
will just cover the tail of the preceding shell. When viewed from
the side, the shells should be gently rounded, not humped. If
humped, you are lifting the tube too high above the work surface
(Fig. 3).
REVERSE SHELL For an interesting variation, the reverse shell bor-
der produces sheik which alternate in direction.
Icing Consistency: Medium
Tube: Any star tube (18 and 22 arc rhe most commonly used I
Method: Squeeze firmly, allowing rhe icing to fan out as for a
regular shell. Then move the tube to the left, up and around, in a
question mark shape (Fig. I). Gradually relax the pressure as you
pull the tube down to the center, forming a straight tail. Repeat
the procedure—only this time swing the rube around to the nght
in a backward question mark. Continue alternating shells around
the border (Fig. 2).
FLEUR-DE-LIS Yet another variation of the shell, a flcur de-lis is
composed of 3 shells—a regular shell and 2 reverse shells, it is
most often used for the sides of a cake.
Icing Consistency: Medium
Tube: Any star tube (18 and 22 are the most commonly used)
Method: Pipe an elongated shell (Fig. 1). To its left, pipe a reverse
shell, shaped like a regular question mark (Fig. 2). To its right,
pipe another reverse shell shaped like a backward question mark.
400 COMPLEMENTARY ADORNMENTS
Allow the tails of the reverse shdls to come up on top of the
center shell» being careful to have all rails meet to form a point
(Fig. 3).
SHELL WITH FLUTE Combining 2 different piping techniques, the
shdl and the stand-up petal used for a sweet pea (page 406)» re-
sults in an unusual and elegant decorative effect.
long Consistency: Medium
Method: Make a shell border, allowing a little extra room be-
tween each shdl to accommodate the flute (Fig. 1). To make a
flute, use the rose tube 104. Allow the wide end of the tube to
rest between the 2 shells. Squeeze the bag while raising the tube
slightly to allow the flute to rise between the 2 shdls (Fig. 2). Stop
rhe pressure, lower the tube, and pull away. Repeat this proce-
dure between every shdl or every other shell.
RUFFLE: Ruffles are used on the sides of a cake.
lang Consistency: Medium
Tube: Any rose tube {104 is often used)
Position of Rig: 45-degree angle at 3:00» tube with wide end down
and narrow end slightly raised from the surface
Method: Squeeze firmly using a back-and-forth motion to pro-
duce zigzag ruffles
W222)
SPECIAL EFFECTS AND DECORATIVE TECHNIQUES 401
DOTS AND PEARLS: One or two staggered rows of balls create a
lovely, graceful border. Dots are subtle and delicate on the sides
of a cake as well,
lang Consistency: Soft
Tube: Any round tube (3 is a nice size for the sides, 8 for a 12-
inch base, 6 for a 9-inch base, 4 for a 6-mch base)
Position of Bag: 90-degree upnght to surface, tube slightly above
surface
Method: Squeeze with steady, even pressure. As the icing begins
to build up, raise the rube with it keeping the tip buried in the
icing. When a well-rounded shape is achieved, stop the pressure
as you bring the tip to the surface. Use the edge of the tip to shave
off any point, moving the tip in a clockwise direction. Points are
more apt to form with stiffer icing. Points can also be removed
by waiting until the icing crusts slightly and pressing gently with
a fingertip. If the icing is still soft, dip the fingertip in water first.
ROPE This border consists of a chain of S shapes intertwined to
create the illusion of a twisted rope. It is quite easy to accomplish.
Idng Consistency: Medium
Tube: Any star tube (18 and 22 are usually used)
Posidon of Bag: 45-degree angle at 4:30, tube lightly touching
surface
Method: Squeeze with steady, even pressure. Move the tube up,
around, and down to the right to create a sideways S curve. Stop
squeezing and lift the bag away. Insert the tube under the left side
of the S and repeat che same procedure, lifting the tube as you go
up and around.
BASKET WEAVE When rhe basket weave is used to dewrate the
sides of a cake and flowers are used on top, it creates the illusion
of a basket filled with flowers.
402 COMPLEMENTARY ADORNMENTS
The basket weave is an easy but somewhat time consuming
technique. Since the entire sides of the cake will be covered with
icing to form the basket weave, only the thinnest coating of icing
should be used to frost the cake.
Icing Consistency: Medium
Tube: 3 and 47
Position of Bag: 45 degree angle at 6:00 for vertical lines, 3:00
tor horizontal lines
Method: Basket weave goes more quickly if two bags are used.
For vertical stripes, use tube 3. Starting at the top of the cake,
touch the tip to the surface to attach the icing and then raise the
tube slightly to allow rhe icing to fall freely against the side of the
cake. (This will produce a more even line.) Squeeze evenly and
firmly, drawing the tube down the side to the bottom and touch
the tip at the bottom.
For horizontal basket weave, use tube 47 with serrated side
facing up. Use rhe round line as the center guide for the stripes.
With the tip touching the surface, start squeezing, lifting slightly
to nde over the vertical line. Stop squeezing and pull very slightly
to straighten the stripe. Touch down to the surface to attach. Space
the second stripe one stripe width away from the first. Repeat
until to the bottom of the cake.
Starting from the top, drop a second vertical line down the
side of the cake to cover the right edges of stripes. (If a little stripe
sticks out, don’t worry, it will he covered by the next alternating
row of stripes.) (Fig. 1).
For the second row of stripes, pipe between the first row,
again using the vertical line as a center guide. To create the illu-
sion of wicker weaving in and out, be sure to tuck the tip slightly
under the vertical line before you begin squeezing. Don't worry
about small gaps, "real*’ baskets have them too! (Fig. 2.)
note: For a different variety of basket weave, use tube 47 for
vertical and horizontal lines.
SCROLLWORK. Albeit a bit baroque, scrollwork lends a charm-
ingly antique quality to the sides of a cake.
Icing Consistency: Medium
Tube: 3 and 16 (a round tube and a star tube)
Posidon of Bag: 45-degree angle
Method: Use tube 3, touching the surface lightly, to draw an in-
verted C shape with a long tail pointing to the left. Starting at the
top of the C, draw a second C with a long tail upside down.
Continue around the cake, reversing C shapes as you go. Add
SPECIAL EFFECTS AND DECORATIVE TECHNIQUES 401
curved lines to the tails of the C (Fig. 1).
With tube 16, trace over the design, making a scries of feath-
ers1 reverse shells (page 400), all facing the same direction (Fig. 2).
Note: For a softer effect, use a round 5 tube tn place of the
star tube (Fig. 3).
STRING WORK: String work is unquestionably the most refined
and elegant of all borders. It does not appear often, even on wed-
ding cakes, because it is exacting and time-consuming. All it really
requires is patience and an icing of proper consistency. Royal ic-
ing made with liquid egg white is ideal because it is strong and
elastic enough for the finest string work. Buttercream, however,
also works if the strings are kept relatively short.
lang which is too thick will not flow easily from the tube
and will break. If too thin, it w ill lack elasticity and snap. To test
consistency, drop a loop of icing from your finger and adjust as
necessary.
/ciflg Consistency: Thin
Tube: Any small round tube (3 is often used)
Position of Bag: The height of the bag should be shoulder level
and at 4:30, the tube lightly touching the surface only to attach.
For maximum control, keep tbe height of the tip constant. Do not
allow the tube to follow the drop of the string. (This is a very
common error in piping strings. Not allowing the tip to drop goes
against all instincts!)
Method: With dots of iang, mark a row of equally spaced points
around the perimeter of the cake. Touch the tip of the tube to
attach rhe icing at first dot. While squeezing, pull the bag away
from the surface toward you. Continue squeezing to allow the
icing to droop naturally. Resist the temptation to follow the droop
of the icing with the tip. The rip should be the same distance from
the surface as the distance from point to point. Stop squeezing
and touch the tip to the next doc to attach the loop. Continue
around the entire cake. To form a douhlr row of string work,
«М COMPLEMENTARY ADORNMENTS
complete the first row and then pipe a second row of shallow
loops inside the first {Fig. 1). For an even more striking effect,
overlap the string work to create an interwoven look. This is much
less complicated than it appears. First make a standard size loop,
starting at the first dot and ending at the second. Starting at the
center top of that loop, attach the icing and drop another loop,
attaching it between the second and third dots. The third loop
starts where the first loop ended and finishes at the third dot. The
fourth loop starts where the second loop ended. Believe me, this
is easier done than said! (Fig. 2.)
The size of the loop and the distance between loops should
be in proponion to the size of the cake. A small loop looks insig-
nificant on a large cake; a large loop looks disproportionate on a
small cake.
DROP FLOWERS: These are the simplest flowers to make. They
can be piped directly onto a cake or onto wax paper to be air-
dried or frozen and then lifted onto the cake.
Icing Consistency: Stiff
Tube: Any star tube or drop flower tube (dosed star)
Position of &ig: 90-degree upright angle, tube Vi-inch above surface
Method: For a straight flower, squeeze the bag firmly without
moving it until the icing flower is as wide as you desire. Push the
rube down slightly and stop squeezing. Slowly and precisely lift
the tube up and away.
For a swirled flower, turn the hand holding the bag as far to
the left as possible. As you squeeze, turn your hand to rhe right
as far as possible and stop the pressure. This should be a gradual
motion. It helps to use the surface as a pivot by pressing the tip
lightly to the surface. Dot the centers if desired, using a round
number 3 tube and contrasting color.
PIPED FLOWERS
SPECIAL EFFECTS AND DECORATIVE TECHNIQUES 405
SWEET PEA: This simple flower can be piped in sprays directly
onio a cake or made ahead. И made from royal icing, the sharp
stem can be poked into the side of a cake to suspend the flower
firmly in place.
lang Consistency: Stiff
I ube: Any rose tube (104 is often used}; a number 3 round tube
for the stem
Position of Bag: 45-dcgree angle ar 11:00 for the base and 6:00
for the petals
Method: To make the base, rest the wide end of the rose tube on
the surface with the narrow end very shghdy elevated. As you
start squeezing, swing tbe tube gradually from 11:00 to 1:00,
forming a flat arc (Figs. 1 and 2),
For the petals, rest the tube on the surface at the bottom
center of the base with the narrow end pointing straight up. As
you squeeze, raise the tube slightly, then lower and stop the pres-
sure. Rock your hand slightly forward to break off rhe icing (Fig.
3-5). Repeat this procedure to make 2 side petals, angling the
tube first slightly to the left, then to the right (Figs. 6 to 8).
For the stem, use a number 3 round tube to touch the base
of the flower, and as you squeeze to build up icing, gradually
draw the rube away, relaxing the pressure to form stem {Fig. 9>,
406 COMPLEMENTARY ADORNMENTS
LILY OF THE VALLEY: There is a special tube and technique that
makes it possible to capture this charming bell shape.
Icing Consistency: Stiff
Tube: 1 and 80
Position of Bag: 45-degree angle
Method: Pipe a narrow cursed stem with a number 1 tube. Use a
wet, fine paint brush to smooth out any bumps and bubbles (Fig.
I). Pipe the outline oi a leaf and several tiny stems off the main
item. Each small stem will hold an individual blossom (Fig. 21.
Change to a number 80 tube. Hold the tube slightly above
the surface, curved end toward you. Squeeze out a small amount
of icing until it curves upwards. Then touch the bottom of the
curve to the cake and continue squeezing while moving up and
over toward you in a slightly circular movement {Fig. 3). Stop the
pressure completely and pull away the tube. To keep the bdl shape
from opening up, pull the tube away in a slightly downward
motion.
ROSEBUDS AND HALF ROSE These flowers arc exquisitely realis-
tic. They can be formed directly on the cake or made ahead.
Icing Consistency: Stiff
Tube: Any rose tube (104 is often used); number 3 round tube
for the stem and sepals
Position of Bag: 45-degree angle at 3:00, tube with wide end down
and narrow end straight up. Careful positioning is critical to achieve
this chape.
Method: With the wide end of the tube touching the surface, start
squeezing, moving the tip sharply back and forth to create a cupped
base. Release the pressure and twist your hand slightly to the right
to cipen up the nght side of the cup and keep it from curving over.
Slide the tip down and away from the side to release the King and
create a sharp edge (Fig. 1}.
lane up the tube so that die entire opening touches the entire
nght edge of the base. Leaving the rube still and in place, squeeze
the bag firmly. Icing will catch the edge and roll itself into an
interlocking center bud (Fig. 2}.
SPECIAL EFFECTS AND DECORATIVE TECHNIQUES 407
Attach the stem or go on to create a half rose.
For a half rose, hold the rube wide end down and narrow
end straight up to the left of the has*. Squeeze, raising the tube
slightly, then lower and stop die pressure to form a side petal
(Fig. 3). This is the wmt basic motion as for the base only it wops
midway at the center of the flower. Follow the same procedure to
make a second side petal, going from right to left and slightly
overlapping the first petal (Fig. 4). To form stem and sepals, use
round tube number 3. Touch the base, allowing icing to build up
while gradually drawing the tube away (Fig. 5). Bury the tip in
the base and gradually relax the pressure as you move the tip up
the petal and slightly away to form 3 sepals.
PIPED ROSE There is something about a rose piped from a pastry
tube that is pure magic. People are always spellbound when
watching a demonstration of piped roses—even 1, after all these
years of decorating cakes, find myself in awe, forgetting that 1 can
do them too!
Piped roses make a time-honored decoration for any cake.
For a new twist, make royal icing rose candleholders by insenmg
a candle m the center of each rose before the icing dries. When
the icing has dried completely, lay the rose on its side and pipe a
IVj-tnch stem from its base. When thoroughly dry, poke the stem
directly into the cake by first making a small hole with a metal
skewer.
fang Consistency: As stiff as possible while still squeezable
Tube: 12 round tube for the bate; any rose tube (104 is most
often used] for the petals
Position of Big: For base: rose nail is held in left hand, bag at
90-degree upright angle, tube slightly above nail.
For petals: 4.5-degree angle at 4:30, tube with wide end
touching base and narrow end turned slightly inward and then
gradually outward for each row of petals.
Base: Attach a wax paper square to the rose nail with a dot of
icing. Hold the bag perpendicular to nail, with the number 12
round tube touching the center. Squeeze with heavy pressure,
keeping the tip buned m the icing until you build up a good size
base [Fig. 1), Ease pressure as you gradually raise the tube to
form a bottom-heavy conical shape (Fig. 2). This base should be
1*4 times as high as the opening of the rose tube used to make
the petals (Fig. 3).
. Bud: Hold the bag at a 45-dcgree angle to the nail, with the back
over to rhe nghr so your fingertips face you. Touch the wide end
of rose tube 104 to the top of icing base, with the narrow end
turned slightly inward (Fig. 4|.
408 COMPLEMENTARY ADORNMENTS
As you start to squeeze, pull the tube up and away from the
top of rhe base, stretching the icing into a ribbon band (Fig. 5).
At the same time, turn rhe nail counterclockwise and swing the
band of icing around the tip and back down to where you first
starred, overlapping starting point and continuing down to the
bonom of the base for stability (Fig. 6).
First Row of 3 Petals: Touch die wide end of the rose tube ro the
icing bud close to the bottom, with the narrow tube end pointing
straight (Fig. 7). Turn the nail counterclockwise and move the
tube up, around, and down toward you in a half-circle motion to
form a petal (Fig. #). Turn the nail а У> turn for each petal.
Following the same procedure, start at the base of the first
petal» overlapping it slightly, and squeeze out icing as you move
the tube up, around, and down toward you ro form a second
petal (Fig. 9).
Again, following same procedure, start at the base of the sec-
ond petal and squeeze out icing as you turn the nail to form a
third petal, slightly overlapping the first petal (Figs. 10 and 11).
Second Row of 4 Petals: Touch the wide end of the rose tip to
just under the first row of petals in the center of one of them,
with the narrow end of the rube pointing slightly outward. As you
SPECIAL EFFECTS AND DECORATIVE TECHNIQUES 40*
squeeze, rum the nail а turn and move rhe tube up, around,
ami down to form a petal. Starting at base of this petal, follow
the same procedure to make 3 more petals. The petals should be
same height ал those in the first row (Figs. 12 and 13).
Third Row of S to 7 Petals: Touch the wide end of the rose tube
to the base under the second row of petals in the center of one of
them, with the narrow end of the tube pointing slightly farther
out than die previous row. Again turn the nail slightly and squeeze
out the first petal. Follow the same procedure until the last row
of petals has been completed (Fig. 14).
tip: If you wish to curve rhe edges of the petals, dip a fingertip in
cornstarch and gently mold them.
Remove the rose from the nail by lifting the wax paper square
from the nail. If you haven’t used wax paper, remove the rose
with scissors held in a slightly open position (Fig. 15). Do not
close rhe scissors until the rose is positioned on the cake or other
surface.
PIPED LEAVES Pale green tinted icing leaves, piped around and
between the roses, add a nice touch.
Icing Consistency: Thin
Tube: 67 or 352
Position of Bag: 45-degree angle
Method: There are 2 basic types ot piped leaves: the plain or flat-
leaf and the ruffled stand-up leaf.
For a plain leaf, touch the tip to the surface and squeeze,
gradually drawing the tube away. Release the pressure gradually,
drawing rhe leaf to a point (Fig. 1). It is practically impossible to
get a sharp point using я notched leaf tube which produces the
center vein. For a leaf with a precise point but a less defined cen-
ter vein, use tube 352. One of the pointed ends should face down.
For a stand-up leaf, squeeze with heavier pressure to build
up a base to support the leaf. Then pull the tube straight up and
away as you relax the pressure and draw to a point (Fig. 2}. If
you have built up an adequate base and the leaf will not stand
up, the icing is too thin or soft.
410 COMPLEMENTARY ADORNMENTS
Writing requires, thin icing which flow» smoothly from the tube
and Lots of penmanship practice. 1 personally do not like to see
writing on a cake, but sometimes the occasion calls for it, so I try
to make it as integral a part of the design as possible.
Practice on an inverted cake pan or the counter before piping
the writing directly onto the cake. Unless you have a lot of expe-
rience writing on cakes, it is easy co become rusty. Printing is a
lot easier than script.
/dug Consistency: Thin
Tube: Any small round cube (3 is the most often used)
Position of Big: 45-degree angle at 6:00 for printing, 3:00
for script
Method: For printing, touch the tip to the surface. As you start
squeezing, raise the tip slightly to keep the lines even. Snip iqueezmg
a little before the end of the line and tug ever so slightly to
straighten che line before touching the tip down co attach. Release
the pressure, remove the tip, and start the next line.
For script, die tip should always be touching the surface lightly.
For both printing and script, be sure to move your entire
arm, not just your hand. This results in a smoother design.
ROYAL ICING CALLIGRAPHY: Because I, like most people, do not
write cm calces every day of the week, it is risky business indeed
to find myself with a pastry bag poised above an up-to-that-point
perfect cake—wondering how I'm going to fit in the letters and
how they will look and what I will do if 1 ruin the cake.
To avoid this anxiety, 1 have worked out the following risk-
free system for getting the letters on the cake, plus a choice of
capital letter calligraphy.
Wherever I have traveled, 1 have searched for attractive let-
ters to use for cakes. My search finally ended one day on a flight
between San Francisco and New York. 1 found the unusual type
style on page 412 in a stunning in-flight magazine called Vis j
Vis. It took months to track it down, but 1 finally found their
headquarters and received official permission to use the letters for
this book. They are courtesy of Vis 4 Vis (East-West Network}
and were designed by the talented L.A.-bascd artist and logo de-
signer Michael Manoogian.
A decorative monogram can be fun to create and makes an
attractive design. Make a template by photocopying or tracing the
letters, reducing or increasing the size as desired. Tape the tracing
securely to rigid cardboard or a baking sheet and lay a nonstick
liner on top. Use a few pieces of tape to hold it in place. Pipe,
WRITING
SPECIAL EFFECTS AND DECORATIVE TECHNIQUES 411
following the design. Use a number 3 tube for the letters and a
number 1 for the optional “illumination” ; free'form lines and swirls
decorating the letter).
Remember to hold the tube above the surface so the icing
falls freely. The icing should be soft enough to flow smoothly but
stiff enough for control.
Allow the icing to dry thoroughly before removing the panel
from the template. A small angled spatula is perfect for lifting the
letters and placing them on the cake. A lightly held tweezer is
also handy.
GOLD LEAR For the most elegant and stunning effect, gold leaf
can be applied to the letters. Real 22-karat gold leaf, sometimes
referred to as patent gold, is available tn wgn painting supply stores.
It comes m thin sheets which seem to dissolve on touch. The gold
is not absorbed into the system so it offers no nutritive value,
although some fancifully say that it is good for the heart. In India,
gold leaf is used to decorate desserts or to float in a magical liquid
pool on soup. Goldwasscr, a German liqueur, also contains flecks
of gold. My fnend Bob Miller, an artist, even gilds his Thanksgiv-
ing turkey', managing to partially gild himself as well in the joyful
process!
Using gold on letters is tricky but thrilling because it is so
very beautiful. When I asked the salesman how to make the gold
stick he suggested “wring” until 1 told him it was for eating. Egg
white, however, works very well.
To apply gold, use a fine artist’s brush to brush a thin coat-
ing of lightly beaten egg white on a small section of the letter. lift
a small piece of gold leaf with a sharp pointed tweezer and lay it
on top. It will tend to curve around and ding to the egg white.
Use the same brush to smooth it in place. If the letters are used
on rolled fondant, the gold can be applied after the letters are in
place as it will not stick to the fondant. Use a bit of egg white to
attach letters co the fondant.
412 COMPLEMENTARY ADORNMENTS
Icing Consistency: Thin
Tube: Round number 2
Positron of Bag: 45-degree angle
Method: Trace or photocopy the drawing onto paper with dark
ink.
The ideal surface for piping these delicate panels is a nonstick
liner Jpage 458) because it is easy to remove the delicate filigree
work without risking breakage. Parchment can also be used hut
removal is more nsky. In any event, minor breakage can be re-
paired even after the panels are attached to the cake, but it is
always safer to make one or two extra.
Tape the tracing securely to ngid cardboard or a baking sheet
and lay the nonstick liner on top. Use a few pieces of tape to hold
it in place. Pipe, following the design- If desired, use pmk royal
icing for contrast, to pipe roses it is unimportant if you deviate
from the design because after removing the template it will always
look breath takingly beautiful.
Remember to hold the tube above the surface so the icing
falls freely. The icing should be soft enough to flow smoothly bur
stiff enough for control. Pipe a second line on top of the first
around the outside edge for extra stability. Carefully slide out the
template and use it as the guide for all of the panels.
Allow the icing co dry for at least 30 minutes before remov-
ing tbe panels from the liner. It helps to hold the panels on a flat
ROYAL ICING ROSE
LATTICE PANELS
SPECIAL EFFECTS AND DECORATIVE TECHNIQUES 413
PAINTED ROYAL
ICING FLOWERS
counter, allowing small sections to extend over the edge. Support
the panel with a broad spatula while pulling the liner down and
away from the extended section. Small breaks can be filled in and
repaired even when on the cake.
Using a damp artist’s brush to shape the piped icing creates subtle
effects. Use only enough water to keep the brush marks from
showing,
LILIES OF THE VALLEY: Piping and then painting the tiny flowers
onto a fondant-covered cake gives the illusion of fine embroidery.
Icing Canxixtency: Thin
Tube: Round number 1
Ргшгюп of Bag: 45-degree angle
Method: Pipe a narrow curved stem, using a number 1 rube (Fig.
1). Use a wet, tine paint brush to smooth out any bumps and
bubbles. Pipe the outline of a leaf and several tiny stems off the
main stem (Fig. 2), Each small stem will hold an individual blos-
som. For the blossoms, pipe small oval dots of icing on the ends
of each stem (Fig. 3). Using the brush, pull down points from
each oval to form bell-shaped blossoms (Fig. 4). Dilute green food
coloring with water to produce the palest possible shade. Use rhe
brush to highlight the flowers with touches of color.
BLEEDING HEART FLOWERS:
icing Comixtertcy: Thm for leaves, medium fur blossom*
Tube: Round numbers 2 and 5; scar number 14
Method: The heart-shaped flowers are piped entirely with a dec-
orating tube, but the leaves are outlined and filled in with the aid
of an artist’s brush. For the leaves, use paste food color to tint
the royal icing a deep shade of green. Mix in a little blue if the
color is too bright. Keep in mind that the color will darken so
make it a little lighter than the color you want. The leaves should
be outlined free form following the sketch and using a number 2
414 COMPLEMENTARY ADORNMENTS
tube (Fig. 1). Tbe same tube can be used to pipe the stenu. To fill
in the leaves, switch to a number 5 tube and squeeze out the icing
with a back-and-forth motion (Fig. 2). Work on one leaf at a time
so that the icing does not start to crust. Smooth squiggles of icing
with a wet brush (Fig. 3). Tint some of the iang bright pink for
the flowers. The heart shape is piped like a shell design (page 399)
but with a plain round number 5 tube so that it looks like a tear
drop. For dosed buds, pipe only one teardrop shape. For blos-
soms, pipe two ode-by «de teardrops, first angling the tube slightly
to the left, then slighdy to the right (Fig, 4). Change to a number
1 round tube to add curved strings tn the point (Fig. 5). Pipe a
tiny upside-down shell with white icing and use a number 14 star
tube for the tip of the blossom (Fig. 6).
SPECIAL EFFECTS AND DECORATIVE TECHNIQUES 415
PART III
Ingredients and
EQUIPMENT
/interest in the science of ingredients began when I was a
freshman at the University of Vermont. I had |usr learned to make
lemon meringue pie tn a foods class and wanted to share the mar-
velous caring experience with some friends. We were all very poor
so everyone contributed money tor the ingredients. It was. there-
fore. especially humiliating» when, after using three quarters of a
box of cornstarch, the Hili ng still would not thicken. Determined
to get to the bottom of this mystery, 1 analyzed each ingredient
and finally scaled on the water as the only possible culprit. We
submitted the water for a mineral test and, sure enough, it had
the highest possible level. This made me aware that there was
more to cooking—and especially baking—than met the eye. It was
many years before I made lemon menngue pie again.
It seems like forever ago that baking seemed such an utter
and thrilling mystery.
It was about a decade later that I became seriously interested
in cake baking and wrote my master's thesis on yellow cake. I
remember making the cake one day when a neighbor stopped by
to visit. Bob was from rural Georgia where, in those days, people
raised most of what they ate. Hts mother had a pig killed every
year, turning the entire animal into the best home-smoked sau*
sage I have ever encountered. (Bob had endeared himself to me
for life by sharing his precious supply.)
That day, as he watched me transfer the batter to the cake
pan, he said: “You must be a good cook.” “Why?” 1 asked. His
answer: “Because you cook the way my mother cooks; nothing
goes to waste. It’s an attitude. People who cook that way seem to
care about it more, so it comes out better.”
That, in a nut shell is my philosophy about ingredients- When
you love what you do, no ingredient goes tu waste so only the
very best need be chosen in the first place. And, of course, it is
not the quality of rhe ingredients акте that makes the difference
between the extraordinary and tbe mediocre—it is the reverence
with which one approaches baking and the desire to offer the best
of what many consider to be the best pan of the meal, dessert.
BAKERS JOY: This is a combination of flour and oil for spraying
on cake pans. It is faster and neater than greasing and flouring
and produces a beautifully scaled, crumb’free crust. If you can’t
find it in your local supermarket, get in touch with the manufac-
turer for the nearest distributor 'Ipage 445). This is a fabulous
product.
BAKING POWDER: Baking powders are mixtures of dry add or
INGREDIENTS 419
acid salts and baking soda with starch or flour added to standardize and help sta-
bilize the mixtures. Double-acting means that they will react, or liberate carbon
dioxide, partially from moisture during the mixing stage and partially when exposed
to heat during the baking stage. Ir is, therefore, important to store the baking pow-
der in an airtight container to avoid humidity. There is also a substantial loss of
strength in baking powder after one year. Date the bottom of tbe can when you first
buy it, or write the expiration date on the lid with a felt-tip marker.
I use Rumford baking powder, an all-phosphate product containing calcium
acid phosphate. It lacks the bitter aftertaste associated with SAS baking powders,
which also contain sodium aluminum sulfate. (The supposed advantage of SAS pow-
ders is that they release a little more carbon dioxide during the baking stage than
during the mixing stage, but 1 find I can interchange equal volume and weight of
either type of baking powder.)
Rumford baking powder is usually available in health food stores (probably
because aluminum compounds are considered dangerous by many health conscious
people).
BAKING SODA Sodium bicarbonate has an indefinite dielf life if not exposed to
humidity. In Canada I once discovered a wonderful variety called Cow Brand (good-
ness knows why). It contained a tiny amount of a harmless chemical ingredient
which prevented it from dumping. Unless you can obtain this type of baking soda,
it is best to sift it before measuring,
BEESWAX: Used for making spun sugar because of its high melting point, it helps
keep the strands flexible. Bee’s wax is available at sculptor's supply stores some
sewing supply stores, and, of course, through apiaries.
CHESTNUTS: Most of the canned chestnuts 1 have seen come from France. Different
types of puree vary widely in sugar content so pay dose attention to the label.
Marrons entiers au nature!: These arc whole peded chestnuts in water. Creme de
marrons: This cream, made up of candied pieces of chestnut, has a total of 48
percent sugar and glucose. This в not to be confused with chestnut puree, for it is
far too sweet for any of the uses in this book. Puree de matrons au nature!: The
label reads that only glucose is added, я> this product is virtually unsweetened. It
does, however, contain water, making it too soft for some uses. To find this puree,
try specialty food stores such as Dean Sc DeLuca (page 445).
Albert Uster Imports carries СагтаЧ chestnut puree and an excellent, firm,
lightly sweetened puree, also called Purtc de Marrons, which contains 20 to 22
percent sugar. Marrons glares: These whole candied chestnuts are suitable for gar-
nishing.
CHESTNUT FLOUR This flour, which is mainly starch, is made from milled dried
chestnuts. It is available from France in health food stores. Georgio DeLuca of Dean
& DeLuca has produced wonderfully flavored chestnut flour from the magnificent
chestnuts of Italy.
To retain the distinctive flavor, chestnut flour should he refrigerated. It will
keep for at least one year.
420 INGREDIENTS AND EQUIPMENT
Chocolate is a very important ingredient in cakes and butter-
creams. Working with it over the past ten yean, I have found
there is an enormous difference in both texture and flavor among
brands and have developed my own personal preferences. I highly
recommend that you do a blind tasting to determine your own.
One of my favorite dark chocolates is Lindt’s Courante, a
couverturc that can be used in place of bittersweet chocolate for
the recipes in this book (see page 442 for exact sugar content
equivalencies). I also love Tobler’s Extra Bittersweet and Tradi-
tion and Undt’s Excellence. (Lindt also has a couverturc called
Excellence, so be careful not co confuse the two.) Another favorite
is French Valrhona’s Extra Bittersweet, which has a delicious,
winy undertone (available through Gourmand, page 445). An ex-
cellent American Chocolate is Nestle’s Chocolat d’Or (available
through International Leisure Activities, page 445). When it comes
to milk chocolate 1 adore Lindt for its creamy smexithness and
lovely caramel flavor notes, and I absolutely cannot stay away
from Hershey’s Golden Almond bar. For white chocolate, the only
one 1 find acceptable is Tobler's Narcisse. Others are sweeter and
sometimes almost chalky.
Fortunately, Tobler chocolate is carried in many supermar-
kets. In New York a great discount place to buy chocolate is called
Economy Candy on Essex Street. Lindt Courante is available
through Maid of Scandinavia (page 445).
Many fine chocolates, such as Tobler, are produced under
Kashruth supervision. Write to the manufacturer or distributor
for a letter of certification if you want to use a chocolate in ко*
shrr cooking.
Brands of chocolate differ partly because of special formulas
unique to each company, which determine the blend of the beans,
the type and amount of flavorings, and the proportions of choc-
olate liquor and cocoa butter. Taste and texture arc also greatly
affected by the length of roasting, grinding, and conching. Grind-
ing reduces partide size and conching—a wavelike motiun—re-
leases volatile oils, develops flavor, and coats che sugar and cocoa
particles with cocoa butter, which reduces the feeling of gritty
abrasiveness. Too much conching can result in an oily texture.
European, particularly Swiss, chocolate is usually conchcd for up
to 96 hours, which produces the characteristic velvety-smooth
texture Europeans favor and which Mime Americans find too
rich. (Ar least that used to be the case. Since the recent chocolate
craze hit this country, I doubt if many people find anything
chocolate too rich.) American chocolate may be conched for
only 4 to 5 hours if at all, though some brands claim as many
as 74 hours of conching.
CHOCOLATE
INGREDIENTS 421
Lecithin, an emulsifier found in soy bean5, is used to stabilize chocolate. Its
presence reduces the amount of cocoa butter required to cover the cocoa partides.
It frees the cocoa buner to act as a floating medium for the partides. It also reduces
viscosity, making it less thick. Only a very small quantity is necessary, for example
I gram lecithin per kilogram for white chocolate, slightly more for dark chocolate.
Lecithin is used in even the finest quality chocolate. As it is not “Kosher for Pass-
over,*’ a Swiss company, Maestrani, exports an excdlent chocolate containing no
lecithin. The dark chocolate is pareve (contains no dairy products). See Taam-Tov
Food, Inc. (page 445).
The U.S. government provides restrictions and classifications for chocolate that
dictate the type of fat and percentage of chocolate liquor* To be classified as real
chocolate, it must contain no fat other than cocoa butter (with the exception of 5
percent dairy butter to aid emulsification, which does not have to appear on the
label).
PURE CHOCOLATE Pure chocolate, also referred to as bitter, baking, or unsweetened
chocolate, contains only chocolate liquor (cocoa solids and cocoa butter) and
flavorings. Depending on the vanety of the cocoa bean used, .50 to 58 percent of
the chocolate liquor is axoa butter, averaging 53 percent. The bulk of tbe remainder,
the cocoa solids, contains 10.7 percent protein and 28.9 percent starch. [This is the
same amount present in the nibs—the term for the cocoa bean after removal of the
pod—before processing.) No lecithin may be added, but a great variety of flavorings
is permissible, such as vanilla or vanillin (synthesized vanilla), ground nuts, coffee,
salt and various extracts.
COCOA: Cocoa is rhe pure chocolate liquor with three-quarters of the cocoa butter
removed The remaining cocoa is then pulverized. Most European cocoa is Dutch-
processed, which means that the cocoa has been treated with a mild alkali to mdlow
the flavor and make it more soluble. There is no need to sift cocoa for a recipe
when it will be dissolved in water. In recipes such as Chocolate Rolled Fondant or
Chocolate Meringue, it is advisable to process or sift the cocoa if it is lumpy so
that it will incorporate more evenly.
My favorite Dutch-processed cocoa is Lindt’s from Switzerland, which recently
has become available in this country. It comes in dark and light (1 prefer the dark)
and is carried by Maid of Scandinavia. Poulain, Valrhona, and Van Houten are also
excellent Dutch-processed cocoas. My favorite non alkalized cocoa is Hershey’s. It
offers the characteristic chocolate flavor most Americans grew up adoring. Smelling
the cocoa will tell you a lot about its flavor potential but the best test is baking a
cake with it.
COCOA BUTTER The quality of cocoa butter is related to the quality of the bean
from which it came and the process of separating it from the chocolate liquor. Many
chocolatiers prefer Swiss cocoa butter, which is produced by cold pressing and is
lighter in color and finer in flavor. Swiss cocoa butter us carried by Albert Uster
Imports Ipage 445).
When working with cocoa buner, it is helpful to know that it us solid at room
temperature and that it has a low melting point (just below body temperature) that
is called “sharp,” meaning it changes quickly from solid to liquid, unlike buner
422 INGREDIENTS AND EQUIPMENT
which is more gradual. Adding cocoa butler to mixtures will make them firmer but
will also offer more of a mclt-in-thc mouth experience.
Store cocoa butter in an airtight container so that it doesn't pick up other fla-
vors. Refrigerated, it will keep for several years.
Cocoa butter is a vegetable fat and contains no cholesterol. It is, unfortunately,
high in saturated fat.
BITTERSWEET OR SEMISWEET AND EXTRA BITTERSWEET: Bittersweet or semisweet
and extra bittersweet (for which there is no U.S. government standard) arc pure
chocolate liquor with sugar, vanilla or vanillin, and extra cocoa butter added.
Semisweet morsels have to be more viscous to maintain their chip shape during
baking. Every manufacturer has his own terminology or formula for this category
of chocolate. They can be used interchangeably in recipes, but char sweetness levels
will vary. iFor more precise sweetness equivalencies, see page 444.)
COUVERTURE Used for candy dipping and some decorarive work, this is often
referred to a$ compound chocolate in the United States. In Europe, however, it is
made from the highest quality real chocolate, which has a high percentage of cocoa
butter, resulting in low viscosity and subsequently a thin ooanng and a glossy sheen
when used for dipping or decorations such as chocolate bands. There is no U.S.
standard for the European couverture either, but in Europe couverture must have a
minimum of 36 percent cocoa butter and may have as much as 40 percent. Japanese
couverture may have as much as 42 percent.
MILK CHOCOLATE Milk chocolate contains pure chocolate liquor, milk solids, butter,
vanilla or vanillin, and extra cocoa butter.
Milk chocolate docs not have as long a shelf life as dark chocolate because the
milk solids become rancid (though not as quickly as in white chocolate due to the
protective presence of cocoa solids).
WHITE CHOCOLATE: White chocolate is not considered to be “real chocolate” in
the United States became it contains no cocoa solids. Better-quality white chocolates
arc, however, made with cocoa butter and have a delicious flavor. White chocolate
contains about 30 percent fat, 30 percent milk solids, and 30 percent sugar. It also
contains vanilla or vanillin and lecithin. When melted. it sets faster than dark
chocolate but is softer at room temperature. Its shelf life is much shorter than dark
chocolate because of the milk solids.
In addition to making delicious butrercreams and cakes, a small amount of
melted white chocolate is great in an emergency to thicken buttercream or pastry
cream. This small amount of white chocolate adds firmness without significantly
altering the character of (he mixture.
COMPOUND CHOCOLATE Compound chocolate is classified as chocolate “flavor”
because, instead of cocoa butter, it contains vegetable shortening such as soya, palm
kernel, or coconut oil. This ty pe of fat is more stable than cocoa butter and docs
not require tempering (page 380) to prevent bloom (discoloration). It also affords
the chocolate a higher melting point, which means it will remain unmelted at warmer
temperatures. For this reason, it is .sometimes referred to as “summer coating.” Its
taste is acceptable and some people find it delicious (they сапЧ have tasted the real
INGREDIENTS 413
thing), but it lacks the complexity and fullness of fine-quality chocolate. Soil, tor
small decorative touches when you don’t have time to temper chocolate, it is a py
to have on hand.
Compound chocolate is produced in many colory. It is available at candy supply
houses and by mail through Maid of Scandinavia. Albert Uster Imports makes my
favontr dark compound chocolate called Саппа Glaze. It is very dark and lustrous
and comes in a 13.25 pound block suitable for large-scale use.
AVERAGE CHOCOLATE MASS AND COCOA BUTTER CONTENT: Chocolate mass
refers to the total amount of cocoa solids and cocoa butter.
cocoa (breakfast cocoa—usually Dutch-processed): 22 to 25 percent cocoa buncr
cocoa (regular—usually nonalkaltzed): 10 to 21 percent cocoa butter
tuner of unsweetened baking chocolate Ipure chocolate liquor): 50 to 58 percent
cocoa butter, averaging 53 percent
coo ver rare chocolate: 60 to 78 percent chocolate mass of which 36 to 40 percent is
cocoa butter
extra bittersweet chocolate: 60 percent chocolate mass of which 30 percent is co-
coa buner
semisweet or bittersweet chocolate: 49.5 to 53 percent chocolate mass of which 27
percent is cocoa butter. U.S. government standards requires a minimum of 35 per-
cent chocolate liquor.
semisweet bits: 41.5 percent chocolate mass of which 29 percent is cocoa buner
sweet chocolate: 34 percent chocolate mass of which 27 percent is cocoa buner.
U.S. government standards requires a minimum of 29 percent chocolate liquor.
milk chocolate: 34 to 38 percent chocolate mass of which 29 to 33 percent is cocoa
butter, plus 12 percent whole milk solids. U.S. government standards requires a
minimum of 10 percent chocolate liquor.
STORING CHOCOLATE: The best way to store chocolate or cocoa is to keep it well
wrapped in an airtight container (chocolate is quick to absorb other odors and must
not be exposed to dampness! at a temperature of 60°F. to 75°F. with less than 50
percent relative humidity. Under these conditions dark chocolate should keep well
for at least two years. I have experienced chocolate stored at ideal conditions for
several years and it seems to age like a line wine, becoming more mellow and subtle.
Milk chocolate keeps, even at optimum conditions, for only a little over one year
and white chocolate, about one year.
CITRON. ANGELIQUE. AND MIXED CANDIED FRUITS: Used primarily for fruit cake
and decorative work, they are available through Albert Uster Imports and specialty
food stores. Stored airtight at room temperature, they last for years. Du nut
refrigerate as they become rock hard.
COBASAN This is a wonderful product from Germany for stabilizing whipped cream
and buttercreams, к consists of sorbitol and glucose. A minute quannty added before
whipping the cream, or before adding the butter to the buttercream, emulsifies the
fat, enabling the whipped cream to hold up for as lung as 6 hours at room
temperature and makmg it easier to pipe buttercream without it softening as quickly.
It does not work, however, with ultrapasteurized cream because the fat molecules
are altered due to the higher heat at which this cream is pasteurized.
424 INGREDIENTS AND EQUIPMENT
Cobasan is available from Albert Uster Imports. The plastic
hottie contains 1 quart which will probably last a lifetime unless
you open a hake shop!
CORNSTARCH AND ARROWROOT Thrse two starches haw tw ee
the thickening power of flour and produce more translucent glazes.
Arrowroot also adds a slight sparkle. Thickening is accomplished
by absorption of liquid. As the starch granules absorb the liquid,
they swell and become fragile. It ts, therefore, very important rmt
to stir vigorously after thickening has occurred because it will
break down these fragile, swollen granules and the glaze will be
thin.
Cornstarch does not thicken until it has reached a full boil
(212°E), while arrowroot requires only 15 ST. to 176T. Prolonged
cookmg past rhe thickening point will also break down the starch
and thin rhe glaze.
NOTE: Starches have limited shelf life. If they are stored tor several
years they will eventually lose their thickening power.
CREAM OF TARTAR: Potassium acid tartratc is a by-product of
the wine industry. Its shelf life is indefinite. I have found that by
adding 1 teaspoon cream of tartar per 1 cup egg whites, it
stabilizes them so that it becomes virtually impossible to dry them
out by overheating. Cream of tartar is also used as an interfering
agent in sugar syrups to inhibit crystallization and to lower the
pH of certain batters, such as angel food cake, to produce a whiter
crumb.
BUTTER: Butter is one of my favorite flavors. The best fresh, un-
salted butter has the flowery, grassy smell of a summer meadow.
It seems downright unfair that this indispensable ingredient should
not be equally wonderful for one's health. But it isn’t. So rhe only
rotation is to eat smaller portions—but never to substitute any
other solid fat.
Salted butter does not have the glorious flavor of fresh un-
salted butter. If only sailed butter is available, remove 1 teaspoon
salt from the recipe per pound of butter used. It is also possible
to make your own butter from cream, but if only ultra-pasteur-
ize cream is available it may not be worth the trouble. Commer-
cial butter is made from cream with a very high butterfat content
and i$ churned immediately after flash pasteurization. This en*
sure» the best flavor and longest shelf life. If you make your own
butter, it will stay fresh for only one week.
To make butter: Place heavy cream in a food processor and pro-
cess unnl it begins to thicken. For every cup of cream, add 2
tablespoons cold water. Process until the cream separates into sol-
ids. Strain out the liquid (this unsoured buttermilk is delicious to
drink) and dry the resulting butter thoroughly with paper towels.
One cup of cream yields about 3 ounces butter.
DAIRY
INGREDIENTS 415
When buying commercial butter, grade A or AA contains about 81 percent fat,
15.5 percent water, and 6 percent protein. Lower grades will contain more water.
Two ways tn determine the water content are if the refrigerated butter remains fairly
soft and if, when the butter is cut» small droplets of water appear. Excess water can
be removed by kneading the butter in ice water for several minutes and then drying
it thoroughly with paper towels.
Store buner ainight as it absorbs odors very readily. Avoid wrapping directly
in foil as the butter may absorb a metallic odor. Butter freezes well for several
months. Be sure to let it defrost completely before clarifying or it may bum instead
of brown.
CLARIFIED BUTTER: Several recipes in this book call for clarified beurrr noisette.
This refers to clarified butter which has browned to the color of noisettes (French
for "hazelnuts”). Beurre noisette offers a richer, more delicious flavor.
When butter is clarified, the water evaporates and the milk solids drop to the
bottom. The milk solids cannot begin to brown until all the water has evaporated.
When adding clarified butter to chocolate, it is important that no water remain, so
milk solids in the butter should have started to turn golden brown before the liquid
butter is strained.
To clarify butter: Melt butter in a heavy saucepan over medium heat, partially cov-
ered to prevent spattering. Do not stir. When the butter looks dear, cook, uncov-
ered, watching carefully until the sobds drop and begin to brown. When the bubbling
noise quiets, all the water has evaporated and the butter can bum easily. To make
beurre noisette, allow the solids to turn dark brown. Strain immediately through a
fine strainer or cheesecloth-lined strainer. Clarified butter will keep for months re-
frigerated or just about indefinitely frozen, as it is the milk solids that cause the
butter to become rancid quickly. I always make extra to have on hand. (The browned
solids are excellent for adding flavor to bread dough.) Clarified butter will only be
75 percent the volume of whole buner. For example, if you need 3 tablespoons
clarified butter, start with 4 tablespoons buner.
MILK: Milk contains 87.4 percent water, 3.5 percent protein, and 3.5 to 3.7 per-
cent fat.
Nature’s most perfect milk, in my opinion, is goat $ milk. Goar's milk is lower
in cholesterol with more findy emulsified butterfat, and the flavor is slighdy sweeter
and seems purer than cow's milk. If you are lucky enough to have access to goat’s
milk, feel free to use it in any recipe calling for milk.
CULTURED BUTTERMILK: Buttermilk contains 90.5 percent water, 3.6 protein, and
1.5 to 2 percent butterfat. It is a soured product, obtained by treating skim or
part-skim milk with a culture of lactic acid bacteria.
HALF AND HALF Half and half is */s light cream and ’4 milk. It contains 79.7
percent water, 3.2 percent protein, and 11.7 percent fat. If you ever run out of
milk and have half and half, it's easy to substitute for milk required in a recipe
(page 443).
UGHT CREAM: Light cream contains 71,5 percent water, 3 percent protein, and 20.6
percent fat. It is increasingly difficult to find.
426 INGREDIENTS AND EQUIPMENT
HEAVY CREAM Heavy cream contains 56.6 percent water, 2.2
percent protein, and 36 to 40 percent fat (averaging 36 percent).
If the heavy cream in your area seems low in butterfat (is difficult
to beat and separates easily), ir is easy to increase the butterfat
content (page 254).
Heavy cream can be frozen for several months, defrosted,
and used for making either ganache or butter cake. Freezing,
however, alters the fat structure, making cream impossible to whip
and unsuitable for making emulsifications such as creme jngLtise
or ice cream. (The texture will not be smooth.)
SOUR CREAM. Sour cream contains 71.5 percent w ater, 3 percent
protein, and 18 to 20 percent far. It is made from light cream,
soured by the addition of lactic acid culture.
EGGS: All my recipes use USDA grade large eggs. As a rule of
thumb, 5 extra large eggs equal about 6 large eggs. Values for
recipes in this book are given for weight and volume so it’s fine
to use any size egg if you weigh or measure them. As the weight
of rhe eggs and thickness of the shell can vary a great deal even
within a given grade (from 1.75 ounces to 2.5 ounces for large
eggs), I find it safer to weigh or measure even when using large
fRgs-
Egg white contains: 87.6 percent water and 10.9 percent protein
Egg yolk contains: 51.1 percent water, 16 percent protein, and
30.6 percent fat
Egg whites freeze perfectly for at least one year. It is also
possible to freeze yolks. Stir in Yi teaspoon sugar per yolk to keep
them from becoming sticky after they are defrosted. (Remember
to subtract this amount of sugar from the rcdpe.l
DRAGEES (drahZJAYS): These little balls of silver or gold consist
mainly of sugar. The USDA considers them nontoxic and accept-
able for decorative use. Of course, they are not intended to be
consumed by the handful. Dragles are carried by cake-decorating
supply stores such as Maid of Scandinavia (page 445). When ask-
ing for them, it is safer to refer to them as silver or gold balls as
no two people pronounce this item the same way!
ESSENCES; Exquisite steam-distilled French fniit essences such as
wild strawberry, passion fruit, and apricot are available in tmy
bottles from La Cuisine Ipage 445), A few drops gu a long way.
They are quite inexpensive.
The protein content of flour is listed on the bag and refers to the FLOUR
number of grams of protein per 4 ounces'! 13 grams flour.
INGREDIENTS 427
SWAN’S DOWN OR SOFTASILK CAKE FLOUR 8 grams of protein per 4 ounces?! 13
grams flour. Caterers have told me that when they get 100-pound sacks of cake
flour ot a different brand than these, they do nor get as fine a rexnite in their cakes.
Self rising cake flour contains P/z teaspoons baking powder and Vi teaspoon
salt per cup of flour. It is fine to use this flour for reopes requiring the same pro-
ponion of baking powder if you eliminate the baking powder and salt from the
recipe. The cakes preceding the All-Occasion Downy Yellow Cake» for example, use
less baking powder per cup of flour, so sdf-nsing flour will cause thr cake to collapse.
A case of Swan’s Down cake flour, containing twelve 2-pound boxes, can be
purchased for about $16 by calling their toll-free number Ipage 445).
BREAD FLOUR: 14 grams of protein per 4 ounces?!13 grams flour.
ALL-PURPOSE FLOUR; 8 to 14 grams of protein per 4 ounces''113 grams flour.*
Storage: Flour should be stored away from the heat so that it doesn’t dry out. I find
that cake flour can be stored for several years, but after 2 years, bread flour seems
ro lose some of its strength. Bread flour, which I purchase from a mill, becomes
rancid after 8 months. Flour with tbe bran removed, such as cake flour and super-
market bread flour, does not become rancid or attract bugs readily.
FLOWERS Fresh flowers make beautiful and even flavorful additions to cakes but
great care must be taken to ensure that they are nor a poisonous variety. Some
edible flowers are apple blossoms, borage flowers, citrus blossoms (orange and
lemon), day lilies (not tiger lilies, which have spots), English daisies, hibiscus,
hollyhocks, honeysuckle, lilacs, pansies, petunias, nasturtiums, roves, tulips, and
violets. If purchasing them, be sure they have been grown as a food source, nor as
ornamentals which may have been sprayed with insecticide. Noncdible flowers such
a-s lilies of the valley are fine to use as part ot an arrangement or corsage for the
top of the cake which will be lifted oft before serving.
Marzipan roses can be purchased through Albert Uster Imports (page 445).
FONDANT: Masa Ticino is a ready-made rolled fondant product that comes in 153-
pound boxes for the commercial baker. It has a slightly lustrous surface and needs
only to he kneaded lightly and rolled. It is available from Albert Uster Imports
(page 445}.
FOOD COLOR Liquid food color, available in grocery stores, is fine when just a
little color is needed. For stronger colon, paste food colors are preferable because
they do not alter the consistency of the frosting as much. Powdered food color is
even more intense than paste but can be very messy. Both paste and powder are
suitable for adding to chocolate. Liquid food color will cause the chocolate to seize
and become unworkable.
Colors are available in a great variety; there is even one that makes an off-
white frosting whiter. In general, food color intensifies as it sits so it is best to mix
colors with ingredients a few hours before using them.
* To calculate the percentage of prattwt m flour, lauhipb tbe number ot yams of рсоил conuirwd in 1 В
вглп» of flour (tbs information » found in the nutntiueal mbnnation 11seed on lhe ряВсзрс! by 100
divide the resulting number by 113.
Ехаяф1г For cake flour; * । percent
42Я INGREDIENTS AND EQUIPMENT
Uw glycerine, not water, to thin paste color or it will become brittle. Another
caveat: Frostings containing lemon juice will turn an off-color if blue food color
is added.
Paste and powder food color are available at candy supply stores and by mail-
order through Maid of Scandinavia ipage 445} and Wilton (page 445). The former
even has food color pens.
GELATIN: According to Knox, their gelatin, which comes in T-gram/’Zi-ouncc
packages, is equal to 5 sheets of leaf gelatin measuring 2% inches by 8l/i inches. It
will gel 2 cups liquid. I find that 1 package of gelatin measures 2'/« teaspoons. Leaf
gelatin should be soaked 30 minutes in cold water until it becomes soft like plastic
wrap. Water is then squeezed out and gelatin soaked in hot liquid until dissolved.
Some people prefer leaf gelatin to powder because it imparts less flavor. 1 do not
find the difference significant.
Powdered gelatin should be softened in cool water for at least 5 minutes before
being heated to dissolve it. According to the Lipton Research Department, “While
it is true that extensive boiling will dr-nature unfavored gelatin . . . norma] use in
recipes, including boiling, will not adversely affect rhe product."
Gelatin will continue co thicken a mixture over a 24-hour period. Once it has
reached its maximum thickness, it will not thicken any further (even on freezing—
another myth dispelled). Freezing also does not affect thickening power. The gelatin
mixture can be frozen, thawed, remelted, and refrozen several times before losing
its strength.
GLYCERINE Glycerine is a clear, heavy liquid made from fats and oils. It is used in
rolled fondant to add sheen and keep the texture soft. It is ideal to thicken chocolate
to the consistency for decorative piped work. It also works to thm paste food colors.
Glycerine is available in candy or winemaking supply stores and from Maid of
Scandinavia (page 445) and Wilton (page 445}.
GOLD: 22-karat gold leaf and silver leaf are available in sign-painting supply
stores. ’"Gold" and "silver’* powders are available through the Chocolate Gallery
•Ipage 445).
GREEN TEA (POWDERED): Japanese powdered green tea, which I use to flavor
whipped cream, biscuit, and marzipan, is available in Eastern food supply stores
and by mail order from Katagin (page 445).
LEKVAR Apricot lekvar is apneot preserves which contain the skin of the apricot
as well as the fruit. The flavor is more intense and delicious than ordinary apricot
preserves. Available through Paprikas Weiss (page 445) and Maid of Scandinavia
(page 445).
NUTS: Freshly shelled nuts have the best flavor but the shelled canned varieties are
excellent and are a lot more convenient.
The skin on hazelnuts is very bitter and difficult to remove. An easy method,
taught to me by Carl Sontheimer (father of the food processor), uses baking soda.
For Vi cup of nuts, have \¥i cups boiling water in a large saucepan and add 2
tablespoons baking soda. Boil the nuts for 3 minutes. The water will turn black
from the color in the skins. Test a nut by running it under cold water. The skin
INGREDIENTS 429
should slip off easily. If not, boil a few minutes longer. Rinse nuts well under cold
running water and ensp or brown them in a 35O°F. oven for 20 minutes, watching
carefully so that they don’t burn. Hazelnuts, also called filberts, are available from
Hazy Grove Nuts (page 445}.
Pistachio nuts will lose flavor if boiled. Their skin is not bitter but if added to
mixtures will spoil the lovely, pale green color. To remove this skin, toast the nuts
for 10 minutes in a 35O°F. oven and use your fingers or fingernails to remove the
skin. Salted pistachio nuts should not be used for dessert recipes. If your supermar-
ket does not carry unsalted pistachio nuts, they can he ordered shelled and unsalted
from Rachel Aksdrod (page 445) or Keenan Farms I page 445).
Lightly toasting all nuts greatly enhances their flavor.
Nuts keep well over one year if stored airtight in the freezer. I use either freezer
bags, expelling all the excess air, or glass canning jars, filling the empty head space
with wadded-up plastic wrap.
Nuts should always be at room temperature before grinding to prevent them
from exuding too much oil. When grating or grinding nuts such as almonds, starting
with sliced nuts results in more even and drier ground nuts. For every cup of ground
almonds needed, start with 1V* cups sliced almonds.
If only whole nuts are available, st an using the grating disc of the food proces-
sor. Then switch to the metal blade and pulse until the nuts arc finely chopped. A
tablespoon or so of cornstarch, flour, or powdered sugar—borrowed from the rest
of the recipe—will help absorb oil and prevent the ground nuts from clumping.
A small food processor seem to work best for evenly grinding nuts. The .Mouli
hand-grater also does a fine fob.
NUT PASTES: Nut paste terminology is among the most confusing in the baking
industry. Diamond brand almond paste, for example, claims to be 100 percent pure
almond. This actually means that it contains no other nut substance and not that it
doesn’t contain any sugar! (In the industry, peach kernel pits are sometimes
substituted for almonds to makr a less expensive “almond” paste.) Imported almond
pastes may contain as much as 50 percent sugar. Distributors such as Rachel
Akselrod and Albert Uster have this information about the products they* carry.
Almond {taste manufactured in America usually consists of 25 to 35 percent
sugar I some of which is invert,'1 and sweet and bitter almonds. |Thc bitter almonds
are much more intense in flavor than the sweet.} Almond paste is used to make
marzipan by adding additional sugar.
The recipes in this book calling for almond paste require the domestic, or 25 to
35 percent sugar, variety.
Diamond brand almond paste is available at some supermarkets and through
Maid of Scandinavia (page 445). Rachel Akselrod (page 445) and Albert Uster (page
445) also carry almond paste in larger quantities.
Pure 100 percent pistachio paste with no sugar added is also available in a
Small container from Rachel Akselrod. This is an excellent product made from rhe
most flavorful pistachio nuts. The skins have not been removed, however, so a small
amount of food color will be necessary to restore the characteristic green color.
Pure 100 percent hazelnut paste with no sugar added is available in a small
container from Albeit Uster. This is a fabulous addition to white chocolate when
adding extra sugar is undesirable, as with Crfcme Ivoire Praline (page 249). It is im-
430 INGREDIENTS AND EQUIPMENT
possible to make a hazelnut paste of this smoothness without highly
specialized equipment.
Praline paste consists of hazelnuts or a combination of al-
monds, hazelnuts, and 50 percent sugar. (Lesser qualities have a
higher percentage of sugar.) I prefer the 100 percent hazelnut and
caramelized sugar variety. This can be purchased in small, expen-
sive quantities through Maison Glass (page 445). A small amount
goes a long way and it is worth every penny. 1 have experimented
endlessly only to find that homemade praline paste always has a
slightly gritty consistency.
Praline paste keeps 1 year refrigerated and indefinitely fro-
zen. On storage, some of the oil separates and floats to the top.
This can be stirred back into the praline paste or poured off to
use in Guilt-Free Chocolate Chiffon Cake (page 158) or White
Chocolate Buttercream (page 248) in place of some of the neutral
oil called for in the recipe.
OIL Mineral oil, available in drugstores and winemaking supply
stores, is excellent for adding to chocolate because it never be-
comes rancid. Safflower or other flavorless oils are fine but be-
come rancid quickly and cannot be stored without refrigeration
for more than a few weeks. When using walnut oil, smell it first
to ensure that it has not become rancid. Walnut oil is carried by
specialty food stores such as Dean &c DeLuca (page 445). When
using oil to make cakes, it is important that it contain no silicates
because they act to prevent the foaming necessary for aerating the
cake. Most oils arc nude without the addition of silicates; a glance
at the label will tell you if it has been added.
PAM: 1 prefer Pam to other nonstick vegetable spray products be-
cause it has virtually no odor. It is composed of lecithin, a natural
emulsifying agent derived from soybeans, and a tiny amount of
soybean oil. Nonstick spray is particularly useful when working
with rolled fondant. Il prevents the fondant from sacking without
having to add cornstarch or powdered sugar which could mar its
surface.
PASSION FRUIT An excellent frozen puree is carried by Rachel
Akselrod (page 445).
PIPING GEL: Clear piping gel consists mainly of corn syrup, agar
agar, and tartaric aad (cream of tartar). It is available at cake-
decorating supply stores such as Maid of Scandinavia and Walton.
I find it useful for attaching chocolate bands ro a cake when I
don't want to use a flavored felly. Piping gel can also be lightly
tinted with food color or mixed with cocoa, powdered sugar, and
water to make a brilliantly glossy chocolate decorating medium
(page 389).
INGREDIENTS 431
SUGAR HOW SUGAR IS MAD€: Sucrose, rhe primary sugar used in cake-
making, is a sugar obtained from sugar beets or sugar cane. There
ts absolutely no difference between these two sources in rhe final
product if the sugar is refined to 99.9 percent sucrose. A molecule
of sucrose is composed of one fructose and one glucose molecule
joined together tn form a simple carbohydrate, easy to digest and
full of energy. Other plants are capable of nuking sugar, but both
cane and beet make it in quantities large enough to support refin-
ing. Sugar from the plants is dissolved in water and the resulting
syrup is boiled in large steam evaporators. The substance that
remains is crystallized in heated vacuum pans and the liquid, now
called molasses, is separated from the crystals by spinning it in a
centrifuge. At this stage the sugar is known as raw sugar and
contains 3 percent impurines or extraneous matter, lhe raw sugar
crystals are washed with steam and are called turbmado sugar,
which is 99 percent pure sucrose. Although it closely resembles
refined white sugar in sweetening ability and composition, it can-
not always be substituted in recipes. Its moisture content varies
considerably, which, coupled with its molasses flavor and coarse
granulation, can affect a recipe without careful adjustment.
Refined white sugar is processed from turbmado sugar. The
turbmado sugar is heated again to a liquid state, centrifuged, clar-
ified with lime or phosphoric acid, and then percolated through a
column of beef-bone char or mixed in a solution of activated car-
bon. lliis last process whitens the sugar and removes all calcium
and magnesium salts. Finally, the sugar is pumped back into vac-
uum pans where it is heated until it crystallizes. The resulting
sugar is 99.9 percent sucrose. Sugar that is less refined may be
somewhat gray in color and the protein impurities may cause
foaming when the sugar is added to the liquid in a given recipe.
BROWN SUGAR Most brown sugar is ordinary refined sucrose
with some of the molasses returned to it (3.5 percent for light
brown sugar, 6.5 percent for dark brown). 1 like to use dark Mus-
covado sugar from Malawi (available at Dean & DeLuca, page
445). Muscovado natural raw sugar doesn’t have its natural mo-
lasses removed, so its flavor seems more pure and subde. When a
recipe calls for brown sugar, it is light brown sugar unless other-
wise specified.
Equal volume of either type of brown sugar compared to white
sugar has the same sweetening power, but brown sugar must be
measured by packing it into the cup. Dark brown sugar weighs
the most because of the added molasses. .Molasses also adds mois-
ture to the sugar. Brown sugar contains 2.1 percent water while
plain white sucrose only contains .5 percent.
432 INGREDIENTS AND EQUIPMENT
If you run nut of brown sugar and have white sugar and molasses on hand, it’s
easy to make your own (see substitutions, page 442).
MOLASSES. Containing 24 percent water, unsulfured molasses such as Grandma’s
has the best flavor because it is refined from the concentrated juice of sugar cane.
The sul hired variety is usually a byproduct of sugarmaking and tastes of the residues
of sulfur dioxide introduced during the sugarmaking process.
REFINER’S SYRUP: Containing 15 to 18 percent water, this is a delicious by-product
of sugar refining, When syrup, after many boilings, ceases to yield crystals it is filtered
and concentrated into this golden-colored syrup. Lyle’s, a British company, packages
it as Lyle’s Golden Syrup. It can be used interchangeably with light com syrup.
Refiner’s syrup is earned by specialty stores such as Dean & DeLuca Ipage 445}.
GLUCOSE: Containing 15 to 19.7 percent water, glucose is an invert sugar found in
many plants and in great abundance in com. It is manufactured in syrup form in
varying concentrations. Hospitals use it at very low concentrations. Glucose with
suitable concentration for baking is thicker than corn syrup. It is subject to
fermentanon and will develop small bubbles and a sour taste, so once the container
is opened it should be refrigerated. If kept airtight and not contaminated by a wet
spoon, for example, it will last indefinitely. The 19.’ percent water (42p to 43°
Ba nine) glucose is available through candymaking supply houses and by mail-order
through Maid of Scandinavia (page 445) and Wilton (page 445).
CORN SYRUP: Containing about 24 percent water, corn syrup consists of glucose
(from corn sugar) with fructose added to prevent crystallization. It ts susceptible to
fermentation if contaminated, so care should be taken not to return any unused
portion to the bottle. Fermented com syrup has a sour taste and should be discarded.
If used in low concentration, corn syrup has, by volume, half the swevtening power
of sucrose but in high concentration is about equal. Since the major difference
between glucose and com syrup is the water content, if some of the water in the
com syrup is evaporated, it can be used interchangeably with glucose (see
Approximate Equivalencies and Substitutions, page 443).
GRANULATIONS AND FORMS Of SUGAR. All 99.9 percent refined sucrose has equal
sweetening power despite the degree of granulation. Powdered sugar has 3 percent
cornstarch added to prevent lumping, but aside from this small percentage 1 pound
of sugar equals 1 pound of sugar. (This may seem obvious hut 1 have read strange
things to the contrary.)
Regular granulated or tine granulated: This is the all-purpose sugar found in most
sugar bowls and available in all supermarkets. This granulation is suitable for mak*
ing syrups, but for most other baking a finer granulation is preferable. Using a tood
processor it is possible to make a more finely granulated sugar, but the crystals will
not be as uniform in sire as in commercially produced finer grain sugars. Don’t
confuse the term fine granulated with superfine which is much finer.
Extra-fine: Available commercially, this sugar is also known as fruit sugar because
it is used in the preservation of fruits. Most professional bakers use this granulation
as their all-purpose sugar if they can’t find baker's special. When used in cakes it
INGREDIENTS 433
results in a tine crumb and lighter texture because, with the smaller crystals, more
surface area is available to trap air. In the creaming process, the sharp or angular
surfaces of the sugar crystals catch air. If the surface were smooth, as with powdered
sugar, the grains would |ust dump together and not allow air in between. The more
crystals there are, the more air will be incorporated. Finer sugar also dissolves more
easily and makes lighter, more ddicate meringues.
Baker's special: Available commercially, this sugar is slightly finer than extra-fine
and almost as fine as superfine. This is the perfect granulation for all cake baking. I
buy it in 100-pound sacks. A dose approximation can easily be made in the food
processor using a coarser granulation and processing for a few minutes.
Castor sugar: This is a term that appears in British cookbooks. The sugar, common-
place in England, is slightly finer than baker's special. If you are converting a British
rrcipr, substitute baker's special or the more widely available superfine sugar.
Bar sugar, superfine, or ultra fine: This is the finest granulation of sugar and comes
only in 1-pound boxes. It is sometimes called bar sugar because it is used in bars to
make drinks that require fast-dissolving sugar. For the same reason, it is ideal for
making meringues and cakes.
Loaf or cube sugar: This is merely granulated sugar that has been pressed into molds
when moist and then allowed to dry so it maintains the shape. Some recipes, partic-
ularly in the confectionery area, specify loaf sugar because at one time it was more
refined. Today, this is not the case, in fact, due to modem methods of manufactur-
ing, the cubes have traces of oil from the molds, which makes them less desirable
for sugar boiling.
Medium coarse and coarse pearl sugar: Known as “strong* sugar because it resists
color changes and inversion at high temperatures, this type of sugar is ideal for
confections and cordials. The large granules are sometimes used to sprinkle on cook-
ies and pastries.
Powdered, confectioner's, or icing sugar: While it is possible to achieve a very fine
granulation in a food processor, it is not possible to make true powdered sugar.
This can only be done commercially. At one time, powdered sugar was stone-ground,
but now it is ground in a steel magnesium rotary which rums against varying de-
grees of fine screens, each one determining a different fineness of rhe grind. The
coarser the granulation of the initial sugar, the more even will be the final grind. As
might be expected, the finer the granulation, the greater the tendency of the sugar
to lump, which explains why 3 percent cornstarch is added to absorb any moisture
from the air before the sugar can. The cornstarch adds what is perceived as a raw
taste and makes powdered sugar less suitable than granulated sugar for use with
ingredients that are not to be cooked.
Powdered sugar comes in 3 degrees of fineness; 10X, rhe finest (available in
supermarkets), 6X, and 4X, both of which are available commercially. Maid of
Scandinavia carries what they claim to be even finer than 10X powdered sugar,
suitable for the finest string work in royal icing. 10X works well for fine designs
with royal icing, and I have sometimes even used 6X with excellent results.
In general it is preferable to avoid sifting powdered sugar for royal idng be-
cause of the possibility of lint or other impurities causing discoloration or blocking
the tiny openings of the smaller decorating tubes. But, if the powdered sugar is
4M INGREDIENTS AND EQUIPMENT
lumpy, sifting becomes necessary. Great care should be taken that all utensils and
work surfaces are sparkling clean.
SUGAR SYRUPS' When making a sugar syrup for Italian menngue or classic
buttercream, for example, the sugar is concentrated to produce a supersaturated
solution from a saturated one. A saturated sugar solution contains rhe maximum
amount of sugar possible at room temperature without precipitating out into crystals.
A supersaturated sugar solution contains more sugar than the water can dissolve at
room temperature. Heating tbe solution enables the sugar to dissolve. Cold oats
is capable of bolding double its weight in sugar, but by heating it more sugar can
dissolve in the same amount of water. A sugar solution begins with sugar, partially
dissolved in at least one-third its weight of cold water, к is stirred continuously
until boiling, at which time all the sugar is dissolved. If sugar crystals remain on
the sides of the pan they should be washed down with a wet pastry brush. The
solution is now considered supersaturated and, to avoid crystallization, must no
longer be stirred.
As the water evaporates, the temperature of the solution rises and the density
increases. Concentration of rhe syrup is dependent upon the amount of water left
after evaporation. The temperature of the syrup indicates the concentration. As long
as there is a lot of water in the syrup, the temperature does not rise much above the
boiling point of water. But when most of the water has boiled away, the tempera-
ture can now nse dramatically, passing through various stages (page 436; and even-
tually rising to the temperature of melted sugar (32O°FJ when all the water is gone.
Concentration can also be measured by density using a saccharometer or Baumc
sugar weight-scale. A Baumc scale is graduated from 0 to 44° and corresponds in a
direct relationship to the degrees Fahrenheit or Centigrade. The degree of evapora-
tion can also be measured by consistency by dropping a small amount ot the syrup
into ice water.
Supersaturated solutions are highly unstable and recrystallization can occur from
agitation or even |ust by standing unless the solution was properly heated in the first
place. The use of an “interfering agent” such as invert sugar fa little more than one-
fourth the weight of the granulated sugar!, butter, cream of tartar, or citric acid
helps keep the solution stable by interfering with the crystalline structure formation.
This is useful when the solution will be used in a way that will involve repeatedly
dipping into it. such as for making spun sugar.
As melted sugar reaches higher temperatures, many chemical changes begin to
occur. The sugar cannot start co caramelize unti* all the water is evaporated. As it
starts to caramelize, its sweetening power decreases. At this point, when all the
water has evaporated, stirring will not cause the sugar to crystallize. The addition
of a significant amount of an ingredient, such as nuts, can lower the temperature
considerably and this will cause crystallization to occur instantly if no interfering
agent was used.
Caramr? is extremely difficult to make in humid weather because sugar is highly
hygroscopic [attracts water). The moisture in the air will make the caramr’ sticky.
When sugar syrup has been prepared in advance, it is sometimes necessary to
check the exact quantity of sugar and water it contains. It is important to know
that the Baumc reading in a cold solution measures slightly higher than the same
solution when hot.
INGREDIENTS 4.И
Another variant that affects density reading is altitude. Because water boils at
a lower temperature as altitude increases (there is less air pressure weighing on top
of the water to prevent it from changing from liquid into vapor), there will be a
different temperature for the same concentration of sugar syrup at different alti-
tudes. For each increase of 500 feet in elevation, syrup should be cooked to a tem-
perature 1°F. lower than the temperature called for at sea level. If readings are taken
in Celsius, for each 900 feet of elevation cook the syrup to a temperature IXL. lower
than called for at sea level. These adjustments should be made up to 32OUF., the
melting point of sugar. Altitude does not change this.
TEMPERATURES AND TESTS FOR SUGAR SYRUP
215'F. Thread: The liquid sugar may be pulled into battle threads between the fingers. Thu is used for candy, fruit liqueur making, and some iangs-
220 to 222’F. Ptarl: The thread formed by pulling the liquid sugar may be stretched. When a cool mecal spoon is dipped into the syrup and then raised, the syrup гиги off in drops which merge to form a sheet This it used for the above and also for jelly.
230 to 234’F. Bfow or Souffle: The bubbles in the boding sugar resemble snowflakes. The syrup spins a 2-inch thread when dropped from a spoon. This is used tor making sugar candy and syrup.
234 to 24OT. Soft ball: Syrup dropped into ice water may be formed into a ball which flattens on removal from the water. This is used for fondant, fudge, pep- permint creams, and classic buttercream.
244 to 24ГЕ Firm ball: Syrup dropped into ice water may be formed into a firm bail which does not flatten on removal from the water. This is used for cara- mels. nougats, and soft coffees.
250 to 266*F. Hard bait: Syrup dropped into ice water may be formed into a hard ball which holds its shape on removal but is still plastic. This is used for toffee, divinity, marshmallows, and popcorn balls.
270 to 29C*F. Soft crack: Syrup dropped into ice water separates into threads which are hard but not brittle. This is used for butterscotch and taffy.
300 to 3I(FF. Hard crack: Syrup dropped into ice water separates into hard, bottle threads. Thu is used for brink and for glaceed fruits.
32(FF. Clear liquid: The sugar liquefies. This is used for making barley sugar (a candy).
ЗЗГЕ Brown liquid: The liquefied sugar turns brown. This is used for light caramel.
356’F, Medium brown liquid: The liquefied sugar darkens. This is used for pra- line, spun sugar, caramel cages, and nougatine.
374®F. Dark brown liquid: The liquefied sugar darkens further. This is used as a coloring agent for sauces.
4l(TF. fihek Jack: The liquefied sugar turns black and then decomposes.
VANILLA: When Marcel Akselrod sent me a sample vanilla bean, 1 knew when it
had arrived because, when i went to pick up my mail, the entire letter box was
436 INGREDIENTS AND EQUIPMENT
perfumed with the heavenly smell of Tahitian vanilla. The bean was fatter and more
moist than any 1 had ever seen. Vanilla beans vary enormously in quality. The best
beans come from Tahiti, Madagascar» and Mexico. The Tahitian beans are larger
than the others and all three are about twice the size and mure highly perfumed
than other beans. This makes it difficult to give equivalencies for distilled vanilla
(extract)» which also vanes enormously in concentration [referred to commercially
as “folds”). The Tahitian beans are so aromatic, I use one-half a bean in a recipe
specifying one bean.
Sometimes you will notice a white substance coating the vanilla beans. This is
not mold; it is flavorful vanilla crystals.
Vanilla accentuates other flavors. The bean adds a subtle depth of flavor and
unique sweet quality. The extract, though easier to use, lacks that sweet roundness
and in excess will even impart a bitter edge.
My favorite vanilla extract is produced by Mero and comes from Grasse, the
perfume region of France. It is available from La Cuisine {page 445). 1 like to trans-
fer it to a plastic squeeze-bottle dispenser with a pointed tip and add a Tahitian
vanilla bean. (This is a great use for used vanilla beans, which still have lots of flavor
even after the seeds have been removed. Be sure to rime the bean if it has been used
to flavor another liquid and dry it in a low oven or with the heat of rhe oven’s pilot
light.)
The recipes in this book which call for vanilla extract refer to the supermarket
variety for purposes of standardization. When I use Mero vanilla extract, 1 use a
little less than one-half the amount specified in these recipes.
My next choice after Mero vanilla is Nielsen-Massey vanilla, which is earned
by many specialty stores such as Dean & DeLuca (page 445) and Williams-Sonoma
(page 445). Recently, Nielsen-Massey has introduced an excellent Tahitian vanilla
extract.
YEAST: 1 prefer using fresh yeast to dry, just on general principle. I like its lively
reaction and forthright, earthy smell. But if the yeast isn’t absolutely fresh, the final
baked product will have a slightly sour taste. The best way to determine freshness
is by smell, as the color may not have changed even when shghdy past its prime.
Fresh yeast freezes indefinitely, but certain precautions must be taken in defrosting.
Yeast is a live organism and must be “awakened” gradually from the frozen state.
To defrost, place in the refrigerator for a minimum of 48 hours. Since a few yeast
cells will have been destroyed in the process, use ’/« more than specified in the recipe.
It’s fine to use dry yeast (sec substitutions page 443), but the quick- or rapid-
rise yeasts need a different procedure. For one thing, they cannot be proofed. In the
10 minutes of proofing time, they will have thoroughly exhausted all their energy
and leavening power.
ZEST: Zest refers to the colored portion of the citrus peel. The white portion, or
pith, should be avoided as it is quite bitter. The fruit is easier to zest before squeezing.
A zester is the ideal piece of equipment to remove only the outer peel (see page
458). The fine strips should then be chopped with a knife or food processor. 1 like
to add some of the sugar from the reape and process it with the zest. This keeps
the zest from clumping and disperses it more evenly when added to the larger mix-
INGREDIENTS W
ture- A vegetable peeler will also work to remove wider strips
which can then be cut or chopped fine.
WEIGHTS The weight of all ingredients fnr recipes in thu book is given in
both the metric and avoirdupoir systems. The grams have been
rounded off to the nearest whole number without decimal points
(except for leavening which needs to be more precise), the ounces
to the nearest quarter ounce. Either system works, bur do not
expect the mathematics to correlate exactly.
There is no doubt about it; weighing is faster, easier, and
more accurate than measuring. Most bakers, including myself,
prefer the metric system for its precision in small quantities. There
isn’t any adjustment necessary if you have a metric scale and the
recipe gives metric amounts! If you do not have a scale with a
digital readout, round off the grams to the nearest convenient
number. The amount will still be quite accurate as, after all, one
gram is only about one twenty-eighth of an ounce.
The way I have presented the volume measures is the way in
which I would measure them. Instead of writing 6 tablespoons
sugar, I express it as H cup + 2 tablespoons because that is the
more convenient approach. Also, the fewer measures used, the
less room for error.
I am offering a chan of weights for your convenience in con-
verting other recipes. The weights were determined by innumera-
ble trials over a three-year period at seven stories above sea level
with a Mettler scale (which is used in scientific laboratories). 1
spent my entire first pay check as a chocolate consultant on this
scale, with no regrets. People ask me the point in having such
accurate equipment when most people will not. .My feeling is that
if I am to set the standard, I want it to be as close to the absolute
as possible. That way, when others deviate, it will still work be-
cause there is always a range of acceptable error.
For those who measure instead of w*eigjh, the dip and sueep
method of measuring refers to dipping the measuring cup into a
bin containing the ingredient and sweeping off the excess with a
long, flat spatula or knife.
Lightly spooned into cup refers to spooning the ingredient
into the cup and then sweeping off the excess with a long, flat
spatula or blade. This method yields less of the ingredient than
the dip and sweep method.
Sifted means that the ingredient is sifted into a cup that is
sitting on a counter. Tire cup is never touched or (pensh tbe
thought) shaken. Only the handle is held when the excess is swept
off with a spatula or knife.
Dry ingredients should be measured in a cup designed for
solids. I prefer the Foley stainless-steel set of measuring cups and
41Я INGREDIENTS AND EQUIPMENT
spoons. The 2-cablespoon cup, however, measures less than it
should. Other measuring cups may vary in size and are generally
less reliable.
Liquid ingredients, including honey and other syrups, should
be measured in a liquid measure with a spout. There is a differ-
ence in volume between liquid and solid measuring cups. The most
accurate liquid measure at the present time is made by Oven Ba-
sics. I happened to find it when I was teaching in Florida and to
my delight, 1 cup of water weighed exactly 8.337 ounccsi'236.35
grams, which is the dictionary definition of an 8-ounce cup of
water. This is not true of many other brands. Some are off by
quite a bit, and the marks are not level.
FOOD SUBSTANCE METHOD OF MEASURE WEIGHT OF 1 CUP
ounces gfAITLt
FATS butler - . - । 8 227
danfied butter ibeurre nnnerrei 6.8 195
cocoa butter 9 256
vegetable shortening 6.75 191
mineral oil 6.86 196
saftiowcr oil 7.5 215
walnut oil FLOURS 73 215
cake sifted light!) spooned dip and sweep 33 4 4.5 100 114 130
all-purpou* sifted ltghrl> spooned dip and sweep 111 5 114 121 145
bread sifted lightly spooned dip and sweep 4.25 43 53 121 130 157
buckwheat lightly spooned dip and sweep 4 4.5 115 125
whole wheat sifted 4.5 125
Oitrnwl 97 Oaham 123 PVMnit 253
INGREDIENTS 439
FOOD SUBSTANCE METHOD OF MEASURE WEIGHT OF 1 CUP
ounce* grams
chestnut sifted 38 109
corn March lightly spooned or sifted 4.2 120
Dutch-processed cocoa sifted lightly spooned dip and sweep 2.6 3.25 333 75 92 95
nonalkalircd cocoa suclt as Hershey’s: utnc as Dutch-pr<xx»ed except for LIQUIDS lightly spooned 2.9 82
heavy cream 8.12 232
milk, buttermilk, sour cream, and half and half 8.5 242
molasses 11.25 322
com syrup 113 328
glucose 11.75 336
honey 11.75 336
refiner’s syrup 12 340
apple jelly 10.75 308
water 1337 136
lemon juice, strained 8.75 250
orange juice, strained 8.5 242
amaretto 8.75 250
Raradc Pahnka |apricot caw de-vie) 7.7 222
Chambord (black raspberry liqueur) 9.1
Cherry Kipta (cherry wmel 8.9
Cognac 7.9 225
Cointreau 8.5 244
Kahlua (coffee liqueur) 9.6 267
kirsch (cherry eau-de-vie) 7.8 224
light rum 7.8 224
440 INGREDIENTS ANO EQUIPMENT
FOOD SUBSTANCE METHOD OF MEASURE WEIGHT OF 1 CUP
ounce* grams
Mandarine Napoleon 8.5 243
Myers's Rum (dark rum) 7.7 220
Pistasha 7 200
Vodka Б 230
William’s pear liqueur or eau-de-vie NUTS 7.7 222
almonds slivered sliced or coarsely chopped finely ground powder fine 4.2 2 3.75 М2 120 85 107 89
walnuts and pecans halves coarsely dropped 3.5 4 100 . 114 _
harelnurs whole s 142
L ..... . . . _ ... .. . ptstachius whole 532 152
almond paste 10 284
hazdniH praline paste ^CHESTNUT 10.88 30B
Pure* de Мдгпнк (unsweetened) 8-8 252
homemade Puree de Marrons (nnswcetcisodj 8.5 244
Car ma Puree de Marrons (25 io 30 percent Migaii SUGAR 9.5 272
granulated and superfine dip and (weep 7 200
powdered lightly spooned 4 115
light brown packed 7.66 217
dark brown packed 8.4 239
FOOD SUBSTANCE QUANTITY WEIGHT
ounces grams
EGGS
1 large egg in shell 2 56.7
INGREDIENTS <41
APPROXIMATE
EQUIVALENCIES
AND
SUBSTITUTIONS
Making one thing into another is never 100 percent, but in a
pinch it’s nice to know how to come dose to the original.
Most substitution charts tell you how to sour milk with vin-
egar to replace buttermilk. While the acidity level seems the same,
the sour flavor is nowhere near the rich, full tanginess of butter-
milk. Of course, substituting an item such as granulated sugar
and molasses for brown sugar is another story, because adding
molasses to granulated sugar is the way brown sugar is made in
the industry as wdl.
•М2 INGREDIENTS AND EQUIPMENT
FOR SUBSTITUTE
glucose firing 1 cup light corn syrup to a full boil and remove from the beat. Cool completely and stir in ‘A cup unheated corn syrup.
1 pound unpaired butter 1 pound lightly salted butler but remove 1 teaspoon salt from the recipe
1 cup milk I cup minus 1 tablespoon half and half, remove 1 tablespoon butter from the recipe, and add 2 tablespoons water
1 cup sifted cake flour У« cup sifted, bleached all-purpose Hour plus 2 tablespoons cornstarch (this is 15% cornstarch)
1 cup light brown sugar 1 cup granulated sugar plus cup unsulfured light molasses
1 cup dark brown sugar 1 cup granulated sugar plus Vi cup unsulfured light molasses
0.25 -mince package (2У« teaspoons) active dry yeast 1 packed tabkspoon (0.75 ounce) compressed fresh yeast I
1 packed tablespoon (.75 ounce) compressed fresh yeas ( 1 packed tablespoon phis 1 packed teaspoon (1 ounce} thawed frozen compressed fresh yeasi
note: The yeast equivalency ts approximate and works well. If
you have a scale accurate for small amounts, you may want the
more precise conversion:
1 package active dry yeast = 2’Zt teaspoons .25 ounce = 7
grams
1 package compressed fresh yeast = .6 ounce « 17 grams
If recipe calls for dry yeast, x 2.42 is amount of fresh needed.
If recipe calls for fresh yeast, X .41 is amount of dry yeast
needed.
Using volume, you need 1.4 times the volume of packed fresh
yeast to replace dry.
Exchanging one type of semisweet or bittersweet chocolate for
another will work but will often give surprisingly different flavor
results. Even if the percentages of cocoa solids, cocoa butter, and
sugar arc the same, the type of bean and degree ot roasting is
responsible for significant variations. If may also result in differ-
ent texture. The best way to determine which bittersweet or semi-
sweet chocolate to use is to taste it.
Chocolatiers are gjvcn the exact contents of the chocolate
they use by the manufacturers. For the consumer to get this infur-
CHOCOLATE
INGREDIENTS 443
mation is next to impossible. For me, it took two trips to Swit-
zerland. I am greatly indebted to Dr. Buser and Markus Gerber
of Tobler and Riidi Spriingii of Lindt for entrusting me with this
valuable information. (I flew home from Switzerland feeling as
though I had the crown jewels tucked into my notebook.]
The main factor to consider in exchanging bittersweet or
semisweet chocolate is the sugar content, so the following is a list
of approximate sugar content for 1 ounce chocolate.
Lindt Courante: 2 teaspoons sugar
Tobler extra bittersweet: 2JA teaspoons sugar
Tobler Tradition, Lindt Excellence: 3‘A teaspoons sugar
Tobler Bittersweet, Lindt Surfin, and most American semisweet
chocolate: З'Л teaspoons sugar
I find the quality of bitter (unsweetened I chocolate available
to the consumer tn this country lacking, so 1 always substitute a
fine-quality bittersweet or semisweet. If you have a favorite choc-
olate recipe calling for bitter (unsweetened} chocolate and wish to
improve the flavor: For every ounce of bitter chocolate called for,
substitute 2 ounces bittersweet or semisweet. For every 2 ounces
of bittersweet or semisweet used, remove 2 tablespoons sugar and
¥> teaspoon butter from the reape.
Cocoa offers a richer, stronger chocolate flavor to cakes than
does chocolate. Fewer cocoa solids than contained in the choco-
late arc necessary to achieve rhe same flavor intensity (see Under-
standing Cakes, page 474), but it is necessary to dissolve the cocoa
in liquid to unlock the full flavor.
To convert a cake recipe using bittersweet or vemrswecr
chocolate to a more chocolaty cocoa cake: For every ounce of
bittersweet or semisweet chocolate, substitute 1 tablespoon plus
1% teaspoons (.33 ounce>'9.5 grams) cocoa, 1 tablespoon plus '/i
teaspoon sugar (.5 ounoc/14.5 grams), 1 ¥1 teaspoons unsalted buner
(.25 ounce'7 grams]. For full flavor, be sure to dissolve the cocoa
in at least *4 cup liquid in rhe recipe.
To convert a cake recipe using unsweetened chocolate to a
more chocolaty cake: For every ounce of bitter or unsweetened
chocolate, substitute 3 tablespoons cocoa plus 1 tablespoon cocoa
butter or unsalted butter. For full flavor, be sure to dissolve the
cocoa in at least 2 tablespoons liquid in recipe.
Other useful chocolate information: To approximate 1 ounce
couverturc when you need a chocolate that will coat thinly, ixve 1
ounce fine-quality bittersweet or semisweet chocolate plus */i tea-
spoon (.19 ounce/5.4 grains} cocoa butter.
444
INGREDIENTS AND EQUIPMENT
Rachel Akselrod: 212/517-5370
Alberto-Culver Company (Baker’s Joy): 2525 Armitage Avenue,
Melrose Park, Illinois 60160. 312/450-3000
Albert Uster Imports Inc.: 9211 Gaither Road, Gaithersburg,
Maryland 20877. 800/231-8154
Chocolate Gallery: 34 West 22nd Street, New York, New York
10010. 212/675-2253
Dean & DeLuca: 560 Broadway, New York, New York 10012.
212'431-1691; outside New York: 80Q'’227-7714, Monday-
Friday, 9 Л..М.-5 p.m.
Gourmand: 636 South Pickett Street, Alexandria, Virginia 23304.
703/461-0600
Harrington’s: Main Street, Richmond, Vermont 05477. 802/434-
4444
Hazy Grove Nuts (hazelnuts or filberts): P.O. Box 25753, Port-
land. Oregon 97225. 503/244-0593.
International Leisure Activities INestltfs chocolate): 107 Tremont
City Road, Springfield, Ohio 45503. 513/399-0783
Katagiri and Company, Inc.: 224 East 59th Street, New York,
New York 10022. 212/755-3566
Keenan Farms, Inc. (unsalred pistachio nuts): P.O. Box 248, Av-
enal, California 93204. 209/386-9516
La Cuisine: 323 Cameron Street, Alexandria, Virginia 22314. 800/
521-1176
Maid of Scandinavia: 32-44 Raleigh Avenue, Minneapolis, Min-
nesota 55416. 800/328-6722
Maison Glass: 111 East 58th Street. New York. New York 10022.
212-755-3316
Nielsen Massey Vanillas: 28392 North Ballard Drive, lake For-
est, Illinois 60045. 312/362-2207
Paprikas Weiss Importer: 1546 Second Avenue, New York, New
York 10028. 212788-6003
Swan’s Down Cake Flour: Luzianne Blue Plate Foods. 640 Mag-
azine Street, New Orleans, Louisiana 70130. 8OO/692-7895,
Monday-Friday, 9 л.м.—2:30 p.m.
Taam-Tov Food, Inc.: 188 28rh Street, Brooklyn, New York,
11232. 718/788-8880
Wilton Enterprises: 22440 West 75th Street, Woodridge, Illinois
60517. 312/963-7100
MAJOR
INGREDIENT
DISTRIBUTORS
AND
MANUFACTURERS
INGREDIHNTS 445
Cuisinm Food ftvtoaor and power strainer
Cuisinirt как
Tilia vjcwm
sealer
Hra*? чМу tumwblc
Sms’! Hcmkds
Liquid
Pixr-i cutter
М-огкЬ nykm
pawn Ьпк
12-inch polyester
рангу bug
6-cup nxnui-butwm txr*i
French rack* w.
Cake leveler
Syrup syringe
Rawer former
Sptm-tuut torii
Fine rtue»h strainer
A ___________—_______
1 Wtbthof Jcarc* knife
JMp
Large devnratH^ rubes "Folry »й1'4 tnewunng <вр».
( or Ju® Rose tyody dorp Jar |Ьд-гпидас»гт
Cccdon Rusc^j^latc chtnnunHter
iGRBPomb
Bask pastry
Ь-ruh *ci«ccr
Arquette
s ft Л
r— M
Tnii’gnl.ir uryi
I
л »И j' —г
t rtfiilil!
Foley rwxMjririf: цяхпп Cake tester
•146
INGREDIENTS AND EQUIPMENT
EQUIPMENT 447
any people assume that fine cake baking requires not only
a wealth of technical knowledge but also a labyrinth of special-
ized equipment. In reality, apart from basics such as mixing bowls,
rubber scrapers or spatulas, and noncorrodible saucepans, the
equipment for successful baking can be boiled down to ten items.
Of course there are many delightful gadgets designed to make
work more efficient, but the following items are indispensable:
OVEN
ELECTRIC MIXER
Accurate oven temperature is extremely important for cake bak-
ing. As ovens can lose their calibration, they should be checked
every few months. Most oven thermometers arc quite inaccurate,
so I usually use the Cordon Rose sugar syrup thermometer, wir-
ing it to the rack to hold it in position. The thermostat in most
ovens fluctuates at least 10*F. above and below ideal temperature.
The new Wolf commercial ranges, however, have minimal fluc-
tuation. Another test for oven temperature is to make All-Occa-
sion Downy Layer Cake (page 39). If it takes longer than the
recommended time, you know that your oven is too low at the
setting used.
The ideal oven for cake baking is one which has little dis-
tance from top to bottom and a rotating turntable. Home models
which come closest to this ideal are countertop convection'micro-
wave models. The turntable is actually designed for the micro-
wave option, but it happens to be ideal for even baking as well. I
do not like commercial convection ovens because the fans are too
powerful for fragile items. (I’ll always remember the class with
White House pastry chef Roland Messnicr when his langue du
chat butterflies actually flew off the baking parchment and crashed
into the gusty fan of the Blodgett convection oven!)
Countertop models with fans blowing directly down on the
cake arc equally undesirable.
Although manufacturers say to lower the temperature 25°F.
when using countertop convection ovens, 1 find that using the same
temperature as a normal oven results in the same baking time.
An electric hand-hdd mixer can be used for any cake or butter-
cream but is not powerful enough to handle a very stiff mixture
such as royal icing or fondant. It also does not do quite as good
a |ob as a large heavy-duty mixer in aerating ^/«oise and other
foam cakes. My favorite electric hand mixer, more powerful than
most, is manufactured by Krups. With an optional attachment it
doubles as an immersion blender (page 457).
44M INGREDIENTS AND EQUIPMENT
People who do a lot of baking sooner or later end up with a
heavy-duty stand mixer. The two best mixers of this sort are the
KitchenAid K5 senes and the Kenwood Major from England, cur-
rently distributed under the name General Slicing (sources 10 and
19). They axe both excellent mixers. The Kenwood has a larger
capacity (7 quarts compared to 5 quarts! but works well with
small amounts. It also has a stronger motor with a device which
protects it from burning out if overheated. The conical shape of
the bowl and the ability to adjust the beaters to come as dose as
possible to the bottom make for thorough and even mixing. The
K.5 hearer cannot be adjusted, but the whisk beater will reach die
bottom of the bowl if it is not fully engaged. Push it on its holder
but do not lock it into position. Lower the beater to hold it in
place. It will just reach the bottom of bowl. 'Thank you, Carole
Walter.)
Heavy-duty mixers offer the choice of a flat “spade” beater
and a whisk beater. I he flat beater is intended for general mixing
and the whisk beater to beat as much air as possible into the
mixture, such as when beating egg whites, or sponge-type cakes.
1 find pouring shields more cumbersome than helpful. When
adding flour or powdered sugar, which tends to fly out of the bowl,
I drape a large piece of plastic wrap over the top of the mixer,
including the top of die bowl. Any powdery substance which leaps
up dues not ding to the plastic as it would to a doth towel, and
the plastic enables you to see what is happening to the mixture.
It t$ useful to have a second bowl and even a second whisk
beater as many cake and buttercream recipes are made in
two parts.
The K5 can handle up to 2 cups egg whites (16 large whites),
a 7-egg genoise, an 8 egg butter cake, or any mixture that will
not exceed 4 quarts. The Kenwood can handle any mixture that
will not exceed 6 quarts.
For larger-scalc baking the 20-quart Hobart is an ideal size.
It can also be used with a 10-quart bowl. These two bowls can
handle any recipe tn the master cake section ot this book in one
batch. I chose the model Hobart makes for hospitals, which is
stainless steel with stainless steel beaters. The salesman tried to
talk me out of it because it was so much more expensive than the
enameled steel model, but I explained to him it was like investing
in art—it is as beautiful to me as a piece of sculpture.
It is sometimes difficult to find a repair service for a mixer,
especially for the Kenwood, so I am listing a repair service
licensed to repair both the Kenwood and the Kitchen Aid
(source 1).
EQUIPMENT 449
CAKE PANS
The cake pans used most in this book are 9 inches by 1 *6 inches
because they are the most readily available. Aluminum pans with
a dull finish are ideal and straight sides ate preferable ал cakes
baked in straight-sided pans are easier to frost. Avoid shiny pans,
black pans, or glass pans (see Baking and Storing Cakes,
page 20}.
Any rack can be used to allow air circulation for quick cooling of
a cake. The best racks I have found are from France (sources 6
and 13). The wire is closer together, offering more support, To
prevent cakes from sacking to the racks, I occasionally spray them
with nonstick vegetable spray. 1 never use soap on the racks, just
a spray of water or a wet brush when necessary to remove crumbs.
METAL SPATULAS
A small metal spatula with a narrow 4-inch blade and a wooden
handle ts the best implement for frosting a cake. It is also helpful
to have one with a longer blade for smoothing the top (sources
14, 16, and 24).
LIQUID MEASURES
The most accurate and well-marked heatproof measuring cups I
have found are made by Oven Basics. When shopping for mea-
suring cups, look for ones with level markings. A cup of water
read below the meniscus (the curved upper surface of the water)
should be close to 8 ounces. In addition to measuring liquids,
these cups are ideal for pouring hot sugar syrup into an egg mix-
ture. They also help to maintain the temperature of the syrup
which keeps it fluid enough to pour. The handles remain cool to
the touch and the spouts control the way the liquid pours. If heated
first with boiling water, the cup will be even more effective in
retaining heat.
SOLID MEASURES
Foley stainless-steel cups arc the most attractive and most accu-
rate. Tupperware’s cups arc also excellent and include a practical
% cup and ’/♦ cup. Solid measures must have unbroken, smooth
rims, making it possible to level off any excess.
450 INGREDIENTS AND EQUIPMENT
Foley stamle»-«ed measuring spoons and Tupperware heavy-duty
plastic are my favorites. I especially like the Tupperware spoons
because they include unusual sizes such as Vi teaspoon, 4 tea-
spoons, and Vi tablespoon. I have found other brands of measur-
ing spoons to be somewhat smaller than these two brands.
MEASURING
SPOONS
This item can sieve fruit purees with seeds, danfy butter, and sift
flour. The stainless-steel extra-fine mesh strainers front Italy are
my favorite (available in gourmet kitchen shops;.
FINE STRAINER
This is the item 1 miss most when I teach in other places. It is
difficult to take with me because plane* do not allow passengers
to board with knives in their hand luggage (and I never trust vital
equipment to the baggage compartment). In order to level a cake
or slice it horizontally, if is essential to have a serrated blade longer
than the diameter of the cake. This b a difficult knife to find but
fortunately Albert Uster Imports (source 4) carries an excellent
14-inch blade version called “wavy edge slicer 14-inch round tip.'*
The serrated blade also can be used to make wavy lines on an
iced cake's surface (page 358).
LONG SERRATED
KNIFE
NICE TO HAVE
SCALE An accurate scale makes baking much faster and more
reliable. My favorite nonelectric scale, which travels with mewhen
I teach, is produced by Cuisinarts. It weighs only up to 10 ounces/
300 grams but is designed on the pendulum principle rather than
spring and thus is accurate to plus or minus 2 grams. At home I
use the Mettler PE 16 electronic scale, a top-quality, very expen-
sive laboratory scale from Switzerland, accurate to within 2 gram,
it weighs up to 35 pounds.' 16,000 grams, which makes it conve-
nient for large-scale baking such as wedding cakes (source 15).
All three scales can be used to weigh in avoirdupoir nr metric
systems.
VACUUM SEALER; Vacuum sealing extends shdf life, prevents freezer
burn and is effective for keeping humidity out of ingredients like
chocolate, flour and baking powder. The Tilia (page 465, source
3) is a commercial quality machine.
THERMOMETERS Thermometers are used in cooking when precise
temperatures must be obtained, as when working with chocolate,
sugar syrups, and yeast. Even a few degrees of inaccuracy ate
enough to put chocolate out of temper so that it won't set cor-
rectly, produce Italian menngue that will never thicken, or kill
yeast so that brioche won’t rise. For a thermometer to be reliable,
it must be accurate to within 1*. I used to assume that a thermom-
eter was an absolute measure of temperature. Then I discovered
that the instrument, used to measure variables, could itself be a
EQUIPMENT 451
variable by as much as 201*.! And worse yet, it may vary in its
inaccuracy at different degrees of its range. Driven by a personal
need for reliable thermometers, I decided to have them manufac-
tured tn my own catena.
Once having made the commitment to produce highly accu-
rate thermometers for the food industry» 1 approached a manufac-
turer specializing in laboratory thermometers, where precision is
an imperative. The thermometers they produce are made to in-
dustrial specifications and arc calibrated to standards trace-
able to the National Bureau of Standards in Washington, D.C.
The Condon Rose chocolate thermometer has a range of 401.
to 1301. in widely spaced 1-degree increments (sources 8, 11, 14,
and 18).
The Cordon Rose candy/deep fat thermometer has a range of
20s?. to 50O°F. in 2-degree increments (sources 8, 14, and 18).
Two key points in producing an accurate thermometer: It
must be glass with the calibration (scale) etched directly on it, and
it must be mercury if it has a high range. Mercury exceeds the
accuracy of any other material including that used for electronics.
It is the only substance which will continuously repeat rhe iden-
tical reading of a given temperature.
Problems with other materials:
1. Thermometers with metal stems and dials arc made using two
different kinds of metal coils which expand and contract at
different rates. When one metal expands more than the other,
the dial turns. After continued use, the coils tend to wear, de-
creasing accuracy.
2. Thermometers with calibration or degree reading on a wooden
or metal plaque attached to the glass thermometer and not
directly on it may not be lined up to precisely the right point.
3. Digital thermometers are battery-operated. As die banery wears,
accuracy decreases.
But no matter how accurate the thermometer, or any other
instrument of measure, it is soil prone to human error. It becomes
necessary to understand how to use and care for a thermometer—
a simple matter but one that must be learned.
How to read я thermometer: Since many people hold a thermom-
eter with the left hand while stirring with the right, 1 designed the
Cordon Rose thennometer* with two opposing scales so that they
can be read left- or right-handed.
A thermometer should be read at eye level, slanted slightly to
one side. The immersion level, indicated by an etched ring toward
the base, is the point at which a thermometer is calibrated to read
452 INGREDIENTS AND EQUIPMENT
most accurately. Ihermonieters should be immersed up to this
level when read, although one that is well made will still read
with a fair degree of accuracy despite the degree of immersion. If
working with a small amount of liquid, tilt tbe pan slightly to
increase the depth of the liquid when reading the thermometer.
The highest accuracy of a thermometer is not at either ex-
treme of its scale.
How to care for a thermometer: It is best to hang a thermometer
out of harm’s way as rattling around in a drawer may cause mer-
cury separation.
This can also occur if the thermometer was handled roughly
during shipping or if it has been dropped.
Temperature readings will nor be accurate if rhe mercury has
separated.
To prevent breakage, avoid extremes in temperature. When
removing the thermometer from a hot liquid, for example, do not
place it on a cold drain board. Also, do not allow the thermom-
eter to rest on a pan’s bottom, because when it lies on its side the
uneven heat distribution could cause it to crack. Clips to attach
thermometers to the side of a pan are prone to slipping because
they do not conform to a universal pan size or shape. I prefer to
hold the thermometer, which is possible as the glass does not con-
duct the heat.
WHtSKS: 1 find two sizes of whisks particularly useful for baking:
a small one which will reach into the corners of a saucepan or
howl and an enormous balloon whisk for folding one mixture
into another in place of a spatula. My large whisk measures 14%
inches in circumference (source 8).
CAKE PANS: In addition to the standard 9-inch by 1 ‘/j-inch pans,
there are several other sizes and shapes required for the recipes in
this book. Two of my favorite manufacturers of sturdy straight-
sided 2-inch-high cake pans are Chicago Metallic (source 19) and
Magic Line (source 16).
The Magic Line includes 2-inch and 3-inch-high loose-bot-
tom pans, which I prefer to springforms for their heavier weight.
(1 like to use the removable bottom discs to transfer cake layers.)
The line also indudes sturdy square and rectangular pans with
perfectly squared comers and a hard to find 6-inch (4-cup) tube
pan with a removable bottom. This size is perfect for one-fourth
the recipe used in the standard 10-inch (16-cup) tube pan.
EQUIPMENT Ш
The following ts a list of harder to find pans and their sources:
2-inch-high wedding cake pans from 6 to 18 inches: Sources 14,
16 and IS (Maid of Scandinavia has promised to carry all sizes
including odd numbers such as 13 and 15).
17-inch by 12-inch sheet елке pan: My favorite is by Wearevcr
{source 18) or Magic lune (source 16) because it is heavy enough
not to warp.
Hundt, Raby Hundt, Rundt-lette and Rundt-styic muffin pans:
Cast aluminum is the best but not available for the muffin pans
(source 14).
9-inch wide by 2-inch-high Wilton heart-shaped pan: Sources 14,
18, and 24.
9Mt-inch by 6f/t-inch Wilton oval cake pan: Sources 14 and 24.
Heating core: Pamsh (source 16) makes a ’‘heating core” which
can be placed in the center of any cake pan, turning it into a tube
pan. A 9-inch (10-cup) tube pan with a removable bottom is ideal
for baking half-size chiffon and angel food cakes but is very dif-
ficult to find. A 9-mch spnngform with a heating core works per-
fectly!
IVi-cup Turk's head pan: Perfect for fruitcake (source 21).
2-inch-high expandable flan ring: I enpy using flan rings to mold
cakes, but the standard French flan rings do not conform to the
American cardboard rounds used for the base of the cake. A French
454 INGREDIENTS AND EQUIPMENT
black steel expandable flan ring, however, adjusts to Hr cake rounds
from 7 to 14 inches in diameter (source 13).
9-inch-wide by meh high brioche pan: Sources 8, 13, and 14.
Making your own pan: If you ever need a pan of a certain size
and cannot order it in tunc, it is possible to make a pan from foil.
1 learned this technique when I worked at Reynolds Aluminum
Company many years ago. An advantage to a foil pan is that the
sides can be taken apart after baking, making it function as a
springtorm.
To make a foil pan: Wrap a cardboard cake round with a layer
of foil, securing it on the bottom with tape. Multiply the diameter
by 4 (this will be the drcumlervnoe) and tear off a length of heavy-
duty foil tn correspond. Fold this foil in half lengthwise and in
half again to make a band 494 inches wide. If the pan only nerds
to be 2 inches high, fold in half one more time. Cut short Vt-inch
snips on a long side at I-inch intervals. Place the foil-coverrd cir-
cle on a can or ocher object to elevate it. Fold the foil band around
it, attaching it by bending the snipped ends flat against the bot-
tom of the circle. Attach with tape. Allow the band to overlap
and secure with tape. Stand the pan upright and place it on a
baking sheet for extra support.
Round-bouom bowl: A perfectly round-bottom bowl for molded
charlottes is next to impossible to find. Dean & DeLuca Isource
7) carries a magnificently designed stainless-steel model from Ger-
many in the useful 6-cup and other sizes. (Coming makes a 6-cup
glass buwl with a relatively small flat area at the bottom.)
VOLUME OF STANDARD PAN SIZES
5 inches x 2 inches 2¥i cups
6 inches x 2 inches ЗУ» cups
7 inches x 2 inches 5У» cups
8 inches x 2 inches 7 cups
9 inches x 2 inches cups
10 inches x 2 inches ЮУ» cups
11 inches x 2 inches 13 cups
12 inches x 2 inches 1594 cup*
13 inches x 2 inches 18 cups
14 inches x 2 inches 21 cups
15 inches x 2 inches 24 cups
16 inches x 2 inches 27'A cups
17 inches x 2 inches 31 ’Л cups
18 inches x 2 inches 34 У» cups
13 inches x 9 inches x 2 inches 15 cups
18 inches x 12 inches x 2 inches 29 cups
EQUIPMENT 455
A round cake pan is ¥« the volume of a square cake pan of the
same size. So to determine the volume of a square cake pan, mul-
tiply the volume of a round cake pan of the same diameter
by 133
Loaf pans (measured from the top):
8 inches x 4 inches x 2’A inches 4 cups
8V4 inches x 4% inches x l¥i 6 cups
inches
9 inches x 5 inches x 3 inches 8 cups
Heart-shape pan:
(9 inches at its widest point, 8 inches from center to 8 cups
point, 2 inches high I
Oval pan (9У* inches x 6% inches! 6 cups
Angel cake tube pan |6 inches x 3 inches) 4 cups
Angel cake tube pan i9 inches x 3 inches) 10 cups
Angel cake tube pan (10 inches x 4 inches) 16 cups
To determine the volume of an odd-shaped pan, use a liquid mea-
sure to pour water into the pan until it reaches the brim.
Rule of thumb for odd-size pans: For Genoise Classique (page
120), use half the number of eggs as the cup capacity of the pan.
For butter cake, use one quarter as many eggs as the cup capacity.
Example: An 8-cup capacity pan uses a 4-egg formula for Genoise
Classique and a 2-egg formula for a buner cake (1 whole egg -2
yolks or llA whites,)
MAGI-CAKE STRIPS. These metallic fabric strips (page 20) help to
produce a level cake ideal for icmg and decorating (source 14).
SPATULAS: Large commercial and regular Rubbermaid spatulas
are very efficient for scraping and folding, but they retain odors
SO it is best to reserve a separate set for baking. In addition to the
4-inch metal spatula listed on the essential list, small and large
angled or offset spatulas are also convenient to spread mixtures
evenly in pans or on cake rolls,
A broad inflexible spatula or pancake turner is useful for lift-
ing iced cake layers (sources 14, 16, 18, and 24),
BENCH SCRAPER Metal bench scrapers are excellent for cleaning
counters without scratching. Plastic scrapers [conies in French,
probably because they were originally made from horns) are also
useful for other purposes because of their flexibility. At LcNdtre‘s
school in France, the professor always had a corne tucked in his
toque for leveling a cake, tasting batter, or folding ingredients
together. The phrase 1 heard the most often during my week of
Study was "Ой est ma comet” I’AVhcre is my scraper?"!—like
456 INGREDIENTS AND EQUIPMENT
the proverbial absentminded professor looking for his glasses. Im-
mediately following this request, twenty corncs were enthusiasti-
cally brought forth before he remembered that his was m its usual
location—his hat.
IMMERSION BLENDER A powerful, portable blender that enables
you to mix in any suitable container, it is particularly useful for
smoothing chocolate or buttercream mixtures. (The Krups porta-
ble mixer has an immersion blender attachment.)
SAUCEPAN WITH NONSTICK COATING A medium-size heavy
saucepan such as W earner with a nonstick lining « ideal for creme
sugar syrups, and reducing liquids because very little of
the liquid sticks to the pan. Do not use for caramel as very high
temperatures will eventually damage the lining. (Available at
housewares stores and the Broadway Panhandler, source 18.)
CUISINART POWER STRAINER This beautifully designed attach-
ment co the food processor juicer pays for itself by extracting more
puree than any other device 1 have used. Unlike a food mill, it
does not allow even the tiniest raspberry’ seed to pass through. It
is also very easy to clean. See source 6 for the number to call for
the closest distributor.
SIFTER The primary reason flour is sifted is to separate and aerate
the flour particles, enabling them to mix more uniformly with the
liquid. It does not do an adequate job of mixing dry ingredients;
this is better accomplished in the mixer or even by stirring with a
fork.
I am not an advocate of the triple sifter because, if 1 have
already weighed the flour, I am never certain how much gets lost
in the labyrinth of the sifter. When making g&tutse, for example,
1 sift the flour before mixing the batter so that it will be ready to
add at the nght moment. Then I sift a secund time onto the bat-
ter. I prefer an electric sifter (at the present time only battery-
powered ones are available) because it only has one mesh strainer
and is very fast {source 14). A strainer works wei* too with a
tablespoon to press the flour through it.
CARDBOARD ROUNDS: Corrugated cardboard rounds (also re-
ferred to as cake circles) are invaluable for supporting cake layers.
They arc available in large quantities from paper supply houses
and in small packages from cake-decorating supply stores (sources
14, 16, 18, and 24).
The best ones have a waxy waterproof surface called glas-
sine. Doilies can be attached to the cardboard with double-sided
tape or a loop of regular tape.
I also have a lifetime supply of elegant, golden cardboard
EQUIPMENT 457
rounds embossed with my logo, which I ordered from France, к
was, unfortunately, necessary to order an enormous quantity to
fulfill the minimum requirement so most of my closets are stacked
with these rounds. I sometimes use the 6-inch ones as postcards?
GLASSINE DOILIES: These doilies are treated with glassine to make
them greaseproof so that they do not show stains or disintegrate
from moisture. They are available ar paper supply houses and
some cake-decorating supply stores such as Maid of Scandinavia
{source 14).
PARCHMENT: Parchment is available at cake-decorating supply
stores and specialty stores in rounds and rolls for lining the bot-
toms of cake pans and triangles to make piping bags. 1 use parch-
ment cones instead of pastry bags when working with food
coloring, which usually stains the bags, and also when working
with a particularly heat-sensitive frosting. The stiffness of the
parchment prevents your hand from coming as dose to the frost-
ing as a cloth bag would allow, so the frosting remains firmer for
a longer time. Lining pan bottoms with parchment enables the
cake to release perfectly when unmolding.
REUSABLE NONSTICK PAN LINERS: This is one of my favorite
products because absolutely nothing sticks to it, making it ideal
for caramel, meringues, and ladyfingers. It has been around for
many years but is sometimes difficult to find. European Home
Products in Connecticut (page 465) carries it under the name
sanStick (source 9).
SLOTTED SKIMMER: A medium or large skimmer makes a much
better folding instrument than docs a rubber spatula, because the
small holes provide just the right resistance to blend ingredients
without deflating the batter. It helps to bend back the handle slightly
to decrease the angle.
ANGEL FOOD CAKE FOLDER This inexpensive device is almost
extinct. It was designed specifically for folding flour into very stiff
menngue for angel food cake and it is perfectly suited to the task.
I found this item in the Vermont Country Store Catalog {source
SgSjSr 20). They refer to it as an “old-time wire kitchen beater.* It doesn’t
always appear in the catalog, but they assure me that they have a
large supply.
^лг ZESTER AND STRIPPER I will always remember the look on James
r—Beard’s face when he described these utensils to our class many
у-*. years ago. He held a small object in either hand and said: “This
is the zester and this is the stripper.*’ He had a definite gleam in
his eye.
A zester has a small metal head with tiny rough holes in it.
458 INGREDIENTS AND EQUIPMENT
When scraped across a citrus fruit, it penetrates just deeply enough
to remove the perl without touching the bitter pith beneath. The
stripper, on the other hand, removes wider strips of the same peel.
PORCELAIN SPOONS: These spoons, made of French porcelain,
are designed to be tasting spoons because they do not conduct
heat or absorb odors. This also makes them perfect for stirring
hot liquids, and they can be used in the microwave. I especially
like porcelain spoons for making caramel cages. It’s easier to see
the true color of the caramel against the white of the porcelain
(sources 5 and 7).
CAKE TESTER: Cake-decorating supply stores carry thin metal wires
with loops ar the end which make only a small hole in a cake
when testing for donrnesv Wooden tcxrthpick-s are fine to use also.
MARKING PEN: Stationery stores carry a marking prn called El
Marko which writes on plastic containers and foil and is not ob-
literated by moisture, perfect for items to be stored in the freezer.
MARBLE: The Kitchen Bazaar in Washington, D.C.. (source 12)
carries an 18-inch square of marble for a very reasonable price.
This is a good size for everything from pastry to chocolate and
nougatine. Do not allow citrus juice or alcohol to touch the mar-
ble as it will stain it and spoil the finish.
HOT TRAY OR GRIDDLE: If your oven does not have a pilot light,
hot trays w ith temperature controls or electric griddles work well
for melting chocolate, providing they do not exceed 120T. To
check the temperature, set the control at the lowest possible mark,
place a cup of water with a thermometer in it on the tray or
griddle and take a reading over a period of 2 hours or until you
feel sure that the temperature will not exceed 110*F. (to be on the
safe side). The Farberware griddle, on its lowest setting, is engi-
neered to maintain a stable temperature of 90 to 110°F. If the
heat is below 12(FF., you should be able ro rest the palm of your
hand on its surface without discomfort for 3 seconds. Another
good heat source is the area above some refrigerator*. Every*
dwelling has different sources of natural heating or cooling areas.
CUtSINART GRIDDLE. Tins beautifully designed griddle is perfect
for pancakes. A 13-mch stainless-steel surface encases а 2 Vi pound
sohd copper disc, providing exceptionally even heat for so large a
size.
HEART-SHAPED ELECTRIC WAFFLE IRON: An electric waffle iron
produces the most uniformly golden, crisp waffles with the least
effort (always a plus first thing tn the morning). 1 prefer the non-
stick version (source 22).
EQUIPMENT 459
SPECIAL PANCAKE PANS: The Danish Ebleskivcr pan produces
rounded pancakes puffs (sources 8, 13, and 18). The Swedish
“Plett" pan is ideal for making perfectly shaped 214-inch pan-
cakes or blim (sources 13 and 18).
SYRUP SYRINGE: A large plastic syringe without needle is more
efficient for sprinkling cakes with syrup than a pastry brush. It i$
even calibrated to measure the amount used for each side of tbe
cake. If you can't coax one from your doctor, they are available
at medical supply stores. Although intended to be disposable, they
can be reused indefinitely for syrup. I use a 70 cc syringe (about
2.25ч»ипсе capacity) and shake out the liquid rather than use the
plunger. After washing, do not reinsert the plunger until ready to
use or it will stick. Before using, spray the inside lightly with non-
stick vegetable spray.
ICE-WATER BATH When a recipe says to “cool to room temper-
ature” and you want to do this quickly, an ice-water bath works
well, providing the mixture can be stirred to equalize the temper-
ature. To make an ice-water bath, place ice cubes in a large con-
tainer and add enough cold water just to float them. Sprinkle a
handful of salt on top to lower the temperature (as in making ice
cream). If the mixture to be cooled is in a glass bowl, which holds
the temperature, and it should not be chilled beyond a specific
point, have ready some hot water to take the chill off the bowl
when it has reached the proper temperature. Mixtures that should
not be stirred, such as ganache, can be placed in a large heat-
conductive pan such as copper. Setting the pan on a marble counter
will further draw out the heat.
HOT-WATER BATH (BAIN MARIE) There arc many times when you
need to hear something very gently rather than ovet direct heat.
If you do not own a double boiler, or if it is too small, use a
saucepan or pot whose opening is slightly smaller than the diam-
eter of the mixing bowl. Fill it with a few inches of hot or sim-
mering water and place the bowl on top. In most cases you will
not want the bottom of the bowl to touch the water. Stir or fold
the mixture continuously while heating.
When using a hot water bath for custard-type cakes, it is best
to place a piece of parchment in the bottom of the pan containing
the water so that the pan with the batter does not come into
direct contact with the metal of the larger pan.
CAKE SERVING KNIFE: My favorite serving knife is a thm-bladed
triangular “tart" knife made by Wiisthof (source 26). They also
make a vmall deeply verrated knife ideal for beveling cake edges
or for cutting airy sponge-type cakes.
460 INGREDIENTS AND EQUIPMENT
CHERRY FITTER: In the Fruit Topping chapter I described how to
use a hairpin to pit cherries. Large hairpins are sometimes difficult
to find. “Jumbo metal hairpins” are available through the Ver-
mont Country Store (source 20},
GLASS CAKE DOME This attractive and useful serving piece al-
lows you to show off the cake while keeping it moist and fresh,
к is difficult to find cake domes in large sizes so it’s great to know
that a company called ACC manufactures them in 8-indi, I fl-
inch, and Il-inch diameters. If you contact them (source 2) they
will tell you the store closest to you which cames their products.
Some of my best cake-decorating supplies were never manufac-
tured with cakes in mind. Orthodontic pliers, a tiny agate spatula,
a set of scalpels, and a magnificent scalloped serving plate were
all once used in my mother’s dental office. Rose petal cutters, a
tiny wooden roller I use for marzipan, and a handsome stainless
steel flour scoop came from a pottery and ceramic supply store.
Windsor-Newton paintbrushes, an 18-inch metal ruler for
smoothing cake tops, a dear plastic ruler, and an assortment of
flexible and unusually shaped spatulas came from an an supply
store. .And small quantities of ingredients are stored in stainless-
steel dressing jars from a surgical supply house.
TURNTABLE An inexpensive plastic turntable such as a lazy Su-
san, sold in supermarkets, works as well as a heavyweight footed
variety. Either can be elevated by placing it on a large inverted
cake pan. The commercial heavyweight turntable is necessary when
frosting and decorating large tiered cakes. Mine doubles as a sturdy
but elegant cake server by placing a large serving plate or marble
round on top. It is available at cake-decorating supply stores and
by mail order (sources 14, 16, and 24).
CAKE LEVELER This 16-inch serrated blade has three adjustable
heights: 1 Yi inches, IV» inches, and 2 inches. As most wedding
cake layers fall between these sixes, it is very practical for obtain-
ing perfectly level layer* (source 14).
A cake saw, with multiple adjustments using two thumb screws
rather than fixed notches, is also practical (source 16).
Basic decorating tube id: Wilton and Atcco produce sturdy
tubes which arc nickel coated and have welded, almost invisible
seams. (Atcco also has a less expensive line in which the seams
are visible, resulting in less precise piping.) When the tubes flatten
and become deformed through much use, an inexpensive plastic
tube corrector is all that is needed to put them back into shape.
Plastic couplers make it possible to change tubes without empty-
ing the pastry bag.
SUPPLIES
FOR CAKE
DECORATING
EQUIPMENT 461
Bckanol tubes, the Rolls-Royce of decorating rubes, are man-
ufactured in England, but rhe only address 1 have for ordering
them land it was hard to come by) is in South Africa (source 25).
These tubes are made of shiny, sturdy cast metal. The)' arc long
and elegant, with precisely cut openings, making them ideal for
the finest string and lace work. Their numbers do not correspond
in any way to the American tubes, so it is easiest to order the
whole set of 21 tubes. A metal coupler can be ordered for them
also. Expect to wait several months for shipment. It is worth it,
though. These pastry tubes will last a lifetime.
1 keep a separate set of tubes for working with royal icing as
even a trace of grease will break it down. Only ho< water is needed
to wash rubes encrusted with royal icing. Alternately, tubes can
be well washed and soaked in a little vinegar to ensure removal
of grease.
A basic set of tubes includes:
small round tubes: Numbers 2, 3» 4, 12
large round tube: Number 6 (‘Л-inch
diameter)
large round tube: Number 9 (Уч-inch
diameter)
drop flower: Numbers 30, 131
(*)
star tubes: Numbers 18, 22
G
leaf tubes: Numbers 67, 70
raee tubes: Numbers 102, 103. 104
lily of the valley tube: Number 181
। Number 7 flower nail for piping roses
ft (Sources: 14, 16 and 24)
\i PASTRY BAGS: In addition to small parchment bags, I use two
sizes and types of pastry bags. The 12-inch polyester bag is made
by Wilton and the 14-mch nylon bag comes from France and is
also available at most cake-decorating supply stores. The soft ny-
lon bag is ideal for piping whipped cream mixtures. It is not as
effective for fat-based mixtures because the grease seeps through
the material. For this purpose, I prefer the polyester bag, which is
462 INGREDIENTS AND EQUIPMENT
also soft enough for comfort in the hand but firm enough to pre-
vent too much transfer of heat from your hand to the frosting.
Bags larger than 12 inches are nor as suitable for burtcrcreams
because the heat from your hand softens large quantities of but-
tercream. It is also more difficult to squeeze unless your hand is
very large. To remove all traces of bunercream from pastry bags,
it helps to soak them in hot water and vinegar.
Just as I have a separate set of tubes for royal icing, I also
reserve one pastry bag to use only for royal icing to avoid rhe
possibility of grease contamination. Alternately, polyester bags can
be soaked in vinegar and detergent to remove grease or odor. To
dry bags, invert them over tall» narrow soda or wine bottles.
Nylon bags are so soft and floppy that the easiest way to fill
them is to place them in a blender container, cuffing rhe top of
the bag over rhe opening for support. (Seal off the opening first
by twisting thr bag directly above the tube and pushing it into
the tube to keep the filling from leaking out,}
Disposable plastic bags, which can be used one time and
thrown out, are also available through cake-decorating supply stores
(sources: 14, 16, and 24).
Heavy-duty freezer Ziploc hags make ideal disposable pastry
bags. Simply cut off one corner and insert a coupler Ipuge 3911.
The closure keeps frosting from oozing out the top.
FLOWER FORMERS: This set of long plastic rubes, cut in half
lengthwise, provides concave and convex surfaces for drying icing
flowers and chocolate leaves to a more natural, lifelike shape. They
are available at cake-decorating supply stores.
FLOWER SINKERS: If using real flowers a day ahead to decorate a
cake, these plastic vials, equipped with tiny sponges to hold water,
will keep tbe flowers fresh. The smallest ones are available either
from a florist or flower supply shop.
RIBBON: The most beautiful ribbon I have found comrs from Ers
G. Bonnet-J. Mazaud and Cie, in Pans (source 8). That is where
I get my gold lame ribbon. They also carry a ribbon line called
degrjJc. which has a rainbow ot color, each one gradually bleed-
ing into the next. Any ribbon can be used around a cake covered
with rolled fondant or white chocolate bunercream, but nbbon
should be waterproof or grease resistant if the cake is frosted with
a softer buttercream.
CAKE BASES: Heavy cardboard serving boards covered with dec-
orative foil ate available at cake-decorating supply stores such as
Maid of Scandinavia (source 14). Rolls ot decorative tod are also
available should you choose to cover your own wood base, к is
also possible to use a mirror as a cake base, providing it is at least
‘/k-inch thick.
EQUIPMENT 465
BUTCHER S WAX: Available tn paper goods supply stores, this shiny
heavy-duty wax paper is wonderful tor chocolate work. I he sur-
face of the chocolate set against the wax paper takes on a high
shine.
NOTF ABOUT
SHOPPING FOR
EQUIPMENT
TRIANGULAR SCRAPER: Cake-decorating supply stores often carry
this tool for making chocolate ruffles. It is actually a hardware
store item.
PIZZA CUTTER: The heavy-duty commercial variety offers steady,
even pressure tor cutting rolled fondant, marzipan, and nuugatine
{sources 7 and 14).
SPUN SUGAR FORK: Oddly enough, this is the one item that docs
not have its own official design. In France pastry chefs tradition-
ally use wire whisks, whose curved loops have been cut with snips
to form straight wires. Another way to make a device for spun
sugar is to use a cake breaker designed for cutting angel food
cakes. Bend every other tine in opposing directions {source 14).
.Many ot the places listed on pages 465 and 466 have catalogs
which they will send if you call or write requesting them. Maid
of Scandinav ia offers the most extensive catalog.
The Bridge Company is a New York institution—where I
timidly bought my first cake pan over 20 years ago. {Fred Bridge
has a reputation both for quality equipment and for utter impa-
tience with anything vaguely resembling frivolity. His lovely wife»
Carolyn, who used to be a top food photography cake stylist,
used to give me valued advice on cake baking.)
Bridge carries a variety of quality pans and cake-decorating
equipment from France.
Char/es Lamalie, a charming Frenchman, has another New
York shop catering to lovers of French baking equipment. Hr is
primarily a wholesaler but will also sell to consumers.
Dean & DeLuca tn New York’s SoHo is known for carrying
unique items of fine quality.
The Broadway Panhandler, also in SoHo, has some of the
best equipment and prices in town.
La Спите in Alexandria, Virginia, is an excellent source for
French baking equipment.
The Kirchen Bazaar in Washington, D.C., has several stores
and a newsletter that keeps you informed of special sales and new
developments in equipment.
4M INGREDIENTS AND EQUIPMENT
WHli&ms-Sonoma has many scores and an elegant mail-order
catalog which reflects the quality of equipment they carry. They
are the exclusive U.S. distributor of the Ugolmi Minigel—my fa-
vorite ice-cream machine.
1. Acme American Repaint: 99 Scott Avenue, Brooklyn, New
York 11237, 718/456-6544
2. ACC: P.O. Box 118, Hewlett, New York 11557. 516/569-
BOO
3. Nationwide Marketing: 340 Townsend Street, San Francisco,
California 94107. 800/777-5452
4. Albert Uster Imports, Inc.: 9211 Gaither Road, Gaithers-
burg, Maryland. 800/231-8154
5. Charles Lamallc: 36 West 25th Street, New York, New York
10010. 212'242-0750
6. Cuisinaru, Inc.: 5 Wisconsin Avenue, Norwich, Connecticut
06360. 800/243-8540
7. Dean & DcLuca: 560 Broadway, New York, New York
10012. 212/431-1691; outside New York: 800/227-7714,
Monday-Friday, 9 a.m,-5 p.m.
8. Ets G. Bonnet-J. Maraud and Cie: 325, rue Saint-Martin, Pans
3ieme 75003 France. 33-1-4272-3582
9. European Home Products: P.O. Box 2524, Waterbury, Con
necticut 06723. 203/866-9683; outside Connecticut: 800*225-
0760
10. General Slicing: 1152 Park Avenue, Murfreesboro, Tennessee
37130. 615/893-4820
11. J. B. Prince Company. Inc.: 29 West 38th Street, New York,
New York 10018. 212'302-8611. (Professional culr>r
equipment only}
12. Kitchen Bazaar: 1098 1 aft Street, Rockville, Maryland 20850.
301/424-7501
13. La Cuisine: 323 Cameron Street, Alexandna, Virginia 22314.
800/521-1176
14. Maid of Scandinavia: 32-44 Raleigh Avenue, Minneapolis,
Minnesota 55416. 800/328-6722
15. Mettler Instrument Corporation: Box 71, Hightstown, New
Jersey 08520. 609/448-3000
16. Parrish Decorating Supplies, Inc.: 314 W’est 58th Street, his
Angeles, California 90037. 213/750-7650.800/736-8443
17. The Bridge Company: 214 East 52nd Street, New York, New
York 10022. 212/688-4220
18. The Broadway Panhandler: 520 Broadway, New York, New-
York 10012. 212/966-3434
MAJOR
EQUIPMENT
DISTRIBUTORS
AND
MANUFACTURERS
EQUIPMENT 465
19. Th* Hobart Corporation: Troy, Ohio 45374. 513/335-7171
20. The Vermont Country Store: Route 100, Weston, Vermont
05161. 802*824-3184
21. Turkart: P.O. Box 2737, Paterson, New Jersey. 800/526-5209
22. Vitantonio: 34355 Vokes Drive, East Lake, Ohio 44094.
23. Williams-Sonoma: Mail Order Department, P.O. Box 7456,
San Francisco, California 94120-7456. 415/421-4242
24. Wilton Enterprises: 22440 West 75th Street, Woodridge, Il-
linois 60517. 312/963-7100
25. Wool Craft and Hobby Shop: P.O. Box>'Posbus 11325,
Dorpspruit 3206, 270 Boom Street, Pietermaritzburg, South
Africa 3201. 27-331-54051
26. Wiisrhof-Trident of America, Inc.: 2 Westchester Plaza, P.O.
Box 546, Elmsford, New York 10523. 914/347-2185
466 INGREDIENTS AND EQUIPMENT
PART IV
Special
section FOR
PROFESSIONALS AND
PASSIONATE
AMATEURS
'L/hefs de cuisine often boast about having worked in some of
the great kitchens of France. As a baker, I am equally proud to
say that I have spent time as a consultant in the research and
development laboratories of one of our nanon’s largest baked gcxjds
corporations.
My taste has been honed by years of earing all over the world
and my techniques by years of experience as a student and teacher.
But to have had the oppportunity of working with scientific ex-
perts, of tasting and seeing the results of countless experiments, is
an experience that I treasure. I have, in fact, spent so much time
analyzing and thinking about cakes that I sometimes feel as though
I’ve entered the microcosmic structure of the cake itself!
1 am also grateful to my wonderful friend Shirley Corriher, a
research biochemist and inspired cooking teacher, who over the
years has unearthed many valuable articles from scientific jour-
nals and spent innumerable hours discussing and illuminating cake
theory. It is this understanding which enables me to be both cre-
ative and successful
Say, for example, that you want to convert your favorite
cheesecake recipe to a white chocolate cheesecake. Adding white
chocolate without taking into account that it contains 30 percent
sugar and then removing this amount from the sugar in the redpe
will oversweeten the cake.
Baking without an understanding of the ingredients and how
they work is like baking blindfold. Sometimes everything works.
Bur when it doesn’t you have to guess at how to change it.
Cakes made with flour fall into 3 basic categones:
• Butter cake, containing solid butter or other shortening.
• Sponge-type cake, containing a high proportion of eggs to flour
and melted butter or oil.
♦ Sponge-type cake, containing a high proportion of eggs co flour
but no butter, oil, or other fat.
The easiest way to compare the cakes in these 3 categories is
with a chart showing the percentage of liquid, egg, flour, sugar,
and fat. The chart takes mto account that unclanfied butter is not
100 percent fat. Butter actually contains about 81 percent fat and
153 percent Liquid. (Clarifying removes the liquid and milk solids.)
U ndcr-
standing
Cakes
UNDERSTANDING CAKES 469
Looking at this chan» I see for the first time that, although 1
thought my pound cake formula had equal weights of cggs^'flour/
sugar with slightly more butter, when taking into account the
amount of liquid contained in the butter, the formula, in fact» has
the exact same percentage of butter fat as other ingredients! The
chiffon cake has almost the same proportions as the genoise with
syrup except that the liquid and sugar are added to the chiffon
cake before baking.
Analyzing this chart tells you to some degree what the cake
will be like. The when moistened with syrup, has a sugar
and liquid content similar to that of butter cake. Since the genotre
has a much higher percentage of egg, which also contributes
moisture, it will seem moester than the butter cake as well as lighter
in texture. The angel food cake at 34 percent sugar and with only
egg whites and no fat to weigh it down, is a lot sweeter and lighter
than pound cake—which has only 22 percent sugar, whole eggs,
and a lor of butter.
PERCENTAGES OF MAJOR INGREDIENTS IN BASIC CAKE TYPES
Type of cake htjuid sujgur file4
Pound Cake 12% 22% 22% 22% 22%
Pancake 52% 20% 23% 0% 5%
Basic Rutter Cake 24% 10% 27% 27% 12%
G6wmc Classiquc 0% 46% 23% 23% 8%
with Synip 22% 31% 16% 25% 6%
Biscuit Roulade with Syrup 0% 59% 14% 27% 0%
15% 47% 11% 27% 0%
Biscuit de Savoie 0% 51% 23% 26% 0%
with Syrup 32% 28% 13% 27% 0%
Biscuit a la Cuillicrr 0% 50% 25% 25% 0%
Sponge Cake 4% 45% 20% 31% 0%
Angel Food Cake 6% 47% 13% 34% 0%
Chiffon Cake 14% 35% 18% 24% 9%
*T<xai hi content neduaive Ы the nadk tcilxl' and water canrainrd in the buncr
470 SPECIAL SECTION FOR PROFESSIONALS AND PASSIONATE AMATEURS
Basic American butter cake ts one of the world’s best. It is ftavor-
ful yet not overly sweet, soft and light in texture, and moist enough
tn stand on its own or to accommodate a variety of fillings and
frostings.
The ingredients fall into two main categories.- Those that form
and strengthen the cake structure and those that weaken it.
In the first category arc flour and eggs, both of which contain
proteins that coagulate when baked to form the framework or
supporting structure of the cake. The flour also contains starch
which gelatinizes (absorbs water) and stabilizes the structure.
In the second category are fat, sugar, and leavening, which
in varying ways tenderize the structure by weakening it.
Liquid bridges both categories because it combines with the
gluten forming proteins of flour to form gluten, one of the struc-
tural networks of the cake. But excessive liquid causes a cake to
collapse. Usually a cake with weak structure resembles an .4
(straight sides but sinking center). A cake containing too much
liquid, however, resembles an X (level top but sides caved m toward
the middle). A butter cake batter with too much liquid will be
thin and the baked cake will be heavy. A batter with less liquid
will be thicker and the resulting cake lighter with a more open
crumb. The perfect balance of liquid offers both structural sup-
port and moistncss that is also perceived as tenderness.
CAKE FLOUR Cake flour contains 2 gluten-formmg proteins, glia-
din and glutenin. When liquid is added, they connect to form the
resilient strands that provide a small part of the cake’s structure.
The most important structural component, however, is starch,
which absorbs water and swells ^gelatinizes) to set the structure.
Cake flour is made from finely milled soft winter wheat which
is high in starch and low in gluten-forniing proteins. Because of
its finer granulation, it absorbs fat and moisture more quickly
than hard spring wheat which contains more protein.
The size of the gas cells in a cake determines the quality of
the grain of the finished cake and is directly dependent upon how
much the batter expands during baking before the cells rupture.
This is influenced partly by the size of the flour panicles, partly
by the batter's pH, and partly by the type of shortening used.
Cake flour, due to bleaching by chlorination, has a lower pH
(more acid I than other flours. This produces a sweeter flavor and
a liner, more velvety crumb because the greater acidity lowers the
temperature at which the proteins coagulate. This also makes it
possible for the cake structure to support more sugar, butter, and
heavier panicles such as chopped nuts or chocolate -
The chlonnarion process offers other advantages. It attacks
UNDER.
STANDING
BUTTER
CAKES
INGREDIENTS
UNDERSTANDING CAKES 471
the starch granules, enabling water to enter more easily. In industry, cake flour is
often milled with sugar so that the sugar particles become imbedded in the flour
granules, providing an avenue for the water to enter and hydrate the March. Chlo-
rination also senes to inhibit gluten formation. Recent research has revealed that
fat adheres to the surface of chlorinated starch particles, resulting in better aeration
(more even, uniform distribution of air).
It is possible to substitute equal weights of bleached all-purpose flour for cake
flour by adding л small prrcentge of cornstarch. But the result will not be the same
because the flour is coarser and the pH higher. Self-rising cake flour cannot be used
interchangeably with cake flour because it contains approximately 1’/: teaspoons
baking powder and ’4 teaspoon salt per cup of flour. Ibis will coarsen and weaken
the texture of cakes requiring only 1% teaspoons or less baking powder per cup.
EGGS: Eggs contribute structure and serve as a means for incorporating air into the
batter. They also supply some of the cake's liquid. The yolk of an egg is a rich
source of natural emulsifying agents, which help suspend the fat evenly throughout
the batter. Cakes prepared with egg whites only are slighdy softer than those with
either whole egg or all yolk because the yolk becomes firmer after coagulating
(baking) than does the white. In a layer cake recipe 1 egg can be replaced by 2
yolks or I’Zt whites. If using all yolks, the structure will be slighdy weaker, so the
bakmg powder needs to be decreased by *4 teaspoon for every 3 yolks used. (Yolks
tenderize by coating some of the gluten-forming proreins in the flour, preventing
excessive gluten formation.)
The advantage of using only yolks is superior flavor and a more golden color.
The crust also browns more because the yolk is higher in protein and contains fat.
BUTTER Buner, or sold fat, tenderizes and aerates the cake. It tenderizes by coating
some of the gluten-forming proteins in the flour, preventing excessive gluten
formation. Cells created by air beaten into the fat provide focal points for the
collection of the steam formed in baking and for the carbon dioxide liberated from
sodium bicarbonate by the acid in baking powder. Unsalted butter produces the
best flavor, not only because of its owm incomparable flavor but also because it
releases the flavors of other ingredients more fully. A cake with less buner, for
example, will seem lew sweet- Margarine or other fats do not release flavor as well.
Butter will hold the maximum amount of air if its temperature is 65T. to 75”F.
when beaten. During baking, the melting fat makes the batter more mobile because
fat is insoluble (does not dissolve) in water. It disperses into tiny particles through-
out the batter. Some people use up to 50 percent hydrogenated shortening instead
of pure butter because it contains emulsifiers that disperse the fat more evenly, in-
creasing the elasticity on the film of protein around the air bubbles for better volume
and texture. I find, however, that using 100 percent buner at the correct tempera*
ture yields perfect texture in addition to superior flavor.
SUGAR Sugar contributes flavor (sweetness) and facilitates the incorporation of air
into the fat. Superfine sugar is preferable because the finer the crystals, the more
numerous the air cells. Powdered sugar is not suitable because it lacks the sharp
crystal edges which help incorporate the air. In a batter containing a large amount
of sugar, the gas cells expand more before the batter sets because the sugar elevates
472 SPECIAL SECTION FOR PROFESSIONALS AND PASSIONATE AMATEURS
the temperature at which the egg protein coagulates and the stanch granules gelatinize.
This creates a more open texture, weakening the cake's structure and making it
tnelt faster in the mouth. It should be noted that tenderness and softness are two
different qualities. A cake high in sugar will fall apart easily (is more “tender”) but
it also has a harder “mouth fed."
Sugar ‘‘tenderizes’* cake in two significant ways. It competes with the starch to
absorb the liquid by combining with the 2 gluten-forming proteins in the flour to
prevent them from forming gluten, making the structure too rigid. Interestingly,
even if the gluten is already formed when the sugar is added, rhe sugar still combine-5
with the proteins to break up the gluten. In a baked cake sugar also serves to retain
moisture.
SALT: The only function of salt in a cake is to accentuate or heighten flavor, Without
salt, the cake would have a decidedly flat taste,
LEAVENING; Baking powders are mixtures of dry acid or and salt and baking soda
with starch or flour added to standardize and stabilize the mixtures. They are
formulated so that there is no excess of either baking soda or acid left in the product
after the desired reaction is accomplished. The product of their reaction is carbon
dioxide, which aerates and lightens the batter by enlarging the already existing air
cells creamed into the fat. (It does not create new air cells.) Double-acting means
that part of the reaction takes place when the baking powder comes into contact
with liquid and the remainder is activated by heat during baking.
Too little baking powder results in a tough cake with a humped top, compact
crumb, and poor volume. Too much baking powder results in a coarse, open, fragile
crumb and often a fallen center.
Baking soda may be used m a cake formula to neutralize an acid ingredient
such as molasses, sour cream, or cocoa which has not been “dutchcd" (treated with
alkali). A half teaspoon of baking soda is required to neutralize the acid ot 1 cup of
sour milk. This process (the lactic acid of the sour milk reacting with rhe baking
soda) provides leavening equal to that of approximately 4 times its volume of baking
powder. So if я formula calls for Vi cup milk and I’/i teaspoons baking powder, it
ts possible to substitute '/: cup sour milk and the Уд teaspoon baking soda necessary
for neutralization. This equals the leavening power of 1 teaspoon baking powder so
only Vi teaspooon of baking powder needs ro be added. Molasses needs Vi to 1
teaspoon baking soda per cup for neutralization.
Because the acidity of these products vanes, there is the risk of adding more
baking soda than can be dissipated by the amount of acid present. This excessive
alkalinity will slow down coagulation of the proteins and result in a coarse, open
crumb and bitter, steely flavor. It is preferable to use too little baking soda rather
than too much.
In working with buttermilk formulas for layer cake, 1 find that Vi cup butter-
milk 4- У» teaspoon baking soda equals IVi teaspoons baking powder rather than
the 1 teaspoon suggested by the U.S.D.A. This indicates that these figures are not
exact and substitutions have to be taken with a grain of salt, so ro speak. In any
event, I prefer not to neutralize the flavor of buttermilk with baking soda, as I find
the taste fuller and the texture finer using baking powder alone.
UNDERSTANDING CAKES 47)
COCOA: Cocoa is superior to chocolate for cake baking because
it provides more intense chocolate flavor. To get equal intensity
using chocolate, it is necessary to use the equivalent of more co-
coa solids, cocoa buner. and dairy butter unless the chocolate is
cooked with water as in Moist Chocolate Genoise (page 132).
This is because the flavor components in chocolate are locked in
by the cocoa butter. Cooking the chocolate in water dissolves the
surrounding barrier of cocoa butter and swells the cocoa particles
until they rupture, unlocking the flavor components.
Cocoa has a toughening effect on cake structure so cakes
containing cocoa have a higher amount of baking powder to com-
pensate.
Baking soda is traditionally used for chocolate cakes because
it neutralizes its mild acidity. The color of a devil's food cake is
due to the pigments supplied by the cocoa or chocolate. They
change color with a change in hydrogen ion concentration. At a
pH of 5.U they are yellow. Baking soda, which increases the al-
kalinity, turns the hue to mahogany red at 7.5 pH. The increase
in pH also results in the coarser texture and bitter flavor usually
associated with devil’s food cake. If using “durched chocolate,” it
is unnecessary, in fact undesirable, to add baking soda to neutral-
ize acidity because the dutching process is an alkali treatment of
the cocoa beans during roasting which eliminates acetic acid, giv-
ing the cocoa smoother flavor, richer color, and improved solu-
bility. (Some people perceive undutched cocoa as stronger, others
as more bitter rather than more intense in chocolate flavor.)
Sometimes a process called “instantizing” is used to roughen
and fluff up the grains of cocoa and make them dissolve more
easily.
LIQUID: Milk products are the preferred liquid for yellow or white
butter cakes and water is usually the preferred liquid for chocolate
butter cakes. Milk products offer a richer flavor, but the proteins
in milk solids cause chocolate to have a bitter taste. (Taste a
chocolate cake made with milk alongside one made with water
to note the remarkable difference in flavor.) Fruit juices are not
recommended because they alter the acid balance of the batter,
which affects the texture and causes it to become gummy.
In addition to taste, the function of liquid in a cake batter is
to dissolve the salt and sugar and make possible the reaction of
the soda and acid in the baking powder to form carbon dioxide.
Liquid also disperses the fat and flour, hydrates the protein and
starch in the flour, and provides steam to leaven the cake.
MIXING THE BA 11 ER I have adapted the two-stage method of mixing batter, used com-
mercially with high-ratio shortening (which makes it possible to
474 SPECIAL SECTION FOR PROFESSIONALS AND PASSIONATE AMATEURS
use a higher ratio of sugar), for use with buner. (1 do not consider
it an advantage to have more sugar and unequivocally prefer the
flavor of butter to other shortenings.] Shortening is capable of
aeration at a wider range of temperatures than butter. Rut if the
butter ts 65*F. to 75°F. and the other ingredients are at room
temperature,* this mixing method is my preferred one. It is much
faster and easier than the creaming method, and the results are
more consistent. The gram ts finer and more velvety and the crumb
more tender than with the creaming method.
The two-stage method produces a more tender cake because
the butter ts added to the flour with a minimum of liquid (just
enough to disperse the fat) at the beginning of the mixing process.
The butter coats some of the gluten-forming proteins in the flour,
preventing excessive gluten formation. This protects the cake from
toughening due to overmixing. A significant amount of air still
gets incorporated into the batter with this method. Proof of this
is that, although the pan is filled only Vi full instead of the usual
%, the batter still rises to the top.
Another advantage of the two-stage method is that since all
the dry ingredients are added together, at the beginning, it is pos-
sible to disperse them evenly with the mixer. As sifting does not
uniformly disperse dry ingredients unless repeated many rimes,
using the mixer instead is a great time and energy saver. (Flour
should be sifted once to aerate and separate the particles which
enable it to hydrate more evenly.}
The single most critical factor to successfully baking a cake is
oven temperature. No matter how carefully ingredients are weighed,
measured, and mixed, an oven that is too cool or too hoc will
min a cake's texture. Since most oven thermometers are less than
adequate, the best rest is to bake All-Occasion Downy Yellow
Cake (page 39). This basic butter cake will give you a clue as to
how your oven is calibrated.
There is a lot you can tell from the outside appearance of a
baked cake. If the top crust is evenly golden brown and flat or
gently rounded, the cake within will be fine grained, soft, and
tender. If the cake is peaked and tests done before 20 minutes,
your oven is too hot. If it sinks slighdy in rhe middle, takes more
than 30 minutes to bake, and has a coarse texture, your oven is
not hot enough.
When a cake bakes, expanding gas from steam and leavening
enlarges the air bubbles trapped in the fat during rhe mixing pro
ccss. The bubbles expand until the surrounding cell walls rupture,
the flour and egg proteins coagulate, and the flour's starch gela-
• tdeiUy. the bullet Utuuld be the liquid and e/л* 6O*F., and the finished batter
JVF. к- 7TF.
BAKING THE CAKE
UNDERSTANDING CAKES 475
tinizcs to set the structure. At too low a temperature heat pene-
tration ts slow and the ceils overexpand and collide, funning larger
cells before coagulation and gelatinization can set the structure.
This explains why the grain is coarser in a cake that has been
baked too slowly and why a 12-inch cake is somewhat coarser
than a 6-inch cake.
WHAT CAN Assuming you are working with a well-balanced formula, when a
GO WRONG butter cake falls, peaks and cracks, or has poor texture, the first
thing to consider is the oven temperature. The next is the proper-
tion of ingredients (how they were weighed or measured). Incor-
rect substitutions without adjustments are often the problem; jumbo
eggs instead of large, all-purpose Hour instead of cake flour with-
out making the necessary ad|ustments, or old baking powder.
The next thing to consider is the method of mixing the bat-
ter. If using the two-stage method, this is rarely a problem. It is
hard to toughen the bancr by overbearing because the early ad-
dition of the buner serves as protection. With the creaming method,
overmixing develops the gluten, especially if all-purpose flour has
been used, and results in a tight grain with a peaked top. The
leavening has to force its way through the tough cell walls, creat-
ing long tunnels and erupting and cracking the surface of the cake.
Undernuxing does not form enough gluten, which results in
a crumbly, coarse grain and a very flat top crust with a slightly
fallen center.
Assuming you are making one of the cake recipes in this book,
and you have accurately weighed or measured the ingredients, the
most common problems jnd their causes are:
UNDER-
STANDING
g£noise AND
SPONGE (FOAM)-
TYPE CAKES
Sponge-ty pe cakes are characteristically lighter and springier than
butter cakes. When comparing the percentage of ingredients in a
genoise to that of a basic butter cake (page 470), it's easy to see
why this is the case. Gdnoise sprinkled with syrup (which is the
way it is usually consumed] has about 3 times the amount of egg
as butter cake and only about */j the flour and butter.
476 SPECIAL SECTION FOR PROFESSIONALS AND PASSIONATE AMATEURS
1 cut the flour for my ginoise recipe with 50 percent cornstarch, thereby low-
ering the overall percentage of protein. It ts possible to decrease the cake flour in
this way because one of the major differences between sponge-type cakes and butter
cakes is that the sponge cake structure comes primarily from egg protein reinforced
by starch from the flour. A genoise actually can be made without any flour protein
by using all starch, but the texture will not be quite as light or resilient.
The main goal in making a sponge-type cake is to achieve as much volume in
the baked cake as possible. Since the eggs are the most important ingredient for
volume, the way in which they are beaten, their temperature, and the manner of
adding other ingredients to them arc all important considerations. Genoiset for ex-
ample, contains butter, which weighs down the egg foam, so to counteract this the
eggs are warmed before beating to help them attain their greatest possible volume.
The butter is also added warm to keep it from solidifying and resting too heavily on
the egg foam.
Too much volume is not desirable either because if there is more volume than
the structure can support the genoise will collapse.
Again referring tn the chart (page 470), comparing Biscuit de Savoie without
syrup to genoise without syrup shows why the biscuit will be lighter than the gibt-
oise. It has no fat to weigh it dowm plus it has more sugar and egg for aeration. For
this reason, it is not necessary to heat the eggs for a biscuit in order to increase the
amount of volume during beating. It is desirable, however, to bake the biscuit tn an
ungreased pan because the absence of fat [except for the small amount in the yolk)
and the high proportion of egg would cause the biscuit to shrink away from the
sides of the pan and collapse.
A genoise or Biscuit de Savoie would be dry and somewhat tough without a
moistening syrup. The perfect amount softens the texture. If too much is added,
however, the cake becomes almost mushy. Biscuit de Savoie can hold a lot more
syrup than genoise because it has a stronger structure.
A sponge-type cake without fat requires either a moistening syrup or a high
proportion of sugar to tenderize it. American sponge cake, for example, traditionally
uses no syrup bur it has 31 percent sugar and angel food cake has 34 percent sugar.
Chiffon cake, which has the moist richness of butter cake with the lightness of
sponge-type cake, uses oil to tenderize it so it can get by with only 24 percent sugar,
less than a buner cake. (It has 9 percent oil compared co the 12 percent butter in
the butter cake but oil, which is liquid, coats the protein more effectively, so less is
needed to achieve a similar degree of tenderness;. A small amount of baking powder
adds just enough extra volume without endangering the fragile structure. Superfine
sugar is preferable, as in butter cakes, because the finer the crystals, the more nu-
merous the air cells.
Sponge, chiffon, and angel food cakes are all so light and spongy they require
the added support of a tube pan for maximum volume and must hang upside down
to stretch and keep from collapsing until coo! enough for the structure to set. Angel
food is the lightest cake because it has al) egg whites for the largest and most stable
foam /requiring less flour for structure) and the highest proportion of sugar. Since
coagulated egg whites are rubbery in the absence of fat, the extra amount of sugar
is necessary to •’tenderize” the cake. There is a limit as to how much sugar can be
added to a cake. Beyond a certain point, the sugar will actually prevent the batter
UNDERSTANDING CAKES 477
from setting by raising the coagulation temperature of the egg and limiting starch
gelatinization.
Cake flour produces better sponge-type calces than does all-purpose because of
its finer granulation, lower protein content, and lower pH. Cream of tartar, which
is an acidic salt, is also added to stabilize the egg whites and lower the pH, creating
a finer grain, making the cake more tender, and keeping it from shrinking. It is
thought that the acid enables the films of protein in the air cells of rhe foam to last
until die heat can set the structure. In a white angel food cake, the lower pH will
make the crumb whiter.
As with butter cakes, a high baking temperature for sponge-type cakes pro-
motes a more rapid setting of the batter and absorption of less water by the starch
of the flour. This results in a greater volume and a moister, mote tender cake. Higher
temperatures also improve texture but are not equally beneficial to the external ap-
pearance of the cake. Above 35ОТ. the crust of sponge-type cakes becomes
overbrowned.
47S SPECIAL SECTION FOR PROFESSIONALS AND PASSIONATE AMATEURS
his chapter, devoted to the large special occasion cake, « for
the master cake baker or dedicated home baker, к contains all
the information needed to make <j«y size white, yellow, or choc-
olate butter cake from 6 to 18 inches and any yellow or chocolate
genoise from 6 to 12 inches. It also tells you how much butter-
cream and syrup are required for each. There are recipes for other
favorite cakes in large proportions, such as cheesecake and pound
cake, and detailed instructions for assembling and storing tiered
cakes.
The Showcase Cakes chapter, beginning on page 163, con-
tains 5 completed examples of tiered wedding cakes- But the in-
formation in ths chapter will enable you to make endless variations
of just about any cake your heart desires.
While it is possible to produce large cakes without any spe-
cial equipment other than large pans and a sufficient number of
racks, certain pieces of equipment make the job much easier and
more efficient. A 10- or 20-quart Hobart mixer, for example, makes
it possible to mix the batter for a 3-Tiered Wedding Cake for 150
people in one batch. With the KitchenAid K.S (5-quart mixer), it
i$ necessary to divide the batter into 2 batches for a butter cake
and 4 batches for genoise A highly motivated person could even
use an electric hand held mixer by preparing the batter m 4 batches
(2 for the 12-mch layers, 1 for the 9-inch layers, and 1 for the 6-
inch layers}.
Another mayor consideration when making large cakes is oven
size. 1 once made a 4-ticred wedding cake in my apartment kitchen.
The two 15-inch bottom layers and two 6-inch top layers were
baking in my Wolf oven while the two 12-inch layers baked in
the Sharp countertop convection oven and the two 9-inch layers
in the Cusinart Air Surge. Since 1 like to turn each layer 90 de-
grees halfway through its specific baking time to promote even
baking, timers were going off at mad intervals. 1 decided that,
henceforth, 3 tiers at a time would be my limit.
F ool proof
Formulas
and
Techniques
for riahing
Large
Wedding
and Special
Occasion
Cakes
LARGE WEDDING AND SPECIAL. OCCASION CAKES 474
Refrigeration space ts not usually a problem, because most cakes put together
the day before the event can wt at cool room temperature overnight.
A large wedding or special occasion cake somehow manages to require an ex-
traordinary number of bowls, pans, and utensils and usually takes ar least 12 hours
of solid work to complete. I don't know how the following tradition ever got started,
but somehow, when the cake is frosted and ready for the piped decorations, that is
my moment of glory, of supreme joy and celebration, because now the best part can
begin: the artwork. I fill the pastry bag, pour a tiny glass of my best Napoleon
cognac {which 1 find far too strong at any other time), and am transported to an-
other world.
When the mess is cleared away and the cake sitting on its pedestal, ready to be
photographed for my album, it always amazes me how this pristine and exquisite
cake could have created such havoc. And 1 wonder idly how many non bakers ever
realize tbe work that goes into its preparation. It really doesn't matter though; there
is the pleasure of coming into contact with people who are at their happiest, either
about ro be married or celebrating some other joyous event. Then there is the un-
paralleled joy of creation, making the cake.
A beginner’s greatest fear when embarking on a first wedding cake is that it
won’t look even. When I used to give week-long baking classes, I would take the
students to visit New York bakeries. They were surprised, when encouraged to scru-
tinize the cakes and decorations close up (as ruthlessly as they would their own),
that, although scarcely a cake was perfectly level or the decorations very precise, rhe
overall effect was still impressive.
Г11 always remember the night my husband came into the room co look at my
latest creation before going to bed. I had been baking wedding cakes for about two
years, and one had even been photographed for Bon Appetit magazine. He ap-
praised the newest cake and then said evenly: “You’re getting really good; they’re
beginning to look level.”
Actually, it was Bon Appctrt that started my wedding cake business when they
asked me to make a special occasion cake for an article featuring my cooking school.
It was the first time they had ever presented a wedding cake. It was also the first
time that I had ever made one. My concept was to offer a cake that the bride could
bake for her own wedding and which could be prepared in advance to give her time
tu attend to last-minute details. The cake, covered with rolled fondant and deco-
rated with pale pink manxpan roses and nny dots reminiscent of pearls cascading
from the cop, is included in this book. It was my first experience m having an inner
vision materialize with such fidelity, and it is still my favorite wedding cake.
While over the years many people have made the cake, if not for their own
wedding then for a sister’s or daughter's, an inordinate number of them wanted me
to make the cake myself. I never considered this possibility when I wrote the article.
The first person to call was planning her daughter's wedding 18 months away. She
was planning the decor to match the cake—even the bridesmaids’ dresses were to
be dotted Swiss! One baker from Long Island called to berate me jokingly for de-
signing docs. She said: “Everyone wants dots now and you know what a pain . . .
they are to make!" Since that time seven years ago, I have made over 100 wedding
or special occasion cakes. Al first my husband and I often attended the weddings
4Ж1 SPECIAL SECTION FOR PROFESSIONALS AND PASSIONATE AMATEURS
because I had gotten to know the bride so well while designing
her cake. Eventually, to Elliott's relief, the novelty wore off.
• Otvw space: Assess how many layers can be baked at one time
and coordinate this with the refrigeration space available for
holding unbaked batter. Alternately, decide how many batches
of batter you will mix. Remember: Cake pans must have air
circulation all around them while baking. Do not overcrowd
them.
• Refrigeration space: Check available space if the completed cake
needs to be refrigerated. Refrigerator racks can be removed to
give more height.
• Equipment: Beyond the basics, such as pans and spatulas, there
will be special pieces of equipment necessary to complete some
of the tiered cakes.
Review the Equipment chapter [page 446) or see the list of
special equipment and structural supports needed for each rec-
ipe in the Showcase Cakes chapter (pages 163 to 224).
♦ Cooling racks: Keep in mind that you will need a rack for each
cake layer.
• Magi-Cake Strips: Highly recommended for more even layers,
an important factor in having the finished cake look attractive
and professional (pages 20 and 456).
• Mixer Capacity
Cake layers: Indication of mixer size and number of hatches
necessary’ is given at the top of each recipe in this chapter.
Buttercreams: The buttercreams in this chapter can be made in
1 batch in a 5-quart mixer. With a hand-held mixer you will
need to make 2 or 3 batches.
The average-size wedding cake consists of 3 tiers—12 inches, 9
inches, and 6 inches—and feeds about 150 people. A 3-tier cake
is the largest convenient size to cut and serve, so, if extra cake is
desired, a sheet cake can he baked, frosted, and portioned in the
kitchen. Since it will be behind the scenes, there is no need for
time-consuming decoration.
In Canada and Japan there is another interesting approach
to the problem of serving a tiered wedding cake. The Hotel Okura
in Tokyo, the most fashionable location for modem Japanese
weddings, devotes an entire storeroom to elaborate, artificial cake
constructions. These wedding cakes are fairy tale monuments of
royal long, entirely inedible save for a small hollow section into
which is inserted and frosted a wedge of fruitcake for the bnde
to cut and serve to the groom. Meanwhile, the rest of the fruit-
SPECIAL THINGS
TO CONSIDER
WHEN
EMBARKING
ON A TIERED
CAKE
SUGGESTED
CAKE SIZE
OPTIONS
LARGE WEDDING AND SPECIAL OCCASION CAKES 4K1
cake, baked in large rectangles, is conveniently being cut back-
stage in the kitchen. This way the guests don’t have to wait nearly
as long tor their pieces of cake and all can be served more or less
at the same time!
This chapter contains recipes for the standard 3-tier butter
cake in white, yellow*, and chocolate, the same size cake in dassic
or chocolate genow, and cheesecake.
For those who prefer a towering presentation of 4 or more
tiers, I am also offering a chart which will enable you to bake any
size buner cake from 6 inches to 18 inches and a second chart
with frosnng amounts. These charts art the soul of this book and
took years to perfect. It will save you the hours of planning, cal-
culation, and trepidation 1 went through each time someone re-
quested a different amount of cake (which seemed to be each time).
Wedding cake portions are traditionally small because they
are usually served after a large dinner which often includes other
desserts as well. People are surprised by how» little cake is actually
needed tn relation to the number of guests, partly because these
days many people forgo dessert entirely. There are always some
who leave before the cake-cutting ceremony, which comes ar the
very end.
When I calculate the number of servings necessary for a but-
ter cake, I estimate that my base formula of 1 cup flour (or flour/
cocoa) serves 11. This works out to be about 1.5 tablespoons
flour per serving. The size of the serving is cither a square 2 inches
high by 2 inches deep by I’/ii inches wide or a slim rectangle 4
inches high by 2 inches deep by % inch wide.
The only time I ran out of cake was when I made Golden
Glory Wedding Cheesecake (page 217) for my niece Joan Beren-
baum Stackhouse's wedding. The wedding was m Westport, Con-
necticut, and just prior to the event the cake was being
photographed nearby for Martha Stewart’s book Weddings. All
of our relatives and Joan’s friends knew about this and were ea-
gerly saving their appetites. Some people, alas, lined up for sec-
onds before everyone else had received a first serving. 1 could have
used two wedding cakes that day! I encouraged Joan to serve the
cop tier too, as this cheesecake doesn’t freeze well anyway, and
promised to bake her one exactly like it for ber first anniversary.
482 SPECIAL SECTION FOR PROFESSIONALS AND PASSIONATE AMATEURS
NUMBER OF SERVINGS PAN SIZE (all pans are round and 2 inches high)
40 one 12-tndi pan’
50 two 10-tnch pans
75 two 10-inch and two 7-inch pans
801 one 18-tnch x 12-inch sheet рал
100 one 15-mcii and one 12-inch pan
110 two 12-inch and two 8-inch pane
150 two 12-inch, two 9-inch, and 6-rnch pans
175 two 13-inch, two 10-fltch. and two 7-inch pans
201) rwo 15 inch, two IO-inch, and two 6* inch pans
225 two 15-itKh, two 11-«nch, and two 7-inch pans
250 two 15-rnch. two 12-inch, and two 9-inch pans
27$ two 15-meh. two 12-inch. two 9-inch. and two 6-inch pans
300 two 16-inch, rwo 1 3-inch, and two 10-inch pans
350 two IB-inch, two 14-tnch. and two 10-inch pans
450 two IB-inch, two 15-inch. two 12-inch. two 9-mch. and rwo fc-inch pans
• For biitrwr cak«y w 4 time» the base formula. for yellow jptwoisr 7 tim the base
fornwir, for chocolMt хеиоие 9.75 nmn die base formula.
f Sheet cake serving ere 2 inches by 2 inches by № inches. U cut into 2-mch squares,
it would make 54 servings
note: For aesthetics, the relationship of tiers to each other must
be taken into account. If you wish to combine different sizes not
on the chart, try stacking the cake pans to see the effect.
Wedding cakes are usually prepared with white, yellow, or even
chocolate butter cake. The firm yet tender texture makes ir ideal
for constructing multitiered layers.
To keep a butter cake fresh and moist when preparing more
than twenty-four hours ahead, sprinkle the Layers with Syrup {page
505). Use 3 cups of Syrup for every 6'Л cups of sugar used to
prepare the cake batter.
BUTTER
WEDDING
CAKES
LARGE WEDDING AND SPECIAL OCCASION CAKES 483
6-inch and 9-inch pans, the cakes should scan co shrink
from the sides only after removal from the oven. The 12-
inch layers should bake until they just start co shrink from
che sides. To promote mure even baking, turn the 12-inch
layers 180° (halfway around) halfway through the baking
time. Do this quickly so the oven temperature does not drop.
Allow the cakes to cool in che pans on racks for 10
minutes (20 minutes for 12-inch layenj. Loosen the sides
with a spatula and invert onto greased wire racks. To pre-
vent splitting, reinven and cool completely before wrap-
ping airtight with plastK wrap and foil.
NOTE: Do not underbake the 12-inch layers.
When preparing the cake more than 24 hours ahead
of serving or if extra moistness is desired, sprinkle layers
with 3 cups of Syrup (page 505).
3-Tcr
Chocolate Butter
Wedding Cake ,
to Serve 150*
INGREDIENTS MEASURE WEIGHT
room remperarure iu/шпе putuidk' ounces kilt Warm grams
FOR TWO 6-INCH BY 2- INCH LAYERS AND TWO 9-INCH BY 2-INCH LAYERS
6 Urge eggs 10 scant fluid ounces t 10.5 ounces 300 grams (weighed without shells)
water ( boiling) 2 liquid cups f 1 pound 0.75 ounce 473 grams
vanilla 1 tablespoon ♦ 1 tcasptxim • IS grams
sifted сяке Hour 4У4сир$ 1 pound 0.5 ounce 475 grams
unsweetened cocoa tDuicb-proccsscd) 1 cups 2 tablespoons 1 lightly spooned into ciipl 4.5 ounces 125 grams
* tUifuiw» a 5-qairt mixer.
4H6
SPECIA1 SECTION FOR PROFESSIONALS AND PASSIONATE AMATEURS
INGREDIENTS MEASURE WEIGHT
room temperature volume pounds ounces k/Jogram& gram*
sugar 3 cups 1 pound 5 ounces 600 grams
baking powder 3 tablespoons 1.5 ounces 44 grams
salt 1 Vi teaspoons • 10 grams
unsalted butter FOR TWO 12-INCH BY 2- INCH LAYERS 1 V$ cups 12 ounces 340 grams
7 large egg-» 11 fluid ounces f 12.25 ounces t weighed w 350 grams ithoui shells;
water (boilingj 2 Vi liquid cupsf 1 pound 3.5 ounces 550 grams
vanilla 1 tablespoon+ 2 Vi teaspoons • 21 grams
sifted cake flour 5 Vi cups 1 pound 3.5 ounces 553 grams
unsweetened cocoa (Dutch-processed I I Vi cups 4- 2 tablespoons (lightly spooned into cup) 5 ounces 147 grams
sugar 3Vi cups 1 pound K.5 ounces 700 grams
baking powder 2 tablespoons 4- 2% teaspoons • 43 grams
salt IV* teaspoons ♦ 12 grams
unsalted butter 1V* cups 14 ounces 400 grams
t U*e a g|a«* ПЧ*4*|1ППК cup,
Grease rhe pans» line the bottoms with parchment or wax
paper» and then grease again and flour. For very even cakes
use Magi-Cake Strips (pages 20 and 456).
INSTRUCTIONS FOR MIXING BATTER FOR ALL SIZES
OF CHOCOLATE BUTTER CAKES
Arrange 2 oven racks as clow to the center of the oven as
possible with at least 3 inches between them.
Preheat the oven to 3SCPF.
FINISHED HEIGHT.
Each layer is about IVi
inches.
STORE:
.Airtight: 2 days room tem-
perature. 5 days refriger-
ated. 2 months frozen.
SERVE:
At room temperature.
LARGE WEDDING AND SPECIAL OCCASION CAKES 447
In a medium bowl whisk together the cocoa and boil
ing water until smooth and cool to room temperature.
In another medium bowl lightly combine the eggs» V*
of the cocoa mixture, and the vanilla.
In a large mixing bowl combine all the remaining dry
ingredients and mix on low speed for 1 minute to blend.
Add the butter and remaining cocoa mixture. Mix on low
speed until the dry ingredients are moistened. Beat at me-
dium speed (high speed if using a hand mixer) for 1 Vi min-
utes to aerate and develop the cakes structure. Scrape down
the sides.
Gradually beat in the egg mixture in 3 batches, beating
for 20 seconds after each addition to incorporate the ingre-
dients and strengthen the structure. Scrape down the sides.
Scrape the barter into the prepared pans, filling about
halfway, and smooth with a spatula. {For exact hatter weight
in each pan, refer to the chart on page 483.} Arrange the
pans in the oven so that air can circulate around them. Do
not allow them to touch each other or the oven walls. Bake
25 to 35 minutes for 6-inch layers, 35 to 45 minutes for 9-
inch layers, 4<) to 50 minutes for 12-inch layers or until a
tester inserted near the center comes out dean and the cake
springs back when pressed lightly in the center. In the 6-
inch and 9-inch pans, the cakes should start to shrink from
the sides only after removal from the oven. The 12-inch
layers should bake until they just start to shrink from the
sides. To promote more even baking, turn the 12-inch lay-
ers 180° (halfway around) halfway through the baking time.
Do this quickly so the oven temperature docs not drop.
Allow the cakes to cool in the pans on racks for 10
minutes {20 minutes for 12-inch layers]. Loosen the sides
with a small metal spatula and invert onto greased wire
racks. To prevent splitting, convert and cool completely
before wrapping airtight with plastic wrap and heavy-duty
foil.
NOTE; Do not underbake the 12-inch layers. If you cut the
tops of the cake layers to make them more level, you will
notice many small holes. Do not be alarmed because they
do nor show up when cake is sliced. The crumb will be fine
and even.
When preparing die cake more than 24 hours ahead
of serving or if extra moistness is deured, sprinkle layers
with 3 cups of Syrup (page 505).
Ш SPECIAL SECTION FOR PROFESSIONALS AND PASSIONATE AMATEURS
The chart that follows will show you how to make any size cake
and how many people each layer will serve. There is often con-
fusion regarding layers and tiers. A wedding cake is made up of
tiers, each tier consisting of 2 equal layers sandwiched with filling.
To use the chart, you will need a calculator, a piece of paper,
and a pencil. Refer to the size cake you want and mark down the
Rose factor which applies to 2 layers. For example, let’s say you
want to make a 2-tiet yellow cake consisting of an 8-inch tier and
a 12-inch tier. The Rose factor for two 8-inch layers is 3.5; the
Rose factor for two 12-inch layers is 7.
The 8-inch size falls in baking powder level 1; the 12-inch
size, in baking powder level 3. Because each size requires a differ-
ent amount of baking powder in proportion to the other ingredi-
ents, 2 separate batters are needed.
To make the batter for the 8-inch layers, multiply each ingre-
dient in the base formula by Rove factor 33. For the baking pow-
der, refer to level 1 for yellow cake. The number will be IVi
teaspoons. Multiply this by 33.
To make the batter for the 12-inch layers, multiply each in-
gredient in the base formula by Rose factor 7. For the baking
powder, refer to level 3 for yellow cake. The number will be 1И
teaspoons. Multiply this by Rose factor 7. Thai's all there is to it.
Refer to page 494 if you need a review of mixing techniques. If
you bake often, you will not need this because the simple tech-
nique is the same for all the butter cakes in this book.
For irregularly shaped pans, refer to page 456 in the Ingre-
dients and Equipment chapter.
HOW TO MAKE
ANY SIZE ROUND
BUTTER CAKE
FROM 6-INCHES
TO I84NGHES
LARGE WEDDING AND SPECIAL OCCASION CAKES 489
MASTER CHART FOR BUTTER CAKES
рал жяе ;2 Livers пкб 2 •Осбг» hiphl number of геггмдо (2 L»>ers/ ftow factor (number of times ГО multtfilt Ьляс, batter wcijght for each рал bakina time at ЗЯГР.
BAKING Level 1 POWDER 1 6 inches 7 indict H mdies -EVELS 20 25 35 2.5 3.5 12.5 ounces/356 grams 1 pound'460 grams 1 pound 6.75 ounccv'650 grams 25-35 minutes 25-35 minutes 30-40 minutes
Level 2 9 inches 10 inches 45 55 4 5 26.25 ouncos/750 grams 2 pounds/930 grams 30—40 minutes 30 40 minutes
Level 3 11 tnchet 12 inches В inches 14 inches 65 7$ 100 110 6 7 9 10 2.5 pound v*1 kilogram 140 grams 2 pounds 13.5 ounce*/1 kilogram 330 grains 3 pounds 12.5 ounces-1 kilogram 725 grams 4 pounds 33 ounces* 1 kilogram 920 grains 35-45 minutes 40-50 minutes 40—50 minutes 40-50 minutes
Level 4 15 inches 16 inches 17 incho 130 150 175 12 14 16 5 pounds/! kilograms 280 grams 6 pounds- 2 kilograms 700 grams 6 pounds 12.5 ounces/3 kilograms 90 grams 40-50 minutes 45-55 minutes 45-55 minutes
Level 5 18 inches 185 17 7 pounds 33 ounces '3 kilograms 280 grams 45-55 minutes
Level 6 13-inch x 9-inch rectangle IE-inch x 12-inch rectangle 40 80 3.5-4 7-8 1 kilogram 300 grams-1 kilogram 500 grams 2 kilogram 670 grams -3 kilograms 50 grams 40-50 minutes 35-45 minutes
490 SPECIAL SECTION FOR PROFESSIONALS AND PASSIONATE AMATEURS
tips: Large layers are more prone tn underbaking than
overbaking. The cake should just start to shrink from the
sides of the pan when done. Be sure tu use Magi-Cake Strips
(pages 20 and 456) tor very even layers.
A 12-inch by 2-inch pan (Rose factor 4) serve? 40 to
50 people and is a good size for large parties. The single
layer will be 1% inches high.
NOTt: Barter weight takes into account the amount dinging
to the bowl and beater (about the same regardless of the
batter size). Larger sizes will therefore have proportionately
more batter; for example, 4 times the Rose factor will yield
slightly more than double 2 times the Rose factor.
Base
Formula
for Butter Cakes
SERVES I I
WEDDING
CAKE
PORTIONS
INGREDIENTS MEASURE WEIGHT
ЛХИ71 ICmpCTAlurt ♦o/lUTX- vanco grazni
WHITE BASE CAKE 1 ’4 large egg whites 3 tabksfMXHi* 1_5 ounces 45 grams
milk Vi liquid cup 2.75 ounces 80 grams
vanilla Yt teaspoon 0.11 ounce 3 grams
sifted cake flour 1 cup 3 J ounces 101) grams
sugar Vt. cup 33 ounces 100 grams
baking powder sec amount for each individual cake м/с (page 491»
salt Yt teaspoon 0.05 ounce 1.67 grams
unsaked buncr Imuit be softened! 4 tablespoons [ -2- - 1 hi 2 ounce* 56.75 grams
Total Hauer Weight: 13.S <Hinc«/387 grams {♦ baking powder)
LARGE WEDDING AND SPECIAL OCCASION CAKES 491
SERVES II
WEDDING CAKE PORTIONS
INGREDIENTS MEASURE WEIGHT
room icmpcrjturc «o/trtne ounces grams
YELLOW BASE CAKE 2 latgc egg yolks 2 tablespoon* 4- 1 teaspoon 1.25 ounces 37 grams
milk ¥f liquid cup 2.75 ounces 30 grams
vanilla % teaspixm 0.11 ounce 3 grams
lifted cake Hour 1 cup 3.5 ounces 100 grams
sugar •/j cup 3.5 ounces 10(1 grams
baking powder set amount for each individual cake size ipage 490l
salt V* teaspoon U.05 ounce 1.67 grams
un sailed butler (must be softened 1 4 tablespoons 2 ounces 56.75 grams
Total Barter Weight: 13-2 ounceV37? grams (+ baking powder}
BAKING POWDER AMOUNTS FOR YELLOW AND WHITE BASE CAKES
Level 1 6-meh to 8-meh cakes 1VS teaspoons per base 0-26 ounce 7.35 grams
Levd 2 9-iiwh to 10-inch cakes 1V* teaspoons per base 0.23 ounce 6.52 grams
Level 3 11-meh to 14-inch cakes IVi teaspoons per bast 0.19 ounce 5.51 grams
Levd 4 15-meh to 17-inch cakes 1 teaspoon per base 0.17 ounce 4.90 grams
Levd 5 18-uxh cakes % teaspoon per base 0.15 ounce 4.25 grams
Level 6 sheet cakes 1 % teaspoons per base 0_21 ounce 6.13 grams
note: The weights are in more precise units than most scales
arc capable of registering. When making just a few tiers» I
use measuring spoons. 1 have given these weights for large-
scale baking. When they are multiplied, the amounts are
more practical to weigh and more accurate.
UNDERSTANDING
The larger the pan size, the less baking powder is used in
proportion ro the other ingredients. This is because of sur-
face tension. The larger rhe diameter of the pan, the slower
the heat penetration and the less support the rising cake
492 SPECIAL SECTION FOR PROFESSIONALS AND PASSIONATE AMATEURS
receives because the sides are farther from the center. Bak-
ing powder weakens the cake’s structure by enlarging the
air spaces so decreasing the baking powdci strengthens the
structure and compensates for retarded gelatinization and
the decrease in support.
SERVES I I
WEDCHNG CAKE PORTIONS
INGREDIENTS MEASURE 1 WEIGHT
пктз wntpcrjture tofarw owners grams
CHOCOLATE BASF CAKE unsweetened cocoa |Ducch- pruccMcd) 3 tablespoons; + IVj teaspoons (dip and sweep method 1 0.75 ounce 21 grams
water (boding! V4 liquid cup (use glass measuring cup) 2.75 «Minco 78 grams
1 large egg 3 tablespoon» ♦ teaspoon 1.75 ounces 50 grams (weighed without shells!
vanilla H teaspoon 0.11 ounce 3 grams
sifted cake Hour cup +• 2 teaspoon* 2.75 ounces 79 grams
sugar VS cup 3.5 ounces 100 grams
baking powder see amount for each individual cake size (below/
salt Vi teaspoon 0.05 ounce 1.67 grams
assailed buner |must be softened) 5 tablespoons + 1 teaspoon 2.66 ounces 75.67 grams
Total Bitttcr Wcrg/it.- 13.65 ounces/390 grams (4- baking powder)
BAKING POWDER AMOUNTS FOR CHOCOLATE BASE CAKES
Level 1 6-inch co S-inch cakes 14 teaspoons per base 0.28 ounce 7.96 grams
Level 2 9-inch to 10-inch cakes 1 Vi teaspoons per base 0.26 ounce 7.35 grants
Level 3 11-inch to 14-inch cakes 14 traypuom per base 0.21 ounce 6.13 grams
Level 4 15-inch to 17-inch cakes 14 teaspoons per base 0.19 ounce 5.51 grams
Level 5 18-inch cake* 1 teaspoon per base 0.17 ounce 4.9 grams
Level 6 sheet cake* 1Vi teaspoons per base 0.23 ounce 6.52 grams
LARGE WEDDING AND SPECIAL OCCASION CAKES 493
SPECIAL
INSTRUCTIONS
FOR MIXING A
SINGLE BATTER
FOR VARYING
SIZES OF BUTTER
CAKE LAYERS
Despite the different amounts of baking powder required for dif-
ferent size layers there is a way to save time and mix all the
batter at once. If you bake tiered cakes often, this is a very effi-
cient and useful technique to possess. It requires a 10-quart Ho-
ban mixer and enough oven space to bake all the layers at once
or a refrigerator to hold some of the layers while the others are
baking. Describing this method is rather like tying a shoelace—
once you learn, it's easy to do but awkward to put into words. I
assure you that once you try it you will find it easier chan mixing
separate batches, yet each cake will come out level and with per-
fect texture. It’s best to calculate all the amounts before starting
to mix the batter. Once you have these formulas worked out for
your must common size cakes, you won’t need to refer to the
chart. Don't be put off by the figures; it’s simple grade school
mathematics. Double-check your multiplication and the system is
infallible.
1. First choose the sizes of the cake layers. Refer to the Master
Chart for Layer Cakes I page 483) and write down the Rose
factor for each pan size. Add these numbers and the sum will
be the total Rose factor by which to multiply everything in the
base except for the baking powder.
2. To determine the baking powder, choose the level for the larg-
est pans you are using and multiply it by the total Rose factor
(for all the tiers).
3. Mix the barter, and scale out (pour into pans and weigh) only
the pans in the largest level, referring to the chart for the weight
of the batter in each pan. (Be sure to subtract the weight of
rhe pans!)
4. Now go back to the chart and find the Rose factors for the
remaining layers. Add and the total will be the new Rose factor.
5. Multiply this new factor by the original level of baking pow-
der. That is how much baking powder is now remaining in the
batter.
6. Now choose the level of baking powder for the next largest
pans and multiply it by the new Rose factor. This is how much
baking powder must now be in the bancr.
To determine the amount to add, calculate the difference
(subtract the amount needed in the barter from the amount
already in rhe batter'. This is how much baking powder it is
necessary to add.
7. To add baking powder: Dissolve it in the smallest possible
amount of ice water and stir it thoroughly into the remaining
batter.
8. Scale this barter into all pans in the same level and proceed
with remaining batter in the same way.
494 SPECIAL SECTION FOR PROFESSIONALS AND PASSIONATE AMATEURS
Here is an example to help you double-check the system (1
am using only the metnc system tor the example a$ too many
figure» would br confusing, but of course the avoirdupotr system
or volume works in the same way.)
EXAMPLE Batter for a 3-tier yellow cake using 6-tnch, 9-mch. and
12-inch pans.
1. The total Rose factor for these layers is 13.
2. 5.5J grams (1И< teaspoons) baking powder (the level for the
largest pan size, 12 inches) times the total Rose factor 13 =
71.63 grams.
3. Put 1 kilogram + JJOgra/m of batter in each 12-inch pan.
4. The Rose factor for the remaining 9-inch and 6-inch layers is
6 (the new Rose factor).
5. Multiply the original levd of baking powder (5.51 grams) by
6. This equals 33 grants (the amount of baking powder now
in the batter).
6. The baking powder level for the next largest pans (9 inches)
is 6.52 grams (1W teaspoons}. Multiply by 6 to get 39 grams.
This is how much baking powder must now be in the bane:.
To determine the amount to add, calculate the difference be-
tween what must now be in the batter {39 grams) and the
amount already in the batter {33 grams). The difference is 6
grams (about 1 % teaspoons).
7. Dissolve the 6 grams of baking powder in the smallest pos-
sible amount of ice water and stir it thoroughly into the re-
maining batter.
8. Put 750 grams of batter in each 9-mch pan.
9. The Rcxte factor for the 6-inch layers is 2 (the new Rose factor).
10. Multiply 2 by the original level of baking powder used (5.51
grams). This equals 11 grams (the amount of baking powder
now in the batter).
11. The baking powder level for the 6-tnch pans is 735 grams
(1’Л teaspoons]. Multiply by 2 ro get 14.7 grams. This is how-
much baking powder must now be in the banes.
To determine the amount to add. calculate the difference
between what must now be tn the baner (14.7 grams) and
the amount already in the batter (11 grams). The difference
is 3.7 grams (% teaspoon).
12. Dissolve the 3.7 grams of baking powder in the smallest pos-
sible amount of ice water and stir it thoroughly into the re-
maining baner.
13. Put 356 grams of batter in each 6-inch pan. All the batter
will have been used.
LARGE WEDDING AND SPECIAL OCCASION CAKES 49$
GENOISE
WEDDING
CAKES
коте: The idea of adding baking powder to the already prepared
batter may seem controversial, but here's why it works: The bak-
ing powder must be double acting and it must be evenly dis-
persed. This is best accomplished by dissolving it. Ice water is
used to dissolve the baking powder because double-acting baking
powder is activated partly by liquid and partly by heat. The cold
water retards this reaction.
For the same reason, cake batter, once poured into the pan,
can be refrigerated for several hours before baking and will lose
no discernible volume.
It is a delightful surprise to find airy, moist genoise inside a large
wedding cake. Despite its delicate texture, it is possible to tier a
g&totse using supporting structures (page 534). The problem is
that without a 10-quart Hobart mixer the genoise has to be made
in 4 batches. Even with a 20-quart Hoban, it should be made in
2 batches because there is too much loss of volume dunng the
time it takes to divide a single batch into 6 pans and then place
them in the oven.
If you only have a Kitchen Aid ICS (and I remember the days
when I used to say: “If only 1 had a K5!”) and you want to make
a 3’tiered genoise wedding cake for 150 people, refer to the chart
on page 497 for quantities. The two 6-inch layers can be prepared
as one batch, the two 9-mch as a second batch, and each 12-inch
layer as a separate batch. (Need I add, this is a true labor of love.)
When folding the flour into the egg and sugar mixture, be
sure to incorporate all the flour particles completely or they will
become encapsulated in the batter and fall to the bottom of the
cake. If this should happen, wait until the cake is cool and with
the tip of a sharp knife pick out the particles, (Because they are
heavier than the rest of the batter, they fall to the bottom.) Once,
years ago, I was lazy and left them in the cake. Everyone admired
the “unusual little nuts!”
496 SPECIAL SECTION FOR PROFESSIONALS AND PASSIONATE AMATEURS
3-licr Gdnoisc
Classiquc
Wedding Cake
to Serve 150*
INGREDIENTS MEASURE WEIGHT
room cempefjirure voJirmc pounds. ounces Ajlgra/nwgrarris
FOR TWO 6-INCH BY 2- INCH LAYERS AND TWO 9-INCH BY 2-INCH LAYERS
clarified buerrr nai^cttc (clarified browned butter, page 426) Vi liquid cupf plus 1 (ablcspoon 4 ounces 110 grams
vanilla I tablespoon • 12 grams
12 large eggs 19 fluid ounces (2 liquid cups •+3 fluid ounces* | 1 pound 5 6(Ю grams ounces {weighed without shells;
sugar 1 *6 ctlpt 103 ounces 300 grams
sifted cake flour Ш cups 5.25 ounces 150 grams
cornstarch FOR TWO 12-INCH BY 2- INCH LAYERS 1V» cups llightly spooned mtucup; 5.25 ounces 150 grams
danikd beurre noisette J dan tied browned bunef, page 426) Vi liquid cupf 4.5 ounces 1.30 grams
vanilla 1 tablespoon + 1 teaspoon ♦ 16 grams
14 large eggs 22 fluid ounces (21*4 liquid cups'T 24.5 ounces (weighed w 700 grams itbotu dicflsl
tujar 1 У* cup 12 ounces 350 grams
sifted cake flour 1 % cups 6 ounces 175 grams
cornstarch 1 VS cups + 2 tables poons (lightly spooned into cup) 6 ounces 175 grams
SYRUP: 5 cups (page 505). Refer to the chart on page 502 for bow much layer. to apply to each
* Requires a 1 U-quun nocan mixer
fUse glass measuring cups.
LARGE WEDDING AND SPECIAL OCCASION CAKES 497
FINISHED HEIGHT.
After trimming the bottom
and top crusts. each Layer is
about 116 inches.
STORE
Without tyrup, 2 days room
temperature, 5 days refriger-
ated, 2 months frozen. After
completing the cake, the fla-
vor* ripen and rhe moisture
is more evenly distributed 1
day later.
SERVE
Room temperature or lightly
chilled.
Grease the pans, line the bottoms with parchment or wax
paper, and then grease again and flour. For very even cakes
use Magi-Cake Strips (pages 20 and 456).
INSTRUCTIONS FOR MIXING BATTER FOR ALL SIZES
OF GENOISE CLASSIQUE
Arrange 2 oven racks as dose to the center of the oven as
possible with at least 3 inches between them.
Preheat oven to 350cE
Warm the beurre noisette until almost hot (110°F. to
120*T). Add the vanilla and keep warm.
In a large mixing bowl set over a pan of simmering
water place the eggs and sugar and heat until just luke-
warm, stirring constantly. (The eggs may also be heated by
placing them still in their shells in a large mixing bowl in
an oven with a pilot light for 3 hours or overnight.)
Using the whisk beater, beat on high speed for 5 min-
utes or until triple in volume.
Meanwhile, sift together the flour and cornstarch.
Transfer the egg mixture to a bowl large enough to
fold in the other ingredients. Remove 3 cups of the egg
mixture and thoroughly whisk it into the beurre noisette.
(If making the batter in several batches, decrease amount
of egg mixture removed accordingly. For example, if mak-
ing batter for only two 9-inch layers, reserve only 2 scant
cups.)
Sift Vi flour mixture over the remaining egg mixture,
folding gently but rapidly with a large balloon whisk or
slotted skimmer until the flour has almost disappeared. Re-
peat with remaining flour mixture until all the flour has
entirdy disappeared. Fold in the butter mixture only until
incorporated.
Pour immediately into the pans (they will be at least
two thirds full) and bake immediately 20 to 35 minutes for
6-inch and 9-inch layers and 30 co 40 minutes for 12-inch
layers or until the cake is golden brown and starts to shrink
slightly from the sides of the pan. Avoid opening the oven
door before the minimum rime is over or the cake may fall.
Test towards che end of baking by opening the oven door
slightly and, if at a quick glance it does not appear done,
dose the door at once and check again in 5 minutes.
I.oosen the sides with a small metal spatula and un-
mold at once onto lightly greased racks. Reinvert to cool.
Remove the crust when ready to complete the cake and
sprinkle the syrup evenly on all layers Ipage 357).
note: 12-inches is the largest round genoise that can be
made without loss in quality of texture. A larger pan does
not offer enough support.
498 SPECIAL SECTION FOR PROFESSIONALS AND PASSIONATE AMATEURS
INGREDIENTS
MEASURE
5- 11СГ
Gdnoisc au
Chocolat
Wedding Cake
to Serve 150*
WEIGHT
room гЫшпе ounces grams
FOR TWO 6-INCH BY 2- NCH LAYERS AND TWO 9-INCH BY 2-INCH LAYERS clanhed beurre n alien c I'clanftcd browned butter, page 426) */2 liquid cvpf ♦ 1 tablespoon 4 ounces 110 grams
unsweetened cocoa (Dutch- processed) Уч cup f 3 tablespoons 1 lightly spooned into cup) 3 ounces 87 grams
waler (budling) Уч liquid cupj 6.25 ounces 177 grams
vaniBa 1 tablespoon ♦ 12 grams
15 large eggs 3 liquid cupsf I pound 750 grams 10.25 ounces (weighed without sheik)
nijtar 1И cups 10.5 ounces 300 grams
sifted cake Hour FOR TWO 12-INCH BY 2- INCH LAYERS 2 cups + 2 tablespoons 7.5 ounces 213 grams
clarified bentre noisette (clarified browned butter, page 426! У> liquid cup* 4.5 ounces 130 grams
unsweetened cocoa (Dutch- processed) 1 cup + 1 tablespoon {tightly spooned into cup 3.5 ounces 100 grams
water 1 liquid uupf 8,25 ounces 236 grams
vanilla 1 tablespoon ♦ 1 teaspoon • 16 grams
• Roqsun» a 1 Пнумгг Hoban mixer,
f Uk jL»m тгляитод cups.
LARGE WEDDING AND SPECIAL OCCASION CAKES 499
INGREDIENTS MEASURE WEIGHT
room (стрегзтк VO/lWDC ounces g/ams
18 large eggs ЗУ2 liquid cupsf 2 pounds 900 gran» (weighed without fchdls!
sugar 1% cup 12.2$ ounces 350 grams
sifted cake flour 2% cups 8.7$ ounces 250 gran»
SYRUP 5 cups (page 505). Refer to the chart on page 50 J (or how much to brush on each
layer
f Ute gfau телмпгц cup*.
Grease the pans, line the bottoms with parchment or wax
paper, and then grease again and flour. For very even layers
use Magi-Cake Strips {pages 20 and 456).
FINISHED HEIGHT
After trimming (he bottom
and tup crusts, each layer is
about 1 Vj inches.
STORE:
Without syrup, 2 days room
temperature, 5 days refriger-
ated, 2 months frozen. After
completing the cake, the fla-
vors ripen and the moisture
ts more evenly distributed 1
day later.
SERVE:
Room temperature or lightly
chilled.
INSTRUCTIONS FOR MIXING BATTER FOR AU SIZES
OF GENOISE AU CHOCOLAT
Arrange 2 oven racks as close to the center of the oven as
possible with at least 3 inches between them.
Preheat rhe oven to 35CPF.
Warm the beurre noisette until almost hot (110°F. to
HOT.]. Keep warm.
In a medium bowl place the cocoa and boiling water
and whisk together until the cocoa is completely dissolved.
Stir in the vanilla and set aside, leaving the whisk in the
bowl. Cover with plastic wrap to prevent drying.
Ln a large mixing bowl set over a pan of simmering
water place the eggs and sugar and heat until just luke-
warm, stirring constantly. [The eggs may also be heated by
placing them still m their shells in a large mixing bowl in
an oven with a pilot light for 3 hours or overnight.)
Using the whisk beater, beat on high speed for .5 min*
utex or until triple in volume. Transfer the egg mixture to
a bowl large enough to fold in the other ingredients.
Remove 3 cups of the egg mixture and whisk it into
the cocoa mixture until smooth. (If making hatter in sev*
eral batches, decrease the amount of egg mixture removed
accordingly. For example, if making batter for only two 9-
mch layers, reserve only 2 cups.)
Sift the flour over the remaining egg mixture, folding
gently but rapidly with a slotted skimmer or sparula until
all flour has entirely disappeared. Fold in the cocoa mixture
until almost evenly incorporated. Add the beurre noisetie
in 2 batches, folding with a large balloon whisk or rubber
spatula* just until evenly incorporated. Pour immediately
• 1—work well tn Irw I for lump* of flour. They can be dissolved by
'nj[ between thumb »nd forefinger.
500 SPECIAL SECTION FOR PROFESSIONALS AND PASSIONATE AMATEURS
into the pans !they will be at least three-quarters full) and
bake 25 to 35 minutes for 6-inch and 9-inch layers and 35
to 45 minutes for 12-inch layers or until the cake starts to
shrink from the sides of the pan. Avoid opening the oven
door before the minimum time is over or the cake may fall.
Test toward the end of baking by opening the oven door
slightly and» if at a quick glance it does not appear done,
close the door at once and check again in 5 minutes.
Loosen the sides with a spatula and unmold at once
onto lightly greased racks. Reinvert to cool. Remove the
crust when ready to complete the cake and sprinkle the
syrup evenly on all layers (page 357).
note: 12 inches is the largest genoise that can be made
without low in quality of texture. A larger pan does not
offer enough support.
Syrup
for 3-Ticr
Genoise to
Serve 150
MAKES 5 CUPS
(2 pounds 15 ounces'
I kilogram 340 grams)
* Um" sb»» яшмипщ ст»р»
In a 2-quart saucepan with a tight-fitting lid combine the
sugar and water and bnng to a rolling boil» stirring con-
stantly. Cover immediately, remove from the heat, and cool
completely. Transfer to a hquid measuring cup and stir in
the liqueur. If syrup has evaporated slightly, add enough
water to equal 5 cups syrup.
STORE:
1 month refrigerated tn an
airtight container.
LARGE WEDDING AND SPECIAL OCCASION CAKES 501
HOWTO
MAKE 6-INCH
TO 12-INCH
ROUND
GENOISE
The chart that follows will show you how to make any size grw-
oise from 6 inches to 12 inches plus an 18-tnch sheet сакс. 1 find
that in a round genoise 12 inches is the largest size possible with-
out loss of quality in texture. Larger pans do not offer adequate
support. This chart will also tell you how many people each layer
will serve and how much syrup is needed for each layer.
To use rhe chart, you will need a calculator, a piece of paper,
and a pencil. Refer to the мхе cake you want and mark down the
Rose factor which applies to 2 layers. Turn to rhe Classique Base
or Chocolat Base on page 504 and multiply each ingredient by
the Rose factor.* The figures on the base chart may appear awk-
ward (such as 1-8 teaspoons) but, when multiplied by the Rose
factor, will yield more reasonable amounts. If, for example, after
multiplying, you end up with 4.8 teaspoons, simply round off to
rhe nearest convenient unit of measure, 4% teaspoons. These ta-
bles are precise to enable you to have more leeway in rounding
off the figures. Charts sometimes have a way of looking ominous
and restricting, but there is a range of acceptable deviation and a
few grams more or less will not be discernible.
MASTER CHART FOR GENOISE CLASSIQUE
pan me (2 layers each 2 inche* 6 iachcv number of servings \2 Livers) 20 Rose factor ‘number ot tunes to muidph base) 4 baktne time at .WE 20-25 minures syrup needed for 2 layers ¥< cup
7 incho 25 5 20-25 minutes 1 cup
8 inches 35 7 25—35 minutes 1 *4 cups
9 inches 4 5 8 25—35 пишись 1 Vi cups
10 inches 55 11 25-30 minutes 2 cups
11 inches 65 13 25-30 minute* 2Vb cups
12 inches 75 14 30—35 minute* 2% cups
1 Л-inch by 9-inch rectangle 45 Я 20-30 minutes 1 Vi cups
18-inch by 12- inch rectangle 75 1 14-16 30—40 minute* 2У-» to 3 cup*
* tl u*ing »uiume instead at weight, keep in mind char 3 naspeons * I tablespoon
and 16 ublnp<Mxl> • 1 cup.
502 SPECIAL SECTION FOR PROFESSIONALS AND PASSIONATE AMATEURS
tips: Large layers ane more prone to underbaking than
overbaking. Tbe cake should just start to shrink from the
sides of the pan when done. Be sure ro use Magi-Cake Strips
(pages 20 and 456) for even layers.
Pans can be filled up to ‘/2 inch from top.
One 12-inch by 2-inch layer (Rose factor 7) serve» 40
to 50 people and is a good size for large parties. (Please
check above table for rwo 12-inch layers and divide in half
to make 1 layer).
MASTER. CHART FOR G^NCHSE AU CHOCOLAT
ran me \2 invert елсЬ 2 mchct high 6 inc ho number of tervingc (2 faycr*) 20 Колс factor {number of Irmo to multiply Ьме) -W 5 bukiag time ar 35W 30-35 minutes ivrup needed for 2 layers ¥* cup
7 inches 25 7 30-35 minutes 1 cup
8 incites 35 9 30-35 minutes IVi cups
9 inches 45 10 30-35 minutes IV2 cups
10 inches 55 14 35-40 minutes 2 cups
11 inches 65 16 35-40 minutes 236 cups
12 inches 76 18 40-45 minutes 2 Vi cups
13-meh by 9-inch rectangle 45 10 30—40 minutes 1V6 cups
18-inch by 12- inch rectangle 75 18-20 40—50 minutes 2У« to 3 cups
TIP5: Chocolate g&tutie layer» are more prone to under-
baking than overbaking and will fall slightly if not baked
long enough. The cake should start to shrink from the sides
of the pan when done. Be sure to use Magi-Cake Strips for
even layers (pages 20 and 456).
Pans can be filled up ro Vi inch from top.
A 12-inch by 2-inch layer (Rose factor Я.75) serves 40
to 50 people and is a gcxsd size for large parties. Multiply
everything in the base by 8.75, but it’s fine to use 9 large
eggs.
LARGE WEDDING AND SPECIAL OCCASION CAKES 503
Base
Formulas
for Genoise
SERVES 5
WEDDING
CAKE
PORTIONS
INGREDIENTS
MEASURE
WEIGHT
room temperature resume OtWKO graxrrr
GENOISE CLASSIQUE BASE darified beurre noisette J clarified browned butter, page 4261 0.75 tahlespiMMi 0.32 ounce 9 grams
vanilla 0J5 teaspoon ♦ 1 gram
1 Urge egg 3 tableipouns + 'б teaspoon 1.75 ounces 50 grams (weighed w ithout shdl I
sugar 2 tablespoons 0.88 ounce 25 grams
sifted calc flour 2 tablespoons 0.44 ounce 123 grams
cornstarch GfNOISE au chocolat BASE 1 tablespoon 4* 2 teaspoons 0.44 ounce 12.5 grants
clarified beurre noiicnc idarified browned butter, page 426) I.В teaspoons 0.25 ounce 7 grants
unsweetened cocoa I Dutch* processed: 1 tablespoon ! lightly spooned into cupl 0.2 ounce 5.8 grants
water 2.4 teaspoons 0.42 ounce 12 grams
vanilla 0.2 teaspoon ♦ 0.8 gram
1 brge egg 3 tablespoons + Уз teaspoon 1.75 ounces 50 grams (weighed without shdls}
sugar 1.6 tablespoons 0.7 ounce 20 grams
sifted cake flour 2.3 tablespoons 0.5 ounce 14.2 grams
504 SPECIAL SECTION FOR PROFESSIONALS AND PASSIONATE AMATEURS
Base Formula
for I Cup
Syrup
MAKES I CUP
(9.25 ounces/264 ^am$)
INGREDIENTS MEASURE WEIGHT
nwiin trmpcraturv ^ат HiJwnr 6 tablespoons пилсе* 2.5 ounces gram* 75 grams
waler Vj liquid cup I’ixe glass measuring cup! 53 ounces 156 grams
liqueur of your choice 3 tablespoons 1.5 ounces 40 grams
STORE:
1 month refrigerated in an
airtight container.
In a saucepan with a tight-fitting lid combine the sugar and
w ater and bnng co a rolling boil, stirring constantly. Cover
immediately, remove from the heat, and cool completely.
Transfer to a liquid measuring cup and stir in the liqueur.
If the syrup has evaporated slightly, add enough water to
equal 1 cup syrup. (If multiplying this base for a larger
quantity, add water to equal the appropriate amount}.
Isn’t it almost unbelievable that a creamy 12-inch cheesecake will
support 2 nets of cake on top of it? Actually, I wasn't sure that
it would, so the first time I tried it involved a certain amount of
risk. I remember my husband saying (as he drove the cake over
bumpy roads to Connccucut, trying not to hear my panicked gasps):
“What are you worried about; you’ve never had a cake collapse!”
And my answer: “This could be the first time! To my knowledge
no one has ever tiered a cheesecake before, and it may be for a
good reason.’*
Completed the night before, the bottom of the 12-inch tier
looked like it had widened ever so slightly and tiny cracks had
developed under the surrounding ribbon. Nonetheless the cake
stayed in perfect shape throughout the 2-hour drive, and 2-hour
outdoor photo session, and then an additional 2-hour wait at room
temperature before serving.
WEDDING
CHEESECAKES
LARGE WEDDING AND SPECIAL OCCASION CAKES 505
Рал of what suppons the creamy custard filling arc plastic
straws and cardboard rounds between the tiers. Delicious White
Chocolate Cream Cheese Buttercream (page 525) encases each tier
and offers additional support.
If you like, you can bake 1 sheets of Biscuit Roulade (page
142), preferably the almond version, and cut circles to serve as
bases fot each tier. (The 12-inch round needs to be patched a bit
as the pan ts only 18 inches by 11 inches). If using the biscuit,
you can eliminate the cornstarch in the cheesecake batter because
the biscuit will absorb any excess moisture. Attach the biscuit to
the cardboard rounds with a little buttercream. It is also fine to
unmold the cheesecake layers directly onto cardboard rounds
without using any base as long as the rounds are waterproofed
with a thin layer of buttercream.
The wedding cheesecake consists of a single 3-inch-deep layer
per tier. I am giving the formula for 12-inch, 9-inch, and 6-inch
layers as well as a slightly smaller formula suitable for an 18-mch
by 12-inch by 2-inch sheet cake, which is a very convenient size
for a large party. I once covered an 18-inch sheet cheesecake in
alabaster rolled fondant for a bar mitzvah and wrote the Ten
Commandments in 14-karat gold Hebrew calligraphy on top. The
border consisted of bright blue forget-me-nots with tiny silver
dragees in the centers and entwined with white royal icing scroll-
work {the colors of the flag of Israel). It was the most beautiful
cake I ever made.
I was so happy decorating it that I started to sing long-for-
gonen Hebrew songs from my childhood. I had pleasant thoughts
of my great-grandfather, who was a rabbi in Russia, and of his
wife after whom I was named. I even found a complete miniature
replica of a Torah and located the particular section appri>priate
for the day of the year that the bar mitzvah boy would read. I
painted the plastic posts with goid paint and set the torah be-
tween the two illuminated tabloids of the Ten Commandments.
(The owner of the paint store refused payment because it was for
a Torah, even though I told him it was going on a cake. He said
he wanted to support Judaism in whatever form he found it. I
w as very touched.)
I still remember my surprise and bewilderment when the bar
mitzvah mother told me hesitatingly chat she had expected some-
thing—well—a little more fancy. Plumes I suppose,
NOTE: Don’t forget to arrange for refrigeration space!
506 SPECIAL SECTION FOR PROFESSIONALS AND PASSIONATE AMATEURS
3-Tcr
Wedding
Cheesecake
to Serve 150*
* Requires 5-quart mixer large erwajih to handle the batter in 2 batches. It
can also be prepared in several batches in a food processor (page 82|.
f Use glass treasuring cups.
12-mch, 9-inch, and 6-inch
cake pans, each 3 inches
deep, plm 3 larger pain to
serve as water baths. (The
sides of the water bath pans
must be 3 inches or ondcr
or baking will be slowed.)
Grease die baking pans and
line the bottoms with parch-
ment or wax paper.
LARGE WEDDING AND SPECIAL OCCASION CAKES 507
rarty
Cheesecake
Io Serve 100*
INGREDIENTS MEASURE WEIGHT
room temperature vofumc pounds чигм co ki kfgratntt. gni m s
cream cheese 8 (8-ounce] packages 4 pounds 1 kilogram 814 grams
sugar 4 cups 1 pound 12 ounces SOO grams
cornstarch V« cup 1 ounce 30 grams
12 large eggs 2 liquid cups 4- 3 fluid ounces* 1 pound 5 ounces 600 grams
lemon juice, freshly squeezed 16 liquid cupt 43 ounces 125 grams
vanilla 2 tablespoons 24 grains
salt 1 teaspexin • 7 grams
sour cream 12 cups (3 quarts] 6 pounds 6 ounces 2 kilograms 9(M grams
opmmaf; Apricot Swirl 1'ilhng ipage 51()| 3 V» cups 2 pounds 6 ounces 1 kilogram 79 grams
18-inch by 12-iisch by 2-
mch cake pan greased and
bottom lined with parch*
ment or wax paper. If post»*
ble, have ready a larger pan,
such as a hill size sheet pan,
to serve as water bath. (The
sides of tbe water bath pan
must be 2 inches or less.)
TO UNMOLD
1 lave ready sturdy corru-
gated glassine-coated card-
boards the size of the cake
layers or ’/i inch larger if
planning to frost (water-
proofed with a thin layer of
• Require» » 5-quart mixer large enough ui handle to batter in 2 hatches. It
Gin also be prepared in wrrral hxlchcx in a 1<ин1 procnwir (page K2K
t Lsc f^iss meawnrg cups.
INSTRUCTIONS FOR MIXING BATTER FOR ALL SIZES
OF CHEESECAKE
Arrange oven racks as close to the center of the oven as
possible with ar least 4 mdses between them.
Preheat the oven to 35(FF.
In a mixing bowl beat the cream cheese and sugar,
preferably with flat beater, until very smooth (about 3 min-
utes!. Beat in the cornstarch. Bear in the eggs, 1 at a time,
bearing after each addition until smooch and scraping down
the sides of the bowl. Add the lemon juice, vanilla, and salt
and beat until incorporated. Beat in the sour cream just
until blended.
508 SPECIAL SECTION FOR PROFESSIONALS AND PASSIONATE AMATEURS
Pour rhe filling into the prepared panic). (If adding
apricot filling, see page 510,) It will come dose to the top(s).
Set the pan(s) in the larger pan(s) and fill each surrounding
pan with at least 1 inch hoc water. Bake in the preheated
oven for 50 minutes. Turn off the oven and allow’ the cakes
to cool in the oven without opening the door for 1 hour.
Remove to rack(s) and cool to room temperature (1 hour
for the «nailer layers, longer for the 12-inch layer and sheet
cake). Cover with plastic wrap and refrigerate overnight.
bunercreatn), to serve as a
base for each layer.
Run a (bin metal spat-
ula between the sides of
each cake and the pan, mak-
ing sure to press well
against the sides of the pan,
and place the pan on heated
burner (or 10 to 20 seconds,
moving it back and forth.
Invert onto a cardboard pre-
pared round and remove rhe
parchment. If the cake does
not release, return ro the hoc
burner for a fess more
seconds.
Refrigerate until ready
to frost (see Uhirc Choco-
late Cream Cheese Butter-
cream, page 525).
STORE:
3 days refrigerated before
hosting or decurating; 24
hours refrigerated after dec-
orating. Texture suffers on
freezing.
SERVE:
Lightly chilled.
LARGE WEDDING AND SPECIAL OCCASION CAKES 509
Swirl
Filling for
Cheesecake
MAKES
ABOUT 4 CUPS
INGREDIENTS MEASURE WEIGHT
room ктреглгше dried California apricots irJiwnc 2Vs cups, packed pomuh/ouiKr* 1.75 pounds 794 gratiks
water 1 quart 2 pounds 945 grains
lemon juice» freshly «queered 3 tablesfXKim 1.5 ounces 47 grains
tugar 1 cup 7 (Minces — 200 grams
STORE:
5 days refrigerated, I year
frozen
In a small saucepan place the apncocs and water and allow
to stand, covered, for 2 hours. Simmer 20 minutes over
very low heat, tightly covered, or until the apricots are soft,
Puree along with any remaining liquid in a food processor
or blender. Press through a food mill or fine strainer (page
457). You should have 3 to 4 cups puree. Use only up to
3% cups and store the remainder. Snr in the lemon juice
and sugar. Store in an airtight container until ready co make
the cheesecake batter.
To use the filling, fill each of the prepared pans 'Л full
with hatter. Drizzle the filling over the banet and swirl with
a small metal spatula. Pour in more barter to a capacity of
¥i and repeat with more filling. Top with the remaining
batter and filling and swirl again. Use a total of 3*Z» cups
for sheet cake, 1*6 cups filling for the 12-inch pan, 1 cup
for the 9-inch pan, and 'A for the 6-inch pan. (To bake, sec
page 509.)
TIP: Premium-quality California apricots, found in spe-
cialty and health food stores, are brighter orange and have
a superior flavor to most packaged varieties.
510 SPECIAL SECTION FOR PROFESSIONALS AND PASSIONATE AMATEURS
his is the large-scale version of Perfect Pound Cake
(page 25). Baked in a large Bundt pan, it has a beautiful
golden crust and impressive shape. Although firmer than
the small version, it is still meltingly tender and buttery.
The plain pound cake is excellent but, if you like, try one
of the variations on pages 26 and 27. (You will need to
multiply any variation ingredients by 3.5.)
SERVES
2 5 t о 3 0
Preheat the oven to 35(PF.
In a medium bowl combine milk, eggs, and vanilla and
bear lightly.
In a large mixing bowl combine the dry ingredients
and mix on low speed for 1 minute to blend.
Add the butter and ¥i the egg mixture. Mix on low-
speed until dry ingredients are moistened. Beat at medium
speed (high speed if using a hand mixer) for 1 minute to
aerate and develop the cake's structure.
Scrape down the side. Gradually beat in the remain-
ing egg mixture in 2 batches, beating for 20 seconds after
each addition to incorporate the ingredients and strengthen
rhe structure. Scrape down die sides.
Scrape the batter into the prepared pan and smooth
with a spatula. The batter will be 116 inches from the tup.
Bake 45 ro 50 minutes or until a wire cake tester in-
serted in the center comes out clean and the cake springs
back when pressed lightly in the center and ts just starring
to shrink from the sides of the pan. Cool completely before
wrapping airtight.
rarty-Pcrfcct
Pound Cahc
One 12-cup Bundt pan or
9-cup Kugelhupf, greased
and floored.
FINISHED HEIGHT.
3 inches.
STORE:
Airtight: 3 days room tem-
perature. I week refriger-
ated, 2 months frozen.
SERVE
Room temperature.
LARGE WEDDING AND SPECIAL OCCASION CAKES Sil
note: Although a 12-cup Bundt pan could accommodate
an 8-cgg formula (1Уэ rimes the яхе of the 6-egg formula),
I find that the texture u nut as tender.
И you ate lucky enough to possess a cast-aluminum
unlined Bundr pan, your pound cake will have the most
beautiful crust. Nordicware currently produce* only the cast-
aluminum Bundt pan with a nonstick liner which darkens
the crust. Avoid lighter weight Bundt pans as they do not
bake as evenly and darken the crust.
Ax a point of interest, while developing this large-scale
recipe, I discovered that contrary to a layer cake, extra
baking powder makes a pound cake more chewy rather than
more tender.
LARGE-
SCALE
BUTTER-
CREAMS FOR
WEDDING
CAKES
The biggest dilemma when making a wedding or special occasion
cake is how much frosting and filling will be necessary. In a bak-
ery this is never a problem because any excess frosting from one
cake can easily be used for the next. A small caterer or home
baker does not usually know when the next cake will be, partic-
ularly one which will require that particular frosting.
I have kept records over the years as to how much of which
kind of frosting I use for different size cakes. The chart on the
following page tcHects rhe results. 1 have given slightly generous
amounts because it is better to have too much frosting than to
have to make a new batch at the last minute. And it is difficult to
gauge exactly bow much frosting each person will use.
The amounts on the chan assume that the tilling and frosting
will be applied no less than inch thick and no mure than ’A
inch thick A layer cake usually shnnks so that it is ¥2 inch smaller
in diameter than the pan. Cardboard cake rounds are made the
same size as standard cake pans- This means that there is У» inch
between the sidei of the cardboard and the sides of rhe cake. It is
easy to use the side of the board as a guide, applying У» inch of
frosting all around. It isn't necessary to use this method or as
much frosting around the sides of a square or rectangular cake,
because it is simpler to make frosting level when working with a
straight line instead of a curve.
The chart also suggests amounts of buttercream for decorat-
ing. I prefer piped buttercream decorations that are small and el-
egant for both esthetic and gustatory reasons, but. if your preference
is for a more opulent style be sure to make some extra butter*
cream,
The in the master cake section are all 1inches high
and the layer cakes are IV» inches to 2 inches high. This means
that each tier of 2 layers will be about ЗУ» inches to 4% inches
512 SPECIAL SECTION FOR PROFESSIONALS AND PASSIONATE AMATEURS
high when frosted (the height of the layers phis the cardboard,
filling, and frosting}.
This depends, of course, on the amount of frosting used.
Following the chart are 6 buttercream recipes suitable for
wedding or special occasion cakes, in quantities sufficient to fill,
frost, and decorate a 3-tiered cake for 150 people,
MASTER CHART FOR FROSTING QUANTITIES
cake iizc (2 layers) amount needed between the lay- ers amount needed for top алэоши needed fhr sides total amount needed
6 inches Vi cup V» cup 1 cup 2 cup
7 inches V» cup ¥, cup 1% cups 234 cup
8 inches % cup У* cup 134 cups 3 cup
9 inches • 1 cup 1 cup 134 cup 344 cups
10 inches 1V* cups 1У* cups 1У* cup 4У» cups
11 inches 134 cups 134 cups 2 cup 5 cups
12 inches 1 % cups 1У» cups 2 cup 534 cups
13 inches 2 cups 2 cups 2’Л cups 6У* cups
14 inches 234 cups 234 cup 234 cups 734 cups
15 inches 2У» cups 2¥« cups 2У» cup» S cups
16 inches 3 V* cups ЗУ* сир» 3 cup» 9У» cups
17 inches ЗУ» cap* ЗУ, сир» ЗУ» сир» 10¥« cups
IS inches 4 cups I 4 cups 4 сир» 12 cups
/ layer 13 inches by 9 mcfacs by inches 1 *4 cups 2 сир» IV* cups 4 V; cups
18 incises by 12 inches by 1У4 inches ♦ 4 cups 2 cup 6 cups
EXTRA. hi For 3 g buttercream. For 3 g cream. "TERCREAM FOR DECORATING raduated tiers with tbe bottom пет no larger than 12 inches, add 1 to 2 cups raduated ост» with tbe bottom tier larger than 15 indies, add 3 cups butler-
note: A 5-quarr mixer can handle up to 16 cups butter-
cream.
LARGE WEDDING AND SPECIAL. OCCASION CAKES 513
Mousseline
Buttercream for
a 3-Ticr Cotte
to Serve 150
MAKES II CUPS
Iwthout optional additions)
(4¥> pounds/2 kilograms
144 grams)
his buttercream is very light, smooth, and incredibly
easy to use for piped decorations. It is soft enough for
beautiful shell borders yet strong enough to pipe roses. Li-
queur gently perfumes the buttercream, and, if it's tinted,
it also enhances the color. Mandarine, for example, lends
the palest aura of apneot. If the wedding cake requires a
whiter look, use a dear liqueur.
This is a thrilling buttercream to prepare because it
starts off looking thin and lumpy and, about three quarters
of the way through, starts to emulsify into a luxurious cream.
A word of caution: If the butter is too soft ot the room
too hot, what could have been a sann-smooth cream breaks
down into a grainy hopeless puddle. Once this buttercream
is made, however, it holds up better than any other.
WEIGHT
INGREDIENTS
MEASURE
rvvm rmqxvarure Hshmte pound* ounces G/c^nims/grants
imxahcd butter, softened but coof 165T.) 5 cups 2.5 pounds _ 1 kilogram 114 grams
sugar 2*.A cups 17.5 ounces 500 grams
water ¥♦ cup 6.25 ounces 177 grams
12 large egg whites 1 Vi Liquid cups (use glass measuring cup! 12.5 ounces 560 grams
cream of tartar l¥i teaspoons • 12 grams
liqueur such as Grand Marnier or an eau-de-vie I liquid cep (use gloss measuring cup) 8.5 ounces 240 grams
optional addition*: see below
STORE
2 days room temperature,
10 days refrigerated, 8
months frozen. Allow but-
tercream to come to room
temperature before reheating
In a mixing bowl beat the butter until smooth and creamy
and set aside in a cool place.
Have ready a 2-cup heatproof glass measure near the
range.
In a medium size heavy saucepan (preferably with a
nonsnek lining! stir together 2 cups sugar and the water.
514 SPECIAL SECTION FOR PROFESSIONALS AND PASSIONATE AMATEURS
Hear, stirring constantly, until the sugar dissolves and the
syrup is bubbling. Stop stirring and turn down the heat to
the lowest setting. (If using an electric range remove from
the heat.)
In another mixing bowl beat the egg whites until foamy,
add the cream of tartar, and beat until soft peaks form
when the beater is raised. Gradually beat in the remaining
Vi cup sugar until stiff peaks form when the beater is raised
slowly.
Increase the heat and boil the syrup until a thermom-
eter registers 24IFF. to 25O*F. (firm-ball stage). Immedi-
ately pour into die glass measure to stop the cooking.
Beat the syrup into the whites in a steady stream. Do
not allow the syrup to fall on the beaters or it will spin
onto the sides of the bowl. Start by pouring a small amount
of the syrup onto the whites with the mixer turned off,
Beat at high speed for 5 seconds. Stop mixer and add a
larger amount of syrup. Beat for 5 seconds. Continue with
remaining syrup. For the last addition, use a rubber scraper
to remove the syrup dinging to the glass measure. Beat at
low speed for 2 minutes or until cool.
Beat in the butter at medium speed, 1 tablespoon at a
time. At first the mixture will seem thin but will thicken
beautifully by the rime all the butter is added. If at any time
it looks curdled, raise the speed slightly and beat until
smooth before continuing to add more butter.
Lower the speed slightly and gradually drizzle in the
liqueur.
Reheat lightly from time to time to maintain silky tex-
ture. Buttercream becomes spongy on standing.
OPTIONAL ADDITIONS
These flavorful additions (except for the white chocolate)
will also tint the buttercream. If you want the outside of
the cake to be white, consider using one of these variations
for the filling such а.ч the Lemon Curd Mousseline in the
Dotted Swiss Dream (page 222}.
CHOCOLATE MOUSSELINE- Beat in 12 ounces melted and
cooled extra bittersweet or bittersweet chocolate.
WHITE CHOCOLATE MOUSSELINE Beat in 12 ounces mehed
white chocolate, preferably Tobler Narcisse.
FRUIT MOUSSELINE: Add up to 2 cup» of lightly sweetened
Raspberry or Strawberry Puree (page 338) or Orange, Pas-
sion, Lemon, or Lime curd [pages 340 to 342).
h or it will break down irre-
trievably.
POINTERS FOR SUCCESS.
CxNTect butter temperature
is crucial. If yxm suspect that
the butter was too warm (or
the kitchen is very hot) and
the buttercream starts thin-
ning out and curdling, check
the temperature. If (he mix-
ture docs nut fed cool, re-
frigerate it until it reaches
65 T. to 70PF. ot until cool
to the touch. If by chance
you have used butter
straight from the refrigera-
tor and the mixture feeh
ice-cold, suspend the bowl
over a pan of simmering
water (don't let it touch the
water! and beat very briefly,
stirring vigorously when (be
mixture starts to melt
slightly at the edges. Dip the
bottom of the bowl tn a
larger bowl of ice water for
a few seconds to cool it. Re-
move and beat by hand un-
til smooth.
LARGE WEDDING AND SPECIAL OCCASION CAKES 51S
N coclassic
Buttercream
for a 3-Ticr Cake
to Serve 150
MAKES 8 CUPS
(without optional additions)
(3V5 pounds'I kilogram
6C0 grams <
*-Xhis pale yellow buttercream is perfect both as a creamy
filling and as a silky undercoat for Cr£me Ivoire Deluxe in
Pistachio and Rose Wedding Cake (see color photograph).
If you would like to flavor the buttercream, sec additions
to buttercream (pages 518 to 521).
INGREDIENTS MEASURE WEIGHT
room rcmperacir/c 12 large egg yolks w/umc 7 fluid ounces po ил di ounces 7.75 ounces кгкф/мпъ'цгнпн 223 grams
sugar 1V5 cup* 10.5 ounces 300 grams
corn syrup 1 liquid cup [ute glass measuring cup) 11.5 ounce* 328 grams
unbaked butter (must be softened) 4 cop* 2 pounds 907 grams
ортюпл!: liqueur or cau-de- v»C of your choice % to Vi cup (use glass measuring cup) 2 (u 4 ounce* 60 to 120 grams
STORE:
6 hours room temperature,
t week refrigerated. 8
months frozen.
POINTERS FOR SUCCESS:
The syrup must come to a
rolling boil or the buner-
cream will be roo thin.
Have ready near the range a lightly greased 2-cup heat*
proof glass measure.
In the bowl of an electric mixer, beat the yolks until
light tn color. Meanwhile, combine the sugar and com syrup
in a medium size saucepan (preferably with a nonstick lin-
ing! and heat, stirring constantly, until the sugar dissolves
and the syrup comes to a rolling boil. (The entire surface
will be covered by large bubbles.) Immediately transfer to
the glass measure to stop the cooking.
Beat the syrup into the yolks in a steady stream. Do
not allow the syrup to fall on the beaters or the syrup will
spin onto the sides of the bowl. Stan by pouring a small
amount of syrup over the yolks with the mixer turned off.
Immediately beat at high speed for 5 seconds. Stop the mixer
and add a larger amount of syrup. Beat for 5 seconds. Con-
tinue with the remaining syrup. For the last addition, use a
rubber scraper to remove the syrup dinging to the glass
measure.
516 SPECIAL SEC I ION FOR PROFESSIONALS AND PASSIONATE AMATEURS
Beat until completely cool. Gradually beat tn the but-
ter, then any of the optional flavorings (pages 518 to 521).
Place in an airtight bowl. Bring to room temperature before
using. Rcbcat if necessary to restore the texture.*
Classic
Buttercream
for a 3-Ticr
Cake Io Serve
150
v-X his recipe produces the same buttercream as the Neo-
classic version. If you would like ro flavor the buttercream,
see the additions to buttercream (pages 518 to 521).
MAKES 8 CUPS
(without optional additions)
(3 pounds 2.5 ounces/
I kilograms 440 grams)
CLASSIC CHOCOLATE CARAMEL CRUNCH: The flavors of
caramel and chocolate blend beautifully and the powdered
caramel adds a slightly crunchy texture. Because caramel is
sweet it is best to use extra bittersweet chocolate in the
base.
To make, chocolate caramel crunch buttercream: Beat Vi
cup powdered caramel [page 313) into Classic Chocolate.
CLASSIC COFFEE: This method of making coffee extract yields
a buttercream with the rich taste of good strong coffee.
To make coffee buttercream: Beat % cup Medaglia d’Oro
instant espresso powder dissolved in 2 teaspoons boding
water intn the buttercream. For a more aromatic flavor,
add ‘4 to *4 cup Kahlua.
CLASSIC MOCHA ESPRESSO. Chocolate and coffee always
make a lovely combination.
To make mocha espresso buttercream: To Classic Choco-
late, add 14 cup Medaglia d'Oro instant espresso powder
dissolved in 2 teaspoons boiling water. For more intense
coffee flavor, add Ул to 46 cup Kahlua.
CLASSIC PRALINE: The best praline paste {page 430], a
smooth combination of hazelnuts and caramelized sugar,
makes a fabulous addition to any buttercream. Because the
paste contains about 50 percent sugar it is necessary to re-
move some of the sugar from the ba-se.
To make praltne buttercream: When making buttercream,
decrease the sugar by 3 tablespoons. Beat ’A cup praline
paste into the finished buttercream.
CLASSIC CHOCOLATE PRAUNE: Praline intensifies the deli-
cious flavor of chocolate.
To make chocolate praline buttercream: Beat 12 ounces
melted and cooled bittersweet chocolate into Classic Pra-
line Buttercream. Alternately, beat Vz cup praline paste into
Classic Chocolate Buttercream if it was prepared with ex-
tra bittersweet chocolate. {Either method will be the same
level of sweetness.)
CLASSIC PRALINE CRUNCH Praline powder (page 315) is
made of ground hazelnuts and caramel but is not turned
into a paste. This gives a crunchy texture to the butter-
cream.
To make pralrne crunch buttercream- When making the
buttercream, decrease the sugar by 3 tablespoons. Beat Vi
cup praline powder (page 315) into the finished butter-
cream.
LARGE WEDDING AND SPECIAL OCCASION CAKES 519
CLASSIC CHOCOLATE PRALINE CRUNCH: This buttercream
is like Classic Chocolate Praline except for the crunchy tex-
ture provided by the praline powder.
To make chocolate praline crunch buttercream: Beat 12
ounces melted and cooled bittersweet chocolate into Clas-
sic Praline Crunch Buttercream. Alternately, beat ¥1 cup
praline powder into Classic Chocolate Buttercream if it was
prepared with extra bittersweet chocolate. (Either method
will be the same level of sweetness.)
CLASSIC CHESTNUT: This buttercream is excellent with
chocolate cake.
To make chestnut buttercream. To make 6 cups of butter-
cream, start with ’Л recipe buttercream and add 2 times
the quantity of recipe for lightly sweetened rum-flavored
chestnut puree !paSe 353).
CLASSIC RASPBERRY: My Raspberry Sauce is so concen-
trated it scarcely affects the consistency of the buttercream
base. This is the purest raspberry flavor of any frosting 1
have ever experienced.
To make raspberry buttercream. Beat 1 cup lightly sweet-
ened Raspberry Sauce (page 337) into the finished butter-
cream. If not planning to use the same day, add a few drops
of red food color to prevent fading.
CLASSIC STRAWBERRY: The strawberry flavor is surpris-
ingly fresh and intense. It is, of course, silky and creamy
but has the added interest of tbe tiny strawberry seeds. I
find that strawberries frozen without sugar have more fla-
vor than most commercially available fresh-picked straw-
berries—even at the height of season.
To make strawberry buttercream: Beat 1 cup unsweetened
Strawberry Puree (page 338) into the finished buttercream
with a few’ optional drops of essence of wild strawberry
[page 427) for further intensity. If not planning to use the
same day, add a few drops of red food color to prevent
fading.
CLASSIC APRICOT: This buttercream has a tart, honeyed
flavor and a very pale golden color.
To make apricot buttercream: Beat 1 cup heated, strained,
and cooled apneot preserves or lekvar (page 429) into the
finished buttercream with a few optional drops ot essence
of apricot (page 427} for further intensity.
CLASSIC PINEAPPLE: Home-prexerved pineapple is a deli-
cious, slightly tart addition to buttercream.
320 SPECIAL SECTION FOR PROFESSIONALS AND PASSIONATE AMATEURS
To make pineapple buttercream: Beat 2 cups pureed pine-
apple (page 351) into the finished bunercream and add 2
to 4 tablespoons kirsch or rum.
CLASSIC LEMON: To achieve a truly lemon flavor it is nec-
essary tn use both fresh lemon juice and lemon extract (ac-
tually the pure dl of lemon). Lemon juice alone is not intense
enough and the extract alone ts too hitter.
To make lemon buttercream: When making the butter-
cream, replace V2 cup water with V2 cup freshly squeezed
lemon juice. After adding the buner, beat in Vi teaspoon
lemon extract.
CLASSIC ORANGE: An intense orange flavor is difficult to
achieve using orange extract because it is quite bitter. Finely
grated orange zest and an aromatic French orange essence
(page 427), which includes the pulp, do produce an excel-
lent orange flavor.
To make orange buttercream: Add 4 teaspoons orange es-
sence and 2 tablespoons orange zest to the finished butter-
cream,
CLASSIC ORANGE BLOSSOM: Orange flower water gives this
buttercream the perfume of orange blossoms. Be sure to
add the Tang. It consists mainly of orange oil. The small
amount adds the lilting zip associated with fresh orange
flavor.
To make orange blossom buttercream: Add 2 teaspoons
(27 grams) Tang dissolved in ¥1 cup orange flower water,
2 tablespoons (36 grams) orange zest, and ¥4 cup Grand
Marnier to rhe finished buttercream.
CLASSIC PASSION: This buttercream captures the slightly tart,
utterly distinctive taste of fresh passion fruit.
To make passion buttercream: Beat up to 1V2 cups passion
curd (page 342) into finished bunercream and add 2 tea-
spoons of essence of passion fruit (page 427) for further
intensity.
LARGE WEDDING AND SPECIAL OCCASION CAKES 521
СгСГПС
Ivoire Deluxe
for о 5-Ticr
Cake to Serve
150
Luxury White Chocolate
Buttercream
O' remc Ivoire is like a bonbon or chocolate truffle. On
first bite it seems firm, only to dissolve immediately in the
mouth, releasing the buttery and faintly chocolaty flavors.
The color of thu glorious buttercream is pale ivory,
reminiscent of an antique satin wedding gown. It is excel-
lent as a frosting for a wedding cake and ideal when some-
one requests a chocolate wedding cake with a traditional
ivory-colored exterior.
The contrast of the bittersweet dark chocolate cake
against the silky sweet white chocolate buttercream 1$ spec-
tacular. Because of its richness and firm consistency, 1 like
to fill and lightly frost the cake with Neoclassic Ipage 516>
or Classic Buttercream (page 517). Because I then frost and
pipe decorations with the Creme Ivoire, 1 am giving a smaller
recipe than for the ocher buttercreams.
MAKES
5'4 CUPS
INGREDIENTS MEASURE WEIGHT
room remptvafure tofunac роил ds ounces кИоцгат s. grams
white chocolate (preferably Tobler Narciise) 16 (3-ounce) bars 3 pounds I kilogram 360 grams
cocoa butter, melted* Vi liquid cupf 4.5 ounces I2S grams
clarified urwolted butter! Vi liquid cup f 3.5 ounces 98 grams
flavorlcM oil sudi as mineral or safflower V.- liquid cup f 3.5 ounces 100 grams
STOKE
Mineral oil has an indefinite
shelf life, but safflower oil
will become rancid m a mat-
ter of weeks. Therefore, if
prepared with mineral oil,
buttercream will keep at
room temperature for 1
month. (The clarified butter
shortens its shelf life at
room temperature J If pre-
pared with another oil. store
at room temperature 1
week, refrigerate 3 months,
or freeze 1 year.
POINTERS FOR SUCCESS:
Follow directions on how to
clarify butter. When melting
the chocolate, stir often and
* Met che cocoa butter in a double boiler, under the hrat from the pilot light
at ла спея, or in a microwave che umc way as for dark chocolate ijuge 379).
fllwi glaw cup.
t If you do not have danhed huttrr on hand, you will nerd 10 dardy 11
wNcspoon» 15 5 OWTKrv'ISd gram*; umaltrd huticr. In a heavy utuirpjn melt
the butter over medium heat, partially covered to prevent splattering When
the butter looks clear, cook, unentered, watching carefully until the sobds
drop and fust becm co brown. Four immediately through a fine «Miner or a
urainrr lined wrtli cheesecloth.
Break the chocolate into individual squares and place in a
bowl set over a pot of hot water (no hotter than 160°F.)
on low heat. The water must not touch the bottom of the
bowl. Add the cocoa butter, clarified butter, and oil.
Remove from the heat and stir until the chocolate be-
gins to melt. Return to the heat if the water cools, but be
careful not to let it get too hot. Stir until smooth. [The
chocolate may be melted with rhe od and butters in a mi-
crowave oven if stirred every 15 seconds. Remove before
522 SPECIAL SECTION FOR PROFESSIONALS AND PASSIONATE AMATEURS
fully melted and stir, using rite residual hear ro complete
melting.!
Because of the milk solids in the white chocolate, the
buttercream must be chilled and stirred to prevent seeding
(the formation of tiny lumps). Fill a large bowl with ice
cubes and water and sprinkle with 1 or 2 tablespoons salt.
Fill a second bowl or the sink with very hot water. Set the
bowl of buttercream in the ice water. Stir constantly with
whisk until you just see whisk marks on the surface. Im-
mediately place the bowl over the bowl of hot water to
take off the chill. This will only take seconds. Feel the bot-
tom of the bowl. It should feel cool not cold.
Allow the buttercream to sit for a few minutes, stirring
occasionally with whisk. If it does not form peaks when
the whisk is raised, chill again fur a short time.
be sure that not even a drop
of water get» into the melted
chocolate. If seeding should
occur, try beating with an
immersion blender (page
427) or remdt the butter-
cream, pass through a fine
strainer, and chill again,
stirring constantly. Be sure
to use a fine-quality white
chocolate which contains
cocoa butter. 1 find Tobler
Narcisse to have the best
llavor and the least sweet-
ness.
Frasting the cake first
with a thin layer of Classic
Buttercream offers an inter-
esting textural contrast and
gives the Creme Ivoirc an
ideal surface for adherence.
Otherwise rt will have a ten-
dency to separate from the
cake when cut. (1 also use
the Classic Buttercream
plain or flavored as a till-
ingj
Keep piped decoration?
simple, such as a shell bor-
der (page 399). This butler
cream pipes with more
exquisite detail than any
other, but the heat of your
hand will make piping more
than a few designs at a time
difficult. To counteract this
problem, use several parch-
ment bags, placing jute a
small amount of butter-
cream in each, and switch
bags at first sign of soften-
ing. Cooling your hand in
ice water also helps.
LARGE WEDDING AND SPECIAL OCCASION CAKES 523
Crdnc
Ivoire
for a 3-Ticr
Cake Io Serve
150
White Chocolate Huttrreream
STORE:
Mineral oil Ьол an indefinite
shelf like, hut safflower nil
will become rancid in a mat-
ter of week'. Therefore, if
prepared with mineral oil,
buttercream will keep at
room temperature for 6
months. If prepared with
another oil, store at room
temperature 1 week, refrig-
erate 3 montht, or freeze 1
year.
POINTERS FOR SUCCESS:
Carefully follow direchom
for melting chocolate. Be
sure that not even a drop of
water gets into the melted
chocolate. If seeding should
occur, try* beating with an
immersion blender ipage
427) or remelt tbe butter-
cream, pass through a fine
he delicious creamy flavor of this buttercream 15 sim-
ilar to the deluxe version but is simpler and less expensive
to make. It consists of pure white chocolate softened to
frosting consistency by a neutral oil. It has that wonderful
melt-in the mouth quality offered by the cocoa buner in
the white chocolate. (That is the only “butter*' in the but-
tercream.)
This buttercream has a perfect frosting consistency so
it does not require an undercoat of Classic Buttercream,
but it is too soft to bold its shape for decorative piping. If
you wish to make decorative borders on your cake, prepare
I or 2 cups Creme Ivoire Deluxe Ipage 246).
MAKES
14 CUPS
INGREDIENTS MEASURE WEIGHT
room temperature wWume pottodvoumxs kilograms gram*
white chocolate 'preferably loblcr Narcisse) 37М» p-ounce) bars 7 pounds 3 kilograms 175 grams
flavorless oil such os mineral or safflower Л liquid cups (use a glass measuring cup! 1 pound 5 ounce» 600 gram*
Break the chocolate into individual squares and place in a
bowl set over a pot of hot water (no hotter than 160*F.]
on low heat. The water must not touch bottom of bowl.
Add the oil.
Remove the pot from the heat and stir until the choc-
olate begins to melt. Return to the heat if the water cools,
but be careful it does not ger too hot. Stir until smooth.
(The chocolate may be melted with the oil in a microwave
oven tf stored cxrry 15 seconds. Remove before fully melted
and stir, using the residual heat to complete melting.)
Because of the milk solids in the white chocolate, the
buttercream must be chilled and stirred to prevent seeding
(the formation of tiny lumps). Fill a large bowl with ice
cubes and water and sprinkle with 1 or 2 tablespoons salt.
Fill a second bowl or the sink with very hot water. Set the
bowl of buttercream in the ice water and stir constantly
with whisk, until you just sec whisk marks on the surface.
Immediately place the bowl over the bowl of hot water to
take off the chill. This will only take seconds. Feel tbe bot-
tom of the bowl. It should feel cool not cold.
524 SPECIAL SECTION FOR PROFESSIONALS AND PASSIONATE AMATEURS
Allow the buttercream to sit for a few minutes, stirring
occasionally with whisk. If it does not form peaks when
die whisk is raised, chill again for a short time.
strainer, and chill again,
stirring constantly. If the
weather is SO’F. or above,
reduce the oil to 6 table-
spoons (3 liquid ounces).
к-X his ivory-colored buttercream is mellow and creamy—
a perfect complement for cheesecake. It makes an unusual
and spectacular presentation because it pipes wonderfully
and is the identical color of the cheesecake within. White
ch ко I ate adds firmness of texture» sweetness» and an un-
definabk flavor.
While
Chocolate
Cream Cheese
Frosting
For a 3-Ticr
Cake to Serve
150
MAKES 13
CUPS
INGREDIENTS MEASURE WEIGHT
roam icmpcntiurc volume pounds'oimccs Ысдегалп. gram»
white chocolate (preferably Tobkr Narcisse) 8 |3-OW*C€| bars 1 % pounds 680 grams
cream cheese (must be softened) 4 fS-ouncej packages 2 pounds 907 grams
unsalted butter (must be softened) 2 cups I pound 454 grams
lemon juice, freshly squeezed '/* cup 2 ounces 62 grams
Break the chocolate into individual squares and place in a
bowl set over a pot of hot water (no hotter than 16CFF.)
on low heat. The water must not touch the bottom of the
bowl.
Remove the pot from the heat and stir until the choc-
olate begins to melt. Return to the heat if the water cools,
but be careful it does not get too hot. Stir until smooth.
(The chocolate may be melted in a microwave on high power
if stirred every 15 seconds. Remove before fully melted and
Stir, using the residual heat to complete melting.)
STORE
1 day room Temperature, 2
weeks refrigerated, 2
months frozen. Allow ro
come to room temperature
before rebearing.
POINTERS FOR SUCCESS:
Do not overheat die choco-
late and stir constantly
while melting. Be sure no
LARGE WEDDING AND SPECIAL OCCASION CAKES 525
moisture gets into the
melted chocolate (see Melt-
ing White Chocolate, page
379). Beat constantly while
adding the chocolate to pre-
vent lumping. If lumping
should occur, it can be rem-
edied by pressing rhe buner-
creatn through a fine
strainer.
Buttercream may sepa-
rate slightly if room temper-
ature is very warm. This can
be corrected by setting the
bowl in ice water and
whisking mixture. The but-
tercream becomes spongy on
standing. Rebear to restore
smooth creamy texture. Use
see to chill your hand during
piping to maintain firm tex-
ture.
Allow the chocolate to cool to room temperature, stir-
ring occasionally.
In a mixing bowl beat the cream cheese (preferably
with a flat heater) until smooth and creamy. Gradually beat
in the cooled chocolate until smoothly incorporated. Beat
in rhe butter and lemon juice. Use at once or to ensure
smoothness reheat at room temperature before frosting.*
noth: My friend Shirley Corriher reports that when using
this frosting for a wedding cake in the beat of an Atlanta
summer, she tried decreasing the butter to 4 ounces and it
held up quite wdl.
Silk
Meringue Praline
Buttercream
for a 3-Ticr
Cake
MAKES 13
CUPS
his ts one of my very favorite buttercreams. It is smooth
and delicious, airy yet stable. It is resistant to warm tem-
peratures and is a dream for piping decorations. Because
the buttercream takes on the pale golden color of the pra-
line paste (sec the color photograph of the Chocolate Pra-
line Wedding Cake) it is suitable for a wedding cake only
when the traditional white look is not required. It goes well
with any type of butter cake or g&toue.
* Dn ttot rrhcjr chilkd biittrrcreun until it has readied room n-mperature or
it may curdle.
.Ш SPECIAL SECTION FOR PROFESSIONALS AND PASSIONATE AMATEURS
INGREDIENTS MEASURE WEIGHT
room reflipezarure w/uiw pfHMids/oumxit kiktgrMirt
CREME ANGLAISE sugar % cup 5Л5 ounces 150 grams
15 large egg yolks 9 fluid ounces * 9.75 ounces 279 grams
3 large vanilla beans, split length w we | • • •
milk ITALIAN MERINGUE 1 V; liquid cups 12.75 ounces 363 grams
sugar I cup + 5 table* potxu 9.25 ounces 262 grams
water 'A liquid cup' 2.75 ounces 80 grams
6 Urge egg whites ¥« liquid cup ’ 6.25 ounces 180 grams
cream of tartar У* teaspoon ♦ •
unsalted butter (must be softened), beaten until creamy 6 cups 3 pounds 1 kilogram 360 grams
praline paste IV» cups I pound 454 grams
* L4c a mcnynng cup.
f Vam. u besiii alter* the moat driiuxnn flavor, bat, if you «iah tn avoid the
little Hadi хрс^к», rtplair the bean* with I ubkspoan v*nilb <хтнл, added
to the conltd errmr strgiaw, И wsinj Tahiti»» bean», jsc only I Vi beans.
TO MAKE CREME ANGLAISE
Have ready near the range a sieve set over a bowl. In a
medium, heavy noncorrodtble saucepan combine the sugar»
yolks, and vanilla bean.
In a small saucepan bring the milk to the boiling point.
Add ’/i cup to the yolk mixture, stirring constantly. Grad-
ually add the remaining milk, stirring, and cook over me-
dium-low heat, stirring constantly, until just before the
boiling point. The mixture will start to steam slightly and
an accurate thermometer will register 170°F. (The temper-
ature must not exceed 18СУТ. or rhe mixture will curdle.)
Immediately pour into the strainer, scraping up any
clinging to the pan.
Scrape the small black seeds from the vanilla bean into
the custard and cool to room temperature. (To speed the
cooling, place the bowl in another bowl or sink partially
filled with ice water.) Cover and refrigerate up to 5 days or
until ready to complete buttercream.
STOKE:
6 hours room temperature,
1 week refrigerated. 8
months frozen. If frozen or
refrigerated, be sure to al-
low the buttercream to
come to room temperature
before reheating it or it will
break down. The butter-
cream may look almost
soupy when it has reached
room temperature, but re-
beating will make it as firm
as new!
POINTERS FOR SUCCESS:
Creme Anghise- Tbe tem-
perature must reach at least
160*F. and must not exceed
180*F. or it will curdle.
ИйИлп Meringue: For
maximum stability, the
сутир must reach 248*F. and
not exceed 25O*F. as higher
temperatures will break
LARGE WEDDING AND SPECIAL OCCASION CAKES 527
down the whites. The
whites must be free of any
grease or trace of yolk. Do
not ovcrbcaL
Bvrrarcrramr Rcbeat
when it becomes spongy.
TO MAKE ITALIAN MERINGUE
Have ready near the range a 2-cup heatproof glass mea-
sure.
In a small heavy saucepan (preferably with a nonstick
lining) stir together 1 cup sugar and the water. Heat, stir-
ring constantly, until the sugar dissolves and the syrup is
bubbling. Scop stirring and turn down the heat to the low-
est setting. (If using an electric range, remove from die hear.)
In a mixing bowl beat the egg whites on low speed
until foamy, add the cream of tartar, and beat on high speed
until soft peaks form when the beater is raised. Gradually
beat in the remaining 5 tablespoons of wigar until stiff peaks
form when the beater is raised slowly.
Increase the heat and boil the syrup until a thermom-
eter registers 248°F. to 2.S0T. (firm-ball stage). Immedi-
ately pour into the glass measure to stop the cooking.
With the mixer on high speed, beat the syrup into the
whites in a steady stream. [>o not allow the syrup to fall
on the beaten or the syrup will spin onto the sides of the
bowl. Use a rubber scraper to remove the syrup dinging to
the glass measure. Beat at low speed until cool. (Italian Me-
nngue keeps for 2 days refrigerated. Rebeat briefly before
using.)
TO COMPLETE BUTTERCREAM
In a large mixing bowl (at least 5 quarts) place rhe butter
and beat on medium speed for 30 seconds. Gradually beat
in rhe creme anglaisc and praline paste until smooth. Add
the Italian menngue in 4 batches, beating briefly until just
incorporated. If the mixture looks curdled instead of silken
smooth, it is too cold. Allow it to sit at room temperature
to warm to 70*F. before continuing to beat or place the
bowl in a hot water bath very briefly until the buttercream
against the sides of the bowl just starts to melt. Remove at
once and beat until smooth. This buttercream becomes
slightly spongy on standing. Rebeat before using.
NOTE; To make plain Silk Menngue Buttercream, increase
the sugar to 116 cups (10.5 ounces/300 grams) and omit
the praline paste. You may also make any of the variations
on pages 241 to 243 by using the plain Silk Meringue But-
tercream and tripling the optional additions.
528 SPECIAL SECTION FOR PROFESSIONALS AND PASSIONATE AMATEURS
It Urge single-layer round or rectangular cake looks
stunning glazed with a dark, shiny Chocolate Cream Glaze.
It also is the most delicious of all chocolate glazes. Cognac
heightens the flavor, but if a fine-quality chocolate is used
the Cognac is optional.
This recipe makes enough to glaze a 12-inch by 2-inch
by I’Zunch cake. For an 18-inch by 12-inch by 2-inch cake,
double the recipe.
Chocolate
Cream
Glaze tor Large
Cakes
MAKES 4 CUPS
WEIGHT
MEASURE
INGREDIENTS
bittersweet chocolate lo/time 6 13-ounce) bars pounds, оол ccs 1 pound 2 ounces kdogr.ims grams 510 grams
heavy cream 2 cups 1 pound 464 grams
optional: Cognac 2 tablespoons I ounce I 28 grams
TO PREPARE CAKE FOR GLAZING
Brush all crumbs from the surface and place on a card-
board round the same size as the cake. Suspend the cake
on a rack set on a baking sheer to catch excess glaze.
It is best to have enough glaze to cover the cake with
one application as touch-ups don't usually produce as flaw-
less a finish. Excess glaze can be frozen and reheated at a
later dare.
TO PREPARE GLAZE
In a food processor with the metal blade, break the choc-
olate into pieces and process until very fine (or finely grate
the chocolate). Place in a medium-size heavy saucepan.
Heat the cream to the boding point and pour three
quarters of it over the chocolate. Cover for 5 minutes to
allow rhe chocolate to melt. Gently mix unol smooth, trying
not to create air bubbles. Pass through a fine steamer, stir
in the optional Cognac, and allow to cool just until tepid.
CHECK FOR CONSISTENCY
At a tepid temperature, a small amount of glaze should
mound a bit when dropped from a spoon before smoothly
disappearing. If the glaze is too thick and the mound re-
mains on the surface or the glaze seems curdled, add some
of the warm remaining cream by the teaspoon. If the glaze
should happen to be too thin, gently stir in a small amount
of melted chocolate.
STORE:
3 days room temperature, 2
weeks refrigerated, 6
months frozen.
POINTERS FOR SUCCESS
Your favorite M-misweet or
binersweet eating chocolate
will result in the best choco-
late glaze. If the chocolate is
not smooth-textured in the
bar it will not be smooth in
the ganache cither.
The butterfat content of
cream varies, which will af-
fect the consistency of the
glaze. Always check for con-
sistency at a tepid tempera-
ture. If it is the correct
consistency when tepid, even
if it is too cool when ap-
plied and lumps, the cake
can be placed in a warm
oven for a few seconds and
glaze will smooth. If glaze
had been texted when hot
and was the right consis-
tency, but was poured when
too cool and lumped, the
extra heat would not help.
On the other hand, if glaze
LARGE WEDDING AND SPECIAL OCCASION CAKES 529
tad been the correct com»*
tency when cool, it would
never firm adequately on (he
cake.
To rebeat, ore a double
boiler, stirring gently, or a
microwave on high power,
stirring and folding every 7
seconds.
P istachio
narzipan
for a 3-Ticr
When the consistency is correct, use at once or store
and reheat. The glaze should be poured onto the center of
the cake, allowing the excess to flow down the sides. Smcxith
quickly and evenly with a large metal spatula, moving it
lightly back and forth across rhe top until smooth. It any
spots on the sides remain unglazed, use a small metal spat*
uia to lift up some glaze which has fallen onto the baking
sheet and apply to uncovered area.
Lift rack and tap lightly to settle glaze. Lift cake from
rack using a broad spatula or pancake turner and set on a
serving plate or on a dean rack if planning to apply a sec-
ond coat of glaze.
If you want to cover the cake more thickly and evenly,
2 coats can be applied by the following technique: Pour the
glaze over cake and smooth quickly with a spatula to cre-
ate a thin, even coat. Refrigerate for 20 minutes or until
turn. Apply a second coat of tepid glaze. (You will need
about 1 ’Л times the glaze for a double coat.)
Allow to set for at least 2 hours at room temperature.
Rctrigeranng will dull the glaze slightly.
Cake
MAKES
I /♦ POUNDS/
S67 G R A M $
(enough for 12-inch, 9-inch.
and 6-rnch discs)
eople who don’t like marzipan usually change their
minds when they encounter this pistachio version. I created
it as a surprise inside each tier of my brother’s wedding
cake {page 219).
INGREDIENTS MEASURE WEIGHT
vo/ume pounds bunco kilogram*- gram s’
shelled unsahed pistachio nuts ! cup 5.25 ounces 152 grams
powdered sugar 3 cup» (lightly spooned into cup) 12 ounces 340 grams
com syrup У1 liquid Cup lute a glass measure) 4 ounces 108 grams
glycemic or unfavored oil 2 tcaspoom • •
opnoaa/r 8 drops green food color • • ♦
530 SPECIAL SECTION FOR PROFESSIONALS AND PASSIONATE AMATEURS
Bake the nuts in a .ISO’F. oven for 5 to 10 minutes or until
the skins separate from the nub when scratched lighdy with
a fingernail. Remove as much of tbe skin as possible.
In food processor process the nuts until a мпскнЬ paste
is obtained. Add the powdered sugar and process until well
mixed. Add the com syrup and glycerine and process until
blended, about 2D seconds. The mixture will appear dry,
but a small amount pressed between your fingers should
hold together. If it seems too dry, add more com syrup, %
teaspoon at a time. If you wish to deepen rhe color, add
the optional f<x>d coloring. Continue processing until the
marzipan has a smooth, dougblike consistency. Knead briefly
by hand until uniform in color.
The marzipan may be used at once, hut is easier to
work with if allowed to rest 1 hour. Wrap tightly with plastic
wrap and place in an airtight container.
To roll discs, divide the marzipan in half. Roil ’Л be-
tween 2 sheets of plastic wrap into a thin circle 13 inches
in diameter. Peel off the top layer of plastic. Using a lightly
greased 12-inch cake pan bottom as a guide, cut out a 12-
inch circle with a sharp knife or pizza cutter. Knead the
leftover marzipan into the remaining marzipan. Roll this
portion between plastic wrap into a thin circle 10 inches in
diameter. Using a lightly greased 9-inch cake pan bottom
as guide, cut out a 9-mch circle. Knead the leftover marzi-
pan together and again roll it out between plastic wrap into
a thin circle 7 inches in diameter. Using a lightly greased 6-
inch cake pan, cut out a 6-inch circle.
It is easiest to apply marzipan if it has been frozen for
a few minutes to make it less flexible. Place the 12-inch
circle, still covered with plastic wrap, on a baking sheet
and freeze. The marzipan will adhere to the plastic wrap.
Position it over the 12-inch tier of a frosted cake, support-
ing the marzipan with your palm if necessary, and lay it on
the cake. It should not be moved once it is positioned. Ped
off the plastic. Repeat with remaining circles.
STORE:
6 months refrigerated, 1
year frozen.
LARGE WEDDING AND SPECIAL OCCASION CAKES 531
Classic
Rolled Fondant
for a 3-Ticr
Cake to Serve
150
MAKES
ABOUT 7‘Л
POUNDS/
3 KILOGRAMS
402 GRAMS
{enough to cover 12-inch,
9-rich, and 6-inch tiers)
he alabaster perfection of rolled fondant make* an
exquisite background for decorating a wedding cake. It seals
in the freshness of rhe cake for several days, giving rime for
the most ethereal and elaborate of piped decorations.
In England, where this fondant originated, it is tradi-
tional even for home cooks to wear only white when pre-
paring it, as even a fleck of lint can cause an off color in
the pristine white.
These days rolled fondant is used more in Australia
than tn any other country—no doubt why a cake covered
in rolled fondant and decorated with royal iemg is often
referred to a$ the fabled Australian method of cake deco-
rating.
INGREDIENTS
MEASURE
WEIGHT
глот irmpetMiNC gelatin nJi/iiK 3 tablespoon* pound* ounce* 1 ouisce kilagrarns/fifiMni 2M grams
water * V« liquid cup 6.2 5 outxes 177 grams
glucose f 1’A cups (use a glass measure) 17.5 ounces 504 grams
glycerine 3 tablespoons 2 ounces 54 grams
solid white shortening Vt cup + 2 tablespoons 2.5 ounces 72 grams
powdered sugar 24 cups (lightly spooned into cup) 6 pounds 2 kilograms 722 grams
STORE:
1 month room temperature.
Can be frozen indefinitely.
• For j lUvoc »йгшюп, tepLace *6 che watei uiifi ru«c*Mlcr <ir orange Hnwrr
water.
f IЦ nip, (17,25 oencrv492 fra mi; «ОСП »yriip will jnc equal muxs d you
use only Ул cup 4- I tablespoon water instead nf V. cup.
Sprinkle the gelatin over the water in a 4-<up heatproof
measuring cup or bowl and allow it to sit for 5 minutes.
Set the cup in a small pan of simmering water and stir until
the gelatin is dissolved. (This can also be done in a few
seconds in a microwave on high power.) Blend in rhe glu-
cose and glycerine, then add the shortening and stir until
melted. Remove from the heat.
Place sugar in a very* large bowl and make a well in
512 SPECIAL SECTION FOR PROFESSIONALS AND PASSIONATE AMATEURS
the center. Add the gelatin mixture and stir with a wooden
spoon until blended. Mix with lighdy greased hands and
vigorously knead in the bowl until most of the sugar is
incorporated. Turn out onto a smooth lighdy greased sur-
face such as Formica or marble and knead until smooth
and satiny.
If the fondant seems very dry, add several drops of
water and knead well. If it seems too sticky, knead in more
powdered sugar. The fondant will resemble a smooth, well-
shaped stone. When dropped, it should spread very slightly
but retain its shape. It should be malleable like day, soft
but not sticky.
Rolled fondant may be used at once but seems to work
much more easily when allowed to rest for several hours.
It is important to cover the fondant to prevent drying. Wrap
tightly with plastic wrap and place in an airtight con-
tainer.* Il will firm slightly on standing.
When ready to roll out, spray the work surface and
rolling pin with nonstick vegetable spray. For covering a
cake, see page 360.
TIPS: A 20-quart Hobart with a spade beater can be used
to do the initial mixing. Kneading must be done by hand
or the texture suffers. For small hands, divide the mixture
into two batches. Be sure to keep each batch covered to
prevent drying.
OUTSIDE CRUST: In order to frost a cake evenly and smoothly, it
must be as level as possible and have a crumb-free crust. There
arc two baker's tricks that make this easy to accomplish. The first
is to spray Baker's Joy on the cake pans. This combination of
flour and oil results in a beautifully sealed crust. The second tnck
is to wrap the cake pans with Magi-C.ake Strips (pages 20 and
456). Together with well-balanced formulas and varying the
amount of baking powder for different cake sizes, these tips result
in very level cake layers.
If a cake should come out domed, use a serrated knife with
a blade longer than the diameter of the cake to level it. Or use a
cake leveler or cake saw (page 461).
If the sides are uneven and there seem to be many loose
crumbs, a crumb coating such as Jewel Glaze {page 329) or a very
thin layer of frosting keeps the crumbs from marring the surface
of the frosting.
FROSTING,
TIERING, AND
STORING
WEDDING
CAKES
PREPARING THE
CAKE FOR
FROSTING
* II «lured iood«m terms ver) tnft, л itvt кспгкК in the micrawaie before
kneading will work wtxickn tn make it pliable.
LARGE WEDDING AND SPECIAL OCCASION CAKES 533
When covering a cake with rolled fondant, it is necessary to
bevel the top edge to soften the angle, preventing rhe fondant
from cracking. A small serrated knife is perfect for this.
It is also necessary to apply a thin layer of jelly or frosting to
all surfaces of the cake so that the fondant will adhere well. (See
piping |ell, page 431, or Jewel Glaze, page 329.) A pastry feather
or brush works well.
CAKE SERVING BASE: It is usually difficult to find large, perfectly
flat cake plates for wedding cakes. A few possible solutions are:
M-inch-thick plywood covered with florist foil, 14-inch to ‘/i-inch
thick sandblasted glass (see color photograph), or 'A»-inch I’lcxi-
glass or a mirror. All must be custom made. Wooden boards can
be painted with gold leaf, but this must be done at least 2 days
ahead so that the odors have disappeared before the cake is placed
on the base. Cake decorating supply stores also carry decorative
silver or gold foil in rolls and large round serving boards covered
with foil. Aesthetically, the serving base should be about 3 inches
to 5 inches larger in diameter than the bottom tier of the cake.
SUPPORTING THE
CAKE
Making a tiered wedding cake is like constructing an edifice out
of improbable elements. Certain supports are vital to keep one
tier from sinking into another and to prevent the entire cake from
collapsing. When making a wedding cake, I often feel like an ar-
chitect.
BOTTOM SUPPORT To start with, each tier must be supported by
a rigid but lightweight base. Disposable cardboard is the easiest
solution.
Corrugated cardboard cake rounds the size of standard cake
pans are available at cake-decorating supply stores (page 457) or
can be cut from cardhoard. 1 prefer the precut rounds because
their edges are smooth, making it easier to use them as a guide
for smooching the frosting on the sides. Those waterproofed with
a glassine surface are ideal.
To keep the cake from slipping off the cardboard spread a
few dabs of frosting on the cardboard before placing the layer
on it.
Frost the cake layers {see page 359 if you need to review
fronting techniques) and attach tbe bottom tier to the serving board
before inserting any inner supports. To attach to serving board,
use several strips of strong double-sided adhesive tape or make
loops of tape (known as Mobius loops) on the serving board.
INTERNAL SUPPORT To enable the bottom layers to support the
weight of additional tiers, wooden dowels are traditionally in-
534 SPECIAL SECTION FOR PROFESSIONALS AND PASSIONATE AMATEURS
serted into each tier to distribute the weight. Wooden dowels are
difficult to cut, so one day, as my husband was watching me
struggle with wire cutters and shooting stumps of dowels he came
up with the brilliant solution of using plastic non-flexible straws
instead. My immediate response was “impossible,” but he assured
me that plastic can support a great deal of weight and the hollnw
centers offer more support by displacing less cake. He added that,
unlike wood, the plastic would not interface with the surrounding
cake, causing an off flavor. 1 tried a test cake, piling many brass
weights on top and, after three days had elapsed, found that this
technique really does work. I published the plastic straw tech-
nique as part of a wedding cake article for a national food mag-
azine and received one indignant, bordering on outraged, letter
insisting that the cake in question would certainly collapse. But
since that time 1 have noticed the straw technique appearing in
other books on cake decorating and regret that it couldn’t have
been patented?
To insert plastic straw supports, first mark an outline on the
frosted cake tier where the next tier will go. Use the pan that the
layer was baked in as a guide. If the cake was frosted with a soft
buttercream invert die pan, center it, and press lightly to leave an
imprint (Fig- 1). if the topping is a firm one, such as the Crime
Ivoire Deluxe or Rolled Fondant, center the pan and allow rhe
bottom to rest on the bunercream. Use a toothpick to make little
holes in the frosting all around the base of pan (Fig. 2).
Insert a plastic straw into the center of the cake until it touches
the base and mark the straw with a penal at the cake surface
(Fig. 3). Remove the straw and cut off at rhe pencil mark. Use
this straw as a guide to cut other straw supports the same length.
Insert 1 straw in the center of rhe cake and the other straws
equidistant in a circle just inside the guide marks. A 12-inch layer
needs 8 straws and 1 for the center. A 9-inch layer needs 6 straws
and 1 for the center. The top tier does not need supports because
nothing heavy will be resting on it.
An inflexible heavy-duty pancake turner is the best device for lift-
ing and placing the tiers. A small angled spatula helps to support
rhe edge while removing the pancake turner and displaces less
frosting. Lift each tier with the pancake turner, using your other
hand to support rhe other «de and center it over the tier below,
using the outline as your guide. Allow the side of the cake by your
hand to touch down and gently lower tbe other side. Leave enough
space so that the pancake turner docs not touch any frosting.
Gradually slide away the pancake turner (Fig. 1). When you al-
PLACING THE TIERS
LARGE WEDDING AND SPECIAL OCCASION CAKES 535
most reach the edge, transfer the weight to the small angled spat-
ula and carefully slide it out (Fig. 2).
Pipe a border ot buttercream around the base of each tier to
seal in the freshness and give the edge a finished appearance.
nott: If cake is to be transported a great distance over rough
terrain, you can stake the tiers as extra security to keep them
from sliding. Sharpen one end of a wooden dowel, I inch lower
than the height of the finished cake, and using a hammer, drive it
through to the bottom. Frost or place ornament on top of cake
to hide the small hole.
STORING THE
WEDDING CAKE
A cake frosted and decorated with buttercream can be made 1
day ahead and left at cool room temperature (except for cheese-
cake, which requires refrigeration). If made with butter cake, it
will keep refrigerated for 3 days. It is essential that a butter cake
be removed from the refrigerator 6 hours before serving or the
texture will not be soft and light. If the wedding cake is made
with genoise it will keep refrigerated for 5 days. Remove from the
refrigerator at least two hours ahead to allow the buttercream to
soften. A wedding cheesecake must be refrigerated until serving
day and keeps for 24 hours refrigerated.
TRANS-
PORTING
AND SERVING
WEDDING
CAKES
TRANSPORTING THE
WEDDING CAKE
William Greenberg, a famous New York baker, gave me some
important advice at the beginning of my cake baking career: “There
are only two people trustworthy enough to deliver a wedding
cake—the person who baked it and the person who paid for it.”
As a consequence, 1 have never had a single disaster befall one of
my cakes {except, of course, foe my brother's wedding cake, which
suffered the fate of a major blizzard and a hungry airline crew).
Usually I have the customer pick up the cake, but if 1 am
going to the wedding I always deliver it personally. At first I would
bnng a pastry bag filled with icing in case of repair, but as I never
once needed it, I abandoned the practice.
The ideal protection for a tiered cake is a corrugated card-
board box just slightly larger than the base. It is also safer for the
box to be higher than the top tier so that the top flaps can be
taped closed. The rigid sides of the box cannot touch the sides of
the cake because the frosted cake sides are smaller than the bot-
tom cake base on which they are resting.
If the weather is cool, the trunk of a car offers the most level
area for the cake. A damp terry towel under the cake box helps
to keep it from sliding. Try to avoid major bumps in the road
when driving.
536 SPECIAL SECTION FOR PROFESSIONALS AND PASSIONATE AMATEURS
Wedding cake pocbom are traditionally small because they usu-
ally are served after a large dinner that often includes other des-
serts. The size of the serving is either a square 2 inches high by 2
inches deep and 1% inches wide (the tier divided into 2 layers} or
a slim rectangle 4 inches high by 2 inches deep by V* inch wide
{the full height of the tier).
After the bride cuts the traditional first slice from the bottom
tier, the top tier is removed if she is planning to save it for her
first anniversary. This is a tradition chat probably started when
wedding cakes were made of fruitcake and could survive one year
in the freezer. Treating butrer cake or genoise in this manner is a
tradition that 1 heartily hope will be forgotten. (Let's not even
discuss the tradition of che bride's sleeping with a piece of the
cake under her pillow’)
The most practical way co cut 8-inch or larger tiers of wed-
ding cake is in concentric circles until the small 4-inch to 6-inch
center round remains. That should be cut into narrow wedges. It
is easiest to start with the top tier and remove each tier before
cutting, but it is also possible to cur each tier while it ts snll rest-
ing on the tier below.
SERVING A
TIERED CAKE
LARGE WEDDING AND SPECIAL OCCASION CAKES 557
Index
When a recipe has mure than one reference, the first page number,
in boldface, refers to the recipe itself; page numbers which follow
refer to other recipes in which rhe main recipe is used.
A
All occasion downy vdkm* buc-
ter cake, 39-40, IM
All purpose flour, 428
AlfiKiodlsh
biscuit. 144. 81-84, 217-219
hitter,w-ert loco* pcnobC. 134-
133
burnt, milk cboculate gatwdie.
277.62-43
cake, gulden, 37-38
dtocobh* cherry pound cake,
J2-33
chcoxarc c+*p whipped cream,
Mt, 127-HR, 179-180
daoquniw, KU-303, 166-167,
ао-м
golden Grand Marnier cake,
Hrtipan:
bees. 367-UR, IRS-186
covenng a cake wnh, 363
Jccoi JiKxb. 563-J65, 367-
368
mvfl tea, 321. 261
for modeling. 322. 222-224,
364-365
quinli-sseticul. 320-321
tdsa, 364-363, 222-224,
428
stem and leaves, 363, 216-
217
nmotme. MS-319, 1Н6-1И8
barqueoes and caooucx 368-
369
Isueey ururnJc, 319, 185-
1*6
petit* lour* frtun. .369
sugar trmprraturr fur, 434
paxtr. «XL 441
a taste of heavm, 166-167
weighing, 441
Angel food cakets), 160
chocolate lover's, 160-162
folders. 4JR
highliihcs for successful. 154—
155
understanding, 477
untndditiR. 22
Angelique, 424
Angel's hair ispun sugar), cara-
mel. 316-317, 217-219
forks for making. 464
Apococ:
buttercream, classic, 233-234,
35—36, 125-116
for a 3-tier cake to serve 150,
520
dosed cream, 265
glare, shiny. PR
golden cage. 172-173
golden glory wedding cheese-
cake. 2P-219
Irfcvar, 429
-orange xaucr, гЬ<хт*.лг< ve-
lour crepes wuK 116-11R
purer. 335, 265
sit meringue Ьипттсаяа, 243,
115-126, P2-P3
suui filing for cheesecake, 510,
217-219
Arrowtooc, 424-425
Art Dsxu cake, 204-206
В
Bas-а mane (hut-waltz bather.
46<J
Baked Hawaii, 163—169
Baker’* Jcrv, 419-410
Baku*. 20-21. 475-476
oemperature, 21,448.475,476,
478
Baking |«u<ier. 420, 442» 47)
m nerol cake*, 494—496
Baking s«ia, 420, 442, 473
Banina
cake. Cordon Row, 69-70
cheewcakr, 83
Bands, chocolate. 387-188, 84—
87, 1*9-190
Barquel tes:
Chea L'Ama Louis, 186-188
1к>ц01||«с cutouts and, 36*
369
Basket .eave, piped, 402-403
Bavarian uwiu:
chiffon, 289
orange, 288-2*9. 181 -183
pear. 290-292. 175-177
vanilla. 287-289, 142-144.
148-149.177-17*
541
Caramel (гпягмшпС
for j cage and dust, М3—
314. Г2-171
«.hucwlatr mmth Ьиггегсгеалц
г1л«*к, 212
for j 1-cirr cake to serve 150.
SIS
ocdfvc sdk ernnpa- butter-
cream, 242
golden cagr. 172-173
fer pralmr pm»dcr and choc-
nbtr praline, 315
silk menngue buttercream,
241-142
for xp=n sugar |япцгГ» hair).
316-317.217-219
temperature for. 436
tips for working with. 312—
313
Cardboard round», 457—<58
Carrol nng, gnldm wheat, 75—
76
СЬлппЛу стёрт». 110-111.112-
113, 114-115
Charlottes, 174-181
shuxiltte chip, 179—|fcf)
ethereal pear, 175-177
irraagr chocolate crown. 181-
183
piprig techniques for. 373-374
daisy top. 374
ladyfingers, 373
spiral bmc, 373-374, 181-
113
scarlet emprew, 177—173
*Ьлрс» for, 364-374
Checkerboard fantasy cake, 52-
53
Cheesecakes, 80-34
apricot swirl filling hx, 510.
217-211
banana, 83
bottom» tor, 82-83
Credro Rose cream. 31 34
fruit swirl. 84
golden gluts wedding, 217—
219
party, m urn 100, 508-509
hie PasMivtr. t3, SI-84
3-twr wedding, to serve 150,
507.217-219
-rddtot, 303-310
white chocolate. 83
Slack Forest itr спал roll,
193-194
Black forest «ее cream torte.
142-193
branded burgundy, 346—347,
12-11, 84-87, 190-194
ihixnLtrr almond pound cake,
32-33
Swis» Black Forest cake. 1 MO-
192
a taste of hea»«\ 166—167
topping, fresh, 344-345, 31-
84, 169-170
"vrnt winter, 345-346, Ml -
84, 169-170
Cherry pierrr», 4й1
Chestnut {*|, 420
hurrrncrean-. da sue, 233, 42-
43
tor a 3-oer cake to ser»c 150.
520
buttercream, easy, 333—3S4.
42-41
chocolate embrace, 189—190
Ilnur, 420-421, 440
grwniw, 122-124, 189-190
le matron, 42
moww «.ream, 262-261, 122-
124, 189-190
pwrer. 353-354
purrhastd, 420
wfighiruL *41
sand cake, 42-43
silk iiienrguc buttenrram, 241,
42-4.3
vermicelli, 262-263
Chiffon, Bavarian, 289
Chiffon cakes, 134-160
!;udt free ditxxiUtr, I 58—160
nghlight* itor Mtccrafal, 154-
155
lemon gfow, 157-158
«гя«<г gforw, 155-156
nndersrandmg. 477
unmolding, 22
Chocolate. 421-424
bittersweet. 423, 424
brands of, 421
«км, 421, 424. 440, 474
Dutch-procmedk 422, 424,
4-h i. 4'1 474
cocoa buner, 422-423» 424,
439
compound. 378. 380, 423-424
coustrturc, .182. 535. 4X1, 424
decorating with, глг dxiultte
<tocnrari<m«
exchanging type» uf> in reopcs,
443-444
grating. 330
melteg. 379
milk, 24.1. 424
pure Ibtrtrr; baking; unv»wr-
twcdl, 422, 424
semisweet. 243, 424
storing. 424
summer coating. 373. 335, 389
sweet, 424
tempcrwtg, 378, 380-382
types of. 443-444
white, 423
working with. 378-382
Chuvulue buttercream*:
Caramel crunch, classic, 232
for a 3-nrr cake to ttnr 150.
519
classic, 231, 52-53. 198-199
for a J net cake to sene 150.
318
egg whirr, da»«K, 136-237
milk, 230.60-61,62-61, |9R
mocha ефгсэд. с1жт*к, 232
tor a 3-tier cake «и serve I SO,
519
mousseline. 245
lot a 3 net cake so serve 150,
515
praline, daswc, 112
fur a 3-tirr <*fo- co mtv»* 150,
519
praline crunch, dassk, 232-
233
for a J-oer cake to serie 150,
520
«ilk menngix, 242
truffle. 242-243
Chocokare cakes:
an deco, 204-206
barqaettes Chez L'Aaw Louis,
186-188
biscuit; 144, 177-j 7g, 192-
194
buttrswett cocoa almond gin
otsc, 134-135
bittersweet rnytc torte. 198-
199
Black Forest ice cream rcJ,
193-194
Black Forest see cream torte,
192-193
bread. 28-29
checkerboard fantasy, 32-53
cherry almond pramd, 32—33
chestnut embrace, 189—190
chocolate chip charlotte, 179-
180
chocolate loser's angri load,
160-162
doudroll, 133—119, 196, 197
шиа MitifAe mil. 140—141,
195
Cordon Rose Christmas log,
197
dependence. 87
Domingo. 58-59
dciwn-hieae m.iyormjnc. 6*-
65
the enchanted forest. 195
flame. 87
fudge, 60-61, 193
fudc, genoise letHry, 136-117
genowc au cho<.ulat. 129-131,
184
gulden Grand Marnier, 44—46
guih-fwr chiffon, 158-160
induigence. 86
moist, gdnoiw, 132-133, 190-
192, 201-202
nur-flawrcd genotse. 131
oblivion truifle tcete, 84-87.
204-206
orange crown, 181-183
fur Patsover, 13
perirci аВ-Атегкап butter,
54-55,164, 199-201
perfect al American torte, 56-
S7, 148
344 INDEX
ЕПС tone. 1**6
porcelaint. I99-2U1
peehne wedding, 216-217
4_«n bee, 185-186
xcurkt empress, 144
spike, 198
serawherry Maria, 1.44
$wm Н1*ч1с FnrrM, 19(1-192
tnrture, 87
triple, 201-202
triple layer deva's ккк(, 62-
63
rdour crepe* with orangr-
apneot sauce, 116-1 IS
Chocolate «iecuMtaont:
kiiuk. 387-388, 84-87, IB»
I Mi)
cigarette», 383
cocoa piping gel, 319
curK 382-Ш. 216-217
cutours, 38n, 185-186
discs. 386, 185-186
doilies, 389
hustling, 34t6, 58—59
gjazeg •*irh webbing. 389-390
Eating chocolate for. 380
rnce band. 388-389. 160-
M2, 184
leaves. 585-386. 84-87. IMS-
201,219 221
mclhdg chocolate for. 379
pine cone petals. 383, 196
piping. 388-389
praline, 315
praline Shots, 386-387, KJ1 -
202
railed fondant. 309-310, 199-
201
cuvenng cakr with, 362-363
row MexMmg paver. 325-316,
58-59, 198-101, 216-
217, 390
roses, poredainiring, 391
ruffles» 383-385
sheers 386-387, 201-202
snowflakes, 382, 193-194,
262-263
Lcrnpertrw, ubu.<ilaie for, 378,
3*CU382
writing. 389
Chosdate trasaing», we duxo
late buttercream»; choco-
late ganache
ChixiAatc ganache*,
burnt abound milk. 277. 62-
63
butter glare, 273—274
erwm tfare. 271—272,44-46,
52-53, 198-199
dark, filing, trusting, and sauce,
269-270. 179-180. 196.
197
kght whipped, h-ing and frost-
ing. 268-269. 136-137,
138-141, 144, 181-183,
195, 201-202
praline, 270
quids light whipped. 268-269
raq^rry, 276. 199-201
sour cream, 275. 35-36. 37-
31. 69-7(1
Chocobtr glaw
buner. 273-274
cream. 271-272. 44-46, 52-
53. 198-199
for large cakes. $29-530
wahrat drizzle, 249-250, 7|-
-2. 158-160
Chocolate inningix.
cocoa. 298. 193
cocoa Midu, 374-375, 195
dacqumse, 303
Italian 300-302
royal king. 296
spanned. 298
Chocolate whipped creuni
chocolate chip, 258, 127-128.
179-180
cocci*. 253
mocki. 253, 138-143
ChdcMcrtil, recipe» with low сл
no, 11-12
Cb-ppeJ mas. 324-315, 41. 76-
80, 171-172,216-217
Chnsmns log. l.cednn Rnsr
chocolate’, 197
Cigarettes. chocolate, 383
Citron, 424
Clarified buner. 426. 439
Classic:
egg white chocolate butter-
cream, 236-237
railed hxidani. 106—У38, 127-
128. 202-206, 207-209
Im a 3-ues take au serve 130,
532-533,214-216.222-
224
Classic buetervrcitn, 228-229,
IM-167
apeiux. 233-234, 15-16,
123-126
<hr»mut, 233. 42-4.1
chocolate. 131. 52-53» 198-
199
chocolate caramel crunch. 232
chocolate praline. 132
chocolate praline crunch. 232-
234
coHee. 232, 62-63
lemon. 234, 41-42, 48-49.
50-51,69-70. 127-128,
165
maple, 233. 40
mocha »sprr»Mi, 232
ием<г. 234. 127-128
nrangr hkwuim, 134, 125-126
pasuon. 134
pineapple, 134
prahme, 232
pratine crunch. 131
raspberry, 233, 37-38, 127-
118
trrawbrrry, 233
Cbtw. bunercream tor a 3 tier
cake tu sene 150. 517-
518,214-216.219-
221
apnetx, 520
chestnut, 520
chocolate» 518
chocolate caramel crunch, 519
chocolate praline. 519
chocolate praline crunch, 520
coffee, 519
lemon, 521
mocha espresso, 519
osange, 521
usance blossom, 521
passion, 521
pwrapgAf. 520-521
praline. 519
prahne crunch, 519
raspberry. 520
strawberry. 520
Cobosan. 424
Cocoa, 4 74
buner. 422-423. 424, 439
Durch processed. 422, 424.
44U, 473, 474
leavening and, 473, 474
nua»uriiig, 440
»rr abo chocuiate
Ctxxa meringue 298, 195
ЙсЬ, 374-375, 195
Gxm piping pel, 389
Cneru u-hipprd cream, 2-53
Схепмг, trrshly gram! 352
Confer
bunercream, classic. 232, 62-
63
tor a J ner cake so sene 150.
519
uiratncl silk menngue butter*
uream, 242
diixxilMe torture. 87
errm* anghtitc cate, 284-28.5.
04—87
i->prr».«i silk meringae butter-
cream, 242
mocha espresso bunercream.
classic. 232
for a 3 uer take to sene 150,
519
mocha whipped cream. 253,
138-143
CuHet cake, sour cream. 90-91
Compowsd dtoudate, 378. 380.
423-424
Cutisetvc
raspberry, Cocd'in Rrwr. 331—
«2, 87, 175-178, 26,5-
264
•trawherrv, Crcdmi Row, >33-
334
Codcie:s|i
chocolate Italian meringue,
300-302
crumb crust, 82-83
Cordon Row;
banana cake, 69-70
chocolare Chmcmas log 197
INDfeX 545
Fmhwsoi frouing, 359—560
Enchanted forvn, the» 195
Equipment, 44$ —<66
angr trwxi cake folder, 45$
bench scraper, 456-457
blender. 4j?
bowk. 455
cake decorating, 461-464
Ьа$к cube «1, 441 -462
butcher’s wax, 464
cake bases. 463
cake leveler, 461
flower former», 463
flower мпкегк 463
pastry b>p, 462-463
pizza сипи, 464
nbbon. 463
-spun sugar fork, 464
triangular »craper, 464
turntuhle. 461
cake tester, 459
cardboard round», 457-458
cherry pitter. 461
dtscributiMS of, 465 444
skidtev, 458
eketne mixer, 448-449
glass cake ifonw, 461
hot tray oc piddle, 459
bor water bach (bain maheh
460
tce> water bach, 460
km.ex, 451, 460
fur large cakes, 479-480, 481
Magi-Cake Slop*, 456
manufacturer» cd, 465—466
marble, 459
marking pen, 459
metMsnng cup*, 450
mcxwanng specec. 451
и. -44 4
patajsl, 20-21, 450, 45.3—456
lining, 20» 458
making a fod. 455
pancake, 460
sa^epans, 457
ttandard tirm of, 455-456
pancake pans. 460
parchment. 458
racks, 451)
scale, 451
кпм^ knife, 46U
«hupping fen, 464—465
sifter, 457
skimmrr, 45k
spaiulaa, 45(1, 456
spoons, porcelain. 459
strainer, 451. <57
stripper. 458—459
syrup springe, 460
rhcrmcimetrrv 4$ I -45.3
waffle rnc, 459
whisks. 453
acsaer, 458-459
Equivalencies. 442-443
E*pt e»sa, sec* coffee
Essences. 427
Ethereal pear charfoetr, 175-177
Filing l, ire bsBttrrrrvam fn»«r-
тд* and fillings; cream
framing* and Allings
Fwr and ux, 286
Heur-dolis, pip'd, 41»
Fkair, 427-428, 4?k
cake, 42*. 471-472. 478
-neasumg. 439—440
substituting type of, in rec<*es.
443
Hower foemess, 463
Hower*.
oymKudl 326-327, 80. |i.\
172, 186-188. 217-219,
313—314
dried, 367
fresh, 347. 428, 463
modeled. see hand-modeled and
cutout deccranoos
ptped, ter ptped King decora*
LruftS
Hower uniccrv 463
Foam cakes, see чЧ2Ч1Рс-type cakes
Fondant, food pnx^ssar poured,
JO5-3U6
Fondant, rolled, 304, 306—.312
Cilla lilies, 366-367, 204-206
diuuJme, 309-310. 199-201,
362-363
dawk, 306-308. 127-128.
202-206, 207-209
for a 3-txr cake to serve 150,
532-533, 214-216, 222-
224
co*errg a cake with. 355.360-
363
decoratxvat*, 363-564, .366-
367
pastille 311-312
Fiord «for. 428-429
Frwailing. choculafr. 386, 58-
59
Freezing cakes. 23, 164
Fresh:
berry mrrtnguc torte. 260
bkatlurtv ггтрршд. 348, 81-
84,169-170
cherrv тор png. 344-345. 81-
84.169-170
dowers. a* decoration. 367,
428. 463
preserved pineapple, 151, 168-
169. 234, 286
Freshly grated coconut, 352
Frosting*, buttercream trex-
ing* and filling*, cream
trusting* and hlitngs
Frosting tcchm/ji-s, 11. 358-360
rmbciwcd, 359-360
spikes. 360
swiried, 360
see decora nos**. deuurat-
ЮД technique»
Frui<|a):
cknid ertaan, 264-265, 129-
131, 144, 148-149. 184
curd cream, 264, 142-144
mixed candied. 424
mousseline, 245, 37-38, 41,
42, 48—49. 50-51, 69-
70, 129-131. 167, 202-
204, 222-224
for a 3*Ccr cake In serve 150,
515
swsrl cheesecake, 84
Fruit cakes, 65, 66-70
C nrdon Row banana, 69-70
cupcakes, 68
Ins fruity fruitcake. 66-68
Fruit topping* and purer», 328-
354
agmrot. 335, 265
braodued burguodi cherries,
346-347, 32-33, 84-47,
190-194
candied rest. 342-343, 155-
156, 181-183
chestnut. 353-354
Gurdon Ruse raspberry cut»*
serve. 331-332,87.
17$, 263-264
Cordon Rose arawberry con
serve, 333-354
cran raspberry gujx-, 3.30,81-
84
fresh blueberry, 348, 81-84,
169-170
fresh chrrrv, 344- 345,81-84,
169-170
fresh!» graced coconut. 352
fresh preserved prxupple, 3.51,
163-169. 234, 286
jewel glare. 329-330. 81-87,
175-177. 217-219
sh.ny 330, 175-177
1тк>л curd, 340-342, 81-84.
222-224. 264, 266
lime curd. 341
oearypc curd, 342, 264
puivut card, 342, 264
peach. 336, 265
poached pears, 350-351, 175-
177
pumpkin, 334
raspberry. 337-338, 84-87,
160-162, 175-П8. 204-
206. 214—216, 265,278
strawberry, 338-339. 265. 278
wmtrr bluehcrrv. 349, 81-84,
165
wiccer cherrv, 345-346, Fl-
84. 169-170
cake, chocolate. 60—61, 198
hot. 88. 87
Fudgy gfnotsc Jeffrey, 136-137
G
Cmnache, 267-278
burnt almond mdk cbocvlatr,
277. 62-63
548 INDEX
chocolate barter glare,. 273-
274
chccolate cream glaze. 271-
272.44-46, 52-53, Wit-
149
dark chocolate tilling. fnxrmg»
and saner, 2w9-271>, |79-
180, 194, 197
light whipped flfang and frost-
n«. 268-269, 136-137,
138-141. 144. 181-183.
195,201-202
pc al.re, 270
quick hglit tMupgvd, 268-269
raspberry. 274, 199-201
sour cream. 275. J5 36, 37-
38. 69-70
white. 278, 84-87
Gel, piping, 431
LiMJuu, .189
Gclatm, 429. 441
Gencnc. 118, 119-137
biscuit sy.» 477
hitrcrswcrt cocoa almond,
134-135
chestnut, 122-124. 189-190
audiocoiat. 129-131. 181
bax formula lur, 504
mxcrr chart foe, 503
mixing h-irter hx all аде» of,
500-501
3-cier wedding cake tn serve
151X499-501
dawque. 120-122, 166-147,
169-170, 179-180, 264
base formula lor, 504
inaMter chart foe, 502-503
mixing batter hx all wi at,
498
3-cicr wedding rake to serve
150,497-498
gnldm. 125-126, I72-17J
highlights for successful, 119
Jeffrey, hidgy. 136-137
moist chocolate, 132-133,
190-192, 201-202
mrt-tuvcircd chaxxiLatr. 131
nvhe. 122
ayruping, 357
uiUcixanjR^ 476—47R
unrrxiklmg, 22
•nlirg елкгч 496-504
white, 127-128» 202-204
Ginger biscuit. 144
Glass cake domes, 461
Glassine.
cardboard rounds, 457
dathes, 458
Glare, glaring:
chocnlatr butter, 273—274
chnuJatr ч-ггэт, 271—272,44-
46, 52-53» 192, 198-
199
fur Urge cairn, 529-530
uhuculatr walnut drixrlr, 249—
250, 71-77, IS8-lr.il
cun-raspberry. 334), tl-84
creme rvoire. 248-249, 4H ^9,
50-51, 84-8?
a tine (scare deluxe. 246—247,
48-49,50-51.84-87,167
jrwd. 329-330,81-87, 175-
177.2П-219
shiny apneot, 178
shmy jewel, 330. 175-177
webbing with, 389-390
Glucose, 433, 44U
substituting for, in recipes. 443
Glycerine, 429, 442
Gold dust, caramel, 313—314,
172-173
Golden:
altnond cake, 37-38
butter cream cake, 34-35.
207-209. 264
cage, 172-173
рпепк, 125-126, 172-173
gjnrv wedding cheesecake.
217-219
Grand Marnier cake. 44- 46
книгу butter cake. 48-49
wheat carrot nng, 75-76
Gold leaf. 429
ixi royal King letters, 412
Gram! Manner:
cake, golden, 44-46
crepes Sireette, 112-113
strawberry Maria, 184
Grating chocolate. 380
Gerasing and fiownng puns, 20-
21
Green tea. 429
biscuit, 144
marzipan, 321, 241
mtnissr cream, 261, 144
Griddles. 59
Gutlt'free chocolate chrffoo сакс.
158-160
H
Half and haH, 427. 440
Hand-modeled and cutout deu>
raooru, 363-373
bjfqurtlrs and LUtenrts, mxj-
gatuK, 368-369
bet*, marzipan, 367-368, 185-
186
butterflies 562
tala lilax rnlkd kmitnt, 366-
367, 204-206
ch ar bi it» shapes, 369-374
curved lower*, 363-364
tsy leaves, pssuchau mandpan,
363. 197
pinwheels, 369
tibboti, .16.1
runes, marxiparo. 364—365,
222-224
xcuia and leavrv manipin,
363. 216-217
Hazdriutisj:
caraaad for prabnc powder and
chocolate praline, 315
chocolate indulgence, 86
dauefoutse. 302-303. MS- 1I
142-263
ряЖ, 430-431, 441
removing skin on, 429-430
weighing. 441
see айо praline
Heanisj:
meringue ar dacquolse, 375-
176
-shaped deutne wallle men,
419
High .ilnttide adjustments. 21—
22
Holiday hallelujah streusel
touche. 94-97, 98-100
Haney:
huttrrerram, royal, 235, 34-
35. 185-186
nougjrmc crunch, 319, 185—
186
queen bee. 185 *186
uetgfong» 440
Hot fudge. 88. 8?
H:ii trays. 459
Hot-watcr baths |b.iins manci»
460
la* cream:
fire and see, 286
pineapple, 286. 168-169
roS. Black Forest. 193-194
tnrte, Black lores:. 192-193
.amlla, 2HS—286, K~, I I n-
118, 192-194
ke-watrr baths, 460
king:
royal, 294-294, 202-206,
207-20». 214-216. 222-
224
calagraphy. 411-412
chocolate, 296
floacr*. painted, 414-415
roar lattice paurk, 413—415
irv eho butreroroam Irusttngs
and blimp., pped icing
decnrahrKK
hmnemun blenders.. 457
lr^/nlnrrs, 419-445
angrliqur, 424
arrorwnnx, 424-425
Baker's Joy. 419—420
baking powder, 420, 442. 473
m nrred cake*. 494-496
baking soda, 420. 442, 473
beeswax, 420
butter, 425, 472
brum* nixseetc, 426, 439
ebritied. 426, 439
grrav ng pan wvth. 20
making, 425 -426
nuag barter and, 474-475
suhsnturmg type «if. m ГОС-
<x”. 4-43
weighing. 439
INDEX 549
.Muutaelinc buttercream /сои#.;
В I, 167,202-204, 222-
224
*+mc chocolate. 245
Mousseline- buMcmrtwn tor a
J net sake tn *nc 150,
514-515
chocolate, 515
iron, 515
white chocolate, 515
Mushroom*. uwringDci 576, 197
N
Nancy BLur»\ dassk Anxrkan
T"eV' rake. 150-151
Nnxfasuc buttercream. 230 251,
166-16?
jpeuxu, 255-234, 35-36,
125-126
chestnut, 233, 42-43
cbocukte, 231, 52-55, |98-
199
cbocnlare caramel crunch, 232
cbc«ilulr praline, 232
ebnodatr praline crunch, 232-
234
coffee. 232, 62-63
lemon. 234, 41-42, 4R-49,
50-51, 69-70, 127-128,
165
maple, 233, 40
mocha espresso, 232
orange. 234, 127-121
orange ItkniMxn. 234, 125-126
passion. 234
pineapple. 234
praline, 232
pmline crunch, 232
raspberry, 233, 3?-38, 127-
128
small recipe for, 187
strawberry, 23.5
Neociareic buttercream foe a 3-
uer cake so serve 150. 516,
214-216, 219-221
aprrcnt-. 520
chestnut. 520
chocolate, 518
diociilare curamd crunch, 519
duKnbre praline, 519
chocolate praline crunch, 52U
coffee, 519
lemon. 521
madia c^irevm, 519
orange. 521
urangr hkts^im, 521
passion. 521
pmeapple, 520-521
praline, 519
praline crunch, 519
raspberry, 520
strawberry. 520
Nougatine. 318-319, 186-1 EH
burquccrcs aod cutouts, 368-
369
hooey crunch. 319, 185- 186
pefri* taurs from, 169
ацяг remptranarc for, 43b
Nuns), 429-41I
chopped, 324-325.40, 76-80,
171-17X216-217
-flavored chocolate geiiinse. I 1 I
pastes, 430-411, 441
weighing, 441
sir ahn грл-tfic 6mil's of nuts
О
Oil,, 451, 419
Orange:
jpciccit sauce, choudMe co-
lour crepes wnh, 116-118
Bavarian. 288-289. 181-183
buttercream. clatuc, 234, 127-
128
for a 3-crr cake to serve 150,
521
candied aesa, 542-543, 155-
156, 181-183
chocolate crown, 181-183
erfpes Sutrnc, 112-113
curd. М2, 2M
gio* chiffon cake. 155-156
golden Gt and Martuer cake,
44-46
silk menngue buttercream,
burnt, 242
white lily cake. 202-204
Orange tiofiscen:
Ьипегсгемп, daux, 234, 125-
124
foe a 3-ticr «.ake to serve 150,
521
Oval bttcurt, 147, 168-169
Ovens, *48
Painted royal icing flowers. 414-
415
Pam, 431
P.«K»X 20-21, 450, 453-456
lining. 2<i. 458
making a tail. 455
pancake. 46П
MCKtpcins, 457
ttandard sizes of. 455-456
Pancakes, 89
best huckwhr.it blim La Tu-
Irpe, 106-108
Nkaebeny buckwheat. 10(2-103
Nuebetry bunetiinlL llir.>—11)1
ChannSy crepes. 110-111,
112-115, 114-115
chocolate velour erfpes with
orange-apricot since,
116-118
crepes Suxette. 112-113
lemon cream Лискш <.rrjx>,
112-113
kiuun srcpes Snrette, 114-115
•modish, 108-109
Parchment, 20, 458
cones, 194—595
Рапу cakes, see Liryr wedding
and 4k\ul iKmr cakes,
showcase cakes
Pission:
bunercream, dussic. 234
fee a 3cter cake to юге 150,
521
curd, 342, 264
Passxin fruit puree, purchasing,
44
Passu«et, саксу for, 13
Pasiilhgi, 311-312
Pastry bags, 462—463
Peach
cloud cream, 265
puree, 336, 265
Fteort*?:
Bavarian crcam. *90-292,
I75-J77
charlotte, ethereal. 175-177
poached, .35(1-351, 175-177
Pearled sugar effect, for piped
ladyfingers. 183
PearK piped, 402
Pens, markutg. 459
Percentages of ггырл ingredients
m basic cake types, 470
Perfect:
лЙ-Атсгклп chocokate butter
cake, 54-55. 164. 199-
201
all-American chocolate torte,
56-57, 195
pciund cake, 25—27
patty, 511-512
whipped vream, 253, 34—35,
HO, 84-87. 134-135.
1.1А-13Л 138- MS.
144,197,204-206,262-
26.1
Petits hxirs, Imm nougatine, 369
Pina colada cake, 352
Pineapple:
baked Hauaii. 168-169
huticurcaen. classic. 234
fora 3-ner cake co serve 150.
520-521
fredi prtsrrsvd. 351, 168-169,
234, 286
ке creom. 286, 168-169
upsidexiown cake, 92-95
Ph:r iijesc-
chocnlatt, 196
petals, chocoliu, 383, 196
Pine needle OKtmguc, 298, 197,
375
Pinwheels, frutn nougatine, 169
Piped biscuM, 569, 173-J74
Piped Kwig ikwratiiins. 373-378.
391-415
basket weave, 402-401
bleeding heart flemrrs.. 4|4—
II
borders and side decorations,
391. 398-4US
color sKsdr-ig in, J96
consistency of icing and but-
552 INDEX
tercream for, 391. 395-
396
direction of bag <1 making.
397-398
direct»» ol movemmt when
making. 39Я
dors. 402
drop flowers, 4U5
llrur-de-lis, 400
ilnuvrv. 405—41 |
gold leaf an. 412
hali rose, 407-408
lease*. 410-411
litre* of the vtllrr, 414
lily «if the valley, 407
painted royal xing towers,
414-41‘
pearls, 402
puMtiuti ot bag m making, 397
pravtke "buttL-n-rcain" for,
1Я-ДО
pnpnnng a p.in.hcrxru come fix.
394-395
preparing j polyester decorat-
ing ba* for. I
preswet- uMttrnI m making. 398
rosersc shell, 400
rope. 402
rose. 408-410
n»rbu*Ji. 407-40*
roaettr, 399
royal King ni*r lattice- panels,
413-41$
naflk, 401
scrollwork. 403-404
shell, 399-400
die 11 with flute, 401
MUr, 39*
rt'.irow, 396
strwq( wink, 4i>4—405
rwrrt pea, 406
terms for. 391
tube for. 392, 461 —462
writing, 411-412
Piped mcrinfime, 297-29*. 374-
378
cocoa «tides. 374-375, 195
discs and beans, 375-376
rmahrixans, 376
рте nredk*. 375
swans 376-378, 165
Piping:
gH. 431
cncna, 189
Pi«taihuk*|, 4J0
cnrmr angfaivt, 202-2*3. 84-
87
ir*impun, 323-324. 197.216-
217. .163
ny leaves, 36.3, 197
for a 3-tirr cake, 530-531.
219-121
paste, 430
rrmoving skin on. 450
and rose ueddmg cake, 219-
221
weighing, 441
Puxa «.utters. 464
Poached pears. 350-351, 175-
177
Poppy weeks I:
lemon pound cake, 27
weiring, 442
Pnrcdaine. la. 199-201
Porcrlaininng chocolate naves,
391
Porcelain spoons, 459
Pound cakes. 23
chmxilase broad. 16-19
dnxailatc cheer* almond, .32-
33
ddux* douWe-vamlla, 26-27
Irtnoei poppy seed, 27
party-pcricct, 511-512
perfect, 25-27
whirr spice, 3O--31
Poured fondant, fond processor.
305-306
Powdered ецдог, 4J4 435. 441,
472
Prober ‘‘bettercream.” 396—397
Praline:
brioche take, 171-172
buttercream, classic. 131
roe a 3-tier cake oo *cr*e 150,
519
chrHTibtc, 315
chmnbw butim-nram, cbtnic.
232
for a 3-ner cafce co serve 150,
519
cluxxdaee ctuoch buttercream,
classic. 232-233
rmr a Viht гаке ю uwe 150,
520
chocolate tndalgmce, 86
chocolate wedding cake, 216-
»
ci hue anglaate prating. 283-
284, 84-87
creme ivenre praimc, 249, 76—
«0, 12.5-126, 171-172
crunch buocrcrram, dnrnc. 232
for a 3*dcr cake ю «eve 150,
519
ganadw, 27U
рмс, 431
powder, caramel for, 315
sheets, choxilaee, 386—387,
201-102
sik trmnpar hutwrvream, 241,
76-Ю, 125-126, 171-
Г2
for a J-tter cake. 526-528,
216-11’
sugar innpcrabur fix, 436
Prohkm* with cuke baking, 476
Pnmpkin-
purec. 354
-walnut ring. 71-72
Puree-.
•pneot, 33$, 263
cnestnut. 3$3-3$4, 441
purchased. 420, 441
passum fruit, purchased, 431
peach, 336. 265
pumpkin, 354
ratpbeny sauce and. 337-338,
84-87. 160-162, I7S-
178, 204-206, 214-216,
26$, 278
strawberry sauce and, 338-
339. 265. 278
Q
Qur»— bee, 185-186
Quick
creme fraiche, 260
light whipped ganache, 168-
169
-en-miv cakes, 13
Quintessential marxgun. 320-
321
Я
Racks, 450
Raspberry:
buttercream, classic. 233, 37-
м I- 121
fa* a 3-ner сакс ю sersx 150»
520
chocolate flame, 87
doud cream, 265
consefsc, Lurduit Rose. 331—
332, 87, 175-I7R, 263-
264
•cranberry 330, 81-84
cihrmtl penr charinae, 175-
177
gatuche. 276, 199-201
lam cream. 263-264, 134-144
puree and satax, 337-318, 84-
87, 160-162, 175-178,
204-206, 2I<-216, 265.
278
scarkt empress, I 77-178
«Л тепцрае buttercream, 243,
J7-J8. 207-209
Real oki'fashicrted whipped
crown, 254-255.190 192
Refiner’s syrup, 4JJ
Refrigerating cakes, 13, 24
showcase. 164
Remuvmg crusts, 357
ReusaWe nonstick pan tarn. 438
Reverse shells, piped, 400
Rabbon, 360. 463
fondtM, .363
Rdl:
Black Furiv kt cream. 193-
194
chccnlaBe cloud, 138-139,196,
|M.
cocoa auulfe, 140-141, 195
Cevdixi Rc»w thnxilace Christ-
mas log. 197
Rullni fondant. 304, JO6 312
talk lilies» 366-367,204- 206
shiKnlirr. W-310. 199-201,
362-363
INDEX 55.3
RHIrd кпк£шс i
dtm, 306-308. 127-128.
202-206. 207-209
foe a 3-cicr cake to serve
532-533. 150.214-216,
222-224
watering a cake with. 355, .160-
363
decorations, 363—364, 366-
367
pasrdlage. 311-312
R«.pr, p*pcd, 402
R. |
chocnbre. porcdainutng, 391
Kill, piped. 407-40®
fomcr pands, roval icw<, 413-
4M
aurupjii. 5 64-.363. 222-224,
428
mndchng paste, chncidatt.
325-326. 58-59. 198-
201.216-217, 390
p«pcd, 408-410
and pistachio wedding c*«e,
219-221
stems tar, 363
trellis, 207-209
Roscbwds. piped. 407-408
Rw factor, 490-491, 494-496
RoMltw piped. 399
Rov*l hemrv hulrrnrrarw, 235,
34-35» 185-186
Royal tcing. 294-296, 202-206,
207-209. 214-216, 222-
224
calligraphy, 411-412
dbocolate. 296
flowers, painted, 414-415
ru«r Units' panris 41 3-415
Ruffles:
chocolate, 383-385
piped. 401
S»itfk)»vr oil, 431
Salt. 442. 473
Sanirarcd fat. reopes with Inw or
no, 11-12
Saucepam. 45?
SmtCCk *.»».! toppings:
280-281, I KI-
183
сай, 284-285, 84—87
pistachio, 282-283, 84 87
praline. 283-284. 84-87
степи traiche, 259. 35-36,37-
38, 41-42, 106-108
quick, 260
dark chocolate ganache fining,
frowing, and. 269-270,
179-180, 196, 197
fresh blueberry, 348, 81-84,
169-170
fredt therrr, 344-345,81-84.
169-170
hot fudge. 88, 87
raspberry puree and. 337-338.
•4—87, 160-162, 175-
178, 204-206, 214-216,
265, 278
strawberrv puree and, 338-
339.265.278
winter blueberry. 349. 81-84.
165
•inirr cherry, 345-346, 81*
44, 169-170
Sarartn, «riwhcrrv, 79-80
Scales. 45]
Scarlet caftpreuk. 177-178
cbnculatc, 144
Scnillwiwk, piped, 403—404
Sheets, chocolate and chocolate
praline, 386-387, 201-
202
ShcUs. piped. 399-400
Shells with flutes, piped. 401
Shiny:
apnent gLixe, 178
tewd gfow, 330. 175-177
Shortcake, strawberry, 34-35,
264, 331
Shortening:
greasing pan wzh. 20
mixing butter and, 474-475
weighing. 439
Showcase cakes, 163-224
art deco. 204 >06
baked Hawaii, 268-269
hjrrqurtlr» (her I.*Ami Ixniii,
18л-188
bittersweet royale tone. 198-
199
Black Fcirert ice cream nail,
193-194
Black forest ice cream tone,
192-193
hlueberty «wan bkr, 165
charlottes, 174-183
chocolate chip, 179-18U
ethereal pear, 175-177
orange vhtKislatc crown,
181-183
piping techniques for, 373-
374
«carta empress, I77-J78
shapes for, W-Va
chestnut chocolate embrace.
189-190
chocolate pme cone, 196
choccitar «carta empress,
144
chocolate spake, 198
Cordm Row chocnlarr Christ-
mas log. 197
the cwihtMcd forest, 195
Irrr/ing, 164
ta«h hrm пкппрк cotte, 260
golden cage. 172-173
leftover, 164
maple batter cake, 4(1
к mamm, 42
pina colada cake, 352
la porcelatnc, 199-201
prataw brioche cake. 171-172
qiiten bee, 185- 186
rose trellis, 207-209
»ear-«pang^«d rhapsode. 168-
170
Soring. 164
strawberry Мала, 184
strawberry мсапп, 79-80
arjwhrrrv dmrxcake, 34-35.
264.338
Swiss Black Fiwru, 190-192
а laxc cd hcasrn, 164-167
eip« for. (64
tnplt chocolate cake, 201-2(12
vermicelli, 262-263
wedding cakest
Needing heart, 214-216
chocolate ptalinc, 216-217
dotted Swiw dream, 222-
224
gnldcn glory cheesecake.
217-219
pistachio and rose, 219-221
»rr ad>o forge wedding and
special оссмкю cakes
atwte lilac noMaltfo, 167
«hm Wy. 202-204
Sifters, 457
Silk nitnitgur buttercream, 239-
241
apeiuw, 243. 125-126. 172-
173
Ьчалвс orange. 242
caramel. 241-242
chestnut, 243, 42-43
chocolate, 242
chocotac truffle, 242-243
Outfoe uaramrl, 242
espevw, 242
praline, 241, 76-80, 125-126,
171-172
for а Мйг cake, 526-528,
216-217
raspberry, 243. .17-38, 207-
209
strawberry, 243
sihvr leaf. 429
skimmers. 458
snowflake», shocnbtc, 382,
193-194,262-263
Solttnilk flour. 428
«did nteasunes, 438,439-442,
450
sour cream, 427
butter cake, 35-36
coffee coke. 90-91
garuvhc, 275. 35-36, 37-
38. 69-70
leavening and, 47.3
weighing, 440
Spatulas, 450, 456
Spevul occasion cakes, see Urge
wedekng and «pedal ou-
castotk cakes; «>Miuua«r
cakes
Spsce pound cake, white, 30-31
Spikes, frosting. 360
554 INDEX
Spittle
base, piped, 171— 374, 1X1—
183
«fees» menngue or d*cq unite.
37S-J76
Sponge cakes, 118, 119, 150—
Ш
tert Grccnc'x qxn.il, 152-155
ughllgbt» for suromful»
119
Nancy Blitter's domic Amen
can, 150-151
UIMtSCuduig- 22
Spemge-type cakes, 111-162
angel food, 140
chocolate lover's, 160-142
folders, 45*
htddight* h>r xuccrwdwl,
154-155
understanding. 477
unmolding, 22
btsoM, 111—119, 142-149
almond, 144, 81-84, 217-
219
chocolate. 144, 177-178,
IU I M
3lacuiC.cn-, 148-149, J8I-
18?. 349. 373-J74
c«s m. 477
®Лоие vtu. 477
»nget. 144
ttten tea. 144
height» hr wn.xcrdnl. 119
oval, 147, 168-169
ronbdc. 142—144,81» 175-
178. 184-188, 369-373
de teivmc, 145-147, 185-
186
syruping, 357
nnmolding. 22
buervr cakes vs., 477
chiffon cakes, 154-160
gMill-Ircc chacUiitr, 158-160
hiadiltgjitx hx- xuscrxafol,
I - -i-l
lemon 0ow, 157-158
iHMy pmv, 155-156
imdrntandmg, 477
untnolding. 22
chocolate dood rod. 1 Jl-1 J9,
196, 197
cucuo souftk ruL, 140-141,
195
rgo m, 477
grnmw, US. 119-137
haw forrnubs for, 504
biscuit vs., 477
bitlLTtwxret umxki almond,
1.34—1.35
ihrumit 122-124, |*9-|90
au chocolat, 129-131, 184
au diocobt. 3-oer wedding
cake co sene 150, 499-
501
dussKtue. 120-122. 166-
167. 169-170, 179-ISO,
264
classique. 3-oer wedding o»k<
do sets* 150, 497-498
gulden, 125-126, 172-173
highlight* Inr kixarWul, 119
Jeffrey. tvefcy, I36-H7
mawtrr «.haru fix. 502-
50.1
mixing hatter for all srrrs ni,
498. 500-501
moist chucobre, 132-133,
19O-l’»2, 201-202
niir-tljnrxvd ihtxxdatc, I JI
rich. I
synapmg, 357
understanding. 476—478
unm«4ikng. 22
wedding cakcv 496-504
white. 127-128, 202-204
removing crusts from, 357
spongecakes, 118. 119, 1 SO-
153
Bert Greene’s special, 152-
153
highights foe succnsful. 119
Namy Blirxcr’s daswc
American, 150-151
uMtnokimg. 22
understanding. 469, 476-478
Spoom:
measuring, 451
porcelain» 459
5р*х» "Ogar langel's hair% cara-
mel. 316-317.217-219
torkb for making. 464
kabdiard whipped cream, 255-
256, 84—87, 165
Sears» piped. 398
Scar -spangled rhapsody, 169-170
Stick v burrs, 98-100
Slur mg uakn. 23, 5.16
showexw, 164
Straw™. 451,457
Strawberry ।
buttercream, dassk, 213
foe a J-eier cake to senx* 15(1.
520
cloud cream, 265
conserve, Cnrdnn lose, 333-
334
Ma гы. IM
puree arid sauce. 558-339.265,
27*
тжш, 79-80
мкюпезкг» 34—35, 264. 3.18
dk mtrrgiw hutwmvnm. 241
Sc teasel:
hncache, holiday halleluiah, 94-
97, 98-100
•our cream entire cake, 90-91
Serrig won. piped. 404—401
Strippers, 458 459
SubwinjiHins, 442 443
Scgair, 4.12-4.16, 472-473
brown, 432-41.1, 441
uiramcli/ahoe uf. 435, 436
turn syrup. 433, 440
gluixne, 433, 440
gramibnons and forms at,
433-435
dtcAsuring, 441
wdasMs, 433
leavening and, 473
r»i-^dv-v, 440
powdered, 434-435, 441, 472
miner's syrup. 433, 44<i
substituting cypv of. io recipes.
441
syrups 435-416
weighing. 441
Sommer coating. 378. 385, .<89
Super-stabilized whipped cream.
256, 190-192
Чтг«хппв cake fne dccorenng.
357
Swam, meringue. 376-378, 16$
Swaa's LK'iwo ilmir, 42*
Swedish pancakes 108-109
Swrrr pm», piped, 406
Swirled frosting. I6O
Swiss Ul*vk forest cake. 190-
192
Syrup, 157» 460
hast formula lor I cup, 505,
214-217, 219-221, 222-
224
sugair, making, 415-436
for 1-cicr gmoiw tn serve 150.
501
Taste of heaven, a, 164»-167
Temperature. >aktng. 21. 448.
475. 476, 471
Tempering chncri-itr, 37g, .180-
382
HutfUMMaetcrs. 451 453
Tuppaeqp aad sauces:
vrntu-.tngbise, 2*0—281, 1*1-
181
cate. 284—285» 84-87
pirtaduo. 282-283, 84-87
praline, 283-2M. 84-87
ervanr Iraiihr. 259, 15—36, 37—
18. 41-42, 106-10*
quick, 260
dark ckondarv gana-hr filling,
frosting, and, 249-270,
179-180, 196, 197
fiesh blueberry. 348. 81-84,
169-170
Irrsh cherry, 344-345, * I—*4,
169-170
bnt fudge. 88, 87
raspberry puree and, 337-338,
84-«7, 160-162, 175-
171, 204-206, 214-216,
245. 271
strawberry puree and, 33R-
339. 265. 27H
winter bluebcrn, 349, 81-84,
165
winter cherry, 345-344. KI-
84, 169-170
INDEX 555
Torte:
birtrrwtre royak, 198-1*9
Black Forat ice cream, 192-
193
chocolate oblivion tret tie, 84-
8?, 204-206
fresh berry mennpac, 261)
mini mousse. 86
perfect all-American chooo-
Im, 56-57, 198
arauherry Maria. 184
Тгаодцои: scrapers. 464
Тпрк
chocolate cake, 201-202
Layer devil's food cake, 62—63
chotxdace, silk meru^pae but-
itTtrtunv, 242—241
•nrtr, rhncobrt nHrrion. 84-
87. 204-206
Turntables, 461
Understanding cakes, 469-482
taking. 475-476
butter. 469. 471-476
gdncrsc, 476—471
ingredient* and, иг mgrrdi-
ents
mixmg tucier and, 476
problem* ami, 476
sponge-type. 469, 476-478
temperature and. 475. 476,478
Unmnlding cakes, 22—23
Upside-down «>kc, prscupple,
92-93
Vamlla. 436-437
Havanan cream, 287-28*.
142-144, 148-149, 177-
178
•ce cream. 285-286, 87, 116—
118. 192-194
measuring and urij>itng, 442
pound cake, deluxe double-,
26-27
Vegetable cakes, 65, 71-76
golden wheat carrot rmg, 75—
76
puatpkin-walnut ring, 71-72
zucchini cupuakex, 73—74
Vegetable shrwtening:
ртсанпд pan with, 20
tntwrtg tatter anil, 474-475
weighing. 439
Vrnn'C'lb. 262-263
W
Wattle тлел, heart-shaped <l«-
trve, 4S9
Waffles, 8*
bunermilk, 103-104
Murine Cunningham*» raised.
105-106
Walnut.
thocdluie tSnxelr glare, 249—
250, 71-72, 158-160
oil. 431
•fwnpkm ring, 7|-72
weighing, 441
Wedding cakes:
hlnxiing heart, 214—216
chocolate praline, 216-217
dotted Swhs dream, 222-224
gulden gjixv cheesrvakr. 217-
219
pistachio and rose, 219-221
seejiko Urge wedding and spe-
cial occasion cakes
Weighing, 16, 438—442
chart hx, 4.39—442
Whipped cram.
apricot cloud, 265
vhestsiul ПК1ПЧЧС птлгп. 262-
263, 122-124. 189-190
chocolate dup, 258,127-128,
179-181)
cocoa, 253
fruit cloud. 264-265, 129-
131, 144, 148-149, 184
fruit curd, 2h4, 142-144
green tea mousse. 261. 144
mocha, 253. 133-143
peach ckiud, 26$
pt-dra, 253. 34—35. 80, 84-
87. 134—135, 136-137,
138-143, 144, 197. 204—
206, 262-261
for pipuu borders, 257
raspberry diwad, 265
raspherrv jam, 263-264, 138-
144
real old tasluoeed, 234-255,
190-К
stabilized, 255-256, 84-87,
165
strawberry cloud, 2л 5
256. 190-192
WtaAx, 453
ganache, 278, 84 87
gnuxse, 127-128, М2 204
lilac nostalgia, 167
Idy сакс, 202-204
spier pound ca«c, 30-31
velvet buner cake, 46-47, 167
White chocolate. 423
cheeseiukc, 83
cream cheese buntreream.
237-238, 75-76, 81-84
cram cheese- Irmrmg hx a
3-cxr rake to serve ISO,
525-526, 217-219
creme- mure, 24Л-249, 48-49,
50-51. 84-87
pealiii*. 249, 76-80, 12.$-
126, nt-i-’
for a 3-cier cake tn verve 150,
524-525
Lihue Ivoire deluxe. 146-247,
48-49, 50-51. 85-87,
16?
iur a 3-tier cake «n serve I $0,
522-523.219-221
ganache, 278, 84-57
piklnt luxury butter cake, 48-
49
meltnig, 379
muiisxlinc, 24$
for a 3-tier cake to serve 150,
515
rfxiuiUkcs, 382, 193-194,
262-263
uhasper cake, 50-51, 165
Winter:
blueberry toppmg, 349, 81-
84. 165
chetn topping, MS-346, *1-
84, 169-170
Wnring;
with chocolate, 3S9
with royal icing, 411-412
Y
Yean. 437. 443
z
Zest, 437, 442
canned, 342-343, 155-156.
181-183
Zcwers, 437, 458-459
Zucchini cupcakes, 73-74
556 INDEX
ABOUT THE AUTHOR
k-Z (L ose Levy Bcranbaum has her B.S.
and M.A. in food science
and culinary arts, in addition to continuing )ьег studies at many
of the world's leading cooking schools, she has also studied art
and design at the Fashion Institute of Technology in New York
City.
Rose is a member of many professional food organizations
such as Les Dames d’Escoffier and the International Association
of Cooking Professionals, where she has received accreditation as
a food water and teacher.
Rose is a frequent contributor to all the major food maga-
zines and The New York Times. She is also consultant to the
baking and chocolate industnes.
For ten years Rose was owner and director of the Cordon
Rose Cooking School in New York City.
Both Rose and her husband, Elliott, work in New York City.