/


Text
9 mm Submachine Gun
INSTRUCTION
MANUAL
ISRAEL MILITARY INDUSTRIES
TABLE OF CONTENTS
PAGE
Facts about your Uzi 2 Aiming and Firing
Data 8 Clearing the Weapon
Preventive Maintenance 10 Disassembly and Assembly
Daily Maintenance 10 Stock
Weekly Maintenance 12 Barrel
Pre-firing Maintenance 12 Receiver Cover
After-firing Maintenance 13 Bolt and Return Spring
Operation of the Uzi 15 Additional Disassembly
Unfolding and Folding the Stock 15 Operations
Loading and Unloading Extractor
the Magazine 18 Pistol Grip
Loading the Uzi 19 Magazine
Cocking the Weapon 20 Trouble Shooting
PAGE
21
22
23
24
25
26
27
28
28
29
32
34
SAFETY PRECAUTIONS
• When receiving, or handing
over a weapon, inspect it at
once and make sure that it is
not loaded.
• When handling a weapon,
always keep the barrel pointing
upwards at an angle of 60°.
• Never point a weapon at anyone
even after you have checked it
and are certain that it is
unloaded.
• Make sure that the fire selector
is on SAFE position to
guarantee that the weapon is
safe whenever:
—You have stopped firing it.
—The weapon is being
transported or moved.
—The weapon is not in use.
AMMUNITION
Never try to fire a cartridge that is
heavily corroded, dented or one
which has a loose bullet.
NEVER try to clean a cartridge
with gasoline or any other
inflammable material, nor with
detergents or solvents.
1
Facts About Your
UZI Submachine Gun
The UZI submachine gun is a
lightweight, air-cooled, magazine-
fed, shoulder or hip weapon that
can fire automatic or semi-
automatic.
UZI with metal stock —
left hand view
UZI with wooden stock —
left hand view
2
A brief description of the weapon
and its components follow. (See
illustration, pages 4 & 5.)
• The barrel (1) is attached to the
receiver (8) by the barrel
retaining nut.
• The barrel retaining nut catch
(2) is on the front end of the
receiver (8).
• The front (4) and rear (12) sights
and their guards are located on
the front and rear top ends of
the receiver.
• The plastic handguard (5) is
attached to the bottom front end
of the receiver. The front
carrying sling swivel is located
on the top left side of the
receiver.
• The receiver cover (6) with the
cocking knob is located above
the pistol grip.
The pistol grip (11) is attached
to the rear lower part of the
receiver (8).
The fire selector (10) is located
at the top of the left side of the
pistol grip (11).
The magazine catch (16) is
located on the lower left side of
the pistol grip (11).
The trigger (9) and its guard are
located in front of the pistol grip
(11).
The grip safety (15) is located at
the rear upper part of the pistol
grip (11).
The stock (14) is attached to the
rear end of the receiver. The
rear carrying sling swivel is
attached to the stock (14).
3
1. Barre!
2. Barre! Retaining
Nut
3. Barre! Retaining
Nut Catch
4. Front Sight--------
5. Handguard---------
6. Receiver Cover----
4
12. Rear Sight
13. Receiver Cover Catch
14. Folding Stock
15. Grip Safety
16. Magazine Catch
17. 25-round Magazine
5
SAFETY FEATURES
6
FIELD
STRIPPING
Receiver Cover
Bolt Assembly
Barrel
Servicing of the weapon is simple:
only five parts need to be handled in
field stripping. No tools are required
when stripping the weapon.
7
DATA
WEIGHT
Submachine gun with metal stock 3.5 kg
Submachine gun with wooden stock 3.6 kg
Magazine, 25 rounds, empty 200 g
Magazine, 25 rounds, loaded 500 g
Magazine, 32 rounds, empty 220 g
Magazine, 32 rounds, loaded 600 g
LENGTH
Overall, metal or wooden stock 650 mm
With metal stock folded 470 mm
Barrel 260 mm
MECHANICAL FEATURES
Rifling R.H. 4 grooves, 1 turn in 254 mm (10 inches).
8
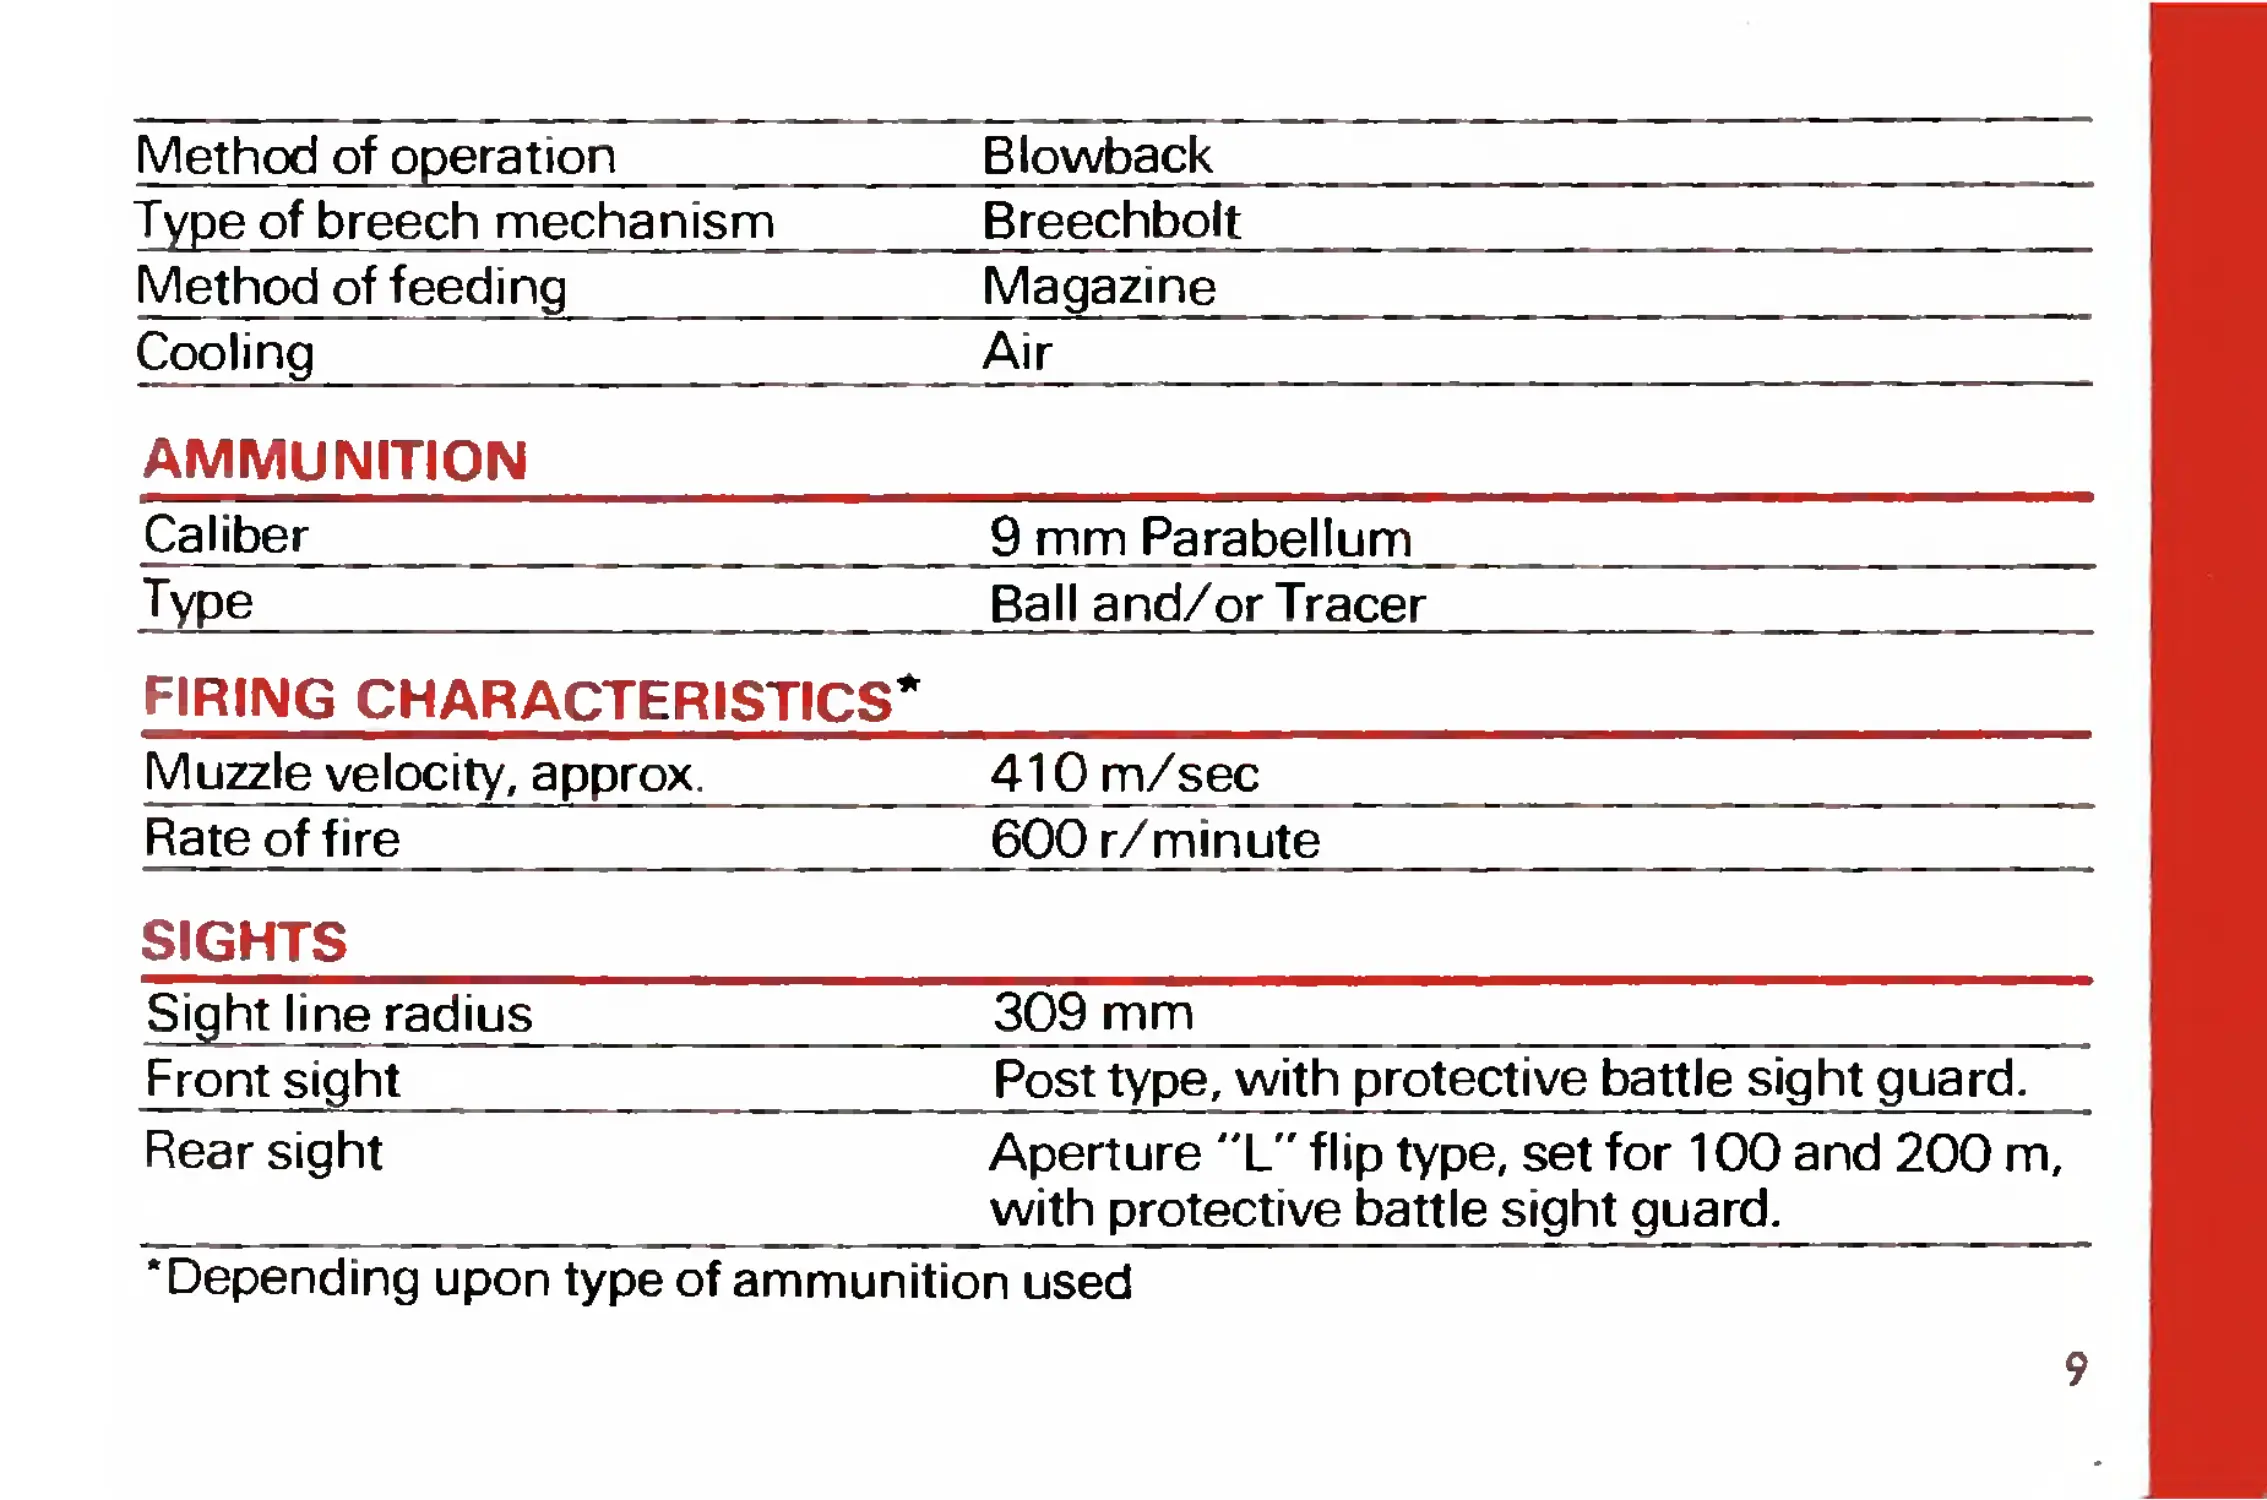
Method of operation Blowback
Type of breech mechanism Breechbolt
Method of feeding Magazine
Cooling Air
AMMUNITION
Caliber 9 mm Parabellum
Type Ball and/or Tracer
FIRING CHARACTERISTICS*
Muzzle velocity, approx. 410 m/sec
Rate of fire 600 r/minute
SIGHTS
Sight line radius 309 mm
Front sight Post type, with protective battle sight guard.
Rear sight Aperture "L" flip type, set for 100 and 200 m, with protective battle sight guard.
'Depending upon type of ammunition used
9
Preventive
Maintenance
GENERAL
Comprehensive knowledge of how
to service and handle weapons is of
great importance. Special attention
must be paid to cleaning,
lubricating and inspecting the
weapon; this will determine
whether or not the weapon will
function properly when you need it.
In order to achieve accuracy in
firing, the barrel bore and the
chamber must be serviced
thoroughly. The receiver, the bolt
and the moving parts of the weapon
must be kept clean and lightly
lubricated to ensure that the
10
weapon will operate efficiently
under all conditions.
Experience has shown that most
failures which occur while
operating the weapon are due to
negligence in maintenance.
DAILY MAINTENANCE
In order to keep the submachine
gun in good operating condition, the
following daily cleaning and
servicing schedule must be
maintained.
1. Disassemble the weapon as
specified on pages 23-26.
2. Clean all dismantled parts,
remove all traces of oil and dirt; use
swab soaked with lubricant.*
*Use only suitable rust preventive
lubricant.
3. Clean the barrel bore. Swab out
from chamber to muzzle. Use
cleaning rod or pul (through with
swab. Continue until swabs come
out clean. Then dry.
4. Clean the chamber thoroughly,
using chamber brush or cleaning
rod wrapped with swab.
5. After cleaning, lightly lubncate
the bore and chamber with a swab
dipped in lubricant to prevent
corrosion and pitting.
6. Clean the bolt. Use swab dipped
in lubricant.
7. Lightly coat bolt and receiver
contact surfaces with lubricant.
8. Clean return spring assembly.
Use swab soaked with lubricant.
9. Clean trigger mechanism. Use
swab dipped in lubricant.
10. Assemble the weapon
(pgs. 25-27).
11. Check proper functioning of the
weapon by cocking and releasing.
Repeat several times.
While carrying out the daily
maintenance the following
inspection must be carried out:
1. Inspect the barrel visually and
make sure it is free of corrosion,
erosion and copper residues, and
that it is not bulging.
2. Check that the dismantled parts
are serviceable, particularly the
firing pin and the extractor; make
sure they are clean.
Caution: Refer to an armorer on
finding faulty parts.
11
WEEKLY MAINTENANCE
Similar to Daily Maintenance
procedure, with the following
additional operations:
1. Inspect the bolt visually and
make sure that the firing pin is
round and undamaged.
2. Inspect extractor visually and
make sure that it is serviceable.
3. Check that the fire selector
functions properly.
4. Check to be sure that the front
sight blade is rigid and
undamaged.
5. Check to be sure that the rear
sight is serviceable.
6. Make sure that the accessories
are complete, clean and
serviceable.
12
PRE-FIRING MAINTENANCE
In order to ensure proper
functioning of the weapon the
following instructions must be
adhered to:
1. Disassemble the weapon.
2. Remove oil and dirt from
dismantled parts
3. Clean barrel bore and chamber
thoroughly as specified in Daily
Maintenance. Leave dry.
4. Lighly lubricate the bolt and
receiver contact surfaces.
5. Assemble the weapon.
6. Check proper functioning of the
weapon by cocking and releasing.
Repeat several times.
AFTER-FIRING MAINTENANCE
Trace of soot and other deposits
such as gunpowder ash,
accumulated inside the bore and
inner parts of the weapon, cause
corrosion. Therefore, it is most
important that the weapon be
cleaned immediately after firing.
Disassemble the weapon and
service it as follows:
1. Clean barrel bore and chamber
with swab dipped in lubricant.
Continue until swabs come out
clean. Then dry.
2. After cleaning, lubricate lightly.
3. In order to remove deposits from
the bore, it is advisable to use hot
water mixed with 2%-3% soap or
washing soda.
4. To clean the barrel with soapy
water use a 9 mm armorer's funnel
and proceed as follows:
a. Make sure that the seal ring is
mounted on the funnel stem. Insert
the outlet of the funnel into the
chamber, while the weapon is held
vertically with the muzzle pointing
downwards.
b. Pour large quantities of soapy
water into the barrel. Repeat
several times.
c. Dry the bore and chamber.
d. Clean the bore and chamber,
using swab dipped in lubricant.
Continue until swabs come out
clean. Then dry.
e. Lightly lubricate the bore and
chamber, using swab dipped in
lubricant.
13
CLEANING THE BOLT
1. Clean the bolt, using swab
dipped in lubricant. Continue until
swabs are clean. Then dry.
2. After cleaning, lubricate lightly.
CLEANING THE TRIGGER
MECHANISM
1. Clean sear and other parts.
2. Lubricate lightly.
CLEANING EXTERNAL
SURFACES AND OTHER
PARTS
1. Clean external surfaces and
other parts.
2. After cleaning, lubricate lightly,
using swab dipped in lubricant.
14
INSPECTION AND CHECKING
1. While carrying out the above
mentioned operations, inspect the
weapon as specified in Daily
Maintenance.
2. Assemble the weapon.
3. Check for proper functioning of
the weapon by cocking and
releasing. Repeat several times.
4. Make sure that the accessories
kit is complete, clean and
serviceable.
Operation of the UZI
UNFOLDING THE STOCK
1. Grip the weapon in left hand,
under trigger guard, barrel facing
left.
2. Strike butt plate with palm of
right hand in a downward and
forward direction. The butt will
disengage from its catch (fig. 1).
3. Grasp butt plate and pull
rearward until stock locks (fig. 2).
15
FOLDING THE STOCK
1. Grasp the weapon under hand
guard.
2. Press in locking button located
adjacent to rear of receiver and
rotate assembly downward
(fig- 3).
3. Press right rear side plate
inward, adjacent to hinge pin and
rotate rear section upward and
forward, (fig. 4).
4. Rotate weapon until pistol grip
faces upward with hand in center
of cover. Strike butt plate firmly
downward with heel of hand
snapping it into position (fig. 5).
16
17
LOADING AND EMPTYING THE
MAGAZINE
LOADING
1. With magazine in upright
position & slots facing you, place
cartridge on follower w'th bullet
facing left.
2. Press down until cartridge snaps
18
under lip (fig. 6).
3. Repeai until loaded.
4. Do not load more tnan 25
cartridges.
EMPTYING
1. Push out cartridge with thumb
(fig 7).
2. Repeat until magazine is empty.
LOADING THE UZI
INSERTING THE MAGAZINE
1. With right hand on pistol grip,
hold weapon in upright position
(about 60°).
2. Tilt the weapon to the right, and
insert the magazine into the
pistol grip opening with your left
hand. Push until magazine catch
snaps into place (fig. 8).
Note: While inserting the magazine i
the fire selector must be on "S"
(safe) position. i
19
COCKING THE WEAPON
1. While still holding pistol grip,
after inserting a loaded
magazine, squeeze the grip
safety and pull cocking knob all
the way back until bolt is held in
its rear position.
2. The weapon is now cocked and
renaered safe.
23
[ Note. Be sure that fire selector is on
"S" (safe) position.
AIMING AND FIRING
1. Unfold the siock (see page 15).
2. After loading the weapon as
previously described, place rear
sight at required range, 100m or
200m (fig. 10).
3. Grasp the UZI with one hand on
the pistol grip (trigger finger
outside of trigger guard) and the
other hand on handguard.
4. Raise and pull stock firmly into
shoulder.
5. Line up your sights with your
target by placing the top of the
post in the center of the rear
aperture (fig. 11).
6. Move fire selector to "R" (semi-
automatic) or "A" (automatic).
Place trigger finger on trigger and
squeeze until weapon fires.
21
GRIP SAFETY MUST BE FULLY
DEPRESSED.
7. Upon interruption of firing, set
fire selector on "S" (safe)
position.
8. Upon completion of firing, unload
(clear — see below) and set fire
selector on "S" (Safe).
UNLOADING THE WEAPON
1. Remove magazine (fig. 12).
11
2. Clear weapon (fig. 13).
3. Place fire selector on "S" (safe)
Disassembly
and Assembly
GENERAL
1 This chapter deals oniy with
those disassembling and
assembling operations which a
soldier is allowed to carry out in
the field. Dismantling or
assembling of any other parts is
forbidden.
2. Dismantling operation must be
earned out on a clean surface
and dismantled parts should be
placed in order of their removal.
3. Assembling is always carried out
in reverse order to dismantling
unless otherwise specified.
FIELD STRIPPING
Carry out the following operations
before dismantling:
Remove magazine. Clear weapon
several times to make sure there is
no live cartridge in the chamber.
DISASSEMBLING THE STOCK
(Wooden stock only)
1. Press stock catch (fig. 15).
2. Remove stock while sliding it
backwards.
ASSEMBLING THE STOCK
(Wooden stock only)
1. Slide stock forward into place.
2. Firmly push it forward until it
snaps into place.
24
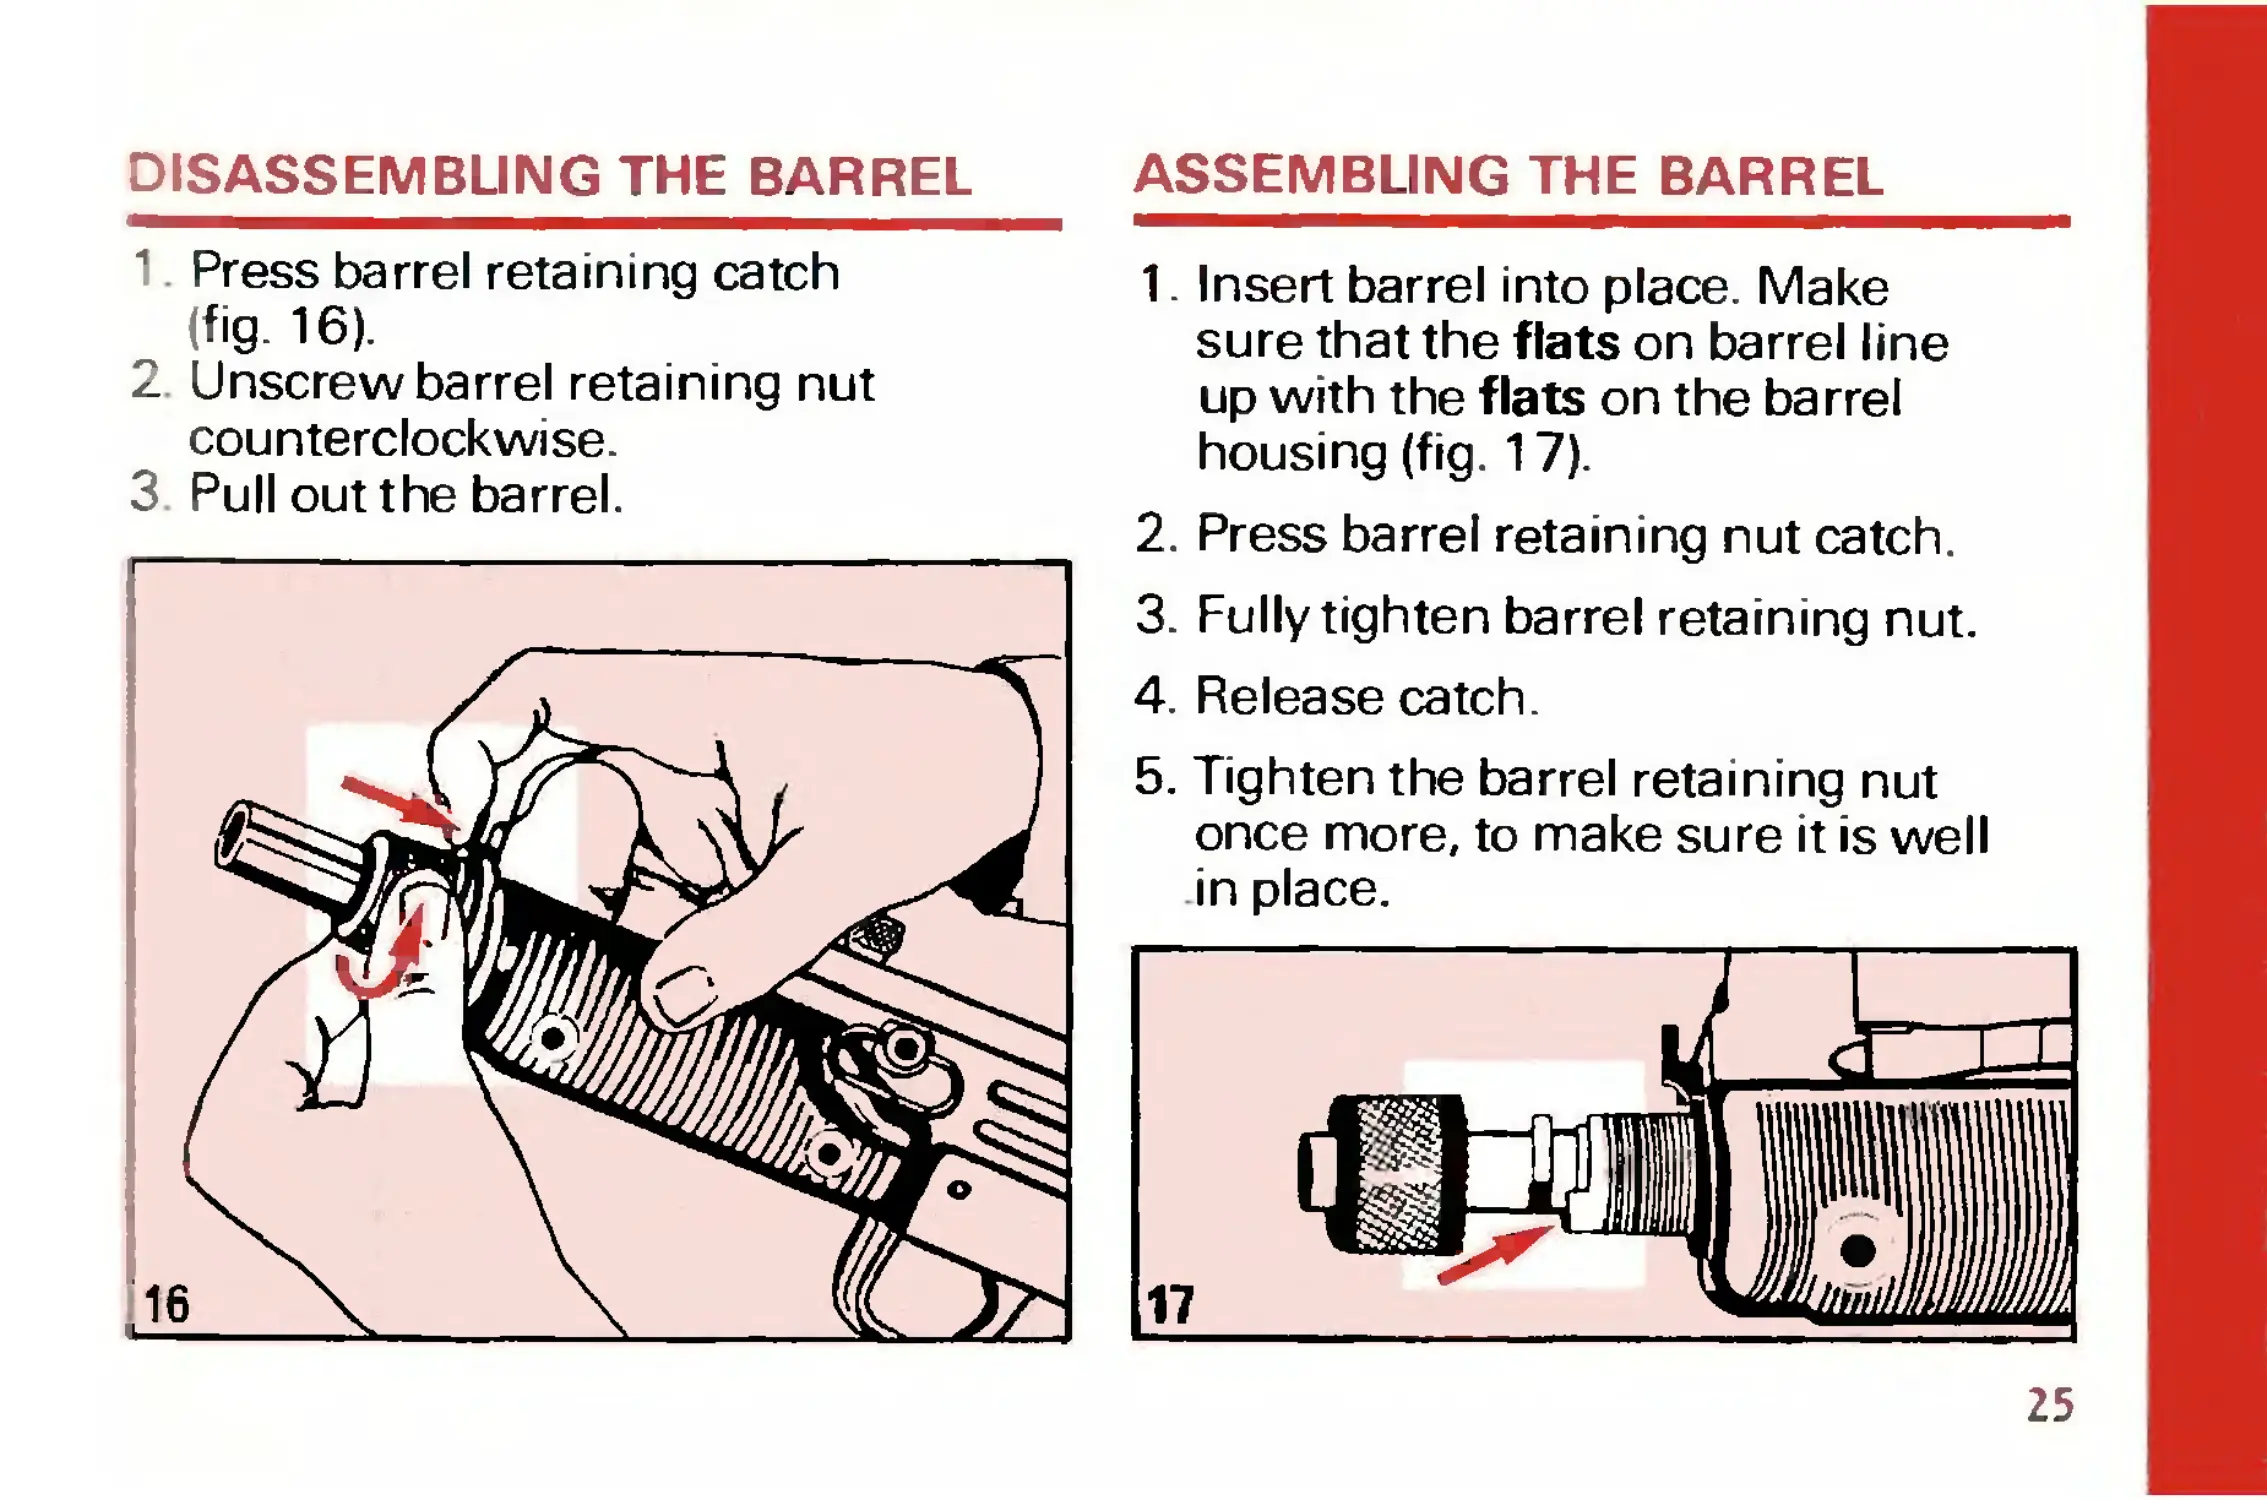
DISASSEMBLING THE BARREL
1 Press barrel retaining catch
(fig 16).
2 Unscrew barrel retaining nut
counterclockwise
3 Pull out the barrel.
ASSEMBLING THE BARREL
1. Insert barrel into place. Make
sure that the flats on barrel line
up with the flats on the barrel
housing (fig. 17).
2 Press barrel retaining nut catch.
3. Fully tighten barrel retaining nut.
4. Release catch.
5. Tighten the barrel retaining nut
once more, to make sure it is well
in place.
25
DISASSEMBLING RECEIVER
COVER
1. Press receiver cover catch.
2. Slightly pull receiver cover
upwards, then remove (fig. 18).
DISASSEMBLING THE BOLT
AND RETURN SPRING
ASSEMBLY
1. Push back bolt and pull it
upwards and out, together with
return spring assembly (fig. 19).
2. Remove return spring assembly
from bolt.
26
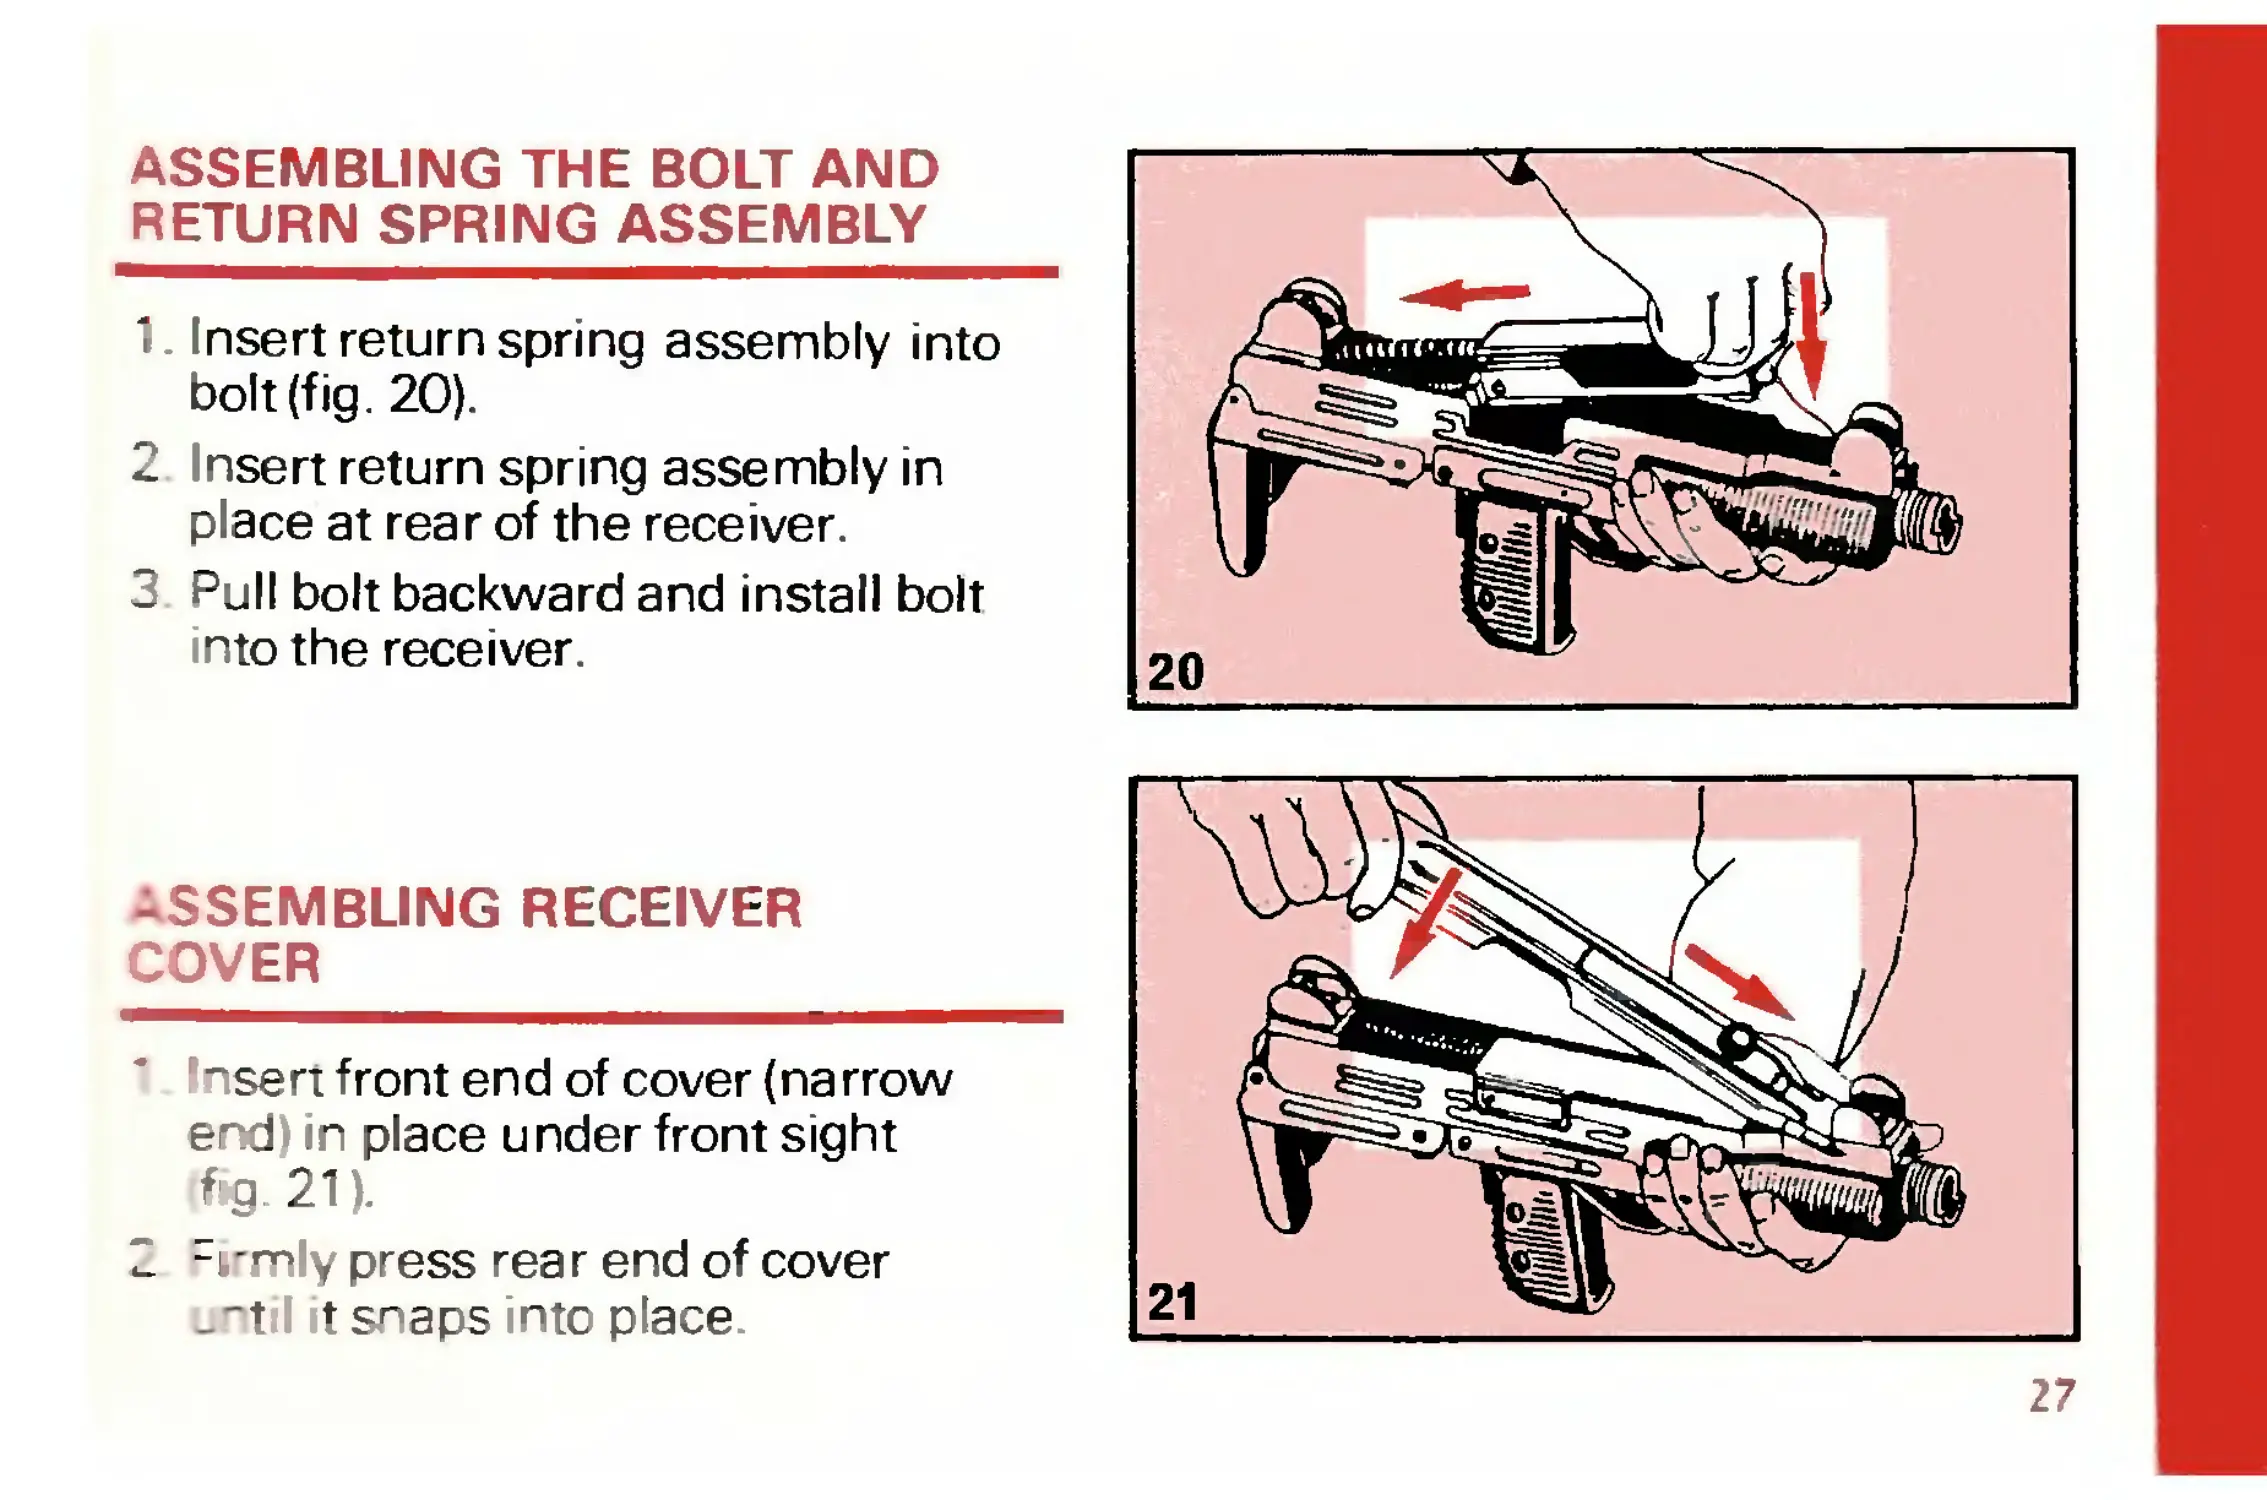
ASSEMBLING THE BOLT AND
RETURN SPRING ASSEMBLY
1 . Insert return spring assembly into
bolt (fig. 20).
2 nsert return spring assembly in
place at rear of the receiver.
3 Pull bolt backward and install bolt
into the receiver.
-SSEMBLING RECEIVER
COVER
nsert front end of cover (narrow
end in place under front sight
fig. 211.
2 ml\ press rear end of cover
_,’t t snaps nto place
20
27
ADDITIONAL
DISASSEMBLY
OPERATIONS
(In case of emergency)
DISASSEMBLING THE
EXTRACTOR
1. Push out extractor pin. Use bullet
of rifle cartridge or punch (fig. 22).
2. Remove extractor while pulling it
out backward (fig. 23).
28
DISASSEMBLING THE PISTOL
GRIP
1. Push out the take-down pin of
the pistol grip (fig. 24).
2. Remove pistol grip while pulling
it downward (fig. 25).
29
ASSEMBLING THE
EXTRACTOR
1. Insert the extractor in its place
inside the bolt (fig. 26).
2. Push the extractor inward until
the slot coincides with the hole in
the bolt.
3. Make sure the slot on the top of
the extractor is in line with the
mark on the bolt above the
extractor groove (fig. 27).
4. Insert the extractor pin in its
place (from the smooth side of
the bolt).
30
ASSEMBLING THE PISTOL
GRIP
1 Make sure that the sear does not
protrude upward. If it does, place
fire selector on "R" (semi-
automatic position) and press the
sear downward until it engages
tne disconnector.
nsert pistol grip front in place at
1 he lower front part of receiver
fig- 28).
Rr=ss the grip safety and push
the p:stol grip upwards into
ice. Make sure that the pistol
ь take-down pin hole coincides
wth tne receiver take-down pin
4 Insert pistol grip take down pin in
place (from pistol grip left side).
DISASSEMBLING AND
ASSEMBLING THE MAGAZINE
DISASSEMBLING
WARNING: Magazine spring is
under pressure and can fly out and
cause injury if not held in place
during assembly and disassembly.
Do not point magazine base toward
face or other person.
1. Before disassembling the
magazine, remove all cartridges.
2. Hold magazine with base facing
upwards.
3. With the aid of a small pointed
object, push base catch inward
(fig. 29).
4. With catch depressed, carefully
push magazine base forward
32
approximately one centimeter
(until catch protrusion is visible al
edge of base).
5. Carefully holding spring in place
with index finger, remove
magazine base (with other hand)
(fig- 30).
6. Using both hands, ease spring
and follower out of housing (fig. 31).
ASSEMBLING
1. Hold magazine with lips
downward, slots facing away
from you.
2. Insert follower with legs up and
long leg to your right, and drop
into place. Do not force.
3. Hold spring vertical with catch up
so that catch is higher on the
right side.
4. Insert spring into housing.
5. Compress spring so that catch is
slightly below housing bottom.
6. While holding spring with index
finger, insert base with square
edge facing magazine and push
home until catch locks.
33
Trouble Shooting
Failure to fire may be caused by an
empty magazine. In any case,
immediate action must be taken.
IMMEDIATE ACTION
Remove magazine and wait 3
seconds with barrel pointing in a
safe direction, then inspect
magazine.
1. MAGAZINE EMPTY
Cock to remove possible last
round. Inspect chamber and if
empty, insert full magazine,
recock and continue firing.
2. MAGAZINE NOT EMPTY
(Malfunction)
a. Recock to clear possible
34
defective or wrongly
positioned round. If a round or
case ejects, inspect chamber
and if empty, reload and
continue firing.
b. If nothing ejects, fully draw
back bolt and check if a
cartridge or case is in
chamber. If empty, reload and
continue firing.
c. If base of cartridge is visible,
fire in a safe direction. If
weapon fires and ejects,
reload and continue.
d. If weapon does not fire, set fire
selector "S" (Safe) and follow
trouble shooting procedure for
"spent case or round stuck in
chamber" (see page 39).
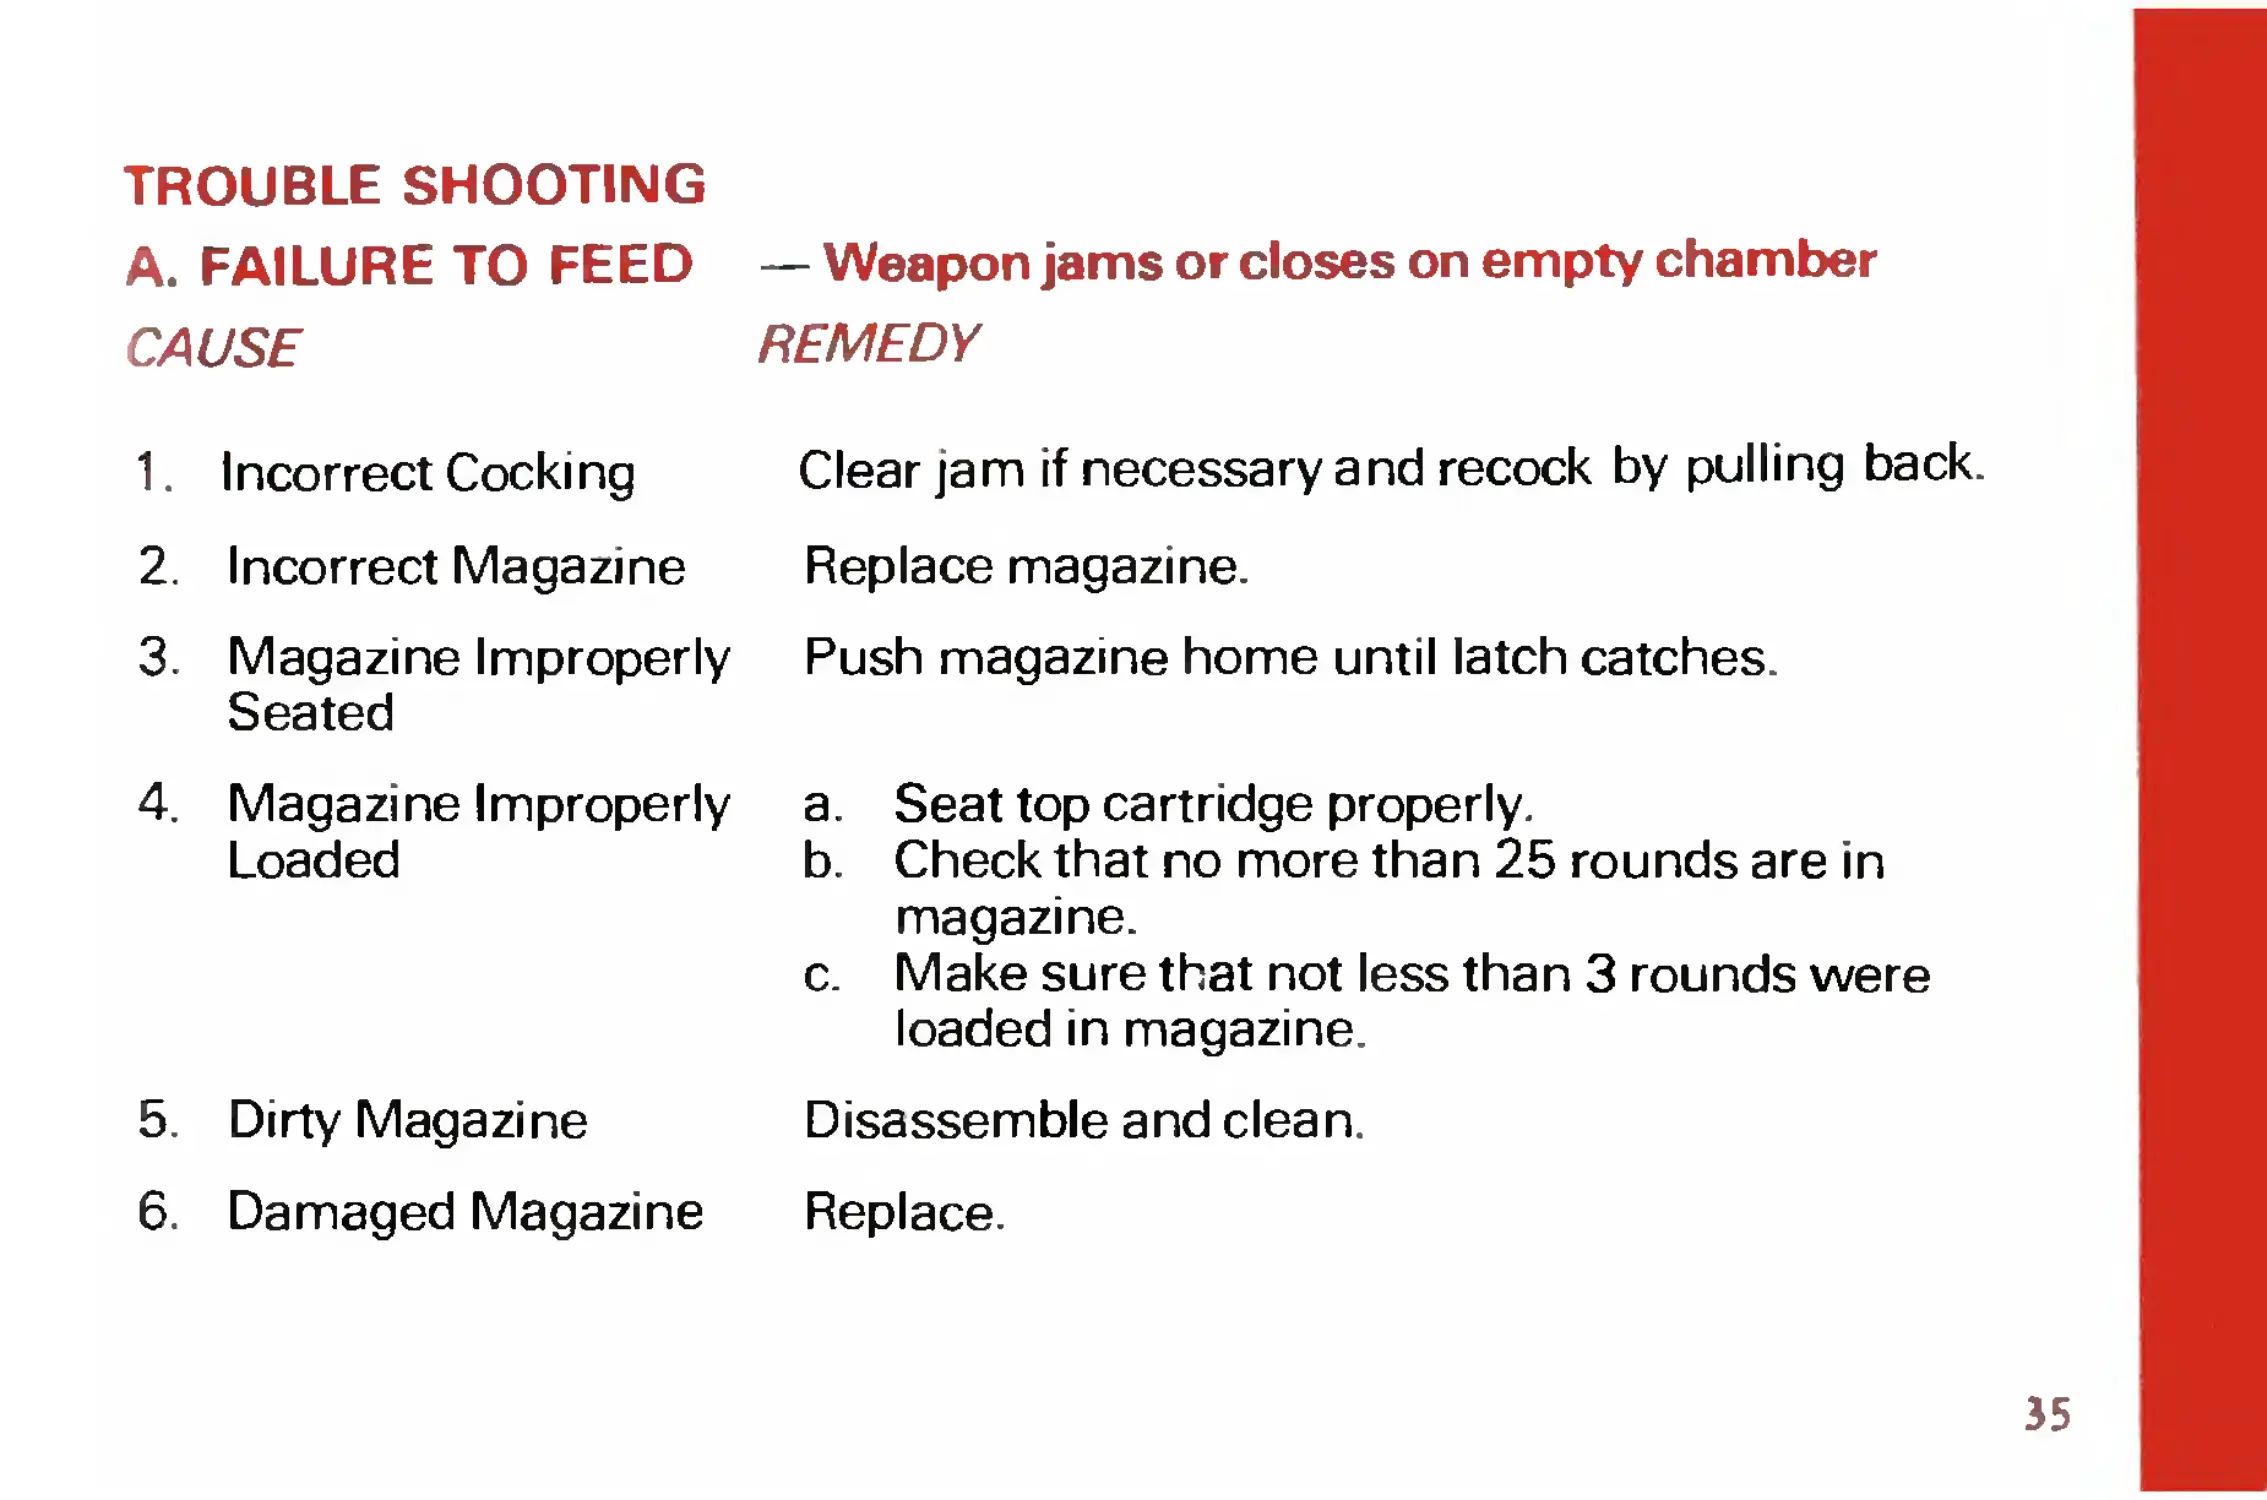
TROUBLE SHOOTING
A. FAILURE TO FEED CAUSE 1. Incorrect Cocking 2. Incorrect Magazine 3. Magazine Improperly Seated 4. Magazine Improperly Loaded 5. Dirty Magazine 6. Damaged Magazine — Weapon jams or closes on empty chamber REMEDY Clear jam if necessary and recock by pulling back. Replace magazine. Push magazine home until latch catches. a. Seat top cartridge properly. b. Check that no more than 25 rounds are in magazine. c. Make sure that not less than 3 rounds were loaded in magazine. Disassemble and clean. Replace.
35
7. Short Recoil 8. Double Feed B. FAILURE TO CHAMBER CAUSE 1. Incorrect Cocking 2. Dirty Chamber 3. Defective Chamber 4. Very Dirty Weapon 5. Defective Return Spring Clear jam. Check chamber for cleanliness. Check type of ammunition (may be underpowered). Try other reliable 9mm ammunition. a. Inspect for stuck case or cartridge (E). b. Check extractor and ejector (D). — Bolt does not fully close and weapon does not fire REMEDY Remove magazine. Recock and reload. Clean. Check for damaged cartridges. Check for sluggishness in bolt and firing mechanism. Clean and oil as necessary. Check for recurrent sluggishness in operation Check spring assembly for damage. Replace if necessary.
36
C. FAILURE ТО FIRE — Bolt snaps home but weapon will not fire
CAUSE REMEDY
1. Bolt not Fully Closed Follow procedure for incorrect cocking (A.1) or short recoil (A.7).
2. Defective Cartridge Inspect primer. If fully indented discard safely. If not fully indented, check firing mechanism.
3. Dirty Firing Mechanism Defective Firing Pin Defective Return Spring 4. Barrel Not Properly Seated Check for sluggishness of operation. Clean and replace as necessary. Make sure that the FLATS on the barrel line up with the FLATS on the barrel housing protrusion. Tighten barrel retaining nut until clicking noise stops.
37
D. FAILURE TO — The bolt may not fully recoil, the fired
EXTRACT OR EJECT case may not eject, or the weapon may
jam (spent case left in chamber).
REMEDY
CAUSE
1.
2.
Underpowered
Ammunition (Short
Recoil)
Dirty or Damaged
Chamber
Check ammunition and change to another
reliable ammunition.
Inspect, clean, replace barrel if necessary.
3.
Defective Ammunition
4.
Fouled Extractor
Check ammunition for damage. Replace if
problem persists.
Clean extractor.
5.
6.
Extractor Defective or
Missing
Damaged Ejector
Replace.
Replace if necessary.
38
E. SPENT CASE OR ROUND STUCK IN CHAMBER
CAUTION: The following procedure should be carried out only after following
the steps in "Immediate Action" (see page 34; 2b, c, d).
1. Remove bolt assembly.
2. With barrel in place, insert cleaning rod through front of barrel. Push or tap
gently to remove obstruction.
3. Check chamber and bore. Clean before reassembly.
4. If obstruction cannot be removed, disassemble barrel and contact armorer.
39
WOODEN STOC
y y ISRAEL MILITARY INDUSTRIES
POB.1044 Ramat Hasharon 47100 ISRAEL
SERTOGRAPH 01/98/B-3000 29.810.6361 PRINTED IN ISRAEL
00.951-3001
EXjcNDEb
folded
METAL STOCK
OPTIONS