/


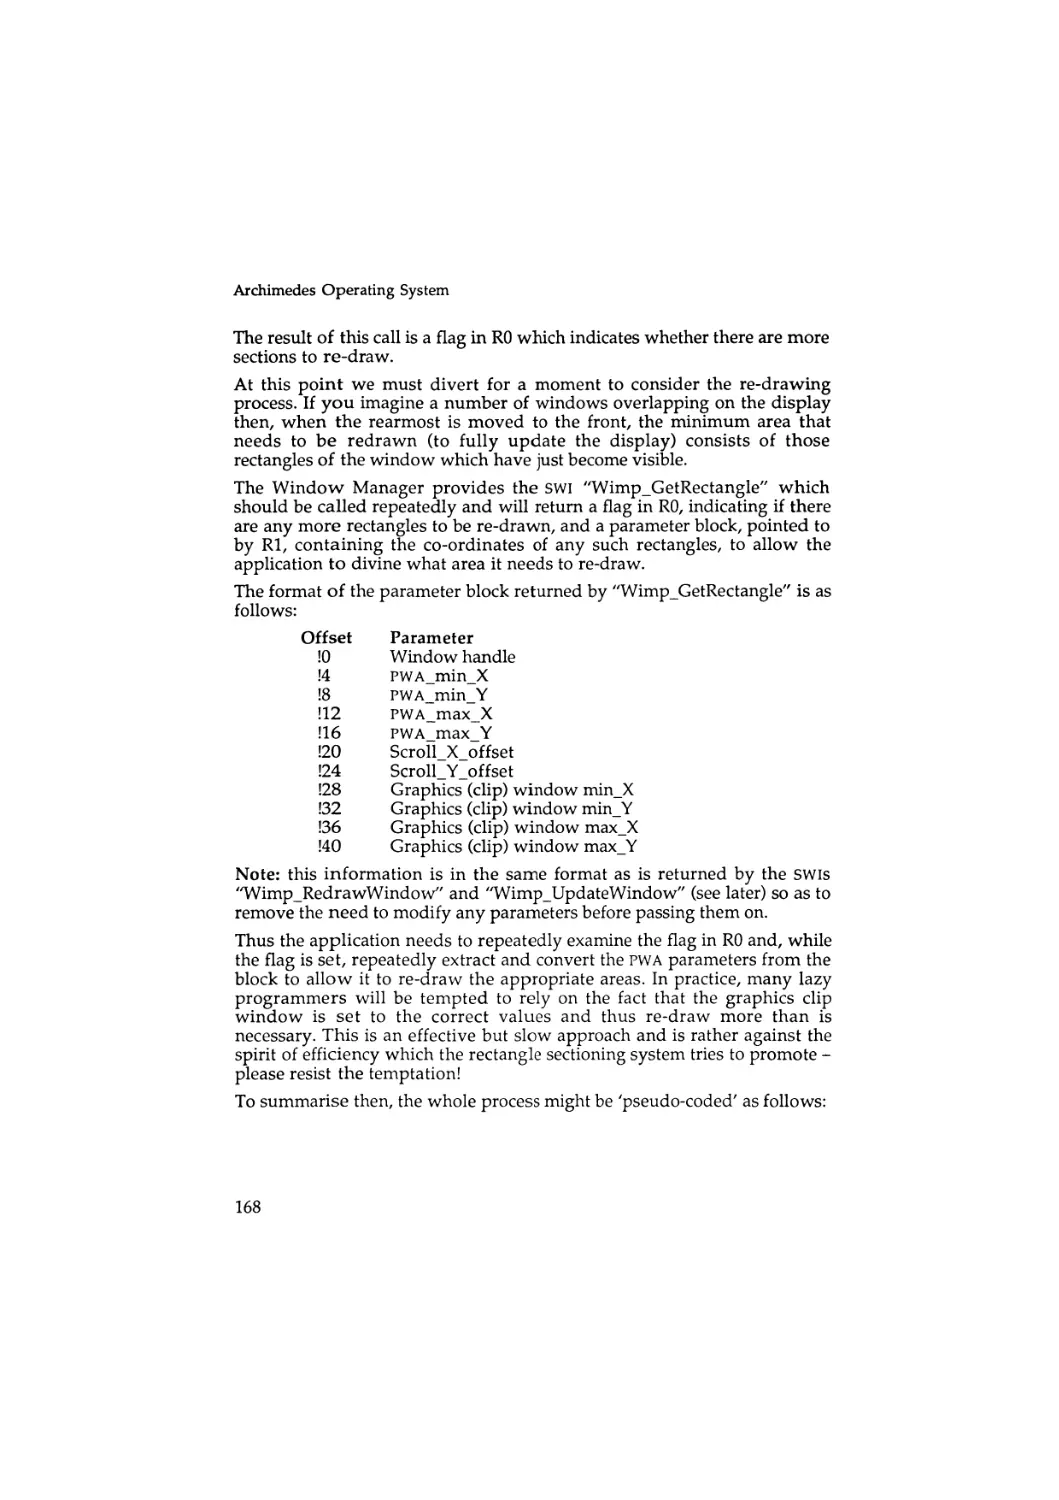


Text
Archimedes Operating System
A Dabhand Guide
Alex and Nic van Someren
DABS
PRESS
For Alice and Carol
Archimedes Operating System:
A Dabhand Guide
© Alex and N i c van Someren
ISBN 1-870336-48-8
First edition, third impression June 1991
Editor: Bruce Smith
Proofreading: Syd Day
Typesetting: Bruce Smith
Cover: Clare Atherton
All Trademarks and Registered Trademarks are hereby acknowledged. Within this
Reference Guide the term BBC refers to the British Broadcasting Corporation.
All rights reserved. No part of this book (except brief passages quoted for critical
purposes) or any of the computer programs to which it relates may be reproduced
or translated in any form, by any means mechanical electronic or otherwise
without the prior written consent of the copyright holder.
Disclaimer: Because neither Dabs Press nor the authors have any control over the
way in which the contents of this book are used, no warranty is given or should be
implied as to the suitability of the advice or programs for any given application. No
liability can be accepted for any consequential loss or damage, however caused,
arising as a result of using the programs or advice printed in this book.
Published by Dabs Press, PO Box 48, Prestwich, Manchester M25 7HN.
Tel. 061-773 8632 Fax. 061-773 8290
Typeset in 10 on l l p t Palatino by Dabs Press using the Acornsoft V I E W
wordprocessor, MacAuthor, Apple Macintosh SE and LaserWriter II NT.
Printed and bound in the UK by BPCC Wheaton, Exeter, Devon EX2 8RP
2
Contents
Introduction
13
1 : RISC Technology
15
Listing and Appendicies
What this Book is Not About
13
14
The History of RISC
RISC and the Archimedes
The ARM
The MEMC Memory Controller
The VIDC Video Controller
The IOC Input/Output Controller
Conclusion
15
16
17
18
18
18
19
2 : The ARM Instruction Set
20
The Programmer's Model
R15: The Program Counter
Conditional Execution
ARM Assembler Command Syntax
Shifted Operands
Brannch Instructions: B, BL
Arithmetic & Logical Instructions
Comparison Instructions
Multiplication Instructions
Single Register Load and Store Instructions
Multiple Register Load/Store Instructions
Softv/are Interrupts
3 : The BASIC V Assembler
Basic Concepts
Using the Assembler
Variable Initialisation from BASIC
20
20
22
24
24
25
26
27
27
29
31
32
33
33
33
33
Archimedes Operating System
Labels in Assembler Source
Allocating Memory
Assembling Into Memory
Offset Assembly
Dealing with Forward References
Implementing Two-pass Assembly
Other Assembler Directives
Position Independence of Object Code
Executing Assembler Programs
Conclusion
4 : The Operating System
40
Communicating with the OS
H o w SWis Work
SWI Names
SWI Error Handling
Error Handling - Numbering
Error Generation
40
41
42
43
44
45
5 : Command Line Interpreter
4
34
34
35
35
35
36
37
37
38
39
47
OS_CLl Command Syntax
File Redirection
Command Line Aliases
OS_CLi Commands
47
48
49
50
^CONFIGURE
*ECHO
*ERROR
*EVAL
*FX
*GO
*COS
*HELP
*IF
""IGNORE
*KEY
*SET
*SETEVAL
*SETMACRO
*SHADOW
51
52
52
53
53
53
54
54
55
55
56
57
58
58
58
Contents
*SHOW
*STATUS
"TIME
*TV
*UNSET
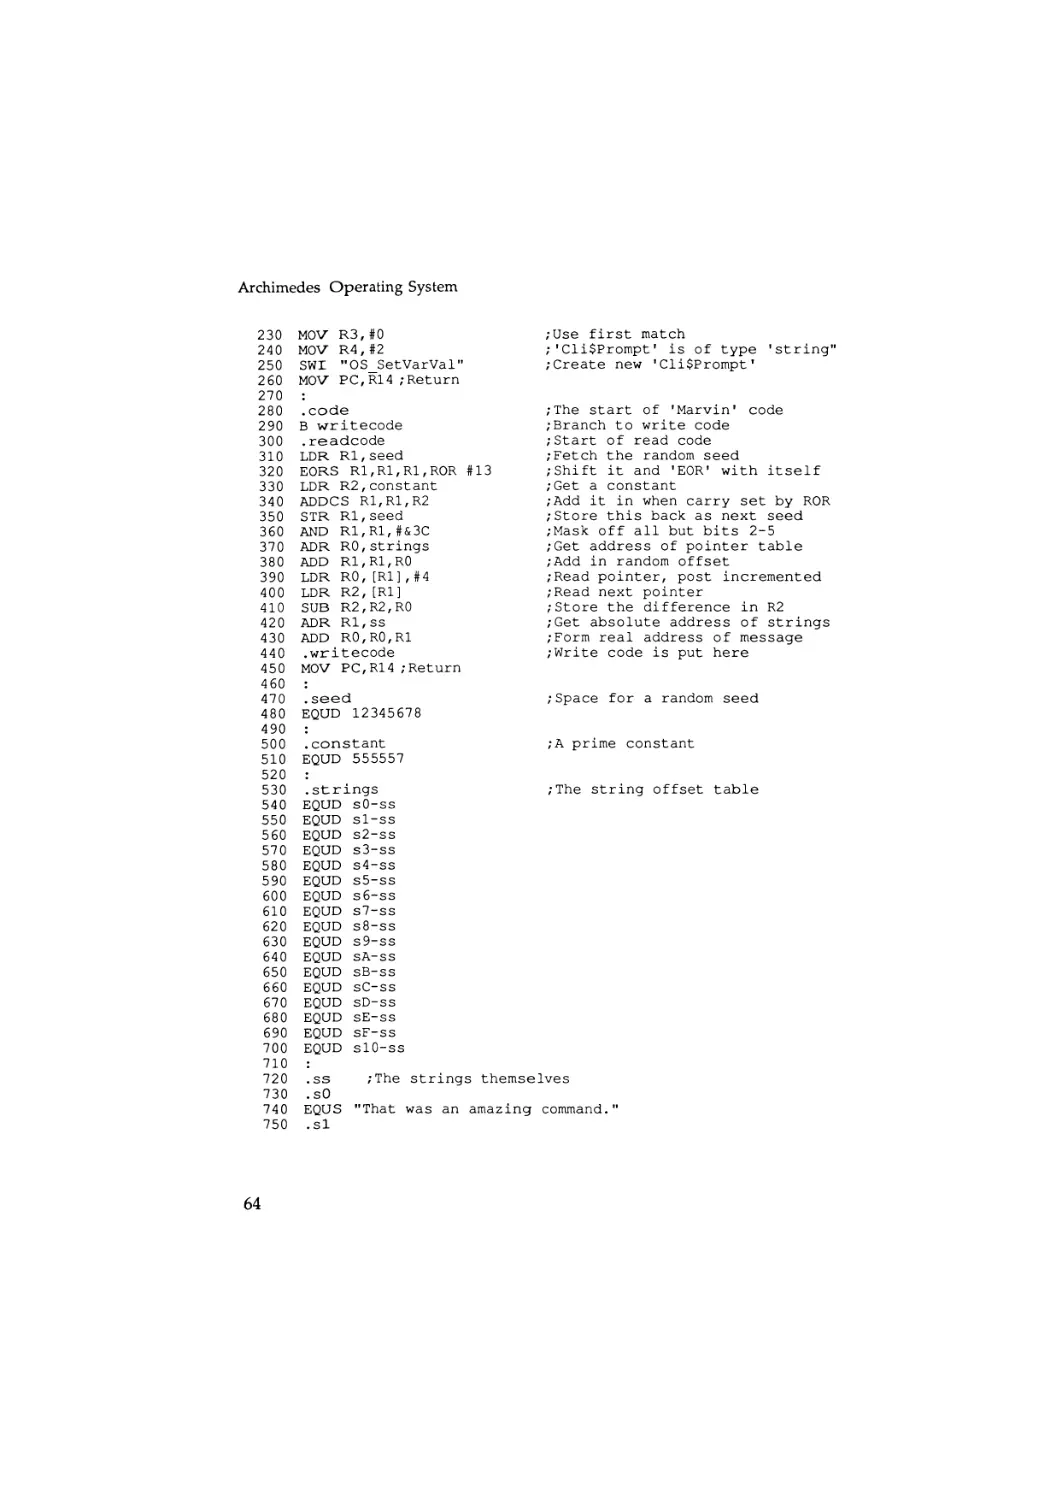
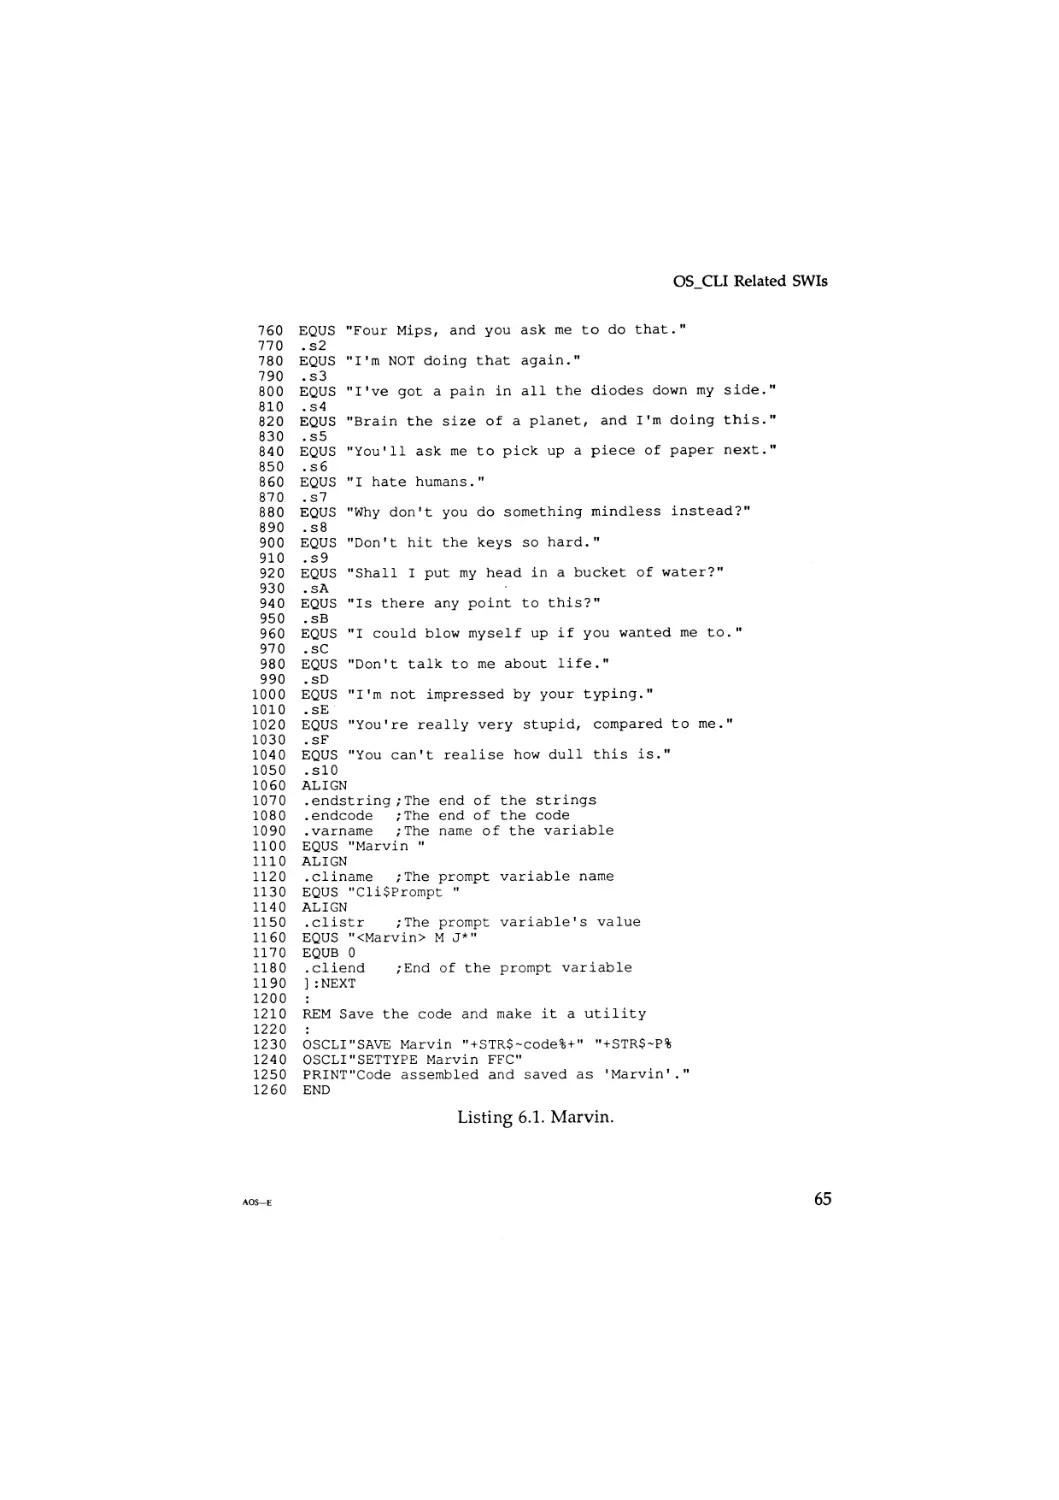
6 : OS_CLI Related SWIs
OS_CLI
OS_ReadVarVal
OS_SetVarVal
Marvin
7 : Filing Systems
Introduction
Naming of Filing Systems, Files and Directories
Directories
Files on Different Filing Systems
Device Filing Systems
Ancillary File Information
Load and Execute Addresses
File Types and Date Stamping
Libraries and Search Paths
8 : The FileSwitch Module
59
59
60
60
60
61
61
61
62
62
66
66
67
67
68
69
70
70
71
71
74
FileSwitch Commands
74
*ACCESS
*APPEND
*BUILD
*CAT
*CDIR
*CLOSE
*COPY
''COUNT
*CREATE
*DELETE
*DIR
*DUMP
*ENUMDIR
*EX
75
76
76
77
77
77
78
79
80
80
81
81
82
82
5
Archimedes Operating System
*EXEC
*INFO
*LCAT
*LEX
*LIB
*LIST
*LOAD
*OPT
*PRINT
*REMOVE
""RENAME
*RUN
*SAVE
*SETTYPE
*SHUT
"•SHUTDOWN
*SPOOL
*SPOOLON
*STAMP
*TYPE
*UP
*WIPE
9 : Filing System SWIs
OS.File (SWI &08)
OS.Find (SWI &0D)
File Path Considerations in OS_Find
Error Handling Extension
OS_GBPB (SWI &0C)
OS_BGet (SWI &0A)
OS.BPut (SWI &0B)
OS_Args (SWI &09)
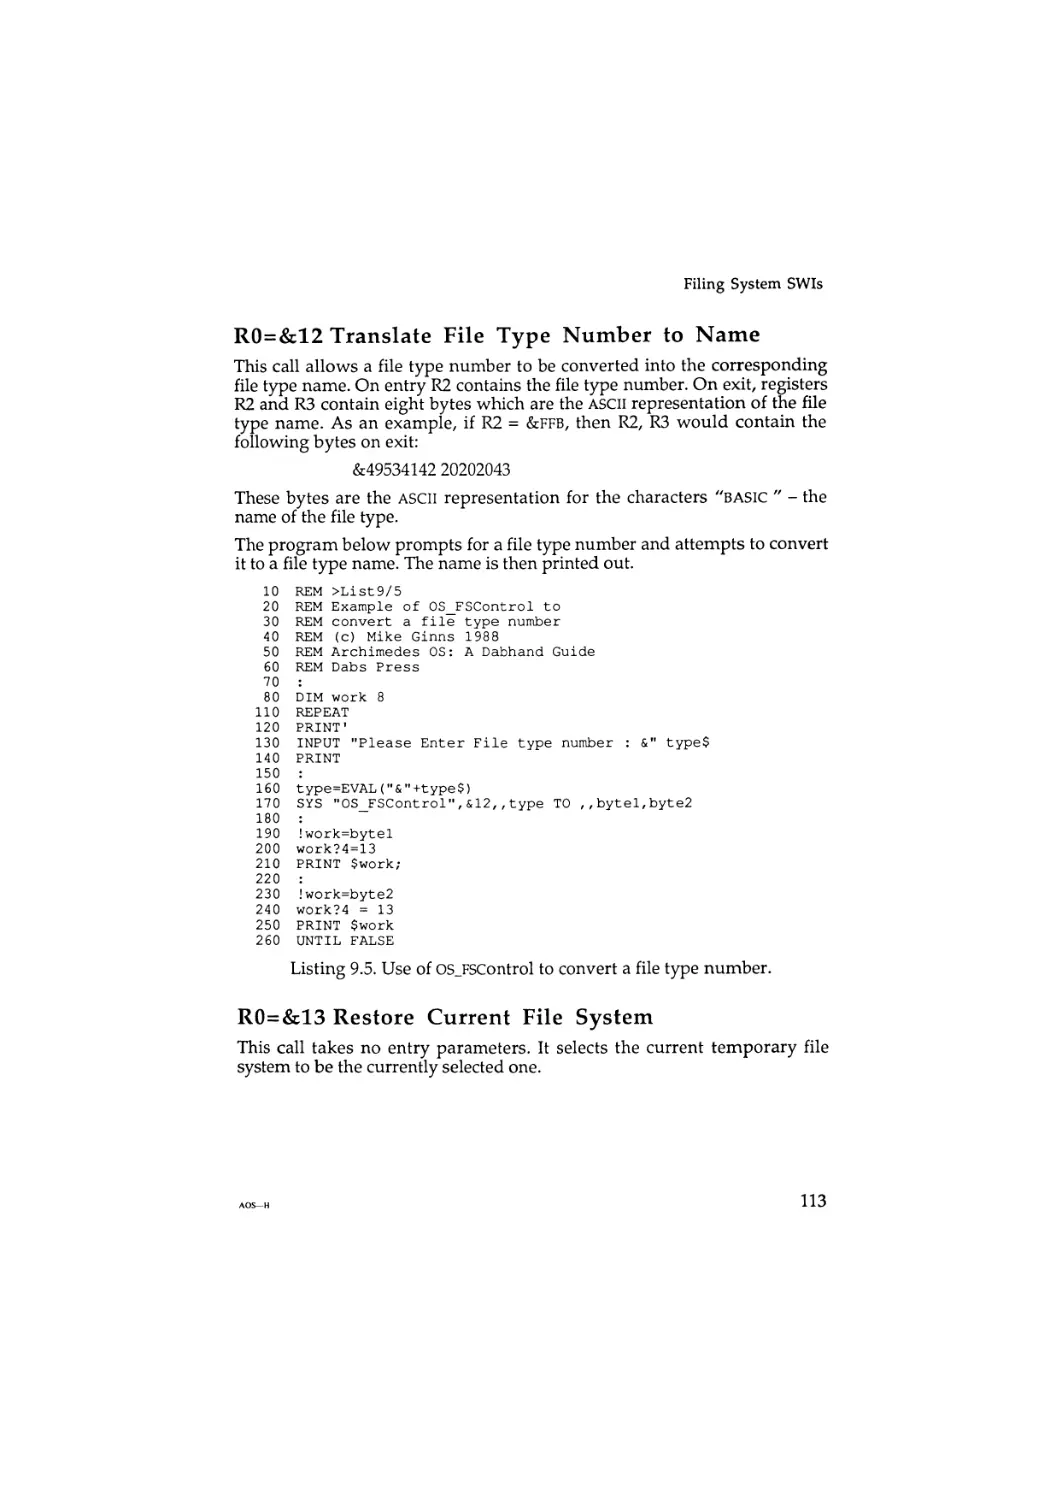
OS.FSControl (SWI &29)
1 0 : Modules
M o d u l e Related Commands
"MODULES
*RMCLEAR
*RMKILL
6
83
83
83
84
84
84
85
86
86
87
87
88
88
89
89
89
90
90
90
91
91
92
93
93
100
101
102
102
105
107
107
109
119
119
120
120
120
Contents
*RMLOAD
*RMREINIT
*RMRUN
*RMTIDY
*UNPLUG
1 1 : Writing Modules
Workspace Memory
Module Errors
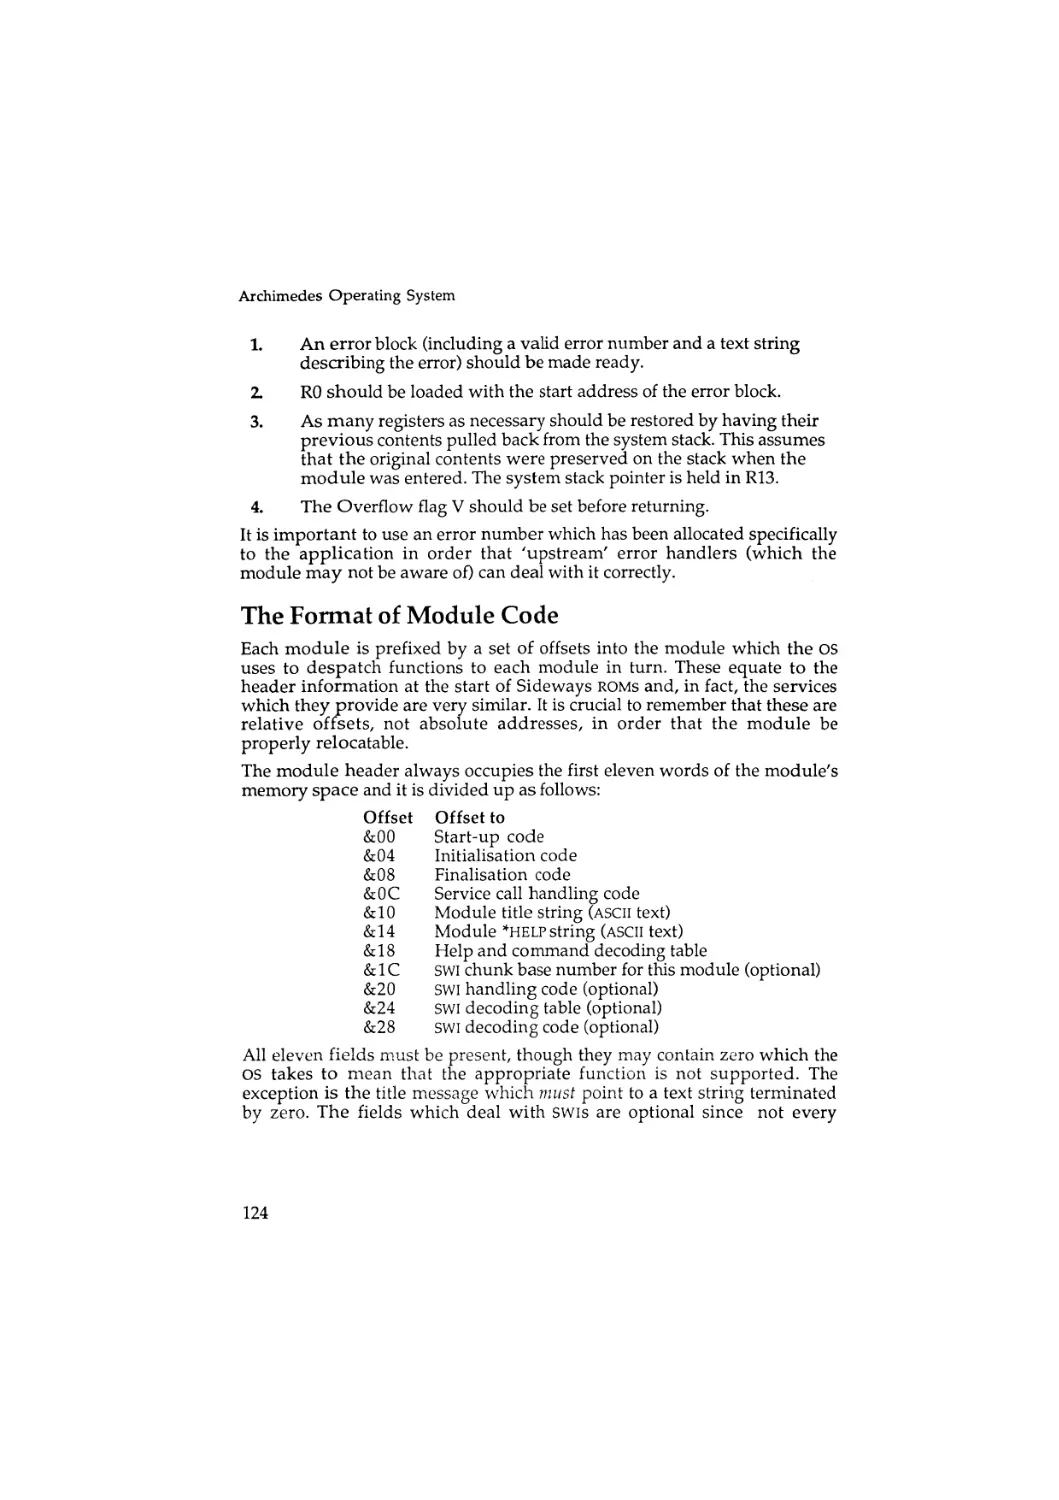
The Format of Module Code
Module Start-up Code
Module Initialisation Code
Module Finalisation Code
Service Call Handling Code
Service Call Reason Codes
Module Title String
Help String
Help and Command Decoding Table
Decoding Table Layout
SWI Chunk Base Number
SWI Handling Code Offset
SWI Decoding Table
SWI Decode Code
A Note About SWI Translations
OS.Module (SWI &1E)
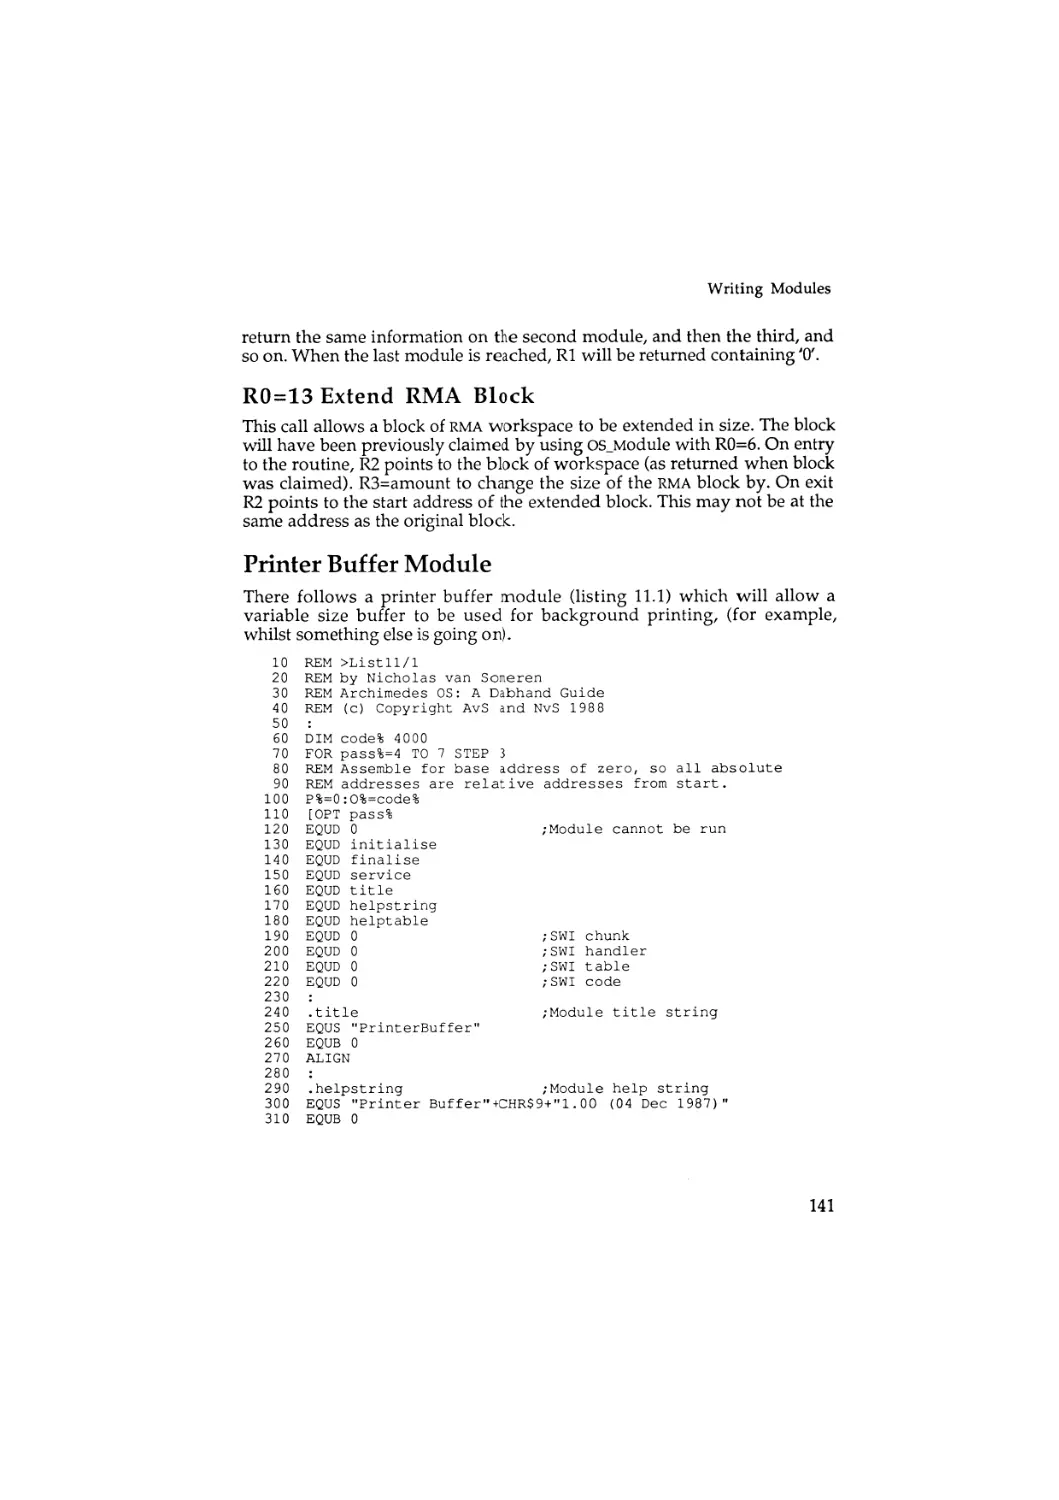
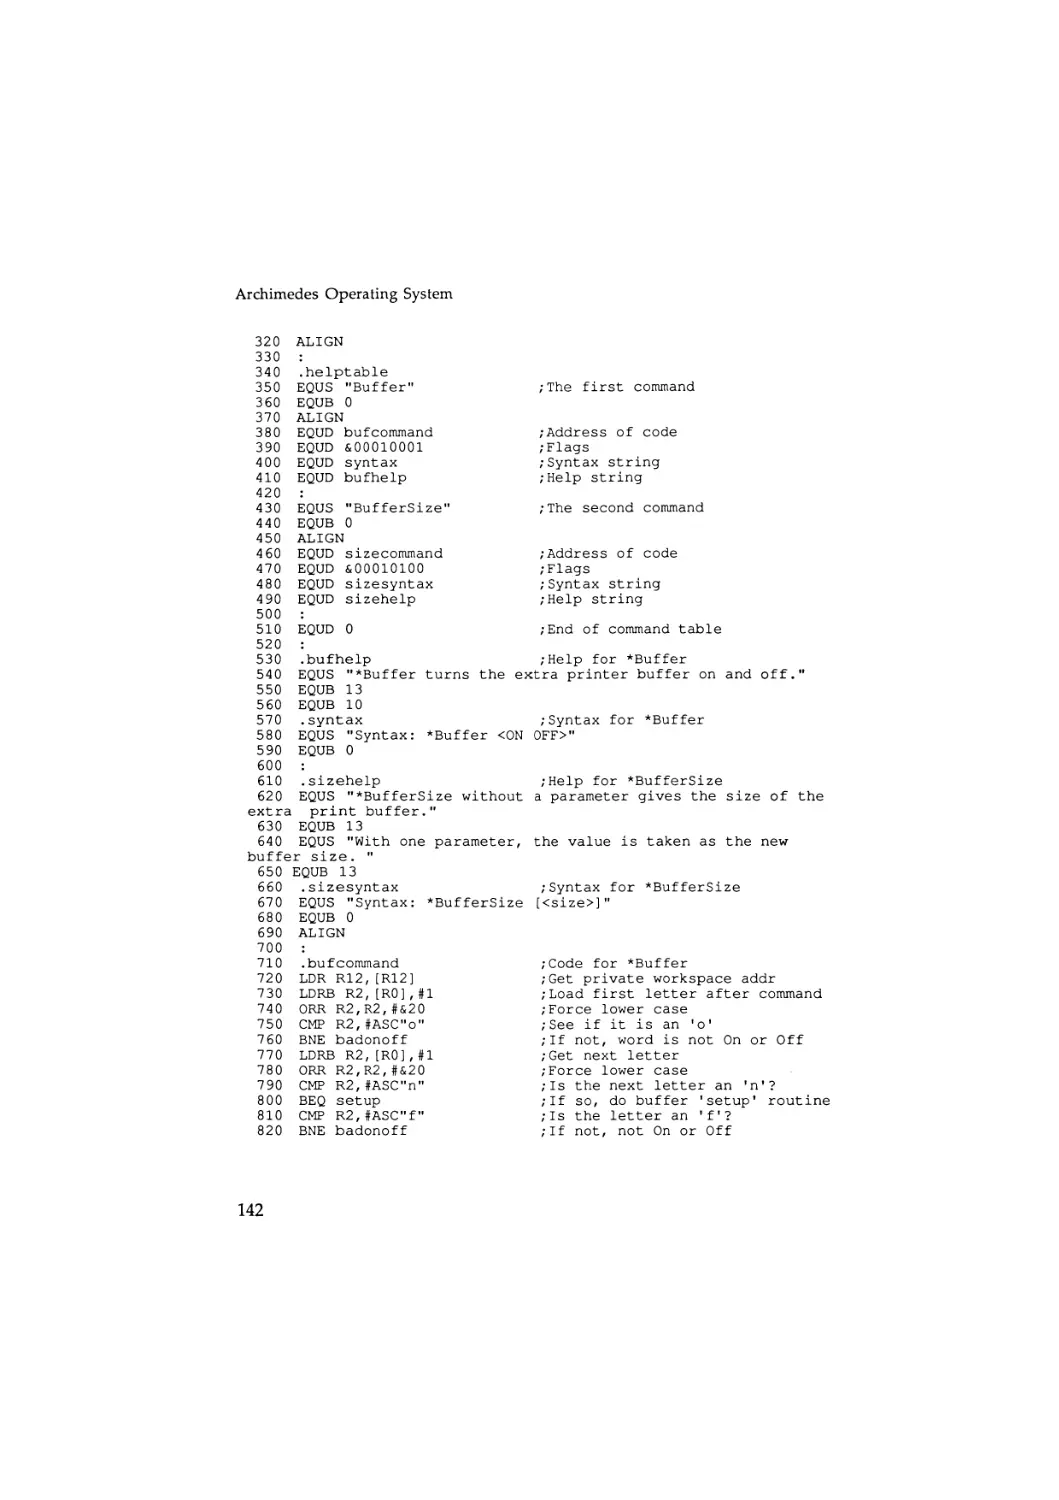
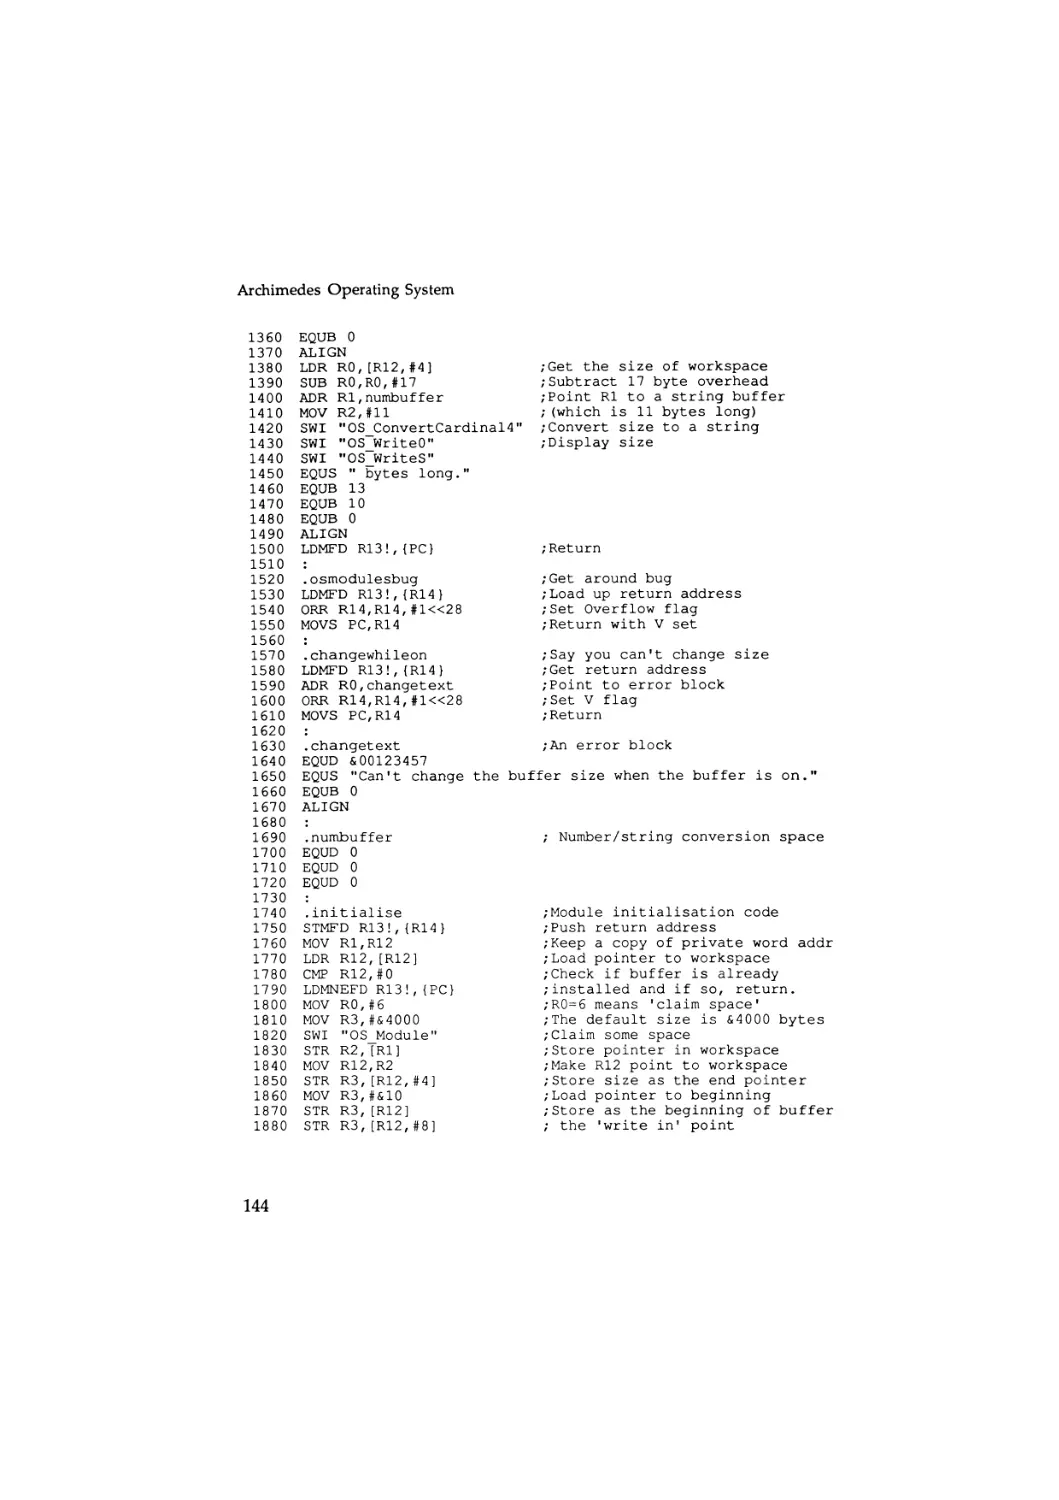
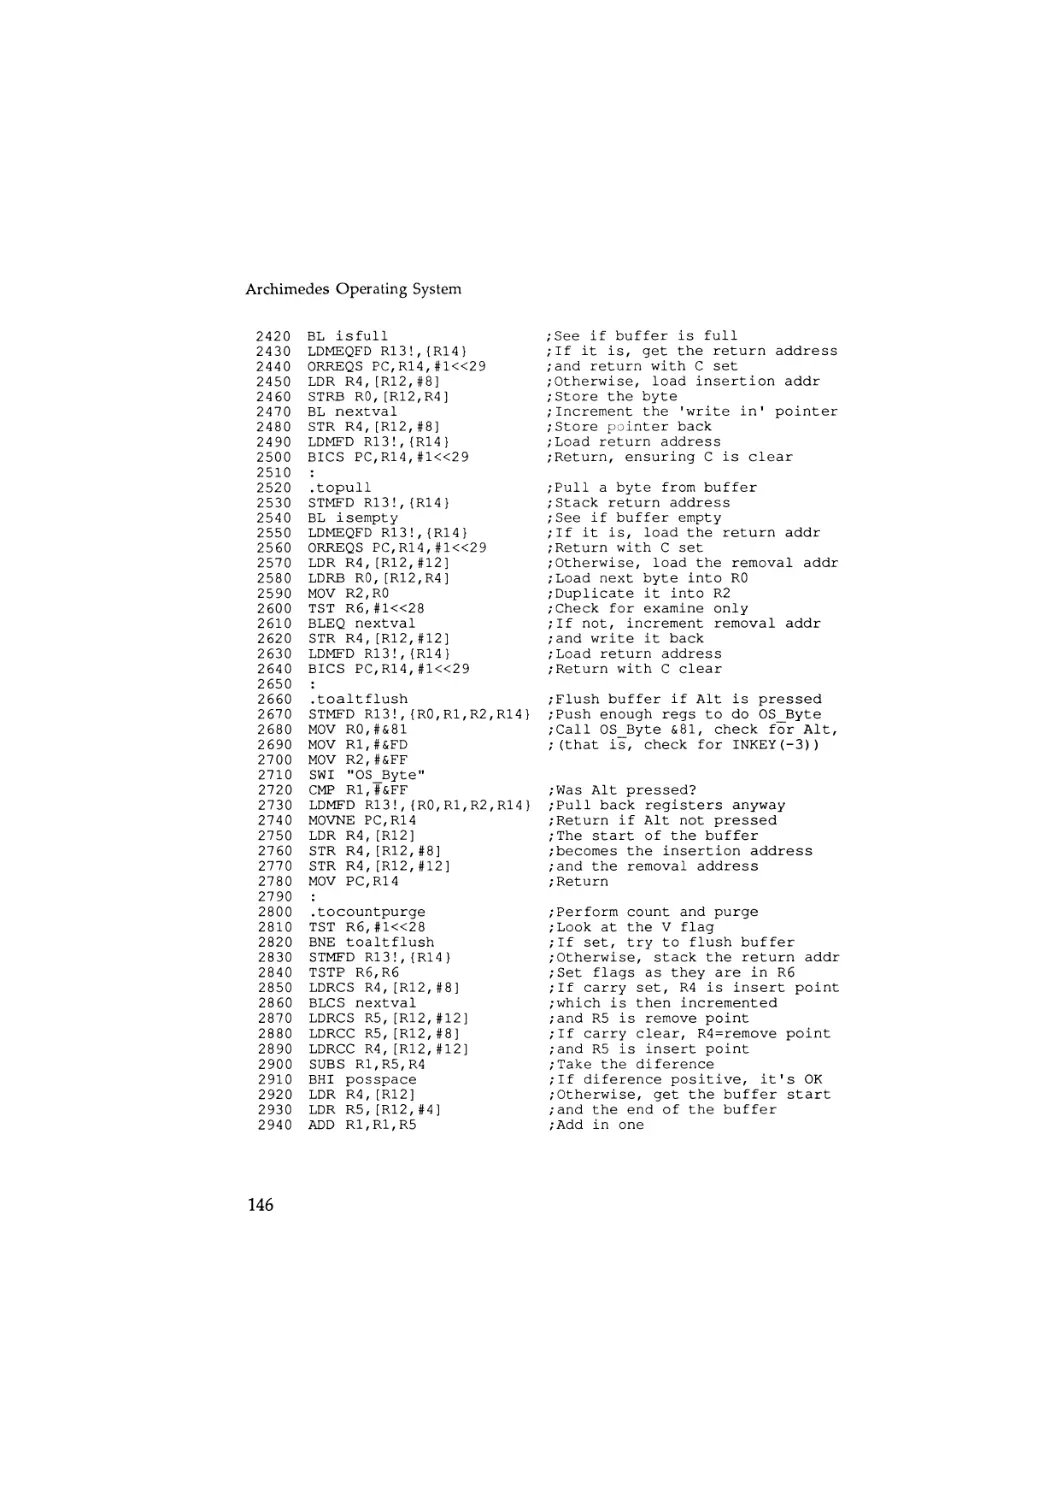
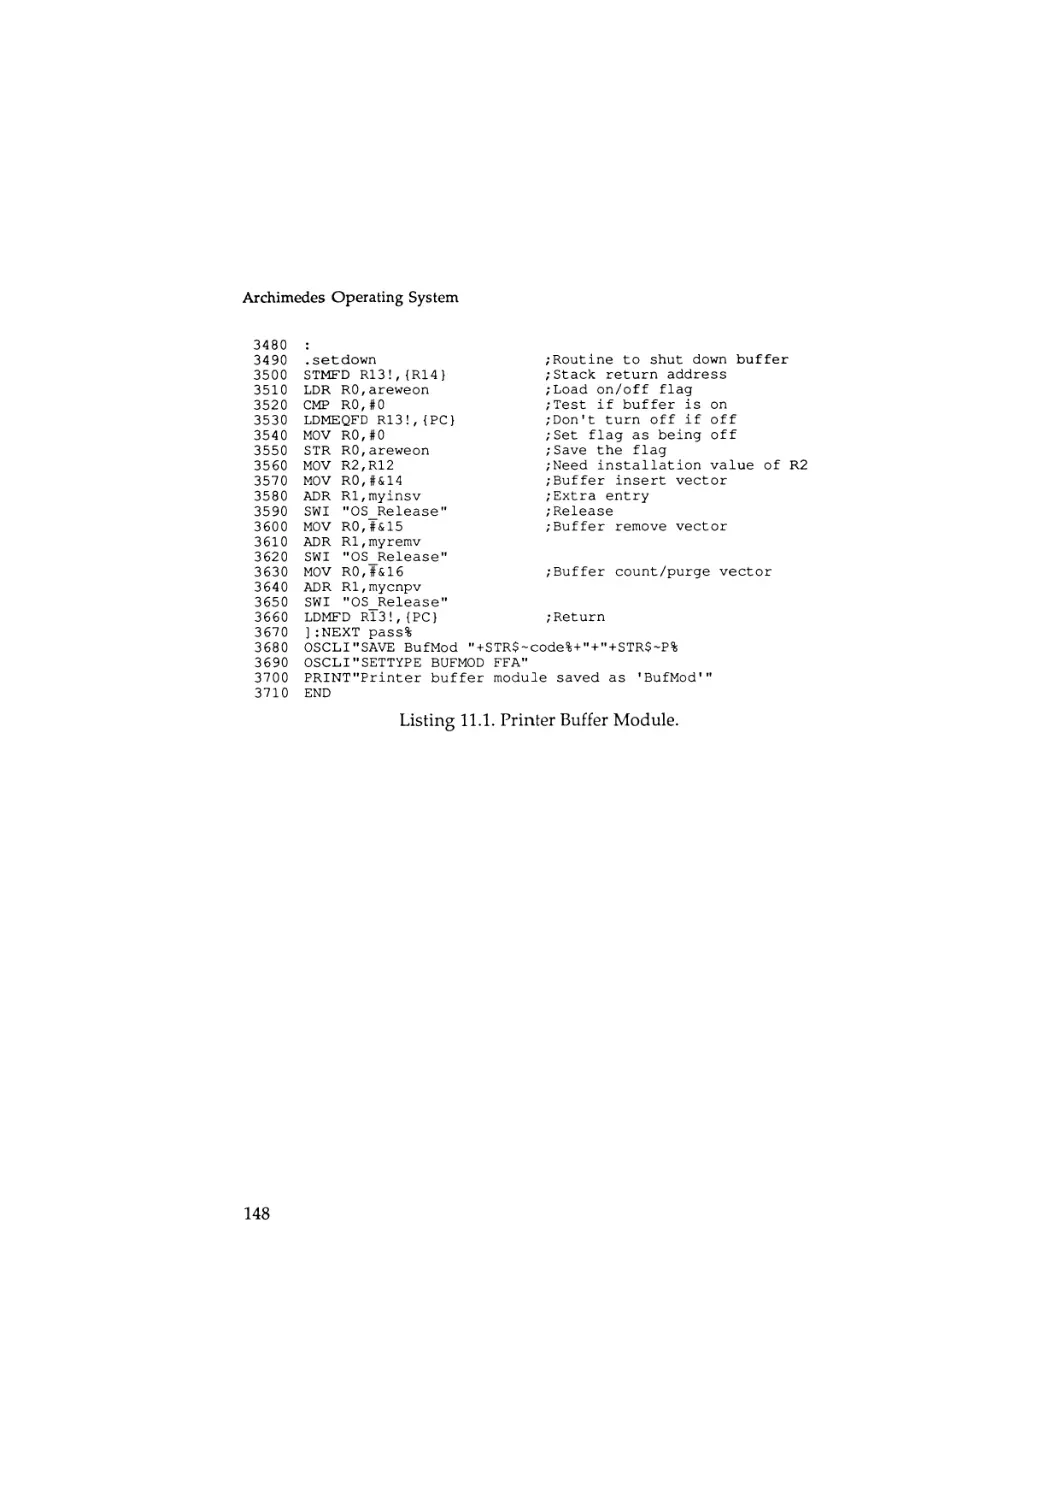
Printer Buffer Module
12 : Writing Applications
Starting Applications
OS_GetEnv (SWI &10)
Alternative Ways of Starting Applications
Temporarily Running Another Application
Top Down Applications
The T W I N Text Editor
Memory Management
ARM Memory Structure
Heap Management Software and SWls
OS_Heap (SWI &1D)
OS.ValidateAddress (SWI &3A)
121
121
121
122
122
123
123
123
124
125
125
126
126
127
132
132
133
133
136
136
137
137
137
138
141
149
149
150
150
151
151
152
153
153
154
154
156
7
Archimedes Operating System
General Guidelines on Compatibility
The Shell Module - Source Code
13 : The Window Manager
What's On Offer?
The Structure of Windows
W i n d o w Manager Co-ordinate System
Programming Using the Window Manager
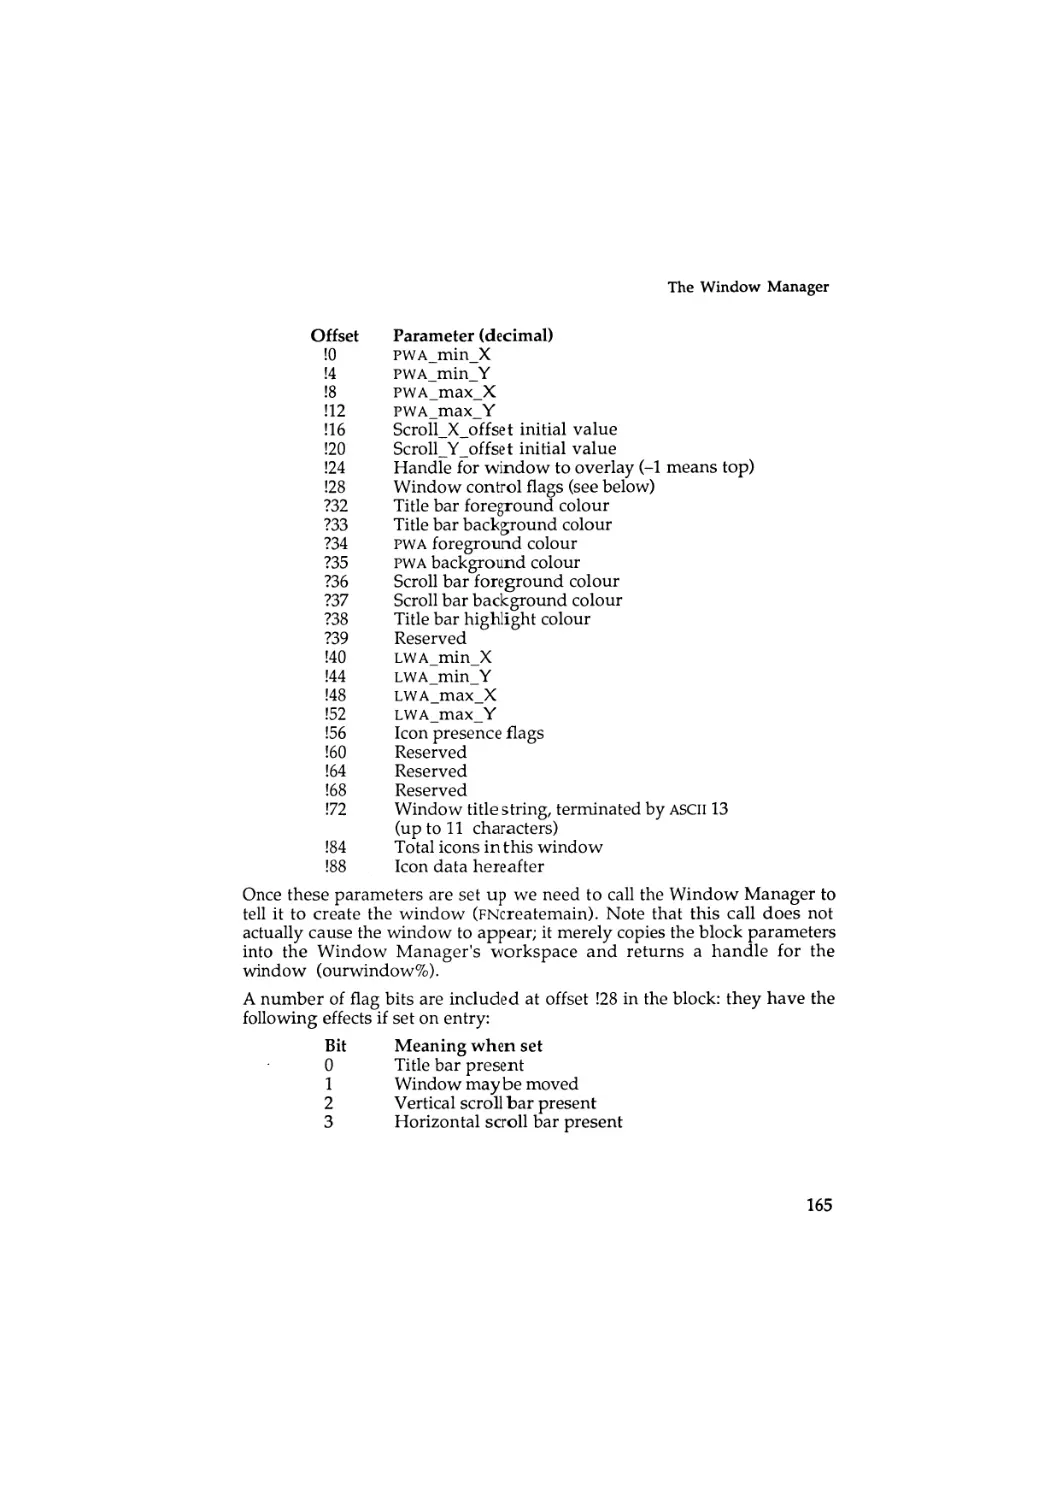
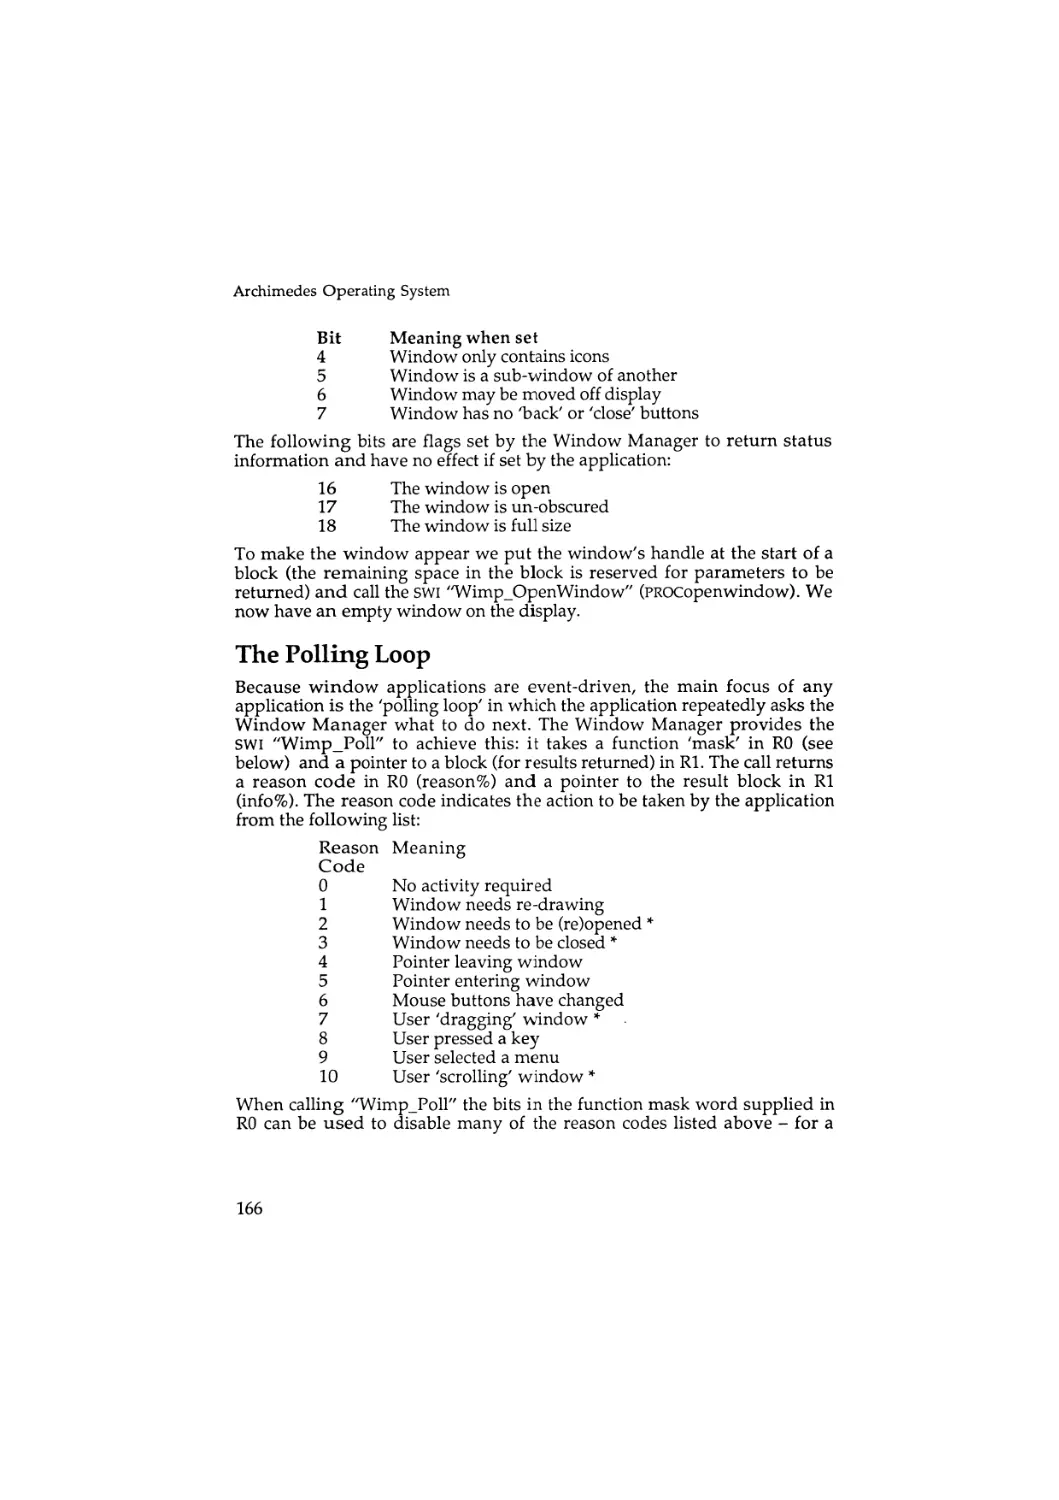
Writing a Window Manager Application
The Polling Loop
Dealing With Reason Codes
Closing Down the Application Window
W i n d o w Manager Support for Menus
The Structure of Menus
Programming Menus
Menus in the WimpMaze Example
1 4 : The Font Manager
Dealing with the Font Manager
An Example
Getting Text on the Display
Plot Type Options
Conversions Between the Co-ordinate Systems
Conclusion
1 5 : Sound Introduction
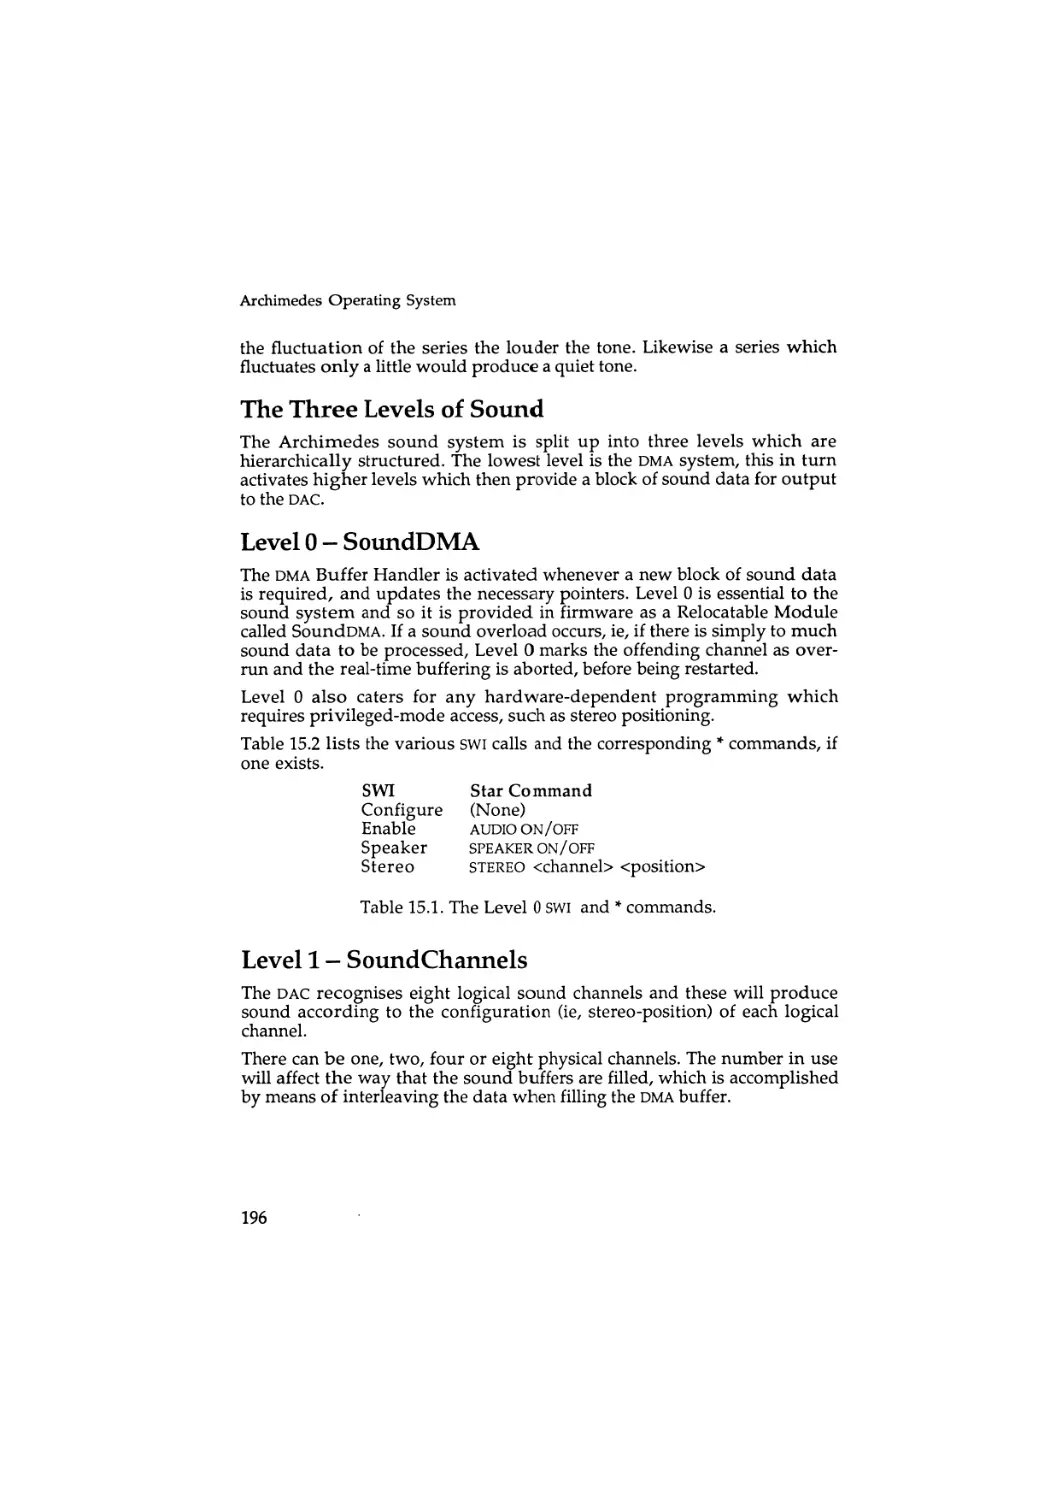
The Three Levels of Sound
Level 0 - SoundDMA
Level 1 - SoundChannels
Level 2 - SoundScheduler
1 6 : Sound Star Commands
Level 0 Commands
Level 1 Commands
Level 2 Commands
1 7 : Sound SWI Calls
Level 0 SWI Commands
Level 1 SWI Commands
8
156
157
161
161
162
163
163
164
166
167
172
172
173
173
175
186
186
187
188
189
190
193
195
196
196
196
197
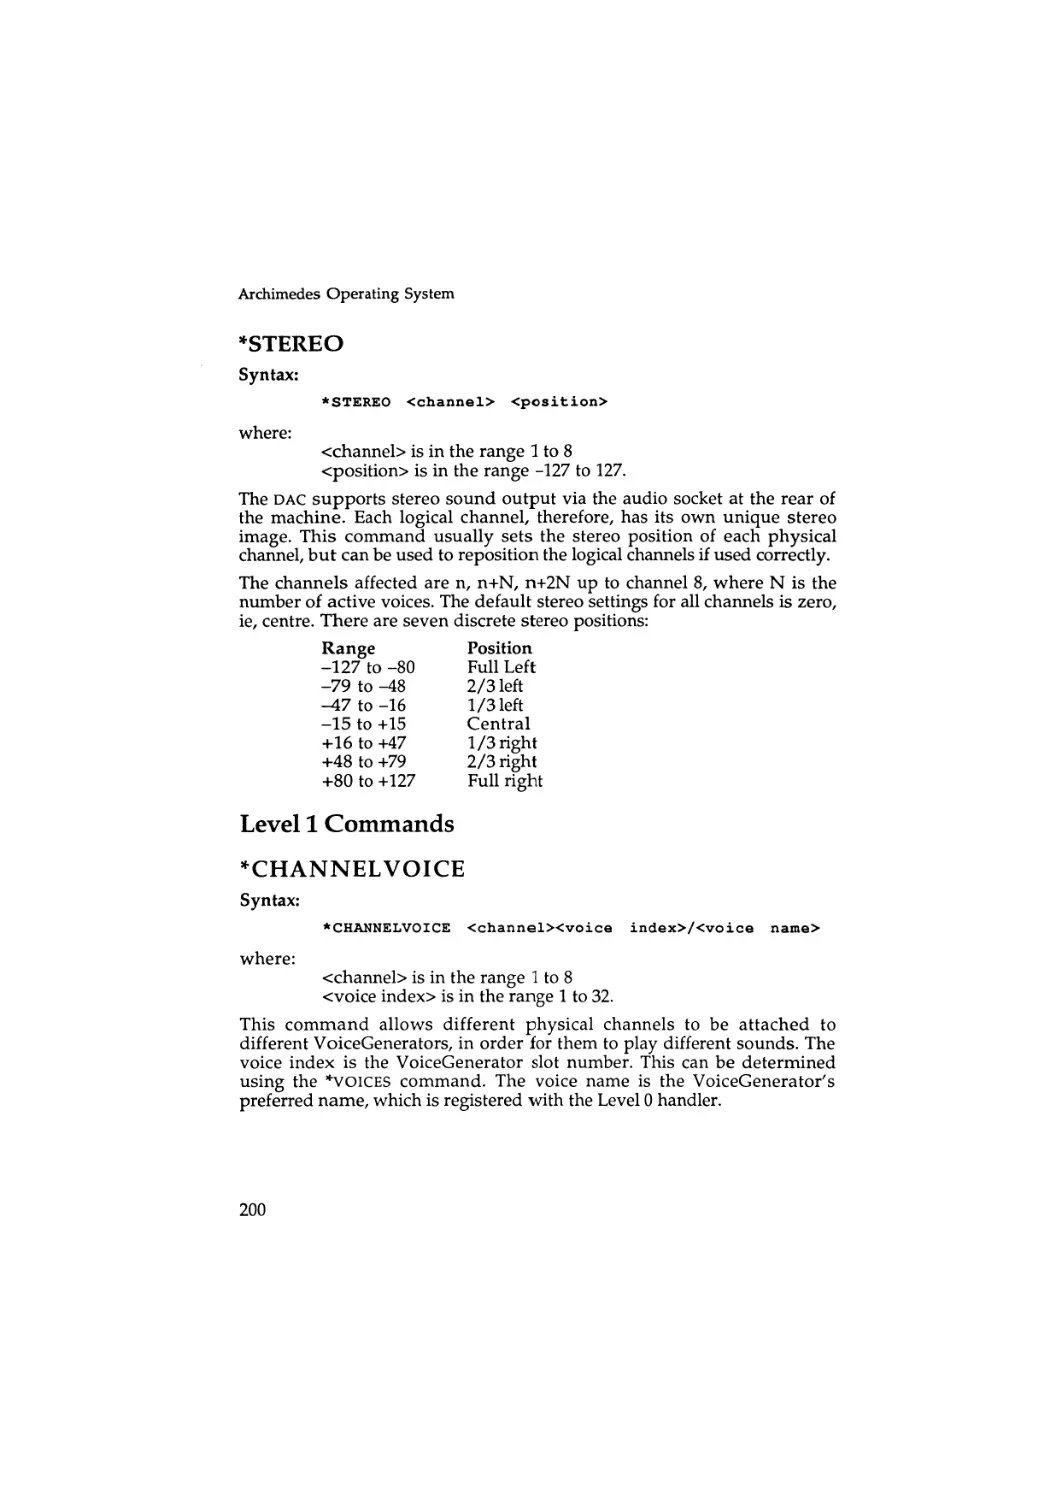
199
199
200
205
207
207
215
Contents
Level 2 SWI Commands
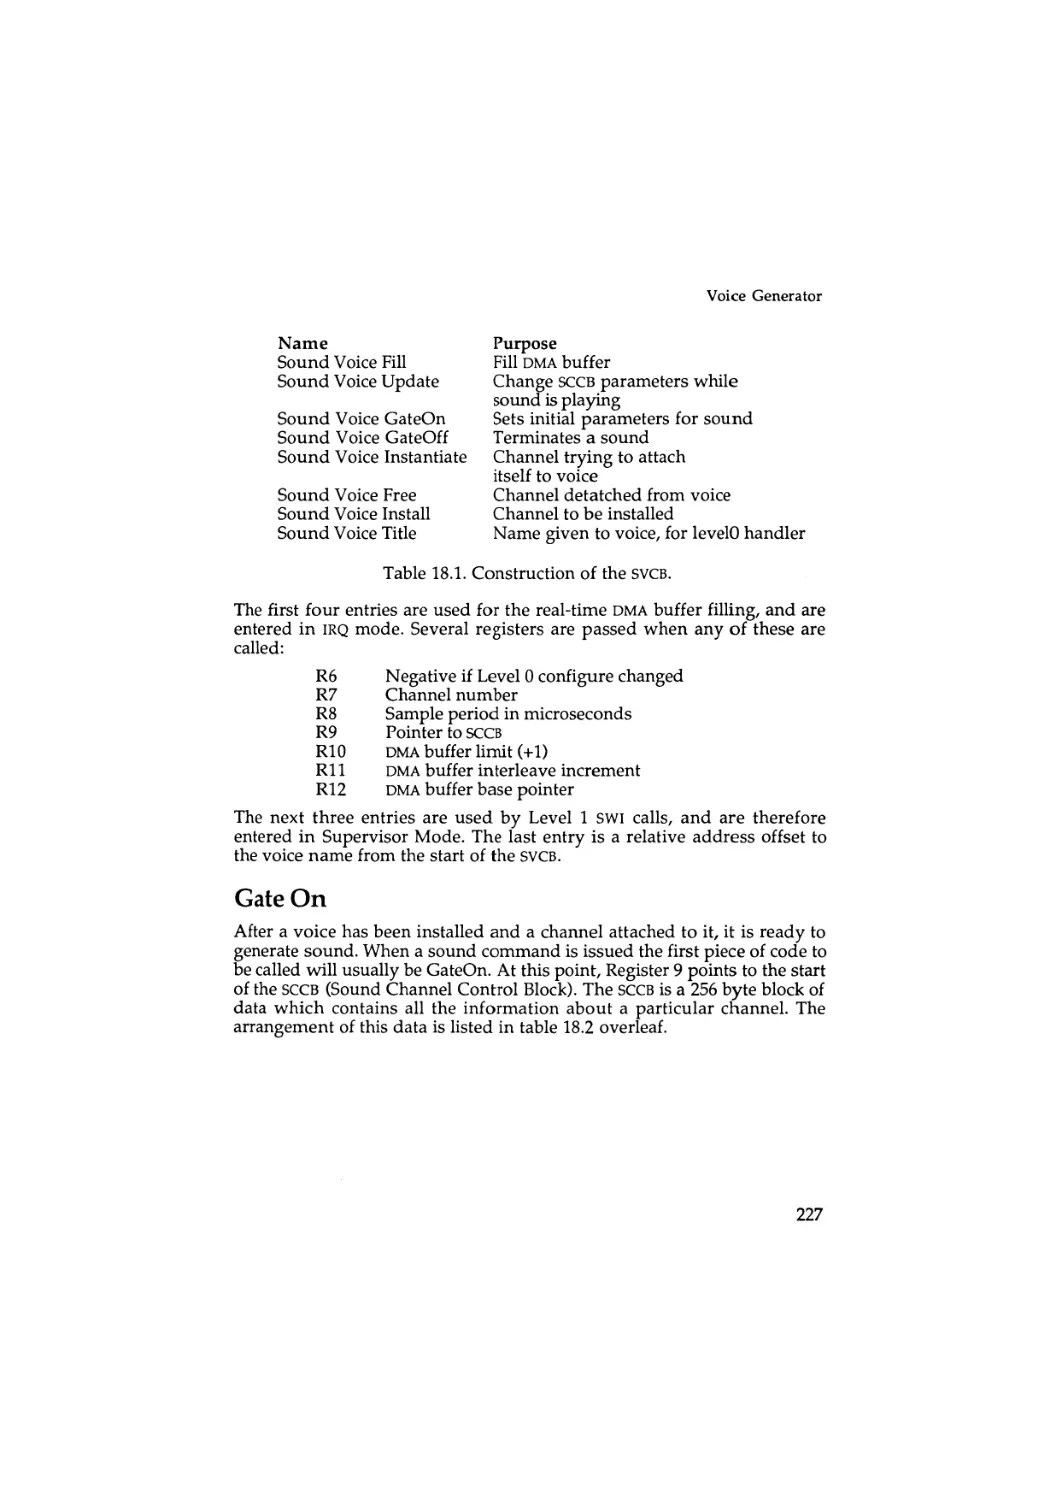
18 : The Voice Generator
The SVCB
Gate On
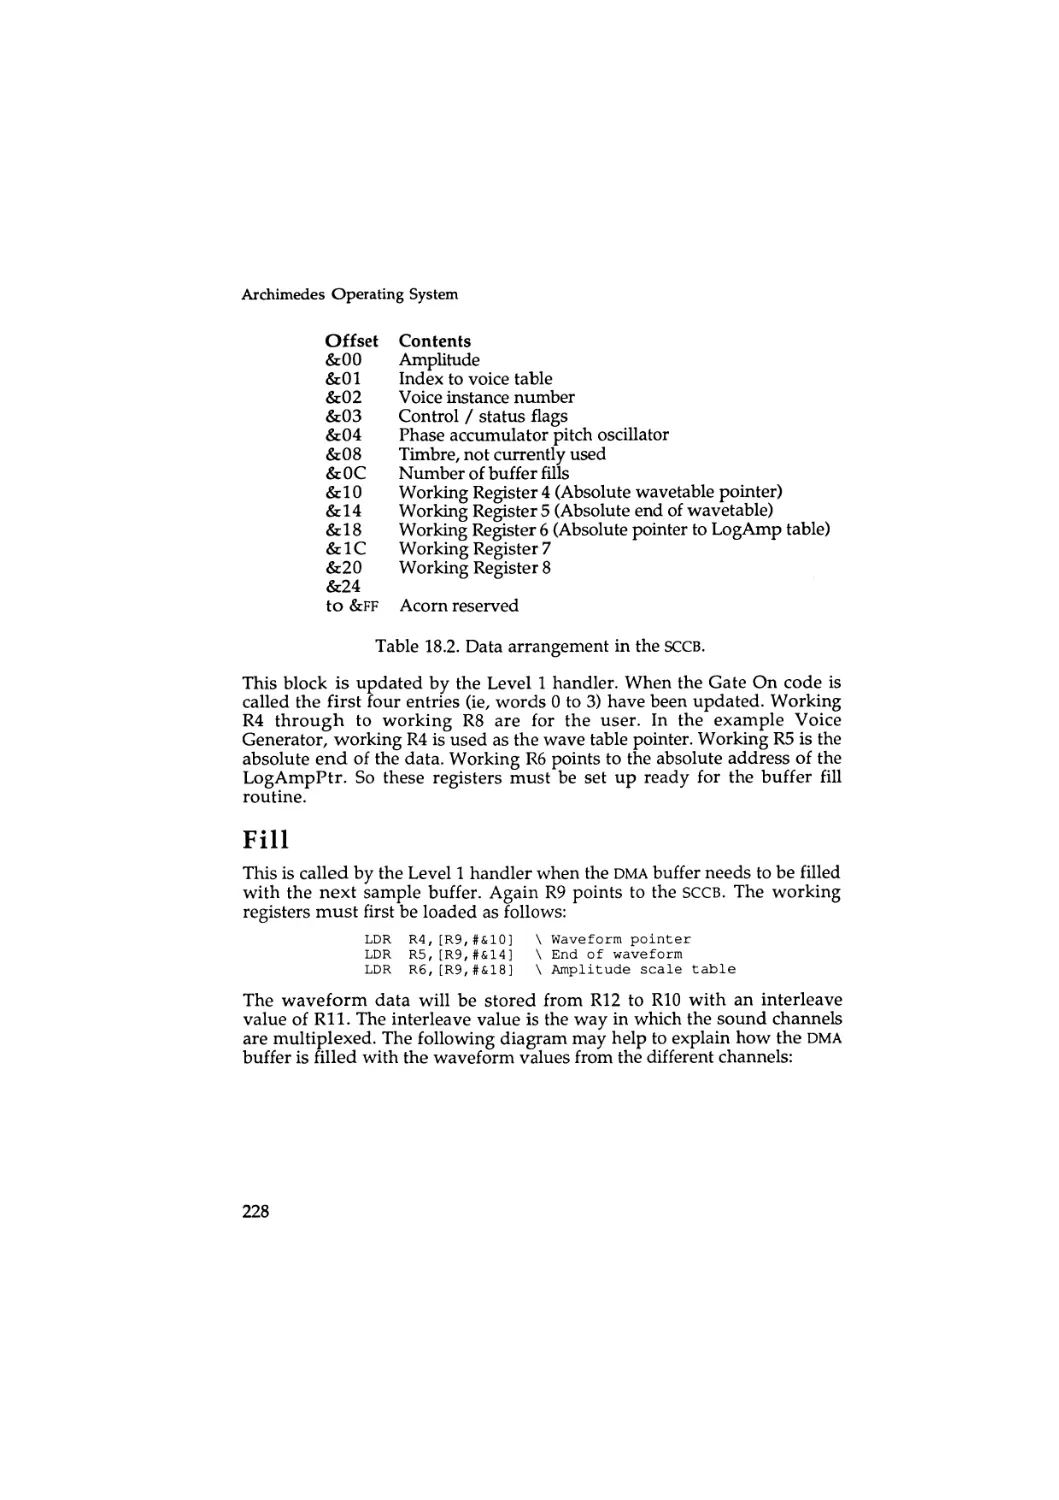
Fill
Gate Off
Update
Instantiate
Free
Install
Voice Generator Code
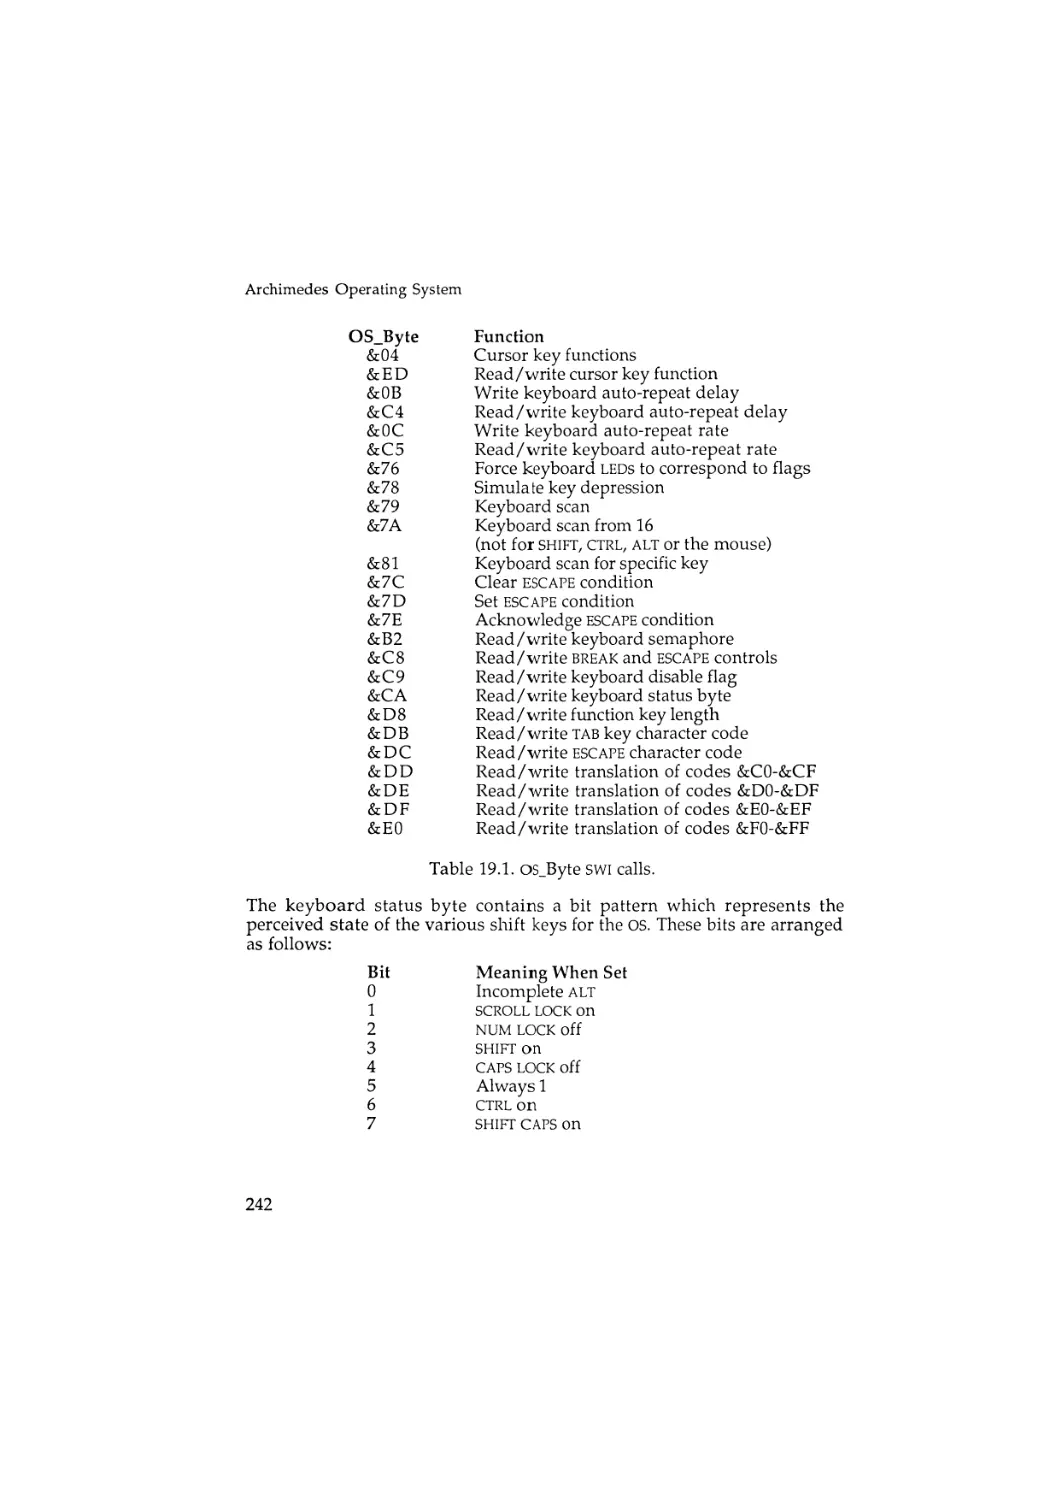
19 : Character Input/Output
Simple Input/Output
Character Input
Getting Hold of Single Characters
Whole Lines of Characters
Keyboard Control Functions
Character Output
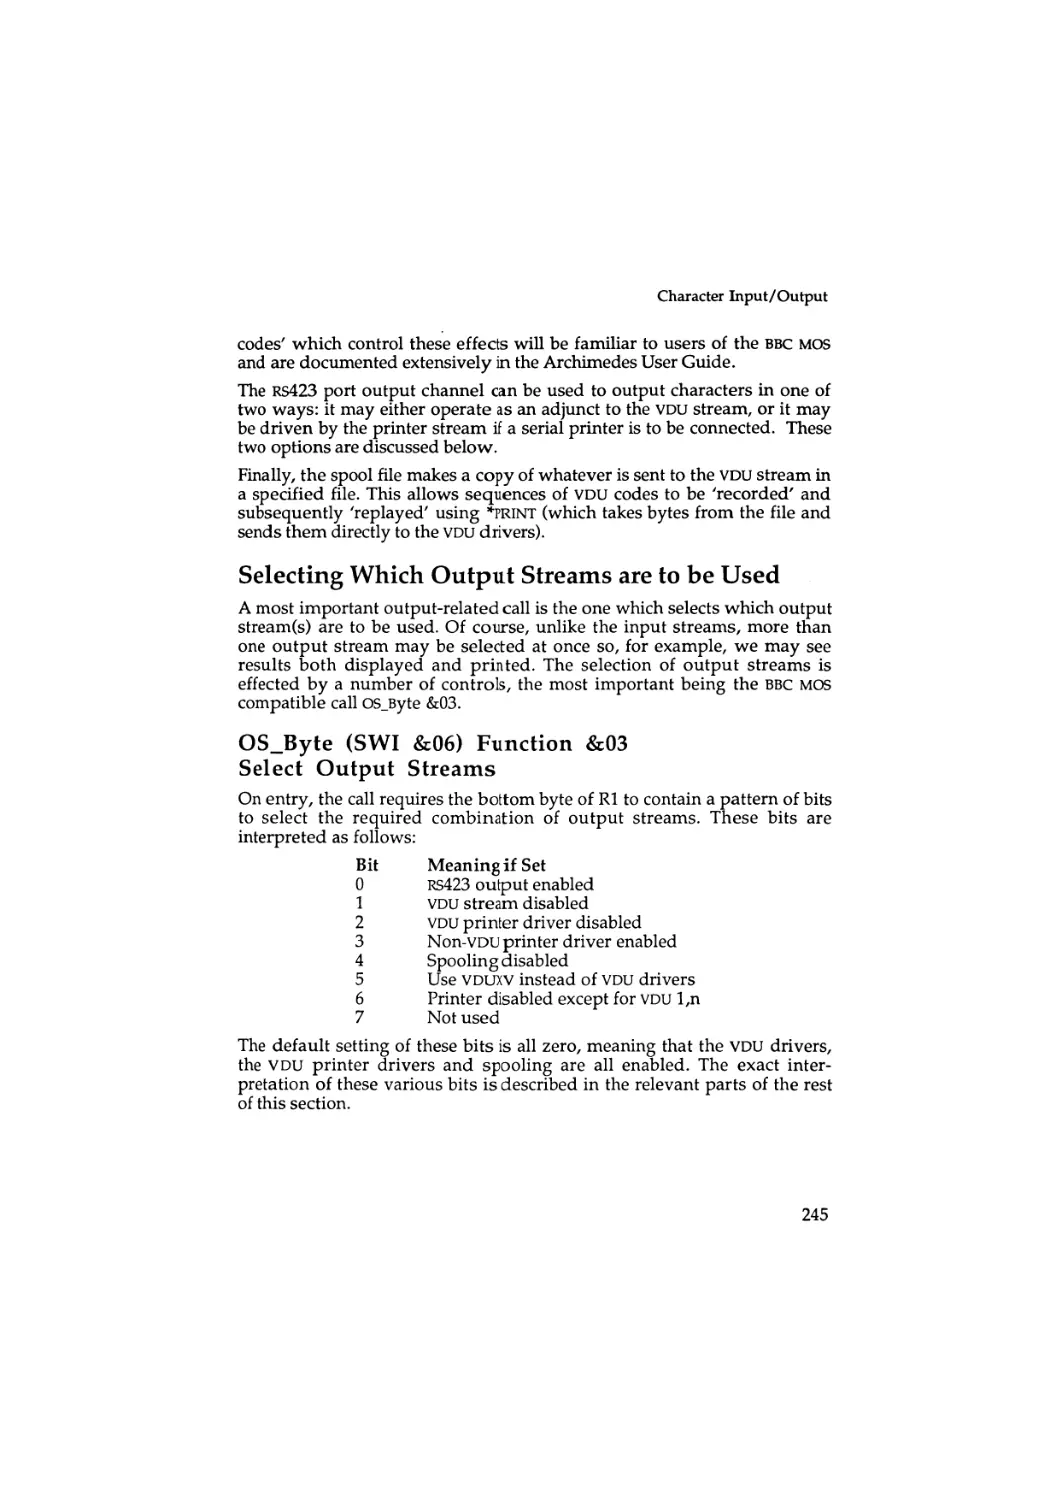
Selecting Which Output Streams are to be Used
Selecting the V D U Stream
Selecting the RS423 Output Stream
Selecting the Printer Stream
Selecting the Spool File Stream
Character Output to the Selected Streams
2 0 : Vectors
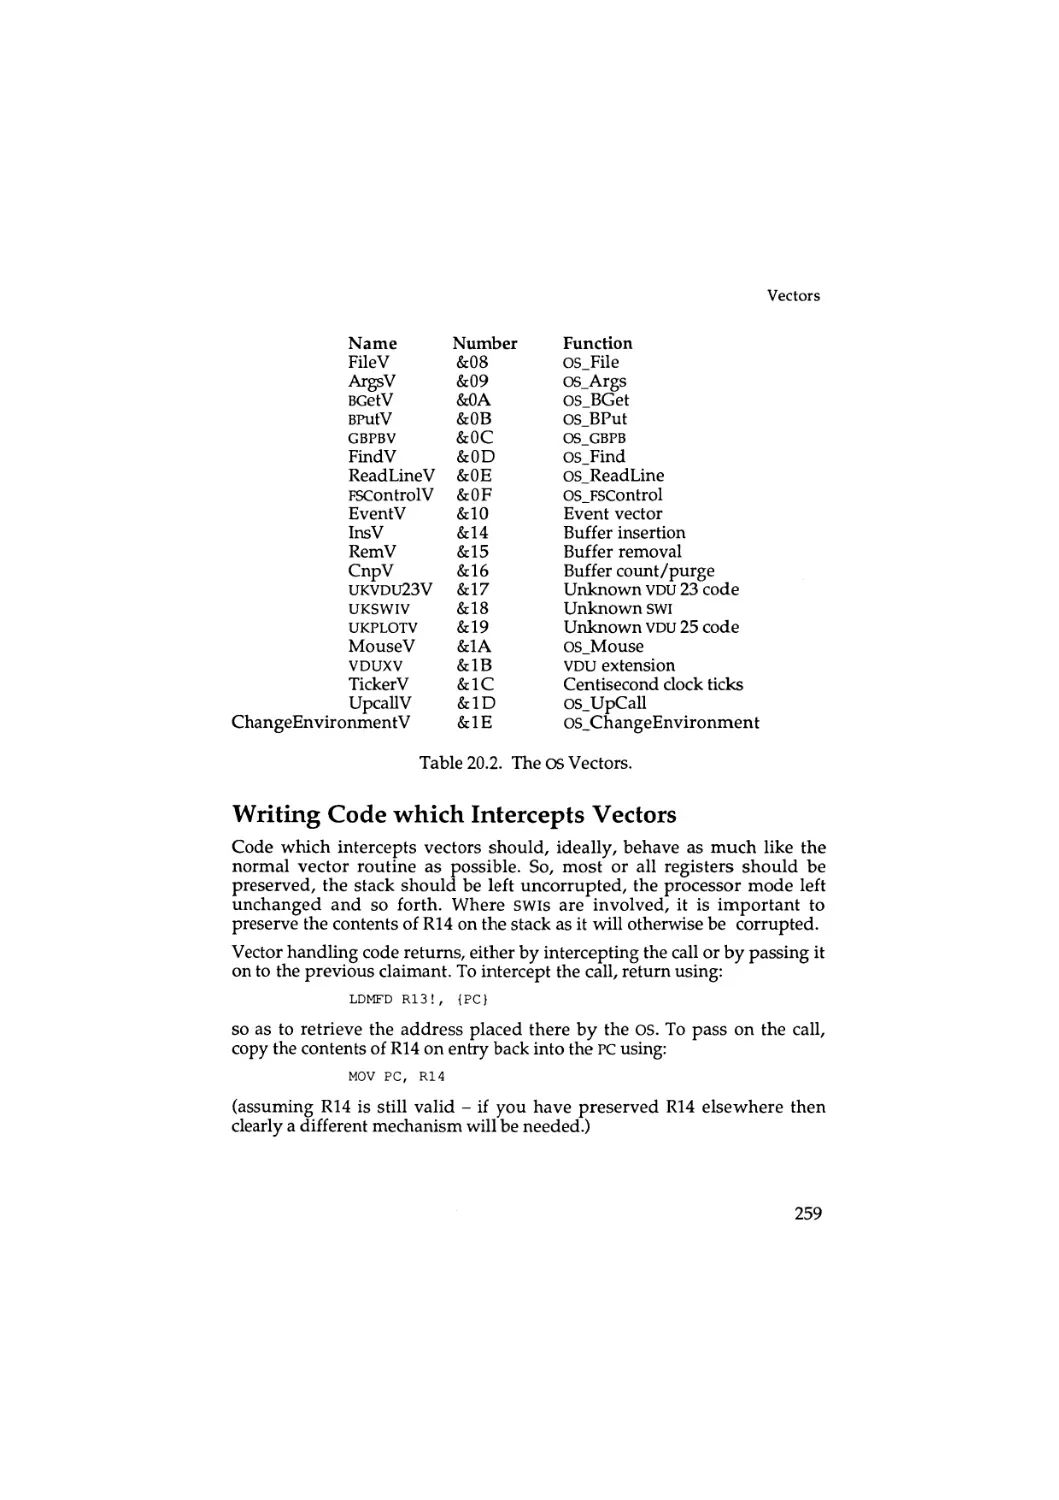
The Hardware Vectors
The Operating System Software Vectors
Writing Code which Intercepts Vectors
SWIs Which Deal with Vectors
221
226
226
227
228
231
232
232
232
232
232
238
238
238
239
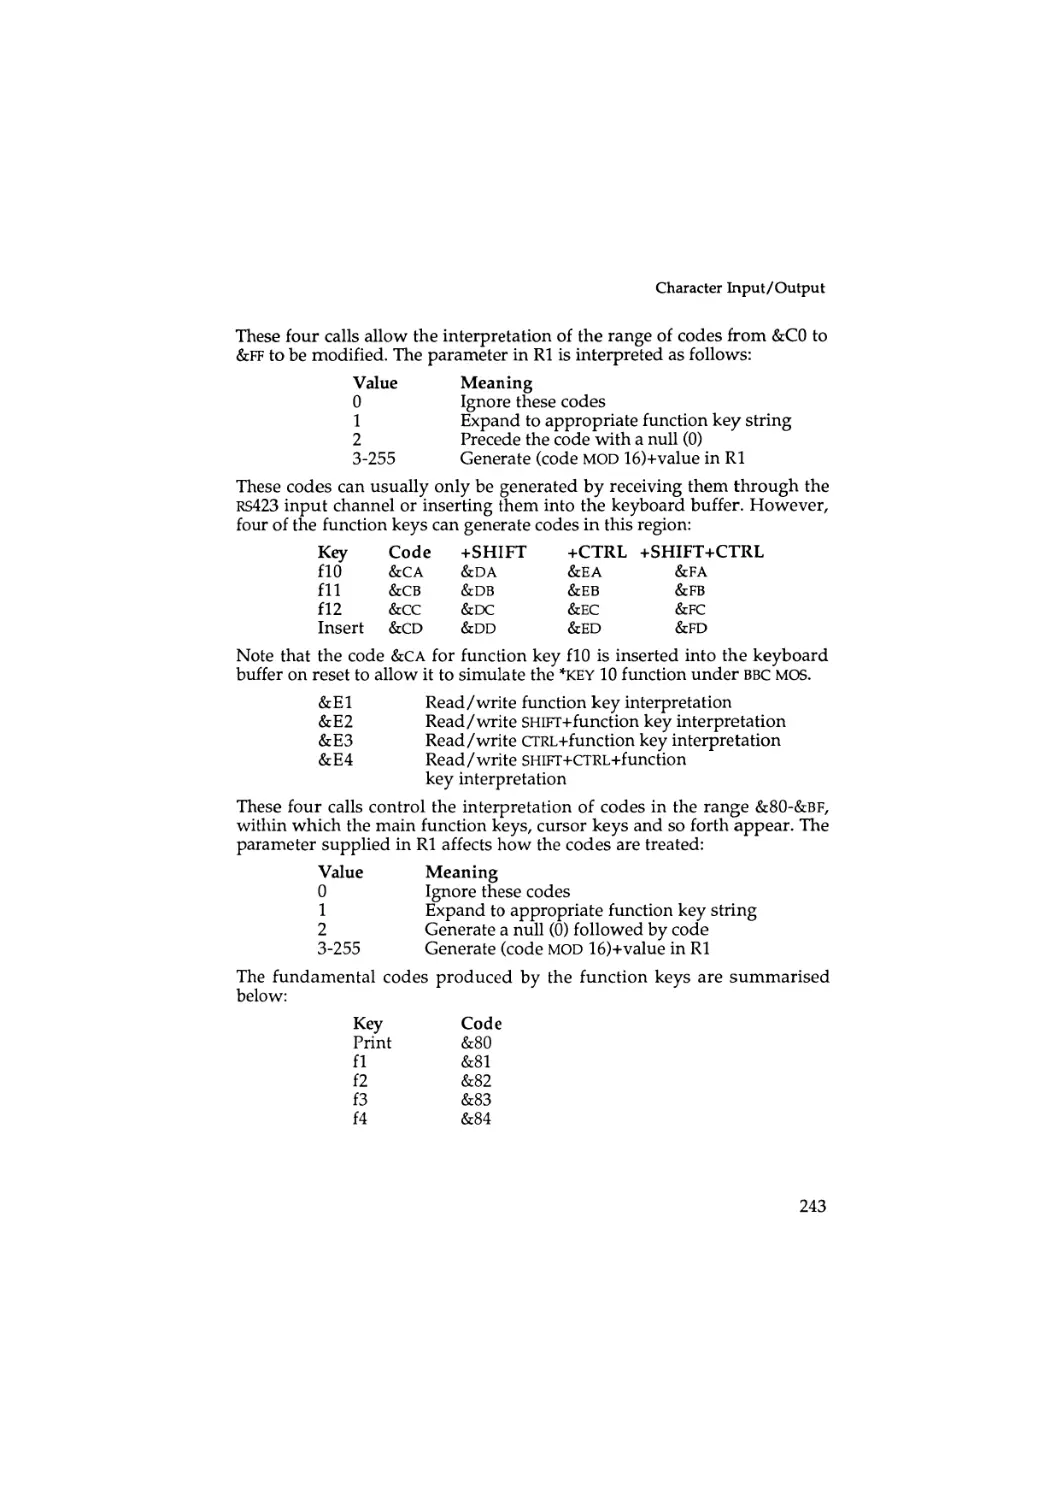
240
241
244
245
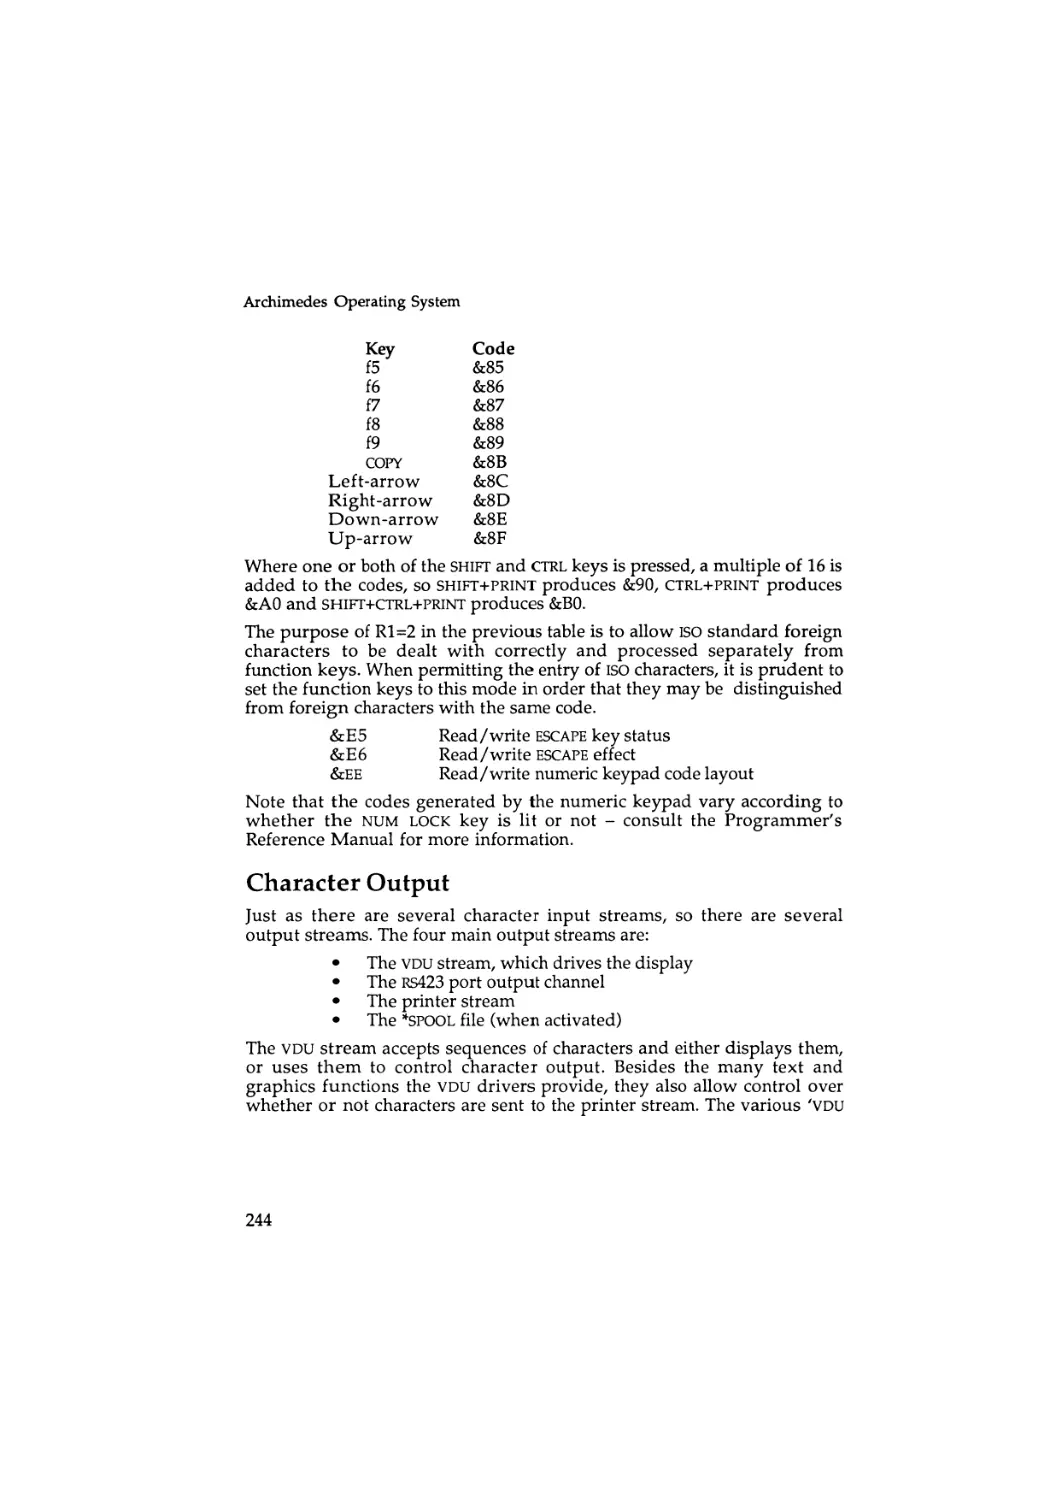
246
246
246
247
248
255
255
258
259
260
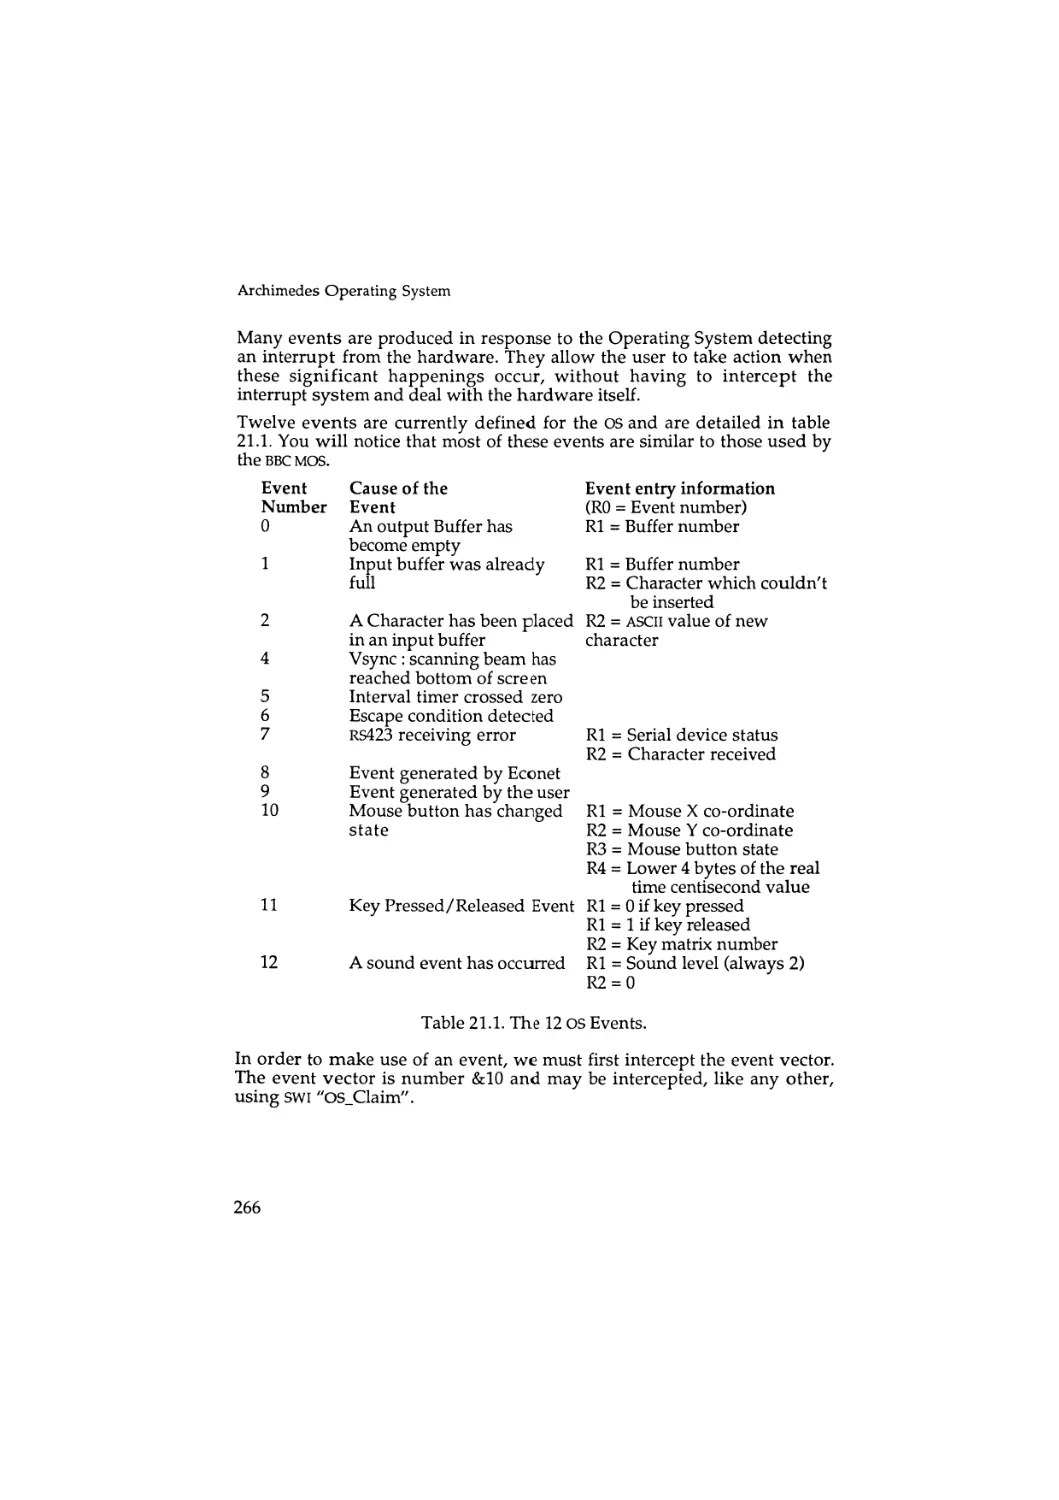
2 1 : Interrupts and Events
263
Good Behaviour
Switching Interrupts on and Off
The Main Interrupt Vector
Events
264
264
265
265
9
Archimedes Operating System
2 2 : Conversion SWIs
271
23 : Miscellaneous SWIs
278
String Conversion and Decoding
ASCII to Binary Conversions
Binary to ASCII Conversions
Timer Functions
V D U Related SWIs
24 : The ARM Chip Set
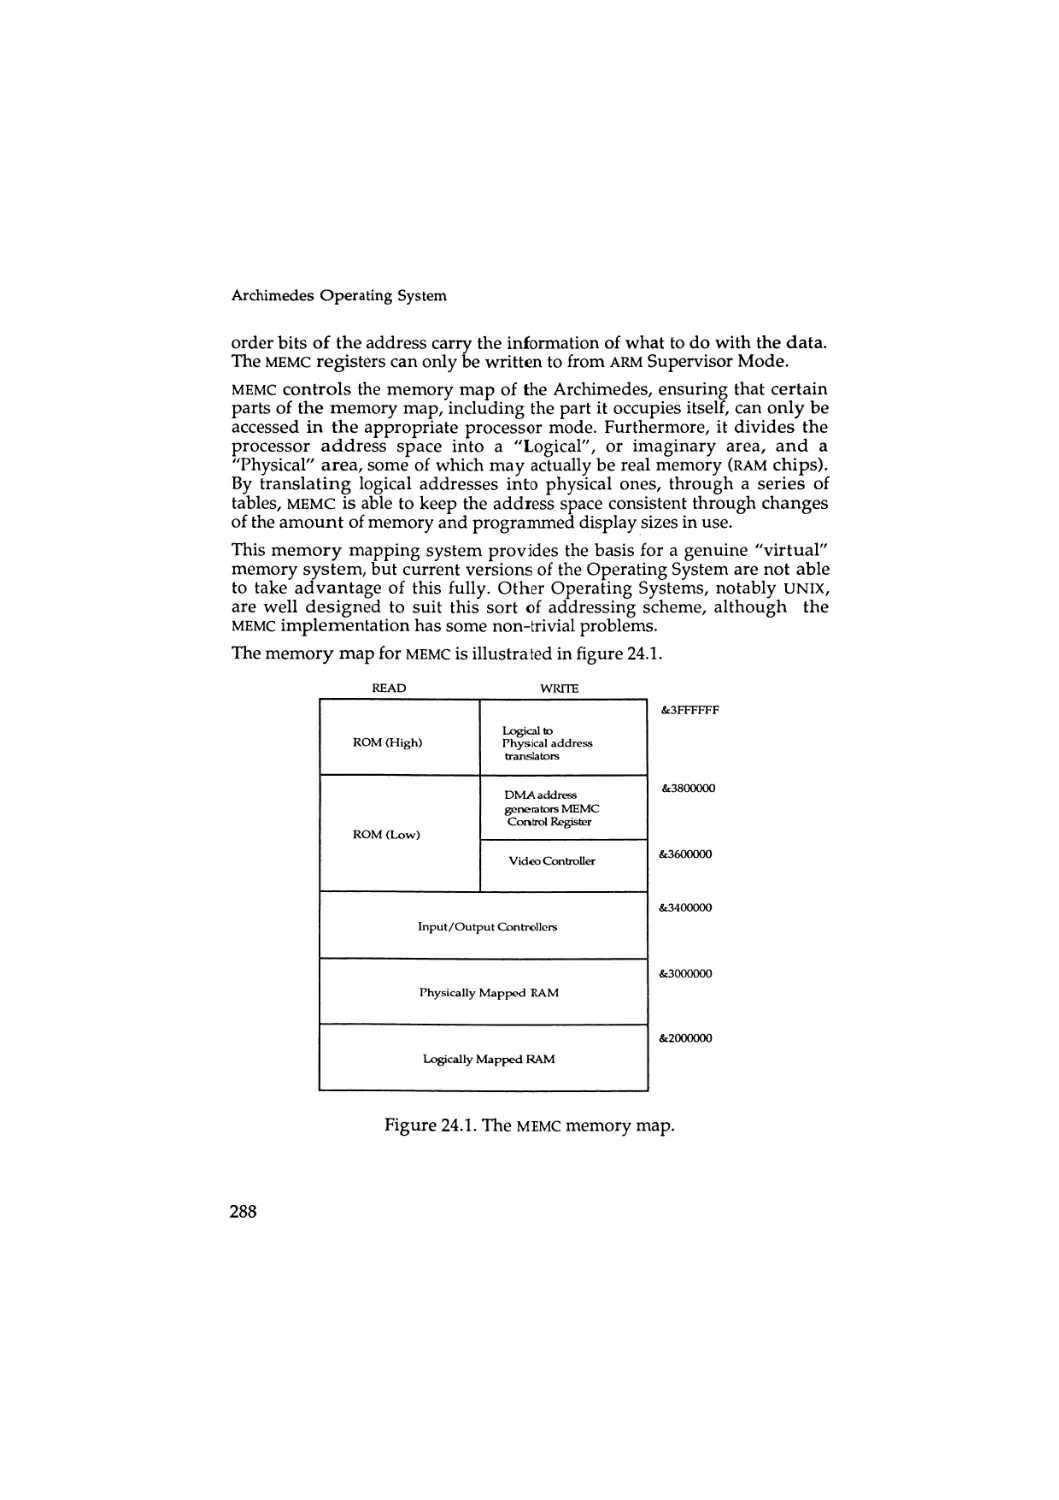
Inside M E M C
Virtual Memory Support
The MEMC Control Register
The Logical to Physical Translator
DMA Address Generators
Inside VIDC
Sound Frequency and Stereo Position
Inside IOC
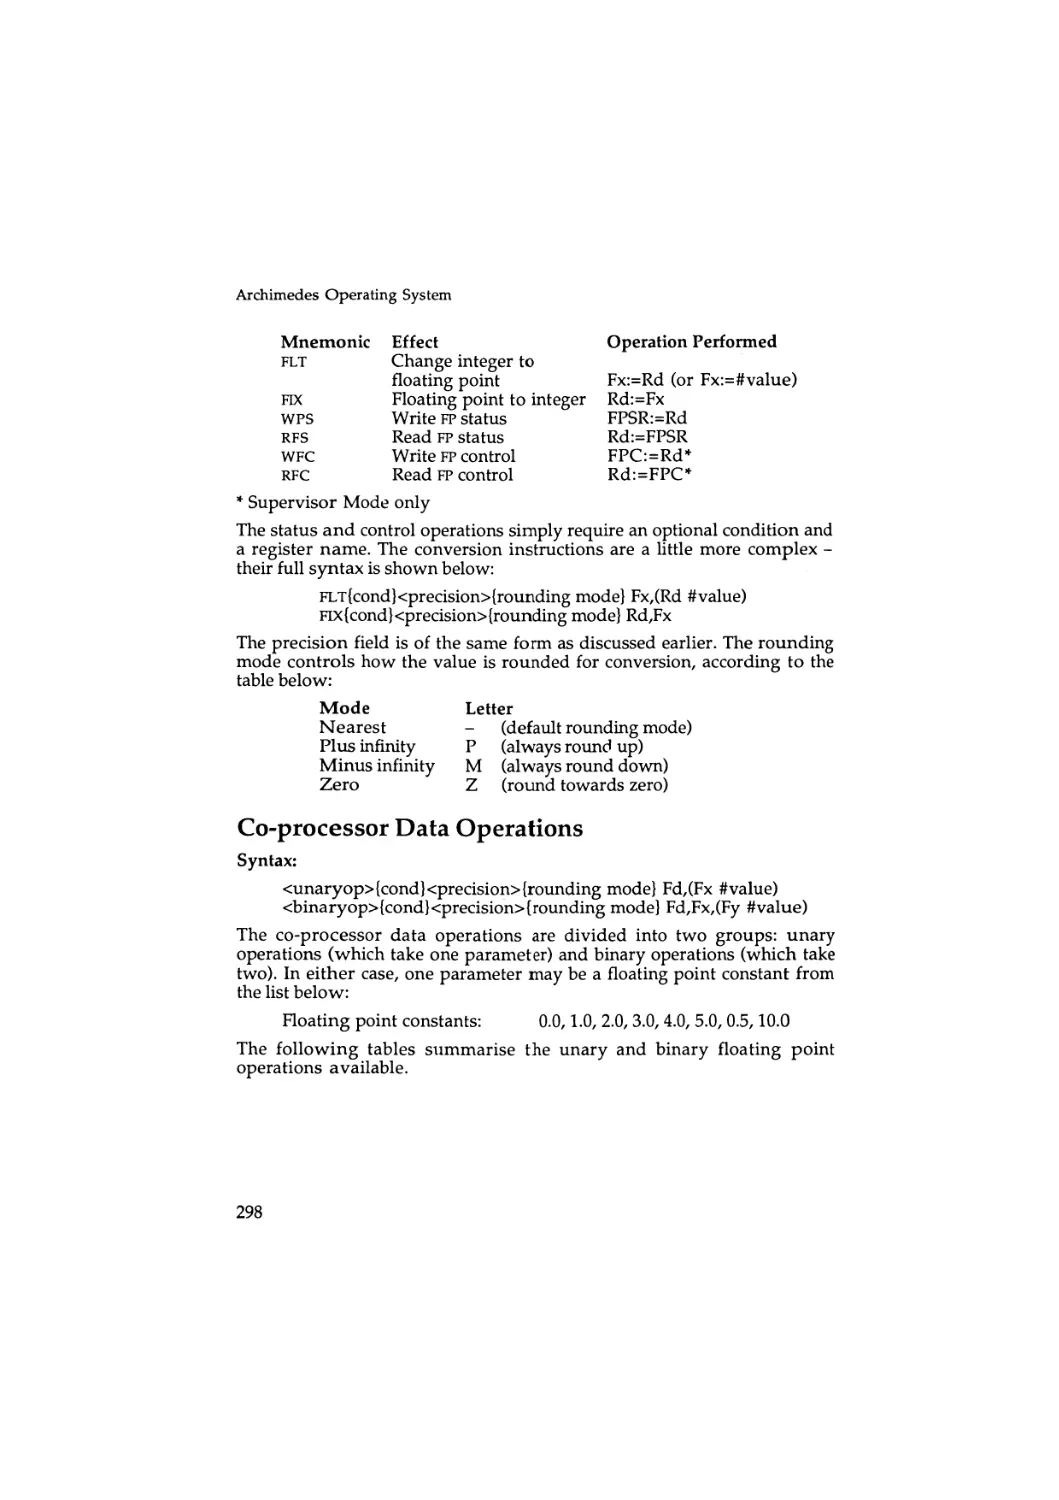
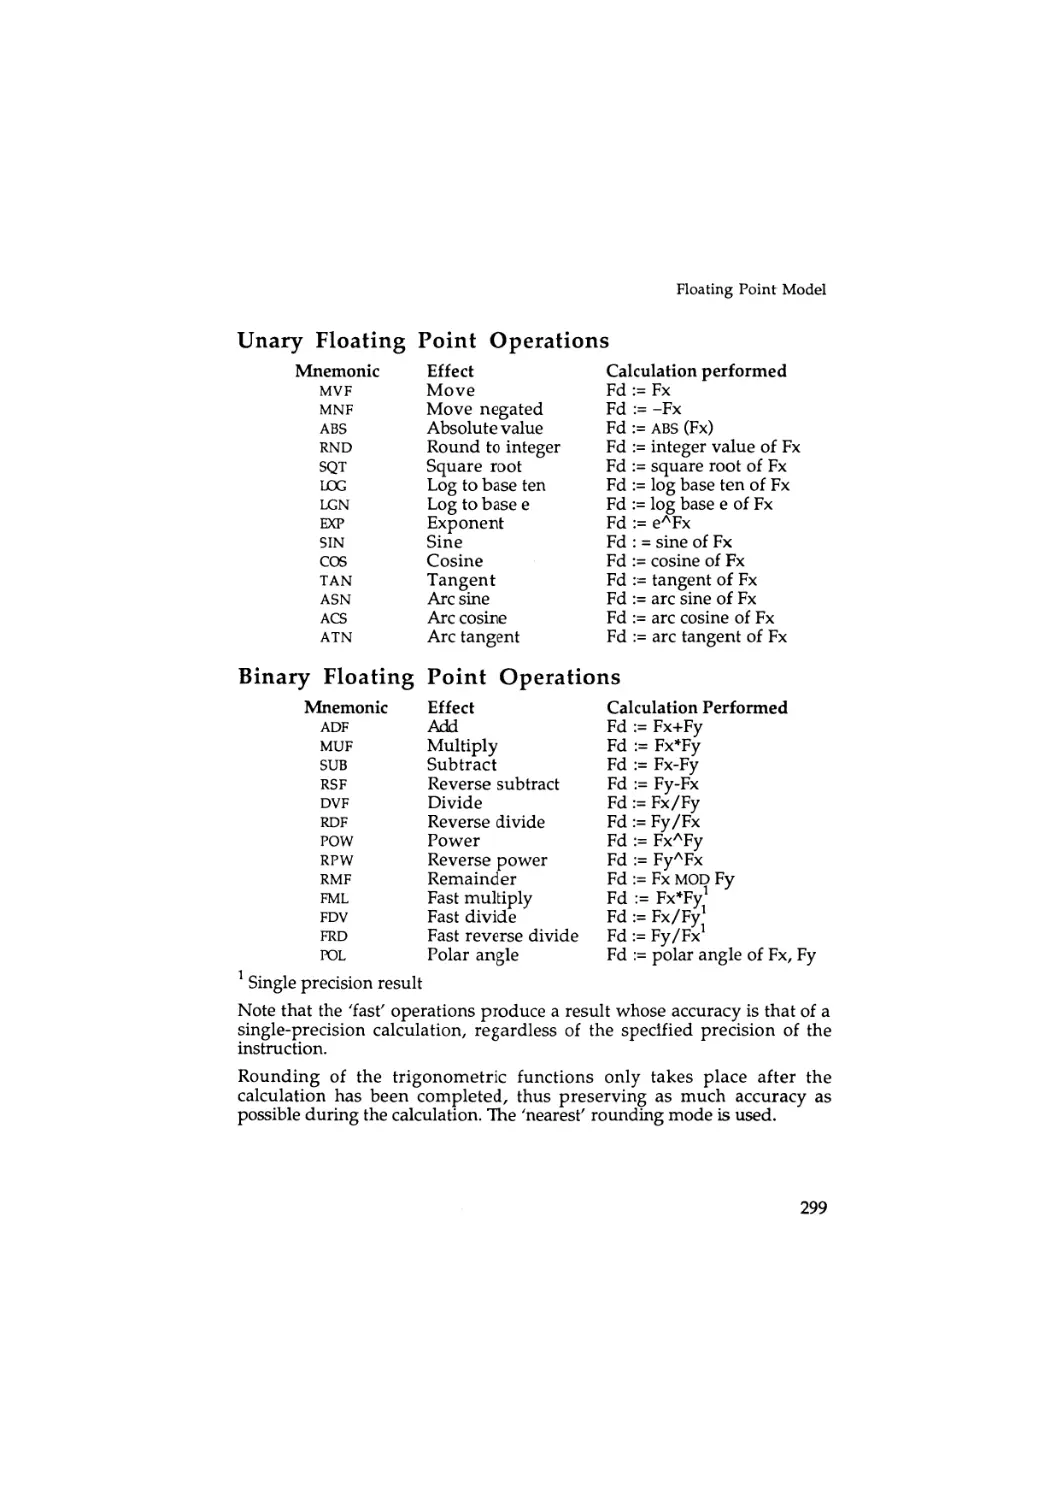
25 : Floating Point Model
Floating Point Programmer's Model
The A R M Floating Point Instructions
Co-processor Data Transfer
Co-processor Register Transfer
Co-processor Data Operations
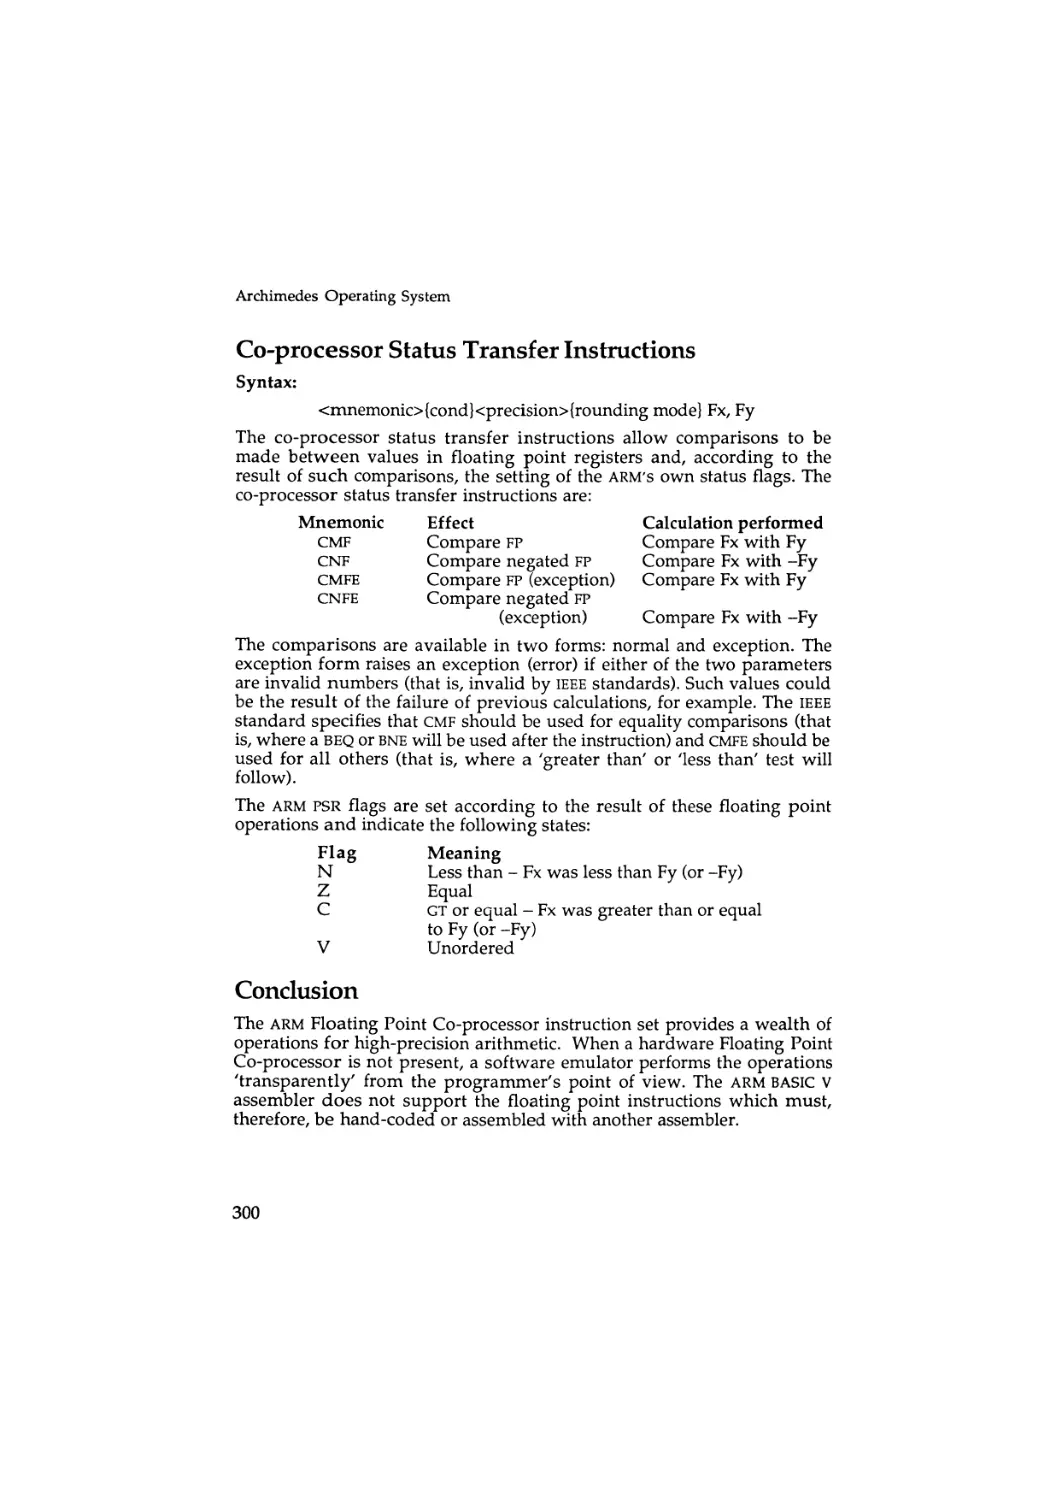
Co-processor Status Transfer Instructions
Conclusion
271
273
274
278
281
287
287
289
289
290
290
291
292
293
295
295
296
297
297
298
300
300
Appendices
A : Programs Disc
B : Dabhand Guides Guide
Index
10
302
304
311
Contents
Program Listings
4.1.
4.2.
6.1.
9.1.
9.2.
9.3.
9.4.
9.5.
9.6.
9.7.
11.1.
12.1.
12.2.
12.3.
13.1.
14.1.
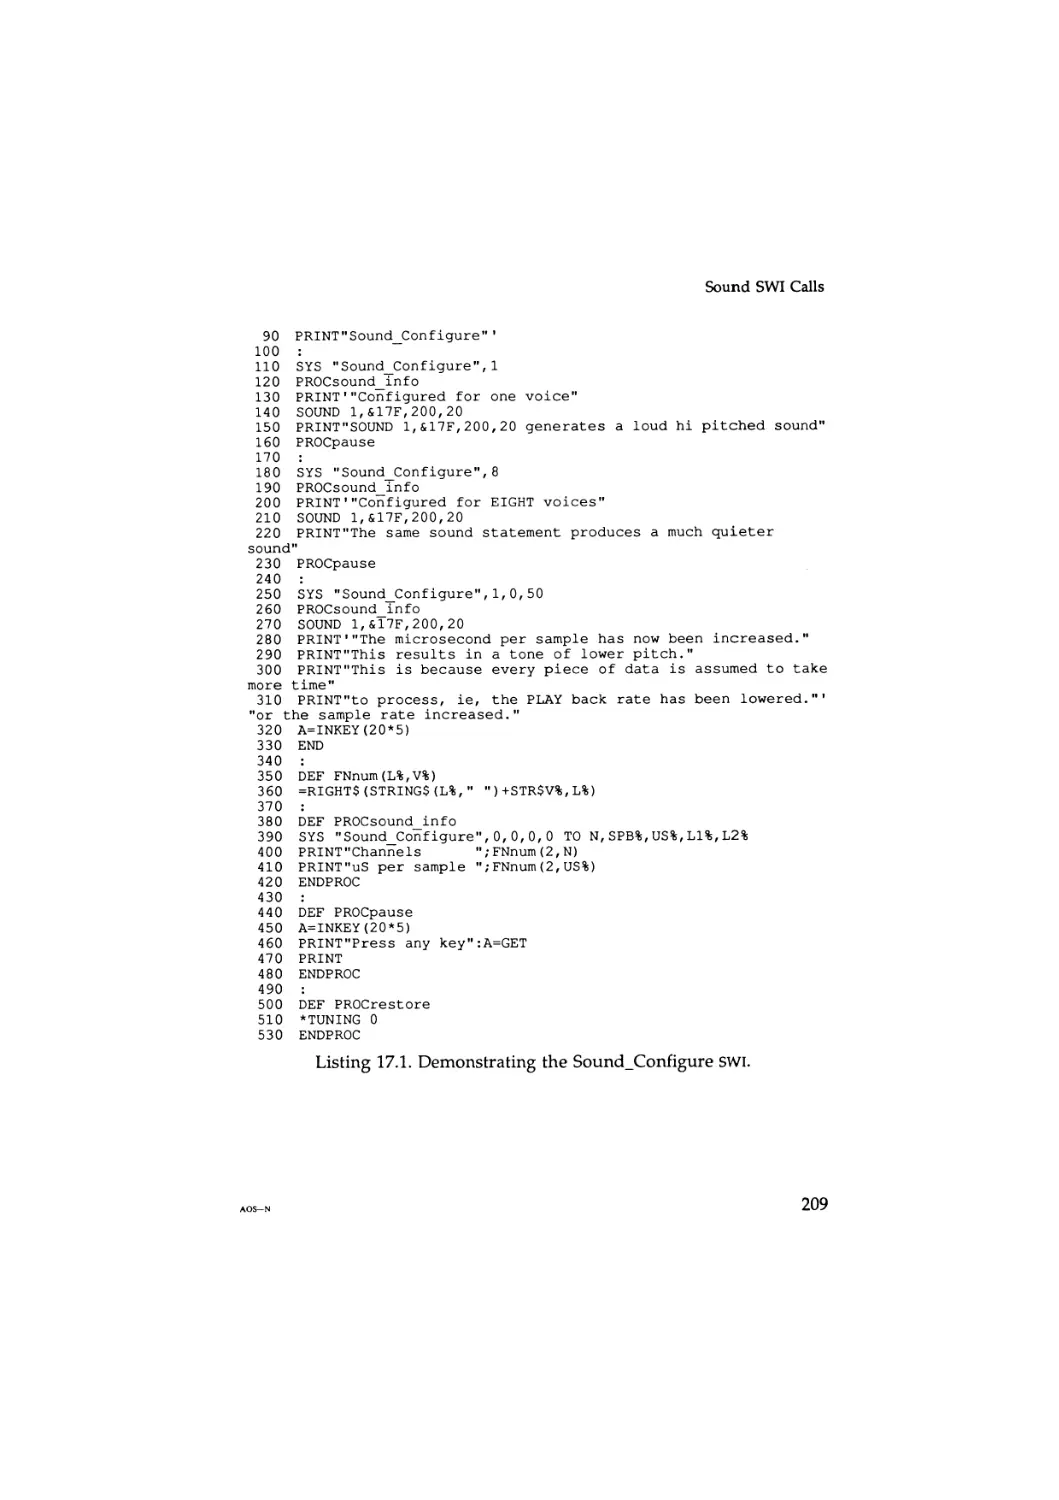
17.1.
17.2.
17.3.
17.4.
17.5.
17.6.
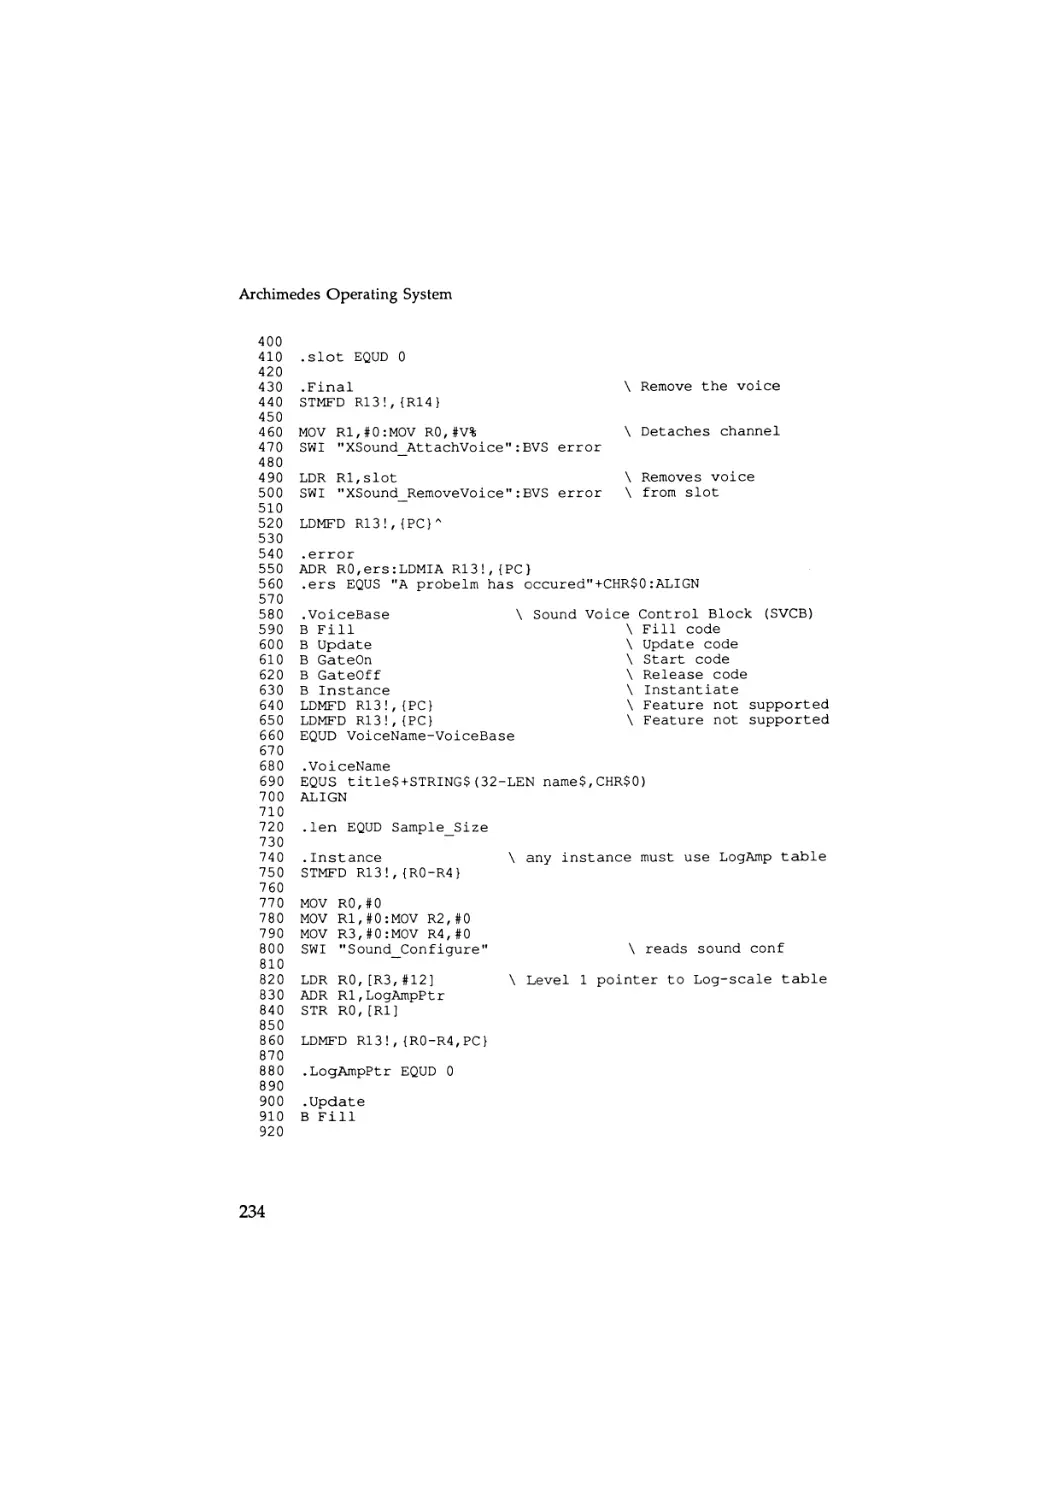
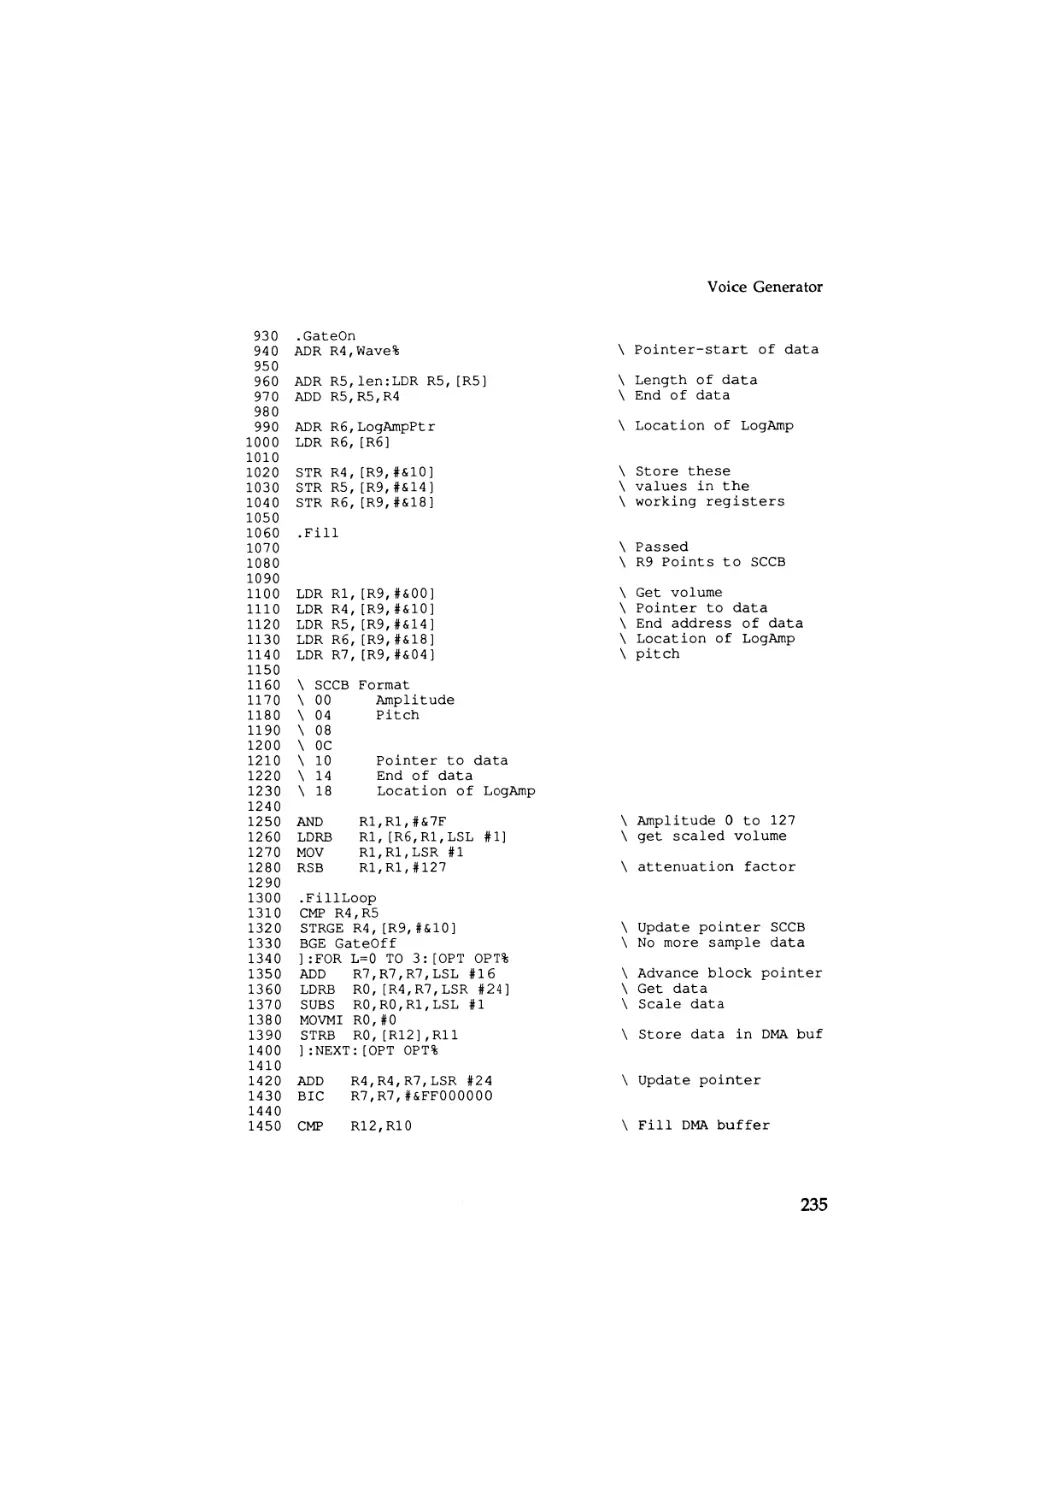
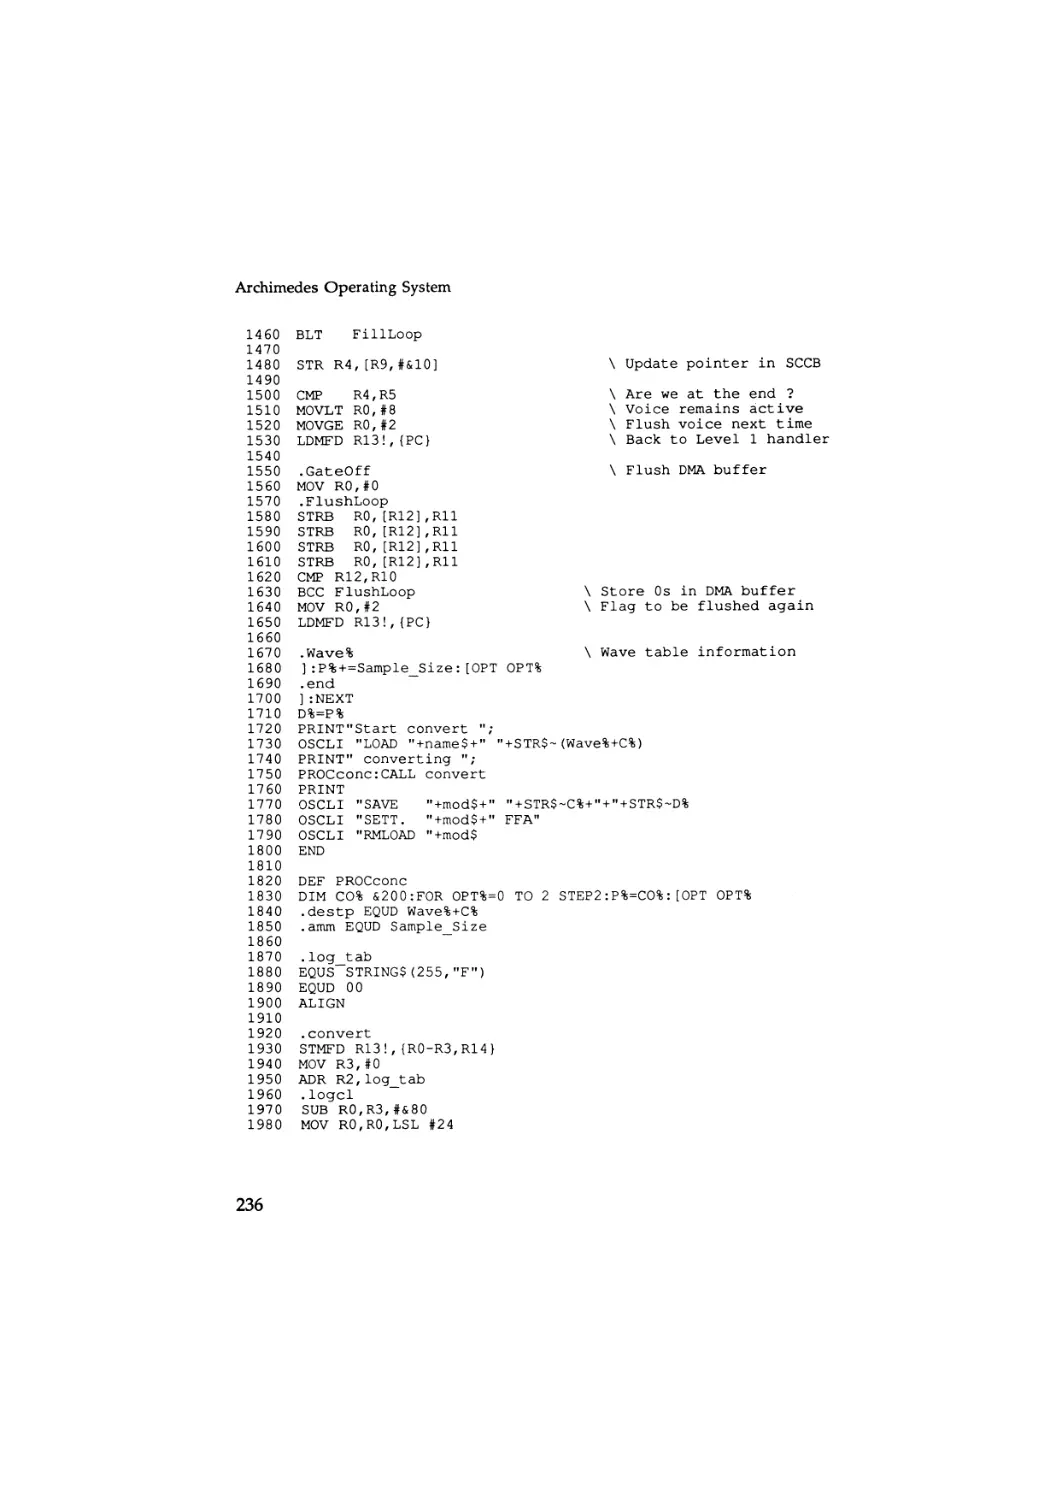
18.1.
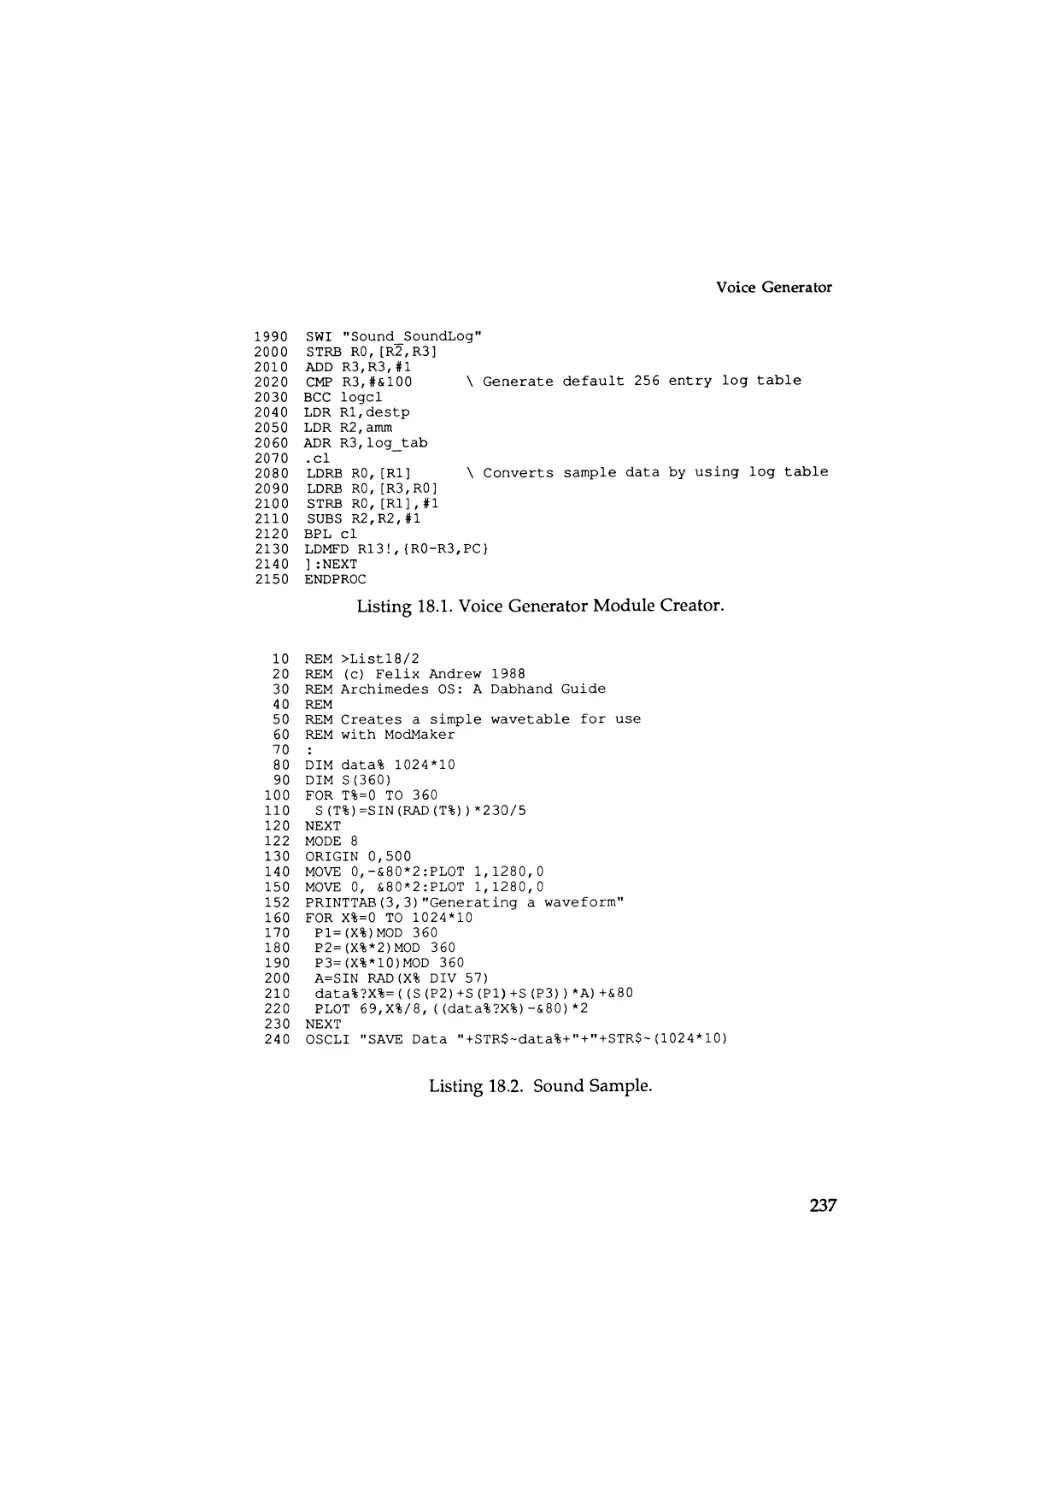
18.2.
19.1.
19.2.
19.3.
20.1.
20.2.
20.3.
21.1.
21.2.
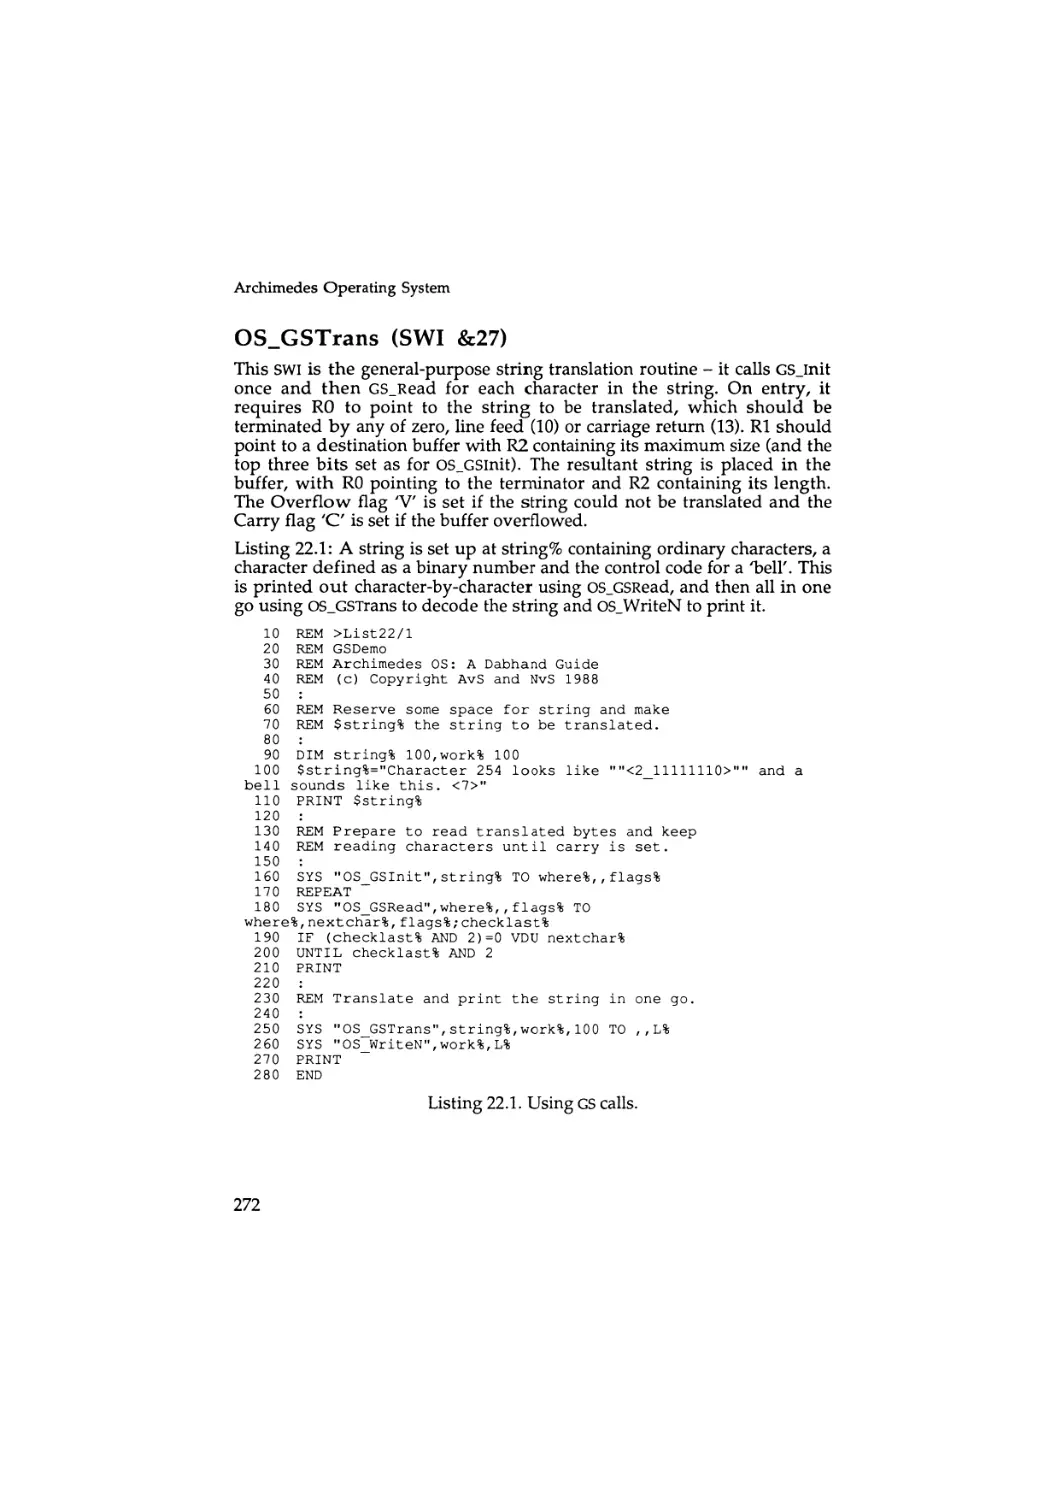
22.1.
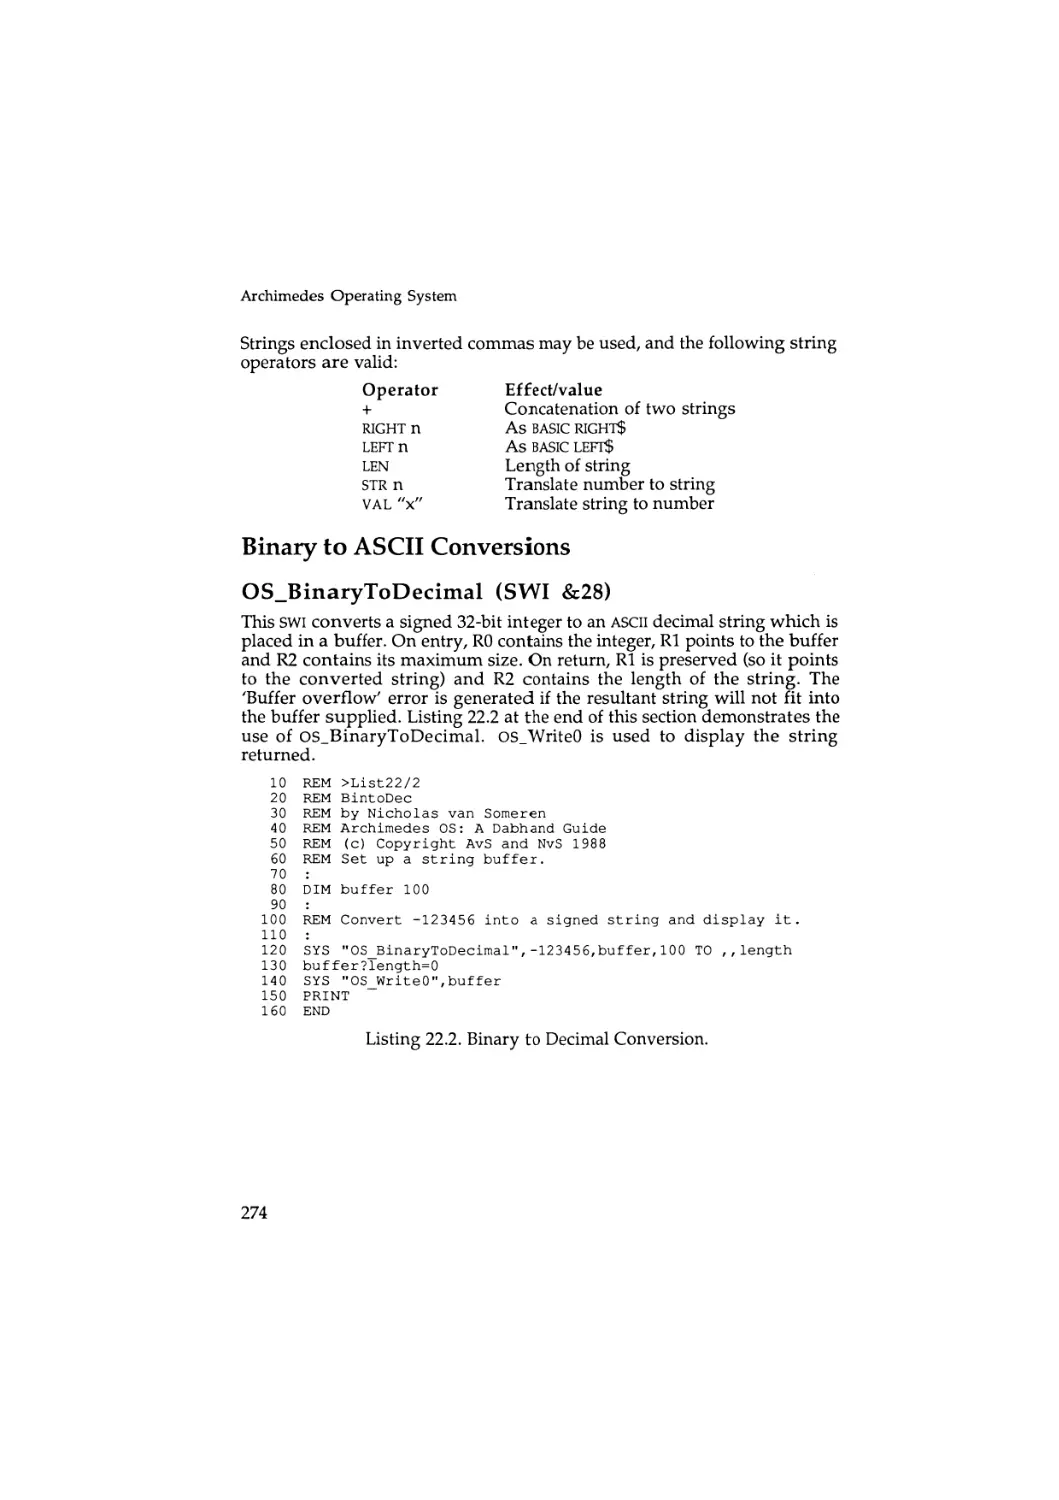
22.2.
22.3.
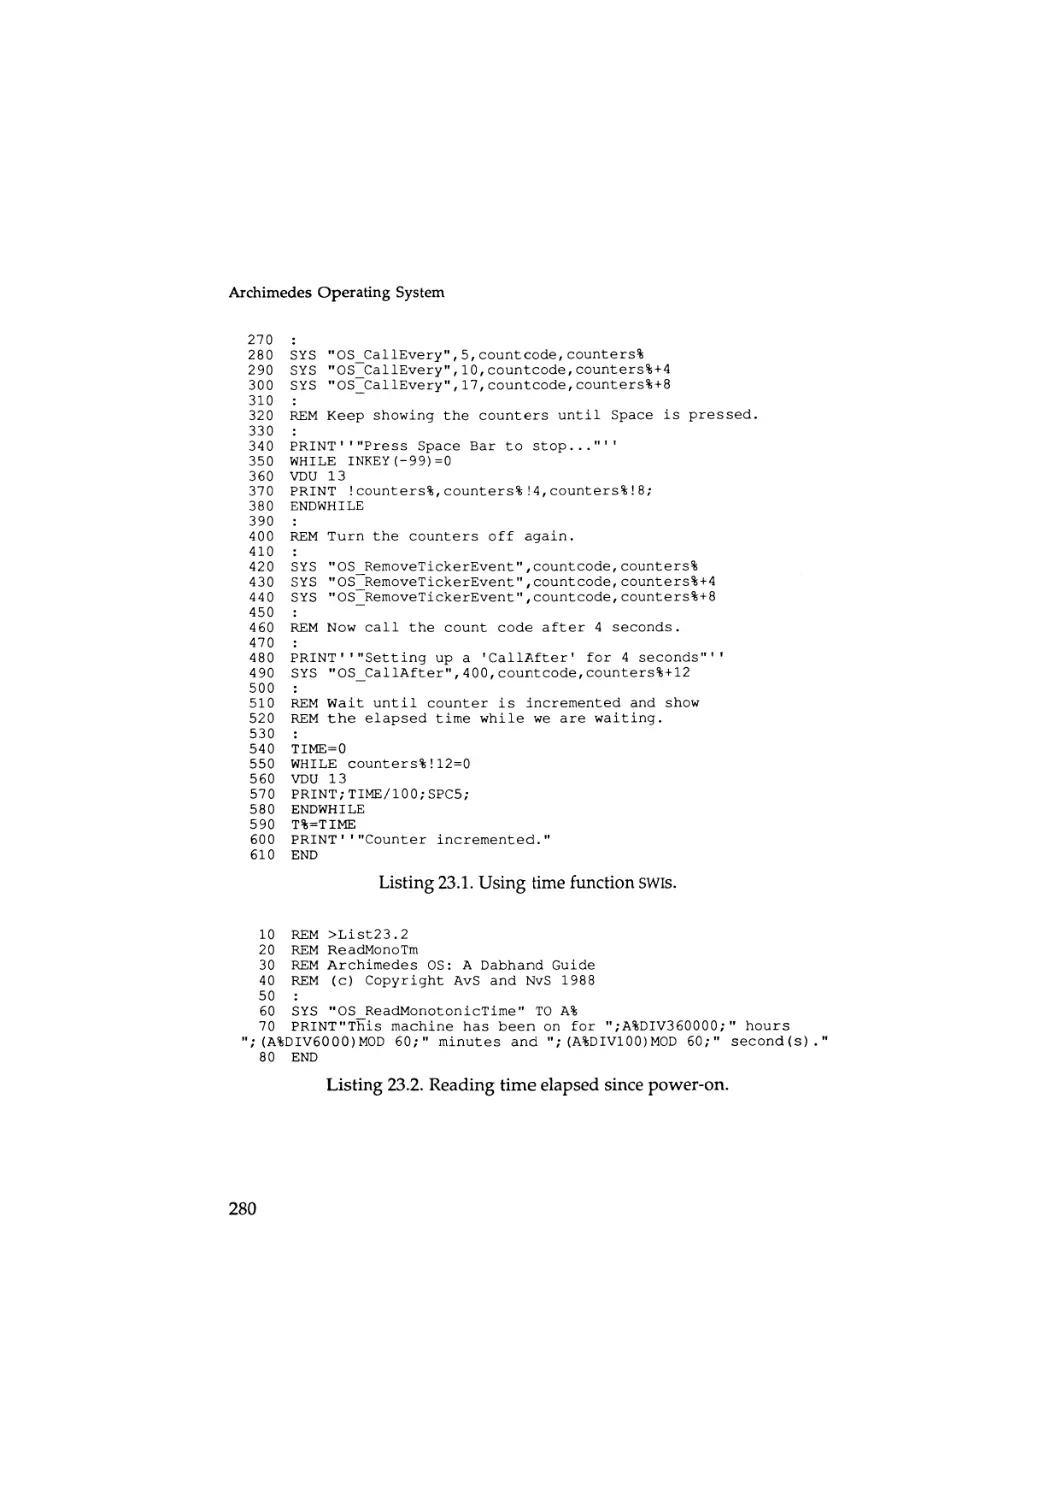
23.1.
23.2.
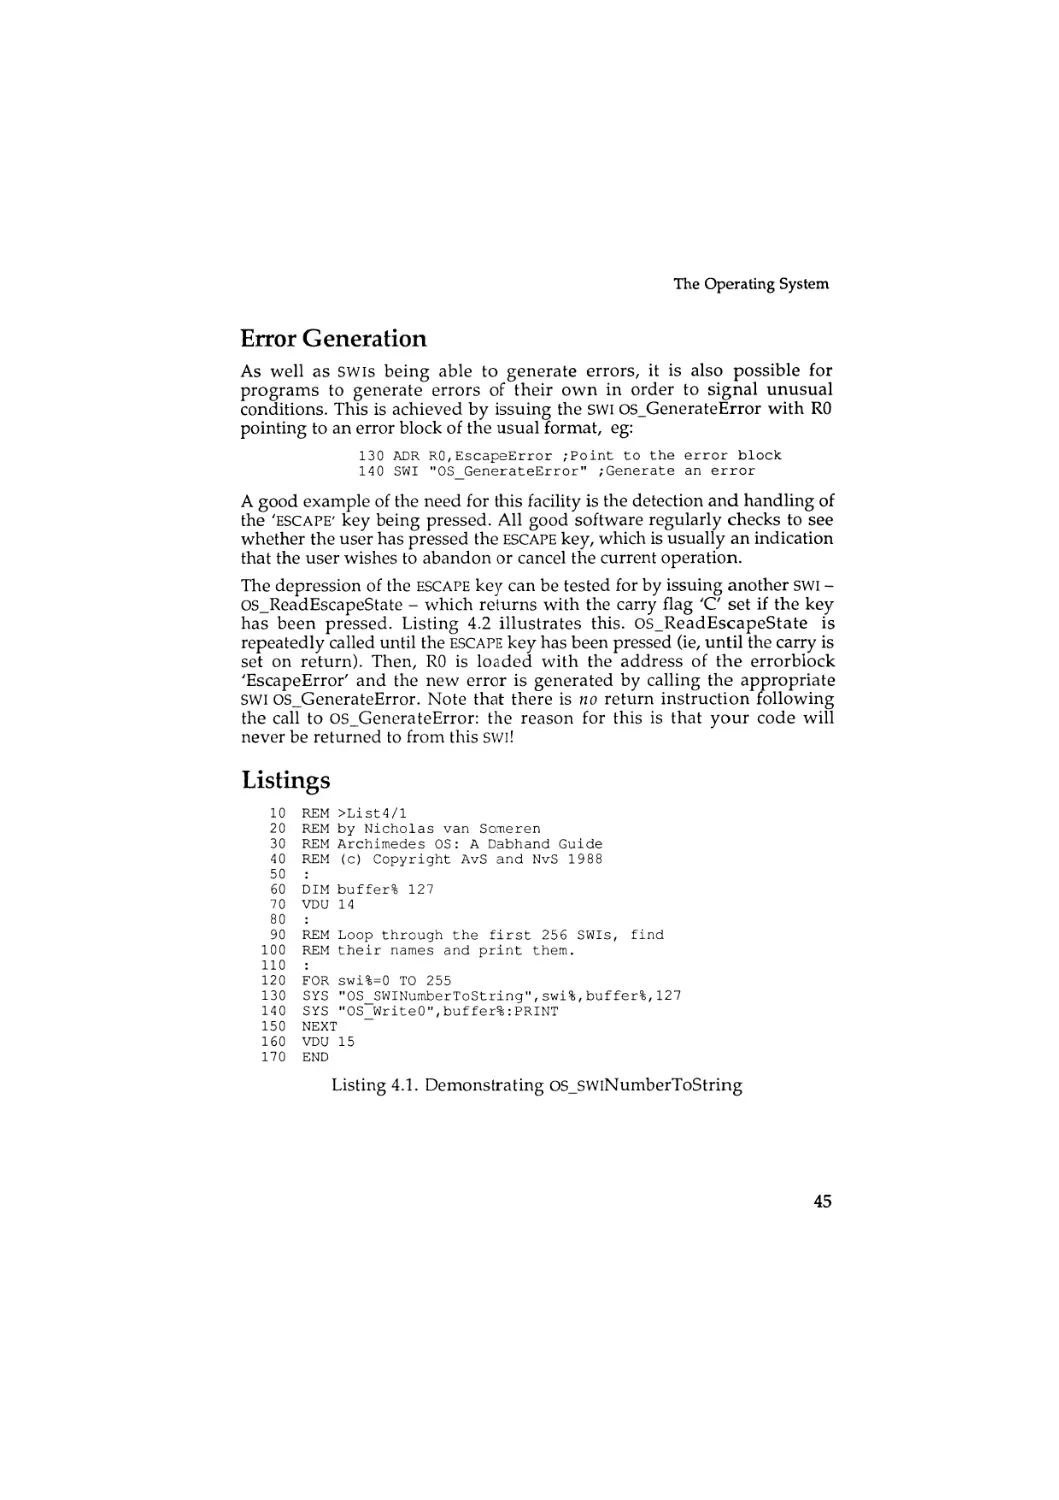
Demonstrating OS_SWlNumberToString
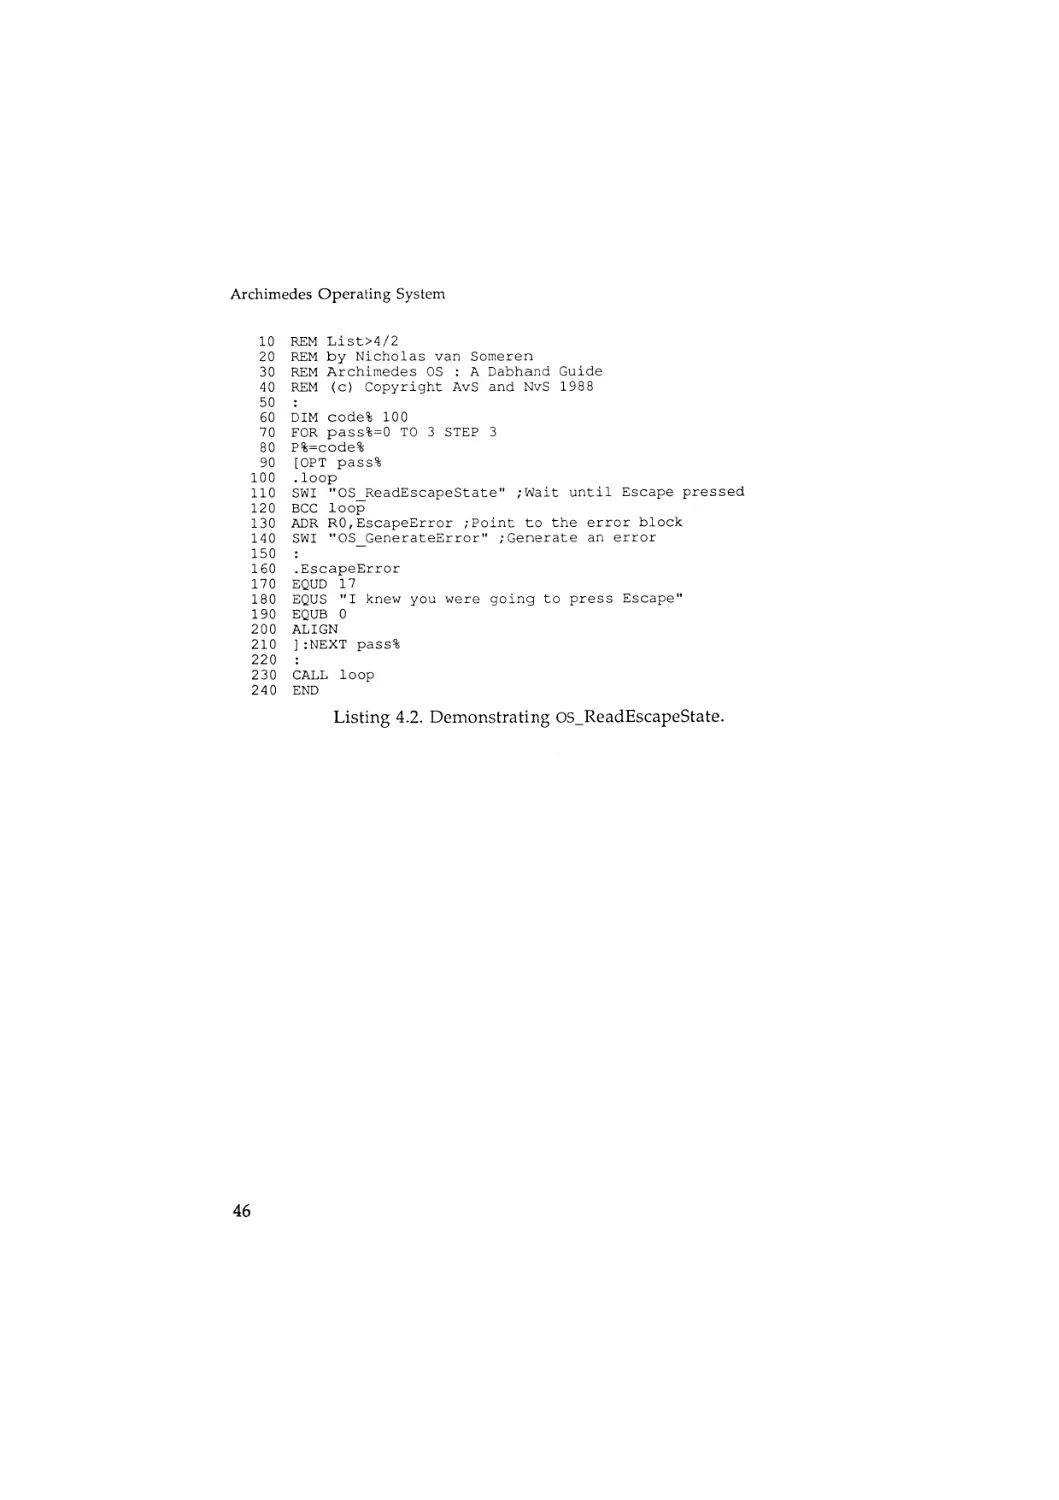
Demonstrating OS_ReadEscapeState
Marvin
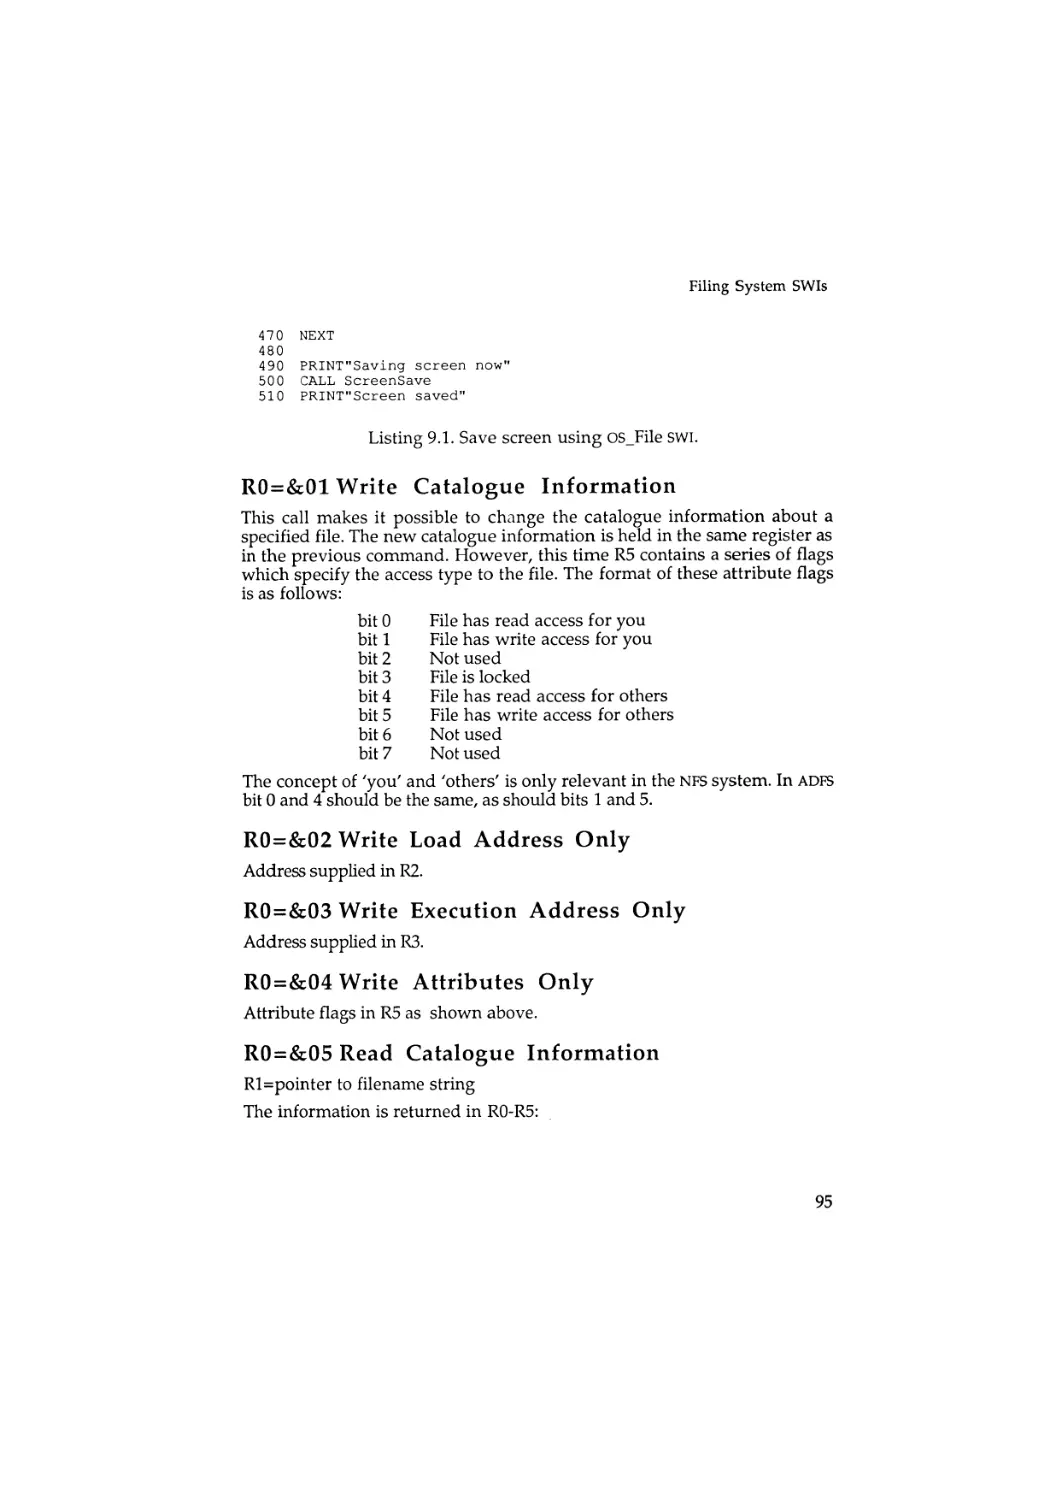
Save screen using OS_File SWI
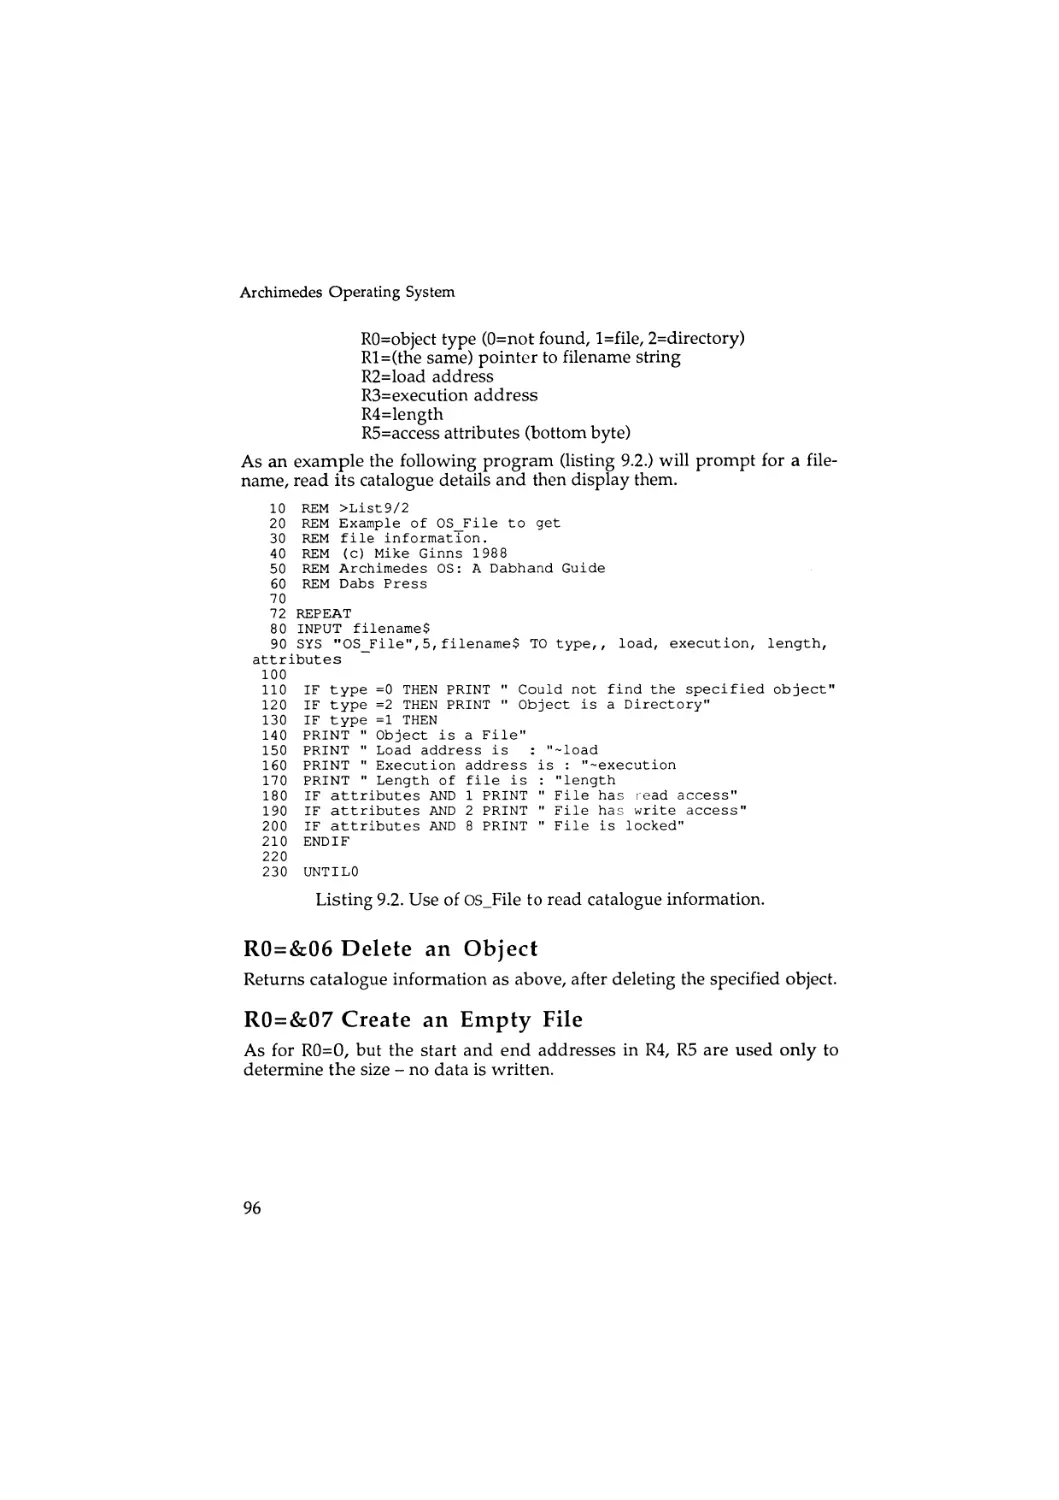
Use of OS_File to read catalogue information
Load a block of screen memory
Using OS_Bget to count spaces and words
Use of OS_FSControl to convert a file type number
Display directory tree
Manipulating file attributes
Printer Buffer Module
The Shell source
The Heap
Validate Address
WimpMaze
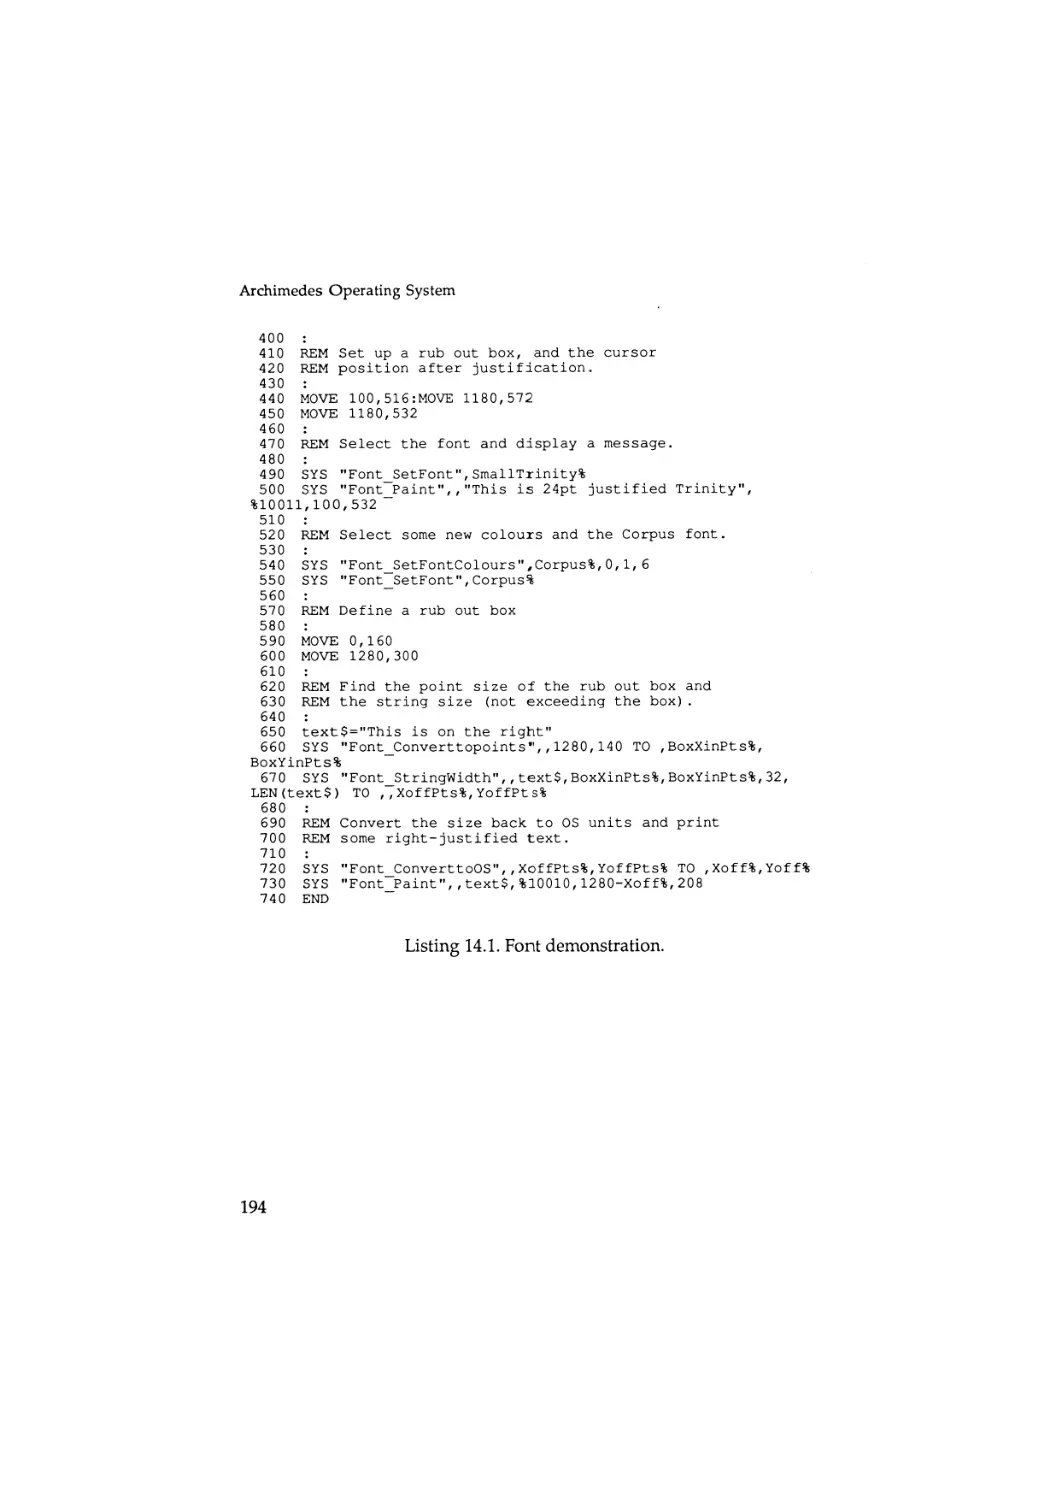
Font demonstration
Demonstrating the Sound_Configure swi
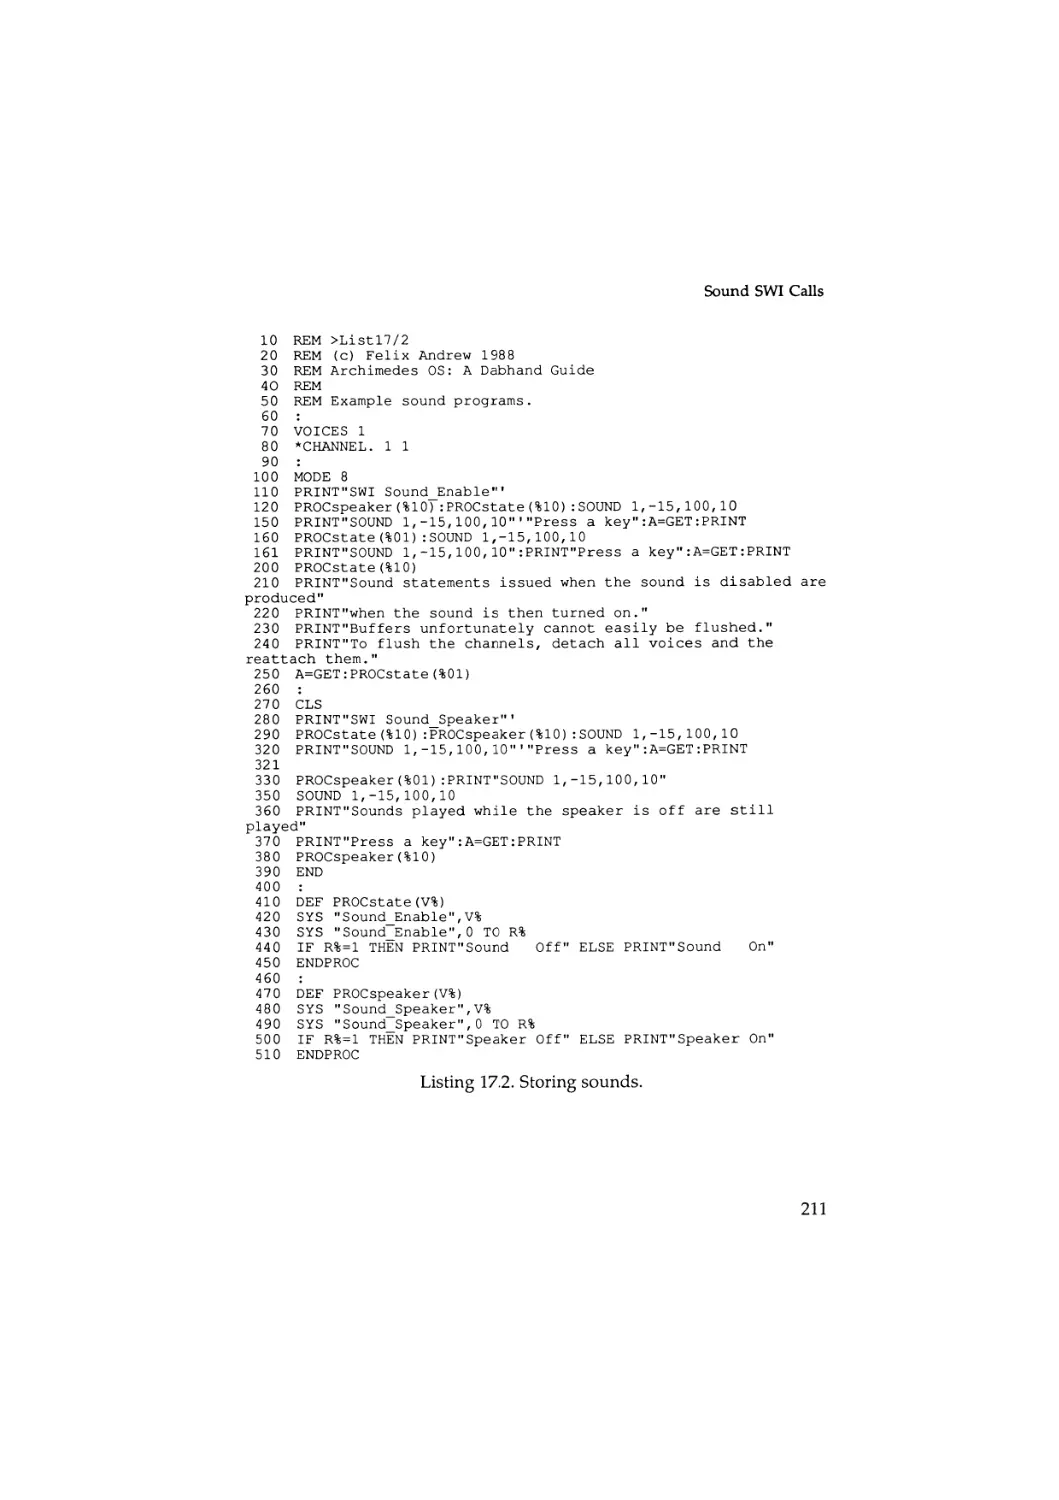
Storing sounds
Stereo re-positioning
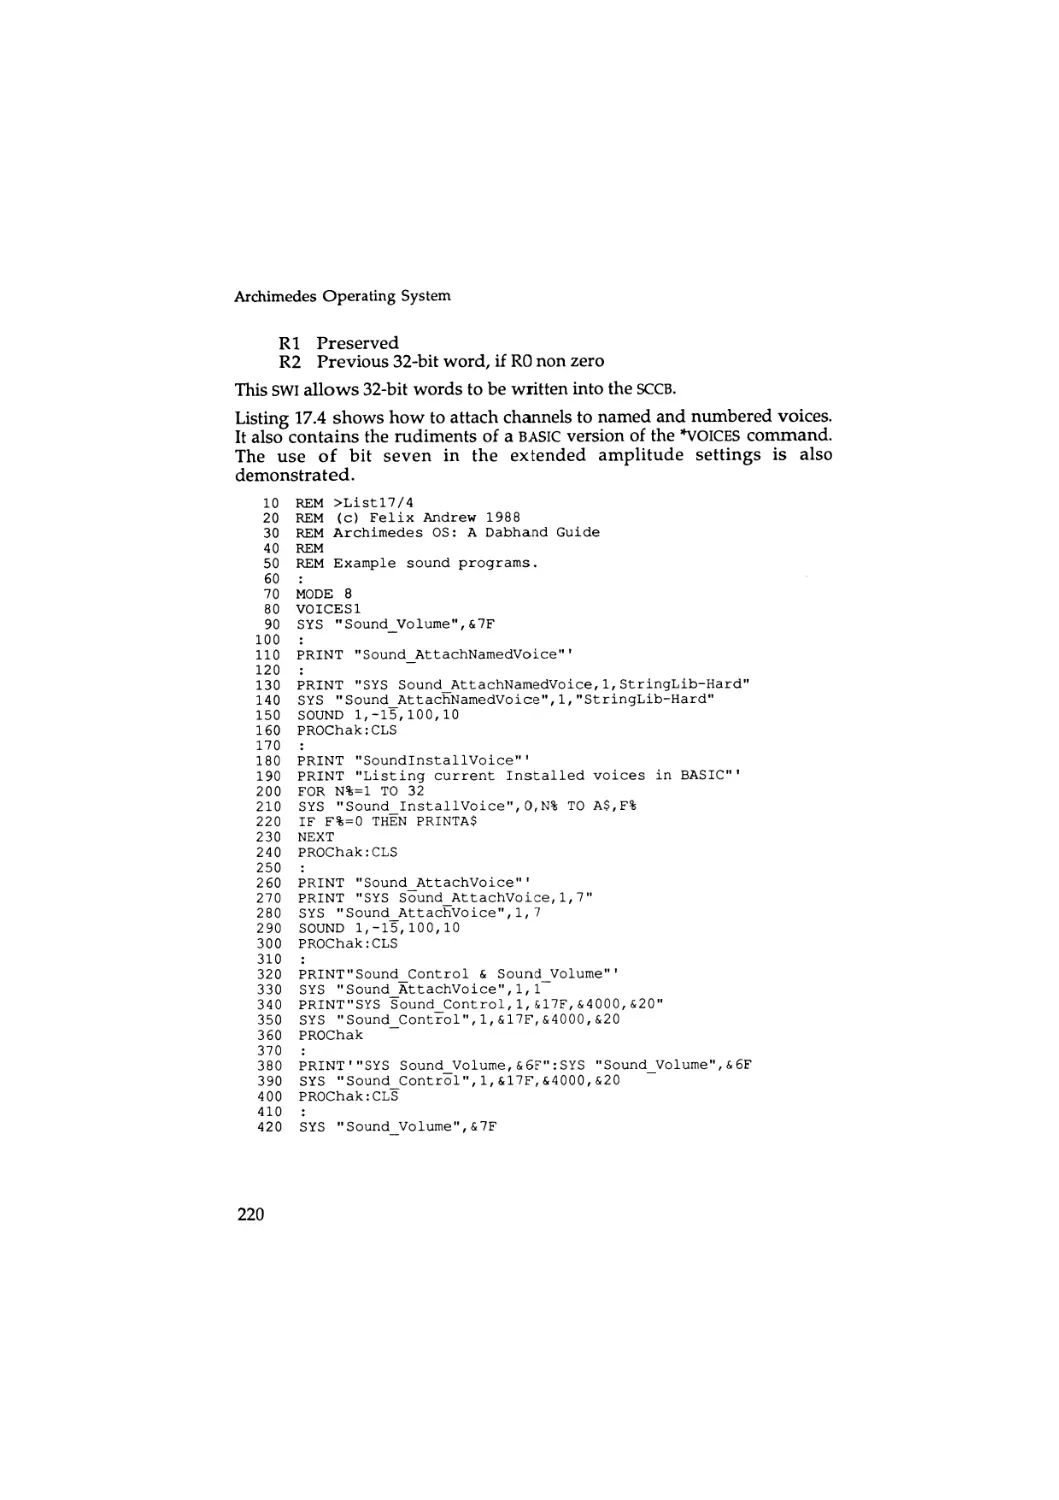
Attaching channels
Demonstrating the QSchedule command
Using QTempo and QBeat
Voice Generator Module Creator
Sound Sample
Simple I/O
Writel example
PrettyPlot
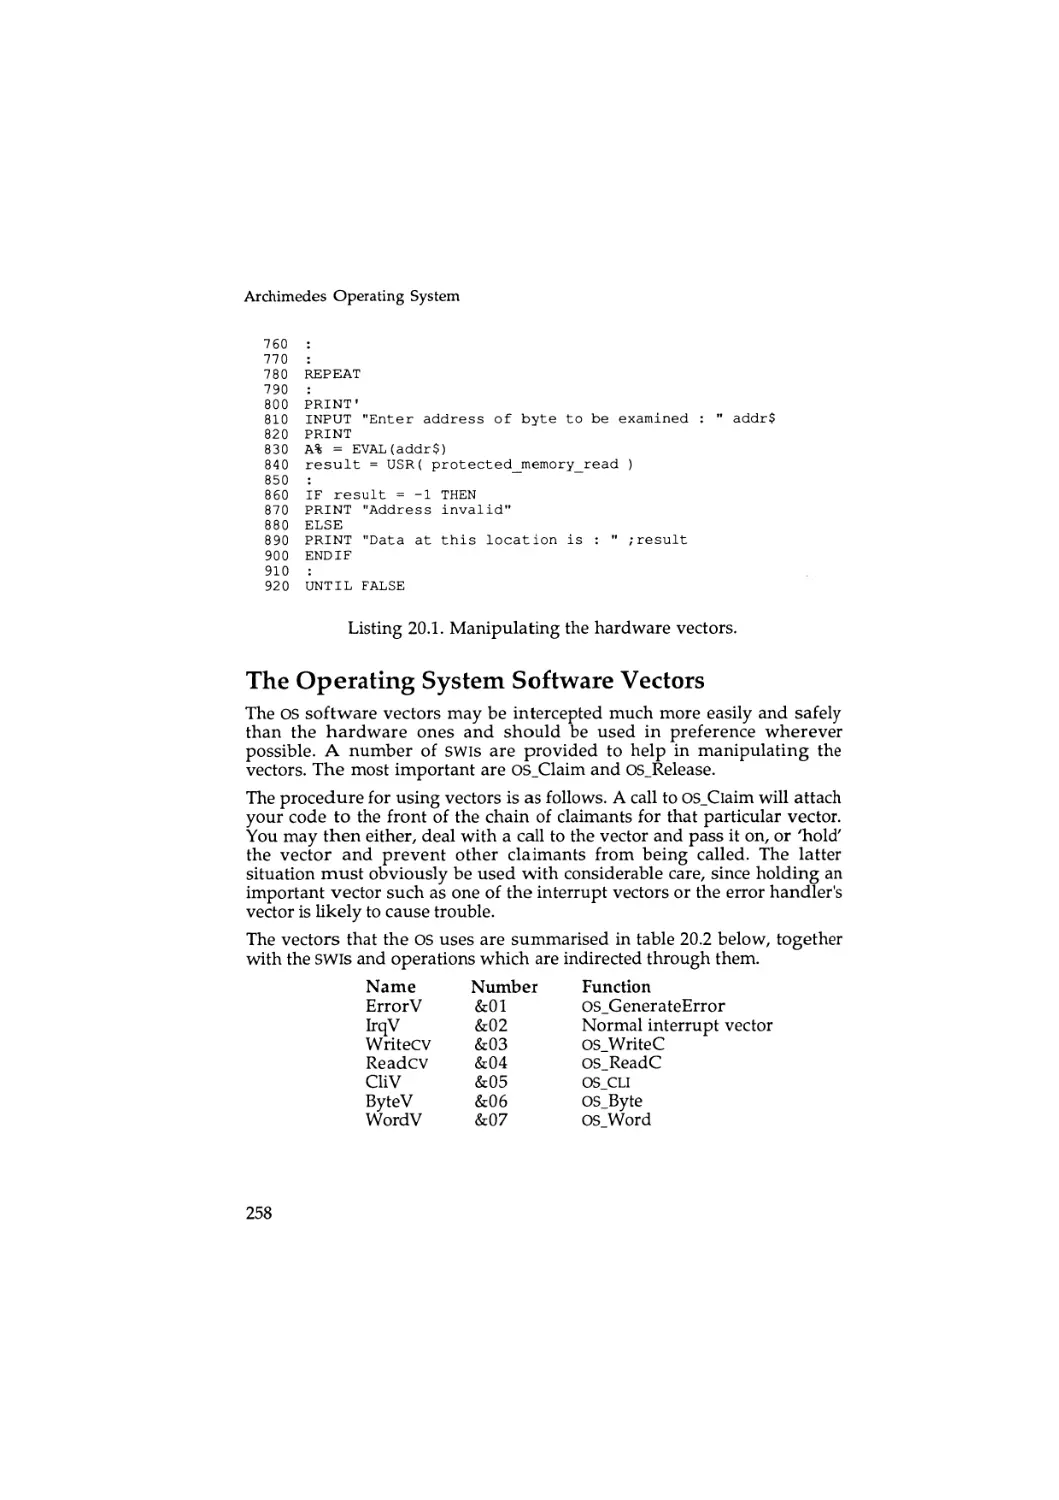
Manipulating the hardware vectors
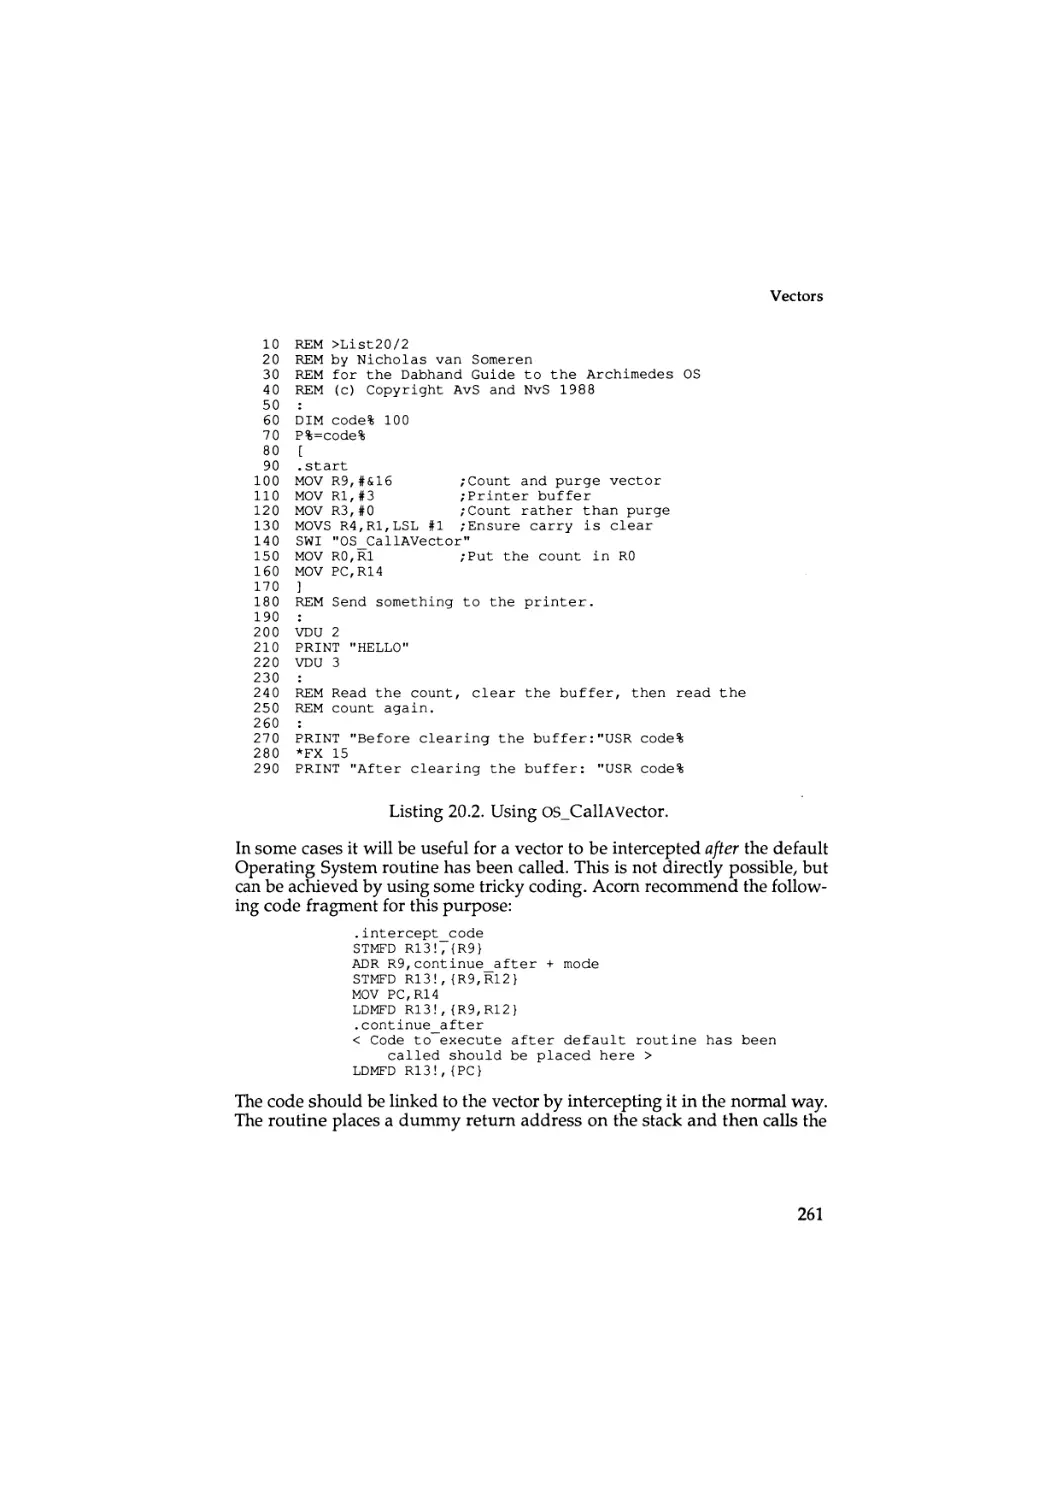
Using OS_CallAVector
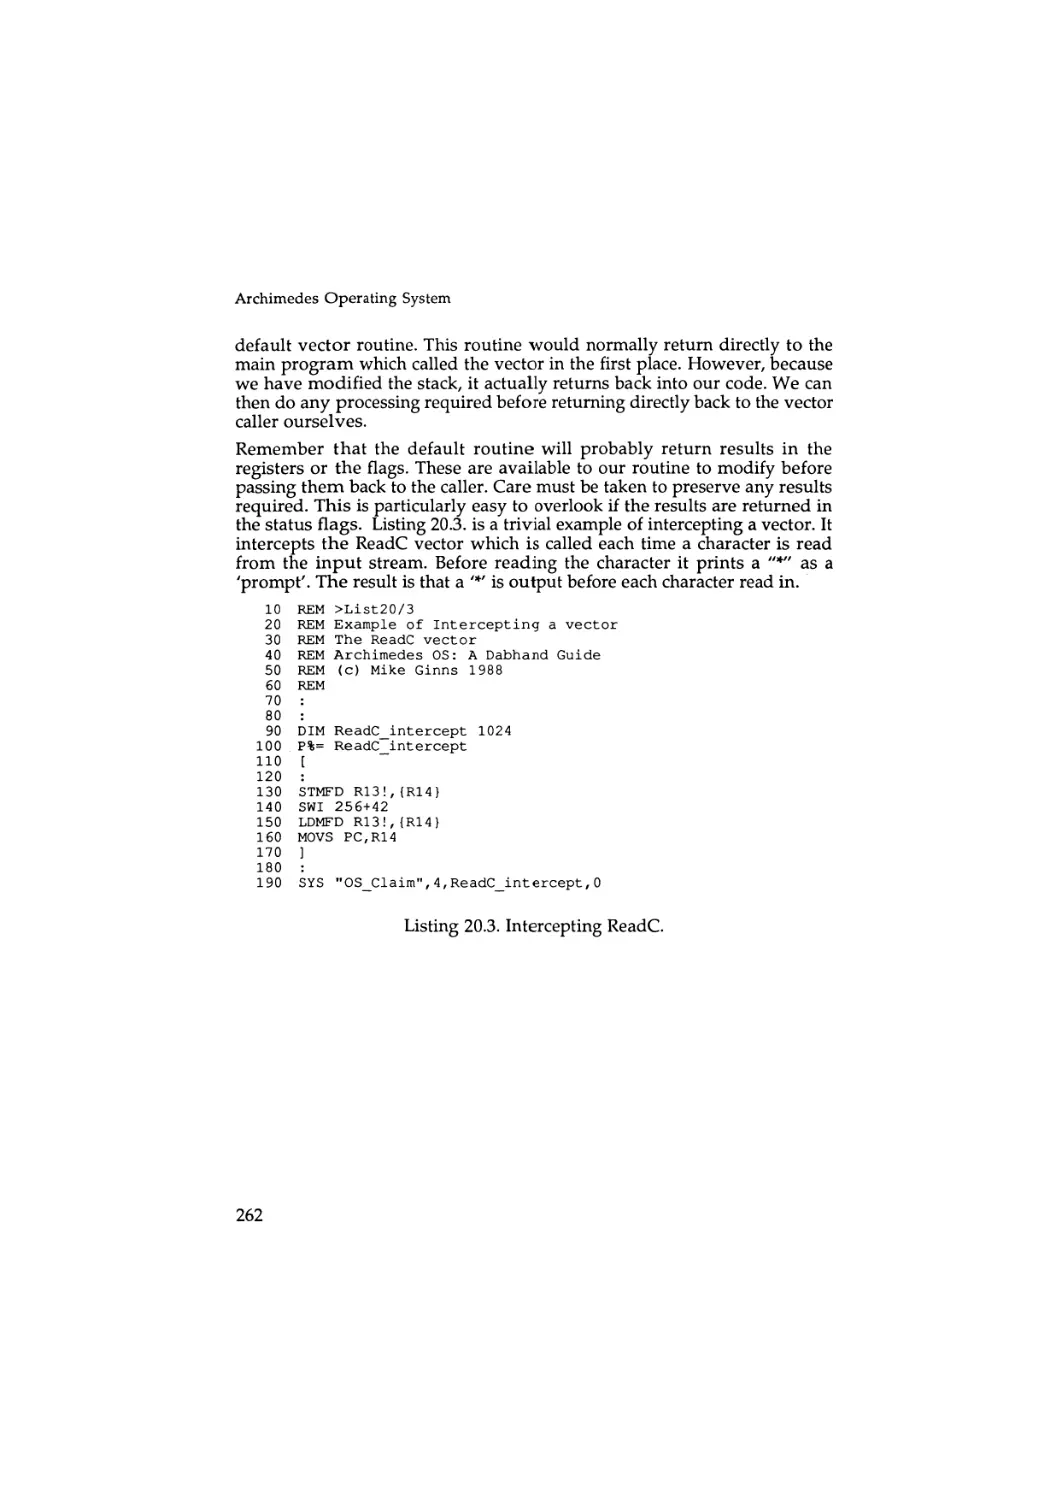
Intercepting ReadC
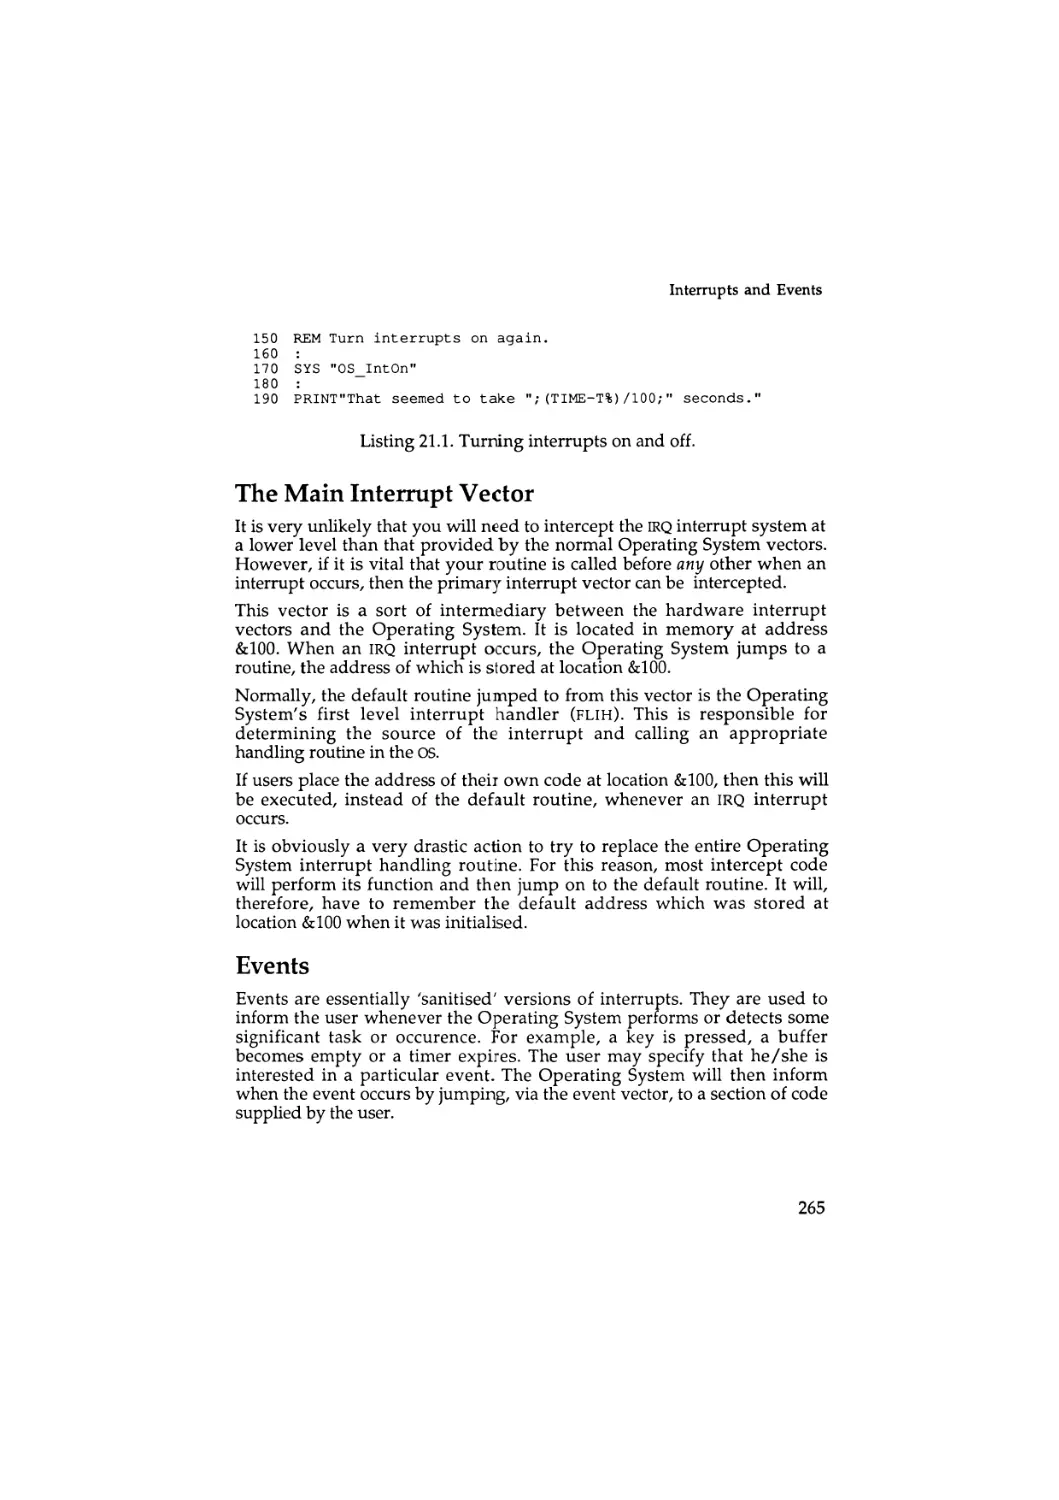
Turning interrupts on and off
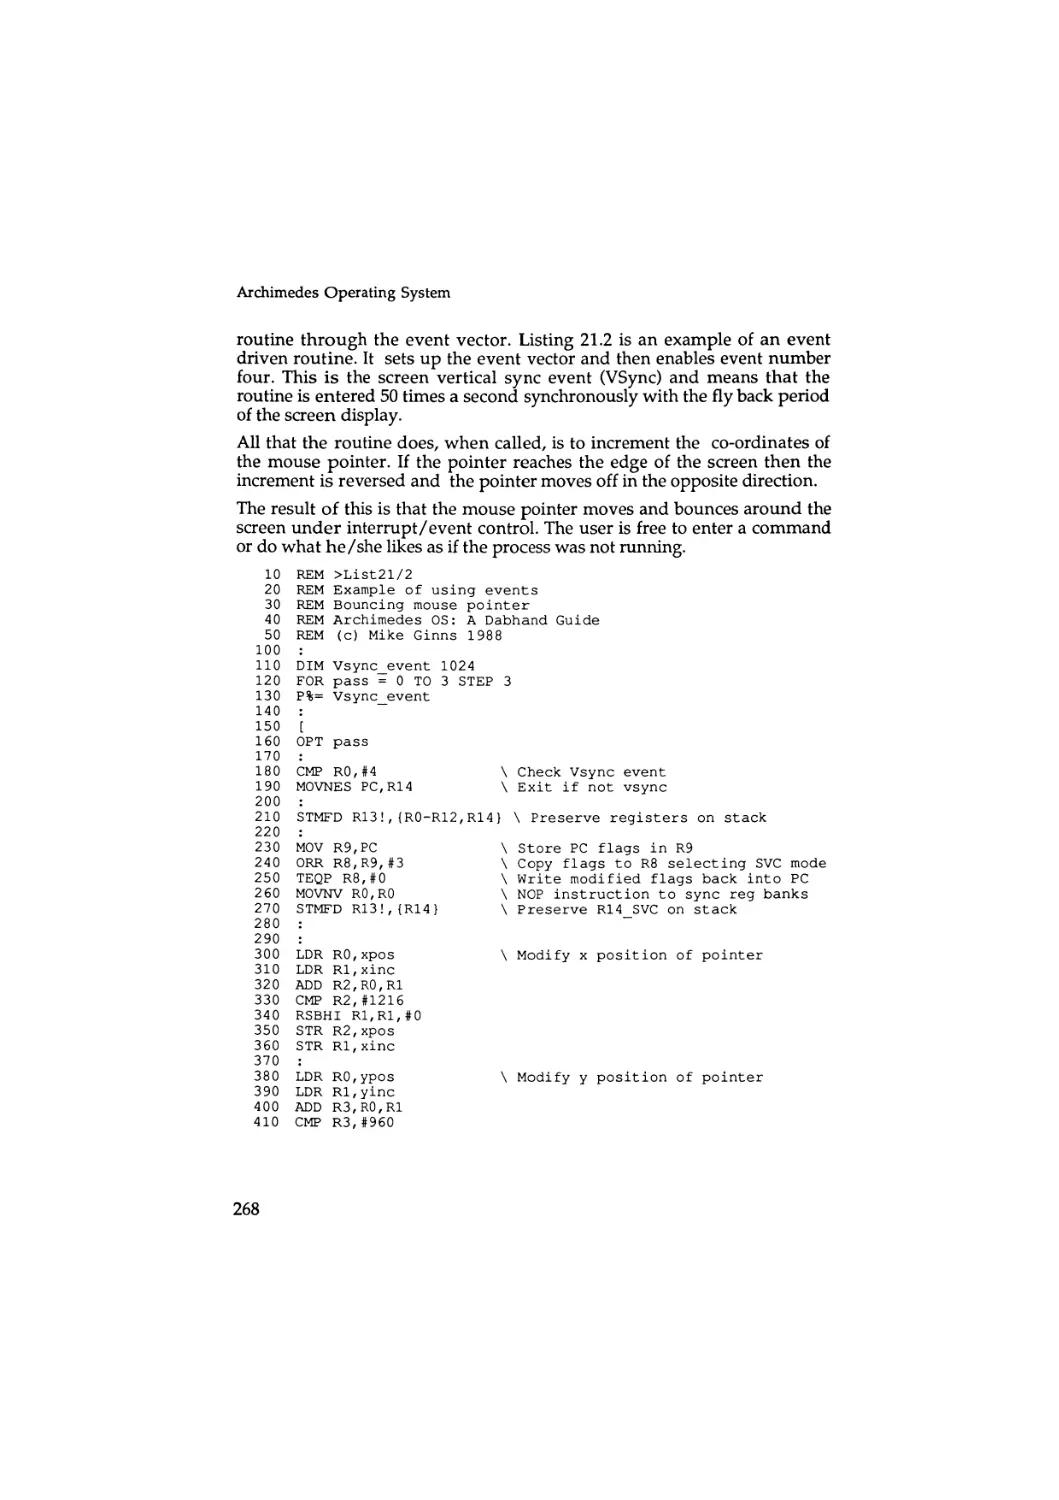
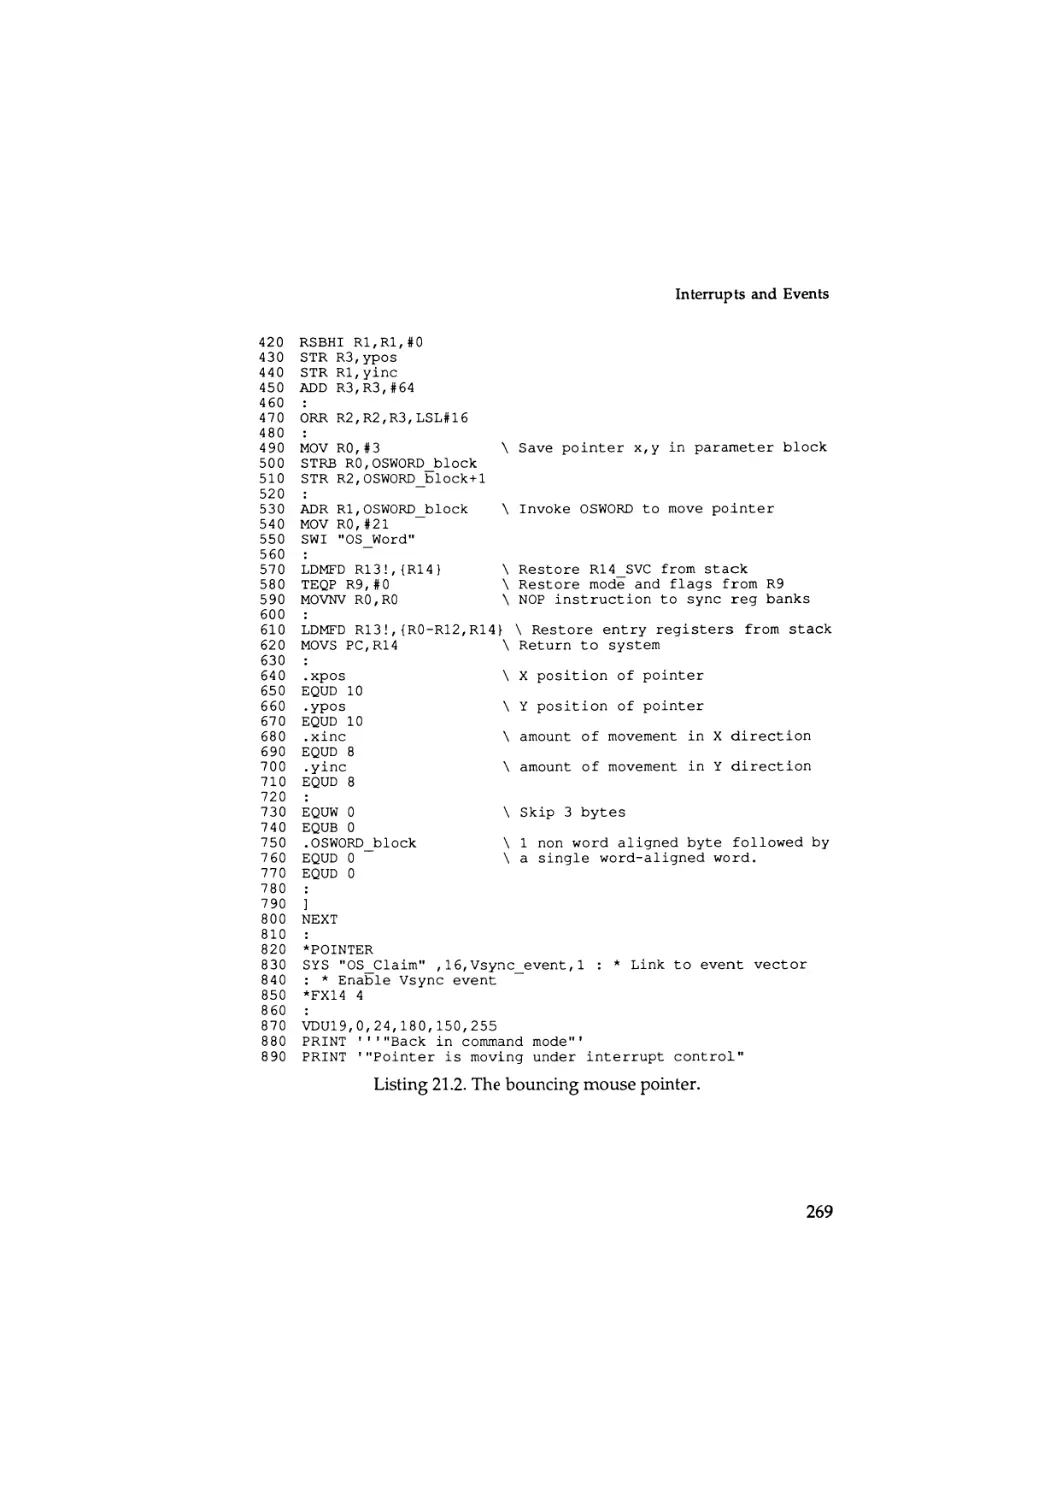
The bouncing mouse pointer
Using GS calls
Binary to Decimal Conversion
Demonstrating number conversion
Using timed function SWls
Reading time elapsed since power-on
45
46
63
94
96
99
106
113
116
117
141
157
159
160
176
193
208
211
213
220
222
224
233
237
252
253
253
256
261
262
264
268
272
274
276
279
280
11
Archimedes Operating System
23.3.
23.4.
23.5.
23.6.
23.7.
23.8.
Checking screen mode
Cursor related SWIs
Reading the mouse buffer
Read V D U variables for given mode
Using OS_ReadPalette
Reading a pixel
281
282
282
284
285
286
This Book and You!
This book w a s written using the T W I N Text Editor on an Archimedes
microcomputer. The authors' files were transfered and edited in V I E W . The
completed manuscript was transferred serially to an Apple Macintosh SE
where it w a s typeset using MacAuthor. Final camera-ready copy was
produced on an Apple L a s e r W r i t e r IIMT from which the book was printed
by A. Wheaton & Co.
Correspondence with Dabs Press, or the authors, should be sent to the
address given on page 2.
All correspondents will be advised of future publications, unless we receive
a request otherwise. Personal details held will be provided on request, in
accordance with the Data Protection Act. Catalogues detailing the full
range of Dabs Press books and software are available free of charge on
request.
Publisher's Note
Dabs Press would like to express their thanks and gratitude to Felix
Andrew for the chapters on sound and Mike Ginns for the icing!
Author's Note
The authors would like to thank David Acton for his assistance in
preparing this book and David Knell for his work on the Floating Point
Assembler software.
12
Introduction
Welcome to 'Archimedes Operating System: A Dabhand Guide', a book
which describes the features and facilities of the Operating System for
Acorn Archimedes computers. In publishing this book, our intention is to
explain this rich and sophisticated piece of software which is, of necessity,
rather complex. Though considerable technical documentation already
exists, much of it is rather impenetrable to those who do not already
understand the Operating System - this book aims to rectify the problem.
In addition it supplies some vital information not published before - in
particular that relating to the sound system.
Within this book you will find a sizeable part of the Operating System (OS)
documented in detail - and in, what we hope, is an easily digestible form.
Many examples and program listings are included and these are also
available on a disc which has been produced as a companion to this guide.
The programs disc also includes several extra programs and comes
complete with its own User Guide. Appendix A contains full details.
Each chapter of this book describes a particular aspect of the OS. The first
section is an introduction to R I S C technology, and subsequent chapters
describe basic Operating System functions, filing systems and it's internal
structure. Two of the most useful and, we suspect, the most used
components - the Window Manager and the Font Manager - are given
particular attention.
Listings and Appendices
Many example listings, both short and long, are included in the relevant
sections of this book. It is recommended that where an example program
does not specify a display mode, an 80-column mode (such as mode 0)
should be selected. Several appendices have also been included and are
situated at the end of this book. These summarise information which is best
left in tabular form.
13
Archimedes Operating System
What this Book is Not About
This book should not be regarded as an introduction to the Archimedes for
inexperienced users: it assumes the reader has an understanding of the
fundamentals of assembly language programming and is familiar with the
basic functions of an Operating System. In particular, it is aimed at those
familiar w i t h the B B C Microcomputer M O S , although an experienced
programmer will encounter no difficulties. Though one of the chapters of
this book summarises A R M assembly language, it is by no means a tutorial
introduction and you are refered to publications such as
Archimedes
Assembly Language: A Dabhand Guide by Mike Ginns and published by
Dabs Press.
In attempting to explain the inner workings of the OS there is necessarily
some overlap with technical details that also appear in other published
works: most notably, Acorn's Programmer's Reference Manuals ( P R M ) . It is
certainly not our intention to try to replace the PRM, instead we are seeking
to make this kind of information easier to understand. In practice, if you
are planning on producing commercial application software or programming to an advanced level, we recommend that you refer to the P R M in
conjunction with this guide: we have not attempted to cover absolutely
every last detail of the OS.
14
1 : RISC Technology
The History of the RISC
As computer users devise increasingly sophisticated and complex
applications, so the computer industry strives to provide them with m o r e
powerful machines. Countless debates about the design and architecture of
computer equipment ensure that a wealth of new ideas continues to be
turned into finished products. In recent years one of the best publicised of
these debates has been whether microprocessors should have simpler or
more complicated instruction sets to aid the writers of 'machine-code'
software, in particular high-level language compilers. One camp promotes
Complex Instruction Set Computers (ClSCs); the other advocates Reduced
Instruction Set Computers (Rises).
The details of the RISC versus CISC debate are well outside the scope of this
book, but it is worth acquiring a basic understanding of the concepts
involved. Promoters of CISC architecture would like us to believe that it is
most efficient to have microprocessors that execute highly sophisticated
instructions - almost equal in complexity to those of the high-level
languages in which most applications will be written. Clearly, if a microprocessor has instructions which multiply arrays together, for example, or
instructions to extract substrings from larger sequences of characters, then
the life of the compiler-writer will be apparently easier. However, such
instructions are usually completed in several (and possibly many) cycles of
a microprocessor's master clock and this limits the number of instructions
that can be executed per second.
Advocates of the RISC philosophy, on the other hand, recommend
instruction sets where every instruction performs a fairly simple task (to
increment a register for example). This simplicity permits most instructions
to be executed in as little as one cycle. So although we may have to use
more instructions to achieve the same goal, each instruction takes the
shortest possible amount of time. This approach has the disadvantage that
the computer's memory needs to be capable of being addressed quite fast.
Such memory is usually expensive.
15
Archimedes Operating System
While programmers may or may not like the instructions they h a v e t o u s e ,
other considerations need to be taken into account for any real application.
In particular, there is the issue of interrupts. If a CISC machine is in the
m i d d l e of a l o n g and complicated instruction, it is usually impossible to halt
it reliably a n d service an interrupt. The instruction must be completed,
possibly taking a very long time, and only then may the interrupt request be
dealt with. O f course, Rises suffer rather less from this problem, w h i c h is
k n o w n a s 'interrupt latency', because most instructions will be completed
just a few cycles after the interrupt.
Although t h e matter of interrupt latency is just one of many in the CISC
versus RISC contest, it is one which is close to the hearts of users of Acorn
computers. And close to the hearts of the architects of Acorn's products.
The BBC Microcomputer (which uses the 6502 microprocessor) has the
great virtue that much of its operation revolves around interrupts. This
allows its users the pleasure of 'type-ahead' keyboards and background
printing t a s k s , to name but two examples. In designing their own
microprocessor, one of Acorn's goals was to ensure that interrupt latency
was as low a s possible, thereby allowing the strengths of the BBC Micro to
be engendered in the Archimedes.
In the final analysis, each kind of architecture has certain virtues. As far as
users of Acorn's RISC - Archimedes - are concerned, the important fact is
that RlSCs run with breathtaking speed and have an instruction set of great
consistency and simplicity. These qualities make Archimedes computers a
pleasure to use and to program, and with such attributes being paramount
for most of u s , it hardly matters whether or not CiSCs are really 'better'.
RISC and the Archimedes
For a variety of reasons, Acorn was not satisfied with the RISC microprocessors being designed by other manufacturers and decided to embark
upon its o w n RISC project. During 1983 the specification of a 32-bit
microprocessor began to take shape in the minds of Acorn's senior
engineers. Known as ARM, an acronym for Acorn RISC Machine, the device
was conceived as the heart of the next generation of Acorn computer
products. Its design owes a good deal to the 6502 microprocessor, which
Acorn had used with great success for many years. In particular, both the
6502 and the ARM have very short interrupt latency (well under one
microsecond on an 8 Mhz ARM). Acorn engineers were also able to go one
better than other RISC manufacturers with, for example, the provision of
fifteen general-purpose registers and several other sets of registers which
are invisibly 'paged in' when servicing interrupts.
16
RISC Technology
In Archimedes computers the A R M is supported by three other custom-built
chips. These were designed by Acorn and are collectively called the ' A R M related chip set'. Individually known as the M E M C , V I D C and I O C they are
responsible for memory control, video and sound control, and input/
output control respectively. This four-chip set requires very little other
than R A M , R O M , a screen and a keyboard to form a complete computer.
Whilst the ARM can operate without any of these chips, a desktop computer
needs memory management and i / o to be useful, and these devices provide
such features with an absolute minimum of extra circuitry.
The rest of this section is concerned with the A R M and the functions that
each of the A R M related chips provide. If you are more concerned with
programming the ARM rather than the hardware itself then you may want
to skip on to the next section and perhaps read this one later.
The ARM
The A R M is a 32-bit RISC-architecture microprocessor with a full 32-bit data
bus and a 26-bit address bus providing a uniform 64Mb address space. The
processor is pipelined so that all parts of the system can be usefully
employed in every cycle when executing register-to-register instructions.
The A R M has an instruction set of 44 basic instructions. Each instruction
contains a condition code that causes an instruction to be skipped if the
condition is not satisfied. This allows highly efficient software to be written
and has benefits for both in-line and branching sequences. The A R M
contains twenty seven 32-bit registers which partially overlap, allowing
the instant preservation of register contents for context switches
associated with interrupt servicing.
The A R M has four modes of operation. Besides the normal 'User Mode', a
'Supervisor Mode' is provided for Operating System software. Supervisor
Mode allows certain operations to be performed which are not permitted
in User Mode, in particular those that directly refer to peripheral devices.
The two other operating modes deal with interrupt processing. The A R M
has two levels of interrupts: 'normal' and 'fast'. Interrupt servicing causes
a change of processor mode as appropriate and also switches in the
shadow registers for the relevant mode.
The A R M may be used in self-contained computer systems with minimal
hardware support. However, three other ARM-related chips are available
to workstation designers. These are discussed here.
AOS-B
17
Archimedes Operating System
The MEMC Memory Controller
The memory controller, or M E M C , is responsible for the interface between
the A R M and the video controller (VIDC), i / o controller (ioc) and low-cost
dynamic memory devices which form the main RAM.
The current version of the M E M C can support up to 4Mb of physical memory
and provides all the necessary timing and refresh signals that cheap
dynamic R A M chips require. The M E M C contains an address translation
table which maps some of the logical address space of the A R M on to the
physical m e m o r y available, simultaneously providing a three-level
protection system. This assists with 'virtual memory' and allows multitasking operating systems to be implemented without extra hardware.
The M E M C also supports a number of Direct Memory Access ( D M A ) channels
which are used by the V I D C to keep the display, cursor and sound channels
running with minimal processor intervention.
The VIDC Video Controller
The video controller, V I D C , is a combined video and audio processor. It
enables the generation of video images at a number of different pixel
resolutions and bits-per-pixel. The V I D C also contains a colour mapping
palette to allow the displayed colours to be selected from a range of 4096
possible hues.
Stereo sound is also generated by the V I D C and filtered by off-chip
electronics into two channels of high-quality audio.
The current version of the V I D C is capable of generating colour displays of
up to 640 b y 512 pixels of four bits-per-pixel. A small amount of extra
circuitry (fitted to Archimedes 400-series computers) allows a 1280 by 960
monochrome display to be produced, rivalling the image quality of
engineering workstations in the £20,000 price region.
The IOC Input/Output Controller
The input/output controller, or I O C , provides peripheral and interrupt
control signals with programmable timing parameters to suit most
applications.
The I O C contains four independent 16-bit programmable counters configured as two timers and two baud-rate generators (for RS232 and
keyboard communications). A bi-directional serial keyboard interface is
also included.
18
RISC Technology
Four programmable types of peripheral access timing are generated by the
IOC to control 'podules'. The IOC also deals with interrupt requests, masks,
and peripheral and podule status.
Finally, the IOC provides a number of direct control lines (some bidirectional) which may be used to drive peripherals and i / O circuitry.
Conclusion
The ARM and its related chip-set form a very powerful 32-bit computer
core which takes up less than ten square inches of circuit board space. When
coupled with RAM, ROM, disc drives and display electronics, a complete
workstation can be constructed with a component count which would, just
a few years ago, have been inconceivably low. It is a tribute to Acorn's
design staff that this impressive array of devices is available well in
advance of most competitors' RISC micros, let alone support circuits.
19
2 : The ARM Instruction Set
This chapter provides an introduction to the A R M instruction set and to the
assembly language in which it is programmed. If you already have
experience o f A R M assembly language programming or you have read
Archimedes Assembly Language: A Dabhand Guide then you will probably
want to skip on to the next two chapters. We include a brief synopsis here
for those w h o have little or no prior experience of A R M assembly
language.
An appendix at the back of this book discusses the extensions to the A R M
instruction set which allow floating-point operations to be coded in
assembly language. Because the assembler built into the B A S I C V interpreter
does not cater for these instructions we have included a program on the
disc which accompanies this book to allow such instructions to be
assembled.
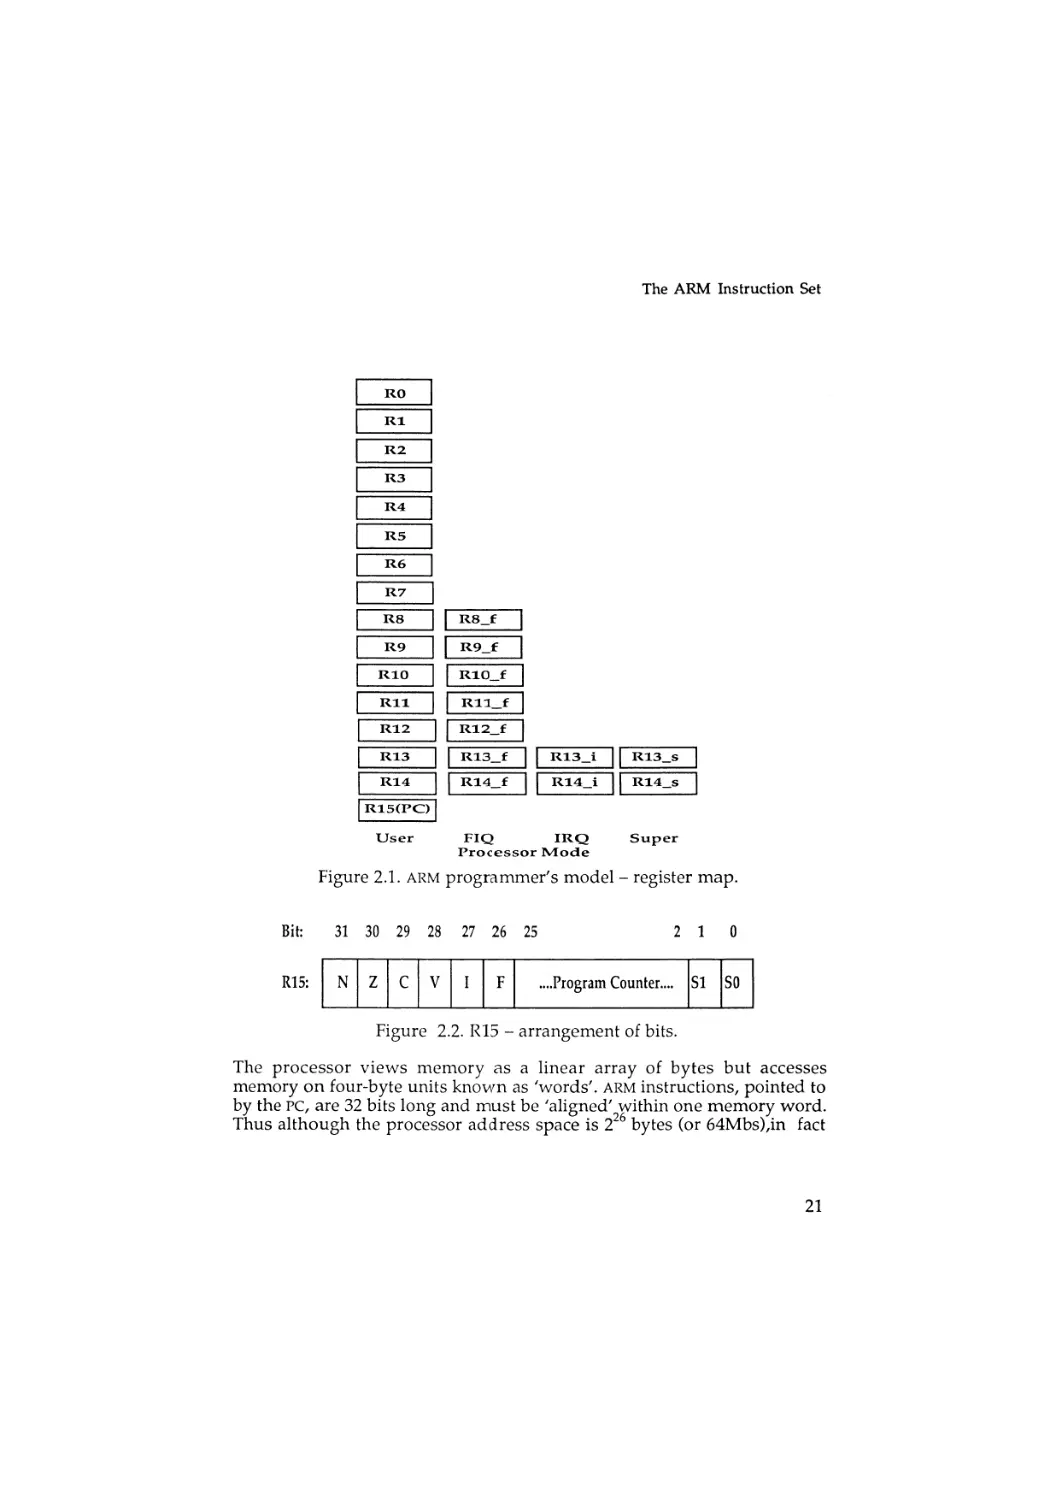
The Programmer's Model
The A R M provides sixteen 32-bit registers which are usually known as RO
to R15. In fact, a number of 'shadow' registers are provided in the
processor a n d these are switched in automatically when the processor
mode changes. This means that interrupt service routines don't need to
save registers explicitly and can thus be executed more quickly. So while
only 16 registers are accessible to the programmer at any one time, a total
of 27 are actually provided.
The 'programmer's model' of the registers is shown in the figure 2.1 on the
next page.
R15: The Program Counter
Unlike RO to R14, R15 is not a general-purpose register; instead, it contains
the Program Counter (PC) and the Processor Status Register (PSR). The
program counter occupies 24 bits of the register, with the remaining eight
bits used as the P S R . Six of the P S R bits contain status flags and the
remaining two indicate which of the four processor modes prevails. The
exact arrangement of bits is illustrated in figure 2.2 overleaf.
20
The ARM Instruction Set
RO
Rl
R2
R3
R4
R5
R6
R7
R8
R8_f
|
R9
R9_f
R10_f
RIO
Rll
Rll_f
R12
R12_f
R13
R13_f
R13_i
R13_s
R14
R14_f
R14_i
R14_s
R15(PC)
User
FIQ
IRQ
Processor M o d e
Super
Figure 2.1. ARM programmer's model - register map.
Bit:
31 30
29
28
27 26
R15:
N
C
V
I
Z
F
25
2
....Program Counter....
1
0
SI
SO
Figure 2.2. R15 - arrangement of bits.
The processor views memory as a linear array of bytes but accesses
memory on four-byte units known as 'words'. ARM instructions, pointed to
by the PC, are 32 bits long and must be 'aligned' within one memory word.
Thus although the processor address space is 2 bytes (or 64Mbs),in fact
2 6
21
Archimedes Operating System
only 24 bits a r e required because word-alignment renders the bottom two
bits unnecessary.
Six of the flag bits may be further subdivided into two groups. The top four
bits are arithmetic flags:
N
Z
C
V
Negative flag
Zero flag
Carry flag
Overflow flag
The other t w o bits are the interrupt disable flags:
I
F
Interrupt request disable flag
Fast interrupt request disable flag
The bottom t w o bits of R15 indicate the processor mode, viz:
00
01
10
II
User Mode
Fast Interrupt Service Mode
Interrupt Service Mode
Supervisor M ode
Of course, the virtue of having the PC and PSR accessible through R15 is
that the ARM instruction set is consistent with respect to all registers.
You should note that R14 is often used as a temporary store for the PC
during subroutine calls - this is discussed with the Branch with Link
instruction below.
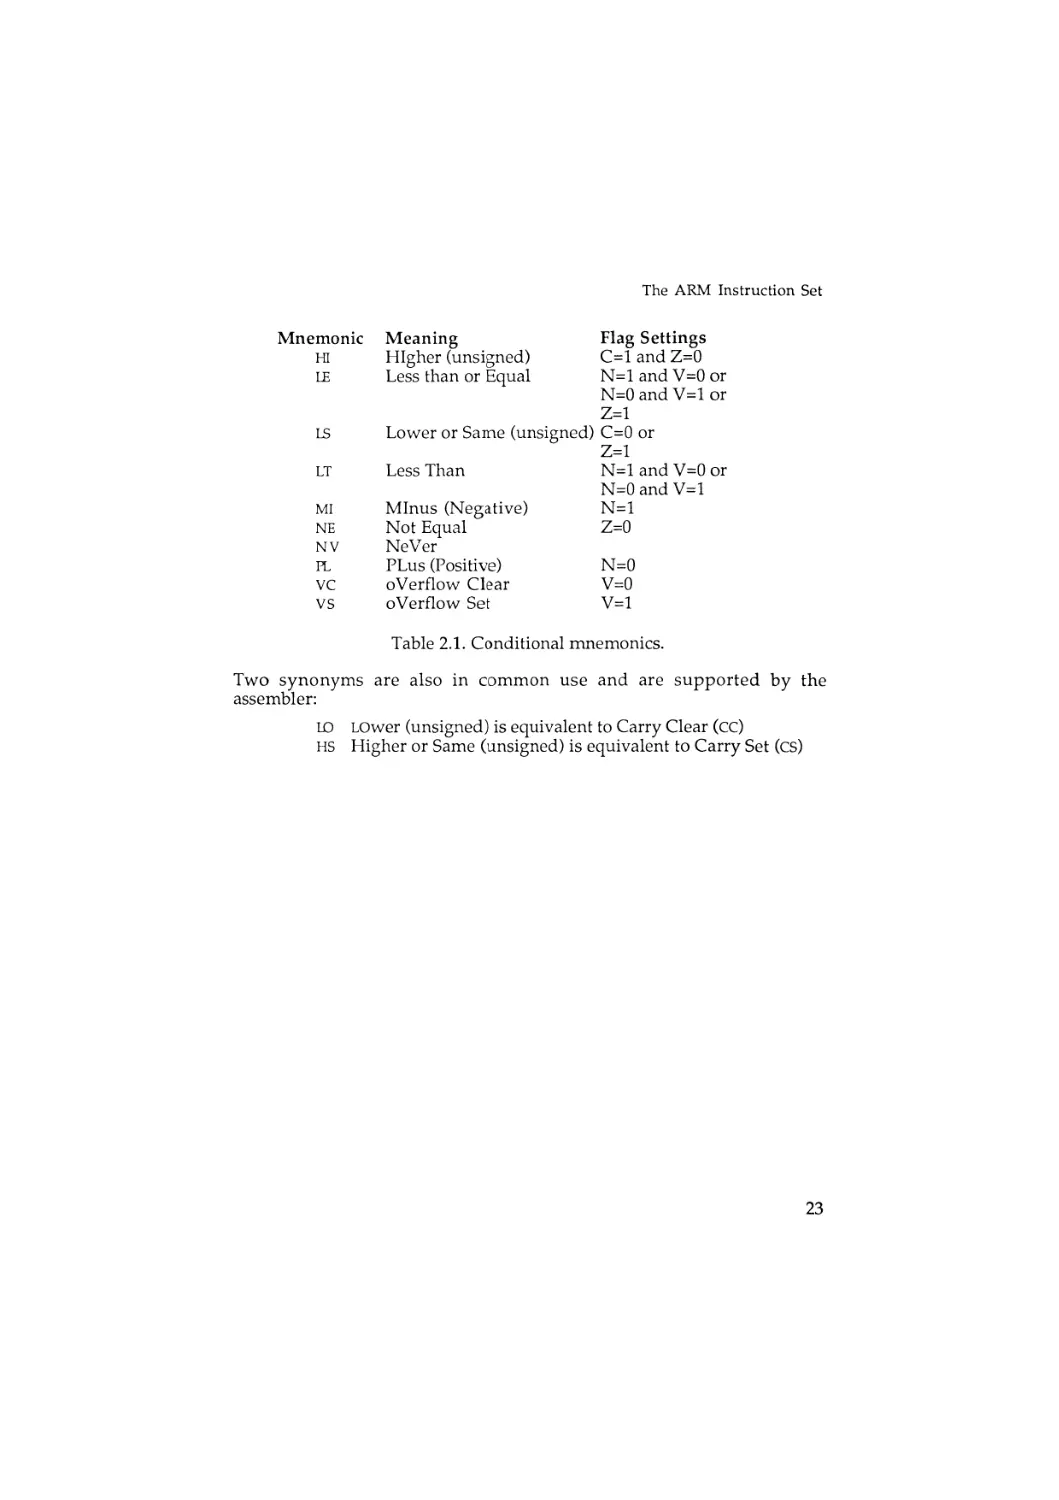
Conditional Execution
Each ARM instruction contains a field determining whether or not the
instruction is executed, depending on the state of the arithmetic flags N, Z,
C, and V. In addition, there are the two conditions 'Always' and 'Never'.
The sixteen possible condition combinations are shown in table 2.1, along
with their two-letter ARM Assembler mnemonics:
Mnemonic
AL
<X
CS
BQ
GE
GT
22
Meaning
ALways
Carry Clear
Carry Set
EQual
Greater than or Equal
Greater Than
Flag Settings
C=0
C=l
Z=l
N = l and V = l or
N=0 and V=0
N = l and V = l and Z=0 or
N=0 and V=0 and Z=0
The ARM Instruction Set
Mnemonic
HI
LS
LT
MI
NE
NV
PL
VC
VS
Meaning
Higher (unsigned)
Less than or Equal
Flag Settings
C = l and Z=0
N = l and V = 0 or
N=0 and V ==1
l or
Z=l
Lower or Same (unsigned) C=0 or
Z=l
Less Than
N = l and V ==0
0 or
N=0 and V = l
Minus (Negative)
N=l
Not Equal
Z=0
NeVer
PLus (Positive)
N=0
oVerflow Clear
V=0
overflow Set
V=l
Table 2.1. Conditional mnemonics.
Two synonyms are also in common use and are supported by the
assembler:
LO LOwer (unsigned) is equivalent to Carry Clear (cc)
HS Higher or Same (unsigned) is equivalent to Carry Set (CS)
Archimedes Operating System
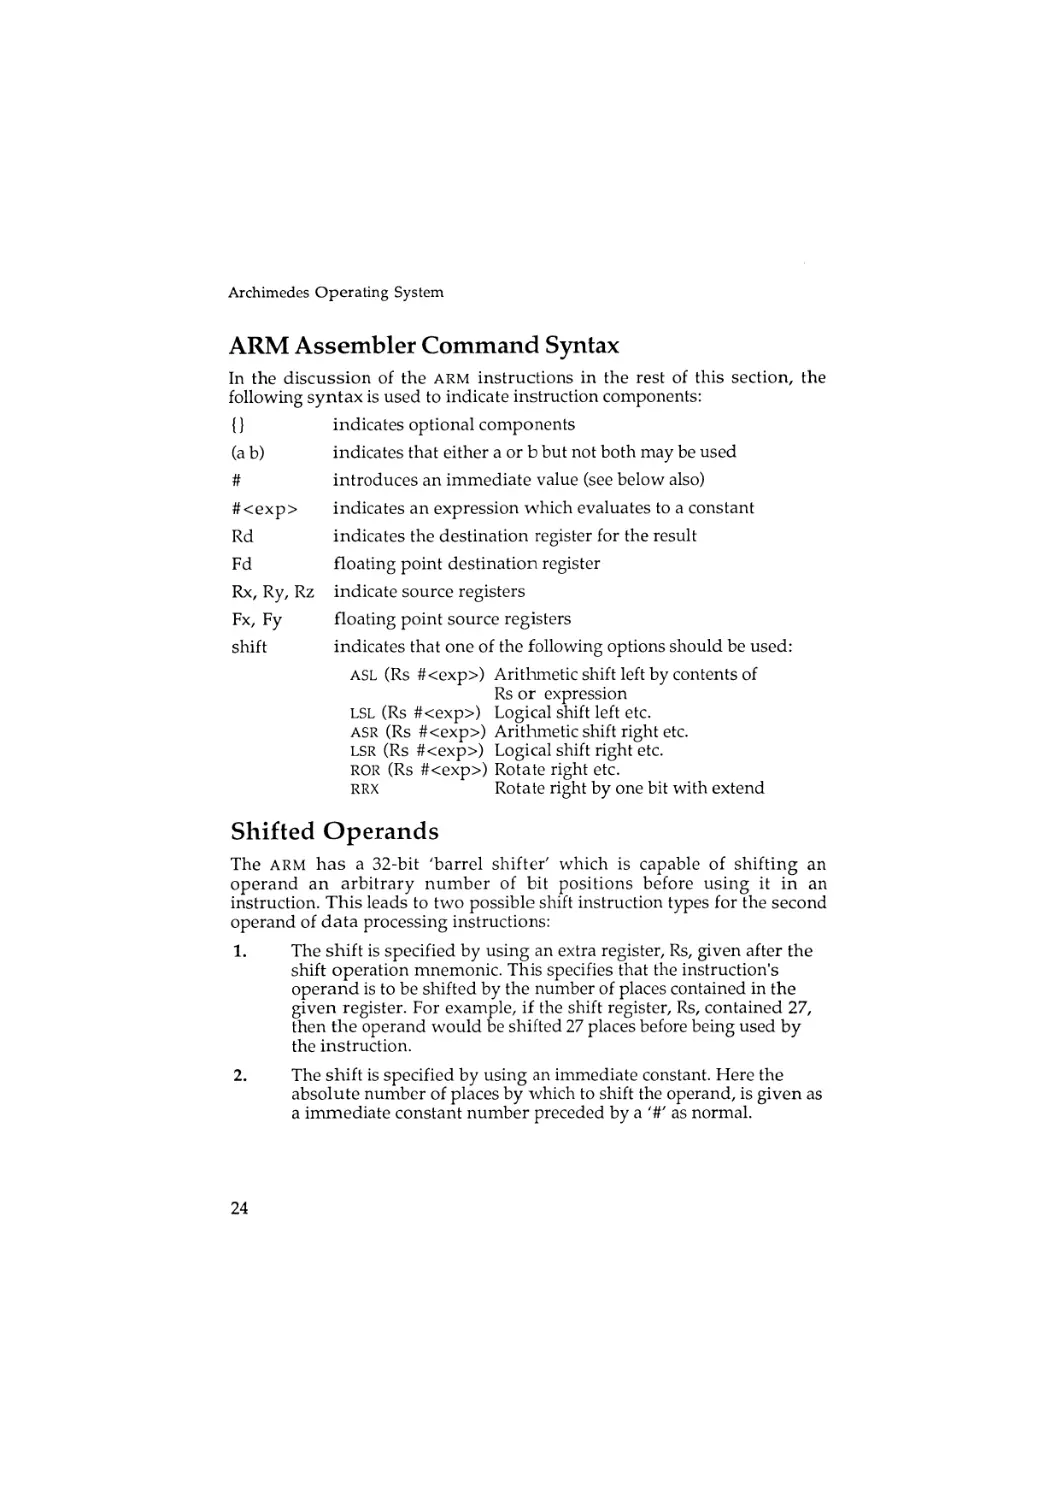
ARM Assembler Command Syntax
In the discussion of the ARM instructions in the rest of this section, the
following syntax is used to indicate instruction components:
{}
indicates optional components
(a b)
indicates that either a or b but not both may be used
#
introduces an immediate value (see below also)
#<exp>
indicates an expression which evaluates to a constant
Rd
indicates the destination register for the result
Fd
floating point destination register
Rx, Ry, Rz
indicate source registers
Fx, Fy
floating point source registers
shift
indicates that one of the following options should be used:
ASL (Rs # < e x p > ) Arithmetic shift left by contents of
Rs or expression
LSL (Rs # < e x p > ) Logical shift left etc.
ASR (Rs # < e x p > ) Arithmetic shift right etc.
LSR (Rs # < e x p > ) Logical shift right etc.
ROR (Rs # < e x p > ) Rotate right etc.
RRX
Rotate right by one bit with extend
Shifted Operands
The ARM h a s a 32-bit 'barrel shifter' which is capable of shifting an
operand an arbitrary number of bit positions before using it in an
instruction. This leads to two possible shift instruction types for the second
operand of data processing instructions:
1.
The shift is specified by using an extra register, Rs, given after the
shift operation mnemonic. This specifies that the instruction's
operand is to be shifted by the number of places contained in the
given register. For example, if the shift register, Rs, contained 27,
then the operand would be shifted 27 places before being used by
the instruction.
2.
The shift is specified by using an immediate constant. Here the
absolute number of places by which to shift the operand, is given as
a immediate constant number preceded by a ' # ' as normal.
24
The ARM Instruction Set
Note: It is pointless to try to attempt to shift an instructions operand if the
operand is given itself as an immediate constant. Shifts are only valid,
therefore, when the second operand to an instruction is given in a register.
No matter how a data shift is specified, the maximum number of places to
shift by is always 31.
Branch Instructions: B, BL
Syntax:
B{L}{cond}
<expression>
Like all other ARM instructions, the following instructions are only
executed if the condition field is true. The ARM assembler assumes a
condition of ALways (ensuring execution) unless you specify otherwise.
There are two different kinds of branch instruction: B (for Branch) and BL
(for Branch with Link). The mnemonics are chosen to produce conditional
instructions which are similar to their equivalent 6502 instructions, eg, BEQ
for Branch if EQual.
Pure branches simply perform a relative branch to the specified offset if the
condition field of the instruction is true. Thus, a minimal (and quite useless)
loop is assembled as follows:
.label
BAL
label
Unlike the 6502, the ARM branch instruction takes an offset which is almost
large enough to encompass the entire address space of the processor. You
will recall that this is 64Mbs or 2 bytes, but because instructions must be
word-aligned, only 24 bits are required in the instruction. This means that
branch instructions can reference any word in the entire 64Mb address
space and 'out of range' errors cannot occur.
2 6
Branch with Link (BL)
The Branch with Link instruction differs from the Branch instruction in that
it provides a return address for the branch, ie, a subroutine facility. Before
the branch is made (if the condition field allows) the PC is adjusted and
saved into R14 to provide a 'link' to the address of the instruction after the
Branch with Link.
To return from a Branch with Link several possible mechanisms are
available according to two criteria: whether the PSR should be restored or
not and whether R14 is still valid or needs to be retrieved from a stack. The
former affects whether subroutines can alter the flags and the latter is
25
Archimedes Operating System
necessary to support more than one level of subroutine calling. These
mechanisms are outlined below:
Return through
Return through
Return popping
and restore PSR
Return popping
(PSR unaltered)
R14 and restore PSR
R14 (PSR unaltered)
address from stack
address from stack
MOVS PC,R14
MOV PC,R14
LDMFD Ry!,{PC}
A
LDMFD Ry!,{PC}
where Register 'Ry' is acting as the stack pointer. These instructions will
make a little more sense when you have read the whole chapter!
Arithmetic and Logical Instructions
Syntax:
< m n e m o n i c > { c o n d } { S } Rd,Rx, (Ry{,shift} #<exp>)
or where instruction requires only one source parameter:
< m n e m o n i c > { c o n d } { S } Rd, (Ry{,shift} #<exp>)
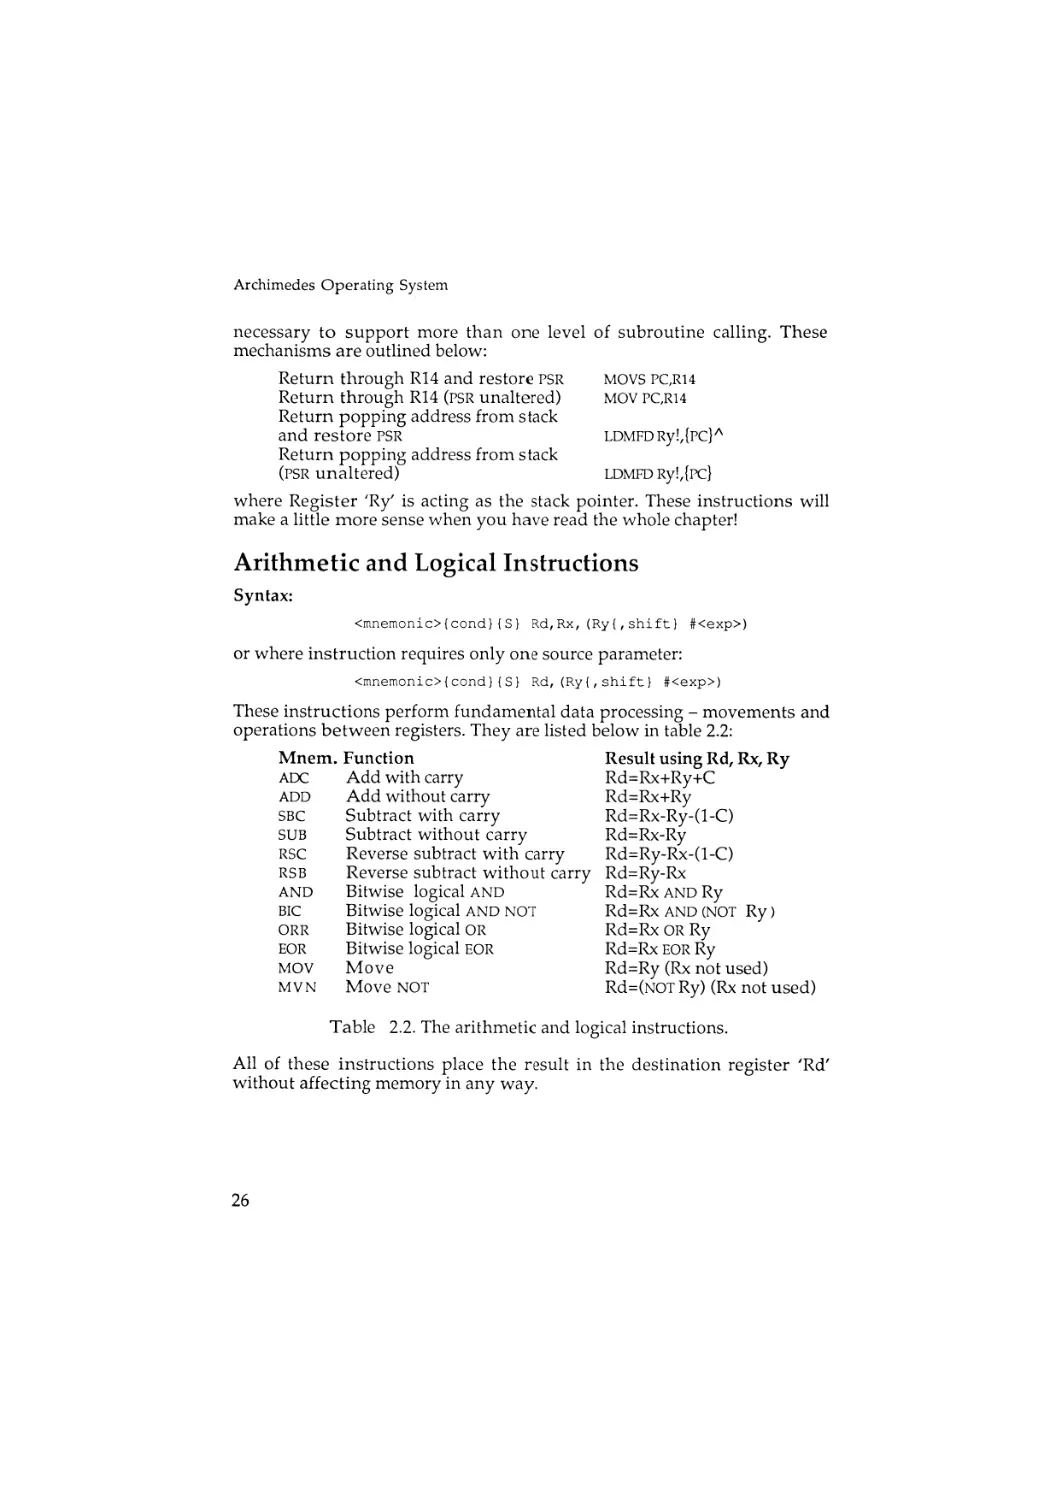
These instructions perform fundamental data processing - movements and
operations between registers. They are listed below in table 2.2:
Mnem.
ADC
ADD
SBC
SUB
RSC
RSB
AND
BIC
ORR
EOR
MOV
MVN
Function
Add with carry
Add without carry
Subtract with carry
Subtract without carry
Reverse subtract with carry
Reverse subtract without carry
Bitwise logical AND
Bitwise logical AND NOT
Bitwise logical OR
Bitwise logical EOR
Move
Move NOT
Table
Result using Rd, Rx, Ry
Rd=Rx+Ry+C
Rd=Rx+Ry
Rd=Rx-Ry-(l-C)
Rd=Rx-Ry
Rd=Ry-Rx-(l-C)
Rd=Ry-Rx
Rd=Rx AND Ry
Rd=Rx AND (NOT Ry)
Rd=Rx OR Ry
Rd=Rx EOR Ry
Rd=Ry (Rx not used)
Rd=(NOT Ry) (Rx not used)
2.2. The arithmetic and logical instructions.
All of these instructions place the result in the destination register 'Rd'
without affecting memory in any way.
26
The ARM Instruction Set
In addition, each of these instructions may use a shifted operand as
described earlier.
The 'S' option in the instruction controls whether the PSR flags are affected
by the result of the operation. When 'S' is present the arithmetic operations
affect the N, Z, C and V flags, and bitwise logical operations affect the N, Z
and C flags (C being affected if shifted operands are used).
If R15 is specified as the destination register then 'S' is used to decide
whether all 32 bits of R15 are updated (if S is present) or just the 24 P C bits
(if S is not present). Note that in User Mode the mode bits and the I and F
flags cannot be altered. Where R15 is used as a source operand, if R15 is
used as the first operand (Rx) only the 24 bits of the P C are available, but
when employed as a second operand (Ry) all 32 bits are available.
Comparison Instructions
Syntax:
<mnemonic>{cond}{P}
Rx, (Ry{,shift}
#<exp>)
The comparison instructions are much the same as the arithmetic and
logical instructions except that they always set the flags (ie, 'S' is always
implied) and they do not return a result.
The comparison instructions are as follows:
Mnem.
CMN
CMP
TEQ
TST
Function
Compare (negative)
Compare
Test equal bitwise
Test bitwise
Arithmetic/logic used to set flags
Rx+Ry
Rx-Ry
Rx EOR Ry
Rx A N D Ry
Besides their fundamental function of setting the flag bits according to the
result, the comparison instructions may also be used to force the PSR bits to
a specific state by means of the T ' option. When present, the 'P' option
causes the top six bits and the bottom two bits of the result to replace the
PSR flags and mode bits in the corresponding positions.
Multiplication Instructions
Syntax:
<mnemonic>{cond}{S} Rd, R x , R y { , Rz}
The A R M multiplication instructions (detailed below) perform integer
multiplication on two full 32-bit operands, giving the least significant 32
27
Archimedes Operating System
bits of the result. The Multiply and Add instruction also adds the third
operand into the result last of all.
Mnemonic
MUL
MLA
Function
Arithmetic used
Multiply
Rd=Rx*Ry
Multiply and add Rd=(Rx*Ry)+Rz
The PC m a y not be used as the destination
operation after all). Nor may the destination
The 'S' option controls whether the N and Z
V and C flags are unchanged and undefined,
register (a quite meaningless
register Rd be the same as Rx.
flags are set by the result. The
respectively.
A full 64-bit result may be generated with the following sequence:
.fullmultiply
/ R e p l a c e x,y,p,q and t by register numbers
;pq = x * y
/ R e g i s t e r t is used for temporary space
/ B r e a k x and y into
M O V t,x,LSR #16
M O V p , y , L S R #16
B I C x,x,t,LSL #16
B I C y , y , p , L S L #16
16bit
numbers
/ M u l t i p l y the chunks t o g e t h e r in pairs
M U L q,x,y
M U L y,t,y
M U L x,p,x
M U L p,t,p
/ A d d the p r o d u c t s up,
/ w i t h careful c o n s i d e r a t i o n
A D D S x,y,x
A D D C S p,p, #&10000
A D D S q,q,x,LSL #16
A D C p , p , x , L S L #16
for carry's
The ARM does not provide a division instruction, but a simple section of
code to achieve this is listed below:
.divide
/ D i v i d e RO by Rl
C M P R0,R1
M O V M I RO, #0
M O V M I PC,R14
C M P R1,#0
A D R E Q R0,divbyzero
SWIEQ "OS_GenerateError"
STMFD R13!,{R2,R3}
M O V R2, #1
28
/Test if result is zero
/If it is, give result *
/ and return
/Test for division by zero
/ and flag an error
/ when necessary
The ARM Instruction Set
MOV R3,#0
CMP R1,#0
.raiseloop
BMI raisedone
CMP R1,R0
BHI nearlydone
M0VS R 1 , R 1 , L S L #1
MOV R 2 , R 2 , L S L #1
B raiseloop
.nearlydone
MOV R 1 , R 1 , L S R #1
MOV R 2 , R 2 , L S R #1
.raisedone
CMP R0,R1
SUBCS RO,RO,R1
ADDCS R 3 , R 3 , R 2
MOV R 1 , R 1 , L S R #1
MOVS R 2 , R 2 , L S R #1
BCC raisedone
MOV R0,R3
LDMFD R13!, {R2,R3}
MOV PC,R14
;Accumulate
;Move result
; and
result
into RO *
return
.divbyzero ;The e r r o r block
EQUD 18
EQUS "Divide by Z e r o "
EQUB 0
ALIGN
; * Remove the lines marked w i t h asterisks to
; return RO MOD Rl instead of RO DIV Rl
Single Register Load and Store Instructions
Syntax:
<mnemonic>{cond}{B}{T}
Rd,
<address>
Although the ARM has a large number of internal registers for efficiency, it
is of course necessary to have some w a y of loading and storing the
contents of these registers from and to main memory. It is a tenet of RISC
philosophy to minimise the complexity of these instructions, and the ARM is
no exception. The ARM load and store instructions are shown below:
Mnemonic
LDR
STR
Function
Load register
Store register
Both of these instructions deal with a register (to be loaded or stored) and
an address calculated with one of seven addressing modes.
29
Archimedes Operating System
The whole 3 2 bits of the register or memory location concerned are affected
unless a ' B ' is added to the mnemonic in which case only a single byte is
transferred.
The simplest addressing mode takes a register number, the specified
register containing the address to load from or store to. This is known to
users of most other microprocessors as 'register indirect' addressing.
Other o p t i o n s include adding an immediate value or the contents of
another register to the address contained in the first register. This is known
as pre-indexed addressing since the calculation of the final address is
performed before the load or store takes place. The register may
optionally b e updated with the result of the address calculation by
appending a n exclamation mark '!' after the addressing mode.
The syntax of the pre-indexed address modes is as follows:
Address calculation
Contents of Rx
(Contents of Rx)+m
(Contents of Rx)+(contents of Ry)
(Contents of Rx)+
(contents of Ry, shifted by s bits)
(Contents of Rx)+
(contents of Ry, shifted by the
number of places held in Rs)
Syntax
[Rx]
[Rx,#m]{!}
[Rx,Ry]{!}
[Rx,Ry,shift #s]{!}
[Rx,Ry,shift Rs]{!}
Alternatively, the address calculation may take place after the load or
store, such addressing being known as post-indexed addressing. Postindexed addressing automatically writes the result back into the specified
register, so a n exclamation mark is never needed.
The syntax of the post-indexed addressing modes is shown below:
Calculation performed and written back
(Contents of Rx)
- then increment Rx b y ' m '
(Contents of Rx)
- then increment Rx by contents of Ry
(Contents of Rx)
- then increment Rx by contents of Ry,
shifted by s bits)
Syntax
[Rx],#m
[Rx],Ry
[Rx],Ry,shift #s
Remember that, in all post-indexed addressing modes, the data is obtained
from the address held in Rx alone. It is only after this has happened that
the contents of Rx are changed by adding the suitably specified offset. In
30
The ARM Instruction Set
pre-indexed addressing, this modification of the address in Rx takes place
first. The data is then loaded from the newly modified address. Finally, if
write back is selected, the new modified address, just used, is stored back in
Rx, replacing its original contents.
If you give the assembler a simple expression as the address it will
generate a pre-indexed instruction using R15 ( P C ) as the base register, thus
providing 'position-independent' assembly. An error will be generated if
the address is outside of the range of the instruction (+ or - 4095 bytes).
Note also that it is not possible to use a register to specify a shift amount
with the LDR and STR instructions.
If T ' is added to the mnemonic the M E M C memory controller is forced to
cause an address translation in Supervisor Mode (which would not usually
happen). In User mode address translation takes place all of the time so
this is unnecessary.
Multiple Register Load/Store Instructions
Syntax:
< m n e m o n i c > { c o n d } ( I D)(A B) R x { ! } , <Rlist>{*}
When writing subroutines and procedures it is frequently necessary to
preserve the contents of several registers; usually this is achieved by
pushing them on to a stack so that they may be popped off later. To save
(programming) time the A R M provides instructions for loading and storing
any or all of the internal registers. In fact, one instruction suffices for each
operation because individual bits in the instruction indicate which registers
are to be dealt with.
The multiple register instructions are summarised below:
Mnemonic
LDM
STM
Function
Load multiple registers
Store multiple registers
The contents of register Rx are used as the base address for the load or
store operation. The list of registers 'Rlist' will be loaded from or stored to
memory, starting with the lowest numbered register.
Two mandatory components of the instruction affect its operation: the (ID)
field controls whether addresses loaded from or saved to are Increased or
Decreased from the base address in Rx. It is therefore possible to create
stacks which extend either upwards or downwards in memory.
31
Archimedes Operating System
The second control field (A B) indicates whether the address used is
modified after or before the load or store operation. If 'A' is used, the first
register is dealt with and then the address is updated before the next
register. Alternatively, using 'B' causes the address to be updated before
each register is dealt with. To simplify the programmer's life, synonyms
are available for these two control fields: an 'F' (for 'Full stack') may be
used in place of 'B' and an 'E' (for 'Empty stack') may may be used instead
of 'A'. Similarly, the second letter may be replaced with 'D' for 'Descending or 'A' for 'Ascending'. All Acorn software uses Full Down (FD) stacks
and it is recommended that you follow suit.
7
Software Interrupts
Syntax:
SWI
<expression>
The r e m a i n i n g ARM instruction is the Software Interrupt (SWl). The
purpose of the SWI instruction is to allow the Operating System to make its
facilities available to the user without allowing the user any direct control
in Supervisor Mode. On encountering this instruction, ARM changes to
Supervisor M o d e (thus preserving the user's R13 and R14 registers in their
own register bank) and jumps through the SWI vector to allow the
instruction to be processed. The assembler evaluates the expression that
follows the SWI mnemonic into a 24-bit field which is used to determine the
action required.
Both the Arthur and RISC OS Operating Systems use SWIs as the fundamental control mechanism for user software. The 24-bit SWI number is
decoded and used to select the Operating System routine to be performed
before returning to the next instruction of the user's program. We shall see
a great deal more of SWIs throughout this book.
32
3 : The BASIC V Assembler
Basic Concepts
Having examined the instructions available to ARM programmers we need
to devote some attention to the A R M assembler which allows us to create
machine code programs from the keyboard.
Of course, it would be possible to hand assemble the instructions for our
program by looking up their opcodes as numerical values and composing
complete instructions. However, quite aside from the effort involved in this
process, the complexity of the instructions at the individual bit level is such
that only a real masochist would attempt this more than a couple of times.
Instead, Acorn has followed the tradition started by the B B C Microcomputer and included an assembler in the B A S I C interpreter. This is to
Acorn's benefit because the assembler can take advantage of many of the
housekeeping facilities that B A S I C needs for itself; it is also to the programmer's benefit for much the same reasons!
Most readers will be familiar with the 6502 assembler provided in B B C
B A S I C for the B B C Microcomputer. Whether you are or not, it is worth
reading the synopsis that follows because some significant extensions are
present in the ARM version.
Using the Assembler
In common with the 6502 assembler the A R M assembler is entered when
encounters an opening square bracket ' ['. Similarly, a closing
square bracket ' ] ' exits the assembler and returns control to the B A S I C
interpreter.
ARM BASIC
Variable Initialisation from BASIC
and the assembler are inexorably intertwined in that they share the
same variables and workspace. Thus it is possible to initialise variables to
useful values from B A S I C and then employ them in the assembler. For
example, to create a constant w e might say:
BASIC
AOS—C
33
Archimedes Operating System
Screen_mode=128
and thereafter employ 'Screen_mode' throughout our assembler program.
This has t h e virtue that we need only alter this one variable and reassemble our software to update all its occurences.
Labels in Assembler Source
The assembler takes advantage of B A S I C in a similar way to allow you to
use alphanumeric labels in the assembler program. Each location in the
program which needs to have a label is marked by preceding it with a full
stop. For example:
.my_label M O V
R0,R1
labels the address at which the ' M O V R O , R I ' instruction is stored as
'my_laber to allow branches and references to it elsewhere.
The assembler does this by creating a BASIC variable of the same name, ie,
my_label, a n d setting it to the value of P% (see later) at the time the label
was encountered. When a reference to the label is necessary elsewhere, it
may simply be referred to by name, eg:
BLEQ
my_label
Again, this has the virtue that only the label needs to be moved before reassembly in order to update all references to it.
Allocating Memory
The A R M assembler deposits the object code it generates into memory at a
defined place (see later). In order to prevent BASIC and the assembler from
attempting to make conflicting use of this memory we need to advise BASIC
that it should not be corrupted. This is achieved using a special case of the
B A S I C ' D I M ' operator. To reserve 1000 bytes for assembler object code we
might use the following:
DIM o b j e c t _ c o d e %
1000
which reserves at least 1000 bytes and leaves the B A S I C variable
'object_code%' pointing to the first byte. Note that memory reserved in this
way is guaranteed to be word aligned, ie, its start address will always be
on a word boundary (address divisible by four).
You may find this mechanism useful for reserving space for tables or to
allow you to refer to large amounts of data from the assembler.
34
The BASIC V Assembler
Assembling Into Memory
Once you have reserved an area of memory into which the assembler may
put the object code it produces, you must advise the assembler of the
location of the memory. The assembler shares the BASIC variables P% and
0 % for this purpose.
P% is used to point to the start of the memory area, eg:
P%=object_code%
When assembly begins, the first instruction assembled will be placed at P%
and the value of P% will then be inceased by four automatically after
assembling each instruction so that it points to where the next instruction
should be placed. Thus, when the assembly is complete, P% will be left
pointing to the byte after the last instruction assembled.
Offset Assembly
The use of P% as a pointer has the drawback that you must assemble your
code at the position where it will ultimately be used. This is not always
convenient. Programs which need to be executed at a different address to
that at which they are assembled may contain references to memory
locations which are fixed at assembly time. To allow for this, the variable
0 % may be used to set the address at which the object code is to be stored.
The assembler responds by placing the object code in memory starting at
0 % but uses P% to resolve any absolute memory references in the object
code. 0 % and P% are incremented together in this case.
Of course, you need to advise the assembler that you wish the object code
generated to be executed in a different place - this is achieved by setting bit
two of the assembler directive OPT and is discussed in more detail below.
Dealing With Forward References
As we saw above, the assembler allows labels to be placed in the source
program to make the program easier to understand. However, it is
possible for a situation to arise in which the assembler cannot immediately
resolve all references to labels. Consider the following program fragment:
B
forward_label
.forward
label
35
Archimedes Operating System
which on its own would cause an assembler error ('Unknown or missing
variable'). A s you can see, there is a reference to a label which has not yet
been encountered by the assembler and whose address is therefore
unknown. T o overcome this we can perform the assembly twice, discarding
the results (and errors) from the first attempt. This is known as 'two-pass'
assembly a n d should b e used in preference to other approaches because it
covers all eventualities.
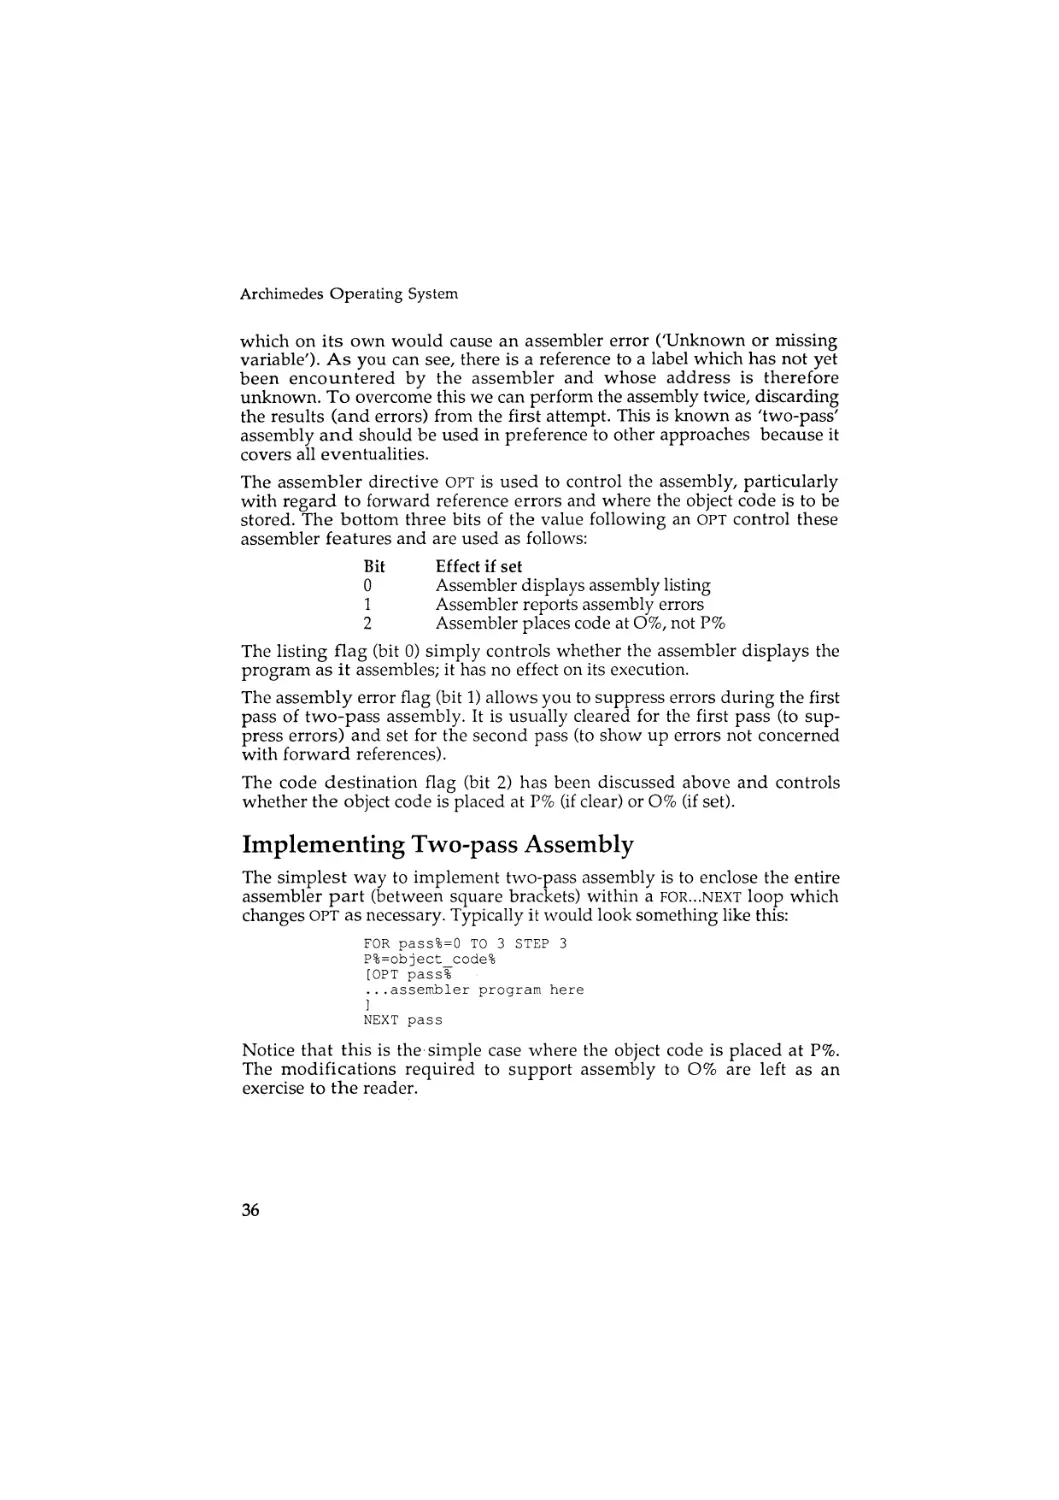
The assembler directive OPT is used to control the assembly, particularly
with regard to forward reference errors and where the object code is to be
stored. The bottom three bits of the value following an OPT control these
assembler features and are used as follows:
Bit
0
1
2
Effect if set
Assembler displays assembly listing
Assembler reports assembly errors
Assembler places code at 0 % , not P%
The listing flag (bit 0) simply controls whether the assembler displays the
program as it assembles; it has no effect on its execution.
The assembly error flag (bit 1) allows you to suppress errors during the first
pass of two-pass assembly. It is usually cleared for the first pass (to suppress errors) and set for the second pass (to show up errors not concerned
with forward references).
The code destination flag (bit 2) has been discussed above and controls
whether the object code is placed at P% (if clear) or 0 % (if set).
Implementing Two-pass Assembly
The simplest way to implement two-pass assembly is to enclose the entire
assembler part (between square brackets) within a FOR...NEXT loop which
changes OPT as necessary. Typically it would look something like this:
FOR p a s s % = 0 TO 3 STEP 3
P%=object_code%
[OPT p a s s %
...assembler p r o g r a m here
NEXT p a s s
Notice that this is the simple case where the object code is placed at P%.
The modifications required to support assembly to 0 % are left as an
exercise to the reader.
36
The BASIC V Assembler
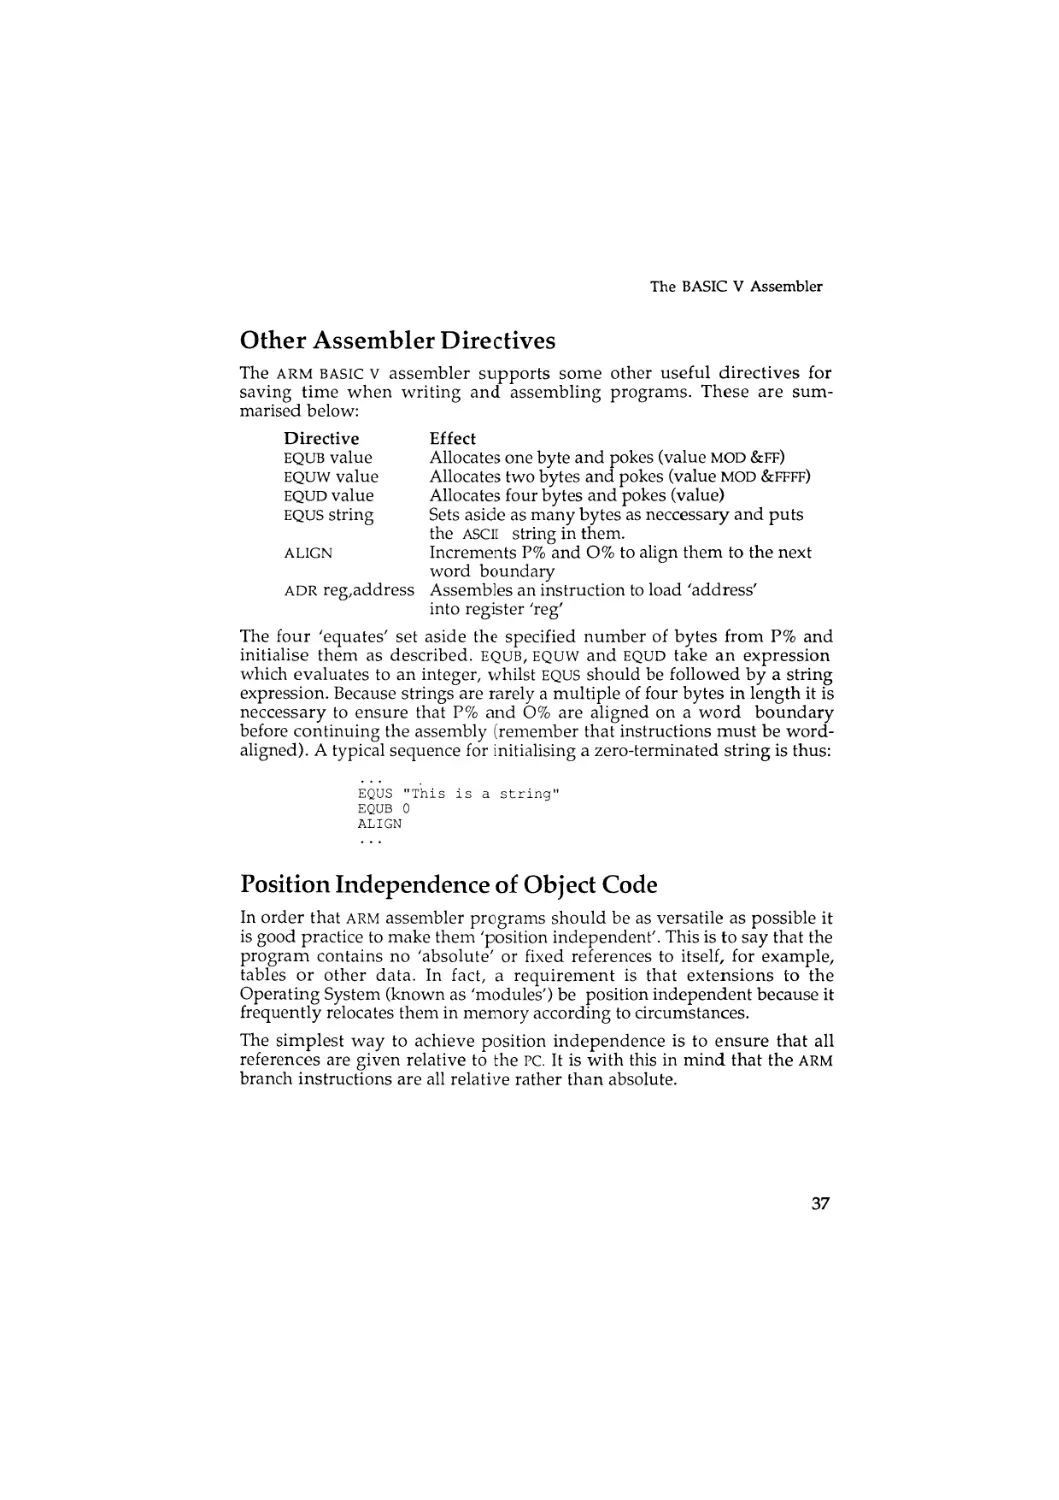
Other Assembler Directives
The A R M B A S I C V assembler supports some other useful directives for
saving time when writing and assembling programs. These are summarised below:
Directive
value
E Q U W value
E Q U D value
E Q U S string
EQUB
ALIGN
A D R reg,address
Effect
Allocates one byte and pokes (value M O D & F F )
Allocates two bytes and pokes (value M O D & F F F F )
Allocates four bytes and pokes (value)
Sets aside as many bytes as neccessary and puts
the ASCII string in them.
Increments P% and 0 % to align them to the next
word boundary
Assembles an instruction to load 'address'
into register 'reg'
The four 'equates' set aside the specified number of bytes from P% and
initialise them as described. E Q U B , E Q U W and E Q U D take an expression
which evaluates to an integer, whilst E Q U S should be followed by a string
expression. Because strings are rarely a multiple of four bytes in length it is
neccessary to ensure that P% and 6% are aligned on a word boundary
before continuing the assembly (remember that instructions must be wordaligned). A typical sequence for initialising a zero-terminated string is thus:
E Q U S "This is a
EQUB 0
ALIGN
string"
Position Independence of Object Code
In order that ARM assembler programs should be as versatile as possible it
is good practice to make them 'position independent'. This is to say that the
program contains no 'absolute' or fixed references to itself, for example,
tables or other data. In fact, a requirement is that extensions to the
Operating System (known as 'modules') be position independent because it
frequently relocates them in memory according to circumstances.
The simplest way to achieve position independence is to ensure that all
references are given relative to the PC. It is with this in mind that the A R M
branch instructions are all relative rather than absolute.
37
Archimedes Operating System
The assembler directive A D R assists by automatically generating an ADD or
S U B instruction which will ensure that the specified register contains a
position independent pointer to the specified address (by using the PC in its
calculation). Consistent use of this directive allows you to ensure that your
software is position independent.
An acid test for determining whether software is truly position independent is to assemble it at two different locations and compare the listings
produced using a text editor or file comparison program. By scrutinising
the differences between the two listings it is possible to identify instructions
which need re-writing.
Executing Assembler Programs
Once a program has assembled correctly it is usually a good idea to save
the object c o d e ! The length of the object code can be determined by
subtracting the start address from P% (or 0 % ) , eg:
P R I N T " O b j e c t code starts at "~objcode_code%"
o b j c o d e _ c o d e % " bytes long."
and
is
"~P%-
This information is enough to allow you to save it using the operating
system command ' * S A V E ' . The simplest syntax of this command is:
*SAVE<f i l e n a m e > < s t a r t a d d r > < e n d a d d r >
{<executeaddr>{<reloadaddr>}}
or alternatively:
*SAVE<f i l e n a m e > < s t a r t a d d r > + < l e n g t h > { < e x e c u t e a d d r > { < r e l o a d a d d r > }
}
where all of the address-related information is assumed to be entered in
hexadecimal and the execute and reload addresses are optional.
Once the object code has been saved it may be executed in several ways.
Firstly, it may be executed in memory without reloading by means of one of
two BASIC commands:
CALL
startlabel
or alternatively:
variable=USR(startlabel)
with 'startlabel' being either the name of the entry point or its address in
hexadecimal. Either of these commands will start executing the object code
at the specified address, hopefully producing the expected results!
Alternatively, the saved object code may be executed by re-loading it and
running it. T h e operating system deals with loading automatically if you
38
The BASIC V Assembler
type any of the following three synonymous commands to run the object
code:
*<filename>
or:
*RUN
<filename>
or:
*/<filename>
For more information on * S A V E and its address parameters consult the
Archimedes User Guide or Programmer's
Reference
Manual.
Conclusion
The A R M B A S I C V assembler allows programs to be written quickly and
easily by providing the programmer with a familiar environment in which
to work ( B A S I C ) and extending it very slightly to cater for the quirks of
assembler programming. This successful formula was adopted with the
BBC Microcomputer and has been updated to deal with the complexities of
the A R M .
39
4 : The Operating System
The 'Operating System' is the name given to the fundamental software in
a computer which provides the environment in which the user works.
Without an Operating System it would not be possible to type commands at
the k e y b o a r d , see those commands on the display or even execute
programs. T h e Operating System relieves the user of the complexities of
controlling the various peripheral devices connected to the computer and
allows the computer to be operated with meaningful commands rather
than by machine-code programming. At the same time, the Operating
System software is broken up into many distinct routines which may be
called individually, so as to allow programmers to take advantage of
useful facilities that have already been written.
The most crucial role of the Operating System is in controlling the
i n p u t / o u t p u t devices connected to the computer: in particular, the
keyboard, screen display and storage devices such as disc drives. This is
achieved with the help of hardware 'interrupts' - signals from peripherals
which indicate that they need attention from the computer. If you have
programmed in assembly language on a BBC Microcomputer then you are
likely to be aware of the importance of interrupts. They are equally
important in the Archimedes and, as we saw in the introduction, the ARM is
very competent at servicing interrupts quickly.
The Acorn Archimedes computers are sophisticated and powerful machines
which are designed to be expanded by the addition of new software and
new hardware. Clearly, the Acorn staff responsible for the design of the
computer cannot think of every possible extension which their myriad users
might devise, so instead they concentrate on making the Operating System
as general as possible while allowing it to be expanded with ease.
Communicating with the OS
There are two mechanisms by which users can communicate their wishes to
the Operating System. The more familiar of the two is the keyboard
'command l i n e ' which interprets commands beginning with *. The OS
displays an asterisk whenever it is ready for a command to be typed by the
user for execution, and for this reason its prompt symbol is itself an
40
The Operating System
asterisk (useful because it saves the user from having to type o n e ) . When
this prompt is visible, any o f the Operating System commands (or
commands supported b y other resident software) m a y be entered for
execution. The Operating System will respond either b y taking t h e
specified action or reporting an error if the command w a s not understood.
Because the command line is so crucial to the operation of the Operating
System we shall examine it in greater detail later.
The second way in which communication with the Operating System c a n
take place is through the use of 'software interrupts' or 'SWis'. As w e s a w
in the previous chapter, the ARM has an instruction known as SWI which
effectively acts as a subroutine call into the Operating System. This
instruction always takes a 24-bit parameter to indicate which operation is
desired. It may also require other parameters to be placed in the A R M
registers according to the operation.
The reason that these two different techniques exist is simply one of
efficiency. For human beings, writing a short piece of assembler every time
we want the computer to do something is seriously inefficient. On the other
hand, the converse is true for programs (where composing and issuing
long text strings is equally inefficient - particularly in terms of memory
usage). Thus, the command line exists to make it easier for the user to enter
quick commands, while the S W I instruction is used to achieve all these
effects and others from within programs.
It is worth noting that in fact the 'command line interpreter' (CLl) is actually
an Operating System routine which may be called by means of a SWI, so in
reality there is only one way of communicating with the Operating System,
viz using SWis. However, it will be convenient to think of the two as being
distinct.
How SWis work
The 24-bit SWI identification field is large enough to allow just over sixteen
million different SWis to be specified. In practice, this field is divided up into
several groups to allow different kinds of SWI to be numbered in related
ways. The meaning of the individual SWI number bits is as follows:
Bits 23-20
These top four bits are used to identify the Operating System
of which the SWI is a part. All four bits must be set to be zero
to indicate that the SWI is relevant to Arthur and RISC OS;
other Operating Systems will use different values.
41
Archimedes Operating System
Bits 19-18
These two bits are used to indicate which piece of software is
responsible for executing the SWI. The table below
summarises the possibilities:
Bit 19
0
0
1
1
Bit 18
0
1
0
1
Meaning
Operating System
Operating System extensions (Acorn)
Third party applications
User programs
Bit 17
This bit, known as the 'X' bit, is used to specify how errors
that occur during the execution of the SWI should be dealt
with. It is discussed in more detail in the section on SWI error
handling.
Bits 16-6
These eleven bits identify the group or 'chunk' of 64 SWls for
each specific application. Chunk numbers are allocated b y
Acorn as new software requires. A few SWI chunks have
already been allocated to various parts of the Operating
System and filing systems. If you produce commercial
software which requires several SWIs you should apply to
Acorn for a chunk number.
Bits 5-0
The bottom six bits indentify the particular SWI within a given
chunk. This allows up to 64 SWls (which is more than enough)
for each application.
SWI Names
Obviously, it w o u l d be i n c o n v e n i e n t to h a v e to r e m e m b e r or look u p a 24bit n u m b e r e v e r y time y o u w a n t e d to call a SWI f r o m a p r o g r a m . T o save
t i m e , the O p e r a t i n g S y s t e m p r o v i d e s a m e c h a n i s m for g i v i n g SWls textual
n a m e s a n d t h e n c o n v e r t i n g b e t w e e n SWI n a m e s a n d SWI n u m b e r s . T w o
SWls, w h o s e textual n a m e s are:
OS_SWlNumberToString
OS_SWlNumberFromString
a l l o w t h e O p e r a t i n g S y s t e m to p e r f o r m t h e s e c o n v e r s i o n s . S i n c e the
O p e r a t i n g S y s t e m c a n n o t pluck t e x t u a l n a m e s f r o m thin air, the a u t h o r of
a particular SWI is obliged to follow a d o c u m e n t e d s t a n d a r d to allow these
conversions t o take place. This is discussed in the section on ' m o d u l e s ' .
Listing 4.1 u s e s OS_SWiNumberToString to print out the n a m e s of t h e first
256 SWIs. OS_SWlNumberToString r e t u r n s e a c h SWI n a m e at the location
called buffer % and the n a m e is printed using OS_Write0.
42
The Operating System
Both the ARM BASIC command 'SYS' and the ARM BASIC assembler perform
this conversion automatically whenever they encounter a SWI name
enclosed in inverted commas.
In order to make these conversions somewhat simpler to implement, the
SWI chunk 'name' followed by an underline '_' is used to prefix the SWI, so
the conversion SWls are named 'OS_...' because they are provided by the
Operating System. SWls provided by other software modules d o the same,
so the A D F S SWls are all prefixed by ' A D F S _ . . . ' and so forth.
Note that SWI names must be spelt exactly as seen, so capital and lowercase letters are crucial to correct SWI calling. If you mis-spell the SWI name
an error will be generated. We can only hope that in future versions of the
Operating System case independence and abbreviation of SWI names will
be permitted.
SWI Error Handling
Almost every SWI needs to deal with circumstances where an error may
arise, such as where it is passed insufficient or erroneous parameters or
because the action it tried to take failed for some low-level reason. Two
mechanisms for dealing with swi errors are defined by the Operating
System so that programmers may take appropriate action.
In its simplest form, SWI error handling is achieved through the use of the
ARM'S Overflow flag ' V . All SWls indicate their successful completion by
clearing this flag, a result which is easily dealt with by means of a branch
instruction after the SWI instruction. If an error arises, the SWI sets the ' V
flag and returns with ARM register RO containing a pointer to a block of
information describing the error. SWls which behave in this way are known
as 'error-returning'.
The format of the error block pointed to by RO for error-returning SWIs is:
Bytes 0-3
Bytes 4-n
Byte n+1
Error number
Error message (ASCII text)
Zero (to terminate the error message string)
Error blocks must be word-aligned and may not exceed 256 bytes in length.
The more sophisticated form of error handling is controlled by the 'X' bit in
the SWI number which was mentioned earlier. When this bit is set the SWI
will return to the calling application with the ' V flag in the appropriate
state (as above). However, it is frequently convenient to h a v e a generalpurpose error handler within an application (for example, the BASIC
statement ON ERROR) which deals with all errors in a consistent w a y . By
43
Archimedes Operating System
issuing the SWI instruction with the 'X' bit clear, error control is passed by
the Operating System to the currently defined 'error handler', which takes
appropriate action. SWis which behave in this way are known as 'error
generating'. The error handler is established through the u s e o f an
Operating System 'vector', and this and other vectors are discussed in the
next section.
The SWI n a m i n g system allows the state of the 'X' bit to be controlled by
prefixing the SWI name with a capital 'X'. The default for SWI error control
is the error generating state, ensuring that errors are flagged b y the
current error handler automatically. Error-returning SWis use the 'X'
prefix, so the error-returning form of the name conversion SWI mentioned
above is:
XOS_SWINumberToString
Note that it is vital to remember to include software to deal with errors if
the error-returning form is being used.
Error Handling - Numbering
In much the same way as SWis are uniquely numbered, so the errors which
SWis produce are numbered in a consistent way. The error number field in
an error block is 32 bits long and the bits are used as follows:
Bit 31
If set, indicates a serious error from which returning is
impossible
Bit 30
Defined to be clear, but may be set to indicate internal errors
Bits 29-24
Reserved
Bits 28-3
Error generator identification field (see below)
Bits 7-0
Error number (0-&FF)
The middle two bytes of the error number form a field which identifies the
particular piece of software responsible for generating the error. This is
similar to the SWI 'chunk' field, but note that it has no numerical
relationship with the chunk number whatsoever. Of the 65535 available
error generator indentification fields, a small number have been allocated
to existing software such as the Operating System. Just as for SWI chunks,
software authors should apply to Acorn for an error generator field of
their own.
44
The Operating System
Error Generation
As well as SWls being able to generate errors, it is also possible for
programs to generate errors of their own in order to signal unusual
conditions. This is achieved by issuing the SWI OS_GenerateError with RO
pointing to an error block of the usual format, eg:
130 A D R R O , E s c a p e E r r o r ;Point to the error b l o c k
14 0 SWI " O S _ G e n e r a t e E r r o r " ;Generate an e r r o r
A good example of the need for this facility is the detection and handling of
the ' E S C A P E ' key being pressed. All good software regularly checks to see
whether the user has pressed the E S C A P E key, which is usually an indication
that the user wishes to abandon or cancel the current operation.
The depression of the E S C A P E key can be tested for by issuing another SWI OS_ReadEscapeState - which returns with the carry flag ' C set if the key
has been pressed. Listing 4.2 illustrates this. O S _ R e a d E s c a p e S t a t e is
repeatedly called until the E S C A P E key has been pressed (ie, until the carry is
set on return). Then, RO is loaded with the address of the errorblock
'EscapeError' and the new error is generated by calling the appropriate
SWI OS_GenerateError. Note that there is no return instruction following
the call to OS_GenerateError: the reason for this is that your code will
never be returned to from this SWi!
Listings
10
20
30
40
50
60
70
80
90
100
110
120
130
140
150
160
170
R E M >List4/l
R E M by N i c h o l a s van Someren
REM Archimedes OS: A Dabhand Guide
R E M (c) Copyright AvS a n d NvS 1988
:
D I M b u f f e r % 127
V D U 14
:
R E M Loop through the first 256 SWIs, find
R E M their names and print them.
:
F O R swi%=0 TO 255
SYS " O S _ S W I N u m b e r T o S t r i n g " , s w i % , b u f f e r % , 1 2 7
SYS O S _ W r i t e 0 " , b u f f e r % : P R I N T
NEXT
V D U 15
END
n
Listing 4.1. Demonstrating OS_SWlNumberToString
45
Archimedes Operating System
10
20
30
40
50
60
70
80
90
100
110
120
130
140
150
160
170
180
190
200
210
220
230
240
REM L i s t > 4 / 2
REM b y N i c h o l a s van S o m e r e n
REM A r c h i m e d e s OS : A D a b h a n d Guide
REM (c) Copyright AvS and NvS 1988
:
DIM c o d e % 100
FOR p a s s % = 0 TO 3 STEP 3
P%=code%
[OPT p a s s %
.loop
SWI O S _ R e a d E s c a p e S t a t e
;Wait until Escape p r e s s e d
BCC l o o p
A D R R 0 , E s c a p e E r r o r ;Point to the error block
SWI " O S _ G e n e r a t e E r r o r " ;Generate an error
:
.EscapeError
E Q U D 17
EQUS "I knew you w e r e g o i n g to p r e s s E s c a p e "
EQUB 0
ALIGN
] .NEXT p a s s %
:
CALL loop
END
,,
M
Listing 4.2. Demonstrating OS_ReadEscapeState.
46
5 : Command Line Interpreter
The Operating System Command Line Interpreter (os_CLl) allows you to
use many of the functions provided by SWis without having to go to the
effort of writing an assembler program. Obviously this is more useful as
far as the user is concerned, but the penalty paid is one of speed - it takes
time for the OS to decode the command and its parameters before the the
appropriate SWis are actually invoked.
Aside from the commands that the OS understands, modules may also add
to the available OS.CLI commands; this is how the different filing systems
provide their own device-specific commands. You too can add OS_CLl
commands provided by your own modules - this is discussed in the chapter
on modules (Chapter 11).
If you are familiar with the BBC Microcomputer MOS you will recognise the
style of Operating System commands, which are preceded by a '*'. Many
of the commands understood by the BBC MOS are also understood by the
Archimedes OS, providing some consistency and making life easier for users
familiar with the BBC. Most interactive applications written for Acorn
computers provide some means for entering Operating System commands;
for example, ARM BASIC simply passes on any line that starts with an
asterisk.
To cater for the entry of * commands without having an application
running the OS Supervisor (language number 0) allows the direct entry of
command lines, displaying an asterisk as a prompt and allowing you to
miss out the initial asterisk when entering the command.
OS_CLI Command Syntax
A number of other special characters may be included in OS_CLl commands
to affect the way in which they are processed. These are detailed below.
Leading Spaces and Asterisks
Because it is very easy to type an extra asterisk by mistake, OS_CLl ignores
all asterisks which precede commands. Similarly, all leading spaces are
also ignored so as to allow some flexibility of syntax. Unfortunately, there
47
Archimedes Operating System
is s o m e inconsistency in the way spaces are used, particularly with regard
to 'redirection' which is discussed below.
Comments
A facility exists to tell OS_CLi to ignore a command line so that it m a y be
used as a comment: this is achieved by putting a vertical bar ' I' at the start
of the line (ie, after any leading asterisks or spaces). One reason you might
wish to do this is to allow an ' E X E C ' file to contain both commands and
comments which describe the commands, or to display instructions for the
user without OS_CLi trying to interpret them.
Command Decoding Extensions
Several characters have reserved meanings within command lines. For
example, the forward oblique or 'slash' ('/') is used as an abbreviation for
*RUN, so the following are identical:
*RUN FileToBeRun
*/FileToBeRun
The colon (':') is used to follow filing system names to allow a temporary
change of filing system. This makes it possible to perform some quick action
on another filing system without having to explicitly change between the
two. Hence, the following command sequences are equivalent when the
ADFS is the current filing system:
*NET
*INFO
*ADFS
$ .Alex. Book. OS__CLI
and, rather m o r e quickly:
*INFO
NET : $ . Alex . Book. OS_CLI
File Redirection
A feature of the Operating System which will be new to BBC MOS users is
'file redirection'. This allows characters to be read from files rather than
the keyboard, and characters to be sent to a file instead of the screen. Thus,
the effect of redirection is similar to having an E X E C or SPOOL file opened
automatically before the command is executed.
The 'greater than' ('>') and 'less than' ('<') symbols, sometimes known as
'angle brackets' are used to represent file redirection. To allow OS_CLl to
decode this feature braces ( ' { ' , ' } ' ) must also be used before and after the
48
Command Line Interpreter
redirection command, and they must be preceded and followed b y exactly
one space.
As an example, here is a command which catalogues the current directory
and places the resultant output into the file 'CurrentCat' (don't forget to
follow the spacing exactly):
*CAT
{ >
CurrentCat
}
Note that the file CurrentCat will be created if it does not already exist, but
its contents will be overwritten if it does. You may display t h e contents of
the file CurrentCat (which will look exactly like a normal catalogue) with:
*TYPE
CurrentCat
Conversely, the following command would run the B A S I C
'TestProg' with all its input taken from the file 'Proglnput':
*BASIC
-quit
{ <
Proglnput
program
} TestProg
Finally, it it possible to append any output to a file ( r a t h e r than
overwriting the file if it exists) using two 'greater than' symbols, thus:
*EX
Once again, the
this file.
{ »
CurrentCat
}
*TYPE
command may be used to display the n e w version of
These redirection commands are a very powerful w a y of creating
automatic command sequences, since it is possible to override the normal
input and output of any command in this way.
Command Line Aliases
OS_CLl commands may be assigned 'aliases' allowing more than one name
to be given to commands, this makes it possible to assign n a m e s to commands which you personally prefer as alternatives for the built-in names.
OS_CLi supports aliases of the form 'Alias$command', where ' c o m m a n d ' is
the name of the alias we wish to add. The OS_CLl command * S E T is used to
set up the alias, and any parameters that follow the c o m m a n d m a y be
passed on using the pseudo-variables %0 to %9.
A good example is the case of the B A S I C command M O D E . Most BBC Micro
users will have, at one time or another, mistakenly typed something like
' * M O D E 3 ' . Using aliases we can add a * M O D E command t o m a k e this
possible:
*SET Alias $MODE
AOS—D
ECHO
<22>
<%0>
49
Archimedes Operating System
(The ECHO command will be discussed shortly, but its meaning is fairly selfevident.)
The effect o f this command is to allow us to type *MODE mode_number,
whereupon OS_CLl will expand the alias to issue:
VDU 22,mode_number
and thereby achieve the desired effect.
The same principle can be applied to get around another common error.
Users frequently type ' * > ' instead of '*.' because they have not released
Shift quickly enough. To handle this we can use:
*SET Alias$>
CAT
Finally, besides the parameter pseudo-variables %0 to %9 we may also use
the pseudo-variable '%*x' to pass on all of the rest of the command line
after parameter number V . This is particularly useful when we are simply
providing a n alias for an existing command. As an example, consider the
command ' c c ' which is used to compile a program written in the language
' C . If we wanted an alias 'compile' for this command, we would simply
need to type:
• SET
Alias$compile
cc
%*0
and, although the command 'cc' takes a variable number of parameters,
our alias 'compile' will always work.
OS_CLI Commands
The rest of this chapter is devoted to the commands that OS_CLl recognises
on its own. A large number of other '*' commands are provided by the
filing systems and by other software modules; these are described in the
appropriate chapters elsewhere in this book.
When discussing the syntax of these commands we use the following
notation for parameters:
<name>
a parameter name to be filled in as appropriate (without the
angle-brackets)
(<name>)
an optional parameter
xIy
two parameters, either of which but not both may be used
50
Command Line Interpreter
^CONFIGURE
Syntax:
^CONFIGURE
{<parameter 1> {<parameter 2>}}
The *CONFiGURE command displays or sets the various machine options
which are stored in non-volatile memory. These are used to initialise the
machine on power-up or hard break (CTRL-Reset). It is important to note
that configuration settings do not take effect immediately, so it is usually
necessary to issue the appropriate *FX command (or similar) if you want to
change a setting right away.
When the command is issued with no parameters, all the available
configuration options are listed.
When used with one parameter, the named option is configured.
When used with two (or more) parameters, the option named <parameter
1> is configured to the value of <parameter 2 > etc.
Where numerical values are required, several forms may be used:
nnn
&nn
base_nnn
A decimal number
A hexadecimal number
The number nnn in number-base 'base', eg, 2_1111 is
the same as &F which is the same as (decimal) 15.
A huge number of possible configuration parameters exist, more than it
makes sense to cover in a book such as this. For more information refer to
the relevant section of the User Guide or the Programmer's
Reference
Manual.
51
Archimedes Operating System
*ECHO
Syntax:
*ECHO
<string>
This c o m m a n d translates the string provided as the parameter using the
Operating System routine OS_GSTrans and then prints out the result.
OS.GSTrans understands the split-bar format for control codes (eg, IB for
turning on the printer) as well as aliases and other Operating System
variables. It is also possible to include characters by putting their ASCH code
in angle brackets, for example:
*ECHO
<22>
<o>
has the same effect as MODE 0 in BASIC. Similarly:
*ECHO
<Alias$.>
displays the alias defined for the command *. (which is equivalent to *CAT
unless the alias has been altered).
*ECHO is not particularly useful o n its own, but as we saw earlier it may be
used to define new OS_CLl commands which control the VDU.
*ERROR
Syntax:
* E R R O R <error number>
<error
message>
This command generates an error whose number and associated message
are supplied. This is most useful for raising errors to do with new OS_CLl
commands, eg:
* ERROR
52
123
You
can't
do
that!
Command Line Interpreter
*EVAL
Syntax:
*EVAL <expression string>
This command evaluates the expression supplied and displays the result
and is the OS_CLl version of the SWI call OS_EvaluateExpression, which is
documented in the section on conversion facilities. It allows string
manipulation and simple arithmetic involving Operating System variables
and integers, eg:
*EVAL
<alex>+1024
*FX
Syntax:
*FX <parameter 1>
{{,}<parameter 2> {{,}<parameter 3>}}
*FX has the same effect as it does in the BBC MOS, which is to say it calls the
appropriate OS_Byte routine with the parameters supplied. For example:
*FX 5,4
sets printer output to be directed to the Econet printer.
Either commas or spaces may be used to separate the parameters, whose
number varies according to the nature of the routine.
*GO
Syntax:
*G0 {<parameter 1>}
{<argument
list>}
*GO is used to begin execution of machine code at the address specified by
<parameter 1>, or at address &8000 if it is not supplied. In either case, the
argument list is passed to the called program using registers. This allows
an application program to be loaded at a fixed address and then called
later, rather than using * R U N or similar.
53
Archimedes Operating System
*GOS
Syntax:
*GOS
This c o m m a n d , an abbreviation for 'Go Supervisor', enters the Operating
System Supervisor which then displays its familiar '*' prompt.
*HELP
Syntax:
*HELP
{<keywords>}
The * H E L P command has the same effect as the B B C M O S command of the
same n a m e , ie, it displays help text on topics whose keywords are
provided.
Because Archimedes computers have a large amount of R O M there is at
least a line or two of help information on every resident command, so you
can expect a useful result from this command for almost every eventuality.
Try typing:
*HELP
COMMANDS
this will produce a list of the modules currently available, each of which is
followed b y a list of keywords on which more help is available. For
example:
*HELP
MOUNT
DISMOUNT
lists a line or two of help on the A D F S commands
*MOUNT
and ^ D I S M O U N T .
It is possible to abbreviate keywords by ending them with a full stop. This
produces help on all the keywords beginning with the given sequence of
letters, so:
*HELP
s.
will produce help on all the available commands that begin with an 'S'.
54
Command Line Interpreter
*IF
Syntax:
*IF
<expression> THEN <command 1> {ELSE < c o m m a n d 2>}
This v e r y powerful statement allows commands to b e
conditionally on the result of <expression>. If <expression>
which is to say yields a non-zero result, then <command 1> is
Otherwise, where the ' E L S E ' part of the command has been
<command 2> is executed.
executed
is 'true',
executed.
included,
The expression is evaluated using the SWI OS_EvaluateExpression in the
same way as *EVAL, SO it may include system variables, integer arithmetic
or string manipulation if desired. For example, if there were two
directories - one called "1988" and one called "1989" then we could enter
the appropriate one automatically by using:
*IF
<Sys$Year>="1988" THEN
DIR
1988
ELSE
DIR
1989
*IGNORE
Syntax:
* IGNORE {<ASCII c h a r a c t e r code>}
The *lGNORE command has the same effect as *FX 6 and is the immediate
form of the ^CONFIGURE IGNORE command; ie, it sets the character which
will not be sent to the printer. The main use of this is for stripping
unwanted line feeds (ASCII 10) from the printer stream to avoid extra blank
lines. For example:
*IGNORE
10
prevents line feeds from being sent to the printer. When no character code
is supplied, all characters are sent to the printer.
55
Archimedes Operating System
*KEY
Syntax:
* K E Y <key number>
{<key
definition>}
This c o m m a n d is the same as its BBC MOS counterpart. It allows a string to
be assigned t o one of the sixteen function keys so that each time the key is
pressed subsequent input is provided by the defined string. For example:
*KEY
1 *GOS|M*ADFS|M*DISMOUNT|M*BYE|M
sets up function key ' f l ' to enter the OS supervisor ( * G O S ) , select the A D F S
( * A D F S ) , dismount the currently selected disc (*DISMOUNT) and park the disc
heads if a h a r d disc is selected (*BYE). Notice the use of GS_Trans style
control codes (in this case IM, representing R E T U R N ) which are decoded
before being stored as the key's definition.
The sixteen k e y s comprise the ' P R I N T ' key (zero), the row of keys labelled fl
to f l 2 , the ' C O P Y ' key (eleven) and the left, right, down and up arrow keys
(twelve to fifteen respectively).
An Operating System variable called K E Y $ < k e y number> exists for each
key. This m a y be assigned using *SET (see below).
56
Command Line Interpreter
*SET
Syntax:
*SET < v a r i a b l e name>
<string>
* S E T assigns the given string to the named Operating System variable,
creating the variable if it doesn't already exist.
Variables can be either of type 'number' or type 'string', with obvious
effects on expression evaluation (you can't multiply strings!). The * S E T
command is used just for strings - * S E T E V A L is used for numbers (see
below).
As an example of
*SET
*SET:
Silly
"This
is a silly
message"
creates and assigns the string to the variable 'Silly', which m a y then be
displayed with * E C H O , thus:
*ECHO
<Silly>
Notice the use of angle-brackets to force
rather than just printing the word 'Silly'.
*ECHO
to evaluate the variable,
The OS provides a number of built-in variables which already exist and may
be altered by the user, though never deleted. They include the following:
Variable name
Sys$Time
Sys$Date
Sys$Year
Contents
Current time in the style 23:59:59
Current date in the style Fri, 31 December
Current year in the style 1988
So, to change the time we might say:
*SET
*SET
Sys$Date Fri, 25
Sys$Year 1987
December
In addition, other parts of the Operating System or other modules may add
further variables of their own, for example:
Variable name
Cli$Prompt
Key$l
Contents
Command line prompt string (default is '*')
String associated with function key f 1
57
Archimedes Operating System
*SETEVAL
Syntax:
* S E T E V A L < v a r i a b l e name>
<expression>
This c o m m a n d allows numeric variables to be assigned. It evaluates the
expression using OS_EvaluateExpression and then assigns it to the named
variable, creating the variable if necessary. For example:
•SET Control 0
*SETEVAL Control
Control+1
*SETMACRO
Syntax:
* S E T M A C R O < v a r i a b l e name>
<expression>
*SETMACRO is almost the same as *SETEVAL, but the evaluation of the
expression is deferred until each time the variable is accessed. The
assignment can therefore change each time. The classic use of this is to
have an OS_CLl prompt which is the time, thus:
*SETMACRO
CLI$Prompt
<Sys$Time>
which has got to be the ultimate aid for clock-watchers!
*SHADOW
Syntax:
*SHADOW
{<value>}
This c o m m a n d is provided explicitly to allow compatibility with the BBC
MOS (on machines from the BBC B-f onwards). Values of 1 and 2 force
subsequent mode changes to use screen memory banks 1 and 2. Bank 2 is
used if no value is supplied.
58
Command Line Interpreter
*SHOW
Syntax:
*SHOW
{<variable
name>{*}}
*SHOW displays the name, type and current value of system variables.
When no variable name is supplied all variables are displayed; otherwise a
specific variable is displayed, eg:
*SHOW
Cli$Prompt
which displays a result of the style:
CLI$Prompt
: type String, v a l u e
: Yes, Master?
By appending an asterisk to a partial variable name a wildcard effect is
introduced, so:
*SHOW
Sys$*
will display all of the system variables. Similarly, the following will display
the current assignments of all the function keys:
*SHOW
Key$*
*STATUS
Syntax:
*STATUS
{<configuration
option>}
This command allows you to examine the current setting of one or all of
the configuration options set with ^CONFIGURE. When no parameter is
supplied the entire list will be displayed. Otherwise, if a valid option name
is supplied, its current setting is displayed.
For example, to display the configured screen mode:
*STATUS
MODE
or to display the configured international language setting:
*STATUS
COUNTRY
Don't forget that the settings displayed by *STATUS are those that will
come into effect next time the machine is powered-up or reset - they are
not necessarily prevailing at the time the *STATUS command is issued.
59
Archimedes Operating System
*7IME
Syntax:
*TIME
This c o m m a n d displays the time and date in the format defined b y the
system variable Sys$DateFormat. The default is of the style:
Fri,31 Dec 1999.23:59:59
though this format can be changed by altering Sys$DateFormat - consult
the SWI OS_ConvertStandardDateAndTime in the section on numeric
conversion facilities for information on formatting.
*TV
Syntax:
*TV
{<offset>
{{,}<interlace>}}
This is the immediate form of the TV configuration option. Note that its
settings do n o t take effect until the next change of display mode.
The offset parameter allows the whole display picture to be moved up and
down by a number of character lines: 1 means move up by one line, 255
means move down by one line, etc.
The i n t e r l a c e parameter controls whether an interlaced picture is
produced: a zero switches interlace on, a one switches it off. If this
parameter is not supplied then the interlace state remains unaltered.
*UNSET
Syntax:
*UNSET <variable name>{*}
*UNSET deletes one or more non-system variables. If an asterisk is used
then all variables which begin with the characters supplied will be deleted.
You cannot delete a system variable, although no error will be reported if
you try to d o so.
60
6 : OS_CLI Related SWIs
<2ji
This chapter details the SWls which relate to the CLI, specifically OS_CLi SWI
itself and the two SWls which deal with Operating System variables as
used by *SET and *SHOW.
OS_CLI (SWI &05)
Command Line Interpreter
On entry, RO should point
asterisks) terminated by any
(ASCII 13). The string will be
and its effects and the results
to a command string (without any leading
of zero, line feed (ASCII 10) o r carriage return
processed as an Operating System command
returned are dependent on the command.
OS_ReadVarVal (SWI &23)
Read the Value of an OS Variable
This call allows the existence or the type and value of one or more OS
variables to be established. On entry, RO should point to a zero terminated
string containing the name of the variable(s), optionally including the
wildcards '*' to match zero or more characters and ' # ' to match exactly
one character. R l should point to a buffer for the SWI to use, with R2
containing the maximum size of that buffer. A special case is provided by
setting bit 31 of R2 which simply determines whether the specified
variable(s) exist by returning with R2=0 if not.
On the first call to this SWI, R3 should contain zero. If wildcard matches are
expected then subsequent calls should be made with the previous contents
of R3 preserved, its value being updated automatically by the SWI. The
'XOS' form of this SWI should be used where wildcard matches are expected
in order to avoid the 'no more matches' error which will be generated after
the last match is read.
R4 should contain three if the result should be expanded by OS_GSTrans
before returning (see next page). Other values are ignored.
61
Archimedes Operating System
After the first call to this SWI, the type and value of the specified variable
will be returned (or those of the first match in the case of wildcard
searches). R2 will contain the number of bytes which were read from the
string, R3 will point to the variable's value and R4 will contain a number
indicating its type.
The table below summarises the possible OS variable types:
R4
0
1
2
Type
String
Signed 32-bit integer
Macro
If R4 does n o t contain three on entry, the value of the variable is returned
either as an integer or as a string. If R4 does contain three then integers are
converted to signed strings and GS_Trans is called to expand any variable
names in macros. In the latter case, R3 points to the start of the string.
OS_SetVarVal (SWI &24)
Create/Assign to/Delete an OS Variable
This call allows OS variables to be created, deleted or have their value
altered. Note that not all of the possible types which may be created can be
read with the previous SWI.
On entry RO should point to the name of the variable terminated by a space
or control character. R l should point to the value to which the variable
should be set, its format dependent upon the type of the variable. R2 should
contain the length of the value (but see below). R3 should be set to zero on
the first call and will be updated by the SWI to deal with wildcards when
assigning or deleting. Finally, R4 should contain the type of the variable
from the table below:
R4
0
1
2
3
16
Treatment of value
Value is OS_GSTransed before assignment
Value is taken as an integer
Value is taken as a string
Value is passed through OS_EvaluateExpression
Value is a piece of code to execute (see below)
To delete a variable the top bit of R2 should be set for types 0-3 and R2
should contain 16 for type 16.
When the call returns, R3 will be updated and should be preserved for the
next call if wildcards are being employed. R4 returns the type that was
62
OS.CLI Related SWIs
created if OS_EvaluateExpression was used (since it might be either a
string or integer).
If the 'code' type is used you can supply your own code to deal with read
and write operations. In this case, R l should point to the header of the code
and R2 should contain its length. The code must be preceded by a header
which consists of two branches which call the write routine and the read
routine respectively. The code is called in Supervisor Mode so R14 should
be preserved on the system stack before any SWls are used.
The write entry point is called with Rl pointing to the value to be written
and R2 containing its length. The read entry point is called with no entry
parameters and your code should return a pointer to the value in RO and its
length in R2. A number of errors may be generated by OS_SetVarVal
according to various parameter or syntax errors in its use.
Marvin
There follows an extensively annotated example (affectionately known as
'Marvin') which illustrates the use of the SWI OS_SetVarVal. It uses some
devious code to randomly change the value of Arthur variable Cli$Prompt
- the variable that contains the string printed when Arthur awaits a
command. The program assembles a piece of code called "Marvin" and
*MARVIN will load and execute this code. To see its results type QUIT. And
when you've had enough, press <CTRL-BREAK>!
1 0
20
30
40
50
60
70
80
90
100
110
120
130
140
150
160
170
180
190
200
210
220
REM >List6/l
REM M a r v i n S r c e
REM by Nicholas v a n Someren
REM A r c h i m e d e s OS : A D a b h a n d G u i d e
REM
(C) Copyright A v S and NvS 1988
DIM c o d e % 1000
FOR p a s s % = 0 TO 3 STEP 3
P%=code%
[OPT p a s s %
.start
SWI " O S _ R e a d M o n o t o n i c T i m e "
STR R 0 , seed
ADR R 0 , v a r n a m e
ADR Rl, code
MOV R 2 , # e n d c o d e - c o d e
MOV R3,#0
MOV R 4 , #&10
SWI "OS_SetVarVal"
ADR R 0 , cliname
ADR Rl, clistr
MOV R 2 , # c l i e n d - c l i s t r
Get random number seed
Save it
Get v a r i a b l e name's a d d r e s s
and address of our c o d e
and length of our c o d e
Use first match of n a m e
'Marvin' is of type 'code'
C r e a t e variable 'Marvin'
Get
'Cli$Prompt' s t r i n g a d d r e s s
and address of v a l u e s t r i n g
and length of v a l u e s t r i n g
63
Archimedes Operating System
230
240
250
260
270
280
290
300
310
320
330
340
350
360
370
380
390
400
410
420
430
440
450
460
470
480
490
500
510
520
530
540
550
560
570
580
590
600
610
620
630
640
650
660
670
680
690
700
710
720
730
740
750
64
MOV
MOV
SWI
MOV
/Use first m a t c h
/ Cli$Prompt
is of t y p e
/Create n e w C l i $ P r o m p t
R3,#0
R4,#2
"OS SetVarVal"
P C , R 1 4 /Return
1
1
I
. code
B writecode
. readcode
L D R Rl,seed
E O R S R 1 , R 1 , R 1 , R 0 R #13
L D R R 2 , constant
A D D C S R1,R1,R2
S T R Rl,seed
A N D R1,R1,#&3C
A D R R0,strings
A D D R1,R1,R0
L D R R O , [Rl],#4
L D R R 2 , [Rl]
SUB R2,R2,R0
A D R Rl,ss
A D D RO,R0,Rl
.writecode
M O V P C , R 1 4 /Return
/The start of 'Marvin' code
/Branch t o w r i t e c o d e
/Start o f read code
/Fetch t h e random s e e d
/Shift it and E O R ' w i t h i t s e l f
/Get a constant
/Add it in when carry set b y R O R
/Store t h i s back as n e x t s e e d
/Mask o f f all but b i t s 2-5
/Get a d d r e s s of p o i n t e r t a b l e
/Add in r a n d o m offset
/Read p o i n t e r , post i n c r e m e n t e d
/Read n e x t pointer
/Store t h e difference in R2
/Get a b s o l u t e address o f s t r i n g s
/Form real address o f m e s s a g e
/Write c o d e is put h e r e
1
:
. seed
E Q U D 12345678
/Space for a random
.constant
E Q U D 555557
;A p r i m e
.strings
E Q U D sO-ss
E Q U D sl-ss
E Q U D s2-ss
E Q U D s3-SS
EQUD S4-SS
EQUD S5-SS
E Q U D s6-ss
E Q U D s7-ss
E Q U D s8-ss
E Q U D s9-ss
E Q U D sA-ss
E Q U D sB-ss
E Q U D sC-SS
E Q U D sD-ss
E Q U D sE-ss
E Q U D sF-ss
E Q U D slO-ss
/The s t r i n g offset
:
.ss
/The s t r i n g s
themselves
.sO
EQUS
.si
"That w a s an
'string*
f
a m a z i n g command."
seed
constant
table
OS_CLI Related SWIs
760
770
780
790
800
810
820
830
84 0
850
860
870
880
890
900
910
920
930
94 0
950
960
970
980
990
1000
1010
1020
1030
1040
1050
1060
1070
1080
1090
1100
1110
1120
1130
114 0
1150
1160
1170
1180
1190
1200
1210
1220
1230
1240
1250
12 60
E Q U S "Four M i p s , and you ask me t o do that."
.s2
E Q U S "I'm N O T doing that again."
.s3
E Q U S "I've got a pain in all the d i o d e s down my s i d e . "
.s4
E Q U S "Brain the size of a planet, and I'm d o i n g t h i s . "
.s5
E Q U S "You'll ask me to p i c k up a p i e c e of p a p e r n e x t . "
.s6
E Q U S "I hate h u m a n s . "
.s7
E Q U S "Why don't you do something mindless i n s t e a d ? "
.s8
E Q U S "Don't hit the keys so h a r d . "
.s9
E Q U S "Shall I put my head in a bucket of w a t e r ? "
.sA
E Q U S "Is there any point to t h i s ? "
.SB
E Q U S "I could blow m y s e l f up if you wanted m e t o . "
.sC
E Q U S "Don't talk to m e about l i f e . "
.sD
E Q U S "I'm not impressed by your t y p i n g . "
.sE
E Q U S "You're really very stupid, compared to m e . "
.sF
E Q U S "You can't realise how dull this is."
.slO
ALIGN
.endstring ;The end of the strings
.endcode
;The end of the code
.varname
;The name of the v a r i a b l e
E Q U S "Marvin "
ALIGN
.cliname
;The prompt variable name
E Q U S "Cli$Prompt "
ALIGN
.clistr
;The prompt variable's value
E Q U S "<Marvin> M J*"
EQUB 0
.cliend
;End of the prompt v a r i a b l e
].NEXT
:
R E M Save the code and make it a utility
:
OSCLI"SAVE Marvin "+STR$~code%+" "+STR$~P%
O S C L I " S E T T Y P E Marvin F F C "
P R I N T " C o d e assembled and saved as 'Marvin'."
END
Listing 6.1. Marvin.
AOS—E
65
7: Filing Systems
Introduction
Filing systems are the parts of the Operating System which are responsible
for the storage and retrieval of large amounts of information collectively
known as 'files'. Each different storage medium has its own filing system to
deal with t h e housekeeping and hardware control neccessary for the
storage d e v i c e concerned. Because many of the operations that filing
systems perform are the same for all devices, the Operating System divides
the management of files into two sections: a generic part, concerned with
all filing systems, and a specific part which deals with a specific kind of
device. The generic part is known as the 'FileSwitch' and it controls the
interface between the user and a particular filing system. This approach
has many advantages, not least that it keeps the 'user interface' (syntax of
commands) consistent and further, it reduces the amount of software
required to implement a new filing system.
The filing systems which are most intensively used on Archimedes
computers are the Advanced Disc Filing System (ADFS) and the Econet
local area network filing system (NFS). An introduction to the ADFS is
included in the User Guide which is part of the Archimedes package - if you
are not already familiar with the basic operation of the ADFS then you
should read the chapter on filing systems in the User Guide before reading
the rest of this chapter.
The OS also provides some 'device' filing systems which allow the keyboard, screen and printer to be treated as filing systems in themselves. This
mechanism makes input/output more consistent across all of the standard
peripherals. W e shall examine these peripheral devices in more detail later
in this chapter. While the Arthur OS doesn't support a 'RAM filing system'
RISC OS does and this will be a major time-saver for floppy discs users. No
doubt many third-parties will produce filing systems for their own devices
which will hopefully keep to the standards set by existing Acorn software.
66
Filing Systems
Naming of Filing Systems, Files and Directories
Most filing systems consider data as an arbitrary collection of bytes
referred to by name - this is the definition of a 'file'. Every file has a name,
the 'filename', which uniquely identifies it within the current area of work.
Filing systems do not themselves make any distinction between the kind of
data stored in a file; it is up to the Operating System, the user and the
application to determine whether the data in a given file is of a suitable
format.
The naming of files must obey certain rules in order to allow filing systems
to operate in a consistent way. In particular, filenames should ideally be
composed exclusively of letters, digits or underline symbols - they should
not contain any punctuation symbols because most of these are reserved
for special meanings.
Both the ADFS and NFS support filenames of up to ten characters, with no
distinction being made between upper and lower case letters. You should
be extremely cautious when using foreign language (or 'top-bit-set')
characters in filenames because the support for them is very limited in
current software and they will have nasty side-effects if files are
transferred to older systems, particularly BBC Micro implementations of
the ADFS.
The punctuation symbols shown below have special meanings that prevent
them from being used in filenames - if you use them by mistake you can
expect error messages to result:
-
*
#
@
$
&
\
A
%
Directories
Most filing systems provide a means of grouping files together in clumps
known as 'directories'. It is entirely up to the user how directories are used,
but it is common to group related files in the same directory to make them
easier to find. An important restriction is that all the filenames within a
given directory must be unique, otherwise it would be impossible to be sure
which file was being referred to. However, directories may contain other
directories (called 'sub-directories') and so on, leading to a 'hierarchical'
arrangement of nested directories.
The top of a directory hierarchy is known as the 'root' and is represented in
Acorn filing systems by the dollar symbol '$'. Each disc device, whether it is
floppy or hard, has a root whose 'real' directory name is the name of the
67
Archimedes Operating System
disc. Thus the disc name (preceded by a colon ':') can usually be used
interchangeably with the dollar symbol to refer to the root directory.
At any given time one of the directories in the hierarchy will be in use - this
is known as the Currently Selected Directory (CSD) and is represented by
the ampersat symbol '@'. Files within the CSD may be referred to by their
name alone; files in other directories must be referred to by a name
sequence which uniquely identifies them and is known as their 'pathname'.
The pathname is formed by stringing together the appropriate sequence of
directory n a m e s connected by full stops. Thus, a file called 'Fred' in
directory 'Alex' which is in turn a subdirectory of the root has the full
pathname '$.Alex.Fred'.
The other reserved punctuation symbols noted earlier have special
meanings when used in pathnames; these are:
:
Joins directory/file names in a pathname, eg:
Alex.Fred
Precedes a disc name (equivalent to $), eg:
:MyDisc.Alex
Note that the colon is also used to follow a filing system name; see later.
$
&
@
A
%
\
Represents the root directory of the disc, eg, $.Alex
Represents the User Root Directory (URD)
Represents the Currently Selected Directory (CSD)
Represents the 'parent' directory
Represents the Currently Selected Library (CSL)
Represents the Previously Selected Directory (PSD)
The URD and CSL have not been mentioned before, but are discussed later in
this chapter. The meaning of the 'parent' directory is fairly self-evident,
being the directory which contains the directory so far specified in a
pathname. T h e use of the caret symbol ' ' is intended to convey movement
'up' the hierarchy, with the root imagined as being at the top.
A
Files on Different Filing Systems
A powerful extension to pathnames allows them to specify that a file is to
be found on a particular filing system; this allows pathname strings to be
composed f o r any file on any filing system, but without the burden of
needing to change filing systems back and forth manually.
A filing system name is introduced by following it with ":". The logic of this
is that the next thing usually specified is a disc name (though this is
68
Filing Systems
optional), so the consistency of the naming system is preserved. For
example:
NET:$.Alex.Fred
refers to the file 'Fred' in the directory 'Alex', which is a sub-directory of
the root of the currently-selected network file server. Similarly:
ADFS : .-BigDisc . Programs . BASIC .Pretty
refers to the file 'Pretty' which is in the sub-directory 'Programs.BASlC' on
the disc entitled 'BigDisc'. Note that here two colons are required, one to
follow the filing system name and the other to precede the disc name.
For BBC MOS compatibility reasons the old style of enclosing filing system
names in hyphens, eg, -NET—, is still tolerated by the OS but its use should be
avoided wherever possible.
Device Filing Systems
Another very useful aspect of filing system naming is that the keyboard,
display and printer may be treated as filing systems in themselves for the
purpose of byte-oriented operations. It is not sensible to try to load or save
programs to the device filing systems!
Six different device filing systems are currently supported (seven if we
include null:). They are listed below along with a brief note on their
functionality:
Device Name
kbd:
rawkbd:
vdu:
rawvdu:
printer:
null:
Input/Output:
Functions Available
Input only, returned by OS_ReadLine
Input only, returned by OS_ReadC
Output only, processed by GS_Read then
sent to OS_WriteC
Output only, issued through OS_WriteC
Output only, issued direct to current printer
Input returns End Of File, Output is discarded
The 'raw' forms of the keyboard and VDU devices deal with characters
exactly as they are encountered, whilst the 'cooked' forms apply the
specified pre-processing (mainly to cater for escape sequences using the
vertical bar ' I') before passing the data on. Note that the way to generate
an End Of File condition on the keyboard is to type <CTRL-D> and press
RETURN. In case you are wondering, this mechanism is borrowed from the
Unix Operating System, perhaps a hint of things to come.
69
Archimedes Operating System
Quite aside from the fact that the device filing systems are just plain useful,
their existence preserves the consistency of the the OS device naming syntax
through nearly all the devices available on standard Archimedes computers
(the notable exception being the RS423 port). If you consider the potential
difficulties o f signifying the end of file on the RS423 device it is not hard to
see why the authors of the OS chose not to implement it right away.
It may have occurred to you that the ability to treat the VDU and keyboard
as filing systems means that several of the standard Operating System
utilities are really redundant; for instance, *BUILD and *TYPE. However,
compatibility requires them to be provided nevertheless, and this seems to
be the main reason they survive.
Ancillary File Information
Load and Execute Addresses
As well as having a name, every file has two 32-bit fields associated with it
which give the Operating System information about where it should be
loaded in m e m o r y and where execution should begin. Not surprisingly,
these are referred to as the 'load address' and 'execute address'. Load and
execute addresses are only really necessary for machine code programs
because the Operating System deals automatically with other kinds of files,
as we shall see shortly.
If you use the *LOAD command to load a file into memory, the load address
associated with the file is used by default. It is possible to override this by
supplying a different load address as part of the *LOAD command, though
this clearly requires the file to be relocatable if it is a piece of machine-code.
The * R U N < f i l e n a m e > command (and its synonyms * < f i l e n a m e > and
V<filename>) allow machine code programs to be loaded and executed in
one go - in this case the file is loaded at its load address and then executed
starting at its execute address. The execute address must be within the
program or the Operating System will generate an error. (By 'within the
program' w e mean it must be greater than or equal to the load address but
less than the load address plus the length.)
If the top twelve bits of the load address are set, ie, if the first three
hexadecimal digits are 'FFF', the file is treated in a special way. Such an
address is outside the addressing range of the ARM so the OS uses this as a
flag for storing file type information, allowing a number of useful
automatic features to be provided.
70
Filing Systems
File Types and Date Stamping
Where a file has a load address with the top twelve bits set, the remaining
bits are used to keep three useful pieces of information: the file's type, and
the date and time 'stamp', initially indicating precisely when it was
created. Clearly it is very useful to have this information because it allows
us to keep track of the 'age' of programs. Furthermore, the file's type
allows us let the OS decide h o w to deal with a file when we issue nonspecific commands such as *<filename>.
The format of the file type, date and time information stored in the load
and execute address fields is as follows:
Load Address
Execute Address
FFFtttdd
dddddddd
Here, the file type information is represented by the three hexadecimal
digits shown as 'ttt', and the date and time by the ten hexadecimal digits
'dddddddddd'. When a file is created or has its date stamp updated, the
absolute time is stamped onto the file in the form of the number of
centiseconds (hundredths of a second) since 00:00:00 on the 1st January 1900
- this is usually a pretty large number! Whilst such accuracy is not generally
required, it is readily available from the real-time clock and internal
counters in the Archimedes, so it is stamped in full for speed. The command
*STAMP may be used to update the date and time stamp on a given file, and
this is discussed later in this chapter.
The Operating System uses the file type to decide what action to take when
requested to *RUN the file. Since a command of the form *<filename> is a
synonym for *RUN, we can be lazy and type only the name of a file to save
time. It then looks up the file type and decides what to do.
Operating System aliases may be defined for each possible file type - they
allow the two cases of *LOADing and *RUNning the file to be determined
separately. Each file type may have two such aliases:
Run$Type_ttt
Load$Type_ttt
for *RUN, * / or *<filename>
for *LOAD
Whenever either of these actions is applied to a file, the Operating System
checks for a defined alias and uses it if possible. For example, the aliases
for files whose type is 'BASIC program' (type &FFB) are:
Load$Type_FFB
Run$Type_FFB
BASIC - L o a d %*0
BASIC - Q u i t %*0
71
Archimedes Operating System
which c a u s e the BASIC interpreter to be entered with the appropriate
options set a n d the remainder of the command line passed on with % * 0 .
The file type aliases may be set using the *SET command as is usual for OS
variables, s o where we have files for our own software (file type & A B C ) we
can establish them with:
*SET
• SET
Load$Type_ABC MyCode %0
Run $ T ype_ABC MyCode %0
You can u s e *SHOW to display the current settings for file types. Here is a
list of the file types currently allocated by Acorn for OSl.2:
Type
&FFF
&FFE
&FFD
&FFC
&FFB
&FFA
&FF9
&FF8
&FF7
&FF6
&FEF
&FEE
&FED
&FE0
Meaning
ASCII text
EXEC commands
Data
Transient program
BASIC program
Relocatable module code
Sprite definition
Application code
BBC Micro font definition
OS font manager font definition
Desktop diary file
Desktop notepad file
Palette definition
Desktop accessory code
The file type range from &000 to &7FF is free for use by user programs, all
other values being reserved by Acorn.
Libraries and Search Paths
When a c o m m a n d is given to the Operating System, it first establishes
whether the command is supported by any of the software installed in the
computer's ROM or RAM. If not, the OS attempts to find a file of the same
name in t h e C S D and execute it. Clearly, if all our extensions to the
Operating System had to be provided in one directory, the hierarchical
directory system would be wasted.
In order that we may enter OS commands to run files which are not in the
CSD, we need to be able to indicate where else the OS should search. This is
achieved through the use of 'libraries'. A second directory, known as the
Currently Selected Library (or CSL), may be nominated as the place for
Arthur to search when it encounters an unrecognised command. The CSL is
72
Filing Systems
represented by the percent character '%' in pathnames, and may be set
using the *LIB command, which is followed by the pathname of the chosen
library directory. Thus, one or more directories (though only one at a time)
can be used to keep a library of command files. To allow us to override
this, whenever a directory name is included explicitly in the command then
other searches do not take place.
7
The Operating System takes this idea a stage further and provides OS
variables which allow multiple search paths to be set up.
Two different classes of search path are available; one for commands,
analogous to the library system described above, and one for other 'read'
functions such as loading or opening files for input.
Two OS variables are provided to establish these search paths:
Run$Path
File$Path
for execute operations
for read operations
and these may be set using *SET in the usual way. Each m a y contain a
sequence of directory pathnames, separated by commas and terminated by
a full stop. The default settings for these variables are:
Run$Path
File$Path
,%.
which is to say that commands files for execution are searched for first in
the CSD, then in the CSL and that files to be read are only searched for in the
CSD. What makes this facility particularly useful is that since pathnames
may contain filing system names, the path strings can specify libraries on
one or several different filing systems. Obviously, the amount of time spent
dealing with the command increases as the number of items in the path
strings do, particularly where multiple filing systems are in use, but
frequently the impact of this is scarcely noticeable to the user.
73
8 : The FileSwitch Module
The FileSwitch is an Operating System module which makes OS_CLl '*'
commands a n d SWls available for general filing system control. By
separating o u t the filing system functions which are common to all filing
systems, the FileSwitch ensures the consistency of the user interface and
makes the implementation of new filing systems easier by reducing the
number of functions that need to be supported.
All FileSwitch commands are non-filing system specific, and they include
commands f o r file and directory creation, deletion, cataloguing, examination, copying and so forth. Most of the FileSwitch OS_CLi commands have
one or more equivalent SWls which are used to call the selected filing
system as appropriate.
FileSwitch Commands
The following few pages cover each of the FileSwitch commands in some
detail - of course, *HELP will provide an online summary. In describing the
syntax of these commands we use the word 'object' to mean either a file or
a directory.
74
The FileSwitch Module
*ACCESS
Syntax:
*ACCESS <object name>
[D] {L} {W} {R} {/}
{W} {R}
The ""ACCESS command allows the user to control the access attributes of a
file, and allows limited control of directory attributes. It takes an 'object'
name - the name of a file or directory (optionally including wildcards) and a string of up to six attribute symbols. These attributes are applied to
the object, replacing those that were previously present. T h e possible
attributes are:
D
Indicates that the object is a directory. This attribute may not be
altered by the *ACCESS command but is included here for
completeness.
L
When present this attribute 'locks' an object, preventing it from
being deleted, written to or overwritten except by specifically
overriding the lock. This is primarily to prevent accidental
damage to files, but directories always default to 'locked' so as to
remind you to be cautious. Of course, the locked bit doesn't
prevent the contents of directories being altered; only the deletion
of the directory itself.
W
The presence of this attribute allows writing to files. To
successfully OPENOUT or OPENUP a file its access must include a W
and must not include an 'L'. This attribute has no relevance for
directories.
R
The presence of this attribute allows reading from files. To
successfully OPENIN or OPENUP a file its access must include an 'R'.
This attribute has no relevance for directories.
/
The oblique character separates the attributes for the two levels of
security on Econet systems, known as 'private access' (before the
oblique) and 'public access' (after it). Familiarity with the Econet is
required to take full advantage of this attribute, which is not
supported by the ADFS.
Example:
*ACCESS MyFile
LR
Locks and prevents writing to 'MyFile'.
75
Archimedes Operating System
•APPEND
Syntax:
*APPEND
<filename>
The * APPEND command is used to add text entered from the keyboard to
the end of a n existing file. It operates in the same way as *BUILD (see
below), but requires that file already exists and then extends it. *APPEND is
terminated b y an ESCAPE condition.
Example:
*A P P E N D
ExecFile
Allows text to be added to the end of 'ExecFile'.
*BUILD
Syntax:
*BUILD
<filename>
*BUILD creates the named file (or, if it already exists, overwrites it if
attributes permit) and then writes to the file all text entered from the
keyboard. Its most common use is for the creation of *EXEC files (see
below). *BUILD is terminated by an ESCAPE condition (that is usually, but
not necessarily, by pressing the ESCAPE key). The default file type used by
*BUILD is &FFD (Data), which must be changed to &FFE using *SETTYPE (see
later) if the file is to be *EXECed automatically.
Example:
*BUILD
!Boot
Creates and allows text to be entered into .Boot.
76
The FileSwitch Module
*CAT
Syntax:
*CAT
{<directory>}
The *CAT command 'catalogues' (lists the contents of) the specified directory. If no directory pathname is given, the CSD is catalogued.
Examples:
*CAT
*CAT
$.Programs
Catalogues the CSD and the directory $.Programs.
*CDIR
Syntax:
*CDIR <directory>
{<maximum size>}
The *CDIR command creates a new empty directory with the specified
pathname, setting its attributes to the default of 'DL'. The NFS accepts the
optional 'maximum size' parameter and ensures that the directory will be
able to contain the specified number of objects. ADFS takes no notice of this
parameter.
Example:
*CDIR
NewDir
Creates a new directory 'NewDir' in the CSD.
*CLOSE
Syntax:
*CL0SE
This command ensures that all file buffers in RAM are written out to the
appropriate files and then closes all open files on the current filing system.
77
Archimedes Operating System
*COPY
Syntax:
*COPY <source s p e c >
<destination s p e c >
{<options>}
The *COPY c o m m a n d is a general-purpose file duplicating command of
considerable power. It requires at least two parameters: a source specification and a destination specification (both of which may contain
wildcards) a n d then copies all the specified objects from the source to the
destination. Directory names may be used in both source and destination
specifications, but are interpreted differently. When a wildcard is used in a
directory n a m e in the source, only the first match is used; when used in
filenames a wildcard must appear in both source and destination, in which
case the wildcard field is preserved. For example:
*COPY
$.Alex.*
Net: Alex.Safety.*
will copy all the files in '$.Alex' on the current filing system into the
network directory 'Alex.Safety', preserving the names of the files as it
does so. However, the following:
*COPY
*.Nick
NewFile
will only c o p y the file called 'Nick' from the first subdirectory of the CSD to
the file 'NewFile'.
A range of options may be appended to the *COPY command:
C
Confirm. The user is asked to confirm that each file is to be copied.
D
Delete. Files are deleted after they have been copied.
F
Force. Destination files are overwritten if they already exist.
P
Prompt. The user is prompted for disc changes when copying
between discs. This is for use with single disc drives.
Q
Quick. Allows application memory to be used during copying, thus
speeding up lengthy copies considerably. However, programs in
the application space will be destroyed, and the user will be
returned to the OS Supervisor on completion of the command.
R
Recurse. Causes sub-directories to be copied as well, saving time
when an entire directory structure needs copying. Note: it is
unwise to recursively copy a directory into one of its subdirectories as this will result in an infinite loop which will fill u p
the disc!
78
The FileSwitch Module
V
Verbose. Displays information about each file copied.
The Operating System pseudo-variable Copy$Options contains the default
settings of these options. The default actions may be overridden by giving
the desired attribute set after the command. For example:
*COPY
This
That
~RV
Any attribute not specified after the command assumes the state specified
in the default Copy$Options variable. Specifying an option causes the
corresponding action to be selected. Specifying an option prefixed by a
causes the option to be de-selected and the corresponding action is not
taken.
In the above example, we specify that a Recursive copy (R) is not to take
place but that we want to force Verbose mode (V) to be selected. The other
options revert to their default settings.
*COUNT
Syntax:
*C0UNT <file specification>
{<options>}
The *COUNT command totals the size of the file(s) that match the
specification (which may contain wildcards) and displays the results
rounded to the nearest lk. It also responds to the 'R' and V' options in the
same way as *COPY, allowing multiple directories to be sized and the files
involved to be displayed.
/
Example:
*COUNT
$ R
Finds the total size of all files on a disc.
79
Archimedes Operating System
*CREATE
Syntax:
*CREATE < f i l e n a m e > {<size> {<execute address> {<load a d d r e s s > } } }
The *CREATE command reserves space for a file without actually writing
any data i n t o it. The optional size parameter sets the number of bytes
reserved, z e r o being used by default. The execute and load addresses may
be set, the load address defaulting to zero if not supplied. Where both
addresses a r e omitted, the file type is set to &FFD (Data).
Example:
* CREATE
BigFile
20000
Creates a n e w file 'BigFile' 128k long.
•DELETE
Syntax:
* D E L E T E <object name>
The *DELETE command deletes the named object from the catalogue so that
the space it occupies may be re-used. An error message will be generated if
the object d o e s not exist or is locked or, in the case of directories, if the
directory is not empty. Wildcards may be used in all fields of the pathname
except the last and so, to delete several files at once, *WIPE should be used
instead (see below).
Example:
•DELETE
Junk
Deletes the file called 'Junk'.
80
The FileSwitch Module
*DIR
Syntax:
*DIR
{<directory>}
This command changes the Currently Selected Directory (CSD). If no
directory name is supplied the current directory is set to the user root
directory (URD). If the command was processed successfully, the directory
which was the CSD when the command was issued becomes the previously
selected directory (PSD) and is accessible with *BACK in the ADFS.
Examples:
*DIR
*DIR
$ .Fred.Software
Re-selects the URD as the CSD and sets the CSD as '$.Fred.Software'.
*DUMP
Syntax:
*DUMP <filename>
{<offset into file>
{<start a d d r e s s > } }
*DUMP opens the specified file and displays its contents in hexadecimal and
ASCII as text lines in the following format:
Address
00008000
: 00 01 02 03 04 05 06 07
: 42 32 43 01 01 0D 9C 4D
: ASCII data
: B C
M
Each line shows the address, hexadecimal value and ASCII value of each
byte, with unprintable ASCII codes represented by full stops. The width of
the displayed lines varies according to the display mode selected: it is 16
bytes wide in 80-column modes.
The address field usually shows how far through the file each byte
appears, starting at the file's load address for code files or at zero for timestamped files.
The optional 'offset into file' parameter allows dumping to begin part way
through the file - useful for skipping past the beginning of files.
The optional 'start address' parameter enables you to substitute the load
address of the file for a different address, making the displayed address of
each byte be the start address plus the offset within the file.
AOS—F
81
Archimedes Operating System
*ENUMDIR
Syntax:
*ENUMDIR <directory> <file>
{<search p a t t e r n > }
The *ENUMDIR command lists the objects found in the specified directory
into the n a m e d file as a series of text lines delimited by line feeds (ASCII 10).
It is like a file-orientated version of *CAT. The optional 'search pattern'
may be used to restrict the objects listed out by means of a wildcard search.
Example:
*ENUMDIR
& CatFile
Lists the contents of the CSD in the file 'CatFile'.
*EX
Syntax:
*EX
{<directory>}
The *EX command 'examines' the contents of the specified directory (or the
CSD if none is specified) and displays a line of information about each in the
following format:
Date-stamped files:
Filename
Attributes
File type
Time
Date
Length
Disc position
Unstamped files:
82
Filename
Attributes
Load addr
Execute addr
Length
Disc position
The FileSwitch Module
*EXEC
Syntax:
*EXEC {<filename>}
*EXEC allows you to tell the OS to take keyboard input from the named file
instead of the keyboard. The file is opened for input and characters are
read from it until the end of the file is reached, when it is closed automatically and input restored to the keyboard.
The *EXEC function may be terminated early by the inclusion of '*EXEC'
without a filename. Alternatively, including another *EXEC <filename>
command will close the current file, open the new one, and start taking
input from the new file instead.
Example:
*EXEC
!Boot
Switches character input to the file ".Boot".
*INFO
Syntax:
*INF0 <object name>
The *lNFO command behaves in much the same way as the *EX command
but deals with an object name (optionally including wildcards) rather than
a directory name. Thus '*INFO *' is equivalent to '*EX'.
Example:
*INFO
SomeFile
Displays detailed information about 'Somefile'.
*LCAT
Syntax:
*LCAT {<subdirectory>}
*LCAT displays a catalogue of the currently selected library, or one of its
subdirectories if a parameter is supplied.
83
Archimedes Operating System
*LEX
Syntax:
*LEX
{<subdirectory>}
*LEX displays file information for the currently selected library, or one of
its subdirectories, in the same way as *EX. On its own *LEX is equivalent to
'*EX
%'.
*LIB
Syntax:
*LIB
{<directory>}
*LIB sets the currently selected library (CSL) to the named directory, so that
it will be searched when a file to be *RUN is not found in the CSD. The CSL is
represented b y the symbol '%' and it is necessary to set the OS variable
Run$Path to include '%' so that the library is searched.
*LIST
Syntax:
*LIST <filename>
The *LIST command displays the contents of the specified file in the format
specified b y ^CONFIGURE DumpFormat. Each line is displayed with a line
number.
84
The FileSwitch Module
*LOAD
Syntax:
*LOAD <filename>
{<load a d d r e s s > }
The *LOAD command loads the specified file into memory. If n o load
address is provided the file's existing load address is used; otherwise the
file is loaded at the address supplied. If the file is Date stamped, then the
action of load changes. The OS looks for a system variable of the type
Alias$@LoadType_ttt, where 'ttt' is the type of the file being loaded. If the
variable exists then the OS 'executes' the string assigned to the variable by
sending it to OS_CLl.
For example, by default, the variable 'Alias$@LoadType_FFB BASIC - Load
%0' is set up by the OS. All BASIC programs are saved in files with are
stamped with the file type FFB. Thus if we *LOAD a BASIC program, the OS
actually performs *BASIC -load <filename>. This automatically starts up
BASIC with the specified BASIC program resident in memory.
Several known file types are aliased in this way so that appropriate action
is taken if a date stamped file of the corresponding type is *LOADed. A
similar scheme is used to deal with attempts to *RUN a date stamped file.
You can ues *SHOW to display the current file type settings.
85
Archimedes Operating System
*OPT
Syntax:
* O P T <option number> {<value>}
The *OPT c o m m a n d is used to set various filing system options for the
current filing system. These are as follows:
*OPT 0
Resets the *OPT options to their defaults
*OPT l , < x >
Affects whether *iNFO-style file information is displayed
when files are loaded or saved. The value of < x > is
interpreted as follows:
0
1
2
3
No information displayed.
The filename is displayed.
The filename and its load address,
execution address and length are displayed.
Either the above, or file type and date-stamp
information are displayed, according to the
file type.
*OPT 4 , < x > Sets the auto-boot option as follows:
0
1
2
3
No auto-boot
*LOAD the boot file
*RUN the boot file
*EXEC the boot file
The boot file is either .Boot (for the ADFS) or !ArmBoot (for the NFS).
*PRINT
Syntax:
*PRINT <filename>
The "PRINT command opens the named file for input and sends the contents
of the file to the VDU drivers. This means that ASCII control codes will have
their VDU effect, rather than being displayed as split-bar ' I' sequences.
86
The FileSwitch Module
*REMOVE
Syntax:
*REMOVE <object n a m e )
This command operates as for *DELETE except that no error is generated if
the specified object does not exist. Note that wildcards are not permitted you should use *WIPE instead.
Example:
*REMOVE
NoSuchFile
Appears to delete the file 'NoSuchFile' without error.
•RENAME
Syntax:
*RENAME <current object name> <new object n a m e >
The * R E N A M E command changes the pathname by which t h e specified
object is known. It can, therefore, not only change the name of an object,
but also 'move' it within the directory hierarchy. The object must already
exist and its new name must not exist in the target directory.
Examples:
*RENAME
Joules
Carol
Changes the name of file 'Joules' to 'Carol'.
*RENAME
&.Physics.Nicko
$.Exams.Power
Moves the file 'Nicko' from the subdirectory 'Physics' of t h e CSD into
$.Exams and renames it 'Power'.
87
Archimedes Operating System
*RUN
Syntax:
* R U N <filename>
{<parameters>}
*RUN both loads and then executes the specified file, using the load and
execute addresses associated with the file. Parameters may optionally be
added which are accessible to the program when it begins execution.
Example:
*RUN
4YourLife
Loads and executes the file '4YourLife'.
*SAVE
Syntax:
*SAVE < f i l e n a m e x s t a r t
a d d r x e n d addr>{<exec addr>{<reload
addr>}}
or alternatively:
*SAVE < f i l e n a m e > < s t a r t
addr>+<length>{<exec addr>{<reload
addr>}}
*SAVE copies the specified area of memory to a named file. The memory
area and the file's associated load and execute addresses may be specified
in one of the two forms shown above. In the first case the start address
and the address of the byte after the last byte to be saved are supplied; in
the second case the start address and the length in bytes are supplied.
A reload address may optionally be supplied, causing the file thereafter to
be loaded at a different address from where it is saved.
Where execute and reload addresses are not supplied, defaults of the start
address for saving are assumed.
Example:
*SAVE
TheWorld
0
+4 0 0 0 0
Saves 256k of memory into file 'TheWorld'.
88
The FileSwitch Module
*SETTYPE
Syntax:
*SETTYPE <filename> <type>
*SETTYPE allows the file type set by the OS for the file to be changed. The 12bit 'type' is applied to the named file, normally entered as three hexadecimal digits.
Example:
*SETTYPE
Alphabet
ABC
Sets the file type of file 'Alphabet' to &ABC.
*SHUT
Syntax:
*SHUT
This command has the same effect as *CLOSE (ie, it closes all open files) but
it affects all filing systems rather than just the currently selected one.
•SHUTDOWN
Syntax:
*SHUTDOWN
This command has an even broader effect than *SHUT. It performs all the
functions of *SHUT and also logs the user off any network file servers in
use and dismounts any discs, both floppy and hard, so leaving the computer
in a 'disconnected' state. The use of ^SHUTDOWN at the end of working
sessions is highly recommended.
89
Archimedes Operating System
*SPOOL
Syntax:
*SPOOL
{<filename>}
The *SPOOL command opens the named file (the 'spool file') and sends all
subsequent VDU output to it. In many ways *SPOOL is the inverse operation
of *EXEC. If the file already exists then its contents are overwritten.
*SPOOLON
Syntax:
*SPOOLON
{<filename>}
*SPOOLON h a s the same effect as *SPOOL, except that VDU output is appended to the file if it exists, rather than overwriting it. If the file does not
already exist, *SPOOLON is exactly equivalent to *SPOOL.
Either *SPOOL or *SPOOLON without a parameter will close the spool file.
*STAMP
Syntax:
*STAMP
<filename>
*STAMP overwrites the old date and time-stamp for the specified file with
the current date and time. The file type is set to &FFD if the file was not
already stamped.
Example:
*STAMP
PennyBlack
Stamps the file 'PennyBlack' with the current date and time.
90
The FileSwitch Module
*TYPE
Syntax:
*TYPE <filename>
The "TYPE command has a similar effect to the *LIST command, ie, it
displays the contents of the file in the way defined by the configuration
'DumpFormat', but does not precede each line with a line number.
Example:
*TYPE
Pitman
Displays the contents of file 'Pitman' on the screen.
*UP
Syntax:
*UP
{<how_far>}
The *UP command moves a specified number of levels 'up' through the
directory hierarchy of the currently selected filing system - equivalent to
*DIR followed by a sequence of caret symbols ' ' .
A
Example:
*UP
2
Performs a *DIR .
A
A
91
Archimedes Operating System
*WIPE
Syntax:
* W I P E <object
spec>
{<options>}
The *WIPE c o m m a n d deletes the specified object(s) with wildcards being
permitted. T h i s allows several files or the contents of directories to be
deleted in o n e go. A number of options may also be included:
C
Confirm. Prompts you for confirmation before each deletion.
F
Force.
R
Recurse. Deletes subdirectories and their contents as well.
V
Verbose. Displays file information prior to deletion.
Deletes objects even if they are locked.
Operating System variable Wipe$Options contains the default settings for
these options - they may be overridden when issuing *WIPE by specifying
the desired attribute set after the command. Again use a tilde
to deselect a particular feature, eg:
*WIPE
my_file
No confirmation required.
92
~C
9 : Filing System SWis
In a d d i t i o n t o the c o m m a n d line interface t h e FileSwitch m o d u l e also
p r o v i d e s a r a n g e o f SWis w h i c h a l l o w the s a m e effects t o be a c h i e v e d
efficiently f r o m within p r o g r a m s . Just as m a n y of the '*' c o m m a n d s b e a r a
strong r e s e m b l a n c e t o BBC MOS c o m m a n d s , s o the Operating System filing
system SWis resemble BBC MOS calls.
The BBC MOS defines a general interface to filing systems t h r o u g h r o u t i n e s
k n o w n a s OSFILE, OSFIND, OSARGS, OSGBPB, OSBGET a n d OSBPUT. These a r e
p r o v i d e d u n d e r t h e OS u s i n g SWis w i t h similar n a m e s , v i z : O S _ F i l e ,
OS_Find, OS_Args, OS_GBPB, OS_BGet a n d OS_BPut. For m o s t o f t h e s e
routines the p a r a m e t e r s each require a r e taken in the s a m e o r d e r a s for t h e
BBC MOS. The m a i n difference is that u n d e r the OS, p a r a m e t e r s a r e p a s s e d in
the ARM'S registers instead of in a table of b y t e s in m e m o r y a s is t h e c a s e
with the BBC MOS. The g e n e r a l rule for c o n v e r t i n g s o f t w a r e f r o m t h e BBC
MOS f o r m to w o r k o n this OS is t o take the p a r a m e t e r s in the o r d e r t h e y
a p p e a r in the BBC MOS table a n d place t h e m in successive ARM registers.
These SWis a r e outlined b e l o w a l t h o u g h o n l y the situations w h e r e t h e y
b e h a v e s i g n i f i c a n t l y differently f r o m their o r i g i n a l BBC MOS f o r m a r e
highlighted.
OS_File (SWI &08): Operate on Entire Files
OS_File SWI d e a l s w i t h l o a d i n g , s a v i n g a n d m o d i f y i n g the attributes of
whole files. Register RO contains a 'function c o d e ' indicating w h a t action is
to be taken. Other, successive registers contain the required p a r a m e t e r s :
R0=&00 Save memory to file
R l = p o i n t e r t o filename string
R 2 = l o a d a d d r e s s of file
R 3 = e x e c u t i o n a d d r e s s of file
R4=start a d d r e s s of d a t a in m e m o r y
R 5 = e n d a d d r e s s of d a t a in m e m o r y
As a n e x a m p l e , the p r o g r a m g i v e n b e l o w will s a v e an entire MODE 12 screen
in a file called SCREEN. Because it is accessing screen m e m o r y directly it is
93
Archimedes Operating System
much faster than the corresponding ScreenSave command provided by the
OS. Make sure you have 80k left on your disc to hold the screen! A complementary load screen program listing is given later in this chapter under the
description o f the the OS_File SWI.
10
20
30
40
50
60
70
80
90
100
110
120
130
140
150
160
170
180
190
200
210
220
230
240
250
260
270
280
290
300
310
320
330
340
341
350
360
370
380
390
400
410
420
430
440
450
460
94
REM
REM
REM
REM
REM
REM
>List9/l
E x a m p l e of OS F i l e to save
screen memory
(c) M i k e G i n n s 198)B
A r c h i m e d e s O S : A D a b h a n d Guide
Dabs Press
D I M S c r e e n S a v e 1024
F O R p a s s = 0 TO 3 STEP 3
P%= S c r e e n S a v e
[
OPT pass
ADR
ADD
SWI
LDR
R 0 , Pblock
\ R e a d Start address of screen
R 1 , R 0 , #8
"OS R e a d V d u V a r i a b l e s "
R4,Pblock+8
\ Start address for SAVE n o w in R 4
ADD
R 5 , R 4 , #1024*80
\ R5
MOV
ADR
MOV
MOV
R0,#0
R l , filename
R2,#0
R3,#0
\
\
\
\
SWI
"OS_File"
\ Call 0S_File t o perform t h e
MOV
PC,R14
\ Return to B A S I C
(end address) = R 4 + 80
Kbytes
Select Save 0S_File option
M a k e Rl point t o file name
zero re-load address
zero execution address
SAVE
.filename
EQUS
"Screen"
EQUB
0
ALIGN
.Pblock
EQUD
14 9
EQUD
-1
\ O S V a r . number
for start of
]
NEXT
MODE
12
F O R T%= 0 TO 300
G C O L 0,RND(7)
C I R C L E F I L L RND(128;0) , RND (1024) ,RND (150)
screen
Filing System SWis
470
480
490
500
510
NEXT
P R I N T " S a v i n g screen n o w "
CALL ScreenSave
PRINT"Screen saved"
Listing 9.1. Save screen using OS_File SWI.
R0=&01 Write Catalogue Information
This call makes it possible to change the catalogue information about a
specified file. The new catalogue information is held in the same register as
in the previous command. However, this time R5 contains a series of flags
which specify the access type to the file. The format of these attribute flags
is as follows:
bit 0
bit 1
bit 2
bit 3
bit 4
bit 5
bit 6
bit 7
File has read access for you
File has write access for you
Not used
File is locked
File has read access for others
File has write access for others
Not used
Not used
The concept of 'you' and 'others' is only relevant in the NFS system. In ADFS
bit 0 and 4 should be the same, as should bits 1 and 5.
R0=&02 Write Load Address Only
Address supplied in R2.
R0=&03 Write Execution Address Only
Address supplied in R3.
R0=&04 Write Attributes Only
Attribute flags in R5 as shown above.
R0=&05 Read Catalogue Information
Rl=pointer to filename string
The information is returned in R0-R5:
95
Archimedes Operating System
R0=object type (0=not found, l=file, 2=directory)
Rl=(the same) pointer to filename string
R2=load address
R3=execution address
R4=length
R5=access attributes (bottom byte)
As an example the following program (listing 9.2.) will prompt for a filename, read its catalogue details and then display them.
10 R E M >List9/2
20 R E M E x a m p l e of 0 S _ F i l e t o get
30 R E M file i n f o r m a t i o n .
40 R E M (c) M i k e G i n n s 1988
50 R E M A r c h i m e d e s O S : A D a b h a n d G u i d e
60 R E M D a b s Press
70
72 R E P E A T
80 I N P U T filename$
90 SYS " O S _ F i l e " , 5 , f i l e n a m e $ TO t y p e , , load, e x e c u t i o n , l e n g t h ,
attributes
100
110 IF t y p e =0 THEN PRINT " Could not find the specified o b j e c t "
120 IF t y p e =2 THEN P R I N T " Object is a Directory"
130 IF t y p e =1 THEN
140 P R I N T " Object is a F i l e "
150 P R I N T " Load address is
: "-load
160 P R I N T " E x e c u t i o n a d d r e s s is : "-execution
170 P R I N T " L e n g t h of file is : "length
180 IF a t t r i b u t e s A N D 1 P R I N T " File h a s read a c c e s s "
190 IF a t t r i b u t e s A N D 2 P R I N T " File has write a c c e s s "
200 IF a t t r i b u t e s A N D 8 P R I N T " File is locked"
210 END I F
220
230
UNTIL0
Listing 9.2. Use of OS_File to read catalogue information.
R0=&06 Delete an Object
Returns catalogue information as above, after deleting the specified object.
R0=&07 Create an Empty File
As for R 0 = 0 , but the start and end addresses in R4, R5 are used only to
determine the size - no data is written.
96
Filing System SWis
R0=&08 Create a Directory
This new call has the same effect as *CDIR: it takes a zero-terminated name
string pointed to by R l and the minimum number of entries the directory
should contain in R4 (zero will provide the default).
Note the minimum number of directory entries is not relevent to ADFS and
is ignored. It is, however, of use with the NFS system.
Rl=pointer to directory name string
R4=minimum number of entries (zero for default number)
As an example the following code fragment will create a sub-directory
called "Richy" in the root directory ($).
ADR Rl, filename
MOV R4,#0
MOV R0,#8
SWI "OS_File"
.filename
EQUS
" $ . Richy"
EQUB
0
R0=&09 Write Date/Time
Stamp
This call acts exactly the same as *STAMP; it takes a filename string and
applies the current date/time to it. The file has a file type of &FFD after the
call has been used.
Rl=pointer to filename string
R0=&OA Save Memory to Date/Time
Stamped File
This is just the same as the R 0 = 0 case, but since the load and execute
addresses are not required, only the file type is needed (in R2).
Rl=pointer to filename string
R2=file type (bottom 12 bits)
R4=start address of data in memory
R5=end address of data in memory
R0=&OB Create a Date/Time Stamped File
This is the same as the R0=7 case, but again the parameter in R2 is the file
type since the load and execute addresses are not required.
AOS—G
97
Archimedes Operating System
R 0 = & 0 C Load File with Path String
Files are usually searched for using the path sequence set by the Operating
System variable File$Path. This call allows File$Path to be overridden by
providing a path string pointed to by R4. The other parameters are as for
R0=&FF (see below).
R 1 - R 3 As for R0=&FF
R4=pointer to path string
R 0 = & 0 D Read Catalogue Information with
Path String
This is the catalogue form of the above, so it is equivalent to R0=5 except
that R4 h o l d s a pointer to the chosen path string which overrides
File$Path. T h e results are returned just as for R0=5.
Rl=pointer to filename string
R4=pointer to path string
R 0 = & 0 E Load File with Path Variable
This is the same as R0=&0C except that it requires the path string to be
held in an OS variable, so R4 points to this variable instead of an immediate string. R1-R3 are as for R 0 = & F F (see below).
R 0 = & 0 F Read Catalogue Information with
Path Variable
This is the same as R0=&0D except that the path string must be in an OS
variable pointed to by R4.
R 0 = & 1 0 Load File Using No Path
The minimal version: the filename is taken as supplied, with no path being
used to prefix it. Otherwise, this is the same as R0=&0C, and its parameters are as for R 0 = & F F (see below).
R 0 = & 1 1 Read Catalogue Information Using
No Path
The same a s R0=&0D except that no path string prefixes the filename.
98
Filing System SWis
R 0 = & 1 2 Set File Type Only
In much the same way as for R0=2 to 4, this call allows just the file type to
be set.
Rl=pointer to filename
R2=file type (bottom 12 bits)
R 0 = & F F Load File Into Memory
This call is the general purpose file loading SWI. It reads a file's catalogue
information and then loads it at one of two addresses: either the one
supplied b y the file's information, or an overriding address in R2. Which of
the two addresses is used is determined by the bottom byte of R3: if zero,
the override in R2 is used, otherwise the file's own load address is used.
Rl=pointer to filename string
R2=load address (if R3 lsb=0)
R3=file/override flag (see above)
On return the registers are filled as for R0=&05, eg:
R0=1 (object type is file)
Rl=(the same) pointer to filename string
R2=load address
R3=execute address
R4=length
R5=access attributes
The program listed below (listing 9.3) will load a data file directly back into
a screen memory. When RUN, it tries to reload the MODE 15 screen saved by
the program given in OS_File (RO = 0), ie, listing 9.1.
Try using the OS ScreenLoad and ScreenSave commands to perform the
same operation and notice the speed difference!
10
20
30
40
50
60
70
80
90
100
110
120
130
REM
REM
REM
REM
REM
REM
>List9/3
Example of 0S_File to load
screen memory
(c) Mike Ginns 1988
A r c h i m e d e s O S : A Dabhand G u i d e
Dabs Press
D I M ScreenLoad 1024
F O R pass = 0 TO 3 STEP 3
P%= ScreenLoad
[
O P T pass
99
Archimedes Operating System
140
150
160
170
190
200
210
220
230
240
250
260
270
280
290
300
301
310
320
330
340
350
360
370
380
390
400
410
\ Get a d d r e s s of start of s c r e e n
A D R R O , Pblock
A D D R1,R0,#8
S W I "OS R e a d V d u V a r i a b l e s
L D R R2,Pblock+8
\ Load a d d r e s s for file n o w in R 2
MOV
ADR
MOV
SWI
R0,#&FF
Rl,filename
R3,#0
"OS_File"
\
\
\
\
Select O S _ F i l e LOAD o p t i o n
F i l e n a m e to load
O v e r - r i d e files own load a d d r e s s
Call O S _ F i l e t o p e r f o r m LOAD
MOV
PC,R14
\ Back t o B A S I C
.filename
E Q U S "Screen"
EQUB 0
ALIGN
.Pblock
E Q U D 149
E Q U D -1
\ OS v a r . n u m b e r for start of s c r e e n
]
NEXT
M O D E 12
P R I N T TAB(10,10) " L o a d i n g screen n o w "
C A L L ScreenLoad
Listing 9.3. Load a block of screen memory.
OS_Find (SWI &0D) Open/Close File for
Byte Access
OS_Find SWI (and its related BBC MOS routine OSFIND) allow the
programmer to inform the filing system that a file needs to be made
available for byte or block access. This is known as 'opening' a file. The
converse 'closing' operation must be performed when the file operation is
completed. Opening a file causes the filing system to translate a filename
string into an integer 'handle' - a number representing the file which is
used extensively by other file operations. To close a file, this handle must be
supplied to uniquely identify the file. OS_Find's only purposes are the
opening a n d closing of files.
Currently, the file manager allows 24 files to be open at any one time. A
given file c a n be opened for read access up to 24 different times, allowing
multiple read access to the same file. However, a file can only be opened
once for write access. If a file has been opened for write access then it
100
Filing System SWis
cannot be opened for read access. Similarly if a file is already open for read
access then it cannot be opened for write access.
In general for OS_Find, RO again defines the type of action and R l points to
the filename or contains the handle (depending on the operation). R2
points to a path string, where the option to use it is chosen.
R 0 = & 4 x Open File for Input
Rl is a pointer to the filename, and the resultant handle is placed in RO on
exit. The file must already exist, otherwise a handle of zero is returned.
R 0 = & 8 x Create and Open File For Output
Again, R l is a pointer to the filename and the handle is returned in RO. If
the named file exists, it is opened for output and the file pointer and length
are reset to zero. If the file doesn't exist, it is created and opened.
R 0 = & C x O p e n File for Input/Output
This is the same as R0=&4x except that it allows output to the file as well
as input. A handle of zero is returned if the file does not already exist.
See the discussion of paths below.
File Path Considerations in OSJFind
Because of the OS's new features with respect to file paths, a modification
to these functions to cater for paths is provided. Where a path prefix is
desired, a pointer to it is placed in R2 and the appropriate value from the
table below added to the base RO function number (see above):
Value
0
1
2
3
Meaning
Use File$Path to prefix the specified filename
Use the string pointed to by R2 as a path
Use OS string variable pointed to by R2
as a path
Use no path at all
101
Archimedes Operating System
Error Handling Extension
Two kinds o f error handling extension have been added. The first allows
an error to b e raised if an attempt is made to open a directory, the norm
being to permit it but disallow any operations on that handle.
The second allows an error to be raised if the specified file does not already
exist, the n o r m being simply to return a handle of zero.
Where a path prefix or error handling extension is desired, values from the
table below should be added to the base R0 function number (see above) as
appropriate:
Value
4
8
Meaning
Cause an error if a directory is opened
Cause an error if the file doesn't already exist
OS_GBPB (SWI &0C) Get/Put Multiple Bytes
from/to an Opened File
This SWI is the same as its BBC MOS counterpart OSGBPB, but with a number
of extensions.
The first four calls provide for reading from or writing to an open file using
either the file's current pointer or a new pointer which is supplied. The
general form is:
R0=function code
Rl=file handle
R2=memory address (for reading from or writing to)
R3=number of bytes to be transferred
R4=new pointer (where relevant)
Both R2 and R4 are updated during the call to reflect the final memory
address and pointer value. For read operations, R3 returns the number of
bytes not transferred (usually zero) and sets the Carry flag C if any bytes
were not transferred.
R0=&01 Write Bytes to File at New
Pointer Position
Requires valid R4.
102
Filing System SWis
R0=&02 Write Bytes to File at Current
Pointer Position
R4 is ignored.
R0=&03 Read Bytes from File at New
Pointer Position
Requires valid R4.
R 0 = & 0 4 Read Bytes from File at Current
Pointer Position
R4 is ignored.
The remaining OS_GBPB function codes perform miscellaneous filing system
functions. Most are the same as their BBC MOS counterparts.
R 0 = & 0 5 Read Title and *OPT 4 Boot Setting
This call should be made with R2 pointing to a block of memory where the
results are returned as follows:
The length of the name string
The name string itself
The boot option (one byte)
R 0 = & 0 6 R e a d CSD Name and Privilege Byte
R2 should point to a block of memory on entry. The information is returned
at this point in the following format:
A zero byte
The length of the CSD name
The CSD name itself
The privilege byte
The privilege byte is used by Econet to indicate a status of 'owner'
(byte=&00) or 'public' (byte=&FF). For ADFS, this byte is always zero.
R 0 = & 0 7 Read CSL Name and Privilege Byte
This call is the same as R0=6 but returns details of the currently selected
library.
103
Archimedes Operating System
R 0 = & 0 8 Read Entries from CSD
This call returns a block of directory information comprising the names of
successive objects in the CSD. Data is returned in memory at the address
supplied in R 2 . The number of entries to be read is supplied in R3, and R4
should contain the first object number. If R4 contains zero, the first name to
be returned will be the first alphabetically. The resulting data in memory is
of the form:
Length of name
Name (null-terminated)
...repeated for the number of objects specified
If not all the names could be supplied, the Carry flag is set and R3 is left
containing t h e number of those that are outstanding. Otherwise R3
contains zero and the Carry flag is clear.
R 0 = & 0 9 Read Entries from Specified Directory
This call is a n extended form of the previous one. As well as the parameters
shown above, it also allows the directory you wish to read (by supplying a
pathname pointed to by R l ) to be specified. The size of the memory buffer is
held in R5 (so that it doesn't overflow) and a wildcard string is pointed to
by R6 (to select which entries are to be returned). Clearly this is a lot more
versatile than the R0=&08 form.
Names that match the wildcard are returned in the buffer as a series of nullterminated strings, their number being returned in R3. R4 is updated to
allow more entries to be read. If there are no more enteries it contains - 1 .
R 0 = & 0 A Read Entries and Information from
Specified Directory
This call effectively performs the SWI version of *EX. Its parameters are the
same as above, but it returns a block of information for each entry rather
than just the name. This block is word aligned and formatted as follows:
Offset
&00
&04
&08
& 0C
&10
&14
104
Information
Load address
Execute address
Length
Access attributes
Object type
Object name (null-terminated)
Filing System SWIs
Listing 9.4 at t h e e n d of this s e c t i o n illustrates how this OS_GBPB call is
used. The c o m m a n d :
SYS " O S _ G B P B " , 1 0 , d i r $ , d a t a % , l , n e x t % , 6 3 , " * " TO ,,,number%,next
is u s e d to e x t r a c t t h e d e t a i l s o f t h e n e x t d i r e c t o r y entry. The entry
p a r a m e t e r s (from left t o right) a r e :
OS_GBPB c o d e
directory name
place to p u t file information
n u m b e r of files t o e x a m i n e
first entry to e x a m i n e
size of d a t a block ( d a t a % )
w i l d c a r d string
the last i t e m is that w h i c h filenames are m a t c h e d against. In this c a s e
is u s e d a s t h e w i l d c a r d string, so all files will m a t c h . After the call,
variable n u m b e r % contains 0 if n o m o r e entries could b e f o u n d or 1
valid e n t r y existed. The variable n e x t % is u p d a t e d so that it p o i n t s to
next group of entries (in this case, just the next entry).
"*"
the
if a
the
The p r o c e d u r e PROCexaminedir is r e c u r s i v e , s o that d e t a i l s of subdirectories a r e also displayed. This recursion is implemented by the c o m m a n d :
H
PROCexaminedir(dir$+ ."+FNgetname(data%+&14),level%+l)
In other w o r d s , t h e p r o c e d u r e calls itself w i t h the n a m e o f one of its
subdirectories. The call os_FSControl is u s e d to convert the ' t y p e ' of a file
into a string describing the type.
OS.BGet (SWI &0A)
Get Byte at Pointer from File
OS_BGet SWI is exactly the s a m e a s the BBC MOS call OSBGET - r e a d i n g t h e
next sequential byte f r o m a n o p e n file w h o s e handle is specified a n d then
incrementing the file pointer b y o n e . On entry, R l should c o n t a i n t h e file
handle a n d o n return, R0 will contain t h e byte read. The Carry flag ' C is
clear if t h e byte w a s r e a d correctly a n d s e t if a p r o b l e m arose (most likely
through a n end-of-file condition or an invalid handle).
As an e x a m p l e of OS_BGet the following p r o g r a m (listing 9.4) r e a d s every
b y t e in a file a n d c o u n t s t h e n u m b e r o f s p a c e s . This g i v e s , albeit
a p p r o x i m a t e l y , indication of the n u m b e r of w o r d s in the file ( a s s u m i n g
each is separated b y only o n e space!).
105
Archimedes Operating System
10 R E M > L i s t 9 / 4
20 R E M E x a m p l e of 0 S _B G e t t o count
30 R E M s p a c e s / w o r d s in a file
40 R E M (c) M i k e Ginns 1988
50 R E M A r c h i m e d e s O S : A D a b h a n d Guide
60 R E M D a b s P r e s s
70
80
90 D I M W o r d C o u n t 1024
100 F O R p a s s = 0 TO 3 STEP 3
110 P%= W o r d C o u n t
120
[
130 O P T p a s s
140
150 \ O n entry R 0 p o i n t s t o n a m e of file
160
\ t o t a l of number of spaces
170 M O V R 1 0 , # 0
180
\ P o i n t s to file name
190 M O V R 1 , R 0
\ O p e n for read access only
200 M O V R 0 , # 6 4
210 M O V R 2 , # 0
\ R e t u r n s file handle in R0
220 SWI " O S _ F i n d "
230
240 M O V R 8 , R 0
. c o u n t loop
250
260 M O V R 1 , R 8
\ Get b y t e from file
270 SWI " O S _ B G e t "
\ If E O F quit loop
280 B C S q u i t loop
290 CMP R 0 , # 3 2
\ Is it a space ?
\ If s o , increment the count
300 A D D E Q R 1 0 , R 1 0 , # 1
\ If n o t end of file then loop
310 B c o u n t _ l o o p
320
.quit loop
330
340 M O V R 1 , R 8
350 M O V R 0 , # 0
\ C l o s e file
360 SWI " O S _ F i n d "
370
\ M a k e word count available t o USR
380 M O V R 0 , R 1 0
390
400 M O V S P C , R 1 4
410
420
]
430 N E X T
440
450 M O D E 0
460 D I M f i l e n a m e 16
470 I N P U T "Please enter t h e filename to be investigated :
$filename
480
490 P R I N T "Counting w o r d s n o w "
500 A % = filename
106
Filing System SWIs
510
520
530
w o r d s = USR( W o r d C o u n t )
:
P R I N T "Number of w o r d s counted is : " words
Listing 9.4. Using OS_Bget to count spaces and words.
OSJBPut (SWI &0B) Put Byte at Pointer to File
This call performs the reverse of OS_BGet and is equivalent to the BBC MOS
call OSBPUT. It writes the byte passed in R0 to the file whose handle is
supplied in R l at the current file pointer, and then increments the file
pointer b y one to allow further OS_BPut calls to work correctly.
OS_Args (SWI &09)
Read/Write Open File Information
This is another of the general-purpose SWls and has an equivalent under
the BBC MOS, although the meanings of most of the operations differ and,
therefore, are all documented here.
The general format of the call is that on entry, R0 contains a function code,
R l contains a file handle and R2 contains data to be written (for write
operations). Usually all registers are preserved, except where information
is being read, in which case it is returned in R2.
R0=&O0Read Sequential File Pointer/Filing
System Number
To make life difficult this function code has two meanings, making it a
special case. When entered with R1=0 (instead of a valid file handle) it
returns the number of the current filing system in R0 (using the BBC MOS
numbering strategy).
If R l holds a valid file handle (ie, a non-zero value) this call returns the
current value of the sequential pointer of that file in R2.
R0=&01 Write Sequential File Pointer
The reverse of the above call, it allows the sequential file pointer to be
written (set). It should be entered with a valid file handle in R l and the new
file pointer value in R2. If the new pointer value is beyond the current
extent of the file then its size is increased accordingly and the new area
filled with zeros.
107
Archimedes Operating System
R 0 = & 0 2 Read File Extent
This call allows the current file extent (length) to be read into R2 for the file
whose handle is supplied in R l .
R 0 = & 0 3 Write File Extent
This call allows the extent of the file whose handle is supplied in R l to be
set to the value in R2. If this value is larger than the existing extent, the file
is extended accordingly and the new area filled with zeros.
R 0 = & 0 4 R e a d Allocated Size
This call allows the amount of space actually allocated to the file to be read
- enabling y o u to determine how much space is left before new space need
be allocated. It returns in R2 the allocated space for the file whose handle is
supplied in R l .
R 0 = & 0 5 Read End-of-file Status
This is one o f two ways of sensing the end-of-file condition (the alternative
being OS_Byte call &7F provided for BBC MOS compatibility). When supplied
with a file handle in R l , this call returns a non-zero result in R2 if the file
pointer is equal to the file's extent, otherwise it returns zero.
R 0 = & 0 6 Write Allocated Size
This is the reverse of the call with R0=4 (above) - allowing you to advise
the Operating System that at least the amount of space in R2 should be
reserved for the file whose handle is supplied in R l . On return, R2 contains
the amount o f space actually allocated.
R 0 = & F F 'Ensure' File Buffers
This call, carried over from the BBC MOS, is equivalent to part of the
'closing' process for files (under OS_Find). It ensures that all filing system
buffers are written out to their corresponding files, thus allowing them to
be closed. O n entry, R l must contain either zero (in which case all files are
'ensured') or a valid file handle (in which case just the chosen file's buffers
are 'ensured').
108
Filing System SWIs
OS_FSControl (SWI &29)
General Filing System Control
This call provides a wide range of different actions to be performed o n the
selected filing system, including setting the CSD or CSL, *RUNning a file,
*CATaloging a directory and so on. The most useful of these routines a r e
described in the following section.
On entry to OS_FSControl, register R0 contains a number which specifies
which of the many operations is to be carried out. The contents of other
registers depend on the action being performed and a r e described
individually in the following sections.
R 0 = & 0 0 Set Current Directory
This call is used to change the currently selected directory (CSD) for the file
system. It is equivalent in effect to the Operating System command *DIR
<dirname>. On entry to the routine, R l must point to a zero-terminated
string which contains the name of the directory to be selected. If the
directory name is null, then the current directory reverts to the root
directory as default.
R 0 = & 0 1 Set Library Directory
This call is similar to the above, but is used to change the currently selected
library directory (CSL). It is equivalent in function to the Operating System
command *LIB <dirname>. On entry to the routine, R l must point to a
terminated string which contains the name of the directory to be selected as
the library. If the directory n a m e is null, then the library directory reverts to
a default, typically $.Library for ADFS (if this is present).
R0=&02 Reserved for Operating System
Do not use.
R0=&03 Reserved for Operating System
Do not use.
R0=&04 RUN file
This routine will *RUN the named file. The name of the file to be loaded and
executed must be contained in a terminated string which is pointed to by
109
Archimedes Operating System
register R l . T h e file is searched for in the directories specified in the system
variable Run$Path. By default, this is set up to be the current and then the
library directory.
If the file being *RUN is date stamped then a suitable RUN alias is looked for
which corresponds to the file type. See the section on *LOAD for a description of the action taken.
R 0 = & 0 5 Catalogue a Directory
This routine performs an equivalent function to the command *CAT
<dirname>. T h e name of the directory to be catalogued is contained in a
terminated string which is pointed to by register R l . If this name is null,
then the currently selected directory is catalogued. For example:
SYS
"OS_FSControl", 5,""
R 0 = & 0 6 Examine Current Directory
This call prints out full catalogue information on each file in the specified
directory. It is therefore equivalent to the command *EX <dirname>. The
name of the directory to be examined is contained in the null terminated
string pointed to by register R l .
R 0 = & 0 7 Catalogue Library Directory
This performs a similar function to the call with R0=&05 except that it
displays a catalogue on the currently selected library directory like *LEX.
Again R l points to a terminated directory name. If this is null then the
current library directory itself is catalogued. Otherwise the name is taken
to be that of a sub-directory within the library directory which is catalogued instead.
R 0 = & 0 8 Examine Library Directory
This call is similar to that with R0=&06 except that information on files in
the current library directory is displayed. If R l points to a null string, then
the files in the library directory itself are examined. Otherwise it is
assumed to point to the name of a sub-directory within the library. The
catalogue details of the files in this sub-directory will then be printed
instead.
110
Filing System SWIs
R0=&09 Examine Specified Objects
This call allows a, possibly ambiguous, file name and path to be specified. It
then prints out information on any file which matches this specification. On
entry R l points to the file name/path to be used. For example, if R l pointed
to the string " A * " , then information would be printed on all files beginning
with an 'A' in the current directory. Similarly "$.Richy.A*" would examine
every file beginning with an " A " in the sub-directory "Richy".
R0=&0A Set File System Options
This call is equivalent to the command *OPT n,m where 'n' is the option
number to be set a n d ' m ' is the value. On entry, R l contains the option
number (n) and R2 the parameter value (m). For example, if R l contained
four and R2 contained three, then the call would perform *OPT 4,3 and
select a *EXEC boot option. If R1=0 then the settings of all of the file system
options are reset to their default state. For example:
M O V R0,#&0A \ Set * OPT
MOV Rl, #4
MOV R2, #3
SWI " O S _ F S C o n t r o l
4,3
M
R 0 = & 0 B Set File System from Named Prefix
This call sets the currently selected file system to be that specified in the
string pointed to by R l . If this string does not contain a valid file system
name then no action is taken. As an example, consider the following
program:
M O V R0,#&0B
A D R Rl, string
SWI "OS_FSControl"
.string
EQUS "ADFS.fred"
EQUB 0
The file manager will recognise the file system name within the string and
select the ADFS system.
On exit from the routine the following registers return information.
Rl
Points to immediately after the file system's name if one was
present in the string.
R2
Equals - 1 if no file system name specification was found.
Ill
Archimedes Operating System
R3
Points to a special field if one was present.
Note that ' n a m e : ' is the preferred way of specifying a file system name
within a command. However, the older alternative - n a m e - can be used
instead.
R 0 = & 0 C Add File System
Add a new file system to those recognised by the file manager. This call is
only of interest to readers considering writing a completely new file
system.
R 0 = & 0 D Lookup File System
This call returns information about a file system. On entry R l identifies the
file system to be investigated. R2 specifies how the file system name is
terminated. O n exit: R l = file system name and R2 points to the file system
control block. This call is only of interest to readers considering writing a
completely n e w file system.
R 0 = & 0 E Select File System
This call selects a specified file system to be the current one. This call is only
of interest to readers considering writing a completely new file system.
R 0 = & 0 F Boot File System
This call requests the currently selected file system to perform the boot
operation. This is done when SHIFT-BREAK is pressed. The exact nature of
the boot operation depends on the file system but usually involves autorunning a file.
R 0 = & 1 0 File System Removal
Removes the specified file system from those recognised by the File
manager. This call is only of interest to readers considering writing a
completely n e w file system.
R 0 = & 1 1 Add Secondary File System Module
Add a secondary module to the main file system module. This call is only of
interest to readers considering writing a completely new file system.
112
Filing System SWIs
R 0 = & 1 2 Translate File Type Number to Name
This call a l l o w s a file t y p e n u m b e r t o be c o n v e r t e d into the c o r r e s p o n d i n g
file type n a m e . On e n t r y R2 contains the file t y p e number. On exit, registers
R2 a n d R3 c o n t a i n eight bytes w h i c h a r e the ASCII r e p r e s e n t a t i o n o f t h e file
type n a m e . As a n e x a m p l e , if R2 = &FFB, then R2, R3 w o u l d c o n t a i n t h e
following b y t e s o n exit:
&49534142 20202043
These b y t e s a r e the ASCII r e p r e s e n t a t i o n for t h e c h a r a c t e r s "BASIC " - t h e
n a m e of t h e file type.
The p r o g r a m b e l o w p r o m p t s for a file type n u m b e r a n d a t t e m p t s t o c o n v e r t
it to a file t y p e n a m e . The n a m e is then printed out.
10 R E M > L i s t 9 / 5
20 R E M Example of O S _ F S C o n t r o l to
30 R E M convert a file type number
40 R E M (c) Mike Ginns 1988
50 R E M A r c h i m e d e s O S : A D a b h a n d Guide
60 R E M D a b s P r e s s
70 :
80 D I M w o r k 8
110 R E P E A T
120 P R I N T '
130 INPUT "Please E n t e r File type number : &" t y p e $
140 P R I N T
150 :
160 t y p e = E V A L ( " & " + t y p e $ )
170 SYS " O S _ F S C o n t r o l " , & 1 2 , , t y p e TO ,, bytel,byte2
180 :
190 !work=bytel
200 w o r k ? 4 = 1 3
210 P R I N T $work;
220 :
230 !work=byte2
240 w o r k ? 4 = 13
250 P R I N T $work
260 U N T I L FALSE
Listing 9.5. Use of OS_FSControl to c o n v e r t a file type n u m b e r .
R0=&13 Restore Current File System
This call t a k e s n o e n t r y p a r a m e t e r s . It selects t h e c u r r e n t t e m p o r a r y file
system to b e t h e currently selected o n e .
AOS—H
113
Archimedes Operating System
R 0 = & 1 4 Reserved for the Operating System
Do not use this call.
R 0 = & 1 5 Return File System Handle
When dealing with files we usually identify them using a file handle
provided b y the file manager. This call translates this file manager's file
handle into the corresponding one actually used by the selected file system.
On entry R l = f i l e manager's file handle. On exit Rl = the corresponding
handle as used by the file system.
R 0 = & 1 6 Shut
This call provides an equivalent function to the *SHUT command. It closes
all files on the file system.
R 0 = & 1 7 ShutDown
This call provides an equivalent function to the ^SHUTDOWN command. It
closes all files on the file system. In addition it logs off all file servers and
dismounts any ADFS discs.
R 0 = & 1 8 Set File Attributes from String
This call provides an equivalent function to the *ACCESS command. It
allows the attributes for any named files to be set. On entry, Rl points to a
string specifying the files to be affected. This may include a wild card to
affect several files. R2 points to a string which contains the new attributes
to be set.
R 0 = & 1 9 Rename Objects
The call performs a *RENAME. O n entry R l points to the first file/path
name and R 2 points to the second. The call then renames the first specified
file as the second file specification.
R 0 = & 1 A Copy Object
The call provides a general file copy facility. On entry the following
registers contain information:
Rl
R2
114
Pointer to first file/path name
Pointer to second file/path name
Filing System SWIs
R3
R4
R6
R7
R8
Action mask
Optional start date
Optional start date
Optional end date
Optional end date
The call is the equivalent of * C O P Y . All files matching the first file/path
specification are copied to the second file/path specification. Various
options for the copy can be specified in the flags contained in R3. The flags
are as follows:
Bit
8
7
6
5
4
3
2
1
0
Function
Set to select printing of information during copy
Set if the original file is to be deleted after the copy
Set if user is to be prompted to change disc as required
Set if copy is allowed to use application space to speed up copy
Set to select verbose mode during copy
Set if user is to be prompted to confirm each copy
If set, only files between the given time/date stamps are
to be copied
If set, locked files are unlocked and overwritten by the copy
Set to allow recursive copying of file through sub-directories
R0=&lBWipe Objects
This routine provides an equivalent operation to the *WIPE command. On
entry the registers must be set up as follows:
Rl
R3
R4
R6
R7
R8
Pointer to file/path name to delete
Action mask
Optional start date
Optional start date
Optional end date
Optional end date
The option flags in R3 are the same as those used in the COPY routine.
R0=&1C Count Objects
This routine provides an equivalent operation to the *COUNT command.
On entry the registers must be setup as follows:
Rl
R3
R4
Pointer to file/path name to count
Action mask
Optional start date
115
Archimedes Operating System
Optional start date
Optional end date
Optional end date
R6
R7
R8
The option flags in R3 are the same as those used in the COPY routine. On
exit from the routine R2 contains the total number of bytes counted in all
matching files. R3 contains the number of matching files counted.
To illustrate the many and varied filing system calls, listing 9.6 is included
at the end o f this section. The operation of the program is self-explanatory
and demonstrates how to use the most common forms of the more useful
filing system SWis.
10 R E M > L i s t 9 / 6
20 R E M TypeTree
30 R E M b y Nicholas v a n Someren
40 R E M A r c h i m e d e s O S : A D a b h a n d Guide
50 R E M (c) Copyright AvS and NvS 1988
60 R E M Set aside some w o r k s p a c e and terminate the
70 R E M file type string w i t h a Return.
80 :
90 D I M d a t a % 63,typebuf% 10
100
typebuf%?8=13
110 :
120 R E M Input directory n a m e , using CSD by default,
130 R E M and examine it.
140 :
150 I N P U T " W h i c h Directory ?"dir$
160 IF d i r $ = " " d i r $ = " @ "
170
PROCexaminedir(dir$,0)
180
END
190 :
200 R E M E x a m i n e the d i r e c t o r y d i r $ . The depth of the
210 R E M e x a m i n a t i o n is l e v e l % . next% is the next
220 R E M c a t a l o g u e entry to b e read and number% is the
230 R E M number of entries that were actually read.
240 :
250 DEF P R O C e x a m i n e d i r ( d i r $ , l e v e l % )
260 L O C A L next%,number%
270
next%=0
280 :
290 R E M W h i l e there is a n o t h e r entry to read, read its
300 R E M name and catalogue information and store it at
310 R E M d a t a % . If another w a s found (number%>0) then
320 R E M print its name and determine its t y p e .
330 :
340 W H I L E n e x t % o - l
350 SYS O S _ G B P B , 1 0 , d i r $ , d a t a % , l , n e x t % , 6 3 , *
TO
,,, n u m b e r % , next%
360 IF n u m b e r % > 0 THEN
370 P R I N T T A B (10) ; " : "TAB (level%*3+12) ; F N g e t n a m e ( d a t a % + & 1 4 ) ;
,,
116
,,
,,
,,
Filing System SWIs
380 V D U 13
390 :
400 R E M If the entry w a s a d i r e c t o r y examine it.
410 :
420 IF d a t a % ? & 1 0 = 2 THEN
430
PRINT"Directory"
440
PROCexaminedir(dir$+"."+FNgetname(data%+&14),level%+l)
450 :
460 R E M If it w a s a file, and t h e top 12 bits of the
470 R E M load address are &FFF, find t h e file t y p e .
480 R E M Otherwise, print it as 'code'.
490 :
500
ELSE
510 IF (!data% » > 20)=&FFF THEN
520 SYS "OS_FSControl",18,, (!data% > » 8)AND &FFF TO
,,!typebuf%,typebuf%
530 P R I N T $ t ypebu f%
54 0 E L S E
550
PRINT"Code"
560 E N D IF
57 0 E N D I F
58 0 E N D I F
590
ENDWHILE
60 0 E N D P R O C
610 :
62 0 R E M Extract the file name stored at addr%.
630 :
640 D E F FNgetname(addr%)
650 L O C A L b$
660 W H I L E ?addr%>31
670
b$+=CHR$(?addr%)
680
addr%+=l
690
ENDWHILE
700 = b $
Listing 9.6. Display directory tree.
10
20
30
40
50
60
70
80
90
100
110
120
130
140
150
R E M >List9/7
R E M FileTest
R E M b y Nicholas van Someren
REM Archimedes OS: A Dabhand Guide
R E M (c) Copyright AvS and N v S 1988
:
D I M text% 1000
endtext%=text%
P R I N T "Please enter some lines of text, p r e s s i n g R e t u r n "
P R I N T "after each. Press Return b y itself to e n d . "
INPUT LINE a$
W H I L E (endtext%+LEN(a$)<text%+1000) AND a$<>""
$endtext%=a$
endtext%+=LEN(a$)+1
INPUT LINE a$
117
Archimedes Operating System
160 END W H I L E
170 P R I N T " T h a n k y o u - saving t e x t . . . "
180 SYS " O S _ F i l e " , 0 , " T e x t F i l e " , 0 , 0,text%, e n d t e x t %
190 * I N F O TextFile
200 P R I N T " C h a n g e all t h e file information:"
210 SYS " O S _ F i l e " , 1 , " T e x t F i l e " , & F F F F F E 1 2 , & 3 4 5 6 7 8 9 A , , 8
220 * I N F O TextFile
230 P R I N T " C h a n g e t h e load a d d r e s s : "
240 SYS " O S _ F i l e " , 2 , " T e x t F i l e " 0
250 * I N F O TextFile
260 P R I N T " C h a n g e t h e e x e c u t i o n a d d r e s s : "
270 SYS O S _ F i l e " , 3, " T e x t F i l e " , ,&87654321
280 * I N F O TextFile
290 P R I N T " C h a n g e t h e a t t r i b u t e s : "
300 SYS " O S _ F i l e " , 4 , " T e x t F i l e " , , , , 3
310 * I N F O TextFile
320 P R I N T " O p e n t h e file - ";
330 SYS O S _ F i n d " , 1 9 2 , " T e x t F i l e " TO filehandle%
340 P R I N T " t h e file h a n d l e is "/filehandle%
350 P R I N T " R e a d in a b y t e - ";
360 SYS " O S _ B G e t " , , f i l e h a n d l e % TO g o t b y t e %
370 P R I N T " t h e b y t e w a s " ; g o t b y t e %
380 P R I N T " R e a d t h e extent of the file - ";
390 SYS " O S _ A r g s " , 2 , f i l e h a n d l e % TO ,,fileextent%
400 P R I N T " t h e e x t e n t is " ; f i l e e x t e n t %
410 P R I N T " S e t t h e p o i n t e r to the end of the file:"
420 SYS " O S _ A r g s " , 1 , f i l e h a n d l e % , f i l e e x t e n t %
430 P R I N T " W r i t e b a c k the b y t e we read on to the end:"
440 SYS " O S _ B P u t " , g o t b y t e % , f i l e h a n d l e %
450 P R I N T " R e a d t h e m i d d l e t h i r d of the file:"
460 SYS " O S _ G B P B " , 3, f i l e h a n d l e % , text%, fileextent% D I V
3, f i l e e x t e n t % D I V T O , , e n d t e x t %
470 P R I N T " S a v e t h e m i d d l e t h i r d back onto the end:"
480 SYS " O S _ G B P B " , 1 , f i l e h a n d l e % , t e x t % , e n d t e x t % text%, fileextent%+l
490 P R I N T " F o r c e t h e file to b e updated w i t h : "
500 SYS " O S _ A r g s " , & F F , f i l e h a n d l e %
510 P R I N T " C l o s e t h e file and examine the result:"
520 SYS " O S _ F i n d " , 0 , f i l e h a n d l e %
530 * T Y P E TextFile
;
,,
M
Listing 9.7. Manipulating file attributes.
118
10 : Modules
The most fundamental way in which the Operating System can be
expanded is by the use of 'Relocatable Modules' - pieces of software which
add applications or services to the computer in a well-defined and
structured way. The BBC MOS allowed users to install 'Sideways ROMs' in
order to add to the computer - the module concept allows the same thing
to be achieved but in a more elegant and consistent way.
The most crucial way in which modules differ from Sideways ROMs is
simply that modules do not need to be physically installed in the computer.
Instead, the OS maintains an area of memory - the Relocatable Module
Area (RMA) - and allows modules to be loaded in to this area for execution, in any order you like. In this way the physical complexity of taking the
computer apart and inserting ROMs is removed, but at the same time the
elegance of expanding the system software is preserved. You should note
that, in fact, it is possible to install modules in ROM: this is exactly how a
large amount of the built-in software is provided, but this mechanism is not
intended for use by 'mere mortals' such as we; only for Acorn themselves.
As we have seen throughout this book, a good deal of emphasis has been
placed on BBC MOS compatibility by the authors of the OS. The software
interface to modules is no exception in this respect - familiar ideas such as
service entry points and service codes are still to be found. Clearly, in order
to be able to improve upon the BBC MOS a number of features have been
removed and many more added. Nevertheless, the role of the module
writer is made a good deal simpler by perpetuating a lot of the old ideas.
If you have had experience of writing Sideways ROMs then you are very
unlikely to encounter any difficulty in understanding how the module
system is designed to work.
Module Related Commands
Before examining the detailed implementation of modules it is necessary to
have a grasp of the commands which are provided to deal with module
management. These commands are provided by the OS and take advantage
of the module interface which we will be examining later on.
119
Archimedes Operating System
•MODULES
Syntax:
* MODULES
The ^ M O D U L E S command displays a list of all the modules which are
installed in the computer. No distinction is made between modules which
are supplied in ROM and those which have been installed into RAM from a
filing system. For each module present, a one-line entry appears which
details the module's name (for use with other commands), the base address
in memory where the module appears and the address of where the
module's private workspace begins. Unfortunately, ^MODULES does not
trouble to tell us the amount of workspace consumed by each module,
which is a pity - you have to work it out in your head instead!
*RMCLEAR
Syntax:
*RMCLEAR
This command clears the RMA of all modules which can safely be removed
(not including system modules) and thus frees up their code space and
workspace to maximise the amount of free memory in the RMA.
*RMKILL
Syntax:
* R M K I L L < m o d u l e name>
The *RMKILL command removes an individual module from the RMA in the
same way as does *RMCLEAR - freeing its code space and workspace.
System modules 'murdered' in this way revive themselves after a hard
reset or upon receipt of the *RMREINIT command (see below).
120
Modules
*RMLOAD
Syntax:
*RMLOAD <filename>
{<initialisation string>}
This c o m m a n d loads a n d initialises the specified file, w h i c h m u s t b e a valid
piece of m o d u l e c o d e a n d m u s t be of file t y p e 'Module', ie, w i t h file t y p e
c o d e &FFA. After initialisation in this w a y t h e m o d u l e will r e s p o n d to its
c o m m a n d s a n d to others s u c h as *HELP in the usual w a y .
The initialisation string is optional a n d specific to the m o d u l e b e i n g l o a d e d
- it c a n b e u s e d t o r e q u e s t a p a r t i c u l a r a m o u n t o f w o r k s p a c e f o r the
m o d u l e o r for w h a t e v e r other p u r p o s e the a u t h o r of t h e m o d u l e requires.
*RMREINIT
Syntax:
*RMREINIT <module name>
{reinitialisation string>}
The *RMREINIT c o m m a n d is u s e d to resuscitate m o d u l e s w h i c h have been
*RMKlLLed o r *UNPLUGged ( s e e b e l o w ) . It is effectively t h e same as the
initialisation p a r t of *RMLOAD, b u t of c o u r s e the m o d u l e m u s t a l r e a d y be
present in the m a c h i n e (which is usually only the case for s y s t e m m o d u l e s ) .
*RMRUN
Syntax:
*RMRUN <filename>
{ i n i t i a l i s a t i o n string>}
This c o m m a n d e x e c u t e s m o d u l e s in the s a m e w a y a s *RUN e x e c u t e s r a w
m a c h i n e c o d e p r o g r a m s . The file m u s t h a v e a file t y p e of &FFA a n d is
l o a d e d a n d e x e c u t e d if it is valid. *RMRUN is u s u a l l y r e s e r v e d for starting
large applications rather t h a n just s y s t e m extensions.
121
Archimedes Operating System
*RMTIDY
Syntax:
*RMTIDY
As its name suggests, *RMTIDY compacts the RMA and maximises the free
memory available. Because modules need to be warned when this is
happening (they may be running) certain modules will initiate their own
tidying u p , so sounds may cease and files may be 'ensured' onto the
appropriate storage medium, for example.
*UNPLUG
Syntax:
*UNPLUG
{<module
name>}
*UNPLUG a l l o w s a s y s t e m m o d u l e (in ROM) t o be e x c l u d e d f r o m t h e
initialisation p r o c e s s , r e n d e r i n g it c o m p l e t e l y inoperable until *RMRElNiTed
a g a i n . B e c a u s e this c o m m a n d alters c o n f i g u r a t i o n m e m o r y , t h e m o d u l e
will not r e a p p e a r e v e n after s w i t c h i n g the p o w e r off a n d on. It is therefore
i m p o r t a n t t o r e m e m b e r t h e m o d u l e ' s n a m e , a n d for this r e a s o n e n t e r i n g
*UNPLUG o n its o w n will give a list o f the m o d u l e s which a r e u n p l u g g e d .
There is a m a j o r SWI a s s o c i a t e d w i t h m o d u l e m a n a g e m e n t t h a t is k n o w n ,
logically e n o u g h , a s OS_Module. OS_Module is detailed b e c a u s e it m a k e s
extensive r e f e r e n c e to c o n c e p t s n o t yet d i s c u s s e d . You m i g h t like to skip
f o r w a r d s t o it if y o u h a v e a n y d o u b t s during w h a t follows.
122
11 : Writing Modules
Writing a module is very similar to writing a Sideways ROM for the BBC
MOS. However, because of the relocatable nature of modules, a number of
special considerations need to be taken into account. Furthermore, several
standards must be obeyed if the module is to be dealt with correctly by the
OS and is therefore to run successfully.
The rest of this chapter describes how modules must respond to these
various standards.
Workspace Memory
To allow a module to maintain its own status information and indeed to do
its job in the broadest sense it must have access to an area of memory it can
call its own. This workspace must be claimed from the RMA by calling the
module manager using the SWI OS_Module with the appropriate reason
code. Whenever a module is entered by the OS, register R12 is set to point to
one word of memory which has been set aside as minimal workspace for
that module. The OS adopts a standard that this word is used as a pointer
to the actual workspace of the module (which, after all, will probably need
to be larger than one word). Such workspace may therefore be addressed
by using an instruction like:
LDR R12, [R12]
to get the real start address of the workspace into R12.
The use of this standard has several advantages. When *RMTIDY is issued
the OS can adjust the pointer for each module that has been moved as
appropriate. Also, when a module does not provide any code for shutting
itself down (known as 'finalisation code') the OS can take the default action
of de-allocating the workspace pointed to by the module's private word.
Module Errors
Modules also need to conform to the the OS standard for raising errors so
that standard error handlers can deal with them. A module should deal
with an error by following these four steps:
123
Archimedes Operating System
1.
2.
A n error block (including a valid error number and a text string
describing the error) should be made ready.
R0
should be loaded with the start address of the error block.
3.
As m a n y registers as necessary should be restored by having their
previous contents pulled back from the system stack. This assumes
that the original contents were preserved on the stack when the
m o d u l e was entered. The system stack pointer is held in R13.
4.
The Overflow flag V should be set before returning.
It is important to use an error number which has been allocated specifically
to the application in order that 'upstream' error handlers (which the
module m a y not be aware of) can deal with it correctly.
The Format of Module Code
Each m o d u l e is prefixed by a set of offsets into the module which the OS
uses to despatch functions to each module in turn. These equate to the
header information at the start of Sideways ROMs and, in fact, the services
which they provide are very similar. It is crucial to remember that these are
relative offsets, not absolute addresses, in order that the module be
properly relocatable.
The module header always occupies the first eleven words of the module's
memory space and it is divided up as follows:
Offset
&00
&04
&08
&0C
&10
&14
&18
& 1C
&20
&24
&28
Offset to
Start-up code
Initialisation code
Finalisation code
Service call handling code
Module title string (ASCII text)
Module *HELP string (ASCII text)
Help and command decoding table
SWI chunk base number for this module (optional)
SWI handling code (optional)
SWI decoding table (optional)
SWI decoding code (optional)
All eleven fields must be present, though they may contain zero which the
OS takes to mean that the appropriate function is not supported. The
exception is the title message which must point to a text string terminated
by zero. T h e fields which deal with SWis are optional since not every
124
Writing Modules
module will provide SWls of its own. Each of the fields is discussed in detail
below.
To illustrate the rather complex process of developing a piece of module
software, a lengthy example - listing 11.1 - is included at t h e end of this
section. The example is a printer buffer which, when installed, will use a
specified amount of memory to store characters sent to the printer t o allow
you to carry on with something else while printing something o u t .
The listing is extensively annotated, and should you be interested in
writing module software, y o u are advised to study the example until
convinced of the concepts and rules involved.
Module Start-up Code
This is an offset to the code which will be executed if the module is started
as an application, normally as a result of a *RMRUN command. Because
modules do not have to provide an application it is valid for this offset to
contain zero, in which case the OS will not attempt to start it up.
On entry through this offset, the CPU will be in User Mode and have
interrupts enabled. Registers will not contain any useful information
except for R12 which, as ever, points to the word of private workspace.
The start-up entry is used whenever OS_Module obeys a 'run' or 'enter'
reason code.
Module Initialisation Code
The initialisation code is guaranteed to be called through this offset before
any other part of the module is called. This obliges it to ensure that all
other pointers, variables and so forth have been correctly established. It is
valid for a module not to have any initialisation code, in which case zero
should be placed at this offset.
Commonly, a module will use this opportunity to claim workspace, set up
R12 to point to the workspace, attach to vectors, announce its presence and
so on.
On entry, the CPU will be in Supervisor Mode (because it has just left the
Operating System) with R13 pointing to the supervisor stack and R14 will
contain a return address in the usual way. If the location pointed to by R12
is not equal to zero then this may be assumed to be a re-initialisation call
(ie, not the first time around) which may have to be treated differently.
125
Archimedes Operating System
Finally, RIO points to the remainder of the command line so that user
options may b e decoded.
Returning f r o m this call should be achieved by using:
MOV
PC,R14
with the processor state, interrupt state and registers R7-R11 and R13
preserved. T h e Overflow flag ' V should be used to specify whether an
error has occurred, with R0 pointing to the error block and 'V' set if this is
the case.
This offset is called whenever OS_Module obeys a 'run', 'load', 'reinit' or
'tidy reason code.
7
Module Finalisation Code
This is the reverse of the initialisation entry point - it is the 'last call' before
the module will be expected to expire. Usually this circumstance is reserved
for situations where the module is being explicitly killed as a result of
*RMKILL or because the RMA is being tidied up as a result of *RMTIDY. It is
possible for a module to 'refuse to die' by causing an error in the usual
way; otherwise, an exit should be taken using the link register R14 as
normal. In otherwords, if the module is running, it may not be possible for
it to safely shutdown. This is an error.
On entry, RIO contains a flag which indicates whether this finalisation call
is because of 'true death' (from *RMKILL) or 'suspended animation' from
*RMTIDY or similar). RIO contains one in the former case and zero in the
latter. R12 points to the private word and R13 to the supervisor stack.
It is legitimate for a module to have no finalisation entry, in which case the
OS will de-allocate its workspace on the assumption that R12 is a valid
pointer to it.
This offset is called whenever OS_Module obeys a 'remit', 'delete', 'tidy' or
'clear' reason code.
Service Call Handling Code
The service call entry point is closely related to the same entry point for BBC
MOS Sideways ROMs and, in fact, many of the 'service codes' used to initiate
functions are the same or similar. Service calls are initiated as a result of
calls to OS_ServiceCall or the BBC MOS compatible OS_Byte &8F (whose use
should be minimised). This entry point is provided for compatibility only the OS uses the command line and SWI interfaces for most functions.
126
Writing Modules
On entry to the service call handling code R l contains the reason code of
the desired service, R12 points to the private word, R13 points to a full
descending stack and R14 contains a return address.
The module must decode R l and execute software to deal with it
appropriately. It is important to remember that, for much of the time,
every module installed in the computer will be being 'offered' the same
reason codes in sequence and thus it is important to preserve all the
incoming information in such a way as to allow other modules to take their
own action. In practice, it is legitimate for a module either to ignore a
reason code, or to 'claim' it so as to prevent other modules from being
offered it. These three circumstances are summarised below:
1.
To refuse to deal with a reason code:
Exit with all registers preserved using MOV PC,Rl4
2.
To deal with a reason code and pass it on:
Decode the reason code
Preserve all registers
Execute the appropriate software
Restore registers
Exit using MOV PC,Rl4
3.
To 'claim' a reason code:
Decode the reason code
Execute the appropriate software
Set R1=0 (indicating the call has been claimed)
Exit using MOV PC,Rl4
Service Call Reason Codes
Let us now look at the meaning of each of the valid reason codes. There are
quite a few of them, so don't feel you have to digest the whole lot on the
first reading. The reason codes, which are passed to modules in register
Rl, are detailed below in numerical order. Where exit and entry conditions
may be important in passing or returning information they are given.
127
Archimedes Operating System
R 1 = & 0 0 Service Call was Claimed
Exit:
R1=0
This reason code is returned to indicate that the call has been claimed by
the module. A module will never be called with this reason code as the OS
will prevent further calling upon receiving it.
R l = & 0 4 Unknown OS command
Entry:
R0=pointer
to unknown command string
Exit success:
R 1 = 0 (to claim the call)
R 0 = 0 (to indicate no error)
Exit failure:
R l = ( d o n ' t care)
R0=pointer to error block
The ' u n k n o w n command' reason code is provided for BBC MOS compatability - y o u do not need to respond to it since a more modern approach is
available a n d described later.
If you can understand the command then you should execute the appropriate software and return by claiming the call with R1=0. If an error occurs
you should return with R0 pointing to the error block.
R l = & 0 6 Error Pending
Entry:
R0=pointer
to error
This reason code is used to advise modules that an error has occurred but
has not yet been dealt with by the error handler. To ensure that other
modules find out too, you must not claim this call - simply return with all
registers as they were received.
128
Writing Modules
R l = & 0 7 Unknown OS_Byte
Entry:
R2=OS_Byte number
R3=parameter 1
R4=parameter 2
Exit:
R1=0 to claim, otherwise preserve contents of R l
If your module provides extra OS_Byte functions they may be recognised
and acted upon by means of this reason code. If OS_Byte number in R2 is one
you provide, you should deal with it, and then claim the call with R1=0.
Otherwise, return with all registers preserved so that other modules can
have a go.
R l = & 0 8 Unknown OS_Word
Entry:
R2=OS_Word number
R3=parameter 1
Exit:
R1=0 to claim, otherwise preserve as entry
This is the same as the above but for OS_Word functions. Note that
OS_Word has just one parameter which is a pointer to a parameter block.
R l = & 0 9 *HELP
Entry:
R0=pointer to *HELP command
The normal way of dealing with * H E L P commands is through the
help/command decoding table offset at the start of the module. This call is
issued before *HELP decoding and should therefore only be claimed if you
wish to completely replace the *HELP command (which is most unlikely and
fairly rash).
AOS—I
129
Archimedes Operating System
R 1 = & 0 B Release FIQ vector
Immediately after the release of the FIQ vector (similar to N M I under B B C
M O S ) this call is issued to all other modules to advise them that the vector
may be claimed (see below). For more information refer to the chapter on
vectors (Chapter 20).
R 1 = & 0 C Claim FIQ vector
This call is used to advise modules that the vector is about to be claimed.
For more information refer to the chapter on vectors (Chapter 20).
R 1 = & 1 1 Memory Mapping Change
Entry:
R2=pointer to currently active module
Exit:
R 1 = 0 to claim, otherwise preserve as entry
The OS issues this call when it needs to reorganise the memory map of the
computer b y altering the tables in the memory controller M E M C . By taking
note of this call it is possible for your module to discover that it would be
affected by such a reorganisation, and indeed may prevent such a reorganisation by claiming the call. On entry, R2 contains a pointer which, if within
your module code, indicates that your module should claim the call.
R l = & 1 2 Start Up Filing System
Entry:
R2=filing system number
When the user types a filing system startup command (eg, * N E T or * A D F S )
this call is issued to warn filing systems that they should shut down. Unless
you are writing a filing system, which is outside the scope of this book, you
do not need to take any notice of this call, which must not be claimed.
R l = & 2 7 Machine Reset Warning
At the end of the machine reset sequence this call is issued to warn modules
that a reset has occurred. This call must not be claimed.
130
Writing Modules
R l = & 2 8 Unknown ^CONFIGURE Parameter
See R l = & 2 9 below.
R l = & 2 9 Unknown *STATUS Parameter
The above two reason codes are issued as requests to handle an unknown
option to either ""CONFIGURE or ^STATUS. These were present on the earlier
BBC and Master machines and are provided on the Archimedes for compatability. The OS provides a new system for handling configuration options
which is described in a subsequent section.
R1=&2A Application About to Start
This call is offered around the modules to warn them that a new application is about to start up and use the application space. No parameters are
passed on entry. A module can set R1=0 if it wants to prevent the new
application from starting up! This may be useful, for example, if the
application has data in it which is unsaved and would be destroyed by a
new application taking over the application space.
R l = & 4 0 Re-initialise Filing System
This call has no entry or exit parameters but signifies that the file manager
has just re-initialised. If a module contains a file system, then it should
respond to this call by adding its file system to those recognised by the
manager. This can be done using OS_FSControl, with an 'add file system'
reason code.
R l = & 4 2 Translate File Type
This call is issued when the file manager is trying to convert an
unrecognised file type number to a file type name. On entry, R2 contains
the unrecognised file type number. If a module recognises this then it
should return with the eight ASCII bytes of the file type name in R2 and R3.
For more details see the section on OS_FSControl.
R l = & 4 3 International Character Set Service
This call will be of interest to readers who are producing modules which
provide international character sets and/or new keyboard alphabets. More
details are contained in the PRM.
131
Archimedes Operating System
R l = & 4 4 Advise Connected Keyboard Type
This call is offered around the modules to inform them of the type of
keyboard which is in use on the machine. On entry R2=0 for the 'old style
keyboard'. R 2 = l for the A300-A400 machine keyboards. It may be of interest
to modules which contain custom designed keyboard handlers.
R l = & 4 5 Software Pre-reset
This call is issued to inform them that a software reset is about to occur.
This means that the break key has been pressed and the Operating System
is going to generate a reset. A software reset is distinct from a hardware
reset which is caused by the RESET button being pressed.
R l = & 4 6 Mode Change Warning
This call is to inform the modules that the Operating System has just
changed to a new screen mode. It may be useful if a module provides screen
related functions and needs to be aware of the properties of the current
screen m o d e . It could update itself on receipt of this call by reading the new
settings of the VDU variables.
Module Title String
Each module must have a title string to allow it to be identified by name
when issuing *RM commands or via OS_Module. This offset points to the
start of a zero-terminated string containing the module name, ideally
adopting the Acorn standard of capitalising the first letter of each word.
Spaces and control characters must be avoided.
Help String
This offset points to the zero-terminated string which will be displayed by
*HELP MODULES etc. Spaces and tab characters (which tab to the next eightcharacter column) are allowed, but no other control characters should be
included.
It is important to include a help string no matter how trivial the module.
And to keep the output of *HELP MODULES tidy it is diplomatic to follow the
Acorn standard, viz:
Module name <tab> v.vv (dd mm myyyy)
132
Writing Modules
That is, the module name should be followed by one or more tabs to make it
occupy 16 characters, the version number should be three decimal digits in
the form v.vv and the date the software was released, if included, should
be of the form 25 Feb 1965.
Help and Command Decoding Table
The help and command decoding table is the main mechanism that the OS
employs to interact with a module and thus decide whether a particular
command should be processed by that module. The table consists of a list of
records, each of which contains a keyword and the associated information
to allow that keyword to be processed - for example, the address of code
to execute, the number of parameters expected and so forth. The keyword
may be a command, a help subsection or (preferably) both.
By providing this table the module delegates the responsibility for decoding
unknown commands to the OS, thus ensuring that command processing is
consistent across all modules by preventing individual programmers from
taking on the work themselves.
Decoding Table Layout
The format of the decoding table records is shown below. A record must
appear for each keyword, whether it be a command or a help word.
ASCII keyword string, terminated by a zero byte
ALIGN to word boundary, before:
Code offset for this keyword
Parameter information word
Offset to invalid syntax string, terminated by zero
Offset to help text string, terminated by zero
Each record begins with the ASCII text string of the keyword terminated by
a zero. W e then align to a word boundary and insert the offset within the
module at which may be found the code to interpret the keyword. If the
keyword is for help only then we use a zero offset to indicate this. Next
comes a word of information about the parameters (described below) and
then an offset to a text message indicating that the user has employed an
inappropriate syntax for the command. Finally, a word is included which is
an offset to the string of help text to be generated when the keyword is
used as a parameter to *HELP, eg:
*HELP
ThisKeyword
133
Archimedes Operating System
Keywords should only include alphabetic characters to be safe from the OS
trying to decode them (believing them to be filenames or similar). The
decoding process is case-insensitive, but for display purposes it is most
elegant to continue the Acorn standard of capitalising the initial letters of
each word.
The code offset points to the routine which will be called when the
command is entered. If the offset contains zero the keyword can only be
used as a *HELP parameter (and therefore, issuing the keyword as a
command w i l l result in a 'Bad command' error unless the command is
recognised elsewhere). Otherwise, issuing the command '""KEYWORD' will
cause the code to be executed with R0 pointing to the rest of the command
line (stripped of leading spaces) and R l containing the number of
parameters discovered by OS_Cli (which uses spaces or double inverted
commas as delimiters).
The parameter information word i s divided up into its four constituent
bytes, each o f which has a different function:
Byte
0
1
2
3
Function
Minimum n u m b e r of p a r a m e t e r s a l l o w e d (0-255)
OS.GSTrans m a p (see below)
Maximum n u m b e r of p a r a m e t e r s a l l o w e d (0-255)
Flag byte
The m i n i m u m a n d m a x i m u m n u m b e r of p a r a m e t e r s fields a r e selfe x p l a n a t o r y : if t o o f e w o r t o o m a n y p a r a m e t e r s a r e s u p p l i e d b y the user
the OS will d i s p l a y the s y n t a x error m e s s a g e (pointed to b y the a p p r o p r i a t e
offset g i v e n a b o v e ) .
OS_GSTrans m a p c o m p r i s e s a bit for e a c h of t h e first e i g h t p a r a m e t e r s
w h i c h i n d i c a t e s w h e t h e r t h e OS s h o u l d p a s s the p a r a m e t e r t h r o u g h
OS_GSTrans b e f o r e p a s s i n g it o n t o the c o m m a n d execution s o f t w a r e . This
allows the b u r d e n of identifying a n d translation OS variables, for e x a m p l e ,
to b e p l a c e d o n t h e OS. When a bit is set the r e l e v a n t p a r a m e t e r will be
processed b y GSTrans before receipt by the routine.
The flag b y t e is currently defined to contain three bits (the t o p three) w h i c h
indicate s p e c i a l cases for c o m m a n d s . These are detailed b e l o w .
Bit 31
Setting this bit tells the OS that the command is specific to a particular filing
system. OS_Cli will only acknowledge such commands if they are part of
the current filing system and so different filing systems may support their
134
Writing Modules
own specific versions of the same command without fear of being called at
inappropriate times (ie, when they are not the current filing system).
Bit 30
When this bit is set the OS takes the keyword to be a parameter of the
""CONFIGURE and *STATUS command (and only executes it where relevant).
When the code is executed, R0 contains an indicator of the service required:
R0=0
The command was ""CONFIGURE with no parameters so print a
syntax string for the configuration commands the module
recognises and return through R14.
R0=1
The command was *STATUS <keyword> so print the current
configuration setting for the keyword and return through R14.
R0=<any other value>
For any other value the command was ^CONFIGURE <keyword>
and R0 points to the rest of the command line to allow the
parameters to be extracted. The parameters should be decoded
and the configuration bytes set as appropriate.
If the module detects a syntax error in the parameters it should return
through R14 with the Overflow flag ' V set and R0 containing a value indicating the type of error:
Value
0
1
2
3
>3
Type of error
Bad configuration option
Numeric parameter required
Parameter too large
Too many parameters
""CONFIGURE returns error code
Bit 29
Setting this bit indicates that the ""HELP offset points to a piece of code
instead of a text string. This allows ""HELP information to vary (as it does,
for example, under the ANFS when advising the user of their Econet station
number). The code is entered with R0 pointing to a buffer area to use and
Rl containing its size. The call is made with R2 containing either zero or a
pointer to the remainder of the help string to be printed.
The invalid syntax string is printed by the OS whenever the parameters
supplied by the user are outside the bounds specified in the minimum and
maximum 'number of parameters' fields.
135
Archimedes Operating System
The help text string offset in the module header points to the text which
will be p r i n t e d if the keyword it refers to is appended after a * H E L P
command. T h e string is OS_PrettyPrinted, allowing tabs and hard spaces to
be freely used within it to ensure tidy formatting on the screen.
SWI Chunk Base Number
The SWI chunk base number is the first of the optional SWI handling fields of
the module header. It identifies the chunk of SWis supported by the module,
a chunk being defined to be 64 SWis in total.
The OS uses this information to determine which module supports the
unknown SWI which has been issued. If its number is in the range:
base to base+63
then this should be the module which deals with this SWI and the OS enters
the appropriate piece of code through the next offset.
SWI Handling Code Offset
This is where the code to deal with SWis is pointed to. It is up to the author
of the module to ensure that the appropriate action is taken on receipt of
the unknown SWI number.
On entry to the code, the ARM registers hold important information. R l l
contains the SWI number within the given module (between 0 and 63), R12
points to the private word and R13 to the supervisor stack. The code is
entered with interrupts disabled and they should be re-enabled if processing is going to take more than 20 microseconds (although the code must be
able to cope with interrupts if you do re-enable them). To enable interrupts,
use the following instructions:
MOV Rn, R14
TEQP Rn, #1<27
;The IRQ bit
is bit
27
The code should return from the entry point through R14 in the usual way,
setting any relevant flags (eg, Overflow V for errors) before doing so.
/
/
Note that the module does not have to deal with the 'X' prefix for SWis,
which allows optional error generation, since returning with ' V set will
cause the OS to generate the error automatically.
136
Writing Modules
SWI Decoding Table
This offset points to a table to allow the translation of SWI names into
numbers and vice versa (but see the note below). The format of the table is:
SWI group prefix (eg, Wimp )
Name of Oth SWI
Name of 1st swi
/
/
Name of nth SWI
Zero to indicate end of list
where each of the text strings (the group prefix and the SWI names) is
terminated by zero. The idea is that as many SWis as possible should have
their names included here so that the OS can deal with them itself. If the OS
is trying to deal with a name which does not appear in this table or whose
SWI number is greater than that of the last entry in this list, it calls the SWI
decode code (below).
SWI Decode Code
On entry R0 indicates the required function and the remaining parameters
are as follows:
If R0<0 then the OS wants to convert a text string (pointed to b y R l ) into a
number. Return through R14 with R0 set to the SWI number in the range 0
to 63 or, if the SWI was unrecognised, return with R0<0.
If R 0 > = 0 then the OS wants to convert the number in R0 into a text string.
It supplies a pointer to its string processing buffer in R l , and R2 supplies
the offset in that buffer at which it actually wants the string to be placed.
The limit of the size of the buffer is in R3. The module is therefore expected
to look up the string in its SWI decode table and place the string in the
buffer (starting at R1+R2). R2 should be increased by the length of the
string. Note that the zero terminator is added by the OS, so it does not need
to be copied into the buffer.
A Note About SWI Translations
To summarise the effect of the two entry points above:
First, the SWI decoding table is used first by the OS to discern whether a
particular SWI string can be recognised. If it does not appear in the table
137
Archimedes Operating System
(ie, its SWI number is greater than the last in the table) it calls the SWI
decode code.
Secondly, t h e SWI decode code allows an application-specific mechanism
for performing the translation to be implemented. It is up to you to get this
right if you use it!
In general, it is better to use the SWI decode table fully and put zero in the
SWI decode code offset so that it is not called. This keeps the behaviour of
the OS consistent and reduces the chances of error, although it is a little less
flexible.
OS_Module (SWI &1E)
The OS_Module SWI is the low-level call which performs the operations
provided b y the *RM series of OS commands. It also deals with other
functions vital to the operation of the module system: for example, the
claiming a n d releasing of RMA space.
OS_Module takes a reason code in R0 to activate each particular function,
other parameters being specific to the individual function. Usually the OS
will prevent you from applying this call to modules which it thinks are
currently active - thus you may not 'kill' BASIC by calling that OS.Module
function f r o m BASIC itself.
When a filename is required (for example, to load or run a module) the file
must have the correct type (&FFA) and respond to initialisation calls when
loaded. W h e r e the parameters refer to a module by name, the n a m e is
taken to be a string of upper or lower case characters which is terminated
by a character with an ASCII code of less than 33. As ever, the Overflow
flag V will be set if an error occurs and R0 will point to an error block in
the usual w a y . The exact cause of such an error is specific to each individual reason code.
/
/
R 0 = 0 Run Module
This call is equivalent to *RMRUN, with R0 pointing to a module filename
on entry. If the call succeeds it will not return.
R 0 = 1 Load Module
This call is equivalent to *RMLOAD. On entry, R0 must point to a filename
string. Space is allocated in the RMA and the module is loaded.
138
Writing Modules
If a module of the same name already exists it will be overwritten. The
Overflow flag 'V' will be set if an error occurs.
R 0 = 2 Enter Module
This call is equivalent to *RMENTER Module, and allows a module to be
made the current application. On entry, R l must point to the module name
string and R2 to the parameters to be passed on to the module. If the call is
successful then User Mode is entered and the module started up.
R 0 = 3 Re-initialise Module
This call is equivalent to *RMREINIT Module, resetting the module without
having to reload it. On entry R l must point to the module name string.
R 0 = 4 Delete Module
This call attempts to remove the module and de-allocate any space the
module may have claimed. On entry, Rl must point to the module name
string.
R 0 = 5 Get RMA Space
This call is passed on to the Heap Manager to get information about the
RMA. It takes no entry parameters but returns, in R2, the size of the largest
free space in the RMA and, in R3, the total free space.
R 0 = 6 Claim RMA Space
This call allows the module to claim space in the RMA to use as workspace
- performed by the Heap Manager. On entry, R3 should contain the size of
the space you want and the call will return with R2 pointing to the start of
the allocated space. If the space could not be allocated the Overflow flag
V will be set.
R 0 = 7 Release RMA Space
This call has the reverse effect of the above, releasing space from the RMA
heap by calling the Heap Manager. On entry, R2 should point to the block
to release.
139
Archimedes Operating System
R 0 = 8 Tidy RMA Space
This call polls each installed module and offers it a non-fatal finalisation
call, allowing modules to de-allocate their space if they are able to do so. It
then compacts the RMA space and reinitialises each module. Errors will be
generated if any of the modules refuse to be finalised or reinitialised.
R 0 = 9 Clear RMA Space
This call deletes each module in turn by calling them through their finalisation entry point. Errors will be generated if any of the modules refuses to be
finalised.
R 0 = 1 0 Create Module by Linking
It may sometimes be useful, especially during testing, to be able to install a
module into the system which is not physically in the RMA space. This call
allows the user to link a module, held anywhere in memory, into those
already contained in the RMA. On entry Rl points to the address in memory
at which the new module starts. O n exit the module is an integral part of
the system and behaves exactly the same as a RMA resident module. In
future versions of the Operating System, it is probable that it will be
required f o r the word immediately before the module to contain the
module's length.
R 0 = 1 1 Create Module by Copying
This call again installs a module which is not in the RMA. However, instead
of linking the module into the system at its present address, it first copies it
into the RMA space. The module is then initialised as if it had be loaded into
the RMA from disc. The call is often useful when developing a module to
copy a module, assembled into the application space, to the R M A for
testing. On entry to the call, R l points to the start address of the module
and R2 must contain its length.
R 0 = 1 2 Get Module Information
This call returns information about a given module. The information is that
displayed b y the command ^MODULES, ie, the module's base address and the
address of the start of its workspace in the RMA.
On entry R l should contain '0' on the first call. It will then return the
address of the first module in R l and the address of its private word of
workspace in R2. Subsequent calls to the routine, with R l unchanged, will
140
Writing Modules
r e t u r n t h e s a m e information o n the s e c o n d m o d u l e , a n d then t h e third, and
so o n . When the last m o d u l e is r e a c h e d , R l will b e returned containing
R 0 = 1 3 Extend RMA Block
This call allows a block of RMA w o r k s p a c e to b e e x t e n d e d in size. The block
will h a v e been previously claimed b y using OS_Module with R 0 = 6 . On entry
to the r o u t i n e , R2 points to the block of w o r k s p a c e (as r e t u r n e d w h e n block
w a s c l a i m e d ) . R 3 = a m o u n t to c h a n g e the size of the RMA block b y . On exit
R2 p o i n t s to the start address o f the e x t e n d e d block. This m a y n o t b e at the
s a m e a d d r e s s as the original block.
Printer Buffer Module
There f o l l o w s a printer buffer m o d u l e (listing 11.1) w h i c h will allow a
v a r i a b l e size buffer to be u s e d for b a c k g r o u n d p r i n t i n g , ( f o r e x a m p l e ,
whilst s o m e t h i n g else is going o n ) .
10
20
30
40
50
60
70
80
90
100
110
120
130
140
150
160
170
180
190
200
210
220
230
240
250
260
270
280
290
300
310
R E M >Listll/l
R E M b y Nicholas v a n Someren
R E M A r c h i m e d e s OS : A Dabhand G u i d e
R E M (c) Copyright A v S and NvS 198 8
:
D I M c o d e % 4000
F O R p a s s % = 4 TO 7 STEP 3
R E M A s s e m b l e for b a s e address of zero, so all a b s o l u t e
R E M a d d r e s s e s are relative a d d r e s s e s from s t a r t .
P%=0 :0%=code%
[OPT p a s s %
/Module cannot be r u n
EQUD 0
EQUD initialise
EQUD finalise
EQUD service
EQUD title
EQUD helpstring
EQUD helptable
;SWI c h u n k
EQUD 0
;SWI h a n d l e r
EQUD 0
EQUD 0
;SWI t a b l e
EQUD 0
;SWI c o d e
:
.title
EQUS "PrinterBuffer"
EQUB 0
ALIGN
/Module title
string
/Module help string
.helpstring
EQUS "Printer B u f f e r " + C H R $ 9 + 1 . 0 0 (04 Dec 1 9 8 7 ) "
EQUB 0
M
141
Archimedes Operating System
320 A L I G N
330
.helptable
340
;The first command
350 E Q U S "Buffer"
360 E Q U B 0
370 A L I G N
/Address of code
380 E Q U D b u f c o m m a n d
;Flags
390 E Q U D &00010001
/Syntax string
400 E Q U D syntax
/Help string
410 E Q U D b u f h e l p
:
420
/The second command
430 E Q U S " B u f f e r S i z e "
440 E Q U B 0
450 A L I G N
/Address of code
460 E Q U D s i z e c o m m a n d
/Flags
470 E Q U D &00010100
/Syntax string
480 E Q U D s i z e s y n t a x
/Help string
490 E Q U D s i z e h e l p
:
500
/End of command table
510 E Q U D 0
:
520
/Help for *Buffer
.bufhelp
530
540 E Q U S "*Buffer t u r n s the extra printer b u f f e r on and o f f . "
550 E Q U B 13
560 E Q U B 10
/Syntax for *Buffer
.syntax
570
580 E Q U S "Syntax: *Buffer <ON 0FF>"
590 E Q U B 0
600
/Help for *BufferSize
610
.sizehelp
620 E Q U S " * B u f f e r S i z e without a parameter gives the size o f the
print buffer."
extra
630 E Q U B 13
640 E Q U S "With one p a r a m e t e r . the value is taken as the n e w
buffer s i z e . "
650 E Q U B 13
.sizesyntax
/Syntax for *BufferSize
660
670 E Q U S "Syntax: *BufferSize [<size>]"
680 E Q U B 0
690 A L I G N
:
700
710
.bufcommand
/Code for *Buffer
720 L D R R 1 2 , [R12]
/Get private workspace addr
730 L D R B R 2 , [R0] , #1
/Load first letter after c o m m a n d
740 O R R R 2 , R 2 , #&20
/Force lower case
750 CMP R 2 , #ASC"o"
/See if it is an 'o'
760 B N E b a d o n o f f
/If not, w o r d is not On or O f f
770 L D R B R 2 , [R0], #1
/Get next letter
780 O R R R 2 , R 2 , #&20
/Force lower case
/Is the next letter an 'n'?
790 CMP R 2 , #ASC"n"
/If so, do buffer 'setup' routine
800 B E Q s e t u p
/Is the letter an ' f ?
810 CMP R 2 , #ASC"f"
820 B N E b a d o n o f f
/If not, not On or Off
142
Writing Modules
830
840
850
860
870
880
890
900
910
920
930
940
950
960
970
980
990
1000
1010
1020
1030
1040
1050
1060
1070
1080
1090
1100
1110
1120
1130
1140
1150
1160
1170
1180
1190
1200
1210
1220
1230
1240
1250
1260
1270
1280
1290
1300
1310
1320
1330
1340
1350
L D R B R 2 , [R0],#1
ORR R2,R2,#&20
CMP R 2 , # A S C " f "
BEQ setdown
;Try the next letter
;in lower case
/Is it an ' f ?
/If it i s , do b u f f e r
.badonoff
ADR R0,bufneedonoff
ORR R14,R14, # 1 « 2 8
M O V S PC,R14
/Cause an error
/Point R0 to error b l o c k
/Set overflow flag for error
/Return with flag set
/The error block for
.bufneedonoff
E Q U D &00123456
E Q U S "*Buffer n e e d s O N or OFF after it.
EQUB 0
ALIGN
.sizecommand
S T M F D R 1 3 ! ,{R14}
MOV R11,R12
L D R R 1 2 , [R12]
CMP R 1 , # 0
BEQ tellsize
L D R R 2 , areweon
CMP R 2 , # 0
BNE changewhileon
MOV R1,R0
MOV R0,#10
SWI " O S _ R e a d U n s i g n e d "
ADD R9,R2,#17
LDR R10,[R12,#4]
SUB R 3 , R 9 , R 1 0
MOV R2,R12
MOV R0,#13
SWI "OS M o d u l e "
1
setdown'
On/Off
/Code for the * B u f f e r S i z e c o m m a n d
/Stack the return a d d r e s s
/Keepcopy of p r i v a t e w o r d addr
/Load p o i n t e r from p r i v a t e w o r d
/Were t h e r e zero p a r a m e t e r s ?
/If so, just print out t h e size
/If n o t , see if t h e b u f f e r is o n
/Is the buffer 'off» ?
/If n o t , give an e r r o r
/Rl p o i n t s to the c o m m a n d tail
/Convert string t o d e c i m a l v a l u e
/Add 17 t o the r e q u i r e d size
/Find old size of w o r k s p a c e
/Find t h e d i f f e r e n c e
;R2 p o i n t to w o r k s p a c e
/Extend by signed a m o u n t
/NOTE - A r t h u r 1.20 h a s a b u g in this code
/and does not set the V flag when an error o c c u r s
/but does p o i n t to t h e error block with R 0 .
CMP R 0 , # 1 3
BNE osmodulesbug
STR R 2 , [Rll]
STR R 9 , [R2, #4]
MOV R3,#&10
STR R 3 , [R2]
STR R 3 , [R2, #8]
S T R R 3 , [R2, #12]
L D M F D R13!,{PC}
/Test if R0 has c h a n g e d
/If it h a s , the b u g h a s shown
/Store the new w o r k s p a c e a d d r e s s
/in t h e private w o r d
/Store n e w w o r k s p a c e e n d p o i n t e r
/Load t h e start of b u f f e r p o i n t e r
/and store at 'Start o f b u f f e r
/'Write in' p o i n t e r
/and 'Read out' p o i n t e r
/Return
/User h a s asked for b u f f e r
.tellsize
SWI " O S _ W r i t e S "
E Q U S "The extra p r i n t e r b u f f e r is
1
size
143
Archimedes Operating System
1360 E Q U B 0
1370 A L I G N
/Get the size of w o r k s p a c e
1380 L D R R0, [R12, #4]
/Subtract 17 byte o v e r h e a d
1390 S U B R 0 , R 0 , # 1 7
/Point Rl t o a string b u f f e r
1400 A D R R l , n u m b u f f e r
;(which is 11 b y t e s long)
1410 M O V R 2 , # l l
1420 S W I " O S _ C o n v e r t C a r d i n a l 4 " /Convert size to a string
/Display size
1430 S W I " O S _ W r i t e 0 "
1440 S W I " O S _ W r i t e S "
1450 E Q U S " bytes long."
1460 E Q U B 13
1470 E Q U B 10
1480 E Q U B 0
1490 A L I G N
/Return
1500 L D M F D R 1 3 ! , {PC}
1510
/Get around b u g
1520
. osmodulesbug
/Load up return a d d r e s s
1530 L D M F D R 1 3 ! , {R14}
/Set O v e r f l o w flag
1540 O R R R 1 4 , R 1 4 , # 1 « 2 8
/Return w i t h V set
1550 M O V S PC,R14
1560
1570
/Say you can't change size
. c h a n g e w h i leon
1580 L D M F D R 1 3 ! , {R14}
/Get return address
1590 A D R R 0 , c h a n g e t e x t
/Point t o error b l o c k
1600 O R R R 1 4 , R 1 4 , # 1 « 2 8
/Set V flag
1610 M O V S PC,R14
/Return
1620
1630
/An error block
.changetext
1640 E Q U D &00123457
1650 E Q U S "Can't c h a n g e the b u f f e r size w h e n the b u f f e r is o n .
1660 E Q U B 0
1670 A L I G N
1680
1690
Number/string conversion space
. n u m b u f fer
1700 E Q U D 0
1710 E Q U D 0
1720 E Q U D 0
1730
1740
M o d u l e initialisation code
.initialise
1750 S T M F D R13!,{R14}
P u s h return address
1760 M O V R 1 , R 1 2
Keep a copy of p r i v a t e w o r d a d d r
1770 LDR R 1 2 , [R12]
Load pointer to w o r k s p a c e
1780 CMP R 1 2 , # 0
Check if buffer is already
1790 L D M N E F D R 1 3 ! , {PC}
installed and if so, r e t u r n .
1800 M O V R 0 , # 6
R0=6 m e a n s 'claim s p a c e '
1810 M O V R 3 , I&4000
The default size is &4000 b y t e s
1820 SWI " O S _ M o d u l e
Claim some space
1830 STR R 2 , [Rl]
Store p o i n t e r in w o r k s p a c e
1840 M O V R 1 2 , R 2
Make R12 point to w o r k s p a c e
1850 STR R 3 , [R12, #4]
Store size as the end p o i n t e r
1860 M O V R 3 , # & 1 0
Load pointer to b e g i n n i n g
1870 STR R 3 , [R12]
Store as the b e g i n n i n g of b u f f e r
1880 STR R 3 , [ R 1 2 , # 8 ]
the 'write in' p o i n t
M
144
Writing Modules
1890
1900
1910
1920
1930
1940
1950
1960
1970
1980
1990
2000
2010
2020
2030
2040
2050
2060
2070
2080
2090
2100
2110
2120
2130
2140
2150
2160
2170
2180
2190
2200
2210
2220
2230
2240
2250
2260
2270
2280
2290
2300
2310
2320
2330
2340
2350
2360
2370
2380
2390
2400
2410
STR R3, [R12,#12]
L D M F D R 1 3 ! , {PC}
; and the
/Return
1
read out' p o i n t
:
.finalise
STMFD R13!,{R14}
L D R R12,[R12]
BL setdown
CMP R10,#0
M O V R0,#7
M O V R2,R12
SWINE "OS M o d u l e "
LDMFD R 1 3 ! , {PC}
/Module finalisation code
/Stack return address
/Get pointer to w o r k s p a c e
/Turn buffer off
/See if it is a fatal s h u t d o w n
/Prepare to release space
/Release space if fatal
/Return
shutdown
:
.service
CMP Rl, #&27
M O V N E PC,R14
STMFD R13!, {R0}
M O V R0, #0
STR R 0 , areweon
LDMFD R13!,{R0}
M O V PC,R14
/Module service code
/Look for post-reset s e r v i c e
/If not, return
/Buffer is ' o f f after reset
/Preserve
/Return
registers
:
.areweon
EQUD 0
/'Is the buffer o n ?
1
flag
:
;+0 is start of b u f f e r from 0
;+4 is end of b u f f e r from 0
;+8 is the point for insertion
/+12 is the point for removal
:
.nextval
L D R R5, [R12, #4]
A D D R4,R4,#1
CMP R4,R5
LDREQ R 4 , [R12]
M O V S PC,R14
/Increment R4 w i t h w r a p around
/Find the end of the b u f f e r
/Increment R4
/See if R4 points off the end
/If so, load up start p o i n t
/Return, returning all flags
:
.isempty
LDR R 4 , [R12, #8]
L D R R5, [R12, #12]
CMP R4,R5
M O V PC,R14
/Test if buffer is empty
/Look at 'write in' point
/ and 'read out' point
/and compare them
/Return
:
.isfull
STMFD R13!,{R14}
L D R R 4 , [R12, #8]
BL nextval
L D R R5, [R12, #12]
CMP R4,R5
LDMFD R13!,{PC}
/Test if buffer is full
/Stack return address
/Get insertion address
/What w i l l it b e after next ?
/Look at removal address
/Will insertion catch up?
/Return
:
.topush
STMFD R13!,{R14}
/Push a b y t e into b u f f e r
/Stack return address
Archimedes Operating System
2420
2430
2440
2450
2460
2470
2480
2490
2500
2510
2520
2530
2540
2550
2560
2570
2580
2590
2600
2610
2620
2630
2640
2650
2660
2670
2680
2690
2700
2710
2720
2730
2740
2750
2760
2770
2780
2790
2800
2810
2820
2830
2840
2850
2860
2870
2880
2890
2900
2910
2920
2930
2940
146
BL isfull
L D M E Q F D R13!,{R14}
ORREQS PC,R14,#1«29
L D R R 4 , [R12,#8]
S T R B R0, [R12,R4]
BL n e x t v a l
S T R R 4 , [R12, #8]
L D M F D R13!, {R14}
BICS PC,R14,#1«29
:
.topull
S T M F D R13!, {R14}
BL isempty
L D M E Q F D R13!,{R14}
ORREQS PC,R14,#1«29
L D R R 4 , [R12,#12]
L D R B R0, [R12,R4]
M O V R2,R0
TST R 6 , # l « 2 8
B L E Q nextval
S T R R 4 , [R12,#12J
L D M F D R13!, {R14}
BICS PC,R14,#1«29
:
.toaltflush
STMFD R13!,{R0,Rl,R2,R14}
MOV R0,#&81
MOV R1,#&FD
M O V R 2 , #&FF
SWI "OS_Byte"
CMP R 1 , # & F F
LDMFD R13!,{R0,Rl,R2,R14}
M O V N E PC,R14
L D R R 4 , [R12]
S T R R 4 , [R12,#8]
STR R 4 , [R12, #12]
MOV PC,R14
:
.tocountpurge
TST R 6 , # l « 2 8
BNE toaltflush
S T M F D R13!, {R14 }
T S T P R6,R6
L D R C S R4, [R12, #8]
B L C S nextval
L D R C S R5, [R12, #12]
L D R C C R5, [R12, #8]
L D R C C R4,[R12,#12]
S U B S R1,R5,R4
BHI p o s s p a c e
LDR R 4 , [R12]
LDR R 5 , [R12, #4]
ADD R1,R1,R5
;See if b u f f e r is full
;If it is, get the return a d d r e s s
;and return with C set
;Otherwise, load i n s e r t i o n a d d r
/Store the b y t e
/Increment the 'write in* p o i n t e r
/Store p o i n t e r back
/Load return address
/Return, ensuring C is c l e a r
/Pull a byte from b u f f e r
/Stack return address
/See if b u f f e r empty
/If it is, load the return a d d r
/Return with C set
/Otherwise, load the r e m o v a l addr
/Load next byte into R0
/Duplicate it into R2
/Check for examine only
/If not, increment r e m o v a l a d d r
/and write it back
/Load return address
/Return with C clear
/Flush b u f f e r if Alt is p r e s s e d
/Push enough regs to do O S _ B y t e
/Call OS_Byte &81, check for A l t ,
/(that is, check for I N K E Y ( - 3 ) )
/Was Alt pressed?
/Pull back registers a n y w a y
/Return if Alt not p r e s s e d
/The start of the b u f f e r
/becomes the insertion a d d r e s s
/and the removal address
/Return
/Perform count and p u r g e
/Look at the V flag
/If set, try to flush b u f f e r
/Otherwise, stack the r e t u r n addr
/Set flags as they are in R6
/If carry set, R4 is insert p o i n t
/which is then incremented
/and R5 is remove point
/If carry clear, R 4 = r e m o v e p o i n t
/and R5 is insert point
/Take the diference
/If diference positive, it's OK
/Otherwise, get the b u f f e r start
/and the end of the b u f f e r
/Add in one
Writing Modules
2950
2960
2970
2980
2990
3000
3010
3020
3030
3040
3050
3060
3070
3080
3090
3100
3110
3120
3130
3140
3150
3160
317 0
3180
3190
3200
3210
3220
3230
3240
3250
3260
3270
3280
3290
3300
3310
3320
3330
334 0
3350
3360
3370
3380
3390
3400
3410
3420
3430
3440
3450
3460
3470
SUB R1,R1,R4
.posspace
M O V R 2 , R 1 , L S R #8
L D M F D R13!,{PC}
:
.myinsv
CMP Rl,#3
M O V N E S PC,R14
STMFD R13!, {R0,R1,R4, R5}
BL topush
L D M F D R13!, {R0,Rl,R4,R5, PC
:
.myremv
STMFD R13!, {R6}
M O V R6,PC
CMP Rl,#3
LDMNEFD R 1 3 ! , { R 6 }
MOVNES PC,R14
STMFD R13!, {Rl,R4,R5}
BL topull
L D M F D R 1 3 ! , { R l , R 4 , R 5 , R6, PC
:
.mycnpv
STMFD R13!,{R6}
M O V R6,PC
CMP Rl,#3
LDMNEFD R13!,{R6}
M O V N E S PC,R14
S T M F D R13!,{R4,R5}
BL t o c o u n t p u r g e
LDMFD R13!,{R4,R5,R6,PC}
:
.setup
STMFD R13!,{R14}
L D R R0, areweon
CMP R0,#0
LDMNEFD R13!,{PC}
MVN R0,#0
STR R0, areweon
M O V R2,R12
L D R R0, [R12]
S T R R0, [R12, #8]
S T R R0, [R12, #12]
M O V R0,#&14
A D R Rl, myinsv
SWI "OS_Claim"
M O V R0,#&15
A D R Rl, myremv
SWI "OS_Claim"
MOV R0,#&16
A D R Rl, mycnpv
SWI "OS_Claim"
L D M F D R13!,{PC}
;and t a k e out the other
;The v a l u e in Rl is now p o s i t i v e
/Put t h e top 3 b y t e s into R2
;Return
;Entry in the insert v e c t o r
/Check for printer b u f f e r
;If not, return
/Push some registers
/Do the push
/Return with r e g i s t e r s
list
/Entry in remove vector list
/Stack R 6
/and p u t a copy of the P C in it
/Check for printer b u f f e r
/Restore R6 if not p r i n t e r b u f f e r
/Return if not printer b u f f e r
/Stack u p some registers
/Do t h e pull
/Return with all r e g i s t e r s
/Entry in count/purge v e c t o r list
/Preserve R6
/Take a copy of PC
/Test for printer b u f f e r
/Restore R6 if not p r i n t e r b u f f e r
/Return if not printer b u f f e r
/Stack more registers
/Do t h e count or p u r g e
/Return with all r e g i s t e r s
/Routine to install b u f f e r
/Stack return address
/Load t h e flag
/Compare with zero
/If not, already i n s t a l l e d
/Otherwise, set t h e flag
/and store it.
;R12 w a n t e d on entry t o v e c t o r
/Empty buffer
/Buffer insert vector
/Use address of n e w r o u t i n e
/and claim vector
/Buffer remove vector
/Buffer count/purge
vector
/Return
147
Archimedes Operating System
3480
34 90
3500
3510
3520
3530
3540
3550
3560
3570
3580
3590
3600
3610
3620
3630
3640
3650
3660
3670
3680
3690
3700
3710
:
/Routine to shut down b u f f e r
.setdown
/Stack return address
S T M F D R13!, {R14}
/Load on/off flag
L D R R0, areweon
/Test if b u f f e r is on
CMP R 0 , # 0
/Don't turn off if off
L D M E Q F D R13!,{PC}
/Set flag as being off
M O V R0,#0
/Save the flag
S T R R 0 , areweon
/Need installation v a l u e of R 2
MOV R2,R12
/Buffer insert vector
M O V R0,#&14
/Extra entry
ADR Rl,myinsv
/Release
SWI " O S _ R e l e a s e "
/Buffer remove vector
MOV R0,#&15
A D R Rl,myremv
SWI " O S _ R e l e a s e "
;Buffer count/purge v e c t o r
MOV R0,#&16
ADR Rl,mycnpv
SWI " O S _ R e l e a s e "
/Return
L D M F D R13!, {PC}
] :NEXT pass%
STR$~code%+"+"+STR$~P%
OSCLI"SAVE BufMod
O S C L I " S E T T Y P E B U F M O D FFA"
P R I N T " P r i n t e r b u f f e r m o d u l e saved as 'BufMod''
END
Listing 11.1. Printer Buffer Module.
148
12: Writing Applications
The Operating System provides support for two essentially different types
of software: applications and utilities. Typically an application will be a
major self-contained program like a word processor or a game. Such a
program would run in the A R M ' S User Mode to maximise protection
against bugs. A utility would usually b e an extension to the operating
system and therefore run in A R M ' S Supervisor Mode, with all the control
(and lack of security) which this affords.
Mechanisms are built in to provide for and formalise the execution of both
applications and utilities. There are several reasons for the Operating
System wanting to keep track of which is the current application and
where in memory it is, mainly to do with the protection of system
workspace and workspace for other programs. As a result, in order to start
an application the user must tell the Operating System through one of the
prescribed channels.
Starting Applications
One way to start an application is to enter the *GO command at the
Supervisor command line or thiough the OS_CLi SWI. The *GO command
takes at least one parameter, the first parameter being the memory
address of the machine-code that needs to be executed as an application.
The rest of the parameters in the command are passed on to the
application for its specific use.
The other way to start an application from the command line is to use the
* R U N command on a file. When a machine code file is run which has no file
type set, it is run as an application in a manner equivalent to *LOADing the
file at the load address and then issuing a *GO to the execution address. An
example of an application started in this way is the TWIN text editor used
to write this book.
Applications have a certain number of privileges, notably the right to use
the lion's share of the RAM in the machine. Application memory is deemed
to start at &8000 and extend up to limits defined by the other applications
in use (if any). In order to find out what resources are at its disposal the
149
Archimedes Operating System
application m a y issue a number of SWis. The most important of these and
the one that all applications will need to use is OS_GetEnv.
OS_GetEnv(SWI &10)
This SWI returns a number of important pieces of information about the
'environment' in which an application is running. It takes no parameters
but returns three pointers in R0, R l and R2.
R0 points to the text of the command line used to start the application
running. T h i s string will have been modified by aliases, by parameter
substitution and, if *GO was used to start the application, the address after
*GO will h a v e been removed. Thus the string will always be a command
followed b y a parameter list for the application. Applications which can
take a parameter such as a file name (eg, text editors) may therefore
examine this string for filenames etc.
R l points t o the first byte of memory that is not available to the
application, ie, if R l contains &60000 then the application may use the
memory f r o m &8000, the start of application RAM, to &5FFFF but may not
use the bytes from &60000 upwards. If the application is going to run for
more than a few instants, or if it is going to build a long stack, it should set
R13 (the usual stack pointer) to this value so that the stack will extend
downwards into the application space from the top.
R2 points to a five byte area containing the absolute time at which the
application was started. This is in the standard format of the number of
centiseconds since the start of this century and can be converted to a
displayable string using the swi OS_ConvertStandardDateAndTime.
Alternative Ways of Starting Applications
There are two further ways in which a piece of machine code can be started
as an application. Firstly, machine code intended to be run at &8000 can be
given file type of &FF8 (Absolute) using *SETTYPE and the the file can be
*RUN. Alternatively the code may be in a module, as BASIC V is, and be
executed w h e n that module is started. To demonstrate the use of
OS_GetEnv in this situation enter the following few lines at the BASIC
prompt:
SYS "0S_GetEnv" TO A % , B %
SYS "OS_WriteO",A%
PRINT ~B%,~HIMEM
150
Writing Applications
The BASIC module is the current application so you can see the string that
started BASIC running and the workspace limit, along with BASIC'S pseudovariable HIMEM which defines the upper limit of memory for BASIC.
In order to allow a module to start up as an application, it must respond to
a "Command defined in its command table which activates the module as
an application by using OS_Module with R0=2. Some example code to do
this can be seen in the Shell module listed below.
Temporarily Running Another Application
A particularly useful thing to be able to do from inside an application is to
temporarily run another application. If, for example, you are working
within a text editor and you need to perform some quick calculation, it
would be a pity if you had to save your work and exit completely. Another
example is wishing to use the *COPY command in its 'quick' mode where it
behaves as if it were an application. Note that, being able to do this is not
multi-tasking since only one application is running at a time, but it is a
major timesaver nevertheless. In order for applications to be nested in this
way we need to be able to exit from them just as neatly as we enter them,
preserving important workspace and so forth as we go.
All the methods of starting applications examined above are effectively
'permanent', ie, once an application is running it is the only one that the
Operating System takes care of. To leave that application an OS_Exit SWI
should b e issued, returning control back to an Operating System handler
routine designed for this purpose. By default this handler returns control to
the Supervisor (with its '*' prompt). However, an application started previously can set the address to which control will be returned by the exit
handler using the SWI OS_ChangeEnvironment This allows control to be
returned to it later, providing the basis for a system of nested application
calls.
To change the OS_Exit handler return address R0 should contain 11 and SWI
OS_ChangeEnvironment should be called. On return R l will contain the
new return address. On return from this SWI R l will contain the old return
address which should be stored safely for use when OS_Exiting from your
application, so that a string of applications may be nested.
Top Down Applications
If one simply sets the return address to some location within the current
application before exiting, there is a good chance that the new application
will blindly trample over all of the available workspace, unaware that
151
Archimedes Operating System
other applications may wish to preserve it. This is, of course, the situation
where just o n e application is in use at a time, but is insufficient to provide
for nested applications. Instead, an application which is designed t o u s e
workspace from the top down can protect itself from other applications by
lowering t h e upper workspace limit which will be returned to other
applications, thus rendering itself 'invisible'.
OS_ChangeEnvironment provides a call for this purpose: when entered
with R0=0 it will set the apparent top of workspace to the value in R l . By
writing an application in such a w a y that it steals workspace from t h e top
of memory and sets the new workspace limit to just below the lowest
location, it uses other applications which will not conflict.
An example of this approach is detailed later in the "Shell" module. When
this module is entered as an application it examines the upper workspace
limit and reduces it by 256 bytes. It then saves the previous values of the
environment parameters and goes about its business of repeatedly reading
lines entered at the keyboard into a buffer and passing them t o t h e
command line interpreter. It continues to do this until a blank line is
entered, a t which point it restores the old environment parameters a n d
exits. Some care needs to be taken, since on returning with OS_Exit t h e
contents of registers are undefined.
Although the Shell module is only a demonstration, not too useful in itself,
it is a fully-fledged application. Y o u might like to use it as a template for
producing your own top down applications.
The TWIN Text Editor
Acorn's TWIN editor uses the top down approach in an interesting (if a little
naughty) manner, TWIN is designed to be loaded somewhere in the middle
of the application workspace; the memory above the program code is used
to store the text being edited. The memory below the start of the program
is made available to other applications that can be started from the
command line (eg, * C O P Y ) . TWIN is not altogether satisfactory in this
respect as the position at which it is loaded is fixed (by its default load
address) a n d can only be altered by means of system calls or a special
utility. A m u c h better solution to the problem, and one used by the Shell
program, is to have the program code resident in a module (and thus
always accessible) and, when the program is started as an application, to
take workspace from the top of the available RAM as discussed above.
When other applications are started from the command line they may use
workspace u p to the new limit and this process may be repeated until no
more workspace is available.
152
Writing Applications
An alternative way of allocating workspace would be to allow applications
to claim workspace from within the RMA. This has the virtue that the size
of the workspace may be dynamic, because the Operating System allows
the memory in the workspace to be consumed and replaced at will using
memory management routines; these are discussed in the next section.
Memory Management
All applications require memory of one form or another in which to
operate. When programming in BASIC it is not necessary to concern oneself
with issues of memory management because the BASIC interpreter does the
work for you. However, if you intend to write stand-alone applications of
your own, particularly in assembler, it is important to be aware of the
facilities provided for managing memory. These issues are made all the
more important when more than one application is running under a multitasking o s such as RISC o s
A number of routines are provided to allow applications to do their own
memory management. They are all based on a standard memory concept,
known as a 'heap', from which chunks of memory may be claimed and
released by applications with the assistance of the OS.
ARM Memory Structure
The ARM CPU has a possible address space of 64Mbs, of which only the
lower 32Mbs is relevant in Archimedes because this is the space in which
RAM is seen to exist. The ARM and MEMC chips contrive to make this 32Mbs
space (known as the 'logical' address space) available to applications in
User Mode by translating references to it through MEMC'S internal tables.
This allows the OS to decide which sections of the logical address space are
actually present as 'physical' memory, and this forms the basis of a
segmented 'virtual' memory system.
Physical memory is divided up into 128 'pages' whose size varies according
to the amount of memory actually fitted to the machine: 300 Series
computers have pages of 8k while 400 series machines have pages of 32k.
Blocks of pages are allocated as the workspace for particular OS functions
according to the configuration settings used. See the chapter on the ARM
support chips for more detailed information.
153
Archimedes Operating System
Heap Management Software and SWIs
The OS H e a p Manager provides routines which allocate and de-allocate
chunks of memory from a chosen area of memory. This mechanism is used
by the OS t o deal with memory management within the RMA amongst
others. User applications can make use of the Heap Manager's facilities by
providing it with information about the size of a block of memory a n d then
calling it for allocations and de-allocations.
The Heap Manager keeps track of the component chunks of the heap by
means of h e a p description blocks which consist of four word units. T o start
using the H e a p Manager you need some memory; if you are writing an
application y o u may use the application workspace or, if you are writing a
module, y o u may claim memory from the RMA using OS_Module with R0=6
(see the chapter on Modules). The pointer to the start of free memory
(perhaps returned by OS_Module) should be handed to the Heap Manager
for it to place its heap descriptor block at the start. After the heap has been
initialised (see below) other calls may then be made to the Heap Manager
to allocate a n d de-allocate blocks.
One SWI is used to deal with the Heap Manager - OS_Heap. On entry, it
takes a reason code in R0 and appropriate parameters in other registers,
returning w i t h results in registers and the Overflow flag ' V set if any error
occurred.
O S _ H e a p (SWI & 1 D )
R 0 = 0 Initialise Heap
This call m u s t be made once before any use is made of other calls to
OS_Heap. O n entry, R l should point to the start of the area of memory to be
used as a h e a p (the first four words of which will be used as the heap
description block) with R3 containing its size (in bytes). Both of these
values must be word-aligned and they may not exceed 32Mb and 16Mb
respectively.
R 0 = 1 Describe Heap
This call g i v e s information about the state of the heap - its largest
available block and the total amount of free space. On entry, R0 must point
to the heap description block. The results returned are the size of the
largest available block in R2 and the total free space in R3. The Overflow
flag V is set if the heap description block was invalid.
/
154
/
Writing Applications
R 0 = 2 Claim Heap Block
This call allocates a block f r o m the h e a p if sufficient space exists. On entry,
R l m u s t p o i n t to the h e a p d e s c r i p t i o n block a n d R3 m u s t c o n t a i n t h e
desired size of block. On r e t u r n , either R2 is a pointer to the allocated block
(if sufficient s p a c e w a s free) o r t h e Overflow flag ' V is set (if t h e r e w a s
insufficient space).
R 0 = 3 Release Heap Block
This call r e l e a s e s a block of t h e h e a p if the supplied pointer is v a l i d . On
entry, R l m u s t point to the h e a p description block a n d R2 to t h e block to b e
de-allocated. No results a r e r e t u r n e d b u t the Overflow flag ' V will be set
if either of the block pointers w a s invalid.
R 0 = 4 Extend Heap Block
This call a l l o w s y o u to increase or decrease t h e size of a currently allocated
block. On e n t r y , R l points t o the h e a p a n d R2 to t h e block itself w i t h R3
containing the signed 32-bit n u m b e r b y w h i c h the size of the block should b e
altered. On return, R2 contains a pointer to t h e n e w block. Note: since the
Heap Manager m a y h a v e h a d to allocate n e w space t o a c c o m m o d a t e y o u r
request, t h e pointer to the block m a y h a v e c h a n g e d - y o u m u s t take note of
any s u c h c h a n g e yourself.
There is a b u g in Arthur 1.20 w h i c h m e a n s that this call d o e s n o t a l w a y s
work. Sometimes it fails to reallocate the block correctly if t h e block needs
to be m o v e d within the h e a p . Unfortunately, n o detailed i n f o r m a t i o n w a s
available at the time of writing.
R 0 = 5 Extend the Heap
Contrary to the description in the Programmer's Reference Manual, this
call is not implemented in Arthur 1.20.
Listing 12.1 at the e n d of this section illustrates the OS_Heap SWI. A h e a p is
initialised a n d three blocks of memory a r e claimed f r o m it. The p r o c e d u r e
PROCdescribeheap calls OS_Heap w i t h R0=1 in o r d e r t o e x t r a c t details
about the h e a p .
155
Archimedes Operating System
OS_ValidateAddress (SWI &3A)
One SWI is provided which allows you to establish whether a range of
memory locations is accessible in User Mode (ie, that M E M C h a s t h e
specified logical memory range paged into physical memory).
On entry, R0 and R l contain the lower and upper limits of the address
range to be checked. The call returns with the Carry flag ' C clear if the
address r a n g e is currently paged into physical RAM and ' C set if n o t .
Listing 1 2 . 3 at the end of this section illustrates the use o f
OS_validateAddress.
There is a b u g in Arthur 1.20 which causes references to some addresses
below screen memory to be marked as valid when, in fact, they are not
paged into physical memory - beware!
General Guidelines on Compatibility
Acorn documentation suggests a number of guidelines which, if followed,
will maximise the chances that existing software will be easily portable
onto future versions and releases of the OS, so that programs written will
run under Arthur 1.2, RISC OS and any future release. It is important to
remember that this is one of the reasons we have an Operating System at
all - to improve portability. Common sense is the best guide here, so SWls
should be u s e d instead of calling ROM addresses, hardware should never be
written to directly and so on. Many of the SWls the OS provides are present
to allow access to internal information - be sure to use them. It is a good
idea to take advantage of the WIMP facilities when writing applications, as
this is clearly Acorn's intention in providing them.
Another aspect of portability, which is critical, is to allow software t o be
easily installed on hard discs. This raises a number of issues to do with
directory structures, in particular assumptions about the root directory.
Firstly, files should never be referred to by their full pathname, eg,
$.MyApp.RunCode. If they are, moving the program onto a hard disc
means duplicating the whole directory structure.
Instead, utilities used by your application should be kept in a library
directory in the root, resources such as fonts should be kept in some suitably
named directory in the root, eg, $.Fonts, and anything else should grow
from a sub-directory whose name is the same as that of the application.
You can then use the *URD command to set this application directory as the
User Root Directory during initialisation. By ensuring that the application
156
Writing Applications
only ever refers to its own directory using the URD symbol
the application easily portable.
w e can keep
To get things started there could be a text file in the library used to start the
application called, say, "StartApp" and containing:
*URD $.MyAppDir
*SET Font$Prefix $.Fonts
*RUN &.RunCode
To set up the User Root
To set up resources (ie, the fonts)
To start the application
To move the application to another system with a hard disc, all that needs
to be done is to copy the application directory tree structure, the contents of
the library and the contents of the resource directories over to the hard disc
root. Then, simply editing the the first line of the startup file will install the
new application.
The Shell Module - Source Code
10
20
30
40
50
60
70
80
90
100
110
120
130
14 0
150
160
170
180
190
200
210
220
230
240
250
260
270
280
290
300
310
320
R E M >Listl2/l
D I M c o d e % 511
FORpass%=OT03STEP3
P%=0:O%=code%
[OPT pass%+4
EQUD start
EQUD 0
EQUD 0
EQUD 0
EQUD title
EQUD help
EQUD helptable
EQUD 0
EQUD 0
EQUD 0
EQUD 0
;Entry p o i n t as an
application
.title
E Q U S "ShellModule"
EQUB 0
.help
EQUS "Shell M o d u l e "
EQUB 9
E Q U S "1.00 (05 Jul 1 9 8 8 ) "
EQUB 0
ALIGN
.helptable
EQUS "Shell"
EQUB 0
ALIGN
EQUD doshell
;Entry p o i n t
for the
command
157
Archimedes Operating System
330
340
350
360
370
380
390
400
410
420
430
440
450
460
470
480
4 90
500
510
520
530
540
550
560
570
580
590
600
610
620
630
64 0
650
660
670
680
690
700
710
720
730
740
750
760
770
780
7 90
800
810
820
830
840
850
158
EQUD
EQUD
EQUD
EQUD
0
shellsyntax
shellhelp
0
.shellhelp
E Q U S "*Shell starts up t h e shell
E Q U B 13
.shellsyntax
E Q U S "Syntax : * S h e l l "
EQUB 0
ALIGN
.doshell
A D R R l , title
MOV R2,R0
MOV R0,#2
SWI " O S _ M o d u l e "
application."
;Pass the name of the m o d u l e
;the command tail
;R0=2 for start m o d u l e a p p .
/Do the SWI
.start
SWI " O S _ G e t E n v "
SUB R 1 2 , R 1 , #&100
MOV R0,#0
MOV R1,R12
SWI "OS__ChangeEnvironment"
STR R l , [R12, #8]
MOV R0,#11
ADR Rl,exitback
MOV R2,R12
SWI " O S _ C h a n g e E n v i r o n m e n t "
S T M I A R12, {R1,R2}
.loopback
SWI & 1 2 A
ADD R0,R12,#32
MOV Rl,#127
MOV R2,#32
MOV R3,#255
SWI " O S _ R e a d L i n e
CMP R 1 , # 0
BEQ exit
SWI " O S _ C L I "
.exitback
B loopback
.exit
MOV R 0 , # 0
LDR R l , [R12, #8]
SWI " O S _ C h a n g e E n v i r o n m e n t "
MOV R 0 , #11
L D M I A R12, {R1,R2}
SWI " O S _ C h a n g e E n v i r o n m e n t "
M O V R 0 , #0
MOV R l , #0
MOV R 2 , # 0
n
;Find the
;Move RAM
/Indicate
;new RAM
RAM limit
limit down
change in RAM
limit
limit
/Store old RAM limit
/Indicate change in E X I T h a n d l e r
/New Exit address
/Value returned in R12 on e x i t
/and store the old lot
/Print a star
/find the line buffer
/line length
/read a line
/Is it of zero length ?
/If so to do the Exit
/Otherwise execute the command
/and loop back
/To reset the RAM limit
/get old RAM limit
/and set it
/Resetting EXIT handler
/get old handler
/and set it
Writing Applications
860
870
880
890
900
910
S W I "OS E x i t "
;And exit
NEXT
O S C L I " S a v e ShellMod " + S T R $ ~ c o d e % + " + " + S T R $ ~ P %
O S C L I " S e t T y p e ShellMod FFA"
Listing 12.1. The Shell source.
10 R E M > L i s t l 2 / 2
20 R E M by N i c h o l a s v a n Someren
30 R E M A r c h i m e d e s O S : A Dabhand G u i d e
4 0 R E M (c) Copyright A v S and NvS 1988
50 :
60 R E M R e s e r v e plenty of space for t h e h e a p .
70 R E M and initialise i t .
80 :
90 D I M H e a p &10000
100 S Y S "0S_Heap",0,Heap,,&10000
110
PROCdescribeheap
120 :
130 R E M Get t h r e e b l o c k s from the h e a p .
140 :
150 S Y S "0S_Heap",2,Heap,,&400 TO ,,blocklk
160 S Y S "0S_Heap",2,Heap,,&800 TO ,,block2k
170 S Y S "0S_Heap",2,Heap,,&1000 TO ,,block4k
180 P R I N T " B l o c k s of 1,2 and 4k h a v e b e e n allocated a t
&";-blocklk;",&";~block2k;" and &";~block4k;" r e s p e c t i v e l y . "
190
PROCdescribeheap
200 :
210 R E M R e t u r n the lk block to the h e a p and e x t e n d
220 R E M t h e 4k block by lk.
230 :
240 S Y S "0S_Heap",3,Heap,blocklk
250 SYS "0S_Heap",4,Heap,block4k,&400
260 P R I N T " T h e lk block h a s b e e n d e a l l o c a t e d , and the 4k b l o c k
e x t e n d e d by lk"
27 0 P R O C d e s c r i b e h e a p
280 :
290 R E M N o t e : e x t e n d i n g the 2k b l o c k instead w i l l r e v e a l
300 R E M a b u g in A r t h u r 1.20.
310 R E M SYS "OS_Heap",5 does not w o r k at all!
320 E N D
330 :
34 0 D E F P R O C d e s c r i b e h e a p
350 S Y S " O S _ H e a p " , l , H e a p TO
largeblock,space
159
Archimedes Operating System
360
370
380
P R I N T ' " T h e largest b l o c k is &";-largeblock;"
P R I N T " T h e r e are &";-space;" bytes free."'
ENDPROC
bytes
long."
Listing 12.2. The Heap.
10 R E M > L i s t l 2 / 3
20 R E M b y Nicholas van Someren
30 R E M A r c h i m e d e s O S : A D a b h a n d Guide
40 R E M (c) Copyright AvS and NvS 1988
50 :
60 R E M D e f i n e step size as & 2 0 0 0 , start address as 0,
70 R E M t o t a l memory found as 0 and v a l i d a t e start a d d r e s s .
80 :
90
chunk%=&2000
100
addr%=0
110
total%=0
120 SYS " O S _ V a l i d a t e A d d r e s s " , a d d r % , a d d r % TO ;C%
130 :
140 R E M A s long as a d d r % is in user area and addr% is
150 R E M n o t valid, increment t h e address and try a g a i n .
160 :
170 W H I L E addr%<&2000000
180 W H I L E C% AND 2
190
addr%+=chunk%
200 SYS " O S _ V a l i d a t e A d d r e s s " , a d d r % , a d d r % TO ;C%
210 END W H I L E
220 :
230 R E M O n c e a valid address is found, find how long the
240 REM v a l i d block of memory is.
250 :
260 P R I N T " B l o c k from &";~addr%;
270
start%=addr%
280 W H I L E (C% AND 2)=0
290
addr%+=chunk%
300 SYS " O S _ V a l i d a t e A d d r e s s " , a d d r % , a d d r % TO ;C%
310 END W H I L E
320 P R I N T " to &";~addr%-l;" that is &";~addr%-start%;" b y t e s
long"
330
total%+=(addr%-start%)
34 0 END W H I L E
350 :
360 REM O n c e address is over &2000000, print out the t o t a l .
370 :
380 P R I N T ;total%/1024;"k b y t e s asigned."
390 P R I N T " N o t e : There is a b u g in OS_ValidateAddress in A r t h u r
1.20 - "
400 P R I N T " t h e last block will be incorrect."
410 END
Listing 12.3. Validate Address
160
13 : The Window Manager
This chapter is devoted to the intricacies of the Window Manager,
sometimes known as the WIMP system, and how to use and program with
it. The Window Manager is used extensively by the Desktop, so if you are
not already familiar with the Desktop you might find it useful to
experiment with it before proceeding.
The Window Manager provides a rich set of facilities which allows
programmers to produce applications with a consistent style of user
interface. This consistency has benefits both for non-technical users
(because they have less to remember) and for programmers (because it
simplifies programming). Furthermore, adopting Acorn's window standard will ease the movement of applications up to future versions of the
OS. This is of particular relevance in allowing several applications to be
used concurrently under Operating Systems such as RISC OS.
What's On Offer?
The Window Manager co-ordinates the user interface aspects which have
recently become fashionable throughout the computer world, namely:
windows, icons, mice and pull-down menus (hence the acronym WIMP).
This approach to user interface design was popularised b y the Apple
Macintosh, though its origins were in Xerox's work with the programming environment known as Smalltalk.
The idea is that different pieces of work appear on the display as a series of
windows, analogous to sheets of paper. Their size, shape and position may
be altered by the user to suit the task currently in hand. This allows each
piece of work to be imagined as occupying as much display space as
necessary, with some smaller part of it actually being visible according to
the prevailing size of the window. By re-sizing and re-positioning
windows the user can change the focus of their attention as desired. Such
effects are achieved through the use of the mouse, which allows positions
on the display to be indicated simply by 'pointing . The three mouse buttons
are used to select and adjust various controls by 'clicking' on display
'buttons'. These buttons are defined to have specific meanings under the
Window Manager: the left-hand button is for 'selection', the middle button
7
AOS-K
161
Archimedes Operating System
for pulling down 'menus' and the right-hand button is for 'adjusting'
selections.
Icons are application-specific graphical objects, usually designed so that
they represent the function they affect, which may be positioned within a
window for selection with the mouse.
'Menus' of functions may be provided that allow software to be controlled
by pointing to a menu entry rather than typing at the keyboard, and this
mechanism can be extended more or less ad infinitum by the use of submenus f r o m the first menu and so on. The use of menus ensures that the
user can only make valid selections (since the menus won't contain invalid
ones) and thus greatly reduces the scope for user error.
The Structure of Windows
A window consists of an area containing the work (known as the 'Physical
Work Area' or PWA) bounded by a number of controls for the window. In
the centre of the top of the window is a 'title bar' which contains the
textual n a m e attached to the window. A window may be 'dragged' around
the display b y holding down the select button, while the pointer is within
the title b a r , and then moving the pointer elsewhere, releasing the button
when the desired destination is reached.
At the top left corner of most windows are two buttons: 'go to back' which
moves the window behind any other windows on the screen; and 'close'
which removes the window completely. At the top right corner is the
'toggle' button which causes the window to expand to its full size and
move to the front (if it is not already there).
In the b o t t o m right-hand corner of most windows is a 'stretch' button dragging it allows the overall size of the window to be increased and
decreased within limits set by the programmer. The maximum possible size
is the same as that achieved by clicking on the full size button.
Along the right-hand side a n d / o r the bottom edge of most windows are
'scroll b a r s ' . When the window is not as large as the maximum working
area it is possible to scroll the P W A over the whole extent of the work
(known as the 'Logical Work Area' or LWA) to make any portion visible. At
each extreme of the scroll bars are arrow buttons which scroll the PWA in
the appropriate direction by a small amount. Within the scroll bars are
shaded boxes whose size indicate how much of the LWA is visible within the
PWA. Their position indicates which part (rather than how much) is visible.
You can d r a g these boxes within the scroll bars to make large changes to
the visible portion; repeated clicking on the arrows gets a little tedious.
162
The Window Manager
Window Manager Co-ordinate Systems
The main part of any window is the Physical Work Area (PWA) of that
window. This is bounded by two co-ordinate pairs which define its position
on the display - the bottom left-hand corner (minimum values of X and Y)
and top right-hand corner (maximum values of X and Y). These are known
as (PWA_min_X,PWA_min_Y) and (PWA_max_X,PWA_max_Y). In addition, an offset co-ordinate is required to define which part of the Logical
Work Area (LWA) is being displayed by the window; this co-ordinate is
relative to the LWA origin, and it is k n o w n as (Scroll_X_offset,
Scroll_Y_offset). It can be seen that, by adjusting the values of these
offsets, it is possible to control which part of the LWA is visible within the
PWA.
Note: confusingly, the Scroll_X_offset is the offset of the left edge of the
PWA from the left edge of the LWA, but the Scroll_Y_offset is the offset of
the top edge of the PWA from the bottom edge of the LWA. The reason for
this appears to be that graphics origins are usually at the bottom left corner
of the display, whereas text origins are usually at the top left.
Finally, the LWA origin may be displaced from the graphics origin of the
display, thus adding another level of complexity to co-ordinate calculations! The co-ordinate of the LWA origin (and bottom left-hand corner) is
defined b y (LWA_min_X,LWA_min_Y) and its other extreme by the coordinate (LWA_max_X,LWA_max_Y).
These systems of co-ordinates allow our application and the Window
Manager to decide where on the display to plot text and graphics. All
plotting is achieved relative to the LWA origin, so co-ordinates must be
calculated in these terms before plotting. Furthermore, the Window
Manager provides the moveable parts of the scroll bars automatically, so
it needs to be able to divine what amount of the LWA is visible in each
direction.
Programming Using the Window Manager
Writing applications which take advantage of the W i n d o w Manager
requires an approach which programmers, whose experience is limited to
BASIC, may find a little unusual: window applications respond passively to
'advice' from the Window Manager about what to do next, rather than
actively testing for the occurrence of particular conditions. This approach,
known as 'event-driven' programming, allows the Window Manager to
pass information to each window application selectively, in much the same
way as the BBC MOS passes information to Sideways ROMs. This is done by
163
Archimedes Operating System
using a s y s t e m of 'reason codes'. Such selectivity allows the Window
Manager to time-slice the computer's processing power and thus provide a
limited f o r m of multi-tasking to window applications. Future versions of
the OS are expected to offer true multi-tasking by extending this system,
hopefully without requiring much re-writing of window applications.
Before w e move on to examine the stages involved in getting an
application running under the Window Manager, it is worth noting that
most of the work involved needs to be completed before testing begins! Do
not expect t o be able to test a window application stage by stage, since
there is t o o much interaction between the components for this to be
feasible. Instead, it is better to use the examples herein as a template for
developing your own applications and modify them, rather than start from
scratch.
In this section we shall make extensive reference to the 'WimpMaze'
example - listing 13.1 at the end of the chapter. This is a w i n d o w
application which makes use of many, though not all, of the facilities
provided b y the Window Manager. It randomly generates a rectangular
maze within a window and allows the user to traverse it, using the mouse
to leave a trail of dots whenever the left-hand button is pressed. These
dots may b e deleted by back-tracking over their trail while holding down
the same button. The entrance to the maze is always in the bottom left
corner and the exit in the top right corner. The scroll bars may be used to
change the portion of the maze which is visible at any moment. You might
like to try running the application to try it out before reading on.
Writing a Window Manager Application
The Stages
To get a w i n d o w application started, the first thing to do is to call the
Window M a n a g e r ' s initialisation swi "Wimp_Initialise". This takes no
parameters and simply returns the version number of the W i n d o w
Manager software being used. Having done this we need to set up a
control block (block%) containing the various parameters which define the
window. These parameters are arranged within the control block as show
on the page opposite:
164
The Window Manager
Offset
!0
!4
!8
!12
!16
!20
!24
!28
?32
?33
?34
?35
?36
?37
?38
?39
!40
!44
!48
152
156
!60
!64
!68
!72
!84
!88
Parameter (decimal)
PWA_min_X
PWA_min_Y
PWA_max_X
PWA_max_Y
Scroll_X_offset initial value
Scroll_Y_offset initial value
Handle for window to overlay (-1 means top)
Window control flags (see below)
Title bar foreground colour
Title bar background colour
PWA foreground colour
PWA background colour
Scroll bar foreground colour
Scroll bar background colour
Title bar highlight colour
Reserved
LWA_min_X
LWA_min_Y
LWA_max_X
LWAmaxY
Icon presence flags
Reserved
Reserved
Reserved
Window title string, terminated by ASCII 13
(up to 11 characters)
Total icons in this window
Icon data hereafter
Once these parameters are set up we need to call the Window Manager to
tell it to create the window (FNcreatemain). Note that this call does not
actually cause the window to appear; it merely copies the block parameters
into the Window Manager's workspace and returns a handle for the
window (ourwindow%).
A number of flag bits are included at offset !28 in the block: they have the
following effects if set on entry:
Bit
0
1
2
3
Meaning when set
Title bar present
Window may be moved
Vertical scroll bar present
Horizontal scroll bar present
165
Archimedes Operating System
Bit
4
5
6
7
Meaning when set
Window only contains icons
Window is a sub-window of another
Window may be moved off display
Window has no 'back' or 'close' buttons
The following bits are flags set by the Window Manager to return status
information and have no effect if set by the application:
16
17
18
The window is open
The window is un-obscured
The window is full size
To make the window appear we put the window's handle at the start of a
block (the remaining space in the block is reserved for parameters to be
returned) a n d call the SWI "Wimp_OpenWindow" (PROCopenwindow). We
now have an empty window on the display.
The Polling Loop
Because w i n d o w applications are event-driven, the main focus of any
application is the 'polling loop' in which the application repeatedly asks the
Window Manager what to do next. The Window Manager provides the
SWI " W i m p _ P o l l " to achieve this: it takes a function 'mask' in R0 (see
below) and a pointer to a block (for results returned) in R l . The call returns
a reason c o d e in R0 (reason%) and a pointer to the result block in R l
(info%). The reason code indicates the action to be taken by the application
from the following list:
Reason Meaning
Code
0
No activity required
1
Window needs re-drawing
2
Window needs to be (re)opened *
3
Window needs to be closed *
4
Pointer leaving window
5
Pointer entering window
6
Mouse buttons have changed
7
User 'dragging window *
8
User pressed a key
9
User selected a menu
10
User 'scrolling' window *
7
When calling "Wimp_Poll" the bits in the function mask word supplied in
R0 can be u s e d to disable many of the reason codes listed above - for a
166
The Window Manager
given r e a s o n c o d e n u m b e r , the bit w i t h t h e s a m e n u m b e r s h o u l d b e set to
disable it ( t h o s e m a r k e d witli '*' m a y n o t b e d i s a b l e d ) . The n o r m a l
r e q u i r e m e n t is for all events t o be enabled, in w h i c h case a m a s k of z e r o is
used.
Dealing with Reason Codes
For a n a p p l i c a t i o n to w o r k correctly it n e e d s
reason c o d e s b y taking appropriate action,
W i n d o w Manager r o u t i n e s . Each r e a s o n
initiated b y t h e u s e r ' s actions a n d t h e y a r e
following pages.
t o r e s p o n d t o m a n y of these
f r e q u e n t l y b y calling o t h e r
c o d e i n d i c a t e s s o m e effect
detailed i n d i v i d u a l l y in t h e
0 No Activity
The z e r o r e a s o n c o d e indicates t h a t t h e u s e r h a s n o t t a k e n a n y a c t i o n s
w h i c h affect t h e application. Usually this r e a s o n c o d e w o u l d b e i g n o r e d ,
but c e r t a i n applications will n e e d t o u p d a t e the display f r o m time t o t i m e
(for e x a m p l e , clocks) a n d this 'null' r e a s o n c o d e p r o v i d e s a n o p p o r t u n i t y to
p e r f o r m this kind of action.
In listing 13.1 the null r e a s o n c o d e triggers PROCdothatthing w h i c h c h e c k s
to s e e if t h e u s e r h a s quit the p r o g r a m o r the e n d of t h e m a z e h a s b e e n
r e a c h e d . If n o t , it checks the state of t h e m o u s e b u t t o n s a n d u p d a t e s t h e
display a c c o r d i n g l y . The c o r r e c t m e c h a n i s m for this kind of m o u s e sensing
is t o u s e r e a s o n c o d e six, but b e c a u s e that only indicates a c h a n g e of state
of t h e b u t t o n s r a t h e r than their c u r r e n t state o u r l a z y p r o g r a m m e r h a s
opted f o r this (slightly n a u g h t y ) a p p r o a c h !
1 Window Needs Re-diawing
This r e a s o n code is supplied to indicate the start of the s e q u e n c e required to
u p d a t e a w i n d o w o n t h e display, p e r h a p s b e c a u s e it h a s b e e n m o v e d , r e sized o r b e c o m e visible because of c h a n g e s t o the w i n d o w s f o r m e r l y o n t o p
of it. Of c o u r s e , this process is also required the v e r y first t i m e a w i n d o w is
displayed.
The p a r a m e t e r block, pointed to b y R l , s i m p l y contains t h e h a n d l e of t h e
w i n d o w c o n c e r n e d at offset R l + 0 .
To r e s p o n d t o t h e r e - d r a w r e q u e s t , t h e a p p l i c a t i o n m u s t first ask t h e
W i n d o w Manager t o r e - d r a w t h e p a r t s it is r e s p o n s i b l e f o r . This is
a c h i e v e d b y calling the SWI " W i m p _ R e d r a w W i n d o w " w i t h a p a r a m e t e r
block (just containing t h e w i n d o w h a n d l e ) p o i n t e d to b y R l (PROCredraw).
167
Archimedes Operating System
The result of this call is a flag in R0 which indicates whether there are more
sections to re-draw.
At this point we must divert for a moment to consider the re-drawing
process. If y o u imagine a number of windows overlapping on the display
then, when the rearmost is moved to the front, the minimum area that
needs to b e redrawn (to fully update the display) consists of those
rectangles of the window which have just become visible.
The W i n d o w Manager provides the SWI "Wimp_GetRectangle" which
should be called repeatedly and will return a flag in R0, indicating if there
are any more rectangles to be re-drawn, and a parameter block, pointed to
by R l , containing the co-ordinates of any such rectangles, to allow the
application to divine what area it needs to re-draw.
The format o f the parameter block returned by "Wimp_GetRectangle" is as
follows:
Offset
!0
!4
!8
!12
!16
!20
!24
!28
!32
!36
!40
Parameter
Window handle
PWA_min_X
PWA_min_Y
PWA_max_X
PWA_max Y
Scroll_X_offset
Scroll_Y_offset
Graphics (clip) window min_ X
Graphics (clip) window min_ Y
Graphics (clip) window max. X
Graphics (clip) window max Y
Note: this information is in the same format as is returned by the SWis
' Wimp_RedrawWindow'' and Wimp_UpdateWindow" (see later) so a s to
remove the need to modify any parameters before passing them on.
/
//
Thus the application needs to repeatedly examine the flag in R0 and, while
the flag is set, repeatedly extract and convert the PWA parameters from the
block to allow it to re-draw the appropriate areas. In practice, many lazy
programmers will be tempted to rely on the fact that the graphics clip
window is set to the correct values and thus re-draw more than is
necessary. This is an effective but slow approach and is rather against the
spirit of efficiency which the rectangle sectioning system tries to promote please resist the temptation!
To summarise then, the whole process might be 'pseudo-coded' as follows:
168
The Window Manager
Reason c o d e 1 received
SYS "Wimp_RedrawWindow" „block% TOflag%
WHILE flag%
extract co-ordinates
r e - d r a w t h e specified rectangle
SWI "Wimp_GetRectangle" „block% TOflag%
ENDWHILE
You c a n s e e exactly this kind of c o d e in PROCredraw in listing 13.1. Because
the m a z e cells are of fixed size, the p r o g r a m relates the r e - d r a w r e c t a n g l e
to t h e cells o f the m a z e a n d then plots t h e m u s i n g PROCdrawcell.
2 Window Needs to be (Re)Opened
This r e a s o n c o d e is p r o d u c e d w h e n e v e r a w i n d o w is brought t o t h e front,
re-sized, or scrolled. Normally it is e n o u g h s i m p l y to pass on t h e p a r a m e t e r
block r e t u r n e d on this r e a s o n c o d e to the SWI "Wimp_OpenWindow". Some
a p p l i c a t i o n s m a y w i s h t o set flags t o i n d i c a t e that a p a r t i c u l a r k i n d o f
w i n d o w h a s been opened.
In listing 13.1 w e simply p a s s o n the p a r a m e t e r s to "Wimp_OpenWindow"
untouched.
The p a r a m e t e r s returned b y this call a r e in t h e block pointed to b y R l at the
following offsets:
Offset
!0
!4
18
!12
!16
!20
!24
!28
Parameter
Window handle
New PWA_min_X
New PWA_min_Y
New PWA_max_X
New PWA max Y
New Scroll X offset
New Scroll_Y_offset
Window handle of window to put on top
Note: the format of this parameter block is the same as that required by SWI
"Wimp_OpenWindow" so it may be passed on unaltered.
3 Window Needs to be Closed
This reason code has the opposite meaning to the one above - it indicates
that the user has clicked on the 'close' box of the window. Once again, it is
almost sufficient to pass on the parameter (the window handle, at R l + 0 ) to
the SWI "Wimp_CloseWindow". Usually though, your application will also
169
Archimedes Operating System
want to set a flag indicating that the window has been closed and that the
application should therefore shut down any data relating to the window.
This is precisely what happens in the example program, where the flag
'exitwhenredrawn%' is set to indicate impending termination.
4 Pointer Leaving Window
This reason code is generated each time the mouse pointer is moved out of
the PWA, the trigger point being the edge of the PWA and not the edge of
the whole window. The window handle is returned at R l + 0 in the usual
way.
The normal use of this is to prevent depression of the mouse buttons
having any effect while the pointer is outside the window, or to close
menus and other 'pop-up' devices automatically as the pointer moves
away from them.
The example program sets the flag 'ourwindow%' (which contains the
handle of o u r window) to - 1 on this call so as to prevent mouse button
activity elsewhere. It is reset to the window handle by the next reason
code.
5 Pointer Entering Window
This reason code is complementary to reason code 4 - it is generated each
time the pointer enters the PWA part of the window. The window handle is
returned at R l + 0 in the usual way. This call allows for windows which
appear automatically when the pointer enters a particular part of the
display.
Listing 13.1 uses this call to make the flag 'ourwindow%' valid again by
setting it to the window handle at R l + 0 . This flag is used to determine
whether m o u s e buttons have an effect elsewhere in the program.
6 Mouse Buttons have Changed
This reason code is issued each time the mouse buttons change state. It
does not indicate which mouse buttons are actually being held down; only
that they h a v e been pressed or released. The following parameters are
returned in the parameter block for this reason code:
170
The Window Manager
Offset
!0
!4
!8
!12
!16
!20
Parameter
Mouse X co-ordinate
Mouse Y co-ordinate
New state of m o u s e buttons
Window handle (or - 1 if outside all w i n d o w s )
Icon handle (or - 1 if not on an icon)
Old state of m o u s e buttons
The f o r m a t of the m o u s e state flags at !8 are as follows:
Bit
0
1
2
4
6
8
10
Meaning
Right button pressed (adjust)
Middle button pressed ( m e n u )
Left button pressed (select)
Dragging with right button
Dragging with left button
Single click of right button
Single click of left button
Listing 13.1 uses this call to identify w h e n the m i d d l e ( m e n u ) b u t t o n h a s
been p r e s s e d w i t h i n its w i n d o w c a u s i n g the pop-up m e n u to a p p e a r
(PROCmouse, PROCsetupmenu).
7 User Dragging Window
This r e a s o n c o d e is r e t u r n e d at the end of a d r a g sequence w h o s e effect is
a p p l i c a t i o n - s p e c i f i c . Consult the Programmer's Reference Manual for
more information.
8 User Pressed a Key
This r e a s o n c o d e is issued if the u s e r p r e s s e s a key w h e n the p o i n t e r is
within one of the application's w i n d o w s . The Window Manager a t t e m p t s
to d i s p l a y text at the position of the text c u r s o r ( k n o w n as the ' c a r e t ' )
w h o s e p o s i t i o n m a y b e set w i t h the p o i n t e r . This r e a s o n c o d e is
a c c o m p a n i e d b y the following p a r a m e t e r block:
Offset
!0
!4
!8
!12
!16
!20
!24
Parameter
Window handle in w h i c h caret a p p e a r s
Icon handle (or - 1 if no icon)
Caret_X_offset (within PWA)
Caret_Y_offset (within PWA)
Height of caret
Position of carat within text string
Code of key pressed
171
Archimedes Operating System
The entry o f characters into windows is beyond the scope of this book and
the reader is advised to consult the Programmer's Reference Guide for
more information.
9 User Selected a Menu
This reason code is returned when the user has made a selection from an
active m e n u (which has been set up using SWI "Wimp_CreateMenu"). The
parameter block contains the item numbers of the menu items selected,
with R l + 0 containing the item from the first menu level, R l + 4 containing
the item number from the second menu level and so on up to a terminating
- 1 . See the section on menus later for more information.
Closing Down the Application Window
Having established the mechanisms for getting a window onto the screen
and running an application behind it, we need to be able to shut down an
application cleanly. This is achieved with the assistance of two SWis "Wimp_DeleteWindow" and "Wimp_CloseDown".
"Wimp_DeleteWindow" takes a window handle at R l + 0 and removes that
window f r o m the display. "Wimp_CloseDown" shuts down the entire
Window Manager and clears the display.
Window Manager Support for Menus
Besides providing overall control of windows, the Window Manager also
contains a number of routines which offload the more mundane aspects of
dealing with user selections from 'menus'. The idea behind menus, as we
saw earlier, is to minimise the scope for user error by predefining the valid
selections f r o m the menu. The OS Window Manager supports multi-level
or 'hierarchical' menus, which allow complex sequences of selections to be
made from almost any number of menu levels. The user causes a menu to
appear by clicking on the middle mouse button: the application determines
which w i n d o w the pointer is over at the time and the Window Manager
displays the appropriate menu and allows the user to make a selection. By
taking advantage of the Window Manager support for menus, application
p r o g r a m m e r s may be relieved of the burden of dealing with menu
selections a n d simply concern themselves with the effects of these selctions.
The results of selections are returned in a control block provided by
Wimp_Poir reason code nine.
M
172
The Window Manager
The Structure of Menus
A menu is described by the application to the Window Manager in a similar
way to that used for windows. In fact, menus are really just windows
whose contents are predefined - this predefinition allowing the Window
Manager to do most of the work in dealing with user selections.
A menu consists of a list of entries displayed as a column of lines of text
within a window. The window has none of the control buttons and scroll
bars associated with normal windows, but instead each of the menu entries
may have three graphical effects associated with it:
The first is that it may be 'dimmed', a shading effect which indicates that it
is not valid to select the entry.
The second is a 'tick' or check mark which indicates that the entry is already
selected or is a default value.
The third is an 'arrow' facing off the right-hand side of an entry which
indicates the presence of a sub-menu or window. Moving the mouse to the
right over one of these arrows causes the sub-menu to appear to the right
of the first menu, and this process may continue through more levels of submenu ad nauseam. The Window Manager attempts to be intelligent about
the positioning of menus so, if the sub-menu is selected from a menu which
is already near the right-hand edge of the screen it will be displaced left to
ensure it is completely visible.
Programming Menus
To prepare the Window Manager for the handling of menus it is necessary
to call the SWI " W i m p _ C r e a t e M e n u " once for each m e n u in the
application. This call takes a pointer to the menu's control block and a coordinate pair which specifies where it should initially appear on the
display. The program should then return to the main polling loop to await
the issue of reason code nine which indicates that a selection has actually
been made.
SWI Wimp_CreateMenu (SWI &400D4)
Create a New Menu Structure
This call advises the Window Manager that a menu structure should be
installed in its tables. On entry, R0 must either contain - 1 (in which case all
menus are closed) or a pointer to the menu definition block for the new
173
Archimedes Operating System
menu. In t h e latter case (R2,R3) give the co-ordinates of the top left-hand
corner of the menu when it is displayed.
The menu control block consists of a series of entries, each of which is in the
same format. The first defines the top level menu and its entries, with
pointers leading the way to the sub-menu definitions and so on. The
structure of the menu control block is as follows:
Offset
!0
?12
?13
?14
?15
! 16
!20
!24
!28
Contents
Menu title string terminated by zero
Menu title foreground colour
Menu title background colour
Work area foreground colour
Work area background colour
Width of sub-menus (pixels)
Height of sub-menus (pixels)
Separation between menu entries (pixels)
Menu entries start here
The menu entries consist of 24-byte blocks which contain the names and
flags for each entry. Their format is as follows:
Offset
!0
!4
!8
!12
Contents
Flags:
Bit 0 - Set means 'tick' the entry
Bit 1 - Set means follow this entry with a
dotted divider
Bit 2 - Set means this entry may be overwritten by user
Bit 7 - Set means this is the last item in the menu
Pointer to sub-menu or handle of sub-window or - 1
(for neither)
Icon flags
Text of entry terminated by zero
(11 characters maximum)
Where an entry has a sub-menu, the presence of a valid pointer or window
handle at offset !4 causes the arrow to appear automatically. For submenus, the offset of the sub-menu in the menu control block should be
inserted h e r e ; for sub-windows, the window handle of the appropriate
window should be inserted.
The structure of sub-menu entries is just the same as that for the first
menu, with all the information indicated above repeated as necessary.
174
The Window Manager
Menus in the WimpMaze Example
The example program at the end of this chapter makes limited use of the
menu facility by providing a menu which permits the foreground and
background colours of the display to be changed. This is set u p when the
middle button is pressed (PROCmouse) by the procedure PROCsetupmenu.
Subsequently, the Wimp_Poll reason code is issued and PROChandlemenu is
called to extract the parameters returned by the reason code and change
the display colours accordingly.
Note: do not be discouraged b y the length of PROCsetupmenu. It is rather
long-winded since each menu entry has to be individually defined, but the
menu system itself is not at all complicated. When setting up menus, you
may find it easiest to type a 'dummy entry and duplicate it several times
(eg, by using the copy facility in the Arm BASIC Editor).
7
The WIMP routines described previously are sufficient to carry out most
window based operations. The WIMP Manager provides several more
advanced calls to help in manipulating windows in specialised ways. A
complete list of the facilities provided is given below.
SWI
Number
&400C0
&400C2
&400C4
&400C6
&400C8
&400CA
&400CC
&400CE
&400D0
&400D2
&400D4
&400D6
&400D8
&400DA
&400DC
Routine
Name
Wimpjnitialise
Wimp_CreateIcon
Wimp_DeleteIcon
Wimp_CloseWindow
Wimp_RedrawWindow
Wimp_GetRectangle
Wimp_GetWindowInfo
Wimp_GetIconState
Wimp_DragBox
Wimp_SetCaretPosition
Wimp_CreateMenu
Wimp_WhichIcon
Wimp_SetPointerShape
Wimp_CloseTemplate
Wimp_ProcessKey
SWI
Number
&400C1
&400C3
&400C5
&400C7
&400C9
&400CB
&400CD
&400CF
&400D1
&400D3
&400D5
&400D7
&400D9
&400DB
&400DD
Routine
Name
Wimp_CreateWindow
Wimp_DeleteWindow
Wimp_OpenWindow
Wimp_PoU
WimpJJpdateWindow
Wimp_GetWindowState
Wimp_SetIconState
Wimp_GetPointerInfo
Wimp_ForceRedraw
Wimp_GetCaretPosition
Wimp_DecodeMenu
Wimp_SetExtent
Wimp_OpenTemplate
Wimp_LoadTemplate
Wimp_CloseDown
To assist in the design and creation of WIMP windows, Acorn has produced
a window designer. This allows the various parameters defining a window
to be easily selected and varied. A window definition file, called a template,
is then produced by the designer. The WIMP manager provides two SWI calls
to allow this template file to be loaded into the WIMP system. The window
175
Archimedes Operating System
definitions held within it are then available to the
created using wiMP_CreateWindow.
10
20
30
40
50
60
70
80
90
100
110
120
130
140
150
160
170
180
190
200
210
220
230
240
250
260
270
280
290
300
310
320
330
340
350
360
370
380
390
400
410
420
430
440
450
460
470
480
490
500
176
WIMP
as if they had been
REM >Listl3/l
R E M by N i c h o l a s v a n S o m e r e n
R E M A r c h i m e d e s O S : A D a b h a n d Guide
R E M (c) Copyright A v S a n d NvS 1988
:
ON E R R O R P R O C e r r o r : E N D
:
R E M Select m o d e 12 and s e t up the p a l e t t e .
:
M O D E 12
VDU 19,15,16,16,16,160
backcol%=3
forcol%=4
VDU 19,8,backcol%
VDU 19,9,forcol%
:
R E M I n i t i a l i s e the W i m p .
:
SYS " W i m p _ I n i t i a l i s e " TO v e r s i o n %
:
R E M Set up m a z e v a r i a b l e s .
:
side%=20
area%=side%*side%
D I M a % a r e a % , b % a r e a % * 2 , b l o c k % 255
:
R E M R e s e r v e space for m e n u s and enter
R E M t h e m a i n loop.
:
D I M m e n u % 1023
:
REPEAT
:
REM C r e a t e a new m a z e . E a c h cell will be
REM 1 0 0 by 100 p i x e l s on the screen.
:
PROCnewmaze
scale%=100
:
REM W e ' l l start in the b o t t o m left corner.
weareX%=0
weareY%=0
? a % = ? a % OR 16
:
REM D e f i n e and open our w i n d o w .
:
ourwindow%=FNcreatemain
P R O C o p e n w i n d o w (ourwindow%)
:
REM S e t up flags to i n d i c a t e if user has solved
The Window Manager
510
520
530
540
550
560
570
580
590
600
610
620
630
640
650
660
670
680
690
700
710
720
730
740
750
760
770
780
790
800
810
820
830
840
850
860
870
880
890
900
910
920
930
940
950
960
970
980
990
1000
1010
1020
1030
AOS-L
R E M maze or left the p r o g r a m .
solved%=0
solvedwhendrawn%=0
exit%=0
exitwhendrawn%=0
R E M The polling loop - polls the Wimp
R E M maze is solved or game is q u i t .
until
REPEAT
SYS "Wimp_Poll",,block% TO r e a s o n % , i n f o %
C A S E reason% OF
W H E N 0:PROCdothatthing :REM Null reason code
W H E N l:PROCredraw(info%)
W H E N 2 : S Y S "WimpjDpenWindow",,info%
W H E N 3:SYS "Wimp_CloseWindow", , i n f o % : e x i t w h e n d r a w n % = T R U E
:REM Pointer leaving
W H E N 4:ourwindow%=-l
:REM Pointer e n t e r i n g
W H E N 5:ourwindow%=info%!0
:REM Mouse b u t t o n s
W H E N 6:PROCmouse(info%)
:REM User Drag
WHEN 7
:REM K e y P r e s s e d
WHEN 8
:REM Menu Select
W H E N 9:PROChandlemenu(info%)
W H E N 10
:REM Scroll Request
OTHERWISE
ENDCASE
U N T I L solved% O R exit%
R E M Delete the old w i n d o w and repeat
R E M Otherwise, exit t i d i l y .
if solved.
PROCdeletewindow(handle%)
U N T I L exit%
PROCfinish
END
D E F FNcreatemain
block%!0=200
:REM Window, m i n X
block%!4=200
: REM Window, min Y
b l o c k % ! 8 = 1 0 0 0 :REM Window, m a x X
b l o c k % ! 1 2 = 7 0 0 :REM Window, max Y
b l o c k % ! 1 6 = - 2 0 :REM X scroll offset
block%!20=480
: REM Y scroll offset
block%!24=-l
: REM Open at the t o p
block%!28=%llll
: R E M Flags
block%?32=7
: REM Title fore' c o l o u r
block%?33=0
: REM Title b a c k ' c o l o u r
colour
block%?34 = 9
: REM W o r k f o r e
block%?35=8
: REM Work b a c k ' colour
block%?36=5
: REM Scroll outer c o l o u r
block%?37=6
: REM Scroll inner c o l o u r
block%?38=l
: REM Highlighted t i t l e colour
block%?39=0
: REM R e s e r v e d
1
177
Archimedes Operating System
1040
1050
1060
1070
1080
1090
1100
1110
1120
1130
1140
1150
1160
1170
1180
1190
1200
1210
1220
1230
1240
1250
1260
1270
1280
1290
1300
1310
1320
1330
1340
1350
1360
1370
1380
1390
1400
1410
1420
1430
1440
1450
1460
1470
1480
1490
1500
1510
1520
1530
1540
1550
1560
178
block%!40=-20
:REM Work area extent, m i n X
b l o c k % ! 44=-20
:REM Work area extent, m i n Y
b l o c k % ! 48=side%*scale%+20
:REM Work area extent, m a x X
b l o c k % ! 52=side%*scale%+20
:REM Work area extent, m a x Y
block%!56=%00000111000000000000000000011001
:REM F l a g s
block%!60=0
:REM Work area button type
block%!64=0
:REM Sprite control p o i n t e r
block%!68=0
:REM Reserved
$ (block%+72) ="My W i n d o w . "
:REM Window title
block%!84=0
:REM Number of icons
:
R E M C r e a t e the w i n d o w a n d return its h a n d l e .
:
S Y S " W i m p _ C r e a t e W i n d o w " , , b l o c k % TO h a n d l e %
=handle%
:
R E M O p e n a w i n d o w : set u p b l o c k % with the
R E M h a n d l e , read information about the
R E M w i n d o w and use this information to open it.
:
DEF PROCopenwindow(handle%)
block%!0=handle%
SYS "Wimp_GetWindowState",,block%
SYS "WimpjDpenWindow",,block%
ENDPROC
:
R E M Close a window.
:
DEF PROCdeletewindow(handle%)
block%!0=handle%
SYS "Wimp_DeleteWindow ,,block%
ENDPROC
:
R E M K e e p redrawing the m a z e until there is
R E M n o t h i n g else to redraw.
:
DEF PROCredraw(block%)
SYS " W i m p _ R e d r a w W i n d o w " , , b l o c k % TO flag%
W H I L E flag%
:
R E M C a l c u l a t e the edges of the graphics window.
:
rectminX=block%!28
rectminY=block%!32
rectmaxX=block%!36
rectmaxY=block%!40
:
R E M C a l c u l a t e the size o f the graphics window.
:
sizeX=rectmaxX-rectminX
sizeY=rectmaxY-rectminY
:
R E M C a l c u l a t e w i n d o w p o s i t i o n on PWA.
M
The Window Manager
1570
1580
1590
1600
1610
1620
1630
1640
1650
1660
1670
1680
1690
1700
1710
1720
1730
174 0
1750
1760
1770
1780
1790
1800
1810
1820
1830
1840
1850
1860
1870
1880
1890
1900
1910
1920
1930
1940
1950
1960
1970
1980
1990
2000
2010
2020
2030
2040
2050
2060
2070
2080
2090
:
vertminX=block%!20+block%!28-block%!4
vertmaxY=block%!24+block%!40-block%!16
vertmaxX=vertminX+sizeX
vertminY=vertmaxY-sizeY
:
R E M C a l c u l a t e w i n d o w p o s i t i o n on w o r k area.
:
offX=rectminX-vertminX
offY=rectminY-vertminY
:
R E M R e d r a w each m a z e cell w i t h i n t h e w i n d o w .
:
F O R I%=(vertminX D I V scale%) TO (vertmaxX D I V scale%)
F O R J%=(vertminY DIV scale%) T O (vertmaxY D I V scale%)
P R O C d r a w c e 1 1 ( 1 % , J%)
NEXT
NEXT
:
R E M Check if there is anything else to draw.
:
S Y S " W i m p _ G e t R e c t a n g l e " , , b l o c k % TO flag%
ENDWHILE
ENDPROC
:
R E M D r a w a maze cell if c o - o r d i n a t e s are w i t h i n m a z e .
:
D E F P R O C d r a w c e l l ( X % , Y%)
L O C A L C%
IF X%>=0 A N D X % < s i d e % AND Y%>=0 A N D Y%<side% THEN
C%=?(a%+X%+side%*Y%)
MOVE X%*scale%+offX,Y%*scale%+offY
:
R E M D r a w left, t o p , right and b o t t o m s i d e s .
:
P L O T 1 + ( ( C % AND 1)=1),0, (scale%-l)
P L O T 1 + ( ( C % AND 8 ) = 8 ) , (scale%-l),0
P L O T 1 + ( ( C % AND 4 ) = 4 ) , 0 , - ( s c a l e % - l )
P L O T 1 + ( ( C % AND 2 ) = 2 ) , - ( s c a l e % - l ) , 0
:
R E M M o v e to the centre and d r a w t h e c i r c l e .
:
MOVE
(X%+.5)*scale%+offx,(Y%+.5)*scale%+offY
IF (C% A N D 16)=16 THEN
PLOT 153,scale%/3,0
ELSE
PLOT 155,scale%/3,0
ENDIF
ENDIF
ENDPROC
:
DEF PROCmouse(block%)
IF (block%?8 A N D 2)=2 A N D (block%!12)=handle% THEN
179
Archimedes Operating System
2100
2110
2120
2130
2140
2150
2160
2170
2180
2190
2200
2210
2220
2230
2240
2250
2260
2270
2280
2290
2300
2310
2320
2330
2340
2350
2360
2370
2380
2390
2400
2410
2420
2430
2440
2450
2460
2470
2480
2490
2500
2510
2520
2530
2540
2550
2560
2570
2580
2590
2600
2610
2620
180
PROCsetupmenu
SYS "Wimp_CreateMenu", , m e n u % , b l o c k % ! 0 , b l o c k % ! 4
E N D IF
ENDPROC
:
R E M Set up c o l o u r s u b - m e n u .
:
DEF PROCsetupmenu
$menu%="Colours"+CHR$0
menu%?12=4
:REM Colours
menu%?13=3
menu%?14=6
menu%?15=2
menu%!16=200
:REM Width
menu%!20=32
:REM Height of e n t r i e s
menu%!24=16
:REM Entry gap height
menu%!28=0
:REM No flags
m e n u % ! 32=menu%+80
:REM Pointer to sub m e n u
m e n u % ! 3 6 = % 0 0 0 0 0 0 0 0 0 0 0 0 0 0 0 0 0 0 1 1 1 0 0 1 :REM Menu flags
m e n u % ? 3 9 = f o r c o l % « 4 OR (forcol% EOR %111)
:REM Icon c o l s
$(menu%+40)="Foreground"+CHR$0
:REM Entry text
menu%!52=&80
:REM Flag as last e n t r y
menu%!56=menu%+300
m e n u % ! 60=%000000000000000000111001
m e n u % ? 6 3 = b a c k c o l % « 4 OR (backcol% E O R %111)
$ (menu%+64)="Background"+CHR$0
menu%!80=0
:REM Header (as above)
menu%?92=4
menu%?93=3
menu%?94=6
menu%?95=15
menu%!96=128
menu%!100=40
menu%!104=0
mb%=menu%+108
mb%!0=0
IF f o r c o l % = % 0 0 0 THEN mb%?0=l
mb%!4=-l
:REM No sub-menu
mb%!8=%00000111000000000000000000111001
:REM Flags
IF b a c k c o l % = % 0 0 0 THEN m b % ! 8 = m b % ! 8 OR 1 « 2 2
$ (mb%+12)="Black"
:REM Entry text
mb%+=24
:REM Set mb% - next entry
mb% ! 0 = 0
IF f o r c o l % = % 0 0 1 THEN mb%?0=l
mb%!4=-l
mb%!8=%00010110000000000000000000111001
IF b a c k c o l % = % 0 0 1 THEN m b % ! 8 = m b % ! 8 OR 1 « 2 2
$(mb%+12)="Red"
mb%+=24
mb%!0=0
IF f o r c o l % = % 0 1 0 THEN mb%?0=l
mb%!4=-l
mb%!8=%00100101000000000 0O0000000111001
The Window Manager
2630
2640
2650
2660
2670
2680
2690
2700
2710
2720
2730
2740
2750
2760
2770
2780
2790
2800
2810
2820
2830
2840
2850
2860
2870
2880
2890
2900
2910
2920
2930
2940
2950
2960
2970
2980
2990
3000
3010
3020
3030
3040
3050
3060
3070
3080
3090
3100
3110
3120
3130
3140
3150
IF b a c k c o l % = % 0 1 0 T H E N m b % ! 8=mb% ! 8 O R 1 « 2 2
$(mb%+12)="Green"
mb%+=24
mb%!0=0
IF forcol%=%011 T H E N mb%?0=l
mb%!4=-l
mb%!8=%00110100000000000000000000111001
IF b a c k c o l % = % 0 1 1 T H E N m b % ! 8 = m b % ! 8 O R 1 « 2 2
$ (mb%+12)="Yellow"
mb%+=24
mb%!0=0
IF forcol%=%100 T H E N mb%?0=l
mb%!4=-l
mb%!8=%01000011000 000000000000000111001
IF b a c k c o l % = % 1 0 0 T H E N m b % ! 8 = m b % ! 8 O R 1 « 2 2
$(mb%+12)="Blue"
mb%+=24
mb%!0=0
IF forcol%=%101 T H E N m b % ? 0 = l
mb%!4=-l
mb%!8=%01010010000000000000000000111001
IF b a c k c o l % = % 1 0 1 T H E N m b % ! 8 = m b % ! 8 OR 1 « 2 2
$(mb%+12)="Magenta"
mb%+=24
mb%!0=0
IF forcol%=%110 THEN mb%?0=l
mb%!4=-l
mb%!8=%01100001000000000000000000111001
IF b a c k c o l % = % 1 1 0 T H E N m b % ! 8 = m b % ! 8 OR 1 « 2 2
$(mb%+12)="Cyan"
mb%+=24
mb%!0=&80
IF forcol%=%lll T H E N mb%?0=&81
mb%!4=-l
mb%!8=%01110000000000000000000000111001
IF b a c k c o l % = % l l l T H E N m b % ! 8 = m b % ! 8 OR 1 « 2 2
$(mb%+12)="White"
mb%+=24
menu%!300=0
:REM S u b - m e n u for b a c k g r o u n d
menu%?312=4
menu%?313=3
menu%?314=6
menu%?315=15
menu%!316=128
menu%!320=40
menu%!324=0
mb%=menu%+328
mb%!0=0
:REM A l l entries as b e f o r e
IF b a c k c o l % = % 0 0 0 T H E N mb%?0=l
mb%!4=-l
mb%!8=%00000111000000000000000000111001
IF forcol%=%000 THEN m b % ! 8 = m b % ! 8 OR 1 « 2 2
$ (mb%+12) ="Black"
181
Archimedes Operating System
3160
3170
3180
3190
3200
3210
3220
3230
3240
3250
3260
3270
3280
3290
3300
3310
3320
3330
3340
3350
3360
3370
3380
3390
3400
3410
3420
3430
3440
3450
3460
3470
3480
3490
3500
3510
3520
3530
3540
3550
3560
3570
3580
3590
3600
3610
3620
3630
3640
3650
3660
3670
3680
182
mb%+=24
mb%!0=0
IF b a c k c o l % = % 0 0 1 T H E N m b % ? 0 = l
m b % ! 4=-l
m b % ! 8=%00010110000000000000000000111001
IF f o r c o l % = % 0 0 1 T H E N m b % ! 8=mb% ! 8 OR 1 « 2 2
$(mb%+12)="Red"
mb%+=24
mb%!0=0
IF b a c k c o l % = % 0 1 0 THEN m b % ? 0 = l
mb%!4=-l
mb%!8=%001001010000000000O0000000111001
IF f o r c o l % = % 0 1 0 T H E N m b % ! 8=mb% ! 8 OR 1 « 2 2
$(mb%+12)="Green"
mb%+=24
mb%!0=0
IF b a c k c o l % = % 0 1 1 T H E N m b % ? 0 = l
mb%!4=-l
m b % ! 8 = % 0 0 1 1 O 1 0 0 0 0 0 O 0 0 0 0 0 0O0000000111001
IF f o r c o l % = % 0 1 1 T H E N m b % ! 8=mb% ! 8 OR 1 « 2 2
$ (mb%+12)="Yellow"
mb%+=24
mb%! 0=0
IF b a c k c o l % = % 1 0 0 T H E N m b % ? 0 = l
mb%!4=-l
m b % ! 8=%01000011000000000000000000111001
IF f o r c o l % = % 1 0 0 T H E N m b % ! 8 = m b % ! 8 OR 1 « 2 2
$(mb%+12)="Blue"
mb%+=24
mb%!0=0
IF b a c k c o l % = % 1 0 1 THEN m b % ? 0 = l
mb%!4=-l
mb%! 8=%01010010000000000000000000111001
IF f o r c o l % = % 1 0 1 T H E N m b % ! 8 = m b % ! 8 OR 1 « 2 2
$(mb%+12)="Magenta"
mb%+=24
mb%!0=0
IF b a c k c o l % = % 1 1 0 THEN m b % ? 0 = l
mb%!4=-l
mb%!8=%01100001000000000000000000111001
IF f o r c o l % = % 1 1 0 T H E N m b % ! 8 = m b % ! 8 OR 1 « 2 2
$(mb%+12)="Cyan"
mb%+=24
mb%!0=&80
IF b a c k c o l % = % l l l THEN m b % ? 0 = & 8 1
mb%!4=-l
mb%!8=%01110000000000000000000000111001
IF f o r c o l % = % l l l T H E N m b % ! 8 = m b % ! 8 OR 1 « 2 2
$(mb%+12)="White"
mb%+=24
ENDPROC
:
DEF P R O C h a n d l e m e n u ( b l o c k % )
The Window Manager
3690
3700
3710
3720
3730
3740
3750
3760
3770
3780
37 90
3800
3810
3820
3830
3840
3850
3860
3870
3880
3890
3900
3910
3920
IF b l o c k % ! 0 < > - l A N D b l o c k % ! 4 < > - l THEN
VDU 1 9 , 9 - ( b l o c k % ! 0 ) , b l o c k % ! 4 , 0 , 0 , 0
IF b l o c k % ! 0 = l b a c k c o l % = b l o c k % ! 4 ELSE f o r c o l % = b l o c k % ! 4
ENDIF
ENDPROC
:
R E M P R O C d o t h a t t h i n g is c a l l e d when t h e Wimp is i d l e .
:
DEF PROCdothatthing
IF s o l v e d w h e n d r a w n % O R e x i t w h e n d r a w n % THEN
IF s o l v e d w h e n d r a w n % solved%=TRUE ELSE exit%=TRUE
ELSE
IF w e a r e X % = s i d e % - l A N D w e a r e Y % = s i d e % - l THEN
:
R E M T h e m a z e has b e e n solved so set appropriate
R E M flags, delete w i n d o w e t c .
:
solvedwhendrawn%=TRUE
block%!0=handle%
PROCdeletewindow(ourwindow%)
s c a l e % = (scale% D I V 5 ) AND &FFC
ourwindow%=FNcreatemain
PROCopenwindow(ourwindow%)
ELSE
3940
3950
3960
3970
3980
R E M C h e c k pointer, check if a button
R E M and p o i n t e r is inside w i n d o w .
:
MOUSE areatX%,areatY%,buttons
IF o u r w i n d o w % = h a n d l e % AND b u t t o n s o O
3930
3990
:
:
is p r e s s e d
THEN
4000
R E M E x a m i n e w i n d o w state, d e t e r m i n e t h e
4010
R E M r e l a t i o n s h i p b e t w e e n w i n d o w and w o r k area
4020
R E M and find w h i c h maze cell t h e p o i n t e r is in.
4030
:
4040
block%!0=handle%
4050
SYS "Wimp_GetWindowState",,block%
4060
offX=block%!4-block%!20
4070
offY=block%!16-block%!24
4080
areatX%=(areatX%-offX)DIV scale%
4090
areatY%=(areatY%-offY)DIV scale%
4100
IF ( w e a r e X % o a r e a t X % OR w e a r e Y % o a r e a t Y % ) A N D
areatx%>=0 A N D a r e a t X % < s i d e % A N D areatY%>=0 AND a r e a t Y % < s i d e % THEN
4110
:REM If the mouse can move the n e w cell, d o so
4120
IF w e a r e X % = a r e a t X % + l AND w e a r e Y % = a r e a t Y % A N D (?(a%+weareX%
+side%*weareY%)AND1) PROCmousemove
4130
IF w e a r e X % = a r e a t X % A N D w e a r e Y % = a r e a t Y % + l A N D (?(a%+weareX%
+side% * w e a r e Y % ) A N D 2 ) P R O C m o u s e m o v e
4140
IF w e a r e X % = a r e a t X % - l AND w e a r e Y % = a r e a t Y % A N D (?(a%+weareX%
+side%*weareY%)AND4)=4 PROCmousemove
4150
IF w e a r e X % = a r e a t X % A N D w e a r e Y % = a r e a t Y % - l A N D
(?(a%+ w e a r e X %
+side%*weareY%)AND8)=8 PROCmousemove
4160
ENDIF
183
Archimedes Operating System
4170
ENDIF
4180
ENDIF
4190
ENDIF
4200
ENDPROC
4210 :
4220 R E M M o v e the pointer w h e n p o s s i b l e .
4230 :
4240 DEF P R O C m o u s e m o v e
4250 IF ( ? ( a % + a r e a t X % + s i d e % * a r e a t Y % ) A N D 16)=16 THEN
4260 :
4270 R E M R e t r a c e step and u p d a t e s c r e e n .
4280 :
4290 ? ( a % + w e a r e X % + s i d e % * w e a r e Y % ) = ? ( a % + w e a r e X % + s i d e % * w e a r e Y % )
&EF
4300 SYS " W i m p _ F o r c e R e d r a w " , h a n d l e % , w e a r e X % * s c a l e % + 4 ,
w e a r e Y % * s c a l e % + 4 , (weareX%+l) w e a l e % - 4 , (weareY%+l)*scale%-4
4310
ELSE
4320 :
4330 R E M M o v e to a new cell a n d u p d a t e screen.
4340 :
4350 ? ( a % + a r e a t X % + s i d e % * a r e a t Y % ) = ? ( a % + a r e a t X % + s i d e % * a r e a t Y % )
&10
4360 SYS " W i m p _ F o r c e R e d r a w " , h a n d l e % , a r e a t X % * s c a l e % + 4 ,
a r e a t Y % * s c a l e % + 4 , (areatX%+l)*scale%-4, (areatY%+l)*scale%-4
4370
ENDIF
4380
weareX%=areatX%
4390
weareY%=areatY%
4400
ENDPROC
4410
AND
OR
:
4420 R E M T h e m a z e g e n e r a t o r .
4430 :
4440 D E F P R O C n e w m a z e
4450 L O C A L P%,X%,Y%,L%
4460
FORI%=0TOarea%-lSTEP4:a%!I%=0:NEXT
4470
P%=0
4480 P R O C n e w c e l l ( R N D ( s i d e % ) - 1 , RND(side%) -1)
4490
REPEAT
4500 IF P % > 3 AND R N D ( 1 0 0 ) < > 1 L%=RND(3)+P%-4 E L S E L%=RND(P%)-1
4510
X%=?(b%+L%):Y%=?(b%+L%+area%)
4520
P%=P%-1
4530
? (b%+L%)=?(b%+P%) :?(b%+L%+area%)=?(b%+P%+area%)
4540
Flag%=0
4550
REPEAT
4560 C A S E R N D (4) OF
4570 W H E N 1:IF X%<>0 IF (?(a%+X%-l+Y%*side%) AND &80)<>0
? ( a % + X % + Y % * s i d e % ) = ? ( a % + X % + Y % * s i d e % O R 1:? (a%+X%-l+Y% *side%)
= ? ( a % + X % - l + Y % * s i d e % ) OR 4:Flag%=-l
4580 W H E N 2:IF Y%<>0 IF (?(a%+X%+(Y%-1}*side%) AND &80)<>0
? ( a % + X % + Y % * s i d e % ) = ? ( a % + X % + Y % * s i d e OR 2 : ? (a%+X%+ (Y%-1) *side%)
= ? ( a % + X % + ( Y % - 1 ) * s i d e % ) O R 8:Flag%=-l
4590 W H E N 3:IF X % < > s i d e % - 1 IF (? (a%+X%+l+Y%*side%) A N D & 8 0 ) < > 0
? ( a % + X % + Y % * s i d e % ) =? (a%+X%+Y%*side%) O R 4 : ? (a%+X%+l+Y%*side%)
= ? ( a % + X % + l + Y % * s i d e % ) O R l:Flag%=-l
184
The Window Manager
4600 W H E N 4:IF Y%<>side%-1 IF (?(a%+X%+(Y%+1)*side%) A N D &80)<>0
? ( a % + X % + Y % * s i d e % ) = ? ( a % + X % + Y % * s i d e OR 8:?(a%+X%+(Y%+1)*side%)
= ? ( a % + X % + (Y%+1)*side%) OR 2:Flag%=-l
4610 E N D C A S E
4620 U N T I L F l a g %
4630
PROCnewcell(X%,Y%)
4640 U N T I L P%=0
4650
X%=0:Y%=0:?(a%+X%+Y%*side%)=?(a%+X%+Y%*side%)OR1
4660
X%=side%-1:Y%=side%-1:?(a%+X%+Y%*side%)=?(a%+X%+Y%*side%)OR4
4670
ENDPROC
4680 :
4690 D E F P R O C n e w c e l l ( X % , Y % )
4700 ? ( a % + X % + Y % * s i d e % ) = ? ( a % + X % + Y % * s i d e % ) O R &C0
4710 IF X%>0 IF (?(a%+X%-l+Y%*side%) A N D &40)=0 P R O C l i s t a d d ( X % 1,Y%)
4720 IF X%<side%-1 IF (?(a%+X%+l+Y%*side%) AND &40)=0
P R O C l i s t a d d ( X % + 1 , Y%)
4730 IF Y%>0 IF (?(a%+X%+(Y%-1)*side%) AND &40)=0
P R O C l i s t a d d ( X % , Y%-1)
4740 IF Y%<side%-1 IF (?(a%+X%+(Y%+1)*side%) AND &40)=0
P R O C l i s t a d d ( X % , Y%+
4750 E N D P R O C
4760 :
4770 D E F PROClistadd(I%,J%)
4780 ? ( a % + I % + J % * s i d e % ) = ? ( a % + I % + J % * s i d e % ) O R &40
4790 ? ( b % + P % ) = I %
4800
?(b%+P%+area%)=J%
4810 P%=P%+1
4820 E N D P R O C
4830 :
4840 R E M The error h a n d l e r , w h i c h u s e s P R O C f i n i s h to b e t i d y .
4850 :
4860 D E F PROCerror
4870
PROCfinish
4880 P R I N T R E P O R T $ ; " at line ";ERL
4890 E N D P R O C
4900 :
4910 R E M Shut d o w n the W i m p s y s t e m t i d i l y .
4920 :
4930 DEF PROCfinish
4940 SYS W i m p _ C l o s e D o w n "
4950 *FX 4
4960 ^POINTER 0
4970 V D U 4,26,20,12
4980 E N D P R O C
n
Listing 13.1. WimpMaze.
185
14 : The Font Manager
The 'Font Manager' and its twin - the 'Font Painter' - allow characters to
be displayed in a number of fonts, anti-aliased, scaled to a n y size,
proportionally spaced and with optional position justification. The fonts
are stored i n two sets of files (known as the 'metric' and 'pixel' files) which
define the shape of the font and contain pixel bit-maps of the font
characters. B y calling the Font Manager, an application may request a
specified font in a given size and then display (optionally coloured) text in a
chosen screen mode.
The Font Manager deals with the business of reading font definitions into
memory (a process known as 'caching') and scaling the fonts to the
required size as it does so. An area of memory may be set aside for the Font
Manager's cache using the configuration option FontSize, and this limits
the number of fonts which may be cached at any moment. If insufficient
space is available in memory the Font Manager will delete some of the
existing fonts to make room for fresh ones. Thus the application does not
have to deal with the memory management issues.
The Font Painter takes the cached font definitions and paints them onto the
display either by means of SWI calls or through the normal VDU channel for
printing text. This latter technique is achieved by intercepting the V D U
extension vector VDUXV.
So that the Font Manager and the Font Painter can communicate with
each other effectively there is a fixed relationship between the scales each
use. The F o n t Manager works in / o o * s of a 'point', a typographer's
measure which is roughly / nd
of an inch. Thus the Font Manager's basic
units are V 7 2 o o o
°f
i
- The Font Painter, on the other hand, works
with screen units (pixels) which it assumes to be V i 8 0 of an inch, so there
are n o m i n a l l y 90 pixels per inch in mode zero (which has half the
theoretical maximum resolution).
1
l
tns
a
n
1 0
72
n c n
t n
Dealing with the Font Manager
The Font Manager handles the movement and scaling of font files which
are stored o n the selected filing system. The OS variable Font$Prefix
186
The Font Manager
specifies where the font files are to be found. Font files are stored in subdirectories of a directory whose name is the name of the font, so a full
pathname is derived by using the contents of Font$Prefix followed by the
name of the font, eg, after entering:
•SET
Font$Prefix
$.Welcome.Fonts
the files for the font named Trinity will henceforth be found in:
$.Welcome.Fonts.Trinity
To allow the Font Manager to perform caching and de-caching automatically it is necessary to follow this procedure:
1.
Request the font using SWI "FontJFindFont" by name, specifying
its point size and screen resolution. A font 'handle' is returned by
the Font Manager.
2.
Use this handle in any subsequent requests to the Font Manager.
3.
Advise the Font Manager that the font is no longer needed by
calling SWI "Font_LoseFont" with the handle.
When an application requests a font, the Font Manager first checks the
cache to see if the font is already available in the specified size. If so, the
handle of the font is returned immediately; otherwise, the Font Manager
loads the font information from the filing system (evicting other fonts from
the cache if necessary) and returns a new handle to the application.
An Example
Listing 14.1 is a full listing of an example program which uses the Font
Manager. Bearing in mind the sequence described above, here is a
summary of how the program works.
First, the SWI "Font_CacheAddr" is issued to determine which version of
the Font Manager is being used and to return the total size of the font
cache and the amount already used. This call is made with R0 containing
zero and returns with the version number*!00 in R0, the amount of cache
used in R l and the total cache size in R2. The following line of BASIC
achieves this:
SYS "Font_CacheAddr"
TO
version%,cacheused%,cachesize%
Next, three different combinations of font and size are requested from the
Font Manager using swi "Font_FindFont". This takes a pointer to the
font name in R l , the width in points*16 in R2, the height in points*16 in R3
187
Archimedes Operating System
and, optionally, the X and Y resolutions of the display in pixels per inch in
R4 and R5 (if zero is supplied then the default is used). The Font Manager
returns a handle to the font in R0. The following line of Basic gets the
handle in Trinity% for a 48 point square version of the supplied font
"Trinity Medium":
SYS " F o n t _ F i n d F o n t " , , "Trinity .Medium", 48*16, 48*16 TO Trinity
The palette needs to be set up to anti-alias the fonts correctly in the selected
mode (mode 12 in the example). Fonts are inherently anti-aliased using 16
colours, so in modes where this number of colours is not spare, the number
of anti-aliasing levels must be reduced. This is achieved by issuing SWI
"Font_SetPalette" which takes as parameters the background logical
colour in R l , the foreground logical colour in R2, the foreground colour
offset (see below) in R3, the physical background colour in R4 and the 'last'
physical foreground colour in R5.
Consider the following line from the example listing 14.1:
SYS
n
" F o n t _ S e t P a l e t t e , , 0 , 1 , 6 , & 0 0 0 0 0 0 0 0 , &F0F0F000
The last two figures indicate the start and end physical colours. These are
in the form &BBGGRR00 where B B , G G and RR are the blue, green and red
intensities respectively. So the line above will result in a colour scale from
black ( & 0 0 0 0 0 0 0 0 ) to white (&FOFOF0OO). The parameters 0,1,6 determine
which logical colours are used for this colour scale. The 0 indicates that
logical colour 0 is to be used for the background colour, the 1 defines the
colour scale as starting at logical colour 1 and the 6 means that 6 colours
(excluding the background colour) are to be used in the scale. Hence, logical
colours 0 to 7 are redefined to form an ascending black-to-white colour
scale.
The next line in the example performs a similar function, setting logical
colours 7 to 15 to form a scale from white to dark-green. Note that the
example listing 14.1 uses the physical colour white to terminate one colour
scale and begin another. By sharing colours in this way, a larger variety of
shades may be squeezed into a limited logical colour range.
Getting Text on the Display
Having identified to the Font Manager those fonts which will need caching
and having set up the palette for anti-aliasing, we may now proceed to
actually display text.
The first stage is to identify the colours in which we wish to display the
chosen font using the swi "Font_SetFontColours". This SWI takes a font
188
The Font Manager
handle in R0 (or 0 for the 'current' or most recently used font), a background logical colour in R l , a foreground logical colour in R2 and a
foreground colour offset in R3 (as above). This call returns no results, but
simply establishes the colours that will subsequently be used. The following
line is used in the example listing:
SYS
"Font_SetFontColours", Trinity%, 7,8,7
The second stage is to ask the Font Manager to be prepared to print in the
font we intend to use. This is achieved using the SWI "Font_SetFont" which
simply takes the font handle in R0 and returns no results, eg:
SYS
"Font_SetFont",Trinity%
Finally, we can actually pass to the Font Painter the text to be displayed,
accompanied by a 'plot type' indicating the way in which it should appear.
The S W I "Font_Paint" achieves this, taking a pointer to the string to be
displayed in R l , the plot type in R2 (see below) and the X and Y coordinates where the text is to start in R3 and R4 respectively.
It is important to note that the pair of co-ordinates specifying the position
where the text will start refer to the bottom left-hand corner of the box
that one may imagine enclosing the text, rather than the top left-hand
corner as is the case when printing text following a V D U 5.
Plot Type Options
The plot type parameter contains four flags whose meanings are as
follows:
Bit 0: S e t - J u s t i f y Text
When this bit is set, the Font Painter will attempt to fully justify the text
string. To do this, you must have supplied the co-ordinates of the righthand limit to which justification should extend. Only the X-axis part of this
co-ordinate is really relevant since the Y-axis value must be the same as
that of the text starting position if you want horizontal text! The coordinate is supplied by issuing a graphics M O V E command before issuing the
SWI, so for example:
M O V E 1280,732
SYS "Font_Paint",,"This w i l l be
justified",%10001,0,732
will produce the text string "This will be justified" with the lower left-hand
corner of the opening 'T' at (0,732) and the lower right-hand corner of the
closing'd' at (1280,732).
189
Archimedes Operating System
Bit 1: Set - Pre-draw Rubout Box
This option tells the Font Painter to 'rub out' a box surrounding the text by
filling it with the background colour before the text is painted onto the
screen. To d o this, two pairs of co-ordinates must have been supplied by
issuing MOVE commands: the first to specify the bottom left-hand corner of
the box and the second the top right-hand corner. For example:
M O V E 0,716:MOVE 1280,772
S Y S "Font_Paint", ,"A rub out b o x " , T r i n i t y % , % 1 0 0 1 0 , 0,732
If this operation is to be combined with justification the box co-ordinates
must be issued first, followed by the justification limit co-ordinate. For
example:
MOVE
MOVE
SYS
0,716:MOVE
1280,732
1280,772
"Font_Paint",,"This
:REM rub out box
will be
justified",%10011,0,732
Bit 2: Set - Absolute Co-ordinates Supplied
This bit should allow co-ordinates to be specified relative to the cursor
position or absolutely (when set). OS vl.20 ignores the state of this bit and
always treats the co-ordinates as absolute.
Bit 3: Not used
Bit 4: O S Co-ordinates/Font Painter Co-ordinates
This bit allows the co-ordinates of the text display position to be set either
in OS units (ie, within the theoretical display limits of 1280,1024) or in Font
Painter co-ordinates with units of V 7 2 o o o °f
i - The application of
the latter form is limited, so it is suggested you always set this bit and use
OS co-ordinates (as we have).
tns
a n
n c n
Conversions Between the Co-ordinate Systems
Two SWls are provided to convert between Font Painter co-ordinates in
V72ooo °f
i
d OS VDU driver co-ordinates. These SWls simply take
an X,Y co-ordinate pair in R1,R2 and return its converted form in R1,R2.
tns
a
n
R C n
a R
SWI Font_ConverttoOS (SWI &40088)
Convert Font Painter to OS
This SWI converts a pair of Font Painter co-ordinates in units of /72000th
inch to OS co-ordinates. On entry, the X,Y pair is supplied in R1,R2 with the
converted result being returned in the same registers.
1
190
The Font Manager
SWI Font_Converttopoints (SWI &40089)
Convert OS to Font Painter
This SWI converts a pair of OS co-ordinates in screen units to Font Painter
co-ordinates in /72000th i h units. On entry, the X,Y pair is supplied in
R1,R2 with the converted result being returned in the same registers.
1
n c
Size Calculations for Characters and Strings
The Font Manager provides several SWis to allow detailed information
about the currently selected font to be examined. These are documented
below:
SWI Font_ReadDfn(SWI
Read Font Definition
&40083)
This call returns a set of registers containing information about the font
whose handle is supplied. On entry R0 should contain a font handle and R l
should point to a buffer large enough to hold the font name ( < = 12 bytes).
The results are returned in registers as follows:
Register
Rl
R2
R3
R4
R5
R6
R7
Information
Still points to buffer, which now contains font name
Width of font *16
Height of font *16
Width resolution in pixels per inch
Height resolution in pixels per inch
Number of other users of font
Number of other accesses since this font was last used
SWI Font_ReadInfo (SWI &40084)
Read Character Information
This call returns the co-ordinates of a box which is just large enough to
accommodate any character in the font, useful for deciding how large a rub
out box to define. On entry, R0 must contain the font handle, with the coordinates returned as follows:
Register
Rl
R2
R3
R4
Information
X_min (OS co-ordinates, inclusive)
Y_min (OS co-ordinates, inclusive)
X_max (OS co-ordinates, exclusive)
Y_max (OS co-ordinates, exclusive)
191
Archimedes Operating System
SWI Font_StringWidth (SWI &40085)
Calculate String Width in Current Font
This call performs a number of calculations on a text string to determine
how much space it will occupy.
On entry R l must point to the string, R2 and R3 specify the maximum
offsets in Font Manager co-ordinates which the string is allowed to occupy
(see below), R4 contains the character at which the string may be split if it
will not fit entirely and R5 contains the positional index of the last
character allowed in the calculation.
The results returned indicate where the cursor would be after the string
was printed as (X,Y) in R2 and R3, the number of occurrences of the
specified split character in R4 and the positional index of the point at which
the calculation terminated (according to the character criteria supplied).
By judicious use of these parameters it is possible to determine where to
split text lines for wordprocessor formatting (by setting R4 to ASCII 32), find
the 'length of a string or calculate proportional spacing values.
7
To show this facility in action, the example program right-justifies a piece
of text by:
1.
Defining a rub out box.
2.
Converting its size into Font Manager co-ordinates.
3.
Calculating the 'length' of the string in Font Manager coordinates.
4.
Converting these co-ordinates back into OS co-ordinates.
5.
Printing the string at an X offset of 1280 minus the previous result.
The following program fragment reproduces this in much the same way as
the example listing 14.1:
M O V E 0 , 4 6 0 : M O V E 1 2 8 0 , 600 :REM set up rub out box
SYS " F o n t _ C o n v e r t t o p o i n t s " , , 1280,140 TO , B o x X i n P t s % , B o x Y i n P t s %
SYS " F o n t _ S t r i n g W i d t h " , ,"Try C o r p u s " , B o x X i n P t s % , B o x Y i n P t s % , 3 2 , 1 3
TO, , X o f f P t s % , Y o f f P t s %
SYS " F o n t _ C o n v e r t t o O S " , , X o f f P t s % , Y o f f P t s %
TO , X o f f % , Y o f f %
SYS " F o n t _ P a i n t \ , "Try C o r p u s " , % 1 0 0 1 0 , 1 2 8 0 Xoff%,500
192
The Font Manager
Conclusion
The Font Manager and Font Painter provide the basis for complex text
display facilities based on high-resolution, anti-aliased fonts. Unfortunately, the complexity of the font management software as a whole
makes the process of executing software written for this module rather
painful to watch. Furthermore, anti-aliasing only works at its best for
relatively large characters displayed in black on white, which is not really
surprising given the heritage of the technique in the world of typesetting.
10 R E M >Listl4/l
20 R E M by Nicholas v a n Someren
30 R E M A r c h i m e d e s O S : A D a b h a n d G u i d e
40 R E M (c) Copyright AvS and NvS 1988
50 :
60 M O D E 12
70 :
80 R E M The variable F o n t $ P r e f i x should be set to
90 R E M the directory c o n t a i n i n g the f o n t s .
100 :
110 *SET Font$Prefix $.Welcome.Fonts
120 :
130 R E M Read Font M a n a g e r version and load fonts.
140 :
150 SYS "Font_CacheAddr" TO v e r s i o n % , c a c h e u s e d % , c a c h e s i z e %
160 v e r s $ = " F o n t M a n a g e r v e r s . "+STR$(version%/100)
170 SYS " F o n t _ F i n d F o n t " , , " T r i n i t y . M e d i u m " , 4 8 * 1 6 , 4 8 * 1 6 TO
Trinity%
180 SYS " F o n t _ F i n d F o n t " , , " C o r p u s . M e d i u m " , 3 2 * 1 6 , 3 2 * 1 6 T O C o r p u s %
190 SYS " F o n t _ F i n d F o n t " , , " T r i n i t y . M e d i u m " , 2 4 * 1 6 , 1 8 * 1 6 TO
SmallTrinity%
200 :
210 R E M Set up the p a l e t t e and show them as s t r i p e s .
220 :
230 SYS "Font_SetPalette", ,0,1, 6, &00000000, &FOF0FOO0
24 0 SYS "Font_SetPalette", , 7, 8, 7, &F0FOF000, &00600000
250 F O R s%=0 TO 1279 STEP 80
260 GCOL s%/80
270 R E C T A N G L E FILL s%,0,79,1023-32
280 N E X T
290 :
300 REM Choose the c o l o u r s and the Trinity font.
310 :
320 SYS " F o n t _ S e t F o n t C o l o u r s " , T r i n i t y % , 7 , 8 , 7
330 SYS " F o n t _ S e t F o n t " , T r i n i t y %
340 :
350 R E M Define a rub out b o x and print a m e s s a g e .
360 :
370 M O V E 50,800
380 M O V E 1230,940
390 SYS " F o n t _ P a i n t " , , v e r s $ , % 1 0 0 1 0 , 5 0 , 8 4 0
AOS-M
193
Archimedes Operating System
400 :
410 R E M Set up a rub out box, and t h e cursor
420 R E M p o s i t i o n after justification.
430 :
440 M O V E 100,516:MOVE 1180,572
450 M O V E 1180,532
460 :
470 R E M Select the font and display a m e s s a g e .
480 :
490 SYS "Font_SetFont", S m a l l T r i n i t y %
500 SYS "Font_Paint",,"This is 24pt justified Trinity",
%10011,100,532
510 :
520 R E M Select some new c o l o u r s and the C o r p u s font.
530 :
540 SYS " F o n t _ S e t F o n t C o l o u r s " C o r p u s % , 0 , 1 , 6
550 SYS " F o n t _ S e t F o n t " , C o r p u s %
560 :
570 R E M D e f i n e a rub out box
580 :
590 M O V E 0,160
600 M O V E 1280, 300
610 :
620 R E M F i n d the point size of the rub out box and
630 R E M t h e string size (not exceeding t h e b o x ) .
640 :
650 t e x t $ = " T h i s is on the right"
660 SYS " F o n t _ C o n v e r t t o p o i n t s ™ , , 1 2 8 0 , 1 4 0 TO ,BoxXinPts%,
BoxYinPts%
670 SYS "Font_StringWidth",, t e x t $ , B o x X i n P t s % , B o x Y i n P t s % , 32,
L E N ( t e x t $ ) TO , , X o f f P t s % , Y o f f P t s %
680 :
690 R E M Convert the size b a c k to OS units and print
700 R E M some r i g h t - j u s t i f i e d t e x t .
710 :
720 SYS " F o n t _ C o n v e r t t o O S " , , X o f f P t s % , Y o f f P t s % TO , X o f f % , Y o f f %
730 SYS "Font_Paint", ,text$, %10010, 1280-Xoff%, 208
740
END
/
Listing 14.1. Font demonstration.
194
15 : Sound Introduction
The Archimedes A-series machines support an eight channel, stereo digital
sound system. This is provided by V I D C using a Direct Memory Access
( D M A ) output channel and analogue output circuitry ( D A C ) . There is no
analogue sound system on the Archimedes. All sounds, or waveforms, are
created either mathematically or by use of data tables. The sound data is
processed entirely by software which must also perform any filtering or
modulation required.
The D M A generates audible sounds by having the digital data held in its
buffer converted into analogue signals. The buffer itself is filled by the
Voice Generators which are normally implemented as Relocatable
Modules and have direct access to the sound channels.
Figure 15.1. Graphs
The data itself is first logarithmically scaled to provide a greater dynamic
range. This scaling is undertaken automatically by the firmware. The value
of each piece of data can be thought of as an indication of the position of a
speaker cone. For example, a constant series of values will not produce any
sound at all as the speaker cone will not move. On the other hand a rapidly
fluctuating series of values will produce a high frequency tone. The greater
195
Archimedes Operating System
the fluctuation of the series the louder the tone. Likewise a series which
fluctuates o n l y a little would produce a quiet tone.
The Three Levels of Sound
The Archimedes sound system is split up into three levels which are
hierarchically structured. The lowest level is the DMA system, this in turn
activates higher levels which then provide a block of sound data for output
to the DAC.
Level 0 - SoundDMA
The DMA Buffer Handler is activated whenever a new block of sound data
is required, and updates the necessary pointers. Level 0 is essential to the
sound system and so it is provided in firmware as a Relocatable Module
called SoundDMA. If a sound overload occurs, ie, if there is simply to much
sound data to be processed, Level 0 marks the offending channel as overrun and the real-time buffering is aborted, before being restarted.
Level 0 a l s o caters for any hardware-dependent programming which
requires privileged-mode access, such as stereo positioning.
Table 15.2 lists the various SWI calls and the corresponding * commands, if
one exists.
SWI
Configure
Enable
Speaker
Stereo
Star Command
(None)
AUDIO O N / O F F
SPEAKER O N / O F F
STEREO
<channel> <position>
Table 15.1. The Level 0 SWI and * commands.
Level 1 - SoundChannels
The DAC recognises eight logical sound channels and these will produce
sound according to the configuration (ie, stereo-position) of each logical
channel.
There can b e one, two, four or eight physical channels. The number in use
will affect the way that the sound buffers are filled, which is accomplished
by means of interleaving the data when filling the DMA buffer.
196
Sound Introduction
Level 1 controls the allocation and de-allocation of channels and will
automatically flush de-allocated channels. Level 1 also provides the means
by which pitch and volume are altered, will attach channels to voice
generators, install and detach voice generators and allows direct real-time
control of musical parameters.
Table 15.2 lists the various SWI calls and corresponding * commands associated with Level 1 sound.
SWI
AttachNamedVoice
AttachVoice
Control
ControlPacked
InstallVoice
LogScale
Pitch
ReadControlBlock
RemoveVoice
SoundLog
Tuning
Volume
WriteControlBlock
Star Command
*CHANTNELVOiCE <channel> <voice name>
*CHANNELVOlCE <channel> <voice index>
*SOUMD<channel><ampxpitchxduration>
*VOICES
""TUNING < n >
*VOLUME < n >
Table 15.2. SWI calls associated with Level 1 sound
Level 2 - SoundScheduLer
Level 2 facilitates the queuing of sounds, ie, their playing in a predetermined order. In addition it also provides the data structures which allow
multiple channel music or sound to be synchronised under simple program
control - the playing of chords.
Notes, timbral changes and most importantly user-supplied code routines
may be scheduled in arbitrary time order. Queued sounds are activated as
events at the appropriate tempo-dependent time in the future. Unfortunately it is not possible to queue sounds to play in the 'past', as some
sound systems allow. Level 2 also allows changes in tempo and beats per
bar to change dynamically whilst maintaining note synchronisation.
Table 15.3 (overleaf) lists the various SWI calls and corresponding *
commands associated with Level 2 sound.
197
Archimedes Operating System
SWI
Star Command
QBeat
QDispatch (reserved)
QFree
Qlnit
QRemove (Reserved)
QSchedule
*QSOUND<chan><amp><pitch><dur><nBeats>
QTempo
*TEMPO <n>
Table 15.3. Level 2 swi calls.
198
16 : Sound Star Commands
This chapter details the various * commands associated with sound and
their use. They are classified in alphabetical order under their sound level
num-ber as defined in the previous chapter.
Level 0 Commands
*AUDIO
Syntax:
*AUDIO
ON/OFF
All sound interrupt and D M A activity is stopped when * A U D I O O F F is issued.
The D M A buffer is no longer filled so no sound is produced by the DAC. Once
Audio is turned back on with *AUDiO ON, the D M A and interrupt system are
returned to the status they held prior to being turned off. During the time
when audio is off, Level 1 and Level 2 activities are also suspended,
although software interrupts to all levels are still permitted, even if no
sound results. This can be advantageous as it allows sounds to be
'remembered' while A U D I O is off, and to be hastily played as soon as A U D I O
is turned back on.
^SPEAKER
ON/OFF
Syntax:
•SPEAKER
ON/OFF
This command effectively turns the internal speaker on or off - it has no
effect on the external stereo output. It achieves this by muting the
monophonic mixed signal to the internal loudspeaker amplifier. All D M A
activity continues so sounds will be processed as usual. If you do not
envisage using the external stereo output, then this command can be used
instead of the A U D I O command.
199
Archimedes Operating System
*STEREO
Syntax:
*STEREO
where:
<channel>
<position>
<channel> is in the range 1 to 8
<position> is in the range -127 to 127.
The DAC supports stereo sound output via the audio socket at the rear of
the machine. Each logical channel, therefore, has its own unique stereo
image. This command usually sets the stereo position of each physical
channel, b u t can be used to reposition the logical channels if used correctly.
The channels affected are n, n + N , n + 2 N up to channel 8, where N is the
number of active voices. The default stereo settings for all channels is zero,
ie, centre. There are seven discrete stereo positions:
Range
- 1 2 7 to - 8 0
-79 to-48
-47 to-16
- 1 5 to +15
+16 to+47
+48 to+79
+ 8 0 to +127
Position
Full Left
2 / 3 left
1/3 left
Central
1/3 right
2 / 3 right
Full right
Level 1 Commands
^CHANNEL VOICE
Syntax:
*CHANNELVOICE
where:
<channel><voice
index>/<voice
name>
<channel> is in the range 1 to 8
<voice index> is in the range 1 to 32.
This c o m m a n d allows different physical channels to be attached to
different VoiceGenerators, in order for them to play different sounds. The
voice index is the VoiceGenerator slot number. This can be determined
using the ""VOICES command. The voice name is the VoiceGenerator's
preferred n a m e , which is registered with the Level 0 handler.
200
Sound Star Commands
Examples of use:
* CHANNELV01CE
* CHANNELVOICE
1 1
1 StringLib-Soft
^CONFIGURE SoundDefault
Syntax:
•CONFIGURE
where:
SoundDefault<speaker><coarsevol><voice>
<speaker> is 0 or 1
<coarsevol> (coarse volume) is in the range 0 to 7
<voice> is in the range 1 to 16.
This command sets the default sound configuration. As these settings are
held in non-volatile C M O S R A M , they remain in use until the machine is
completely reset or they are changed again. Upon power-up, C T R L - R E S E T ,
or B R E A K , these values are used to initially configure the speaker, master
volume control and the default bells' voice.
The speaker parameter controls whether the internal loudspeaker should
be on (1) or off (0). The coarse volume sets the default amplitude of the
system sound. This value is equivalent to the * V O L U M E setting divided by
16, ie, a coarse volume of 2 is equivalent to a * V O L U M E setting of 32. The
Voice parameter can be used to set which voice generator channel one, the
default system bell channel, will be attached to.
Example of use:
•CONFIGURE
SoundDefault
1 6
7
*SOUND
Syntax:
•SOUND
<channel>
<amplitude>
<pitch>
<duration>
This is the direct equivalent of BASIC'S S O U N D command. When used, and
providing the selected channel is active and attached, the sound will be
reproduced immediately.
The parameters passed to * S O U N D , are all unsigned integers. It should be
noted that when passing negative numbers all 32 bits should be passed, for
example, to pass the value - 1 the equivalent hexadecimal number,
& F F F F F F F F , must be passed.
201
Archimedes Operating System
Amplitude
There are t w o forms of amplitude - linear and logarithmic. The linear
form is expressed as a simple number in the range 0 (silence) to - 1 5 (loud).
The logarithmic scale runs from &100 (silence) to &17F (loud), and a
change of & 1 0 represents a doubling or halving of the volume. Bit seven
can be used as a toggle to facilitate a 'smooth' change of the sound.
For example:
*SOUND
*SOUND
1 &17F
1 &1EF
&4200
&4000
&FE
&20
will cause the first sound to change pitch and amplitude as soon as the
second command is issued.
Pitch
There are t w o ways in which pitch can be specified. The first method
allows specification in steps of a quarter of a semitone. The range of
values for this method is 0 to 255. The lowest note (0) is the B, one octave
and a semitone below middle C. Middle C has a value of 53. Table 16.1 can
be used to look-up the pitch value associated with which note.
Note
A
A#
B
C
C#
D
D#
E
F
F#
G
G#
1
1
5
9
13
17
19
21
25
29
33
37
2
41
45
49
53
57
61
65
69
73
77
81
85
3
89
93
97
101
105
109
113
117
121
125
129
133
4
137
137
141
145
149
153
161
165
169
173
177
181
5
185
189
193
197
201
205
209
213
217
221
225
229
6
223
237
241
245
249
253
Table 16.1. Note associated Pitch values.
A finer degree of control can be obtained using a second method in which
values are specified in the range &0100 to &7FFF. Each value is constructed from 15-bits. The top three bits (14, 13 and 12) specify the octave
number, w h i l e the remaining 12-bits define the fractional part of the
octave. Each octave is, therefore, split up into 4096 different pitch levels.
Middle C in this case has a value of &4000. Table 16.2. defines these values
for each note for ease of reference:
202
Sound Star Commands
Note
A
A#
B
C
C#
D
D#
E
F
F#
G
G#
1
&0155
&02AA
&0400
&0555
&06AA
&0800
&0955
&0AAA
2
&0C00
&0D55
&0EAA
&1000
&1155
&12AA
&1400
&1555
&16AA
&1800
&1955
&1AAA
3
&1C00
&1D55
&1EAA
&2000
&2155
&22AA
&2400
&2555
&26AA
&2800
&2955
&2AAA
4
&2C00
&2D55
&2EAA
&3000
&3155
&32AA
&3400
&3555
&36AA
&3800
&3955
& 3 AAA
5
&3C00
&3D55
&3EAA
&4000
&4155
&42AA
&4400
&4555
&46AA
&4800
&4955
& 4 AAA
6
&4C00
&4D55
& 4EAA
&5000
&5155
&52AA
&5400
&5555
&56AA
&5800
&5955
& 5 AAA
7
&5C00
&5D55
&5EAA
&6000
&6155
&62AA
&6400
&6555
&66AA
&6800
&6955
& 6 AAA
8
&6C00
&6D55
&6EAA
&7000
&7155
&72AA
&7400
&7555
&76AA
&7800
&7955
&7AAA
9
&7C00
&7D55
&7EAA
Table 16.2. Table of Pitch values.
"TUNING
Syntax:
•TUNING
n
where:
n is a value in the range
-&OFFF
to
&OFFF
This command overrides the system pitch base. It can be used to raise or
lower the pitch of all sounds. The value is a 16-bit number, which is split up
into two parts.
The top four-bits represent the octave number (O), the remaining bits are
the fractional part of the octave (FFF). A value of zero resets the tuning to
the default value. The value is relative, so to raise the pitch of all notes by
one octave, you would use:
•TUNING
41000
•VOICES
This command will list all the currently installed VoiceGenerator's names
which have been registered with the Level 0 handler. Channels that have
been attached to these voices are also indicated. The voice number is the
voice index which is used in the *CHANNELVOlCE command. The numbering
of the voices depends on the order in which they were installed, so it may
change. Typically the command might return the following:
203
Archimedes Operating System
1
2
3
4
Voice
1
2
3
4
5
6
7
8
9
Name
WaveSynth-Beep
StringLib-Soft
StringLib-Pluck
StringLib-Steel
StringLib-Hard
Percussion-Soft
Percussion-Medium
Percussion-Snare
Percussion-Noise
*AA/S^~-^channel
Allocation
Map
Figure 16.1. Default "VOICES output.
*VOLUME
Syntax:
*VOLUME
n
where:
n is a value in the range 1 to 127.
This command sets the master volume of the sound system. The range is 1
(quietest) to 127 (loudest). This value is used by all voice generators to scale
the amplitudes of their sounds. The amplitude of any sound command will
be scaled b y this value. The default value is 127 and this may be changed by
using the "CONFIGURE VOLUME command. For example:
* VOLUME
63
or alternatively:
*CONFIGURE
204
VOLUME
63
Sound Star Commands
Level 2 Commands
*QSOUND
Syntax:
*QSOUND
<chan>
<amp>
<pitch>
<duration>
<nBeats>
This command is similar to the * S O U N D command, but differs in that it is
possible to specify on which beat this note should be played. For full
information on the first four parameters see the description for * S O U N D
above.
The beat is an internal counter which is set to zero at the start of each bar.
The beat increment is set by the " T E M P O command. If a value of & F F F F F F F F
(-1) is used for nBeats then, instead of being scheduled for a given number
of beats, the sound is synchronised with the last scheduled sound. For
example:
10
20
30
40
50
BEATS 200
REPEAT
UNTIL B E A T = 0 :REM Wait for start of next
*QSOUND 1 &17F &4000 &10 50
*QSOUND 2 &17F &5000 &10 &FFFFFFFF
bar
This program will produce two tones, one octave apart, to be made 50
beats after the start of the next bar.
•TEMPO
Syntax:
*TEMPO n
where n is a value in the range 0 to &FFFF
This command affects the rate at which scheduled events are played back.
The value n, in fact, sets the rate at which the beat counter is incremented,
and is used to queue the scheduled sounds, for instance:
Value
2048(&0800)
4096(&1000)
8192 (&2000)
Beat increment
Each beat lasts twice as long
Default.
Each beat is half as long
Scheduled sounds
Slowed down
Speeded up
The default value is &1000. This corresponds to one microbeat per centisecond.
205
Archimedes Operating System
Each bar is split up into a number of beats. The duration of each beat is
affected b y the tempo. The beat counter is set to zero at the start of each
bar. If sounds or music are scheduled using *QSOUND or the five parameter
BASIC SOUND statement, then the execution of notes can be speeded up or
slowed d o w n by changing the TEMPO. The durations of the notes are not
changed.
206
17 : Sound SWI Calls
The SWI calls associated with the Archimedes sound system are detailed
below. They are arranged according to their level classifications.
Level 0 SWI Commands
Sound_Configure
Pass:
R0
Rl
R2
R3
R4
Number of channels (n) [rounded up to 1,2,4,8 (N)]
Samples per buffer
Period in microseconds (|aS)
Levell handler code, [normally 0 to preserve system levell]
Level2 handler code, [normally 0 to preserve system level2]
Zero for any parameters will not change that setting.
Constraints:
R0 1 . . 8 (rounded to 1,2,4,8)
R l 1 6 / N . . Sound DMA Buffer limit/N
R2 3 / N . . 2 5 5 / N
Returned:
Previous settings.
Default:
R0
Rl
R2
1
&D0
48
The Number of Sound Channels (R0)
The value passed in R0 will be rounded to 1,2,4,8. Channels are
multiplexed into the eight logical channels available. If only one physical
channel is available then all eight logical channels will be used for sound.
Similarly if only two physical channels are available, then every other
logical channel will be used for each physical channel, ie, channel 1 will use
logical channels 1,3,5 and 7, and channel 2 will use logical channels 2,4,6
and 8.
207
Archimedes Operating System
Because of this interleaving the channels are multiplexed into one half,
quarter or eighth of the sample period. This results in the overall signal
level per channel being scaled down by the same amount, so the overall
signal peak level for all multi-channel modes remains constant. The more
physical channels in operation, the quieter each one becomes.
The D M A Buffer Size and Sample Rate ( R l , R2)
As a rule these settings should not generally be altered. The sample rate is
probably of greatest use as its parameter defines how long each piece of
sample data should last. 10000 bytes of sample data played at the default
sample rate of 48 microseconds would result in a sound lasting 0.48
seconds. If the sample rate was then changed to 50 microseconds, the
sound would last 0.50 seconds. Therefore, if data is sampled at different
sample rates, but the same relative pitch needs to be maintained, then this
can be achieved by altering the sample rate value. The value of 48
microseconds is derived in the following way:
8 channel multiplex rate
=
Overall audio sample rate =
period per byte
=
=
=
166.666 kHz
20.833 kHz
1/sample rate = 1/(20833)
4.8e-5
48 usee
The D M A buffer size should not be changed. Every time the buffer becomes
empty a buffer fill request interrupt occurs, and the voice generators are
requested to fill the buffer. It is important that this interrupt rate is kept at
a sensible level so as not to interrupt the processor to often. The default
rate is around one centisecond - more precisely 0.99841 centiseconds. This
value of 0.99841 centiseconds is derived in the following way:
Sample rate per channel
Bytes per channel (DMA size)
Interrupt rate
Buffer period
20833 Hz
208
20833/208
1/100.1587
= 100.1587 Hz
= 0.99841 centiseconds
The following program (Listing 17.1) demonstrates the use of the
Sound_Configure SWI; the effect of more voices on the amplitude and the
effect of changing the microseconds per sample has on pitch.
10
20
30
40
50
60
70
80
208
REM >Listl7/l
REM (C) F e l i x A n d r e w 1988
REM A r c h i m e d e s O S : A D a b h a n d
REM
REM E x a m p l e sound p r o g r a m s .
:
MODE 8
PROCrestore
Guide
Sound SWI Calls
90
PRINT"Sound_Configure"'
100 :
110 SYS "Sound_Configure",1
120
PROCsound_info
130 P R I N T ' " C o n f i g u r e d for one v o i c e "
140 SOUND 1,&17F,200,20
150 P R I N T " S O U N D 1,&17F,200,20 g e n e r a t e s a loud hi p i t c h e d sound"
160
PROCpause
170 :
180 SYS "Sound_Configure",8
190
PROCsound_info
200 P R I N T ' " C o n f i g u r e d for EIGHT v o i c e s "
210 SOUND 1,&17F,200,20
220 P R I N T " T h e same sound statement p r o d u c e s a much q u i e t e r
sound"
230
PROCpause
240 :
250 SYS "Sound_Configure",1,0,50
260
PROCsound_info
270 SOUND 1,&17F,200,20
280 P R I N T ' " T h e microsecond per sample has now been i n c r e a s e d . "
290 P R I N T " T h i s results in a tone of lower p i t c h . "
300 P R I N T " T h i s is b e c a u s e every p i e c e of data is a s s u m e d to take
more t i m e "
310 P R I N T " t o process, ie, t h e P L A Y back rate has been lowered."'
"or the sample rate increased."
320 A = I N K E Y ( 2 0 * 5 )
330 END
340 :
350 DEF FNnum(L%,V%)
360 = R I G H T $ ( S T R I N G $ ( L % , " ")+STR$V%,L%)
370 :
380 DEF PROCsound_info
390 SYS "Sound_Configure",0,0,0,0 TO N , S P B % , U S % , L l % , L 2 %
400 P R I N T " C h a n n e l s
";FNnum(2,N)
410 P R I N T " u S per sample ";FNnum(2,US%)
420 E N D P R O C
430 :
440 DEF PROCpause
450 A = I N K E Y ( 2 0 * 5 )
460 P R I N T " P r e s s any key":A=GET
470 PRINT
480 E N D P R O C
490 :
500 DEF PROCrestore
510 *TUNING 0
530
ENDPROC
Listing 17.1. Demonstrating the Sound_Configure SWI.
AOS—N
209
Archimedes Operating System
Sound_Enable
Passed:
R0
N e w State
2 = ON
1 = OFF
0 = No change (just read previous state)
Returned:
R0 Previous state
2 = ON
1 = OFF
This SWI is used by the *AUDIO command and suspends any DMA interrupts.
It is important to remember that any subsequent sound commands may be
'stored', s o that when the sound is enabled the 'stored' sounds will be
played immediately.
There is no simple way to flush the sound buffers. The only way to clear the
sounds is to detach and then re-attach the voices, or to set the SCCB channel
flags for e a c h to two, which will make the Level 0 handler flush the
channels, however, doing this is prone to problems, as the Voice
Generator's will not be informed of the change.
Sound_Speaker
Passed:
R0
N e w State
2 = ON
1 = OFF
0 = No change (just read previous state)
Returned:
R0 Previous state
2 = ON
1 = OFF
This SWI is used by the ^SPEAKER command and switches off the mono-mix
of the left a n d right audio channels to the internal loudspeaker amplifier.
Sounds are still processed and DMA interrupts continue. The stereo audio
output remains active. The following program (Listing 17.2) illustrates the
'storing of sounds while Audio is off and the effect of Speaker off.
7
210
Sound SWI Calls
10 R E M >Listl7/2
20 R E M (c) Felix A n d r e w 1988
30 R E M A r c h i m e d e s O S : A D a b h a n d G u i d e
40 REM
50 R E M E x a m p l e sound p r o g r a m s .
60 :
70 V O I C E S 1
80 ^ C H A N N E L . 1 1
90 :
100 M O D E 8
110 P R I N T " S W I S o u n a ^ E n a b l e "
120 P R O C s p e a k e r ( % 1 0 ) : P R O C s t a t e ( % 1 0 ) : S O U N D
1,-15,100,10
150 P R I N T " S O U N D 1 , - 1 5 , 1 0 0 , 1 0 " " P r e s s a k e y " : A = G E T : P R I N T
160 P R O C s t a t e (%01) :SOUND 1,-15,100,10
161 P R I N T " S O U N D 1,-15,100,10":PRINT"Press a k e y " : A = G E T : P R I N T
200 P R O C s t a t e (%10)
210 P R I N T " S o u n d statements issued w h e n t h e sound is d i s a b l e d are
produced"
220 P R I N T " w h e n the sound is then t u r n e d o n . "
230 P R I N T " B u f f e r s u n f o r t u n a t e l y cannot easily b e f l u s h e d . "
240 P R I N T " T o flush the c h a n n e l s , d e t a c h all v o i c e s a n d the
reattach them."
250
A=GET:PROCstate(%01)
260 :
270 C L S
280 P R I N T " S W I S o u n d _ S p e a k e r "
290 P R O C s t a t e (%10) rPROCspeaker(%10) :SOUND 1,-15,100,10
320 P R I N T " S O U N D 1,-15,100,10"'"Press a k e y " : A = G E T : P R I N T
321
330 P R O C s p e a k e r ( % 0 1 ) : P R I N T " S O U N D 1,-15,100,10"
350 S O U N D 1,-15,100,10
360 P R I N T " S o u n d s p l a y e d w h i l e the speaker is o f f are still
played"
370 P R I N T " P r e s s a key":A=GET:PRINT
380
PROCspeaker(%10)
390 E N D
400 :
410 D E F P R O C s t a t e ( V % )
420 S Y S "Sound_Enable",V%
430 S Y S "Sound_Enable",0 TO R%
440 IF R%=1 THEN P R I N T " S o u n d
Off" ELSE PRINT"Sound
On"
450 E N D P R O C
460 :
470 D E F P R O C s p e a k e r (V%)
480 S Y S "Sound_Speaker",V%
490 S Y S "Sound_Speaker",0 TO R%
500 IF R%=1 THEN P R I N T " S p e a k e r O f f " E L S E P R I N T " S p e a k e r O n "
510
ENDPROC
1
1
1
Listing 17.2. Storing sounds.
211
Archimedes Operating System
Sound_Stereo
Passed:
R0
Rl
Returned:
R0
Rl
Logical / Physical Channel
Image position
-128
no change
-127
Full left
-79
2 / 3 left
-47
1 / 3 left
Central
0
1 / 3 right
47
2 / 3 right
79
127
Full right
Preserved
Previous image position
This SWI facilitates the re-positioning of the stereo image of the specified
channel. There are seven stereo image positions. Depending on the number
of physical channels, the call can be used to either position the physical OR
logical channels. Repositioning of the logical channels is not advised.
For N physical channels enabled this call will move channels C, C + N ,
C + 2 N up to logical channel 8. A table of the logical channels that will be
moved according to the physical channel specified and the number of
physical channels is given below:
Physical
1
Channel
1
2
3
4
5
6
7
8
1
3
5
7
212
Logical channels moved
1,2,3,4,5,6,7,8
2,3,4,5,6,7,8
3,4,5,6,7,8
4,5,6,7,8
5,6,7,8
6,7,8
7,8
8
1,3,5,7
3,5,7
5,7
7
Sound SWI Calls
Physical
Channel
2
4
6
8
Logical channels moved
2,4,6,8
4,6,8
6,8
8
1
5
2
6
3
7
4
8
1,5
5
2,6
6
3,7
7
4,8
8
1
2
3
4
5
6
7
1
2
3
4
5
6
7
This method of moving the logical channels can be used to produce
different stereo positions.
The following program (Listing 17.3) indicates the relative merits of logical
channel stereo positioning, as opposed to physical channel positioning and
positioning of the channels while a sound is being played. For sensible
results this program is best run using speakers or headphones attached to
the audio jack at the rear of the machine.
10 R E M > L i s t l 7 / 3
20 R E M (c) F e l i x A n d r e w 1988
30 R E M A r c h i m e d e s O S : A Dabhand G u i d e
40 R E M
50 R E M Example sound p r o g r a m s .
60 :
70 M O D E 8
80 P R I N T " S W I S o u n d _ S t e r e o " '
81 P R I N T " T h i s effect can not be e x p e r i e n c e d by using
internal s p e a k e r " '
90 D I M posn (7)
100 F O R N % = 1 TO 7
110 R E A D p o s n ( N % )
120 N E X T
130 :
140 V O I C E S 1
the
213
Archimedes Operating System
150
160
170
180
190
200
210
220
230
240
250
260
270
280
290
300
310
320
330
340
350
360
370
380
390
400
410
420
430
440
450
460
470
480
490
500
510
530
540
550
560
570
580
590
600
610
620
630
640
650
P R I N T " M o v i n g stereo p o s n THEN p l a y i n g a sound"
S Y S " S o u n d _ S t e r e o " , 1 , 0 : S O U N D 1,-15,1,10
F O R P%=1 TO 7
P R I N T " S t e r e o ";posn(P%)
SYS " S o u n d _ S t e r e o " , l , p o s n ( P % )
S O U N D 1,-15,100,10
A=INKEY(40)
NEXT
:
PROCpak
P R I N T " M o v i n g stereo posn W H I L E p l a y i n g a sound"
S O U N D 1,-15,100,10*6
F O R P%=7 TO 1 STEP-1
P R I N T " S t e r e o ";posn(P%)
SYS " S o u n d _ S t e r e o " , l , p o s n ( P % )
A=INKEY(40)
NEXT
P R I N T " T h e click occurs w h e n the stereo posn is m o v e d "
PROCpak
CLS
:
P R I N T " M o v i n g the logical c h a n n e l s "
VOICES2
P R I N T " L o g i c a l channels 1,3,5 and 7 on the left"
SYS " S o u n d _ S t e r e o " , 1 , - 1 2 7 : S O U N D 1,-15,180,10:PROCpak
:
P R I N T " L o g i c a l channel 7 o n the right"
SYS " S o u n d _ S t e r e o " , 7 , 1 2 7 : S 0 U N D 1,-15,180,10:PROCpak
:
P R I N T " L o g i c a l channels 5 and 7 on the right"
SYS " S o u n d _ S t e r e o " , 5 , 1 2 7 : S 0 U N D 1,-15,180,10:PROCpak
:
P R I N T " L o g i c a l channels 3,5 and 7 on the right"
SYS " S o u n d _ S t e r e o " , 3 , 1 2 7 : S O U N D 1,-15,180,10:PROCpak
:
P R I N T " L o g i c a l channels 1,3,5 and 7 on the right"
SYS " S o u n d _ S t e r e o " , 1 , 1 2 7 : S O U N D 1,-15,180,10:PROCpak
END
:
DATA -127,-79,-47,0,47,79,127
:
DEF P R O C p a k
PRINT"Press a key":A=GET:PRINT
ENDPROC
:
DEF F N n u m ( L % , V % )
= R I G H T $ ( S T R I N G $ ( L % , " ")+STR$V%,L%)
:
DEF F N h n u m ( L % , V % )
= R I G H T $ (STRING$(L%," ")+STR$~V%,L%)
1
Listing 17.3. Stereo re-positioning.
214
Sound SWI Calls
Level 1 SWI Commands
Sound_Install Voice
Passed:
R0
Rl
Voice Generator Header Code
0 for don't change
Voice slot specified
0 for next free slot
Returned:
R0 String pointer - name of previous voice (or error message)
Rl
voice number allocated
0 indicates a failure to install
This SWI is used to install a voice generator at which point any number of
physical channels can be attached to it. The code necessary to produce voice
generators is given below. The installed voice list can be examined by
passing zero in R0, on exit the voice name will be pointed to by R0. In
Arthur 1.2 the voice table is limited to 32 entries.
Sound_Remove Voice
Passed:
Rl
Voice slot to remove
Returned:
R0 string pointer - name of previous voice (or error message)
R1 voice number removed
0 indicates a failure to remove a voice
This SWI is used to remove voice generator's. It may be called if the voice
generator is a module and the RMA is tidied, or cleared.
Sound_AttachNamed Voice
Passed:
R0
Rl
Physical channel number
Pointer to voice name (zero terminated string)
Returned:
R0 Preserved
R l Preserved
Oif fail
215
Archimedes Operating System
This call is used by the *CHANNELVOiCE command and will attach the
physical channel specified in R0 to the named voice. When a channel is
attached to a new voice, the previous voice is shut down and the new voice
reset. There is no facility to swap voices while a sound is being played. This
level will attach the logical channels depending on the number of physical
channels.
SoundLAttach Voice
Passed:
R0
Rl
Physical channel number
Voice slot to attach
0 to detach voice and mute
Returned:
R0 Preserved
0 if illegal channel number
R l Previous voice number
0 if not previously attached
This SWI allows a particular physical channel to be attached to a voice slot,
the number of which can be ascertained from the output information
displayed b y * V O I C E S . Voice slot numbers may change so *voiCES should
always be u s e d first to obtain the correct number.
When a n e w voice is attached, the old voice is first shut down and there is
no facility to swap voices mid-sound. This call is used b y the
*CHANNELVOiCE command and this level caters for the logical channels.
Sound_Volume
Passed:
R0
Sound volume
1 (quietest) to 127 (loudest)
0 will inspect last setting
Returned:
R0 Previous volume
This SWI sets the overall volume and is used by the *VOLUME command.
Internally t h e volume is represented as a 7-bit logarithmic value, so a
change of & 1 0 represents a doubling or halving of the volume. Voice
generators should take note of this value, and scale their waveforms
accordingly. The default value is taken from the CMOS RAM setting.
216
Sound SWI Calls
Sound_SoundLog
Passed:
R0 Signed 32-bit number
Returned:
R0 8-bit signed scaled logarithm
This SWI converts 32-bit signed integers to an 8-bit signed logarithmic
value using an internal lookup table. It is used to convert sampled data to a
logarithmic scaled value for use in Voice Generators.
Sound_LogScale
Passed:
R0 8-bit signed audio logarithm
Returned:
R0 8-bit scaled logarithm
This SWI maps an internal 8-bit signed logarithm to one scaled to the
current volume.
Sound_Pitch
Passed:
R0
15-bit pitch value
bits 14-12 represent the octave number
bits 11-0 represent the octave division
Returned:
R0 32-bit phase accumulator value
This SWI maps a 15-bit pitch to an internal format pitch value.
Sound_Tuning
Passed:
R0
New tuning value
0 - don't change
Returned:
R0 Previous setting
This SWI sets the tuning parameter and is used to offset the pitch values
used throughout the system and is used by the *TUNING command. See the
217
Archimedes Operating System
description of the "TUNING command in the previous chapter for an
explanation of the range of R0.
Sound_Control
Passed:
R0
Rl
Physical Channel
Amplitude
Either 0-15
or &100 to &1FF
of which bit 7 is:
R2
R3
0 for GATE ON/OFF
1 for smooth update
Pitch
Either 0-&FF
or &0100 TO &7FFF for enhanced pitch control
bits 14-12 represent octave number
bits 1 1 - 0 represent fractional part of the octave
duration in 5 centisecond periods
except &FF which is infinite
Returned:
R0-R3
Preserved
This SWI c o m m a n d allows immediate execution of the specified sound
channel - t h e parameters take effect on the next buffer fill entry. The GATE
o n / o f f causes a new note to be played resulting in a possible 'click', whilst
smooth causes the changing of note parameters without restarting the
note. This allows the pitch or volume of a note to be altered while it is
playing, and can be effectively used for pitch-bend.
For an explanation of amplitude and pitch see the *SOUNE> command.
N o t e : GATE is in effect a switch which allows the sound to be turned off
(effectively killing the last note) then on (to play the next one). The GATE
option should not be used if a smooth change from one note to another is
required.
Sound_ControlPacked
Passed:
R0
Rl
218
Amplitude and channel (&AAAACCCC)
High word is amplitude, low word is channel
Duration and pitch (&DDDDPPPP)
High word is duration, low word is pitch
Sound SWI Calls
Returned:
R0,R1
Preserved
In operation this SWI is similar to Sound_Control, but differs in that its
parameters are packed together. For example:
SYS "Sound_Control",1, &17F,&4200, 16
becomes:
SYS "Sound_ControlPacked", & 0 1 7 F 0 0 0 1 , & 0 0 1 0 4 2 0 0
Sound_ReadControlBlock
Passed:
R0
Rl
Channel
Offset to read from
Returned:
R0 Preserved
0 if fail, invalid read offset
R l Peserved
R2 32-bit word read if R0 non zero
This SWI will read-32 bit words from the Sound Channel Control Block
(SCCB). The values in the SCCB are not standard and they will depend on the
particular Voice Generator, and Level 1 handler. The following is a list of
the SCCB values which are supposed to be constant under the system Level 1
handler:
Word
0
1
2
3
4-8
Use
Amplitude, index to voice table, voice instance, control flags
Phase accumulator pitch oscillator
Number of buffer fills
Working registers
Sound_WriteControlBlock
Passed:
R0
Rl
R2
Channel
Offset to write
32-bit value to write
Returned:
R0 Preserved
0 if fail, invalid read offset
219
Archimedes Operating System
R l Preserved
R2 Previous 32-bit word, if R0 non zero
This SWI allows 32-bit words to be written into the SCCB.
Listing 17.4 shows how to attach channels to named and numbered voices.
It also contains the rudiments of a BASIC version of the *voiCES command.
The use of bit seven in the extended amplitude settings is also
demonstrated.
10
20
30
40
50
60
70
80
90
100
110
120
130
140
150
160
170
180
190
200
210
220
230
240
250
260
270
280
290
300
310
320
330
340
350
360
370
380
390
400
410
420
220
REM >Listl7/4
R E M (c) F e l i x A n d r e w 1988
R E M A r c h i m e d e s O S : A D a b h a n d Guide
REM
R E M E x a m p l e sound p r o g r a m s .
:
MODE 8
VOICES1
SYS "Sound_Volume",&7F
:
P R I N T "Sound_AttachNamedVoice"'
:
P R I N T "SYS Sound_AttachNamedVoice, 1, StringLib-Hard"
SYS
"Sound_AttachNamedVoice",1,"StringLib-Hard"
S O U N D 1,-15,100,10
PROChak:CLS
:
PRINT "SoundlnstallVoice"
P R I N T "Listing current Installed voices in B A S I C "
F O R N % = 1 TO 32
SYS " S o u n d _ I n s t a l l V o i c e " , 0 , N % TO A $ , F %
IF F % = 0 THEN PRINTA$
NEXT
PROChak:CLS
:
P R I N T "Sound_AttachVoice" •
P R I N T "SYS S o u n d _ A t t a c h V o i c e , 1 , 7 "
SYS " S o u n d _ A t t a c h V o i c e " , 1 , 7
S O U N D 1,-15,100,10
PROChak:CLS
:
P R I N T " S o u n d _ C o n t r o l & Sound_Volume"
SYS " S o u n d _ A t t a c h V o i c e " , 1 , 1
PRINT"SYS Sound_Control,1,&17F,&4000,&20"
SYS " S o u n d _ C o n t r o l " , 1 , &17F, &4000, &20
PROChak
:
P R I N T ' " S Y S Sound_Volume,&6F":SYS
"Sound_Volume",&6F
SYS " S o u n d _ C o n t r o l " , l , & 1 7 F , & 4 0 0 0 , & 2 0
PROChak:CLS
:
SYS " S o u n d _ V o l u m e " , & 7 F
1
1
1
Sound SWI Calls
430
440
450
460
470
471
480
490
500
510
520
530
540
550
560
570
SYS
"Sound_AttachVoice",l,7
P R I N T " S m o o t h update o f s o u n d s "
SYS
"Sound_Control",l,&16F,&4000,&20
A=INKEY(10)
SYS
"Sound_Control",l,&lFF,&4200,&20
PROChak
P R I N T " a s opposed t o "
S Y S "Sound_Control", 1,&16F,&4000,&20
A=INKEY(10)
SYS
"Sound_Control",l,&17F,&4200,&20
:
END
:
DEF PROChak
P R I N T ' " P r e s s any k e y " : A = G E T
ENDPROC
1
Listing 17.4. Attaching channels.
Level 2 SWI Commands
Sound_QInit
Passed:
Nothing
Returned:
R0 0 indicates success
Calling this SWI clears any scheduled sounds queued and resets the tempo
and beat variables to their default values.
Sound_QSchedule
Passed:
R0
Schedule period (from start of bar)
& F F F F F F F F (-1) to synchronise with the last schedule event
R l 0 causes a Sound_ControlPacked call
SWI number, of the form &F000000 + SWI number
R2,R3
Are the parameters for R0 and R l for the SWI
Returned:
R0 0 is successfully queued
<0 for failure, or queue full
221
Archimedes Operating System
This SWI is used by the *QSOUND command. Registers 2 and 3 contain the
data which would normally be passed in registers 0 and 1 to the
S o u n d _ C o n t r o l P a c k e d SWI. Register 0 holds the nBeats parameter.
Register 1 will normally be zero, in which case the Sound_ControlPacked
SWI will be called, eg,
SYS "Sound_QSchedule",10, 0, &017F0001, &00204000
is equivalent to:
SYS "Sound_ControlPacked", &017F0001, &00204000
except that it will be played 10 beats after the new bar, when the beat
counter is set to zero. This is identical to:
*QS0UND 2 &17F & 4 0 0 0 &20 10
or alternatively:
SOUND
2,&17F,&4000,&20,10
which plays a middle C for &20*5 centiseconds on channel 2 when the beat
counter reaches 10.
If register 1 is non-zero then other SWls can be called. This is a very
powerful feature. For example, if at the start of the third bar in a piece of
music you wanted to attach channel 5 to voice 3, instead of having to
continually check to see if the piece of music had reached the third bar, you
could simply insert in the sound data the following SWI call:
SYS "Sound_QSchedule", 0, Sound_AttachVoice,5, 3
where Sound_AttachVoice is the value of the SWI plus &F0O00OO,
Sound_AttachVoice+&F000000.
ie,
The program given in listing 17.5 demonstrates the QSchedule command in
both forms, b y attaching channel one to different voices during the queuing
of the sounds.
10
20
30
40
50
60
70
80
90
100
110
120
222
REM > L i s t l 7 / 5
REM (c) Felix A n d r e w 1988
REM A r c h i m e d e s O S : A D a b h a n d Guide
REM
REM E x a m p l e sound p r o g r a m s .
:
MODE 8
PRINT"SYS Sound_QSchedule"
:
SYS S o u n d _ Q I n i t
T E M P O &400:BEATS 100
SYS & 3 9 , , " S o u n d _ A t t a c h V o i c e " TO Sound_AttachVoice
n
n
Sound SWI Calls
130
140
150
160
170
180
190
200
210
220
230
240
250
260
270
Sound_AttacnVoice+=&F000000
:
P R I N T " A t t a c h channel one to v o i c e one, ";
SYS "Sound_QSchedule",19, Sound_AttachVoice,1,1
:
PRINT"play a n o t e "
SYS "Sound_QSchedule", 20, 0, & 0 1 7 F 0 0 0 1 , &00104000
:
P R I N T " A t t a c h channel one to v o i c e THREE, ";
SYS
"Sound_QSchedule",79,Sound_AttachVoice,1,3
:
PRINT"play a note"'
SYS "Sound_QSchedule", 80, 0, & 0 1 7 F 0 0 0 1 , &00104200
:
END
1
Listing 17.5. Demonstrating the QSchedule command.
Sound_QTempo
Passed:
R0
New tempo 1 to & F F F F (&1000 default)
0 for don't change
Returns:
R0 Previous tempo value
This SWI is used by the * T E M P O command. It is used to set the tempo
parameter which is used by the Level 2 scheduler.
Sound_QBeat
Passed:
R0
0 returns beat counter value
- 1 returns the current beat C O U N T value
< - 1 resets the beat counter and C O U N T to zero
>0 sets the beat C O U N T to N, counts 0 to N - l
Returned:
R0 Current beat counter number is passed
0
otherwise the previous beat C O U N T value is used
This call is used by the BASIC commands B E A T and BEATS. The beat counter is
an internal counter which starts at zero and counts up to the beat C O U N T
value.
The varied use of QTempo and QBeat are highlighted in the Listing 17.6.
223
Archimedes Operating System
10
20
30
40
50
60
70
80
90
100
110
120
130
count
140
150
160
170
180
190
200
210
220
230
240
250
260
270
280
290
300
310
320
330
340
350
360
370
380
390
400
410
420
430
440
450
460
470
480
490
500
510
520
224
REM >Listl7/6
REM (c) Felix A n d r e w 1988
R E M A r c h i m e d e s O S : A D a b h a n d Guide
REM
R E M E x a m p l e sound p r o g r a m s .
:
MODE 8
T E M P O &1000
P R I N T "Sound_QBeat"
:
SYS " S o u n d _ Q B e a t " , & 1 0 0
PRINT"SWI Sound_QBeat,&100"
P R I N T " T h i s has set t h e beat C O U N T to &100, ie b e a t s w i l l
from"
P R I N T " 0 to &FF"
PROCinfo
PROChak
:
SYS " S o u n d _ Q B e a t " , - 2 : P R I N T " S Y S Sound_QBeat,-2"
P R I N T " T h e beat c o u n t e r h a s been turned off"
PROCinfo
PROChak
:
SYS " S o u n d _ Q B e a t " , 2 0 : P R I N T ' S Y S Sound_QBeat,20"
P R I N T " T h e beat c o u n t e r h a s b e e n turned on, range 0 to 1 9 "
PROCinfo
PROChak
:
CLS
PRINT"Sound_QTempo" '
:
OFF
SYS " S o u n d _ Q T e m p o " , & 1 0 0 0
SYS " S o u n d _ Q B e a t " , 2 0 0
T I M E = 0 : P R I N T " A t p r e s e n t t h e counter counts q u i c k l y "
REPEAT
SYS " S o u n d _ Q B e a t " , 0 TO C%
PRINTTAB(5,5)C%"
";
U N T I L TIME >500
:
PRINTTAB(0,7)
P R I N T " A l t e r i n g TEMPO to slow it down"
PRINT"SYS Sound_QTempo,&F0"
SYS " S o u n d _ Q T e m p o " , & F 0
:
TIME=0
REPEAT
SYS " S o u n d _ Q B e a t " , 0 TO C%
P R I N T T A B (5, 11) C % "
";
U N T I L TIME >500
:
ON: P R I N T
END
1
Sound SWI Calls
530
540
550
560
570
580
590
600
610
:
DEF P R O C i n f o
SYS "Sound_QBeat",0 TO counter:PRINT"Beat counter
SYS "Sound_QBeat",-l TO count: PRINT"Beat COUNT
ENDPROC
"/counter
";count
DEF P R O C h a k
PRINT"Press a key":A=GET:PRINT'
ENDPROC
Listing 17.6. Using QTempo and QBeat.
AOS—O
225
18 : Voice Generator
The voice generator is a segment o f machine code which is used to fill the
DMA buffer on demand. Before it can be used, a generator must first be
installed a n d then channels can be attached to it. The voice generator code
contains an eight word entry control block called the Sound Voice Control
Block - SVCB.
SVCB entries are used by the Level 1 handler to call the appropriate pieces
of code for attaching and detaching the voice under supervisor mode, and
real-time buffer filling which is entered in IRQ mode. The title is used by the
Level 1 h a n d l e r to identify the voices and should be concise, but
informative.
The speed o f the generators is of paramount importance, and so ROM based
voice generators are usually copied down into the RMA, as modules, for
faster execution of code. Homegrown voice generators should therefore
usually be implemented as relocatable modules. This is necessary because if
the machine code moves, or is wiped, without the Level 1 handler being
informed that the voice is no longer active. Any subsequent use of sound
will probably cause an error which, due to the very rapid and repeated
calling of t h e code, will result in a stream of errors which cannot be
stopped other than by resetting the machine.
A side effect of this is that modules have to be written in such a way that if
the RMA is tidied up the voice will be detached before the tidy, and the
reattached afterwards. This is very easily accomplished due to the
initialisation and finalisation calls made to a module when such a
command is issued.
The SVCB
The SVCB is made up of eight word entries, and their construction is shown
overleaf in table 18.1.
226
Voice Generator
Name
Sound Voice Fill
Sound Voice Update
Sound Voice GateOn
Sound Voice GateOff
Sound Voice Instantiate
Sound Voice Free
Sound Voice Install
Sound Voice Title
Purpose
Fill DMA buffer
Change SCCB parameters while
sound is playing
Sets initial parameters for sound
Terminates a sound
Channel trying to attach
itself to voice
Channel detatched from voice
Channel to be installed
Name given to voice, for levelO handler
Table 18.1. Construction of the SVCB.
The first four entries are used for the real-time DMA buffer filling, and are
entered in IRQ mode. Several registers are passed when any of these are
called:
R6
R7
R8
R9
RIO
Rll
R12
Negative if Level 0 configure changed
Channel number
Sample period in microseconds
Pointer to SCCB
DMA buffer limit (+1)
DMA buffer interleave increment
DMA buffer base pointer
The next three entries are used by Level 1 SWI calls, and are therefore
entered in Supervisor Mode. The last entry is a relative address offset to
the voice name from the start of the SVCB.
Gate On
After a voice has been installed and a channel attached to it, it is ready to
generate sound. When a sound command is issued the first piece of code to
be called will usually be GateOn. At this point, Register 9 points to the start
of the SCCB (Sound Channel Control Block). The SCCB is a 256 byte block of
data which contains all the information about a particular channel. The
arrangement of this data is listed in table 18.2 overleaf.
227
Archimedes Operating System
Offset
600
601
602
603
604
&08
& OC
& 10
&14
& 18
& 1C
&20
&24
t o &FF
Contents
Amplitude
Index to voice table
Voice instance number
Control / status flags
Phase accumulator pitch oscillator
Timbre, not currently used
Number of buffer fills
Working Register 4 (Absolute wavetable pointer)
Working Register 5 (Absolute end of wavetable)
Working Register 6 (Absolute pointer to LogAmp table)
Working Register 7
Working Register 8
Acorn reserved
Table 18.2. Data arrangement in the SCCB.
This block is updated by the Level 1 handler. When the Gate On code is
called the first four entries (ie, words 0 to 3) have been updated. Working
R4 t h r o u g h to working R8 are for the user. In the example Voice
Generator, working R4 is used as the wave table pointer. Working R5 is the
absolute e n d of the data. Working R6 points to the absolute address of the
LogAmpPtr. So these registers must be set up ready for the buffer fill
routine.
Fill
This is called by the Level 1 handler when the DMA buffer needs to be filled
with the n e x t sample buffer. Again R9 points to the SCCB. The working
registers m u s t first be loaded as follows:
LDR
LDR
LDR
R 4 , [R9,#&10]
R 5 , [R9,#&14]
R6,[R9,#&18]
\ W a v e f o r m pointer
\ End of waveform
\ A m p l i t u d e scale t a b l e
The waveform data will be stored from R12 to RIO with an interleave
value of R l l . The interleave value is the way in which the sound channels
are multiplexed. The following diagram may help to explain how the DMA
buffer is filled with the waveform values from the different channels:
228
Voice Generator
Interleave value
1
Voices
1
Bytes from Channels
1 1 1 1 1 1 1 1
b0blb2b3b4b5b6b7
b8b9bAbBtC. . .
2
1 2 1 2 12
12
b0b0blblb2b2b3b3
Mb4b5b5b6. . .
2
4
1 2 3 4 1 2 3 4
bObObObOblbl b l b l
b2b2b2b2b3. . .
4
8
1 2 3 4 5 6 7 8
bObObObObObObObO
blblblblbl. . .
8
It is a very simple matter to write the
the buffer:
.Loop
STR R0, [R12],R11
CMP R 1 2 , R 1 0
BLT Loop
F O R ... N E X T
loop in assembler to fill
\ Get wave form v a l u e into R0
\ Store the v a l u e and increment
\ Reached end of the b u f f e r ?
Rll
In the example R4 points to the waveform data. Therefore the next value
in the waveform data must be loaded into R0 so it can be stored into the
correct position in the DMA buffer, and R4 updated to point to the next
byte.
When a piece of the waveform is played, every byte of the waveform will
be placed in the DMA buffer. T o double the pitch the data must be played
twice as fast, in effect taking every other piece of waveform data. To half
the pitch each piece of data must be placed in the buffer twice, eg,
Bytes stored in the buffer
Normal pitch
Twice the pitch
Half the pitch
0 1 2 3 4 5 6 7 8 9 10
0 2 4 6 8 10 12 14 16 18 20
0 0 1 1 2 2 3 3 4 4 5
R2 contains the value used to advance the waveform and R4 points to the
next piece of data. The following piece of assembler will advance the
waveform, and load the value into R0:
ADD
LDRB
R 2 , R 2 , R 2 , L S L #16
R 0 , [R4,R2,LSR #24]
229
Archimedes Operating System
R2 is split u p into two parts. Bits 16 to 31 are used as the phase
accumulator, while bits 0 to 15 are used as the increment. The high byte of
R2 is used t o load the correct byte from the waveform. If, for example,
every byte f r o m the waveform was required, R2 would initially have the
value &00000100:
Iteration
0
1
2
3
R2
&00000100
&01000100
&02000100
&03000100
High byte
&00
&01
&02
&03
So to take every piece of data twice, R2 would h
Iteration
0
1
2
3
4
R2
&00000080
&00800080
&01000080
&01800080
High byte
&00
&00
&01
&01
&02000080
&02
The value just obtained should be scaled to the current volume. On entry
R l contains the amplitude passed with the sound command, and this value
also needs to be scaled. R6 points to the logarithmic amplitude lookup table
through w h i c h the amplitude is scaled. The following assembler will
perform this task:
AND
LDRB
MOV
RSB
R1,R1,#&7F
\
Rl, [R6,R1,LSL#1] \
R 1 , R 1 , L S R #1
\
R1,R1,#127
\
Amplitude in range 0 t o
Get value from t a b l e
Scale it
m a k e attenuation factor
&7F
This conversion is made as soon as the fill code is entered. The wave form
values are also scaled and then stored in the DMA buffer:
SUBS
R0,R0,R1,LSL
MOVMI R 0 , # 0
STRB R0, [R12],R11
#1
\ Scale amplitude
\ correct for underflow
\ Store value in DMA b u f f e r
Once the buffer has been filled R4 is updated, so that the next time the
buffer fill is called it points to the next byte in the waveform, this must then
be stored back into the SCCB:
ADD
STR
230
R4,R4,R2,LSR
R4,[R9,#&10]
#24
\ Update the pointer
\ store in SCCB
Voice Generator
Gate Off
This is called when the waveform pointer reaches the end of the sampled
data, or a new sound has been issued and the buffer needs to be flushed.
Any remaining parts of the DMA buffer must then be filled with zeros,
which is accomplished using the same FOR ... NEXT loop, but this time
storing zeros in the DMA buffer:
MOV
R0,#0
.Floop
STRB R0, [R12],R11
STRB R0, [R12],R11
STRB R0, [R12],R11
STRB R0, [R12],R11
CMP
R12,R10
BLT
Floop
The Level 1 handler must now be informed that the sample has been
finished, and it must flush the channel buffers next time. This is done by
setting the control/status bits in the SCCB. The flags are as follows:
Bit
7
6
5
4
3
2
1
0
Meaning
Quiet, inactive
Kill pending
Initialise pending
Fill pending
Active
Overrun
Flush bit 1
Flush bit 0
The low two bits are used as a flush counter. If the fill is successful exit with
R0 set to eight. To inform the Level 1 handler that the voice needs to be
flushed, exit with R0 set to two or three.
If you stop sound abruptly then there may be an audible click. This can be
avoided in two ways. Firstly alter the sampled data so that the sound 'dies'
away. This is best done by extending the sample, and then adding a slight
echo. T h e second, and preferable way, is to make the sound decay by
entering a release phase, which may require buffer filling for a number of
buffer periods. In this case close attention to the number of buffer fills
(word 3 in the SCCB) is advised.
231
Archimedes Operating System
Update
Generally w h e n a sound is played the previous sound is terminated, Gate
Off, and then the new sound starts, Gate On. If however a smooth change
over is required then setthe relevant bit in the amplitude parameter. The
amplitude w i l l be in the range &100 to &17F. However, if bit 7 is set, a
smooth update will be requested. If this is the case then the update code is
called, and the SCCB parameters are updated. In the example voice
generator all this call does is to call the buffer fill code, as the fill code
always refers to the SCCB for the amplitude and pitch.
Instantiate
Many channels may be attached to one voice, however complex voice
generators m a y not be able to support more than one voice. Therefore, this
code is called with the channel number-1 passed in R0. If the voice cannot
support another channel then the value in R0 must be changed.
Free
This is called whenever a channel is detached from a voice, so that the
Voice Generator can keep an up to date list of attached channels. This call
must free t h e channel. The channel number-1 is passed in R0 and all
registers m u s t be preserved.
Install
This code i s somewhat redundant as Voice Generators should be
i m p l e m e n t e d as relocatable modules, and will therefore already be
installed w h e n called.
Voice Generator Code
The p r o g r a m listed opposite (listing 18.1) will convert a sampled
waveform, created using the Armadillo sampling software, to a relocatable voice module. When run, you will be asked to supply two filenames the sample filename and the filename for the module. Next enter the name
of the voice, eg, crash or piano, and finally the channel number you wish to
attach to the voice when it is loaded or initialised. Listing 18.2. will create a
suitable data file that can be used with ModMaker (listing 18.1).
The sample will then be loaded, converted, the module header code added,
and then saved to disc. The module will then automatically be loaded back
232
Voice Generator
in. Typing "VOICES will list the new voice, while "MODULES and *HELP
MODULES will supply information pertaining to the new voice.
You can quickly test the new module using a few simple star commands:
* F X 213 <pitch>
* F X 212 <volume>
" F X 211 <channel>
Sets the pitch of the bell
Sets the bell volume (&80 loudest)
Sets the bell channel number
The sample can be heard by pressing CTRL-G. It should not be too hard to
find the correct playback pitch, and it is best to use the &100 upwards pitch
values.
10
20
30
40
50
60
70
80
90
100
110
120
130
140
150
160
170
180
190
200
210
220
230
240
250
260
270
280
290
300
310
320
330
340
350
360
370
380
390
REM >Listl8/l
R E M (c) Felix A n d r e w 1988
REM A r c h i m e d e s O S : A Dabhand Guide
REM
REM V o i c e G e n e r a t o r M o d u l e Creator
:
INPUT"Sample name ";name$
INPUT"Module name ",mod$
INPUT"Voice Title ";title$
:
X=OPENIN(name$):Sample_Size=EXT#X:CLOSE
P R I N T " V o i c e ?";:V%=GET-48
DIM C % &1000+Sample_Size
:
F O R OPT%=4 TO 6 STEP2
P%=0:O%=C%:[OPT O P T %
.Head
EQUD 0
E Q U D Init
E Q U D Final
EQUD 0
:
E Q U D Title
E Q U D Help
EQUD 0
#X
.Title EQUS t i t l e $ + " V o i c e " + C H R $ 0 . A L I G N
.Help
EQUS t i t l e $ + C H R $ 9 + " l . F A ("+MID$(TIME$, 5,11)+")"+CHR$0
.Init
STMFD
\Set the v o i c e
R13!,{R14}
up
A D R R 0 , V o i c e B a s e : M O V R1,#0
SWI "XSound InstallVoice":BVS
STR R l , s l o t : M 0 V R 0 , # V %
SWI "XSound A t t a c h V o i c e " : B V S
LDMFD
R13!,{PC}
error
error
\ Install v o i c e in next
\ free slot
\ Attaches channel V%
\ to new v o i c e
A
233
Archimedes Operating System
400
410
420
430
440
450
460
470
480
490
500
510
520
530
540
550
560
570
580
590
600
610
620
630
640
650
660
670
680
690
700
710
720
730
740
750
760
770
780
790
800
810
820
830
840
850
860
870
880
890
900
910
920
234
.slot EQUD 0
\ Remove t h e v o i c e
.Final
S T M F D R13!,{R14}
\ Detaches
MOV
SWI
R 1 , # 0 : M O V R0,#V%
"XSound_AttachVoice":BVS
error
LDR
SWI
Rl,slot
"XSound R e m o v e V o i c e " : B V S
error
LDMFD
R13!,{PC}
channel
\ Removes v o i c e
\ from slot
A
.error
ADR R0,ers:LDMIA R13!,{PC}
.ers EQUS "A p r o b e l m has occured"+CHR$0:ALIGN
\ Sound V o i c e
.VoiceBase
\
B Fill
\
B Update
\
B GateOn
\
B GateOff
\
B Instance
\
L D M F D R13!, {PC}
\
L D M F D R13!, {PC}
EQUD VoiceName-VoiceBase
.VoiceName
EQUS title$+STRING$(32-LEN
ALIGN
.len EQUD
MOV
MOV
MOV
SWI
LDR
ADR
STR
\ any instance must use LogAmp
table
R13!,{R0-R4}
R0,#0
R 1 , # 0 : M O V R2,#0
R 3 , # 0 : M O V R4,#0
"Sound_Configure"
R 0 , [R3, #12]
Rl,LogAmpPtr
R 0 , [Rl]
LDMFD
name$,CHR$0)
Sample_Size
. Instance
STMFD
Control B l o c k (SVCB)
Fill code
Update code
Start code
Release code
Instantiate
Feature not s u p p o r t e d
Feature not s u p p o r t e d
R13!,{R0-R4,PC}
.LogAmpPtr
. Update
B Fill
EQUD 0
\ reads sound
\ Level
conf
1 p o i n t e r to Log-scale
table
Voice Generator
930
940
950
960
970
980
990
1000
1010
1020
1030
1040
1050
1060
1070
1080
1090
1100
1110
1120
1130
1140
1150
1160
1170
1180
1190
1200
1210
1220
1230
1240
1250
1260
1270
1280
1290
1300
1310
1320
1330
1340
1350
1360
1370
1380
1390
1400
1410
1420
1430
1440
1450
.GateOn
ADR R4,Wave%
\ Pointer-start
A D R R 5 , l e n : L D R R 5 , [R5]
ADD R5,R5,R4
\ Length of d a t a
\ End of data
ADR R6,LogAmpPtr
L D R R 6 , [R6]
\ Location of
STR R 4 , [R9, #&10]
STR R 5 , [R9,#&14]
STR R 6 , [R9, #&18]
\ Store these
\ v a l u e s in t h e
\ working r e g i s t e r s
of data
LogAmp
.Fill
\ Passed
\ R9 P o i n t s t o
LDR
LDR
LDR
LDR
LDR
\
\
\
\
\
\
\
\
Rl,
R4,
R5,
R6,
R7,
\
\
\
\
\
[R9, #&00]
[R9,#&10]
[R9, #&14]
[R9, #&18]
[R9, #&04]
SCCB
Get volume
Pointer to d a t a
End address of data
Location of L o g A m p
pitch
SCCB Format
Amplitude
00
Pitch
04
08
0C
Pointer t o data
10
End of data
14
Location o f LogAmp
18
AND
LDRB
MOV
RSB
R1,R1,#&7F
R l , [R6,R1,LSL
R 1 , R 1 , L S R #1
R1,R1,#127
#1]
.FillLoop
CMP R 4 , R 5
STRGE R 4 , [R9, #&10]
BGE GateOff
]:FOR L=0 TO 3:[OPT O P T %
ADD
R7,R7,R7,LSL #16
LDRB
R 0 , [R4,R7,LSR #24]
SUBS
R 0 , R 0 , R 1 , L S L #1
MOVMI R0,#0
STRB
R 0 , [R12],R11
]:NEXT:[OPT O P T %
\ A m p l i t u d e 0 to 127
\ get scaled v o l u m e
\ attenuation
factor
\ Update p o i n t e r
\ No m o r e sample
\ Advance block
\ Get data
\ Scale data
SCCB
data
pointer
\ Store data in D M A b u f
ADD
BIC
R 4 , R 4 , R 7 , L S R #24
R7,R7,I&FF00000O
\ Update
pointer
CMP
R12,R10
\ Fill D M A b u f f e r
235
Archimedes Operating System
1460
1470
1480
1490
1500
1510
1520
1530
1540
1550
1560
1570
1580
1590
1600
1610
1620
1630
1640
1650
1660
1670
1680
1690
1700
1710
1720
1730
1740
1750
1760
1770
1780
1790
1800
1810
1820
1830
1840
1850
1860
1870
1880
1890
1900
1910
1920
1930
1940
1950
1960
1970
1980
236
BLT
FillLoop
S T R R 4 , [R9,#&10]
\ Update p o i n t e r in
CMP
MOVLT
MOVGE
LDMFD
\
\
\
\
R4,R5
R0,#8
R0,#2
R13!, {PC}
.GateOff
MOV R0,#0
.FlushLoop
STRB
R0, [R12] ,R11
STRB
R0, [R12] ,R11
STRB
R0,[R12],R11
STRB
R0, [R12] ,R11
CMP R 1 2 , R 1 0
BCC FlushLoop
MOV R0,#2
L D M F D R13!, {PC}
SCCB
A r e we at t h e end ?
V o i c e remains a c t i v e
F l u s h v o i c e next t i m e
Back to L e v e l 1 h a n d l e r
\ F l u s h DMA
buffer
\ Store 0s in DMA b u f f e r
\ Flag to be flushed a g a i n
\ W a v e table i n f o r m a t i o n
.Wave%
] : P % + = S a m p l e _ S i z e : [OPT O P T %
.end
] :NEXT
D%=P%
P R I N T " S t a r t convert ";
O S C L I "LOAD " + n a m e $ + " "+STR$~(Wave%+C%)
P R I N T " converting ";
P R O C c o n c : C A L L convert
PRINT
O S C L I "SAVE
"+mod$+" "+STR$~C%+"+"+STR$~D%
O S C L I "SETT.
" + m o d $ + " FFA"
O S C L I "RMLOAD "+mod$
END
DEF P R O C c o n c
D I M C O % &200:FOR OPT%=0 T O 2 STEP2:P%=CO%:[OPT
. d e s t p EQUD W a v e % + C %
.amm E Q U D Sample_Size
.log_tab
EQUS STRING$(255,"F")
E Q U D 00
ALIGN
.convert
STMFD R13!,{R0-R3,R14}
MOV R3,#0
ADR R2,log_tab
.logcl
SUB R 0 , R 3 , # & 8 0
M O V R 0 , R 0 , L S L #24
OPT%
Voice Generator
1990
2000
2010
2020
2030
2040
2050
2060
2070
2080
2090
2100
2110
2120
2130
2140
2150
SWI "Sound_SoundLog
S T R B R0, [R2,R3]
A D D R3,R3,#1
\ G e n e r a t e default 256 entry log t a b l e
C M P R3,#&100
B C C logcl
L D R Rl,destp
L D R R2,amm
A D R R3,log_tab
.cl
\ Converts sample data by u s i n g log t a b l e
L D R B R0, [Rl]
L D R B R0, [R3,R0]
S T R B R0, [Rl], #1
SUBS R2,R2,#1
B P L cl
L D M F D R 1 3 ! , { R 0 - R 3 , PC
]:NEXT
ENDPROC
Listing 18.1. Voice Generator Module Creator.
10
20
30
40
50
60
70
80
90
100
110
120
122
130
140
150
152
160
170
180
190
200
210
220
230
240
R E M >Listl8/2
R E M (c) Felix Andrew 1988
REM Archimedes OS: A Dabhand Guide
REM
R E M Creates a simple w a v e t a b l e for use
REM with ModMaker
:
D I M data% 1024*10
D I M S(360)
F O R T%=0 TO 360
S(T%)=SIN(RAD(T%))*230/5
NEXT
MODE 8
ORIGIN 0,500
M O V E 0,-&80*2:PLOT 1,1280,0
M O V E 0, &80*2:PLOT 1,1280,0
PRINTTAB(3,3)"Generating a waveform"
F O R X%=0 TO 1024*10
P l = ( X % ) M O D 360
P 2 = ( X % * 2 ) M O D 360
P 3 = ( X % * 1 0 ) M O D 360
A=SIN RAD(X% DIV 57)
data%?X%=((S(P2)+S(PI)+S(P3))*A)+&80
PLOT 6 9 , X % / 8 , ((data%?X%)-&80)*2
NEXT
O S C L I "SAVE Data " + S T R $ ~ d a t a % + " + " + S T R $ ~ ( 1 0 2 4 * 1 0 )
Listing 18.2. Sound Sample.
237
19 : Character Input /Output
Simple Input/Output
Some of the most fundamental operations provided by the Operating
System are those which allow it to get characters typed by the user and to
print characters on the display for the user to read. These functions are
essential to allow the user to communicate with the OS and they are also a
vital component of all applications software.
The OS provides a sophisticated set of SWls which allows single-character
communication between the computer and the user through its display and
keyboard. M a n y of these routines are provided for compatibility with the
BBC MOS; others are new or improved facilities.
This section is devoted to the mechanisms for character input/output ( i / o )
- it describes the basis upon which the OS's character i / o is built and
examines the most useful of the many SWls that the OS provides.
Character Input
In c o m m u n i c a t i n g with the Operating System, and indeed with
applications programs, we need to be able to deal with anything from a
single keypress to multiple lines of text. The fundamental aspect of both of
these extremes is the character - a single unit which may be a letter of the
alphabet, a punctuation symbol, a control code and so on. Sequences of
characters a r e known to the OS as 'streams' (think of the 'flowing' of
characters) a n d the OS allows one of three possible input streams to be
active at any moment.
The three possible character input streams are:
•
•
•
the keyboard itself
the RS423 port input channel
a *EXEC file
These streams are mutually exclusive: only one of them may be active at
any moment (because this is a single-user, single-tasking OS at present). So,
the most fundamental character input operation is to allow us to decide
238
Character Input/Output
where characters are coming from. Exactly this mechanism is provided b y
one of OS_Byte SWis - the compatible equivalent of *FX 2 under t h e BBC MOS.
OSJSyte (SWI &06) Function &02
Select Input Stream
This SWI takes a parameter in R l which selects between the keyboard and
the RS423 port as follows:
Value
0
Source
Keyboard - with RS423 disabled
2
Keyboard - with RS423 enabled
1
RS423
It also returns the previous selection in R l as either 0 or 1 (again relating to
the table above). The difference between the two keyboard source types is
that, when the RS423 port is enabled, characters will be received and
buffered by the RS423 port even though it is not selected as the current
input stream.
Getting Hold of Single Characters
Having selected which source of characters is in use, we actually need to
fetch the characters. Once again, BBC MOS compatibility obliges us to obey
certain rules. In particular, a SWI is provided called 'OS_ReadC' which
behaves in the same way as its BBC MOS counterpart (OSRDCH). OS_ReadC
waits for a character to be entered and then returns with its ASCII code.
O S J t e a d C (SWI &04)
Wait for and Return an ASCII Character
No calling parameters are required. The SWI returns with R0 containing
the ASCII code of the character and the Carry flag ' C clear if it is valid. If
an ESCAPE condition occurs (eg, if the ESCAPE key was pressed) then the
carry flag is set and R0 will contain the ASCII escape code &1B.
Alternatively, we may check to see if a key has been pressed without
waiting for one. This is provided by the BBC MOS compatible call OS_Byte
&81 which reads a key within a time limit (which may be zero).
239
Archimedes Operating System
OSJByte (SWI &06) Function &81
Return ASCII Key with Time Limit
On entry, t h i s S W I requires R l and R2 to contain a time limit (in
centiseconds) with the low byte in R l and the high byte in R2 (this
arrangement is for B B C M O S compatibility). When the call returns, R l
contains the A S C I I code of the key pressed, or & F F if no key was pressed
within the specified time. Also, R2 will contain a flag indicating the result,
which will b e zero if a valid key was pressed, &1B if an E S C A P E condition
occurred or & F F if a timeout occurred.
OS_Byte & 8 1 , when supplied with a negative time limit, can also perform a
specific key scan function as it does under the BBC MOS. This is described
later.
Whole Lines of Characters
Because it is so common for a program to need to input a whole line of
characters at a time, a standard routine is provided to do so. In fact, two
routines are provided, one of which is BBC MOS compatible. It is preferable
that new software uses the latter, since the lifetime of the former is likely to
be limited.
The effect of these routines is to accept a sequence of characters from the
current i n p u t stream and store them in the input buffer. The Delete
character is dealt with in the usual way, viz. it is copied to the display and
removes the last character from the buffer, C T R L - U is also decoded to delete
the entire contents from the buffer and the displayed line accordingly. The
line may be terminated by entering R E T U R N , E N T E R , CTRL-J or by pressing the
E S C A P E key. The line returned in the buffer always has a final A S C I I 13
appended t o it, regardless of the way in which input was actually
terminated.
The B B C M O S compatible form is the familiar O S W O R D &00 call - it will read
a line of text entered by the user into a buffer. A number of frills are
provided too: we may limit the maximum and minimum A S C I I codes of
characters placed in the buffer (to prevent control codes being included, for
example) a n d we may limit the overall length of the line (to prevent our
buffer overflowing). The OS_Word form of this routine is detailed opposite.
240
Character Input/Output
OS_Word (SWI &07) Function &00
Read a Line from the Input Stream
On entry, this call needs to be provided with a parameter block of bytes.
The address of this block should be placed in R l and should be arranged as
follows:
Position
Rl+0
R1+1
Rl+2
R l 4-3
R l +4
Contents
LSB of buffer address
MSB of buffer address
Maximum number of characters
Lowest permissible ASCII code
Highest permissible ASCII code
When the call returns, R2 will contain the length of the line entered (not
including the terminating character), and the Carry flag ' C will be clear
normally and set if an ESCAPE condition occurred during input. The OS form
of this routine is SWI OS.ReadLine.
OSJleadLine (SWI &0E)
Read a Line from the Input Stream
On entry, the same parameters must be supplied as for the OS_Word call,
but they are packed into the registers slightly differently:
Register
R0
Rl
R2
R3
Contents
Pointer to buffer
Maximum number of characters
Lowest permissible ASCII code
Highest permissible ASCII code
On return, R l will contain the length of the line entered, and the Carry flag
will normally be clear but set if an ESCAPE condition occurred.
Keyboard Control Functions
As well as the character and line input functions, a large number of
keyboard control calls are also provided to allow low-level modification of
the way the keyboard operates. Almost all of these calls are provided
through the OS.Byte SWI and are, therefore, compatible with the BBC MOS.
Table 19.1 describes the calls supported and mentions where differences
between the BBC MOS and the OS exist.
AOS—P
241
Archimedes Operating System
OS_Byte
&04
&ED
&0B
&C4
&0C
&C5
&76
678
679
&7A
&81
&7C
&7D
&7E
&B2
&C8
&C9
&CA
&D8
&DB
& DC
&DD
&DE
&DF
&E0
Function
Cursor key functions
Read/write cursor key function
Write keyboard auto-repeat delay
Read/write keyboard auto-repeat delay
Write keyboard auto-repeat rate
Read/write keyboard auto-repeat rate
Force keyboard LEDs to correspond to flags
Simulate key depression
Keyboard scan
Keyboard scan from 16
(not for SHIFT, CTRL, ALT or the mouse)
Keyboard scan for specific key
Clear ESCAPE condition
Set ESCAPE condition
Acknowledge ESCAPE condition
Read/write keyboard semaphore
Read/write BREAK and ESCAPE controls
Read/write keyboard disable flag
Read/write keyboard status byte
Read/write function key length
Read/write TAB key character code
Read / write ESCAPE character code
Read/write translation of codes &C0-&CF
Read/write translation of codes &D0-&DF
Read/write translation of codes &E0-&EF
Read/write translation of codes &F0-&FF
Table 19.1. OSjByte swi calls.
The keyboard status byte contains a bit pattern which represents the
perceived state of the various shift keys for the OS. These bits are arranged
as follows:
Bit
0
1
2
3
4
5
6
7
242
Meaning When Set
Incomplete ALT
SCROLL LOCK on
N U M LOCK Off
SHIFT o n
CAPS LOCK off
Always 1
CTRL on
SHIFT CAPS On
Character Input/Output
These four calls allow the interpretation of the range of codes from &C0 to
&FF to be modified. The parameter in R l is interpreted as follows:
Value
0
1
2
3-255
Meaning
Ignore these codes
Expand to appropriate function key string
Precede the code with a null (0)
Generate (code MOD 16)+value in R l
These codes can usually only be generated by receiving them through the
RS423 input channel or inserting them into the keyboard buffer. However,
four of the function keys can generate codes in this region:
Key
Code
no
fll
fl2
Insert
&CA
&CB
&CC
&CD
+SHIFT
&DA
&DB
&DC
&DD
+CTRL
&EA
&EB
&EC
&ED
+SHIFT+CTRL
&FA
&FB
&FC
&FD
Note that the code &CA for function key flO is inserted into the keyboard
buffer on reset to allow it to simulate the * K E Y 10 function under BBC MOS.
&E1
&E2
&E3
&E4
Read/write function key interpretation
Read/write SHiFT+function key interpretation
Read/write CTRL+function key interpretation
Read/write SHlFT+CTRL+function
key interpretation
These four calls control the interpretation of codes in the range &80-&BF,
within which the main function keys, cursor keys and so forth appear. The
parameter supplied in R l affects how the codes are treated:
Value
0
1
2
3-255
Meaning
Ignore these codes
Expand to appropriate function key string
Generate a null (0) followed by code
Generate (code MOD 16)+value in R l
The fundamental codes produced by the function keys are summarised
below:
Key
Print
fl
(2
f3
f4
Code
&80
&81
&82
&83
&84
243
Archimedes Operating System
Code
&85
&86
&87
&88
&89
&8B
&8C
&8D
&8E
&8F
Key
f5
f6
f7
IS
f9
COPY
Left-arrow
Right-arrow
Down-arrow
Up-arrow
Where one or both of the S H I F T and C T R L keys is pressed, a multiple of 16 is
added to t h e codes, so S H I F T + P R I N T produces &90, C T R L + P R I N T produces
&A0 and S H I F T + C T R L + P R I N T produces &B0.
The purpose of R l = 2 in the previous table is to allow ISO standard foreign
characters to be dealt with correctly and processed separately from
function keys. When permitting the entry of ISO characters, it is prudent to
set the function keys to this mode in order that they may be distinguished
from foreign characters with the same code.
&E5
&E6
&EE
Read/write ESCAPE key status
Read/write E S C A P E effect
Read/write numeric keypad code layout
Note that the codes generated by the numeric keypad vary according to
whether t h e N U M L O C K key is lit or not - consult the Programmer's
Reference Manual for more information.
Character Output
Just as there are several character input streams, so there are several
output streams. The four main output streams are:
The V D U stream, which drives the display
The RS423 port output channel
The printer stream
The * S P O O L file (when activated)
The V D U stream accepts sequences of characters and either displays them,
or uses t h e m to control character output. Besides the many text and
graphics functions the V D U drivers provide, they also allow control over
whether or not characters are sent to the printer stream. The various ' V D U
244
Character Input/Output
codes' which control these effects will be familiar to users of the BBC MOS
and are documented extensively in the Archimedes User Guide.
The RS423 port output channel can be used to output characters in one of
two ways: it may either operate as an adjunct to the V D U stream, or it may
be driven by the printer stream if a serial printer is to be connected. These
two options are discussed below.
Finally, the spool file makes a copy of whatever is sent to the V D U stream in
a specified file. This allows sequences of V D U codes to be 'recorded' and
subsequently 'replayed' using * P R I N T (which takes bytes from the file and
sends them directly to the V D U drivers).
Selecting Which Output Streams are to be Used
A most important output-related call is the one which selects which output
stream(s) are to be used. Of course, unlike the input streams, more than
one output stream may be selected at once so, for example, we may see
results both displayed and printed. The selection of output streams is
effected b y a number of controls, the most important being the BBC MOS
compatible call OS_Byte &03.
OSJByte (SWI &06) Function &03
Select Output Streams
On entry, the call requires the bottom byte of R l to contain a pattern of bits
to select the required combination of output streams. These bits are
interpreted as follows:
Bit
0
1
2
3
4
5
6
7
Meaning i f Set
RS423 output enabled
V D U stream disabled
V D U printer driver disabled
Non-VDU printer driver enabled
Spooling disabled
Use V D U X V instead of V D U drivers
Printer disabled except for V D U l,n
Not used
The default setting of these bits is all zero, meaning that the V D U drivers,
the V D U printer drivers and spooling are all enabled. The exact interpretation of these various bits is described in the relevant parts of the rest
of this section.
245
Archimedes Operating System
Another OS_Byte Call - function & E C - may be used to read / w r i t e this
setting in the normal BBC MOS way.
Selecting the VDU Stream
The V D U stream is the fundamental route through which most characters
are sent. T h e V D U driver software accepts characters from the V D U stream
and either displays them (in the case of printable characters), acts upon
them (in the case of control codes) and/or sends them on to the printer
(when printing has been enabled).
When bit one of the output select byte is set, the V D U stream is completely
disabled, preventing any characters from being displayed or being sent to
the printer.
When bit five is set, the O S calls to the V D U drivers are replaced by calls
through the V D U extension vector ( V D U X V ) to allow replacement V D U
drivers to b e installed. See the chapter on vectors (Chapter 20) for more
information.
Selecting the RS423 Output Stream
Characters m a y be sent to the buffered RS423 output stream in one of two
ways:
1.
W h e n bit 0 of the output select byte is set, characters sent to the
V D U drivers are duplicated into the RS423 output buffer and then
transmitted under interrupt control of the RS423 hardware in the
usual way.
2.
Alternatively, an RS423 printer may be selected using the printer
selection call (see later) in which case control of whether
characters are sent to the output channel is handed over to the
printer controls discussed below.
Selecting the Printer Stream
Usually, characters to be sent to the printer pass through the V D U drivers.
Two control codes are used to tell the V D U drivers whether to pass on
characters to the printer: one of them turning the printer stream on and the
other turning it off. However, the output select bits have the following
overriding effects:
• W h e n bit two is set, no characters will be sent to the printer at all.
246
Character Input/Output
• When bit six is set, characters may only be sent to the printer
using the VDU l,n sequence (this requires the VDU drivers to be
enabled).
• Finally, when bit three is set, all characters sent to the VDU
drivers are duplicated to the printer - regardless of whether the
appropriate codes have heen sent to the VDU drivers to enable
printing.
Several different kinds of printer may be attached to Archimedes computers; the call OS_Byte &05 allows one of the alternatives to be chosen.
OS_Byte (SWI &06) Function &05
Select Printer Driver
On entry, this call takes a parameter in R l which indicates the chosen
printer driver. The possible values are shown below:
Value
0
1
2
3
4
5-255
Printer Driver Selected
Printer sink (characters discarded)
Parallel (Centronics) printer
RS423 output channel printer
User printer
Econet network printer
Other user printers
The previous setting is placed in R l on return from this call. It corresponds
exactly to its BBC MOS equivalent, as does the associated OS_Byte &F5
which allows the current setting to be read.
The following OS_Bytes may also be used in a BBC MOS compatible way:
&06
&F6
&B6
Write printer ignore character
Read/write printer ignore character
Read/write NOIGNORE status - bit 7 set for
'no ignore' character
Selecting the Spool File Stream
Initially, spooling of printed output must be selected by issuing a *SPOOL
command to open the spool file. Once this has been done, characters
subsequently sent to the VDU drivers will be duplicated into the selected
spool file until spooling is turned off again.
247
Archimedes Operating System
However, b i t four of the o u t p u t select byte c a n be set to temporarily disable
spooling w i t h o u t actually closing t h e file etc. This m a y be useful if y o u do
not w a n t g r a p h i c s sequences sent to the spool file, for e x a m p l e .
An OS_Byte c a l l is p r o v i d e d to r e a d the file handle of the c u r r e n t s p o o l file,
a l l o w i n g y o u to take c o n t r o l of t h e spooling p r o c e s s at a l o w e r l e v e l , if
desired.
OS_Byte (SWI &06) Function &C7
Read/Write Spool File Handle
On entry R l a n d R2 s h o u l d be set as usual for this type of call, v i z :
To r e a d t h e c u r r e n t h a n d l e :
R 1 = 0 , R2=255
w i t h the r e s u l t r e t u r n e d in R l .
To w r i t e t h e h a n d l e :
R l = n e w h a n d l e (supplied b y OS_Find), R2=0
w i t h t h e n e w setting r e t u r n e d in R l .
Character Output to the Selected Streams
Having e s t a b l i s h e d h o w to select the various o u t p u t streams, we n o w n e e d
to be able to a c t u a l l y s e n d c h a r a c t e r s to the selected s t r e a m ( s ) . The m o s t
f u n d a m e n t a l call to a c h i e v e this is t h e BBC MOS compatible call OS_WriteC,
w h i c h is e q u i v a l e n t to the BBC MOS call OSWRCH.
O S J W r i t e C (SWI &00)
Write a Character to the Output Streams
On e n t r y t h e c h a r a c t e r s h o u l d be in the b o t t o m byte of R0. The c h a r a c t e r is
sent to all of t h e currently selected o u t p u t streams. No result is r e t u r n e d .
120 M O V R 0 , # A S C " A "
130 SWI "0S_WriteC"
There is also a r a n g e of SWI n u m b e r s , which h a v e the s a m e effect as calling
OS_WriteC b u t display an ASCII character w h o s e n u m b e r is d e t e r m i n e d f r o m
the SWI n u m b e r . The r a n g e of SWI n u m b e r s r u n s f r o m &100 to &1FF, w i t h
the ASCII c h a r a c t e r w h o s e c o d e is the SWI n u m b e r less &100 b e i n g p r i n t e d ,
ie, SWI &120 d i s p l a y s a s p a c e a n d so forth.
248
Character Input/Output
OSJWritel (SWis &100 to &1FF)
Write Specified ASCII Character
This range of SWis takes no entry parameters and returns no results. An
example of these SWis is provided at the end of the chapter (listing 19.1).
This call is invaluable for debugging, since it allows the programmer to
output a character when the execution of the program reaches the SWI
instruction without any of the registers being corrupted.
Additionally, a number of calls are provided to output multiple character
'strings'. These strings may be in one of two forms: either immediately
following the SWI instruction (an 'in-line' string) and terminated by a zero,
or at an arbitrary location in memory, again terminated by a zero. It is
crucial, in both cases, to ensure that the string begins on a byte boundary,
so it is wise to use the A L I G N directive in the A R M B A S I C assembler where
appropriate.
OS_WriteS (SWI &01)
Write an 'In-line' String to the Output Streams
The call takes no entry parameters because the string to be written begins
immediately after the instruction. It must be terminated by a zero.
Execution of instruction begins at the next word after the end of the string.
160
170
180
190
SWI "0S_WriteS"
EQUS "This is a test"
EQUB 0
ALIGN
There is a slight restriction to be wary of when using OS_WriteS. It is
possibly to make any A R M instruction execute conditionally by suffixing
various condition codes to it. It may be thought, therefore, that we could
write code like the following.
10
20
30
40
50
60
70
80
M
SWI O S _ R e a d C "
CMP R 0 , # A S C y "
SWIEQ " O S _ W r i t e S
EQUS "Option selected"
EQUB 0
ALIGN
M
M
< rest of p r o g r a m >
The idea is for the OS_WriteS instruction to write "Option Selected" only
when a 'y has been previously entered.
7
249
Archimedes Operating System
It is certainly true that if a 'y' is not entered, the SWI instruction will not
execute. H o w e v e r , in this case, the A R M program counter will not be
manipulated by the SWI to start execution after the string which follows it.
The result o f this is that the A R M will continue execution immediately after
the S W I " O S _ W r i t e S " instruction itself. It will attempt to interpret the
characters i n the string as A R M instructions and execute them! This can
cause some spectacular crashes and the cause of the failure is often hard to
track down.
In practice, therefore, a conditional execution suffix should never be added
to a SWI "OS.WriteS" instruction.
OS_WriteO (SWI &02)
Write an Indirect String to the Output Streams
On entry, R0 must point to the start of the string. The string must be
terminated b y a zero.
220 A D R
230 SWI
R0,a_string
"OS_Write0"
Where the string is of fixed length an alternative form may be used:
OS_WriteN ( S W I &46) - write a fixed length string to the output streams.
On entry, R0 must point to the start of the string and R l must contain the
number of bytes to write (not necessarily the same as the length of the
string).
220 F O R i%=l TO L E N a$
230 SYS " 0 S _ W r i t e N " , a $ , i %
240 SYS " O S _ N e w L i n e "
250 N E X T
Because text printing is such a common activity, the OS contains a primitive
text formatting call which deals with common control codes: this is the SWI
OS_PrettyPrint.
OS_PrettyPrint takes a string and prints out each
character, translating any embedded carriage returns ( A S C I I 13), tabs
( A S C I I 9) a n d 'hard spaces' (code 31). The Archimedes usually treats
carriage returns as simply meaning 'move back to the start of the line'
without moving the printing position down one line as, for example, the
BBC MOS did. Tabs are expanded to align text to the start of the next eightcharacter column, and text w h i c h overflows a display line is ' w o r d wrapped' at the next space, unless it is a 'hard' space in which case it is left
alone. The combination of these translation facilities is useful, if a little
simplistic.
250
Character Input/Output
OS_PrettyPrint (SWI &44)
Format and Print an ASCII String
On entry, R0 must point to the start of a zero-terminated string. The text
of the string is translated, where necessary, and all characters sent to
OS_WriteC. No results are returned.
The last useful OS output SWI simply prints a carriage return (ASCII 13)
followed b y a line feed (ASCII 10), so it is aptly named OS_NewLine.
OS_NewLine (SWI &03)
Move Print Position to Start of Next Line
The call takes no parameters and returns no results.
Listings
10
20
30
40
50
60
70
80
90
100
110
120
130
140
150
160
170
180
190
200
210
220
230
240
250
2 60
270
280
290
300
310
320
R E M >Listl9/l
R E M b y N i c h o l a s van S o m e r e n
REM Archimedes O S : A Dabhand Guide
R E M (c) Copyright A v S and N v S 198 8
:
D I M b u f f e r 1 0 0 , c o d e % 2000
F O R p a s s % = 0 TO 3 STEP 3
P%=code%
[OPT p a s s %
.start
.swiO
M O V R0,#ASC"A"
SWI "0S_WriteC"
:
.swil
SWI "0S_WriteS"
E Q U S "This is a t e s t "
EQUB 0
ALIGN
:
.swi2
ADR
R0,a_string
SWI " O S _ W r i t e 0 "
:
.swi3
SWI " O S _ N e w L i n e "
:
.swi4
SWI "0S_WriteS"
E Q U S "Press a k e y . . . "
EQUB 0
SWI "OS R e a d C "
251
Archimedes Operating System
330
340
350
360
370
380
390
400
410
420
430
440
450
460
470
480
490
500
510
520
530
540
550
560
570
580
590
600
610
620
630
640
650
660
670
680
690
700
710
720
730
740
750
760
770
780
790
800
810
820
830
840
850
252
SWI "0S_WriteC"
SWI " O S _ N e w L i n e "
:
.swi5
A D R R0, a_command_string
SWI " O S _ C L I "
:
.swiE
SWI " O S _ W r i t e S "
E Q U S "Enter a string, followed by R e t u r n . "
EQUB 0
ALIGN
ADR
R0,buffer
MOV Rl,#100
MOV R2,#32
MOV R3,#126
SWI " O S _ R e a d L i n e "
ADD R4,R0,R1
MOV R5,#0
STR R 5 , [R4]
SWI " O S _ W r i t e 0 "
SWI " O S _ N e w L i n e "
:
.swi21
MOV R0,#16
A D R R l , a_number_string
SWI " O S _ R e a d U n s i g n e d
:
.swi23
ADR Rl,buffer
MOV R3,#0
.swi231oop
A D R R 0 , a_variable_name
MOV R2,#100
MOV R4,#3
SWI " X O S _ R e a d V a r V a l
M O W S S PC,R14
MOV R0,R3
SWI " O S _ W r i t e 0 "
SWI " O S _ N e w L i n e
B swi231oop
:
.a_string
E Q U S "This is a silly little string"
EQUB 0
ALIGN
:
. a_command_string
E Q U S "EX $"
EQUB 0
ALIGN
:
. a_number_string
M
M
n
Character Input/ Output
860
870
880
890
900
910
920
930
940
950
960
970
980
990
EQUS "&4DE23"
EQUB 0
ALIGN
:
.a_va r i ab1e_name
EQUS " A l i a s $ * "
EQUB 0
ALIGN
]:NEXT p a s s %
P R I N T • " P r e s s Return to test.."
R E P E A T UNTIL GET=13
CLS
CALL start
END
Listing 19.1. Simple i / O .
10
20
30
40
50
60
70
80
90
100
110
120
130
REM >Listl9/2
R E M b y N i c h o l a s van Someren
R E M A r c h i m e d e s O S : A Dabhand G u i d e
R E M (c) Copyright AvS and NvS 1988
:
R E M Take a string and for each of its characters,
R E M call SWI &100 p l u s the value of the c h a r a c t e r .
:
a $ = " T h i s is a test"+CHR$13+CHR$10
F O R char%=l TO LEN(a $)
SYS &100+ASC(MID$(a$,char%,l))
NEXT
END
Listing 19.2. Writel example.
10 R E M >Listl9/3
20 R E M by N i c h o l a s van Someren
30 R E M A r c h i m e d e s O S : A Dabhand G u i d e
40 R E M (c) Copyright AvS and NvS 1988
50 :
60 MODE 0
70 :
80 R E M M a k e a$ a tabulated string and print it ' p r e t t i l y .
90 :
100
a$="THIS"+CHR$9+"IS"+CHR$9+"TEST +CHR$13+"and"+CHR$9+
"so"+CHR$9+"is"+CHR$9+" this."
110 SYS "OS_PrettyPrint",a$
120
PRINT
130 :
140 R E M R e a d data and plot it.
1
,,
253
Archimedes Operating System
150
160
170
180
190
200
210
220
230
240
250
260
270
280
290
300
310
:
REPEAT
READ m%,x%,y%
SYS " O S _ P l o t " , A B S ( m % ) , x % , y %
UNTIL m%<0
:
R E M P r i n t out substrings o f a$
F O R i%=l TO L E N a$
SYS " O S _ W r i t e N " , a $ , i %
SYS "OSJSfewLine"
NEXT
END
:
D A T A 4, 500,500
D A T A 5,700,500
D A T A 5, 700,700
DATA -5,500,500
Listing 19.3. PrettyPlot.
254
2 0 : Vectors
Just as the BBC MOS made extensive use of vectors, so the Archimedes O S
does too - allowing O S routines to be bypassed, if necessary. The
mechanism for using vectors has been rationalised so that a consistent
view of vector handling is provided to all software.
Before looking at the details of the software vectors provided by the
Operating System, it is worth noting that the A R M itself also uses vectors.
These are completely distinct from the Operating System ones and are
called the hardware vectors.
The Hardware Vectors
The hardware vectors are a series of locations fixed in memory which the
A R M will jump to if it encounters a situation which it cannot itself directly
deal with. For example, the user m a y be attempting to execute an
unknown instruction or to access some non-existent memory location. In
these and other similar situations, the A R M breaks off its current task and
begins execution at the appropriate hardware vector. When the system
wasinitialised, the OS will have placed branch instructions in each of these
vectors so that the A R M will jump to a suitable piece of code within the
Operating System to handle the situation which is causing the problem.
The various hardware vectors are listed below in table 20.1:
Vector Location
&00000000
&00000004
&00000008
&0000000C
&00000010
&00000014
&00000018
&0000001C
Called in response to
Machine R E S E T
Unknown Instruction
Software Interrupt (swi)
Pre-fetch Abort
Data Abort
Address Exception
Interrupt occurring (IRQ)
Fast Interrupt occurring ( F I R Q )
Table 20.1. The Hardware vectors.
255
Archimedes Operating System
It is theoretically possible for users to place their own branch instruction in
one of the hardware vectors. This would allow some user code to be
executed in the corresponding circumstance. However, this is a very risky
occupation, and there is usually an easier to use facility provided by the
Operating System. For example, to add extra SWI instructions we do not
need to replace the SWI hardware vectors as the OS provides an 'Unknown
swr software vector.
One common reason for manipulating the hardware vectors is to change
the m a c h i n e ' s response to memory access faults. If some non-existent
memory is accessed then one of the memory fault vectors, &0O00O0OC to
&00000014, is called. The normal effect of this is for the Operating System
to report a fatal error and stop executing the current task.
In some cases, for example when writing a memory editor, this is not a
very desirable thing to happen. It would be better to simply warn the user
that a particular location is invalid and allow editing to continue of the rest
of memory.
The subroutine presented below can do exactly this. On entry to the
routine, R0 should contain the address of the memory location to be read.
On exit, R0 will contain the data byte found at this location or - 1 if the
access to the memory location caused a fault. Note that, the original
contents of the hardware vectors are preserved on entry and restored on
exit. This is vital, so that a real memory fault at some later time does not
cause the subroutine to be suddenly re-entered!
10
20
30
40
50
60
70
80
90
100
110
120
130
140
150
160
170
180
190
200
210
220
256
REM >List20/l
R E M A r c h i m e d e s O S : A D a b h a n d Guide
R E M (c) M i k e G i n n s 1988
R E M E x a m p l e of m a n i p u l a t i n g the hardware v e c t o r s
REM
REM
:
D I M p r o t e c t e d _ m e m o r y _ r e a d 1024
F O R p a s s = 0 TO 3 STEP 3
P% = p r o t e c t e d _ m e m o r y _ r e a d
[
OPT p a s s
:
\ On e n t r y R0 = a d d r e s s o f byte to read
\ On e x i t R0 = c o n t e n t s o f location
\ OR R 0 = -1 if m e m o r y a d d r e s s invalid
:
\ E n t e r SVC m o d e . May n o t be able to access h a r d w a r e
\ f r o m u s e r m o d e in future operating systems
:
SWI " O S _ E n t e r O S "
:
vectors
Vectors
230
240
250
260
270
280
290
300
310
320
330
340
350
360
370
380
390
400
410
420
430
440
450
460
470
480
490
500
510
520
530
540
550
560
570
580
590
600
610
62 0
630
64 0
650
660
670
680
690
700
710
720
730
740
750
AOS—Q
MOV R3,#0
L D R R l , [R3,#&10]
\ Old contents of data abort v e c t o r
L D R R 2 , [R3,#&14]
\ Old contents of exception v e c t o r
STMFD R13!,{R1,R2} \ Preserve p r e v i o u s contents on stack
\ Instruction p a t t e r n
MOV Rl,#&F0OOOO00
STR R 1 , [ R 3 , # & 1 0 ]
1
for A N D N V R0,R0,R0»
\ Place
(NOP)
'NOP' in data abort
vector
\ Construct suitable b r a n c h instruction to jump t o the
\ memory
fault code from the exception v e c t o r
ADR
SUB
MOV
ORR
Rl,memory_fault
\ Routine called if illegal access
Rl,Rl,#20+8
\ V e c t o r at &14 + 8 for P i p e L i n e
R1,R1,LSR#2
\ Should be a word address
R1,R1, #%11101010«24
\ Include branch op w i t h address
STR R1,[R3,#&14]
\ Store b r a n c h in e x c e p t i o n
vector
\ Try to read the b y t e of memory, t h e address of w h i c h
\ in register R 0 . If this results in a m e m o r y fault,
\ t h e n the 'memory_fault
code is executed.
is
1
LDRB R 0 , [R0]
.after_load_instruction
\ A c c e s s memory l o c a t i o n
\ Reached even if m e m o r y fault
L D M F D R13!,{R1,R2}
M O V R3,#0
STR R1,[R3,#&10]
STR R2,[R3,#&14]
\ Get original v e c t o r s
stack
\ Restore data abort v e c t o r
\ Restore exception v e c t o r
TEQP P C , # 0
MOVNV R0,R0
\ Back to user m o d e
M O V PC,R14
\ Return to
\
\
\
\
from
caller
This code is only e x e c u t e d if a memory fault o c c u r e d when
the specified location was accessed. It p l a c e s -1 in R0
then jumps back to the instruction immediately a f t e r the
LDR instruction.
.memory_fault
MVN R0,#0 \ Move -1 into R0
B after_load_instruction
i
NEXT
257
Archimedes Operating System
760
770
:
:
780
REPEAT
800
810
820
830
840
PRINT'
I N P U T "Enter a d d r e s s o f b y t e to b e examined
PRINT
A % = EVAL(addr$)
result = USR( protected_memory_read )
860
870
880
890
IF r e s u l t = - 1 THEN
P R I N T "Address i n v a l i d "
ELSE
P R I N T "Data at t h i s l o c a t i o n is : " ;result
E N D IF
920
U N T I L FALSE
790
850
900
910
:
: " addr$
:
:
Listing 20.1. Manipulating the hardware vectors.
The Operating System Software Vectors
The OS software vectors may be intercepted much more easily and safely
than the hardware ones and should be used in preference wherever
possible. A number of SWls are provided to help in manipulating the
vectors. T h e most important are OS_Claim and OSjRelease.
The procedure for using vectors is as follows. A call to OS_Qaim will attach
your code to the front of the chain of claimants for that particular vector.
You may then either, deal with a call to the vector and pass it on, or 'hold'
the vector and prevent other claimants from being called. The latter
situation m u s t obviously be used with considerable care, since holding an
important vector such as one of the interrupt vectors or the error handler's
vector is likely to cause trouble.
The vectors that the OS uses are summarised in table 20.2 below, together
with the SWls and operations which are indirected through them.
Name
ErrorV
IrqV
WriteCV
Readcv
CliV
ByteV
WordV
258
Number
&01
&02
&03
&04
&05
&06
&07
Function
OS_GenerateError
Normal interrupt vector
OS.WriteC
OS.ReadC
OS_CLl
OS.Byte
OS.Word
Vectors
Name
FileV
ArgsV
BGetV
BPUtV
GBPBV
FindV
ReadLineV
FSControlV
EventV
InsV
RemV
CnpV
UKVDU23V
UKSWIV
UKPLOTV
MouseV
VDUXV
TickerV
UpcallV
ChangeEnvironmentV
Number
&08
&09
&0A
&0B
&0C
&0D
&0E
&0F
&10
&14
&15
&16
&17
&18
&19
&1A
&1B
&1C
&1D
&1E
Function
OS.File
OS_Args
OS_BGet
OS.BPut
OS.GBPB
OS_Find
OS_ReadLine
OS_FSControl
Event vector
Buffer insertion
Buffer removal
Buffer count/purge
Unknown VDU 2 3 code
Unknown SWI
Unknown VDU 25 code
OS_Mouse
VDU extension
Centisecond clock ticks
OS.UpCall
OS_ChangeEnvironment
Table 20.2. The OS Vectors.
Writing Code which Intercepts Vectors
Code which intercepts vectors should, ideally, behave as much like the
normal vector routine as possible. So, most or all registers should be
preserved, the stack should be left uncorrupted, the processor mode left
unchanged and so forth. Where SWis are involved, it is important to
preserve the contents of R14 on the stack as it will otherwise be corrupted.
Vector handling code returns, either by intercepting the call or by passing it
on to the previous claimant. To intercept the call, return using:
LDMFD R 1 3 ! ,
{PC}
so as to retrieve the address placed there by the OS. To pass on the call,
copy the contents of R14 on entry back into the PC using:
MOV PC, R14
(assuming R14 is still valid - if you have preserved R14 elsewhere then
clearly a different mechanism will be needed.)
259
Archimedes Operating System
SWIs Which Deal with Vectors
T h e m o s t fundamental SWls relating to vectors are O S . C l a i m and
OS_Release - they allow you to attach or detach your routine from the
front of the list of claimants for a given vector.
OSJZlaim (SWI &1F)
On entry, t h e vector number to be intercepted should be placed in R0 (taken
from the list above), the address of your routine in R l and a pointer to the
private workspace for the routine in R2. The private workspace pointer
allows R12 to be initialised where the claimant is a module.
3380
3390
3400
3410
3420
3430
3440
3450
34 60
MOV
ADR
SWI
MOV
ADR
SWI
MOV
ADR
SWI
R0,#&14
Rl,myinsv
"OS_Claim"
R0,#&15
Rl,myremv
"OS_Claim"
R0,#&16
Rl,mycnpv
"OS C l a i m "
/Buffer insert v e c t o r
;Use address of new routine
;and claim vector
/Buffer remove v e c t o r
/Buffer count/purge vector
No results a r e r e t u r n e d b y this call.
OS.Release (SWI &20)
This SWI t a k e s the s a m e p a r a m e t e r s as OS_Claim a n d r e m o v e s the specified
c l a i m a n t f r o m t h e list a s s o c i a t e d w i t h the specified v e c t o r - p r e v e n t i n g
s u b s e q u e n t calls to it. The printer buffer similarly releases the v e c t o r s .
3570
3580
3590
3600
3610
3620
3630
3640
3650
/Buffer insert vector
M O V R0,#&14
A D R Rl,myinsv
/Extra entry
SWI "OSJRelease"/Release
;Buffer remove vector
M O V R0,#&15
A D R Rl,myremv
SWI "OS_Release"
B u f f e r count/purge vector
M O V R0,#&16
A D R Rl,mycnpv
S W I "OS R e l e a s e "
OS_CallAVector (SWI &34)
This SWI calls the vector whose number is in R9 on entry, the parameters
specific to the vector being provided in R0 to R8. The SWI is useful for
calling routines which have no entry point other than through the vector,
eg, InsV. Listing 20.2 is an example of the use of this SWI.
260
Vectors
10
20
30
40
50
60
70
80
90
100
110
120
130
140
150
160
170
180
190
200
210
220
230
240
250
260
270
280
290
R E M >List20/2
R E M by N i c h o l a s v a n Someren
R E M for the D a b h a n d G u i d e to t h e A r c h i m e d e s OS
R E M (c) Copyright A v S and N v S 1 9 8 8
:
D I M c o d e % 100
P%=code%
[
.start
M O V R9,#&16
;Count and p u r g e vector
M O V Rl,#3
/Printer b u f f e r
M O V R3,#0
;Count rather t h a n purge
M O V S R 4 , R 1 , L S L #1 /Ensure carry is clear
S W I "0S_CallAVector"
M O V R0,R1
/Put the count in R0
M O V PC,R14
]
R E M Send something t o the p r i n t e r .
:
VDU 2
P R I N T "HELLO"
VDU 3
:
R E M Read t h e count, clear the b u f f e r , then read t h e
R E M count again.
:
P R I N T "Before c l e a r i n g the b u f f e r : " U S R c o d e %
* F X 15
P R I N T "After clearing the b u f f e r : "USR c o d e %
Listing 20.2. Using OS_CallAVector.
In some cases it will be useful for a vector to be intercepted after the default
Operating System routine has been called. This is not directly possible, but
can be achieved by using some tricky coding. Acorn recommend the following code fragment for this purpose:
.intercept_code
STMFD R 1 3 ! , {R9}
ADR R9,continue_after + mode
STMFD R 1 3 ! , { R 9 , R 1 2 }
M O V PC,R14
LDMFD R 1 3 ! , { R 9 , R 1 2 }
.continue_after
< Code to e x e c u t e after d e f a u l t routine h a s b e e n
called s h o u l d be p l a c e d h e r e >
LDMFD R 1 3 ! , {PC}
The code should be linked to the vector by intercepting it in the normal way.
The routine places a dummy return address on the stack and then calls the
261
Archimedes Operating System
default vector routine. This routine would normally return directly to the
main program which called the vector in the first place. However, because
we have modified the stack, it actually returns back into our code. W e can
then do any processing required before returning directly back to the vector
caller ourselves.
Remember that the default routine will probably return results in the
registers or the flags. These are available to our routine to modify before
passing t h e m back to the caller. Care must be taken to preserve any results
required. This is particularly easy to overlook if the results are returned in
the status flags. Listing 20.3. is a trivial example of intercepting a vector. It
intercepts the ReadC vector which is called each time a character is read
from the input stream. Before reading the character it prints a " * " as a
'prompt'. T h e result is that a '*' is output before each character read in.
10
20
30
40
50
60
70
80
90
100
110
120
130
140
150
160
170
180
190
REM >List20/3
R E M E x a m p l e of I n t e r c e p t i n g a vector
R E M T h e ReadC v e c t o r
R E M A r c h i m e d e s O S : A D a b h a n d Guide
R E M (c) Mike Ginns 1988
REM
:
:
D I M R e a d C _ i n t e r c e p t 1024
P%= R e a d C _ i n t e r c e p t
[
:
S T M F D R 1 3 ! , {R14}
SWI 2 5 6 + 4 2
L D M F D R13!,{R14}
M O V S PC,R14
]
:
SYS
OS_Claim",4,ReadC_intercept,0
,,
Listing 20.3. Intercepting ReadC.
262
21 : Interrupts and Events
Interrupts allow the flow of instruction processing to be diverted (usually
temporarily) as a result of an external signal. The A R M C P U caters for two
levels of interrupt - normal Interrupt ReQuests (iRQs) and Fast Interrupt
reQuests (FIQS), each of which has a set of 'shadow' registers to allow low
interrupt latency. Each kind of interrupt may be selectively enabled or
disabled by setting the flag associated with that particular interrupt type in
the status part of the A R M PC.
When an interrupt is received, the C P U finishes the execution of the current
instruction and saves the P C in the link register R14 associated with the
particular interrupt. It then disables the relevant interrupt, by setting the
relevant flags, and calls the interrupt service routine by jumping through
the appropriate vector.
The two classes of interrupt are treated slightly differently: since F I Q S are
designed for very fast operations, their vector appears last in the hardware vector table so that a branch is not necessary. The F I Q code must
therefore reside in the space between the hardware vector at &1C and
address & F C so as not to corrupt the OS workspace beyond & F C .
The interrupt service routine needs to determine which device has caused
the interrupt and then deal with it as necessary. Clearly this is entirely
device dependent. Finally, the interrupt service routine needs to return to
the point of interruption, which is achieved b y the following instruction:
SUBS PC, R14, #4
(The offset of four is applied because the value in R14 is one instruction
ahead of the actual instruction to execute).
Usually, you will not need to create interrupt service routines of your own
because the O S provides a well-defined system for passing unknown
interrupts around to applications using the vector claim call OS_Claim,
which was discussed earlier.
263
Archimedes Operating System
Good Behaviour
In general, interrupt routines should keep interrupts disabled (the default
state) while being executed. This is to prevent the service routine from
being called again before it has finished dealing with the current interrupt.
Most SWls m a y safely be called from within interrupt routines, provided
that the contents of R14_SVC are saved before the call. Acorn recommends
the following code to do this:
M O V R 9 , PC
O R R R 8 , R9, #3
TEQP R 8 , #0
MOVNV
R0,
R0
S T M F D R13!, {R14}
SWI s w i _ n u m b e r
L D M F D R13!, {R14}
TEQP R 9 , #0
MOVNV
R0,
R0
/save t h e current PC & mode in R 9
/use R9 to m a k e R8 a supervisor v e r s i o n
/use R8 to change mode
/no-op ** REQUIRED **
/stack the supervisor R14
/call the SWI
/get R 1 4 back
/and restore the original state
/no-op ** REQUIRED **
The no-op instructions are needed because changing processor mode can
change register banks and the result of access to banked registers is not
defined for o n e cycle.
Obviously, it is silly for FIQ service routines to call SWls as this pretty much
defeats the purpose of using FIQS.
Switching Interrupts On and Off
It is possible to globally enable and disable interrupts by means of the SWls
OS_IntOn and OSjntOff which neither take nor return any parameters.
Clearly the use of these SWls should be avoided, as they have marked (and
usually undesirable) effects on the operation of the OS. An example of the
use of these SWls is given below in listing 21.1.
10
20
30
40
50
60
70
80
90
100
110
120
130
140
264
REM > L i s t 2 1 / l
REM b y N i c h o l a s v a n Someren
REM A r c h i m e d e s O S : A D a b h a n d Guide
REM (c) C o p y r i g h t AvS and NvS 1988
:
:
REM T u r n i n t e r r u p t s off and loop for a w h i l e .
:
SYS " O S _ I n t O f f "
PRINT"Testing..."
T%=TIME
FOR x = l TO 100000
NEXT
:
Interrupts and Events
150
160
170
180
R E M Turn interrupts on a g a i n .
:
SYS "OS_IntOn"
:
190
PRINT"That seemed t o t a k e " ; ( T I M E - T % ) / 1 0 0 ; "
seconds."
Listing 21.1. Turning interrupts on and off.
The Main Interrupt Vector
It is very unlikely that you will need to intercept the IRQ interrupt system at
a lower level than that provided b y the normal Operating System vectors.
However, if it is vital that your routine is called before any other when an
interrupt occurs, then the primary interrupt vector can be intercepted.
This vector is a sort of intermediary between the hardware interrupt
vectors and the Operating System. It is located in memory at address
&100. When an IRQ interrupt occurs, the Operating System jumps to a
routine, the address of which is stored at location &100.
Normally, the default routine jumped to from this vector is the Operating
System's first level interrupt handler ( F L I H ) . This is responsible for
determining the source of the interrupt and calling an appropriate
handling routine in the OS.
If users place the address of their own code at location &100, then this will
be executed, instead of the default routine, whenever an I R Q interrupt
occurs.
It is obviously a very drastic action to try to replace the entire Operating
System interrupt handling routine. For this reason, most intercept code
will perform its function and then jump on to the default routine. It will,
therefore, have to remember the default address which was stored at
location &100 when it was initialised.
Events
Events are essentially 'sanitised versions of interrupts. They are used to
inform the user whenever the Operating System performs or detects some
significant task or occurence. For example, a key is pressed, a buffer
becomes empty or a timer expires. The user may specify that h e / s h e is
interested in a particular event. The Operating System will then inform
when the event occurs by jumping, via the event vector, to a section of code
supplied by the user.
1
265
Archimedes Operating System
Many events are produced in response to the Operating System detecting
an interrupt from the hardware. They allow the user to take action when
these significant happenings occur, without having to intercept the
interrupt system and deal with the hardware itself.
Twelve events are currently defined for the OS and are detailed in table
21.1. You will notice that most of these events are similar to those used by
the BBC MOS.
Event
Number
0
1
2
4
5
6
7
9
10
11
12
Cause of the
Event
An output Buffer has
become empty
Input buffer was already
full
Event entry information
(R0 = Event number)
R l = Buffer number
R l = Buffer number
R2 = Character which couldn't
be inserted
A Character has been placed R2 = ASCII value of new
in an input buffer
character
Vsync : scanning beam has
reached bottom of screen
Interval timer crossed zero
Escape condition detected
RS423 receiving error
R l = Serial device status
R2 = Character received
Event generated by Econet
Event generated by the user
Mouse button has changed R l = Mouse X co-ordinate
state
R2 = Mouse Y co-ordinate
R3 = Mouse button state
R4 = Lower 4 bytes of the real
time centisecond value
Key Pressed/Released Event R l = 0 if key pressed
R l = 1 if key released
R2 = Key matrix number
A sound event has occurred R l = Sound level (always 2)
R2 = 0
Table 21.1. The 12 OS Events.
In order to m a k e use of an event, we must first intercept the event vector.
The event vector is number &10 and may be intercepted, like any other,
using SWI "OS.Claim".
266
Interrupts and Events
After the vector has been intercepted the attached routine will be called
whenever an enabled event occurs. To allow it to differentiate between
events, the routine is entered with the event identifying number in R0.
Other parameters are passed in various registers as described above.
To enable an event, so that when it occurs the event vector is called, we use
the following *FX command.
* F X 14,<n>
Where 'n' is the number of the event which we want to enable. Similarly to
disable an event again, we use:
* F X 13,<n>
Obviously, in an assembler program, the SWI OS_Byte version of these two
*FX's would be used. For example, to enable event number four we could
use the following code:
MOV R0,#14
MOV Rl,#4
SWI OS_Byte
\ Using O S B Y T E 14
\ Event number 4
\ Call OSBYTE
On exit from either OS_Byte, R l indicates the previous state of the event in
the following way:
R l = 0 Event was previously disabled
R l > 0 Event was previously enabled
As stated previously, most events are triggered by the Operating System
detecting an interrupt. The same rules concerning the writing of interrupt
handling routines also apply to writing event handlers.
To return after an event routine is completed, we simply use:
MOVS PC,R14
This is possible as the OS will have set up a return address in R14 for use. It
will then deal with the more complex problem of returning to the
interrupted code. Note that, like interrupt routines, event handlers must
preserve R14_svc before using a SWI instruction. The code to do this was
given earlier in the interrupt section.
The user can generate his/her own event by using:
SWI "OS_GenerateEvent"
On entry, R0 should contain the number of the event which you require to
generate. Event number 9 has been specifically reserved as a 'User Event'.
R1,R2,R3 etc can contain event parameters to pass to the event handling
267
Archimedes Operating System
routine through the event vector. Listing 21.2 is an example of an event
driven routine. It sets up the event vector and then enables event number
four. This is the screen vertical sync event (VSync) and means that the
routine is entered 50 times a second synchronously with the fly back period
of the screen display.
All that the routine does, when called, is to increment the co-ordinates of
the mouse pointer. If the pointer reaches the edge of the screen then the
increment is reversed and the pointer moves off in the opposite direction.
The result of this is that the mouse pointer moves and bounces around the
screen under interrupt/event control. The user is free to enter a command
or do what h e / s h e likes as if the process was not running.
10
20
30
40
50
100
110
120
130
140
150
160
170
180
190
200
210
220
230
240
250
260
270
280
290
300
310
320
330
340
350
REM >List21/2
R E M E x a m p l e of u s i n g e v e n t s
REM Bouncing mouse pointer
R E M A r c h i m e d e s <O S : A D a b h a n d
R E M (c) Mike Ginns 1988
:
D I M V s y n c _ e v e n t 1024
F O R p a s s = 0 TO 3 STEP 3
P%= V s y n c event
:
[
OPT pass
;
CMP R0,#4
M O V N E S PC,R14
\ Check V s y n c
\ Exit if not
event
vsync
:
STMFD
R 1 3 ! , { R 0 -R12 ,R14}
\ Preserve registers on
stack
:
M O V R9,PC
ORR R8,R9,#3
TEQP R8,#0
M O V N V R0,R0
S T M F D R13!,{R14 }
;
\
\
\
\
\
Store PC flags in R9
Copy flags to R8 selecting SVC m o d e
W r i t e m o d i f i e d flags back into P C
NOP instruction to sync reg b a n k s
Preserve R14_SVC on stack
:
360
L D R R 0 , xpos
L D R R l , xinc
ADD R2,R0,R1
CMP R 2 , # 1 2 1 6
R S B H I R1,R1,#0
S T R R 2 , xpos
STR R l , xinc
370
380
390
400
410
LDR
LDR
ADD
CMP
268
Guide
\ Modify x p o s i t i o n of pointer
:
R 0 , ypos
R l , yinc
R3,R0,R1
R3,#960
\ Modify y p o s i t i o n of p o i n t e r
Interrupts and Events
420
430
440
450
460
470
480
490
500
510
520
530
540
550
560
570
580
590
600
610
620
630
640
650
660
670
680
690
700
710
720
730
740
750
760
770
780
790
800
810
820
830
840
850
860
870
880
890
R S B H I R1,R1,#0
S T R R3,ypos
S T R Rl, yinc
A D D R3,R3,#64
ORR
R2,R2,R3,LSL#16
M O V R0, #3
STRB R0,OSWORD_block
S T R R2,OSWORD_block+l
\ Save p o i n t e r x,y in p a r a m e t e r
A D R Rl,OSWORD_block
M O V R0, #21
SWI "OS_Word
\ Invoke O S W O R D to move
block
pointer
H
L D M F D R13!,{R14}
TEQP R 9 , # 0
M O V N V R0,R0
Restore R 1 4 _ S V C from stack
Restore m o d e and flags from R 9
NOP instruction to sync r e g b a n k s
L D M F D R 1 3 ! , { R 0 - R 1 2 , R 1 4 } \ Restore entry registers
Return t o system
M O V S PC,R14
from
stack
X p o s i t i o n of pointer
.xpos
E Q U D 10
.ypos
E Q U D 10
. xinc
EQUD 8
.yinc
EQUD 8
Y p o s i t i o n of pointer
EQUW 0
EQUB 0
.OSWORD_block
EQUD 0
EQUD 0
amount
o f movement
in X d i r e c t i o n
amount
o f movement
in Y d i r e c t i o n
\ Skip 3 b y t e s
\ 1 non w o r d aligned b y t e f o l l o w e d by
\ a single word-aligned w o r d .
NEXT
^POINTER
SYS "OS_Claim" ,16,Vsync_event,1
: * Enable V s y n c event
*FX14 4
VDU19,0,24,180,150,255
P R I N T ' ' " B a c k in command
1
PRINT
mode"
: * Link to event
vector
1
'"Pointer is m o v i n g under interrupt
control"
Listing 21.2. The bouncing mouse pointer.
269
Archimedes Operating System
Notice how the code presented earlier to preserve R14_SVC is actually used
in the program. Try using *FX13,4 and *FXl4,4 to disable and enable the
event which drives the routine. You should see the pointer stop and start
appropriately.
270
22 : Conversion SWIs
One aspect of the OS, which is likely to be appreciated by every programmer, is its range of useful conversion SWls for dealing with the various
formats for strings, numbers, dates and so forth. This chapter summarises
these SWls concisely - you will probably find yourself using them a great
deal!
String Conversion and Decoding
These SWls perform conversions on strings for the OS to use. In particular,
they expand E S C A P E characters entered using the split-bar ' I' syntax for
control characters and the angle-bracket ' < > ' syntax for O S variables and
embedded integers. You will notice that each SWI builds upon the features
of the preceding ones.
OS_GSInit (SWI &25)
This call must be made once before using either of the following two string
conversion SWls. On entry, R0 should point to the string to be converted
and R2 should have its top three bits set as follows:
Bit
31
30
29
Effect if Set
Inverted commas around strings are not stripped out
Split-bar control codes are not translated
The first space is treated as the terminator
R0 a n d R2 are r e t u r n e d with v a l u e s a p p r o p r i a t e for calling t h e other SWls.
OS_GSRead (SWI &26)
This call gets the n e x t c h a r a c t e r f r o m a string initialised b y OS_GSlnit. It is
used b y t h e n e x t SWI, OS_GSTrans. On entry it takes the v a l u e s of R0 a n d R2
set u p b y OS_GSinit a n d r e t u r n s the d e s i r e d c h a r a c t e r in R l , u p d a t i n g R0
and R2 a s n e c e s s a r y . OS_GSRead p e r f o r m s t h e a c t u a l t r a n s l a t i o n of the
v a r i o u s e l e m e n t s of s y n t a x m e n t i o n e d earlier - d e c o d i n g , f o r e x a m p l e ,
control c h a r a c t e r s d e n o t e d b y split-bar s e q u e n c e s .
271
Archimedes Operating System
OS_GSTrans (SWI &27)
This SWI is the general-purpose string translation routine - it calls G S j n i t
once and t h e n GS_Read for each character in the string. On entry, it
requires R0 to point to the string to be translated, which should be
terminated b y any of zero, line feed (10) or carriage return (13). R l should
point to a destination buffer with R2 containing its maximum size (and the
top three bits set as for OS_GSinit). The resultant string is placed in the
buffer, with R0 pointing to the terminator and R2 containing its length.
The Overflow flag ' V is set if the string could not be translated and the
Carry flag ' C is set if the buffer overflowed.
Listing 22.1: A string is set up at string% containing ordinary characters, a
character defined as a binary number and the control code for a 'bell'. This
is printed out character-by-character using OS_GSRead, and then all in one
go using OS_GSTrans to decode the string and OS_WriteN to print it.
10 R E M > L i s t 2 2 / l
20 R E M G S D e m o
30 R E M A r c h i m e d e s O S : A D a b h a n d Guide
40 R E M (c) Copyright A v S and NvS 1988
50 :
60 R E M R e s e r v e some space for string and m a k e
70 R E M $ s t r i n g % the string t o be translated.
80 :
90 D I M s t r i n g % 100,work% 100
100 $ s t r i n g % = " C h a r a c t e r 254 looks like ""<2_11111110>"" and a
b e l l s o u n d s like t h i s . < 7 > "
110 P R I N T $string%
120 :
130 R E M P r e p a r e to read t r a n s l a t e d bytes and keep
140 REM r e a d i n g c h a r a c t e r s u n t i l carry is set.
150 :
160 SYS " O S _ G S I n i t " , s t r i n g % TO w h e r e % , , f l a g s %
170
REPEAT
180 SYS " O S _ G S R e a d " , w h e r e % , , f l a g s % TO
where%, nextchar%, flags%;checklast%
190
IF (checklast% AND 2)=0 V D U nextchar%
200 U N T I L checklast% A N D 2
210
PRINT
220 :
230 REM T r a n s l a t e and print t h e string in one g o .
240 :
250 SYS " O S _ G S T r a n s " , s t r i n g % , w o r k % , 1 0 0 TO , , L%
260 SYS " O S _ W r i t e N " , w o r k % , L %
270
PRINT
280
END
Listing 22.1. Using GS calls.
272
Conversion SWIs
ASCII to Binary Conversions
OS_ReadUnsigned (SWI &21)
This call converts an unsigned string in a given number base to a 32-bit
binary number. On entry, R0 should contain the number base (in the range
two to thirty-six), Rl should point to the string and R2 should contain the
maximum permissible value.
The string may contain valid digits and characters, which may be preceded
with '&' for hexadecimal or with 'base_' for a given base. The string is
analysed up to the first invalid character for the given base. So, for
example, the string '89A' will return 89 if decimal is specified.
The top three bits of R0 contain flags which allow various range checks:
Bit
31
30
29
Effect if set
Terminator must be less than ASCII 33
Value must be in range 0 to 255
Value must be in range 0 to R2
The call returns with R l pointing to the end of the string (if it was valid), or
is unaltered (if the string was invalid). R2 contains the converted value, or
zero if an error arose. The Overflow flag ' V will be set if the string was not
in the specified format.
OS_EvaluateExpression (SWI &2D)
This very sophisticated SWI translates a string expression which may
include a whole range of arithmetic, logical and string operations. On
entry, R0 points to the source string, Rl points to a buffer for the translated
result and R2 contains the maximum size of that buffer. On return, the type
of the result is indicated by R l , which is zero for an integer result and nonzero for a string (whose actual length is returned in R2, with R0 intact). If
the size of the buffer is exceeded the error 'Buffer overflow is generated.
7
OS_EvaluateExpression applies OS_GSTrans to the string i n order to
evaluate any parameters in angle-brackets, and treats any sequences of
letters which are not operators as variable names. Valid numeric and
logical operators are:
+
=
<>
>>
AND OR
AOS—R
*
/
MOD
>= <= <
>
>>>
<<
EOR NOT
273
Archimedes Operating System
Strings enclosed in inverted commas may be used, and the following string
operators are valid:
Operator
+
Effect/value
Concatenation of two strings
RIGHT n
As BASIC RIGHT$
LEFT n
As BASIC L E F T $
LEN
STR n
VAL " x "
Length of string
Translate number to string
Translate string to number
Binary to ASCII Conversions
OS_BinaryToDecimal (SWI &28)
This S W I converts a signed 32-bit integer to an ASCII decimal string which is
placed in a buffer. On entry, R0 contains the integer, R l points to the buffer
and R2 contains its maximum size. On return, R l is preserved (so it points
to the converted string) and R2 contains the length of the string. The
'Buffer overflow' error is generated if the resultant string will not fit into
the buffer supplied. Listing 22.2 at the end of this section demonstrates the
use of O S _ B i n a r y T o D e c i m a l . OS_WriteO is used to display the string
returned.
10
20
30
40
50
60
70
80
90
100
110
120
130
140
150
160
REM >List22/2
REM BintoDec
R E M b y Nicholas van Someren
R E M A r c h i m e d e s O S : A D a b h a n d Guide
R E M (c) C o p y r i g h t AvS a n d NvS 1988
R E M Set up a string b u f f e r .
:
D I M b u f f e r 100
:
R E M Convert - 1 2 3 4 5 6 into a signed string and d i s p l a y i t .
:
SYS " O S _ B i n a r y T o D e c i m a l " , - 1 2 3 4 5 6 , b u f f e r , 1 0 0 TO
length
buffer?length=0
SYS " O S _ W r i t e 0 " , b u f f e r
PRINT
END
Listing 22.2. Binary to Decimal Conversion.
274
Conversion SWIs
OS_Convert Group
(SWIs &D0-&EA)
This range of SWls is responsible for conversions between integers and
ASCII strings of various types. Each SWI takes a value in R0, a pointer to a
buffer in R l and the maximum buffer size in R2.
There are several forms of each SWI, to deal with input and output values
of different sizes - in each case the appropriate digit is appended to the SWI
name given below.
On return, R0 now points to the buffer, R l to the terminating character of
the string within the buffer and R2 contains the number of bytes left in the
buffer. The 'Buffer overflow' error is generated if the resultant string will
not fit into the buffer supplied.
OS_ConvertHexl/2/4/6/8
(SWIs &D0-&D4)
These SWls produce a hexadecimal result of the specified number of digits,
with leading zeros added as necessary. Note that an ampersand '&' is not
added to the start of the string.
OS_ConvertCardinall/2/3/4
(SWIs &D5-&D8)
These SWls produce an unsigned decimal result using the specified number
of bytes of the input value - no leading zeros are added to the start of the
string.
OS_ConvertIntegerl/2/3/4
(SWIs &D9-&DC)
These SWls produce a signed decimal result (ie, with a leading minus sign
' - ' if relevant) using the specified number of bytes of the input value - no
leading zeros are added.
OS_ConvertBinaryl/2/3/4
(SWIs &DD-&E0)
These SWls produce an ASCII binary string result using the specified number
of bytes of the input value with leading zeros added.
275
Archimedes Operating System
OS_ConvertSpacedCardinall/2/3/4
(SWis &E1-&E4)
These SWis are the same as the ConvertCardinal group except that they
insert a space between every three digits of the result, eg, 811679 becomes
811 679.
OS_ConvertSpacedIntegerl/2/3/4
(SWis &E5-&E8)
These SWis are the same as the Convertlnteger group except that they also
insert a space between every three digits.
SWI Name and Number Conversions
Two SWis a r e provided which convert a SWI name to its number and vice
versa. The standard SWI naming structure is used, viz:
{X}ChunkName_Name
The exact case of each letter of a SWI name is as important as ever.
OS_SWINumberToString
(SWI &38)
On entry, R0 contains the SWI number to be converted, R l points to a buffer
and R2 contains the maximum size of the buffer. The call looks u p the
textual f o r m of the SWI and, if possible, returns it as a null-terminated
string in the buffer pointed to by R l .
OS_SWINumberFromString
(SWI &39)
On entry, R0 points to a string terminated by an ASCn value of less than 33.
The call looks up the SWI number for the given string and returns it in R0.
The 'X' error bit 17 and the SWI chunk number will have been added to the
SWI number automatically, so this call deals with all relevant cases.
10
20
30
40
50
60
70
276
REM
REM
REM
REM
REM
DIM
>List22/3
NumberConv
b y N i c h o l a s van S o m e r e n
A r c h i m e d e s O S : A D a b h a n d Guide
(c) C o p y r i g h t A v S and NvS 1988
R% 100
Conversion SWIs
80
90
100
110
120
130
140
150
160
170
180
190
R E M For each of the converstion SWIs, find the n a m e of
R E M the conversion a n d u s e it to convert & 8 9 0 4 E A 1 2 .
:
F O R I%=&D0 TO &E8
SYS "OS_SWINumberToString",I%,R%,100
S Y S "OS_Write0",R%
S Y S &120
S Y S I%,&8904EA12,R%,100
S Y S "OS_Write0",R%
S Y S "OS_NewLine"
NEXT
END
Listing 22.3. Demonstrating number conversion.
277
23 : Miscellaneous SWIs
This chapter discusses the use of a number of SWls which do not fall neatly
into any of the groups described in previous chapters, but which nevertheless, serve a useful purpose. They are listed here in groups according to
function a n d are presented in alphabetical order within the groups. Each
SWI description is accompanied by an example program to illustrate its
function more clearly.
Timer Functions
Several SWls exist that allow routines to be called at regular intervals or
after a specified delay. These routines expect to be given a time specification (as appropriate), a pointer to a routine to execute and a value to
place in R 1 2 when executing the routine (to simulate the workspace
pointer for modules). These SWls are:
SWI "OS_CallAfter
SWI "OS_CallEvery"
SWI OS_RemoveTickerEvent
,,
//
,,
SWI &3B
SWI &3C
SWI &3D
SWI "OS_CallAfter" (SWI &3B)
Execute Routine after Time Delay
This call takes a delay in centiseconds in R0, the address of a routine to be
executed in R l and the value to be passed in R12 to the routine in R2. A
timer is set u p by the OS and the code will be executed after the specified
delay. This call returns (almost) immediately with no return parameters.
SWI "OS_CallEvery" (SWI &3C)
Repeatedly Execute Routine
This call is similar to the above, but it calls the routine repeatedly at the
interval specified in centiseconds in R0, the other two parameters being the
same as those for OS_CallAfter. Once initiated, this call to the routine will
occur at the specified interval until it is terminated in software (see below)
278
Miscellaneous SWis
or the machine is reset. The routine should be as short as possible and, in
general, behave as if it were an interrupt service routine.
SWI "OSJtemoveTickerEvent" (SWI &3D)
Shut Down Timed Execution
This call takes the address of a loutine in R0, and in R l the value which is
passed to the routine's R12 (the two consistent parameters from the above
calls). It uses this information to identify and remove a timed event from
the internal lists of the OS.
In listing 23.1 you can see eacli of these SWis being used. The example
creates a series of counters which are incremented at different speeds
according to the interval time selected for each.
SWI "OSJleadMonotonicTime" (SWI &42)
Read Time Since Power-on
This call returns the number of centiseconds which have elapsed since the
computer was switched on. It takes no entry parameters and returns the
time in R0. Listing 23.2 demonstrates this.
10
20
30
40
50
60
70
80
90
100
110
120
130
140
150
160
170
180
190
200
210
220
230
240
250
260
R E M >List 23/1
REM CallAftEv
R E M by Nicholas v a n Someren
REM Archimedes OS: A Dabhand Guide
R E M (c) Copyright AvS and NvS 1988
D I M c o d e % 1 0 0 0 , c o u n t e r s % 16
P%=code%
[
.countcode / A simple routine
STMFD R13!,{R0}
/Preserve R0 on stack
L D R R 0 , [R12]
;Load what is pointed to by R 1 2
A D D R0,R0,#1
/Increment it
S T R R 0 , [R12]
/Store it b a c k
L D M F D R13!,{R0}
/Restore R0
M O V PC,R14 /Return
]
:
R E M Zero all the c o u n t e r s
:
!counters%=0
counters%!4=0
counters%!8=0
counters *;! 12=0
:
R E M Use O S _ C a l l E v e r y to call t h e counter code
R E M at three different r a t e s .
5
279
Archimedes Operating System
270
280
290
300
310
320
330
340
350
360
370
380
390
400
410
420
430
440
450
460
470
480
490
500
510
520
530
540
550
560
570
580
590
600
610
:
SYS " O S _ C a l l E v e r y " , 5 , c o u n t c o d e , c o u n t e r s *
SYS " O S _ C a l l E v e r y " , 1 0 , c o u n t c o d e , c o u n t e r s % + 4
SYS " O S _ C a l l E v e r y " , 1 7 , c o u n t c o d e , c o u n t e r s % + 8
:
R E M K e e p showing the counters until Space is p r e s s e d .
:
P R I N T * ' " P r e s s Space Bar t o s t o p . . . " "
W H I L E INKEY(-99)=0
V D U 13
P R I N T ! c o u n t e r s ^ , c o u n t e r s * !4,counters%!8;
END WHILE
:
R E M T u r n the counters off again.
:
SYS " O S _ R e m o v e T i c k e r E v e n t " , c o u n t c o d e , c o u n t e r s *
SYS " O S _ R e m o v e T i c k e r E v e n t " , c o u n t c o d e , c o u n t e r s * + 4
SYS
"OS_RemoveTickerEvent",countcode,counters*+8
:
R E M N o w call the count c o d e after 4 s e c o n d s .
:
P R I N T ' " S e t t i n g up a ' C a l l A f t e r
for 4 s e c o n d s "
SYS " O S _ C a l l A f t e r " , 400, countcode,counters%+12
:
R E M W a i t u n t i l counter is incremented and show
R E M t h e elapsed time w h i l e we are waiting.
:
TIME=0
W H I L E counters*!12=0
VDU 13
PRINT;TIME/100;SPC5 ;
END WHILE
T%=TIME
P R I N T ' "Counter incremented."
END
1
1
1 1
1
Listing 23.1. Using time function SWIs.
10 R E M > L i s t 2 3 . 2
20 R E M R e a d M o n o T m
30 R E M A r c h i m e d e s O S : A D a b h a n d Guide
40 R E M (c) Copyright AvS and NvS 1988
50 :
60 SYS " O S _ R e a d M o n o t o n i c T i m e " TO A %
70 P R I N T "This m a c h i n e has b e e n on for "; A % D I V 3 6 0 0 0 0 ; " h o u r s
"; ( A % D I V 6 0 0 0 ) M O D 6 0 ; " m i n u t e s and "; (A%DIV100) M O D 6 0 ; " s e c o n d ( s ) . "
80 E N D
Listing 23.2. Reading time elapsed since power-on.
280
Miscellaneous SWis
VDU Related SWis
While we have consciously chosen not to repeat the documentation of the
VDU drivers in this book, a number of SWis have been provided which
perform useful extraneous functions. They are rather a mixed bag, so
further explanation is left to the descriptions of the individual calls.
SWI "OS_CheckModeValid" (SWI &3F)
Check Whether a Given Mode is Available
This call tests to see if a given screen mode, supplied in R0, can be
accommodated by the memory available. If it can, the Carry flag ' C is
cleared and R0 is preserved; otherwise the Carry flag is set and R0
contains either - 1 if no such mode exists or - 2 if there is insufficient
memory to support it. Also, R l is returned containing the mode number
which the VDU would use instead (its best approximation).
Listing 23.3 issues this SWI for each of the modes from 0 to 23 a n d displays
the results returned.
10
20
30
40
50
60
70
80
90
100
110
120
130
140
150
160
170
180
R E M >List23/3
R E M b y N i c h o l a s van Someren
REM Archimedes OS: A Dabhand Guide
R E M (c) Copyright AvS and N v S 1988
:
R E M Go t h r o u g h all t h e m o d e s , checking w h e t h e r
R E M they can be selected.
:
F O R m o d e % = 0 TO 23
SYS " O S _ C h e c k M o d e V a l i d " , m o d e % TO s t a t u s % , u s e m o d e %
P R I N T " M o d e ";mode%;
C A S E s t a t u s % OF
W H E N - 1 : P R I N T " is not available; w o u l d use m o d e " ; u s e m o d e %
W H E N - 2 : P R I N T " is too b i g ; w o u l d u s e mode " ; u s e m o d e %
O T H E R W I S E : P R I N T " is O K "
ENDCASE
NEXT
END
Listing 23.3. Checking screen mode.
281
Archimedes Operating System
SWI "OS_RemoveCursors" (SWI &36)
Remove the Cursor(s) from the Display
SWI "OS_RestoreCursors" (SWI &37)
Restore the Cursor(s) to the Display
These SWis turn the display cursor on and off. They neither take nor return
any parameters. This is an alternative form of the VDU 23,0,0/1 process.
Listing 23.4 demonstrates this in action.
10
20
30
40
50
60
61
70
80
90
100
110
111
120
R E M >List23/4
R E M b y N i c h o l a s v a n Someren
R E M A r c h i m e d e s O S : A D a b h a n d Guide
R E M (c) Copyright A v S and NvS 1988
:
MODE 0
REPEAT
SYS " O S _ R e m o v e C u r s o r s "
P R I N T " C u r s o r off - p r e s s a key"
key=GET
SYS " O S J R e s t o r e C u r s o r s "
P R I N T " C u r s o r on - p r e s s a key"
key=GET
U N T I L FALSE
Listing 23.4. Cursor related SWis.
SWI " O S . M o u s e " (SWI &1C)
Return Mouse Information
This call returns the oldest entry in the OS mouse buffers. It takes no
parameters, but returns the mouse X and Y co-ordinates in R0 and R l , the
state of the mouse buttons in R2 and the absolute time at which the reading
was taken i n R3. The buttons are flagged in the bottom three bits of R2,
with bit 0 being the right-hand button, bit 1 the middle button and bit 2 the
left-hand b u t t o n . The absolute time is taken directly from the SWI
OS_ReadMonotonicTime which is documented above.
Listing 23.5 demonstrates this call by accepting a series of movements and
button depressions and plotting lines interconnecting the locations where
the buttons were pressed.
10
20
30
40
50
60
282
REM > L i s t 2 3 / 5
REM b y N i c h o l a s van Someren
R E M A r c h i m e d e s O S : A D a b h a n d Guide
REM (c) C o p y r i g h t A v S and NvS 1988
:
MODE 0
Miscellaneous SWIs
70
80
90
100
110
120
130
140
150
160
170
180
x90
200
210
220
230
240
250
260
270
:
R E M Turn t h e p o i n t e r on, get a few entries into
R E M the m o u s e b u f f e r and w a i t for R e t u r n .
:
^POINTER
P R I N T " M o v e the p o i n t e r to d i f f e r e n t places on the s c r e e n "
P R I N T " a n d press a m o u s e b u t t o n on e a c h . P r e s s R e t u r n "
P R I N T " w h e n you h a v e finished."
R E P E A T UNTIL G E T = 1 3
:
R E M Display up to 2 0 p o s i t i o n s .
:
CLS
F O R n = 0 TO 2 0
SYS " O S _ M o u s e " TO x,y,z,t
D R A W x,y
PRINTTAB(0,0);z;",";t;SPC10
wait=INKEY(100)
NEXT
^POINTER 0
END
Listing 23.5. Reading the mouse buffer.
SWI "OS_ReadModeV" (SWI &35)
Read Mode Variables
This call allows a number of internal VDU variables to be read for a given
mode (which is not actually selected). On entry, R0 should contain the
chosen mode and Rl the number of the variable (from the list below). When
the call returns, R2 will contain the value of the specified variable or the
Carry flag ' C will be set if either of the parameters were invalid.
The VDU variables which may be extracted are listed below in table 23.1.
Number
0
1
2
3
Meaning
Mode indicators
Bit 0
clear = graphics mode
set = text only mode
Bit 1
set = teletext mode
clear = non-teletext mode
Bit 2
set = interline gap in this mode
clear = no gap in this mode
Number of text columns in this mode minus one
Number of text rows in this mode minus one
Maximum logical colour ( 1 , 3 , 1 5 or 63)
283
Archimedes Operating System
Number
4
5
6
7
8
9
10
Meaning
Horizontal pixel resolution
0=1280
1=640
2=320
3=160
Vertical pixel resolution
1=512
2=256
Number of bytes per row of pixels
Number of bytes used by this mode
Shift factor for row start address
To find the offset to the start of
row Y from the start of screen
memory add ( Y « S h i f t factor)*5
Log to base two of number of bits per pixel
Log to base two of number of bytes per pixel
Table 23.1. The VDU variables.
Example 23.6 demonstrates the use of this SWI by extracting the number of
columns, r o w s , colours and the size of each mode from 0 to 21 and displays
the results as a table.
10
20
30
40
50
60
70
80
90
100
110
120
130
140
150
160
170
180
REM >List23/6
REM ReadModeV
R E M b y Nicholas van Someren
R E M A r c h i m e d e s O S : A D a b h a n d Guide
R E M (c) Copyright AvS and NvS 1988
MODE 0
:
R E M D i s p l a y information about screen m o d e s .
:
PRINT"Mode","Cols.","Rows","Colours","Size"
F O R m o d e % = 0 TO 21
SYS " O S _ R e a d M o d e V a r i a b l e " , m o d e % , 1 TO ,,cols
SYS " O S _ R e a d M o d e V a r i a b l e " , m o d e % , 2 TO ,,rows
SYS " O S _ R e a d M o d e V a r i a b l e " , m o d e % , 3 TO ,,colours
SYS " O S _ R e a d M o d e V a r i a b l e " , m o d e % , 7 TO ,,size
PRINT
;mode%,;cols+l,;rows+l,;colours+l,;size/1024;"K"
NEXT
END
1
Listing 23.6. Read VDU variables for given mode.
284
Miscellaneous SWis
SWI "OS_ReadPalette" (SWI &2F)
Read Palette Values
This call reads the palette settings for a particular logical colour (supplied
in R0) for a specific part of the display (supplied in R l ) . The value in R l
should be 16 for a normal colour, 24 for a border colour or 25 for a cursor
colour.
The results, in the form of the first flashing colour and the second flashing
colour, are returned in R2 and R3. If the colour is steady then these
numbers will be the same. Each is a four byte value, with the bottom byte
containing control information and the remaining three indicating the
amount of red, green and blue respectively. The control byte contains one
of the following values:
Value
0-15
16
17-18
Meaning
BBC compatible colour
Steady colour specified as RGB
Mark or Space flashing colour specified as RGB
Listing 23.7 demonstrates the use of this SWI by presenting the palette
definitions for each logical colour in a specified display mode.
10
20
30
40
50
60
70
80
90
100
110
120
130
140
150
160
170
180
190
200
210
220
230
240
250
260
REM >List23/7
R E M b y N i c h o l a s van Someren
R E M A r c h i m e d e s O S : A Dabhand Guide
R E M (c) Copyright AvS and NvS 1988
:
R E M Set the print field to 8 and input screen m o d e .
:
@%=8
INPUT"Which screen m o d e ? " m o d e %
MODE mode%
PRINT"Colour","Red","Green","Blue","Sup cy"
F O R col%=0 TO 15
SYS "OS_ReadPalette",col%,16 TO , , m a r k % , s p a c e %
:
R E M If m a r k % = s p a c e % then colour is steady,
R E M otherwise, colour is flashing.
:
IF m a r k % = s p a c e % THEN
r e d $ = S T R $ ( ( m a r k % » 8 ) AND&FF)
g r e e n $ = S T R $ ( ( m a r k % » l 6 ) AND&FF)
b l u e $ = S T R $ ( ( m a r k % » 2 4 ) AND&FF)
IF m a r k % A N D &80 sup$="Y" ELSE sup$="N"
ELSE
red$=STR$ ( ( m a r k % » 8 ) AND&FF) + ", "+STR$ ( ( s p a c e % » 8 ) A N D & F F )
g r e e n $ = S T R $ ( ( m a r k % » 1 6 ) AND&FF) +", "+STR$ ( ( s p a c e % » 1 6 ) AND&FF)
b l u e $ = S T R $ ( ( m a r k % » 2 4 ) AND&FF) +", "+STR$ ( ( s p a c e % » 2 4 ) AND&FF)
1
285
Archimedes Operating System
270
280
290
300
310
320
IF m a r k * AND &80 s u p $ = " Y " E L S E sup$="N"
IF s p a c e % AND &80 s u p $ + = " , Y " E L S E sup$+=",N"
E N D IF
P R I N T STR$col%,red$,green$,blue$,sup$
NEXT
END
Listing 23.7. Using OS.ReadPalette.
SWI "OSJteadPoint" (SWI &32)
Read Colour of Pixel
This call allows the colour and tint of a pixel to be read. The co-ordinates
of the pixel must be supplied as (R0,R1) with the results returned in R2-R4
as follows:
Register
R2
R3
R4
Information
Colour of pixel
Tint of pixel
Validity flag (0=valid, - l = o f f the display)
Listing 23.8 demonstrates this SWI by printing some colour bars and
allowing the pointer to be moved about the display, printing the colour and
tint found at each pixel.
10
20
30
40
50
60
70
80
90
100
110
120
130
14 0
150
160
170
180
190
200
210
220
230
REM >List23/8
R E M b y N i c h o l a s van S o m e r e n
R E M A r c h i m e d e s O S : A D a b h a n d Guide
R E M (c) Copyright A v S and UvS 1988
:
R E M S e t up screen and t r a p errors tidily.
:
MODE 8
OFF
ON E R R O R O N : O S C L I " P O I N T E R 0":END
F O R c o l % = 1 2 9 TO 132
C O L O U R col%
P R I N T S T R I N G $ ( 8 0 , " ")
NEXT
REM T u r n the p o i n t e r on, and display the colour of
REM t h e p i x e l on w h i c h t h e pointer is located.
:
^POINTER
REPEAT
M O U S E x,y,z
SYS " O S _ R e a d P o i n t " , x , y TO ,,colour,tint,flag
PRINTTAB (30,14)colour,tint;
UNTIL FALSE
Listing 23.8. Reading a pixel.
286
24 : The ARM Chip Set
In order to produce an overall cost-effective computer system Acorn
needed more than just a cheap processor, they needed the supporting
circuitry to go with it. Shortly after the design of the A R M was finished
Acorn's V L S I design team designed three chips to complete a workable
computer. These chips became known as M E M C , V I D C and I O C and are a
memory controller, a video controller and an i / o controller respectively.
M E M C is responsible for refresh and address multiplexing for the low-cost
high-density dynamic R A M which Acorn chose to design in. It also deals
with memory protection in different processor operating modes. Finally, it
stores the addresses of the memory used for the video display, cursor
generation and the sound output, providing Direct Memory Access ( D M A )
control for those features.
is responsible for turning three streams of data, fed it by M E M C , into a
video picture and stereo sound, containing the colour palette and
providing all the timing of video synchronisation signals.
VIDC
IOC is a versatile input/output controller, comprising a number of counter/
timers, several bi-directional input/output lines and both edge and levelsensitive interrupt lines.
The rest of this section is devoted to an examination of some of the internal
details of these chips. Because one of the purposes of an Operating System
is to render it unnecessary to program such devices directly, we have
chosen not to examine their register structure in too much detail. If you
really must change their contents yourself, rendering your programs
dangerous to most users, you can get hold of the relevant data books
directly from VLSI Technology, the foundry which mass produces them.
Inside MEMC
is a device which may only be addressed; data to be written to M E M C
is encoded onto the address lines to reduce the pin count. This is done by
mapping M E M C into a very large section of the memory map and using the
lower order address bits to carry the data information, while the higher
MEMC
287
Archimedes Operating System
order bits of the address carry the information of what to do with the data.
The M E M C registers can only be written to from A R M Supervisor Mode.
M E M C controls the memory map of the Archimedes, ensuring that certain
parts of the memory map, including the part it occupies itself, can only be
accessed in the appropriate processor mode. Furthermore, it divides the
processor address space into a "Logical", or imaginary area, a n d a
"Physical" area, some of which may actually be real memory ( R A M chips).
By translating logical addresses into physical ones, through a series of
tables, M E M C is able to keep the address space consistent through changes
of the amount of memory and programmed display sizes in use.
This m e m o r y mapping system provides the basis for a genuine "virtual"
memory system, but current versions of the Operating System are not able
to take advantage of this fully. Other Operating Systems, notably U N I X ,
are well designed to suit this sort of addressing scheme, although the
M E M C implementation has some non-trivial problems.
The memory map for
MEMC
is illustrated in figure 24.1.
READ
WRITE
&3FFFFFF
ROM (High)
ROM ( L o w )
Logical to
Physical address
translators
DMA address
generators MEMC
Control Register
Video Controller
&3800000
&3600000
&3400000
Input/Output Controllers
&3000000
Physically Mapped RAM
&2000000
Logically Mapped RAM
Figure 24.1. The
288
MIMC memory map.
The ARM Chip Set
The memory in both the logically and physically mapped areas is divided
into a number of "pages". M E M C provides for up to 128 pages of memory
and these pages can be 4 , 8 , 1 6 or 32k in size, all being the same chosen size.
The memory in the physically mapped area corresponds directly to the
dynamic R A M chips, for which M E M C provides the addressing and refresh
timing.
Virtual Memory Support
Each page in the logical memory area can be programmed, either to
correspond to one of the 128 pages of physical R A M or is considered to be
"paged out", in which case it has no corresponding physical page. In the
latter case, if the processor tries to access any word in the inaccessible
page, an "Address Exception" is caused. This allows software to be added
to provide a virtual memory system, ie, the user program (and the higher
levels of the Operating System) believe that there is a full complement of
32Mbs of R A M in the system and can happily access any address in the
logical area. If the logical address has no corresponding physical address,
then the address exception would be trapped by software and the lower
level Operating System would find the appropriate page of memory,
usually somewhere on a hard disc. Thus, just a few megabytes of R A M and
a 32Mb hard disk can appear to be 32Mbs of R A M , albeit rather slower than
the real thing.
The MEMC Control Register
Most features of M E M C are controlled by the M E M C control register. This
register is programmed by making up an address according to the data to
be programmed, and then writing (anything, the data is ignored) to that
address. The address layout is shown in figure 24.1 below:
Address B i t s
(25-0)
25 24 23 22 21 20 19 18 17 16 15 14 13 12 11 10 9 8 7 6 5 4 3 2 1 0
1 1
0
1
1 x
1
1
1
x
x
x t
o
s v d d h h L l p p x x
Figure 24.2. The
MEMC
Control Register
Key to M E M C Control Register
x
t
o
AOS—S
Don't care
Test mode, this bit must be zero
Operating System mode, used to protect R A M from
user programs:
289
Archimedes Operating System
s
v
d
h
1
p
0 Program User Mode
1 Operating System User Mode
Sound D M A bit
0 Disabled
1 Enabled
Video DMA bit
0 Disabled
1 Enabled
Dynamic R A M refresh bits
00 No Refresh
01 Refresh only during video flyback
10 No Refresh
11 Continuous refresh
High R O M access time
00 450 ns
01 325 ns
10 200 ns
11 200 ns with 60ns nibble-mode
Low ROM access time
00 450 ns
01 325 ns
10 200 ns
11 200 ns with 60ns nibble-mode
Page Size
004k
018k
10 16k
1132k
The Logical to Physical Address Translator
As we saw above, memory accesses to addresses below 32Mbs (&2000000)
are translated through the logical to physical address translator. This part
of M E M C is very closely coupled to the Operating System and should never
be programmed by user programs. If you are curious about its workings,
the details o f its operation can be obtained from the data sheet on M E M C
which is available from VLSI Technology.
DMA Address Generators
Part of M E M C ' s function is to provide Direct Memory Access ( D M A )
addresses f o r V I D C . V I D C is not connected to the address bus and so can not
290
The ARM Chip Set
output addresses for data it requires. Instead, these addresses are
generated by M E M C which then freezes the processor while it directs R A M to
put the data onto the bus, allowing V I D C to read it. The D M A address
registers are programmed with the physical addresses of the information
and so should only be modified by the Operating System. The important
VIDC registers are:
Video
Cursor
Sound
Vinit, Vstart, Vend and an invisible Vptr
Cinit
Sstart, SendN and Sptr
and their formats are as follows:
25 24 23 22 21 20 19 18 17 16 15 14 13 12 11 10 9 8 7 6 5 4 3 2 1 0
l l O l l x n n n
Physical Address
Physical Address x x
Bits 16-2 refer to bits 18-4 of the physical address to be used; this address
must lie on a 16 byte boundary, in order that M E M C can retrieve the data
efficiently from R A M which is using a fast "nibble mode".
The start of screen address (the logical address of the memory location of
the top left-hand corner of the screen) can be programmed "legally" by
using OS_Word &22.
Inside VIDC
VIDC is the exact opposite of M E M C in that it has no connections to the
address bus at all, only connections to the data bus. Register selection is
achieved using the higher order bits of the 32-bit data word, while the
actual data is in the lower order bits. VIDC triggers the transfer of
information at addresses generated by M E M C using several control lines
which interconnect the chips. When any of the buffers in VIDC become
nearly empty, a M E M C controlled data transfer is requested and the buffers
reloaded.
The major programmable aspect of VIDC, as far as user programs are
concerned, is the colour palette, which translates logical colours stored in
memory into physical colours which are actually displayed. There are
three, four-bit Digital to Analogue Convertors (DACs) which drive the
output connector, allowing 4096 different colours to be displayed. In 2, 4
and 16 colour modes these DACs may be used to generate the relevant
number of colours by loading them with values in the format shown below:
291
Archimedes Operating System
Palette registers (as seen in 2 , 4 or 16 colour modes):
Sb3b2blb0g3g2glg0r3r2rlr0
S
b3, b 2 , b l , bO
g3, g 2 , g l , gO
r3, r2, r l , rO
Supremacy bit, allowing video mixing
with external hardware
Blue colour control bits
Green colour control bits
Red colour control bits
In the 256 colour modes the top four bits of the logical colour are sent
directly to the colour D A C S as shown below. The bottom four bits index into
sixteen palette registers which provide the remaining eight bits of data
needed by the DACs, also shown below:
Palette registers (as seen in 256 colour modes):
S d 7 b 2 b l bO d6 d5 g l gO d4 r2 rl rO
S
b2, b l , bO
g l , gO
r2, r l , rO
d7, d6, d5, d4
Supremacy bit, allowing video mixing
with external hardware
Blue colour control bits
Green colour control bits
Red colour control bits
Direct data bits from logical colour
By default, the 256 colour palette is arranged so that:
d3=b2
d2=r2
dl=rl,gl & bl
dO=rO,gO & bO
ie, the 8-bit data becomes %BGgRbrTt, where Rr, Gg, Bb and Tt are two bit
numbers representing levels of Red, Green, Blue and Tint (whiteness).
Sound Frequency and Stereo Position
VIDC will reproduce up to eight channels of sound through two logarithmic
DACs which provide a stereo effect. The data for each channel is supplied in
successive bytes, whose transfer is triggered by the sound buffer becoming
nearly empty. Each channel has a stereo position register associated with it
and the stereo effect is created by pulse width modulation of the analogue
level between the left and right channel DACs.
292
The ARM Chip Set
Inside IOC
IOC is a versatile interface and peripheral control chip which contains a
number of programmable interrupt masks, input/output lines and four
counter/timers. The OS sets up these timers to perform various internal
functions:
•
Timer 3 generates the baud rate for the serial keyboard interface.
•
Timer 2 is used to generate baud rates for the RS423 serial controller,
which needs an external generator to achieve disparate transmit
and receive rates.
•
Timer 0 is used by the Operating System to generate t h e /
second
interrupts which are used to time the system clock, colour flash rate
and keyboard repeat rate (amongst others!).
1
1 0 0
The remaining timer (timer 1) can be used for any purpose and is free for
user programs. All the timers have the same register layout and are
programmed similarly. Each timer may be loaded with a 16 bit value which
is decremented by one every 5O0nS. When the counter value reaches zero
an interrupt will be generated if the control registers have been set appropriately and the counter re-loaded.
The following piece of assembler should allow you to set up Timer 1 to
generate interrupts which may be caught via the IrqV vector (see the
chapter on Vectors). On entry, EO should contain the counter initialisation
value in the lower 16 bits.
.UseCounter
;R0 c o n t a i n s the value for the c o u n t e r in low 16 bits
LDR R 2 , I O C _ B a s e
STRB
R0,[R2,#&50]
;Store low byte
MOV R 0 , R 0 , L S R #8
STRB R0, [R2,#&54]
;Store high b y t e
MOV R 0 , P C
;Get the User M o d e P S R
SWI " O S _ E n t e r O S "
MOV R 1 , P C
;Get the s u p e r v i s o r m o d e P S R
ORR R 1 , R 1 , # 3 « 2 6
;Mask out i n t e r r u p t s
TSTP R1,R1
;Set t h e PSR flags
LDRB R 3 , [R2, #&12]
ORR R 3 , # % 0 1 0 0 0 0 0 0
;or u s e BIC to c l e a r bit
STRB R 3 , [ R 2 , # & 1 0 ]
TSTP
R0,R0
/Restore the P S R flags
STR R 0 , [ R 2 , # & 5 8 ]
/Start the c o u n t e r
. IOC_Base
EQUD & 0 3 4 0 0 0 1 0
293
Archimedes Operating System
And here is a listing of a sample interrupt handler which checks to see if it is
indeed the timer which has caused an interrupt:
. InterruptCode
STMFD R 1 3 ! , { R 0 , R 2 }
LDR R 2 , I O C _ B a s e
LDRB R0, [ R 2 , #&16]
A N D S R 0 , R 0 , #%01000000
BNE O u r l n t e r r u p t
LDMFD R13!,{R0,R2}
MOV P C , R 1 4
/Don't
claim
/Claim
interrupt
.Ourlnterrupt
your c o d e
here
LDMFD R 1 3 ! ,{R0,R2,PC}"
294
25 : Floating Point Model
Besides the integer arithmetic and data processing instructions we have
seen, the A R M was designed with a general-purpose 'co-processor'
interface which allows its instruction set to be expanded. This mechanism
was provided primarily to allow hardware support for floating point
operations, which are more commonly performed by complex software
packages.
The A R M Co-processor Interface provides a two-level mechanism for
expanding the instruction set. There exists an 'undefined instruction'
vector, through which A R M will jump if it encounters an instruction which
is unrecognised by the A R M itself and is not supported by any additional
hardware present. The Co-processor Interface allows hardware to be
added to deal with new instructions, but where the hardware is absent, the
undefined instruction vector provides the means for a software emulator
to take its place (albeit more slowly). This is precisely the mechanism
employed for floating point operations.
The Operating System contains a module called the 'Floating Point
Emulator (the F P E ) which deals with floating point arithmetic. If a floating
point co-processor is fitted, the F P E is pre-empted and the operations are
actually completed by hardware. Whether hardware is present or not,
however, the software interface (that is, the programmer's view) remains
the same, thus providing an important 'transparency' and ensuring that
the same software can be used in either situation.
7
Unfortunately, one hurdle remains: the A R M B A S I C Assembler does not
support floating point instructions (which were still being defined when the
assembler was written) and thus they must either be hand-assembled or
called through a more sophisticated assembler (yet to be announced).
Floating Point Programmer's Model
The A R M floating point system conforms to the I E E E specification which is in
common use throughout the computer industry. The A R M programmer's
model provides eight floating point registers, known as FO to F 7 , and a
number of precision formats which allow the programmer to trade off
295
Archimedes Operating System
speed against accuracy. Whilst the format used internally is not defined,
there are f o u r formats for storage of floating point numbers in memory
which are outlined below:
IEEE Single precision (S)
3 2 bits:
1 sign bit
23-bit mantissa (fraction)
8-bit exponent
IEEE Double precision (D)
6 4 bits:
1 sign bit
52-bit mantissa (fraction)
11-bit exponent
Double extended precision (E)
9 6 bits:
1 sign bit
64-bit mantissa (fraction)
15-bit exponent
16 bits not used
Packed decimal BCD (P)
9 6 bits:
1 sign digit
19-digit mantissa
4-digit exponent
The ARM floating point model also provides for a floating point status
register to indicate the status of calculations. This register includes the
following flags:
Overflow
Underflow
Division by zero
Inexact result
Invalid operation
Flags indicating the result of floating point operations are automatically
copied into the ARM status register by means of the Co-processor
Interface, thus keeping the programmer's job as simple as possible.
The ARM Floating Point Instructions
The ARM co-processor interface defines three distinct types of instruction,
all of which are used in the floating point system. They are:
296
Floating Point Model
CPDT
CPRT
CPDO
Co-processor data transfer
(for moving values to and from memory)
Co-processor register transfer
(for moving between A R M and F P registers)
Co-processor data operation
(for initiating co-processor operations)
The A R M floating point system supports a number of actual instructions for
each of these instruction types. The rest of this section details all of these
instructions.
Co-processor Data Transfer
Syntax:
<mnemonic>{cond}<precision> Fx, address
There are two
CPDT
instructions for floating point data movement:
Mnemonic
Effect
LDF
Load floating point register
STF
Store floating point register
These instructions move data between main memory and the floating point
registers. They require the following parameters to be specified:
<precision> One of S, D, F or P (as discussed earlier)
Fx
One of the floating point registers F0-F7
address
Either [Rn]{,#offset} or [Rn,#offset]{!}
The offset is from the A R M base register specified and is in the range -1020
to +1020. The offset is added to the base register when write-back is
specified with pre-indexed addressing and is always added when postindexed addressing is used.
Co-processor Register Transfer
Syntax:
varies - see below
There are six C P R T instructions for floating point register movement. Two
are concerned with conversions between floating point and integer values;
the remaining four deal with the floating point control and status registers.
The C P R T instructions are summarised overleaf:
297
Archimedes Operating System
Mnemonic
FLT
FIX
WPS
RFS
WFC
RFC
Effect
Change
Chanc integer to
floating point
Floating point to integer
Write FP status
Read F P status
Write F P control
Read FP control
Operation Performed
Fx:=Rd (or Fx:=#value)
Fx:=Rd
Rd:=Fx
FPSR:=Rd
Rd:=FPSR
FPC:=Rd*
Rd:=FPC*
* Supervisor Mode only
The status a n d control operations simply require an optional condition and
a register n a m e . The conversion instructions are a little more complex their full syntax is shown below:
FLT{cond}<precision>{rounding mode} Fx,(Rd #value)
Flx{cond}<precision>{rounding mode} Rd,Fx
The precision field is of the same form as discussed earlier. The rounding
mode controls how the value is rounded for conversion, according to the
table below:
Mode
Nearest
Plus infinity
Minus infinity
Zero
Letter
(default rounding mode)
P
(always round up)
M (always round down)
Z
(round towards zero)
Co-processor Data Operations
Syntax:
<unaryop>{cond}<precision>{rounding mode} Fd,(Fx #value)
<binaryop>{cond}<precision>{rounding mode} Fd,Fx,(Fy #value)
The co-processor data operations are divided into two groups: unary
operations (which take one parameter) and binary operations (which take
two). In either case, one parameter may be a floating point constant from
the list below:
Floating point constants:
0.0,1.0, 2.0, 3.0,4.0, 5.0, 0.5,10.0
The following tables summarise the unary and binary floating point
operations available.
298
Floating Point Model
Unary Floating Point Operations
Mnemonic
MVF
MNF
ABS
RND
SQT
LOG
LGN
EXP
SIN
COS
TAN
ASN
ACS
ATN
Effect
Move
Move negated
Absolute value
Round to integer
Square root
Log to base ten
Log to base e
Exponent
Sine
Cosine
Tangent
Arc sine
Arc cosine
Arc tangent
Calculation performed
Fd := Fx
Fd := - F x
Fd := ABS (Fx)
Fd := integer value of Fx
Fd := square root of Fx
Fd := log base ten of Fx
Fd := log base e of Fx
Fd := e F x
F d : = sine of Fx
Fd := cosine of Fx
Fd := tangent of Fx
Fd := arc sine of Fx
Fd := arc cosine of Fx
Fd := arc tangent of Fx
A
Binary Floating Point Operations
Mnemonic
ADF
MUF
SUB
RSF
DVF
RDF
POW
RPW
RMF
FML
FDV
FRD
POL
Effect
Add
Multiply
Subtract
Reverse subtract
Divide
Reverse divide
Power
Reverse power
Remainder
Fast multiply
Fast divide
Fast reverse divide
Polar angle
Calculation Performed
Fd
Fd
Fd
Fd
Fd
Fd
Fd
Fd
Fd
Fd
Fd
Fd
Fd
:= Fx+Fy
:= Fx*Fy
:= Fx-Fy
:= Fy-Fx
:= F x / F y
:= F y / F x
:= F x F y
:= F y F x
:= Fx M O D Fy
:= Fx*Fy*
:= F x / F y
:= F y / F x
:= polar angle of Fx, Fy
A
A
1
Single precision result
Note that the 'fast' operations produce a result whose accuracy is that of a
single-precision calculation, regardless of the specified precision of the
instruction.
Rounding of the trigonometric functions only takes place after the
calculation has been completed, thus preserving as much accuracy as
possible during the calculation. The 'nearest' rounding mode is used.
299
Archimedes Operating System
Co-processor Status Transfer Instructions
Syntax:
<mnemonic>{cond}<precision> {rounding mode} Fx, Fy
The co-processor status transfer instructions allow comparisons to be
made b e t w e e n values in floating point registers and, according to the
result of such comparisons, the setting of the A R M ' S own status flags. The
co-processor status transfer instructions are:
Mnemonic
CMF
CNF
CMFE
CNFE
Effect
Compare F P
Compare negated F P
Compare F P (exception)
Compare negated F P
(exception)
Calculation performed
Compare Fx with Fy
Compare Fx with - F y
Compare Fx with Fy
Compare Fx with - F y
The comparisons are available in two forms: normal and exception. The
exception f o r m raises an exception (error) if either of the two parameters
are invalid numbers (that is, invalid by I E E E standards). Such values could
be the result of the failure of previous calculations, for example. The I E E E
standard specifies that C M F should be used for equality comparisons (that
is, where a B E Q or B N E will be used after the instruction) and C M F E should be
used for all others (that is, where a 'greater than' or 'less than' test will
follow).
The A R M P S R flags are set according to the result of these floating point
operations a n d indicate the following states:
Flag
N
Z
C
V
Meaning
Less than - Fx was less than Fy (or -Fy)
Equal
GT or equal - Fx was greater than or equal
to Fy (or - F y )
Unordered
Conclusion
The A R M Floating Point Co-processor instruction set provides a wealth of
operations for high-precision arithmetic. When a hardware Floating Point
Co-processor is not present, a software emulator performs the operations
'transparently' from the programmer's point of view. The A R M B A S I C V
assembler d o e s not support the floating point instructions which must,
therefore, b e hand-coded or assembled with another assembler.
300
Floating Point Model
The complexity of the I E E E floating point arithmetic standard is such that it
is not possible to give full details in a general-purpose book such as this.
The interested reader is referred to Acorn Floating Point Co-processor
documentation and to the I E E E standard definition document.
301
A : Programs Disc
A Programs Disc to accompany this book is available direct from Dabs
Press. It contains all the example programs listed in these pages plus
several extra utility programs. The disc is supplied with its own manual for
ease of use.
The bonus programs include:
ListSWis
A program to list all the SWI names in a particular SWI
number chunk.
Find
A utility program which will locate a file or group of files that
are 'lost' somewhere on a disc. The file specification, which
may include wildcards, and directory path may be specified.
DirCopy
A utility program which copies whole directories from one
disc to another on a single-drive machine. It has the file type
of an application because it uses all the RAM in a machine to
speed up the copying of directory structures and their files.
The transfer is typically achieved with only two disc swaps on
an Archimedes 310.
DescRMA
A development utility which is useful when developing
programs which use the RMA (eg, modules). It simply
provides a printout of the RMA description returned by the
SWI called OS_Module.
The Floating Point Assembler
F P A allows floating-point instructions to be included in machine-code
programs assembled using the B A S I C V assembler, BASIC V does not usually
allow floating-point mnemonics to be assembled, so the F P A adds extensions in the form of a B A S I C L I B R A R Y which permit this.
The new pseudo mnemonics that are added are:
FEQ<S>const
FEQD
302
const
Assembles a 4-byte single precision constant.
An 8-byte double precision one.
Programs Disc
FEQE
const
A 12-byte high-precision one.
FEQP
const
A 12-byte packed
BCD
one.
Examples of using these are also included on the disc.
The disc is available in 3.5in A D F S format and the programs are not copy
protected in any way, so you are free to integrate them into your own
software as it develops. The disc is compatible with all versions of the
Archimedes and both Arthur and RISC O S Operating Systems.
To obtain your copy of the Archimedes Operating System programs disc
send £9.95 to the address on page 2. Cheques and POs should be made
payable to Dabs Press. Access and Visa card orders are acceptable by
phone, simply by quoting your card number, type and expiry date - and
don't forget your address!
303
B : Dabhand Guides Guide
/OIL,
^0
Books and Software for the Archimedes
Dabs Press already have a list o f books, software and games for the
A r c h i m e d e s and this is being expanded to include a wide range of
Archimedes products. Those already in an advanced stage of preparation
are detailed in the following pages. Please note that all details are correct
at the time of writing but are subject to change without notice. Please
phone or write to confirm availability before ordering.
All future publications are in an advanced state of preparation. Content
lists serve a s a guide, but we reserve the right to alter and adapt them
without notification. Publication dates and contents are subject to change.
All quoted prices are inclusive of VAT (on software; books are zero-rated),
and postage and packing (abroad add £2 or £10 airmail). All are available
from your local dealer or bookshop or, in case of difficulty, direct from
Dabs Press.
Archimedes Books
Archimedes Assembly Language
By Mike Ginns. Price £14.95. Spiral bound 368 pages.
ISBN 1-870336-20-8. Available now. NEW Second Edition
Programs disc £9.95 - £21.95 inclusive when ordered with book.
This popular
and informative
book
includes coverage of RISC OS.
is now
in its Second
Edition
and
This is a complete guide to programming the Archimedes in machine code.
Mike Ginns provides a clear, step-by-step account of using the assembler
using simple, but useful, programs and provide the practice to illustrate the
theory, thus making it ideal for the beginner. But this guide goes much
further. For instance, it explains h o w to use the Debugger and there is a
304
Dabhand Guides Guide
large section on implementing B A S I C equivalents in machine code, plus
coverage of Arthur and RISC OS and using SWis, W I M P S and fonts.
The powerful Operating System is covered with details of how to access its
many facilities from the machine code level. Within this are details of using
graphics, sound, windows, t h e font painter and the mouse, all from within
machine code programs. To make the transition from BASIC t o machine
code as painless as possible, the book contains a large section on implementing BASIC statements in machine code.
A programs disc accompanies the book which contains all of the various
programs used in the text, plus 11 extra utility programs including a
disassembler, various m e m o r y manipulators and a disc sector editor. The
programs disc is supplied with its own 16 page manual.
Reviews:
Rise User, July/August 1988: "The style of the text throughout the book is
easy to read...I would recommend Archimedes Assembly
Language."
Archive, August 1988: "The actual explanations are lucid...Overall
then,
this is a comprehensive
and wide ranging book which stands up well as
both a tutorial on assembly language and as a guide to the
programming
environment and facilities provided by Arthur. I recommend it..."
C : A Dabhand Guide
By Mark Burgess. Price £14.95. Perfect bound 512 pages.
ISBN 1-870336-16-X. Available now. NEW Second Edition
Programs disc £9.95 - £21.95 inclusive when ordered with book.
PCW Said: "...I only wish it had been available
when I was learning
C."
A behind-the-scenes storm has quietly been sweeping over the microcomputer world during the last few years: it is the C programming
revolution. So much so that all the popular micros now have C compilers
available to them.
Spread over an amazing 5 1 2 pages, this thoroughly readable Dabhand
Guide leaves you in no doubt as to the natural language in which to
program your computer. F r o m elementary principles, PCW contributor and
author, Mark Burgess introduces the C philosophy in a highly readable, no
nonsense manner. Step by step, page by page you ascend the C ladder with
simple illustrated and documented programs.
But why should you want to learn C at all? The answers are many, not
least compatibility, portability and speed. C is a general purpose language.
AOS-T
305
Archimedes Operating System
It can be u s e d to write any kind of program from an accounting package to
an arcade game. It has sophisticated facilities built in which are quite unlike
those of any other language. The range of C commands span from a higher
level than BASIC to as low a level as machine code. C holds nothing back
from the programmer - there are virtually no limitations.
C is a standard language - programs the world over are written to this
standard a n d in such a way as to allow them to be transferred to other
machines a n d run again, in many cases with little or no editing required. A
source program written in C on the Amstrad PC, for instance, would
generally compile and run quite happily on the Archimedes, the Amiga, or
any other PC for that matter.
Speed - a vital factor in the running of programs - is assured because a C
program is compiled into ultra fast machine code. Write your very own
commands in a friendly environment and let the C compiler transform it
into machine code - no assembly language need be known! And what's
more the original C source program remains intact for re-editing or fine
tuning as y o u require.
Thirty-seven chapters, six appendices, a glossary and a comprehensive
index make C: A Dabhand Guide probably the guide to programming in C.
Included is a chapter on programming in C on the Archimedes, (and BBC
and the Master 128/Master Compact for that matter).
Unique diagrams and illustrations help the reader to visualise programs
and to think in C. Assuming only a rudimentary knowledge of computing in
a language such as BASIC or PASCAL, the reader is provided with a grounding in how to build up programs in a clear and efficient way.
To help the beginner a complete chapter on fault finding and debugging
assists in tracing and correcting both simple and complex errors.
A Programs Disc is available for most of the major micros, and this
contains the listings in the book plus several other useful utilities including
an adventure game and an indexer. The extra programs are documented
in an informative manual.
The first review of C: A Dabhand Guide appeared in Beebug Magazine in
June 1988 a n d it had this to say: "The 512 pages cover all important aspects
of C.the
tone is friendly
and the explanations
are full and easy to
understand
without
being patronising...the
program structure
diagrams
which illustrate the larger programs are very helpful...the book being full
of good advice about program design and layout. In conclusion,
then, a
very good, reasonably priced introduction to C for the
non-specialist."
306
Dabhand Guides Guide
BASIC v
By Mike Williams. Price £9.95. Perfect bound 140 pages approx.
ISBN 1-870336-75-5. Available February 1989.
This book provides a practical guide to programming in B A S I C V on the
Acorn Archimedes and covers B A S I C V on RISC O S . Assuming a familiarity
with the B B C B A S I C language in general, it describes the many n e w
commands offered by B A S I C V , already acclaimed as one of the best and
most structured versions of the language on any micro, and is illustrated
with a wealth of easy-to-follow examples throughout.
An essential aid for all Archimedes users, it will also appeal to existing
BASIC users who wish to be conversant with its many new features. B A S I C
V includes several new control structures which are major innovations.
These are discussed and the text is littered with simple but effective
examples. For the graphics programmer, the new extended graphics
commands are covered with interesting examples of their use along with
control and manipulation of the colour palette.
Other major topics covered include:
and C A S E
Use of mouse and pointer
Local error handling.
Sound
The Assembler
• WHILE, IF
•
•
•
•
• Matrix operations
• Functions and Procedures
• Operators and string handling
• Arthur and RISC OS
• Programming hints and tips
The author, Mike Williams, is Editor of Beebug magazine and Rise User,
the largest circulation Archimedes specific magazine.
Archimedes Software
Archimedes Basic Compiler
By Paul Fellows. Price £99.95 Inclusive. Available Now NEW Version 2.
Two discs. 148 page Reference Guide, 56 page User Guide.
Demo Disc available for £2. Refundable on full order. Supports over 100
BASIC V commands and supplied with sample programs.
ABC: The fast and powerful
way to write instant machine
code!
If you want it all - speed, power and performance, then look no further
than the Archimedes Basic Compiler. A B C takes programs written in B A S I C
V and transforms them into superfast A R M machine code. Speed increases
307
Archimedes Operating System
of 5000% a r e possible depending on the nature of the program being
compiled.
A&B C o m p u t i n g said: "ABC is a vital part of the programmer's toolbox, it
puts compilers
on other systems to shame. Unquestionably one of the most
impressive pieces of software I have yet seen running on the
Archimedes/'
Archive Magazine said: "I can tell you now, I am very impressed.
superb package, which I thoroughly
recommend..."
This is a
Main Features:
• Converts BASIC V programs to A R M machine code
• Completely stand-alone code—does not access BASIC ROM
• All compiled code is position independent
• S p e e d increases of over 5000% possible
• C o d e size ratio approx. 1:1 (against tokenised source)
• Target program size limited only by disc space
• Conditional compilation supported
• Supports floating point arithmetic (using FPE)
• C A L L and USR parameter passing greatly enhanced
• N e w pseudo-variables included
• Runs on any Archimedes
• Friendly window-based control system
• Relocatable module making option
• Application, utility and service module types supported
• Full in-line assembler support
• Compiles using disc or RAM or both
• Execute immediately after compilation
• Large range of compiler directives
• Manifest constants implemented for extra speed
• Comprehensive and interesting examples disc
• Intelligent disassembler produces source of compiled code
• No additional runtime modules required
• No intermediate code s y s t e m
• 148pp Reference Guide and 56pp User Guide
• ARM fp processor compatible
• RISC O S and Arthur 1.2 compatible
• Technical support to registered users
• Absolutely no royalties to pay on compiled code
Version 2 n o w supports the following additions and improvements:
• Double/Extended precision floating point
parameters
• Multiple-ENDPROCs and function returns
• RETURN
308
Dabhand Guides Guide
• LOCAL Errors
• Scope rules
• Extended Compiler Directives
A B C is written by Paul Fellows, head of the Acorn team which wrote the
original Archimedes Operating System. Complete specification available
on request.
Instigator
By Mike Ginns. Price £49.95. Available March 1989.
The R I S C O S Compatible Archimedes System Manager
Instigator is a powerful extension to your Archimedes Operating System Arthur 1.2 and RISC OS - and the ideal foil for programmers and software
developers alike. Containing over 65 * commands this module provides a
wide range of exciting and invaluable system aids.
Instigator provides an extremely powerful working environment for the
user. It allows tasks be carried out quickly and efficiently. You get on with
the task in hand, Instigator provides the necessary information for you and
works with the Operating System to carry out your wishes, whether you
are using application packages or programming the machine itself.
Its new commands and facilities will prove indispensable to any serious
user of the Archimedes system. The commands make new operations
possible, help to simplify the use of existing features and give the user
unprecedented control over the machine.
Instigator Commands
Here is a list of some of the commands provided by Instigator:
*Medit, *Mmove, *Mfill, *Mfind, *Diss, *Tidy, "Compare, *Blist,
*Dimmer, *Half, *Full, *VIDC, *OpenWindow, "CloseWindow, *Files,
^Confirm, *FSsave, *FSload, ""Compress, ""Uncompress, "Printer, *CSD,
*SetPath, ""Paths, *UsePath, *KillPaths, *SavePaths, *LoadPaths,
^Return, ""RGB, ^Colours, *SetPalette, "Palette, *ListPalette,
*KillPalette, "SavePalette, ""LoadPalette, *Keys, "SaveKeys, "UoadKeys,
*SaveOSVars, *LoadOSVars, ""OSVars, *SaveCMOS, *LoadCMOS, "istatus,
*Dedit, *Dget, ""Dput, *Dsearch, "FreeMap, ""LineEdit, ""Archive,
^History, ""Cut, ""Definemode, "Hourglass, "Percentage, ""Xinfo,
""Smooth
Instigator is supplied on disc as a Relocatable Module. An examples disc is
included along with a 100 page User Guide.
309
Archimedes Operating System
And There's More!
Dabs Press will be adding to their increasing range of quality books and
software f o r a wide range of micros during the next year. For the
A r c h i m e d e s this includes ABC65 a 6502 cross compiler allowing 6502-based
code and Sideways RAM images to be generated from BASIC V developed
and tested on the Archimedes. The stand-alone 6502 code can then be
transferred to a BBC B , B + , Master 128 or Master Compact computer.
ABC65 will b e available in the second quarter of 1989.
Forthcoming for the A m i g a is ACE, a BBC BASIC v and Amiga Microsoft
BASIC compiler bearing a strong resemblance to ABC but taking particular
advantage of the Amiga's own graphics and sound facilities. Books to be
released for the Amiga include AmigaDOS: A Dabhand Guide (which covers
releases 1.2 and 1.3), Amiga BASIC: A Dabhand Guide and Amiga 500 First
Steps.
The Z88 will be supported with Z88: A Dabhand Guide and Z88 PipeDream:
A Dabhand Guide. The former is an indispensable guide for all Z88 users
while the later is the Z88 wordprocessors companion.
For the P C and A m s t r a d PCs our range of books will be extending to
include Ability Plus: A Dabhand Guide, Shareware: A Dabhand Guide and
PostScript: A Dabhand Guide. These will complement our titles WordStar
1512/Express: A Dabhand Guide and SuperCalc 3: A Dabhand Guide.
For full details on these and other Dabs Press publications, write or phone
now for our free and extensive catalogue. See page 303 for address details.
310
Index
#
$
%*0
%0
%
&
* command
V
•ACCESS
•APPEND
•AUDIO
•BUILD
•CAT
•CDIR
•CHANNEL VOICE
•CLOSE
•CONFIGURE
•COPY
•COUNT
•CREATE
•DELETE
•DIR
•DUMP
•ECHO
•ENUMDIR
•ERROR
•EVAL
•EX
•EXEC
•FX
•GO
•GOS
•HELP
•IF
•IGNORE
•INFO
•KEY
•LCAT
•LEX
•LIB
•LIST
67
67
50
49
67 72 84
67
40 47
48 70
75
76
196 199
76
77
77
197 200
77
51 59
78
79
80
80
81
81
52
82
52
53
82
83
53
53 149
54
54
55
55
83
56
83
84
73 84
84
•LOAD
•MODULES
•OPT
•PRINT
•QSOUND
•REMOVE
•RENAME
•RMCLEAR
•RMKILL
•RMLOAD
•RMREINIT
•RMRUN
•RMTIDY
•RUN
•SAVE
•SET
•SETEVAL
•SETMACRO
•SETTYPE
•SHADOW
•SHOW
•SHUT
•SHUTDOWN
•SOUND
•SPEAKER
•SPOOL
•SPOOLON
•STAMP
•STATUS
•STEREO
•TEMPO
•TIME
•TUNING
•TV
•TYPE
•UNPLUG
•UNSET
•UP
•VOICES
•VOLUME
•WIPE
70 85
120
86
86
198 205
87
87
120
120 121126
121
121
121 125
122126
48 70 88
88
49 56 57
58
58
72 76 89
58
59
89
89
197 201
196 199
90
90
71 90
59
196 200
198 205
60
197 203
60
91
121 122
60
91
197 203
197 204
92
311
Archimedes Operating System
6502
<
>
67
67
16 33
48 67
48 271
48 271
ABC
307
add
26
address calculation
20
address exception
255
address validation
156
address, hardware
156
ADFS
66
adjust button
162
ADR
38
Alias$
49
Alias$LoadType
85
aliases
49
alignment
21 34
allocation, memory
34
amplitude
202
AND
26
anti-aliasing
186 188 193
application environment 150
application top-down
151
application workspace
152 153
application writing
149
application, temporary
151
Archimedes
304
ArgsV
259
arithmetic instruction
26
ARM
1617 287
arrow icon
162
arrow
173
Arthur 1.2 bugs
155 156
ascending stack
32
ASCII conversion
273 274
assembler
20 24 32 304
assembler, floating point 302
assembly directive
37
assembly error
36
assembly language
304
assembly, offset
35 36
assembly, two-pass
36
attribute
75
312
bar, double
bar, split
bar, vertical
barrel shifter
base number, SWI chunk
BASIC V
BGetV
binary conversion
boot options
box, rub-out
BPutV
braces
branch
branch with link
branch, return from
buffer size, DMA
bugs, Arthur 1.2
button
button, adjust
button, menu
button, mouse
button, select
ByteV
271
271
271
24
136
20 33 307
259
273 274
86
190
259
48
25 34
25
26
208
155 156
161
162
162
170
161
258
Cflag
caching, font
calculation, address
CALL
carat
caret
Carol
Carry flag
catalogue
ChangeEnvironmentV
character input/output
character input
character line
character output
check mark
chunk, memory
chunk, SWI
CISC
claim heap
Cli$Prompt
clicking
CliV
close icon
CnpV
22
186
20
38
171
68
87
22
77
259
238
238
240
244
173
153
42
15
155
57
161
258
162
259
Index
co-ordinate conversion
190
co-ordinate, Font Painter 190
co-ordinate, OS
190 191
co-ordinate, window
163
co-processor
295
code, condition
22 23
command decoding
133
command line interpreter 40 41 47
commands, OS_CLI
50
comments
48
compare
27
comparison instruction 27
compatability, software
156
condition code
22 23
control, keyboard
241
conversion SWIs
271
conversion, ASCII
273 274
conversion, binary
273 274
conversion, co-ordinate 190
conversion, string
271
conversion
275
ConvertBinary
275
ConvertCardinal
275
ConvertHex
275
Convertlnteger
275
ConvertSpacedCardinal 275
ConvertSpacedlnteger
275
copy options
78
Copy$Options
78 79
CPDO
297 298
CPDT
297
CPRT
297
create directory
77
CSD
68 72 81
CSL
68 72 83 84
currently selected directory 68
currently selected library 68
cursor
282
DAC
data abort
date stamp
death, module
decoding code, SWI
decoding table
decoding table, SWI
decoding, command
decoding, help
decoding, string
195 291
255
71 90
126
137
133
137
133
133
271
descending stack
32
describe heap
154
DescRMA
302
device filing system
66 69
dimming
173
DirCopy
302
directive, assembly
37
directory
67
directory tree
116
directory, create
77
directory, currently selected 68
directory, examine
82
directory, parent
68
directory, previously selected 68
disc name
68
disc, program
302
display position
60
display screen
286
divide
28
division
28
DMA
18 287 290
DMA buffer size
208
double bar
271
dragging
162171
DumpFormat
84
empty stack
32
environment
150
environment, applicationl50
EOR
26
equates
37
error handling, file
102
error numbering
44
error, assembly
36
error, module
123
error, SWI
43
ErrorV
258
ESCAPE
45 76 239 244
evaluation, expression
273
event, vertical sync
268
event-driven
163
EventV
259
event
265
examine directory
82
exception, address
255
execute address
70
38 39
execution
expression evaluation
273
extend heap
155
313
Archimedes Operating System
file error handling
file naming
file redirection
file renaming
file type
113
File$Path
FileSwitch
FileV
filing system, device
filing system, RAM
filing system
fill
finalisation, module
FindV
Find
FIQ
flag, Carry
flag,C
flag, icon
flag, Negative
flag, N
flag, Overflow
flag, overflow
flag, V
flag, Zero
flag,Z
FLIH
floating point
floating point assembler
floating point emulator
floating point instruction
font caching
Font Manager
Font Painter
font
Font Painter co-ordinate
Font painting options
Font$Prefix
FontSize
Font_CacheAddr
Font_ConverttoOS
Font_Converttopoints
Font_FindFont
Font_LoseFont
Font_Paint
Font_ReadDfn
Font_ReadInfo
314
102
67
48
87
70 71 72 85 89
73101
66 74
259
66 69
66
66 69 93
228
126
259
302
255 263
22
22
165
22
22
22 43
124
22 4 3 1 2 4
22
22
265
295
302
295
295
186
186
186
186
190
189
186 187
186
187
190
191
187
187
189
191
191
Font_SetFontColours
Font_SetFont
Font_SetPalette
Font_StringWidth
foreign character
format, module
forward reference
FPA
FPE
free
frequency, sound
FSControlV
full stack
function key
188
189
188
192
67
124
35
302
295
232
292
259
32
243
gate off
gate on
GBPBV
guidelines, software
231
227
259
156
handle
165
handling code offset, SWI136
hardware address
156
hardware vector
255
header, module
124
heap manager
154
heap, claim
155
heap, describe
154
heap, extend
155
heap, initialise
154
heap, memory
153
heap, release
155
help decoding
133
help string, module
132
icon flag
icon, arrow
icon, close
icon, shuffle
icon, stretch
icon, toggle
IEEE
immediate value
in-line string
independence, position
indexing
indirect string
initialisation, module
initialise heap
input stream
165
162
162
162
162
162
295
24
249
37
30
250
125
154
238
Index
MEMC
18 287
input, character
238
memory address translation 290
input/output, character 238
input/output, simple
238
memory allocation
34
install
232
memory chunk
153
instantiate
232
memory heap
153
instruction, arithmetic
26
memory management
153
instruction, comparison 27
memory map
288
instruction, floating point295
memory page
153
instruction, logical
26
memory reservation
34
instruction, multiple register 31
memory, logical
153 288
instruction, unknown
255
memory, physical
153 288
InsV
259
memory, virtual
153 288 289
intercepting vector
259
menu button
162
menu
interlace
60
172 173
interrupt
20 21 2240 263 metric
186
interrupt, software
32 255
mode variables
283
IOC
18 287 293
mode, screen
283
IRQ
255 263
module
119 123
IrqV
258
module death
126
module error
123
justification, text
189
module finalisation
126
module format
kbd:
124
69
module header
Key$
124
56 57
module help string
keyboard control
132
241
module initialisation
keyboard status byte
125
242
module start-up
keypress
125
171
module title string
132
label
25 34 35
module workspace
123
library
68 72
module, printer buffer
141
limit, time
240
module, relocatable
119
line, character
240
module, shell
152157
link register
20 25
mouse
161 282
link, branch with
25
mouse button
170
list, register
31
MouseV
259
ListSWIs
302
multi-tasking
153 164
load address
70
multiple register instruction 31
load register
29
multiplication
27 28
Load$Type
71
multiply
27 28
logical instruction
26
logical memory
N flag
22
153 288
Logical Work Area
Negative flag
22
162
LWA
NFS
66
162 163 165
NOT
26
machine code
304
null reason code
167
machine RESET
255
null:
69
macro
58 62
number, SWI
41
manager, heap
154
numbering, error
44
map, memory
288
Marvin
63
315
Archimedes Operating System
offset assembly
35 36
options, boot
86
options, copy
78
options, Font painting
189
OR
26
OS co-ordinate
190 191
OSRDCH
239
OSWORD & 0 0
240 241
OS_Args
107
OS_BGet
105
OS_BinaryToDecimal
274
OS_BPut
107
OS_Byte &02
239
OS_Byte &03
245
OS_Byte &05
247
OS_Byte &81
240
OS_Byte &C7
248
OS_Byte SWIs
242
OS_CallAfter
278
OS_CallAVector
260
OS_CallEvery
278
OS_ChangeEnvironmentl51 152
OS_CheckModeValid
281
OS_Claim
260
OS_CLI
47 61
OS_CLI commands
50
OS_Convert SWIs
275
OS_EvaluateExpression 53 273
OS_Exit
151
OS_File
93
OS_Find
100
OS_FSControl
109
OS_GBPB
102
OS_GenerateError
45
OS_GenerateEvent
267
OS_GetEnv
150
OS_GSInit
271
OS.GSRead
271
OS_GSTrans
62 134 272
OS_Heap
154
OS_Module
122 138 151
OS_Mouse
282
OS_PrettyPrint
250 251
OS_ReadC
239
OS_ReadEscapeState
45
OS_ReadLine
241
OS_ReadModeV
283
OS_ReadMonotonicTime279
316
OS_ReadPalette
285
OS_ReadPoint
286
OS ReadUnsigned
273
OS_ReadVarVal
61
OS_Release
260
OS_RemoveCursors
282
OS_RemoveTickerEvent 279
OS_RestoreCursors
282
OS ServiceCall
126
OS SetVarVal
62
OS SWINumberFromString42 276
OS_SWINumberToString 42 276
OS ValidateAddress
156
OS WriteC
248
OS Writel
249
OS WriteO
250
OS_WriteS
249
output stream
245
output, character
244
Overflow flag
22 43
overflow flag
124
page, memory
153
palette
285 291
parent directory
68
pathname
68
PC
20
physical memory
153 288
Physical Work Area
162
pitch
202
pixel
186 286
pointing
161
point
186
polling
166
polling loop
166
position independence 37
position, display
60
position, stereo
292
post-indexing
30
pre-fetch abort
255
pre-indexing
30
previously selected directory 68
printer buffer module
141
printer stream
246
printer:
69
PRM
14
program counter
20
program disc
302
Programmers Reference Manual 14
Index
PSD
PSR
punctuation
PWA
R14
R15
RAM filing system
rawkbd:
rawvdu:
ReadCV
ReadLineV
reason code
reason code, null
reason-code
redirection, file
redraw, window
register list
register, load
register, shadow
register, store
release heap
relocatable module
relocatable module area
RemV
reservation, memory
return
return from branch
RISC
RMA
ROM
root
RS423 stream
rub-out box
Run$Path
Run$Type
sample rate
screen mode
screen save
screen, display
scroll bar
scroll offset
search path
select button
selection
service call
service routine
shadow register
shell module
68
20
67
162163 165
20 25
20
66
69
69
258
259
127167
167
164
48
167
31
29
263
29
155
119
119
259
34
26
26
15
119
156
67
246
190
73
71
208
283
94
286
162
165
72
161
161
126
263
263
152 157
shifting
24
shuffle icon
162
sideways ROM
119
simple input/output
238
Smalltalk
161
software compatability
156
software guidelines
156
software interrupt
32 255
software vector
258
sound frequency
292
Sound SWIs
207
SoundChannels
196
SoundDefault
201
SoundDMA
195 196
SoundScheduler
197
Sound_AttachNamedVoice 215
Sound_AttachVoice
216
Sound_Configure
207
Sound_Control
218
Sound_ControlPacked
218
Sound_Enable
210
Sound_Install Voice
215
Sound_LogScale
217
Sound_Pitch
217
Sound_QBeat
223
Sound_QInit
221
Sound_QSchedule
221
Sound_QTempo
223
Sound_ReadControlBlock 219
Sound_RemoveVoice
215
Sound_SoundLog
217
Sound_Speaker
210
Sound_Stereo
212
Sound_Tuning
217
Sound_Volume
216
Sound_WriteControlBlock 219
split bar
271
spool file
247
spool stream
247
stack, ascending
32
stack, descending
32
stack, empty
32
stack, full
32
start-up, module
125
status byte, keyboard
242
stereo position
292
store register
29
stream, input
238
317
Archimedes Operating System
stream, output
stream, printer
stream, RS423
stream, spool
stream, VDU
stretch icon
string conversion
string decoding
string, in-line
string, indirect
sub-directory
sub-menu
subtract
supervisor mode
supremacy
SVCB
SWI
SWI chunk
SWI chunk base number
SWI decoding code
SWI decoding table
SWI error
SWI handling code offset
SWI number
SWI translation
SWIs, conversion
SWIs, OS_Byte
SWIs, OS_Convert
SWIs, Sound
SWIs, VDU
SWIs, WIMP
Sys$
Sys$DateFormat
245
246
246
247
246
162
271
271
249
250
67
173174
26
17 22 32
292
226
32 41
42
136
137
137
43
136
41
137
271
242
275
207
281
175
57
60
temporary application
151
test
27
text justification
189
tick mark
173
TickerV
259
time limit
240
timer
278 293
title bar
162 165
title string, module
132
toggle icon
162
top-down, application
151
translation, memory address 290
translation, SWI
137
tree, directory
116
318
TWIN
two-pass assembly
149 152
36
UKPLOTV
UKSWIV
UKVDU23V
unknown instruction
unknown PLOT vector
unknown SWI vector
unknown VDU23 vector
up
UpCallV
update
user interface
user mode
USR
259
259
259
255
259
259
259
68
259
232
161
17 22
38
V flag
22 43 124
validation, address
156
variables, mode
283
VDU extension vector
259
VDU stream
246
VDU SWIs
281
vdu:
69
VDU
186
VDUX
186
VDUXV
259
vector
255 263
vector, hardware
255
vector, intercepting
259
vector, software
258
vector, unknown PLOT 259
vector, unknown SWI
259
vector, unknown VDU23 259
vector, VDU extension
259
vertical bar
271
vertical sync event
268
VIDC
18 287 291
virtual memory
153 288 289
voice generator code
232
voice generators
195
voice generator
226
WIMP
161
WIMP SWIs
175
Wimp_CloseDown
172
Wimp_CloseWindow
169
Wimp_CreateMenu
172 173
Wimp_DeleteWindow 172
Wimp_GetRectangle
168
Index
Wimp_Initialise
Wimp_OpenWindow
Wimp_Poll
Wimp_RedrawWindow
Wimp_UpdateWindow
window co-ordinate
window control block
Window Manager
window
window redraw
Wipe$Options
WordV
workspace, application
workspace, module
write-back
WriteCV
writing, application
164
166169
166172
167168
168
163
164 165
161163 1 7 5
161
167
92
258
152153
123
30
258
149
Xbit
42 44
Zflag
Zero flag
\
22
22
67
67
48
48 271
48
67
A
{
I
}
319
Archimedes Operating System
Notes
320