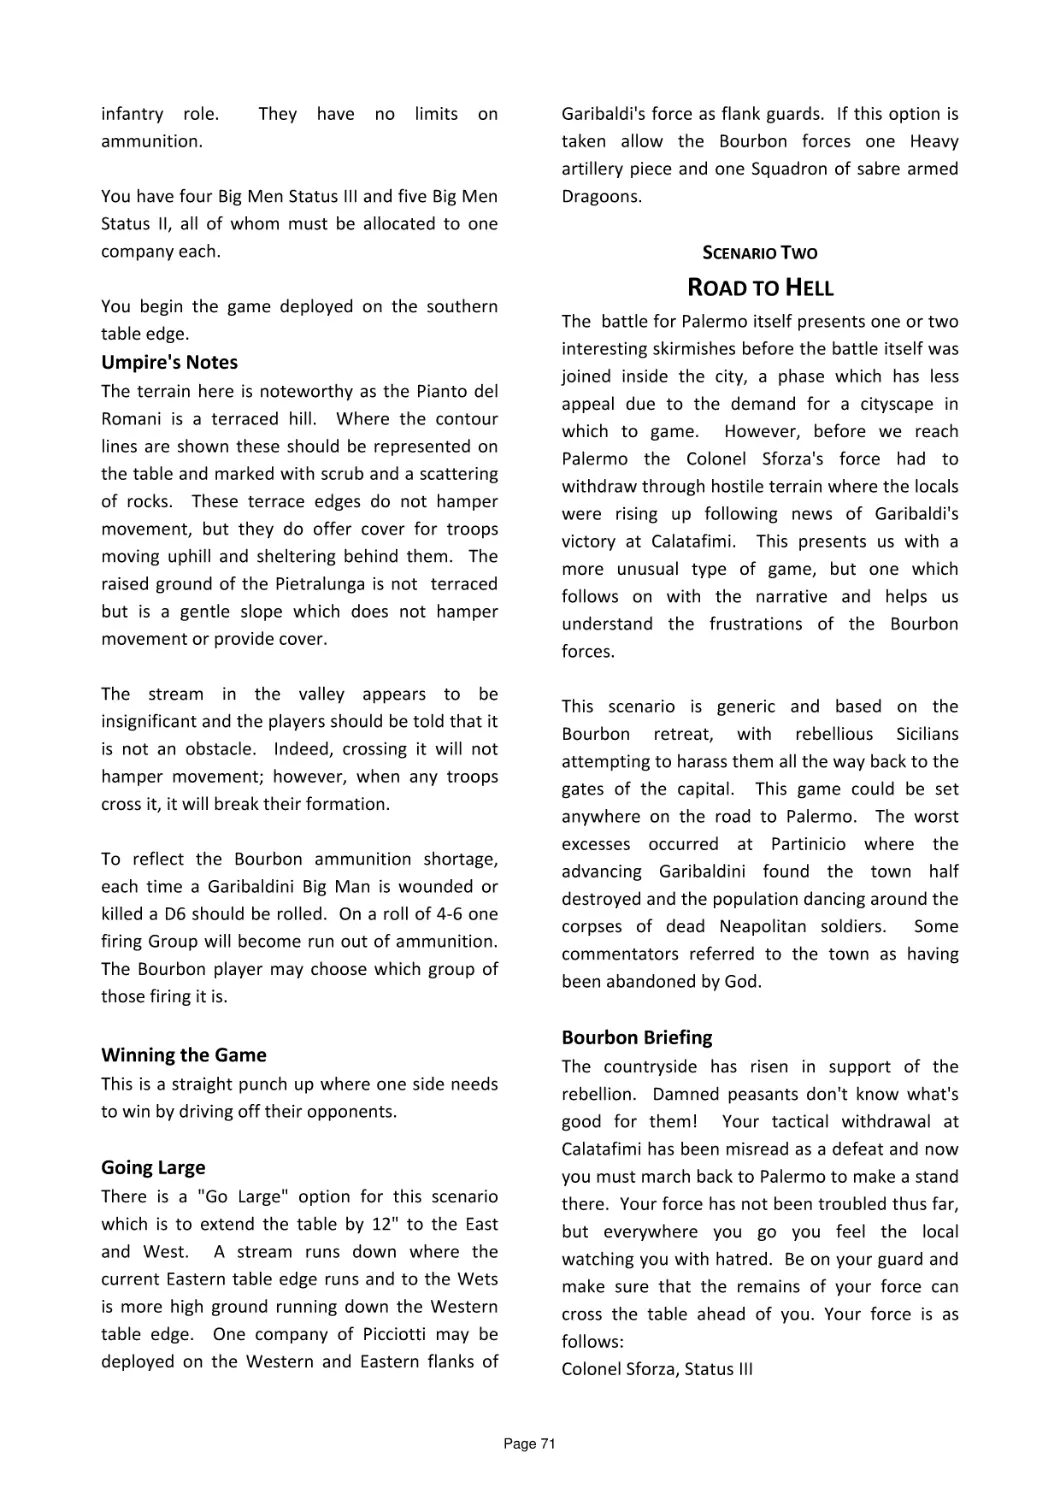
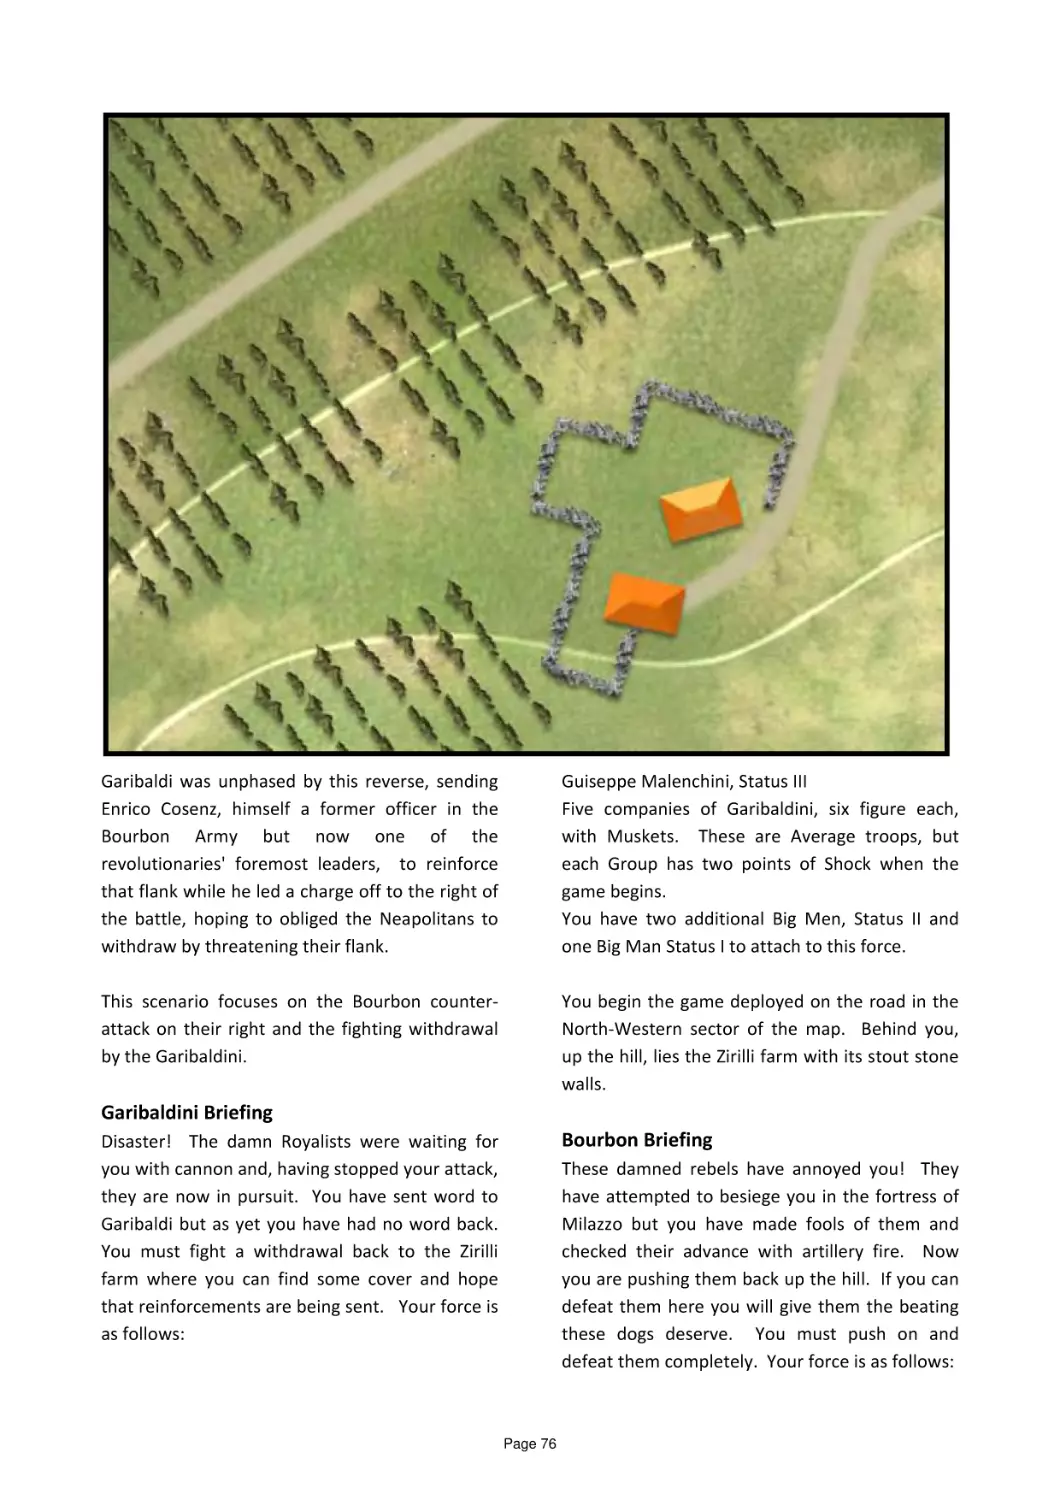
/


Text
Page 3
Page 4
Page 63
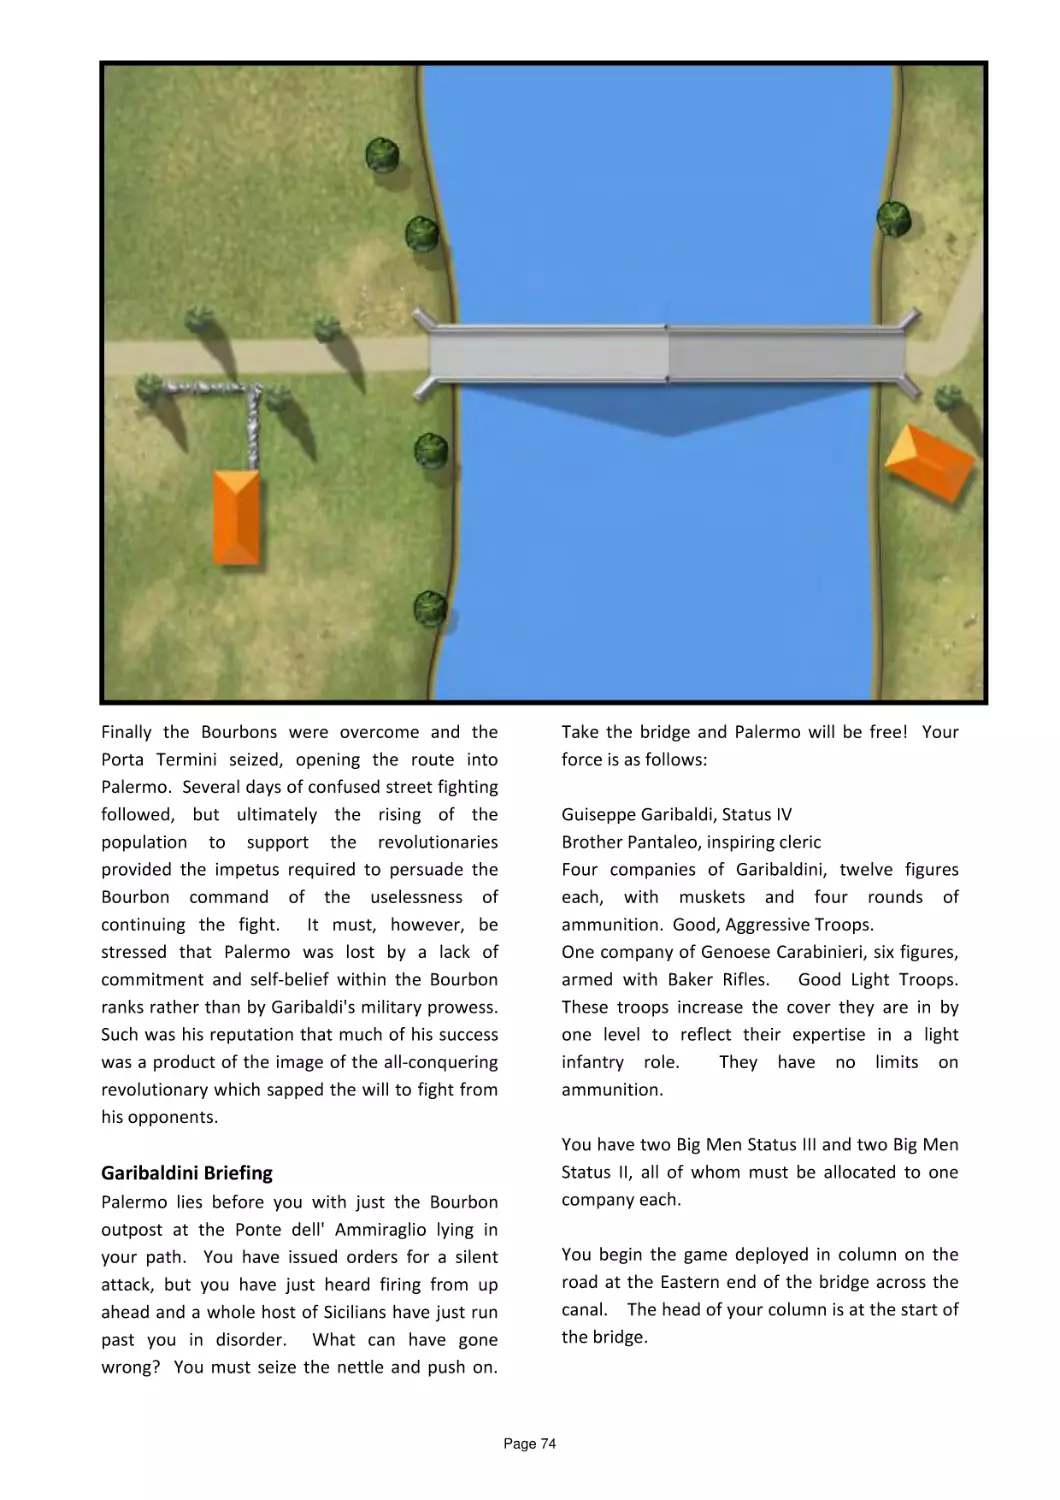
Taking the Biscuit. Not a Hob Nob in
sight as Garibaldi takes on the
Bourbons in Sicily in 1860. A guide
to fighting "The Thousand" with
Sharp Practice with five cracking
scenarios
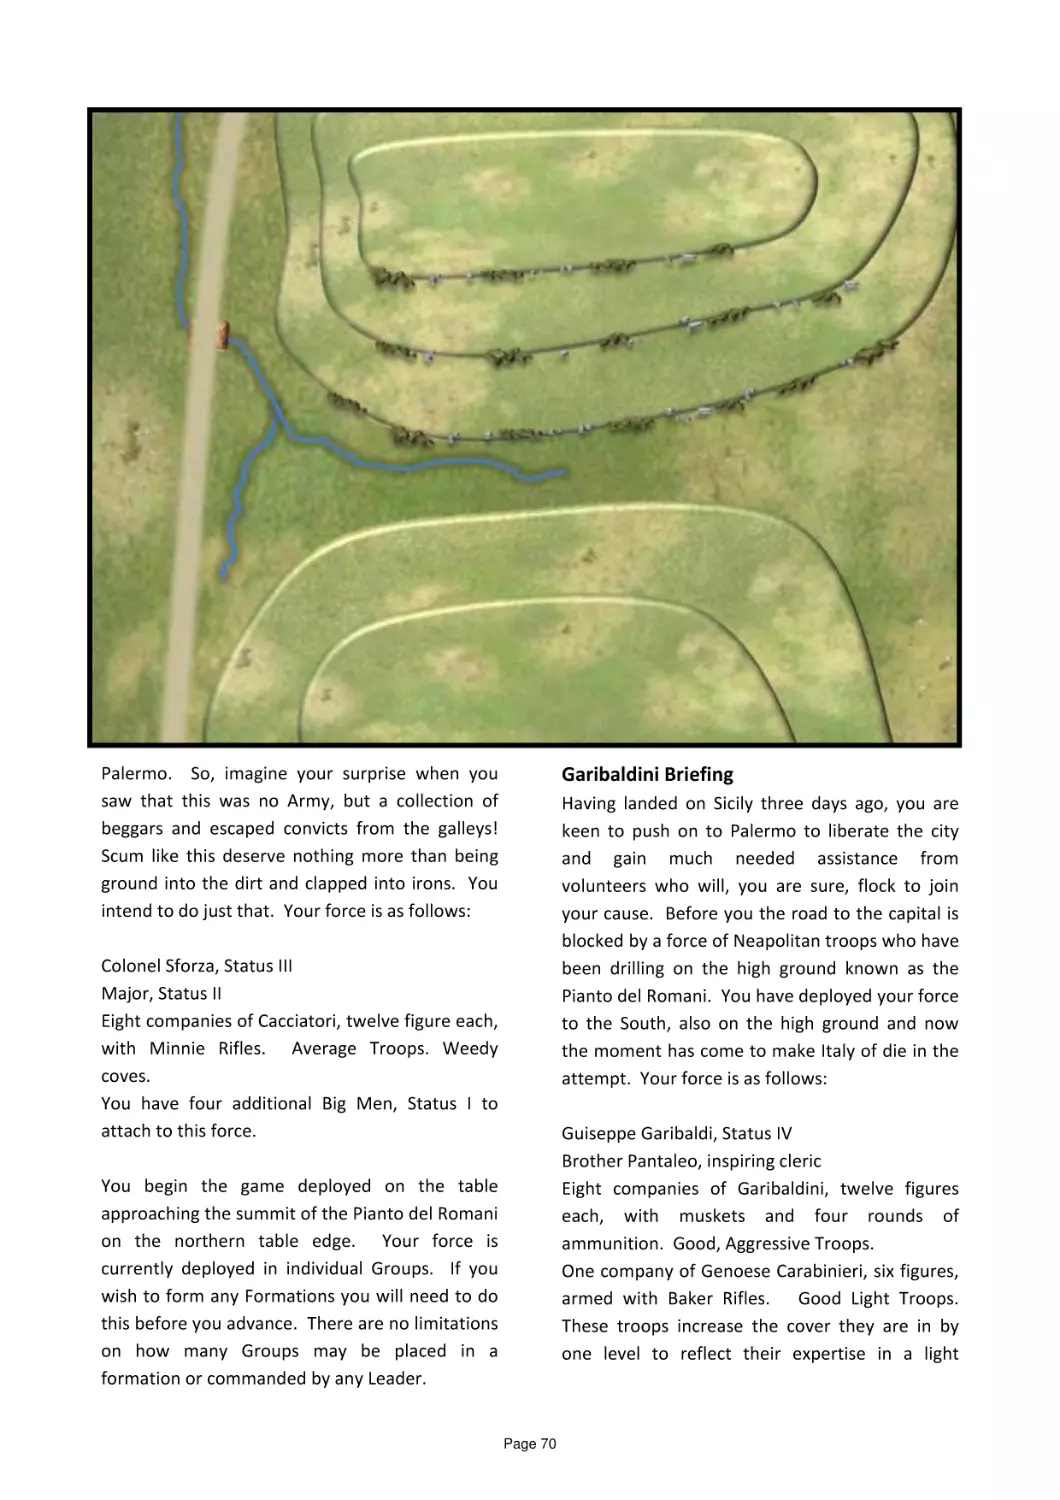
Introduction.
The dynamic duo
welcome you to this Special with a
few words of pseudo-wisdom
Page 80
Blitz to Boulogne.
A Chain of
Command mini-campaign for the
Welsh Guards defending Boulogne in
1940 against the cream of the
Panzer Divisions
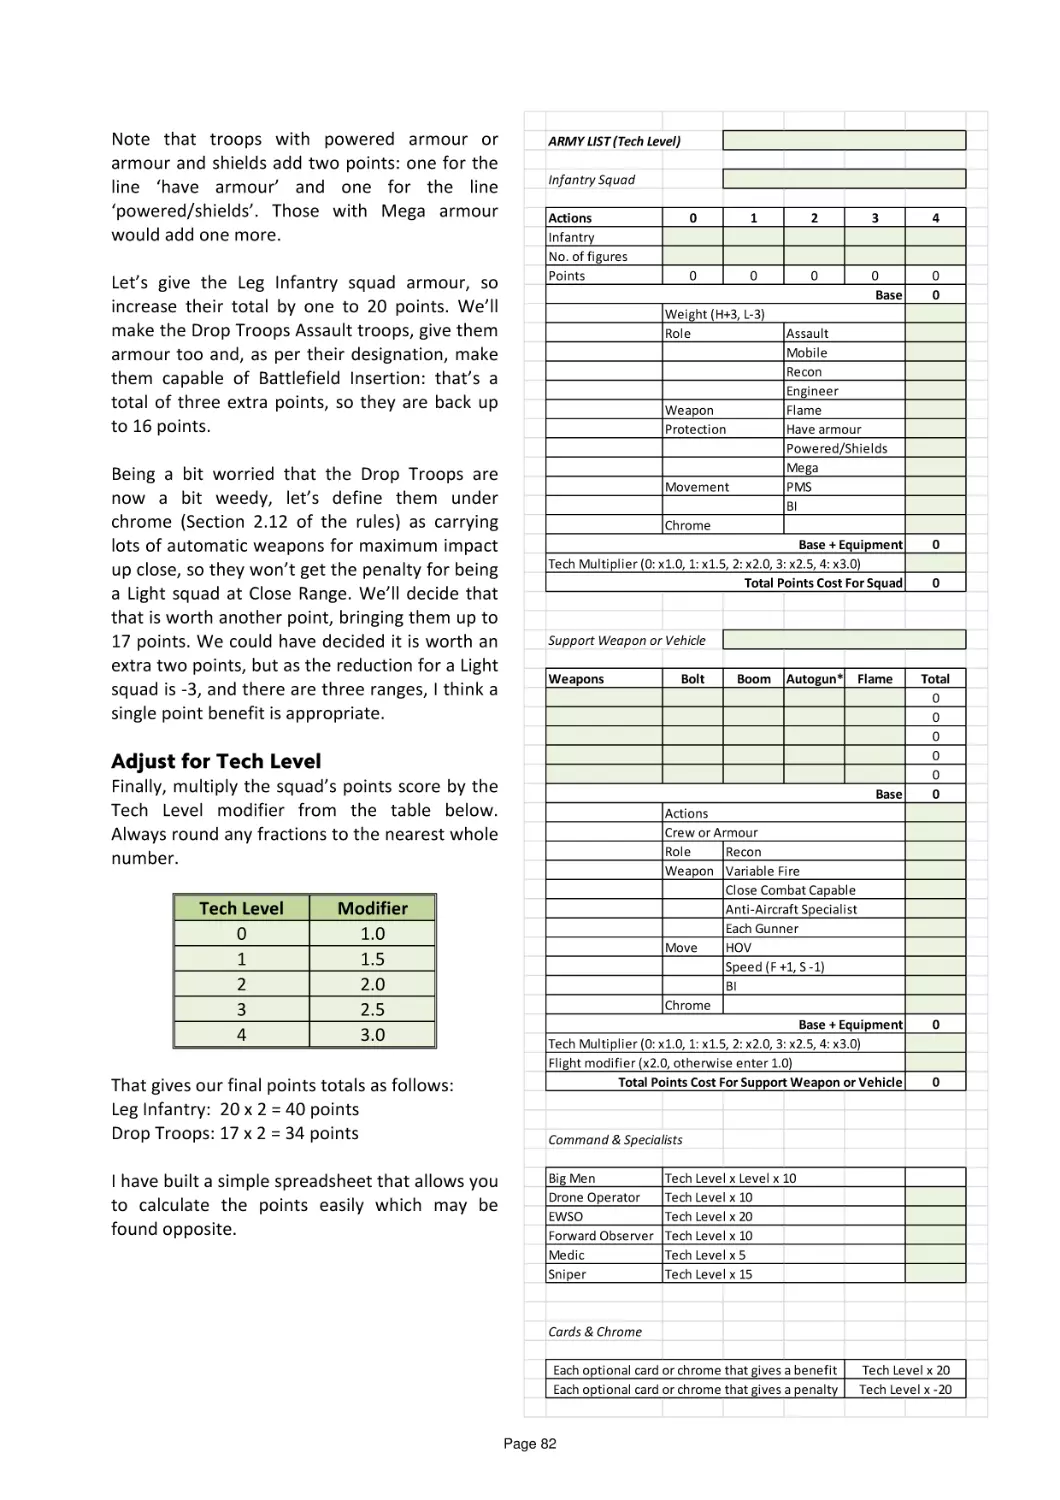
Quadrant 13, A Point System.
Robert Avery boldly goes where no
Lardy has gone before and presents
a points system for the Quadrant 13
Sci-Fi rules
Page 86
The Roundwood Report. Sidney
invites three men into his sofa to see
what comes up. Nothing new there
you may say, and the action soon
hots up when the talk turns to Lardy
Games Days.
Get the low down
from three hardened veterans of
these events
Page 96
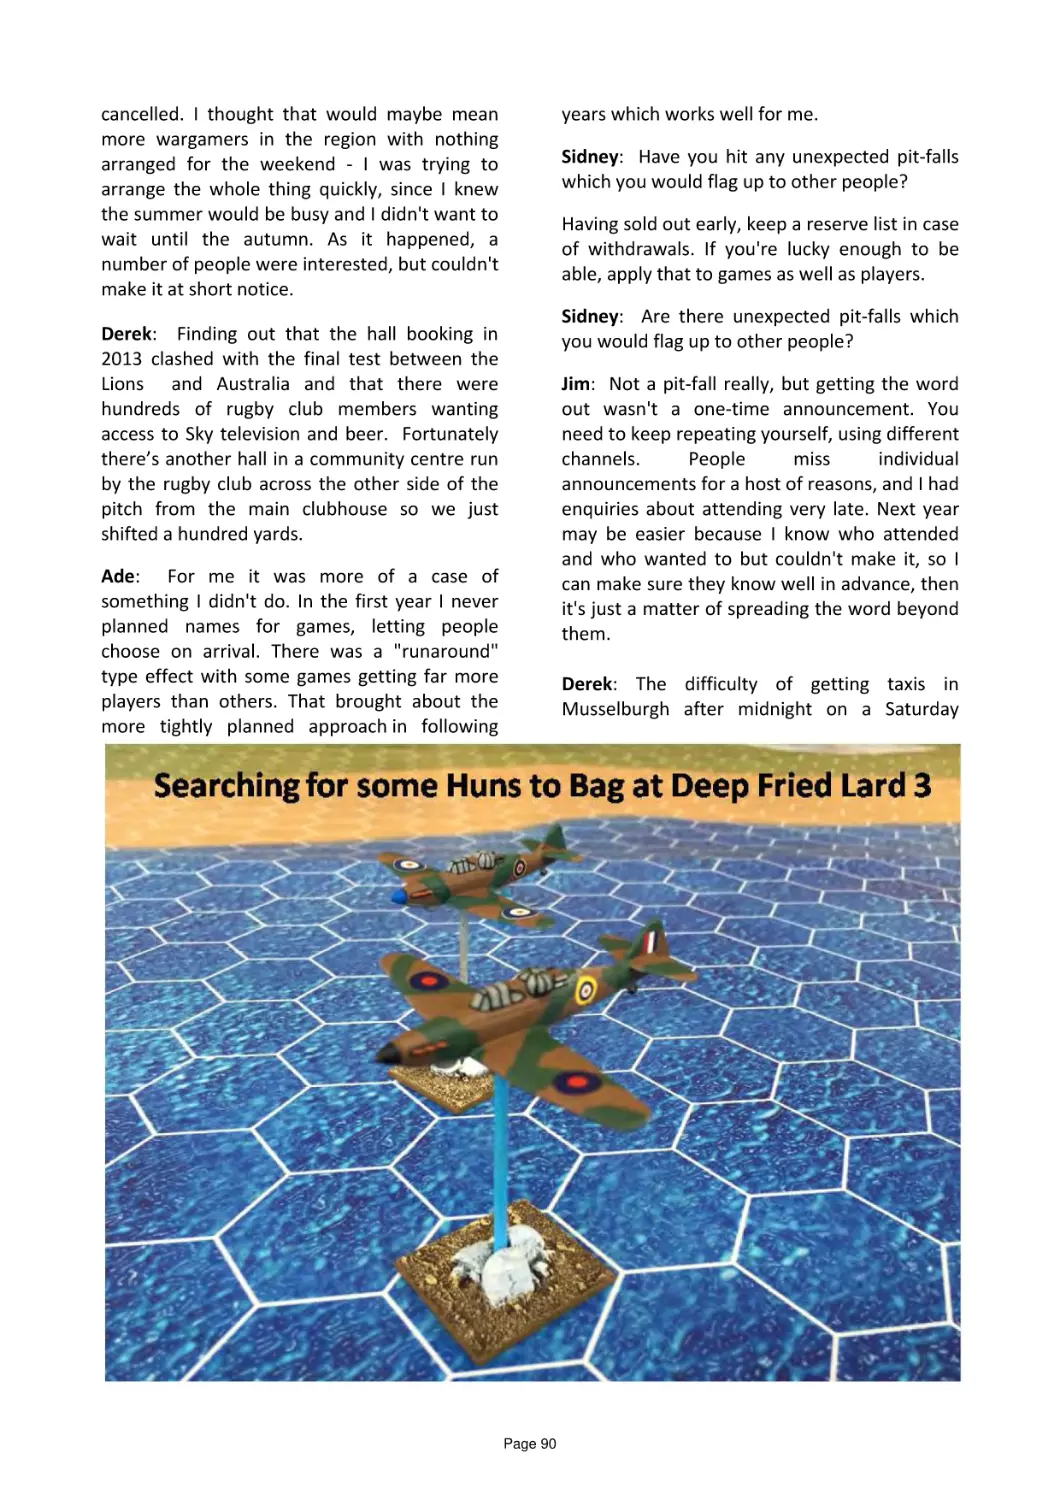
Fork-Tailed Lardies. Hot foot from
the casting couch, James Crate looks
at the P-38 in Bag the Hun
Page 101
Le Hameau. A Le Feu Sacre scenario
for
this
bi-centennial
battle,
featuring the action at Ligny
Page 105
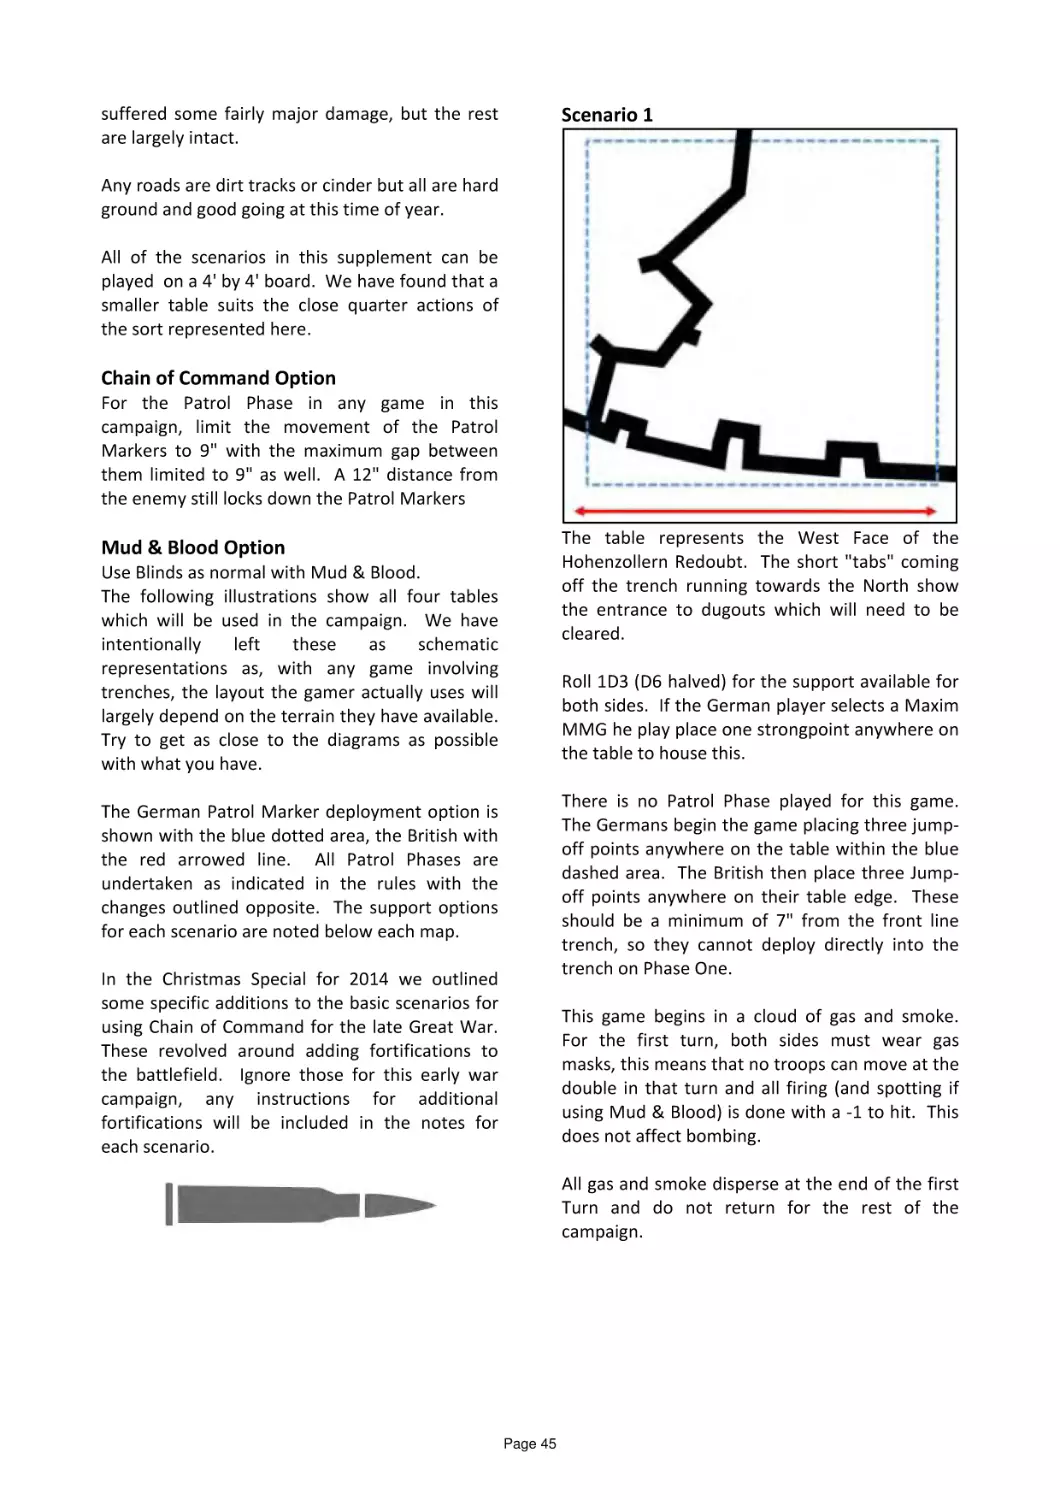
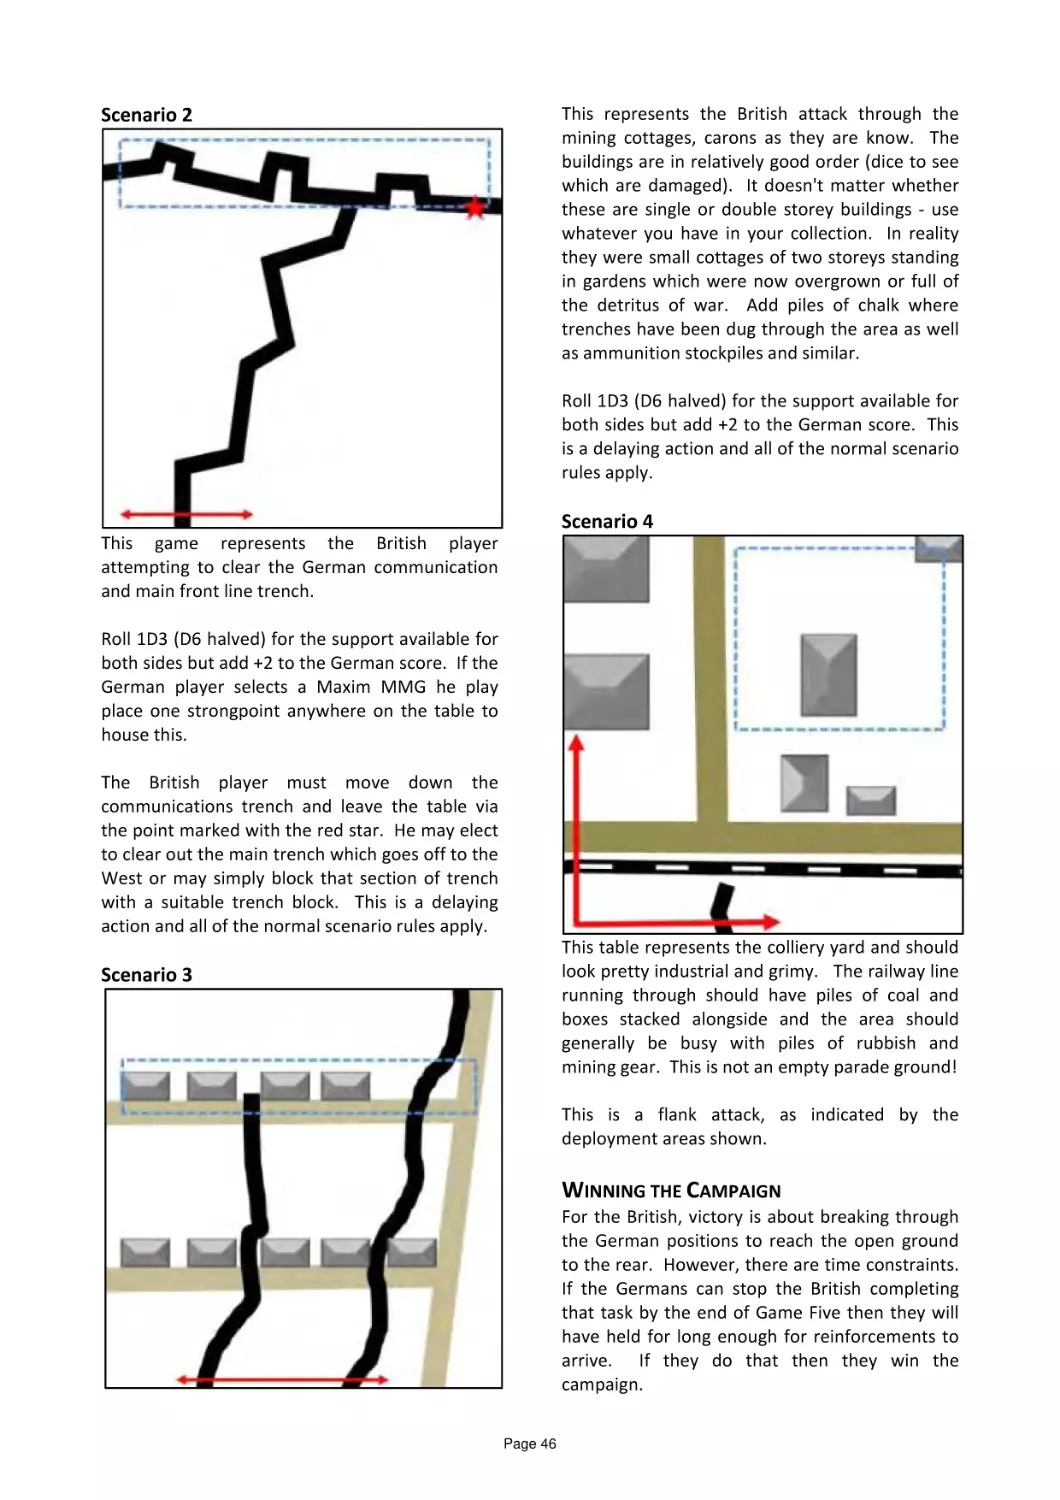
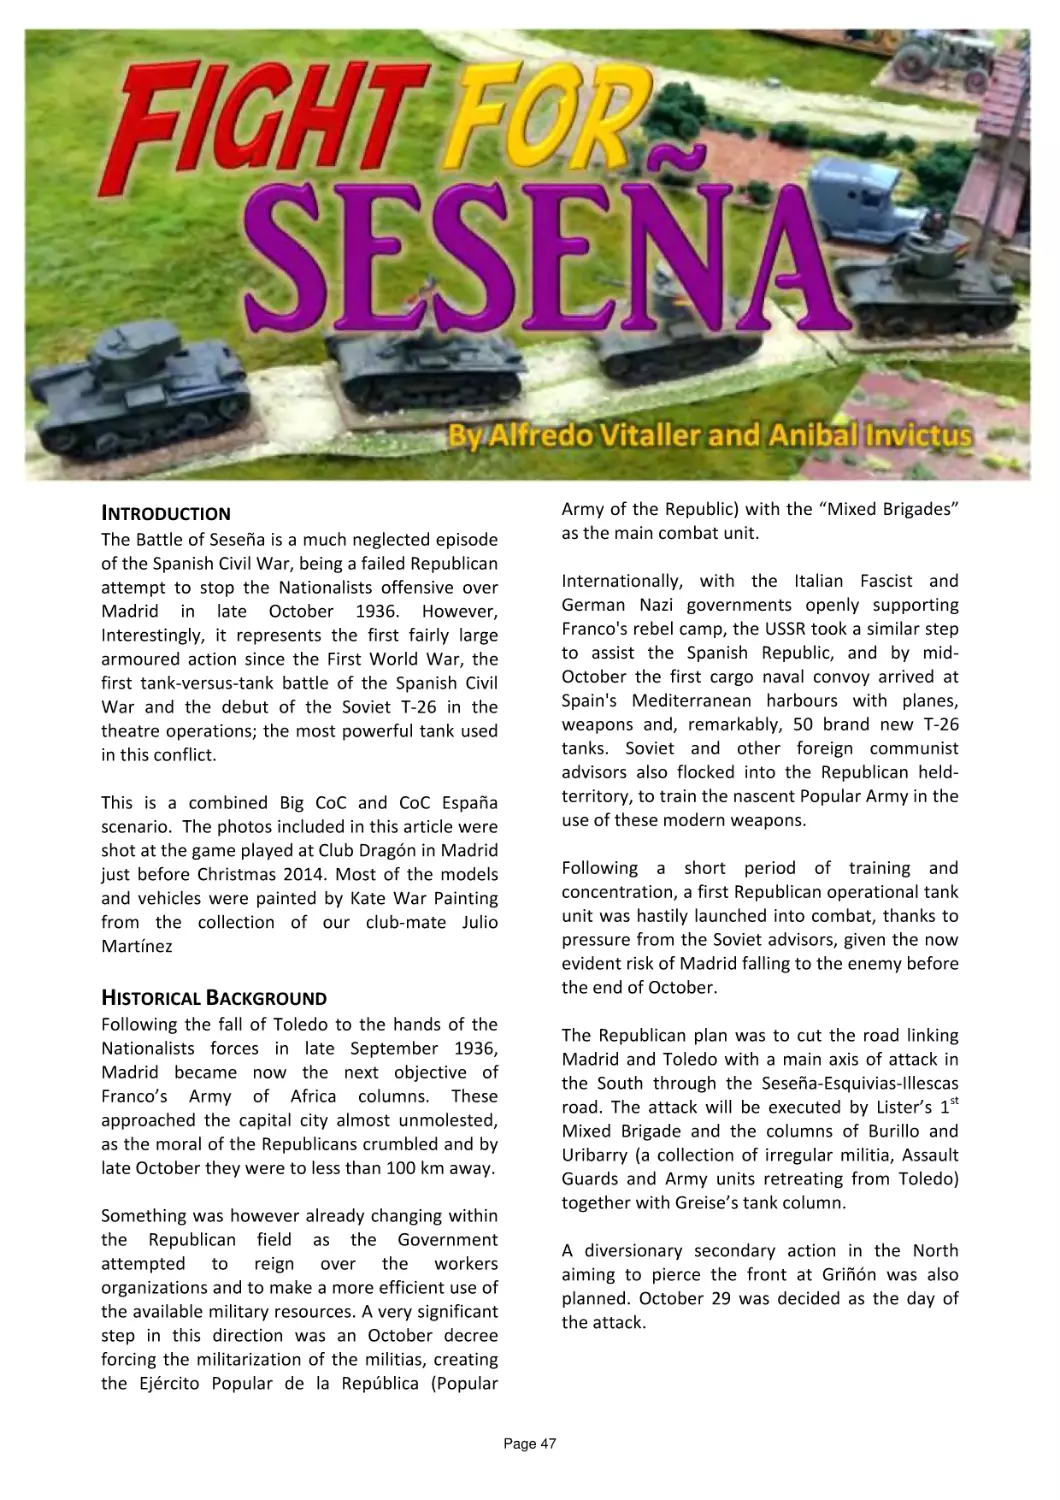
At Your Convenience. A Great War
mini-campaign covering the Battle of
Loos in 1915. Srorming to victory in
four Scenarios
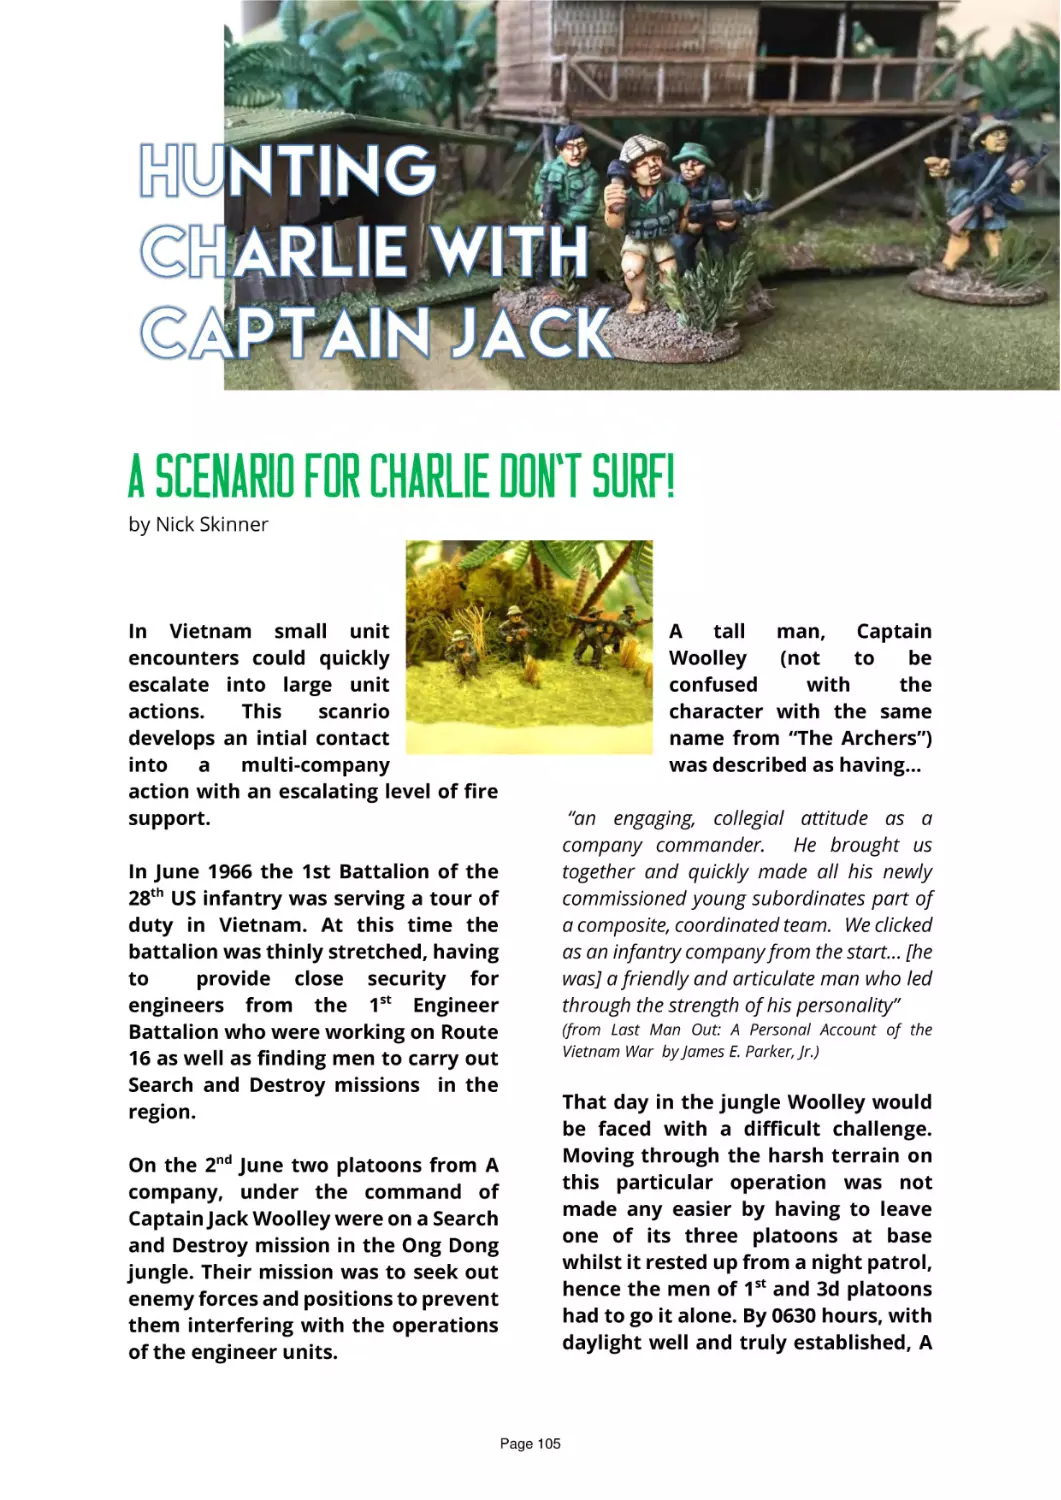
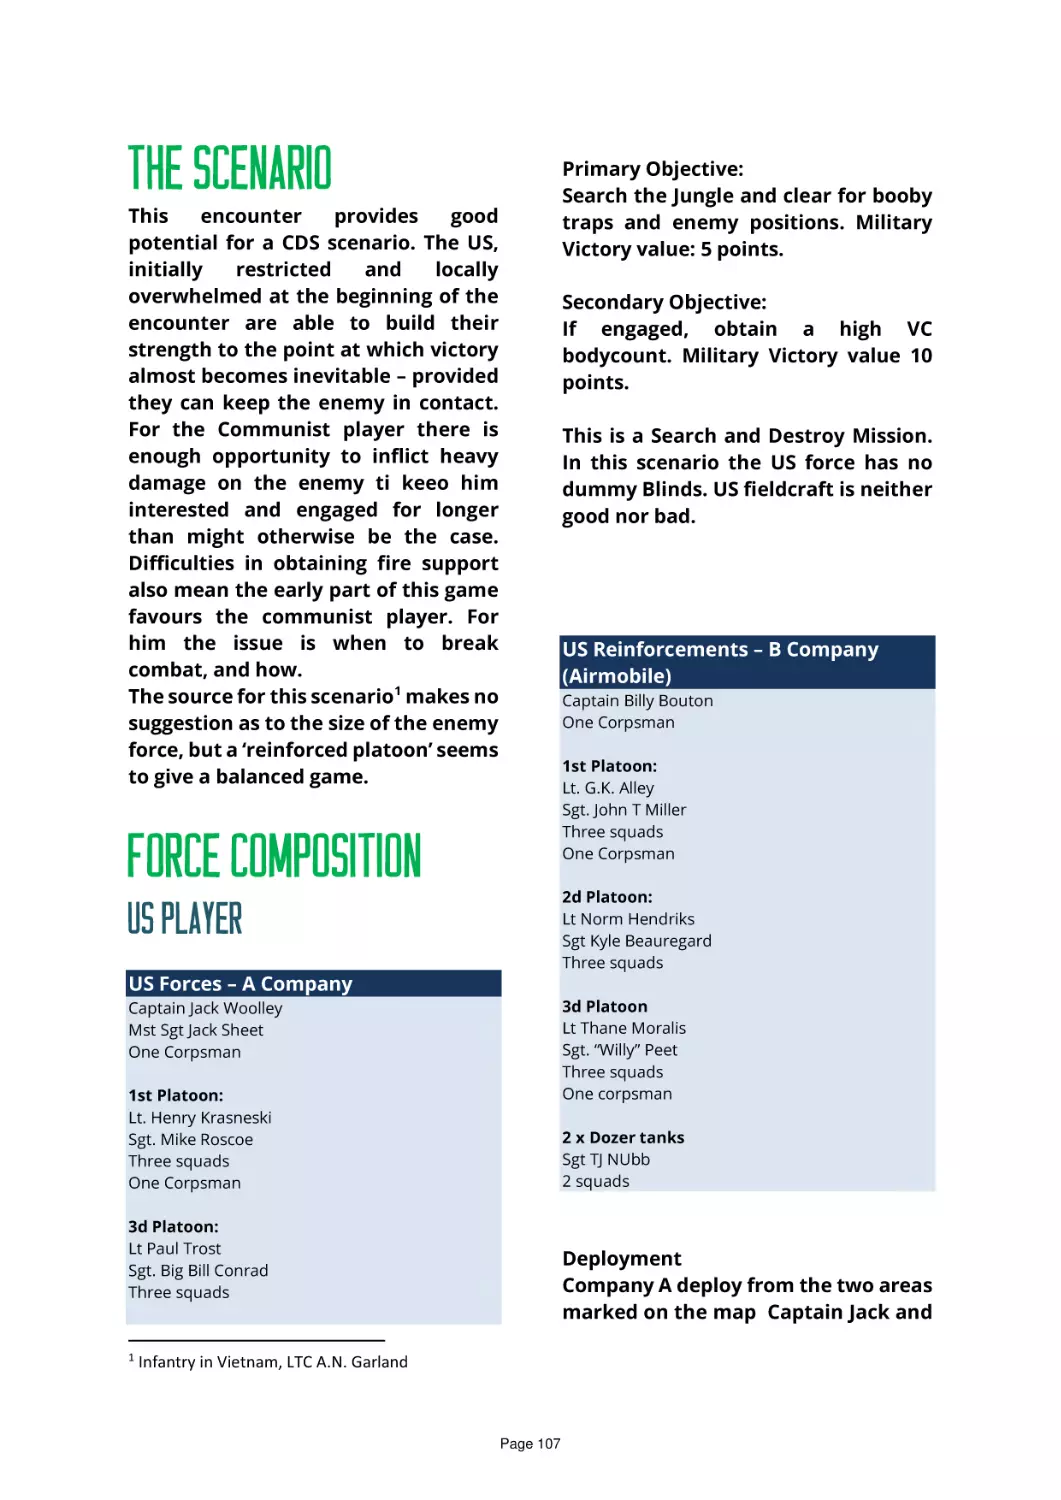
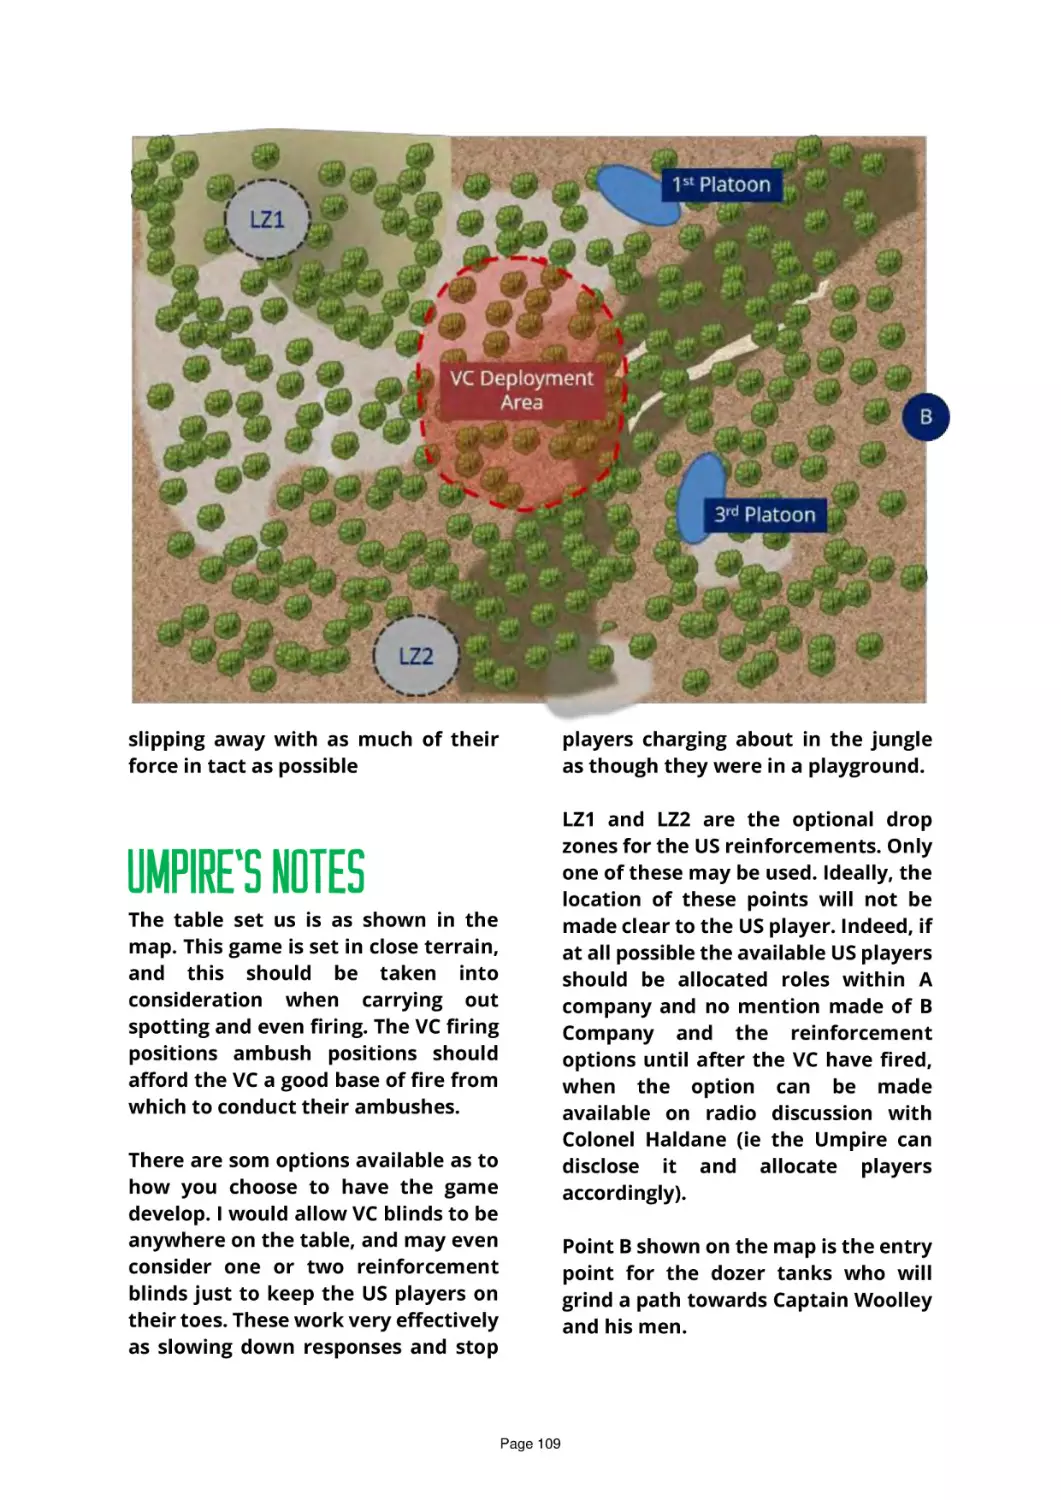
Hunting Charlie with Captain Jack.
Having escaped from Grey Gables,
Captain Jack Wooley heads for
Vietnam with this scenario for
Charlie Don't Surf
Page 111
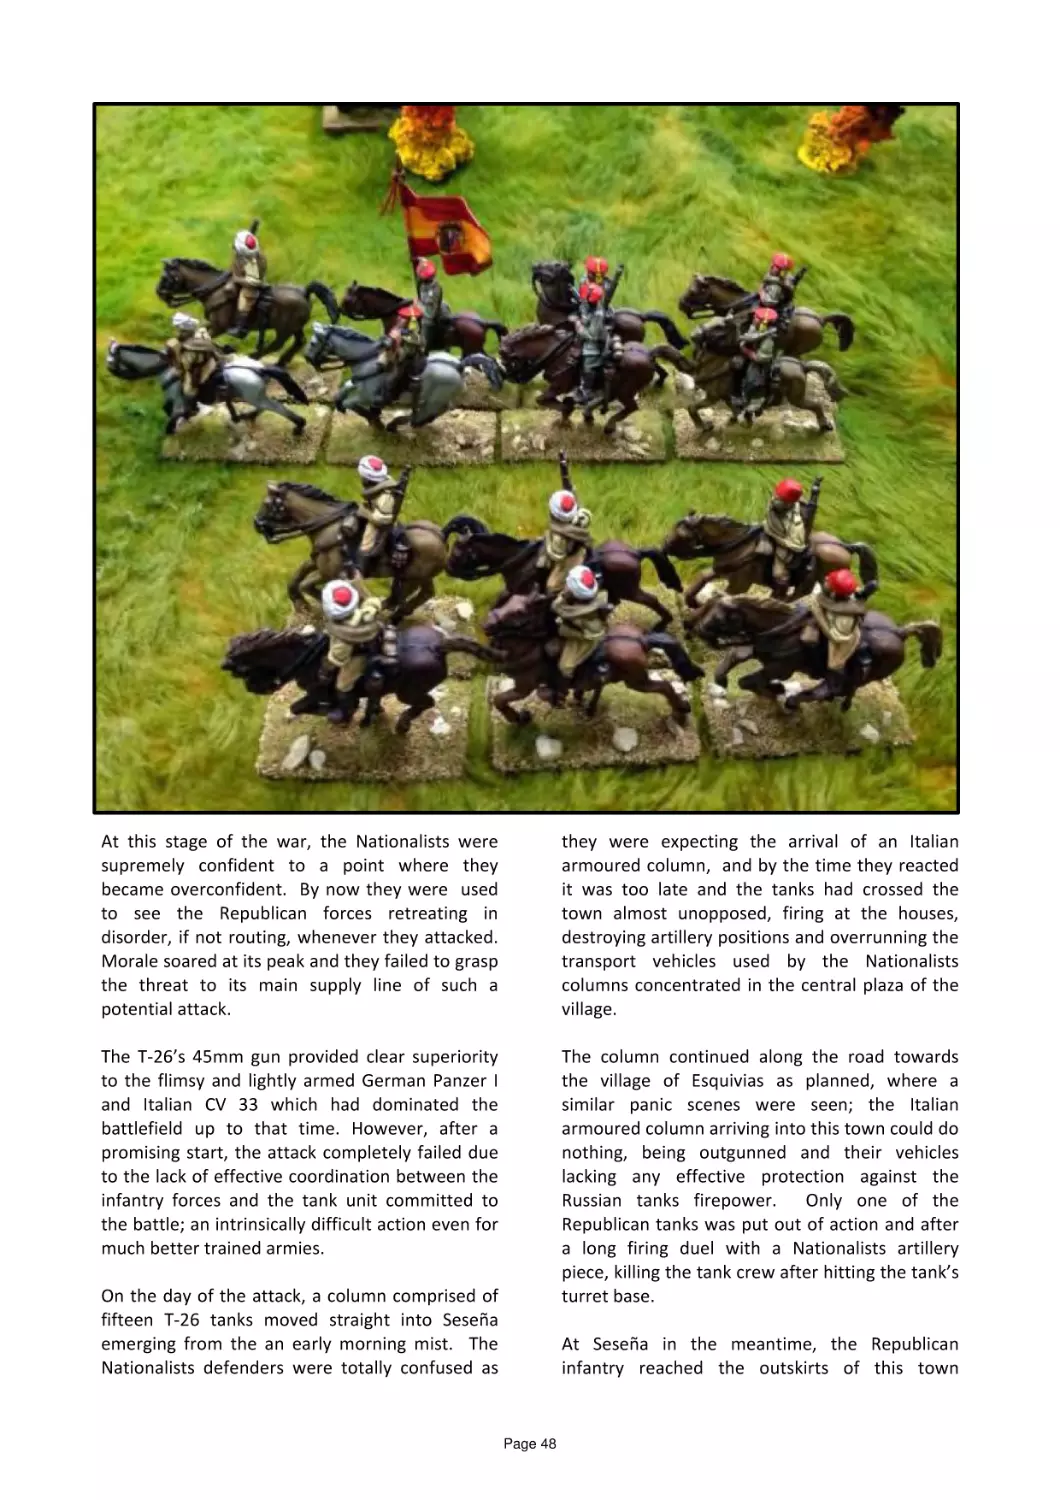
Fight for Sesna. Alfredo Vitaller and
Anibal Invictus of Madrid look at this
1936 tank action for the Spanish Civil
War
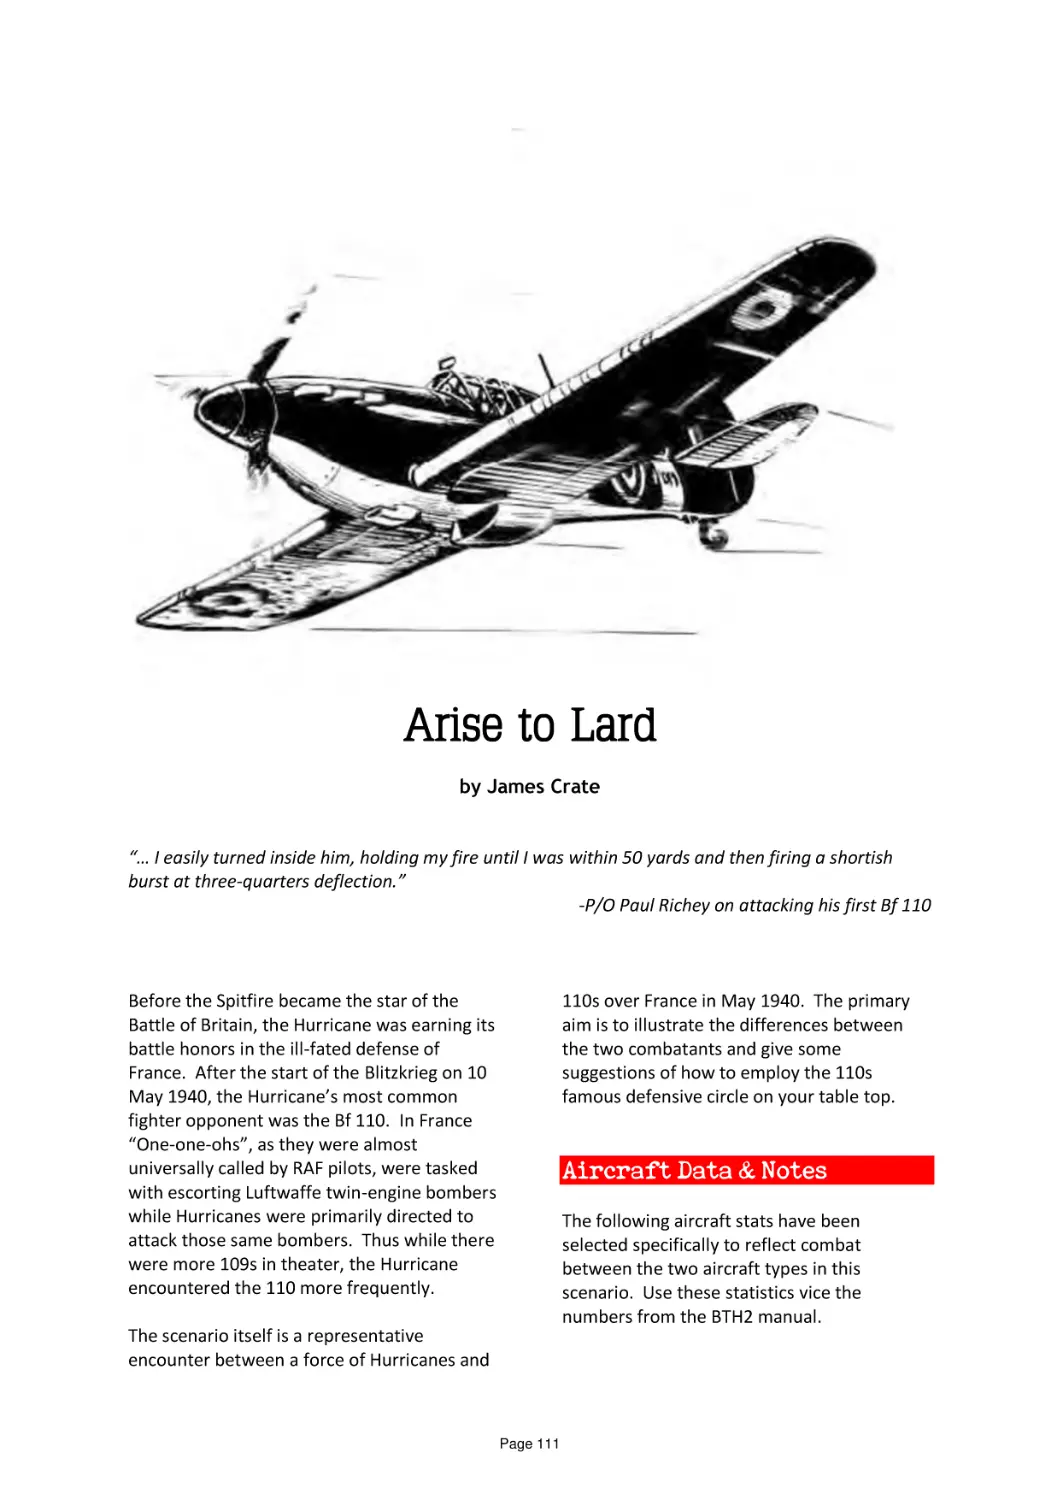
Arise to Lard. A look at air tactics
from 1940 and how to apply these
ideas with Bag the Hun. James Crate
gets his hat-trick in this Special
Page 117
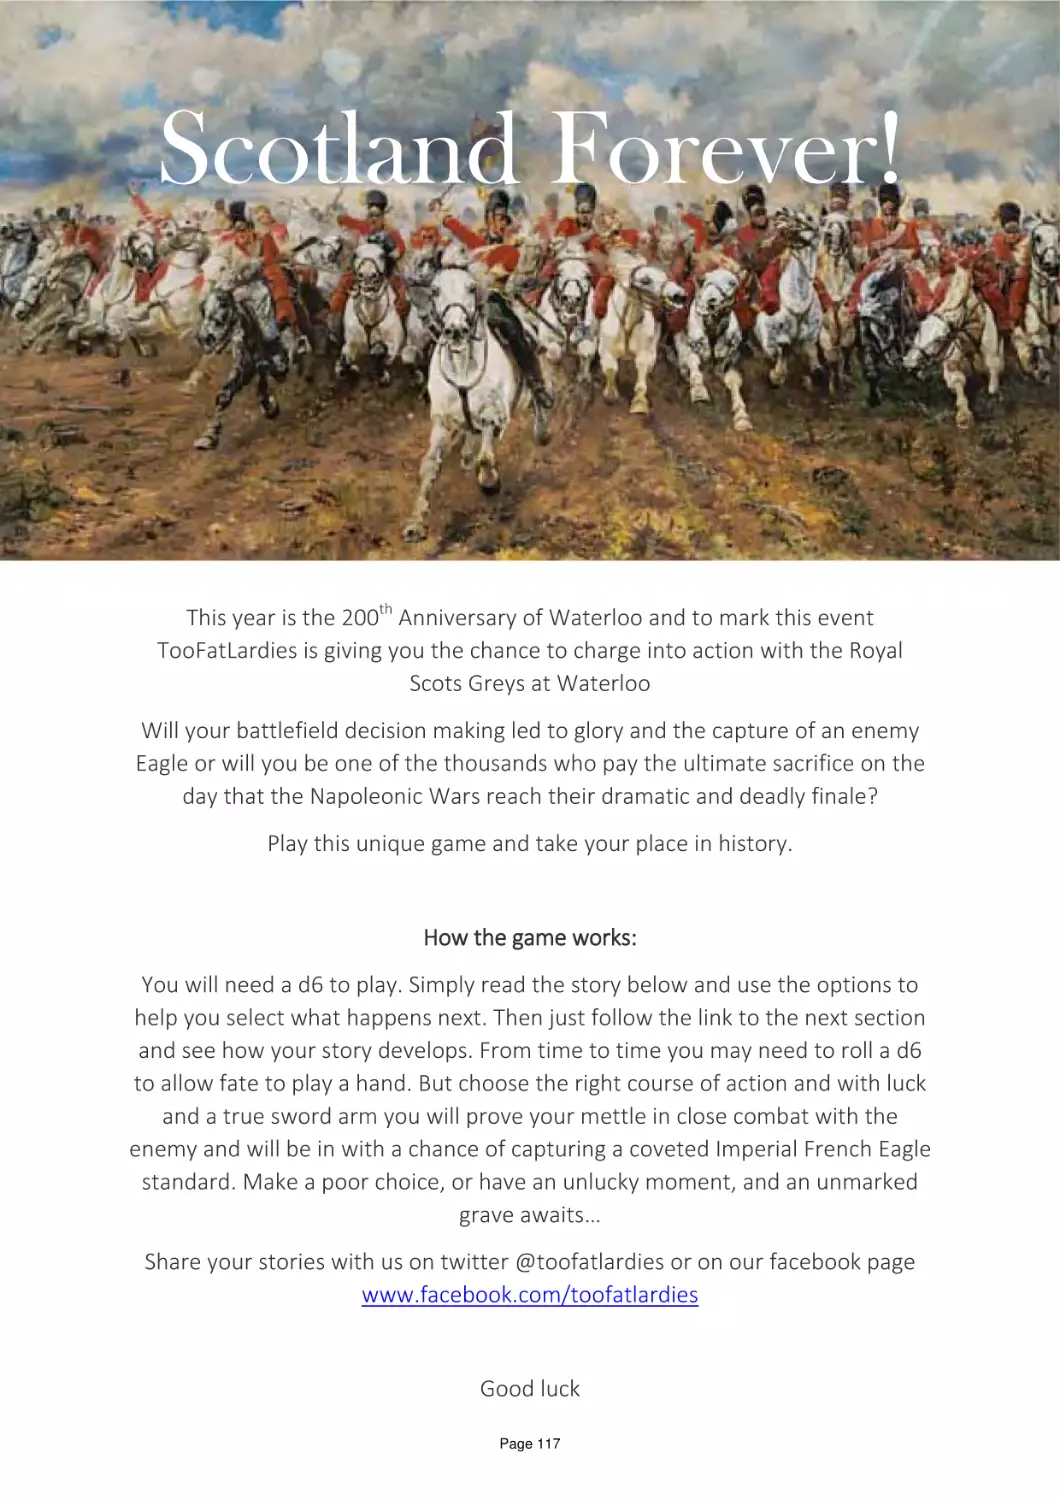
Scotland Forever! In a diversion
from our usual format, we present a
very special game to celebrate the
200th Anniversary of a very Special
event. Waterloo. Do you have what
it takes to capture an Eagle? Find
out here as you ride with the Scots
Greys.
Page 16
Action at the Crooked Billet. Jan
Spoor presents this AWI action for
Sharp Practice which involves a pub.
What better objective for life, let
alone a game?
Page 25
Glowaczow 1944. An I Ain't Been
Shot Mum scenario at the end of
Operation Bagration with plenty of
heavy metal on display
Page 28
Page 35
Page 47
Page 51
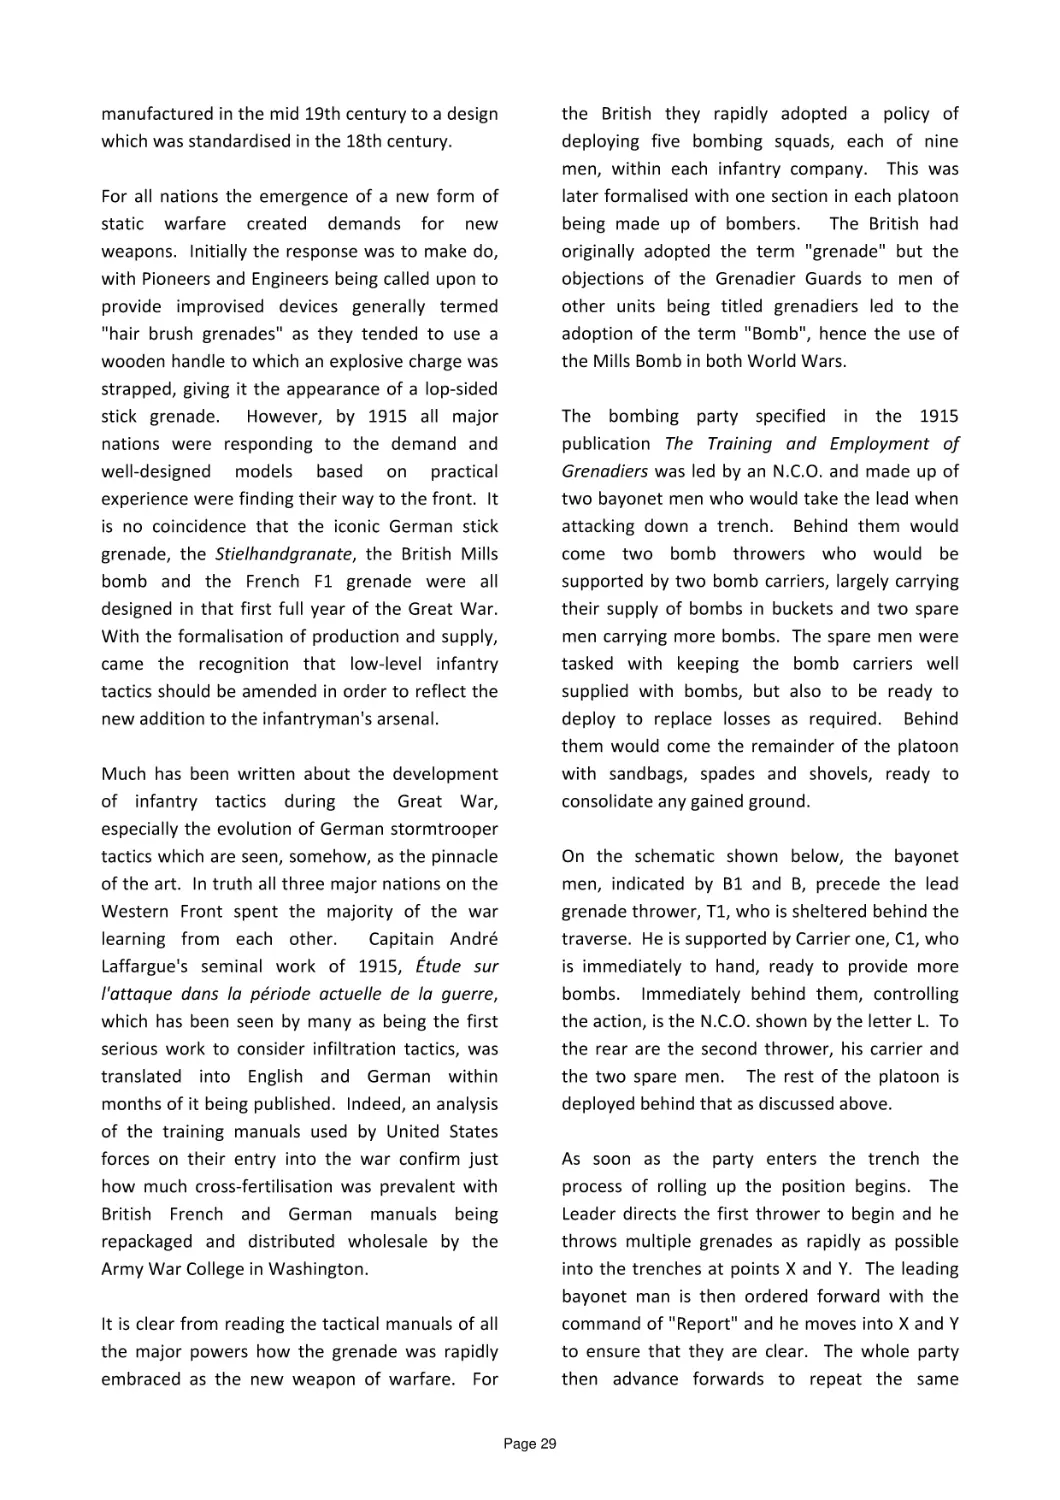
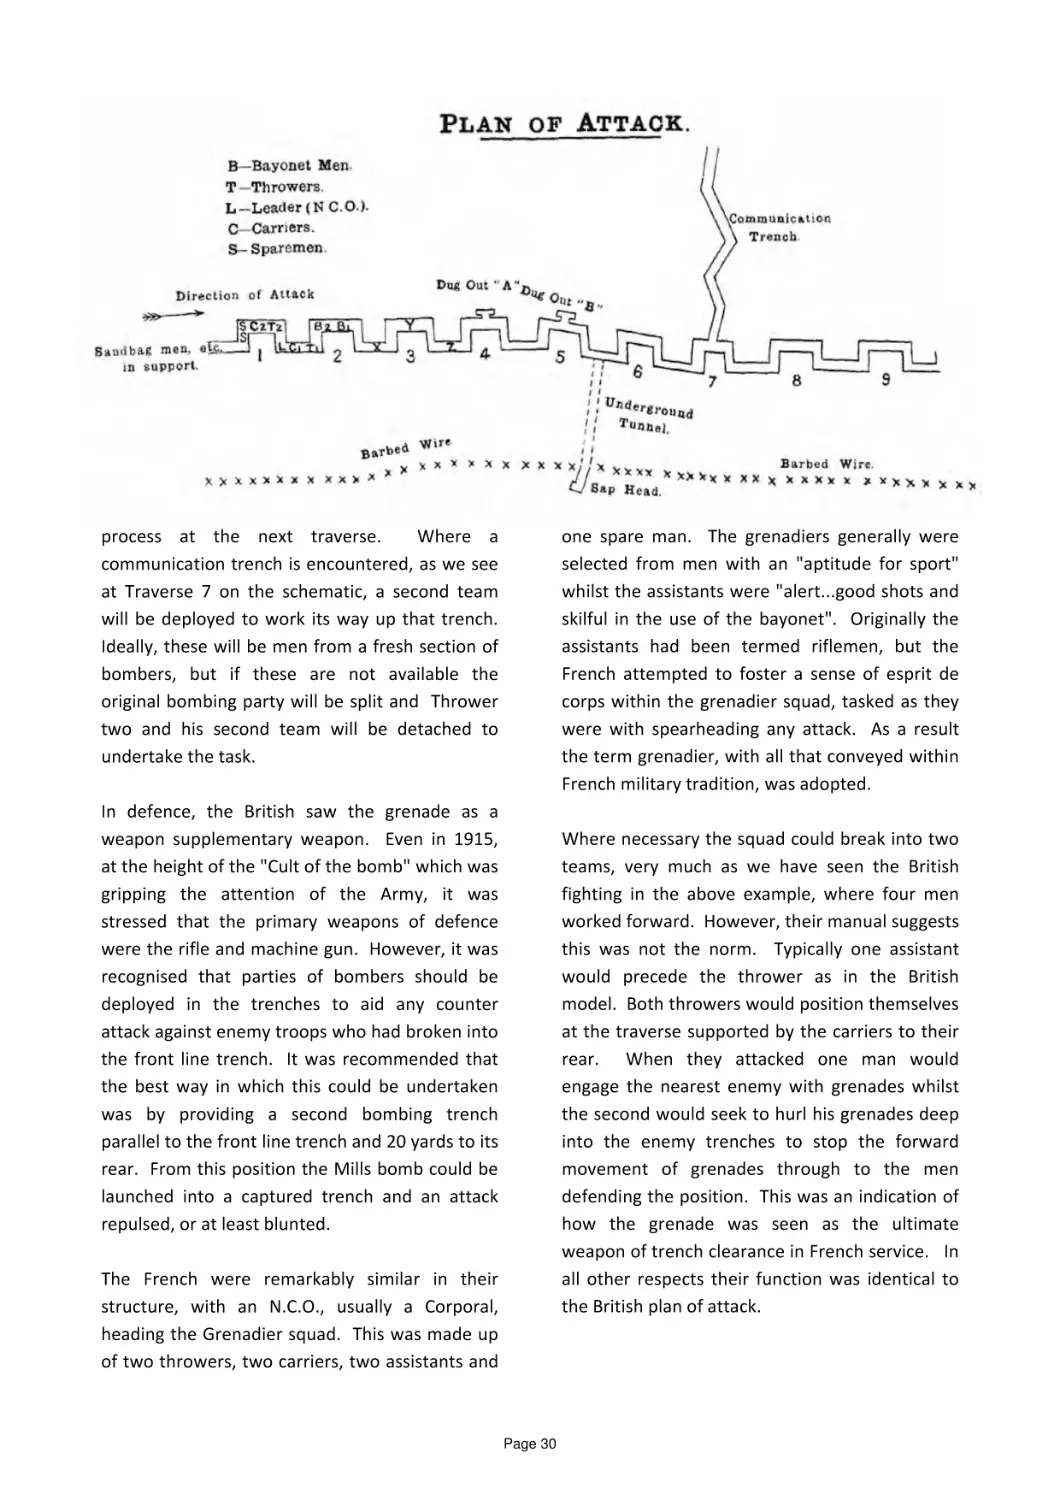
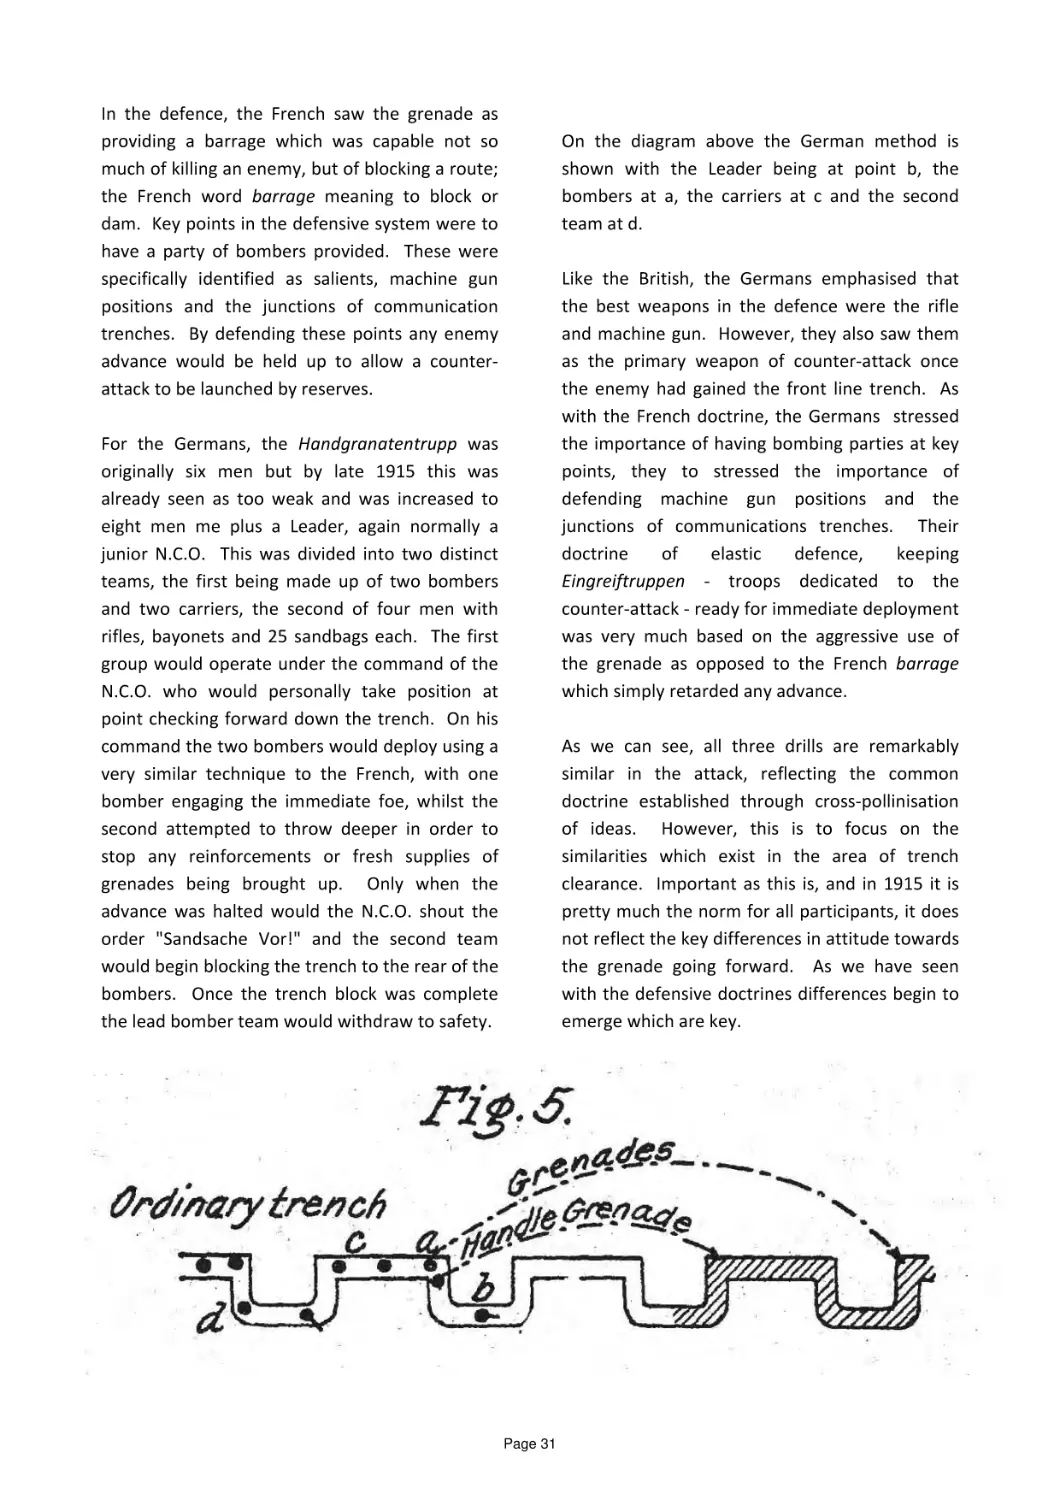
Handgranaten! The development of
hand grenade during the Great War.
An overview of the three main
doctrines and their application
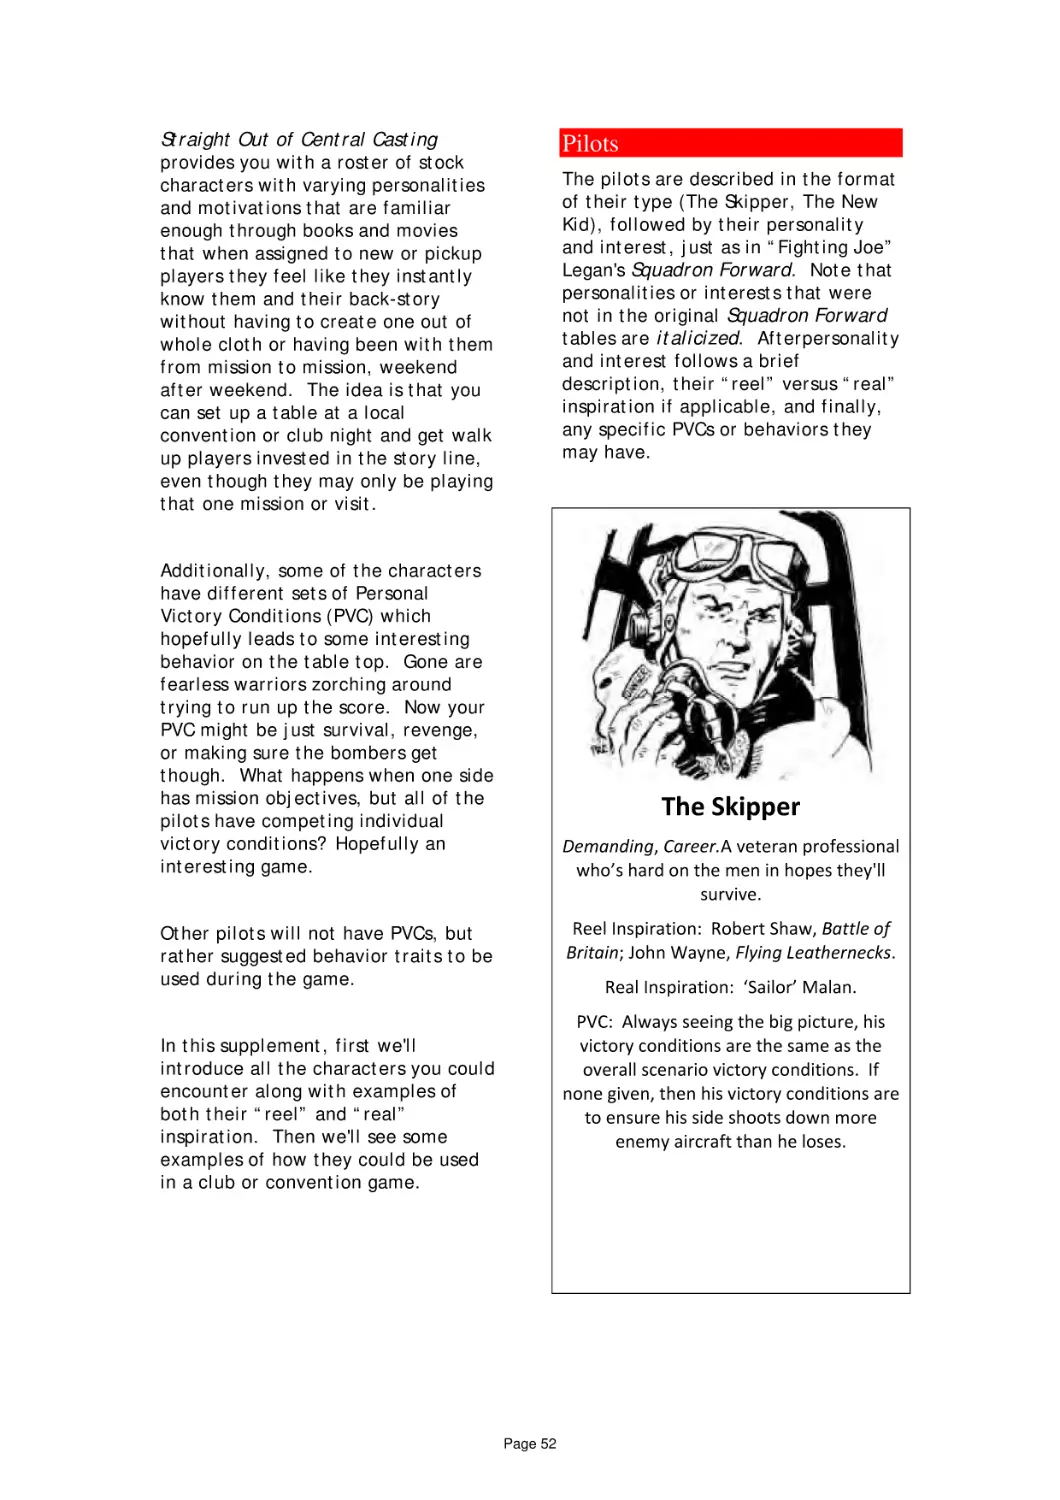
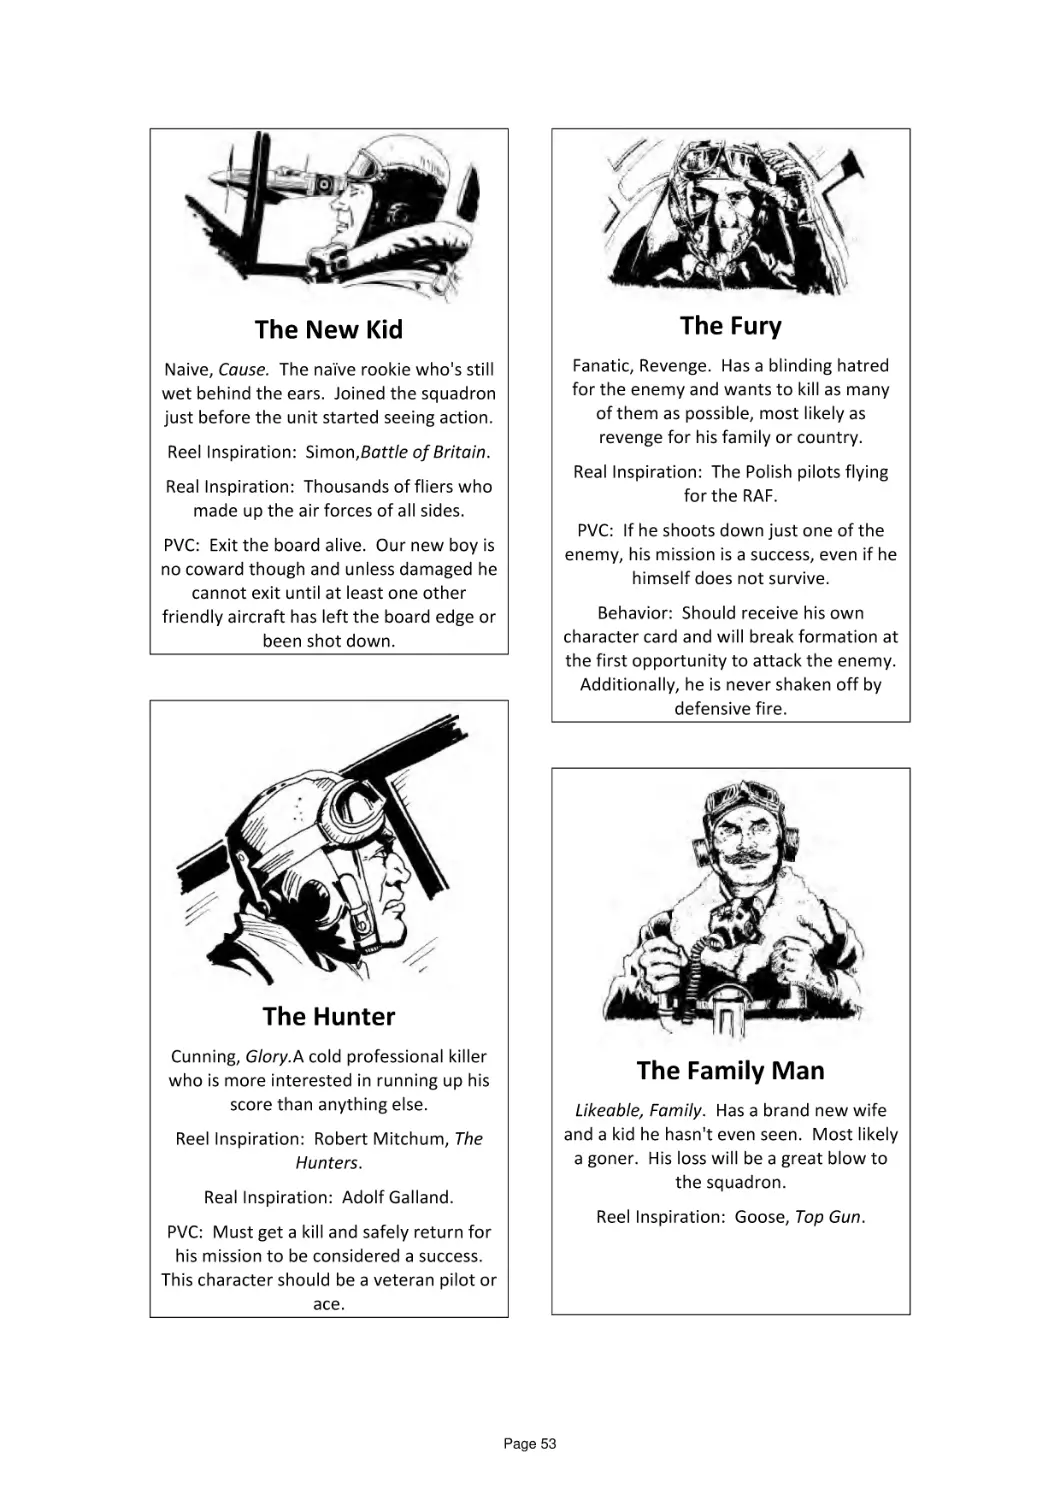
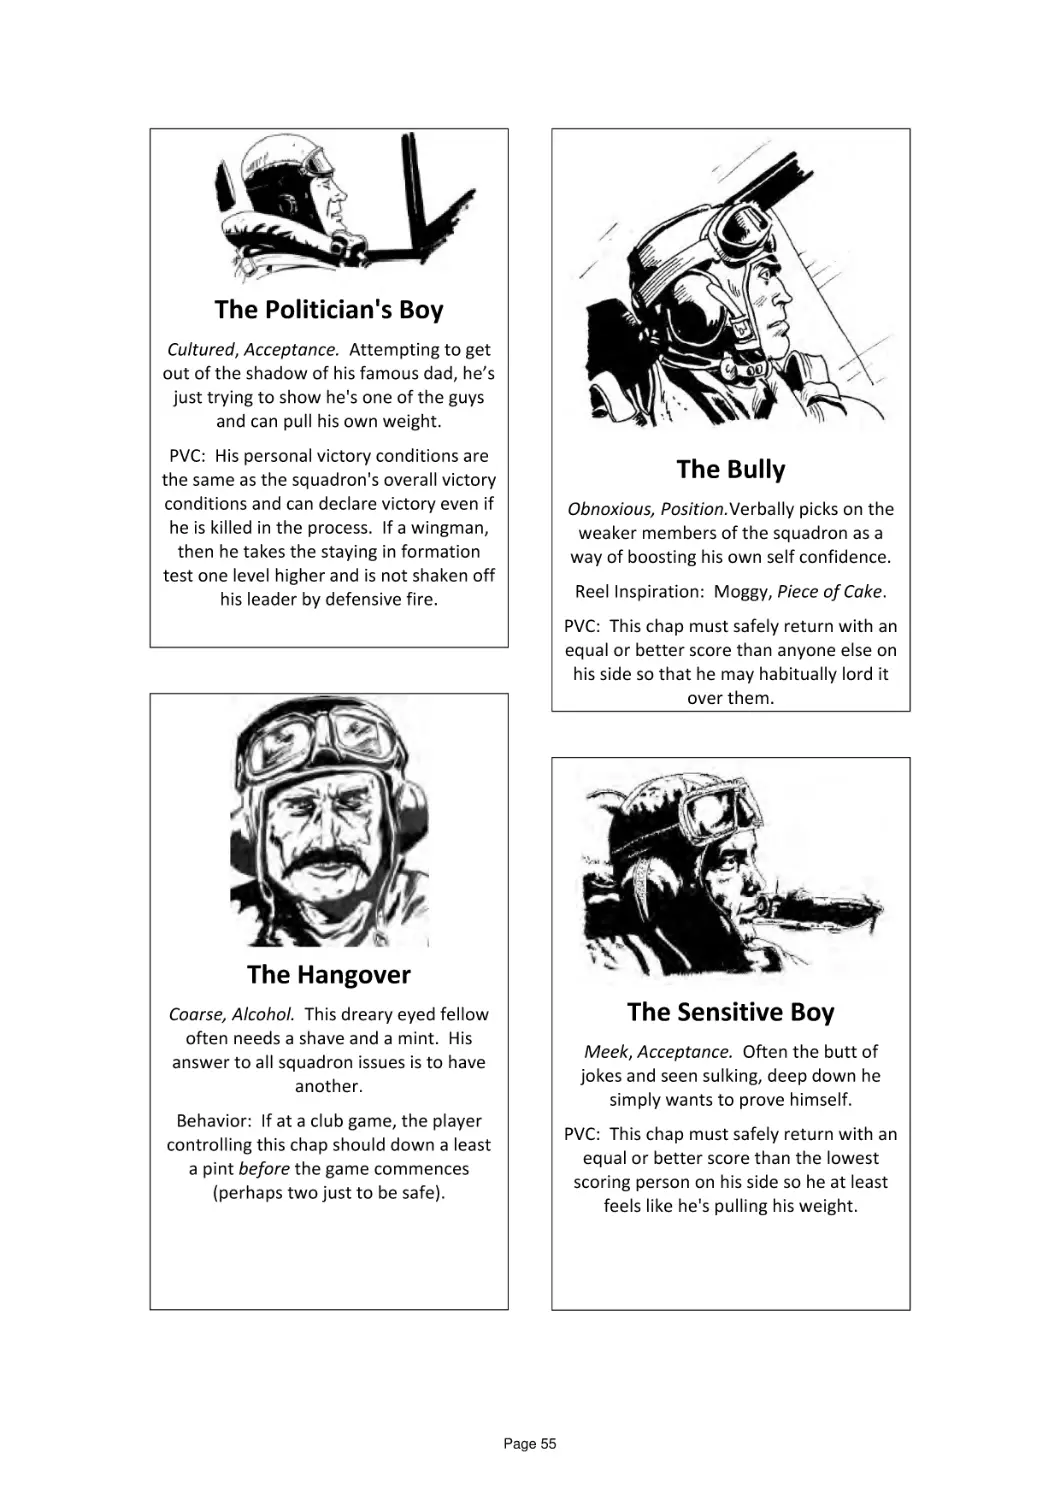
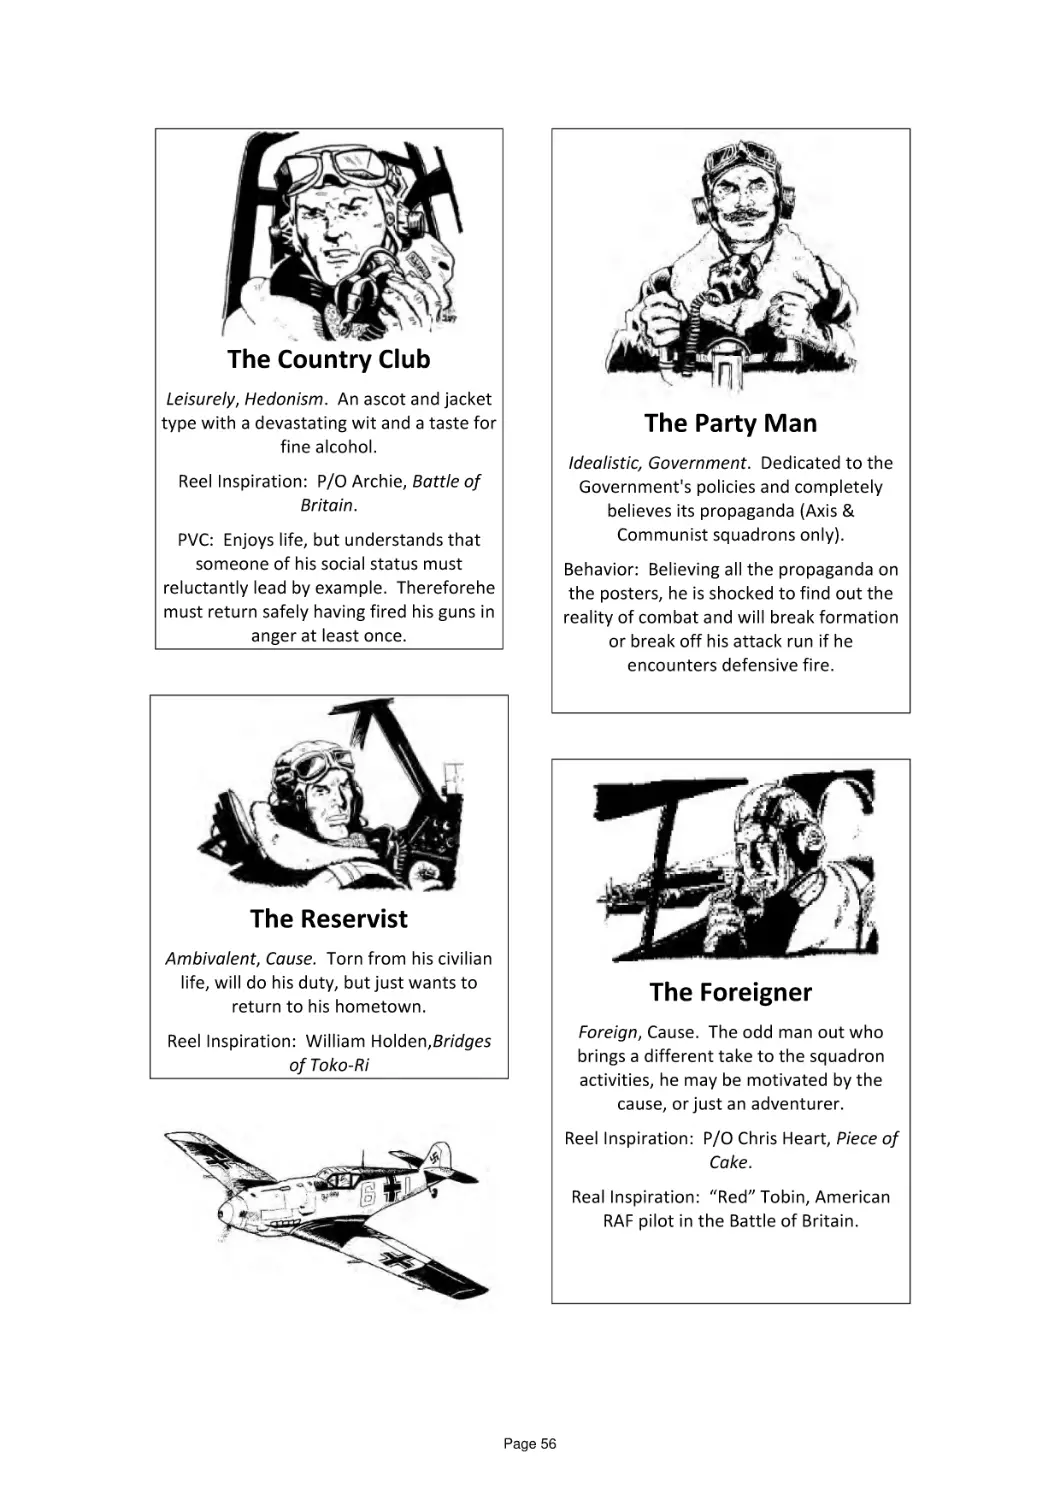
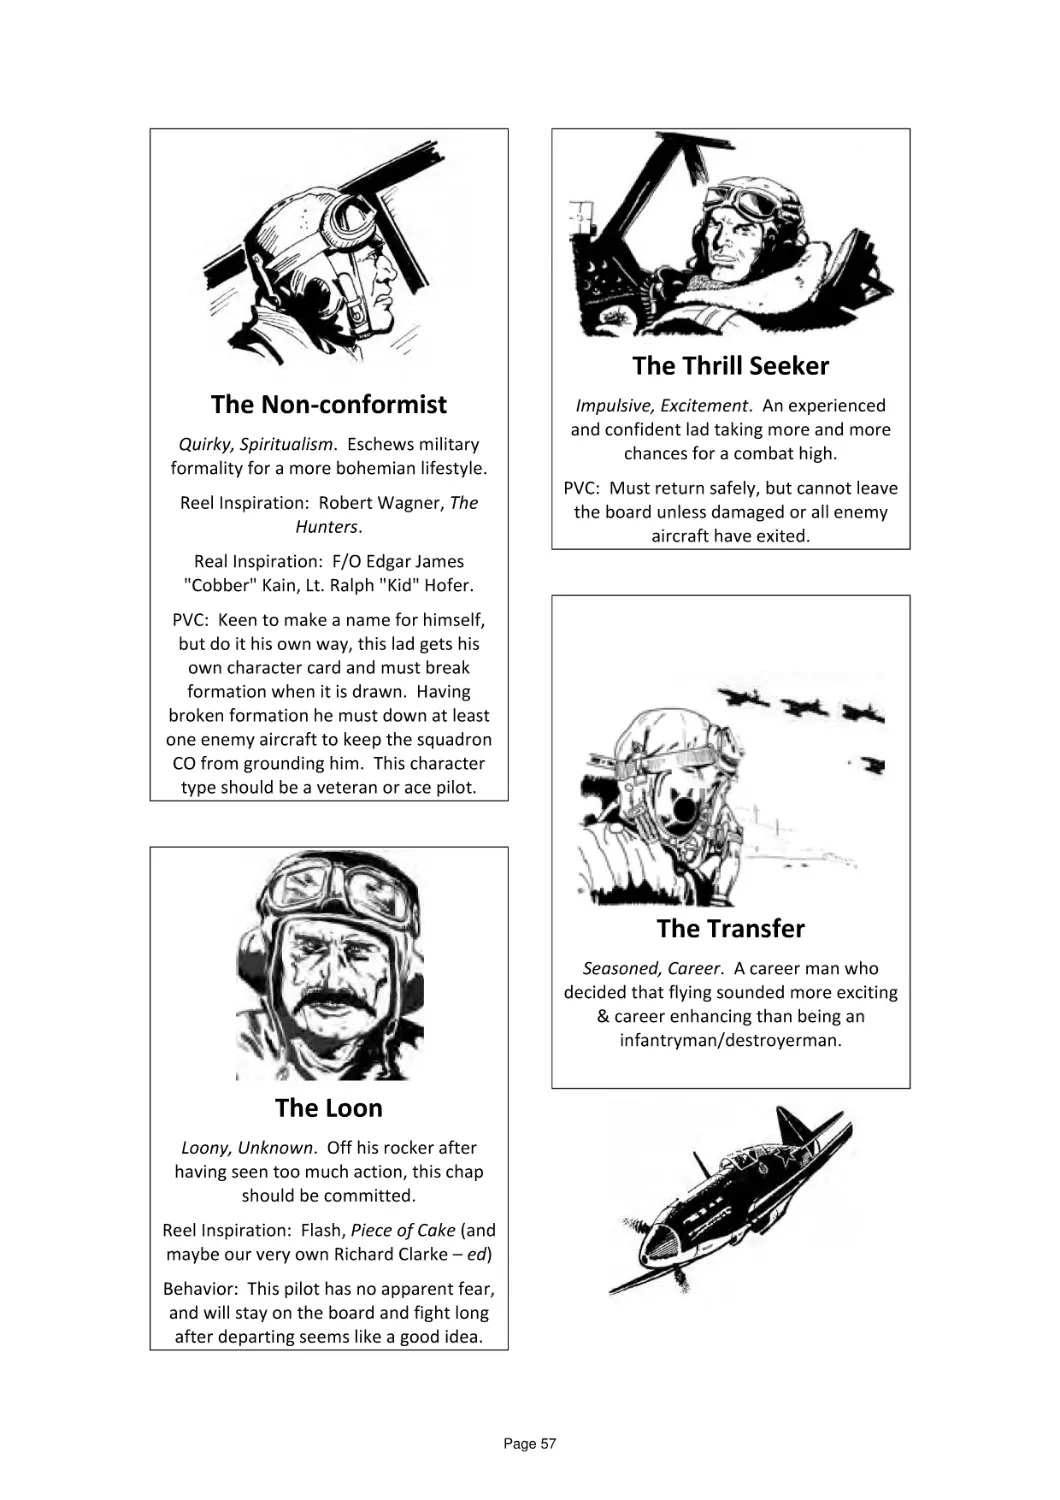
Straight out of Central Casting.
Keen to add some characters to your
Bag the Hun games? James Crate is
inspired by legend of the silver
screen as well as a few from real life
Page 2
celebrations still further we bring you the
chance to capture an Eagle as you charge
forward with the Scots Greys. This is something
a bit different which we hope you'll enjoy. Let
us know how you get on!
As always we have tried to pack the special with
scenarios and ideas to enhance your gaming
fun. We are reliant on your submissions to
make the Specials interesting and varied, so if
you fancy putting pen to paper please don't
hesitate to contact us. We are very happy to
provide any assistance you like and a set of
submission notes will soon be available on Lard
Island News.
Hello and welcome to this, the 2015 Summer
hamper full of Lard to keep you going
throughout the long, hot summer which we
hope may even turn up this year! But, whatever
the weather, we have a whole pile of meaty
goodness to hurl onto the metaphorical
barbeque that is wargaming.
As usual with all of the Specials we have tried to
include some really interesting pieces which
allow you to run whole campaigns or even begin
a new period. I have to admit to having head
turned by the new Garibaldini range from
Gringo 40's; it's a period I did a lot of research
on years ago and the arrival of this range really
got me digging out old books and buying new
ones. I had originally planned to do three
scenarios, but I got so involved I trotted out a
couple of extras, so that article not only
provides a guide to using Sharp Practice for the
1860 campaign, but also has five scenarios.
Talking of which, some of you will already have
noticed that Lard Island News looks a bit
different. We have put a major effort into
updating and modernising the site, largely
thanks to a co-operative project we have
worked on with the University of Stirling in
Scotland. They were looking for a guinea-pig to
let their students loose on, and when it comes
to web design we have all the skills of a small
rodent so were the perfect match. As a result
we have a great new look, with feeds from
Twitter, the forum and an easy to follow
"navigation interface" which means that finding
and following articles on all sorts of subjects is
so much easier. It's a huge improvement,
especially if you're looking for downloadable
support material.
We hope you enjoy the
changed look.
We have two full campaigns in this Special, an
early war venture for Chain of Command with
the Welsh Guards defending Boulogne and then
a Great War campaign for Mud & Blood (or the
Chain of Command and Mud & Blood mash-up
we presented in the last special) focussing on
the battle of Loos. With the Great War
centenaries rolling round, I am finding myself
studying the way tactics developed in real time
as we progress through the conflict. Loos was
the first action where the British deployed gas,
but it also marked the real beginning of the
modern hand-grenade and the development of
infantry tactics beyond just the rifle. We cover
that in a companion piece which looks
specifically at hand grenades and how they
were employed by the various participants.
As always, we hope you have a great summer
and we look forward to presenting a whole host
of new material before we reach Christmas.
Richard Clarke & Nick Skinner
Lard Island
Talking of anniversaries, it would be remiss of
me to not pick up on the recent events and
celebrations surrounding the 200th anniversary
of the battle of Waterloo. To extend the
Page 3
All along the coast of northern France, the British
were now looking at the ports which had seen so
many British troops arrive on the continent
during the Phoney War as potential points for
evacuation. In London Churchill was faced with
the uncomfortable political choice between
supporting France whole-heartedly or attempting
to retain a British Army in being which could
defend the South of England. In true Churchillian
fashion he vacillated.
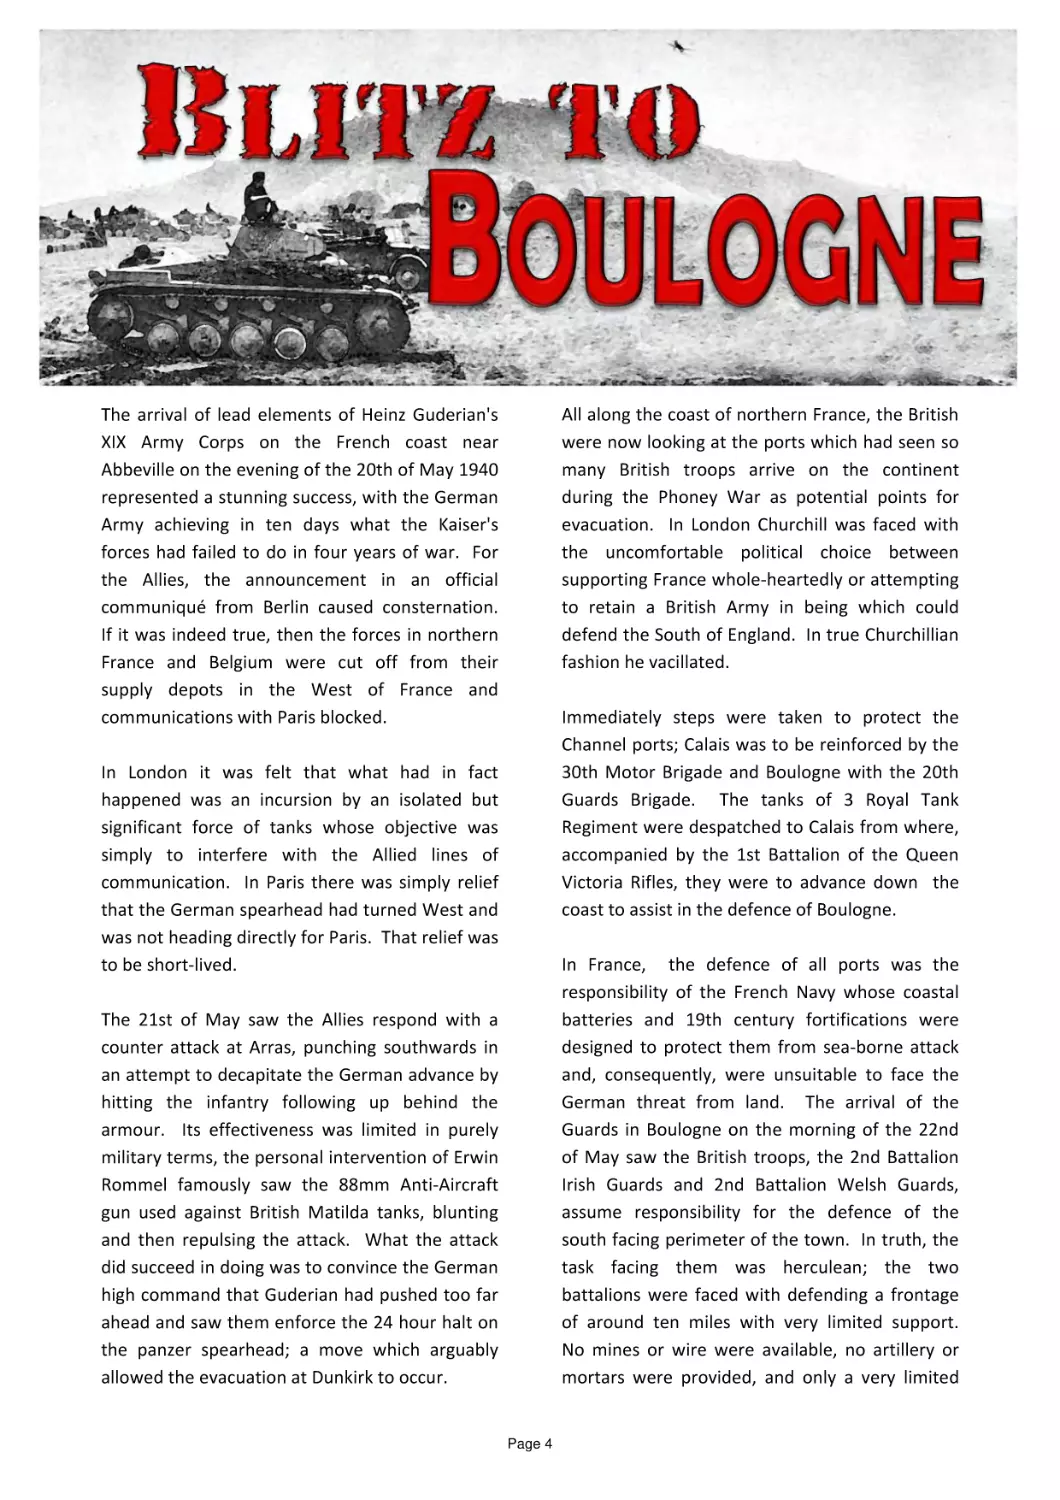
The arrival of lead elements of Heinz Guderian's
XIX Army Corps on the French coast near
Abbeville on the evening of the 20th of May 1940
represented a stunning success, with the German
Army achieving in ten days what the Kaiser's
forces had failed to do in four years of war. For
the Allies, the announcement in an official
communiqué from Berlin caused consternation.
If it was indeed true, then the forces in northern
France and Belgium were cut off from their
supply depots in the West of France and
communications with Paris blocked.
Immediately steps were taken to protect the
Channel ports; Calais was to be reinforced by the
30th Motor Brigade and Boulogne with the 20th
Guards Brigade. The tanks of 3 Royal Tank
Regiment were despatched to Calais from where,
accompanied by the 1st Battalion of the Queen
Victoria Rifles, they were to advance down the
coast to assist in the defence of Boulogne.
In London it was felt that what had in fact
happened was an incursion by an isolated but
significant force of tanks whose objective was
simply to interfere with the Allied lines of
communication. In Paris there was simply relief
that the German spearhead had turned West and
was not heading directly for Paris. That relief was
to be short-lived.
In France, the defence of all ports was the
responsibility of the French Navy whose coastal
batteries and 19th century fortifications were
designed to protect them from sea-borne attack
and, consequently, were unsuitable to face the
German threat from land. The arrival of the
Guards in Boulogne on the morning of the 22nd
of May saw the British troops, the 2nd Battalion
Irish Guards and 2nd Battalion Welsh Guards,
assume responsibility for the defence of the
south facing perimeter of the town. In truth, the
task facing them was herculean; the two
battalions were faced with defending a frontage
of around ten miles with very limited support.
No mines or wire were available, no artillery or
mortars were provided, and only a very limited
The 21st of May saw the Allies respond with a
counter attack at Arras, punching southwards in
an attempt to decapitate the German advance by
hitting the infantry following up behind the
armour. Its effectiveness was limited in purely
military terms, the personal intervention of Erwin
Rommel famously saw the 88mm Anti-Aircraft
gun used against British Matilda tanks, blunting
and then repulsing the attack. What the attack
did succeed in doing was to convince the German
high command that Guderian had pushed too far
ahead and saw them enforce the 24 hour halt on
the panzer spearhead; a move which arguably
allowed the evacuation at Dunkirk to occur.
Page 4
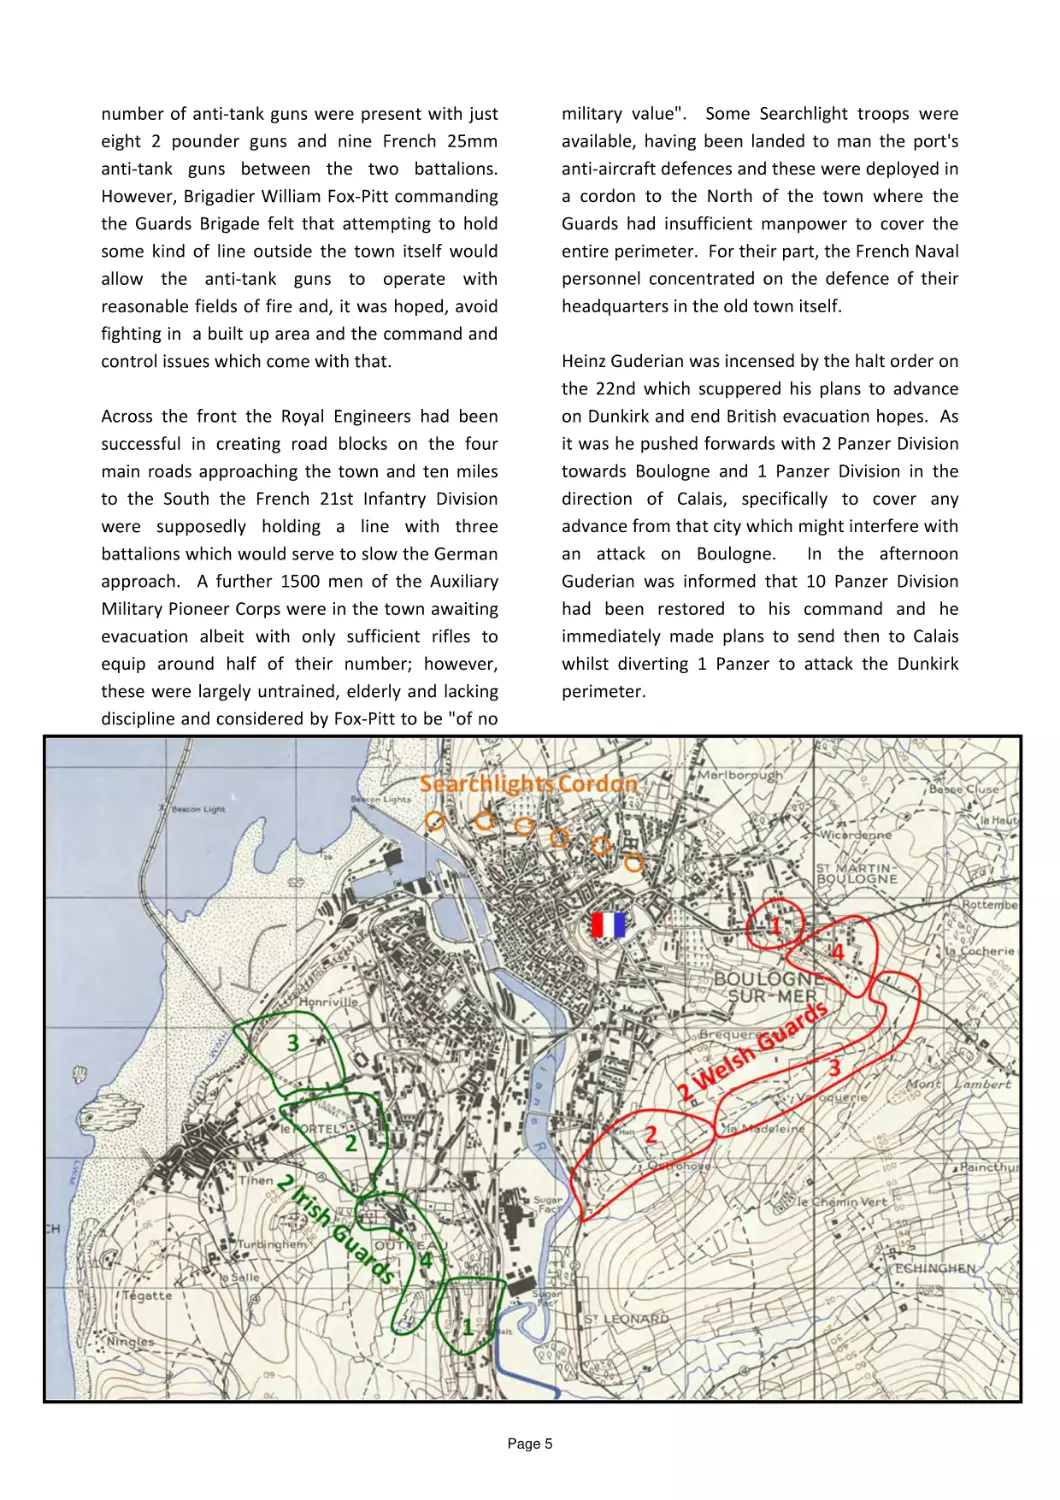
military value". Some Searchlight troops were
available, having been landed to man the port's
anti-aircraft defences and these were deployed in
a cordon to the North of the town where the
Guards had insufficient manpower to cover the
entire perimeter. For their part, the French Naval
personnel concentrated on the defence of their
headquarters in the old town itself.
number of anti-tank guns were present with just
eight 2 pounder guns and nine French 25mm
anti-tank guns between the two battalions.
However, Brigadier William Fox-Pitt commanding
the Guards Brigade felt that attempting to hold
some kind of line outside the town itself would
allow the anti-tank guns to operate with
reasonable fields of fire and, it was hoped, avoid
fighting in a built up area and the command and
control issues which come with that.
Heinz Guderian was incensed by the halt order on
the 22nd which scuppered his plans to advance
on Dunkirk and end British evacuation hopes. As
it was he pushed forwards with 2 Panzer Division
towards Boulogne and 1 Panzer Division in the
direction of Calais, specifically to cover any
advance from that city which might interfere with
an attack on Boulogne.
In the afternoon
Guderian was informed that 10 Panzer Division
had been restored to his command and he
immediately made plans to send then to Calais
whilst diverting 1 Panzer to attack the Dunkirk
perimeter.
Across the front the Royal Engineers had been
successful in creating road blocks on the four
main roads approaching the town and ten miles
to the South the French 21st Infantry Division
were supposedly holding a line with three
battalions which would serve to slow the German
approach. A further 1500 men of the Auxiliary
Military Pioneer Corps were in the town awaiting
evacuation albeit with only sufficient rifles to
equip around half of their number; however,
these were largely untrained, elderly and lacking
discipline and considered by Fox-Pitt to be "of no
Page 5
Dawn of the 23rd of May saw the Irish and Welsh
Guards stood to waiting for the German
onslaught. In fact it failed to materialise until
0730 when the Germans began to push against
the Irish Guards 1 Company. Captain McCausland
had lost one of his platoons the night before, but
strong resistance held off the Germans and saw
them shift their main attack onto 4 Company's
frontage, in particular an outlying platoon
position by a small reservoir to the South of
Outreau.
Here Lt. Reynolds' platoon was
surrounded and isolated along with a section of
the carrier platoon.
Despite attempts to
withdraw them at 0845 the platoon was lost
when tanks surrounded their position.
Generalleutnant Rudolf Veiel commanding 2
Panzer, split his force into two columns to attack
Boulogne.
The first, commanded by
Generalmajor von Prittwitz was to advance via
Etaples and attack the town from the South. The
second, under Oberst von Vaerst was tio move up
the N1 from Montreuil to Samur and Baincthun
from where it was to swing round to try to
encircle the town from the East.
The first column encountered the first defenders
on the 22nd of May when they ran into elements
of the French 48th Infantry Regiment at Nesles,
12 miles to the South of the port. The three
French battalions meant to be forming a
defensive line here were still largely entrained
and were routed by German armour. However, a
small headquarters element fought bravely and
delayed the German advance for two hours
before their position was outflanked and bypassed. Driving North they reached the outskirts
of the port as light was fading and began to probe
against the Irish Guards who held the perimeter
to the West of the La Liane River.
With the net tightening the Irish Guards were
obliged to withdraw towards the town itself,
shrinking their perimeter as they went. With
British and French destroyers lying off the coast
and firing in support of the action, the flat, open
ground to the South was a dangerous route and
the majority of the fighting here was German
efforts to penetrate up the riverside road
towards the harbour. Again the much weakened
1 Company under Captain McCausland held them
at bay for much of the morning.
The Irish Guards has just seven anti-tank guns
across their whole battalion frontage, four 2
pounders and three French 25mm weapons. On
the extreme left of their position the 1st
Company had just two 25mm pieces and the
Germans made strenuous attempts to push
forward to identify these by pushing single tanks
forward whilst covering the advance with a
second tank further back and observing. It was a
deadly tactic, the lead tank being destroyed, but
it worked. With the British positions identified
the Germans called for artillery support and
began battering the position/
German
motorcycle troops were then pushed forward to
engage the defenders and these pushed up the
road by the railway line which led to the sugar
factory. Several attempted were made up until
10pm when the most southerly Guards platoon
was isolated and almost destroy and the two
anti-tank guns were destroyed in an assault
launched with a shower of hand-grenades.
To the East the Welsh Guards had enjoyed a
relatively peaceful day on the 22nd, deploying
into their allocated Company positions and
brining their anti-tank guns from the docks in
lorries before man-handling them into the line. A
lack of transport meant that relocating these
guns would prove impossible in the ensuing fight,
so positions had to be chosen in order to achieve
the best results on the perimeter.
As the day wore on, the Welsh Guards only made
first contact with the enemy at around 2000
when, as in the Irish Guards sector, the Germans
pushed small number of tanks forward to try to
identify the anti-tank positions in the defences
before withdrawing. During the night patrols
were sent out but no enemy presence was
identified, although firing from the South of Mont
Page 6
At around 1800 a warning order was issued
informing the battalion that Boulogne was to be
evacuated. Again the Welsh begin falling back
towards the quay. Now German tanks were
pushing forward, aware that the only defences
that they would be faced with was anti-tank
rifles, the British anti-tank guns having been
abandoned on the original perimeter. Artillery
was ranged in on the harbour and one destroyer
was set on fire but managed to exit the harbour
under fire. Resistance continued until 2300 when
HMS Windsor evacuated the main body of Welsh
Guards, part of 4 Company was lost when it was
isolated and pinned down by German armour.
The last of the Irish Guards had been evacuated
at around 21.30. Of the 1500 men who landed
on the 22nd of May over 600 were listed as
casualties. Politically the decision to abandon
Boulogne was a strain on Anglo-French relations.
In the old town the French Naval forces held the
citadel for a further 24 hours, the Germans being
obliged to breach the mediaeval walls and storm
the area.
Indeed, it was the political
ramifications of this withdrawal which
condemned 30 Brigade at Calais to have to fight
to the last, a second such evacuation being
politically impossible.
Lambert was proof that German artillery was
deployed there.
At 0730 German tanks attacked 3 Company from
Mont Lambert but were repulsed by effective
anti-tank fire. A second attack was launched at
0900 with tanks and infantry supported by
artillery and mortars against 2 and 3 Companies.
This was again held until 1100 when ever more
accurate artillery fire made the 2 Company's
position difficult, especially as ammunition was
running short. Both companies fell back to the
light railway line to their rear and took up
positions around Breqerecque where they were
reinforced with a party of around sixty A.M.P.C.
men. It was here that the battalion received
fresh orders to withdraw into the town itself to
block any German advances from the East where
the Germans had outflanked 3 Company and
were engaging 4 Company.
Withdrawing into the town the Welsh Guards
established road blocks and prepared to fight it
out. As was so often the case in 1940 there was
serious concern about Fifth Columnists and
reports of snipers engaging the troops from
within the town abounded. Indeed the search for
these was still on-going when an aerial
bombardment by the Luftwaffe hit the town at
1730 although the Welsh Guards were not
affected as the Germans were focussing their
efforts on the quay where British destroyers were
evacuating men and Royal Navy demolition
parties were at work destroying the harbour
facilities.
Wargaming Boulogne 1940
There are numerous actions which could be
selected by the gamer wishing to game Boulogne;
the defence of Outreau by 1 Company, Irish
Guards being one great option for a short
campaign or two or three games, with increasing
German assets being applied to lever them out.
However, my preference is to look at the Welsh
Guards as this provides some varied terrain and
an opportunity to create a fighting withdrawal
from the perimeter all the way to the quayside.
By now the Irish Guards had withdrawn to a final
defensive cordon around the Bassin Napoleon
but German pressure in this sector was limited,
having withdrawn to allow the Luftwaffe a free
hand. In the East of the town the Welsh Guards
were systematically holding points of resistance
for as long as possible before falling back to the
next viable position, thus retarding the German
advance.
Defending Boulogne
The following campaign has been designed to run
with At the Sharp End, the campaign supplement
for Chain of Command. As such, not all of the
campaign rules are duplicated here. Rather all of
Page 7
the rules within At the Sharp End are applied
unless otherwise stated here.
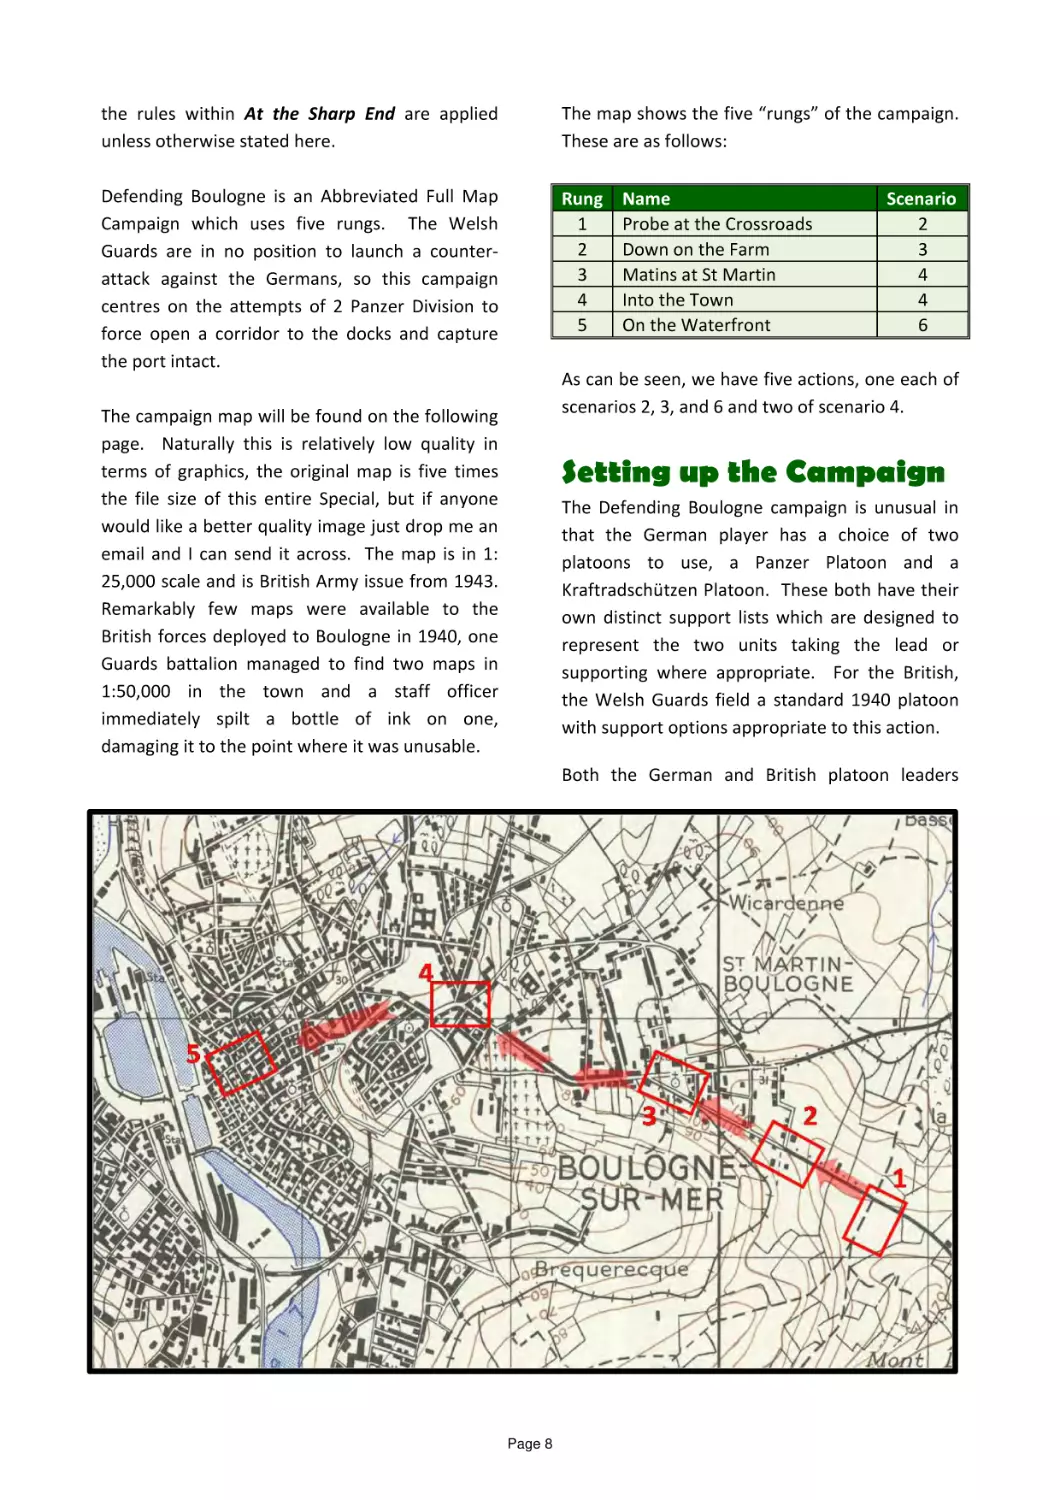
The map shows the five “rungs” of the campaign.
These are as follows:
Defending Boulogne is an Abbreviated Full Map
Campaign which uses five rungs. The Welsh
Guards are in no position to launch a counterattack against the Germans, so this campaign
centres on the attempts of 2 Panzer Division to
force open a corridor to the docks and capture
the port intact.
Rung
1
2
3
4
5
Name
Probe at the Crossroads
Down on the Farm
Matins at St Martin
Into the Town
On the Waterfront
Scenario
2
3
4
4
6
As can be seen, we have five actions, one each of
scenarios 2, 3, and 6 and two of scenario 4.
The campaign map will be found on the following
page. Naturally this is relatively low quality in
terms of graphics, the original map is five times
the file size of this entire Special, but if anyone
would like a better quality image just drop me an
email and I can send it across. The map is in 1:
25,000 scale and is British Army issue from 1943.
Remarkably few maps were available to the
British forces deployed to Boulogne in 1940, one
Guards battalion managed to find two maps in
1:50,000 in the town and a staff officer
immediately spilt a bottle of ink on one,
damaging it to the point where it was unusable.
Setting up the Campaign
The Defending Boulogne campaign is unusual in
that the German player has a choice of two
platoons to use, a Panzer Platoon and a
Kraftradschützen Platoon. These both have their
own distinct support lists which are designed to
represent the two units taking the lead or
supporting where appropriate. For the British,
the Welsh Guards field a standard 1940 platoon
with support options appropriate to this action.
Both the German and British platoon leaders
Page 8
platoons), they may field all of their men in one
ad hoc platoon. However, they may not field
more than three Bren guns in the core force,
although more may be selected from the support
options.
should be experienced men who have been with
their platoons for some time. In truth the Welsh
Guards were a relatively new formation, the 2nd
Battalion never newly raised for the war and
having never been in action previously. However,
they had trained intensely and were led largely
by experienced officers drawn from other
battalions.
Certainly their performance at
Boulogne reflects a rating of Regular.
The Germans have two armoured platoons and
two Kraftradschützen platoons available for the
campaign. Any additional troops will have to be
selected from the support lists.
For their outlook at the start of the campaign, the
German commander should roll a D6 and add 1,
whereas the Welsh Guards commander will just
roll a D6. The CO and men’s opinion for both
sides begins at zero.
On the German side, the emphasis must be on
keeping their force strong enough to keep
pushing forward in a series of "leap-frog" actions.
Only one platoon may be committed to attack in
each campaign turn. No platoon may attack in
consecutive turns.
Replacements & Reinforcements
Both sides may call for replacements and
reinforcements during the campaign; however,
how this occurs differs. For the Welsh Guards,
two platoons are available for the duration of the
campaign. The emphasis must be on keeping
their force strong enough to keep defending in
depth, falling back where necessary in order to
keep their force intact. Only one platoon may be
committed to action in each campaign turn. No
platoon may attack in consecutive turns;
however, a platoon may defend in any number of
consecutive turns.
At the outset of the campaign, the 1st panzer
platoon must attack in Game One. After this the
player may select either a panzer or motorcycle
infantry platoon for the subsequent games. This
continues through the campaign with the player
choosing which of his platoons attacks in each
campaign turn.
The German player receives no reinforcements or
replacements during the campaign. He may elect
to amalgamate two platoons of the same type
(panzer or Kraftradschützen) at the end of any
game in the campaign.
However, this
amalgamated unit may never be larger or better
equipped than a full-strength platoon as listed in
the Army List, nor may an amalgamated platoon
attack in a campaign turn if any element of it was
committed to the attack in the previous turn.
At the outset of the campaign, the 1st platoon will
defend in Game One. If the British player wins
that game he may hold his ground with the same
platoon or may withdraw, abandoning the
position, in which case the 2nd platoon will defend
in the next scenario. This continues through the
campaign with the player choosing whether to
hold his ground or fall back through the platoon
which is preparing the next position to his rear.
After two platoons are amalgamated, any "spare"
men over and above a full strength platoon may
be kept at Company HQ to be used as
replacements in subsequent turns.
The Welsh Guards are also allowed to call for
Replacements once during the campaign. They
may only do so once they reach Scenario Five to
reflect the men from the Regimental Aid Post
joining in the last-ditch defence. If the Welsh
Guards have less than thirty men left in total at
that stage (combining the strength of both
INITIATIVE
The campaign will begin with the German player
holding the initiative and attacking in Scenario
One. After that, who holds the initiative at the
beginning of each campaign turn will depend on
the result of the previous game.
Page 9
and that a Rifle Corps battalion will strengthen
your defences. When they arrive this should be a
rather fairer fight!
At any point in the campaign where they hold the
initiative, the British may not launch a counterattack. However, they may strengthen their
defences as covered in At the Sharp End. For
each campaign turn where the British begin
holding the initiative, they may add one Teamsized entrenchments OR one additional point of
support for all subsequent games.
This
represents the British being able to improve their
defences if they delay the German thrust.
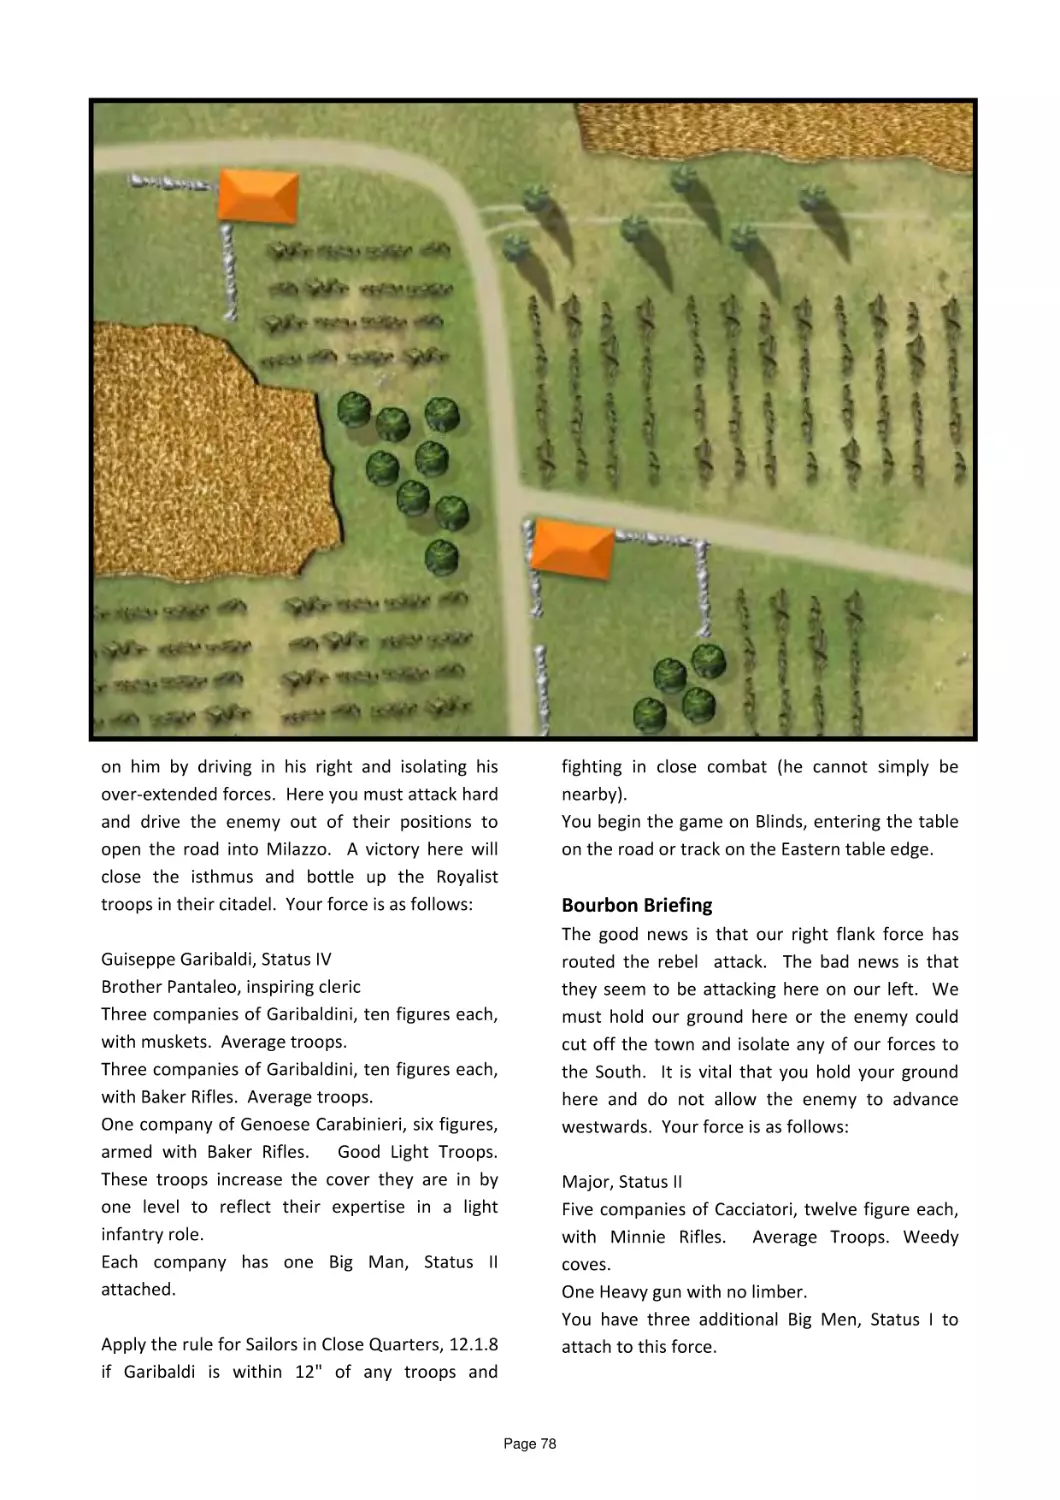
Your force is as follows:
Command Dice: 5
Quality: Regular
PLATOON HEADQUARTERS
Lieutenant, Senior Leader, with pistol
Sergeant, Senior Leader, with rifle
2” MORTAR TEAM
2” mortar with two crew
BOYS AT RIFLE TEAM
Boys AT rifle with two crew
THE ARMY LISTS & BRIEFINGS
The following briefings may be handed to the
British and German players, along with the lists
are used for the forces in this campaign. They are
based on standard organisational structures for
the period, but with support options specific to
this campaign and based on what equipment was
known to be in the area at the time as well as
preferences within that formation.
SECTIONS ONE TO THREE
Corporal, Junior Leader, with rifle
LMG TEAM
RIFLE TEAM
Bren gun with three Four riflemen
crew
It is not entirely necessary to roll for your
characters for each scenario as we are not
following the same platoon throughout the
campaign. However, we recommend at least
rolling up the details for the Senior Leaders for
each game as this does allow the gamer to inject
some humanity to the proceedings.
BRITISH SUPPORT LIST
LIST ONE
Medical Orderly
Stiffen the Ranks of one section
Adjutant
Car, no crew
Entrenchments for one Team
BRITISH BRIEFING
You have just arrived in Boulogne and marched
out to the edge of the town to take up defensive
positions there. It's been a long, hard day getting
everything into position and digging in.
Unfortunately you have neither wire nor mines to
strengthen your position, but your men are in
good spirits and ready to face the Boche.
LIST TWO
Roadblock
Boys AT rifle Team, 2 men
2” mortar Team, 2 men
“1 pounder” 25mm anti-tank gun with five
crew and Junior Leader
One A.M.P.C. Section with Junior Leader
LIST THREE
Sniper Team
2 pounder Anti-Tank gun with five crew and
Junior Leader
Your orders are to hold Boulogne, but you have
insufficient men to really defend such a large
area. What is more, a lack of motor transport
means that if you are pushed back from your
current positions you will have to abandon your
anti-tank guns. You have been told that a British
Armoured force will be joining you tomorrow
from Calais where it is currently disembarking
LIST FOUR
Regular Infantry Section with Junior Leader
Belgian anti-tank gun with four crew
Forward Observer and 3” mortar section
Page 10
The support list options listed are the same as
those in the main Chain of Command rule book,
with the same specific rules applying. However,
the options listed in blue have some limitations
as outlined below. Some options are unique to
this campaign and are also covered in detail here.
perimeter. This gun has a crew of four men and
no Junior Leader. It activates on a Command Dice
roll of 1. It may not be commanded or rallied by
any British Leaders. This option may only be
selected once in the campaign and only in
Scenario 1.
Stiffen the Ranks
With so much of their kit left behind in England,
the Guards had many spare men with which they
could stiffen the ranks of the rifle sections. This
option adds two men to a single section.
Anti-Tank Guns
The British deployed all of their anti-tank guns on
the external perimeter. To reflect this, no antitank gun may be selected from Scenario Three
onwards.
Car
The British used a number of French civilian
vehicles in Boulogne. One of these may be
pressed into service to carry one Team.
Roadblock
Most of the roadblocks used around Boulogne
itself were improvised, being either piled up
furniture or disabled vehicles. These may be
cleared by any German Panzer pushing against
them and moving through them at the rate of
1D6 per turn during which time the AFV may not
fire or undertake any other actions. Infantry may
cross a roadblock by treating it as a major
obstacle
GERMAN BRIEFING
You have crossed all of France in the past ten
days! It seems that the enemy are unable to
stand before our Panzers and now you are racing
towards the Channel Ports to crush the arrogant
English who are falling back to the coast. If they
escape behind the "wooden walls" of the Royal
Navy they will always remain as a threat to peace
in Europe. You cannot allow them to escape.
A.M.P.C. Section
Whilst considered by Fox-Pitt to be of no military
value, a number of A.M.P.C. men did fight well at
Boulogne when deployed with the Welsh Guards.
This is a eight man rifle armed single Team, one
of which is a Junior Leader with an Initiative of 1.
These men are treated as Green troops.
Before you lies Boulogne. If you can capture the
port you will deny your enemy the escape route
he will so badly need.
However, Luftwaffe
reconnaissance planes report that the enemy are
landing troops even now. If you delay for even
an hour the enemy will get stronger and the
reality is that your panzers are weak through
losses caused simply by break downs. You must
push on with all speed to seize the port and trap
the English!
3" Mortar Section
With just two weapons, the barrage from the
mortar section covers an area 8" square. This
option may only be selected once in the
campaign and then only in Scenarios 1, 2 or 3.
Belgian Anti Tank Gun
A number of Belgian units were four to have
withdrawn on Boulogne. One anti-tank gun with
its crew joined the Welsh Guards defences on the
Your force is as follows:
Page 11
Panzer Platoon
Kraftradschützen Platoon
The first German platoon option is the Panzer
Platoon made up of light Mark II tanks.
The second German platoon option is the
motorcycle rifle platoon.
Command Dice: 5
Quality: Regular
Command Dice: 5
Quality: Regular
KRAFTRADSCHUTZEN PLATOON HQ
Leutnant, Senior Leader, with pistol
Driver with carbine
One heavy motorcycle
5CM MORTAR TEAM
Junior Leader with carbine
One 5cm light mortar team with two crew
Two drivers with carbine
Two heavy motorcycles with sidecar
PANZER PLATOON HEADQUARTERS
Lieutenant, Senior Leader, with pistol
Panzer IIC
PANZER TRUPP
Four Panzer IIC with one Junior Leader each
GERMAN PANZER SUPPORT LIST
LIST ONE
GRUPPE ONE TO THREE
Medical Orderly
Adjutant
Kubelwagen, no crew or weapon
Obergefreiter, Junior Leader, with MP40
LIST TWO
Le.GrW36 5cm mortar Team, 3 men
Pre-Game Barrage
LIST THREE
Sniper Team
Panzer IB with Junior Leader
Kraftradschützen LMG Team
LIST FOUR
LMG TEAM
LMG TEAM
MG34
Four crew
Two drivers with
carbines
Two heavy
motorcycles with
sidecar
MG34
Three crew
Two drivers with
carbines
Two heavy
motorcycles with
sidecar
KRAFTRADSCHUTZEN SUPPORT LIST
LIST ONE
Forward Observer and 8cm mortar battery
Panzerjäger I with Junior Leader
Kleine Befehlspanzer I with Senior Leader
Medical Orderly
Adjutant
LIST FIVE
LIST TWO
Le.GrW36 5cm mortar Team, 3 men
Pre-Game Barrage
Panzer II H of J with Junior Leader
Pz.IV C with Junior Leader
Kraftradschützen Gruppe
LIST THREE
LIST SEVEN
Panzer IB with Junior Leader
KraftradSchützen LMG Team
sIG33 15cm with five crew and a Junior
Leader
LIST FOUR
Forward Observer and 8cm mortar battery
The support list options listed are the same as
those in the main Chain of Command rule book,
with the same specific rules applying.
Pz.II A-C with Junior Leader
Panzerjäger I with Junior Leader
LIST FIVE
Panzer II H of J with Junior Leader
Pz.IV C with Junior Leader
The Panzers morale is covered by Section 14.8 in
the main rules.
LIST SEVEN
sIG33 15cm with five crew and a Junior
Leader
Page 12
The terrain here is shown as flat, although it
actually slopes down from the German edge,
marked in red, towards the Welsh Guards
positions. A circular mound topped by a cross is
by the crossroads, but otherwise the terrain here
is unremarkable. The Germans are seeking to
probe the British defences and destroy any antitank guns before by-passing the remaining
defenders and pushing into Boulogne.
The support list options listed are the same as
those in the main Chain of Command rule book,
with the same specific rules applying. The
Kradschützen may elect to leave their
motorcycles off table and fight on foot if they
desire.
Kraftradschützen LMG Team
The LMG team is a four man LMG team with two
carbine armed drivers manning a heavy
motorcycle and sidecar combination each.
For this scenario the German must deploy a
Panzer Platoon. They have an additional six
points of support for the first time this scenario is
played with that number increasing by a further
six points each time it is replayed.
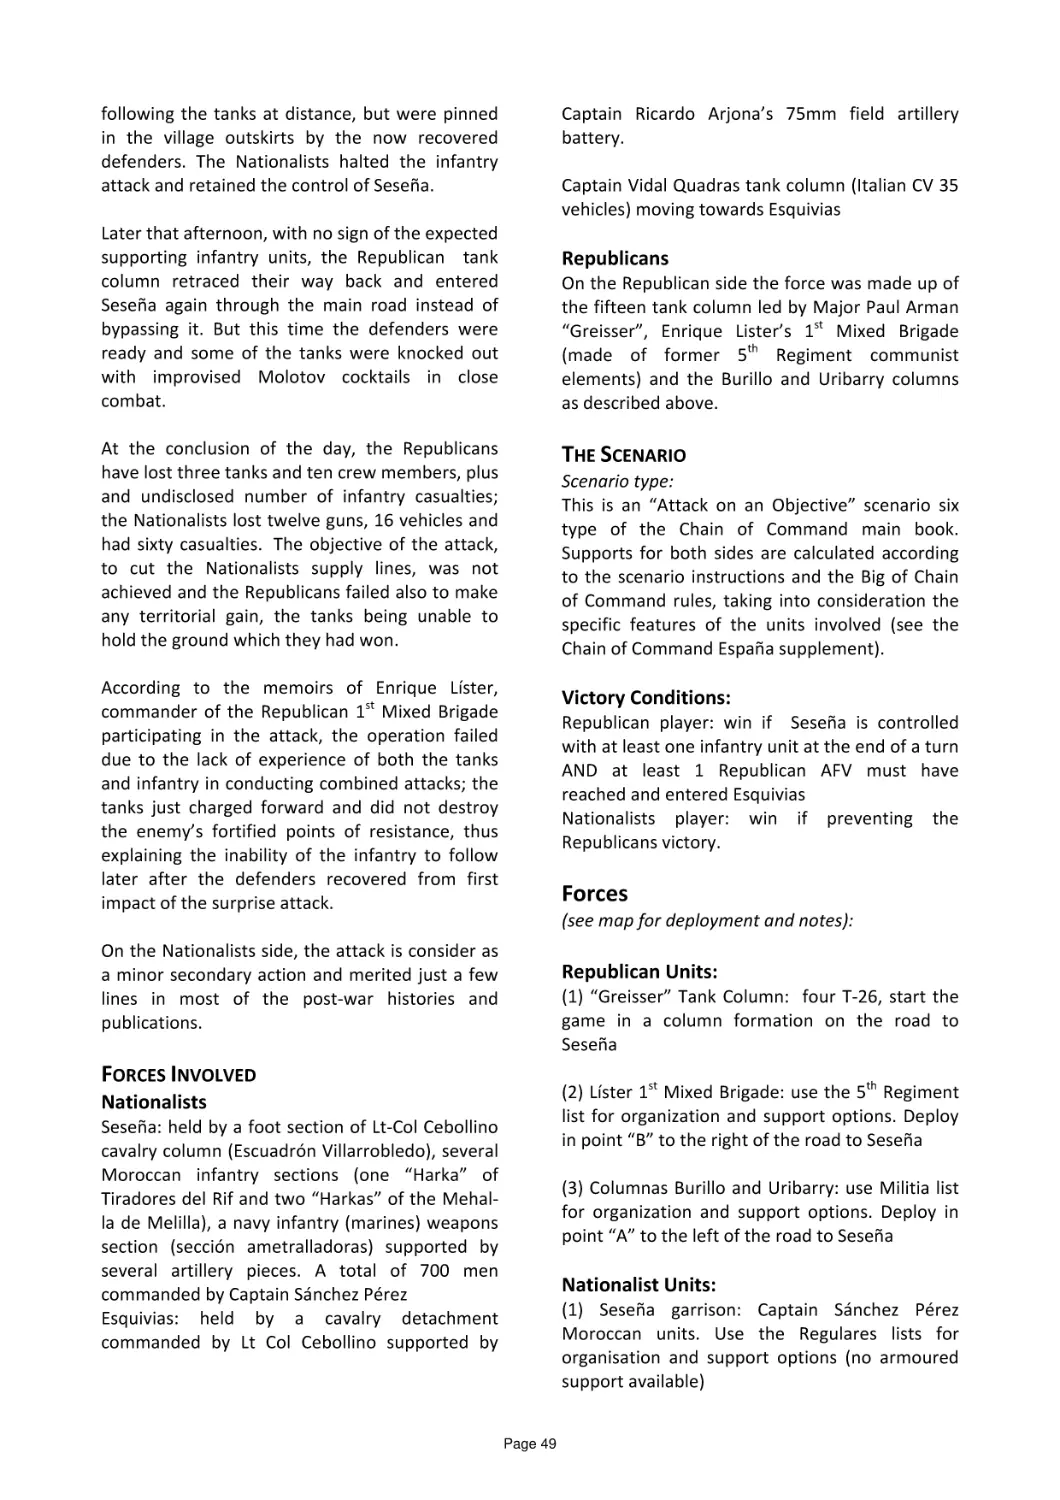
Setting up the Tables
The tables for the Defending Boulogne campaign
are determined by the real terrain. We have
produced five maps on the following pages based
on the period maps and with some consultation
of Google Earth. The scenario notes from At the
Sharp End should all be used, especially the
additional support amendments. The following
comments are more descriptive to assist setting
up the table.
The British have twelve points of support for this
scenario. If this scenario is replayed, any antitank guns which survive a previous game may not
be moved but must be placed on the table before
the patrol phase is played out.
Scenario Two – Down on the Farm
Scenario One - Probe at the Crossroads
Again, the terrain here slopes down gradually
from the German starting point, as indicated by
the red line, towards the British positions. The
German objective here is to capture the
farmhouse on the road and open the route into
Boulogne itself.
The Germans have ten points of support for this
scenario each time it is played. The British have
Page 13
completing the picture. The gardens here are
more yards although it is not an entirely urban
landscape, with some fruit trees and lawns
present.
just six points of support whenever this scenario
is played. As with Scenario One, if this game is
replayed due to a British victory, any anti-tank
guns deployed here will be fixed in position and
must be placed on the table before the patrol
phase is played out.
Scenario Three – Matins at St Martin
The German table edge is indicated in red and,
again, this is a delaying action.
When the Germans attack in this scenario they
will get twelve points of support. The British will
get four points.
The large church on the road junction at St
Martin-Boulogne was a natural defensive
position, covering as it did two of the main routes
into the town from the East. The terrain slopes
down quite markedly here, as indicated by the
contours, with the highest ground being along
the red line which indicates the German table
edge.
Scenario Five – On the Waterfront
This is a Delaying Action scenario, as reflected by
the Patrol Marker deployment areas.
The German will have eight points of support
whenever this scenario is played, the British will
have six points.
This scenario will probably require some
imagination in setting up as few of us have a
table full of merchants mansions to hand. There
is a bit argument for using shoe boxes, or similar,
with some intelligent, minimalist, tarting up.
However, I'd suggest it is worth it as it's a great
street fighting game.
Scenario Four – Into the Town
This is a very busy table as we head into Boulogne
itself. In this area of town the buildings are
largely two storied houses lining busy streets.
Adding cars or abandoned military vehicles will
enhance the look considerably, with piles of
rubble and some damage from air attack
The German table edge is marked in red. They
get twelve support points when this scenario is
played, the British get six points.
Page 14
Running the Campaign
of 20 (Guards) Brigade go into the bag along a
thousand men from other units.
For both sides, this campaign is all about timing.
The British are attempting to evacuate wounded
men, nurses and "useless mouths" throughout
the campaign and, as time passes, will seek to
evacuate their whole force if they can survive
that long. They also begin demolishing the port
installations once it is clear that the defenders
will be evacuated. For the Germans, they are
seeking to act with speed in order to capture the
port intact (in Berlin Operation Sea Lion is already
being talked about) and also, probably more
importantly, to stop British troops evacuating to
fight another day. A British Army intact will
always be a thorn in the side of the Germans and
Hitler had identified the British as the greatest
threat to his plans of German European
dominance.
If the Germans win by the end of turn six, they
win a major victory, capturing the bulk of the
facilities intact.
If the Germans win by the end of turn 7, they
capture the bulk of the Guards Brigade but the
harbour facilities have been so badly damaged
that the British may claim a draw.
At the end of turn eight, the British can claim a
minor victory, having evacuated around half of 20
Guards Brigade.
If the Germans have failed to win scenario five by
the end of this campaign turn the British will
evacuate all of their troops successfully and may
claim a major victory.
To reflect the changing picture during the
campaign, the British should be kept informed of
what little communication there is between
London and Boulogne which indicates the
changing mood in London. The following table is
used:
Turn
3
5
6
8
9
Event
The Tanks and reinforcements from Calais
will not be arriving. They are heavily
engaged in that city.
Warning Order issued. Boulogne is to be
evacuated. Destroyers are en route to
take off the garrison.
Hospitals currently being evacuated of
wounded and nurses.
Immediately withdraw to the waterfront
defensive area
If you win this game you will win
sufficient time to be evacuated
This information should, ideally, only be available
to the British player, the German player should
not be aware of precisely what is going on.
If the Germans win Scenario Five on Campaign
turn five, they have won a complete victory. All
Page 15
one such farmer, try him, and execute him as
a warning to others. The Continental
command even discussed forcibly relocating
all civilians from the area around the city in
order to create a desert from which the
British could draw no sustenance.
Background
After capturing New York City in 1776 and
driving the American Army before it over
several battlefields, the British Army moved
to Pennsylvania in 1777. They occupied the
American capital of Philadelphia in
September, defeating the Continentals in two
more
battles
at
Brandywine
and
Germantown before settling into winter
quarters in the City of Brotherly Love.
Beaten but not defeated, the American Army
hovered nearby throughout the fall and
winter, launching occasional raids and
foraging operations, but unable to defeat the
British or drive them out of Pennsylvania.
Lacey took his orders seriously, telling his
men to catch any Americans supplying the
British and kill them in cold blood, leaving
their corpses and their goods to rot on the
highway. Though full of bombast towards
unarmed civilians, Lacey was not so bold
when it came to meeting British patrols. He
kept his headquarters constantly on the
move, shifting between one militia force and
another as they coalesced and then melted
away. Meanwhile, he sent a constant stream
of missives to Washington, complaining of his
lack of any sort of supply, support, or
manpower and begging for food and whiskey
from the equally bereft Continental
commissariat.
As winter changed to spring in 1778, the
British forces in Philadelphia continued to
avail themselves of the farm produce of the
region. Some farmers supplied the British
grudgingly or only under threat, but others
brought goods to market in Philadelphia
voluntarily, happy to exchange food for
sound British coin instead of dubious rebel
currency.
General Sir William Howe, the British
commander, determined to protect loyal
local farmers, decided that Lacey's forces had
to be eliminated. Lieutenant Colonel John
Graves Simcoe, commander of the Loyalist
unit known as the Queen's Rangers, a
"legion" or combined-arms corps of cavalry
and infantry, came up with a plan to put an
end to the militia menace. Collecting all
available intelligence on the militia's
Lieutenant General George Washington, the
American commander, ordered local militia
to do everything they could to stop this flow
of supplies to the enemy. Writing to
Pennsylvania militia Brigadier General John
Lacey, Washington insisted that examples be
made of those willing to provide produce to
the redcoats. He suggested that Lacey find
Page 16
rather than under cover of darkness. They
heard the American outposts firing on
Abercromby and spurred to attack. Kerr and
the Philadelphia dragoons headed for Lacey's
headquarters, to seize it as a rally point if
needed, while the Chester County dragoons
and the Rangers formed the second part of
the pincer and attacked the rebel camp from
the rear.
movements, Simcoe formulated an operation
to catch and crush the rebel troops and their
blustering Brigadier.
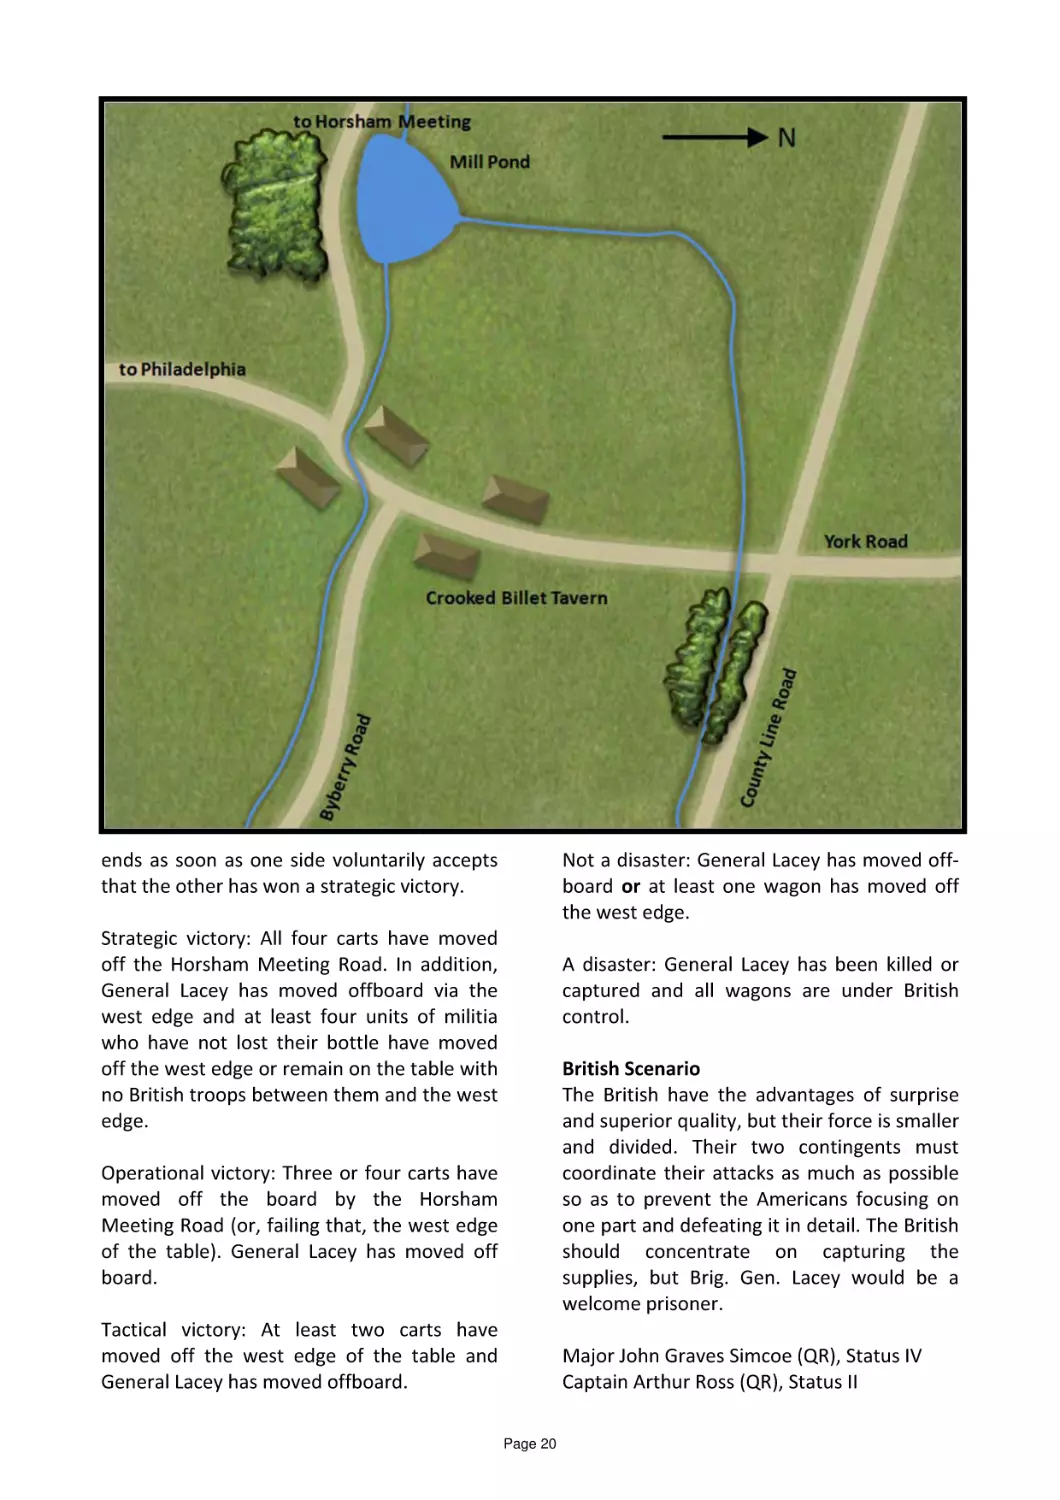
The Americans had rounded up several
wagon loads of provisions and, moving back
towards the Continental Army encampment,
had stopped at a small settlement named for
its well-known tavern, the Crooked Billet
(modern day Hatboro, Pennsylvania).
Simcoe's plan involved a night march by
horse and foot that would surround and
isolate the American freebooters. Surprised
and with no place to retreat, the militia
would surely surrender. Leaving Philadelphia
at evening, the British marched silently
through the darkness. On the morning of 1
May 1778, the attack began.
The militia formed up and attempted to
march away with its plunder but, when
confronted by British troops on all sides,
abandoned the wagons and tried to fight
their way out of the trap in which they had
been caught. They eventually passed into a
wood, and the British stopped pursuing
them. After regrouping, the Americans
returned to the Crooked Billet, notionally
ready to renew the fight. But the British
were long gone, taking their booty, their
prisoners, and their dead and wounded
comrades with them. This cannot have been
accomplished very swiftly, suggesting on the
face of it that the Americans, when they
returned, presumably knew they were in no
real danger of staging a rematch.
General Lacey detailed scouts to detect the
approach of enemy troops, but none of them
went out when they were supposed to
(overnight), and when they did go out, some
either failed to detect the British or detected
them and remained quiet, fearing they would
be spotted and killed if they raised the alarm.
Only one of three or four scouting parties
engaged the British under Abercromby's men
with fire, after first finding a well covered
position to defend.
The Americans lost 30 to 35 men killed or
wounded in the encounter and maybe twice
as many taken prisoner out of an estimated
400 men; they lost a dozen wagonloads of
provisions (flour, salt, and whiskey) they had
gathered, as well as personal baggage, which
were taken into Philadelphia and sold, the
proceeds shared among the men of Simcoe's
and Abercrombie's expedition. The British
suffered minimal casualties, perhaps half a
dozen killed or wounded. Lacey courtmartialed the officers who had failed to scout
the approach of the British but was able to
win a conviction only of one of them. He
himself was relieved of duty soon after and
rusticated with a minor administrative role in
the Bucks County militia. Abercromby and
Simcoe fought at the battle of Monmouth
and in other campaigns throughout the
remainder of the war. Abercromby went on
to hold civil and military roles in British India,
Abercromby had arrived in the area first, and
he sent his horse and some mounted infantry
to establish an ambush position between the
militia camp and the American Army in
anticipation that the Americans would
retreat that direction. He then pressed on up
the York Road to attack the front of the
American camp with the remainder of the
light infantry. These were fired on by the
American outposts as they approached the
camp.
Simcoe's force had managed to avoid all
enemy scouts and narrowly avoided
attacking a different group of Loyalists
returning to Philadelphia from their own raid.
But the Rangers' march took longer than
Simcoe had hoped; they arrived in daylight
Page 17
Formations of units in column must feature
one unit behind another.
finally serving as Commander in Chief of
British forces in India. He was elected to
Parliament and ended his career as Governor
of Edinburgh Castle. Simcoe served after the
war as Lieutenant Governor in Upper Canada
and held various military commands. He too
was appointed Commander in Chief in India,
eight years after Abercromby had held the
title, but he died in England before he could
assume the command.
Kills on mounted troops are considered to kill
both horse and rider; ignore the "Shooting at
Donkey Walloper" rules.
American Scenario
The Americans begin in that most unenviable
of situations, asleep and dreaming in the
presence of their enemy. The American
militia are weak in resolve and musketry
(according to Lacey, many of them had no
weapons) but strong in numbers. Their goal is
to protect their supplies and convoy them
away to safety, if possible. Failing that, they
must extricate their fighting force. Failing
that, they should at least ensure that General
Lacey escapes.
Refighting the Action
For our game, each infantry or cavalry figure
represents roughly five men. All infantry
units may be arrayed in close-order line (two
figures deep), extended order (one figure
deep), column (two figures wide), or skirmish
(like extended order, but spaced one or two
bases apart). Cavalry units may deploy in
extended order, column, or skirmish.
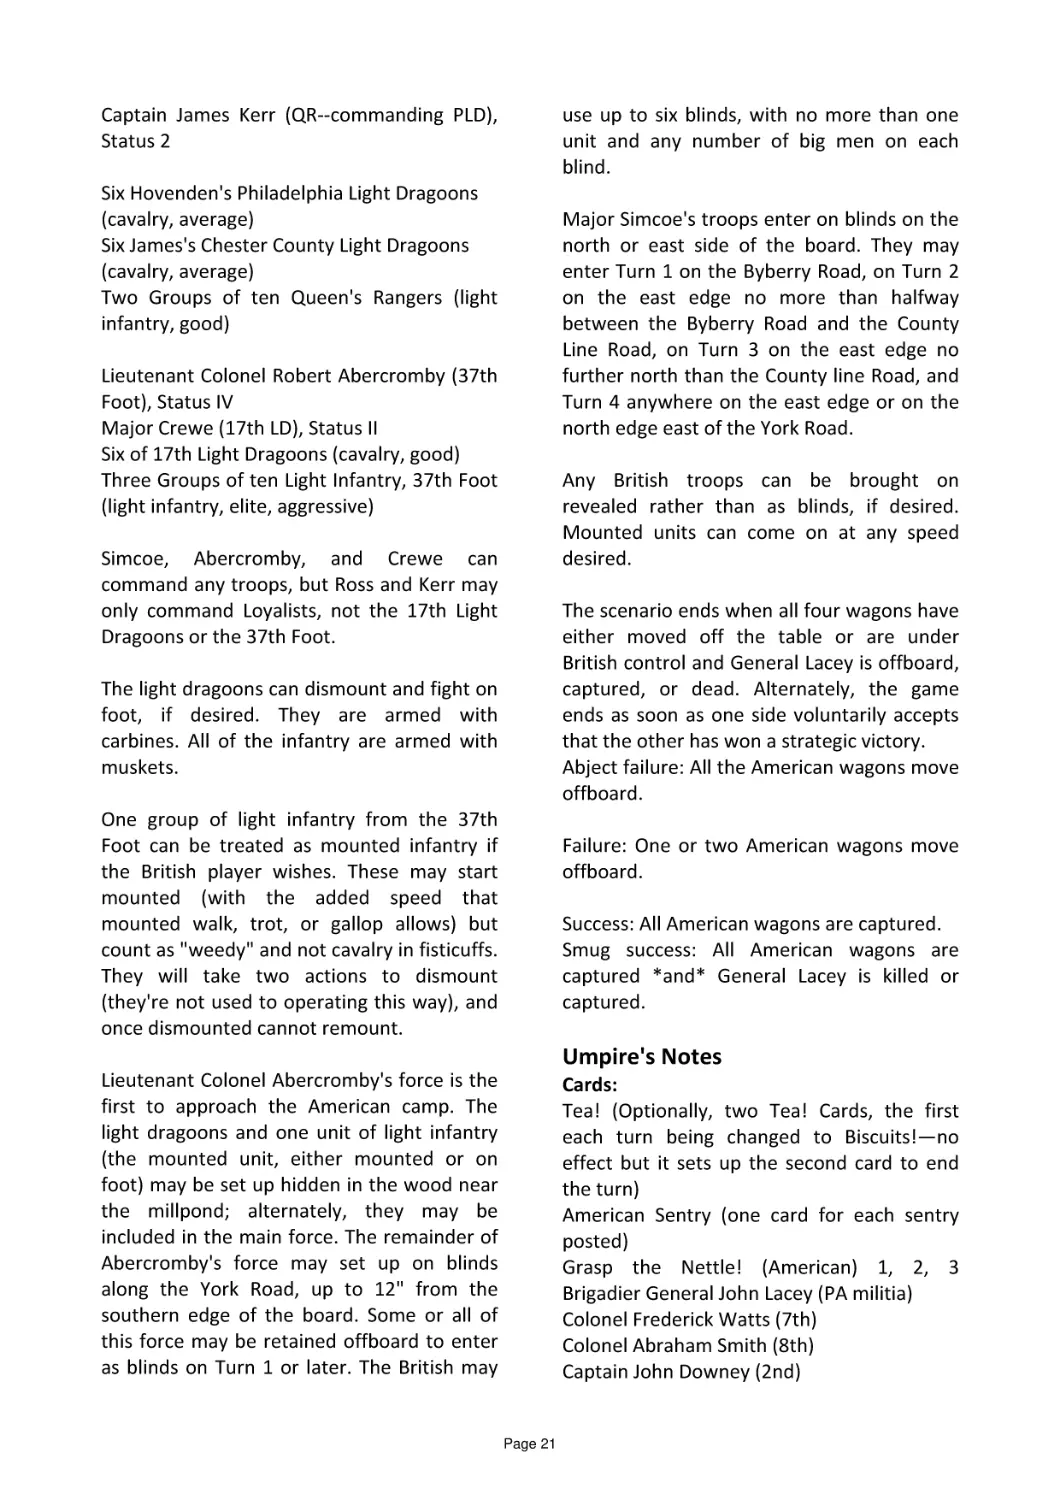
Brigadier General John Lacey, Status III
Colonel Frederick Watts (7th), Status II
Colonel Abraham Smith (8th), Status II
Captain John Downey (2nd), Status II
Captain William Pugh (4th), Status II
Units in column may fire the front rank only,
45 degrees to either side; units in skirmish
may fire up to 90 degrees to either side (a
180 degree arc); units in extended order may
fire up to 45 degrees to either side; units in
close order line may fire directly to the front,
but count only half their second-rank figures.
For shooting modifiers, treat all units as "in
formation". Units in extended order do not
count either the "firer is a formation in line"
when giving fire or the "target is a formation
in line" when fired upon. Troops firing at a
target in skirmish order lose a quarter of
their dice when firing. Light dragoons may
fire when mounted; mounted infantry may
not fire when mounted.
Two Groups of ten men, 2nd Battalion
Philadelphia City Militia (Delaney's)
Two Groups of ten men, 4th Battalion
Bucks County Militia (Roberts')
Two Groups of ten men, 7th Battalion
Cumberland County Militia (Watts')
Two Groups of ten men, 8th Battalion
Cumberland County Militia (Smith's)
of
of
of
of
Four wagons full of supplies, each with a
carter. Lacey can command any of the
American troops, but each of the other Big
Men can fully command only groups from his
battalion. He can use his initiative or "grasp
the nettle" cards to remove shock from other
groups, but not to activate them. Two or
more units from different battalions can be
combined into one formation, but only Lacey
can command it.
In fisticuffs, troops in skirmish order lose half
their dice after all other computations;
troops in close order gain an extra die for
every four after other computations.
Multiple units can be grouped into
formations per the standard SP rules; units in
line or extended order formations may be
either side by side or one behind the other.
In the latter case, only the front unit may fire.
All militia are infantry, poor quality, and
count as weedy in fisticuffs. They move as
light infantry but fire as line troops; all of
Page 18
and removed from the game without
sounding the alarm.
them are armed with muskets. Once a militia
group "loses its bottle", accumulating twice
as much shock as men, it cannot recover any
more shock for the remainder of the
scenario.
A big man who is alerted may immediately
use his initiative to alert any other big man or
unit in his building and/or to move outside.
Once he is outside, he can use any remaining
initiative to sound the alarm for wagons (and
their units) or sentries within his normal
initiative radius. To alert a building, he must
move to it and spend an initiative.
All militia units and big men are deployed at
start sleeping in buildings or at (under)
wagons (Big Men *must* be in buildings),
with the exception of sentries. No more than
one unit can set up “in” a wagon or building.
When a unit is alerted, it is immediately put
on the table touching the building or wagon
it occupied. It starts with 1D6+1 shock, to
represent the disorder occasioned by
surprise and alarm. It may be in any order
and any facing, but it may not start in a
formation with another unit. It may not be
placed in contact with an enemy unit. If it
cannot be placed without touching an enemy
unit, it is considered captured and removed
from the table. If a unit should be still
sleeping (not alerted) in a building or wagon
that is contacted by an enemy unit or blind, it
is considered captured and removed from
the table.
Up to two figures per battalion (a maximum
of eight figures) may be detached from any
militia to act as sentries. These may be
deployed up to 9" from an occupied building
or wagon or from another sentry. A card is
added to the deck for each sentry. They may
only spot, using one or both of their dice in a
single spotting attempt per turn.
When sentries attempt to spot, roll 1D6. On a
1,2,3 use their current range to the spotting
target for determining success. On a 4,5 use
the next column to the right (shifting off the
table is an automatic failure). On a 6, that
sentry cannot spot that turn. If a sentry has
an action die remaining after successfully
spotting a British unit off its blind, he may
use it to fire a signal gun. Otherwise, he may
fire a signal gun on the "Tea!" card. (note
that if a sentry reveals a dummy blind, he
may NOT fire a signal gun.)
Starting on the turn after a wagon is alerted,
its carter can move the wagon the normal
2D6 of "beast of burden" movement on the
"Tea!" card. Alternately, a carter can be
activated and moved by a friendly big man, in
the same way as a unit is activated. Note that
a wagon may not move more than once per
turn.
A signal gun alerts any sentry within 9" and
any big man in a building within 9".
If a carter or wagon is contacted by an enemy
unit, blind, or Big Man, the carter will then be
commanded by that side until he is once
again "tagged" by the other side. Should two
opposing units both be in contact with a
carter at the same time, he will hide under
his cart until one unit chases off the other.
A sentry who is alerted my fire his signal gun
the next time his card comes up or once the
Tea! Card comes up; if he is alerted on the
Tea! card, he may not fire then but must wait
until the next turn for either his card to come
up or the Tea! card for that turn. Once a
sentry has fired his signal gun, his card is
removed from the deck and he must
immediately move to rejoin his unit, moving
at 2D6 on the Tea! card. Sentries who are
contacted by either blinds or deployed
enemy troops are automatically captured
The scenario ends when all four wagons have
either moved off the table or are under
British control and General Lacey is offboard,
captured, or dead. Alternately, the game
Page 19
Not a disaster: General Lacey has moved offboard or at least one wagon has moved off
the west edge.
ends as soon as one side voluntarily accepts
that the other has won a strategic victory.
Strategic victory: All four carts have moved
off the Horsham Meeting Road. In addition,
General Lacey has moved offboard via the
west edge and at least four units of militia
who have not lost their bottle have moved
off the west edge or remain on the table with
no British troops between them and the west
edge.
A disaster: General Lacey has been killed or
captured and all wagons are under British
control.
British Scenario
The British have the advantages of surprise
and superior quality, but their force is smaller
and divided. Their two contingents must
coordinate their attacks as much as possible
so as to prevent the Americans focusing on
one part and defeating it in detail. The British
should concentrate on capturing the
supplies, but Brig. Gen. Lacey would be a
welcome prisoner.
Operational victory: Three or four carts have
moved off the board by the Horsham
Meeting Road (or, failing that, the west edge
of the table). General Lacey has moved off
board.
Tactical victory: At least two carts have
moved off the west edge of the table and
General Lacey has moved offboard.
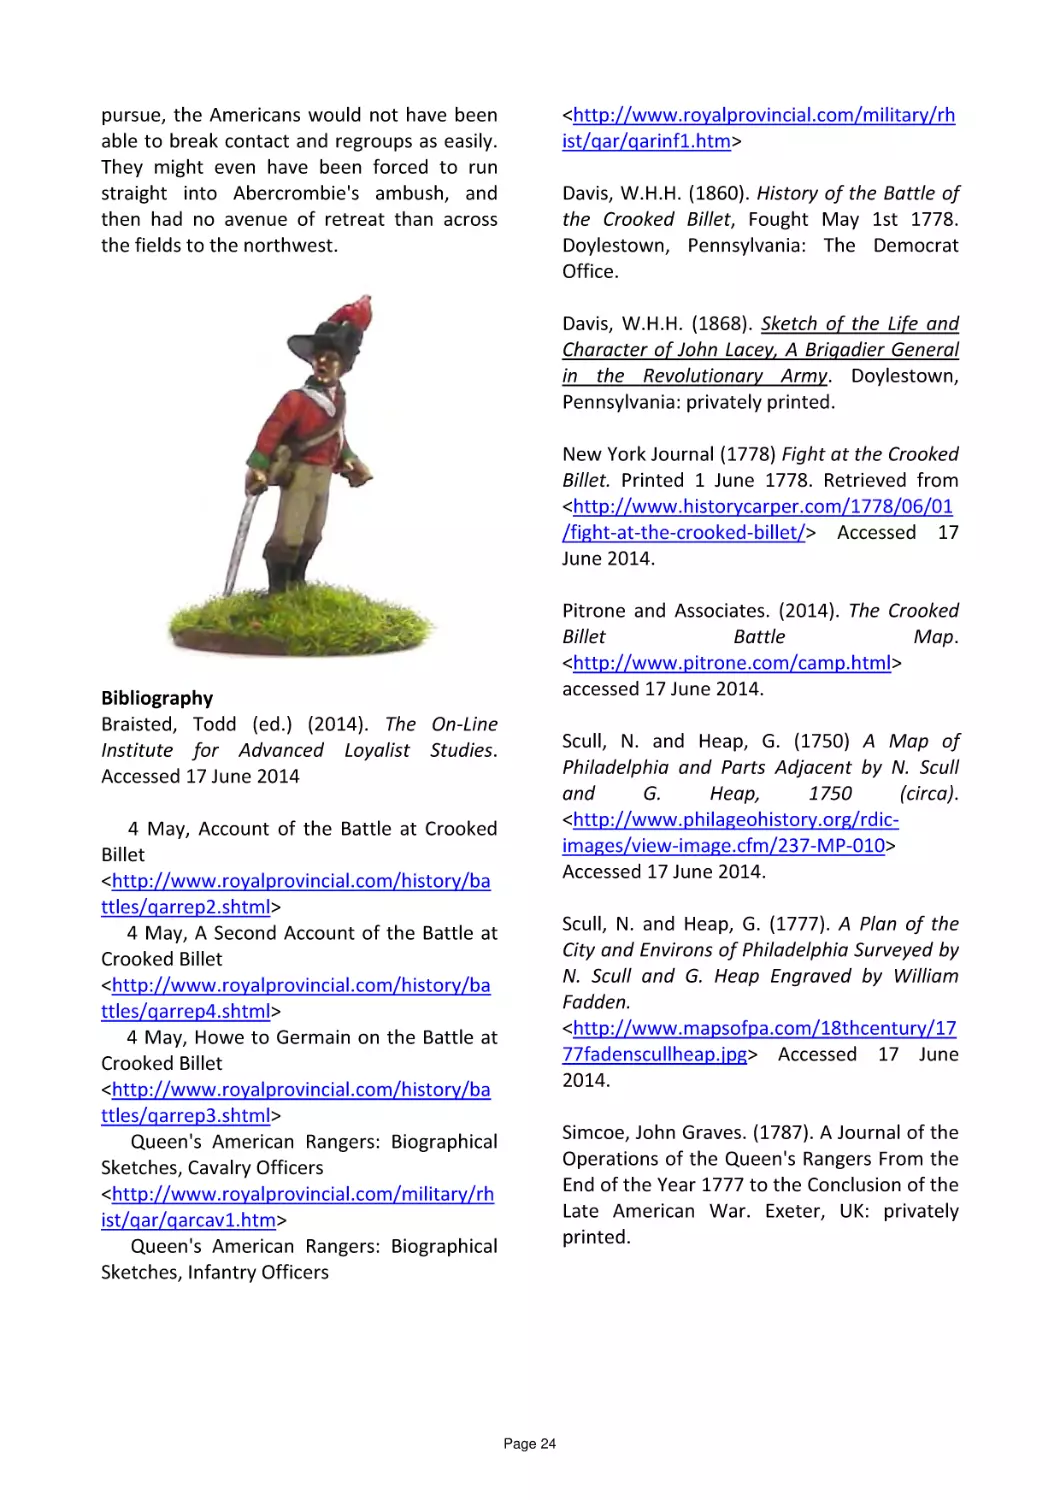
Major John Graves Simcoe (QR), Status IV
Captain Arthur Ross (QR), Status II
Page 20
use up to six blinds, with no more than one
unit and any number of big men on each
blind.
Captain James Kerr (QR--commanding PLD),
Status 2
Six Hovenden's Philadelphia Light Dragoons
(cavalry, average)
Six James's Chester County Light Dragoons
(cavalry, average)
Two Groups of ten Queen's Rangers (light
infantry, good)
Major Simcoe's troops enter on blinds on the
north or east side of the board. They may
enter Turn 1 on the Byberry Road, on Turn 2
on the east edge no more than halfway
between the Byberry Road and the County
Line Road, on Turn 3 on the east edge no
further north than the County line Road, and
Turn 4 anywhere on the east edge or on the
north edge east of the York Road.
Lieutenant Colonel Robert Abercromby (37th
Foot), Status IV
Major Crewe (17th LD), Status II
Six of 17th Light Dragoons (cavalry, good)
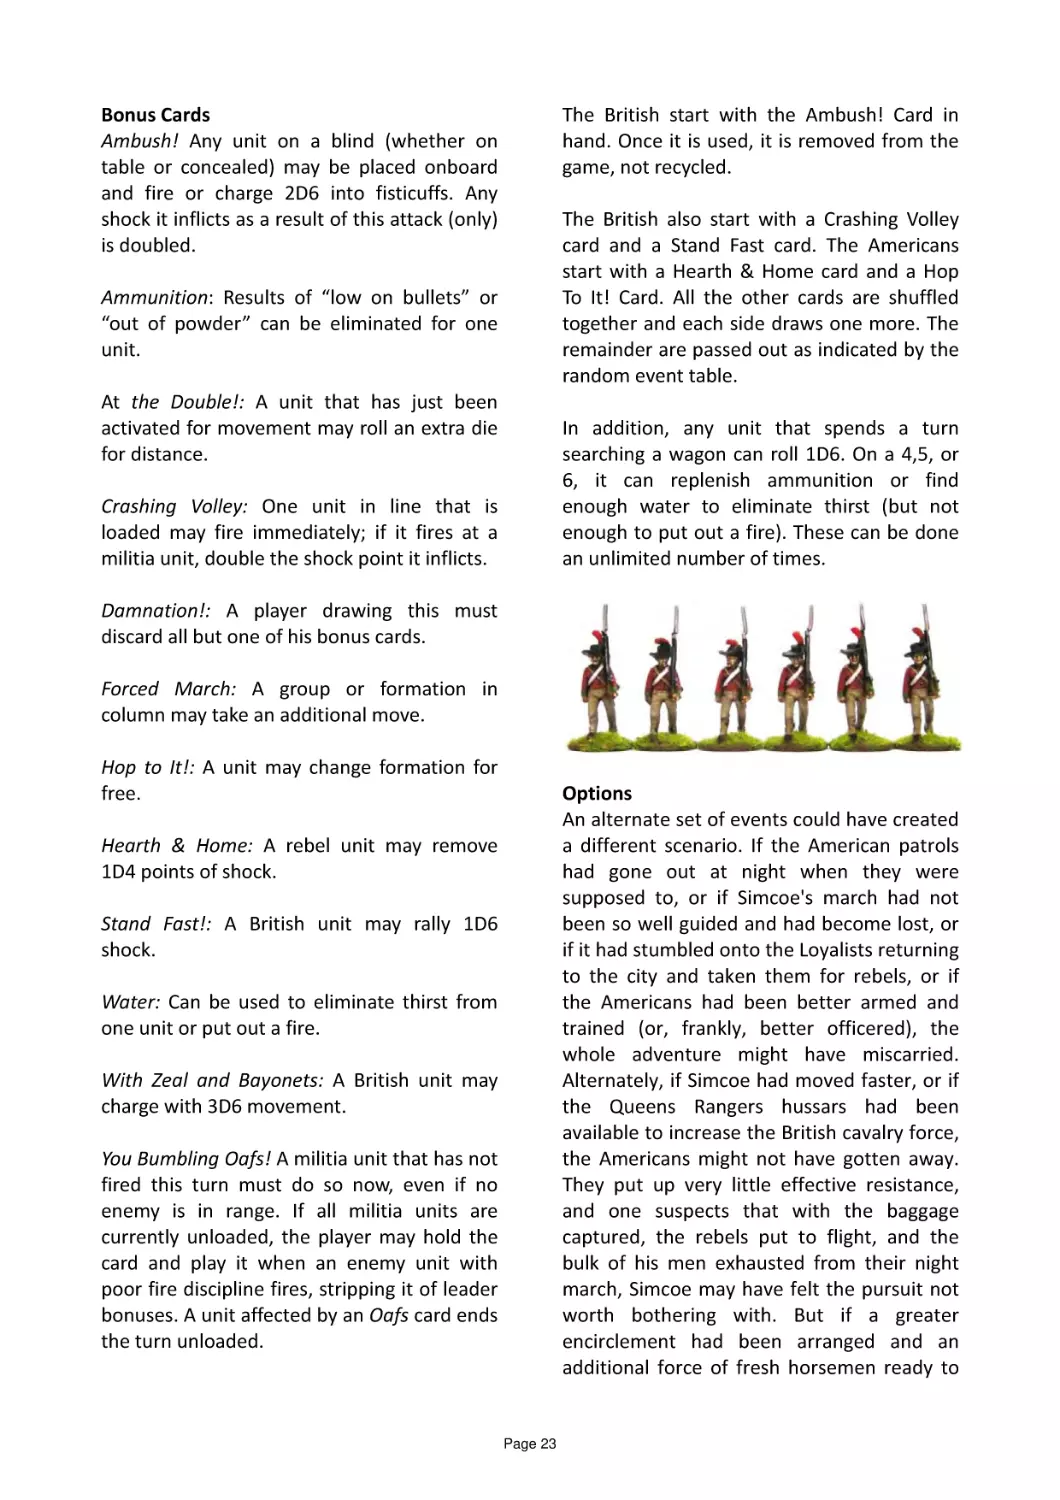
Three Groups of ten Light Infantry, 37th Foot
(light infantry, elite, aggressive)
Any British troops can be brought on
revealed rather than as blinds, if desired.
Mounted units can come on at any speed
desired.
Simcoe, Abercromby, and Crewe can
command any troops, but Ross and Kerr may
only command Loyalists, not the 17th Light
Dragoons or the 37th Foot.
The scenario ends when all four wagons have
either moved off the table or are under
British control and General Lacey is offboard,
captured, or dead. Alternately, the game
ends as soon as one side voluntarily accepts
that the other has won a strategic victory.
Abject failure: All the American wagons move
offboard.
The light dragoons can dismount and fight on
foot, if desired. They are armed with
carbines. All of the infantry are armed with
muskets.
One group of light infantry from the 37th
Foot can be treated as mounted infantry if
the British player wishes. These may start
mounted (with the added speed that
mounted walk, trot, or gallop allows) but
count as "weedy" and not cavalry in fisticuffs.
They will take two actions to dismount
(they're not used to operating this way), and
once dismounted cannot remount.
Failure: One or two American wagons move
offboard.
Success: All American wagons are captured.
Smug success: All American wagons are
captured *and* General Lacey is killed or
captured.
Umpire's Notes
Lieutenant Colonel Abercromby's force is the
first to approach the American camp. The
light dragoons and one unit of light infantry
(the mounted unit, either mounted or on
foot) may be set up hidden in the wood near
the millpond; alternately, they may be
included in the main force. The remainder of
Abercromby's force may set up on blinds
along the York Road, up to 12" from the
southern edge of the board. Some or all of
this force may be retained offboard to enter
as blinds on Turn 1 or later. The British may
Cards:
Tea! (Optionally, two Tea! Cards, the first
each turn being changed to Biscuits!—no
effect but it sets up the second card to end
the turn)
American Sentry (one card for each sentry
posted)
Grasp the Nettle! (American) 1, 2, 3
Brigadier General John Lacey (PA militia)
Colonel Frederick Watts (7th)
Colonel Abraham Smith (8th)
Captain John Downey (2nd)
Page 21
Captain William Pugh (4th)
Blinds (Simcoe's force)
Blinds (Abercromby's force)
Grasp the Nettle! (British) 1, 2, 3, 4
Major John Graves Simcoe (QR)
Captain Arthur Ross (QR)
Captain James Kerr (QR)
Lieutenant Colonel Robert Abercromby (37th
Foot)
Major Crewe (17th LD)
Random Events
Firing Random Events
1 The firing group is low on bullets. Fire at
short range only until resupplied.
2 Out of powder! No more shooting by
the firing group until resupplied.
3 Spooked! The target of this shooting
takes an immediate retire move,
regardless of its wounds.
4 Smoke: A pall of smoke hangs across the
immediate front of the unit, reducing
visibility to 6”. Firing through this will be
done with one third fewer dice than
normal. The smoke clears on the third
subsequent Tea! card.
5 One man’s barrel explodes. Roll a D6 for
a hit with a +1.
6 Scalp ‘em! A unit that has just been fired
on by enemy within 9” rushes them for
an immediate bout of fisticuffs.
7 Fire! The building or wagon nearest to
the firers has caught alight (if within 12”
of the firer or target). Smoke will start to
emerge next turn. Any troops within a
burning building must leave, put the fire
out within three turns, or be eliminated.
It takes a water card and a unit’s action
dice to douse a fire.
8 Damn & Blast! Scared by the firing some
local livestock have escaped. 2D6”
movement. Each turn roll a deviation
dice to see which direction they head in.
They will disrupt any formation that
they contact, leaving it unformed. They
will halt once they are at least 9” from
any humans.
9/ Bonus Card – draw one bonus card
10 immediately
Movement Random Events
1 Indecision… A Big Man is suddenly unsure
which way to go. No move this turn for
him. If he’s already moved this turn, he
forfeits his next move.
2 Marshy ground: Subtract an additional -1
per die from a unit’s movement this turn.
3 An eye for ground: Add one to each of a
unit’s movement dice this turn.
4 Drunkard! – One man passes out drunk.
Mark a casualty to a unit.
5 Panick! An American unit in LOS of the
enemy falls back one move immediately,
away from the nearest visible foe.
6 Scout finds a path/ford! One unit can
move through the next wood or across
the next stream it encounters as if the
obstacle is not there.
7 Fear. One Big Man with the target unit is
struck down by fear. He takes his move
immediately, running to the rear with as
many men as he can command. Next turn
he must remain stationary or retire
further.
8 Looting: D6/2 men from a British unit
within 12” of a building or wagon slope
off to loot. They will be moved there
immediately and remain until contacted
by a Big Man.
9 Thirst: This group needs water. Any
movement is conducted with a -1 pip per
dice until they get it.
10 Bonus Card – draw one bonus card
immediately
Page 22
The British start with the Ambush! Card in
hand. Once it is used, it is removed from the
game, not recycled.
Bonus Cards
Ambush! Any unit on a blind (whether on
table or concealed) may be placed onboard
and fire or charge 2D6 into fisticuffs. Any
shock it inflicts as a result of this attack (only)
is doubled.
The British also start with a Crashing Volley
card and a Stand Fast card. The Americans
start with a Hearth & Home card and a Hop
To It! Card. All the other cards are shuffled
together and each side draws one more. The
remainder are passed out as indicated by the
random event table.
Ammunition: Results of “low on bullets” or
“out of powder” can be eliminated for one
unit.
At the Double!: A unit that has just been
activated for movement may roll an extra die
for distance.
In addition, any unit that spends a turn
searching a wagon can roll 1D6. On a 4,5, or
6, it can replenish ammunition or find
enough water to eliminate thirst (but not
enough to put out a fire). These can be done
an unlimited number of times.
Crashing Volley: One unit in line that is
loaded may fire immediately; if it fires at a
militia unit, double the shock point it inflicts.
Damnation!: A player drawing this must
discard all but one of his bonus cards.
Forced March: A group or formation in
column may take an additional move.
Hop to It!: A unit may change formation for
free.
Options
An alternate set of events could have created
a different scenario. If the American patrols
had gone out at night when they were
supposed to, or if Simcoe's march had not
been so well guided and had become lost, or
if it had stumbled onto the Loyalists returning
to the city and taken them for rebels, or if
the Americans had been better armed and
trained (or, frankly, better officered), the
whole adventure might have miscarried.
Alternately, if Simcoe had moved faster, or if
the Queens Rangers hussars had been
available to increase the British cavalry force,
the Americans might not have gotten away.
They put up very little effective resistance,
and one suspects that with the baggage
captured, the rebels put to flight, and the
bulk of his men exhausted from their night
march, Simcoe may have felt the pursuit not
worth bothering with. But if a greater
encirclement had been arranged and an
additional force of fresh horsemen ready to
Hearth & Home: A rebel unit may remove
1D4 points of shock.
Stand Fast!: A British unit may rally 1D6
shock.
Water: Can be used to eliminate thirst from
one unit or put out a fire.
With Zeal and Bayonets: A British unit may
charge with 3D6 movement.
You Bumbling Oafs! A militia unit that has not
fired this turn must do so now, even if no
enemy is in range. If all militia units are
currently unloaded, the player may hold the
card and play it when an enemy unit with
poor fire discipline fires, stripping it of leader
bonuses. A unit affected by an Oafs card ends
the turn unloaded.
Page 23
<http://www.royalprovincial.com/military/rh
ist/qar/qarinf1.htm>
pursue, the Americans would not have been
able to break contact and regroups as easily.
They might even have been forced to run
straight into Abercrombie's ambush, and
then had no avenue of retreat than across
the fields to the northwest.
Davis, W.H.H. (1860). History of the Battle of
the Crooked Billet, Fought May 1st 1778.
Doylestown, Pennsylvania: The Democrat
Office.
Davis, W.H.H. (1868). Sketch of the Life and
Character of John Lacey, A Brigadier General
in the Revolutionary Army. Doylestown,
Pennsylvania: privately printed.
New York Journal (1778) Fight at the Crooked
Billet. Printed 1 June 1778. Retrieved from
<http://www.historycarper.com/1778/06/01
/fight-at-the-crooked-billet/> Accessed 17
June 2014.
Pitrone and Associates. (2014). The Crooked
Billet
Battle
Map.
<http://www.pitrone.com/camp.html>
accessed 17 June 2014.
Bibliography
Braisted, Todd (ed.) (2014). The On-Line
Institute for Advanced Loyalist Studies.
Accessed 17 June 2014
Scull, N. and Heap, G. (1750) A Map of
Philadelphia and Parts Adjacent by N. Scull
and
G.
Heap,
1750
(circa).
<http://www.philageohistory.org/rdicimages/view-image.cfm/237-MP-010>
Accessed 17 June 2014.
4 May, Account of the Battle at Crooked
Billet
<http://www.royalprovincial.com/history/ba
ttles/qarrep2.shtml>
4 May, A Second Account of the Battle at
Crooked Billet
<http://www.royalprovincial.com/history/ba
ttles/qarrep4.shtml>
4 May, Howe to Germain on the Battle at
Crooked Billet
<http://www.royalprovincial.com/history/ba
ttles/qarrep3.shtml>
Queen's American Rangers: Biographical
Sketches, Cavalry Officers
<http://www.royalprovincial.com/military/rh
ist/qar/qarcav1.htm>
Queen's American Rangers: Biographical
Sketches, Infantry Officers
Scull, N. and Heap, G. (1777). A Plan of the
City and Environs of Philadelphia Surveyed by
N. Scull and G. Heap Engraved by William
Fadden.
<http://www.mapsofpa.com/18thcentury/17
77fadenscullheap.jpg> Accessed 17 June
2014.
Simcoe, John Graves. (1787). A Journal of the
Operations of the Queen's Rangers From the
End of the Year 1777 to the Conclusion of the
Late American War. Exeter, UK: privately
printed.
Page 24
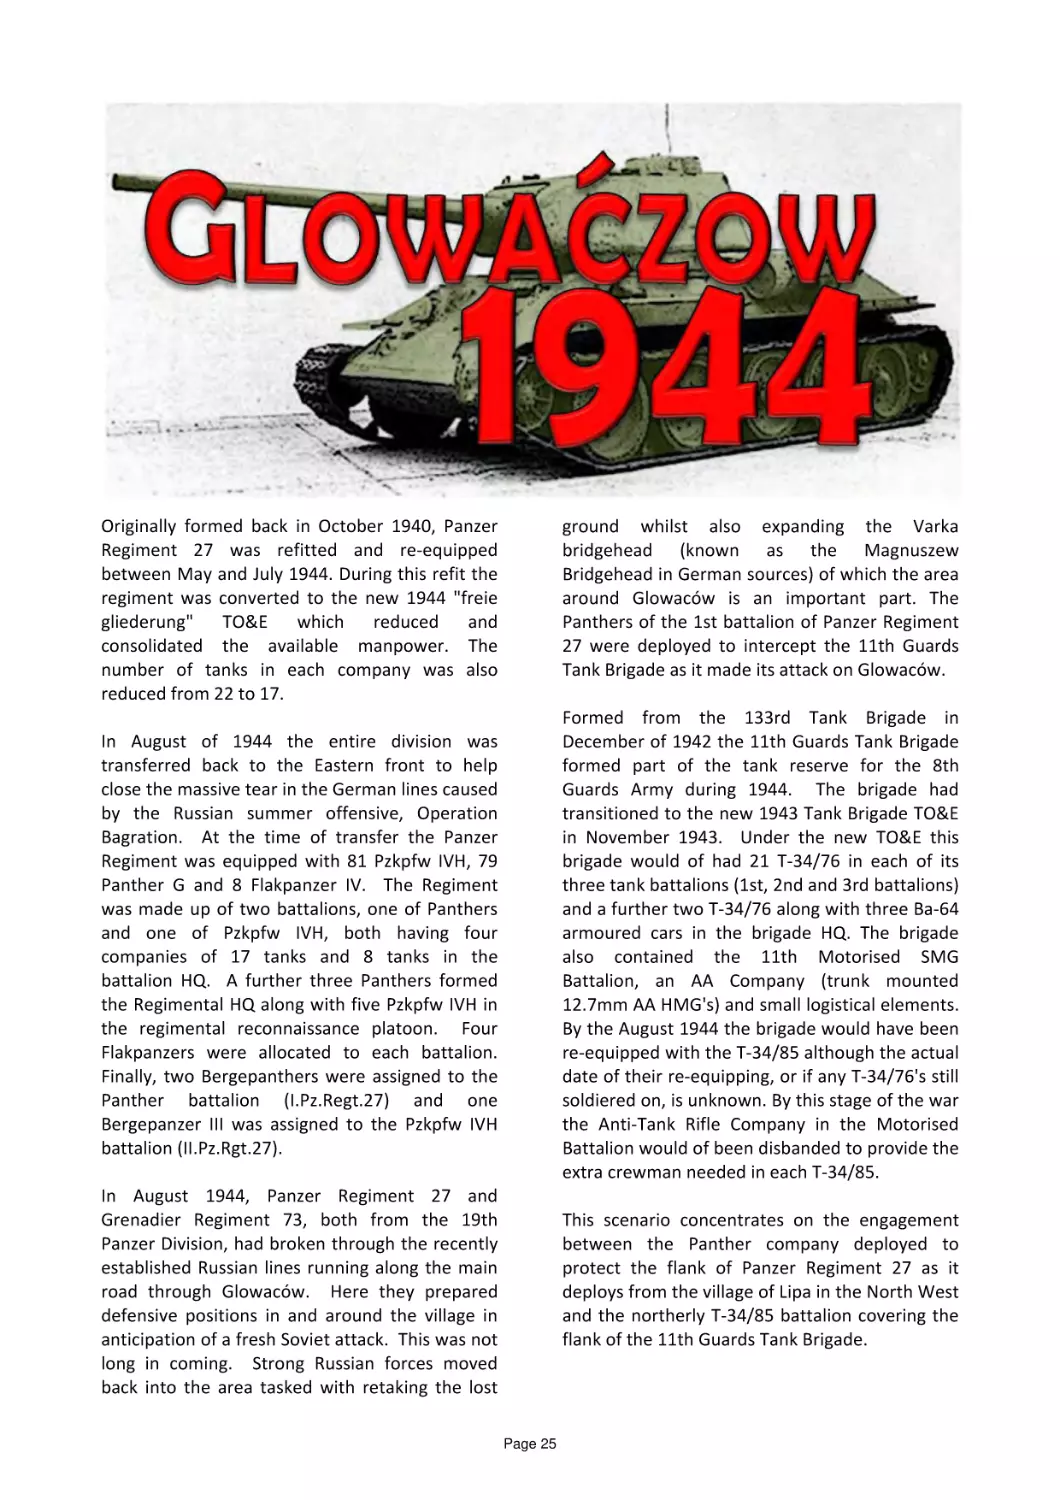
Originally formed back in October 1940, Panzer
Regiment 27 was refitted and re-equipped
between May and July 1944. During this refit the
regiment was converted to the new 1944 "freie
gliederung" TO&E which reduced and
consolidated the available manpower. The
number of tanks in each company was also
reduced from 22 to 17.
ground whilst also expanding the Varka
bridgehead (known as the Magnuszew
Bridgehead in German sources) of which the area
around Glowaców is an important part. The
Panthers of the 1st battalion of Panzer Regiment
27 were deployed to intercept the 11th Guards
Tank Brigade as it made its attack on Glowaców.
Formed from the 133rd Tank Brigade in
December of 1942 the 11th Guards Tank Brigade
formed part of the tank reserve for the 8th
Guards Army during 1944. The brigade had
transitioned to the new 1943 Tank Brigade TO&E
in November 1943. Under the new TO&E this
brigade would of had 21 T-34/76 in each of its
three tank battalions (1st, 2nd and 3rd battalions)
and a further two T-34/76 along with three Ba-64
armoured cars in the brigade HQ. The brigade
also contained the 11th Motorised SMG
Battalion, an AA Company (trunk mounted
12.7mm AA HMG's) and small logistical elements.
By the August 1944 the brigade would have been
re-equipped with the T-34/85 although the actual
date of their re-equipping, or if any T-34/76's still
soldiered on, is unknown. By this stage of the war
the Anti-Tank Rifle Company in the Motorised
Battalion would of been disbanded to provide the
extra crewman needed in each T-34/85.
In August of 1944 the entire division was
transferred back to the Eastern front to help
close the massive tear in the German lines caused
by the Russian summer offensive, Operation
Bagration. At the time of transfer the Panzer
Regiment was equipped with 81 Pzkpfw IVH, 79
Panther G and 8 Flakpanzer IV. The Regiment
was made up of two battalions, one of Panthers
and one of Pzkpfw IVH, both having four
companies of 17 tanks and 8 tanks in the
battalion HQ. A further three Panthers formed
the Regimental HQ along with five Pzkpfw IVH in
the regimental reconnaissance platoon. Four
Flakpanzers were allocated to each battalion.
Finally, two Bergepanthers were assigned to the
Panther battalion (I.Pz.Regt.27) and one
Bergepanzer III was assigned to the Pzkpfw IVH
battalion (II.Pz.Rgt.27).
In August 1944, Panzer Regiment 27 and
Grenadier Regiment 73, both from the 19th
Panzer Division, had broken through the recently
established Russian lines running along the main
road through Glowaców. Here they prepared
defensive positions in and around the village in
anticipation of a fresh Soviet attack. This was not
long in coming. Strong Russian forces moved
back into the area tasked with retaking the lost
This scenario concentrates on the engagement
between the Panther company deployed to
protect the flank of Panzer Regiment 27 as it
deploys from the village of Lipa in the North West
and the northerly T-34/85 battalion covering the
flank of the 11th Guards Tank Brigade.
Page 25
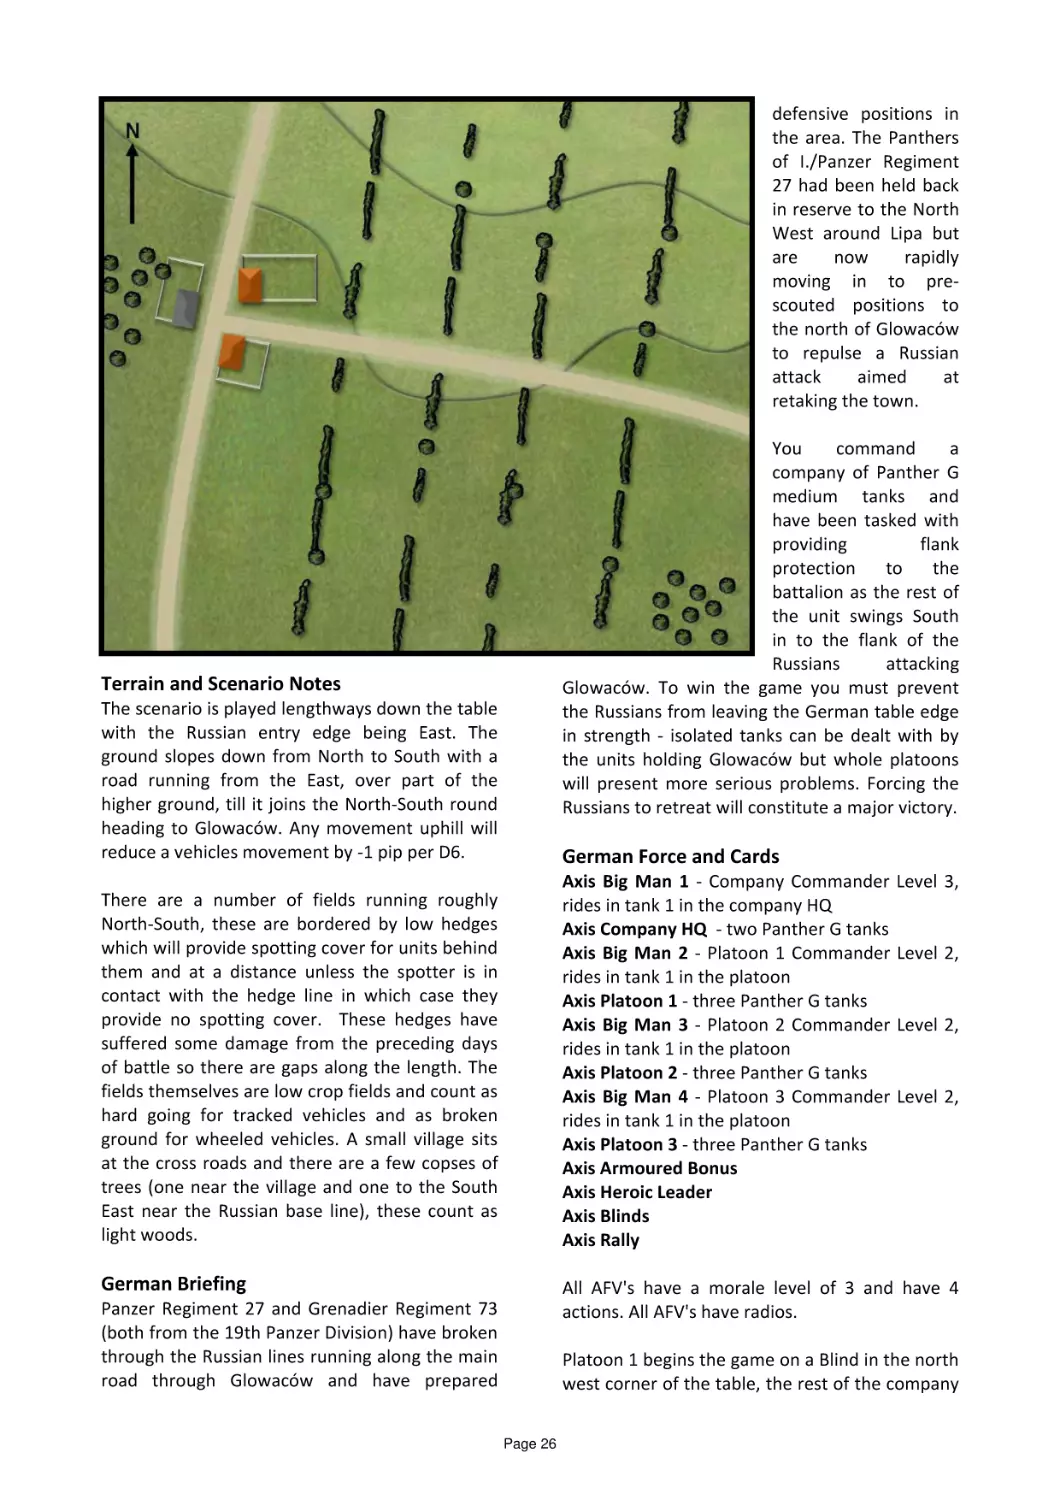
defensive positions in
the area. The Panthers
of I./Panzer Regiment
27 had been held back
in reserve to the North
West around Lipa but
are
now
rapidly
moving in to prescouted positions to
the north of Glowaców
to repulse a Russian
attack
aimed
at
retaking the town.
You
command
a
company of Panther G
medium tanks and
have been tasked with
providing
flank
protection
to
the
battalion as the rest of
the unit swings South
in to the flank of the
Russians
attacking
Glowaców. To win the game you must prevent
the Russians from leaving the German table edge
in strength - isolated tanks can be dealt with by
the units holding Glowaców but whole platoons
will present more serious problems. Forcing the
Russians to retreat will constitute a major victory.
Terrain and Scenario Notes
The scenario is played lengthways down the table
with the Russian entry edge being East. The
ground slopes down from North to South with a
road running from the East, over part of the
higher ground, till it joins the North-South round
heading to Glowaców. Any movement uphill will
reduce a vehicles movement by -1 pip per D6.
German Force and Cards
There are a number of fields running roughly
North-South, these are bordered by low hedges
which will provide spotting cover for units behind
them and at a distance unless the spotter is in
contact with the hedge line in which case they
provide no spotting cover. These hedges have
suffered some damage from the preceding days
of battle so there are gaps along the length. The
fields themselves are low crop fields and count as
hard going for tracked vehicles and as broken
ground for wheeled vehicles. A small village sits
at the cross roads and there are a few copses of
trees (one near the village and one to the South
East near the Russian base line), these count as
light woods.
Axis Big Man 1 - Company Commander
rides in tank 1 in the company HQ
Axis Company HQ - two Panther G tanks
Axis Big Man 2 - Platoon 1 Commander
rides in tank 1 in the platoon
Axis Platoon 1 - three Panther G tanks
Axis Big Man 3 - Platoon 2 Commander
rides in tank 1 in the platoon
Axis Platoon 2 - three Panther G tanks
Axis Big Man 4 - Platoon 3 Commander
rides in tank 1 in the platoon
Axis Platoon 3 - three Panther G tanks
Axis Armoured Bonus
Axis Heroic Leader
Axis Blinds
Axis Rally
German Briefing
Level 3,
Level 2,
Level 2,
Level 2,
All AFV's have a morale level of 3 and have 4
actions. All AFV's have radios.
Panzer Regiment 27 and Grenadier Regiment 73
(both from the 19th Panzer Division) have broken
through the Russian lines running along the main
road through Glowaców and have prepared
Platoon 1 begins the game on a Blind in the north
west corner of the table, the rest of the company
Page 26
enters the table in the north west on Blinds on
turns 2 (CHQ and platoon 2) and 3 (platoon 3). A
dummy Blind is available but must be deployed
with the Blind representing platoon 1.
Soviet Force and Cards
Allied Big Man 1 - Company Commander Level 3,
rides in a T-34/85
Allied Big Man 2 - Platoon 1 Commander Level 2,
rides in tank 1 in the platoon
Allied Platoon 1 - three T-34/85 tanks
Allied Big Man 3 - Platoon 2 Commander Level 2,
rides in tank 1 in the platoon
Allied Platoon 2 - three T-34/85 tanks
Allied Big Man 4 - Platoon 3 Commander Level 2,
rides in tank 1 in the platoon
Allied Platoon 3 - three T-34/85 tanks
Allied Big Man 5 - Company Commander Level 3,
rides in a T-34/85
Allied Big Man 6 - Platoon 4 Commander Level 2,
rides in tank 1 in the platoon
Allied Platoon 4 - three T-34/85 tanks
Allied Big Man 7 - Platoon 5 Commander Level 2,
rides in tank 1 in the platoon
Allied Platoon 5 - three T-34/85 tanks
Allied Big Man 8 - Platoon 6 Commander Level 2,
rides in tank 1 in the platoon
Allied Platoon 6 - three T-34/85 tanks
Allied Big Man 9 - Battalion Commander Level 4,
rides in a T-34/85
Allied Big Man 10 - Platoon 7 Commander Level
1, rides in armoured car 1 in the platoon
Allied Platoon 7 - three Ba-64 armoured cars
Allied Armoured Bonus
Allied Rapid Deployment
Allied Vehicle Breakdown
Allied Heroic Leader
Allied Recce Bonus
Allied Blinds
Allied Rally
Note
As the Panther battalion has already engaged in
combat over the preceding few days I have
reduced the strength of the company to account
for some losses and for mechanical issues.
Russian Briefing
Around mid afternoon elements of the Russian
11th Guards Tank Brigade are to take part in a
counter attack aimed at retaking Glowaców. The
brigade has been scheduled to attack from the
North East passing to the North of the village of
Leźemce, further Russian forces (including IS-2
tanks and infantry) will attack to the South of
Leźemce around the same time to complete the
envelopment of Glowaców.
You command a battalion of T-34/85 and have
been tasked with guarding the right flank against
any counter attack by the Germans. Once the
flanks are secure you have also been tasked with
placing your battalion to the West of Glowaców
to prevent reinforcements reaching the town
whilst the rest if the Brigade assaults the towns
defences. To win you must remove the threat
posed by any flanking German forces. To win a
major victory you must also exit at least two
functional platoons off the far table edge. To help
in achieving your aims a platoon of armoured
cars has been provided to screen your advance
and help identify German forces ahead of you.
All AFV's have a morale level of 3 and have 3
actions. All AFV's have radios.
Platoon 10 begins the game on a Blind in the
south east corner of the table, the rest of the
battalion enters the table on the eastern edge on
Blinds on turns 2 (company 1) and 3 (company 2).
Vehicle
Armour
Strike
Calibre
Speed
Panther G
11
12
75mm
Fast Tracked
T-34/85
7
10
85mm
Fast Tracked
Ba-64
2
MG
MG
Wheeled
Page 27
Notes
which had previously been the preserve of the
Engineer began to find their way into the hands
of the infantryman. Typical of this development
was the arrival of the hand grenade in the
trenches.
In 1914 the armies of Europe went to war with
one common feature; their fighting men were
almost universally equipped with the magazine
fed bolt action rifle, supported by small
detachments of machine guns crewed by men
trained specifically for that task. For the most
part, the armies of the great Empires were
comprised of conscripts; even Britain, with the
long-service regulars of the British Expeditionary
Force, was obliged to rapidly train up huge bodies
of men with no military experience in order to
fight a war on the continent.
In 1902, with a prescience which now appears
somewhat remarkable, the British War Office
declared that the hand grenade had no place in
modern warfare. The origins of this weapon are
shrouded in the mists of time. Some date them
back to Byzantium and the use of Greek Fire in
the early middle-ages, we know for certain that
grenados were used in the English Civil War and
that across the 18th and 19th centuries their use
became synonymous with the intricacies of siege
warfare. Indeed, within two years of the War
Office's declaration of obsolescence, the events
of the Russo-Japanese War obliged a significant
rethink.
In many respects the training undertaken by
these largely conscript armies was typified by the
initial training undertaken by Britain's rapidly
enlarged Army. Musketry, full pack marching and
square bashing were the order of the day, with
an emphasis on fire and movement of the type
we looked at in the 2013 Christmas Special; very
much based on the existing pre-war drill manuals.
Sub units manoeuvring forward under covering
fire; pinning the enemy with rifle and artillery fire
before an assault with the bayonet were common
fare for men of almost all nations.
Over the next few years hand grenades were
designed according to the whims of a handful of
self-promoting parties, each seeking to have their
design approved and adopted. The net result
was that the British adopted the Hand Grenade
Mark 1 in 1908, but by the time war broke out six
years later only tiny numbers were available.
This was a situation mirrored across Europe. In
Germany the total stock of grenades were in the
Engineering stores of the frontier fortresses,
ready to be used in their defence. The French
Army had only small number of similar devices,
After the initial war of movement on the Western
Front the lines began to solidify as the spade and
entrenching tool rapidly became the soldier's
primary weapon. From the Channel to the Swiss
border a solid front line ensured that the conflict
swiftly began to approximate the conditions of
siege warfare and, as a consequence, the tools
Page 28
the British they rapidly adopted a policy of
deploying five bombing squads, each of nine
men, within each infantry company. This was
later formalised with one section in each platoon
being made up of bombers. The British had
originally adopted the term "grenade" but the
objections of the Grenadier Guards to men of
other units being titled grenadiers led to the
adoption of the term "Bomb", hence the use of
the Mills Bomb in both World Wars.
manufactured in the mid 19th century to a design
which was standardised in the 18th century.
For all nations the emergence of a new form of
static warfare created demands for new
weapons. Initially the response was to make do,
with Pioneers and Engineers being called upon to
provide improvised devices generally termed
"hair brush grenades" as they tended to use a
wooden handle to which an explosive charge was
strapped, giving it the appearance of a lop-sided
stick grenade. However, by 1915 all major
nations were responding to the demand and
well-designed models based on practical
experience were finding their way to the front. It
is no coincidence that the iconic German stick
grenade, the Stielhandgranate, the British Mills
bomb and the French F1 grenade were all
designed in that first full year of the Great War.
With the formalisation of production and supply,
came the recognition that low-level infantry
tactics should be amended in order to reflect the
new addition to the infantryman's arsenal.
The bombing party specified in the 1915
publication The Training and Employment of
Grenadiers was led by an N.C.O. and made up of
two bayonet men who would take the lead when
attacking down a trench. Behind them would
come two bomb throwers who would be
supported by two bomb carriers, largely carrying
their supply of bombs in buckets and two spare
men carrying more bombs. The spare men were
tasked with keeping the bomb carriers well
supplied with bombs, but also to be ready to
deploy to replace losses as required. Behind
them would come the remainder of the platoon
with sandbags, spades and shovels, ready to
consolidate any gained ground.
Much has been written about the development
of infantry tactics during the Great War,
especially the evolution of German stormtrooper
tactics which are seen, somehow, as the pinnacle
of the art. In truth all three major nations on the
Western Front spent the majority of the war
learning from each other.
Capitain André
Laffargue's seminal work of 1915, Étude sur
l'attaque dans la période actuelle de la guerre,
which has been seen by many as being the first
serious work to consider infiltration tactics, was
translated into English and German within
months of it being published. Indeed, an analysis
of the training manuals used by United States
forces on their entry into the war confirm just
how much cross-fertilisation was prevalent with
British French and German manuals being
repackaged and distributed wholesale by the
Army War College in Washington.
On the schematic shown below, the bayonet
men, indicated by B1 and B, precede the lead
grenade thrower, T1, who is sheltered behind the
traverse. He is supported by Carrier one, C1, who
is immediately to hand, ready to provide more
bombs. Immediately behind them, controlling
the action, is the N.C.O. shown by the letter L. To
the rear are the second thrower, his carrier and
the two spare men. The rest of the platoon is
deployed behind that as discussed above.
As soon as the party enters the trench the
process of rolling up the position begins. The
Leader directs the first thrower to begin and he
throws multiple grenades as rapidly as possible
into the trenches at points X and Y. The leading
bayonet man is then ordered forward with the
command of "Report" and he moves into X and Y
to ensure that they are clear. The whole party
then advance forwards to repeat the same
It is clear from reading the tactical manuals of all
the major powers how the grenade was rapidly
embraced as the new weapon of warfare. For
Page 29
one spare man. The grenadiers generally were
selected from men with an "aptitude for sport"
whilst the assistants were "alert...good shots and
skilful in the use of the bayonet". Originally the
assistants had been termed riflemen, but the
French attempted to foster a sense of esprit de
corps within the grenadier squad, tasked as they
were with spearheading any attack. As a result
the term grenadier, with all that conveyed within
French military tradition, was adopted.
process at the next traverse.
Where a
communication trench is encountered, as we see
at Traverse 7 on the schematic, a second team
will be deployed to work its way up that trench.
Ideally, these will be men from a fresh section of
bombers, but if these are not available the
original bombing party will be split and Thrower
two and his second team will be detached to
undertake the task.
In defence, the British saw the grenade as a
weapon supplementary weapon. Even in 1915,
at the height of the "Cult of the bomb" which was
gripping the attention of the Army, it was
stressed that the primary weapons of defence
were the rifle and machine gun. However, it was
recognised that parties of bombers should be
deployed in the trenches to aid any counter
attack against enemy troops who had broken into
the front line trench. It was recommended that
the best way in which this could be undertaken
was by providing a second bombing trench
parallel to the front line trench and 20 yards to its
rear. From this position the Mills bomb could be
launched into a captured trench and an attack
repulsed, or at least blunted.
Where necessary the squad could break into two
teams, very much as we have seen the British
fighting in the above example, where four men
worked forward. However, their manual suggests
this was not the norm. Typically one assistant
would precede the thrower as in the British
model. Both throwers would position themselves
at the traverse supported by the carriers to their
rear. When they attacked one man would
engage the nearest enemy with grenades whilst
the second would seek to hurl his grenades deep
into the enemy trenches to stop the forward
movement of grenades through to the men
defending the position. This was an indication of
how the grenade was seen as the ultimate
weapon of trench clearance in French service. In
all other respects their function was identical to
the British plan of attack.
The French were remarkably similar in their
structure, with an N.C.O., usually a Corporal,
heading the Grenadier squad. This was made up
of two throwers, two carriers, two assistants and
Page 30
In the defence, the French saw the grenade as
providing a barrage which was capable not so
much of killing an enemy, but of blocking a route;
the French word barrage meaning to block or
dam. Key points in the defensive system were to
have a party of bombers provided. These were
specifically identified as salients, machine gun
positions and the junctions of communication
trenches. By defending these points any enemy
advance would be held up to allow a counterattack to be launched by reserves.
On the diagram above the German method is
shown with the Leader being at point b, the
bombers at a, the carriers at c and the second
team at d.
Like the British, the Germans emphasised that
the best weapons in the defence were the rifle
and machine gun. However, they also saw them
as the primary weapon of counter-attack once
the enemy had gained the front line trench. As
with the French doctrine, the Germans stressed
the importance of having bombing parties at key
points, they to stressed the importance of
defending machine gun positions and the
junctions of communications trenches. Their
doctrine
of
elastic
defence,
keeping
Eingreiftruppen - troops dedicated to the
counter-attack - ready for immediate deployment
was very much based on the aggressive use of
the grenade as opposed to the French barrage
which simply retarded any advance.
For the Germans, the Handgranatentrupp was
originally six men but by late 1915 this was
already seen as too weak and was increased to
eight men me plus a Leader, again normally a
junior N.C.O. This was divided into two distinct
teams, the first being made up of two bombers
and two carriers, the second of four men with
rifles, bayonets and 25 sandbags each. The first
group would operate under the command of the
N.C.O. who would personally take position at
point checking forward down the trench. On his
command the two bombers would deploy using a
very similar technique to the French, with one
bomber engaging the immediate foe, whilst the
second attempted to throw deeper in order to
stop any reinforcements or fresh supplies of
grenades being brought up. Only when the
advance was halted would the N.C.O. shout the
order "Sandsache Vor!" and the second team
would begin blocking the trench to the rear of the
bombers. Once the trench block was complete
the lead bomber team would withdraw to safety.
As we can see, all three drills are remarkably
similar in the attack, reflecting the common
doctrine established through cross-pollinisation
of ideas. However, this is to focus on the
similarities which exist in the area of trench
clearance. Important as this is, and in 1915 it is
pretty much the norm for all participants, it does
not reflect the key differences in attitude towards
the grenade going forward. As we have seen
with the defensive doctrines differences begin to
emerge which are key.
Page 31
Indeed, the concern was that by encouraging the
bomber to hide behind the traverse was hardly
an effective way of encouraging an offensive
spirit. Indeed, evidence suggested that when
firm opposition was met, and particularly one
who themselves had a supply of grenades, a
stalemate would result which would end any
progress for either side. Unlike the Germans, the
British attempted to seek a solution which was
less dependent on one singular approach. In July
1918 the British moved from their distinctive
platoon organisation with four mutually
complimentary sections of rifles, bombers, rifle
bombers and Lewis guns, to a structure which
saw all of those weapons incorporated into mixed
sections where the bomb was simply one option
which could be selected in a specific tactical
situation.
As early as 1915 the Germans were
experimenting with specialist assault troops. The
origins of these appear to be partially built on a
desire to develop and learn new techniques.
Many such units were, at the outset at least, seen
as a nucleus which would be taught "best
practice" and then disseminate that information
among their comrades. However, as the idea
developed it became a case of developing highly
trained units equipped for very specific tasks.
Hauptmann Willi Rohr Sturmabteilung of the
Garde Schutzen Bataillon was equipped with a
veritable arsenal of support weapons as early as
the Summer of 1915. This was to provide an
early indication of how, rather than spreading a
homogenous message through the German Army
as a whole, elite units would be allowed to
flourish and ensure an uneven spread of
resources.
What was equally important was the emphasis
these assault units placed on the hand-grenade
as their primary weapon of attack. The image of
the stormtrooper, laden with sandbags full of the
ubiquitous stielhandgrenaten present the
enduring image of the spring offensive of 1918.
The very name of Ernst Junger's opus "Storm of
Steel" reinforces that image further. Here we see
a distinct contrast with the British Army who,
despite a major emphasis on the bomb in 1915
and early 1916, were coming to very different
conclusions about its employment.
Reflecting after the war, Erich Ludendorf stated:
"The excessive use of hand grenades came
about because these could be usefully and
safely employed from behind shelter, whereas
a man using a rifle must leave cover...When it
came to hand-to-hand fighting, the superiority
of the enemy in men was much too great. The
infantry soldier had forgotten his shooting
through use of grenades"
By the time war broke out again in 1939, the
armies of the world had adopted the British
approach, recognising the importance of the
grenade, but not its absolute primacy.
A
situation which remains today.
Even before the battle of the Somme, training
Pamphlet SS110, Preliminary Notes on the
Tactical Lessons of Military Operations, stressed:
"It must be realised by all ranks that the rifle
and bayonet is the main infantry weapon.
Grenades are useful for clearing small lengths
of trench and for close quarter fighting after a
trench has been rushed; but no great or rapid
progress will ever be made by bombing, and an
assault across the open after adequate
preparation will usually be a quicker and in the
long run less costly operation than bombing
attacks on a large scale"
Gaming with Grenades
The grenade in the context of the Great War was
a useful tool for what the French defined as five
specific situations. Firstly, the defence of a
trench in close range fighting; secondly, the
systematic clearance of a trench; thirdly, the final
preparation for an assault on a hostile trench;
fourthly, mopping up troops in dugouts and
bunkers and, finally, when raiding a trench.
These are very specific situations, indeed I would
Page 32
had a throwing range of around 30 yards as an
absolute maximum, with 20 yards being more
likely. With a danger zone of 100 yards created
by the shrapnel this meant that the user needed
to be sure of having cover from which to operate
from.
go so far as to suggest that there is a whole lot of
overlap going on with several of those.
We do, of course, have two options here.
Through the Mud & the Blood are, of course,
devoted to platoon sized skirmishes in the period,
but we introduced the idea of using Chain of
Command with them in a hybrid in the last
Special . That concept is still very much a work in
progress but one which I feel is worth pursuing.
The emphasis on the specialist teams and squads
in the Great War makes the Chain of Command
option all the more appealing. However, here
was can look at both options
The French F1 grenade was, essentially, a smaller
version of the Mills Bomb, reliant on
fragmentation for effect but being slightly lighter
it could achieve greater ranges. "All except
awkward men" being able to achieve a range of
30 yards.
If we want to better represent the specific
weapons, we can translate these ranges into
inches and consider the explosive and shrapnel
effect if the weapons. This gives us the following
results for Mud & Blood.
What we attempted to do in the Summer Special
was to present a playable order of battle for the
main nations on the Western Front. Part of that
was to abstract the role of bombers slightly by
representing most of a bombing party as riflemen
whilst the dedicated bombers represent the
business end of the unit. To my mind this
abstraction works pretty well, but if we want a
more precise and less generic approach to
grenades we can certainly add some different
national characteristics to our games.
Weapon
Range
Stielhandgrenate
Mills Bomb
F1
12"
8"
9"
Effect
As rules
+1 Shock
As rules
In Chain of Command we are faced with a slightly
different mechanism as the throwing of grenades
is somewhat randomised. For the Great War,
where men were allocated to, and trained for,
specific roles, it seems reasonable to allow
dedicated bombers to be rather more reliable. I
would suggest that for these men we Should
simply apply the same range bands as Mud &
Blood. However, when untrained men have
simply been issued with grenades in the hope of
stemming the tide of an enemy attack (as often
happened) then we revert to the main rules in
Chain of Command, but simply limit the
maximum range to those shown.
So, an
untrained man with a Mills bomb rolling double
5, for example, would be capped at a range of 8".
The Hardware
Of course, when we discuss grenades in the Great
War we are not comparing apples with apples.
There are some significant differences which
affect the way in which they were deployed. The
German stick grenade was primarily a concussion
grenade, where a thin jacket of metal housed the
explosive charge and produced a limited amount
of shrapnel. In the confined space of trenches,
the effect of the explosion alone was usually
sufficient to kill of render ineffective anyone
within close proximity. The addition of the
wooden handle aided the thrower so that despite
being 1lb 5oz (around 600g) in weight, distances
of 40 yards could be achieved.
The Units
We can, of course, simply use the bombing
sections or parties identified in CoCking Up
Through the Mud & the Blood article in the
Christmas 2014 Special. However, if we wish we
This performance contrasts significantly with the
Mills Bomb which was a fragmentation grenade,
reliant on a shower of shrapnel for killing. With a
weight of 1lb 110z (around 750g) the Mills bomb
Page 33
indicate the barrage being deployed there. No
troops may move into this area.
can field more specific teams, as outlined above,
to see how they function on the battlefield.
These we can structure as follows:
BRITISH
GERMANY
BOMBER SECTION
Corporal, Junior Leader, with rifle
Two bombers
Two bayonet men
Two carriers
Two spare men with rifles
RIFLE GRUPPE ONE
Gefreiter, Junior Leader, with rifle
Eight riflemen
Two untrained bombers
ASSAULT GRUPPE ONE
TEAM ONE
Information on US organisation is hard to find. It
is an accepted fact that the bomber section
contained twelve men, but how they were
structured it is difficult to be sure. This is not
least the case because of the large amount of
manuals which were issued based on the
experience of the British, French and Germans.
Amongst that it is difficult to ascertain how, or
even if, a particularly American doctrine
emerged. What is certain is that all twelve men
in the bomber section would not be specialist
bombers and that, undoubtedly, some would be
operating as bayonet men and some as carriers.
My suggestion would be to use the structure
shown below, although, much to my annoyance,
this is utter conjecture:
Gefreiter, Junior Leader, with rifle
Two bombers
two carrier
TEAM TWO
Four riflemen with sandbags and entrenching
tools
Germany has two types of units here. Firstly the
rifle Gruppe in an infantry platoon. These count
as untrained bombers so use the grenade rules in
Chain of Command. The second unit, the Assault
Gruppe in a stormtrooper unit, represent bomber
specifically trained for that task and use the rules
shown above.
FRANCE
GRENADIER-VOLTIEGUR SQUAD
Caporal, Junior Leader, with rifle
Two bombers
Two carriers
Three riflemen
This force may be deployed as two teams as
follows:
One Junior Leader with rifle
One bomber
One carrier
One rifleman
SECTION ONE
This French unit replaces the Grenadier-Voltigeur
squad in the standard platoon. The French
should have a new national characteristic rule,
"Barrage", which allows them to block a 6"
section of trench between 3" and 9" from the
position of a Grenadier-Voltigeur squad or any
squad equipped with grenades in an emergency.
This does not kill any enemy, but that area of
trench is blocked with cotton wool or similar to
Conclusion
Corporal, Junior Leader, with rifle
Three bombers
Four Riflemen
Four carriers
The US forces were predominantly issued with
the Mk II "Pineapple" grenade which had a very
similar performance to the French F1.
Of course we can add very specific rules to cover
particular weapons or situations, as will be seen
in the Loos scenario below. However this article
does cover a broad sweep of the war from late
1915 onwards as the distinct doctrines emerged
and, I hope, will add some variety to our games.
Page 34
extreme and the politicians were embarrassed
when newspapers rightly flagged up the failure of
the attack at Aubers Ridge in May on the
government's apparently inability to resolve this
issue.
The Battle of Loos in September and October of
1915 is noteworthy for several reasons. It saw
the first British use of poison gas as well as being
the first large scale engagement to involve
elements of the New Army which had responded
to Kitchener's call and joined the ranks. Here
these one-time civilians would prove they had
the pluck of the regular troops who remained
from the original British Expeditionary Force.
By September 1915 the newly created Ministry of
Munitions was addressing the crisis, new
factories were being built and laws were passed
which ensured that sufficient labour was
available. However, the solution had yet to reap
benefits and when planning for the attack at Loos
it was clear that insufficient artillery shells were
available to provide the desired initial
bombardment. What was more, with chlorine
gas a new addition to the British arsenal, there
were insufficient supplies available to provide the
screen which was desired. At many places smoke
was to be used in an attempt to give the
impression of a gas cloud.
The attack was planned as part of a joint AngloFrench offensive which was, somewhat hopefully,
determined to end trench warfare and restore a
war of manoeuvre, with the French advancing
north in to Belgium and the British supporting
them by driving a wedge into the German lines
South of the La Bassée Canal.
As a third "first", the offensive saw the first major
use of specialist British tunnelling units who
planted mines under the German front line
trenches as well as digging Russian saps into NoMan's-Land to provide cover for the advancing
troops. On the one hand the attack at Loos had
all of the hallmarks of innovation and original
thinking, yet, on the other hand, there is clear
evidence that the British were being obliged to
put the politics of their alliance with the French
before stark military realities.
Despite attempts by British commanders to get
plans changed, the reality was that the French
Army leadership under General Joffre was
determined to take the offensive in order to deny
the Germans the initiative.
Despite the
misgivings of Sir Douglas Haig, commanding 1st
Army and tasked with heading the offensive in
the British sector, political expediency took
precedent over stark military logic when Lord
Kitchener insisted that the British role as
subordinate partner at this stage of the war, was
Since the beginning of the war, British industry
had been unable to keep up with the demand for
artillery shells. By mid-1915 the shortages were
Page 35
to their South the 15th (Scottish) Division would
attack Loos village before moving on to Hill 70 on
the ridge behind it. Finally the 47th (London)
Division was to seize the double Crassier, a huge
mound of mining spoil, which the Germans were
using for observation and which would for a flank
guard once seized.
to support the French wherever they could. The
attack was scheduled for the 25th of September.
As a sop to Haig's misgivings, it was announced
that the attack would be supported by a gas
attack in order to compensate for the shortage of
shells.
Despite the shortage, the British had
learnt at Aubers Ridge that only the heaviest of
guns could breach the German wire. Over 100
pieces were assembled with what shells could be
amassed for the task. Even so, it was accepted
that the materiel to hand was insufficient, making
the gas component essential. This saw a reliance
on the weather come to the fore as a positive
forecast for wind was required.
Once these forces had broken into the enemy
positions the British reserves would be unleashed
to advance into the open ground beyond,
exploiting the victory. Sir Richard Haking's XI
Corps was accompanied by the Cavalry Corps and
the Indian Cavalry Corps in forming this reserve
but, unusually, control of this body was not given
to Haig but retained by Sir John French,
commander of the B.E.F.
The Attack Begins
At this stage of the war the British were keen to
comply with the Hague Convention which
outlawed the use of gas shells. As a result the
140 tons of Chlorine gas which were to proceed
the attack were released from containers dug
into the parapet of the British positions, a
method entirely dependent on the weather. At
0500 on the morning of the 25th, Haig was still
unconvinced that the conditions were right. An
RFC weather specialist had declared them to be
favourable, but in the end the General was
obliged to get a staff officer to light a cigarette in
order to observe the drift of the smoke towards
the German lines. Only then did Haig order the
gas to be released at 0550.
To the north, in I Corps sector, 2 Division attacked
along both banks of the La Bassée Canal but were
met with heavy fire which completely halted their
attack. With no hope of pushing on to form the
flank guard along the canal, they fell back to their
start position and took no further part in the
action.
In the northern sector of the battlefield Hubert
Gough's I Corps was to initiate the battle by
detonating mines under the German mines on
the northern side of the canal before attacking
the lines to their front. The (9th Scottish) Division
was to take the Hohenzollern Redoubt, shown on
the map by a red letter H. The 7th Division on
their right was then to advance in sequence with
the 9th to secure the Lens road between Hulluch
and Haisnes.
To their South, the 9th (Scottish) Division were
enfiladed by fire from the German strongpoint at
Mad Point, marked with an M on the main map,
some units, such as 8 Black Watch, suffering
grievous casualties, but made much better
headway against the Hohenzollern Redoubt
where the wire had been cut efficiently by
artillery fire. This allowed them to bomb their
way through the redoubt before progressing on
towards Fosse 8, the pit head which provided the
German artillery with their main spotting
position. Soon after 0800 some elements had
progressed as far at Pekin trench on the outskirts
of Haisnes but were unsupported due to
confusion which led other Battalions to believe
that that position had been captured and was
held in strength.
To the South Sir Henry Rawlinson's IV Corps was
to attack with the 1st Division was to strike out
for the Lens La Bassée road around Hulluch whilst
Across 9th Division's front what had been a
strong opportunistic advance was now left
incoherent and pinned down as small but
Page 36
over their lines where the troops were assembled
ready for the assault. The enemy wire was then
discovered to be undamaged and the attack
stalled when attempts to cut the wire were
thwarted by German machine gunners. As the
gas and smoke cleared the whole Brigade's attack
was stalled and, unsupported the 1st Brigade cold
not push on any further.
efficient German reinforcements were brought
forward in the late morning.
The Southernmost Division in I Corps sector was
the 7th Division which struggled to move forward
due to lingering gas combined with inefficient gas
hoods. The 1 South Staffordshires and 2 Royal
Warwicks lost around three-quarters of their
strength to artillery and machine gun fire before
they got to the German front lines.
Yet
elsewhere other units were more successful.
Before 0900 some men were crossing the Lens
road and moving into Hulluch and against
German positions at Cite St Elie. However, this
was to be the high water mark in this sector as
German reinforcements meant that the troops
could not push on without reinforcements.
To the South of the 1st Division, 15 (Scottish)
Division was badly delayed when the gas cloud
failed to move forward with the anticipated
speed. In the end the infantry were obliged to
advance through the gas cloud to emerge into
the open with over a hundred yards still to cross
before they reached the German lines. Machine
gun and artillery fire decimated the ranks of the
attackers but aggressively led parties of men
worked their way forward and rolled up the front
line trench with bombs, opening the route
forward to capture Loos village which fell by
0800. The main Lens-La Bassée road was reached
In IV Corps sector, the 1st Division had mixed
fortunes. The 1st Brigade advanced through
heavy fire to capture their objectives, but to their
South the 2nd was delayed when gas drifted back
Page 37
much debate about the positioning of the reserve
at Loos, suffice to say that in a situation where
any delay was critical, this served to retard the
move forward considerably. What was more,
French retained command of the Corps until the
point when it arrived in the front trenches, only
then could Haig issue his orders. As the force
advanced along communications trenches these
were found to be crammed with wounded men
and it was 1320 before the Corps informed Haig
that they were under his command.
by 0915 and elements of the Division were able
to take up the flank guard position which, as yet,
had not been assumed by the 47th Division.
On the extreme right, in the 47th Division's sector
the gas cloud moved according to plan with the
Germans caught before they realised what was
happening. The Double Crassier was secured and
However, units pushing forward were badly
handled by machine gun fire and localised
counter attacks with grenades stopped them
seizing their target position South of Loos where
they were to have formed a flank guard.
By now 15 (Scottish) Division which had been so
successful in taking Hill 70 had been ejected from
that position by a counter-attack and a line of
machine gun positions established along the La
Bassée to Lens road. Fresh attacks against Hill 70
were repulsed during the afternoon without
problem.
The highlight of the morning in IV Corps sector
came when the 15th Division seized the redoubt
at Hill 70 to see the Germans retreating in poor
order. These troops began to advance down the
far side of Hill 70 but fire from the German
secondary positions brought this to a halt at
around 10.30, with many British troops exposed
with little or no cover. Now a lack of shells
prevented the British reacting with adequate
force to the newly identified German positions
which were beginning to cause significant
casualties. What was desperately needed were
reinforcements to provide some additional
impetus.
To the North of Hulluch the 1st Division was
obliged to withdraw due to casualties, leaving
only a screen of men holding their positions.
However, it was not all bad news. At 1430 four
hundred men of the German 157th Infantry
Regiment surrendered, opening up a fresh route
for the reserves to use. Two Divisions from XI
Corps were ordered to push through between
Hulluch and Cite St Auguste, but again delays
meant that these orders were not issued down to
Brigade level until 1700. By the time the orders
were processed down to battalion level it was an
hour later and darkness was approaching. What
was more the men had not been provided with
any food. Orders were now issued by First Army
for the men not to advance beyond the Le Bassée
road that night, but again it was nearly 0200 on
the 26th before that got through. This nicely
illustrated the issues faced by commanders
without effective means of communicating with
their subordinates, especially once an advance
got underway and fixed wire telephones were left
behind.
Command or Control?
Sir John French, commander in chief of the B.E.F.,
was no fool, he had secured a reputation as a
competent leader in the Boer War, a theatre
where reputations were more often lost than
made. As early as 0845 on the 25th of September
Haig had sent a messsage to French requesting
the release of XI Corps to support the attacks. All
of the Corps reserves had been committed by
that point and it was clear that progress was
being made but that it was patchy.
Unfortunately French had abandoned his
headquarters and his staff to be as close to the
battle as possible and, with limited
communications, this proved to be a disaster.
Whilst French agreed to release Haking's force he
drove to deliver the order in person. There is
By the end of the day, I Corps had made no
progress in the North as far as Mad Point, but had
seized the Hohenzollern Redoubt from where
Page 38
what it seemed and declined to advance. Had XI
Corps been in the reserve trenches that morning
rather than several miles to the rear there is
undoubtedly the illusive chance that Loos would
be remembered as a great success as opposed to
simply another stage in the learning process
which would, eventually, see the British Army
develop the right range of skills required to gain
that final breakthrough some three years later.
they held a line, albeit a tenuous one, out
towards Hulluch. IV Corps Held its ground from
the Double Crassier in the South, had captured
the village of Loos and held outposts facing
Hulluch.
For Haig and the British forces the 26th was to be
the moment when XI Corps would make a
difference but, as was so often the case, the
opportunity for real gains only came when the
attacker benefitted from initial surprise. In fact
21 and 24 Divisions spent most of the night
struggling forward whilst the Guard Division had
not even arrived on the battlefield by the
following morning.
The Seaforth Highlanders - A Case Study
All of this is, of course, very much the "big
picture" which provides us with the context of
the overall battle, or at least the critical first day.
As we know, Mud & Blood and Chain of
Command focus more on the detail at the tactical
end of the operation where was can replicate the
nuances of conflict at this stage of the war. To
my mind, it is only by looking at the fine detail of
any conflict that we can truly understand its
unique features and that involves taking a more
focussed approach on what is happening at the
sharp end.
British attempts to break through at Loos
continues for two more days but with little
success. The following two weeks saw the
Germans counter-attack in order to try to regain
the ground lost. History considers Loos to be a
stalemate, indeed if one considers the casualties
over the period of the battle to the 15th of
October when fighting finally fizzled out, the
British lost significantly more men than the
Germans, 59,000 men to 26,000. However, it is
worth considering that the French attack at Lens
on the 25th was launched not in synchronicity
with the British attack, but around six hours later
at midday. By the time the Germans reacted to
the French offensive, the British had reached
their high water mark and were, to all intents and
purposes retreating. Had the roles been reversed
and the British attacked at midday, it is unlikely
that German reserves could have been spared
with a major French offensive occurring in the
same sector of the front.
To do this we will look at the 7th battalion
Seaforth Highlanders who attacked as part of the
26th Brigade of the 9th (Scottish) Division against
one of the most formidable points in the line, the
Hohenzollern Redoubt. Here I shall turn to their
Regimental History to set the scene:
"The morning of September 25th broke dull
and grey. The wind was light and variable,
veering between south-west and south, and
seemed little favourable to the use of gas,
which it had been decided to employ for the
first time against the enemy. Until the last
moment there was some doubt whether the
original programme would be followed out.
Nevertheless at ten minutes to six a.m. the
gas cylinders were turned on. After some ten
minutes a smoke screen was sent up from the
British trenches. Then after an interval, the
cylinders were turned on again full blast. Two
minutes before the time fixed for the assault,
the gas was stopped ; the air was thickened
up by triple smoke candles ; and our men
As it was, the poor positioning of reserves too far
to the rear and the insistence of Sir John French
on retaining control of these leaves Loos as one
of the great "what if's" of the Great War. At 1240
on the afternoon of the 25th of September the
British 3rd Cavalry Division was ordered to move
forward to achieve the longed for breakout. As it
was its commander, Major-General Briggs,
recognised that the opportunity was not quite
Page 39
8th Gordons, who had been in support, went
through them and carried on the attack. The
7th Seaforths had orders to stay where they
were and convert their trench into a fire
trench, at the same time making ready to
deal with a counter-attack. They had lost
touch with the Camerons on their left in the
course of their advance, and their position on
that flank was insecure until a battalion of the
Black Watch came into line with them. They
had lost their colonel and their adjutant at
eight o'clock that morning. All four company
commanders had been killed or wounded
early in the action, and most of their officers
had become casualties. All day they were
exposed to a murderous shrapnel fire, but
the behaviour of the men was beyond all
praise."
climbed out of the trenches and lined up
behind the smoke barrier in readiness for the
attack, which had been timed for twenty
minutes past six.
(T)he 7th Battalion left their trenches over
against the Hohenzollern Redoubt. As they
advanced at a steady walk behind clouds of
smoke, machine-gun fire was opened on
them and a few men went down under it.
Then, quickening their pace, they bore down
upon the Redoubt. At its first trench they lost
a good many of their officers. Nevertheless
they continued to advance, and bombed their
way up the communication trenches leading
from the Redoubt to the main German
trench; pressed forward and went right on to
the Trois Cabarets between Fosse 8 and the
village of Haisnes. Here they stayed and
waited until the two front companies had
been reinforced by the remainder of the
battalion. It was now half-past seven, and the
The battalion had first advanced against the West
Face trench of the redoubt, shown on the
detailed trench map above. The machine gun fire
Page 40
the four scenarios presented as stand-alone
games.
they had encountered was from German
positions in the Big Willie trench which was not
engaged in the first stage of the operation.
THE CAMPAIGN LADDER
With the West face cleared they bombed their
way through the redoubt's trenches, clearing
dugouts as they went, following which they
bombed up the communication trench to the
main German front line trench. There they
entered the area of the Corons, cottages built by
the mining companies in the area to house their
workers. This area was made up of five rows of
cottages which were partially fortified as part of
the German defences. Here machine gun fire
from the North West swept the streets but the
Seaforths cleared the area and continued their
advance through the colliery at Fosse 8 and on to
the crossroads at Les Trois Cabaret where they
went firm and assumed a defensive stance. As
attested to in the passage above, it had been a
hard day, with high officer casualties, and yet the
battalion had endured and fought its way deep
into the enemy defences.
The Master Map, shown below, shows the four
"rungs" of the campaign. These are as follows:
Rung
1
2
3
4
Name
Attack on the Redoubt
Bombing down the line
Through the Corons
Taking the Colliery
Scenario
3
4
4
5
SETTING UP THE CAMPAIGN
This campaign looks at the spearhead of the
attack and is very much about the British
attempting to keep up the momentum of their
attack to complete the campaign. If they clear
the colliery at Rung Four within five games, they
will automatically take up their position at Les
Trois Cabarets and win the campaign.
On the German side, their job is to cause attrition
which will slow down the Seaforths to the point
where they fail to push through to their objective
by the end of Game Five. As such the margin of
error for the British is a slim one.
All stirring stuff, but what appeals most to me
about the Seaforth's day is that they end up
fighting through some very different terrain. The
initial assault is a classic attack along a front line
trench, clearing dugouts as they go. Next is the
attack down the communication trench, again a
task for bombers, before they move on to a semifortified street clearing operation in the Corons
and then a fight for an open industrial area. This
is a chance to sample some very different fighting
in a small, pint sized, campaign!
The British player has three platoons available for
the game, representing the fact that large
numbers of men were delayed in clearing out the
Hohenzollern Redoubt and, in the chaos of
trench warfare, the cohesion of the battalion was
lost and small groups pushed on to achieve their
objectives on their own initiative. Only one
platoon may be committed to attack in each
campaign turn. No platoon may attack in
consecutive turns; however a player may defend
in any number of consecutive turns.
CUIDICH'N RIGH - HELP THE KING
This is a four stage ladder campaign in the style of
the Pint Sized campaigns and takes its name from
the Regimental motto of the Seaforth
Highlanders. It's a short campaign, set over just a
few hours and in a particularly Great War
environment, so consequently has some
peculiarities to it. As a result you really don't
need At the Sharp End to play this through;
indeed if preferred you could simply play through
There are no reinforcements available to the
British during the campaign, nor may the player
amalgamate any platoons during the campaign.
The German player has one platoon at the start
of the campaign and may deploy a second
platoon as reinforcements at any point in the
Page 41
At any point in the campaign where they hold the
initiative, the Germans may not launch a counterattack but they may add one point of additional
defences to their table for the next game only.
This will then surrender the initiative to the
British who must then attack.
campaign. When this fresh platoon deploys the
original platoon is removed from play.
At the end of each game, casualties are
determined according to the rules in At the Sharp
End, but with the time available being limited no
wounded men will ever return to their units
during the course of the campaign. If not using
At the Sharp End, simply count one man in every
three lost in any game as simply having been
shaken and allow him to immediately return to
duty. Round up for any odd numbers.
ARMY LISTS
The following basic platoon lists along with the
accompanying support lists are used for this
campaign.
INITIATIVE
The campaign will being with the British player
holding the initiative and attacking in Game One.
After that, who holds the initiative will depend on
the result of the previous game.
Page 42
BRITISH
Command Dice: 5
BRITISH NATIONAL CHARACTERISTICS
PLATOON HEADQUARTERS
Lieutenant, Senior Leader, with pistol
Sergeant, Senior Leader, with rifle
THE PLAYING FIELDS OF ETON
RIFLE SECTION ONE
The British Army’s emphasis on sports and
physical fitness, combined with their officers
being chaps who know how to play the game,
will allow any assault lead by a British officer
using two Command Initiatives to add an
additional D6 of movement. This will not
count as an additional dice of movement
when calculating the defender’s close combat
dice.
Corporal, Junior Leader, with rifle
Ten riflemen
BOMBER SECTION
Corporal, Junior Leader, with rifle
Two bombers
Two bayonet men
Two carriers
Two spare men with rifles
RIFLE SECTION TWO
Corporal, Junior Leader, with rifle
Ten riflemen
RIFLE SECTION THREE
BRITISH BRIEFING
Corporal, Junior Leader, with rifle
Ten riflemen
This is a major attack and it is absolutely critical
that we advance to achieve our objectives as
rapidly as possible.
We must clear the
Hohenzollern Redoubt, advance down the
communication trench to the enemy's main front
line trench before moving into the coal mine,
clearing the workers cottages before taking the
colliery itself. Remember, the bomb is your
friend in close quarters but the rifle and bayonet
will do the work when we get to the open. Good
luck!
If the British player wishes, he may equip one or
two riflemen in each Rifle Section with bombs.
However, these men will be untrained bombers.
The following very limited Support Options are
available for this campaign:
BRITISH SUPPORT LIST
LIST ONE
GERMAN
Engineer Wire Clearing Team, 3 men
Adjutant
Trench block or French Wire
Command Dice: 5
PLATOON HEADQUARTERS
Sergeant, Senior Leader, with rifle
LIST TWO
Stokes 3” mortar firing smoke from off-table
RIFLE GRUPPE ONE
The Stokes mortar was used for the first time at
Loos to deliver smoke. This option is only
available in Game One and will allow the player
to place a 12" square section of smoke anywhere
on the table at the start of Turn One. Troops
moving in smoke may never do so at the double.
Gefreiter, Junior Leader, with rifle
Eight riflemen
The British are using the Mark 1 hand grenade for
this game which should be treated as the German
stick grenade as covered in the Handgranaten
article.
RIFLE GRUPPE FOUR
RIFLE GRUPPE TWO
Gefreiter, Junior Leader, with rifle
Eight riflemen
RIFLE GRUPPE THREE
Gefreiter, Junior Leader, with rifle
Eight riflemen
Gefreiter, Junior Leader, with rifle
Eight riflemen
Page 43
The following support options are available.
GERMAN NATIONAL CHARACTERISTICS
GERMAN SUPPORT LIST
LIST ONE
HANDGRANATEN!
The German army used the hand grenade as
their close quarter weapon of choice.
Adjutant
Trench block or French Wire
To reflect this, when a Leader attached to a
Team or Squad uses two Command Initiatives,
he may lead a charge against any enemy
within 12” preceded by a hail of grenades.
Roll 1D6, subtracting 1 if the enemy is in light
cover, 2 if in hard cover. On a roll of 1 or 2,
one hand grenade has hit the target unit; on 3
or 4, two grenades hit; on 5 or 6, three
grenades hit the target. Roll for the effect of
these and the Team or Squad may then move
with up to 3D6 to try to initiate Close Combat.
LIST TWO
Sniper Team
Reserve case of grenades
LIST THREE
SOS barrage
Maxim 08 MMG with five crew and Junior
Leader
Off-table Machine Gun
Wood and sandbag bunker (hard cover)
LIST FOUR
Concrete bunker
The off-table machine gun option may only be
selected for Scenarios 1 and 2.
THE SCENARIOS
The scenarios below are not designed to present
perfectly balanced forces on both sides, we do
not quote the Platoon Force Ratings for each
scenario, but we have used these to determine
the level of support available. For each scenario
we have provided the players with the total
Support Points which they may use to select from
the campaign specific support lists.
The reserve case of grenades is sufficient to equip
two men as untrained bombers for that one
game. It must be placed at a key point on the
table, in a bunker, at a trench junction or
machine gun position. The Gruppe which wishes
to convert two riflemen to bombers must move
to that point in order to take advantage of this
option.
GENERAL TERRAIN NOTES
We have provided specific but limited terrain
notes for each scenario but some general
remarks will prove helpful. This is summer of
1915 where a shell shortage has been gripping
the British Army for nearly a year. As a result this
is not the shell shattered landscape which many
people associate with the Great War. Instead a
few shell holes should be randomly distributed
around key points, such as crossroads or the main
colliery complex, but largely the ground is
undisturbed grassland with trenches carved into
the chalk. If you want to be very specific, for a
game at a show or convention for example, all
the trenches should have white chalky spoil
around them where they have been dug out.
Where buildings are present, the wood and
sandbag bunker option can be used to convert
one to a strongpoint, as opposed to building a
separate bunker.
GERMAN BRIEFING
The British are attacking and the Devils are using
gas! You must attempt to delay them for as long
as possible as you are certain that a counterattack will be launched quickly.
At every
opportunity inflict maximum casualties on the
Englanders!
You have one chance for reinforcements during
this campaign. Choose well when to call for
these.
Any buildings present are largely intact. Roll a
dice for each house and on a 6 it should have
Page 44
suffered some fairly major damage, but the rest
are largely intact.
Scenario 1
Any roads are dirt tracks or cinder but all are hard
ground and good going at this time of year.
All of the scenarios in this supplement can be
played on a 4' by 4' board. We have found that a
smaller table suits the close quarter actions of
the sort represented here.
Chain of Command Option
For the Patrol Phase in any game in this
campaign, limit the movement of the Patrol
Markers to 9" with the maximum gap between
them limited to 9" as well. A 12" distance from
the enemy still locks down the Patrol Markers
The table represents the West Face of the
Hohenzollern Redoubt. The short "tabs" coming
off the trench running towards the North show
the entrance to dugouts which will need to be
cleared.
Mud & Blood Option
Use Blinds as normal with Mud & Blood.
The following illustrations show all four tables
which will be used in the campaign. We have
intentionally
left
these
as
schematic
representations as, with any game involving
trenches, the layout the gamer actually uses will
largely depend on the terrain they have available.
Try to get as close to the diagrams as possible
with what you have.
Roll 1D3 (D6 halved) for the support available for
both sides. If the German player selects a Maxim
MMG he play place one strongpoint anywhere on
the table to house this.
There is no Patrol Phase played for this game.
The Germans begin the game placing three jumpoff points anywhere on the table within the blue
dashed area. The British then place three Jumpoff points anywhere on their table edge. These
should be a minimum of 7" from the front line
trench, so they cannot deploy directly into the
trench on Phase One.
The German Patrol Marker deployment option is
shown with the blue dotted area, the British with
the red arrowed line. All Patrol Phases are
undertaken as indicated in the rules with the
changes outlined opposite. The support options
for each scenario are noted below each map.
In the Christmas Special for 2014 we outlined
some specific additions to the basic scenarios for
using Chain of Command for the late Great War.
These revolved around adding fortifications to
the battlefield. Ignore those for this early war
campaign, any instructions for additional
fortifications will be included in the notes for
each scenario.
This game begins in a cloud of gas and smoke.
For the first turn, both sides must wear gas
masks, this means that no troops can move at the
double in that turn and all firing (and spotting if
using Mud & Blood) is done with a -1 to hit. This
does not affect bombing.
All gas and smoke disperse at the end of the first
Turn and do not return for the rest of the
campaign.
Page 45
This represents the British attack through the
mining cottages, carons as they are know. The
buildings are in relatively good order (dice to see
which are damaged). It doesn't matter whether
these are single or double storey buildings - use
whatever you have in your collection. In reality
they were small cottages of two storeys standing
in gardens which were now overgrown or full of
the detritus of war. Add piles of chalk where
trenches have been dug through the area as well
as ammunition stockpiles and similar.
Scenario 2
Roll 1D3 (D6 halved) for the support available for
both sides but add +2 to the German score. This
is a delaying action and all of the normal scenario
rules apply.
Scenario 4
This game represents the British player
attempting to clear the German communication
and main front line trench.
Roll 1D3 (D6 halved) for the support available for
both sides but add +2 to the German score. If the
German player selects a Maxim MMG he play
place one strongpoint anywhere on the table to
house this.
The British player must move down the
communications trench and leave the table via
the point marked with the red star. He may elect
to clear out the main trench which goes off to the
West or may simply block that section of trench
with a suitable trench block. This is a delaying
action and all of the normal scenario rules apply.
This table represents the colliery yard and should
look pretty industrial and grimy. The railway line
running through should have piles of coal and
boxes stacked alongside and the area should
generally be busy with piles of rubbish and
mining gear. This is not an empty parade ground!
Scenario 3
This is a flank attack, as indicated by the
deployment areas shown.
WINNING THE CAMPAIGN
For the British, victory is about breaking through
the German positions to reach the open ground
to the rear. However, there are time constraints.
If the Germans can stop the British completing
that task by the end of Game Five then they will
have held for long enough for reinforcements to
arrive. If they do that then they win the
campaign.
Page 46
Army of the Republic) with the “Mixed Brigades”
as the main combat unit.
INTRODUCTION
The Battle of Seseña is a much neglected episode
of the Spanish Civil War, being a failed Republican
attempt to stop the Nationalists offensive over
Madrid in late October 1936. However,
Interestingly, it represents the first fairly large
armoured action since the First World War, the
first tank-versus-tank battle of the Spanish Civil
War and the debut of the Soviet T-26 in the
theatre operations; the most powerful tank used
in this conflict.
Internationally, with the Italian Fascist and
German Nazi governments openly supporting
Franco's rebel camp, the USSR took a similar step
to assist the Spanish Republic, and by midOctober the first cargo naval convoy arrived at
Spain's Mediterranean harbours with planes,
weapons and, remarkably, 50 brand new T-26
tanks. Soviet and other foreign communist
advisors also flocked into the Republican heldterritory, to train the nascent Popular Army in the
use of these modern weapons.
This is a combined Big CoC and CoC España
scenario. The photos included in this article were
shot at the game played at Club Dragón in Madrid
just before Christmas 2014. Most of the models
and vehicles were painted by Kate War Painting
from the collection of our club-mate Julio
Martínez
Following a short period of training and
concentration, a first Republican operational tank
unit was hastily launched into combat, thanks to
pressure from the Soviet advisors, given the now
evident risk of Madrid falling to the enemy before
the end of October.
HISTORICAL BACKGROUND
Following the fall of Toledo to the hands of the
Nationalists forces in late September 1936,
Madrid became now the next objective of
Franco’s Army of Africa columns. These
approached the capital city almost unmolested,
as the moral of the Republicans crumbled and by
late October they were to less than 100 km away.
The Republican plan was to cut the road linking
Madrid and Toledo with a main axis of attack in
the South through the Seseña-Esquivias-Illescas
road. The attack will be executed by Lister’s 1st
Mixed Brigade and the columns of Burillo and
Uribarry (a collection of irregular militia, Assault
Guards and Army units retreating from Toledo)
together with Greise’s tank column.
Something was however already changing within
the Republican field as the Government
attempted to reign over the workers
organizations and to make a more efficient use of
the available military resources. A very significant
step in this direction was an October decree
forcing the militarization of the militias, creating
the Ejército Popular de la República (Popular
A diversionary secondary action in the North
aiming to pierce the front at Griñón was also
planned. October 29 was decided as the day of
the attack.
Page 47
At this stage of the war, the Nationalists were
supremely confident to a point where they
became overconfident. By now they were used
to see the Republican forces retreating in
disorder, if not routing, whenever they attacked.
Morale soared at its peak and they failed to grasp
the threat to its main supply line of such a
potential attack.
they were expecting the arrival of an Italian
armoured column, and by the time they reacted
it was too late and the tanks had crossed the
town almost unopposed, firing at the houses,
destroying artillery positions and overrunning the
transport vehicles used by the Nationalists
columns concentrated in the central plaza of the
village.
The T-26’s 45mm gun provided clear superiority
to the flimsy and lightly armed German Panzer I
and Italian CV 33 which had dominated the
battlefield up to that time. However, after a
promising start, the attack completely failed due
to the lack of effective coordination between the
infantry forces and the tank unit committed to
the battle; an intrinsically difficult action even for
much better trained armies.
The column continued along the road towards
the village of Esquivias as planned, where a
similar panic scenes were seen; the Italian
armoured column arriving into this town could do
nothing, being outgunned and their vehicles
lacking any effective protection against the
Russian tanks firepower. Only one of the
Republican tanks was put out of action and after
a long firing duel with a Nationalists artillery
piece, killing the tank crew after hitting the tank’s
turret base.
On the day of the attack, a column comprised of
fifteen T-26 tanks moved straight into Seseña
emerging from the an early morning mist. The
Nationalists defenders were totally confused as
At Seseña in the meantime, the Republican
infantry reached the outskirts of this town
Page 48
following the tanks at distance, but were pinned
in the village outskirts by the now recovered
defenders. The Nationalists halted the infantry
attack and retained the control of Seseña.
Captain Ricardo Arjona’s 75mm field artillery
battery.
Captain Vidal Quadras tank column (Italian CV 35
vehicles) moving towards Esquivias
Later that afternoon, with no sign of the expected
supporting infantry units, the Republican tank
column retraced their way back and entered
Seseña again through the main road instead of
bypassing it. But this time the defenders were
ready and some of the tanks were knocked out
with improvised Molotov cocktails in close
combat.
Republicans
On the Republican side the force was made up of
the fifteen tank column led by Major Paul Arman
“Greisser”, Enrique Lister’s 1st Mixed Brigade
(made of former 5th Regiment communist
elements) and the Burillo and Uribarry columns
as described above.
At the conclusion of the day, the Republicans
have lost three tanks and ten crew members, plus
and undisclosed number of infantry casualties;
the Nationalists lost twelve guns, 16 vehicles and
had sixty casualties. The objective of the attack,
to cut the Nationalists supply lines, was not
achieved and the Republicans failed also to make
any territorial gain, the tanks being unable to
hold the ground which they had won.
THE SCENARIO
According to the memoirs of Enrique Líster,
commander of the Republican 1st Mixed Brigade
participating in the attack, the operation failed
due to the lack of experience of both the tanks
and infantry in conducting combined attacks; the
tanks just charged forward and did not destroy
the enemy’s fortified points of resistance, thus
explaining the inability of the infantry to follow
later after the defenders recovered from first
impact of the surprise attack.
Victory Conditions:
Scenario type:
This is an “Attack on an Objective” scenario six
type of the Chain of Command main book.
Supports for both sides are calculated according
to the scenario instructions and the Big of Chain
of Command rules, taking into consideration the
specific features of the units involved (see the
Chain of Command España supplement).
Republican player: win if Seseña is controlled
with at least one infantry unit at the end of a turn
AND at least 1 Republican AFV must have
reached and entered Esquivias
Nationalists player: win if preventing the
Republicans victory.
Forces
(see map for deployment and notes):
On the Nationalists side, the attack is consider as
a minor secondary action and merited just a few
lines in most of the post-war histories and
publications.
Republican Units:
(1) “Greisser” Tank Column: four T-26, start the
game in a column formation on the road to
Seseña
FORCES INVOLVED
(2) Líster 1st Mixed Brigade: use the 5th Regiment
list for organization and support options. Deploy
in point “B” to the right of the road to Seseña
Nationalists
Seseña: held by a foot section of Lt-Col Cebollino
cavalry column (Escuadrón Villarrobledo), several
Moroccan infantry sections (one “Harka” of
Tiradores del Rif and two “Harkas” of the Mehalla de Melilla), a navy infantry (marines) weapons
section (sección ametralladoras) supported by
several artillery pieces. A total of 700 men
commanded by Captain Sánchez Pérez
Esquivias: held by a cavalry detachment
commanded by Lt Col Cebollino supported by
(3) Columnas Burillo and Uribarry: use Militia list
for organization and support options. Deploy in
point “A” to the left of the road to Seseña
Nationalist Units:
(1) Seseña garrison: Captain Sánchez Pérez
Moroccan units. Use the Regulares lists for
organisation and support options (no armoured
support available)
Page 49
(2) Esquivias garrison:: Lt Col Ceb
bollino cavalry
a an on-bo
oard 75mm gun
g piece. Use
U
squadron and
the Cavalryy lists for organisation
o
and suppo
ort
options (no armoured support is allo
owed)
Nationalists
(A
A) Seseña garrison: can
nnot fire in the first 2
acctivation phaases but can
n roll dice to
t move, go
o
taactical or to
o accumulatte Chain off Command
d
po
oints.
(3) Captain
n Vidal Quaadras tank column: fo
our
Italian CV33, three wiith MGs and one with a
flamethrow
wer). Deploy at point “C””
Special Ru
ules:
(B
B) Esquiviass garrison: the cavalryy unit willl
acctivate when
n the Republicans tanks are
a at 12” off
th
he town limitts; the gun w
will be operaational threee
ph
hases after the first cavalry activation
n.
Being a hisstorical scen
nario, the patrol phase is
forfeited an
nd the unitss must deplo
oy in the fixed
locations in
ndicated in the notes above
a
and the
map attached.
(C
C) Captain Vidal
V
Quadraas tanks: the armoured
d
co
olumn will be
b released only after the cavalryy
un
nits at Esquivvias are activvated for the
e first time.
Republican
ns:
(A) Historiccally, Greisseer’s tank column operated
along the road.
r
To sim
mulate this situation
s
tan
nks
can only move
m
along the road with
w
any tank
operating at
a a maximu
um 12” distaance from the
road.
(B) The Rep
publican infan
ntry will activate only aftter
all operatio
onal tanks had crosseed and exited
Seseña tow
wards Esquivias.
Page 50
Straight Out of Central Casting
Adding pilot personalities to your games of Bag The Hun
by James Crate
"Johnny walked into the bar with his
kitbag in hand and his jacket draped
over his arm. He peered around the
dim smoke filled room seeing
numerous characters in different
variations of uniforms and flight
gear. In the corner, a card game had
drawn some loud customers,
including one who announced to the
crowd that tonight was his night.
Near the bar, a tall chap with a
pencil thin mustache chatted up one
of the few females to be found. In
the back of the room an older hand
(probably 25 years age) peered over
his drinking glass at the new arrival
with the hawk like eyes of a hunter.
So this was his new squadron. He
didn't know any of the men from his
previous squadrons, but he certainly
knew the type."
which can be used with Bag the Hun
or any other table top miniature war
game. They will allow walk up
players at a convention or club game
to have a bit of fun and add some
personality to their table top missions
even if they are only playing a oneoff.
Air gaming differs from some of the
other some conflicts that arrive on
our tables in that it is really about
individual combat. And because of
this, air gaming often takes on an
element of role playing that other
types of miniature games sometimes
do not.
Unknown airfield somewhere near
the action.
Joe Legan's Squadron Forward did a
great job of capturing this dynamic
and providing a framework for not
only generating random World War II
scenarios, but for generating an
entire squadron to shepherd from
mission to mission. But what about a
one time club, convention or pick-up
game? If some of your players are
only going to be around for one
afternoon or evening, how do you get
the players invested in a one-off
mission? Can you do Squadron
Forwardone night only? With this
supplement to the supplement - you
can!
The Skipper. The Ladies Man. The
Glory Hound. The New Boy. We all
know the types. We've seen them in
countless movies and books. But
even for a crowd that knows the
difference between real war and reel
war, these familiar characters have a
certain appeal. And if you've read
any pilot autobiographies or even
served in a real squadron, you know
that there's a certain element of
truth or recognition in these
archetypes. These familiar
characters from both reel and real
life will serve as the jumping off
point for this air gaming supplement,
Page 51
Straight Out of Central Casting
provides you with a roster of stock
characters with varying personalities
and motivations that are familiar
enough through books and movies
that when assigned to new or pickup
players they feel like they instantly
know them and their back-story
without having to create one out of
whole cloth or having been with them
from mission to mission, weekend
after weekend. The idea is that you
can set up a table at a local
convention or club night and get walk
up players invested in the story line,
even though they may only be playing
that one mission or visit.
Pilots
The pilots are described in the format
of their type (The Skipper, The New
Kid), followed by their personality
and interest, just as in “Fighting Joe”
Legan's Squadron Forward. Note that
personalities or interests that were
not in the original Squadron Forward
tables are italicized. Afterpersonality
and interest follows a brief
description, their “reel” versus “real”
inspiration if applicable, and finally,
any specific PVCs or behaviors they
may have.
Additionally, some of the characters
have different sets of Personal
Victory Conditions (PVC) which
hopefully leads to some interesting
behavior on the table top. Gone are
fearless warriors zorching around
trying to run up the score. Now your
PVC might be just survival, revenge,
or making sure the bombers get
though. What happens when one side
has mission objectives, but all of the
pilots have competing individual
victory conditions? Hopefully an
interesting game.
The Skipper
Demanding, Career.A veteran professional
who’s hard on the men in hopes they'll
survive.
Reel Inspiration: Robert Shaw, Battle of
Britain; John Wayne, Flying Leathernecks.
Other pilots will not have PVCs, but
rather suggested behavior traits to be
used during the game.
Real Inspiration: ‘Sailor’ Malan.
PVC: Always seeing the big picture, his
victory conditions are the same as the
overall scenario victory conditions. If
none given, then his victory conditions are
to ensure his side shoots down more
enemy aircraft than he loses.
In this supplement, first we'll
introduce all the characters you could
encounter along with examples of
both their “reel” and “real”
inspiration. Then we'll see some
examples of how they could be used
in a club or convention game.
Page 52
The New Kid
The Fury
Naive, Cause. The naïve rookie who's still
wet behind the ears. Joined the squadron
just before the unit started seeing action.
Fanatic, Revenge. Has a blinding hatred
for the enemy and wants to kill as many
of them as possible, most likely as
revenge for his family or country.
Reel Inspiration: Simon,Battle of Britain.
Real Inspiration: The Polish pilots flying
for the RAF.
Real Inspiration: Thousands of fliers who
made up the air forces of all sides.
PVC: If he shoots down just one of the
enemy, his mission is a success, even if he
himself does not survive.
PVC: Exit the board alive. Our new boy is
no coward though and unless damaged he
cannot exit until at least one other
friendly aircraft has left the board edge or
been shot down.
Behavior: Should receive his own
character card and will break formation at
the first opportunity to attack the enemy.
Additionally, he is never shaken off by
defensive fire.
The Hunter
Cunning, Glory.A cold professional killer
who is more interested in running up his
score than anything else.
The Family Man
Likeable, Family. Has a brand new wife
and a kid he hasn't even seen. Most likely
a goner. His loss will be a great blow to
the squadron.
Reel Inspiration: Robert Mitchum, The
Hunters.
Real Inspiration: Adolf Galland.
Reel Inspiration: Goose, Top Gun.
PVC: Must get a kill and safely return for
his mission to be considered a success.
This character should be a veteran pilot or
ace.
Page 53
The Gambler
Daring, Fortune. Always looking for a dice
or card game and is lives his live with
certainty that the next big score is just
around the corner.
The Ladies Man
Suave, Skirts. A smooth operator with a
pencil thin mustache who’s persistent and
charming.
Reel Inspiration: Tyrone Power, Yank in
the RAF; John Carroll, Flying Tigers.
Behavior: This guy gets all the girls AND
all the breaks. During any mission he can
re-roll a dice once (but only once) per
mission, and must stay with the new
result.
The Condemned
Pessimistic, Survival. This glum fellow is
sure his number is up. Reel Inspiration:
1Lt Jerry Bragg, The Flying Misfits.
Behavior: If an enemy gets on his tail, he
knows his number is up and will just fly
straight ahead until someone shoots the
bandit off his tail.
The Glory Hound
Selfish, Position.This bloke is in it for the
gloryand will self promote his
accomplishments over others.
Reel Inspiration: George Peppard, The
Blue Max.
The Haunted
Behavior: Gets his own character card
and will break off and move
independently when his card comes up.
Reserved, Survival. Having had a close
brush with death, this fellow is having a
hard time getting back in the saddle.
PVC: If he damages at least one enemy
aircraft he can claim a personal victory (he
will also claim it adefinite kill regardless).
Behavior: Will break off and head for
home if he is sufficiently far from the rest
of his squadron.
Page 54
The Politician's Boy
Cultured, Acceptance. Attempting to get
out of the shadow of his famous dad, he’s
just trying to show he's one of the guys
and can pull his own weight.
PVC: His personal victory conditions are
the same as the squadron's overall victory
conditions and can declare victory even if
he is killed in the process. If a wingman,
then he takes the staying in formation
test one level higher and is not shaken off
his leader by defensive fire.
The Bully
Obnoxious, Position.Verbally picks on the
weaker members of the squadron as a
way of boosting his own self confidence.
Reel Inspiration: Moggy, Piece of Cake.
PVC: This chap must safely return with an
equal or better score than anyone else on
his side so that he may habitually lord it
over them.
The Hangover
The Sensitive Boy
Coarse, Alcohol. This dreary eyed fellow
often needs a shave and a mint. His
answer to all squadron issues is to have
another.
Meek, Acceptance. Often the butt of
jokes and seen sulking, deep down he
simply wants to prove himself.
Behavior: If at a club game, the player
controlling this chap should down a least
a pint before the game commences
(perhaps two just to be safe).
PVC: This chap must safely return with an
equal or better score than the lowest
scoring person on his side so he at least
feels like he's pulling his weight.
Page 55
The Country Club
Leisurely, Hedonism. An ascot and jacket
type with a devastating wit and a taste for
fine alcohol.
The Party Man
Idealistic, Government. Dedicated to the
Government's policies and completely
believes its propaganda (Axis &
Communist squadrons only).
Reel Inspiration: P/O Archie, Battle of
Britain.
PVC: Enjoys life, but understands that
someone of his social status must
reluctantly lead by example. Thereforehe
must return safely having fired his guns in
anger at least once.
Behavior: Believing all the propaganda on
the posters, he is shocked to find out the
reality of combat and will break formation
or break off his attack run if he
encounters defensive fire.
The Reservist
Ambivalent, Cause. Torn from his civilian
life, will do his duty, but just wants to
return to his hometown.
The Foreigner
Foreign, Cause. The odd man out who
brings a different take to the squadron
activities, he may be motivated by the
cause, or just an adventurer.
Reel Inspiration: William Holden,Bridges
of Toko-Ri
Reel Inspiration: P/O Chris Heart, Piece of
Cake.
Real Inspiration: “Red” Tobin, American
RAF pilot in the Battle of Britain.
Page 56
The Thrill Seeker
The Non-conformist
Impulsive, Excitement. An experienced
and confident lad taking more and more
chances for a combat high.
Quirky, Spiritualism. Eschews military
formality for a more bohemian lifestyle.
PVC: Must return safely, but cannot leave
the board unless damaged or all enemy
aircraft have exited.
Reel Inspiration: Robert Wagner, The
Hunters.
Real Inspiration: F/O Edgar James
"Cobber" Kain, Lt. Ralph "Kid" Hofer.
PVC: Keen to make a name for himself,
but do it his own way, this lad gets his
own character card and must break
formation when it is drawn. Having
broken formation he must down at least
one enemy aircraft to keep the squadron
CO from grounding him. This character
type should be a veteran or ace pilot.
The Transfer
Seasoned, Career. A career man who
decided that flying sounded more exciting
& career enhancing than being an
infantryman/destroyerman.
The Loon
Loony, Unknown. Off his rocker after
having seen too much action, this chap
should be committed.
Reel Inspiration: Flash, Piece of Cake (and
maybe our very own Richard Clarke – ed)
Behavior: This pilot has no apparent fear,
and will stay on the board and fight long
after departing seems like a good idea.
Page 57
The Academy Man
The Pariah
Egotistical, Position. A second generation
military man who was quite the big man
on campus and always wears his academy
ring.
A popular squadron pilot was killed and
the other pilots, but not the official
investigation, decided this guy is to
blame.
Behavior: Will claim any shared kill as
100% his own after the battle
Reel Inspiration: Edmund MacDonald,
FlyingTigers.
Behavior: Seeking to prove himself
worthy, he will hang around a fight long
after good sense dictates that he should
leave.
The Comedian
The Hot Head
Sarcastic, Attention. The squadron
jokester who never takes anything
seriously and has an under his breath oneliner for all official policy.
Impulsive, Cause.Always breaks formation
to charge in and attack. Never thinks to
see if it could be a trap or wait for
reinforcements.
Reel Inspiration: Harrison Ford,Hanover
Street.
Behavior: This chap should have his own
character card and must break formation
at the first sight of the enemy and go
charging in.
Behavior: If shot down and captured, this
chap will crack up the guards and then
makes good his escape back to friendly
lines.
Page 58
The Texan
The Round Man
Boisterous, Home. Quick with an
anecdote about roping or riding, he
always wears cowboy boots with his flight
gear (American, British or Canadian
squadrons only).
Jovial, Gluttony. Constantly ribbed for his
rotund shape, this chap is a fine pilot, but
all wonder how he squeezes into a
cockpit.
Real Inspiration: E. J. "Jumbo" Gracie,
RAF.
Behavior: If shot down, his accent and
boots will give him away and he will be
immediately captured.
Behavior: If you are flying in his section,
please provide him with a donut or other
pastry as soon as your game is over –
assuming he makes it back alive.
The Film Star
Showy, Career. Joined the war effort as a
boost to his career, his showy antics in the
air and on the ground sometimes draw
the ire of the career officers.
The Exchange Pilot
Personable, Career. A seasoned pilot
from another service here on exchange
duty.
Reel Inspiration: Ensign Hallam "Oscar"
Scott, A Wing and a Prayer.
Behavior: Having completed at least one
tour in his own service, upgrade this pilot
one level from whatever is rolled or
initially part of the scenario (Sprog to
Regular, Regular to Veteran, etc.).
PVC: Must fire his guns in anger and
return safely. He needs a good hero story
to tell the girls and press, but he also
wants to be around to share the story.
Page 59
The Everyman
The Brawler
Likeable, Cause. One of the countless
men who fought the war. A Johnson,
Smith, Schmidt, Suzuki, Ivanov or Russo.
Aggressive, Fighting. This chap is always
looking for a good fight in the air & on the
ground, especially after a few pints.
Behavior: There is absolutely nothing
exceptional about this man – except that
he and thousands like him are the ones
who filled the cockpits in the greatest air
war in history. Should he survive the
game, be sure and buy him a pint and
listen to his story.
Real Inspiration: Major “Greg” Boyington,
USMC.
Behavior: Will barrel in regardless of
odds, but inspiring those with him. Gets
an extra dice when firing because he will
go in with or without a wingman.
The Tinkerer
Easygoing, Engineering. Loves to work
with maintenance crews in the shops.
Often spends more time with them than
the other pilots.
The Showboat
Ostentatious, Glory. Draws attention to
himself by doing low passes, stunting and
wearing custom uniforms.
Real Inspiration: P-47 ace David C.
Schilling.
Behavior: His extra knowledge from
experience and talking to the ground
crews allows him to get the most out of
an engine and thus he can add an extra
pip to his D4 roll if he so desires.
Behavior: At the end of any mission he
flies and makes it back to base, roll a 2D6.
If he rolls a 2 or 3, he is killed in a low pass
“beating up” the home airfield. Rotten
luck.
Page 60
The Footballer
Social, Status. Star of the Academy team,
he is recognized throughout the service
wherever he goes.
Behavior: A man of action who is prone
to believing in his own legend, he should
have his own character card and break off
to go hunting on his own when it comes
up.
The Intellectual
Serious, Music. Tall and serious, an Ivy
league grad whose chief relaxation is
listening to popular music.
The Author
Reflective, Writing. This thoughtful lad is
keeping a detailed diary so that he may
write a wartime bestseller on his
experiences.
The Olympian
Determined, Competition. Participated in
the 1936 Olympics and now brings that
same determination into flying for his
country.
Real Inspiration: Paul Richey, RAF, author
of “Fighter Pilot”.
PVC: If he shoots down an aircraft or gets
shot up and makes it back to base, he can
claim a personal victory as either will
make for a real page turning story in his
book.
Behavior: His superb physical
conditioning makes him tough to kill and
thus he can ignore the first pilot wounded
result.
Page 61
Ensign New-Kid (Ensign Newkidd?).
You get the idea. Now you know who
is who with just a glance at their
name on the roster. No more, “now
which one is he?” When you line out
Pilot Officer Hangover off the
squadron roster, you know there’ll be
an empty barstool tonight. This is
useful if A) you’re not very clever at
coming up with last names and
associated backstories or B) if your
squadron is having a lot of attrition –
why waste clever names and
backstories on someone who isn’t
going to last more than one mission.
Second Lieutenant Family-Man we’re
looking at you.
Running the Game at a Club or
Convention
So how do you incorporate some of
the above personalities? Assume you
are running a club or convention
game. You can put all or some of the
above pilots onto index cards,
tailoring the list to your liking. As the
evening’s players walk up they can
draw their pilot from the deck. You
can put the short briefings from
above on the other side of the card,
on a hand out, or simply read the
description of their pilot straight from
this article.
Now a Johnny Walkup is not simply
moving an anonymous fighter model
across the table, but rather is playing
a character that he can have some
investment in. Since this pilot may
have personal victory conditions that
are separate from the basic mission
victory conditions, they may lead to
some interesting behavior. If you
play a club game where the losing
side must pay for the winners drinks
(highly recommended with the right
crowd), then you’ll really see chaps
striving to hit their personal victory
conditions.
Summary
So there you have it. A stockpile of
ready-made characters for all your
Bag the Hun aerial adventures that
can be used to add flavor and color to
any convention or club game, even
for walk ups who’ve never played the
game. Of course these could be used
with modification for any air game
and any era. Need a pair of pilots to
cover that recce plane into North
Vietnam, Lieutenants Showboat and
Comedian are just your guys.
Naturally all of the above types could
be used with future editions of Algy
as well. Of course much great thanks
goes to Joe Legan whose Squadron
Forward inspired the above. Now …
off you go. Good luck, and good
hunting.
Using the Charters with
Squadron Forward
The above list of pilot archetypes is
not limited to just club or convention
games. You can also use them with
Joe Legan’s excellent Squadron
Forward supplement. In fact the
personality and motivation notations
were designed to go with that very
supplement. What it does is give you
pre-loaded backstories to quickly fill
out your squadrons.You can use the
type name as their last name. Thus
you would have Squadron Leader
Skipper, Pilot Officer Round-Man
(Roundmann?), Sergeant Pilot
Footballer and Flying Officer Bully.
Or perhaps Lieutenant Commander
Hunter, Lieutenant Country-Club,
Lieutenant Junior Grade Fury and
Page 62
continuing forward with the building of the
nation became dependent on more clandestine
and unofficial agents who could act without
concern for normal diplomatic niceties. It was
well known that the Bourbons ruled in Naples
through fear and force of arms and that the
population regularly rose up in protest, equally
regularly being crushed with unrestrained
violence. If a force could be assembled to
provide a rallying point for the people of the
South, there was a reasonable hope that this
could meet with some success, especially if the
expedition was led by a charismatic leader.
Fortunately such a leader was at hand; Giuseppe
Garibaldi.
The process of Italian Unification, the creation of
a single nation state where previously a
patchwork of small states had existed, was a
lengthy one, beginning with the revolutions of
1848 and only finally ending with the Treaty of
Saint-Germain in 1919.
At times, the struggle to create one Italian nation
seemed an unlikely goal, faced with the power of
the Austrian Empire and her satellites; however,
the support of Emperor Napoleon III and the war
of 1859 saw the aggrandisement of the Kingdom
of Sardinia, with the addition of Lombardy,
Tuscany, Modena and Parma to their lands.
Whilst the war of 1859 was a key step to the
eventual unification, there could be little doubt
that the political gains for Sardinia had been
gained chiefly by French bayonets backed up by
political pressure from Paris to achieve the peace.
This now presented Italian nationalists with a
significant problem. The Austrians retained
Venetia in the North East, the Papal States
continued to dominate central Italy and the
Kingdom of the Two Sicilies with its Bourbon
monarch ruled in the South. Most importantly
this new arrangement was supported by France,
making further expansion achieved by Sardinian
military might an unlikely prospect. The dream of
unification appeared as unachievable as ever.
Garibaldi requires little introduction; he is a
national hero in several South American nations
thanks to his participation in their wars in the
1830's and 40's. In 1848, the year of revolutions,
he was appointed a General by the new
government in Milan and the Roman Republic of
1849. For European liberals and revolutionaries
Garibaldi was the poster-boy of his age. As a
result, when in May of 1860 when he was
persuaded to lead an expedition to invade the
island of Sicily, over a thousand men from across
Italy and beyond gathered to join him. Whilst the
majority of these were young men inspired by
patriotic fervour, the mix was leavened by the
hard core of Europe's revolutionary movement.
With the option of expansion through traditional
military means politically impossible, the hopes of
Page 63
violent attacks from the local population leading
to recriminations and atrocities on both sides.
Seizing two steamships from the dock in Genoa,
they then sailed to Quarto where the party of
1088 men and one woman embarked. Whilst the
popular myth sees "the thousand" equipped in
their red shirts, the truth is that civilian dress was
predominant, with a complete lack of uniforms
and a reliance on dated smooth-bore muskets.
This rag-tag force was sailing to face over 25,000
well-trained Neapolitan troops on Sicily; unlikely
odds by anyone's calculations.
Before the Garibaldini lay Palermo, the capital of
Sicily. Commanded by Bourbon General Lanza
the city was defended by strong walls and 16,000
men. With the revolutionary ranks now swollen
to 2000 men the odds still seemed unlikely.
Garibaldi was, however. very aware that Lanza
was an indecisive commander, albeit with some
aggressive and more dynamic subordinates.
Forming a column from his antiquated and
useless artillery, his wounded and over a
thousand
Sicilian
volunteers,
Garibaldi
despatched this force with orders to make a
visible withdrawal from the city. This succeeded
in drawing off a significant Bourbon force which
set off in pursuit. Meanwhile Garibaldi led his
force across the mountains to attack the city at
the most weakly held gate and there forced an
entrance. A significant part of the population
rose to support their liberator and the garrison
withdrew into the Royal Palace.
Landing at Marsala, Sicily's westernmost tip, on
the 11th of May, the expedition could have been
ended there and then if the Neapolitan naval
commander in the area acted with alacrity and
determination. As it was, the presence of the
Royal Navy, protecting the interests of the British
wine growing colony, persuaded him not to
bombard the town and the assembling
Garibaldini, allowing them to establish
themselves on land. Within days Garibaldi had
declared himself dictator of Sicily in the name of
King Victor-Emmanuel II of Sardinia.
Despite the return of the columns which had
been duped into leaving the city, General Lanza
was a broken man. With the Royal Navy
intervening in an attempt to save civilian lives, an
armistice was signed which saw the Bourbons
abandon the city, heading East to abandon the
island which was now in the grip of a popular,
albeit militarily ineffective, revolt against their
ruler. Only the fortresses at Syracuse, Augusta,
Messina and Milazzo remained in Bourbon hands.
Garibaldi's first objective was to capture the city
of Palermo where, once established, he believed
that volunteers would swell his ranks. Several
hundred men had joined the colours at Marsala,
and when organising his forces Garibaldi
envisaged that companies would soon become
battalions and then Regiments.
On the 15th of May the first encounter with
Bourbon forces took place neat Calatafimi, where
the 8th Battalion of the Cacciatori a Piedi under
Major Sforza blocked the road to Palermo. In a
violent action the Garibaldini won a narrow
victory when the Bourbon troops ran out of
ammunition and were obliged to withdraw.
Militarily, the driving in of a Bourbon outpost was
insignificant; politically it was a disaster. The
population were well aware of Garibaldi's history
and his very name being attached to an
immediate victory served to persuade them that
the hour of liberation was at hand. Within the
Bourbon ranks, morale fell as their retreat to
Palermo saw them come under increasingly
In June Garibaldi attacked Milazzo and, despite
determined resistance by the local commander a
lack of support from the senior command saw the
citadel surrender after a brief siege. With Sicily
almost entirely under Garibaldi's rule, the
remaining strongholds were allowed to wither on
the vine as lack of supplies obliged their
surrender over the coming months.
In August Garibaldi crossed the straights and
landed in Calabria. Some resistance was met as
the force marched North, but many Bourbon
Page 64
Additionally, whilst Sharp Practice is a large
skirmish game, with one figure being one man in
reality, it is very possible to apply a scale of 1:10
which allows the representing of the entire
Thousand on the tabletop; an appealing option
which allows some of the most significant actions
of the war, especially in Sicily, to be refought.
units were now disbanding rather than fight,
many joining the ranks of the Garibaldini. On
the 7th of September Naples fell without a fight,
King Francis II abandoning his capital and retiring
northwards. At the start of October 20,000
Garibaldini fought 28,000 Neapolitans at the
Battle of Volturno where he won a narrow victory
due to the inefficiency of the Bourbon
commanders. However, it was sufficient. A
Sardinian Army under King Victor Emmanuel II
had fought its way through the Papal States and
now arrived in Naples to declare the founding of
the Kingdom of Italy. Royal troops now took up
the siege of Gaeta, the last Bourbon fortress
which held out until the following year.
With his task completed, at least for now,
Garibaldi retired to his home on the island of
Caprera. However, he remained committed to
the idea of an Italy "from the Alps to the
Adriatic". In 1862 he mounted an unauthorised
and disastrous attack on Rome. In 1866 he
fought again against the Austrians in the Alps and
in 1870 he rallied to the cause of the French
Republic in their fight against the Prussian
invaders.
ORGANISING THE GARIBALDINI
Upon landing at Marsala Garibaldi organised the
Thousand into eight companies, each of 120 men.
The first was commanded by Nino Bixio, the
second by Guiseppe Dezza, the third by Francesco
Stocco, the fourth, completing the first battalion,
by Guiseppe La Masa. In the second battalion the
fifth company was commanded by Francesco
Anfossi, the sixth by Giacinto Carini, the seventh
by Benedetto Cairoli and the eight under Edoardo
Bassini. The Genoese Carabinieri were retained
as a separate unit under Antonio Mosto, despite
having just 43 men. Additionally there was a
party of 23 guides.
WARGAMING THE "THOUSAND"
In many respects the expedition of the Mille is
perfect for Sharp Practice. The rules not only
cover the period in terms of weaponry, but they
also focus on the importance of leadership on the
battlefield; the area which provides the key
differentiator between the two forces.
Constantly during the campaign it was poor and
unimaginative leadership on the Bourbon side
which let down troops who were determined and
brave.
This contrasted sharply with the
leadership of the Garibaldini where personal
example and individual bravery were very much
the norm. Garibaldi himself was constantly
reproached for leading from the front, but he
refused to change his ways and constantly put
himself in danger, serving as an inspiration for his
men.
Subsequent recruitment saw thousands of
Sicilians join the force. However, these were of
dubious military value initially, being largely
made up of youths who whilst happy to snipe at
an opponent from a distance were less inclined to
close with the bayonet - the most popular tactic
for the Garibaldini. Over time these Picciotti
were to provide good service, a ninth company
being formed from the best of the volunteers
before the fall of Palermo.
Page 65
as a Baker Rifle with which they may skirmish.
These troops increase the cover they are in by
one level to reflect their expertise in a light
infantry role.
As time progressed volunteers arrived from all
across Europe, bringing manpower, leaders and
better equipment. The bulk of the Garibaldini
were originally armed with antiquated muskets
when they landed on Sicily, with the Carabinieri
having 1851 pattern Swiss Stutzer rifled carbines.
With the fall of Palermo, Garibaldi was able to
equip his men with the captured Minie rifles
which the Bourbon troops used; a significant
improvement. What little artillery the force
originally possessed was antiquated muzzle
loading smoothbore pieces of dubious value.
However, this situation improved as Neapolitan
weapons were capture and imported weapons,
came in from abroad. One British supported sent
a battery of rifles breach loading Whitworth guns
to Garibaldi.
Picciotti
Groups of 6 figures armed with muskets, two
Groups making a single company. Poor Light
Troops classed as Weedy Coves in close combat.
These troops should be only able to skirmish
when behind cover. When in the open they fire
without the light troops benefit. The Picciotti
Group should have one Status I Big Man for every
two Groups.
Volunteers, July 1860 Onwards
To represent the additional volunteers who
joined Garibaldi's ranks after the fall of Palermo.
These could be deserters from the Bourbon
ranks, European volunteers or Sicilians who had
received some training or been seasoned by their
first military encounters. These are Average
Troops formed into Groups of eight figures. Roll
a d6: on a roll of 1-3 they have Muskets, on 4-6
they have Baker Rifles. Volunteers should have
one Status II Big Man for every two Groups with
one Status III Big Man commanding where more
than four Groups are fielded.
To reflect all of these factors, we can organise our
Garibaldini as follows:
Garibaldini May to June 1860
Groups of 12 figures armed with muskets. Good
troops, Aggressive. Apply the rule for Sailors in
Close Quarters, 12.1.8 if Garibaldi is within 12" of
any troops and fighting in Fisticuffs (he cannot
simply be nearby). During this period the
Garibaldini have sufficient ammunition for just
four rounds of fire. One Status III Big Man should
be present with each Group in the first four
companies. In companies 5 to 8 the Big Man
should be Status II.
Garibaldini Cavalry
Cavalry played a small part in the campaign of
1860 but they do make for an attractive game
option, especially as Garibaldi's main mounted
unit was two squadrons of 100 Hungarian
Hussars each. These are Good troops organised
into ten figure squadrons. They are sabre armed
and count as Aggressive in Fisticuffs. These
cavalry should have one Status II Big Man where
one Group is fielded and have an additional
Status III Big Man when both Groups are used.
Garibaldini, July 1860 Onwards
Groups of 10 figures armed with Baker Rifles.
Good troops, Aggressive. Apply the rule for
Sailors in Close Quarters, 12.1.8 if Garibaldi is
within 12" of any troops and fighting in close
combat (he cannot simply be nearby). Whilst the
Garibaldini have Minie rifles they are not skilled
in their use, so we treat them as Baker Rifles.
One Status II Big Man should be present with
each Group.
Garibaldini Artillery
Almost non-existent at the start of the campaign,
what was available was antique smooth bore
pieces. Allow just two guns to be present before
July 1860 and treat these as light guns with a
maximum range of 36". After that time the more
Genoese Carabinieri
One Group of Six figures armed with modern
carbines. Good Light troops. Treat their weapon
Page 66
modern guns should be treated as Heavy Guns.
Where breach loading pieces are present these
take just one Action to reload. One Big Man,
Status I, should be present for every gun fielded.
period in its structure and armament. Unable to
entirely rely on its own subjects, the Bourbons
recruited from Switzerland and the German
states to create a dependable core of
mercenaries whose loyalty was to the Crown.
GARIBALDINI SPECIAL RULES
The Army was made up of a Royal Guard of two
Grenadier Regiments, each of three battalions of
six companies. A single Cacciatori Regiment also
had three battalions of six companies whilst the
single one Tiragliatori Battalion had eight
companies of 100 men. A Royal Naval Infantry
Regiment completed the Guard infantry with
three six company battalions. Finally two Hussar
Regiments had four squadrons each.
Nine LIves
Garibaldi was famed for his bravery and
aggressive leadership. To reflect his Devil-maycare attitude we give Garibaldi two "The Devil's
Own Luck" cards. These differ slightly from the
main rules (see section 16) in that he can discard
one of these card when he is hit but before
rolling for the effect. If Garibaldi does not have
one of these cards available and is wounded any
Garibaldini within 18" will immediately take one
point of shock. If he is killed any Garibaldini on
the table take three Shock immediately.
The Line infantry was made up of fifteen
Regiments of infantry, each with three battalions.
Each battalion had four fusilier companies, one
company of Grenadiers and one company of
Cacciatori. One elite Regiment of Carabinieri had
two battalions in total. Each battalion had a
strength of just over 900 officers and men.
Brother Pantaleo
Brother Giovanni Pantaleo was a fighting man of
the cloth who was a great patriot and brave
leader. He may join any Group to minister to
them during combat. Any Group within 9" of
Brother Pantaleo will ignore the first point of
shock they suffer in any turn.
The main combat forces of the Bourbon
monarchy in Sicily were made up of what, in
theory, were Light Infantry battalions; fifteen
battalions of Cacciatori and three battalions of
Foreign Carabinieri, largely Swiss and Bavarian
troops. These battalions had eight companies
with an average strength of 120 men each and
were formed into their own Brigades with three
or four battalions plus some artillery support. In
fact these units fought as line infantry, being
trained to deliver controlled volleys as opposed
to independent actions of light troops elsewhere.
The Bourbon Cavalry was made up of Three
Dragoon Regiments, two Lancer Regiments, one
Regiment of Mounted Carabinieri and one of
Mounted Cacciatori. All of these had four
Squadrons of 150 men.
Artillery was in a state of flux, attempting to
move to a rifled system but still largely with
smooth bore weapons, some of which were being
re-bored with rifling.
ORGANISING THE BOURBON FORCES
The Bourbon Army of the Kingdom of the Two
Sicilies was based on the French Army of the
Page 67
To reflect the above we represent the Bourbon
force as shown below:
two Actions to Load, one to present and a fourth
Action to fire.
Bourbon Line Infantry
Groups of eight figures armed with muskets. No
distinction is made between the companies.
Poor troops, Weedy coves in Fisticuffs. Two
Groups form a Company with one Status I Big
Man being present with each Company. If a
whole battalion of six companies is fielded a
Status II Big Man is added to the force.
GENERAL SPECIAL RULES
To reflect the somewhat chaotic and uncertain
nature of the conflict in 1860, add five Taking the
Biscuit cards to the Game Deck.
When dealt,
these remain in play until used by a player of
either side. They may be used to either enhance
a Big Man's command ability in that turn, much
as a Grasp the Nettle card is used, or, if two such
cards are available, the player whose Big Men
card has been drawn may activate that character
with two additional command initiative or he
may activate that character as normal before
then activating any Big Man who has not yet
been activated in the current turn. When doing
so that Big Man activates with one additional
command initiative for that turn only.
Bourbon Light Infantry
Groups of eight figures armed with Minie Rifles.
Average troops but Weedy Coves in Fisticuffs.
One Group of 12 men forms a Company with one
Status I Big Man being present for every two
companies fielded. If a whole battalion of eight
companies is fielded two Status II Big Men are
added to the force as its commander and his
deputy.
To use a card, the player must actually use the
card for a purpose, he may not simply claim the
card in order to remove it from play.
Bourbon Cavalry
Organised into Groups of eight figures armed
with sabre or lance. Two Groups form a
Squadron with one Status I Big Man attached to
each Squadron. Where a whole Regiment is
fielded a Status II Big Man may be added to
command that force.
Random Events and Bonus Cards
All of the usual Random Events and Bonus Cards
in Sharp Practice remain as in the rules. The
exceptions are as follows:
Vive l'Emperor is replaced by Viva Garibaldi. The
player with the most impressive facial hair get a
bonus move for a Big Man. If no facial hair is
present, or if ladies without facial hair are
playing, the player with the most prominent item
of red clothing may claim this card.
Bourbon Artillery
All guns should be treated as Heavy Guns. One
Status I Big Man should be present with each gun
fielded.
NEAPOLITAN SPECIAL RULES
Fuego! This card may not be used against
Bourbon troops who have very good, if slow, fire
discipline.
Controlled Volleys
The Neapolitan forces were trained to deliver
controlled volleys against their enemy, even
supposedly Light troops operating in this manner.
To reflect this, the Bourbon troops require one
additional Action after loading to present their
weapons and fire in a controlled manner. As
such, the musket armed line troops will require
one Action to load, one to Present and a third to
fire. The Minie armed Light troops will require
Page 68
one dressed in red, the colour of the uniforms
worn by criminals on the galleys still then in use,
he determined to crush the "beggars" in one
engagement.
SCENARIOS
Garibaldi's campaign of 1860 provides us with
ample opportunity to fight all sorts of skirmishes
and small battles using Sharp Practice. When
researching this piece I was struck how the
actions around Milazzo alone in July could fill a
scenario supplement with varied and exciting
games of very manageable proportions.
Deploying his battalion on the high ground of the
Pianto del Romani he put his troops through their
drills in an attempt to intimidate the rabble he
saw before him. For his part, Garibaldi deployed
his thousand on the raised ground of the
Pietralunga to the South of the Bourbon position.
It was clear that the Sicilian volunteers were not
ready to face an organised opponent, so it was
his original force which was deployed to meet the
foe.
My own preferences are for actions with forty to
seventy figures a side as I feel this allows us to
get the most from the rules, with formations
playing a significant part, something I feel that
distinguishes Sharp Practice from the more usual
lower level skirmish games where the actions of
individual figures is paramount.
For several hours both sides watched each other
before the Bourbon bugles sounded and their line
surged forward. With limited ammunition the
Garibaldini rushed forward to meet their
assailants with the bayonet, checking their
advance in the valley before pushing them back
up the terraced slopes of the Pianto del Romani.
Here the local population had created the
terraces to aid their agriculture.
For the
Garibaldini, each break in the terracing provided
cover where they could get their breath back
before surging on up the slope to take on the
Neapolitans once again. At 3pm the Bourbon
troops were out of ammunition and reduced to
hurling rocks and stones.
Realising the
implications of this Garibaldi ran forward at the
head of his men to seize the final terrace, obliging
his foe to withdraw.
Having said that, I make no apologies for the fact
that the first scenario presented demands around
a hundred figures per side. The chance to game
with the whole "Thousand" is simply too good to
miss. If you are building up a force for this
period from scratch, fear not, you'll find plenty of
smaller actions where just thirty or forty figures a
side will get you started.
Table size is not really that important, we tend to
play on a 6' by 5' area and the maps are generally
around that size. Buildings tend to be two
storied, but use whatever you have to hand.
SCENARIO ONE
HERE WE MAKE ITALY, OR DIE!
This scenario represents the first battle of the
1860 campaign, as Garibaldi advances on
Palermo he finds his route blocked to the South
West of Calatafimi by the Neapolitan Army's 8th
Cacciatori battalion commanded by Colonel
Sforza. This force was under orders not to attack
the Garibaldini but rather to stop the local
population lending them any assistance. It
seemed that the Bourbon high commend was
determined to allow the rebels to fail through
lack of sustenance as opposed to seeking a
confrontation. However, when Sforza saw what
he took to be a rabble of civilians with the odd
It had been a hard fought action but one which
would shape the campaign to come.
This is an unapologetically large action, the
opportunity to game with the entire Thousand is
too appealing to miss. If desired you can reduce
the numbers by half, but do reduce the Big Men
present as well as the troop numbers.
Bourbon Briefing
Your orders are for you to take your battalion and
to block an "Army" of rebels advancing on
Page 69
Palermo. So, imagine your surprise when you
saw that this was no Army, but a collection of
beggars and escaped convicts from the galleys!
Scum like this deserve nothing more than being
ground into the dirt and clapped into irons. You
intend to do just that. Your force is as follows:
Garibaldini Briefing
Having landed on Sicily three days ago, you are
keen to push on to Palermo to liberate the city
and gain much needed assistance from
volunteers who will, you are sure, flock to join
your cause. Before you the road to the capital is
blocked by a force of Neapolitan troops who have
been drilling on the high ground known as the
Pianto del Romani. You have deployed your force
to the South, also on the high ground and now
the moment has come to make Italy of die in the
attempt. Your force is as follows:
Colonel Sforza, Status III
Major, Status II
Eight companies of Cacciatori, twelve figure each,
with Minnie Rifles. Average Troops. Weedy
coves.
You have four additional Big Men, Status I to
attach to this force.
Guiseppe Garibaldi, Status IV
Brother Pantaleo, inspiring cleric
Eight companies of Garibaldini, twelve figures
each, with muskets and four rounds of
ammunition. Good, Aggressive Troops.
One company of Genoese Carabinieri, six figures,
armed with Baker Rifles. Good Light Troops.
These troops increase the cover they are in by
one level to reflect their expertise in a light
You begin the game deployed on the table
approaching the summit of the Pianto del Romani
on the northern table edge. Your force is
currently deployed in individual Groups. If you
wish to form any Formations you will need to do
this before you advance. There are no limitations
on how many Groups may be placed in a
formation or commanded by any Leader.
Page 70
infantry role.
ammunition.
They
have
no
limits
Garibaldi's force as flank guards. If this option is
taken allow the Bourbon forces one Heavy
artillery piece and one Squadron of sabre armed
Dragoons.
on
You have four Big Men Status III and five Big Men
Status II, all of whom must be allocated to one
company each.
SCENARIO TWO
ROAD TO HELL
You begin the game deployed on the southern
table edge.
The battle for Palermo itself presents one or two
interesting skirmishes before the battle itself was
joined inside the city, a phase which has less
appeal due to the demand for a cityscape in
which to game. However, before we reach
Palermo the Colonel Sforza's force had to
withdraw through hostile terrain where the locals
were rising up following news of Garibaldi's
victory at Calatafimi. This presents us with a
more unusual type of game, but one which
follows on with the narrative and helps us
understand the frustrations of the Bourbon
forces.
Umpire's Notes
The terrain here is noteworthy as the Pianto del
Romani is a terraced hill. Where the contour
lines are shown these should be represented on
the table and marked with scrub and a scattering
of rocks. These terrace edges do not hamper
movement, but they do offer cover for troops
moving uphill and sheltering behind them. The
raised ground of the Pietralunga is not terraced
but is a gentle slope which does not hamper
movement or provide cover.
The stream in the valley appears to be
insignificant and the players should be told that it
is not an obstacle. Indeed, crossing it will not
hamper movement; however, when any troops
cross it, it will break their formation.
This scenario is generic and based on the
Bourbon retreat, with rebellious Sicilians
attempting to harass them all the way back to the
gates of the capital. This game could be set
anywhere on the road to Palermo. The worst
excesses occurred at Partinicio where the
advancing Garibaldini found the town half
destroyed and the population dancing around the
corpses of dead Neapolitan soldiers. Some
commentators referred to the town as having
been abandoned by God.
To reflect the Bourbon ammunition shortage,
each time a Garibaldini Big Man is wounded or
killed a D6 should be rolled. On a roll of 4-6 one
firing Group will become run out of ammunition.
The Bourbon player may choose which group of
those firing it is.
Bourbon Briefing
Winning the Game
The countryside has risen in support of the
rebellion. Damned peasants don't know what's
good for them! Your tactical withdrawal at
Calatafimi has been misread as a defeat and now
you must march back to Palermo to make a stand
there. Your force has not been troubled thus far,
but everywhere you go you feel the local
watching you with hatred. Be on your guard and
make sure that the remains of your force can
cross the table ahead of you. Your force is as
follows:
Colonel Sforza, Status III
This is a straight punch up where one side needs
to win by driving off their opponents.
Going Large
There is a "Go Large" option for this scenario
which is to extend the table by 12" to the East
and West. A stream runs down where the
current Eastern table edge runs and to the Wets
is more high ground running down the Western
table edge. One company of Picciotti may be
deployed on the Western and Eastern flanks of
Page 71
Six Groups of 6 figures armed with muskets. Poor
Light Troops classed as Weedy Coves in close
combat.
Major, Status II
Six companies of Cacciatori, eight figure each,
with Minnie Rifles. Average Troops. Weedy
coves.
One Heavy artillery piece with limber
One squadron of Dragoons, eight figures
You have four additional Big Men, Status I to
attach to this force.
You have two Status I Big Men to add to this
force.
These troops should be only able to skirmish
when behind cover. When in the open they fire
without the light troops benefit.
Picciotti Briefing
The damned Neapolitans have been defeated by
the famous General Garibaldi. You believe that
he has come to free you from the terrible rule of
the local nobility and divide the land fairly among
those whose labour makes this harsh land
habitable. Now is the moment when you can hit
at the soldiers who have kept you in bondage for
so long. You have nothing to lose but your
chains! Your force is as follows:
Umpire's Notes
The Bourbon force begins the game in column on
the road on the Western end of the table. The
player must deploy the rearmost Group on the
table edge where the road enters, with all other
Groups in column in front of that. The column
many be organised as the player wishes, but no
Group may be more than 6" from any other
Group. The exception is one single Group which
may lead the column as scouts. These may
deploy up to 12" from another Group; however,
all force must be on the road.
Bandit Leader, Status II
Page 72
SCENARIO THREE
The Picciotti may treat any area of cover on the
table as a Blind and may deploy to that point
providing no enemy troops are within 4" of them
when they deploy.
THE ADMIRAL'S BRIDGE
The battle for Palermo throws up several options
for skirmishes, the fight for the Ponte dell'
Ammiraglio being one of the best options as the
Garibaldini approached the city, with a Bourbon
outpost attempting to delay their progress.
Any Group of Picciotti may leave the table by any
table edge or by entering any area of cover which
is more than 12" from any enemy troops. This
represents their local knowledge. Troops leaving
by a table edge have left the area and may not reenter the game. Troops leaving via any cover
may subsequently re-deploy onto the table at any
other point of cover.
On the evening of the 25th of May Garibaldi was
visited by a party of three British Naval officers
and the correspondent of the Times newspaper.
The journalist was Hungarian born and an
experience soldier who had been into Palermo
and seen that the Porta Termini was the only gate
not to be defended by artillery. He passed on this
information and plans were made accordingly.
Winning the Game
The Picciotti win the game if they inflict double
the casualties on the Bourbon forces than they
suffer with a minimum of a dozen Bourbon
troops killed.
The major obstacle to this plan was the long and
narrow Norman bridge, the Ponte dell'
Ammiraglio, which had an outpost of Bourbon
troops defending it. However, all of the men in
the attacking column were ordered to make a
silent approach which, it was hoped, would allow
them to surprise the outpost.
Postscript
Great revolutionary though he may have been,
the Sicilian peasantry were somewhat
disappointed to find that the nobility were
allowed to continue with their ownership of the
land as previously. Indeed Garibaldi deployed his
own troops to violently suppress at least one
peasant rebellion during 1860 when the locals
realised that this was not a revolution in the
sense which they had imagined.
Garibaldi's trusted Hungarian Lieutenant, Lajos
Tüköry, led the way with a small party of guides
supported by Sicilian volunteers under La Masa.
As they came within sight of the city the Sicilians
were overcome with emotion and began shouting
"Palermo! Palermo".
The Bourbon sentries
sounded the alarm and the initial rush by Tüköry
was repelled with ease. This in turn caused the
Sicilians to lose heart and disperse in panic.
Once can only imagine Garibaldi's frustration that
his carefully planned attack had been ruined.
Turning to Bixio he called "Set an example!", and
the Genoese Carabinieri and four companies of
Garibaldini stormed forward. The fight lasted an
hour, during which time Tüköry was mortally
wounded. Bixio was also wounded, shot in the
chest, but he removed the bullet himself and
carried on fighting.
Page 73
Take the bridge and Palermo will be free! Your
force is as follows:
Finally the Bourbons were overcome and the
Porta Termini seized, opening the route into
Palermo. Several days of confused street fighting
followed, but ultimately the rising of the
population to support the revolutionaries
provided the impetus required to persuade the
Bourbon command of the uselessness of
continuing the fight. It must, however, be
stressed that Palermo was lost by a lack of
commitment and self-belief within the Bourbon
ranks rather than by Garibaldi's military prowess.
Such was his reputation that much of his success
was a product of the image of the all-conquering
revolutionary which sapped the will to fight from
his opponents.
Guiseppe Garibaldi, Status IV
Brother Pantaleo, inspiring cleric
Four companies of Garibaldini, twelve figures
each, with muskets and four rounds of
ammunition. Good, Aggressive Troops.
One company of Genoese Carabinieri, six figures,
armed with Baker Rifles. Good Light Troops.
These troops increase the cover they are in by
one level to reflect their expertise in a light
infantry role.
They have no limits on
ammunition.
You have two Big Men Status III and two Big Men
Status II, all of whom must be allocated to one
company each.
Garibaldini Briefing
Palermo lies before you with just the Bourbon
outpost at the Ponte dell' Ammiraglio lying in
your path. You have issued orders for a silent
attack, but you have just heard firing from up
ahead and a whole host of Sicilians have just run
past you in disorder. What can have gone
wrong? You must seize the nettle and push on.
You begin the game deployed in column on the
road at the Eastern end of the bridge across the
canal. The head of your column is at the start of
the bridge.
Page 74
Bourbon Briefing
SCENARIO FOUR
Sound the alarm, call out the Guard! The rebels
are upon us! Your force is guarding the Ponte
dell' Ammiraglio before the Porta Termini on the
South Eastern side of Palermo. It seems that you
are under attack. You must do all you can to hold
out in order to allow troops to man the gate into
the city. Your numbers are few, but you do have
the bridge is narrow. You must do what you can.
Your force is as follows:
DEATH AMONG THE VINES
Bourbon forces surrendered Palermo in early
June of 1860 and began to evacuate the bulk of
Sicily. Their remaining major garrisons were
ordered to hold their positions and avoid being
besieged. They had 18,000 men at Messina, 2000
at Syracuse, 1000 at Milazzo and just 500 in
Augusta. General Tomasso Clary was promoted
to the rank of Marshall and began to plan a
counter-offensive in order to regain Palermo.
The first step in this involved moving one of his
best officers, Colonel Fernando Bosco, to Milazzo
with 3000 men where he was ordered to hold a
ring of villages which protected the town and
citadel which, located as they were on a
promontory, could easily be besieged is the
narrow isthmus was seized.
Captain, Status II
Lieutenant, Status I
Three Groups of eight figures armed with
muskets. Poor troops, Weedy coves.
Umpire's Notes
The table is dominated by the canal with the long
narrow bridge across it. The canal is completely
unfordable.
The bridge is a 12th century
structure which has a pronounced hump in the
middle where two steep ramps lead up to the
centre.
Troops cannot remain in formation
which crossing the bridge due to its narrowness.
Troops clearly behind the "hump" cannot be fired
at by troops the other side of the hump unless
they are within 3" of the hump when only the
front rank can fire.
Garibaldi, meanwhile, had expanded his forces
significantly.
Thousands of Sicilians had
volunteered and support was constantly arriving
from overseas as men inspired by revolutionary
zeal had made the journey to take part in the
historic events. Thus reinforced Garibaldi had
split his forces into three groups in order to
occupy the whole island; Bixio heading along the
South coast for Syracuse, Cosenz headed into the
interior whilst Medici moved along the northern
coast towards Milazzo.
The buildings are stone and provide hard cover.
The trees are purely ornamental but they do
serve to break up and otherwise bland table.
After some initial skirmishing, with Bourbon
troops attempting to deny the Garibaldini the
outlying villages, the forces joined battle on the
20th of July with attacks being made along the
entire Bourbon line. Here the broken terrain saw
the battle degenerate into a series of small
actions (all perfect for Sharp Practice!). On their
left, a body of Tuscan volunteers under
Malenchini hit the Bourbon line where four
artillery pieces were covering their approach and
were thrown back with losses. Bosco ordered his
right to advance to complete the victory over this
force which was now obliged to conduct a
fighting withdrawal through the vine covered
slopes up to the Zirilli farm.
Winning the Game
The Bourbons win the game outright if they hold
the bridge at the end of the game. They win a
victory if they hold the house near the western
table edge. If they are swept from the table they
have lost.
Page 75
Garibaldi was unphased by this reverse, sending
Enrico Cosenz, himself a former officer in the
Bourbon Army but now one of the
revolutionaries' foremost leaders, to reinforce
that flank while he led a charge off to the right of
the battle, hoping to obliged the Neapolitans to
withdraw by threatening their flank.
Guiseppe Malenchini, Status III
Five companies of Garibaldini, six figure each,
with Muskets. These are Average troops, but
each Group has two points of Shock when the
game begins.
You have two additional Big Men, Status II and
one Big Man Status I to attach to this force.
This scenario focuses on the Bourbon counterattack on their right and the fighting withdrawal
by the Garibaldini.
You begin the game deployed on the road in the
North-Western sector of the map. Behind you,
up the hill, lies the Zirilli farm with its stout stone
walls.
Garibaldini Briefing
Bourbon Briefing
Disaster! The damn Royalists were waiting for
you with cannon and, having stopped your attack,
they are now in pursuit. You have sent word to
Garibaldi but as yet you have had no word back.
You must fight a withdrawal back to the Zirilli
farm where you can find some cover and hope
that reinforcements are being sent. Your force is
as follows:
These damned rebels have annoyed you! They
have attempted to besiege you in the fortress of
Milazzo but you have made fools of them and
checked their advance with artillery fire. Now
you are pushing them back up the hill. If you can
defeat them here you will give them the beating
these dogs deserve. You must push on and
defeat them completely. Your force is as follows:
Page 76
Game Deck for a Big Man commanding the gun.
This arrives at the North Western corner when
that card is dealt.
Major, Status II
Five companies of Cacciatori, twelve figure each,
with Minnie Rifles. Average Troops. Weedy
coves.
You have three additional Big Men, Status I to
attach to this force.
A Blank Card should be added to the Game Deck.
When this has been turned five times Garibaldini
reinforcements arrive on the road on the Eastern
table edge. These are as follows:
You begin the game off-table, approaching from
the North West. When a leader's card is dealt for
the first time he and the men he commands will
deploy on the North Western corner of the table
or in contact with any troops which are deployed
at that point (as more troops deploy they will
cluster around that corner until they move away)
to reflect the somewhat chaotic advance through
the vines. All of your Groups begin the game out
of Formation.
Enrico Cosenz, Status III
Two Groups of twelve Garibaldini, twelve figures
each, with Baker Rifles. Good, Aggressive Troops.
Winning the Game
At the end of this game whoever holds the Zirilli
Farm wins the game. If the farm is contested,
the side with the larger number of Big Men is
considered to have the best cohesion and will,
therefore, win the day.
You are attempting to get artillery pushed
forward through the vines but so far this is
proving difficult. You may attempt to call this
forward by expending one command initiative in
any turn, This allows you to wave your arms and
shout in a suitably histrionic manner in the
general direction of the artillerymen. Who
knows, it might help!
SCENARIO FIVE
AVANTI! CORRAGIO, UOMINI!
With the Bourbon success on their right flank,
Garibaldi was determined to use the situation to
his advantage. Sending Cosenz to reinforce
Malenchini on his left, he attacked hard on his
right, driving along the coast through the farms,
mills, wheat fields and vineyards which scattered
across the coastal plain.
Here he was
commanding a force of volunteers who had
joined his force only recently, many of whom
were seeing action for the very first time.
Umpire's Notes
The terrain here slopes up towards the South and
South East with the vines being liberally scattered
across the table. Note that the vines are planted
as shown, providing free passages for movement
through them. Whilst in the vines order is lost
somewhat, with no more than two Groups
forming into a single Formation while in the
vines.
Standing exposed to the enemy fire, Garibaldi
pushed his volunteers forward with words of
encouragement, "Avanti! Corragio, uomini!",
exhorting them to find courage in the battle.
The Zirilli farm is made up of two stone buildings
which are hard cover. The walls surrounding
them are around four foot high and also provide
hard cover for men behind them.
This action follows the attack parallel to the
northern coastline which saw the Garibaldini
approaching Milazzo from East and outflanking
the Bourbon advance Southwards.
On the third attempt at waving his arms and
shouting
histrionically,
the
Neapolitan
commander succeeds in getting his artillery
forward. On the next Turn add a card to the
Garibaldini Briefing
With news that the enemy are winning off on
your left, you are determined to turn the tables
Page 77
fighting in close combat (he cannot simply be
nearby).
You begin the game on Blinds, entering the table
on the road or track on the Eastern table edge.
on him by driving in his right and isolating his
over-extended forces. Here you must attack hard
and drive the enemy out of their positions to
open the road into Milazzo. A victory here will
close the isthmus and bottle up the Royalist
troops in their citadel. Your force is as follows:
Bourbon Briefing
The good news is that our right flank force has
routed the rebel attack. The bad news is that
they seem to be attacking here on our left. We
must hold our ground here or the enemy could
cut off the town and isolate any of our forces to
the South. It is vital that you hold your ground
here and do not allow the enemy to advance
westwards. Your force is as follows:
Guiseppe Garibaldi, Status IV
Brother Pantaleo, inspiring cleric
Three companies of Garibaldini, ten figures each,
with muskets. Average troops.
Three companies of Garibaldini, ten figures each,
with Baker Rifles. Average troops.
One company of Genoese Carabinieri, six figures,
armed with Baker Rifles. Good Light Troops.
These troops increase the cover they are in by
one level to reflect their expertise in a light
infantry role.
Each company has one Big Man, Status II
attached.
Major, Status II
Five companies of Cacciatori, twelve figure each,
with Minnie Rifles. Average Troops. Weedy
coves.
One Heavy gun with no limber.
You have three additional Big Men, Status I to
attach to this force.
Apply the rule for Sailors in Close Quarters, 12.1.8
if Garibaldi is within 12" of any troops and
Page 78
judicious application of the rules which allow the
gamer to "tailor make" his force in terms of
selecting those characteristics which best allow
its specific characteristics and character to shine
through.
You begin the game on Blinds which may be
placed anywhere on the table at least 24" from
the eastern table edge. You may have two
dummy Blinds.
Umpire's Notes
Until recently figures for the period were, in
28mm at least, few and far between. Fortunately
this gap has been amply filled by Gringo 40's who
have recently released their range for this very
period. Indeed it was seeing these in the flesh
which led me to revisit a period which has always
intrigued me. Ged at Gringos 40 is always a
helpful chap to deal with which always makes
handing over hard earned cash so much easier.
You can find details of this, and his other ranges,
here: http://www.gringo40s.com/
The table should be an attractive pastoral scene,
with small farmhouse nestling in amongst fields,
vines and olive orchards. The table is flat.
Both sides have reserves for this game. Garibaldi
has one additional Company of Garibaldini, albeit
one with very little ammunition. They have
sufficient for just two rounds of fire. To bring
these forward, Garibaldi must be within 12" of
the eastern table edge and must spend two
command initiatives to bring them onto the
table. This cannot happen until at least three
Neapolitan companies are deployed on the table.
For those looking for off-the-peg products,
Empress Miniatures produce some very nice
rustic looking farm buildings which were
designed for their Spanish Civil War range but will
work in any part of Southern Europe very well
indeed. Empress Miniatures can be found here:
http://www.empressminiatures.com/
The Neapolitans may deploy Colonel Bosco
himself onto the table with his escort of a single
Group of Dragoons. A Blank Card is added to the
Game Deck and once this has been dealt three
times Bosco's card is added to the deck. Bosco is
a Status III Big Man.
Naturally we will be covering this period when we
produce the second edition of Sharp Practice, but
for now the rules presented here will allow Sharp
Practice users to get cracking with this fun period.
Winning the Game
Garibaldi's objective here is to simply smash
through the Bourbon troops and exit his force off
the road in the North Western table edge. This
will allow him to close off the isthmus and cut off
any Bourbon troops to his South. The Bourbons
win if they reduce Garibaldi's force to twenty
men or less. They win a major victory if they stop
the Garibaldini leaving the table but their road
objective.
Conclusion
I hope that this piece has provided sufficient an
over view of Garibaldi's campaign in Sicily to
show what an interesting and fun period this is
to game. The somewhat chaotic nature of an
irregular force, albeit one led by a highly
charismatic and efficient leader, can provide
some interesting gaming challenges which can be
well-represented by Sharp Practice with a
Page 79
Although we can research the troops present for
historical encounters (at the same time
absorbing a useful feel for the approximate
relative strengths of historical units) we cannot
do the same thing for sci-fi battles, at least not
without a mass of experimentation.
One of the great things about Quadrant 13, the
TooFatLardies rules for company-sized Sci-Fi
wargaming, is the fact that you can construct
and use any army from any figure manufacturer
or fictional source.
Want to use Space Dwarves from a mix of
manufacturers? No problem. An army based on
not-Star Wars? Also no problem. You name it,
Q13 can simulate it.
What is needed is a mechanic that allows you to
calculate, for example, how many Chuhuac
blaster-armed, velociraptor-like infantry squads
should be fielded if their Aphid enemy has three
Flycatcher hover tanks at their disposal…at least
until you’ve played enough to get a feel for the
ratio yourself.
This flexibility, however, does come with a price.
Quite a few people have mentioned to me that
they have a problem not so much with actually
building the armies themselves, but with then
working out what troops to deploy on each side
to give a good game…especially for
heterogeneous armies such as humans versus
bugs.
Yes, it’s the ultimate heresy: a points system.
The Ultimate Heresy
What you will therefore find below is a
rudimentary points system for Q13 that I believe
will allow you to field two forces of
approximately the same strength on the
tabletop.
Put simply, they can use the guidelines in the
rules to give their medium tanks the right sized
gun but then have difficulty in working out how
many tanks to field in order to make it a ‘fair
fight’ with the opposition. Unlike the
TooFatLardies historical rule sets, there is no
frame of reference.
A few words of caution, however. Firstly, this is
not any sort of endorsement for points systems
in general.
No Frame of Reference
Q13 is unique amongst the TFL canon in dealing
with the non-real. It therefore needs something
like this to help translate what is effectively
fiction into playable ‘fact-tion’. Do not expect
points systems for IABSM or CDS to follow!
Discussing this issue with Richard Clarke, the
two of us gradually came to the conclusion that
this lack of a frame of reference is a real
problem.
Page 80
We can see that the Leg Infantry squad has
three figures that give it zero Actions, one figure
that gives one Action, one figure that gives two
Actions, four figures that give three Actions and
one figure that gives four Actions.
Secondly, this system still doesn’t solve the
basic problem of estimating the worth of an
anti-tank gun if the enemy has no tanks present.
Yes, it compares an anti-tank gun (sorry, support
weapon classed as DF Bolt) with a tank, but has
no situational modifiers.
With the Drop Troops, it is two figures that give
zero Actions, one figure that gives one Action
etc.
To calculate the base cost of an infantry squad,
simply multiply the number of figures by the
number of Actions that each gives.
Finally, and in keeping with most things Lardy,
this is not a system for rules lawyers and rivetcounters. It is designed to give you a quick-start
way of getting a playable game onto the
tabletop as soon as possible: a short-cut to the
feel of what the relative strengths of units are.
So, for our Regular Leg Infantry squad, the
calculation is as follows: (3 * 0) + (1 * 1) + (1 *
2) + (4 * 3) + (1 * 4) = 19 points
So, are we sitting comfortably? Then I’ll begin…
Commanders and Specialists
Very simple. Just multiply the army’s Tech Level
by the factors shown in the table below.
And for our Veteran Drop Infantry squad it is:
(2 * 0) + (1 * 1) + (1 * 2) + (3 * 3) + (1 * 4) = 16
points
Unit
Big Men
Drone Operator
EWSO
Forward Observer
Medic
Sniper
Adjust for Weight
Points
Tech Level x Level x 10
Tech Level x 10
Tech Level x 20
Tech Level x 10
Tech Level x 5
Tech Level x 15
Now add a modifier for the weight of the squad
(Section 2.4.3 of the rules).
This is simple: if the squad is Heavy, add three
points; if the squad if Light, subtract three
points. Don’t change the base points cost if the
squad is Standard.
Tech Level 0 armies should use 1 as their
multiplier.
In our example above, let’s define the Leg
Infantry squad as Standard, so it remains at 19
points, but let’s define the Veteran Drop Troops
squad as Light, as they will drop into combat
with personal weapons only, and so their points
cost reduces to 16 – 3 = 13 points.
Infantry Squads
Start by looking at the number of Actions that
the infantry squad has (Section 2.4.4 of the
rules).
Adjust for Other Characteristics
Let’s assume we are pointing up the following
(a) a Regular 10-man Standard Leg Infantry
Squad and (b) a Veteran 8-man Light Drop
Squad. The army as a whole is Tech Level 2.
Now add one point for each of the following
that apply:
Role
Checking the rules, their Actions are defined as
follows:
Actions
Leg
Infantry
Drop
Infantry
0
1, 2, 3
1
4
2
5
1, 2
3
4
3
6, 7, 8,
9
5, 6, 7
Weapon
Protection
4
10
8
Movement
Chrome
Page 81
Assault
Mobile
Recon
Engineer
Flame
Have armour
Powered/Shields
Mega
PMS
BI
As appropriate
Note that troops with powered armour or
armour and shields add two points: one for the
line ‘have armour’ and one for the line
‘powered/shields’. Those with Mega armour
would add one more.
Let’s give the Leg Infantry squad armour, so
increase their total by one to 20 points. We’ll
make the Drop Troops Assault troops, give them
armour too and, as per their designation, make
them capable of Battlefield Insertion: that’s a
total of three extra points, so they are back up
to 16 points.
Being a bit worried that the Drop Troops are
now a bit weedy, let’s define them under
chrome (Section 2.12 of the rules) as carrying
lots of automatic weapons for maximum impact
up close, so they won’t get the penalty for being
a Light squad at Close Range. We’ll decide that
that is worth another point, bringing them up to
17 points. We could have decided it is worth an
extra two points, but as the reduction for a Light
squad is -3, and there are three ranges, I think a
single point benefit is appropriate.
ARMY LIST (Tech Level)
Infantry Squad
Actions
Infantry
No. of figures
Points
0
1
2
3
4
0
0
0
0
Base
0
0
Weight (H+3, L-3)
Role
Weapon
Protection
Movement
Assault
Mobile
Recon
Engineer
Flame
Have armour
Powered/Shields
Mega
PMS
BI
Chrome
Base + Equipment
Tech Multiplier (0: x1.0, 1: x1.5, 2: x2.0, 3: x2.5, 4: x3.0)
Total Points Cost For Squad
Tech Level
0
1
2
3
4
Modifier
1.0
1.5
2.0
2.5
3.0
That gives our final points totals as follows:
Leg Infantry: 20 x 2 = 40 points
Drop Troops: 17 x 2 = 34 points
I have built a simple spreadsheet that allows you
to calculate the points easily which may be
found opposite.
0
Support Weapon or Vehicle
Weapons
Bolt
Boom
Autogun* Flame
Adjust for Tech Level
Finally, multiply the squad’s points score by the
Tech Level modifier from the table below.
Always round any fractions to the nearest whole
number.
0
Base
Actions
Crew or Armour
Role
Recon
Weapon Variable Fire
Close Combat Capable
Anti-Aircraft Specialist
Each Gunner
HOV
Move
Speed (F +1, S -1)
BI
Chrome
Base + Equipment
Tech Multiplier (0: x1.0, 1: x1.5, 2: x2.0, 3: x2.5, 4: x3.0)
Flight modifier (x2.0, otherwise enter 1.0)
Total Points Cost For Support Weapon or Vehicle
Total
0
0
0
0
0
0
0
0
Command & Specialists
Big Men
Drone Operator
EWSO
Forward Observer
Medic
Sniper
Tech Level x Level x 10
Tech Level x 10
Tech Level x 20
Tech Level x 10
Tech Level x 5
Tech Level x 15
Cards & Chrome
Each optional card or chrome that gives a benefit
Each optional card or chrome that gives a penalty
Page 82
Tech Level x 20
Tech Level x -20
Support Weapons & Vehicles
Adjust for Other Characteristics
Support weapons and vehicles are handled in a
similar fashion to infantry, but their base points
cost is derived from their weaponry rather than
their Actions.
Just as with infantry squads, now add one point
for each of the following that apply:
Role
Weapon
To calculate the base points cost of a vehicle or
support weapon, add up all SVs of all weapons.
Those weapons able to fire both Boom and Bolt
count as having two SVs, and Autoguns add one
for each extra barrel (Section 2.7.3 of the rules).
Remember that twin guns count as two
weapons.
Move
Chrome
Again, let’s look at an example. Our army,
above, wants to deploy a medium-weight, fast
attack tank to support its leg infantry. The tank
is armed with a single SV5 Both DF gun, and a
two-barrelled SV2 Autogun.
Recon
Variable Fire
Close Combat Capable
Anti-Aircraft Specialist
Each Gunner
HOV
Speed (F +1, S -1)
BI
As appropriate
In our example, this tank is Fast, but that’s all:
so that adds one, making 23 points so far.
Adjust for Tech Level
Finally, as with the infantry, multiply the points
score by the Tech Level modifier from the table
below:
The base points cost for the tank is therefore (5
+ 5) + (2 + 1) = 13 points.
Tech Level
0
1
2
3
4
Note that you should count the points cost of
any off-table support weapons just as if they
were on table.
Adjust for Actions
Next, add the number of Actions available to the
vehicle or support weapon. Off-table
vehicles/weapons have no Actions, so add
nothing here.
Modifier
1.0
1.5
2.0
2.5
3.0
That gives our final points totals as follows:
Fast Attack Tank: 23 x 2 = 46 points
Flight
And finally, for vehicles, double the score if the
vehicle can fly, either STP or N-STP (Section
2.5.7.4 of the rules).
In our example, the tank is defined as Regular,
so that is three Actions i.e. +3.
That gives us a points cost so far, of 13 + 3 = 16
points.
Adjust for Crew or Armour
Next, for support weapons only, add the
number of crew.
If, on the other hand, you are pointing up a
vehicle, then add the appropriate Armour Value
(AV).
In our example, our tank is medium tank,so
would have an armour value of between four
and eight, so let’s make it AV6, so that’s +6.
That gives us a points cost so far, of 16 + 6 = 22
points.
Page 83
Then add a Bonus Move card for the tanks and
drop troops (40 points); a Rally card for all (40
points); and a Rapid Deployment card for the
drop troops (40 points).
Cards and Chrome
For each optional card (Section 3.1.2 of the
rules) added to the pack that gives a bonus, no
matter what proportion of the army it refers to,
add Tech Level x 20 points to the cost of your
army.
Likewise, for each optional card (Section 3.1.2 of
the rules) added to the pack that gives a
penalty, no matter what proportion of the army
it refers to, subtract Tech Level x 20 points to
the cost of your army.
Total: 998 points.
I’m now ready to fight another 1,000 point
army!
Finally, add or subtract an amount based on one
of the factors already mentioned or a multiplier
of Tech Level for any Chrome not yet covered.
Note that if a Specialist is attached to a
particular infantry squad, support weapon or
vehicle, just add the raw points for them (i.e.
without the Tech Level multiplier) in under
Chrome. As an example, a Recovery Drone, that
repaired vehicles, would add five points under
Chrome, and count as a Medic to vehicles i.e.
could remove Shock.
Our Example
To see all this in action, let’s say that I am
building an army based on the units above.
I have two 3-squad platoons of leg infantry and
a small, 2-squad platoon of drop troops (each
headed by a Big Man) supported by a squad of
five fast attack tanks. That gives me points as
follows:
Commander: 80 points (Level 4 Big Man)
Leg Platoon 1: 160 points (Level 2 Big Man @ 40
points plus three squads at 40 points each)
A Final Word
So there you have it: a points system for Q13
that should help you get your figures onto the
table
Leg Platoon 2: 160 points (Level 2 Big Man @ 40
points plus three squads at 40 points each)
I will post the spreadsheet as a download on the
Vis Lardica website and, in due course, a
completed version for each of the existing army
lists.
Drop Platoon: 128 points (Level 3 Big Man @ 60
points, plus two squads at 34 points each)
Tank Squad: 270 points (Level 2 Big Man @ 40
points plus five vehicles at 46 points each)
Below is a working example: the spreadsheet for
my Chuhuac forces from Loud Ninja Games.
Add a Medic (10 points); a Sniper (30 points)
and an EWSO (40 points).
Page 84
Page 85
1
4
1
1
Chrome
Movement
Weapon
Protection
Weight (H+3, L-3)
Role
0
1, 2, 3
3
0
Bolt
Boom Autogun* Flame
2
2
2
2
2
2
Base
Actions
Armour
Role
Recon
Weapon Variable Fire
Close Combat Capable
Anti-Aircraft Specialist
Each Gunner
Move
HOV
Speed (F +1, S -1)
BI
Chrome
Base + Equipment
Tech Multiplier (0: x1.0, 1: x1.5, 2: x2.0, 3: x2.5, 4: x3.0)
Flight modifier (x2.0, otherwise enter 1.0)
Total Points Cost For Vehicle
Weapons
Close Defence
Close Defence
Close Defence
Close Defence
Close Defence
Close Defence
Sirrus APC
19
2.0
1.0
38
1
Total
2
2
2
2
2
2
12
3
3
29
2.0
58
1
1
3
4
6,7,8,9 10, 11, 12
4
3
12
12
27
Base
Assault
Mobile
Recon
Engineer
Flame
Have armour
Powered/Shields
Mega
PMS
BI
2
5
1
2
Trooper Squad
CHUHUAC (2)
Base + Equipment
Tech Multiplier (0: x1.0, 1: x1.5, 2: x2.0, 3: x2.5, 4: x3.0)
Total Points Cost For Squad
Actions
Infantry
No. of figures
Points
ARMY LIST (Tech Level)
1
3
1
1
Chrome
Movement
Weapon
Protection
Weight (H+3, L-3)
Role
0
1, 2
2
0
3
5, 6
2
6
Base
Assault
Mobile
Recon
Engineer
Flame
Have armour
Powered/Shields
Mega
PMS
BI
2
4
1
2
Bolt
4
4
2
2
Boom Autogun* Flame
Base
Actions
Armour
Role
Recon
Weapon Variable Fire
Close Combat Capable
Anti-Aircraft Specialist
Each Gunner
Move
HOV
Speed (F +1, S -1)
BI
Chrome
Base + Equipment
Tech Multiplier (0: x1.0, 1: x1.5, 2: x2.0, 3: x2.5, 4: x3.0)
Flight modifier (x2.0, otherwise enter 1.0)
Total Points Cost For Vehicle
Weapons
Main Gun
Rocket Launcher
Close Defence
Close Defence
Battlesuit
Base + Equipment
Tech Multiplier (0: x1.0, 1: x1.5, 2: x2.0, 3: x2.5, 4: x3.0)
Total Points Cost For Squad
Actions
Infantry
No. of figures
Points
Assault Trooper Squad
20
2.0
1.0
40
Total
4
4
2
2
0
0
12
3
5
11
2.0
22
1
1
0
9
4
1
2
1
1
Chrome
Movement
Weapon
Protection
Weight (H+3, L-3)
Role
0
1
1
0
3
4, 5
2
6
Base
Assault
Mobile
Recon
Engineer
Flame
Have armour
Powered/Shields
Mega
PMS
BI
2
3
1
2
Tech Level x Level x 10
Tech Level x 10
Tech Level x 20
Tech Level x 10
Tech Level x 5
Tech Level x 15
Rally
Bonus Move
Charge
Rapid Deployment
Dynamic Commander
Cards & Chrome
Big Men
Drone Operator
EWSO
Forward Observer
Medic
Sniper
Command & Specialists
40
40
40
40
40
Base + Equipment
Tech Multiplier (0: x1.0, 1: x1.5, 2: x2.0, 3: x2.5, 4: x3.0)
Total Points Cost For Squad
Actions
Infantry
No. of figures
Points
Special Ops Squad
20
40
20
10
30
16
2.0
32
1
1
1
4
6
1
4
13
1
4
1
1
Chrome
Movement
Weapon
Protection
Weight (H+3, L-3)
Role
0
1, 2, 3
3
0
3
6, 7, 8, 9
4
12
Base
Assault
Mobile
Recon
Engineer
Flame
Have armour
Powered/Shields
Mega
PMS
BI
2
5
1
2
Base + Equipment
Tech Multiplier (0: x1.0, 1: x1.5, 2: x2.0, 3: x2.5, 4: x3.0)
Total Points Cost For Squad
Actions
Infantry
No. of figures
Points
Grav Bike Squad
21
2.0
42
1
1
1
0
15
3
4
and Jim Catchpole their experiences running
Games Days in their neck of the woods.
Hello and welcome to another Roundwood
Report where I, Sidney Roundwood, once again
attempt to shed light on the mysterious and
somewhat anarchic world of Lard.
To give some contextual background, Ade
Deacon of the Wyvern Wargamers hosted the
very first Lardy Games Day, Operation Market
Larden, in Evesham back in 2012. This was
swiftly followed within a matter of weeks by
Deep Fried Lard, organised by Derek Hodge of
the South East Scotland Wargames Club and
Jim of Durham Wargames Club joined the party
this year, organising Wor Lard in March.
Readers will no doubt be familiar with Richard
Clarke's "Up Front" column in Wargames,
Soldiers & Strategy magazine where he
regularly shares his insights into the hobby, its
past and its future. One of the themes
addressed recently has been the evolution of
the wargames show and how those which do
not adapt with the times will not flourish. As
usual with Rich's column it stimulated the little
grey cells and got me thinking about the way
we view wargames "shows" and what they
deliver.
Interestingly, the format for all of these events
is strikingly similar: a full day of wargaming
followed by beer and curry in the evening. I
asked Ade Deacon if this was the format he had
developed.
There is, of course, the perpetual debate about
whether UK shows should be more like US
Conventions, with the emphasis on gaming
rather than shopping and this made me realise
that in some ways, the day of gaming is
something which has been successfully
delivered for a number of years now by what
can collectively be described as the Lardy
Games Days. So I thought that rather than
simply talk to Rich or Nick I'd invite three more
interesting guests to the Roundwood Report
Sofa to discuss with Ade Deacon, Derek Hodge
Ade: No that was down to Rich. When first
asked if he would personally attend a day of
TFL games, he replied "Of course, if the day is
ended with beer........oh, and curry there must
be curry." Thus the concept had arrived.
Sidney: Why does that not surprise me! So
chaps, what motivated you all to run a Lard
themed Games Day?
Page 86
Ade: I was a late bloomer, not reaching Lard
enlightenment
until
around
2008,
but I'd had my best fun wargaming in over
thirty years of the hobby playing TFL games and
become a complete convert into their "friction"
type of approach. Initially I decided to
"#spreadthelard" by giving folks who were
buying into more run-of-the-mill "IGO-UGO"
systems produced by the industries' big hitters
a chance to try something a little different.
When it quickly became apparent from the TFL
Yahoo Group that there was already an
extremely good community feel of likemindedness, there was the added incentive to
meet up and game with some of them in
person.
but it has always clashed with our club show.
When I found, from a discussion on the list that
other Lardies in the region were interested in
the idea of our own Lard Day, I just decided
that someone needed to seize the moment and
it
might
as
well
be
me!
Sidney: Jim how did you deal with getting a
venue for the event?
Jim: Part of my reason for stepping forward
was I thought our club in Durham was a perfect
venue. We have the room and facilities, and it
is easy to get to from anywhere in the region and
many
parts further afield. I simply approached our
club before announcing anything, who were
very supportive of the idea.
Derek: I was inspired by reports of similar
events that people were running elsewhere. I
can’t really remember what exactly, it was
either an article in one of the Specials or
something on the web that finally pushed me
into doing something about it.
Derek: We don't have a permanent facility in
Edinburgh like the Durham club has, so I
started off with a list of absolute requirements
for the sort of Games Day I would want to
attend myself; space to play wargames and a
bar. I also needed easy access to the services
essential for a good evening entertainment, a
decent pub, a curry house and transport home.
Jim: For me, it just felt like something whose
time had come. I've always wanted to get to a
Lardy Day, but Lard Island has always felt too
far for a day out, Operation Market Larden
more so. Deep Fried Lard would be just doable,
Initially I hoped that we could use the Navy
Club in Edinburgh, the normal venue for the
Page 87
South East Scotland Wargames Club, but the
room we use there is not available at the times
needed on a Saturday. I looked at the premises
used by other wargames clubs in Central
Scotland, but none of them were suitable,
usually with no bars and often in the middle of
nowhere.
on the Village Hall Committee so there's never
a problem booking the venue. Failing that I
suppose I would have explored a few halls or
community centres locally. There also needs to
be ample parking for my tractor.
Sidney: I always have the thought in my mind
that organising a Games Day will always mean
getting ample numbers of people to run games.
How does that pan out?
Inspiration came and I asked about the
functions room at my local rugby club, it’s busy
on Saturdays during the season, but they had
some free Saturdays in June, before the main
holiday season starts. Musselburgh Rugby Club
is close to an excellent pub which was CAMRA
Pub of the Year for the Lothians in 2014 [a
trophy everyone I know believes they nicked
from another pub down the road! Ed.], a
decent Indian restaurant and a couple of
hotels. They’ve got storage space where I can
leave stuff overnight before and after the event
and the price is quite reasonable. And it’s all
within walking distance of my house.
Derek: It’s simple really, I strong-arm friends
and send an email round people who have
expressed an interest in coming, asking if
they’d like to put on a game. Enough of them
say yes for it all to work out. It helps that
people who run games get first shot at games
they get to play.
Jim: That was the easy bit actually; they just
volunteered themselves! I didn't have to do
anything.
Sidney: What about you Ade?
Ade: There's a very healthy group of Lardistas
in the club's ranks, so volunteers to put some
games on isn't really an issue. We've had
roughly a 50:50 balance between home-grown
and visitor-run games in all three previous
Ade: Fortunately I attend a club called Wyvern
Wargamers and they have a fantastic venue in
a modern village hall. Another club member is
Page 88
years at OML. Rich is normally keen to promote
his newest offering too and in the inaugural
year he was running his "Lard Approved"
program which gave budding authors a chance
to get their concepts into the public eye.
Following the success of the first event, there's
luckily been no shortage of willing umpire's.
Now it's more about momentum.
providing the "Total Experience" It really is as
simple as that.
Jim: The only real objective was for everyone
to have a good time. Towards that end, I felt
we should have a range of games on offer, and
as it happened, the games offered met that. I
did make sure that our optional extra games
would add to the variety as well.
Sidney: How do you spread the word about
the event?
Derek: To have fun. What’s not to like about
playing wargames with friends, drinking lots of
beer and eating curry?
Derek: As far as I know most people initially
heard about Deep Fried Lard by reading a post
on Lard Island News, through the Yahoo Group,
or by word of mouth. After two years of
running the event I’ve got an email list to
circulate as well. Numbers seem to have
stabilised around the mid-twenties, but that’s
fine.
Sidney: With something like seven Games Days
behind you collectively, what would you say
has worked for you?
Ade: I know it's not everyone's way, but having
a clear plan really works for me. I know for
example that our venue's comfortable capacity
is about 36 people and roughly 10 games. So I
aim early to sell it as quickly as possible with
those in mind. I also ask for three choices of
preference from each player from a list of
known systems. That way I know I can sort
names to games and enhance the chances of
everyone getting what they wanted from the
day. Knowing how many intend to stay for the
social "debrief" also helps.
Jim: I initially announced it on the TFL forum
and yahoo group, then started finding contact
details for local clubs, who I sent off invitations
to. For the next one (I have already been told
there will be one!), I will probably try getting
more flyers out at shows before the event, and
working up a list of forums where
announcements would be useful and welcome.
Ade: First option for spaces is offered to
previous attendees by email now and the take
up is almost total. In the beginning we floated
the idea via the TFL Yahoo Group. Now of
course I could also solicit the TFL Forum. This
year we had at least five new faces solely from
word of mouth, which was particularly pleasing
as it showed growth of both TFL's product
awareness and the event itself.
Jim: Keep written records beforehand - of
contact
details,
invitations
sent,
announcements
made,
attendees,
arrangements made - but don't over-plan the
day itself. For the day itself, I had a simple list
of people who should be attending and any
preferences they had expressed, so I
could point them in the right direction, but who
actually played what was arranged on the
spot. We also had everything ready for a couple
of extra games which could have been
dropped into the schedule if needed.
Sidney: This may be a daft question as within
the context of Lard Richard is not really a chap
with a corporate approach to his gaming, but
do you have any goals or objectives when
organising a Games Day?
Derek: Just keeping it simple.
Ade: Primary goal is to get more people
playing Lardy games. Primary objective is to
send them home thinking it's been a great
event. There's a really social side to TFL
gaming, so facilitating that too is important in
Sidney: Has there been anything which hasn't
worked, or stuff which has gone wrong and you
wouldn't repeat?
Jim: I picked the weekend because A Call To
Muster, in Middlesborough, had been
Page 89
cancelled. I thought that would maybe mean
more wargamers in the region with nothing
arranged for the weekend - I was trying to
arrange the whole thing quickly, since I knew
the summer would be busy and I didn't want to
wait until the autumn. As it happened, a
number of people were interested, but couldn't
make it at short notice.
years which works well for me.
Sidney: Have you hit any unexpected pit-falls
which you would flag up to other people?
Having sold out early, keep a reserve list in case
of withdrawals. If you're lucky enough to be
able, apply that to games as well as players.
Sidney: Are there unexpected pit-falls which
you would flag up to other people?
Derek: Finding out that the hall booking in
2013 clashed with the final test between the
Lions and Australia and that there were
hundreds of rugby club members wanting
access to Sky television and beer. Fortunately
there’s another hall in a community centre run
by the rugby club across the other side of the
pitch from the main clubhouse so we just
shifted a hundred yards.
Jim: Not a pit-fall really, but getting the word
out wasn't a one-time announcement. You
need to keep repeating yourself, using different
channels.
People
miss
individual
announcements for a host of reasons, and I had
enquiries about attending very late. Next year
may be easier because I know who attended
and who wanted to but couldn't make it, so I
can make sure they know well in advance, then
it's just a matter of spreading the word beyond
them.
Ade: For me it was more of a case of
something I didn't do. In the first year I never
planned names for games, letting people
choose on arrival. There was a "runaround"
type effect with some games getting far more
players than others. That brought about the
more tightly planned approach in following
Derek: The difficulty of getting taxis in
Musselburgh after midnight on a Saturday
Page 90
night. I now advise people needing to get a taxi
back to their hotel to leave the pub early or to
book a mini-cab in advance.
for information on, but the banter is very much
about people meeting with friends in a social
environment and having a laugh. Talking of
which, have you had any amusing situations
emerge which have caused a chuckle?
Sidney: What, for you, has been the most
positive aspect of your Games Day?
Jim: Well, there was the case in the afternoon
where a certain rules author had a go at playing
a very popular set of rules he wrote, in a game
which was biased towards his side, and was
comprehensively trounced!
Ade: The huge enjoyment of gaming and
socialising with like-minded wargamers. It can
be hard work running the event at times, but
you definitely get back more than you put in.
Jim: Meeting new people, some of whom I
have heard of and even conversed with online,
and knowing that on the day everyone had a
good time.
Derek: The “Retreat from Musselburgh” is
something of a legend in Scottish Lardy circles;
when Richard and the Ayrshire Lardies, all
slightly worse for wear, took the long way
round on their way back to their hotel after
failing to find a taxi. They’ve not gone back to
that hotel since, it’s located in services just off
the Edinburgh bypass which could easily be
used as a set for zombie apocalypse movies.
Derek: The way that it’s helped build up a
distinct Lardy community in Scotland.
Sidney: I think that's a key point Derek. The
whole Lard venture is very much about
developing a sense of community and engaging
with likeminded gamers. I know that has been
very much inspired by Richard from the outset;
the Yahoo Group may be terrible for searching
Ade: As anyone who's ever been for a beer
with Rich will confirm there are always going to
be lots; far too many to mention! But as they
Page 91
say "What happens on tour, stays on tour"
who be interested in getting the ball rolling in
those locations I'd be very keen to support you
in that.
Sidney: From my own experience I can confirm
that that is a very wise policy! Moving swiftly
on, my thanks to Jim, Derek and Ade for their
informative comments. It certainly sounds like
you're all doing an excellent job, long may it
continue.
Sidney: Why don't you set something up in
those locations?
Richard: As we've heard from the lads, the fact
is that having local knowledge and contacts is
key to running a successful day. Here in St
Albans I can set up the venue, I know the pubs
and the curry houses which will suit the event.
I really don't have that knowledge in those
other locations. We need a local to make it
work. They will know the local clubs and shops
where they can publicise the event too. In fact
everything which is simple when you know the
turf becomes incredibly difficult when you
don't.
Now, moving on, I've just been joined by
Richard in the Lard Island studio. Richard, do
you see Lardy Games Days as important going
forward and was it you who insisted on beer
and curry being written into the contract?
Richard: Blimey, yes. For me the Lardy gaming
days are the epitome of what gaming is all
about. Yes, the day has wargaming at its heart,
but the addition of the beer and curry means
that we get a chance to not just play games but
also to discuss games and the hobby in general.
Meeting up with like-minded friends to share
our enjoyment and to chat and generally
socialise is the best part of the hobby. What's
more, we not only get to discuss games we
have a good laugh to. It is this fantastic social
network that means that when any of us go to
wagames shows around the country we know
we will probably meet up with fellow Lardies
and be among friends.
That's a huge
achievement in a hobby which, with the
internet at its centre, can sometimes feel a bit
lonely. I've always wanted Lard to be about
developing a community and I think the Games
Days are central to making that work.
Sidney: That does make sense. So its
volunteers take one pace forward then?
Richard: It certainly is. I'd be there to offer
support and advice and help publicise the
event, but I do need boots on the ground.
These days I'd prefer to do Lardy Games Days
to the traditional wargame show. For me the
Lardy days are so much more fun.
Sidney: Can you see this being
outside the UK?
extended
Richard: Why not? Getting to the continent is
something we're happy to do. North American
or Australasia are somewhat more problematic,
but I'm not going to say "never". What is good
is that Eureka Miniatures USA is now our agent
across the pond and Rob is very keen to put
games on at Conventions, so I am hoping that
this will provide the US community with a
similar focal point at Conventions as we go
forward.
Sidney: So how would you like to see them
move forward?
Richard: Good question. I'd really be keen for
people to come forward to fill in the gaps on
the map. In an ideal world I'd love to get
Games Days up and running in the West
Country, the North West, Wales and the South
Coast. We do have the launch of the St Albans
Games Day this October and I'm keen for that
to get a permanent place on the calendar. If
there is anyone in those other three locations
Sidney: So, what's on the menu for the rest of
2015?
Page 92
Richard: Obviously Fighting Season is at the top
of the pile. We are in the public playtest stage
now for that. The Sci-Fi rules which we are
developing are piggy-backing onto that and we
are currently playtesting Sharp Practice v2 on
Lard Island. Lots in store in fact, it should be a
very exciting twelve months ahead.
Richard: Yeah. Essentially, I believe that the
best set of rules would be an invisible set. By
which I mean one that is so intuitive that once
you've played a few games you barely have to
ever look at it. That means that you try where
possible to have shared mechanisms so the
learning experience is as simple as possible.
Sidney: Sharp Practice 2. That is interesting.
My career as an international blogosphere
celebrity has kept me away from Lard Island
recently, can you tell me more about that one?
Sidney: How does one avoid that being
simplistic?
Richard: That's where the skill is involved. As
an example, think about the shieldwall rule in
Dux. Where the troops in shieldwall ignore the
first kill on each group in the combat. That
uses the same rule as the normal combat but it
makes one very subtle and easy to remember
change which means that you get a very
different set of results without having to look
at a table of plus and minus factors. After one
round of combat the bloke with his troops in
shieldwall has learnt that rule and will never
need to consult the rule book on that point
again.
Richard: Yes, sure. You can blame Neil at
Meeples & Miniatures for this one actually. In
an interview on his show last year he asked me
if there were things I'd change in any of our
rule sets and I said I'd like to update Sharp
Practice. It was rather odd as I hadn't
consciously been thinking about it, but the
more I thought about it I realised that was the
case.
Sharp Practice has been a huge hit for us, I
have honestly lost count of the number of print
runs we have had done, but it is well over
thirty. In many ways the rules were the
unlocking of a new branch of the Lard family
tree of rules. Since we published them we
have followed on with Mud & Blood, Dux
Britanniarum and Chain of Command which all
share the same common DNA. That said, there
are significant differences between Sharp
Practice and Chain of Command in almost
every aspect of the system, not surprisingly we
have just got a bit better at writing rules in the
past seven years since Sharp Practice came out.
The rules don't feel much different but they are
just a lot more streamlined and that makes
learning them a bit more intuitive to use.
Sidney: Okay, so what are the things in Sharp
Practice you'd like to change?
Richard: Firing for a start. At the moment you
really cannot play Sharp Practice without
referring to the playtest sheet on the back of
the rules. There are a whole lot of range bands
and a whole lot of different weapon specific
scores required to see whether the different
weapons hit. Look at Chain of Command. Two
simple range bands and constant to hit roll
targets. At close range all weapons hit on 4, 5
or 6. That is so much more streamlined and it
is that type of change we are looking to
introduce to streamline Sharp Practice.
But that isn't all. I am very keen to take the
concept of national characteristics in Chain of
Command and use them in Sharp to cover off
things like drill and fire management.
Sidney: This ties in with your concept of
invisible rules I presume, can you remind us
about that?
Page 93
Sidney: Aha, so will that introduce a Chain of
Command style dice system? Is this the death
of cards.
world has turned since we introduced IABSM
and got a huge anti-cards backlash. Look at
Dux Britanniarum; that uses cards in a very
interesting way and we have had no complaints
about the cards there. There are quite a few
games out there now which use very similar
card driven systems to Sharp Practice and some
which could even be mistaken for twins, and
we just don't hear the same complaints now
that we did ten years ago. To my mind, this is
not a decision about do people universally like
cards, but one about what is the best
mechanism to produce the game we want, and
for Sharp Practice cards simply work.
Richard: Actually, no. We did try Sharp
Practice using Command Dice and it was really
not what we wanted. Sharp Practice is not
about using limited command assets to make
the best tactical decisions for our force; it's a
bodice-ripper of a story, all about derring-do
and madly heroic men doing daft things. The
card system is absolutely perfect for that.
However, that isn't to say it will remain entirely
unchanged. We are introducing a few changes
which we think will add some fun and also add
some historical colour too.
Sidney: So when can we look forward to the
arrival of that?
Sidney: That is interesting. Do you think some
people will see that as a retrograde step? A
return to cards having moved away from them?
Richard:
Richard: No idea. Before Christmas I hope.
That's certainly my plan. I've been mulling it
over for a long time and I know precisely the
look and feel that I'm looking for. It's just a
I am actually convinced that the
Page 94
case of testing those and getting it all together
for publication. Of course we'll be producing
card decks and other ancillary bits to go with it
and that takes time and effort.
Richard: There are lots of things in the pipe
line. Rhodesia for Chain of Command as well as
Red Dawn, the Cold War version. The biggest
thing next will be the Sci-Fi rules. We are
finding that Fighting Season is really assisting
with some of the most modern technology, we
can incorporate some of the ideas there into
those.
Sidney: And what of Fighting Season? How are
things progressing there?
Richard: Really well. I cannot pretend that
developing any set of asymmetrical warfare
rules is easy and Leigh and I have spent a lot of
time playtesting these and developing ideas in
order to really try to capture the feel of the
conflict, it's been very challenging but we have
broken through the pain barrier you get with
any prototype rule set and are really now
having fun with the game. Wherever we take it
people seem to really enjoy the game. For me,
the big challenge now is distilling all the
conceptual ideas I have about the campaign
system and getting that into a working format.
Then we're really ready to go.
Sidney: Sounds like you're going to be busy for
a long time to come. What about some of the
projects, like the Boer War or I Ain't Been
Nuked Mum, how do they fit in?
Richard: Essentially both of those projects are
very close to fruition, but they are in-fills which
can be dropped into the schedule depending
on what is happening with the other big
projects. I have long given up predicting dates.
Stuff gets done when my inspiration levels
bring that project to the top of the pile. That's
the only way I can work I'm afraid. It's not very
commercial, but it is the simple unvarnished
truth.
Sidney: It's a very different game to WWII
Chain of Command.
Sidney: Exciting times ahead then and I am
sure we will all look forward to seeing them all
come to fruition.
Richard: Yeah, it certainly is, but that is in the
way it feels rather than the way it plays.
Anyone coming to Fighting Season will find all
of the mechanisms instantly recognisable but
the game feels very different due to some small
but subtle changes. I really like that. No big
learning experience, just a very different
tactical feel.
My thanks to Ade, Derek, Jim and Richard for
joining me on the sofa of truth. Remember you
can catch up with what is happening in
Roundwood's
World
at
my
blog
http://sidneyroundwood.blogspot.co.uk/ I do
hope you'll join me there. Have a great
summer.
Sidney: So Fighting Season is first, then Sharp
Practice v2, then what?
Page 95
Forked Tailed Lardies
P-38s for Bag the Hun
by James Crate
In the fall of 1943 the US 8th Air Force was
struggling to decisively turn the tide in
the air war against Germany and the
Luftwaffe. Several high profile raids in
late summer and fallhad suffered
unsustainable casualty rates among the
bombers. One of the primary factors in
these losses was the inability of USAAF
and RAF fighters to escort the bombers
all the way to their targets. A variety of
different means were tried to address
this gap in coverage including drop tanks
and developing new aircraft. In the short
run, it was hoped that introducing the
long range P-38 would provide an
immediate answer. The P-38 had been
very successful against the Japanese
during missions covering the vast
distances of the Pacific. It was hoped
that P-38s could replicate this long range
success against the Luftwaffe. However,
while the P-38 had chalked up an
enviable record in long range missions at
low and medium altitude in a tropical
environment, long range missions at high
altitude in the freezing winter sky
against the Luftwaffe was quite a
different proposition.Among the first
forces to try would be the 55th Fighter
Group who started to conduct regular
long range escort for 8th Air Force
bombers in November 1943. The
Luftwaffe came to call the P-38 der
Gabelschwanz-Teufel, the "fork-tailed
devil".
Order of Battle
USAAF, 8th Air Force, 55th Fighter Group
Swindle Red Flight – Four P-38HLightnings, led
by Major McTwinboom
Roll on the BTH2 Pilot Generation Table for
pilot skill. Use the USA Late War table.
Swindle Blue Flight – Four P-38HLightnings,
led by Captain Triggerwell
Roll on the BTH2 Pilot Generation Table for
pilot skill. Use the USA Late War table.
Luftwaffe, Jagdgeschwader (JG) 1
Schwarm 1 – Four Bf 109G-6, led by
Hauptmann Hans Huhn
Roll on the BTH2 Pilot Generation Table for
pilot skill. Use the Luftwaffe 1944 table.
Schwarm 2 – Four Bf 109G-6, led by
LeutnantGuttbohme
Roll on the BTH2 Pilot Generation Table for
pilot skill. Use the Luftwaffe 1944 table.
When rolling for aircrew, neither side may
have more than two aces. If more than two
aces are rolled up, lower the extras to
Veteran. If the Luftwaffe side rolls up two Jr
Aces, they have the option of changing one of
them to a Top Ace and the other to a Veteran.
Cards
Major McTwinboom (Swindle Red 1)
Swindle Red Flight Move
Swindle Red Flight Fire
Captain Triggerwell (Swindle Blue 1)
Swindle Blue Flight Move
Swindle Blue Flight Fire
The scenario itself is a generic encounter
between two flights of P-38Hs versus a
like number of Bf 109Gs during
November of 1943. Although generic, it is
representative of several initial
encounters between the 55th Fighter
Group and the Luftwaffe during the early
attempts to use the P-38 as a long range
escort fighter by the 8th Air Force.
Hauptmann Hans Huhn (Black 1)
Schwarm 1 Move
Schwarm 1 Fire
Page 96
LeutnantGuttbohme (Yellow 5)
Schwarm 2 Move
Schwarm 2 Fire
Altitude Bonus
Tally Ho!
Achtung! Indianer!
Bail Out!
No Fuel To Duel – Per the Finest Hour
supplement, only applies to the USAAF side.
Top & Jr Ace Bonus Cards (per BTH2 rules if
ace pilots are rolled on pilot skill table).
Note: No bogeys or bogey cards are used for
this scenario (see below).
Altitude Bands for High
Altitude Combat
Board Set Up
As the P-38s are new to the 8th Air Force, the
Luftwaffe are not expecting any fighters this
deep along the bomber route. Thus they will
momentarily have the element of surprise.
Place the Luftwaffe Bf 109s in the middle of
the board in an appropriate formation at
Altitude Band 5. The P-38s will be placed
bearing 2D6 and range 3D6 from the Schwarm
1 leader at Altitude Band 6.
One optional house rule that I use for high
altitude 8th Air Force combat is flipping the
thickness of the altitude bands. Although this
scenario doesn’t include heavy bombers, for
8th Air Force scenarios that do, putting the
bombers at Band 5 with their escort at Band 6
works better than having them all in Band 5 as
you would with normal BTH2 bands. This
scenario was playtested using the altitude
bands as follows:
Bearing – Roll a 2D6. A roll of 7 equals the
109s 12 o’clock (ie straight out in front of the
Luftwaffe leader). A roll of 2 would equal the
109 leader’s 7 o’clock. A roll of 12 would
equal the 109 leader’s 5 o’clock. Simply go
around clockwise for other numbers. For
example a roll of 6 would place the P-38s
initially at the 109 leader’s 11 o’clock. There
is no roll that places the P-38s at the 109s
dead 6 o’clock. Thus it is more likely that the
P-38s will start off in front of the 109s at a
higher altitude, but there is a chance that they
may start in a more advantageous position to
the rear.
Band 6 – 27,000 to 30,000 feet and above
Band 5 – 24,000 to 26,000 feet
Band 4 – 21,000 to 23,000 feet
----Band 3 – 16,000 to 20,000 feet
Band 2 – 11,000 to 15,000 feet
----Band 1 – Less than 10,000 feet
----Band 0 – Hedgehopping / On the deck
Basically the first 10 thousand feet is 1 band,
the second 10 thousand is 2 bands and the
third 10 thousand is 3 bands. What this does
is decrease the rate of climb as altitude
increases without having to change the ROC
number. It happens via the bands naturally
vice having to change your pips per climb in
different bands like in Algy. You could
optionally do the same thing with 9 bands of
2, 3 & 4 bands in the tens, teens and twenties
Range – Once you have the bearing, the lead
P-38 will be 3D6 hexes away, again at Altitude
Band 6. The P-38s may start facing whichever
direction the flight leader desires.
This is the initial set up, no bogeys are used,
simply get at it.
Page 97
adds 2 dice. I also add 1 dice for any guns on
the fuselage centerline. Thus a Bf 109E-4
would have 6 dice for its wing guns (4 for the
first + 2 for the second) and 3 dice for it’s over
the nose rifle caliber machine guns (1 for each
+ 1 for being on centerline), for a total of 9 –
which exactly matches the rating from Finest
Hour.
altitude blocks respectively. The only other
caveat is that an aircraft must be in control to
operate at Band 0 or hedgehopping altitude.
Out of control aircraft that fall below band 1
crash. They do not get an extra attempt to
bail at altitude 0.
Aircraft Stats
Modeling the P-38 versus Bf
109 in Bag the Hun
The following aircraft stats have been
selected specifically to reflect a high altitude
combat between the two aircraft types in this
scenario.
“The enemy will try turning with us and then
invariably half rolls.”
-Lt Col Mark Hubbard
20th Fighter Group, 8th Air Force
P-38H:
SPD: 8
MAN: 4
ALT: 6*
ROC: 2
ROB: 3
SIZ: 3
Front: 13
Compressibility Recovery Procedure: “Most
important of all, don’t get into
compressibility.”
– P-38 Pilot Training Manual
The P-38 gets 4 factors from the 20 mm
cannon and 9 from the machine guns (8+1 for
being on centerline) for a total of 13. It has
enough ammo for 10 seconds of cannon firing
and 36 seconds of machine gun fire.
This scenario is designed to show how the
unique performance of the P-38 can be
modeled in Bag the Hun. The P-38 is tricky for
the BTH combat system. As author Jay Stout
points out in his excellent (and highly
recommended) The Men Who Killed the
Luftwaffe, the performance difference
between most of the single engine fighters
being used over France and Germany at this
point in the war was fairly minor. They
possessed roughly similar speeds and turn
performance, the latter being more a function
of pilot skill than anything else. The P-38 was
another proposition altogether. Although a
twin-engine fighter like the Bf 110, it did not
have to drag around an extra aircrewman or
as much fuselage, and thus had better
performance. Yet it was still not strictly the
same in performance class as the single seat
fighters it faced. The knock on the P-38s that
initially flew with the 8th Air Force in late 1943
were essentially three fold: 1) engine
problems in the freezing weather, 2) low
initial roll rate, 3) problems diving due to
compressibility.
*A P-38 in Altitude Band 6 may always claim
the Altitude Bonus card over any Bf 109 at the
same altitude.
Bf 109G:
SPD: 7
MAN: 5
ALT: 6
ROC: 2
ROB: 2
SIZ: 1
FIRE: 9
The Bf 109G-6 gets 4 factors from the 20 mm
cannon and 5 from the machine guns (4+1 for
being on centerline) for a total of 9. It has
enough ammo for 12 seconds of cannon firing
and 22 seconds of machine gun fire.
Note: When I calculate firepower, an initial
20mm receives 4 dice while each subsequent
Page 98
Luftwaffe Abschwung – If attempting to
evade a P-38 via a Split-S (Abschwung), the
Luftwaffe player should add an additional -1
to the Staying on the Tail Testdie roll. This
makes it even more likely that a Luftwaffe
pilot will be able to evade a P-38 via a Split-S
than versus other aircraft types.
Engine problems are somewhat beyond the
scope of the short tactical fight of Bag the
Hun, but you could simulate this by having
one or two fewer P-38s if you wish.
P-38 Maneuvering – P-38 pilots must treat all
Tricky maneuvers as Hard. Of note, this
means that as Hard maneuvers, only one may
be performed each move. Thus a P-38 may
only perform oneBreak Turn per move (and
only after passing a Hard Maneuver Test if
required by pilot skill). Easy maneuvers are
still Easy and thus do not require testing to
perform.
The Luftwaffe’s opinion of the
maneuverability of the P-38 was wildly
different depending on which pilot you talked
to, and in reality depended in large part upon
the skill level of the pilots whom they
encountered. While all Luftwaffe pilots
agreed that the combination of 20mm & 50
cals firing along centerline were very deadly
and to be avoided, there was no agreement
on the maneuverability of the P-38. Some
Luftwaffe pilots thought the Lightning was
very maneuverable and others thought it
meat on the table. In a sense they were both
right. The P-38 could turn very tightly, once it
got established in the turn. But its initial roll
rate to get into the turn was sluggish.
Optional: To even more closely get the feel of
flying the P-38 as described by its pilots, you
can add the additional restriction of a P-38
having to perform an Easy Turn before it can
perform a Break Turn. This will be one more
special exception to have to remember though
in addition to the above.
As far as diving, Luftwaffe pilots had long used
the Split-S (Abschwung) as an evasive
maneuver and continued to do so throughout
the winter 1943-44 air war (in fact long after it
became hazardous to do so versus P-47s).
Although this maneuver was not developed
specifically to counter the P-38, the
compressibility problems that the P-38
encountered in the dive meant that it was an
effective maneuver for Luftwaffe pilots
against that type.
Recommended P-38 Tactics
In all theaters it was recommended that P-38
pilots use slashing or hit and run tactics.
Additionally, pilots were instructed to use the
P-38s superior climb after each attack to
reposition for another attack. In Bag the Hun
this can be simulated by P-38 pilots being
patient and waiting for a run of cards. Try to
finish each trip thought the deck of cards at
altitude 6. After the shuffle, plan on an
element on the edge of the fight using the
Altitude Bonus, Tally Ho and Flight Move card
as a run of three cards to swoop in, perhaps
dive down one band, and then climb away. If
you aren’t able to get into a firing position,
resist the urge to use the second or third of
these cards to turn more than 90 degrees for
a better shot. Rather, climb away and plan on
using another run of them after the next
shuffle.
I tried several different rules and exceptions
in trying to get the feel of this specific contest
right, but I also did not want anything overly
complicated with too many specific
exceptions for regular Bag the Hun players to
remember. I’ve settled on two rules for this
specific scenario, one applied by the Luftwaffe
player, and one applied by the USAAF player,
so that each only has to remember one
additional rule beyond the normal Bag the
Hun rules. They are:
Page 99
Variants
Objectives
1) Try adding eighteen B-17Fs at Altitude Band
5. If you add the bombers, add underwing
cannon pods to half the Bf 109s making them
“Kanonboote” (gunboats).
I haven’t bothered with points since that was
not part of the accounting that would really
be done back at base between the
intelligence officers and the pilots. Each side
is simply looking to shoot down as many of
the enemy as possible while minimizing their
own losses. That said, when determining a
victor realize that while the loss of a veteran
or ace pilot would be blow to either side, the
USAAF can replace aircraft and regular pilots
almost as if they have an infinite supply while
the Luftwaffe cannot.
Bf 109G/R6:
SPD: 6
MAN: 3
ALT: 6
ROC: 2
ROB: 2SIZ: 1
FIRE: 13
The Bf 109G-6/R6 “Kanonboote” with two
fixed underwing MG-151 cannon pods gets an
additional 4 fire factors from the 20 mm
cannons, but pays the price in being treated
as a loaded aircraft. The underwing 20 mm
pods each have 10 seconds of firing time.
Reading
Recommended Reading for the P-38 in the
ETO (all conveniently available on Kindle
except for the P-38 PTM which is available as
a PDF)
2) Change the time period to mid-1944 and
replace the P-38Hs with the P-38J-25. The P38J-25 had hydraulically actuated aileron
boost which vastly improved the rate of roll
and new electrical dive flaps solved the
compressibility dilemma. For the P-38J-25 the
MAN rating is now 5, Luftwaffe pilots treat a
Split-S as a Hard maneuver, and Tricky
maneuvers by P-38 pilots are once again
treated as Tricky maneuvers (ie change the P38 MAN rating to 5 and drop the two special
rules from above).
The Men Who Killed the Luftwaffe, Chapter 16
Fighter-on-Fighter Combat, by Jay A. Stout
P-38 Lightning Aces 1942-43, Chapter 6 The
Mighty Eighth, by John Stanaway
Fork-Tailed Devil, Chapter 9 Across the
Channel, by Martin Caiden
Pilot Training Manual for the P-38 Lightning,
by HQ Army Air Forces (PDF)
P-38J-25:
SPD: 8
MAN: 4
ALT: 6*
ROC: 2
ROB: 3
SIZ: 3
Front: 13
Page 100
The events following Napoleon's return from exile in Elba in February of 1815 need little introduction. The
rallying of France behind their Emperor and the reaction of the powers at the Congress of Vienna declaring
him an outlaw led directly to the Hundred Days Campaign, possibly the most famous military campaign in
history.
Threatened on all sides by numerically superior forces of Britain, Prussia, Austria and Russia, Napoleon had
little choice but to act aggressively in an attempt to defeat his opponents in detail. In doing so he turned to
the North and on the 15th of June initiated hostilities by driving in Prussian piquets on the Sambre South of
Charleroi. His plan was a simple on and reminiscent of his earlier successes. The Prussians were
concentrated as a force and therefore formed the most coherent threat whereas the British forces were
still somewhat dispersed. If he could defeat the Prussians and push them East he would isolate the Duke of
Wellington and be able to turn his forces against the British and Dutch.
The 16th of June was an eventful day, with Ney and Wellington fighting each other to a stand-still at Quatre
Bras, but with Napoleon winning a victory over Blucher at Ligny. However despite what was clearly a
tactical victory, Blucher was able to retain his force largely intact and thereby achieve the strategic
objective of maintaining contact with the British and Dutch forces, paving the way for the combined Allied
victory at Waterloo three days later.
INTRODUCTION
This scenario describes the western part of the Ligny battlefield, where Vadamme’s III Corps fought
elements of Prussian 1st and 2nd Corps
for the villages of La Haye, Le Hameau
and Wagnele. Immediately to the east
lies the village of St Amand, where the
other two divisions of III Corps were
fighting. The initial French assaults
pushed the Prussians out of the villages
and back across Ligny brook. At about
4pm, Blücher himself organised and led
a counter attack…
THE BATTLEFIELD
The battle should be fought on a small
table, ideally 4’ by 4’. The Ligny Brook
is easily fordable for infantry and
cavalry (troops defending will count
Terrain Advantage), but artillery can
only cross on the roads. The built up
areas have defence factor 3. The crop
fields shown were able to conceal
movement of troops so they count as
Light Terrain. The two deployment
areas shown are separated by only 12”.
Page 101
PRUSSIA
R
AN ORDER OF BATTLE
E - LIGN
NY
C-in-C Prin
nce Blücher
(Bold/Solid)
2nd Infantryy Brigade (1stt Corps) Pircch II
Infantry Reg
giment #6 (1
1st West Prusssian)
B class
2 battalionss musketeerss
B class
Fusilier batttalion
Infantry Reg
giment #28
2 battalionss musketeerss
C class
Fusilier batttalion
C class
2nd Westpha
alian Landweehr
3 battalionss
D class
Artillery
8x6lb guns
Foot Battery #3
C class
(Solid)
SK1
SK2
Élan
Élan
SK1
SK2
Élan
Élan
SK1
h (Solid)
5th Infantry Brigade (2ndd Corps) von Tippelskirch
st
Infantry Reg
giment #2 (1
1 Pommeran
nian)
Élan
C class SK1
2 battalionss musketeerss
Fusilier batttalion
Élan
C class SK2
Infantry Reg
giment #25
2 battalionss musketeerss
D class SK1
Fusilier batttalion
D class SK2
th
5 Westpha
alian Landweehr
3 battalionss
Britttle
D class SK1
Artillery
Foot Battery #10
8x6lb guns
C class
Foot Battery #37
8x6lb guns
C class
Leh
hmann
(Solid)
Reserve Arttillery 1st Corrps
Foot Battery #2
8x12lb gunss
C class
Foot Battery #6
8x12lb gunss
C class
eserve Cavalry
Jürggass
2nd Corps Re
st
1 Brigade
Thü
ümen
11th Hussarss
C class
C class
6th Neumark Dragoons
nd
C class
2 Silesian Uhlans
hr
Soh
2nd Brigade
3rd Branden
C class
nburg Hussarrs
th
C class
5 Pommerranian Hussaars
C class
8x6lb guns
Horse Batteery #6
rd
Sch
3 Brigade
hulenburg
ns
1st Dragoon
B class
4th Kurmarkk Landwehr
D class
Reinforcem
ments:
6th Infantry Brigade 2nd Corps
2/3rd Elbe Laandwehr
Infantry Reg
giment #26
2 battalionss musketeerss
Fusilier batttalion
Kraaft
(Solid)
Light Cavalrry
Line Cavalryy
Lancers
Light Cavalrry Élan
Light Cavalrry Élan
Horse Artillery
Line Cavalryy
Light Cavalrry
(Solid)
D class SK1
C class SK1
C class SK2
Page 102
1st Cavalry Brigade
(Solid)
B
3rd Corps
C
Maarwitz
C class Lancers
7th Uhlans
C class Lancers
8th Uhlans
* The Prussian infantry battalions in
nvolved weree very strongg compared to
t the French
h. Either use
e 16 figure
Prussian units, or add a battalion to each regimeent to make them 4 battalions strongg.
FRENCH
H ORDE
ER OF BATTLE - LIGNY
Y
III Corps
Vandam
mme
Giraard
7th Division (from II Corrps)
1st Brigade
11th Legere
2 battallions
2 battallions
82nd Ligne
2nd Brigade
12th Legere
3 battallions
4th Ligne
2 battallions
Artillery
Foot Battery
8x6lb guns
bert
10th Infantrry Division
Hab
st
1 Brigade
3 battallions
34th Ligne
th
3 battallions
88 Ligne
2nd Brigade
22nd Ligne
3 battallions
th
70 Ligne
2 battallions
2nd Etrangerr (Swiss) 1 baattalion
Artillery
8x6lb guns
Foot Battery
Reserve Arttillery
Foot Battery
8x12lb gunss
3rd Cavalry Division
Domon
st
1 Brigade
4th Chasseurs a Cheval
9th Chasseurs a Cheval
2nd Brigade
12th Chasseurs a Cheval
Artillery
Horse Batteery
6x6lb guns
Reinforcem
ments:
5th Cavalry Division
Subervie
1st Brigade
1st Chevauxx-Legers Lancciers
2nd Chevauxx-Legers Lancciers
2nd Brigade
11th Chasseurs a Cheval
(Bold/Solid
d)
(Able)
B class SK3
C class SK1
TLI,, Élan
C class SK2
C class SK1
TLI
B class
(Solid)
C class SK1
C class SK1
C class SK1
D class SK1
B class SK2
Élan
B class
B class
(Able)
C class Light Cavalrry
C class Light Cavalrry
B class Light Cavalrry
B class Horse Artillery
(Bold/SSolid)
C class Lancers
C class Lancers
C class Light Cavalrry
Page 103
Artillery
Horse Battery
6x6lb guns
B class Horse Artillery
DEPLOYMENT AND REINFORCEMENTS
The game begins after the battle has been raging for 90 minutes. Therefore, it is possible for troops to be
deployed at a distance of 12”. Any command that wishes to start the game on a blind must deploy 16” or
more from the enemy deployment zone.
The French must occupy La Haye with Girard’s Division which is on a Hold order. Otherwise they maybe
deploy commands on any type of blind, on any order.
Girard’s Division had taken casualties during the initial assault on La Haye. Roll a D6 for each battalion:
1:
2 casualties
2,3,4: 1 casualty
5,6:
no casualties
The Prussians must deploy the 5th Infantry Brigade immediately behind Wagnele and the 2nd Infantry
Brigade opposite La Haye. They may be on any orders the player requires. Other units may be on any type
of blind, on any type of order. It is recommended that the Prussians are allowed to split their Cavalry
division by making some of the Brigadiers “Independent”.
The Prussian Reinforcements arrive on turn 4 at point A.
The French Reinforcements arrivce on turn 2 at point B.
The game ends after 10 moves, just before Duhesme’s Young Guard division arrives to evict the Prussians.
VICTORY CONDITIONS
Prussian Major Victory
Prussian Minor Victory
French Minor Victory
French Major Victory
Take and hold La Haye, La Haye Farm, Le Hameau and rout at least 6
battalions of French infantry
Take and hold La Haye, La Haye Farm and Le Hameau
Hold two of La Haye, La Haye Farm and Le Hameau
Hold La Haye, La Haye Farm and Le Hameau
HISTORICAL OUTCOME
The Prussian 2nd Brigade was met by a storm of fire as it moved against La Haye. It recoiled, but rallied and
attacked again. The French troops were sorely pressed when the inspirational Girard was mortally
wounded. Both brigadiers were down as well, and the French infantry broke. To the west, the Prussian 5th
Brigade, supported by Cavalry, debouched from Wagnele. French infantry, concealed in the crop fields,
stopped the Prussian advance and then charged with the bayonet, breaking the 25th Prussian infantry
regiment. The outnumbered French cavalry was expertly handled by Domon to keep the Prussians at bay.
Just at this moment, d’Erlon’s Corps began to appear behind the French flank. It is difficult to say what
effect it had on Vandamme’s Corps, but it certainly sowed confusion in the French higher command,
causing Napoleon to delay his planned assault in the centre of the battlefield to send reinforcements to the
left flank.
For their part, the Prussians thought that the French were preparing to retreat, so attacked with even
greater intensity. Blucher personally led the 3 battalion of the 1st Pommeranian regiment to capture Le
Hameau. It, along with Wagnele, Le Haye and the northern section of St Amand were all in Prussian hands
and the crisis of the battle was at hand. At this point, Duhesme and his Young Guard division arrived with
its band playing the Chant du Départ. Vandamme’s exhausted men rallied and joined the guardsmen as
they drove the Prussians from the villages at the point of the bayonet.
Page 104
A scenario for Charlie Don’t Surf!
by Nick Skinner
In Vietnam small unit
encounters could quickly
escalate into large unit
actions.
This
scanrio
develops an intial contact
into
a
multi-company
action with an escalating level of fire
support.
A
tall
man,
Captain
Woolley
(not
to
be
confused
with
the
character with the same
name from “The Archers”)
was described as having…
“an engaging, collegial attitude as a
company commander. He brought us
together and quickly made all his newly
commissioned young subordinates part of
a composite, coordinated team. We clicked
as an infantry company from the start… [he
was] a friendly and articulate man who led
through the strength of his personality”
In June 1966 the 1st Battalion of the
28th US infantry was serving a tour of
duty in Vietnam. At this time the
battalion was thinly stretched, having
to
provide close security for
engineers from the 1st Engineer
Battalion who were working on Route
16 as well as finding men to carry out
Search and Destroy missions in the
region.
(from Last Man Out: A Personal Account of the
Vietnam War by James E. Parker, Jr.)
That day in the jungle Woolley would
be faced with a difficult challenge.
Moving through the harsh terrain on
this particular operation was not
made any easier by having to leave
one of its three platoons at base
whilst it rested up from a night patrol,
hence the men of 1st and 3d platoons
had to go it alone. By 0630 hours, with
daylight well and truly established, A
On the 2nd June two platoons from A
company, under the command of
Captain Jack Woolley were on a Search
and Destroy mission in the Ong Dong
jungle. Their mission was to seek out
enemy forces and positions to prevent
them interfering with the operations
of the engineer units.
Page 105
reinforcement, to which Colonel
Haldane responded initially by
committing Company C and some
tank dozers that were normally used
for the engineering duties. In
addition, Company B were to be
prepared to be inserted by helicopter
into an area southeast of the fighting
from where they could swiftly relieve
the pressure on A company and move
on to crush the enemy.
company had moved into the thickest
part of the vegetation and had
established a Company CP. From here
Captain Woolley opted to send his
platoons out to the left and the right
in order to clear the ground of enemy
mines and booby traps and ensure the
engineers could operate free from the
risk of ambush.
The terrain in this part of the area of
operations was a transition zone
overgrown rubber plantation that
gradually gave way to heavy jungle.
But this support would take time to
arrive, and A company were taking
hits. The close nature of the fighting
meant that accurate artillery support
could not be brought down and if
Woolley were to disengage the enemy
would slip away and claim a victory.
Wolley had to keep the enemy in
action until reinforcements and vital
medical assistance could arrive.
As the men of 3d platoon moved
through the ground, they found the
change in terrain adversely affected
their movement, and the squads
became more bunched as the jungle
became more dense.
So when they unexpectedly hit an
enemy position to their front they
were not in the best formation.
Extending to the flanks was difficult
and all squads became pinned by
enemy fire. 1st platoon, moving on a
different line of advance, was called
up to assist, but they too hit the
enemy base camp position which was
defended in numbers and were
themselves unable to advance.
Captain Jack and A Company bore the
brunt of the fighting, suffering a
number of casualties from the close
range accurate fire from the enemy
position. Eventually the ability to
transport men and arms enabled the
US troops to conclude the action,
which escalated with the arrival of
Company B, whose advance from the
LZ to the contact position was
supported by artillery and gunships.
Woolley had a problem. Both of his
platoons were committed and taking
casualties. He had no reserve, and the
platoons, although engaged, were
unable to manoeuvre to provide
mutual support and whilst he had no
way of outflanking the enemy
position, his own flanks were poorly
exposed.
None the less, the contact lasted all
day, until in the end it was a
combination of men from Captain
Jack’s A company, reinforcing troops
from B company and tank dozers that
eventually
cleared
the
enemy
position. Casualties were high, with 45
men receiving what Garland calls
“primary medical therapy”.
Reaching quickly for the radio to
battalion, Captain Jack requested
Page 106
THE scenario
Primary Objective:
Search the Jungle and clear for booby
traps and enemy positions. Military
Victory value: 5 points.
This
encounter
provides
good
potential for a CDS scenario. The US,
initially
restricted
and
locally
overwhelmed at the beginning of the
encounter are able to build their
strength to the point at which victory
almost becomes inevitable – provided
they can keep the enemy in contact.
For the Communist player there is
enough opportunity to inflict heavy
damage on the enemy ti keeo him
interested and engaged for longer
than might otherwise be the case.
Difficulties in obtaining fire support
also mean the early part of this game
favours the communist player. For
him the issue is when to break
combat, and how.
The source for this scenario1 makes no
suggestion as to the size of the enemy
force, but a ‘reinforced platoon’ seems
to give a balanced game.
Secondary Objective:
If engaged, obtain a high VC
bodycount. Military Victory value 10
points.
This is a Search and Destroy Mission.
In this scenario the US force has no
dummy Blinds. US fieldcraft is neither
good nor bad.
US Reinforcements – B Company
(Airmobile)
Captain Billy Bouton
One Corpsman
1st Platoon:
Lt. G.K. Alley
Sgt. John T Miller
Three squads
One Corpsman
FORCE COMPOSITION
2d Platoon:
Lt Norm Hendriks
Sgt Kyle Beauregard
Three squads
US PLAYER
US Forces – A Company
3d Platoon
Lt Thane Moralis
Sgt. “Willy” Peet
Three squads
One corpsman
Captain Jack Woolley
Mst Sgt Jack Sheet
One Corpsman
1st Platoon:
Lt. Henry Krasneski
Sgt. Mike Roscoe
Three squads
One Corpsman
2 x Dozer tanks
Sgt TJ NUbb
2 squads
3d Platoon:
Lt Paul Trost
Sgt. Big Bill Conrad
Three squads
1
Deployment
Company A deploy from the two areas
marked on the map Captain Jack and
Infantry in Vietnam, LTC A.N. Garland
Page 107
his HQ may arrive at either of the two
deployment points.
FORCE COMPOSITION
Due to the close nature of the terrain
and the overall situation at this time
no air support is available for this
operation prior to the arrival on table
of Company B. Once Company B are on
table then fire support missions from
6 x 105mm howitzers is available
subject to call in and helicopter
gunship support can also be available
at this time.
VIET-CONG PLAYER
Communist Forces
Viet-Cong
Leader: Hoi Bau
1 x Level 1 sniper
3 x six man AK47 groups
1 x RPD team
Leader: Bo Duc Thanh
1 x 3 man team of grenadiers
2 x 8 man AK47 groups
1 x 60mm mortar team
1 x RPD Team
The dozer tanks – supported by
elements from Company C (one squad
per tank) arrive at point B on the third
turn of the Blank Card after Company
B have deployed.
Communist cadre forces have now
established a new base camp in the
jungle from which operations against
the engineers will be conducted.
Once the communist troops fire
Captain Jack can use his next available
card to call for reinforcements from
Colonel
Haldane.
These
reinforcements will arrive in the form
of the Air mobile Company B on the
fourth turn of the blank card after the
call for reinforcements has gone out–
which might be a long time.
The communist player may opt to
deploy his troops in any of the areas
marked on the map.
The VC force has four Blinds, one for
each group and three dummy blinds.
In this scenario VC fieldcraft is neither
good.
For the VC player, this means that
there is plenty of time to inflict
significant damage on the two US
platoons, before thinking about
pulling off.
Primary Objective: Ambush US forces
twice,
inflicting
double
figure
casualties. Military Victory value 10
points each ambush
Secondary Objective: To slip away to
the south (bottom table edge) with
less than ten casualties
Military value: 10 points
The VC orders are to maximise
damage on the US troops before
Company B may enter the table at
either one of the two LZ. However this
must be determined by the US player
on the first turn of the blank card
after the VC player commences firing.
Company B deploy with a forward
observer who can then begin to call in
artillery and they may also commence
helicopter gunship strikes.
Page 108
slipping away with as much of their
force in tact as possible
players charging about in the jungle
as though they were in a playground.
LZ1 and LZ2 are the optional drop
zones for the US reinforcements. Only
one of these may be used. Ideally, the
location of these points will not be
made clear to the US player. Indeed, if
at all possible the available US players
should be allocated roles within A
company and no mention made of B
Company and the reinforcement
options until after the VC have fired,
when the option can be made
available on radio discussion with
Colonel Haldane (ie the Umpire can
disclose it and allocate players
accordingly).
UMPIRE’S NOTES
The table set us is as shown in the
map. This game is set in close terrain,
and this should be taken into
consideration when carrying out
spotting and even firing. The VC firing
positions ambush positions should
afford the VC a good base of fire from
which to conduct their ambushes.
There are som options available as to
how you choose to have the game
develop. I would allow VC blinds to be
anywhere on the table, and may even
consider one or two reinforcement
blinds just to keep the US players on
their toes. These work very effectively
as slowing down responses and stop
Point B shown on the map is the entry
point for the dozer tanks who will
grind a path towards Captain Woolley
and his men.
Page 109
Cards
This scenario
following:
POSTSCRIPT
will
require
the
Captain Jack Woolley
Lt. Henry Krasneski
Lt Paul Trost
1st Platoon (A
Company)
Captain Billy Bouton
Lt G.K. Alley
Sgt John T Miller
Mst Sgt Jack Sheet
Sgt. Mike Roscoe
Sgt Big Bill Conrad
3rd Platoon (A
Company)
Sgt Kyle Beauregard
Lt. Thane Moralis
Sgt Norm Hendriks
1st Platoon (B
Company)
US Armour
Sgt “Willy” Peet
2d Platoon (B
Company)
Sgt TJ Nubb
3d Platoon (B
Company)
Bo Duc Thanh
VC Group 1
VC sniper
Di Di mau
Time Out
Ammunition Shortage
Forward Observer
Dust Off
Hoi Bau
VC Blinds
VC Group 2
VC support weapons
Critical Wound
Blank card
Artillery Support
Authorisation
In Garland’s book this encounter is
given as an example of an action in
which close terrain and the difficult
situation on the ground combined to
make Casevac a real headache.
In his account of the action, Garland
explains how Colonel Haldane, on
hearing that A Company were in close
action and taking hits, immediately
instructed his second in command,
Major Allee, to get medical support up
by helicopter. Captain Isaac Goodrich,
the
battalion
surgeon,
was
immediately sent out in an OH-13
helicopter alongside two medics to
get to Company A supported with a
Huey supply helicopter that they
commandeered for the purpose. With
no decent landing site available the
mission of the dozer tanks became
even more important as they carved a
path through to A company.
If you wish to represent this in the
scenario, simply convert the Company
B to arrive either on the North or
South table edge and restrict
helicopter access to any LZ that the
dozer tanks can create. To allow this, I
suggest the tanks can each clear 1d6
square inches of jungle per turn, with
a LZ needing (say) and area 6x6 to
land.
Adjusting the scenario this way
definitely makes a more demanding
game for the US players and that can
only be a good thing!
Page 110
Arise to Lard
by James Crate
“… I easily turned inside him, holding my fire until I was within 50 yards and then firing a shortish
burst at three-quarters deflection.”
-P/O Paul Richey on attacking his first Bf 110
Before the Spitfire became the star of the
Battle of Britain, the Hurricane was earning its
battle honors in the ill-fated defense of
France. After the start of the Blitzkrieg on 10
May 1940, the Hurricane’s most common
fighter opponent was the Bf 110. In France
“One-one-ohs”, as they were almost
universally called by RAF pilots, were tasked
with escorting Luftwaffe twin-engine bombers
while Hurricanes were primarily directed to
attack those same bombers. Thus while there
were more 109s in theater, the Hurricane
encountered the 110 more frequently.
110s over France in May 1940. The primary
aim is to illustrate the differences between
the two combatants and give some
suggestions of how to employ the 110s
famous defensive circle on your table top.
Aircraft Data & Notes
The following aircraft stats have been
selected specifically to reflect combat
between the two aircraft types in this
scenario. Use these statistics vice the
numbers from the BTH2 manual.
The scenario itself is a representative
encounter between a force of Hurricanes and
Page 111
Bf 110C-2:
SPD: 7
MAN: 3
ALT: 6
ROC: 1
ROB: 3
SIZ: 3
Front: 11
Rear: 1
a total of 9. The Hurricane has enough ammo
for 18 seconds of machine gun fire.
Angriffskreis –
The Attack Circle
During the Blitzkrieg and beyond, 110 pilots
would form up into a defensive circle when
attacked by a more maneuverable opponent.
This circling maneuver was called the
Angriffskreis (Attack Circle) by 110 formation
leaders. Some 110 flight leaders saw
offensive potential in the Angriffskreis as they
theorized that it would allow them to them to
temporarily occupy a piece of sky, perhaps
near a target area or while friendly bombers
passed through. However, in a display of
gallows humor, many Luftwaffe pilots
referred to this maneuver as the Angstkreis or
“Circle of Fear”. This formation/maneuver
was called a Lufbery Circle in other air forces,
being named after Lafayette Escadrille ace
Raoul Lufbery who ironically did not invent
the tactic.
The Bf 110C-2 gets 4 factors from the 20 mm
cannon and 5 from the machine guns (4+1 for
being on centerline) for a total of 11. It has
enough ammo for 7 seconds of cannon firing
and 54 seconds of machine gun fire.
No Break Turns: Time and again in period
accounts, Hurricane pilots talked about the
ease of out turning the 110. I have read that
comment in so many accounts written both
during and after the war that it was hard to
have a game that did not address this. Thus
for this scenario, Bf 110 aircraft may not
perform a Break Turn maneuver.
Angriffskreis: Bf 110C may treat the Lufbery
as a simple maneuver.
Bag the Hun 2 describes the Lufbery Circle as
both a formation and a maneuver. This is the
exact right way to think about the Lufbery.
However, while the Lufbery Circle section in
BTH2 gives some rules on how to execute the
circle, there is still a fair amount left to the
imagination. The below gives some
playtested guidance on the specifics of
recreating the Angriffskreis on your table top.
No Protection: The Bf 110C-2 that flew in
France in 1940 lacked cockpit armor
protection found on later models. Thus any
“Pilot Hit” result, treat as pilot KIA. Starting in
June of 1940 armor was added and this
penalty may be removed for any Bf 110C-3 or
C-4s used in Battle of Britain scenarios.
Hurricane I:
SPD: 6
MAN: 6
ALT: 6
ROC: 1
ROB: 2
SIZ: 1
Front Fire: 9
Note that the above factors in speed, climb
and firepower are different from the data
given in BTH2. Among other things, the
Hurricane I gets 8 factors from the 8 wing
mounted machine guns +1 for being noted by
pilots as being a very steady gun platform for
Figure 1: The Lufbery as shown in BTH2
Page 112
1: Move straight ahead 3 hexes and then
execute two Easy Turns in a row.
2: Execute two Easy Turns in a row and then
move 3 hexes.
3: Move 1 hex, execute an Easy Turn, move 2
hexes and execute another Easy Turn.
4: Execute an Easy Turn, move straight ahead
3 hexes and then execute another Easy Turn.
5: You get the idea
6: Execute three Easy Turns in a row with his
9 pips of movement.
The Aircraft Data Tables of Bag the Hun 2
state that the Bf 110C may treat the Lufbery
as a simple maneuver. This is exactly right
and should be the case in your game. The
Lufbery description in the Manoeuvres
section shows the recommended circle size
for single- and twin-engine aircraft.
Essentially it shows a track in the sky and all of
the aircraft should ostensibly be on that track.
However, if taken literally this results in
situations where an enemy Hurricane could
be behind a 110 in a shooting position, but
the trailing 110 is unable to take a shot at the
offending British fighter due to the
constrictions of the track. There also tends to
be a lot of counting and eyeballing to ensure
everyone is on the track or path. Finally, the
circle as recommended works well for six
aircraft, but not so good for a very common
number like four. Thus for all of the reasons
given above, I suggest not worrying about the
twin-engine circle dimensions as shown, and
use the following instead:
You must execute two Easy Turns in the same
direction, but are not limited to just two Easy
Turns (although in practice 3 is probably the
limit). If used properly, adding some straight
flight with the turns would allow the leader to
slowly move his formation toward the edge of
the board if he needed to. Now, as the other
aircraft in formation take their positions they
must meet the below parameters:
1: Each trailing aircraft must be positioned
behind the 3-9 Line of the aircraft in front of
it. On the 3-9 Line does not count as being
behind.
2: Each leading aircraft must be in front of
the 3-9 Line of the aircraft behind it. On the
3-9 Line does not count as being in front of.
3: As stated in the BTH2 rules, aircraft in the
formation may be no closer than 3 hexes or
no further than 10 hexes from all other
aircraft in the formation. The BTH2 rules
state that there “must be two clear hexes
between aircraft at all times” which is just
another way of saying no closer than 3 hexes.
4: You must have a minimum of 3 aircraft to
form a Lufbery (as you could not meet the
requirements of the above with just two).
The 3-9 Line – Most air gamers are familiar
with the “clock code” where 12 o’clock is
straight ahead and 6 o’clock is dead behind.
This leaves 3 o’clock being 90 degrees to the
right of the nose, while 9 o’clock is 90 degrees
to the left. Drawing a line between the two
clock positions we get the “3-9 Line” which in
most World War II fighters is roughly
analogous to the line formed if you drew a
line from wingtip to wingtip. The 3-9 Line
bisects the front hemisphere of the aircraft
from the aft hemisphere. The term came into
wide spread use in the fighter community
after World War II, but is effective in
communicating what we’re talking about.
Remember that in the BTH2 Aircraft Data
Tables, the Bf 110C notes state that forming
the Lufbery counts as simple maneuver for
that type and should be played as such in this
scenario.
With our definitions out of the way, here are
the parameters for executing Lufbery in Bag
the Hun:
To get into the formation, the lead aircraft
declares on his move that he is forming the
circle (“Angriffskreis!”) and then must execute
at least two Easy Turns in the same direction
not combined with any other maneuvers.
Thus a 110 leader whose base speed is 7 and
who rolled a D4 of 2 could:
When forming the circle, if you have other
friendly 110s at the same altitude band and
within 10 hexes of the formation leader, they
may join the circle/formation.
Page 113
Flying the Angriffskreis
“One-one-oh party!” Bonus Card
The BTH2 rules state that “the spiraling nature
of this formation resulted in a loss of altitude,
and this should be reflected by a reduction in
altitude of one band for every two moves that
the spiral is maintained.” While the spiraling
nature could certainly cause a gradual
lowering of the formation, this was not always
the case, and in any rate, I can never
remember if I dropped the formation last turn
or the turn before. To alleviate this, if the 110
formation leader rolls a D4 of 1 or 2, or elects
to not roll a D4 at all during his move, the
formation will drop 1 altitude band (with a
commensurate increase in 1 pip for altitude
change). A D4 of 3 or 4 results in the
formation maintaining its current altitude
while conducting its circling maneuver.
“It was found that each of the single seater
aircraft could easily out-turn the Me.110 at
low altitude …”
-AFDU Report No 38, Tactical Trials
Messerschmitt 110
The sluggishness of the 110 compared to the
Hurricane allowed RAF pilots to usually take
and keep the initiative during their
confrontations. Thus to further show the
initiative that RAF single seat aircraft had
against the Bf 110, it is recommended adding
a single “One-one-oh party!” Bonus Card to
the deck. On the turn of this card, a single
Allied pilot of any skill level can use the card
exactly as an Ace Pilot Bonus Card. So for this
scenario, the Allied player may select any
Hurricane pilot and that pilot may attempt to
either move or fire (not both). If the pilot
using this card is part of a formation, then he
may utilize this card to move the formation,
provided the section has not previously
moved under its section or character card in
the same turn. The “One-one-oh party!”
Bonus Card should only be used in scenarios
where Allied single seat fighters are
exclusively fighting Bf 110s. If playing a
scenario where the RAF faces a mixed force of
109s and 110s, do not add this card to the
deck.
One advantage of this formation is that EVERY
aircraft in the formation may receive the
“Firer has Wingman” bonus when conducting
attacks with its forward firing guns.
As a tactical consideration, with eight aircraft
the Luftwaffe player may elect to for two
counter rotating circles of four stacked at
consecutive altitudes vice a single one of
eight. This can complicate the problem for
the attacking aircraft.
While the Lufbery has some definite
advantages, it is important to remember from
the BTH2 rules, “if an aircraft is forced out of
formation either as the result of failing a
control test or as a consequence of a bad miss
or enemy fire, then the formation is broken
and each aircraft must act independently.”
Thus the RAF player should attempt to attack
any Lufbery circles early in an attempt to
break them up.
Order of Battle
County of Flummoxed Squadron – Operating
with their Hurricanes near the front lines from
their third base in as many days.
Red 1: Veteran Pilot (F/L Neville Dysetower)
Red 2: Regular Pilot
Red 3: Regular Pilot
Yellow 1: Jr Ace Pilot (F/O “Clobber” Fame)
Yellow 2: Regular Pilot
Yellow 3: Spog Pilot
Should the formation leader decide to
abandon the Lufbery circle voluntarily, he
must move straight ahead, and the trailing
aircraft will form up in a “line astern”
formation behind him with 1 hex spacing.
Zerstörergeschwader von Schtabbin –
Honoring their WWI namesake, this 110
squadron has been dining on French fighters
and light bombers for the last two days.
Page 114
Today it has been sent slightly ahead of the
bombers to clear a path for a deep strike at
major French city.
1 Schwarmfuhrer: Junior Ace (Haupt
Wolfgang Heckside)
2 Rottemann: Regular Pilot
3 Rottefuhrer: Veteran Pilot
4 Rottemann: Sprog Pilot
5 Schwarmfuhrer: Veteran Pilot (Leut HansJadda Jadda)
6 Rottemann: Veteran Pilot
7 Rottefuhrer: Regular Pilot
8 Rottemann: Regular Pilot
Cards
F/L Neville Dysetower (Red 1)
Red Section Move
Red Section Fire
F/O “Clobber” Fame (Yellow 1)
Yellow Section Move
Yellow Section Fire
Hauptmann Wolfgang Heckside
Schwarm 1 Move
Schwarm 1 Fire
Leutnant Hans-Jadda Jadda
Schwarm 2 Move
Schwarm 2 Fire
Altitude Bonus
Tally Ho!
Achtung! Indianer!
Bail Out!
RAF Jr Ace Bonus Card
Luftwaffe Jr Ace Bonus Card
110 Tail Gunners Fire
Note: No bogeys or bogey cards are used for
this scenario (see below).
Page 115
Board Set Up
Suffering from overconfidence, Hauptmann
Wolfgang Heckside is not expecting much
resistance in this sector, thus the Hurricanes
(for once alerted) have the opportunity to
perhaps get the jump on the Luftwaffe. Place
the Luftwaffe Bf 110s in the middle of the
board in an appropriate formation at Altitude
Band 4. The Hurricanes will be placed bearing
2D6 and range 4D6 from the Schwarm 1
leader at Altitude Band 5.
Bearing – Roll a 2D6. A roll of 7 equals the
110s 12 o’clock (ie straight out in front of the
Luftwaffe leader). A roll of 2 would equal the
110 leader’s 7 o’clock. A roll of 12 would
equal the 110 leader’s 5 o’clock. Simply go
around clockwise for other numbers. For
example a roll of 6 would place the Hurricanes
initially at the 110 leader’s 11 o’clock. There
is no roll that places the Hurricanes at the
110s dead 6 o’clock. Thus it is more likely that
the Hurricanes will start off in front of the
110s at a higher altitude, but there is a chance
that they may start in a more advantageous
position to the rear.
Objectives
I haven’t bothered with points. Each side is
simply looking to shoot down as many of the
enemy as possible while minimizing their own
losses. In this scenario, the RAF have superior
aircraft but are outnumbered, thus things
should be relatively even. That said, in this
campaign the Luftwaffe can more easily
replace their losses, so the RAF will have to
shoot down quite a few 110s for a notable
victory. A draw favors the Luftwaffe.
Range – Once you have the bearing, the lead
Hurricane will be 4D6 hexes away, again at
Altitude Band 5. The Hurricanes may start
facing whichever direction the flight leader
desires.
This is the initial set up, no bogeys are used,
simply get at it.
Recommended Reading
Arise to Conquer by RAF ace Ian Gleed, was
originally published during the war in 1942.
With its in-the-moment prose and taka-taka
delivery, no book for me more captures the
feel of the Bag the Hun game than Arise to
Conquer. You cannot finish a chapter without
wanting to put some Hurricanes on your
gaming table – my absolute highest
recommendation.
Variants
Obviously you can change the scenario by
determining pilot skill via the Pilot Generation
Table. Additionally, try adding nine Luftwaffe
medium bombers at altitude 4. If you do, I
recommend adding another flight of six
Hurricanes. You can use the aircraft statistics
and rules from above for a Battle of Britain
scenario as well.
Tony Holmes’ Hurricane I vs Bf 110 1940 from
Osprey was also instrumental in preparing this
scenario.
Page 116
Scotland Forever!
This year is the 200th Anniversary of Waterloo and to mark this event
TooFatLardies is giving you the chance to charge into action with the Royal
Scots Greys at Waterloo
Will your battlefield decision making led to glory and the capture of an enemy
Eagle or will you be one of the thousands who pay the ultimate sacrifice on the
day that the Napoleonic Wars reach their dramatic and deadly finale?
Play this unique game and take your place in history.
How the game works:
You will need a d6 to play. Simply read the story below and use the options to
help you select what happens next. Then just follow the link to the next section
and see how your story develops. From time to time you may need to roll a d6
to allow fate to play a hand. But choose the right course of action and with luck
and a true sword arm you will prove your mettle in close combat with the
enemy and will be in with a chance of capturing a coveted Imperial French Eagle
standard. Make a poor choice, or have an unlucky moment, and an unmarked
grave awaits…
Share your stories with us on twitter @toofatlardies or on our facebook page
www.facebook.com/toofatlardies
Good luck
Page 117
Note: This has been extensively playtested so you shouldn’t get into a loop but – if you do, simply go
back a stage, take a different option and rejoin the action!
START HERE
A field near the village of Mont St. Jean
18th June 1815
What a difference a day makes. This time yesterday you were weary, wet and retreating before a
French Army that had beaten the Prussians and looked set to plunder Brussels. Today you stand in
glorious sunshine as part of the Allied Army that will blunt Bonaparte’s bloody ambitions for the
last time. You shift uneasily in the saddle and look at your pocket watch. Two hours since the
cannonade began and now their roar seems louder than ever. Thank God you are on the reverse
slope, safe from the carnage. But somebody is getting it and that’s for sure. The steady procession
of wounded men to the rear serves only to steel your mind for the day ahead. You know that
infront of where your squadron stands, beyond the crest of the slope and out of sight ,
Bonaparte’s army is on the move, their advances led by their fearsome and deadly horse artillery
batteries. You look around at the men of your squadron. Despite just a few days of campaigning
most look weary, red eyed and caked in mud. Yesterday’s heavy rain and manoeuvring created
such a mud bath that even the neatest of troopers could not prevent becoming caked from head
to foot. The guns roar again and in the distance the sounds of bugle call and drums are softened to
the point that they become almost rhythmical. To your left Trooper Thurleigh, a young faced man
from Renfrewshire catches your eye.
“Do you think we’ll be at them soon, Sergeant”, he asks.
“Aye lad”, you reply, “soon enough”.
You move to the end of the file, looking back along the line of the squadron. Captain Cheney
glimpses at you and then rides off to the front of the regiment. Through swirling smoke the
sounds of the dreaded Pas de Charge can be heard coming from the slope. The French are on the
attack. To your right, a party of blood-spattered Dutch infantry bolt to the rear, carrying a
wounded comrade and shedding their equipment in their haste to get to safety. The French are
pushing hard. This is it.
The battle is close by.
An aide-de-camp wearing a guards uniform flashes past you, stopping violently when he reaches
Colonel Hamilton. Orders are relayed. From the main line a roar of musketry is heard, adding a
further crescendo of noise and throwing yet more smoke into the dry air.
Go to 1
Page 118
-1The aide-de-camp raises his hat to the Colonel, and in a moment he is gone again. Colonel
Hamilton exchanges some words with Captain Cheney and Captain Payne calls for the bugler.
Suddenly, you are aware that your lips are dry. You move to lick them, and realises that the
dryness extends to your entire mouth. You swallow hard. The Colonel twists excitedly in his
saddle, his voice bursting with pride and exhilaration. He nods to the bugler and raises his voice to
the men, all of whom fidget nervously as they watch events unfold.
“Now then Scot’s Greys…. Charge!”
Captain Cheney repeats the command with formal precision
"The Division will draw swords. Eyes right. Draw….SWORDS!"
Division will prepare to charge
CHARRRRRRRGGGGGE!!!!!
The men respond with excited professionalism. Taking the reins firmly in left hand you shift
uncomfortably in the saddle and adjust your accoutrements as you begin to move forward. You
unsheath your heavy dragoon sword and grasp it firmly. The ground beneath you is broken and
uneven, but your horse seems to be treading a steady path. Whether your horse responds to you
directly, or is simply following the moment of its comrades is hard to say but in a moment and in a
fashion that seems perfectly natural, the push towards the enemy has begun. The horses press on,
the riders maintaining cohesion to ensure the squadrons retain their formation. The pace
quickens. The roar of musketry increases and the sound of artillery fire seems to reach new
heights. Around you men are cheering. To your left Troopers Pascoe and Thurleigh manage
somehow to shake hands as their mounts push forward. Each man exchanges glances with those
around them, and each sees, in the face of his colleague, a determined face of exhilaration – and
the hidden curse of fear. Fate awaits. The charge has begun.
Go to 2
-2All along the ridge the body of grey horses pushes forwards, their hooves throwing up great
clumps of Belgian earth with each stride. As you pass the crest of the ridge the spectacle of battle
is laid out before you, but it is so vast, so confused, and so disguised by smoke that you cannot
make sense of the scene. Focus on the job in hand. Maintain cohesion. Keep the boys together. As
you pass through the ranks of the Gordon Highlanders the momentum quickens. In your ears,
above the sounds of the battle, you can hear the skirl of the pipes as the bagpipers play a stirring
tune. A few of the highlanders, spurred on by the momentum of the cavalry, surge forward to join
the charge. You can now see the enemy columns arranged before you, barely 100 yards ahead. A
pox scarred and burly highlander attempts to grasp your straps as you pass, seemingly wanting to
be pulled along by the charge. His clumsy grasps disturb your mount who buckles and instinctively
pulls away from him. What do you do?
Do you…
Extend an arm to the Highlander to encourage his forward movement - Go to 4
Kick in your heels and press forwards – Go to 11
Page 119
-3Through the smoke of battle you see the dark jacketed mass of men moving up the slope and
through the corn towards you. The range closes to 50 yards. As one they look up to face the
cavalry and in an instant their momentum ceases. Their forward movement stops with an
exaggerated sway as though an anchor had been dropped in their midst. The poor wretched
infantry behold the might of the mounted British and for a moment you feel pity for them.
Scattered shots ring out, but seem to serve little purpose other than make your own men cheer
even louder. This is it. The thrill of the charge, a massed movement of men and horse in perfect
cohesion falling mercilessly upon a pitiful foe. Just a few more heart thumping strides and you are
upon them. With a throat wrenching cry of “Scotland Forever!” you plunge on into the enemy
formation, battling to control your mount with one hand and wield your heavy dragoon sabre in
the other. The clash of steel on steel rings on your ears whilst your eyes, streaming from the thrill
of the charge and the sting of the acrid smoke, struggle to identify targets among the throbbing
mob of men and horses that now surrounds you. The cohesion of the squadron, so perfect at the
commencement of the attack, is lost in an instant as a series of individual melees break out. Out of
the corner of your eye you see Thurleigh pitch forwards from his horse and into the corn, his face
contorted in his death throes. With a sudden lurch your mount spurs you towards the distinctive
shako of a Frenchman. He turns towards you with anger in his eyes and sets to thrust his
bayonetted weapon towards your exposed right side.
Do you:
Kick on to leave the threat behind you and delve deeper into the formation - Go to 5
Parry his thrust - Go to 10
Attempt to cleave his head with your flashing blade – Go to 36
-4You extend an arm to the burly Scot - “Come on then you mad bugger!” – and attempt to pull the
highlander forward. He runs forward with you, grabbing hold of your stirrup and running for all his
worth. But the pace of the animal is too much for the infantryman, weighed down with his full kit.
After a few moments he releases his grip, and yells a breathless fare-ye-well as you speed on
down the slope.
Go to 3
Page 120
-5Breathing heavily, you move on down the slope. The order of the charge has now started to give
way to disruption and chaos. The ranks of the French appear to be broken, and whilst some men
break for safety, others assemble in isolated pockets in an attempt to survive the mounted
onslaught. Casualties litter the ground. To your right you see a Greys officer, unhorsed and
wounded, engaged in a fierce fight with two French fusiliers.
Do you
Control your mount to move to the officer’s aid? - Go to 6
Push on down the slope? – Go to 8
-6Moving with determination, your horse barges into one of the fusiliers, knocking him to the
ground. The Greys officer, inspired at your arrival, plunges his sword into the chest of the prone
Frenchman, whose colleague lunges at the officer. Instinctively you plunge towards the
Frenchman, sword arm raised, and cut him down with a shoulder jarring sweep of your blade.
The officer, recognisable now as Captain Payne, turns towards you and demands that you offer
him your mount.
Do you
Dismount and hand the reins to your senior? – Go to 42
Extend him an arm – your mount can carry two? – Go to 7
Ignore his pleas and push on towards your next enemy? - Go to 8
-7Manoeuvring close to the officer you extend an arm to haul him up behind you. As you do so a
French fusilier steadies himself and fires his musket. The ball strikes the officer full in the back, and
his lifeless hand loses its grip as he slumps to the ground.
Roll a dice:
1,2,3 - Go to 17
4,5,6 - Go to 27
Page 121
-8The officer shouts something in your ears as you push on into the throng. Around you the picture
is one of panic and carnage. Bodies of friend and foe alike a littered on the ground all around,
some writhing in their death throws.
Go to 17
-9Feeling exposed and vulnerable without a horse you lose your footing for a moment in the uneven
ground. The battle swirls around you and in a moment the scene shifts again, a moustachioed
Frenchman fixes your gaze and turns to face you, pointing his trembling musket at you. Barely a
few feet away, if he fires you are done for. He pauses for a moment. Out of the corner of your eye
you see more Frenchmen moving around you. Your cause seems desperate, and for the first time
the fear of death flashes into your mind.
DO you
Raise your sword in a determined effort to die fighting?
Roll a d6:
1,2,3,4 - Go to 14
5,6 - Go to 10
Recognise that your position is hopeless and offer up your sword?
Go to 40
Turn and run?
Go to 46
-10The Frenchman recoils as he fires his weapon, the flash of flame from the barrel extending almost
into your face. You feel a hammer blow to your chest which knocks you backward. As you fall, you
glimpse more Greys moving around you. You gasp for breath and hit the floor hard, flat on your
back and staring up at the blue sky. A rushing sensation in your chest fills your mind and stops
your breath. You cough. The rushing sensation becomes an intense and crippling heat like
something is crushing you. You cough again as a welcome and warm light calms the noise,
removes the pain and embraces you in endless honour.
Your battle is over
Page 122
-11Terrain and excitement mean that the squadron formations are poorly maintained. Somehow you
are in the front rank and oh - such a sight – before you stretches row upon row of Frenchmen
moving steadily up the ridge. You glimpse across and see Colonel Hamilton, sword arm raised,
urging the Greys onward. As one, the body of horsemen react to his urging, kicking in their heels
and careering down the slope.
Go to 3
-12Shaken, battered and breathing deeply, you make it back through the ranks of the highlanders
through whom you have charged just a few minutes before. The men raise a cheer as you pass, a
bugle call allows you to find the survivors of your troop. Eyes wide, you listen to the tales of your
comrades and hear the names of some of those who fell. The French it appears are in turmoil, the
battle surely won. But what a cost, and as Sergeant Ewart presents a group of officers with an
eagle that he has captured on the battle field you stare down at your blood soaked hands. Glory
for the regiment. Survival for you.
Your battle is over
-13A loud cheer greets you as you make your way back up the slope. The highlanders, many of whom
had charged forward with you just a few moments previously, are raising the bonnets and
shouting hoarse cries of salute. Inresponse you raise the captured eagle above your head in a sign
of victory. Slowly your comrades form up around your, desperate to hear the story of how you
secured such a prize. Their wide eyed faces are streaked with blood and sweat, and Trooper
McLaren enthrals all with his tale of how he saw the Colonel fall in his moment of greatest glory.
All are agreed that the French are beaten, their formation smashed by the charge. Captain Cheney
approaches, accompanied by none other than the Earl of Uxbridge who greets you warmly
“A fine day, Sergeant, to be capturing the enemy’s standards and sending his armies back to Paris
– don’t you think? Now…tell me how you came upon this…..”
Your battle is over. You are a hero.
Page 123
-14The Frenchman pulls the trigger and there is an earsplittingly loud bang. For a moment everything
stops. Then you see the look in the eye of the Frenchman – a misfire! What luck! With a maniacal
cry and pushed on by sheer fervour you thrust forward with a firm movement of your arm and the
unfortunate Frenchman crumbles as your blade pierces his ribs. With a twist you seal his fate and,
in the same movement, extract the blade and turn around. A riderless horse – Thurleigh’s horse almost knocks you over but stops, almost fatefully, between you and the French horde.
Do you…
Mount the horse and push on down the slope - Go to 15
Stay on foot -there are plenty of Frenchmen still to kill here - Go to 40
-15Leaping instantly to the saddle, you sweep your sword arm down, keeping the cowardly French at
bay. The scene around you is one of chaos. All around you is in turmoil. Above it all are the
screams of the dying and the incessant thunder of the guns. Instinctively you kick your heels into
the animal’s side and it reacts with a startled jolt, and in a moment the scene changes…
Go to 16
-16Fifteen years of service flash before your eyes in a moment. Surely nothing can match this, the
thrill of pitched battle with the old enemy. The noise of gunfire mingles with the screams of battle
and the cries of the wounded. You tighten your grip on your sword.
Do you…
Take a moment to get your bearings - Go to 18
Plunge on into the smoke - Go to 17
Page 124
-17For a moment you find yourself alone, then, emerging into an area of good visibility you realise
that you have pushed a great distance down the slope. Around you fleeing French soldiers are
being cut down by rampant greys, who, emerging rapidly from the smoke, are careering downhill,
cheering wildly. The momentum of the charge and the exhilaration of smashing the French
columns is driving men forwards – surely now this battle is won !
If you have already captured the Eagle go to 43
If not,
Roll a d6
1,2,3 – Go to 38
4, 5 - Go to 20
6 – Go to 18
-18In the distance you can hear a bugle call of recall. To your right you see Colonel Hamilton in melee
with a French officer and spur your mount to support him. As you close, he skewers the
Frenchman through the face and twists in his saddle, looking through you to a distant point. With
a frenzy in his eyes and a cry of “Charge the Guns!” he pushes past you, followed by a dozen other
troopers.
Do you…
Join this valiant group? - Go to 29
Heed the bugle call? - Go to 19
Plunge into the wider melee? - Go to 20
-19You steady your mount and begin to head back up the slope. As you do so, a French lancer
appears behind and to your left, his red and white pennant whipping violently as he manoeuvres
the tip of the weapon towards you. You accelerate to pull away from him, desperate to heed the
call of the bugle, but the Frenchman, on a fresh and light horse, easily gains ground on you,
thrusting his lance at you. As you twist in the saddle to deflect his blow, the lance point gouges
deep into the flanks of your horse, making the animal fall to the ground – spilling you clumsily
from the saddle. In an instant you are thrown forward, your losing your shako and taking a
mouthful of Belgian soil. Clumsily, shaken, you rise to your feet, turning to face the lancer – but he
has moved on.
Go to 12
Page 125
-20In a brief lull you see men around you engaged in fierce combat, in the main, the greys are carving
a path through the French column who appear broken and fearful. Ahead of you a burst of
sunlight highlights the embroidered colour of a French flag. AN Eagle! What a prize! You move
speedily and smoothly forwards, man and horse moving with a smooth determination that
suggests the horse has also recognised the importance of its goal. In a moment you are alongside
a group of French infantry guarding their regimental flag.
Do you…
Make a grab for the eagle? - Go to 21
Attack the soldiers? - Go to 10
-21Using your height advantage, you make a grab for the eagle. Amazingly, your gloved hand grips
the shaft first time, yanking the colour towards you. The Frenchman, shocked at your intervention,
instinctively pulls away, almost wrenching you from the saddle. Determined to retain his flag and
the honour of his regiment the grizzly looking Frenchman thrusts his sword towards your groin.
With your sword in one hand and the eagle and the reins in the other, you are momentarily off
balance. What do you do?
Attempt the parry the blow whilst you regain your balance?
1 to 4 go to 22
5 to 6 go to 41
Ignore the Frenchman’s attack and launch one of your own?
1,2 – go to 23
3,4 - go to 28
5,6 - go to 41
-22With a flash of your blade you parry his attack, breaking your opponent’s sword in the process. In
a flash, your arm comes up, and as you regain your balance you bring your sword arm down,
enabling you to deliver a fatal blow to the Frenchman, cleaving his shakoless head with a powerful
blow that releases his grip on the eagle and life. Pulling the flag in towards your side you pull your
horse around to the left to head off with your prize
Go to 23
Page 126
-23Before you can act another horseman comes up alongside you. You look up into the eyes of a
French Lancer, his gold helmet and green jacket temporarily lit up as a shaft of sunlight breaks
through the smoke. His rapid approach has you at a disadvantage.
Do you…
Turn to fight him? - Go to 24
Kick your heels to make good your escape? – Go to 27
-24You turn to face the lancer, who throws his lance at you. Aided by the momentum of your turn,
you instinctively parry the lance down your right side. The Frenchman, cursing his luck, fumbles
momentarily for his sword, presenting you with the opportunity to strike
Do you…
Make an attack?– Go to 25
Kick your heels to make good your escape? –Go to 34
-25Instinctively you whip your sword arm upwards, cutting the Frenchman through the chin and
exposing his teeth, which for a moment, shine like a row of grave stones in the eerie light. With a
bloody cry, he falls from the saddle. You kick your heels and move off, still clutching your prize.
Go to 38
-26Twisting in the saddle the Captain looks at you with dark eyes. At the sight of your prize he raises
his hand to his hat, raising it for a moment in an act of salute. “you brave fellow”, he cries; “take
that to the rear; you have done enough until you get quit of it”. “Be off with you – find the
general, but go alone for we still have business to do before Bonaparte is beaten”. Then, in a
moment, he turns back towards the bugler by his side, and in a moment they both plunge forward
into the fray.
Go to 13
Page 127
-27Moving urgently, you get but a few paces before you are faced with another adversary. A brave
and grizzle foot soldier, abandoned by so many of his colleagues, seems intent on making a fight
of it. The deafening noise of his musket stuns your horse, who flinches at the sound. The ball zips
past your head, missing it by inches. Unphased, you and your adversary close the distance, and,
with a gritty determination the steely eyed Frenchman makes a thrust with is bayonet.
Do you…
Parry? - Go to 10
Or attack? - Go to 28
-28With swift determination you sidestep your horse, avoiding the foot soldier’s clumsy attack, and
deliver a punishing swipe of your battered sword that takes the Frenchman out of the action. Your
horse stumbles in the even ground, but with a cool deftness that comes with a life in the saddle,
you regain control and cool the beast. Without another thought, you kick your heels and move on
If you have the Eagle, go to 43
If not, go to 38
-29Led by Hamilton the group charge on, striking down fleeing Frenchmen as they go. Fuelled by your
success and the momentum of the charge your plunge onwards, and soon find yourself in
amongst the enemy guns. Around them is a scene of carnage, with Greys and other Union Brigade
troopers riding amok amongst the hapless gunners. For a short time at least, these guns will do no
more slaughter. An artilleryman swings his ramrod at your horse, but with a deft movement you
avoid his blow and close in on a cannon, abandoned by all bar a lanky looking gunner, whom you
sabre mercilessly.
Go to 44
Page 128
-30“Look out lads - lancers!”
The body of Greys makes a valiant effort to close ranks to defend against the attack of French
lancers. The British horses, blown from their charge, lack the lightness of control needed to
respond to this new threat. Breathing heavily, you steel yourself for another combat as the cavalry
close, choosing an approaching Frenchman as your adversary. He fixes you with his gaze and, as
the distance closes between you, you to stand up in your stirrups to gain the crucial height
advantage and leverage that will enable you to level the odds.
The enemy closes with your small group, and out of the corner of your eye you see Colonel
Hamilton fall from his horse. Momentarily distracted, your enemy has you at a slight advantage
and he makes a firm thrust at you with his lance. With a deft twist of your arm you deflect the
blow, and the lance travels across the front of your body until it lays flat across your chest.
Do you…
Take the chance to grasp the shaft? – Go to 45
Or twist to the right to launch an attack? - Go to 31
-31The Frenchman, acting swiftly, releases his lance and reaches for his sword. He is clearly and
experienced warrior, for as you bring your sword down he is able to parry your blow. With a cry of
“Vive L’Empereur!” he thrusts his lighter sword towards your side, and you feel a warm burning as
the steel cuts through your flesh. With a wince and a cry you shift in the saddle, and swipe
uselessly with your sword. You and the Frenchman are now knee to knee, your swords locked
together bloody combat. Your wound burns – he already has an advantage over you. Something
desperate is needed.
Do you…
Attempt to bring your sword hilt up into his face? - Go to 33
Or attempt to pull him from the saddle? - Go to 32
-32You grab desperately for his straps, gripping them firmly through your heavy gloves. Standing
painfully in your stirrups, you pull the Frenchman towards you with all your strength, lifting him
from his saddle. With his lance now lost and sword arm restricted, the Frenchman resorts to
grabbing your face with his left hand, his coarsely gloved fingers gripping your jaw and holding you
by the mouth, pulling your jaw downwards.
Roll a d6
1,2,3,4 - go to 33
5,6 - go to 34
Page 129
-33Whipping your hand upwards, the sword hilt smashes into the Frenchman’s jaw with a painful
crack, stunning him and throwing him backwards. With a follow up thrust you plunge your sword
into his abdomen, and the Frenchman gives a gurgling cry as he keels sideways away from you,
falling from his saddle and thudding to the ground.
Recomposing yourself for a moment you turn to face the front once more, and are instantly struck
in the face by something hard. Shocked and with your vision momentarily blurted, you see
another lancer to your left, releasing his grip on the lance that he has just struck you with and
turning about on his horse to re-engage you with his sword arm.
Do you …
Bring your sword arm round?- Go to 34
Make a grab for the lance to pull the Frenchman closer? - Go to 45
-34You bring your sword arm round, but the Frenchman, fresh and experienced, is faster. You feel a
chest tightening pain as his blade spears you through under your left arm, penetrating so deeply
that the sword, now embedded in you up to the hilt, ends not only your fight but your grip on life.
With eyes wide you fall to the ground, snapping the blade of the Frenchman’s weapon with your
ribs as you fall to the ground.
Your last breath is taken from you as you thud into the Belgian soil and you join the ranks of the
fallen.
Your battle is over
-35Kicking in your heels, you see a way back through the fight. The French infantry are broken, of that
there is no doubt, but now the greys, scattered across the slope and with horses blown, face a
great danger. With luck, you can restore some order and capitalise on your brilliant and
devastating charge.
If you have the Eagle, go to 43.
If not, go to 20
Page 130
-36Before you can act, the Frenchman thrusts at you, and you can feel the hard steel of his bayonet
as it pushes against, but not into, your thigh. In a moment, your sabre crashes into his epaulette,
and your arm judders as the heavy blade cleaves into the flesh of your adversary. Terribly
wounded, the Frenchman staggers back and your horse kicks on once more.
Do you
Wheel round to finish him off? - Go to 37
Kick in with your heels and push on down the slope? - Go to 5
-37As though jerked away by the hand of the Almighty, your horse collapses, throwing you from the
saddle and into the corn. Shocked, but still grasping you sword, you struggle to your feet, suddenly
feeling exposed and breathless amidst the throng.
Go to 9
-38A French Officer appears out of the smoke, leading a group of men. He thrusts at your with his
sword,
Roll a d6
On a 1,2,3,4 - Go to 39
On a 5 or 6 - Go to 34
-39Sparks fly from the blade as you parry the Frenchman’s thrust. With desperate fervour and
amazing speed he swings his sword at you again, but this time a swift and powerful parry from
your heavy dragoon blade soon shatters his inferior weapon, and with an upward slash you piece
his abdomen, disembowelling the unfortunate enemy and he crumples with a sickening cry.
If you are on foot go to 40
If you are mounted and have the eagle, go to 43
If you are mounted but don’t have the eagle, got to 44
Page 131
-40It seems that fate is not finished with you just yet…
“Here Sergeant, take this…”
You turn to see Captain Cheney, who extends to you the reins of a horse. With consummate ease
the Captain strikes down a Frenchman who makes a strike at him. Eagerly, you mount up, but
before you can thank the Captain he has disappeared down the slope.
Roll a d6
1,2 - Go to 18
3,4 - Go to 27
5 - Go to 17
6 - Go to 20
-41You are an excellent swordsman, but this Frenchman is better. With astounding skill the enemy
has you beaten, and with a flick of his Gallic wrist he plunges his blade deep into your chest. You
slump forward, your motion snapping the blade as you fall to the ground.
As you fall to the ground your eyes catch sight of a glittering Eagle. Then all is dark. A mass grave
awaits.
Your battle is over
-42The officer takes your mount and rides into the throng without a word.
Go to 9
-43Gripping the Eagle tightly you spur your horse on up the slope. What a prize! A group of bloodied
troopers from your own squadron cheer at the sight of you. Captain Cheney is with them.
Go to 26
Page 132
-44A bugle call sounds through the smoke. Recall. Recall to where? All is confusion. Through the
swirling smoke you see a sight that strikes fear into your heart – enemy lancers
Go to 30
-45You grasp the shaft of the Frenchman’s lance, pulling him close to your face. You look into the
eyes of a moustachioed dark skinned fellow, much smaller than you. At that moment a trooper of
the greys appears at your side, delivering a heavy blow to the Frenchman’s shoulder which cleaves
him through to the chest. You watch him fall away from you. His fight is over. Yours is not
Go to 35
-46You turn and run, the long corn swishing noisily as you stumble along, then, in a moment, there is
a horseman by your side
Roll a d6
1,2 go to 40
3,4,5,6 go to 47
-47You look up into the eyes of a mounted French officer. With a cry of Vive L’Empereur he raises his
sword and strikes you down, the blade of his sword carving into your neck and shoulder. You fall
to the ground, bleeding heavily. The battle moves around you, but laying painfully in the corn the
fighting takes on a surreal form. Choking on the warmth of your own blood, day becomes dusk,
and dusk becomes night. Movement is impossible, and you drift in and out of consciousness. The
moon moves slowly across the sky. In the morning, you find yourself looking into the face of a
woman, much older than you. Her face is dirty and her clothes are worn, and bloody. Her hand is
in your pocket. She takes your pocket watch and your pipe. You try to speak but she scurries away.
You drift again into unconsciousness and soon all around you is darkness.
Your battle is over
Page 133