/


ISBN: 0-7153-1794-6

Text
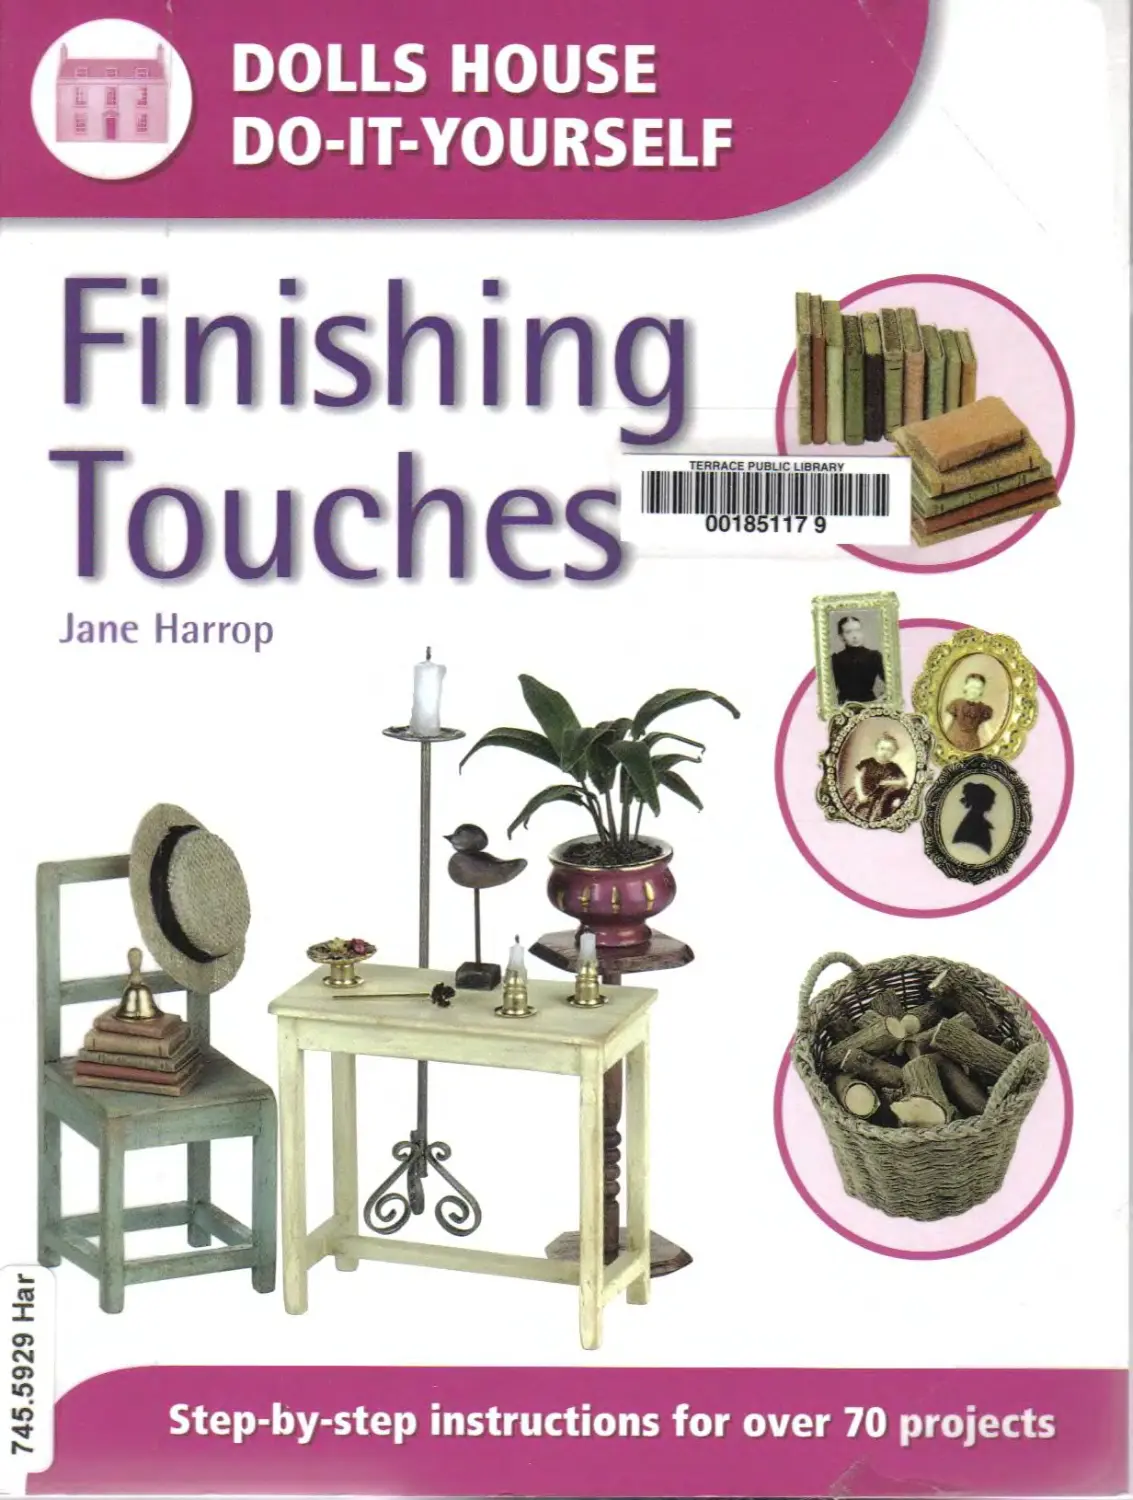
DOLLS HOUSE
DO-IT-YOURSELF
Finishing
Jane Harrop
Step-by-step instructions for over 70 projects
TERRACE PUBLIC LIBRARY
IIIIIIIWIIIIIIIIIIIIIIII
00185117 9
745.5929 Наг
DOLLS HOUSE
DO-IT-YOURSELF
Finishing Touches
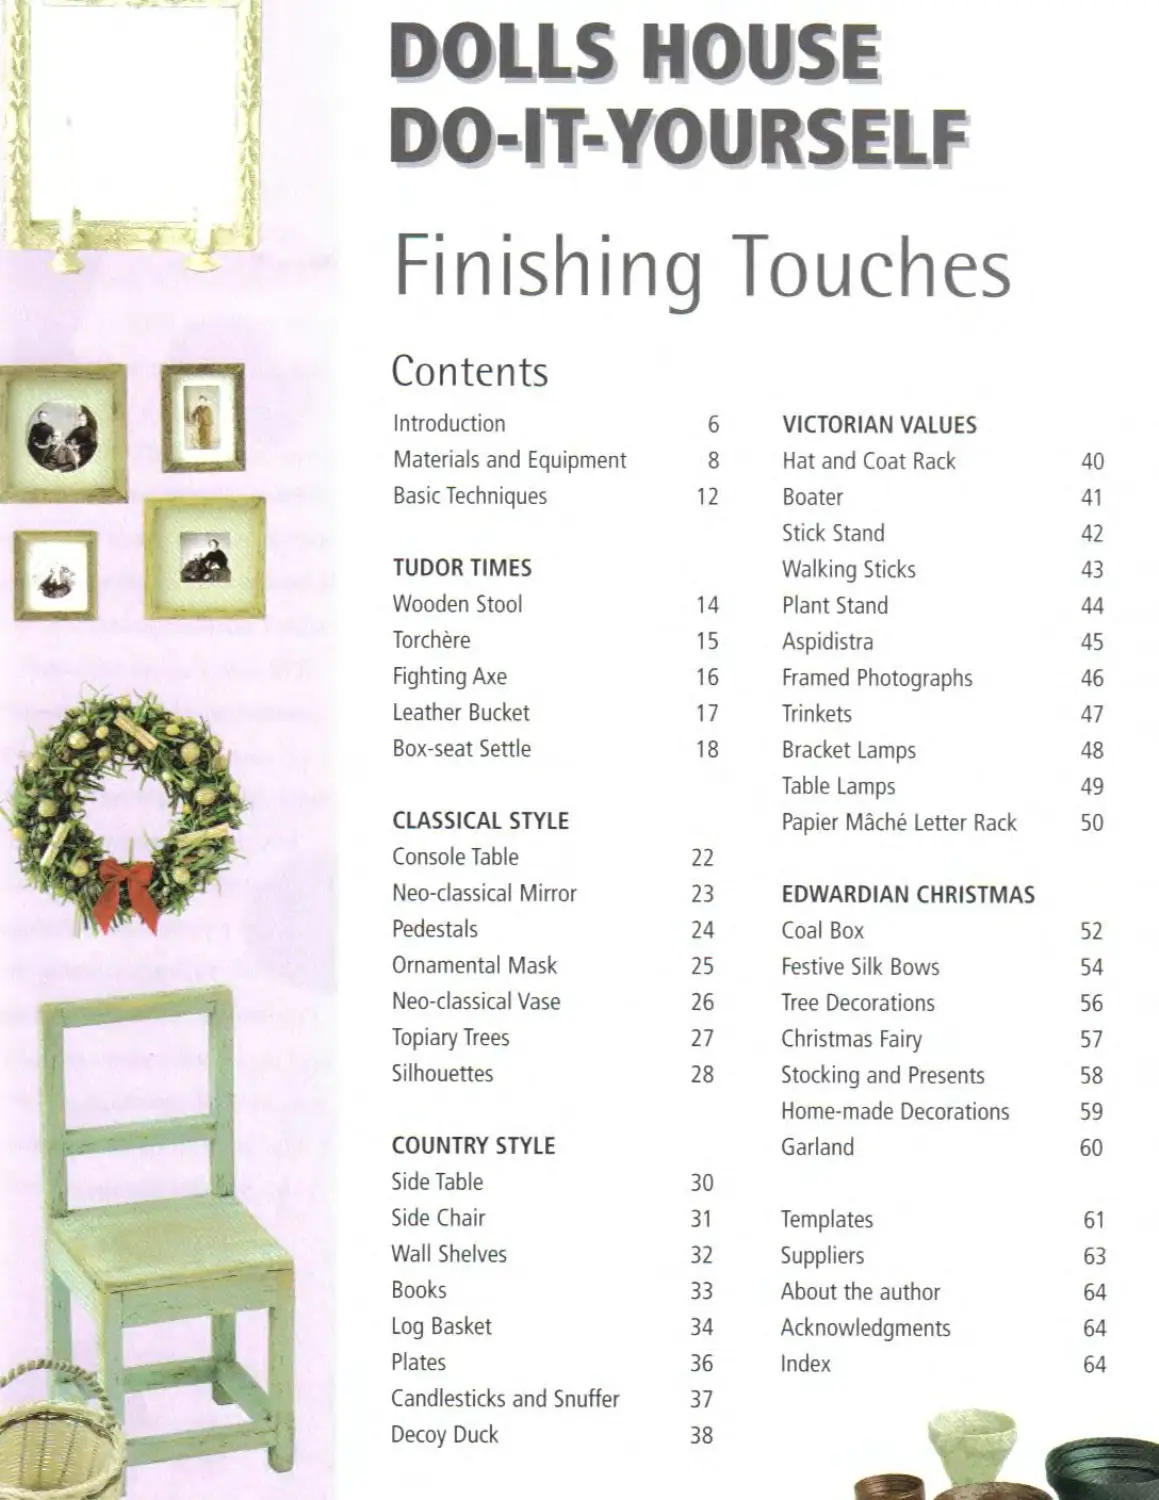
Contents
Introduction
Materials and Equipment
Basic Techniques
TUDOR TIMES
Wooden Stool
Torchere
Fighting Axe
Leather Bucket
Box-seat Settle
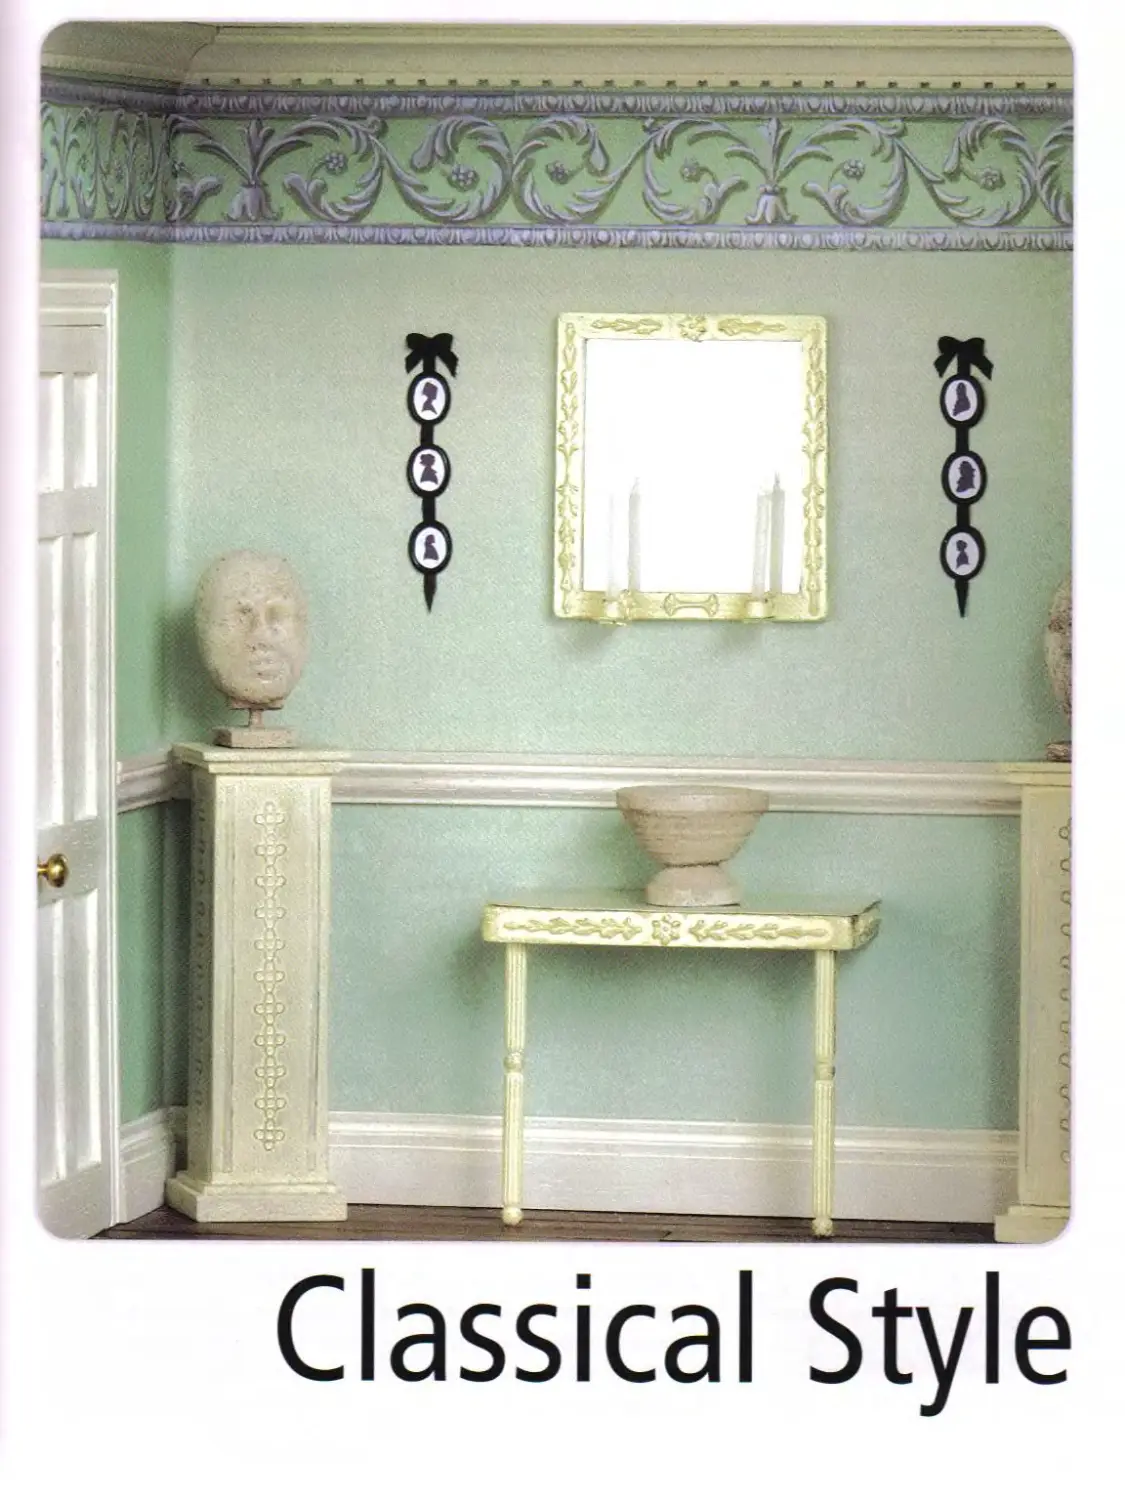
CLASSICAL STYLE
Console Table
Neo-classical Mirror
Pedestals
Ornamental Mask
Neo-classical Vase
Topiary Trees
Silhouettes
COUNTRY STYLE
Side Table
Side Chair
Wall Shelves
Books
Log Basket
Plates
Candlesticks and Snuffer
Decoy Duck
6
8
12
14
15
16
17
18
22
23
24
25
26
27
28
30
31
32
33
34
36
37
38
VICTORIAN VALUES
Hat and Coat Rack 40
Boater 41
Stick Stand 42
Walking Sticks 43
Plant Stand 44
Aspidistra 45
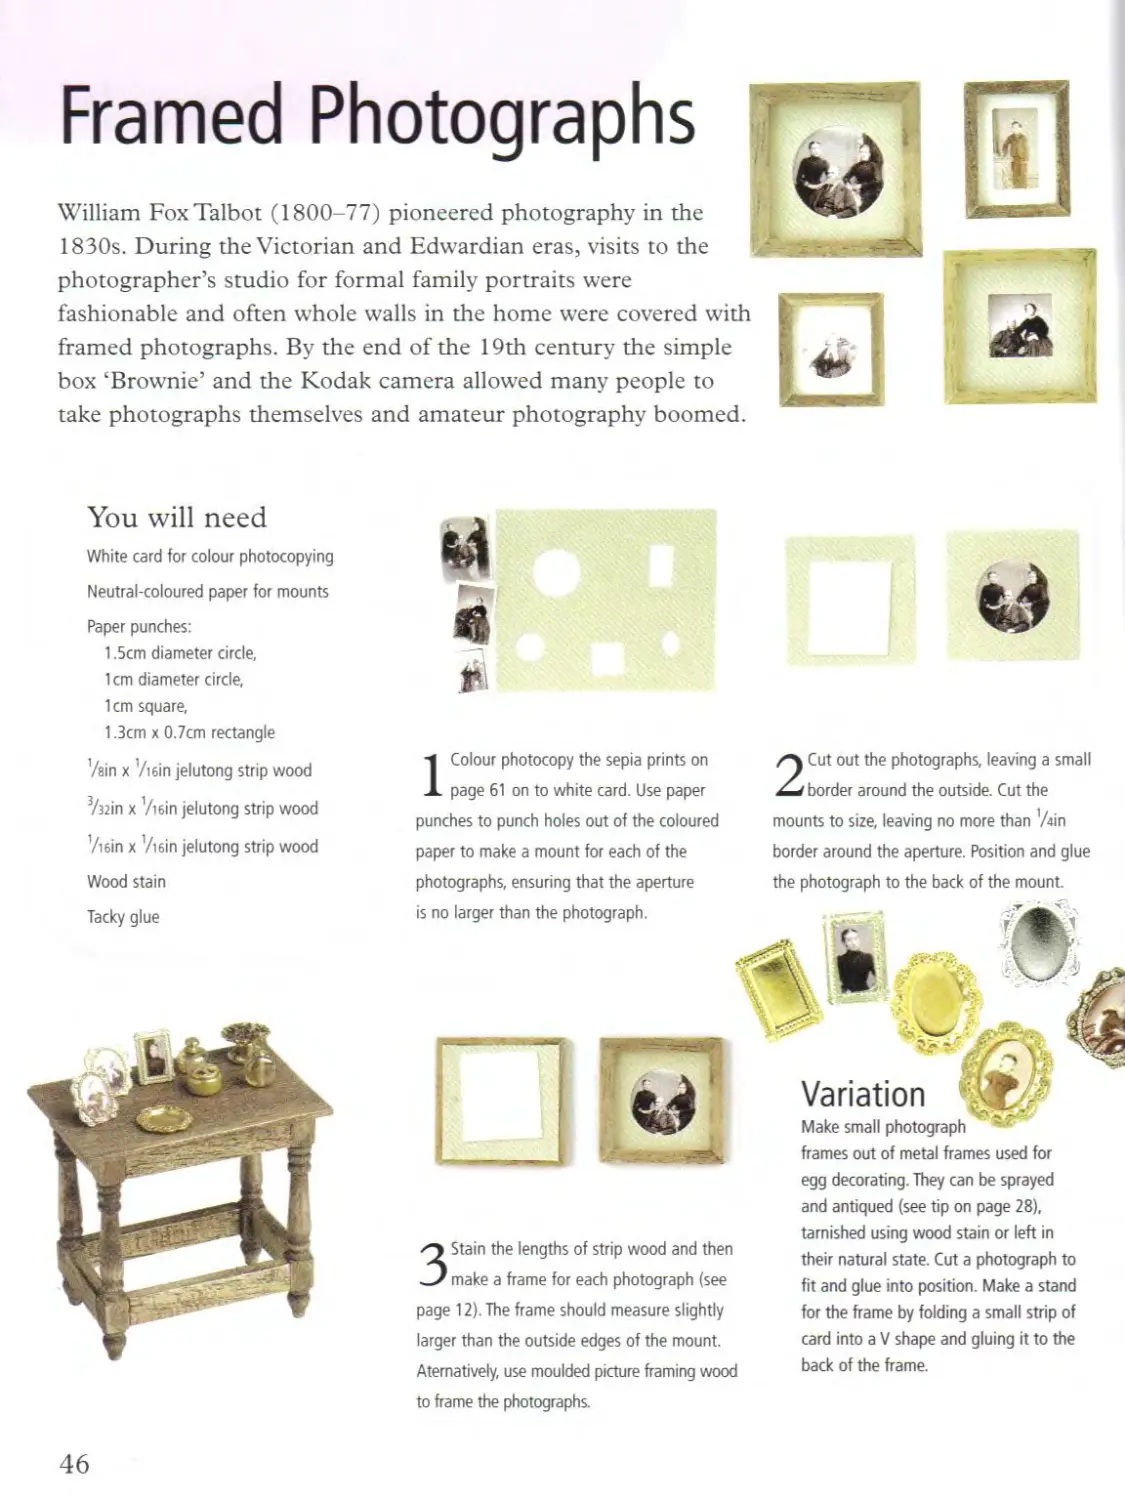
Framed Photographs 46
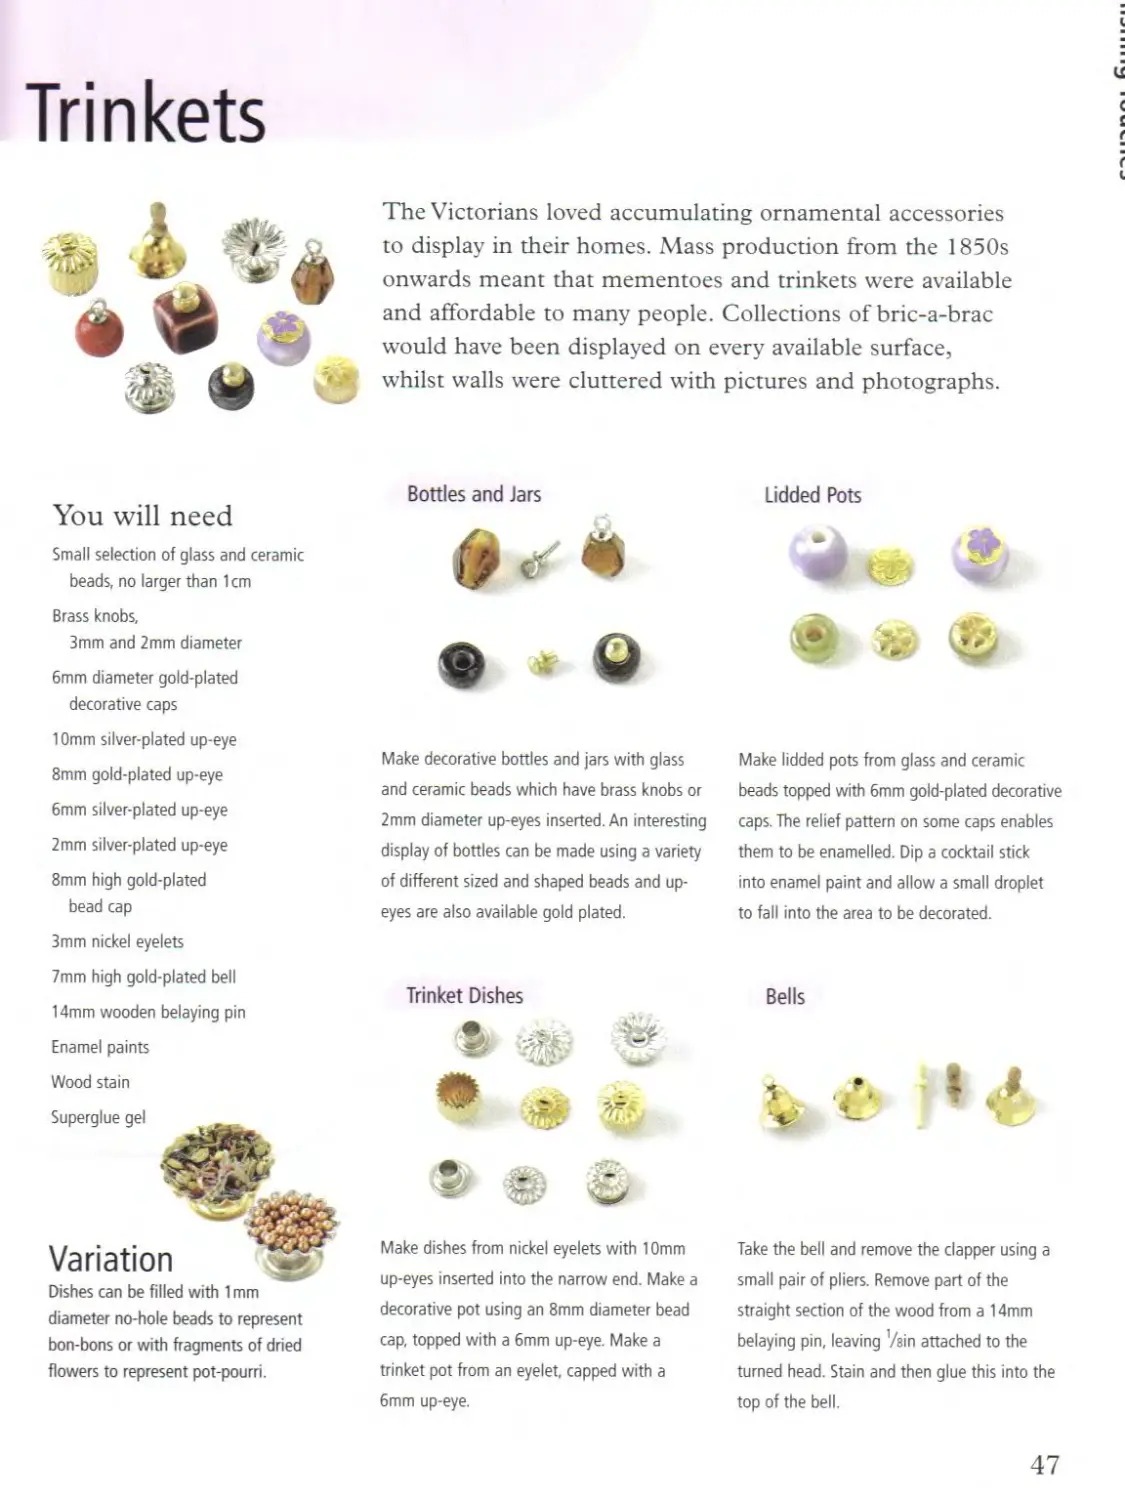
Trinkets 47
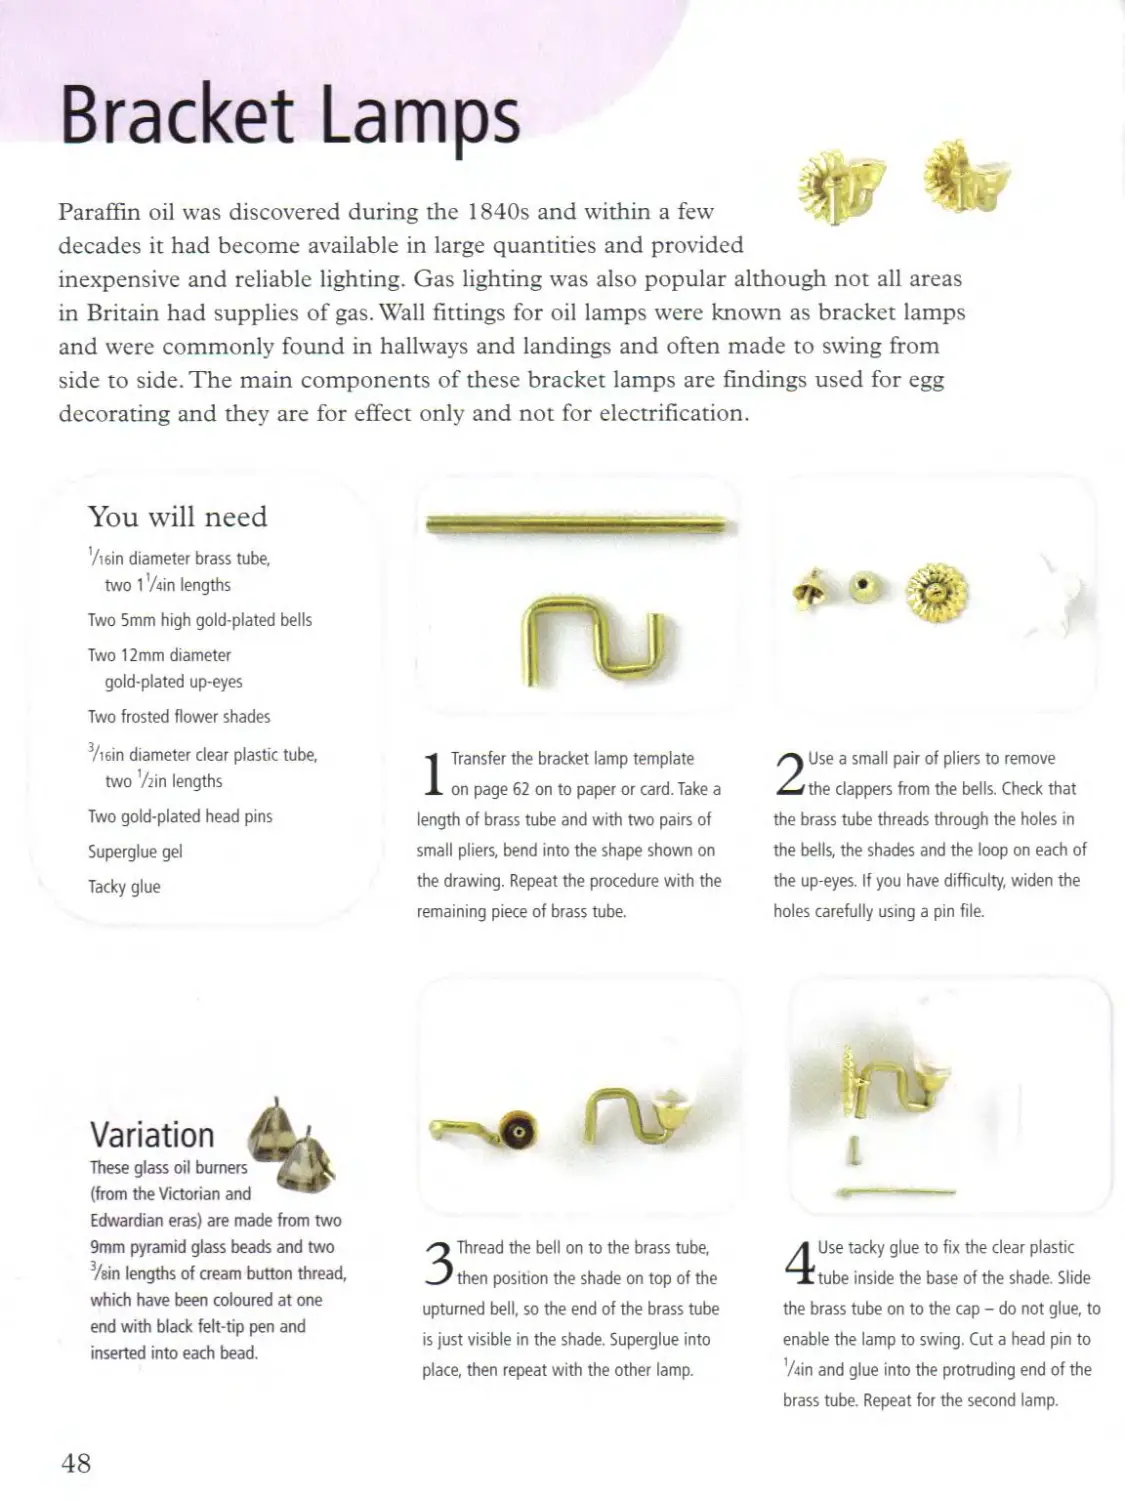
Bracket Lamps 48
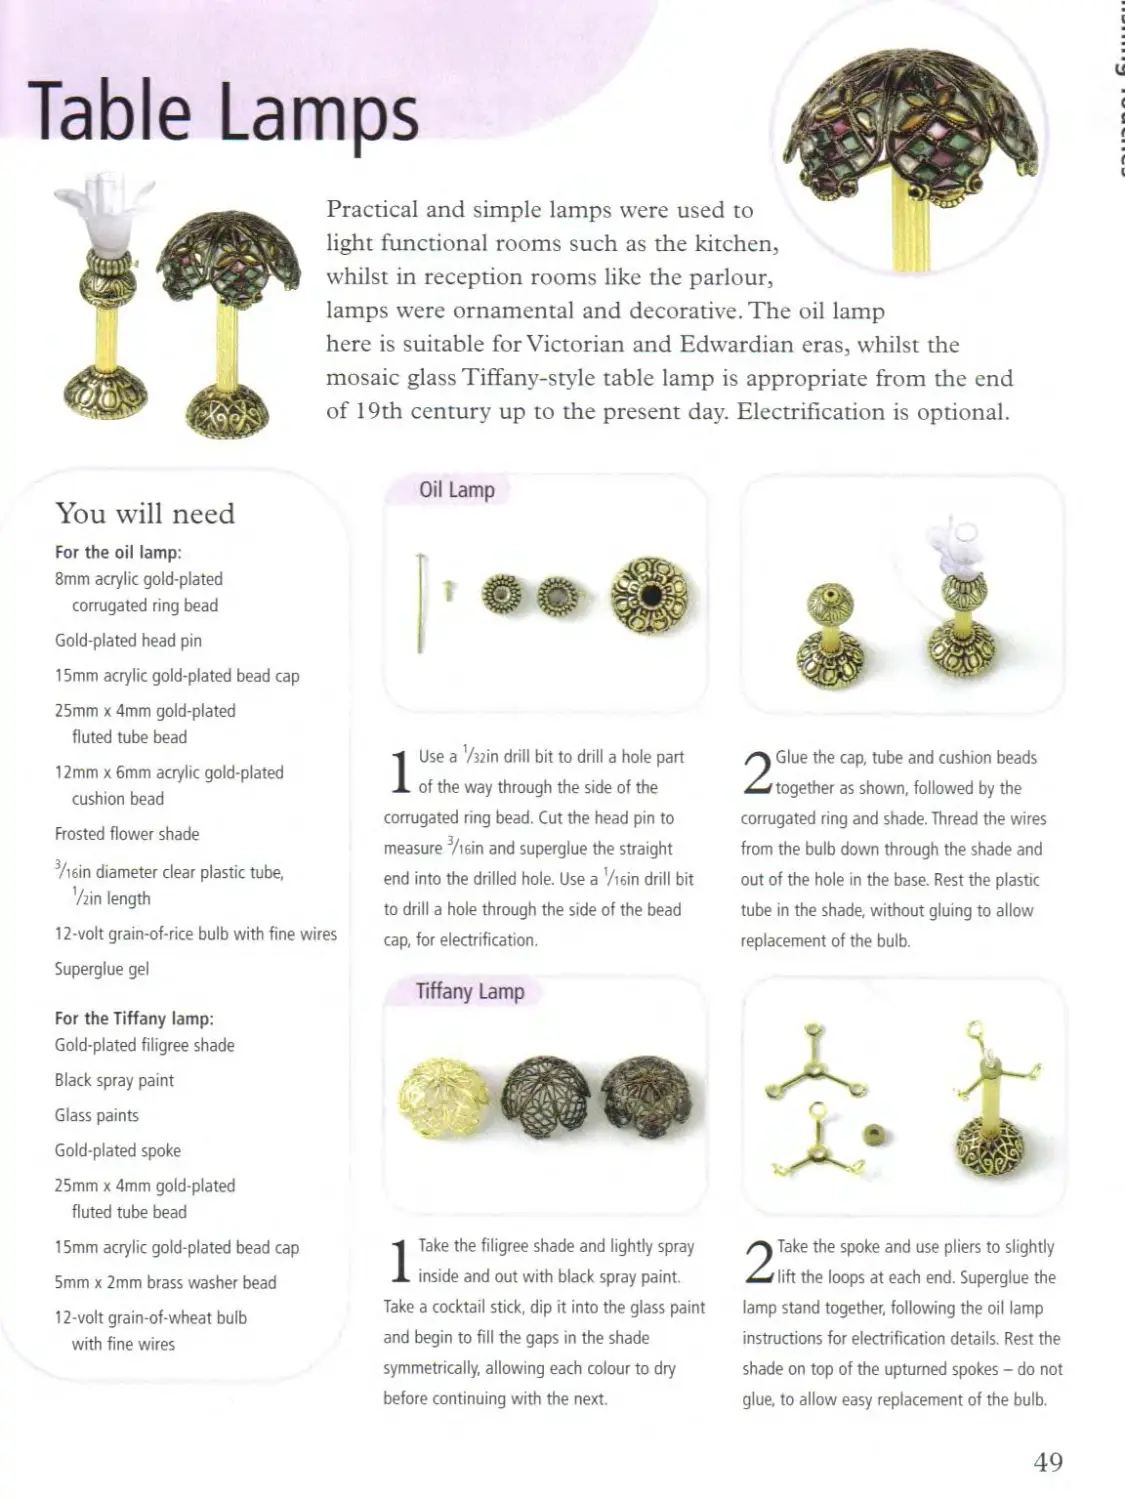
Table Lamps 49
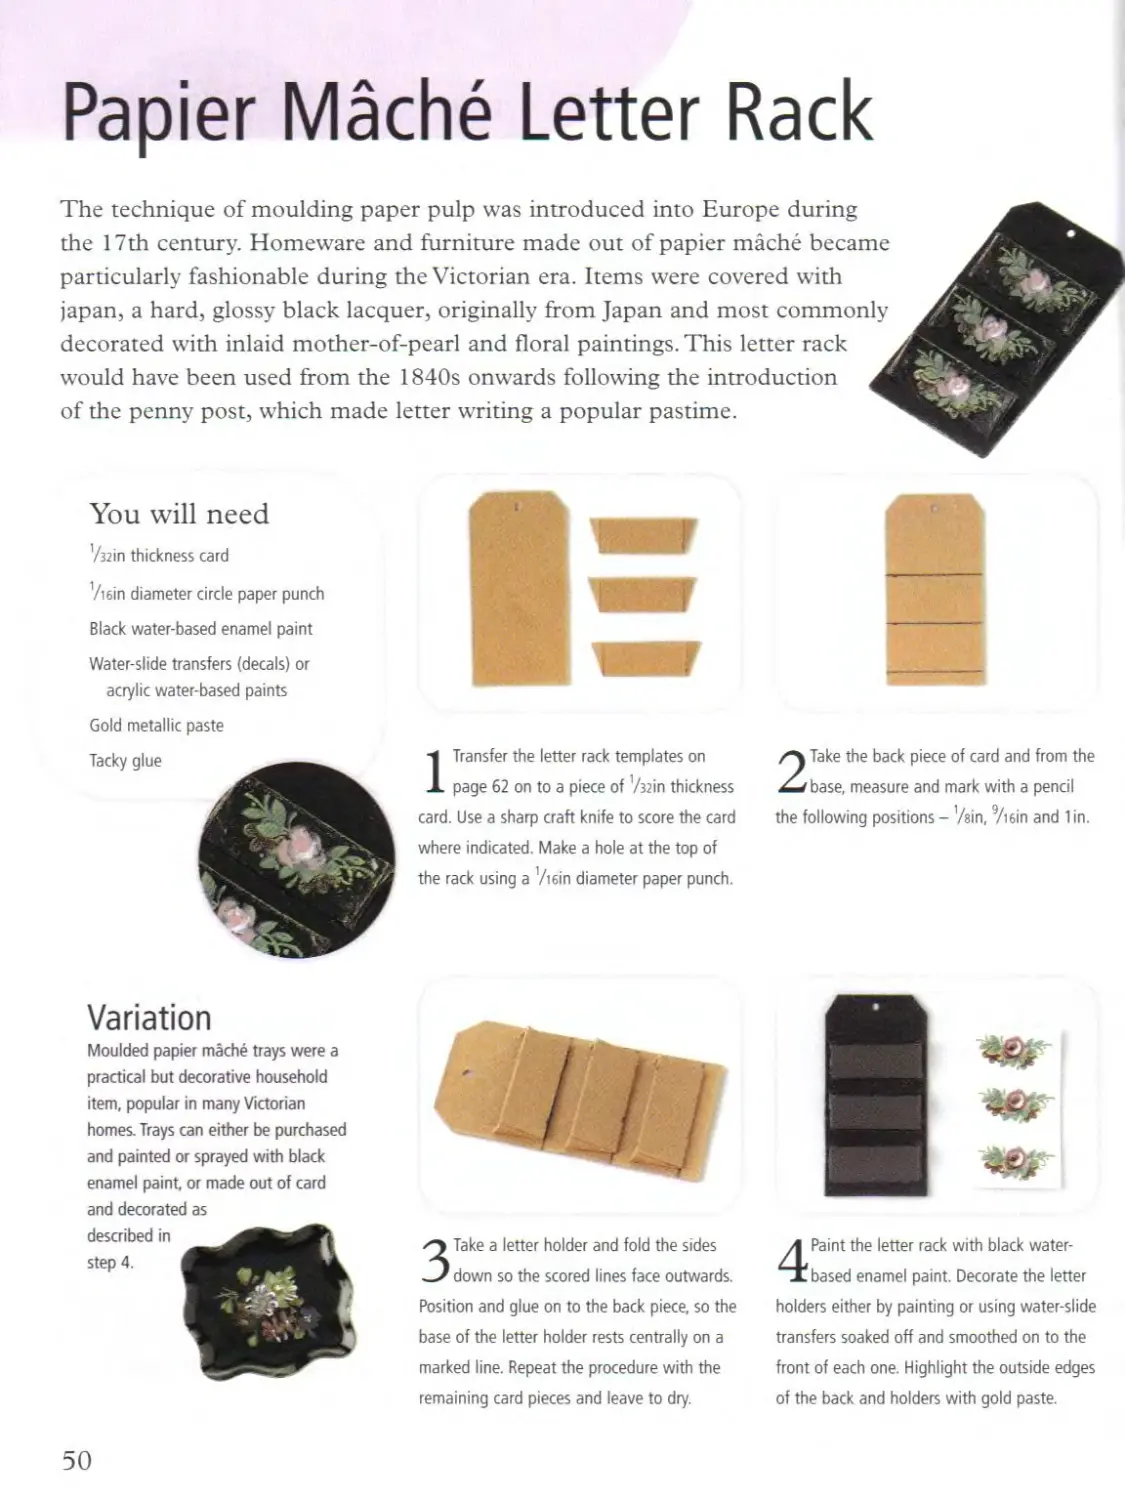
Papier Mache Letter Rack 50
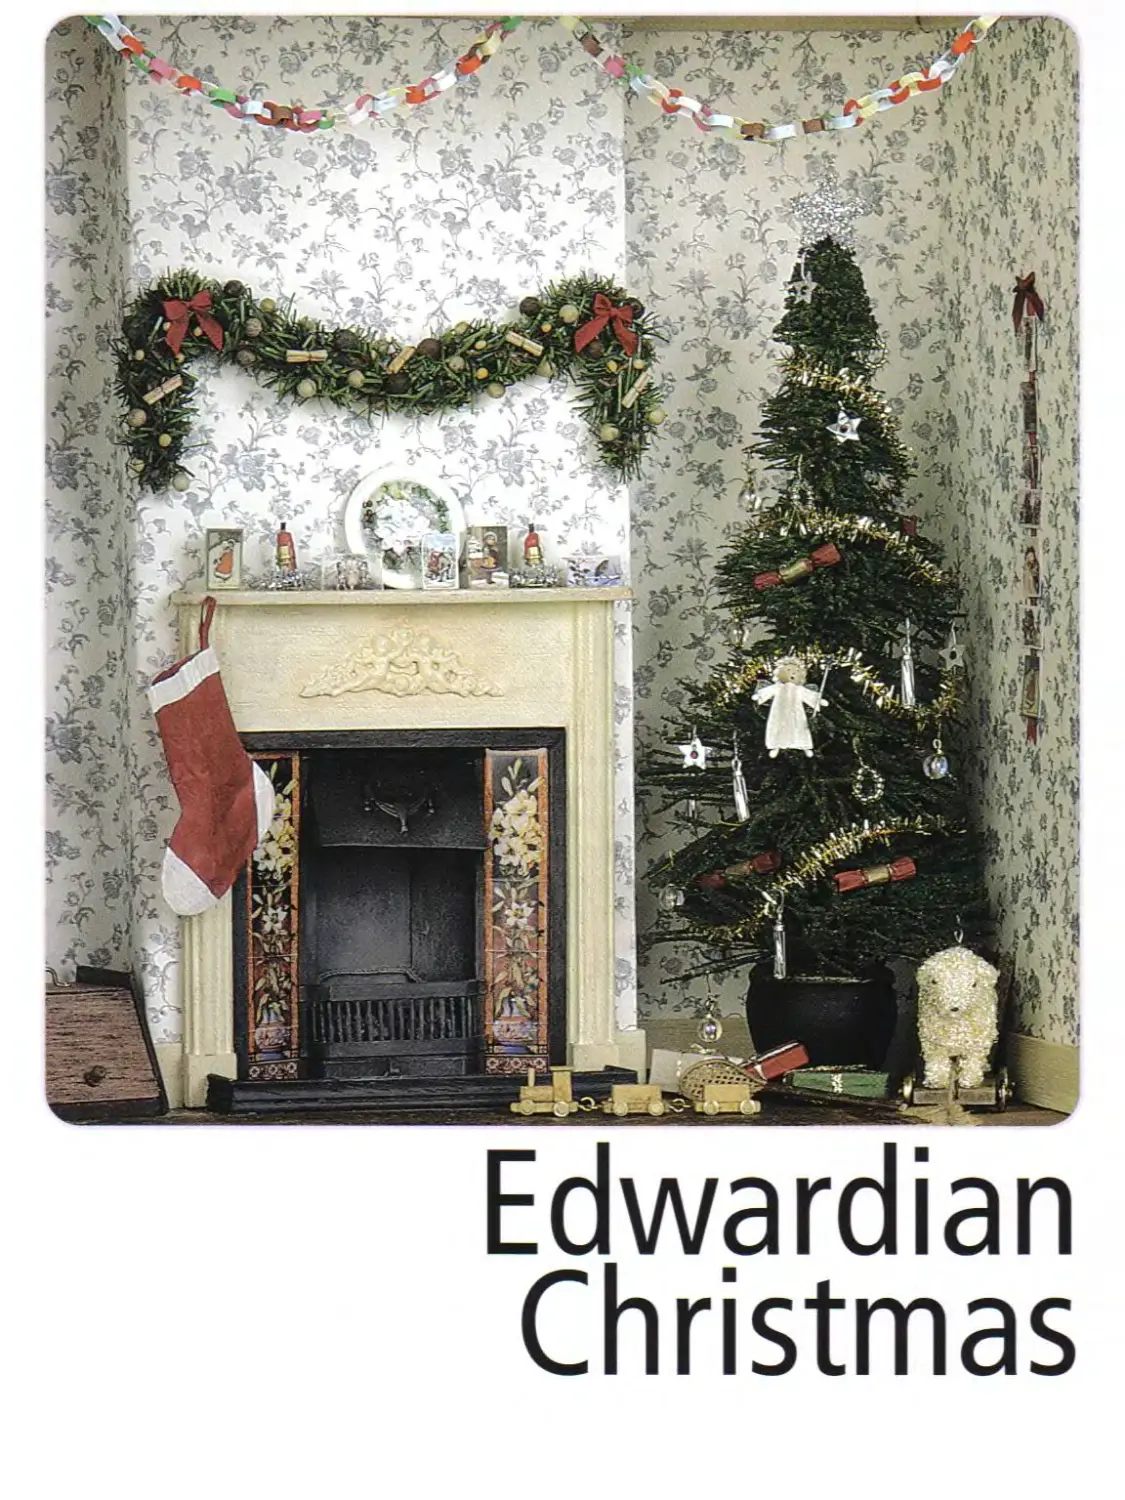
EDWARDIAN CHRISTMAS
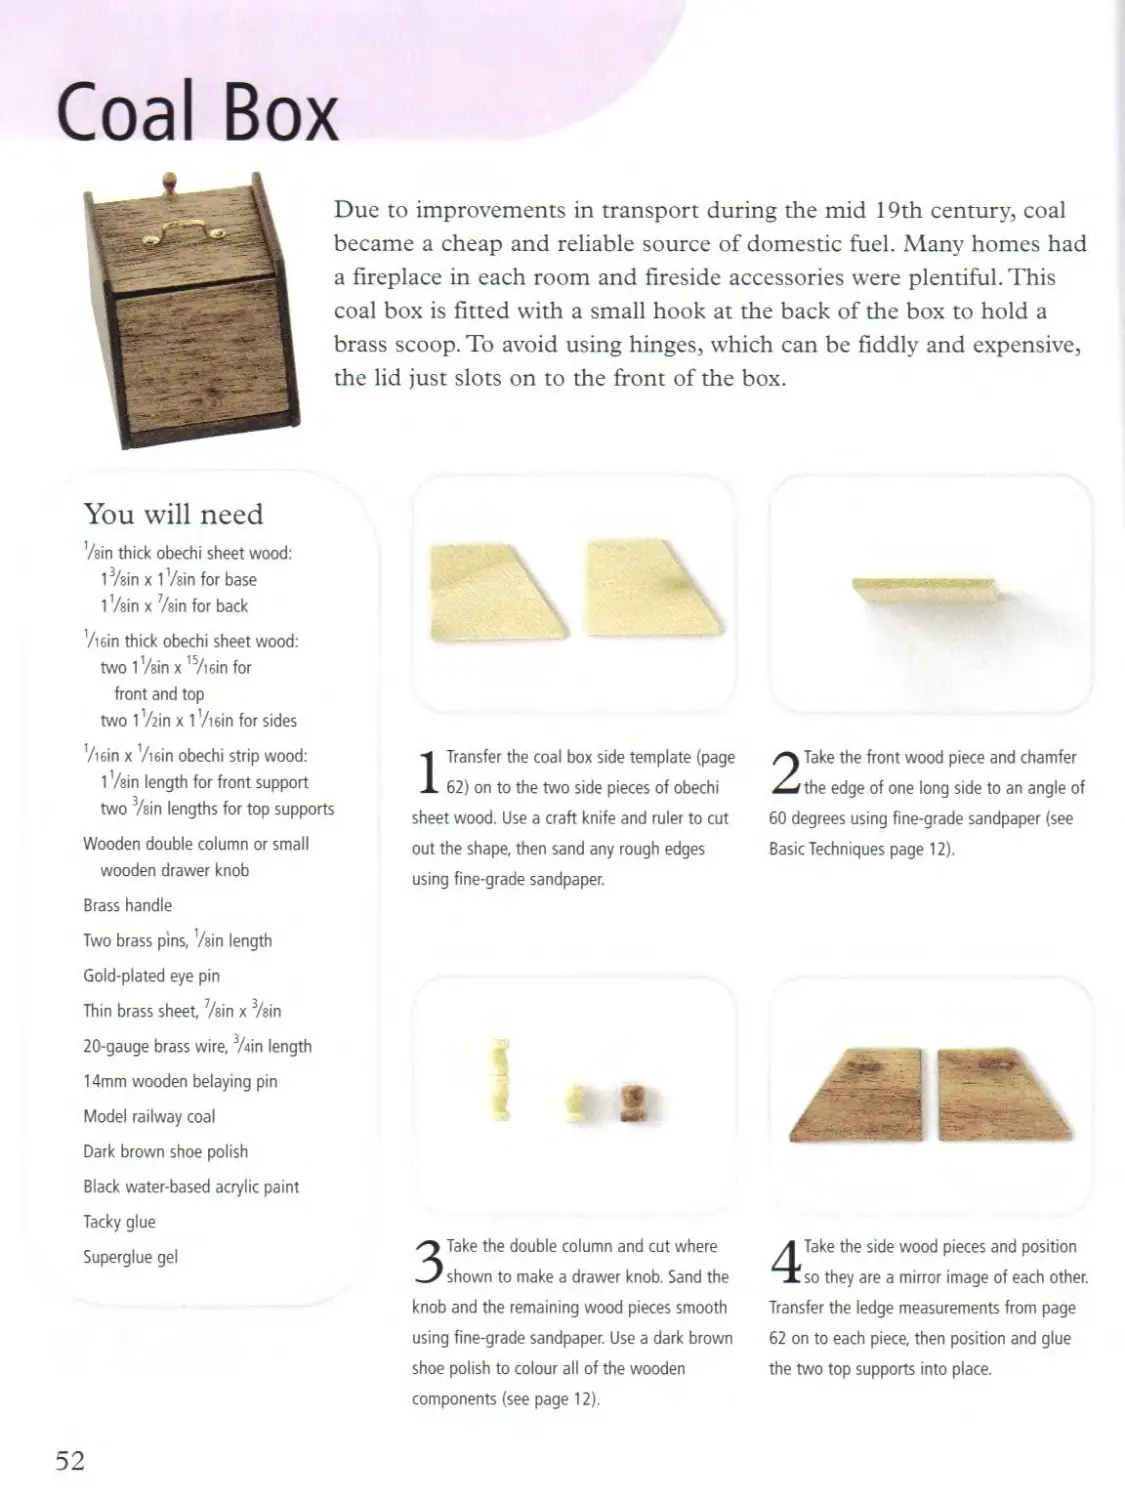
Coal Box 52
Festive Silk Bows 54
Tree Decorations 56
Christmas Fairy 57
Stocking and Presents 58
Home-made Decorations 59
Garland 60
Templates 61
Suppliers 63
About the author
Acknowledgments
Index 64
лэ»
a a
Introduction
*1
I have been making
miniatures now for ten years
and what started as a hobby is
now my part-time job: I sell my
work to collectors and teach
To help you with
this, each project is
introduced with a
short history and
adult education classes on
illustrated variations are
making dolls’ house miniatures.
provided throughout to suggest
This book guides you through
how a project could be adapted
making miniature
ornamental and decorative
interior accessories in
Д one-twelfth scale, through
step-by-step instructions and
photographs (actual
There is a huge range
of projects to make and
\ other periods.
4
size where
Xy possible).
although they have been
grouped by era or style, many
® can be made for inclusion into
to suit another period.
The first chapter visits the
Elizabethan era, from the mid
16th century through to the
beginning of the 17th, a time
that saw prosperous
merchants and
politicians building
homes to display their
wealth, although furniture
and accessories were sparse,
even in the largest homes.
The mid Georgian period
(1760-90) was the age of
6
elegance, introduced by Robert
Adam and his associates who
brought classical elements
of style into
architecture
and interiors.
The ‘country’ look
evolved into a charming, rustic
style particularly popular during
the 19th century. It originated in
rural communities in the homes
of those who weren’t able to
keep up with the latest vogues
and fashions.
The Victorian era (1830-1901)
was a time when piety, moral
issues and the importance of
family life was coupled with a
love of the home. The industrial
revolution gave rise to factories
and mass production,
resulting in affordable
furnishings and
decorative accessories.
♦
The final chapter
focuses on the magic of
Christmas time during
the Edwardian period
(1901-14), when the upper
and expanding middle classes
delighted in filling
their homes with attractive
Christmas decorations.
I hope that you will find my
choice of projects in this book
both stimulating and satisfying.
Whether you are seeking to
add period furniture or stylish
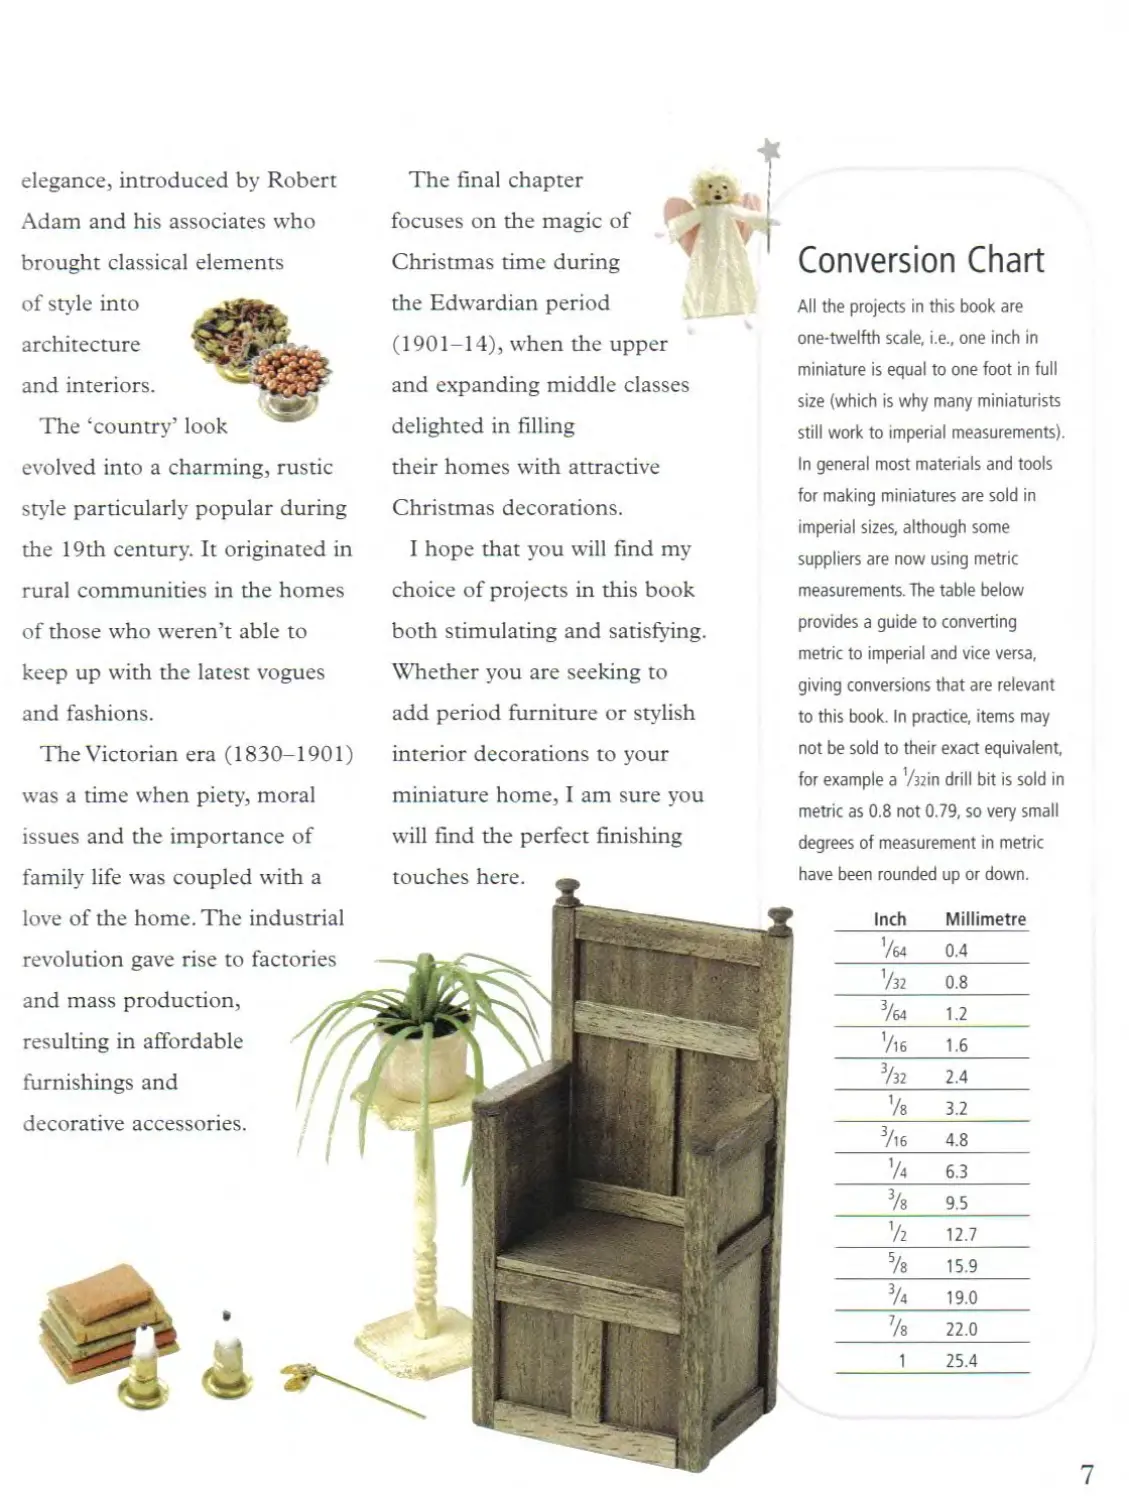
Conversion Chart
All the projects in this book are
one-twelfth scale, i.e., one inch in
miniature is equal to one foot in full
size (which is why many miniaturists
still work to imperial measurements).
In general most materials and tools
for making miniatures are sold in
imperial sizes, although some
suppliers are now using metric
measurements. The table below
provides a guide to converting
metric to imperial and vice versa,
giving conversions that are relevant
to this book. In practice, items may
interior decorations to your
miniature home, I am sure you
will find the perfect finishing
touches here.
not be sold to their exact equivalent,
for example a 'Azin drill bit is sold in
metric as 0.8 not 0.79, so very small
degrees of measurement in metric
have been rounded up or down.
Inch Millimetre
7« 0.4
0.8
7« 1.2
7is 1.6
73! 2.4
'/« 3.2
7» 4.8
?4 6.3
7s 9.5
7z 12.7
7t 15.9
3/4 19.0
7e 22.0
1 25.4
7
Materials and Equipment
This section describes the basic materials and equipment you will need to complete the
projects. They are readily available from craft and model shops but if you have difficulty
in sourcing any of the items refer to Suppliers on page 63. Read through a project before
you begin to ensure you have all the materials and equipment needed.
There is also important safety advice on page 11.
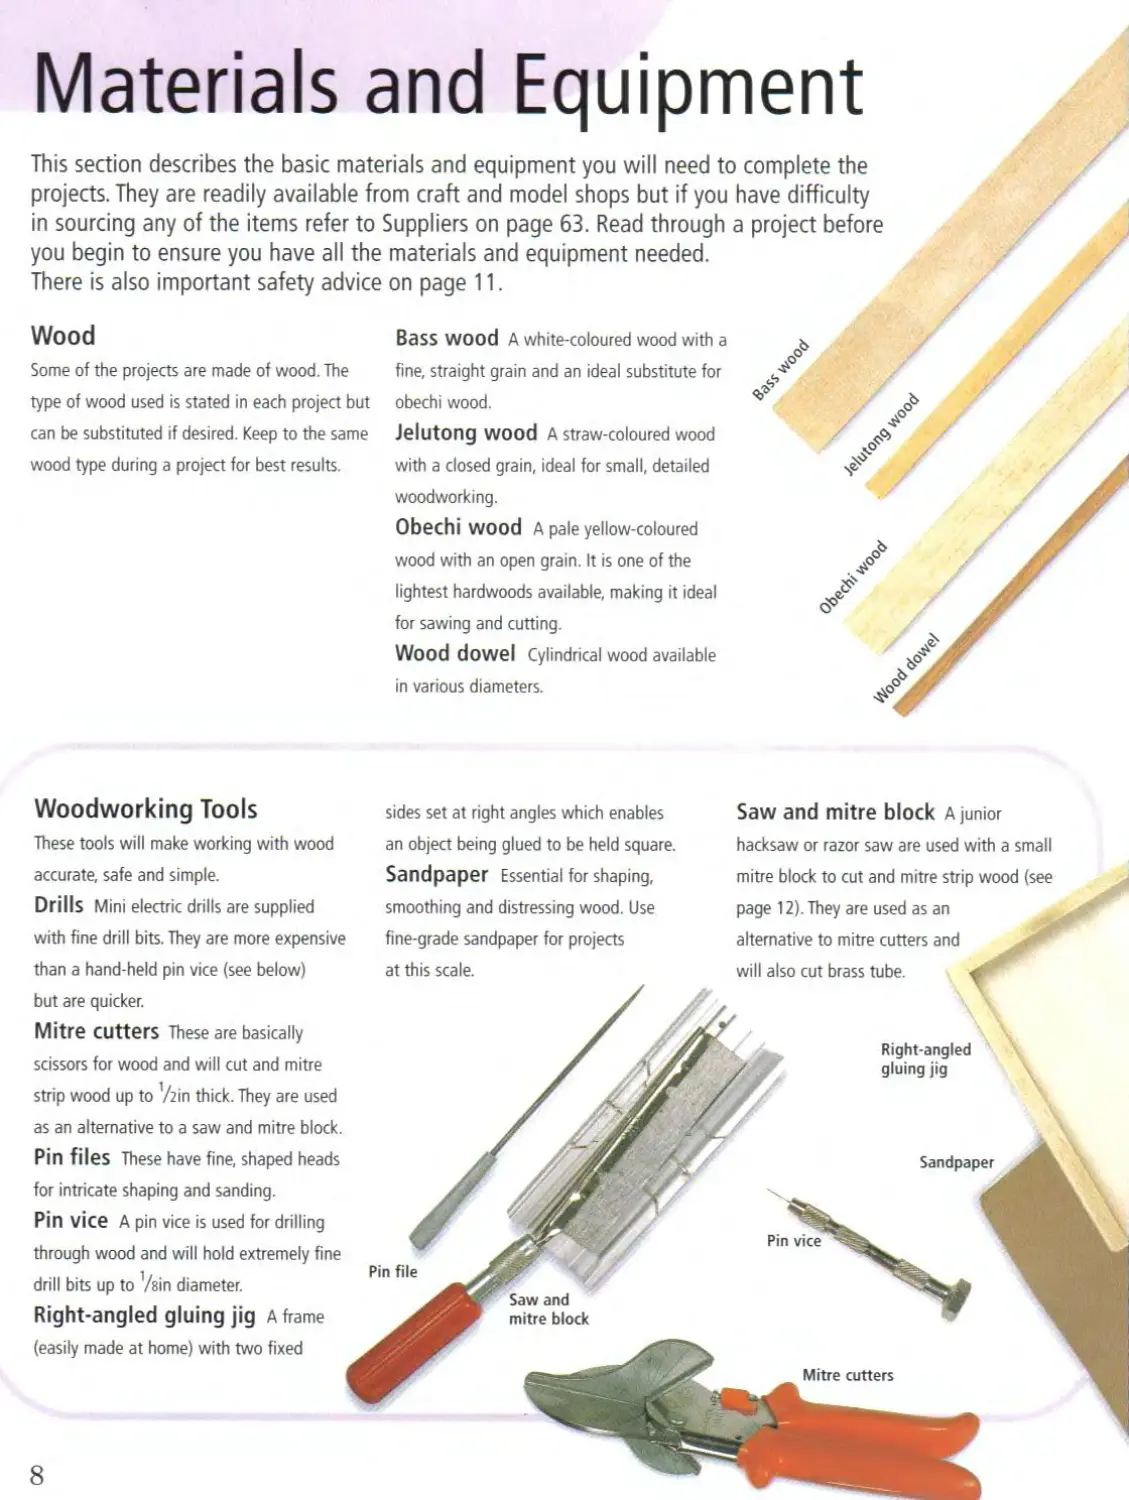
Wood
Some of the projects are made of wood. The
type of wood used is stated in each project but
can be substituted if desired. Keep to the same
wood type during a project for best results.
Bass wood A white-coloured wood with a
fine, straight grain and an ideal substitute for
obechi wood.
Jelutong wood A straw-coloured wood
with a closed grain, ideal for small, detailed
woodworking.
Obechi wood A pale yellow-coloured
wood with an open grain. It is one of the
lightest hardwoods available, making it ideal
for sawing and cutting.
Wood dowel Cylindrical wood available
in various diameters.
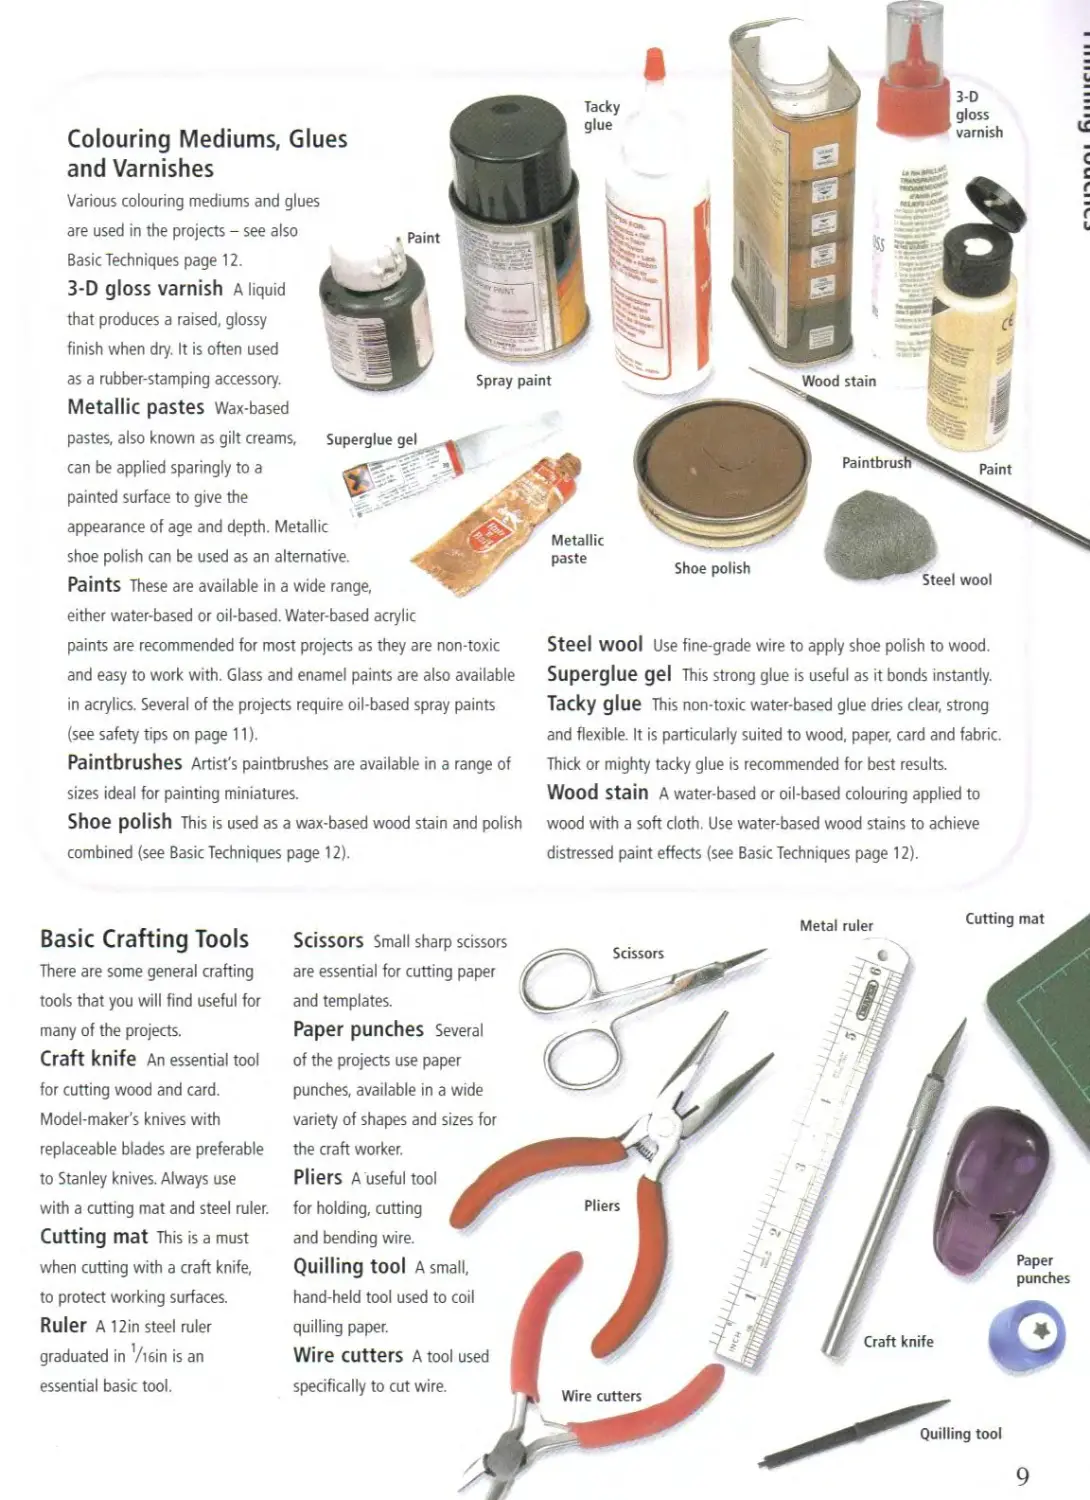
Woodworking Tools
These tools will make working with wood
accurate, safe and simple.
Drills Mini electric drills are supplied
with fine drill bits. They are more expensive
than a hand-held pin vice (see below)
but are quicker.
Mitre cutters These are basically
scissors for wood and will cut and mitre
strip wood up to ’/zin thick. They are used
as an alternative to a saw and mitre block.
Pin files These have fine, shaped heads
for intricate shaping and sanding.
Pin vice A pin vice is used for drilling
through wood and will hold extremely fine
drill bits up to Vein diameter.
Right-angled gluing jig A frame
(easily made at home) with two fixed
sides set at right angles which enables
an object being glued to be held square.
Sandpaper Essential for shaping,
smoothing and distressing wood. Use
fine-grade sandpaper for projects
at this scale.
Saw and mitre block A junior
hacksaw or razor saw are used with a small
mitre block to cut and mitre strip wood (see
page 12). They are used as an
alternative to mitre cutters and
will also cut brass tube. +
8
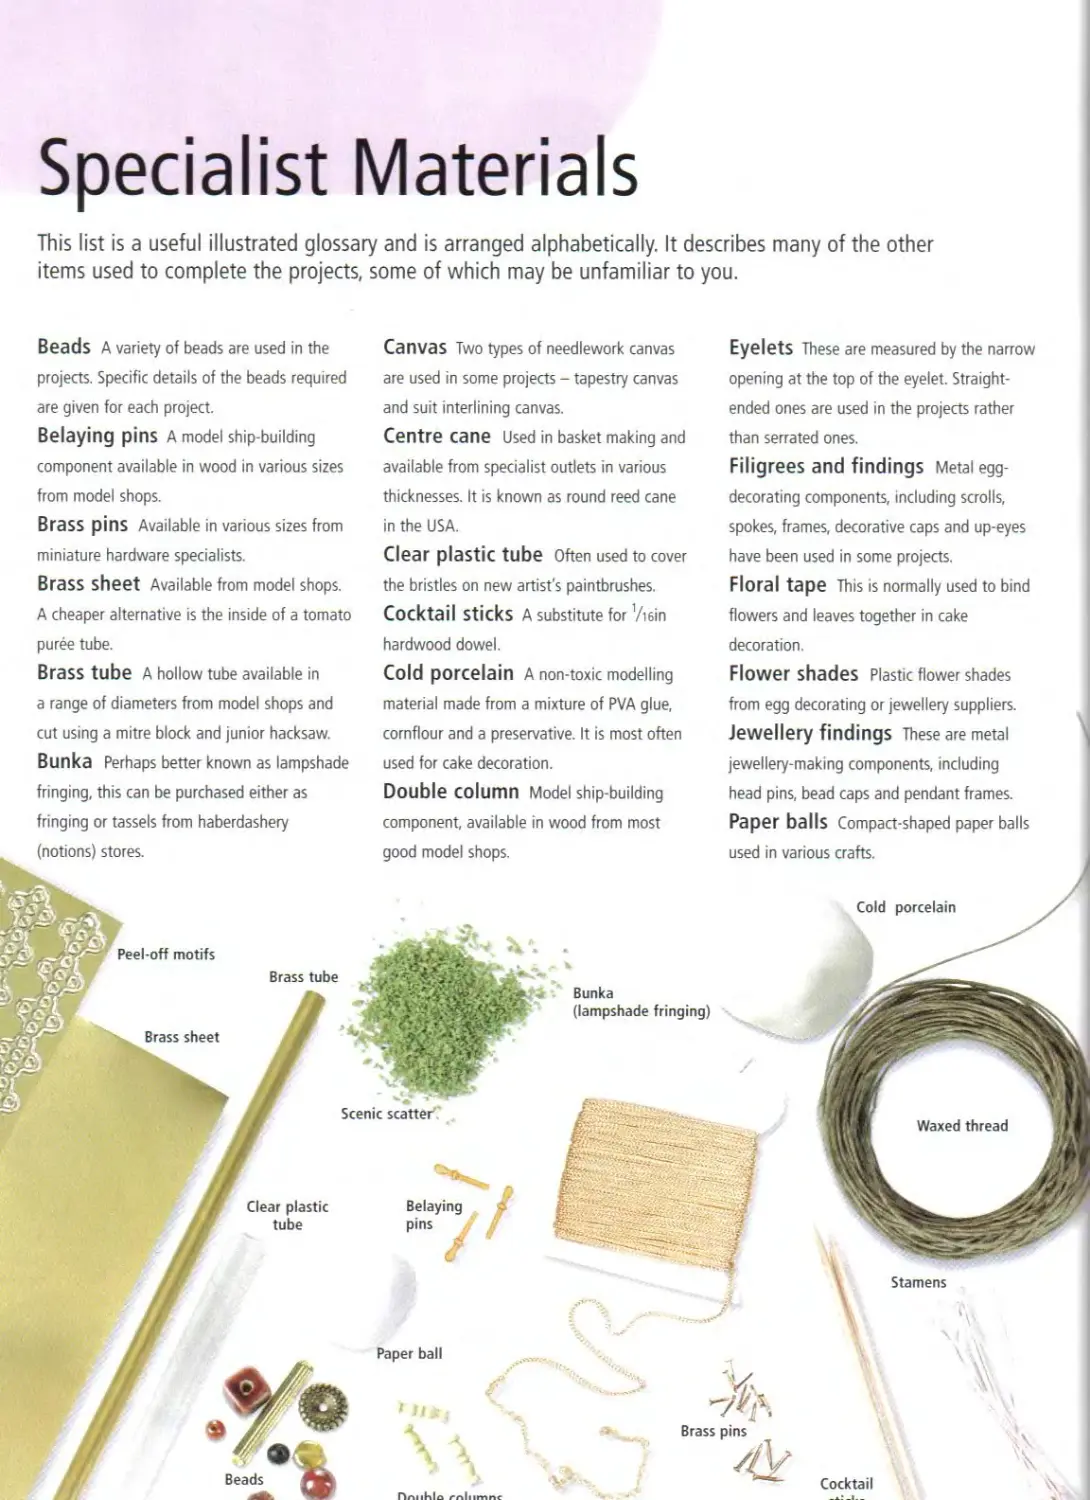
Colouring Mediums, Glues
and Varnishes
Various colouring mediums and glues
are used in the projects - see also
Basic Techniques page 12.
3-D gloss varnish A liquid
that produces a raised, glossy
finish when dry. It is often used
as a rubber-stamping accessory.
Metallic pastes Wax-based
pastes, also known as gilt creams,
can be applied sparingly to a
painted surface to give the
appearance of age and depth. Metallic
shoe polish can be used as an alternative.
Paints These are available in a wide range,
either water-based or oil-based. Water-based acrylic
paints are recommended for most projects as they are non-toxic
and easy to work with. Glass and enamel paints are also available
in acrylics. Several of the projects require oil-based spray paints
(see safety tips on page 11).
Paintbrushes Artist's paintbrushes are available in a range of
sizes ideal for painting miniatures.
Shoe polish This is used as a wax-based wood stain and polish
combined (see Basic Techniques page 12).
Steel wool Use fine-grade wire to apply shoe polish to wood.
Superglue gel This strong glue is useful as it bonds instantly.
Tacky glue This non-toxic water-based glue dries clear, strong
and flexible. It is particularly suited to wood, paper, card and fabric.
Thick or mighty tacky glue is recommended for best results.
Wood Stain A water-based or oil-based colouring applied to
wood with a soft cloth. Use water-based wood stains to achieve
distressed paint effects (see Basic Techniques page 12).
Basic Crafting Tools
There are some general crafting
tools that you will find useful for
many of the projects.
Craft knife An essential tool
for cutting wood and card.
Model-maker's knives with
replaceable blades are preferable
to Stanley knives. Always use
with a cutting mat and steel ruler.
Cutting mat This is a must
when cutting with a craft knife,
to protect working surfaces.
Ruler A 12in steel ruler
graduated in ’/i6in is an
essential basic tool.
Scissors Small sharp scissors
are essential for cutting paper
and templates.
Paper punches Several
of the projects use paper
punches, available in a wide
variety of shapes and sizes for
the craft worker.
Pliers A useful tool
for holding, cutting
and bending wire.
Quilling tool A small,
hand-held tool used to coil
quilling paper.
Wire cutters A tool used
specifically to cut wire.
Quilling tool
9
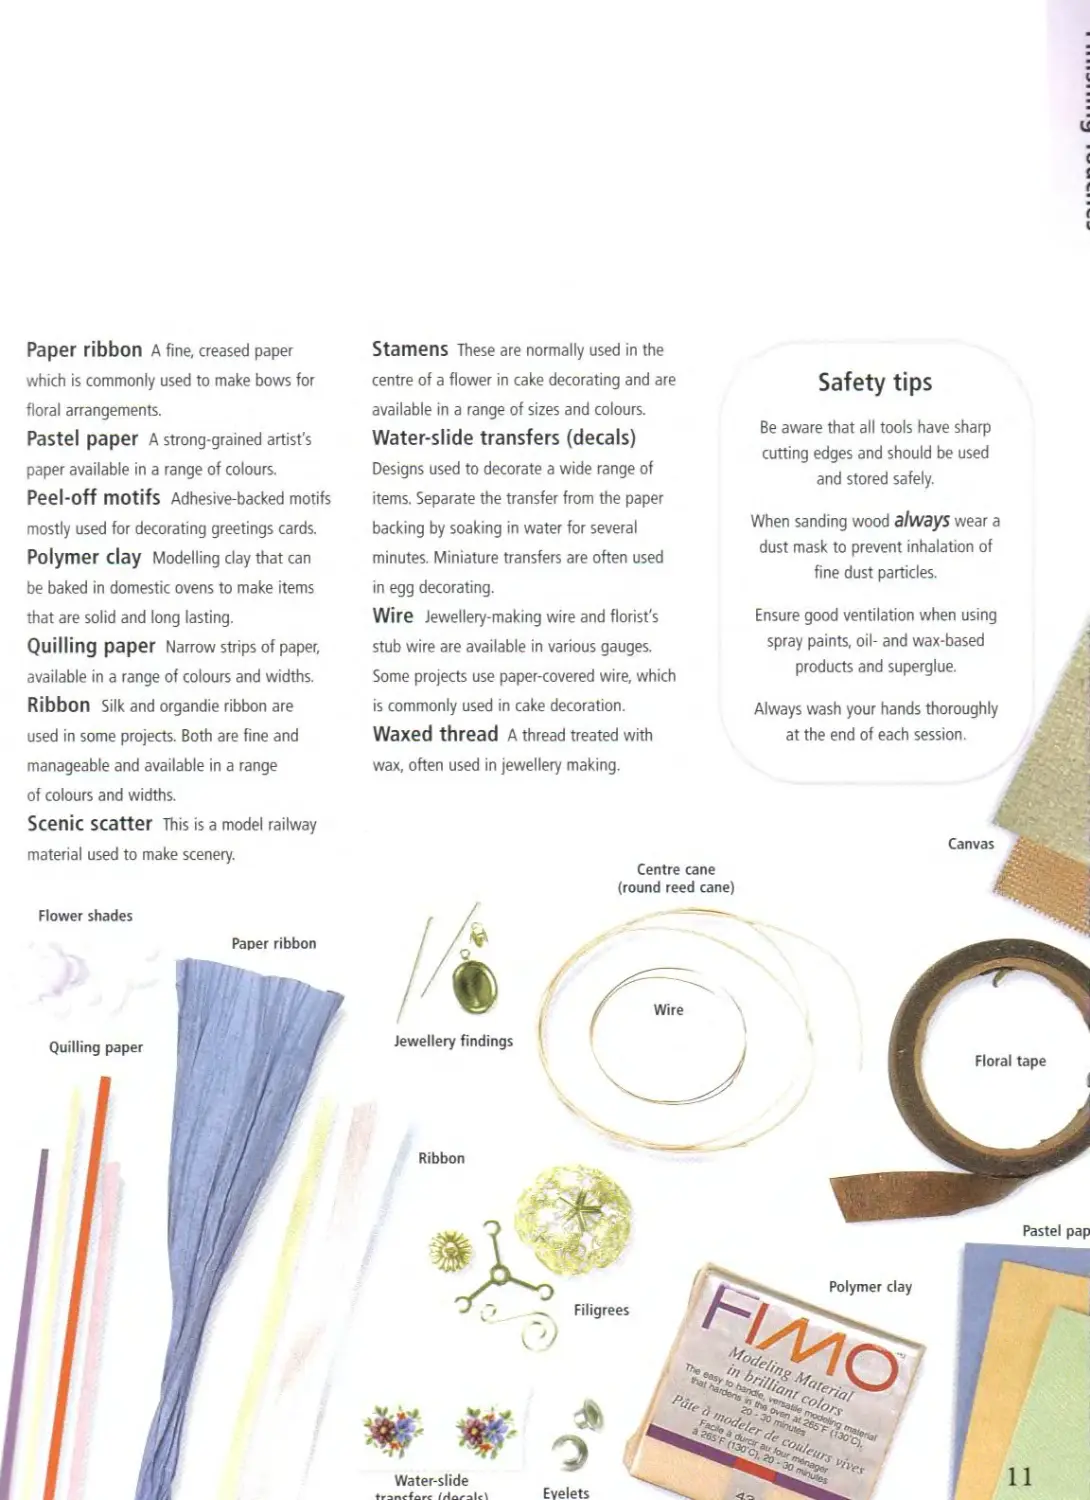
Specialist Materials
This list is a useful illustrated glossary and is arranged alphabetically. It describes many of the other
items used to complete the projects, some of which may be unfamiliar to you.
Beads A variety of beads are used in the
projects. Specific details of the beads required
are given for each project.
Belaying pins A model ship building
component available in wood in various sizes
from model shops.
Brass pins Available in various sizes from
miniature hardware specialists.
Brass sheet Available from model shops.
A cheaper alternative is the inside of a tomato
puree tube.
Brass tube A hollow tube available in
a range of diameters from model shops and
cut using a mitre block and junior hacksaw.
Bunka Perhaps better known as lampshade
fringing, this can be purchased either as
fringing or tassels from haberdashery
Canvas Two types of needlework canvas
are used in some projects - tapestry canvas
and suit interlining canvas.
Centre cane Used in basket making and
available from specialist outlets in various
thicknesses. It is known as round reed cane
in the USA.
Clear plastic tube Often used to cover
the bristles on new artist's paintbrushes.
Cocktail sticks A substitute for Viein
hardwood dowel.
Cold porcelain A non-toxic modelling
material made from a mixture of PVA glue,
cornflour and a preservative. It is most often
used for cake decoration.
Double column Model ship-building
component available in wood from most
Eyelets These are measured by the narrow
opening at the top of the eyelet. Straight-
ended ones are used in the projects rather
than serrated ones.
Filigrees and findings Metal egg-
decorating components, including scrolls,
spokes, frames, decorative caps and up-eyes
have been used in some projects.
Floral tape This is normally used to bind
flowers and leaves together in cake
decoration.
Flower shades Plastic flower shades
from egg decorating or jewellery suppliers.
Jewellery findings These are metal
jewellery-making components, including
head pins, bead caps and pendant frames.
Paper balls Compact-shaped paper balls
Paper ribbon A fine, creased paper
which is commonly used to make bows for
floral arrangements.
Pastel paper A strong-grained artist's
paper available in a range of colours.
Peel-off motifs Adhesive-backed motifs
mostly used for decorating greetings cards.
Polymer clay Modelling day that can
be baked in domestic ovens to make items
that are solid and long lasting.
Quilling paper Narrow strips of paper,
available in a range of colours and widths.
Ribbon Silk and organdie ribbon are
used in some projects. Both are fine and
manageable and available in a range
of colours and widths.
Scenic scatter This is a model railway
material used to make scenery.
Flower shades
Stamens These are normally used in the
centre of a flower in cake decorating and are
available in a range of sizes and colours.
Water-slide transfers (decals)
Designs used to decorate a wide range of
items. Separate the transfer from the paper
backing by soaking in water for several
minutes. Miniature transfers are often used
in egg decorating.
Wire Jewellery-making wire and florist's
stub wire are available in various gauges.
Some projects use paper-covered wire, which
is commonly used in cake decoration.
Waxed thread a thread treated with
wax, often used in jewellery making.
Safety tips
Be aware that all tools have sharp
cutting edges and should be used
and stored safely.
When sanding wood always wear a
dust mask to prevent inhalation of
fine dust particles.
Ensure good ventilation when using
spray paints, oil- and wax-based
products and superglue.
Always wash your hands thoroughly
at the end of each session.
Basic Techniques
This section covers the commonly used basic techniques required to make the projects
in this book and should be referred to when necessary.
Using Colouring Mediums
The projects use various colouring mediums,
including water-based acrylic paints, shoe
polish and wood stain.
Paints Apply acrylic water-based paints with
an artist's paintbrush: medium (approx, size 6)
and fine (approx, size 000) are needed for
some projects. Several of the projects use
oil-based spray or enamel paints; follow the
manufacturer's safety instructions when using
these products.
Shoe polish Apply shoe polish to wood
using fine-gauge wire wool and buff up to a
sheen with clean wire wool or a cloth. Avoid
using polish on edges to be glued, as the bond
will not be as strong.
Wood Stain Apply wood stain to wood
using a soft cloth and use sparingly as too
much can warp the wood. Stain parts before
assembly, allowing them to dry completely.
Distressing Techniques
A distressing technique is used to imitate age
and wear and tear to a surface. Wood in
particular responds well to such treatments.
Make up the project following the
instructions and paint with water-based acrylic
paint. Sand the item in places where natural
wear and tear would occur, to reveal the
wood. Cover the whole article with a light
water-based wood stain such as antique pine
or medium oak. Remove the stain from the
wood in accessible areas with a damp cloth.
The stain will settle in the cracks and colour
the bare wood, mimicing worn paint and grime.
Use water-based wood stain and shoe polish
sparingly to achieve aged finishes on other
materials, such as paper, card and fabric.
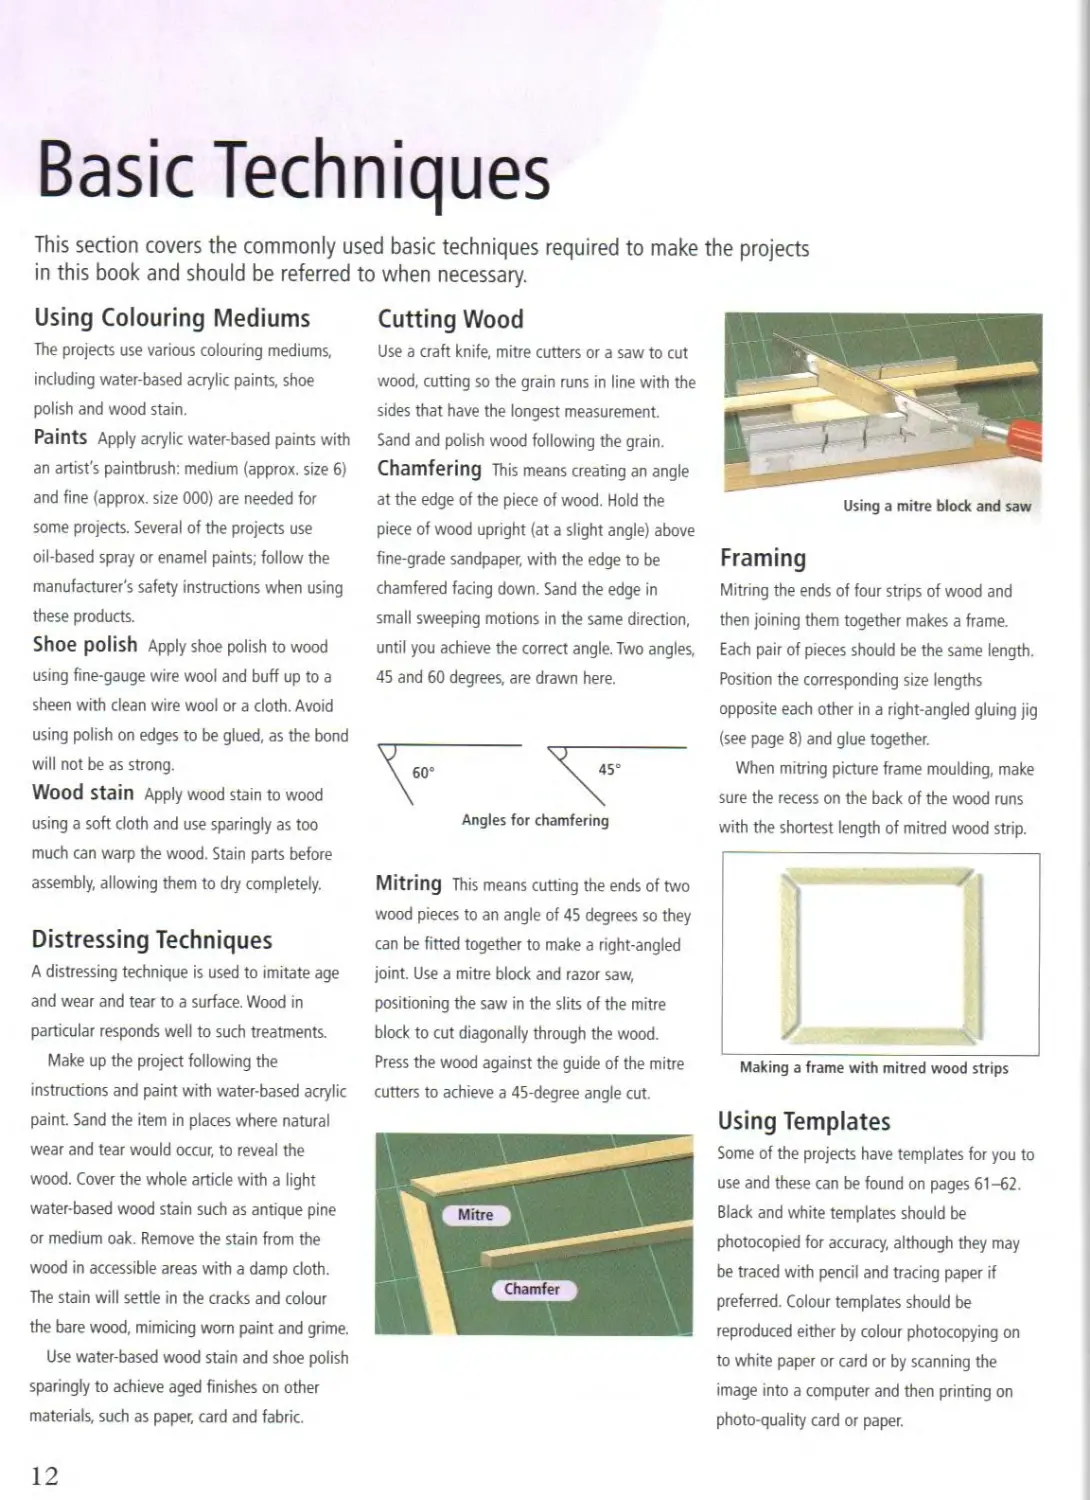
Cutting Wood
Use a craft knife, mitre cutters or a saw to cut
wood, cutting so the grain runs in line with the
sides that have the longest measurement.
Sand and polish wood following the grain.
Chamfering This means creating an angle
at the edge of the piece of wood. Hold the
piece of wood upright (at a slight angle) above
fine-grade sandpaper, with the edge to be
chamfered facing down. Sand the edge in
small sweeping motions in the same direction,
until you achieve the correct angle. Two angles,
45 and 60 degrees, are drawn here.
Mitring This means cutting the ends of two
wood pieces to an angle of 45 degrees so they
can be fitted together to make a right-angled
joint. Use a mitre block and razor saw,
positioning the saw in the slits of the mitre
block to cut diagonally through the wood.
Press the wood against the guide of the mitre
cutters to achieve a 45-degree angle cut.
Using a mitre block and saw
Framing
Mitring the ends of four strips of wood and
then joining them together makes a frame.
Each pair of pieces should be the same length.
Position the corresponding size lengths
opposite each other in a right-angled gluing jig
(see page 8) and glue together.
When mitring picture frame moulding, make
sure the recess on the back of the wood runs
with the shortest length of mitred wood strip.
Making a frame with mitred wood strips
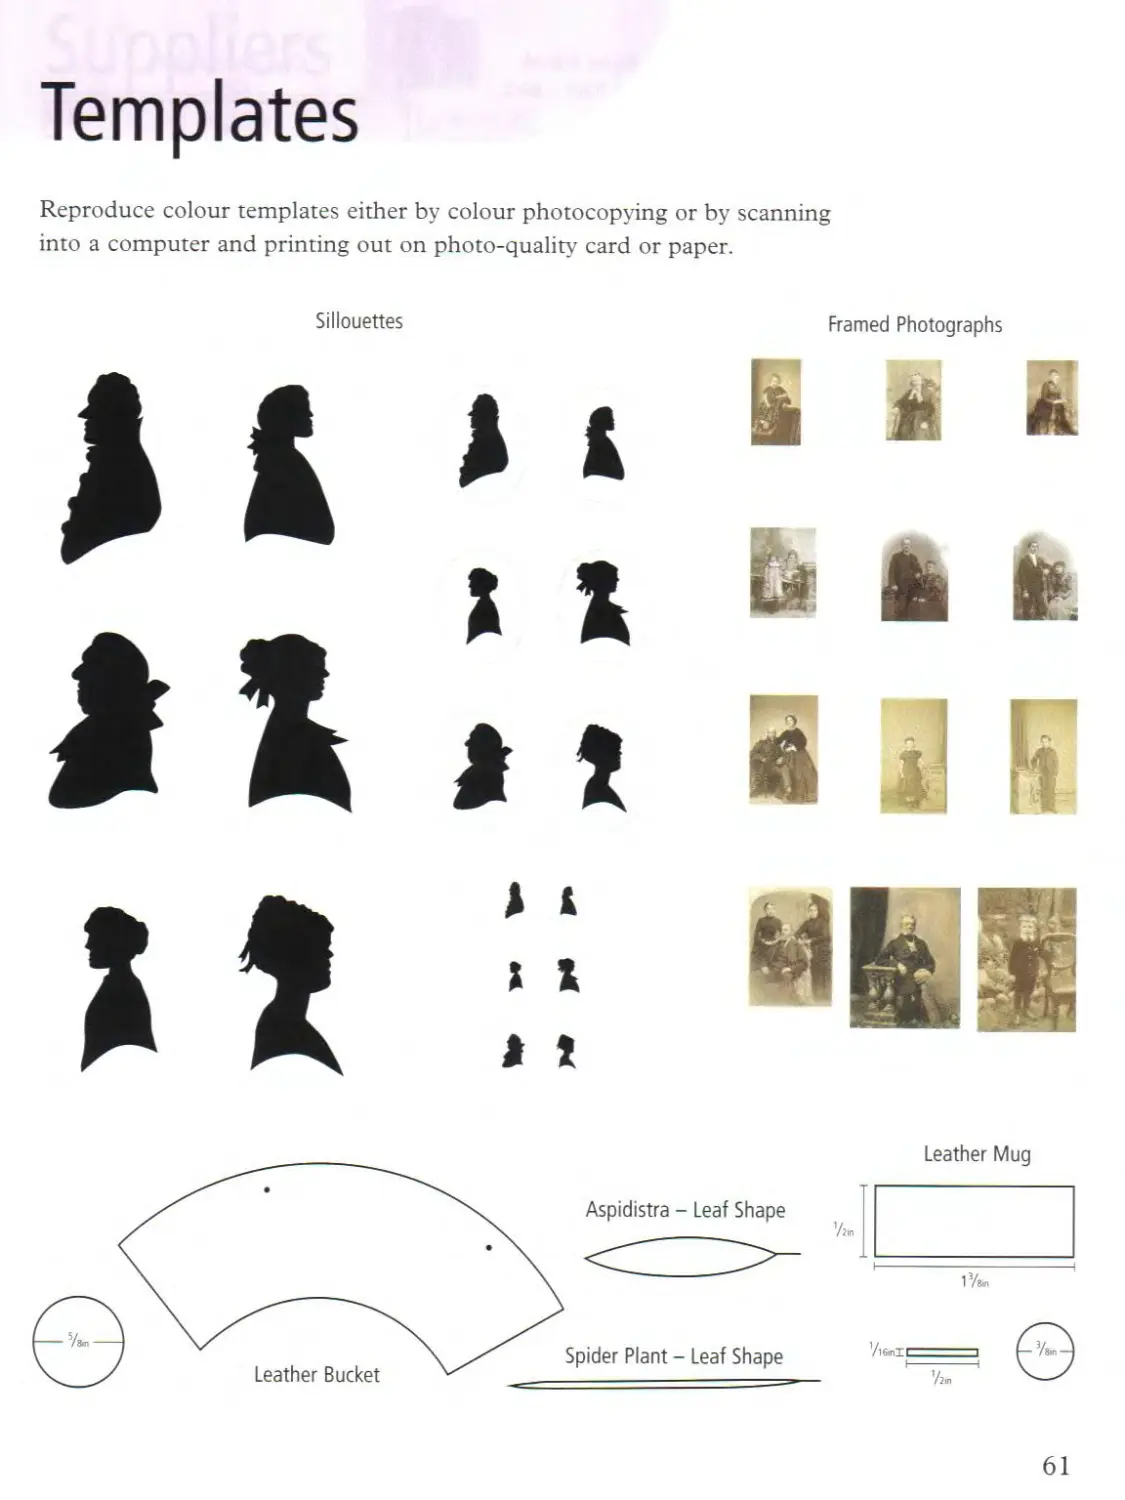
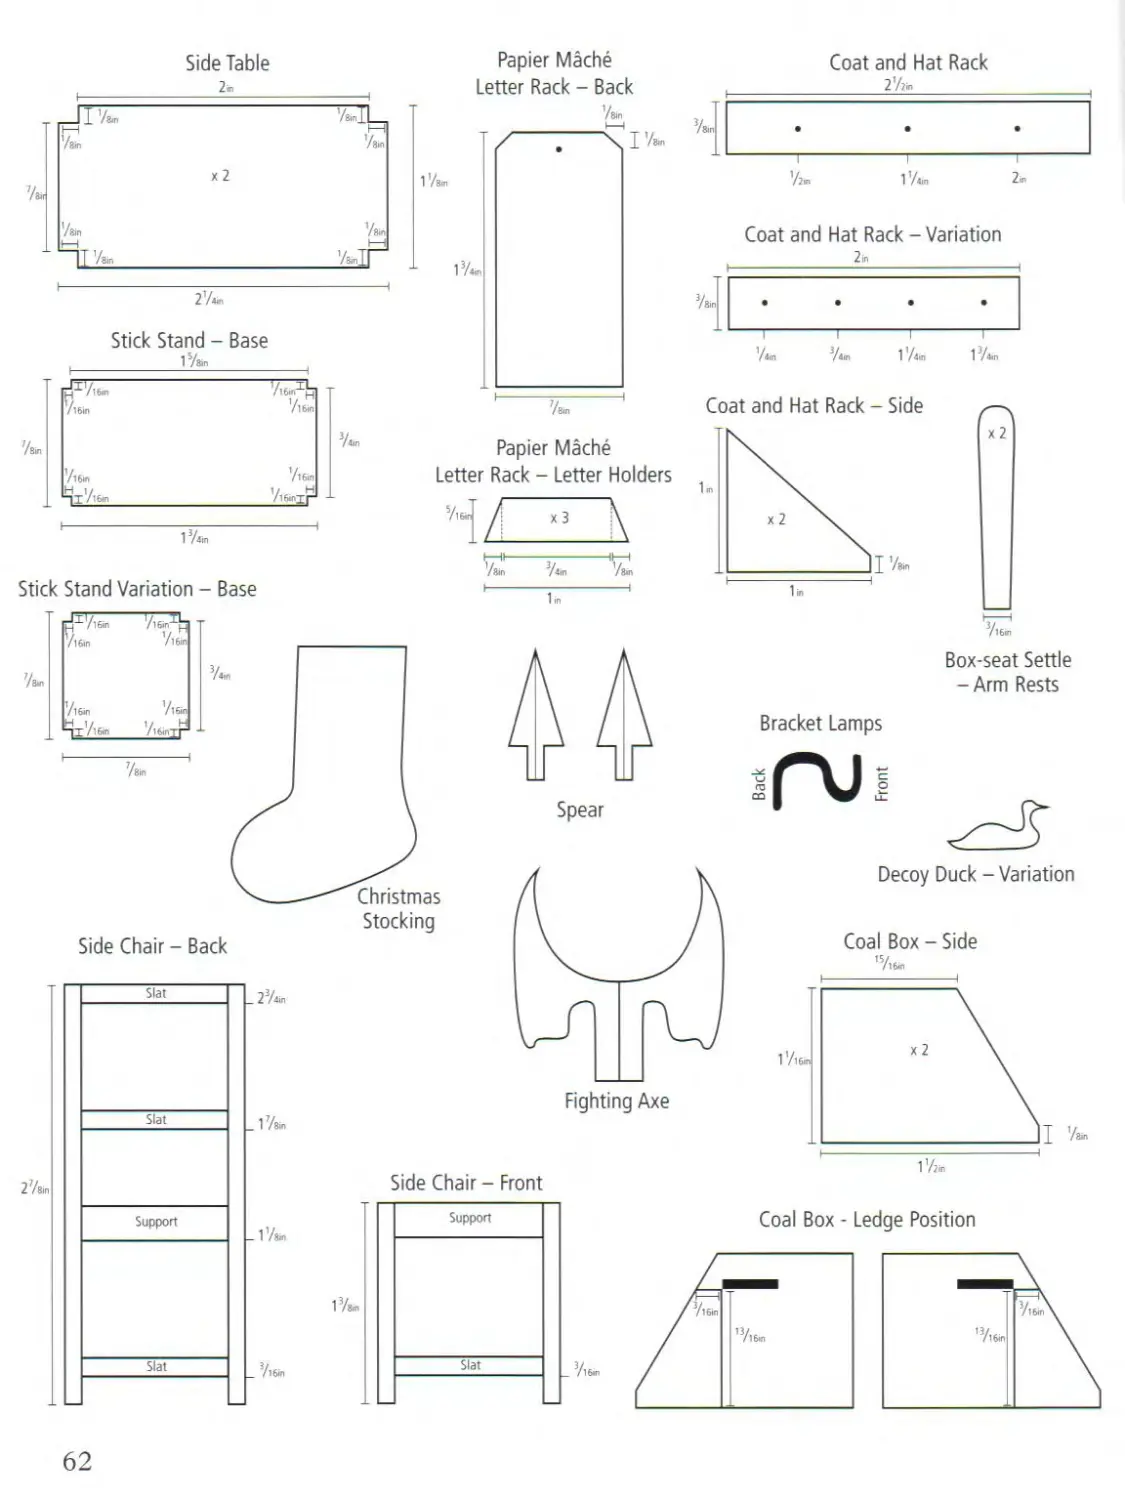
Using Templates
Some of the projects have templates for you to
use and these can be found on pages 61-62.
Black and white templates should be
photocopied for accuracy, although they may
be traced with pencil and tracing paper if
preferred. Colour templates should be
reproduced either by colour photocopying on
to white paper or card or by scanning the
image into a computer and then printing on
photo-quality card or paper.
12
Tudor Times
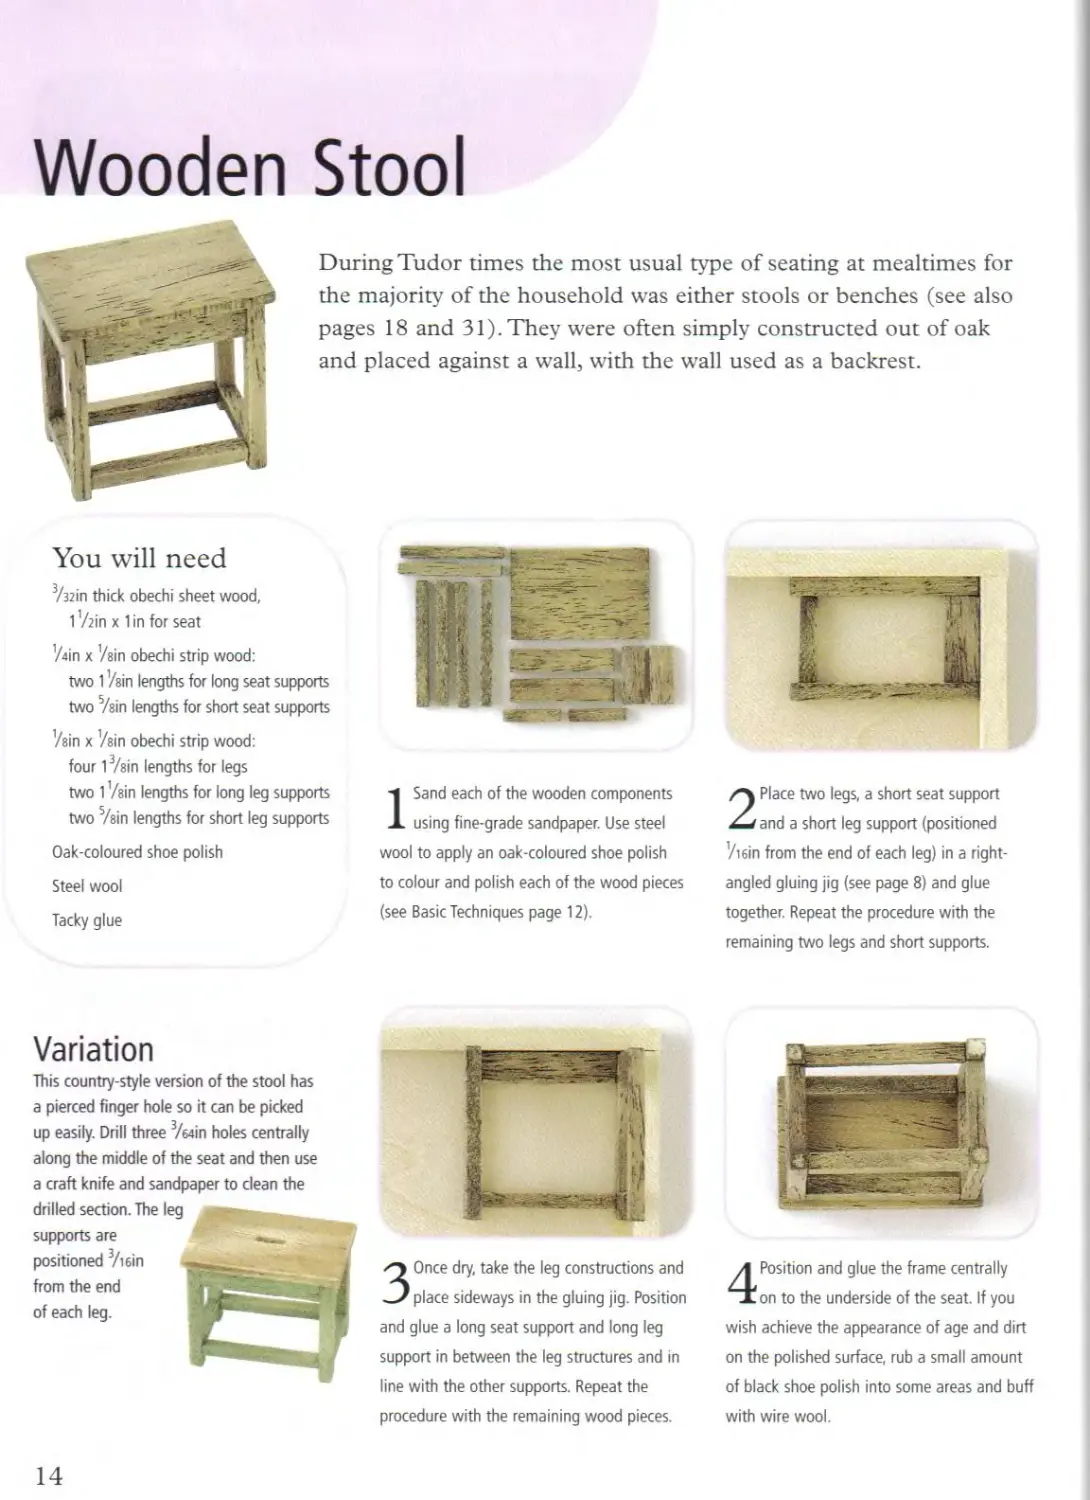
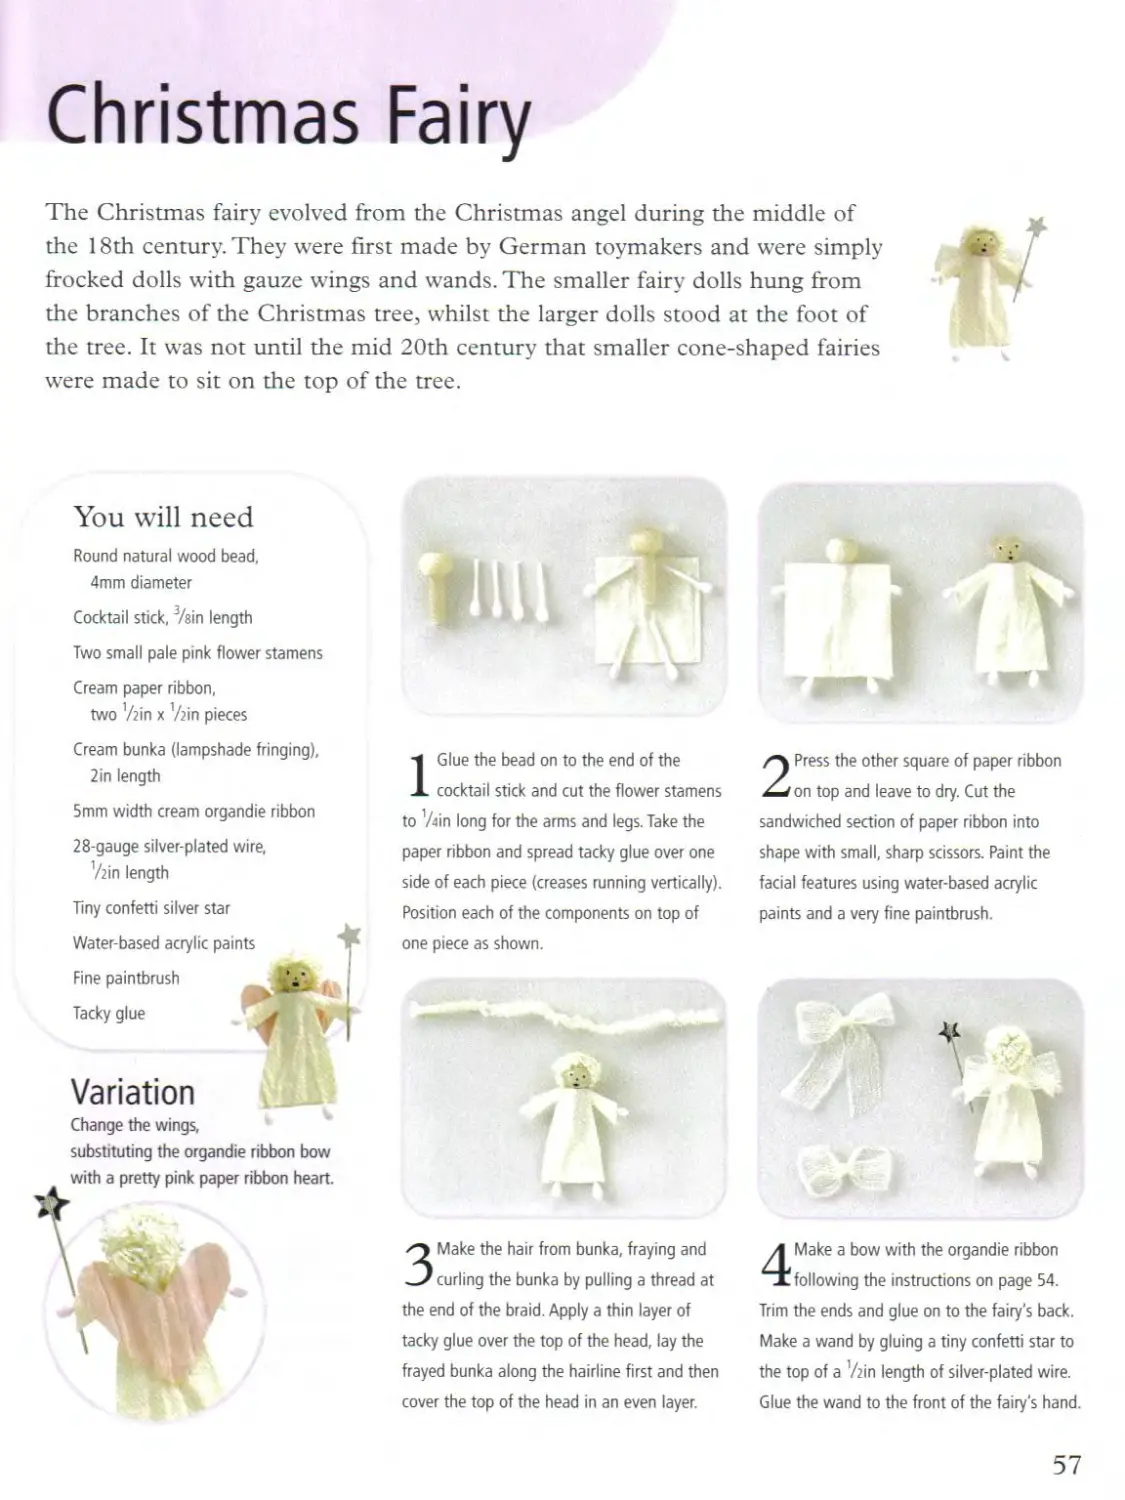
Wooden Stool
During Tudor times the most usual type of seating at mealtimes for
the majority of the household was either stools or benches (see also
pages 18 and 31). They were often simply constructed out of oak
and placed against a wall, with the wall used as a backrest.
You will need
3/з21’п thick obechi sheet wood,
1'Ain x 1 in for seat
'Ain x '/sin obechi strip wood:
two 1 '/ein lengths for long seat supports
two Vein lengths for short seat supports
Vein x '/sin obechi strip wood:
four 13/sin lengths for legs
two 1 '/sin lengths for long leg supports
two 5/sin lengths for short leg supports
Oak-coloured shoe polish
Steel wool
Tacky glue
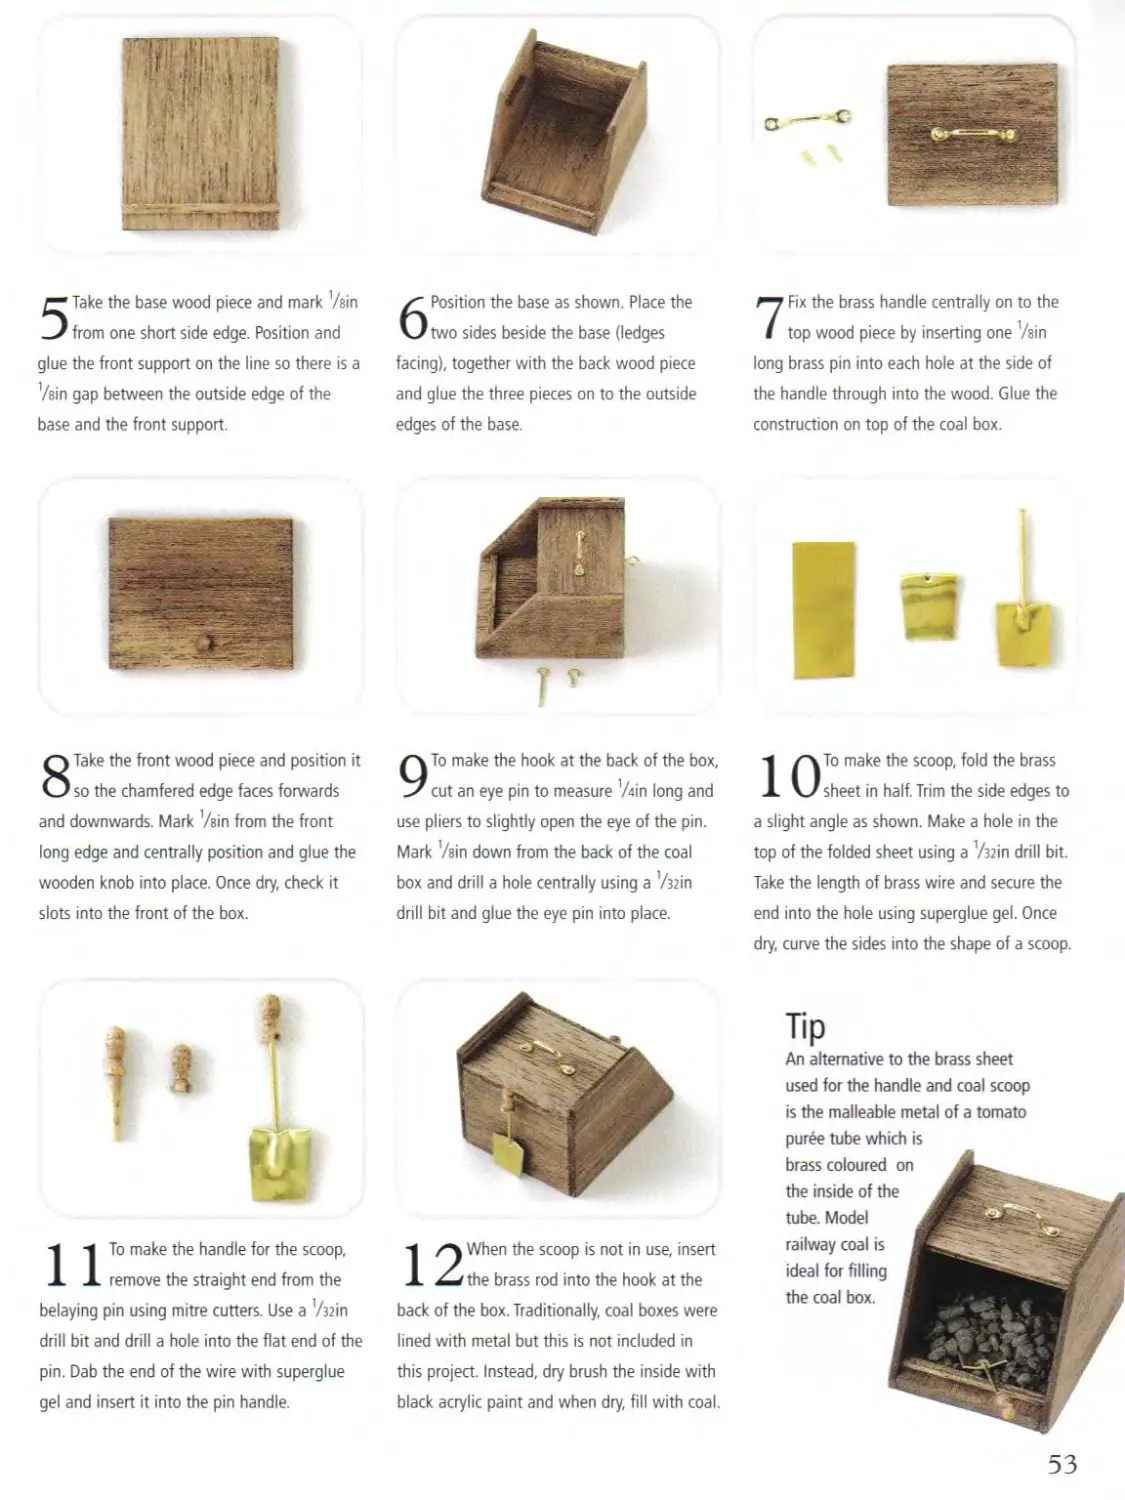
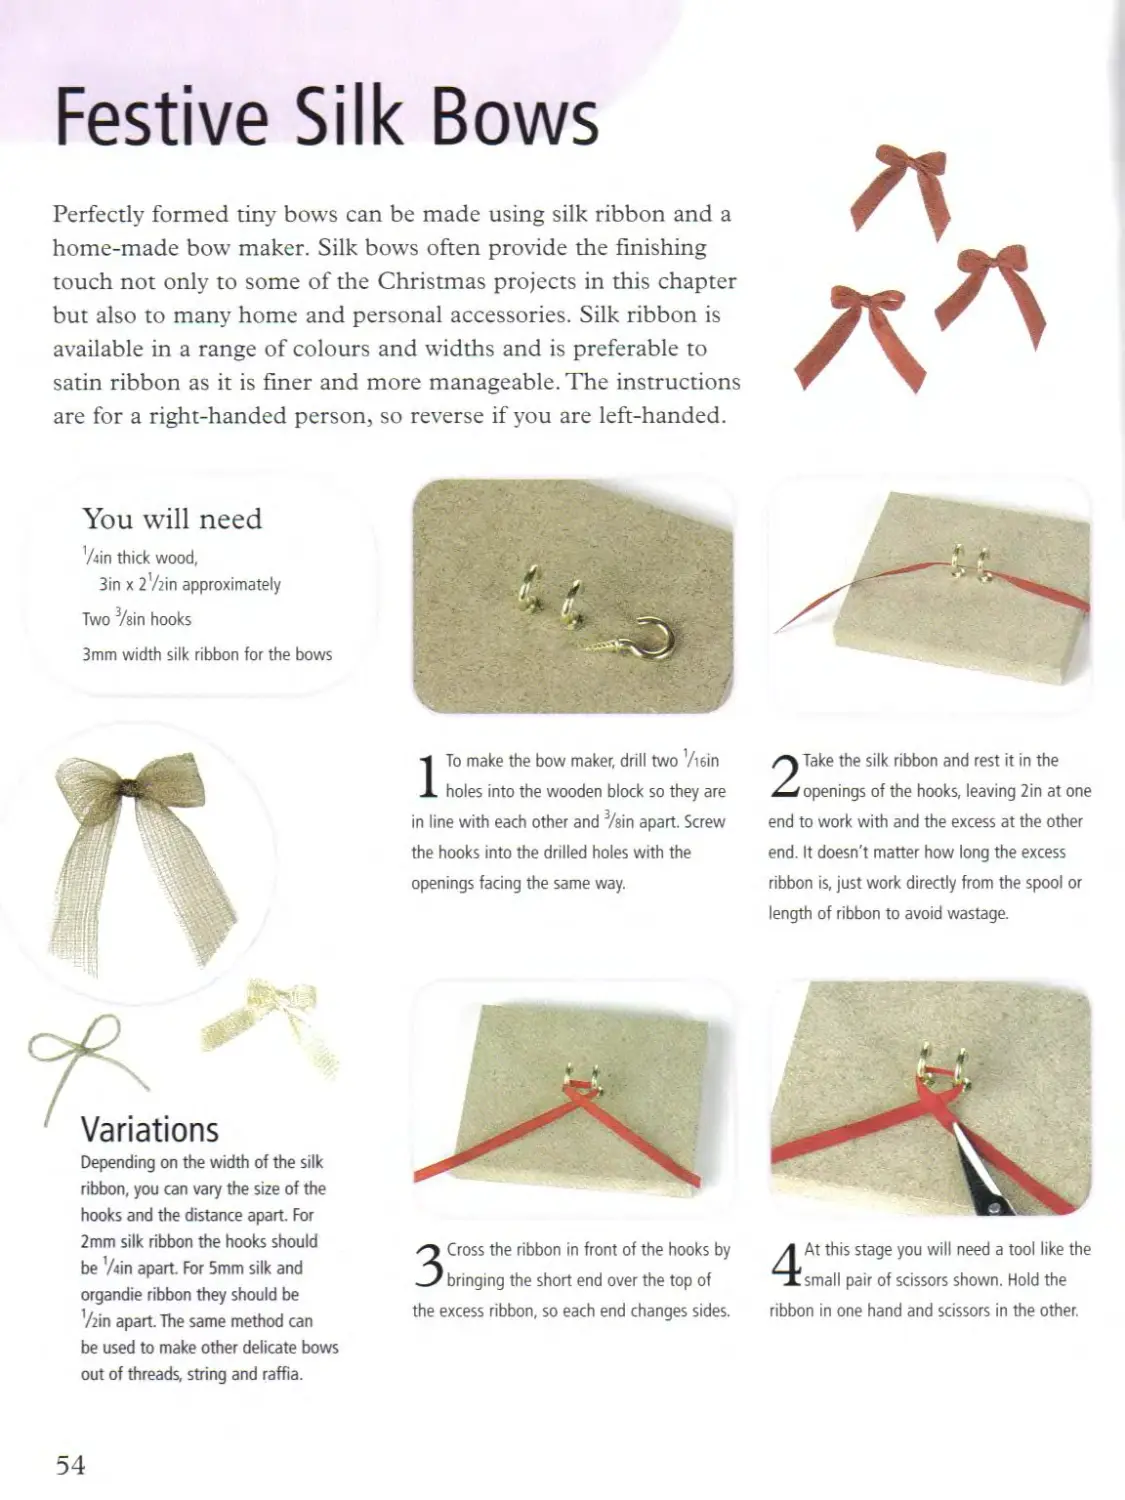
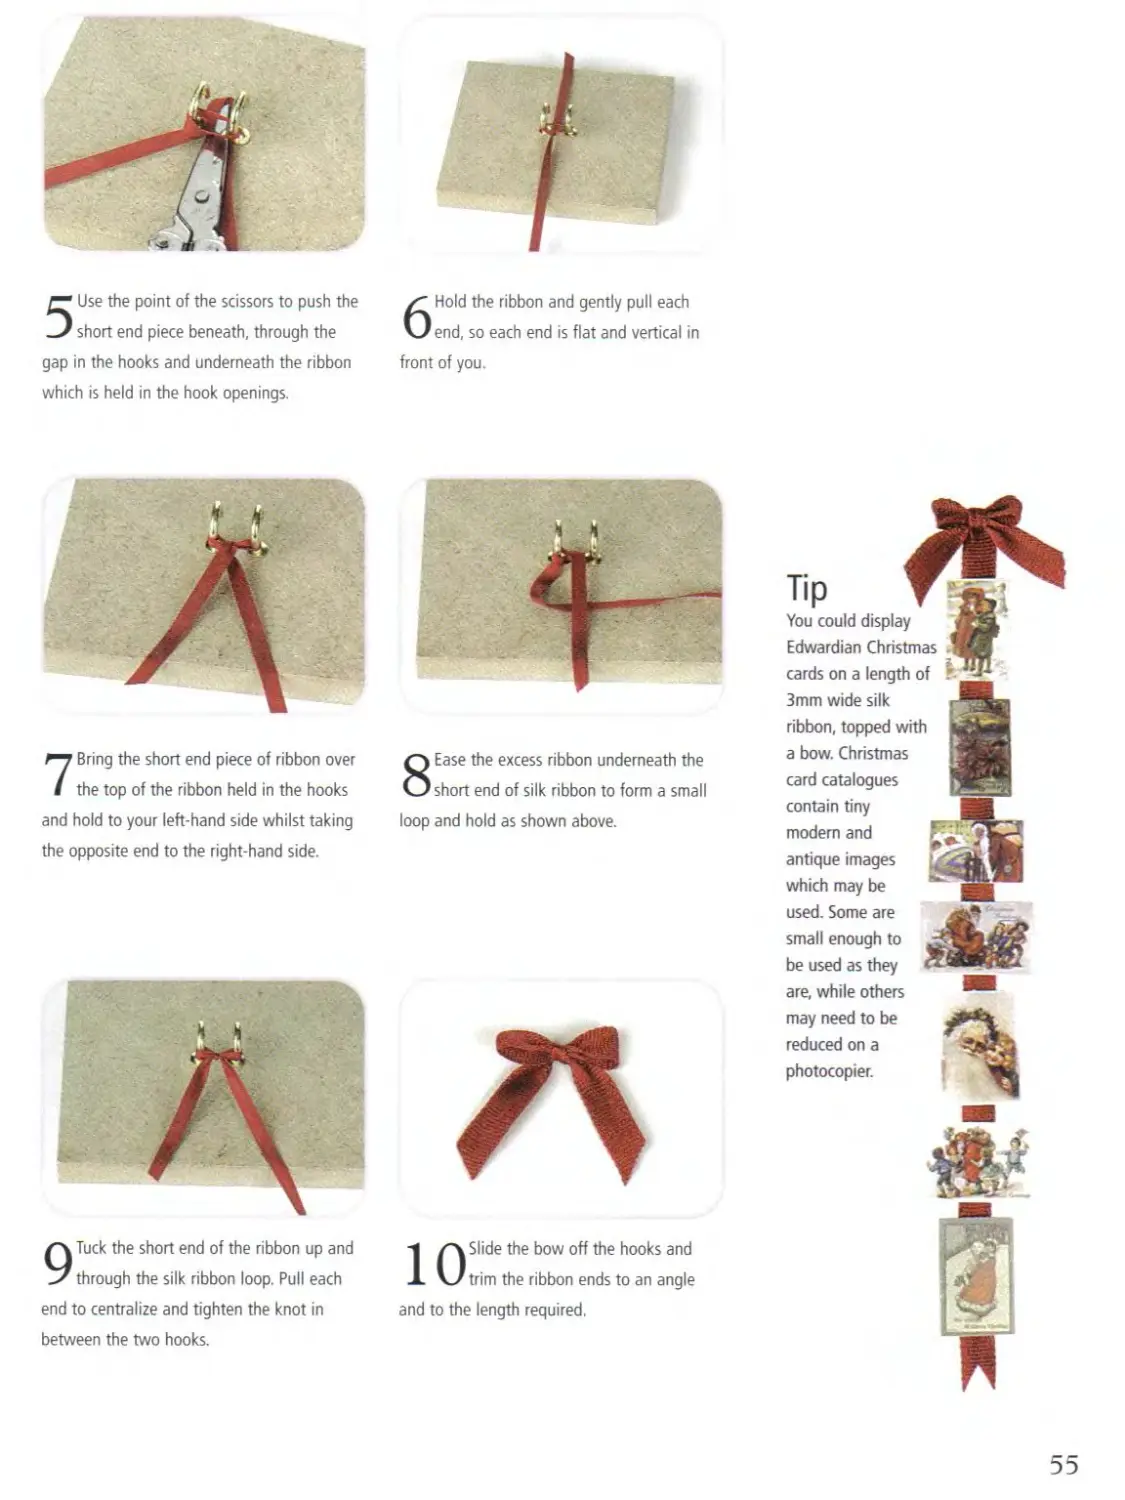
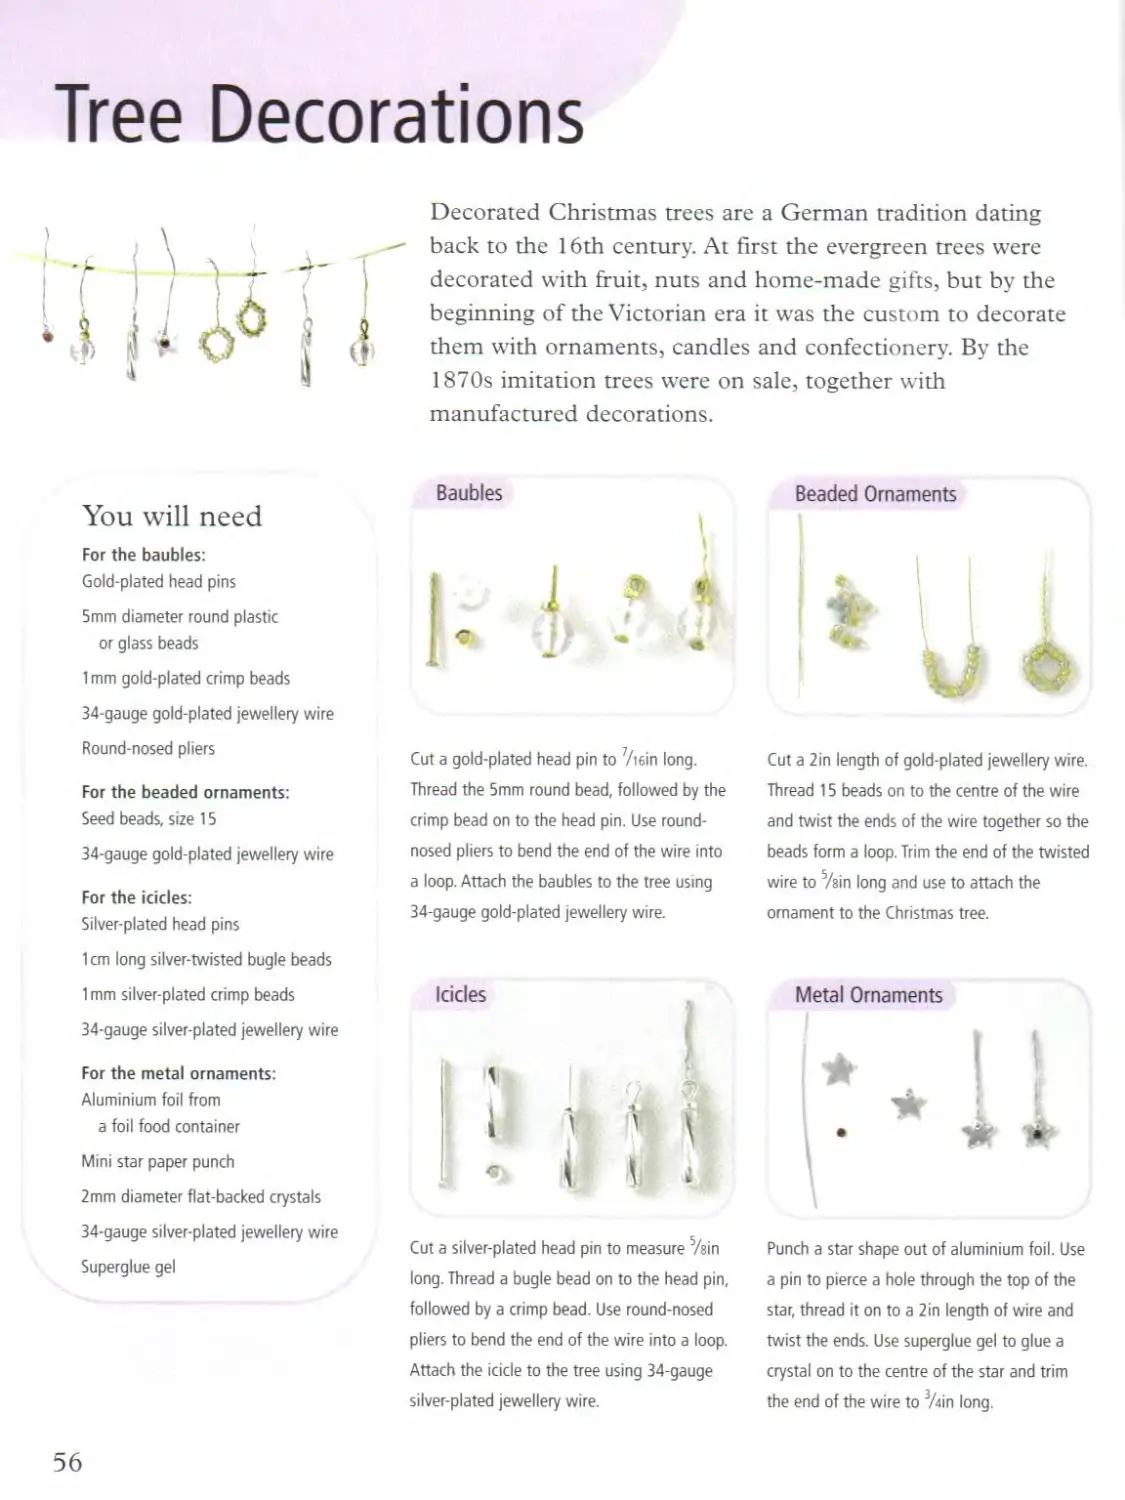
ISand each of the wooden components
using fine-grade sandpaper. Use steel
wool to apply an oak-coloured shoe polish
to colour and polish each of the wood pieces
(see Basic Techniques page 12).
2 Place two legs, a short seat support
and a short leg support (positioned
'/win from the end of each leg) in a right-
angled gluing jig (see page 8) and glue
together. Repeat the procedure with the
remaining two legs and short supports.
Variation
This country-style version of the stool has
a pierced finger hole so it can be picked
up easily. Drill three J/win holes centrally
along the middle of the seat and then use
a craft knife and sandpaper to clean the
drilled section. The leg
supports are
positioned Viein
from the end
of each leg.
30nce dry, take the leg constructions and
place sideways in the gluing jig. Position
and glue a long seat support and long leg
support in between the leg structures and in
line with the other supports. Repeat the
procedure with the remaining wood pieces.
4 Position and glue the frame centrally
on to the underside of the seat If you
wish achieve the appearance of age and dirt
on the polished surface, rub a small amount
of black shoe polish into some areas and buff
with wire wool.
14
1
Torchere
cainnm Аникин
For many people during Tudor times, the light from a domestic fire would have
been the only source of illumination. The wealthy used wax candles held in various
types of candleholders. Heavy, floor-standing torcheres were usually made out of
wood or iron and often had a pricket, a spike fitting in the centre of the pan, which
held the candle upright. See also the candlesticks on page 37.
You will need
'/i6in diameter brass tube,
З'/zin length
9/iein diameter aluminium
dinner plate
Gold-plated head pin, 1 in length
Three gold-plated scrolls,
74in long
White cake candle
Pewter enamel spray paint
Superglue gel
1 Place the aluminium plate
upside-down and drill a
hole centrally through the .
middle using a 3/64in drill bit. л
Cut the head end off the ,
gold-plated head pin so
it measures 'Ain. Keep
the opposite end as this is used to make the
pricket.
2 Use superglue gel to secure the head
pin into one end of the brass tube
Variation
This candlestick is a smaller
version of the torchere and is
made following the same
instructions. Use a 1 ’Zoin length
of ’/i6in diameter brass tube, a
6mm gold-plated bead cap,
three 7/i6in long gold-plated
scrolls and a slim white
cake candle.
and the straight end of the pin (the
pricket) into the opposite end. The pricket
should protrude by 3/sin. Glue the scrolls
on to the end of the brass tube, allowing
each one to dry before gluing the next.
(Alternatively, solder the scrolls on for a
stronger join.) Put the plate through the
spike to rest on top of the tube and glue
into place. Once dry, spray the torchere
with pewter enamel spray paint.
Cut and prepare a white cake candle
(see step 2, page 37)
to ’/2in long and
insert on to
the pricket.
15
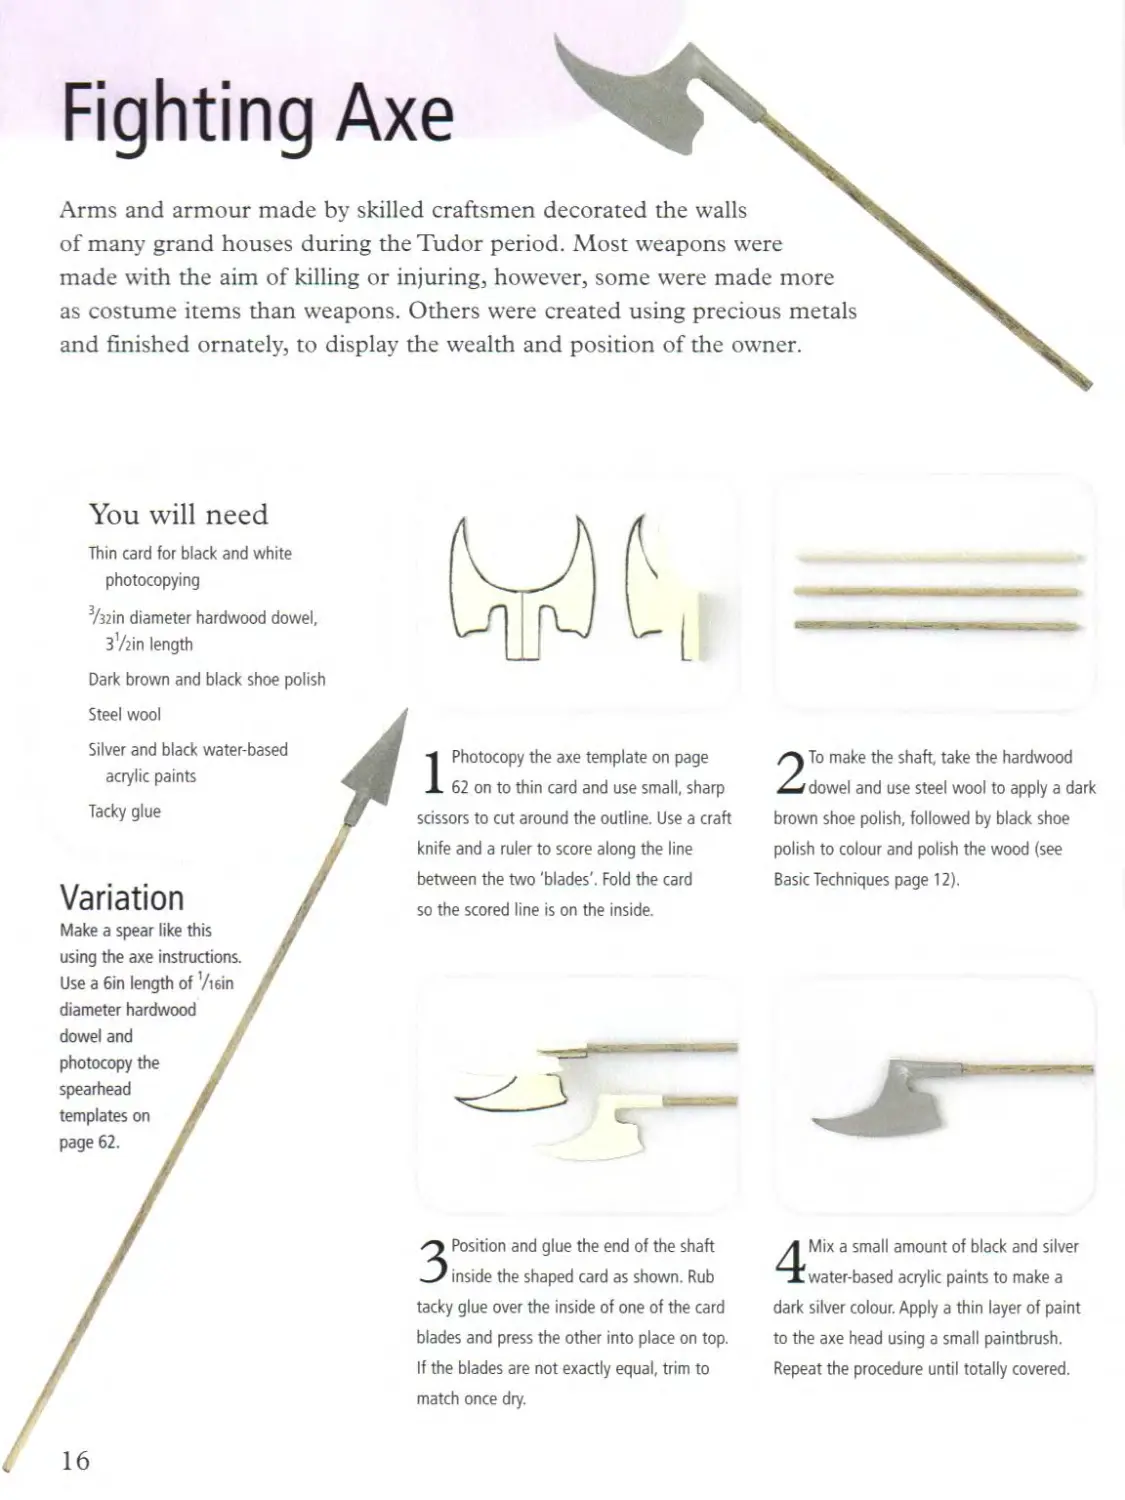
Fighting Axe
Arms and armour made by skilled craftsmen decorated the walls
of many grand houses during the Tudor period. Most weapons were
made with the aim of killing or injuring, however, some were made more
as costume items than weapons. Others were created using precious metals
and finished ornately, to display the wealth and position of the owner.
You will need
Thin card for black and white
photocopying
3/32in diameter hardwood dowel,
3/2in length
Dark brown and black shoe polish
Steel wool
Silver and black water-based
acrylic paints
Tacky glue
Variation
Make a spear like this i
using the axe instructions, я
Use a 6in length of ’/«in я
diameter hardwood - '
dowel and
photocopy the &
spearhead я
templates on я
page 62. я
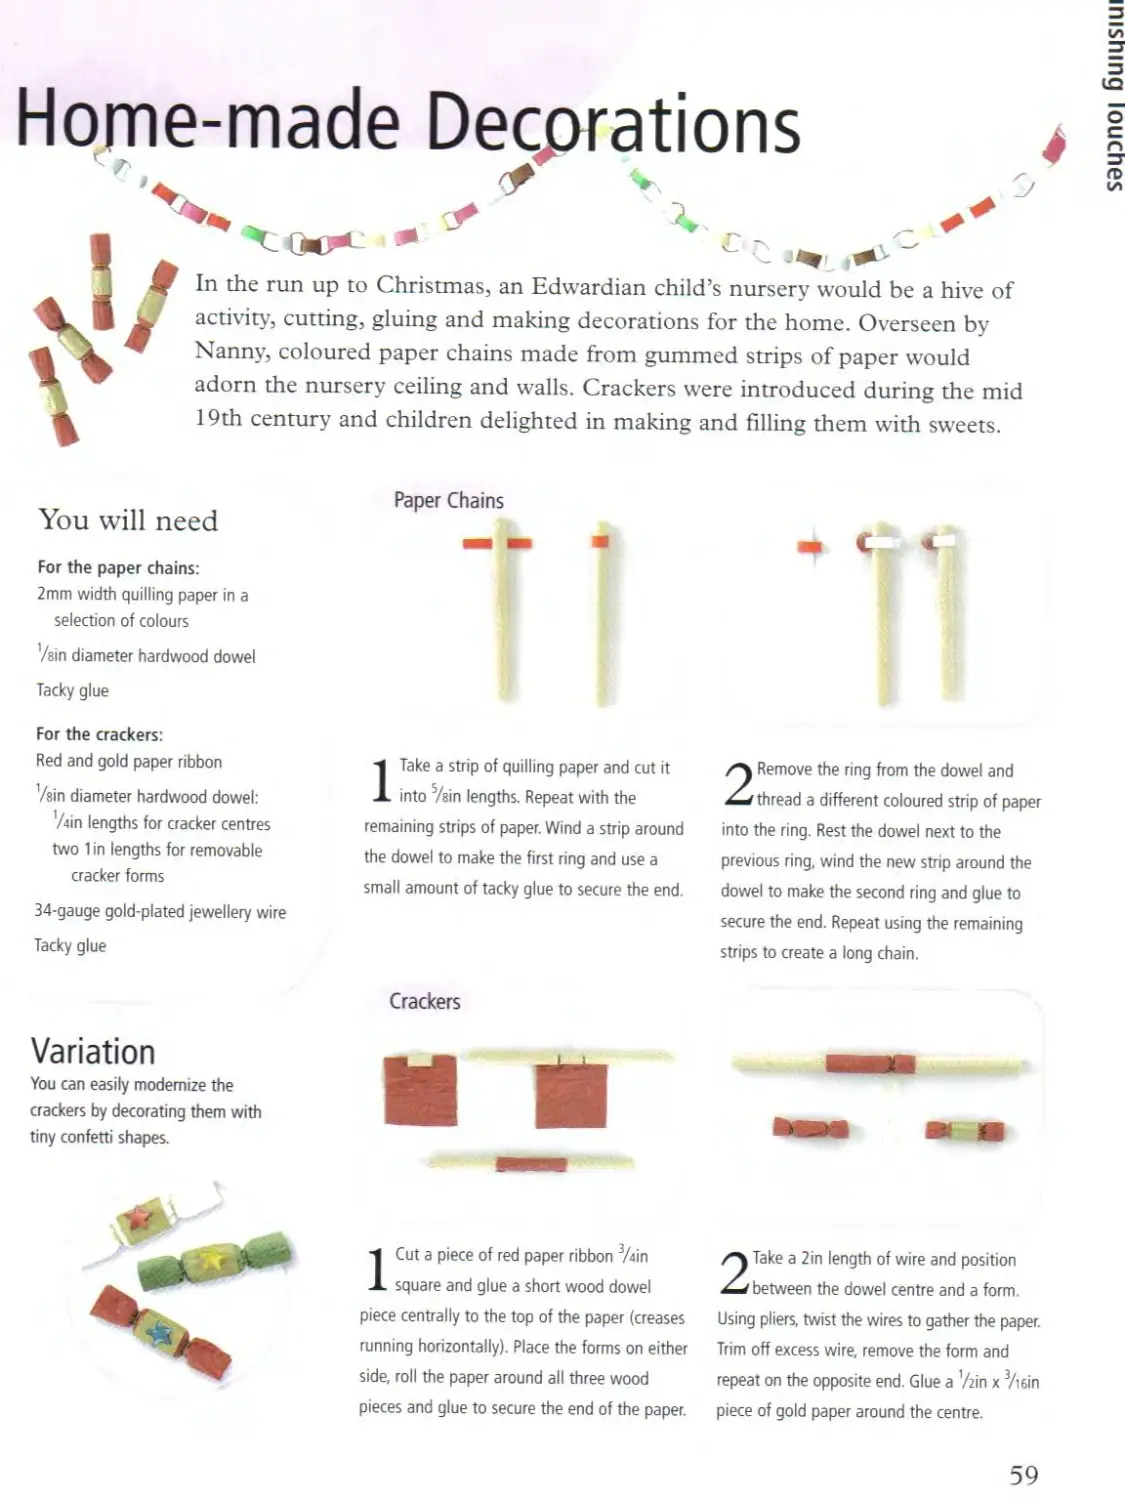
1 Photocopy the axe template on page
62 on to thin card and use small, sharp
scissors to cut around the outline. Use a craft
knife and a ruler to score along the line
between the two 'blades'. Fold the card
so the scored line is on the inside.
2 To make the shaft, take the hardwood
dowel and use steel wool to apply a dark
brown shoe polish, followed by black shoe
polish to colour and polish the wood (see
Basic Techniques page 12).
3 Position and glue the end of the shaft
inside the shaped card as shown. Rub
tacky glue over the inside of one of the card
blades and press the other into place on top.
If the blades are not exactly equal, trim to
match once dry.
4 Mix a small amount of black and silver
water-based acrylic paints to make a
dark silver colour. Apply a thin layer of paint
to the axe head using a small paintbrush.
Repeat the procedure until totally covered.
16
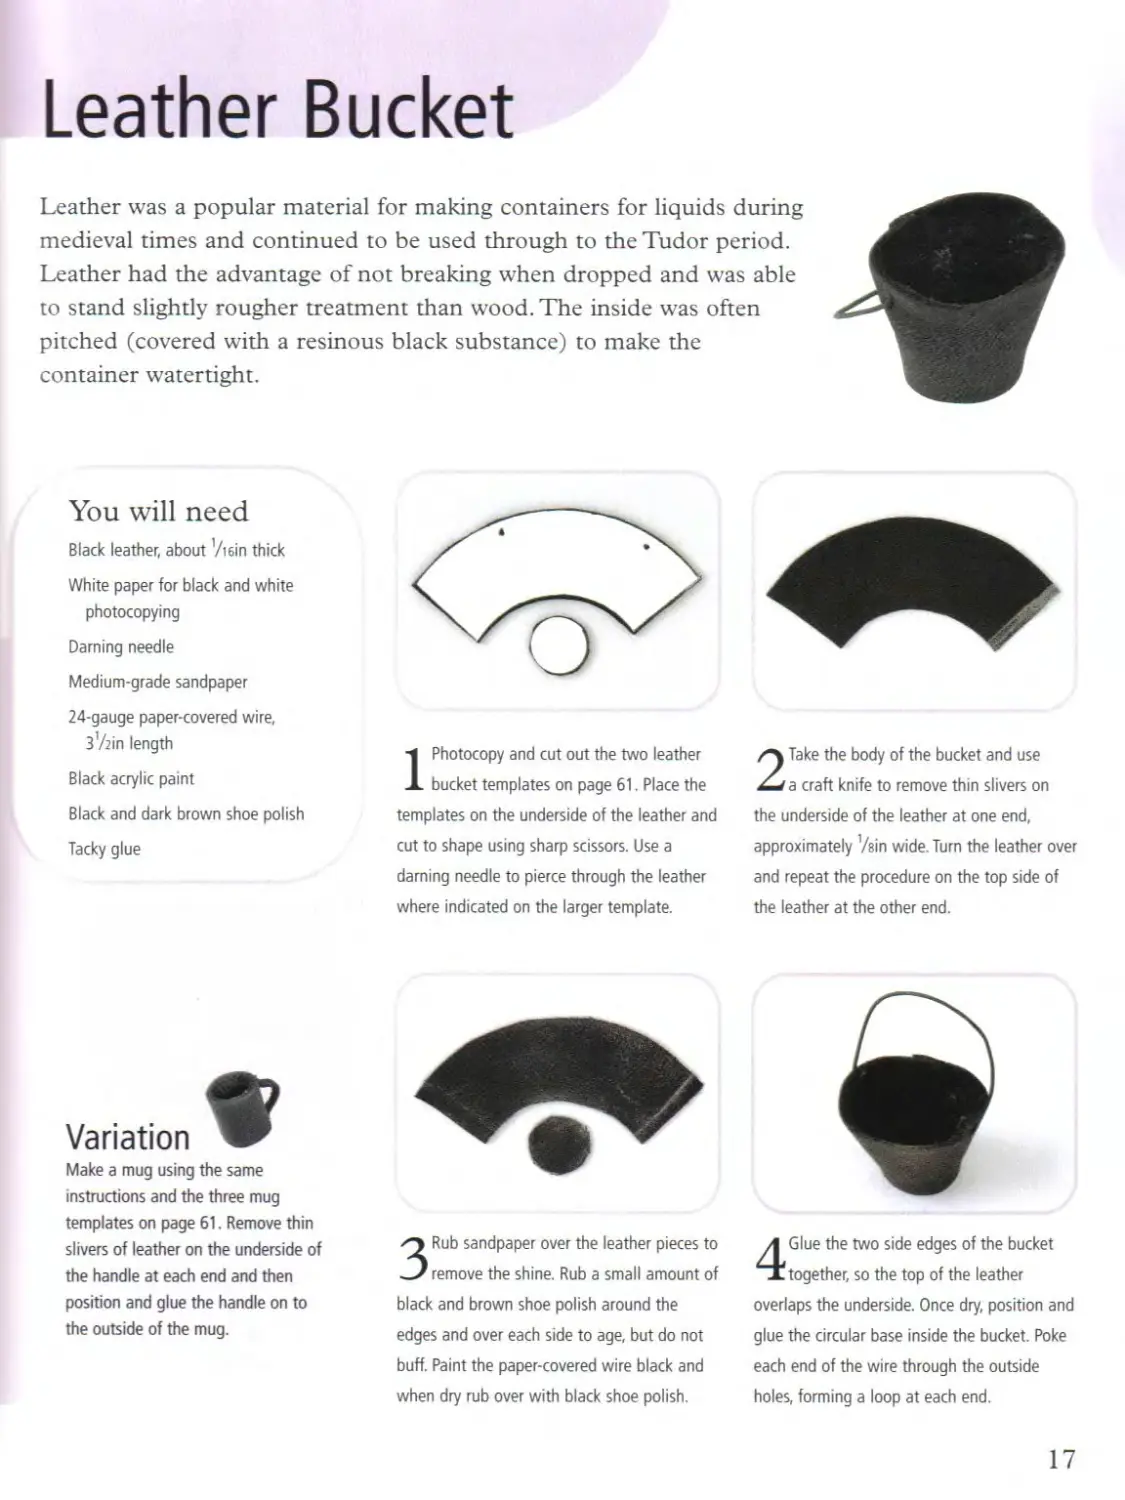
Leather Bucket
Leather was a popular material for making containers for liquids during
medieval times and continued to be used through to the Tudor period.
Leather had the advantage of not breaking when dropped and was able
to stand slightly rougher treatment than wood. The inside was often
pitched (covered with a resinous black substance) to make the
container watertight.
You will need
Black leather, about ’/win thick
White paper for black and white
photocopying
Darning needle
Medium-grade sandpaper
24-gauge paper-covered wire,
3'Ain length
Black acrylic paint
Black and dark brown shoe polish
Tacky glue
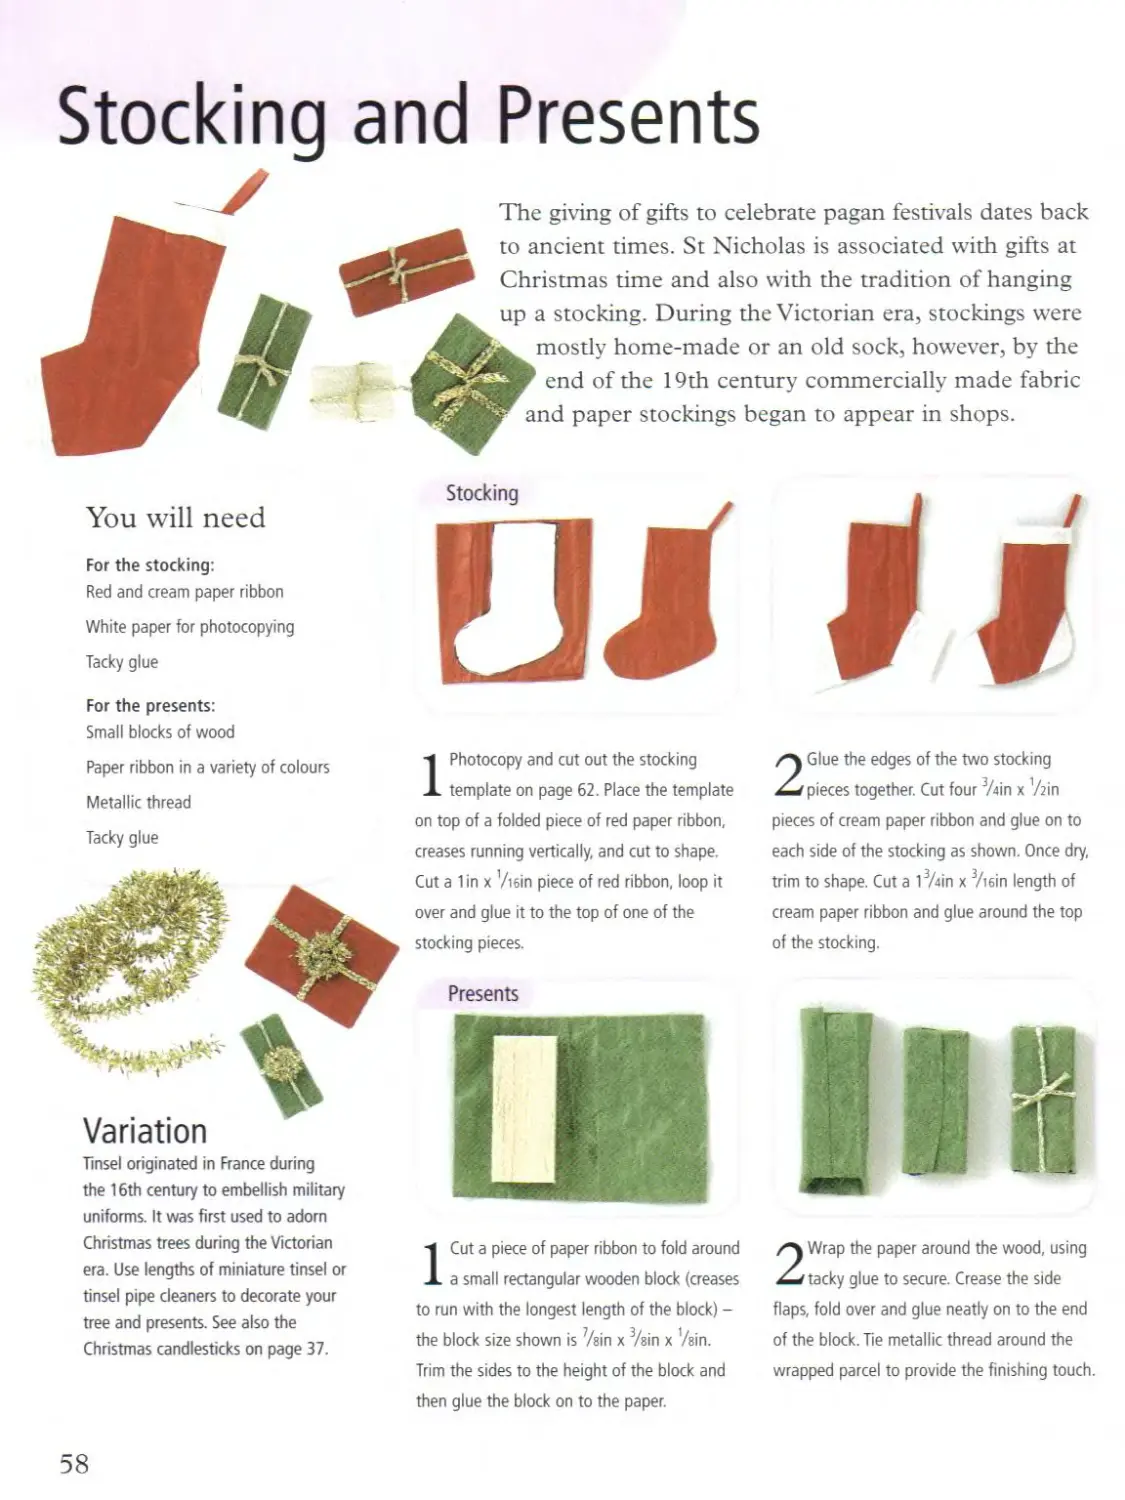
1 Photocopy and cut out the two leather
bucket templates on page 61. Place the
templates on the underside of the leather and
cut to shape using sharp scissors. Use a
darning needle to pierce through the leather
where indicated on the larger template.
2 Take the body of the bucket and use
a craft knife to remove thin slivers on
the underside of the leather at one end,
approximately Vein wide. Turn the leather over
and repeat the procedure on the top side of
the leather at the other end.
Variation
Make a mug using the same
instructions and the three mug
templates on page 61. Remove thin
slivers of leather on the underside of
the handle at each end and then
position and glue the handle on to
the outside of the mug.
3Rub sandpaper over the leather pieces to
remove the shine. Rub a small amount of
black and brown shoe polish around the
edges and over each side to age, but do not
buff. Paint the paper-covered wire black and
when dry rub over with black shoe polish.
4 Glue the two side edges of the bucket
together, so the top of the leather
overlaps the underside. Once dry, position and
glue the circular base inside the bucket. Poke
each end of the wire through the outside
holes, forming a loop at each end.
17
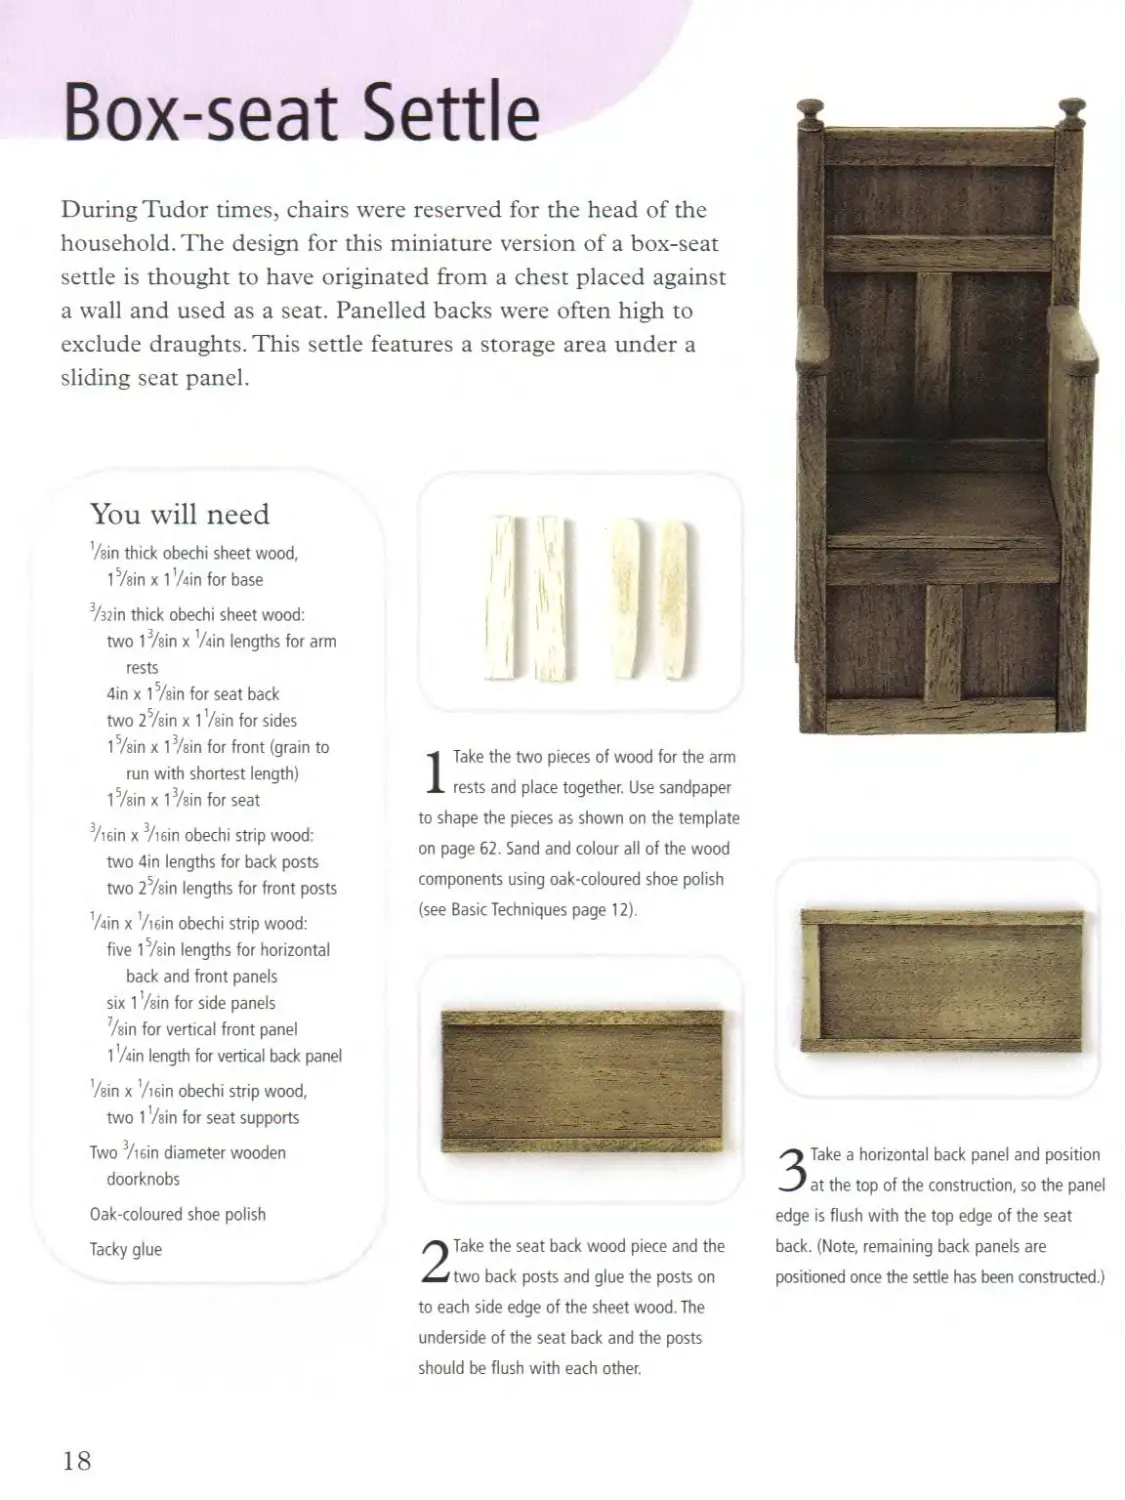
Box-seat Settle
During Tudor times, chairs were reserved for the head of the
household. The design for this miniature version of a box-seat
settle is thought to have originated from a chest placed against
a wall and used as a seat. Panelled backs were often high to
exclude draughts. This settle features a storage area under a
sliding seat panel.
You will need
'/sin thick obechi sheet wood,
15/sin x 1 'Ain for base
3/32in thick obechi sheet wood:
two 1 Vein x ’Ain lengths for arm
rests
4in x 1 Vein for seat back
two 2 Vein x 1 Vein for sides
1 Vein x 1 Vein for front (grain to
run with shortest length)
1 5Ain x 1 Vain for seat
Viein x Viein obechi strip wood:
two 4in lengths for back posts
two 2Vein lengths for front posts
'Ain x Viein obechi strip wood:
five 1 Vain lengths for horizontal
back and front panels
six 1 'Ain for side panels
Ain for vertical front panel
1 'Ain length for vertical back panel
'Ain x Viein obechi strip wood,
two 1 'Ain for seat supports
Two Viein diameter wooden
doorknobs
Oak-coloured shoe polish
Tacky glue
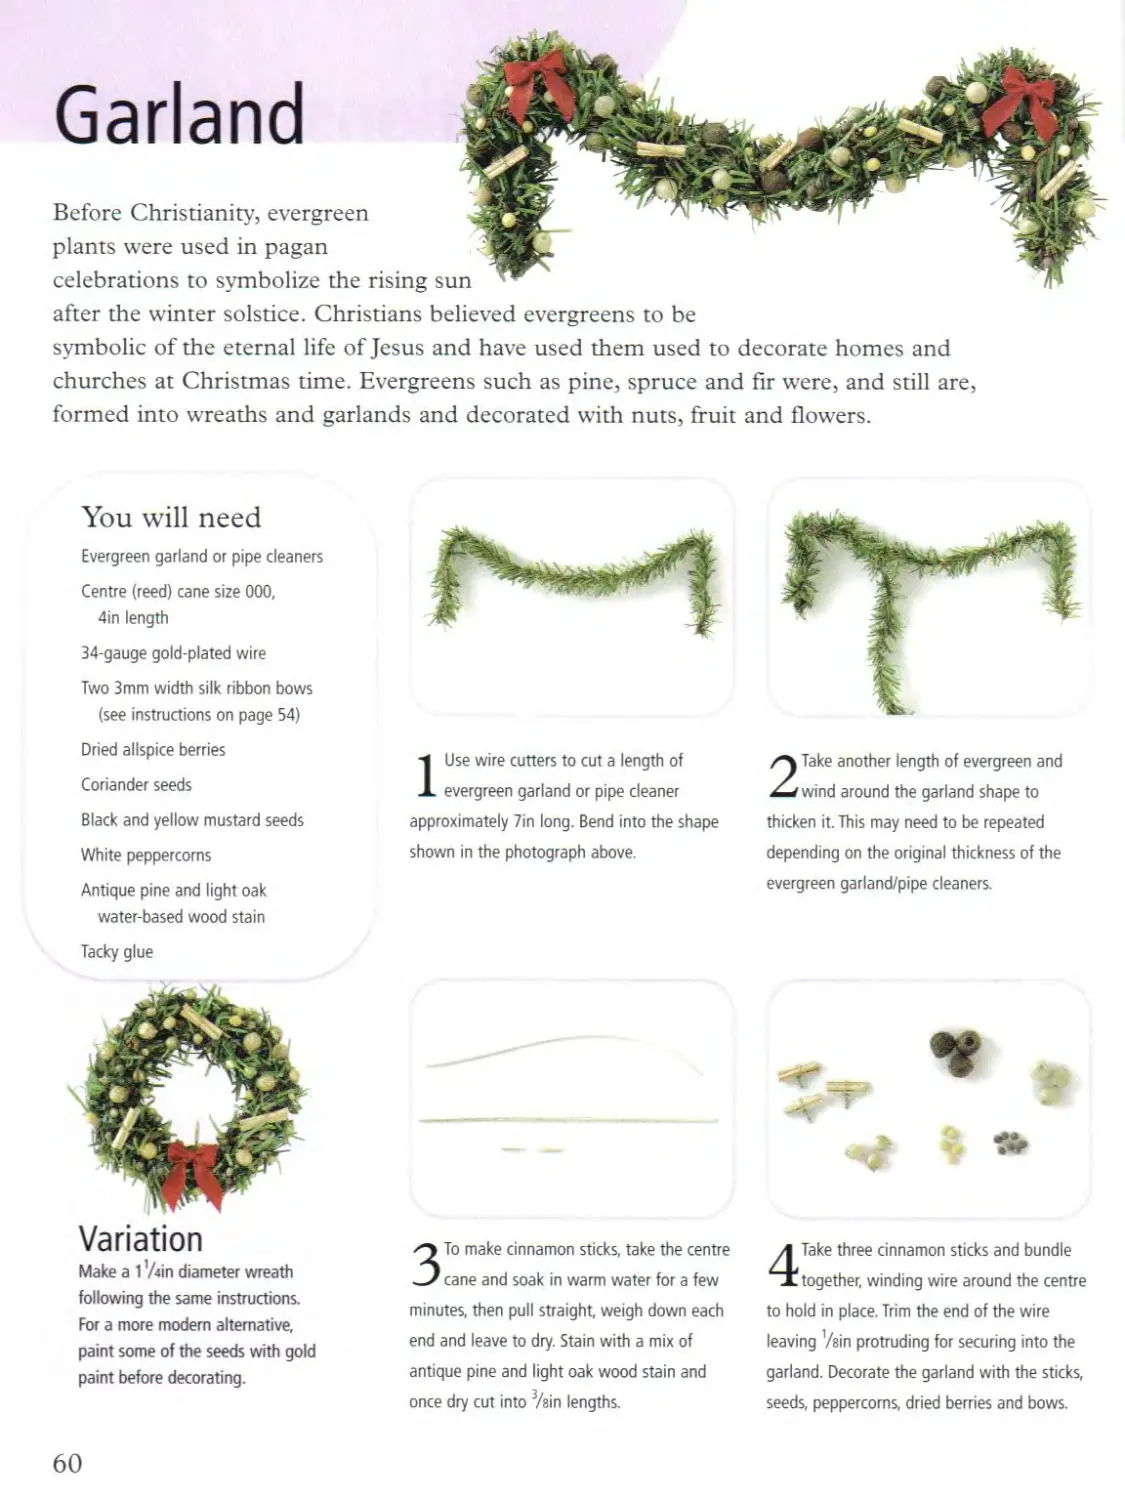
ITake the two pieces of wood for the arm
rests and place together. Use sandpaper
to shape the pieces as shown on the template
on page 62. Sand and colour all of the wood
components using oak-coloured shoe polish
(see Basic Techniques page 12).
2 Take the seat back wood piece and the
two back posts and glue the posts on
to each side edge of the sheet wood. The
underside of the seat back and the posts
should be flush with each other.
ЗТаке a horizontal back panel and position
at the top of the construction, so the panel
edge is flush with the top edge of the seat
back. (Note, remaining back panels are
positioned once the settle has been constructed.)
18
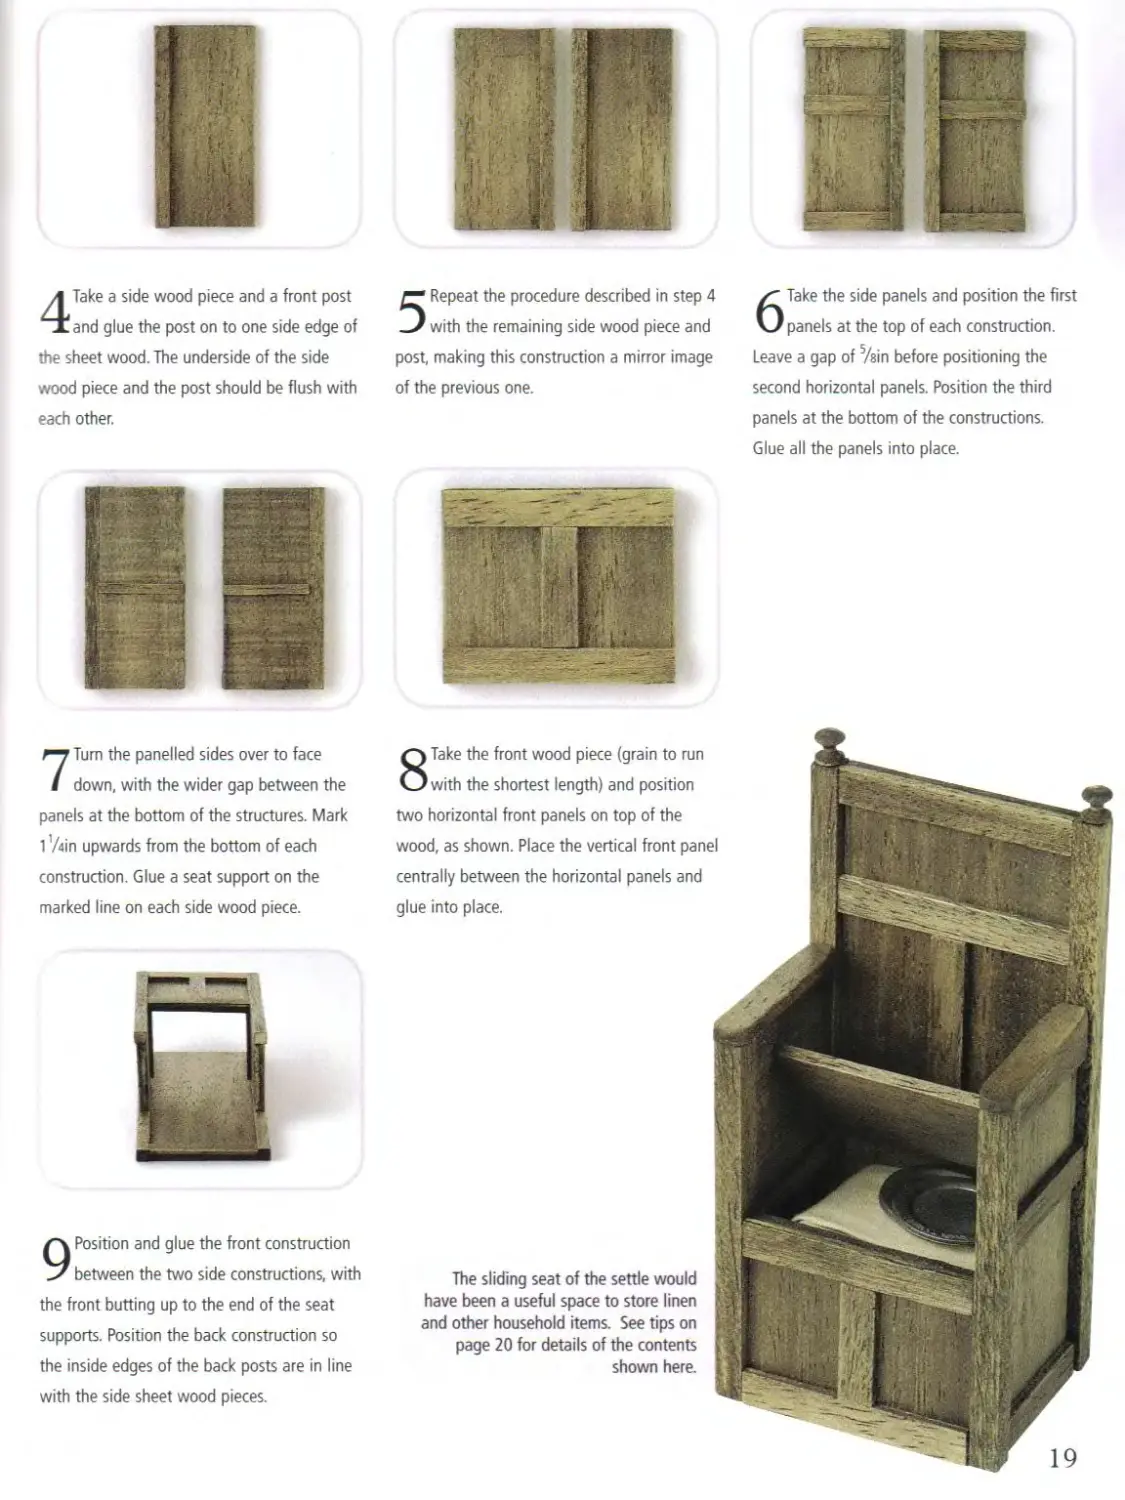
of the previous one.
wood piece and the post should be flush with
each other.
second horizontal panels. Position the third
panels at the bottom of the constructions.
Glue all the panels into place.
7 Turn the panelled sides over to face
down, with the wider gap between the
panels at the bottom of the structures. Mark
1 ’/«in upwards from the bottom of each
construction. Glue a seat support on the
marked line on each side wood piece.
9 Position and glue the front construction
between the two side constructions, with
the front butting up to the end of the seat
supports. Position the back construction so
the inside edges of the back posts are in line
with the side sheet wood pieces.
8 Take the front wood piece (grain to run
with the shortest length) and position
two horizontal front panels on top of the
wood, as shown. Place the vertical front panel
centrally between the horizontal panels and
glue into place.
The sliding seat of the settle would
have been a useful space to store linen
and other household items. See tips on
page 20 for details of the contents
shown here.
19
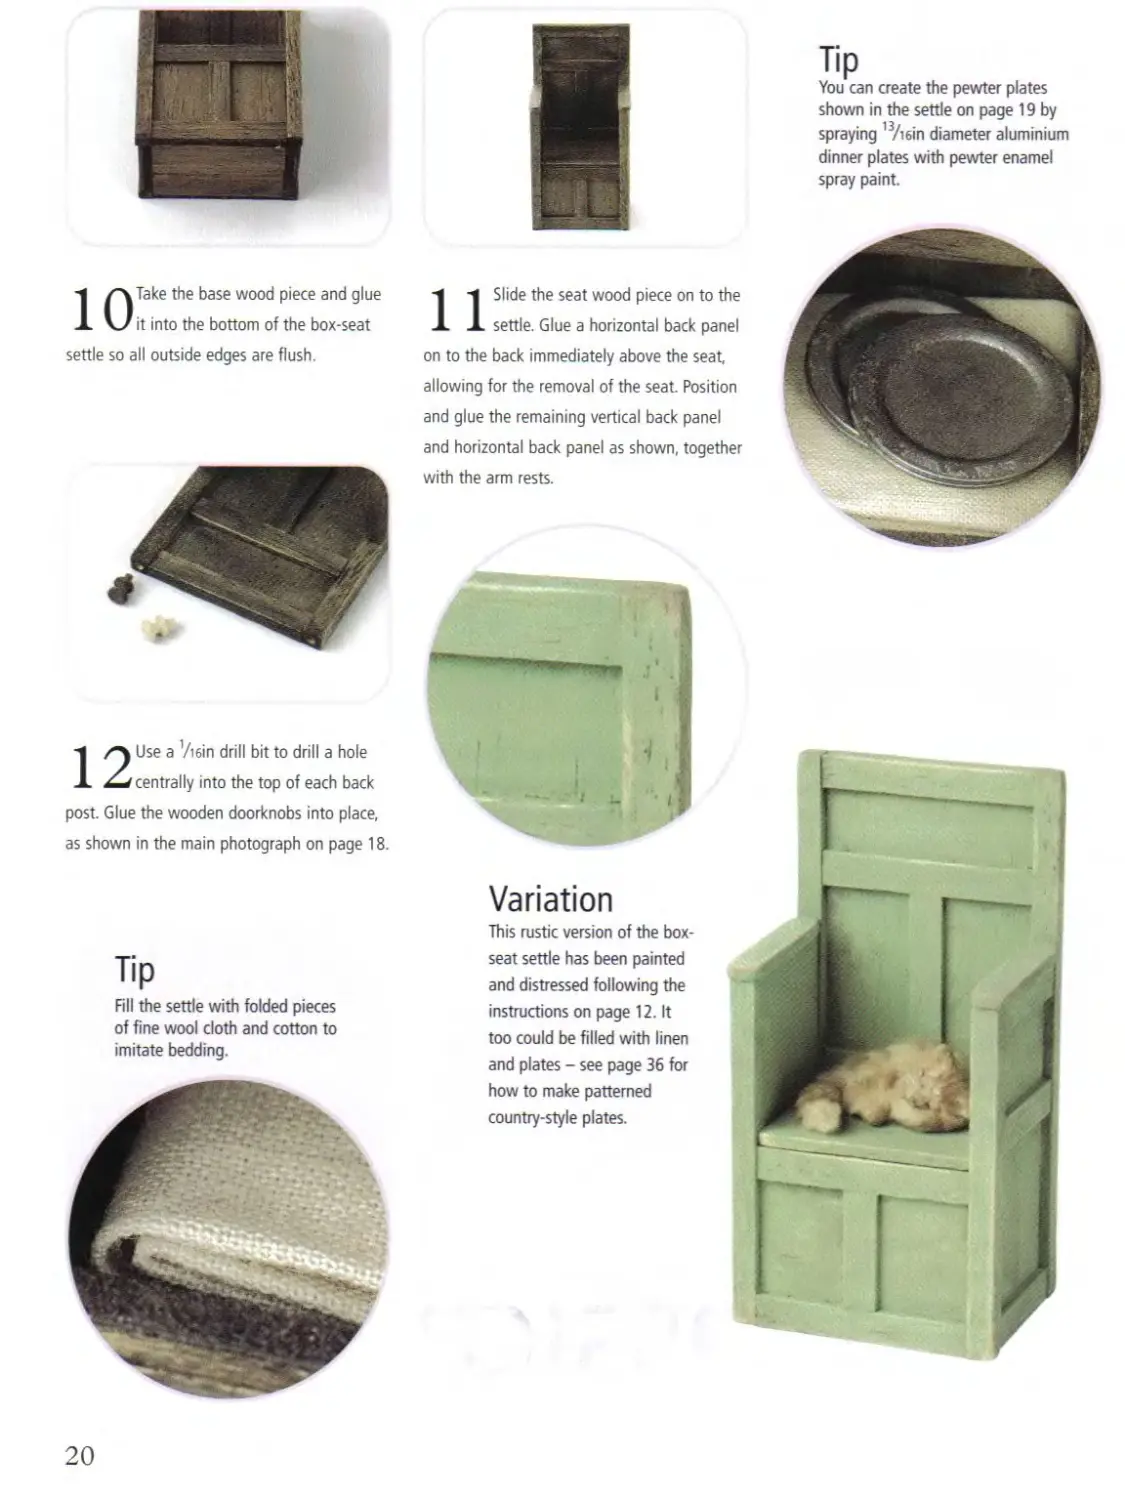
Tip
You can create the pewter plates
shown in the settle on page 19 by
spraying 13/i6in diameter aluminium
dinner plates with pewter enamel
spray paint.
WTake the base wood piece and glue
it into the bottom of the box-seat
settle so all outside edges are flush.
1-1 Slide the seat wood piece on to the
A settle. Glue a horizontal back panel
on to the back immediately above the seat,
allowing for the removal of the seat. Position
and glue the remaining vertical back panel
and horizontal back panel as shown, together
with the arm rests.
1 /*4 Use a Viein drill bit to drill a hole
1 ^/centrally into the top of each back
post. Glue the wooden doorknobs into place,
as shown in the main photograph on page 18.
Tip
Fill the settle with folded pieces
of fine wool cloth and cotton to
imitate bedding.
Variation
This rustic version of the box-
seat settle has been painted
and distressed following the
instructions on page 12. It
too could be filled with linen
and plates - see page 36 for
how to make patterned
country-style plates.
20
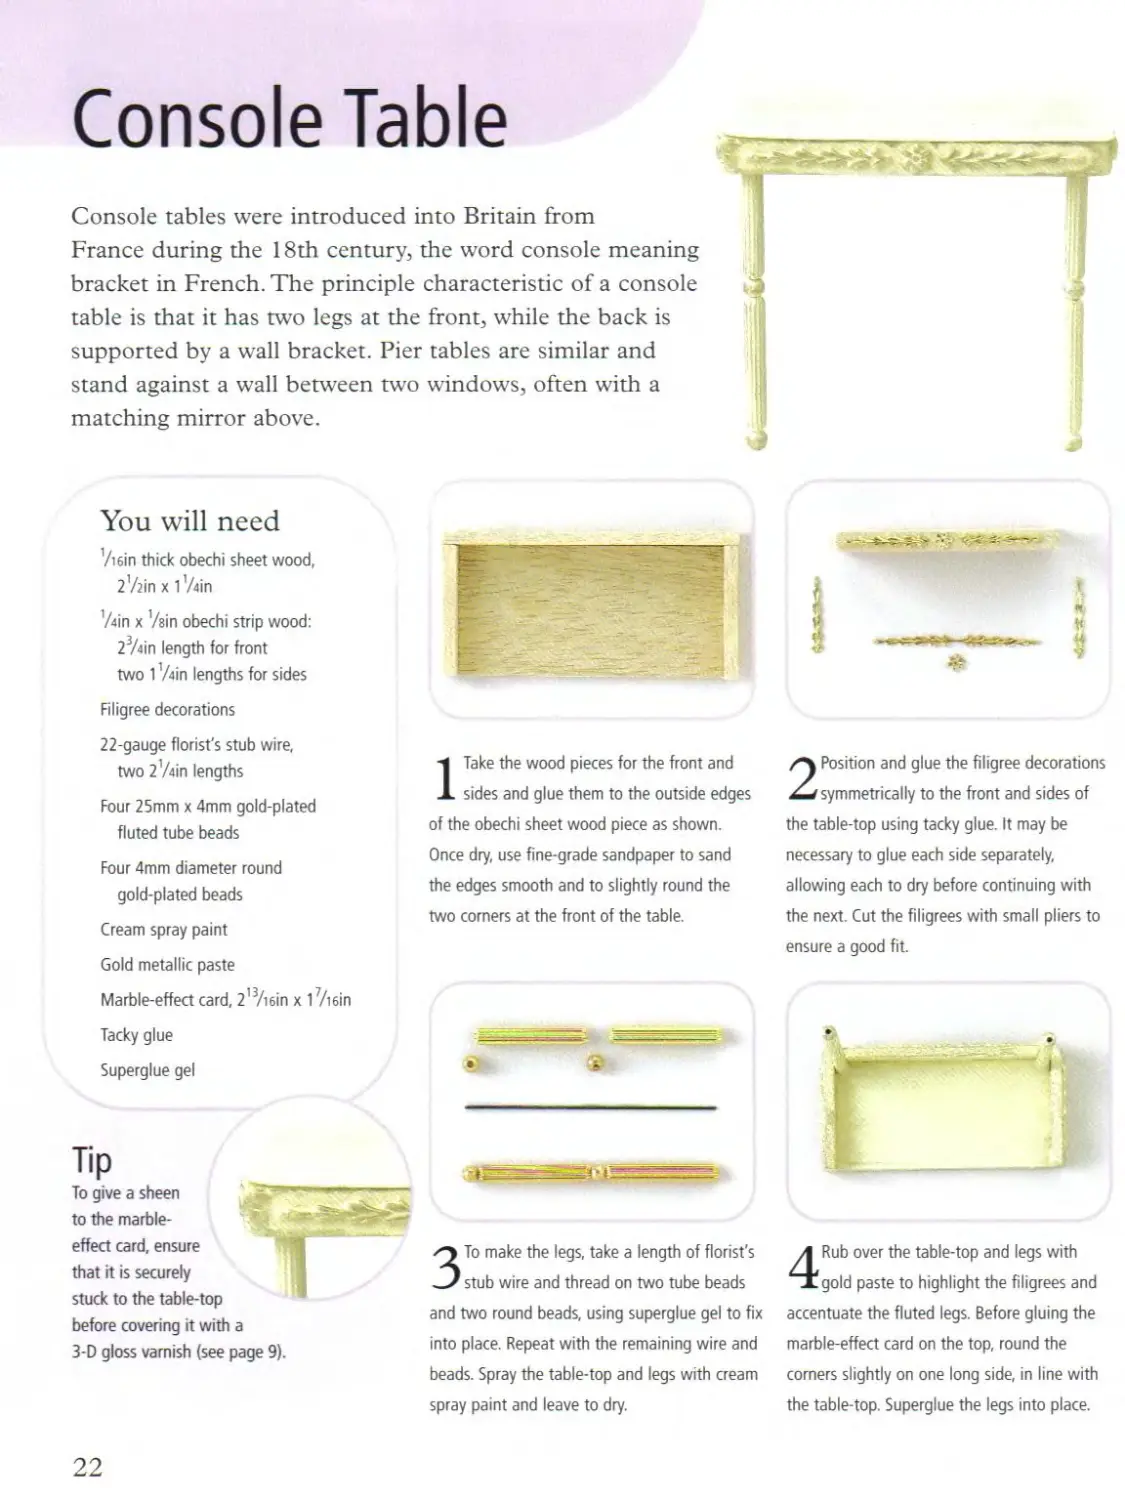
Console Table
Console tables were introduced into Britain from
France during the 18th century, the word console meaning
bracket in French. The principle characteristic of a console
table is that it has two legs at the front, while the back is
supported by a wall bracket. Pier tables are similar and
stand against a wall between two windows, often with a
matching mirror above.
You will need
’/i6in thick obechi sheet wood,
2'/2in x 1 'Z«in
'Ain x Vein obechi strip wood:
23Ain length for front
two 1 'Ain lengths for sides
Filigree decorations
22-gauge florist's stub wire,
two 2'/4in lengths
Four 25mm x 4mm gold-plated
fluted tube beads
Four 4mm diameter round
gold-plated beads
Cream spray paint
Gold metallic paste
Marble-effect card, 2,3/iein x 1 Viein
Tacky glue
Superglue gel
Tip
To give a sheen
to the marble-
effect card, ensure
that it is securely
stuck to the table-top
before covering it with a
3-D gloss varnish (see page 9).
ITake the wood pieces for the front and
sides and glue them to the outside edges
of the obechi sheet wood piece as shown.
Once dry, use fine-grade sandpaper to sand
the edges smooth and to slightly round the
two corners at the front of the table.
3To make the legs, take a length of florist's
stub wire and thread on two tube beads
and two round beads, using superglue gel to fix
into place. Repeat with the remaining wire and
beads. Spray the table-top and legs with cream
spray paint and leave to dry.
2 Position and glue the filigree decorations
symmetrically to the front and sides of
the table-top using tacky glue. It may be
necessary to glue each side separately,
allowing each to dry before continuing with
the next. Cut the filigrees with small pliers to
ensure a good fit.
4 Rub over the table-top and legs with
gold paste to highlight the filigrees and
accentuate the fluted legs. Before gluing the
marble-effect card on the top, round the
comers slightly on one long side, in line with
the table-top. Superglue the legs into place.
22
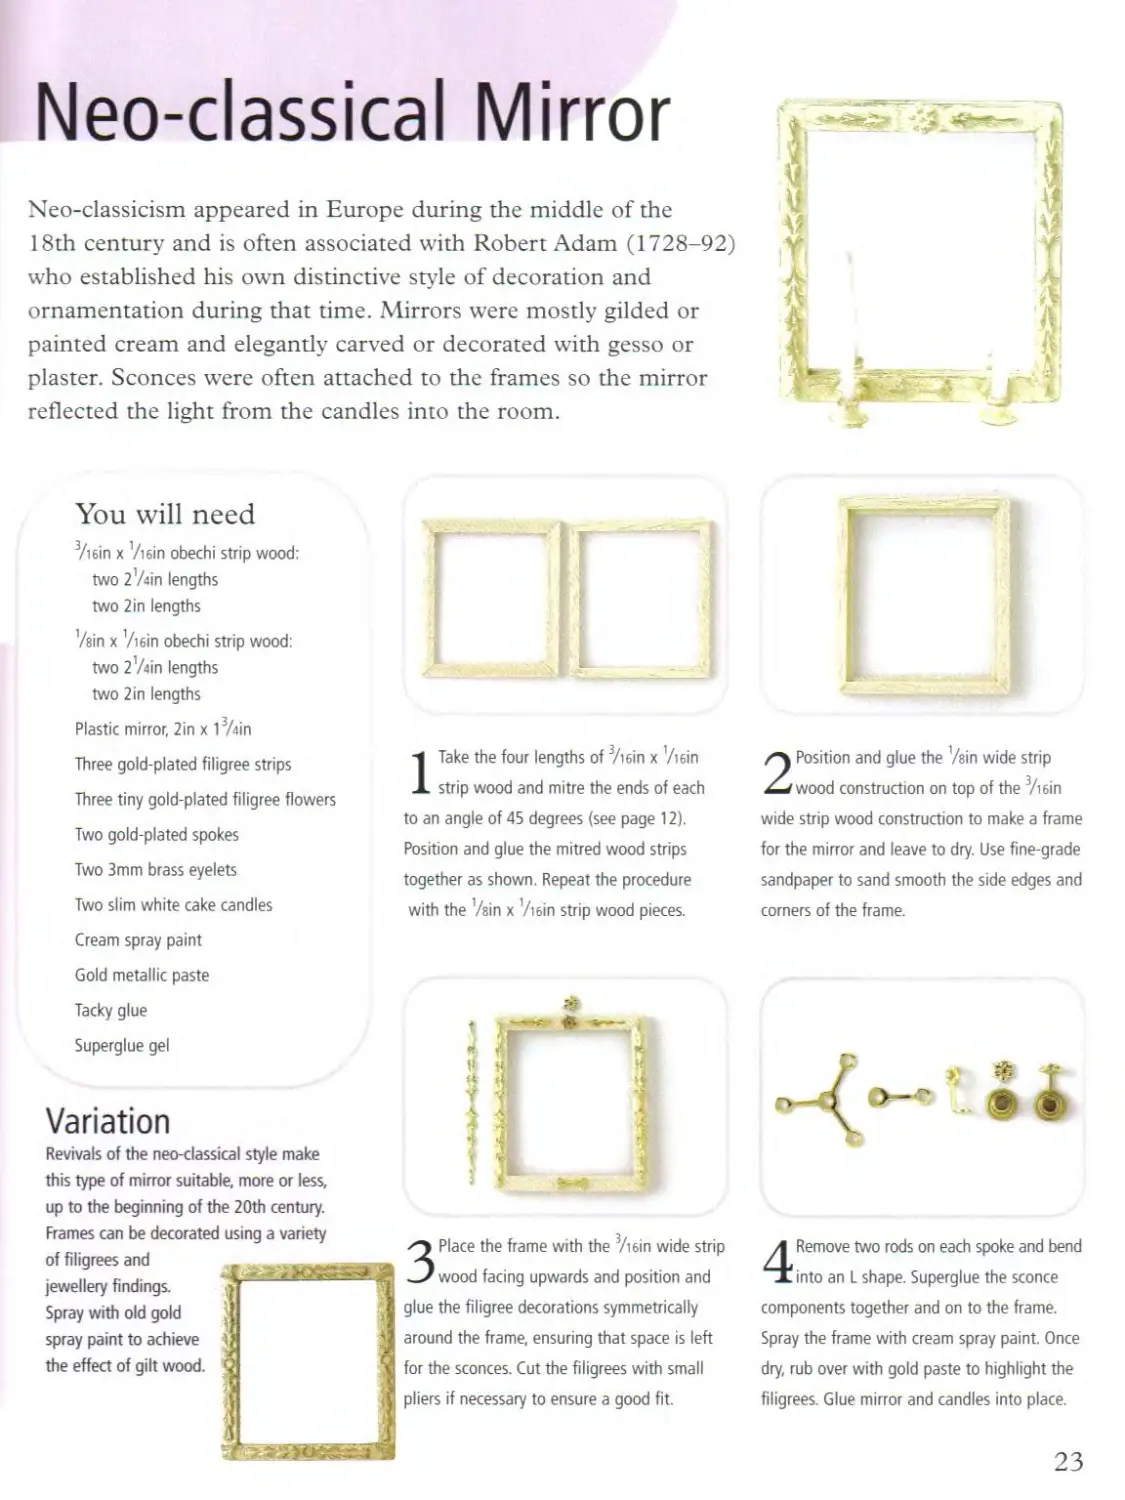
Neo-classical Mirror
Neo-classicism appeared in Europe during the middle of the
18th century and is often associated with Robert Adam (1728-92)
who established his own distinctive style of decoration and
ornamentation during that time. Mirrors were mostly gilded or
painted cream and elegantly carved or decorated with gesso or
plaster. Sconces were often attached to the frames so the mirror
reflected the light from the candles into the room.
You will need
3/win x '/win obechi strip wood:
two 2'Zein lengths
two 2in lengths
'/sin x '/win obechi strip wood:
two 2'Ain lengths
two 2 in lengths
Plastic mirror, 2in x 13Ain
Three gold-plated filigree strips
Three tiny gold-plated filigree flowers
Two gold-plated spokes
Two 3mm brass eyelets
Two slim white cake candles
Cream spray paint
ITake the four lengths of 3/win x '/win
strip wood and mitre the ends of each
to an angle of 45 degrees (see page 12).
Position and glue the mitred wood strips
together as shown. Repeat the procedure
with the '/sin x '/win strip wood pieces.
2 Position and glue the '/sin wide strip
wood construction on top of the 3/win
wide strip wood construction to make a frame
for the mirror and leave to dry. Use fine-grade
sandpaper to sand smooth the side edges and
comers of the frame.
Gold metallic paste
Tacky glue
Superglue gel
Variation
Revivals of the neo-classical style make
this type of mirror suitable, more or less,
up to the beginning of the 20th century.
Frames can be decorated using a variety
of filigrees and
jewellery findings.
Spray with old gold
spray paint to achieve
the effect of gilt wood.
3 Place the frame with the 3/iein wide strip
wood facing upwards and position and
glue the filigree decorations symmetrically
around the frame, ensuring that space is left
for the sconces. Cut the filigrees with small
pliers if necessary to ensure a good fit.
4 Remove two rods on each spoke and bend
into an L shape. Superglue the sconce
components together and on to the frame.
Spray the frame with cream spray paint. Once
dry, rub over with gold paste to highlight the
filigrees. Glue mirror and candles into place.
23
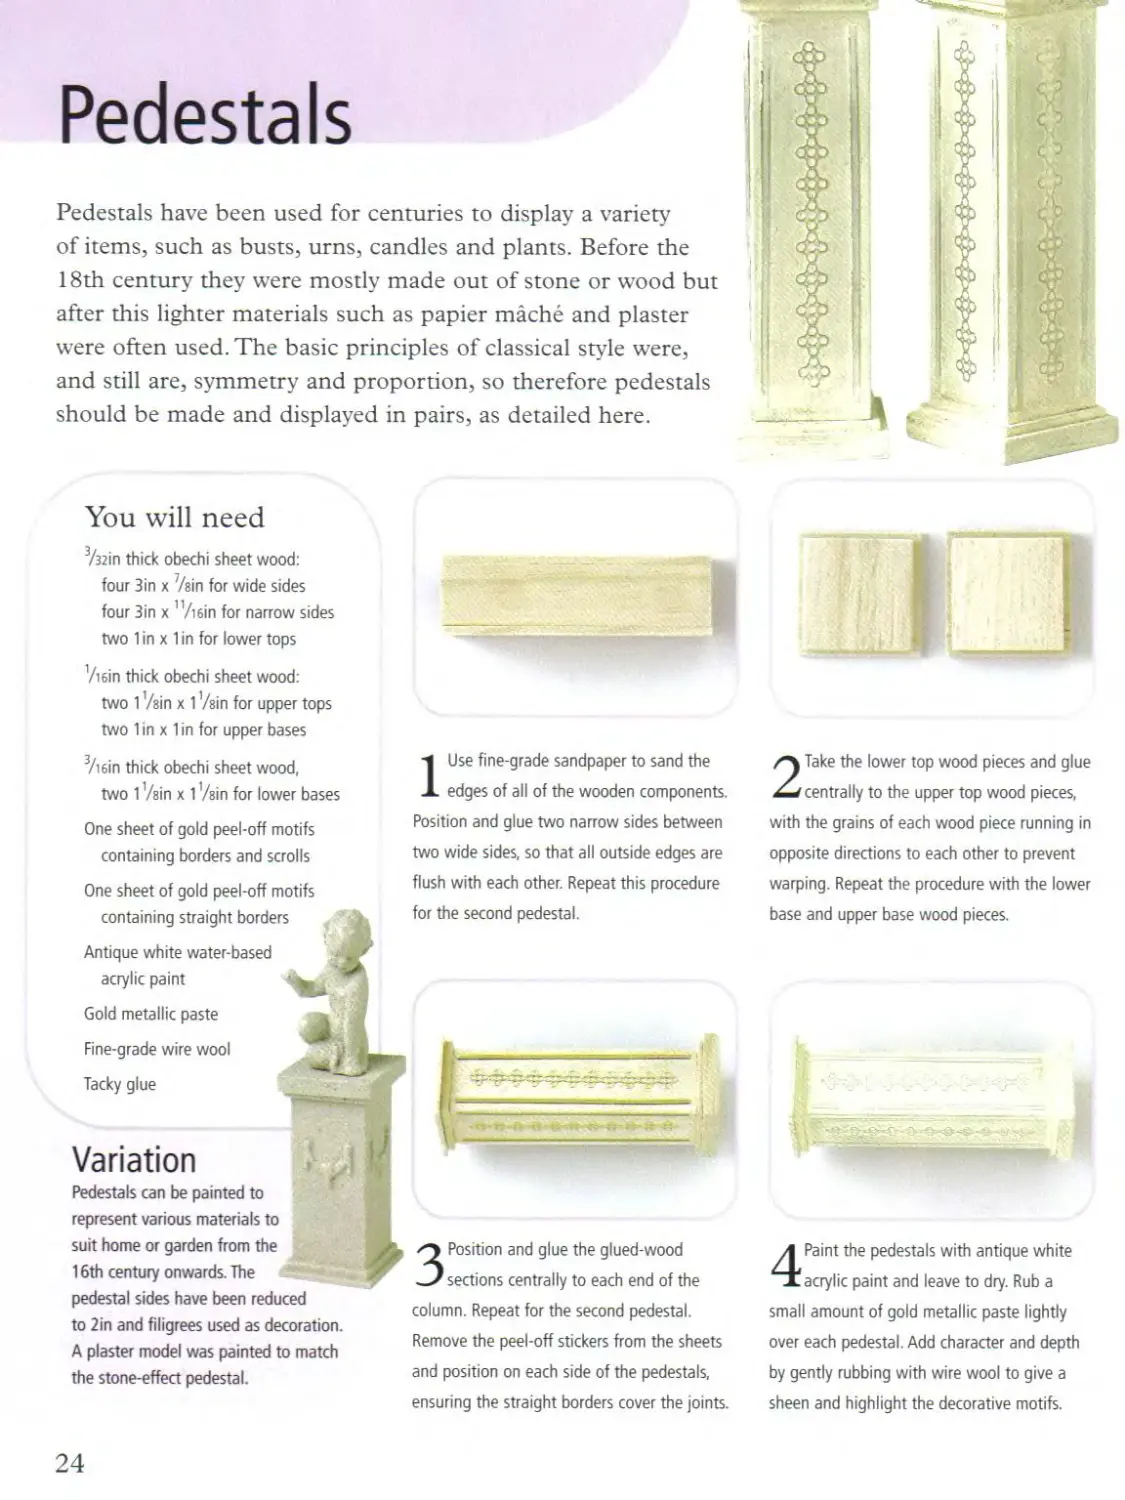
Pedestals
Pedestals have been used for centuries to display a variety
of items, such as busts, urns, candles and plants. Before the
18th century they were mostly made out of stone or wood but
after this lighter materials such as papier mache and plaster
were often used. The basic principles of classical style were,
and still are, symmetry and proportion, so therefore pedestals
should be made and displayed in pairs, as detailed here.
You will need
732in thick obechi sheet wood:
four 3in x Vein for wide sides
four 3in x n/iein for narrow sides
two 1 in x 1 in for lower tops
Viein thick obechi sheet wood:
two 1 Vein x 1 ’/sin for upper tops
two 1 in x 1 in for upper bases
3/i6in thick obechi sheet wood,
two 1 zein x 1 /ein for lower bases
One sheet of gold peel-off motifs
containing borders and scrolls
One sheet of gold peel-off motifs
containing straight borders
Antique white water-based
acrylic paint
Gold metallic paste
Fine-grade wire wool
Tacky glue
IUse fine-grade sandpaper to sand the
edges of all of the wooden components.
Position and glue two narrow sides between
two wide sides, so that all outside edges are
flush with each other. Repeat this procedure
for the second pedestal.
Variation
Pedestals can be painted to
represent various materials to
suit home or garden from the
16th century onwards. The
pedestal sides have been reduced
to 2in and filigrees used as decoration.
A plaster model was painted to match
the stone-effect pedestal.
2Take the lower top wood pieces and glue
centrally to the upper top wood pieces,
with the grains of each wood piece running in
opposite directions to each other to prevent
warping. Repeat the procedure with the lower
base and upper base wood pieces.
Position and glue the glued-wood
sections centrally to each end of the
column. Repeat for the second pedestal.
Remove the peel-off stickers from the sheets
and position on each side of the pedestals,
ensuring the straight borders cover the joints.
4 Paint the pedestals with antique white
acrylic paint and leave to dry. Rub a
small amount of gold metallic paste lightly
over each pedestal. Add character and depth
by gently rubbing with wire wool to give a
sheen and highlight the decorative motifs.
24
Ornamental Mask
A traditional feature of neo-classical interior design is the display of
classical Roman and Greek antiquities. Reproductions of statues and busts,
often carved out of stone or moulded from plaster and decorated, became
the vogue. This ornamental mask is made from a mould using polymer clay
which is then decorated to create the effect of stone. Moulds suitable for
making one-twelfth scale dolls’ house dolls can be purchased through craft
shops or from sugar-craft (cake-decorating) suppliers.
You will need
Face mould
Polymer day
Talcum powder
Stone-effect paint (or grey and
cream acrylic water-based
paint, mixed with a little sand
and tacky glue)
'/sin thick obechi sheet wood,
1/2in x '/2in
Cocktail stick
Tacky glue
IThe mould shown here is from a set
of body sugar-craft moulds. Before
using the mould dust it with talcum
powder each time.
2 Roll a ball of polymer clay to the
required size and shape it into a teardrop
as shown. Point the narrow end into the nose
of the mould, pressing and smoothing the
back as shown.
Variation
Sculptures made out of
plaster and resin are available from
egg-decorating suppliers and can be
decorated in many ways depending
upon your dolls' house needs. See
pedestal, left.
3Ease the clay gently out of the mould
and trim the neck. Harden the clay by
baking in a domestic oven following the
manufacturer's instructions. Once cool, use
a Viein drill bit and drill a hole up through
the neck.
4 Make a stand by drilling a Viein hole
through the centre of the piece of obechi
wood. Join the head and base using a short
length of cocktail stick. Paint with stone-effect
paint or with cream and grey acrylic paint
mixed with a little sand and tacky glue.
25
Neo-classical Vase
Neo-classicism was stimulated by the findings from archaeological
excavations of the classical ruins at Herculaneum and Pompeii in Italy
during the mid 18th century. Reproductions of ancient Greek and Roman
stoneware were made to complement the neo-classical style of interior
design and furnishing so popular during the mid-Georgian era. It would
be useful to read the tip below before beginning this project.
You will need
Packet of 3mm width quilling paper
Quilling tool
Stone-effect paint (or grey and cream
acrylic water-based paint, mixed
with a little sand and tacky glue)
Tacky glue
ITake a strip of quilling paper and place
one end into the slot at the top of the
quilling tool and begin to twist the handle.
At the same time wind the paper tightly and
neatly around the top of the tool until the
whole strip has been coiled. Secure the ends
with a dab of glue.
It is advisable to practise making
small single bowls and vases before
attempting the larger vase. Follow the
steps, first coiling paper to measure
approximately ’Ain diameter and using
the end of a pencil to press and ease it
into shape. Paint your bowls and vases
according to your requirements.
3 Following the previous steps make
another paper coil to measure 1 'Ain
diameter. Taking one of the coils, use your
fingers to gently and carefully press and ease
the paper outwards to form a bowl shape.
Repeat with the remaining paper coil.
2Take another strip of quilling paper and
dab glue on to one end. Place on the coil
so the glued area overlaps the previous end
and continue to wind around in the same
way. Remove from the quilling tool and repeat
the procedure, using your fingers, until the
paper coil measures 3Ain diameter.
4 Paint the bowls and fill the holes inside
and out with diluted tacky glue and
leave to dry. Position the larger bowl on top
of the upturned smaller bowl and glue into
position. Paint with stone-effect paint or with
a paint, sand and glue mixture.
26
Topiary Trees
Topiary, the art of cutting trees, bushes and hedges into
ornamental shapes, dates back to ancient times. Topiary
trees cut into shapes such as balls, cones and pyramids
became particularly fashionable during the 17th century
because of their symmetrical profile. It was the Victorians,
however, who developed topiary and created more unusual
irregular shapes such as animals.
You will need
Four cocktail sticks
Two 1 in egg-shaped paper balls
Green scenic scatter material
Two 1 in high terracotta plant pots
5mm width decorative braid,
8in length
Water-based acrylic paint
Gold metallic paste
Dry tea leaves
Tacky glue
Tip
When making topiary, unvarnished
wooden beads may be used to create
the rounded shapes instead of paper
balls, as in the tree, far right.
1 Paint two cocktail sticks with brown
acrylic paint to represent a tree trunk.
Use the remaining cocktail sticks to
temporarily hold the paper balls and paint
with green acrylic paint. Once dry, cover the
balls with diluted tacky glue, dip them into
the scatter material and leave to dry. If the
scatter coverage is insufficient repeat the
procedure after the glue has totally dried.
2 Position and glue the decorative braid
around the top of each plant pot. Paint
with acrylic paint and once dry rub over
with gold paste. Mix dry tea leaves with
tacky glue and press into each pot for soil.
Place a painted cocktail stick into each ball
and 'plant' before the soil mixture dries.
Variation
Paper balls are available
in a variety of sizes and shapes.
The triple-ball topiary tree has a hole
through the two largest balls so once
they have been covered with the scatter
material they can be threaded on to a
length of painted 73zin wood dowel.
27
Silhouettes
© ©
© ©
© ©
Silhouettes were a consequence of the neo-classical revival during the
18th century. The interior designs of Robert Adam favoured classical
profiles and it was during this time that silhouette art was at its peak,
coupled with the fact that other methods of capturing a person’s
likeness were expensive and time consuming. Miniature silhouettes
were either painted or cut out of black paper and mounted.
You will need
Gold-plated oval pendant frame,
5/i6in x Vein
Black enamel spray paint
White paper for photocopying
Tacky glue
*» • - _
* * ж • 1 ®
J &
Variation
By the late 18th and
early 19th centuries the
vogue for having a
profile captured meant
that many portrait
artists were able to
supplement their income
by painting inexpensive
silhouettes of each
family member. These
were often displayed in
groups or hung on a
ribbon. Make several
framed silhouettes, as
above, and glue them on
to 2mm wide silk ribbon,
topped with a bow (see
page 54 for making bows).
1 Spray the front of the frame with black
enamel spray paint. Colour photocopy
the small oval-bordered silhouette templates
on page 61 on to white paper.
2 Use small, sharp scissors to cut around
the border of a silhouette. Rub a small
amount of tacky glue on to the underside,
then position and glue the silhouette in the
centre of the black oval frame.
Variation
Silhouettes can be
given a different
appearance by being
enlarged and aged.
Photocopy the larger
oval silhouette templates on
page 61, as described in step 1 above,
and then age the silhouette by rubbing a
very light brown shoe polish over the
paper. A coat of 3-D gloss varnish (see
page 9) at the end of step 2 will give the
effect of a glass cover.
Tip
To antique a metal frame, spray the
front with black enamel spray paint.
Once dry, rub the smallest amount
of gold paste over the frame to
highlight any raised areas.
28
Country Style
Side Table
Side tables originated during the 15th century and were designed
to stand against a wall. However, it wasn’t until the 18th century
that they became fashionable (see also the console table, page 22).
The side table was used as an additional surface in the dining
room at mealtimes, a display table in the drawing room and a
place to leave your calling card in hallways of well-to-do homes. This table
has been painted and distressed to achieve the ‘look’ so often associated with country style.
You will need
Viein thick obechi sheet wood,
23/sin x 13/i ein for table-top
’/«in x Vain obechi strip wood:
two 2in lengths for long table-top
supports
two Vain for short table-top supports
’/ain x Vein obechi strip wood:
four 2Vain for legs
2in length for long leg support
two '/ein for short leg supports
Water-based acrylic paint
Water-based wood stain
Tacky glue
ISand each of the individual wooden
components. Place two legs, a short
table-top support and a short leg support
(positioned ’/ein from the end of each leg) in
a right-angled gluing jig (see page 8) and
glue together. Repeat the procedure with the
remaining two legs and short supports.
2 Once dry, take the leg constructions and
place downwards in a gluing jig. Position
the long table-top supports between the leg
structures and glue into place. Glue the long
leg support centrally between the two short
leg supports.
Variation
This side table was
shoe polished before
construction, with a
false drawer and
shelf added to the
basic structure. Use
the template on
page 62 to cut out
two wood pieces from Viein thick obechi
sheet wood. Position and glue one piece
under the table-top supports and the other
on top of the leg supports. Glue two
wooden drawer knobs to the front of the
false drawer to complete the look.
3Glue the table-top in position so that
at the back the side edge is flush with
the leg structure, while the remaining side
edges and front overhang by Viein. Paint
the table using water-based acrylic paints
(see page 12 for distressing technique).
30
Side Chair
Back stools, literally a stool with a back, evolved at the
beginning of the 17th century. They were used primarily in
upper class homes at mealtimes, and when not in use they
would line the walls of the room. By the beginning of the
18th century, full and elaborate sets of armless side chairs
were being made for dining rooms and reception halls.
Country-style versions were less ornate and often painted.
You will need
/sin x '/sin obechi strip wood:
two 27/sin lengths for back leg
two 1 Vein lengths for front legs
six 1 in lengths for slats
’Ain x Vein obechi strip wood,
four 1 in lengths for seat supports
’/win thick obechi sheet wood,
I'Ain x l’Ain for seat
Water-based acrylic paints
Water-based wood stain
Tacky glue
ESHS
ISand each of the wooden components.
Position a slat and a seat support
between two front legs, place into a right-
angled gluing jig (see page 8) and glue into
position, referring to the template on page 62.
2 Position three slats and a seat support
between two back legs, place into the
gluing jig and glue into position, referring to
the template on page 62.
Variation
Since its introduction
in the 1660s cane-
seated furniture has
been popular due to
the lightness,
durability and
elasticity of cane. This
seat is made using the
instructions above but
substituting the seat wi
fora 13/iein
square piece of brown tapestry canvas (18
holes to the inch). Remove a 732in square
from the comers on one side and glue on
to the seat frame.
3Tum the back and front constructions
on their sides and place into the jig.
Position and glue a slat and seat support
between the leg structures and in line with
the other supports. Repeat the procedure
on the opposite side of the chair.
4Take the seat piece and mark '/ein square
out of the comers on a side that has the
grain running along. Remove the two
sections, first cutting against the grain to
avoid splitting. Glue the seat on the frame
and once dry see page 12 for paint distressing.
31
Wall Shelves
Developments in the production of books at the
beginning of the 19th century increased the popularity
of reading; previously it had been an occupation of only
the very wealthy. Small sets of open shelves suitable for
displaying and storing books, together with china and
other ornaments, became a popular wall accessory.
You will need
Vain x Vi6in obechi strip wood,
two 1 Vein lengths for sides
'/rein x ’/win obechi strip wood,
two 21/?in lengths for shelves
'/sin x '/rein obechi strip wood,
two 1 Vein for back supports
vein diameter hardwood dowel
This is a slightly more elaborate set of
polished wall shelves. Follow step 1 above
and then place the shelf sides together and
mark Vi 6in from the straight end. Sand and
shape the wood at the marked point using
the dowel and sandpaper tool. Colour the
wooden components with brown shoe
polish, buffing to a sheen with wire
wool before assembling.
ITake a back support wood piece and
mark '/sin along from one comer of the
wood. Join the mark to the corner opposite
and remove the triangular section. Use fine-
grade sandpaper to gently sand the wood
smooth. Repeat the procedure with the other
back support.
3 Position the side wood pieces to be a
mirror image of each other. From the
straight end on each, mark across at '/sin and
then 1 in. Sand the remaining wooden
components using fine-grade sandpaper and
then stain with a light brown wood stain.
2Take the side wood pieces and mark Viein
along from one comer on each and
remove the triangular sections. Wind a piece
of fine-grade sandpaper around the piece of
dowel, place the two side wood pieces
together and sand and shape the cut sections
of the wood as shown.
4 Position and glue the back supports on
top of the side wood pieces as shown,
keeping all side edges flush. Take the two
shelf wood pieces and position and glue the
ends of each in line with the pencil marks on
the shelf sides.
32
Books
Towards the end of the Victorian era, advances in printing techniques
and processes meant that books became available to a mass market.
Here we are creating the effect of a pile or row of books for the country-
style wall shelves described opposite. Even though each book is created
individually, they are not made with fine detail, that is, with separate pages
and a printed front cover, as it would take forever to fill the shelves!
fell
You will need
Vain x 732in obechi strip wood,
4in length
Vein x 3/з2ш obechi strip wood,
3in length
Vzin x Viein obechi strip wood,
4in length
Vein x Viein obechi strip wood,
3in length
Selection of coloured pastel paper
Water-based acrylic paint
Brown and black shoe polish
Gold metallic paste
Tacky glue
ITake the Vain x 3/32in strip of wood and
use fine-grade sandpaper to gently round
one long side edge, to create the effect of the
book spine. Cut the strip into Vein lengths
using either a mitre block and saw or mitre
cutters. Sand any rough edges.
2 Cut out a book cover from the pastel
paper and rub the outside of the paper
with a small amount of shoe polish or gold
metallic paste to age it. Rub paste or shoe
polish along the straight outside edges
of a wooden block to create the effect
of the pages.
Book sizes
Follow the guide below to make different
sized books:
’Zzin x 3/32in obechi strip - Vein spine length;
Vein x 3/32in obechi strip - 'Ain spine length;
'Ain x Viein obechi strip - Vsin spine length;
Vein x Viein obechi strip - Viein spine length.
«
3Rub a thin, even layer of tacky glue on
the inside of the book cover and glue on
to the block of wood. Use the blunt edge of a
knife to make horizontal indentations on the
spine of the book. Make more books using
the remaining strip wood - see guide, left.
4 As an alternative to making paper book
covers, paint some wooden blocks using
water-based acrylic paints. Age the painted
cover by lightly rubbing over shoe polish or
gold paste. Position the painted books
between paper-covered books for best results.
33
Log Basket
Basket making is an ancient craft and the principles of making
and weaving baskets out of natural materials has altered little since
primitive times. For many centuries wicker baskets, with their
lightness and durability, have been an invaluable means of storing
and transporting goods. Developments in technology during the
20th century have caused a decline in the use of wicker baskets.
You will need
24-gauge white paper-covered floral wire:
nine 7in lengths for stakes
two 1 Vain lengths for handles
two 1 in lengths for inside handles
Brown waxed thread, 15m (16yd)
Medium oak water-based wood stain
Cocktail stick
Tacky glue
Dried twigs for logs
1 Stain all of the paper-covered wire with
medium oak wood stain and leave to dry.
Lay four stakes centrally on top of the
remaining five stakes as shown above.
2 Take the waxed thread and fold over a
Sin length to form a loop. Begin to
secure the stakes together by placing the loop
around one group of stakes as shown above.
Tip
Use mitre cutters or a saw and
mitre block (shown on page 12)
to cut dried twigs to fill your
basket with miniature logs.
ЗТаке the thread that is under the first
group of stakes, over the top of the
second group of stakes. The thread that is
over the first group should be brought under
the second group of stakes.
4 Continue this under-and-over pattern
neatly and evenly around the groups of
stakes in three full circles. Trim the short
excess length of weaving thread, dabbing on
a tiny amount of tacky glue to hold it in place.
34
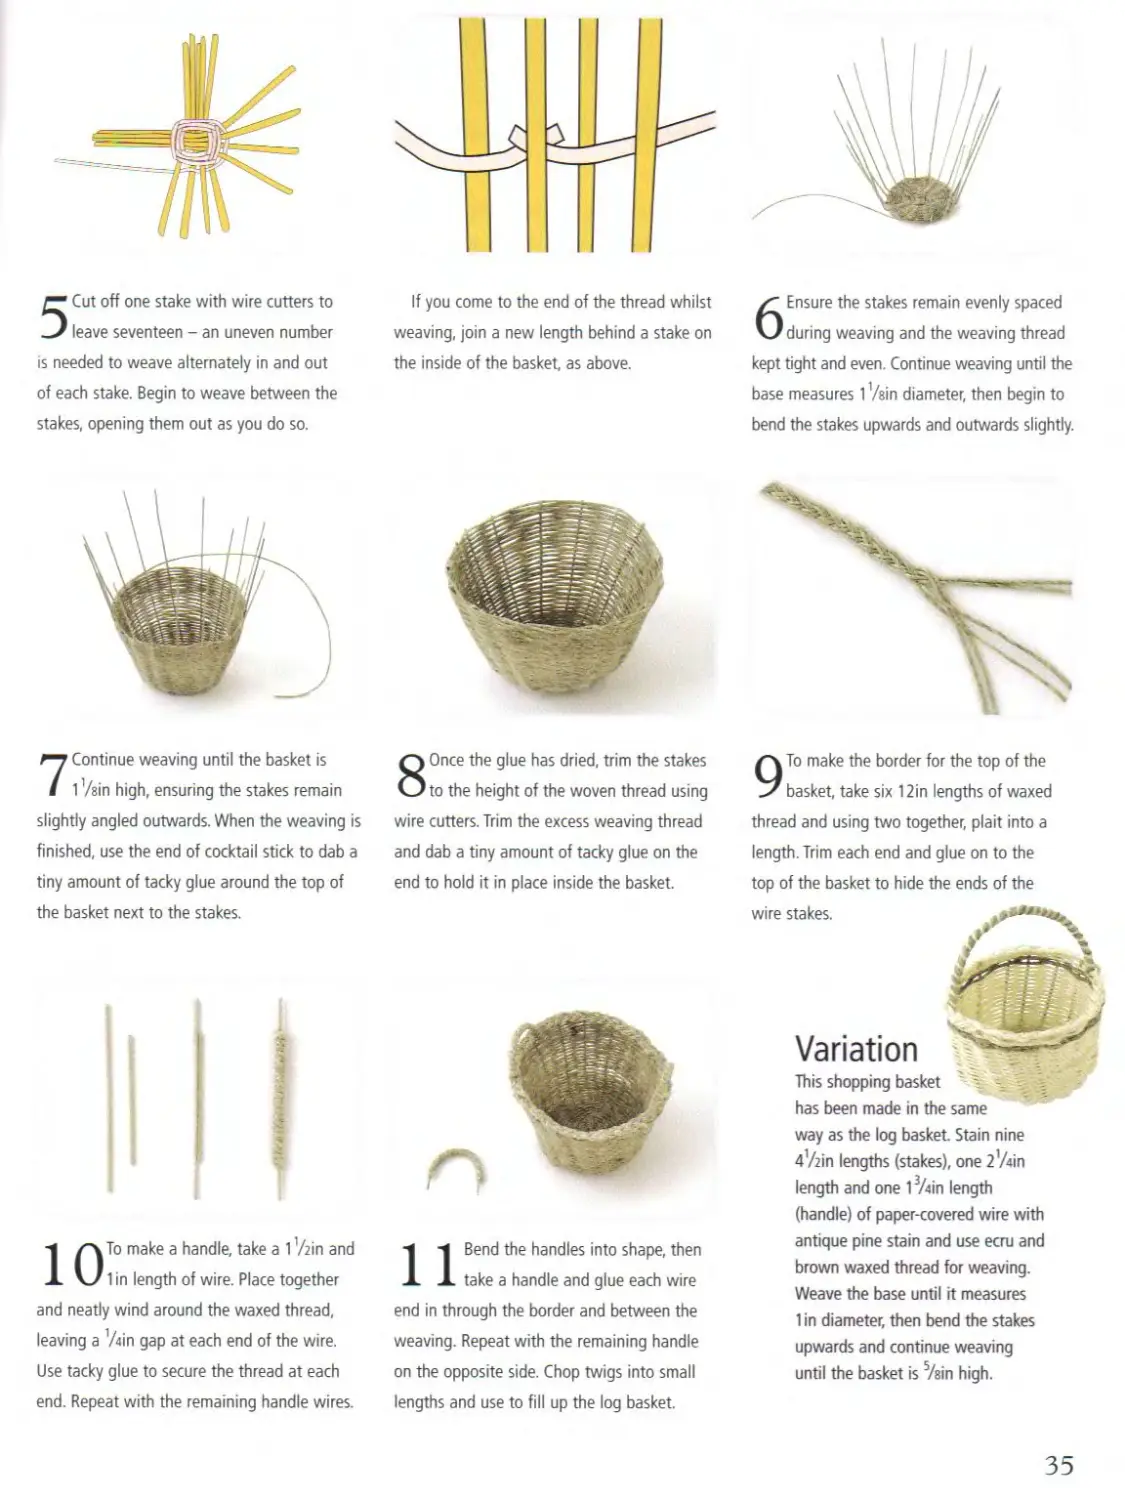
5 Cut off one stake with wire cutters to
leave seventeen - an uneven number
is needed to weave alternately in and out
of each stake. Begin to weave between the
stakes, opening them out as you do so.
If you come to the end of the thread whilst
weaving, join a new length behind a stake on
the inside of the basket as above.
6 Ensure the stakes remain evenly spaced
during weaving and the weaving thread
kept tight and even. Continue weaving until the
base measures 1 Vein diameter, then begin to
bend the stakes upwards and outwards slightly.
7 Continue weaving until the basket is
1 '/sin high, ensuring the stakes remain
slightly angled outwards. When the weaving is
finished, use the end of cocktail stick to dab a
tiny amount of tacky glue around the top of
the basket next to the stakes.
8 Once the glue has dried, trim the stakes
to the height of the woven thread using
wire cutters. Trim the excess weaving thread
and dab a tiny amount of tacky glue on the
end to hold it in place inside the basket.
WTo make a handle, take a 1 'Zzin and
1 in length of wire. Place together
and neatly wind around the waxed thread,
leaving a ’/«in gap at each end of the wire.
Use tacky glue to secure the thread at each
end. Repeat with the remaining handle wires.
14 Bend the handles into shape, then
X take a handle and glue each wire
end in through the border and between the
weaving. Repeat with the remaining handle
on the opposite side. Chop twigs into small
lengths and use to fill up the log basket.
9 To make the border for the top of the
basket, take six 12in lengths of waxed
thread and using two together, plait into a
length. Trim each end and glue on to the
top of the basket to hide the ends of the
wire stakes.
Variation
This shopping basket
has been made in the same
way as the log basket Stain nine
4’/zin lengths (stakes), one 2'Ain
length and one 17«п length
(handle) of paper-covered wire with
antique pine stain and use ecru and
brown waxed thread for weaving.
Weave the base until it measures
1 in diameter, then bend the stakes
upwards and continue weaving
until the basket is Vein high.
35
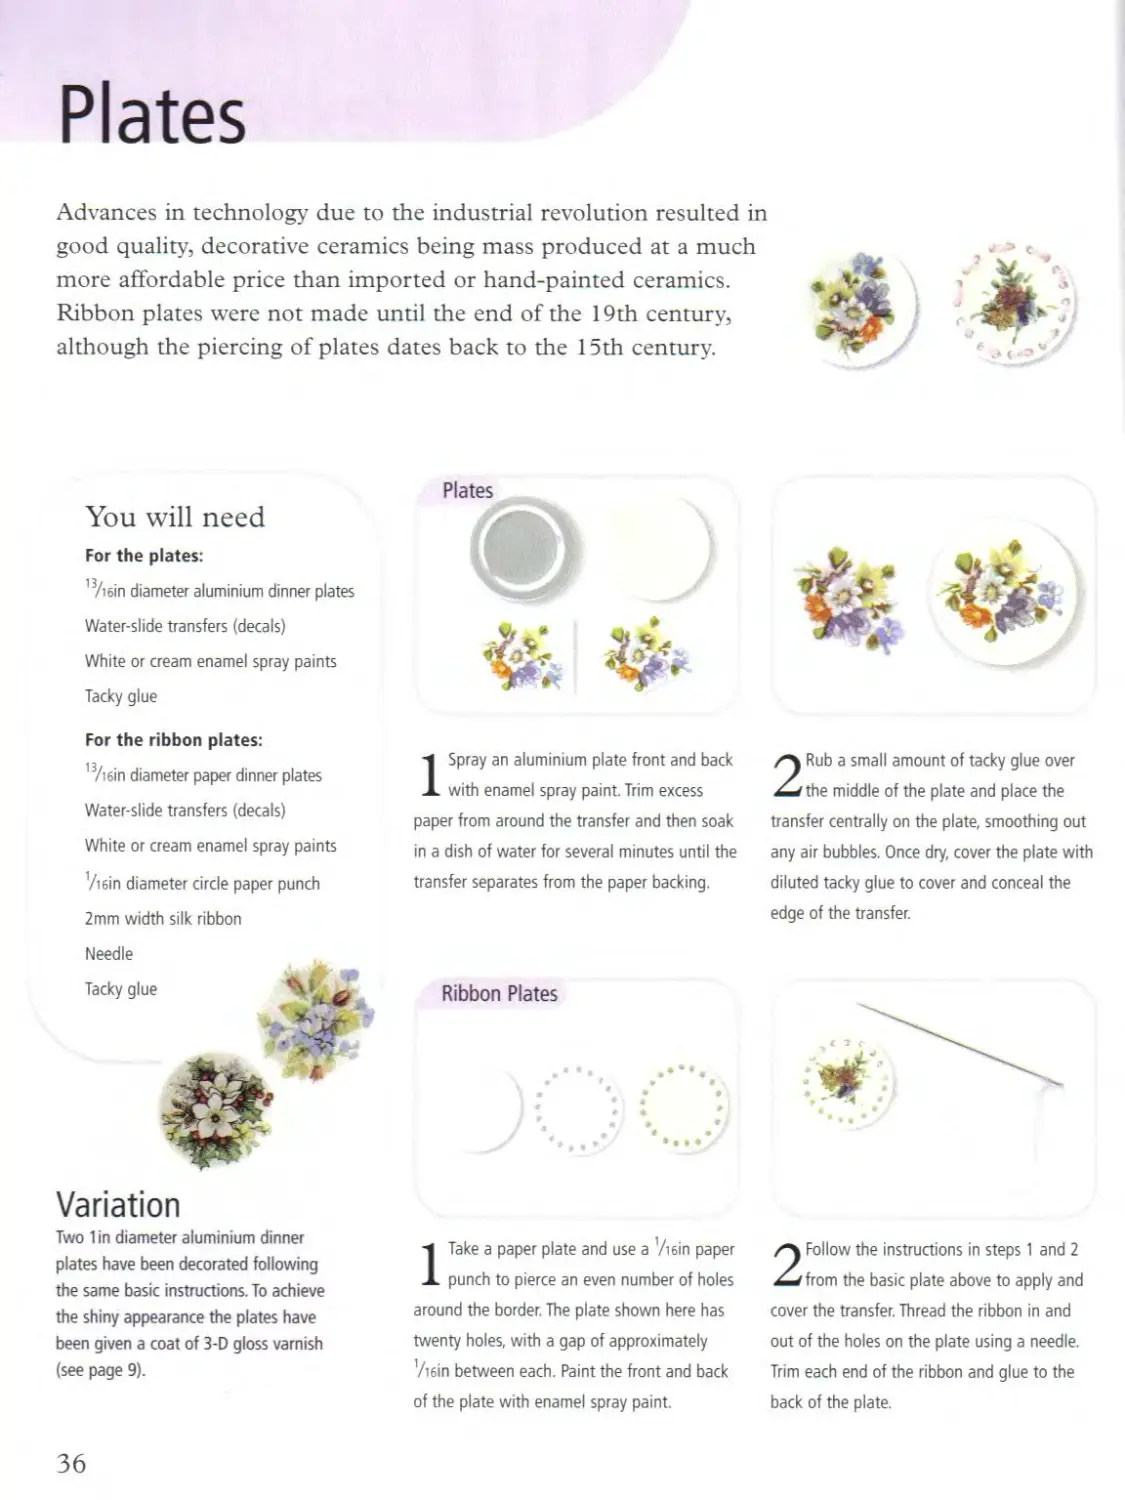
Plates
Advances in technology due to the industrial revolution resulted in
good quality, decorative ceramics being mass produced at a much
more affordable price than imported or hand-painted ceramics.
Ribbon plates were not made until the end of the 19th century,
although the piercing of plates dates back to the 15th century.
*
You will need
For the plates:
1 Viein diameter aluminium dinner plates
Water-slide transfers (decals)
White or cream enamel spray paints
Tacky glue
For the ribbon plates:
,3/i6in diameter paper dinner plates
Water-slide transfers (decals)
White or cream enamel spray paints
’/win diameter circle paper punch
2mm width silk ribbon
Needle
1 Spray an aluminium plate front and back
with enamel spray paint. Trim excess
paper from around the transfer and then soak
in a dish of water for several minutes until the
transfer separates from the paper backing.
2 Rub a small amount of tacky glue over
the middle of the plate and place the
transfer centrally on the plate, smoothing out
any air bubbles. Once dry, cover the plate with
diluted tacky glue to cover and conceal the
edge of the transfer.
Ribbon Plates
Variation
Two 1 in diameter aluminium dinner
plates have been decorated following
the same basic instructions. To achieve
the shiny appearance the plates have
been given a coat of 3-D gloss varnish
(see page 9).
ITake a paper plate and use a ’/rein paper
punch to pierce an even number of holes
around the border. The plate shown here has
twenty holes, with a gap of approximately
'/win between each. Paint the front and back
of the plate with enamel spray paint.
2 Follow the instructions in steps 1 and 2
from the basic plate above to apply and
cover the transfer. Thread the ribbon in and
out of the holes on the plate using a needle.
Trim each end of the ribbon and glue to the
back of the plate.
36
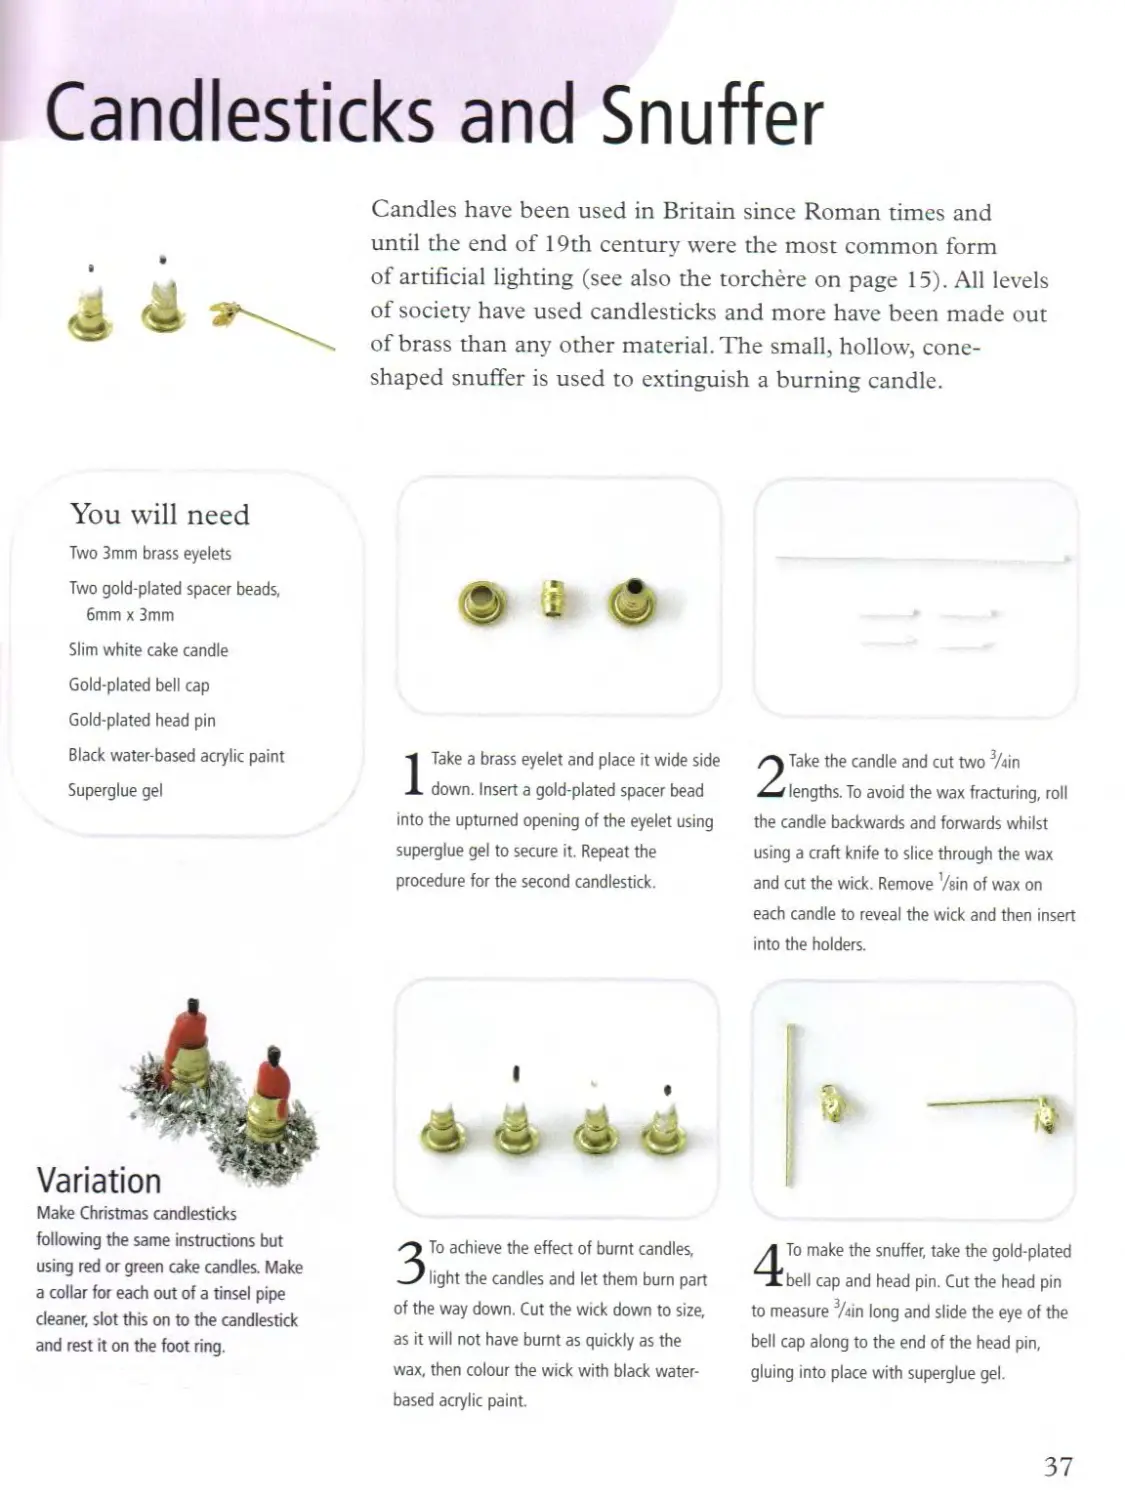
Candlesticks and Snuffer
Candles have been used in Britain since Roman times and
until the end of 19th century were the most common form
of artificial lighting (see also the torchere on page 15). All levels
of society have used candlesticks and more have been made out
of brass than any other material. The small, hollow, cone-
shaped snuffer is used to extinguish a burning candle.
You will need
Two 3mm brass eyelets
Two gold-plated spacer beads,
6mm x 3mm
Slim white cake candle
Gold-plated bell cap
Gold-plated head pin
Black water-based acrylic paint
Superglue gel
i
ITake a brass eyelet and place it wide side
down. Insert a gold-plated spacer bead
into the upturned opening of the eyelet using
superglue gel to secure it. Repeat the
procedure for the second candlestick.
2 Take the candle and cut two 3Ain
lengths. To avoid the wax fracturing, roll
the candle backwards and forwards whilst
using a craft knife to slice through the wax
and cut the wick. Remove Vein of wax on
each candle to reveal the wick and then insert
into the holders.
I
< «Св
® -—Э
Make Christmas candlesticks
following the same instructions but
using red or green cake candles. Make
a collar for each out of a tinsel pipe
cleaner, slot this on to the candlestick
and rest it on the foot ring.
3To achieve the effect of burnt candles,
light the candles and let them bum part
of the way down. Cut the wick down to size,
as it will not have burnt as quickly as the
wax, then colour the wick with black water-
based acrylic paint.
4To make the snuffer, take the gold-plated
bell cap and head pin. Cut the head pin
to measure 3Ain long and slide the eye of the
bell cap along to the end of the head pin,
gluing into place with superglue gel.
37
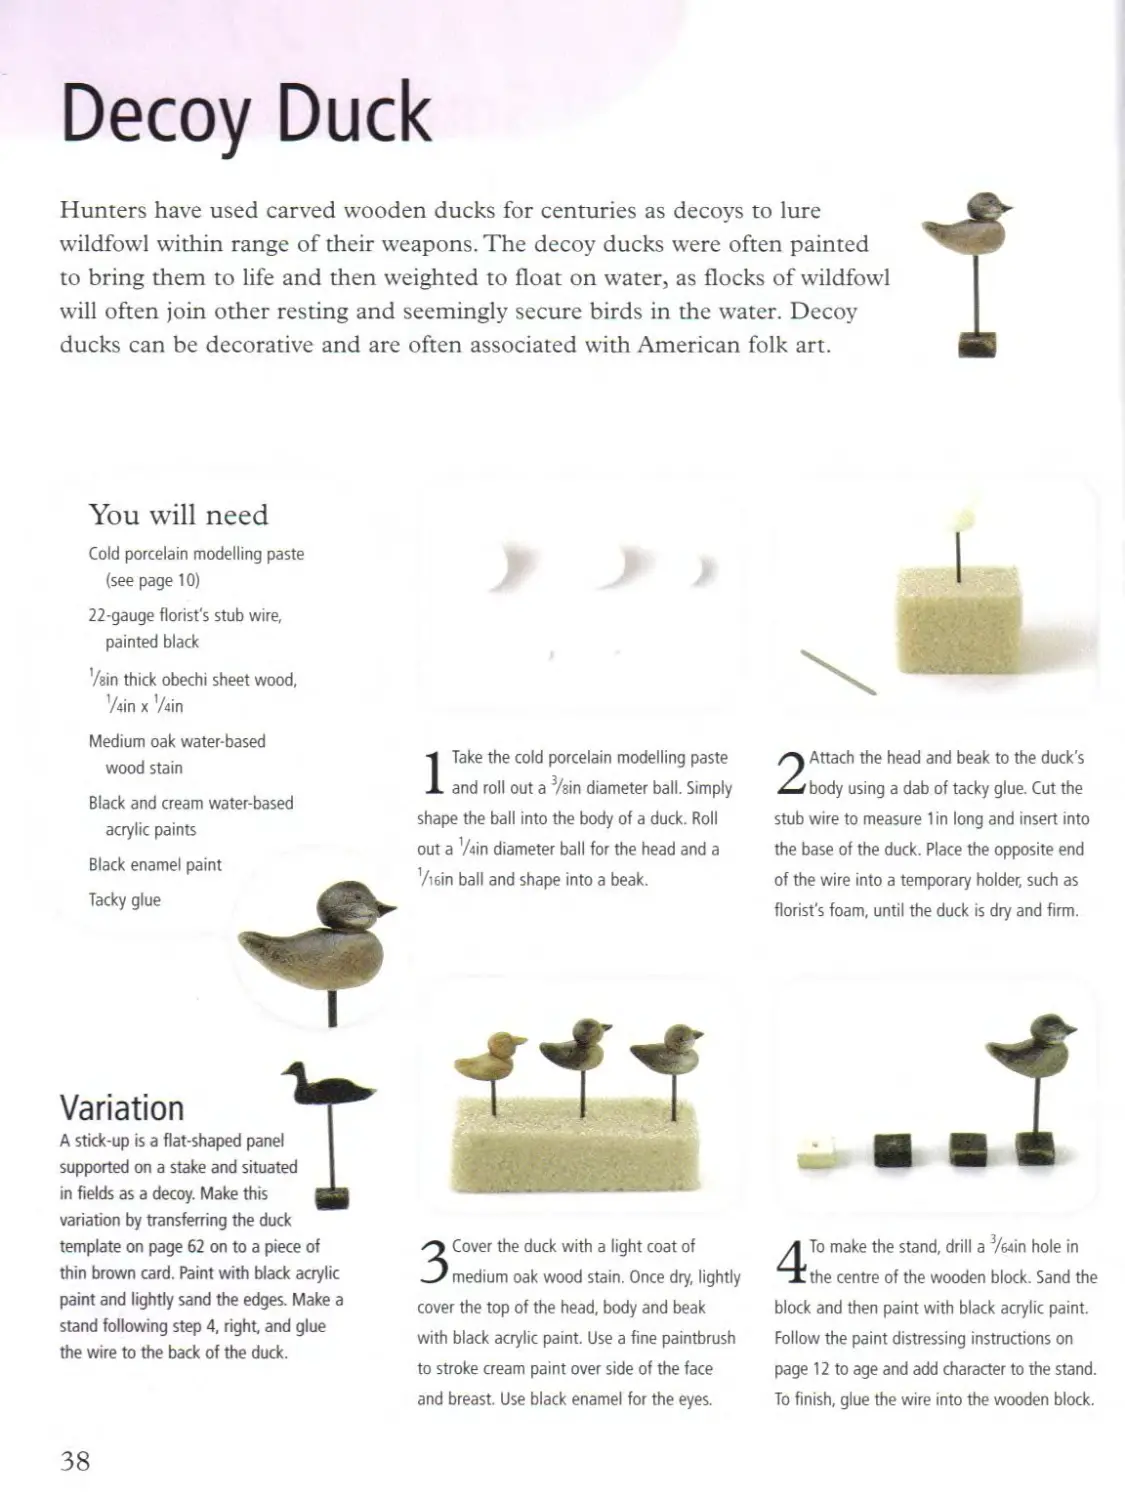
Decoy Duck
Hunters have used carved wooden ducks for centuries as decoys to lure
wildfowl within range of their weapons. The decoy ducks were often painted
to bring them to life and then weighted to float on water, as flocks of wildfowl
will often join other resting and seemingly secure birds in the water. Decoy
ducks can be decorative and are often associated with American folk art.
You will need
Cold porcelain modelling paste
(see page 10)
22-gauge florist's stub wire,
painted black
Vein thick obechi sheet wood,
/«in x ’/«in
Medium oak water-based
wood stain
Black and cream water-based
acrylic paints
Black enamel paint
Tacky glue
Variation
A stick-up is a flat-shaped panel
supported on a stake and situated I
in fields as a decoy. Make this
variation by transferring the duck
template on page 62 on to a piece of
thin brown card. Paint with black acrylic
paint and lightly sand the edges. Make a
stand following step 4, right, and glue
the wire to the back of the duck.
ITake the cold porcelain modelling paste
and roll out a Vein diameter ball. Simply
shape the ball into the body of a duck. Roll
out a ’/«in diameter ball for the head and a
Viein ball and shape into a beak.
3 Cover the duck with a light coat of
medium oak wood stain. Once dry, lightly
cover the top of the head, body and beak
with black acrylic paint. Use a fine paintbrush
to stroke cream paint over side of the face
and breast. Use black enamel for the eyes.
2 Attach the head and beak to the duck's
body using a dab of tacky glue. Cut the
stub wire to measure 1 in long and insert into
the base of the duck. Place the opposite end
of the wire into a temporary holder, such as
florist’s foam, until the duck is dry and firm.
4 To make the stand, drill a 3/e«in hole in
the centre of the wooden block. Sand the
block and then paint with black acrylic paint.
Follow the paint distressing instructions on
page 12 to age and add character to the stand.
To finish, glue the wire into the wooden block.
38
Victorian Values
Hat and Coat Rack
Hooks and racks for hanging up coats and hats were
to be found in entrance halls of many middle class
homes during the Victorian and Edwardian eras. Large
hallways would have been furnished with a hall stand,
a functional piece of furniture used to deposit hats,
coats, boots, umbrellas and walking sticks. This rack
is ideal for a more confined space.
You will need
3/32in obechi thick sheet wood,
two 1 in x 1 in for sides
Vain x '/sin obechi strip wood,
2/2in length for hook support
Vein x '/rein obechi strip wood:
2/2in length for back support
five 2 Vain lengths for slats
Three 14mm wooden belaying pins
for hooks
Dark wood stain or shoe polish
Tacky glue
1 Transfer the coat and hat rack side
template on page 62 on to the two
pieces of sheet wood and use mitre cutters
or a craft knife to remove excess wood. Sand
the edges smooth using fine-grade sandpaper.
Sand the strip wood pieces too.
2 Take the hook support and transfer the
drill hole positions from the template on
page 62 on to the wood piece. Use a '/win
drill bit to drill the holes part-way through the
wood. Use a dark-coloured wood stain or
shoe polish on all of the wooden components.
Variation
These simple racks of hooks are suitable
from the Victorian era and onwards. Take a
2in length of ’/sin x '/sin obechi strip wood
and transfer the drill hole positions on page
62. Follow steps 2 and 3, using four 14mm
wooden belaying pins.
3 Remove part of the straight section of
wood from the belaying pins using mitre
cutters, leaving Viein attached to the turned
head. Glue the straight ends of the belaying
pins into the holes on the hook support.
4 Position and glue the hook support and
back support between the two sides and
leave to dry. Referring to the main photograph
at the top of the page, glue two slats on top
of the rack, in line with the back and front,
and the other three slats in between.
40
Boater
Popular during the Victorian and Edwardian eras, this simply
made boater is a decorative addition to the coat and hat rack opposite.
Although traditionally made from straw, this gentleman’s boater is made
out of canvas. This method can be used to make a wide variety of hats by simply altering the
size and shape of the hat block and brim. Felt or leather may be used as alternative materials.
You will need
Canvas (suit interlining)
Hat block (see step 1)
Small elastic band
3mm width black silk ribbon
Tacky glue
Variation
This hat has been made using a dome-
shaped hat block and increasing the size
of the brim to 1 Vein. Shape the brim by
dampening slightly and holding in shape
until dry. Further decoration may be added
to this hat, although if finely adorned it
would have been stored in a hat box
rather than on a hat rack.
The crown of the boater is made by
moulding the canvas over a hat block,
such as a bottle top or wooden dowel
measuring approximately 3Ain diameter. Cut
a piece of canvas 2'/zin x 2’/2in and soak in
warm water for a minute.
3 Cover a 1 '/zin x 1’/zin piece of canvas on
one side with diluted tacky glue and
leave to dry. Draw a 13/ein diameter circle on
the glued side (underside) of the canvas,
followed by a circle in the centre slightly
smaller than the size of the crown and cut out.
2 Place the soaked canvas around the top
of the mould and hold in place with a
small elastic band. Manipulate the material
until the canvas on top of the mould is flat
and the outside, above the elastic band, is
smooth. Once totally dry, remove and trim to
measure ’Ain high.
4Glue the crown on to the brim, with the
glued side downwards. Trim the boater
with a length of 3mm black silk ribbon. Make
a bow as described on page 54, remove the
ends and then flatten and glue it on, to cover
the join in the ribbon band.
41
Stick Stand
During the Victorian and Edwardian eras, many entrance
halls would have been furnished with a stick stand. Even
though a stick stand was a practical piece of furniture, they
were considered decorative when filled with the many walking
sticks owned by the gentleman of the house. Mass production
during the mid 19th century ensured that there were sticks
available and affordable for a variety of occasions and purposes.
You will need
’/з21П thick card, 1 Van x 7/sin
Vein x Vein obechi strip wood:
four 2V2in lengths for legs
four 1 Vein lengths for front and
back supports
six 74in lengths for side and
middle supports
’Azin thick obechi sheet wood,
four 1 * 3/iein x 3/i6in
Dark wood stain or shoe polish
Black and silver water-based
acrylic paints
Tacky glue
1 Transfer the tray measurements from the
template on page 62 on to the thick card
and cut out. Paint the card with a mixture of
black and silver acrylic paint to give the effect
of a metallic tray base. Once dry, repeat the
procedure on the other side of the card.
2 Sand and stain or shoe polish the
wooden components. Take two legs and
on each mark Vein along from each end. Place
into a right-angled gluing jig (see page 8) and
position and glue two front supports between
the legs, as shown. Repeat with the remaining
legs and back supports.
Variation
Not all Victorian and
Edwardian hallways
were spacious, so
you could make a
smaller version of
the stick stand by
altering the
measurements of the front and back
supports to Vein. See template on page 62
for the tray measurements.
3 Place the front and back sections into
the gluing jig and glue the two side
supports between, as shown. Once dry,
position and glue two supports centrally into
the stand and the remaining ones on to the
opposite side.
4 Position and glue the tray underneath
the stand. To complete, glue the squares
of sheet wood on top of the legs.
42
Walking Sticks
For many centuries walking sticks (canes) have been considered a status
symbol - the larger and more decorative the stick, the higher the rank or
class of the owner. During the 19th century walking sticks were regarded
as a fashionable accessory rather than an aid to walking, and it was unlikely
a gentleman would have been seen out and about without one. Ebony
walking sticks were a popular fashionable accessory for the evening.
You will need
/i6in diameter hardwood dowel,
two 3in lengths
Aluminium foil,
five pieces 5/i6in x ’/isin
4mm round silver bead
4mm round black bead
Centre (reed) cane size 3,
5in length
Black enamel paint
Silver water-based acrylic paint
Wood stain or shoe polish
Tacky glue
Silver-topped Stick
Stain or shoe polish a length of dowel. Shave
one end and glue on a silver bead. Wind a
length of aluminium foil around the shaft
below the bead and glue in place for a collar.
Repeat with another piece of foil to make a
ferrule (tip) and glue into place. Touch up each
end of the stick with silver acrylic paint.
Curved-handled Stick
Stain a 5in length of size 3 centre cane. Soak
in warm water for 20 minutes and then bend
one end over a pencil. Hold in place with a
clothes peg and straighten the opposite end.
Once dry, trim the handle and stick to 3’/ein.
Make a ferrule, as described above.
Ebony Stick
Take a length of dowel and paint with black
enamel paint. Once dry, make a knob (using a
black bead), collar and ferrule for the stick, as
described left
Variation
Porcelain knobs on sticks were
fashionable during the 19th century.
Follow the instructions for the silver-
topped stick but replace the silver
bead with a porcelain or
opaque glass bead. Wind
28-gauge wire
immediately below the
bead as an alternative
collar. Gold foil is
available from craft
shops and can be used
as an alternative to
aluminium foil.
43
Plant Stand
The introduction of mass-produced furniture from about the 1850s onwards
enabled many Victorians to fulfill their need to buy and accumulate decorative
possessions for their homes. Not all furniture was made from quality wood
but the Victorians were particularly good at imitating superior finishes on
inferior-made items. This effective but simply made wooden plant stand is
suitable to either the Victorian or Edwardian eras.
You will need
3/з21п thick obechi sheet wood,
two 1 in x 1 in
Round-ended spindle
Dark wood stain or shoe polish
Tacky glue
ITake a wood piece and use a pencil and
ruler to draw a line from corner to comer
to find the centre. Measure and mark 3/i6in
from each corner then join the marks
using a pencil and ruler.
2 Remove the comer sections using either
mitre cutters or a craft knife. Chamfer
the edges of the wood piece, on the side
without the pencil marks, to an angle of 45
degrees using fine-grade sandpaper (see Basic
Techniques page 12). Repeat steps 1 and 2
with the second piece of wood.
Variation
For a more
contemporary look
make a plant stand as
described above
but decorate
it with a
distressed paint
finish in cream or a colour
to complement your dolls' house
decor (see page 12 for distressing
technique instructions).
3 Measure the diameter of the wide end of
your spindle and using the same sized
drill bit, drill a hole centrally straight through
a wood piece for the base. On the second
piece, drill a hole the same size but only half-
way through for the top.
4 Cut the narrow end off the spindle and
sand smooth. Stain or shoe polish all the
wooden components. Glue the straight end of
the spindle into the base, chamfered side up.
Glue the top into position, with the wood
grain of both pieces in line with the base.
44
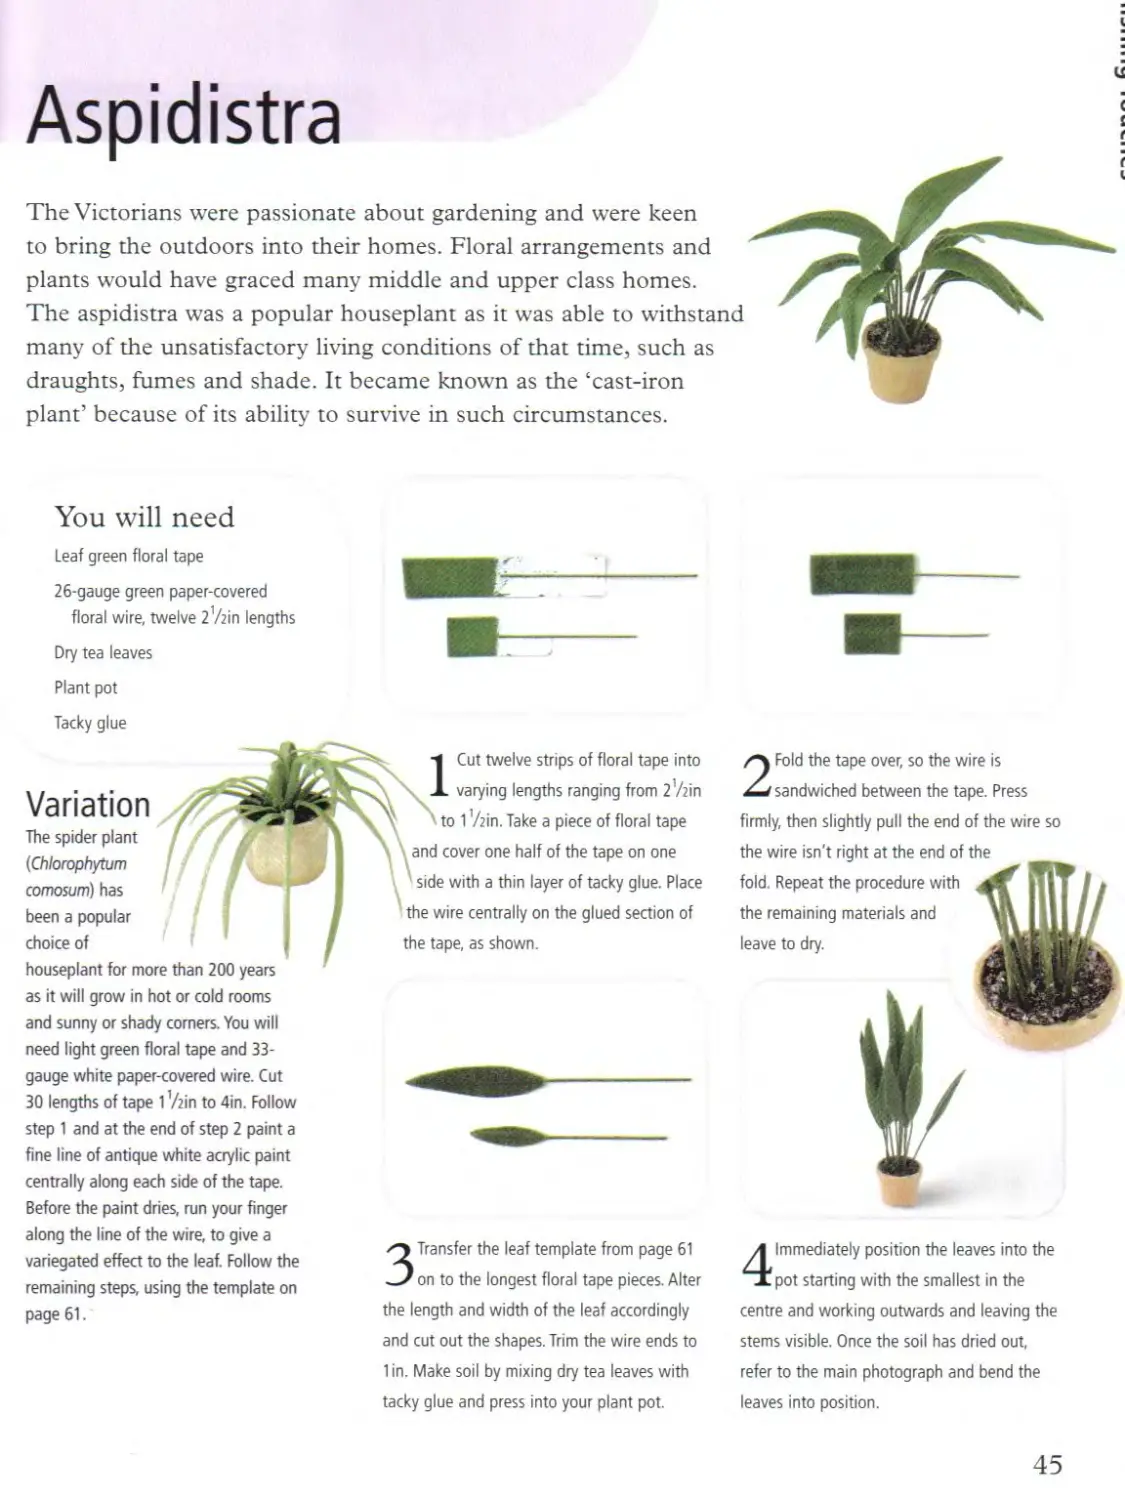
Aspidistra
The Victorians were passionate about gardening and were keen
to bring the outdoors into their homes. Floral arrangements and
plants would have graced many middle and upper class homes.
The aspidistra was a popular houseplant as it was able to withstand
many of the unsatisfactory living conditions of that time, such as
draughts, fumes and shade. It became known as the ‘cast-iron
plant’ because of its ability to survive in such circumstances.
You will need
Leaf green floral tape
26-gauge green paper-covered
floral wire, twelve Z'/tin lengths
Dry tea leaves
Plant pot
Tacky glue
Variation
The spider plant
(Chlorophytum
comosum) has
been a popular
choice of
houseplant for more than 200 years
Cut twelve strips of floral tape into
varying lengths ranging from 2'Ain
to 1 'Ain. Take a piece of floral tape
and cover one half of the tape on one
with a thin layer of tacky glue. Place
the wire centrally on the glued section of
the tape, as shown.
2 Fold the tape over, so the wire is
sandwiched between the tape. Press
firmly, then slightly pull the end of the wire so
the wire isn't right at the end of the
as it will grow in hot or cold rooms
and sunny or shady comers. You will
need light green floral tape and 33-
gauge white paper-covered wire. Cut
30 lengths of tape 1'Ain to 4in. Follow
step 1 and at the end of step 2 paint a
fine line of antique white acrylic paint
centrally along each side of the tape.
Before the paint dries, run your finger
along the line of the wire, to give a
variegated effect to the leaf. Follow the
remaining steps, using the template on
page 61.
3 Transfer the leaf template from page 61
on to the longest floral tape pieces. Alter
the length and width of the leaf accordingly
and cut out the shapes. Trim the wire ends to
1 in. Make soil by mixing dry tea leaves with
tacky glue and press into your plant pot.
4 Immediately position the leaves into the
pot starting with the smallest in the
centre and working outwards and leaving the
stems visible. Once the soil has dried out,
refer to the main photograph and bend the
leaves into position.
45
Framed Photographs
William Fox Talbot (1800-77) pioneered photography in the
1830s. During the Victorian and Edwardian eras, visits to the
photographer’s studio for formal family portraits were
fashionable and often whole walls in the home were covered with
framed photographs. By the end of the 19th century the simple
box ‘Brownie’ and the Kodak camera allowed many people to
take photographs themselves and amateur photography boomed.
You will need
White card for colour photocopying
Neutral-coloured paper for mounts
Paper punches:
1.5cm diameter circle,
1cm diameter circle,
1 cm square,
1.3cm x 0.7cm rectangle
Vein x '/i6in jelutong strip wood
3/з21п x ’/win jelutong strip wood
Viein x '/iein jelutong strip wood
Wood stain
Tacky glue
*4
£
«3
1 Colour photocopy the sepia prints on
page 61 on to white card. Use paper
punches to punch holes out of the coloured
paper to make a mount for each of the
photographs, ensuring that the aperture
is no larger than the photograph.
3 Stain the lengths of strip wood and then
make a frame for each photograph (see
page 12). The frame should measure slightly
larger than the outside edges of the mount.
Atematively, use moulded picture framing wood
2 Cut out the photographs, leaving a small
border around the outside. Cut the
mounts to size, leaving no more than ’Zein
border around the aperture. Position and glue
egg decorating. They can be sprayed
and antiqued (see tip on page 28),
tarnished using wood stain or left in
their natural state. Cut a photograph to
fit and glue into position. Make a stand
for the frame by folding a small strip of
card into a V shape and gluing it to the
back of the frame.
to frame the photographs.
46
Trinkets
The Victorians loved accumulating ornamental accessories
to display in their homes. Mass production from the 1850s
onwards meant that mementoes and trinkets were available
and affordable to many people. Collections of bric-a-brac
would have been displayed on every available surface,
whilst walls were cluttered with pictures and photographs.
You will need
Small selection of glass and ceramic
beads, no larger than 1cm
Brass knobs,
3mm and 2mm diameter
6mm diameter gold-plated
decorative caps
10mm silver-plated up-eye
8mm gold-plated up-eye
6mm silver-plated up-eye
2mm silver-plated up-eye
8mm high gold-plated
bead cap
3mm nickel eyelets
7mm high gold-plated bell
14mm wooden belaying pin
Enamel paints
Wood stain
Suoerolue oel
Dishes can be filled with 1 mm
diameter no-hole beads to represent
bon-bons or with fragments of dried
flowers to represent pot-pourri.
Bottles and Jars
0 4 <
• * ©
Make decorative bottles and jars with glass
and ceramic beads which have brass knobs or
2mm diameter up-eyes inserted. An interesting
display of bottles can be made using a variety
of different sized and shaped beads and up-
eyes are also available gold plated.
Trinket Dishes
Lidded Pots
Ф &
Make lidded pots from glass and ceramic
beads topped with 6mm gold-plated decorative
caps. The relief pattern on some caps enables
them to be enamelled. Dip a cocktail stick
into enamel paint and allow a small droplet
to fall into the area to be decorated.
Bells
4-
Make dishes from nickel eyelets with 10mm
up-eyes inserted into the narrow end. Make a
decorative pot using an 8mm diameter bead
cap, topped with a 6mm up-eye. Make a
trinket pot from an eyelet, capped with a
6mm up-eye.
Take the bell and remove the clapper using a
small pair of pliers. Remove part of the
straight section of the wood from a 14mm
belaying pin, leaving '/ein attached to the
turned head. Stain and then glue this into the
top of the bell.
47
w
Bracket Lamps
Paraffin oil was discovered during the 1840s and within a few
decades it had become available in large quantities and provided
inexpensive and reliable lighting. Gas lighting was also popular although not all areas
in Britain had supplies of gas. Wall fittings for oil lamps were known as bracket lamps
and were commonly found in hallways and landings and often made to swing from
side to side. The main components of these bracket lamps are findings used for egg
decorating and they are for effect only and not for electrification.
You will need
Viein diameter brass tube,
two 1 'Ain lengths
Two 5mm high gold-plated bells
Two 12mm diameter
gold-plated up-eyes
Two frosted flower shades
3Лып diameter clear plastic tube,
two ’Ain lengths
Two gold-plated head pins
Superglue gel
Tacky glue
1 Transfer the bracket lamp template
on page 62 on to paper or card. Take a
length of brass tube and with two pairs of
small pliers, bend into the shape shown on
the drawing. Repeat the procedure with the
remaining piece of brass tube.
2 Use a small pair of pliers to remove
the clappers from the bells. Check that
the brass tube threads through the holes in
the bells, the shades and the loop on each of
the up-eyes. If you have difficulty, widen the
holes carefully using a pin file.
Variation
These glass oil burners
(from the Victorian and
Edwardian eras) are made from two
9mm pyramid glass beads and two
Vein lengths of cream button thread,
which have been coloured at one
end with black felt-tip pen and
inserted into each bead.
0
1 >
3 Thread the bell on to the brass tube,
then position the shade on top of the
upturned bell, so the end of the brass tube
is just visible in the shade. Superglue into
place, then repeat with the other lamp.
4 Use tacky glue to fix the clear plastic
tube inside the base of the shade. Slide
the brass tube on to the cap - do not glue, to
enable the lamp to swing. Cut a head pin to
'Ain and glue into the protruding end of the
brass tube. Repeat for the second lamp.
48
Table Lamps
Practical and simple lamps were used to
light functional rooms such as the kitchen,
whilst in reception rooms like the parlour,
lamps were ornamental and decorative. The oil lamp
here is suitable for Victorian and Edwardian eras, whilst the
mosaic glass Tiffany-style table lamp is appropriate from the end
of 19th century up to the present day. Electrification is optional.
You will need
For the oil lamp:
8mm acrylic gold-plated
corrugated ring bead
Gold-plated head pin
15mm acrylic gold-plated bead cap
25mm x 4mm gold-plated
fluted tube bead
12mm x 6mm acrylic gold-plated
cushion bead
Frosted flower shade
Viein diameter clear plastic tube,
’Ain length
12-volt grain-of-rice bulb with fine wires
Superglue gel
For the Tiffany lamp:
Gold-plated filigree shade
Black spray paint
Glass paints
Gold-plated spoke
25mm x 4mm gold-plated
fluted tube bead
15mm acrylic gold-plated bead cap
5mm x 2mm brass washer bead
12-volt grain-of-wheat bulb
with fine wires
Oil Lamp
IUse a ’Azin drill bit to drill a hole part
of the way through the side of the
corrugated ring bead. Cut the head pin to
measure 3/i6in and superglue the straight
end into the drilled hole. Use a ’/isin drill bit
to drill a hole through the side of the bead
cap, for electrification.
Tiffany Lamp
ITake the filigree shade and lightly spray
inside and out with black spray paint.
Take a cocktail stick, dip it into the glass paint
and begin to fill the gaps in the shade
symmetrically, allowing each colour to dry
before continuing with the next.
2Glue the cap, tube and cushion beads
together as shown, followed by the
corrugated ring and shade. Thread the wires
from the bulb down through the shade and
out of the hole in the base. Rest the plastic
tube in the shade, without gluing to allow
replacement of the bulb.
2 Take the spoke and use pliers to slightly
lift the loops at each end. Superglue the
lamp stand together, following the oil lamp
instructions for electrification details. Rest the
shade on top of the upturned spokes - do not
glue, to allow easy replacement of the bulb.
49
Papier Mache Letter Rack
The technique of moulding paper pulp was introduced into Europe during
the 17th century. Homeware and furniture made out of papier mache became
particularly fashionable during the Victorian era. Items were covered with
japan, a hard, glossy black lacquer, originally from Japan and most commonly
decorated with inlaid mother-of-pearl and floral paintings. This letter rack
would have been used from the 1840s onwards following the introduction
of the penny post, which made letter writing a popular pastime.
You will need
'/azin thickness card
'/win diameter circle paper punch
Black water-based enamel paint
Water-slide transfers (decals) or
acrylic water-based paints
Gold metallic paste
Tacky glue
1 Transfer the letter rack templates on
page 62 on to a piece of ’Azin thickness
card. Use a sharp craft knife to score the card
where indicated. Make a hole at the top of
the rack using a '/rein diameter paper punch.
2 Take the back piece of card and from the
base, measure and mark with a pencil
the following positions - '/ein, 9/iein and 1 in.
Variation
Moulded papier mache trays were a
practical but decorative household
item, popular in many Victorian
homes. Trays can either be purchased
and painted or sprayed with black
enamel paint, or made out of card
and decorated as
Ш
w
w
ЗТаке a letter holder and fold the sides
down so the scored lines face outwards.
Position and glue on to the back piece, so the
base of the letter holder rests centrally on a
marked line. Repeat the procedure with the
remaining card pieces and leave to dry.
4 Paint the letter rack with black water-
based enamel paint. Decorate the letter
holders either by painting or using water-slide
transfers soaked off and smoothed on to the
front of each one. Highlight the outside edges
of the back and holders with gold paste.
50
Edwardian
Christmas
Coal Box
Due to improvements in transport during the mid 19th century, coal
became a cheap and reliable source of domestic fuel. Many homes had
a fireplace in each room and fireside accessories were plentiful. This
coal box is fitted with a small hook at the back of the box to hold a
brass scoop. To avoid using hinges, which can be fiddly and expensive,
the lid just slots on to the front of the box.
You will need
Ain thick obechi sheet wood:
1 3Ain x 1 Vein for base
1 ’/ein x Vein for back
Viein thick obechi sheet wood:
two 1 '/sin x ’ Viein for
front and top
two l’Ain x 1 Viein for sides
Viein x Viein obechi strip wood:
l’Ain length for front support
two vein lengths for top supports
Wooden double column or small
wooden drawer knob
Brass handle
Two brass pins, Vein length
Gold-plated eye pin
Thin brass sheet, Vein x 3Ain
20-gauge brass wire, 3Ain length
14mm wooden belaying pin
Model railway coal
Dark brown shoe polish
Black water-based acrylic paint
Tacky glue
Superglue gel
1 Transfer the coal box side template (page
62) on to the two side pieces of obechi
sheet wood. Use a craft knife and ruler to cut
out the shape, then sand any rough edges
using fine-grade sandpaper.
2 Take the front wood piece and chamfer
the edge of one long side to an angle of
60 degrees using fine-grade sandpaper (see
Basic Techniques page 12).
ЗТаке the double column and cut where
shown to make a drawer knob. Sand the
knob and the remaining wood pieces smooth
using fine-grade sandpaper. Use a dark brown
shoe polish to colour all of the wooden
components (see page 12).
4Take the side wood pieces and position
so they are a mirror image of each other.
Transfer the ledge measurements from page
62 on to each piece, then position and glue
the two top supports into place.
52
5 Take the base wood piece and mark Vein
from one short side edge. Position and
glue the front support on the line so there is a
Vein gap between the outside edge of the
base and the front support.
6 Position the base as shown. Place the
two sides beside the base (ledges
facing), together with the back wood piece
and glue the three pieces on to the outside
edges of the base.
7 Fix the brass handle centrally on to the
top wood piece by inserting one ’/sin
long brass pin into each hole at the side of
the handle through into the wood. Glue the
construction on top of the coal box.
8 Take the front wood piece and position it
so the chamfered edge faces forwards
and downwards. Mark ’/sin from the front
long edge and centrally position and glue the
wooden knob into place. Once dry, check it
slots into the front of the box.
9 To make the hook at the back of the box,
cut an eye pin to measure ’Ain long and
use pliers to slightly open the eye of the pin.
Mark ’/sin down from the back of the coal
box and drill a hole centrally using a '/sain
drill bit and glue the eye pin into place.
WTo make the scoop, fold the brass
sheet in half. Trim the side edges to
a slight angle as shown. Make a hole in the
top of the folded sheet using a ’Azin drill bit.
Take the length of brass wire and secure the
end into the hole using superglue gel. Once
dry, curve the sides into the shape of a scoop.
I
1-1 To make the handle for the scoop,
X remove the straight end from the
belaying pin using mitre cutters. Use a '/azin
drill bit and drill a hole into the flat end of the
pin. Dab the end of the wire with superglue
gel and insert it into the pin handle.
4 /А When the scoop is not in use, insert
brass rod into the hook at the
back of the box. Traditionally, coal boxes were
lined with metal but this is not included in
this project. Instead, dry brush the inside with
black acrylic paint and when dry, fill with coal.
Tip
An alternative to the brass sheet
used for the handle and coal scoop
is the malleable metal of a tomato
puree tube which is
brass coloured on
the inside of the
tube. Model
railway coal is
ideal for filling
the coal box.
53
Festive Silk Bows
Perfectly formed tiny bows can be made using silk ribbon and a
home-made bow maker. Silk bows often provide the finishing
touch not only to some of the Christmas projects in this chapter
but also to many home and personal accessories. Silk ribbon is
available in a range of colours and widths and is preferable to
satin ribbon as it is finer and more manageable. The instructions
are for a right-handed person, so reverse if you are left-handed.
Лл
You will need
'Ain thick wood,
3in x 21/2in approximately
Two vein hooks
3mm width silk ribbon for the bows
ITo make the bow maker, drill two Viein
holes into the wooden block so they are
in line with each other and Vein apart. Screw
the hooks into the drilled holes with the
openings facing the same way.
Depending on the width of the silk
ribbon, you can vary the size of the
hooks and the distance apart For
2mm silk ribbon the hooks should
be 'Ain apart. For 5mm silk and
organdie ribbon they should be
'/zin apart. The same method can
be used to make other delicate bows
out of threads, string and raffia.
3 Cross the ribbon in front of the hooks by
bringing the short end over the top of
the excess ribbon, so each end changes sides.
2Take the silk ribbon and rest it in the
openings of the hooks, leaving 2in at one
end to work with and the excess at the other
end. It doesn't matter how long the excess
ribbon is, just work directly from the spool or
length of ribbon to avoid wastage.
4 At this stage you will need a tool like the
small pair of scissors shown. Hold the
ribbon in one hand and scissors in the other.
54
3Use the point of the scissors to push the
short end piece beneath, through the
gap in the hooks and underneath the ribbon
which is held in the hook openings.
6 Hold the ribbon and gently pull each
end, so each end is flat and vertical in
front of you.
7 Bring the short end piece of ribbon over
the top of the ribbon held in the hooks
and hold to your left-hand side whilst taking
the opposite end to the right-hand side.
8 Ease the excess ribbon underneath the
short end of silk ribbon to form a small
loop and hold as shown above.
Tip
You could display
Edwardian
cards on a length of
3mm wide silk
ribbon, topped with
a bow. Christmas
card catalogues
contain tiny
modem and
antique images
which may be
used. Some are
small enough to
be used as they
are, while others
9 Tuck the short end of the ribbon up and
through the silk ribbon loop. Pull each
end to centralize and tighten the knot in
Slide the bow off the hooks and
-L V/ trim the ribbon ends to an angle
and to the length required.
between the two hooks.
may need to be
reduced on a
photocopier.
55
Tree Decorations
Decorated Christmas trees are a German tradition dating
_ —* back to the 16th century. At first the evergreen trees were
{decorated with fruit, nuts and home-made gifts, but by the
beginning of the Victorian era it was the custom to decorate
them with ornaments, candles and confectionery. By the
1870s imitation trees were on sale, together with
manufactured decorations.
You will need
For the baubles:
Gold-plated head pins
5mm diameter round plastic
or glass beads
1 mm gold-plated crimp beads
34-gauge gold-plated jewellery wire
Round-nosed pliers
For the beaded ornaments:
Seed beads, size 15
34-gauge gold-plated jewellery wire
For the icicles:
Silver-plated head pins
1cm long silver-twisted bugle beads
1 mm silver-plated crimp beads
34-gauge silver-plated jewellery wire
For the metal ornaments:
Aluminium foil from
a foil food container
Mini star paper punch
2mm diameter flat-backed crystals
34-gauge silver-plated jewellery wire
Superglue gel
Cut a gold-plated head pin to 7/iein long.
Thread the 5mm round bead, followed by the
crimp bead on to the head pin. Use round-
nosed pliers to bend the end of the wire into
a loop. Attach the baubles to the tree using
34-gauge gold-plated jewellery wire.
Cut a 2in length of gold-plated jewellery wire.
Thread 15 beads on to the centre of the wire
and twist the ends of the wire together so the
beads form a loop. Trim the end of the twisted
wire to vein long and use to attach the
ornament to the Christmas tree.
Icicles
1
J 4. & 1
I •> Й ® о
Metal Ornaments
Cut a silver-plated head pin to measure 5/ein
long. Thread a bugle bead on to the head pin,
followed by a crimp bead. Use round-nosed
pliers to bend the end of the wire into a loop.
Attach the icicle to the tree using 34-gauge
silver-plated jewellery wire.
Punch a star shape out of aluminium foil. Use
a pin to pierce a hole through the top of the
star, thread it on to a 2in length of wire and
twist the ends. Use superglue gel to glue a
crystal on to the centre of the star and trim
the end of the wire to 3/4in long.
56
Christmas Fairy
The Christmas fairy evolved from the Christmas angel during the middle of
the 18th century. They were first made by German toymakers and were simply
frocked dolls with gauze wings and wands. The smaller fairy dolls hung from
the branches of the Christmas tree, whilst the larger dolls stood at the foot of
the tree. It was not until the mid 20th century that smaller cone-shaped fairies
were made to sit on the top of the tree.
You will need
Round natural wood bead,
4mm diameter
Cocktail stick, 3/ein length
Two small pale pink flower stamens
Cream paper ribbon,
two 1/zin x ’/zin pieces
Cream bunka (lampshade fringing),
2in length
5mm width cream organdie ribbon
28-gauge silver-plated wire,
Vzin length
Tiny confetti silver star
Water-based acrylic paints
Fine paintbrush
Tacky glue
Variation
Change the wings,
substituting the organdie ribbon bow
IGIue the bead on to the end of the
cocktail stick and cut the flower stamens
to Vain long for the arms and legs. Take the
paper ribbon and spread tacky glue over one
side of each piece (creases running vertically).
Position each of the components on top of
one piece as shown.
2 Press the other square of paper ribbon
on top and leave to dry. Cut the
sandwiched section of paper ribbon into
shape with small, sharp scissors. Paint the
facial features using water-based acrylic
paints and a very fine paintbrush.
ЗМаке the hair from bunka, fraying and
curling the bunka by pulling a thread at
the end of the braid. Apply a thin layer of
tacky glue over the top of the head, lay the
frayed bunka along the hairline first and then
cover the top of the head in an even layer.
4 Make a bow with the organdie ribbon
following the instructions on page 54.
Trim the ends and glue on to the fairy's back.
Make a wand by gluing a tiny confetti star to
the top of a 7zin length of silver-plated wire.
Glue the wand to the front of the fairy's hand.
57
Stocking and Presents
The giving of gifts to celebrate pagan festivals dates back
to ancient times. St Nicholas is associated with gifts at
Christmas time and also with the tradition of hanging
up a stocking. During the Victorian era, stockings were
mostly home-made or an old sock, however, by the
end of the 19th century commercially made fabric
у and paper stockings began to appear in shops.
You will need
For the stocking:
Red and cream paper ribbon
White paper for photocopying
Tacky glue
Stocking
fjj
For the presents:
Small blocks of wood
Paper ribbon in a variety of colours
Metallic thread
Tacky glue
1 Photocopy and cut out the stocking
template on page 62. Place the template
on top of a folded piece of red paper ribbon,
creases running vertically, and cut to shape.
Cut a 1 in x Viein piece of red ribbon, loop it
over and glue it to the top of one of the
stocking pieces.
Tinsel originated in France during
the 16th century to embellish military
uniforms. It was first used to adorn
Christmas trees during the Victorian
era. Use lengths of miniature tinsel or
tinsel pipe cleaners to decorate your
tree and presents. See also the
Christmas candlesticks on page 37.
ICut a piece of paper ribbon to fold around
a small rectangular wooden block (creases
to run with the longest length of the block) -
the block size shown is Vein x Vein x ’/sin.
Trim the sides to the height of the block and
2 Glue the edges of the two stocking
pieces together. Cut four 74in x Vain
pieces of cream paper ribbon and glue on to
each side of the stocking as shown. Once dry,
trim to shape. Cut a 134in x 3/i6in length of
cream paper ribbon and glue around the top
of the stocking.
f IE
2 Wrap the paper around the wood, using
tacky glue to secure. Crease the side
flaps, fold over and glue neatly on to the end
of the block. Tie metallic thread around the
wrapped parcel to provide the finishing touch.
then glue the block on to the paper.
58
Home-made Decorations
touches
In the run up to Christmas, an Edwardian child’s nursery would be a hive of
activity, cutting, gluing and making decorations for the home. Overseen by
Nanny, coloured paper chains made from gummed strips of paper would
adorn the nursery ceiling and walls. Crackers were introduced during the mid
19th century and children delighted in making and filling them with sweets.
You will need
For the paper chains:
2mm width quilling paper in a
selection of colours
Vein diameter hardwood dowel
Tacky glue
For the crackers:
Red and gold paper ribbon
Vein diameter hardwood dowel:
'Ain lengths for cracker centres
two 1 in lengths for removable
cracker forms
34-gauge gold-plated jewellery wire
Tacky glue
Variation
You can easily modernize the
crackers by decorating them with
tiny confetti shapes.
ITake a strip of quilling paper and cut it
into vein lengths. Repeat with the
remaining strips of paper. Wind a strip around
the dowel to make the first ring and use a
small amount of tacky glue to secure the end.
Crackers
2 Remove the ring from the dowel and
thread a different coloured strip of paper
into the ring. Rest the dowel next to the
previous ring, wind the new strip around the
dowel to make the second ring and glue to
secure the end. Repeat using the remaining
strips to create a long chain.
ICut a piece of red paper ribbon 3Ain
square and glue a short wood dowel
piece centrally to the top of the paper (creases
running horizontally). Place the forms on either
side, roll the paper around all three wood
pieces and glue to secure the end of the paper.
2Take a 2in length of wire and position
between the dowel centre and a form.
Using pliers, twist the wires to gather the paper.
Trim off excess wire, remove the form and
repeat on the opposite end. Glue a ’/zin x 3/i6in
piece of gold paper around the centre.
59
Garland
Before Christianity, evergreen
plants were used in pagan
celebrations to symbolize the rising
after the winter solstice. Christians believed evergreens to be
symbolic of the eternal life of Jesus and have used them used to decorate homes and
churches at Christmas time. Evergreens such as pine, spruce and fir were, and still are,
formed into wreaths and garlands and decorated with nuts, fruit and flowers.
You will need
Evergreen garland or pipe cleaners
Centre (reed) cane size 000,
4in length
34-gauge gold-plated wire
Two 3mm width silk ribbon bows
(see instructions on page 54)
Dried allspice berries
Coriander seeds
Black and yellow mustard seeds
White peppercoms
Antique pine and light oak
water-based wood stain
Tacky glue
IUse wire cutters to cut a length of
evergreen garland or pipe cleaner
approximately 7in long. Bend into the shape
shown in the photograph above.
2 Take another length of evergreen and
wind around the garland shape to
thicken it. This may need to be repeated
depending on the original thickness of the
evergreen garland/pipe cleaners.
Variation
Make a 1 'Ain diameter wreath
following the same instructions.
For a more modem alternative,
paint some of the seeds with gold
paint before decorating.
3To make cinnamon sticks, take the centre
cane and soak in warm water for a few
minutes, then pull straight, weigh down each
end and leave to dry. Stain with a mix of
antique pine and light oak wood stain and
once dry cut into 3/ein lengths.
4Take three cinnamon sticks and bundle
together, winding wire around the centre
to hold in place. Trim the end of the wire
leaving Vein protruding for securing into the
garland. Decorate the garland with the sticks,
seeds, peppercorns, dried berries and bows.
60
Templates
Reproduce colour templates either by colour photocopying or by scanning
into a computer and printing out on photo-quality card or paper.
Sillouettes
Framed Photographs
61
62
Suppliers
UK
Bead Exclusive
Nixon House, 119-121,Teignmouth
Road, Torquay, Devon TQ1 4HA
tel: 01803 322000
www.beadexclusive.com
For beads and jewellery findings
CelCrafts
Springfield House, Gate Helmsley,
York YO41 INF
tel: 01759 371447
www. eelcrafts, co. uk
For cold porcelain, paper-covered wire
and floral tape
Country Treasures
Rose Cottage, Dapple Heath,
Admaston, Nr Rugeley, Staffordshire
WS15 3PG
tel: 01889 500652
For aluminium and paper dinner plates
Dolls House Holidays
Wells Cottage, 204 Main Road,
Milford, Stafford ST 17 0UN
tel: 01785 664659
For mitre cutters
Evie’s Crafts
79 Dale Street, Milnrow, Rochdale,
Lancs OL16 3NJ
tel: 01706 712489
For paper punches, peel-off motifs,
quilling paper and quilling tools
Fine Design
21 Shawley Crescent, Epsom
Downs, Surrey KT18 5PQ
tel: 01737 210886
For the ginger cat (page 20)
Jane Harrop
4 Buckingham Road, Poynton,
Cheshire SKI 2 1JH
tel: 01625 873117
www. janeharrop. co. uk
For belaying pins, double columns,
centre cane (reed cane), paper ribbon,
pastel paper, stamens, 3mm eyelets,
tacky glue, antique pine and medium
oak water-based wood stain and
3-D gloss varnish
Jennifer’s ofWalsall
51 George Street, Walsall,
West Midlands, WS1 IRS
tel: 01922 623382
www.jennifersofwalsall.co.uk
For obechi wood, spindles, hardware,
tools, plastic mirrors and polymer clay
Jojays
Moore Road, Bourton-on-the-Water,
Gloucestershire GL54 2AZ
tel: 01451 810081
www.jojays.co.uk
For hardware and tools
Little Trimmings
PO Box 2267, Reading, RG4 8WG
tel: 0118 9473155
www.littletrimmings.com
For small-scale haberdashery, canvas,
waxed thread and miniature tinsel
Susan Lee
8 Springfields, Tetbury,
Gloucestershire GL8 8EN
tel: 01666 505936
www.susan-lee-miniatures.com
For the Victorian shoes (page 39)
Salopian Miniatures
50 Willowfield, Woodside, Telford
TF7 5NT
tel: 01952 581101
For tools and accessories
Tee Pee Crafts
28 Holborn Drive, Mackworth,
Derby DE22 4DX
tel: 01332 332772
www.teepeecrafts.co.uk
For egg-decorating findings, filigrees,
beads, brass tube, silk and organdie
ribbon, water-slide transfers, peel-off
motifs, bunka and tinsel
Wood Supplies
Monkey Puzzle Cottage,
53 Woodmansterne
Lane, Wallington,
Surrey SM6 0SW
tel: 020 8669 7266 (eves)
For jelutong wood
US
Cane and Reed
Box 762, Manchester, CT 06045
tel: 800-646-6586
www.caneandreed.com
For round reed cane
Dick Blick Art Materials
PO Box 1267, Galesburg, IL
61402-1267
tel: 800-828-4548
www.dickblick.com
For tools and paper punches
General Bead
371 National City Blvd, National
City, CA 91950-1110
tel: 1-619-336-0100
www.genbead.com
For beads, jewellery findings and
filigrees
Happy Hobby Shop
7125 N. 76th Street, Milwaukee, WI
53223
tel: 414-461-6013
www.happyhobby.com
For tools, glue, bass wood and
brass tube
Marivi’s
9953 S.W.142 Avenue, Miami,
FL33186
tel: 305 388-0010
www.marivis.com
For cold porcelain and cake-decorating
supplies
Nature Coast Hobbies, Inc
6773 S. Hancock Road, Homosassa,
Florida 34448
tel: 352-628-3990
www. naturecoast. com
For belaying pins, double columns
and tools
Rose’s Doll House
12750 W. Capitol Drive,
I Brookfield, WI 53005
tel: 262-373-0350
www.happyhobby.com
For a range of hardware,
tools and spindles
63
Index
About the author
Jane Harrop started making miniatures
as a hobby ten years ago, making and
demonstrating the projects at her local
miniatures club. Her enthusiasm turned
this hobby into her job - she has been
teaching adult education classes on
making miniatures for the past seven
years. Jane sells her work through
miniatures fairs to collectors and also
presents miniatures workshops. This is
her second book for David & Charles,
the first being Dolls House Do-It-Yourself:
Toysand Games. Jane is married with
two daughters and lives in Cheshire, UK.
Acknowledgments
Thank you to the following people who
have helped make this project possible.
Brian Gordon for the artwork. Alan
Denwood and Bob Williams for their
support and advice. Joseph W Harrop
and Rob Salter for Victorian photographs.
Sally Warrington for the Victorian coat.
Jean Tipper for the Victorian plant pot.
Paul Meredith from Rufford Old Hall and
Garth Vincent for historical information.
And finally, thanks to everyone at
David & Charles, Lin Clements and Karl
Adamson for the photographs.
aspidistra 45 filigrees 10 floral tape 10 plates 36 polymer clay 11
bass wood 8 flower shades 10
belaying pin 10 framed photographs 46 quilling paper 11
bell 47 framing 12 quilling tool 9
boater 41
books 33 garland 60 rack of hooks 40
bottles 47 gilt cream 9 ribbon plates 36
bow maker 54 glues 9 right-angled gluing jig 8
bowls 26
box-seat settle 18-20 hat 41 safety tips 11
bracket lamps 48 scenic scatter 11
brass sheet 10 imperial measurements 7 shoe polish 9,12
brass tube 10 shopping basket 35
brushes 9 jars 47 side chair 31
bunka 10 jelutong wood 8 side table 30
jewellery findings 10 silhouettes 28
candlestick 15 silk ribbon 11,54
candlesticks and snuffer 37 leather bucket 17 spear 16
canes 43 leather mug 17 spider plant 45
canvas 10 lidded pots 47 stamens 11
centre cane 10 log basket 34-35 stick stand 42
chamfering 12 stool 14
Christmas, materials and equipment 8-11
candlesticks 37 metallic paste 9 table lamps 49
crackers 59 metric conversion chart 7 templates 61-62
fairy 57 mitring 8,12 templates, using 12
home-made decorations 59 tinsel 58
presents 58 neo-classical mirror 23 tools 8-9
stocking 58 neo-classical vase 26 topiary trees 27
tree decorations 56 torchere 15
coal box 52-53 obechi wood 8 trinkets 47
coat and hat rack 40 ornamental mask 25
cold porcelain 10 varnish 9
console table 22 paints 9,12
cutting wood 12 paper balls 10 walking sticks 43
paper chains 59 wall shelves 32
decoy ducks 38 paper punch 9 water-slide transfers 11
dishes 47 paper ribbon 11 waxed thread 11
distressing 12 papier mache letter rack 50 wire 11
double column 10 papier mache tray 50 wood stain 9,12
pastel paper 11 wreath 60
enamel paints 9,12 pedestals 24
eyelets 10 peel-off motifs 11
pin file 8
festive silk bows 54-55 pin vice 8
fighting axe 16 plant stand 44
64
ЕБИГ"
MS
lane Harrop presents a collection
>f decorative furniture and
accessories for every dolls' house.
Tver 70 illustrated projects and
zariations span a range of styles
:o create the perfect period look.
FUDOR TIMES
wooden stool • torchere • fighting axe
eather bucket • box-seat settle
Carpets
and Ruqs^^
Food
Displays
0
ISBN 0 7153 1434 3 ISBN 0 7153 1435 1
ISBN 0 7153 1433 5
Discover just how easy it can be to make quality
projects to accessorize and furnish your one-twelfth
CLASSICAL STYLE
console table • neo-classical mirror •
iecorative pedestals • ornamental mask
leo-classical vase • topiary trees
silhouette pictures
scale dolls' house when expert guidance is at hand.
COUNTRY STYLE
.ide table • side chair
vail shelves • rows and piles
if books • log basket •
ceramic plates • candlesticks
md snuffer • decoy duck
/ICTORIAN VALUES
:oat and hat rack •
itraw boater • walking
ticks • stick stand • plant
Hand • aspidistra • trinkets •
ramed photographs • bracket
amps • table lamps • papier
nache letter rack
iDWARDIAN CHRISTMAS
estive silk bows • coal box
airy • tree decorations
• Christmas stocking
ind presents •
iome-made
lecorations •
ivergreen garland
David & Charles
US $14.99
(Can $22.99;
41691