/


Text
Advanced Handbook
Introduction 1
Sailing is one of the most enjoyable and challenging sports in the
world. It is a sport that everyone can take part in whether you are
8 years old or 80 years old with boats for all abilities and budgets too.
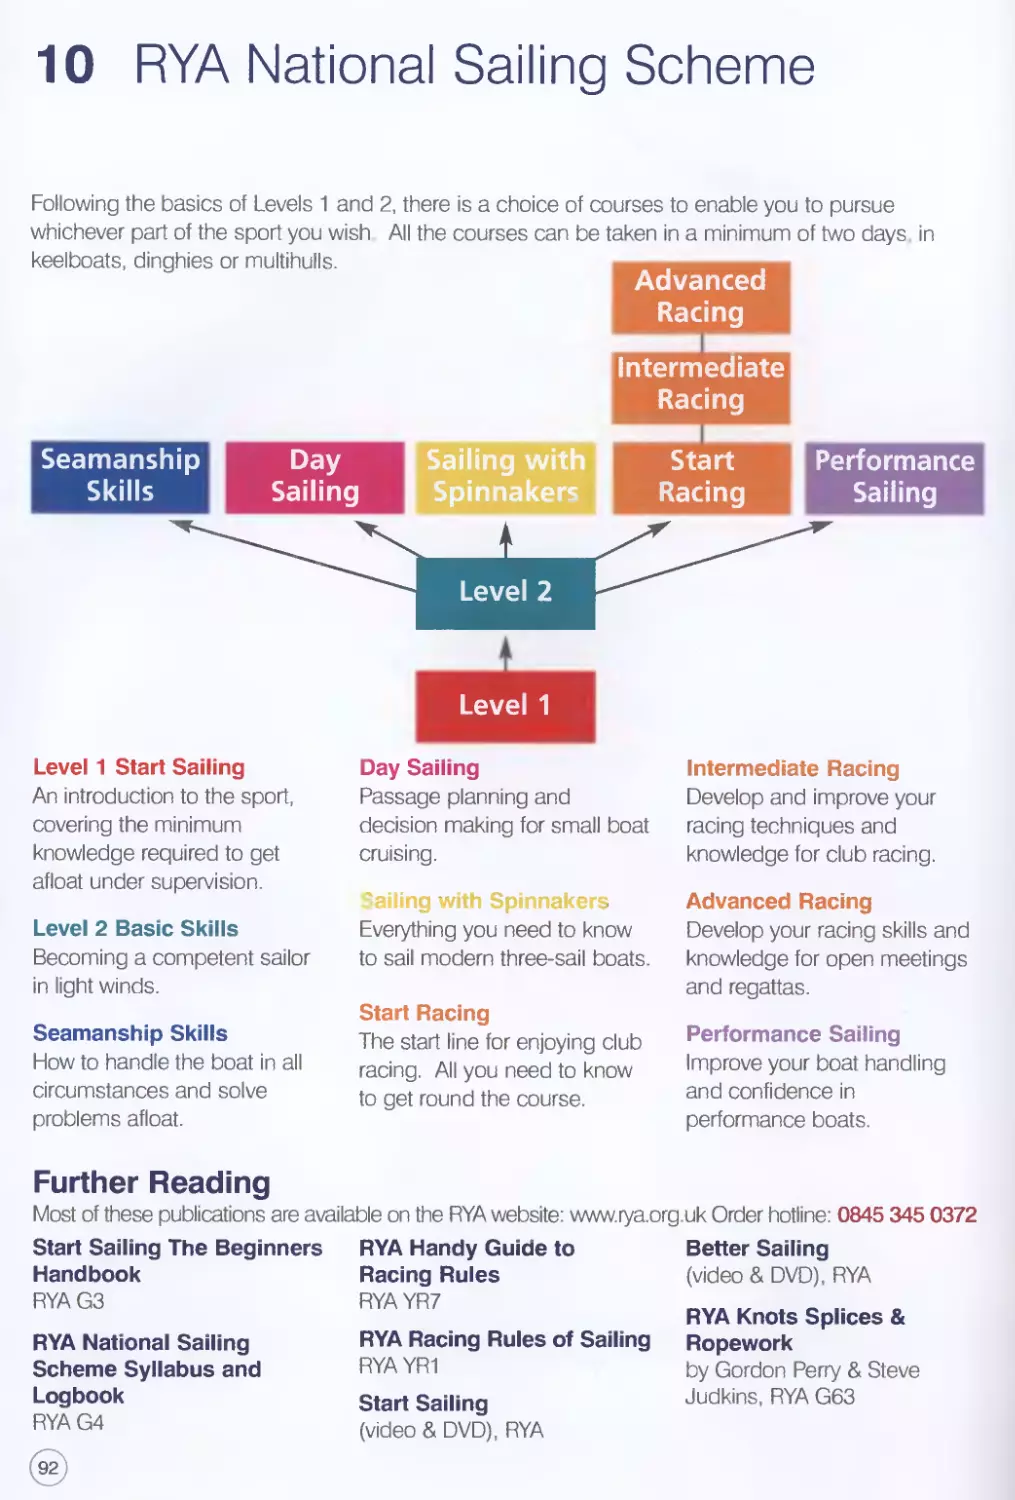
The RYA National Sailing Scheme is the world's leading small boat sailing scheme with over 80,000
people annually taking part in one of the many courses which make up this accessible and
affordable training scheme.
The RYA Advanced Sailing Handbook has been produced to accompany the five advanced sailing
modules within the National Sailing Scheme and follows on from the first book in the series, the Start
Sailing Handbook.
The National Sailing Scheme training courses can be followed in a variety of boats from dinghies, to
keelboats, to multihulls and whilst some techniques and manoeuvres are generic, others are more
boat specific and this publication explains and helps you understand these advanced techniques.
So whatever your choice of boat you can be assured that by following an RYA training course you
will be taking part in a tried and tested programme designed to help you maximise your progress
and develop effective and safe sailing skills.
With over 750 RYA Recognised Training Centres worldwide you will have lots of places to choose
from for training, all of which undergo a rigorous annual inspection to ensure that you undertake
your training course in a safe and well equipped venue under the guidance of trained and
experienced RYA instructors.
Hope you enjoy the book and happy sailing.
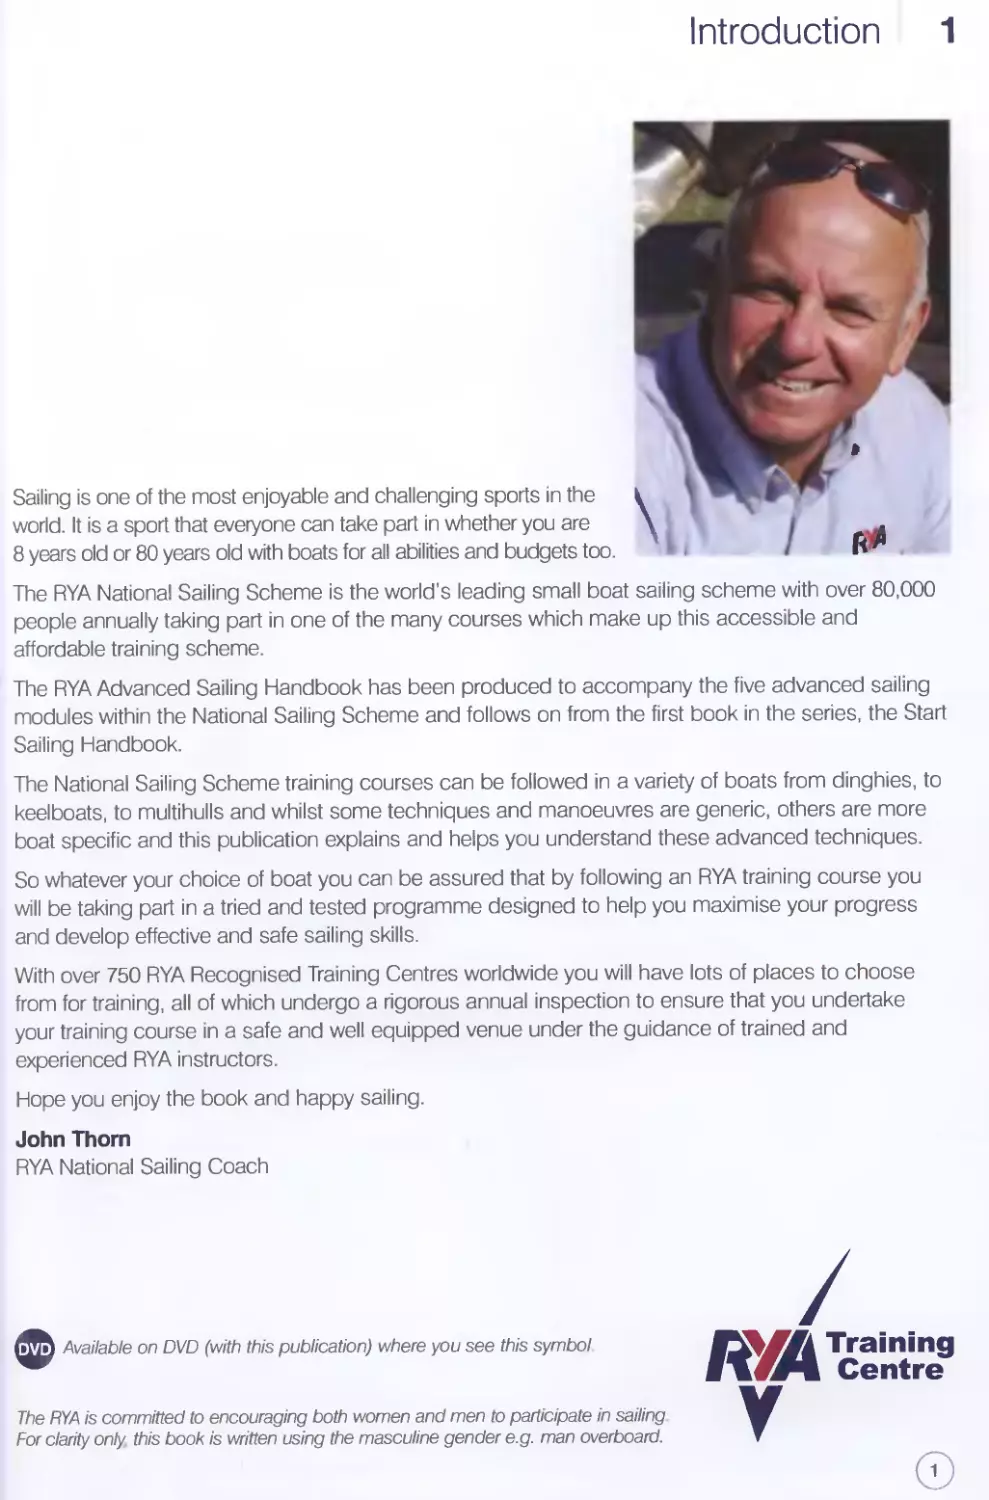
John Thorn
RYA National Sailing Coach
Available on DVD (with this publication) where you see this symbol
The RYA is committed to encouraging both women and men to participate in sailing
For clarity only this book is written using the masculine gender e.g. man overboard.
Seamanship Skills
To carry out any of the manoeuvres in this section, follow these easy steps:
PREPARATION Take a moment to ensure that you, your crew and equipment are fully
prepared.
COMMUNICATION Discuss plans and how best to execute them, with your crew.
APPROACH Approach so that the manoeuvre is as simple as possible. If you need to stop,
what force will stop you? If you need to turn, what will help you turn?
EXECUTION Complete a smooth, effective manoeuvre with an escape plan for
misjudgement or unforeseen situations.
Seamanship can be defined as the easy way* to complete a manoeuvre.
Seamanship Skills 1
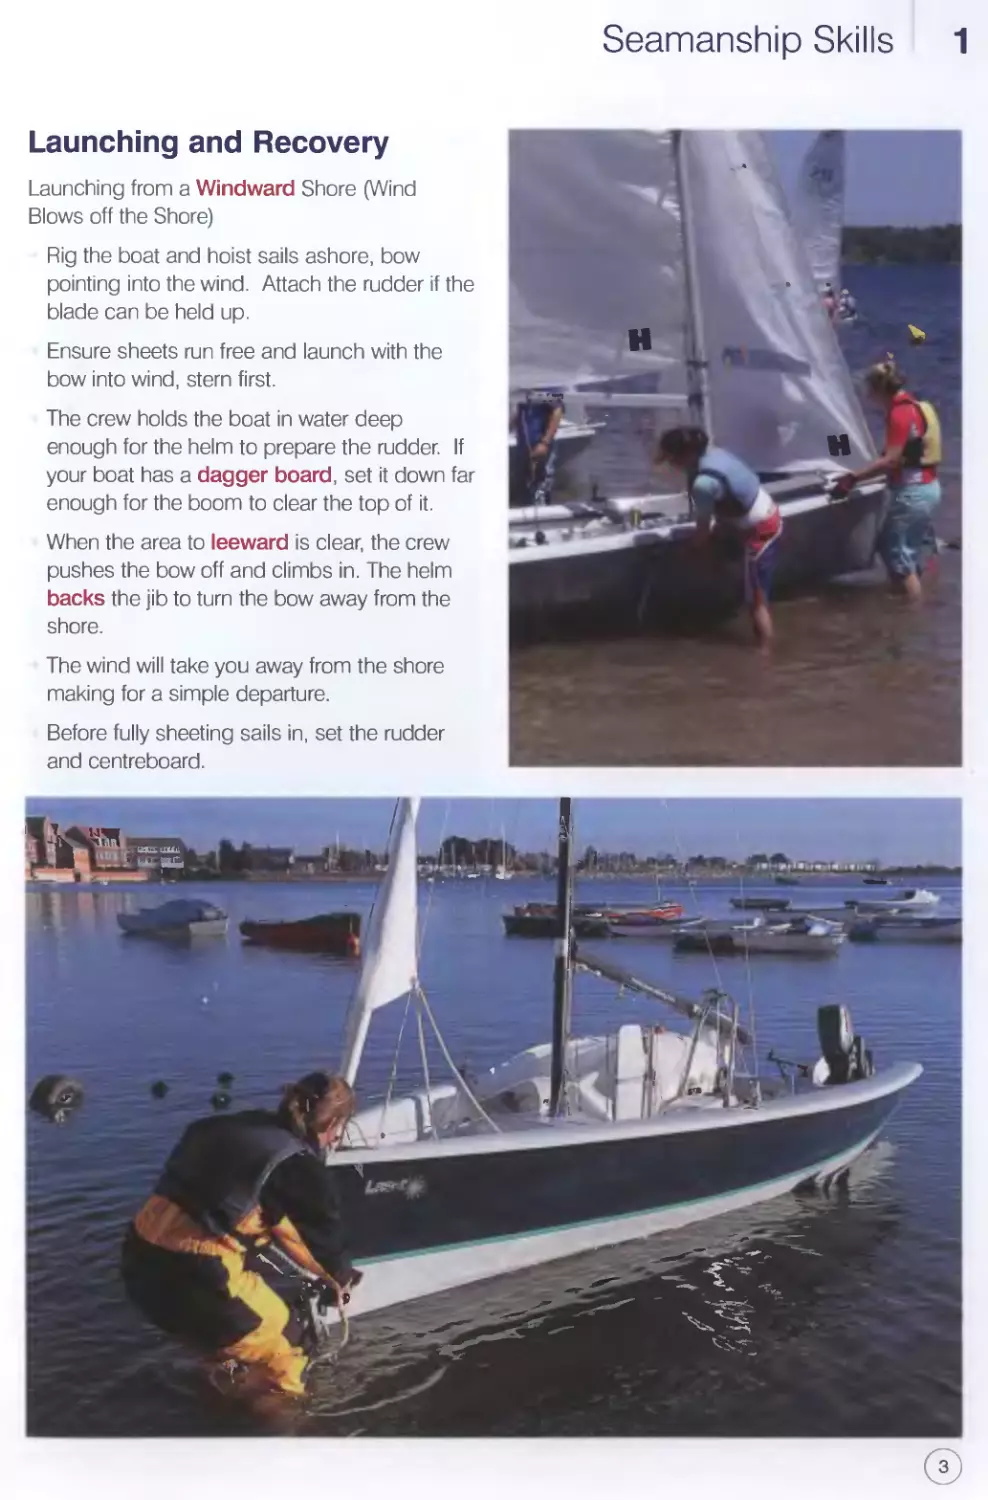
Launching and Recovery
Launching from a Windward Shore (Wind
Blows off the Shore)
Rig the boat and hoist sails ashore, bow
pointing into the wind. Attach the rudder if the
blade can be held up.
Ensure sheets run free and launch with the
bow into wind, stern first.
The crew holds the boat in water deep
enough for the helm to prepare the rudder. If
your boat has a dagger board, set it down far
enough for the boom to clear the top of it.
When the area to leeward is clear, the crew
pushes the bow off and climbs in. The helm
backs the jib to turn the bow away from the
shore.
The wind will take you away from the shore
making for a simple departure.
Before fully sheeting sails in, set the rudder
and centreboard.
1 Seamanship Skills
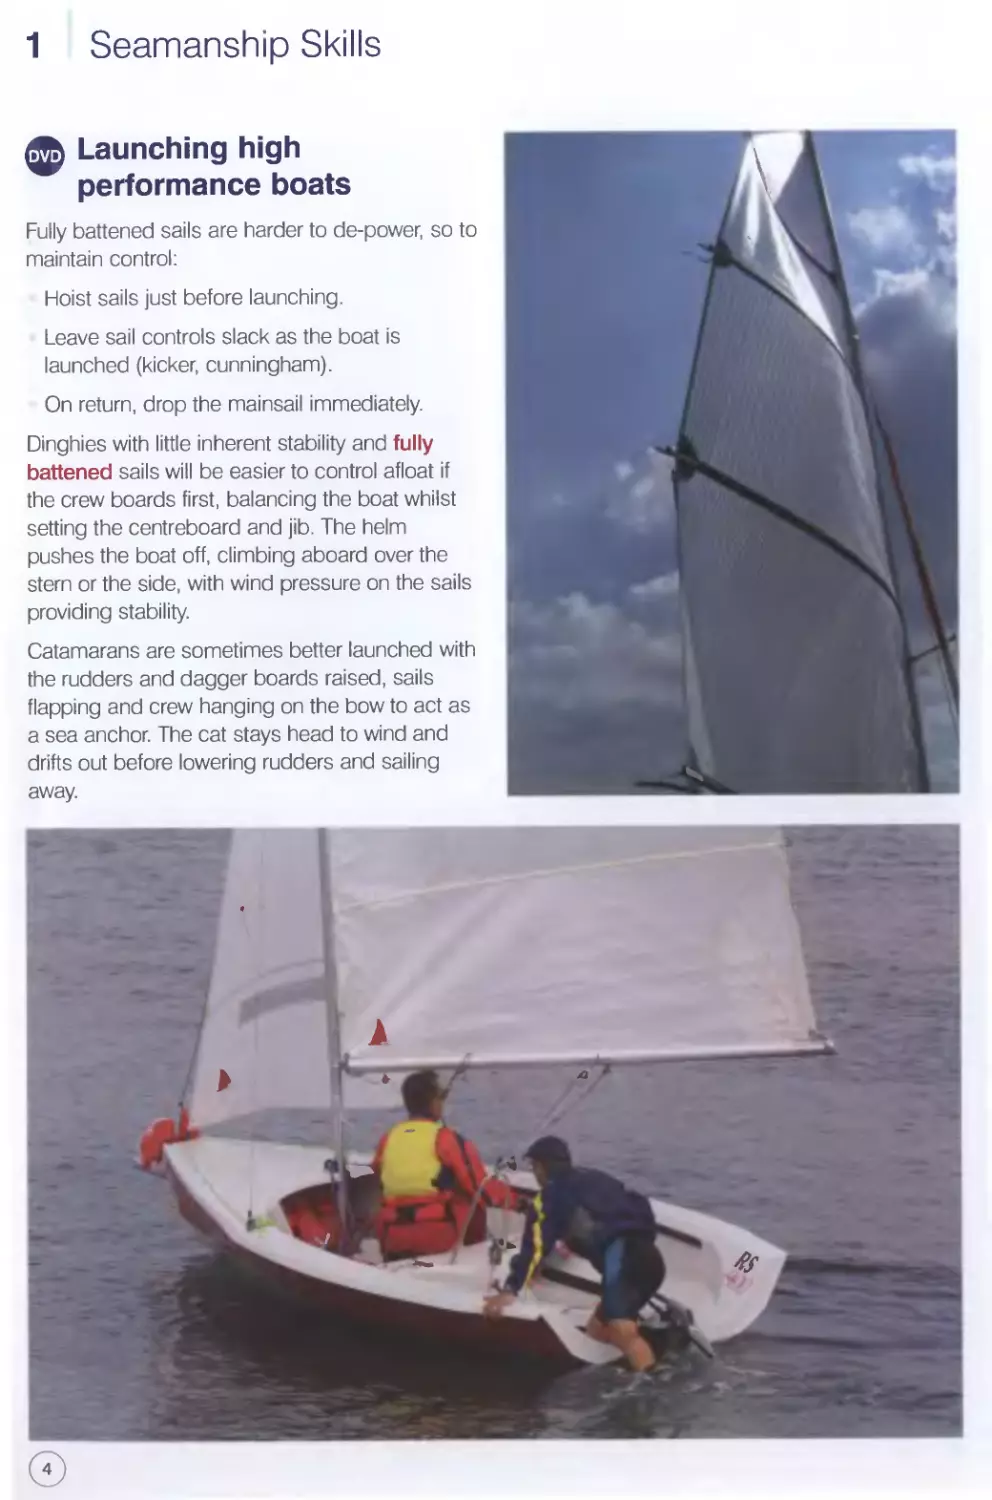
Launching high
performance boats
Fully battened sails are harder to de-power, so to
maintain control:
Hoist sails just before launching.
Leave sail controls slack as the boat is
launched (kicker, cunningham).
On return, drop the mainsail immediately.
Dinghies with little inherent stability and fully
battened sails will be easier to control afloat if
the crew boards first, balancing the boat whilst
setting the centreboard and jib. The helm
pushes the boat off, climbing aboard over the
stern or the side, with wind pressure on the sails
providing stability.
Catamarans are sometimes better launched with
the rudders and dagger boards raised, sails
flapping and crew hanging on the bow to act as
a sea anchor. The cat stays head to wind and
drifts out before lowering rudders and sailing
away.
Seamanship Skills 1
Step 2
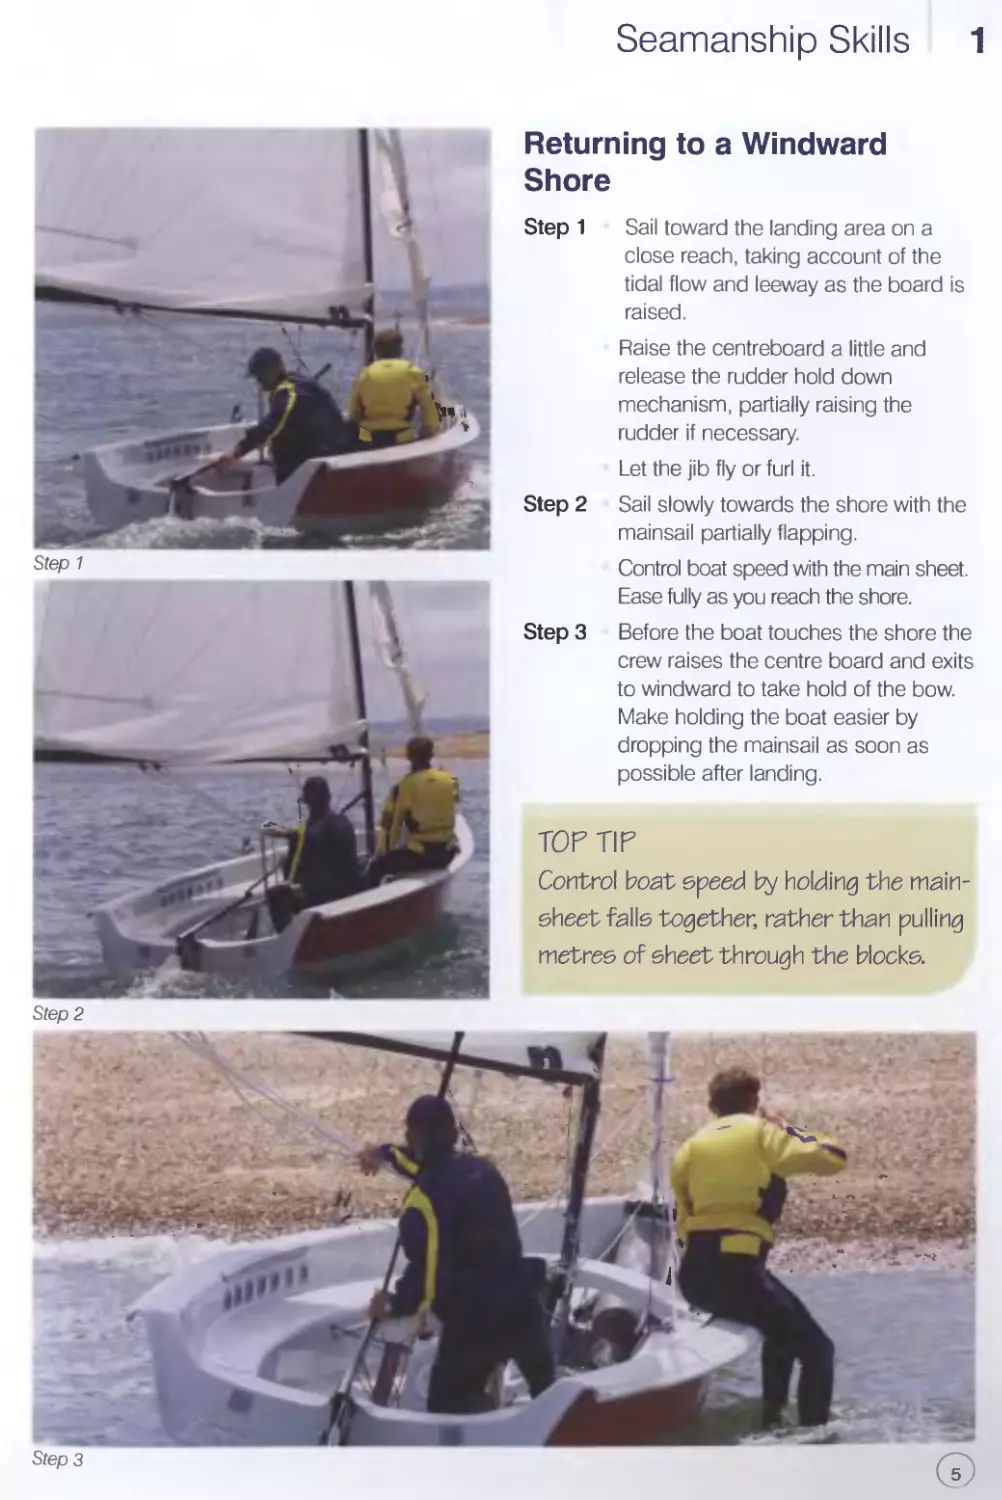
Returning to a Windward
Shore
Step 1 Sail toward the landing area on a
close reach, taking account of the
tidal flow and leeway as the board is
raised.
Raise the centreboard a little and
release the rudder hold down
mechanism, partially raising the
rudder if necessary.
Let the jib fly or furl it.
Step 2 Sail slowly towards the shore with the
mainsail partially flapping.
Control boat speed with the main sheet.
Ease fully as you reach the shore.
Step 3 Before the boat touches the shore the
crew raises the centre board and exits
to windward to take hold of the bow.
Make holding the boat easier by
dropping the mainsail as soon as
possible after landing.
TOP TIP
Control boat speed by holding the main-
sheet falls together, rather than pulling
metres of sheet through the blocks.
1 Seamanship Skills
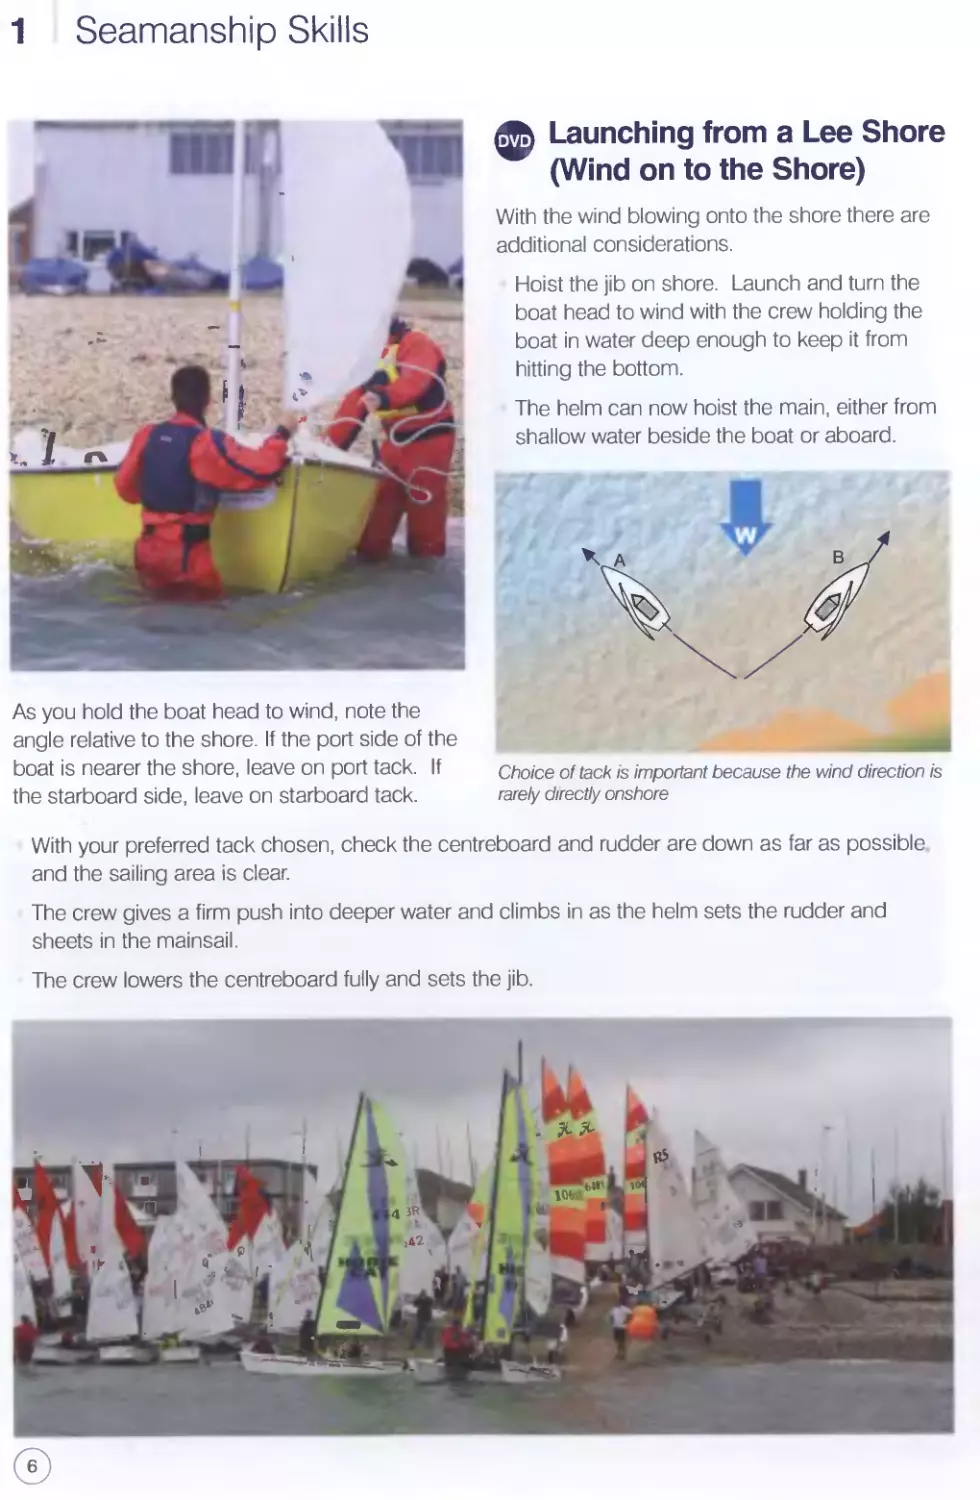
ф Launching from a Lee Shore
(Wind on to the Shore)
With the wind blowing onto the shore there are
additional considerations.
Hoist the jib on shore. Launch and turn the
boat head to wind with the crew holding the
boat in water deep enough to keep it from
hitting the bottom.
The helm can now hoist the main, either from
shallow water beside the boat or aboard.
As you hold the boat head to wind, note the
angle relative to the shore. If the port side of the
boat is nearer the shore, leave on port tack. If
the starboard side, leave on starboard tack.
Choice of tack is important because the wind direction is
rarely directly onshore
With your preferred tack chosen, check the centreboard and rudder are down as far as possible
and the sailing area is clear.
The crew gives a firm push into deeper water and climbs in as the helm sets the rudder and
sheets in the mainsail.
The crew lowers the centreboard fully and sets the jib.
Seamanship Skills 1
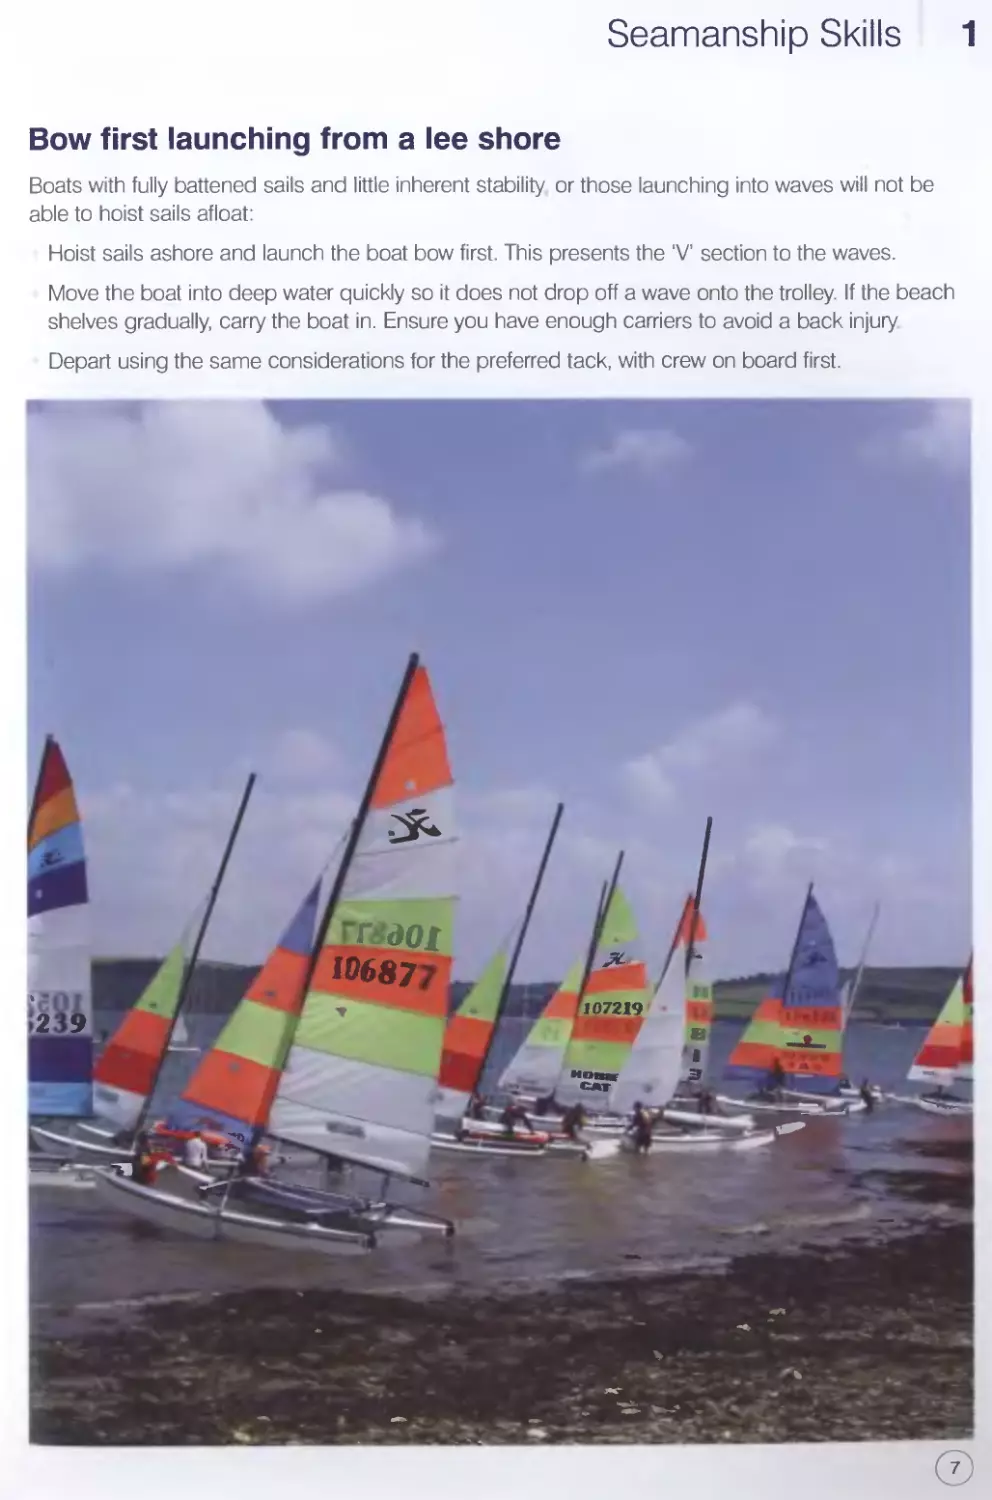
Bow first launching from a lee shore
Boats with fully battened sails and little inherent stability or those launching into waves will not be
able to hoist sails afloat:
Hoist sails ashore and launch the boat bow first. This presents the V section to the waves.
Move the boat into deep water quickly so it does not drop off a wave onto the trolley. If the beach
shelves gradually, carry the boat in. Ensure you have enough carriers to avoid a back injury
Depart using the same considerations for the preferred tack, with crew on board first.
1 Seamanship Skills
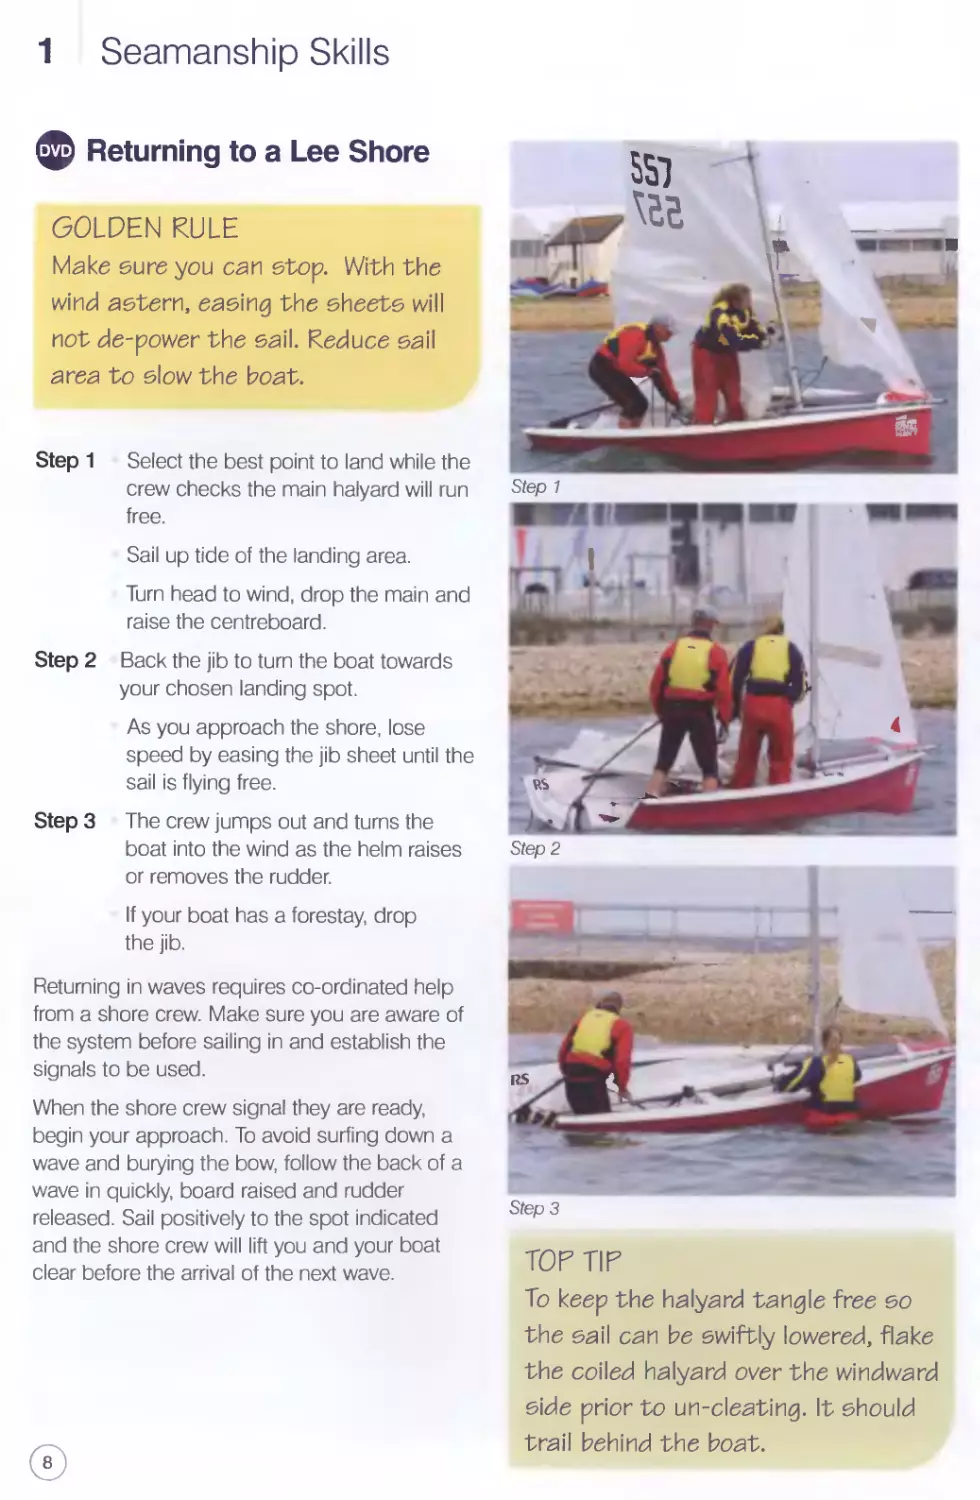
ф Returning to a Lee Shore
GOLPEN RULE
Make sure you can stop. With the
wind astern, easing the sheets will
not de-power the sail. Reduce sail
area to slow the boat.
Step 1 Select the best point to land while the
crew checks the main halyard will run
free.
Sail up tide of the landing area.
Turn head to wind, drop the main and
raise the centreboard.
Step 2 Back the jib to turn the boat towards
your chosen landing spot.
As you approach the shore, lose
speed by easing the jib sheet until the
sail is flying free.
Step 3 The crew jumps out and turns the
boat into the wind as the helm raises
or removes the rudder.
If your boat has a forestay, drop
the jib.
Returning in waves requires co-ordinated help
from a shore crew. Make sure you are aware of
the system before sailing in and establish the
signals to be used.
When the shore crew signal they are ready,
begin your approach. To avoid surfing down a
wave and burying the bow, follow the back of a
wave in quickly, board raised and rudder
released. Sail positively to the spot indicated
and the shore crew will lift you and your boat
clear before the arrival of the next wave.
TOR TIP
To keep the halyard tangle free so
the sail can be swiftly lowered, flake
the coiled halyard over the windward
side prior to un-cleating. It should
trail behind the boat.
1 Seamanship Skills
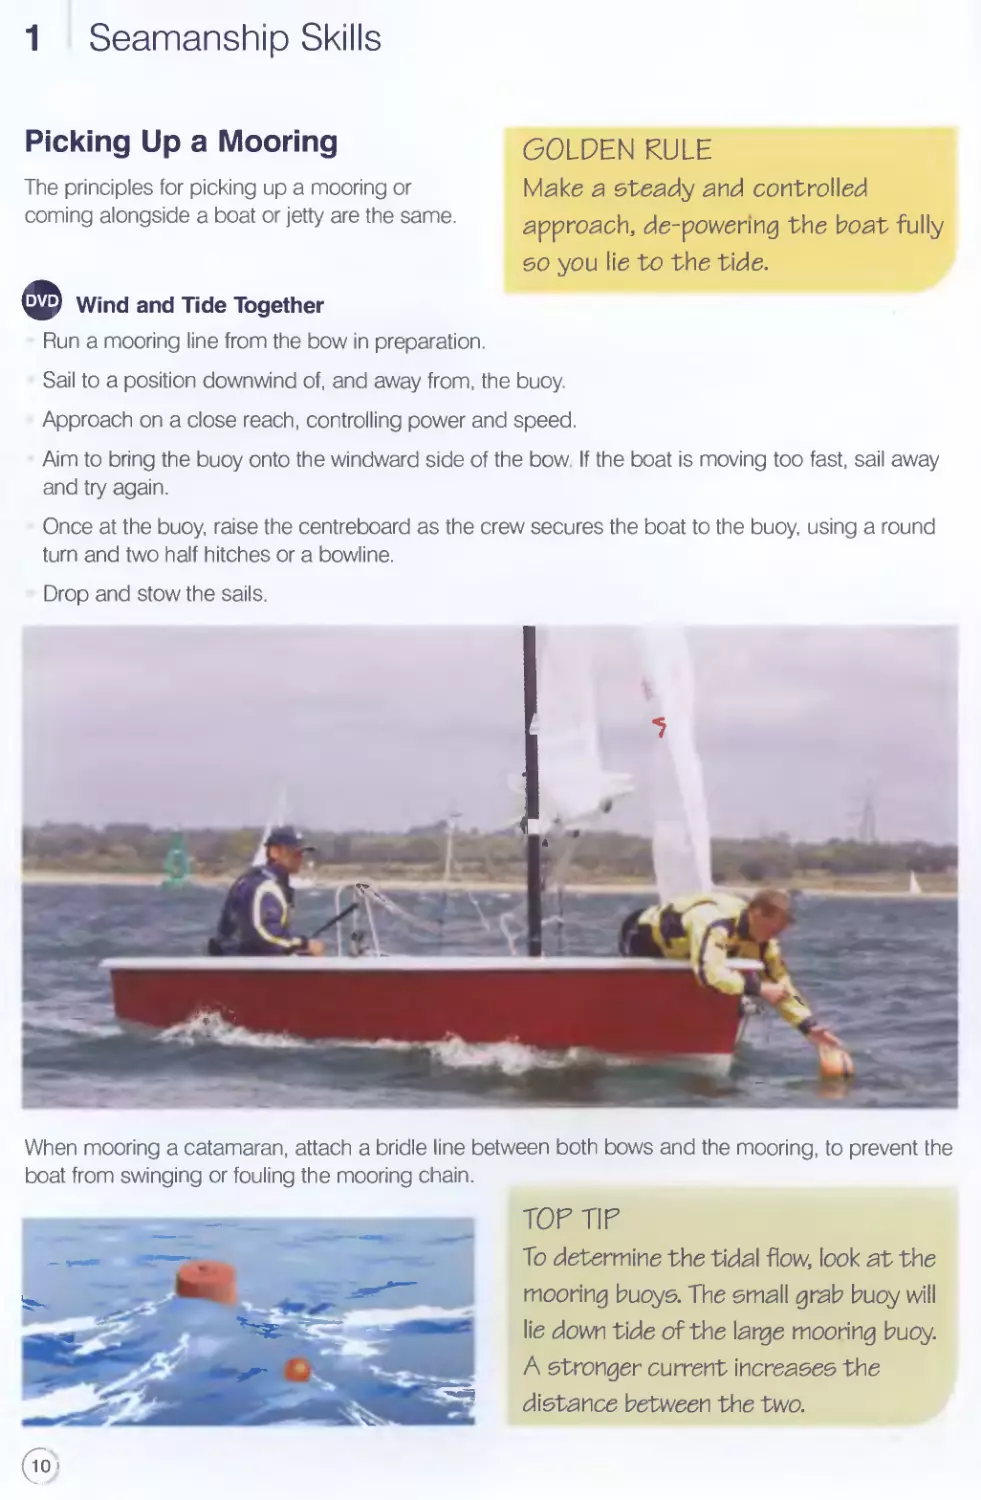
Picking Up a Mooring GOLDEN RULE
The principles for picking up a mooring or Make a steady and controlled
coming alongside a boat or jetty are the same. approach, de-powering the boat fully
50 you lie to the tide.
Wind and Tide Together
Run a mooring line from the bow in preparation.
Sail to a position downwind of, and away from, the buoy.
Approach on a close reach, controlling power and speed.
Aim to bring the buoy onto the windward side of the bow If the boat is moving too fast, sail away
and try again.
Once at the buoy, raise the centreboard as the crew secures the boat to the buoy, using a round
turn and two half hitches or a bowline.
Drop and stow the sails.
When mooring a catamaran, attach a bridle line between both bows and the mooring, to prevent the
boat from swinging or fouling the mooring chain.
TOP TIP
To determine the tidal flow, look at the
mooring buoys. The small grab buoy will
lie down tide of the large mooring buoy.
A stronger current increases the
distance between the two.
Seamanship Skills 1
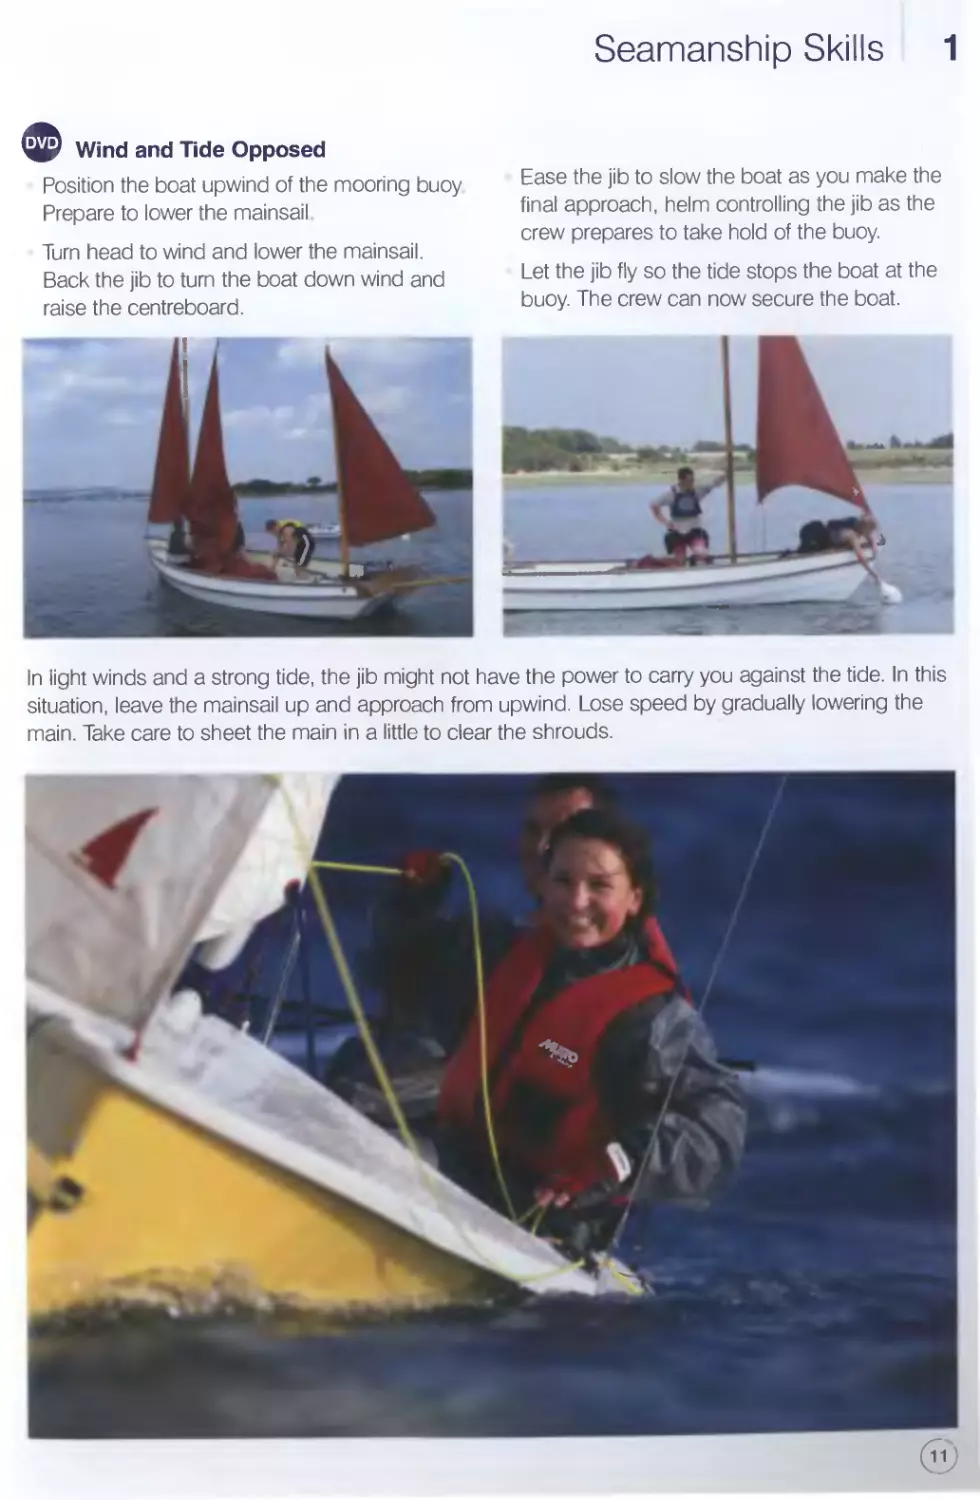
Wind and Tide Opposed
Position the boat upwind of the mooring buoy
Prepare to lower the mainsail
Turn head to wind and lower the mainsail.
Back the jib to turn the boat down wind and
raise the centreboard.
Ease the jib to slow the boat as you make the
final approach, helm controlling the jib as the
crew prepares to take hold of the buoy.
Let the jib fly so the tide stops the boat at the
buoy. The crew can now secure the boat.
In light winds and a strong tide, the jib might not have the power to carry you against the tide. In this
situation, leave the mainsail up and approach from upwind. Lose speed by gradually lowering the
main. Take care to sheet the main in a little to clear the shrouds.
1 Seamanship Skills
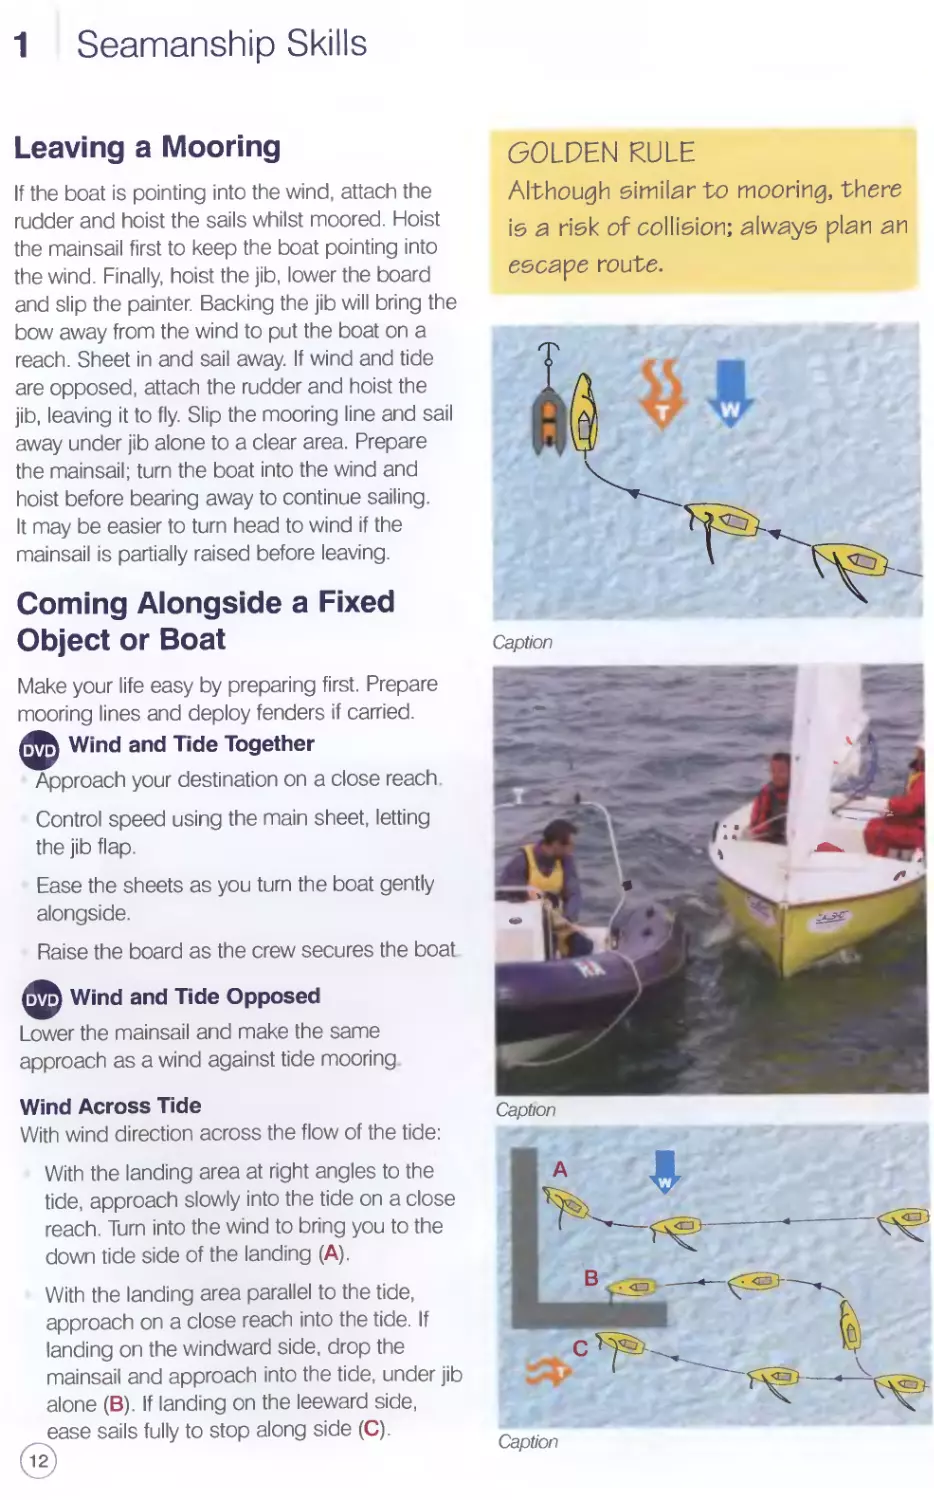
Leaving a Mooring
If the boat is pointing into the wind, attach the
rudder and hoist the sails whilst moored. Hoist
the mainsail first to keep the boat pointing into
the wind. Finally, hoist the jib, lower the board
and slip the painter. Backing the jib will bring the
bow away from the wind to put the boat on a
reach. Sheet in and sail away. If wind and tide
are opposed, attach the rudder and hoist the
jib, leaving it to fly. Slip the mooring line and sail
away under jib alone to a clear area. Prepare
the mainsail; turn the boat into the wind and
hoist before bearing away to continue sailing.
It may be easier to turn head to wind if the
mainsail is partially raised before leaving.
Coming Alongside a Fixed
Object or Boat
Make your life easy by preparing first. Prepare
mooring lines and deploy fenders if carried.
Wind and Tide Together
Approach your destination on a close reach
Control speed using the main sheet, letting
the jib flap.
Ease the sheets as you turn the boat gently
alongside.
Raise the board as the crew secures the boat
Wind and Tide Opposed
Lower the mainsail and make the same
approach as a wind against tide mooring
Wind Across Tide
With wind direction across the flow of the tide:
With the landing area at right angles to the
tide, approach slowly into the tide on a close
reach. Turn into the wind to bring you to the
down tide side of the landing (A).
With the landing area parallel to the tide,
approach on a close reach into the tide. If
landing on the windward side, drop the
mainsail and approach into the tide, under jib
alone (B). If landing on the leeward side,
ease sails fully to stop along side (C).
GOLDEN RULE
Although similar to mooring, there
is a risk of collision; always plan an
escape route.
Caption
Caption
1 Seamanship Skills
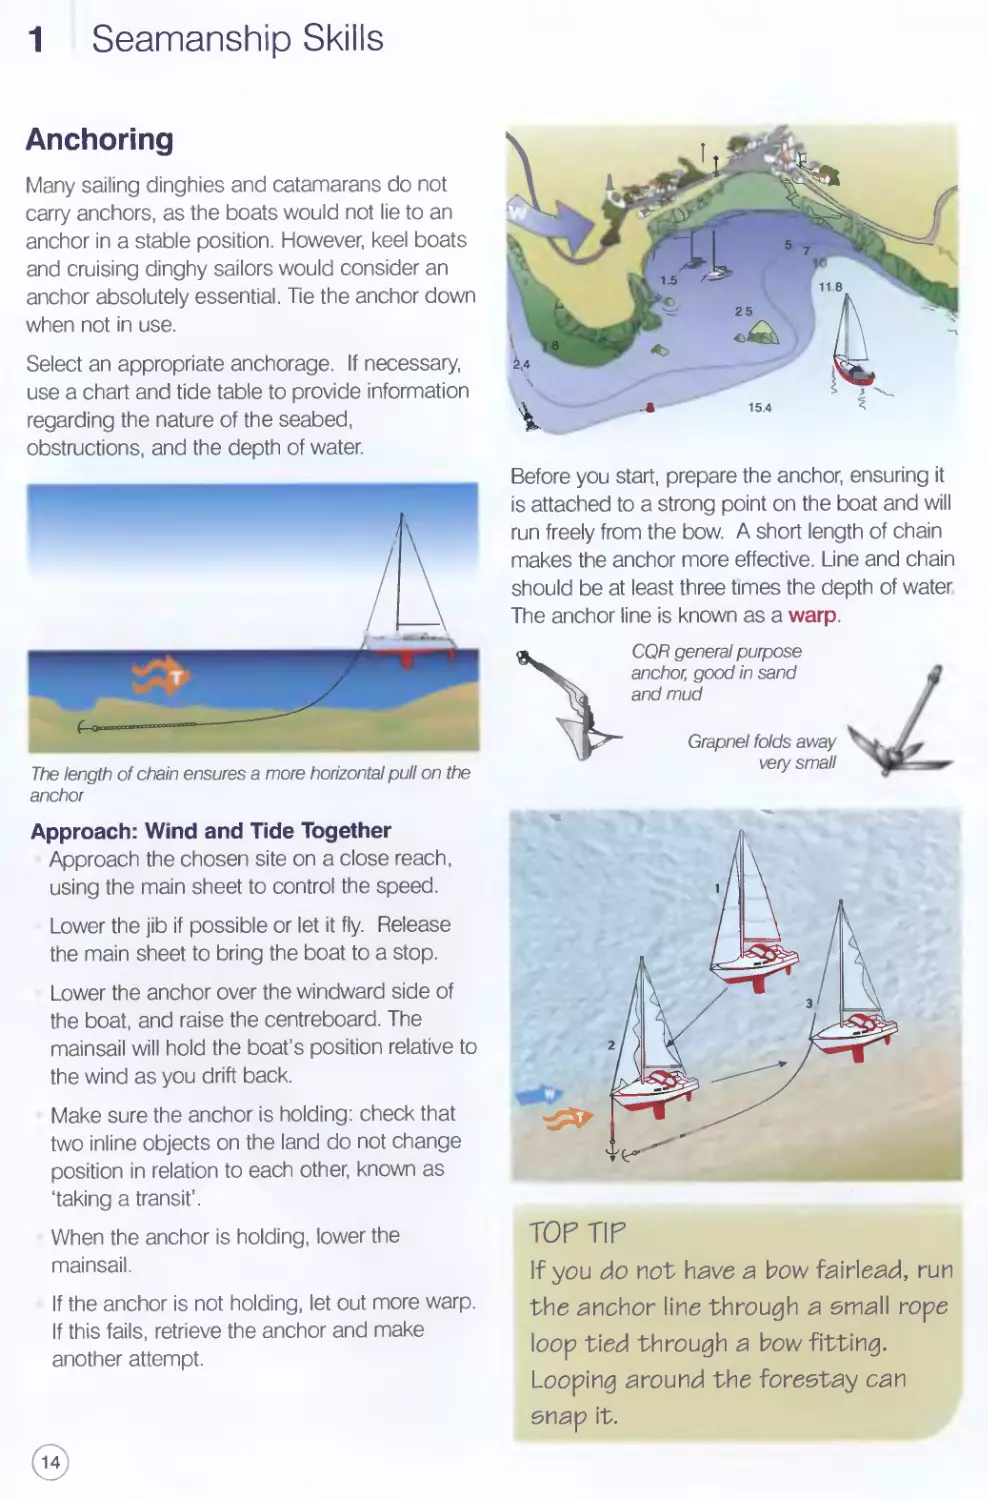
Anchoring
Many sailing dinghies and catamarans do not
carry anchors, as the boats would not lie to an
anchor in a stable position. However, keel boats
and cruising dinghy sailors would consider an
anchor absolutely essential. Tie the anchor down
when not in use.
Select an appropriate anchorage. If necessary,
use a chart and tide table to provide information
regarding the nature of the seabed,
obstructions, and the depth of water.
The length of chain ensures a more horizontal pull on the
anchor
Before you start, prepare the anchor, ensuring it
is attached to a strong point on the boat and will
run freely from the bow. A short length of chain
makes the anchor more effective. Line and chain
should be at least three times the depth of water
The anchor line is known as a warp.
COR general purpose
anchor, good in sand
and mud
Grapnel folds away
very small
Approach: Wind and Tide Together
Approach the chosen site on a close reach,
using the main sheet to control the speed.
Lower the jib if possible or let it fly. Release
the main sheet to bring the boat to a stop.
Lower the anchor over the windward side of
the boat, and raise the centreboard. The
mainsail will hold the boat’s position relative to
the wind as you drift back.
Make sure the anchor is holding: check that
two inline objects on the land do not change
position in relation to each other, known as
‘taking a transit’.
When the anchor is holding, lower the
mainsail.
If the anchor is not holding, let out more warp.
If this fails, retrieve the anchor and make
another attempt.
TOP TIP
If you do not have a bow fairlead, run
the anchor line through a small rope
loop tied through a bow fitting.
Looping around the forestay can
snap it.
Seamanship Skills 1
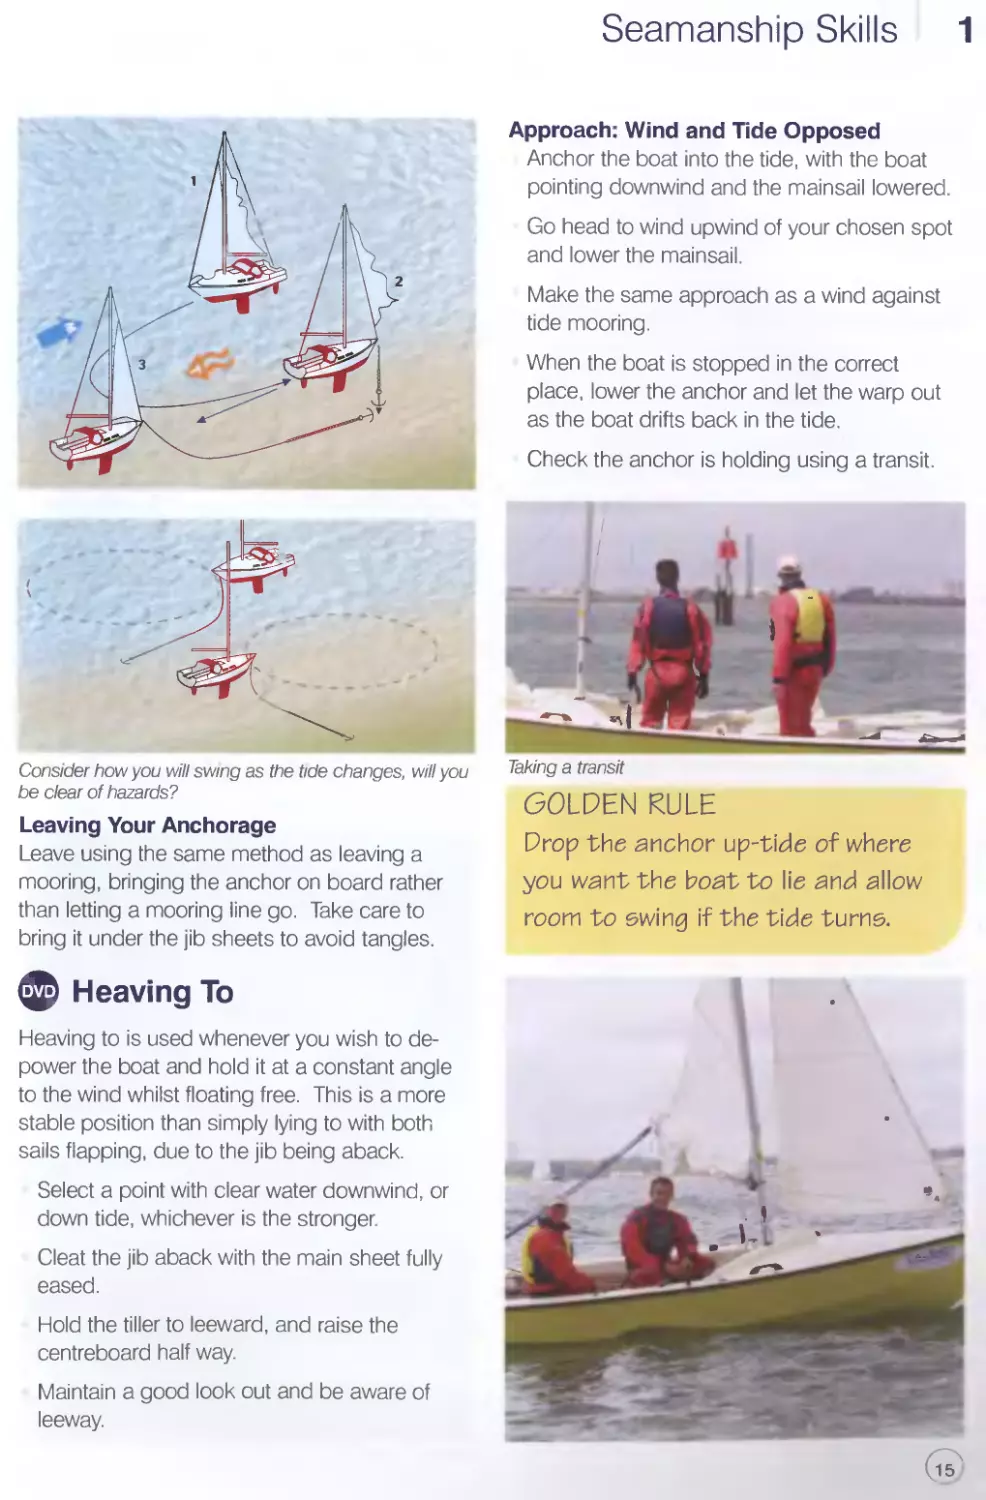
Approach: Wind and Tide Opposed
Anchor the boat into the tide, with the boat
pointing downwind and the mainsail lowered.
Go head to wind upwind of your chosen spot
and lower the mainsail.
Make the same approach as a wind against
tide mooring.
When the boat is stopped in the correct
place, lower the anchor and let the warp out
as the boat drifts back in the tide.
Check the anchor is holding using a transit.
Consider how you will swng as the tide changes, will you
be clear of hazards?
Leaving Your Anchorage
Leave using the same method as leaving a
mooring, bringing the anchor on board rather
than letting a mooring line go. Take care to
bring it under the jib sheets to avoid tangles.
Taking a transit
GOLDEN RULE
Drop the anchor up-tide of where
you want the boat to lie and allow
room to swing if the tide turns.
© Heaving To
Heaving to is used whenever you wish to de-
power the boat and hold it at a constant angle
to the wind whilst floating free. This is a more
stable position than simply lying to with both
sails flapping, due to the jib being aback.
Select a point with clear water downwind, or
down tide, whichever is the stronger.
Cleat the jib aback with the main sheet fully
eased.
Hold the tiller to leeward, and raise the
centreboard half way.
Maintain a good look out and be aware of
leeway.
1 Seamanship Skills
Reefing Afloat In Strong Winds
As the wind becomes stronger, you may need to reduce sail area Methods vary as different
classes use a variety of reefing systems. Make life easy by reefing ashore, at a mooring or at
anchor. If none of these are viable, sail into clear water and heave to
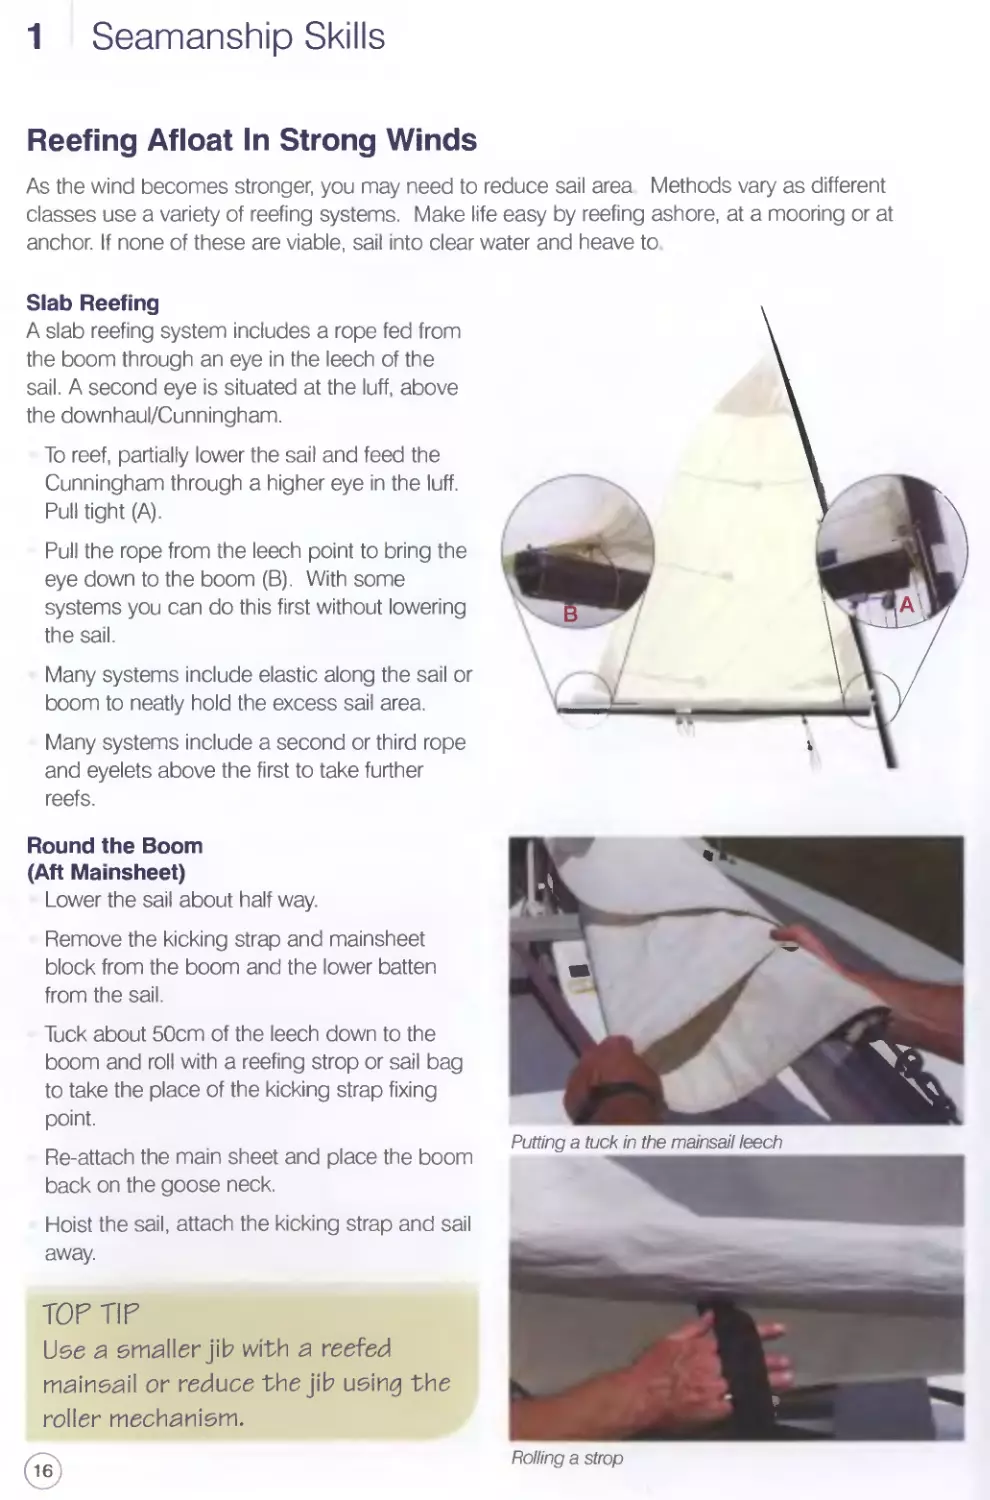
Slab Reefing
A slab reefing system includes a rope fed from
the boom through an eye in the leech of the
sail. A second eye is situated at the luff, above
the downhaul/Cunningham.
To reef, partially lower the sail and feed the
Cunningham through a higher eye in the luff.
Pull tight (A).
Pull the rope from the leech point to bring the
eye down to the boom (B). With some
systems you can do this first without lowering
the sail.
Many systems include elastic along the sail or
boom to neatly hold the excess sail area.
Many systems include a second or third rope
and eyelets above the first to take further
reefs.
Round the Boom
(Aft Mainsheet)
Lower the sail about half way.
Remove the kicking strap and mainsheet
block from the boom and the lower batten
from the sail.
Tuck about 50cm of the leech down to the
boom and roll with a reefing strop or sail bag
to take the place of the kicking strap fixing
point.
Re-attach the main sheet and place the boom
back on the goose neck.
Hoist the sail, attach the kicking strap and sail
away.
TOP TIP
Use a smaller jib with a reefed
mainsail or reduce the jib using the
roller mechanism.
Putting a tuck in the mainsail leech
Rolling a strop
Seamanship Skills 1
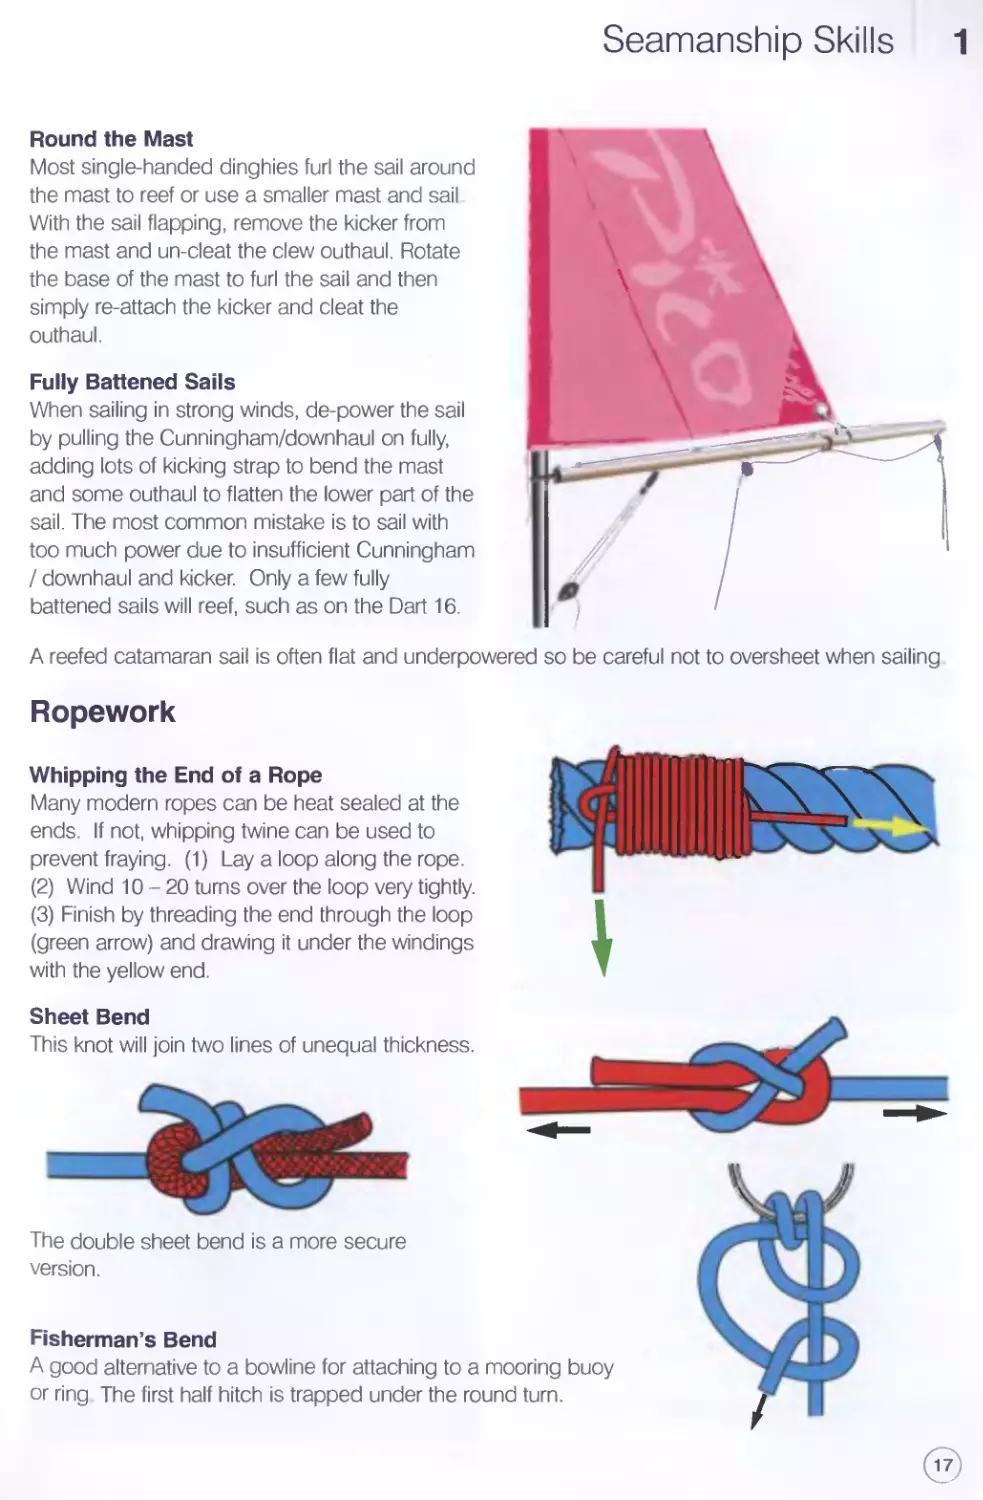
Round the Mast
Most single-handed dinghies furl the sail around
the mast to reef or use a smaller mast and sail
With the sail flapping, remove the kicker from
the mast and un-cleat the clew outhaul. Rotate
the base of the mast to furl the sail and then
simply re-attach the kicker and cleat the
outhaul.
Fully Battened Sails
When sailing in strong winds, de-power the sail
by pulling the Cunningham/downhaul on fully,
adding lots of kicking strap to bend the mast
and some outhaul to flatten the lower part of the
sail. The most common mistake is to sail with
too much power due to insufficient Cunningham
I downhaul and kicker. Only a few fully
battened sails will reef, such as on the Dart 16.
A reefed catamaran sail is often flat and underpowered so be careful not to oversheet when sailing
Ropework
Whipping the End of a Rope
Many modern ropes can be heat sealed at the
ends. If not, whipping twine can be used to
prevent fraying. (1) Lay a loop along the rope.
(2) Wind 10-20 turns over the loop very tightly.
(3) Finish by threading the end through the loop
(green arrow) and drawing it under the windings
with the yellow end.
Sheet Bend
This knot will join two lines of unequal thickness.
The double sheet bend is a more secure
version.
Fisherman’s Bend
A good alternative to a bowline for attaching to a mooring buoy
or ring The first half hitch is trapped under the round turn.
1 Seamanship Skills
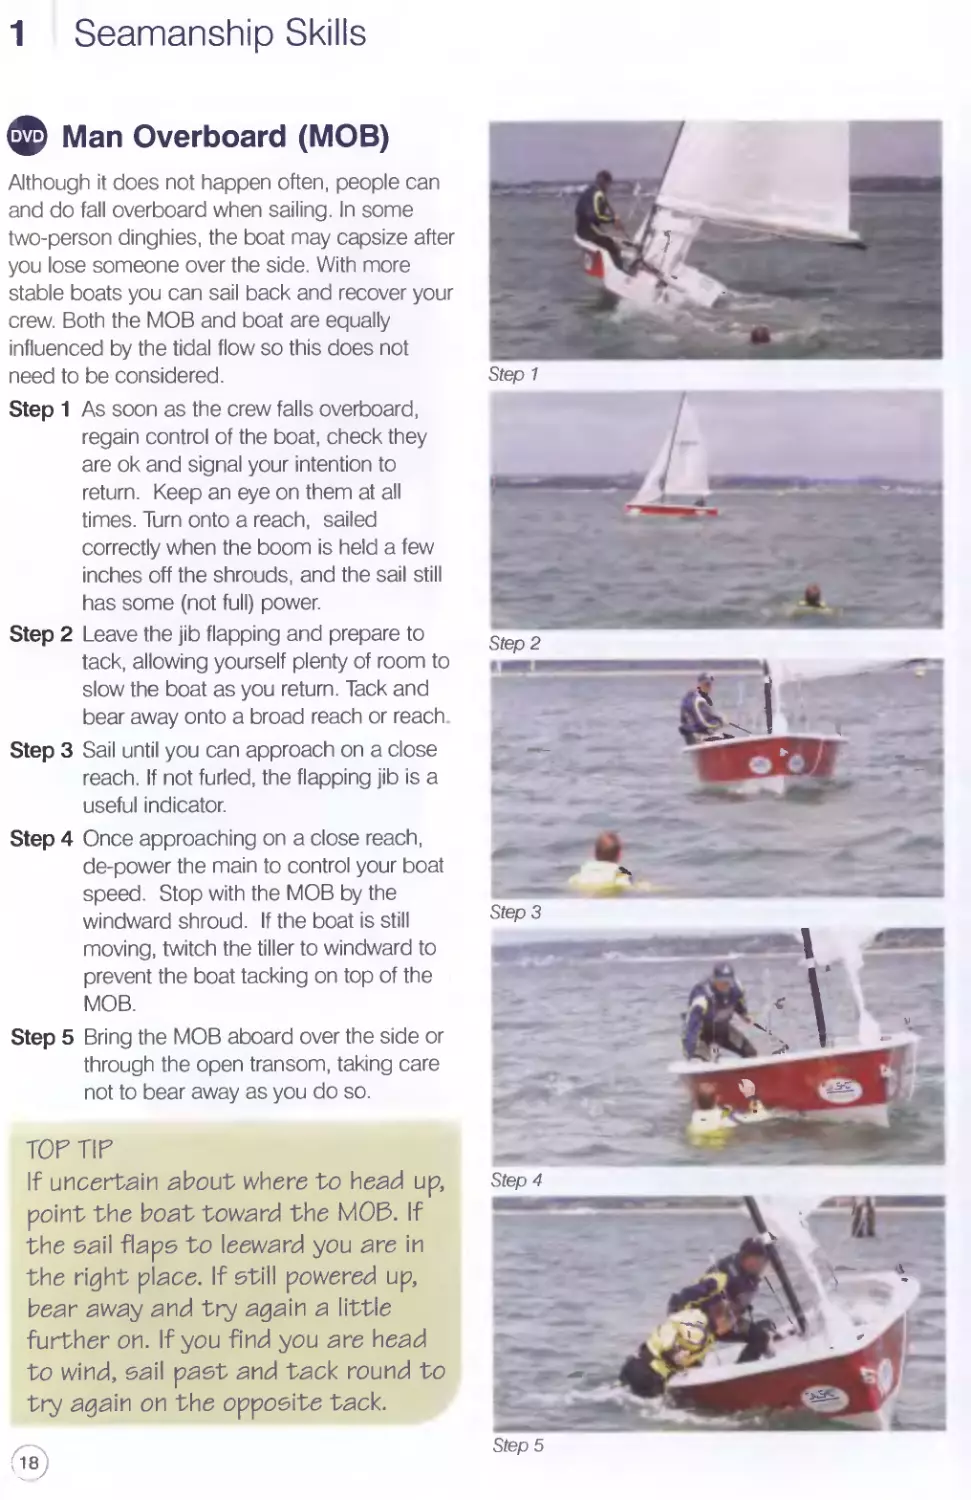
Man Overboard (MOB)
Although it does not happen often, people can
and do fall overboard when sailing. In some
two-person dinghies, the boat may capsize after
you lose someone over the side. With more
stable boats you can sail back and recover your
crew. Both the MOB and boat are equally
influenced by the tidal flow so this does not
need to be considered.
Step 1 As soon as the crew falls overboard,
regain control of the boat, check they
are ok and signal your intention to
return. Keep an eye on them at all
times. Turn onto a reach, sailed
correctly when the boom is held a few
inches off the shrouds, and the sail still
has some (not full) power.
Step 2 Leave the jib flapping and prepare to
tack, allowing yourself plenty of room to
slow the boat as you return. Tack and
bear away onto a broad reach or reach.
Step 3 Sail until you can approach on a close
reach. If not furled, the flapping jib is a
useful indicator.
Step 4 Once approaching on a close reach,
de-power the main to control your boat
speed. Stop with the MOB by the
windward shroud. If the boat is still
moving, twitch the tiller to windward to
prevent the boat tacking on top of the
MOB.
Step 5 Bring the MOB aboard over the side or
through the open transom, taking care
not to bear away as you do so.
TOP TIP
If uncertain about where to head up,
point the boat toward the MOP. If
the sail flaps to leeward you are in
the right place. If still powered up,
bear away and try again a little
further on. If you find you are head
to wind, sail past and tack round to
try again on the opposite tack.
Stef > 1
Step 2
Step 3
Step 4
Step 5
Seamanship Skills 1
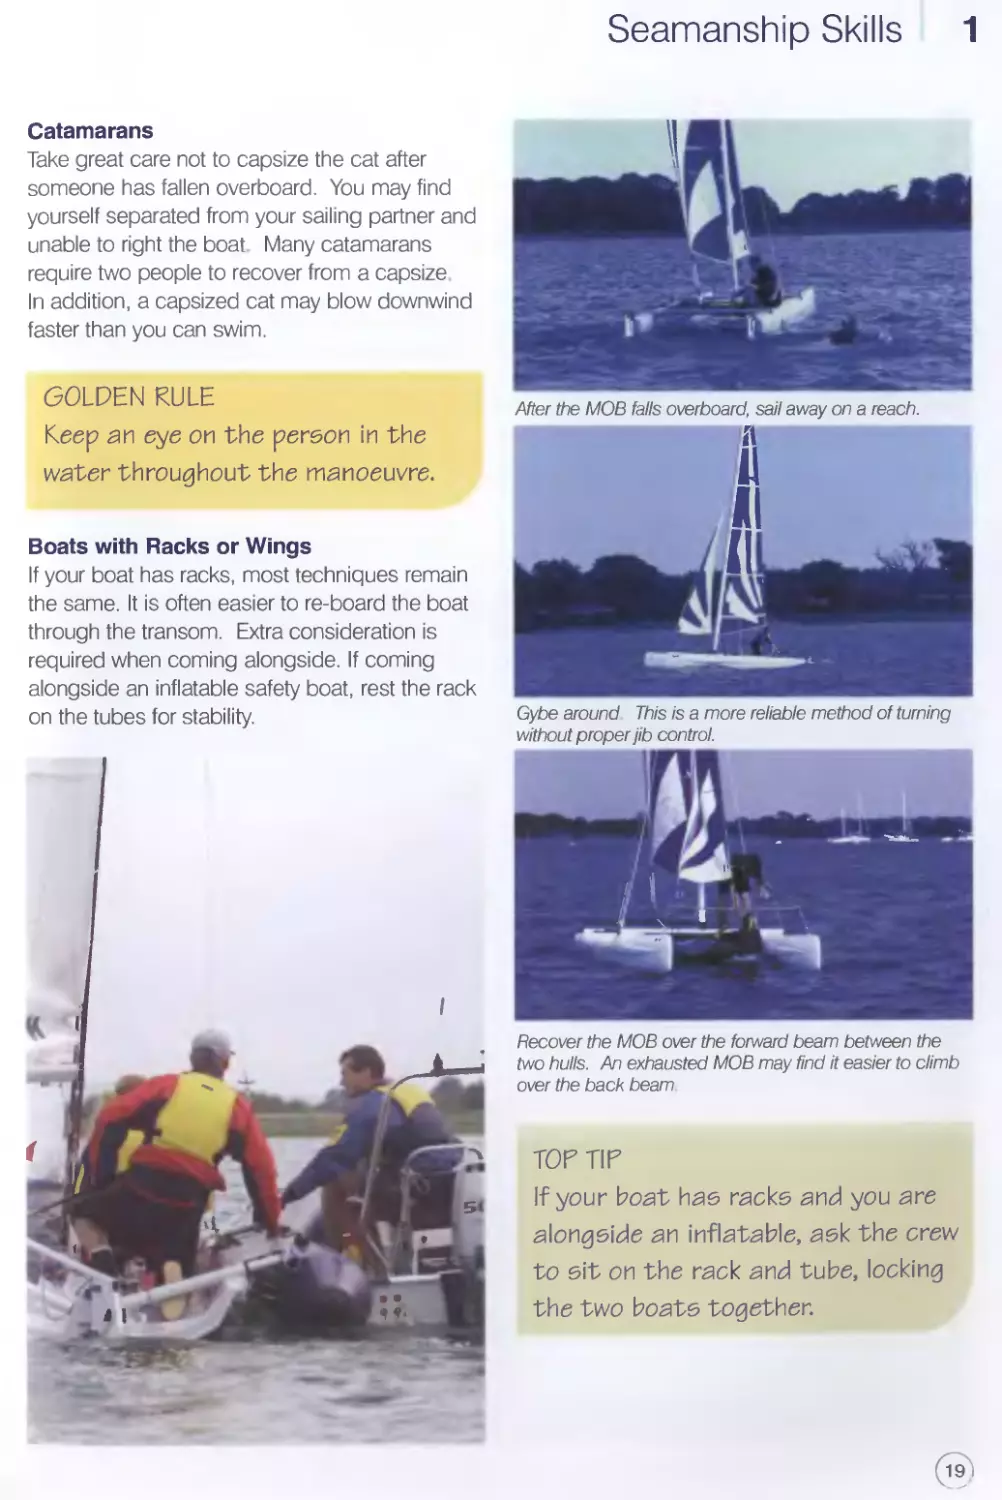
Catamarans
Take great care not to capsize the cat after
someone has fallen overboard. You may find
yourself separated from your sailing partner and
unable to right the boat Many catamarans
require two people to recover from a capsize.
In addition, a capsized cat may blow downwind
faster than you can swim.
GOLDEN RULE
Keep an eye on the person in the
water throughout the manoeuvre.
Boats with Racks or Wings
If your boat has racks, most techniques remain
the same. It is often easier to re-board the boat
through the transom. Extra consideration is
required when coming alongside. If coming
alongside an inflatable safety boat, rest the rack
on the tubes for stability.
After the MOB falls overboard, sail away on a reach.
Gybe around This is a more reliable method of turning
without proper jib control.
Recover the MOB over the forward beam between the
two hulls. An exhausted MOB may find it easier to climb
over the back beam
TOP TIP
If your boat has racks and you are
alongside an inflatable, ask the crew
to sit on the rack and tube, locking
the two boats together.
19
1 Seamanship Skills
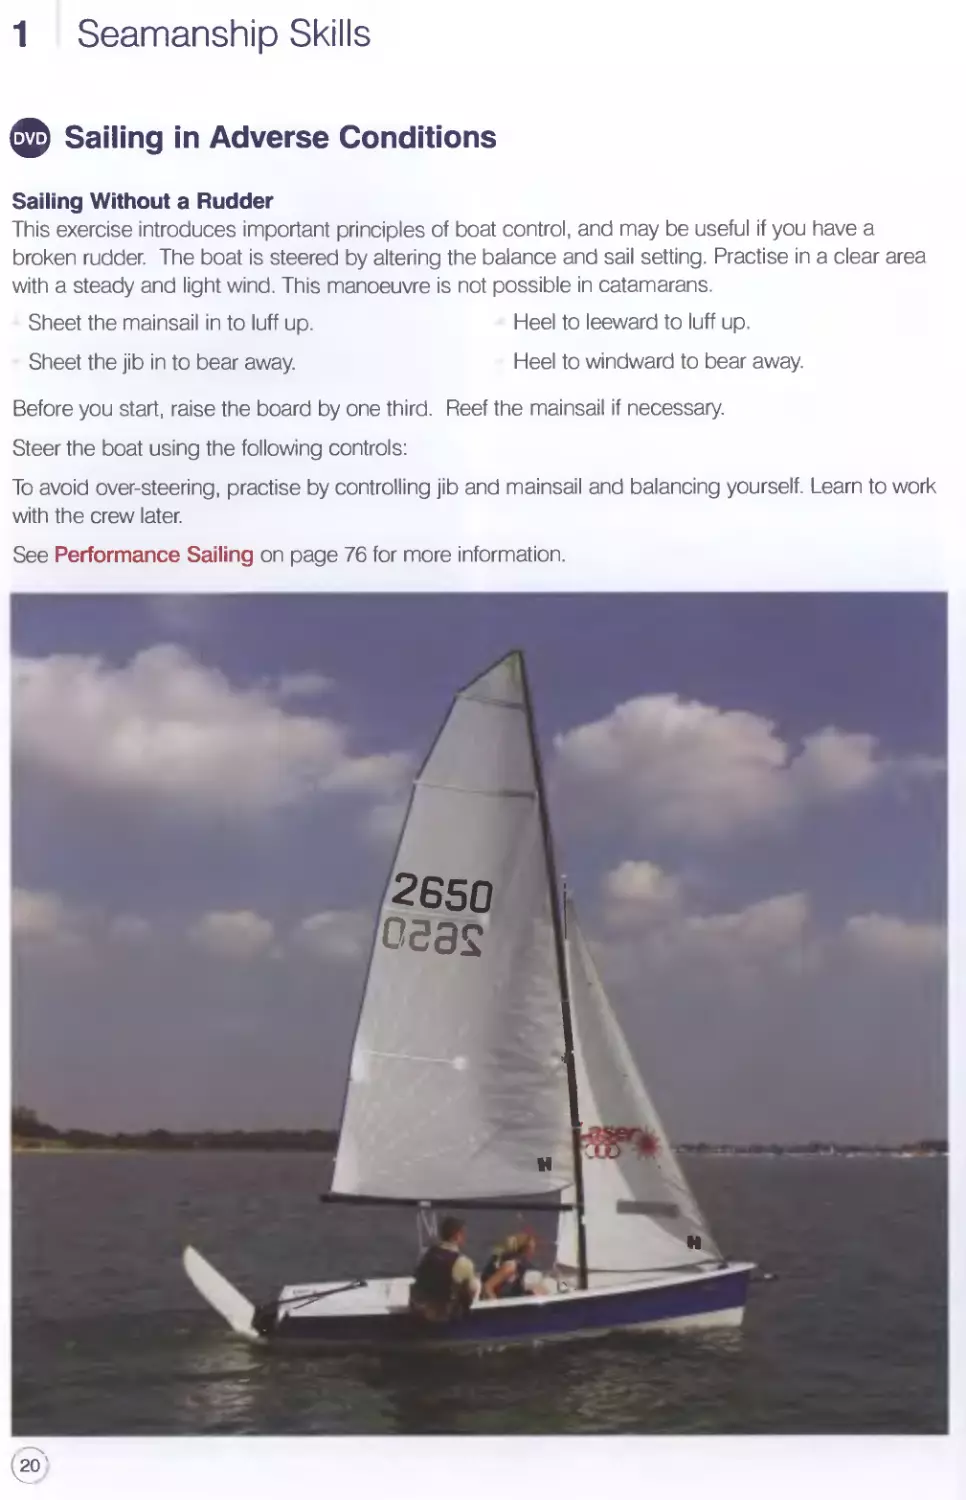
Sailing in Adverse Conditions
Sailing Without a Rudder
This exercise introduces important principles of boat control, and may be useful if you have a
broken rudder. The boat is steered by altering the balance and sail setting. Practise in a clear area
with a steady and light wind. This manoeuvre is not possible in catamarans.
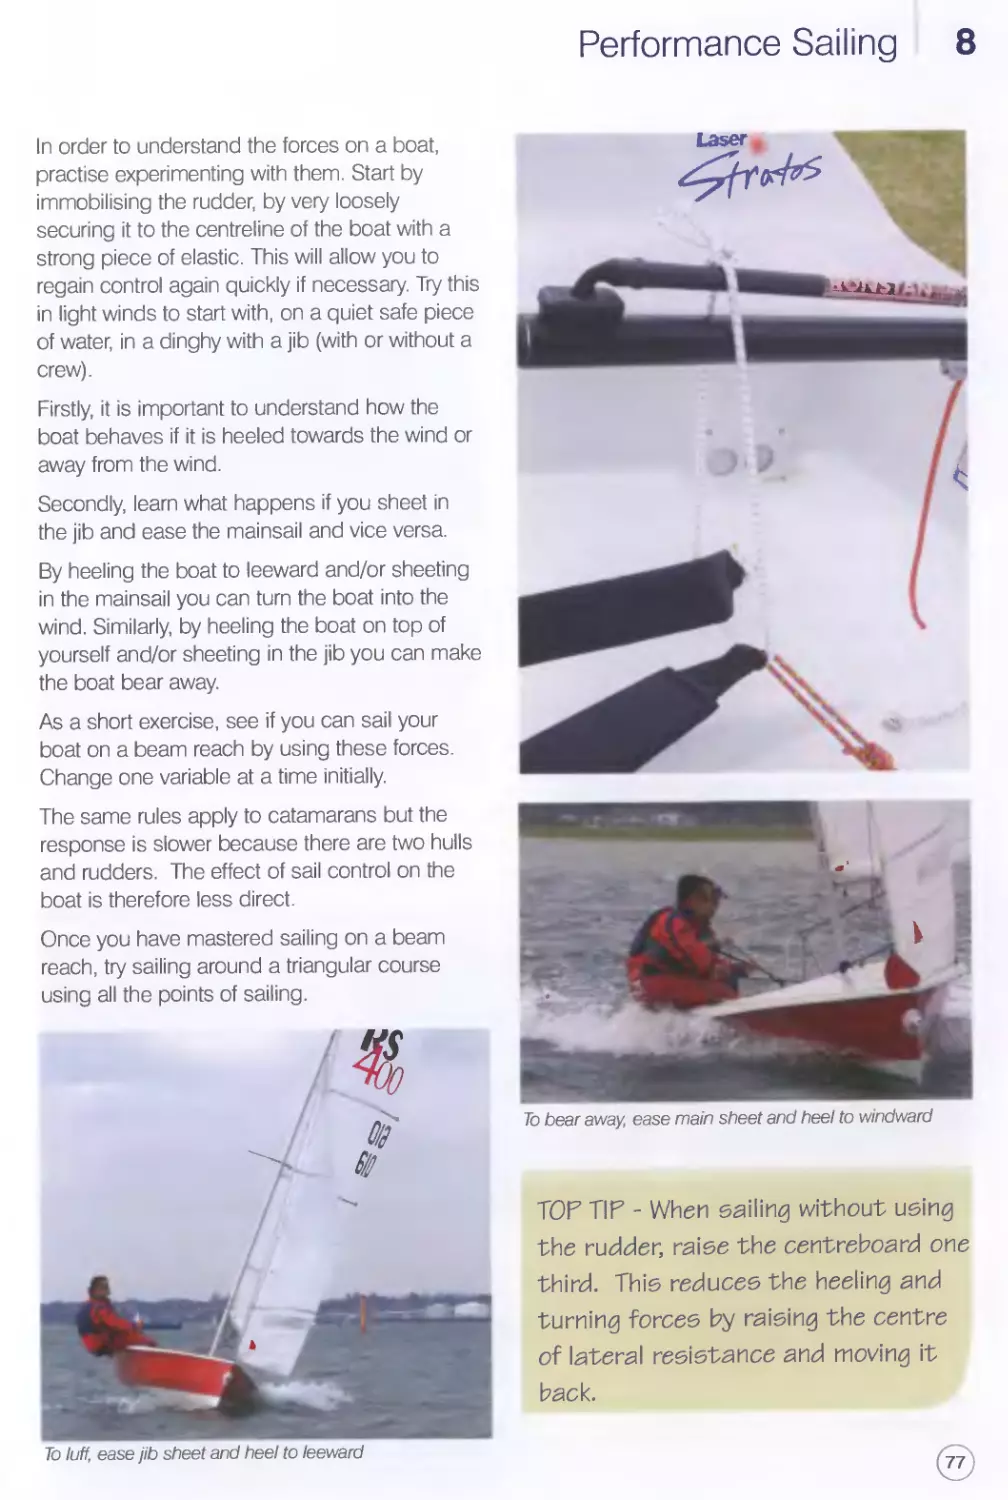
Sheet the mainsail in to luff up. Heel to leeward to luff up.
Sheet the jib in to bear away. Heel to windward to bear away.
Before you start, raise the board by one third. Reef the mainsail if necessary.
Steer the boat using the following controls:
To avoid over-steering, practise by controlling jib and mainsail and balancing yourself. Learn to work
with the crew later.
See Performance Sailing on page 76 for more information.
20
Seamanship Skills 1
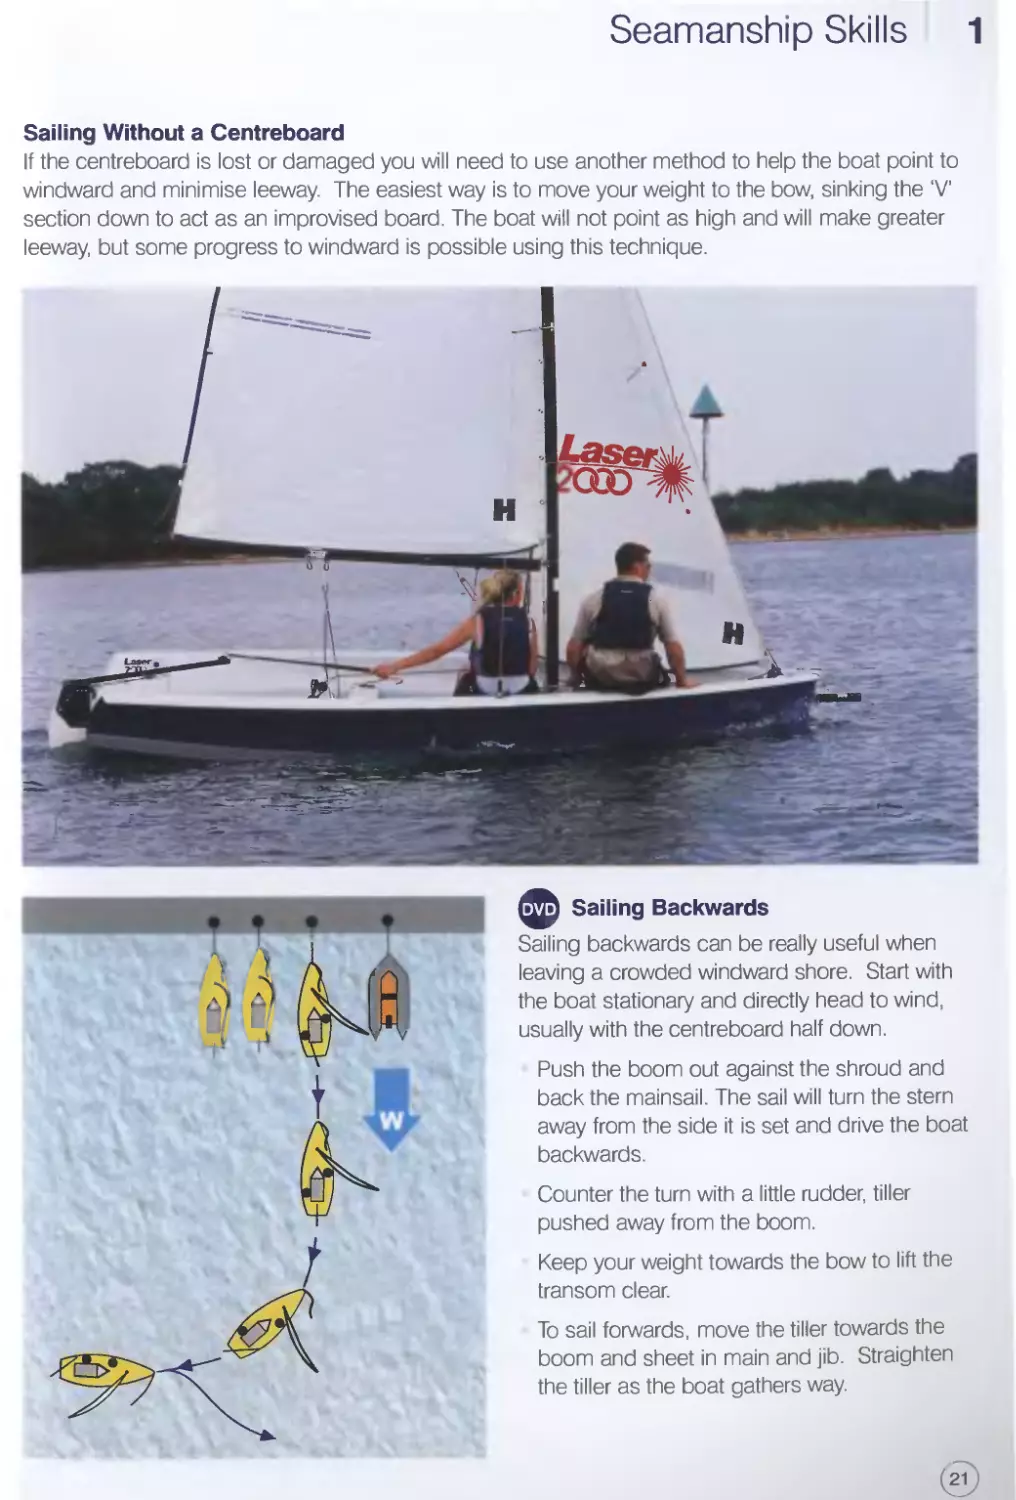
Sailing Without a Centreboard
If the centreboard is lost or damaged you will need to use another method to help the boat point to
windward and minimise leeway. The easiest way is to move your weight to the bow, sinking the ‘V
section down to act as an improvised board. The boat will not point as high and will make greater
leeway, but some progress to windward is possible using this technique.
Sailing Backwards
Sailing backwards can be really useful when
leaving a crowded windward shore. Start with
the boat stationary and directly head to wind,
usually with the centreboard half down.
Push the boom out against the shroud and
back the mainsail. The sail will turn the stern
away from the side it is set and drive the boat
backwards.
Counter the turn with a little rudder, tiller
pushed away from the boom.
Keep your weight towards the bow to lift the
transom clear.
To sail forwards, move the tiller towards the
boom and sheet in main and jib. Straighten
the tiller as the boat gathers way.
21
2 Dealing with Inversion Capsizes
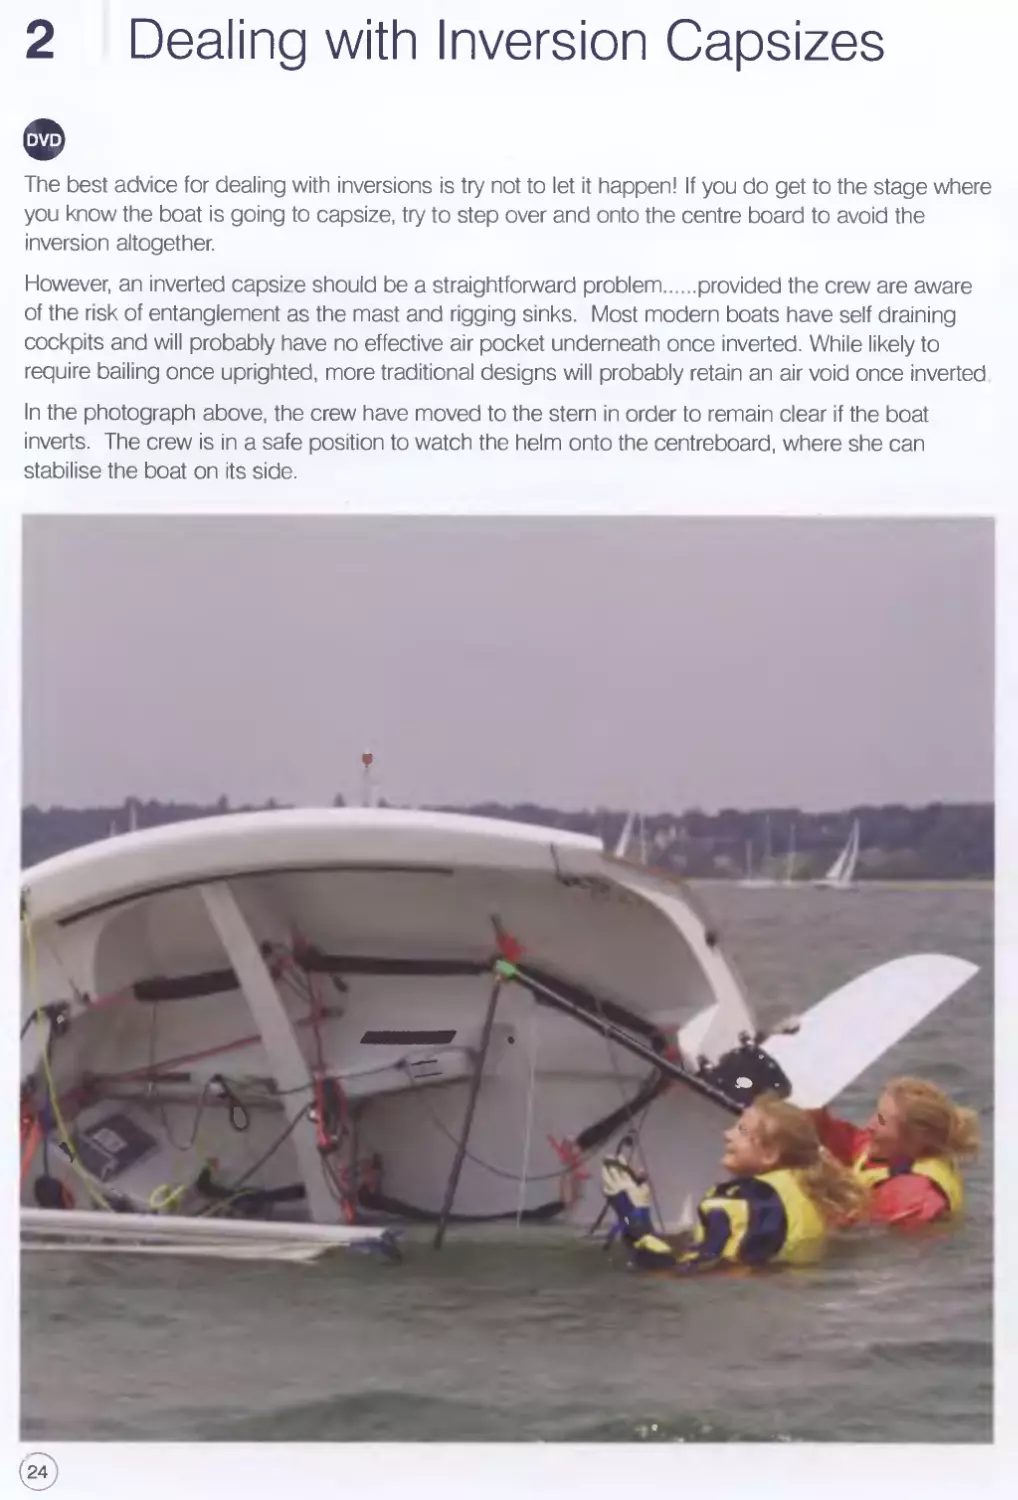
The best advice for dealing with inversions is try not to let it happen! If you do get to the stage where
you know the boat is going to capsize, try to step over and onto the centre board to avoid the
inversion altogether.
However, an inverted capsize should be a straightforward problem....provided the crew are aware
of the risk of entanglement as the mast and rigging sinks. Most modern boats have self draining
cockpits and will probably have no effective air pocket underneath once inverted. While likely to
require bailing once uprighted, more traditional designs will probably retain an air void once inverted
In the photograph above, the crew have moved to the stern in order to remain clear if the boat
inverts. The crew is in a safe position to watch the helm onto the centreboard, where she can
stabilise the boat on its side.
Dealing with Inversion Capsizes 2
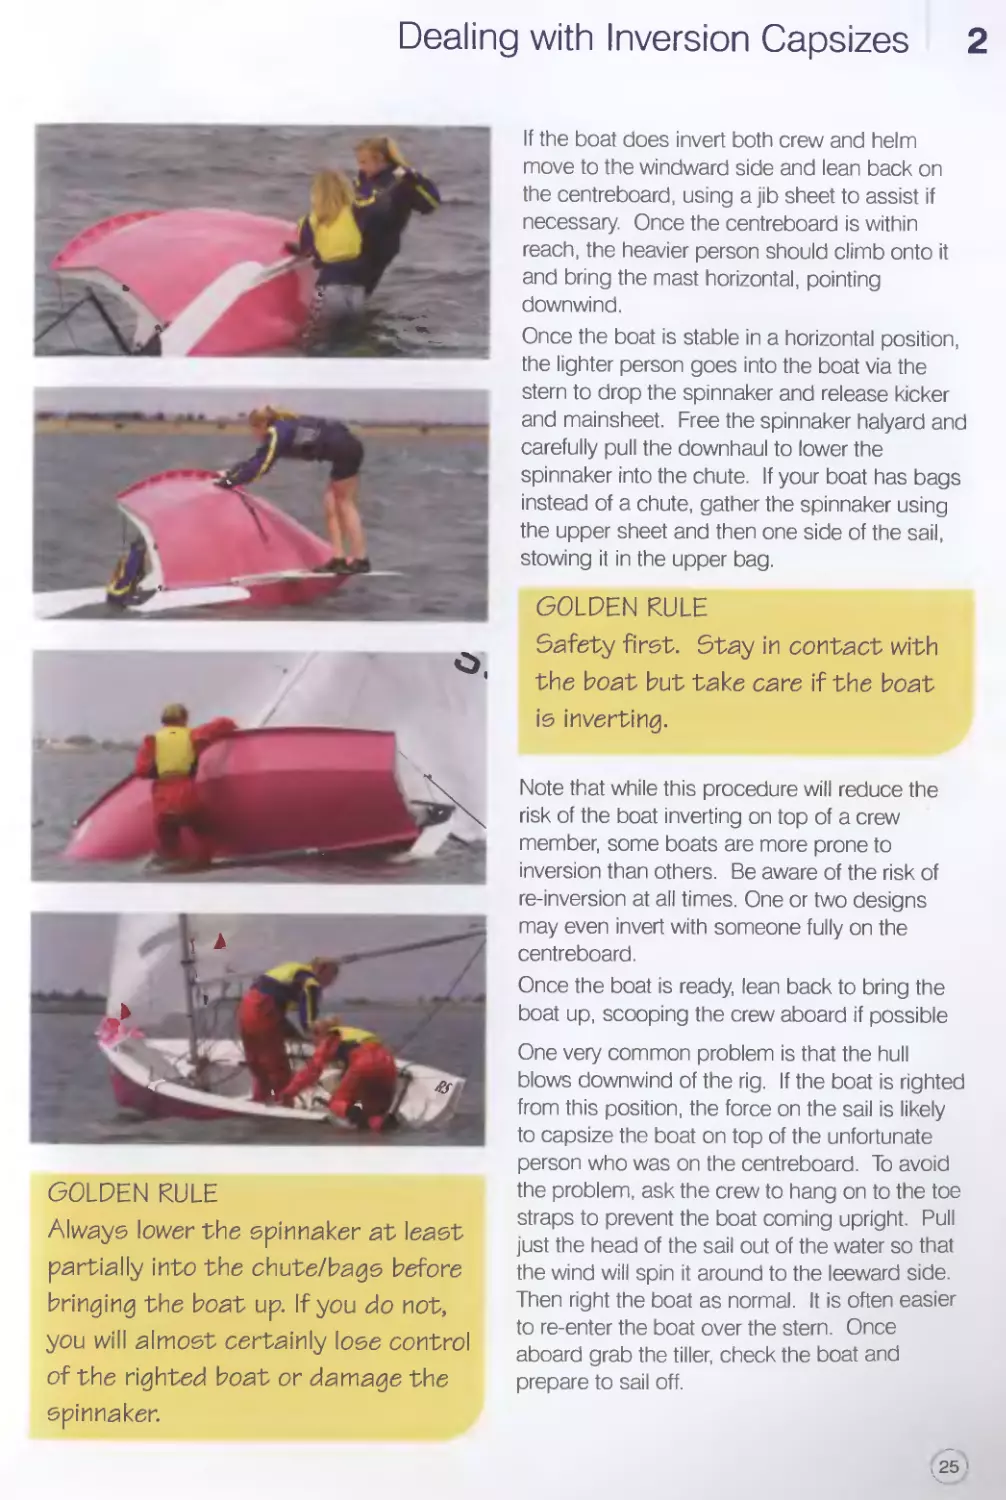
GOLDEN RULE
Always lower the spinnaker at least
partially into the chute/bags before
bringing the boat up. If you do not,
you will almost certainly lose control
of the righted boat or damage the
spinnaker.
If the boat does invert both crew and helm
move to the windward side and lean back on
the centreboard, using a jib sheet to assist if
necessary. Once the centreboard is within
reach, the heavier person should climb onto it
and bring the mast horizontal, pointing
downwind.
Once the boat is stable in a horizontal position,
the lighter person goes into the boat via the
stern to drop the spinnaker and release kicker
and mainsheet. Free the spinnaker halyard and
carefully pull the downhaul to lower the
spinnaker into the chute. If your boat has bags
instead of a chute, gather the spinnaker using
the upper sheet and then one side of the sail,
stowing it in the upper bag.
GOLDEN RULE
Safety first. Stay in contact with
the boat but take care if the boat
is inverting.
Note that while this procedure will reduce the
risk of the boat inverting on top of a crew
member, some boats are more prone to
inversion than others. Be aware of the risk of
re-inversion at all times. One or two designs
may even invert with someone fully on the
centreboard.
Once the boat is ready, lean back to bring the
boat up, scooping the crew aboard if possible
One very common problem is that the hull
blows downwind of the rig. If the boat is righted
from this position, the force on the sail is likely
to capsize the boat on top of the unfortunate
person who was on the centreboard. To avoid
the problem, ask the crew to hang on to the toe
straps to prevent the boat coming upright. Pull
just the head of the sail out of the water so that
the wind will spin it around to the leeward side.
Then right the boat as normal. It is often easier
to re-enter the boat over the stern. Once
aboard grab the tiller, check the boat and
prepare to sail off.
>25
2 Dealing with Inversion Capsizes ф
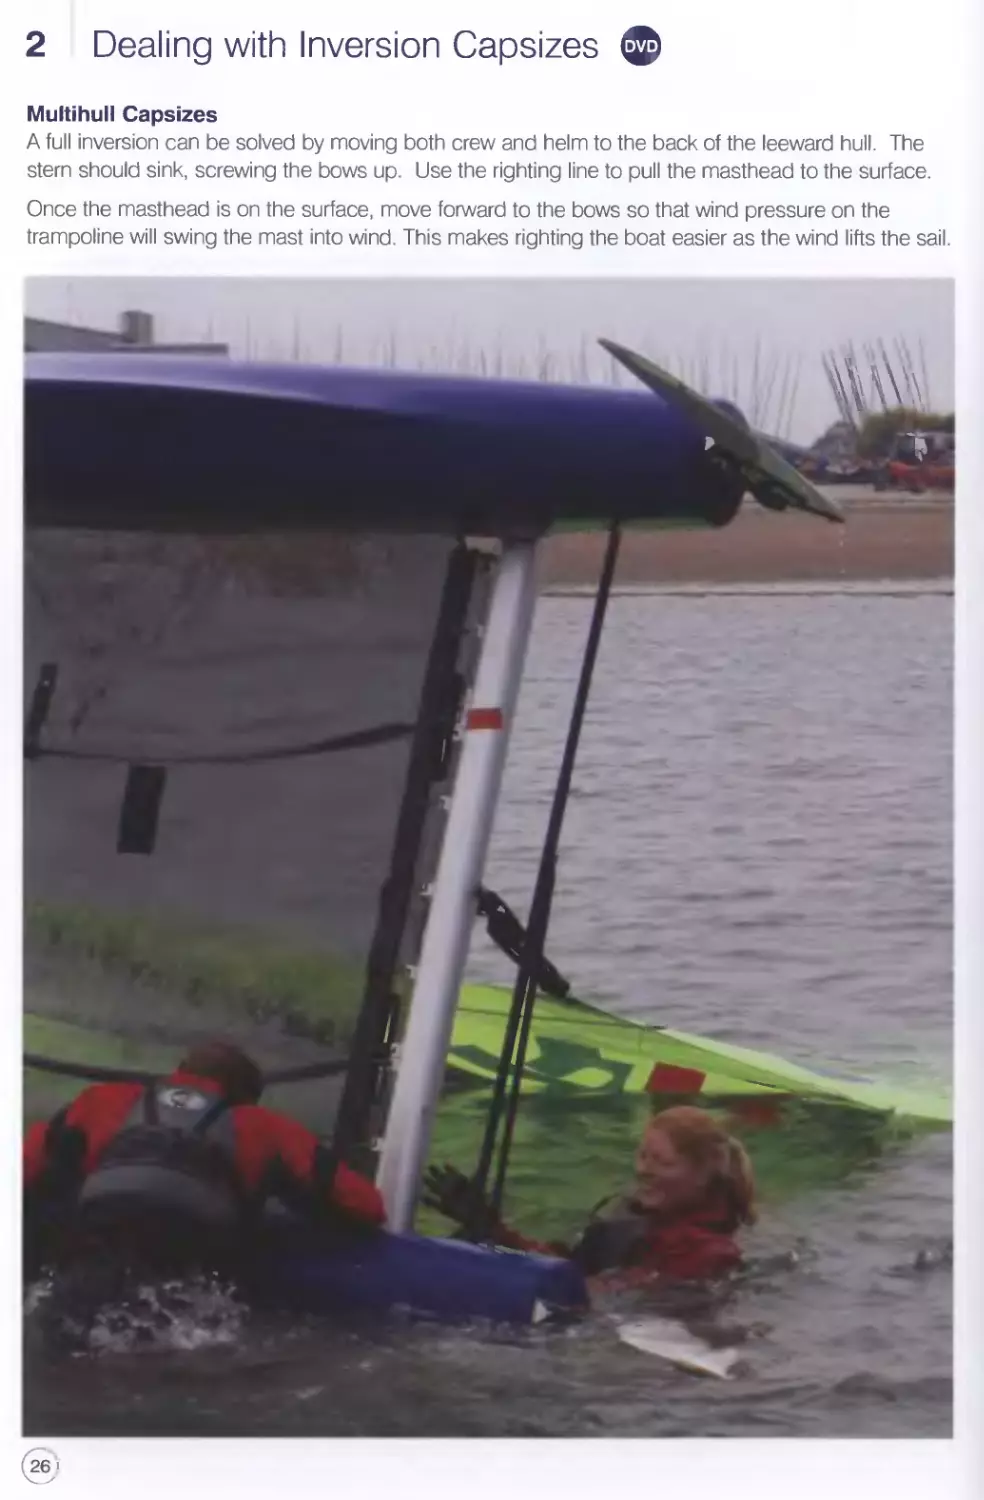
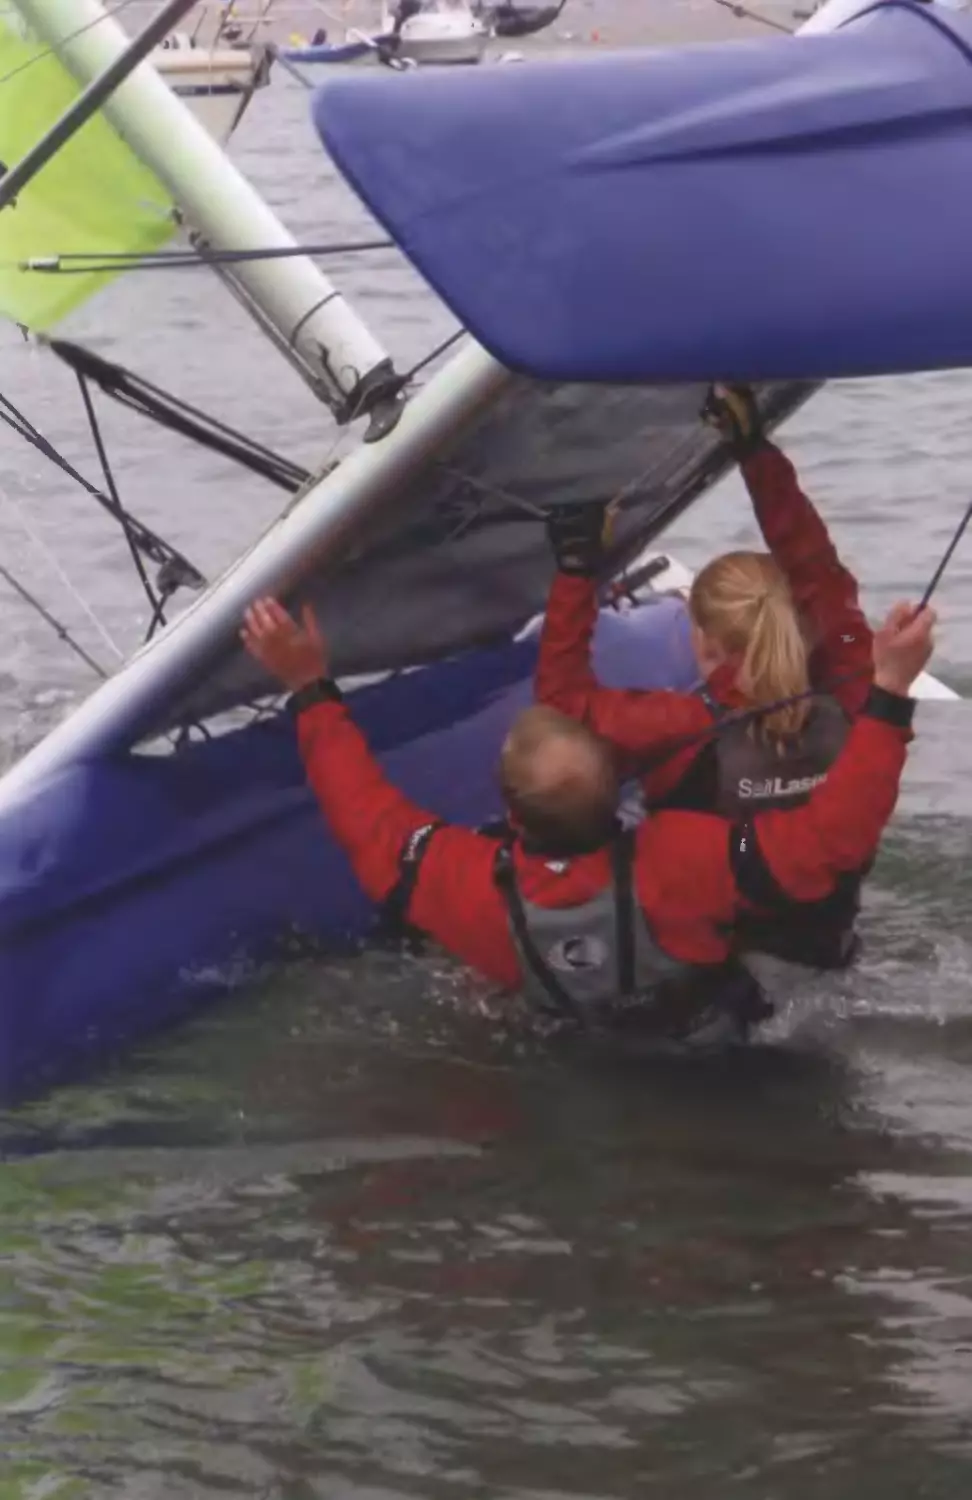
Multihull Capsizes
A full inversion can be solved by moving both crew and helm to the back of the leeward hull. The
stern should sink, screwing the bows up. Use the righting line to pull the masthead to the surface.
Once the masthead is on the surface, move forward to the bows so that wind pressure on the
trampoline will swing the mast into wind. This makes righting the boat easier as the wind lifts the sail.
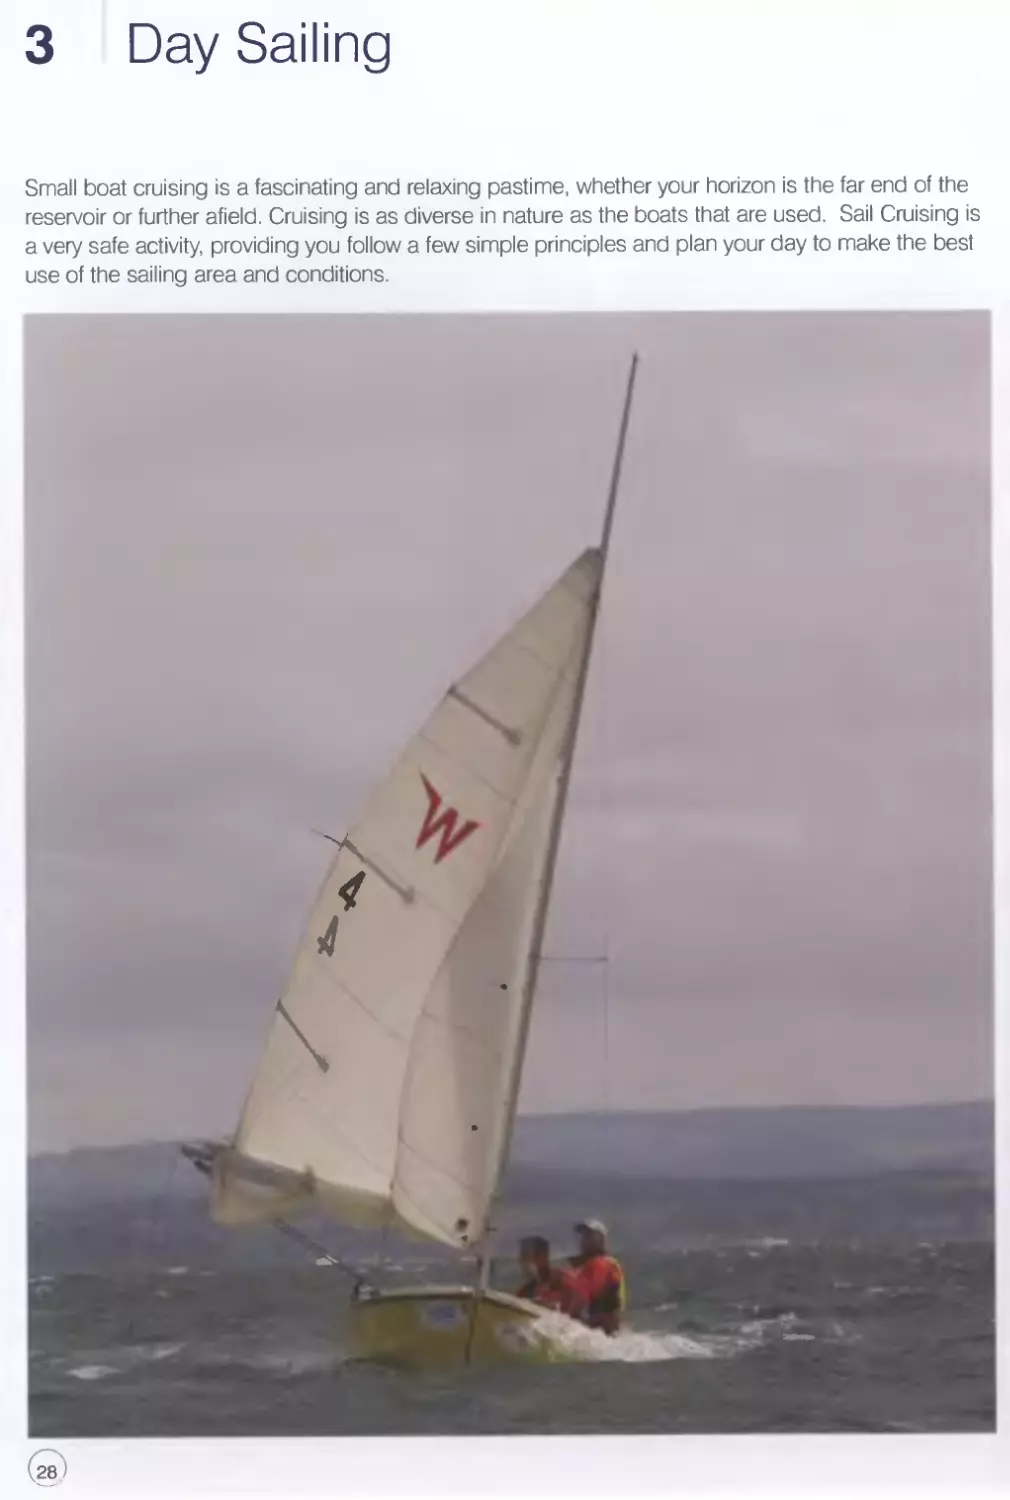
3 Day Sailing
Small boat cruising is a fascinating and relaxing pastime, whether your horizon is the far end of the
reservoir or further afield. Cruising is as diverse in nature as the boats that are used. Sail Cruising is
a very safe activity, providing you follow a few simple principles and plan your day to make the best
use of the sailing area and conditions.
?8
Day Sailing 3
Equipment
Safety
The safety equipment you should carry will
depend on the type of boat, the length and
nature of the trip, and who is on board. Carry
more rather than less, but not at the expense of
weighing down the boat with things you are
unlikely to use.
Catching cold and capsizing are the most
common issues when sailing in the UK, so
always wear a buoyancy aid or lifejacket and
carry waterproofs.
If you are sailing in an area with few other boats, consider taking some means of communication in
case of difficulty. Handheld VHFs or mobile phones are useful, but may fail to reach anyone
depending on location. Boats sailing alone should always carry flares, which should be stored dry.
Flares have a limited shelf life, so always replace them when the date has expired. Day/night flares
are useful to signal your position when in sight of rescue, while parachute flares are more effective in
attracting attention from a distance.
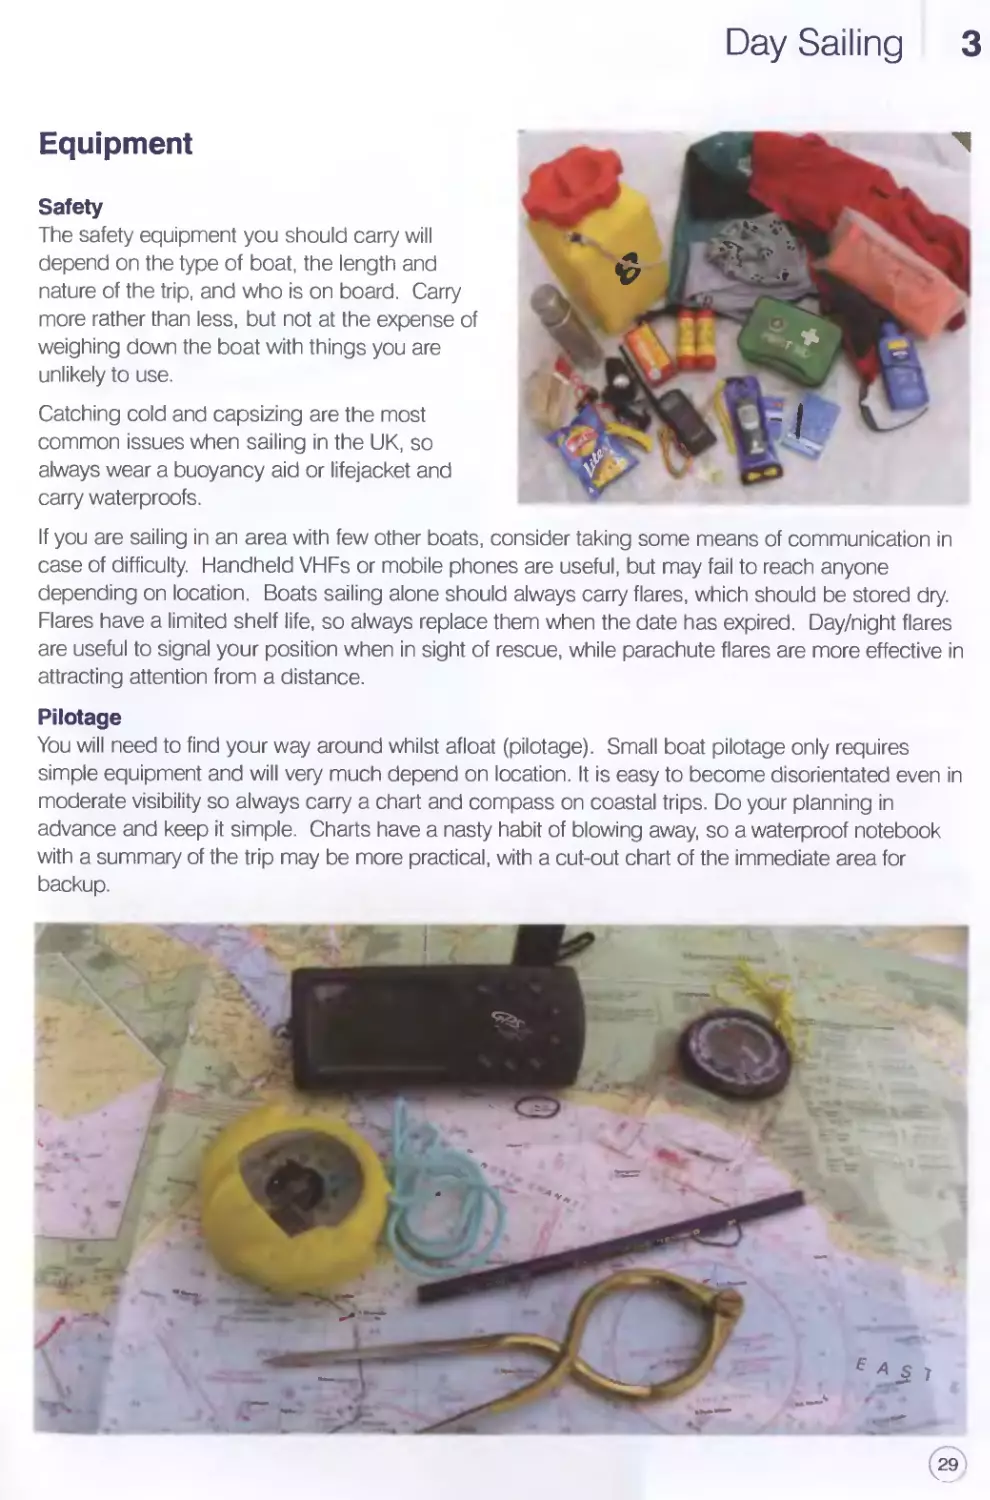
Pilotage
You will need to find your way around whilst afloat (pilotage). Small boat pilotage only requires
simple equipment and will very much depend on location. It is easy to become disorientated even in
moderate visibility so always carry a chart and compass on coastal trips. Do your planning in
advance and keep it simple. Charts have a nasty habit of blowing away, so a waterproof notebook
with a summary of the trip may be more practical, with a cut-out chart of the immediate area for
backup.
k29
3 Day Sailing
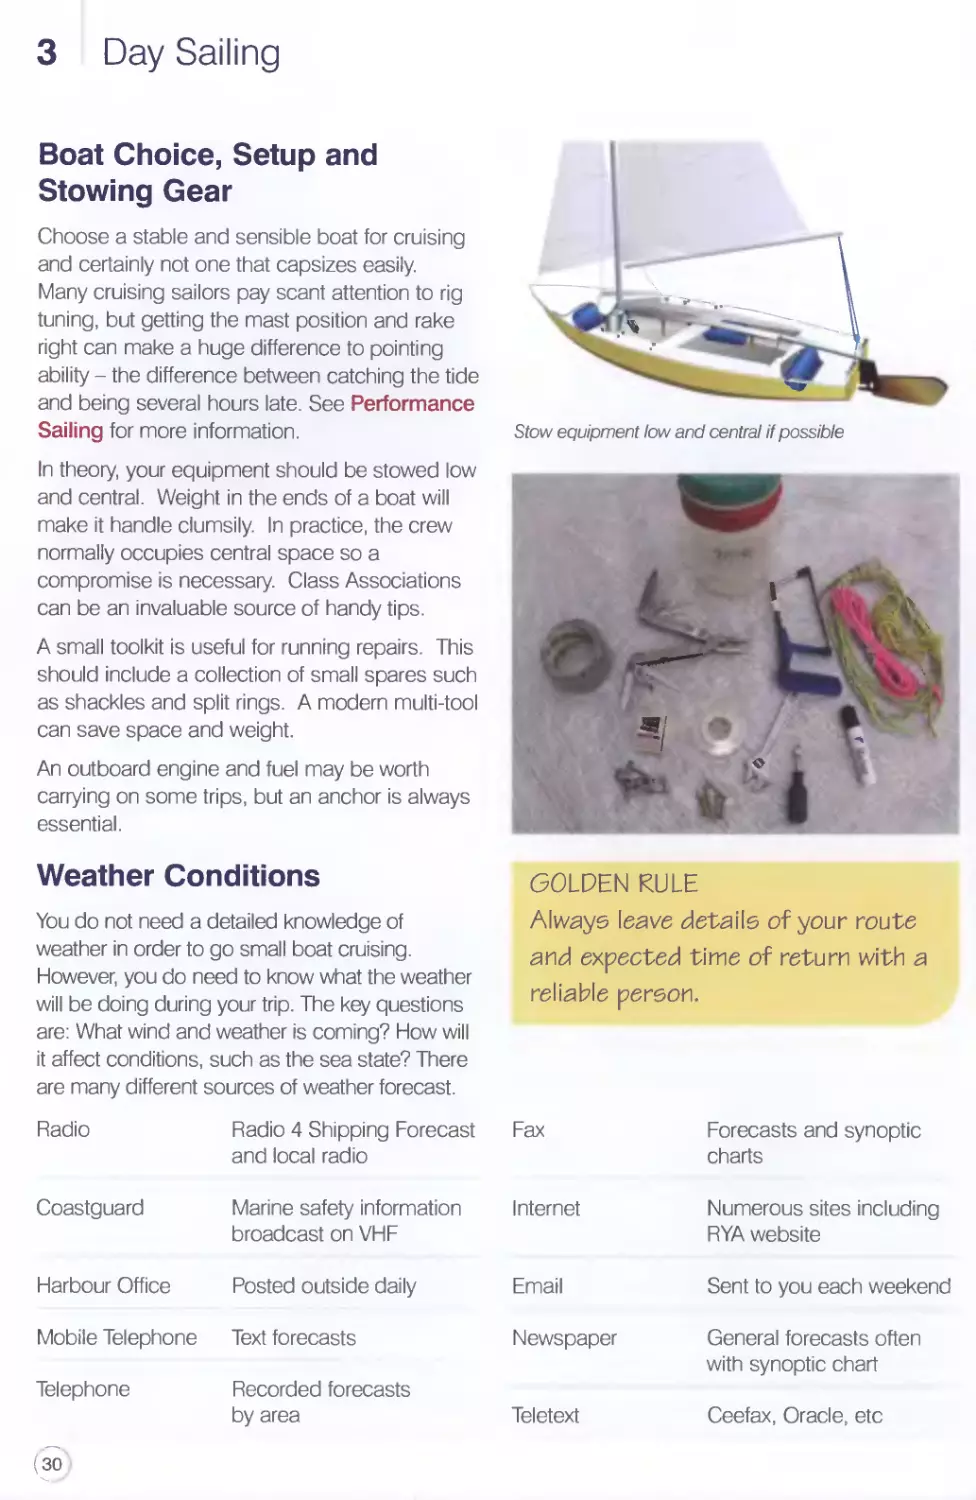
Boat Choice, Setup and
Stowing Gear
Choose a stable and sensible boat for cruising
and certainly not one that capsizes easily.
Many cruising sailors pay scant attention to rig
tuning, but getting the mast position and rake
right can make a huge difference to pointing
ability - the difference between catching the tide
and being several hours late. See Performance
Sailing for more information.
In theory, your equipment should be stowed low
and central. Weight in the ends of a boat will
make it handle clumsily. In practice, the crew
normally occupies central space so a
compromise is necessary. Class Associations
can be an invaluable source of handy tips.
A small toolkit is useful for running repairs. This
should include a collection of small spares such
as shackles and split rings. A modern multi-tool
can save space and weight.
An outboard engine and fuel may be worth
carrying on some trips, but an anchor is always
essential.
Stow equipment low and central if possible
Weather Conditions
You do not need a detailed knowledge of
weather in order to go small boat cruising.
However, you do need to know what the weather
will be doing during your trip. The key questions
are: What wind and weather is coming? How will
it affect conditions, such as the sea state? There
are many different sources of weather forecast.
GOLDEN RULE
Always leave details of your route
and expected time of return with a
reliable person.
Radio Radio 4 Shipping Forecast and local radio
Coastguard Marine safety information broadcast on VHF
Harbour Office Posted outside daily
Mobile Telephone Text forecasts
Telephone Recorded forecasts by area
Fax Forecasts and synoptic charts
Internet Numerous sites including RYA website
Email Sent to you each weekend
Newspaper General forecasts often with synoptic chart
Teletext Ceefax, Oracle, etc
(30
Day Sailing 3
Predicting the Sailing Conditions
It pays to think about how local effects will combine with the general weather. Generally, there is
more wind during the day, due to the heated air low down mixing with strong winds higher up
This is known as thermal mixing, and explains why the breeze usually abates around sunset as the
temperature drops.
In general, if there are light gradient winds (the wind due to a high or low pressure system) in any
direction and there is a difference in temperature between sea and land, there is likely to be a sea
breeze.
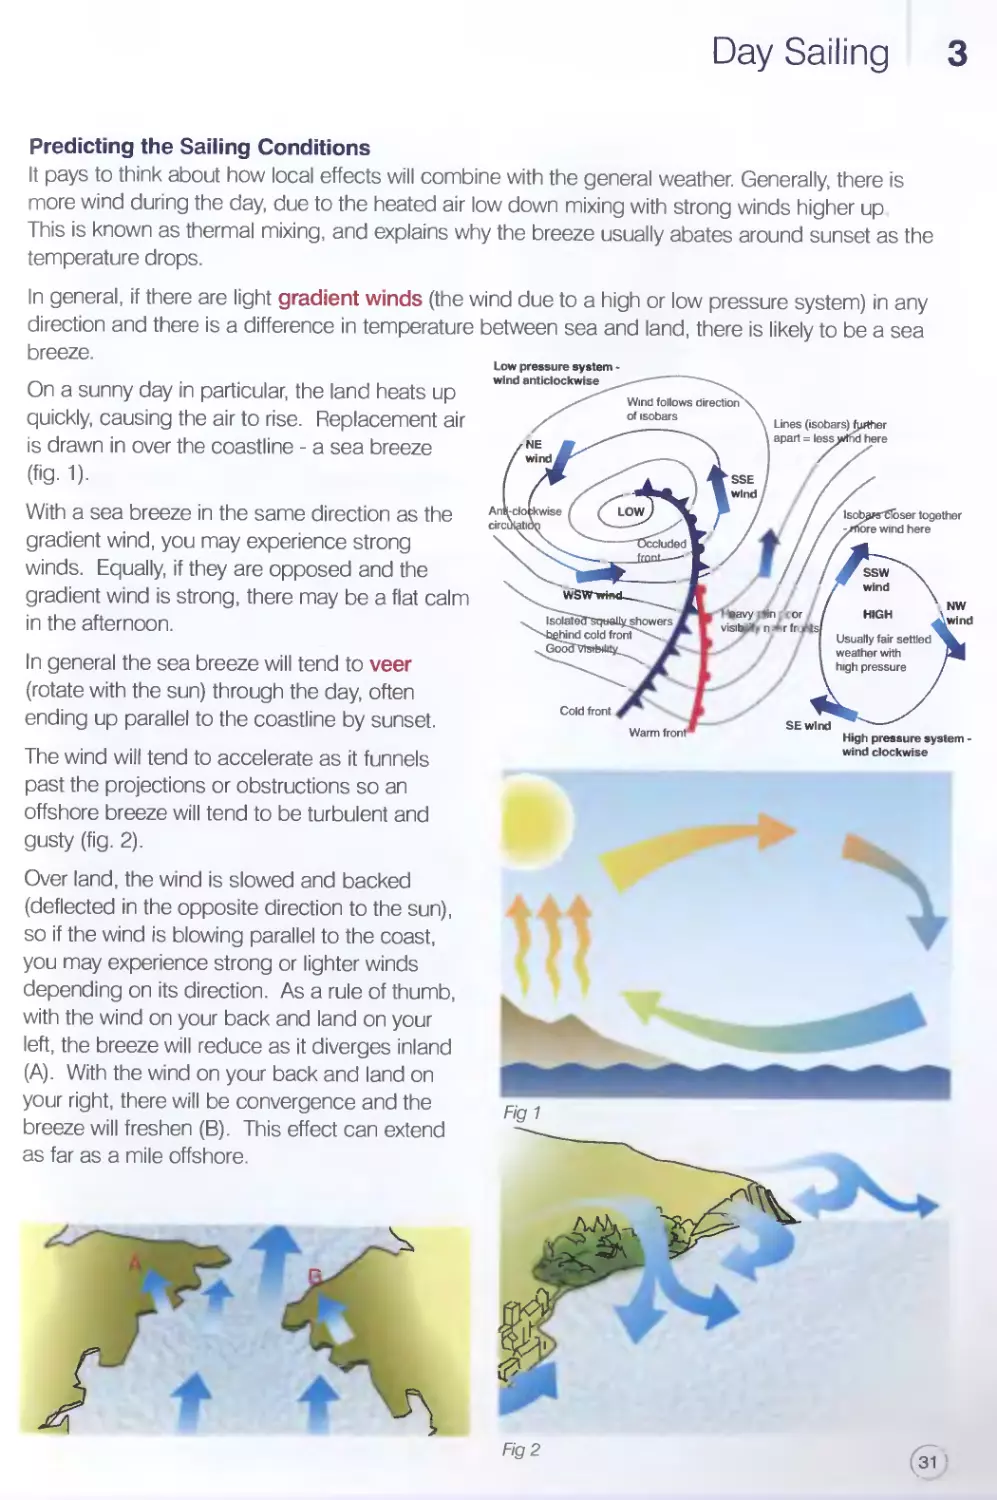
On a sunny day in particular, the land heats up
quickly, causing the air to rise. Replacement air
is drawn in over the coastline - a sea breeze
(fig-1)-
With a sea breeze in the same direction as the
gradient wind, you may experience strong
winds. Equally, if they are opposed and the
gradient wind is strong, there may be a flat calm
in the afternoon.
In general the sea breeze will tend to veer
(rotate with the sun) through the day, often
ending up parallel to the coastline by sunset.
The wind will tend to accelerate as it funnels
past the projections or obstructions so an
offshore breeze will tend to be turbulent and
gusty (fig. 2).
Over land, the wind is slowed and backed
(deflected in the opposite direction to the sun),
so if the wind is blowing parallel to the coast,
you may experience strong or lighter winds
depending on its direction. As a rule of thumb,
with the wind on your back and land on your
left, the breeze will reduce as it diverges inland
(A). With the wind on your back and land on
your right, there will be convergence and the
breeze will freshen (B). This effect can extend
as far as a mile offshore.
3 Day Sailing
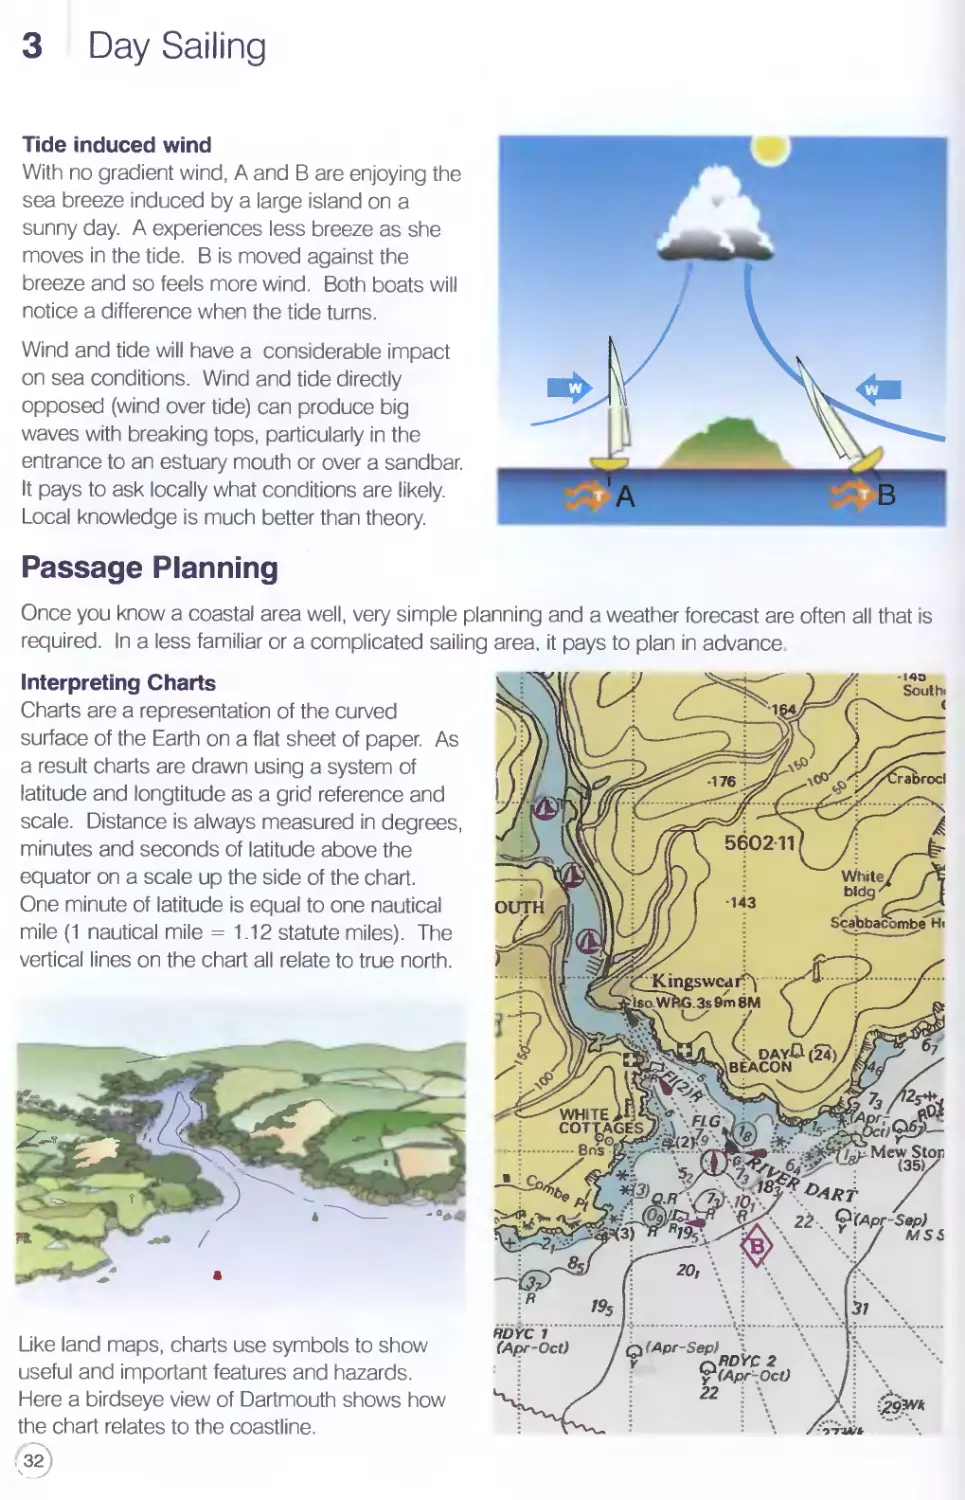
Tide induced wind
With no gradient wind, A and В are enjoying the
sea breeze induced by a large island on a
sunny day. A experiences less breeze as she
moves in the tide. В is moved against the
breeze and so feels more wind. Both boats will
notice a difference when the tide turns.
Wind and tide will have a considerable impact
on sea conditions. Wind and tide directly
opposed (wind over tide) can produce big
waves with breaking tops, particularly in the
entrance to an estuary mouth or over a sandbar.
It pays to ask locally what conditions are likely.
Local knowledge is much better than theory.
Passage Planning
Once you know a coastal area well, very simple planning and a weather forecast are often all that is
required. In a less familiar or a complicated sailing area, it pays to plan in advance
Interpreting Charts
Charts are a representation of the curved
surface of the Earth on a flat sheet of paper. As
a result charts are drawn using a system of
latitude and longtitude as a grid reference and
scale. Distance is always measured in degrees,
minutes and seconds of latitude above the
equator on a scale up the side of the chart.
One minute of latitude is equal to one nautical
mile (1 nautical mile = 1.12 statute miles). The
vertical lines on the chart all relate to true north.
Like land maps, charts use symbols to show
useful and important features and hazards.
Here a birdseye view of Dartmouth shows how
the chart relates to the coastline.
Day Sailing За
Symbols and Abbreviations (5011) published by
the UK Hydrographic Office can be used to
identify features and symbols on the chart.
Depth of water shown is ‘lowest astronomical
tide’ - the lowest tide likely to occur, known as
Chart Datum.
The black line along the coast represents the
highest water level normally occurring, i.e. the
edge of the land.
Direction is indicated in degrees by the compass rose printed on the chart. The compass points to
magnetic north, which changes a tiny amount each year - not significant for basic pilotage The
difference between north on the chart and magnetic north is known as variation and is marked on
the chart’s compass rose.
3 Day Sailing
Pilotage in Practice
Course to steer
Although buoys mark channels, lining up two objects in transit is a very useful indication of a straight
course.
If you are unable to see your objective, use a compass to steer your course. Compasses suffer from
deviation, caused by ferrous or electrical objects in the boat, so your course may not be that
accurate.
You should also allow for the tidal flow, and the aforementioned magnetic variation. On the
compass rose above, the compass needle points to the west (or left) of the grid marked on the
chart. This reduces the bearing so we must add 4 degrees to any course we work out on the chart.
Boat speed
Boat speed is measured in knots, or nautical miles per hour. 1 knot is therefore slightly more than 1
mile per hour. With practice you will be able to estimate your speed quite accurately.
Leeway
A small boat sailing to windward will slide sideways a little, particularly in waves. Estimate leeway by
comparing your wake with the course steered. Allow about 5 degrees for leeway as a good starting
point but you may need to allow considerably more.
Day Sailing За
Tidal Flow
Tidal streams around the UK are relatively strong and therefore are a major consideration when
planning a trip. The level of the sea rises and falls as the tidal currents flow around the coast,
resulting in two high tides and two low tides approximately every twenty five hours. Your trip can be
speeded up, slowed, or the sea conditions altered by the tide.
The critical questions to ask when planning your trip are:
When does the tide change direction?
How much flow is there in which direction?
Is there sufficient depth for a safe course?
Times and heights of high and low water can be found in a nautical almanac, but local tide tables
available from yacht chandlers, sailing clubs or the harbour master’s office provide all you need to
know for local sailing. Remember to correct for BST by adding one hour if necessary.
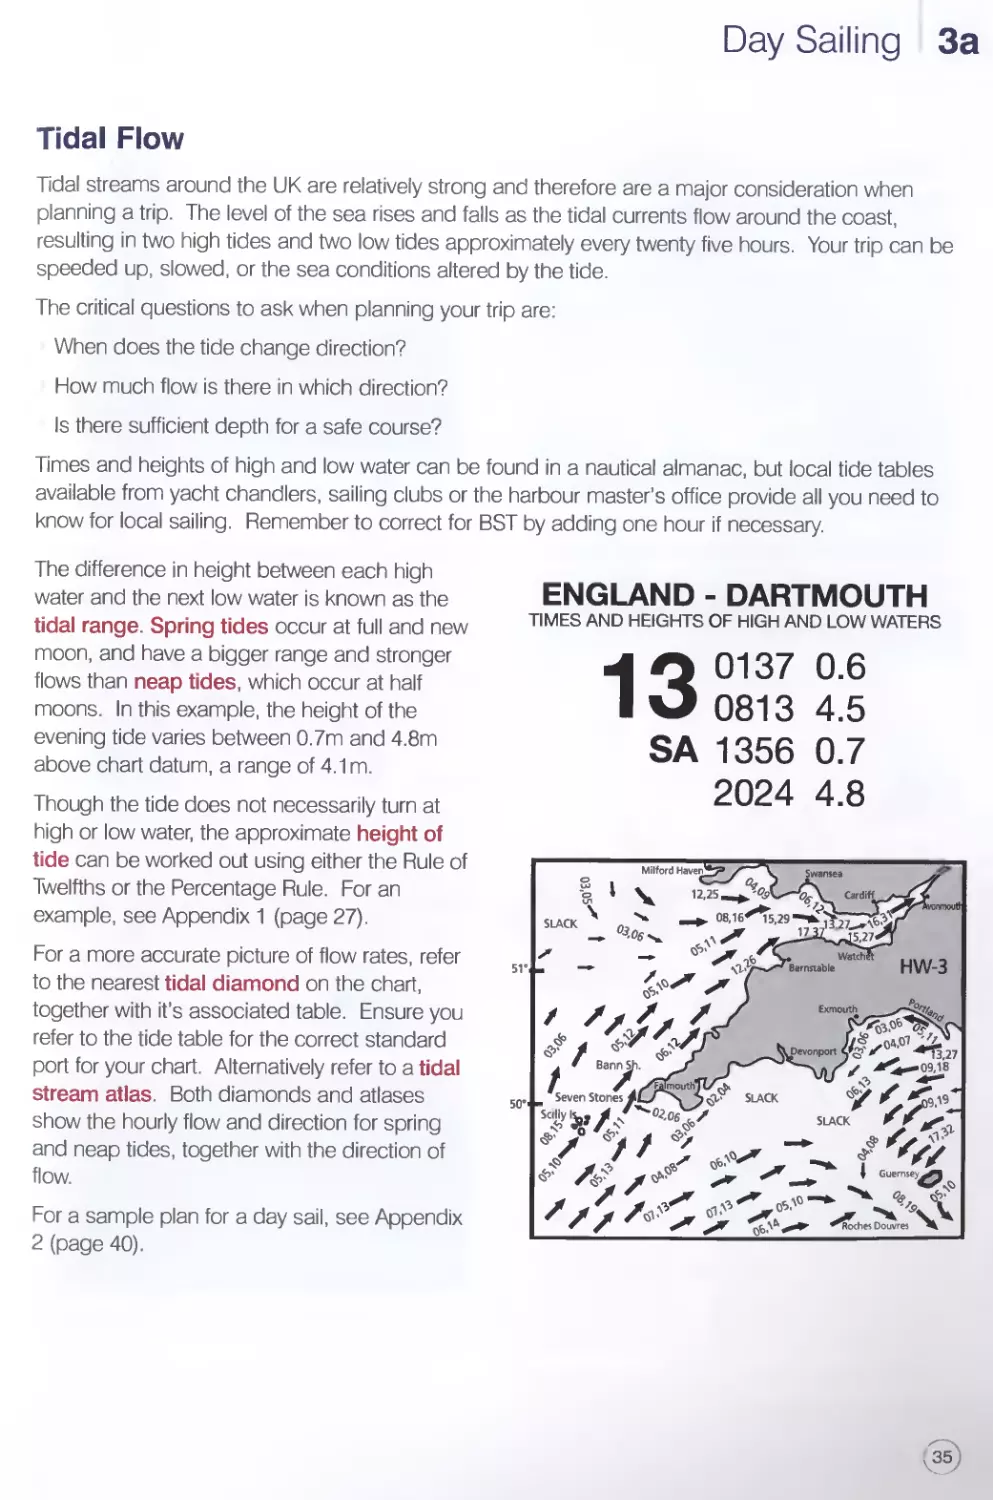
The difference in height between each high
water and the next low water is known as the
tidal range. Spring tides occur at full and new
moon, and have a bigger range and stronger
flows than neap tides, which occur at half
moons. In this example, the height of the
evening tide varies between 0.7m and 4.8m
above chart datum, a range of 4.1 m.
Though the tide does not necessarily turn at
high or low water, the approximate height of
tide can be worked out using either the Rule of
Twelfths or the Percentage Rule. For an
example, see Appendix 1 (page 27).
For a more accurate picture of flow rates, refer
to the nearest tidal diamond on the chart,
together with it’s associated table. Ensure you
refer to the tide table for the correct standard
port for your chart. Alternatively refer to a tidal
stream atlas. Both diamonds and atlases
show the hourly flow and direction for spring
and neap tides, together with the direction of
flow.
For a sample plan for a day sail, see Appendix
2 (page 40).
ENGLAND - DARTMOUTH
TIMES AND HEIGHTS OF HIGH AND LOW WATERS
-f Q 0137 0.6
Ю 0813 4.5
SA 1356 0.7
2024 4.8
3 Day Sailing
Pilotage with GPS (Global
Positioning System)
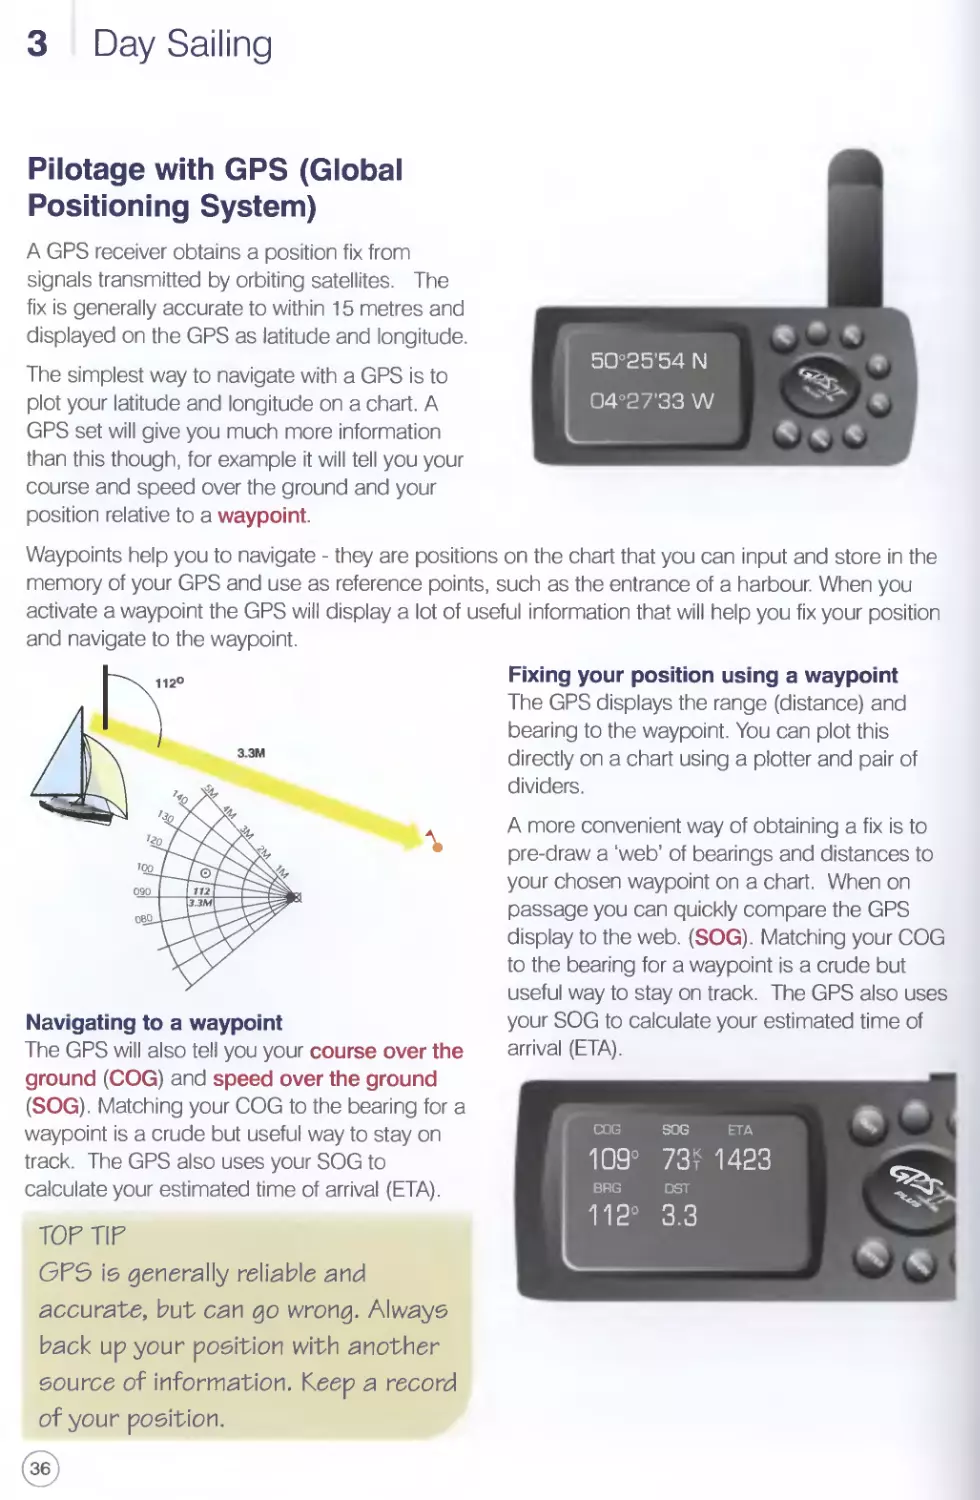
A GPS receiver obtains a position fix from
signals transmitted by orbiting satellites. The
fix is generally accurate to within 15 metres and
displayed on the GPS as latitude and longitude.
The simplest way to navigate with a GPS is to
plot your latitude and longitude on a chart. A
GPS set will give you much more information
than this though, for example it will tell you your
course and speed over the ground and your
position relative to a waypoint.
Waypoints help you to navigate - they are positions on the chart that you can input and store in the
memory of your GPS and use as reference points, such as the entrance of a harbour. When you
activate a waypoint the GPS will display a lot of useful information that will help you fix your position
and navigate to the waypoint.
Navigating to a waypoint
The GPS will also tell you your course over the
ground (COG) and speed over the ground
(SOG). Matching your COG to the bearing for a
waypoint is a crude but useful way to stay on
track. The GPS also uses your SOG to
calculate your estimated time of arrival (ETA).
TOP TIP
GPS is generally reliable and
accurate, but can go wrong. Always
back up your position with another
source of information. Keep a record
of your position.
Fixing your position using a waypoint
The GPS displays the range (distance) and
bearing to the waypoint. You can plot this
directly on a chart using a plotter and pair of
dividers.
A more convenient way of obtaining a fix is to
pre-draw a ‘web’ of bearings and distances to
your chosen waypoint on a chart. When on
passage you can quickly compare the GPS
display to the web. (SOG). Matching your COG
to the bearing for a waypoint is a crude but
useful way to stay on track. The GPS also uses
your SOG to calculate your estimated time of
arrival (ETA).
Day Sailing 3
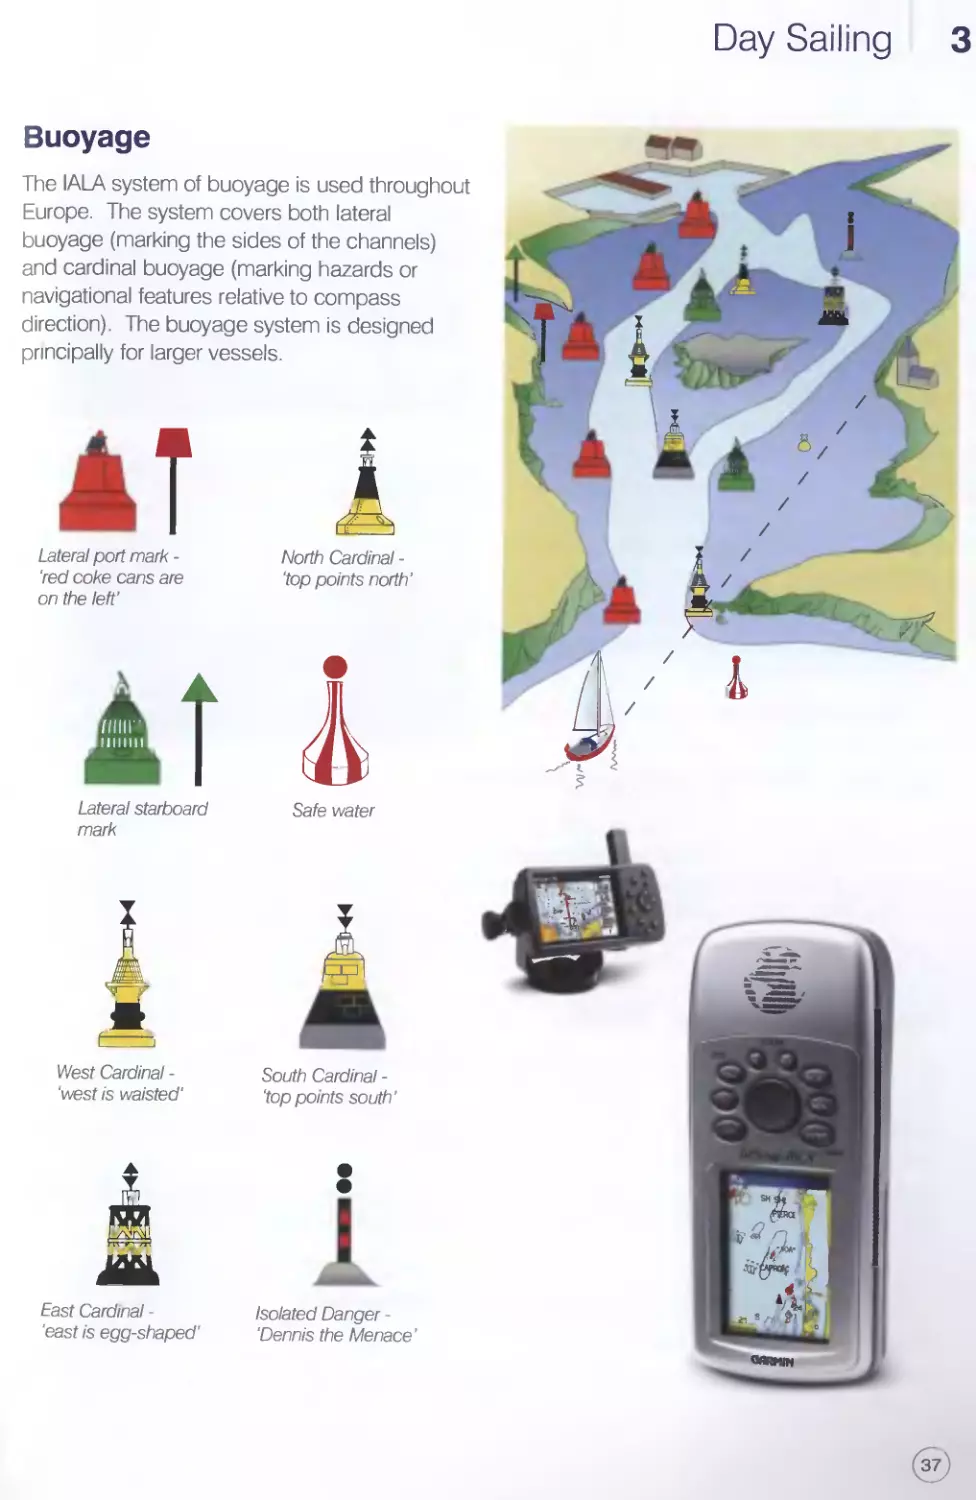
Buoyage
The IALA system of buoyage is used throughout
Europe. The system covers both lateral
buoyage (marking the sides of the channels)
and cardinal buoyage (marking hazards or
navigational features relative to compass
direction). The buoyage system is designed
principally for larger vessels.
Lateral port mark -
'red coke cans are
on the left’
North Cardinal -
‘top points north’
JfflFi I
ДДГ I
Lateral starboard
mark
West Cardinal -
‘west is waisted’
Safe water
South Cardinal -
‘toppoints south’
East Cardinal -
‘east is egg-shaped’
Isolated Danger -
‘Dennis the Menace’
37
3 Day Sailing
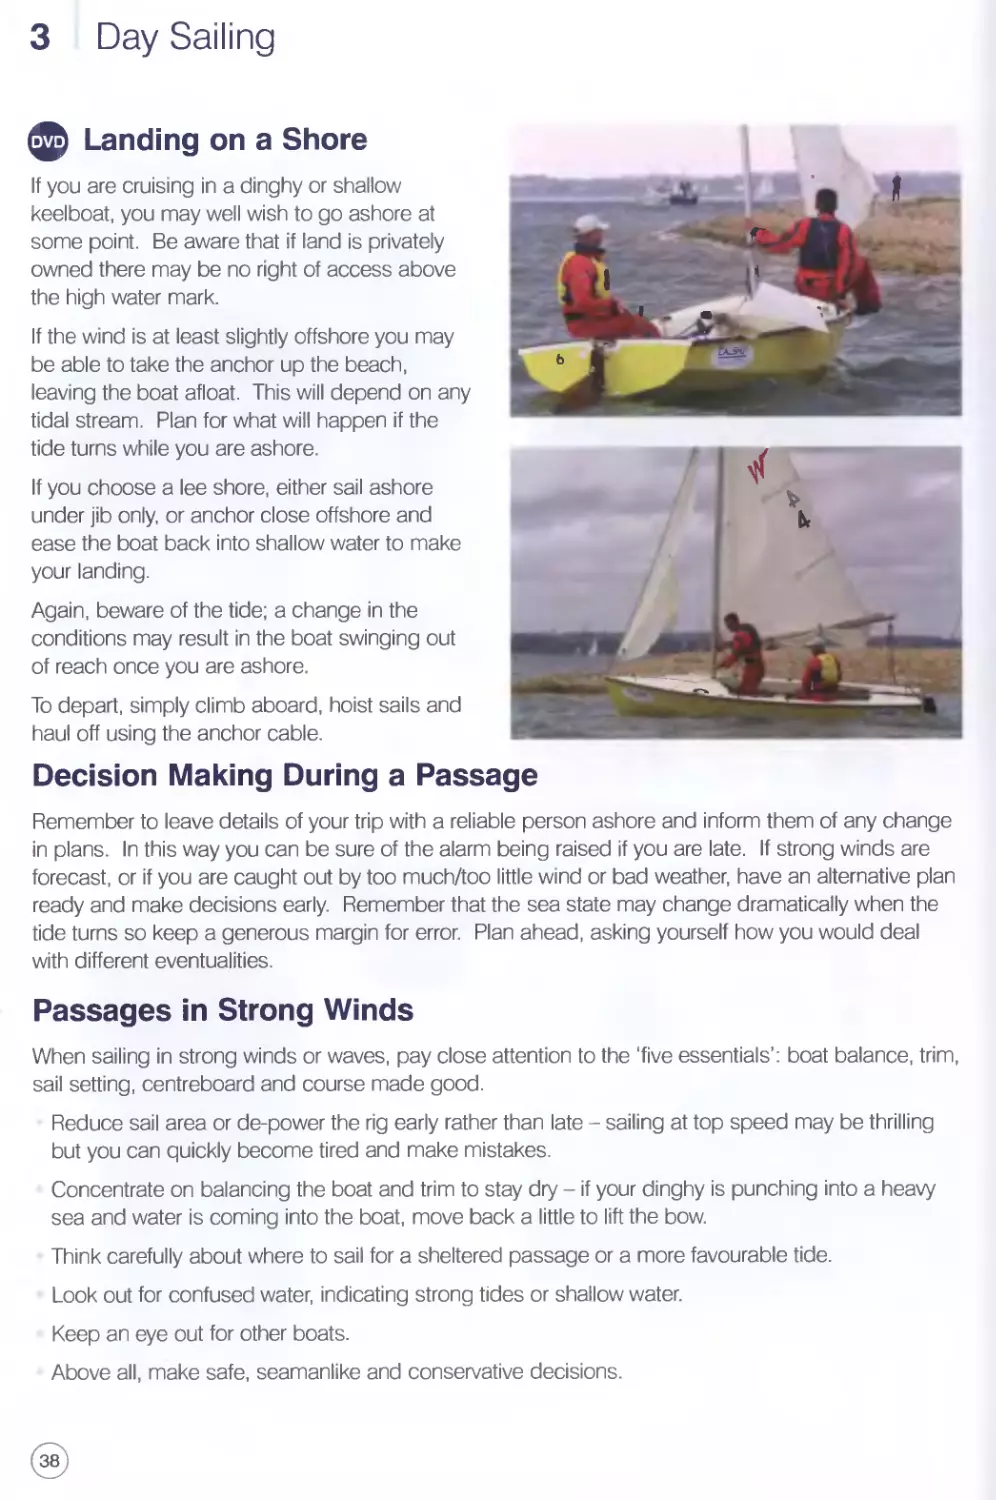
ф Landing on a Shore
If you are cruising in a dinghy or shallow
keelboat, you may well wish to go ashore at
some point. Be aware that if land is privately
owned there may be no right of access above
the high water mark.
If the wind is at least slightly offshore you may
be able to take the anchor up the beach,
leaving the boat afloat. This will depend on any
tidal stream. Plan for what will happen if the
tide turns while you are ashore.
If you choose a lee shore, either sail ashore
under jib only, or anchor close offshore and
ease the boat back into shallow water to make
your landing.
Again, beware of the tide; a change in the
conditions may result in the boat swinging out
of reach once you are ashore.
To depart, simply climb aboard, hoist sails and
haul off using the anchor cable.
Decision Making During a Passage
Remember to leave details of your trip with a reliable person ashore and inform them of any change
in plans. In this way you can be sure of the alarm being raised if you are late. If strong winds are
forecast, or if you are caught out by too much/too little wind or bad weather, have an alternative plan
ready and make decisions early. Remember that the sea state may change dramatically when the
tide turns so keep a generous margin for error. Plan ahead, asking yourself how you would deal
with different eventualities.
Passages in Strong Winds
When sailing in strong winds or waves, pay close attention to the 'five essentials’: boat balance, trim,
sail setting, centreboard and course made good.
Reduce sail area or de-power the rig early rather than late - sailing at top speed may be thrilling
but you can quickly become tired and make mistakes.
Concentrate on balancing the boat and trim to stay dry - if your dinghy is punching into a heavy
sea and water is coming into the boat, move back a little to lift the bow.
Think carefully about where to sail for a sheltered passage or a more favourable tide.
Look out for confused water, indicating strong tides or shallow water.
Keep an eye out for other boats.
Above all, make safe, seamanlike and conservative decisions.
Day Sailing 3
Appendix 1
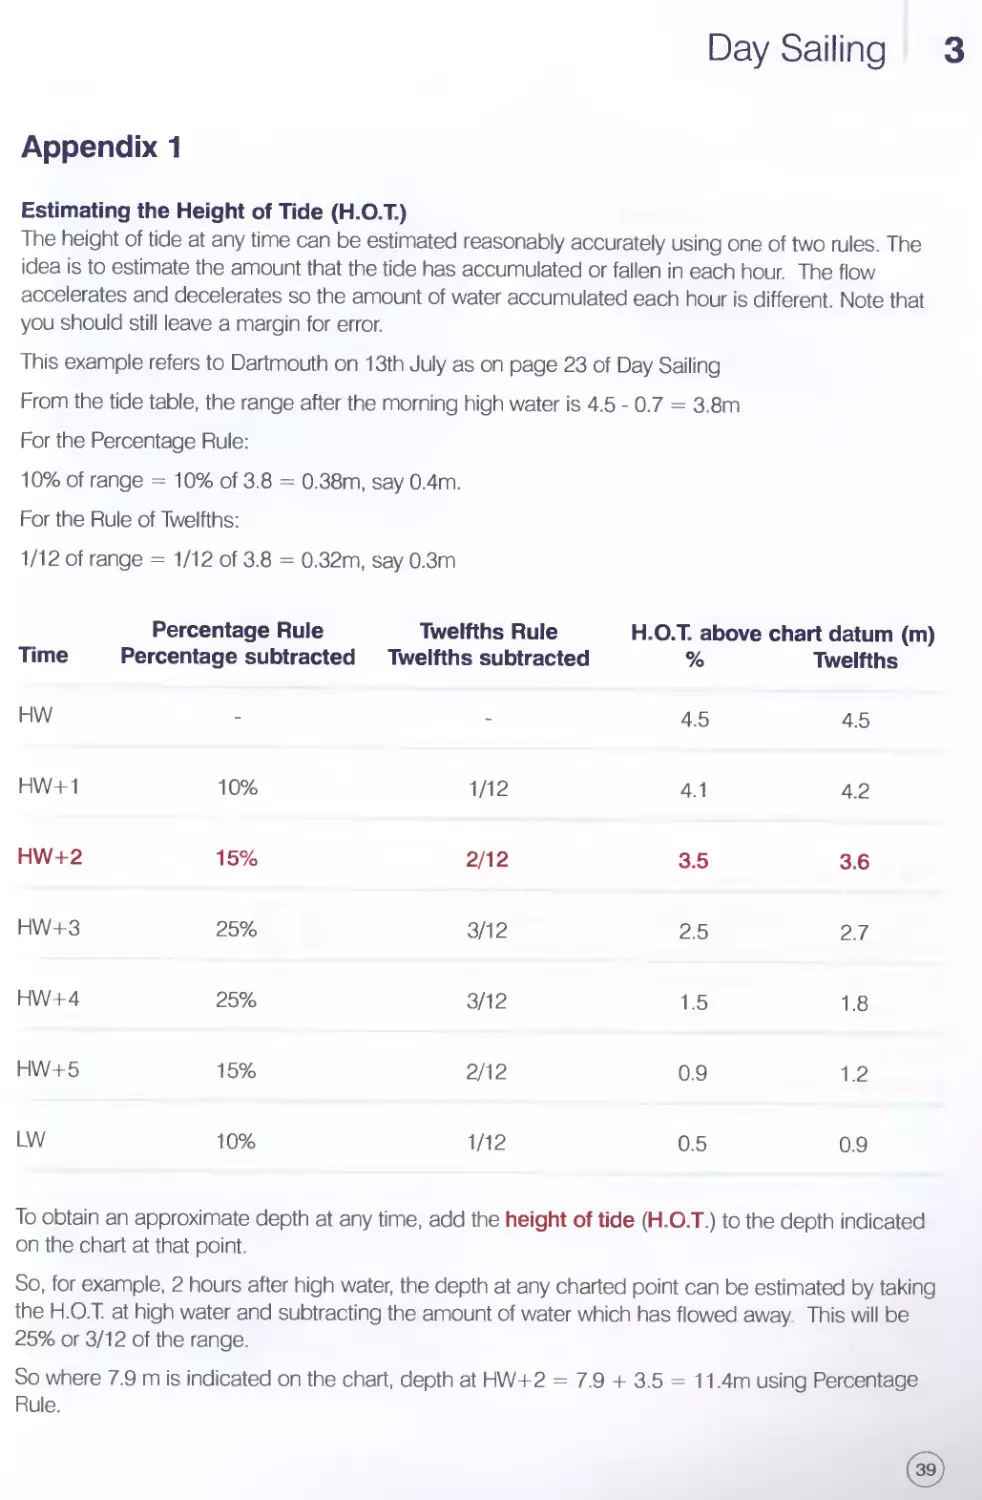
Estimating the Height of Tide (H.O.T.)
The height of tide at any time can be estimated reasonably accurately using one of two rules. The
idea is to estimate the amount that the tide has accumulated or fallen in each hour. The flow
accelerates and decelerates so the amount of water accumulated each hour is different. Note that
you should still leave a margin for error.
This example refers to Dartmouth on 13th July as on page 23 of Day Sailing
From the tide table, the range after the morning high water is 4.5 - 0.7 = 3.8m
For the Percentage Rule:
10% of range = 10% of 3.8 = 0.38m, say 0.4m.
For the Rule of Twelfths:
1/12 of range = 1/12 of 3.8 = 0.32m, say 0.3m
Time Percentage Rule Percentage subtracted Twelfths Rule Twelfths subtracted H.O.T above chart datum (m)
% Twelfths
HW - - 4.5 4.5
HW+1 10% 1/12 4.1 4.2
HW+2 15% 2/12 3.5 3.6
HW+3 25% 3/12 2.5 2.7
HW+4 25% 3/12 1.5 1.8
HW+5 15% 2/12 0.9 1.2
LW 10% 1/12 0.5 0.9
To obtain an approximate depth at any time, add the height of tide (H.O T.) to the depth indicated
on the chart at that point.
So, for example, 2 hours after high water, the depth at any charted point can be estimated by taking
the H.O.T. at high water and subtracting the amount of water which has flowed away This will be
25% or 3/12 of the range.
So where 7.9 m is indicated on the chart, depth at HW+2 = 7.9 + 3.5 = 11.4m using Percentage
Rule.
3 Day Sailing
Appendix 2
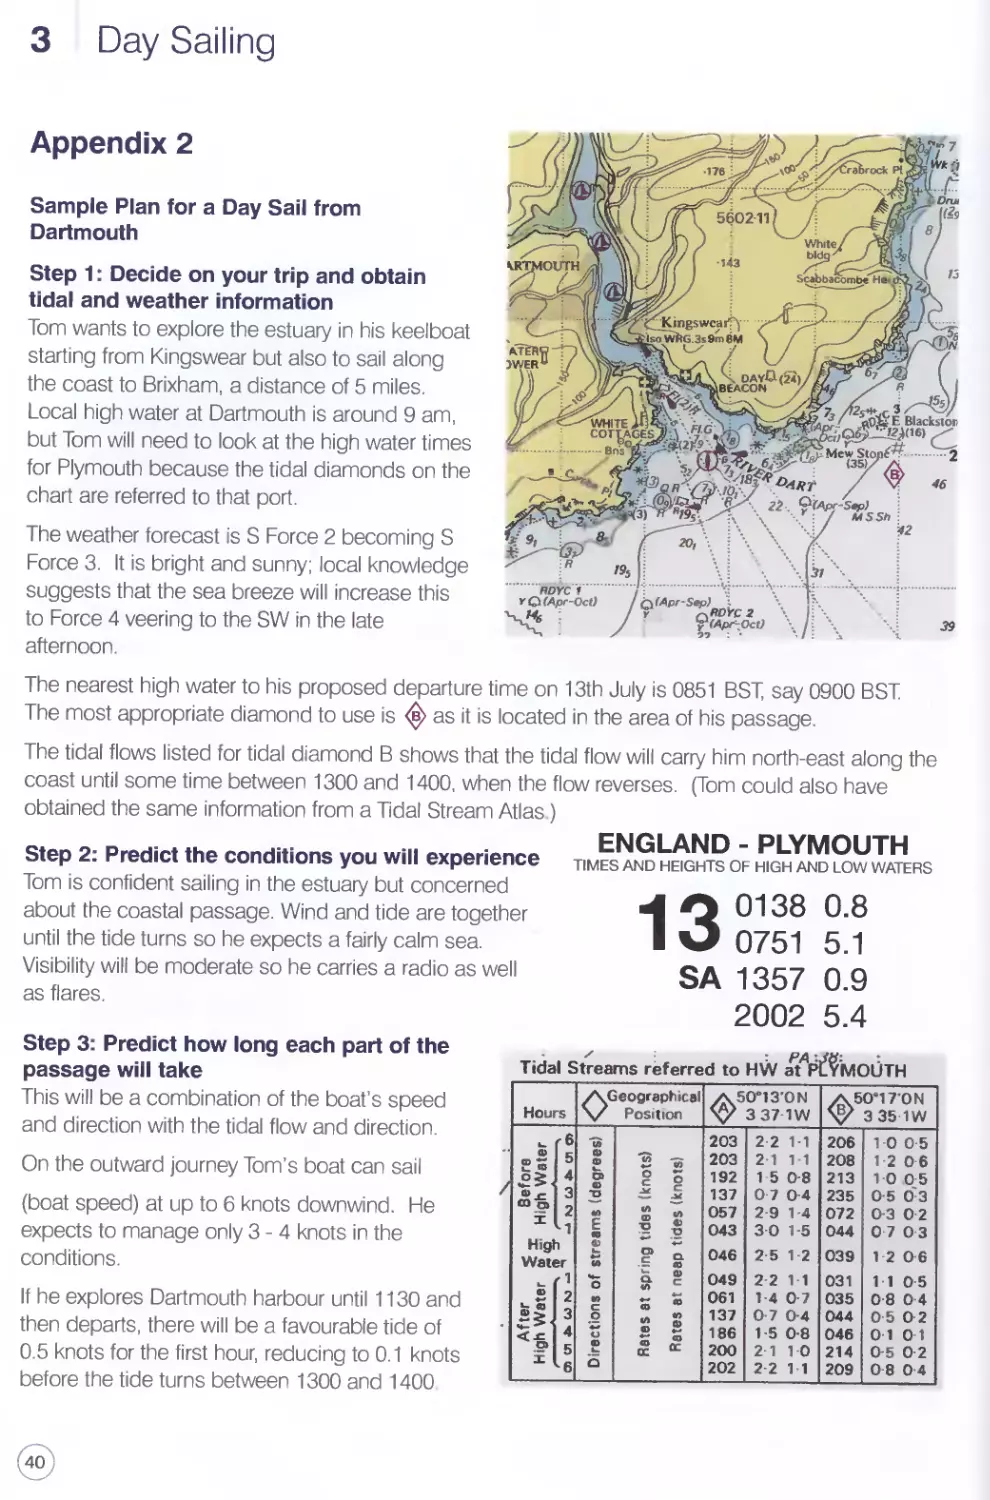
Sample Plan for a Day Sail from
Dartmouth
Step 1: Decide on your trip and obtain
tidal and weather information
Tom wants to explore the estuary in his keelboat
starting from Kingswear but also to sail along
the coast to Brixham, a distance of 5 miles.
Local high water at Dartmouth is around 9 am,
but Tom will need to look at the high water times
for Plymouth because the tidal diamonds on the
chart are referred to that port.
The weather forecast is S Force 2 becoming S
Force 3. It is bright and sunny; local knowledge
suggests that the sea breeze will increase this
to Force 4 veering to the SW in the late
afternoon.
The nearest high water to his proposed departure time on 13th July is 0851 BST, say 0900 BST
The most appropriate diamond to use is <b> as it is located in the area of his passage.
The tidal flows listed for tidal diamond В shows that the tidal flow will carry him north-east along the
coast until some time between 1300 and 1400, when the flow reverses. (Tom could also have
obtained the same information from a Tidal Stream Atlas)
Step 2: Predict the conditions you will experience
Tom is confident sailing in the estuary but concerned
about the coastal passage. Wind and tide are together
until the tide turns so he expects a fairly calm sea.
Visibility will be moderate so he carries a radio as well
as flares.
ENGLAND - PLYMOUTH
TIMES AND HEIGHTS OF HIGH AND LOW WATERS
4 О 0138 0.8
I 0 0751 5.1
SA 1357 0.9
2002 5.4
Step 3: Predict how long each part of the
passage will take
This will be a combination of the boat’s speed
and direction with the tidal flow and direction.
On the outward journey Tom’s boat can sail
(boat speed) at up to 6 knots downwind. He
expects to manage only 3 - 4 knots in the
conditions.
If he explores Dartmouth harbour until 1130 and
then departs, there will be a favourable tide of
0.5 knots for the first hour, reducing to 0.1 knots
before the tide turns between 1300 and 1400
Tidal Streams referred to HW atpd?MOUTH
Day Sailing 3
Combining the tidal flow with the boat speed suggests a speed over the ground of:
1130 to 1230 boat speed + tide = 3 + 0.5 = 3.5 nautical miles
1230 to 1330 boat speed + tide = 3 + 0.1 =3.1 nautical miles
1130 to 1330 total distance covered = 3.5 + 3.1 = 6.6 nautical miles.
Tom should therefore reach Brixham comfortably about the same time as the tide turns against him.
He can explore the harbour on a rising tide before his departure for Brixham, provided there is
enough breeze to carry him over the tide in the harbour, where flows will be stronger, and enough
water to sail. He can check the height of tide (H.O.T.) using the method shown in Appendix 1.
Having stopped for food and explored a little, Tom reckons he might set off at 1530. The tidal
diamond shows a tidal stream of between 1.0 and 0.5 knots towards Dartmouth untill730.
Unfortunately the wind may by then be veering to the SW. Sea conditions will therefore be quite
choppy making it a wetter journey than the outward trip.
In the fresher breeze, Tom decides to reef, estimating that his boat speed will still be about 3 knots
He will be tacking, reducing his speed over the ground (S.O.G.) to perhaps 2 knots.
1530 to 1630 boat speed plus tide = 2 + 1.2 = 3.2 knots
1630 to 1730 boat speed plus tide = 2 + 1.0 = 3.0 knots
Achieving 6.2 nautical miles before 1730 ensures that he should cover the 5 nautical miles
comfortably before the tide turns again at that time.
When does the tide turn?
The tidal diamond information refers to 30 minutes each side of the indicated time:
Published Data: Means:
1200 044 0.5 1130- 1230 044° 0.5 knots
1300 046 0.1 1230- 1330 046 0.1 knots
1400 214 0.5 1330- 1430 214“ 0.5 knots
So, in this example, the tide turns from NE to SW at 1330. There will, of course, be a period of slack
water but the tidal diamonds sometimes do not show this clearly.
Step 4: Alternatives
The outward journey should be predictable. However, the strength and direction of the afternoon sea
breeze will be difficult to predict exactly. If conditions are too rough on the return journey, Tom plans
to simply turn around early and broad reach back to Brixham against the tide, where he will be stuck
overnight.
Though no overfalls (rough seas) are shown on the chart, it would be wise to approach Berry Head
with caution in case there are strong tidal eddies close inshore.
On the other hand, if the sea breeze does not materialise due to cloudy weather, Tom may find the
breeze remains southerly and have an easy return trip with the tide behind him.
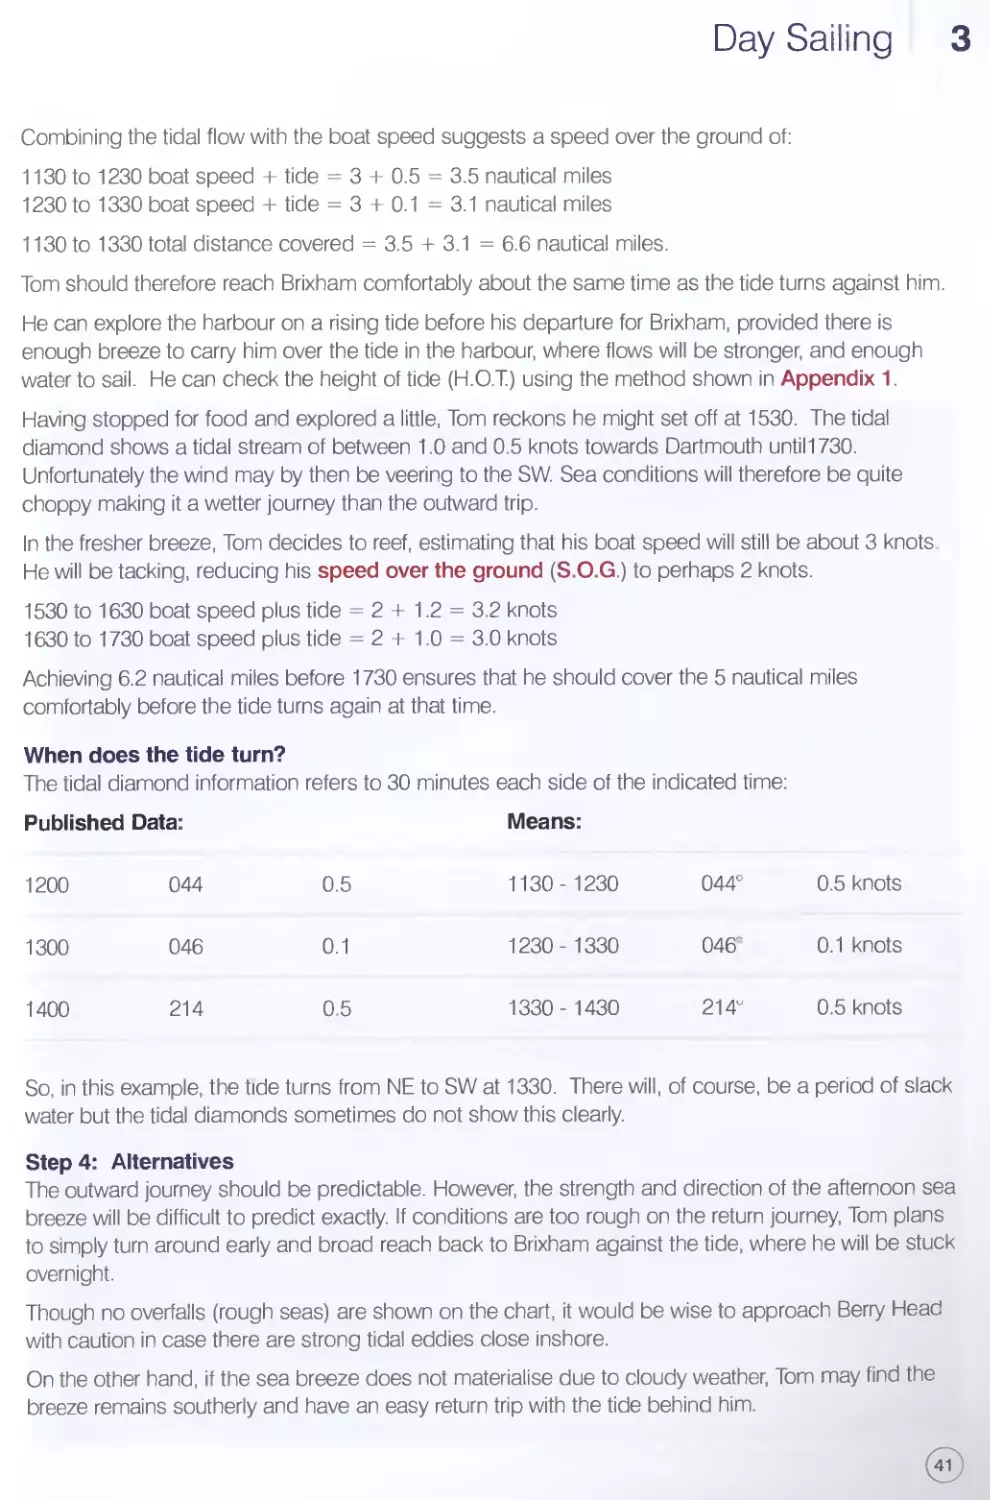
4 Sailing with Spinnakers
Over the years, dinghy and catamaran sailing has undergone a number of far reaching changes...
In the Thirties, Uffa Fox introduced planing dinghies. In the Sixties, the ability to plane to windward
was developed. In the Eighties, Julian Bethwaithe developed the asymmetric spinnaker and
completed the logical gybing downwind technique Many of these developments have evolved
through lighter equipment and better materials, some through better techniques.
Sailing with Spinnakers 4
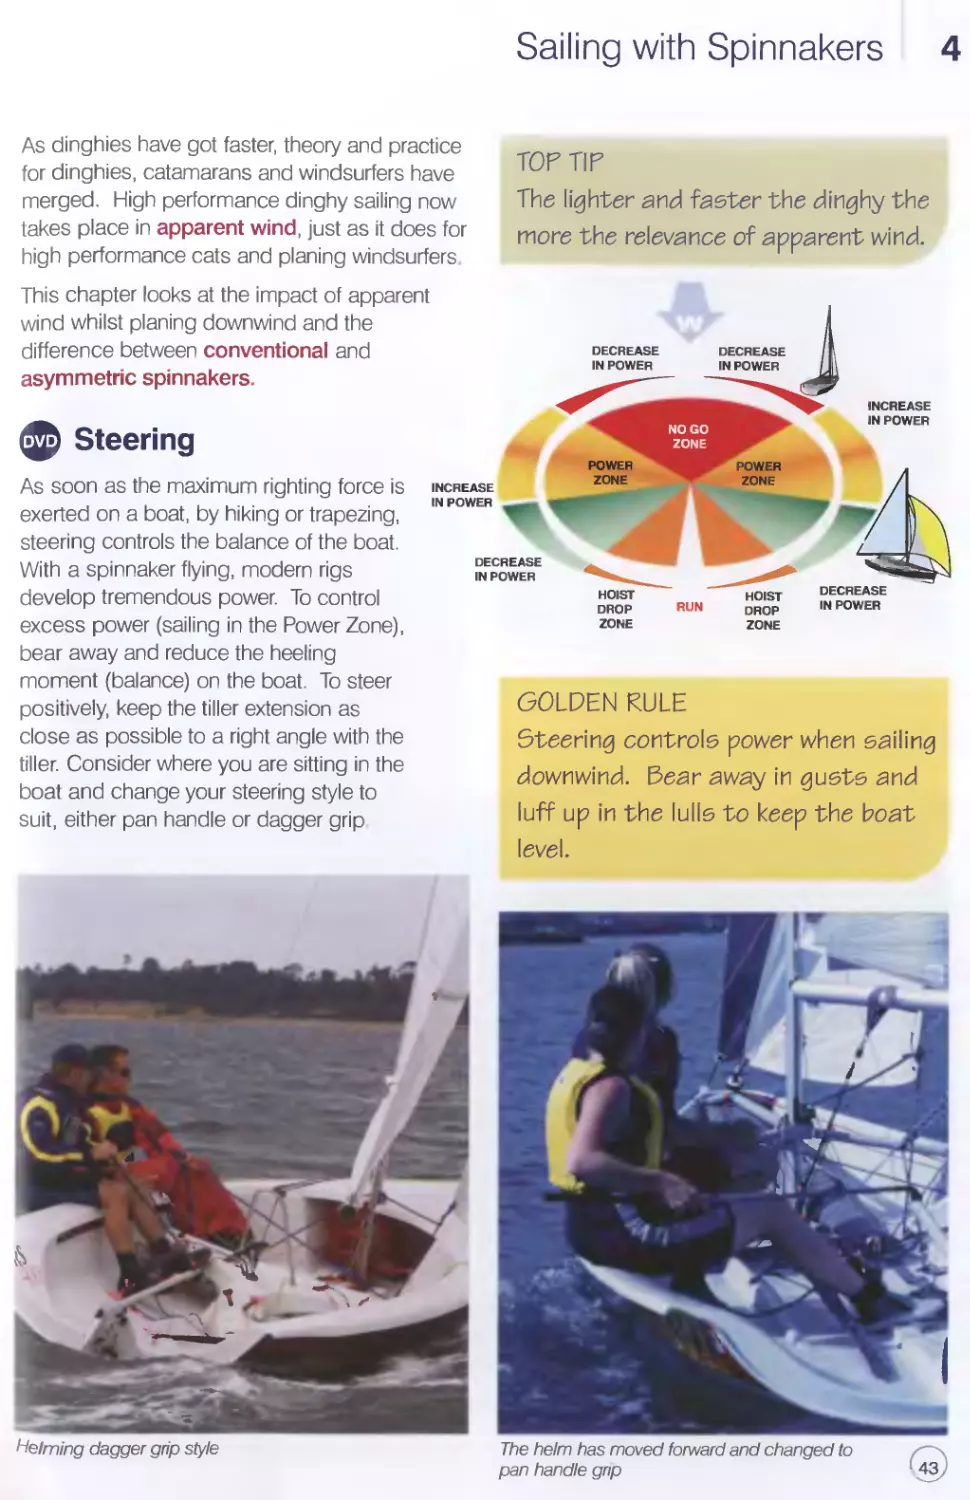
As dinghies have got faster, theory and practice
for dinghies, catamarans and windsurfers have
merged. High performance dinghy sailing now
takes place in apparent wind, just as it does for
high performance cats and planing windsurfers
TOP TIP
The lighter and faster the dinghy the
more the relevance of apparent wind.
This chapter looks at the impact of apparent
wind whilst planing downwind and the
difference between conventional and
asymmetric spinnakers.
ф Steering
As soon as the maximum righting force is
exerted on a boat, by hiking or trapezing,
steering controls the balance of the boat.
With a spinnaker flying, modern rigs
develop tremendous power. To control
excess power (sailing in the Power Zone),
bear away and reduce the heeling
moment (balance) on the boat. To steer
positively, keep the tiller extension as
close as possible to a right angle with the
tiller. Consider where you are sitting in the
boat and change your steering style to
suit, either pan handle or dagger grip
GOLDEN PULE
Steering controls power when sailing
downwind. Bear away in gusts and
luff up in the lulls to keep the boat
level.
4 Sailing with Spinnakers
Conventional and Asymmetric
Spinnakers
The conventional spinnaker was developed to
gain better speed downwind. With the heeling
forces greatly reduced downwind, it was
possible to fly this specialist sail while running
and gain considerable speed without excessive
heeling. Originally only flown on runs, sailors
soon developed the skill of sailing slightly higher
to gain speed.
As sailors in the development classes were at
the forefront of these changes it was no surprise
to see more specialist sails being created by the
Australian 18 foot class. Races wore won by
gybing conventional spinnakers downwind and
sailing much greater distances at a significant
speed advantage in these planing hulls.
Eventually, this led to the creation of an
asymmetric spinnaker, which was not only better
suited to sailing higher angles but also
simplified the spinnaker systems.
Instead of controlling the height and angle of the
conventional pole, the entire technique was
changed to hoisting, gybing and dropping the
spinnaker from a fixed pole. Because the
gybing pole was replaced with a single, central
pole, gybing had become as easy as swopping
the jib from starboard to port or vice versa.
As a result of these developments, there is a
clear choice in the performance boat market
between boats with different types of spinnaker,
each with its own strengths and disadvantages.
TOP TIP
If you can fly a conventional
spinnakeryou will find moving to an
asymmetric easier than from an
asymmetric to a conventional.
44
Sailing with Spinnakers 4
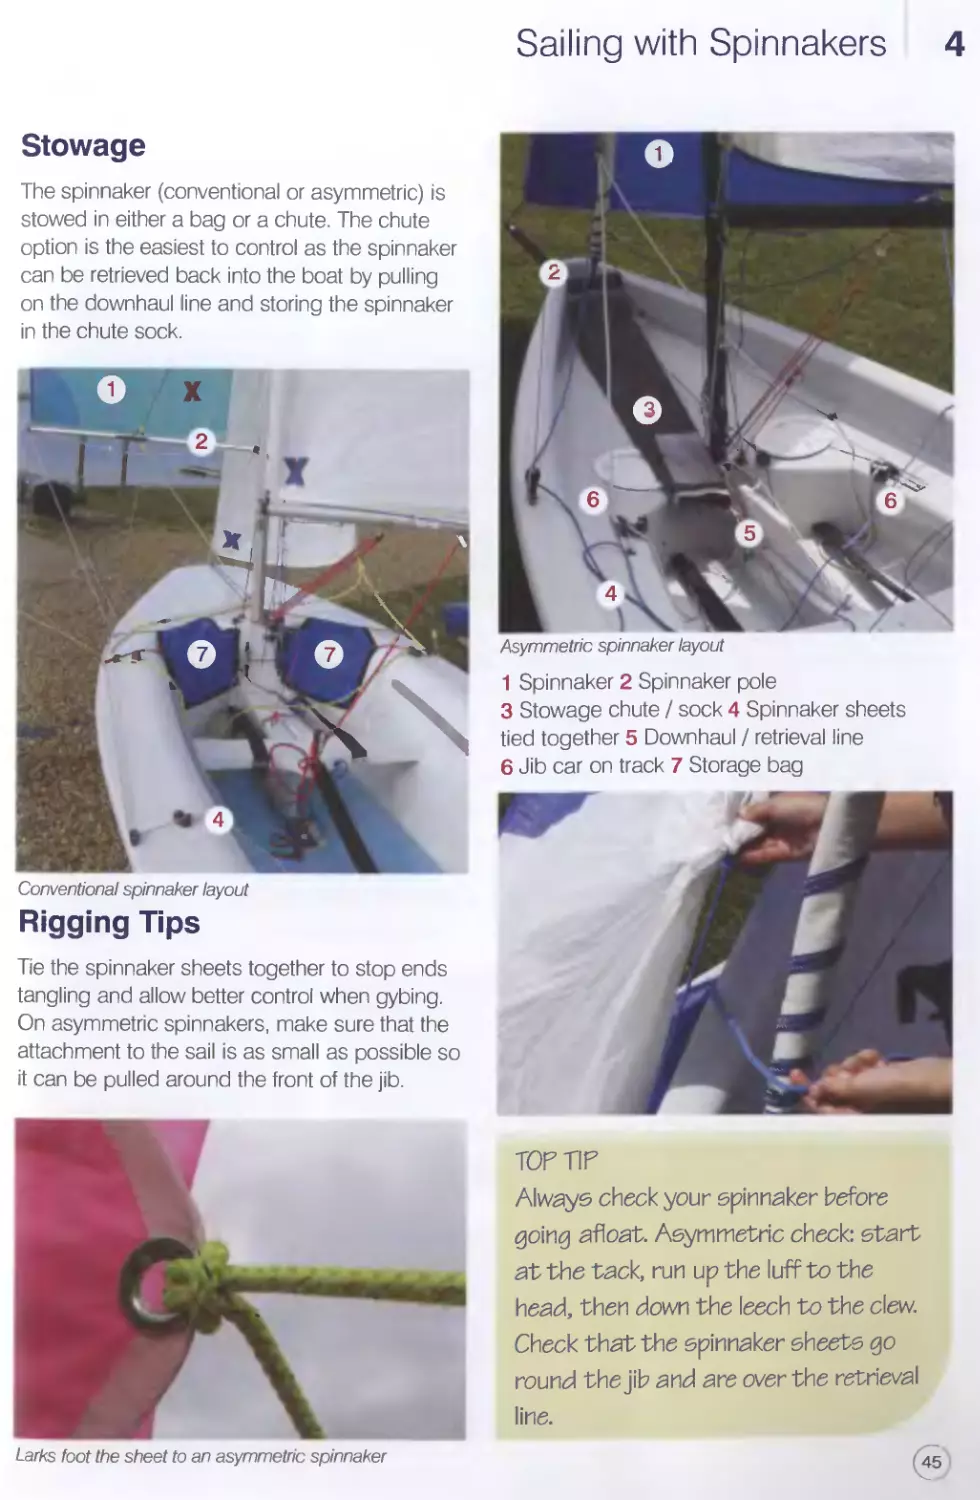
Stowage
The spinnaker (conventional or asymmetric) is
stowed in either a bag or a chute. The cnute
option is the easiest to control as the spinnaker
can be retrieved back into the boat by pulling
on the downhaul line and storing the spinnaker
in the chute sock.
Conventional spinnaker layout
Rigging Tips
Tie the spinnaker sheets together to stop ends
tangling and allow better control when gybing.
On asymmetric spinnakers, make sure that the
attachment to the sail is as small as possible so
it can be pulled around the front of the jib.
Larks foot the sheet to an asymmetric spinnaker
Asymmetric spinnaker layout
1 Spinnaker 2 Spinnaker pole
3 Stowage chute I sock 4 Spinnaker sheets
tied together 5 Downhaul I retrieval line
6 Jib car on track 7 Storage bag
TOP TIP
Always check your spinnaker before
going afloat. Asymmetric check: start
at the tack, run up the luff to the
head, then down the leech to the clew.
Check that the spinnaker sheets go
round the jib and are over the retrieval
line.
4 Sailing with Spinnakers
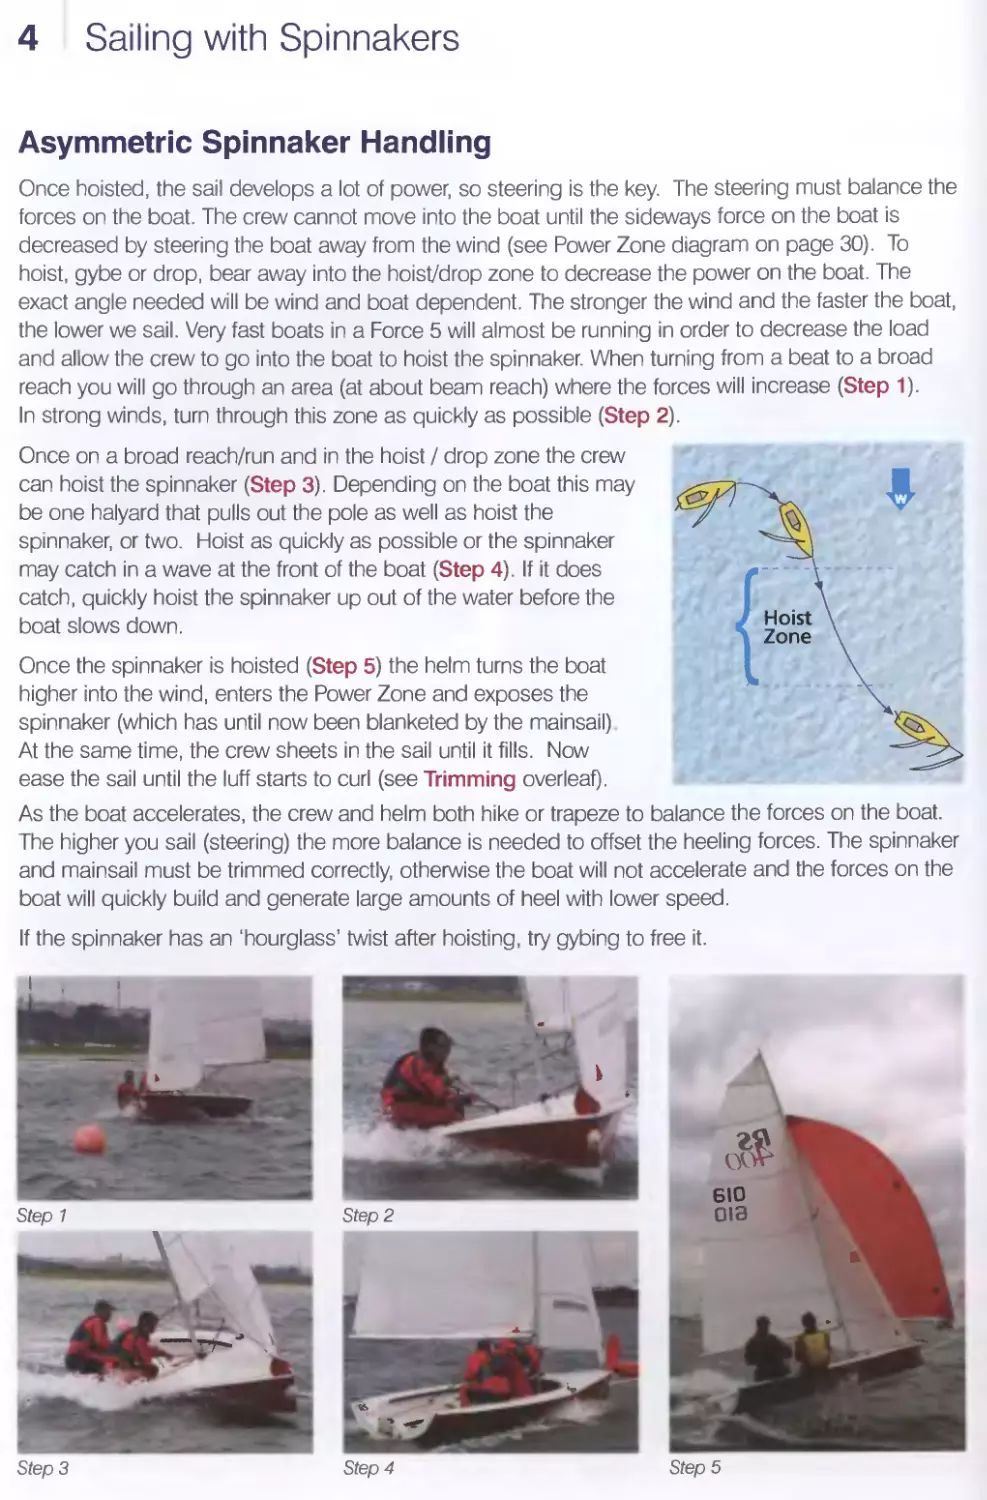
Asymmetric Spinnaker Handling
Once hoisted, the sail develops a lot of power, so steering is the key. The steering must balance the
forces on the boat. The crew cannot move into the boat until the sideways force on the boat is
decreased by steering the boat away from the wind (see Power Zone diagram on page 30). To
hoist, gybe or drop, bear away into the hoist/drop zone to decrease the power on the boat. The
exact angle needed will be wind and boat dependent. The stronger the wind and the faster the boat,
the lower we sail. Very fast boats in a Force 5 will almost be running in order to decrease the load
and allow the crew to go into the boat to hoist the spinnaker. When turning from a beat to a broad
reach you will go through an area (at about beam reach) where the forces will increase (Step 1).
In strong winds, turn through this zone as quickly as possible (Step 2).
Once on a broad reach/run and in the hoist / drop zone the crew
can hoist the spinnaker (Step 3). Depending on the boat this may
be one halyard that pulls out the pole as well as hoist the
spinnaker, or two. Hoist as quickly as possible or the spinnaker
may catch in a wave at the front of the boat (Step 4). If it does
catch, quickly hoist the spinnaker up out of the water before the
boat slows down.
Once the spinnaker is hoisted (Step 5) the helm turns the boat
higher into the wind, enters the Power Zone and exposes the
spinnaker (which has until now been blanketed by the mainsail)
At the same time, the crew sheets in the sail until it fills. Now
ease the sail until the luff starts to curl (see Trimming overleaf).
As the boat accelerates, the crew and helm both hike or trapeze to balance the forces on the boat.
The higher you sail (steering) the more balance is needed to offset the heeling forces. The spinnaker
and mainsail must be trimmed correctly, otherwise the boat will not accelerate and the forces on the
boat will quickly build and generate large amounts of heel with lower speed.
If the spinnaker has an 'hourglass’ twist after hoisting, try gybing to free it.
Sailing with Spinnakers I 4
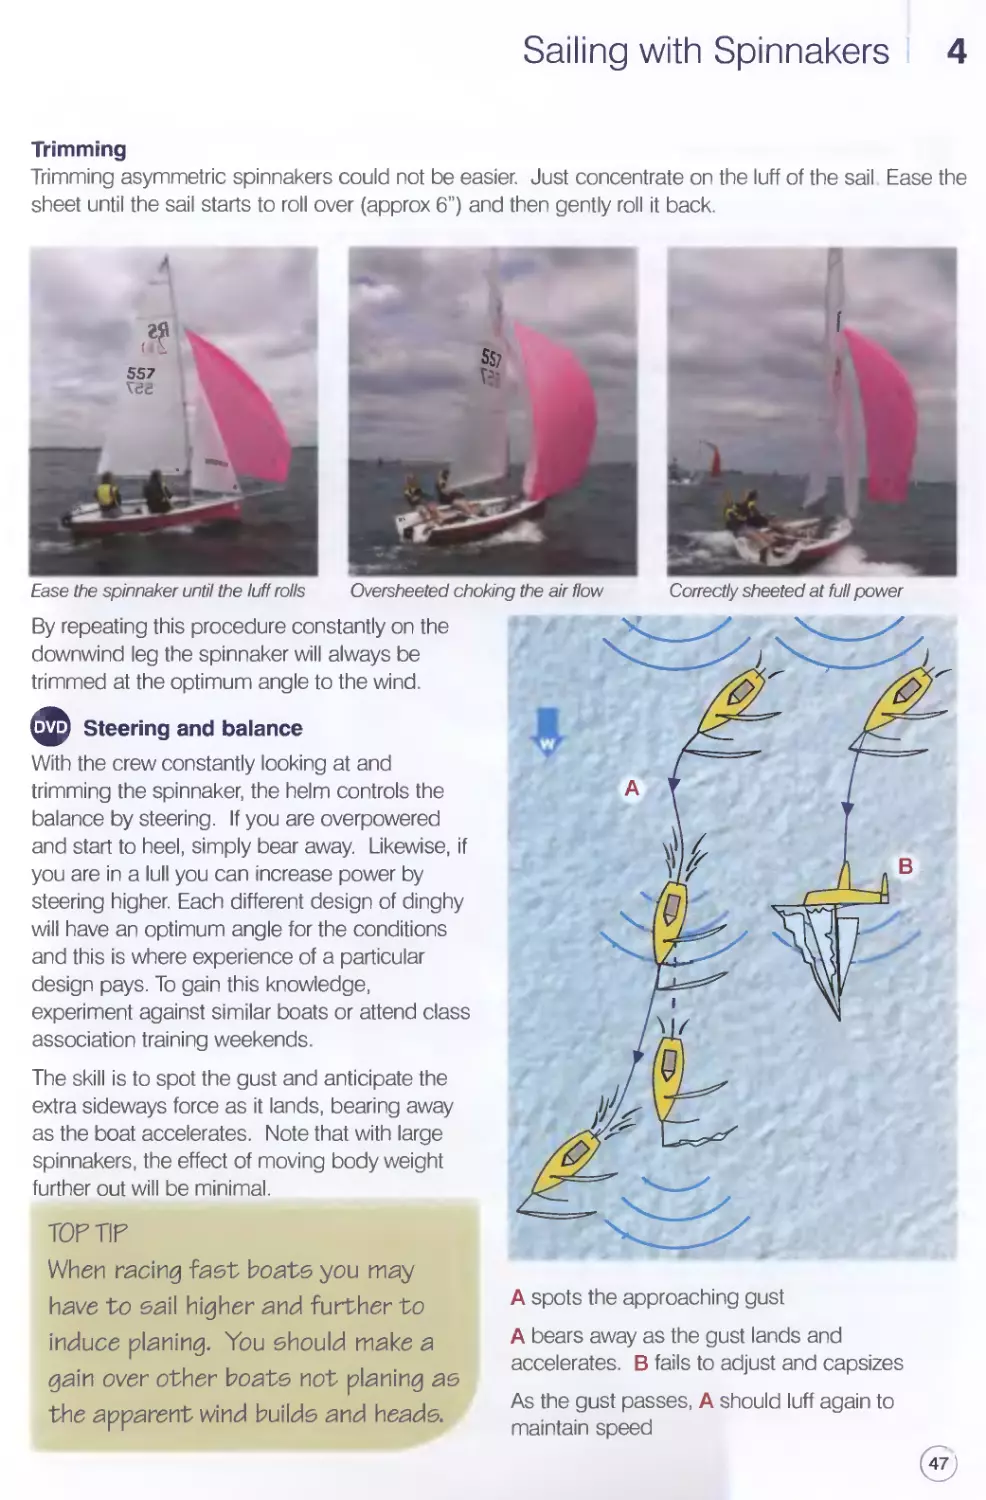
Trimming
Trimming asymmetric spinnakers could not be easier. Just concentrate on the luff of the sail Ease the
sheet until the sail starts to roll over (approx 6”) and then gently roll it back.
Ease the spinnaker until the luff rolls
Oversheeted choking the air flow
By repeating this procedure constantly on the
downwind leg the spinnaker will always be
trimmed at the optimum angle to the wind.
Steering and balance
With the crew constantly looking at and
trimming the spinnaker, the helm controls the
balance by steering. If you are overpowered
and start to heel, simply bear away. Likewise, if
you are in a lull you can increase power by
steering higher. Each different design of dinghy
will have an optimum angle for the conditions
and this is where experience of a particular
design pays. To gain this knowledge,
experiment against similar boats or attend class
association training weekends.
The skill is to spot the gust and anticipate the
extra sideways force as it lands, bearing away
as the boat accelerates. Note that with large
spinnakers, the effect of moving body weight
further out will be minimal.
TOP TIP
When racing fast boats you may
have to sail higher and further to
induce planing. You should make a
gain over other boats not planing as
the apparent wind builds and heads.
Correctly sheeted at full power
A spots the approaching gust
A bears away as the gust lands and
accelerates. В fails to adjust and capsizes
As the gust passes, A should luff again to
maintain speed
47
4 Sailing with Spinnakers
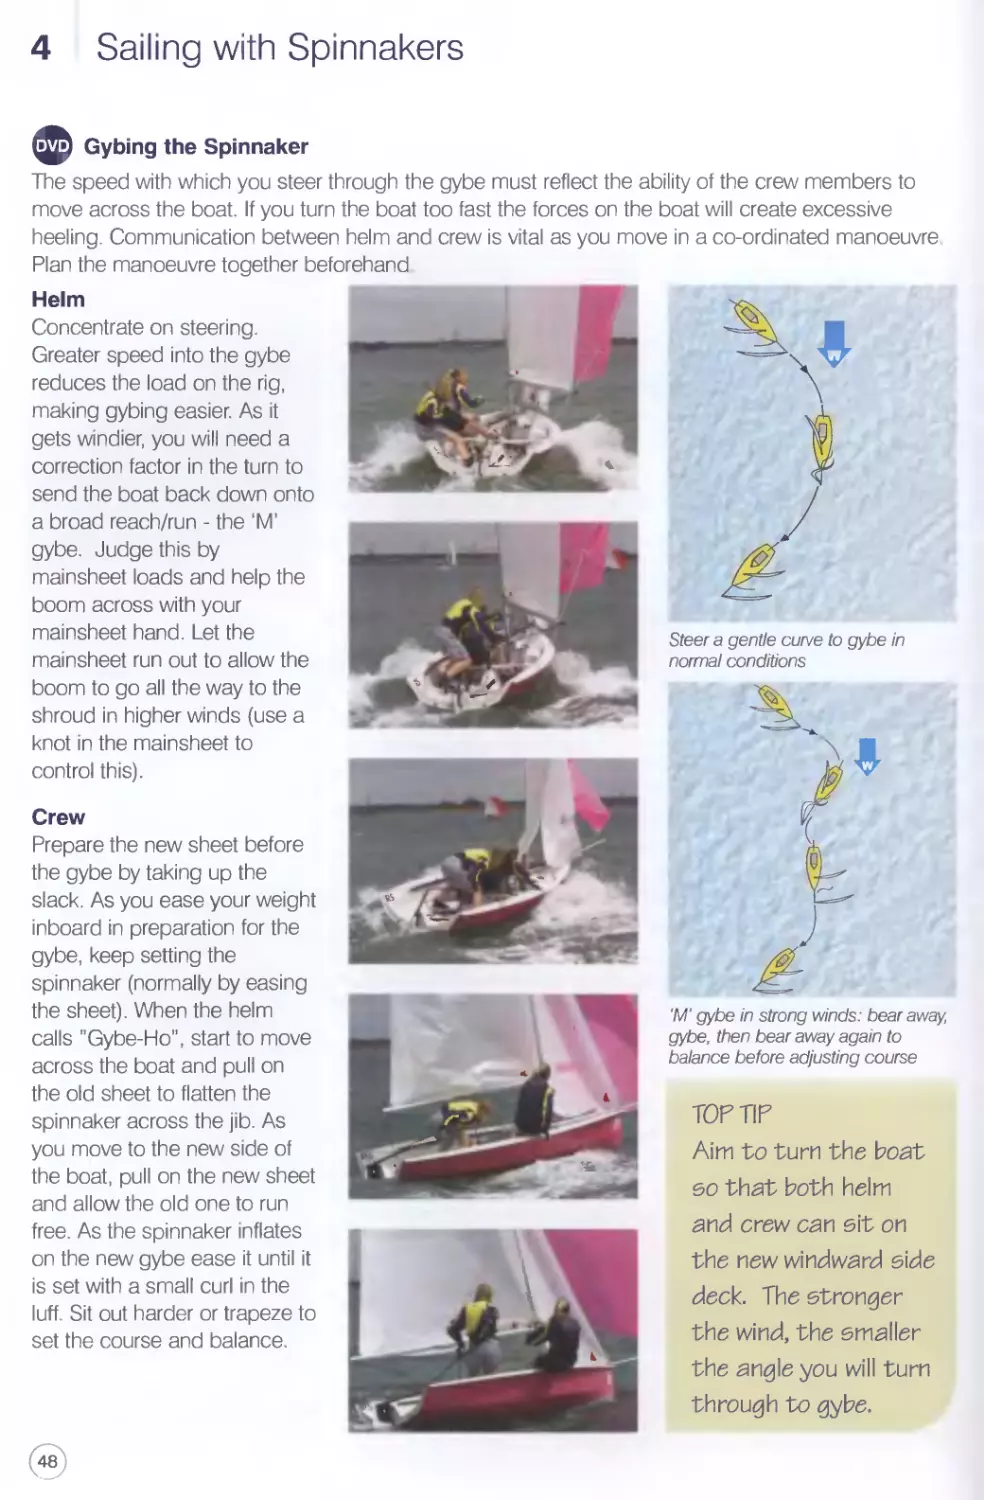
Gybing the Spinnaker
The speed with which you steer through the gybe must reflect the ability of the crew members to
move across the boat. If you turn the boat too fast the forces on the boat will create excessive
heeling. Communication between helm and crew is vital as you move in a co-ordinated manoeuvre
Plan the manoeuvre together beforehand
Helm
Concentrate on steering.
Greater speed into the gybe
reduces the load on the rig,
making gybing easier. As it
gets windier, you will need a
correction factor in the turn to
send the boat back down onto
a broad reach/run - the ‘M’
gybe. Judge this by
mainsheet loads and help the
boom across with your
mainsheet hand. Let the
mainsheet run out to allow the
boom to go all the way to the
shroud in higher winds (use a
knot in the mainsheet to
control this).
Crew
Prepare the new sheet before
the gybe by taking up the
slack. As you ease your weight
inboard in preparation for the
gybe, keep setting the
spinnaker (normally by easing
the sheet). When the helm
calls ”Gybe-Ho”, start to move
across the boat and pull on
the old sheet to flatten the
spinnaker across the jib. As
you move to the new side of
the boat, pull on the new sheet
and allow the old one to run
free. As the spinnaker inflates
on the new gybe ease it until it
is set with a small curl in the
luff. Sit out harder or trapeze to
set the course and balance.
Steer a gentle curve to gybe in
normal conditions
‘M’ gybe in strong winds: bear away
gybe, then bear away again to
balance before adjusting course
TOP TIP
Aim to turn the boat
so that both helm
and crew can sit on
the new windward side
deck. The stronger
the wind, the smaller
the angle you will turn
through to gybe.
Sailing with Spinnakers 4
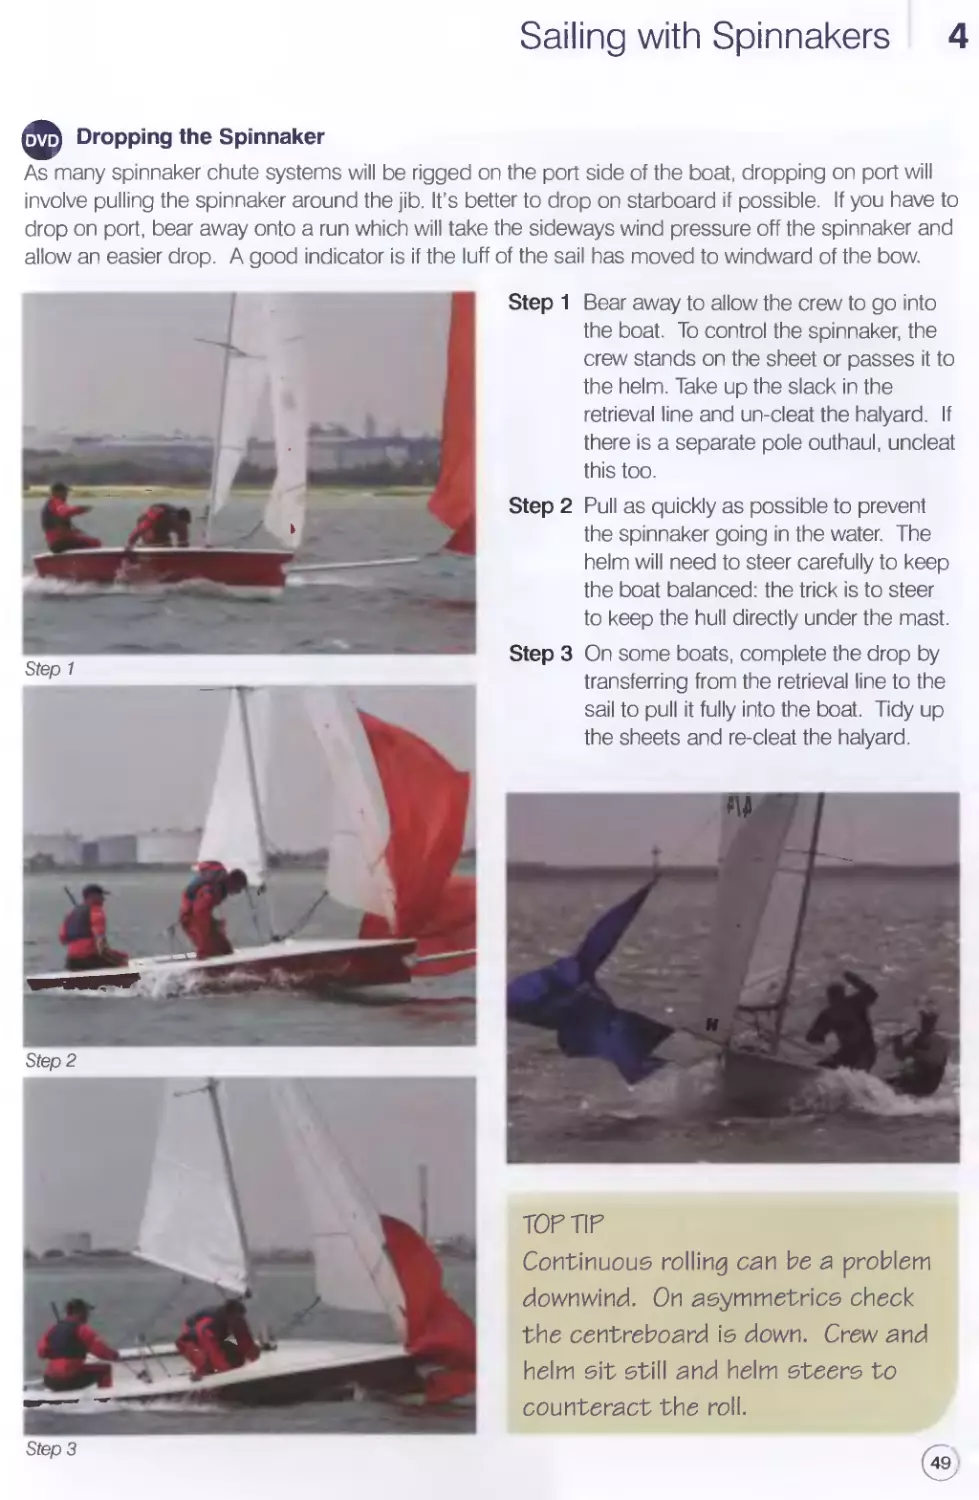
Dropping the Spinnaker
As many spinnaker chute systems will be rigged on the port side of the boat, dropping on port will
involve pulling the spinnaker around the jib. It’s better to drop on starboard if possible. If you have to
drop on port, bear away onto a run which will take the sideways wind pressure off the spinnaker and
allow an easier drop. A good indicator is if the luff of the sail has moved to windward of the bow.
Step 1
Step 2
Step 3
Step 1 Bear away to allow the crew to go into
the boat. To control the spinnaker, the
crew stands on the sheet or passes it to
the helm. Take up the slack in the
retrieval line and un-cleat the halyard. If
there is a separate pole outhaul, uncleat
this too.
Step 2 Pull as quickly as possible to prevent
the spinnaker going in the water. The
helm will need to steer carefully to keep
the boat balanced: the trick is to steer
to keep the hull directly under the mast.
Step 3 On some boats, complete the drop by
transferring from the retrieval line to the
sail to pull it fully into the boat. Tidy up
the sheets and re-cleat the halyard.
TOP TIP
Continuous rolling can be a problem
downwind. On asymmetries check
the centreboard is down. Crew and
helm sit still and helm steers to
counteract the roll.
49
4 Sailing with Spinnakers
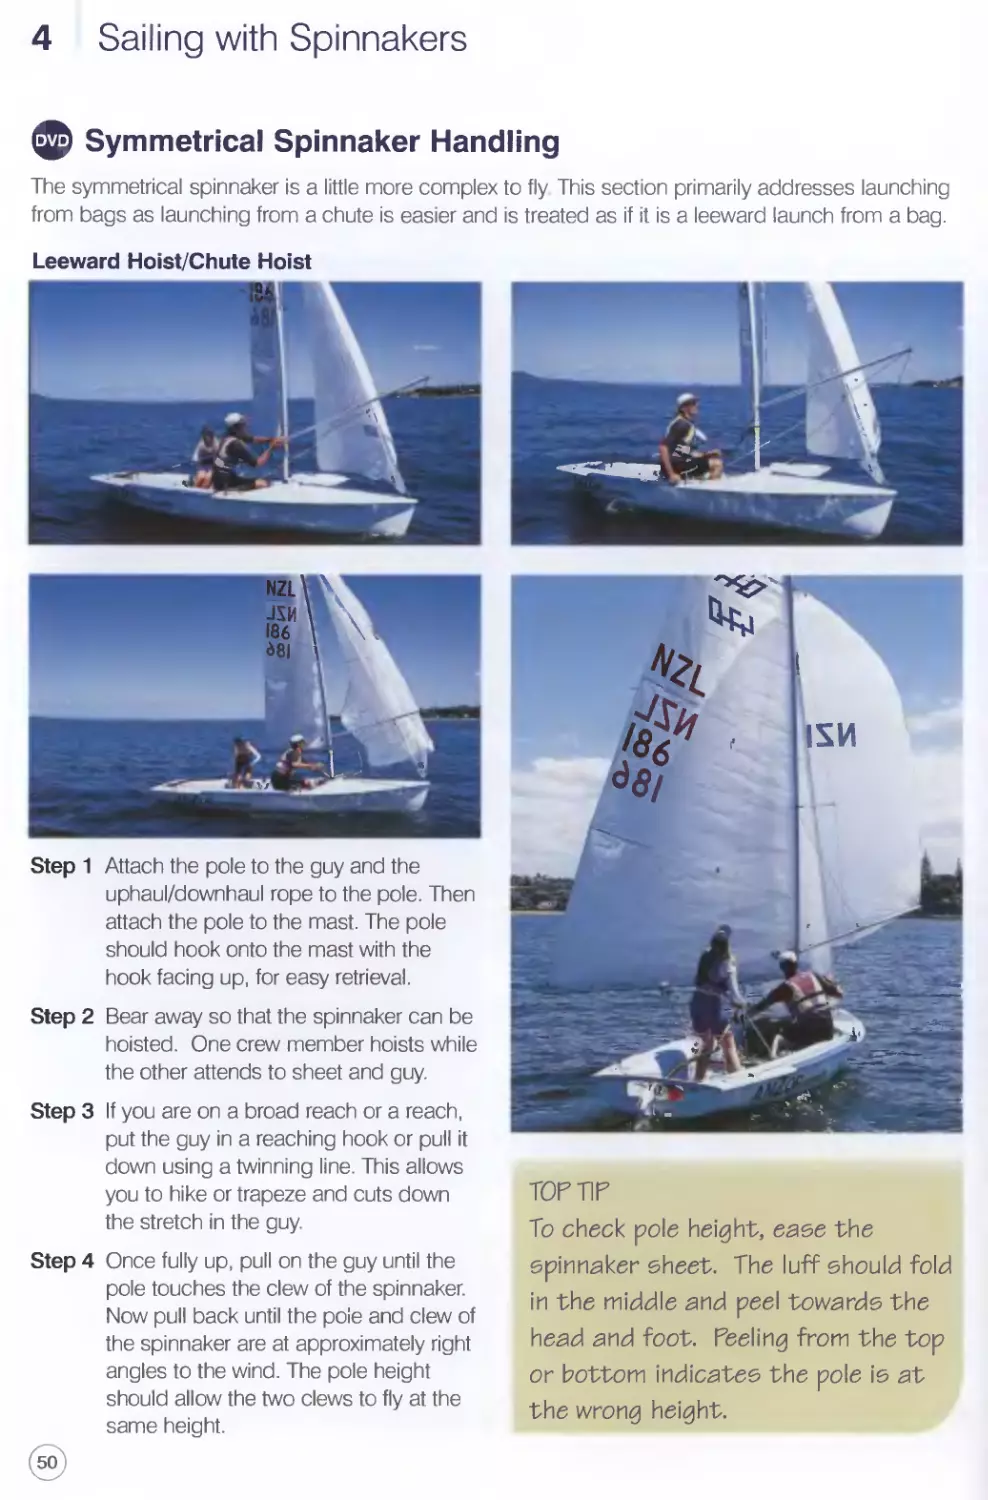
ф Symmetrical Spinnaker Handling
The symmetrical spinnaker is a little more complex to fly This section primarily addresses launching
from bags as launching from a chute is easier and is treated as if it is a leeward launch from a bag.
Leeward Hoist/Chute Hoist
Step 1 Attach the pole to the guy and the
uphaul/downhaul rope to the pole. Then
attach the pole to the mast. The pole
should hook onto the mast with the
hook facing up, for easy retrieval.
Step 2 Bear away so that the spinnaker can be
hoisted. One crew member hoists while
the other attends to sheet and guy.
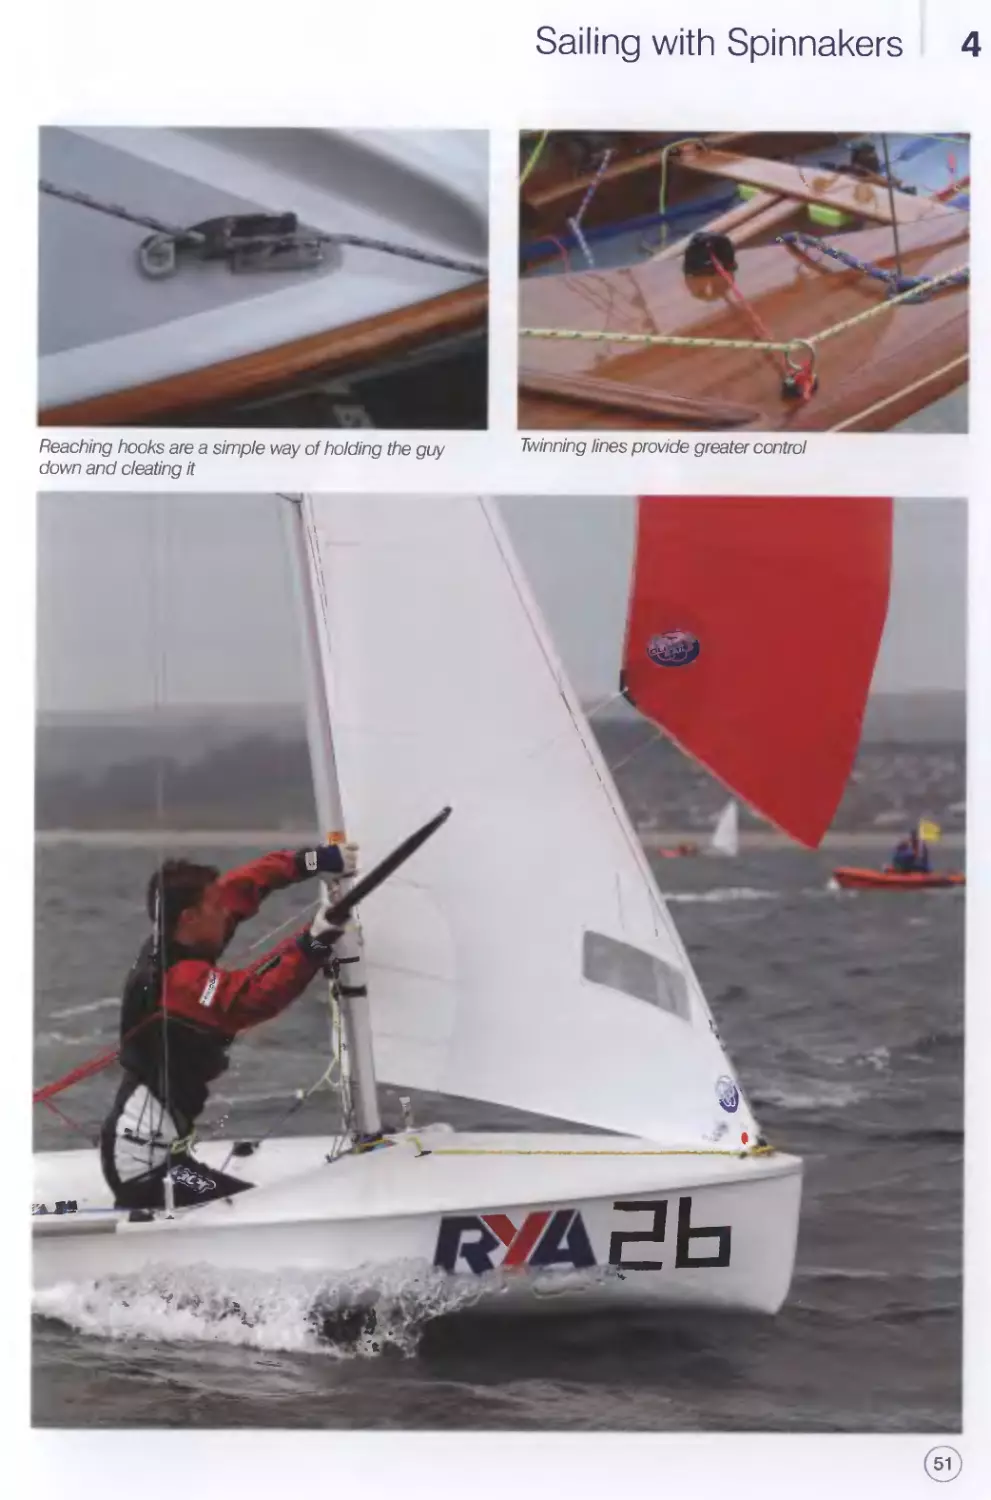
Step 3 If you are on a broad reach or a reach,
put the guy in a reaching hook or pull it
down using a twinning line. This allows
you to hike or trapeze and cuts down
the stretch in the guy.
Step 4 Once fully up, pull on the guy until the
pole touches the clew of the spinnaker.
Now pull back until the pole and clew of
the spinnaker are at approximately right
angles to the wind. The pole height
should allow the two clews to fly at the
same height.
TOP TIP
To check pole height, ease the
spinnaker sheet. The luff should fold
in the middle and peel towards the
head and foot. Peeling from the top
or bottom indicates the pole is at
the wrong height.
Sailing with Spinnakers 4
Reaching hooks are a simple way of holding the guy Twinning lines provide greater control
down and cieating it
4 Sailing with Spinnakers
Windward Hoist
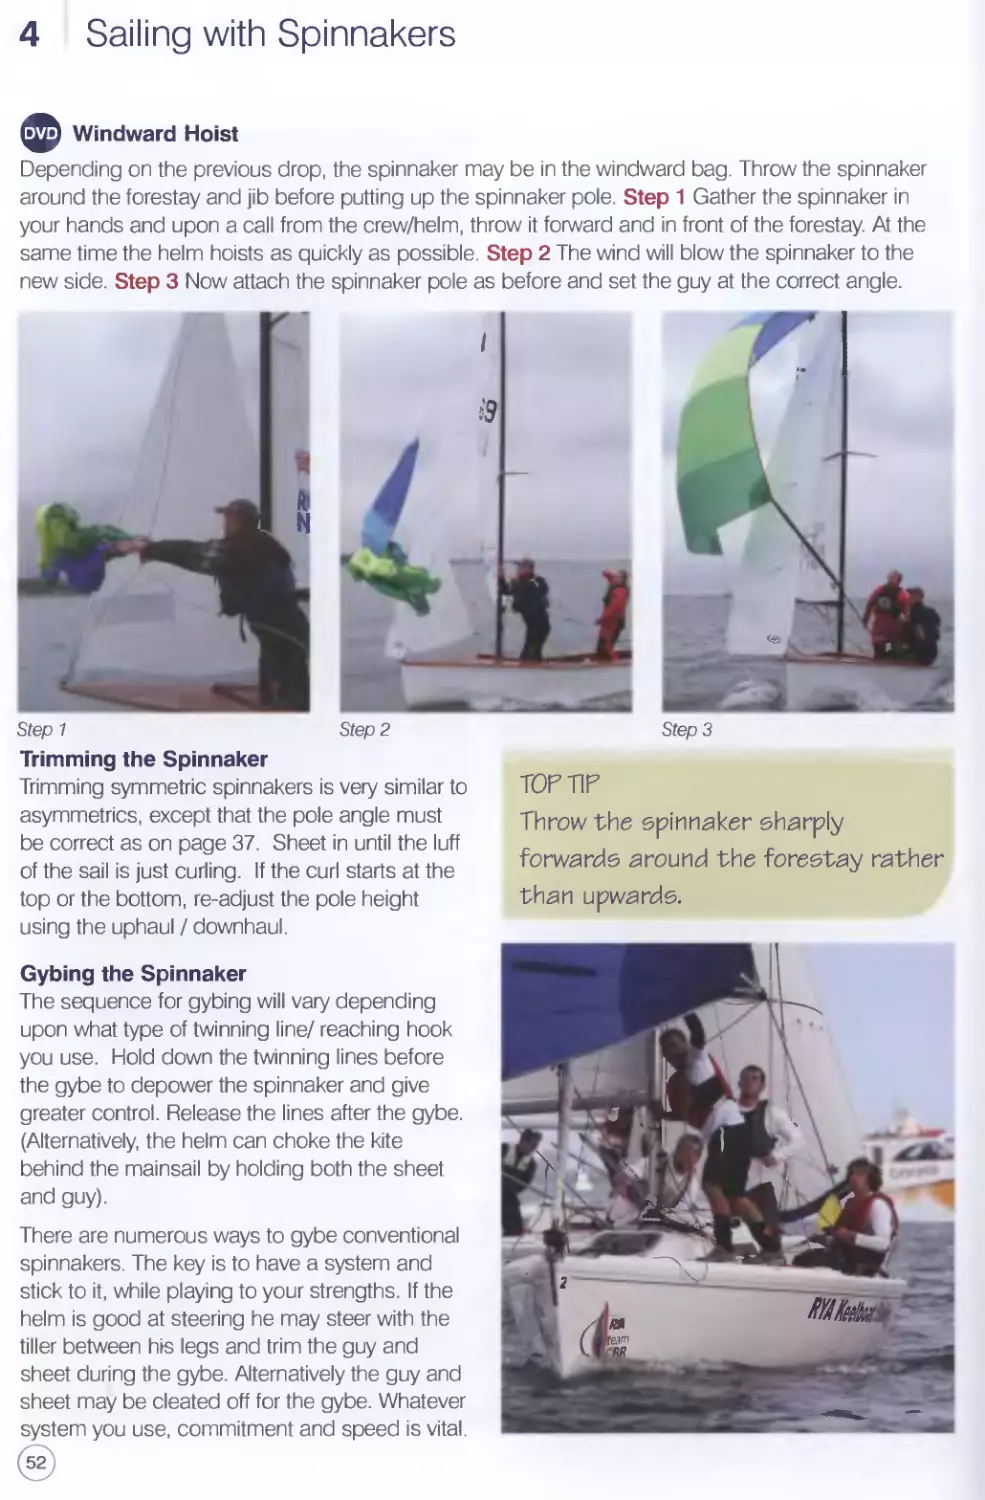
Depending on the previous drop, the spinnaker may be in the windward bag. Throw the spinnaker
around the forestay and jib before putting up the spinnaker pole. Step 1 Gather the spinnaker in
your hands and upon a call from the crew/helm, throw it forward and in front of the forestay. At the
same time the helm hoists as quickly as possible. Step 2 The wind will blow the spinnaker to the
new side. Step 3 Now attach the spinnaker pole as before and set the guy at the correct angle.
Step 1
Trimming the Spinnaker
Trimming symmetric spinnakers is very similar to
asymmetries, except that the pole angle must
be correct as on page 37. Sheet in until the luff
of the sail is just curling. If the curl starts at the
top or the bottom, re-adjust the pole height
using the uphaul I downhaul.
Gybing the Spinnaker
The sequence for gybing will vary depending
upon what type of twinning line/ reaching hook
you use. Hold down the twinning lines before
the gybe to depower the spinnaker and give
greater control. Release the lines after the gybe.
(Alternatively, the helm can choke the kite
behind the mainsail by holding both the sheet
and guy).
There are numerous ways to gybe conventional
spinnakers. The key is to have a system and
stick to it, while playing to your strengths. If the
helm is good at steering he may steer with the
tiller between his legs and trim the guy and
sheet during the gybe. Alternatively the guy and
sheet may be cleated off for the gybe. Whatever
system you use, commitment and speed is vital.
(52)
TOP TIP
Throw the spinnaker sharply
forwards around the forestay rather
than upwards.
Sailing with Spinnakers 4
Run-to-run gybe
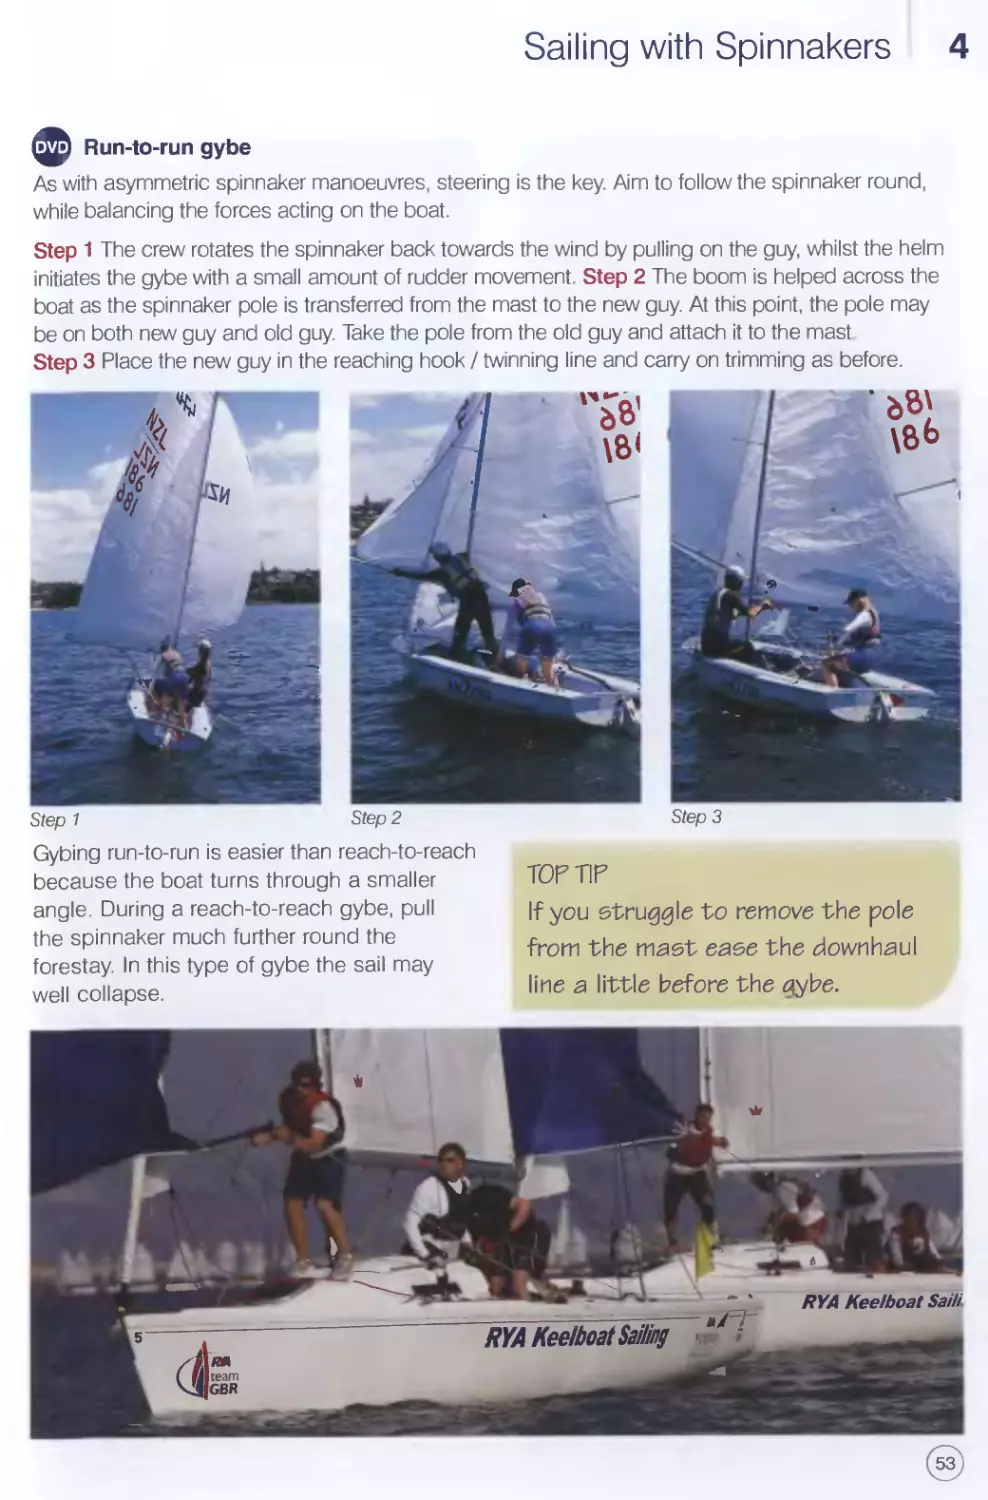
As with asymmetric spinnaker manoeuvres, steering is the key. Aim to follow the spinnaker round,
while balancing the forces acting on the boat.
Step 1 The crew rotates the spinnaker back towards the wind by pulling on the guy. whilst the helm
initiates the gybe with a small amount of rudder movement. Step 2 The boom is helped across the
boat as the spinnaker pole is transferred from the mast to the new guy. At this point, the pole may
be on both new guy and old guy. Take the pole from the old guy and attach it to the mast
Step 3 Place the new guy in the reaching hook / twinning line and carry on trimming as before.
Step 1
Gybing run-to-run is easier than reach-to-reach
because the boat turns through a smaller
angle. During a reach-to-reach gybe, pull
the spinnaker much further round the
forestay. In this type of gybe the sail may
well collapse.
TOP TIP
If you struggle to remove the pole
from the mast ease the downhaul
line a little before the gybe.
4 I Sailing with Spinnakers
Dropping the Spinnaker into Bags
The spinnaker is best dropped on the windward
side. If you are racing using bags, consider
which gybe to drop from, in order to facilitate a
leeward hoist at the next windward mark.
Remove the pole from the mast; fly the kite until
the correct distance from the mark. Store the
pole and drop the spinnaker halyard, while
pulling the leech down and into the windward
bag. The foot will lie on the foredeck, until the
entire spinnaker is in the bag.
For a chute drop, simply pull the spinnaker
into the chute with the downhaul and then store
the pole.
TOP TIP
Working down one leech stops twists.
Never put the two clews together to
gather in as this creates twists.
Sailing with Spinnakers 4
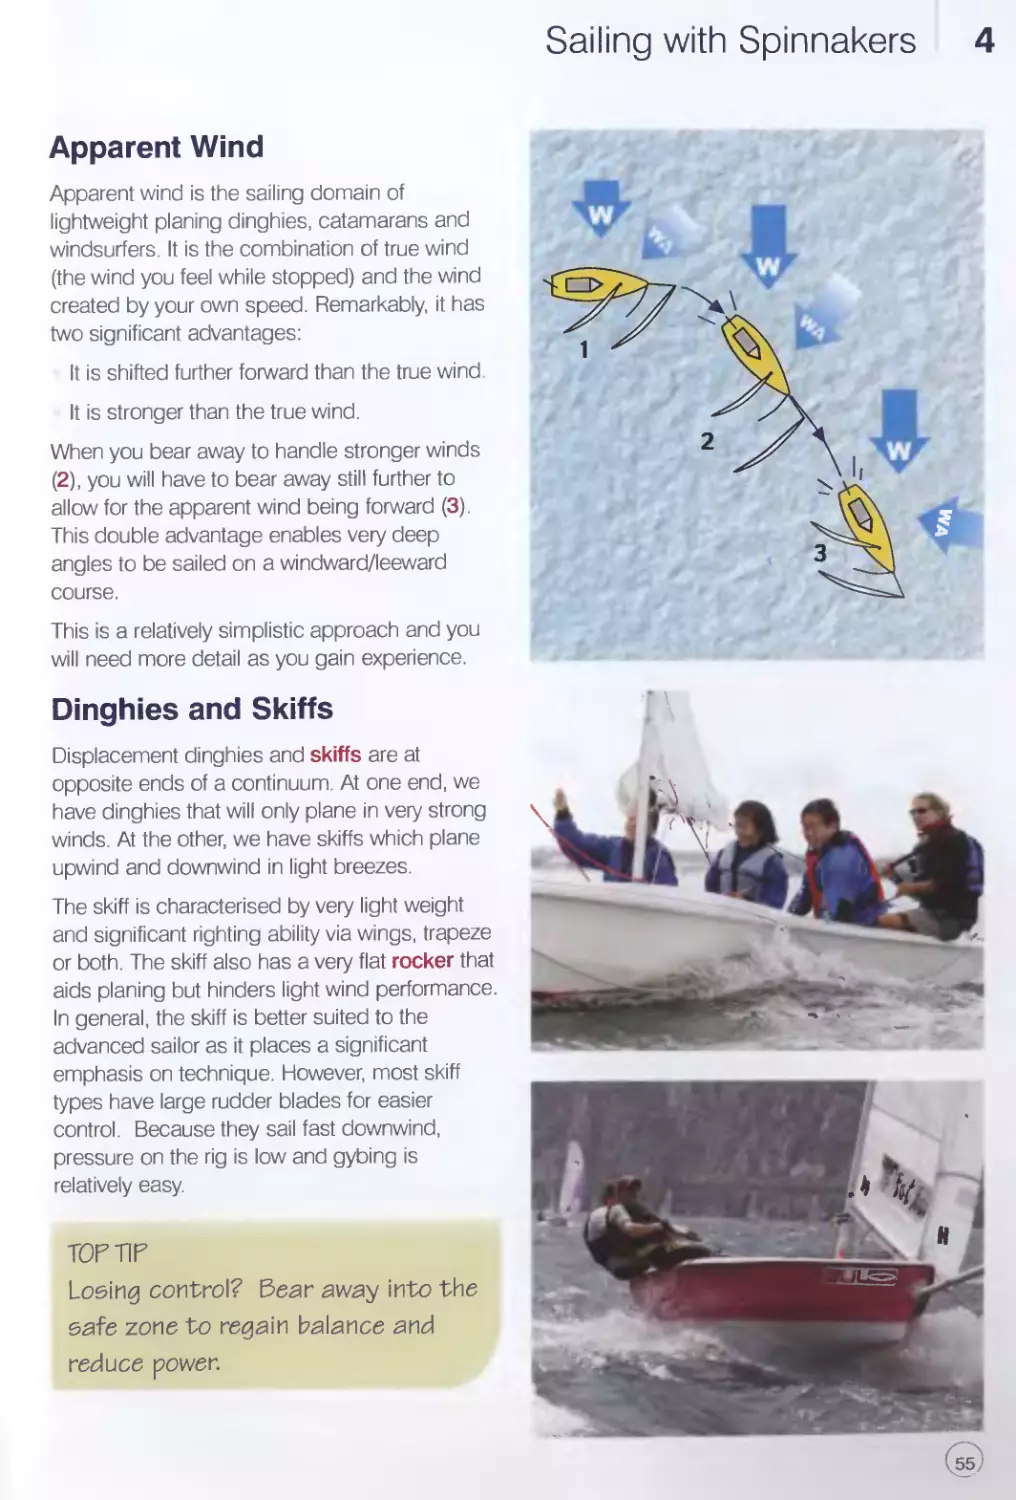
Apparent Wind
Apparent wind is the sailing domain of
lightweight planing dinghies, catamarans and
windsurfers. It is the combination of true wind
(the wind you feel while stopped) and the wind
created by your own speed. Remarkably, it has
two significant advantages:
It is shifted further forward than the true wind
It is stronger than the true wind.
When you bear away to handle stronger winds
(2), you will have to bear away still further to
allow for the apparent wind being forward (3).
This double advantage enables very deep
angles to be sailed on a windward/leeward
course.
This is a relatively simplistic approach and you
will need more detail as you gain experience.
Dinghies and Skiffs
Displacement dinghies and skiffs are at
opposite ends of a continuum. At one end, we
have dinghies that will only plane in very strong
winds. At the other, we have skiffs which plane
upwind and downwind in light breezes.
The skiff is characterised by very light weight
and significant righting ability via wings, trapeze
or both. The skiff also has a very flat rocker that
aids planing but hinders light wind performance.
In general, the skiff is better suited to the
advanced sailor as it places a significant
emphasis on technique. However, most skiff
types have large rudder blades for easier
control. Because they sail fast downwind,
pressure on the rig is low and gybing is
relatively easy
TOP TIP
Losing control? Bear away into the
safe zone to regain balance and
reduce power.
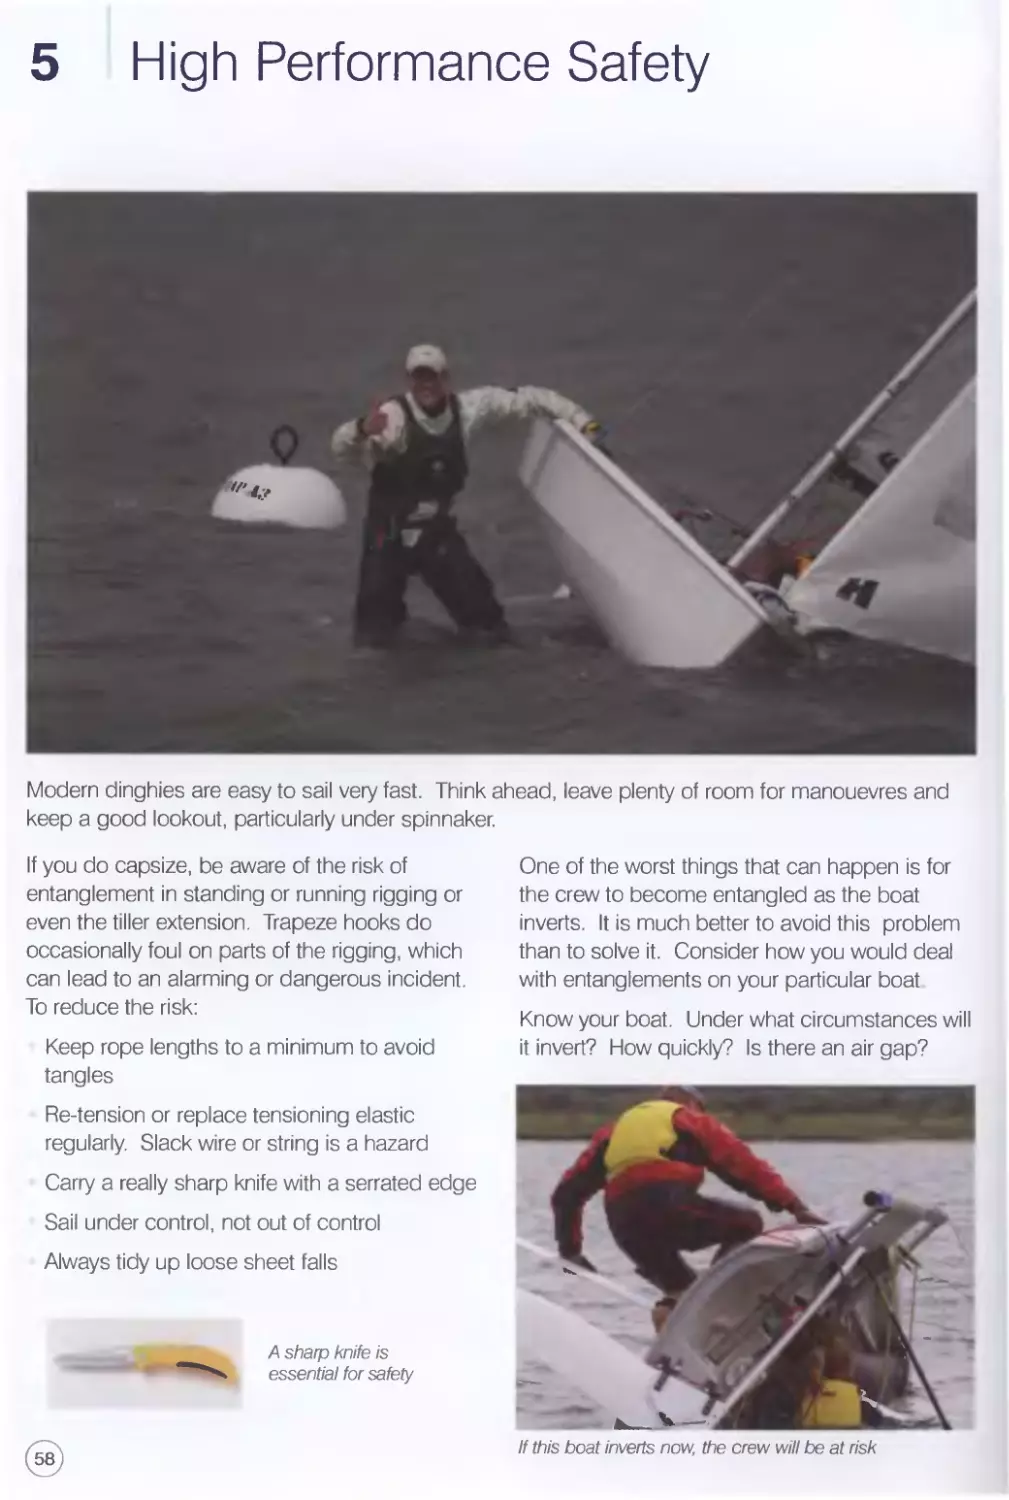
5 High Performance Safety
Modern dinghies are easy to sail very fast. Think ahead, leave plenty of room for manouevres and
keep a good lookout, particularly under spinnaker.
If you do capsize, be aware of the risk of
entanglement in standing or running rigging or
even the tiller extension. Trapeze hooks do
occasionally foul on parts of the rigging, which
can lead to an alarming or dangerous incident.
To reduce the risk:
Keep rope lengths to a minimum to avoid
tangles
Re-tension or replace tensioning elastic
regularly. Slack wire or string is a hazard
Carry a really sharp knife with a serrated edge
Sail under control, not out of control
Always tidy up loose sheet falls
Д sharp knife is
essential for safety
(S)
One of the worst things that can happen is for
the crew to become entangled as the boat
inverts. It is much better to avoid this problem
than to solve it. Consider how you would deal
with entanglements on your particular boat
Know your boat. Under what circumstances will
it invert? How quickly? Is there an air gap?
If this boat inverts now, the crew will be at risk
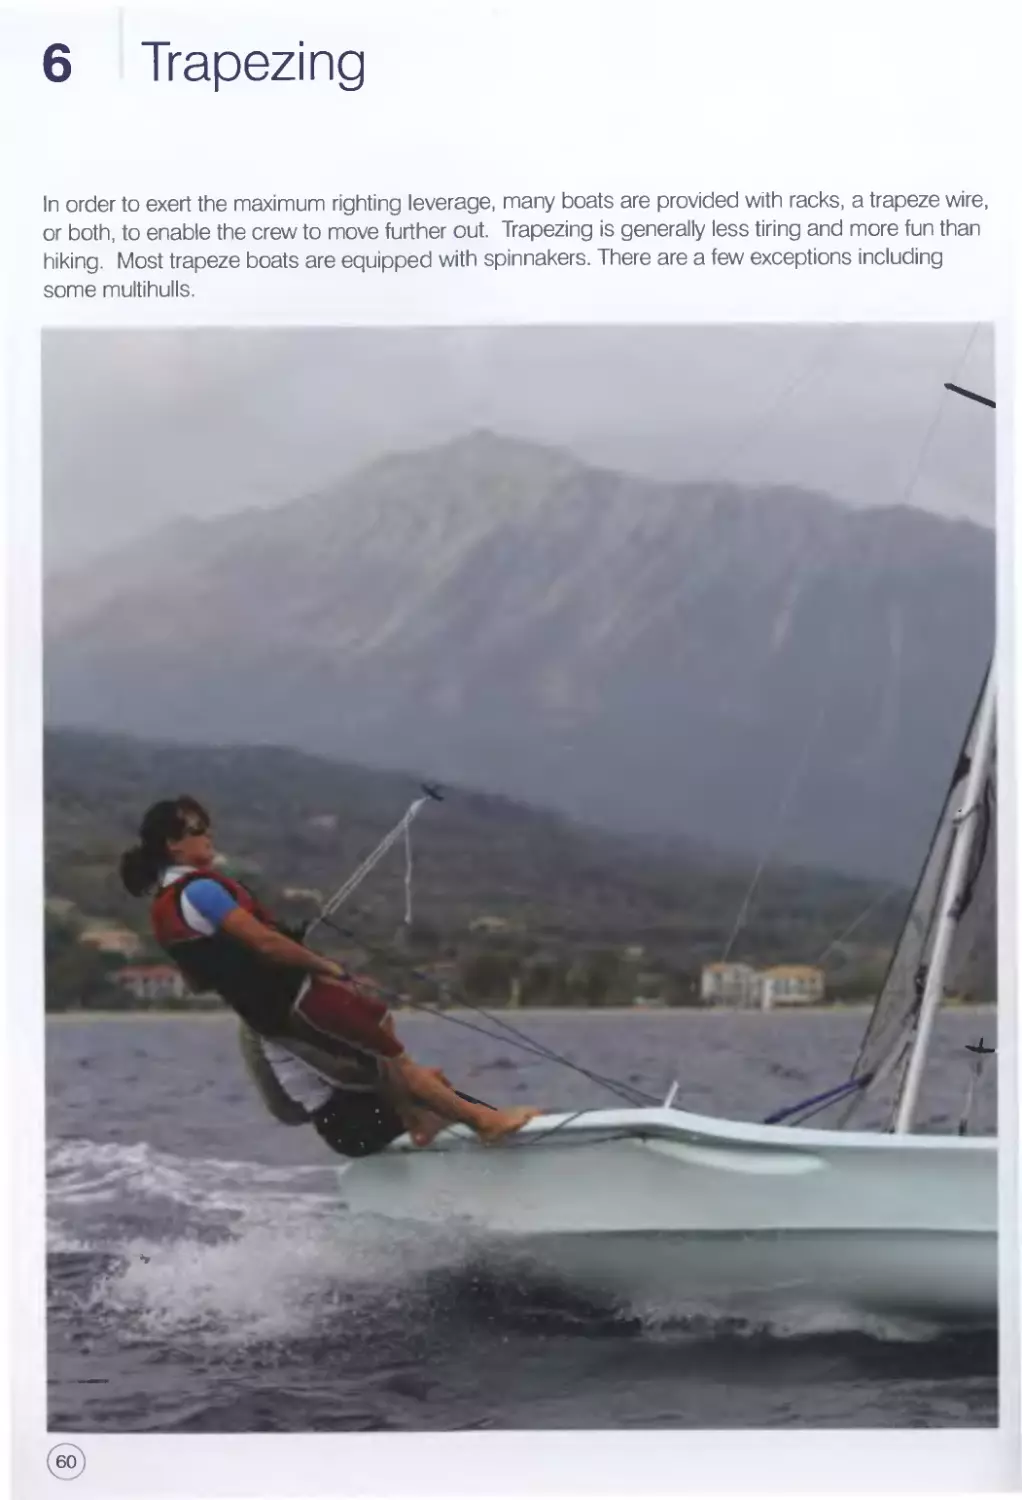
6 Trapezing
In order to exert the maximum righting leverage, many boats are provided with racks, a trapeze wire,
or both, to enable the crew to move further out. Trapezing is generally less tiring and more fun than
hiking. Most trapeze boats are equipped with spinnakers. There are a few exceptions including
some multihulls.
;e°i
Trapezing 6
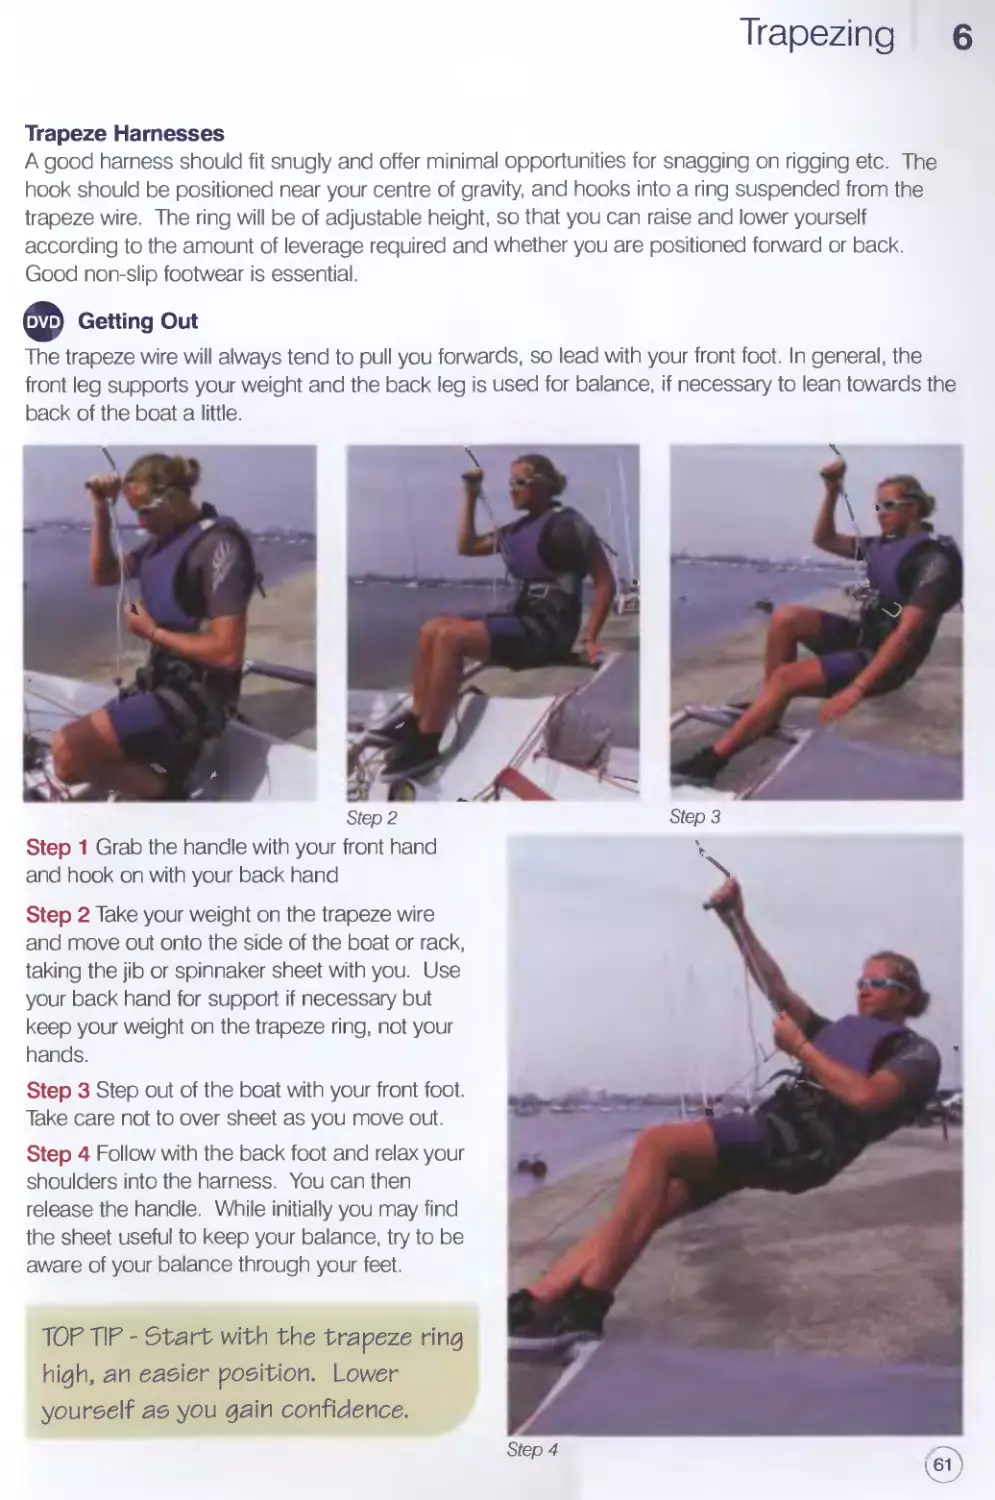
Trapeze Harnesses
A good harness should fit snugly and offer minimal opportunities for snagging on rigging etc. The
hook should be positioned near your centre of gravity, and hooks into a ring suspended from the
trapeze wire. The ring will be of adjustable height, so that you can raise and lower yourself
according to the amount of leverage required and whether you are positioned forward or back.
Good non-slip footwear is essential.
Getting Out
The trapeze wire will always tend to pull you forwards, so lead with your front foot. In general, the
front leg supports your weight and the back leg is used for balance, if necessary to lean towards the
back of the boat a little.
Step 1 Grab the handle with your front hand
and hook on with your back hand
Step 2 Take your weight on the trapeze wire
and move out onto the side of the boat or rack,
taking the jib or spinnaker sheet with you. Use
your back hand for support if necessary but
keep your weight on the trapeze ring, not your
hands.
Step 3 Step out of the boat with your front foot.
Take care not to over sheet as you move out.
Step 4 Follow with the back foot and relax your
shoulders into the harness. You can then
release the handle. While initially you may find
the sheet useful to keep your balance, try to be
aware of your balance through your feet.
TOP TIP - Start with the trapeze ring
high, an easier position. Lower
yourself as you gain confidence.
6 Trapezing
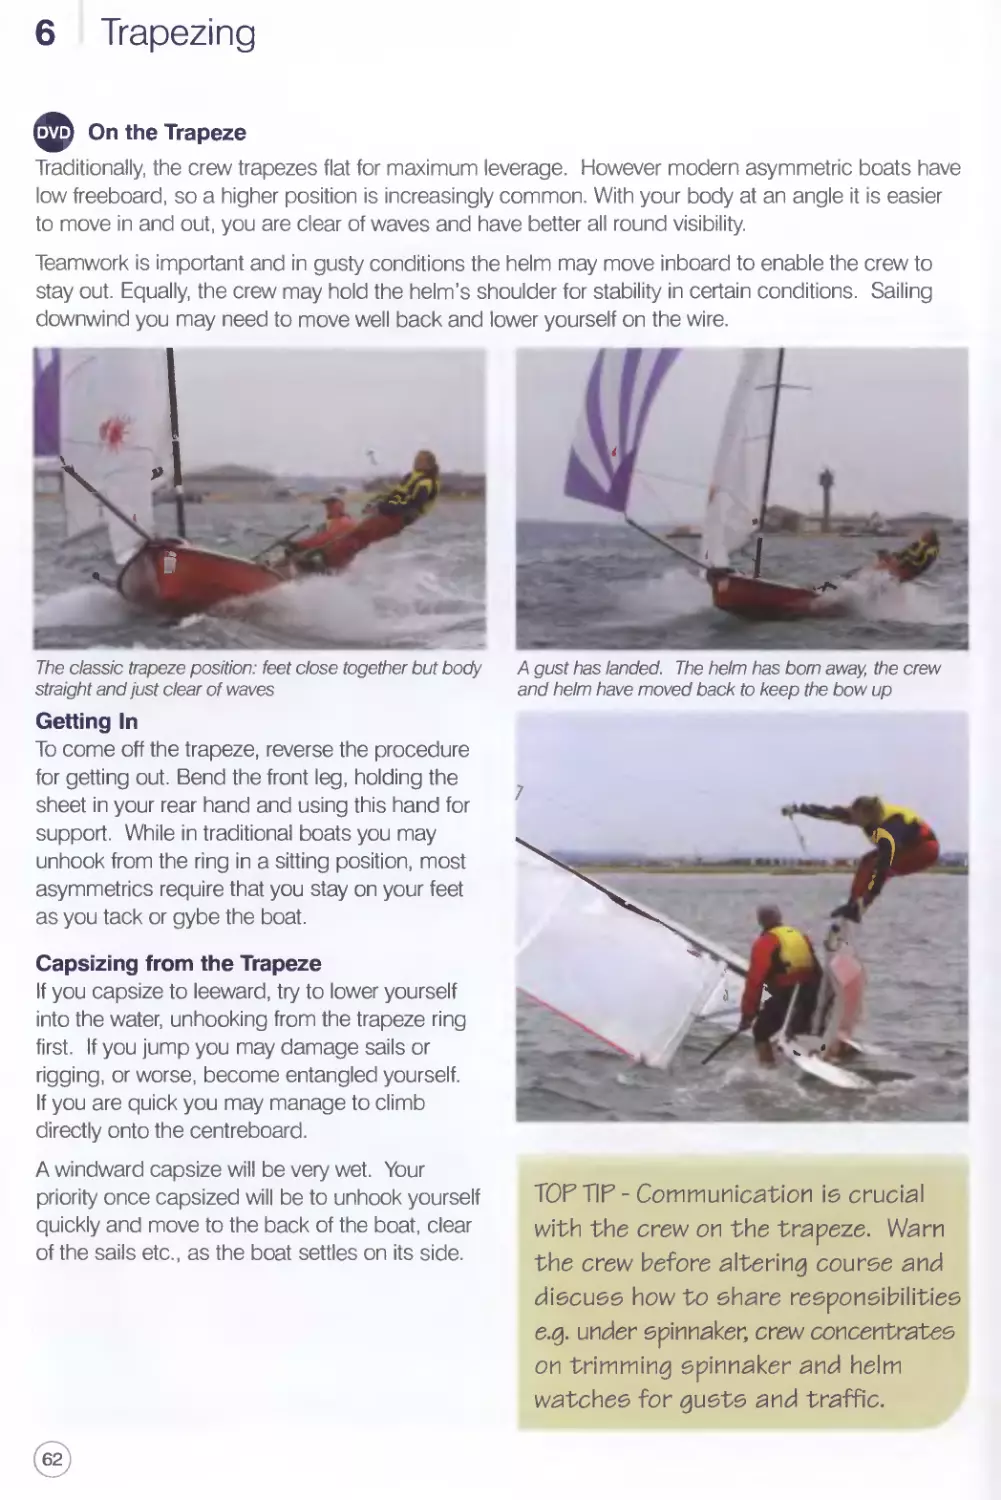
On the Trapeze
Traditionally, the crew trapezes flat for maximum leverage. However modern asymmetric boats have
low freeboard, so a higher position is increasingly common. With your body at an angle it is easier
to move in and out, you are clear of waves and have better all round visibility.
Teamwork is important and in gusty conditions the helm may move inboard to enable the crew to
stay out. Equally, the crew may hold the helm’s shoulder for stability in certain conditions. Sailing
downwind you may need to move well back and lower yourself on the wire.
The classic trapeze position: feet close together but body
straight and just clear of waves
Getting In
To come off the trapeze, reverse the procedure
for getting out. Bend the front leg, holding the
sheet in your rear hand and using this hand for
support. While in traditional boats you may
unhook from the ring in a sitting position, most
asymmetries require that you stay on your feet
as you tack or gybe the boat.
Capsizing from the Trapeze
If you capsize to leeward, try to lower yourself
into the water, unhooking from the trapeze ring
first. If you jump you may damage sails or
rigging, or worse, become entangled yourself.
If you are quick you may manage to climb
directly onto the centreboard.
A gust has landed. The helm has bom away, the crew
and helm have moved back to keep the bow up
A windward capsize will be very wet. Your
priority once capsized will be to unhook yourself
quickly and move to the back of the boat, clear
of the sails etc., as the boat settles on its side.
TOP TIP - Communication io crucial
with the crew on the trapeze. Warn
the crew before altering course and
discuss how to share responsibilities
e.g. under spinnaker, crew concentrates
on trimming spinnaker and helm
watches for gusts and traffic.
62
7 Start Racing
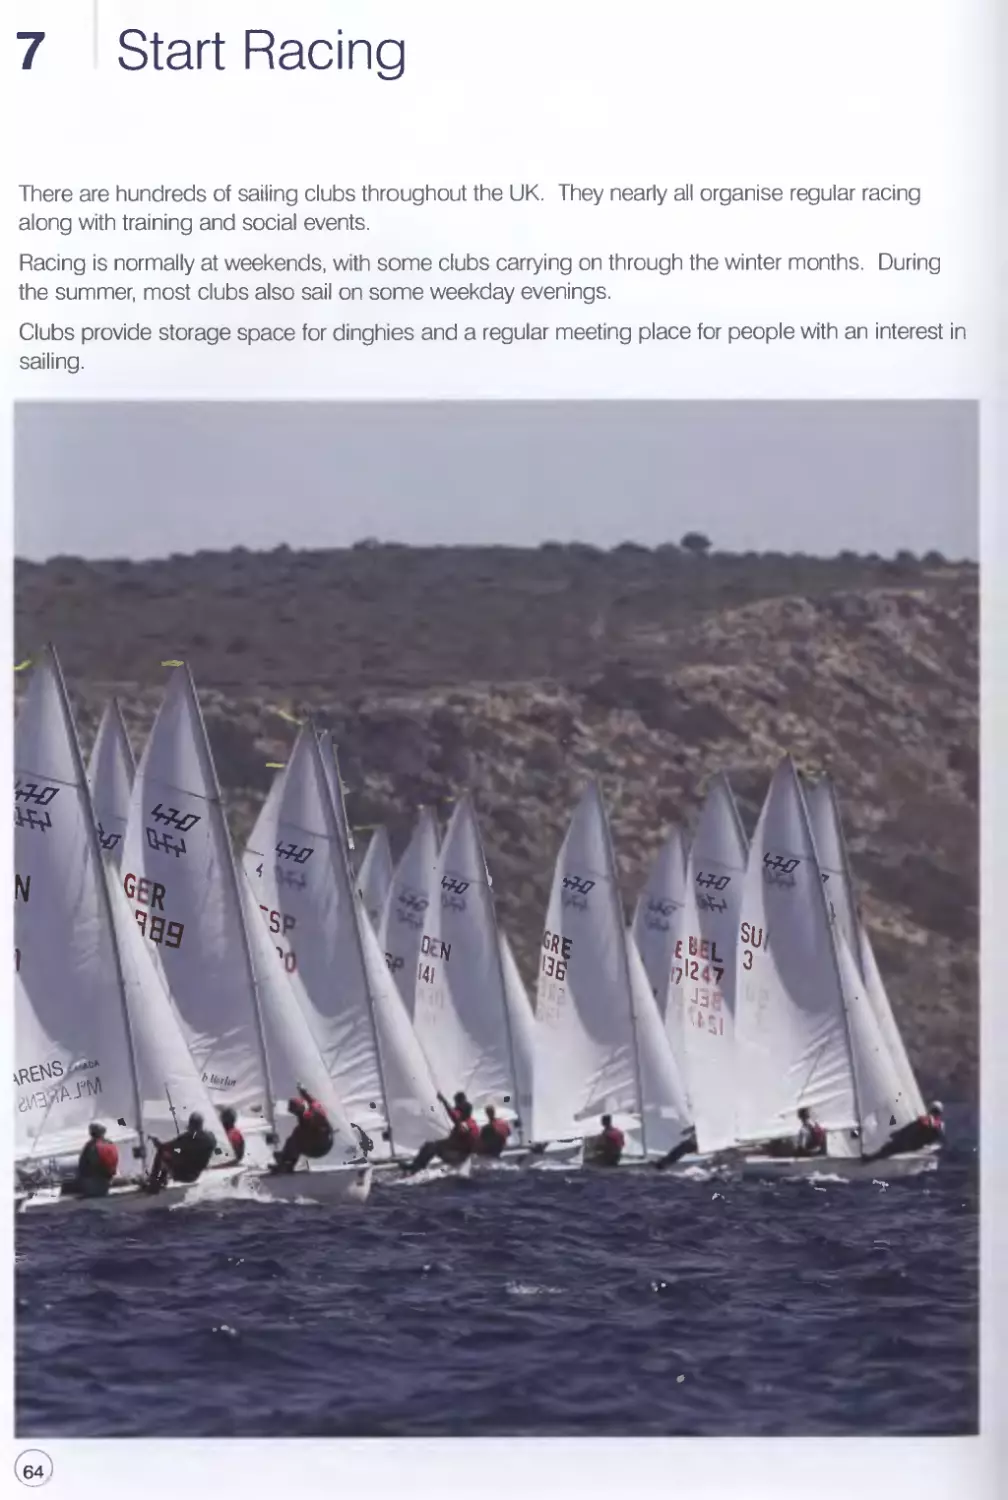
There are hundreds of sailing clubs throughout the UK. They nearly all organise regular racing
along with training and social events.
Racing is normally at weekends, with some clubs carrying on through the winter months. During
the summer, most clubs also sail on some weekday evenings.
Clubs provide storage space for dinghies and a regular meeting place for people with an interest in
sailing.
64
Start Racing 7
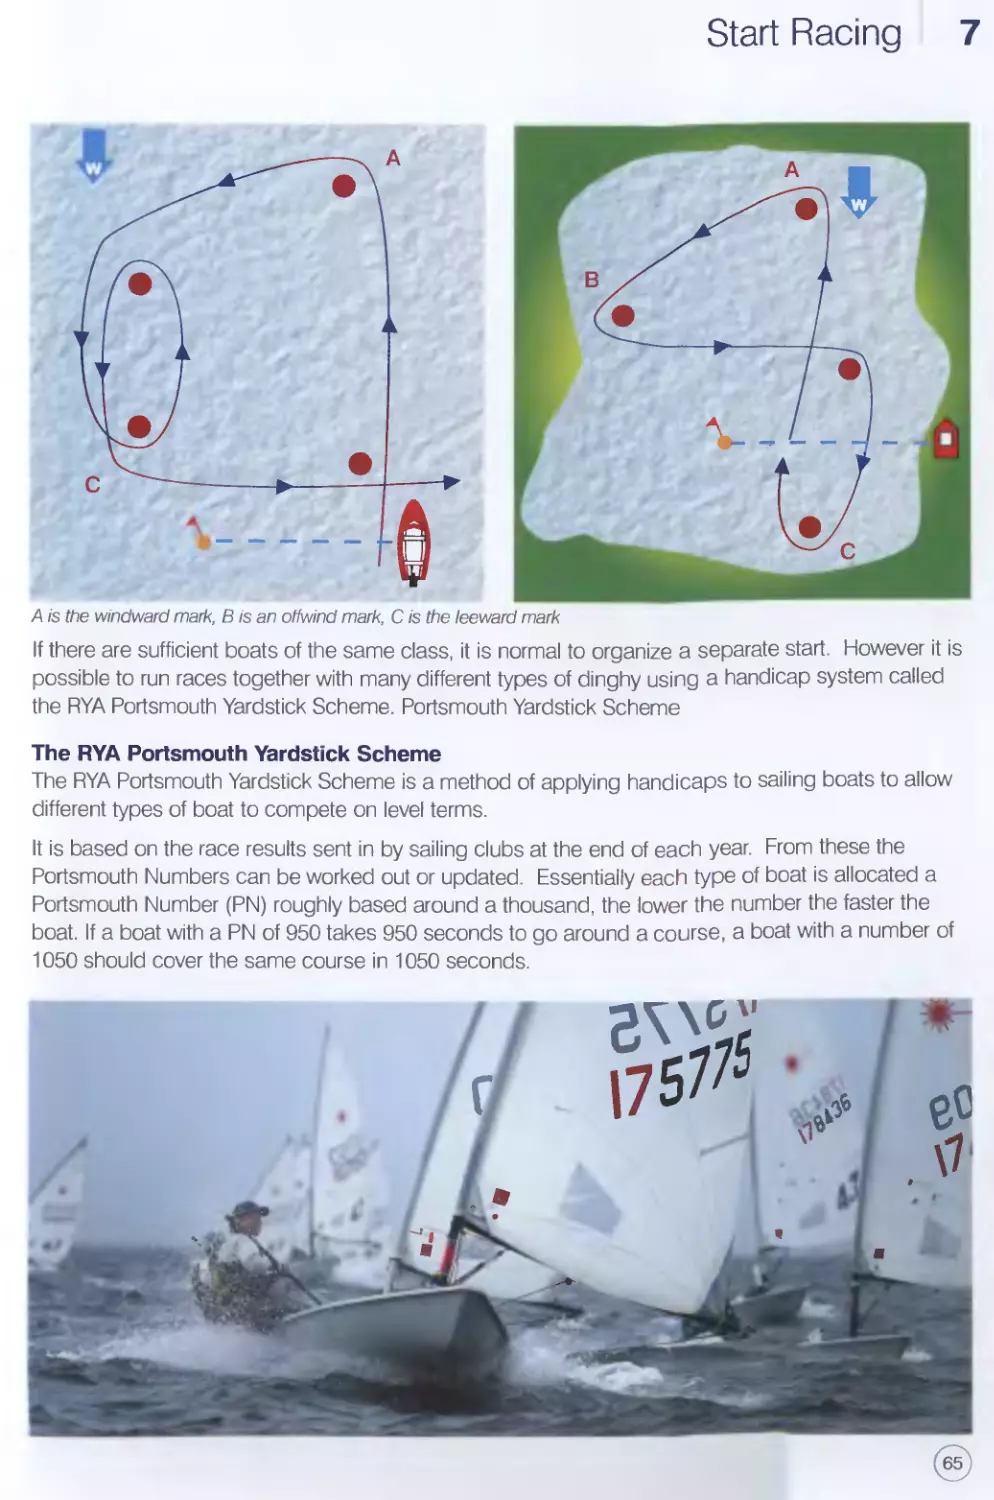
A /s the windward mark, В is an offwind mark, C is the leeward mark
If there are sufficient boats of the same class, it is normal to organize a separate start. However it is
possible to run races together with many different types of dinghy using a handicap system called
the RYA Portsmouth Yardstick Scheme. Portsmouth Yardstick Scheme
The RYA Portsmouth Yardstick Scheme
The RYA Portsmouth Yardstick Scheme is a method of applying handicaps to sailing boats to allow
different types of boat to compete on level terms.
It is based on the race results sent in by sailing clubs at the end of each year. From these the
Portsmouth Numbers can be worked out or updated. Essentially each type of boat is allocated a
Portsmouth Number (PN) roughly based around a thousand, the lower the number the faster the
boat. If a boat with a PN of 950 takes 950 seconds to go around a course, a boat with a number of
1050 should cover the same course in 1050 seconds.
7 Start Racing
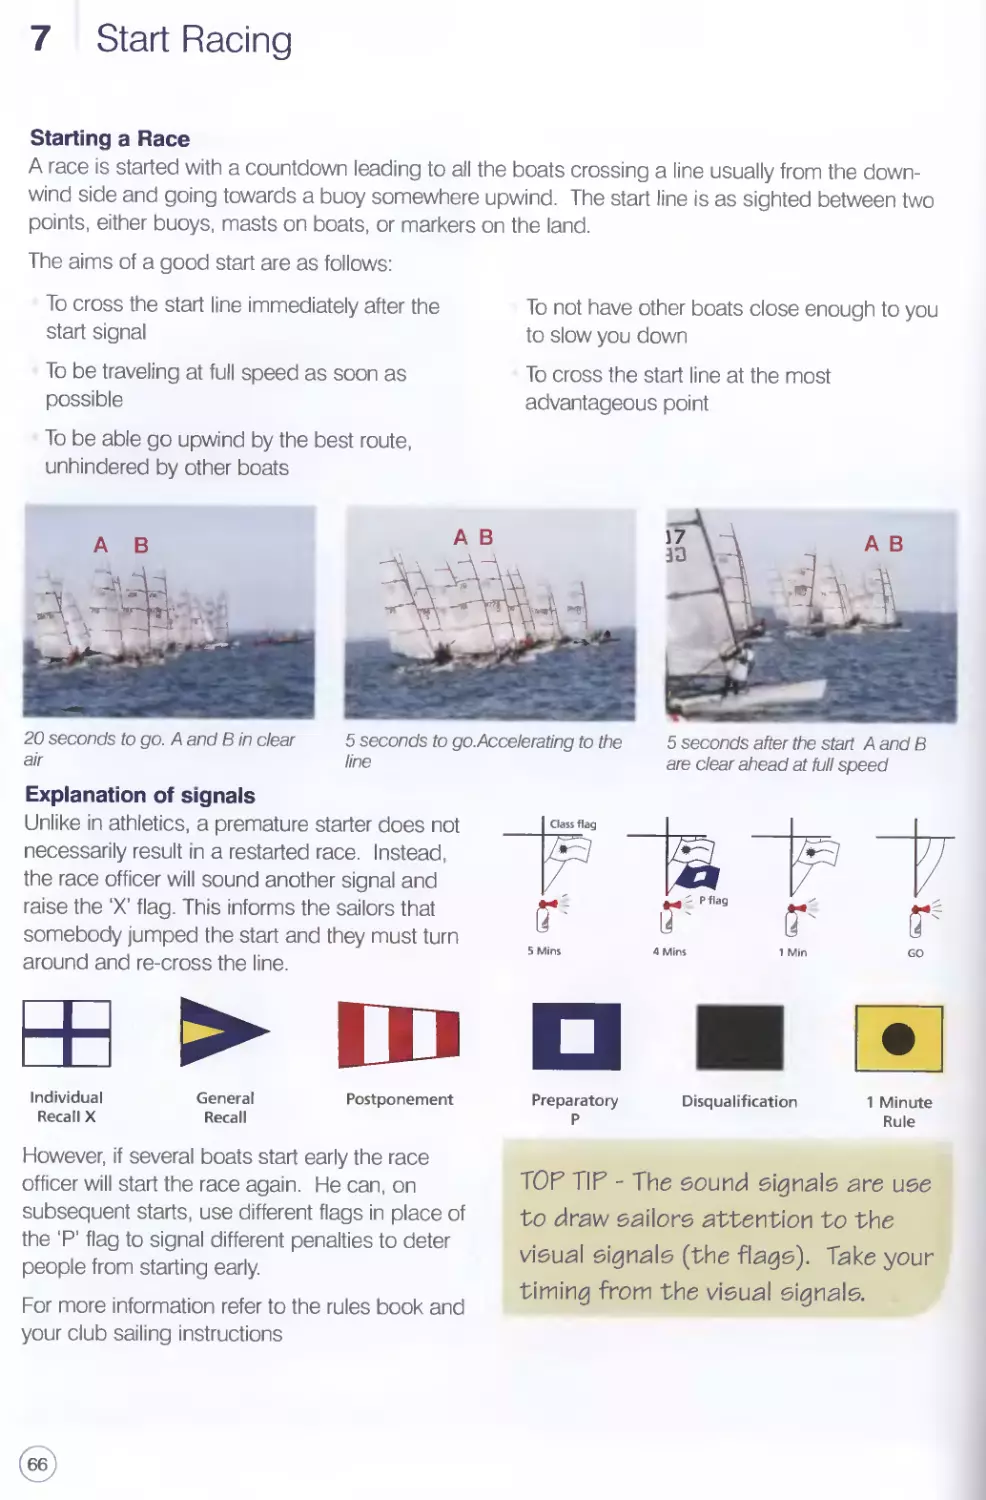
Starting a Race
A race is started with a countdown leading to all the boats crossing a line usually from the down-
wind side and going towards a buoy somewhere upwind. The start line is as sighted between two
points, either buoys, masts on boats, or markers on the land.
The aims of a good start are as follows
To cross the start line immediately after the
start signal
To be traveling at full speed as soon as
possible
To be able go upwind by the best route,
unhindered by other boats
To not have other boats close enough to you
to slow you down
To cross the start line at the most
advantageous point
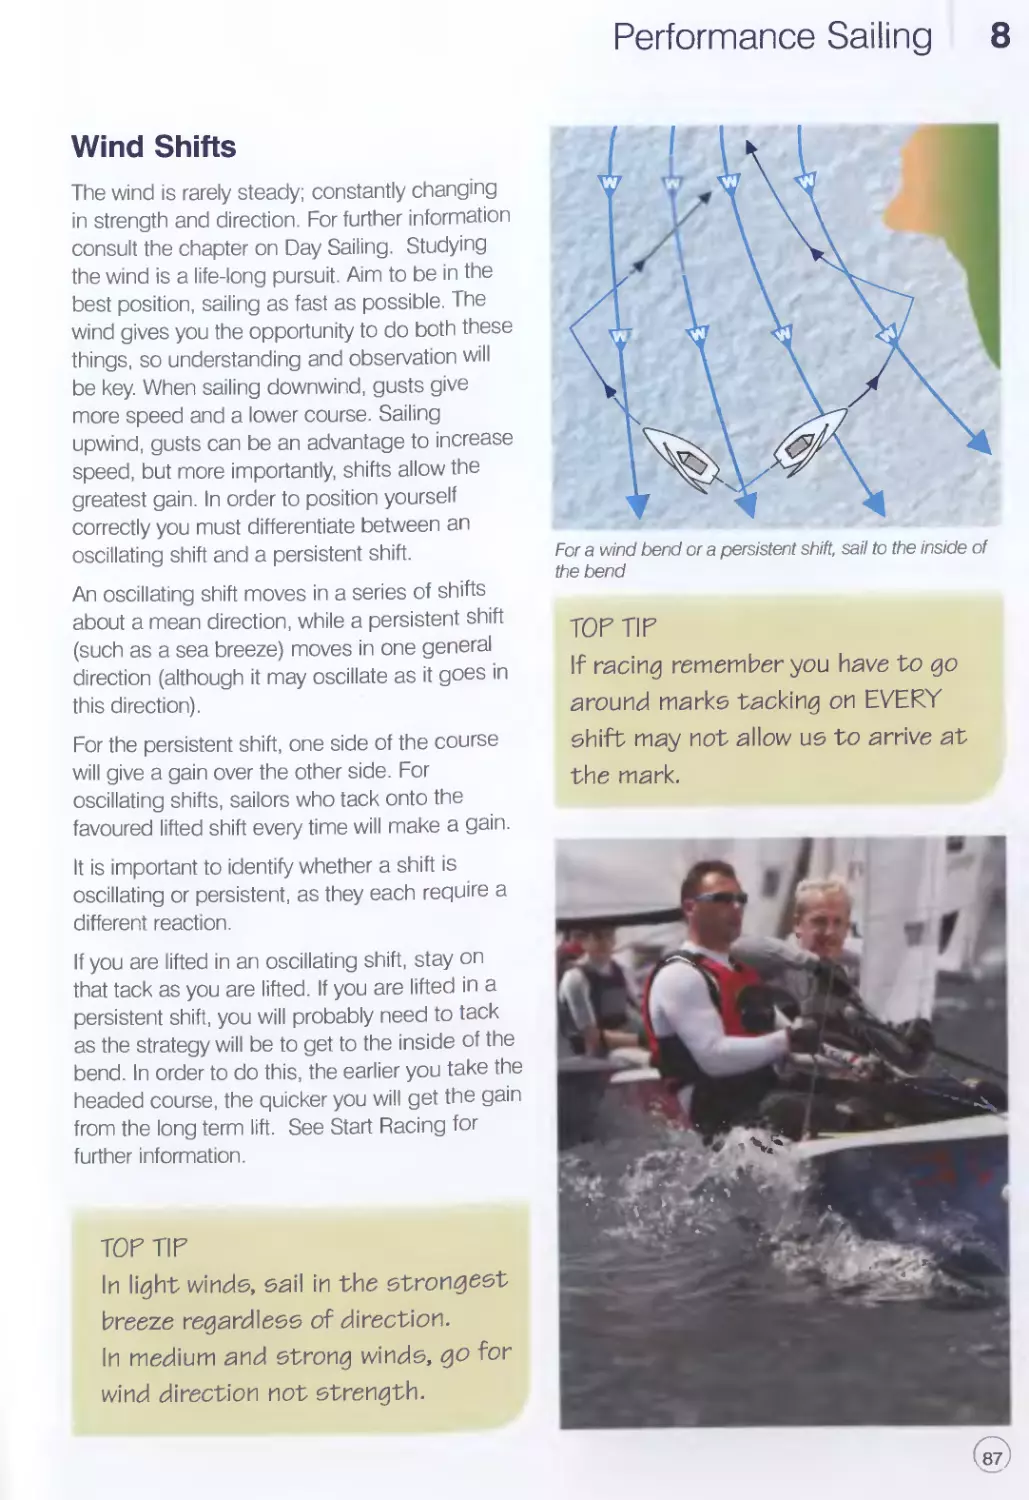
20 seconds to go. A and В in clear
air
5 seconds to go.Accelerating to the
line
5 seconds after the start A and В
are clear ahead at full speed
Explanation of signals
Unlike in athletics, a premature starter does not
necessarily result in a restarted race. Instead,
the race officer will sound another signal and
raise the 'X' flag. This informs the sailors that
somebody jumped the start and they must turn
around and re-cross the line.
Class flag
5 Mins
4 Mins
1 Min
Individual General
Recall X
Recall
Ill
□
Disqualification
1 Minute
Rule
Postponement
Preparatory
P
However, if several boats start early the race
officer will start the race again. He can, on
subsequent starts, use different flags in place of
the ‘P’ flag to signal different penalties to deter
people from starting early.
For more information refer to the rules book and
your club sailing instructions
TOP TIP - The sound signals are use
to draw sailors attention to the
visual signals (the flags). Take your
timing from the visual signals.
7 1 Start Racing
Where on the starting line?
Aim to start in clean air - as clear of other boats as possible.
One of the most important rules in sailing is the port/starboard rule. A boat on port tack must keep
clear of a boat on starboard tack. Because the start inevitably has lots of boats going up wind,
close to each other, it is generally easier to start on starboard tack.
A windward boat must keep clear of a leeward boat, В and C must keep clear of A on the line.
Square line
If the starting line is exactly at right angles to the
wind, there is no advantage in starting at one
end or the other. The distance to the windward
mark will be the same and A, В and C start
equally.
Room to accelerate
Get the boat going as fast as you can, as
quickly as you can. It takes several seconds to
accelerate a boat to full speed when going to
windward. Sail faster as you approach the line
by aiming 10 degrees or so off the wind,
provided that you have room to leeward. A
starts fastest.
Bias
If the start line is not quite at right angles to the
wind then one end of the starting line will be
further upwind than the other and therefore
nearer to the first buoy. The line is said to be
biased. Sail along the line in both directions,
with your mainsail right out. The end you can
sail away from more easily is the one to start
from. A leads B.
How do I know when I’m on the line?
It is very difficult to judge whether or not you are
on the imaginary line, so it is worth taking a
transit. Sail beyond the start line, sight along it
and find an object on shore that is on the line.
You can now tell if you are up to the start line
(or not) by sighting the end of the line with the
object beyond it. Be aware that quite a lot of
the boat protrudes in front of you. A reads the
transits and starts on time.
Start Racing I 7
Going Up The Beat
Making best use of the breeze
Because the wind rarely comes from a consistent direction for
very long, big advantages can be achieved by being on the tack
that takes you nearest to the windward mark. Changes in wind
direction tend to occur during gusts and lulls and keen eyed
sailors will see their effect on the water before they arrive. With
good communication between the helm and crew you can be
ready to tack if the wind heads you (takes you further away from
the windward buoy) or turn upwind a little if the wind lifts you
(takes you nearer the windward buoy). A notices the header and
tacks, then tacks again when the wind oscillates back. A is
ahead of B.
The boat should be sailed as fast as possible (see Performance
Sailing). Generally, the boat should be level (balanced) with the
sails in tight and the controls adjusted to suit the wind strength.
Which side of the beat?
You can make gains upwind
by traveling up the most
advantageous side of the
beat. As you tack going up
the beat you travel to the left
and the right hand side of a
straight line to the windward
buoy. Very often the wind or
the water flow on one side will
be more advantageous than
on the other.
A Sails in more wind than B. A leads
В is slowed by the strong tide A leads
Tacking for the mark
A lay line is the imaginary line that extends
down from the windward buoy depicting a
windward course to the buoy. Tack to get to the
windward buoy as soon as possible. C tacks
late and falls behind A and B.
TOP TIP - Extra effort in the first
<50 seconds after the start can put
you in clean air and allowyou to tack
without other boats in the way.
7 Start Racing
At the Windward Mark
Tactics
Approach on starboard tack if possible, to gain right of way over boats on port tack
Locate the next buoy before you get to the windward buoy, so you are ready to turn straighten to
the new course.
Ease the kicking strap before, and raise the centreboard after, you turn.
Don’t let the boat heel to leeward as you bear away around the buoy, this will make the boat want
to turn upwind.
Don’t hit the buoy with the end of your boom as you let the sail out.
Be aware of other boats around you.
2-boat length circle
Many rules refer to the 2-boat length circle, this
is simply an imaginary circle around the buoy
with a radius of 2 boat lengths.
2-boat lengths at windward mark
Most windward buoys are left to port, so it is
advantageous to approach the buoy on
starboard tack. Some boats will come towards
the buoy on port tack and have to tack before
going round the buoy. There is a rule that
restricts what these boats may do, to reduce
the risk of collisions.
No boat approaching on port and tacking inside
the two boat length circle may cause a boat on
starboard to have to luff (turn upwind) beyond a
close hauled course. Any boat doing so must
take a penalty.
If there are lots of boats on starboard tack coming towards the buoy it is safer for a port tack boat to
tack outside the 2-boat length circle.
В forces A to luff above close
hauled, and must take a penalty
В should go behind A or slow her
approach to arrive after A
В may tack inside A, because
A only has to luff to close hauled
to avoid her
Start Racing 7
Reaching and Running
While you may steer straight between the off wind marks, try to stay in the strongest wind by sailing
low in the gusts and high in lighter breeze
Running
When running straight downwind, be aware of
boats behind you. Because the wind reaches
them first, it is disturbed and slower by the time
it reaches you, resulting in the boats behind
catching you up. It is better to sail to one side
or the other of boats behind you.
At an off wind mark
2-boat lengths at an off wind mark
When arriving at an offwind buoy, close to
another boat, the racing rules dictate whether
you are entitled to pass between the other boat
and the buoy.
When the first boat enters the 2-boat length
circle, the inner boat is only entitled to room if
there is an overlap. If so, the outer boat must
allow sufficient room for the inner boat to pass,
allowing for a gybe if necessary. If there is no
overlap, at the moment the first boat enters the
circle, the inner boat must go round the buoy
behind the outer boat.
Luffing Rights
You may wish to stop a boat overtaking to
windward. To do this you may luff above your
course to the next buoy, but the overtaking boat
must have time to respond. You may not luff
beyond head to wind. The overtaking boat must
keep clear to windward of you unless it gets
clear ahead. If it does you must immediately
return to your original course.
Don’t luff unless you’re sure it’s worth the lost
time - this tactic often costs places in the race.
TOP TIP - To decide if you are in another
boat’s dirty wind, look to see if their
burgee is pointing at you. If it is then
you are probably being slowed down.
TOP TIP - A little water in the boat
can slow it significantly. If the crew
is not hiking or trapezing, the reach
or run can be a good time to empty
the boat.
7 Start Racing
Leeward Buoy, Last Beat And Finish
Wide in, tight out
When passing the leeward buoy sail as close to it as possible as you start the beat. You should
only turn as fast as you can sheet in Go in quite wide. A wide approach will enable you to sail very
close to the mark as you leave To help the boat luff up, a small amount of leeward heel is useful.
A overtakes B.
Last beat, consolidate and cover
By the time you reach the last beat, the boats
will probably be quite spread out.
The priority is to consolidate your position by
not letting any boats past you. To reduce the
chance of this happening, stay between the
boats behind you and the finish line to ensure
they don’t receive any beneficial wind changes
that you miss.
If there is a boat quite near, try to stay directly
upwind of it so it is in your dirty wind. A covers В
TOP TIP - As you arrive at the
leeward buoy, work out if there is
any flow of water with you or against
you. If it is against you, leave the
boat set up for going downwind,
including the spinnaker, until the
last possible moment. If it is with
you, drop early and set up for the
beat to windward before rounding.
Finish line
One end of the finish line may be to leeward of
the other. Try and judge this and go for the end
that is nearest to you - the downwind end.
If you go beyond the lay line for the finish and
there are other boats around you, you are
allowed to hail for room to cross the finish line.
A is given room despite being windward boat.
Start Racing 7
Why Do We Need The Rules?
The rules allow fair racing and should prevent collisions.
The majority of situations are covered by just a few rules. It is not necessary to understand them all
when you start racing, a better understanding will
and obligations to others.
Penalties
Having broken a rule you can exonerate
yourself by doing a penalty turn at the first
opportunity.
A penalty turn will normally be one turn or two
turns as defined by the rules. A one turn
penalty is a tack and a gybe in the same
continuous direction. A two turn penalty is 2
tacks and 2 gybes taken continuously in the
same direction. Find out what penalties are in
place before you race.
Protests
If somebody breaks a rule but does not do their
penalty turns then you may protest. Inform the
other boat that you intend to protest by calling
“Protest”. If they still do not take a penalty you
should inform the race officer of your protest at
the end of the race and complete a protest
form. In order to help in the resolution of rules
disputes in a more immediate, accessible and
appropriate way, the RYA Racing Charter
encourages the use of Advisory Hearings (no
penalty) or RYA Arbitration(reduced penalty) as
an alternative to a formal protest hearing where
possible disqualification may be the outcome.
Choosing a Boat
When you start racing consider what is the right
boat for you. You should consider:
How big you are
What sort of water you will be sailing on
What dinghies are already sailed there
How experienced you are
How difficult is the dinghy to sail
come with experience. Be aware of your rights
When Boats Meet
When boats are on opposite tacks, a port-tack
boat shall keep clear of a starboard-tack boat
When boats are on the same tack and
overlapped, a windward boat shall keep clear of
a leeward boat
When boats are on the same tack and not
overlapped, a boat clear astern shall keep clear
of a boat clear ahead.
ф Boat Preparation For Racing
You do not need a brand new boat and sails to
do well but some simple preparation will help:
Make sure your boat is clean and has no big
scatches or dents
Check that all the controls work
Ensure the mast is in the same place, and at
the same angle, as the fast boats in your class
- check the tuning guide on the class website
Make sure the dinghy is as light as possible
(most classes have a minimum weight)
Insurance, Certificates,
Memberships
Before you start racing you will need third party
insurance cover for your dinghy.
Many classes require a Measurement Certificate,
this means that the boat has been measured,
weighed and possibly buoyancy tested to
conform with class rules.
It is also a good idea to join your class
association. They are a good source of
information and organise class events and
training days. The class website is an excellent
place to start.
73
7 Start Racing
29 er \
siawenA lisitf.
сгпяаэ
GBR 1153
er
____к Start Racing
5Я0Э
GBR5
asc Я8
GBR32
8 Performance Sailing
This chapter is about understanding the forces on the boat: how to use them in light winds and
neutralise them in strong winds.
76
Performance Sailing 8
In order to understand the forces on a boat,
practise experimenting with them. Start by
immobilising the rudder, by very loosely
securing it to the centreline of the boat with a
strong piece of elastic. This will allow you to
regain control again quickly if necessary. Try this
in light winds to start with, on a quiet safe piece
of water, in a dinghy with a jib (with or without a
crew).
Firstly, it is important to understand how the
boat behaves if it is heeled towards the wind or
away from the wind.
Secondly, learn what happens if you sheet in
the jib and ease the mainsail and vice versa.
By heeling the boat to leeward and/or sheeting
in the mainsail you can turn the boat into the
wind. Similarly, by heeling the boat on top of
yourself and/or sheeting in the jib you can make
the boat bear away.
As a short exercise, see if you can sail your
boat on a beam reach by using these forces.
Change one variable at a time initially.
The same rules apply to catamarans but the
response is slower because there are two hulls
and rudders. The effect of sail control on the
boat is therefore less direct.
Once you have mastered sailing on a beam
reach, try sailing around a triangular course
using all the points of sailing.
To luff, ease jib sheet and heel to leeward
To bear away, ease main sheet and heel to windward
TOP TIP - When sailing without using
the rudder, raise the centreboard one
third. This reduces the heeling and
turning forces by raising the centre
of lateral resistance and moving it
back.
77
8 Performance Sailing
ф Sailing Upwind
Tell tales
The sails are sheeted in when sailing upwind.
There are two basic ways to understand your
performance. There is mechanical feedback
from items such as tell tales, compass, burgees,
and the front of the sail. There is also a more
intuitive response, where you sense the ‘feel’ of
the boat. The best option is to combine the two.
When sailing upwind, there are a number of
variables:
wind direction
balance (your ability to hike or trapeze)
steering a course
sail setting (which will be fairly static)
centreboard, which will be fully down
trim (which will be forward to stop transom drag)
created apparent wind due to speed
(catamarans)
With perfect jib set-up, windward tell tales stream slightly
upwards
TOP TIP - Never focus on the leeward
tell tales when sailing to windward,
as you will be many degrees off the
wind before it moves.
When learning, the tell tales are very important to give you feedback on steering. Keep looking to
see how high you are pointing by luffing the boat slightly and checking the tell tales. At the perfect
angle to the wind, the windward tell tales will stream slightly upwards.
Intuition
In certain conditions, ie wet tell-tales sticking to
the sail, feedback may be poor or non-existent,
so try to develop an intuitive feel:
Sail with your eyes shut for short periods
Look out for gusts, for example indicated by
dark patches on water
Play with the sail controls and get feedback
from your crew on how your steering is affected
Once you are fully hiked (and balanced), only
steering and sail-setting will vary. If the jib is in
its correct beating position for the wind strength,
the only variables will be the steering and the
mainsheet. The helm must concentrate fully on
steering whilst the crew looks for gusts,
windshifts and traffic. (See page 31 in Sailing
with Spinnakers on holding the tiller extension
and steering).
If you wander away from the wind, the sails will
generate MORE power than if fully close hauled.
This will result in having to ease the mainsheet
to lose power. If instead you concentrate on
pointing as close to the wind as possible (tell
tales) you will be able to handle the power
without playing the mainsheet as much.
GOLDE RULE - Specific set-up varies
from class to class, so consult your
class association. It does make a
massive difference. Mast rake is
used as the primary means of
powering up or de-powering most
dinghy and catamaran rigs.
Performance Sailing 8
Sailing Downwind - Reaching and Running
When using tell tales on the jib reaching downwind, sheet the sail until the windward tell tale
collapses. Now ease until the leeward tell tale collapses. This will give you an idea of the sheeting
‘band’, within which you need to operate. Note that the upper tell tales will collapse first. As on a
reach, exert a downward pressure on the sheet to control the leech. The jib cars can therefore be
moved forward or out.
When running exactly downwind without a
spinnaker, it normally pays to sheet the jib on
the opposite side to the mainsail. This prevents
it being blanketed by the mainsail and is known
as goose-winging. Tell tales are not particularly
helpful whilst running.
ф Rig Controls
The sheet varies the angle of the sail to the
wind. In light winds, it tensions the jib leech
according to the jib car position on the track.
The kicker maintains mainsail twist, bends the
mast and tensions the leech. Excessive
amounts of kicker flattens the sail.
The Cunningham compresses the mast
moves power forward in the mainsail and
opens (eases) the leech.
The outhaul flattens the lower part of the
mainsail.
TOP TIP - If in doubt always check
the wind position by steering INTO
the wind.
Correct set-up for medium winds
with little twist.
Open leech due to insufficient kicker
tension.
Hooked leech due to excessive
kicker tension.
On catamarans, the mainsail downhaul replaces the Cunningham.
Mainsail shape, mast bend and
rotation, and leech tension are all controlled by mainsheet tension and traveller position
79
8 Performance Sailing
ф Speed and Boat Handling
Light Winds
If you are sailing a two person boat, the light
wind band varies from drifting conditions where
the crew sits to leeward, through to the crew
being on the windward side, but not hiking. In
this wind band, which will vary according to
your boat, concentrate on low drag, twisted
sails and smooth movement with an emphasis
on trim.
To check the trim, simply look at the transom
drag, if it looks turbulent move forward. This is
particularly important in the new designs with
very flat rocker.
Balance the boat with a small amount of
leeward heel. This gives the rudder ‘feel’, the
boat tries to turn into the wind and will help the
sails to set better. Do not overdo this - too
much rudder to correct this weather helm will
cause turbulence and slow the boat down.
The rudder will then act as a brake trying to
resist the turning moment. You may have more
control holding the tiller pan-handle style.
1 Boat heeled to leeward (balance)
2 Weight right forward (trim), transom clear of
water
3 Centre board down
4 Mast upright for maximum power
5 Kicker slack, sail twisted to set for stronger
breeze higher up
6 No Cunningham - creases left in sail
7 Outhaul tight
8 Sail flat to increase air flow
9 Leech tell tales streaming
10 Windward jib tell tales just lifting with jib cars
back
TOP TIP - Sheet in to point higher.
If over-sheeted, the sail stalls,
resulting in poor pointing and speed.
IF IN DOUBT EASE THE SHEET.
Performance Sailing 8
Roll tacks
In light winds, try to take advantage of gusts
and wind shifts. You may find yourself tacking
more often, which slows the boat, so use roll
tacks. In roll tacking, the crew weight and the
forces on the boat are used to your advantage,
resulting in more efficient performance. The
rudder resistance is reduced as the rudder is
being used less to turn the boat. Roll tacks
reduce the drag and deceleration caused as the
boat turns upright and the sails flap, generating
air resistance.
By rolling the boat with your body weight, the
sails are fanned through the air, keeping them
filled for longer and dragging less. In this way
the air flow is re-attached to the sail quicker
after the tack.
V.Crew goes back to leeward
NX \ side to maintain balance
Pull on mainsail.
, Crew helps helm pull boat upright.
Airflow attaches and boat accelerates.
Boat ready to sail on new tack.
Mainsail out.
Crew to leeward.
Small amount of heel.
Discuss tack.
Boat head to wind, crew joir
Rig and hull turn onto new 1
Boat heeled into turn.
Use mainsheet tension, rudder
and heel to turn boat
Step 1 Check the area is clear. Gently steer the boat up head to
wind, by allowing the forces created by the leeward heel
and some tiller angle, to turn the boat. The crew joins
the helm on the windward side to flick the mast and sails
past head-to-wind.
Step 2 As the sails collapse, cross the boat, sheet the jib across
and ease the main. The forces on the rig help swing the
bow away from the wind and onto the new close hauled
course.
Step 3 The boat is pointing in the correct direction but will have
excess leeward heel.
Step 4 The helm and possibly the crew now move smoothly to
windward while pulling in the sails, thus accelerating
the boat back to its entry speed (in racing, more than
its entry speed is illegal). The crew may now need to
return to their leeward position.
The effectiveness of roll tacking will vary from boat to boat. The
Enterprise is a near perfect roll tacking design. Roll tacking is not
quite so effective with catamarans but by moving crew weight to
the windward quarter (the back corner) and spinning the boat on
the inside hull as you enter the no-go zone, the boat will turn
more quickly.
TOP TIP - If your tacks are too flat, delay the
crew joining the helm by a second. You will only
generate maximum roll past head to wind.
f81
Step 4
8 Performance Sailing
цф Roll gybes
The same forces can be used to gybe the boat, with windward heel initiating the turn. Do not force
the mainsail over, more assist it in its natural progress as again, the forces on the boat and sails will
be neutral. Smooth movement is the key. This manoeuvre can be used on dinghies, single-handers
or with spinnakers.
Roll tacks and gybes can be used as the wind strength increases until you think that the forces are
becoming too great to control. For example, you may have problems pulling the boat up again,
having rolled the boat into the tack or gybe, so reduce the heel until you are tacking or gybing
perfectly flat in strong winds.
Step 1
Step 1 Preparation: check the area is clear and
the boom is clear of the shroud.
Step 2 Roll the boat to windward to assist
bearing away, mainsheet hand grasping
the falls directly off the boom.
Step 3 Gybe the main positively as the leech
starts to lift. Centralise the tiller if
necessary and cross the boat smartly to
balance.
Step 4 Balance the boat, sheet sails correctly
and keep a good look out.
TOP TIP
Footwork is crucial when tacking or
gybing. Move your feet across the
boat only when you yourself have to
move асгобб. Premature or defensive
footwork causes capsizes.
Many people gybe quite crudely by simply
standing up and pulling the tiller to windward,
crossing the boat and centralising the tiller as
the sail comes over. Skiff-style boats are better
handled by continuously adjusting the tiller as
the boat turns, only making a large tiller
adjustment if balance becomes a problem
Step 4
Performance Sailing 8
Light To Medium Winds
This wind band starts with the crew sitting on
the windward side but not hiking and ends with
the crew fully hiked with the rig at maximum
power.
In this wind band we are searching for power to
get the crew hiking or on the trapeze. Again, do
not use the kicking strap as this bends the mast
and de-powers the sails. Likewise, do not use
the Cunningham to remove creases in the sail,
as this will again bend the mast through
compression and ease the upper leech,
resulting in less pointing. Simply use the main
and jib sheet to control the leech tension and
hence pointing. Just as in light winds, if the boat
feels stalled and seems to be slow, try easing
the sheet. Jib cars will start to ease forward
from the very light winds to exert more tension
on the leech of the jib.
As in very light winds, the centreboard will be
adjusted for the point of sail and balance will be
very important. Trim may be less important, but
still check the transom for drag.
1 Boat level (balance), crew fully hiked
2 Weight forward (trim)
3 Centre board down
4 Mast straight for maximum power, rake
basically upright - see class tuning guide
5 Take slack out of kicker but do not tension.
Small amount of mainsail twist
6 No Cunningham - creases left in sail
7 Outhaul eased for maximurn power
8 Sail full for maximum power
9 In general, leech tell tales just streaming
10 Windward jib tell tales just lifting with jib cars
forward a little
8 Performance Sailing
Strong Winds
The sails develop excessive power but once you have already exerted your maximum balance by
hiking or trapezing fully, it is necessary to de-power. The trick is to sail the boat flat, easing the sails
in the gusts and sheeting in for the lulls. Tension the kicker to control the leech twist as you play the
mainsheet. This is because if the boom rises as you ease the mainsheet, the sail will develop more
power which will heel the boat further. Jib sheet cars can move aft again, reducing the tension on
the leech, increasing the tension on the foot and aiding twist and de-powering of the jib. The
Cunningham can finally be used, as it will compress and bend the mast, flatten the sail and twist
open the leech in the upper part of the sail.
Upwind, balance combined with speed will be a
key factor. If the boat slows then the forces
(heel) will build very quickly and the boat will
simply fall over while going very slowly. Keep
easing sails to maintain some speed through
the water, even if this hinders pointing. In
moderate gusts you can get away with just
easing the mainsail, but in the bigger gusts
ease the jib sheet otherwise the jib slot will
choke as you are playing so much mainsheet.
Raise the centreboard to reduce
the forces below the boat (lateral
resistance). This also raises them
closer to the rig, reducing heeling.
Once sailing downwind, the forces will be handled by steering; the lower you sail, the less the
heeling force on the boat. Trim well back to counteract the forward forces on the rig.
On catamarans, try to flatten the sail. Increase downhaul and mainsheet tension and play the
traveller. Open the jib slot by moving the jib cars back or out.
1 Boat balanced, crew fully hiked
2 Weight forward but adjusted to allow bow to
rise in waves (trim)
3 Centre board partly raised to ease heeling
4 Mast raked back to reduce power
5 Full kicker tension to bend mast and flatten
sail
6 Full Cunningham to flatten sail, twisting top
half open and bringing power forward in
mainsail
7 Outhaul tight to depower (less tight in
waves)
8 Sail flat to reduce power
9 Leech tell tales streaming
10 Luff tell tales just streaming with jib cars
further back
Class Set-Up
Specific set-up makes a big difference and varies from class to class, so consult your class
association. Rake is used as a primary means of powering up or de-powering most rigs.
Performance Sailing 8
Wind Shifts
The wind is rarely steady; constantly changing
in strength and direction. For further information
consult the chapter on Day Sailing. Studying
the wind is a life-long pursuit. Aim to be in the
best position, sailing as fast as possible. The
wind gives you the opportunity to do both these
things, so understanding and observation will
be key. When sailing downwind, gusts give
more speed and a lower course. Sailing
upwind, gusts can be an advantage to increase
speed, but more importantly, shifts allow the
greatest gain. In order to position yourself
correctly you must differentiate between an
oscillating shift and a persistent shift.
An oscillating shift moves in a series of shifts
about a mean direction, while a persistent shift
(such as a sea breeze) moves in one general
direction (although it may oscillate as it goes in
this direction).
For the persistent shift, one side of the course
will give a gain over the other side. For
oscillating shifts, sailors who tack onto the
favoured lifted shift every time will make a gain.
It is important to identify whether a shift is
oscillating or persistent, as they each require a
different reaction.
If you are lifted in an oscillating shift, stay on
that tack as you are lifted. If you are lifted in a
persistent shift, you will probably need to tack
as the strategy will be to get to the inside of the
bend. In order to do this, the earlier you take the
headed course, the quicker you will get the gain
from the long term lift. See Start Racing for
further information.
TOP TIP
Ih light winds, sail in the strongest
breeze regardless of direction.
In medium and strong winds, go for
wind direction not strength.
For a wind bend or a persistent shift, sail to the inside of
the bend
TOP TIP
If racing remember you have to go
around marks tacking on EVERY
shift may not allow us to arrive at
the mark.
8 Performance Sailing
Tides
As dinghies sail relatively slowly, tide can be a
key factor and make a crucial difference to your
performance. See page 23 in Day Sailing for
more details. Your strategy will depend upon the
strength of the tidal flow.
Look out for headlands, shorelines and the
opportunity to escape, or use, tidal flow to your
advantage. Study tide tables and a tidal stream
atlas before departure to see how much impact
it will have on your sailing in the predicted wind.
Waves
Tide flows around headland
Particularly if sailing on the sea or large inland water, you will rarely have flat water To use the
waves, use body movement (balance), steering and trim to harness or cancel the extra force of
waves.
When the boat is lifted by a wave, it is exposed to stronger, cleaner breeze and is likely to heel
Sailing upwind, you will generally need to de-power the boat as you are raised into the stronger
breeze. Steer up the face of the wave and bear away down the back face of the wave. You may
need to ease the mainsail slightly on the top of the wave and pull it back on as you sail down the
back of the wave.
Downwind conditions are more in your favour. Instead of shedding power as the boat is picked up
by the wave, encourage the boat to surf down the face
Trim forward with body weight and pump the jib and mainsheet to promote surfing. Once surfing,
continue to trim to the new apparent wind on the sails. Move down the face of the wave trying to
gain as much distance to leeward as possible without falling off the face. If your bow is about to rise
into the back of the next wave in front, steer either way to prevent this and trim the sails to suit
Move back to help the bow to rise
Performance Saili
8
9
Glossary of Nautical Terms
• - • I Direction and spi "Jofwnd
affected by nd speed of boat
(verb) (1) Rotate anti-ciockwibc or against
the sun
• (2) A sai tilled in reverse to the norma:
direction by the wind
ы How level the boat is
Anglo of star! i <v to wind if not 90'
Shel rrmg one sail behind another
Floating r n jrk used for navigation с/
mooring
и । Small flag at top of mast
Hinged plate used to resi л
deways movement (leeway)
Device for securing a rope
Course over the ground
Line for tr isioning leading edge
of sail (downhaul)
Plate used to resist leeway,
inserted vertica'ly not hin< jed (see centreboard)
Deflection of compass needle by
other magnetic materials
- - i 'Wind due to weather systems
not local effects
(verb) To turn the boat so that the wind
blows from the opposite side, going downwind
tai. । c Rope or wire used to reuse sails and to
tension leading edge
e - . Wind shift taking you further from your
upwind objective
_c-aning over
Rope or wire used to control twist in
mainsail
t si I Rope looped through itself
Imaginary line along which one can
sail to windward mark without tacking
’ Back edge of sail
The side of the boat that the wind is
blowing away free le the downwind ride
> Sdeways drift of boat due to wind
pressure
Wind shift taking you closer to your upwind
objective
1 (verbi To turn the boat towards th
Glossary of Nautical Terms 9
(noun) Leading edge of I
Angle ol mar ncal
< Buoy U39d to park boat
Pe od in month when tidal range
mail0 51
Line 'jsed to tension foot of sail
horizontally
Skimming ove> surface of water on
bow wave
Amount of curve на bottom of beat
Rope iised to control angle ol sail to
wind
Balloon shaped sail used
downwind
Difference between high and
Ic j w&t«r
। Two fixed objects in line
Foro and aft adjustment of weight in the
boat
-и, Difference in direction between grid
and magnetic North
(verb; Rotate clockwise or in the same
direction as the sun See 'back
Rope used for anchor or mooring
n,, - , Chart position input to GPS
memory
। The side of the boat that the wind
,s blowing on to ie the upwind side
10 RYA National Sailing Scheme
Following the basics of Levels 1 and 2, there is a choice of courses to enable you to pursue
whichever part of the sport you wish All the courses can be taken in a minimum of two days in
Level 1 Start Sailing
An introduction to the sport,
covering the minimum
knowledge required to get
afloat under supervision.
Level 2 Basic Skills
Becoming a competent sailor
in light winds.
Seamanship Skills
How to handle the boat in all
circumstances and solve
problems afloat.
Day Sailing
Passage planning and
decision making for small boat
cruising.
Sailing with Spinnake
Everything you need to know
to sail modern three-sail boats.
Start Racing
The start line for enjoying club
racing. All you need to know
to get round the course.
Intermediate Racing
Develop and improve your
racing techniques and
knowledge for club racing.
Advanced Racing
Develop your racing skills and
knowledge for open meetings
and regattas.
Performance Sailing
Improve your boat handling
and confidence in
performance boats.
Further Reading
Most of these publications are available on the RYA website: www.rya.org.uk Order hotline: 0845 345 0372
Start Sailing The Beginners
Handbook
RYAG3
RYA National Sailing
Scheme Syllabus and
Logbook
RYAG4
(92.
RYA Handy Guide to
Racing Rules
RYA YR7
RYA Racing Rules of Sailing
RYA YR1
Start Sailing
(video & DVD), RYA
Better Sailing
(video & DVD), RYA
RYA Knots Splices &
Ropework
by Gordon Perry & Steve
Judkins, RYA G63
Index
A anchor, preparing 14
anchorage, leaving 15
anchoring 14-15
approach: wind and tide opposed 15
approach: wind and tide together 14
Australian 18 foot class 44
В Berry Head 41
Bethwaite, Julian 42
breezes, sea 31
Brixham 40, 41
buoyage buoys, mooring to see mooring, picking up 37
C capsizes, inversion, dealing with 24-26
multihulls 26
safety 58
spinnakers 25
when trapezing 62
catamarans
capsizes in 26
forces on the boat 17
launching 4
man overboard 19
mooring 10
rig controls 79, 86
charts, interpreting 32-33
compass rose 33, 34
tidal diamond 35, 40, 41
variation 33
COG (course over the ground) 36
coming alongside a fixed object
or boat 10,12
compass rose 33, 34
compasses 34
course over the ground (COG) 36
cruising see day sailing
Cunningham use 79, 86
D
Dartmouth 32, 35, 40
day sailing 28-41
boat choice 30
boat setup 30
buoyage 37
charts, interpreting 32-33
decision making during passage 38
equipment 29
flares 29
landing on shore 38
navigation equipment 29
passage planning 32-33
from Dartmouth to Brixham
and return 40-41
passages in strong winds 38
pilotage equipment 29
pilotage in practice 34
pilotage with GPS
(Global Positioning System) 36
safety equipment 29
stowing gear 30
tidal flow 34, 35, 40-41
toolkit 30
weather conditions
see weather conditions: day sailing
Index
E leeway 34
Enterprise design 81 luffing rights 71
equipment 29 M
F man overboard (MOB) 18-19
fisherman’s bend 17 boats with racks or wings 19
flag signals when racing 66 catamarans 19
flares 29
manouevres, procedure for 2
Fox, Uffa 42
mast rake 78, 86
G Measurement Certificate 73
goose-winging 79 mooring, leaving 12
GPS (Global Positioning System), mooring, picking up 10-11
pilotage with 36 . , , ... wind and tide opposed 11
gybe, 'M' 48
wind and tide together 10
gybe, run-to-run 53
gybes, roll 84 N
gybing downwind technique 42- 44 navigation see pilotage in practice;
gybing with asymmetric spinnaker 48 pilotage with GPS
gybing with symmetrical spinnaker 52-53 navigation equipment, day sailing 29
H 0
heaving to 15 . outhaul use 79
1 P
IAUX system of buoyage 37
passage planning 32-33
insurance 73
day sail from Dartmouth to Brixham
J and return 4 0-41
jetties, coming alongside see coming penalties, race 73
alongside a fixed object or boat performance sailing 76-88
jib car use 79, 85,86 , „ u ... boat handling 80-86
К downwind sailing 79
kicker use 79 footwork when tacking or gybing 84
knots 17 forces on the boat 76-77
L goose-winging 79
launching 3-4 gybes, roll 84
from a lee shore 6-7 intuition 78
bow first 7 mast rake 78, 86
high performance boats 4 reaching 79
(94)
Index
rig controls 79 reaching 71
running 79 rules 73
set-up, specific 86 2-boat lengths circle rule 70, 71
speed 80-86 running 71
tacks, roll 81 RYA Portsmouth
tell tales 78, 79 Yardstick Scheme 65
tides 88 signals 66
upwind sailing 78 starting a race 66, 68
waves 88 starting line position 68
wind shifts 87 tacking 69
winds, light 80-81, 87 at windward mark 70
winds, light to medium 85 recovery see also day sailing:
winds, strong 86 landing on shore
pilotage equipment, day sailing 29 on a lee shore 8
pilotage in practice 34 on a windward shore 5
pilotage with GPS (Global Positioning reefing afloat in strong winds 16-17
System) 36 fully battened sails 17
planing 42, 47, 55 round the boom 16
Portsmouth Yardstick Scheme, RYA 65 round the mast 17
protests, race 73 slab reefing 16
returning to a lee shore 8
returning to a windward shore 5
racing, starting 64-73 ropework 17
accelerating 68 rules, racing 73
baling 71 2-boat lengths circle rule 70, 71
beat, going up 69 RYA Portsmouth Yardstick Scheme 65
beat, last 72
boat, choosing 73 S
boat preparation 73 safety, high performance 58
boats meeting 73 safety equipment 29
class associations 73 sailing, day see day sailing
finish line 72 sailing, performance
flag signals 66 see performance sailing
insurance 73 sailing backwards 21
leeward buoy 72 sailing without a centreboard 21
luffing rights 71 sailing without a rudder 20
Measurement Certificate 73 sea breezes 31
at off wind mark 71 sheet bend 17
penalties 73
protests 73 => 4
Index
sheet use 79, 85, 86 determining 10
skiffs 55, 84 tidal range 35
SOG (speed over ground) 36, 41 tide, height of 35
speed, boat 34 estimating 39
see also performance sailing: speed tide induced wind 32
speed over ground (SOG) 36, 41 tides, neap 35
spinnakers, sailing with 42-55 tides, spring 35
asymmetric spinnaker handling 46-49 tides and performance sailing 88
balance 4/, 49
toolkit 30
dropping 49
gybing with 48 transit, taking 14, 68
hoisting 46 trapezing 60-62
steering 47, 49 capsizing 62
trimming 46-47 getting in 62
asymmetric spinnakers 42, 44 getting out 61
capsizes 25 harnesses 61
conventional spinnakers teamwork 62
see spinnakers, sailing with: on the trapeze 62
symmetrical spinnakers
rigging tips 45 W
steering 43, 47, 49 waves and performance sailing 88
stowage 45 waypoints 36
symmetrical (conventional) weather conditions: day sailing 30-32
spinnakers 44
gradient winds 31
symmetrical spinnaker handling 50-54
dropping 54 predicting sailing conditions 31
gybe, run-to-run 53 sea breezes 31
gybing 52-53 tide induced wind 32
hoist, leeward/chute 50-51 weather forecasts 30
hoist, windward 52 whipping end of a rope 17
pole height 50 wind, apparent 43, 55
trimming 52 wind, tide induced 32
wind, apparent 43, 55 wind shifts 87
starting line position 68 winds, gradient 31
winds, light to medium,
tacking 69 performance sailing in 85
tacks, roll 81 winds, light, performance sailing in 80-81
tell tales 78, 79 winds, strong, passages in 38
tidal flow 34, 35, 40-41 winds, strong, performance sailing in 86
Advanced
Sailing
Advanced Handbook
Advanced Sailing takes you through the full range of skills needed for
independent small boat sailing. The book follows each advanced course
module in the RYA National Sailing Scheme and contains the essential
information you need to succeed afloat. Advanced Sailing follows on from
Start Sailing, the RYA Beginners Handbook.
The RYA
The RYA is the UK governing body representing sailing, windsurfing, motor
boating, powerboat racing and personal watercraft, at sea and on inland
waters. It works for the good of all who enjoy these activities, campaigning
for their interests at local, regional, national, European and world level
More than 130,000 people annually take a RYA training course or
qualification, while RYA coaching provides for every competitive level from
beginner to Olympic champion.
This book is one of over 60 published by the RYA Some relate to specific
training courses and are a valuable study and learning aid. Others provide
technical, legal or general boating advice. All are expertly written,
informative, authoritive - and affordable.
For information on other RYA books, videos and multimedia titles, to find an
RYA-approved training course near you, or to support our wider work and
gain valuable benefits by becoming a personal member, please visit our
website at www.rya.org.uk.
www.rya.org.uk
RYA, the RYA tick logo and YACHTMASTER are registered trade marks of the Royal Yachting Association
(registered in the United Kingdom ai id selected marketing territories).