/


Author: Martens A.
Tags: beauty hairstyles personal care beauty industry
ISBN: 978-1-4654-3796-9
Year: 2015
Text
ANDRÉ
MÄRTENS
10-MINUTE
HAIRSTYLES
50 step-by-step looks
10-MINUTE
HAIRSTYLES
50 step-by-step looks
André Märtens
10-MINUTE
HAIRSTYLES
50 step-by-step looks
With photos by Eugen Mai
CONTENTS
Foreword
6
Hair care
Tools
Styling products
Timeless beauty: classic hairstyles
Changing bangs
Perfect parts
8
10
12
14
16
17
THE LOOKS
18
BASIC TECHNIQUES
Volume
Curls
Waves
Straight hair
The ponytail
Braiding techniques
The chignon
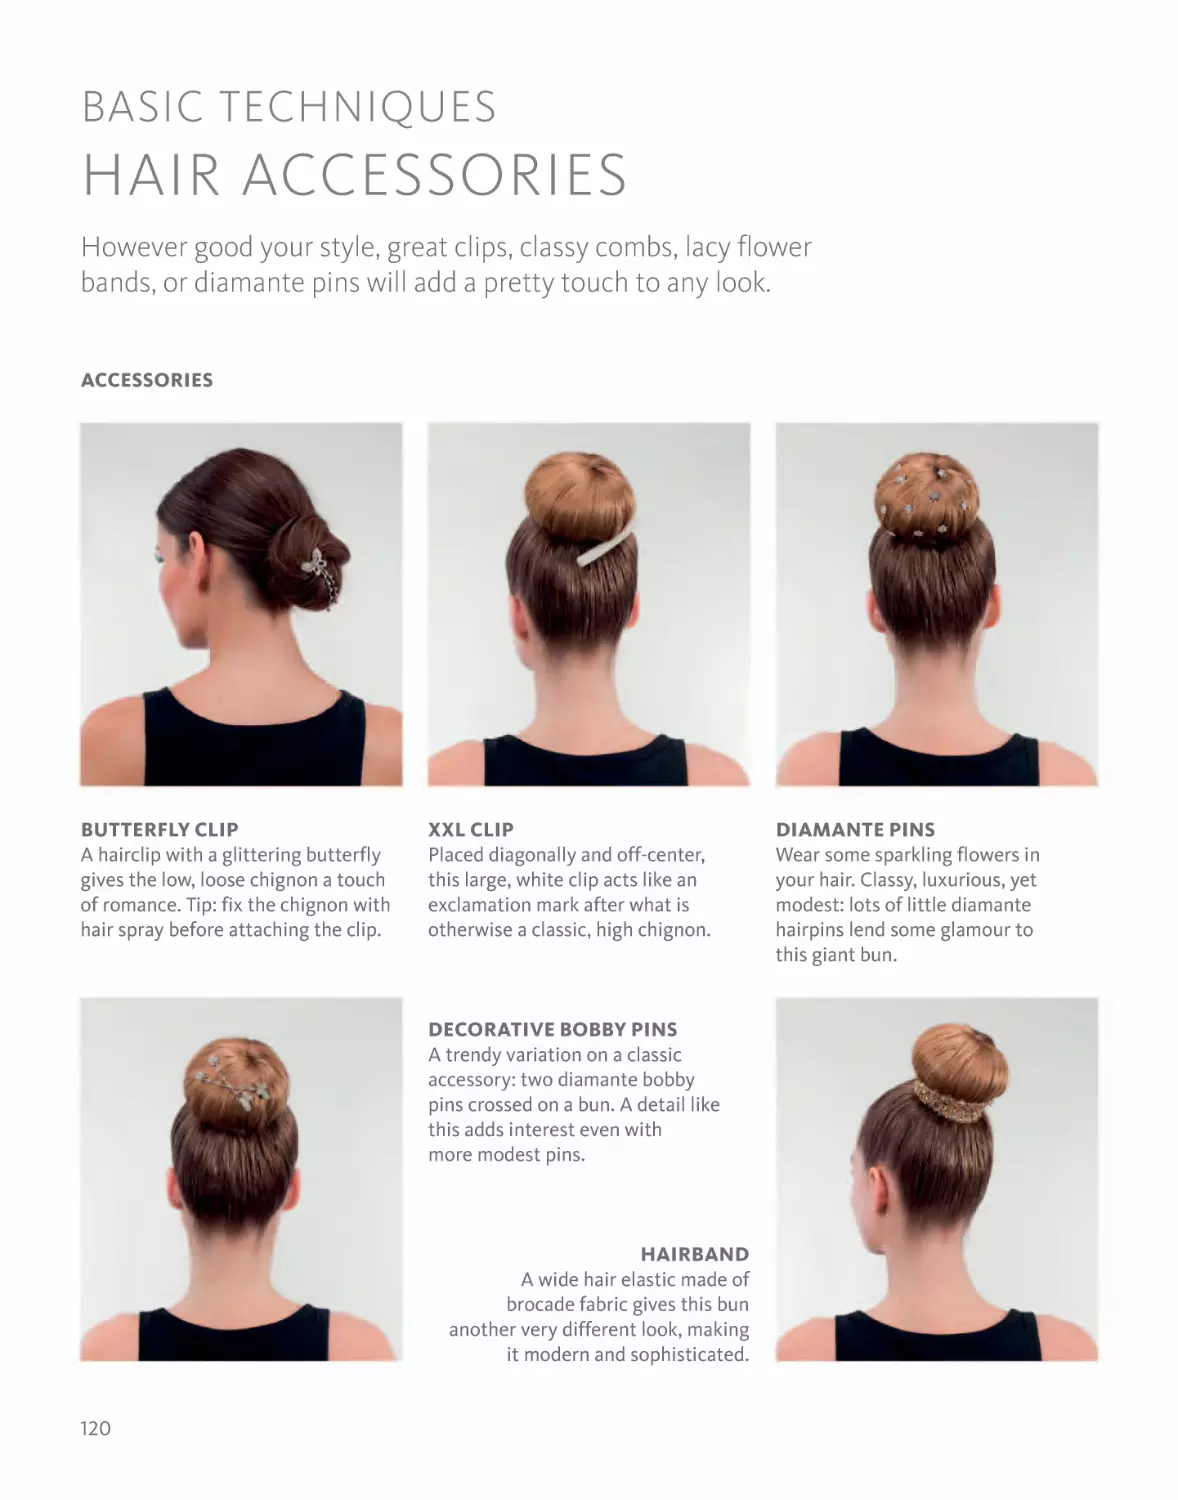
Hair accessories
20
32
46
56
66
76
92
120
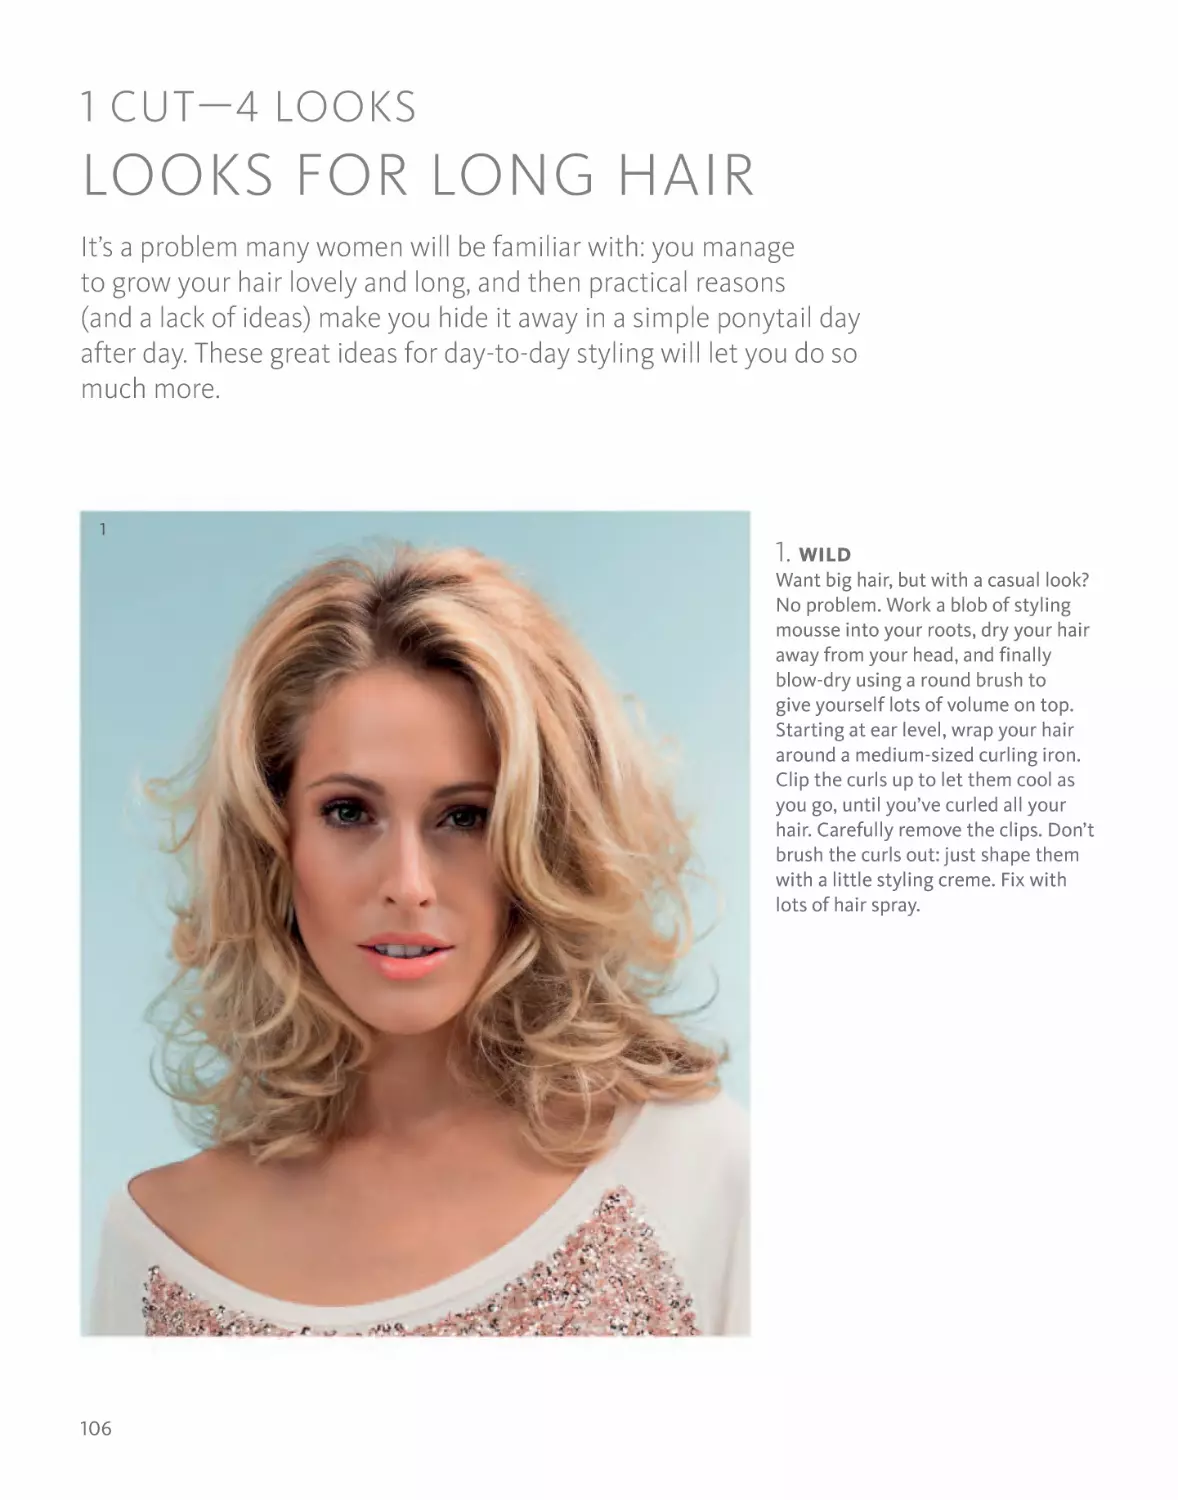
1 CUT—4 LOOKS
An adaptable pixie cut
A versatile bob
Looks for long hair
26
62
106
All perfectly normal: hair types
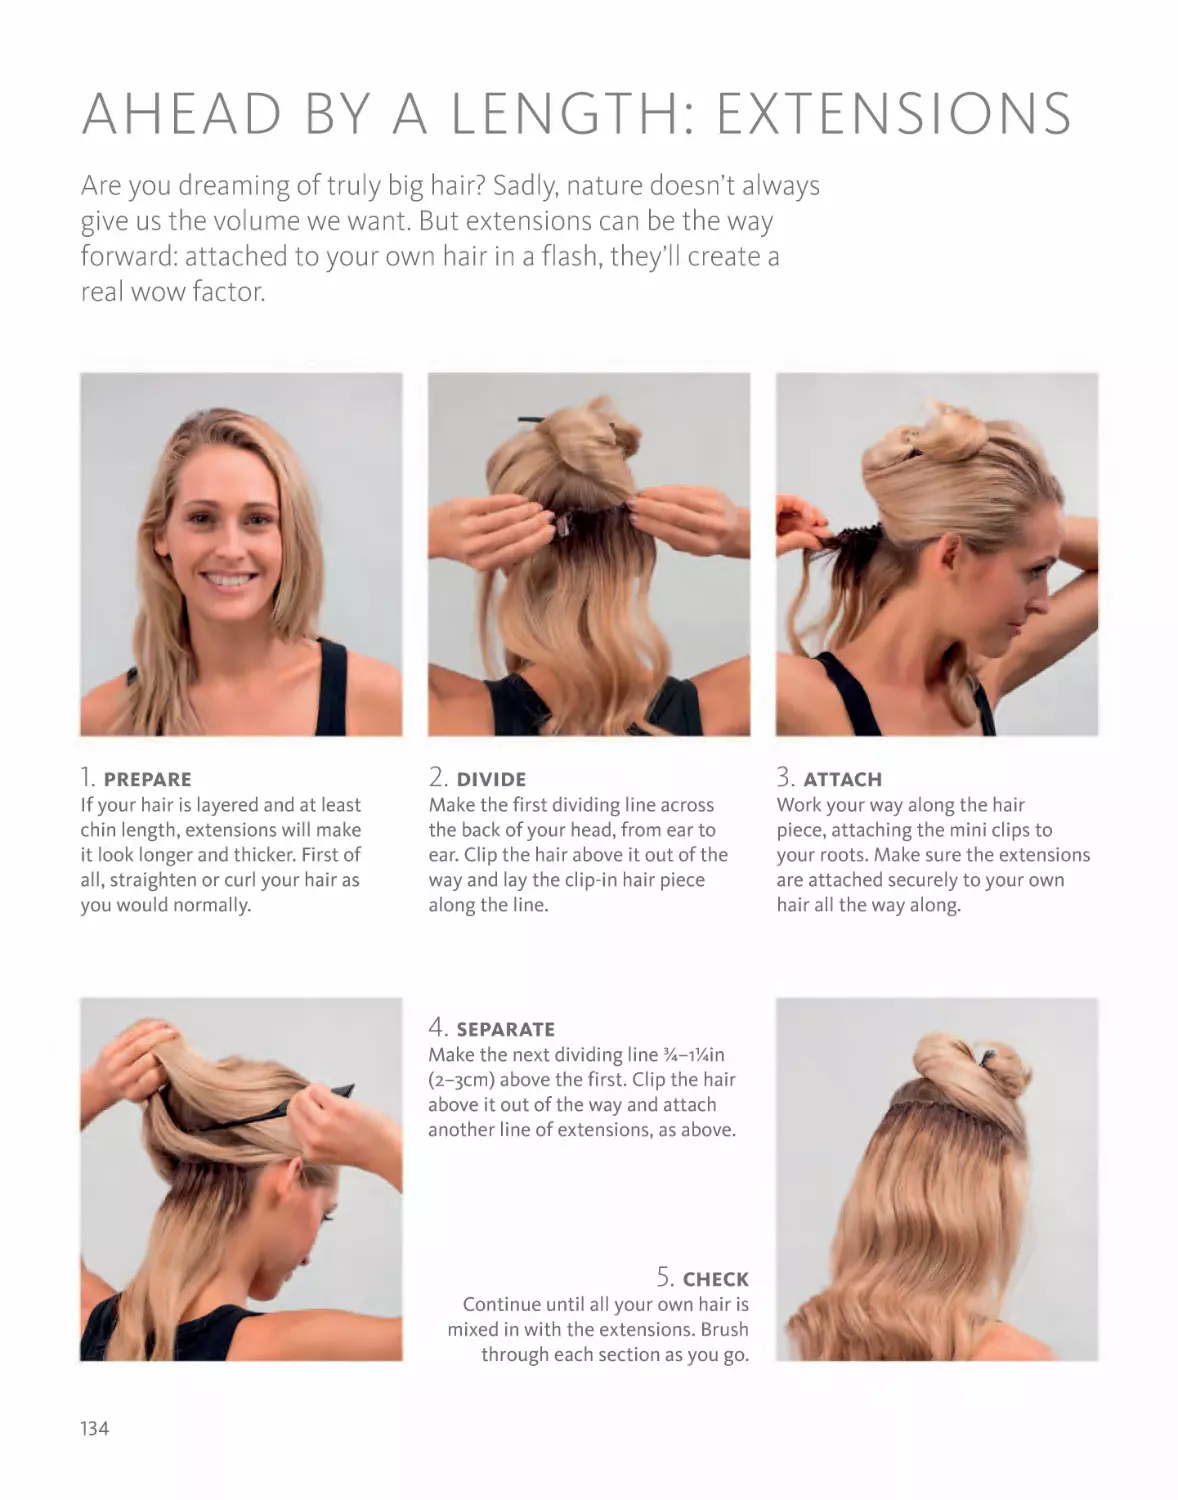
Ahead by a length: extensions
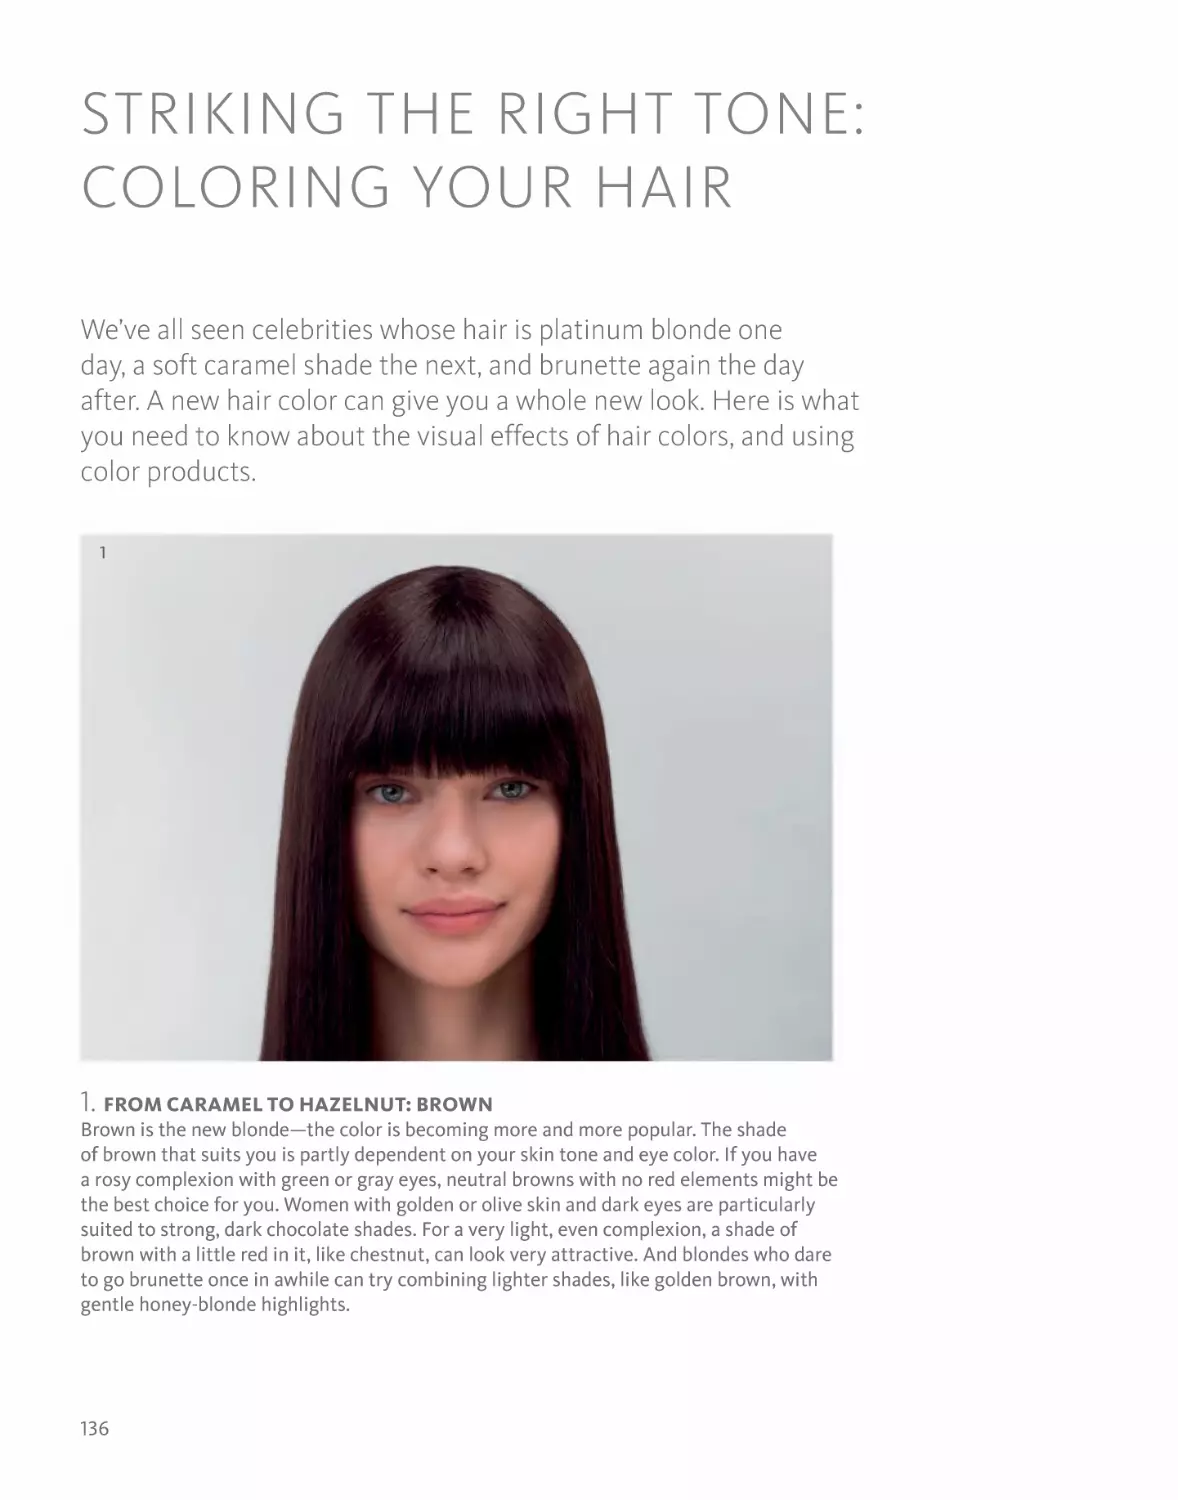
The right tone: coloring your hair
SOS tips
132
134
136
140
Acknowledgments
About the author and the photographer
143
144
5
FOREWORD
When I was doing my training, you didn’t go “to the
hairdresser,” you went “for a perm.” Now almost a no-go
style, it shows just how much tastes and fashion are
always changing. Nowadays, hair is supposed to look as
natural as possible: we respect and build on the structure
that’s already there and, as well as keeping up with the
current trends, we want a look that’s right for us. But,
hand on heart, how often have you gone in search of the
ideal haircut or the perfect style for your type?
Painstakingly growing your hair long, only for split and
thinning ends to make you get rid of it again—usually
following a moment of realization: “I can’t stand this
scraggly mess—I have to get to the hairdresser’s right
now!” Or have you spontaneously decided to dye your
brunette hair strawberry blonde, because it was the
celebrity “in” color—only to realize that the shade
was really unflattering against your rosy complexion?
My advice? Big changes aren’t the only things that can
liven up a look. If you’ve found a good basic cut and a good
length for everyday styling, there are countless ways to
Yours,
reinvent yourself and your whole appearance on a daily
basis. That might mean a different part or a soft color kick,
a trendy chignon, sophisticated braid, or putting gentle,
temporary waves in naturally sleek hair.
In my years of working on Berlin Fashion Week, I’ve seen
a lot of current trends, and have often been called upon to
transform hairstyles in very little time. Inspired by this, on
the following pages I will show you the best styles for hair
of every length, type, and structure—from business chic to
a glamorous evening updo—all easy to manage in ten
minutes, thanks to the clear, step-by-step instructions.
The brush symbols tell you how difficult each style is. One
brush means “very easy; suitable for complete beginners”;
two brushes mean “intermediate—some experience
required,” and three brushes denotes a more challenging
style—although even these are easy to master with a
little practice.
Have fun trying out the styles, being brave, and
reinventing yourself!
HAIR CARE
The be-all and end-all for beautiful hair is finding the right care
products. Shampoo, conditioner, and hair masks are little miracleworkers. They can smooth frizz, temporarily patch together split
ends, or sooth an irritated scalp. They volumize fine hair and give
stressed-out manes their shine back.
SHAMPOO
TWO-IN-ONE SHAMPOO
The main ingredients of shampoos are salt, water,
perfumes, and detergents, which are also called tensides.
These days, tensides are so mild that you can wash your
hair every day. In choosing the right shampoo, you should
consider the needs of your scalp. Does it tend to be oily,
dry, or flaky? Structural problems with your hair, such as
split or dry ends, brittle hair, or frizz, on the other hand,
are a job for conditioner, or an occasional nourishing
hair mask. Important: wet hair thoroughly before
shampooing. Work a blob of shampoo and a little water
into a lather between your hands and gently massage it
into your scalp. The shampoo running down your hair as
you rinse will be enough to clean the ends. Always rinse
out shampoo very thoroughly, particularly from your
roots. Residue can make hair look dull or even give you
an itchy scalp. There’s a shampoo out there for every
hair type—and if in doubt, ask the experts.
Two-in-one shampoos are a relic from the 1980s,
combining shampoo and conditioner. The problem
with them used to be that they often contained insoluble
silicon, which built up every time you washed your hair.
After awhile, it made hair limp, heavy, and straggly.
Today, they usually contain soluble silicone, which can
be washed out. My tip is to check out the “INCI” list of
ingredients. Insoluble silicones include dimethicone,
cyclomethicone, cyclopentoxilase, and dimothiconol.
The soluble (i.e., unproblematic) silicones include
amodimethicone, polysiloxane, PEG/PPG-14/4
dimethicone, and dimethicone copolyol.
PEELING SHAMPOO
Peeling shampoos are a kind of deep cleanse for your hair.
They contain micro beads, strong tensides, or fruit acids,
which free your hair and scalp from build-ups of styling
products and silicon. They can even remove excess
pigments if a home hair dye has come out too dark or
too red. However, peeling shampoos don’t really nourish
your hair, and can easily dry it out, so they should only be
used occasionally.
8
DRY SHAMPOO
This miracle product from the 1970s is currently making
a big comeback. Dry shampoos are usually available as
sprays, containing rice starch and silicon. The starch
absorbs excess oil from your scalp, making hair look fresh
even a day after washing. One bonus side-effect of dry
shampoos is that they give your hair volume and
manageability. Important: use dry shampoo sparingly,
concentrating on your roots. Massage it in with your
fingers and brush out thoroughly. If any residue is left
in your hair, it can give it an unwanted matte finish, or
make it look like it’s covered in a gray film.
LEAVE-IN TREATMENTS
As the name suggests, these are left in your hair and don’t
have to be rinsed out. They are practical if you don’t have
time for an elaborate hair-care routine in the mornings, or
if your hair is fine and stressed, and needs a light product
that doesn’t weigh it down. Important: always use the
quantity specified in the manufacturer’s instructions. Less
is often more, and you can always add more if needed.
Of course, a leave-in treatment is no substitute for a
hair mask.
HAIR OILS
CONDITIONER
Conditioners should optimize the condition of your
hair. They work on the surface of your hair, smoothing
the outer layer to make it sleeker, shinier, and easier to
comb. Conditioner should be used right after washing,
on damp hair. Apply it to the body and ends of your hair,
but never to the roots. Most conditioners are formulated
so that one to three minutes on your hair is sufficient.
Rinse thoroughly with warm water afterward to get rid
of any residue, which can weigh your hair down or make
it look straggly.
HAIR MASKS
Hair masks have a more intensive nourishing effect
than conditioners. You can now find treatments for all
hair types, tailored to the condition of your hair and scalp.
They contain moisturizing and lipid balancing ingredients,
and some also contain silicone for sleek-feeling hair. The
important thing when choosing the right hair treatment
is that it suits the current state of your hair. A hair mask
should always be massaged into towel-dried hair and left
to work for the time specified on the pack. Please don’t
leave it in overnight: this can cause skin reactions. If your
hair is thin and quickly looks flat, you should only use a
mask on the body and ends. If your hair is very stressed,
you can use one several times a week. One intensive
treatment per week is enough for normal hair.
Oils are one of the oldest hair care products in the world,
and they are currently enjoying a real boom: almost all
hair care companies now offer a hair oil. You need to
decide between natural plant oils and “dry” silicone oils.
Most products contain a mix of both. The advantage of
this is that your hair gets the nourishment it needs,
but—if used properly—the product doesn’t leave you with
greasy strands. You should never use too much hair oil:
one to two sprays or pumps, distributed along the
length and ends of your hair, are usually sufficient. Pure
plant oils should be suited to your hair type. The weight
of an oil is determined by the proportion of oleic acid it
contains. For fine, straight hair, use light oils like wild
rose, hemp, broccoli seed, jojoba, and apricot kernel oil.
Heavy oils such as olive, almond, avocado, argan, and
coconut are more suited to thicker, curly hair.
IS IT WORTH BEING FAITHFUL?
Been using the same shampoo for years? In hair care, it
doesn’t always make sense to stay faithful to a product.
From time to time, the condition of your hair changes:
sometimes it’s dry; sometimes it tends toward split
ends, or your scalp will suddenly become oily. These
changes can be caused by all kinds of things. Climate,
age, eating habits, and hormonal changes can all be
triggers. If you notice a change in your hair structure,
change your shampoo to match.
9
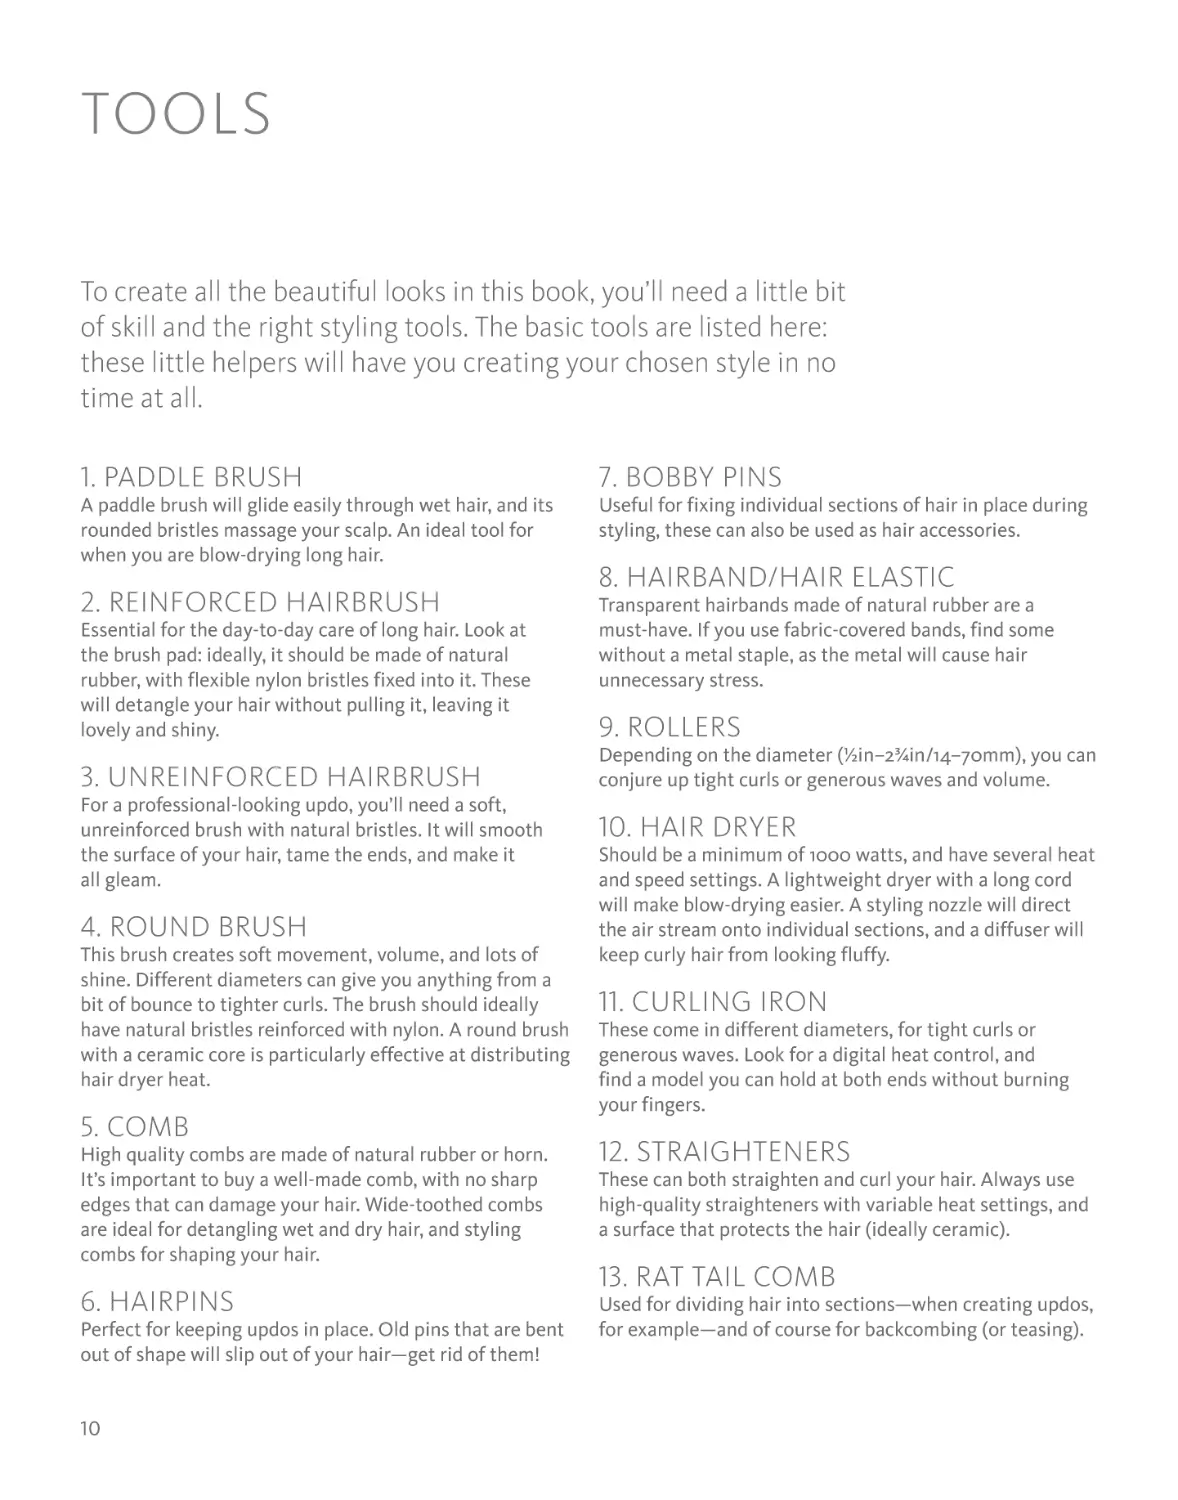
TOOLS
To create all the beautiful looks in this book, you’ll need a little bit
of skill and the right styling tools. The basic tools are listed here:
these little helpers will have you creating your chosen style in no
time at all.
1. PADDLE BRUSH
7. BOBBY PINS
A paddle brush will glide easily through wet hair, and its
rounded bristles massage your scalp. An ideal tool for
when you are blow-drying long hair.
Useful for fixing individual sections of hair in place during
styling, these can also be used as hair accessories.
2. REINFORCED HAIRBRUSH
Transparent hairbands made of natural rubber are a
must-have. If you use fabric-covered bands, find some
without a metal staple, as the metal will cause hair
unnecessary stress.
Essential for the day-to-day care of long hair. Look at
the brush pad: ideally, it should be made of natural
rubber, with flexible nylon bristles fixed into it. These
will detangle your hair without pulling it, leaving it
lovely and shiny.
3. UNREINFORCED HAIRBRUSH
For a professional-looking updo, you’ll need a soft,
unreinforced brush with natural bristles. It will smooth
the surface of your hair, tame the ends, and make it
all gleam.
4. ROUND BRUSH
This brush creates soft movement, volume, and lots of
shine. Different diameters can give you anything from a
bit of bounce to tighter curls. The brush should ideally
have natural bristles reinforced with nylon. A round brush
with a ceramic core is particularly effective at distributing
hair dryer heat.
5. COMB
8. HAIRBAND/HAIR ELASTIC
9. ROLLERS
Depending on the diameter (½in–2¾in/14–70mm), you can
conjure up tight curls or generous waves and volume.
10. HAIR DRYER
Should be a minimum of 1000 watts, and have several heat
and speed settings. A lightweight dryer with a long cord
will make blow-drying easier. A styling nozzle will direct
the air stream onto individual sections, and a diffuser will
keep curly hair from looking fluffy.
11. CURLING IRON
These come in different diameters, for tight curls or
generous waves. Look for a digital heat control, and
find a model you can hold at both ends without burning
your fingers.
High quality combs are made of natural rubber or horn.
It’s important to buy a well-made comb, with no sharp
edges that can damage your hair. Wide-toothed combs
are ideal for detangling wet and dry hair, and styling
combs for shaping your hair.
12. STRAIGHTENERS
6. HAIRPINS
Used for dividing hair into sections—when creating updos,
for example—and of course for backcombing (or teasing).
Perfect for keeping updos in place. Old pins that are bent
out of shape will slip out of your hair—get rid of them!
10
These can both straighten and curl your hair. Always use
high-quality straighteners with variable heat settings, and
a surface that protects the hair (ideally ceramic).
13. RAT TAIL COMB
1
10
2
11
3
4
12
5
13
6
7
8
9
11
STYLING PRODUCTS
Blow-dry lotion, hair spray, wax or pomade, volume powder,
structural spray… you can easily get lost in the jungle of styling
products. Here is a brief overview of the main types of hair
products, what they contain, what they do, and what special effects
you can create with them.
BLOW-DRY LOTION
HAIR SPRAY/HAIR LACQUER
This has now replaced old-style setting lotion. It is mainly
made up of alcohol and setting resins, and sometimes
also contains nourishing ingredients like vitamins or
collagen. A blow-dry lotion gives you hold and volume,
and makes styling with a hair dryer and round brush
easier. A good product shouldn’t make your hair sticky;
it should coat it with a flexible, setting film that can be
brushed out. You can also get “thermoactive” blow-dry
lotions, meaning that the setting effect is increased by
adding heat (with a hair dryer, straighteners, or heated
rollers). Use: spray the product all over towel-dried hair
and give it a brief pre-blow-dry before styling with a
round or paddle brush.
This liquid hairnet consists of artificial resins, solvents,
and perfumes. It protects your hair from damp conditions,
wards off frizz, and gives your style more staying power.
Hair spray can also be used for styling: while your hair
is in rollers, for example, or sprayed on lightly while
backcombing. Extra-strong hair spray is sometimes called
hair lacquer. It will give you long-lasting hold, which is
useful for styles like a sleek, smooth look with your hair
flat against your head. Hold the can very close to your
hairline, spray generously, and brush into place
immediately. Hair will look “wet” and gelled. Use: hair
spray can be sprayed from above onto the top layer of hair,
or worked in from below for more volume. Hold the can
about 8in (20cm) from your head. Hair spray should be
brushed out well before washing your hair, or the resins
can leave a white residue.
STYLING MOUSSE
You can choose a styling mousse to suit your hair type.
Depending on the ingredients, it can pump up fine hair,
care for stressed hair, or give curls more definition. It also
makes your hair easier to comb and prevents it from
picking up static electricity. Mousse is available in various
levels of hold and should not leave your hair feeling
sticky. Use: depending on hair length, distribute a blob
somewhere between the size of a walnut and a mandarin
through your hair with a vent brush, pre-blow-dry, and
shape with a brush, curling iron, or rollers, depending on
your style. For fine hair, choose a mousse that is light and
airy, and not too solid, to make blow-drying easier.
12
HAIR GEL
Gel comes in different grades of solidity. The formula is
based on natural or synthetic pectins (sugar compounds).
Hair gel can be used on wet or dry hair, depending on the
effect you want. For a casual look, add gel to wet hair and
backcomb into shape. After drying, curls will look sculpted
and defined. For a subtle wet look on short hair, rub a little
gel between your palms and brush them over the surface
of your hair with light, tousling movements.
VOLUMIZING POWDER
Volumizing powder comes in little bottles, like talcum
powder. It contains minerals and sugar compounds that
give roots more body and hair more grip. Like mineral
powder sprays, it’s ideal for banishing flat roots if you
have longer hair, but also perfect for styling chignons and
braids. So: for more volume in your roots, shake a small (!)
amount of powder onto the top of your head and work it
in with your fingers. An added advantage is that the extra
volume makes your hair stand away from your scalp,
meaning it stays oil-free for longer. For a perfect bun or a
long-lasting braid, work the volumizing powder along the
length of your hair. Good to know: this magic dust always
gives your hair a bit of a matte finish. If you prefer an
ultra-shiny look, you should avoid volumizing powder.
STYLING CREME/HAIR WAX
HEAT PROTECTION PRODUCTS
Unlike hair gel, these products leave your hair soft and
malleable, not solid. There are different varieties of wax,
styling creme, and pomade; most add shine, but some
create a deliberately matte effect. Important when
applying: always use the smallest possible amount to avoid
weighing hair down unnecessarily. For short hair, rub a
little creme or wax between your palms and run your
hands through your hair with a tousling motion. If hair is
longer and curly, rub styling creme or wax between your
fingertips to give the ends of your hair a high shine. If you
have applied too much wax, the only remedy is to wash
your hair or—if it’s longer—tie it back.
The heat from hair dryers and the 430°F (220°C) reached
by straighteners can take a lot out of your hair. Over time
it becomes stressed, and can end up dry, dull, and brittle.
The heat can also cause split ends and breakage. Heat
protection products, in the form of sprays or gels, protect
hair from this damage. They wrap a super-fine protective
coat of polymers around each individual hair, shielding it
from the heat. A good heat protection product should
leave your hair soft and shiny, not hard or oily. Caution:
the latest research shows that 365°F (185°C) is the
optimum temperature for styling hair without damaging
it. High-quality devices will have a temperature regulator.
STRUCTURE SPRAY
This is a relatively new addition to the styling product
market. Structure sprays, also called micro powder sprays
and mineral fixing sprays, contain the mineral salt calcium
carbonate, together with a fixing polymer. The mineral salt
has a texturizing effect, giving your hair a kind of matte,
sugar-water look, although without leaving it feeling
rough. This makes it easier to backcomb. Structure sprays
can give updos more volume and better structure, and
styles last better because your hair is less slippery.
Important: shake the spray well before use and spray onto
roots for added volume. For shorter hair, you can also use
the spray on the body and ends for a wilder look.
MORE BOUNCE FOR YOUR CURLS
For awhile now, a range of products have
been available specifically for curls and waves.
They contain ingredients that give hair a lot of
moisture—and keep it there. This makes your hair
less frizzy, gives it a lovely shine, and curls look
tighter and more defined. These products don’t
make hair hard or sticky, and curls should stay
soft and flexible.
13
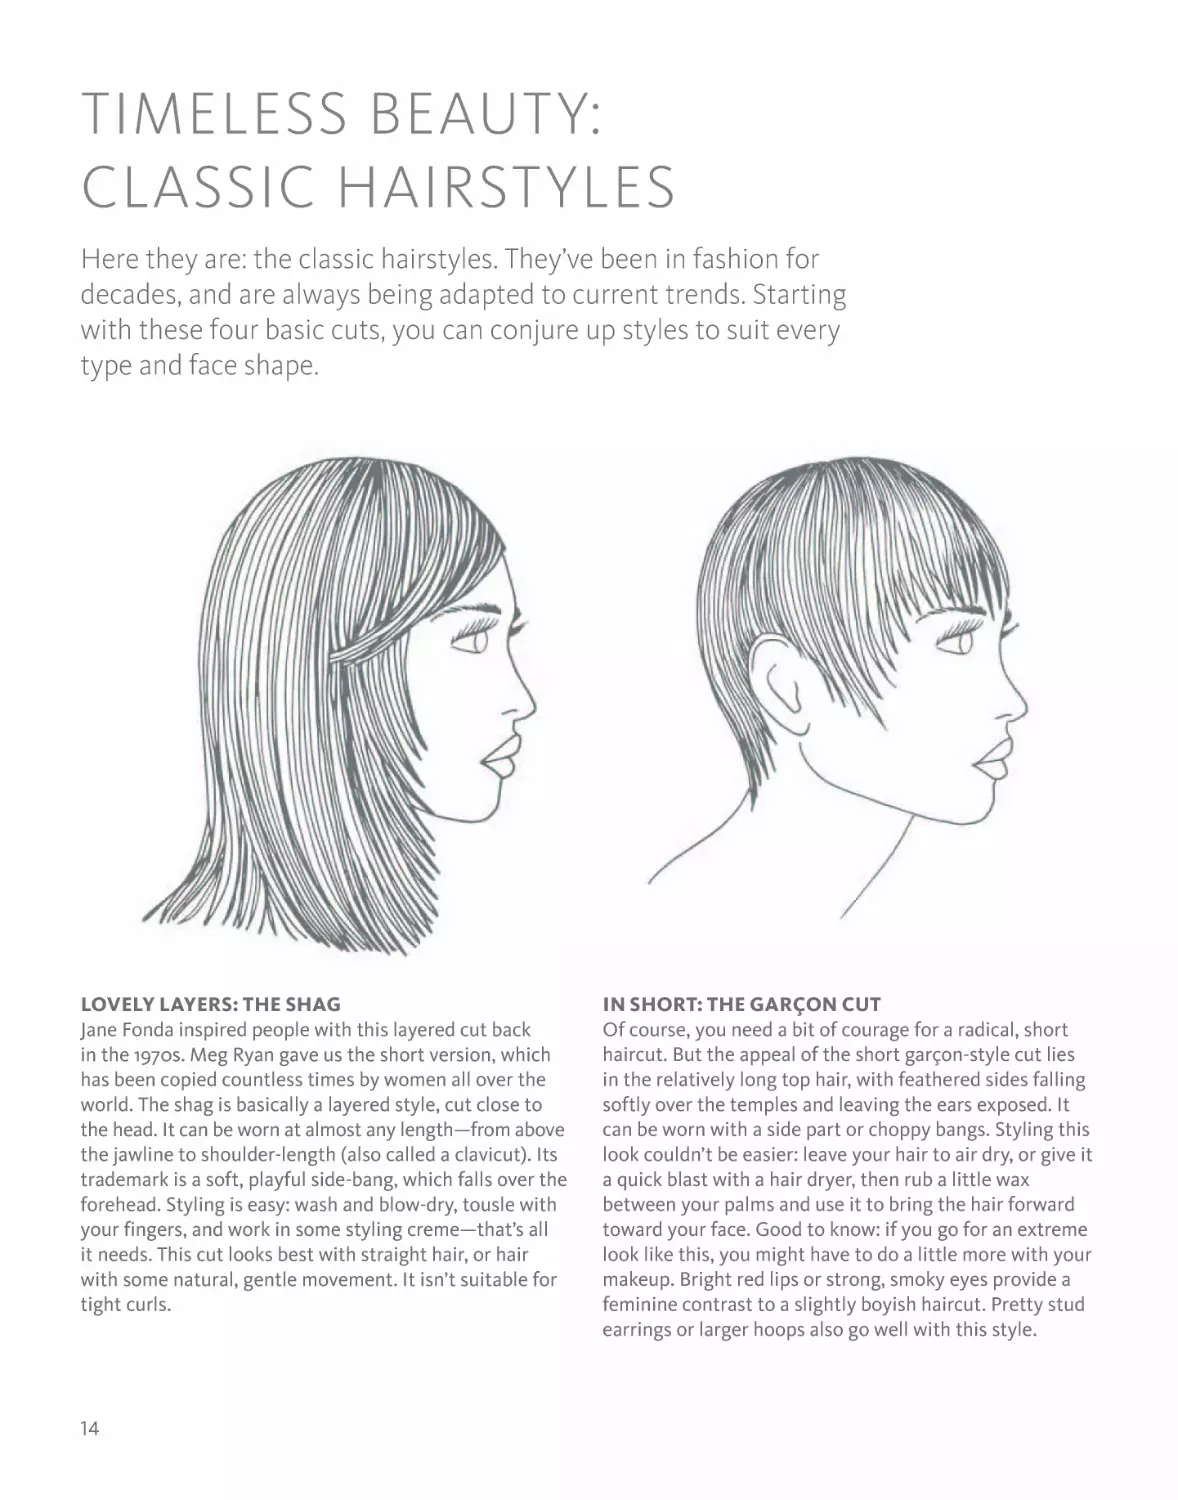
TIMELESS BEAUTY:
CLASSIC HAIRSTYLES
Here they are: the classic hairstyles. They’ve been in fashion for
decades, and are always being adapted to current trends. Starting
with these four basic cuts, you can conjure up styles to suit every
type and face shape.
LOVELY LAYERS: THE SHAG
Jane Fonda inspired people with this layered cut back
in the 1970s. Meg Ryan gave us the short version, which
has been copied countless times by women all over the
world. The shag is basically a layered style, cut close to
the head. It can be worn at almost any length—from above
the jawline to shoulder-length (also called a clavicut). Its
trademark is a soft, playful side-bang, which falls over the
forehead. Styling is easy: wash and blow-dry, tousle with
your fingers, and work in some styling creme—that’s all
it needs. This cut looks best with straight hair, or hair
with some natural, gentle movement. It isn’t suitable for
tight curls.
14
IN SHORT: THE GARÇON CUT
Of course, you need a bit of courage for a radical, short
haircut. But the appeal of the short garçon-style cut lies
in the relatively long top hair, with feathered sides falling
softly over the temples and leaving the ears exposed. It
can be worn with a side part or choppy bangs. Styling this
look couldn’t be easier: leave your hair to air dry, or give it
a quick blast with a hair dryer, then rub a little wax
between your palms and use it to bring the hair forward
toward your face. Good to know: if you go for an extreme
look like this, you might have to do a little more with your
makeup. Bright red lips or strong, smoky eyes provide a
feminine contrast to a slightly boyish haircut. Pretty stud
earrings or larger hoops also go well with this style.
GEOMETRIC AND SHINY: THE BOB
The bob, or page-boy cut, was a modern look in ancient
Egypt. It underwent a big revival in the 1920s, and when
the Beatles came on the scene with their mop tops, the
cut became a symbol for a rebellious generation. Precise,
geometric contours are important for a bob. The cut has
many variants: all the hair can be worn at the same length,
but the interesting variations are those with a shorter,
graduated back, as in the drawing above. Length-wise,
anything is possible from earlobes to collarbone (lob =
long bob), and asymmetric bobs look great, too. They are
usually worn with a full bang, but a choppier front or side
bang looks good as well.
SOFT AND LAYERED: THE PIXIE
Stars like Jean Seberg or Mia Farrow brought the pixie
to Hollywood in the 1960s. As the name suggests, the
cut has a playful, elfin edge. Unlike the garçon cut, the
hair is layered all over, and looks relatively feminine
despite its short length. The short cut will be at its very
best if your hair has a natural, light wave. It’s easy to style:
blow-dry, rub a little wax or styling creme between your
palms, and work it into your hair with your fingers. This
will give it the necessary structure. You can go for more
dramatic makeup with a pixie cut, especially to emphasize
your eyes.
15
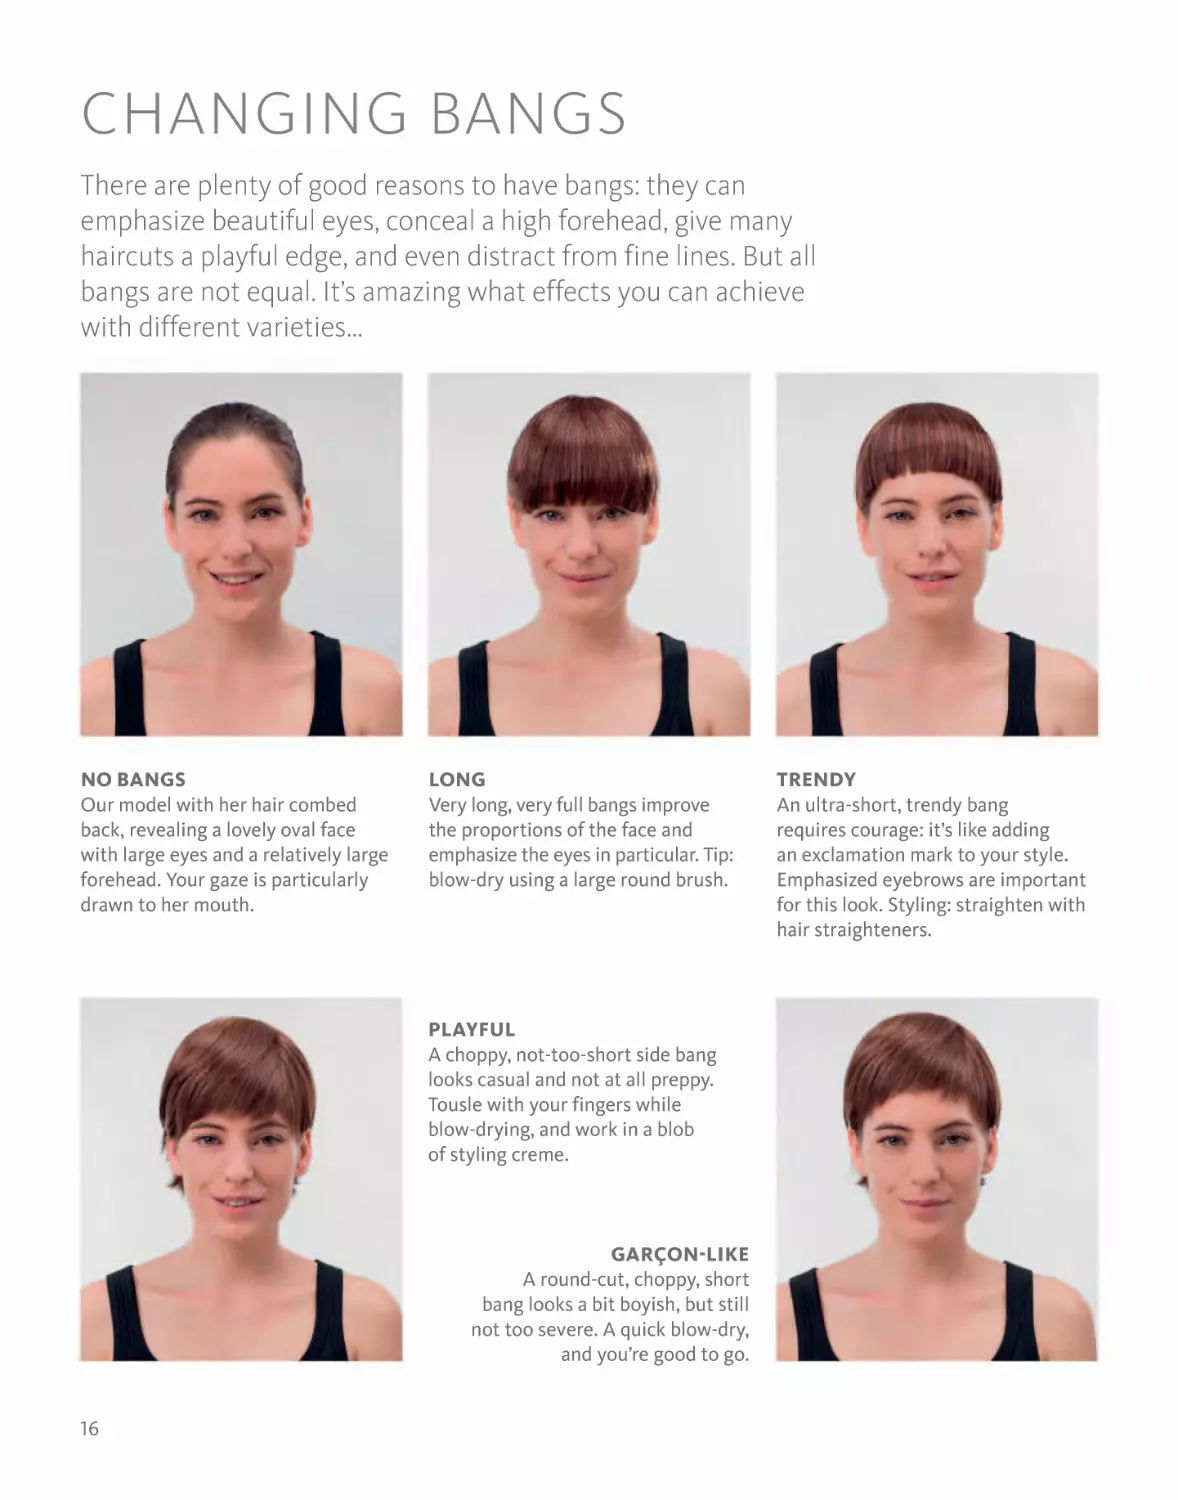
CHANGING BANGS
There are plenty of good reasons to have bangs: they can
emphasize beautiful eyes, conceal a high forehead, give many
haircuts a playful edge, and even distract from fine lines. But all
bangs are not equal. It’s amazing what effects you can achieve
with different varieties…
NO BANGS
Our model with her hair combed
back, revealing a lovely oval face
with large eyes and a relatively large
forehead. Your gaze is particularly
drawn to her mouth.
LONG
Very long, very full bangs improve
the proportions of the face and
emphasize the eyes in particular. Tip:
blow-dry using a large round brush.
PLAYFUL
A choppy, not-too-short side bang
looks casual and not at all preppy.
Tousle with your fingers while
blow-drying, and work in a blob
of styling creme.
GARÇON-LIKE
A round-cut, choppy, short
bang looks a bit boyish, but still
not too severe. A quick blow-dry,
and you’re good to go.
16
TRENDY
An ultra-short, trendy bang
requires courage: it’s like adding
an exclamation mark to your style.
Emphasized eyebrows are important
for this look. Styling: straighten with
hair straighteners.
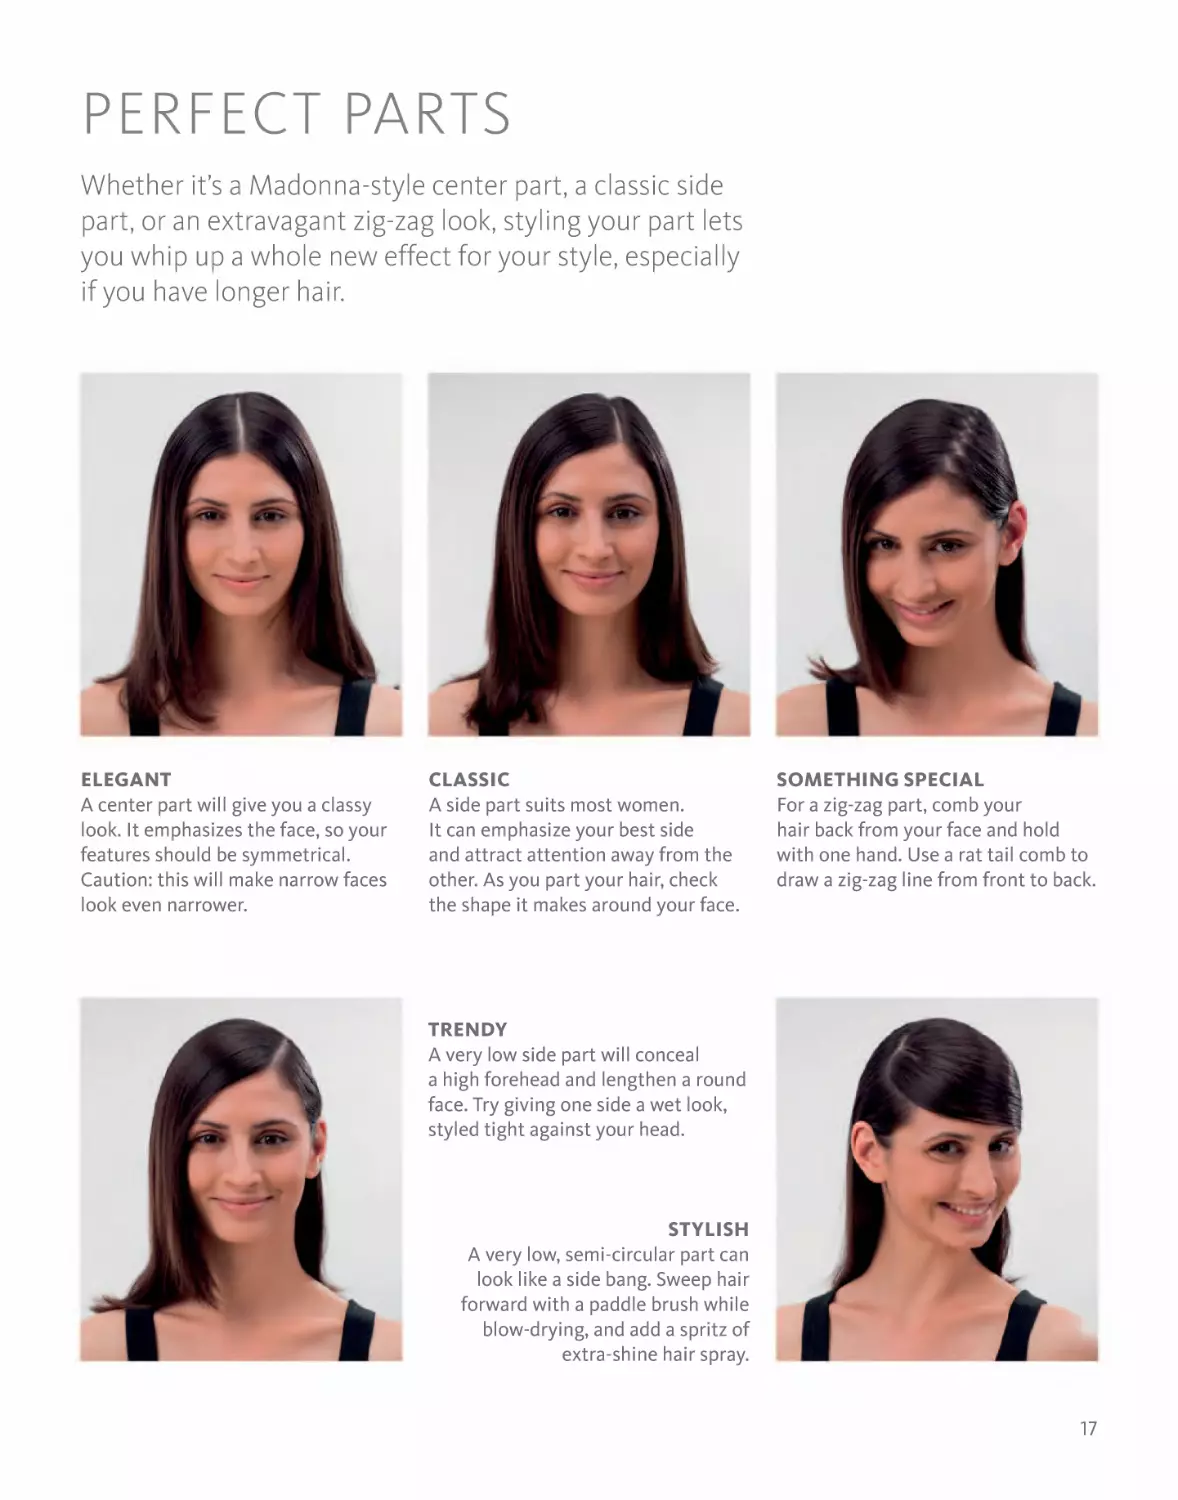
PERFECT PARTS
Whether it’s a Madonna-style center part, a classic side
part, or an extravagant zig-zag look, styling your part lets
you whip up a whole new effect for your style, especially
if you have longer hair.
ELEGANT
A center part will give you a classy
look. It emphasizes the face, so your
features should be symmetrical.
Caution: this will make narrow faces
look even narrower.
CLASSIC
A side part suits most women.
It can emphasize your best side
and attract attention away from the
other. As you part your hair, check
the shape it makes around your face.
SOMETHING SPECIAL
For a zig-zag part, comb your
hair back from your face and hold
with one hand. Use a rat tail comb to
draw a zig-zag line from front to back.
TRENDY
A very low side part will conceal
a high forehead and lengthen a round
face. Try giving one side a wet look,
styled tight against your head.
STYLISH
A very low, semi-circular part can
look like a side bang. Sweep hair
forward with a paddle brush while
blow-drying, and add a spritz of
extra-shine hair spray.
17
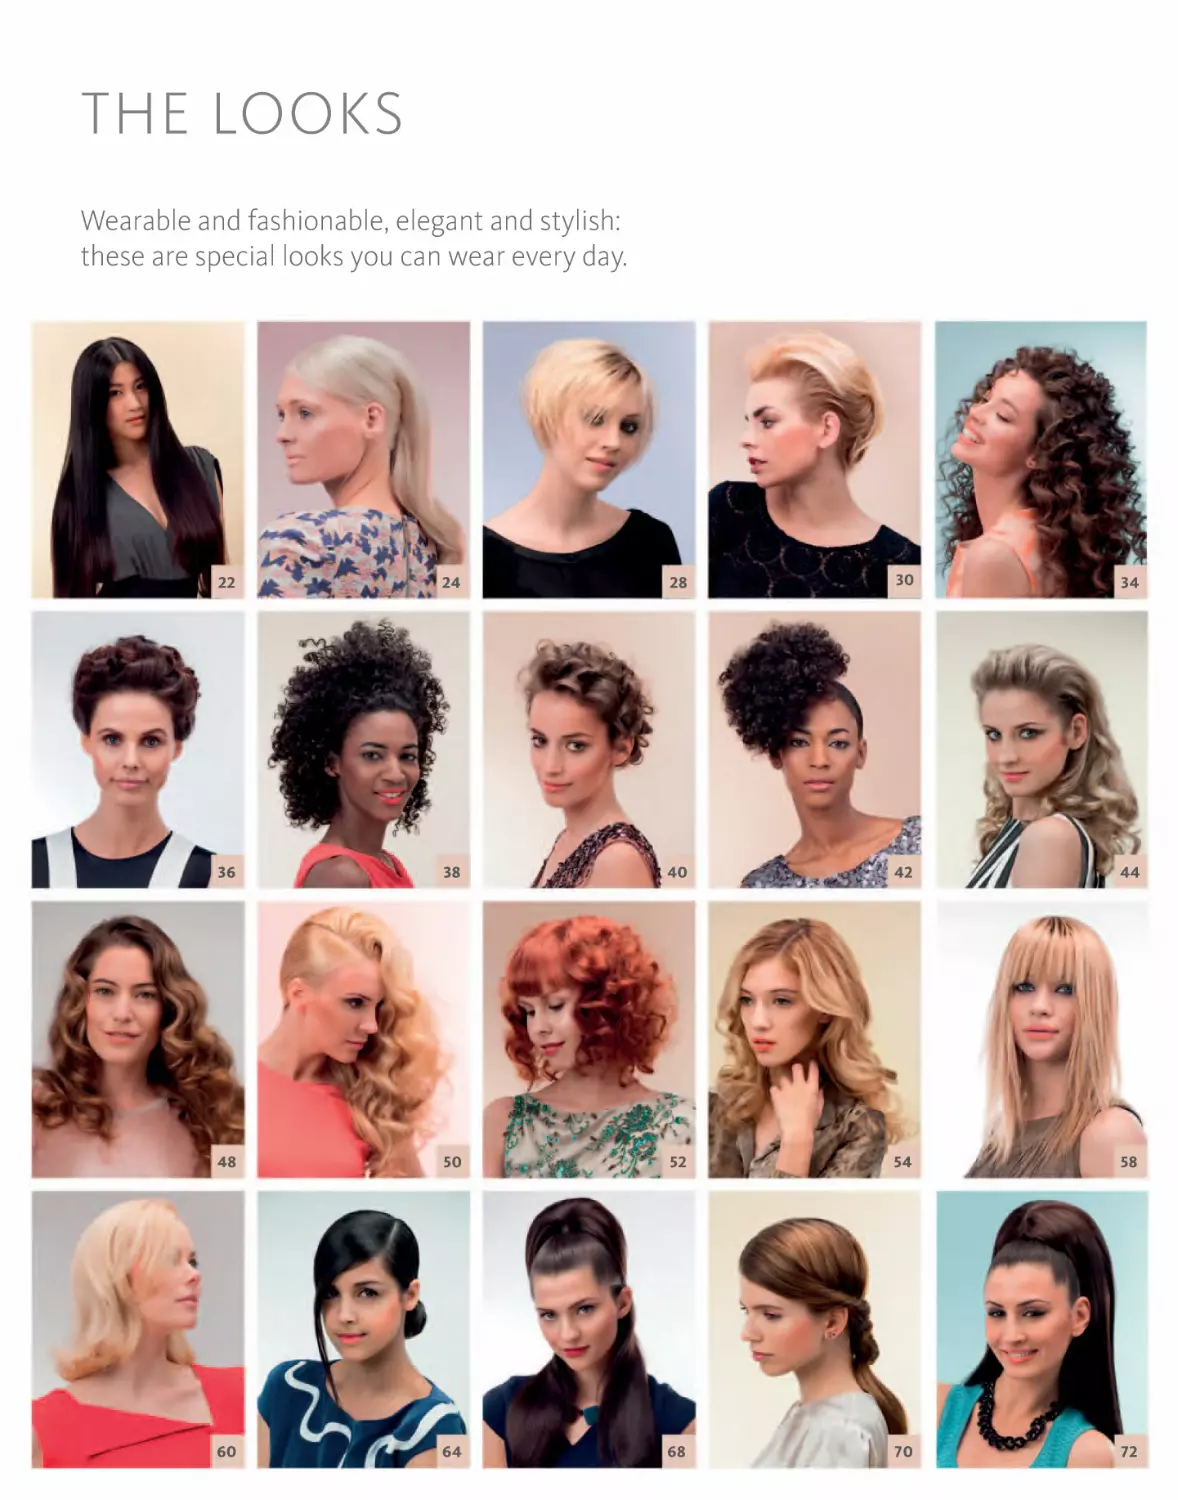
THE LOOKS
Wearable and fashionable, elegant and stylish:
these are special looks you can wear every day.
22
24
28
30
34
36
38
40
42
44
48
50
52
54
58
60
64
68
70
72
74
78
80
82
84
86
88
90
94
96
98
100
102
104
108
110
112
114
116
118
122
124
126
128
130
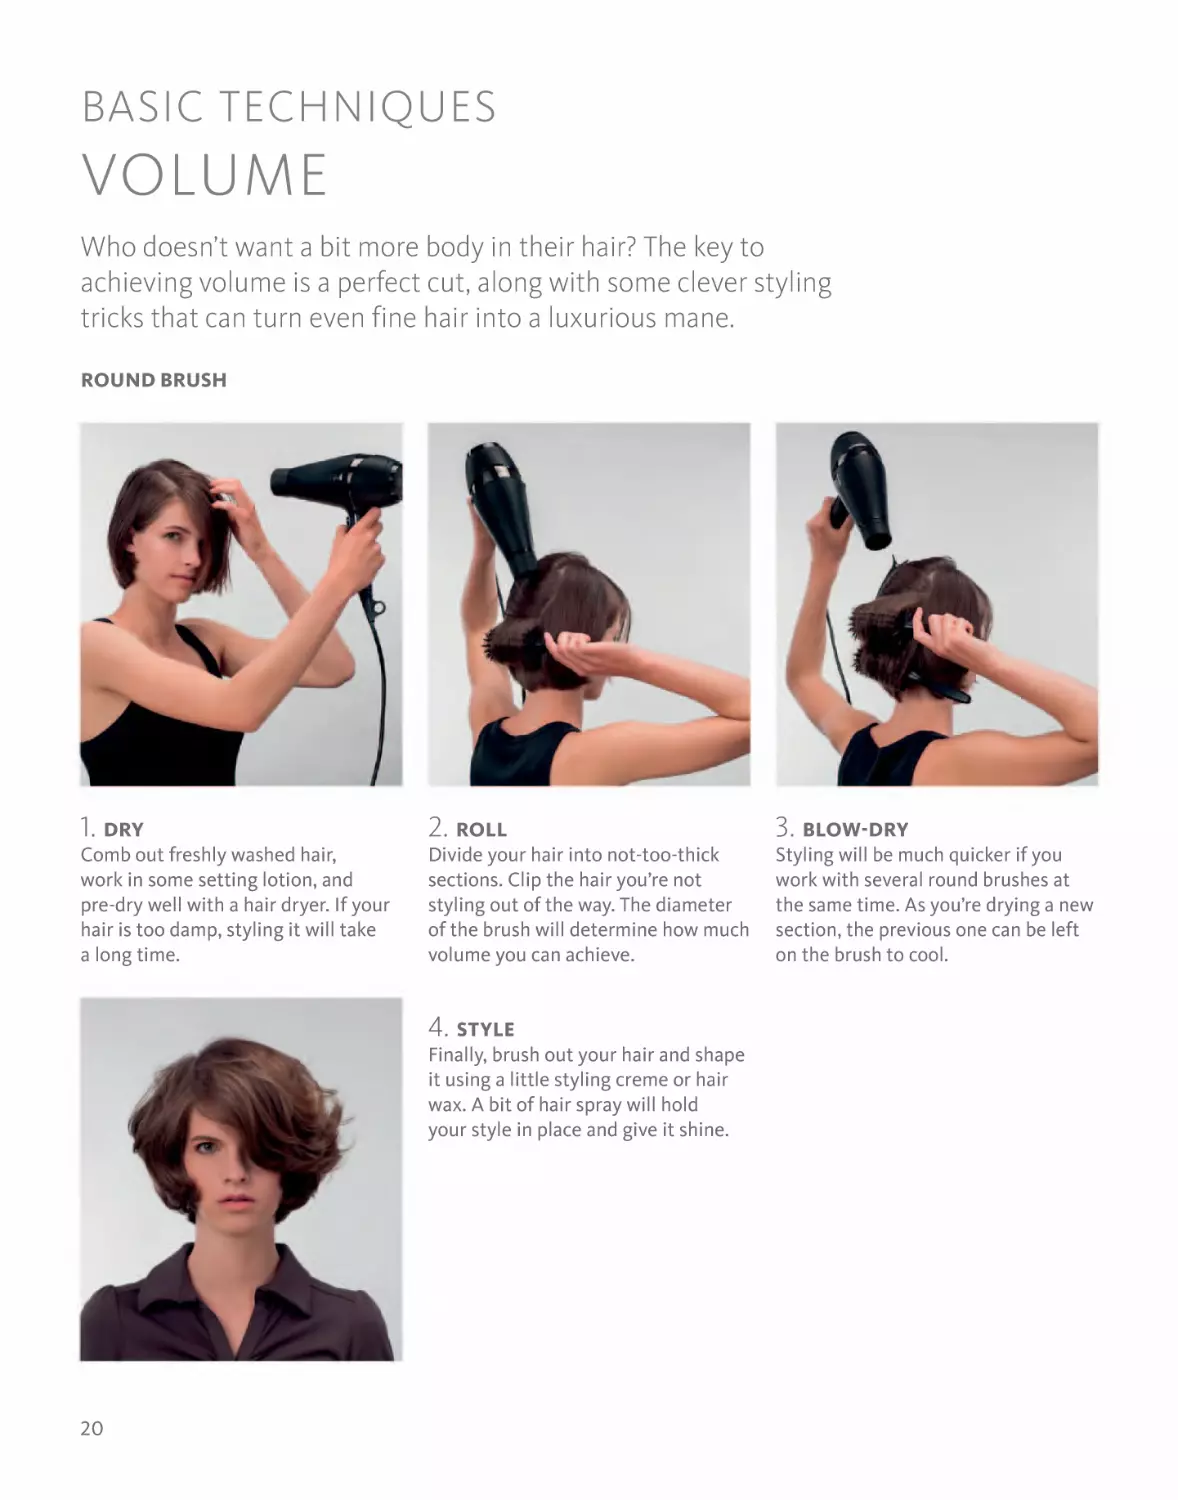
BASIC TECHNIQUES
VOLUME
Who doesn’t want a bit more body in their hair? The key to
achieving volume is a perfect cut, along with some clever styling
tricks that can turn even fine hair into a luxurious mane.
ROUND BRUSH
1. DRY
Comb out freshly washed hair,
work in some setting lotion, and
pre-dry well with a hair dryer. If your
hair is too damp, styling it will take
a long time.
2. ROLL
3. BLOW-DRY
Divide your hair into not-too-thick
sections. Clip the hair you’re not
styling out of the way. The diameter
of the brush will determine how much
volume you can achieve.
Styling will be much quicker if you
work with several round brushes at
the same time. As you’re drying a new
section, the previous one can be left
on the brush to cool.
4. STYLE
Finally, brush out your hair and shape
it using a little styling creme or hair
wax. A bit of hair spray will hold
your style in place and give it shine.
20
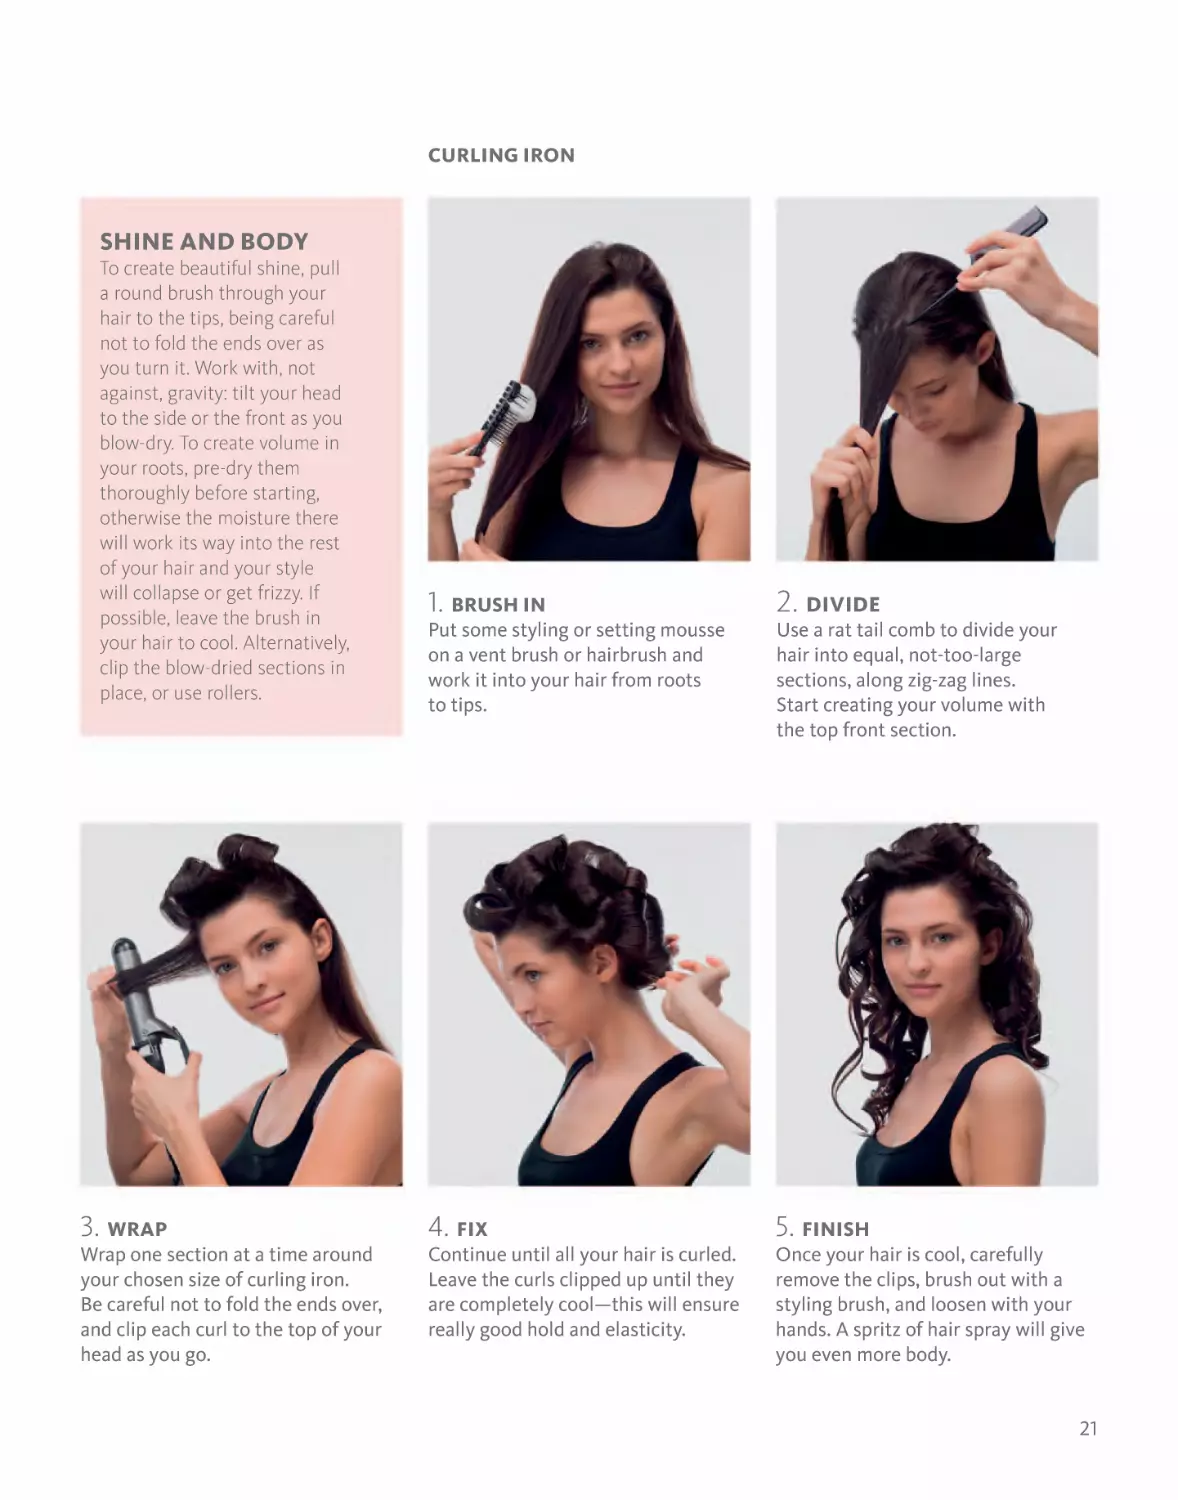
CURLING IRON
SHINE AND BODY
To create beautiful shine, pull
a round brush through your
hair to the tips, being careful
not to fold the ends over as
you turn it. Work with, not
against, gravity: tilt your head
to the side or the front as you
blow-dry. To create volume in
your roots, pre-dry them
thoroughly before starting,
otherwise the moisture there
will work its way into the rest
of your hair and your style
will collapse or get frizzy. If
possible, leave the brush in
your hair to cool. Alternatively,
clip the blow-dried sections in
place, or use rollers.
3. WRAP
Wrap one section at a time around
your chosen size of curling iron.
Be careful not to fold the ends over,
and clip each curl to the top of your
head as you go.
1. BRUSH IN
Put some styling or setting mousse
on a vent brush or hairbrush and
work it into your hair from roots
to tips.
2. DIVIDE
4. FIX
5. FINISH
Once your hair is cool, carefully
remove the clips, brush out with a
styling brush, and loosen with your
hands. A spritz of hair spray will give
you even more body.
Continue until all your hair is curled.
Leave the curls clipped up until they
are completely cool—this will ensure
really good hold and elasticity.
Use a rat tail comb to divide your
hair into equal, not-too-large
sections, along zig-zag lines.
Start creating your volume with
the top front section.
21
MEGA MANES
Very long, thick hair is so heavy it can sometimes lose a bit of
volume at the roots. But the right styling products and a neat
backcombing trick will give your long locks more body.
SILKY SHINE
Very long hair can often
lose its shine, as the lengths
and ends get older over the
years, and go through various
stresses. A shine spray provides
a quick solution. Spray very
sparingly (!) onto hair; its
combination of natural and
silicone oils will give you a
lovely instant gleam.
1. SMOOTH
To give hair a beautiful shine, smooth
the body and ends of your hair with a
little styling cream. Rub the cream
between your palms and run them
through your hair.
2. ADD MOUSSE
For more volume on top, massage
a golf-ball-sized amount of mousse
into your roots with both hands.
For thermoactive products, give your
hair a quick blast with a hair dryer.
3. BACKCOMB
Lift the hair in sections with your
hand and backcomb using a rat
tail comb. Then brush through the
surface hair with a hairdresser’s brush
to make the hair smooth again.
22
VOLUME TWIST WITH IMPACT
Platinum blonde hair suits a standout look, and this style is
futuristic and very cool. The updo variation, with a coil of hair
pinned to the back of your head, gives the whole thing a classical
Roman touch.
1. DIVIDE
2. FIX
Make a horizontal part with a comb
below your crown, from ear to ear, and
tie back the lower section into a high
ponytail with a transparent hairband.
Make a low, short side part and sweep
your hair around the sides of your
head, fixing it at the back on each side
of the ponytail.
3. BACKCOMB
Thoroughly backcomb the middle
section on the top of your head with
a rat tail comb. A little structural
spray will give hair much more grip
and make it easier to style.
HOW TO BACKCOMB
Holding a section of hair by
the ends, insert a rat tail comb
close to the roots and pull
down several times against
the direction of growth. The
individual hairs will mesh
together, giving hair more grip
and volume. Important: if you
are backcombing every day,
you will need some intensive
hair care.
24
4. BRUSH SMOOTH
Use a styling brush to brush the
surface of the backcombed hair
smooth, and let it fall over the pinned
sections on the back of your head. Fix
in place with hair spray.
Variation: twist
the ponytail into
a loose coil and
pin it in place.
The ends should
remain visible.
25
1 CUT—4 LOOKS
AN ADAPTABLE PIXIE CUT
Short, but anything but boring: that’s the best way to describe the
classic pixie. Don’t be fooled into thinking that its length means
there’s no room for change. Here are the prettiest variations on the
timeless short cut.
1
26
1. ELEGANT
Styled completely off of the face,
this pixie looks sophisticated and
glamorous, and has what it takes
for a really elegant evening look.
Here’s how to style it: work some
styling mousse or setting spray into
damp hair and brush it toward the
back of your head with a vent or
paddle brush as you blow-dry. Rub
a little styling creme between your
palms and style the sides back close
against your head. You can also give
the front section a quick backcomb
for more volume. Set in place with
lots of hair spray.
2
4
3
2. TOUSLED
This is a casual, playful look—and it’s
incredibly easy to style, even if you’re
pressed for time in the morning.
Blow-dry your hair, directing the air
forward, backward, right, and left
alternately. Rub a little hair wax
between your palms and run your
hands through your hair to tousle it.
3. SLEEK
A great, fashionable style that will
take you from day to evening. Here’s
how: use a paddle brush to blow-dry
hair smooth and flat against your
head (for hair with some natural
bounce, you can apply a smoothing
product beforehand). Rub a little
styling creme between your palms
and stroke them over your hair.
4. PUNKY
Every woman should be a bit of a
rebel now and then. Turn your pixie
into a wild, rocky cut. Styling is easy:
distribute some setting mousse
through your hair and blow-dry.
Thoroughly backcomb the middle
section on top of your head with a rat
tail comb, adding structural spray
as you go for extra volume. Fix in
place with hair spray.
27
UNSTRUCTURED MINI BOB
This look is based on a layered, ear-length bob. Our example
shows how much variety a short cut can give you—and with
hair this length, styling takes no time at all.
1. BRUSH IN
Squeeze a golf-ball-sized amount of
styling mousse onto a paddle brush
and brush through towel-dried hair
from root to tip.
PLAYING WITH
COLOR
A great hair color with lots
of shine can really bring a bob
into its own. On blonde hair,
different tones will loosen up
your style. Caution: lowlights—
darker strands—can quickly
look dirty in blonde hair.
Leaving darker roots will give
hair more depth and make it
appear fuller.
28
2. BLOW-DRY
Pre-dry your hair with a hair dryer.
When it’s almost dry, start using a
large round brush—this will give
your hair a lovely shine.
3. STRAIGHTEN
Apply a heat-protection
product to the ends of your hair
before straightening it, turning the
straighteners inward slightly as you
go. Tousle with your hands to finish.
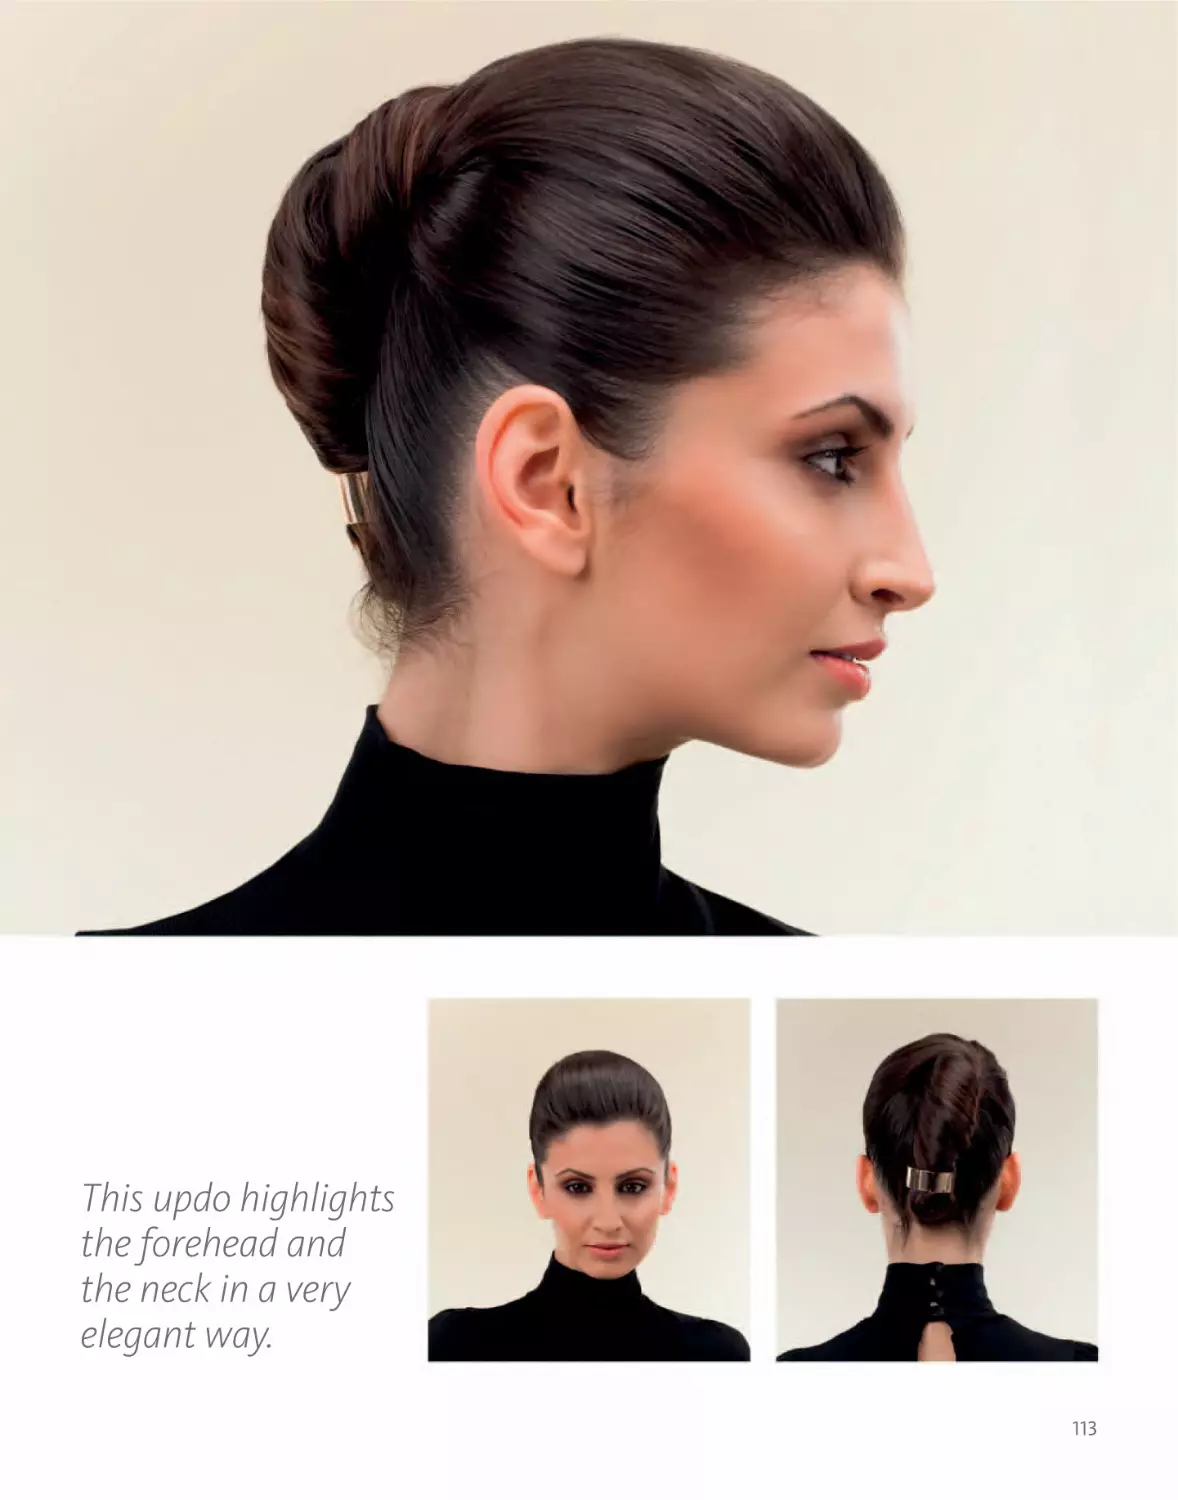
FLOWING UPDO
A contrasting look: from the front and side, this updo almost gives
the impression of being an androgynous short cut, but from the
back it looks soft and feminine.
1. PREPARE
For this look, hair should be at least
shoulder length, and can be straight
or wavy. Comb the front section back
off your forehead, and brush the rest
of your hair smooth.
2. PIN UP
Backcomb a not-too-thin section at
the back of your head, roll it up with
your fingers, and use two crossed
hairpins to pin it into a mini knot.
This will serve as a cushion.
4. BRUSH
Backcomb the front section
thoroughly, then brush it back. Add
definition to your hairline with a little
hair spray. Rub some wax between
your fingertips and distribute
carefully through your hair.
5. FIX
Roll the loose ends of your hair
inward over two fingers and pin
the roll at the nape of your neck with
hairpins. You can structure individual
strands with hair wax.
30
3. DRAPE
Divide the rest of your hair into
strands and pin them to the cushion
knot with hairpins, as invisibly as
possible. Your hair should hang
straight down from the center.
BASIC TECHNIQUES
CURLS
From soft and romantic to a casual, unstructured look, curls flatter
the face and suit everyone. With these techniques, the waves you
want will be literally at your fingertips.
FINGER TWIST WITH HAIRCLIPS
1. DIVIDE
One at a time, separate out relatively
thin strands with a rat tail comb,
spray with blow-dry lotion, and comb
through so that the product covers
the whole length of the strand.
2. TWIST
Use your fingers to twist each strand
around itself, and then around two
fingers, into a not-too-tight curl.
Clip the curl in place with a hairclip.
4. DRY
With your hair dryer on a medium
heat setting, blow-dry your hair
equally all over and let cool
thoroughly—the longer the better.
5. SHAPE
One by one, carefully take
out the hair clips. Don’t brush
the curls out; just loosen them
individually with your fingers.
32
3. FIX
Repeat this process with the rest
of your hair until all the strands have
been curled and clipped to your head.
Spray more blow-dry lotion over the
whole thing.
CURLING IRON
OVERNIGHT CURLS
You can even conjure up the
waves you want in your sleep.
For “rag” curls, curl your hair
around cosmetic or paper
tissues folded lengthwise, and
leave overnight. First, dampen
hair with a little blow-dry spray
or hair spray. Make a center part
that starts at the nape of your
neck, and wrap two sections on
either side around tissues,
knotting the ends when they are
wrapped. Do the same with four
more sections at the front and
above the ears. Take out in the
morning and comb out carefully.
A spritz of hair spray and you’re
good to go!
1. PREPARE
Make a side part and separate your
hair into four large sections. Cover
these one at a time with plenty of
extra-strong hair spray.
2. CURL
3. COOL
Secure these large curls to their
roots, using several bobby pins for
each, and let cool thoroughly. The
longer you leave them, the longer
your look will last.
4. STYLE
Curl each wide section of hair
around a large-barreled curling iron.
Be careful not to fold the ends of your
hair under when curling, as this will
make the end result less attractive.
When they are completely cool,
carefully remove the clips and brush
into shape for soft curls, or just shape
with your fingers for structured,
corkscrew curls.
33
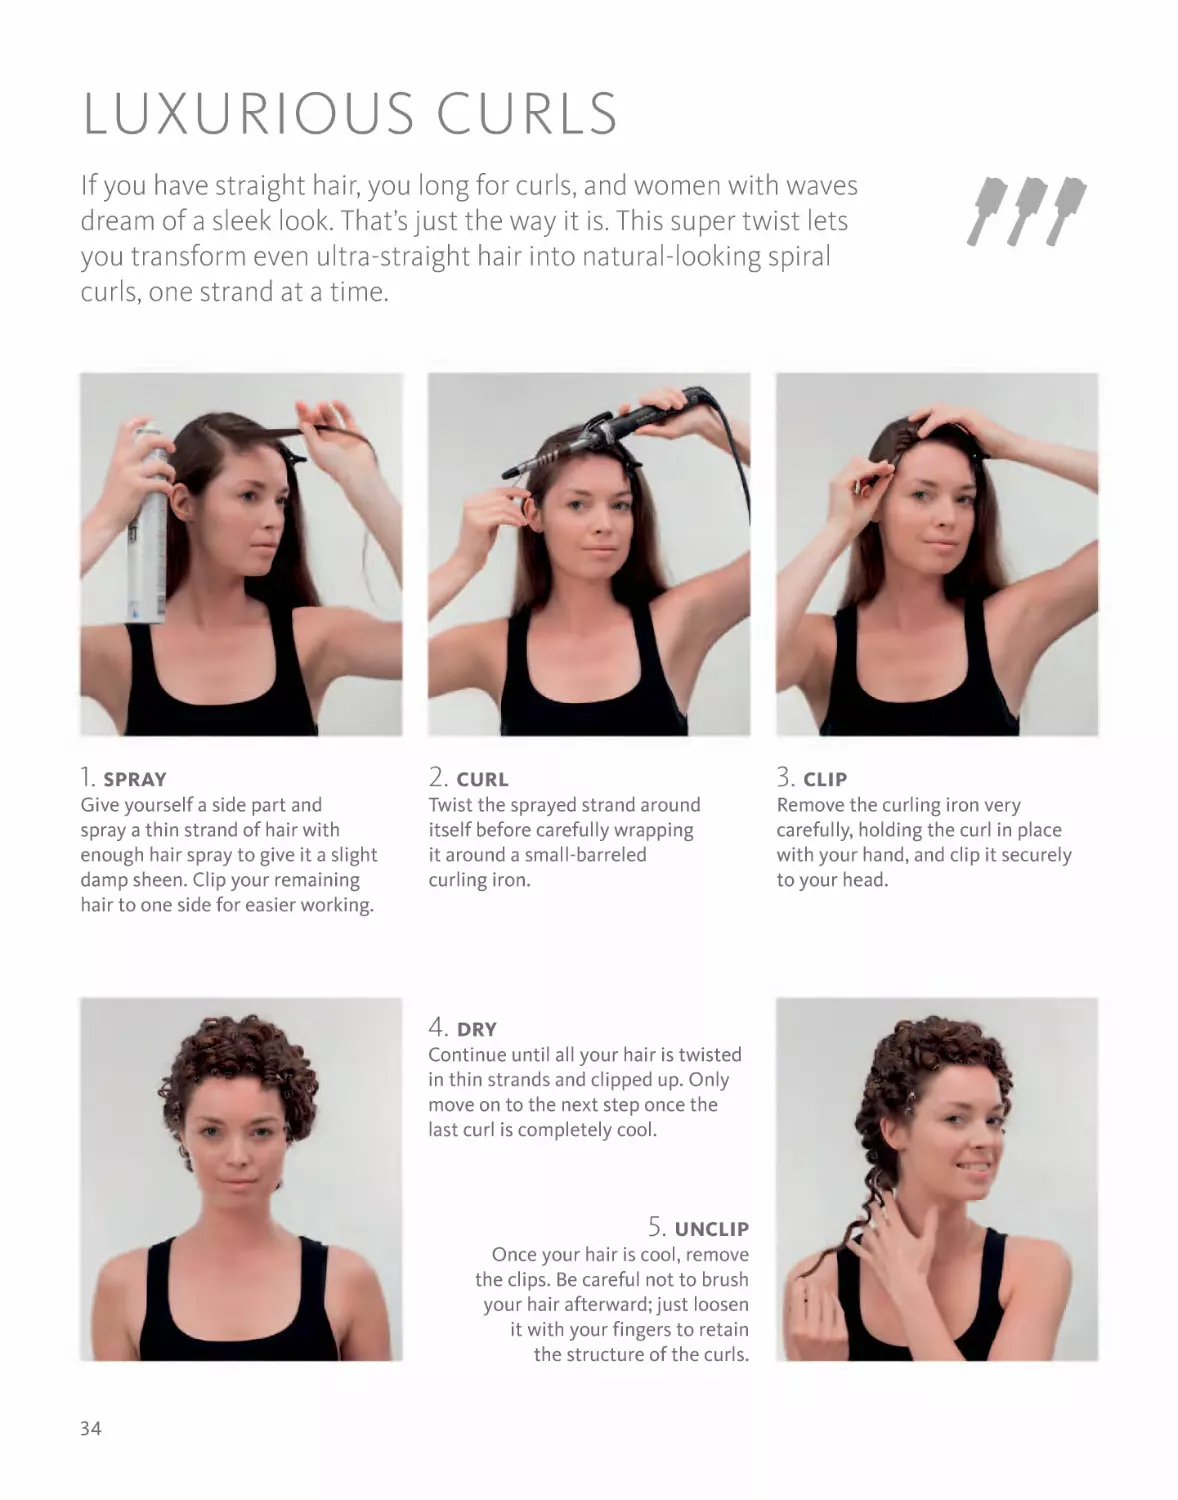
LUXURIOUS CURLS
If you have straight hair, you long for curls, and women with waves
dream of a sleek look. That’s just the way it is. This super twist lets
you transform even ultra-straight hair into natural-looking spiral
curls, one strand at a time.
1. SPRAY
Give yourself a side part and
spray a thin strand of hair with
enough hair spray to give it a slight
damp sheen. Clip your remaining
hair to one side for easier working.
2. CURL
Twist the sprayed strand around
itself before carefully wrapping
it around a small-barreled
curling iron.
4. DRY
Continue until all your hair is twisted
in thin strands and clipped up. Only
move on to the next step once the
last curl is completely cool.
5. UNCLIP
Once your hair is cool, remove
the clips. Be careful not to brush
your hair afterward; just loosen
it with your fingers to retain
the structure of the curls.
34
3. CLIP
Remove the curling iron very
carefully, holding the curl in place
with your hand, and clip it securely
to your head.
UPDO WITH CURLS
This style is great if your hair is at least shoulder-length. It’s an updo
with a difference: small sections are rolled into soft curls with your
fingers and pinned on top of your head. Very feminine—and
extremely glamorous.
1. BACKCOMB
Give yourself a side part. Take
a relatively thin strand from the
top of your head and backcomb it
thoroughly. If your hair is very soft,
add a little structure spray.
2. ROLL
Roll the backcombed section around
two fingers. Make sure the roll isn’t
too tight, and take care to avoid
folding the ends. Hold it in place with
the other hand as you carefully take
your fingers out.
4. LOOSEN
Roll up the rest of your hair section
by section, as described in steps 1–3.
Finally, lift and loosen the curls a little
with the end of a rat tail comb.
36
3. PIN
Fix the roll in place with several bobby
pins. Make sure they disappear into
the hair, and the roll isn’t pressed flat.
AFRO VOLUME
The typical problem for Afro curls and naturally frizzy hair is that
your hair can look like an undefined mass. But you can combat the
cotton candy look. Diffusors and styling products will tame and
define your roots.
1. SET
After washing, spray a thermoactive
blow-dry spray into damp hair. This will
create volume, shine, and structure,
and protect your hair from dryer heat.
2. DRY
Blow-dry your hair using a diffusor
attachment. Holding it against your
hair keeps your curls from fluffing up
in the air stream.
4. PIN
Brush the front section of your
hair back from your forehead and
pin it down with bobby pins two
finger-widths from your hairline.
Fix in place with hair spray, then
remove the pins.
38
3. LOOSEN
Lift individual sections with your
fingers and spray a bit of hair spray or
lacquer onto them from underneath,
creating volume where you want it.
CURLED CHIGNON
Want a soft, feminine, romantic style? Then try this combination
of a bun and gentle curls. The curls take a little bit of time, but the
results are worth it!
1. PREPARE
This style is perfect for at least
shoulder length hair. Your hair
structure doesn’t matter, but if you
have natural curls, you can save time
by skipping the curling step.
2. TIE
Pin two large side sections of hair
out of the way with clips. Tie the rest
of your hair into a ponytail, separate
it into two strands, twist these
together, and tie with a hairband.
4. CURL
Spray the side sections with
hair spray, then curl thin strands
over your middle finger and
clip them up. After ten minutes,
remove the clips and loosen out
the curls with your fingers.
5. FIX
Gently sweep the curly
front sections back and pin
them loosely around the bun.
40
3. KNOT
Roll the twisted ponytail into a round
bun on the nape of your neck. Pin it
securely in place with hairpins, trying
not to let these show.
SIDE POMPADOUR
Tight natural curls or a genuine Afro can be difficult to tame. Here
is an updo that makes a true feature of your curls—and is simple
enough to manage even when you don’t have much time.
1. PREPARE
The pompadour is ideal for chin to
shoulder-length hair. If your hair is
much longer, you will need more
hairpins to turn it into a pompadour.
2. BRUSH UP
Brush all your hair over to one
side of the top of your head and
tie it into a high ponytail using a
transparent hairband.
4. FIX
Use a few hairpins to shape the
pompadour on the front of your head,
making it round and not too high.
42
3. SMOOTH
Create a wet look by spraying a
lot of hair spray onto your hair and
smoothing it down with a styling
comb. This will make even very
curly hair look sleek.
SOFT CURLS WITH VOLUME
Big hair never really goes out of fashion. This style combines soft,
natural waves with volume on the top of your head. The result is a
very feminine look with a touch of Hollywood glamour.
1. BRUSH FLAT
Brush the side sections of your hair
firmly back from your temples with a
styling brush, using lots of hair spray
as you go for hold and shine—it
should create a slightly wet look.
2. BACKCOMB
Backcomb the remaining top
front section of hair thoroughly.
Add structure spray for extra
volume, and to ensure your hair
doesn’t collapse.
4. LOOSEN
Put both hands into the outer
layers of your hair and loosen up
the style a little with a gentle
tousling motion. Add some hair
spray or lacquer to finish.
44
3. BRING TOGETHER
Take the brushed-back sections from
Step 1 and tie them together at the
back of your head with a transparent
hairband. Let the backcombed
section of your hair fall over it.
BASIC TECHNIQUES
WAVES
Looking for gentle, generous glamour waves or a hippyish, crimped
style? Different styling techniques will help you create a mindboggling variety of wavy looks.
ROLLERS
1. PREPARE
Add a little styling mousse to a
paddle or vent brush, and brush
it through wet or dry hair from
roots to tips.
2. ROLL
Starting with the top front section,
wrap your hair around your chosen
size of roller. Use a rat tail comb
to make sure the tips don’t get
folded under.
4. BRUSH OUT
Important: let hair cool well—this will
help your waves last longer. Remove
the rollers and brush your hair back,
starting from your forehead, to shape
it. Hair spray will hold your style
in place.
46
3. DRY
Do the same with the side sections,
and then the hair at the back of your
head, until all your hair is in rollers.
Blow-dry thoroughly with a hair dryer
or hood dryer.
BRAIDING
ROCK AND ROLL
Self-grip or Velcro rollers
come in different sizes, from
½in (12mm) minis to jumbo
rollers 2¾in (73mm) in
diameter. The basic rule is:
the larger the roller, the
softer and larger your waves
will be. The very small ones
let you create curls and
ringlets. Important when
rolling: comb out each strand
well before use so that hairs
don’t get tangled in the fine
plastic hooks. Always roll the
tips cleanly and be careful
not to rip out any hairs as
you roll.
3. TWIST
Continue until you have around eight
to ten braided and heated sections.
Twist each braid into a coil and fix it
to your head with bobby pins.
1. BRAID
Make two parts in your hair to divide
it into three sections. Starting at the
front, braid a thick strand and tie the
end with a hairband.
2. REINFORCE
4. TAKE OUT
5. STYLE
Don’t brush or comb your hair, as this
will destroy the structure. Just shape
it using your fingers and a little
styling creme or hair wax.
Ideally you should keep the braids in
overnight, but a few hours during the
day is fine too. Remove the grips and
hairbands, and gently loosen the
braids with your fingers.
Heat the braid one section at a time
with straighteners, applying gentle
pressure. The heat reinforces the
crimped structure that the braids
will give you.
47
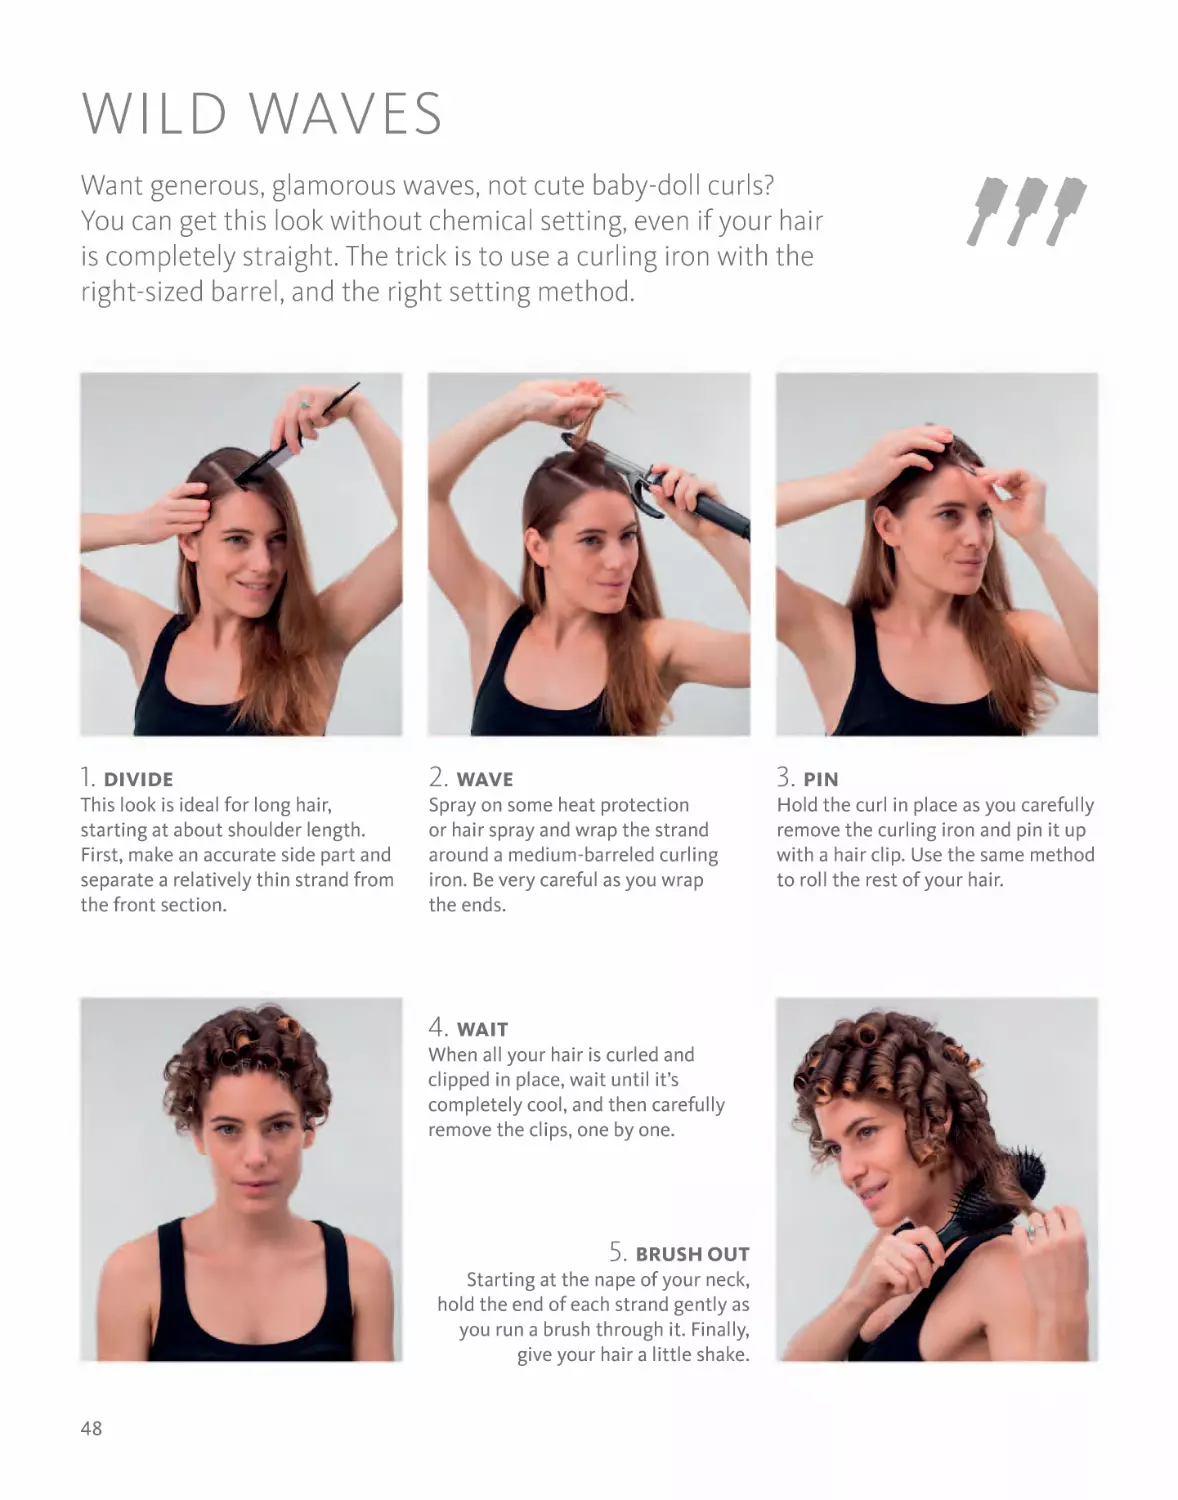
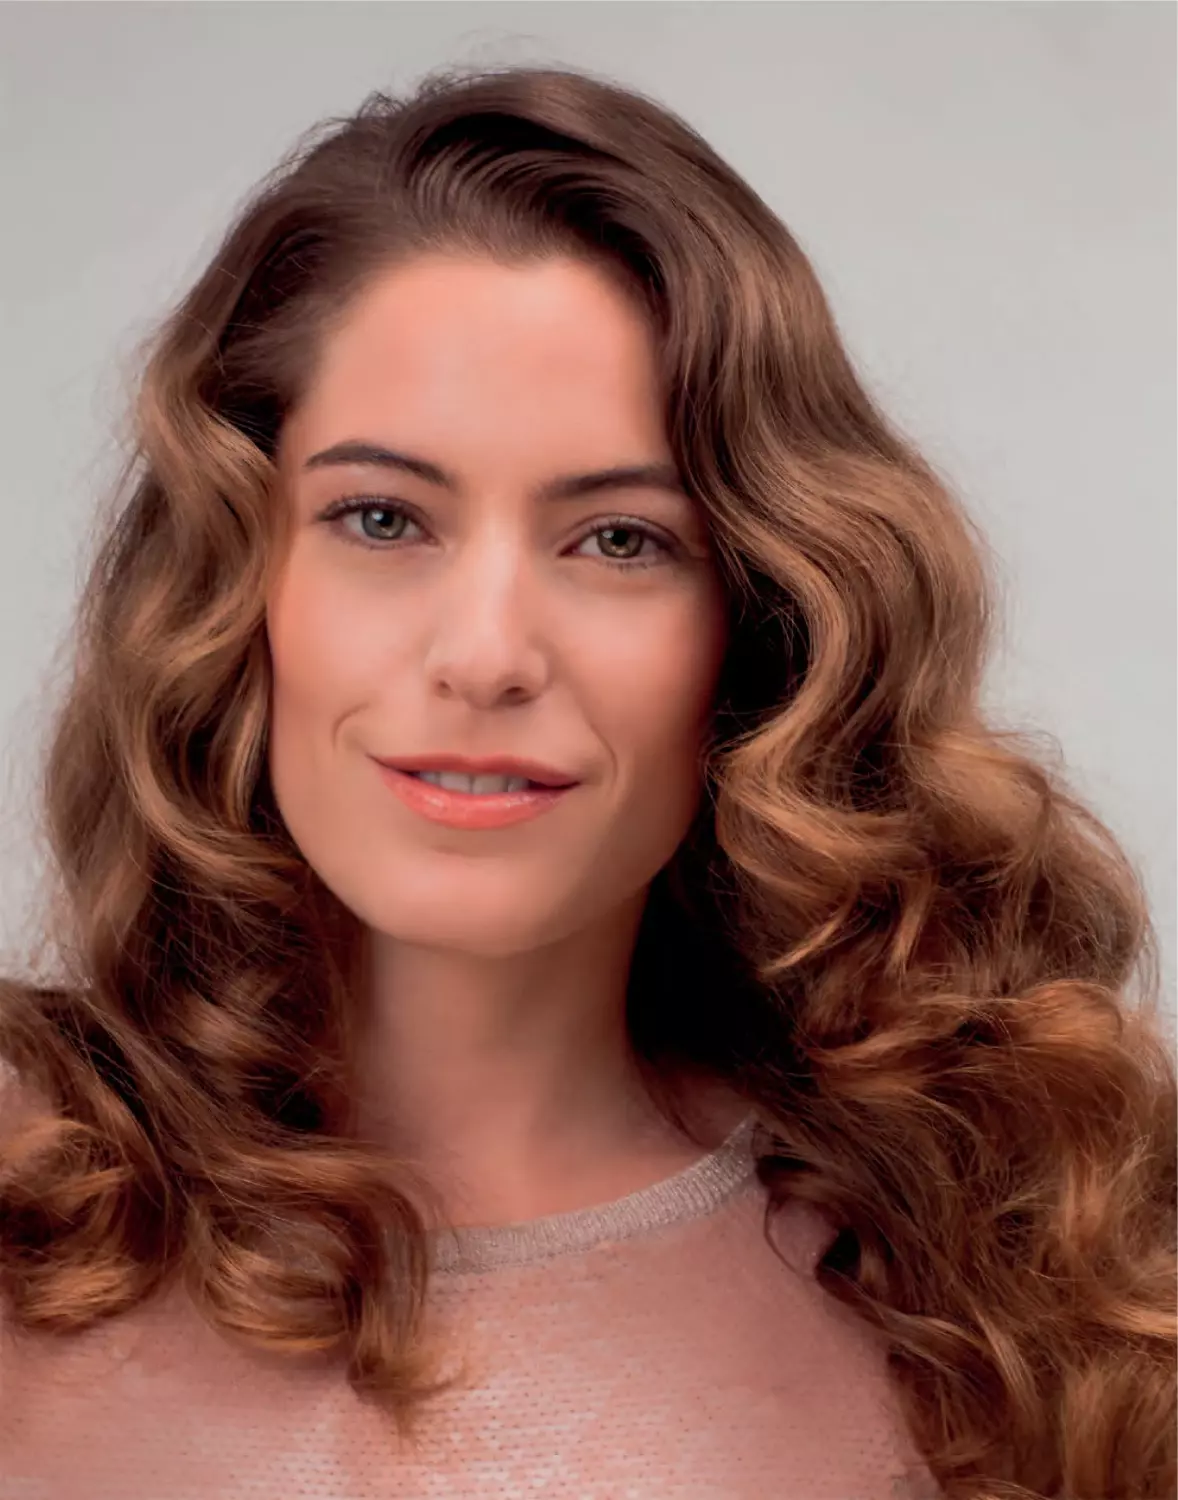
WILD WAVES
Want generous, glamorous waves, not cute baby-doll curls?
You can get this look without chemical setting, even if your hair
is completely straight. The trick is to use a curling iron with the
right-sized barrel, and the right setting method.
1. DIVIDE
This look is ideal for long hair,
starting at about shoulder length.
First, make an accurate side part and
separate a relatively thin strand from
the front section.
2. WAVE
Spray on some heat protection
or hair spray and wrap the strand
around a medium-barreled curling
iron. Be very careful as you wrap
the ends.
4. WAIT
When all your hair is curled and
clipped in place, wait until it’s
completely cool, and then carefully
remove the clips, one by one.
5. BRUSH OUT
Starting at the nape of your neck,
hold the end of each strand gently as
you run a brush through it. Finally,
give your hair a little shake.
48
3. PIN
Hold the curl in place as you carefully
remove the curling iron and pin it up
with a hair clip. Use the same method
to roll the rest of your hair.
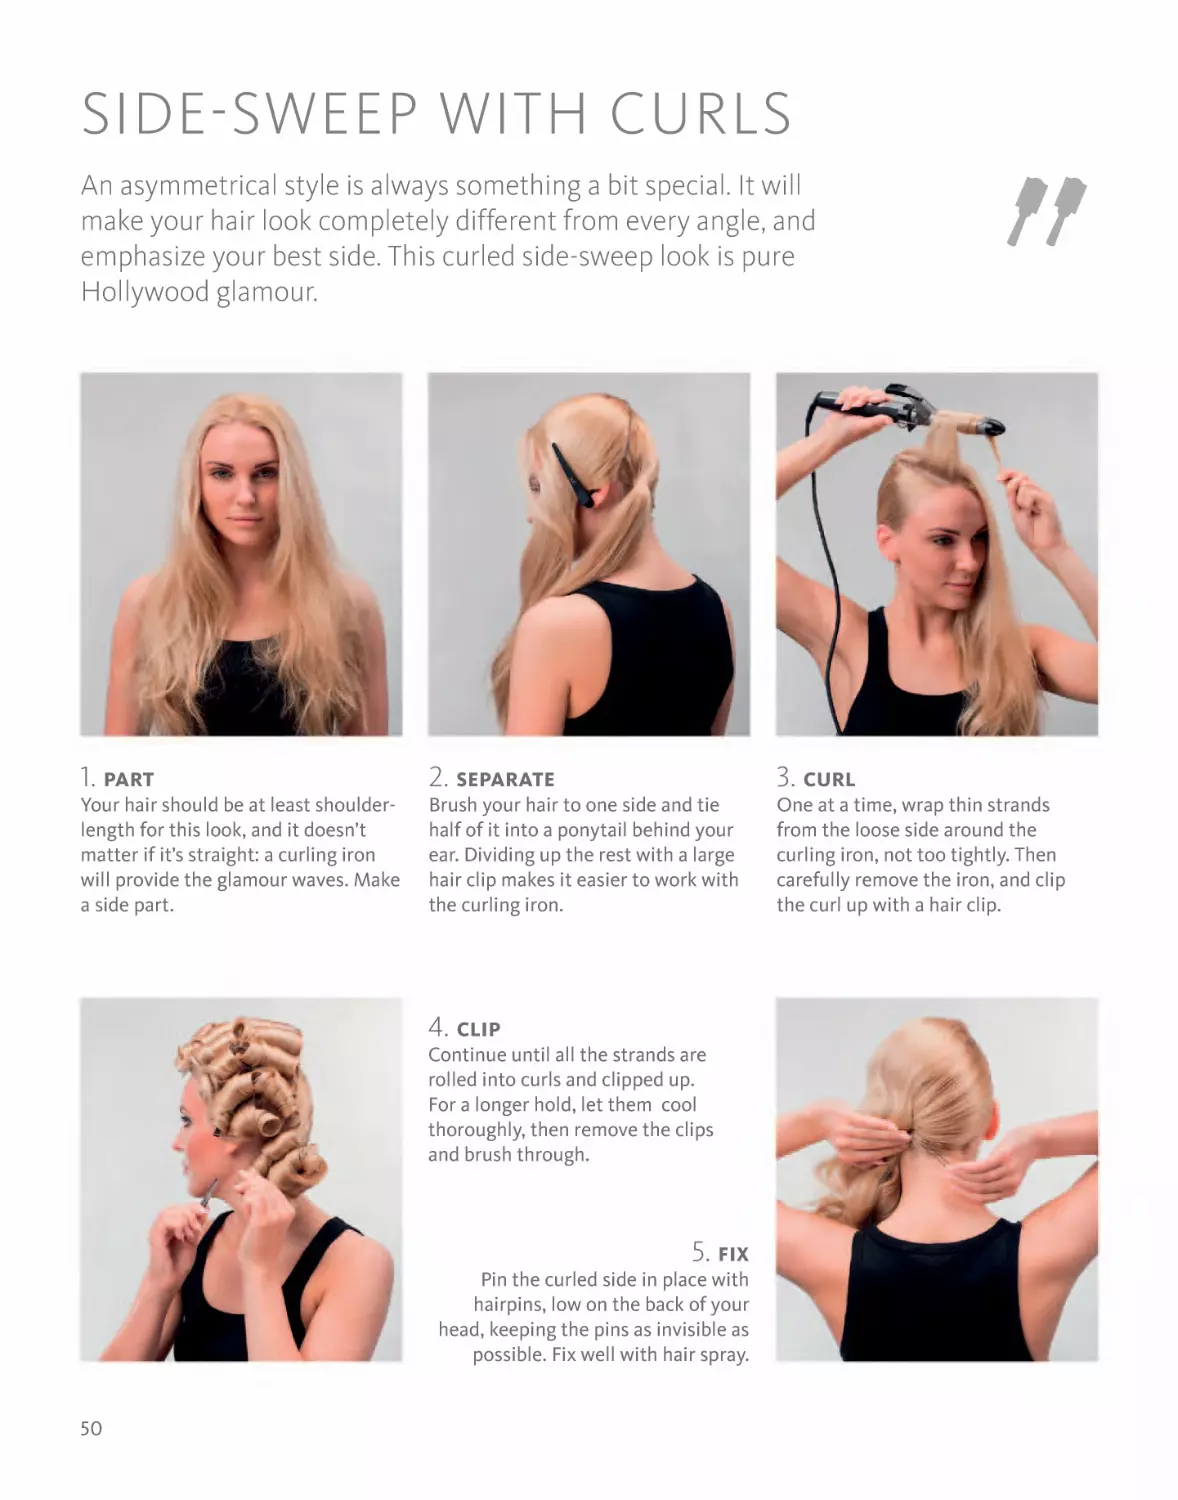
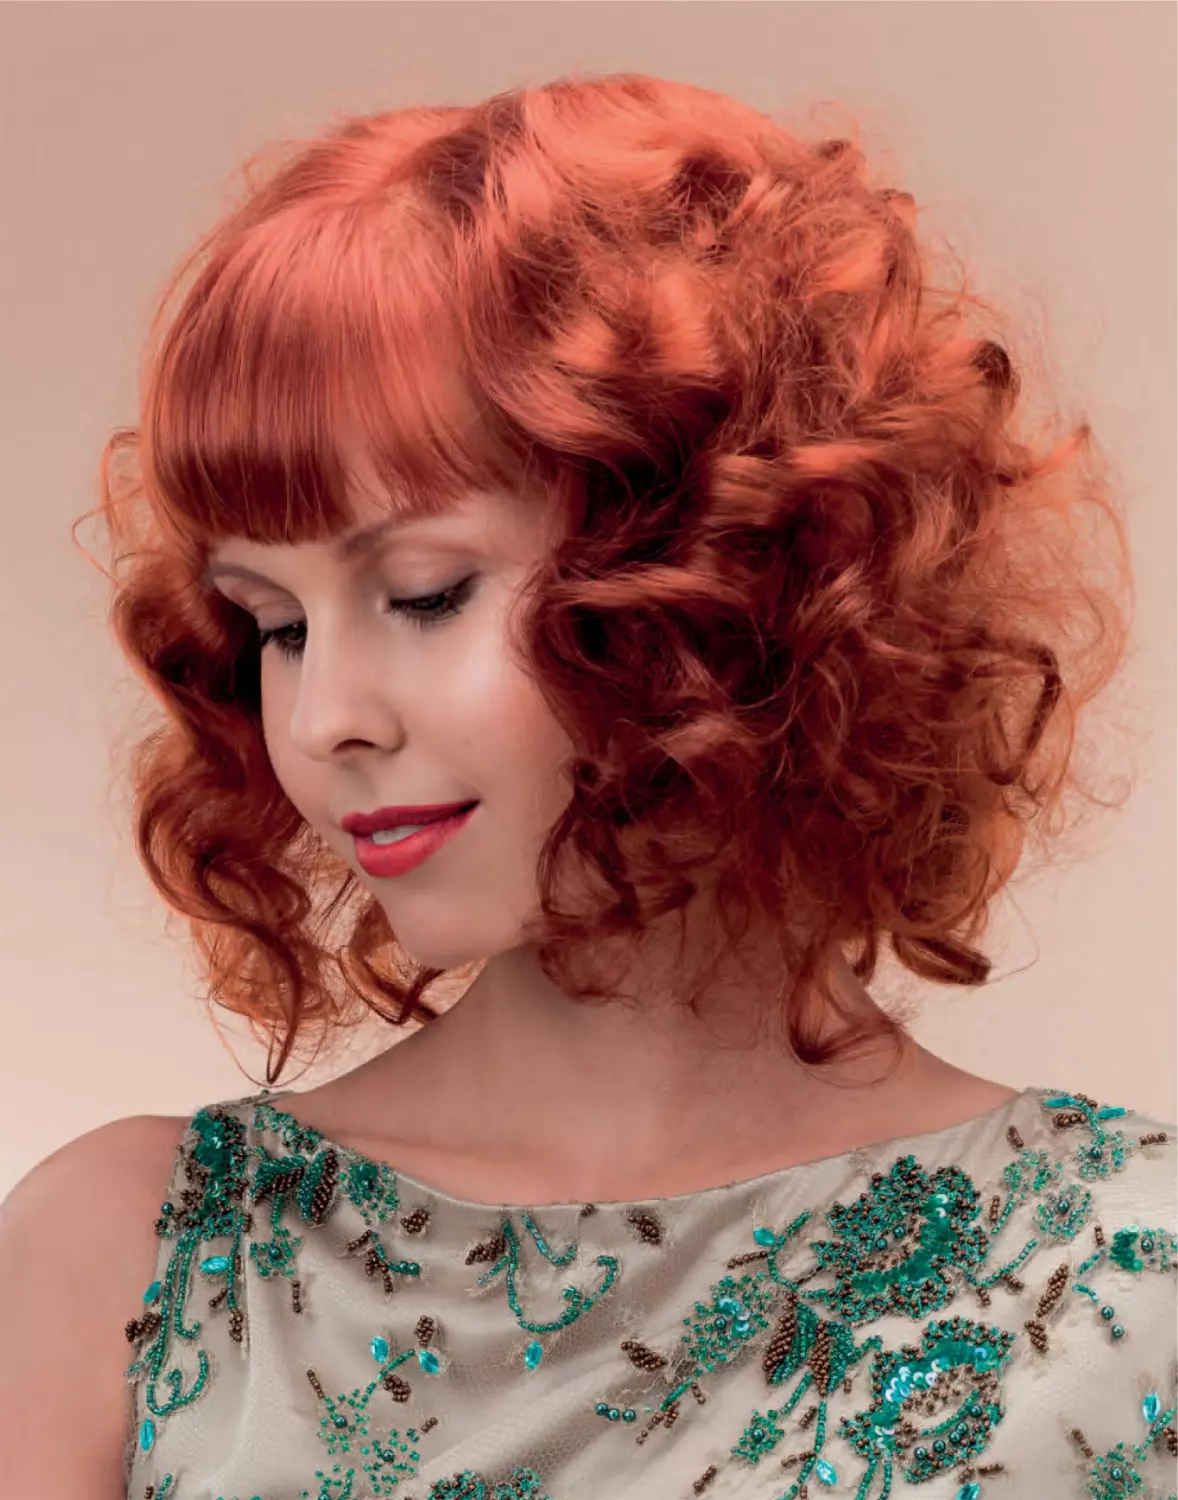
SIDE-SWEEP WITH CURLS
An asymmetrical style is always something a bit special. It will
make your hair look completely different from every angle, and
emphasize your best side. This curled side-sweep look is pure
Hollywood glamour.
1. PART
Your hair should be at least shoulderlength for this look, and it doesn’t
matter if it’s straight: a curling iron
will provide the glamour waves. Make
a side part.
2. SEPARATE
Brush your hair to one side and tie
half of it into a ponytail behind your
ear. Dividing up the rest with a large
hair clip makes it easier to work with
the curling iron.
4. CLIP
Continue until all the strands are
rolled into curls and clipped up.
For a longer hold, let them cool
thoroughly, then remove the clips
and brush through.
5. FIX
Pin the curled side in place with
hairpins, low on the back of your
head, keeping the pins as invisible as
possible. Fix well with hair spray.
50
3. CURL
One at a time, wrap thin strands
from the loose side around the
curling iron, not too tightly. Then
carefully remove the iron, and clip
the curl up with a hair clip.
WAVES WITH CONTRAST
Naturally wavy hair isn’t easy to style, and can end up looking the
same whatever you do. Here is the solution for creating a bit of
variety, with free-flowing curls and straight bangs—and this style
makes shoulder-length hair chin-length.
1. STRAIGHTEN
Divide your bangs into two or three
sections and straighten it with hair
straighteners, using a light pressure.
Important: apply a heat-protection
product before starting.
2. BRUSH OUT
Brush out your curls with a styling
brush, smoothing your hair with your
hand after every stroke. You can fix it
with some extra-strong hair spray.
4. SHAPE
Use your hands to shape your curls
into waves. Take individual sections
in your hand and scrunch gently to
give the waves more structure.
5. PIN
Tie the back section of your hair
into a low ponytail with a transparent
hairband. Turn the end of the ponytail
under and pin it in place as invisibly
as you can with hairpins.
52
3. BACKCOMB
Lightly backcomb your roots to give
the style more volume. Brush the
surface hair smooth again and add
a little hair spray to the roots.
SOFT WAVES
Want “roaring twenties”-style soft waves? Here you go! This curling
technique is suitable for completely straight hair or natural waves,
and is quick and easy to do—no perming involved!
1. PART
These waves look especially luxurious
and glamorous in over-shoulder-length
hair. First, make a side part—the style
looks very different with a center part.
2. PREPARE
Divide your hair into thin sections
and spray it with hair lacquer. This
has a setting effect, and will give your
waves more elasticity and bounce.
4. COOL
Pin each curl to your head with
a hair clip. Let them cool thoroughly,
then remove the hair clips, carefully
brush out your hair, and loosen it into
shape with your fingers.
54
3. WAVE
Wrap the sprayed strands around a
large-barreled curling iron, then
carefully remove the iron while
holding the curl in place with
your hand.
BASIC TECHNIQUES
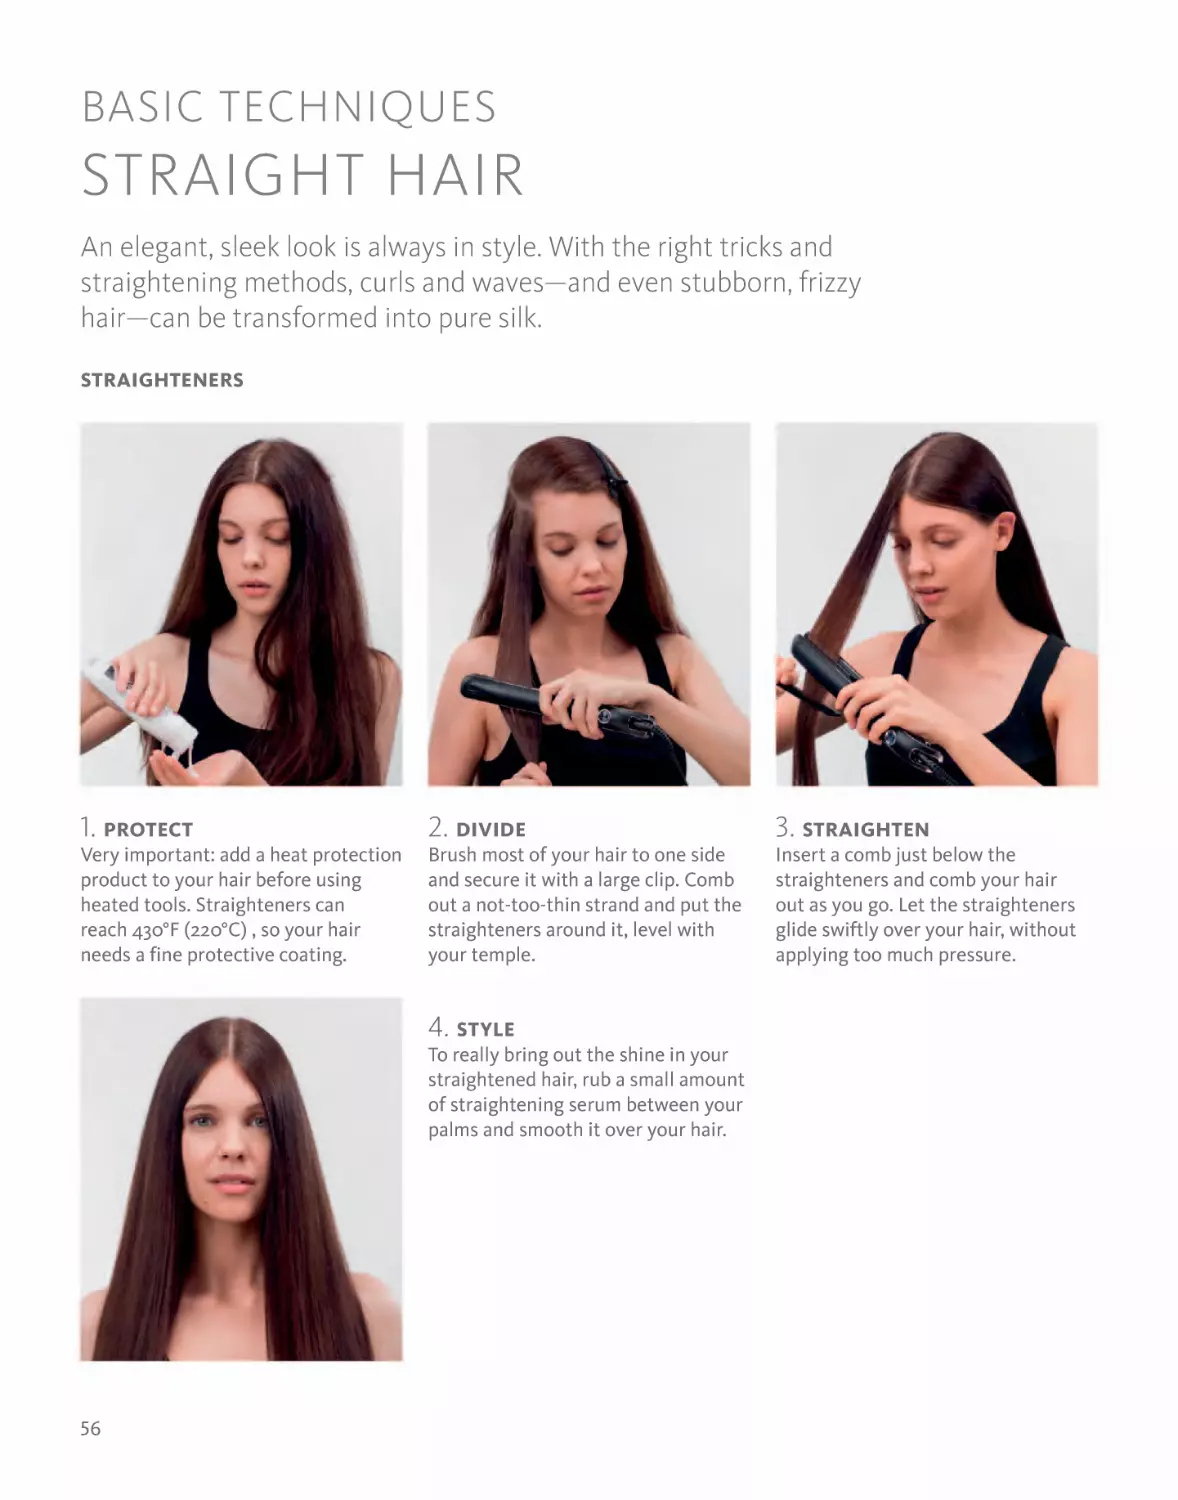
STRAIGHT HAIR
An elegant, sleek look is always in style. With the right tricks and
straightening methods, curls and waves—and even stubborn, frizzy
hair—can be transformed into pure silk.
STRAIGHTENERS
1. PROTECT
Very important: add a heat protection
product to your hair before using
heated tools. Straighteners can
reach 430°F (220°C) , so your hair
needs a fine protective coating.
2. DIVIDE
Brush most of your hair to one side
and secure it with a large clip. Comb
out a not-too-thin strand and put the
straighteners around it, level with
your temple.
4. STYLE
To really bring out the shine in your
straightened hair, rub a small amount
of straightening serum between your
palms and smooth it over your hair.
56
3. STRAIGHTEN
Insert a comb just below the
straighteners and comb your hair
out as you go. Let the straighteners
glide swiftly over your hair, without
applying too much pressure.
ROUND BRUSH
KERATIN
STRAIGHTENING
If you don’t want to straighten
your hair every day, you can
book a “discipline” treatment
with your hairdresser, which will
tame your hair for up to ten
washes, without using chemicals.
A morpho-keratin complex will
give you beautifully straight hair
from the inside out. This is how
it works: an emulsion containing
ceramides and amino acids is
applied to damp hair, shaping it
from within. Wheat proteins and
positively charged polymers
cling to the surface of the hair,
combating frizz and adding shine
from root to tip.
3. ROLL UP
Separate a strand and pull a large
round brush through it several times,
keeping some tension in your hair.
Start blow-drying with the roots and
work toward the ends.
1. PREPARE
Before blow-drying with round
brushes, shampoo and condition
your hair as usual, brush well, and
pre-blow-dry thoroughly to save time.
2. BRUSH IN
4. DRY
5. STYLE
Finally, brush out your straightened
hair, shape it as desired, and hold it in
place with some shine hair spray.
It’s quicker to work with several
round brushes, if you have them.
Important: always leave the brush
to cool in your hair for awhile to
give the style more hold.
Add some blow-dry mousse to a
brush and brush it into your hair from
root to tip. This will give your style
hold, and protect your hair from heat
and frizz.
57
SLEEK WET-LOOK
Your hair doesn’t always need to be super shiny. This deliberately
casual, just-got-out-of-bed look is very hip and gives long hair a
structured but wild look.
1. PROTECT
Make a center part, comb your hair
straight, and apply a heat protection
product (gel or spray) all over it.
Pay particular attention to the
sensitive tips.
2. STRAIGHTEN
Straighten your hair, sliding the
straighteners lightly over thin sections.
Keep the straighteners at the same
angle all the way to the tips for
perfectly straight hair.
4. STYLE
Rub the serum between your palms
and work it into your hair, from ear
level down. Caution: don’t add any
product to your roots; it will make
your hair look greasy.
58
3. COMB
Finally, straighten your bangs and
carefully comb your hair out. Squeeze
a little styling serum into your hand.
MID-LENGTH STYLE
This long bob is also known as a clavicut. Clavicle is another
word for collarbone, and that’s exactly where your hair will end.
This length flatters your face, while your hair is still long enough
to be styled into a ponytail or updo.
1. BACKCOMB
First brush your hair well, then
thoroughly backcomb the hair on the
top of your head. Thin, fine hair may
need a bit of structural spray as well.
2. SPRAY
Backcomb the sides and back with
a rat tail comb as well. Add some hair
spray as you go to give your
hair more grip and a longer hold.
4. SHAPE
Use a hair dryer and brush to flick the
ends of your hair outward. Carefully
remove the clips and brush the style
through gently, or just shape with
your hands.
60
3. SMOOTH
Brush the surface of your hair and
clip the side sections behind your
ears. Use a lot of hair spray and the
flat of your hand to smooth them
down, and let the spray dry.
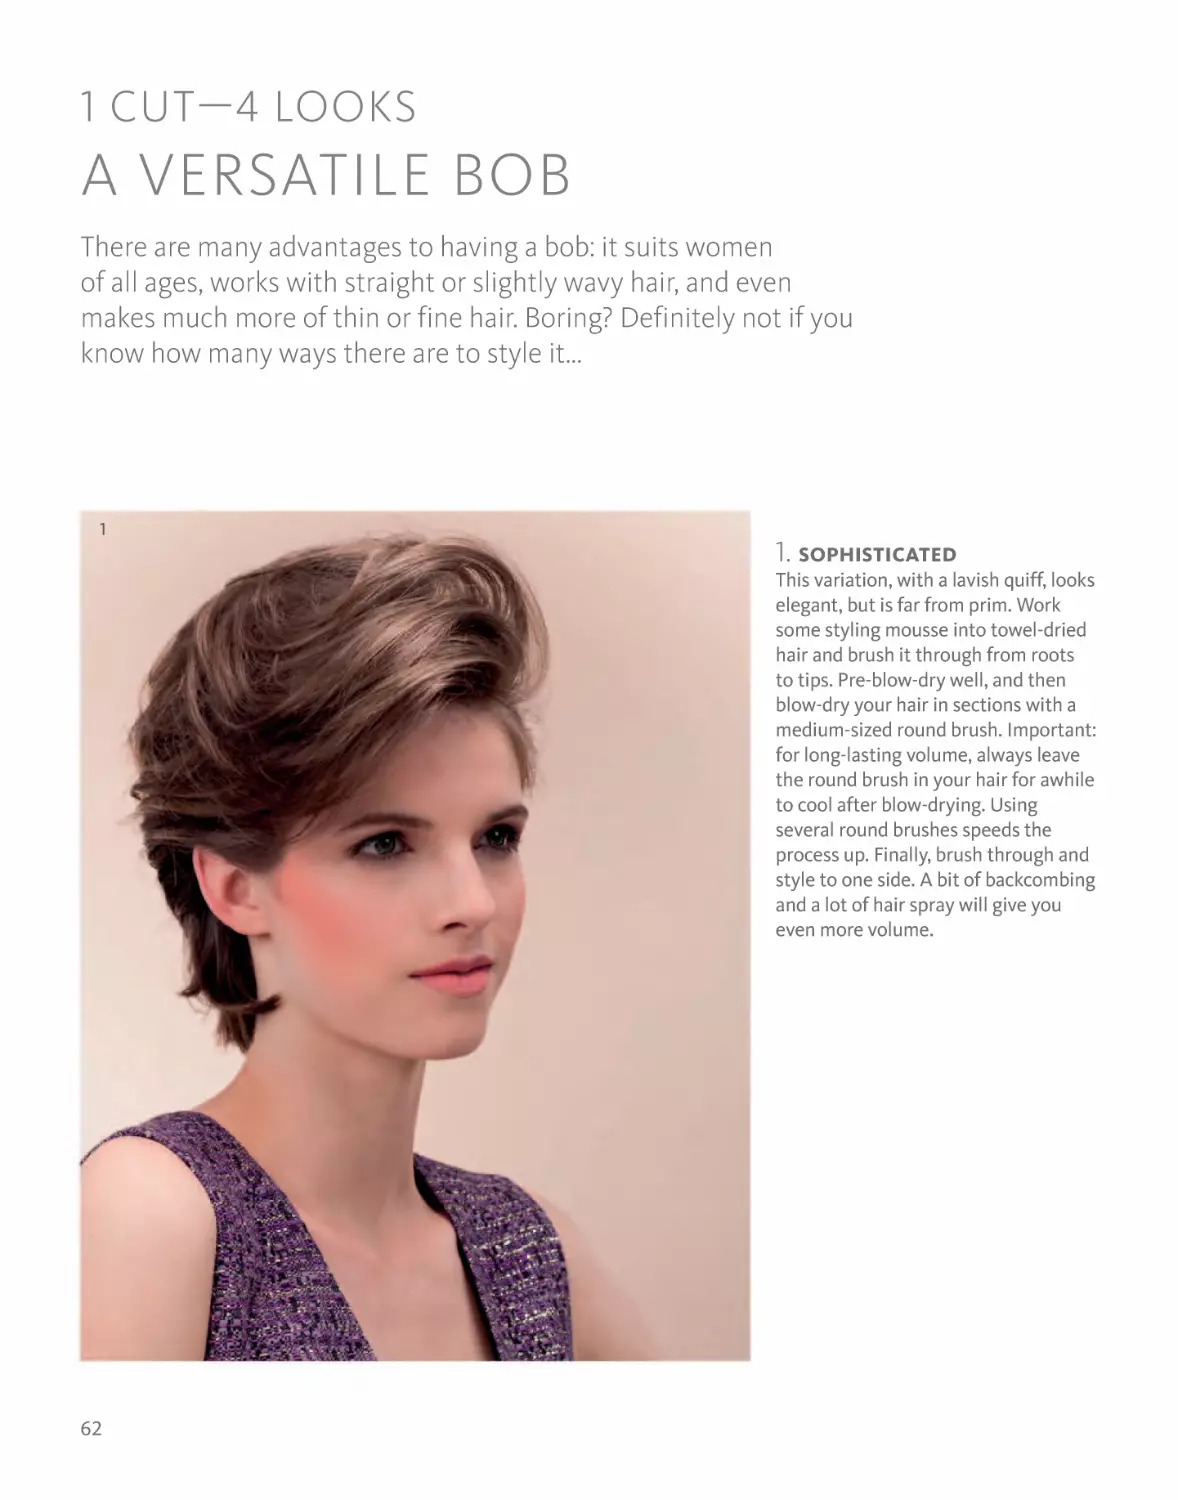
1 CUT—4 LOOKS
A VERSATILE BOB
There are many advantages to having a bob: it suits women
of all ages, works with straight or slightly wavy hair, and even
makes much more of thin or fine hair. Boring? Definitely not if you
know how many ways there are to style it...
1
1. SOPHISTICATED
This variation, with a lavish quiff, looks
elegant, but is far from prim. Work
some styling mousse into towel-dried
hair and brush it through from roots
to tips. Pre-blow-dry well, and then
blow-dry your hair in sections with a
medium-sized round brush. Important:
for long-lasting volume, always leave
the round brush in your hair for awhile
to cool after blow-drying. Using
several round brushes speeds the
process up. Finally, brush through and
style to one side. A bit of backcombing
and a lot of hair spray will give you
even more volume.
62
2
4
3
2. CLASSIC
Rounded and pretty, blow dried to
give you lots of volume, this is an
office-friendly bob. To style: work
some setting mousse into damp hair
and pre-blow-dry thoroughly. Blow-dry
in sections over a large round brush,
so that your hair turns under slightly.
Bring the side bangs down over your
forehead and use hair spray to give the
whole look more hold.
3. PLAYFUL
A bit of a wave will give your bob
a soft, feminine look. Work styling
mousse into damp hair and blow-dry
with medium-sized round brushes, or
Velcro/heated rollers. Let your hair
cool before removing the rollers.
Brush out and tease into shape with
fingers and a little styling creme. Fix
with hair spray.
4. TRENDY
This bob looks sleek and narrow. Use
straighteners to straighten your hair
in sections, turning the ends under
slightly as you go. Brush through,
then rub a little styling creme
between your palms and smooth it
over your hair. A spritz of shine spray
will keep it looking glamorous.
63
SIDE CHIGNON
Very sophisticated, very classic—but with a playful edge: the
difference in this asymmetric chignon lies in the low side-part
and the strands falling low over the forehead.
1. BRUSH
Give yourself a low side-part.
Separate a wide section of hair above
your right ear and pin it to one side.
Tie the rest of your hair back into an
off-center ponytail.
2. LOOP
Put two fingers under your ponytail
and wrap it around them, not too
tightly, to form a loop. Then remove
your fingers and hold the chignon
in place.
3. PIN
Pin the loop in place invisibly using
several hairpins. Then unpin the
section above your ear, backcomb it,
and smooth the surface back down
with a styling brush.
THE DAY AFTER
Hair can be soft and slippery
just after it’s been washed.
For an updo, however, it
needs a bit of grip and
volume. Setting mousse,
structure spray, or salt spray
will make your hair easier to
shape and style. If you can,
wash your hair the night
before for easier styling.
64
4. CONCEAL
Wrap the loose section around the
chignon several times, like a hairband
made of your own hair. Fix securely in
place with hairpins. Pull out a thin
strand at the front.
Variation:
bringing your
hair down over
your forehead like
a side bang makes
for an even more
elegant look.
65
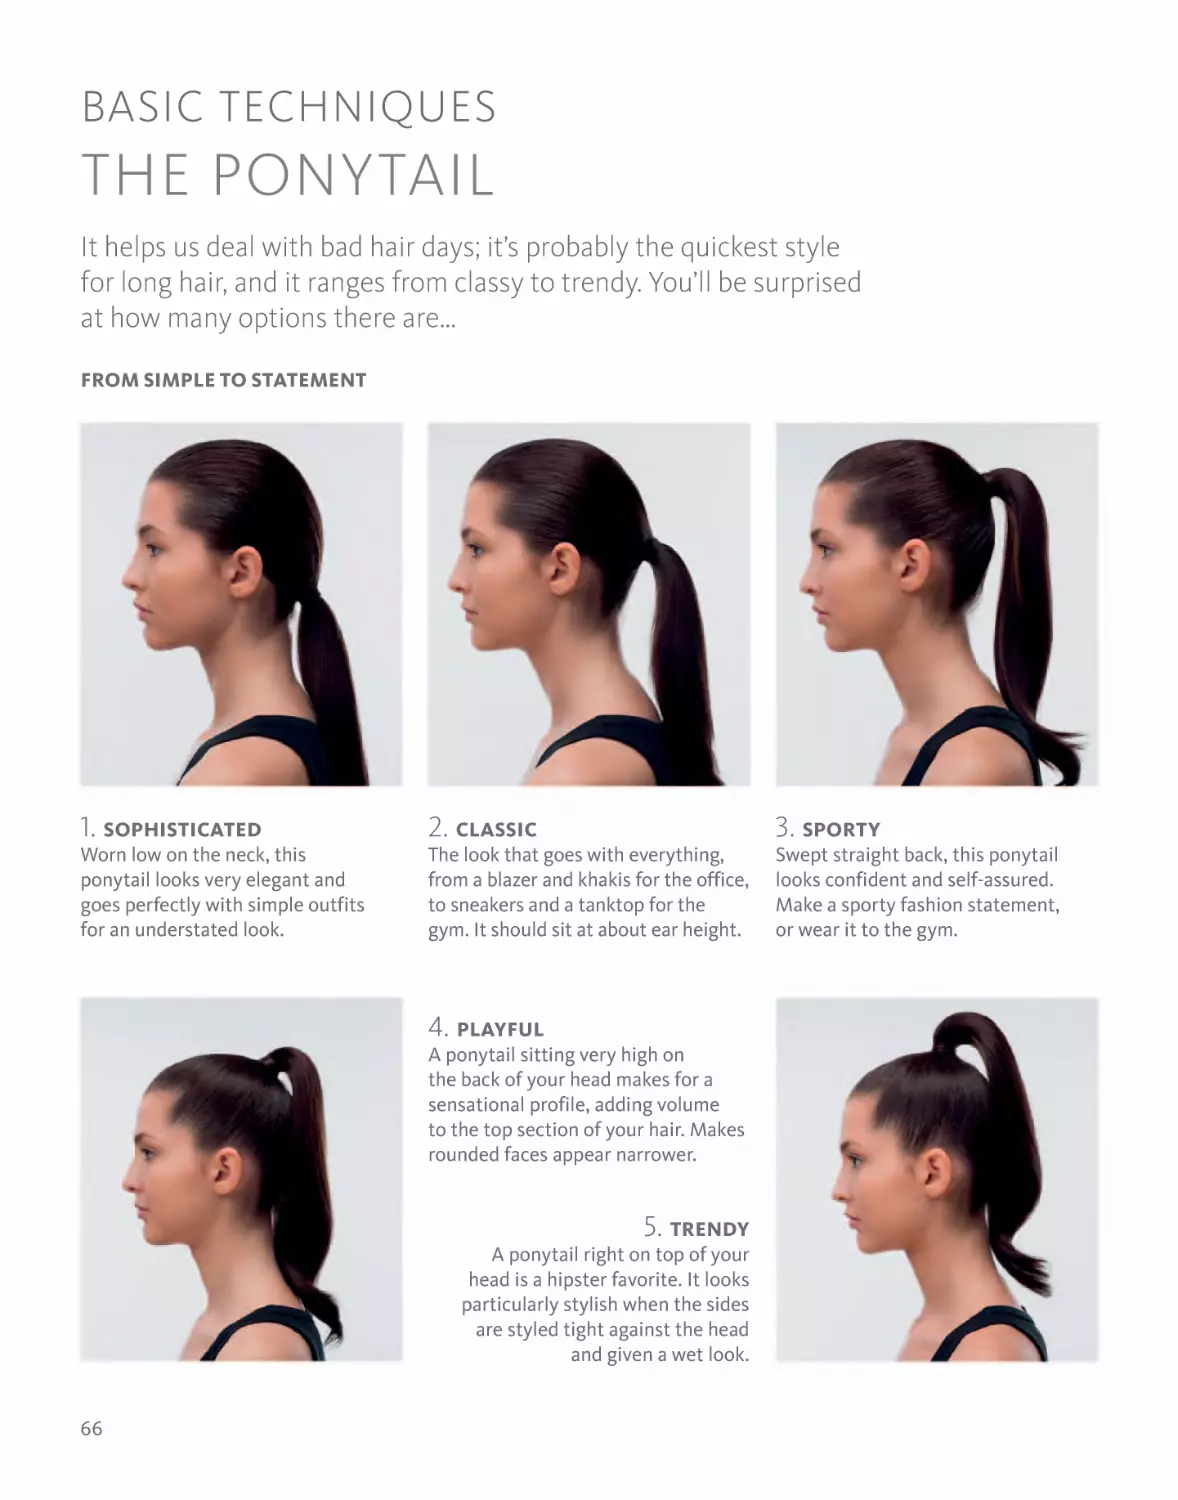
BASIC TECHNIQUES
THE PONYTAIL
It helps us deal with bad hair days; it’s probably the quickest style
for long hair, and it ranges from classy to trendy. You’ll be surprised
at how many options there are...
FROM SIMPLE TO STATEMENT
1. SOPHISTICATED
Worn low on the neck, this
ponytail looks very elegant and
goes perfectly with simple outfits
for an understated look.
2. CLASSIC
The look that goes with everything,
from a blazer and khakis for the office,
to sneakers and a tanktop for the
gym. It should sit at about ear height.
4. PLAYFUL
A ponytail sitting very high on
the back of your head makes for a
sensational profile, adding volume
to the top section of your hair. Makes
rounded faces appear narrower.
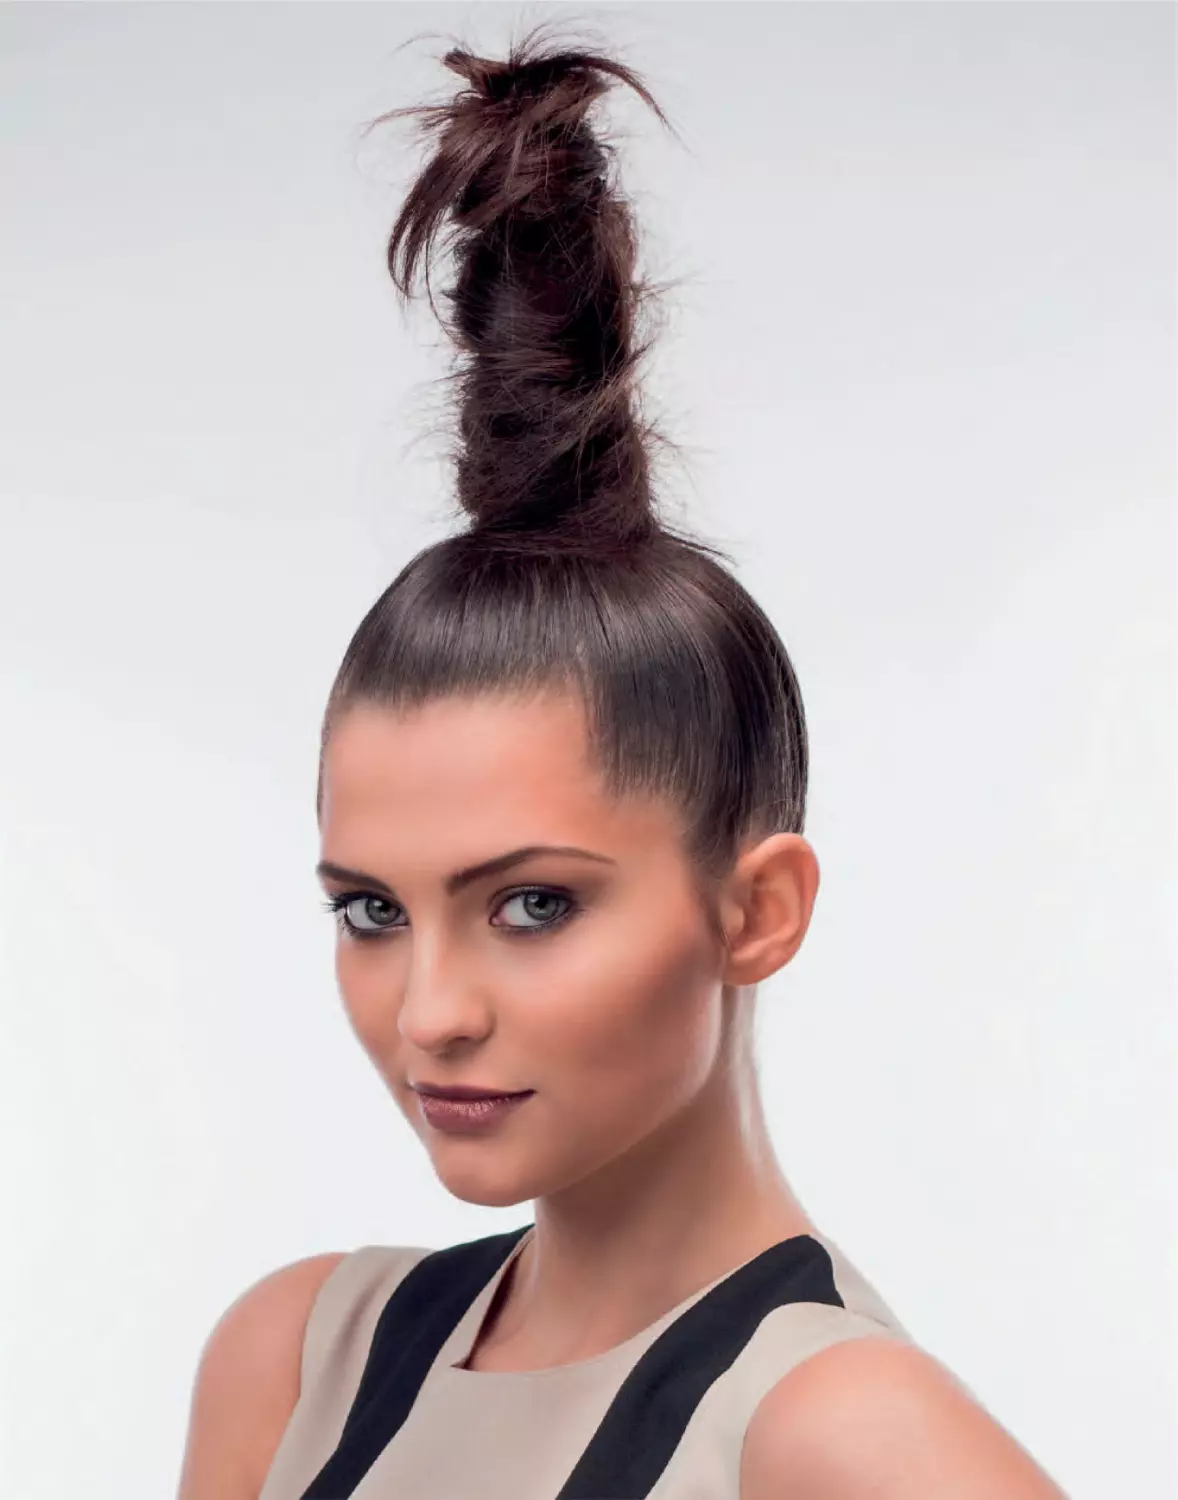
5. TRENDY
A ponytail right on top of your
head is a hipster favorite. It looks
particularly stylish when the sides
are styled tight against the head
and given a wet look.
66
3. SPORTY
Swept straight back, this ponytail
looks confident and self-assured.
Make a sporty fashion statement,
or wear it to the gym.
COVER YOUR HAIRBAND
SOFTLY DOES IT
If you wear a ponytail a
lot, you should really use
a high-quality hairband.
Transparent mini hairbands are
nice and stretchy, but they are
only meant to be used once.
They wear out quickly and can
become brittle. Bands that
have a metal staple in them
can damage hair, and aren’t
suitable for constant use.
Ideally, you want a fabriccovered hairband without a
seam. It should be as stretchy
as possible, so that it doesn’t
rip out too many hairs when
you take your ponytail out.
1. TIE
Once you have tied your ponytail
with a transparent hairband, take
a very thin strand of hair from
underneath and wrap it two or
three times around the hairband.
2. COVER
3. FIX
Pin the ends of the two wrapped
strands in place underneath the
ponytail, as invisibly as possible. Use
pins that match your hair color.
4. STYLE
Take a second thin strand from under
your ponytail and wrap it in the
same direction as the first, until
the hairband is completely covered.
The fine ends of the two strands
should finish behind the hairband.
Hold the style in place with extrastrong hair spray.
67
SIXTIES FOUNTAIN
A bit retro, but still trendy: this updo is something very
special. Styling takes a bit of time, but the results are
really worth it.
1. DIVIDE
Separate a thin strand just above
each ear and fix with a clip. Bring
together about a third of the hair
from the top of your head and tie
it tightly with a hairband.
2. CREATE VOLUME
Backcomb the ponytail on top
of your head thoroughly with a
rat tail comb. Use a little structure
spray as you go for even more
volume and grip.
4. TWIST
Twist the two strands above
your ears with your fingertips,
then lay them around the back
of your head and over the
fountain ponytail. Pin each in
place behind the opposite ear.
68
3. SMOOTH
Use a shallow brush to smooth
down the surface of the backcombed
section, being careful not to lose any
of the volume you’ve created.
ROLLOVER PONYTAIL
What would you say to a more refined version of a ponytail that’s
still super quick to style? A little twist, a double roll, and there you
go: a ponytail that will ensure all eyes are on you.
1. TWIST
Make a side part and brush your hair
smooth. Starting at your temple on
either side, twist a not-too-thin
strand, and pull it back along with
the rest of your hair.
2. TIE
Tie the two twisted strands and
the rest of your hair together
into a low ponytail using a
transparent hairband.
3. PULL THROUGH
Put one finger through the ponytail
from underneath, between the
hairband and your head, and pull
the end of the ponytail all the way
through to make it shorter.
4. ROLL OVER
For longer than shoulder-length hair,
repeat the rollover move. If your hair
is shoulder length or shorter, once
will be enough.
70
Variation: after
pulling through,
divide the ponytail in
two, then twist and
tie in three places.
71
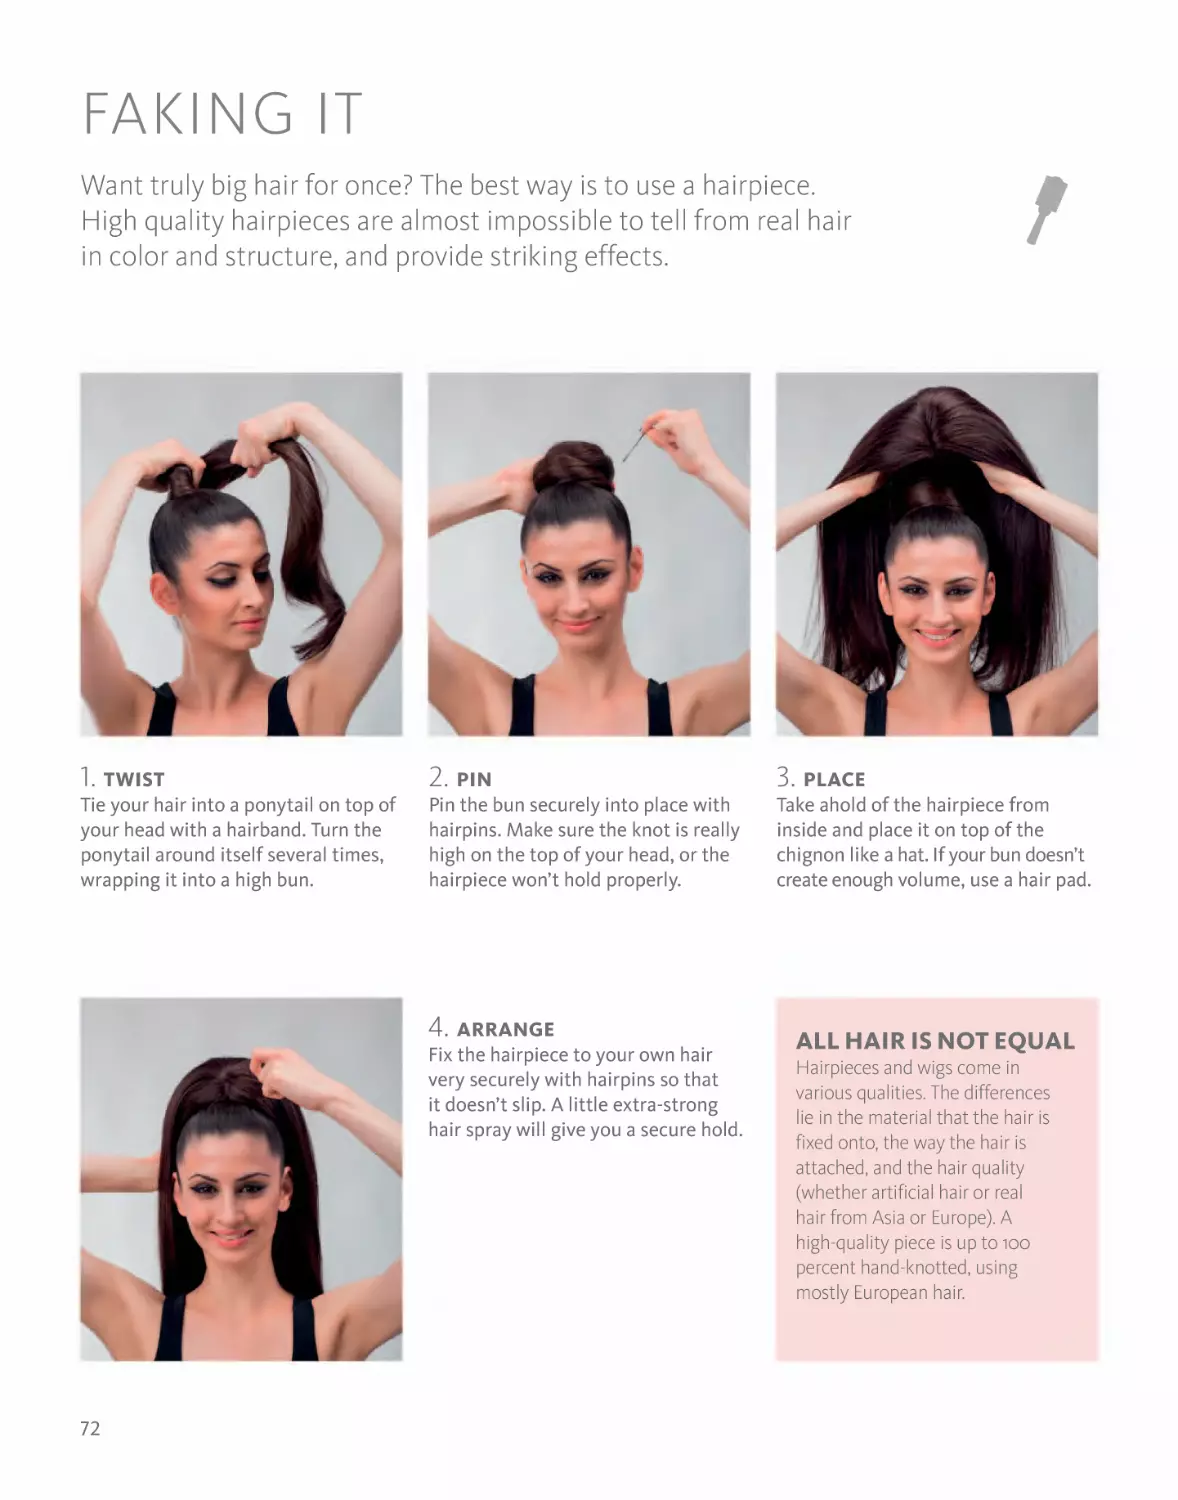
FAKING IT
Want truly big hair for once? The best way is to use a hairpiece.
High quality hairpieces are almost impossible to tell from real hair
in color and structure, and provide striking effects.
1. TWIST
Tie your hair into a ponytail on top of
your head with a hairband. Turn the
ponytail around itself several times,
wrapping it into a high bun.
2. PIN
Pin the bun securely into place with
hairpins. Make sure the knot is really
high on the top of your head, or the
hairpiece won’t hold properly.
4. ARRANGE
Fix the hairpiece to your own hair
very securely with hairpins so that
it doesn’t slip. A little extra-strong
hair spray will give you a secure hold.
72
3. PLACE
Take ahold of the hairpiece from
inside and place it on top of the
chignon like a hat. If your bun doesn’t
create enough volume, use a hair pad.
ALL HAIR IS NOT EQUAL
Hairpieces and wigs come in
various qualities. The differences
lie in the material that the hair is
fixed onto, the way the hair is
attached, and the hair quality
(whether artificial hair or real
hair from Asia or Europe). A
high-quality piece is up to 100
percent hand-knotted, using
mostly European hair.
MESSY PONYTAIL
Want hair that looks as natural as possible? This is a style that
doesn’t look styled: a soft, windswept ponytail with gentle volume
that will flatter your face.
1. DIVIDE
Make a horizontal part from one ear
to the other and separate out a thick
section on either side. Twist each
into a coil and hold it in place with
hair clips.
2. LIFT
Backcomb the roots of the rest of
your hair and pull it into a high
ponytail using an open-ended,
stretchy rubber band.
4. BACKCOMB
Backcomb the top section thoroughly,
then bring it back over the ponytail
and tie it up with the rubber band as
well, knotting the band again.
5. PIN
Cut off the ends of the rubber
band. If necessary, add some
shape to your style with hair
pins. Fix with hair spray.
74
3. TIE
Knot the rubber band and pull it tight.
Take the clips out of the side sections
and let the loose hair fall forward.
BASIC TECHNIQUES
BRAIDING TECHNIQUES
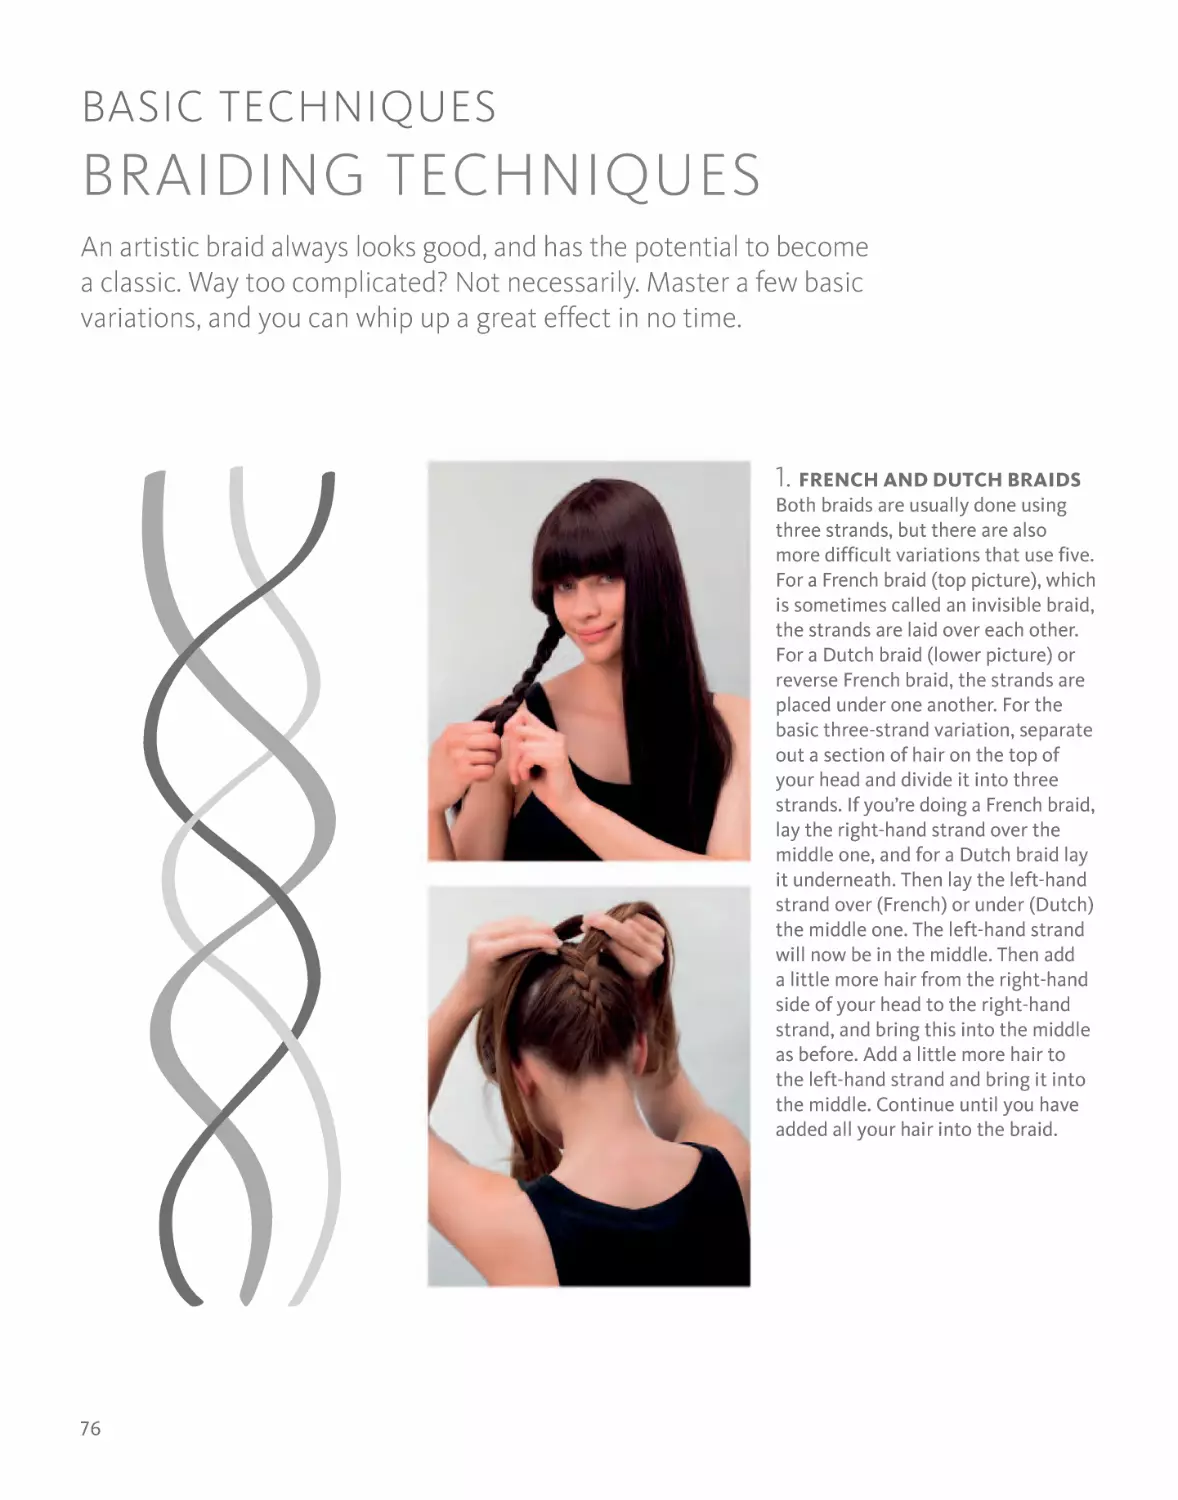
An artistic braid always looks good, and has the potential to become
a classic. Way too complicated? Not necessarily. Master a few basic
variations, and you can whip up a great effect in no time.
1. FRENCH AND DUTCH BRAIDS
Both braids are usually done using
three strands, but there are also
more difficult variations that use five.
For a French braid (top picture), which
is sometimes called an invisible braid,
the strands are laid over each other.
For a Dutch braid (lower picture) or
reverse French braid, the strands are
placed under one another. For the
basic three-strand variation, separate
out a section of hair on the top of
your head and divide it into three
strands. If you’re doing a French braid,
lay the right-hand strand over the
middle one, and for a Dutch braid lay
it underneath. Then lay the left-hand
strand over (French) or under (Dutch)
the middle one. The left-hand strand
will now be in the middle. Then add
a little more hair from the right-hand
side of your head to the right-hand
strand, and bring this into the middle
as before. Add a little more hair to
the left-hand strand and bring it into
the middle. Continue until you have
added all your hair into the braid.
76
2. FISHTAIL BRAID
The fishtail is a trendy braid with an
interesting structure. Braided tightly,
the pattern looks classic; braided
loosely it looks cool and casual. This
is how the herringbone braid works:
separate a section at the top of your
head and divide it into two large
strands using the index finger of your
right hand. Now take a thin strand
from the outside of the left-hand
section and add it to the inside of the
right-hand section. Then change
hands and hold the sections apart
with the index finger of your left
hand. Take a thin strand from the
outside of the right-hand section and
add it to the inside of the left-hand
section. Then change hands again and
repeat the process. Important: make
sure the strands you are braiding in,
and the two main sections, are always
the same thickness, to give you a
regular pattern. Continue like this
until all the hair is braided.
77
EASY BRAIDS
Bring out your inner child: the grade school classic is back, but
it looks cute on grown women, especially worn in combination
with full bangs.
1. PREPARE
Make a center part and brush your
hair completely smooth with a paddle
brush. Take a small amount of styling
cream and rub it into the palm of
your hand.
2. WORK IN
Comb your fingers through your
hair, working the styling cream
into it. This will ensure your hair
stays shiny, and no frizz escapes
from the braids.
4. BRAID
Braid the three strands on one side
together into a tight braid, and tie
off the end with a transparent
hairband. Then do the same with
the other side.
5. FIX
Tie off the second braid with a
hairband. Finally, loosen individual
loops of hair with your fingers to
give the braids more body.
78
3. SEPARATE
Comb your hair once more and make
a straight center part all the way
down to the back of your neck. Divide
the hair on either side into three
equal-sized strands.
MODERN HEIDI
Braided styles never go out of fashion. This crown braid is inspired
by a German folk style, and has a romantic look. Thick hair will
produce a particularly good sculpted effect.
1. PREPARE
For a crown braid, hair should ideally
be well over shoulder-length. First,
make a side part and brush out your
hair thoroughly.
2. DIVIDE
Take a central section at the nape
of your neck. Divide it into three,
take the strands in both hands, and
braid the right strand, then the left,
over the middle strand.
4. TIE
Continue braiding around the side of
your head and across the front, until
all your hair is braided in. Tie off the
end with a transparent hairband.
5. FIX
Bring the end of the braid around to
the back of your head and pin it
in place invisibly with hairpins.
The end should disappear under
the rest of the braid.
80
3. BRAID
Take some hair from the right and
add it into the right strand, then braid
this strand into the middle. Take hair
from the left into the left strand and
braid it into the middle.
HIGH HERRINGBONE BRAID
The herringbone braid’s three-dimensional structure gives it an
artistic edge, and, depending on how you style it, can look either
romantic or fashionable. Don’t worry: the technique is much less
complicated than the results make it look.
1. STRAIGHTEN
Make a center part, brush your
hair, and straighten it section by
section, using a light pressure and
pulling a comb through below the
straightener as you go.
2. TIE
Tie your hair up into a very high
ponytail with a hairband, and
separate it into two equal sections.
Spray in a little structure spray for
better hold.
4. BRAID
Continue until all your hair is braided.
Make sure both sections stay the
same thickness, so that the result
looks regular.
5. TIE
Tie off the bottom of the finished
fishtail with a clear hairband. You
can also add a decorative hair
band to the top of the braid.
82
3. DIVIDE
Take a thin strand from the outside
of the left section and add it to the
inside of the right section. Then take
a strand from the outside right and
add it to the inside left.
Variation:
coiled and pinned,
the fishtail braid
becomes an instant
structured chignon.
83
BRAIDED CHIGNON
A romantic braided look, with a French braid and an offset chignon
providing the star attraction. A great summer festival look that also
works for the office, or as a glamorous evening updo.
1. PART
For this style, your hair should be well
over shoulder length, or the chignon
won’t work. Brush your hair out and
part it wherever you like.
2. BRAID
Separate out three strands from
the top front section, on the side
with more hair. Braid the right then
the left strand over the middle one,
twisting each as you go.
4. TWIST
Braid the left strand into the middle.
Repeat until all your hair is braided,
then tie off the end. Twist your hair
into a coil that sits low on your neck.
5. FIX
Pin the braided chignon securely
in place with hairpins, trying not to
let the pins show. Fix with some
extra-strong hair spray.
84
3. PUT UP
Take some hair to the right of the
braid and add to the right strand,
then braid it into the middle. Take
hair to the left of the braid and add
it to the left strand.
A bit Heidi, a bit
ballerina: this updo
looks different from
every angle.
85
CASUAL CURLY BRAID
Less ornamental, but with an appeal all of its own: the little
hairline braid detail is what makes this look special. Perfect
for shoulder-length hair—and natural waves are welcome!
1. ADD BODY
To make wavy hair look even more
casual, spray some hair spray onto it
from underneath. This will give you
loads of volume, and make your
waves look more structured.
2. CREATE SOME GRIP
Backcomb the front section
thoroughly with a rat tail comb to
give your braid a more luxurious look.
Gently comb the surface of the hair
back down.
4. PIN
Fix the braid in place at ear height,
using a bobby pin or a decorated clip.
The end will fall softly into the rest
of your hair.
86
3. BRAID
Starting at your side part and
working toward the opposite ear, give
yourself a French braid (instructions
on p.76). Work loosely for a softer
appearance.
DIRECTIONAL DUTCH BRAID
The Dutch braid is a classic, and the structure looks particularly
good in relatively thick hair. But with a little teasing, even women
with fine hair can do a lot more with less.
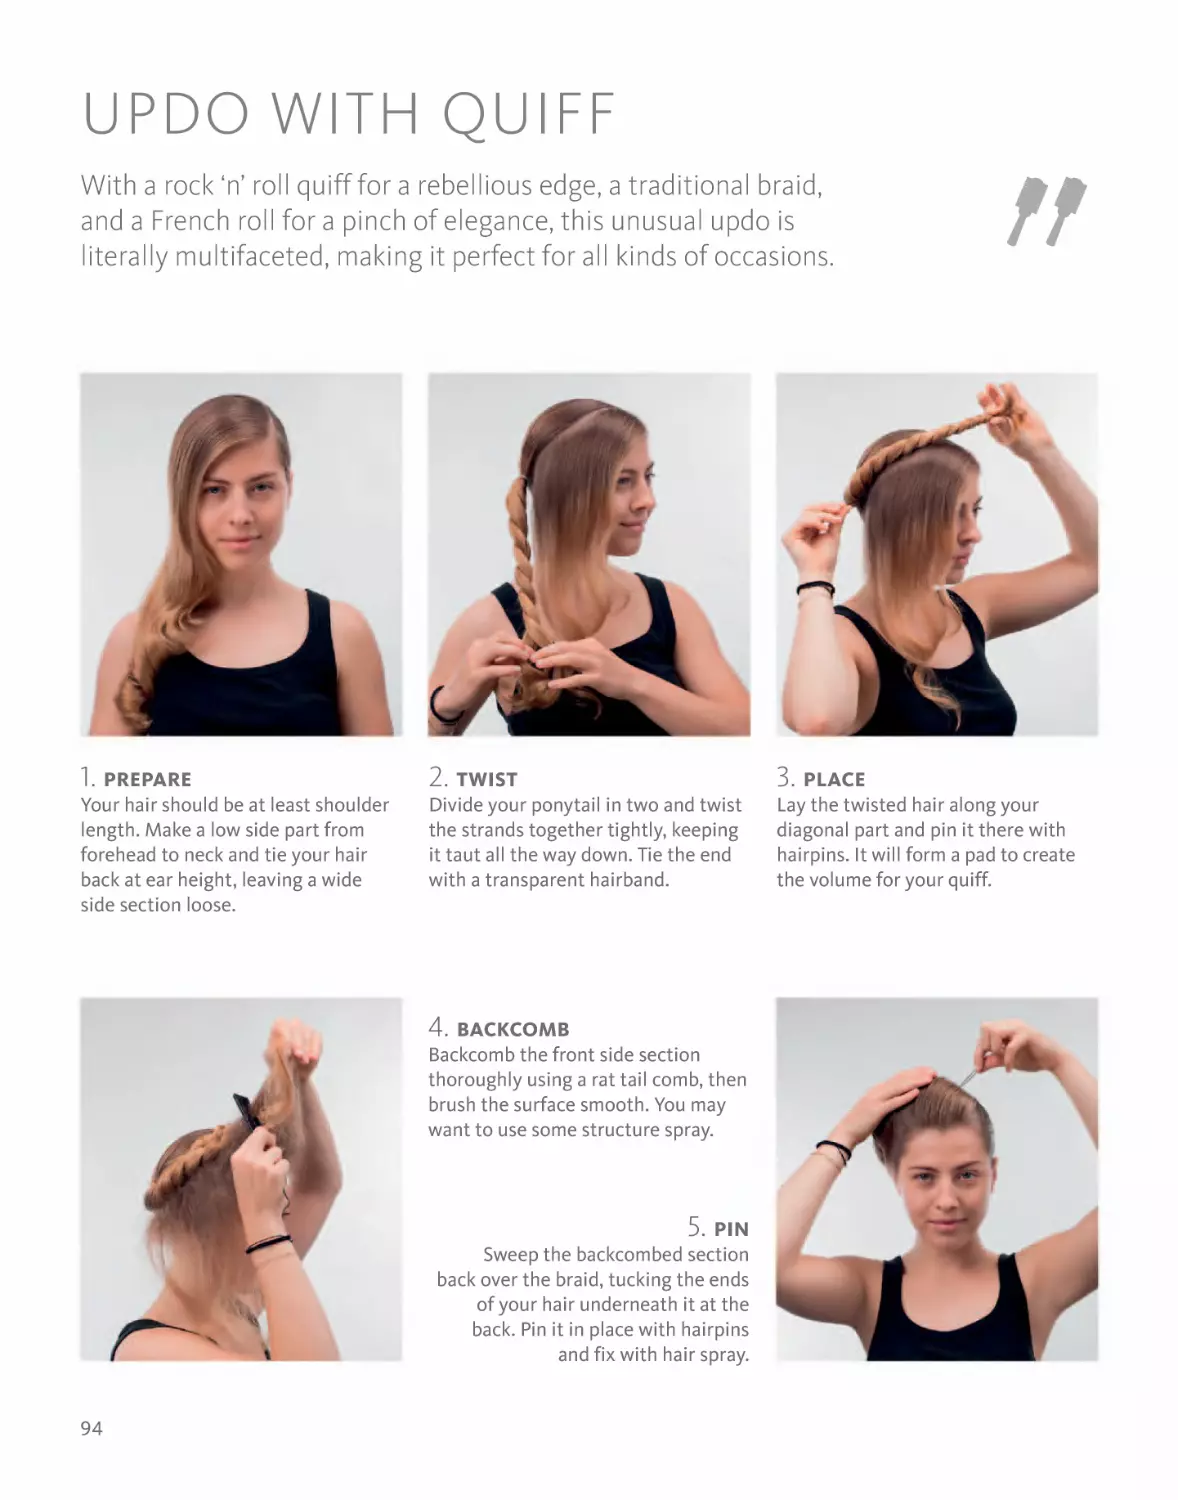
1. PREPARE
For a Dutch braid, your hair should be
at least shoulder-length. Work a little
extra-strong hair spray into your hair
for more grip.
2. BRAID
Starting at the nape of your neck,
separate three strands. Braid the
right strand, then the left under the
middle strand. Gather a little more
hair into the right strand.
4. COIL
Tie off the end with a hairband and
twist the braid into a coil at the front
of your head. Hide the end of the
braid under the coil.
5. PIN
Fix your work of art in place
securely with hairpins. Add some
extra-strong hair spray for extra hold.
88
3. PICK UP
Braid the right strand under the
middle one again, then take a little
hair from the left side into the left
strand. Continue until all your hair
is braided.
Beautiful hair,
however you look
at it: from the front,
back, or in profile.
89
BRAID-PATTERNED CHIGNON
A style best suited to very long, thick hair, which will emphasize the
sculpted effect of this simple braid. However, even with fine hair, the
braid turns this chignon into a real feature.
1. BRAID
Brush your hair smooth and tie it into
a high ponytail with a hairband.
Separate the ponytail into two equal
strands, then twist them and wrap
them around each other.
2. FIX
Keep hold of the strands to make
sure they stay twisted. Finally, tie
off the end of the braid with a
transparent hairband.
4. CONCEAL
Hide the end of the braid under the
chignon. Tip: work with both hands
until you’re completely finished, so
that no hair escapes or unravels.
5. SECURE
Finally, secure the chignon invisibly
with hairpins. A good coating of hair
spray will make sure this glamorous
look holds for hours.
90
3. COIL
Twist the braid into a coil that sits
tight against your head. Hold the
chignon down with one hand while
you coil the braid around itself with
the other.
BASIC TECHNIQUES
THE CHIGNON
You could call it a bun, but chignon sounds more elegant. Either way,
this is an updo inspired by ballerinas. The chignon can be styled with
precision and glamour, or made to look soft and casual.
CLASSIC HIGH CHIGNON
1. PUT ON
Tie all your hair neatly into a
ponytail and pull it through a hair
doughnut. Twist your hair until the
majority of it has disappeared inside
the pad.
2. ARRANGE
Spread the rest of your hair equally
over the doughnut until it is completely
covered, with a hole in the middle.
Stretch a large hairband between
your fingers.
4. FIX
Wrap the ends of your hair around
the chignon and pin them in place,
using hairpins that match your hair
color. Tuck your hair under the
doughnut with a rat tail comb.
5. STYLE
Fix your extra-large bun in
place with lots of extra-strong hair
spray, and give the sides of
your hair a gleaming wet look.
92
3. TIE
Carefully bring the hairband down
over the doughnut until it is sitting
below it, at the root of the ponytail.
The ends of your hair will still stick
out around the band.
CASUAL LOW CHIGNON
QUICK CHANGE
ARTIST
An asymmetrically placed
chignon can be a really
interesting look. You can
wear a side bun either low
on your neck or high up on
your head. For a casual, “just
back from the beach” updo,
put your head down, brush
all your hair forward, twist it
into a knot high on your
head, and fix it in place with
a transparent hairband.
Tease out a few strands and
let them fall over your face
to make it look as if your
hair has been tousled by a
sea breeze.
3. CREATE VOLUME
Separate your ponytail into two or
three strands, add more structure
spray, and backcomb it thoroughly.
1. BACKCOMB
Backcomb your roots all the way
around to keep your hair from
separating. Structure spray will give
you more hold. Smooth down the
surface with a hairbrush.
2. TIE
4. TWIST
5. SHAPE
Shape the loose bun with your hands
and secure it with more hairpins.
Some extra-strong hair spray will
give you longer hold and shine.
Take each strand in turn and twist
it around itself into a loose coil
before pinning it to the base of the
ponytail with hairpins, as invisibly
as possible.
Brush your hair back and tie it into a
loose, low ponytail. Your hair should
cover your ears.
93
UPDO WITH QUIFF
With a rock ‘n’ roll quiff for a rebellious edge, a traditional braid,
and a French roll for a pinch of elegance, this unusual updo is
literally multifaceted, making it perfect for all kinds of occasions.
1. PREPARE
Your hair should be at least shoulder
length. Make a low side part from
forehead to neck and tie your hair
back at ear height, leaving a wide
side section loose.
2. TWIST
Divide your ponytail in two and twist
the strands together tightly, keeping
it taut all the way down. Tie the end
with a transparent hairband.
4. BACKCOMB
Backcomb the front side section
thoroughly using a rat tail comb, then
brush the surface smooth. You may
want to use some structure spray.
5. PIN
Sweep the backcombed section
back over the braid, tucking the ends
of your hair underneath it at the
back. Pin it in place with hairpins
and fix with hair spray.
94
3. PLACE
Lay the twisted hair along your
diagonal part and pin it there with
hairpins. It will form a pad to create
the volume for your quiff.
One way or another:
a cool quiff up front;
elegant from the
side. And then there’s
the back view…
95
FAKE BANG UPDO
Bangs can be really flattering—but once you have them, you’re
stuck with them for awhile. This style lets you see if a side bang
would suit you, with no obligations.
1. PREPARE
This look works particularly well
on longer than shoulder length
hair; your hair type is less important.
Teasing will give even fine hair
sufficient body.
2. BACKCOMB
First, backcomb your hair to give it
more grip and hold. You can increase
hold even more by using a structure
spray or extra-strong hair spray.
4. COVER
The teasing shouldn’t be visible, so
brush the surface of your hair
smooth. Some hair should fall over
your forehead like a side bang.
5. FIX
Merge the ends of your hair into
the back of the updo, then pin them
in place. Backcomb the bang section
further over your forehead. Fix
everything with hair spray.
96
3. DIVIDE
Tilt your head back slightly and brush
your hair to the side, pinning it in
place with bobby pins as you wrap it
around your head. Finally, sweep
your hair across your forehead.
BEEHIVE
A beehive is a sophisticated but dressed-down look for
straight or wavy hair longer than shoulder length. Do it like a
pro and use a hair pad to create volume on top, giving a lot
more body to thin or fine hair.
1. ARRANGE
Make a side part and brush your
hair into shape. If you have very fine,
thin hair, add some mineral powder
spray or volume powder to the roots
and body.
2. BRING TOGETHER
Divide your hair into three: one
section on either side, and one at the
back. Pin a hair pad to the top of your
head and take ahold of the back
section in one hand.
4. BACKCOMB
Separate the side sections into
several strands and backcomb each
one thoroughly. Then run a styling
brush very lightly over the surface
to smooth it down.
5. PIN
Use hairpins to pin the backcombed
side sections up into a French roll
below the pad at the back of your head.
For a more casual look, backcomb out a
few strands from the sides.
98
3. CONCEAL
Wrap this section of hair around the
pad, covering it completely, and fix it
securely in place with hairpins. You
can also add a spritz of hair spray.
TWISTED HIGH CHIGNON
A cool updo for hair that’s at least shoulder length, and either
straight or wavy. Perfect for clubbing—or wear it as a statement
daytime look, with boyfriend jeans and a shirt.
1. TIE BACK
Tilt your head forward, brush your
hair forward, and tie it into a ponytail
at the highest point of your head,
using a transparent hairband.
2. BACKCOMB
Divide the ponytail into several
sections and backcomb them using
a rat tail comb. You may want to add
some mineral powder spray for
better grip.
4. FIX
Pin the twisted sections securely in
place with hairpins. Keep the look
casual by allowing the ends to stick
out. Fix with extra-strong hair spray
for better hold and extreme shine.
100
3. TWIST
Taking a backcombed section in
each hand, lift and twist them
around each other to form a long,
tower-like chignon.
THE GRACE KELLY
That timeless favorite, the French roll, gets an unusual twist
here, with a center part and long bang section. The result is a
glamorous yet casual updo that will make you feel like a movie
star for a big night out.
1. PREPARE
For this style, your hair should be at
least shoulder length. Make a precise
center part and brush the rest of your
hair completely smooth.
2. BACKCOMB
Separate two thick side sections
and clip them just above your
ears. Backcomb the hair on the back
and top of your head, adding some
structure spray for better hold.
4. BRUSH
Brush the surface of the backcombed
hair smooth, bringing it toward the
back of your head. Turn the top
section under and pin it in place,
leaving lots of volume.
5. FIX
Backcomb the side sections
thoroughly, then gently brush
them out, sweep them back, and
pin at the back as invisibly as
possible. Fix with hair spray.
102
3. TWIST
Bring together the lower back
section, tie it in the middle with
a hairband, then twist and pin it
into a mini French roll below the
beehive section.
TWISTED UPDO
You’ll get the hang of these twists in no time. They will give you an
unusual chignon with maximum volume. This works best if your
hair is thick and longer than shoulder length.
1. ROPE TWIST
Make a low side part, and a horizontal
part about an inch above your ears.
Make a ponytail from a thick strand
from the top of your head, divide,
rope twist, and tie off.
2. TWIST
Above the ear opposite the side
part, separate and clip back a thick
strand. Divide the rest of the hair at
the back into two thick strands and
twist them.
4. FIX
Pin up the two twisted sections in the
same way, next to the bun. Unclip the
bang section, sweep it to one side,
and twist it inward.
5. PLACE
Place the ends of the bang
section over the bun and pin them
there with hairpins. Fix the whole
thing in place and give it shine
with strong hair spray.
104
3. PIN
Pin the rope-twist ponytail into a
loose bun with hairpins. If your hair
is very thick and straight, add some
structure spray for more grip.
This piled updo
creates interest at
the back and a
lovely profile, while
the low bang
section flatters
your face.
105
1 CUT—4 LOOKS
LOOKS FOR LONG HAIR
It’s a problem many women will be familiar with: you manage
to grow your hair lovely and long, and then practical reasons
(and a lack of ideas) make you hide it away in a simple ponytail day
after day. These great ideas for day-to-day styling will let you do so
much more.
1
1. WILD
Want big hair, but with a casual look?
No problem. Work a blob of styling
mousse into your roots, dry your hair
away from your head, and finally
blow-dry using a round brush to
give yourself lots of volume on top.
Starting at ear level, wrap your hair
around a medium-sized curling iron.
Clip the curls up to let them cool as
you go, until you’ve curled all your
hair. Carefully remove the clips. Don’t
brush the curls out: just shape them
with a little styling creme. Fix with
lots of hair spray.
106
2
4
3
2. NATURAL
With the top section styled close to
the head and a light wave at the ends,
this style has all you need for a very
casual look. Blow-dry towel-dried hair
straight using a paddle brush, then
blow-dry the lower part of your hair
with a mid-sized round brush to give
the ends some movement. Smooth
the side sections down with a little
styling creme.
3. GLAMOROUS
The perfect look for a big occasion:
a French roll with tons of volume,
combined with soft strands falling
over your face. Spray your hair with
structure spray and backcomb it
thoroughly with a rat tail comb.
Brush it backward and pin it into
a loose French roll. Tease out a
few thick strands at the front,
sides, and back.
4. STYLISH
A gorgeous look that’s just made for
a summer party. Make a very low
side part and brush your hair
back from your face, adding lots of
hair spray to your roots—it should
look damp and shiny. Fasten it into
a soft, asymmetrical bun, leaving the
ends loose to drape around the bun.
Hair spray will give you extra hold.
107
XXL CHIGNON
Want a voluminous updo that will make the most of your
hair—even if it’s fine? Work some hair magic with a clever
teasing technique, the right styling products, and a simple
trick to finish.
1. FASTEN
This style works for hair that is
shoulder length or longer. Brush it
into a high ponytail and fasten it with
a transparent hairband.
2. BACKCOMB
Divide your ponytail into several
sections and backcomb them one at
a time with a rat tail comb. If your
hair is very soft, use structure spray
for added grip.
4. PIN
Pin your hair into a very loose
chignon high on your head. The
looser it is, the more volume you
will have. Fix well with hair spray.
108
3. SMOOTH
Smooth the bushy backcombed
sections back down with a brush.
Retain the volume you’ve created
by brushing only the surface hair.
UPDO WITH A SPIRAL TWIST
Who says an updo always has to be on the back of your head?
This look proves the opposite: an ornamental detail on your
forehead will bring out beautiful eyes, flatter your face, and
give you a sophisticated edge.
1. PREPARE
Hair should be well over shoulder
length for this updo. Give the ends
of your hair a little flick under with
a hair dryer or curling iron.
2. TIE
Brush all your hair into a ponytail
at the front of your head and tie it
tightly with a transparent hairband.
4. TWIST
Twist the ponytail into a spiral,
making sure the hairband is
completely hidden. Let the
ends fall onto your forehead.
5. FIX
Use hairpins to fix the spiral in
place as invisibly as possible.
A generous amount of extra-strong
hair spray will hold this extravagant
style in place for a long time.
110
3. COMB SMOOTH
Spray some extra-hold hair spray onto
the sides and smooth them with a
comb. A damp, shiny look here just
adds to the elegance.
UPDO WITH A CLASSIC ROLL
Perfect for a job interview, elegant for a dinner date; this updo is a
classic, but that doesn’t make it old-fashioned. A little ornament at
the back provides the finishing touch.
1. DIVIDE
Make a horizontal part from ear
to ear. Tie the back section into a high
ponytail, leaving some hair at the
nape of your neck loose.
2. BACKCOMB
Backcomb the front section
thoroughly using a rat tail comb, then
brush the surface smooth again with
a styling brush.
3. FIX
Place the backcombed front section
over the ponytail, then twist it and
pin invisibly with hairpins at the back
of your head.
4. WRAP
Wrap the thin strands from the back
of your neck around the twisted
ponytail and pin them in place. Add
a decorative clip as a finishing touch.
112
This updo highlights
the forehead and
the neck in a very
elegant way.
113
CASUAL FRENCH ROLL
Timeless beauty: the French roll is a classic look for any occasion.
Here is a very stylish version of the updo, which is perfect for work,
or for a date.
1. PREPARE
Your hair should be at least shoulder
length for this style. Soft waves or
curls are no problem, either. Brush
through and work in some mineral
powder spray.
2. SEPARATE
Separate a rectangular section at the
front of your head and clip it out of
the way. Brush the rest of your hair
over to one side.
4. FIX
Twist this hair into a French roll in
the direction it has just come from.
Pin the roll in place securely and
invisibly with hairpins.
5. COVER
Unclip the front section and roll it
over the larger roll, in the opposite
direction. Pin it in place.
114
3. PIN
Spray some extra-hold hair spray
onto the loose hair, then hold it with
one hand as you pin it in place with a
diagonal line of bobby pins down the
back of your head.
TWISTED CHIGNON
A bun is a bun is a… wait a minute… This is a chignon with a cute
twist—quite literally! It looks very different to its simpler relatives.
Twisting your hair gives it a unique structure after you’ve put it up.
1. TIE
The longer and thicker your hair is,
the better. Separate a section at the
front of your head and clip it out of
the way. Tie the rest of your hair into
a high ponytail.
2. BACKCOMB
Backcomb the front section with
a brush, then comb the surface
smooth and bring it back over the
ponytail. Use some structure spray
for added grip.
4. FIX
Make the twisted hair into a coil on
top of your head and pin it securely
with hairpins. Add a lot of extrastrong hair spray for better hold.
5. BACK VIEW
Use a second mirror to check
the back of your head: this is
especially important with updos,
to make sure your chignon is
well-shaped and central.
116
3. TWIST
Take the ponytail in both hands
and twist it until it starts to coil
up by itself.
Très chic:
the twisted chignon
works as a daytime
or an evening look.
117
HIGH GLAMOUR ROLL
Sometimes you just have to think big. If you want to make
a splash at a gala dinner, a ball, or your best friend’s wedding,
why not try this elegant, formal look.
1. PREPARE
Use a curling iron to create
voluminous curls, then separate the
top front section of hair above your
temples and clip it out of the way.
Brush out the rest of your hair.
2. DIVIDE
Part the loose hair in the center,
all the way down to your neck. Add
some structure spray to your roots
on both sides, and backcomb them.
4. PIN
Do the same with the right side.
Make sure the ends of your hair are
hidden under the rolls on both sides.
5. DRAPE
Unclip the front section and
backcomb it thoroughly. Brush the
surface smooth, sweep back, and roll
under. Pin it above the double roll,
leaving lots of volume on top.
118
3. SWEEP
Smooth the surface of both sides
with a brush, then sweep the
left-hand section into a French roll
in the middle and pin it in place
invisibly with hairpins.
Asymmetrical:
give this formal
updo a cute touch
with a loose strand
over your forehead.
119
BASIC TECHNIQUES
HAIR ACCESSORIES
However good your style, great clips, classy combs, lacy flower
bands, or diamante pins will add a pretty touch to any look.
ACCESSORIES
BUTTERFLY CLIP
A hairclip with a glittering butterfly
gives the low, loose chignon a touch
of romance. Tip: fix the chignon with
hair spray before attaching the clip.
XXL CLIP
Placed diagonally and off-center,
this large, white clip acts like an
exclamation mark after what is
otherwise a classic, high chignon.
DECORATIVE BOBBY PINS
A trendy variation on a classic
accessory: two diamante bobby
pins crossed on a bun. A detail like
this adds interest even with
more modest pins.
HAIRBAND
A wide hair elastic made of
brocade fabric gives this bun
another very different look, making
it modern and sophisticated.
120
DIAMANTE PINS
Wear some sparkling flowers in
your hair. Classy, luxurious, yet
modest: lots of little diamante
hairpins lend some glamour to
this giant bun.
CLIPS, PINS, AND BANDS
1
2
3
4
5
6
1. HAIR CLIPS
3. MINI COMBS
5. FLOWER ARRANGEMENT
These come in different sizes
and lengths, and are made of
plastic or (for a classy look) horn.
These can just be used as decoration,
a;lthough wider ones can also hold an
updo together.
2. PONYTAIL CLIP
4. HAIRPINS
Whether large or small, flowers
make a really eye-catching feature.
Don’t use real flowers, as they dry
out too quickly.
A semi-circular metal clip is a
great alternative to a classic
hairband for a ponytail.
Little bits of decoration like flowers
or pearls can turn simple hairpins
into a classy feature.
6. HAIRBANDS
Wide or narrow, patterned or plain—
hairbands bring variety and can make
a real difference to a hairstyle.
121
HIPPY CHIC WITH HEADBAND
Lollapalooza; Coachella: it’s impossible to imagine the world’s
biggest music festivals without the hippy look. Here, long,
center-parted hair is decorated with a soft, narrow band—
girly and totally natural.
1. PUT ON
Give yourself a center part and
brush your hair thoroughly. Hold
the elastic headband from inside
with both hands and place it over
your forehead.
2. LOOSEN UP
Push the end of a rat tail comb into
the hair around the top of your head
and carefully loosen it up so that it
doesn’t lie too flat.
4. STYLE
Pull out a thin strand from your
temples on each side and let them
fall casually over your face. Spray
with extra-strong hair spray.
122
3. ROLL
Take a thin strand from above each
ear, backcomb them lightly, and roll
them back and inward to form a soft
wave. Pin them in place with hairpins.
BEEHIVE WITH DIADEM
The “It-Girls” of this world have shown us the way: the diadem is
one of the hippest hair accessories going, making every hairstyle
look like a crown. Here, it’s used to decorate a classic beehive.
1. SEPARATE
Make a center part, separate a
not-too-thin strand from above each
ear, and clip them in place. Make a
horizontal part across the back
of your head from ear to ear.
2. BACKCOMB
Use a brush to backcomb the hair
on top of your head, one strand at
a time. Add a little structure spray
at intervals as you go.
4. DEFINE
Unclip the sections above your
ears and backcomb them with a rat
tail comb. Brush the surface smooth
and sweep them back along the sides
of the beehive.
5. FIX
Pin the side sections securely
high up on the back of your head
and fix with hair spray. Add the
diadem as a crowning touch.
124
3. WRAP
Wrap the ends of the backcombed
section loosely around two fingers,
turn them under to form a tall
beehive, and pin in place. This will
form a pad for the side sections.
ROMANTIC ROLL WITH FLOWERS
A little bit hippy, a little bit ballerina. You can keep reinventing this
dreamy updo by combining it with a surprising number of different
outfits—from a floaty chiffon dress to hotpants and biker boots.
1. PREPARE
The romantic roll is ideal for hair
that’s at least shoulder length. Hair
type isn’t important—it works just as
well with straight or wavy hair. Make
a center part.
2. CURL
Divide each side section into four
thick strands and curl each with a
large-barreled curling iron. Hold the
curl in place, pull out the curling iron,
clip up, and let cool.
4. PIN
Brush out the curly side sections,
backcomb them lightly, and sweep
them back. The French roll acts as
a hair pad, giving you lots of volume
at the back.
5. DECORATE
Turn the side sections inward over
the roll and pin them in place with
hairpins. Decorate the updo with
real or artificial flowers.
126
3. ROLL
Bring the hair at the back of your
head together and twist it around
itself. Roll it into a high French roll
and pin invisibly with hairpins.
FLOWER POWER STYLE
Classic Flower Power with a modern twist: the flower headband sits
low on your forehead, with a French-roll-type updo at the back.
1. DIVIDE
Make a high horizontal part
from ear to ear with a rat tail comb
and bring the hair at the front
together with your hands.
2. PUT ON
Put the flowered hairband over
the hair you are holding, placing
it on top of the back section, just
above your ears.
4. PIN
Use hairpins to pin the roll in place
over the hairband, securely and
invisibly. Make sure your hair isn’t
too tight against your head—this
style needs some volume.
5. DRAPE
Separate a thin strand above
each ear and bring it to the back.
Pin in place with hairpins.
128
3. GATHER
Backcomb the top section lightly
with a brush or rat tail comb, smooth
the surface back down with your
hands, and wrap into a loose French
roll at the back of your head.
UPDO WITH HEADBAND
From the back, it’s an elegant French roll; from the front, it’s stylish
and alternative: this extravagant updo with a decorative headband
is classic and cool at the same time.
1. DIVIDE
Separate a section of your hair in
front of your crown, down to your
temples. Roll the rest of your hair,
including the sides, into a French roll
on the back of your head.
2. FIX
Pin the roll in place securely and
invisibly with hairpins. It shouldn’t
look too neat—you’re going for cool
and casual!
4. TEASE OUT
Tuck it under and pin in place.
Carefully tease out some hair
to give the style more body.
5. ADD YOUR BAND
Put both hands inside the
headband, stretch it out as far
as you can, and carefully put it over
the finished updo. Tease out some
hair over your forehead.
130
3. BACKCOMB
Divide the top front section into
strands and backcomb them
thoroughly with a rat tail comb.
Smooth the surface with a brush and
lay this section over the roll.
ALL PERFECTLY NORMAL:
HAIR TYPES
Oily or dry scalps, brittle ends, greasy hair: there can be all kinds of
causes for common hair problems. To some extent your hair type
is genetic—all the rest is the result of hormones, environmental
factors, and the right care regime.
GREASY HAIR
STRESSED HAIR
Greasy hair is caused by overactive oil glands, which can
be activated by poor diet, hormonal changes, or stress.
Greasy hair should be washed every day if necessary.
It is a myth that frequent washing activates your oil
glands. You can use a mild volumizing shampoo, as well
as products for oily hair. You should always wash out
conditioner very thoroughly, so that any residue doesn’t
weigh your hair down, and only apply it to the body and
ends of your hair. Dry shampoos are a perfect in-between
solution—they soak up oil like blotting paper. Styling
products that keep your roots away from an oily scalp
can help. These include mousse and hair spray—some of
these contain a small amount of alcohol that has a slight
degreasing effect.
NORMAL HAIR
Hair is actually pretty easy going, and will put up with
a lot: washing, blow-drying, coloring, straightening,
perming, styling. But heap up all these little attacks, and
it can start to get overwhelmed. The scales of the cuticle
or outer layer, which normally lie flat like a closed pine
cone, open out, making your hair rough and brittle. In
the worst case scenario, your hair can end up looking
like cotton candy: dull and with no elasticity. Then it needs
a rescue package, starting with shampoo. Massage the
shampoo gently into your scalp and roots with your
fingertips, not into the body and ends of your hair. You
really must use a conditioner after washing, and very fine
hair will benefit from a light leave-in product. Modern
silicone formulas bind frizz and split ends together, and
leave your hair looking much healthier. A touch of hair
oil on the ends can also work wonders, and a weekly hair
mask is a must.
Is your hair silky to the touch, gleaming, and free from
split ends? Congratulations on being one of the lucky few!
To make sure your hair stays that way, choose the gentlest
shampoo formula you can. And even uncomplicated hair
will benefit from a conditioner and an occasional hair
mask. If you use heat tools like hair dryers, straighteners,
or curling irons a lot, you should always apply a heat
protection product. Overly frequent chemical shaping
(e.g., perms or chemical straightening) can take its toll
even on normal hair.
To keep your hair looking beautiful for as long as possible
after coloring, you should use a care range designed for
colored hair. It will give your hair the care it needs, and
protect the color from fading too quickly. Important: in
summer, dyed hair really needs color protection with a UV
filter, in the form of a spray to be used before spending
any time outdoors.
132
COLORED HAIR
DRY/BRITTLE HAIR
Can be caused by stressful treatments, or a problem with
the growth of your hair brought on by a lack of biotin. This
vital substance is an important building block for keratin
formation, and plays a crucial role in the healthy growth of
skin, hair, and nails. Sometimes your scalp can also produce
too little oil, making it feel itchy and tight. This can have a
variety of causes, and means that the protective film of oil
that covers the surface of healthy hair becomes too thin.
This in turn leads to the hair cuticle becoming porous and
rough, with nothing to prevent moisture from inside
the hair evaporating. You can combat this with lipid
replenishing oils, and silicones that seal in moisture.
A SENSITIVE PLANT: THE SCALP
DANDRUFF
Dandruff is caused by problems with the top layer of cells
on the scalp. Possible triggers include over- or underfunctioning oil glands, problems with your inner organs,
metabolic disorders, dry skin caused by unsuitable or
aggressive care products, badly rinsed-out shampoo, dry
air from central heating, stress, or other psychological
issues. These make your skin lose its protective function,
which allows microorganisms like bacteria or fungus to
multiply on your scalp. The scalp reacts with increased
production of dead skin cells, which then fall off as visible
flakes. Dandruff is best treated every day with a mild
anti-dandruff shampoo or a peeling preparation from your
hairdresser, specifically formulated for over- or underfunctioning of the scalp. Both will calm the scalp and free
it from residue by cosmetically removing flakes. A very
mild cleansing routine is the key to preventing a build-up
of dandruff, and getting rid of it permanently.
A good hairdresser might ask: “And how’s your
scalp doing?” There are plenty of reasons to look
after your scalp. Not least of all, its condition is
crucial for the appearance and condition of your
hair. Like the skin on your body, your scalp sends
out an SOS from time to time. It can itch, burn,
and feel tight. Sometimes it can even look red,
and if this happens you’ll often get oily or dry flakes
as well. Like the rest of your skin, your scalp forms a
protective layer against damaging influences from
outside, and moisture loss from within. To put it
simply, your scalp is a “wall” of lipids (fats) and dead
skin cells. But influences like the climate, dry air from
central heating, certain ingredients in care products,
chemical procedures, and even stress, can lead
to fewer lipids being produced. As a result, the
protective layer becomes thin and permeable.
Relief can come in the form of special calming
shampoos for sensitive scalps, and an ultra-mild
care routine. If these don’t relieve your symptoms,
you may want to consult a dermatologist. It’s possible
the chaos on your scalp is being caused by a fungal
infection, which is quick and easy to treat with the
right drugs and medicated shampoos.
133
AHEAD BY A LENGTH: EXTENSIONS
Are you dreaming of truly big hair? Sadly, nature doesn’t always
give us the volume we want. But extensions can be the way
forward: attached to your own hair in a flash, they’ll create a
real wow factor.
1. PREPARE
If your hair is layered and at least
chin length, extensions will make
it look longer and thicker. First of
all, straighten or curl your hair as
you would normally.
2. DIVIDE
Make the first dividing line across
the back of your head, from ear to
ear. Clip the hair above it out of the
way and lay the clip-in hair piece
along the line.
4. SEPARATE
Make the next dividing line ¾–1¼in
(2–3cm) above the first. Clip the hair
above it out of the way and attach
another line of extensions, as above.
5. CHECK
Continue until all your own hair is
mixed in with the extensions. Brush
through each section as you go.
134
3. ATTACH
Work your way along the hair
piece, attaching the mini clips to
your roots. Make sure the extensions
are attached securely to your own
hair all the way along.
6. FINISH
Unclip the final, top section of your
hair and lay it over the extensions.
Be careful not to bring extensions
too far around to the sides, or the
clips will be visible.
Dream mane:
the fake hair is
impossible to
distinguish from
the real hair here,
but it makes a
huge difference.
FANTASTIC EFFECT
Think of clip extensions as hair you can wear for a special occasion,
like a piece of jewelry or an evening dress. You can get reasonably
priced artificial hair, or varying qualities of real hair. Artificial hair has
a different structure from real hair. It also breaks more easily and can’t
usually be shaped with heat tools. Whatever kind of hair you choose,
make sure the shade is as close as possible to your own hair color.
If you want to add permanent length or thickness, a hairdresser can
bond extensions to your hair using a heat process—the best of which
use natural-quality hair, colored exactly to match your own. They can
stay in for up to three months before the roots grow out enough to
reveal the bond.
135
STRIKING THE RIGHT TONE:
COLORING YOUR HAIR
We’ve all seen celebrities whose hair is platinum blonde one
day, a soft caramel shade the next, and brunette again the day
after. A new hair color can give you a whole new look. Here is what
you need to know about the visual effects of hair colors, and using
color products.
1
1. FROM CARAMEL TO HAZELNUT: BROWN
Brown is the new blonde—the color is becoming more and more popular. The shade
of brown that suits you is partly dependent on your skin tone and eye color. If you have
a rosy complexion with green or gray eyes, neutral browns with no red elements might be
the best choice for you. Women with golden or olive skin and dark eyes are particularly
suited to strong, dark chocolate shades. For a very light, even complexion, a shade of
brown with a little red in it, like chestnut, can look very attractive. And blondes who dare
to go brunette once in awhile can try combining lighter shades, like golden brown, with
gentle honey-blonde highlights.
136
TRY OUT A NEW COLOR
Changing your hair color completely can be a
big step and you might want to make sure you
will be happy about the result. If you’re thinking
about a complete change of color, but don’t
know if it will suit you, there are websites
where you can test the effect of the color
you want before you take the plunge by
uploading a photo of yourself. Another option
is to go to a specialty shop and try out a wig
in that color, if possible with a similar style
to your own hair.
2
2. FROM PLATINUM TO HONEY: BLONDE
Natural blonde is a rare hair color. These days, only
one in every 15 blondes is “real.” No matter: you can
always give nature a little helping hand. Blonde has
many facets. Ash blonde shades work best with a light
tan, and look good cut into a geometric style such as a
bob. But be careful if you have light, beige skin, as the
lack of contrast with your hair color can make ash blonde
quite aging. Golden blonde is a great summer color,
and looks good with a warm, bronzed complexion. It
can be combined with highlights in warm or cool tones.
Red-blonde shades suit warm skin tones, but can also
look great with a very light, porcelain complexion.
3
3. FROM COPPER TO MAHOGANY: RED
Red is more than a hair color: it’s a statement. Only a small
number of people have naturally red hair (though for
Scottish people, the figure is 14 percent, and 10 percent
for Irish people). Many more add an exclamation mark to
their style by coloring their hair in shades of red. But all
reds are not equal, and not every shade suits every skin
type. Warm, yellowy, copper tones suit fair-skinned
women with freckles—just as nature intended. Blueish-red
shades suit very pale, even skin. As a general rule, be
careful with red hair if your skin can get very flushed, or
tends toward enlarged spider veins. Any additional
red is not advisable.
137
MIXING DYES
Mix the two components of the
dye—usually a color cream or gel
and a liquid developer—in a plastic
or glass bowl. Never use metal.
Stir the two parts together with a
plastic color brush until they form an
emulsion. Always use right away.
FIND YOUR COLOR
Most women guess that their own
hair color is much darker than it
actually is, and therefore go for a
dark dye. But what hairdressers
would call a dark blonde, for
example, looks like light brown to
many amateurs. Tip: you will find
sample strands with the hair dyes
in specialty shops. Hold them up
against your own hair in front of
a mirror.
ALL COLORS ARE NOT EQUAL
GENTLY DOES IT
Permanent colors are distinguished by the fact that you
have to mix two components together before use. During
the coloring process, a pigment exchange takes place.
First, the natural pigment in the hair is depleted; then
comes a second step in which the new, artificial pigment
is absorbed. Ammonia or an alkali alternative open up the
outer layer of the hair follicle. Semi-permanent color,
color mousse, and color conditioner, on the other hand,
just deposit color temporarily on the outside of the hair.
This means the color washes out gradually.
Avoid changing your hair color all the time. Celebrities
who are red one day and blonde the next are often
wearing wigs or hairpieces. And color change belongs
firmly in the hands of a professional, who will be an
expert judge of the starting shade and will be able to
choose a suitable, individually tailored color.
THE NUMBERS GAME
Hair dye packaging often has a number as well as the
name of the color. The first number in the color code
(from 1 to 10, though some manufacturers go up to 12)
stands for the depth of color. This relates to natural
colors, from black (1) to a very light blonde at the top of
the scale. The second number gives you the hair color’s
tone. Zero stands for a natural tone, then ash (1), gold (2),
copper (3), mahogany (4), red (5), and violet (6). That said,
not all hair color manufacturers use this system. Some
have their own system that may use letters instead.
138
PLANNING IS EVERYTHING
If you are coloring at home, read the instructions on
your product carefully before you start. Then lay out
everything you need, including a timer. Wear something
to protect your clothes, like an old T-shirt, and use the
protective gloves provided.
NO STRESS
Even if modern formulas and nourishing ingredients
have made the coloring process very mild, don’t put
your hair through too much stress at once. There
should always be at least a two-week gap between
coloring and any chemical treatment (perming/
chemical straightening).
BLONDE MOMENTS
You really need expert knowledge when coloring from
dark to light. Is your hair already colored? How light
or dark is the natural shade? The darker it is, the more
complex the lightening process will be. From a number
4 (mid-brown) and up, hair is pre-dyed blonde and
then treated with a strong lightening hair color. If
hair is even darker, it will need to be bleached more
and then colored with the desired shade, perhaps
using a semi-permanent color. The bigger the color
gap, the quicker and more clearly you will start to see
dark roots coming through.
STRIPY HAIR
The more continuously you use a hair color, the more
lovely and even it will become. Make sure you keep
everything the same: that goes for the mix proportions,
as well as the leave-on time and the intervals at which
you dye your hair. This should be no more or less than
four weeks. The older the uncolored hair is, the more
strongly it will keratinize, and your color may not look
as even. This goes for blonde shades in particular.
STRANDS
Be careful when using dyes containing bleach at home.
Foils in particular are extremely tricky! The biggest
danger is that the bleach or dye will leak out of the foil
and color your roots. Once the chemicals are covered
up, they also work much more quickly and intensively,
so you have to be even more precise about the leave-on
time. With each foil, the time starts as soon as you add
bleach or color.
HIDE YOUR ROOTS
Lightening sprays only have a concealing effect if your
own natural shade is already very light. The darker
your roots, the less sense it makes to use them. They
can lead to yellowy tones in your hair. Another problem
is that the oxidation process is not stopped after a leave-in
time, as it is with a bleaching process. Once they have
been sprayed on, lightening sprays continue working until
you wash you hair. This “creeping oxidation” can do lasting
damage to your hair and its sensitive roots.
SHINING LIGHTS
Bleaching is a stressful process for hair—
especially if you want to transform a relatively
dark starting color into really light locks. The
process is also quite tricky: if you wash the
color mixture out too soon, your hair can end
up looking yellow or orange. Leave it in too
long or use too high a concentration of
hydrogen peroxide, and your hair can take on a
rubbery quality, or even break. The best thing is
to leave the treatment to a hairdresser. He or
she will know exactly how long blonde dye
needs to be left in, and will keep hair damage
to a minimum.
139
SOS TIPS
Damage, drama, and disaster: there are days when everything just
goes wrong. Unfortunately, that also goes for hair care and styling.
But it won’t matter as long as you know the most effective ways to
rescue your hairstyle.
TOO MUCH WAX
OIL SLICK
It can happen all too quickly: dip a bit too deep into the
pomade container, and suddenly your hair looks greasy.
There’s only one remedy: wash it—or comb it back into a
shiny, sleek-look ponytail, if your hair is long enough. For
short hair, reaching for the shampoo is often the quicker
and simpler solution.
If there’s no time to wash your hair, but it looks greasy
and badly needs to be refreshed, just spray on a little dry
shampoo, massage it in for a minute, and then brush it
out thoroughly.
HAIR COLOR TOO DARK
If you color your hair at home, there’s always a risk you’ll
go for the wrong shade. If your hair color comes out too
dark, the following trick will help: wash your hair twice
with an anti-dandruff or peeling shampoo, then apply a
hair mask and leave it in for at least an hour. The shampoo
opens the hair cuticle a little, while the mask will remove
some of the pigment from your hair, and nourish it at the
same time.
FLAT ROOTS
Yesterday you spent hours styling your hair, and this
morning it’s pressed flat against your head. Try perking it
up with the help of a little volumizing powder, massaged
into the roots with small circular motions. If that doesn’t
work, massage some styling mousse into the roots and
blow-dry your hair with a paddle brush against the
direction of growth. It will soon stand up again.
140
KINKY HAIR
Hair clips and bands often leave impressions and kinks
behind, especially in freshly washed hair. There are special
spiral-shaped hairbands that don’t leave these dents.
Otherwise, you can try this blow-dry trick: moisten the
area with water, use a little mousse or styling spray, and
blow-dry over a large round brush.
FLY-AWAY HAIR
In winter, when you come into a much warmer room out
of the cold, and especially if you are wearing a woolly hat,
your hair can suddenly develop an electric charge and
become fly-away. First tip: never brush or comb your hair
immediately; it will only make you look more like Einstein.
Second tip: spray some water into the air above your head
with a mist spray, and carefully run your hands over your
hair. That should bring it back down to earth.
FRIZZY HAIR
You’ve just styled your hair perfectly—then you go out
into damp air, and suddenly little hairs are sticking up
everywhere. Experts call it frizz, and there is a remedy
for it: rub a pinhead-sized amount of hair wax between
warm hands, and then run them over your hair—or use
an anti-frizz spray.
A SHADE TOO RED
An inadvertent red tinge after coloring your hair can be
gorgeous, but it can also make you look pale. If necessary,
cover it with a permanent or semi-permanent dye in an
ashy or neutral shade to hide the red pigment.
UNTAMEABLE CROWN
BURNED SCALP
This can happen before you know it, especially if your hair
is blonde and/or thin: after a long day at the beach, or in
the evening of a hot summer's day, your part or even your
whole head will look sunburnt. SOS remedy: rub some aloe
vera gel into your scalp. This will have a lovely cooling
effect, reduce the inflammation, and is not oily. Even
better: avoid the situation in the first place by wearing a
hat during the day.
POST-POOL GREEN HAIR
Does your hair suddenly develop a green sheen after a dip
in the pool? Dyed blonde hair doesn’t like chlorine, and
can have a chemical reaction to it. Rinsing your hair with
two tablets of acetyl salicylic acid in a quart of still mineral
water should help. Avoid green hair by wearing a
swimming cap, even if it doesn’t look very chic.
NO HAIR DRYER
You’re traveling, and there’s no hair dryer in the hotel
room. Don’t subject your hair to a rough rub with a towel:
let it air dry. Pin up longer hair into a secure knot on the
back of your head while it dries. Keep scrunching curls
and waves together during the day.
Your crown can be a real pain when you’re styling your
hair. Here is how to temporarily tame it: spray a little
styling spray onto its roots, smooth the hair down with
a hair dryer and paddle brush, and fix with lots of strong
hair spray. Never style against your crown: it can make
your hair break! It’s better to find a style where your
crown can be integrated naturally and elegantly.
ORANGE ON BLONDE
If you don’t leave hair dye on for long enough when
you’re going blonde, the result is often an ugly orange
tinge. If this happens, you really need to seek professional
help. A hairdresser can usually save your hair color
without too much stress.
CAMOUFLAGE FOR YOUR ROOTS
If you dye your hair, you will usually start to see
the roots after four weeks. And if you don’t have
time to top off your color, you can always use
eyebrow mascara, which comes in various
colors. Just sweep the brush over the roots,
and in mid-blonde to black hair, the colored gel
will hide any gray or dark regrowth until your
next wash.
141
142
ACKNOWLEDGMENTS
Thanks to Gerhard Roll, who brought me to the Harder hairdressing school in Germany, and
to my teachers Hans Becks, Dirk Glass, and Michael Prinz, who taught me the fundamentals
of this profession. Thanks to my friend Ralf Lutter, who took my first photos, and to Bernd
Michalke, Günter Backhaus, Horst Fett, and Kerstin Lehmann and Gabriele Legouez from
L’Oréal, who supported and believed in me.
Thanks to Ekaterina Schmuhl for the perfect cast for this book.
A thousand thanks to Eugen Mai for his perspective, and for the wonderful pictures.
Many thanks to all the designers for the beautiful outfits: Blacky Dress, Dimitri, Elisabetta
Franchi, Elisabetta Franchi Gold, Ella Singh, Ewa Herzog, Four Flavor, Guido Maria
Kretschmer, Guido Maria Kretschmer ebay-Kollektion, H&M, Irene Luft, Mango, Marcel
Ostertag, Matthias Ophoff, Pull&Bear, Sack’s, Wolford, Zara, Zara W&B Collection.
Heartfelt thanks to all the models, who made themselves available for this book with good
grace and total dedication. And not forgetting their agencies, who were kind enough to
support this project: Agnieszka B., Aicha Hanna M./Procast, Amira Elisa S./Procast, Anna-Lea
B., Anne L./Modelpool, Buki A./4Play, Carmelina C./Modelpool, Carolin S., Claudia B./Procast,
Cora M./Procast, Dora/Procast, Fata H., Germaine Shakira M./Volta Models, Jennifer S./
McFit-Models, Katarina P., Katharina D., Katrin B., Lena L./Procast, Linda B./Modelfabrik,
Luzie G./Procast, Lynn G./Volta Models, Maria B./Modelfabrik, Maria S./Splendide, Michaela
S./ Most Wanted Models, Mirela K., Nele H., Olga P./Procast, Paulina/4Play, Peo S./Procast,
Rebecca K., Rixa Christina W./Procast, Sarah R./Procast, Sophie Luise S., Stephanie W., Sussan
Z./Volta Models, Tu Anh L. T.
Thanks to my wonderful team at the salon, who inspire me and give me the freedom to make
projects like this a reality.
Thanks to my on-set assistant, Nadine Brönner, to Michael Schmidt for the great make-up,
to Nabil El-Rayan for the styling, and Silke Amthor for finding the right words.
To Monika Schlitzer at Dorling Kindersley—many thanks for your faith in my work, and for
letting me do this book.
Thank you, my dear Sigi, for opening so many doors for me—you’re the best.
Thank you to my wonderful parents: my skilled father and my talented mother, from whom I
was able to learn what might just be the best job in the world.
For my son.
Thank you, Susann.
143
ANDRÉ MÄRTENS
With 100 years of family tradition behind him, native Berliner André Märtens found it easy to decide on a career: he started by
training as a hairdresser in his parents’ salon, and at the renowned Friseurfachschule Harder in Duisburg, Germany. He has
been running his own salon in Berlin since 2000. He is not only a long-hair expert; his name stands for performance, quality,
and delightfully simple, elegant shapes. His talent as a hair stylist and trendsetter means he is in demand among professionals
and as a consultant and hair expert for customers in the media. André Märtens also works as a hair artist on fashion shows,
advertisements, video and film productions, musicals, theater, competitions, presentations, and professional training events.
As an ambassador for L’Oréal Professionnel, André Märtens has spent many years styling celebrities for public appearances
and top models for international fashion shows. André Märtens has been “Head of Hair” and the principal Créateur behind
almost all the looks at the Mercedes-Benz Fashion Week Berlin for L’Oréal Professionnel. In his Berlin salon, André Märtens’s
clients include people from the world of politics and economics, and numerous celebrities. André Märtens has the eye of
an international master, and a passion for hair.
ANDRÉ MÄRTENS MANAGEMENT AND PR
Lietzenburger Straße 83
10719 Berlin
Tel. +49 30 88709500
www.andremaertens.de
BrandFaktor . Die Markenmacher . Sigrid Engelniederhammer
Georgenstraße 5 . 80799 München . Tel. +49 (0)89 3837715 12
www.brandfaktor.com
EUGEN MAI
Eugen Mai is a photographer based in Berlin. He is young, experienced, and places an emphasis on the aesthetic quality of
his pictures. He is responsible for multimedia experiences in the areas of fashion, advertising, and film. As a photographer
and an art director, his focus is on producing emotionally charged images, where naturalism and elegance go hand in hand.
www.eugenmai.com
PHOTOGRAPHY Eugen Mai
ADDITIONAL PHOTOGRAPHY Edward Schmuhl, Thomas Rafalzyk
CASTING Ekaterina Schmuhl
HAIR André Märtens
HAIR ASSISTANT Nadine Brönner
MAKE-UP Michael Schmidt
STYLING Nabil El-Rayan
TEXT BY Silke Amthor
EDITOR Julia Niehaus
DESIGNER Diana Dörfl
US SENIOR EDITOR Shannon Beatty
US EDITOR Christy Lusiak
DK GERMANY
PUBLISHING DIRECTOR Monika Schlitzer
PROJECT EDITOR Andrea Göppner, Katharina May
PRODUCTION DIRECTOR Dorothee Whittaker
PRODUCTION COORDINATOR Katharina Dürmeier
PRODUCER Sophie Schiela
DK UK
TRANSLATOR Ruth Martin
PROJECT EDITOR Anna-Selina Sander
MANAGING EDITOR Dawn Henderson
MANAGING ART EDITOR Christine Keilty
SENIOR JACKET CREATIVE Nicola Powling
JACKET DESIGN ASSISTANT Laura Buscemi
JACKET CO-ORDINATOR Francesca Young
SENIOR PRE-PRODUCTION PRODUCER Tony Phipps
PRODUCER Jen Scothern, Olivia Jeffries
DEPUTY ART DIRECTOR Maxine Pedliham
DESIGN DIRECTOR Phil Ormerod
PUBLISHER Peggy Vance
DK INDIA
ASSISTANT EDITOR Maithilee Bhuyan
DEPUTY MANAGING EDITOR Bushra Ahmed
MANAGING ART EDITOR Navidita Thapa
PRE-PRODUCTION MANAGER Sunil Sharma
SENIOR DTP DESIGNER Pushpak Tyagi
DTP DESIGNER Manish Chandra Upreti
First American Edition, 2015
Published in the United States by DK Publishing,
345 Hudson Street, New York, New York 10014
Copyright © 2015 Dorling Kindersley Limited
A Penguin Random House Company
15 16 17 18 19 10 9 8 7 6 5 4 3 2 1
001–284985–Sep/2015
All rights reserved.
Without limiting the rights under the copyright reserved above, no
part of this publication may be reproduced, stored in or introduced
into a retrieval system, or transmitted, in any form, or by any means
(electronic, mechanical, photocopying, recording, or otherwise),
without the prior written permission of the copyright owner.
Published in Great Britain by Dorling Kindersley Limited.
A catalog record for this book is available from the Library of Congress.
ISBN 978-1-4654-3796-9
DK books are available at special discounts when purchased in bulk
for sales promotions, premiums, fund-raising, or educational use. For
details, contact: DK Publishing Special Markets, 345 Hudson Street,
New York, New York 10014 or SpecialSales@dk.com
Printed and bound in China
All images © Dorling Kindersley Limited
For further information see: www.dkimages.com
A WORLD OF IDEAS:
SEE ALL THERE IS TO KNOW
www.dk.com