/


Tags: field manual camouflage
Year: 1944


Text
WAR DEPARTMENT FIELD MANUAL
CORPS OF ENGINEERS
CAMOUFLAGE OF BIVOUACS,
COMMAND POSTS, SUPPLY POINTS,
AND MEDICAL INSTALLATIONS
WAR DEPARTMENT MAY 1944
regraded UNCLASSIFIED w
-лнЯ*иООО OIR. 5200.1R
«. I9ZLH-
WAR DEPARTMENT FIELD MANUAL
FM 5-20C
CORPS OF ENGINEERS
CAMOUFLAGE OF BIVOUACS,
COMMAND POSTS, SUPPLY
POINTS, AND MEDICAL
INSTALLATIONS
WAR DEPARTMENT • MAY 1944
DISSEMINATION of restricted matter
—The information contained in restricted documents and the essential
characteristics of restricted material may be given to any person known to
be in the service of the United States and to persons of undoubted loyalty
and discretion who are cooperating in Government work, but will not be
communicated to the public or to the press except by authorized military
public relations agencies. (See also par. 184, AR 380-5, 28 Sep 1942.)
United States Government Printing Office
Washington 1944
WAR DEPARTMENT,
Washington 25, D. С., 1 May, 1944.
FM 5-20C, Corps of Engineers Field Manual, Camouflage of Bivouacs,
Command Posts, Supply Points, and Medical Installations, is published
for the information and guidance of all concerned.
{A. G. 300.7 (14 Aug 43)1
By order of the Secretary of War:
G. C. MARSHALL,
Chief of Staff.
Official:
J. A. ULIO,
Major General,
The Adjutant General.
Distribution:
As prescribed in paragraph 9a, FM 21-6; В and H (5); R (4); Bn (4);
C 1-4, 8-11, 19, 35, 44, 55 (2), 5-7, 17, 18 (4); RTC (200).
(For explanation of symbols, see FM 21-6.)
CONTENTS
This manual supersedes paragraphs
25 and 27, FM 5-20, 1 June 1940. •
PAGE
Check List...................................... 2
Introduction.................................... 5
PART I. Camouflage of Bivouacs................. 7
Vital Elements of Camouflage............. 7
Development of the Bivouac............... 8
Camouflage Practice in Bivouacs ....... 13
Bivouacs in Snow-Covered Terrain........ 2 3
Camouflage Discipline...................2 8
PART II. Camouflage of Command Posts.......... 3 5
Layout of a Command Post ............... 38
CP in Open Terrain...................... 42
CP in Urban Areas........................44
Decoy CP................................4 5
PART III. Camouflage of Supply Points.......... 46
Planning Supply Points.................. 46
Decoy Supply Points......................62
Waterpoints..............................64
PART IV. Camouflage of Medical Installations . . . 66
Battalion Aid Stations ................. 66
Collecting Stations..................... 70
Clearing Stations....................... 7 0
Medical Vehicles........................ 71
1
CHECK LIST
CAMOUFLAGE OF BIVOUACS
QUARTERING PARTY
1. Study aerial photographs and large-scale maps of area to be occu-
pied. Make one or more tentative camouflage plans designed to take
advantage of dark and heavily textured parts of the ground pattern.
2. Make ground reconnaissance of area.
3. Make final comprehensive camouflage plan. If necessary, draw dia-
gram of plan on map overlay. Make use of overhead cover, clumps of
bushes, scrub growth, folds or other shadow-casting irregularities in the
ground surface. Plan should include:
a. Adequate dispersion.
b. Areas for:
(1) Unit tentage.
(2) Facilities.
(3) Vehicle and equipment parking.
(4) Parking for visiting vehicles.
(5) Security elements.
(6) Cutting natural materials.
(7) Disposal of spoil.
c. Track plan, which:
(1) Makes use of existing foot paths and vehicle tracks.
(2) Keeps new foot paths and vehicle tracks to a minimum and
conceals them by siting them under overhead cover or close to and along
natural lines in the terrain pattern.
(3) Provides a concealed entrance and exit to area.
(4) Provides one-way traffic circulation.
4. Make camouflage plan effective by:
a. Posting traffic signs. Reflectors and lighted signs for night traffic
should have natural or artificial overhead screening.
b. Taping or wiring-in exposed sections of foot paths and vehicle
tracks.
c. Posting traffic guides to prevent short cuts and other violations of-
camouflage discipline.
d. Erecting overhead or oblique screening where necessary.
e. Improve soft and soggy sections of the roadbed to prevent it from
becoming noticeably rutted or widened.
UNIT COMMANDERS
1. Make sure all personnel understand details of camouflage plan.
2. Designate off-limits areas. These include all open ground and bare
spaces in woods extending 10 paces inside from the edge of woods. The
10-pace limit is especially important with green troops.
3. Make a camouflage inspection soon after arrival in area and periodic
inspections throughout stay. Standing operating procedure should include:
2
a. Immediate concealment of parked vehicles and equipment, as far
as conditions permit.
b. No fire at enemy planes unless otherwise ordered.
c. Dispersion to be observed at all times. No congregations of per-
sonnel or equipment.
d. No laundry hung out to dry except at specified times and in speci-
fied spots which are safely covered.
e. Empty cans to be buried and all shiny articles to be kept under
cover.
/. No shelter tents to be pitched by day, except under heavy cover
or in rain or fog, and no latrine screens erected unless otherwise ordered.
g. Latrines to be placed under cover. Paths to latrines to be well
marked and concealed.
h. Spoil from kitchen-refuse pits, latrines, and foxholes to be con-
cealed.
i. Natural and artificial camouflage to be maintained at all times.
CAMOUFLAGE OF COMMAND POSTS
QUARTERING PARTY
All items on check list for bivouacs apply to command posts, with the
following additions:
1. Any expected increase in amount of traffic, personnel, and materiel
must be provided for in the original camouflage plan.
2. Isolated buildings must be avoided.
3. Site must be capable of being occupied for extended periods with-
out being disclosed by changes in surroundings.
4. Locate command post to take advantage of existing roads, tele-
phone and telegraph lines.
5. Vehicles must be parked several hundred yards from command post.
6. Locate new communication lines under natural cover, along terrain
lines, or both.
7. Conceal security-weapons emplacements and tracks to them.
8. Locate protective wire along terrain lines or where an ordinary
fence might logically be placed.
9. When the enemy knows a command post must be in the vicinity,
arrange for a decoy command post.
UNIT COMMANDER
Perform same functions as noted in check list for bivouacs.
CAMOUFLAGE OF SUPPLY POINTS
Check lists for bivouacs and command posts also apply to supply points,
with the following additions:
1. Disperse materiel but stay within the limit of practicable conceal-
ment. That is, do not disperse so much that it will draw attention or
make camouflage impossible.
3
2. Establish waiting areas for vehicles at some distance from loading -
or unloading points.
3. Utilize all existing terrain features—ruins, trenches, craters, etc.—
for storage of supplies.
4. Utilize all existing natural overhead cover consistent with ease of
access and operations.
5. Stack supplies to resemble the shape of the terrain feature in which
they are placed.
6. Construct decoy supply points when it is desired to mislead the
enemy, but only on authority of the force commander.
WATER POINTS
7. Provide good drainage for spilled water.
8. Establish and maintain rigid schedule for vehicle loading.
CAMOUFLAGE OF MEDICAL INSTALLATIONS
IN A DIVISION AREA
All items on check list for bivouacs apply to medical installations in a
division area, with the following additions:
1. Avoid sites near landmarks.
2. Construct any required camouflage quickly to avoid delay in use
of the installation.
3. Litter bearers must use concealed routes whenever possible.
4. Preliminary examination rooms should be light-tight.
5. Tone down metal chests, pails, and shiny objects with dull paint.
6. Ambulances must stop under cover.
7. Park vehicles in concealed areas to rear of installation.
8. Bury empty bottles and other empty shiny containers.
COLLECTING STATIONS
9. Must have sheltered place for vehicles to load, unload, and turn.
10. Turn-off roads from main roads to station must be concealed or
carried past the station.
CLEARING STATIONS
11. Locate in large civilian buildings when possible. Permanent cover
preferable to tents.
12. When tents are required, erect minimum number needed, and only
under overhead concealment.
13. Color tents to match surroundings.
MEDICAL VEHICLES
14. Keep dispersed always.
15. Cover with drapes when parked.
16. When red cross insignia is ordered covered, do not paint it out
—cover it with tarpaulin or other OD-colored material.
4
CAMOUFLAGE
OF
BIVOUACS, COMMAND POSTS,
SUPPLY POINTS, AND
MEDICAL INSTALLATIONS
INTRODUCTION
This manual deals with the camouflage of bivouacs, com-
mand posts, supply points, and medical installations.
Although these installations are treated in separate sec-
tions, their camouflage problems are much alike. Each is an
activity in which personnel and equipment are closely grouped
in one area for more than a few hours. This manual aims to
make clear the camouflage problems involved and the ways
to solve these problems.
5
Part I
CAMOUFLAGE OF BIVOUACS
Part I discusses the means and methods of camouflaging
bivouacs to conceal them from enemy observation.
A unit in bivouac is particularly vulnerable to enemy aerial
observation and attack because its elements are concentrated
in a smaller area than usual; and, except for security elements,
its men are resting and are less alert than on the field of
battle. For these conditions, camouflage must be at its best.
The unit riot only must conceal itself quickly and efficiently
but must avoid the danger of breaches in camouflage disci-
pline, which are most apt to occur wherever any army unit
occupies an area for more than a short time.
VITAL ELEMENTS OF CAMOUFLAGE
As in most military operations conducted swiftly and in for-
ward areas, the two most important elements of camouflage
for bivouacs are siting and the standing operating procedure
(SOP). Siting is the selection of terrain and the judicious
placing of a unit or activity therein. The SOP must be based
on an understanding of camouflage discipline by all ranks.
Clearly, in an operation of this nature, the individual sol-
dier is extremely important. One man's error can nullify the
effects of months of training, the most intelligent planning,
and the most careful behavior by the rest of the unit. A single
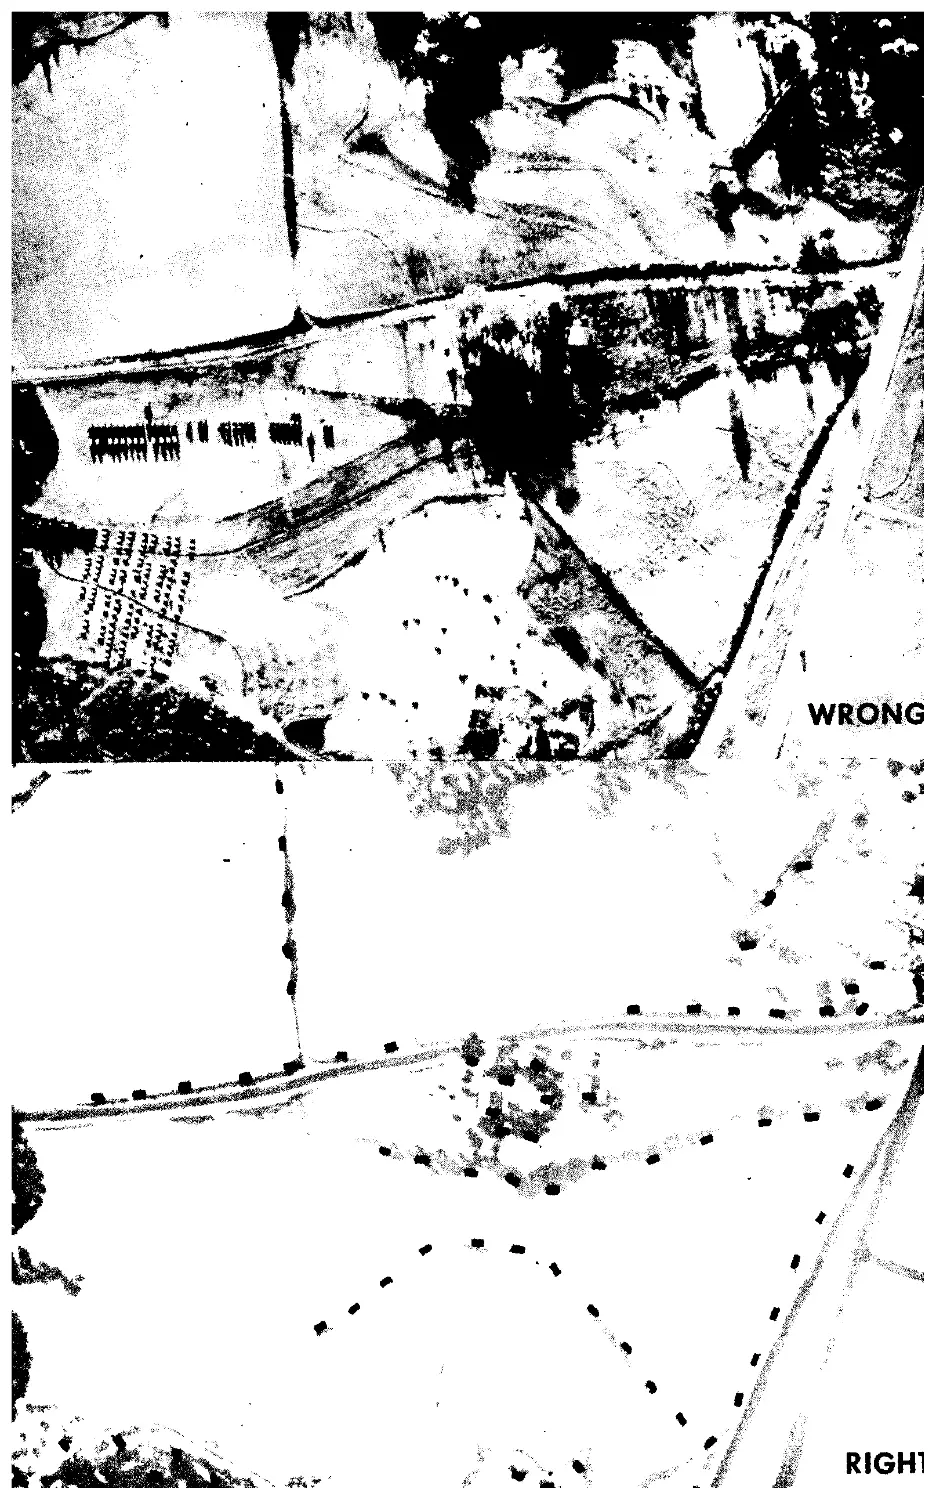
FIGURE 1 ® and @.—The regular alignment of tents and vehicles, as
in the upper picture, presents an easily located and extremely vulner-
able target to the enemy; it is a stupid practice in the presence of the
enemy. Instead, every effort must be made to get the- most out of
concealment factors of the terrain. Even in terrain like this, partial
concealment in bivouac is possible. The drawing below is a lesson in
concealment by siting. This area lacks wooded terrain, but has many
lines made by furrows, hedgerows, roads, and ditches. Therefore, most
vehicles are parked alongside the hedgerows and near the roads, mak-
ing use of the camouflage principle that an object placed parallel to
and on or near a strong terrain line seems to become a part of that line.
Tents are dispersed irregularly underneath trees. Headquarters moves
into existing farm buildings. Communication lines are excellent. The
unit becomes inconspicuous merely by taking care to preserve the
normal appearance of the countryside.
7
mess kit flashing at the wrong moment betrays an innocent-
looking area to the enemy, draws his closer inspection,
and results in disclosure and action against the position.
DEVELOPMENT OF THE BIVOUAC
There are at least four critical stages in the development of
a bivouac. Listed in the order in which they occur, they are:
a. Planning Stage. c. Maintenance Stage.
b. Occupation Stage. d. Evacuation Stage.
PLANNING STAGE.—Frequent bivouacs are characteristic of
mobile warfare. In such warfare, there is seldom time or
facilities to erect elaborate constructions for concealment.
Bivouacs are hasty—quickly entered and quickly departed
from. Camouflage measures are swift, rough, and dependent
upon local materials. But no matter how swift the opera-
tion or how limited time and facilities, the commander of a
unit—always aware of his responsibility for the camouflage
of his organization—must plan for concealment in bivouac.
a. Reconnaissance and choice of position.—The general area of
the bivouac is determined by the tactical plan. Before going
into this general area, the quartering party should become
as familiar as possible with the terrain and the ground pat-
tern through a careful study of maps and aerial photographs.
The quartering party should be fully acquainted with both
the tactical plan and the demands of camouflage and should
be equipped to indicate dispersal points and concealment
areas for all equipment, to tape paths, roads, and areas for
trenches and foxholes, and to post traffic regulations.
The things which the quartering party keeps in mind are:
(1) Mission of the unit. The tactical plan and its demands,
which normally include concealment of the bivouac, must
be satisfied as completely as possible.
(2) Access routes. Effectiveness of concealment depends
greatly on a well-prepared and well-maintained track plan.
(3) Existing concealment qualities of the area.
(4) Size of the area in relation to the unit which will
occupy it. Dispersion helps take advantage of natural con-
cealment; the area must be big enough to allow for it.
(5) Concealment of the all-around defense element of the
position. Even though other elements of a bivouac are well
concealed, a conspicuous all-around defense may betray it.
b. Siting.—Siting is the key to the whole problem. Good
siting solves at least 75 percent of the concealment problem.
8
A good bivouac area, for example, would be one in a large
wooded area containing many existing routes of approach;
but such an ideal place is seldom found—nor is it necessary.
Shadows, terrain lines, rocky areas, villages, farms, even
deserts can absorb a military unit into the terrain. A com-
mander must be ready to fit his organization into any kind
of landscape and make it inconspicuous. The succeeding pages
show some of the ways in which this is done.
c. Preparation and dissemination of orders.—The camouflage
plan must consider the march plan of the organization.
Orders include some description of the camouflage plan and
the important points of camouflage discipline pertinent to
the area. For example, a particular warning may be neces-
sary to avoid a newly plowed field bordering one edge of
the bivouac area.
OCCUPATION STAGE.—A carefully controlled traffic plan
must be rigidly adhered to while the units move into posi-
tion. Guides posted at route junctions should be fully in-
formed as to the camouflage plan. One of their duties is to
enforce camouflage discipline. Turn-ins must be wired in
clearly to prevent widening of corners by vehicles. Foot
troops must follow wired paths through the area. This is a
critical stage in the bivouac. Bad discipline at this time can
nullify any further effort at concealment.
a. Dispersion.—There must be no congestion of vehicles or
installations. Dispersion is one of the best methods of pre-
venting losses in the event of discovery of the position and
consequent aerial or artillery attack. Dispersion should be
automatic. Vehicles will seldom be less than 30 yards apart
in ordinary terrain or less than 100 yards in desert terrain.
The kitchen area should be carefully selected to provide
for adequate dispersion of the various parts of the kitchen.
The three main congested areas must be dispersed—the food-
dispensing area, mess-kit washing area, and eating area.
b. Immediate camouflage measures.—Camouflage is not some-
thing applied as an afterthought to other activities. Camou-
flage measures must be immediate and continuous. If tracks
have been made which can be seen from the air, immediate
steps must be taken to obliterate them, if that is possible.
However, it is an extremely difficult procedure which can
only rarely be counted on to be wholly successful. If leaves
or brush are handy, they should be strewn over tracks almost
as soon as a truck has moved into its position. In sandy
9
areas, sand should be raked over ruts. Branches should cover
tracked areas if these areas are small enough. Vehicles and
other equipment should be concealed with natural materials
or draped with nets as soon as they are in position. Spoil
from foxholes, dug at once, is concealed.
c. Tracks.—When it is impossible to stay on existing routes
and paths, three courses are open to the unit.
(1) Make new paths and tracks along existing natural
lines, such as edges of woods, fence lines, hedgerows, irriga-
tion ditches, terraces, and wire communication lines. New
tracks adjacent to and paralleling such lines are far less con-
spicuous than fresh tracks breaking a “clean” area.
(2) If a new path in an open area must be made/ it must
be extended beyond its destination to a natural termination,
such as a junction with a road. This false section must appear
as well traveled as the true section. A new route must enter
concealment some distance from its destination. Turn-
arounds are avoided. Traffic-control plans which include a
one-way system of travel must be strictly enforced.
(3) With little effort, some tree tops can be pulled and
wired together to cover exposed areas. A more elaborate and
difficult procedure—possible only in somewhat prolonged
bivouacs—is the construction of overhead screens to conceal
small sections of newly created paths and roads. This is a
time-consuming operation and should be considered only as
a last resort in such temporary operations as bivouacs.
MAINTENANCE STAGE.—Next to the occupation stage, the
maintenance stage is the most critical, if the occupation
stage has been successful from a camouflage standpoint, the
maintenance stage is relatively easier. A successful occupa-
tion stage means that the unit has been aware of the camou-
flage problem and has observed camouflage discipline. Suc-
cessful maintenance involves frequent inspection of installa-
tions, active patrol measures for camouflage discipline, and,
if possible, aerial observation and photographs.
a. Kitchen areas.—Critical activities of a unit in bivouac
are those which call for the congregation of troops. A most
important activity of this nature is messing. Here, the track
plan must be rigidly enforced.
Often artificial overhead cover—flat-tops or drapes—may
be necessary to conceal kitchen areas. These must be con-
stantly maintained. Garbage disposal pits must be carefully
concealed, especially the spoil which is dug from them. In
10
the kitchen itself—if cooking stoves other than issue gaso-
line burners are used—the problem of eliminating smoke
should be met by constructing a baffle above the stoves so
that the smoke is well dispersed. The baffle itself should be
camouflaged and concealed from aerial view.
b. Night discipline.—Night discipline is another difficulty.
Men tend to relax in camouflage discipline at night, lulled
into a dangerous feeling of being protected from observation
by darkness. However, because aerial photographs taken at
night will often reveal a unit, whose discipline has become
relaxed, the same standard of camouflage discipline must be
observed by night as by day. Night photographs are sur-
prisingly revealing. Wired and taped paths must be followed
and blackout control must be enforced. No light should be
allowed except under adequate concealment. No cooking is
to be done at night over open fires, nor any laundry put out
to dry where it will be revealed by aircraft photo flares.
c. Bivouacs in open terrain.—Concealment in terrain which
lacks natural overhead cover, such as open fields, deserts,
or the outskirts of villages, depends mainly on careful siting
and wide dispersion. Shelter tents should be pitched along
lines which are normal in the terrain pattern, such as fence
and hedge lines or beside folds in the ground or other shadow-
casting irregularities in the ground surface. Disruptive pat-
terns, made with paint, mud, or native grasses, should be
applied to tents. If time permits, tents and essential equip-
ment should be at least partially dug in and spoil heaped
around them in such a way that their shadows are mini-
mized. Spoil lightens in color as it dries out and must be
toned down with natural materials. During the daytime,
tents are struck and concealed with natural materials.
EVACUATION STAGE.—Camouflage measures of a bivouac
are not at an end when the unit moves out. An evacuated area
can be left in such a mess that aerial photographs by the
enemy will reveal the strength of the unit which occupied
it, the kind of equipment carried, and the direction in which
it went. It is part of camouflage discipline to leave the area
looking undisturbed.
False bivouacs may sometime be used as part of a tactical
plan of operational camouflage. For example, if it is known
that the enemy has discovered a real bivouac, decoys simulate
occupation after the unit moves out. Such operational camou-
flage is carried out only on orders of the force commander.
11
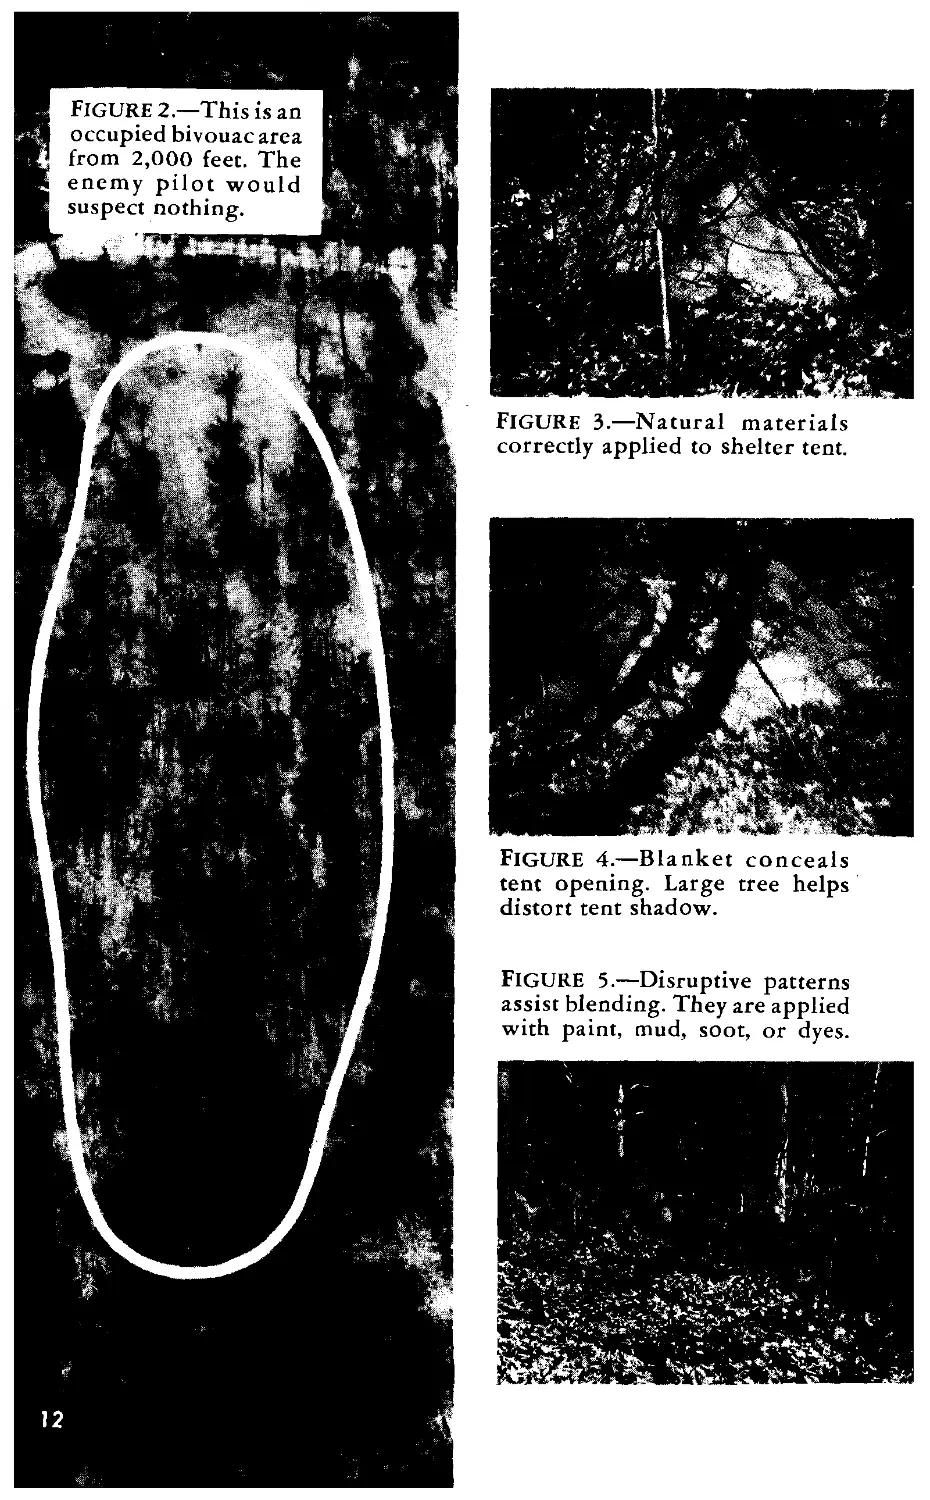
FIGURE 3.—Natural materials
correctly applied to shelter tent.
FIGURE 4.—Blanket conceals
tent opening. Large tree helps
distort tent shadow.
FIGURE 5.—Disruptive patterns
assist blending. They are applied
with paint, mud, soot, or dyes.
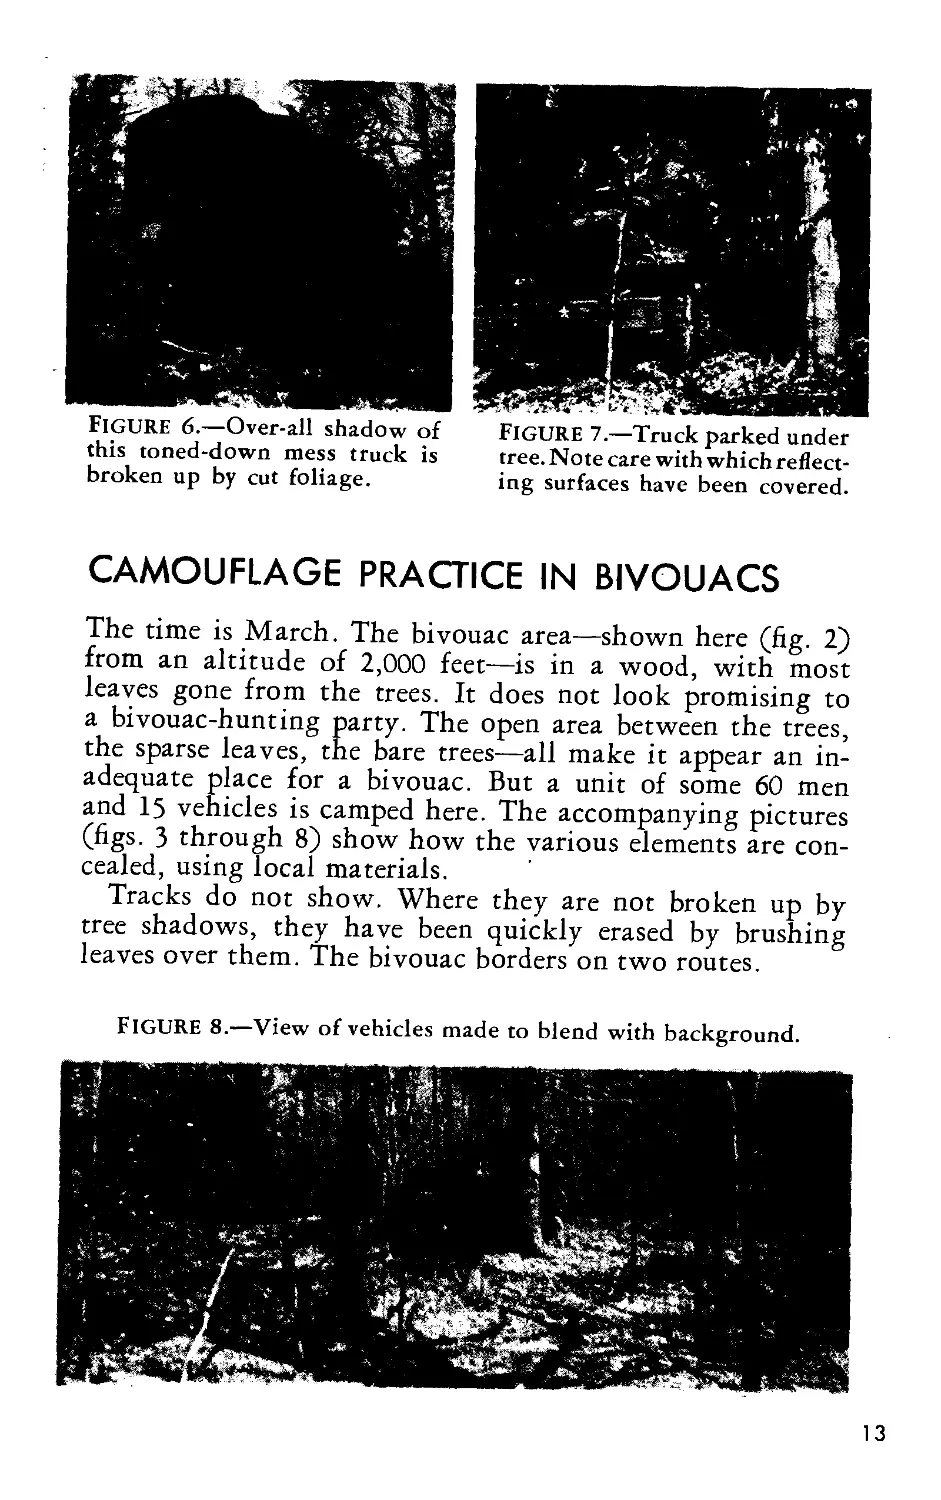
FIGURE 6.—Over-all shadow of
this toned-down mess truck is
broken up by cut foliage.
FIGURE 7.—Truck parked under
tree. Note care with which reflect-
ing surfaces have been covered.
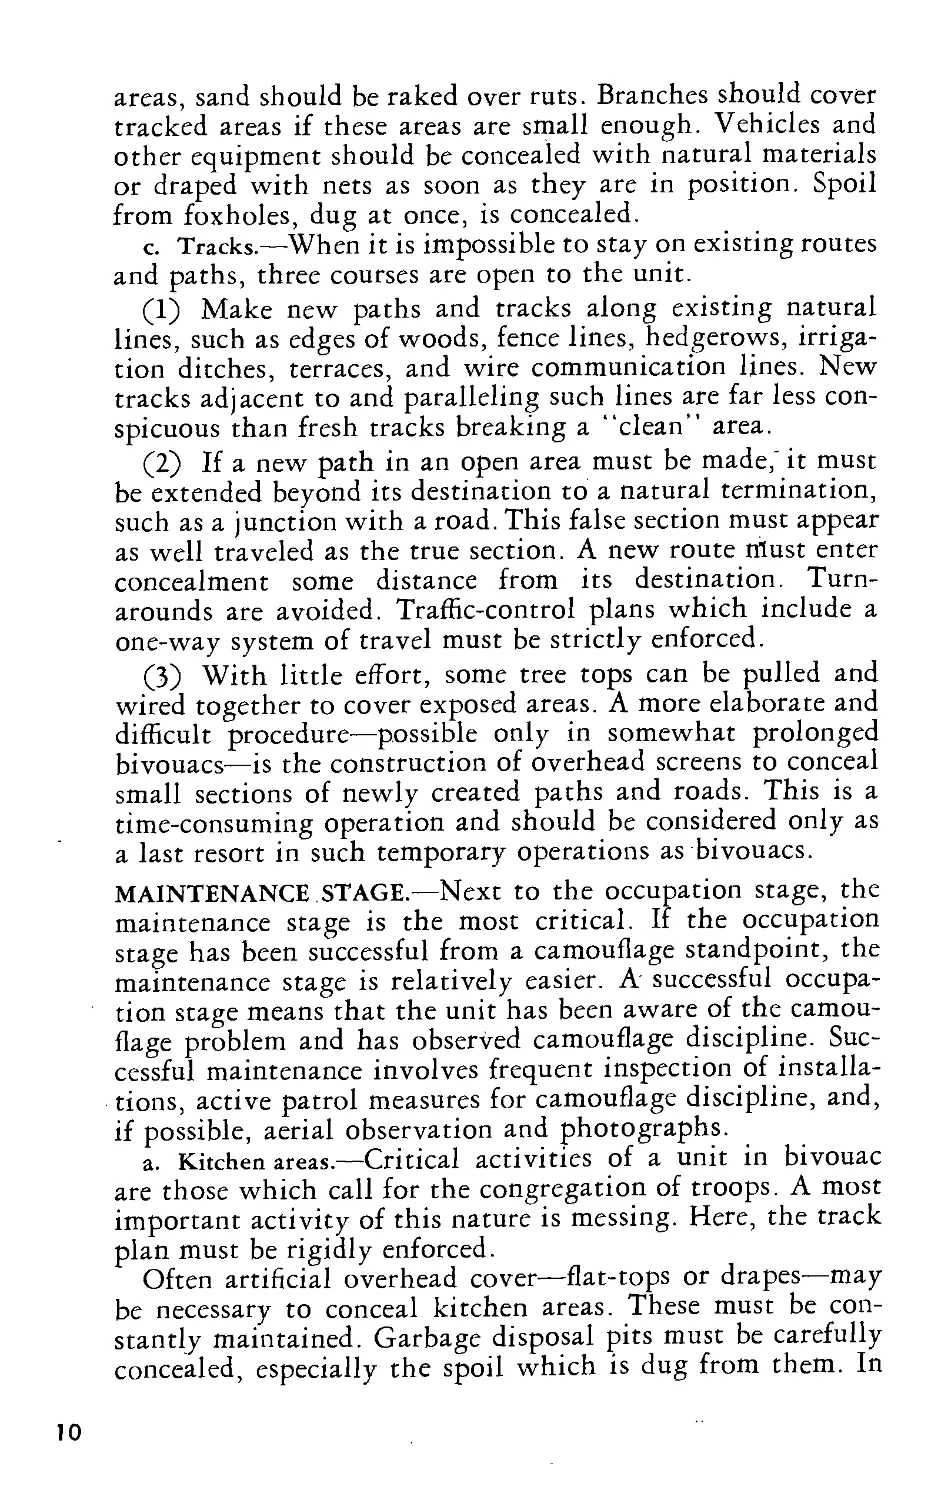
CAMOUFLAGE PRACTICE IN BIVOUACS
The time is March. The bivouac area—shown here (fig. 2)
from an altitude of 2,000 feet—is in a wood, with most
leaves gone from the trees. It does not look promising to
a bivouac-hunting party. The open area between the trees,
the sparse leaves, the bare trees—all make it appear an in-
adequate place for a bivouac. But a unit of some 60 men
and 15 vehicles is camped here. The accompanying pictures
(figs. 3 through 8) show how the various elements are con-
cealed, using local materials.
Tracks do not show. Where they are not broken up by
tree shadows, they have been quickly erased by brushing
leaves over them. The bivouac borders on two routes.
FIGURE 8.—View of vehicles made to blend with background.
13
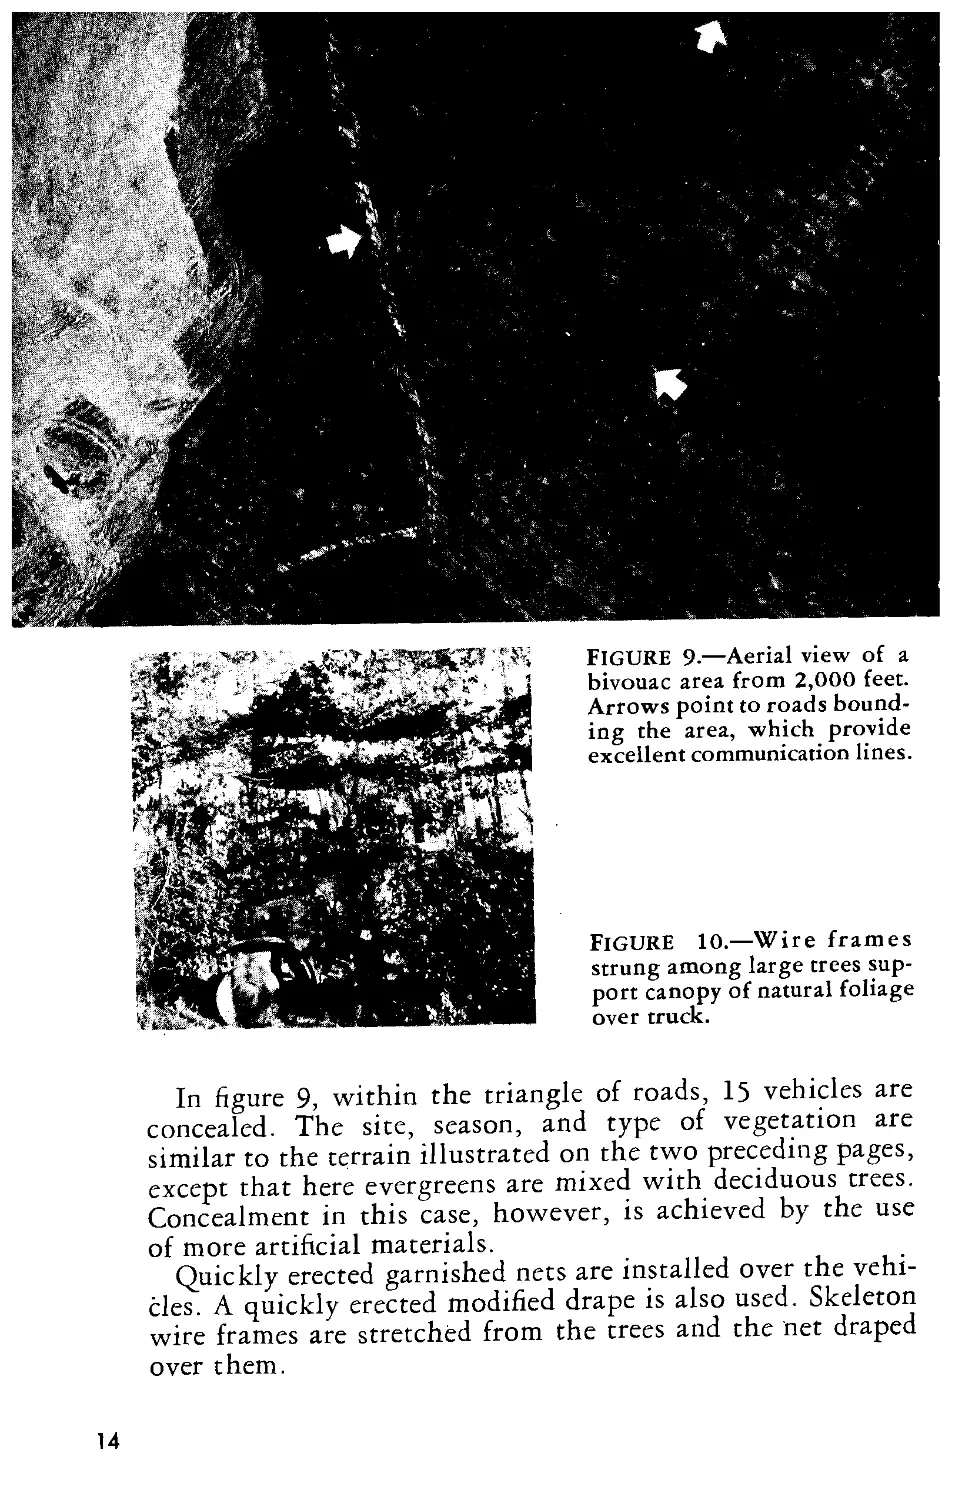
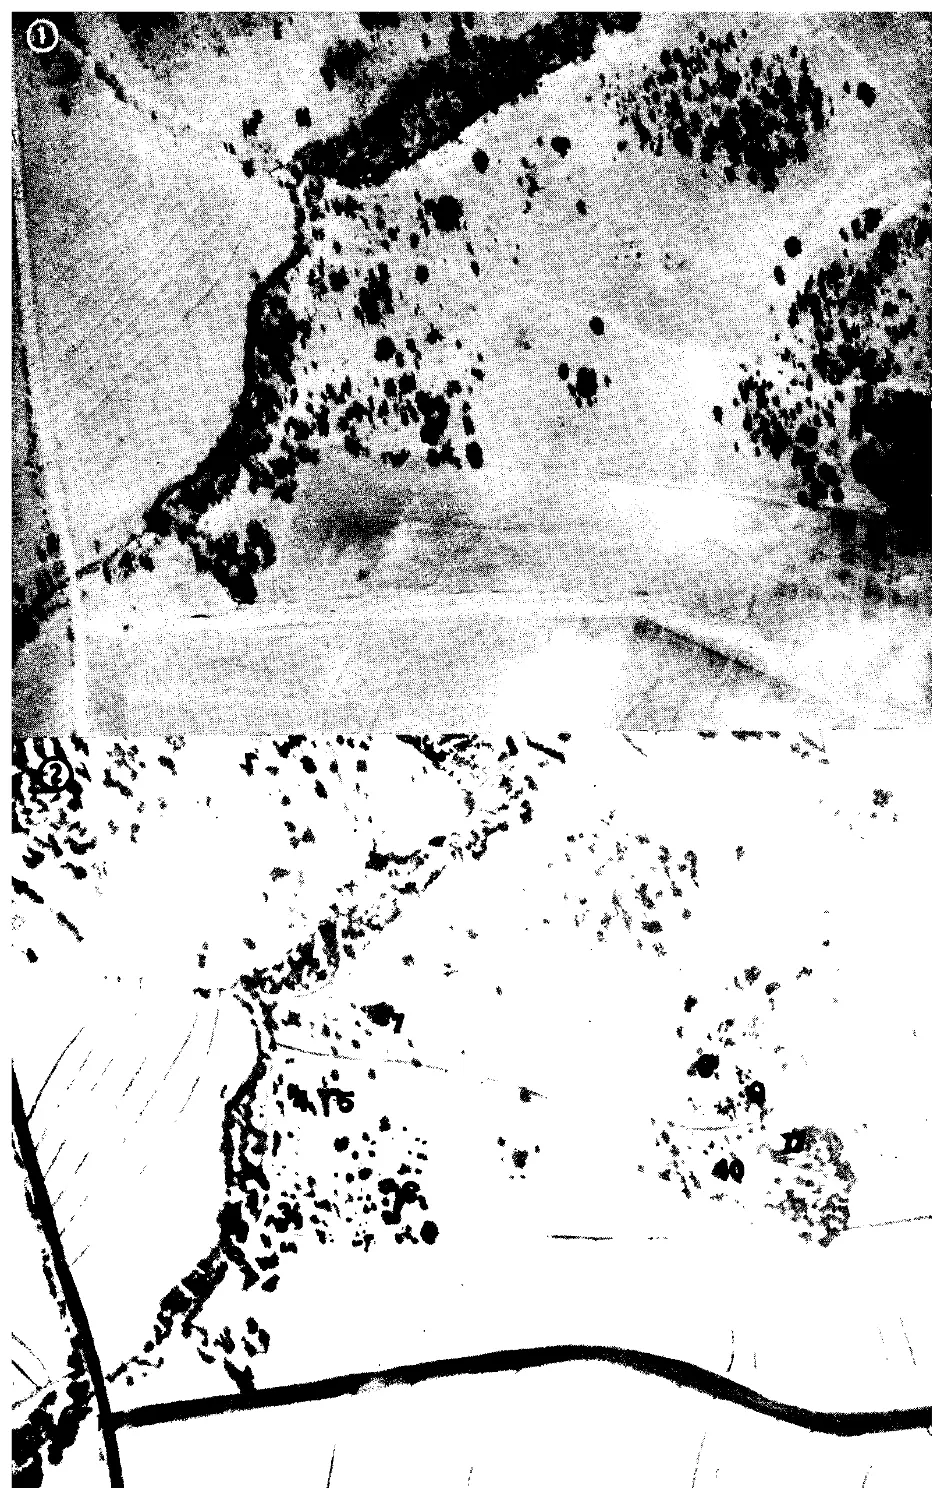
FIGURE 9-—Aerial view of a
bivouac area from 2,000 feec.
Arrows point to roads bound-
ing the area, which provide
excellent communication lines.
FIGURE IO.—Wire frames
strung among large trees sup-
port canopy of natural foliage
over truck.
In figure 9, within the triangle of roads, 15 vehicles are
concealed. The site, season, and type of vegetation are
similar to the terrain illustrated on the two preceding pages,
except that here evergreens are mixed with deciduous trees.
Concealment in this case, however, is achieved by the use
of more artificial materials.
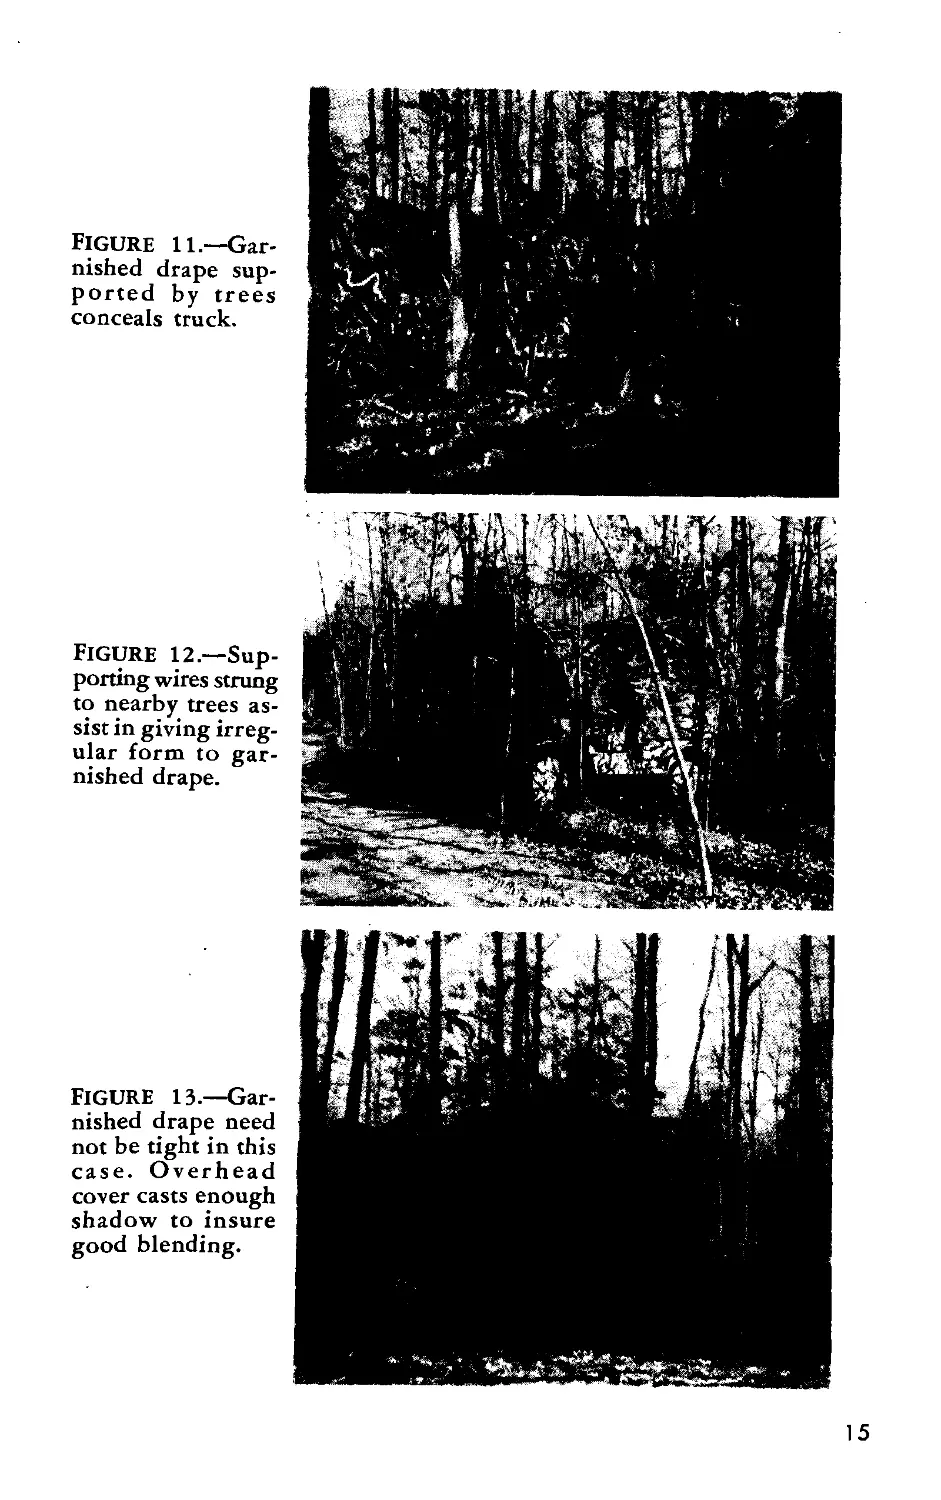
Quickly erected garnished nets are installed over the vehi-
cles. A quickly erected modified drape is also used. Skeleton
wire frames are stretched from the trees and the net draped
over them.
14
1
Figure ll.—Gar-
nished drape sup-
ported by trees
conceals truck.
Figure 12.—Sup-
porting wires strung
to nearby trees as-
sist in giving irreg-
ular form to gar-
nished drape.
FIGURE 13.—Gar-
nished drape need
not be tight in this
case. Overhead
cover casts enough
shadow to insure
good blending.
15
Figure 14 © and ©.—
Scale 1:6,000. Aerial view
with drawing illustrating
bivouac o£ tank destroyer
unit in terrain with sparse
vegetation. Eleven vehicles
are concealed here, indi-
cated in the drawing below.
FIGURE 15.—M6 tank destroyer
camouflaged with 30- by 30-ft.
drape and natural materials (No.
10 in fig. 14 @).
Figure 14 illustrates the effectiveness of proper use of
camouflage principles in bivouac. Note how the new access
route up the left-hand side of the area follows the line of
trees. The route is almost invisible; it certainly is incon-
spicuous.
To increase dispersion, the unit moved some of its vehicles
into the clump of trees on the right, requiring a new access
route to be made. This was done, correctly, by passing the
route through the area and past it to a natural termination,
another road.
Care has been taken to avoid scarring the plowed areas
surrounding the bivouac.
Figures 15, 16, and 17 are ground views of three of the
vehicles concealed in this area. Note how much natural
materials have been depended on and how effective the result
is from the air. In some cases, garnished twine nets, used as
drapes, have supplemented the natural materials.
FIGURE 16.—M6 tank destroyer
concealed with natural materials
(No. 11 in fig. 14 @).
FIGURE 17.—M10 tank destroyer
concealed with natural materials
(No. 3 in fig. 14 @).
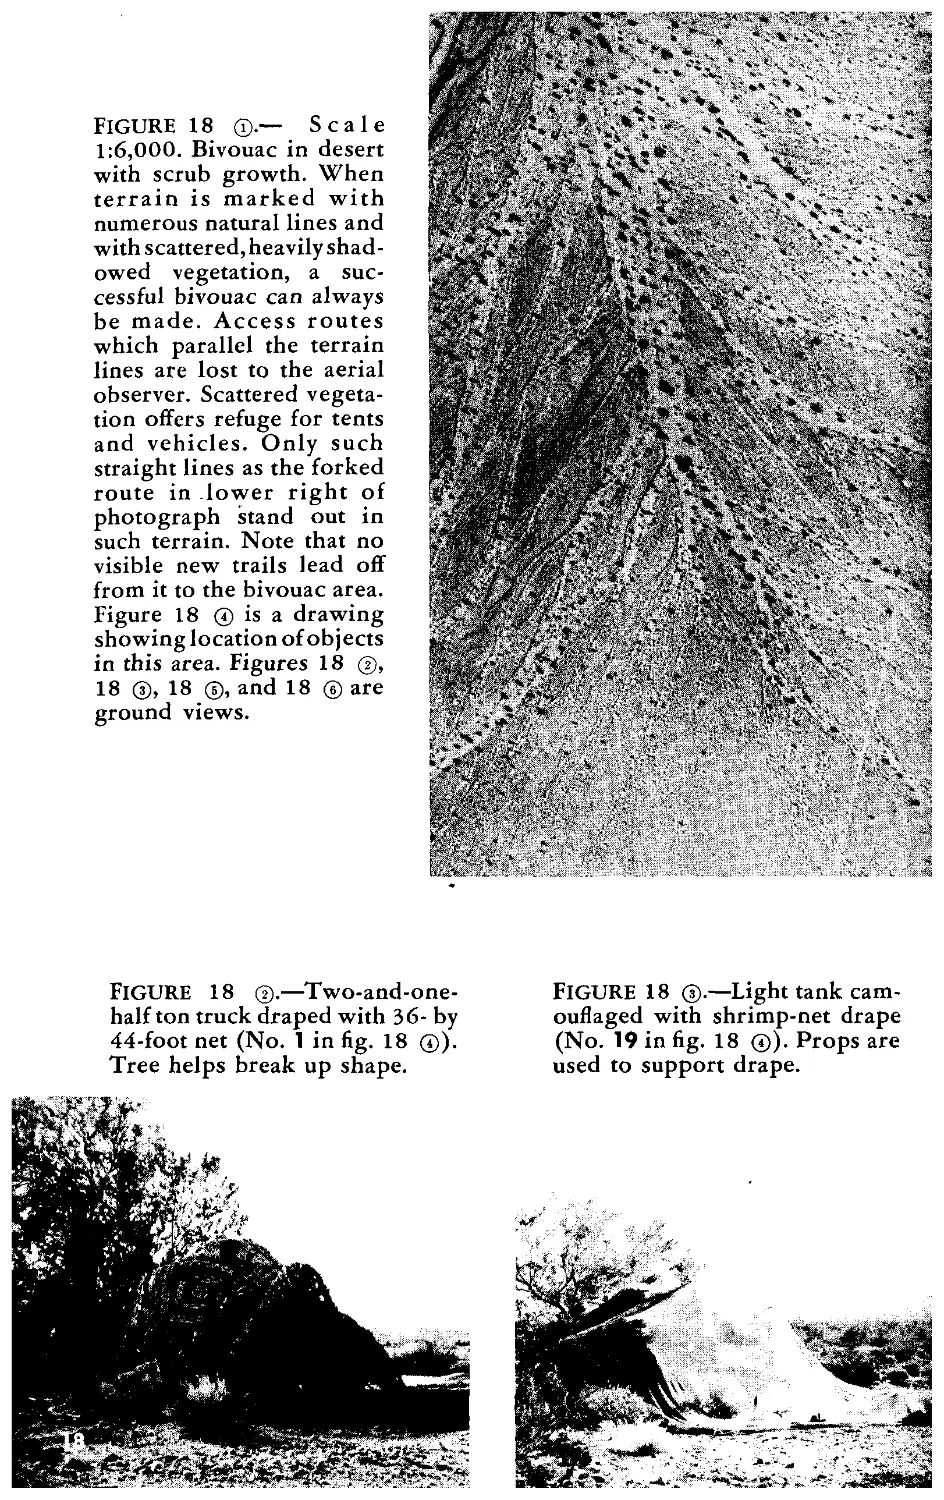
FIGURE 18 ®.— Scale
1:6,000. Bivouac in desert
with scrub growth. When
terrain is marked with
numerous natural lines and
with scattered, heavily shad-
owed vegetation, a suc-
cessful bivouac can always
be made. Access routes
which parallel the terrain
lines are lost to the aerial
observer. Scattered vegeta-
tion offers refuge for tents
and vehicles. Only such
straight lines as the forked
route in lower right of
photograph stand out in
such terrain. Note that no
visible new trails lead off
from it to the bivouac area.
Figure 18 ® is a drawing
showing location of objects
in this area. Figures 18 @,
18 @, 18 ®, and 18 ® are
ground views.
FIGURE 18 @.—Two-and-one-
half ton truck draped with 36- by
44-foot net (No. 1 in fig. 18 ®).
Tree helps break up shape.
FIGURE 18 @.—Light tank cam-
ouflaged with shrimp-net drape
(No. 19 in fig. 18 ®). Props are
used to support drape.
Figure 18 ©.—Drawing
showing objects in figure
18 ®. Nos. 1, 2, 7, 8, 11,
15, 16, and 17 are 2i/i-ton
trucks with shrimp-net
drapes. Nos. 3, 4, and 10
are half-tracks with shrimp-
net drapes. Nos. 6, 12, and
13 are half-tracks with
natural materials. No. 14
is a half-track with a gar-
nished twine-net drape.
Nos. 18 and 19 are light
tanks with shrimp-net
drapes. Nos. 20, 21, and 22
are light tanks with gar-
nished twine-net drapes.
No. 5 is an uncamouflaged
tent. No. 9 is an uncamou-
flaged kitchen area.
FIGURE 18 @.—Light tank cam-
ouflaged with shrimp-net drape
and sited beside tree (No. 18 in
fig- 18 ®)-
Figure 18 ©.—Light tank cam-
ouflaged with garnished twine-
net drape tied into tree (No. 21
in fig. 18 @).
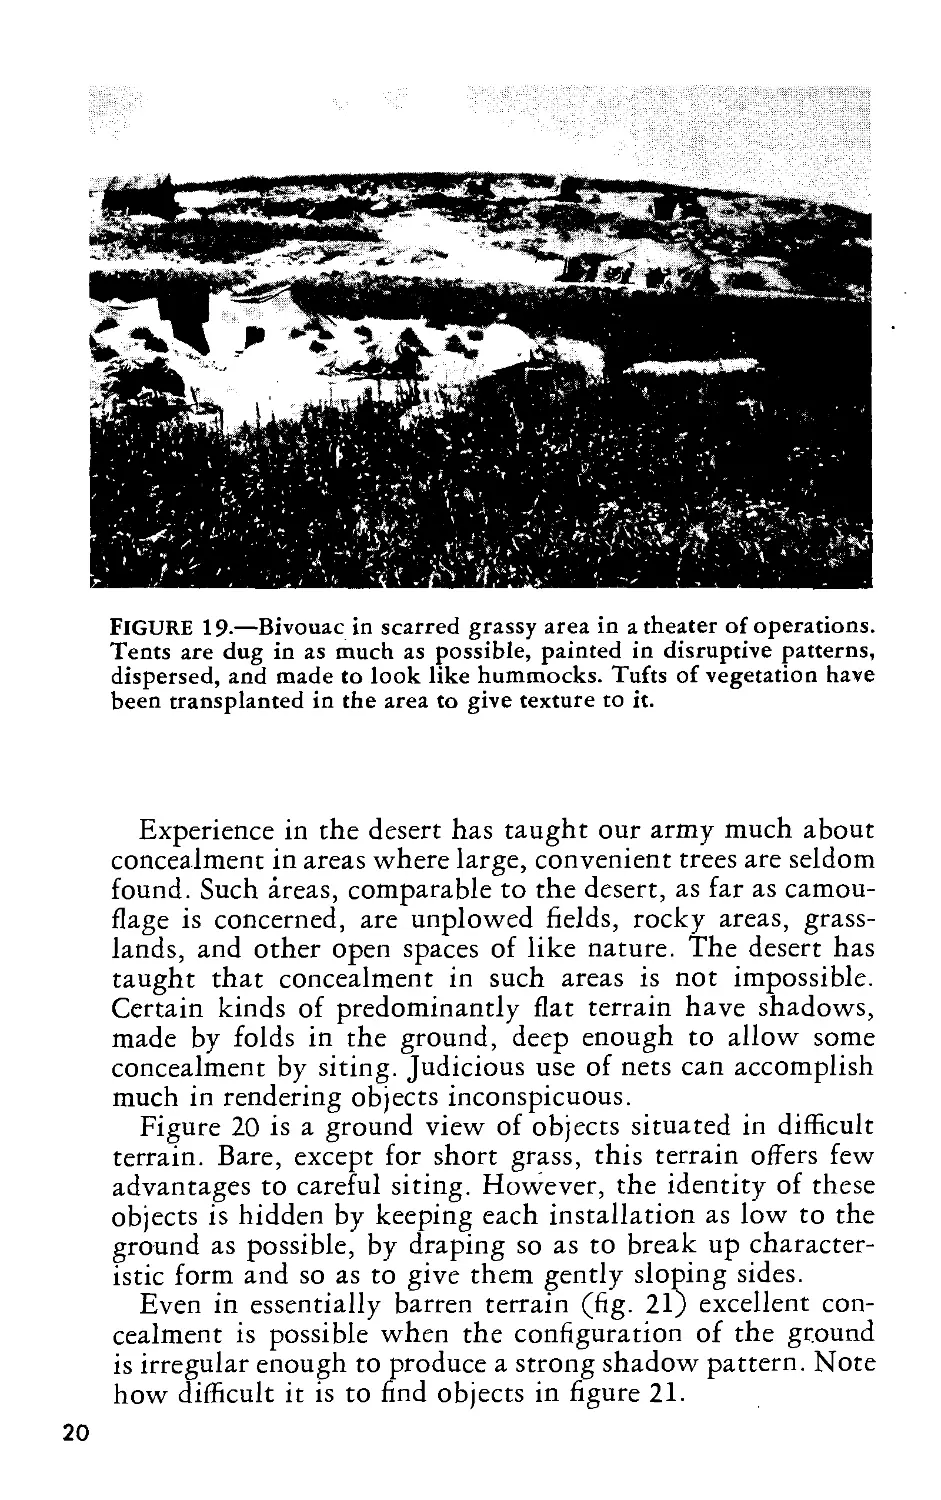
FIGURE 19.—Bivouac in scarred grassy area in a theater of operations.
Tents are dug in as much as possible, painted in disruptive patterns,
dispersed, and made to look like hummocks. Tufts of vegetation have
been transplanted in the area to give texture to it.
Experience in the desert has taught our army much about
concealment in areas where large, convenient trees are seldom
found. Such areas, comparable to the desert, as far as camou-
flage is concerned, are unplowed fields, rocky areas, grass-
lands, and other open spaces of like nature. The desert has
taught that concealment in such areas is not impossible.
Certain kinds of predominantly flat terrain have shadows,
made by folds in the ground, deep enough to allow some
concealment by siting. Judicious use of nets can accomplish
much in rendering objects inconspicuous.
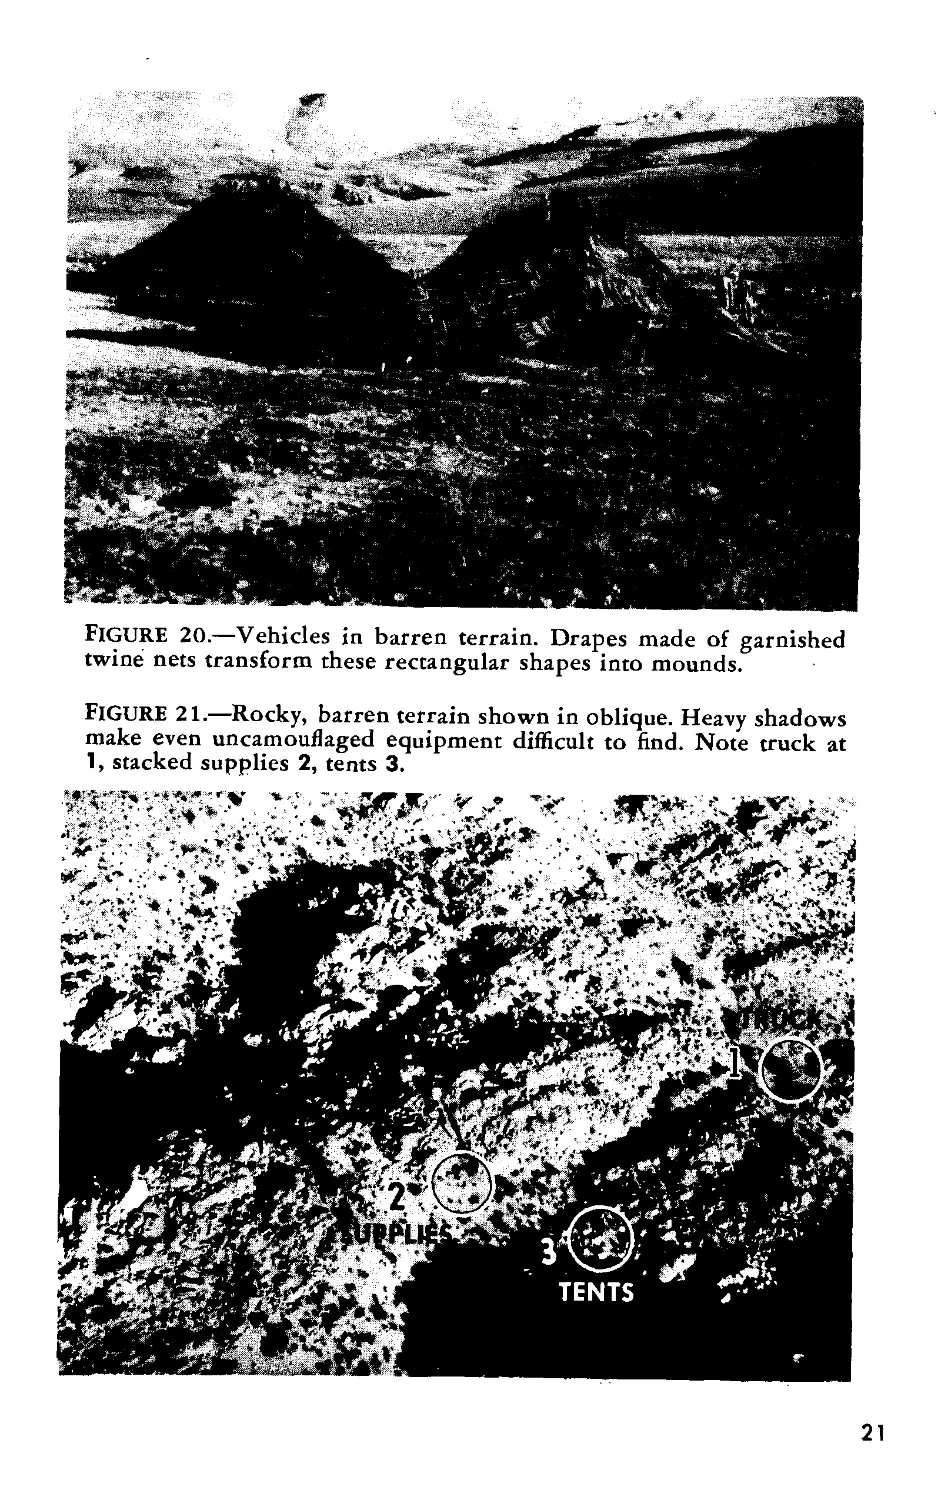
Figure 20 is a ground view of objects situated in difficult
terrain. Bare, except for short grass, this terrain offers few
advantages to careful siting. However, the identity of these
objects is hidden by keeping each installation as low to the
ground as possible, by draping so as to break up character-
istic form and so as to give them gently sloping sides.
Even in essentially barren terrain (fig. 21) excellent con-
cealment is possible when the configuration of the ground
is irregular enough to produce a strong shadow pattern. Note
how difficult it is to find objects in figure 21.
20
FIGURE 20.—Vehicles in barren terrain. Drapes made of garnished
twine nets transform these rectangular shapes into mounds.
FIGURE 21.—Rocky, barren terrain shown in oblique. Heavy shadows
make even uncamouflaged equipment difficult to find. Note truck at
1, stacked supplies 2, tents 3.
21
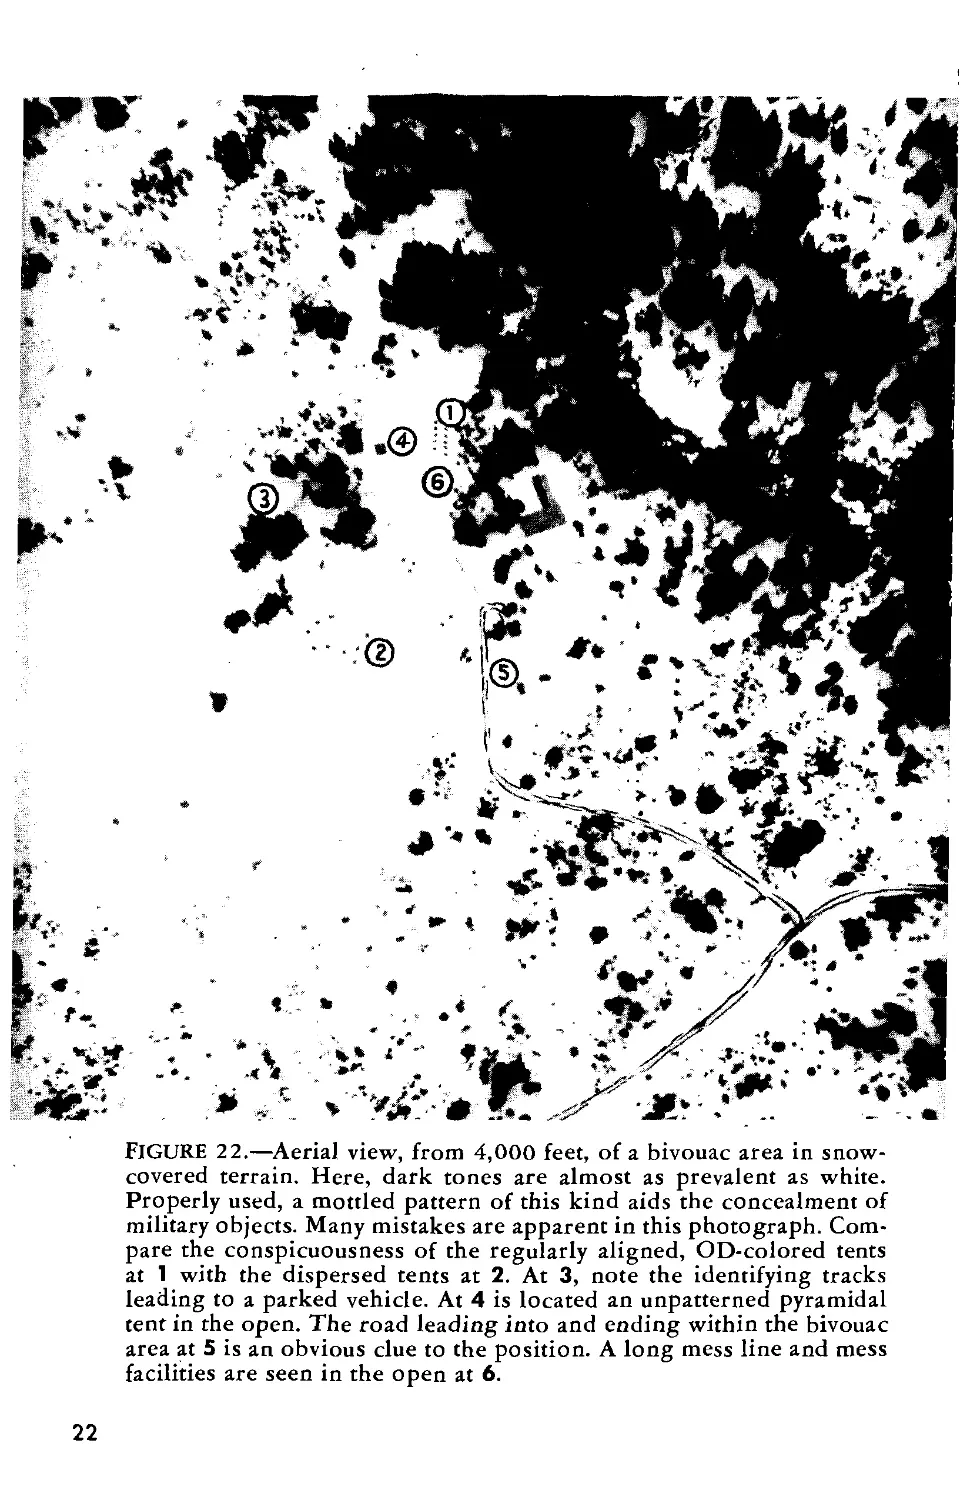
FIGURE 22.—Aerial view, from 4,000 feet, of a bivouac area in snow-
covered terrain. Here, dark tones are almost as prevalent as white.
Properly used, a mottled pattern of this kind aids the concealment of
military objects. Many mistakes are apparent in this photograph. Com-
pare the conspicuousness of the regularly aligned, OD-colored tents
at 1 with the dispersed tents at 2. At 3, note the identifying tracks
leading to a parked vehicle. At 4 is located an unpatterned pyramidal
tent in the open. The road leading into and ending within the bivouac
area at 5 is an obvious clue to the position. A long mess line and mess
facilities are seen in the open at 6.
22
BIVOUACS IN
SNOW-COVERED TERRAIN
Although camouflage in snow-covered terrain follows exactly
the same principles as other camouflage, it presents several
special problems. A blanket of snow often eliminates much
of the ground pattern, making blending difficult. Differences
in texture and color disappear or become less marked. Un-
travelled roads and paths are obliterated. However, snow-
covered terrain is rarely completely white, and by taking
advantage of dark features in the landscape—communication
lines, stream beds, evergreen trees, bushes, shadows of snow
drifts, folds in the ground, and the black shadows of hill-
sides—a unit on the move or in bivouac may often blend
itself successfully into the terrain.
Good route selection is usually more important than any
other single camouflage measure. Exposed tracks are the most
dangerous foe to concealment under snow conditions. They
can be concealed only by blending with the dark features of
the landscape mentioned above. When moving into the biv-
ouac area, extreme care must be exercised to avoid leaving
exposed tracks pointing toward the site. The routing of
vehicles will be difficult because of uncertainty as to the
condition of the ground lying beneath the snow, but in every
case their tracks must be continued past the bivouac area.
Skis and snowshoes must not be used near the area since
their marks are more sharply defined and more easily seen^
than foot tracks. When it is important to conceal vehicle
tracks which have already been made, they should be
smoothed out or sloped obliquely at the sides in order to
minimize their shadows. To avoid tracking up an area, per-
sonnel, vehicles, and materiel should be restricted from
open areas.
Vehicles to which a painted pattern has been applied are
less conspicuous than those painted a solid white. Tentage
and mess facilities may be painted white or pattern painted
depending on the terrain surrounding the bivouac.
23
When practical and when it is certain that the enemy is
aware of our presence in the locality, a decoy bivouac may
be established.
Bivouacs which have been well concealed in snow terrain
for some length of time can be identified easily when the
snow melts, unless precautions are taken. This is because the
compacted snow on much-used paths melts much more slowly
than virgin snow, leaving clearly visible white lines on a
dark background. When this occurs, the snow must be broken
up and spread out to quicken its melting.
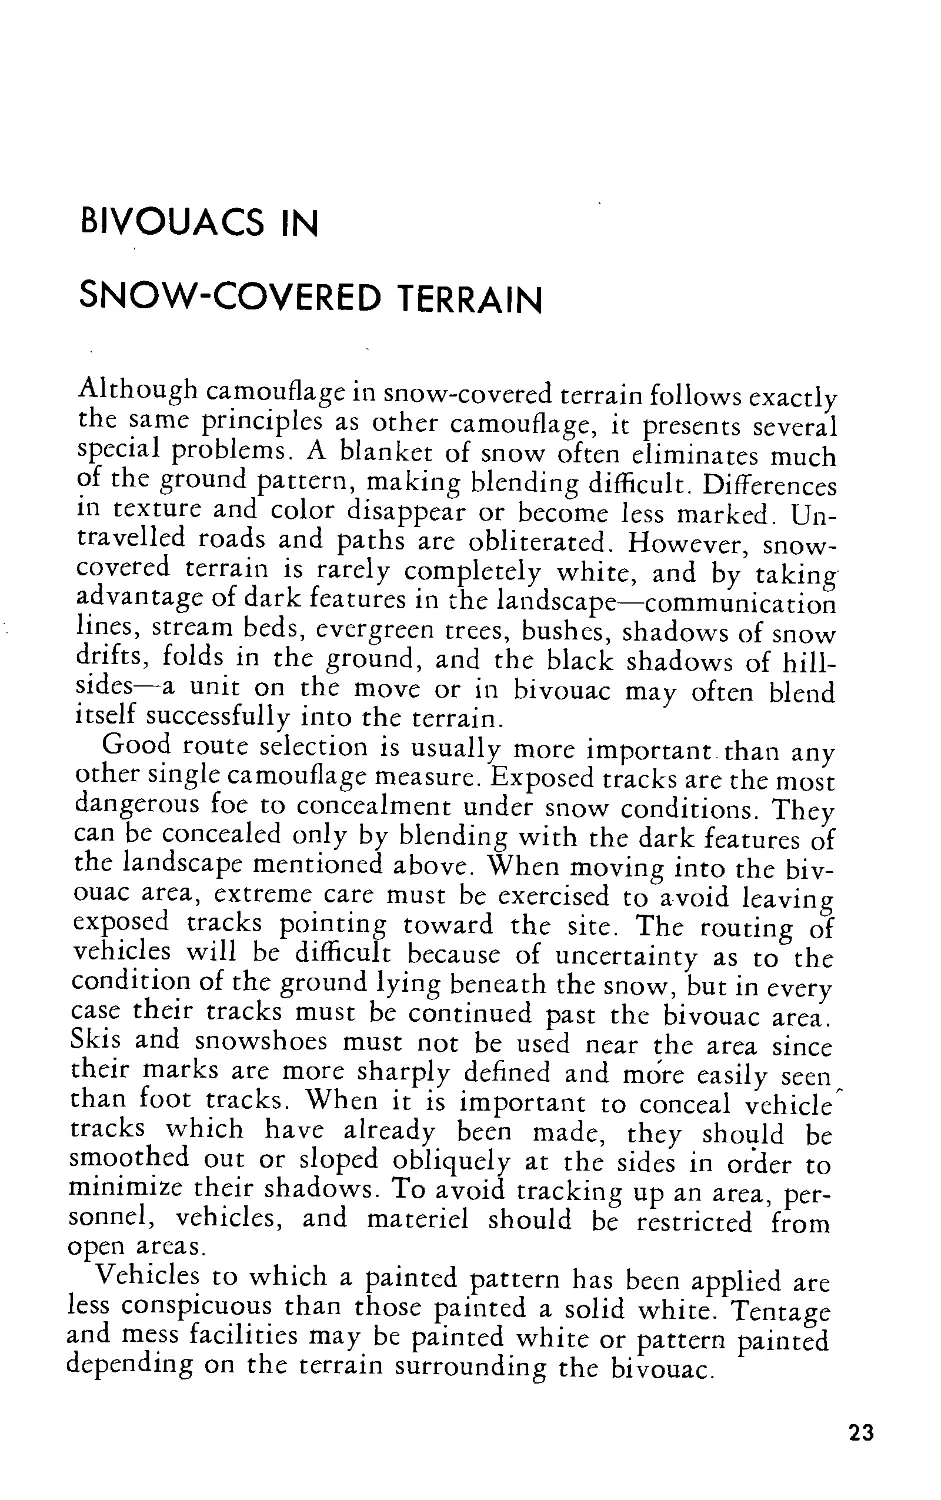
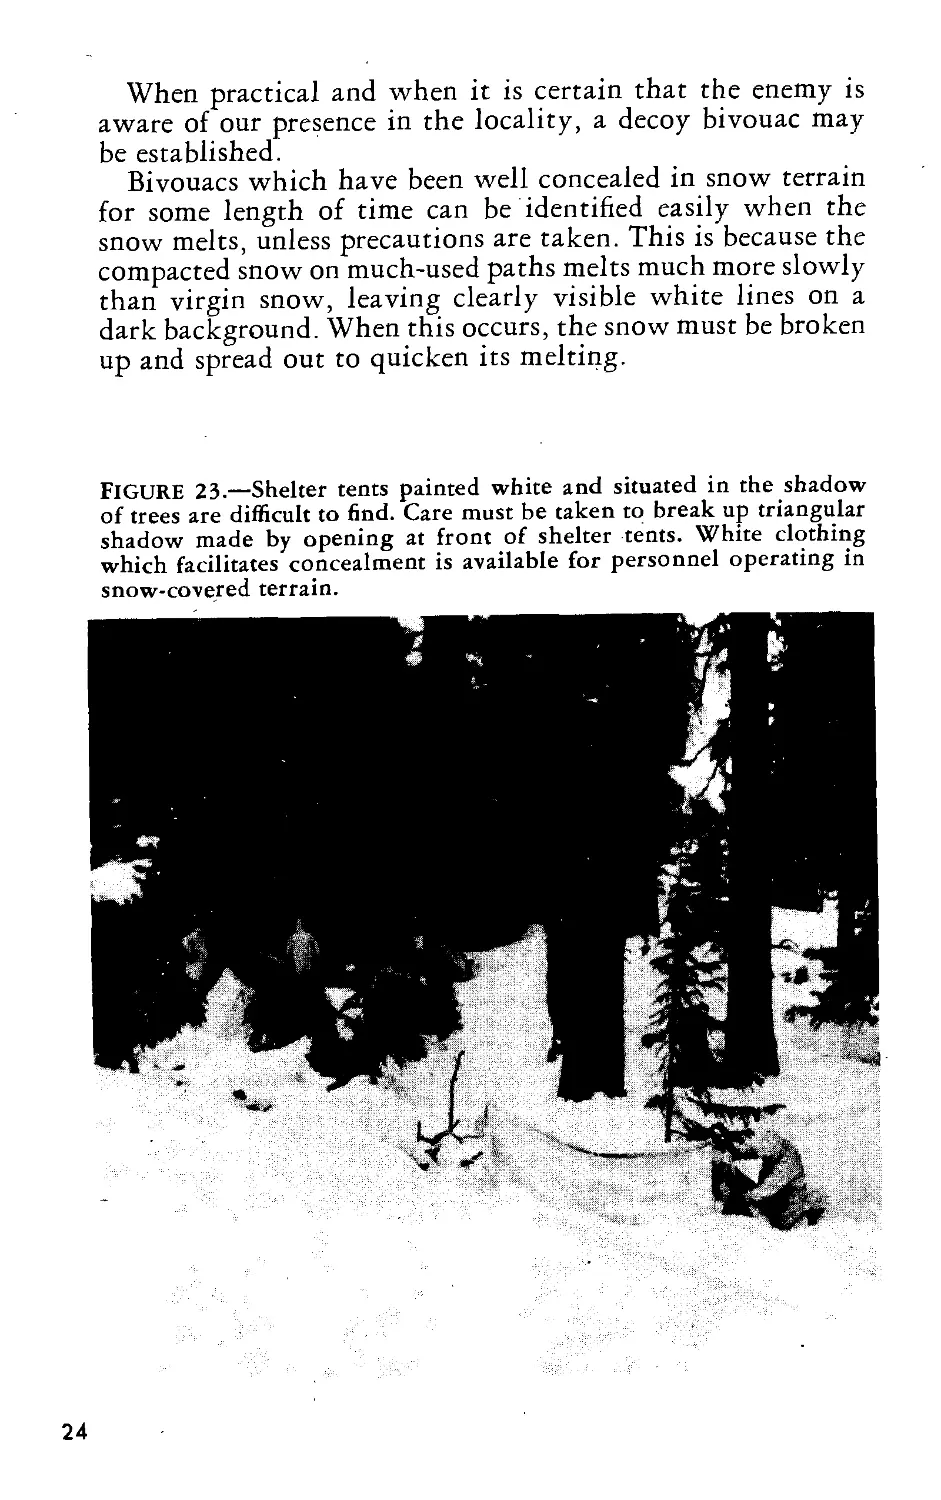
FIGURE 23.—Shelter tents painted white and situated in the shadow
of trees are difficult to find. Care must be taken to break up triangular
shadow made by opening at front of shelter tents. White clothing
which facilitates concealment is available for personnel operating in
snow-covered terrain.
24
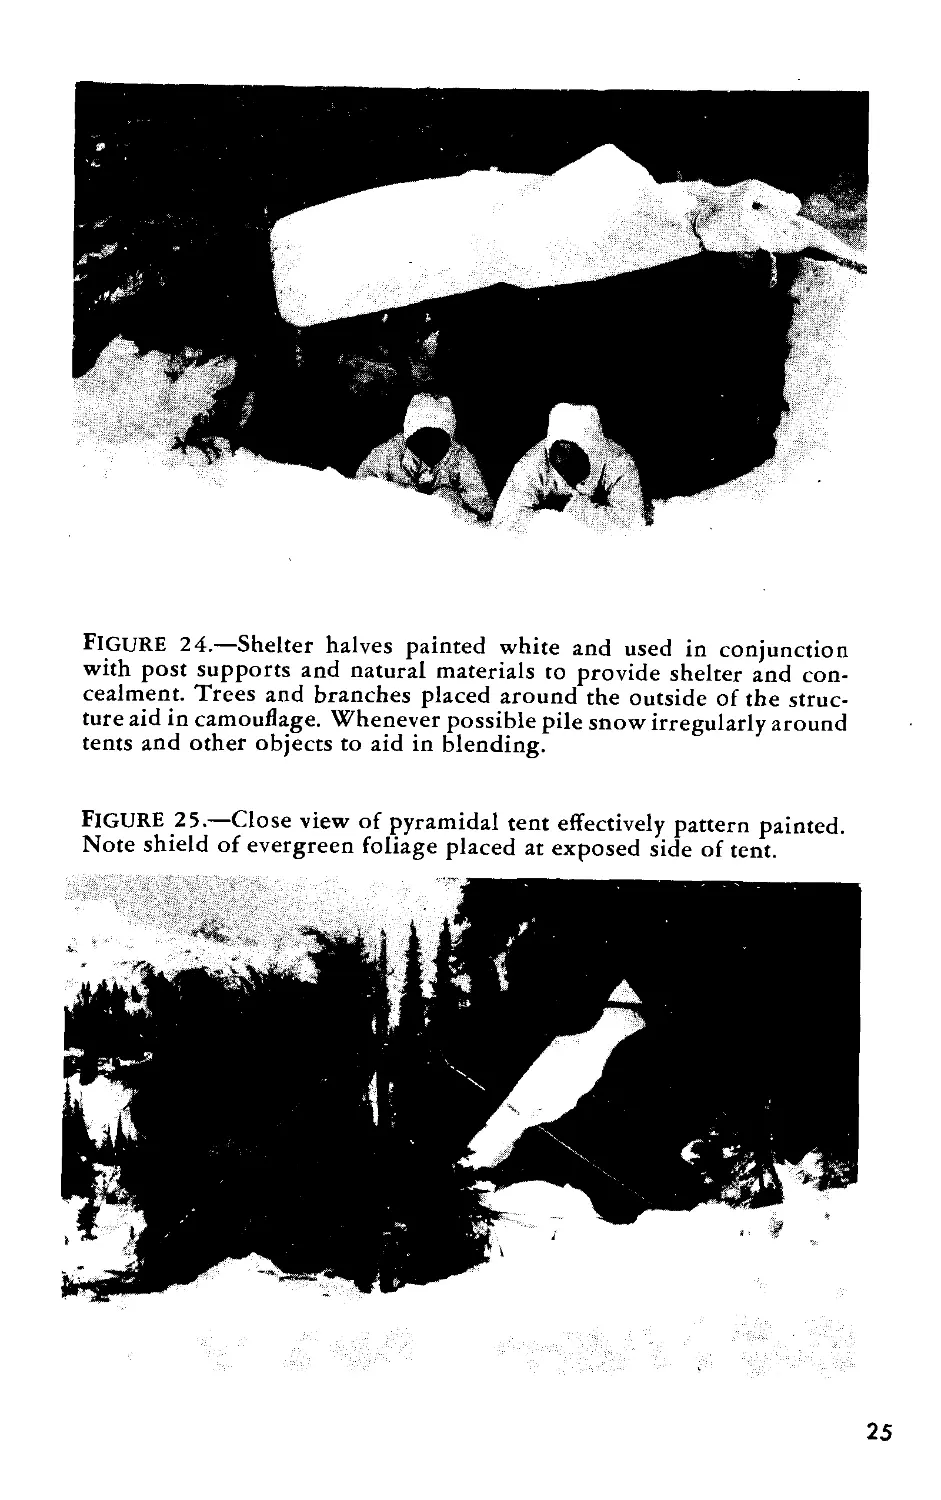
FIGURE 24.—Shelter halves painted white and used in conjunction
with post supports and natural materials to provide shelter and con-
cealment. Trees and branches placed around the outside of the struc-
ture aid in camouflage. Whenever possible pile snow irregularly around
tents and other objects to aid in blending.
FIGURE 25.—Close view of pyramidal tent effectively pattern painted.
Note shield of evergreen foliage placed at exposed side of tent.
25
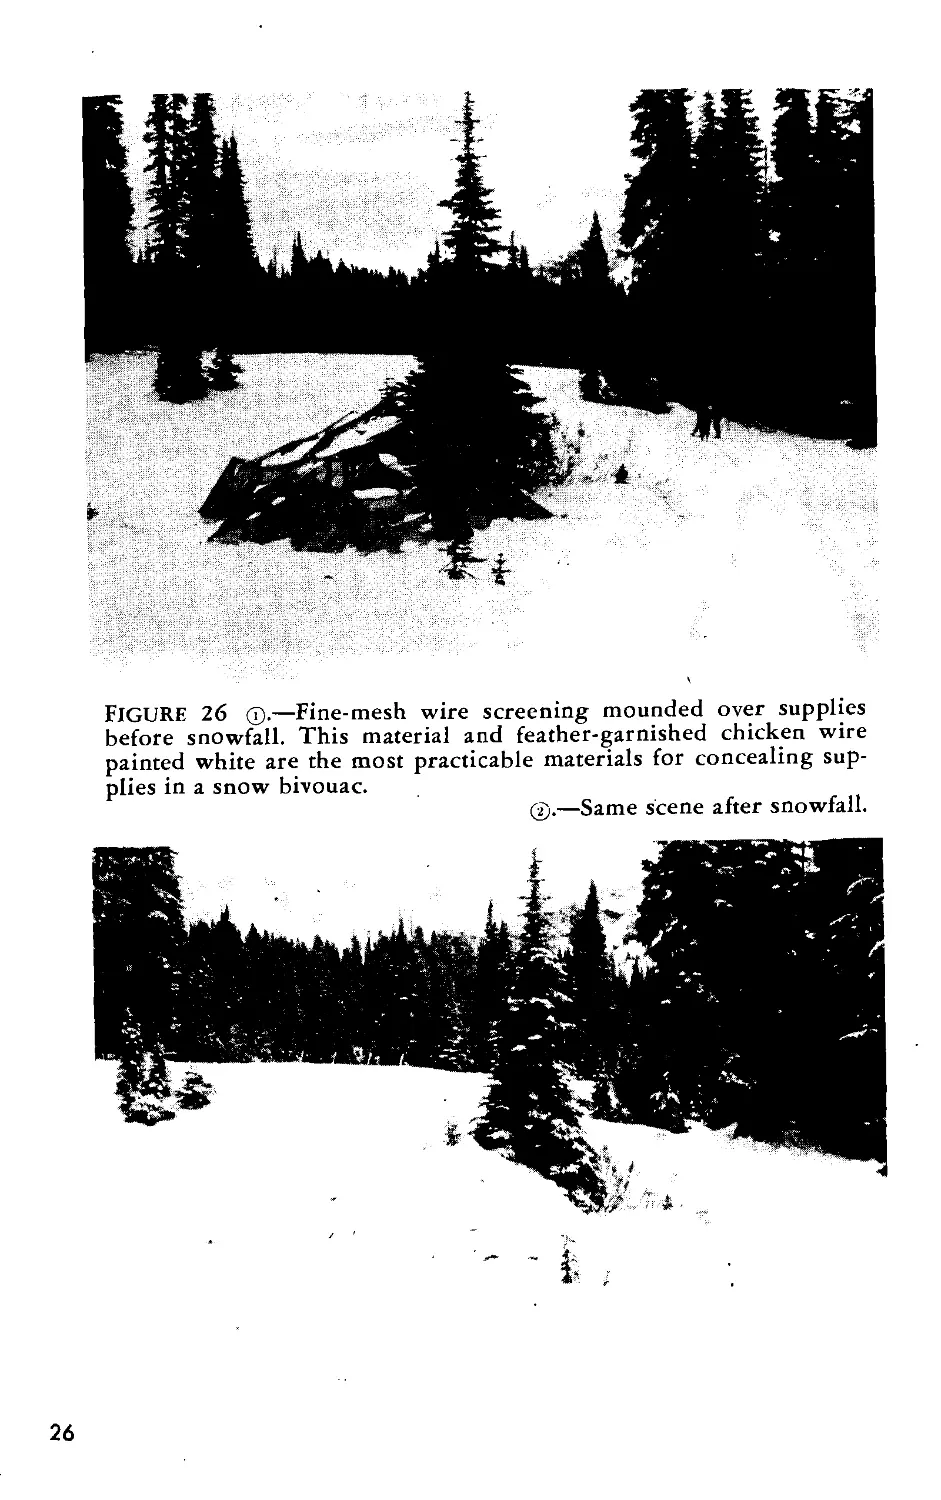
FIGURE 26 —Fine-mesh wire screening mounded over supplies
before snowfall. This material and feather-garnished chicken wire
painted white are the most practicable materials for concealing sup-
plies in a snow bivouac.
@.—Same scene after snowfall.
26
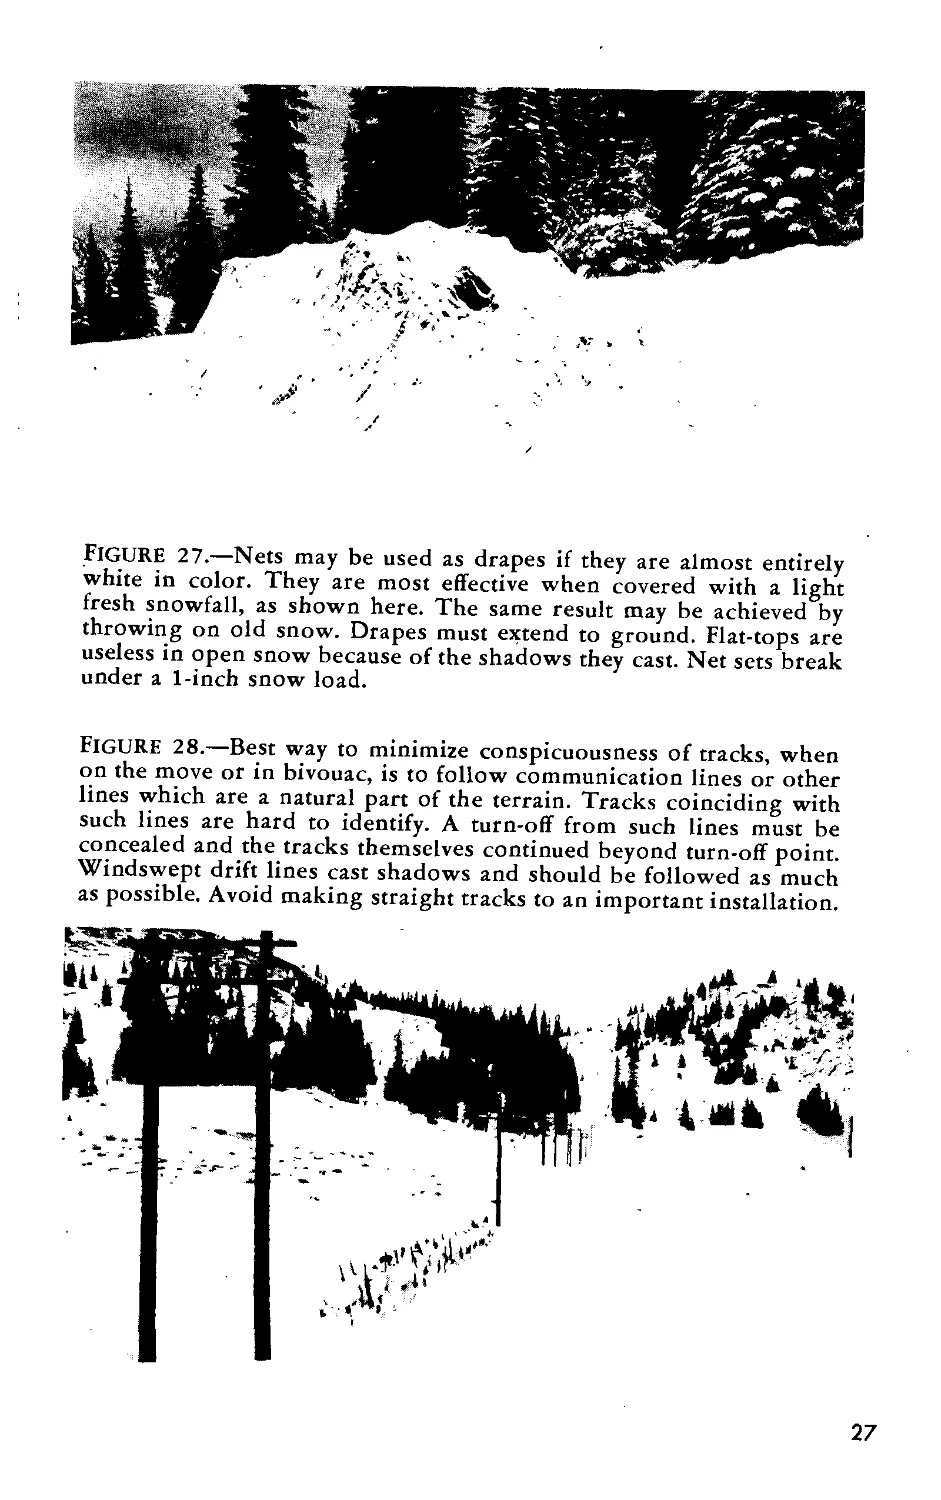
FIGURE 27.—Nets may be used as drapes if they are almost entirely
white in color. They are most effective when covered with a light
fresh snowfall, as shown here. The same result may be achieved by
throwing on old snow. Drapes must extend to ground. Flat-tops are
useless in open snow because of the shadows they cast. Net sets break
under a 1-inch snow load.
FIGURE 28.—Best way to minimize conspicuousness of tracks, when
on the move or in bivouac, is to follow communication lines or other
lines which are a natural part of the terrain. Tracks coinciding with
such lines are hard to identify. A turn-off from such lines must be
concealed and the tracks themselves continued beyond turn-off point.
Windswept drift lines cast shadows and should be followed as much
as possible. Avoid making straight tracks to an important installation.
27
CAMOUFLAGE DISCIPLINE
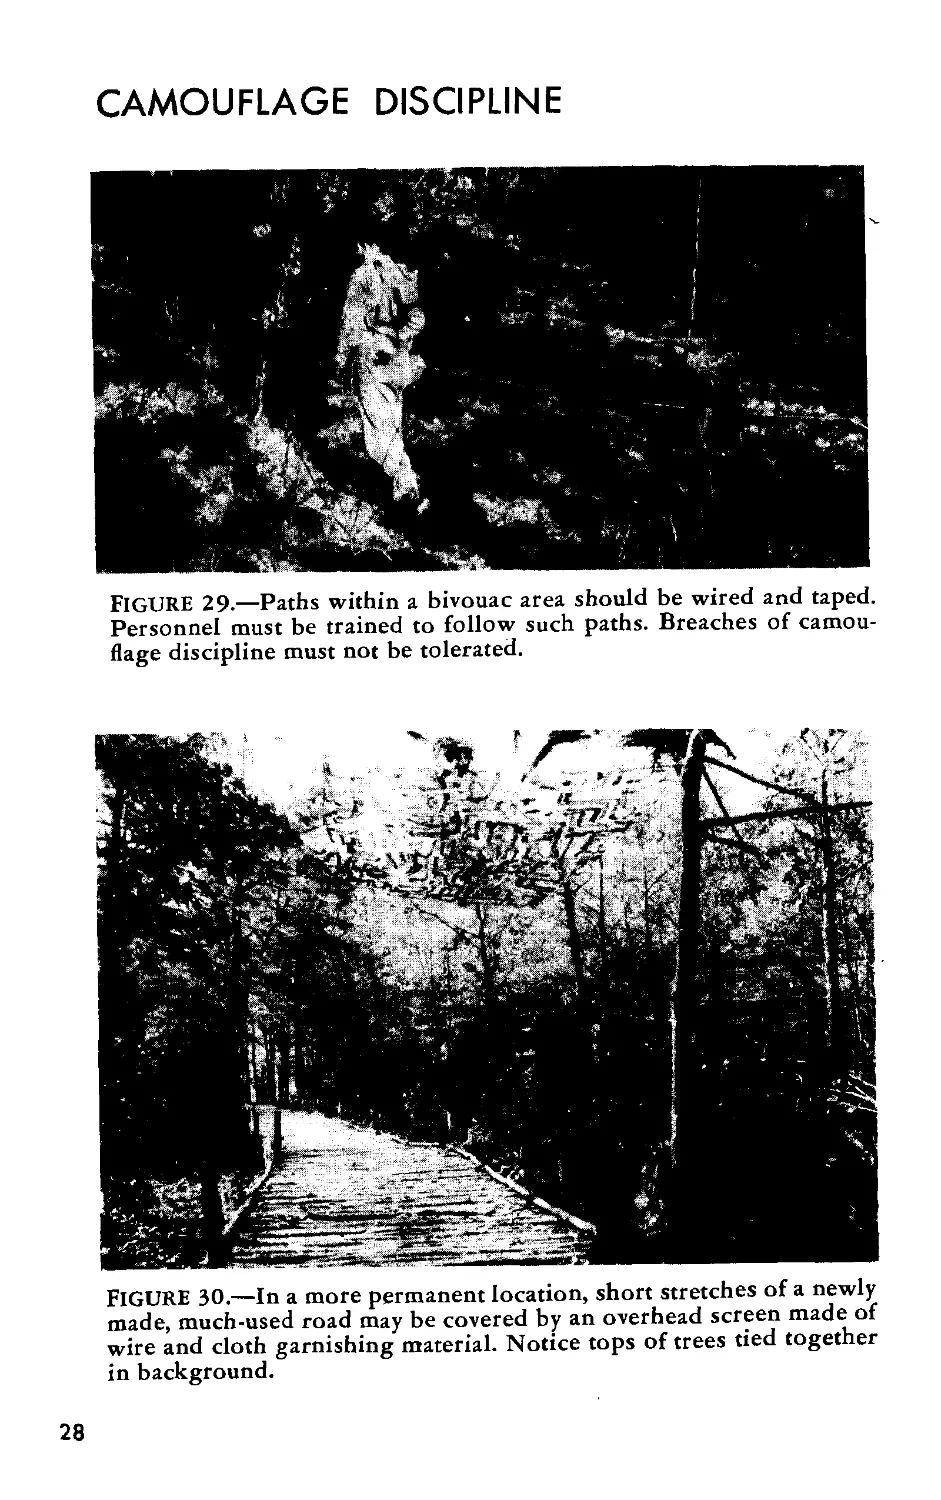
FIGURE 29.—Paths within a bivouac area should be wired and taped.
Personnel must be trained to follow such paths. Breaches of camou-
flage discipline must not be tolerated.
FIGURE 30.—In a more permanent location, short stretches of a newly
made, much-used road may be covered by an overhead screen made of
wire and cloth garnishing material. Notice tops of trees tied together
in background.
28
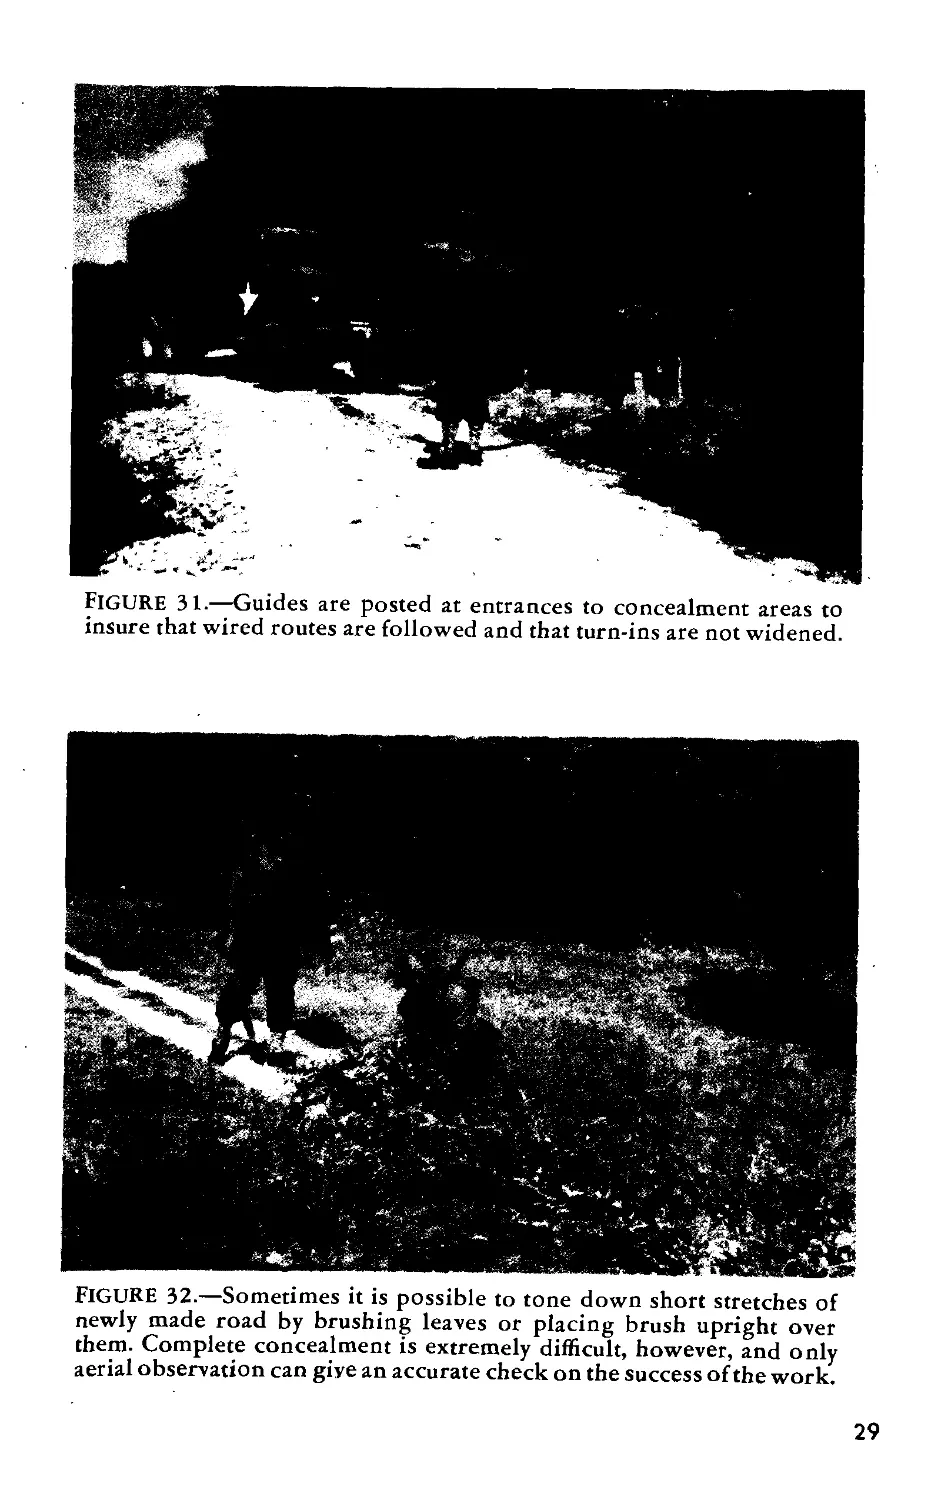
Figure 31.—Guides are posted at entrances to concealment areas to
insure that wired routes are followed and that turn-ins are not widened.
FIGURE 32.—Sometimes it is possible to tone down short stretches of
newly made road by brushing leaves or placing brush upright over
them. Complete concealment is extremely difficult, however, and only
aerial observation can give an accurate check on the success of the work.
29
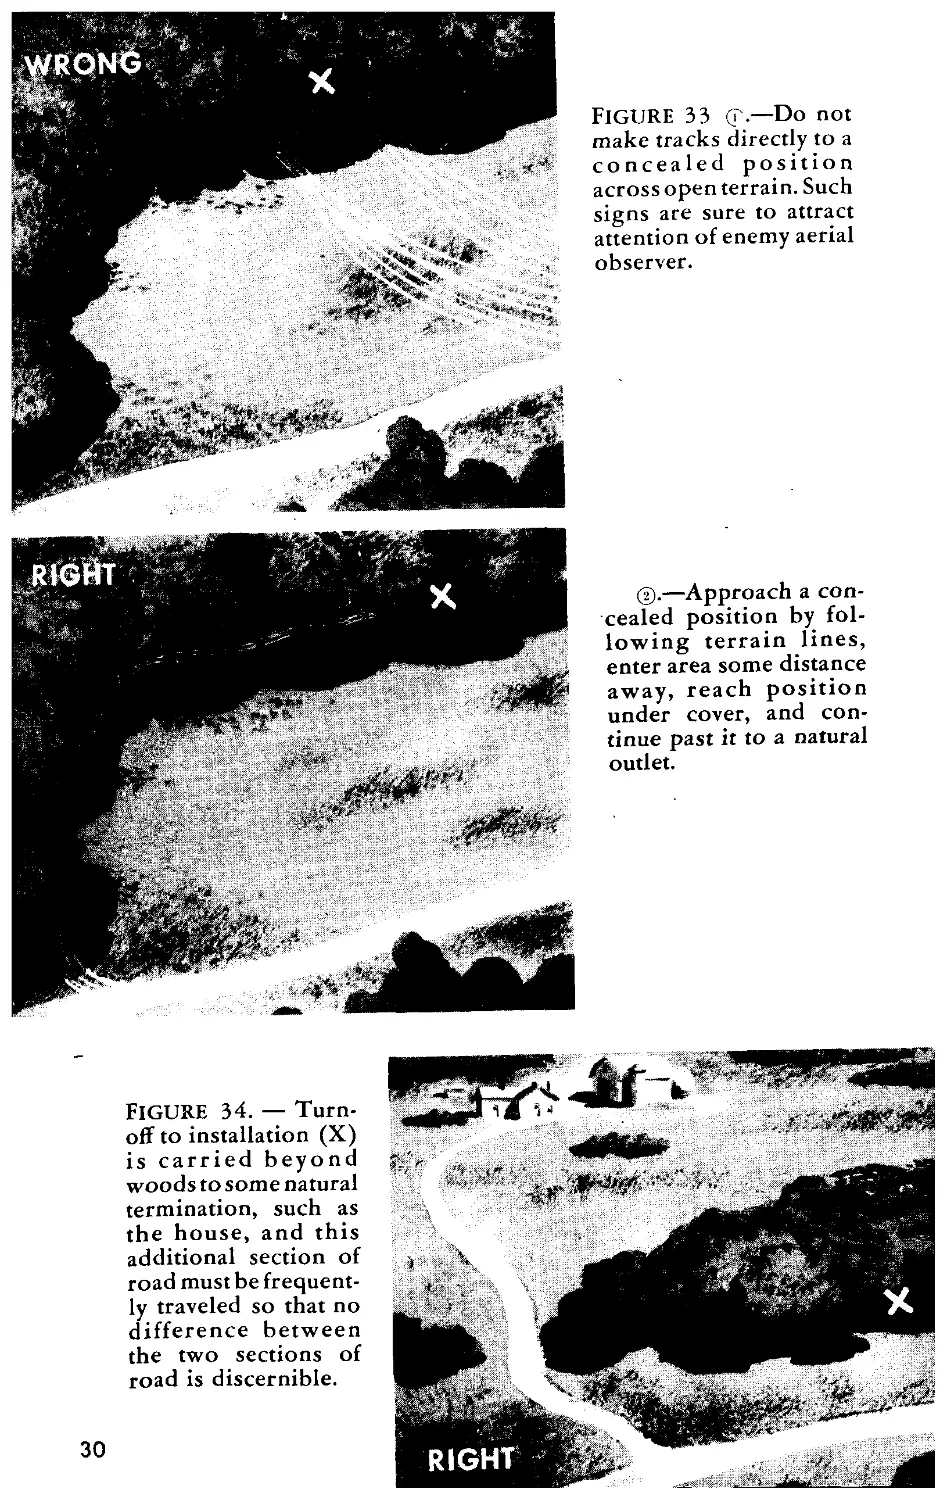
FIGURE 34. — Turn-
off to installation (X)
is carried beyond
woods to some natural
termination, such as
the house, and this
additional section of
road must be frequent-
ly traveled so that no
difference between
the two sections of
road is discernible.
Figure зз (г—Do not
make tracks directly to a
concealed position
across open terrain. Such
signs are sure to attract
attention of enemy aerial
observer.
@.—Approach a con-
cealed position by fol-
lowing terrain lines,
enter area some distance
away, reach position
under cover, and con-
tinue past it to a natural
outlet.
30
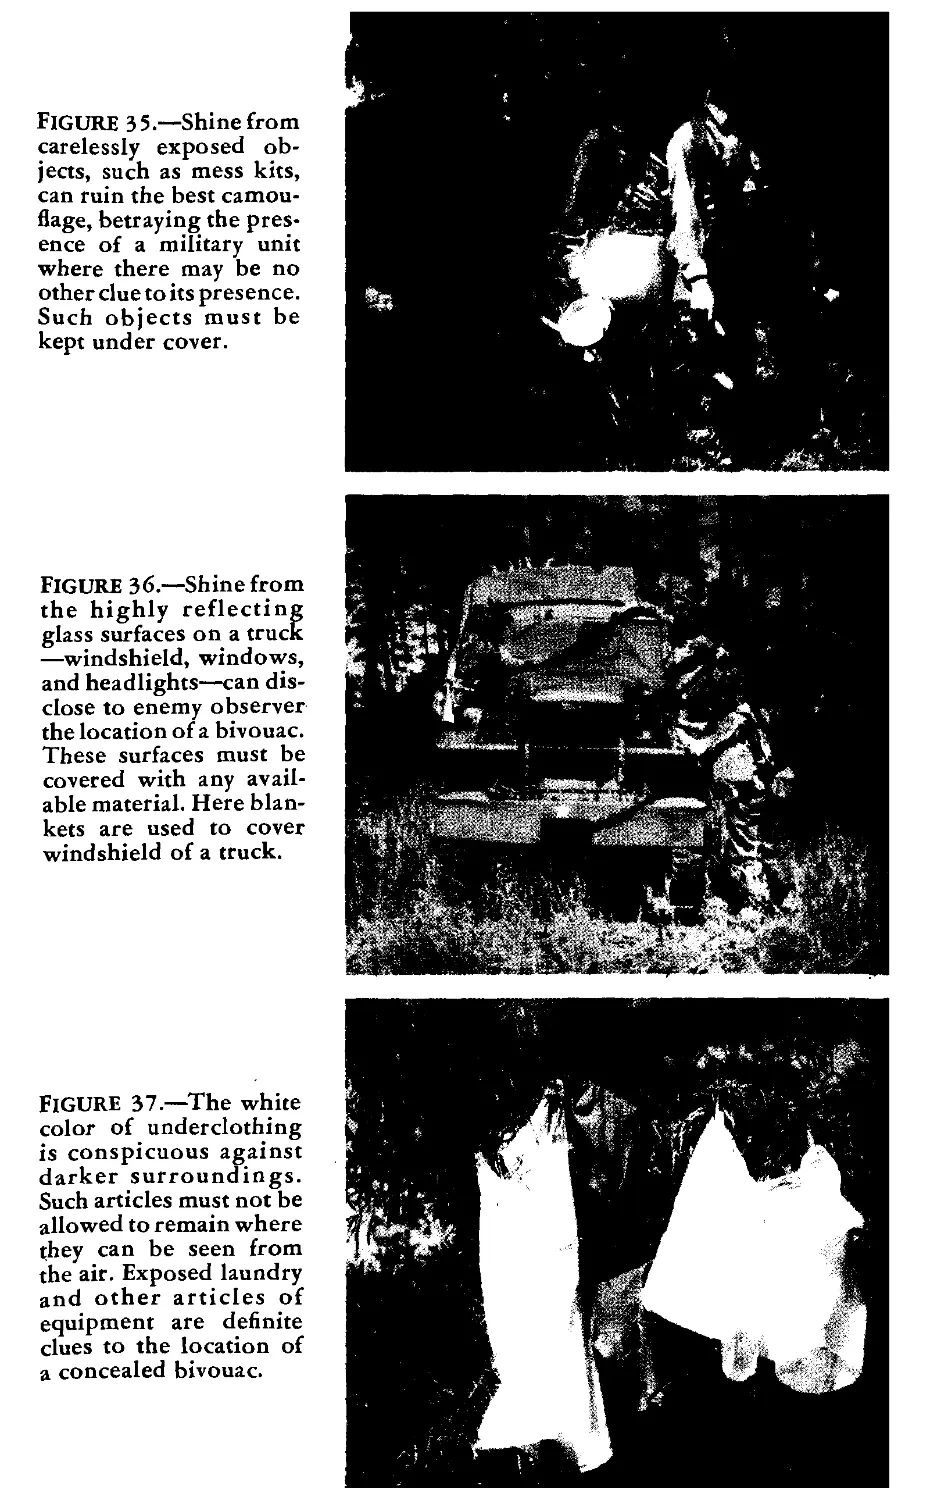
Figure 3 5.—Shine from
carelessly exposed ob-
jects, such as mess kits,
can ruin the best camou-
flage, betraying the pres-
ence of a military unit
where there may be no
other clue to its presence.
Such objects must be
kept under cover.
FIGURE 36.—Shine from
the highly reflecting
glass surfaces on a truck
—windshield, windows,
and headlights—can dis-
close to enemy observer
the location of a bivouac.
These surfaces must be
covered with any avail-
able material. Here blan-
kets are used to cover
windshield of a truck.
FIGURE 37.—The white
color of underclothing
is conspicuous against
darker surroundings.
Such articles must not be
allowed to remain where
they can be seen from
the air. Exposed laundry
and other articles of
equipment are definite
clues to the location of
a concealed bivouac.
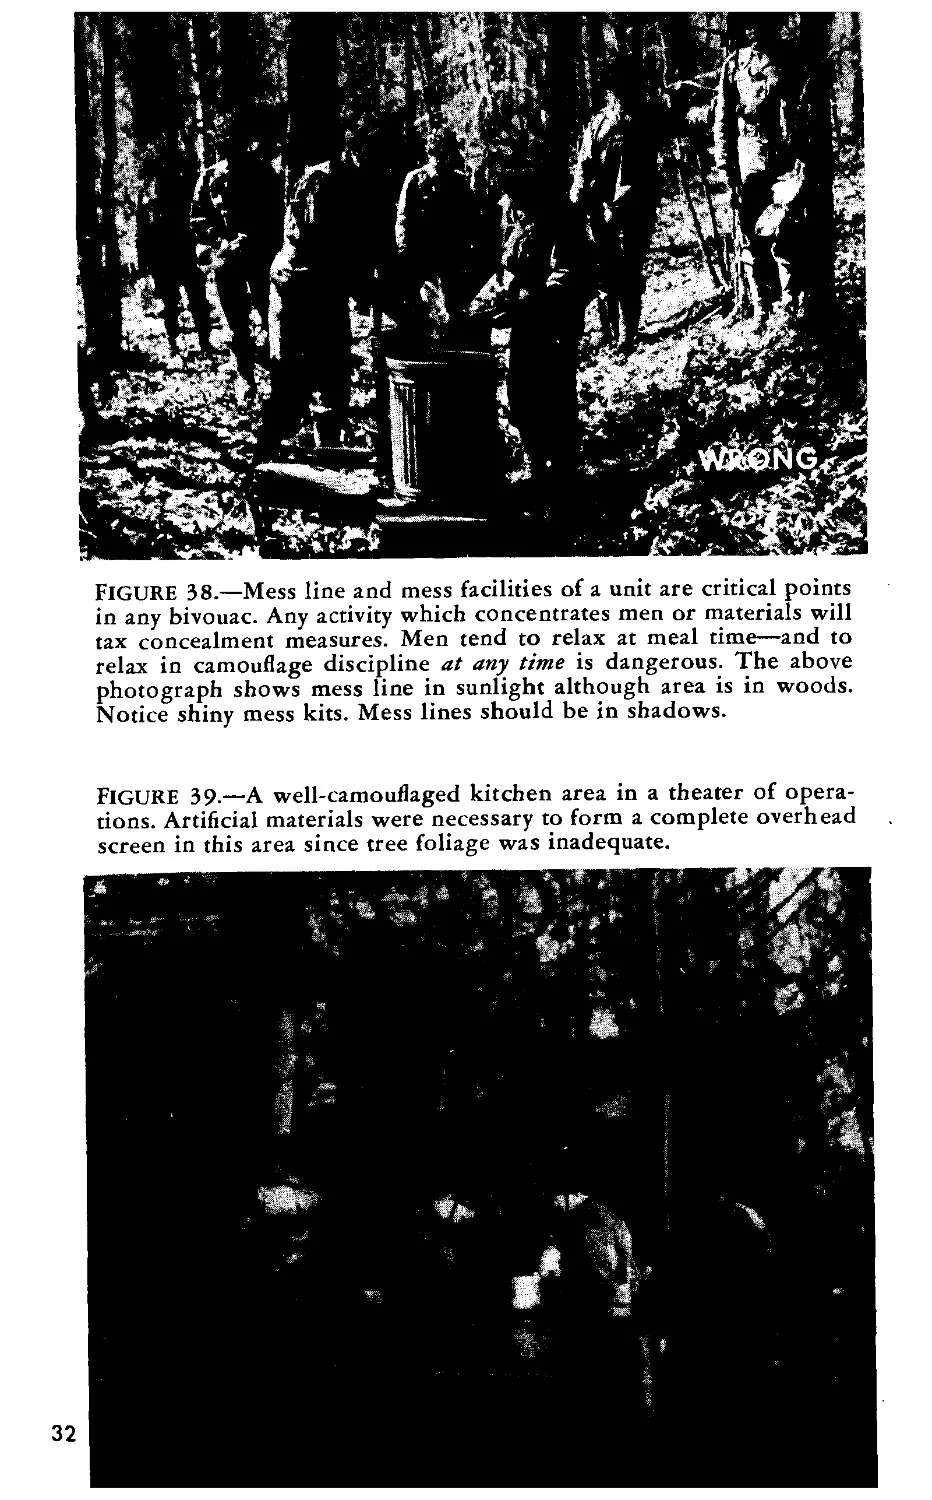
FIGURE 38.—Mess line and mess facilities of a unit are critical points
in any bivouac. Any activity which concentrates men or materials will
tax concealment measures. Men tend to relax at meal time—and to
relax in camouflage discipline at any time is dangerous. The above
photograph shows mess line in sunlight although area is in woods.
Notice shiny mess kits. Mess lines should be in shadows.
FIGURE 39-—A well-camouflaged kitchen area in a theater of opera-
tions. Artificial materials were necessary to form a complete overhead
screen in this area since tree foliage was inadequate.
32
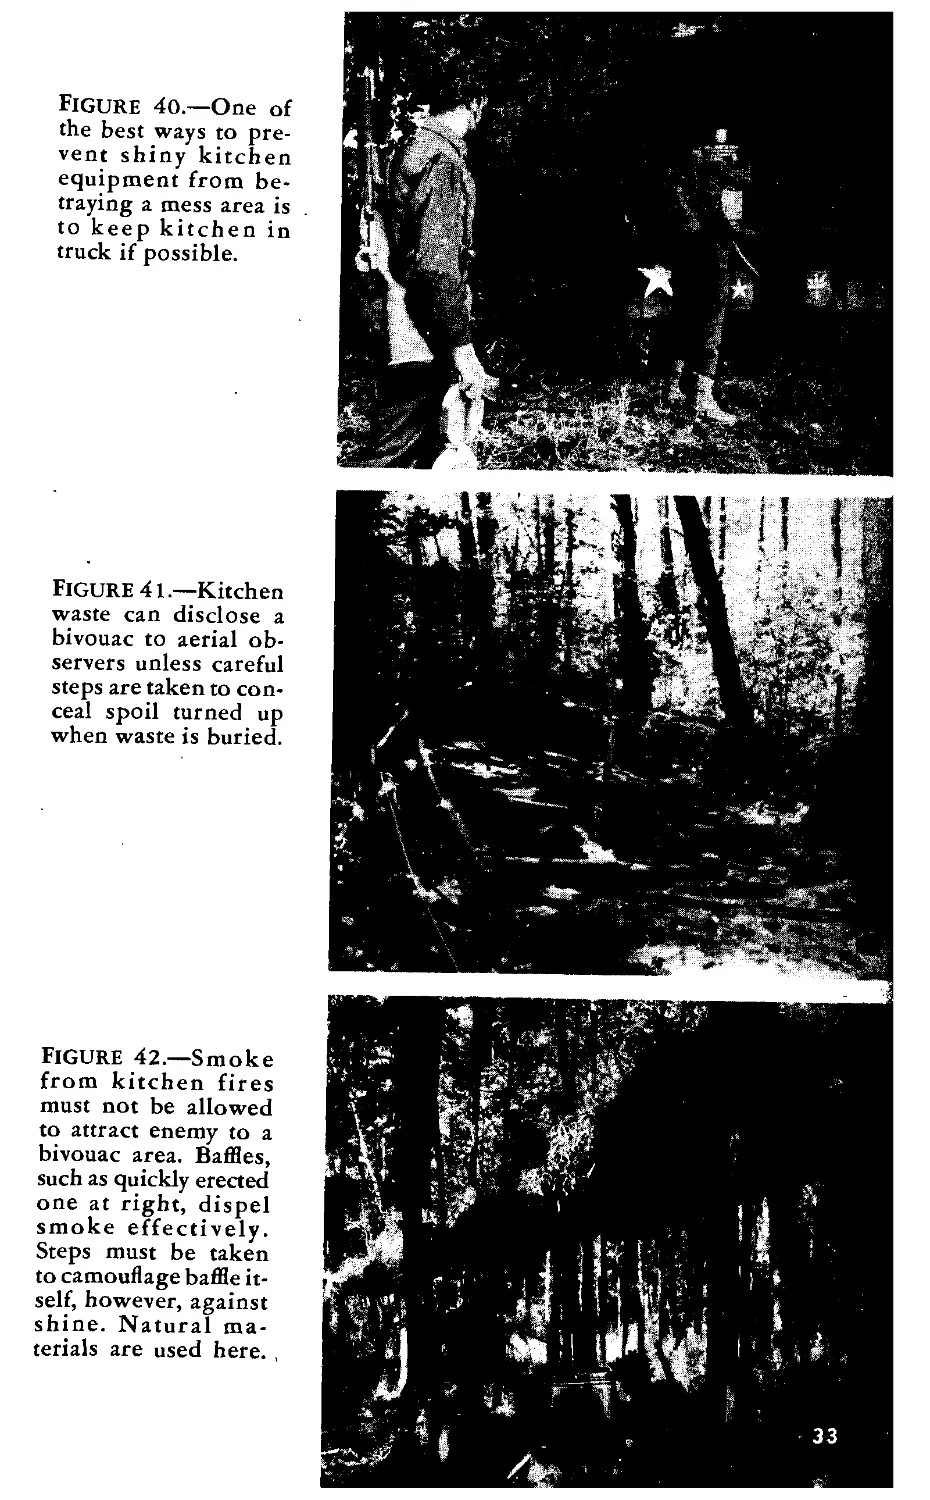
Figure 41 —Kitchen
waste can disclose a
bivouac to aerial ob-
servers unless careful
steps are taken to con-
ceal spoil turned up
when waste is buried.
Figure 42.—Smoke
from kitchen fires
must not be allowed
to attract enemy to a
bivouac area. Baffles,
such as quickly erected
one at right, dispel
smoke effectively.
Steps must be taken
to camouflage baffle it-
self, however, against
shine. Natural ma-
terials are used here.
Figure 4o.—One of
the best ways to pre-
vent shiny kitchen
equipment from be-
traying a mess area is
to keep kitchen in
truck if possible.
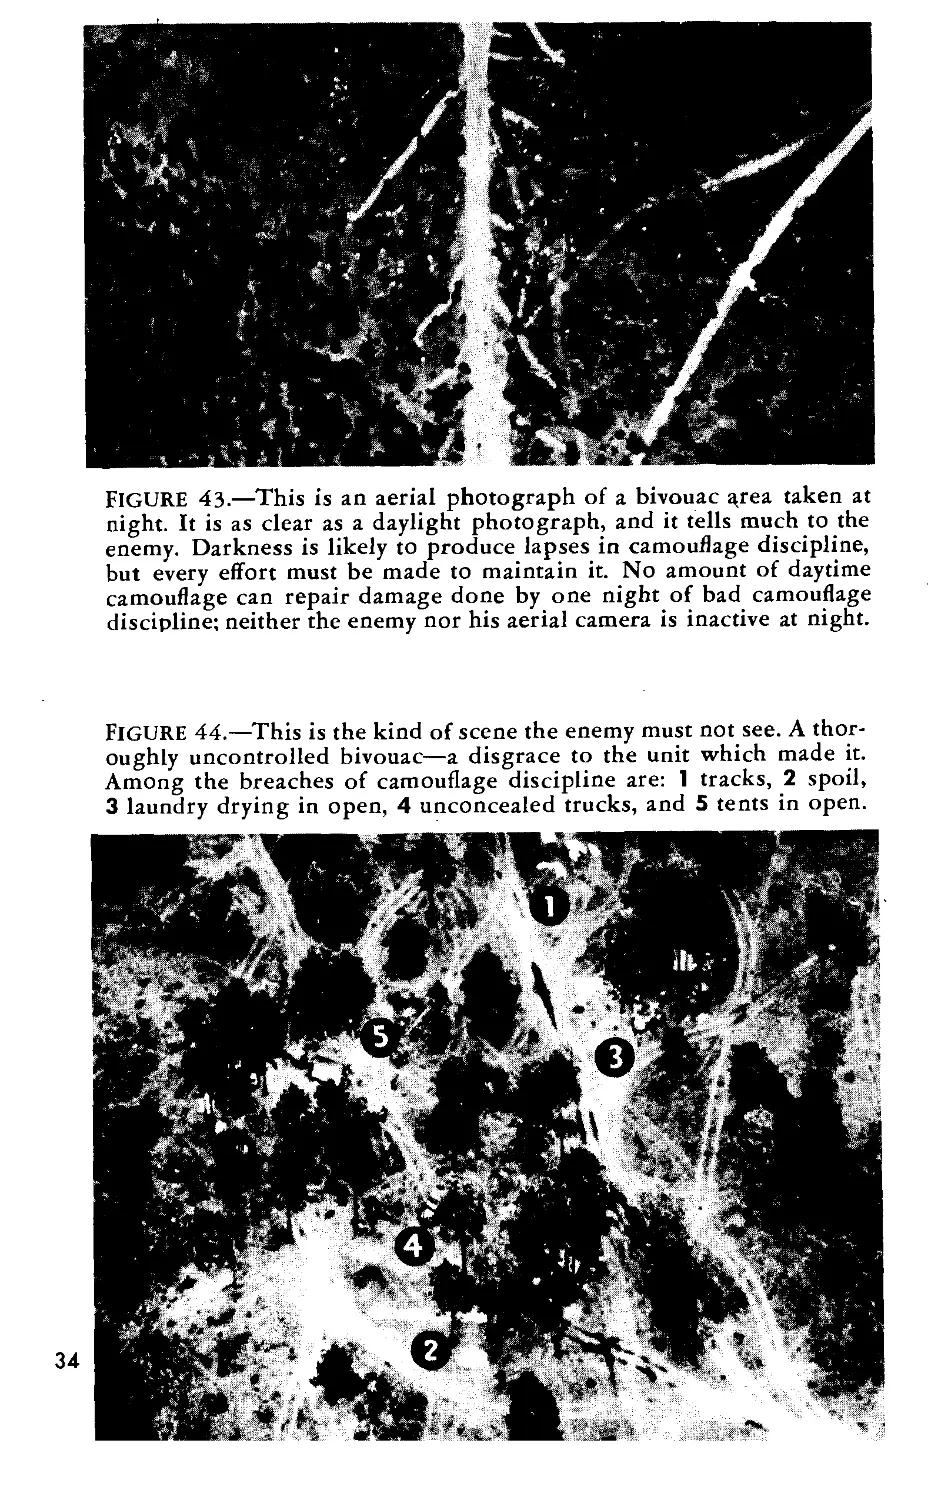
FIGURE 43.—This is an aerial photograph of a bivouac area taken at
night. It is as clear as a daylight photograph, and it tells much to the
enemy. Darkness is likely to produce lapses in camouflage discipline,
but every effort must be made to maintain it. No amount of daytime
camouflage can repair damage done by one night of bad camouflage
discipline; neither the enemy nor his aerial camera is inactive at night.
FIGURE 44.—This is the kind of scene the enemy must not see. A thor-
oughly uncontrolled bivouac—a disgrace to the unit which made it.
Among the breaches of camouflage discipline are: 1 tracks, 2 spoil,
3 laundry drying in open, 4 unconcealed trucks, and 5 tents in open.
Part II
CAMOUFLAGE OF
COMMAND POSTS
The command post is the nerve center of a military unit and,
therefore, is a target much sought by the enemy. Command
posts have functional requirements which result in the crea-
tion of characteristic signs by which they may be readily
identified. These characteristic signs are the first concern of
camouflage.
SPECIAL CHARACTERISTICS—Following are some of the
signs which indicate, to the enemy observer the possible
presence of a large command post:
1. Converging communication lines—wire and road.
2. Concentration of vehicles.
3. Heavy traffic, which causes widened turn-ins.
4. New access routes to a position which could house a
command post.
5- Protective wire and other barriers surrounding the in-
stallation.
6. Defensive weapons’ emplacements around the instal-
lation.
The camouflage solution to these problems is much the
same as that for bivouacs. The primary factors are intelli-
gent use of the terrain and strict enforcement of camouflage
discipline. The command post is simply a specialized kind
of bivouac, with a few additional problems of concealment
peculiar to it.
35
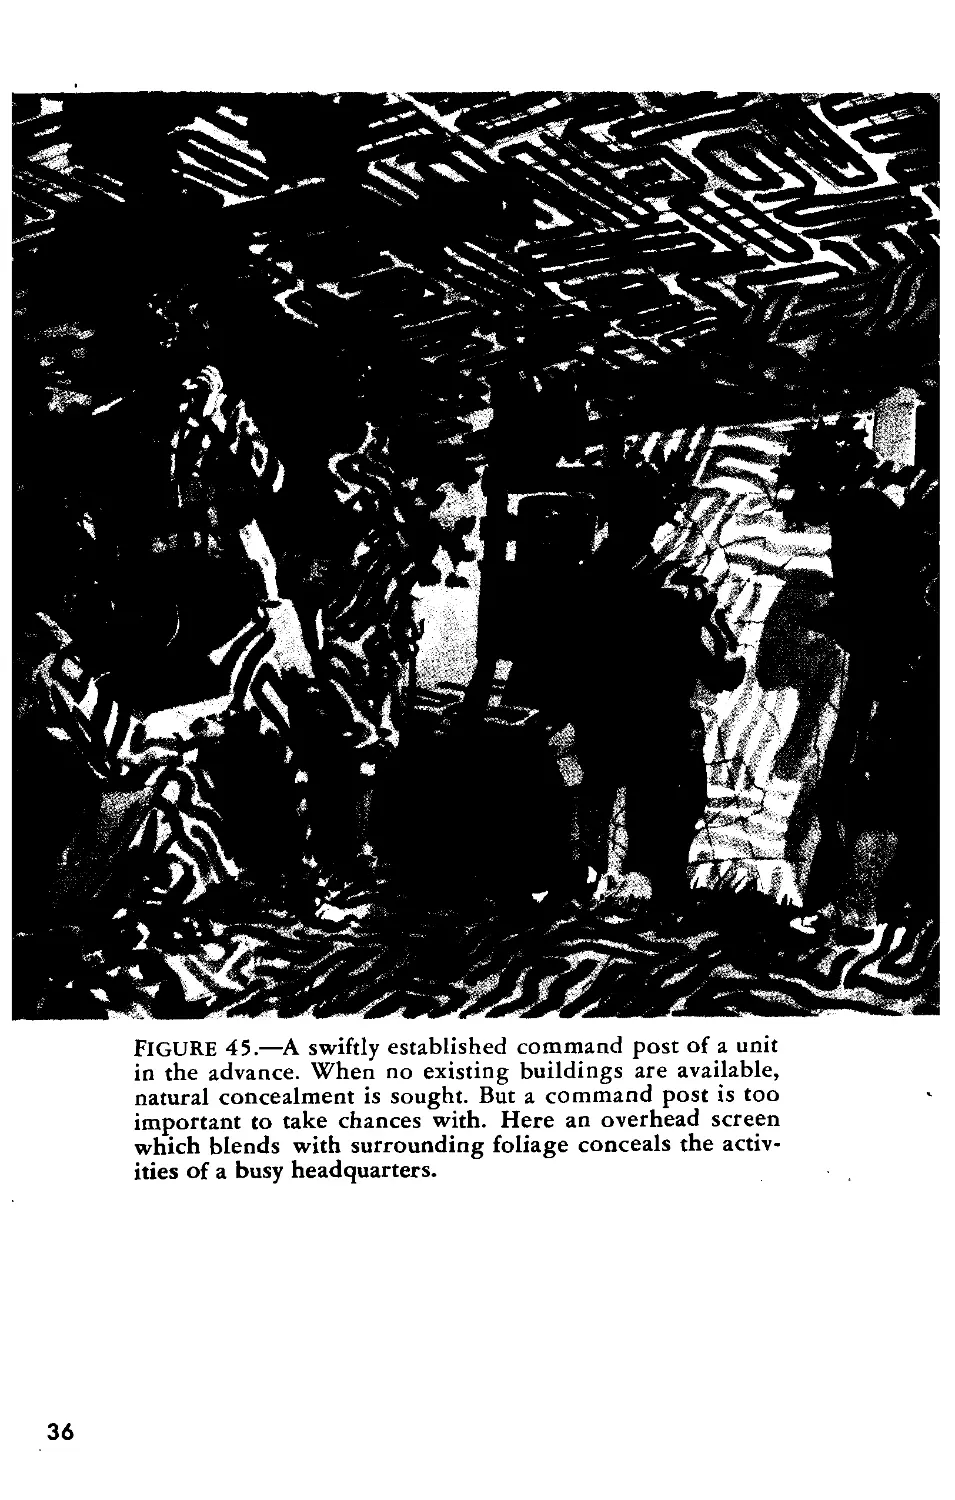
FIGURE 45.—A swiftly established command post of a unit
in the advance. When no existing buildings are available,
natural concealment is sought. But a command post is too
important to take chances with. Here an overhead screen
which blends with surrounding foliage conceals the activ-
ities of a busy headquarters.
36
CHOICE OF POSITION.—The site requirements of a large
command post are essentially the same as for a good bivouac:
preliminary reconnaissance and layout by quartering parties,
rapid concealment of elements, camouflage discipline, and a
well-policed track plan to prevent visitors violating it. There
is one important additional consideration: a large headquar-
ters is likely to remain in an area for a greater length of
time than a bivouacked unit. Therefore the site must be capa-
ble of being continuously occupied, sometimes for days,
while offering a minimum chance of being disclosed through
changes in the surroundings.
It is unwise to locate a headquarters in the only large
buildings within an extensive area of military operations.
It is too obvious a place for such a post. Whether signs
indicate it is being used as a headquarters or not, it is likely
to draw enemy fire. If the post is located in a building, there
must be enough other buildings in the neighborhood to pre-
vent pin-pointing the target.
ACCESS ROUTES.—Communications are the life blood of a
command post: a headquarters is effective only when it is
possible to maintain a rapid exchange of intelligence and
decisions between its numerous subordinate elements and the
headquarters. Command posts sited to take advantage of
existing roads and telephone and telegraph wires are easiest
to conceal since new communications need not be created
and terrain can remain unchanged. When new communica-
tion means must be created, natural cover and terrain lines
are used.
CAMOUFLAGE DISCIPLINE.—After the site has been selected
and after camouflage has been erected to supplement what-
ever natural concealment is available in the position, con-
tinued concealment depends on camouflage discipline. Tracks,
as always, must be controlled. Vehicles should, if possible,
be parked several hundred yards—or sometimes farther—
from the command post. Security weapons’ emplacements
must be concealed; tracks to them must be inconspicuous.
All spoil must be concealed. Protective wire and communi-
cation wire must follow terrain lines and be as well con-
cealed as possible. Night blackout discipline must be rigidly
enforced. Routes to parking areas for visitors must be main-
tained in accordance with the track plan.
37
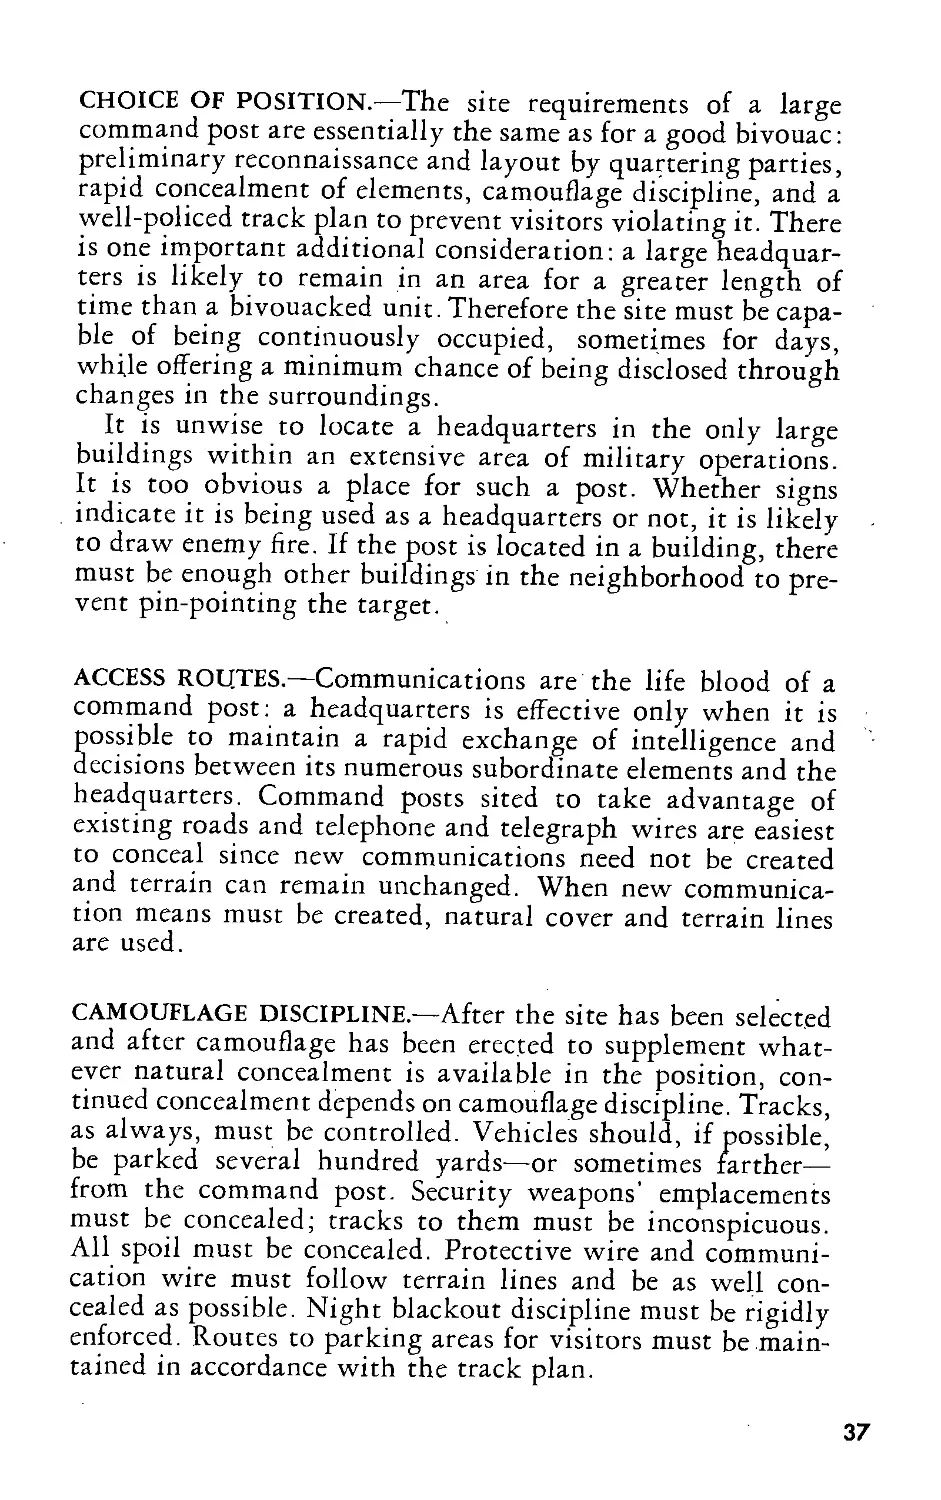
LAYOUT OF A COMMAND POST
FIGURE 46 ©.—Even a hasty glance at this scene would tell the enemy
observer that this is a command post. All the telltale signs are there.
They are military marks on an otherwise ordinary rural scene.
38
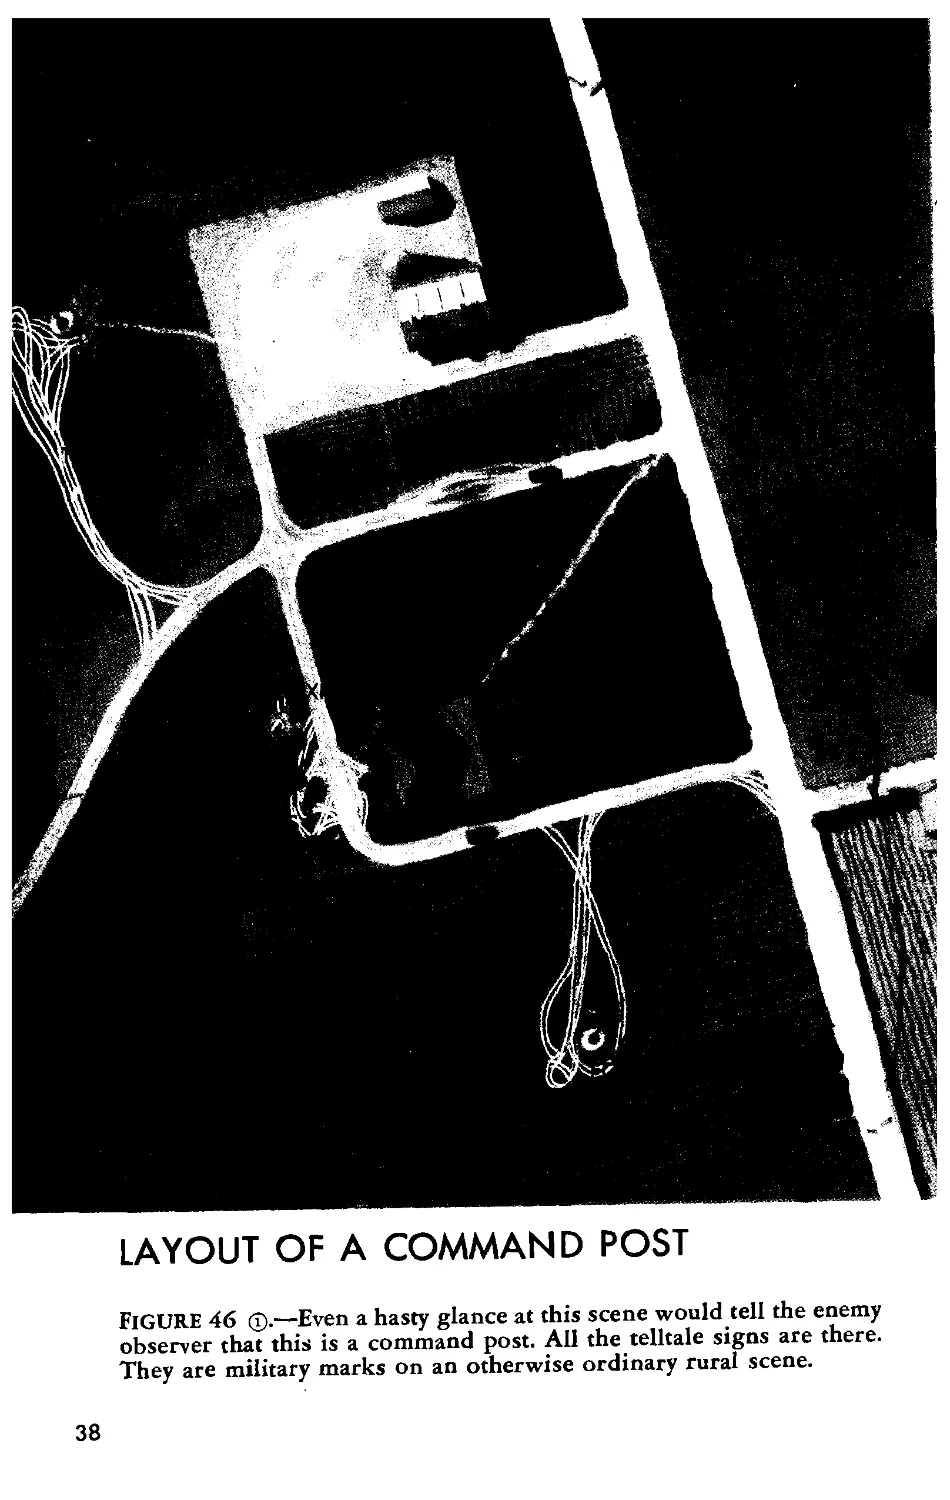
FIGURE 46 —There is nothing in this rural scene to arouse suspi-
cion of enemy. Such a controlled command post is possible only if a
camouflage plan has been made in advance of occupation and followed
closely. Most vehicles should be parked under cover at a distance from
the command post. Personnel should proceed on foot to the build-
ing itself. Protective wire follows terrain lines.
39
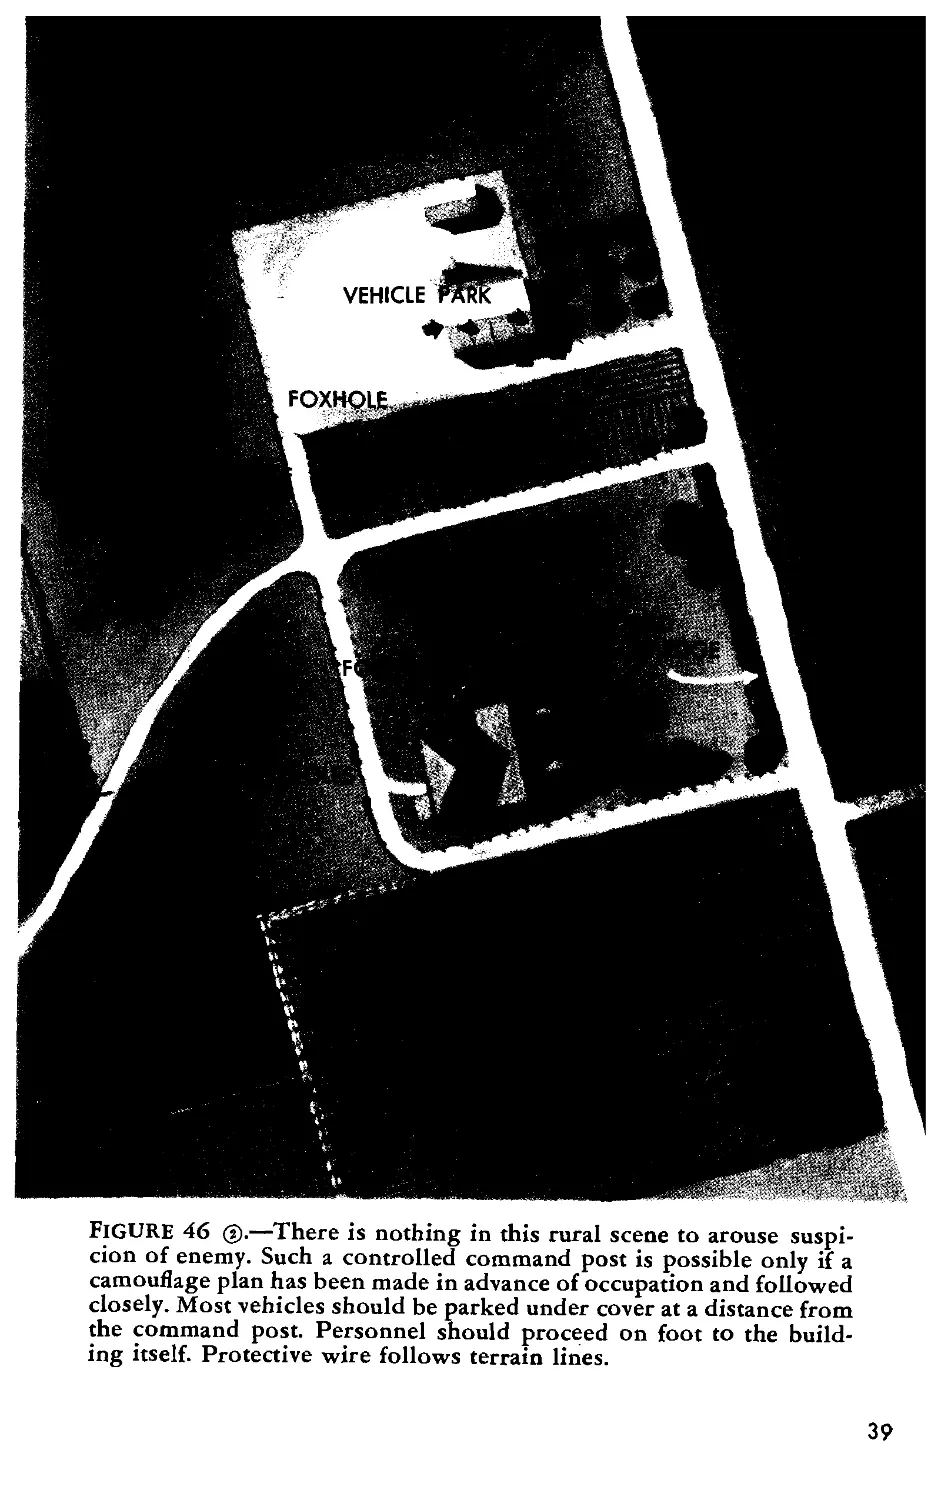
Figure 47. — By
continuing existing
road (dotted lines),
a traffic loop is cre-
ated. This makes a
conspicuous turn-
around unneces-
sary. It also provides
access to vehicle
park concealed in
woods at a distance
from the command
post.
Figure 48.—Small
parking area for
visitors. Overhead
cover is created by
placing natural ma-
terials in wire net-
ting. Unless over-
head cover is avail-
able, visitors’ vehi-
cles must not be
permitted to park
near command post.
FIGURE 49.—Tracks
must be controlled
and all traffic re-
stricted to existing
paths and roads.
Edges of road turn-
offs, intersections,
and short narrow
roads subject to
heavy military traf-
fic are wired in to
prevent conspicu-
ous road widening
and corner cutting.
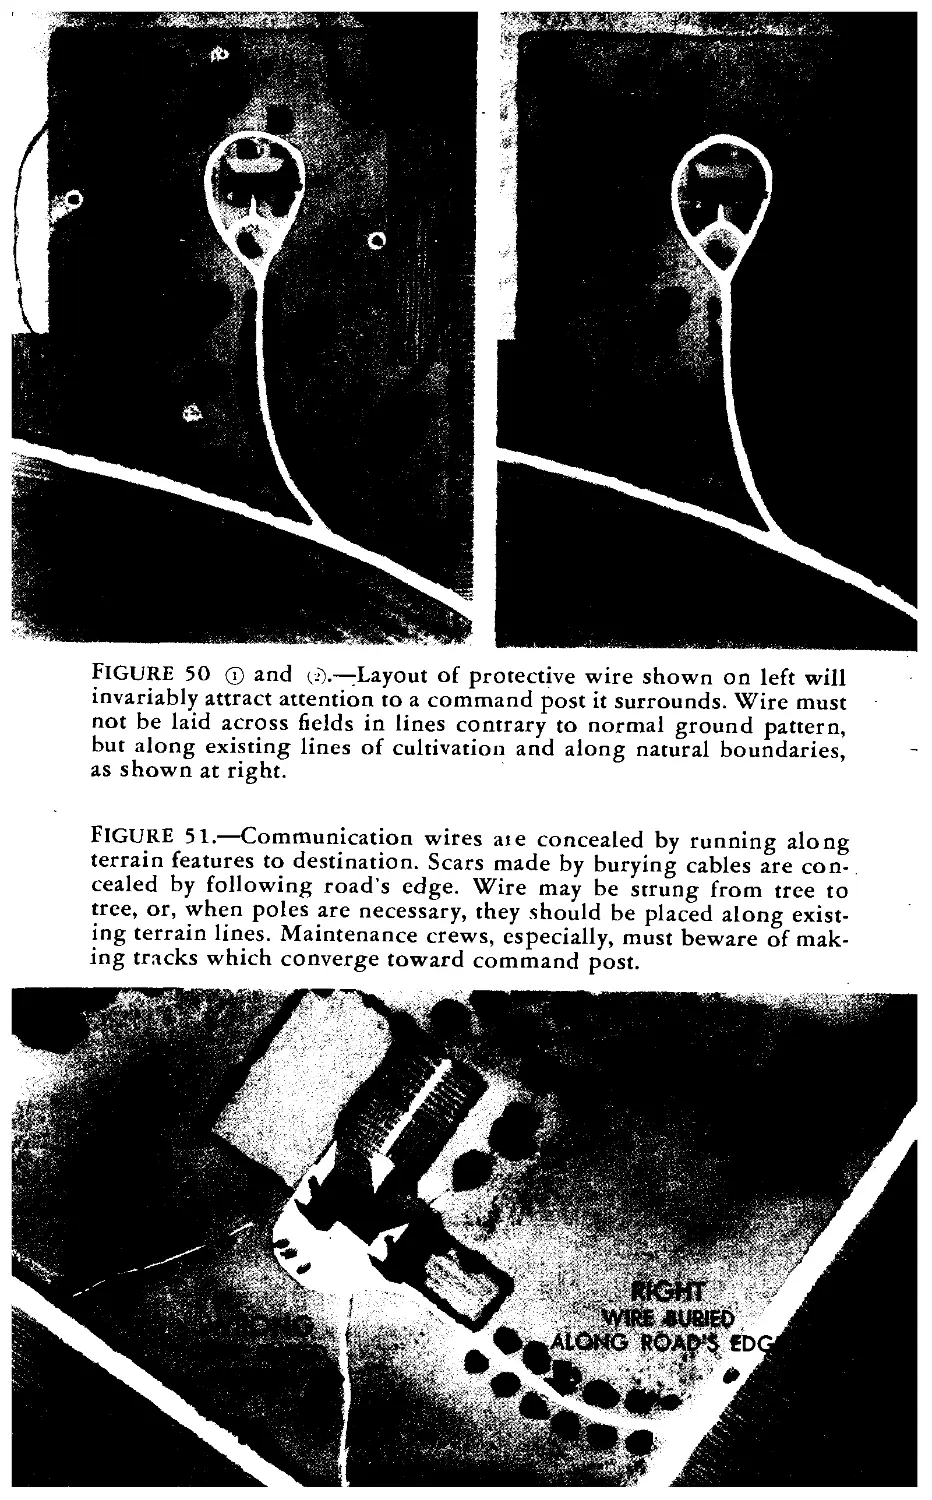
FIGURE 50 @ and c<>.—^Layout of protective wire shown on left will
invariably attract attention to a command post it surrounds. Wire must
not be laid across fields in lines contrary to normal ground pattern,
but along existing lines of cultivation and along natural boundaries,
as shown at right.
FIGURE 51.—Communication wires ate concealed by running along
terrain features to destination. Scars made by burying cables are con-
cealed by following road’s edge. Wire may be strung from tree to
tree, or, when poles are necessary, they should be placed along exist-
ing terrain lines. Maintenance crews, especially, must beware of mak-
ing tracks which converge toward command post.
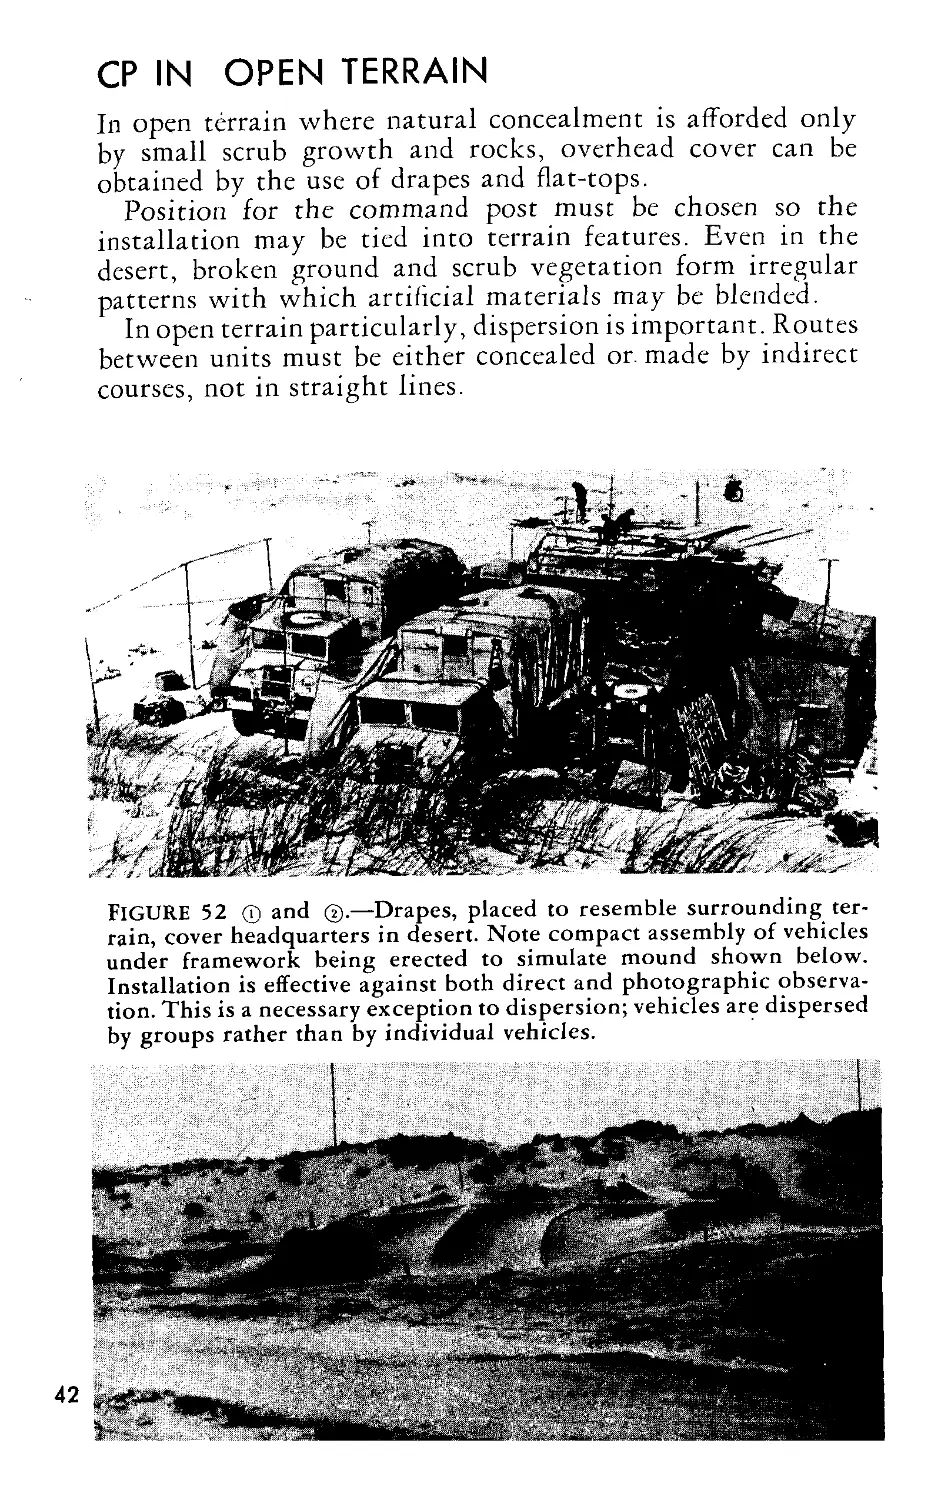
CP IN OPEN TERRAIN
In Open terrain where natural concealment is afforded only
by small scrub growth and rocks, overhead cover can be
obtained by the use of drapes and flat-tops.
Position for the command post must be chosen so the
installation may be tied into terrain features. Even in the
desert, broken ground and scrub vegetation form irregular
patterns with which artificial materials may be blended.
In open terrain particularly, dispersion is important. Routes
between units must be either concealed or. made by indirect
courses, not in straight lines.
FIGURE 52 (T) and —Drapes, placed to resemble surrounding ter-
rain, cover headquarters in desert. Note compact assembly of vehicles
under framework being erected to simulate mound shown below.
Installation is effective against both direct and photographic observa-
tion. This is a necessary exception to dispersion; vehicles are dispersed
by groups rather than by individual vehicles.
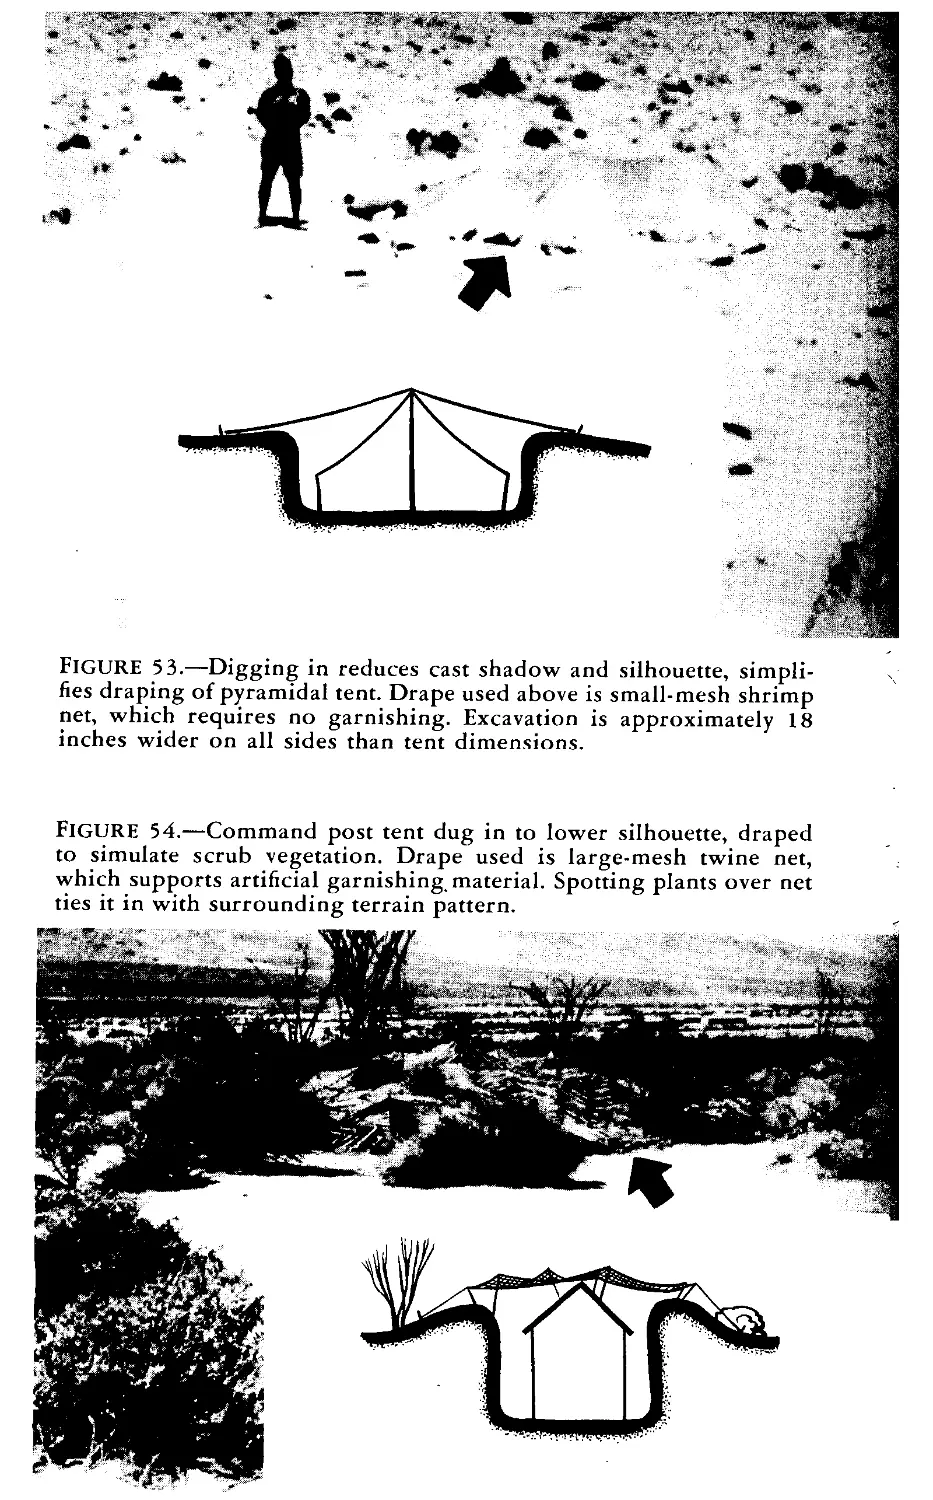
FIGURE 53.—Digging in reduces cast shadow and silhouette, simpli-
fies draping of pyramidal tent. Drape used above is small-mesh shrimp
net, which requires no garnishing. Excavation is approximately 18
inches wider on all sides than tent dimensions.
FIGURE 54.—Command post tent dug in to lower silhouette, draped
to simulate scrub vegetation. Drape used is large-mesh twine net,
which supports artificial garnishing material. Spotting plants over net
ties it in with surrounding terrain pattern.
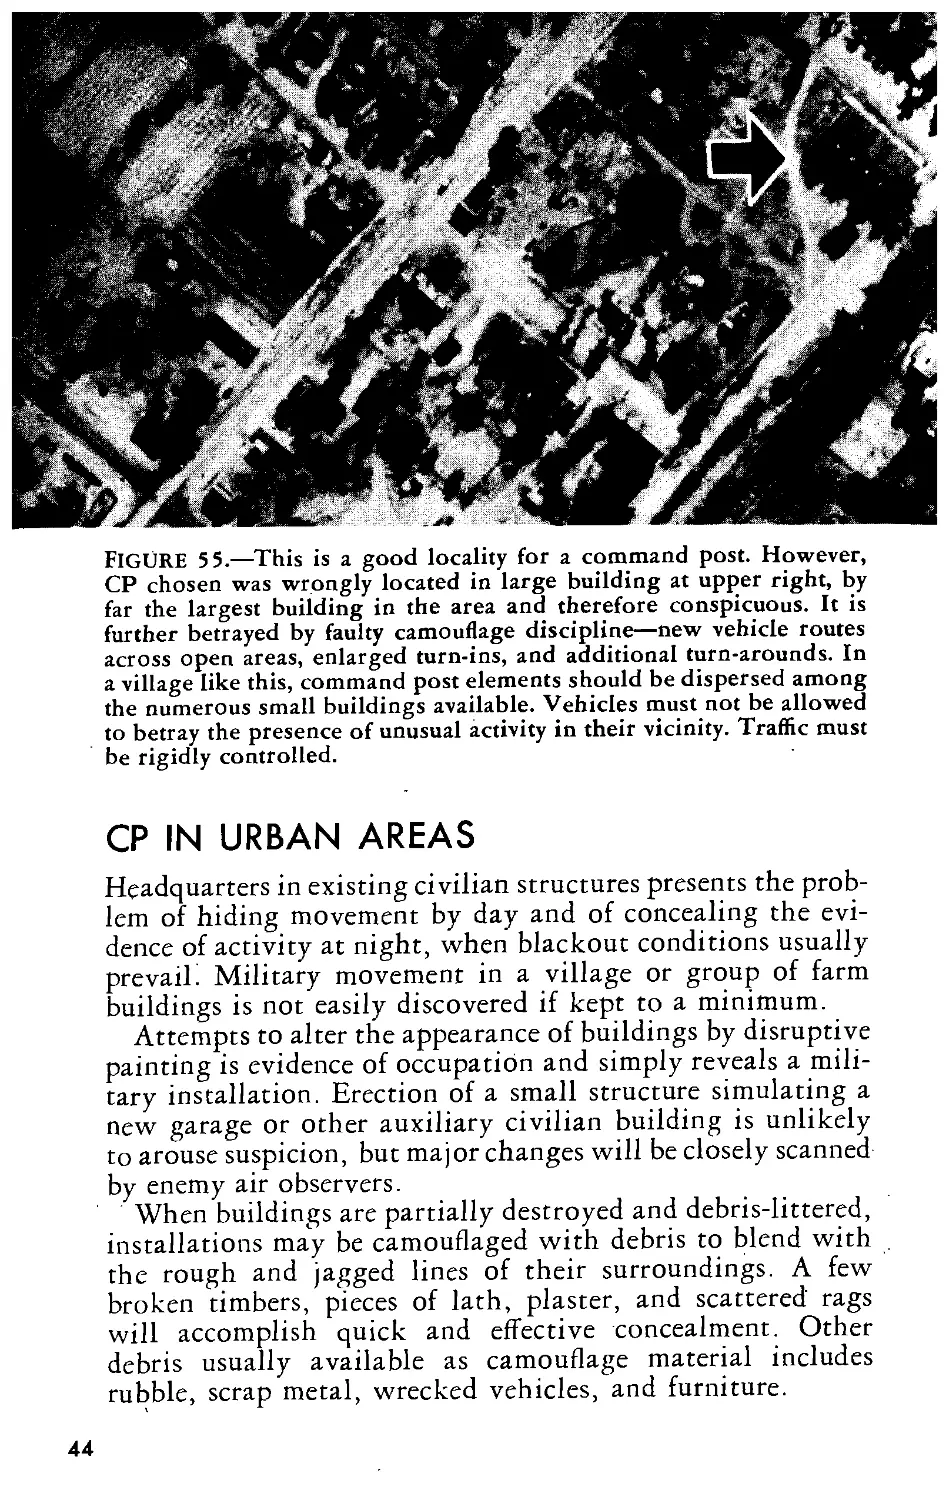
FIGURE 55.—This is a good locality for a command post. However,
CP chosen was wrongly located in large building at upper right, by
far the largest building in the area and therefore conspicuous. It is
further betrayed by faulty camouflage discipline—new vehicle routes
across open areas, enlarged turn-ins, and additional turn-arounds. In
a village like this, command post elements should be dispersed among
the numerous small buildings available. Vehicles must not be allowed
to betray the presence of unusual activity in their vicinity. Traffic must
be rigidly controlled.
CP IN URBAN AREAS
Headquarters in existing civilian structures presents the prob-
lem of hiding movement by day and of concealing the evi-
dence of activity at night, when blackout conditions usually
prevail. Military movement in a village or group of farm
buildings is not easily discovered if kept to a minimum.
Attempts to alter the appearance of buildings by disruptive
painting is evidence of occupation and simply reveals a mili-
tary installation. Erection of a small structure simulating a
new garage or other auxiliary civilian building is unlikely
to arouse suspicion, but major changes will be closely scanned
by enemy air observers.
When buildings are partially destroyed and debris-littered,
installations may be camouflaged with debris to blend with
the rough and jagged lines of their surroundings. A few
broken timbers, pieces of lath, plaster, and scattered rags
will accomplish quick and effective concealment. Other
debris usually available as camouflage material includes
rubble, scrap metal, wrecked vehicles, and furniture.
44
DECOY СР
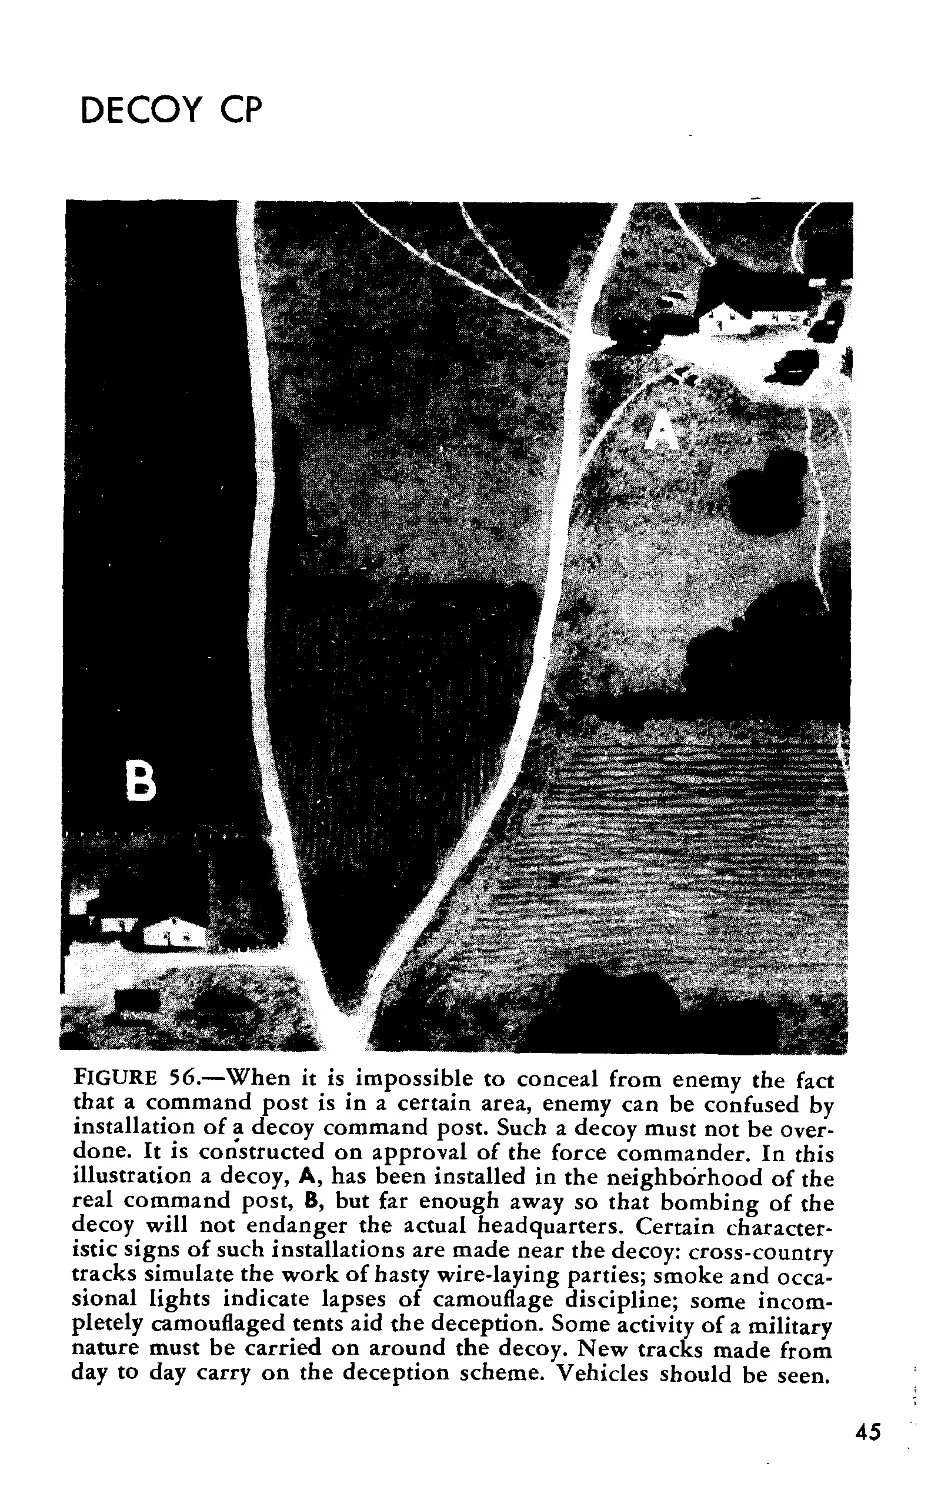
FIGURE 56.—When it is impossible to conceal from enemy the fact
that a command post is in a certain area, enemy can be confused by
installation of a decoy command post. Such a decoy must not be over-
done. It is constructed on approval of the force commander. In this
illustration a decoy, A, has been installed in the neighborhood of the
real command post, B, but far enough away so that bombing of the
decoy will not endanger the actual headquarters. Certain character-
istic signs of such installations are made near the decoy: cross-country
tracks simulate the work of hasty wire-laying parties; smoke and occa-
sional lights indicate lapses of camouflage discipline; some incom-
pletely camouflaged tents aid the deception. Some activity of a military
nature must be carried on around the decoy. New tracks made from
day to day carry on the deception scheme. Vehicles should be seen.
45
Port III
CAMOUFLAGE OF
SUPPLY POINTS
The problem of camouflaging supply points includes all the
difficulties of both bivouac and command-post concealment
—plus a number of particularly troublesome factors peculiar
to supply points alone.
Supply points vary in size from large concentrations of
materials in rear areas to small piles of supplies behind the
front lines—in either case a profltable target for enemy bom-
bardment and shelling.
From a camouflage standpoint, the large area covered by
a supply point is a primary problem. The pictures on the
opposite page illustrate the magnitude of the job. Huge piles
of equipment of all kinds are brought up quickly, must be
unloaded quickly to allow the carriers to return for more,
must be concealed quickly, and yet must be easily accessible
for redistribution and reloading on other carriers. Flat-tops
are an effective solution if the supply points are not too large,
if time and materials for their erection are available, and if
they can be made to blend with the terrain. For supply points
which cannot be concealed, decoy supply points will often
divert the force of an enemy attack.
The rest of part III illustrates simple, hasty methods of
concealing supplies. These are adaptable to almost all types
of supplies, including ammunition and gasoline. In the case
of the latter, the installation is surrounded by a trench to
prevent the spread of fire. The shadow contained within new
trenches, and spoil removed from them, are concealed or
broken up with artificial or natural materials.
PLANNING SUPPLY POINTS
Supply points make use of natural cover and concealment
whenever possible. Stacks of supplies are dispersed to mini-
mize damage from a single bomb- Also, in planning disper-
sion, advantage is taken of natural concealment. New access
roads and paths are planned to use existing overhead cover.
In more permanent installations, tracks running through
short open areas can be concealed by overhead nets slung
46
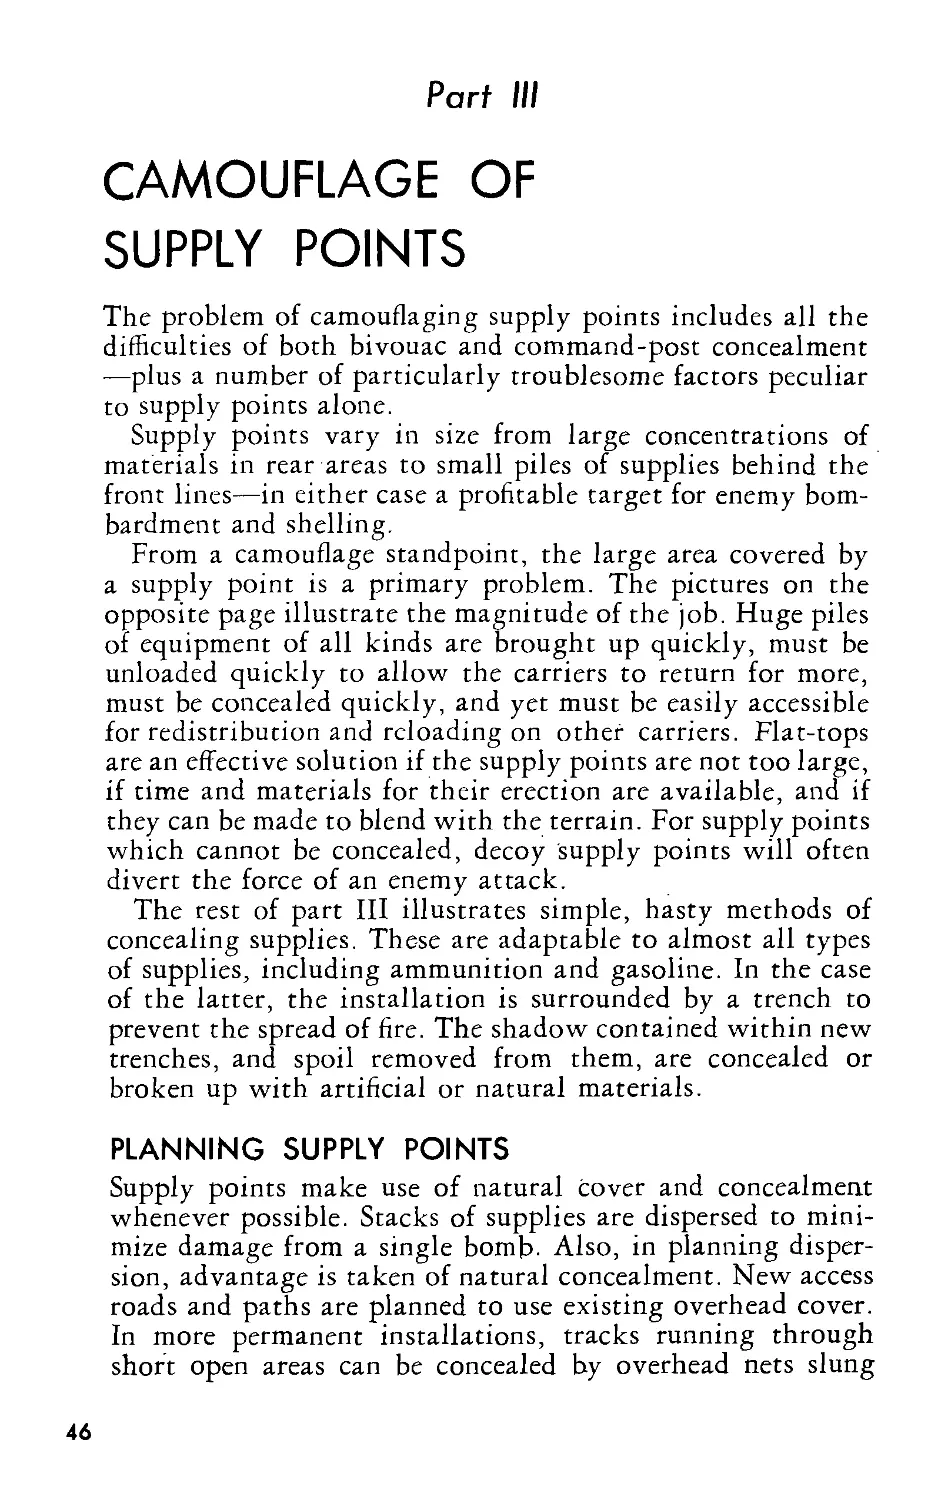
Figure 57 ®.—One
view of the camou-
flage problem. Part of
an engineer supply
point, with oil drums
in background. In a
combat zone, it may
be expected that a
scene like this will be
subject to exploding
bombs and burning
gasoline.
Figure 57 — A
troublesome part of
the camouflage prob-
lem. A class-I supply
point, badly organ-
ized and incompletely
concealed. Loading
trucks are jammed
close together, along
with unconcealed sup-
plies. One well-placed
bomb here could crip-
ple a whole operation.
Figure 57 ©.—An-
other side to the
problem. A beachhead
with supplies stacked
hastily at water’s
edge. In an operation
of this kind, conges-
tion is unavoidable.
As soon as possible,
supplies should be
sorted into the small-
est practicable groups,
dispersed, and con-
cealed under natural
overhead cover or in
one or more of the
ways suggested in fig-
ures 5 5 through 77.
between trees. Traffic control includes measures to conceal
activity and movement at, to, and from the installation.
Even when natural cover is sparse or nonexistent, natural
terrain features are used to advantage. The background is
studied and used. Terrain features are used by stacking sup-
plies in the shadows or dark areas created by these features
or by stacking supplies so that the stacks resemble the fea-
tures. Figures 59 to 74 illustrate the use of background com-
bined with the use of natural or artificial materials.
Camouflage discipline measures at supply points include
track plans that result in a minimum of changes in the
appearance of terrain, control of debris so that it does not
accumulate and attract enemy attention, concealment and
control of trucks waiting to draw supplies, and maintenance
of camouflage measures.
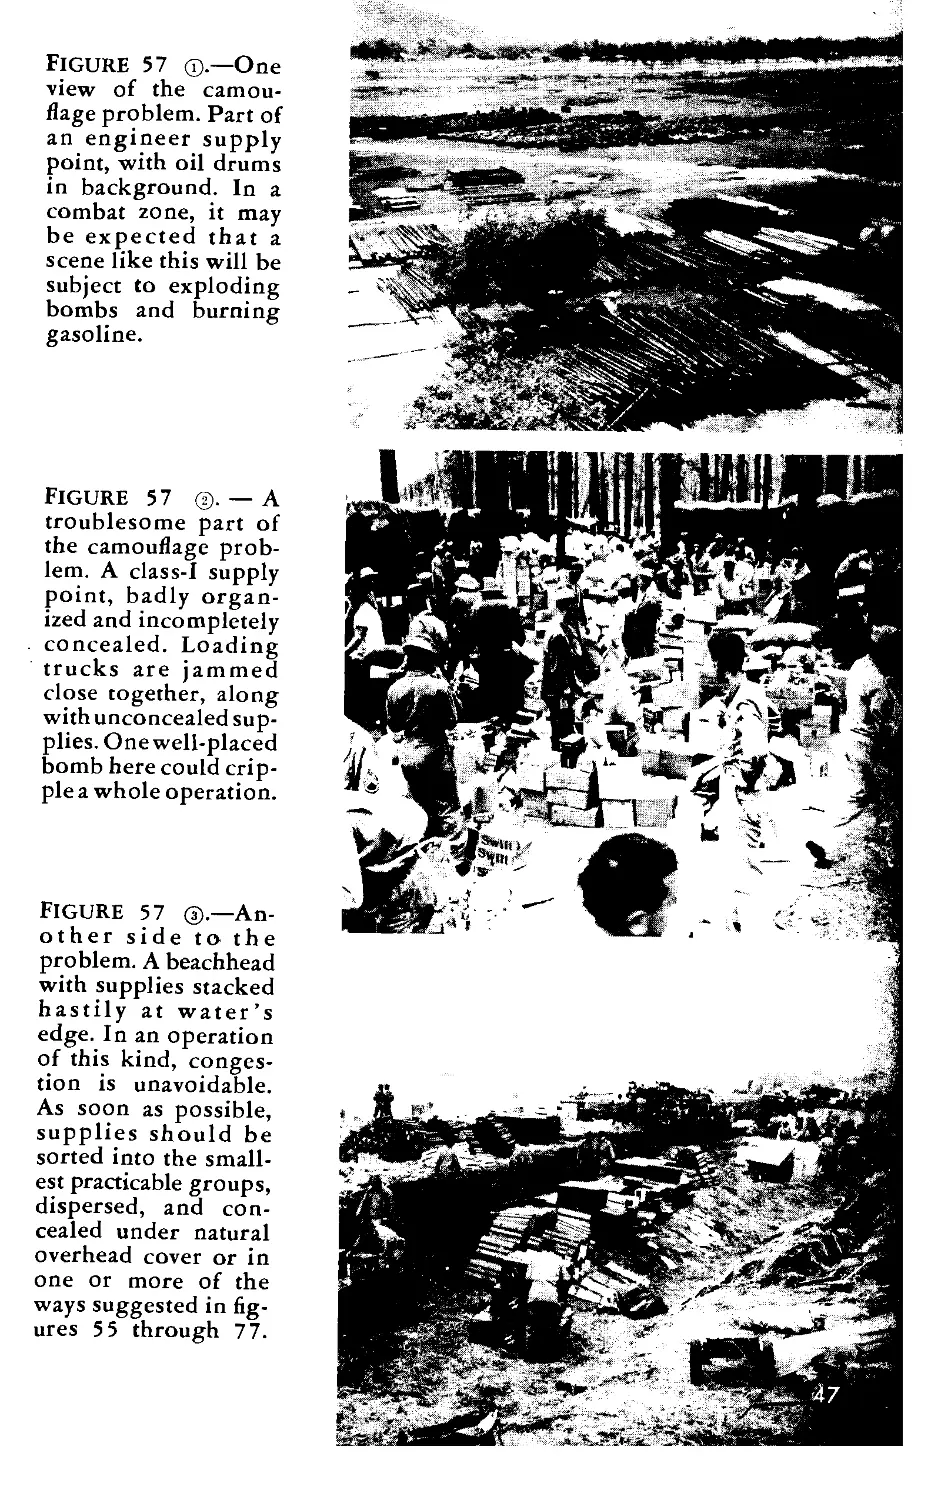
When supplies are stacked in a rectangular shape, they are
made to blend with the color and texture of the background
either by distributing natural materials over the tarpaulin
covering the supplies or by draping supplies with garnished
camouflage nets (fig. 58 (T)). Nets are propped off the sup-
plies so the shape of the installation is irregular.
Supplies stacked in a pyramidal shape may be made to
resemble bushes and small trees by placing natural materials
on the pyramid (fig. 58 or by draping with a garnished
net. One advantage of a pyramidal stack is that it makes a
smaller shadow than other shapes.
Supplies may be stacked in the shadows beside walls or
stone fences, in ditches, trenches, folds in the ground, or
among rock outcrops. Supplies replacing real stones in stone
walls preserve an innocent appearance. Supplies may be
stacked to simulate many other terrain features.
48
FIGURE 59 ®.—Barren country broken by ridges, as in this picture
and in picture below, offer excellent terrain patterns for both distri-
bution and concealment of supplies. Above, supplies are strewn
parallel to ridge at its base, where there is shadow part of day. Covered
with rocks and scrub growth, supplies are inconspicuous.
FIGURE 59 ®-—Here, a shallow dip in the ground is filled with sup-
plies, in a natural extension of the rolling lines. Correct texture is
secured by covering supplies with material from surrounding area.
Arranged irregularly, they will not attract attention from the air.
49
FIGURE 60 ©.—^Enlargement of
part of same area as in ©, show-
ing additional' supplies laid out
in abandoned trench system.
Figure 60 ©.—Dis-
used earthworks em-
ployed for conceal-
ment of supplies.
Below @ is close-up
of stacked portion of
old fortifications. Sec-
tions of wall are re-
moved and replaced
with supplies. Addi-
tional excavation must
not be overdone.
Figure 60 ©.—Sec-
tion of trench with
supplies.
Figure 61 Q.—Meth-
ods of using old posi-
tions to conceal stores.
Real trenches contain
one or two rows of
boxes. False trenches
are made by stacking
boxes and covering
with open-mesh cloth.
Extra row of supplies
may be placed in false
excavations. Details
of this method are
shown in figures 61
and ®.
Figure 61 @.—Supplies stacked
in abandoned weapon pit.
FIGURE 61 @.—Abandoned ve-
hicle pit with stacked supplies.
Figure 62 ®, and ®.—
Aerial photo and sketch of
well-tracked dry salt lake in
desert. Section at A ® is typi-
cal of area which might be
chosen for a supply point.
Sketch @ is a diagram of sup-
plies in A laid out to simulate
tracks in area; details of
stacked supplies.
52
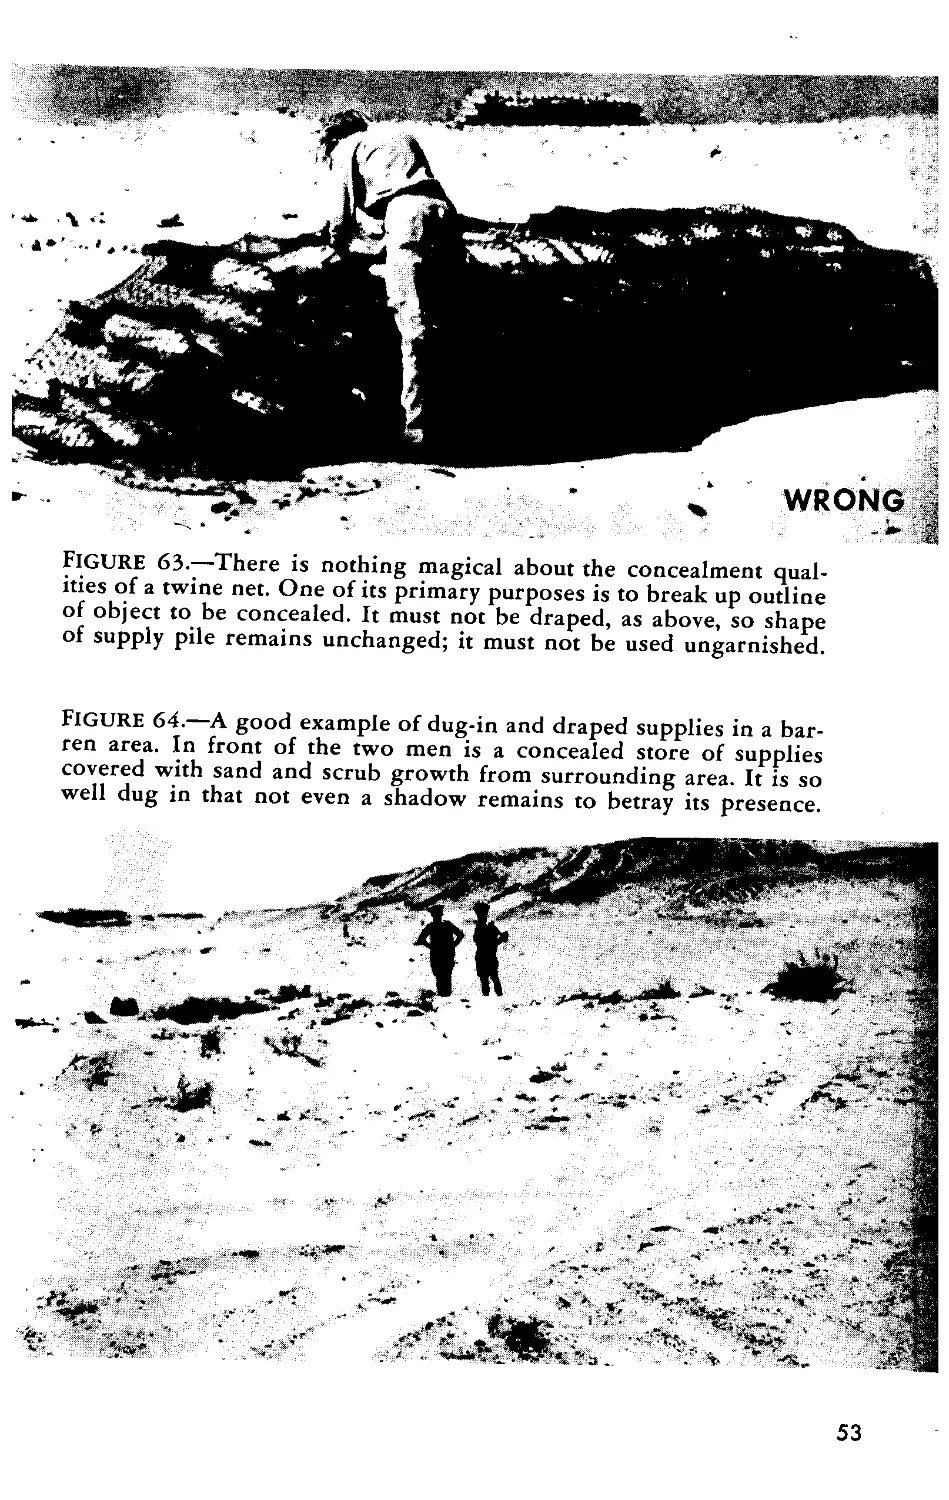
FIGURE 63.—There is nothing magical about the concealment qual-
ities of a twine net. One of its primary purposes is to break up outline
of object to be concealed. It must not be draped, as above, so shape
of supply pile remains unchanged; it must not be used ungarnished.
FIGURE 64.—A good example of dug-in and draped supplies in a bar-
ren area. In front of the two men is a concealed store of supplies
covered with sand and scrub growth from surrounding area. It is so
well dug in that not even a shadow remains to betray its presence.
53
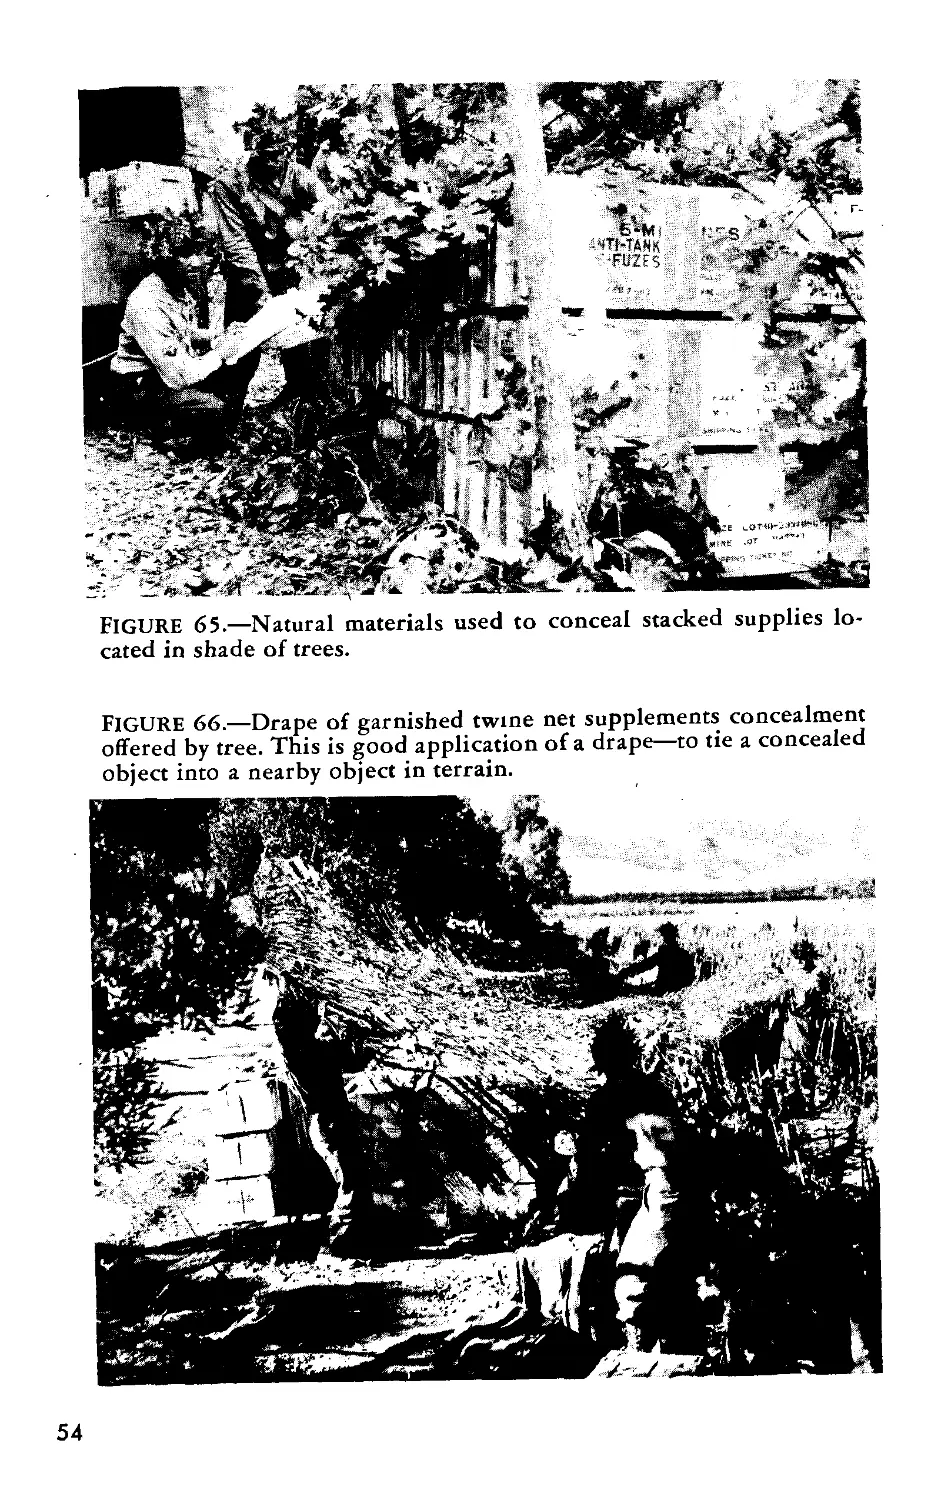
FIGURE 65.—Natural materials used to conceal stacked supplies lo-
cated in shade of trees.
FIGURE 66.—Drape of garnished twine net supplements concealment
offered by tree. This is good application of a drape—to tie a concealed
object into a nearby object in terrain.
54
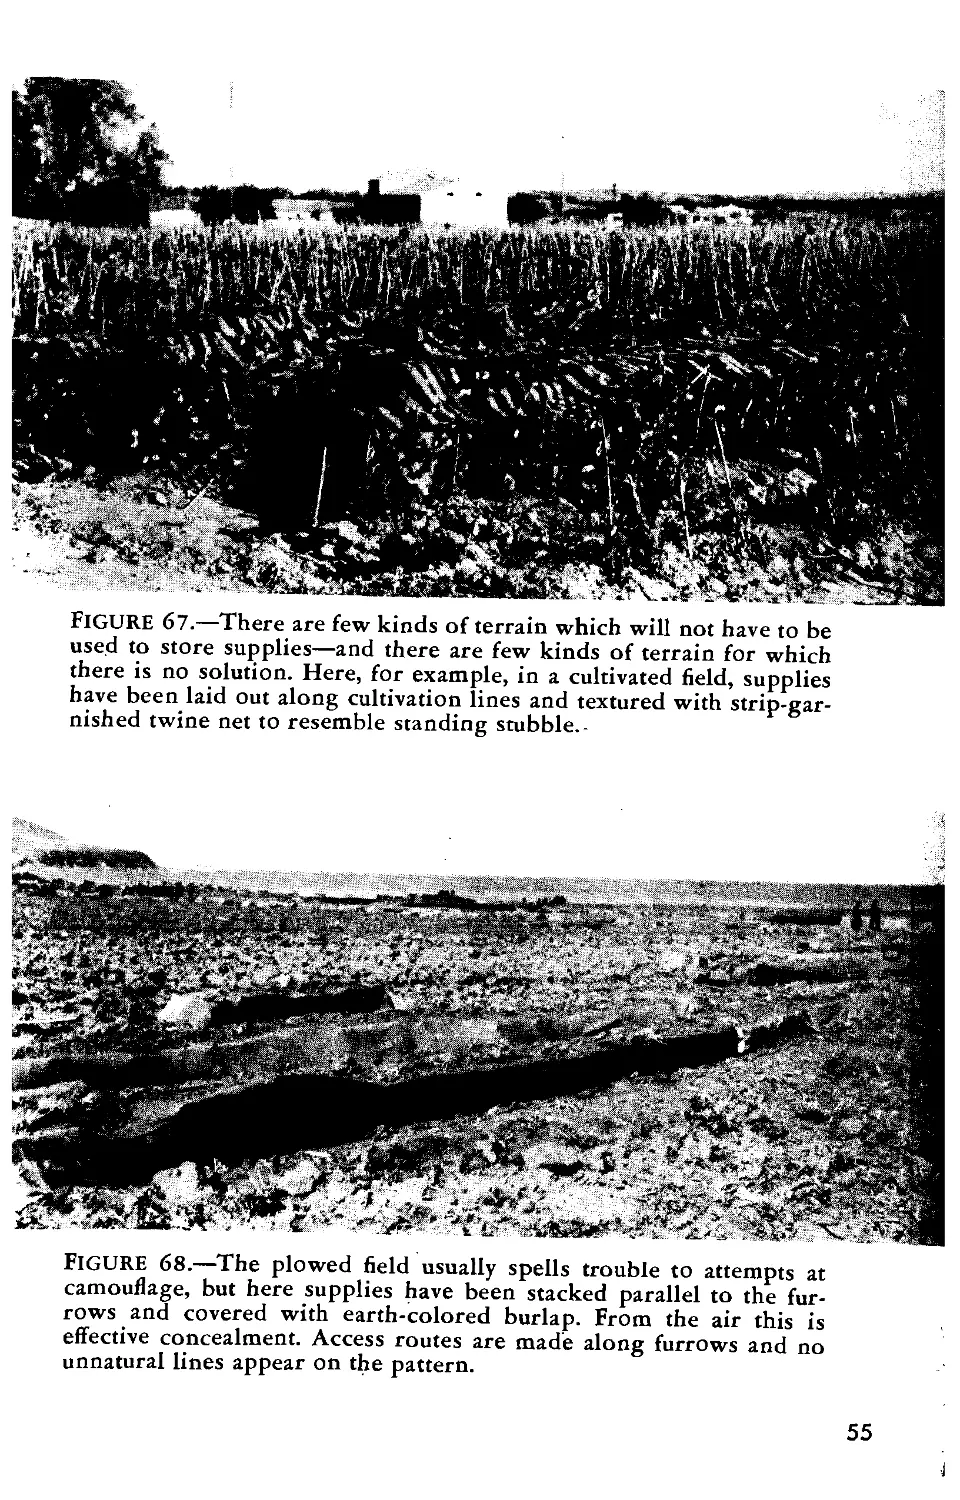
FIGURE 67.—There are few kinds of terrain which will not have to be
used to store supplies—and there are few kinds of terrain for which
there is no solution. Here, for example, in a cultivated field, supplies
have been laid out along cultivation lines and textured with strip-gar-
nished twine net to resemble standing stubble.-
FIGURE 68.—The plowed field usually spells trouble to attempts at
camouflage, but here supplies have been stacked parallel to the fur-
rows and covered with earth-colored burlap. From the air this is
effective concealment. Access routes are made along furrows and no
unnatural lines appear on the pattern.
55
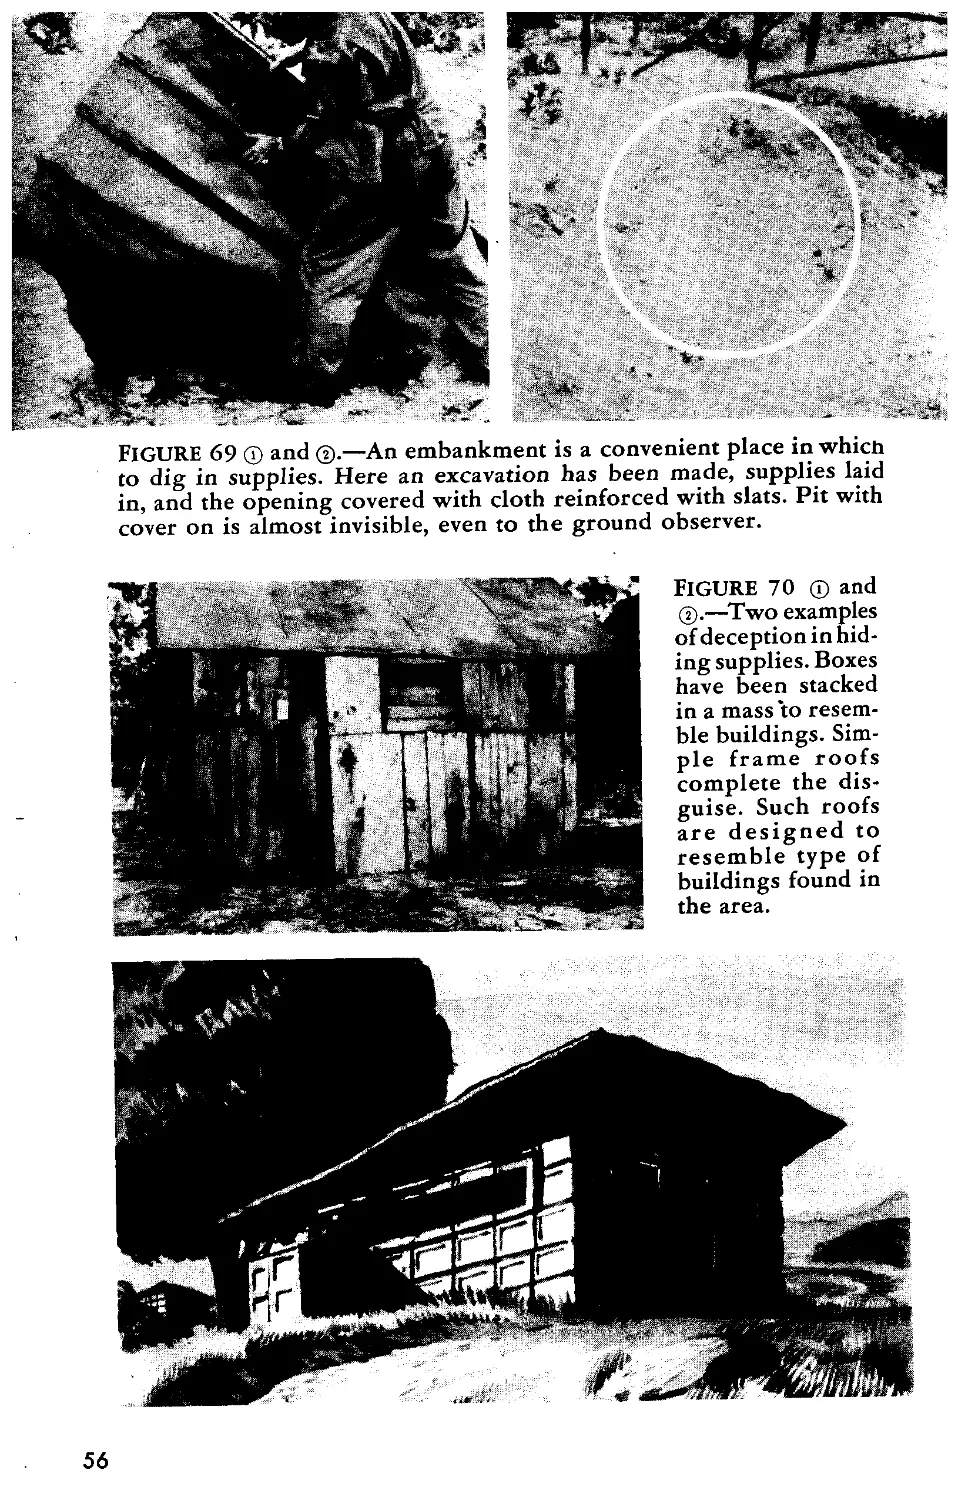
FIGURE 69 @ and @.—An embankment is a convenient place in which
to dig in supplies. Here an excavation has been made, supplies laid
in, and the opening covered with cloth reinforced with slats. Pit with
cover on is almost invisible, even to the ground observer.
Figure 70 ® and
@.—Two examples
of deception in hid-
ing supplies. Boxes
have been stacked
in a mass to resem-
ble buildings. Sim-
ple frame roofs
complete the dis-
guise. Such roofs
are designed to
resemble type of
buildings found in
the area.
56
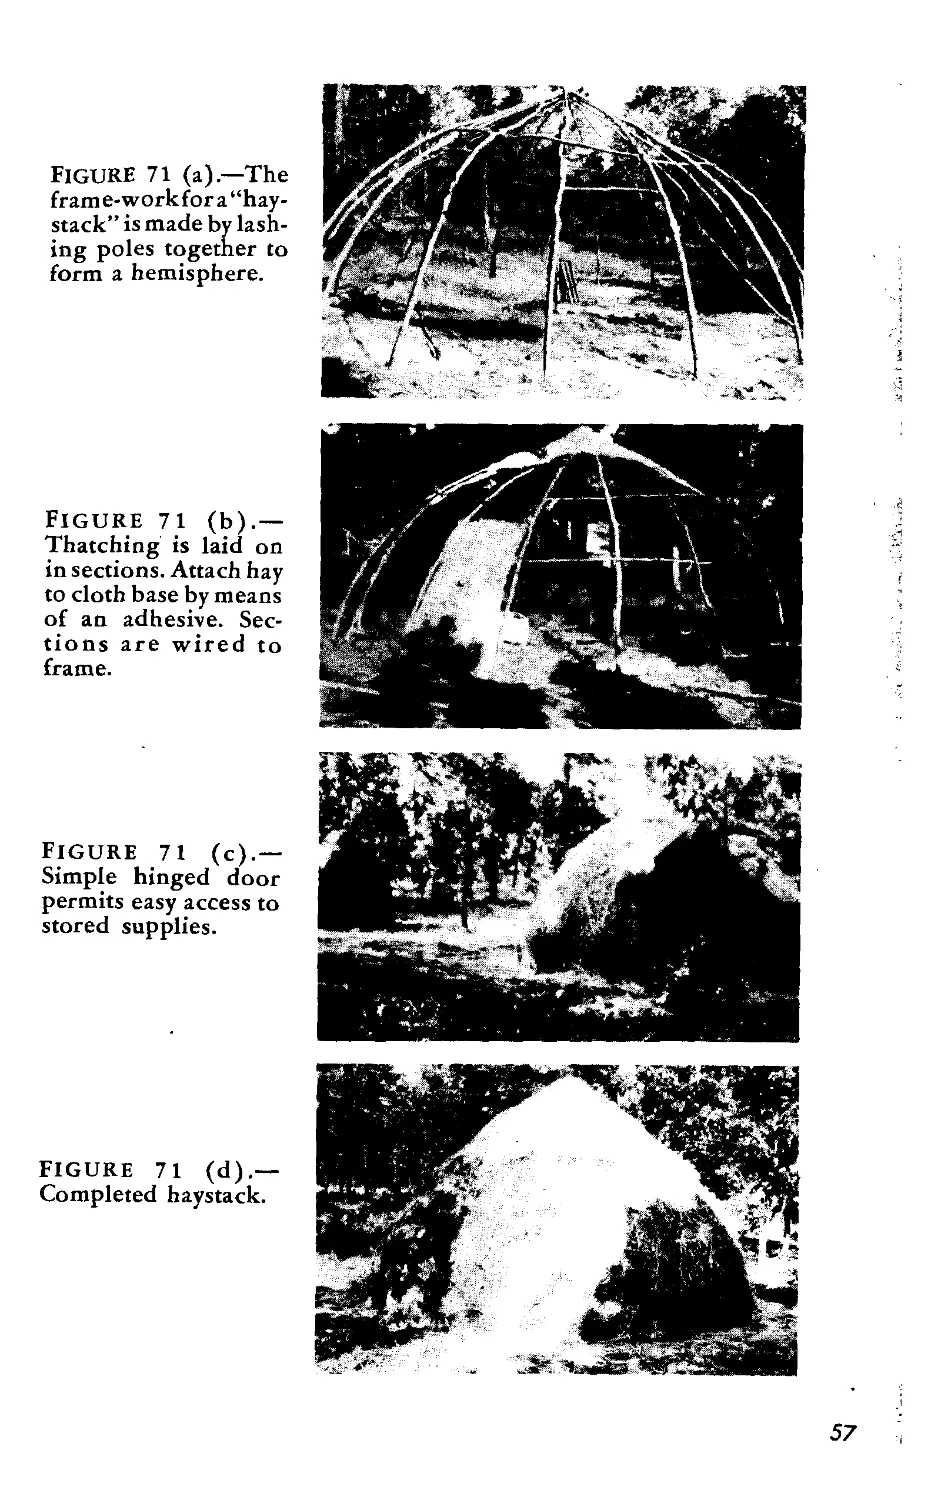
Figure 71 (a).—The
fram e-work for a “hay-
stack” is made by lash-
ing poles together to
form a hemisphere.
Figure 71 (b).—
Thatching is laid on
in sections. Attach hay
to cloth base by means
of an adhesive. Sec-
tions are wired to
frame.
Figure 71 (c).—
Simple hinged door
permits easy access to
stored supplies.
FIGURE 71 (d).—
Completed haystack.
57
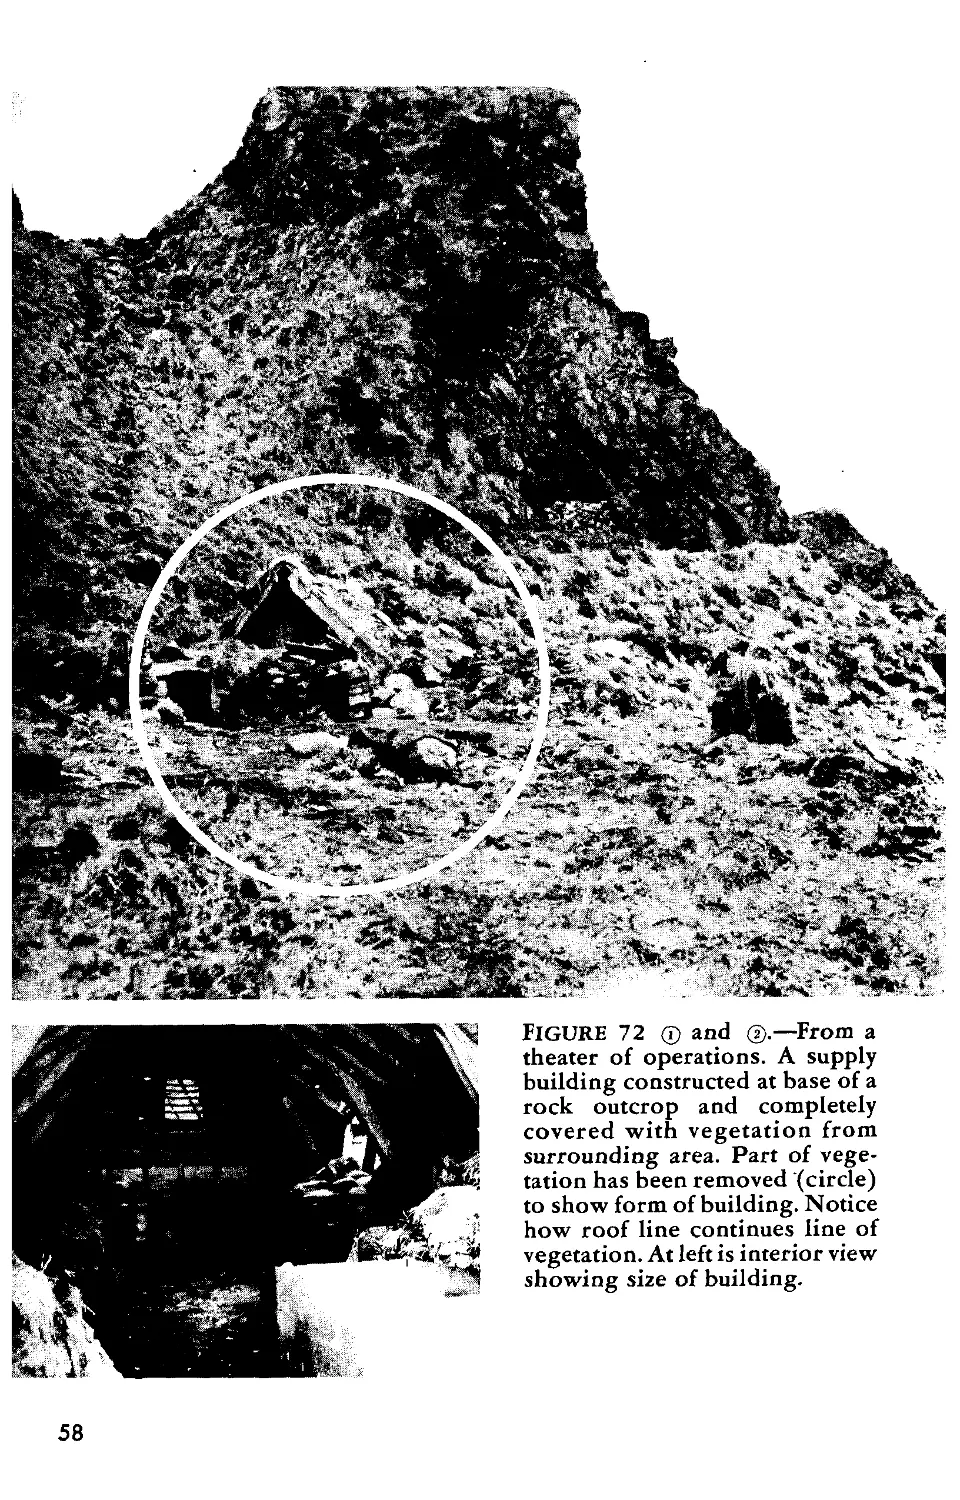
FIGURE 72 ® and ©.—From a
theater of operations. A supply
building constructed at base of a
rock outcrop and completely
covered with vegetation from
surrounding area. Part of vege-
tation has been removed (circle)
to show form of building. Notice
how roof line continues line of
vegetation. At left is interior view
showing size of building.
58
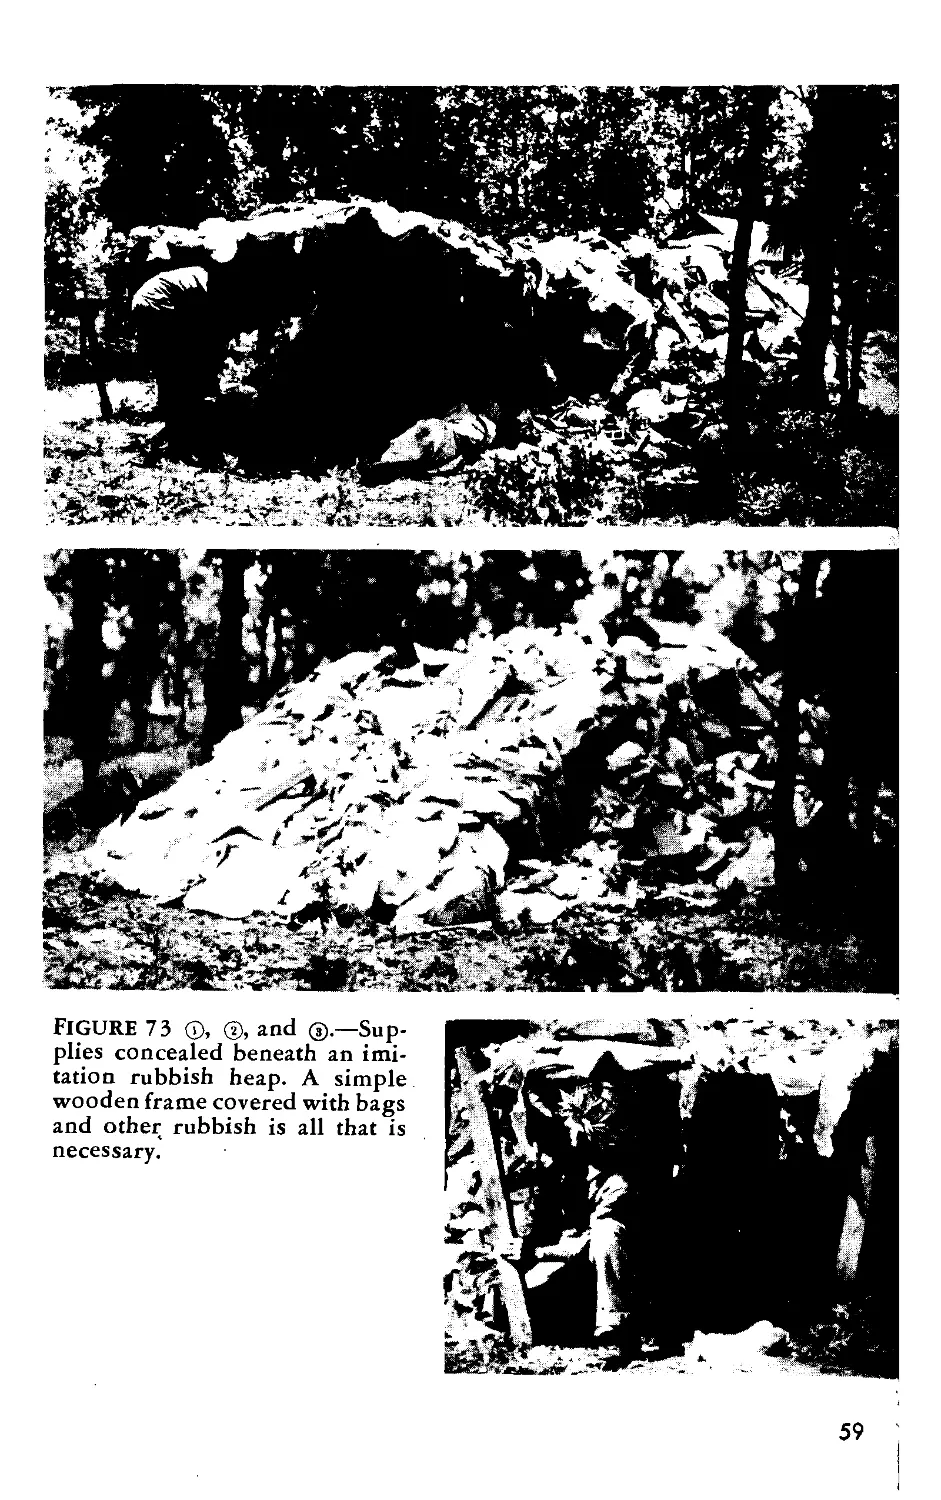
Figure 73 ®, and ©.—Sup-
plies concealed beneath an imi-
tation rubbish heap. A simple
wooden frame covered with bags
and other rubbish is all that is
necessary.
59
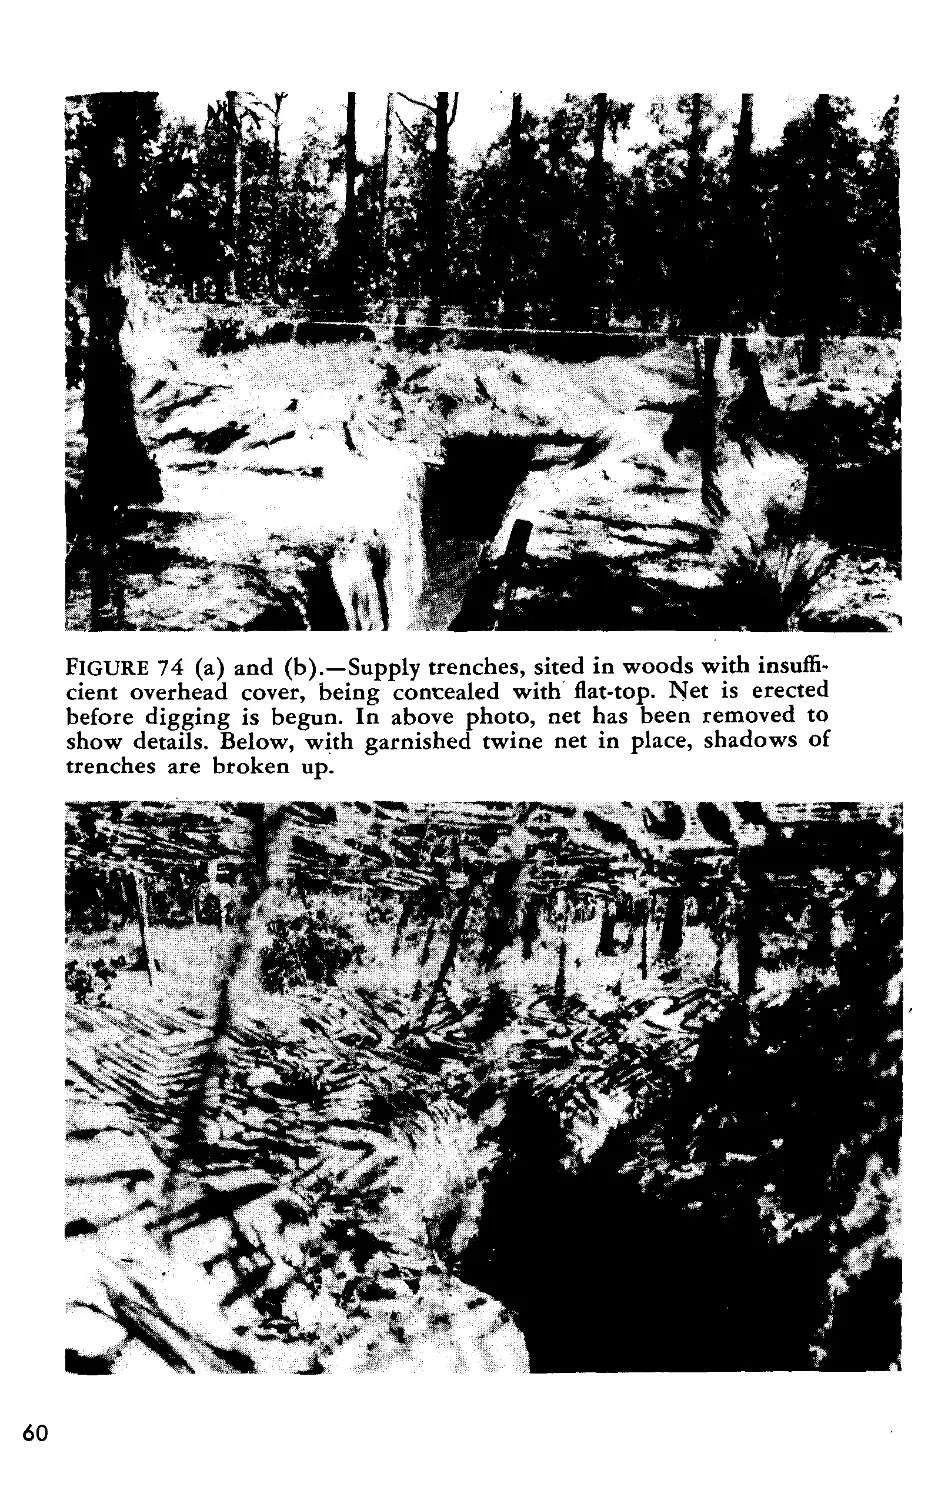
FIGURE 74 (a) and (b).—Supply trenches, sited in woods with insuffi-
cient overhead cover, being concealed with flat-top. Net is erected
before digging is begun. In above photo, net has been removed to
show details. Below, with garnished twine net in place, shadows of
trenches are broken up.
60
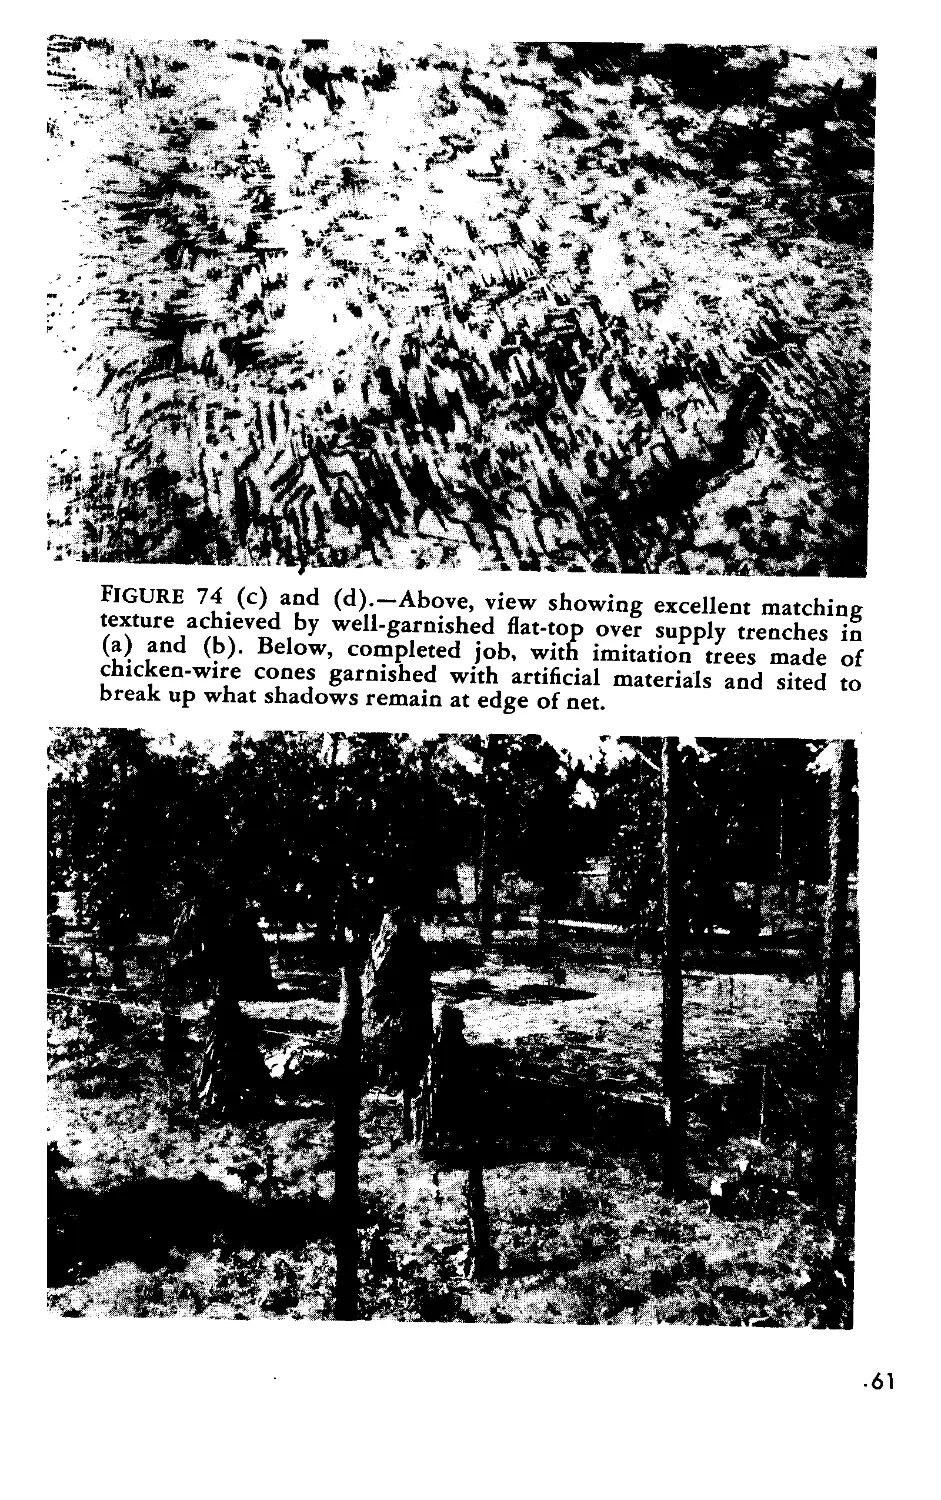
FIGURE 74 (c) and (d).—Above, view showing excellent matching
texture achieved by well-garnished flat-top over supply trenches in
(a) and (b). Below, completed job, with imitation trees made of
chicken-wire cones garnished with artificial materials and sited to
break up what shadows remain at edge of net.
.61
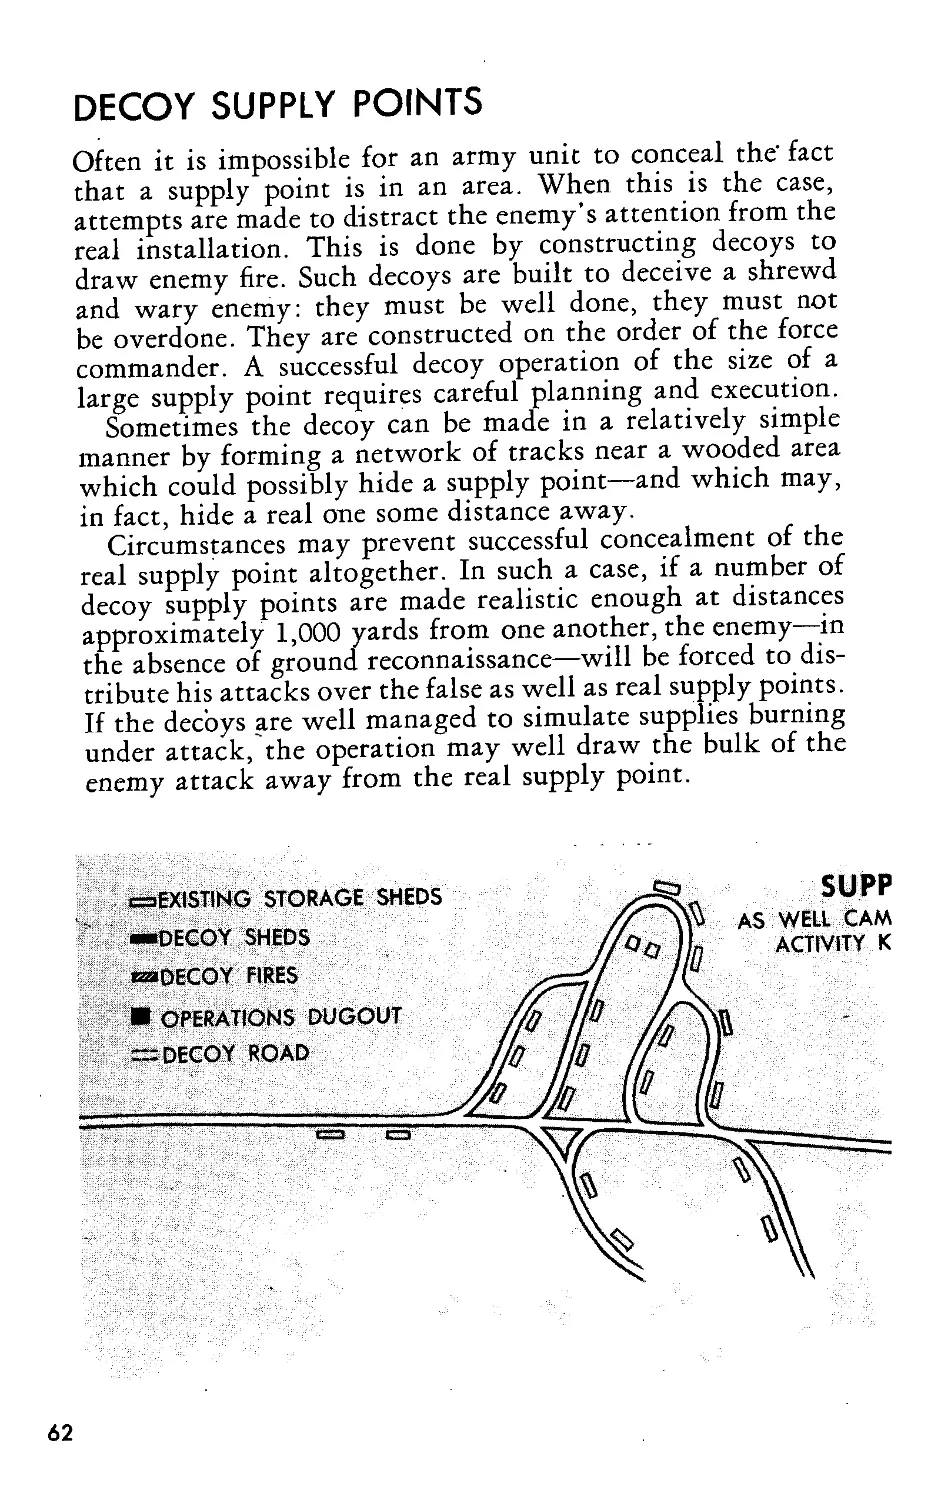
DECOY SUPPLY POINTS
Often it is impossible for an army unit to conceal the' fact
that a supply point is in an area. When this is the case,
attempts are made to distract the enemy’s attention from the
real installation. This is done by constructing decoys to
draw enemy fire. Such decoys are built to deceive a shrewd
and wary enemy: they must be well done, they must not
be overdone. They are constructed on the order of the force
commander. A successful decoy operation of the size of a
large supply point requires careful planning and execution.
Sometimes the decoy can be made in a relatively simple
manner by forming a network of tracks near a wooded area
which could possibly hide a supply point—and which may,
in fact, hide a real one some distance away.
Circumstances may prevent successful concealment of the
real supply point altogether. In such a case, if a number of
decoy supply points are made realistic enough at distances
approximately 1,000 yards from one another, the enemy—in
the absence of ground reconnaissance—will be forced to dis-
tribute his attacks over the false as well as real supply points.
If the decoys are well managed to simulate supplies burning
under attack, the operation may well draw the bulk of the
enemy attack away from the real supply point.
62
Figure 75 is a schematic diagram of decoy supply points
showing their relation to a real supply point. In the case of
large important installations, the construction of several
decoys is often more advantageous than the construction of
a single decoy. This is especially true when the real installa-
tion is sited by necessity in an area where concealment is
impossible or when, even if concealed, the enemy has already
pin-pointed it. Enemy attacks as a result of the use of this
system are dispersed by offering several instead of one target.
Decoys of this type may be on an extremely large scale and
may be constructed to deceive both day and night observa-
tion. For daylight deception they may include considerable
false construction to simulate roads, buildings, tentage, vehi-
cles, personnel, and stacks of supplies.
Troops must be detailed to a decoy installation to main-
tain an appearance of activity corresponding to the activity
normally a part of the real supply point. It has been found
that approximately one-quarter of the personnel stationed
at the parent site is required to maintain realistic activity
at a decoy. New tracks, scars in the ground surface, and
movement of false vehicles and supplies are essential decoy
activities.
For night deception decoy fires, made by flame throwers,
oil baths, smoke pots, or other means, are operated elec-
[GURE 75.
63
trically by remote control from an operations dugout located
a safe distance from the decoy targets. To act as bait for
enemy planes at night, electric lights, also controlled from
the operations dugout, may be installed in tents and false
buildings at various locations within the decoy supply point.
At first warning of the approach of enemy planes all lights
are switched on. When the planes have approached to within
5 miles, all except one or two lights are switched off to make
it seem as though they have been overlooked. As planes come
closer to the decoy, all lights are switched off. Decoy fires
are started only when bombs are dropped near the decoy.
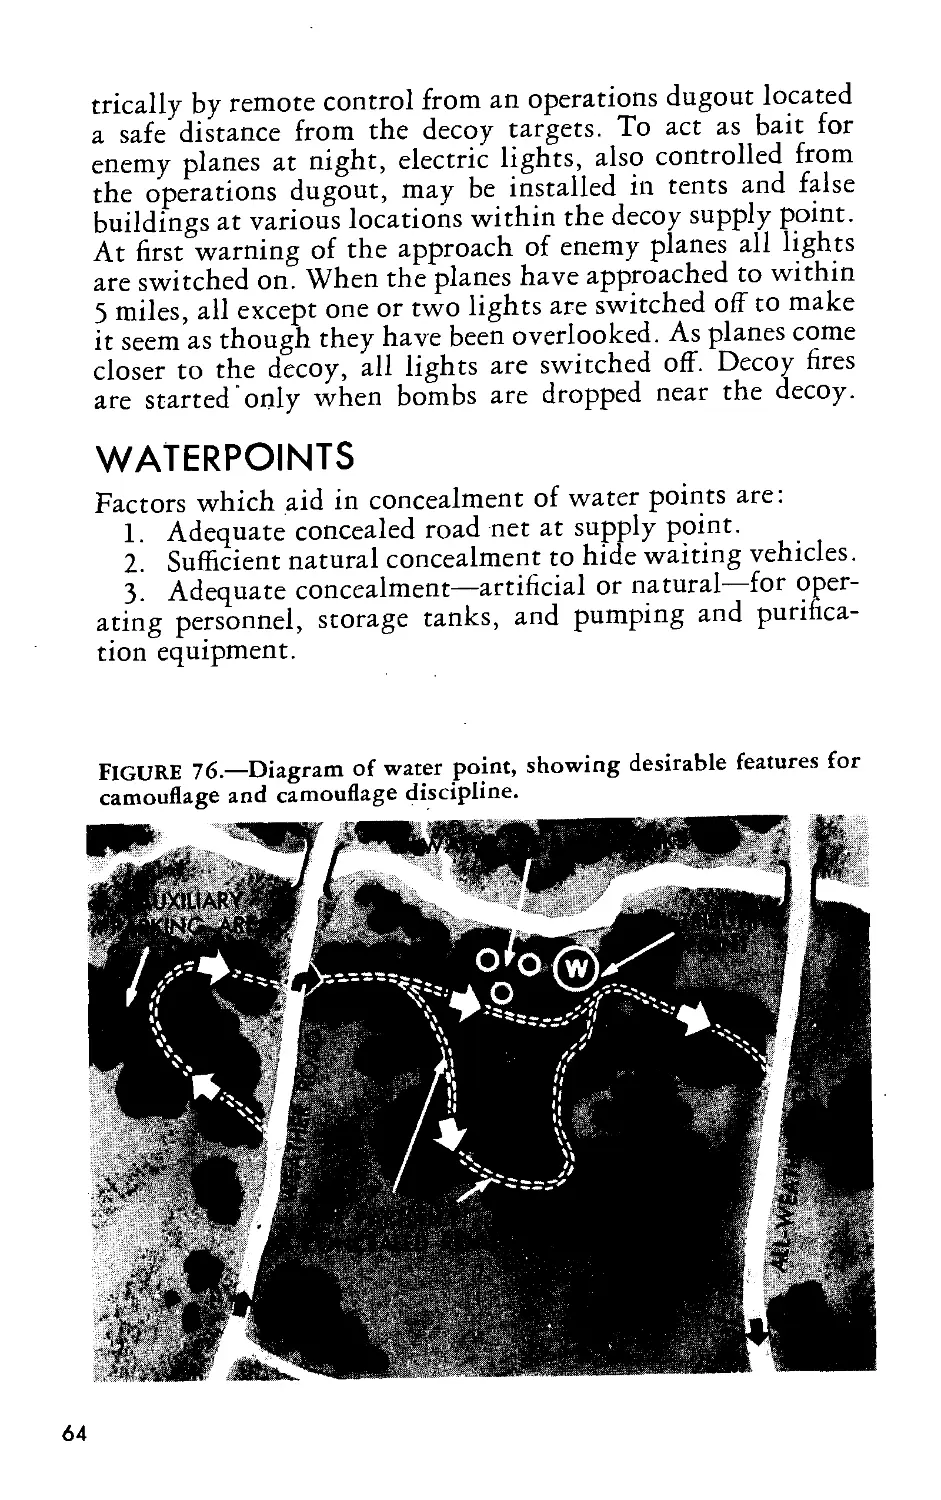
WATERPOINTS
Factors which aid in concealment of water points are:
1. Adequate concealed road net at supply point.
2. Sufficient natural concealment to hide waiting vehicles.
3- Adequate concealment—artificial or natural—for oper-
ating personnel, storage tanks, and pumping and purifica-
tion equipment.
FIGURE 76.—Diagram of water point, showing desirable features for
camouflage and camouflage discipline.
64
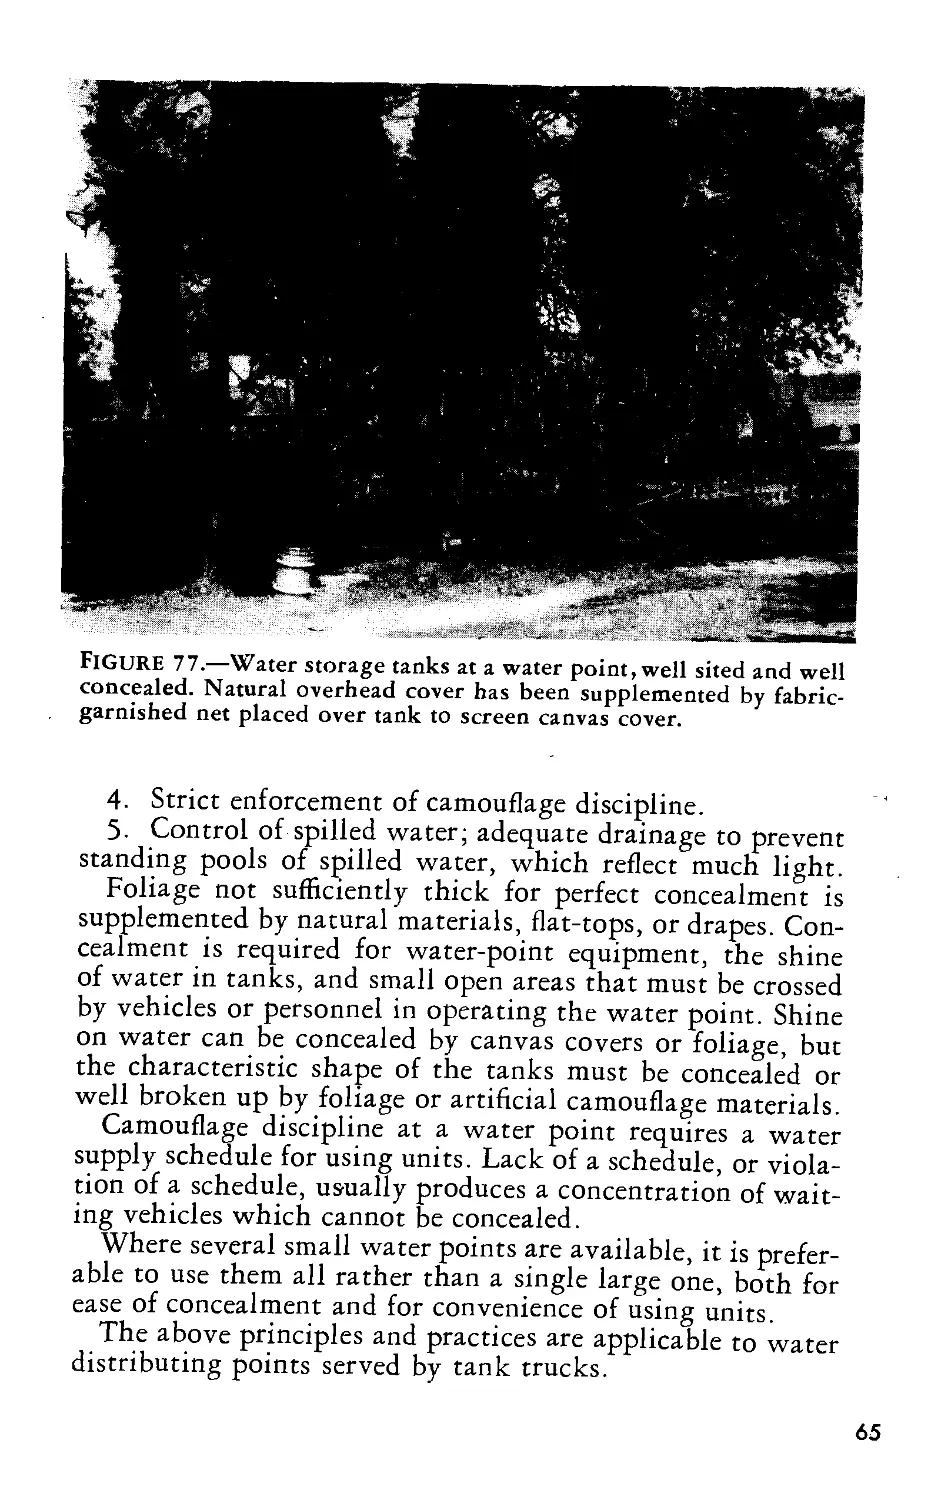
FIGURE 77.—Water storage tanks at a water point, well sited and well
concealed. Natural overhead cover has been supplemented by fabric-
garnished net placed over tank to screen canvas cover.
4. Strict enforcement of camouflage discipline.
5. Control of spilled water; adequate drainage to prevent
standing pools of spilled water, which reflect much light.
Foliage not sufficiently thick for perfect concealment is
supplemented by natural materials, flat-tops, or drapes. Con-
cealment is required for water-point equipment, the shine
of water in tanks, and small open areas that must be crossed
by vehicles or personnel in operating the water point. Shine
on water can be concealed by canvas covers or foliage, but
the characteristic shape of the tanks must be concealed or
well broken up by foliage or artificial camouflage materials.
Camouflage discipline at a water point requires a water
supply schedule for using units. Lack of a schedule, or viola-
tion of a schedule, us-ually produces a concentration of wait-
ing vehicles which cannot be concealed.
Where several small water points are available, it is prefer-
able to use them all rather than a single large one, both for
ease of concealment and for convenience of using units.
The above principles and practices are applicable to water
distributing points served by tank trucks.
65
Part IV
CAMOUFLAGE OF
MEDICAL INSTALLATIONS
IN A DIVISION AREA
In a theater of operations, the camouflage of medical instal-
lations is a command decision. However, the tactical dis-
position of our troops may be disclosed by conspicuous med-
ical installations, so it may be advisable to camouflage them.
Advanced medical installations are usually temporary in
character and location. The problem of camouflage will be
greatly simplified through employment of the following
means:
1. Careful choice of position under natural cover or in
buildings.
2. Hasty camouflage measures to supplement inadequate
natural concealment.
3. Selection of inconspicuous or concealed access routes
before occupying a position.
4. Camouflage discipline to avoid making careless tracks
and to prevent unnecessary exposure of vehicles, equipment,
or personnel to enemy observation in daytime.
5. Complete blackout at night.
BATTALION AID STATIONS
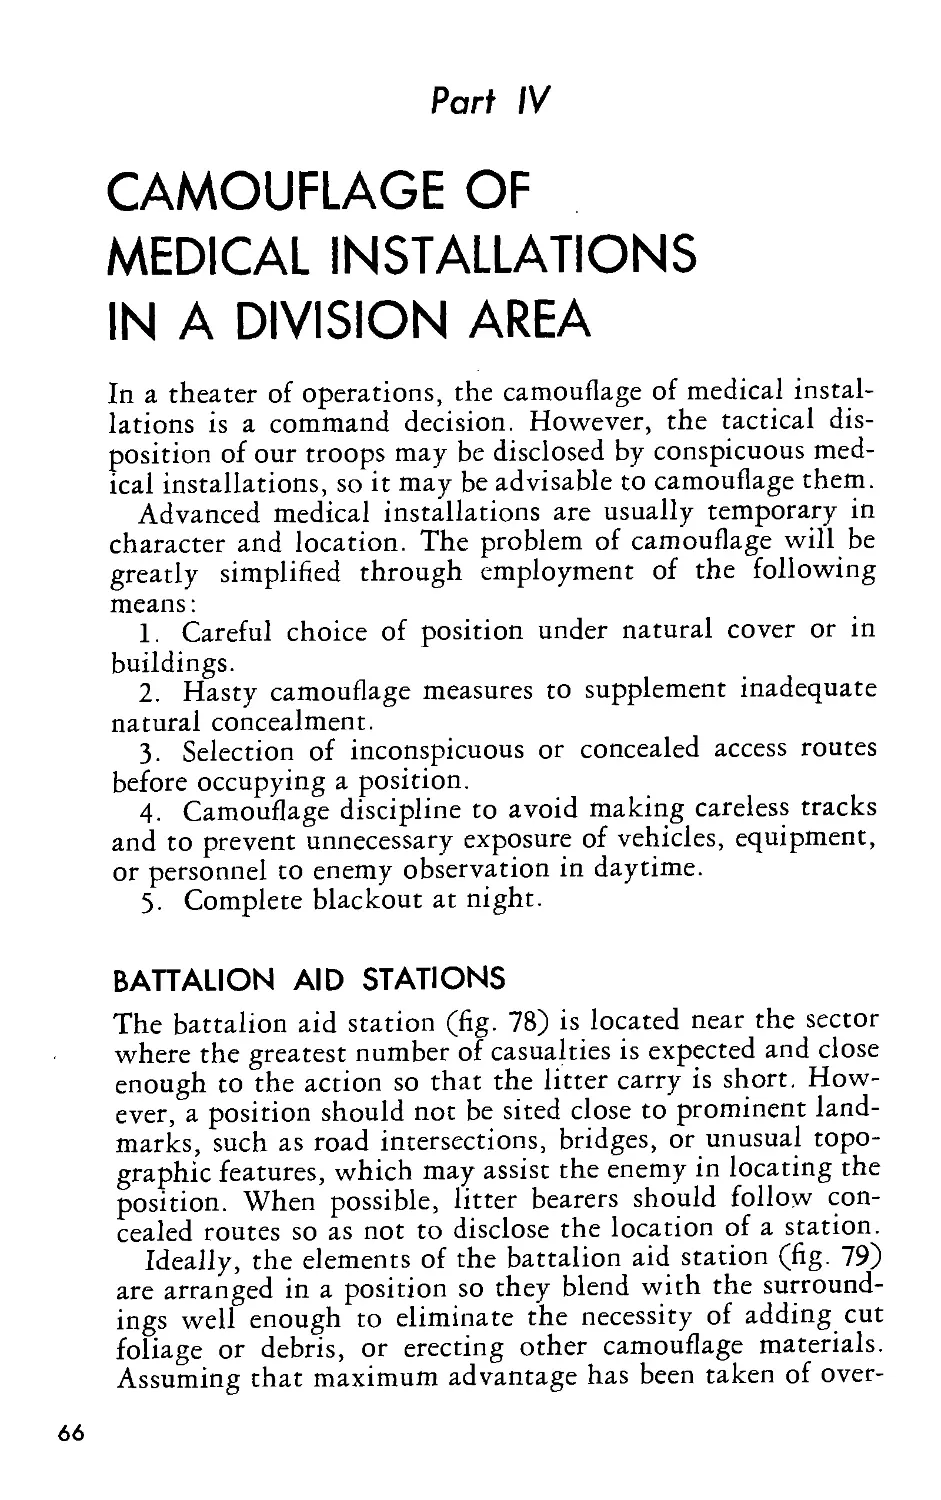
The battalion aid station (fig. 78) is located near the sector
where the greatest number of casualties is expected and close
enough to the action so that the litter carry is short. How-
ever, a position should not be sited close to prominent land-
marks, such as road intersections, bridges, or unusual topo-
graphic features, which may assist the enemy in locating the
position. When possible, litter bearers should follow con-
cealed routes so as not to disclose the location of a station.
Ideally, the elements of the battalion aid station (fig. 79)
are arranged in a position so they blend with the surround-
ings well enough to eliminate the necessity of adding cut
foliage or debris, or erecting other camouflage materials.
Assuming that maximum advantage has been taken of over-
66
Figure 78.
head concealment (fig. 80), additional camouflage work
necessary after the installation has been sited should be
constructed swiftly to avoid delay in the primary function
of front-line medical installations—prompt evacuation of the
wounded. When camouflage nets are available, inadequate
overhead concealment may be improved by the erection of
nets garnished to match the surroundings and used as ham-
mocks or slope screens. If wire netting or wire strands can
be secured, an overhead network may be quickly constructed
to support small cut trees or branches. Such foliage must be
replaced as soon as it wilts.
Preliminary examination and treatment should be con-
ducted, if possible, in a building, cave, or some shelter where
necessary artificial light can be concealed from outside view.,
Lanterns in special blackout boxes (fig. 81) help maintain
blackout conditions. When the position will be occupied for
some time, part of the station may be dug in the side of a
hill, with access provided through concealed shafts or tunnels.
Galvanized metal supply chests, pails, and other shiny
objects (fig. 82) should be toned down with standard ord-
nance OD vehicle paint or phenolic enamel. These paints
will adhere if the brightness of the metal is first dulled with
a solution of 5 percent copper sulphate and 95 percent vinegar,
which is applied with a dauber, rubbed dry after 5 minutes,
and then washed thoroughly in clear water.
Ambulances which evacuate wounded should stop under
cover, practice dispersal, and refrain from making unneces-
sary tracks, such as turn-arounds off existing roads. In day-
time, vehicles are normally located in a concealed .motor
park farther to the rear than the station. Windshield, head-
lights, and other glass are covered (fig. 83) or dulled with
mud to eliminate danger of reflections from bursting shells
or flares.
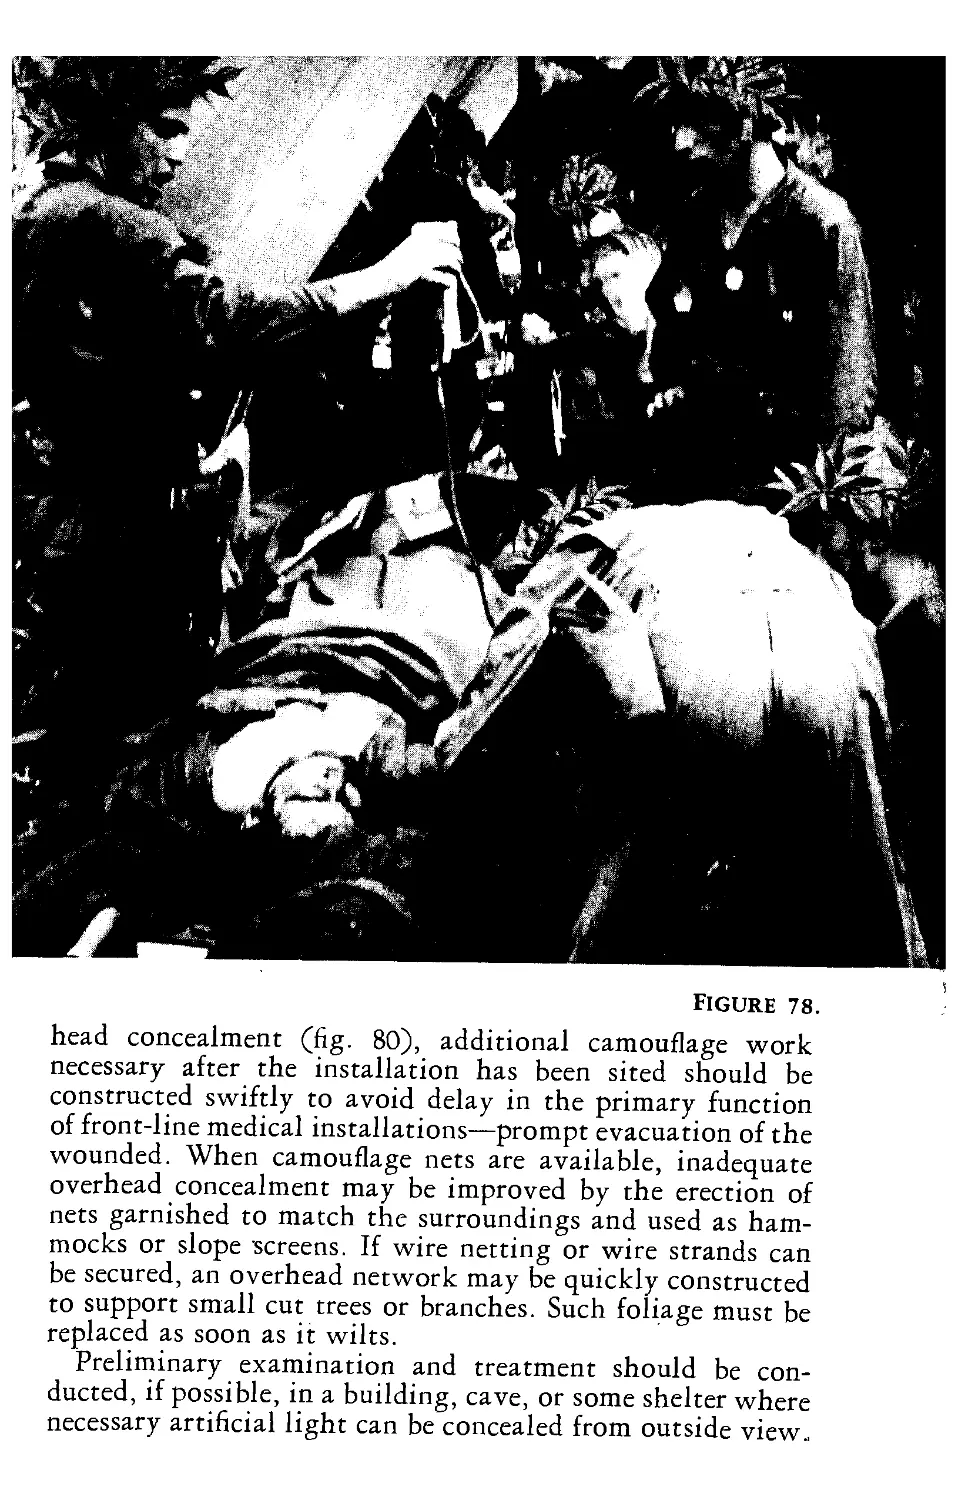
FIGURE 7S>-—Schematic view of typical battalion aid station. Good
siting includes natural concealment, good approaches, and defilade.
Camouflage discipline must be rigidly maintained.
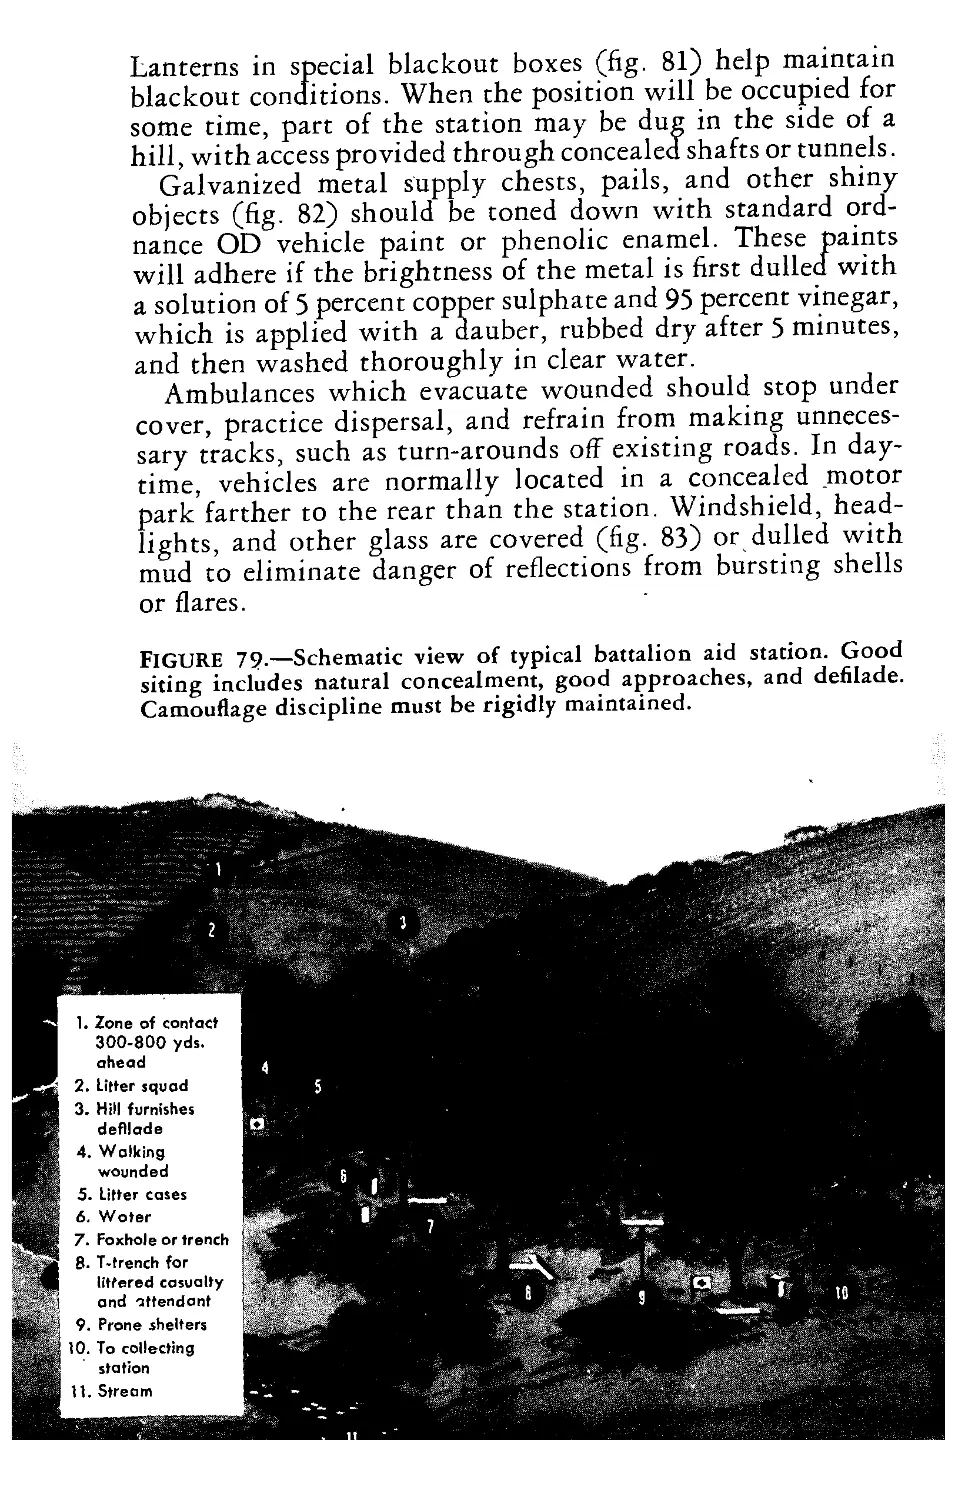
FIGURE 80.—When foxholes and
prone shelters are used to protect
medical personnel and wounded
they should be concealed from
view. Use removable covers
made of natural materials.
FIGURE 81.—Field-expedient
blackout box made of plywood
and tin, contains a standard army
lantern. It has light openings in
side which provide adequate
light and may be closed before
doors or tent flaps are opened to
admit wounded.
FIGURE 82. — Empty blood-
plasma bottles, cans, and con-
tainers may give away position
by reflecting light if carelessly
discarded in the open. Such
debris should be buried in con-
cealed location.
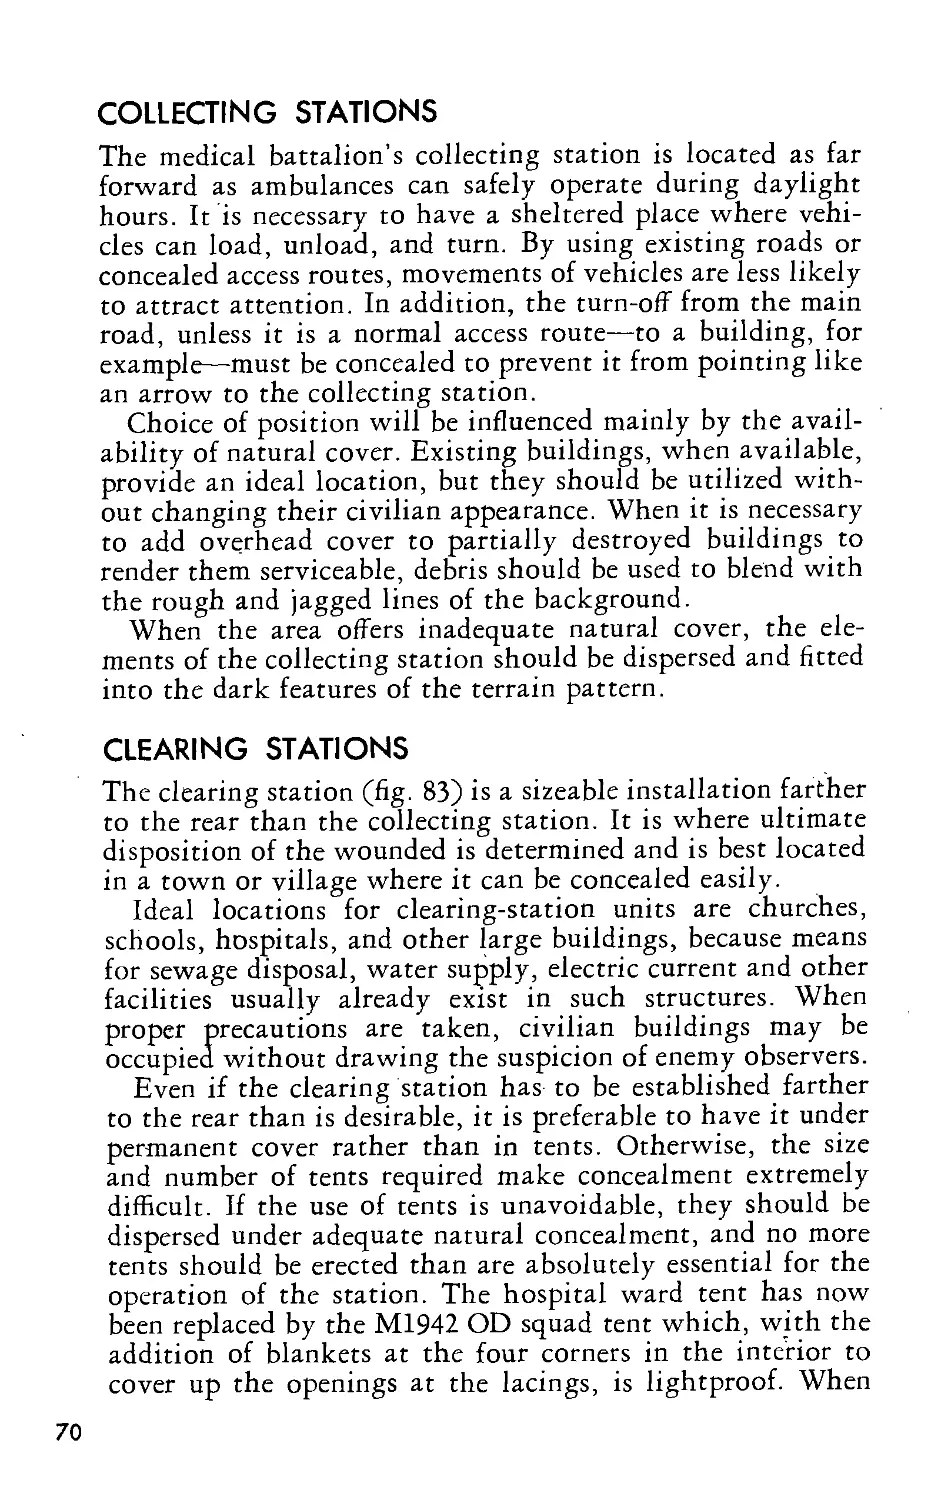
COLLECTING STATIONS
The medical battalion’s collecting station is located as far
forward as ambulances can safely operate during daylight
hours. It is necessary to have a sheltered place where vehi-
cles can load, unload, and turn. By using existing roads or
concealed access routes, movements of vehicles are less likely
to attract attention. In addition, the turn-off from the main
road, unless it is a normal access route—to a building, for
example—must be concealed to prevent it from pointing like
an arrow to the collecting station.
Choice of position will be influenced mainly by the avail-
ability of natural cover. Existing buildings, when available,
provide an ideal location, but they should be utilized with-
out changing their civilian appearance. When it is necessary
to add overhead cover to partially destroyed buildings to
render them serviceable, debris should be used to blend with
the rough and jagged lines of the background.
When the area offers inadequate natural cover, the ele-
ments of the collecting station should be dispersed and fitted
into the dark features of the terrain pattern.
CLEARING STATIONS
The clearing station (fig. 83) is a sizeable installation farther
to the rear than the collecting station. It is where ultimate
disposition of the wounded is determined and is best located
in a town or village where it can be concealed easily.
Ideal locations for clearing-station units are churches,
schools, hospitals, and other large buildings, because means
for sewage disposal, water supply, electric current and other
facilities usually already exist in such structures. When
proper precautions are taken, civilian buildings may be
occupied without drawing the suspicion of enemy observers.
Even if the clearing station has to be established farther
to the rear than is desirable, it is preferable to have it under
permanent cover rather than in tents. Otherwise, the size
and number of tents required make concealment extremely
difficult. If the use of tents is unavoidable, they should be
dispersed under adequate natural concealment, and no more
tents should be erected than are absolutely essential for the
operation of the station. The hospital ward tent has now
been replaced by the M1942 OD squad tent which, with the
addition of blankets at the four corners in the interior to
cover up the openings at the lacings, is lightproof. When
70
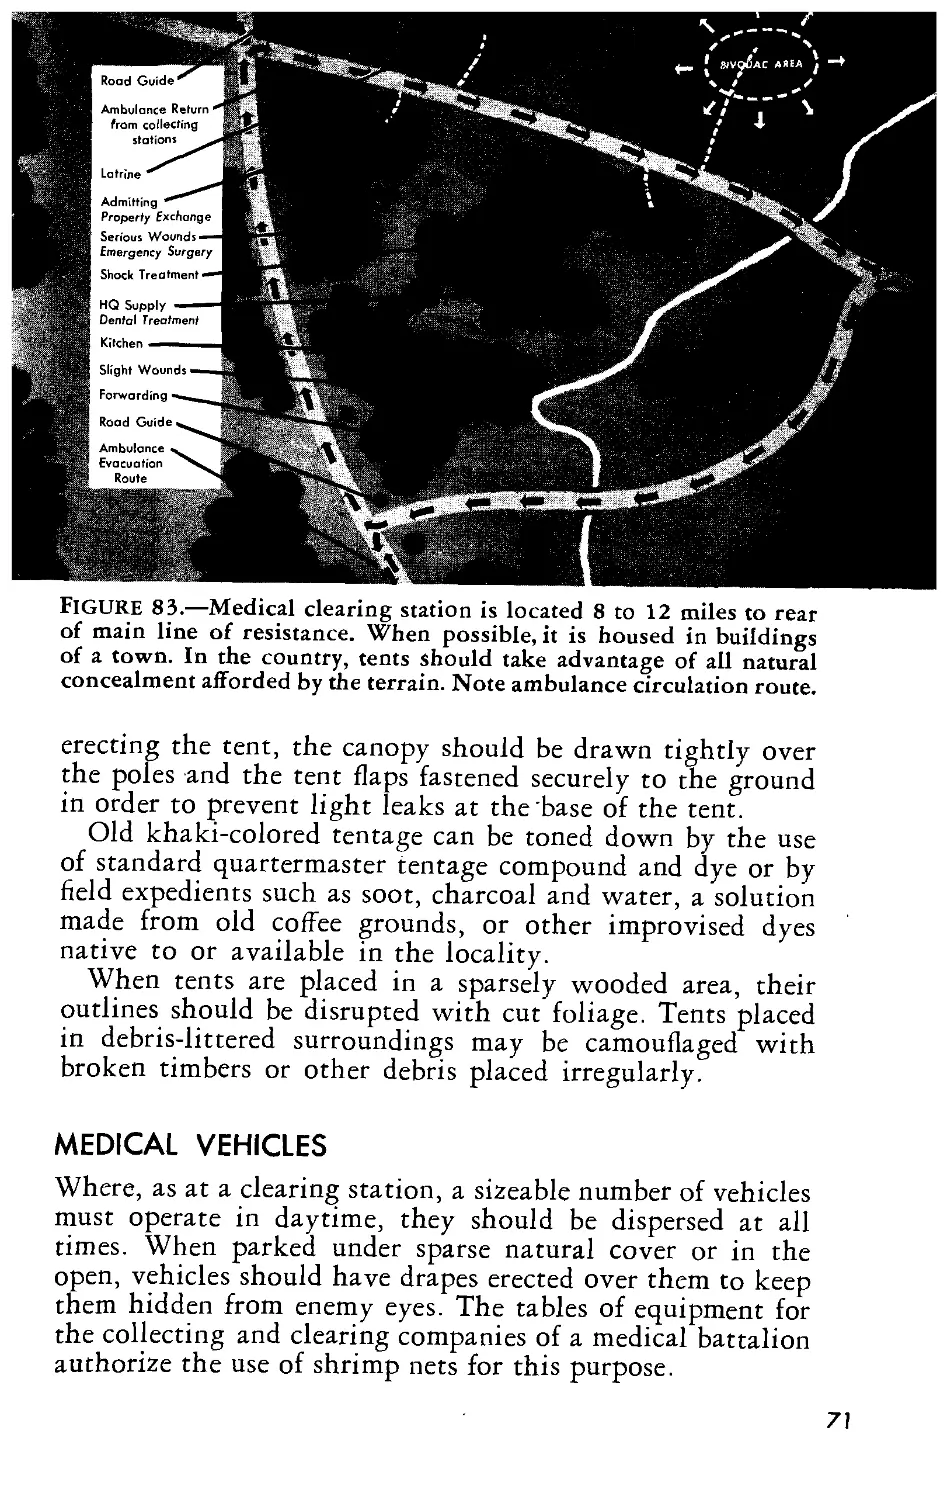
FIGURE 83.—Medical clearing station is located 8 to 12 miles to rear
of main line of resistance. When possible, it is housed in buildings
of a town. In the country, tents should take advantage of all natural
concealment afforded by the terrain. Note ambulance circulation route.
erecting the tent, the canopy should be drawn tightly over
the poles and the tent flaps fastened securely to the ground
in order to prevent light leaks at the base of the tent.
Old khaki-colored tentage can be toned down by the use
of standard quartermaster tentage compound and dye or by
field expedients such as soot, charcoal and water, a solution
made from old coffee grounds, or other improvised dyes
native to or available in the locality.
When tents are placed in a sparsely wooded area, their
outlines should be disrupted with cut foliage. Tents placed
in debris-littered surroundings may be camouflaged with
broken timbers or other debris placed irregularly.
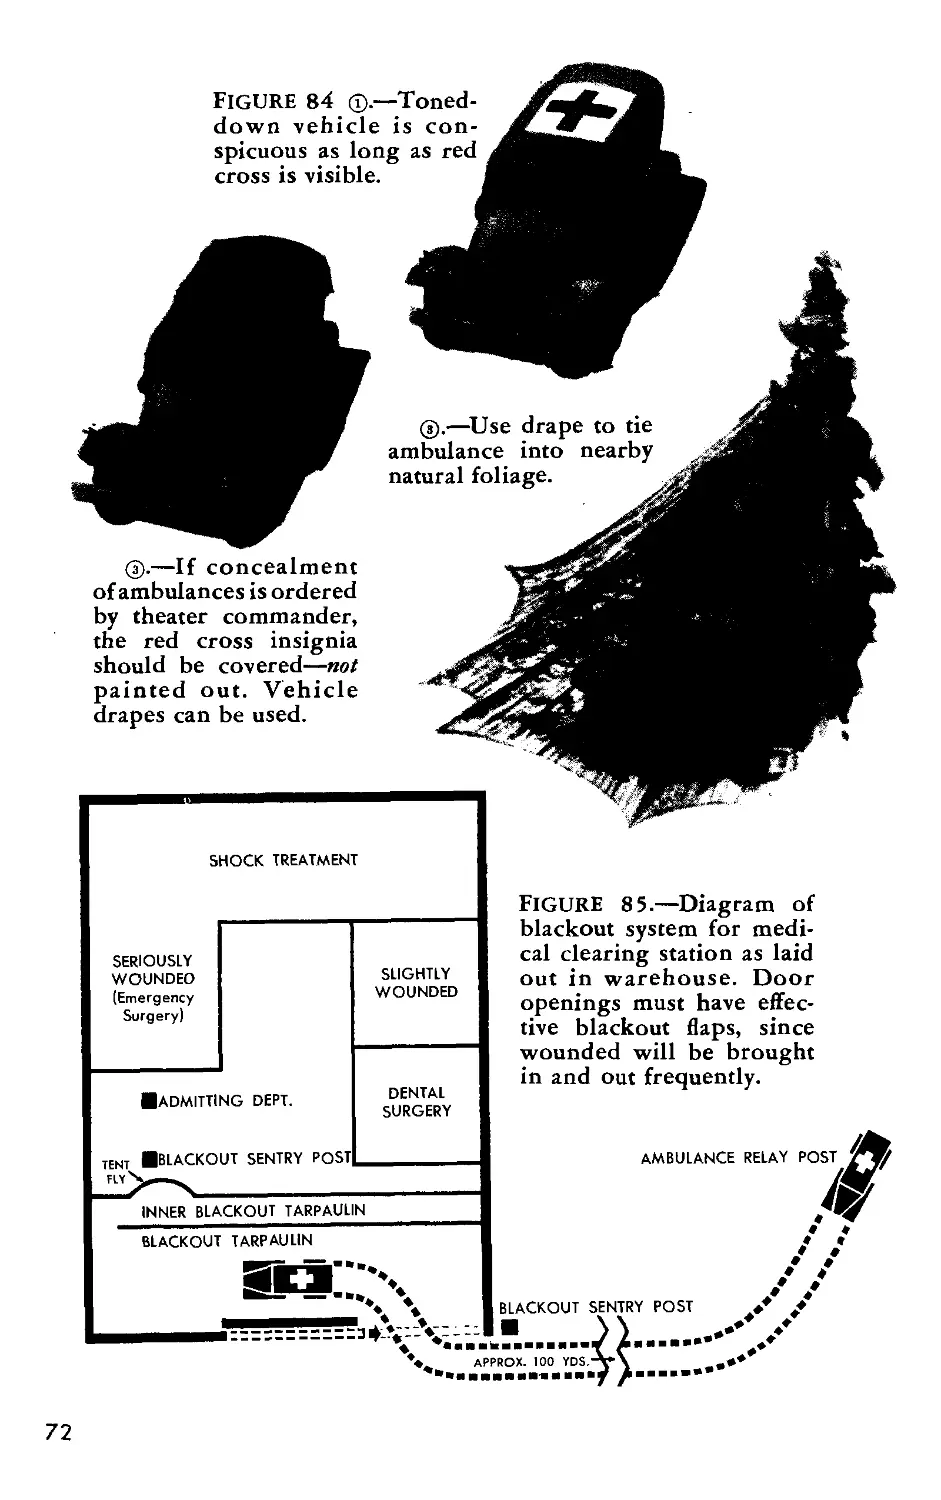
MEDICAL VEHICLES
Where, as at a clearing station, a sizeable number of vehicles
must operate in daytime, they should be dispersed at all
times. When parked under sparse natural cover or in the
open, vehicles should have drapes erected over them to keep
them hidden from enemy eyes. The tables of equipment for
the collecting and clearing companies of a medical battalion
authorize the use of shrimp nets for this purpose.
71
Figure 84 ©.—Toned-
down vehicle is con-
spicuous as long as red
cross is visible.
@.—If concealment
of ambulances is ordered
by theater commander,
the red cross insignia
should be covered—not
painted out. Vehicle
drapes can be used.
SHOCK TREATMENT
SERIOUSLY
WOUNDEO
(Emergency
Surgery)
ADMITTING DEPT.
TENT Bblackout sentry post
piyS»—
INNER BLACKOUT TARPAULIN
BLACKOUT TARPAULIN
@.—Use drape to tie
ambulance into nearby
natural foliage.
FIGURE 8 5.—Diagram of
blackout system for medi-
cal clearing station as laid
out in warehouse. Door
openings must have effec-
tive blackout flaps, since
wounded will be brought
in and out frequently.
SLIGHTLY
WOUNDED
DENTAL
SURGERY
AMBULANCE RELAY POST
BLACKOUT SENTRY POST
APPROX. 100 YDS.'
72