


Author: Schiller R.
Tags: chess chess parties chess championships chess combinations attack in chess
Year: 1996


Text
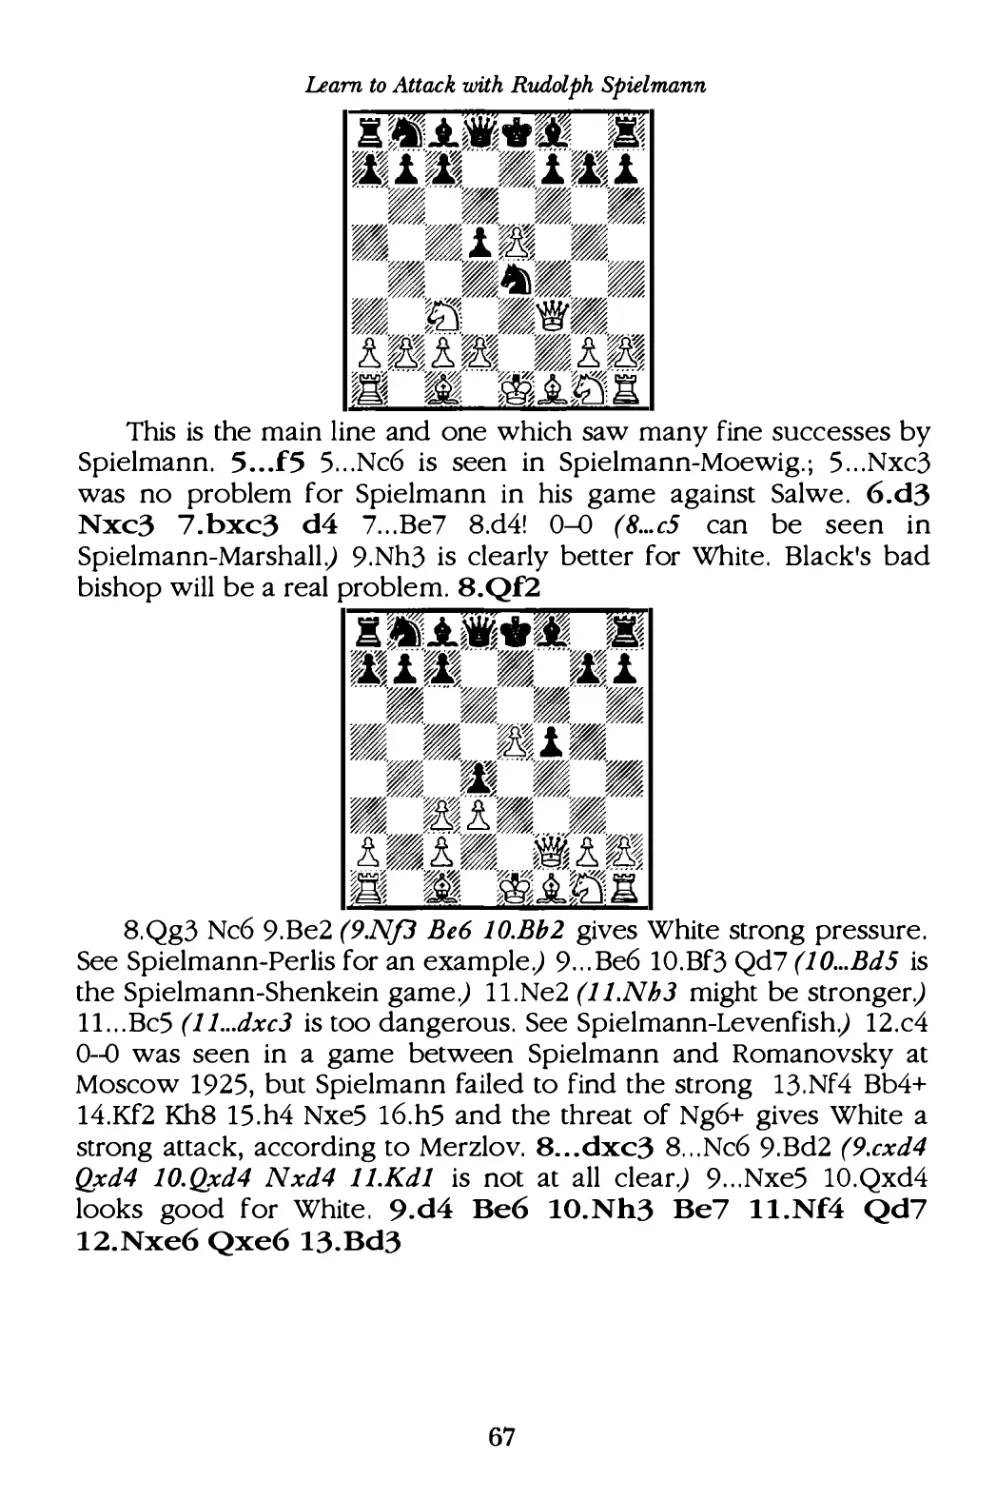
.1
i
-
by Eric Schiller
Learn to Attack
with Rudolph Spielmann
by Eric Schiller
Chess Enterprises
Moon Township, PA
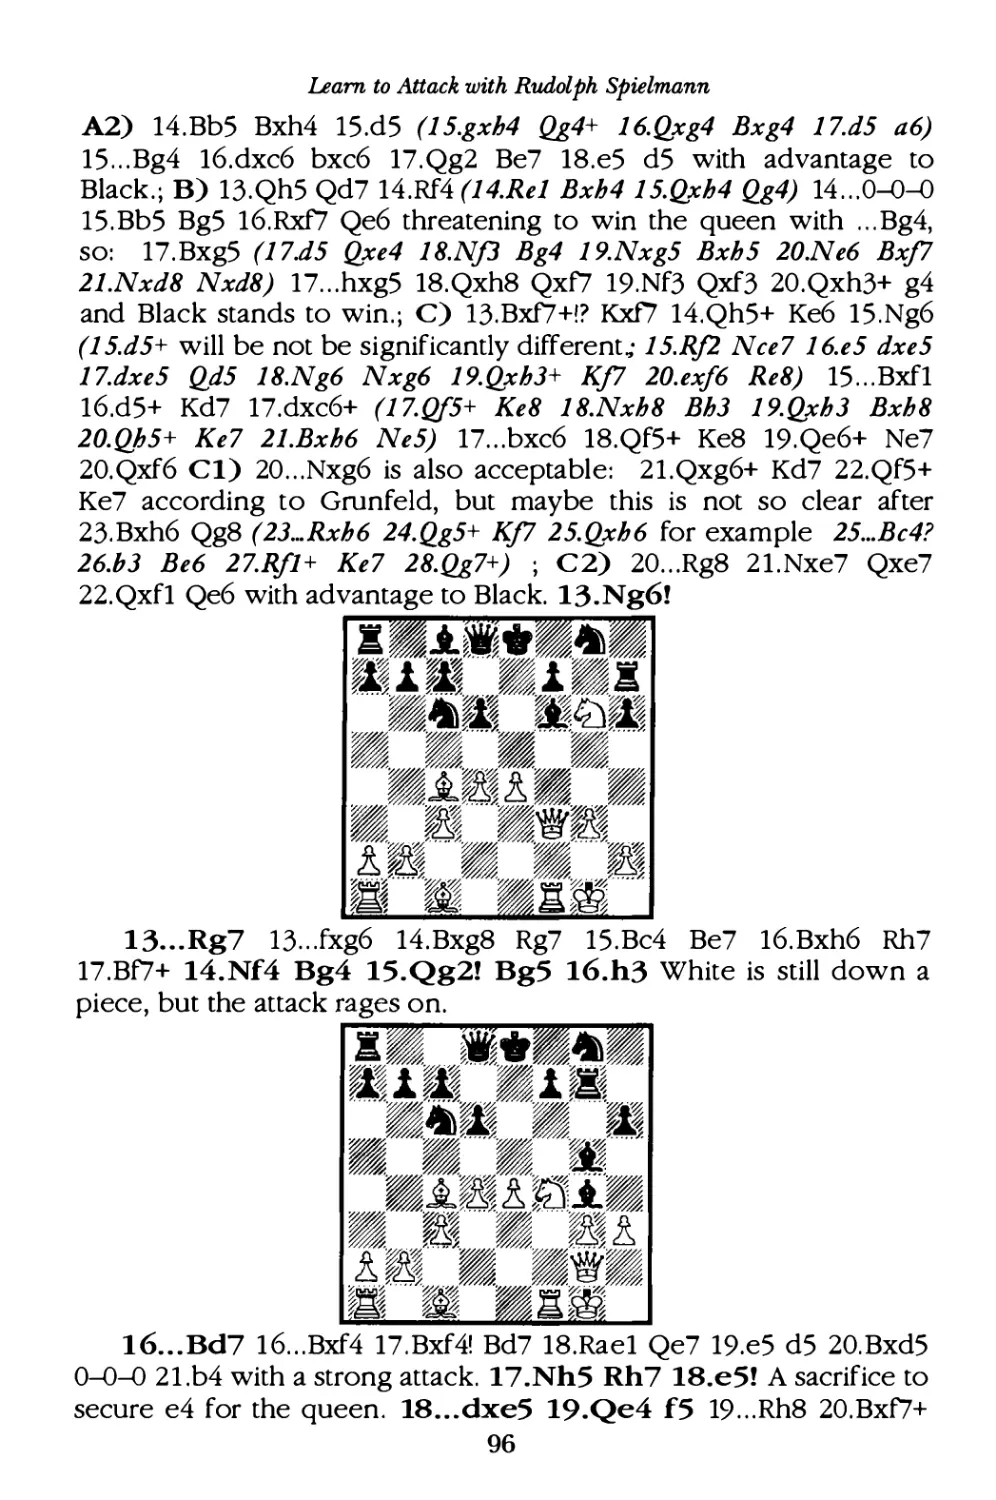
1996
Chess Enterprises, Moon Township PA 15108-2607
© 1996 by Chessworks Unlimited. All rights reserved.
Printed in the United States of America.
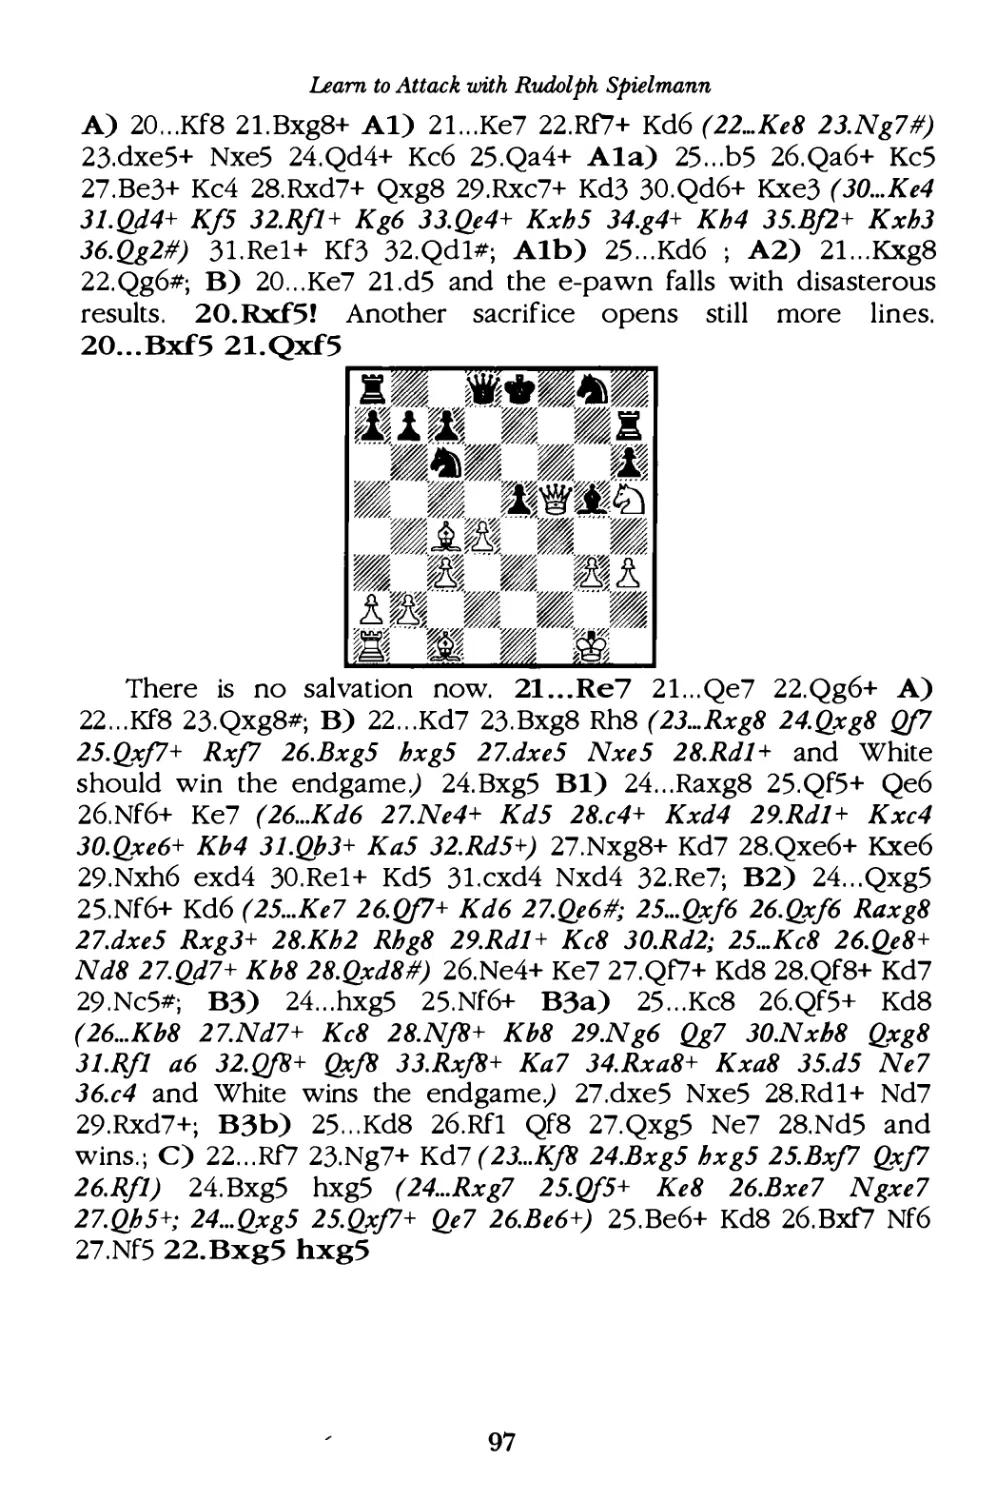
9796 54321
Editor: B.G. Dudley
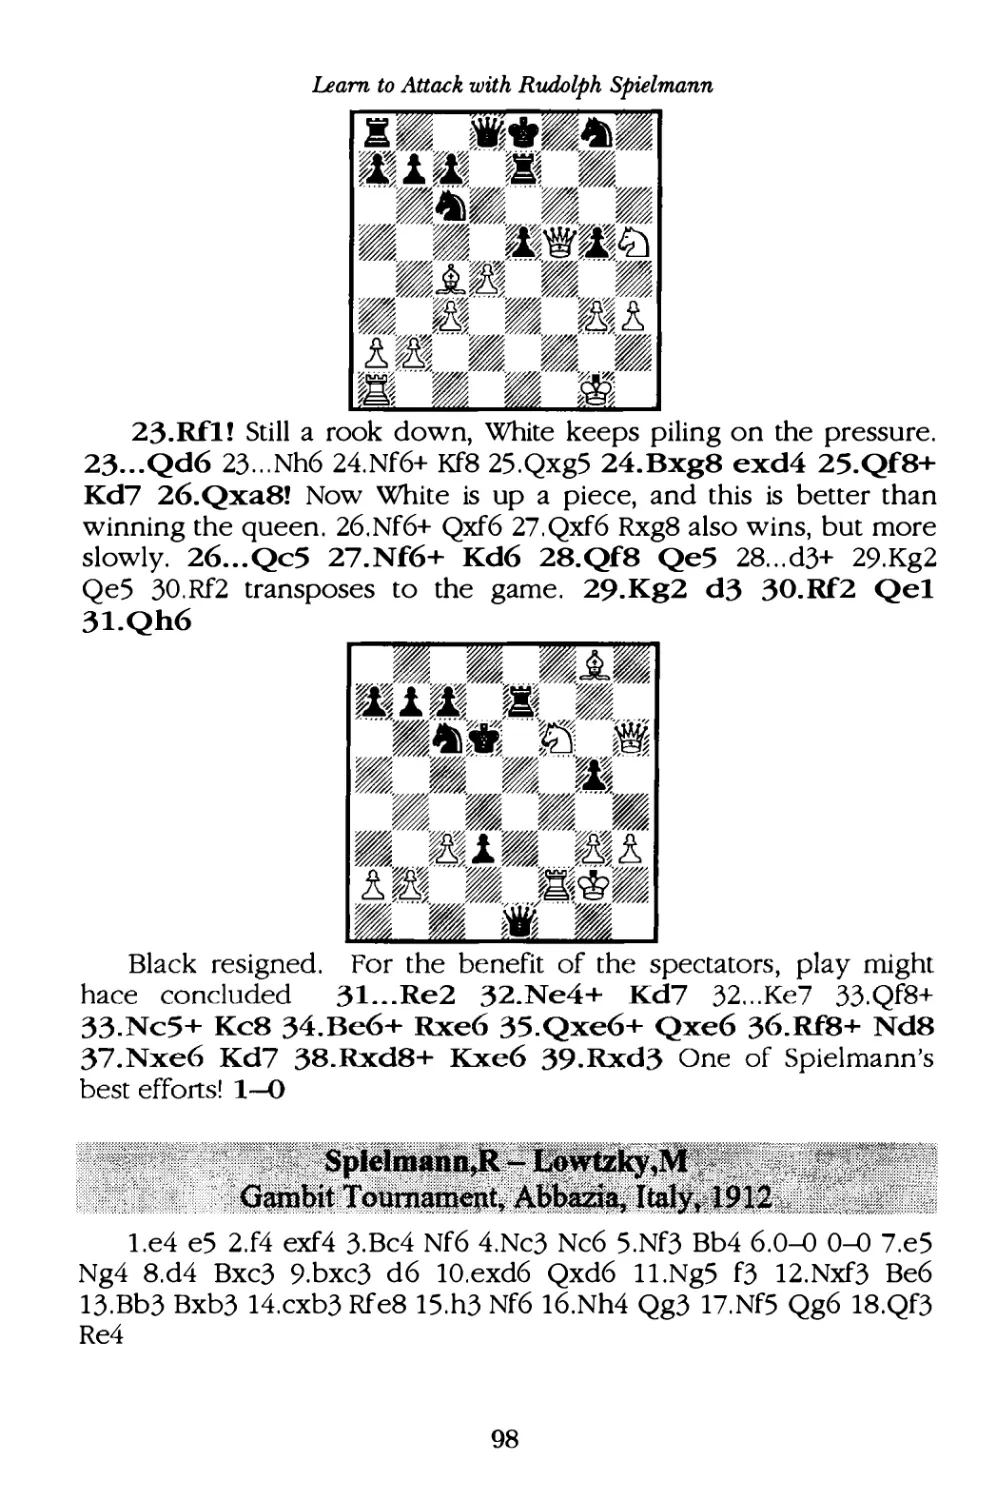
Proofreading: Thomas Magar
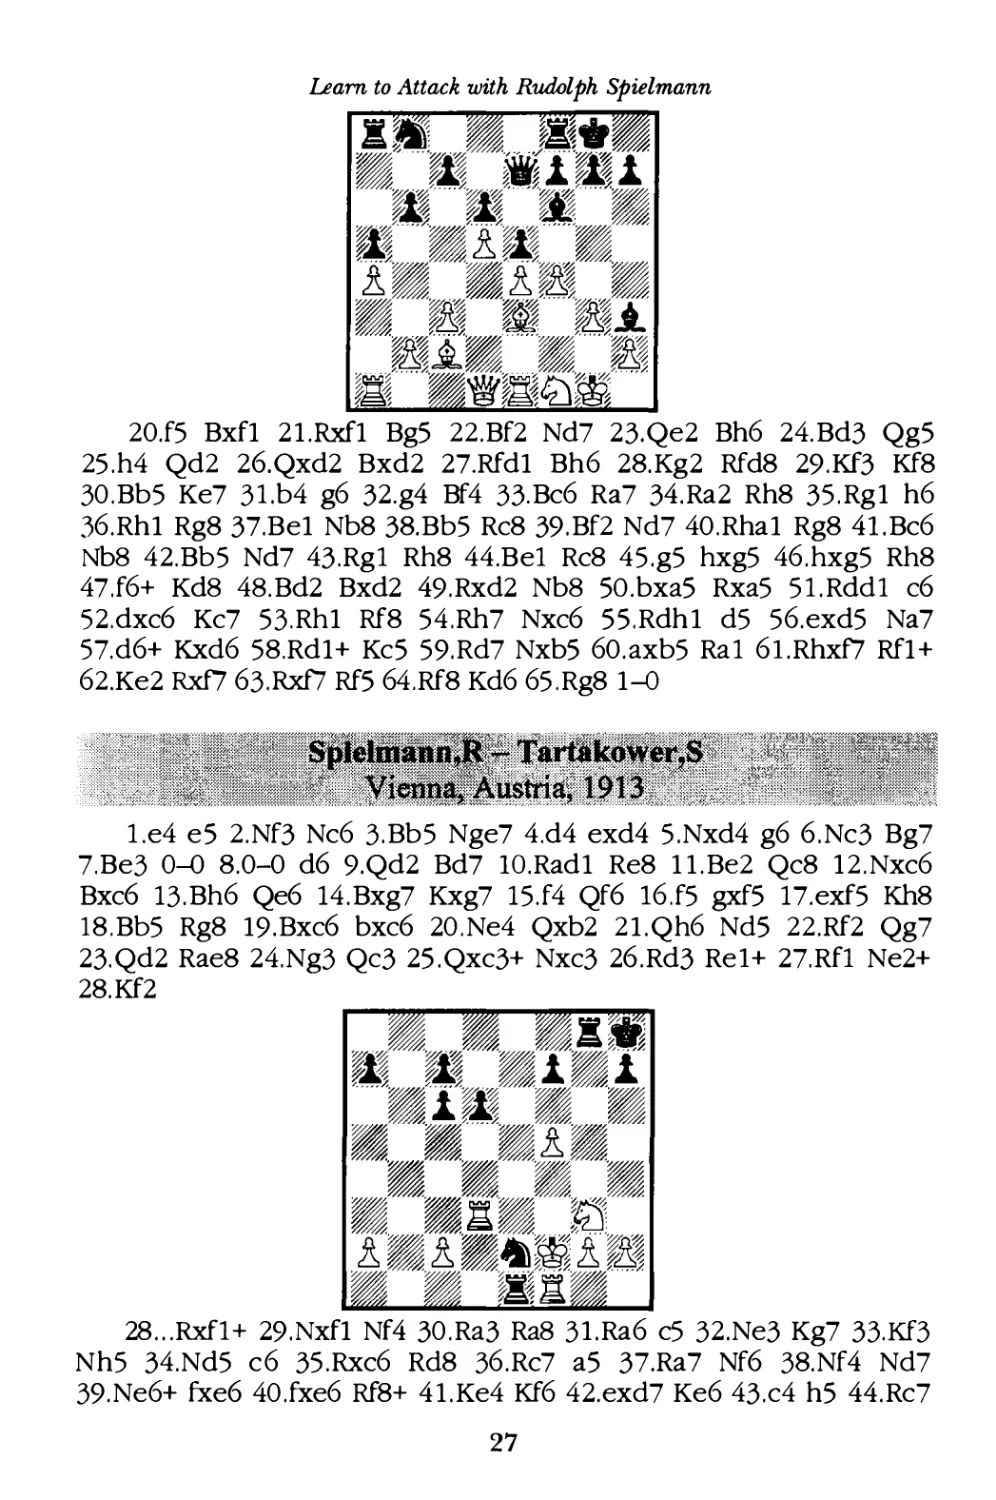
Typesetting: Chessworks Unlimited
Manuscript completed October 26, 1995.
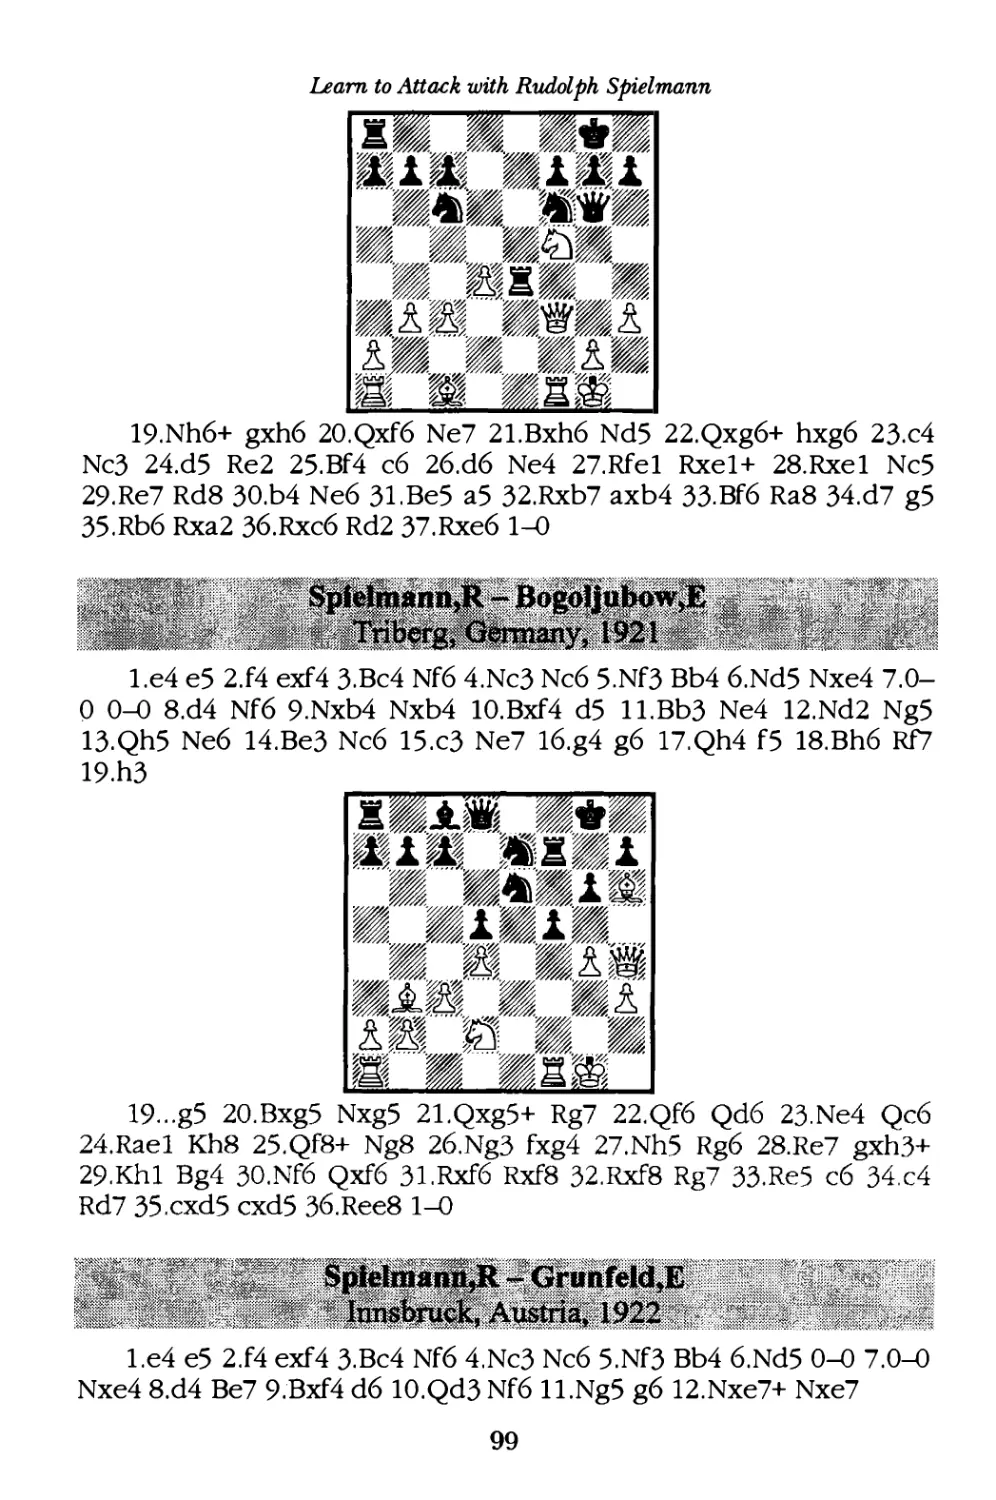
Revisions completed December 7, 1995.
Cover Design: E.F. Witalis Jr.
ISBN:0-945470-57-6
The following hardware and software were involved in the preparation of
this book:
Deja Vu Chess Library 2.0 was used to research the games,
which were then exported to ChessBase for Windows. The
material was then exported into Microsoft Word for Windows
7.0, applying Tilburg, Goudy Handtooled Baskerville Handcut
fonts. All of this work was completed on a 486, DX50 PC running
Microsoft Windows95, and printed on a 600 dpi Apple
Laserwriter Pro 630.
A database of the games used in the preparation of this book is
available from:
Chessworks Unlimited
Post Office Box 1048
El Granada CA 94018-1048
1-800-700-1242
sales@chessworks.com
http://www.chessworks.com
2
Preface
This books is designed to teach the aspiring chessplayer how to
build an attack from the opening. It is based on the games of
Rudolph Spielmann, one of the greatest attacking players of all time .
All of the games belong to the category of the Open Game,
characterized by the initial moves l.e4 e5 .
One hundred games have been selected to illustrate not only·
how to carry out an attack, but how to build an attack from the
opening. I have chosen to concentrate on the Open games because
it is here that the attacking motifs are most clearly illustrated, and the
types of defensive mistakes most closely reflect those made by
beginner and intermediate players .
I have believed for a long time that classical openings , and
particular the Open games, are the best foundation for an aspiring
chessplayer. In fact, almost all World Champions have spent a great
deal of time exploring both sides of these openings , which were
seen even in the recent PCA World Championship match between
Garry Kasparov and Viswa nathan Anand .
It is well-known that the most instructive games for novices are
those which involve players from the Classical and Romantic periods
of chess , roughly between 1890 and 1930. This is due to the general
lack of defensive technique seen in those games . Because one side
often lets an attack succeed, either through ignorance of the threat
or fa ilure to appreciate the positional fa ctors of the game , we can
see how an attack is built and carried out in its pure fo rm . In more
recent games , direct attack usually does not succeed because players
are better schooled in the art of defense .
On the other hand, opportunites for Romantic play still appear.
For example...
Le4 As I was finishing this book I took part in one of the
regular all-Master training tournaments held monthly in the San
Francisco area . I found myself paired with a very strong opponent,
Mike Arne (2400 FIDE) . Since we were due to meet a few weeks
later in an IM norm tournament, I decided that I shouldn't play my
special preparation for him . Naturally with so much Spielmann on
my mind I turned to one of his fa vorite lines, the Worrall Attack in
3
the Spanish Game. My preparation consisted solely of annotating a
few games for this book, and the choice was made at the board. So
this game shows that it is not necessary to study a lot of opening
theory as White in the Spanish Game . All that is needed is some
basic concepts , and either courage or recklessness! l ...e5 2.Nf3
Nc6 3.Bb5 a6 4.Ba4 Nf6 5.Qe2 b5 6.Bb3 Bc5 The sharpest
continuation. 7.c3 I was in no mood for quiet play with 7.d3.
7...0-0 8.0-0 d6 8...d5 9.d3 is unclear, according to ECO. 9.h3
This is probably not necessary, as Black's bishop is headed to b7,
but I wanted to make sure it was kept off of g4, where the pin on
the knight would weaken my control of d4. 9 ...Bb7 lO.Rdl Re8
ll.a4 b4 12.a5 Qb8?! In retrospect, this is an error. The simple
12 ...Qe7 would have given Black an equal
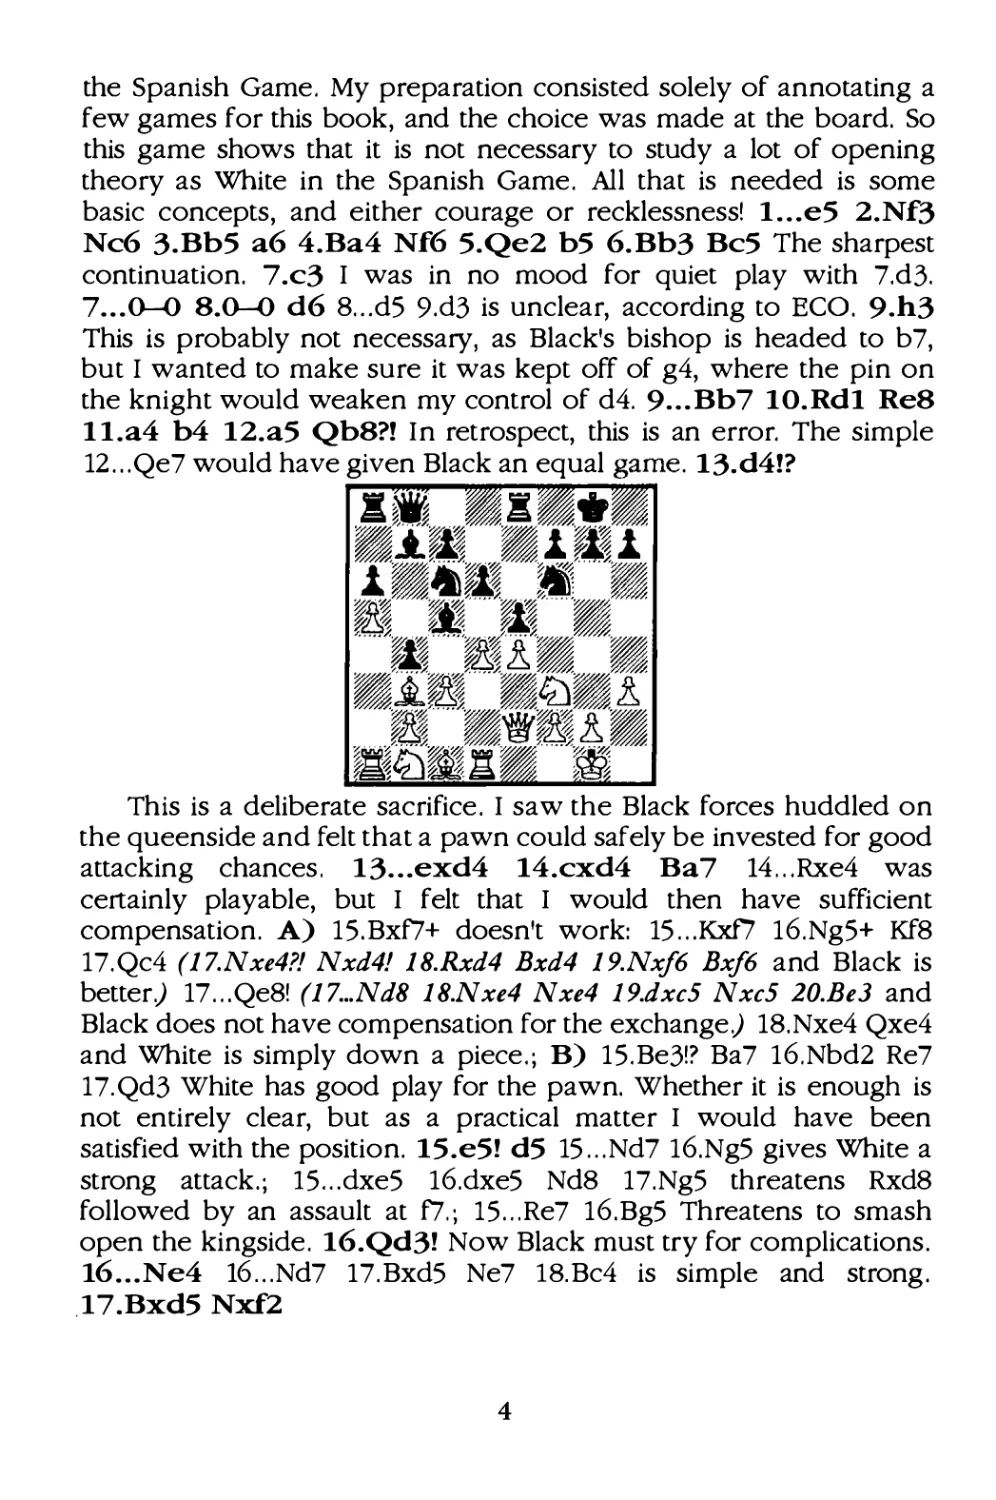
13.d4!?
This is a deliberate sacrifice . I saw the Black forces huddled on
the queenside and fe lt that a pawn could safely be invested for good
attacking chances . 13...exd4 14.cxd4 Ba7 14 ...Rxe4 was
certainly playable, but I felt that I would then have sufficient
compensation. A) 15.Bxf7+ doesn't work: 15 ...Kxf7 16.Ng5+ Kf8
17.Qc4 (1 7. Nxe4?! Nxd4! 18.Rxd4 Bxd4 19.Nxf6 Bxf6 and Black is
better) 17...Qe8! (1 7...Nd8 18.Nxe4 Nxe4 19.dxc5 Nxc5 20.Be3 and
Black does not have compensation for the exchange) 18.Nxe4 Qxe4
and White is simply down a piece .; B) 1S.Be3!? Ba7 16.Nbd2 Re7
17.Qd3 White has good play for the pawn. Whether it is enough is
not entirely clear, but as a practical matter I would have been
satisfied with the position. 15.e5! d5 1S ...Nd7 16.Ng5 gives White a
strong attack .; lS ...dxeS 16.dxeS Nd8 17.Ng5 threatens Rxd8
fo llowed by an assault at f7.; 1S . .. Re7 16.BgS Threatens to smash
open the kingside . 16.Qd3! Now Black must try for complications .
16 ...Ne4 16 ...Nd7 17.Bxd5 Ne7 18. Bc4 is simple and strong .
. 17.Bxd5 Nxf2
4
!�m�-����
tt].i.�� �1�1
1"�'6)� ��---.
..
�.
��������� !W
��.i���
'····'"� ��f --�� ��
�-·····�����-'
���������-
p��!r.il
l
'6�
���mr•··'��
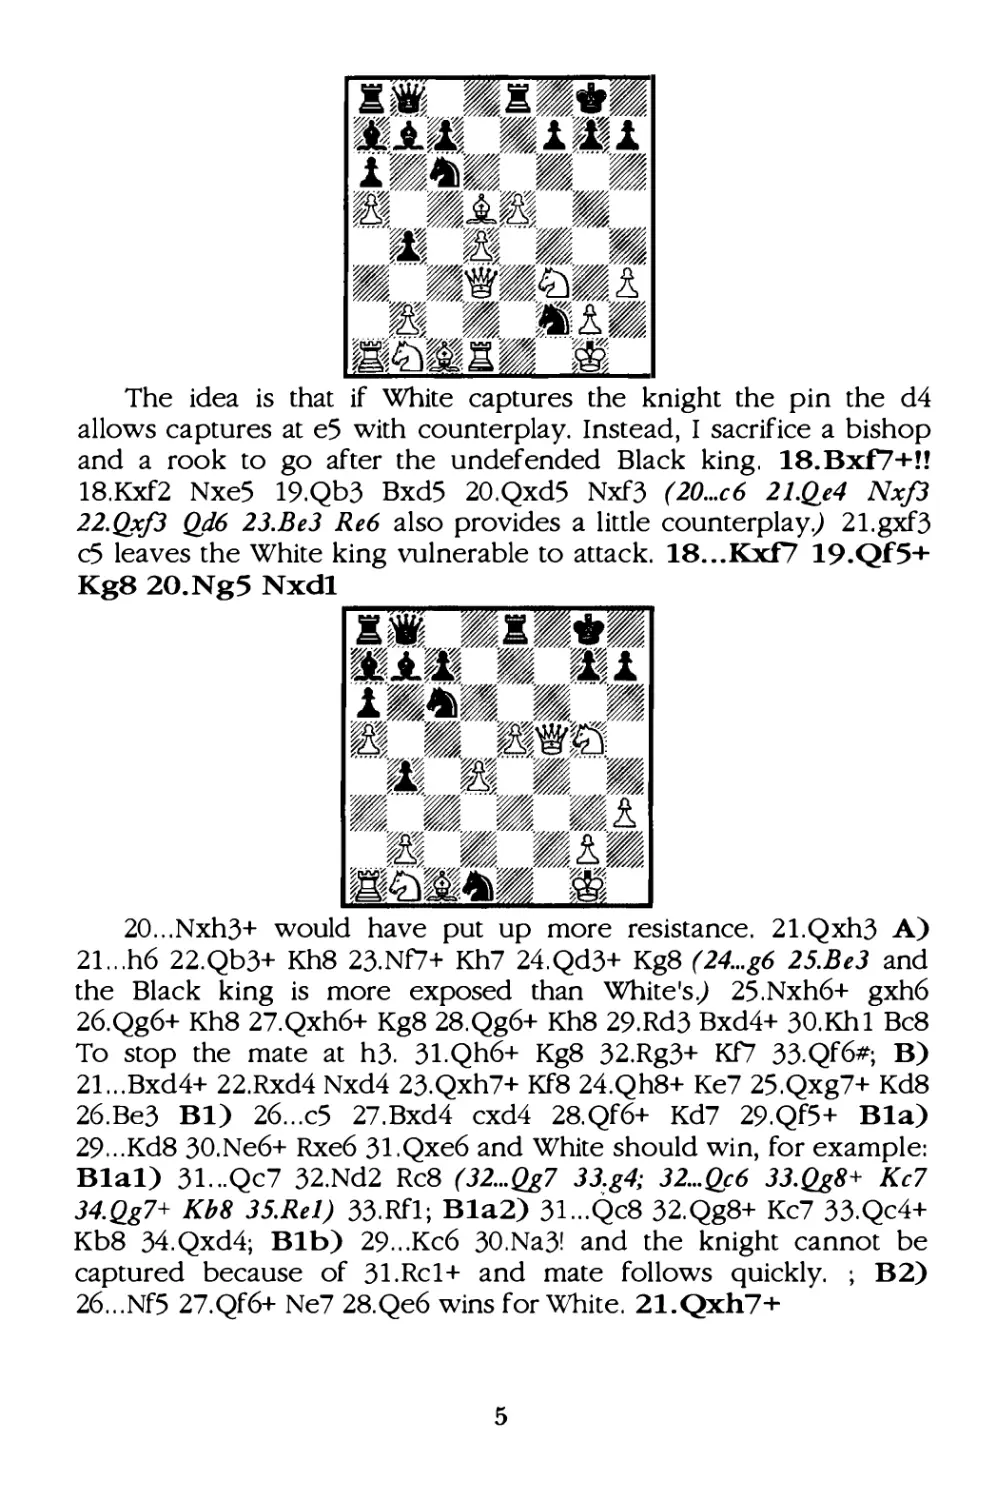
The idea is that if White captures the knight the pin the d4
allows captures at e5 with counterplay. Instead, I sacrifice a bishop
and a rook to go after the undefended Black king . 18.Bxf7+!!
18.Kxf2 Nxe5 19.Qb3 Bxd5 20 . Qxd5 Nxf3 (20... c6 21.Qe4 Nxj3
22. Qxj3 Qd6 23.Be3 Re6 also provides a little counterplay) 21.gxf3
c5 leaves the White king vulnerable to attack. 18. ..Kxf7 19.Qf5+
Kg8 20 .Ng5 Nxdl
��������
1
.
��m�•£•:ft•
...
..
����1
----�'
--
��
��' .. v..
�������
---��
��f--�. ..
;.
?;•;"
�·· · t :· ··/.'%1;�����··,-"·
i����q m
20 ...Nxh3+ would have put up more resistance . 21.Qxh3 A)
21 .. .h6 22.Qb3+ Kh8 23.Nf7+ Kh7 24 . Qd3+ Kg8 (24...g6 25.Be3 and
the Black king is more exposed than White's ) 25 .Nxh6+ gxh6
26.Qg6+ Kh8 27.Qxh6+ Kg8 28 . Qg6+ Kh8 29.Rd3 Bxd4+ 30.Khl Bc8
To stop the mate at h3. 31.Qh6+ Kg8 32.Rg3+ Kf7 33.Qf6#; B)
2l...Bxd4+ 22.Rxd4 Nxd4 23.Qxh7+ Kf8 24.Qh8+ Ke7 25 . Qxg7+ Kd8
26.Be3 Bl) 26 ...c5 27 . Bxd4 cxd4 28. Qf6+ Kd7 29 . Qf5+ Bla)
29 ...Kd8 30.Ne6+ Rxe6 3l. Qxe6 and White should wi n, fo r example:
Blal) 31... Qc7 32.Nd2 Rc8 (32... Qg7 33.g4; 32... Qc 6 33. Qg8+ Kc 7
34.Qg7+ Kb 8 JS.Rel) 33.Rfl ; Bla2) 3l...Q c8 32.Qg8+ Kc7 33.Qc4+
Kb8 34 . Qxd4; Blb) 29 ...Kc6 30 .Na3! and the knight cannot be
captured because of 31.Rcl+ and mate follows quickly. ; B2)
26 ...Nf5 27.Qf6+ Ne7 28. Qe6 wins for White. 21 .Qxh7 +
5
21. ..Kf8 22 .Qh8+ Ke7 23.Qxg7+ Kd8 24.Nf7+
Kd7
This position looks great for White, but it is not so simple .
25.e6+! 25 .Nd6+ Re7 26.Qg4+ Re6 and unfortunately the d-pawn,
being pinned, cannot advance to dS .; 25.Ng5+ Kc8; 25.Bg5 Bxd4+
26 .Khl Nf2+ 27.Kh2 Ne7 25 ...Kxe6 Now there is a long series of
fo rced moves.
������'"''-
�.i.J� �'L)�
�...,�
' ,.;,�� ��'{� �� ��
�����
·;���i
�-··{:···/.We.�����--���
r�'L)��- m
26. Ng5+ Kd5 26...Kd6 is tougher, but after 27.Bf4+ NeS
28. Bxe5+ White plays Nd2 and eventually Black must succumb to
the pressure . 27. Qd7+ If the Black king is allowed to capture the
d-pawn, then the next time it moves it will expose the White king to
check from the bishop at a7, and that may, in some circu mstances ,
6
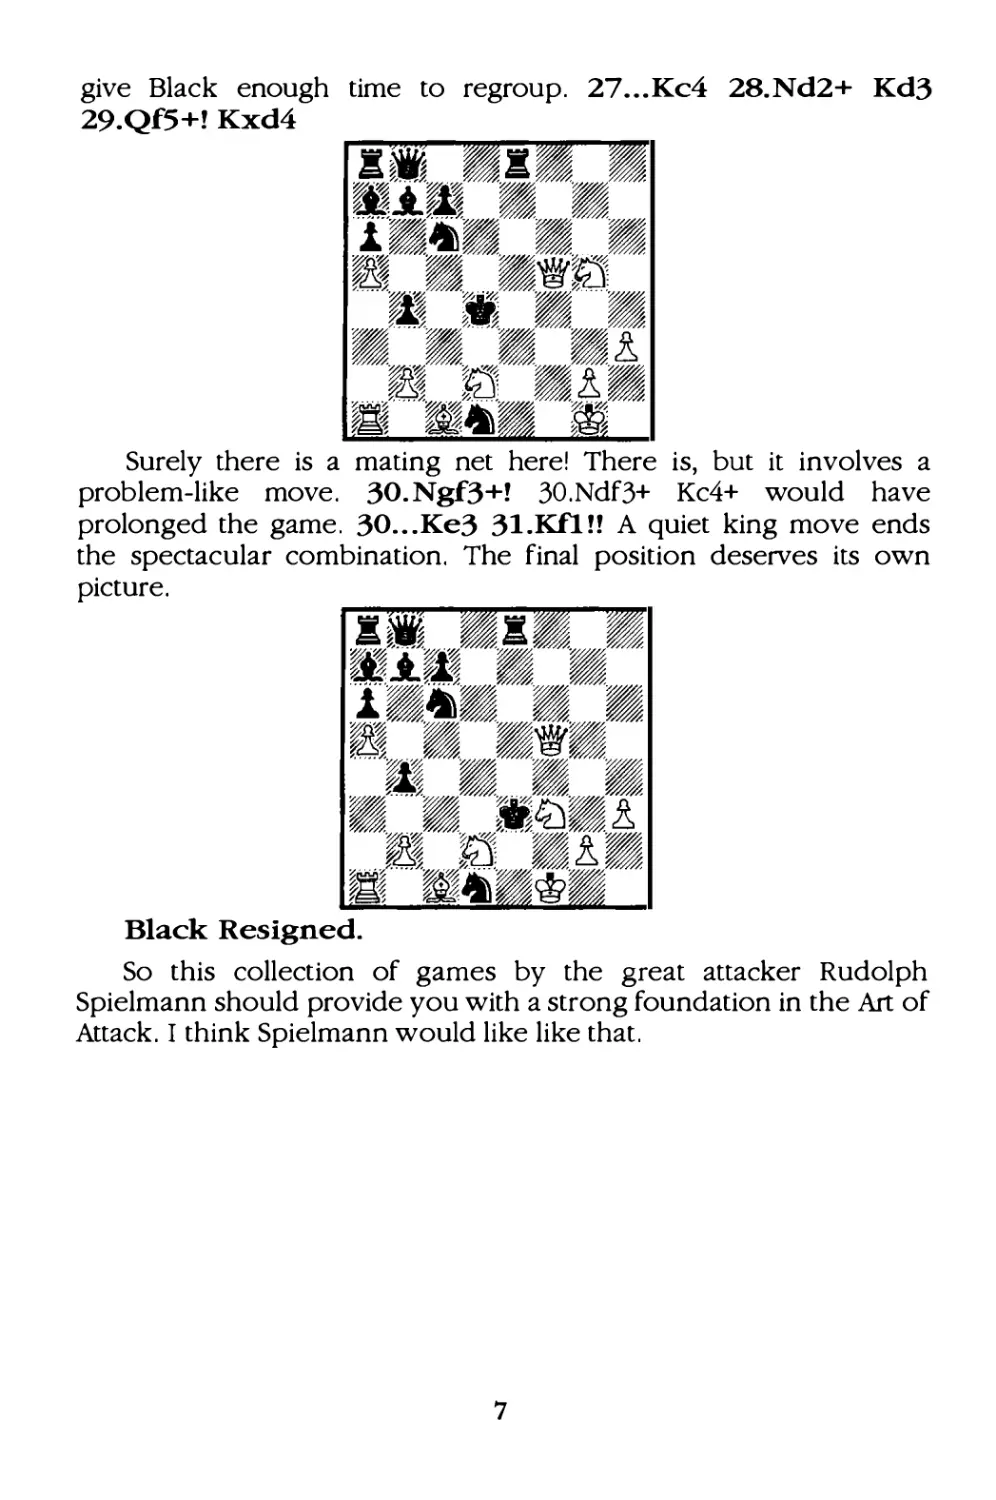
give Black enough time to regroup. 27...Kc4 28. Nd2+ Kd3
29.Qf5+! Kxd4
Surely there is a mating net here! There is, but it involves a
problem-like move . 30 .Ngf3+! 30 . Ndf3+ Kc4+ would have
prolonged the game . 30.. . Ke3 31 .Kfl! ! A quiet king move ends
the spectacular combination. The final position deserves its own
picture .
Black Resigned.
So this collection of games by the great attacker Rudolph
Spielmann should provide you with a strong fo undation in the Art of
Attack . I think Spielmann would like like that .
7
Contents
Introduction -------------------------------------------------------------------------11
The Spanish Game------------------------------------------ ---------------------- 12
CV's. Duz Chotimirsky,F Carlsbad, Germany, 1911 ------------------------12
vs. Leonhardt,P San Sebastian, Spain, 1912-- -
--- --
--
-- ----
-
--- ---
---- --
· --15
vs. Vidmar,M Bled,Slovenia, 1931 ---------------------------------------------15
(\;§. Schlechter,C Saint Petersburg, Russia, 1909--·-·------··
·
-----------· 16
tV& Rubinstein A Berlin Germany 1928---- -
- ---
--- -
·--
-- --
·---- -
-- --
--- -
--- 18
'-·/
'
'
'
�s� Bogoljubow,E Match Senunering, Austria, 1932 -------------------· 20
�s. Johner,P Bad Pistyan, Germany, 1912- --
--- ---
--- ----
--··- --
---- -
·- --
-- -23
vs. Rubinstein,A Mahrisch Ostrau, Czechoslovakia, 1923 --
---
--
-·-·- 24
vs. Grunfeld,E Semmering Baden, Germany, 1926----------------------24
vs. Rohacek,I Bad Sliac, Czechoslovakia, 1932 ----------------------------25
vs. Treybal,K Semmering Baden, Germany, 1926 -----------------------26
vs. Treybal,K Carlsbad, Czechoslovakia, 1929 -----------------------------26
vs. Tartakower,S Vienna, Austria, 1913-------··-----··------ ·-----··------·- 27
vs. Reti,R Moscow, Soviet Union, 1925--------------------- ----------------- 28
The Ital ian Game------··--·------------------· ------------------------------------29
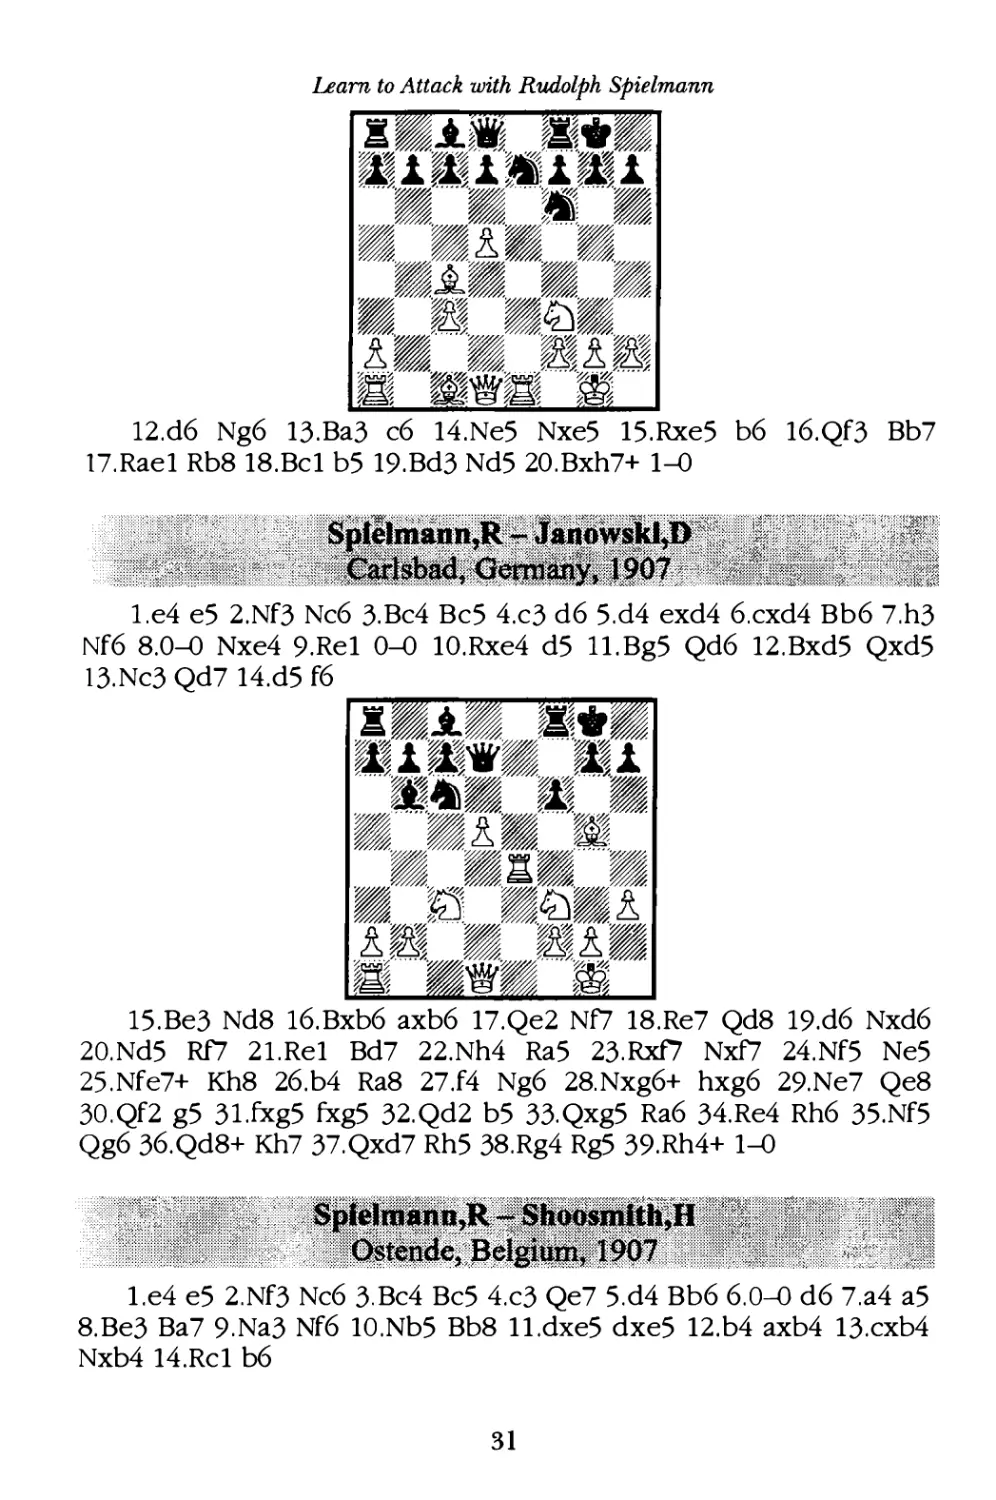
(vsi Duras,O Carlsbad, Germany, 1907---·------------- ·--------------- ------- 29
v�. Cohn,E Carlsbad, Germany, 1907 -----------------------------------------30
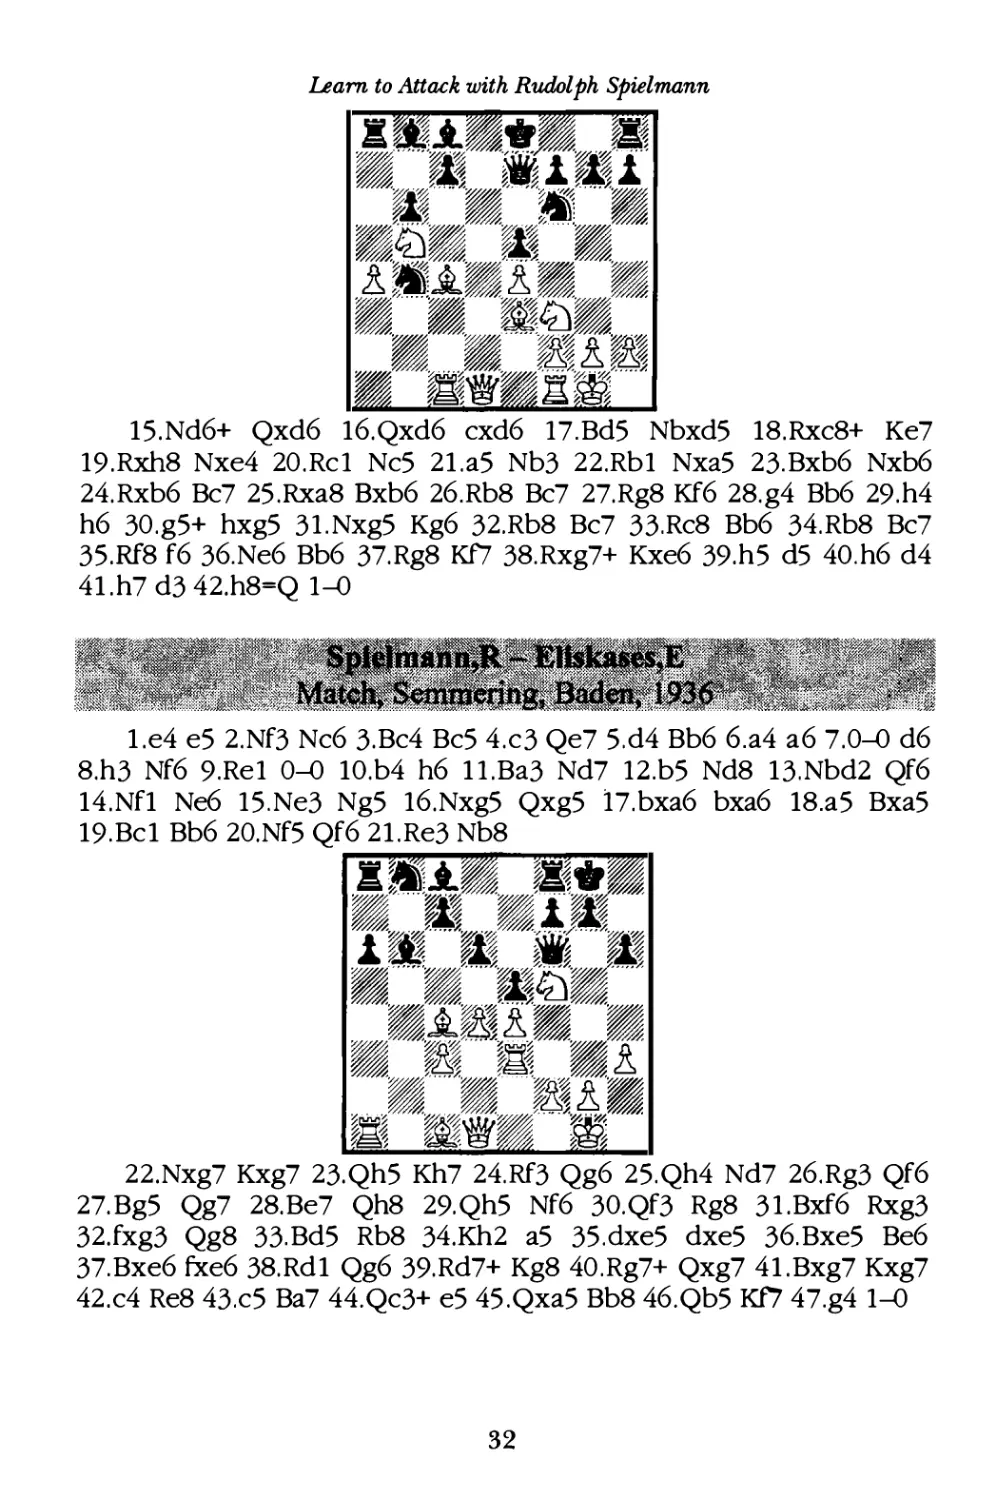
vs. Janowski,D Carlsbad, Germany, 1907------------------------------------31
vs. Shoosmith,H Ostende, Belgium, 1907-----------------------------------31
vs. Eliskases,E Match, Semmering, Baden, 1936 -------------------------32
vs. Forgacs,L Hamburg, Germany, 1910-----------------------------------·-33
vs. Rubinstein,A Carlsbad, Germany, 1907-------------------- -----------·- 33
The Scotch Game------------------------------------------------------------------ 3 4
·:w Rubinstein,A Stockholm, Sweden, 1919 ---------------------------------34
vs. Tarrasch,S Breslau, Poland, 1912 ----------·--·--------------------------- 37
vs. Opocensky,K Baden Baden, Germany, 1914 ------------------------·- 38
vs. Sterk,K Budapest, Hungary, 1913------------ ------·-------------·-------- 38
® Johner,P Carlsbad, Germany, 1907---------·----------------------------- 39
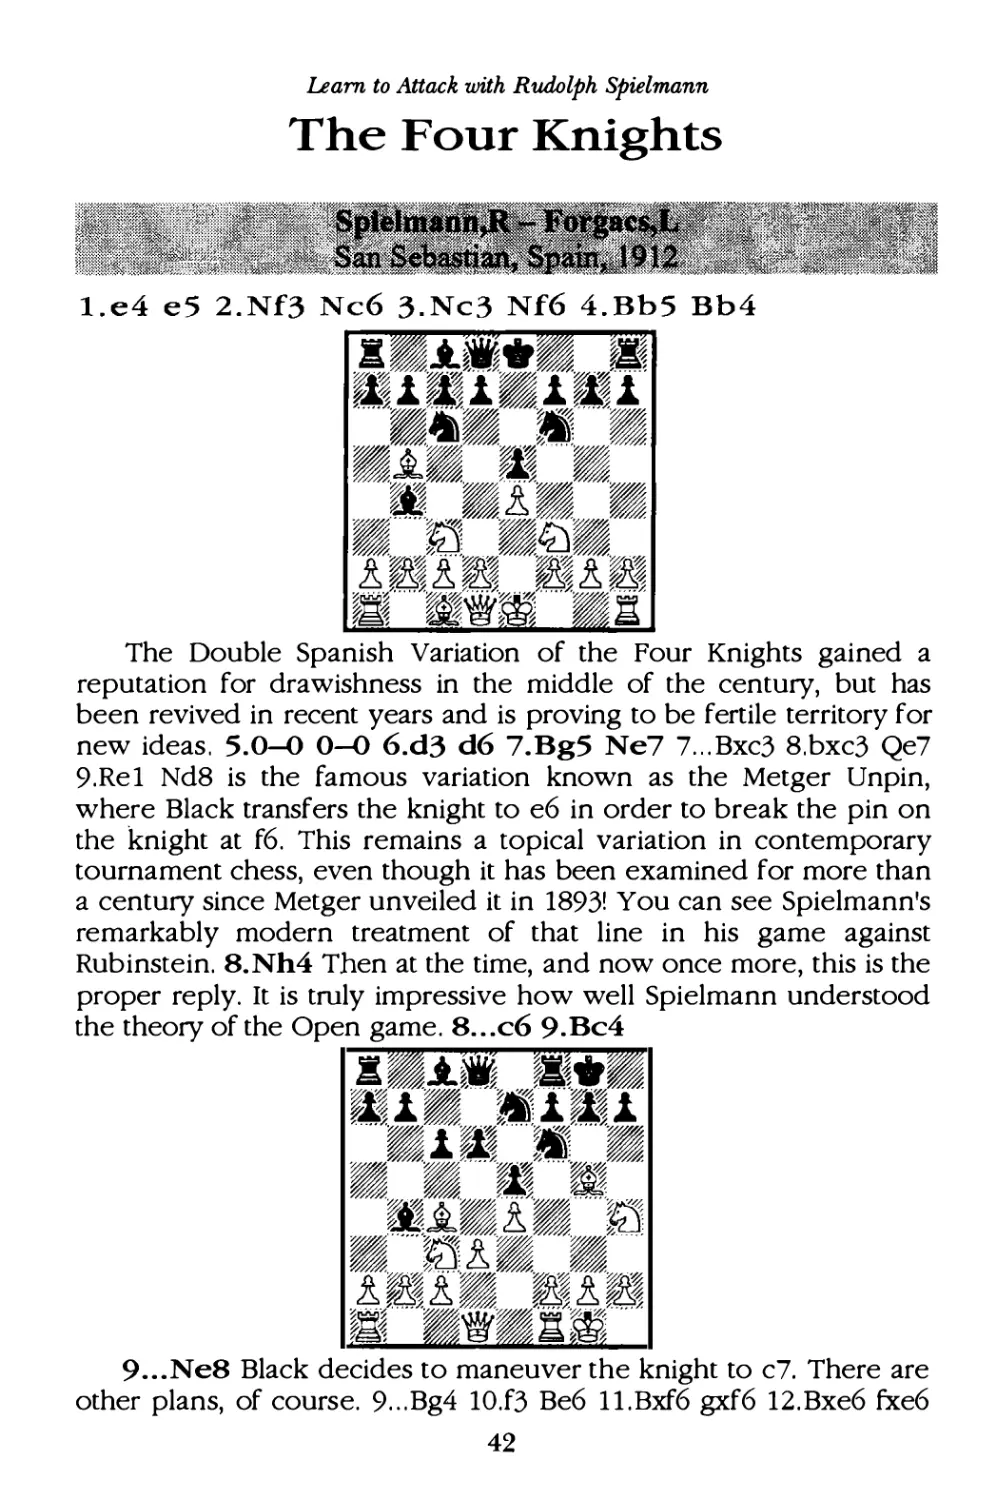
The Four Knights ----------------------- ------- -----------------------------------42
� Forgacs L San Sebastian Spain 1912 ------------------------------------4 2
,_-;:r
'
'
'
vs. Rubinstein,A Carlsbad, Germany, 1911 ---------------------------------44
vs. Perlis,J Vienna, Austria, 1913---------------------------------------------·-45
\f]) Weenink,H Scheveningen, Netherlands, 1923------------------------4 5
vs•. Sterk,K Bad Pistyan, Germany, 1912 -----------------------------------·· 4 9
vs. Reti,R Vienna, Austria, 1914 ----------------------------------------------·· 4 9
8
� Yates,F Semmering, Germany, 1926 ·-···································· 50
vs. Bogoljubow,E Stockholm, Sweden, 1919 ······························· 52
vs. Marshall,F New York, USA, 1927··························-············· 52
The Russian Game-·-················· ····----··--···----------------------------- 53
vs� Marshall,F San Sebastian, Spain, 1912 ---------·- --···---- ···------ --- ··- 53
The Latvian Gambit--- ---------·------------ ------- · ---- · ----- ··----------------- 56
(y
'
s) Nimzowitsch,A Semmering, Germany, 1926 ----------- --------------- 56
The Vien naGame-------------------- ·---------------- ·---------··---------------- 60
�� Flamberg,A Mannheim, Germany, 1914 ---------·-----·-------------··· 60
vsl Loman,R Scheveningen, Netherlands, 1923········---- ··---·· ·----··· 62
vs. Vidmar,M Semmering, Baden Germany, 1926-···--····--·-···-···-- 64
vs. Cohn,E Berlin, Germany, 1908 -·----··························-····-······ 64
vs. Johner,P Bad Pistyan, Czechoslovakia, 1922··---···- -···---·········· 65
vs. Maroczy,G Teplitz Schoenau, Germany, 1922·················-··· ·· 65
vs. Kolhnlein,F Munich, Germany, 1904 •••••••••••••••••••••••••••••••••••• 66
�
.
v
S)
s Prokes,L Prague, Czechoslovakia, 1908 ·····················-··········· 66
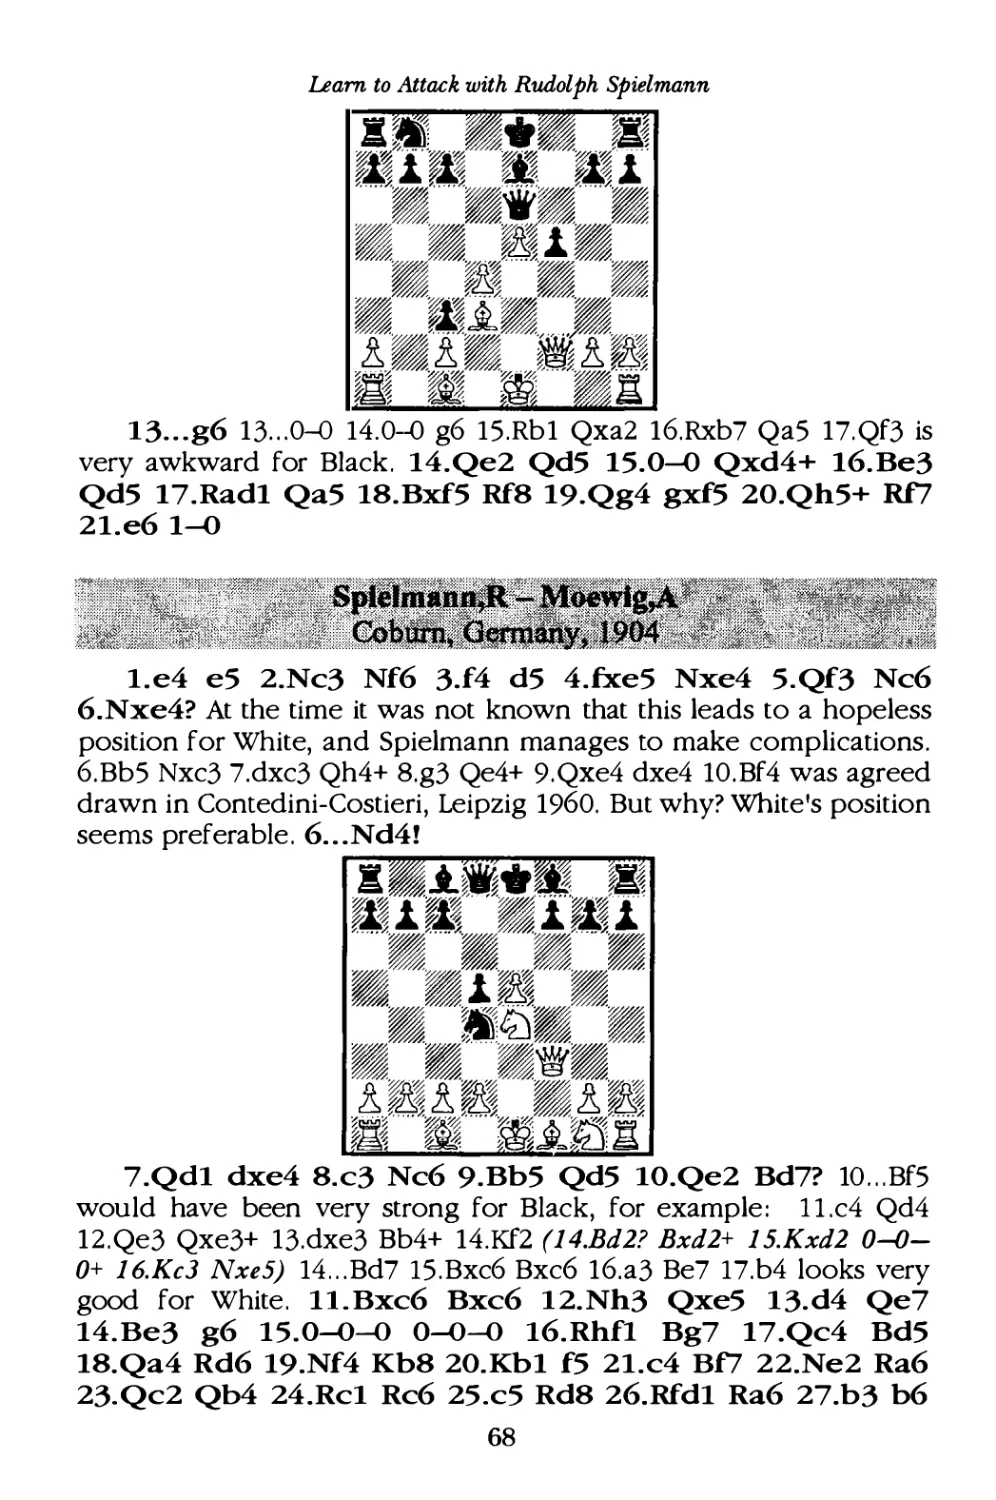
(!J. Moewig,A Coburn, Germany, 1904 ································-····· 68
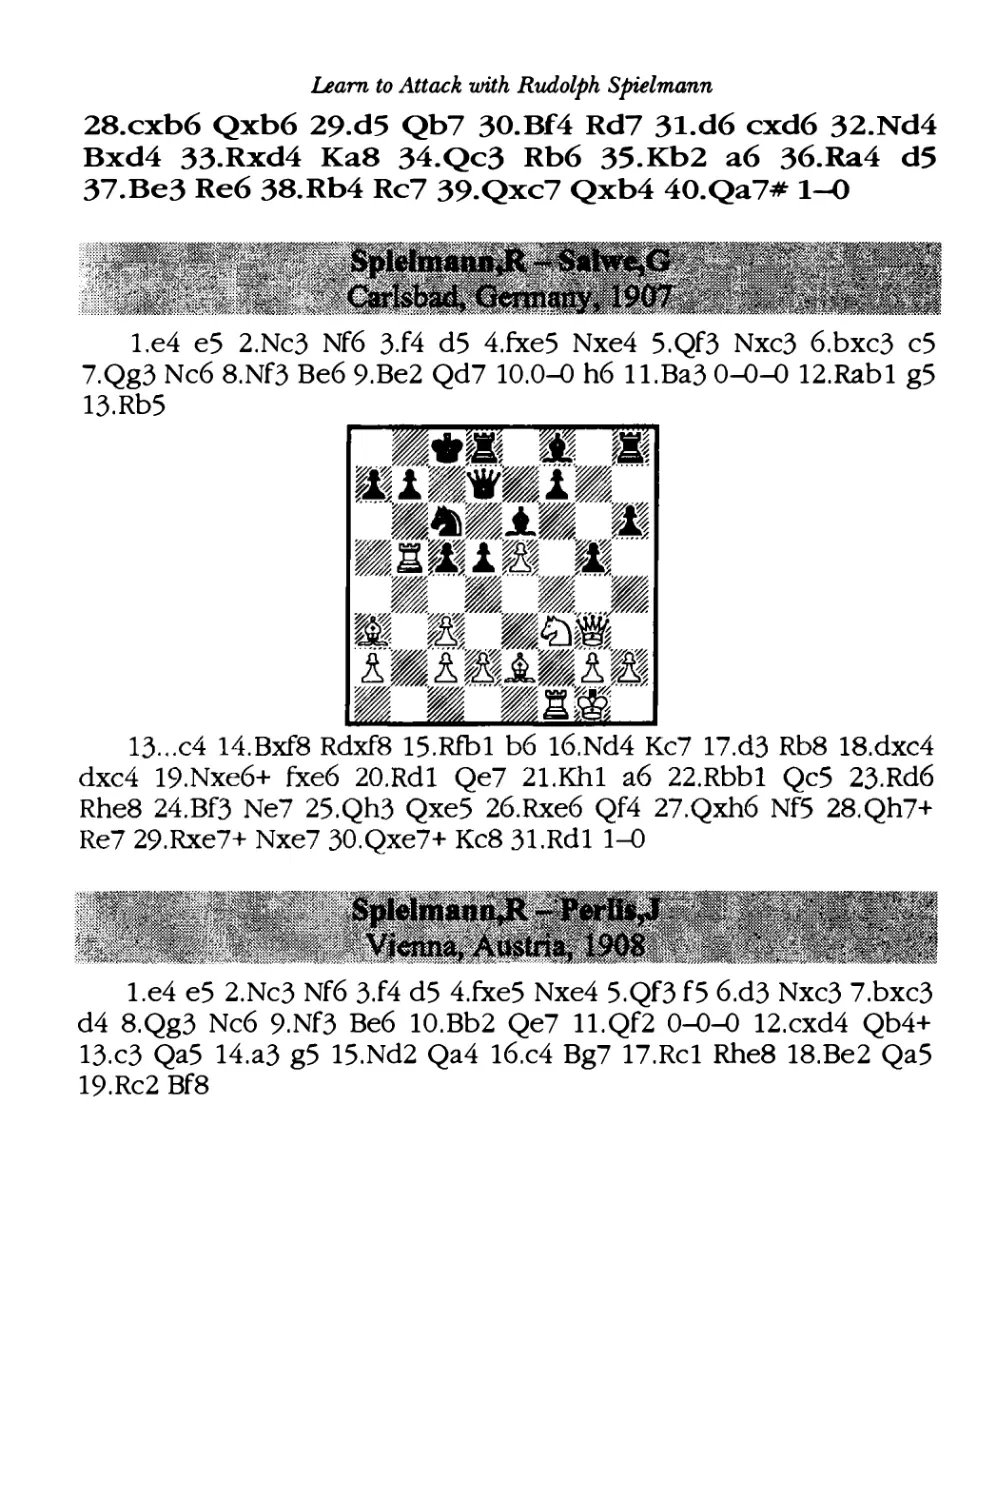
vs. Salwe,G Carlsbad, Germany, 1907 •••••••••••••••••••••••••••••••••••••••• 69
vs. Perlis,J Vienna, Austria, 1908 ······-······································· 69
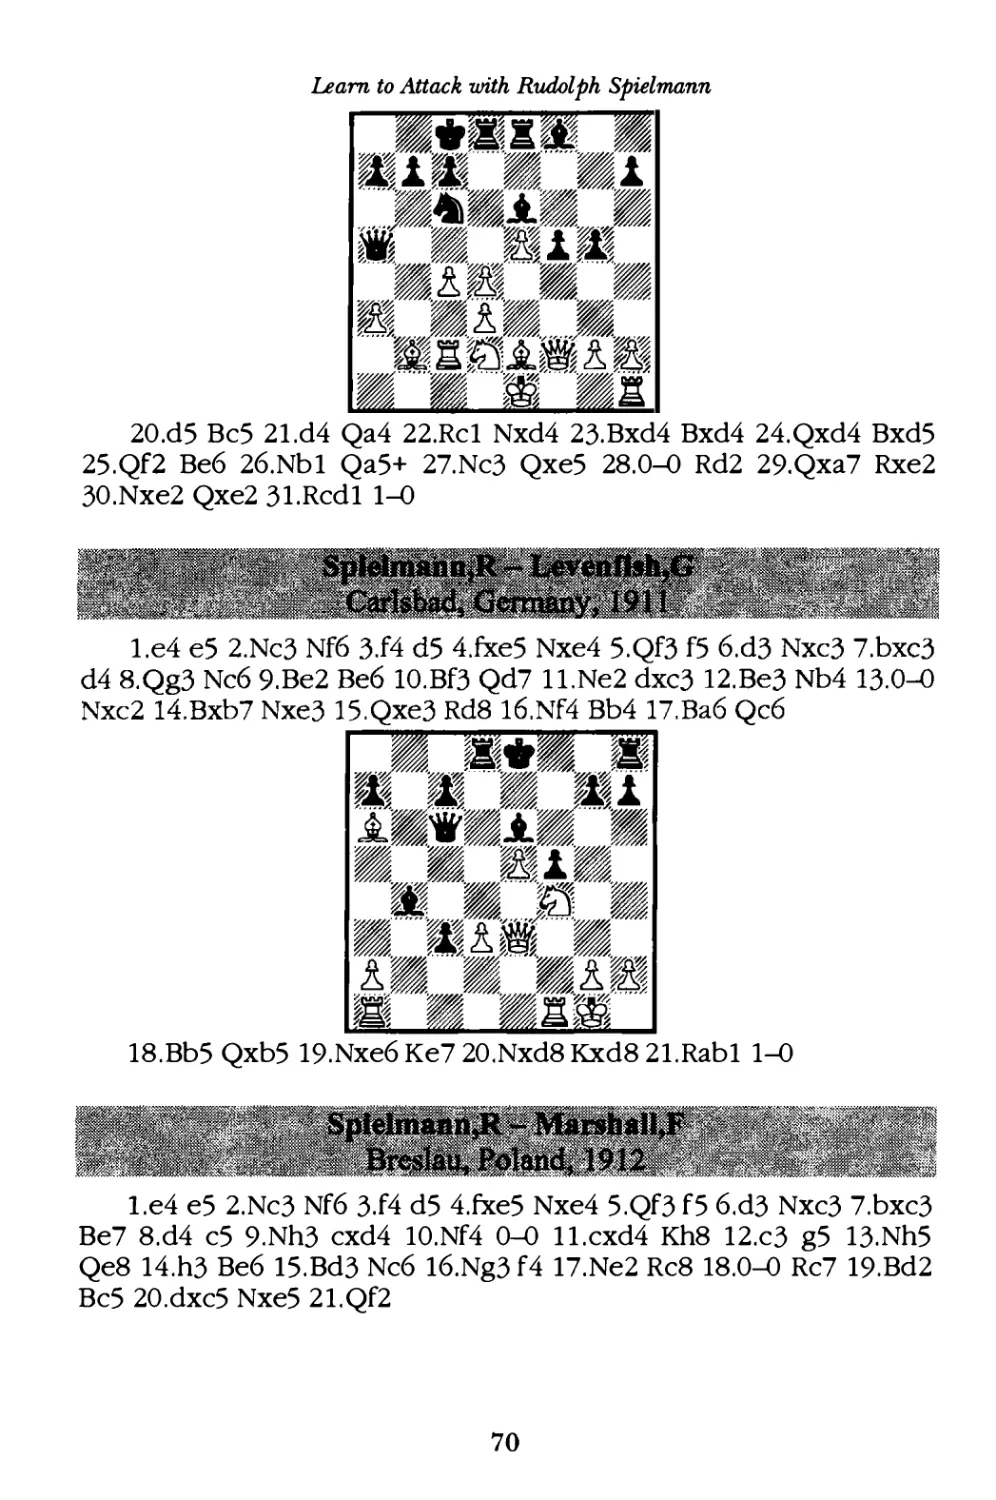
vs. Le venfish,G Carlsbad, Germany, 1911···········-·····-·············· 70
vs. Marshall,F Breslau ,Poland, 1912·····················-············-··· 70
vs. Schenkein,J Vienna, Austria, 1913........................ ................ 71
vs. Treybal,K (as Black) Breslau, Germany, 1912·····-················· 71
vs. Von Gottschali,H Dusseldorf ,Germany, 1908 ••••••••••••••••••••••• 72
vs. Leonhardt,P Match, Munich, Germany, 1906•··••••••·•••••••••••••• 72
@ Reggio,A Ostende, Belgium, 1906······················-················ 73
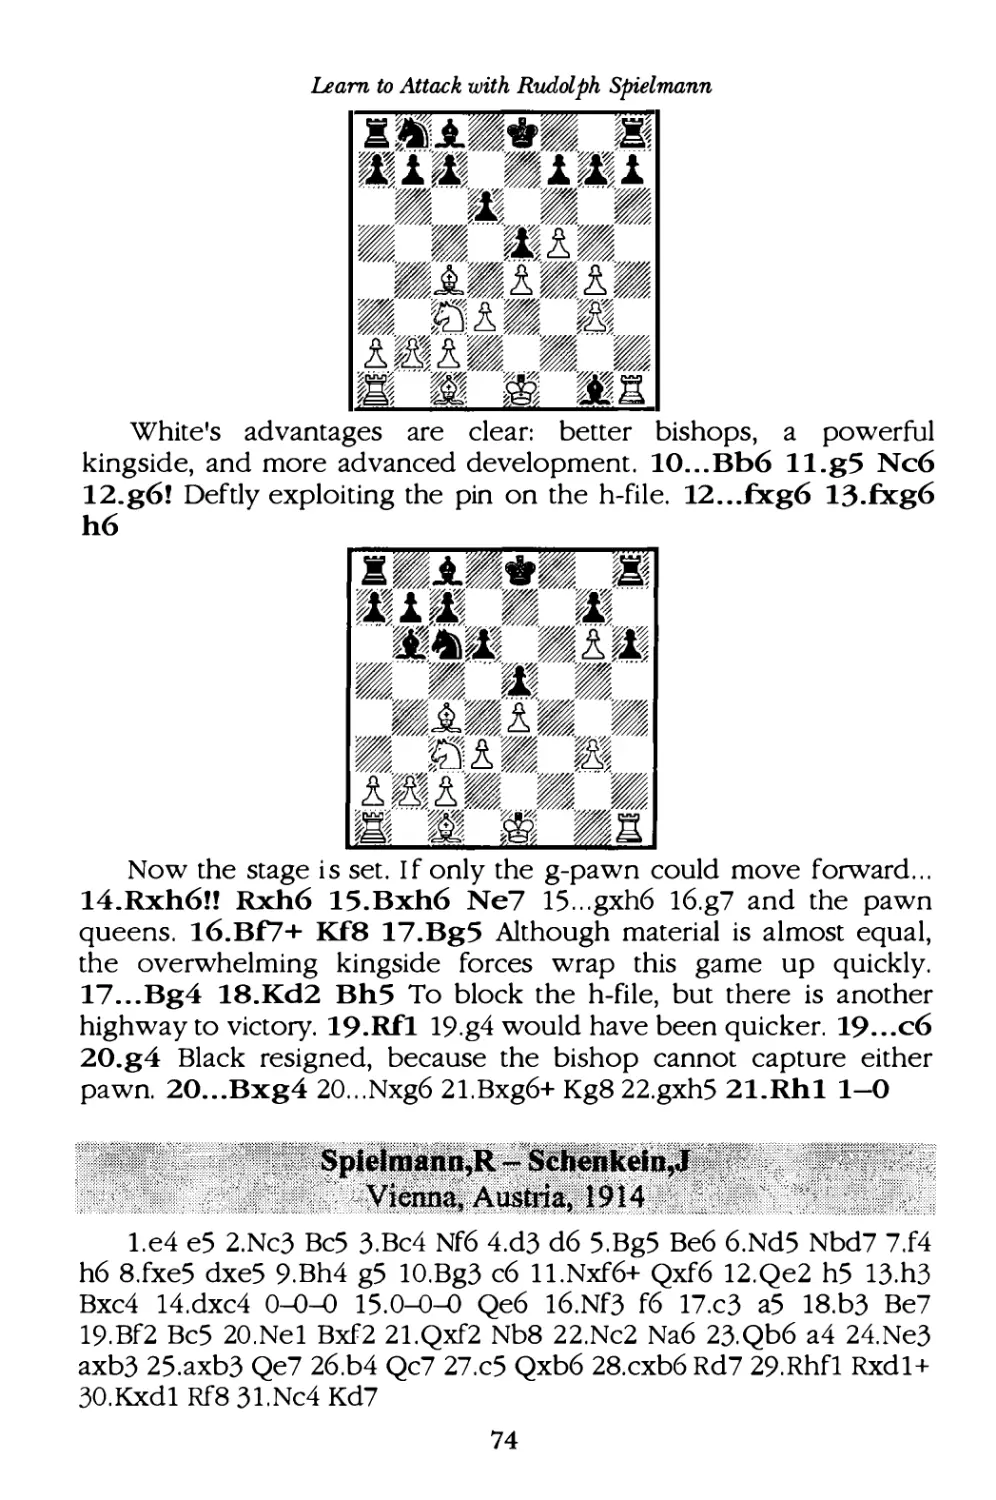
vs. Schenkein,J Vienna, Austria, 1914 ··· -·····-····················· ········· 74
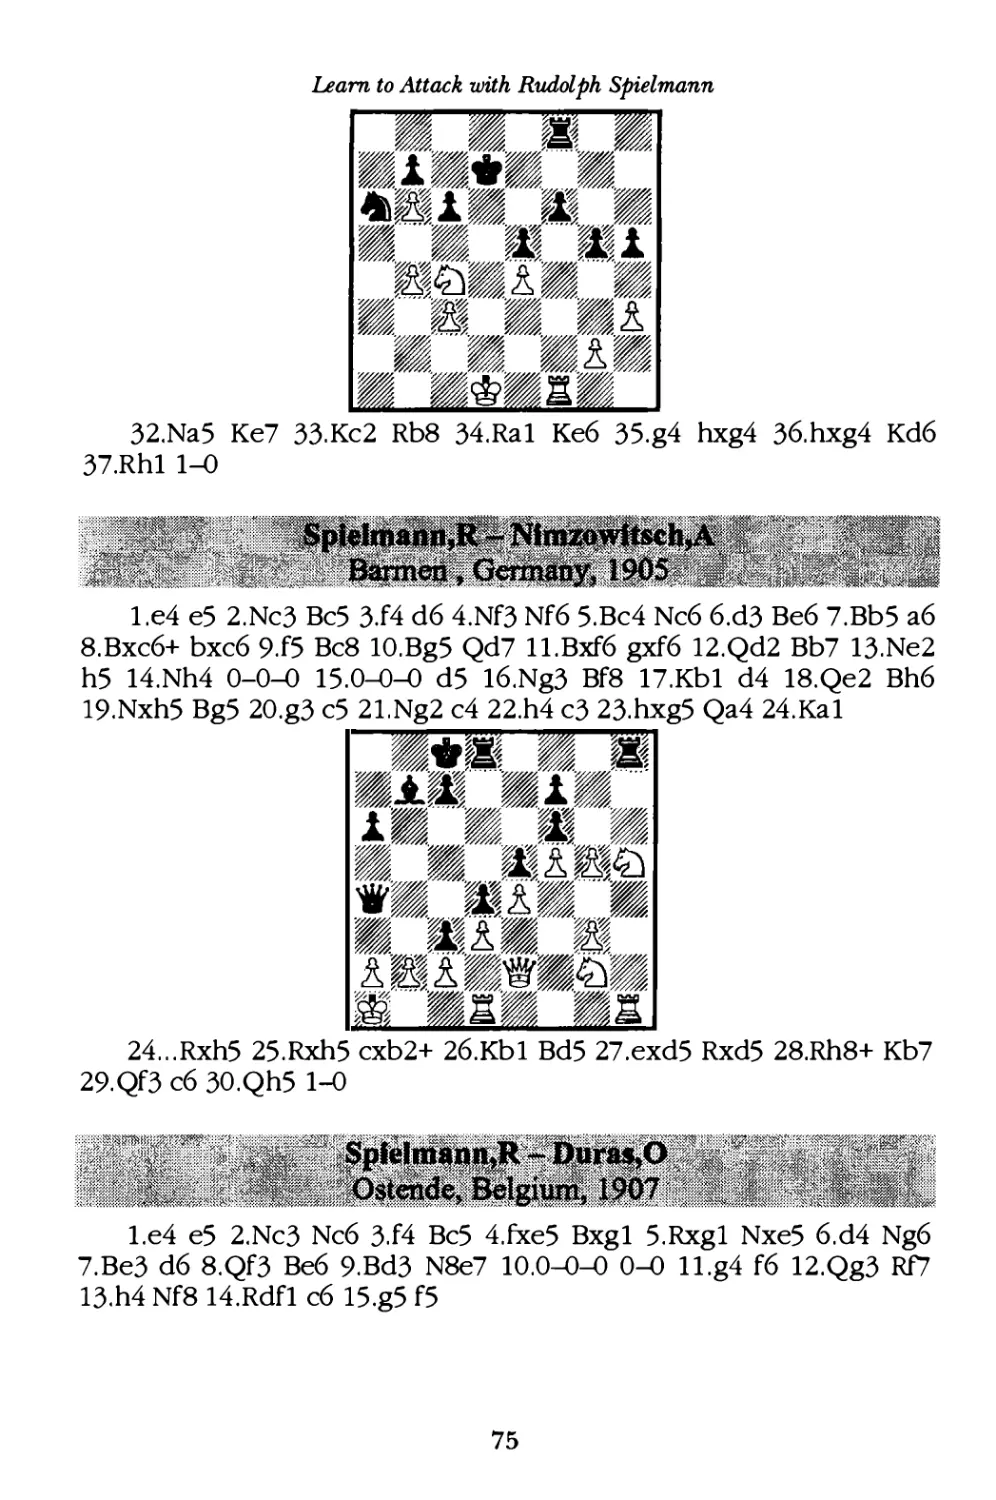
vs. Nimzowitsch,A Barmen , Germany, 1905•••••••••••••••••••••••••••••• 75
vs. Duras,O Ostende, Belgium, 1907.......................................... 75
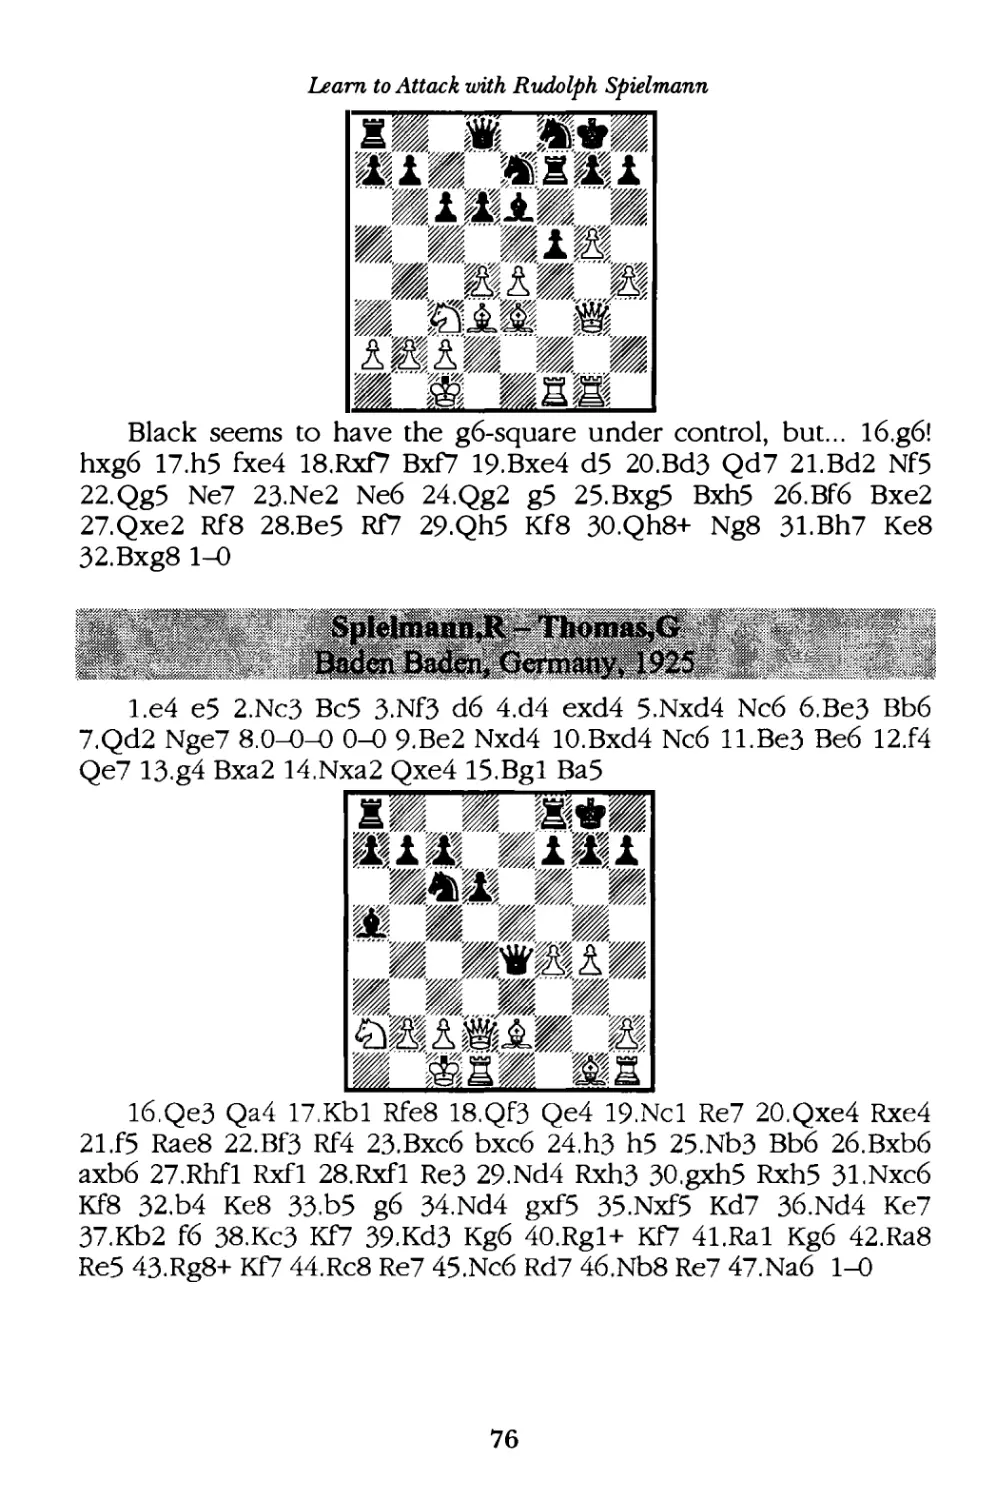
vs. Thomas,G Baden Baden, Germany, 1925 •••·••••• ••••••••·•• •••••••••• 76
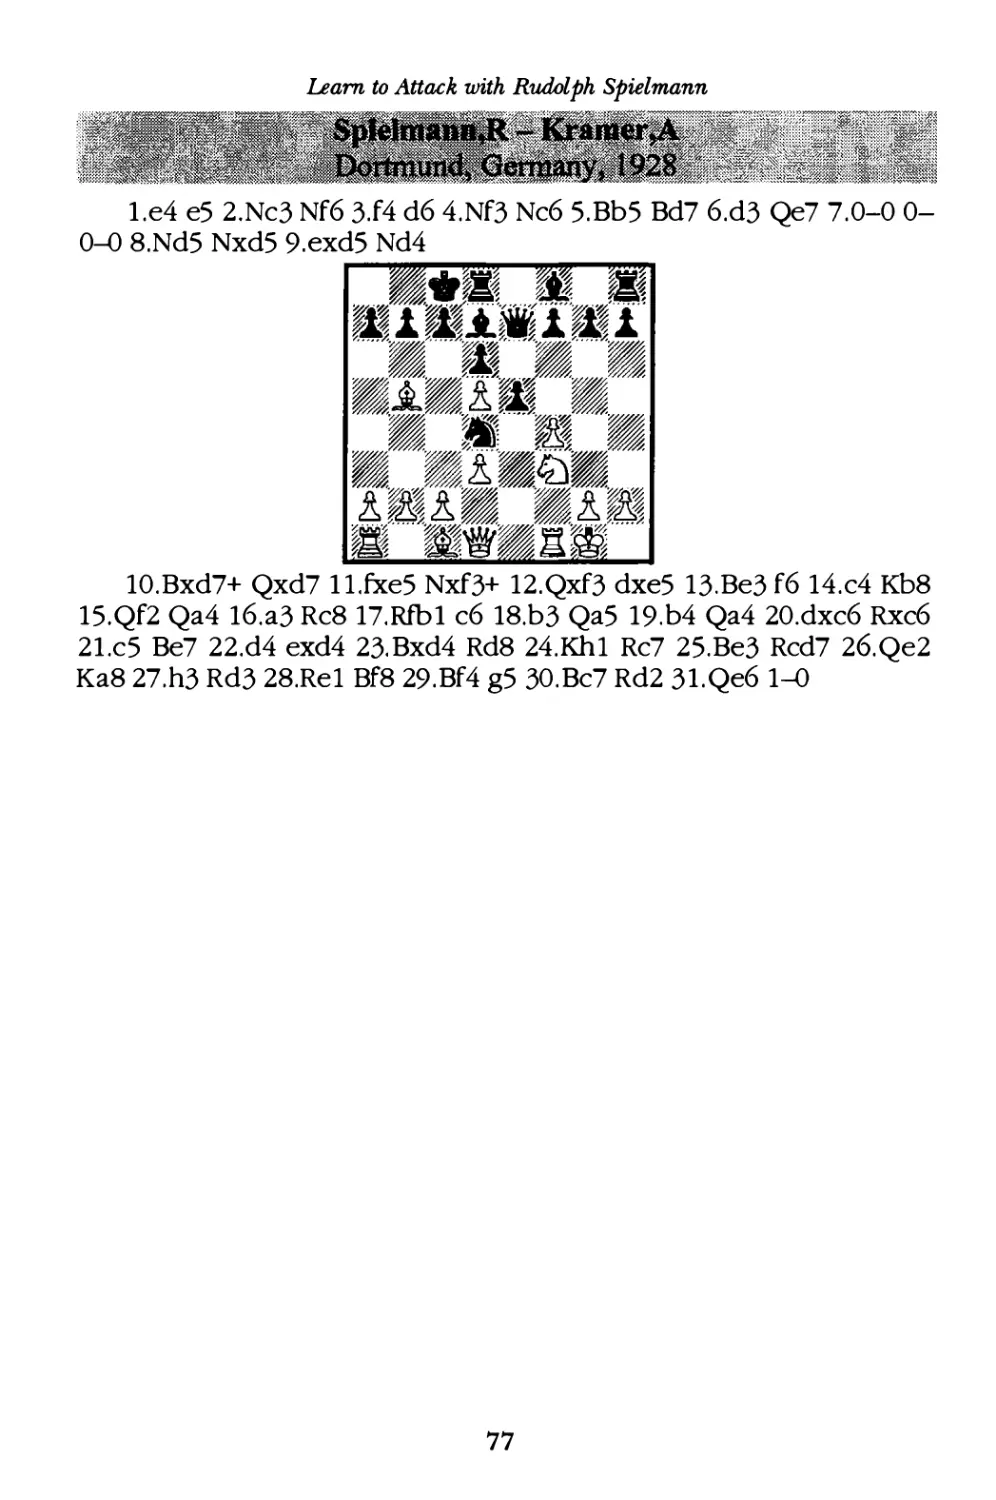
vs. Kramer,A Dortmund, Germany, 1928 ••••·•••••••••••••••••••••••••••••• 77
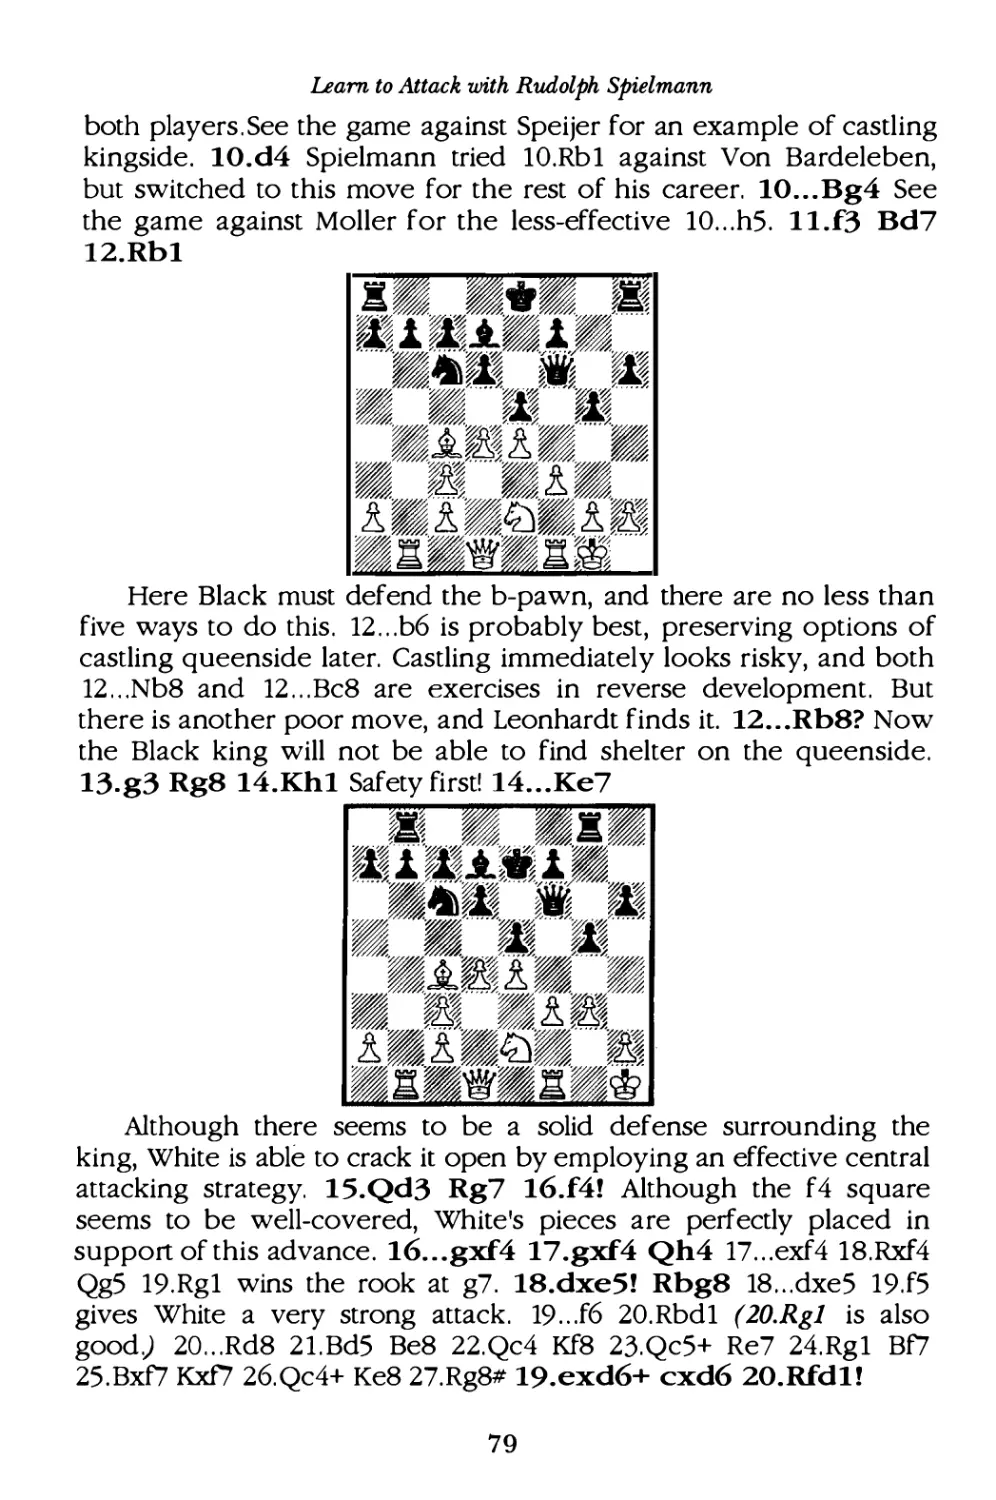
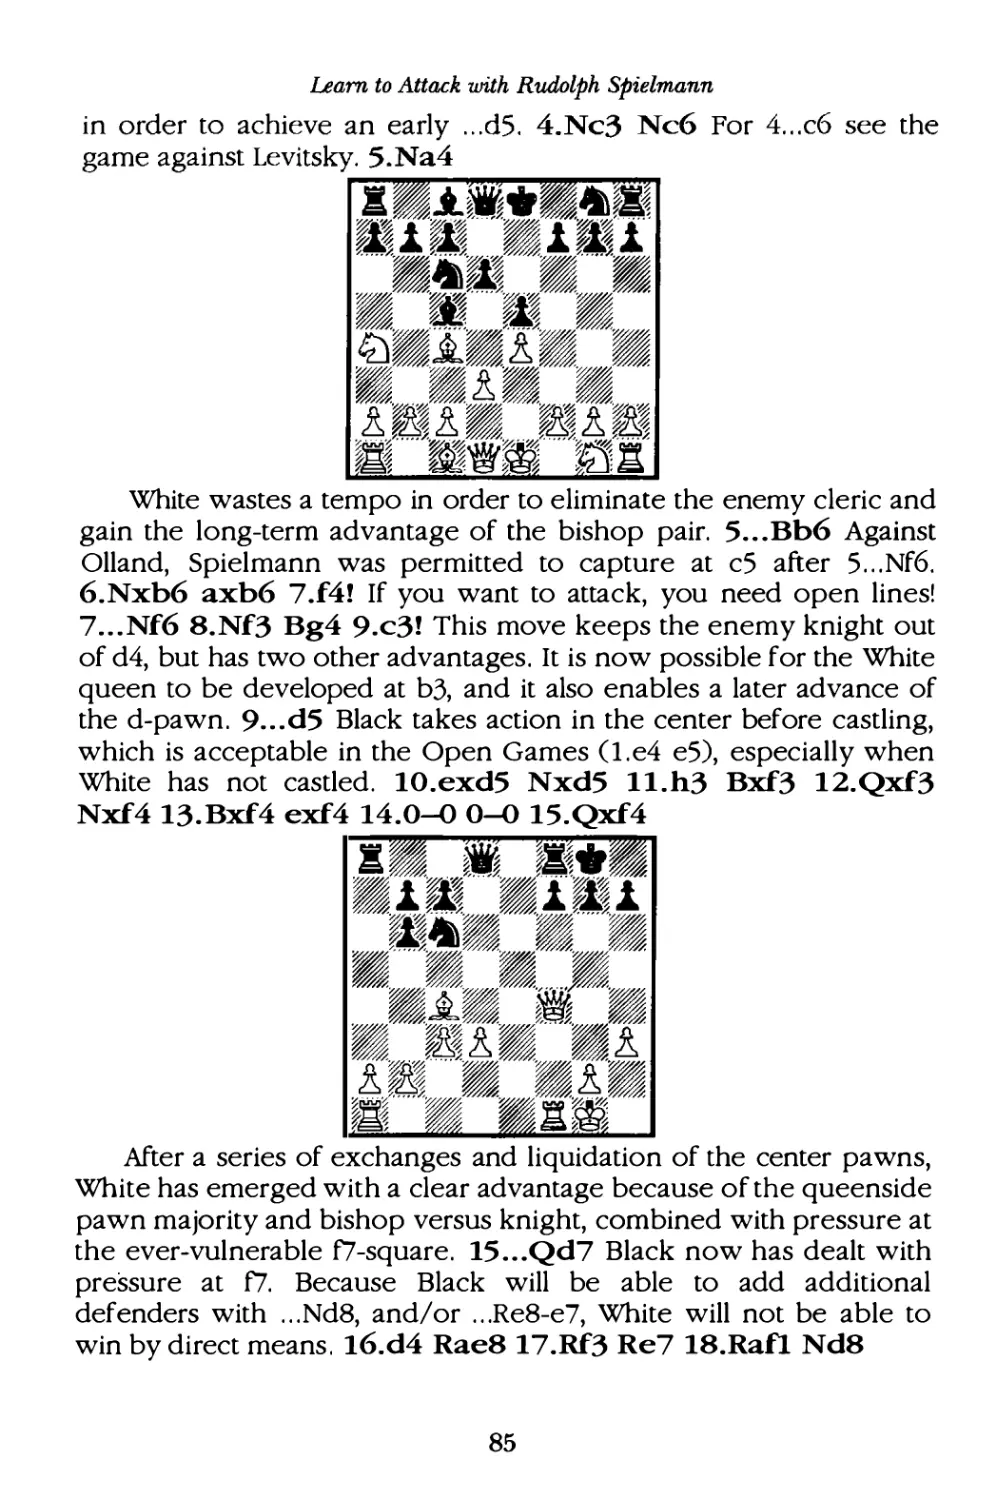
The Bishop's Open in g •••••••••••••••••••••••••••••••••••••••••••••·•••••••••••• 78
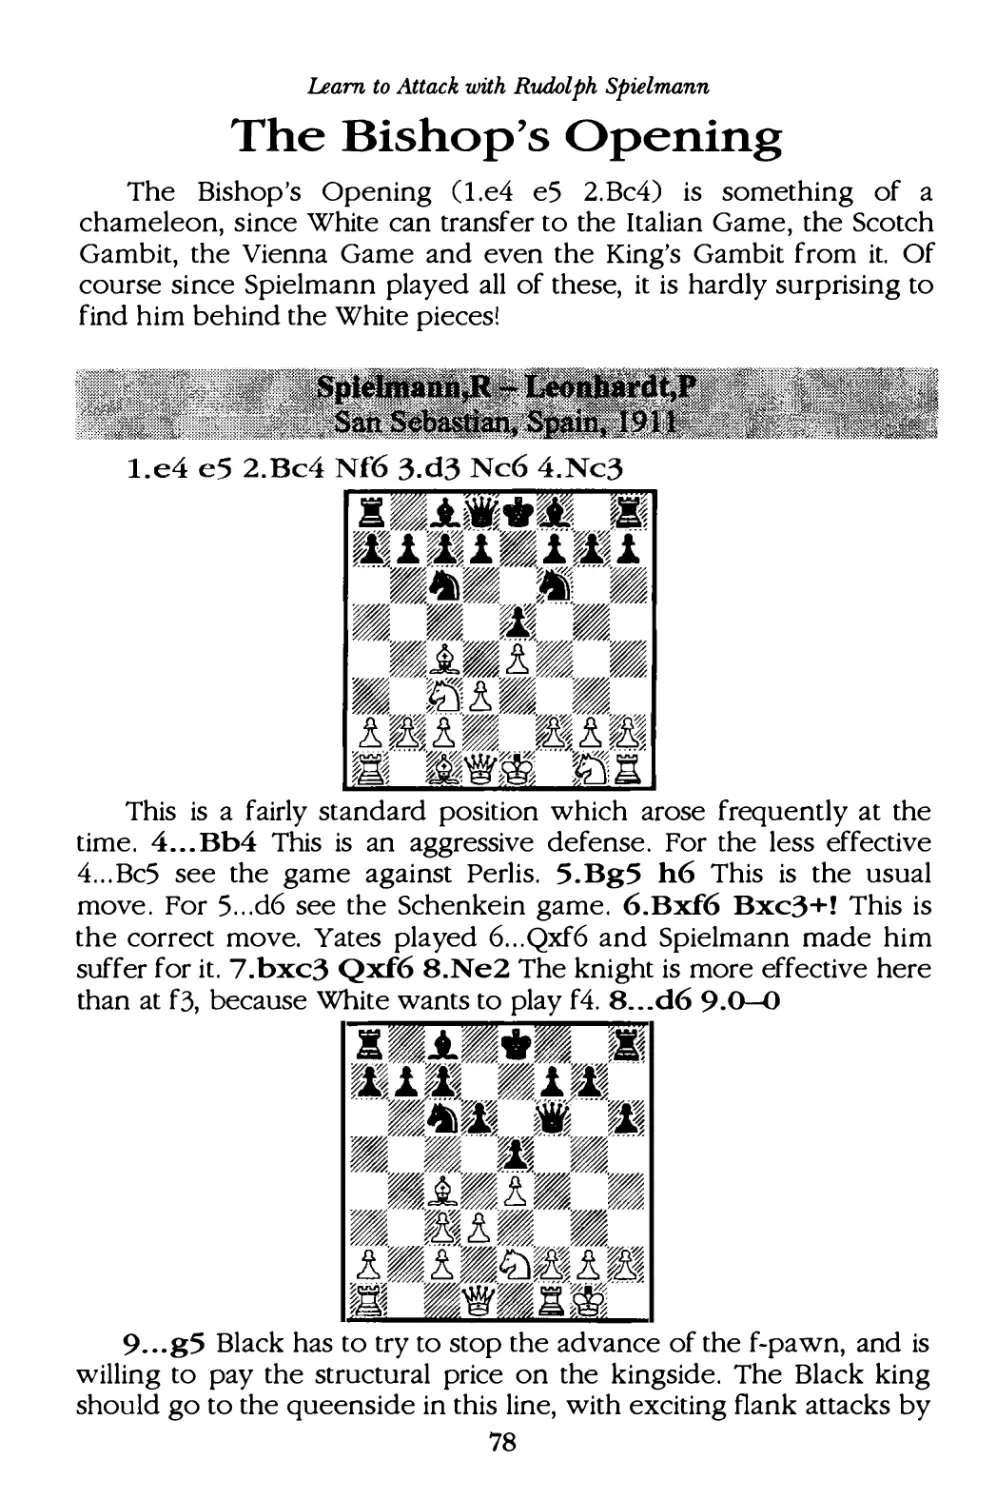
r? Leonhardt P San Sebastian Spain 191 1································ 78
\.Y�
'
'
'
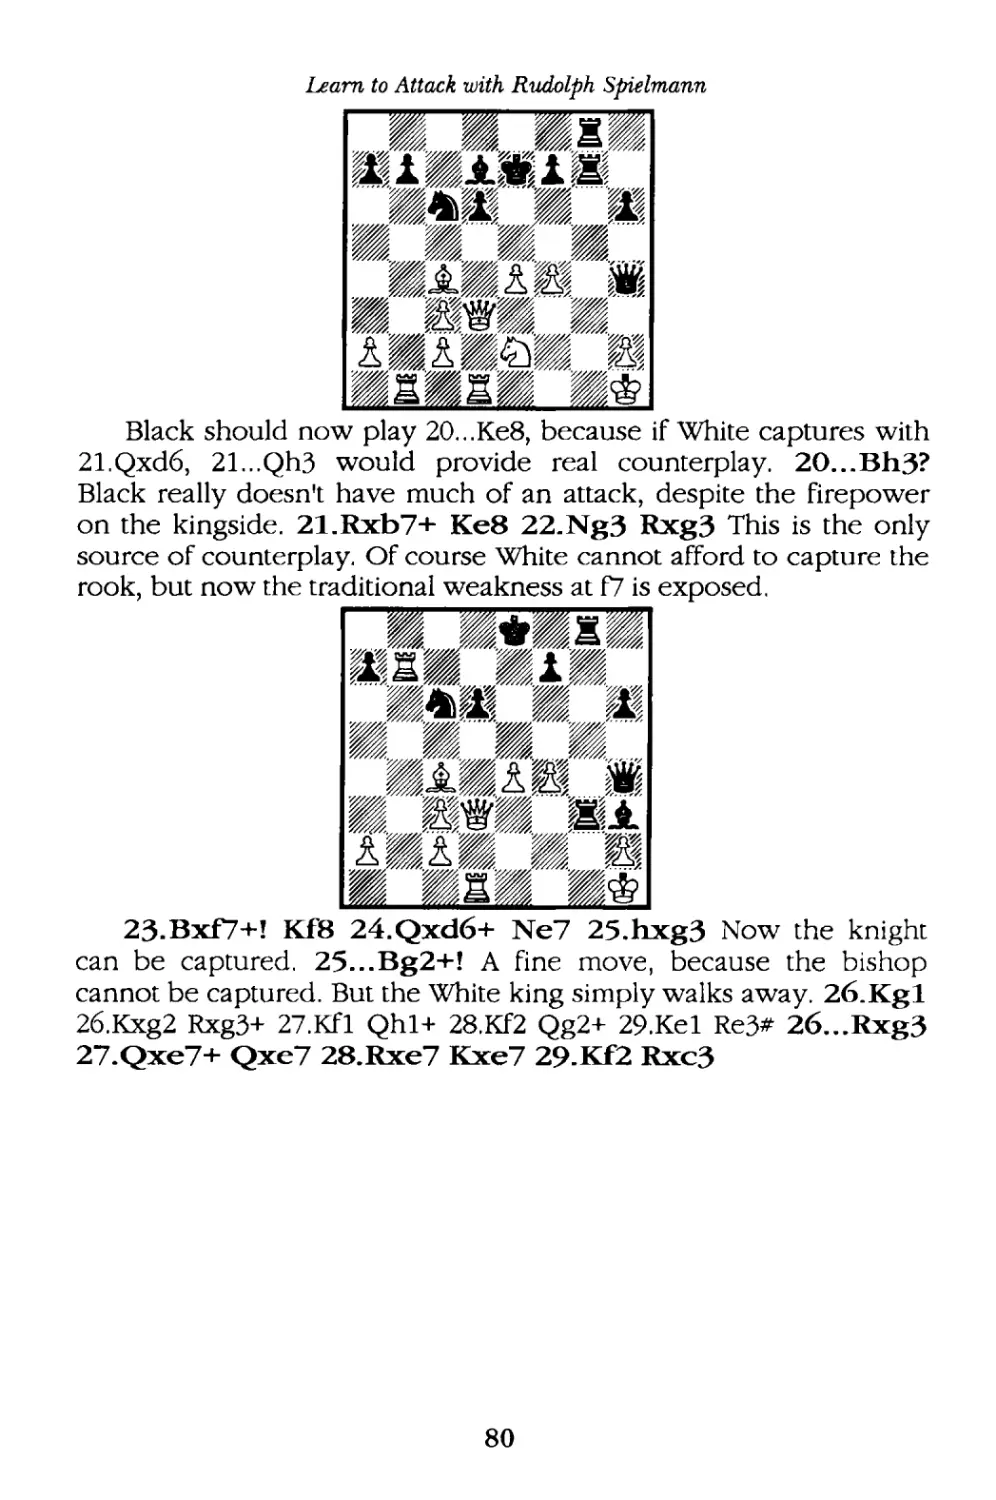
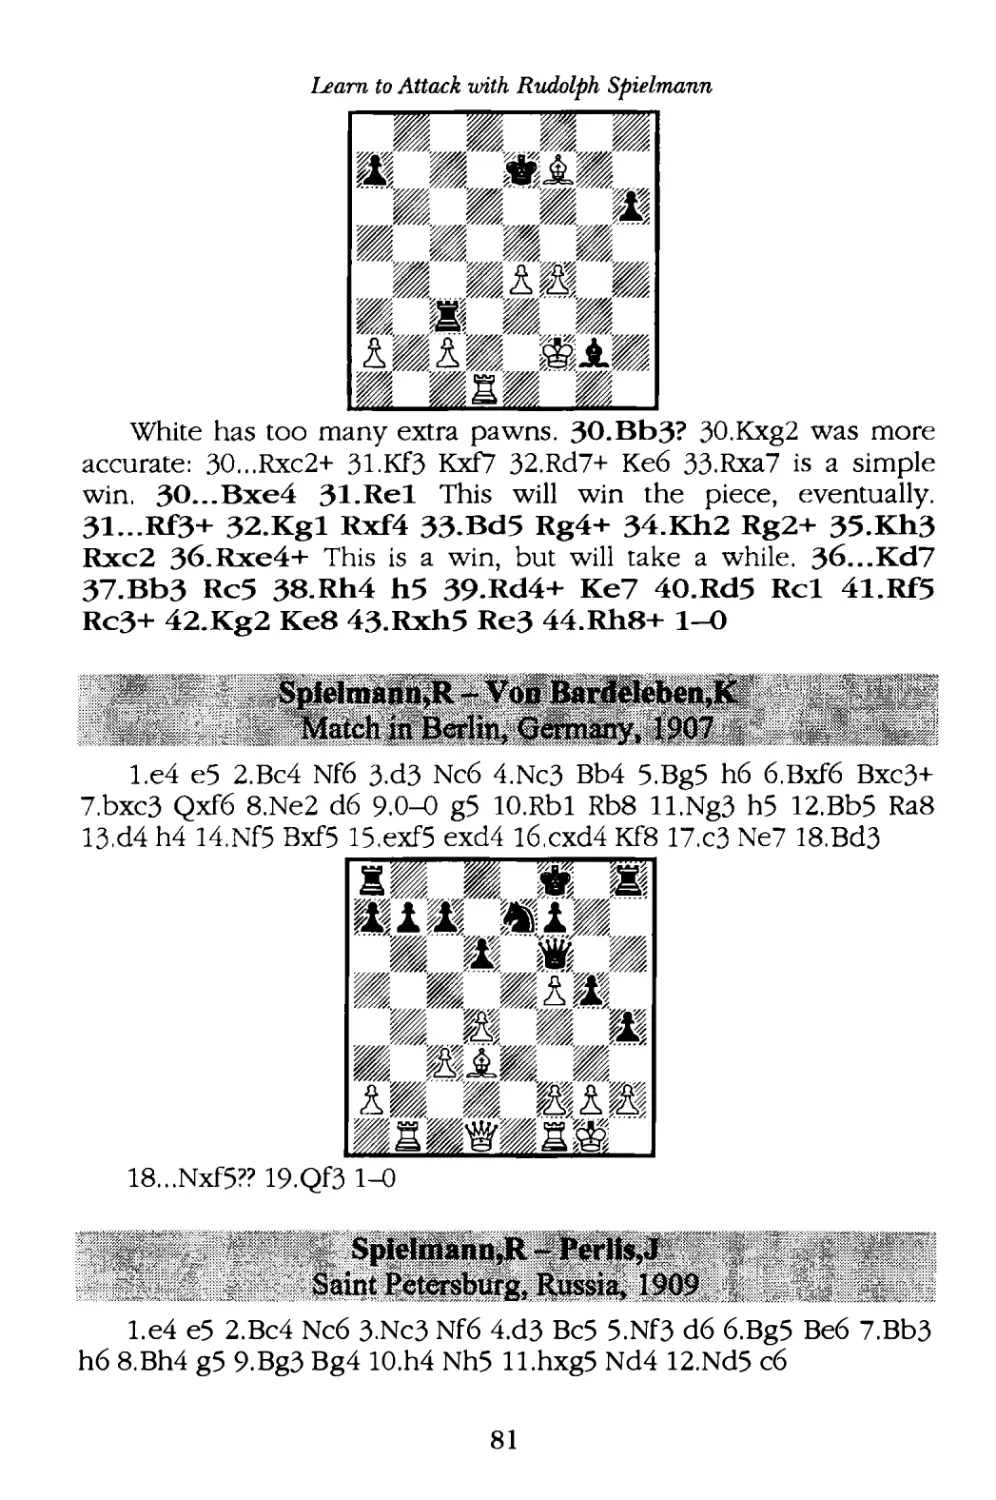
vs. Von Bardeleben,K Match in Berlin, Germany, 1907••••••••••••••• 8 1
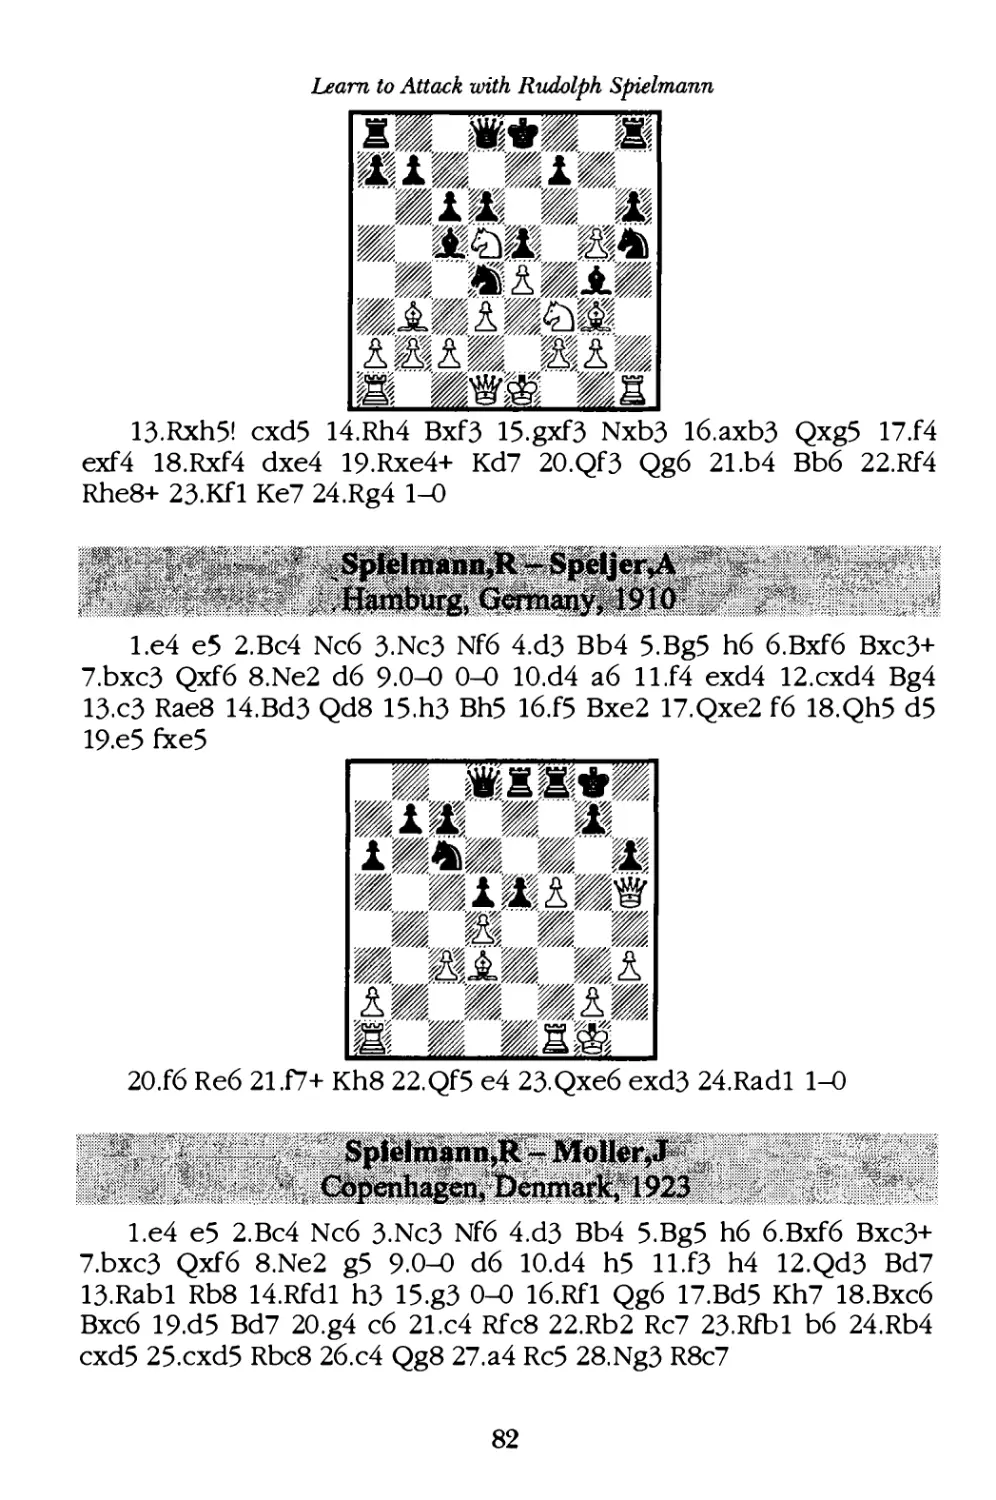
vs. Perlis,J Saint Petersburg, Russia, 1909•••·•••••••·•••••·•••••••••••••••• 8 1
vs. Speijer,A Hamburg, Germany, 1910······································ 8 2
vs. Moller,J Copenhagen, Denmark, 1923··································· 8 2
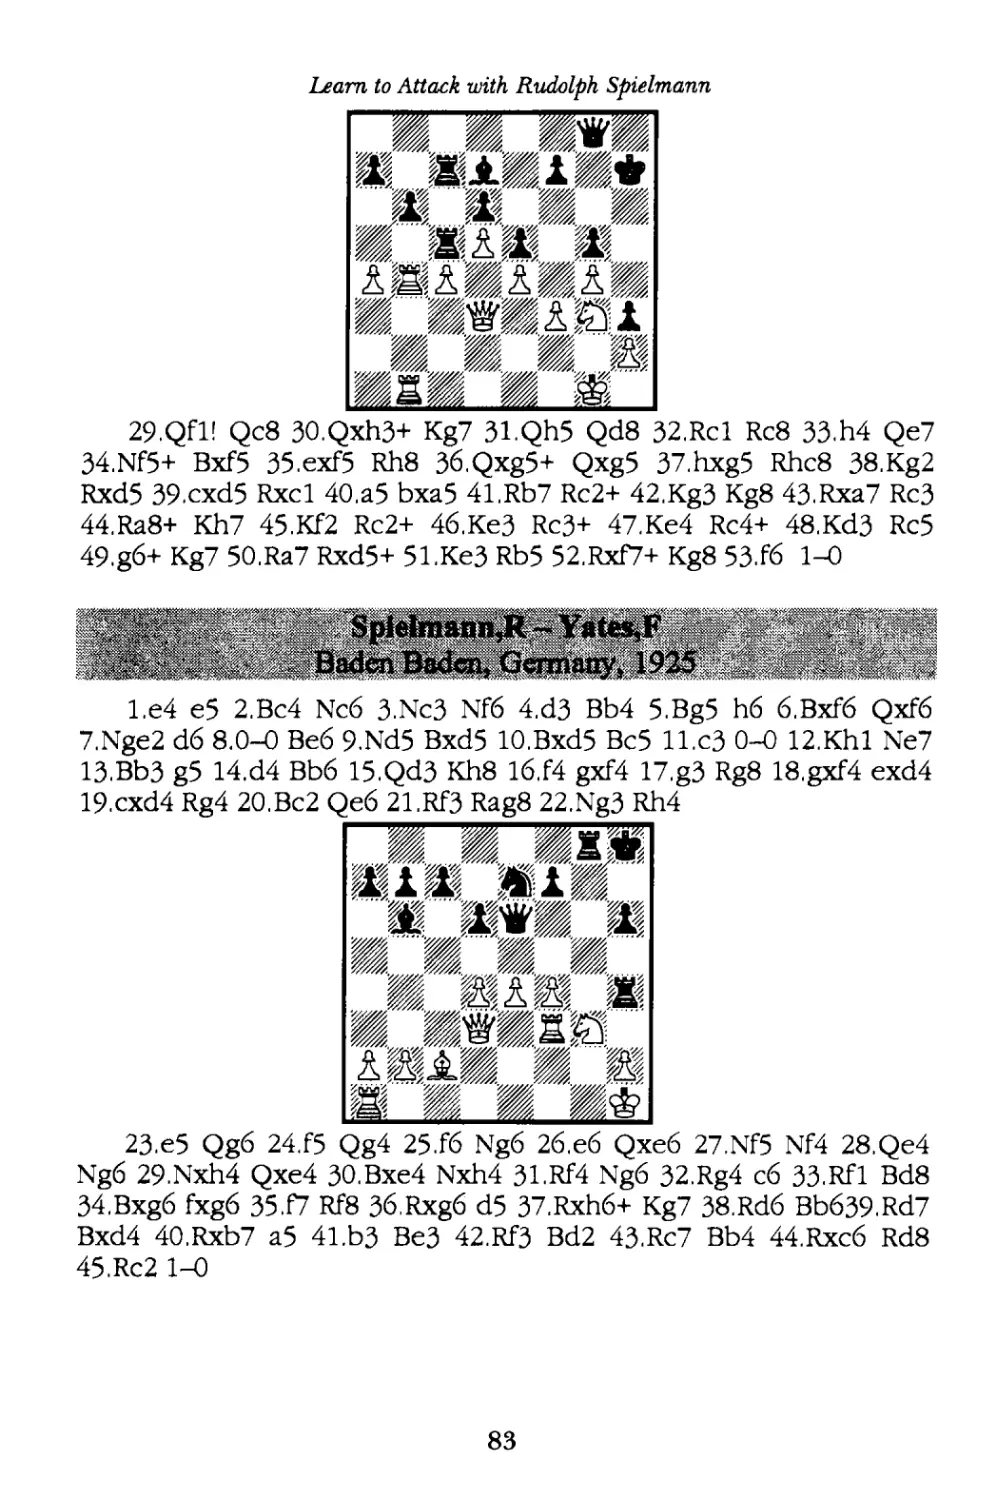
vs. Yates,F Baden Baden, Germany, 1925................................... 83
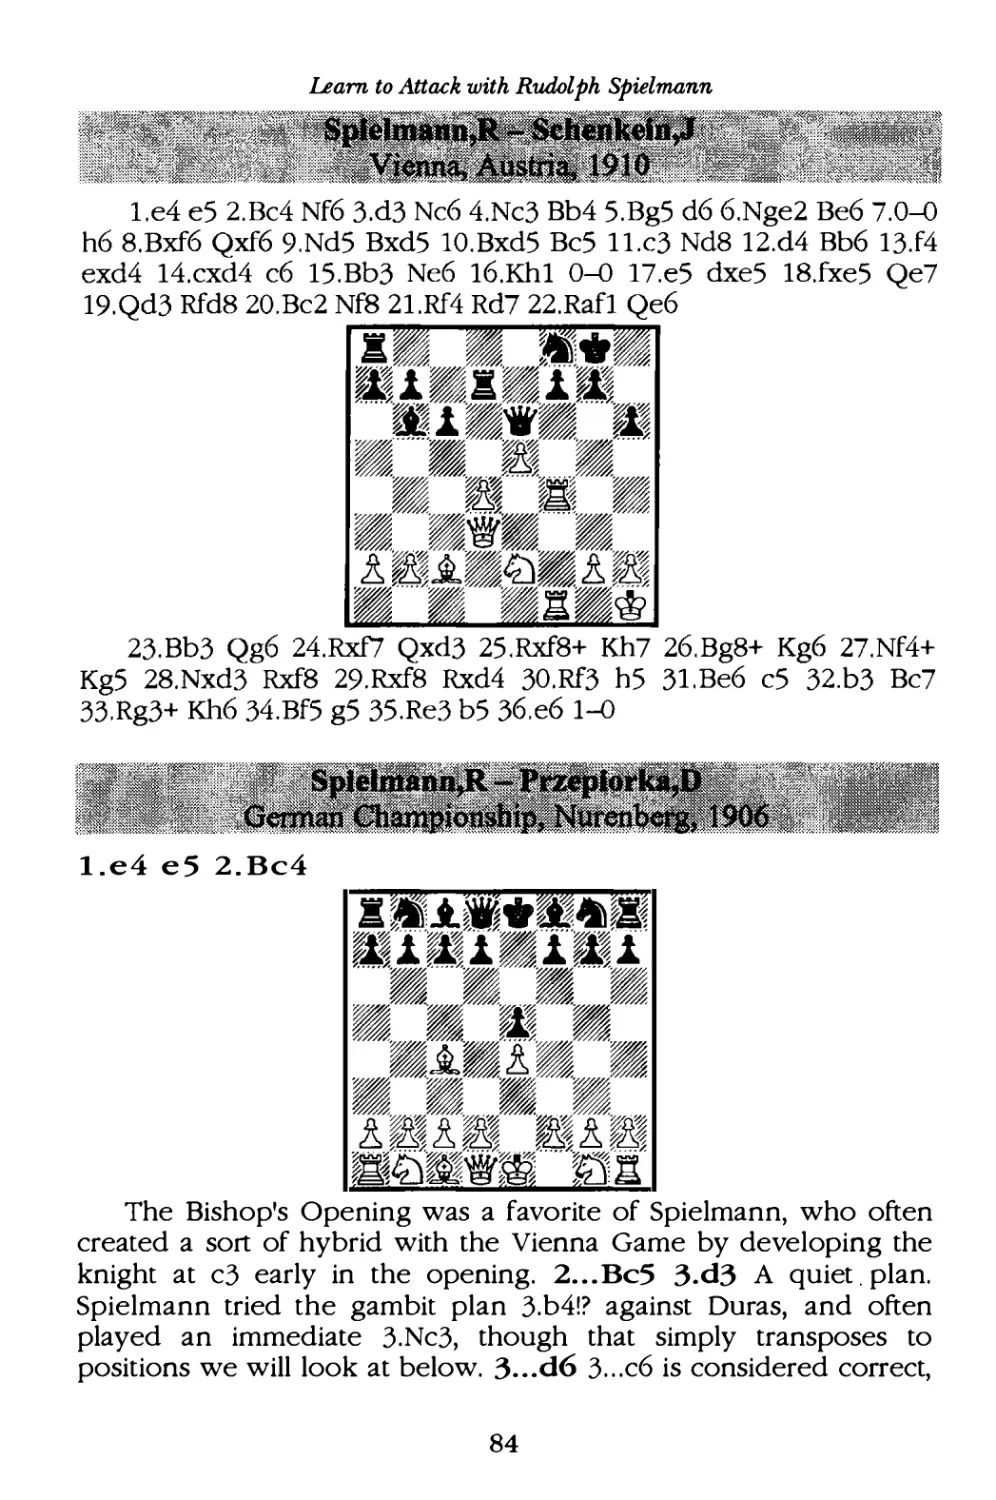
vs. Schenkein,J Vienna, Austria, 1910•••••••••••••••••••••••••••••••••••••••• 8 4
9
,� Przepiorka,D German Championship, Nurenberg, I906 ------
--- 8
4
vs. Duras,O Breslau, Poland, I9I2 --------------------------------------------8 6
vs. Levitsky,S Breslau, Poland, I9I2 ------------------------------------------87
vs. Olland,A Scheveningen, Netherlands, I923---------------- -----------87
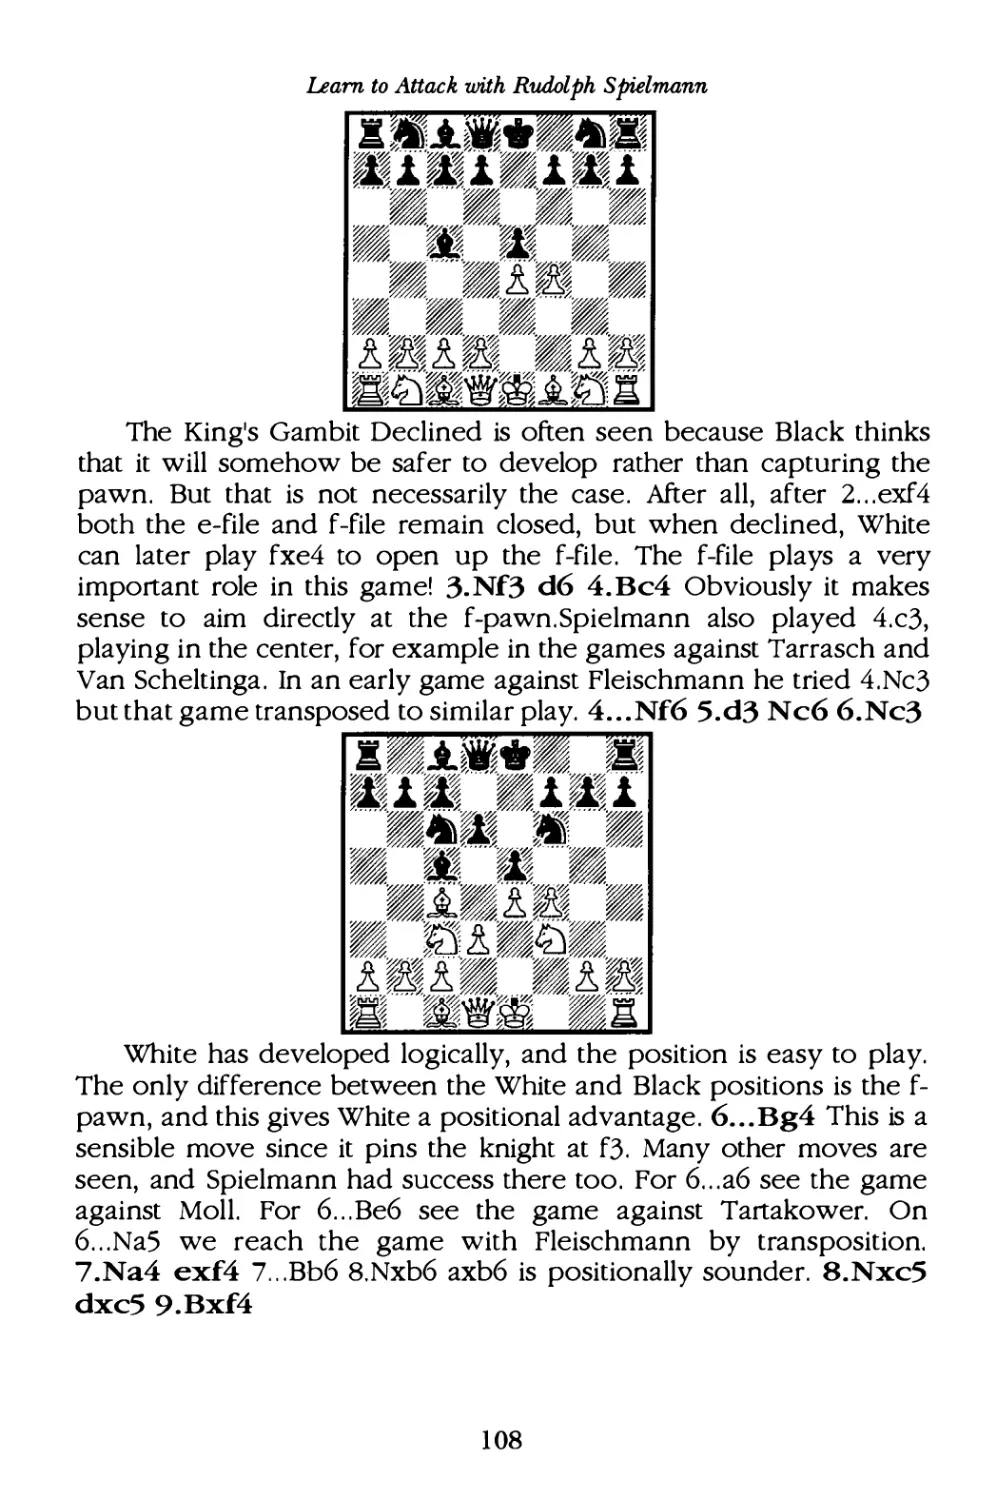
The Kmg's Gambit----------------------------------------------------------------89
'';� Cohn,E Abbazia, Italy, I9I2 ------------------------------------------------- 89
vs., Reti,R Gambit Tournament, Abbazia, Italy, I912 ------------------- 9I
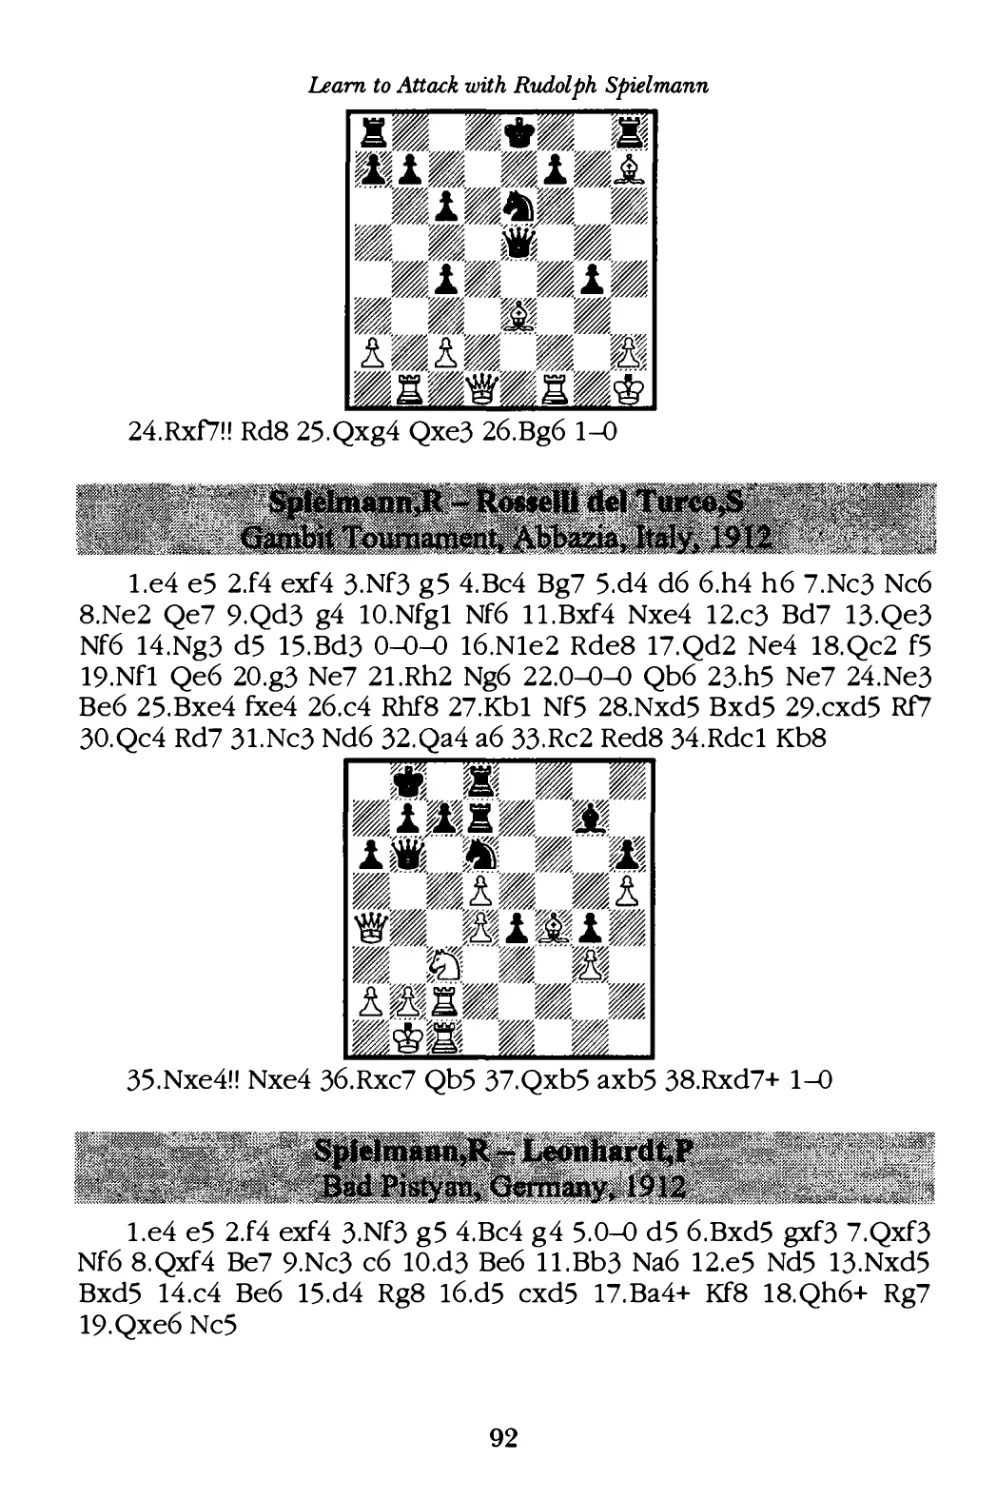
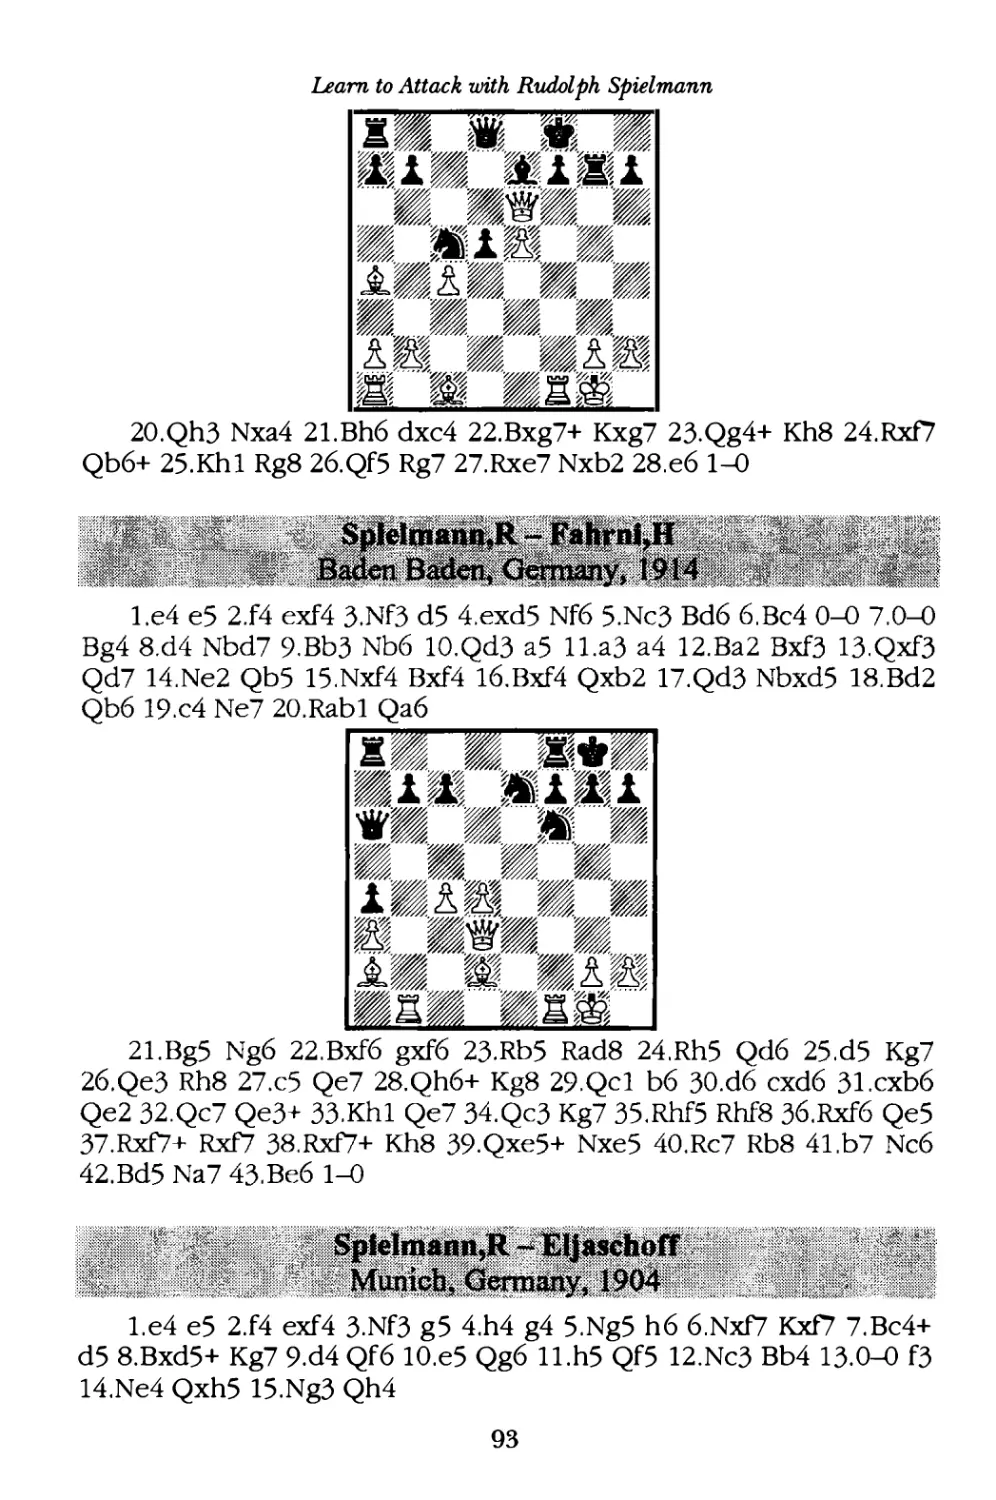
vs. Rosselli del Turco,S,Abbazia, Italy, I9I2 -------------- ----------------- 92
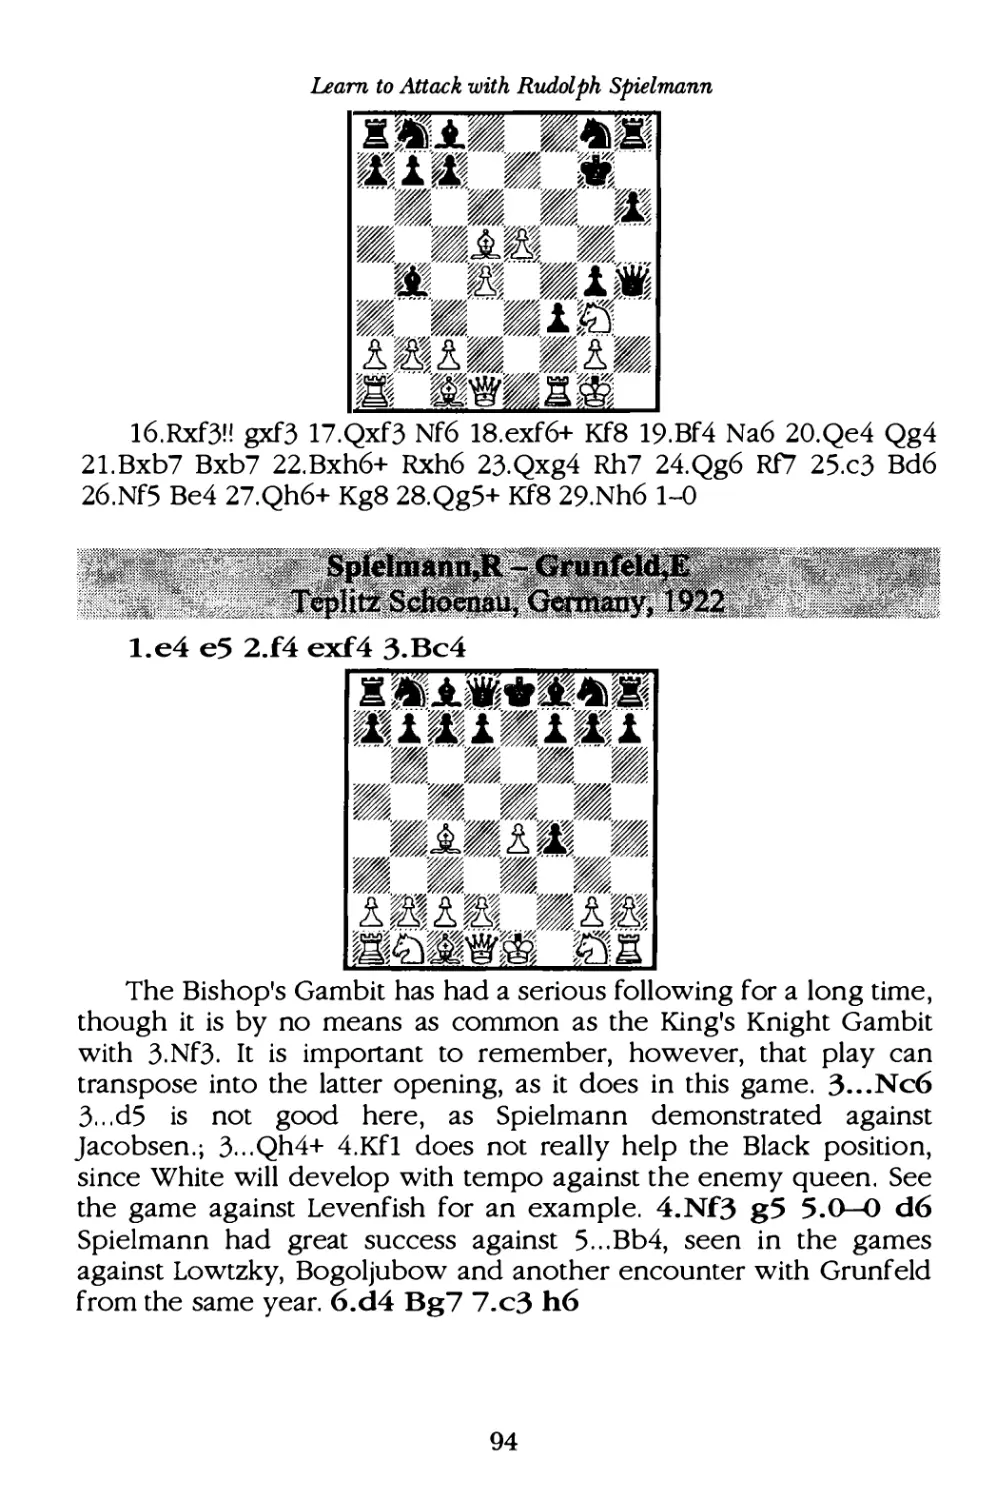
vs. Leonhardt,P Bad Pistyan, Germany, I9I2 -----------------------------92
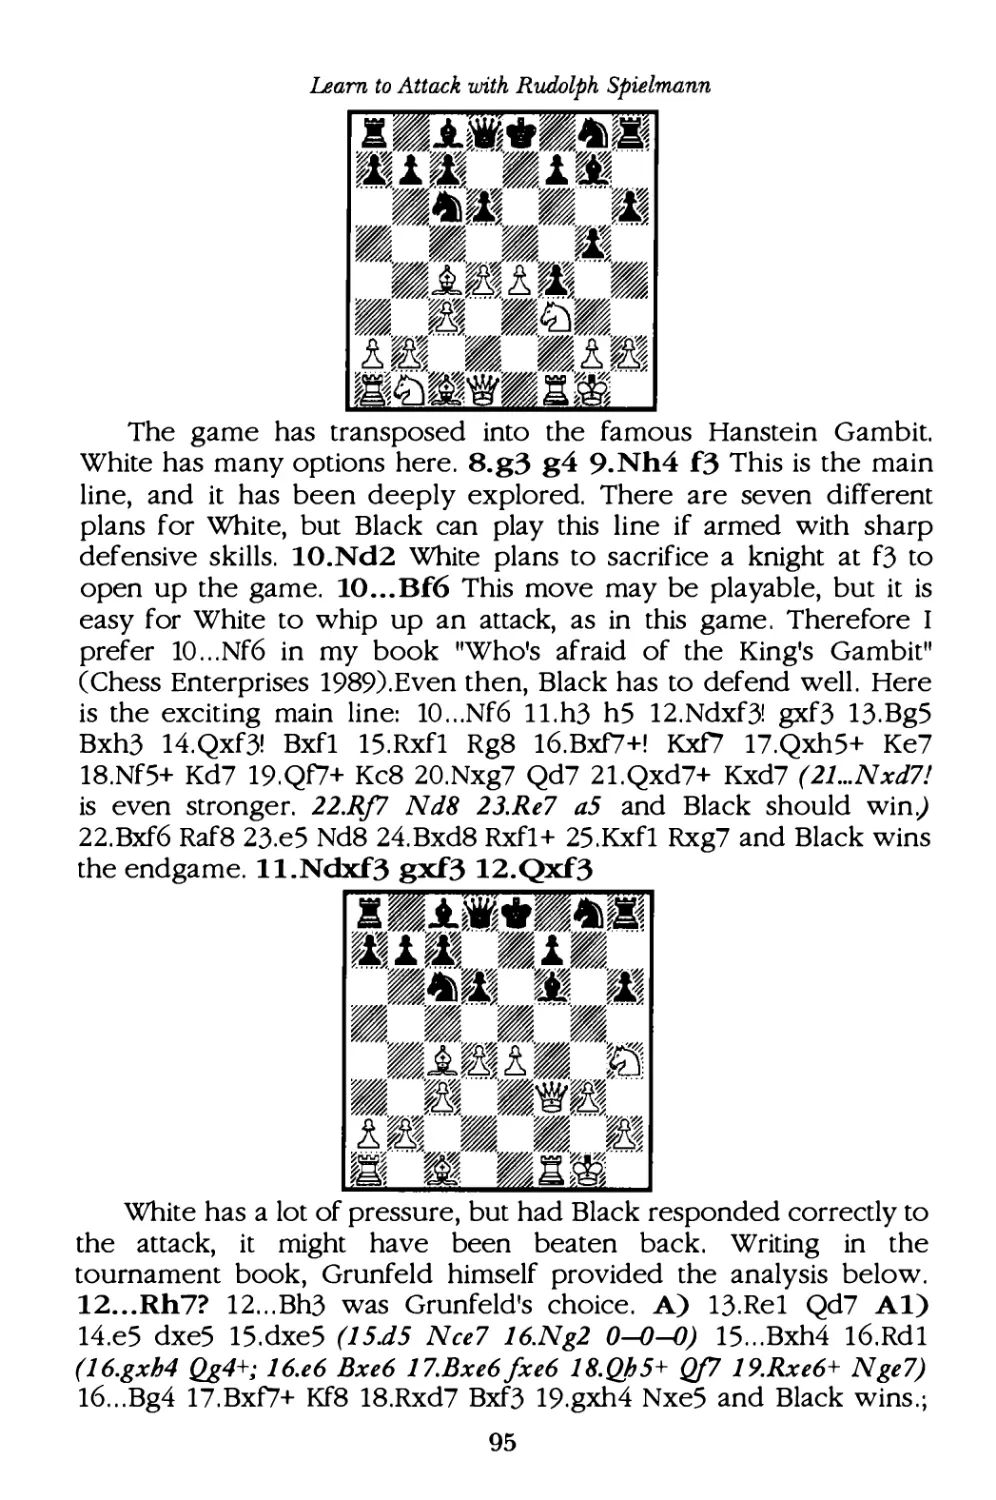
vs. Fahrni,H Baden Baden, Germany, I914 -------------------------------- 93
!�� Eljaschoff, Munich, Germany, I904 ------------------------------------- 93
t vs�:Grunfeld,E Teplitz Schoenau, Germany, I922 ----------------------- 94
vs: Lowtzky,M Gambit Tournament, Abbazia, Italy, I9I2 ------------ 98
vs. Bogoljubow,E Triberg, Germany, I92I- ----------- -------- --------------99
vs. Grunfeld,E Innsbruck, Austria, I922 ------- -- ----------- ---------------- 99
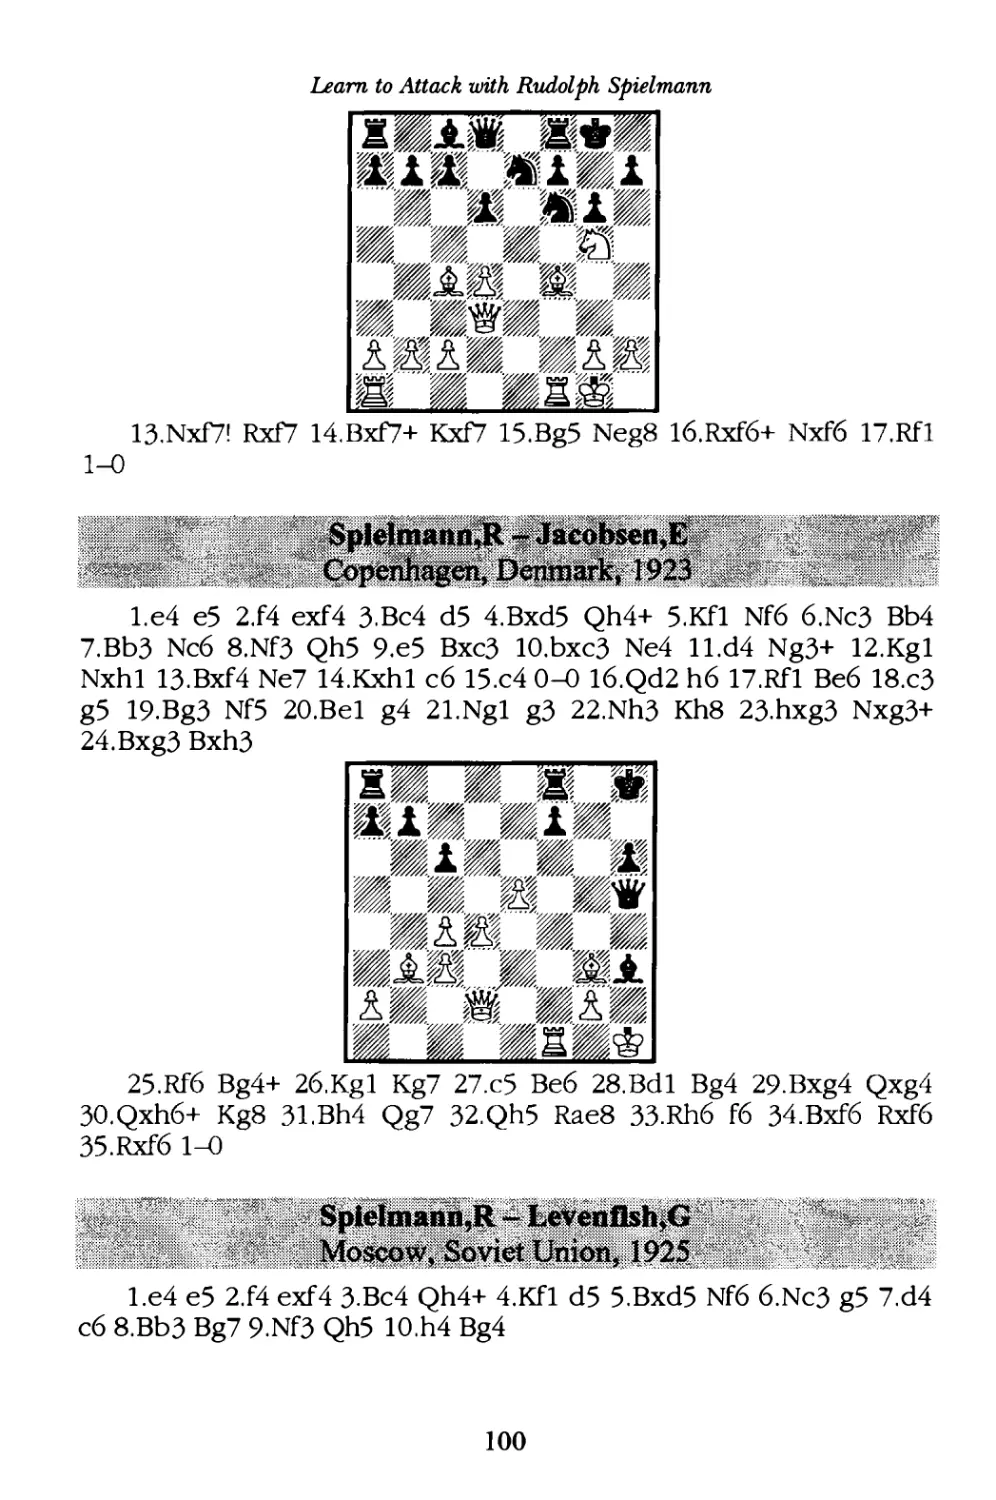
vs. Jacobsen,E Copenhagen, Denmark, I923 ----------------------------- IOO
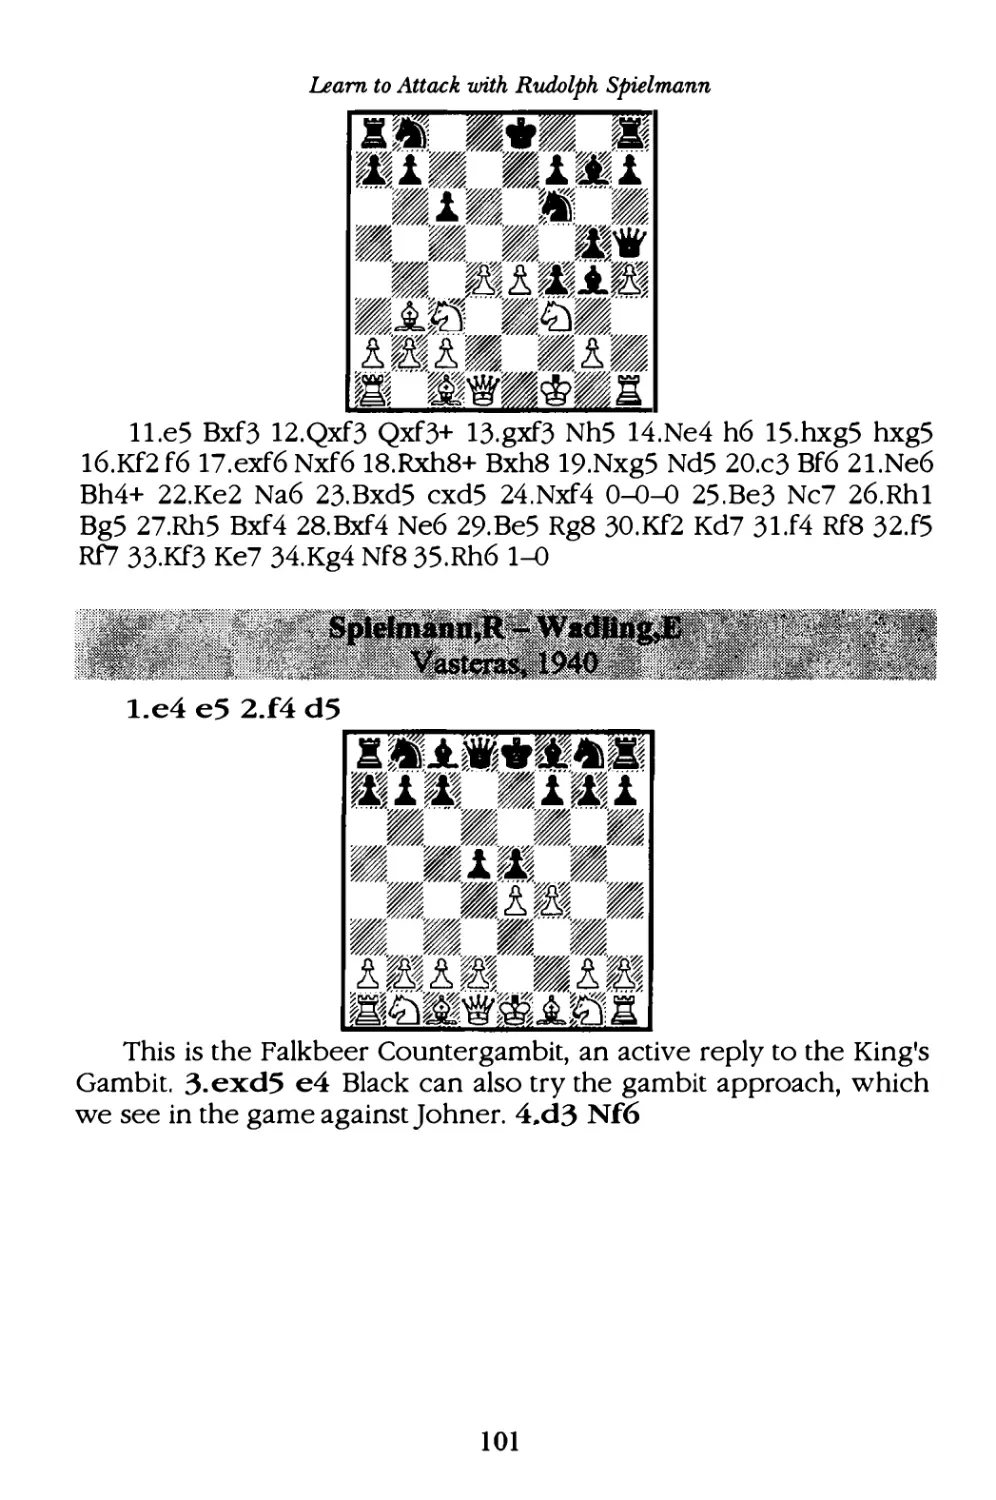
vs. Levenfish,G Moscow, Soviet Union, I925 ----------------------------IOO
\vs� Wadling,E Vasteras, I940--------------------------------------------------- I0I
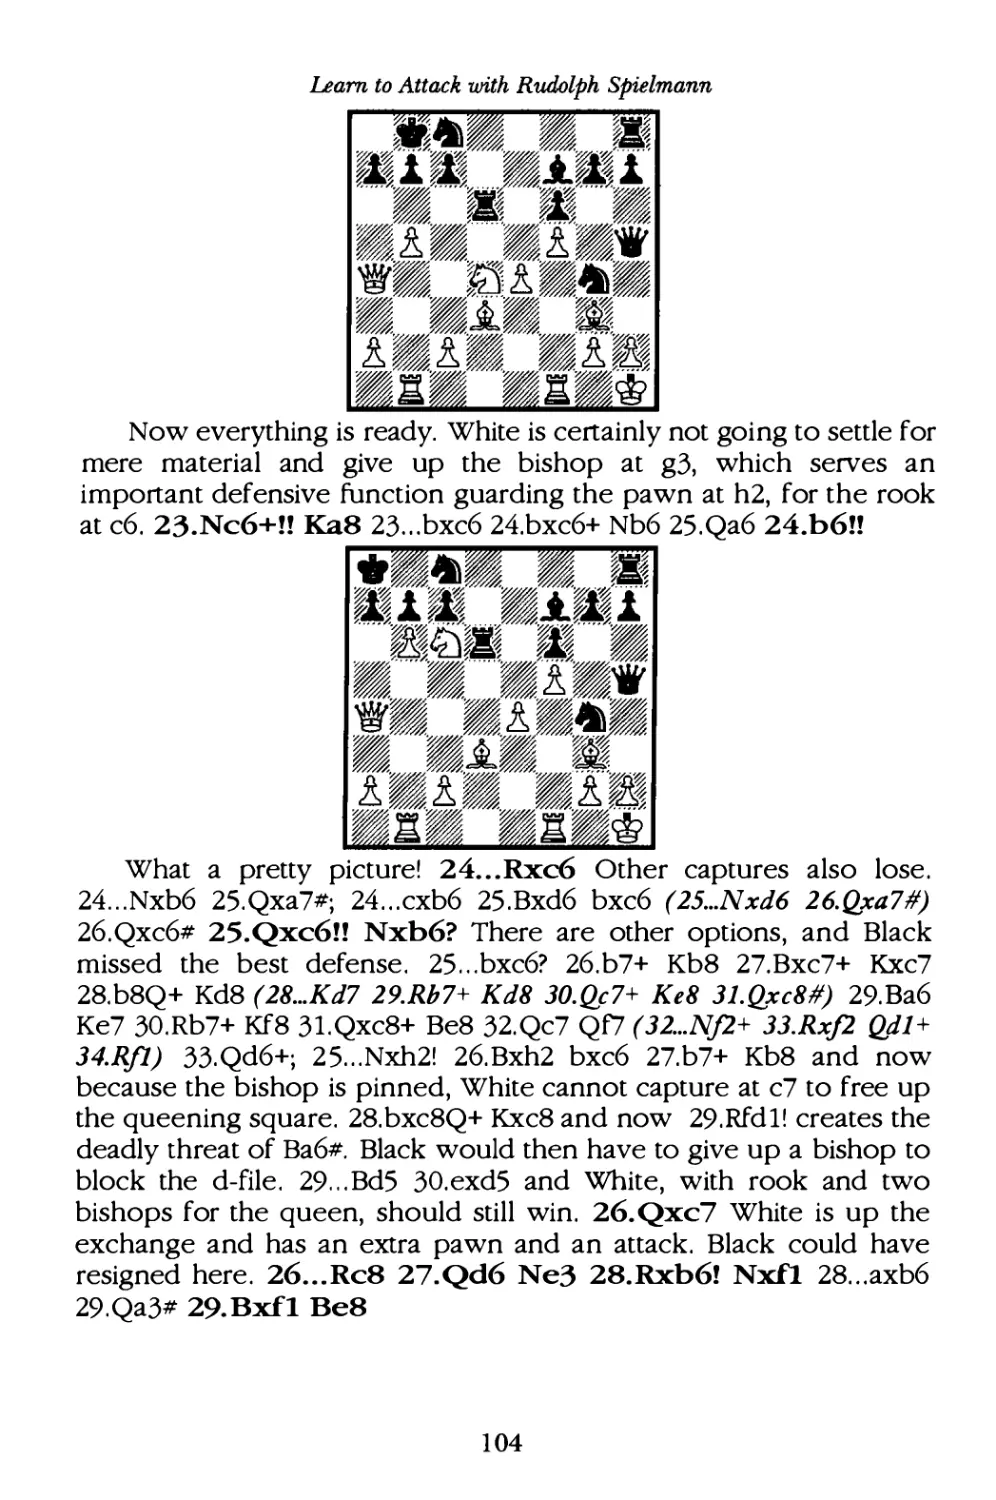
vs. Cohn,W Barmen, Germany, I905 ----------------------------------------I05
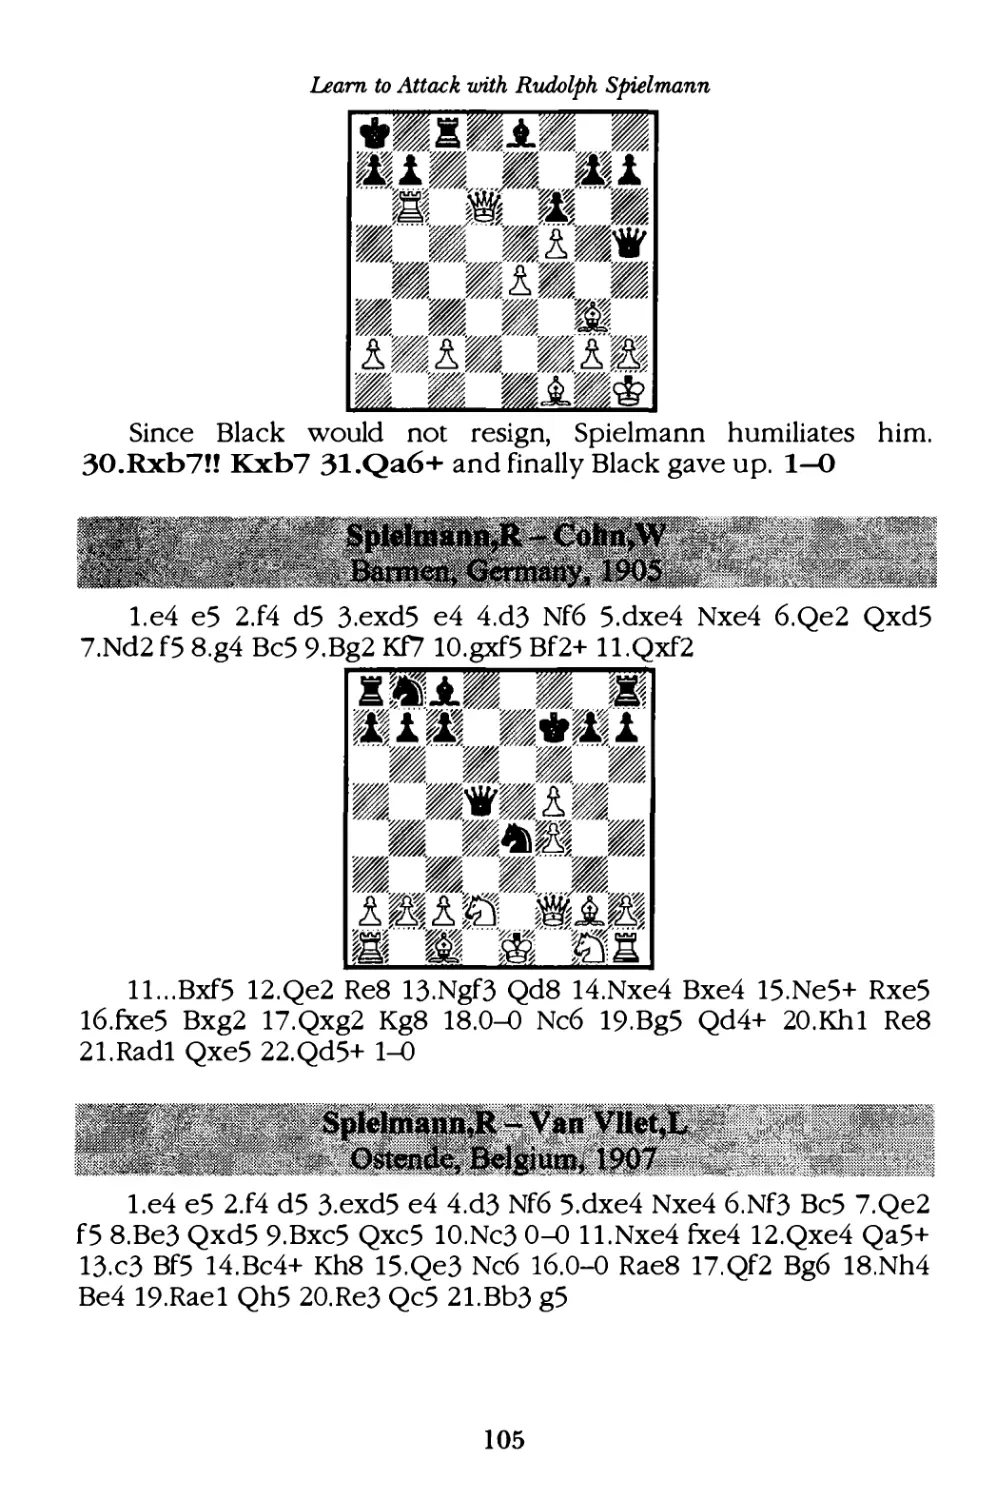
vs. Van Vliet,L Ostende, Belgium, I907 ----------------------------------I05
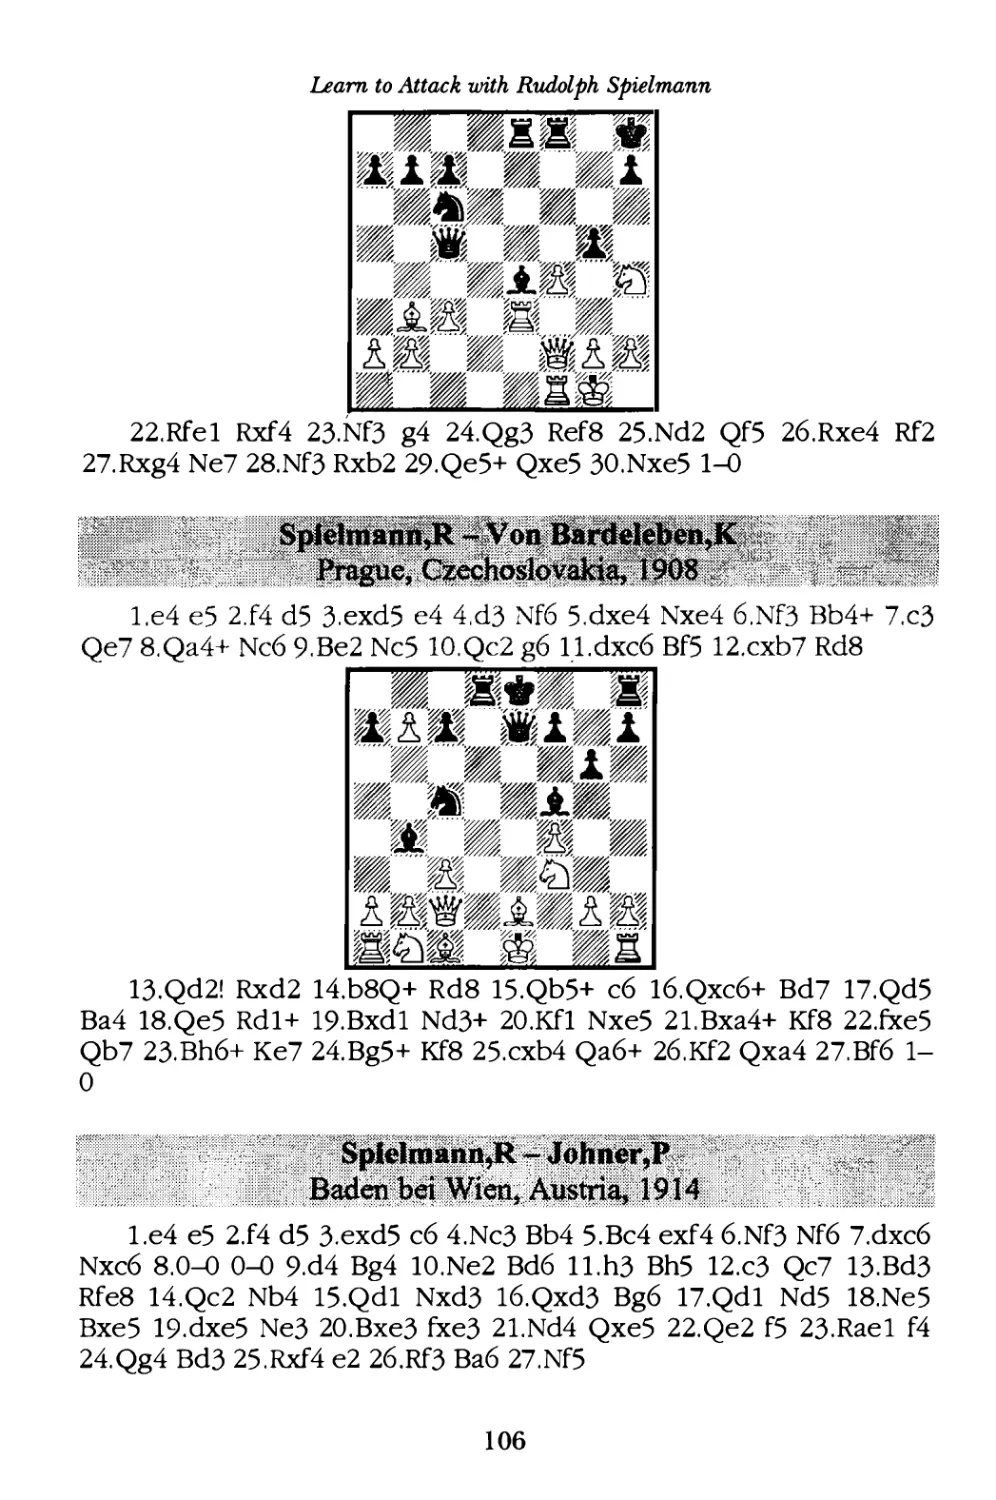
vs. Von Bardeleben,K Prague, Czechoslovakia, I908 -----------------I06
vs. Johner,P Baden Baden, Germany, I9I4 ------------------------------- I06
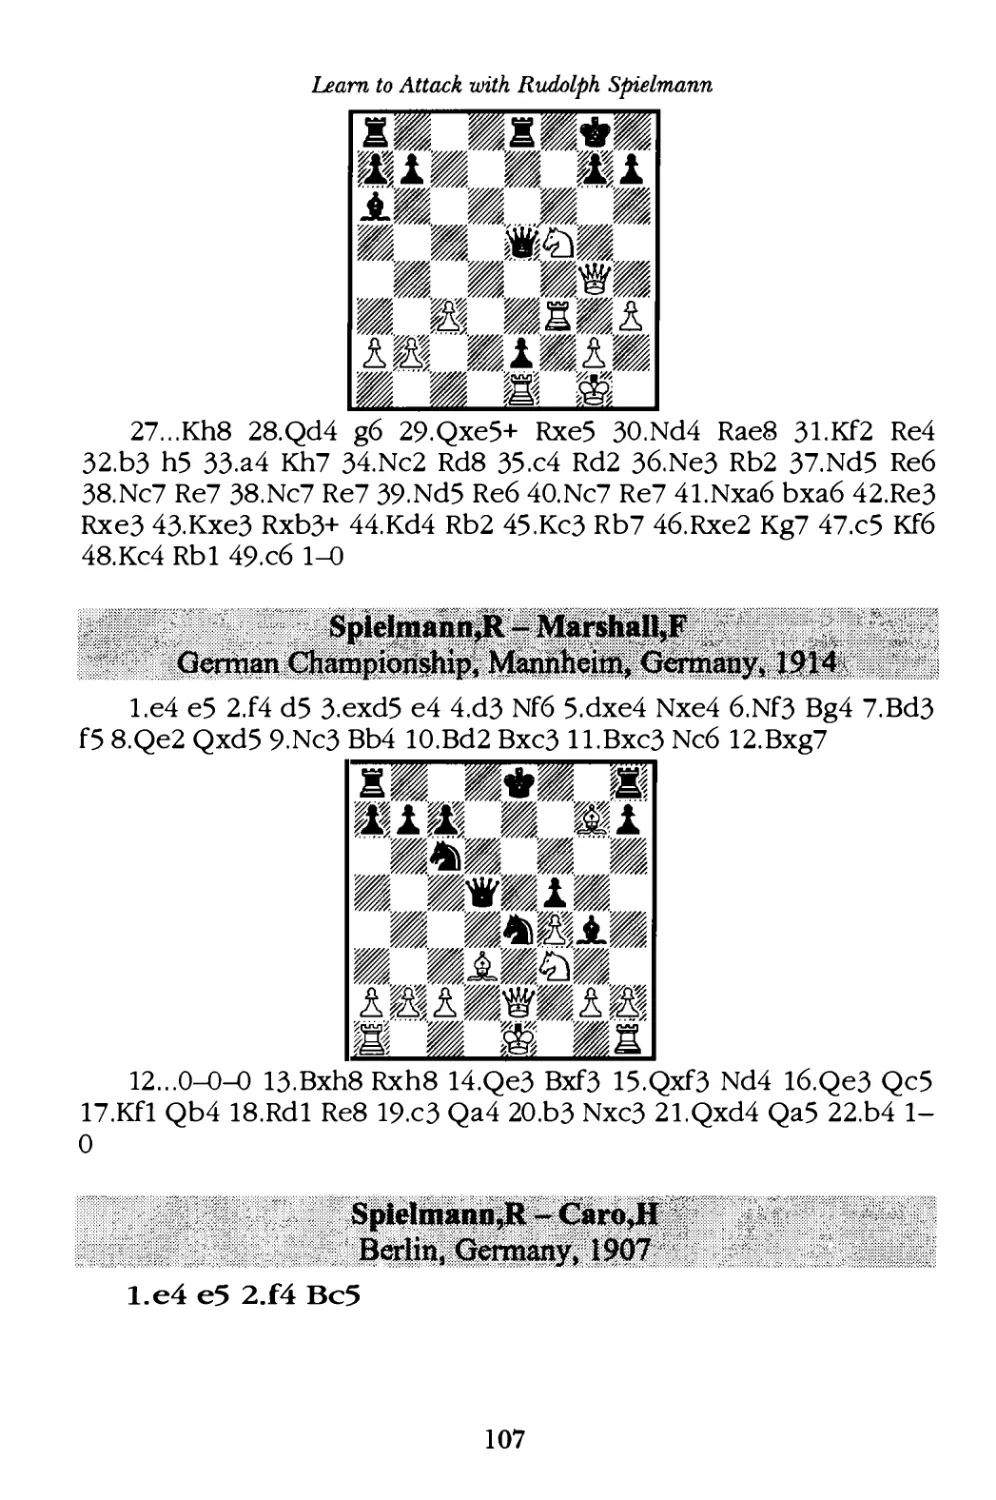
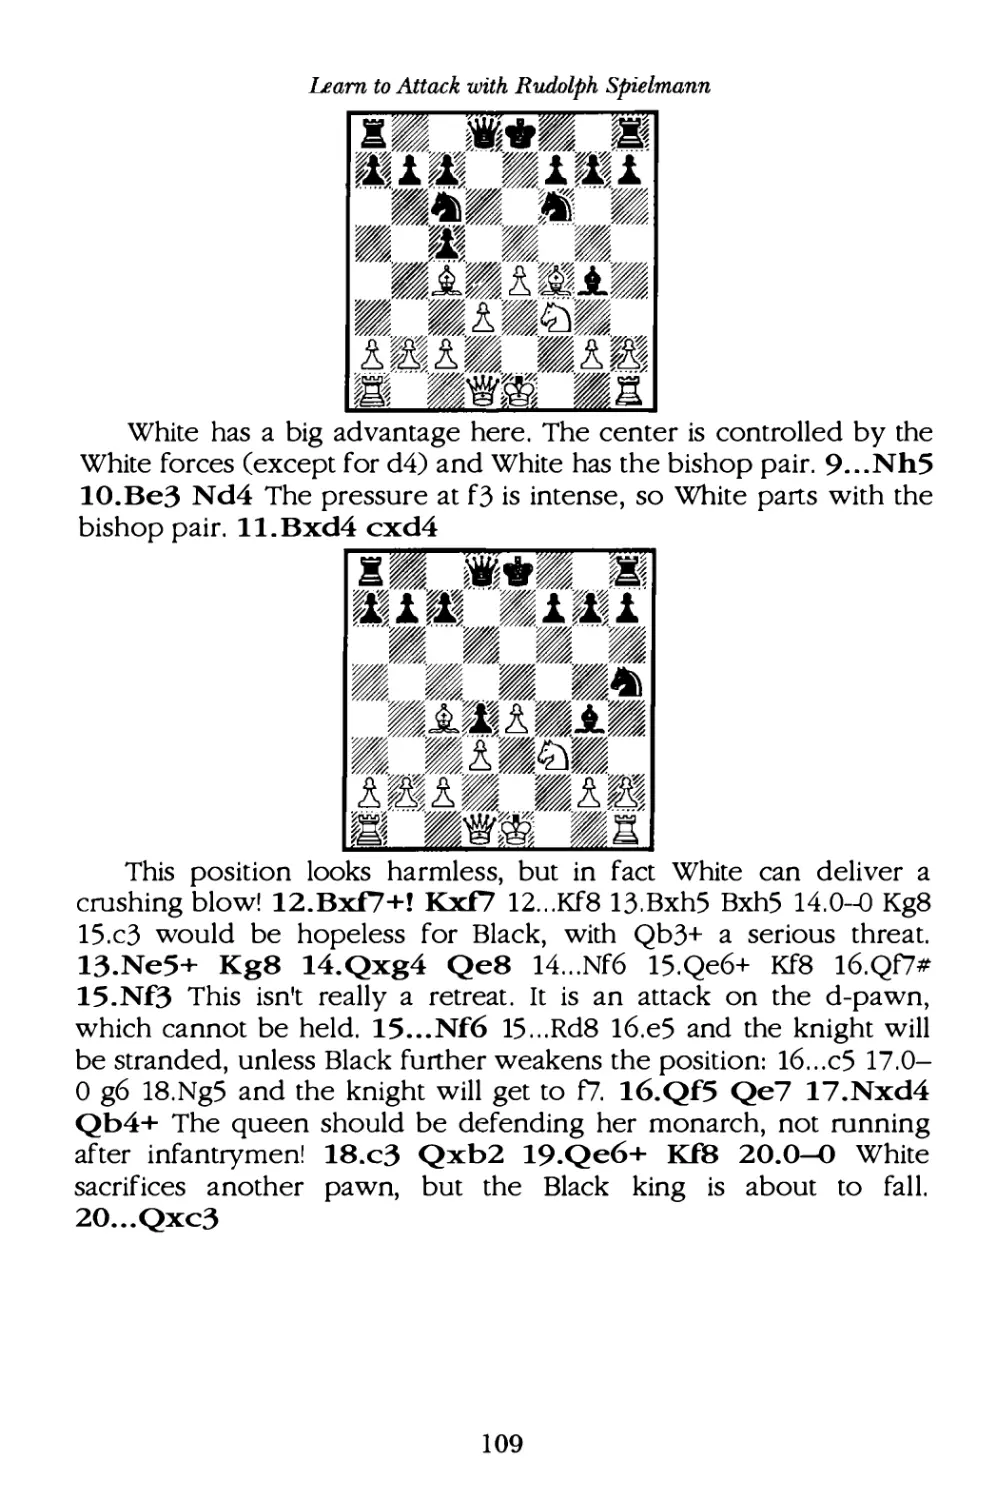
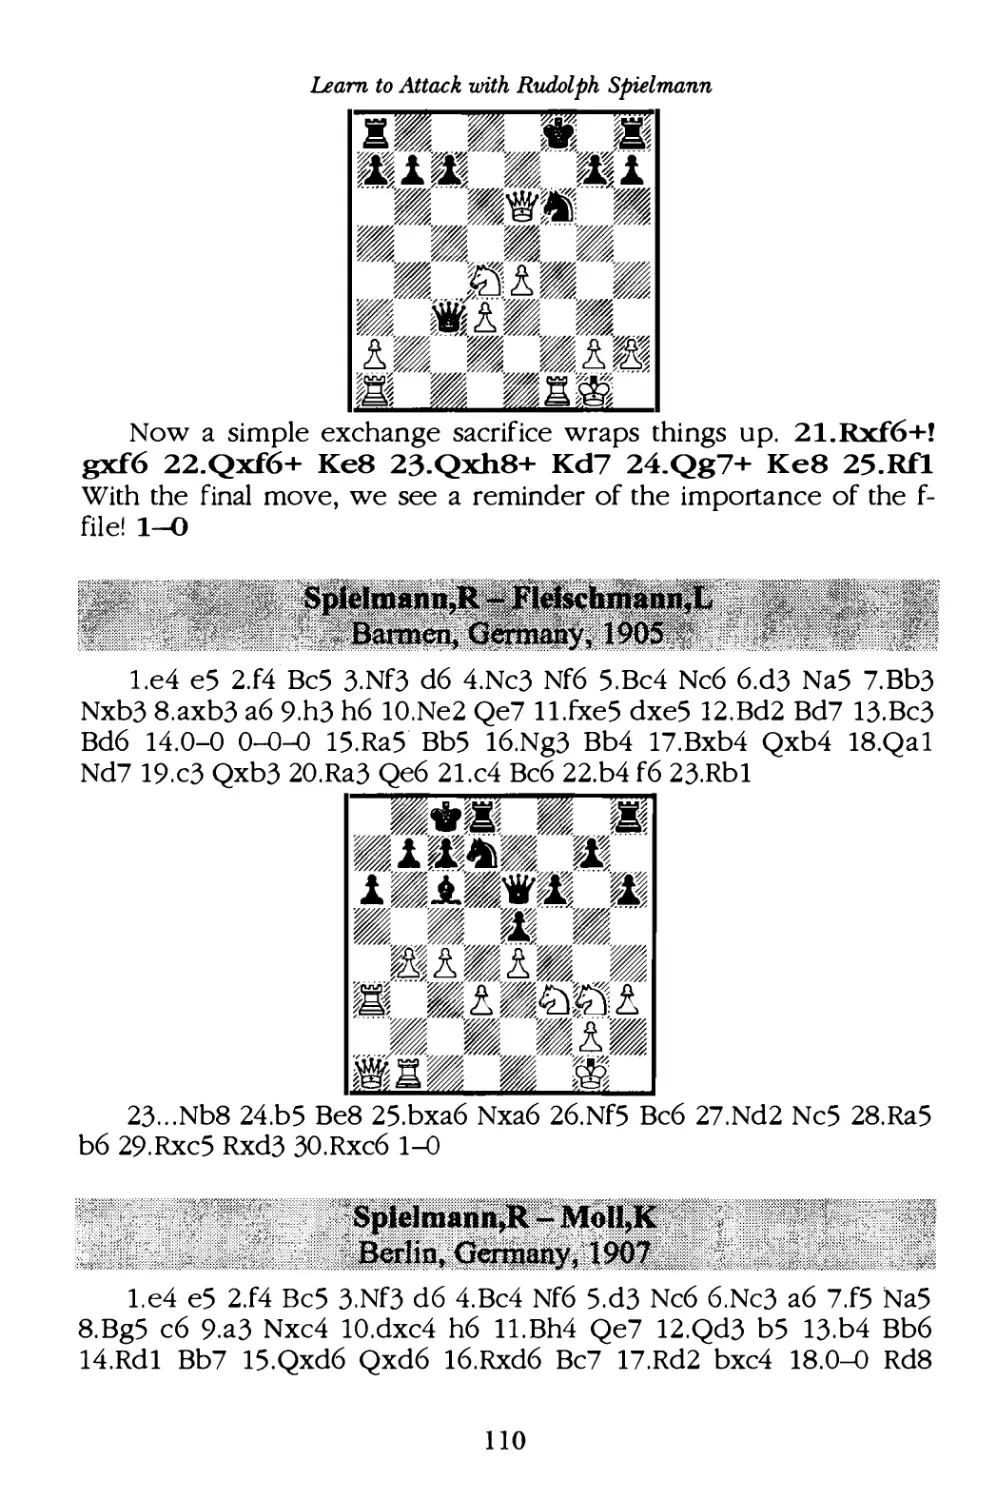
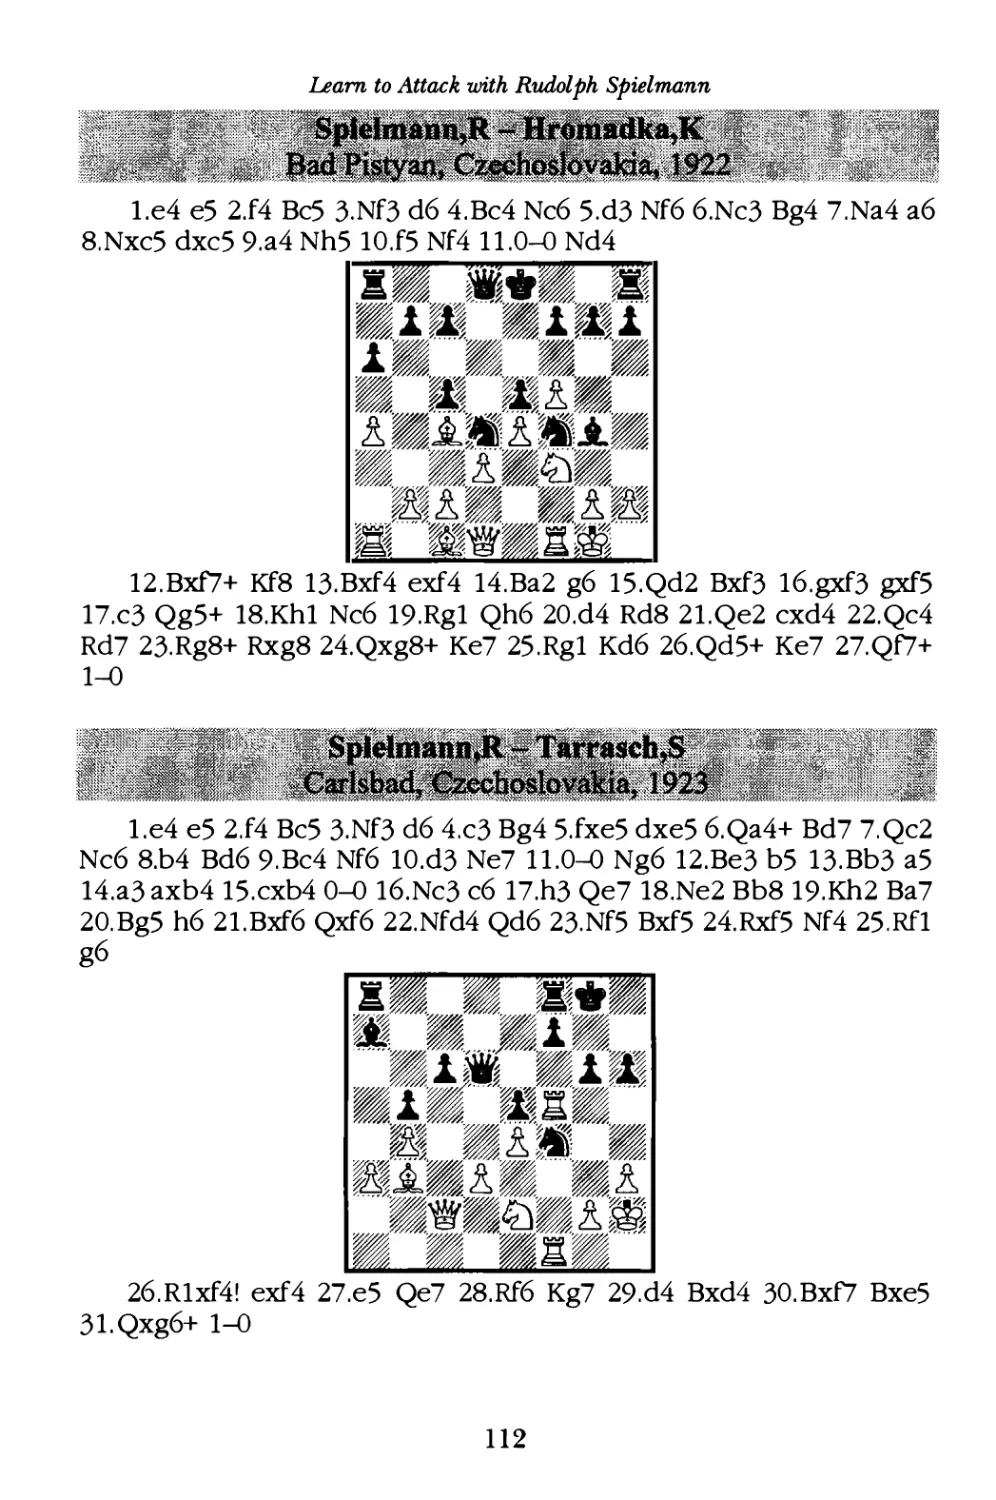
vs. Marshall,F Mannheim, Germany, I9I4 --------- -- --------- ------------I07
�,; Caro,H Berlin, Germany, I907 ----
----------
- ---------
---- ------
--
--- --- I07
vs. Fleischmann,L Barmen, Germany, I905 ------------------------------ 110
vs. Moll,K Berlin, Germany, I907 ------ ----- --------------------------------II 0
vs. Tartakower,S Baden Baden, Germany, I9I4--------------------
--- 11I
vs. Hromadka,K Bad Pistyan, Czechoslovakia, I922 ------------------ 112
vs. Tarrasch,S Carlsbad, Czechoslovakia, I923-------------------------- 112
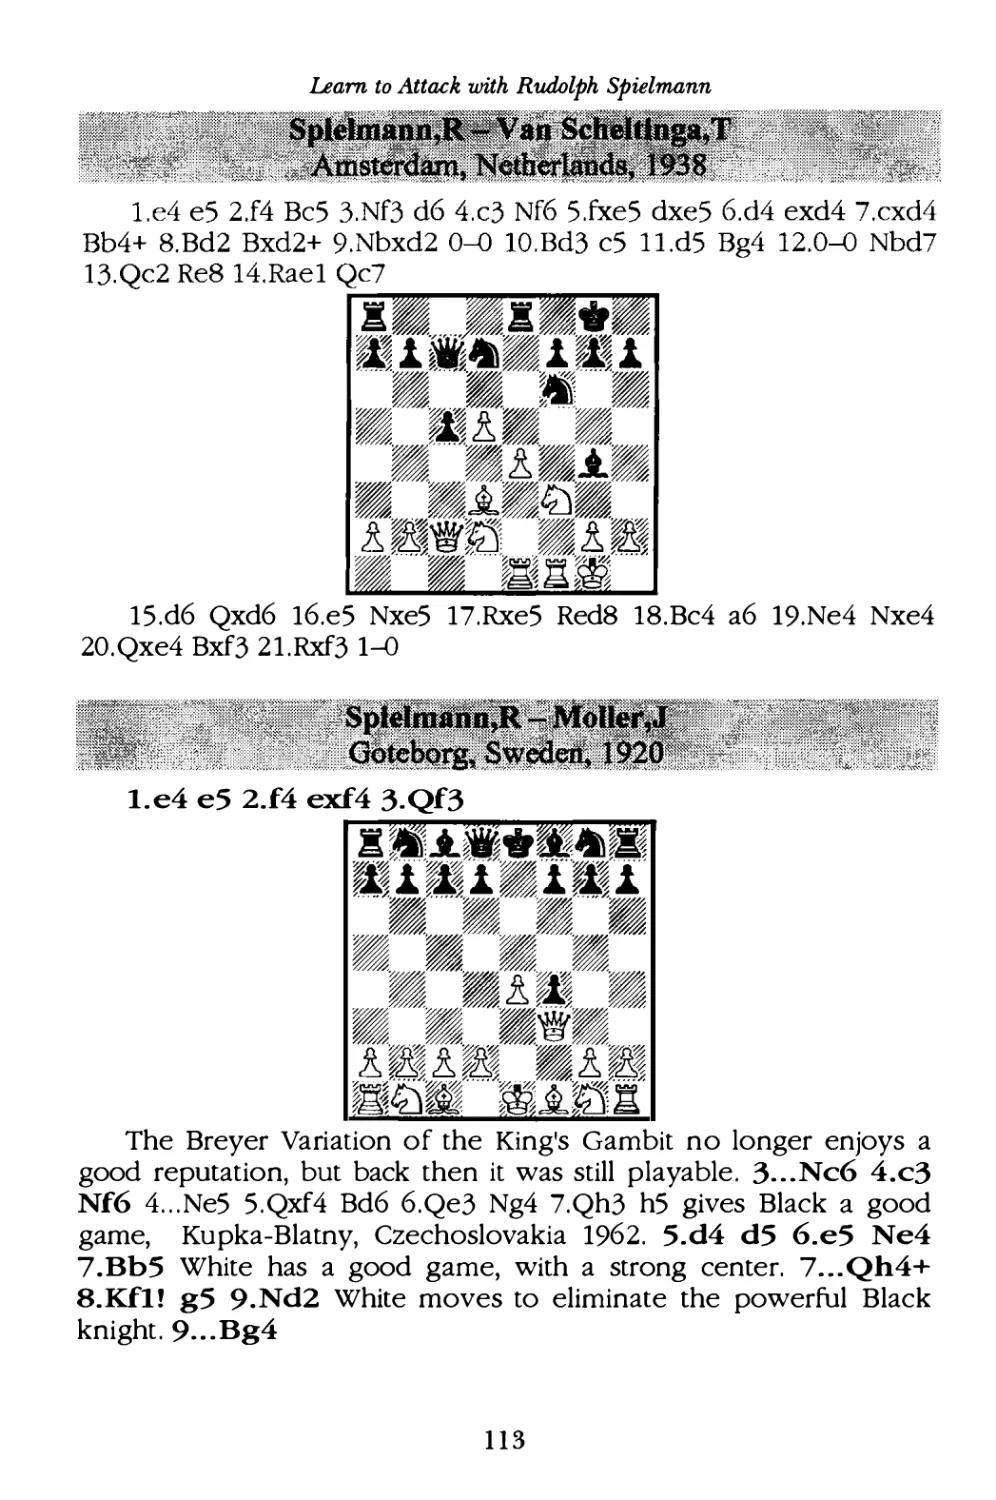
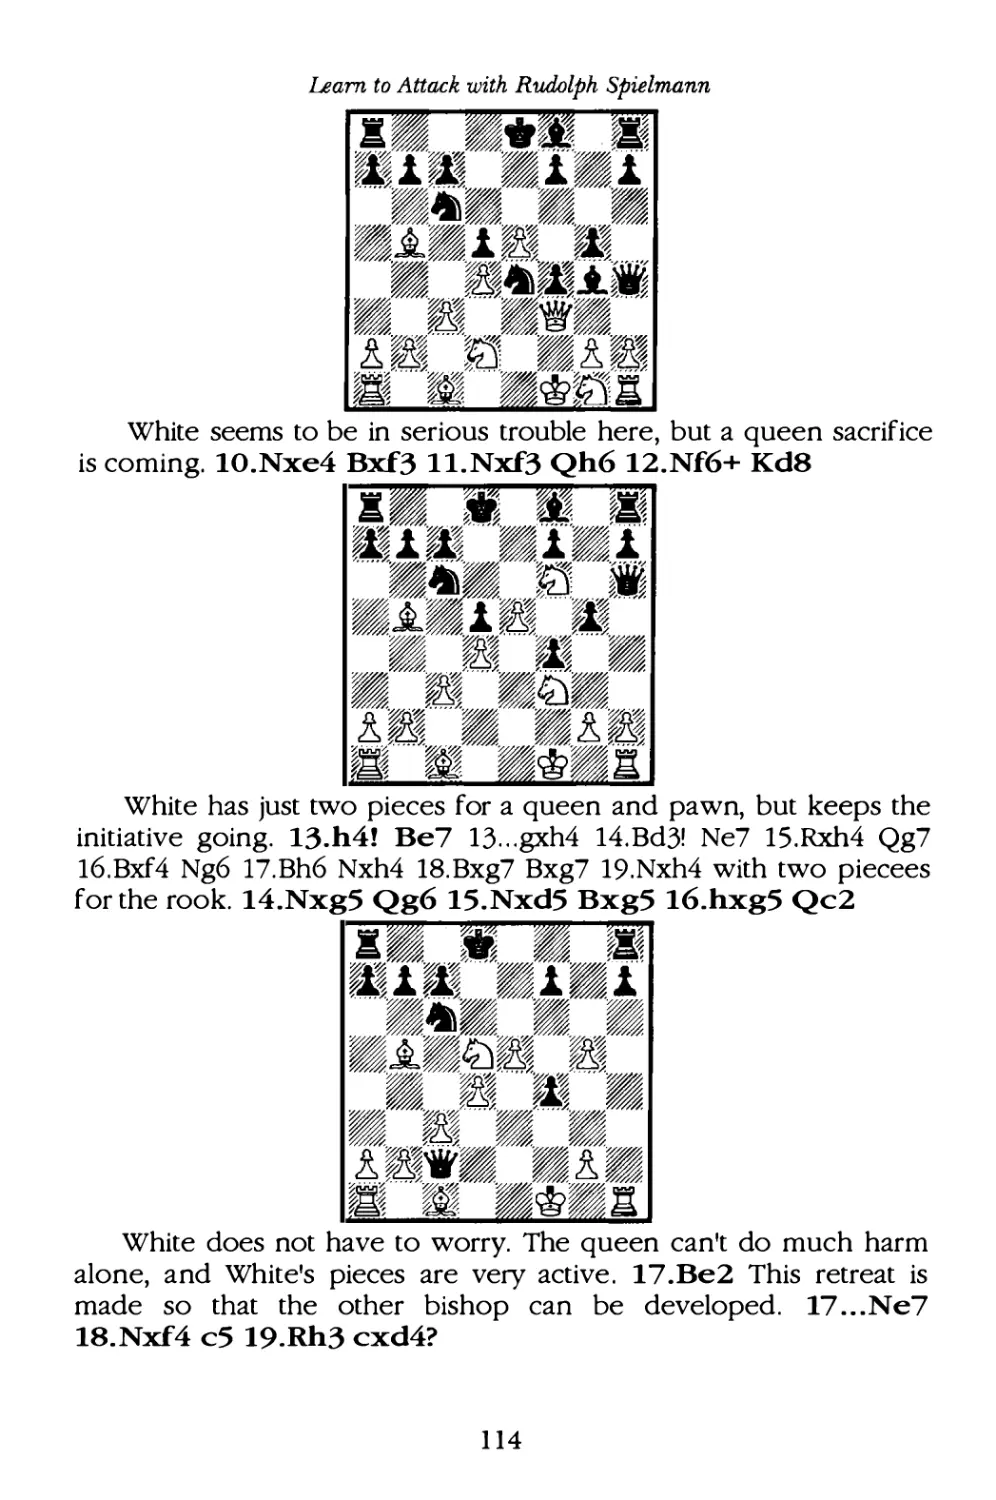
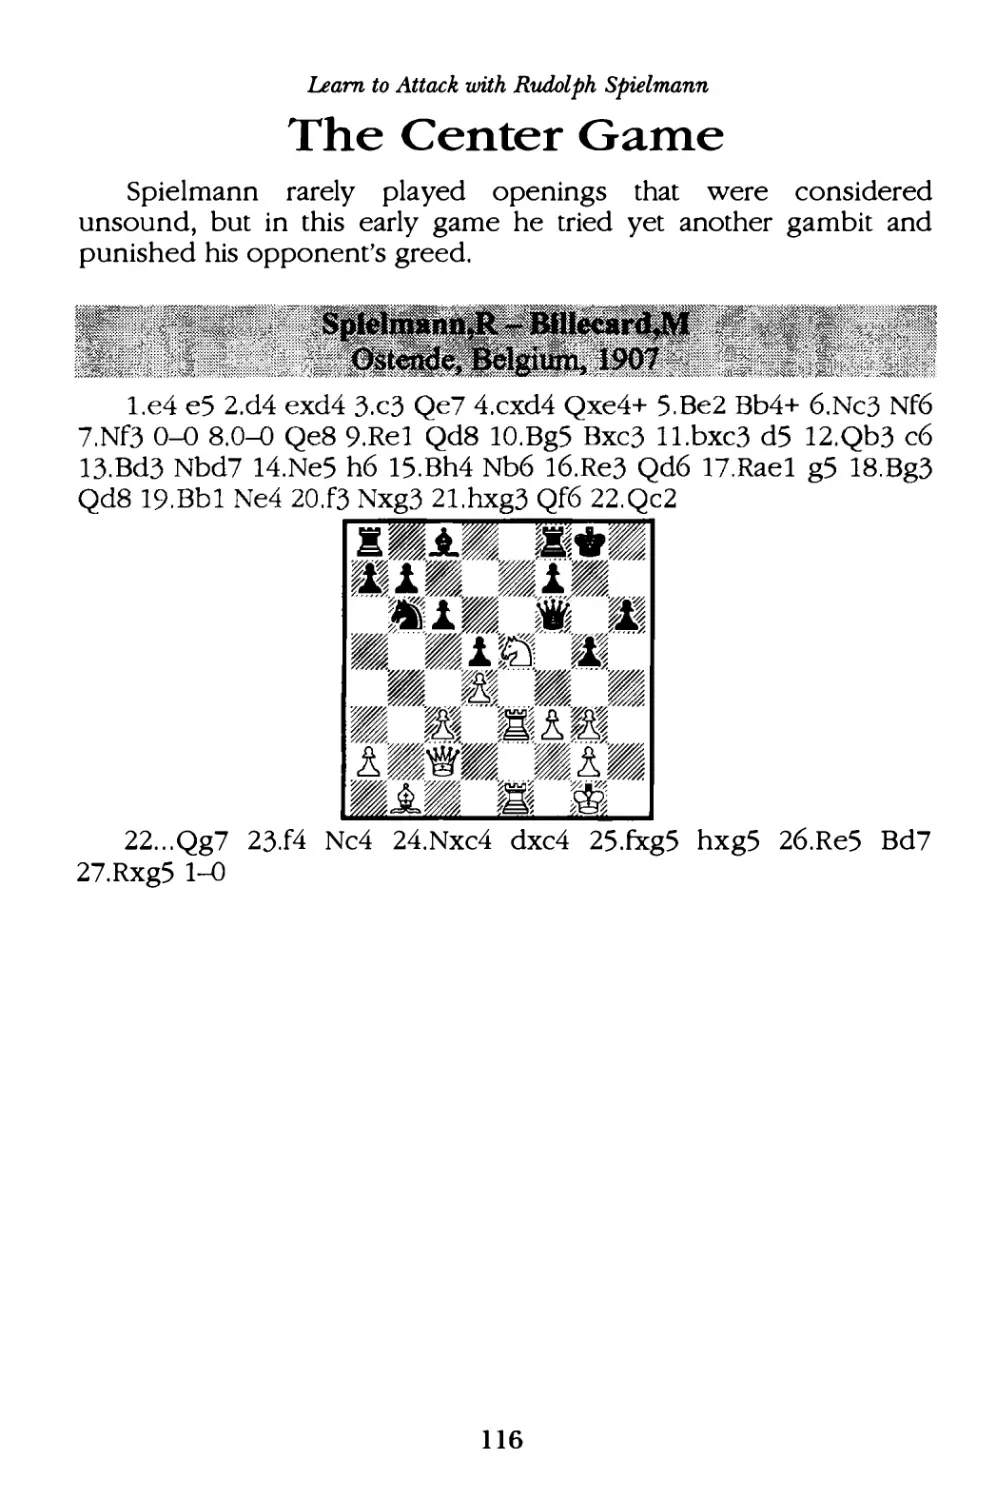
vs. Van Scheltinga,T Amsterdam, Netherlands, I938 ---------------- 113
�- Moller,J Goteborg, Sweden, I920 ----- ------------ -- ---------------------II3
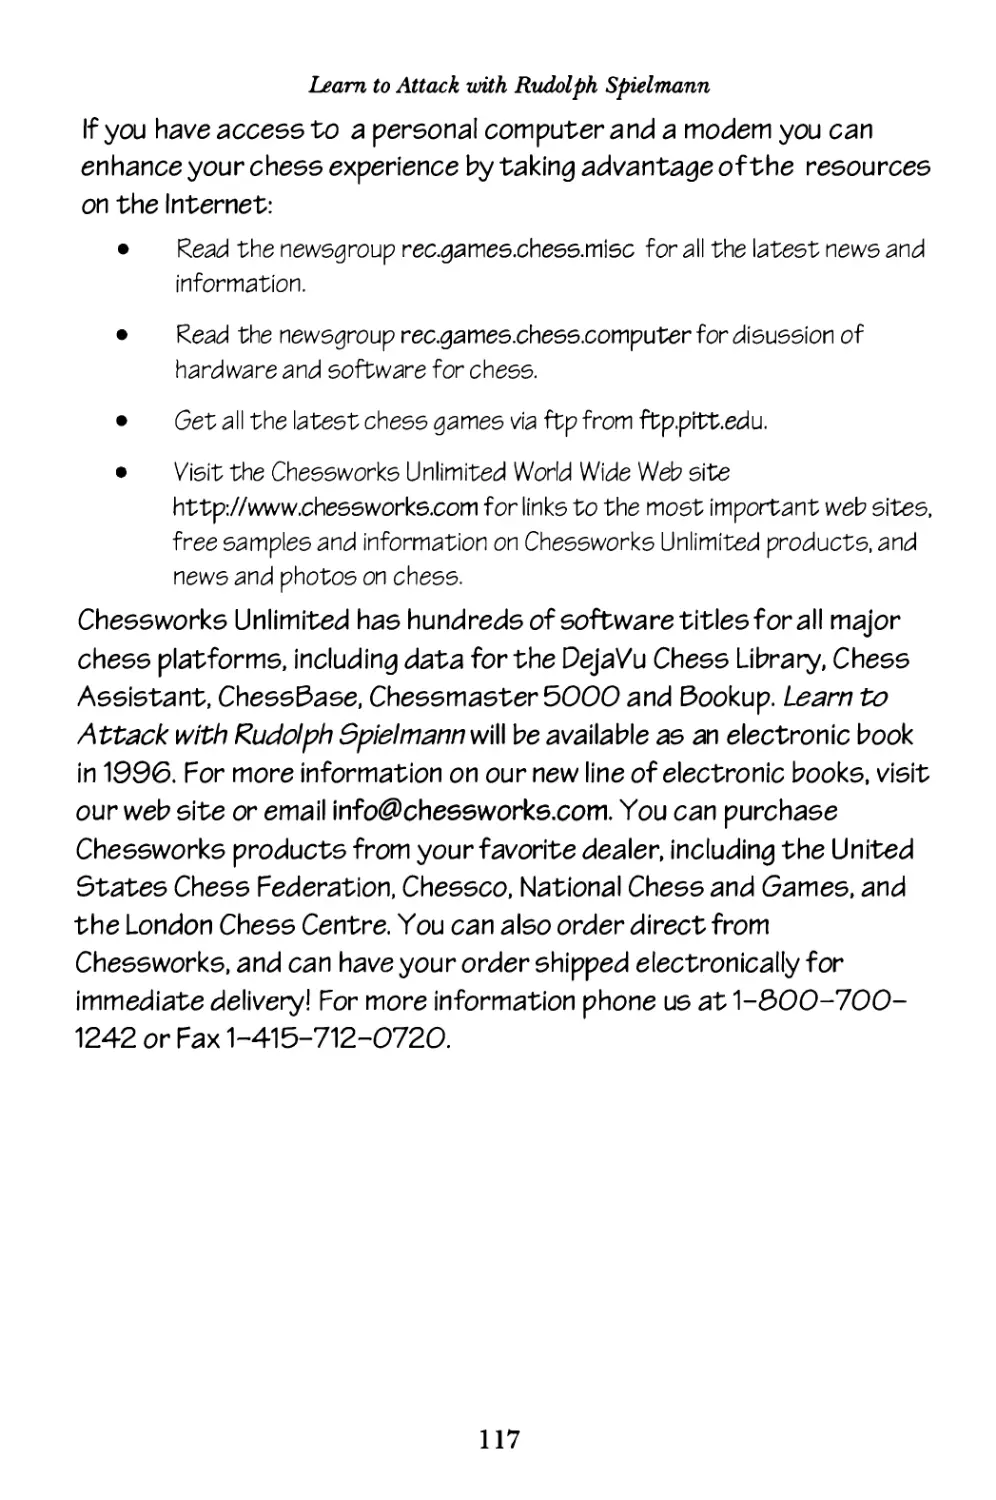
The Center Game------------------ ----------------------------------------------116
vs. Billecard,M Ostende, Belgium, I907 ------------------
- ---------------- 116
1_'-.•J'I
,.
y..
..
.
10
Learn to Attack with Rudolph Sp ielmann
Introduction
Tartakower once dubbed Rudolph Spielmann the Last Knight of
the King's Gambit, and he fully justified that title thoughout his
career. He was born on May 5th
, 1883 and quickly became known as
a child prodigy. It was not until 1905, however, that he began to
play in international events at the age of twenty-two .
He participated in most of the great tournaments of the time ,
and played particularly well in gambit tournaments , where the
players were required to play certain openings involving the
sacrifice of a pawn.
He played frequently in Germany, though he was an Austrian by
birth, born in Vi enna , the cultural mecca of the German-speaking
world. Perhaps it is unsurprising then that his style was esthetically
pleasing. Spielmann never could turn down an opportunity to win
by flashy means, and loved to sacrifice at every opportunity.
Fo llow him here as he leaves stunned opponents in the dust in
some of the greatest tournaments of all time . His "investments" of
material reap such rewards that had he applied these skills to the
stock market he surely would have been a multi-millionaire!
This book is devoted to the Open Game (l.e4 e5) which was the
fo cal point of Spielmann's play. It is designed to improve your
understanding of the art of attack in chess. By studying these games
you will learn not only how to fi nish off an attack with a brilliant
combination, but will also learn the critical art of building an attack
in the first place .
Those interested in fu rther exploring Spielmann's career should
investigate The Chess Career of Rudolph Spielmann by jack Spence .
The multivolume collection of games is in descriptive notation, and
the notes are often flawed tactically (don't worry if you can't fi nd
some of the "wins", they aren't there), but the games themselves are
beautiful and the biographical material is excellent .
11
Learn to Attack with Rudolph Sp ielmann
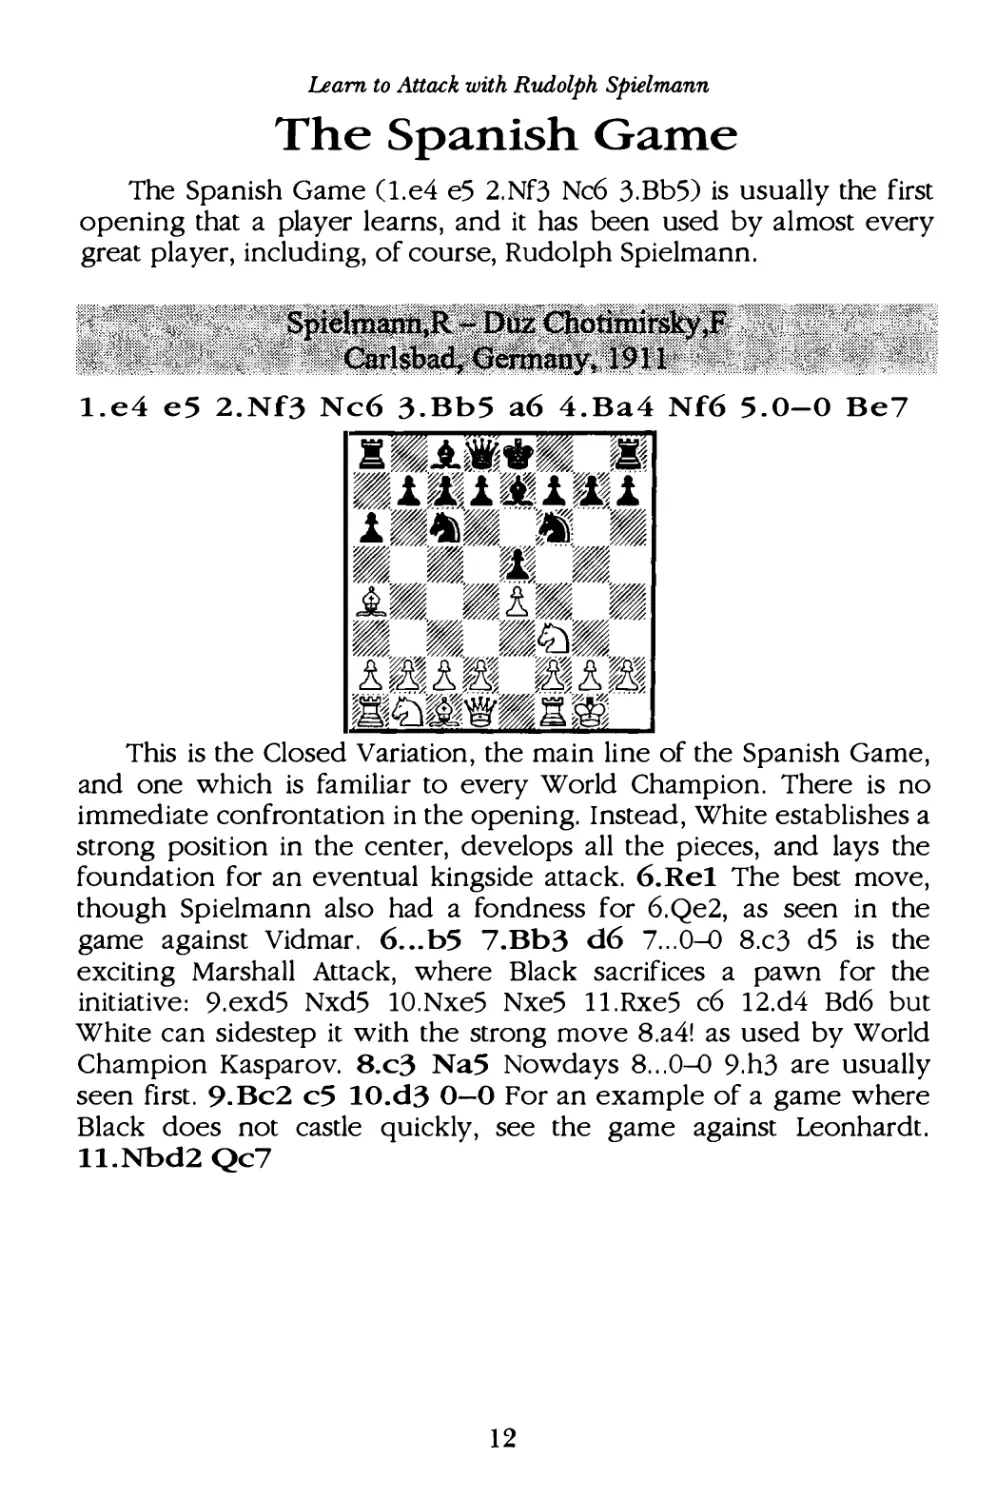
The Spanish Game
The Spanish Game (l.e4 e5 2. Nf3 Nc6 3.Bb5) is usually the first
opening that a player learns , and it has been used by almost every
great player, including, of course, Rudolph Spielmann .
l.e4 e5 2.Nf3 Nc6 3.Bb5 a6 4.Ba4 Nf6 5.0-0 Be7
�-��tBm).
-1��1�1��1
r�,�� -
-
-- -.'--
-
-V.
�
����·····'��
,���,£���
-=�::.�
!�!� �!�
?m'����ft�··· ·/,
This is the Closed Variation, the ma in line of the Spanish Game ,
and one which is fa miliar to every World Champion. There is no
immediate confrontation in the opening. Instead, White establishes a
strong position in the center, develops all the pieces , and lays the
foundation for an eventual kingside attack. 6. Rel The best move ,
though Spielmann also had a fo ndness for 6.Qe2, as seen in the
game against Vidmar. 6 ... b5 7.Bb3 d6 7... 0-0
8.c3 d5 is the
exciting Marshall Attack, where Black sacrifices a pawn for the
initiative: 9.exd5 Nxd5 10.Nxe5 Nxe5 ll.Rxe5 c6 12.d4 Bd6 but
White can sidestep it with the strong move 8.a4! as used by World
Champion Kasparov. 8.c3 Na5 Nowdays 8 ...0-0 9. h3 are usually
seen fi rst . 9.Bc2 c5 10.d3 0-0 For an example of a game where
Black does not castle quickly, see the game against Leonhardt .
ll.Nbd2 Qc7
12
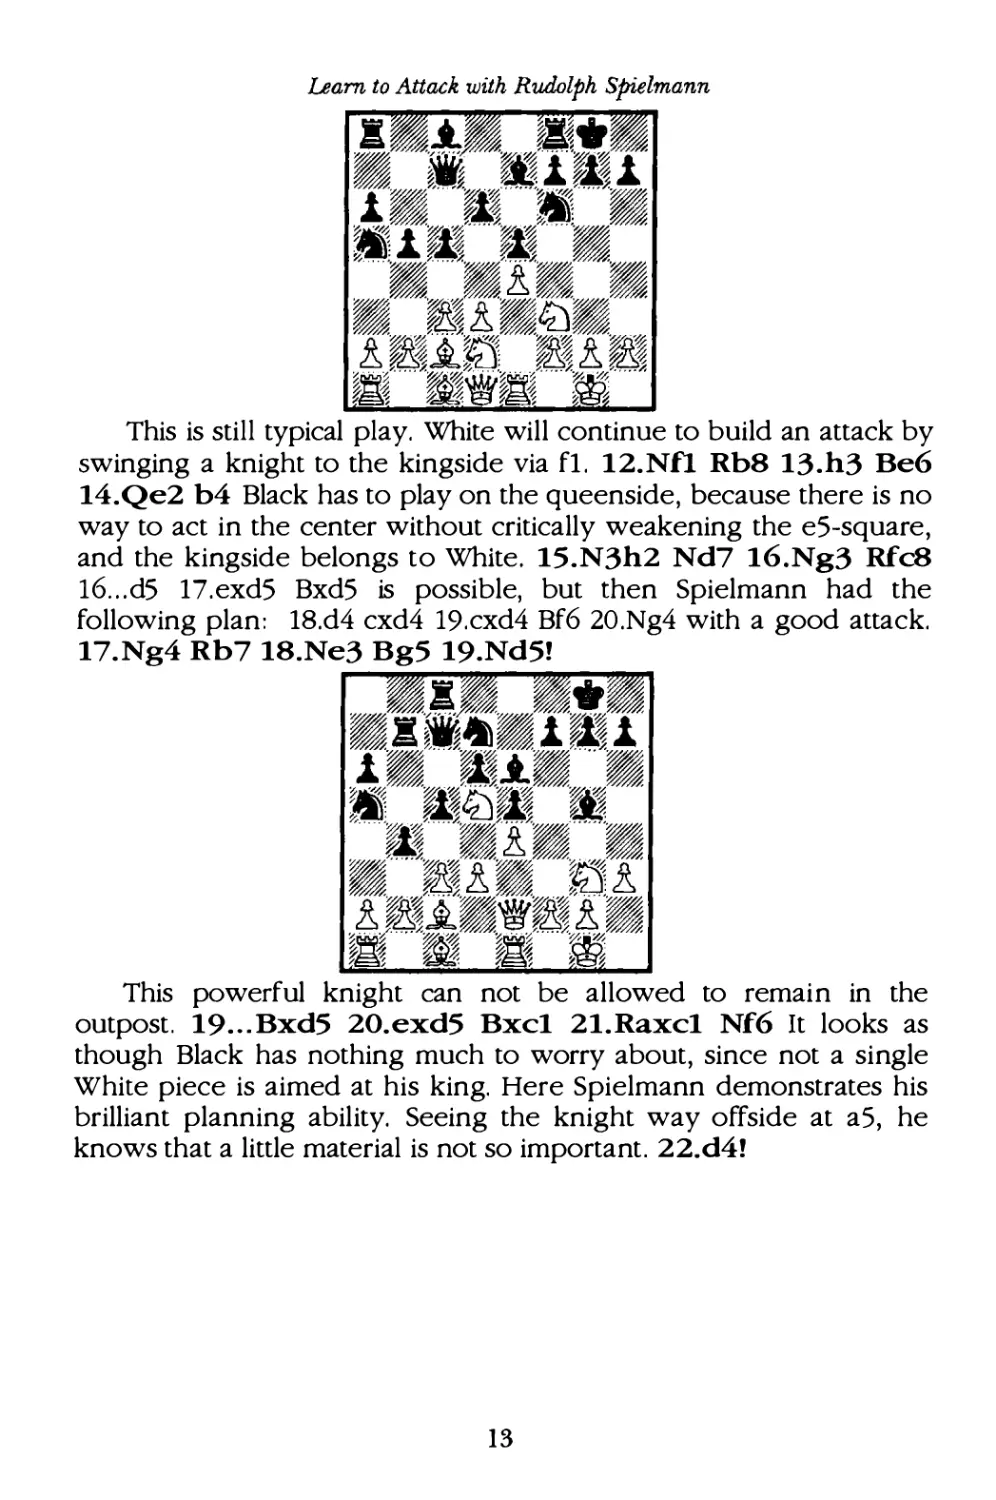
This is still typical play. White will continue to build an attack by
swinging a knight to the kingside via fl . 12.Nfl Rb8 13.h3 Be6
14.Qe2 b4 Black has to play on the queenside, because there is no
way to act in the center without critically weakening the e5-square,
and the kingside belongs to White . 15.N3h2 Nd7 16.Ng3 Rfc8
16...d5 17.exd5 Bxd5 is possible, but then Spielmann had the
fo llowing plan: 18.d4 cxd4 19.cxd4 Bf6 20 .Ng4 with a good attack.
17.Ng4 Rb7 18.Ne3 Bg5 19.Nd5!
.�.,�---�;f(�
-K��-1�1
r�,· -?.•.l�'· . .
�
�
z ''"'
%�?<:'...
�
�'?<:'��f� %
•�CZJ��
�......�/. .. �
�'£�··..�
�, .. v.�,���,
!�l:���lf�
�·· ·· f L�w. ?<'��···f�. . J0_ . .,�
;i;�0< �� ;i;�0< �.
r��r��'E9'&
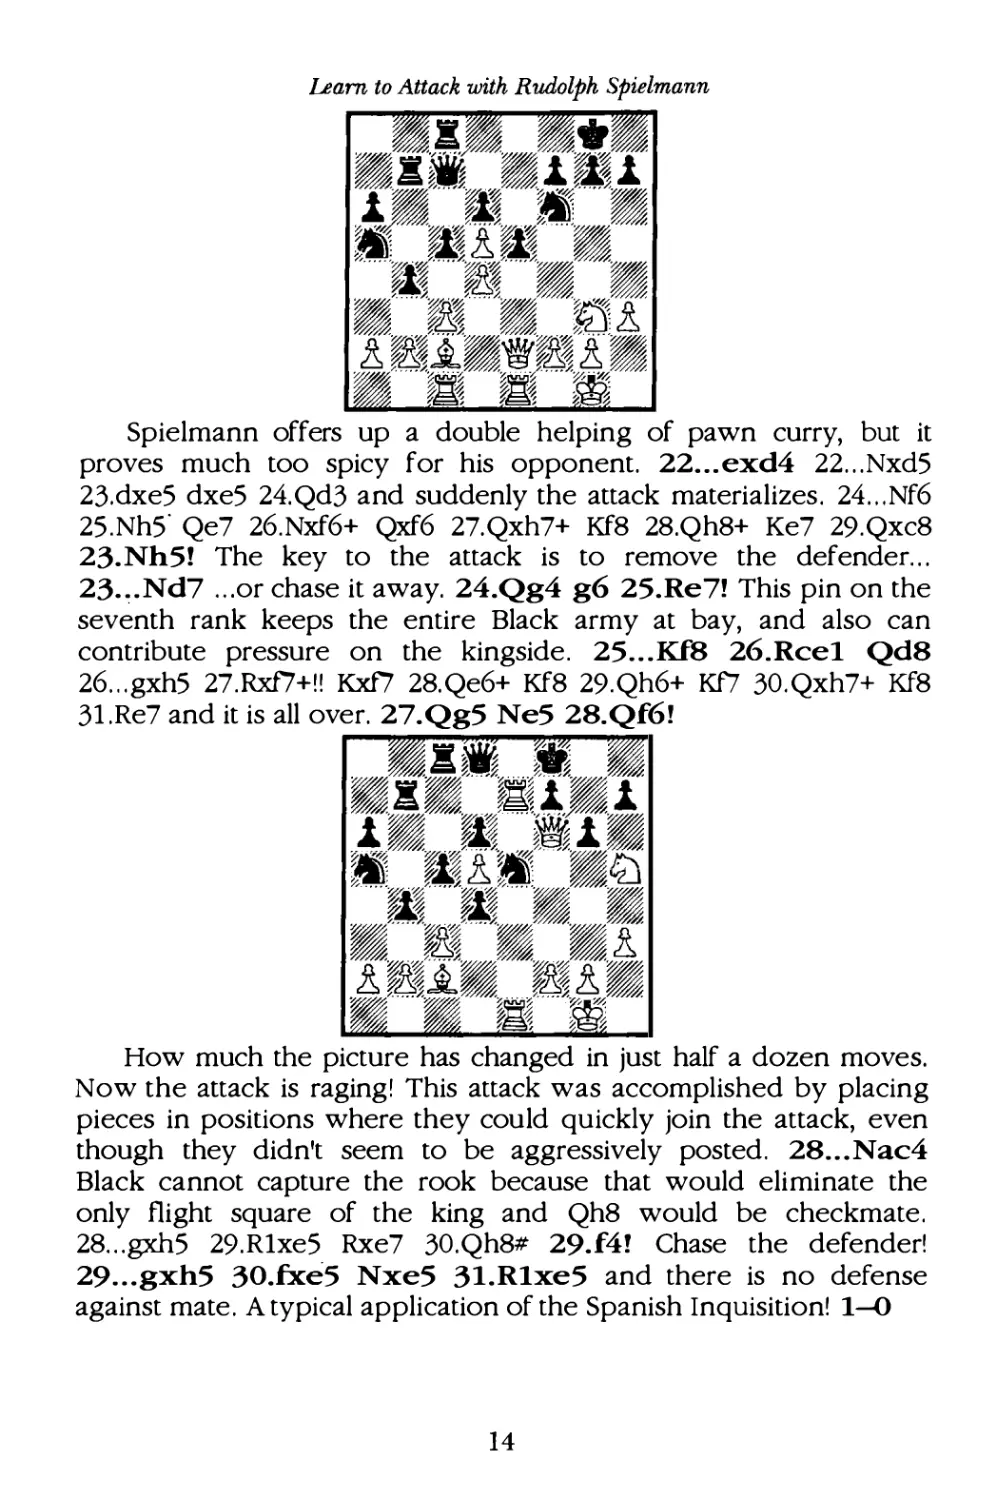
This powerful knight can not be allowed to remain in the
outpost . 19. .. Bxd5 20. exd5 Bxcl 21.Raxcl Nf6 It looks as
though Black has nothing much to worry about , since not a single
White piece is aimed at his king. Here Spielmann demonstrates his
brilliant planning ability. Seeing the knight way offside at aS, he
knows that a little material is not so important . 22.d4!
13
Spielmann offers up a double helping of pawn curry, but it
proves much too spicy for his opponent . 22 ...exd4 22...Nxd5
23.dxe5 dxe5 24.Qd3 and suddenly the attack materializes . 24 . .. Nf6
25.Nh5. Qe7 26. Nxf6 + Qxf6 27.Qxh7+ Kf8 28.Qh8+ Ke7 29 . Qxc8
23.Nh5! The key to the attack is to remove the defendec ..
23.�. Nd7 .. . or chase it away. 24.Qg4 g6 25 .Re7! This pin on the
seventh rank keeps the entire Black army at bay, and also can
contribute pressure on the kingside . 25...Kf8 26 . Rcel Qd8
26... gxh5 27.Rxf7+!! Kxf7 28.Qe6+ Kf8 29.Qh6+ Kf7 30. Qxh7+ Kf8
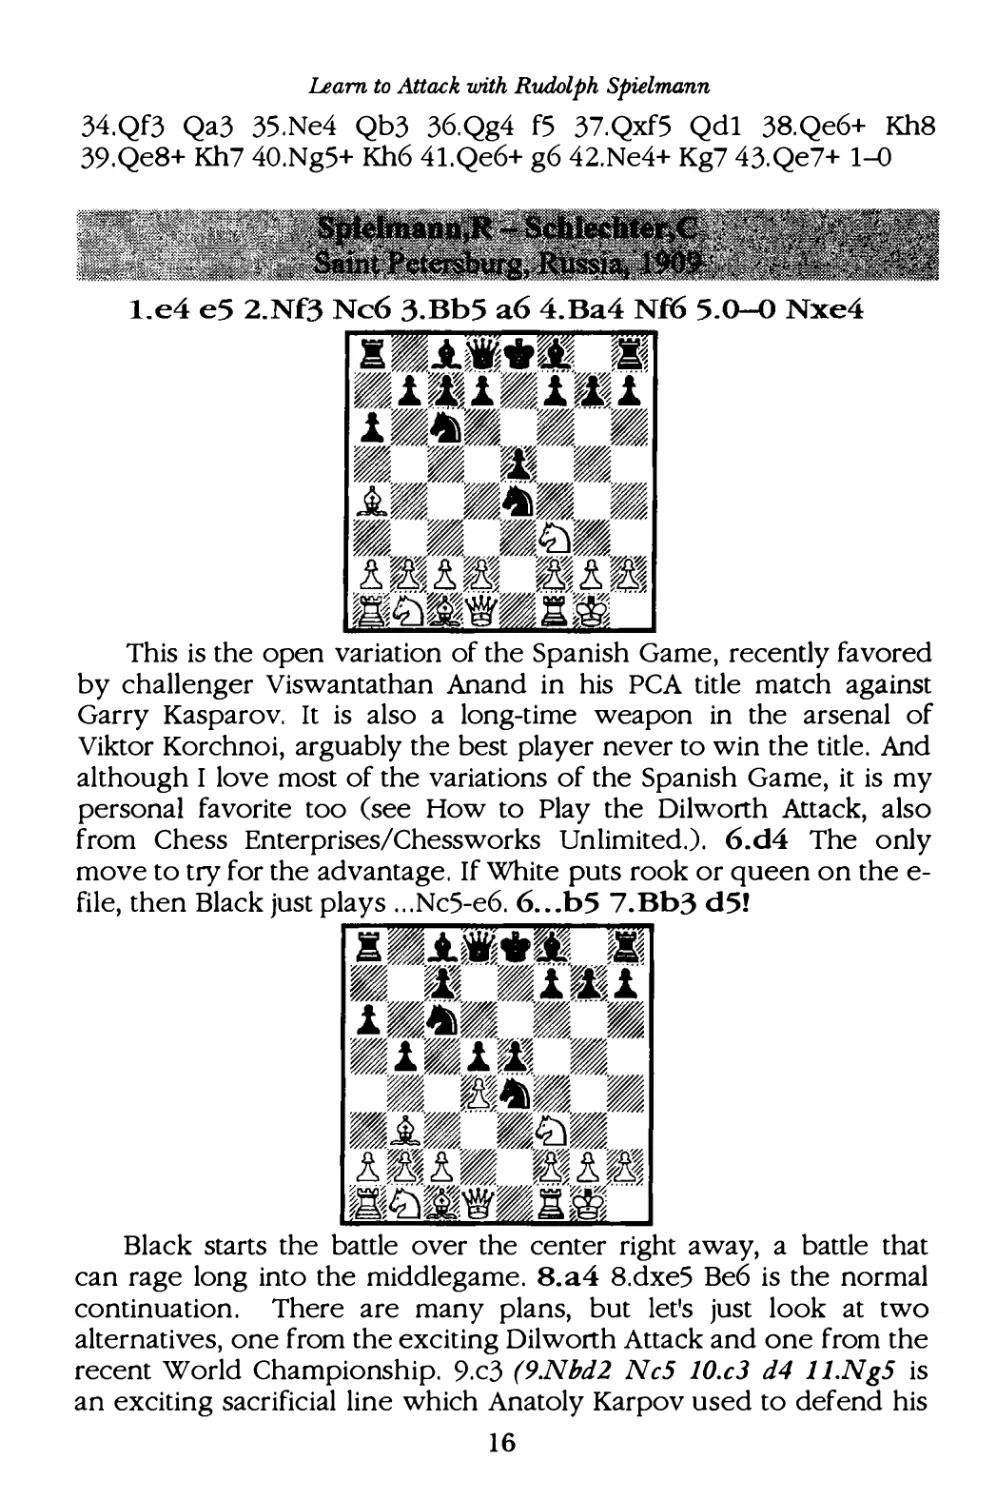
31 .Re7 and it is all over. 27.Qg5 Ne5 28. Qf6!
J�'i
ii'
,\UJl�)�
a �•� �-�
� ��"·'"z ··{' '"� �
mo�� �1�1
l� ��----�!�
z..,..,�W.'0f.
.
.
. �z· ''"'�- . J.�
�W�
?� i*�a.?� � r-._
�- ��16·�·
"'LJ
"·--'�r--
�
m"--'�
��
�'----
�
� ..v.���'
�m-13�-m%���
!���� ��!�
. .. Y-.-� f"y_�""�
••t�1 m
How much the picture has changed in just half a dozen moves.
Now the attack is raging! This attack was accomplished by placing
pieces in positions where they cou ld quickly join the attack, even
though they didn't seem to be aggressively posted . 28 ...Nac4
Black cannot capture the rook because that would eliminate the
only flight square of the king and Qh8 would be checkmate .
28...gxh5 29.Rlxe5 Rxe7 30.Qh8# 29.f4! Chase the defender!
29 ... gxh5 30.fxe5 Nxe5 3l.Rlxe5 and there is no defense
against mate . A typical application of the Spanish Inquisition! 1-0
14
Learn to Attack with Rudolph Sp ielmann
l.e4 eS 2.Nf3 Nc6 3.Bb5 a6 4.Ba4 Nf6 5.0-0 Be7 6.Qe2 bS 7.Bb3
0-0 8.a4 Bb7 9.c3 dS 10.d3 dxe4 ll.dxe4 Nxe4 12.Qxe4 Nd4
13.Qxb7 Nxb3
��m�·���!�
-'YW� -.1�.1
{:·'· .. �. ........, ... �.
�i:• r,m�•
'-��,..7.-�
.:��-�-�
���{... /-
.��r�
�···/3Wi:rf'AwJ3� "<�3
i��m -�x�1
14.Ra2 Qd3 15.Be3 Qc4 16.axb5 Nc l 17.Rxc l Qxa2 18.Qxc7 Bf6
19.bxa6 Rxa6 20 . Qb7 e4 2l.Nfd2 BeS 22.Na3 Qe6 23.Nac4 Rfa8
24 .Nxe5 QxeS 25.Qxe4 QbS 26 . Qb4 QfS 27.h3 hS 28.Qc5 Qe6
29.Qxh5 Ra l 30.Rxa l Rxa l + 3l.Kh2 Qd6+ 32.g3 Qb8 33.b4 Qa8
15
Learn to Attack with Rudolph Sp ielmann
34.Qf3 Qa3 35 .Ne4 Qb3 36.Qg4 f5 37.Qxf5 Qdl 38.Qe6+ Kh8
39. Qe8+ Kh7 40 . Ng5+ Kh6 41.Qe6+ g6 42.Ne4+ Kg7 43.Qe7+ 1-0
This is the open variation of the Spanish Game , recently fa vored
by challenger Viswantathan Anand in his PCA title match against
Garry Kasparov. It is also a long-time weapon in the arsenal of
Viktor Korchnoi, arguably the best player never to win the title. And
although I love most of the variations of the Spanish Game, it is my
personal fa vorite too (see How to Play the Dilworth Attack, also
from Chess Enterprises/Chessworks Unlimited.). 6.d4 The only
move to try for the advantage . If White puts rook or queen on the e
file, then Black just plays ...Nc5-e6. 6... b5 7.Bb3 d5!
.1·-*-··� •
��� %,_ , r,...
,
....� %' · ••-'
� �� �.1��.1
r�•���,--��
�����%���
�,�,t;���
�;_:.:-�.:�.�
.
:
!�!� �!�
" }�3�>;
;
��
�
��j� vJ.3
'"
"
�v·..
..,
��'JMI� � -�
rg���'[5J ��'6'�
Black starts the battle over the center right away, a battle that
can rage long into the middlegame . 8. a4 8.dxe5 Be6 is the normal
continuation . There are many plans, but let's just look at two
alternatives, one from the exciting Dilworth Attack and one from the
recent World Championship. 9.c3 (9.Nbd2 Nc5 JO.c3 d4 JJ.Ng5 is
an exciting sacrificial line which Anatoly Karpov used to defend his
16
Learn to Attack with Rudolph Sp ielmann
title against Viktor Korchnoi in 1978. Kasparov also employed it
against Anand. Here is a typical continuation: JJ... Qx g5 12.Qf3 0�-
0 13.Bxe6+ fx e6 14.Qxc 6 Qx e5 15.b4 Qd 5 16.Qxd5 exd5 17.bxc5 dxc 3
18.Nb3 d4 with a messy position which still has to be fully
investigated) 9...Bc5 10.Nbd2 0--0 11.Bc2 N:xf2!? is the Dilworth
Attack, which gives Black a strong attack in return for giving up two
pieces for a rook and a pawn , usually resulting in a complicated
endgame . 12.Rxf2 f6 13.exf6 Bxf2+ 14.Kxf2 Qxf6 15.Nf1 Ne5 16.Kg1
Nxf3+ 17.Qxf3 Qxf3 18.gxf3 Rxf3 19.Be3 Bh3 20 . Bd4 and there have
been many games played starting from this position! 8... Rb8
9. axb5 axb5 10.dxe5 Be6 The game has transposed to normal
lines . ll.c3 Bc5 12.Nbd2 0-0 Play has proceeded logically.
13.Bc2 Nxd2 14.Qxd2 Qd7 15.Qf4 A year later in Berlin
World Champion Emanuel Lasker demonstrated that 15.b4 obtains a
serious advantage for White . His game against Schlechter went
15.b4 Be7 16.Re1 f6 17.Qd3! g6 18.Bh6 Rfe8 19.exf6 Bxf6 20.Bb3
with strong pressure. 15 ...Ne7 15 ...f6 comes into consideration so
that the f-file can be opened, which helps Black in the battle over
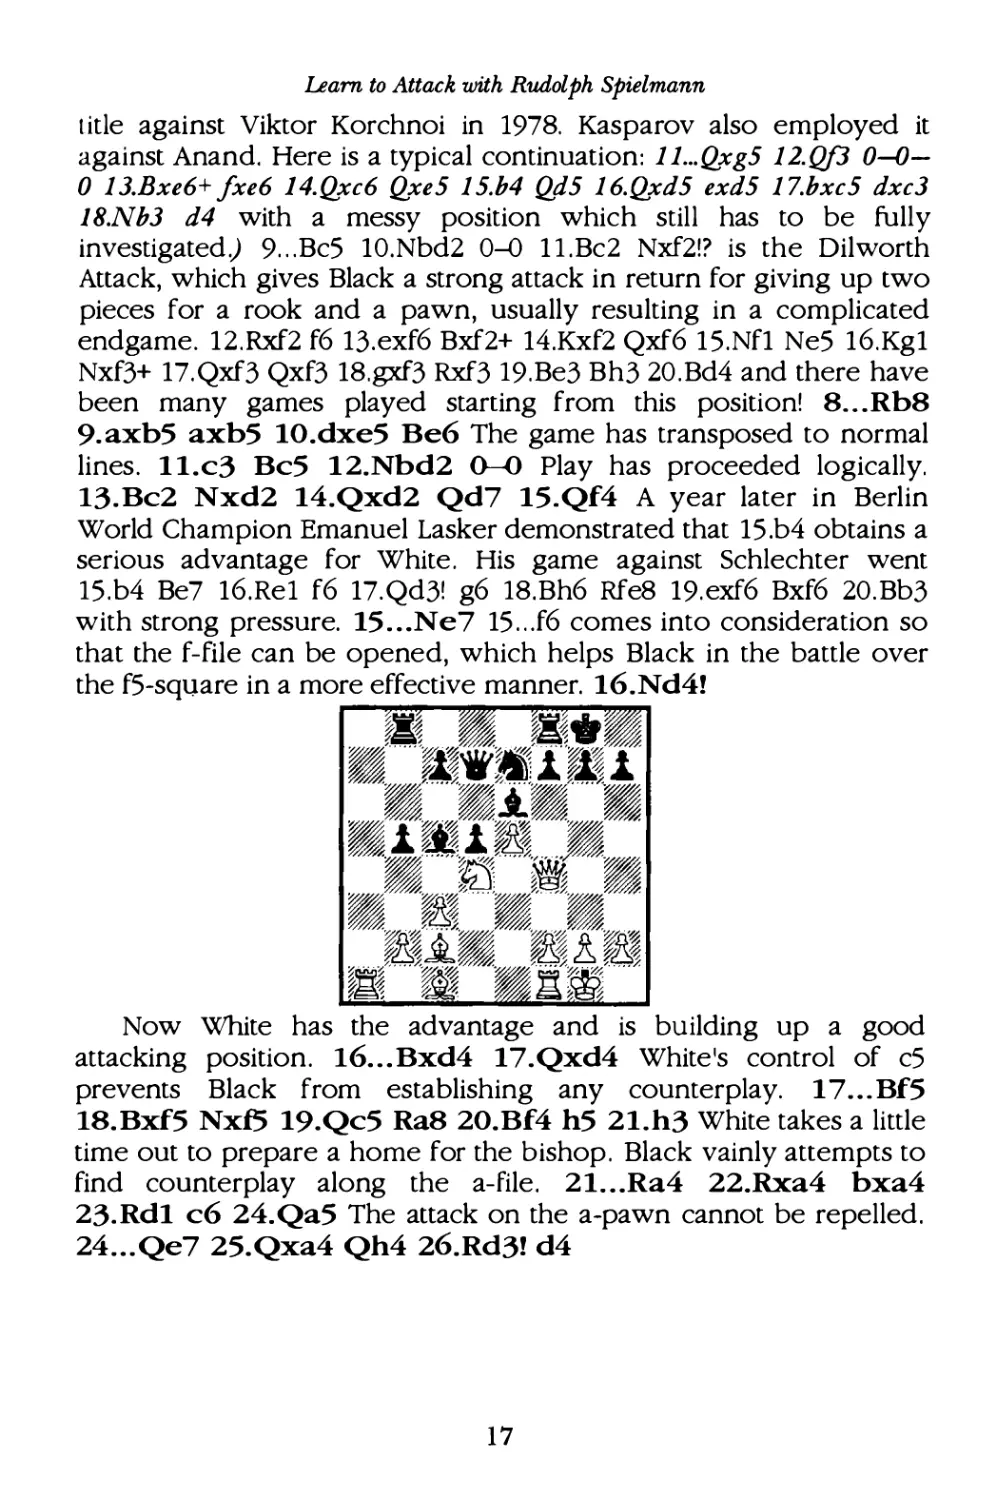
the fS-sqtJare in a more effective manner. 16.Nd4!
�� . ��·-
•...imflitimi
��/..... v.�I-
�'··..·"�
��ffi� ��.��� �
�,���l��-..��
� ��'{;j,�'f!j� �
�����d�
/. ...,...../-%"-""0' ��
�/.
�.,..../.%
.
,-·r
,
{"""'/-
:&'l'li'����'l'li'�·
r��
� ��&
Now White has the advantage and is building up a good
attacking position . 1 6...Bxd4 17.Qxd4 White 's control of cS
prevents Black from establishing any counterplay. 17...Bf5
18.Bxf5 Nxf5 19.Qc5 Ra8 20.Bf4 h5 21.h3 White takes a little
time out to prepare a home for the bishop . Black vainly attempts to
find counterplay along the a-file . 21. ..Ra4 22.Rxa4 bxa4
23. Rd l c6 24.Qa5 The attack on the a-pawn cannot be repelled .
24 ...Qe7 25.Qxa4 Qh4 26 .Rd3! d4
17
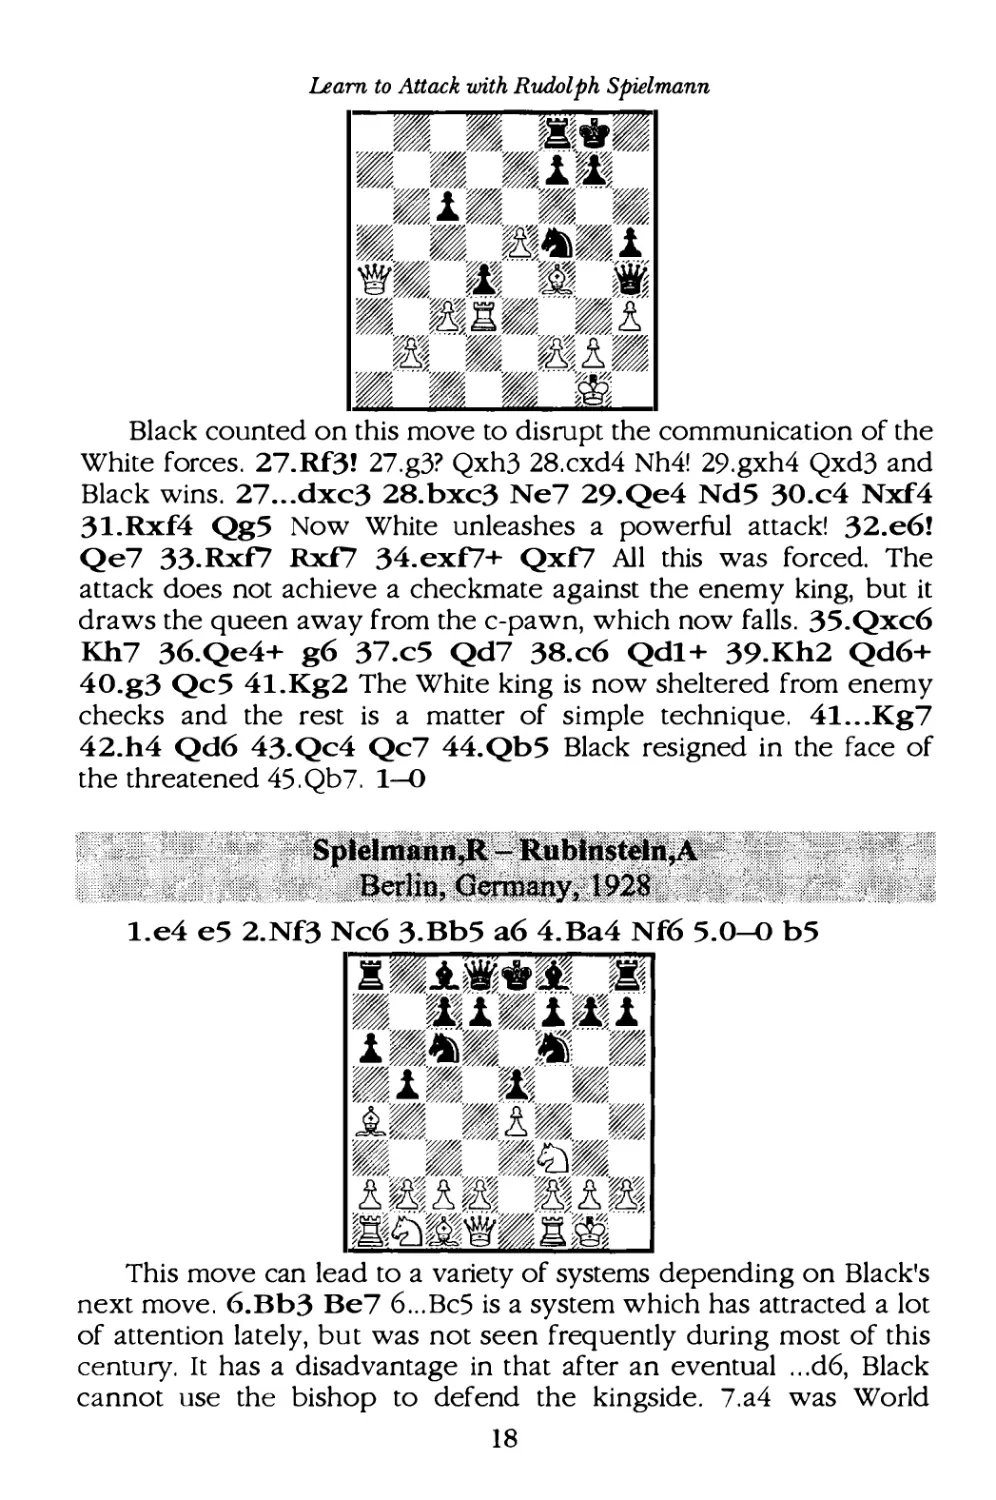
Learn to Attack with Rudolph Spielmann
�����tf&�
:.�,;,
����� . . /,�;� �?'"'
'tW��.1%m�
� %�-if· ""'--;f
�,/,
� �!�
�-./,. ��- "m�
Black counted on this move to disrupt the communication of the
White forces . 27. Rf3! 27. g3? Qxh3 28. cxd4 Nh4! 29 .gxh4 Qxd3 and
Black wins . 27...dxc3 28.bxc3 Ne7 29.Qe4 Nd5 30.c4 Nxf4
3l.Rxf4 Qg5 Now White unleashes a powerful attack! 32.e6 !
Qe7 33.Rxf7 Rxf7 34. exf7+ Qxf7 All this was fo rced. The
attack does not achieve a checkmate against the enemy king, but it
draws the queen away from the c-pawn, which now fa lls. 35 . Qxc6
Kh7 36.Qe4+ g6 37.c5 Qd7 38. c6 Qdl + 39.Kh2 Qd6+
40.g3 Qc5 41.Kg2 The White king is now sheltered from enemy
checks and the rest is a matter of simple technique. 41 . ..Kg7
42.h4 Qd6 43.Qc4 Qc7 44.Qb5 Black resigned in the face of
the threatened 45 . Qb7 . 1-0
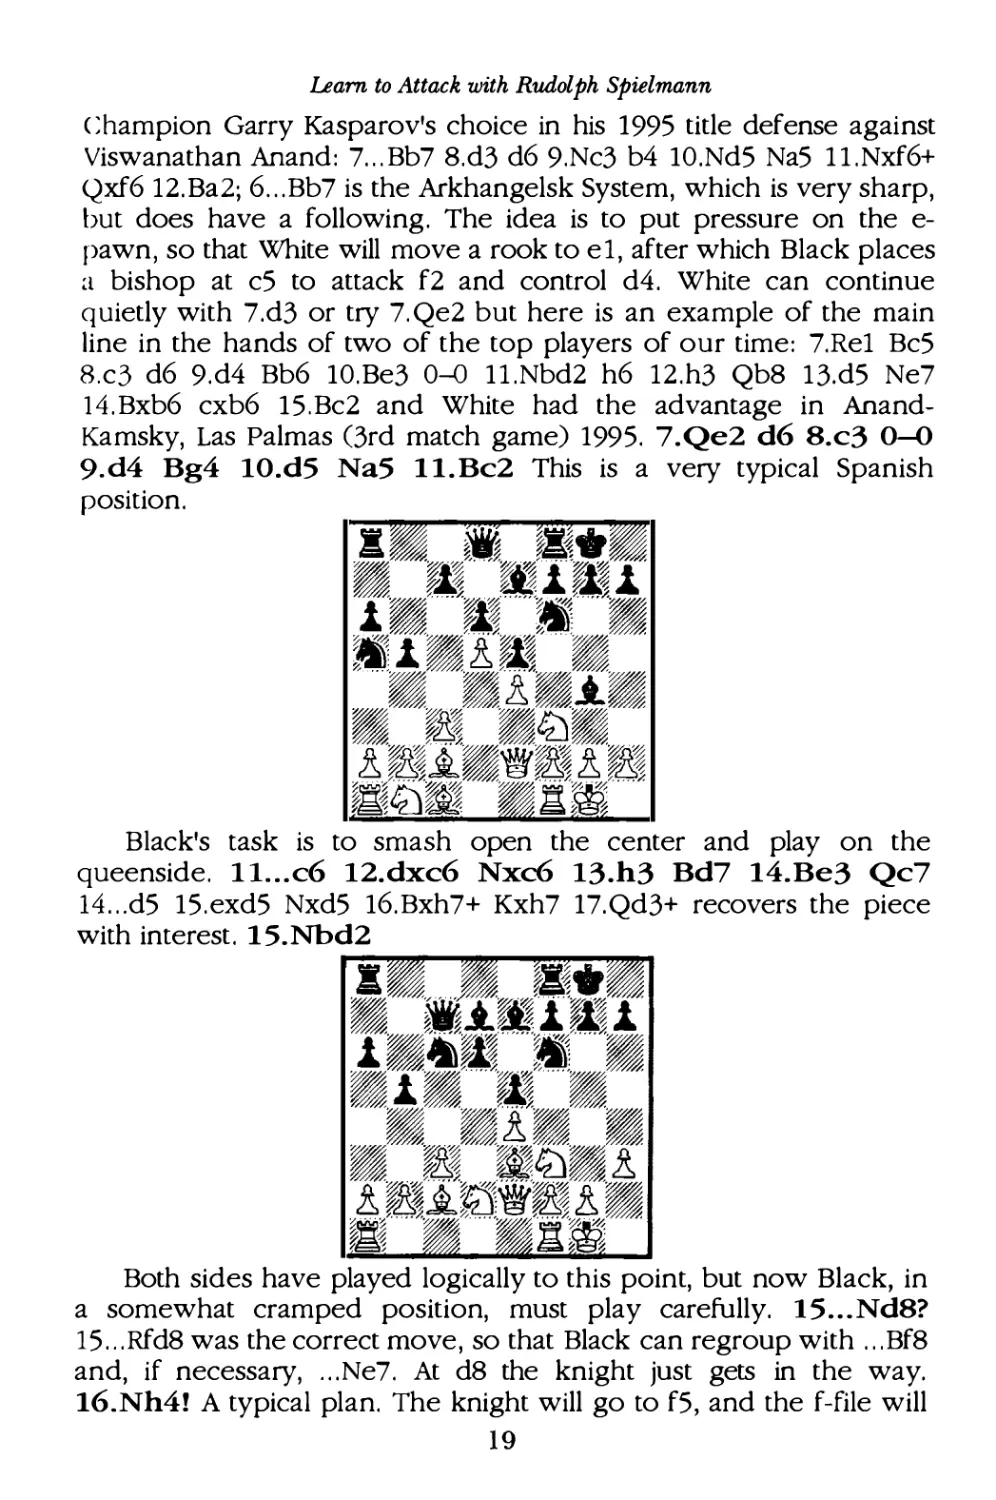
l.e4 e5 2.Nf3 Nc6 3.Bb5 a6 4.Ba4 Nf6 5.0-0 b5
.�...
..
�•• r�
��m1�1m1
'�-���--V.
·'-��� ;��
����,!��
.Q.if.O."'.Q.if@ if@.Q.if@
.!:
::.
P�.!:
::.
P� P�.!:
::.
�
f�cs•�•im'····/,
This move can lead to a variety of systems depending on Black's
next move . 6.Bb3 Be7 6 ... Bc5 is a system which has attracted a lot
of attention lately, but was not seen freq uently during most of this
century. It has a disadvantage in that after an eventual ...d6, Black
cannot use the bishop to defend the kingside. 7.a4 was World
18
Learn to Attack with Rudolph Sp ielmann
Champion Garry Ka sparov's choice in his 1995 title defense against
Viswanathan Anand : 7 ...Bb7 8.d3 d6 9.Nc3 b4 10.Nd5 Na5 ll.Nxf6+
Qxf6 12.Ba2; 6 ...Bb7 is the Arkhangelsk System, which is very sharp ,
but does have a following. The idea is to put pressure on the e
pawn , so that White will move a rook to el, after which Black places
a bishop at c5 to attack f2 and control d4. White can continue
quietly with 7.d3 or try 7.Qe2 but here is an example of the main
line in the hands of two of the top players of our time : 7.Re1 Bc5
8.c3 d6 9.d4 Bb6 10.Be3 0� 11.Nbd2 h6 12.h3 Qb8 13.d5 Ne7
14 . Bxb6 cxb6 15.Bc2 and White had the advantage in Anand
Kamsky, Las Palmas (3rd match game) 1995. 7.Qe2 d6 8.c3 0-0
9.d4 Bg4 10.d5 Na5 ll.Bc2 This is a very typical Spanish
position .
�-�J�%J•!•
���.1�.1
f�'·••V.�••<"".'••oY,�
�r�'jr?if··
·
·'��
�:���x�f�
������� !W
���{ ..����.���·�
�tl�������l�
r�'Z:J� qgm
Black's task is to smash open the center and play on the
queenside. ll. ..c6 12. dxc6 Nxc6 13.h3 Bd7 14.Be3 Qc7
14 ... d5 15.exd5 Nxd5 16.Bxh7+ Kxh7 17.Qd3+ recovers the piece
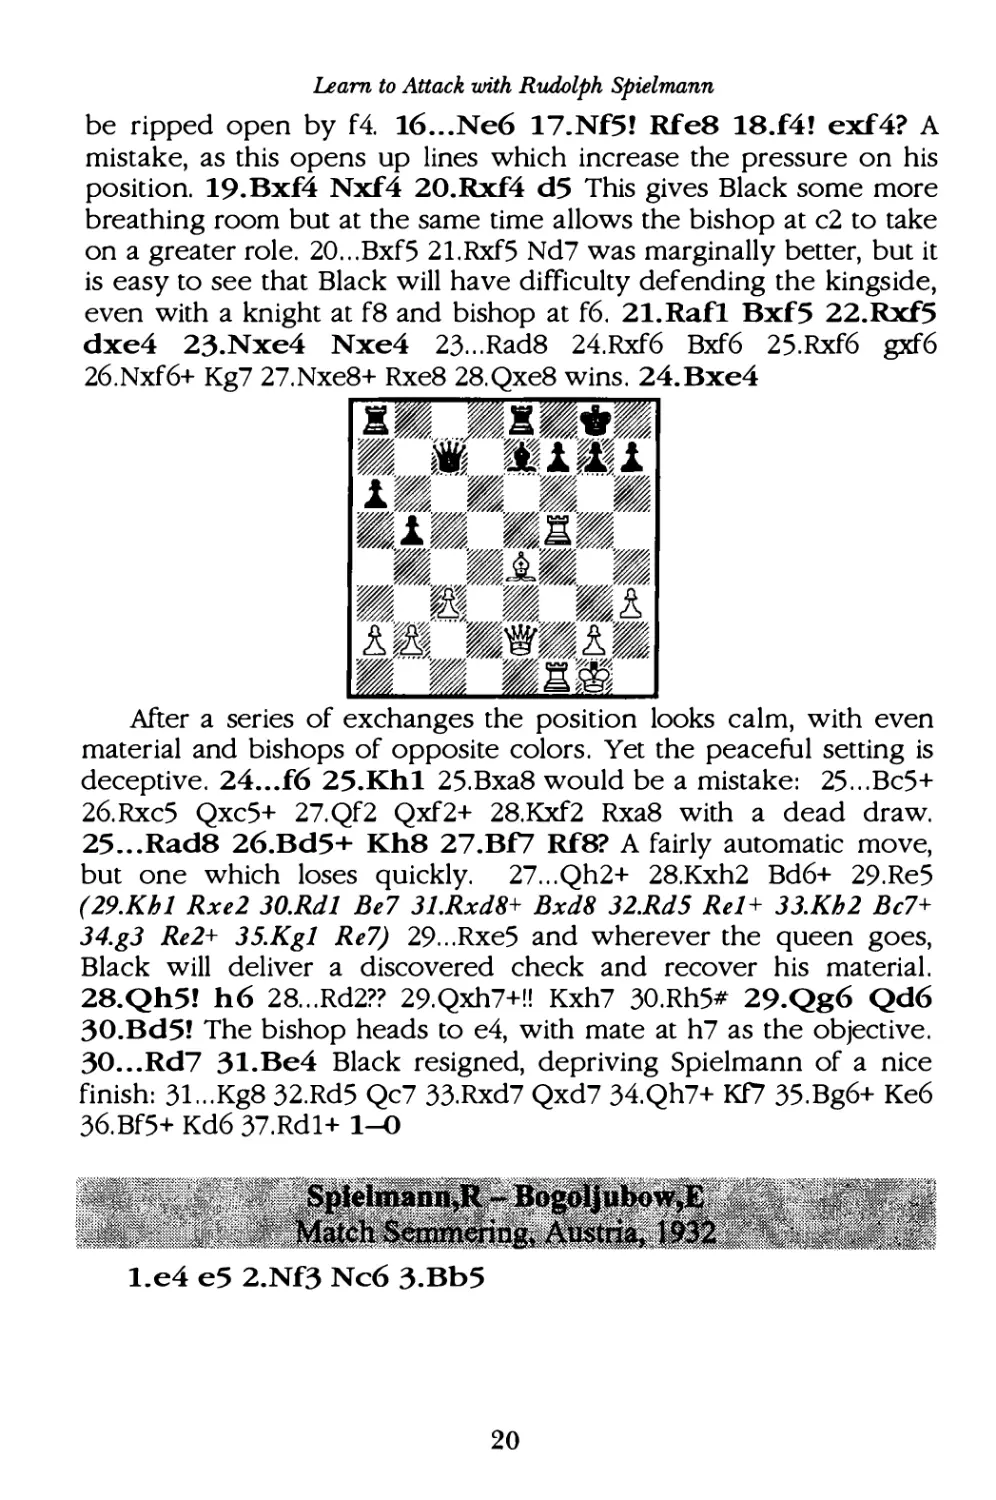
with interest . 15.Nbd2
��r-�r-���"
�� � ?�·�
� ��.{�]],'� {
{�4)�•
·
o••••••Y,�
�r�'··y,��. '��
����,K����
���.���.����
'���,;�����
6P�.JI&,.�LJ'e:lp�6�
��r ··y,�" ,�,t� �
Both sides have played logically to this point, but now Black, in
a somewhat cramped position, must play carefully. 15...Nd8?
15 . . . Rfd8 was the correct move , so that Black can regroup with ...Bf8
and, if necessary, ...Ne7 . At d8 the knight just gets in the way.
16.Nh4 ! A typical plan. The knight will go to f5, and the f-file will
19
Learn to Attack with Rudolph Sp ielmann
be ripped open by f4. 16 ...Ne6 17.Nf5! Rfe8 18.f4! exf4? A
mistake, as this opens up lines which increase the pressure on his
position. 19.Bxf4 Nxf4 20.Rxf4 d5 This gives Black some more
breathing room but at the same time allows the bishop at c2 to take
on a greater role. 20 ...Bxf5 21.Rxf5 Nd7 was marginally better, but it
is easy to see that Black will have difficulty defending the kingside,
even with a knight at f8 and bishop at f6 . 21.Rafl Bxf5 22.Rxf5
dxe4 23.Nxe4 Nxe4 23...Rad8 24.Rxf6 Bxf6 25.Rxf6 gxf6
26.Nxf6+ Kg7 27.Nxe8+ Rxe8 28. Qxe8 wins . 24. Bxe4
��,--- �!���
� • �1��1
��7-•..,?-
�------ ·
�'····"�
,,������
����,���
�������,
�m�uu/.��� ��
�����,�
���&a�):
:9'?
After a series of exchanges the position looks calm, with even
material and bishops of opposite colors . Yet the peaceful setting is
deceptive . 24...f6 25.Khl 25.Bxa8 would be a mistake: 25 ...Bc5+
26. Rxc5 Qxc5+ 27. Qf2 Qxf2+ 28.Kxf2 Rxa8 with a dead draw.
25.. . Rad8 26.Bd5+ Kh8 27.Bf7 Rf8? A fa irly automatic move,
but one which loses quickly. 27 ...Qh2+ 28.Kxh2 Bd6+ 29.Re5
(29. Kh l Rxe2 JO.Rdl Be7 3l.Rxd8+ Bxd8 32.Rd5 Rel+ 33.Kh2 Bc7+
34.g3 Re2+ JS.Kgl Re7) 29...Rxe5 and wherever the queen goes,
Black will deliver a discovered check and recover his material.
28.Qh5! h6 28...Rd2?? 29.Qxh7+!! Kxh7 30 . Rh5# 29.Qg6 Qd6
30.Bd5! The bishop heads to e4, with mate at h7 as the objective .
30 ...Rd7 3l.Be4 Black resigned, depriving Spielmann of a nice
fi nish: 31...Kg8 32.Rd5 Qc7 33.Rxd7 Qxd7 34.Qh7+ Kf7 35. Bg6+ Ke6
36.Bf5+ Kd6 37.Rdl+ 1-0
l.e4 e5 2.Nf3 Nc6 3.Bb5
20
Learn to Attack with Rudolph Sp ielmann
3... a6 The Morphy Defense, which is far and away the main
line of the Spanish Game. 3 . ..Nge7 is seen in the game against
Tartakower. ; 3 ...Nf6 is the Berlin Defense, which can be seen in the
game against Reti . 4.Ba4 Nf6
���������
��..
.
�·� ?�
��lm,·r�.rm.r
r�f4)R��r··7,R
��R��9,;R�
..�'!�
R??lj$R??lj$R??l,;R??lj$
B.�B.�� ��B.��
������ ..7-.ii
This is the normal method of playing the Spanish Game , but in
this game we explore deviations from the main lines . 4 . . . d6 is
explored in the two games against Treybal . 5.Qe2 Castling is
normal, as seen in the other annotated games in this section.
Spielmann tried 5.d3 against both Gruenfeld and johner. He chose
5.Nc3 against Rubinstein. So he re ally did feel at home in many lines
of the Spanish game . 5 ...Be7 5 ...Bc5 is seen in the game against
Rohacek. 6.c3 d6 7.d4 White has achieved the major objective of
the Open Game , the establishment of the ideal pawn center, backed
by a pawn at c3. 7 ...Bd7 8.0-0 0-0 9. Bc2 The fa mous Spanish
Bishop sits in wait at c2, planning to take part in the kingside attack
only after the Black e-pawn is removed from e5 so that the White
pawn can advance . Attacks in the Spanish Game proceed more
slowly than in the other Open Games , but are no less exciting.
9 ...Re8 10.d5 Nb8 ll.h3
21
Learn to Attack with Rudolph Sp ielmann
This move keeps enemy pieces off of g4, and also provides a
home for the knight at h2, from which it can leap into the attack via
g4. In some cases White will advance the g-pawn to g4, and
sometimes the King will be moved to g2, so overall this is a very
useful move ! ll. ..c6 12.dxc6 Bxc6 13.c4 White restrains the
center by preventing the Black pawn from advancing to d5.
13... Nbd7 14.Nc3 Nc5 15.b4! This gains more space on the
queenside . 15 ...Ne6 16.Be3 Bf8 17.Rfdl Qc7 Black has
established a good defensive formation so White will have to build
more advantages before launching an attack. 18.Racl b5 19.Nd5!
Qb7 19.. . Bxd5 20 . cxd5 Nf4 If the knight retreats to d8 it wi ll never
have room to maneuver back into the game . 21.Bxf4 exf4 22.e5!
dxe5?? 23.Bxh7+ Kxh7 24.Rxc7 shows the hidden strength of the
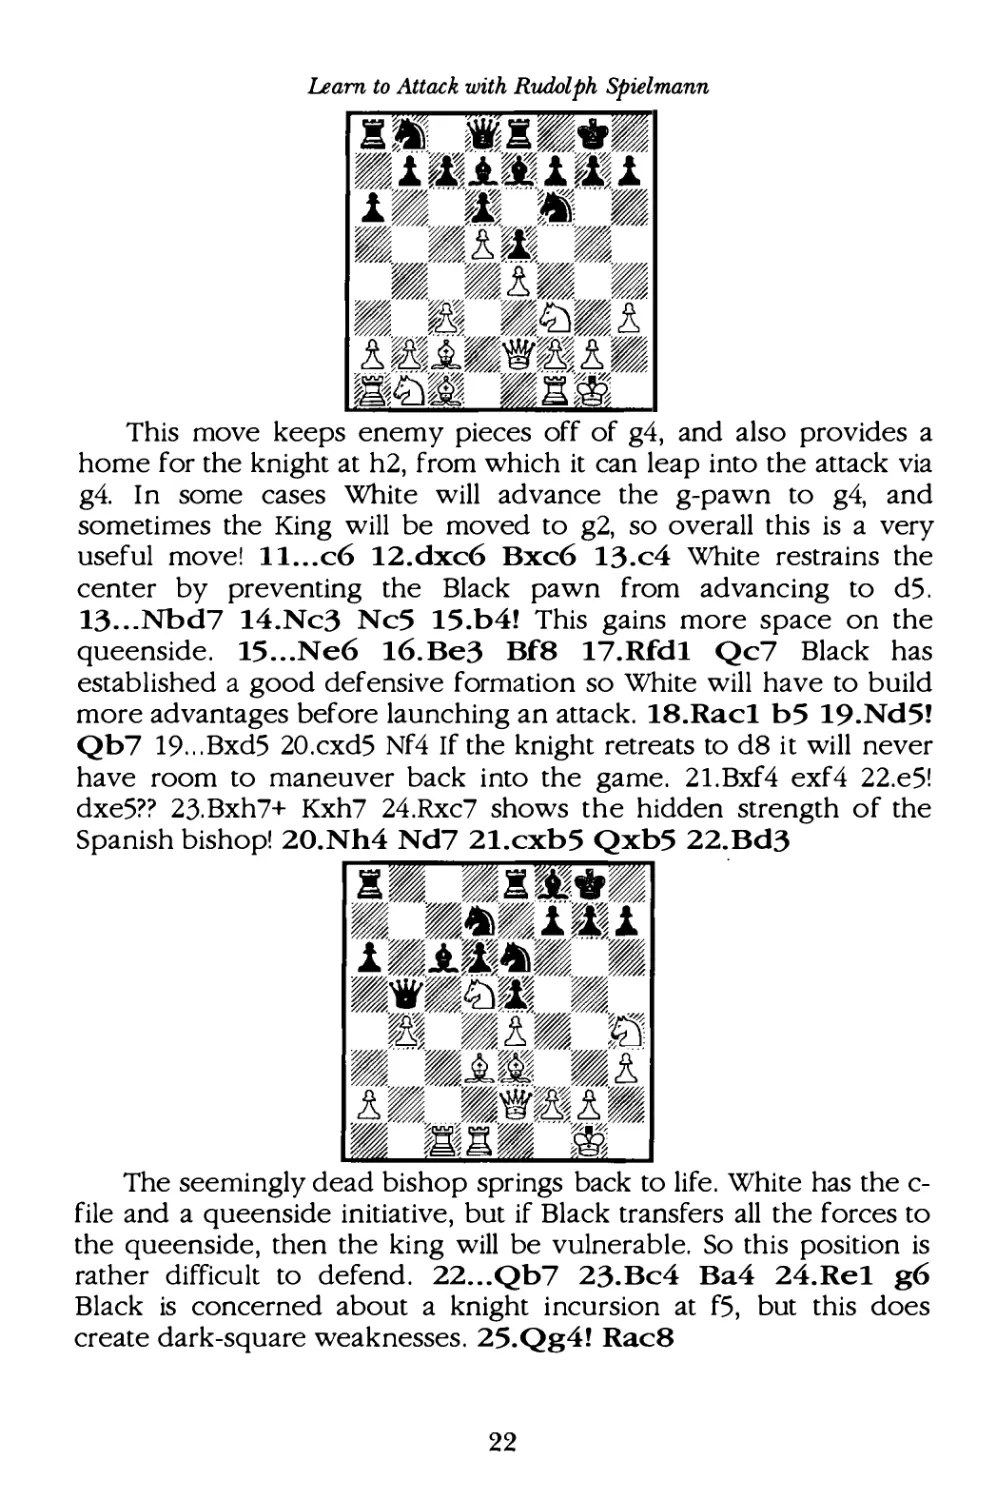
Spanish bishop! 20.Nh4 Nd7 21.cxb 5 Qxb5 22.Bd3
�� ���·�
���6)&lml
l�lm6)�' .. Y,�
���,�m���
��.���(..
����. ..
,�
1� �!� kJ:
�, ..;,�.l� ���!'
!���'i�!�
� ��li�·../.� �
The seemingly dead bishop springs back to life. White has the c
file and a queenside initiative , but if Black transfers all the forces to
the queenside, then the king will be vulnerable. So this position is
rather difficult to defend . 22 .. . Qb7 23.Bc4 Ba4 24.Rel g6
Black is concerned about a knight incursion at f5 , but this does
create dark-square weaknesses . 25.Qg4! Rac8
22
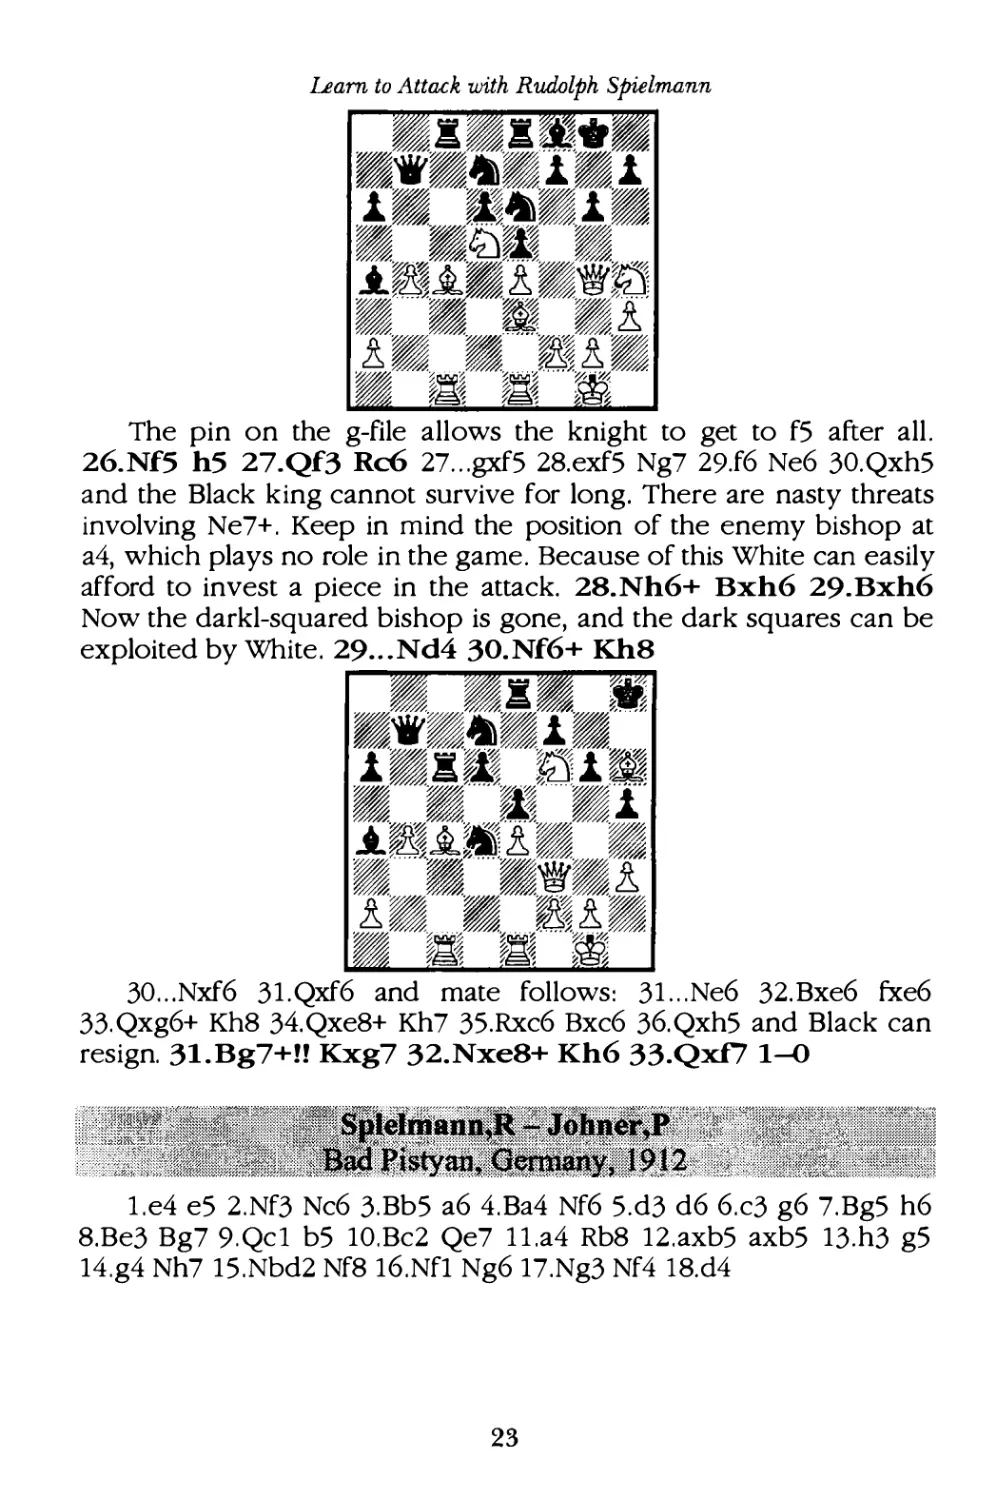
The pin on the g-file allows the knight to get to fS after all.
26. Nf5 h5 27.Qf3 Rc6 27...gxf5 28.exf5 Ng7 29.f6 Ne6 30.Qxh5
and the Black king cannot survive for long. There are nasty threats
involving Ne7+ . Keep in mind the position of the enemy bishop at
a4, which plays no role in the game . Because of this White can easily
afford to invest a piece in the attack. 28. Nh6+ Bxh6 29. Bxh6
Now the darkl-squared bishop is gone , and the dark squares can be
exploited by White . 29...Nd4 30. Nf6 + Kh8
�
�.�.� i,.
��� �� :@�"'··'%
B������<��·�
J.•.�.� -�'J.m
��
�,.... . ���
·�I'
�"'"'"'�% '//,; ..�� ?i
i
�
..
.
���at!� �
�,.,/.�f ·'��� �
,����,,,
�w. �% /�% /"}.� �-
� ��� �'T9l� -�:
r� rg� �):!{&
30 ...Nxf6 31.Qxf6 and mate fo llows: 31...Ne6 32.Bxe6 fxe6
33.Qxg6+ Kh8 34.Qxe8+ Kh7 35.Rxc6 Bxc6 36.Qxh5 and Black can
resign. 31 .Bg7+!! Kxg7 32.Nxe8+ Kh6 33.Qxf7 1-0
l.e4 e5 2.Nf3 Nc6 3.Bb5 a6 4.Ba4 Nf6 5.d3 d6 6.c3 g6 7.Bg5 h6
8.Be3 Bg7 9.Qcl bS 10.Bc2 Qe7 ll.a4 Rb8 12.axb5 axbS 13.h3 gS
14.g4 Nh7 15.Nbd2 Nf8 16.Nfl Ng6 17.Ng3 Nf4 18.d4
23
Learn to Attack with Rudolph Sp ielmann
18...Nxh3? 19.d5 Bxg4 20.dxc6 Nf4 2l .Ng1 Ng2+ 22.Kf1 Nh4
23 .Bd1 Be6 24. Nf3 d5 25.Nxh4 gxh4 26.Nh5 Bf8 27.b4 dxe4 28. Bc5
Qd8 29 . Qe3 f5 30 .Be2 Qg5 31.Bxf8 Rxf8 32.Qa7 1--0
l.e4 e5 2.Nf3 Nc6 3.Bb5 a6 4.Ba4 Nf6 5.Nc3 Be7 6.d3 d6 7.Nd5
Nxd5 8.exd5 b5 9.dxc6 bxa4 10.c4 0--0 11.Qxa4 Bf5 12.Be3 Bxd3
13.0--0--0 e4 14.Ne1 Be2 15.Rd2 Bh5 16.Nc2 a5 17.Nd4 Qc8 18.Qb5
f5 19.Qd5+ Kh8 20.Qe6 Bd8 2l.Qxc8 Rxc8 22.Ne6 Re8 23.Nxd8
Rexd8 24 .Rd5 Ra8 25.Rxf5 Bg6 26.Rg5 Ra6 27.h4 Rxc6 28.b3 Bf7
29 .Rxa5 d5 30 .Rd1 Rb8 31.c5 Kg8 32.Rd4 Rg6 33 .g3 h5 34 .Ra7 c6
35 .Rda4 Rf6 36.Rc7 Be8 37.Raa7 Rf7 38.Kc2 Rxc7 39.Rxc7 Ra8 40.a4
Ra6 4l.Bd4 Bf7 42.Rb7 Be6 43.Rxg7+ Kf8 44.Rb7 Ke8 45.Rb6 Bc8
46 . Rxa6 Bxa6 47 . Kc3 Be2 48. Kd2 Bg4 49.Ke3 Bd 1 50.Kf4 Bxb3 5l.a5
Bc4 52.Kg5 Be2 53.g4! hxg4 54.h5 1--0
l.e4 e5 2.Nf3 Nc6 3.Bb5 a6 4.Ba4 Nf6 5.d3 d6 6.c3 Be7 7.0--0 0--0
8.Re1 b5 9.Bc2 Re8 10.Nbd2 Bf8 ll.a4 Rb8 12.axb5 axb5 13.d4 Bg4
14.h3 Bh5 15.d5 Ne7 16.Nf1 h6 17.g4 Bg6 18.Ng3 Ra8 19.Rxa8 Qxa8
20 . Nh4 c6 2l.dxc6 Qxc6 22.Qf3 Nh7 23.Bb3 Qd7 24 .Rd1 Ng5
24
Learn to Attack with Rudolph Sp ielmann
25. Bxg5 hxg5 26.Nhf5 Nc8 27.h4 Bxf5 28.Nxf5 gxh4 29.Nxh4
Nb6 30 . Nf5 Nc4 31.Bxc4 bxc4 32.Ne3 Qc6 33.Ra1 Re7 34.Nd5 Rd7
35.Kg2 Be7 36.Rh 1 1--0
l.e4 eS 2.Nf3 Nc6 3.Bb5 a6 4.Ba4 Nf6 5.Qe2 Bc5 6.c3 bS 7.Bc2 d6
8.b4 Ba7 9.a4 Bd7 10.axb5 axbS 1l.Na3 Ne7 12.d4 exd4 13.cxd4 0--0
14.0--0 c6 15.Bg5 Ne8 16.d5 f6 17.Bf4 Ng6 18.Bg3 Qb6 19.dxc6 Bxc6
20 . Bb3+ Kh8 21.Nc2 Qb7
22.Ncd4 Bxd4 23.Nxd4 Bxe4 24.Ne6 Rf7 25.Rxa8 Qxa8 26. Nd8
Re7 27.Nf7+ Kg8 28. Nxd6+ Kf8 29.Nxe8 Kxe8 30 . Qxb5+ Bc6 31.Qc4
Bxg2 32.Rc1 Bh3 33.Qg8+ Nf8 34. Bd5 Qa6 35.b5 Qxb5 36 .Ra1 Qa6
37. Bf7+ Kd7 38.Rd1+ Kc6 39. Bd5+ Kc S 40.Qxf8 Qe2 41.Bf3 Qxf3
42.Qxe7+ Kc4 43.Qc7+ 1--0
25
Learn to Attack with Rudolph Sp ielmann
l.e4 e5 2.Nf3 Nc6 3.Bb5 a6 4.Ba4 d6 5.c3 Nf6 6.d4 Bd7 7.Bc2 g6
8.Be3 Ng4 9.Bg5 f6 10.Bd2 Nh6 ll.dxeS dxeS 12.0--0 Nf7 13.Be3 Be7
14.Bb3 Qc8 15.Nbd2 0--0 16.Bd5 Be6 17.b4 f5 18.Qb3 Ncd8
,� ...,. ��·�
�T�1r ---.Ji·�T
r�, --Y-�.t-.r�
-�� ii'J<�.��-�
m �.iJ� tm
�� %�,£���
�/.,,,v.�.� ii'J<�.����
���" '"/-m��" %
!.��!�
�m@•..
··'Zfm..... Y-
19.exfs BxdS 20 . Qxd5 c6 21.Qb3 QxfS 22.Nc4 Ne6 23.Ncxe5
Rad8 24.Nxf7 Rxf7 25.Rad1 h5 26.Rxd8+ Bxd8 27.Re1 Nf4 28 . Bd4 Bf6
29.Ne5 Bxe5 30 .Rxe5 Qd7 31.g3 Nd5 32.Qc2 RfS 33.Qe2 Kf7 34.h4
bS 35.Qe4 Ne7 36.Qe3 Rxe5 37.Qxe5 Qe6 38.Qc7 Ke8 39.Bc5 NfS
40 . Qb8+ Kd7 41.Qb7+ Ke8 42.Qxa6 g5 43.hxg5 Kf7 44.Qa8 h4
45. Qf8+ Kg6 46 .g4 Qe1+ 47.Kh2 Qe5+ 48 .Kh3 Qxc3+ 49. Be3 Nxe3
50.Qg8+ 1--0
l.e4 e5 2.Nf3 Nc6 3.Bb5 a6 4.Ba4 d6 5.c3 Bd7 6.0--0 Nge7 7.d4
Ng6 8.Be3 Be7 9.Nbd2 0--0 10.Bc2 Bf6 11.Nb3 b6 12.a4 aS 13.Nbd2
Bc8 14.Re1 Qe7 15.Nfl Nh4 16.Nxh4 Bxh4 17.g3 Bf6 18.f4 Bh3 19.d5
Nb8
26
uarn to Attack with Rudolph Sp ielmann
20.f5 Bxfl 2l.Rxfl BgS 22.Bf2 Nd7 23.Qe2 Bh6 24.Bd3 QgS
25 .h4 Qd2 26.Qxd2 Bxd2 27.Rfdl Bh6 28.Kg2 Rfd8 29 .Kf3 Kf8
30 .Bb5 Ke7 3l.b4 g6 32.g4 Bf4 33.Bc6 Ra7 34.Ra2 Rh8 35.Rgl h6
36.Rhl Rg8 37.Bel Nb8 38.Bb5 Rc8 39. Bf2 Nd7 40.Rhal Rg8 4I.Bc6
Nb8 42.Bb5 Nd7 43 .Rgl Rh8 44.Bel Rc8 45.g5 hxgS 46 . hxg5 Rh8
47 .f6+ Kd8 48.Bd2 Bxd2 49.Rxd2 Nb8 SO . bxaS RxaS Sl.Rdd l c6
52.dxc6 Kc7 53.Rhl Rf8 54.Rh7 Nxc6 SS.Rdh l dS S6.exd5 Na7
57.d6+ Kxd6 58.Rdl+ Kc S 59.Rd7 NxbS 60.axb5 Ra l 6I . Rhxf7 Rfl +
62.Ke2 Rxf7 63.Rxf7 RfS 64.Rf8 Kd6 6S .Rg8 1--0
l.e4 eS 2.Nf3 Nc6 3.Bb5 Nge7 4.d4 exd4 5.Nxd4 g6 6.Nc3 Bg7
7.Be3 0--0 8.0--0 d6 9.Qd2 Bd7 IO .Rad l Re8 ll.Be2 Qc8 12.Nxc6
Bxc6 13.Bh6 Qe6 14.Bxg7 Kxg7 15.f4 Qf6 I6 .f5 gxfS 17.exf5 Kh8
18.Bb5 Rg8 19.Bxc6 bxc6 20 . Ne4 Qxb2 2l.Qh6 NdS 22.Rf2 Qg7
23.Qd2 Rae8 24.Ng3 Qc3 25 . Qxc3+ Nxc3 26 .Rd3 Rei+ 27.Rfl Ne2+
28.Kf2
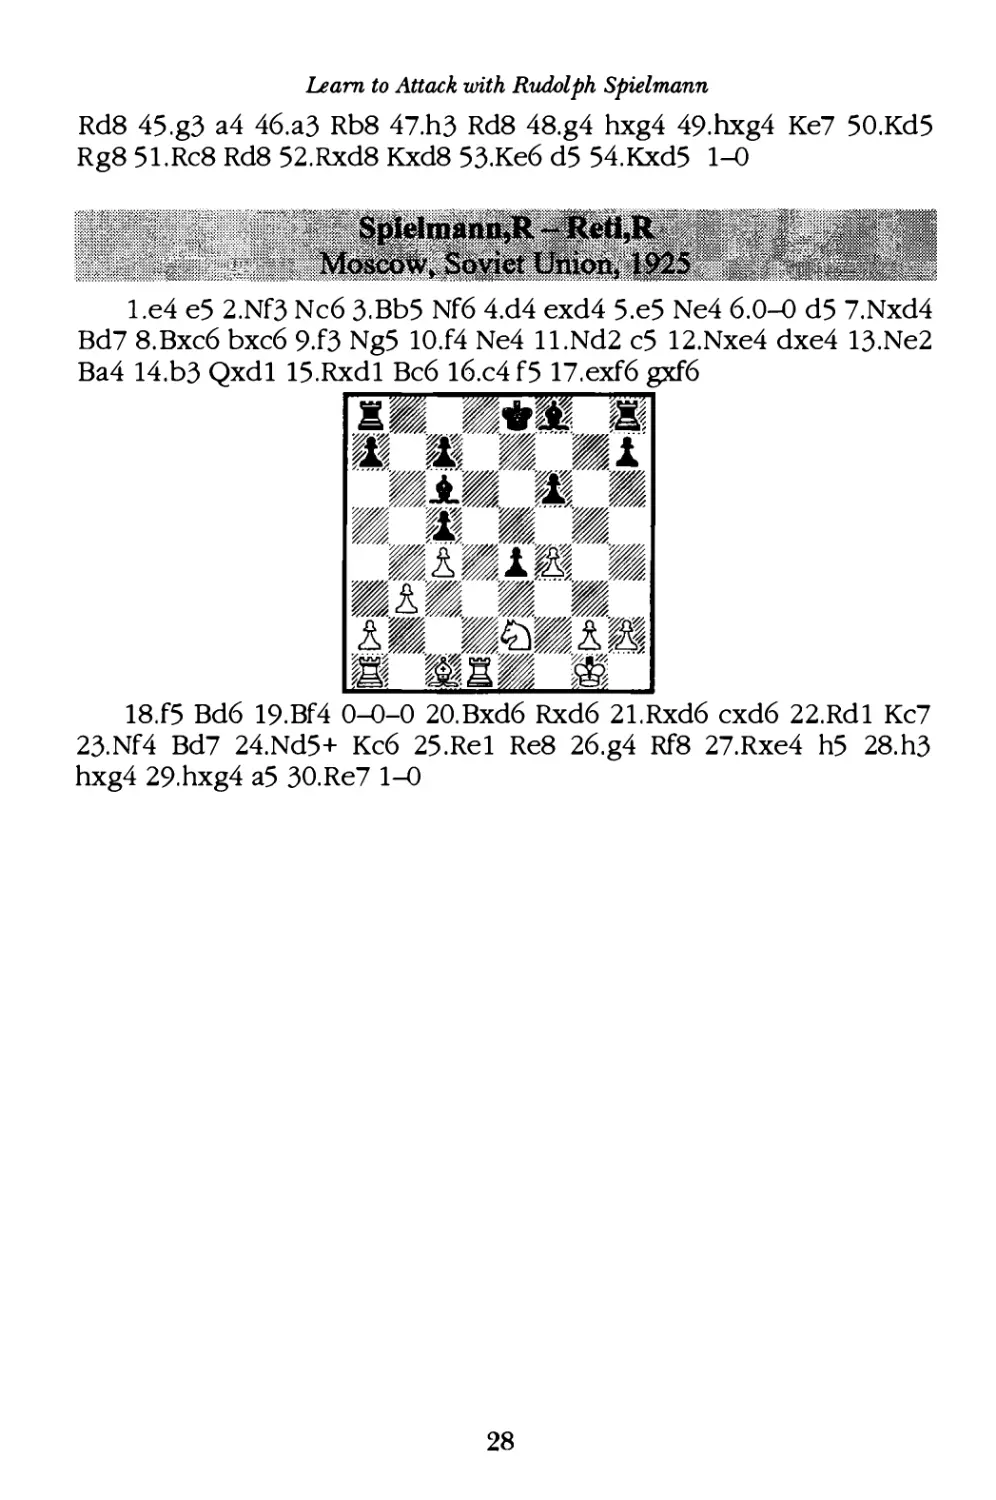
28 ...Rxfl+ 29 . Nxfl Nf4 30 .Ra3 Ra8 3l.Ra6 cS 32.Ne3 Kg7 33.Kf3
NhS 34.Nd5 c6 35.Rxc6 Rd8 36 . Rc7 aS 37.Ra7 Nf6 38.Nf4 Nd7
39. Ne6+ fxe6 40 .fxe6 Rf8 + 4l.Ke4 Kf6 42.exd7 Ke6 43.c4 hS 44.Rc7
27
Learn to Attack with Rudolph Sp ielmann
Rd8 45.g3 a4 46.a3 Rb8 47.h3 Rd8 48.g4 hxg4 49.hxg4 Ke7 50.Kd5
Rg8 5l.Rc8 Rd8 52.Rxd8 Kxd8 53.Ke6 d5 54. Kxd5 1--0
l.e4 e5 2.Nf3 Nc6 3.Bb5 Nf6 4.d4 exd4 5.e5 Ne4 6.0--0 d5 7.Nxd4
Bd7 8.Bxc6 bxc6 9.f3 Ng5 10.f4 Ne4 1l.Nd2 c5 12.Nxe4 dxe4 13.Ne2
Ba4 14.b3 Qxd 1 15.Rxd1 Bc6 16.c4 f5 17.exf6 gxf6
·- -·· ?�
�.l����-·----�
'""
��.!%!•�.1
'"''"�'.f� �� ��
��m��,... ��
�
��/, ""���%��
�.8.·.1� �
�r� .� .. 7-��
:r�����:r�
X
��?;. ·���
%
��,��"'<':""'"
�� WM&�R� ,�
�e3"1 ��
�.?
18.f5 Bd6 19.Bf4 0--0--0 20. Bxd6 Rxd6 2l.Rxd6 cxd6 22.Rd1 Kc7
23.Nf4 Bd7 24.Nd5+ Kc6 25.Re1 Re8 26.g4 Rf8 27.Rxe4 h5 28.h3
hxg4 29.hxg4 a5 30.Re7 1--0
28
Learn to Attack with Rudolph Sp ielmann
The Italian Game
The Italian Game (l.e4 e5 2.Nf3 Nc6 3.Bc4) appealed to
Spielmann, because he liked to station the bishop at c4, where it can
bear down on the vulnerable f7-square .
l.e4 e5 2.Nf3 Nc6 3.Bc4 Bc5 4.c3 Nf6 5.d4 exd4
6.cxd4 Bb4+ This is one of the main lines of the Italian Game .
White invests a little material for rapid development. 7.Nc3? Now
7.Bd2 is known to be stronger, with about equal chances. 7 ...Nxe4
.�.�..
.
... if.
•r•·r��.f.-.r
z... ..V-_'"���z .. .��
������� �
�%l���%�� ��
�.i_�6)- •
� .....�...../-�Z)��
��·-d'·····'�
��%��%
�B:,���;��� ,J��,�
1� m-vwx� -�
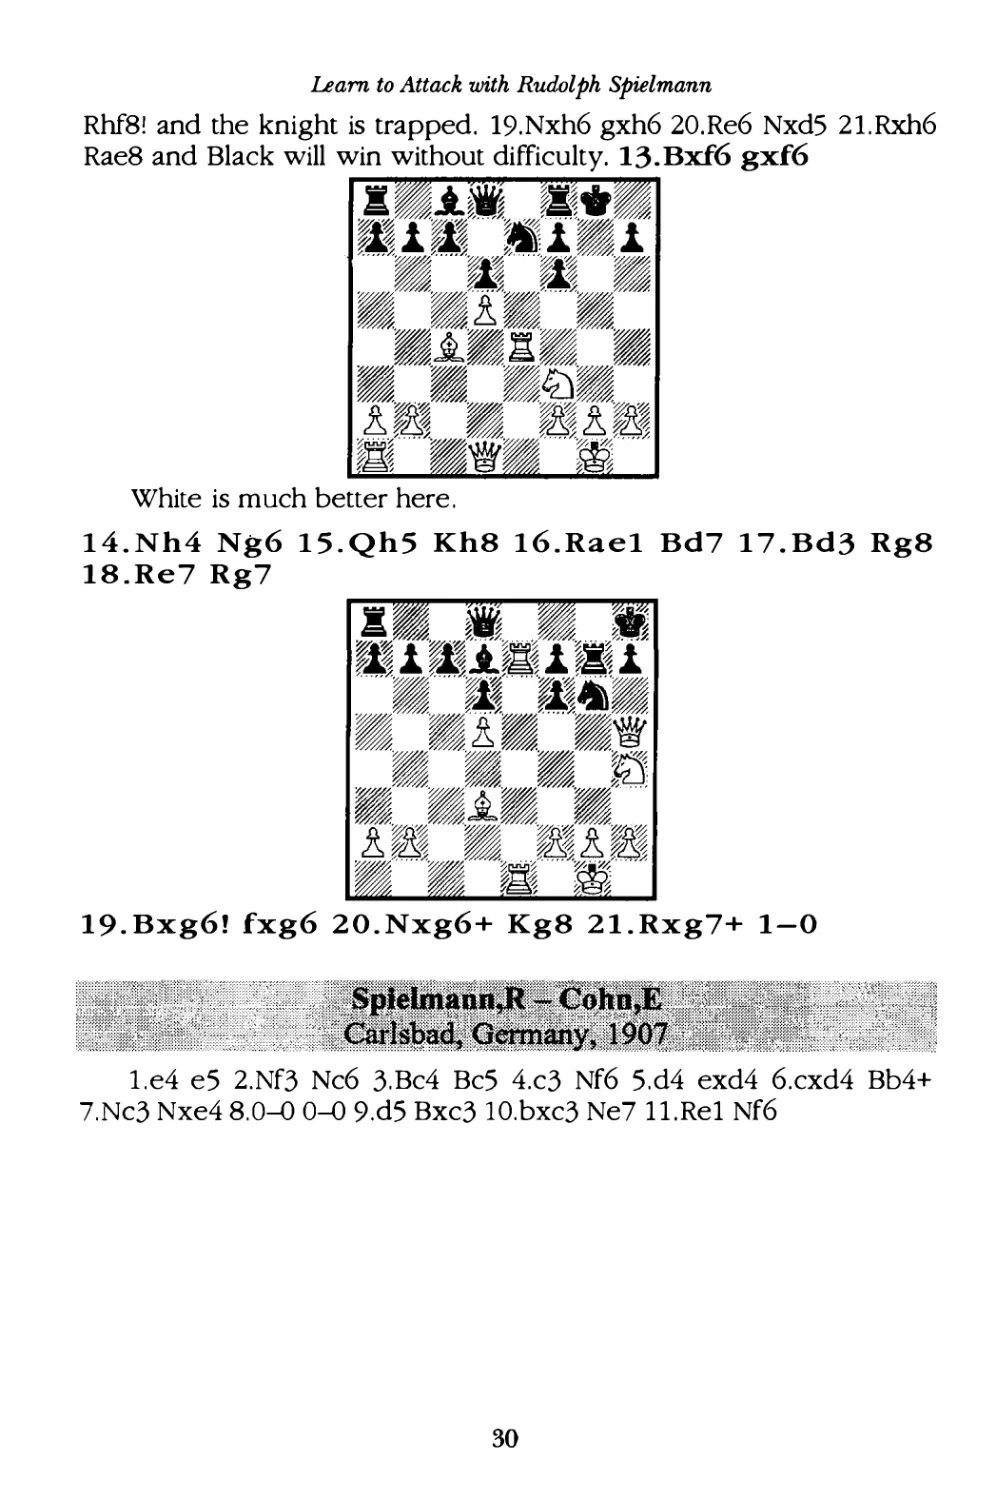
8.0-0 Bxc3 9.d5! White doesn't even bother to recapture the
piece, but simply continues to press forward. 9 ...Bf6! 9 ... Ne5
10.bxc3 Nxf3+ ll.Qxf3 Nd6 12.Rel+ Kf8 13.Ba3 and Black is in big
trouble. lO.Rel This wins the piece back, but is still in well-known
territory. 10 ...Ne7 ll.Rxe4 d6
������--�
!���fl��J�
�.1� ,a):.14%.1
z.... .��z....�m"·····�·· ·-��
���-!��.... . . ;
��
��.i�t� ��
��������
·�%·�·�%-�%
�B:,l�ff)/�:�f!S1��l�
1�m'lt¥��
12.Bg5!? 12.g4 is considered better, but in any case Black has
sufficient defensive resources. 12...0-0
12...Bxg5 13.Nxg5 h6
14.Bb5+ Bd7 15.Qe2 Bxb5 16.Qxb5+ Qd7 17.Qxd7+ Kxd7 18.Nxf7
29
Learn to Attack with Rudolph Sp ielmann
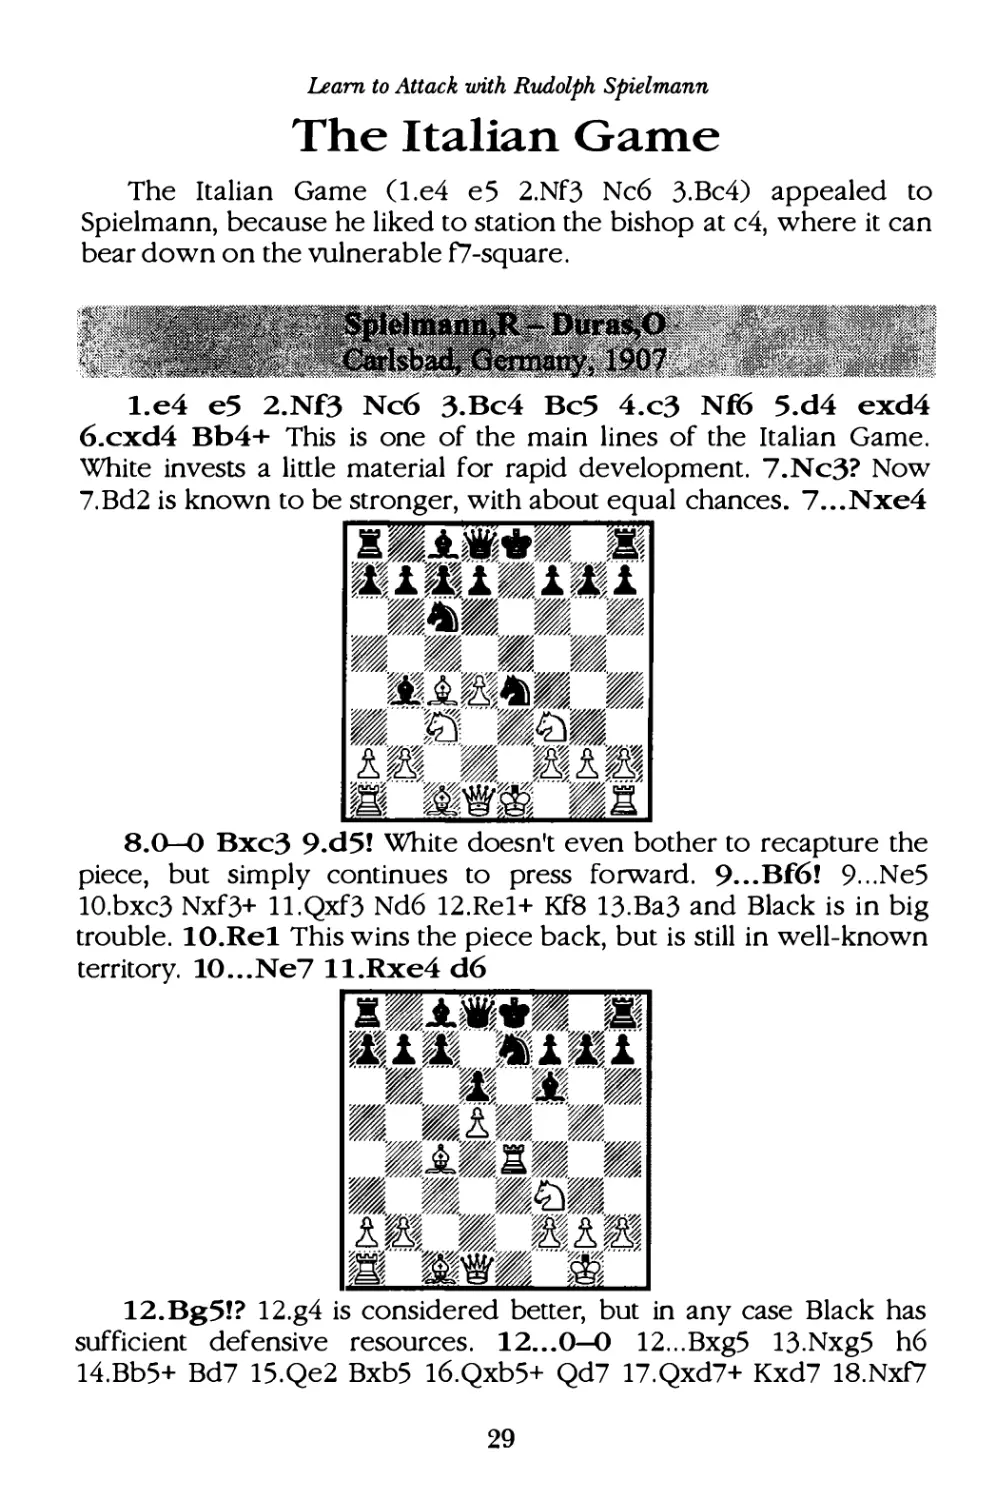
Rhf8! and the knight is trapped. 19.Nxh6 gxh6 20.Re6 Nxd5 2l.Rxh6
Rae8 and Black will win without difficulty. 13.Bxf6 gxf6
White is much better here .
14.Nh4 Ng6 15.Q h5 Kh8 16.Rael Bd7 17.Bd3 Rg8
18.Re7 R g7
19.Bxg6! fxg 6 20.Nxg6+ K g8 21.Rxg7+ 1-0
l.e4 e5 2.Nf3 Nc6 3.Bc4 Bc5 4.c3 Nf6 5.d4 exd4 6.cxd4 Bb4+
7.Nc3 Nxe4 8.0--0 0--0 9 . d5 Bxc3 10.bxc3 Ne7 ll.Rel Nf6
30
12.d6 Ng6 13.Ba3 c6 14.Ne5 Nxe5 15.Rxe5 b6 16.Qf3 Bb7
17 .Rae1 Rb8 18.Bc1 b5 19.Bd3 Nd5 20 . Bxh7+ 1--0
l.e4 e5 2.Nf3 Nc6 3.Bc4 Bc5 4.c3 d6 5.d4 exd4 6.cxd4 Bb6 7.h3
Nf6 8.0--0 Nxe4 9.Re1 0--0 10.Rxe4 d5 ll.Bg5 Qd6 12.Bxd5 Qxd5
13. Nc3 Qd7 14.d5 f6
�-�=-
-�-
-,.
.
15.Be3 Nd8 16.Bxb6 axb6 17.Qe2 Nf7 18.Re7 Qd8 19.d6 Nxd6
20.Nd5 Rf7 2l.Re1 Bd7 22.Nh4 Ra5 23.Rxf7 Nxf7 24.Nf5 Ne5
25 . Nfe7+ Kh8 26 .b4 Ra8 27 .f4 Ng6 28. Nxg6+ hxg6 29.Ne7 Qe8
30 . Qf2 g5 31.fxg5 fxg5 32. Qd2 b5 33. Qxg5 Ra6 34.Re4 Rh6 35.Nf5
Qg6 36. Qd8+ Kh7 37. Qxd7 Rh5 38 . Rg4 Rg5 39.Rh4+ 1--0
l.e4 e5 2.Nf3 Nc6 3.Bc4 Bc5 4.c3 Qe7 5.d4 Bb6 6.0--0 d6 7.a4 a5
8.Be3 Ba7 9.Na3 Nf6 10.Nb5 Bb8 ll.dxe5 dxe5 12.b4 axb4 13.cxb4
Nxb4 14.Rcl b6
31
Learn to Attack with Rwi,Qlph Sp ielmann
z•.t.RwB �
...
..,,� �
?,;�:-�-!��%' '"
� �� �1��1
�� ..
��-· ·"· ..��
�tzS���r- . .
.
��
'·'��fAY.� ��
... .�
��rs��
���� .... :
�.��·�
���!�
����-.i� "�
15.Nd6+ Qxd6 16.Qxd6 cxd6 17.Bd5 Nbxd5 18.Rxc8+ Ke7
19.Rxh8 Nxe4 20 .Rc1 NcS 21.a5 Nb3 22.Rb1 NxaS 23.Bxb6 Nxb6
24.Rxb6 Bc7 25 .Rxa8 Bxb6 26 .Rb8 Bc7 27.Rg8 Kf6 28.g4 Bb6 29 .h4
h6 30.g5+ hxgS 31.Nxg5 Kg6 32.Rb8 Bc7 33.Rc8 Bb6 34.Rb8 Bc7
35.Rf8 f6 36.Ne6 Bb6 37.Rg8 Kf7 38.Rxg7+ Kxe6 39.h5 dS 40 .h6 d4
41 .h7 d3 42.h8=Q 1-0
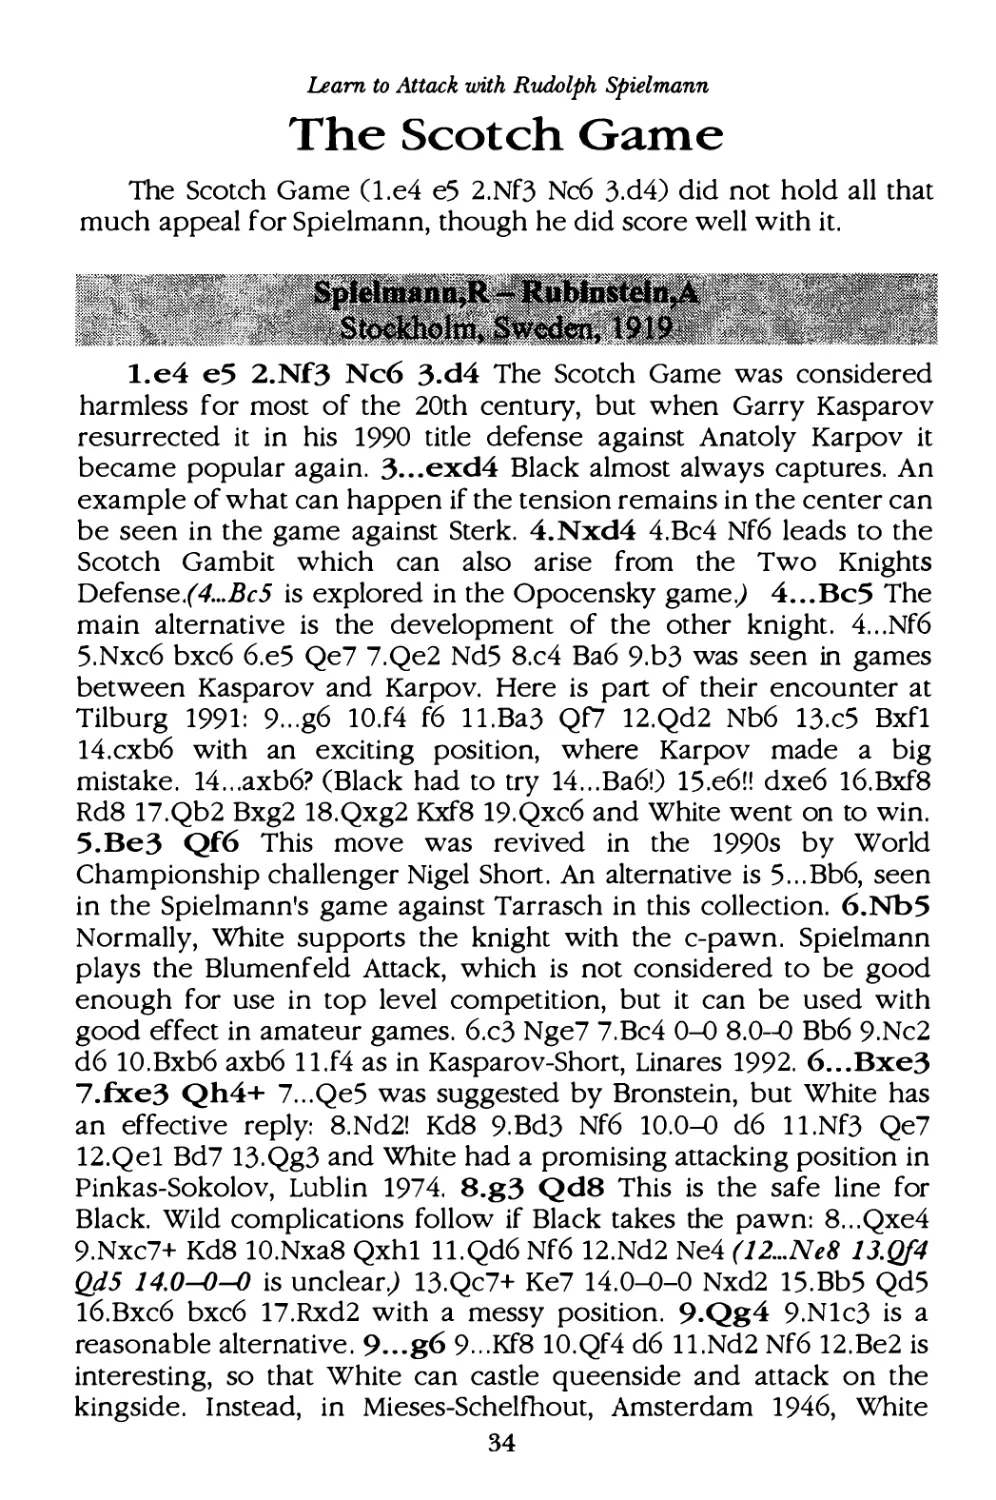
1.e4 eS 2.Nf3 Nc6 3.Bc4 BcS 4.c3 Qe7 S.d4 Bb6 6.a4 a6 7.0-0 d6
8.h3 Nf6 9.Re1 0-0 10.b4 h6 11.Ba3 Nd7 12.b5 Nd8 13.Nbd2 Qf6
14.Nf1 Ne6 15.Ne3 NgS 16.Nxg5 QxgS 17.bxa6 bxa6 18.a5 BxaS
19.Bc1 Bb6 20.Nf5 Qf6 21.Re3 Nb8
....
.
. ?�·-
.....�. }.·'�
�� '//" "'�Y//. '" �'"' "'/""�Y/A'"/
1�� �·� \Ul
l
�·�
����-$.��
......... ..
.
.���'-" "'�
��,�(£���
� .Y//. "J8]}. .... -�
������!
�...
.
.�
�- ,�r�
%' % �Y/.C'W��% �,,, .. ,V.Y_."W, �
�l!'l!',i !?'�\WI� �.
?'.§1 ��
�t
22.Nxg7 Kxg7 23.Qh5 Kh7 24.Rf3 Qg6 25.Qh4 Nd7 26. Rg3 Qf6
27. Bg5 Qg7 28.Be7 Qh8 29.Qh5 Nf6 30.Qf3 Rg8 31.Bxf6 Rxg3
32.fxg3 Qg8 33.Bd5 Rb8 34.Kh2 aS 35.dxe5 dxeS 36.Bxe5 Be6
37.Bxe6 fxe6 38.Rd1 Qg6 39.Rd7+ Kg8 40 . Rg7+ Qxg7 41. Bxg7 Kxg7
42.c4 Re8 43.c5 Ba7 44.Qc3+ eS 45.Qxa5 Bb8 46.Qb5 Kf7 47.g4 1-0
32
Learn to Attack with Rudolph Spie lmann
17.d4! Qxc3 18.Ng5 Be6 19.Qh5 h6 20.d5 hxg5 2l.dxe6 fxe6
22.Qf7+ Kh7 23.Rac 1 Qxa3 24.Rxc7 Qf8 25.Qh5+ Kg8 26.Rxf8+ Rxf8
27.h4 Rac8 28.b6 Rxc7 29.bxc7 Rc8 30 .Qdl 1--0
l.e4 e5 2.Nf3 Nc6 3.Bc4 Be7 4.Nc3 Nf6 5.d3 d6 6.h3 Na5 7.Bb3
Nxb3 8.axb3 0--0 9.0--0 c6 10.Ne2 Qc7 ll.g4 d5 12.Ng3 Re8 13.Qe2
dxe4 14.dxe4 g6 15.Bg5 Be6 16.Qe3 a6 17.Ne1 Nd7 18.Bxe7 Rxe7
19.Qh6 Rd8 20.Kh2 f6 2l.Nd3 Rg7 22.Rg1 Nf8
->�•••
Rfii·j· .:�art
i�lr.�.l�'J. ·�
� :/&���'-· ·-��·· .r.
����·Jr•'•
�r�����r
�m%���m4' ···
·
�··,-�
��.&m �� m
�:r ··
··/,•
��'····��:r ···"
23.Nf5 Bxf5 24.gxf5 Rd4 25 .Rg4 Rdd7 26.Nc5 Rde7 27.Ragl Qd6
28.Nd3 a5 29.h4 Qc7 30 . R4g3 Ref7 31.f4 Qe7 32.fxe5 fxe5 33.Rg5
Nd7 34 .fxg6 hxg6 35.Rxg6 Nf6 36.R1g5 Nxe4 37.Rh5 1--0
33
Learn to Attack with Rudolph Sp ielmann
The Scotch Game
The Scotch Game (l.e4 e5 2.Nf3 Nc6 3.d4) did not hold all that
much appeal for Spielmann, though he did score well with it.
l.e4 e5 2.Nf3 Nc6 3.d4 The Scotch Game was considered
harmless for most of the 20th century, but when Garry Kasparov
resurrected it in his 1990 title defense against Anatoly Karpov it
became popular again. 3 ...exd4 Black almost always captures. An
example of what can happen if the tension remains in the center can
be seen in the game against Sterk . 4.Nxd4 4.Bc4 Nf6 leads to the
Scotch Gambit which can also arise from the Two Knights
Defense .(4...Bc 5 is explored in the Opocensky game J 4...Bc5 The
main alternative is the development of the other knight . 4 ...Nf6
5.Nxc6 bxc6 6.e5 Qe7 7.Qe2 Nd5 8.c4 Ba6 9.b3 was seen in games
between Kasparov and Karpov. Here is part of their encounter at
Tilburg 1991: 9 ...g6 10.f4 f6 ll.Ba3 Qf7 12.Qd2 Nb6 13.c5 Bxf1
14.cxb6 with an exciting position, where Karpov made a big
mistake . 14 ...axb6? (Black had to try 14 ...Ba6!) 15.e6!! dxe6 16.Bxf8
Rd8 17.Qb2 Bxg2 18.Qxg2 Kxf8 19.Qxc6 and White went on to wi n.
5.Be3 Qf6 This move was revived in the 1990s by World
Championship challenger Nigel Short . An alternative is 5 ...Bb6, seen
in the Spielmann's game against Tarrasch in this collection. 6.Nb5
Normally, White supports the knight with the c-pawn . Spielmann
plays the Blumenfeld Attack, which is not considered to be good
enough for use in top level competition, but it can be used with
good effect in amateur games . 6.c3 Nge7 7.Bc4 0--0 8.0--0 Bb6 9.Nc2
d6 10.Bxb6 axb6 11.f4 as in Kasparov-Short, Linares 1992. 6 ...Bxe3
7.fxe3 Qh4+ 7 ...Qe5 was suggested by Bronstein, but White has
an effective reply: 8.Nd2! Kd8 9.Bd3 Nf6 10.0--0 d6 11.Nf3 Qe7
12.Qe1 Bd7 13.Qg3 and White had a promising attacking position in
Pinkas-Sokolov, Lublin 1974. 8.g3 Qd8 This is the safe line for
Black. Wild complications fo llow if Black takes the pawn: 8 ...Qxe4
9.Nxc7+ Kd8 10.Nxa8 Qxh1 11.Qd6 Nf6 12.Nd2 Ne4 (1 2... Ne 8 13.Qf4
Qd 5 14.0--0--0 is unclearJ 13.Qc7+ Ke7 14.0--0--0 Nxd2 15.Bb5 Qd5
16.Bxc6 bxc6 17.Rxd2 with a messy position . 9.Qg4 9.N1c3 is a
re asonable alternative . 9 ...g6 9 ...Kf8 10.Qf4 d6 ll.Nd2 Nf6 12.Be2 is
interesting, so that White can castle queenside and attack on the
kingside. Instead, in Mieses-Schelfuout, Amsterdam 1946, White
34
Learn to Attack with Rudolph Sp ielmann
placed a bishop on c4, where it was vu lnerable to ...Ne5, and then
castled kingside . This wrong-headed plan gave the whole line a
dubious reputation for White .; 9 ...Nf6 10.Qxg7 Rg8 ll.Qh6 Rg6
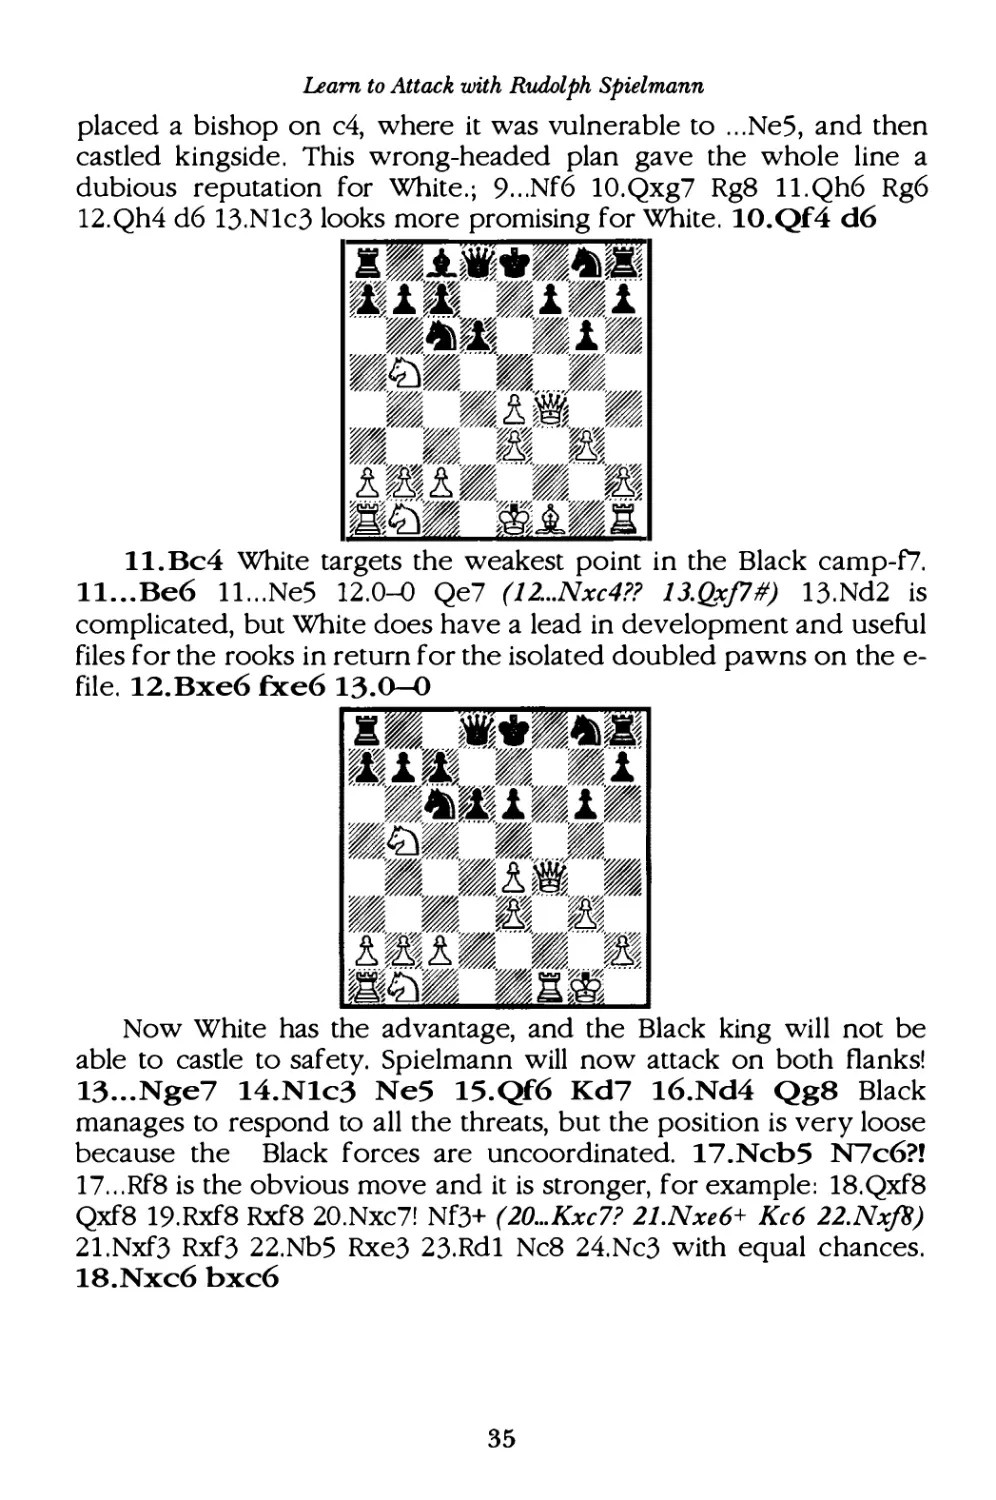
12.Qh4 d6 13.Nlc3 looks more promising for White . 10.Qf4 d6
!•�J·��s•a•
�.1%.14% •.1�.1
,.... . Y.�Ji)m �� 1�
���'· ../.���
ri
����,��
a�a�w.o:��...JW
®�
����
r�r. . ..v.• ..v.�
�:��mt•·t
ll.Bc4 White targets the weakest point in the Black camp-f7.
ll.. . Be6 ll...Ne5 12.0--0 Qe7 (1 2...Nx c4?? 13.Qxj7 #) 13.Nd2 is
complicated, but White does have a lead in development and useful
files for the rooks in return for the isolated doubled pawns on the e
file. 12.Bxe6 fx:e6 13.�
��p-������
!•�n?�i�S•
�.1%.14% • �.1
,.....Y._ i) � r� r�
���..Y.� ��
����,��
a�a�WJ. �'· ···�WJ. ��
����
l� l�' ../.�'
·
·../.�
���- ri·i�...../.
Now White has the advantage, and the Black king will not be
able to castle to safety. Spielmann will now attack on both flanks!
13...Nge7 14.Nlc3 Ne5 15.Qf6 Kd7 16.Nd4 Qg8 Black
manages to respond to all the threats, but the position is very loose
because the Black forces are uncoordinated. 17.Ncb5 N7c6?!
17...Rf8 is the obvious move and it is stronger, for example : 18.Qxf8
Qxf8 19.Rxf8 Rxf8 20 .Nxc7! Nf3+ (20... Kx c7? 2l.Nxe 6+ Kc 6 22. Nxf8)
21.Nxf3 Rxf3 22.Nb5 Rxe3 23.Rdl Nc8 24.Nc3 with equal chances .
18.Nxc6 bxc6
35
L£am to Attack with Rudolph Sp ielmann
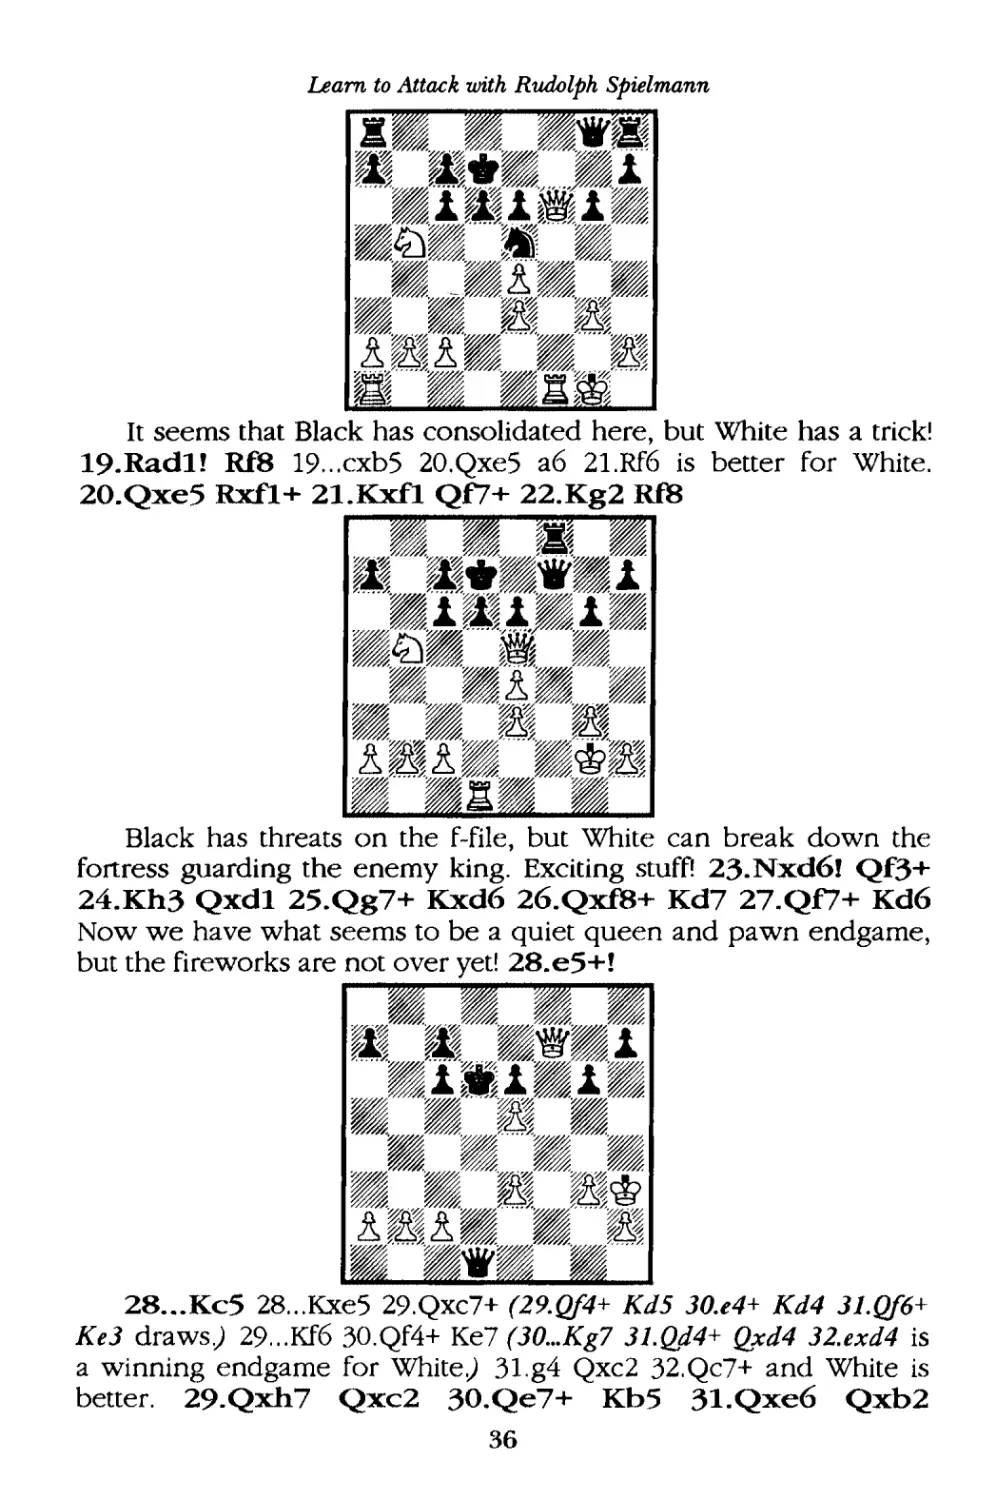
Learn to Attack with Rudolph Spie lmann
32.Qb3+! Spielmann has accurately calculated the king and pawn
endgame, so it is time to end the attack and finish Black off in the
endgame . 32 ...Qxb3 33.axb3
White wins .
33. ..c5 34.Kg4 Kc6 35.Kf3 g5 36.h4 gxh4 37.gxh4
Kd5 38. Kf4 c4 39.bxc4+ Ke6 40.h5 a5 41.h6 Kf7
42.e6+ 1-0
l.e4 e5 2.Nf3 Nc6 3.d4 exd4 4.Nxd4 Bc5 5.Be3 Bb6 6.Nc3 d6
7.Be2 Nf6 8.Qd2 Ng4 9.Bxg4 Bxg4 10.h3 Bd7 ll.Nd5 0--0 12.0--0-
-0
Be6 13.Bg5 Qb8
14.Nf6+! Kh8 15.Nxc6 bxc6 16.Qf4 Qd8 17.Nxh7 f6 18.Nxf8 Qxf8
19.Qh4+ Kg8 20. Bd2 Qc8 2l.a3 Qa6 22.f4 Qc4 23.Qg3 Qxe4 24.Rhe l
Qf5 25.b3 cS 26.Qh4 Bd5 27.g4 Qd7 28.Bc3 Qf7 29.g5 fxg5 30. Qxg5
Bc6 31.Re7 1--0
37
Learn to Attack with Rudolph Sp ielmann
l.e4 eS 2.Nf3 Nc6 3.d4 exd4 4.Bc4 BcS 5.0--0 d6 6.Bg5 Nge7 7.c3
Bg4 8.Bb5 dxc3 9.Nxc3 0--0 10.Bxc6 bxc6 11.h3 Bxf3 12.Qxf3 f6
13.Bf4 Ng6 14.Bg3 Qd7 15.Rad1 Qe6 16.Qd3 NeS 17.Qc2 Bb6
18.Kh2 Rad8 19.f4 Nc4 20 .f5 Qf7 21.Bf2 dS 22.exd5 Bxf2 23.Qxf2
cxdS 24.b3 Nb6 25.Nb5 Qd7 26.Nd4 Rfe8 27.Ne6 Qd6+ 28.Kh1 Rd7
29 . Rd4 cS 30 . Rh4 d4 31.Qf3 32.Rh6 Qe7
33.h4 gxh4 34.Qh5 Qf7 35.Qxh4 NdS 36. Rf3 Rxe6 37.fxe6 Qxe6
38.Rg3+ Kh8 39. Rhg6 Rd8 40 . Qh6 Qe7 41.Rg7 Qe4 42.Rf7 1--0
l.e4 eS 2.Nf3 Nc6 3.d4 d6 4.Bc4 Be7 S.dS NbS 6.h3 fS 7.Nc3 Bf6
8.exf5 BxfS 9.g4 Bg6 10.Bd3 Bxd3 ll.Qxd3 Qd7 12.Be3 a6 13.0--0--0
Qf7 14.Ne4 Bd8 15.Nfg5 Qg6 16.Qb3 Nd7 17.f4 exf4 18.Bxf4 BxgS
19.Bxg5 NcS
20. Nxc5 QxgS+ 21.Kb1 dxcS 22.Qxb7 Rd8 23.Qxc7 Ne7 24.d6
Rf8 25.Rhf1 Rxf1 26.d7+ 1--0
38
Learn to Attack with Rudolph Sp ielmann
I.e4 e5 2.Nf3 Nc6 3.Bc4 Nf6 4.d4 exd4 5.0-0 This is the
Scotch Gambit, which can also be reached via l.e4 e5 2.Nf3 Nc6
3.d4 exd4 4.Bc4 Nf6 5.0-0 5 ...Bc5 5 ...Nxe4 is the usual move these
days, For example: 6.Rel d5 7.Bxd5 Qxd5 8.Nc3 with exciting pins,
which soon get resolved. 8 ...Qa5 9.Nxe4 Be6 10.Bd2 Bb4 ll.Nxd4
Nxd4 12.c3 Be7 13.cxd4 Qd5 with complex play. A typical example
is: 14.Bb4 Bxb4 15.Qa4+ Qc6 16.Qxb4 0-0-0 17.Nc3 Qb6 18.Qxb6
axb6 19.Radl with a level endgame . Black has bishop vs . knight and
a better pawn structure but White has more active rooks and control
of the center, Tinnesand-Konstantinopolsky, Postal 1958. 6.c3
Instead of this move, White usually chooses 6.e5, the Max Lange
Attack, which leads to lots of complications and requires a good
understanding of opening theory. But 6.c3 is a valid gambit in its
own right, and is not as well known.
.!: �-*-�·� �
mrm�l.�� .rm·.r
'· --"·6)�
�-- ..v.
.
-��-���£ .•�
-�··
�•.t.m l• �.
• ��- ---·"·tJ• �
��r�· --"
. ��:r� ��-�
�s���;���tJ
J
��l�
� �'Z:Jm"tW� ��
6...Nxe4 This is the best move for Black. Accepting the gambit
can be dangerous, as are other methods of declining. 6 ...dxc3
7.Nxc3 d6 8.Bg5 gives White a lot of pressure, with the threat of Nd5
in the air. ; 6 ...d5 7.exd5 Nxd5 8.cxd4 Be7 9.Bxd5 Qxd5 10.Nc3 Qd8
ll.d5 gives White a very strong initiative.; 6 ...d3 7.b4 Be7 8.e5 Ng4
9.Rel leaves Black's pieces looking ridiculous, and the d-pawn can
be captured at will. 7.cxd4 d5 7...Be7 8.d5 is clearly good for
White . Black must react more vigorously, which is why 7 ...d5 is
correct here , as in most similar situations . 8.dxc5 dxc4
39
Learn to Attack with Rudolph Sp ielmann
A-��i�m ?{�
� 1� -1�1
,.. .
.
.%�4)� %�'- ---�
�
����� ���
��'.f� �� %�
�����!��
�- ." ���%//,."�-
.
"
!�•�!�
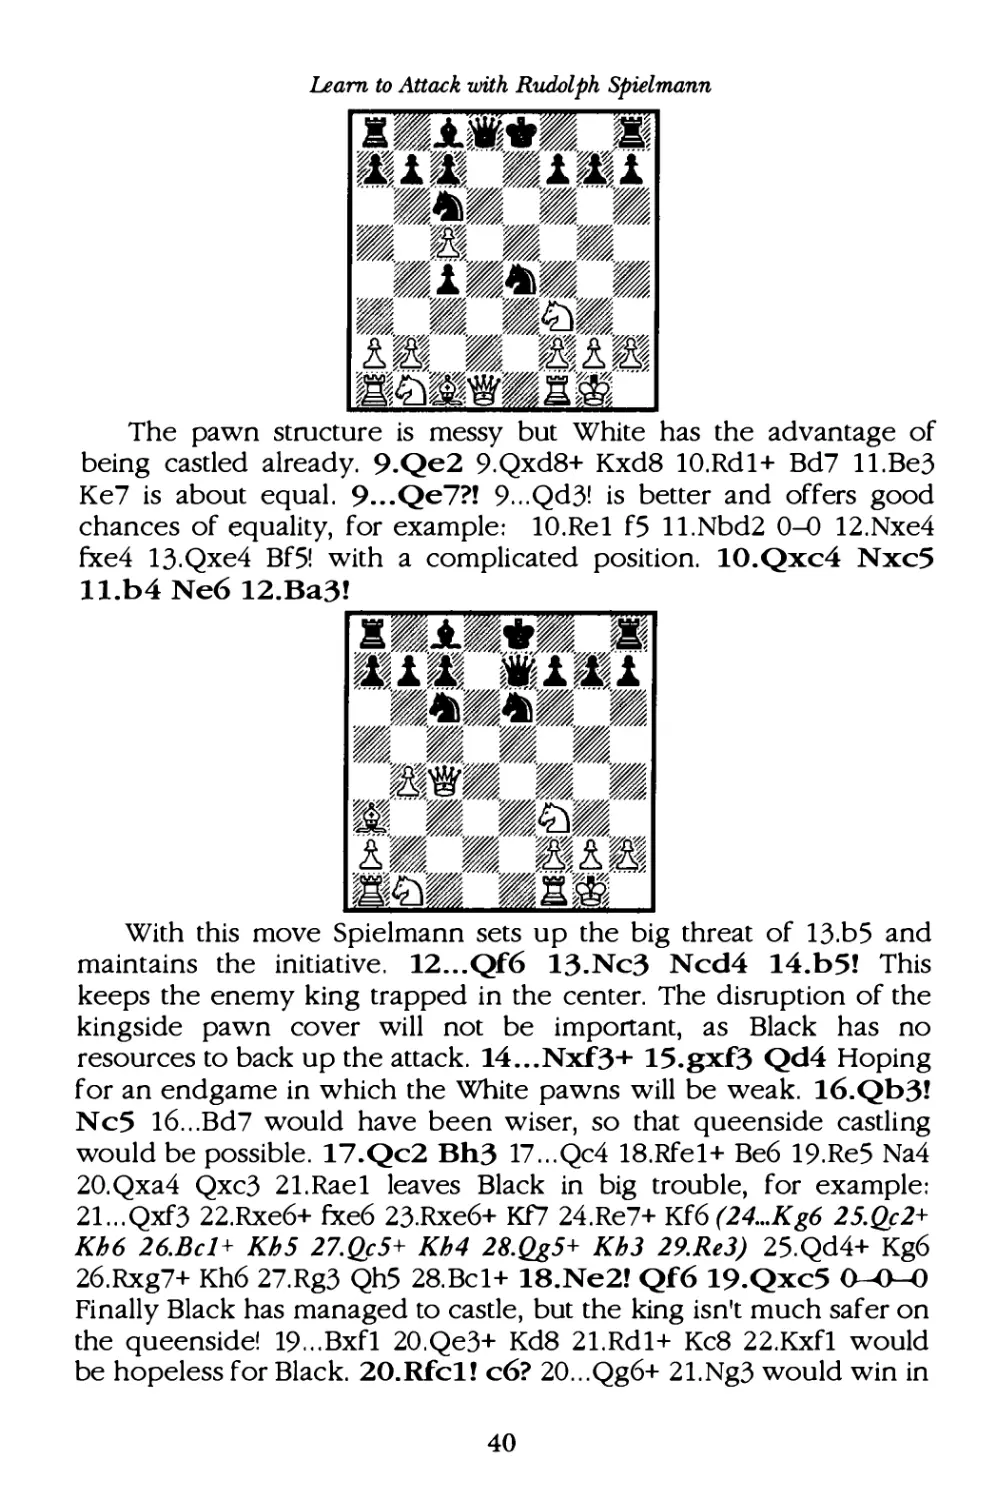
�m��l•tm .
.
%
The pawn structure is messy but White has the advantage of
being castled already. 9.Qe2 9.Qxd8+ Kxd8 lO.Rdl+ Bd7 ll.Be3
Ke7 is about equal . 9 ...Qe7?! 9 ...Qd3! is better and offers good
chances of equality, for example : lO.Rel fS ll.Nbd2 0-0 12.Nxe4
fxe4 13.Qxe4 BfS! with a complicated position. 10.Qxc4 Nxc5
ll.b4 Ne6 12.Ba3!
������r-��
K�..
.
�.� �·�
� % ��%�.,. "·�� %,�@.;,
�·�1� �1�1
,,�/,�4)���'·····��
m�������
���������
-�}.������
.... ;�
�� �%
'
.
"�%'
.
"
l"������4J&�
� �ttJ� �:�
With this move Spielmann sets up the big threat of 13.b5 and
maintains the initiative . 12 ...Qf6 13.Nc3 Ncd4 14.b5! This
keeps the enemy king trapped in the center. The disruption of the
kingside pawn cover will not be important, as Black has no
resources to back up the attack. 14 ...Nxf3 + 15.gxf3 Qd4 Hoping
for an endgame in which the White pawns will be weak. 16.Qb3!
Nc5 16...Bd7 would have been wiser, so that queenside castling
wo uld be possible. 17.Qc2 Bh3 17 ...Qc4 18.Rfe l + Be6 19.Re5 Na4
20. Qxa4 Qxc3 21.Rae l leaves Black in big trouble, for example:
21...Qxf3 22.Rxe6+ fxe6 23.Rxe6+ Kf7 24 .Re7+ Kf6 (2 4...Kg6 25.Qc2+
Kh 6 26.Bcl + Kh 5 27.Qc5+ Kh 4 28.Qg5+ Kh J 29.Re3) 25.Qd4+ Kg6
26 . Rxg7+ Kh6 27.Rg3 QhS 28. Bc l + 18.Ne2! Qf6 19.Qxc5 0-0-
-0
Fi nally Black has managed to castle, but the king isn't much safer on
the queenside! 19 ...Bxfl 20 .Qe3+ Kd8 21.Rdl+ Kc8 22.Kxfl would
be hopeless for Black. 20.Rfcl ! c6? 20...Qg6+ 21.Ng3 would win in
40
uarn to Attack with Rudolph Sp ielmann
the long run, but Black's move made it easy. ; 20 ...Kb8 2l. Qxc7+ Ka8
22.Qg3 is also fa irly simple. 21.Qxa7! 1-0
41
Learn to Attack with Rudolph Sp ielmann
The Four Knights
The Double Spanish Variation of the Four Knights gained a
re putation for drawishness in the middle of the century, but has
been revived in recent years and is proving to be fertile territory for
new ideas . 5.0-0 0--0 6.d3 d6 7.Bg5 Ne7 7 ...Bxc3 8.bxc3 Qe7
9.Rel Nd8 is the fa mous variation known as the Metger Unpin,
where Black transfers the knight to e6 in order to break the pin on
the knight at f6 . This remains a topical variation in contemporary
tournament chess, even though it has been examined for more than
a century since Metger unveiled it in 1893! You can see Spielmann's
re markably modern treatment of that line in his game against
Rubinstein. 8.Nh4 Then at the time, and now once more, this is the
proper reply. It is truly impressive how well Spielmann understood
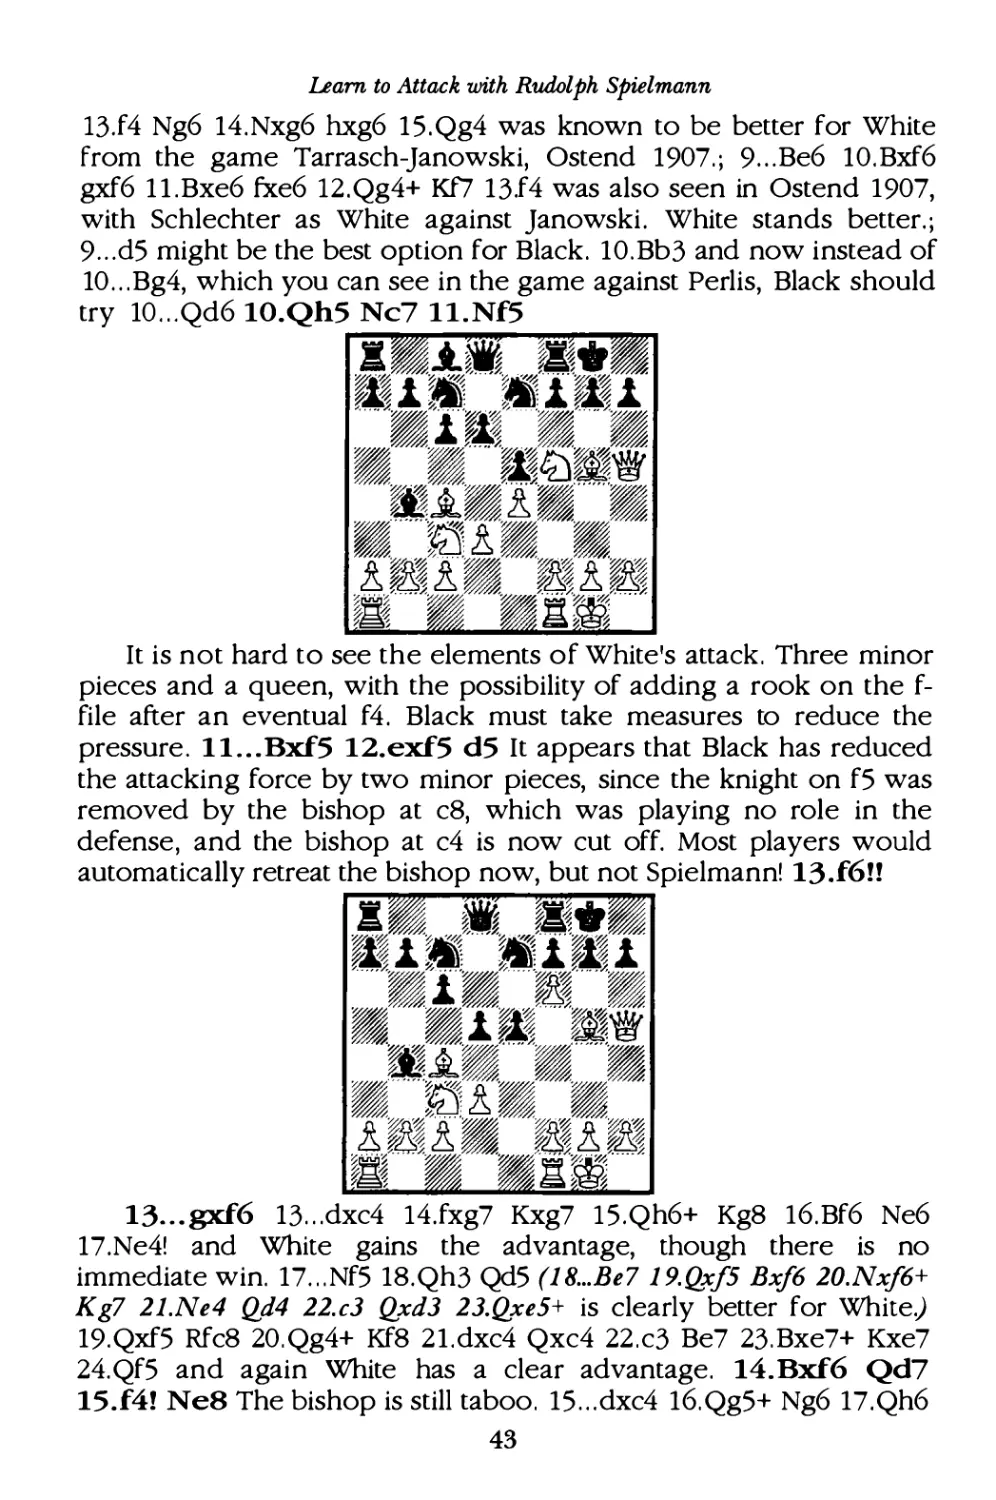
the theory of the Open game . 8 ...c6 9.Bc4
zmi.� ?�•�
m�i. -r..-.r�T
- ..v.� lm ...;.; .....v.�
� ��'· ..":�Jn� -
..�
��
���m
��[�'£�"'""�
� .... ;��
��� ;
��nt .. '�
������
!�!- �!�
��....7-.
fm'·g�·.. ·"
9 ...Ne8 Black decides to maneuver the knight to c7. There are
other plans, of course. 9 ...Bg4 10.f3 Be6 ll.Bxf6 gxf6 12.Bxe6 fxe6
42
uarn to Attack with Rudolph Sp ielmann
13.f4 Ng6 14.Nxg6 hxg6 15.Qg4 was known to be better for White
from the game Tarrasch-Janowski, Ostend 1907.; 9 ...Be6 10.Bxf6
gxf6 1l.Bxe6 fxe6 12.Qg4+ Kf7 13.f4 was also seen in Ostend 1907,
with Schlechter as White against Janowski. White stands better. ;
9 ...d5 might be the best option for Black . 10.Bb3 and now instead of
10 ...Bg4, which you can see in the game against Perlis, Black should
try 10 . . . Qd6 10.Qh5 Nc7 ll.Nf5
A•%�jtt..J.%"-:B
tE.l;ar ;ar.1W.1
'·.. �.
l'l.f····
·
�' ..��
��W�(..
"���� ·��
���Cl:J�'ti'
��l'�i�""'"�
�... .
..
�l��� �
!�! ;���,�
�ll··· · ·"•••'iret?r· ·· ·"
It is not hard to see the elements of White's attack . Three minor
pieces and a queen, with the possibility of adding a rook on the f
file after an eventual f4 . Black must take measures to reduce the
pressure . ll. . . Bxf5 12. exf5 d5 It appears that Black has reduced
the attacking fo rce by two minor pieces, since the knight on fS was
removed by the bishop at c8, which was playing no role in the
defense , and the bishop at c4 is now cut off. Most players would
automatically retreat the bishop now, but not Spielmann! 13.f6!!
A•% .Jtt J•;:m
tE.l;ar -.1��.1
'
·
""-l·
�
�····
·
�
'..·"
�
��� .t· ·..v.��
����'· ..v.�
......
;�
�.....�,
����
'rr�fi'�·'��rr�� '�a:�
�rd�•t��
13... gxf6 13...dxc4 14.fxg7 Kxg7 15.Qh6+ Kg8 16.Bf6 Ne6
17.Ne4! and White gains the advantage, though there is no
immediate win. 17...Nf5 18.Qh3 QdS (1 8...Be7 19. Qxf5 Bxf6 20.Nxf6 +
Kg7 21.Ne4 Qd4 22.c3 Qx d3 23.Qxe5+ is clearly better for White)
19.Qxf5 Rfc8 20 . Qg4+ Kf8 2l.dxc4 Qxc4 22.c3 Be7 23.Bxe7+ Kxe7
24.Qf5 and again White has a clear advantage . 14.Bxf6 Qd7
15.f4! Ne8 The bishop is still taboo . 15...dxc4 16.Qg5+ Ng6 17.Qh6
43
Learn to Attack with Rudolph Sp ielmann
Ne8 18.Ne4 with an overpowering attack. 16.fxe5 Ng6 17.Rf3!
Now we understand White's plan. The f-pawn advanced so that the
rook could be lifted to the h-file. Notice how Spielmann achieved
this without allowing his opponent to establish any counterplay.
Checks at c5 will serve no purpose because the White king is
perfectly safe at hl. 17...Nxf6 18.exf6 Rfe 8 19.Rh3 Now it is all
over. In a modern game, Black would probably resign here .
19...Qxh3 20.Q:xh3 dxc4 2l.Ne4 Bf8 22.Rfl Rad8 23.Rf5
cxd3 24.cxd3 Rd7 25.Rg5 RedS
�.�·�
�,�,··•r-�r
-
-
�� r� ����
�����-----���
�
�� ����L ��
�-��i��
�m�������
!�•�!�
� ,....C<�
�
�i9,m'_..../.
����*
Since Black has stubbornly played on, he is rewarded with a
brilliant and humiliating fi nish. 26.Rxg6+!! fxg6 27.Qe6+ Kh8
28.Ng5 There is no defense to Nf7+ . 1--0
15...exf4 16.e5 Ne4 17.gxf4 f5 18.exf6 Nxf6 19.f5 Nf8 20. Qf3 Qf7
21.Bd3 Bd7 22.Bf4 Re8 23.Be5 c5 24.Khl c4 25.Be2 Bc6 26.Qf4 N8d7
27.Bf3 Re7 28 .Re2 Rf8 29.Rgl Qe8 30.Reg2 Rff7 31.Qh6 Kf8 32.Ng6+
44
Learn to Attack with Rudolph Sp ielmann
hxg6 33.Qh8+ Ng8 34. Bd6 Qd8 35 .Rxg6 Ndf6 36.Rxf6 Rxf6 37.Rxg7
1--0
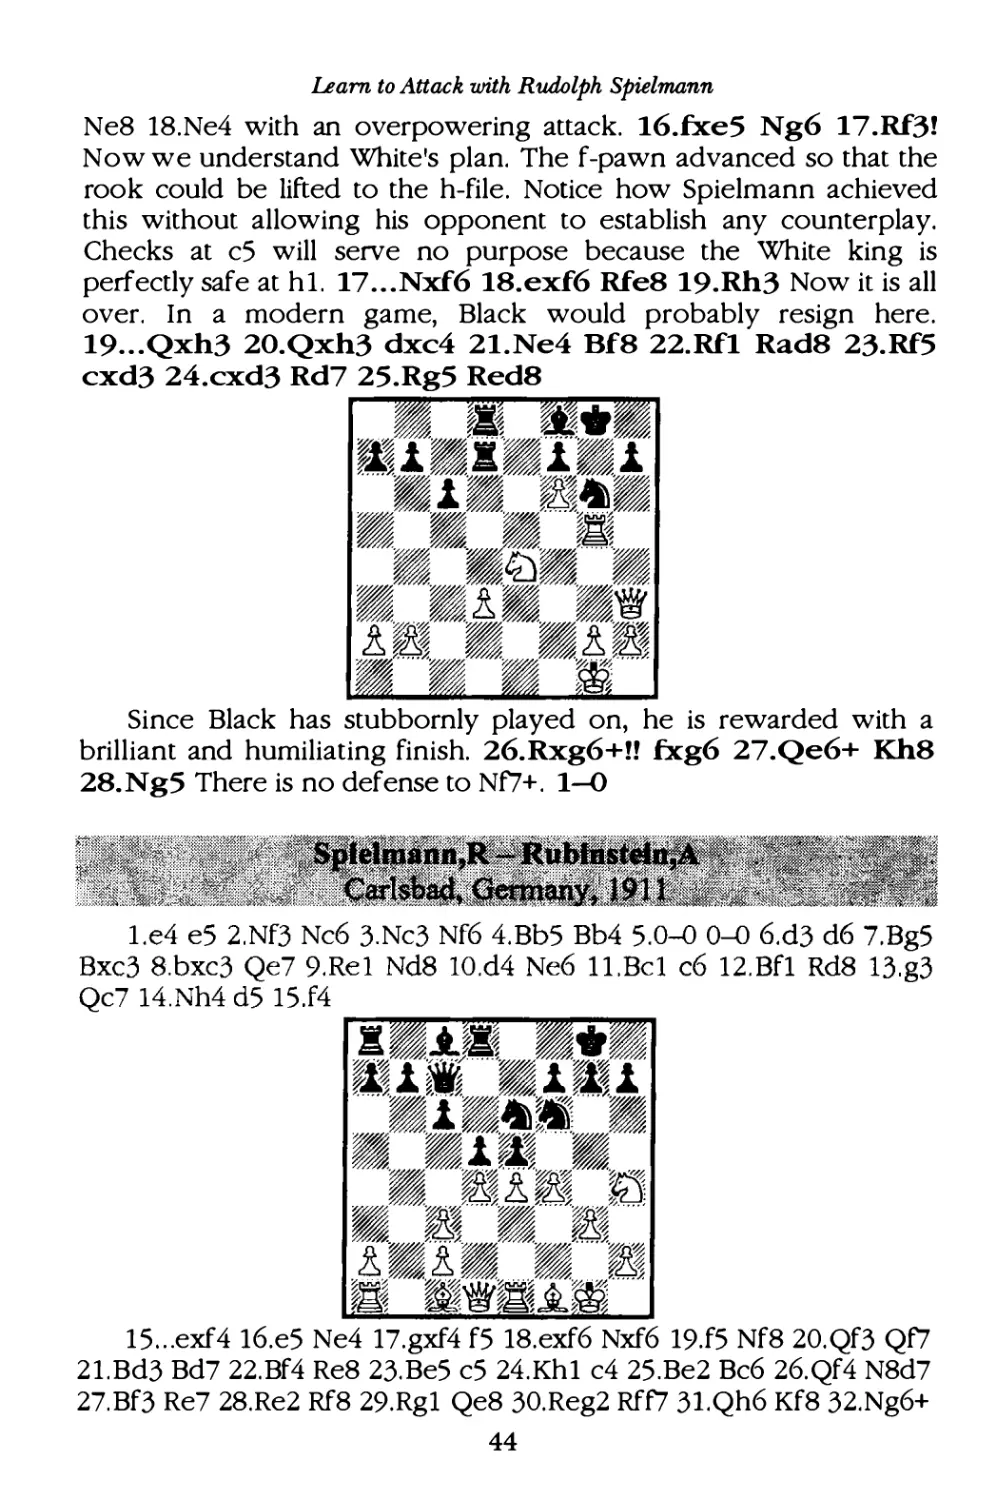
l.e4 e5 2.Nf3 Nc6 3.Nc3 Nf6 4.Bb5 Bb4 5.0--0 0--0 6.d3 d6 7.Bg5
Ne7 8.Nh4 c6 9.Bc4 d5 10.Bb3 Bg4 ll.f3 Be6 12.Bxf6 gxf6 13.f4 exf4
14.exd5 cxd5 15.Ne2 Ng6 16.Nxg6 fxg6 17.Nxf4 Bf7 18.Qf3 Qb6+
19.Kh1 d4 20.Bxf7+ Rxf7 2l.Nd5 Qd6 22.c3 Bc5 23.c4 f5 24.Rae1
Qd7 25.Qf4 Qd6 26.Re5 Qf8 27.Re6 Qg7 28.Rfe 1 g5 29 . Qf3 f4
30 . Qg4 Raf8 3l.b4 Bb6 32.Re8 Bd8 33.Qc8 Rd7
34.Nf6+! 1--0
�®/�'!'I!';,W�·�
��e.?s
�-� -------·-· ·· ·�··
-
-
�
-.1�.1 � �.1
/...i<� �����- -��
����� �-
�
��-�������'· · · ·-�-
�!��•
�/ --��'·£�' · --
��W{¢,
,� ����,� �
� �� ����/�
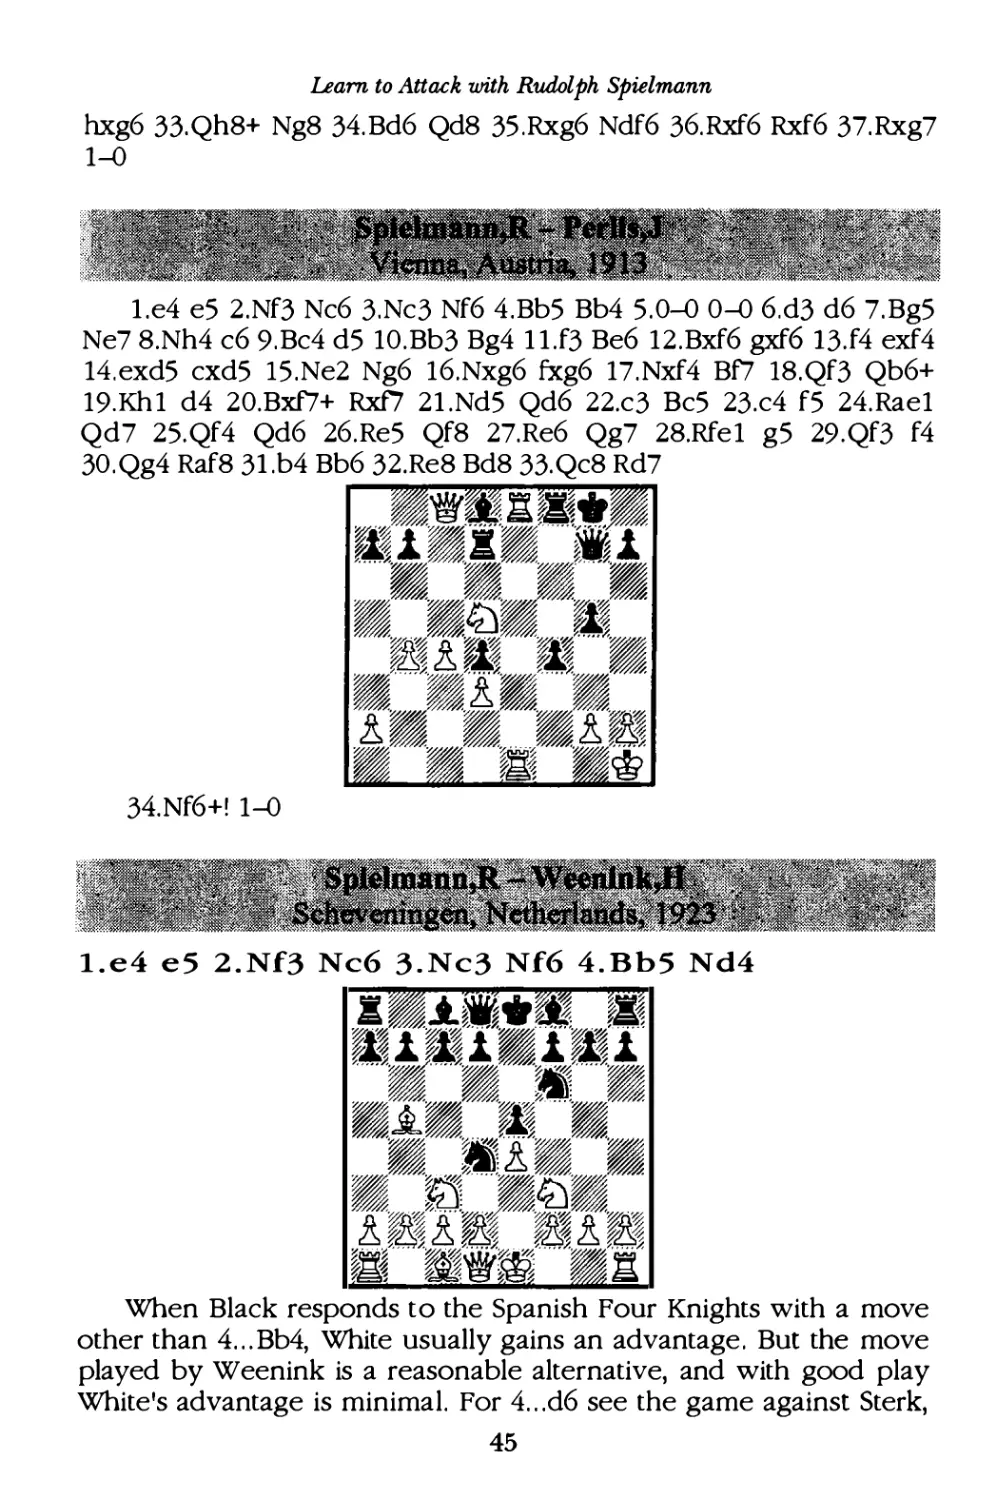
l.e4 e5 2.Nf3 Nc6 3.Nc3 Nf6 4.Bb5 Nd4
When Black responds to the Spanish Four Knights with a move
other than 4 ...Bb4, White usually gains an advantage . But the move
played by Weenink is a reasonable alternative, and with good play
White's advantage is minimal. For 4 ...d6 see the game against Sterk,
45
Learn to Attack with Rudolph Sp ielmann
and for 4 ...Be7 see the encounter with Reti. 5.Nxe5 5.Ba4 is now
considered the most promising plan Spielmann's move is considered
innocuous now, but it is not bad, and Black has to be prepared for
it. 5 . ..Qe7 6.f4?! This move is no longer seen. White should retreat
the knight to f3 instead. But back when this game was played, it was
an experiment waiting to be tried. 6 ... Nxb5 7.Nxb5 d6 8.Nf3
Qxe4+ Black has restored material equality and has the advantage
of the bishop pair.
A��•s•� �r�
�.1� -.1��.1
,.. .
.
C<�r ··"��- ··"�
m��' -.."�� ·-��
������-���
....
.
��
m���-�� �
i�!� ��i�
�:f.. ...
/.��m �-t
9.Kf2? One can forgive White for being tempted by the
possibilities of the open e-file, which can be used for an attack. In
that sense Spielmann's plan is similar to ones often seen in amateur
play. 9.Qe2 Qxe2+ 10.Kxe 2 Kd8 and Black would have a small
endgame advantage, according to the books , for example: ll.Ng5
Bg4+ 12.Kf2 Bh5 13.h3 h6 (1 3... Bg6? 14/5 1 BxfS JS. Nxj7+ Kd7
16.Nxh 8) 14.g4 hxg5 15.fxg5 (J S.gxhS Rxh S 16fx g5 RxgS) 15...Bxg4
16.gxf6 Rxh3 17.Rxh3 Bxh3 with an extra pawn for Black.
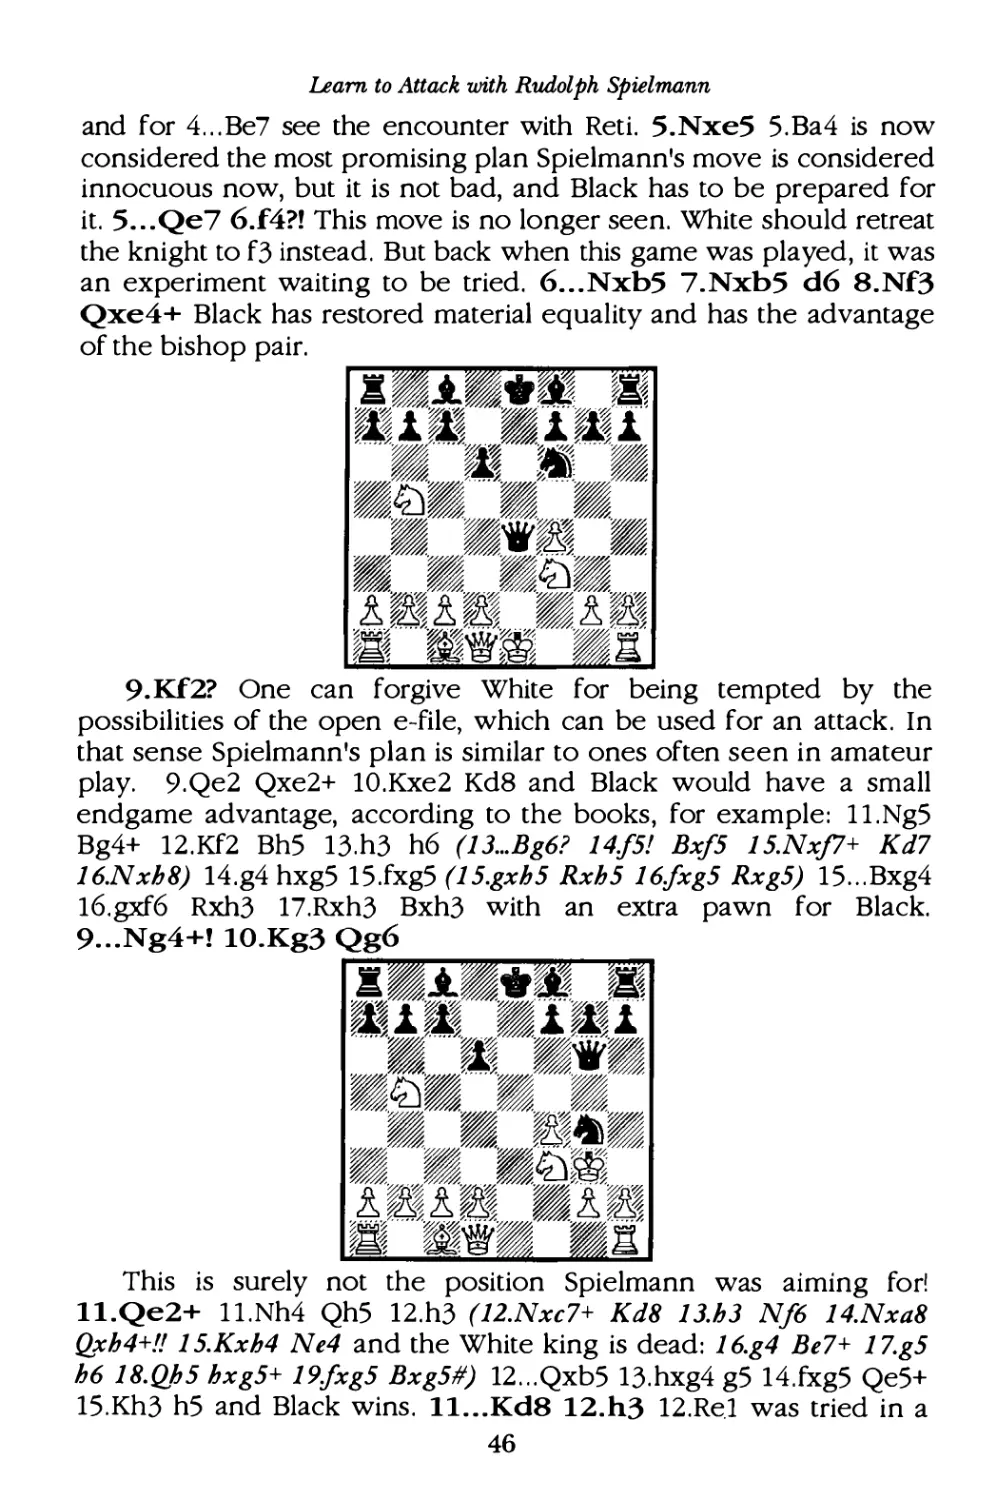
9...Ng4+! 10.Kg3 Qg6
������r-��
.!•-*-••� r�
��1m 7-�.r�.r
%...."� '·
.. ·"
��
�-�
���' ··"����
�m������
m�m�m':..-<� �'" �
�� %�� % ��m�-�
!�!� -!�
�:f
..
7-m��f�•t
This is surely not the position Spielmann was a1mmg fo r!
ll.Qe2+ ll.Nh4 Qh5 12.h3 (12.Nxc 7+ Kd8 13.h3 Nf6 14.Nxa8
Qx h4+!! JS.Kxh4 Ne4 and the White king is dead : 16.g4 Be7+ 17.g5
h6 18.Qh5 hxgS+ 19fx g5 BxgS#) 12 ...Qxb5 13.hxg4 g5 14.fxg5 Qe5+
15.Kh3 h5 and Black wins . ll. . . Kd8 12.h3 12.ReJ was tried in a
46
Learn to Attack with Rudolph Sp ielmann
game two years later against Rubinstein at Baden-Baden, but that
also turned out badly after: 12 ...Bd7 13.Nbd4 Ne3+ 14.Kf2 Nxc2
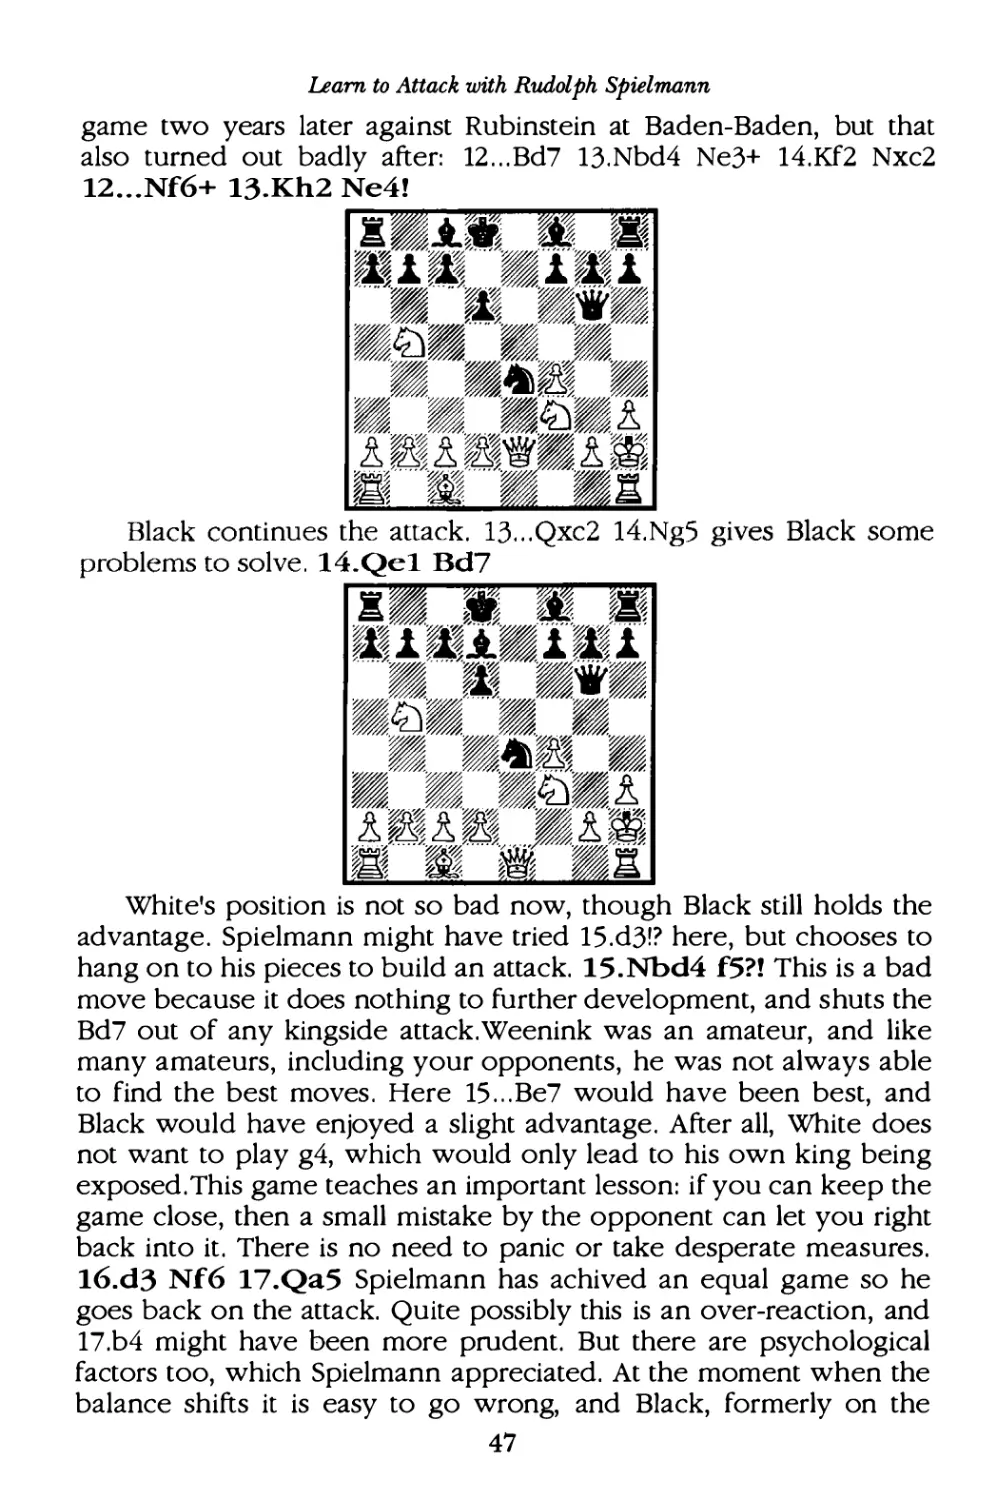
12 ...Nf6 + 13.Kh2 Ne4!
r=���r-�r-��
·���A� �� ;;w�
a�.x.
.
�-��r�
�im' ·,7.-I.•.f
' .. v..- ..Y,��-�-
-�.- ..v..�.�
�-�-���
-�-�-�-'
�� -� ����� ��eP1
}�z������m
��m�.:
White's position is not so bad now, though Black still holds the
advantage . Spielmann might have tried 15.d3!? here, but chooses to
hang on to his pieces to build an attack. 15.Nbd4 f5 ?! This is a bad
move because it does nothing to fu rther development, and shuts the
Bd7 out of any kingside attack .Weenink was an amateur, and like
many amateurs, including your opponents , he was not always able
to find the best moves . Here 15 ...Be7 would have been best, and
Black would have enjoyed a slight advantage . After all, White does
not want to play g4, which would only lead to his own king being
exposed .This game teaches an important lesson: if you can keep the
game close, then a small mistake by the opponent can let you right
back into it . There is no need to panic or take desperate measures .
16.d3 Nf6 17.Qa5 Spielmann has achived an equal game so he
goes back on the attack. Quite possibly this is an over-reaction, and
17.b4 might have been more prudent . But there are psychological
fa ctors too, which Spielmann appreciated. At the moment when the
balance shifts it is easy to go wrong, and Black, fo rmerly on the
47
Now it is Spielmann who must be a little careful. Black is
becoming a nuisance on the kingside, so White throws a monkey
wrench into the works . 20.Ng5! BxgS 21.fxg5 Rf8 This makes
little sense . 21...f4 should have been played, though White would
still have the advantage after 22.Qd5 . 22.Qd5 c6 This looks logical,
but opens up the a5-d8 diagonal, which will prove fa tal. 23.Qb3
b6 24.Ne6+! Bxe6 25.Rxe6 Qf7 26.Rael A good player
brings all of the fo rces into the attack! The pawn at d6 can wa it.
Actually, Black could resign here . 26. ..Qc7 27. Bb4 cS 28.Qd5!
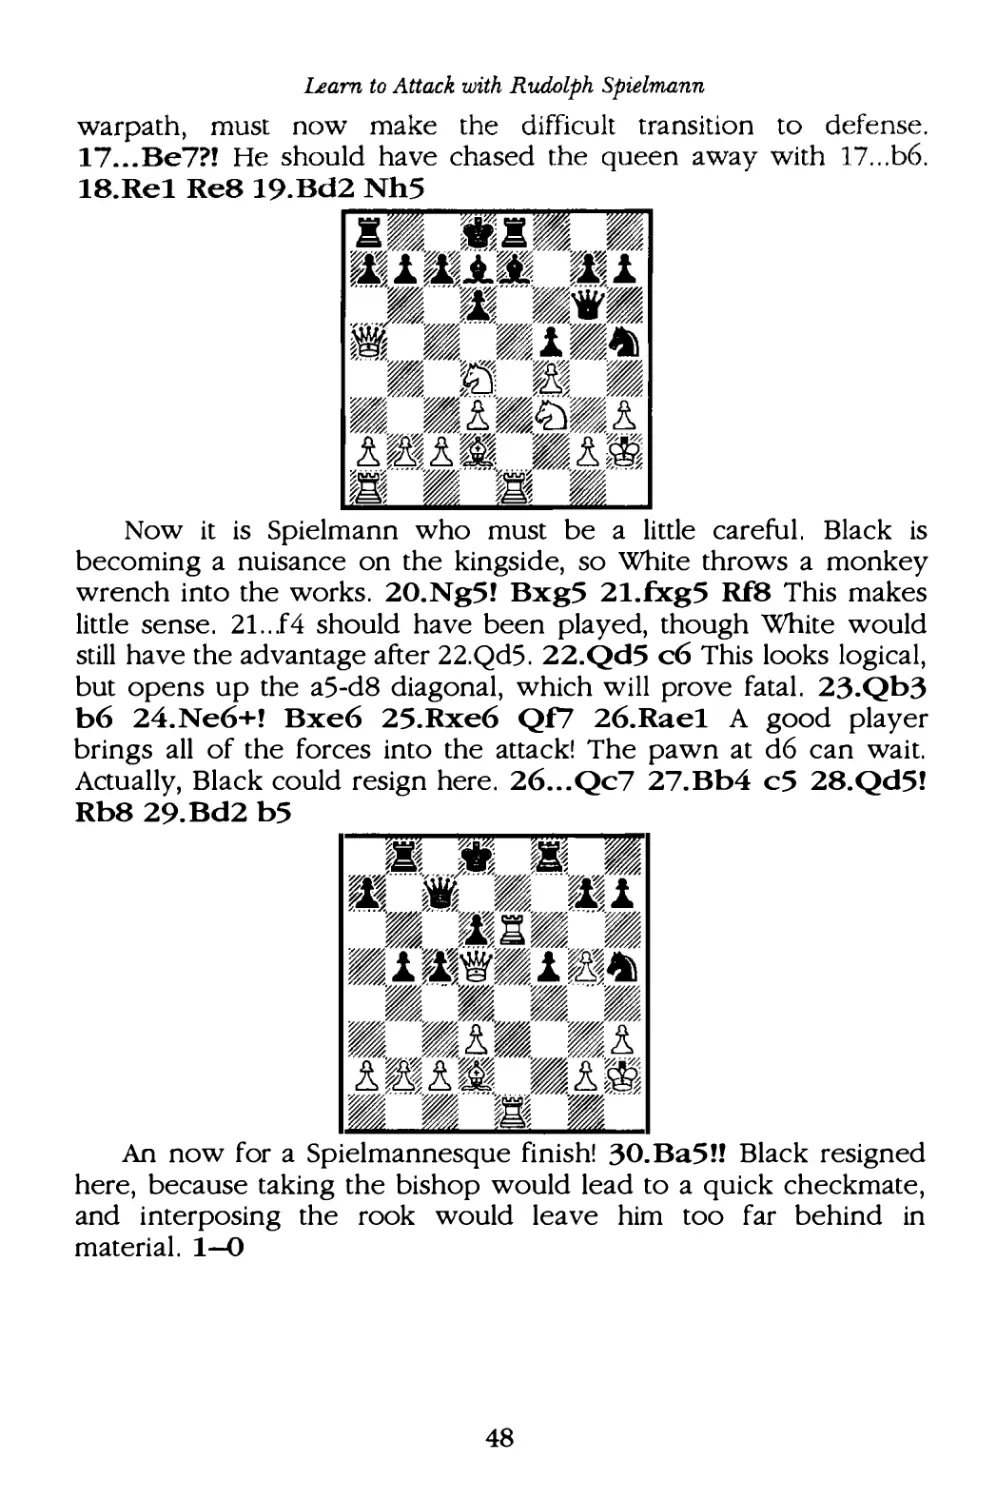
Rb8 29.Bd2 bS
}� -}��
•...<. ,Z�· · ·'�i
,.. ..7.� »••z�r�, ..v.�
m!·��r�:
���.. �� ���..��
���,���,
T�t���Tm
.3.:..· ��
��-�- J
An now for a Spielmannesque fi nish! 30. Ba5 !! Black resigned
here, because taking the bishop would lead to a quick checkmate ,
and interposing the rook would leave him too far behind in
material. 1-0
48
Learn to Attack with Rudolph Sp ielmann
26 .f6 gxf6 27 .Qxf6 c4 28.bxc4 dxc4 29.Qf3 Qe6 30 .h4 aS 3l.Kfl
fS 32.Qe3 QdS 33.Ke2 Qd7 34. Qe5 a4 35.a3 Kg6 36.Ke3 Qa7+ 37.Kf3
Qd7 38.Ke2 Kh5 39.Qf6 Kg4 40.Qxh6 Kh3 41.Qe3 1-D
l.e4 e5 2.Nc3 Nc6 3.Nf3 Nf6 4.Bb5 Be7 5.d4 exd4 6.Nxd4 0-D
7.0-D a6 8.Nxc6 bxc6 9.Ba4 Bb7 lO.eS NdS ll.NxdS cxdS 12.Qg4
�� m�����r��
�..
..
��1�1�1
!
�
'' '"'"
�''""'�
''"'"
�
���!����
,���, ..����
��������
������ %��%
l
�
,�����l� ��� �
�����
12.. .f5 13.exf6 Rxf6 14.Qxd7 Qxd7 15.Bxd7 Rd8 16.Bg4 Rb6
17. Bf4 Rf8 18.Be5 Rg6 19.Bh3 aS 20. Rad l BcS 2l.Bd4 Bd6 22.Rfe l c5
23.Be5 Rb8 24.Bf5 Rh6 25.b3 Kf7 26 .c4 d4 27.Bxd6 Rxd6 28 .Re5 g6
29 .Bd3 Rc8 30.Rde l Rc7 31.f4 Rf6 32.f5 Kg7 33.fxg6 hxg6 34.Rg5
Rcf7 35.h4 Kh6 36.Ree5 a4 37.Rxc5 axb3 38.axb3 Re7 39 .Rce5 RxeS
49
Learn to Attack with Rudolph Sp ielmann
40 .Rxe5 Rf4 4l.Rg5 Rxh4 42.Rxg6+ Kh5 43.Rg7 Be4 44.Bxe4 Rxe4
45 .Kf2 Re6 46.Rg3 1-0
l.e4 e5 2.Nc3 Nc6 3.Nf3 Nf6 4.d4 This is known as the .
Scotch Fou r Knights, since it combines the four knight moves with
the central break at d4. 4 ...exd4 This capture gives White an
advantage in space . better is 4 ...Bb4, as in the Bogoljubow game .
5.Nxd4 Bb4 6.Nxc6 bxc6 7.Bd3
.�-..
..
�·- ¥�
l'J.l·�� ·l'J.l� -��� "l'J.l� ..
� �J.tl.�J.�.!% J.
/. ..�
�,1�� �- .
.
�
�
-=-�;,�
� ....
.
%'//-�����
mhlt��
,.f!JJ�"'ei··� �f/@ �f/@
6�6� �.d§ 6�.d§
��t ··
··/.�
���/.... ./. �
l¥¥/.
rg� ��?E!ti •.sa
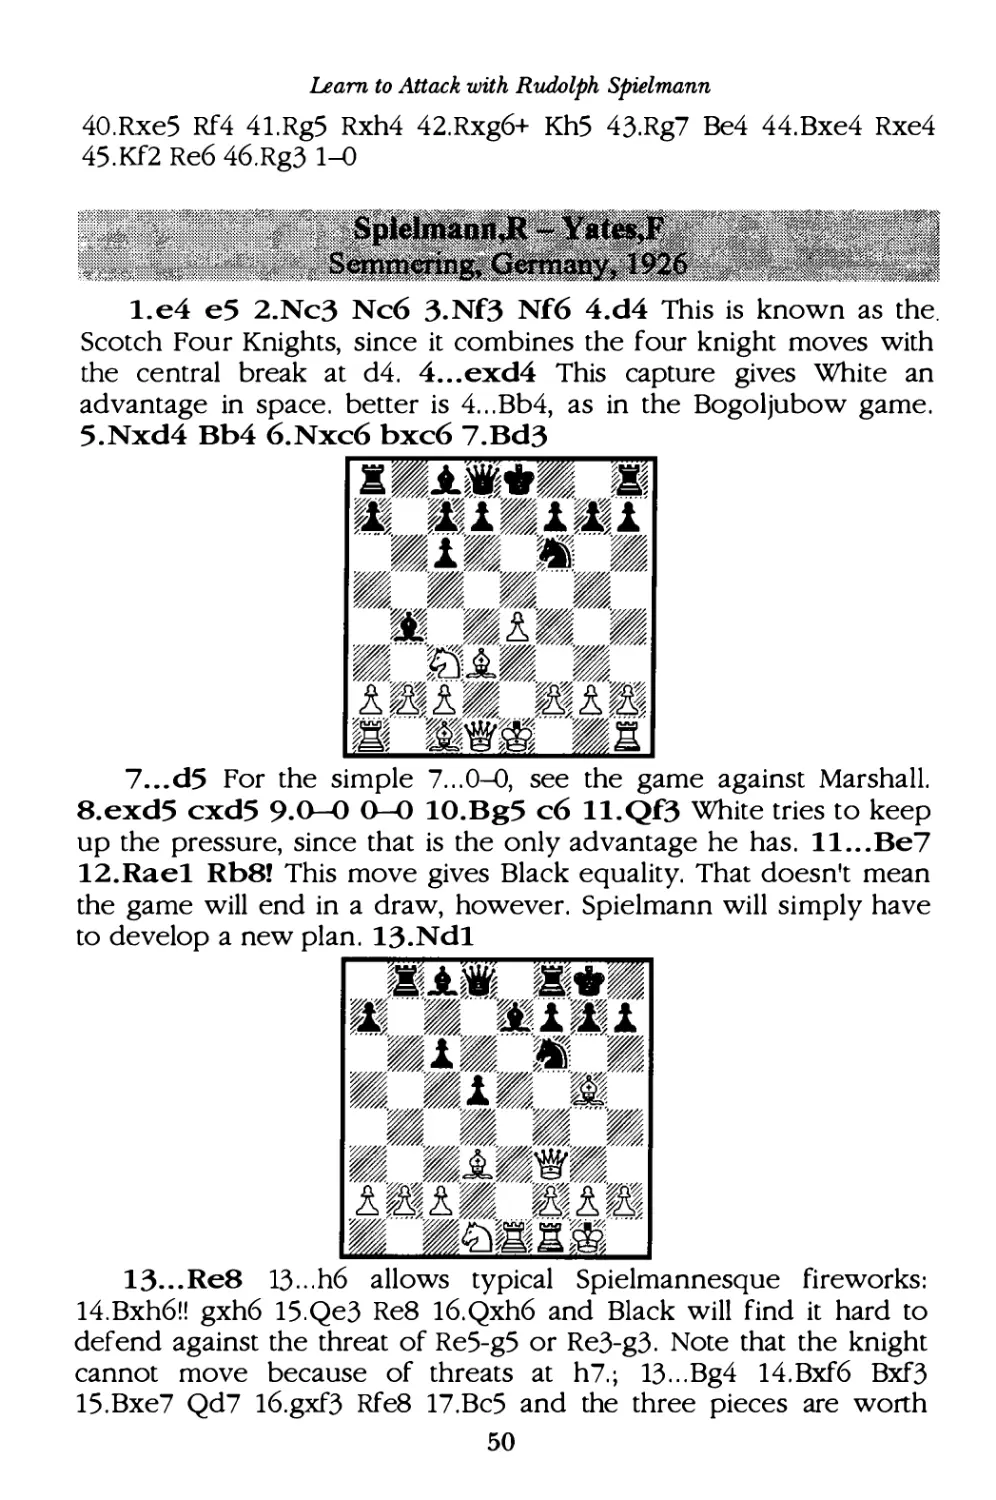
7. ..d5 For the simple 7 . ..0-0, see the game against Marshall.
8. exd5 cxd5 9.0-
-0
0-
-0
10.Bg5 c6 ll.Qf3 White tries to keep
up the pressure, since that is the only advantage he has. ll...Be7
12.Rael Rb8! This move gives Black equality. That doesn't mean
the game will end in a draw, howeve r. Spielmann will simply have
to develop a new plan . 13.Ndl
-----------------
��..
..
� ��--w�
m ,• -��'l. 'li�.1"
'···��
�
�.
.
.. :;
·
·<t ··'�
�����-% --�
m�J.��
���;,�
!�!� �!�
�: ../.����.{t�····
·
/.
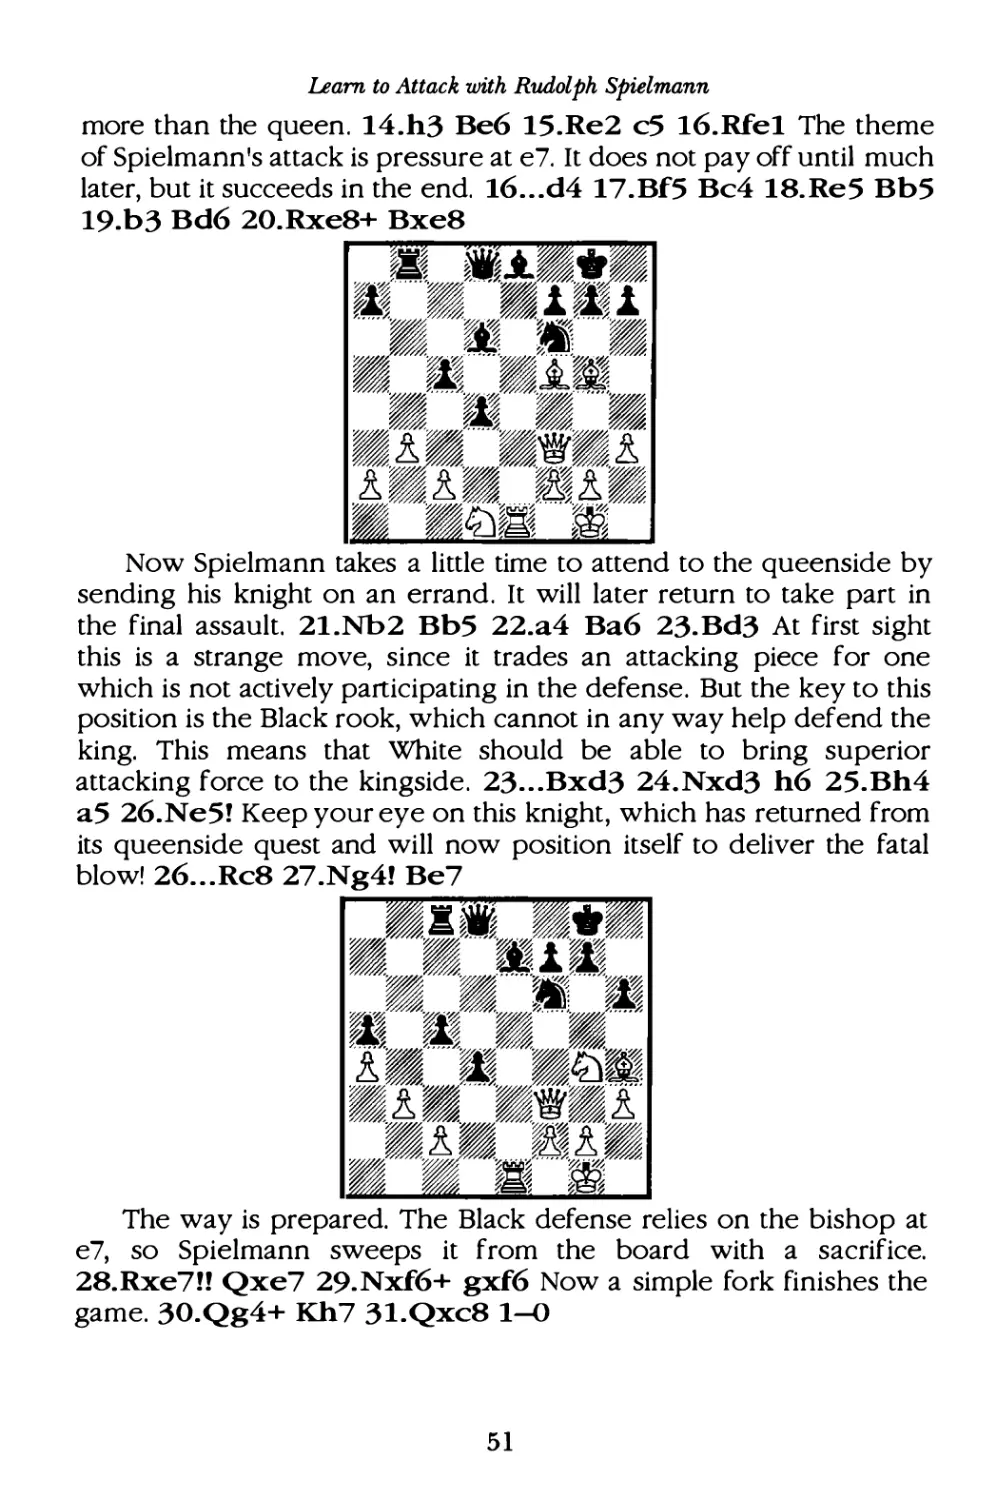
13...Re8 13 ...h6 allows typical Spielmannesque fi reworks :
14.Bxh6!! gxh6 15.Qe3 Re8 16.Qxh6 and Black will find it hard to
defend against the threat of Re5-g5 or Re3-g3 . Note that the knight
cannot move because of threats at h7. ; 13 ...Bg4 14.Bxf6 Bxf3
15.Bxe7 Qd7 16.gxf3 Rfe8 17.Bc5 and the three pieces are worth
50
Learn to Attack with Rudolph Sp ielmann
more than the queen . 14.h3 Be6 15.Re2 c5 16.Rfe l The theme
of Spielmann's attack is pressure at e7. It does not pay off until much
later, but it succeeds in the end. 16...d4 17.Bf5 Bc4 18.Re5 Bb5
19.b3 Bd6 20.Rxe8+ Bxe8
���������
�--Jj''''
% ... v.� ��-� �f ''"f"'v.�
����·�··�;��
•��-j,�
��'-
---C<� �. ---- -
�
�!�'----C<�:�!
!.!���!�
� ��-�rt-
-
��r��
���f�m
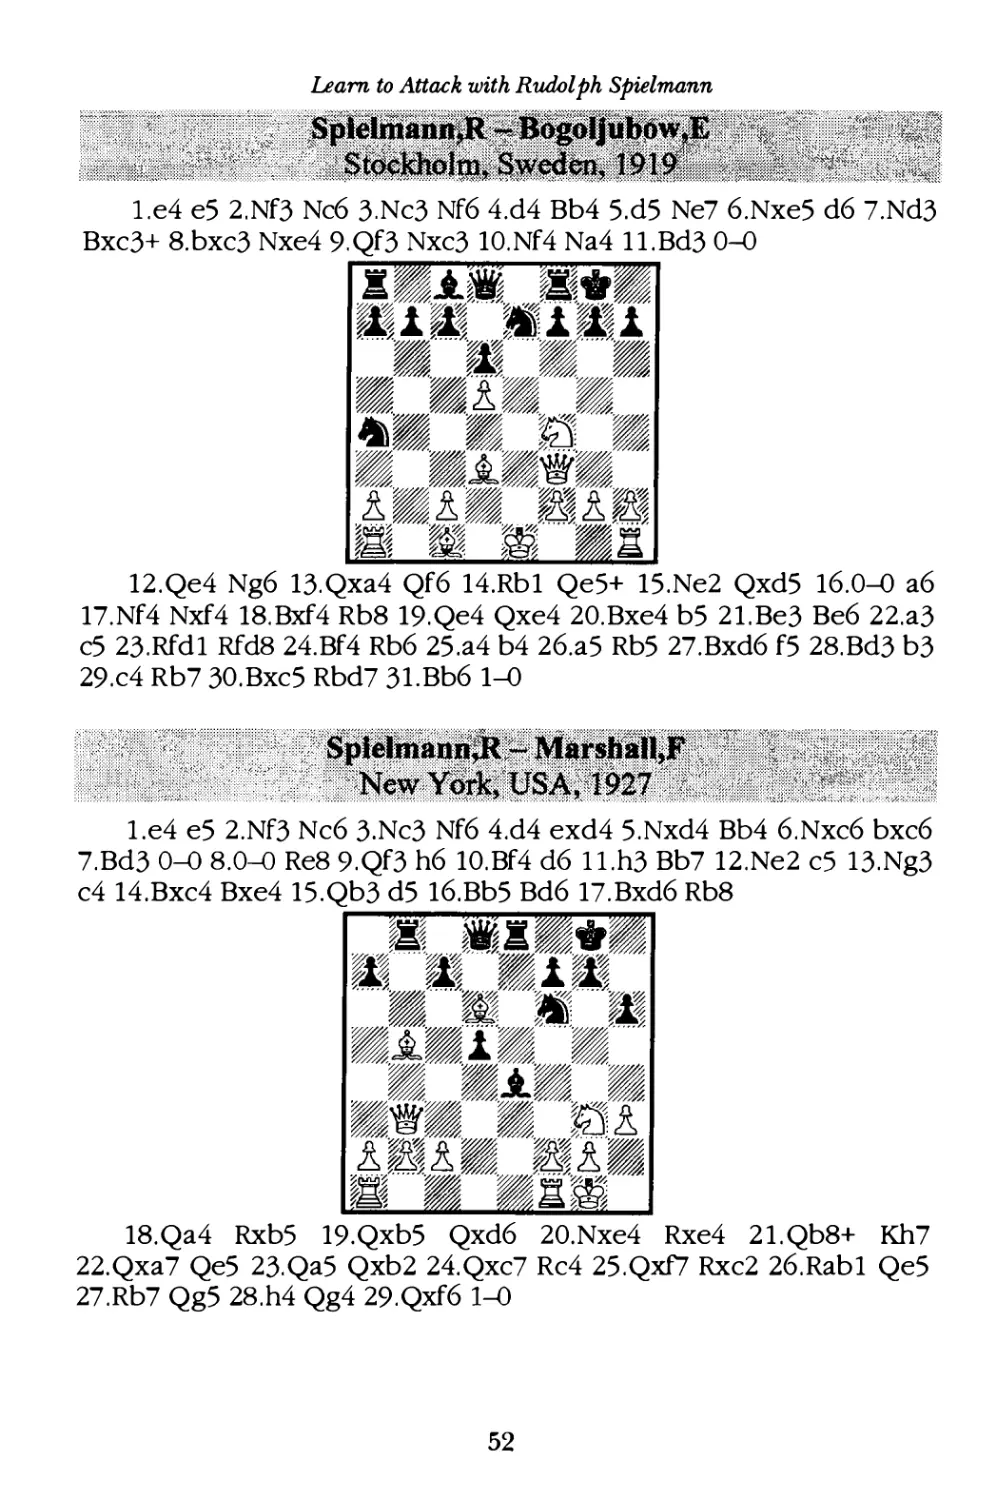
Now Spielmann takes a little time to attend to the queenside by
sending his knight on an errand . It will later return to take part in
the final assault. 21.Nb2 Bb5 22.a4 Ba6 23.Bd3 At first sight
this is a strange move, since it trades an attacking piece for one
which is not actively participating in the defense . But the key to this
position is the Black rook, which cannot in any way help defend the
king. This means that White should be able to bring superior
attacking force to the kingside . 23...Bxd3 24.Nxd3 h6 25.Bh4
a5 26.Ne5! Keep your eye on this knight, which has returned from
its queenside quest and will now position itself to deliver the fa tal
blow! 26...Rc8 27 .Ng4! Be7
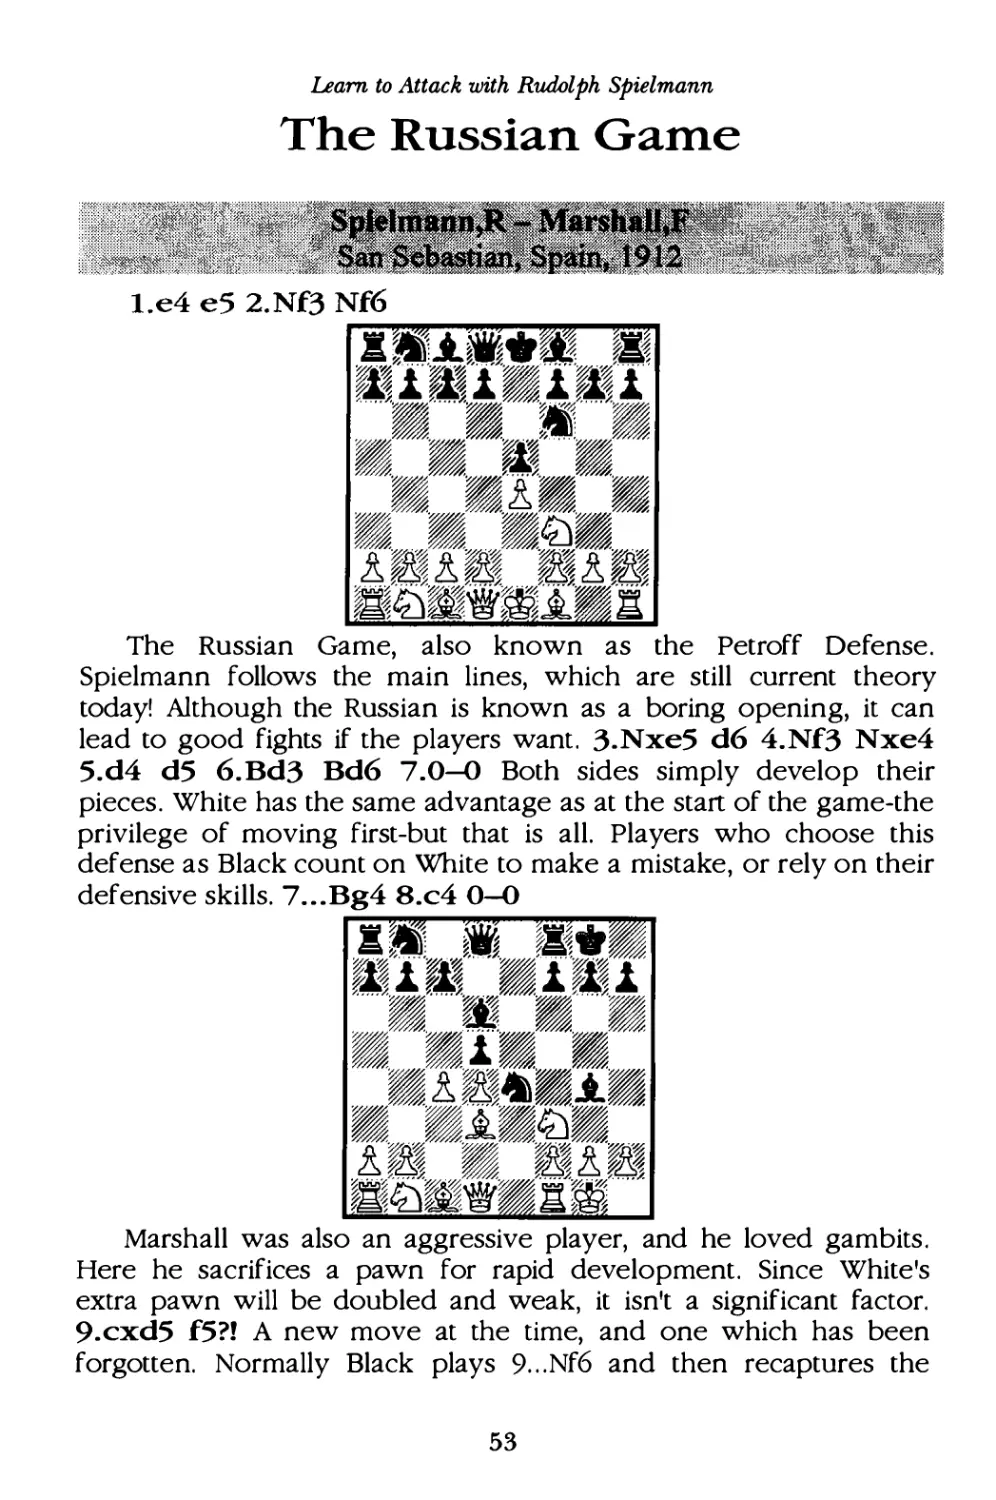
r-��������
�-��%l �-��
••-1�
�� ��
--
----'-----C<�
�����,. ...
;�,....
V-
't�'-- --V.� ����
�r�'
-
--C<��
�·lr
���� �����
•B.• �!
•:w�r£---��'0�
����m
The way is prepared. The Black defense relies on the bishop at
e7, so Spielmann sweeps it from the board with a sacrifice.
28.Rxe7 !! Qxe7 29. Nxf6+ gxf6 Now a simple fo rk finishes the
game. 30.Qg4+ Kh7 31.Qxc8 1--0
51
uarn to Attack with Rudolph Sp ielmann
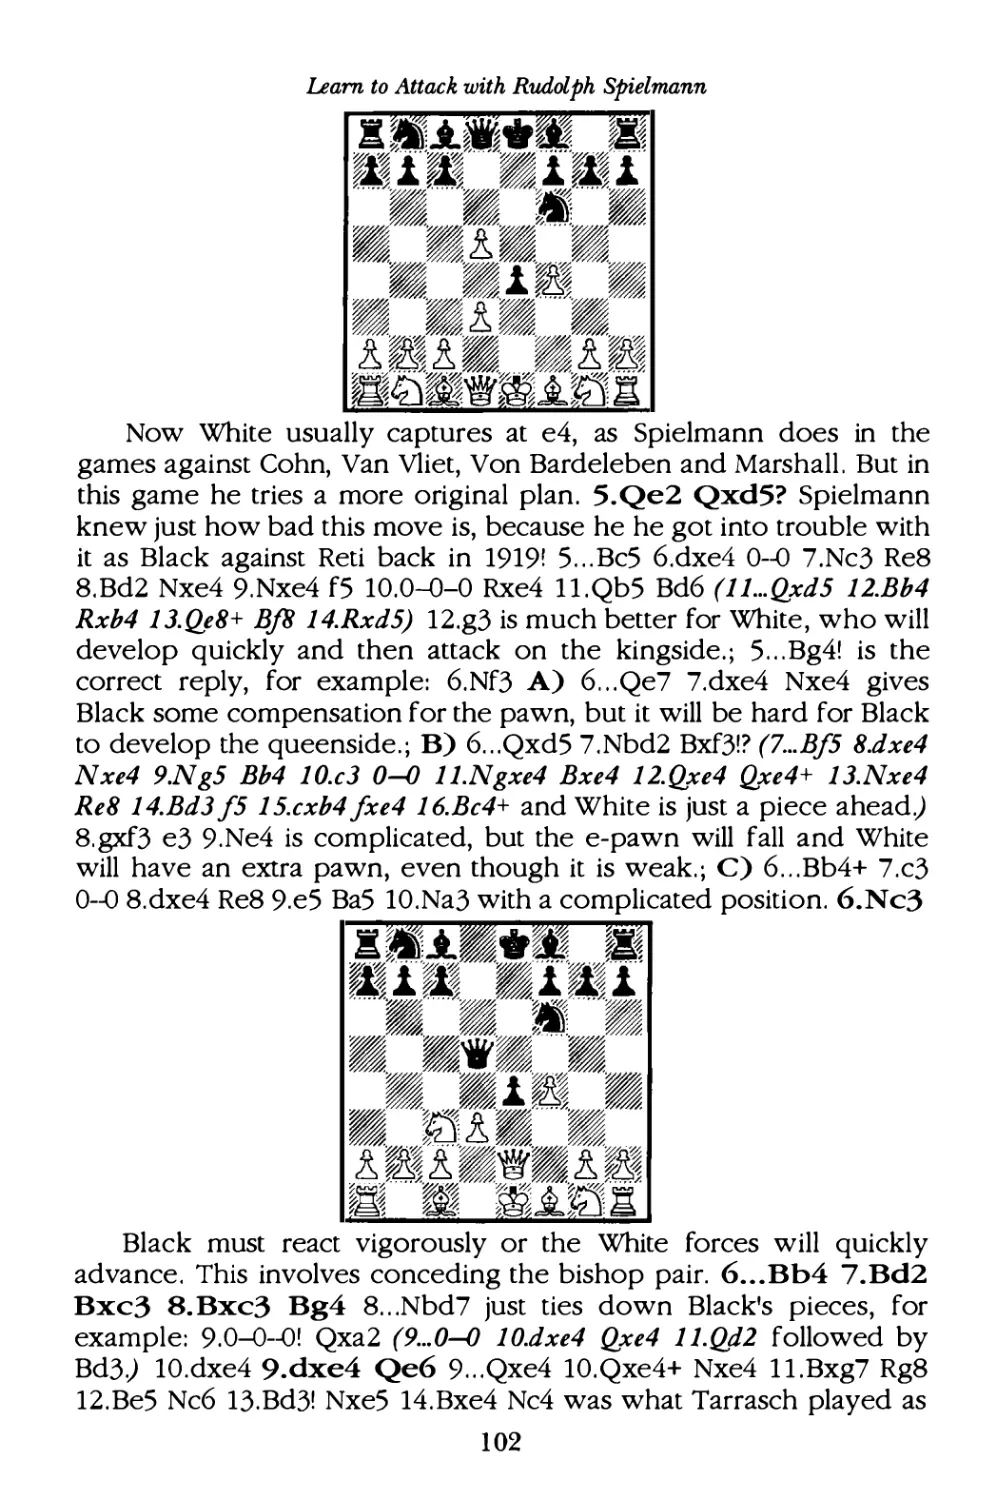
l.e4 e5 2.Nf3 Nc6 3.Nc3 Nf6 4.d4 Bb4 5.d5 Ne7 6.Nxe5 d6 7.Nd3
Bxc3+ 8.bxc3 Nxe4 9.Qf3 Nxc3 10.Nf4 Na4 11.Bd3 0-0
12.Qe4 Ng6 13.Qxa4 Qf6 14.Rb1 Qe5+ 15.Ne2 QxdS 16.0-0 a6
17.Nf4 Nxf4 18.Bxf4 Rb8 19.Qe4 Qxe4 20.Bxe4 b5 21.Be3 Be6 22.a3
c5 23.Rfd 1 Rfd8 24.Bf4 Rb6 25.a4 b4 26.a5 Rb5 27.Bxd6 f5 28.Bd3 b3
29.c4 Rb7 30.Bxc5 Rbd7 31.Bb6 1-0
l.e4 eS 2.Nf3 Nc6 3.Nc3 Nf6 4.d4 exd4 5.Nxd4 Bb4 6.Nxc6 bxc6
7.Bd3 0-0 8.0-0 Re8 9.Qf3 h6 10.Bf4 d6 ll.h3 Bb7 12.Ne2 cS 13.Ng3
c4 14.Bxc4 Bxe4 15.Qb3 d5 16.Bb5 Bd6 17.Bxd6 Rb8
18.Qa4 RxbS 19.Qxb5 Qxd6 20.Nxe4 Rxe4 21.Qb8+ Kh7
22.Qxa7 QeS 23.Qa5 Qxb2 24.Qxc7 Rc4 25 .Qxf7 Rxc2 26.Rab l QeS
27.Rb7 Qg5 28.h4 Qg4 29.Qxf6 1-0
52
Learn to Attack with Rudolph Sp ielmann
The Russian Game
The Russian Ga me, also known as the Petroff Defense .
Spielmann follows the main lines, which are still current theory
today! Although the Russian is known as a boring opening, it can
lead to good fights if the players want . 3.Nxe5 d6 4.Nf3 Nxe4
5.d4 d5 6.Bd3 Bd6 7.0--0 Both sides simply develop their
pieces . White has the same advantage as at the start of the game-the
privilege of moving first-but that is all. Players who choose this
defense as Black count on White to make a mistake , or rely on their
defensive skills. 7 ...Bg4 8.c4 0-
-0
.�. � lf�·�
mi '�f·--7-�·.rmT
,, .,..Y-�f'"���
�' ..Y-
�
���;r����
��,��-f.
-�-' -;·Y-��-�
'�4��i��'�®
�r� � ��r�
��,����,Ji� .. �
Marshall was also an aggressive player, and he loved gambits .
Here he sacrifices a pawn for rapid development . Since White's
extra pawn will be doubled and wea k, it isn't a significant fa ctor.
9.cxd5 f5 ?! A new move at the time, and one which has been
forgotten. Normally Black plays 9 . ..Nf6 and then recaptures the
53
Learn to Attack with Rudolph Sp ielmann
pawn at dS with that knight. 10.Nc3 Nd7 ll.h3 Bh5 12.Nxe4
fxe4 13.Bxe4
.�� � ��·
lft m4- ···'mi
' · ·"�'·····"· �--···
·"�
���lf���f
����%����
��!1-i.��
��----Y.�ci)�,g,·
��%����%��
lll!t;
.
wc;��.���� �
t� �'VWa i!m
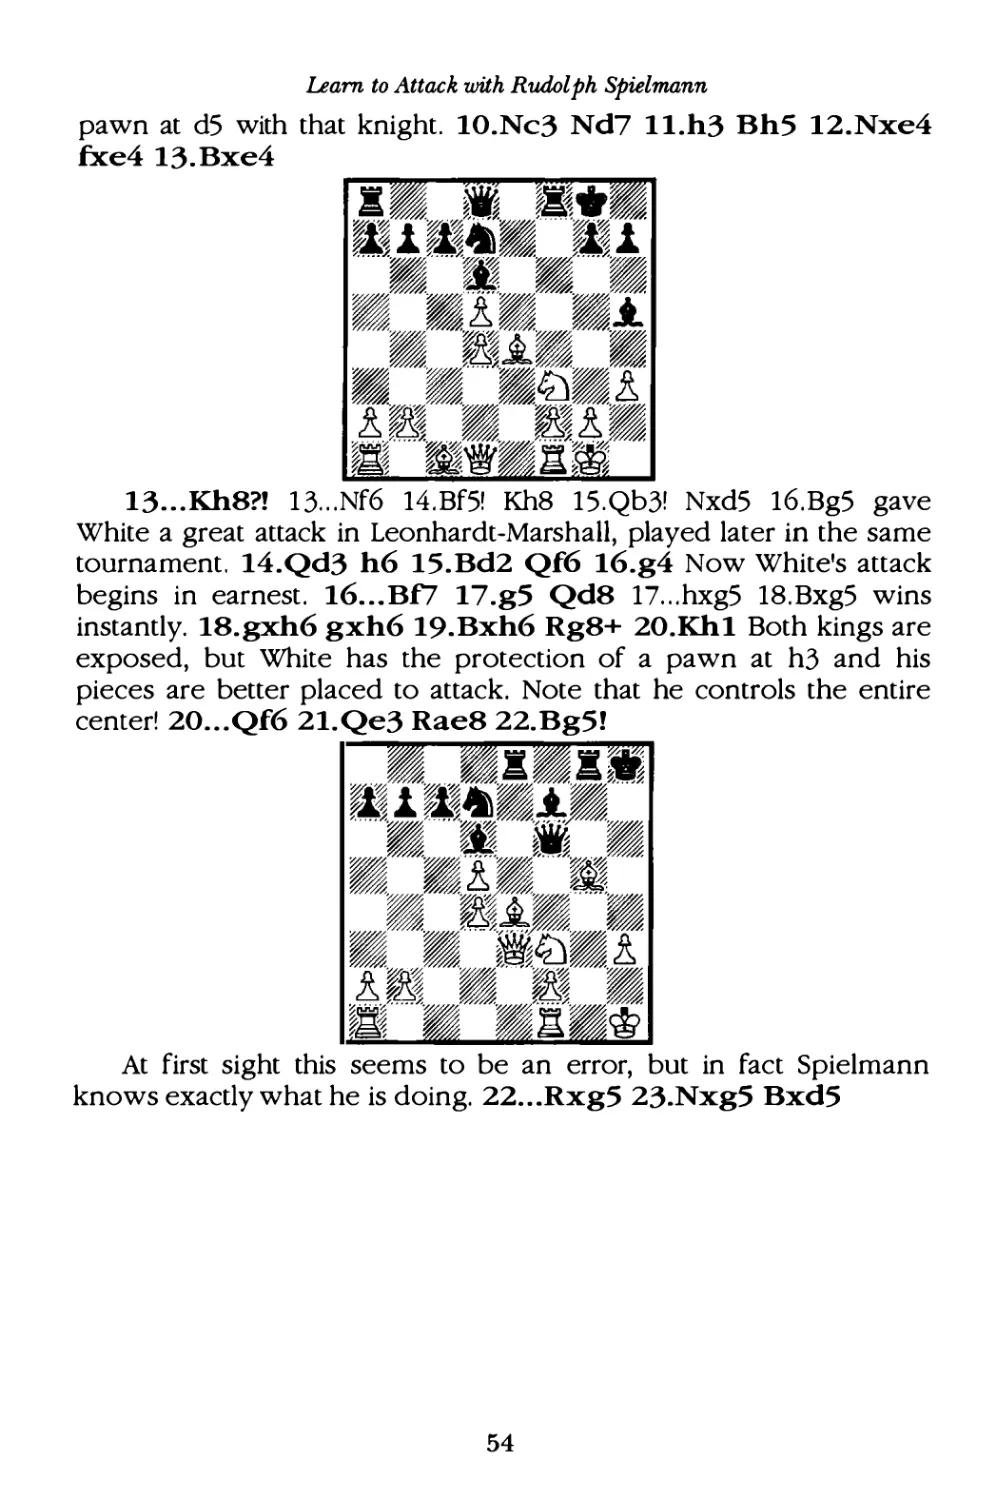
13...Kh8?! 13...Nf6 14.Bf5! Kh8 15.Qb3! NxdS 16.Bg5 gave
White a great attack in Leonhardt-Marshall, played later in the same
tournament . 14.Qd3 h6 15.Bd2 Qf6 16.g4 Now White's attack
begins in earnest . 16... Bf7 17.g5 Qd8 17... hxg5 18.Bxg5 wins
instantly. 18.gxh6 gxh6 19.Bxh6 Rg8+ 20.Khl Both kings are
exposed, but White has the protection of a pawn at h3 and his
pieces are better placed to attack. Note that he controls the entire
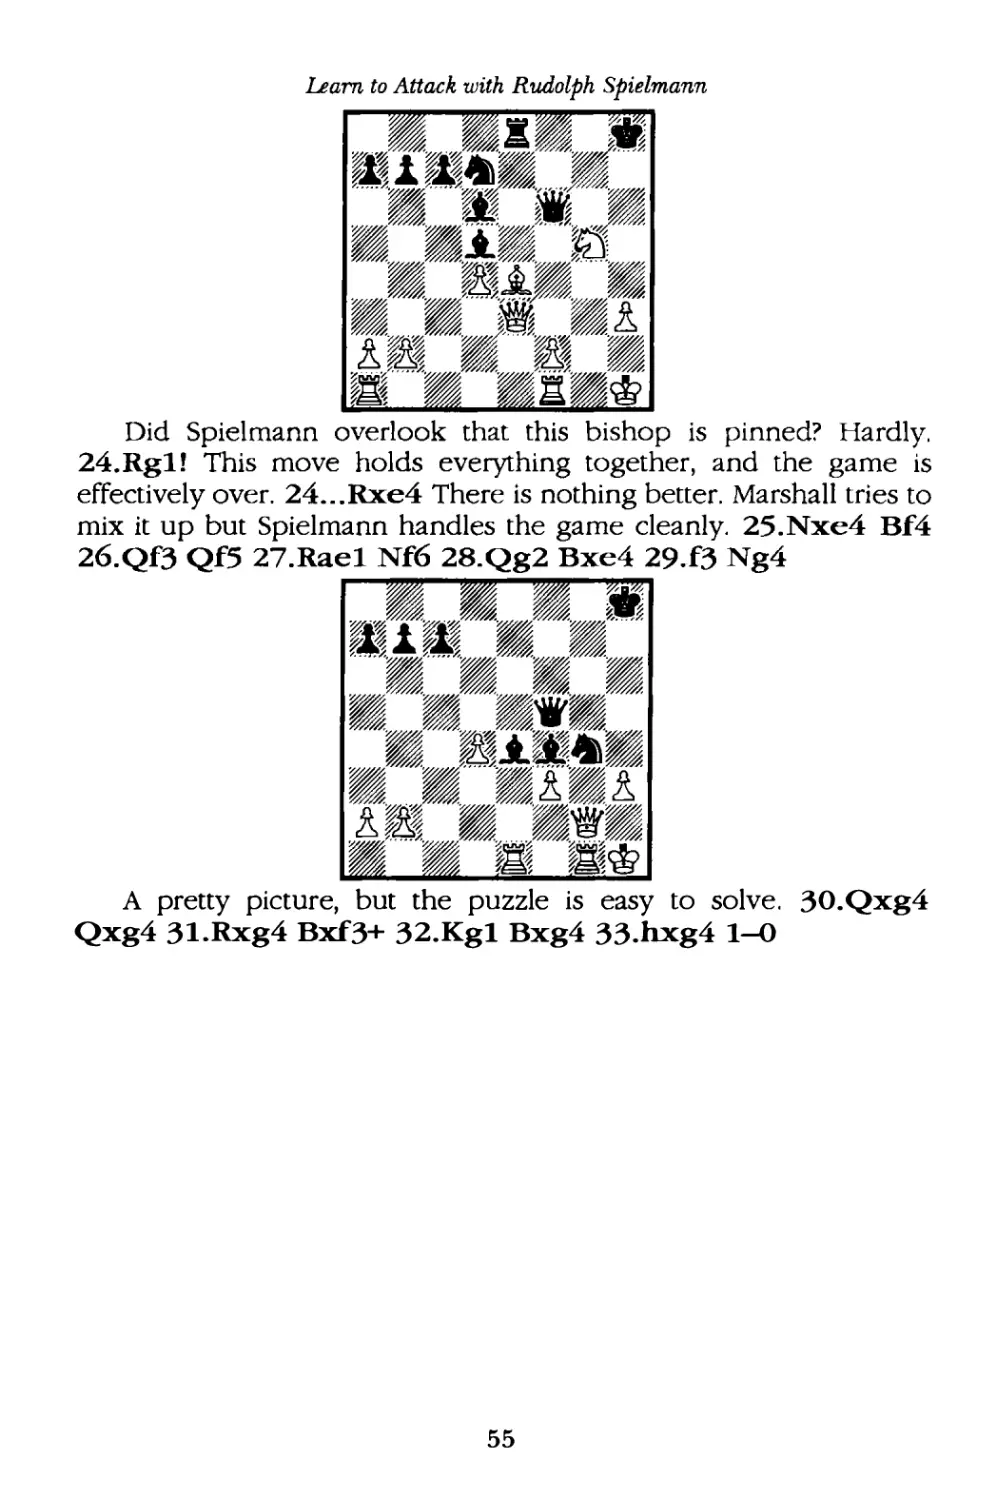
center! 20...Qf6 21.Qe3 Rae8 22.Bg5!
�%��f % ���--!•
�� .1 ��6)�j_-
'·
·
"- ··"� �� ��
� "�·1r�r -"� "
����� -- .. ;
�
���'../.:· ·�·��
���'ZJ�!
i'� ��- -"���
��r--��
��,li� ;
At first sight this seems to be an error, but in fa ct Spielmann
knows exactly what he is doing. 22...Rxg5 23.Nxg5 Bxd5
54
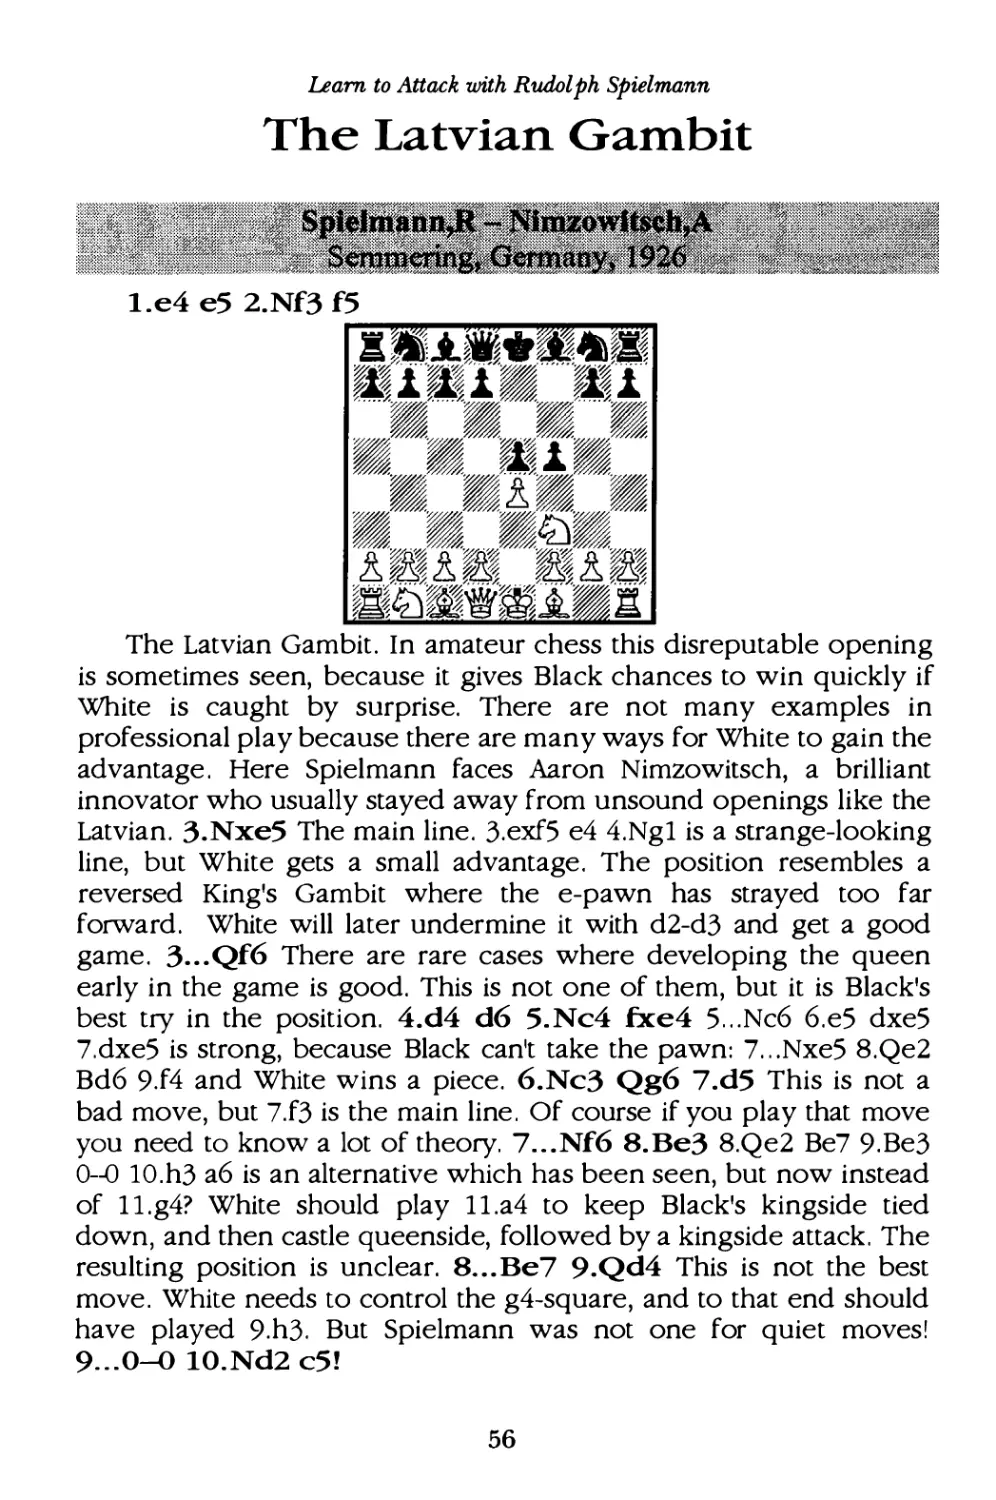
A pretty picture, but the puzzle is easy to solve . 30.Qxg4
Qxg4 31.Rxg4 Bxf3+ 32.Kgl Bxg4 33.hxg4 1-0
55
Learn to Attack with Rudolph Sp ielmann
The Latvi an Gamb it
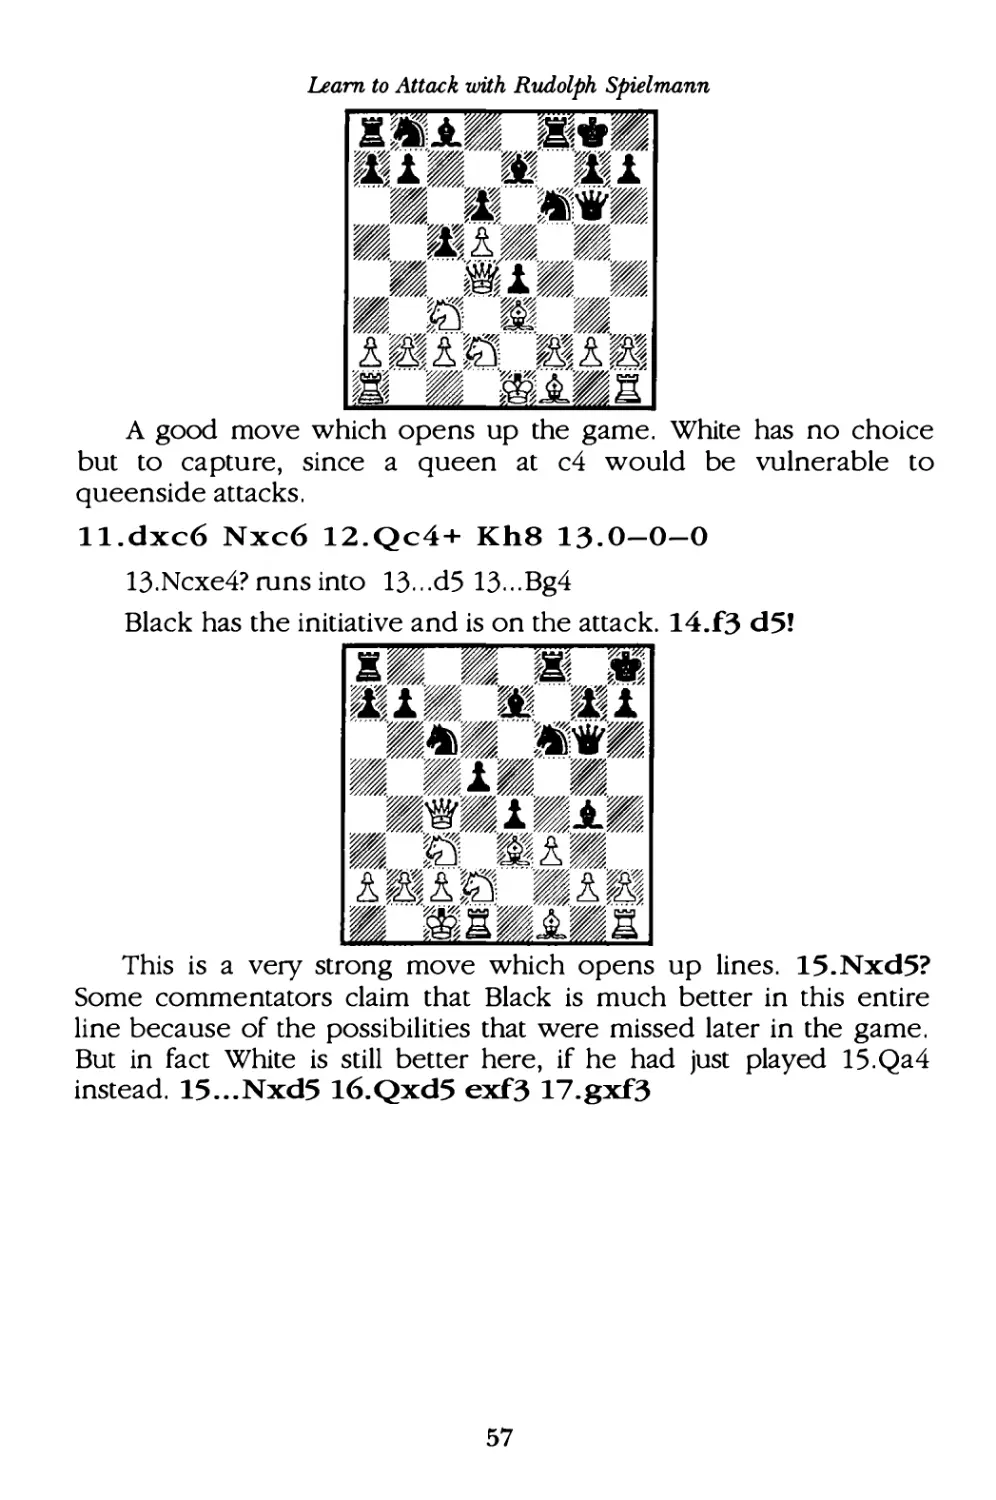
l.e4 e5 2.Nf3 f5
The Latvian Gambit . In amateur chess this disreputable opening
is sometimes seen, because it gives Black chances to win quickly if
White is caught by surprise. There are not many examples in
professional play because there are many ways for White to gain the
advantage . Here Spielmann fa ces Aaron Nimzowitsch, a brilliant
innovator who usually stayed away from unsound openings like the
Latvian. 3.Nxe5 The main line . 3.exf5 e4 4.Ngl is a strange-looking
line, but White gets a small advantage . The position resembles a
reversed King's Gambit where the e-pawn has strayed too far
forwa rd . White wi ll later undermine it with d2-d3 and get a good
game . 3 ...Qf6 There are rare cases where developing the queen
early in the game is good. This is not one of them, but it is Black's
best try in the position. 4.d4 d6 5.Nc4 fxe4 5 ...Nc6 6.e5 dxe5
7.dxe5 is strong, because Black can't take the pawn : 7 ...Nxe5 8.Qe2
Bd6 9.f4 and White wins a piece . 6.Nc3 Qg6 7.d5 This is not a
bad move , but 7 .f3 is the main line . Of course if you play that move
you need to know a lot of theory. 7 ...Nf6 8.Be3 8.Qe2 Be7 9.Be3
0-0 10.h3 a6 is an alternative which has been seen, but now instead
of ll.g4? White should play ll.a4 to keep Black's kingside tied
down , and then castle queenside, fo llowed by a kingside attack . The
resulting position is unclear. 8 . ..Be7 9.Qd4 This is not the best
move . White needs to control the g4-square, and to that end should
have played 9.h3. But Spielmann was not one for quiet moves !
9... 0-0
10.Nd2 c5 !
56
Learn to Attack with Rudolph Sp ielmann
A good move which opens up the game . White has no choice
but to captu re, since a queen at c4 would be vu lnerable to
queenside attacks .
ll.dxc6 Nxc6 12.Qc4+ Kh8 13.0-0-0
13.Ncxe4? runs into 13...d5 13...Bg4
Black has the initiative and is on the attack. 14.f3 d5!
This is a very strong move which opens up lines . 15.Nxd5?
Some commentators claim that Black is much better in this entire
line because of the possibilities that were missed later in the game .
But in fa ct White is still better here , if he had just played 15.Qa4
instead. 15 ...Nxd5 16.Qxd5 exf3 17.gxf3
57
Learn to Attack with Rudolph Sp ielmann
58
Learn to AUack with Rudolph Spielmann
59
Learn to Attack with Rudolph Sp ielmann
The Vienna Game
If there is one opening other than the King's Gambit that comes
to mind when dealing with the art of Rudolph Spielmann, it is surely
the Vienna Game . It is only natural that Spielmann would explore
the opening named for the city of his birth, and by his play he
considerably enriched the theory of this opening.
This is the most common move, though Spielmann also liked
5.Qf3. 5 ...Bg4 This move is no longer considered playable, but at
the time Black was still exploring many paths . 5 ...Bb4 6.Qe2 see the
game against Vidmar. 6.Be2 was seen against Kohlnlein.; 5 ...Nc6
6.Bb5 is a powerful pin, and Black can no longer equalize . 6 ...Bb4
7.Qe2 Bxc3 8.dxc3 0-0 9.Bf4 was good for White in Tarrasch
Schiffers , Hastings 1895.; 5 ...Bc5 6.d4 Bb4 7.Bd2 Nxd2 8.Qxd2 Nc6 is
about even .; 5 ...Be7 6.d4 0-0 7.Bd3 f5 8.exf6 Bxf6 9.0-0 Nc6 was
seen in several Spielmann games . See the game against Loman for
an example. 10.Ne2 is probably the best move . 6.Qe2
60
Learn to Attack with Rudolph Sp ielmann
This position is more complex than it looks , and many plans
have been tried for Black . Back in 1914, Spielmann's opponent tried
an inferior one . 6 ...Nc5 ?! 6 ...Nxc3 7.dxc3 is a little better for White .;
6 ...Ng5 7.d4 A) 7 ...Ne6 8.Be3 (8. h3 BxfJ 9. Qxf3 Nxd4) 8...Nc6 9.0-
0-0 Bb4 10.h3 Bxf3 ll.gxf3 Bxc3 12.bxc3 Qe7 13.Qb5! Qa3+ 14.Qb2
leaves White with powerful bishops against rather useless knights .;
B) 7...Nxf3+ 8.gxf3 Be6 9.Be3 Nc6 10.Qg2 Qd7 11.0-0-0 0-0-0
12.Ne2 is better for White, according to Wienermeisters
Konstantinopolski & Lepeshkin. Translating their book was my
introduction to this fa scinating opening .; 6 ...Nc6 7.Nxe4 dxe4
(7...Nd4 8. Qd3 BxfJ 9.Ng3 gave White a winning game in Euwe
Yates, Hague 1921) 7.d4 Bxf3 7 ...Ne6 8.Be3 cS 9.Qb5+ Qd7
10.Qxd7+ Nxd7 1l.Nxd5 Bxf3 12.gxf3 cxd4 13.Bd2 leaves White
with the better game . 8. Qxf3 Qh4+ 9.g3 Qxd4 10.Be3
'Ii
i'
?� z��·�� ?,'Ii
i'
�
a .,._.
� rs�
mi 'm �R.f.l'
, -�R, -�� �- --�R
R�-'��R�
��"·;-..J� ��
�RRz ·z./•· A� �RW<
.
'l:�
� ?R· ��'JMJi.O:ff.
,�� �tgp�
lBAR· ----·�'
-- "�
��t····f-·��'·�4
r� � �"E!3?A�e
10 ...Qxe5? 10 . ..Qb4 11.0-0-0 Ne6 12.Nxd5 QaS 13.Bc4 is
clearly better for White . 11.0-0-0! The pressure at dS is intense , so
Black must use the c6-square for a pawn . Black thinks that will
provide sufficient defense , but ... ll ...c6 12.Nxd5 !! cxd5
13.Rxd5 Qe6 14.Bc4
61
Learn to Attack with Rudolph Sp ielmann
This is Black's most promising line, simply developing and
getting the king to safety. But that doesn't mean there are no
atta cking chances! 6.d4 0-0 7.Bd3 f5 8.exf6 Bxf6 8 ...Nxf6 is
62
This position has become the main line. 10.Ne2 10.Be3 Bf5
ll.Qe1 Bg6 12.Ne2 Qe7 13.Nf4 Bf7 brought Black equality in
Spielmann-Holzhausen, Berlin 1926.; 10.Nxe4 dxe4 ll.Bxe4 Nxd4
12.Ng5 Bf5 13.c3 Bxg5 14.Bxg5 Qxg5 15.Qxd4 Bxe4 led to a boring
position in Spielmann-Reti, Vienna 1924. 10...Ne7? 10...Nb4! is
Black's best try. ll.c3 Ng6 12.Nf4 N:x£4 13. Bxf4 Bf5 14.Qc2
Bg6 15.Rael Qd7 16.Re3 Rae8 17.Nd2!
�·���.��!r•;:�
�.�.�-� �.1
' ...V-�'
••7-� ����
�
� �� ��"""��
����:-�.���
��m J� ���
��.a��
r���· ·�r�
�· ,./-��······
���'·..V-
17 ...Nxd2 18. Bxg6! Rxe3 19.Bxh7+ Kh8 20. Qxd2 Re7
21.Bg6 White has at least enough compensation for the exchange,
since the Black king is almost impossible to defend. 21...Qg4
22.Qd3 Re4 Black is getting panicky, so returns the exchange .
22 ...Bg5 23.Bxg5 Rxf1 + 24.Qxf1 Qxg5 25.Qf8# 23.Bxe4 dxe4
24.Qxe4 Black had counted on the pin at f4 here , but fa iled to
notice a counterpin. 24...g5 25.Qg6! Bxd4+ This gets a pawn
back, but the Black king is still in trouble. 26.cxd4 Rx£4
63
15.e6! Rg7 16.Qh5 Ne7 17.Bc5 Nc6 18.e7 Nxe7 19.Bxe7 1-D
l.e4 e5 2.Nc3 Nf6 3.f4 d5 4.fxe5 Nxe4 5.Nf3 Bb4 6.Qe2 Bxc3
7.dxc3 0-D 8.Bf4 f6 9.0-D-D fxe5 10.Bxe5 Nc6 ll.c4 Bg4 12.Rxd5
Bxf3 13.gxf3 Qg5+ 14.Kbl Nxe5 15.Qxe4 Rae8 16.Bd3 g6 17.Rel Rf5
18.h4 Qf6 19.Qd4 Rf4 20 .Qc3 Rxh4 21.a3 Rh5 22.Qd4 c6 23.Rd6 Qf7
24.Ka2 c5 25.Qe3 Re7 26.Qxc5 Nc6
64
Learn to Attack with Rudolph Spielmann
27 .Rd8+ Nxd8 28. Qxe7 Nc6 29 . Qd6 Rh4 30. Be4 Qxc4+ 31.b3
Qd4 32.Bd5+ Kg7 33 .Re8 Rf4 34 . Qc7+ Kh6 35.Be4 Qd2 36.Rh8 Kg5
37.Qxh7 Rxe4 38.Qh6+ 1--0
l.e4 eS 2.Nc3 Nf6 3.f4 dS 4.fxe5 Nxe4 S.Nf3 Be7 6.d4 0--0 7.Bd3
f5 8.exf6 Nxf6 9.0--0 Nc6 10.Bg5 Bg4 11.Qe1 h6
K
12.Bxh6 gxh6 13.Qg3 Bd6 14.Ne5 Qe7 15.Nxd5 Nxd5 16.Qxg4+
Qg5 17.Qe6+ Kh8 18.Rf7 1--0
l.e4 eS 2.Nc3 Nf6 3.f4 dS 4.fxe5 Nxe4 S.Nf3 Be7 6.d4 0--0 7.Bd3
fS 8.exf6 Nxf6 9.0--0 Nc6 lO.BgS Bg4 ll.Qe1 h6 12.Bd2 Bxf3 13.Rxf3
Nxd4 14.Rg3 BcS 15.Kh1 ReS 16.Qc1 Nh5 17.Rh3 Nf6 18.Rg3 Qd7
65
21.Bxh7 Kxh7 22.Qh4+ Kg8 23.Rxe8+ Rxe8 24 . Qf4 Re7 25.h4 a6
26.h5 c6 27.h6 gxh6 28.Qxh6 Re l + 29. Kf2 Ra l 30.Qg5+ Kf8 31.Qd8+
Kg7 32.Qb6 Rxa2 33.Qb3 Ra l 34. Qxb7 aS 35.c4 dxc4 36.Qb2 Rdl
37.d5+ Kf8 38.dxc6 Rd8 39.c7 1-D
l.e4 e5 2.Nc3 Nf6 3.f4 d5 4.fxe5 Nxe4 5.Qf3
66
Learn to Attack with Rudolph Sp ielmann
This is the main line and one which saw many fine successes by
Spielmann. 5 ...f5 5 ...Nc6 is seen in Spielmann-Moewig. ; S ...Nxc3
was no problem for Spielmann in his game against Salwe . 6.d3
Nxc3 7.bxc3 d4 7... Be7 8.d4! 0-0 (8...c5 can be seen in
Spielmann-MarshallJ 9.Nh3 is clearly better for White . Black's bad
bishop will be a real problem. 8.Qf2
�-i.
.
�·� ��
m�l.•- ..-7-� ----·--m-l ·
'
-
- - --��'
..�
� *�' --��
��-�,-��-�
�•�1�
��*---��
*�
��--r��.
�
�
�
��("/.��:---·� �
�-��� �m,�fol�
?� � ��.Jib..���
8.Qg3 Nc6 9.Be2 (9.N.f3 Be6 JO.Bb2 gives White strong pressure .
See Spielmann-Perlis for an example) 9 ...Be6 10.Bf3 Qd7 (J O...BdS is
the Spielmann-Shenkein game ) ll.Ne2 (1 l.Nh3 might be stronger)
ll...Bc5 (1 J...dxc3 is too dangerous . See Spielmann-LevenfishJ 12.c4
0-0 was seen in a game between Spielmann and Romanovsky at
Moscow 1925, but Spielmann fa iled to find the strong 13.Nf4 Bb4+
14.Kf2 Kh8 15.h4 Nxe5 16.h5 and the threat of Ng6+ gives White a
strong attack, according to Merzlov. 8 ... dxc3 8 . . . Nc6 9.Bd2 (9.cxd4
Qx d4 JO.Qxd4 Nxd4 ll.Kdl is not at all clear) 9 ...Nxe5 10.Qxd4
looks go od for White . 9.d4 Be6 10.Nh3 Be7 ll.Nf4 Qd7
12.Nxe6 Qxe6 13.Bd3
67
Learn to Attack with Rudolph Sp ielmann
.. �·� ��
�'?/..;�����-����L·'
�.1�.1% • �.1
'· ··
·
·v.�'····v.�-�-····v.�
����B!��
����----V.���
��m-l"����
,_Ai����
r � ��/���r«' ,z*f{@t .
./.
r�m���
13...g6 13...0-0 14.0-0 g6 15.Rbl Qxa2 16.Rxb7 QaS 17.Qf3 is
very awkward for Black . 14.Qe2 Qd5 15.0-0 Qxd4+ 16.Be3
Qd5 17.Rad1 Qa5 18.Bxf5 Rf8 19.Qg4 gx:£5 20.Qh5+ Rf7
2l.e6 1-0
l.e4 eS 2.Nc3 Nf6 3.f4 dS 4.fxe5 Nxe4 S.Qf3 Nc6
6.Nxe4? At the time it was not known that this leads to a hopeless
position for Wh ite, and Spielmann manages to make complications .
6.Bb5 Nxc3 7.dxc3 Qh4+ 8.g3 Qe4+ 9.Qxe4 dxe4 10.Bf4 was agreed
drawn in Contedini-Costieri , Leipzig 1960. But why? White's position
seems preferable . 6 ...Nd4!
��������
K�.t.�·� ?�
m.1%�f -%.:rl.(f
'·..v.�- ..v.
���- ..v.�
���������
��.1�•
�� ��-�:·/.� z�
���-'il��
,�,
���,�
��t·. . /.�
r,{ ..v.m '��-i#i
i
/.
��m�):
:9'
&3=--�� �
7.Qd1 dxe4 8. c3 Nc6 9.Bb5 Qd5 10.Qe2 Bd7? lO ...BfS
wou ld have been very strong for Black, for example : ll.c4 Qd4
12.Qe3 Qxe3+ 13.dxe3 Bb4+ 14.Kf2 (1 4.Bd2? Bxd2+ JS. Kxd2 0-0-
0+ 16.Kc3 Nx e5) 14...Bd7 15.Bxc6 Bxc6 16.a3 Be7 17.b4 looks very
good for White . 11.Bxc6 Bxc6 12.Nh3 QxeS 13.d4 Qe7
14.Be3 g6 15.0-0-0 0-0-0 16.Rhfl Bg7 17.Qc4 Bd5
18. Qa4 Rd6 19.Nf4 Kb8 20.Kb1 fS 2l.c4 Bf7 22.Ne2 Ra6
23.Qc2 Qb4 24 .Rc1 Rc6 25 .c5 Rd8 26.Rfd 1 Ra6 27.b3 b6
68
uarn to Attack with Rudolph Sp ielmann
28.cxb6 Qxb6 29.d5 Qb7 30. Bf4 Rd7 31.d6 cxd6 32.Nd4
Bxd4 33.Rxd4 Ka8 34.Qc3 Rb6 35.Kb2 a6 36.Ra4 d5
37. Be3 Re6 38. Rb4 Rc7 39.Qxc7 Qxb4 40.Qa7# 1-0
l.e4 e5 2.Nc3 Nf6 3.f4 dS 4.fxe5 Nxe4 S.Qf3 Nxc3 6.bxc3 cS
7.Qg3 Nc6 8.Nf3 Be6 9.Be2 Qd7 10.0--0 h6 ll.Ba3 0--0--0 12.Rabl g5
13.Rb5
l.e4 eS 2.Nc3 Nf6 3.f4 dS 4.fxe5 Nxe4 5.Qf3 f5 6.d3 Nxc3 7.bxc3
d4 8.Qg3 Nc6 9.Nf3 Be6 10.Bb2 Qe7 ll.Qf2 0--0--0 12.cxd4 Qb4+
13.c3 QaS 14.a3 gS 15.Nd2 Qa4 16.c4 Bg7 17.Rcl Rhe8 18.Be2 QaS
19.Rc2 Bf8
Learn to Attack with Rudolph Sp ielmann
m -� �!•!•.�
-.1�� � •.1
,....�
.
��'""'�. �� �.
., __ __...��}-�m��
RR�.1��
�-�. l�f --�-/.. . .�.
���.t- ���
,..
..�� ,. �%
.
,..,�.,__ • __,.m �
m��i.� zs �ir�
� ""'� '··--=· --7.� �-
20.d5 BcS 2l.d4 Qa4 22.Rcl Nxd4 23.Bxd4 Bxd4 24.Qxd4 BxdS
2S . Qf2 Be6 26.Nbl Qa5+ 27.Nc3 QxeS 28.0-0 Rd2 29.Qxa7 Rxe2
30 . Nxe2 Qxe2 3l.Rcd l 1-0
18.Bb5 QxbS 19.Nxe6 Ke7 20 . Nxd8 Kxd8 2l.Rab l 1-0
l.e4 eS 2.Nc3 Nf6 3.f4 dS 4.fxe5 Nxe4 S.Qf3 fS 6.d3 Nxc3 7.bxc3
Be7 8.d4 cS 9.Nh3 cxd4 10.Nf4 0-0 ll.cxd4 Kh8 12.c3 gS 13.Nh5
Qe8 14.h3 Be6 15.Bd3 Nc6 16.Ng3 f4 17.Ne2 Rc8 18.0-0 Rc7 19.Bd2
BcS 20 . dxc5 NxeS 2l.Qf2
70
21...Nxd3 22.Qd4+ Rg7 23.Qxd3 BfS 24. Qf3 g4 25.Qf2 gxh3
26.Nxf4 Be4 27.Qd4 Kg8 28.Rf2 hxg2 29.c4 Rg4 30 . Bc3 Rgxf4 31.Rxf4
1-0
l.e4 eS 2.Nc3 Nf6 3.f4 dS 4.fxe5 Nxe4 S.Qf3 fS 6.d3 Nxc3 7.bxc3
d4 8.Qg3 Nc6 9.Be2 Be6 10.Bf3 BdS 1l.Ne2 Bxf3 12.Qxf3 Qd7
13.Rb1 BcS 14.Rb5 Bb6 15.Rd5 Qf7 16.Ba3 dxc3 17.Nf4 g6 18.Kd1
Rd8 19.e6 Qf6
20 .e7 RxdS 21.Qxd5 Qd4 22.Qe6 Qd7 23.Qf6 Qd4 24.Qf8+ 1-0
l.e4 e5 2.Nc3 Nf6 3.f4 dS (It is interesting to see Speilmann
handling the Black side of this line . He manages to inject some
aggression into that as we ll!) 4.fxe5 Nxe4 5.Qf3 f5 6.Nh3 Nc6 7.d3
Nxc3 8.bxc3 d4 9.c4 Bb4+ 10.Kd1 NxeS ll.Qh5+ g6 12.Qh6 Nf7
13.Qf4 Qe7 14.Be2 Be6 15.Rb1 0-0-0 16.Bf3 b6 17.Qg3 Rhe8 18.Nf4
QcS
71
Learn to Attack with Rudolph Sp ielmann
19.Bd5 Bxd5 20. Nxd5 Rxd5 21.cxd5 Nd6 22.a4 b5 23.Qf4 bxa4
24.c4 Nxc4 25.dxc4 Qxc4 26.Rb2 Qd3+ 27.Bd2 Ba3 0-1
l.e4 e5 2.Nc3 Nf6 3.f4 d5 4.d3 Nc6 5.fxe5 Nxe5 6.d4 Nc6 7.e5
Ng8 8.Nf3 Bg4 9.Be3 Bb4 10.Bd3 f6 11.h3 Be6 12.0-0 Qd7 13.Ne2
fxe 5 14.dxe5 Nge7 15.c3 BaS 16.Ng5 h6 17.Nxe6 Qxe6 18.b4 Bb6
19.Bxb6 axb6 20.Nf4 QxeS
�""'-"
"J!
..
..
.,
��i!
!!
!"
""
"
�:o:!"'
!� �%�:t�� �·
�.1�� -� ��
�m��' -···�,. . ..v.m
�'----V.�r��, .. v.
�m-���- -,'f-�- -,��
����:�
�, ../-��r�� ;�r
�
��L� ��
�
�
�4� �.�.:����
r� -�-:!�
2l.Ng6 Qe3+ 22.Khl 0-0-0 23.Nxh8 Rxh8 24.Qg4+ Kb8 25.Qxg7
ReB 26.Rf3 Qe5 27.Qxe5 Nxe5 28.Re3 Nxd3 29.Rxd3 c6 30.Rel Ng8
3l.Re6 Ka7 32.g4 Rf8 33.Kg2 Rf4 34 .Rf3 1-0
l.e4 e5 2.Nc3 Nf6 3.f4 d5 4.d3 d4 5.Nce2 exf4 6.Bxf4 Nc6 7.Nf3
Bg4 8.Rcl Qd7 9.c3 dxc3 10.bxc3 0-0-0 ll.Ng3 BcS 12.d4 Bb6 13.h3
72
Learn to Attack with Rudolph Sp ielmann
13 ...Nxe4 14.hxg4 Nxg3 15.Bxg3 Qxg4 16.Rh3 Rhe8+ 17.Be2 Re3
18.Kfl Rde8 19.Rc2 BaS 20.Ne5 QfS+ 2l.Kgl NxeS 22.Bxe5 QgS
23.Rh5 Qg6 24.Bf4 QxhS 25.Bxh5 Rel + 26.Qxe l Rxe l+ 27.Kf2 Re7
28.c4 1-0
This was one of Spielmann's pet fo rmations, used against many
diffe rent move orders. 4 . ..d6 5.£4 Spielmann used S.BgS effectively
against Schenk. 5 ...Ng4 6.f5 Qh4+ 7.g3 Qh5 8.h3 Bxgl
9.Qxg4 Qxg4 10.hxg4
73
Learn to Attack with Rudolph Sp ielmann
White 's advantages are clear: better bishops, a powerful
kingside, and more advanced development . 10 ...Bb6 ll.g5 Nc6
12.g6! Deftly exploiting the pin on the h-file. 12 ...fx:g6 13.fx:g6
h6
.l•.t.
.
••• f�
�Tm·�·�-······'
, ••V-
�,�� �-.zr�
� ----
·�'• •
V-���'•••
V-
��,�'if� ��
a�:..-,��-�m-��
� [j..8,� �.il
li
l�g·� ��' ../-
�
f� �.'% �r..
.;
p'%
r���m��
Now the stage is set . If only the g-pawn could move forward ...
14.Rxh6!! Rx:h6 15.Bxh6 Ne7 15...gxh6 16.g7 and the pawn
queens . 16.Bf7+ Kf8 17.Bg5 Although material is almost equal,
the overwh elming kingside fo rces wrap this game up quickly.
17...Bg4 18.Kd2 Bh5 To block the h-file, but there is another
highway to victory. 19.Rfl 19.g4 would have been quicker. 19 ...c6
20.g4 Black resigned, because the bishop cannot capture either
pawn. 20...Bxg4 20...Nxg6 21.Bxg6+ Kg8 22.gxh5 21.Rhl 1-0
l.e4 e5 2.Nc3 Bc5 3.Bc4 Nf6 4.d3 d6 5.Bg5 Be6 6.Nd5 Nbd7 7J4
h6 8.fxe5 dxe5 9.Bh4 g5 10.Bg3 c6 ll.Nxf6+ Qxf6 12.Qe2 h5 13.h3
Bxc4 14.dxc4 0-0-0 15.0-0-0 Qe6 16.Nf3 f6 17.c3 a5 18.b3 Be7
19.Bf2 Bc5 20 .Nel Bxf2 21.Qxf2 Nb8 22.Nc2 Na6 23. Qb6 a4 24. Ne3
axb3 25.axb3 Qe7 26 .b4 Qc7 27.c5 Qxb6 28.cxb6 Rd7 29. Rhfl Rxd l +
30.Kxdl Rf8 31.Nc4 Kd7
74
Learn to Attack with Rudolph Sp ielmann
32.Na5 Ke7 33.Kc2 Rb8 34.Ra1 Ke6 35.g4 hxg4 36.hxg4 Kd6
37.Rh1 1-0
1.e4 e5 2.Nc3 Bc5 3.f4 d6 4.Nf3 Nf6 5.Bc4 Nc6 6.d3 Be6 7.Bb5 a6
8.Bxc6+ bxc6 9.f5 Bc8 10.Bg5 Qd7 ll.Bxf6 gxf6 12.Qd2 Bb7 13.Ne2
h5 14.Nh4 0-0-0 15.0-0-0 d5 16.Ng3 Bf8 17.Kb1 d4 18.Qe2 Bh6
19.Nxh5 Bg5 20 .g3 c5 2l.Ng2 c4 22.h4 c3 23.hxg5 Qa4 24 .Ka1
�..�.
�rm� . '� r�� ...<
��' ··"���% !If�
��-��J��·�
� • �B.��'LJ
,.�.[- ""�
� ��%'" ""-��%�
� �B.- �IJ�
l�,K�i�f5�
�·�.{ ..?������
m�����
24...Rxh5 25.Rxh5 cxb2+ 26.Kb1 Bd5 27.exd5 Rxd5 28.Rh8+ Kb7
29.Qf3 c6 30 .Qh5 1-0
l.e4 e5 2.Nc3 Nc6 3.f4 Bc5 4.fxe5 Bxg 1 5.Rxg1 Nxe5 6.d4 Ng6
7.Be3 d6 8.Qf3 Be6 9.Bd3 N8e7 10.0-0-0 0-0 ll.g4 f6 12.Qg3 Rf7
13.h4 Nf8 14.Rdfl c6 15.g5 f5
75
Learn to Attack with Rudolph Sp ielmann
.�.�··�
m.r .----r-·:� ·�.r
, --�.rm:t·•' . .v,•
•m•
.
....�. !
��
�- ��l·' ··v,�
B
� m�R,�Y.r�m:\Wi···.
.
Y.
� ..�:£� �:eg*
iB,fa·-----
- --7.
•...v.mm.f?m m
Black seems to have the g6-square under control, but. .. 16.g6!
hxg6 17.h5 fxe4 18.Rxf7 Bxf7 19.Bxe4 d5 20 .Bd3 Qd7 21.Bd2 Nf5
22. Qg5 Ne7 23.Ne2 Ne6 24. Qg2 g5 25.Bxg5 Bxh5 26. Bf6 Bxe2
27. Qxe2 Rf8 28.Be5 Rf7 29 .Qh5 Kf8 30 .Qh8+ Ng8 31.Bh7 Ke8
32.Bxg8 1-0
76
Learn to Attack with Rudolph Sp ielmann
l.e4 e5 2.Nc3 Nf6 3.f4 d6 4.Nf3 Nc6 5.Bb5 Bd7 6.d3 Qe7 7.0-0 0 -
0-0 8.Nd5 Nxd5 9.exd5 Nd4
10.Bxd7+ Qxd7 ll.fxe5 Nxf3+ 12.Qxf3 dxe5 13.Be3 f6 14.c4 Kb8
15.Qf2 Qa4 16.a3 Rc8 17.Rfbl c6 18.b3 Qa5 19.b4 Qa4 20. dxc6 Rxc6
2l.c5 Be7 22.d4 exd4 23. Bxd4 Rd8 24.Khl Rc7 25.Be3 Rcd7 26.Qe2
Ka8 27.h3 Rd3 28.Rel Bf8 29.Bf4 g5 30.Bc7 Rd2 3l.Qe6 1-0
77
Learn to Attack with Rudolph Sp ielmann
The Bishop's Opening
The Bishop 's Opening (l.e4 e5 2.Bc4) is something of a
chameleon, since White can transfer to the Italian Game , the Scotch
Gambit, the Vienna Game and even the King's Gambit from it. Of
course since Spielmann played all of these, it is hardly surprising to
find him behind the White pieces !
This is a fairly standard position which arose frequently at the
time . 4 ...Bb4 This is an aggressive defense . For the less effective
4 ...Bc5 see the game against Pedis. 5.Bg5 h6 This is the usual
move . For 5 ...d6 see the Schenkein game . 6.Bxf6 Bxc3 +! This is
the correct move. Yates played 6. . . Qxf6 and Spielmann made him
suffer for it. 7.bxc3 Qxf6 8.Ne2 The knight is more effective here
than at f3, because White wants to play f4 . 8. ..d6 9.�
�.�..
.
�·� ?.
m·� �m%���m%· ·'
r��J�m % �:�-ff�m %
-��.�
.�., ..�•.%.,. . . .Y-
��.l�tJr� ��
-��,����
��,...:<�
��-%��%
��� ����,��
?'�� �'e1�&a�&
9. ..g5 Black has to try to stop the advance of the f- pawn, and is
willing to pay the structural price on the kingside . The Black king
should go to the queenside in this line, with exciting flank attacks by
78
Learn to Attack with Rudolph Sp ielmann
both players . See the game against Speijer for an exa mple of castling
kingside . 10.d4 Spielmann tried lO.Rbl against Von Bardeleben,
but switched to this move for the rest of his career. 10 ...Bg4 See
the game against Moller for the less-effective lO...hS. ll.f3 Bd7
12.Rbl
A��.�����r•
�� ��/;�.,"-.•� �
-4)���
• �-·.
.
.
�• .r.l:f ''�
��_l�··t·/.,.,Y-.
���f "��,��
,_1(-��,�
�����i='"'�
Here Black must defend the b-pawn, and there are no less than
five ways to do this . 12 ...b6 is probably best , preserving options of
castling queenside later. Castling immediately looks risky, and both
12 . ..Nb8 and 12 ...Bc8 are exercises in reverse development . But
there is another poor move, and Leonhardt finds it. 12...Rb8? Now
the Black king will not be able to find shelter on the queenside.
13.g3 Rg8 14.Khl Safety fi rst! 14...Ke7
Although there seems to be a solid defense surrou nding the
king, White is able to crack it open by employing an effective central
attacking strategy. 15.Qd3 Rg7 16.f4! Although the f4 square
seems to be well-covered, Wh ite's pieces are perfectly placed in
support of this advance . 16...gxf4 17.gxf4 Qh4 17...exf4 18.Rxf4
QgS 19.Rgl wins the rook at g7 . 18.dxe 5! Rbg8 18 ...dxe 5 19.f5
gives White a very strong attack. 19 . . .f6 20.Rbdl (20. Rgl is also
good ) 20 ...Rd8 21.Bd5 Be8 22.Qc4 Kf8 23.Qc5+ Re7 24.Rgl Bf7
25.Bxf7 Kxf7 26.Qc4+ Ke8 27.Rg8# 19.exd6+ cxd6 20.Rfdl!
79
80
l.e4 e5 2.Bc4 Nc6 3.Nc3 Nf6 4.d3 Bc5 5.Nf3 d6 6.Bg5 Be6 7.Bb3
h6 8.Bh4 g5 9.Bg3 Bg4 10.h4 Nh5 ll.hxg5 Nd4 12.Nd5 c6
81
13.Rxh5! cxd5 14.Rh4 Bxf3 15.gxf3 Nxb3 16.axb3 Qxg5 17.f4
exf4 18.Rxf4 dxe4 19.Rxe4+ Kd7 20 . Qf3 Qg6 2l .b4 Bb6 22.Rf4
Rhe8+ 23.Kfl Ke7 24 . Rg4 1-0
l.e4 e5 2.Bc4 Nc6 3.Nc3 Nf6 4.d3 Bb4 5.Bg5 h6 6.Bxf6 Bxc3+
7.bxc3 Qxf6 8.Ne2 d6 9.0-0 0-0 IO.d4 a6 ll.f4 exd4 12.cxd4 Bg4
13.c3 Rae8 14.Bd3 Qd8 15.h3 Bh5 I6.f5 Bxe2 17.Qxe2 f6 18.Qh5 d5
19.e5 fxe5
20 .f6 Re6 2l .f7+ Kh8 22.Qf5 e4 23.Qxe6 exd3 24.Radl 1-0
l.e4 e5 2.Bc4 Nc6 3.Nc3 Nf6 4.d3 Bb4 5.Bg5 h6 6.Bxf6 Bxc3+
7.bxc3 Qxf6 8.Ne2 g5 9.0-0 d6 10.d4 h5 ll.f3 h4 12.Qd3 Bd7
13.Rab l Rb8 14.Rfd l h3 15.g3 0-0 I6.Rfl Qg6 17.Bd5 Kh7 18.Bxc6
Bxc6 19.d5 Bd7 20 .g4 c6 2l.c4 Rfc8 22.Rb2 Rc7 23 .Rtbl b6 24 .Rb4
cxd5 25.cxd5 Rbc8 26.c4 Qg8 27.a4 Rc5 28.Ng3 R8c7
82
83
Learn to Attack with Rudolph Sp ielmann
l.e4 e5 2.Bc4
The Bishop's Opening was a favo rite of Spielmann, who often
created a sort of hybrid with the Vienna Game by developing the
knight at c3 early in the opening. 2 ...Bc5 3.d3 A quiet plan.
Spielmann tried the gambit plan 3.b4!? against Duras, and often
played an immediate 3.Nc3, though that simply transposes to
positions we will look at below. 3 ...d6 3 ...c6 is considered correct,
84
White wastes a tempo in order to eliminate the enemy cleric and
gain the long-term advantage of the bishop pair. 5 ...Bb6 Against
Olland, Spielmann was permitted to capture at c5 after 5 . . . Nf6 .
6 .Nxb6 axb6 7.f4! If you want to attack, you need open lines!
7...Nf6 8.Nf3 Bg4 9.c3! This move keeps the enemy knight out
of d4, but has two other advantages . It is now possible for the White
queen to be developed at b3, and it also enables a later advance of
the d-pawn . 9 ...d5 Black takes action in the center before castling,
which is acceptable in the Open Games (l.e4 e5), especially when
White has not castled. 10.exd5 Nxd5 ll.h3 Bxf3 12. Qxf3
Nxf4 13.Bxf4 exf4 14.0-0 0-0 15.Qxf4
l•� ���r���
•.�.� •.14%.1
�.6)� ��t···"�
��.J���-��
�����;-··��
��,,���,
'� ;���,�
�···£ ····;p�p'��··w�
t�': - -��
Aft er a series of exchanges and liquidation of the center pawns,
White has emerged with a clear advantage because of the queenside
pawn majority and bishop versus knight, combined with pressure at
the ever-vulnerable f7-square . 15 ...Qd7 Black now has dealt with
pressure at f7. Because Black will be able to add additional
defenders with ...Nd8, and/or ...Re8-e7, White will not be able to
win by direct means . 1 6 .d4 Rae8 17.Rf3 Re7 18.Rafl Nd8
85
uarn to Attack with Rudolph Sp ielmann
Both sides have played obvious moves and there is no way for
White to add any more pressure at f7. So what now? 19.Rg3! The
threat is Qh6. 19 . . . g6 20.Qh6 Qc6 Black must now watch the g6-
square, even though that pawn seems to be strongly defended . Note
that the pawn at f7 does not defend the g-pawn, because it is
pinned. 20 ...c6? 2l.Rf6 b5 22.Rfxg6+ !! hxg6 23.Rxg6# 2l.Bb3 Rfe8
22.Rf4 Now White threatens to transfer the rook to the h-file and
work on h7. 22. ..Re4
So far this has been a textbook exa mple of a good attack . Now
comes the flashy fi nish! 23.Bxf7+!! Nxf7 24.Rxf7 Kxf7
25.Qxh7+ Kf8 26. Rf3+ and there is no way to prevent
checkmate . 1-0
l.e4 eS 2.Bc4 BcS 3.b4 Bb6 4.a4 aS S.bS Nf6 6.d3 dS 7.exd5 NxdS
8.Ba3 Qf6 9.Qf3 Bg4 10.Qg3 Be6 ll.BxdS BxdS 12.Nc3 Be6 13.Nge2
Nd7 14.0-0 Qg6 15.Qf3 0-0-0 16.Nd5 BxdS 17.Qxd5 Nf6 18.Qc4 RdS
19.Be7 Re8 20. Bxf6 ReS 2l.Qb3 gxf6 22.c4 hS 23 .Khl h4 24. h3 c6
2S.bxc6 Rxc6 26.Rabl Re7 27.Nc3 Rd7 28.Nd5 Bd8 29.Rfe l Re6
30 . Qc3 Re8 3l.Rb5 Rg8 32.Rgl Kb8 33.Qb2 Kc8 34.f3 Qxd3 35.Rbl
86
uam to Attack with Rudolph Sp ielmann
35 ...e4?? 36.Rb3 1-0
l.e4 e5 2.Bc4 Bc5 3.Nc3 d6 4.d3 c6 5.Nf3 Bg4 6.h3 Bh5 7.g4 Bg6
8.Bg5 Nf6 9.Nh4 b5 10.Bb3 Nbd7 11.Qf3 Qb6 12.Bxf6 gxf6 13.Nf5 0-
0-0 14.Nh6 d5 15.exd5 Bf8
16.dxc6 Bxh6 17.cxd7+ Rxd7 18.Qa8+ Qb8 19.Qxb8+ Kxb8
20.h4 a5 21.Nxb5 1-0
l.e4 e5 2.Bc4 Bc5 3.Nc3 d6 4.d3 Nc6 5.Na4 Nf6 6.Nxc5 dxc 5 7.f4
exf4 8.Bxf4 Bg4 9.Nf3 0-0 10.0-0 Nd4 11.c3 Nxf3+ 12.gxf3 Bh3
13.Rf2 Nh5 14.Be3 Qh4 15.Qd2 h6 16.f4 b5 17.Bd5 c6 18.Bxc6 Rab8
19.e5 Rb6 20 . Be4 f5 21.Bd5+ Kh7 22.Kh1 Rg6 23.Rg1 Bg4 24.Bxc5
Rd8 25.Bf3 Qh3 26 .Qe3 Bxf3+ 27 . Rxf3 Rxg l+ 28.Kxg 1 Qg4+ 29.Kh1
g5 30 .fxg5 hxg5 31.Rf1 Nf4 32.Rg1 Qh5 33.Bd4 Nh3 34.Rf1 g4
87
88
Learn to Attack with Rudolph Sp ielmann
The King's Gambit
Finally, we come to the opening with which Spielmann's name
is most generally associated, the beloved King's Gambit (l.e4 e5
2.f4) , perhaps the most romantic opening of them all.
l.e4 e5 2.f4
'i
ii'
?� A �*ri"Jkl.�'i
ii'
�
a�•:.._�•� �· �"a
a
r�
�"I-�,-r• :r�-I-
"u·-"�ru--V-���,
--"
�
-
-�-
�-
�� �.,'1f'� �-
-�-�-'· ··u"-
.
�
�m
·
��m��-�m·�
"Af�w�}!§7. ,
.
�, ..,, �
.
��8
�����\WI���- �'I'l
l'
rg1 f.z.
.J
Wl:9��£,. :ea
This is the King's Gambit, beloved opening of Rudolph
Spielmann and many masters before and after him. It leads to
romantically exciting positions where either side can wi n. In
modern times it is considered that White's chances are no better
than Black's, and it is only seen on rare occasions in grandmaster
play. But that is no reason to avoid it as White in amateur
encounters . It is still fun, as it always has been. 2 ...exf4 Black can
decline the gambit in several ways, and we will see some examples
later on of what fate can befall the cowardly player of the Black side .
3.Nf3
This is the main line of the King's Gambit accepted, and fittingly
our example is from the Gambit tournament at Abbazia, where
89
Learn to Attack with Rudolph Sp ielmann
gambit play was obligatory. Not too surprisingly, Spielmann won
this tou rnament! The main point of 3.Nf3 is not so much to prevent
Black from playing ...Qh4+ , though as we shall see in later games
that really isn't such a problem . Instead, the knight is developed as
an attacking weapon, soon to leap into battle at e5 or g5 . 3 ...g5 The
boldest move, and, in my opinion, the best one . For 3 ...Nf6 see the
game against Reti .For 3 ...dS see the game against Fahrni . 4.d4 The
reputation of this move has slid downward and it has been replaced
by both 4.Bc4 and 4.h4. On the other hand, one recent book
promoting the King's Gambit recommends it strongly. I wish I could
agree .Spielmann chose the wiser 4.Bc4 frequently, and you can see
examples in the games against Leonhardt and Rosselli . He also
played 4.h4, and we have an example in the game against Eljaschoff.
4 ...d5? Not best . In my book Who's Afra id of the King's Gambit
(Chess Enterprises 1989) I analyzed the fo llowing line : 4 ...g4 5.Ne5
Qh4+ 6.g3 fxg3 7.Qxg4 Qxg4 8.Nxg4 d5 9.Ne3 dxe4 10.hxg3 Nc6
ll.BbS Bd7 12.Bxc6 Bxc6 13.Nc3 0-0-0 14.d5 Bd7 lS.Nfl Bg7
16.Nd2 Nf6 and Black has a clear advantage . There are many other
paths White can explore, but none of them lead even to an equal
position, so 4.d4 is not recommendable. 5.exd5 g4 6.Qe2+ Qe7
7.Ne5! f3 Black has to do something before the pawns fa ll off the
board . 8.gxf3 gxf3 9.Qxf3 f6
���������
A•�··•m!r�
�.1%1�.1% � �1
z ..Y,�z
..Y-
�r, -�� %,.
-��,&f"�-�
�� ��
" ��
��
�
z ../.� ���
'���'� ������
����� � �LSP
�'!'ir;{;.;:.;�� �� ,t-.' rfi
i
/
rg� �� �? dib•�
This seems to win a piece, but White's attack is just beginning,
and in fact the knight remains to the end of the game! 10.Bb5+
Kd8 11.0-0 Nh6 12. Qxf6! Now there is no more threat to the
knight, and Black has nothing more than a spite check. 12 ...Rg8+
13.Khl Bh3 14.Qxe7+ Kxe7
90
Learn to Attack with Rudolph Sp ielmann
.!.��.!�
�l-� �- -----�,
'--"�'-
--
-"� '- --"
��.
�!� ,���" -'
����----- '
���
���r-- -"�
���
��-�� �� ��-�
ll�������
r�t'L)m ���w
Now even though the queens are go ne, the attack continues
with a fine sacrifice! 15.Rxf8! Rxf8 16.Bg5+ Rf6 16 ...Kd6
17.Nc4+ Kxd5 18.Nc3+ Kxd4 19.Be3# with a mating position that
deserves a diagram:
l.e4 e5 2.f4 exf4 3.Nf3 Nf6 4.Nc3 d5 5.e5 Ne4 6.Be2 Nc6 7.d3
Nxc3 8.bxc3 g5 9.0--0 Rg8 10.d4 g4 ll.Nel f3 12.Bd3 Qh4 13.Bf4
fxg2 14.Nxg2 Qh5 15.Rbl Nd8 16.c4 Be6 17.Ne3 dxc4 18.Be4 c6
19.d5 Bc5 20.Khl Bxe3 21.dxe6 Nxe6 22.Bxe3 Qxe5 23.Bxh7 Rh8
91
LearntoAt
t
ack with Rudolph Sp ielmann
24.Rxf7!! Rd8 25. Qxg4 Qxe3 26.Bg6 1-0
l.e4 e5 2.f4 exf4 3.Nf3 g5 4.Bc4 Bg7 5.d4 d6 6.h4 h6 7.Nc3 Nc6
8.Ne2 Qe7 9.Qd3 g4 10.Nfg 1 Nf6 ll.Bxf4 Nxe4 12.c3 Bd7 13.Qe3
Nf6 14.Ng3 d5 15.Bd3 0-0-0 16.N1e2 Rde8 17.Qd2 Ne4 18. Qc2 f5
19.Nfl Qe6 20 .g3 Ne7 21.Rh2 Ng6 22.0-0-0 Qb6 23.h5 Ne7 24 .Ne3
Be6 25.Bxe4 f:xe4 26.c4 Rhf8 27.Kb1 Nf5 28.Nxd5 Bxd5 29.cxd5 Rf7
30.Qc4 Rd7 3l.Nc3 Nd6 32
a6 33.Rc2 RedS 34.Rdc l Kb8
35.Nxe4!! Nxe4 36. Rxc7 Qb5 37.Qxb5 axb5 38.Rxd7+ 1-0
l.e4 e5 2.f4 exf4 3.Nf3 g5 4.Bc4 g4 5.0-0 d5 6.Bxd5 gxf3 7.Qxf3
Nf6 8.Qxf4 Be7 9.Nc3 c6 10.d3 Be6 1l.Bb3 Na6 12.e5 Nd5 13.Nxd5
Bxd5 14.c4 Be6 15.d4 Rg8 16.d5 cxd5 17.Ba4+ Kf8 18. Qh6+ Rg7
19.Qxe6 Nc5
92
Learn to Attack with Rudolph Sp ielmann
20 .Qh3 Nxa4 21.Bh6 dxc4 22.Bxg7+ Kxg7 23.Qg4+ Kh8 24.Rxf7
Qb6+ 25.Khl Rg8 26.Qf5 Rg7 27.Rxe7 Nxb2 28.e6 1-0
l.e4 eS 2.f4 exf4 3.Nf3 gS 4.h4 g4 S.NgS h6 6.Nxf7 Kxf7 7.Bc4+
dS 8.Bxd5+ Kg7 9.d4 Qf6 lO.eS Qg6 ll.hS QfS 12.Nc3 Bb4 13.0-0 f3
14.Ne4 QxhS 15.Ng3 Qh4
93
Learn to Attack with Rudolph Sp ielmann
.�...
.
� �·5
md'· m�<!
!
�-��"'"""'' · ·
�.1�••
, ...•v,
�
'· ..v,
�
�
-
·
.-7-m
�
��,� ���r ··�
·�·��� ��},� �.,...,
�f��.1�
•.--...·
�'· · ..v,
�
r�· .;z
�� .�
�
���� ····'�
�tf!$b�r�""�"' �
r�� m'tW.��
16.Rxf3 !! gxf3 17.Qxf3 Nf6 18.exf6+ Kf8 19.Bf4 Na6 20.Qe4 Qg4
2l.Bxb7 Bxb7 22.Bxh6+ Rxh6 23.Qxg4 Rh7 24.Qg6 Rf7 25.c3 Bd6
26 . Nf5 Be4 27.Qh6+ Kg8 28.Qg5+ Kf8 29.Nh6 1-0
l.e4 e5 2.f4 exf4 3.Bc4
���������
.�...
..
�·�·?�
m�l·m,_ra i·ml·
'··..v,
�
, ..v,
�
�
�
'.. v,
�
���
�
�
�
-
�
��,� ,� ���
-
�
�
�
�'�},
-
�
��.��� .� ����·�
�t���l�"". ."< ���l�
r� tzJm'tW£� h): �
The Bishop's Gambit has had a serious fo llowing for a long time ,
though it is by no means as common as the King's Knight Gambit
with 3.Nf3 . It is important to remember, however, that play can
transpose into the latter opening, as it does in this ga me. 3 ...Nc6
3 ...d5 is not good here , as Spielmann demonstrated against
jacobsen.; 3 ...Qh4+ 4.Kfl does not really help the Black position,
since White will develop with tempo against the enemy queen . See
the game against Levenfish for an example. 4.Nf3 g5 5.0-0 d6
Spielmann had great success against 5 ... Bb4, seen in the games
against Lowtzky, Bogoljubow and another encounter with Grunfeld
from the same year. 6.d4 Bg7 7.c3 h6
94
The game has transposed into the fa mous Hanstein Gambit.
White has many options here . 8.g3 g4 9. Nh4 f3 This is the main
line, and it has been deeply explored. There are seven different
plans for White, but Black can play this line if armed with sharp
defensive skills. 10.Nd2 White plans to sacrifice a knight at f3 to
open up the game. 10 ...Bf6 This move may be playable, but it is
easy for White to whip up an attack, as in this game . Therefore I
prefer 10 ...Nf6 in my book "Who's afraid of the King's Gambit"
(Chess Enterprises 1989) .Even then, Black has to defend well. Here
is the exciting main line: 10 ...Nf6 ll.h3 h5 12.Ndxf3! gxf3 13.Bg5
Bxh3 14.Qxf3! Bxfl 15.Rxfl Rg8 16.Bxf7+! Kxf7 17.Qxh5+ Ke7
18.Nf5+ Kd7 19.Qf7+ Kc8 20.Nxg7 Qd7 21.Qxd7+ Kxd7 (2J...Nxd7!
is even stronger. 22.R.fl Nd8 23.Re7 aS and Black should win)
22.Bxf6 Raf8 23.e5 Nd8 24.Bxd8 Rxfl + 25 .Kxfl Rxg7 and Black wins
the endgame. ll.Ndxf3 gxf3 12.Qxf3
xm.t.�•m��
Ifi�Jf ,7,��,�- '
/....."li:Wd" "'"� r> ��·��� r>
�����
� %�, ..Y,� ""'�" ,Y,
��,�,��rJ
��iif.!l"�����t·
�%��'YW�
����/.���/, ,,Y,iif.!'�
%2$}!�WkW�
'
�%/ ��,·.., �
�����'rT�
r��
�?'E!3?
White has a lot of pressure , but had Black responded correctly to
the attack, it might have been beaten back. Writing in the
tournament book, Grunfeld himself provided the analysis below.
12...Rh7? 12...Bh3 was Grunfeld's choice . A) 13.Rel Qd7 Al)
14.e5 dxe5 15.dxe 5 (1 5.d5 Nce 7 16.Ng2 0--()--()) 15...Bxh4 16.Rdl
(1 6.gxh4 Qg4+; 16.e6 Bxe6 17.Bxe6fx e6 18.Qh5+ Q/7 19.Rxe6+ Nge 7)
16...Bg4 17.Bxf7+ Kf8 18.Rxd7 Bxf3 19.gxh4 Nxe5 and Black wins.;
95
Learn to Attack with Rudolph Sp ielmann
A2) 14.Bb5 Bxh4 lS.dS (1 5.gxh4 Qg4+ 16.Qxg4 Bxg4 17.d5 a6)
1S...Bg4 16.dxc6 bxc6 17.Qg2 Be7 18.e5 dS with advantage to
Black .; B) 13.Qh5 Qd7 14.Rf4 (1 4.Rel Bxh4 15.Q]ch4 Qg4) 14 ... 0--0-0
lS.BbS BgS 16.Rxf7 Qe6 threatening to win the queen with ...Bg4,
so: 17.Bxg5 (1 7.d5 Qx e4 18.NJ3 Bg4 19.Nxg5 Bxh S 20.Ne6 Bxj7
2l.Nxd8 Nxd8) 1 7...hxg5 18.Qxh8 Qxf7 19.Nf3 Qxf3 20. Qxh3+ g4
and Black stands to win .; C) 13.Bxf7+!? Kxf7 14.Qh5+ Ke6 15.Ng6
(J S. dS+ will be not be significantly differe nt .; JS.Rfl Nce 7 16.e5 dx eS
17.dxe5 QdS 18.Ng6 Nxg6 19.Qxh3+ Kj7 20. exf6 Re8) 1S ...Bxf1
16.d5+ Kd7 17.dxc6+ (1 7. Q[5+ Ke 8 18.Nxh 8 Bh3 19.Qxh 3 Bxh 8
20.Qh5+ Ke 7 2l.Bxh6 Ne S) 1 7...bxc6 18.Qf5+ Ke8 19.Qe6+ Ne7
20.Qxf6 Cl) 20 ...Nxg6 is also acceptable: 21.Qxg6+ Kd7 22.Qf5+
Ke7 according to Grunfeld, but maybe this is not so clear after
23.Bxh6 Qg8 (23... Rxh 6 24. Qg5+ Kj7 25.Qxh 6 fo r example 25... Bc4?
26.b3 Be6 27./lfl+ Ke 7 28.Qg7+) ; C2) 20...Rg8 21.Nxe7 Qxe7
22.Qxf1 Qe6 with advantage to Black. 13.Ng6!
!J��-i�!·
�.1%1�.1% •1•.I
,
....7-
.Ji� %���
� 7-�,
..7-�.-
--..�'-----�
-- ��%�
���
_mA�� ��%�
•��'VW�.R%!
r� ../,���, .J�
r ,f../,�.� ���:2 w( . ../,
rm�-��
13...Rg7 13...fxg6 14.Bxg8 Rg7 1S.Bc4 Be7 16.Bxh6 Rh7
17.Bf7+ 14.Nf4 Bg4 15.Qg2! Bg5 16.h3 White is still down a
piece, but the attack rages on.
��������
!� �%·;��-
�1� m1r�
'---
-
�-Ji� ��- <�
� ��"'- -��
��.f V
������".,� .. . . ;�
.•A������
•��•�!
i�f.. }.
� ����
r £ --��;� ���� ��
f��-��
I6...Bd7 16...Bxf4 17.Bxf4! Bd7 18.Rae1 Qe7 19.e5 dS 20.Bxd5
0-0-0 21.b4 with a strong attack. 17.Nh5 Rh7 18.e5! A sacrifice to
secure e4 for the queen . 18 ...dxe5 19.Qe4 f5 19 ...Rh8 20. Bxf7+
96
Learn to Attack with Rudolph Sp ielmann
A) 20 ...Kf8 21.Bxg8+ Al) 21...Ke7 22.Rf7+ Kd6 (22... Ke 8 23.Ng7#)
23.dxe 5+ NxeS 24 . Qd4+ Kc6 25 . Qa4+ Ala) 25 ...b5 26.Qa6+ Kc5
27 . Be3+ Kc4 28. Rxd7+ Qxg8 29 .Rxc7+ Kd3 30. Qd6+ Kxe3 (30... Ke4
3l.Qd4+ Kf5 32.Rjl+ Kg6 33.Qe4+ Kxh5 34.g4+ Kh4 35.Bf2+ KxhJ
36. Qg2#) 3l.Rel+ Kf3 32.Qd l#; Alb) 25 ...Kd6 ; A2) 21...Kxg8
22.Qg6#; B) 20 ...Ke7 2l .d5 and the e-pawn fa lls with disasterous
results . 20.Rxf5! Another sacrifice opens still more lines.
20...Bxf5 2l.Qxf5
��������
���%�s·a
�1���.�
'··v.·�� @.� ��
� ����%��%. ..v.
� � ��'tW-'2)
����.....v.� .......�
��-m%'· ../.��-m ·�
����!
l�!f .
..v.� ��,....v.�
rt../,�/��.�� r� �
t���m
There is no salvation now. 2l ...Re7 21...Qe7 22.Qg6+ A)
22 ...Kf8 23.Qxg8#; B) 22 ...Kd7 23. Bxg8 Rh8 (23... Rxg8 24.Qxg8 Q/7
25. Qxj7+ Rxj7 26.Bxg5 hxg5 27.dxe5 Nx e5 28.Rdl + and White
should win the endgame ) 24. Bxg5 Bl) 24...Raxg8 25.Qf5+ Qe6
26.Nf6+ Ke7 (26...Kd6 27.Ne4+ Kd5 28.c4+ Kxd4 29.Rdl + Kxc4
30.Qxe6+ Kb 4 3J.Qb3+ Ka5 32. Rd5+) 27. Nxg8+ Kd7 28.Qxe6+ Kxe6
29. Nxh6 exd4 30 .Rel+ Kd5 3l.cxd4 Nxd4 32.Re7; B2) 24...Qxg5
25.Nf6+ Kd6 (25... Ke 7 26.Qf7+ Kd6 27.Qe6#; 25... Qxf6 26. Qxf6 Raxg8
27.dxe5 Rxg3+ 28.Kh2 Rhg8 29.Rdl + Kc8 30.Rd2; 25... Kc8 26.Qe8+
Nd8 27.Qd7+ Kb8 28.Qxd8#) 26.Ne4+ Ke7 27.Qf7+ Kd8 28.Qf8+ Kd7
29 . Nc5#; B3) 24...hxg5 25.Nf6+ B3a) 25 ...Kc8 26.Qf5+ Kd8
(26... Kb8 27.Nd7+ Kc8 28.Nj8+ Kb8 29.Ng6 Qg7 30.Nxh8 Qx g8
3l.Rfl a6 32. Qf8+ Qxj8 33. Rxj8+ Ka 7 34.Rxa8+ Kxa8 35.d5 Ne 7
36.c4 and White wins the endgame) 27 . dxe5 NxeS 28.Rdl+ Nd7
29.Rxd7+; B3b) 25 ...Kd8 26.Rfl Qf8 27.Qxg5 Ne7 28.Nd5 and
wins. ; C) 22...Rf7 23.Ng7+ Kd7 (23... Kj8 24.Bxg5 hxg5 25.Bxj7 Qxj7
26.Rfl ) 24. Bxg5 hxgS (24...Rxg7 25.Qf5+ Ke 8 26.Bxe 7 Ngxe 7
27.Qh5+; 24... Qx g5 25.Q;cj7+ Qe 7 26.Be6+) 25.Be6+ Kd8 26.Bxf7 Nf6
27. Nf5 22.Bxg5 hxg5
97
Learn to Attack with Rudolph Sp ielmann
23.Rfl! Still a rook down, White keeps piling on the pressure .
23...Qd6 23 ...Nh6 24.Nf6+ Kf8 25 . Qxg5 24.Bxg8 exd4 25.Qf8+
Kd7 26.Qxa8! Now White is up a piece, and this is better than
winning the queen . 26 . Nf6+ Qxf6 27 . Qxf6 Rxg8 also wins, but more
slowly. 26...Qc5 27. Nf6+ Kd6 28.Qf8 Qe5 28...d3+ 29.Kg2
Qe5 30.Rf2 transposes to the game . 29.Kg2 d3 30. Rf2 Qel
3l.Qh6
l.e4 e5 2.f4 exf4 3.Bc4 Nf6 4.Nc3 Nc6 5.Nf3 Bb4 6.0-0 0-0 7.e5
Ng4 8.d4 Bxc3 9.bxc3 d6 10.exd6 Qxd6 ll.Ng5 f3 12.Nxf3 Be6
13.Bb3 Bxb3 14.cxb3 Rfe8 15.h3 Nf6 16.Nh4 Qg3 17.Nf5 Qg6 18.Qf3
Re4
98
Learn to Attack with Rudolph Sp ielmann
!Bm�·�•!•
� 1� �14%1
'u ••���� �--�
������
r
' ···'� �
·� �m�����
•��q�
�r�-----����r
!��r---����!�
�--·�wc;����� -"'�
t��-��
19.Nh6+ gxh6 20 . Qxf6 Ne7 2l.Bxh6 Nd5 22.Qxg6+ hxg6 23.c4
Nc3 24.d5 Re2 25.Bf4 c6 26.d6 Ne4 27.Rfe l Rxel + 28.Rxe l Nc5
29 .Re7 Rd8 30.b4 Ne6 31.Be5 aS 32.Rxb7 axb4 33.Bf6 Ra8 34.d7 g5
35.Rb6 Rxa2 36.Rxc6 Rd2 37.Rxe6 1-0
l.e4 e5 2.f4 exf4 3.Bc4 Nf6 4.Nc3 Nc6 5.Nf3 Bb4 6.Nd5 Nxe4 7.0-
0 0--0 8.d4 Nf6 9.Nxb4 Nxb4 10.Bxf4 d5 ll.Bb3 Ne4 12.Nd2 Ng5
13.Qh5 Ne6 14.Be3 Nc6 15.c3 Ne7 16.g4 g6 17.Qh4 f5 18.Bh6 Rf7
19.h3
l.e4 e5 2.f4 exf4 3.Bc4 Nf6 4.Nc3 Nc6 5.Nf3 Bb4 6.Nd5 0--0 7.0--0
Nxe4 8.d4 Be7 9.Bxf4 d6 10.Qd3 Nf6 ll.Ng5 g6 12.Nxe7+ Nxe7
99
Learn to Attack with Rudolph Sp ielmann
l.e4 e5 2.f4 exf4 3.Bc4 d5 4.Bxd5 Qh4+ 5.Kf1 Nf6 6.Nc3 Bb4
7.Bb3 Nc6 8.Nf3 Qh5 9.e5 Bxc3 10.bxc3 Ne4 11.d4 Ng3+ 12.Kg1
Nxh l 13.Bxf4 Ne7 14.Kxh1 c6 15.c4 0-0 16.Qd2 h6 17.Rf1 Be6 18.c3
g5 19.Bg3 Nf5 20 .Be1 g4 2l.Ng1 g3 22.Nh3 Kh8 23.hxg3 Nxg3+
24. Bxg3 Bxh3
1.e4 e5 2.f4 exf4 3.Bc4 Qh4+ 4.Kf1 d5 5.Bxd5 Nf6 6.Nc3 g5 7.d4
c6 8.Bb3 Bg7 9.Nf3 Qh5 10.h4 Bg4
100
Learn to Attack with Rudolph Sp ielmann
W?JI
Ii\1
••,. -�
�"!M !����%Ji--
4%.1� �.1-.1
.....v.
�r�
�........�
�
�
�
�
��-'ml
�-��%��%· ·
·
v.�%
• �!��.i.8
�r�··
·
"�ti
i
�'· ··"
r��A'���r�
�--·�'�f.�/��.��.�
r� �'iWawa�
ll.e5 Bxf3 12.Qxf3 Qxf3+ 13.gxf3 Nh5 14.Ne4 h6 15.hxg5 hxg5
16.Kf2 f6 17.exf6 Nxf6 18.Rxh8+ Bxh8 19.Nxg5 Nd5 20.c3 Bf6 2l.Ne6
Bh4+ 22.Ke2 Na6 23.Bxd5 cxd5 24 . Nxf4 0--0--0 25 .Be3 Nc7 26.Rhl
Bg5 27.Rh5 Bxf4 28. Bxf4 Ne6 29.Be5 Rg8 30.Kf2 Kd7 3l.f4 Rf8 32.f5
Rf7 33.Kf3 Ke7 34.Kg4 Nf8 35.Rh6 1--0
l.e4 e5 2.f4 d5
W?Ji
ii{(-
A\U
U
.•�A"!
!:
Jia.�JJ
a��..
.
�-� OO.•�
�'.f�-- -��.r�·.r
'· ..v.
�· ../.� ��· ,/.�
����� %���
•·.1�•
����'!/.���
�����z..• •f.
��
�� %��%����-.%
,S,,��A��-·�v.�z�v.�
�'"�h!?'�\!J.fl�-"'?R. '"
?'� ��l:9 �& .JilL,�_);�
This is the Falkbeer Countergambit, an active reply to the King's
Gambit. 3. exd5 e4 Black can also try the gambit approach, which
we see in the game against Johner. 4.d3 Nf6
101
Learn to Attack with Rudolph Spielmann
Now White usually captures at e4, as Spielmann does in the
games against Cohn, Van Vl iet, Von Bardeleben and Marshall . But in
this game he tries a more original plan . 5.Qe2 Qxd5? Spielmann
knew just how bad this move is, because he he got into trouble with
it as Black against Reti back in 1919! 5 ...Bc5 6.dxe4 0--0 7.Nc3 Re8
8.Bd2 Nxe4 9.Nxe4 f5 10.0--0--0 Rxe4 ll.Qb5 Bd6 (l l. . . Qx dS 12.Bb4
Rxb4 13.Qe8+ Bf8 14. Rxd5) 12.g3 is much better for White , who will
develop quickly and then attack on the kingside .; 5 ...Bg4! is the
correct reply, for example: 6.Nf3 A) 6 . . . Qe7 7.dxe4 Nxe4 gives
Black some compensation for the pawn, but it will be hard for Black
to develop the queenside .; B) 6...Qxd5 7.Nbd2 Bxf3!? (7... BJS 8.dxe4
Nxe4 9.Ng5 Bb4 JO.c3 0-() II.Ngxe4 Bxe4 12.Qxe4 Qx e4+ 13.Nxe4
Re8 14.Bd3 JS JS.cxb4 Jx e4 16.Bc4+ and White is just a piece ahead)
8.gxf3 e3 9.Ne4 is complicated, but the e-pawn will fall and White
will have an extra pawn , even though it is weak .; C) 6 ...Bb4+ 7.c3
0--0 8.dxe4 Re8 9.e5 BaS 10.Na3 with a complicated position. 6.Nc3
'i
ii'
?J/i
i{(-.
A���·�� �-'W;J
a�gJ:..x.
.
��rs
•.rm ��I-m'.r
/ ""�' ""
�
��
'//.'( ""
�
�����-,��
����r���
���,�/ ..7.
��
'��!'�'�'�
� ·{""'����� �"' �" '/0/....,/.
�c;:
:,o
oZ �em M'>.�:JR:;c;:
:,o
?"� � ��&£"�-]: �
Black must react vigorously or the White fo rces will quickly
advance . This involves conceding the bishop pair. 6 ...Bb4 7.Bd2
Bxc3 8. Bxc3 Bg4 8 ...Nbd7 just ties down Black's pieces, for
example: 9.0--0--0! Qxa 2 (9. .. 0-()
JO.dxe4 Qx e4 II.Qd2 followed by
Bd3) 10.dxe4 9.dxe4 Qe6 9 ...Qxe4 10.Qxe4+ Nxe4 11.Bxg7 Rg8
12.Be5 Nc6 13.Bd3! Nxe5 14.Bxe4 Nc4 was what Tarrasch played as
102
Learn to Attack with Rudolph Sp ielmann
Black agai nst Reti in 1920. But Instead of 15.b3?, allowing Black to
castle queenside, White could have captured at b7 with a big
advantage .; 9 ...Bxe2 was Spielmann's try against Reti, but he should
have gotten a bad game . 10.exd5 Bxf1 11.Kxf1 Nxd5 12.Bxg7 Rg8
13.Re1+ Kd7 14.Rd1 Kc6 15.Bd4 Nxf4 16.Nf3 is obviously better for
White . After 16 ...Nd7 17.Be3 Nxg2 (1 7... Ne 6 18.g3 fo llowed by Kg2
and Rhfl , as played by Bronstein against Szabo in 1949) 18.Nd4+
Kb6 19.Bf2 and now that the bishop is no longer attacked by the
knight, the threat of discovered check is nasty and White also
threatens to continue the attack with Rd3. 10.Qc4! Qe7
10 ...Qxe4+ 1l.Qxe4+ Nxe4 reaches the position from the previous
note (9...Qxe4+) . 11.Bd3 Now White holds on to the extra pawn .
1l. ..Nc6 12.Nf3 0-0-0 13.� Be6 14.Qa4
�-�•!•, ...-� �?�
�.1� �.1�1
'···v.�6)�:f-f'"''v.
�
�
�
�
�
�, ,�
�
-���,�
�
�
�
�
�!���
�
r�lr���r�
r{'.. v...�-��r,( ..v.
r����m
The contour of the game has been established . White wi ll attack
on the queenside and Black will attasck on the kingside . The control
of the center by White makes his task easier. 14 ...Qc5 + 15.Kh1
Ng4 16.Be1! White must keep an eye on the f2-square! 16...f6
17.b4 Qh5 18.Bg3 Kb8 Necessary, as the defender of the pawn
at a7 is about to be chased away. 19.b5 Ne7 20.f5! This opens up
the line for the Bg3 while pushing the enemy bishop to a less useful
square. 20 ...Bf7 21.Rab1! A clever move which sets up later
threats . The idea is that now White pieces may be able to use a6 and
c6, since captures there would result in an open b-file. 21 ...Nc8
22.Nd4 Rd6
103
Now everything is ready. White is certainly not go ing to settle for
mere material and give up the bishop at g3, which serves an
important defensive function guarding the pawn at h2, for the rook
at c6 . 23.Nc6+!! Ka8 23...bxc6 24.bxc6+ Nb6 2S . Qa6 24.b6!!
·��� � ��:
� f� �Rl.m�i�
,.. ..Y.� !E �� �� ,. ....Y.R
R'····/.R�····'R'1rRf
�R�R!Rf.
R�RfR��
�
R
�R�
R
�
.
...�� �
ili ���i�
What a pretty picture! 24...Rxc6 Other captures also lose .
24...Nxb6 25.Qxa7#; 24 ...cxb6 2S . Bxd6 bxc6 (25... Nxd6 26.Qxa 7#)
26. Qxc6# 25.Qxc6 !! Nxb6? There are other options , and Black
missed the best defense . 2S ...bxc6? 26 . b7+ Kb8 27.Bxc7+ Kxc7
28.b8Q+ Kd8 (28... Kd7 29.Rb 7+ Kd8 30. Qc7+ Ke 8 31. Qxc8#) 29.Ba6
Ke7 30. Rb7+ Kf8 3l.Qxc8+ Be8 32.Qc7 Qf7 (32... Nfl + JJ.Rxfl Qd l+
34.Rfl) 33.Qd6+; 25...Nxh2! 26.Bxh2 bxc6 27.b7+ Kb8 and now
because the bishop is pinned, White cannot capture at c7 to free up
the queening square. 28.bxc8Q+ Kxc8 and now 29 .Rfdl! creates the
deadly threat of Ba6#. Black would then have to give up a bishop to
block the d-file . 29 ...Bd5 30.exd5 and White, with rook and two
bishops for the queen, should still wi n. 26.Qxc7 White is up the
exchange and has an extra pawn and an attack. Black could have
resigned here . 26 ...Rc8 27.Qd6 Ne3 28.Rxb6! Nxfl 28...axb6
29 . Qa3# 29. Bxfl Be8
104
Learn to Attack with Rudolph Spielmann
Since Black would not resign, Spielmann humiliates him.
30.Rxb7!! Kxb7 31 .Qa6 + and finally Black gave up. 1-0
1.e4 e5 2.f4 dS 3.exd5 e4 4.d3 Nf6 5.dxe4 Nxe4 6.Qe2 QxdS
7.Nd2 fS 8.g4 BcS 9.Bg2 Kf7 10.gxf5 Bf2+ 11
11...Bxf5 12.Qe2 Re8 13.Ngf3 Qd8 14.Nxe4 Bxe4 15.Ne5+ RxeS
16.fxe5 Bxg2 17.Qxg2 Kg8 18.0-0 Nc6 19.Bg5 Qd4+ 20 .Kh1 Re8
21.Rad1 QxeS 22.Qd5+ 1-0
l.e4 eS 2.f4 dS 3.exd5 e4 4.d3 Nf6 5.dxe4 Nxe4 6.Nf3 BcS 7.Qe2
fS 8.Be3 QxdS 9.Bxc5 QxcS 10.Nc3 0-0 ll.Nxe4 fxe4 12.Qxe4 QaS+
13.c3 BfS 14.Bc4+ Kh8 15.Qe3 Nc6 16.0-0 Rae8 17.Qf2 Bg6 18.Nh4
Be4 19.Rae 1 QhS 20.Re3 QcS 21.Bb3 gS
105
Learn to Attack with Rudolph Sp ielmann
22.Rfe 1 Rxf4 23.Nf3 g4 24.Qg3 Ref8 25 .Nd2 QfS 26 . Rxe4 Rf2
27. Rxg4 Ne7 28.Nf3 Rxb2 29 .Qe5+ QxeS 30. Nxe5 1--0
13.Qd2! Rxd2 14.b8Q+ Rd8 15.Qb5+ c6 16.Qxc6+ Bd7 17.Qd5
Ba4 18.Qe5 Rd 1+ 19.Bxd 1 Nd3+ 20 .Kf1 NxeS 21.Bxa4+ Kf8 22.fxe5
Qb7 23.Bh6+ Ke7 24.Bg5+ Kf8 25.cxb4 Qa6+ 26 . Kf2 Qxa4 27.Bf6 1-
0
l.e4 e5 2.f4 d5 3.exd5 c6 4.Nc3 Bb4 S.Bc4 exf4 6.Nf3 Nf6 7.dxc6
Nxc6 8.0--0 0--0 9.d4 Bg4 10.Ne2 Bd6 11.h3 BhS 12.c3 Qc7 13.Bd3
Rfe8 14.Qc2 Nb4 15.Qd1 Nxd3 16.Qxd3 Bg6 17.Qd1 Nd5 18.Ne5
Bxe 5 19.dxe5 Ne3 20 . Bxe3 fx e3 21.Nd4 Qxe5 22.Qe2 f5 23.Rae 1 f4
24.Qg4 Bd3 25.Rxf4 e2 26.Rf3 Ba6 27.Nf5
106
27...Kh8 28.Qd4 g6 29. Qxe5+ Rxe5 30 . Nd4 Rae8 31.Kf2 Re4
32.b3 h5 33.a4 Kh7 34.Nc2 Rd8 35 .c4 Rd2 36.Ne3 Rb2 37.Nd5 Re6
38. Nc7 Re7 38. Nc7 Re7 39. Nd5 Re6 40. Nc7 Re7 4l.Nxa6 bxa6 42.Re3
Rxe3 43.Kxe3 Rxb3+ 44. Kd4 Rb2 45 .Kc3 Rb7 46.Rxe2 Kg7 47.c5 Kf6
48.Kc4 Rb 1 49.c6 1--0
l.e4 e5 2.f4 d5 3.exd5 e4 4.d3 Nf6 5.dxe4 Nxe4 6.Nf3 Bg4 7.Bd3
f5 8.Qe2 Qxd5 9.Nc3 Bb4 10.Bd2 Bxc3 ll.Bxc3 Nc6 12. Bxg7
��.1����,��
.
�;l.liJ
����
���:
-=����'=
!�!·'iW· ! �
� :{ ,;,�ij'{ ""�P.o'
""p..;,
f�-�-�
12...0--0--0 13.Bxh8 Rxh8 14.Qe3 Bxf3 15.Qxf3 Nd4 16.Qe3 Qc5
17.Kf1 Qb4 18.Rd1 Re8 19.c3 Qa4 20 .b3 Nxc3 2l.Qxd4 Qa5 22.b4 1-
0
I.e4 e5 2.f4 Bc5
107
Learn to Attack with Rudolph Spielmann
The King's Gambit Declined is often seen because Black thinks
that it will somehow be safer to develop rather than capturing the
pawn . But that is not necessarily the case . After all, after 2 ...exf4
both the e-file and f-file re main closed, but when declined, White
can later play fxe4 to open up the f-fi le. The f-file plays a very
important role in this game! 3. Nf3 d6 4.Bc4 Obviously it makes
sense to aim directly at the f-pawn .Spielmann also played 4.c3,
playing in the center, for example in the games against Tarrasch and
Van Scheltinga . In an early game against Fleischmann he tried 4.Nc3
but that game transposed to similar play. 4 ...Nf6 5.d3 Nc6 6.Nc3
-��-*-�·- �
��
?;i"�.:?.t ··-"-.?;i"�..
.
�-i··"'
���.�
'·----����
�af-
-"�
����. �'·
--��� " -�
�����
���·�'£� ��
���,�!&��
!�"!���!�
�···t
--"�.���··�z< �- .. /.
?� �'YW@ -�
White has developed logically, and the position is easy to play.
The only difference between the White and Black positions is the f
pawn , and this gives White a positional advantage . 6 ...Bg4 This is a
sensible move since it pins the knight at f3 . Many other moves are
seen, and Spielmann had success there too. For 6 ...a6 see the game
against Moll. For 6 ...Be6 see the game against Tartakower. On
6...Na5 we reach the game with Fleischmann by transposition.
7.Na4 exf4 7 ...Bb6 8.Nxb6 axb6 is positionally sounder. 8.Nxc5
dxc5 9.Bxf4
108
White has a big advantage here . The center is controlled by the
White fo rces (except for d4) and White has the bishop pair. 9 ...Nh5
10.Be3 Nd4 The pressure at f3 is intense , so White parts with the
bishop pair. ll.Bxd4 cxd4
�'!'!':'
!"!"
"":"
""
This position looks harmless, but in fact White can deliver a
crushing blow! 12.Bxf7+! Kxf7 12...Kf8 13.Bxh5 Bxh5 14.0--0 Kg8
15.c3 wo uld be hopeless for Black, with Qb3+ a serious threat.
13.Ne5+ Kg8 14.Qxg4 Qe8 14...Nf6 15.Qe6+ Kf8 16.Qf7#
15.Nf3 This isn't really a retreat . It is an attack on the d-pawn ,
which cannot be held. 15...Nf6 15 ...Rd8 16.e5 and the knight will
be stranded, unless Black fu rther weakens the position: 16...c5 17.0-
0 g6 18.Ng5 and the knight will get to f7. 16.Qf5 Qe7 17.Nxd4
Qb4+ The queen should be defending her monarch, not running
after infantrymen! 18.c3 Qxb2 19.Qe6 + Kf8 20.0-0 White
sacrifices another pawn, but the Black king is about to fa ll.
20...Qxc3
109
Learn to Attack with Rudolph Sp ielmann
••-•i�
tft��LJJJ.�
,..��L
.
.�� ;.
r··��
������- ,�
����. ·'4�
��
�
-�,...;;
tz5:� �-�
• �itL8.� •
r�- -7.����:�
r��.ia<-��r.{ ..�
f�--��
Now a simple exchange sacrifice wraps things up. 21.Rxf6+!
g:x£6 22.Qxf6+ Ke8 23.Qxh8+ Kd7 24.Qg7+ Ke8 25.Rfl
With the final move , we see a reminder of the importance of the f
file! 1-0
l.e4 e5 2.f4 Bc5 3.Nf3 d6 4.Nc3 Nf6 5.Bc4 Nc6 6.d3 Na5 7.Bb3
Nxb3 8.axb3 a6 9.h3 h6 10.Ne2 Qe7 ll.fxe5 dxe5 12.Bd2 Bd7 13.Bc3
Bd6 14.0--0 0--0--0 15.Ra5 Bb5 16.Ng3 Bb4 17.Bxb4 Qxb4 18.Qal
Nd7 19.c3 Qxb3 20 .Ra3 Qe6 21.c4 Bc6 22.b4 f6 23.Rbl
�·��?�
�m·�-��m·······
l�,t�i�J.f Am
����m'·..
�
�
,.. ..Y-
��r�,i���
z
/""� �� �-
.
''/. �
?� �B,�'2)�B,
'
·'� �� ��� ;�
;·· ..��
��-��/�
��----�
23 ...Nb8 24 .b5 Be8 25.bxa6 Nxa6 26.Nf5 Bc6 27 .Nd2 Nc5 28.Ra5
b6 29.Rxc5 Rxd3 30.Rxc6 1--0
1.e4 e5 2.f4 Bc5 3.Nf3 d6 4.Bc4 Nf6 5.d3 Nc6 6.Nc3 a6 7.f5 Na5
8.Bg5 c6 9.a3 Nxc4 10.dxc4 h6 ll.Bh4 Qe7 12.Qd3 b5 13.b4 Bb6
14.Rdl Bb7 15.Qxd6 Qxd6 16.Rxd6 Bc7 17.Rd2 bxc4 18.0--0 Rd8
110
l.e4 e5 2.f4 Bc5 3.Nf3 d6 4.Bc4 Nc6 5.d3 Nf6 6.Nc3 Be6 7.Bb5 a6
8.Bxc6+ bxc6 9.Qe2 0-0 10.fxe5 dxeS 11.Nxe5 Re8 12.Be3 Qd6
13.Nf3 Bxe3 14.Qxe3 Qb4 15.0-0
��--
-,
����:!'-"�
������ ��:�
'�'�!il'�i
������ --,��
���,���
�'"'
z�,d� �
f•K'�� J� f�
�:{ ,/-� �� ��- ··"
r.5\1 � ���'e'&
15...Qxb2 16.Qc5 Qb6 17.Na4 QbS 18.Qa3 QaS 19.c4 Rab8
20 .Rab 1 Nd7 2l.Rb3 Rxb3 22.axb3 Rb8 23.Nd4 Qb4 24.Qxb4 Rxb4
25.Rb1 c5 26.Nc6 Rb7 27.Kf2 Kf8 28.Ke3 Ke8 29.Kd2 f6 30.Kc3 h5
31.Re1 g5 32.Rf1 h4 33.Re1 h3 34.g3 Bg4 35.e5 Bf3 36. e:xf6+ Kf8
37.Nd8 g4 38.f7 Nf6 39. Nxc5 1--0
Ill
Learn to Attack with Rudolph Sp ielmann
l.e4 e5 2.f4 Bc5 3.Nf3 d6 4.Bc4 Nc6 5.d3 Nf6 6.Nc3 Bg4 7.Na4 a6
8.Nxc5 dxc 5 9.a4 Nh5 10.f5 Nf4 11.0-D Nd4
'i
ii'
!,�� .wa·��� �'i
ii
i'
:i
i
a��·*�r�
� ��'[:i- -����'[:i ....
-.1� .1f�1
{� ..�� �� ·""�
�����'[:i·�·
����!-
r�'£)iftr.r�
� �g;f��s��
�l� �� l�
� ;{ ../.�/���{ �"" v,(·····"
f� �'t:fq���
12.Bxf7+ Kf8 13.Bxf4 exf4 14.Ba2 g6 15.Qd2 Bxf3 16.gxf3 gxf5
17.c3 Qg5+ 18.Kh1 Nc6 19.Rg1 Qh6 20 .d4 Rd8 21.Qe2 cxd4 22.Qc4
Rd7 23.Rg8+ Rxg8 24.Qxg8+ Ke7 25 .Rg1 Kd6 26. Qd5+ Ke7 27. Qf7+
1-D
l.e4 e5 2.f4 Bc5 3.Nf3 d6 4.c3 Bg4 5.fxe5 dxe5 6.Qa4+ Bd7 7.Qc2
Nc6 8.b4 Bd6 9.Bc4 Nf6 10.d3 Ne7 11.0-D Ng6 12.Be3 b5 13.Bb3 aS
14.a3 axb4 15.cxb4 0-D 16.Nc3 c6 17.h3 Qe7 18.Ne2 Bb8 19.Kh2 Ba7
20.Bg5 h6 21.Bxf6 Qxf6 22.Nfd4 Qd6 23.Nf5 Bxf5 24.Rxf5 Nf4 25.Rf1
g6
26.Rlxf4 ! exf4 27.e5 Qe7 28.Rf6 Kg7 29.d4 Bxd4 30.Bxf7 BxeS
31.Qxg6+ 1-D
112
Learn to Attack with Rudolph Sp ielmann
1S.d6 Qxd6 16.e5 NxeS 17.Rxe5 RedS 18.Bc4 a6 19.Ne4 Nxe4
20 . Qxe4 Bxf3 21.Rxf3 1--0
l.e4 eS 2.f4 exf4 3.Qf3
��������
x•-*-�*�41��
m.r�(f�Im'.r
'
.. v.�-
- -�-��- ..v..
��� �� ���
���-,���
���'�
��ff<��- - · ·
"� ':M 'i;i
i;i
"
?'� �� �? �/�..
.
J�
The Breyer Va ri ation of the King's Gambit no longer enjoys a
good reputation, but back then it was still playable . 3 ...Nc6 4.c3
Nf6 4...Ne5 S.Qxf4 Bd6 6.Qe3 Ng4 7.Qh3 hS gives Black a good
game, Ku pka-Blatny, Czechoslovakia 1962. 5.d4 dS 6.e5 Ne4
7.Bb5 White has a good game, with a strong center. 7 . . . Qh4+
8.Kfl! g5 9.Nd2 White moves to eliminate the powerful Black
knight . 9 ...Bg4
113
White seems to be in serious trouble here , but a queen sacrifice
is coming. 10.Nxe4 Bxf3 ll.Nxf3 Qh6 12.Nf6 + Kd8
�m•�?�
mlrJf··-��I'�-.1'
'· ··"
��� ����
�.:-!��----- -�
�� ��' .J�f···"�
� �•.....7-�CE��
���{ --�������
.8,� � �.8,��
�� ---7.��-,;·g
White has just two pieces for a queen and pawn, but keeps the
initiative going, 13.h4! Be7 13..,gxh4 l4,Bd3! Ne7 15,Rxh4 Qg7
16.Bxf4 Ng6 17.Bh6 Nxh4 18.Bxg7 Bxg7 19.Nxh4 with two piecees
for the rook. 14.Nxg5 Qg6 15.Nxd5 Bxg5 16.hxg5 Qc2
��•�?�
�{�f--�� ,�-.1'
--��f������
��! ��.���·�
•..tmtZJ� �
�� �-u •••}.� ···"�
� ��' u��' U�
��
�� -�' ···-������
�s����� �ri�
r�� m �w�It
White does not have to worry. The queen can't do much harm
alone, and White's pieces are very active . 17.Be2 This retreat is
made so that the other bishop can be developed. 17 ...Ne7
18.Nxf4 c5 19.Rh3 cxd4?
114
uam to Attack with Rudolph Sp ielmann
White has two pieces and two pawns for the queen , and Black's
fo rces are uncoordinated. The last thing Black should be doing is
opening lines! 20.Rd3! Now the d-file wi ll be open, and on top of
that the Black queen has no retreat! 20...Kd7 Hoping that White
will capture on d4, which gives the queen some chance of escape.
20. ..Qa4 2l.Rxd4+ 21.Bdl ! Qxd3+ 22.Nxd3 dxc3 23.bxc3
.�.���?�
�r�•·r�-1·
'" "'��-· ···'���
� �� �������
����
�� ��' "'�'"
"'
�
�-��� �� �
��'"'������
%.&.��� -��� �� �
?m �.i.�w�
Now the position is an easy win, with two bishops and a pawn
for a rook. 23...Rhd8 24. Be2 Nf5 25.Bf4 Kc7 26.Rbl b6
27. e6+ Kc8 28. Ne5 1-0
115
Learn to Attack with Rudolph Sp ielmann
The Center Game
Spielmann rarely played openings that were considered
unsound, but in this early game he tried yet another gambit and
punished his opponent's greed.
22...Qg7 23.f4 Nc4 24. Nxc4 dxc4 25.fxg5 hxgS 26. Re5 Bd7
27.Rxg5 1--0
116
LRarn to Attack with Rudolph Sp ielmann
If you have access to a personal com puter and a modem you can
enhance your chess experience by ta king adva ntage ofthe resources
on the Internet:
•
Read the newsg ro up rec.ga mes.chess. misc for all the latest news and
information.
•
Read the newsgroup rec.ga mes.chess.computer for disussion of
hardware and software for chess.
•
Get all the latest chess games via ftp from ftp.pit
t
.edu.
•
Visit the Chessworks Unlimited World Wide Web site
http:!/www.chessworks.com for links to the most importa nt web sites.
free sa mples and information on Chessworks Unlimited prod ucts. and
news and photos on chess.
Chessworks Unlimited has hundreds of softwa re titles for all major
chess platforms. including data for the DejaVu Chess Libra ry, Chess
Assista nt, ChessBa se, Chessmaster 5000 and Bookup. Learn to
Attack with Rudolph Spielmann will be availa ble as an electronic book
in 1996. For more information on ou r new line of electronic books. visit
o ur web site or ema il info@chessworks.com. You can purchase
Chesswo rks products from your favorite dealer, including the United
States Chess Fed eration. Chessco. Nationa l Chess and Games. a nd
the Lo ndon Chess Centre. You can also order direct fro m
Chessworks, and ca n have your order shipped electronically for
immediate delivery! For more information phone us at 1-800 -700-
1242 or Fa x 1-41 5-712-0720.
117
The book will be especially useful to beginners and players rated under 1 500 on
the USCF scale, but the timeless games will provide entertainment to any level
of player.
Eric Schiller is a National Master who
wiitten on a wide variety of
opening strategies . He is Contributing
Editor for Chess Life magzine. His
software
company Chessworks
Unlimited has been involved in many
major chess software proj ects,
including l)eja Vu Chtlu LilmJry,
Kt#parov's Gambit and